Pure Chromatography Instruments Operation Manual
102
Pure Chromatography Instruments Operation Manual 11593990 | F en
-
Upload
khangminh22 -
Category
Documents
-
view
1 -
download
0
Transcript of Pure Chromatography Instruments Operation Manual

Pure Chromatography InstrumentsOperation Manual
1159
3990
| F
en

Imprint
Product Identification:Operation Manual (Original) Pure Chromatography Instruments11593990
Publication date: 02.2022
Version F
BÜCHI Labortechnik AGMeierseggstrasse 40PostfachCH-9230 Flawil 1E-Mail: [email protected] reserves the right to make changes to the manual as deemed necessary in the light of experience,especially with respect to structure, illustrations and technical details.This manual is copyrighted. Information from it may neither be reproduced, distributed, or used forcompetitive purposes, nor made available to third parties. The manufacture of any component with theaid of this manual without prior written agreement is also prohibited.

Büchi Labortechnik AG Table of contents
Operation Manual Pure Chromatography Instruments iii
Table of contents
1 About this document........................................................................................................... 81.1 Warning notices in this document.......................................................................................... 81.2 Symbols................................................................................................................................. 8
1.2.1 Warning symbols ...................................................................................................... 81.2.2 Mark-ups and symbols ............................................................................................. 8
1.3 Trademarks ........................................................................................................................... 91.4 Connected devices ................................................................................................................ 9
2 Safety.................................................................................................................................. 102.1 Proper use ........................................................................................................................... 102.2 Use other than intended ...................................................................................................... 102.3 Staff qualification ................................................................................................................. 102.4 Location of warning signs on the product ............................................................................ 112.5 Residual risks ...................................................................................................................... 11
2.5.1 Faults during operation........................................................................................... 112.5.2 Malware infection due to connections with other devices or network..................... 112.5.3 Damage to the internal memory due to incorrect shutting down of the instrument
................................................................................................................................ 122.6 Personal protective equipment ............................................................................................ 122.7 Modifications........................................................................................................................ 12
3 Product description........................................................................................................... 133.1 Description of function ......................................................................................................... 133.2 Configuration ....................................................................................................................... 14
3.2.1 Front view Pure C-810 / C-815............................................................................... 143.2.2 Front view Pure C-830 / C-835 / C-850 .................................................................. 153.2.3 Rear view................................................................................................................ 153.2.4 Connections on gradient valve ............................................................................... 17
3.3 Type plate............................................................................................................................ 173.4 Scope of delivery ................................................................................................................. 183.5 Technical data ..................................................................................................................... 18
3.5.1 Pure Chromatography Instruments ........................................................................ 183.5.2 Ambient conditions ................................................................................................. 203.5.3 Material................................................................................................................... 21
4 Transport and storage ...................................................................................................... 224.1 Transport ............................................................................................................................. 224.2 Storage ................................................................................................................................ 224.3 Lifting the instrument ........................................................................................................... 23

Table of contents Büchi Labortechnik AG
iv Operation Manual Pure Chromatography Instruments
5 Installation.......................................................................................................................... 245.1 Before installation ................................................................................................................ 245.2 Installation site..................................................................................................................... 245.3 Securing against earthquakes ............................................................................................. 245.4 Establishing electrical connections...................................................................................... 255.5 Establishing solvent connection .......................................................................................... 255.6 Installing the solvent level sensor........................................................................................ 265.7 Assigning solvent to solvent lines........................................................................................ 265.8 Calibrating the solvent level sensor..................................................................................... 275.9 Installing the exhaust (ELSD only) ...................................................................................... 285.10 Assembling the waste bottle................................................................................................ 285.11 Installing the waste level sensor.......................................................................................... 285.12 Calibrating the waste level sensor....................................................................................... 295.13 Assembling the dry air supply (option) ................................................................................ 295.14 Assembling the gas connection (option).............................................................................. 305.15 Assembling the solvent bottle platform (option)................................................................... 315.16 Assembling the sample loop (Prep instruments only) ......................................................... 32

Büchi Labortechnik AG Table of contents
Operation Manual Pure Chromatography Instruments v
6 Operation............................................................................................................................ 336.1 Control panel ....................................................................................................................... 33
6.1.1 Layout of control panel ........................................................................................... 336.1.2 Enter value ............................................................................................................. 346.1.3 Menu bar ................................................................................................................ 356.1.4 Conditions panel..................................................................................................... 376.1.5 Collection panel ...................................................................................................... 386.1.6 Gradient panel ........................................................................................................ 396.1.7 Run panel ............................................................................................................... 406.1.8 Solvent selection panel........................................................................................... 416.1.9 Detector selection panel ......................................................................................... 416.1.10 Slope detection panel ............................................................................................. 42
6.2 Editing a method.................................................................................................................. 426.2.1 Selecting a cartridge (Flash mode)......................................................................... 426.2.2 Selecting a column (Prep mode) ............................................................................ 446.2.3 Selecting a solvent ................................................................................................. 456.2.4 Editing the gradient................................................................................................. 456.2.5 Editing detector selection ....................................................................................... 486.2.6 Editing the wavelength for the UV detector ............................................................ 486.2.7 Editing the fraction collection criteria ...................................................................... 496.2.8 Editing the fraction collection time .......................................................................... 506.2.9 Editing the vapor sensor sensitivity ........................................................................ 526.2.10 Saving a method..................................................................................................... 52
6.3 Editing a solvent .................................................................................................................. 536.3.1 Adding a new solvent ............................................................................................. 536.3.2 Deleting a solvent ................................................................................................... 54
6.4 Tasks during a separation ................................................................................................... 546.4.1 Introducing a sample into the prep system............................................................. 546.4.2 Injecting a sample into the flash system................................................................. 556.4.3 Installing and removing a cartridge......................................................................... 576.4.4 Installing and removing a column ........................................................................... 586.4.5 Inserting the fraction collection tray ........................................................................ 606.4.6 Selecting an existing method.................................................................................. 616.4.7 Selecting values on the dialog box Sample Loading .............................................. 61
6.5 Performing a Flash separation using a method................................................................... 616.5.1 Preparing the instrument ........................................................................................ 616.5.2 Selecting the flash mode (Pure C-850 only)........................................................... 626.5.3 Starting Flash separation using a method .............................................................. 626.5.4 Changings during a separation............................................................................... 626.5.5 Ending a Flash separation...................................................................................... 636.5.6 Shutting down the instrument ................................................................................. 63
6.6 Performing a Flash separation manually ............................................................................. 636.6.1 Preparing the instrument ........................................................................................ 636.6.2 Selecting the flash mode (Pure C-850 only)........................................................... 646.6.3 Starting Flash separation manually ........................................................................ 646.6.4 Changings during a separation............................................................................... 656.6.5 Ending a Flash separation...................................................................................... 656.6.6 Shutting down the instrument ................................................................................. 65
6.7 Performing a Prep separation using a method .................................................................... 666.7.1 Preparing the instrument ........................................................................................ 666.7.2 Selecting the prep mode (Pure C-850 only) ........................................................... 66

Table of contents Büchi Labortechnik AG
vi Operation Manual Pure Chromatography Instruments
6.7.3 Starting a Prep separation using a method ............................................................ 666.7.4 Changings during a separation............................................................................... 676.7.5 Ending a Prep separation ....................................................................................... 676.7.6 Shutting down the instrument ................................................................................. 67
6.8 Performing a Prep separation manually .............................................................................. 676.8.1 Preparing the instrument ........................................................................................ 686.8.2 Selecting the prep mode (Pure C-850 only) ........................................................... 686.8.3 Starting a separation .............................................................................................. 686.8.4 Changings during a separation............................................................................... 696.8.5 Ending a Prep separation ....................................................................................... 696.8.6 Shutting down the instrument ................................................................................. 69
6.9 Identifying fractions.............................................................................................................. 706.9.1 Identifying fractions by peak ................................................................................... 706.9.2 Identifying fractions per vial .................................................................................... 71
6.10 Importing and exporting data............................................................................................... 716.10.1 Printing a run report................................................................................................ 716.10.2 Sending data to USB .............................................................................................. 726.10.3 Sending PDF to USB.............................................................................................. 72
7 Cleaning and servicing ..................................................................................................... 737.1 Regular maintenance work.................................................................................................. 737.2 Carrying out a data backup ................................................................................................. 747.3 Calibrating the display ......................................................................................................... 747.4 Cleaning the nebulizer......................................................................................................... 757.5 Cleaning the check valve..................................................................................................... 767.6 Cleaning the instrument....................................................................................................... 777.7 Cleaning the solid loader ..................................................................................................... 787.8 Removing solvent from an used cartridge ........................................................................... 78
8 Help with faults .................................................................................................................. 798.1 Faults, possible causes and solutions (general).................................................................. 798.2 Faults, possible causes and solutions (cartridge)................................................................ 798.3 Faults, possible causes and solutions (solvent delivery)..................................................... 798.4 Faults, possible causes and solutions (sample injection).................................................... 818.5 Faults, possible causes and solutions (fraction collection).................................................. 818.6 Faults, possible causes and solutions (detection) ............................................................... 828.7 Error messages ................................................................................................................... 838.8 Resetting the Fraction collector arm.................................................................................... 898.9 Replacing the shuttle valve rotor ......................................................................................... 90
9 Taking out of service and disposal.................................................................................. 929.1 Taking out of service ........................................................................................................... 929.2 Disposal............................................................................................................................... 929.3 Returning the instrument ..................................................................................................... 92

Büchi Labortechnik AG Table of contents
Operation Manual Pure Chromatography Instruments vii
10 Appendix ............................................................................................................................ 9310.1 Spare parts and accessories ............................................................................................... 93
10.1.1 Accessories ............................................................................................................ 9310.1.2 Sample introduction accessories............................................................................ 9410.1.3 Spare parts ............................................................................................................. 9510.1.4 Tubes...................................................................................................................... 9510.1.5 Tools and adapter kits ............................................................................................ 9610.1.6 Wear parts .............................................................................................................. 96
10.2 Folder locations ................................................................................................................... 9710.3 Finding out separation conditions with the navigator........................................................... 97
10.3.1 Open the navigator ................................................................................................. 9710.3.2 TLC Silica ............................................................................................................... 9710.3.3 LC-C18 ................................................................................................................... 9910.3.4 LC-Transfer .......................................................................................................... 100

1 | About this document Büchi Labortechnik AG
8/102 Operation Manual Pure Chromatography Instruments
1 About this documentThis operation manual is applicable for all variants of the instrument.Read this operation manual before operating the instrument and follow theinstructions to ensure safe and trouble-free operation.Keep this operation manual for later use and pass it on to any subsequent user orowner.BÜCHI Labortechnik AG accepts no liability for damage, faults and malfunctionsresulting from not following this operation manual.If you have any questions after reading this operation manual:u Contact BÜCHI Labortechnik AG Customer Service.
https://www.buchi.com/contact
1.1 Warning notices in this documentWarning notices warn you of dangers that can occur when handling the device.There are four danger levels, each identifiable by the signal word used.
Signal word Meaning
DANGER Indicates a danger with a high level of risk which could result indeath or serious injury if not prevented.
WARNING Indicates a danger with a medium level of risk which could result indeath or serious injury if not prevented.
CAUTION Indicates a danger with a low level of risk which could result in mi-nor or medium-severity injury if not prevented.
NOTICE Indicates a danger that could result in damage to property.
1.2 SymbolsThe following symbols are displayed in this operation manual or on the device:
1.2.1 Warning symbols
Symbol Meaning
General warning
Dangerous electrical voltage
Flammable substances
Laser class 1
1.2.2 Mark-ups and symbols
NOTE
This symbol draws attention to useful and important information.

Büchi Labortechnik AG About this document | 1
Operation Manual Pure Chromatography Instruments 9/102
R This character draws attention to a requirement that must be met before theinstructions below are carried out.
u This character indicates an instruction that must be carried out by the user.
ð This character indicates the result of a correctly carried out instruction.
Mark-up Explanation
Window Software Windows are marked-up like this.
Tab Tabs are marked-up like this.
Dialog Dialogs are marked-up like this.
[Button] Buttons are marked-up like this.
[Field names] Field names are marked-up like this.
[Menu / Menu item] Menus or menu items are marked-up like this.
Status Status is marked-up like this.
Signal Signals are marked-up like this.
1.3 TrademarksProduct names and registered or unregistered trademarks that are used in thisdocument are used only for identification and remain the property of the owner ineach case.
1.4 Connected devicesIn addition to these operating instructions, follow the instructions and specificationsin the documentation for the connected devices.

2 | Safety Büchi Labortechnik AG
10/102 Operation Manual Pure Chromatography Instruments
2 Safety
2.1 Proper useThe instrument is designed and built for laboratories.The instrument can be used for the following tasks:
� Purification
� Separation of one or more compounds from a mixture
2.2 Use other than intendedUse of any kind other than that described in Chapter 2.1 "Proper use", page 10 andany application that does not comply with the technical specifications (SeeChapter 3.5 "Technical data", page 18) constitutes use other than intended.In particular, the following applications are not permissible:
� Use of the instrument in areas which require explosion-safe instruments.
� Use of the instrument with solvents containing peroxides.
� Use the ELSD without connected exhaust.
� Use the instrument for production purposes.
2.3 Staff qualificationUnqualified persons are unable to identify risks and are therefore exposed to greaterdangers.The device may only be operated by suitably qualified laboratory staff.These operating instructions are aimed at the following target groups:
UsersUsers are persons that meet the following criteria:
� They have been instructed in the use of the device.
� They are familiar with the contents of these operating instructions and theapplicable safety regulations and apply them.
� They are able on the basis of their training or professional experience to assessthe risks associated with the use of the device.
OperatorThe operator (generally the laboratory manager) is responsible for the followingaspects:
� The device must be correctly installed, commissioned, operated and serviced.
� Only suitably qualified staff may be assigned the task of performing theoperations described in these operating instructions.
� The staff must comply with the local applicable requirements and regulations forsafe and hazard-conscious working practices.
� Safety-related incidents that occur while using the device should be reported tothe manufacturer ([email protected]).

Büchi Labortechnik AG Safety | 2
Operation Manual Pure Chromatography Instruments 11/102
BUCHI service techniciansService technicians authorized by BUCHI have attended special training courses andare authorized by BÜCHI Labortechnik AG to carry out special servicing and repairmeasures.
2.4 Location of warning signs on the product
Fig. 1: Location of the warning signs
Laser class 1
2.5 Residual risksThe device has been developed and manufactured using the latest technologicaladvances. Nevertheless, risks to persons, property or the environment can arise ifthe device is used incorrectly.Appropriate warnings in this manual serve to alert the user to these residualdangers.
2.5.1 Faults during operationIf a device is damaged, sharp edges, moving parts or exposed electrical wires cancause injuries.u Regularly check device for visible damage.u If faults occur, switch off the device immediately, unplug the power cord and
inform the operator.u Do not continue to use devices that are damaged.
2.5.2 Malware infection due to connections with other devices or networkConnections with other devices or a network can cause a malware infection to theinstrument.u Install antivirus software and firewall on the instrument before connecting it to
other devices or network.

2 | Safety Büchi Labortechnik AG
12/102 Operation Manual Pure Chromatography Instruments
2.5.3 Damage to the internal memory due to incorrect shutting down of theinstrumentIncorrect shutting down of the instrument can cause damage to the internalmemory.u Shut down the instrument as described. See Chapter 6 "Operation", page 33
2.6 Personal protective equipmentDepending on the application, hazards due to heat and/or corrosive chemicals mayarise.u Always wear appropriate personal protective equipment such as safety goggles,
protective clothing and gloves.u Make sure that the personal protective equipment meets the requirements of
the safety data sheets for all chemicals used.
2.7 ModificationsUnauthorized modifications can effect safety and lead to accidents.u Use only genuine BUCHI accessories, spare parts and consumables.u Carry out technical changes only with prior written approval from BUCHI.u Only allow changes to be made by BUCHI service technicians.
BUCHI accepts no liability for damage, faults and malfunctions resulting fromunauthorized modifications.

Büchi Labortechnik AG Product description | 3
Operation Manual Pure Chromatography Instruments 13/102
3 Product description
3.1 Description of functionPure instruments are purification devices designed to purify complex samples byeither flash chromatography, prep chromatography or by both.
� Flash chromatography has the ability to separate gram size samples in shortperiod.
� Prep-HPLC has the ability to separate complex samples at high resolution.
Pure instruments allow:
� 4 different solvents
� Injection of liquid or solid sample
� Separation on a cartridge or column
� Identifying the compounds by UV and/or ELS detection
� Collecting the desired fractions
Pure instrument schematic:G
radient valve
UVdetector
Fractioncollection
Solvent 2
Solvent 3
Solvent 4
Solvent 1
Pump
Sampleintroduction
Cartridge / colum
n
ELSD

3 | Product description Büchi Labortechnik AG
14/102 Operation Manual Pure Chromatography Instruments
3.2 Configuration
3.2.1 Front view Pure C-810 / C-815
510
9
8
1 2 3 4
67
Fig. 2: Front view Pure C-810 / C-815
1 Control panel 2 RFID reader
3 On/Off switch 4 USB Port
5 Injection port 6 Cartridge holder
7 Flash pump 8 ELSD flow split valve(C-815 only)
9 ELSD nebulizer(C-815 only)
10 Fraction collection bay

Büchi Labortechnik AG Product description | 3
Operation Manual Pure Chromatography Instruments 15/102
3.2.2 Front view Pure C-830 / C-835 / C-850
10
9
8
7
1 2 3 4
56
Fig. 3: Front view Pure C-830 / C-835 / C-850
1 Control panel 2 RFID reader(C-850 only)
3 On/Off switch 4 USB Port
5 Column holder 6 Prep HPLC pump
7 ELSD flow split valve(C-835 / C-850 only)
8 ELSD nebulizer(C-835 / C-850 only)
9 Prep sample injection valve 10 Fraction collection bay
3.2.3 Rear view
NOTE
All electrical connections are not limited energy.

3 | Product description Büchi Labortechnik AG
16/102 Operation Manual Pure Chromatography Instruments
3
7
8
9
10
21
6 5 4
Fig. 4: Rear view
1 Ventilation slot 2 Gradient valve(See Chapter 3.2.4 "Connections ongradient valve", page 17 )
3 Exhaust(used for instruments with ELSDonly)
4 Signal connection(for external air supply)
5 USB ports 6 Power supply connection
7 Fuse 8 On/Off master switch
9 Pressurized air inlet 10 LAN port

Büchi Labortechnik AG Product description | 3
Operation Manual Pure Chromatography Instruments 17/102
3.2.4 Connections on gradient valve
654321
10 9 8 7
Fig. 5: Connections on the rear side
1 Waste line 2 Solvent line 4
3 Solvent line 3 4 Waste level sensor
5 Solvent line 2 6 Solvent line 1
7 Solvent level sensor line 1 8 Solvent level sensor line 2
9 Solvent level sensor line 3 10 Solvent level sensor line 4
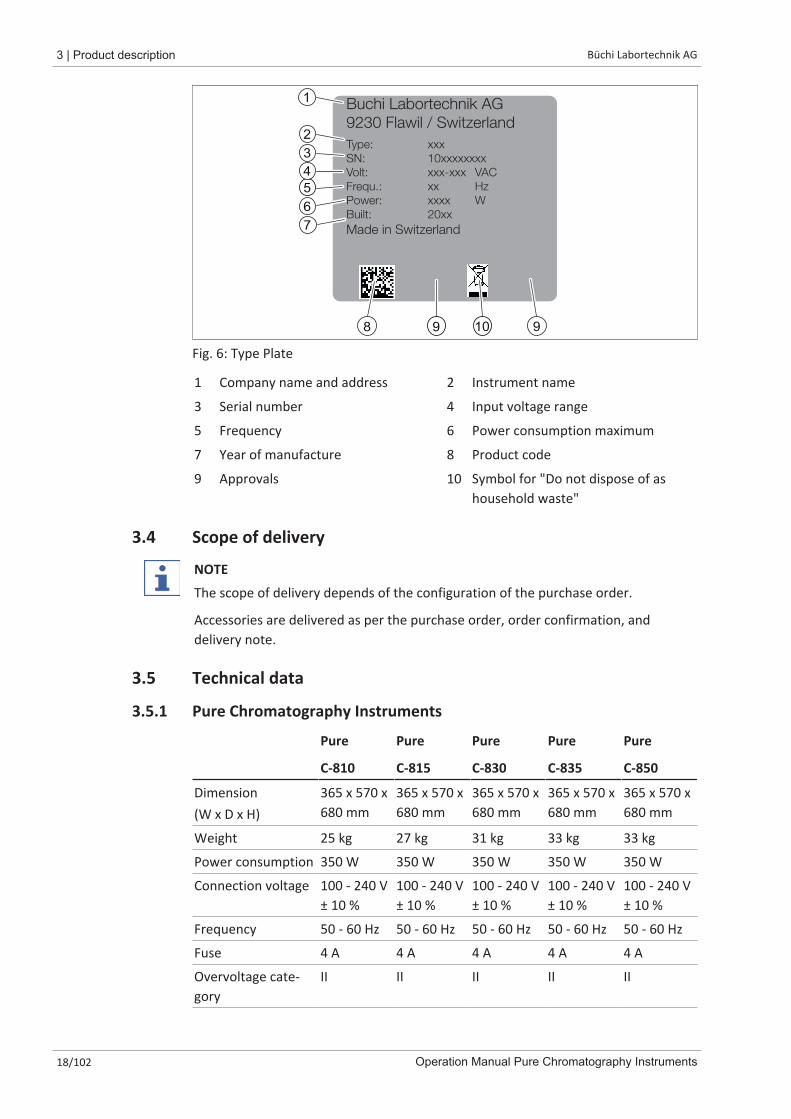
3.3 Type plateThe type plate identifies the instrument. The type plate is located at the rear of theinstrument.
3 | Product description Büchi Labortechnik AG
18/102 Operation Manual Pure Chromatography Instruments
Buchi Labortechnik AG
9230 Flawil / Switzerland
Type: xxx
SN: 10xxxxxxxx
Volt: xxx-xxx VAC
Frequ.: xx Hz
Power: xxxx W
Built: 20xx
Made in Switzerland
6
5
4
1
3
2
7
8 9 10 9
Fig. 6: Type Plate
1 Company name and address 2 Instrument name
3 Serial number 4 Input voltage range
5 Frequency 6 Power consumption maximum
7 Year of manufacture 8 Product code
9 Approvals 10 Symbol for "Do not dispose of ashousehold waste"
3.4 Scope of delivery
NOTE
The scope of delivery depends of the configuration of the purchase order.
Accessories are delivered as per the purchase order, order confirmation, anddelivery note.
3.5 Technical data
3.5.1 Pure Chromatography Instruments
Pure
C-810
Pure
C-815
Pure
C-830
Pure
C-835
Pure
C-850
Dimension(W x D x H)
365 x 570 x680 mm
365 x 570 x680 mm
365 x 570 x680 mm
365 x 570 x680 mm
365 x 570 x680 mm
Weight 25 kg 27 kg 31 kg 33 kg 33 kg
Power consumption 350 W 350 W 350 W 350 W 350 W
Connection voltage 100 - 240 V± 10 %
100 - 240 V± 10 %
100 - 240 V± 10 %
100 - 240 V± 10 %
100 - 240 V± 10 %
Frequency 50 - 60 Hz 50 - 60 Hz 50 - 60 Hz 50 - 60 Hz 50 - 60 Hz
Fuse 4 A 4 A 4 A 4 A 4 A
Overvoltage cate-gory
II II II II II

Büchi Labortechnik AG Product description | 3
Operation Manual Pure Chromatography Instruments 19/102
Pure
C-810
Pure
C-815
Pure
C-830
Pure
C-835
Pure
C-850
Pollution degree 2 2 2 2 2
IP Code IP 20 IP 20 IP 20 IP 20 IP 20
Solvents 4 4 4 4 4
Gas pressure( maximum)
8 bar 8 bar 8 bar 8 bar 8 bar
Compressed air oil and dustfree
oil and dustfree
oil and dustfree
oil and dustfree
oil and dustfree
USB port 3 3 3 3 3
LAN port(RJ45)
1 1 1 1 1
RFID reader(racks)
Yes Yes Yes Yes Yes
RFID reader(cartridges)
Yes Yes No No Yes
Fraction collectorbay
closed closed closed closed closed
Lighted fraction col-lector bay
Yes Yes Yes Yes Yes
Solvent level sensor Yes Yes Yes Yes Yes
Waste level sensor Yes Yes Yes Yes Yes
Vapor sensor Yes Yes Yes Yes Yes
Pump Flash Mode
Pure
C-810
Pure
C-815
Pure
C-830
Pure
C-835
Pure
C-850
Gradient binary binary - - binary
Pressure range 0 - 50 bar 0 - 50 bar - - 0 - 50 bar
Flow rate 0 - 250 mL/min
0 - 250 mL/min
- - 0 - 250 mL/min
Flow rate accuracy < 2 % < 2 % - - < 2 %
Functional principle self-priming self-priming - - self-priming
Specification 3 pistonsradial ar-ranged
3 pistonsradial ar-ranged
- - 2 pistonsparallel ar-ranged
Pump Prep Mode
Pure
C-810
Pure
C-815
Pure
C-830
Pure
C-835
Pure
C-850
Gradient - - binary binary binary

3 | Product description Büchi Labortechnik AG
20/102 Operation Manual Pure Chromatography Instruments
Pure
C-810
Pure
C-815
Pure
C-830
Pure
C-835
Pure
C-850
Pressure range - - 0-300 bar 0-300 bar 0-300 bar
Flow rate - - 0 - 100 ml/min
0 - 100 ml/min
0 - 100 ml/min
Flow rate accuracy - - < 2 % < 2 % < 2 %
Functional principle - - self-priming self-priming self-priming
Specification - - 2 pistonsparallel ar-ranged
2 pistonsparallel ar-ranged
2 pistonsparallel ar-ranged
UV Detector
Pure
C-810
Pure
C-815
Pure
C-830
Pure
C-835
Pure
C-850
UV - Vis wavelengthrange
200 - 800nm
200 - 800nm
200 - 800nm
200 - 800nm
200 - 800nm
Light sources Halogen /Deuterium
Halogen /Deuterium
Halogen /Deuterium
Halogen /Deuterium
Halogen /Deuterium
Lifetime lamp 2000 hours 2000 hours 2000 hours 2000 hours 2000 hours
Detector DAD DAD DAD DAD DAD
DAD scan entirerange
entirerange
entirerange
entirerange
entirerange
ELSD Detector
Pure
C-810
Pure
C-815
Pure
C-830
Pure
C-835
Pure
C-850
Light output laser - 0.3 mW - 1 mW 1 mW
Pressure carrier air - ~0.8 bar - ~0.8 bar ~0.8 bar
Pressure spray air - 3 - 3.5 bar - 3 - 3.5 bar 3 - 3.5 bar
Flow rate air - 2 - 2.5 L/min
- 2 - 2.5 L/min
2 - 2.5 L/min
3.5.2 Ambient conditionsFor indoor use only.
Max. altitude above sea level 2000 m
Ambient temperature 5‒40°C (25°C)No maximum performance above 25°C
Maximum relative humidity 80% for temperatures up to 31°C
Storage temperature max. 45 °C

Büchi Labortechnik AG Product description | 3
Operation Manual Pure Chromatography Instruments 21/102
3.5.3 Material
Component Materials of construction
Housing Powder coated steel 1.4301
Fraction collection bay PMMA / PET
Pump head PEEK
Pump cover PP
Pump excenter housing Aluminum
Tubings FEP
Fitting POM
Valve screw fitting POM
Ferrule ETFE
Cone ring POM
Radial seal PTFE
Pistons Ceramic

4 | Transport and storage Büchi Labortechnik AG
22/102 Operation Manual Pure Chromatography Instruments
4 Transport and storage
4.1 Transport
NOTICERisk of breakage due to incorrect transportation
u Make sure that all parts of the device are safely packed in such a way as toprevent breakage, ideally in the original box.
u Avoid sharp movements during transit.
u After transportation, check the device for damage.u Damage that has occurred in transit should be reported to the carrier.u Keep packing for future transportation.
4.2 Storageu Make sure that the ambient conditions are complied with (see Chapter 3.5
"Technical data", page 18).u Make sure a clean solvent like ethanol or isopropanol is in the pump.u Wherever possible, store the device in its original packaging.u After storage, check the device, all seals and tubing for damage and replace if
necessary.

Büchi Labortechnik AG Transport and storage | 4
Operation Manual Pure Chromatography Instruments 23/102
4.3 Lifting the instrument
WARNINGDanger due to incorrect transportation
The possible consequences are crushing injuries, cuts and breakages.
u The instrument should be transported by two persons at the same time.u Lift the instrument at the points indicated.
u Lift the instrument – this requires two persons each lifting at one of the pointsindicated on the bottom of the instrument.

5 | Installation Büchi Labortechnik AG
24/102 Operation Manual Pure Chromatography Instruments
5 Installation
5.1 Before installation
NOTICEInstrument damage due to switching it on too early.
Switching on the instrument too early after transportation can cause damage.
u Climatize the instrument after transportation.
5.2 Installation siteThe installation site must meet the following requirements:
� Firm, level surface.
� Take into account the maximum product dimensions and weight. See Chapter 3.5"Technical data", page 18
� Clearance on each side of the instrument must be at least 200 mm.
� Do not expose the instrument to any external thermal loads, such as direct solarradiation.
� Do not expose the instrument to increased electromagnetic emissions.Electromagnetic fields in the frequency range between 200 to 300 MHz can causethe instrument to operate incorrectly.
� Make sure that the installation site meets the requirements of the safety datasheets for all solvents and samples used.
NOTE
Make sure that the power supply can be disconnected at any time in an emergency.
5.3 Securing against earthquakesThe instrument has an earthquake fixing point to protect the device against falling.
1
Fig. 7: Securing against earthquakes
1 Fixing point
u Tie the lashing mount to a fixed point using strong cord or a wire.

Büchi Labortechnik AG Installation | 5
Operation Manual Pure Chromatography Instruments 25/102
5.4 Establishing electrical connections
NOTE
Observe the legal requirements when connecting the instrument to the powersupply.
u Use additional electrical safety features (e.g., residual-current circuit breakers) tocomply with local laws and regulations.
The power supply must fulfil the following conditions:1. Provide the mains voltage and frequency specified on the type plate of the
instrument.
2. Be designed for the load imposed by the instruments connected.
3. Be equipped with suitable fuses and electrical safety features.
4. Be equipped with proper earthing.
NOTICERisk of property damage and diminished performance due to use of unsuitablepower cables.
The power supply cables supplied with the product by BUCHI precisely match therequirements of the device. If other power cables that do not meet thoserequirements are used, the device may be damaged and/or its performancediminished.
u Use only the power supply cables supplied with the product or orderedseparately from BUCHI.
u If using any other power supply cables, make sure that they match thespecifications on the type plate.
u Make sure that all connected devices are earthed.u Plug the power cable into the connection on the instrument. See Chapter 3.2
"Configuration", page 14u Plug the mains plug into the mains outlet socket.
5.5 Establishing solvent connection
NOTICESolvent bottles on top of the instrument.
Solvent bottles on top of the instrument can cause property damages.
u Locate the solvent bottles next to the instrument.u Use the optional solvent bottle platform.

5 | Installation Büchi Labortechnik AG
26/102 Operation Manual Pure Chromatography Instruments
Precondition:R Make sure that the instrument is not
connected to the power supply.
u Attach all solvent lines to theinstrument. Connections seeChapter 3.2.4 "Connections on gradientvalve", page 17
u Put the other end of the solvent lineinto the solvent bottle.
u Assign the solvent to the solvent lines.See Chapter 5.7 "Assigning solvent tosolvent lines", page 26
u Install the solvent level sensor. SeeChapter 5.6 "Installing the solvent levelsensor", page 26
5.6 Installing the solvent level sensorPrecondition:R Make sure that the instrument is not
connected to the power supply.
u Attach all solvent level sensors to theinstrument. Connections seeChapter 3.2.4 "Connections on gradientvalve", page 17
u Calibrate the solvent level sensors. SeeChapter 5.8 "Calibrating the solventlevel sensor", page 27
5.7 Assigning solvent to solvent lines
Navigation path
➔ Tools ➔ Solvent Loading
Precondition:R The solvent bottle is connected to the instrument. See Chapter 5.5 "Establishing
solvent connection", page 25

Büchi Labortechnik AG Installation | 5
Operation Manual Pure Chromatography Instruments 27/102
R The solvent you wish to use is part of the solvent library. See Chapter 6.3 "Editinga solvent", page 53
u Navigate to the Solvent Loading dialog according to the navigation path.
ð The display shows the dialog box Solvent Loading .
u Tap the drop-down list next to Line 1.ð The display shows a drop-down list with selectable solvents.u Select the solvent which is connected to solvent line 1.ð The solvent for Line 1 is assigned.ð The drop-down list closes.u Repeat the solvent selection for each line.u Activate the checkbox next to the line you wish to prime.u Tap the button [Auto Prime].u Wait till priming finished.u Tap the button [Close].ð All lines are assigned with solvents.ð The dialog box closes.
5.8 Calibrating the solvent level sensor
Navigation path
➔ Tools ➔ Calibration and Defaults
Precondition:R The solvent level sensor is not covered by solvent.
u Navigate to the Calibrat ion dialog according to the navigation path.
ð The display shows the dialog box Calibrat ion .
u Tap [Zero] for the related solvent line.u Tap the button [Close].ð The dialog box closes.

5 | Installation Büchi Labortechnik AG
28/102 Operation Manual Pure Chromatography Instruments
5.9 Installing the exhaust (ELSD only)u Press the exhaust gas hose (2) on the
exhaust (1).1 2
5.10 Assembling the waste bottle
NOTICEWaste bottle on top of the instrument
Waste bottle on top of the instrument can cause property damages.
u Make sure that there is a decline between the connection on the instrument andthe waste bottle.
u Put the waste line into the waste bottle.
5.11 Installing the waste level sensorPrecondition:R Make sure that the instrument is not
connected to the power supply.
u Attach the waste level sensor to theinstrument. Connections seeChapter 3.2.4 "Connections on gradientvalve", page 17
u Calibrate the waste level sensor. SeeChapter 5.12 "Calibrating the wastelevel sensor", page 29

Büchi Labortechnik AG Installation | 5
Operation Manual Pure Chromatography Instruments 29/102
5.12 Calibrating the waste level sensor
Navigation path
➔ Tools ➔ Calibration and Defaults
Precondition:R The waste level sensor is not covered by liquid waste.
u Navigate to the Calibrat ion dialog according to the navigation path.
ð The display shows the dialog box Calibrat ion .
u Tap [Zero] for [Waste].u Tap the button [Close].ð The dialog box closes.
5.13 Assembling the dry air supply (option)u Connect the signal cable from the air
supply to the instrument.
u Connect the gas connection. SeeChapter 5.14 "Assembling the gasconnection (option)", page 30.
5 | Installation Büchi Labortechnik AG
30/102 Operation Manual Pure Chromatography Instruments
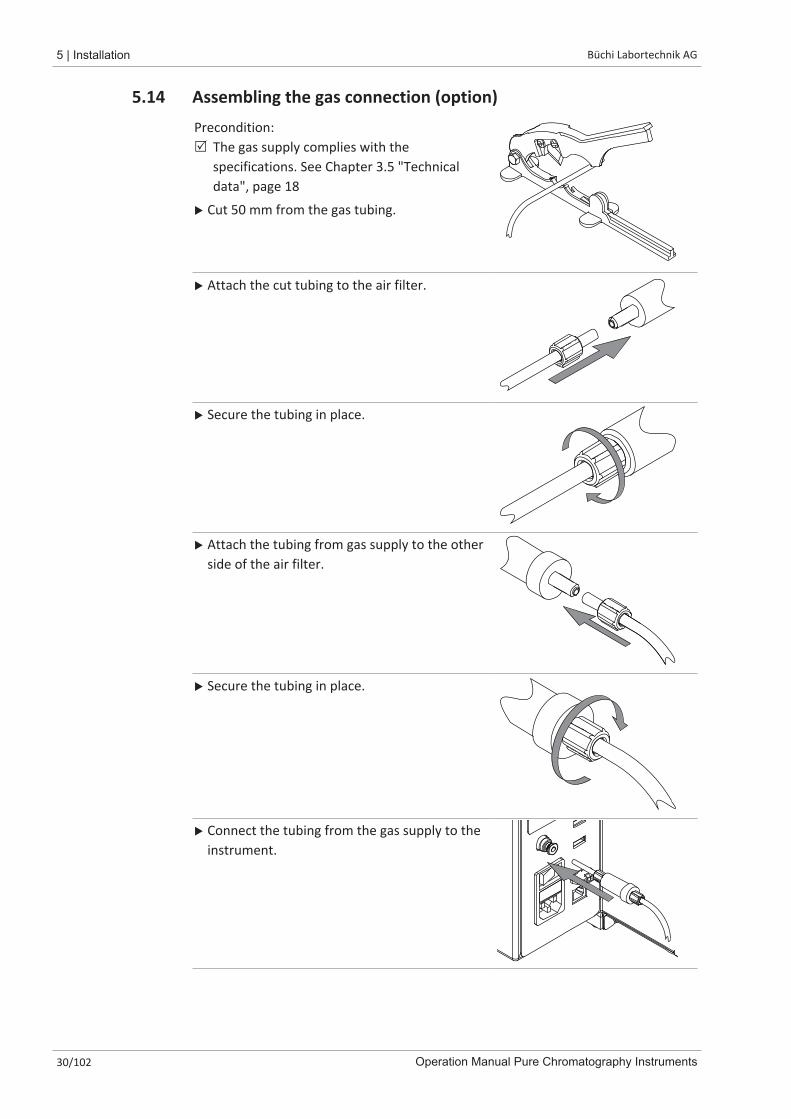
5.14 Assembling the gas connection (option)Precondition:R The gas supply complies with the
specifications. See Chapter 3.5 "Technicaldata", page 18
u Cut 50 mm from the gas tubing.
u Attach the cut tubing to the air filter.
u Secure the tubing in place.
u Attach the tubing from gas supply to the otherside of the air filter.
u Secure the tubing in place.
u Connect the tubing from the gas supply to theinstrument.

Büchi Labortechnik AG Installation | 5
Operation Manual Pure Chromatography Instruments 31/102
5.15 Assembling the solvent bottle platform (option)
NOTICEWaste bottle on top of the instrument
Waste bottle on top of the instrument can cause property damages.
u Do not place the waste bottle an the solvent bottle platform.
u Turn the solvent bottle platform upside down.
u Attach the drain line adapter to the solventbottle platform
u Attach the drain line to the drain line adapter.
u Attach the solvent bottle platform to theinstrument with screws.

5 | Installation Büchi Labortechnik AG
32/102 Operation Manual Pure Chromatography Instruments
5.16 Assembling the sample loop (Prep instruments only)u Attach the sample loop to the
instrument at the position indicated.

Büchi Labortechnik AG Operation | 6
Operation Manual Pure Chromatography Instruments 33/102
6 Operation
6.1 Control panel
6.1.1 Layout of control panel
5
9
8
7
1 2 3 4
6
Fig. 8: Display
No. Description Function
1 [Menu] bar Shows the available menus.See Chapter 6.1.3 "Menu bar", page 35
2 [Conditions] panel Shows the properties and default settingsof the installed column / cartridge.See Chapter 6.1.4 "Conditions panel",page 37
3 [Wavelength] panel Shows available wavelengths and scanoptions.
4 [Collection] panel Shows collection options.See Chapter 6.1.5 "Collection panel",page 38
5 [Gradient] panel Shows chromatograms and gradient ta-ble.See Chapter 6.1.6 "Gradient panel",page 39
6 [Run] panel Shows the operation options.See Chapter 6.1.7 "Run panel", page 40
6 | Operation Büchi Labortechnik AG
34/102 Operation Manual Pure Chromatography Instruments
No. Description Function
7 [Solvent selection] panel Shows selectable solvents.See Chapter 6.1.8 "Solvent selectionpanel", page 41
8 [Detector settings] panel Shows selectable detector options and itssettings.See Chapter 6.1.9 "Detector selectionpanel", page 41
9 [Slope detection] panel Shows selectable slope detection options.See Chapter 6.1.10 "Slope detectionpanel", page 42
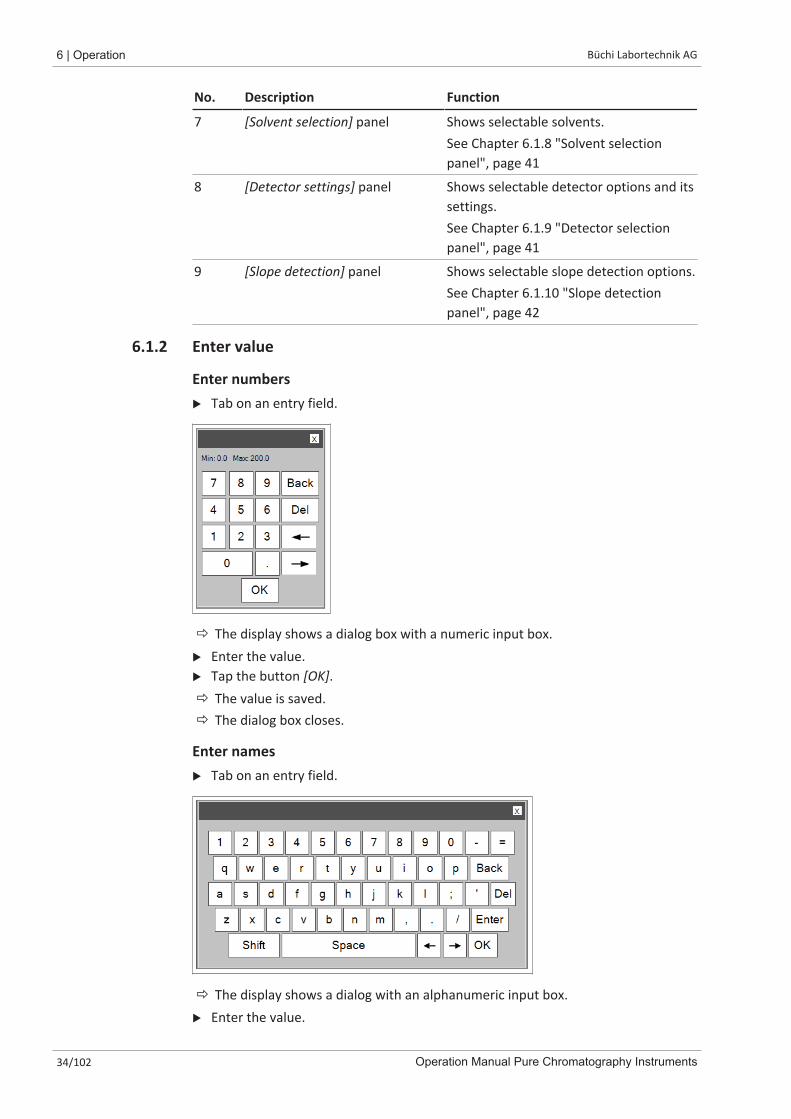
6.1.2 Enter value
Enter numbersu Tab on an entry field.
ð The display shows a dialog box with a numeric input box.u Enter the value.u Tap the button [OK].ð The value is saved.ð The dialog box closes.
Enter namesu Tab on an entry field.
ð The display shows a dialog with an alphanumeric input box.u Enter the value.

Büchi Labortechnik AG Operation | 6
Operation Manual Pure Chromatography Instruments 35/102
u Tap the button [OK].ð The value is saved.ð The dialog box closes.
6.1.3 Menu barThe following menus are available:
Menu Submenu / Action Explanation
[File] [Open Method] Load an existing method.See Chapter 6.4.6 "Selecting an existingmethod", page 61
[Save Method] Save an edited method.See Chapter 6.2.10 "Saving a method",page 52
[Save Method as] Save an edited method with anothername.See Chapter 6.2.10 "Saving a method",page 52
[Open Run] Load a completed run.
[Print Run Report] See Chapter 6.10.1 "Printing a run re-port", page 71
[Print PDF to USB] See Chapter 6.10.3 "Sending PDF to USB",page 72
[Exit] Exit the Pure software to Windows® sys-tem software.
[Shut down] The instrument shuts down.
[Mode] [Flash] Select the Flash mode.See Chapter 6.5.2 "Selecting the flashmode (Pure C-850 only)", page 62
[Preparative] Select the Prep mode.See Chapter 6.7.2 "Selecting the prepmode (Pure C-850 only)", page 66
[View] [Setup] If [Setup] is marked up, the instrument isin setup mode.
[Run in Progress] If [Run in Progress] is marked, a run is inprogress.
[Past Run] If [Past Run] is marked up, the instrumentis in the past run mode.

6 | Operation Büchi Labortechnik AG
36/102 Operation Manual Pure Chromatography Instruments
Menu Submenu / Action Explanation
[Tools] [Solvent Loading] Assign a solvent to a solvent line.See Chapter 5.7 "Assigning solvent to sol-vent lines", page 26
[Solvent Definition] Define solvents.See Chapter 6.3 "Editing a solvent",page 53
[Vapor Sensors and Limits] Edit the vapor sensor sensitivity.See Chapter 6.2.9 "Editing the vapor sen-sor sensitivity", page 52
[Configuration] System configurations.
[Calibration and Defaults] Calibrate the screen.
Set time and date.
Reset UV lamp.
Calibrate solvent level sensors.See Chapter 5.8 "Calibrating the solventlevel sensor", page 27
Calibrate the waste level sensor.See Chapter 5.12 "Calibrating the wastelevel sensor", page 29
Set alarms
[Manual control] Maintenance actions.See Chapter 7.6 "Cleaning the instru-ment", page 77See Chapter 7.7 "Cleaning the solidloader", page 78See Chapter 7.8 "Removing solvent froman used cartridge", page 78See Chapter 8.8 "Resetting the Fractioncollector arm", page 89
[NP<>RP] Change back and forth between normalphase and reverse phase
[Product Services](C-810 C-815 C-850 only)
Override max. pressure limit for car-tridges.
[UV Baseline] Adjust the baseline to zero during a run.
[Language] Select a language.
[Service] BUCHI service technicians only
[Help] [About] The display shows instrument details.
[View Manual] The display shows the Operation manual.
Büchi Labortechnik AG Operation | 6
Operation Manual Pure Chromatography Instruments 37/102
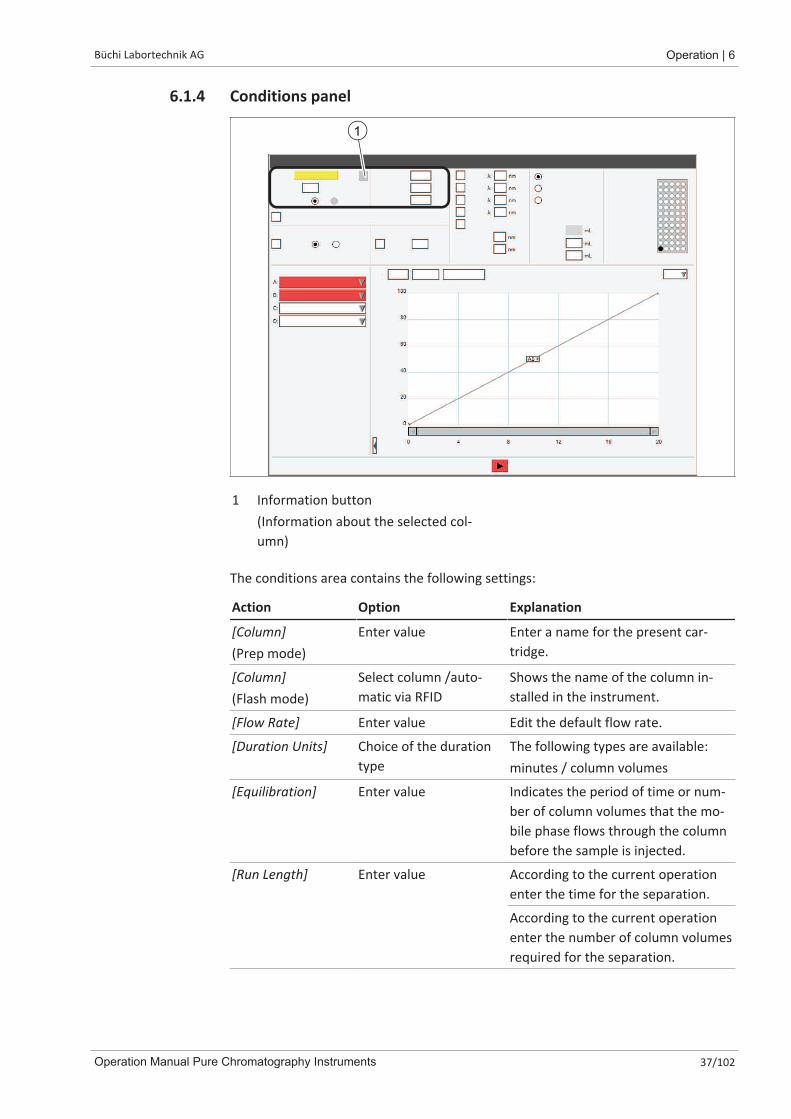
6.1.4 Conditions panel
1
1 Information button(Information about the selected col-umn)
The conditions area contains the following settings:
Action Option Explanation
[Column](Prep mode)
Enter value Enter a name for the present car-tridge.
[Column](Flash mode)
Select column /auto-matic via RFID
Shows the name of the column in-stalled in the instrument.
[Flow Rate] Enter value Edit the default flow rate.
[Duration Units] Choice of the durationtype
The following types are available:minutes / column volumes
[Equilibration] Enter value Indicates the period of time or num-ber of column volumes that the mo-bile phase flows through the columnbefore the sample is injected.
[Run Length] Enter value According to the current operationenter the time for the separation.
According to the current operationenter the number of column volumesrequired for the separation.

6 | Operation Büchi Labortechnik AG
38/102 Operation Manual Pure Chromatography Instruments
Action Option Explanation
[Air Purge Time] Enter value Indicates the period of time that airis passed through the column afterthe separation to remove mobilephase
6.1.5 Collection panel
1
1 Tray number
The collection vial matrix corresponds to the trays. The trays are detected by theauto recognition. The estimated number of vials required for the separation isdisplayed below the solvent usage list in the lower left corner of the Setup window.The fraction collection area contains the following settings:
Action Option Explanation
Fraction collectionoptions
Select value The following options are available:[Collect Peaks] / [Collect All] / [CollectNone]
[Per-Vial Volume] View / Enter value The following values are changeable:[Peak] / [Non-Peaks]

Büchi Labortechnik AG Operation | 6
Operation Manual Pure Chromatography Instruments 39/102
6.1.6 Gradient panel
Edit the gradient and see separation details.
NOTE
According to the instrument status different options are available.
Action Option Explanation
[Table] Create a gradient See Chapter "Editing the gradient intabular mode", page 46
[Navigator] Finding out Flash sepa-ration conditions
See Chapter 10.3 "Finding out sepa-ration conditions with the navigator",page 97
[UV scan details] View Shows the following charts:
� 3D (UV / Time/ Wavelength)
� 2D (Time / Wavelength)
� Absorption maxima
� All scan maxima
[Zoom] Function Zoom the graph.
[Options] Select values Graph options.
[Edit] Select between the op-tions
The graph is in edit mode. See Chap-ter "Editing the gradient in graphicmode", page 47
[View] The graph is in view mode.(No changes possible)
[Zoom] Zoom the graph.

6 | Operation Büchi Labortechnik AG
40/102 Operation Manual Pure Chromatography Instruments
Action Option Explanation
[Gradient hold] Function The gradient is held at the currentsolvent ratio.
The gradient continues to the origi-nal end-point.
[Auto gradient hold] Function The gradient will be held every timethe signal goes over the set thresh-old.
6.1.7 Run panel
The run panel shows available functions according to the current operation.
Symbol Description Meaning
[Start] Is used to start the run or re-start theactual operation if the system hasbeen paused.
[Stop] Is used to terminate the operation ofthe system.
[Pause] Is used to stop the actual operation.If the system is paused due to an er-ror, this button will change to yellow.
[Advance] Is used to advance to the next stepduring equilibration.

Büchi Labortechnik AG Operation | 6
Operation Manual Pure Chromatography Instruments 41/102
6.1.8 Solvent selection panel
Select solvents for a separation. See Chapter 6.2.3 "Selecting a solvent", page 45
6.1.9 Detector selection panel
Action Option Explanation
[ELSD] Enable / DisableSelect value
Action enabled:Select between Low / HighEnter values for threshold
Action disabled:No selection

6 | Operation Büchi Labortechnik AG
42/102 Operation Manual Pure Chromatography Instruments
Action Option Explanation
[UV] Enable / DisableSelect value / Entervalue
Action enabled:Low / HighEnter values for threshold
Action disabled:No selection
[Threshold Detec-tion]
Enter value The threshold defines the valueabove the fraction collector starts tocollect fractions.
6.1.10 Slope detection panel
Action Option Explanation
[Slope detection] Enable / Disable Action enabled:Fraction collection triggered by slope
Action disabled:No detection
6.2 Editing a method
6.2.1 Selecting a cartridge (Flash mode)
NOTE
The automatic reading of the cartridge information can only be done with specificBUCHI RFID tagged cartridges.
u The indication for recognizing the cartridge is a sound.

Büchi Labortechnik AG Operation | 6
Operation Manual Pure Chromatography Instruments 43/102
1
1 Information button(Information about the selected col-umn)
Navigation path
➔ Conditions panel
u Navigate to the Condit ions selection panel according the navigation path.u Tap the input box next to [Column].ð The display shows a menu with selectable cartridges.u Select the cartridges you wish to use.

6 | Operation Büchi Labortechnik AG
44/102 Operation Manual Pure Chromatography Instruments
6.2.2 Selecting a column (Prep mode)
1
1 Information button(Information about the selected col-umn)
Navigation path
➔ Conditions panel
u Navigate to the Condit ions selection panel according the navigation path.u Tap the input box next to [Column].ð The display shows a dialog with an alphanumeric input box.u Enter a name for the column.u Tap the button [OK].u Tap the input box next to [Flow rate].ð The display shows a dialog box with a numeric input box.u Enter a value for the flow rate.u Tap the button [OK].u Tap the input ox next to [Max. Pressure].ð The display shows a dialog box with a numeric input box.u Enter the maximum pressure for the column.u Tap the button [OK].
Büchi Labortechnik AG Operation | 6
Operation Manual Pure Chromatography Instruments 45/102
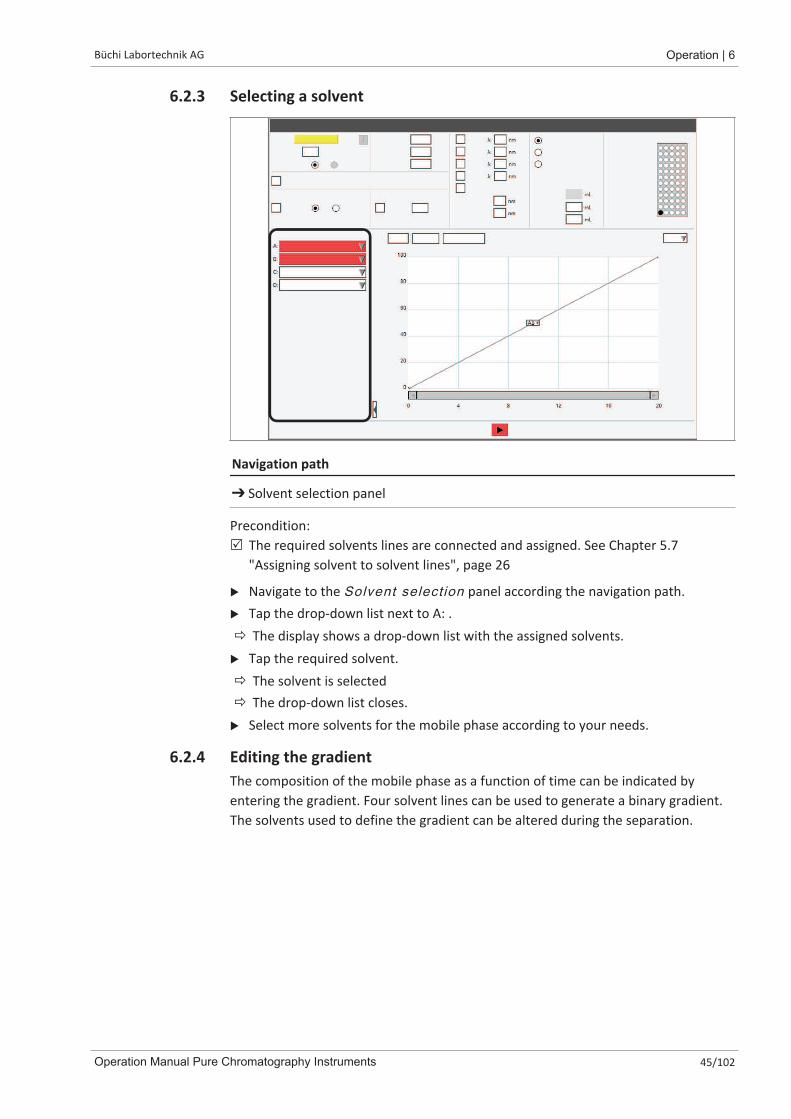
6.2.3 Selecting a solvent
Navigation path
➔ Solvent selection panel
Precondition:R The required solvents lines are connected and assigned. See Chapter 5.7
"Assigning solvent to solvent lines", page 26
u Navigate to the Solvent select ion panel according the navigation path.u Tap the drop-down list next to A: .ð The display shows a drop-down list with the assigned solvents.u Tap the required solvent.ð The solvent is selectedð The drop-down list closes.u Select more solvents for the mobile phase according to your needs.
6.2.4 Editing the gradientThe composition of the mobile phase as a function of time can be indicated byentering the gradient. Four solvent lines can be used to generate a binary gradient.The solvents used to define the gradient can be altered during the separation.

6 | Operation Büchi Labortechnik AG
46/102 Operation Manual Pure Chromatography Instruments
Editing the gradient in tabular mode
The following settings are available:
Action Option Explanation
[Min] Enter value Enter the time until the value in col-umn [% 2nd] is reached.
[Solvents] Select value Select solvent line combinations.
[% 2nd] Enter value Enter the percentage rate for thesecond solvent.
Navigation path
➔ Gradient panel
u Navigate to the Gradient panel according the navigation path.u Tap the button [Table].
ð The display shows the dialog Gradient Table .
u Tap the cell for [Min].ð The display shows a dialog box with a numeric input box.

Büchi Labortechnik AG Operation | 6
Operation Manual Pure Chromatography Instruments 47/102
u Enter the time.u Tap the button [OK].u Tap the cell for [AB▼].ð The display shows a drop-down list with solvent line combinations.u Select the combination that you want to use.u Tap the cell for [% 2nd].ð The display shows a dialog box with a numeric input box.u Enter the percentage for the second solvent.u Tap the button [OK].u Tap the button [Close].ð The gradient is savedð The dialog Gradient table closes
ð The Gradient panel shows the set gradient.
Add additional lines to the Gradient tableu Tap the number field (e.g. 1►).ð The display shows a drop-down list with selectable actions.u Select if the line should be added above or below the selected line.ð A line is added.
Deleting lines from the Gradient tableu Tap the number field (e.g. 1►).ð The display shows a drop-down list with selectable actions.u Select delete.ð The line is deleted.
Editing the gradient in graphic mode
Navigation path
➔ Gradient panel
u Navigate to the Gradient panel according the navigation path.u Tap the button [Edit].ð The Display shows a drop-down list.u Select [Edit].
Add steps to the Gradient graphicu Tap on the line at the time for which you want to edit the gradient and drag it to
the desired %B, then release.
Deleting steps from the Gradient graphicu To remove a step, drag the point to the baseline or to any gray area around the
graph until a red X is visible, then release.

6 | Operation Büchi Labortechnik AG
48/102 Operation Manual Pure Chromatography Instruments
Change solvent combinationsu Solvent line combinations can be accessed by clicking on the AB▼ box to reveal a
drop-down list.
6.2.5 Editing detector selection
Navigation path
➔ Detector selection panel
u Navigate to the Detector select ion panel according the navigation path.u Activate checkbox for the detector you wish to use.ð The detector is activated.
6.2.6 Editing the wavelength for the UV detector

Büchi Labortechnik AG Operation | 6
Operation Manual Pure Chromatography Instruments 49/102
Status Checkbox Explanation Explanation
On The instrument collects fractions.
Monitoring The instrument records the data from theUV detector but does not collect the frac-tions.
Off The instrument does not record datafrom the UV detector and does not col-lect fractions.
Navigation path
➔ Wavelength selection panel
Precondition:R The UV detector is selected.
u Navigate to the Wavelength panel according the navigation path.u Activate the checkbock next to [UV].u Tap the input box next to [UV].ð The display shows a dialog box with a numeric input box.u Enter a value for the wavelength.u Tap the button [OK].ð The dialog box closes.ð The wavelength is saved.
6.2.7 Editing the fraction collection criteria
1
1 Identifier
6 | Operation Büchi Labortechnik AG
50/102 Operation Manual Pure Chromatography Instruments
The following fraction collection criteria are available:
Criteria Meaning
[Collect Peaks] The instrument collects fractions if one detector signal isabove the set threshold.
[Collect All] The instrument collects all the fractions regardless of de-tection signals.
[Collect None] The instrument collects no fractions.
NOTE
[Peak] and [Non-Peaks] default is the maximum volume of the vial.
Navigation path
➔ Collection panel
u Tap the radio button next to criteria you wish to use.ð The criteria is selected.u Tap the input box next to [Peak].ð The display shows a dialog box with a numeric input box.u Enter a the volume you wish to collect.u Tap the button [OK].ð The dialog box closes.ð The value for the volume is saved.u Tap the input box next to [Non-Peaks].ð The display shows a dialog box with a numeric input box.u Enter the volume you wish to collect.u Tap the button [OK].ð The dialog box closes.
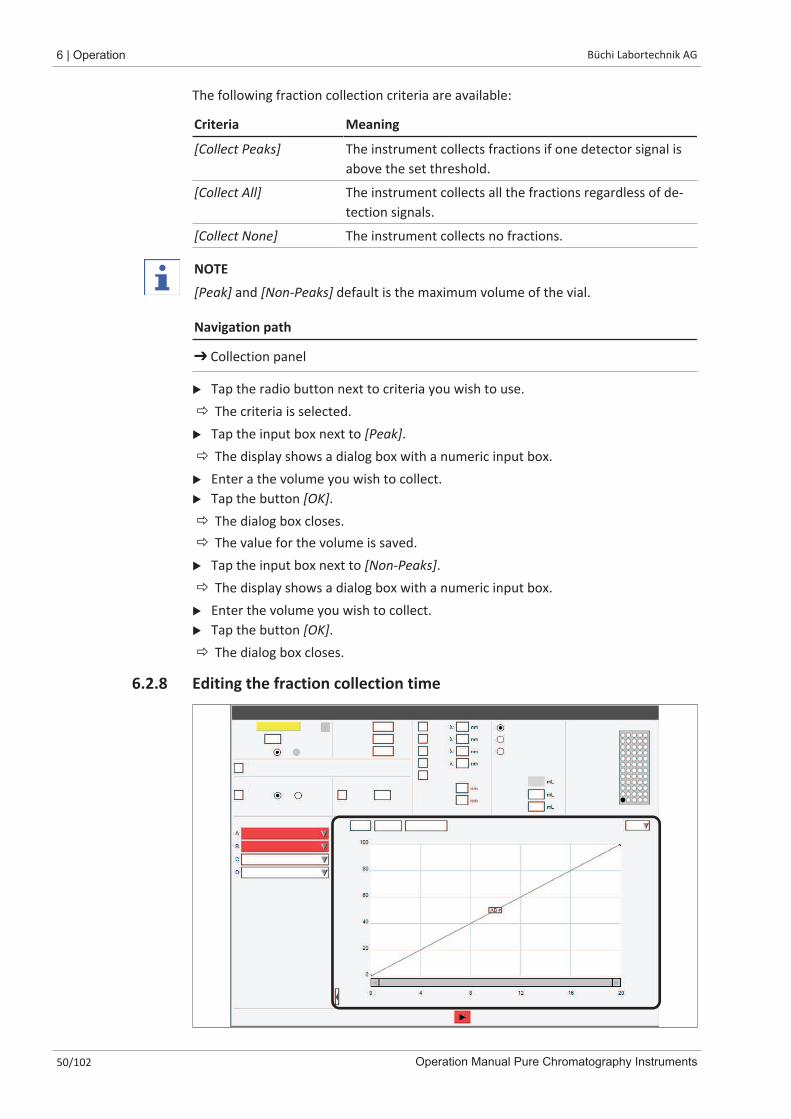
6.2.8 Editing the fraction collection time

Büchi Labortechnik AG Operation | 6
Operation Manual Pure Chromatography Instruments 51/102
Program Collect allows to turn off fraction collection for a specific time.The fraction collector defaults to collect the full run length unless the values fromProgram Collect override the collection.
Navigation path
➔ Gradient panel
u Navigate to the Gradient panel according the navigation path.u Tap the button [Program collect].
ð The display shows the dialog Program col lect .
u Tap the input box.ð The display shows a dialog box with a numeric input box.u Enter the time.u Tap the button [OK].ð The time is saved.ð The dialog box closes.
Add additional lines to the program collectionu Tap the number field (1►).ð The display shows a drop-down list with selectable actions.u Select if the line should be added above or below the selected line.ð A line is added.
Deleting lines from the program collectionu Tap the number field (1►).ð The display shows a drop-down list with selectable actions.u Select delete.ð The line is deleted.

6 | Operation Büchi Labortechnik AG
52/102 Operation Manual Pure Chromatography Instruments
6.2.9 Editing the vapor sensor sensitivity
The vapor sensor detects solvent concentration in the ambient air.The following sensitivity limits are available:
Sensitivity Meaning
High Used for non-volatile solvents
Medium Compromise between the low and high setting
Low Used for volatile or semi-volatile solvents
Off The vapor sensor is off
Navigation path
➔ Tools ➔ Vapor Sensor and Limits
u Navigate to the Vapor Sensors dialog according to the navigation path.
ð The display shows the dialog box Vapor Sensors .
u Tap the drop-down list next [Vapor alarm sensitivity].u Select the sensitivity value you wish to use.u Tap the button [Close].ð The dialog box closes.
6.2.10 Saving a method
Navigation path
➔ File ➔ Save Method as

Büchi Labortechnik AG Operation | 6
Operation Manual Pure Chromatography Instruments 53/102
u Navigate to the Save Method as dialog according to the navigation path.
ð The display shows the dialog box Save Method as .
u Tap the input box [Enter method name].ð The display shows a dialog with an alphanumeric input box.u Enter the name of the method.u Tap the button [OK].ð The dialog box closes.u Tap the button [OK].ð The method is saved.ð The dialog box closes.
6.3 Editing a solvent
6.3.1 Adding a new solvent
Navigation path
➔ Tools ➔ Solvent Definition
u Navigate to the Solvent Definit ion dialog according to the navigation path.
ð The display shows the dialog box Solvent Definit ion .
u Tap the button [Add Solvent].
ð The display shows the dialog box Solvent .
u Tap the input box next to [Name].ð The display shows a dialog with an alphanumeric input box.u Enter the name for the solvent.u Tap the button [OK].ð The dialog box closes.u Tap the input box next to [Info].ð The display shows a dialog with an alphanumeric input box.u Enter information to the solvent according to your requirements.u Tap the button [OK].ð The dialog box closes.u Tap the button [Verify Solvents].
ð The display shows the dialog box Solvent Verif icat ion .

6 | Operation Büchi Labortechnik AG
54/102 Operation Manual Pure Chromatography Instruments
u Select solvent group for the defined solvent.u Tap the button [OK].ð The dialog box closes.ð The solvent is added.u Tap the button [Close].
ð The dialog box Solvent Definit ion closes.
6.3.2 Deleting a solvent
Navigation path
➔ Tools ➔ Solvent Definition
u Navigate to the Solvent Definit ion dialog according to the navigation path.
ð The display shows the dialog box Solvent Definit ion .
u Select the solvent you wish to delete.u Tap the button [Delete Solvent].u Answer the secure question with [Yes].ð The solvent is deleted.
6.4 Tasks during a separation
6.4.1 Introducing a sample into the prep system
u Connect the syringe at the sample loopport.

Büchi Labortechnik AG Operation | 6
Operation Manual Pure Chromatography Instruments 55/102
u Press the plunger.
u Wait until the run starts.
u Disconnect the syringe at the inert loopport.
6.4.2 Injecting a sample into the flash system
Injecting a sample into the flash system at the luer port
CAUTIONNot removed syringe after injection.
A not removed syringe after injection can lead to spill of solvent and injuries.
u Remove the syringe after injection.

6 | Operation Büchi Labortechnik AG
56/102 Operation Manual Pure Chromatography Instruments
u Connect the syringe at the luer port.
u Press the plunger.
u Disconnect the syringe at the luer port.
Injecting a sample into the flash system with a solid loader
NOTE
Removing is done in reverse sequence.
u Loosen the solvent line on the top ofthe cartridge holder.

Büchi Labortechnik AG Operation | 6
Operation Manual Pure Chromatography Instruments 57/102
u Attach the solid loader to the cartridgeholder.
u Attach the solvent line to the solidloader.
6.4.3 Installing and removing a cartridge
NOTE
Removing is done in reverse sequence.
NOTE
Instead of a cartridge a bypass can be installed.
NOTE
The automatic reading of the cartridge information can only be done with specificBUCHI RFID tagged cartridges.
u The indication for recognizing the cartridge is a sound.
u Hold the cartridge above the RFIDreader.
u Wait until the instrument has takenover the cartridge data.

6 | Operation Büchi Labortechnik AG
58/102 Operation Manual Pure Chromatography Instruments
u Lift the clamping plate to release thelock mechanism and pull up the upperpart of the cartridge holder.
u Install the cartridge by pushing thecartridge inlet down into the luerfitting at the bottom plate.
u Lower the upper part of the cartridgeholder over the luer connection.
u Align it.u Firmly press the arm in place to ensure
a proper seal.
6.4.4 Installing and removing a column
NOTE
Removing is done in reverse sequence.

Büchi Labortechnik AG Operation | 6
Operation Manual Pure Chromatography Instruments 59/102
u Install the column in the bottom plateof the column holder.
u Lower down the upper part of thecolumn holder.
u Remove the tubing from the upper partof the column holder.
u Attach the tubing to the column.

6 | Operation Büchi Labortechnik AG
60/102 Operation Manual Pure Chromatography Instruments
u Remove the lower tubing from theupper part of the column holder.
u Attach the tubing to the column.
6.4.5 Inserting the fraction collection tray
NOTE
By default the first available tube on each tray is reserved for waste.
Changing the setting. See Chapter 6.4.7 "Selecting values on the dialog box SampleLoading", page 61
1 2
1 Tab 2 Optical sensor slot
u Place the collection tubes in the collection tray.

Büchi Labortechnik AG Operation | 6
Operation Manual Pure Chromatography Instruments 61/102
u Place the trays in the fraction collector bay.u Make sure that the tab is in the optical sensor slot.
6.4.6 Selecting an existing method
Navigation path
➔ File ➔ Open Method
u Navigate to the Open Method dialog according to the navigation path.
ð The display shows the dialog box Open Method .
u Select the method you wish to use.u The display highlights the selected method black.u Tap the button [OK].ð The method is selected.ð The dialog box closes.
6.4.7 Selecting values on the dialog box Sample LoadingThe display shows the dialog box Sample Loading during the starting phase of aseparation.The following settings are possible:
Action Explanation
[Lower flow rate forspecified time after in-jection]
Reduce flow rate for a specified period, when the pressureincreases significantly at the start of the run after sampleinjection.
[Flush 2nd solvent at theend of the run]
Automatically cleaning the system and column.
[Override Start Vial] Select the start vial according to your needs.
6.5 Performing a Flash separation using a method
NOTE
Pure C-810 / C-815 / C-850 only
6.5.1 Preparing the instrument
Time required: approx. 30 sec.
Precondition:R All commissioning operations have been completed. See Chapter 5 "Installation",
page 24
u Switch the On/Off master switch to On.u Tap the On/Off switch.ð The instrument is starting up.

6 | Operation Büchi Labortechnik AG
62/102 Operation Manual Pure Chromatography Instruments
6.5.2 Selecting the flash mode (Pure C-850 only)
Navigation path
➔ Mode
u Navigate to the Mode menu according to the navigation path.u Select [Flash].ð The flash mode is selected.
6.5.3 Starting Flash separation using a methodPrecondition:R The instrument is prepared. See Chapter 6.5.1 "Preparing the instrument",
page 61
R The required solvents are connected and assigned. See Chapter 5.7 "Assigningsolvent to solvent lines", page 26
R The sample is prepared.
R The waste bottle is empty.
u Calibrate the solvent level sensor. See Chapter 5.8 "Calibrating the solvent levelsensor", page 27
u Calibrate the waste level sensor. See Chapter 5.12 "Calibrating the waste levelsensor", page 29
u Open the protection shield.u Place the fraction collection trays inside the instrument. See Chapter 6.4.5
"Inserting the fraction collection tray", page 60u Close the protection shield.u Open an existing method. See Chapter 6.4.6 "Selecting an existing method",
page 61u Tap the button [OK].u Tap the button [Start] on the Run panel.u According the requirements adjust the file name.u Tap the button [OK].
ð The display shows the dialog box Sample Loading .
u According the requirements adjust the settings. See Chapter 6.4.7 "Selectingvalues on the dialog box Sample Loading", page 61
u Follow the instructions on the display.ð Installing the cartridge. See Chapter 6.4.3 "Installing and removing a cartridge",
page 57ð Introducing the sample into the system. See Chapter 6.4.2 "Injecting a sample
into the flash system", page 55
6.5.4 Changings during a separation
NOTE
Parameters that can be edited are highlighted in green

Büchi Labortechnik AG Operation | 6
Operation Manual Pure Chromatography Instruments 63/102
Possibilities to edit the gradient during a separation:
� Change the gradient. See Chapter "Editing the gradient in graphic mode", page 47
� Hold the gradient. See Chapter 6.1.6 "Gradient panel", page 39
� Auto gradient hold. See Chapter 6.1.6 "Gradient panel", page 39
6.5.5 Ending a Flash separation
NOTE
The separation extends automatically by 5 minutes if the baseline at the end of theseparation is not below the set threshold.
Precondition:R The display shows the dialog box Separation End .
u According to the requirements extend the separation time by 5 minutes.
Precondition:R The display shows the dialog box Run completed .
u Follow the instructions on the display.ð Purging the instrument with air. See Chapter 7.8 "Removing solvent from an
used cartridge", page 78ð Removing the cartridge. See Chapter 6.4.3 "Installing and removing a cartridge",
page 57
6.5.6 Shutting down the instrument
Navigation path
➔ File
Precondition:R The separation process has ended.
u Purge the instrument with purging solvent. See Chapter 7.6 "Cleaning theinstrument", page 77
u Navigate to the [File] menu via the navigation path.u Tap the action [Shut down].u Confirm the secure question with [Yes].ð The instrument is shutting down.
6.6 Performing a Flash separation manually
NOTE
Pure C-810 / C-815 / C-850 only
6.6.1 Preparing the instrument
Time required: approx. 30 sec.
Precondition:R All commissioning operations have been completed. See Chapter 5 "Installation",
page 24
u Switch the On/Off master switch to On.

6 | Operation Büchi Labortechnik AG
64/102 Operation Manual Pure Chromatography Instruments
u Tap the On/Off switch.ð The instrument is starting up.
6.6.2 Selecting the flash mode (Pure C-850 only)
Navigation path
➔ Mode
u Navigate to the Mode menu according to the navigation path.u Select [Flash].ð The flash mode is selected.
6.6.3 Starting Flash separation manuallyPrecondition:R The instrument is prepared. See Chapter 6.6.1 "Preparing the instrument",
page 63
R The required solvents are connected and assigned. See Chapter 5.7 "Assigningsolvent to solvent lines", page 26
R The sample is prepared.
R The waste bottle is empty.
u Calibrate the solvent level sensor. See Chapter 5.8 "Calibrating the solvent levelsensor", page 27
u Calibrate the waste level sensor. See Chapter 5.12 "Calibrating the waste levelsensor", page 29
u Open the protection shield.u Place the fraction collection trays inside the instrument. See Chapter 6.4.5
"Inserting the fraction collection tray", page 60u Close the protection shield.u Select a cartridge. See Chapter 6.2.1 "Selecting a cartridge (Flash mode)", page 42u Tap the drop-down list next to A: on the Solvent Selection panel.
ð The display shows a drop-down list with the assigned solvents.u Tap the required solvent.ð The solvent is selectedð The drop-down list closes.u Select more solvents for the mobile phase according to your needs.u Edit the gradient according to your needs. See Chapter 6.2.4 "Editing the
gradient", page 45u Select the sample collection in the Collect ion panel. See Chapter 6.2.7 "Editing
the fraction collection criteria", page 49u Select the collection criteria in the Collect ion cri teria panel.
u Tap the button [Start] on the Run panel.
ð The display shows the dialog box Sample Loading .
u According the requirements adjust the settings. See Chapter 6.4.7 "Selectingvalues on the dialog box Sample Loading", page 61

Büchi Labortechnik AG Operation | 6
Operation Manual Pure Chromatography Instruments 65/102
u Follow the instructions on the display.ð Installing the cartridge. See Chapter 6.4.3 "Installing and removing a cartridge",
page 57ð Introducing the sample into the system. See Chapter 6.4.2 "Injecting a sample
into the flash system", page 55
6.6.4 Changings during a separation
NOTE
Parameters that can be edited are highlighted in green
Possibilities to edit the gradient during a separation:
� Change the gradient. See Chapter "Editing the gradient in graphic mode", page 47
� Hold the gradient. See Chapter 6.1.6 "Gradient panel", page 39
� Auto gradient hold. See Chapter 6.1.6 "Gradient panel", page 39
6.6.5 Ending a Flash separation
NOTE
The separation extends automatically by 5 minutes if the baseline at the end of theseparation is not below the set threshold.
Precondition:R The display shows the dialog box Separation End .
u According to the requirements extend the separation time by 5 minutes.
Precondition:R The display shows the dialog box Run completed .
u Follow the instructions on the display.ð Purging the instrument with air. See Chapter 7.8 "Removing solvent from an
used cartridge", page 78ð Removing the cartridge. See Chapter 6.4.3 "Installing and removing a cartridge",
page 57
6.6.6 Shutting down the instrument
Navigation path
➔ File
Precondition:R The separation process has ended.
u Purge the instrument with purging solvent. See Chapter 7.6 "Cleaning theinstrument", page 77
u Navigate to the [File] menu via the navigation path.u Tap the action [Shut down].u Confirm the secure question with [Yes].ð The instrument is shutting down.

6 | Operation Büchi Labortechnik AG
66/102 Operation Manual Pure Chromatography Instruments
6.7 Performing a Prep separation using a method
NOTE
Pure C-830 / C-835 / C-850 only
6.7.1 Preparing the instrument
Time required: approx. 30 sec.
Precondition:R All commissioning operations have been completed. See Chapter 5 "Installation",
page 24
u Switch the On/Off master switch to On.u Tap the On/Off switch.ð The instrument is starting up.
6.7.2 Selecting the prep mode (Pure C-850 only)
Navigation path
➔ Mode
u Navigate to the Mode menu according to the navigation path.u Select [Preparative].ð The prep mode is selected.
6.7.3 Starting a Prep separation using a methodPrecondition:R The instrument is prepared. See Chapter 6.7.1 "Preparing the instrument",
page 66
R The required solvents are connected and assigned. See Chapter 5.7 "Assigningsolvent to solvent lines", page 26
R The sample is prepared.
R The waste bottle is empty.
u Calibrate the solvent level sensor. See Chapter 5.8 "Calibrating the solvent levelsensor", page 27
u Calibrate the waste level sensor. See Chapter 5.12 "Calibrating the waste levelsensor", page 29
u Open the protection shield.u Place the fraction collection trays inside the instrument. See Chapter 6.4.5
"Inserting the fraction collection tray", page 60u Close the protection shield.u Open an existing method. See Chapter 6.4.6 "Selecting an existing method",
page 61u Tap the button [OK].u Tap the button [Start] on the Run panel.u According the requirements adjust the file name.u Tap the button [OK].
ð The display shows the dialog box Sample Loading .

Büchi Labortechnik AG Operation | 6
Operation Manual Pure Chromatography Instruments 67/102
u According the requirements adjust the settings. See Chapter 6.4.7 "Selectingvalues on the dialog box Sample Loading", page 61
u Follow the instructions on the display.ð Installing the column. See Chapter 6.4.4 "Installing and removing a column",
page 58ð Introducing the sample into the system. See Chapter 6.4.1 "Introducing a sample
into the prep system", page 54
6.7.4 Changings during a separation
NOTE
Parameters that can be edited are highlighted in green
Possibilities to edit the gradient during a separation:
� Change the gradient. See Chapter "Editing the gradient in graphic mode", page 47
� Hold the gradient. See Chapter 6.1.6 "Gradient panel", page 39
� Auto gradient hold. See Chapter 6.1.6 "Gradient panel", page 39
6.7.5 Ending a Prep separation
NOTE
The separation extends automatically by 5 minutes if the baseline at the end of theseparation is not below the set threshold.
Precondition:R The display shows the dialog box Separation End .
u According to the requirements extend the separation time by 5 minutes.
6.7.6 Shutting down the instrument
Navigation path
➔ File
Precondition:R The separation process has ended.
u Removing the column. See Chapter 6.4.4 "Installing and removing a column",page 58
u Purge the instrument with purging solvent. See Chapter 7.6 "Cleaning theinstrument", page 77
u Navigate to the [File] menu via the navigation path.u Tap the action [Shut down].u Confirm the secure question with [Yes].ð The instrument is shutting down.
6.8 Performing a Prep separation manually
NOTE
Pure C-830 / C-835 / C-850 only

6 | Operation Büchi Labortechnik AG
68/102 Operation Manual Pure Chromatography Instruments
6.8.1 Preparing the instrument
Time required: approx. 30 sec.
Precondition:R All commissioning operations have been completed. See Chapter 5 "Installation",
page 24
u Switch the On/Off master switch to On.u Tap the On/Off switch.ð The instrument is starting up.
6.8.2 Selecting the prep mode (Pure C-850 only)
Navigation path
➔ Mode
u Navigate to the Mode menu according to the navigation path.u Select [Preparative].ð The prep mode is selected.
6.8.3 Starting a separationPrecondition:R The instrument is prepared. See Chapter 6.8.1 "Preparing the instrument",
page 68
R The required solvents are connected and assigned. See Chapter 5.7 "Assigningsolvent to solvent lines", page 26
R The sample is prepared.
R The waste bottle is empty.
u Calibrate the solvent level sensor. See Chapter 5.8 "Calibrating the solvent levelsensor", page 27
u Calibrate the waste level sensor. See Chapter 5.12 "Calibrating the waste levelsensor", page 29
u Open the protection shield.u Place the fraction collection trays inside the instrument. See Chapter 6.4.5
"Inserting the fraction collection tray", page 60u Close the protection shield.u Install a column. See Chapter 6.4.4 "Installing and removing a column", page 58u Tap the drop-down list next to A: on the Solvent Selection panel.
ð The display shows a drop-down list with the assigned solvents.u Tap the required solvent.ð The solvent is selectedð The drop-down list closes.u Select more solvents for the mobile phase according to your needs.u Edit the gradient according to your needs. See Chapter 6.2.4 "Editing the
gradient", page 45u Enter the required times in the Condit ions panel.

Büchi Labortechnik AG Operation | 6
Operation Manual Pure Chromatography Instruments 69/102
u Select the sample collection in the Collect ion panel. See Chapter 6.2.7 "Editingthe fraction collection criteria", page 49
u Select the collection criteria in the Collect ion cri teria panel.
u Tap the button [Start] on the Run panel.
ð The display shows the dialog box Sample Loading .
ð The instrument starts the separation.u According the requirements adjust the settings. See Chapter 6.4.7 "Selecting
values on the dialog box Sample Loading", page 61u Follow the instructions on the display.ð Installing the column. See Chapter 6.4.4 "Installing and removing a column",
page 58ð Introducing the sample into the system. See Chapter 6.4.1 "Introducing a sample
into the prep system", page 54
6.8.4 Changings during a separation
NOTE
Parameters that can be edited are highlighted in green
Possibilities to edit the gradient during a separation:
� Change the gradient. See Chapter "Editing the gradient in graphic mode", page 47
� Hold the gradient. See Chapter 6.1.6 "Gradient panel", page 39
� Auto gradient hold. See Chapter 6.1.6 "Gradient panel", page 39
6.8.5 Ending a Prep separation
NOTE
The separation extends automatically by 5 minutes if the baseline at the end of theseparation is not below the set threshold.
Precondition:R The display shows the dialog box Separation End .
u According to the requirements extend the separation time by 5 minutes.
6.8.6 Shutting down the instrument
Navigation path
➔ File
Precondition:R The separation process has ended.
u Removing the column. See Chapter 6.4.4 "Installing and removing a column",page 58
u Purge the instrument with purging solvent. See Chapter 7.6 "Cleaning theinstrument", page 77
u Navigate to the [File] menu via the navigation path.u Tap the action [Shut down].

6 | Operation Büchi Labortechnik AG
70/102 Operation Manual Pure Chromatography Instruments
u Confirm the secure question with [Yes].ð The instrument is shutting down.
6.9 Identifying fractions
6.9.1 Identifying fractions by peak
Fig. 9: Identifying fractions
Navigation path
➔ Gradient panel
Precondition:R A separation is finished.
u Navigate to the Gradient panel according the navigation path.u Tap the peak with the target value.
ð The Collect ion panel shows the corresponding vial.
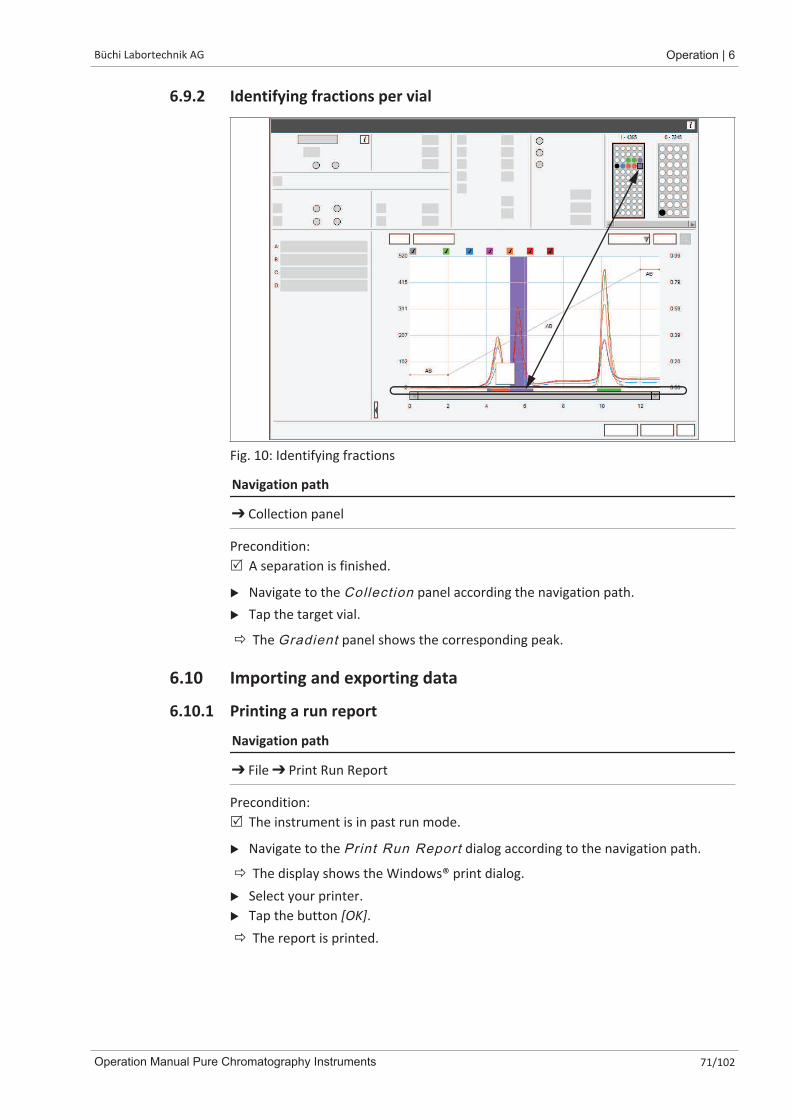
Büchi Labortechnik AG Operation | 6
Operation Manual Pure Chromatography Instruments 71/102
6.9.2 Identifying fractions per vial
Fig. 10: Identifying fractions
Navigation path
➔ Collection panel
Precondition:R A separation is finished.
u Navigate to the Collect ion panel according the navigation path.u Tap the target vial.
ð The Gradient panel shows the corresponding peak.
6.10 Importing and exporting data
6.10.1 Printing a run report
Navigation path
➔ File ➔ Print Run Report
Precondition:R The instrument is in past run mode.
u Navigate to the Print Run Report dialog according to the navigation path.
ð The display shows the Windows® print dialog.u Select your printer.u Tap the button [OK].ð The report is printed.

6 | Operation Büchi Labortechnik AG
72/102 Operation Manual Pure Chromatography Instruments
6.10.2 Sending data to USB
Navigation path
➔ Run panel
Precondition:R The instrument is in past run mode.
u Connect a USB storage device to the instrument.u Navigate to the Run panel according the navigation path.u Tap the button [Data to USB].ð The instrument saves an Excel file to the USB storage device.u Confirm the complete message.ð The data is stored.
6.10.3 Sending PDF to USB
Navigation path
➔ Run panel
Precondition:R The instrument is in past run mode.
u Connect a USB storage device to the instrument.u Navigate to the Run panel according the navigation path.u Tap the button [PDF to USB].ð The instrument saves a PDF file to the USB storage device.u Confirm the complete message.ð The data is saved.
Büchi Labortechnik AG Cleaning and servicing | 7
Operation Manual Pure Chromatography Instruments 73/102
7 Cleaning and servicingNOTE
Users may only carry out the servicing and cleaning operations described in thissection.
Any servicing and repair work which involves opening up the casing may only becarried out by BUCHI service technicians.
u Use only genuine BUCHI consumables and spare parts in order to ensure correctoperation of the device and preserve the warranty.
7.1 Regular maintenance workComponent Action Frequency
Pumps and valves u Purge the instrument with air. SeeChapter 7.8 "Removing solvent from anused cartridge", page 78
u Purge the instrument with purgingsolvent. See Chapter 7.6 "Cleaning theinstrument", page 77
Daily
Tubing u Check for leaks. If a leak is observed,resolve the issue before continuing.
Daily
Fittings u Inspect fittings; if solid material isdeposited on a fitting, clean andtighten (replace) the fitting beforecontinuing.
Daily
Drain lines u Check all drain lines to ensure thatliquid can flow through them to thewaste container
Daily
Waste bottle u Empty the waste bottle Daily
Filters u Check the filters in the solvent bottlesand clean if necessary.
Weekly
Fittings u Check and if necessary tighten thefitting that secures the tubing from themobile phase reservoir manifold to theinlet check valve housing
Weekly
Data u Perform a data backup Weekly
Casing u Wipe down the casing with a dampcloth.
u If heavily soiled, use ethanol or a milddetergent.
Weekly
Warning symbols u Check that the warning symbols on theinstrument are legible.
u If they are dirty, clean them.
Weekly
Display u Wipe down the display with a dampcloth.
Monthly

7 | Cleaning and servicing Büchi Labortechnik AG
74/102 Operation Manual Pure Chromatography Instruments
Component Action Frequency
Nebulizer u Clean the nebulizer. See Chapter 7.4"Cleaning the nebulizer", page 75
Monthly
Air filter u Replace the air filter. Yearly
Sample injectionvalve
u Check if the valve is tight, if necessaryreplace the sealing.
Yearly
Shuttle valve u Check if the valve is tight, if necessaryreplace the sealing.
Yearly
7.2 Carrying out a data backup
Navigation path
➔ File ➔ Exit
u Navigate to the Exit dialog according to the navigation path.u Confirm the secure question.ð The Pure software is shutting down.ð The display shows a Windows® system.u Connect a USB storage device to the instrument.u Open the Windows® Explorer.u Navigate to the data you wish to backup. See Chapter 10.2 "Folder locations",
page 97u Copy the needed data to the USB storage devices.
7.3 Calibrating the displayNavigation path
➔ Tools ➔ Calibration and Defaults
u Navigate to the Calibrat ion and Defaults dialog according to the navigationpath.

Büchi Labortechnik AG Cleaning and servicing | 7
Operation Manual Pure Chromatography Instruments 75/102
u Tap the button [Calibrate].u Follow the instructions on the display.
7.4 Cleaning the nebulizerMaterials Needed:
� HPLC-grade 50:50 methanol: water solution
� Sonication bath
u Switch the On/Off master switch to Off.
u Disconnect the liquid inlet line from thenebulizer.
u Disconnect the gas inlet from the nebulizer
u Remove the knurled screws.
u Remove the nebulizer from the drift tube.
u Place the nebulizer in a beaker filled with 50:50methanol: water solution.
u Sonicate the nebulizer in an ultrasonic bath for10 minutes.
u If the nebulizer is still completely blocked,connect a high-pressure air line to the nebulizerinlet to help remove the blockage.
u If the nebulizer cannot be cleaned, replace thenebulizer.
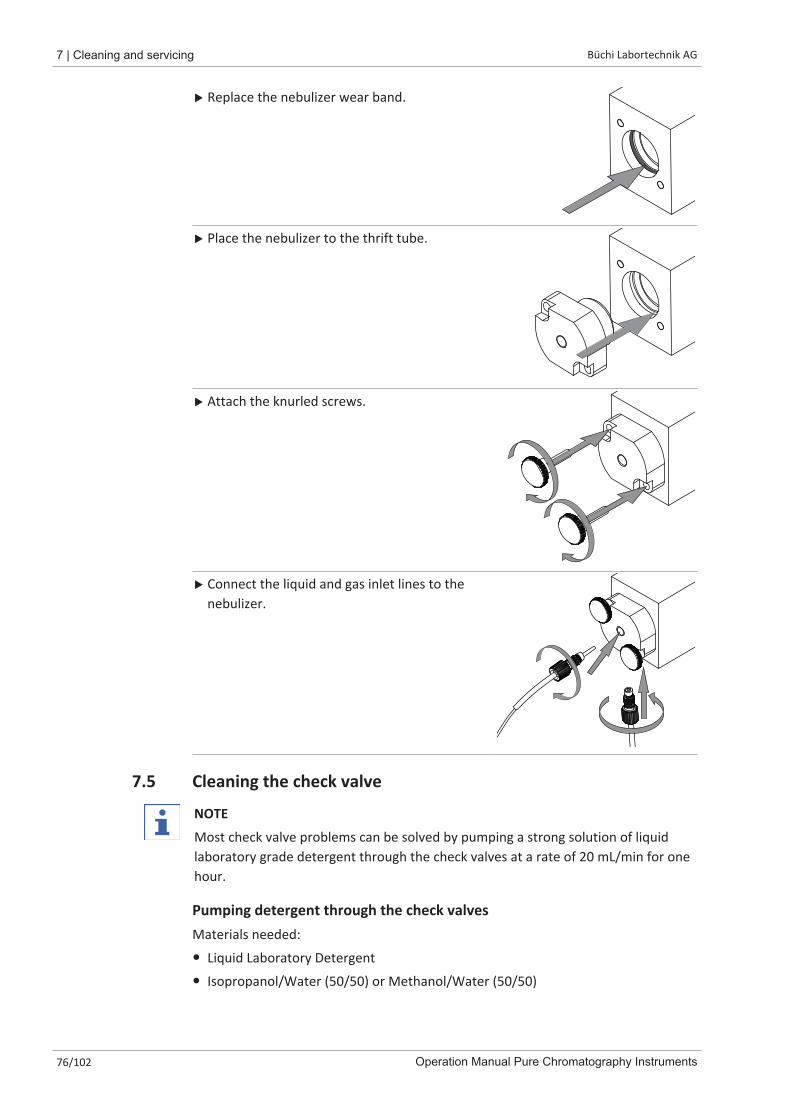
7 | Cleaning and servicing Büchi Labortechnik AG
76/102 Operation Manual Pure Chromatography Instruments
u Replace the nebulizer wear band.
u Place the nebulizer to the thrift tube.
u Attach the knurled screws.
u Connect the liquid and gas inlet lines to thenebulizer.
7.5 Cleaning the check valve
NOTE
Most check valve problems can be solved by pumping a strong solution of liquidlaboratory grade detergent through the check valves at a rate of 20 mL/min for onehour.
Pumping detergent through the check valvesMaterials needed:
� Liquid Laboratory Detergent
� Isopropanol/Water (50/50) or Methanol/Water (50/50)

Büchi Labortechnik AG Cleaning and servicing | 7
Operation Manual Pure Chromatography Instruments 77/102
Navigation path
➔ Tools ➔ Manual Control ➔ Column Flushing...
Precondition:R A bypass is installed. See Chapter 6.4.4 "Installing and removing a column",
page 58
u Navigate to the Column Flushing dialog according to the navigation path.
Sonicate the check valveMaterials needed:
� Open-end wrench, ½”, 9/16" x 5/16"
� Torque wrench
u Switch the On/Off master switch to Off.u Disconnect the mobile phase tubing from the inlet (bottom) of the pump head
using the 9/16” open-end wrench.u Disconnect the mobile phase outlet tubing from the top of the pump head using
the 5/16” open end wrench.u Remove both check valve housings from the pump head using the ½” open-end
wrench.ð The check valve capsule is accessible.u Sonicating the check valve for 10 min in the appropriate solvent.u Install the check valve.u Install the check valve housings back into the pump head.u Tighten the check valve housing to 75 inch pounds with the ½” torque wrench.
7.6 Cleaning the instrument
Navigation path
➔ Tools ➔ Manual Control ➔ Column Flushing...
Precondition:R A purging solvent is assigned to the instrument. See Chapter 5.7 "Assigning
solvent to solvent lines", page 26
u Install a bypass. See Chapter 6.4.4 "Installing and removing a column", page 58
7 | Cleaning and servicing Büchi Labortechnik AG
78/102 Operation Manual Pure Chromatography Instruments
u Navigate to the Column Flushing dialog according to the navigation path.u Enter the required data according to your needs.
7.7 Cleaning the solid loaderNavigation path
➔ Tools ➔ Manual Control ➔ Solid Loader Flushing...
u Install a bypass. See Chapter 6.4.4 "Installing and removing a column", page 58u Navigate to the Solid Loader Flushing dialog according to the navigation
path.
7.8 Removing solvent from an used cartridge
Navigation path
➔ Tools ➔ Manual Control ➔ Air Purging
Precondition:R The cartridge is installed.
u Navigate to the Air Purging dialog according to the navigation path.u Enter the purging time according to your needs.u Tap the button [Column purge].ð The instrument and the cartridges are cleaned.
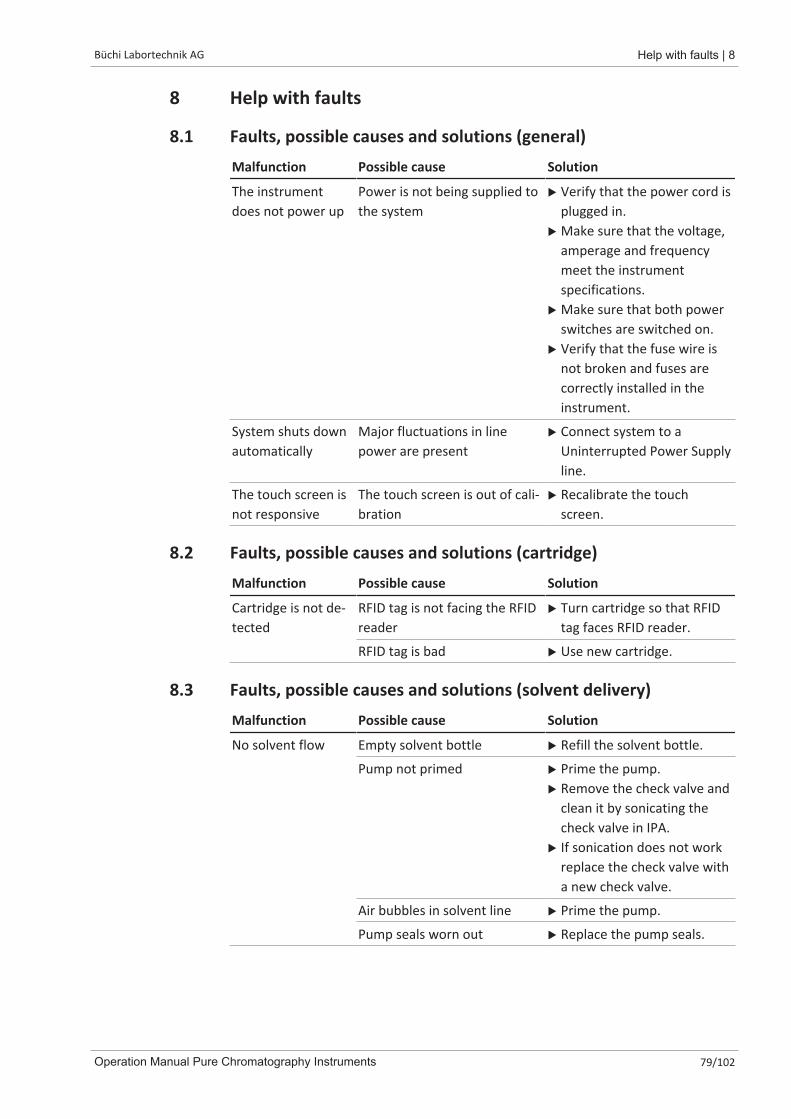
Büchi Labortechnik AG Help with faults | 8
Operation Manual Pure Chromatography Instruments 79/102
8 Help with faults
8.1 Faults, possible causes and solutions (general)Malfunction Possible cause Solution
The instrumentdoes not power up
Power is not being supplied tothe system
u Verify that the power cord isplugged in.
u Make sure that the voltage,amperage and frequencymeet the instrumentspecifications.
u Make sure that both powerswitches are switched on.
u Verify that the fuse wire isnot broken and fuses arecorrectly installed in theinstrument.
System shuts downautomatically
Major fluctuations in linepower are present
u Connect system to aUninterrupted Power Supplyline.
The touch screen isnot responsive
The touch screen is out of cali-bration
u Recalibrate the touchscreen.
8.2 Faults, possible causes and solutions (cartridge)Malfunction Possible cause Solution
Cartridge is not de-tected
RFID tag is not facing the RFIDreader
u Turn cartridge so that RFIDtag faces RFID reader.
RFID tag is bad u Use new cartridge.
8.3 Faults, possible causes and solutions (solvent delivery)Malfunction Possible cause Solution
No solvent flow Empty solvent bottle u Refill the solvent bottle.
Pump not primed u Prime the pump.u Remove the check valve and
clean it by sonicating thecheck valve in IPA.
u If sonication does not workreplace the check valve witha new check valve.
Air bubbles in solvent line u Prime the pump.
Pump seals worn out u Replace the pump seals.

8 | Help with faults Büchi Labortechnik AG
80/102 Operation Manual Pure Chromatography Instruments
Malfunction Possible cause Solution
Pulsation of pump Open or close time of the inletor outlet valves are not correct
u Rinse the pump module withhigh flowrate with ethanolor hot distilled water.
u Change check valves.Residues in solvent
Sealing abrasion outlet valve
Inconsistent solventflow
Loose fitting/air leak into thepump
u Find the loose fittingbetween mobile phasereservoir manifold andpump inlet fitting andtighten it up.
Liquid leak/pump seals wornout
u Fix the leak/replace thepump seals.
Pump head temperaturereaches solvent boiling tem-perature, causing the pump tolose prime and stop flow (thisis likely to occur when runningmethods with highly volatilesolvents such as diethyl etherand methylene chloride)
u Premix the solvents toreduce solvent volatility.
u Place the highly volatilesolvent bottle in an ice bathto eliminate boiling.
System pump pres-sure is higher thanexpected
Blocked solvent lines u Find the blocked lines andreplace it.
Over-tightened fitting u Loosen the fitting or replaceit.
Blocked columns or fluidicpath
u Locate the component thatcaused the blockage, repair,or replace the component.
Leaks Fitting connection not tight u Find the loose fitting andtighten it up.
Damaged solvent line u Find the damaged solventline and replace it.
Pump not running Pump sensor cable becomesdisconnected
u Locate the cable andreconnect to the pumpsensor.
Pump power cable becomesdisconnected
u Locate the power cable andreconnect to the main boardor to the pump.
Incorrect flow path Incorrect fluidic connectionsto/from the mode switchingvalve
u Check/correct the fluidicconnections.

Büchi Labortechnik AG Help with faults | 8
Operation Manual Pure Chromatography Instruments 81/102
8.4 Faults, possible causes and solutions (sample injection)Malfunction Possible cause Solution
Leak around the in-jection port(Flash mode)
Dried sample or particulatematter interferes with syringefitting
u Clean the injection port withappropriate solvent orremove particulate matter.
Defective injection port (Luerfitting) adapter
u Replace the injection port.
Solid loader leaking Loader hardware is not prop-erly set up
u Verify that the loaderhardware is set up correctly.
Leak around theprep injectionvalve/sample loop
Loose fitting u Find the loose fitting andtighten it up.
8.5 Faults, possible causes and solutions (fraction collection)Malfunction Possible cause Solution
Liquid not being col-lected in fractiontubes
Incorrect fraction collectionsettings
u Verify that fractioncollection information is setproperly.
Liquid not centeredin fraction tube
Fraction collector is not cali-brated
u Recalibrate the fractioncollector.
Fraction collector(FC) arm does notmove
Fraction collector arm did nothome properly
u Reset the Fraction collectorarm.
Fraction collector arm motor isslipping
u Tighten the motor coupler.
Fraction collector arm is ob-structed
u Check for cable or burr inthe fraction collector armpath and remove anyobstruction.
Tray not detected RFID tag is bad u Put another tray into thesame position to see if it isrecognized to confirm thecause.
u Replace RFID tag.

8 | Help with faults Büchi Labortechnik AG
82/102 Operation Manual Pure Chromatography Instruments
8.6 Faults, possible causes and solutions (detection)Malfunction Possible cause Solution
ELSD signal is low ordisappears
Sample is too volatile u Sample cannot be detectedby ELSD due to its volatility.
No or low ELSD carrier gas flow u Verify there is gas suppliedto the instrument.
u Check for leak in the gaslines.
u Verify that there is gas flowto the nebulizer from theELSD sampling valve.
u Verify that there is gas flowto the ELSD sampling valve.
Sample stuck on column u Use stronger solvent orchange column chemistry.
ELSD not equilibrated longenough
u Restart run to re-stabilizeand rezero ELSD baseline.
Blocked nebulizer u Sonicate nebulizer to cleanor replace the nebulizer.
Blocked ELSD line u Trace the blockage andreplace the blocked line.
Rotor and/or stator in ELSDSampling valve is worn, dirty,or clogged
u Replace the rotor and/orstator.
Poor ELSD Peakshape
Blocked nebulizer or nebulizertubing
u Clean the nebulizer orreplace the nebulizer tubing.
Nebulizer tubing is not prop-erly connected
u Reinstall the nebulizertubing properly.
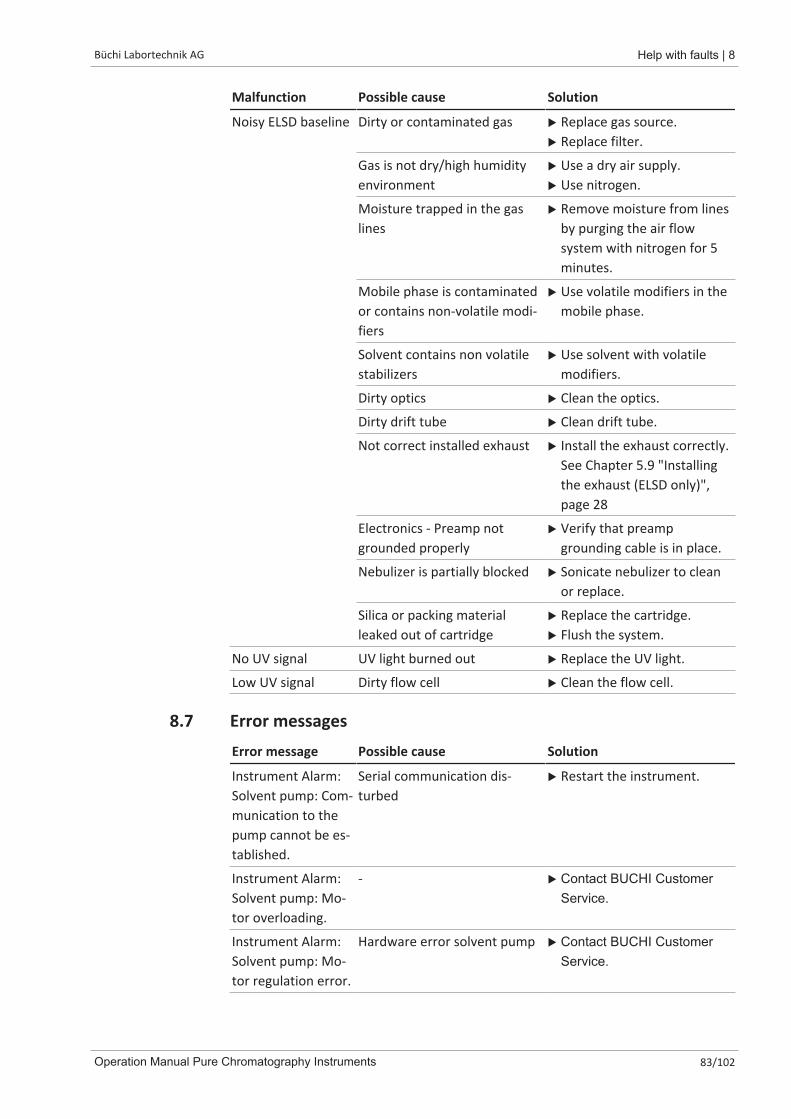
Büchi Labortechnik AG Help with faults | 8
Operation Manual Pure Chromatography Instruments 83/102
Malfunction Possible cause Solution
Noisy ELSD baseline Dirty or contaminated gas u Replace gas source.u Replace filter.
Gas is not dry/high humidityenvironment
u Use a dry air supply.u Use nitrogen.
Moisture trapped in the gaslines
u Remove moisture from linesby purging the air flowsystem with nitrogen for 5minutes.
Mobile phase is contaminatedor contains non-volatile modi-fiers
u Use volatile modifiers in themobile phase.
Solvent contains non volatilestabilizers
u Use solvent with volatilemodifiers.
Dirty optics u Clean the optics.
Dirty drift tube u Clean drift tube.
Not correct installed exhaust u Install the exhaust correctly.See Chapter 5.9 "Installingthe exhaust (ELSD only)",page 28
Electronics - Preamp notgrounded properly
u Verify that preampgrounding cable is in place.
Nebulizer is partially blocked u Sonicate nebulizer to cleanor replace.
Silica or packing materialleaked out of cartridge
u Replace the cartridge.u Flush the system.
No UV signal UV light burned out u Replace the UV light.
Low UV signal Dirty flow cell u Clean the flow cell.
8.7 Error messagesError message Possible cause Solution
Instrument Alarm:Solvent pump: Com-munication to thepump cannot be es-tablished.
Serial communication dis-turbed
u Restart the instrument.
Instrument Alarm:Solvent pump: Mo-tor overloading.
- u Contact BUCHI CustomerService.
Instrument Alarm:Solvent pump: Mo-tor regulation error.
Hardware error solvent pump u Contact BUCHI CustomerService.

8 | Help with faults Büchi Labortechnik AG
84/102 Operation Manual Pure Chromatography Instruments
Error message Possible cause Solution
Instrument Alarm:Solvent pump:Power supply error.
Hardware error solvent pump u Contact BUCHI CustomerService.
Instrument Alarm:Solvent pump: Sol-vent pump motorfan is not working.
Hardware error fan solventpump
u Contact BUCHI CustomerService.
Instrument Alarm:UV detector: Com-munication erroroccurred.
Serial communication dis-turbed
u Restart the instrument.
Instrument Alarm:UV detector: Badblock of High Volt-age (HV) generatorfor lamp or discon-nected lamp or badlamp.
Lamp defect u Check the lamp and restartinstrument.
u Contact BUCHI CustomerService.
No lamp
Hardware error UV detector
Instrument Alarm:UV detector: Badpower supply oflamp heater volt-age.
Hardware error UV detector u Contact BUCHI CustomerService.
Instrument Alarm:UV detector: Badpower supply oflamp anodic volt-age.
Hardware error UV detector u Contact BUCHI CustomerService.
Instrument Alarm:UV detector: Badpower supply of de-tector analog or dig-ital voltage.
Hardware error UV detector u Contact BUCHI CustomerService.
Instrument Alarm:UV detector: 4th cy-cle of lamp ignitionfails.
Lamp defect u Check the lamp and restartinstrument.
Instrument Alarm:UV detector: Lampspontaneouslydouse during unitworking.
Lamp defect u Check the lamp and restartinstrument.

Büchi Labortechnik AG Help with faults | 8
Operation Manual Pure Chromatography Instruments 85/102
Error message Possible cause Solution
Instrument Alarm:UV detector: Lampignition fails aftershort douse in AU-TOZERO functionand repeated HighVoltage impulse andheater cycle failstoo.
Hardware error UV detector. u Contact BUCHI CustomerService.
Instrument Alarm:UV detector: Badidentification oflight peak caused bylow light intensity.
Lamp defective/ Flow cell dirty u Check the lamp and restartinstrument.
Instrument Alarm:UV detector: Badidentification oflight peak caused byunworkable light in-tensity.
Lamp defective/ Flow cell dirty u Check the lamp and restartinstrument.
Instrument Alarm:UV detector: Lowlight intensity wasfound on somephoto elements ofCCD sensor.
Hardware error UV detector u Contact BUCHI CustomerService.
Instrument Alarm:UV detector: Spon-taneously failure onanalog or digitalpower supply.
Hardware error UV detector u Contact BUCHI CustomerService.
Instrument Alarm:UV detector: Erroror base offset ofunit, bad CCD sen-sor, monochroma-tor is open.
Hardware error UV detector u Contact BUCHI CustomerService.
Instrument Alarm:UV detector: Sec-ondary lamp is notworking or lampspontaneouslydouse.
2nd lamp defect u Check the lamp and restartinstrument.

8 | Help with faults Büchi Labortechnik AG
86/102 Operation Manual Pure Chromatography Instruments
Error message Possible cause Solution
Instrument Alarm:UV detector: Anyfan is not working orany fan is discon-nected or mechani-cal blocked.
Hardware error UV detector u Contact BUCHI CustomerService.
Solvent List File Solvent list file corrupted u Shutdown the Puresoftware.
u Delete the solvent list.u Restart the Pure software.
Solvent Lines File:Invalid program ex-ecution.
Solvent lines file corrupted u Shutdown the Puresoftware.
u Delete the solvent list.u Restart the Pure software.
Solvent DefaultsFile: The solvent in-formation file andthe default solventinformation file aremissing.
Software damaged u Uninstall and reinstallsoftware.
Using Default Sol-vent List: Systemdefaults used in-stead of actual re-source.
Solvent file has been deleted u Restart the instrument.
Solvent Pressure:Pressure limit hasbeen exceeded.
Blockage in the line u Remove column.u Replace with bypass.u Determine if column is not
the source of blockage.u If not column is the source
of blockage, then check allfluidic lines.
Sample crashing/precipitate u Purge lines/system with astrong or appropriatesolvent that will dissolve thesample
Valve stuck in incorrect posi-tion
u Reset valve position.u Contact BUCHI Customer
Service.

Büchi Labortechnik AG Help with faults | 8
Operation Manual Pure Chromatography Instruments 87/102
Error message Possible cause Solution
Solvent Pressure 2:Pressure limit hasbeen exceeded.
Blockage in line after the ELSDsampling valve
u Check the fluidic lines andcomponents downstreamfrom the pressure sensor 2(between the ELSD samplingvalve and the fractioncollector valve, waste line)for the source of blockage.
Error in solvent linecalibration file.
Calibration file of solvent linesdamaged
u Shutdown the Puresoftware.
u Delete the calibration list.u Restart the Pure software.
Inlet Gas PressureOut of Range - LOWPRESSURE
No gas or gas flow is low u Check the gas lines in thesystem for leaks.
u Make sure gas source/tankis available.
The pressure gauge is not setcorrectly
u Check pressure gaugesetting to make sure that itis set to deliver 2.5 L/mingas flow (Inlet Pressure withAir State off around 85 - 115psi).
Inlet Gas PressureOut of Range - LOWPRESSURE (Beforerun starts)
Blockage in the system u Check the gas lines in thesystem for blockages.
The pressure gauge is not setcorrectly
u Check pressure gaugesetting to make sure that itis set to deliver 2.5 L/mingas flow (Inlet Pressure withAir State off around 85 - 115psi).
Inlet gas pressureout of range- HIGH(During run)
Blockage in the nebulizer orgas line to the nebulizer
u Check the nebulizer ortubing to the nebulizer forblockages
u Sonicate the nebulizer in asuitable solvent or replacenebulizer
Sensor pressure cal-ibration file
Pressure sensor calibration filedamaged.
u Shutdown the Puresoftware.
u Delete the pressure valuelist.
u Restart the Pure software.

8 | Help with faults Büchi Labortechnik AG
88/102 Operation Manual Pure Chromatography Instruments
Error message Possible cause Solution
Instrument Alarm:Vapor
Vapor sensor settings are settoo sensitive
u Change the vapor limits to alower sensitivity. SeeChapter 6.2.9 "Editing thevapor sensor sensitivity",page 52
Leaks u Check for any leaks in thesolvent flow paths.
Solvent vapors in work area u Solvent vapors in the workarea may set on the alarm.Use the instrument in ahood or well ventilated areawith no open solvents nearthe system.
Vapor sensor no sig-nal
Vapor sensor is not connectedor is defect
u Check the cable to the vaporsensor.
Instrument Alarm:Watchdog
Timing/communication issuein software
If in setup mode:u Restart the instrument.u
If in run mode:u Press reset.u Restart after the run is
finish.
Solvent Pressure Solvent pressure limit hasbeen exceeded
u Remove column.u Replace with bypass.u Determine if column is not
the source of blockage.u If not column is the source
of blockage, then check allfluidic lines.
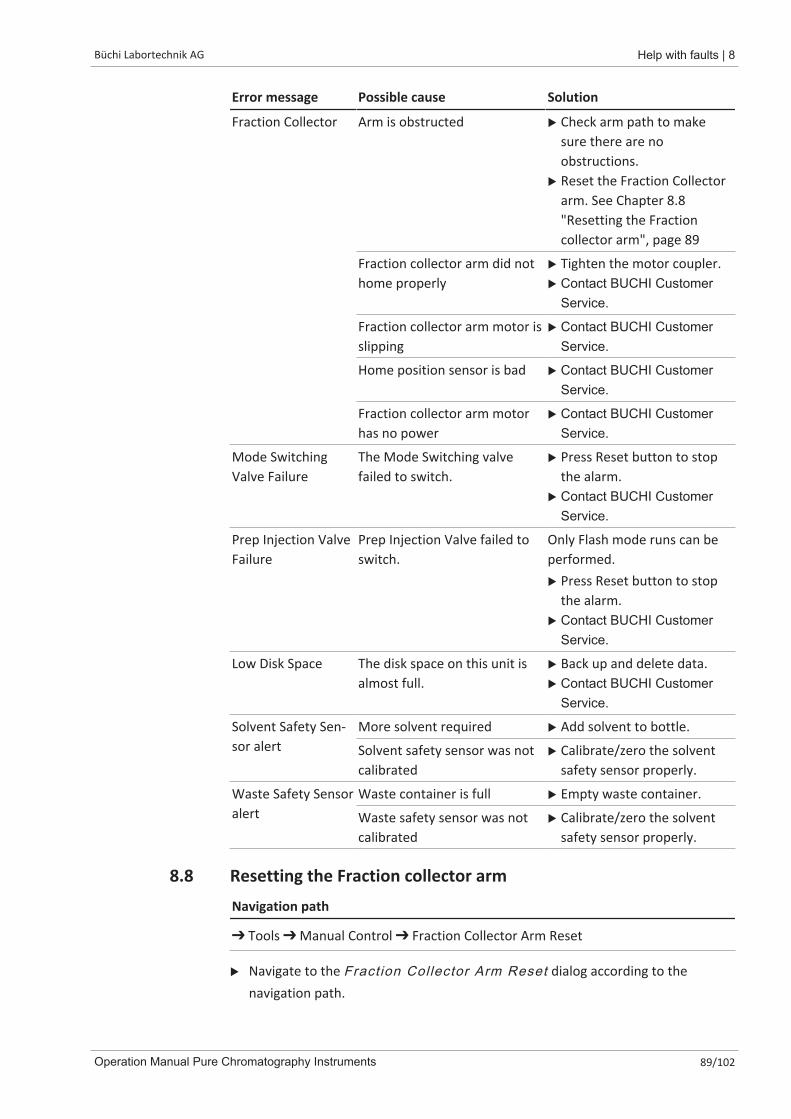
Büchi Labortechnik AG Help with faults | 8
Operation Manual Pure Chromatography Instruments 89/102
Error message Possible cause Solution
Fraction Collector Arm is obstructed u Check arm path to makesure there are noobstructions.
u Reset the Fraction Collectorarm. See Chapter 8.8"Resetting the Fractioncollector arm", page 89
Fraction collector arm did nothome properly
u Tighten the motor coupler.u Contact BUCHI Customer
Service.
Fraction collector arm motor isslipping
u Contact BUCHI CustomerService.
Home position sensor is bad u Contact BUCHI CustomerService.
Fraction collector arm motorhas no power
u Contact BUCHI CustomerService.
Mode SwitchingValve Failure
The Mode Switching valvefailed to switch.
u Press Reset button to stopthe alarm.
u Contact BUCHI CustomerService.
Prep Injection ValveFailure
Prep Injection Valve failed toswitch.
Only Flash mode runs can beperformed.u Press Reset button to stop
the alarm.u Contact BUCHI Customer
Service.
Low Disk Space The disk space on this unit isalmost full.
u Back up and delete data.u Contact BUCHI Customer
Service.
Solvent Safety Sen-sor alert
More solvent required u Add solvent to bottle.
Solvent safety sensor was notcalibrated
u Calibrate/zero the solventsafety sensor properly.
Waste Safety Sensoralert
Waste container is full u Empty waste container.
Waste safety sensor was notcalibrated
u Calibrate/zero the solventsafety sensor properly.
8.8 Resetting the Fraction collector armNavigation path
➔ Tools ➔ Manual Control ➔ Fraction Collector Arm Reset
u Navigate to the Fraction Collector Arm Reset dialog according to thenavigation path.

8 | Help with faults Büchi Labortechnik AG
90/102 Operation Manual Pure Chromatography Instruments
u Confirm the secure question.ð The Fraction collector arm is resetted.
8.9 Replacing the shuttle valve rotorMaterials needed:
� Torx wrench T10
� Pure sampling valve kit
u Switch the On/Off master switch to Off.
Precondition:R Make sure that all tubings are marked for later
installation.
u Remove all tubings.
u Loosen the screws with the Torx wrench.u Remove the valve head.
u Remove the valve rotor.

Büchi Labortechnik AG Help with faults | 8
Operation Manual Pure Chromatography Instruments 91/102
u Make sure that the holes in the new rotor andthe pins inside the valve match.
u Attache the valve head to the instrument withscrews.
u Attach all tubings to the instrument.

9 | Taking out of service and disposal Büchi Labortechnik AG
92/102 Operation Manual Pure Chromatography Instruments
9 Taking out of service and disposal
9.1 Taking out of serviceu Switch off the instrument and disconnect it from the mains power supply.u Remove all tubing and communication cables from the device.
9.2 DisposalThe operator is responsible for proper disposal of the instrument.u When disposing of equipment observe the local regulations and statutory
requirements regarding waste disposal.u When disposing, observe the disposal regulations of the materials used. Materials
used see Chapter 3.5 "Technical data", page 18
9.3 Returning the instrumentBefore returning the instrument, contact the BÜCHI Labortechnik AG ServiceDepartment.https://www.buchi.com/contact

Büchi Labortechnik AG Appendix | 10
Operation Manual Pure Chromatography Instruments 93/102
10 Appendix
10.1 Spare parts and accessoriesUse only genuine BUCHI consumables and spare parts in order to ensure correct,safe and reliable operation of the system.
NOTE
Any modifications of spare parts or assemblies are only allowed with the priorwritten permission of BUCHI.
10.1.1 Accessories
Order no. Image
Pure rack type 1Rack for 12 x 75 mm glass tubes, 1 pc.
11066672
Pure rack type 2Rack for 13 x 100 mm glass tubes, 1 pc.
11066673
Pure rack type 3Rack for 16 x 125 mm glass tubes, 1 pc.
11066674
Pure rack type 4Rack for 16 x 150 mm glass tubes, 1 pc.
11066675
Pure rack type 5Rack for 18 x 150 mm glass tubes, 1 pc.
11066676
Pure rack type 6Rack for 25 x 150 mm glass tubes, 1 pc.
11066677
Pure rack type 7Rack for 9 squared bottles of 480 mL, 1 pc.
11068452
Pure rack type 8 (funnel rack)Rack for 6 funnels
11069407
Pure rack type 9Rack for 16 x 100 mm glass tubes, 1 pc.
11069242

10 | Appendix Büchi Labortechnik AG
94/102 Operation Manual Pure Chromatography Instruments
Order no. Image
Solvent bottle platform kitSolvent bottle platform on top of the instrument. For maxi-mum 4 bottles (volume 4 L each)
11069285
Retaining containerRetaining container for solvent bottle platform for moresafety regarding leaking
11068468
Pure Dry Air Supply unit 11069026
Loading Pumpwith flow rates from 2.5 to 250 mL/min, incl. tubing and fit-ting
11071418
Pure cartridge holder XXLCartridge holder for cartridges of 800 g to 5000 g
11070532
Pure column holder XLColumn holder for column diameters 50 to 70 mm
11068467
Pure nebulizer set 11069464
10.1.2 Sample introduction accessories
Order no.
Pure Solid loader S set, incl. adapter set, sleeve, tubes (20 pcs.) andfrits (40 pcs.)
11068975
Pure Solid loader M set, incl. adapter set, sleeve, tubes (20 pcs.) andfrits (40 pcs.)
11070505
Pure Solid loader frits S (40 pcs.) 11068969
Pure Solid loader frits M (40 pcs.) 11069654
Pure Solid loader tubes S (20 pcs.) 11068971
Pure Solid loader tubes M (20 pcs.) 11069653
Pure Solid loader insertion rod S (1 pc.) 11068973
Pure Solid loader insertion rod M (1 pc.) 11070569
Male union 1/4"-28 sl 11070416
Pure sample loop 2 ml, 1 pc. 11068476
Pure sample loop 5 ml, 1 pc. 11068205

Büchi Labortechnik AG Appendix | 10
Operation Manual Pure Chromatography Instruments 95/102
Order no.
Pure sample loop 10 ml, 1 pc. 11068206
10.1.3 Spare parts
Order no. Image
Pure cartridge holderCartridge holder for cartridges for 4 g to 330 g
11065940
Pure column holderColumn holder for columns diameters 10mm to 50mm
11066594
Injection valve UNF 1/4"-28 044867
Pure transfer line ELSD 11069409
Touch-screen stylus 11068360
Sample injection & mode valve stator 11069688
10.1.4 Tubes
Order no.
Pure Glass Tubes 13 x 100 mm1000 pcs.
148623414
Pure Glass Tubes 16 x 150 mm1000 pcs.
148623416
Pure Glass Tubes 18 x 150 mm500 pcs.
148623410
Pure Glass Tubes 25 x 150 mm500 pcs.
148623411
Pure Squared bottles 480 mL24 pcs.
148623412
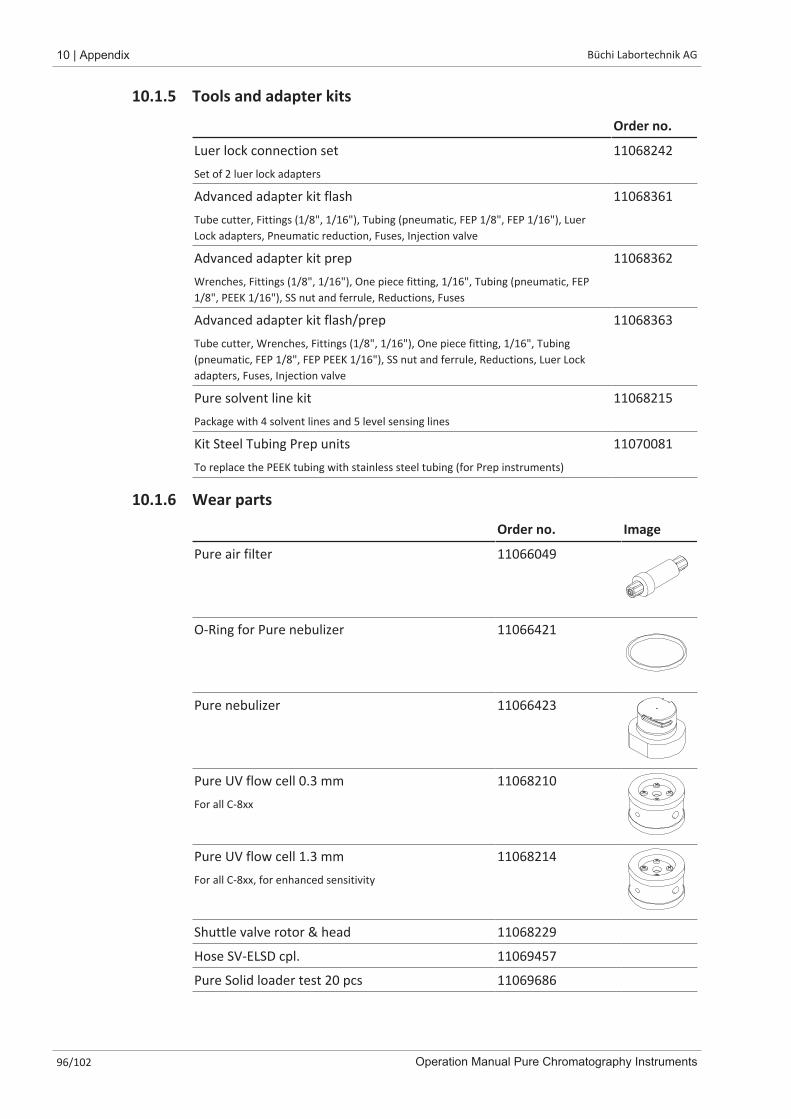
10 | Appendix Büchi Labortechnik AG
96/102 Operation Manual Pure Chromatography Instruments
10.1.5 Tools and adapter kits
Order no.
Luer lock connection setSet of 2 luer lock adapters
11068242
Advanced adapter kit flashTube cutter, Fittings (1/8", 1/16"), Tubing (pneumatic, FEP 1/8", FEP 1/16"), LuerLock adapters, Pneumatic reduction, Fuses, Injection valve
11068361
Advanced adapter kit prepWrenches, Fittings (1/8", 1/16"), One piece fitting, 1/16", Tubing (pneumatic, FEP1/8", PEEK 1/16"), SS nut and ferrule, Reductions, Fuses
11068362
Advanced adapter kit flash/prepTube cutter, Wrenches, Fittings (1/8", 1/16"), One piece fitting, 1/16", Tubing(pneumatic, FEP 1/8", FEP PEEK 1/16"), SS nut and ferrule, Reductions, Luer Lockadapters, Fuses, Injection valve
11068363
Pure solvent line kitPackage with 4 solvent lines and 5 level sensing lines
11068215
Kit Steel Tubing Prep unitsTo replace the PEEK tubing with stainless steel tubing (for Prep instruments)
11070081
10.1.6 Wear parts
Order no. Image
Pure air filter 11066049
O-Ring for Pure nebulizer 11066421
Pure nebulizer 11066423
Pure UV flow cell 0.3 mmFor all C-8xx
11068210
Pure UV flow cell 1.3 mmFor all C-8xx, for enhanced sensitivity
11068214
Shuttle valve rotor & head 11068229
Hose SV-ELSD cpl. 11069457
Pure Solid loader test 20 pcs 11069686
Büchi Labortechnik AG Appendix | 10
Operation Manual Pure Chromatography Instruments 97/102
10.2 Folder locationsExplanation Type Folder
Method files .gfm C:\Users\Public\Documents\Buchi\Pure\meth-ods
Run files .gkfr C:\Users\Public\Documents\Buchi\Pure\runs
10.3 Finding out separation conditions with the navigator
10.3.1 Open the navigator
Navigation path
➔ Gradient panel
u Navigate to the Gradient panel according the navigation path.u Tap the button [Navigator].
ð The display shows the dialog Navigator .
10.3.2 TLC Silica
The TLC-Silica tool uses TLC separation data to provide a recommended gradient forsilica separations of 2 or 3 components.Specification of the samples needed:
� Two different solvent concentrations
� Two separations
� Silica TLC plates

10 | Appendix Büchi Labortechnik AG
98/102 Operation Manual Pure Chromatography Instruments
Precondition:R The display shows the dialog Navigator . See Chapter 10.3.1 "Open the
navigator", page 97
u Select the TLC- Si l ica tab.u Select the radio button for two or three components.u Select the weaker solvent at drop-down list A.u Select the stronger solvent at drop-down list B.u Enter the solvent B concentrations used in the TLC separations.u Measure the distance the spot moved on the silica TLC plates.u Divide the measured value by the distance the solvent traveled.ð This is your Rf- value.u Enter the value in the Rf entry field.u Select the column you wish to use from the drop-down listð The column is selected.ð The display shows the default flow rate.u Adjust the flow rate according to your needs.u Select the radio button for Speed or Purity.u Tap the button [Calculate].ð The display shows the results.u Adjust the following values if necessary:
� Column
� Flow rate
� Speed / Purity
u Tap the button [Accept].ð The gradient is saved for a run.ð The dialog box closes.

Büchi Labortechnik AG Appendix | 10
Operation Manual Pure Chromatography Instruments 99/102
10.3.3 LC-C18
The LC-C18 Tool uses isocratic HPLC separation data to provide a recommendedgradient for reversed phase separations of 2 components.Specification of the samples needed:
� Two isocratic runs on a HPLC column
� Different mobile phase solvent concentrations
� Retention times (t1 and t2) of the components from the chromatograms.
Precondition:R The display shows the dialog Navigator . See Chapter 10.3.1 "Open the
navigator", page 97
u Select the LC-C18 tab.u Select the HPLC column used from the drop-down list.u Select the weaker solvent at drop-down list A.u Select the stronger solvent at drop-down list B.u Enter the solvent concentrations used in the HPLC separations.u Enter the retention times for each separation under each chromatograph.u Select the column you wish to use from the drop-down listð The column is selected.ð The display shows the default flow rate.u Adjust the flow rate according to your needs.u Select the radio button for Speed or Purity.u Tap the button [Calculate].ð The display shows the results.
10 | Appendix Büchi Labortechnik AG
100/102 Operation Manual Pure Chromatography Instruments
u Tap the button [Accept].ð The gradient is saved for a run.ð The dialog box closes.
10.3.4 LC-Transfer
The LC-Transfer tool converts an HPLC gradient into a Flash Chromatographygradient.Specification of the sample needed:
� One run on a HPLC column (in gradient elution mode)
� Times %B changes (t1, t2 and t3)
Precondition:R The display shows the dialog Navigator . See Chapter 10.3.1 "Open the
navigator", page 97
u Select the LC-Transfer tab.u Select the HPLC column type used from the drop-down list.u Enter the flow rate used in the HPLC separation.u Enter the following HPLC gradient conditions:
� lower and higher %B
� times t1, t2 and t3
u Select the cartridge you wish to use for the Flash separation from the drop-downlist.
ð The cartridge is selected.ð The display shows the default flow rate.u Adjust the flow rate according to your needs.

Büchi Labortechnik AG Appendix | 10
Operation Manual Pure Chromatography Instruments 101/102
u Tap the button [Calculate].ð The display shows the results.u Adjust the following values if necessary:
� Flow rate
u Tap the button [Accept].ð The gradient is saved for a run.ð The dialog box closes.

Quality in your hands
BUCHI Affiliates:
We are represented by more than 100 distribution partners worldwide. Find your local representative at: www.buchi.com
BUCHI Support Centers:
Europe
Switzerland/Austria
BÜCHI Labortechnik AGCH – 9230 Flawil T +41 71 394 63 63F +41 71 394 64 [email protected]
Benelux
BÜCHI Labortechnik GmbHBranch Office Benelux NL – 3342 GT Hendrik-Ido-Ambacht T +31 78 684 94 29F +31 78 684 94 30 [email protected]/bx-en
France
BUCHI SarlFR – 91140 Villebon-sur-YvetteT +33 1 56 70 62 50F +33 1 46 86 00 [email protected]/fr-fr
Germany
BÜCHI Labortechnik GmbHDE – 45127 EssenT +800 414 0 414 0 (Toll Free)T +49 201 747 49 0F +49 201 747 49 20 [email protected]/de-de
Italy
BUCHI Italia s.r.l.IT – 20010 Cornaredo (MI)T +39 02 824 50 11F +39 02 575 12 [email protected]/it-it
Russia
BUCHI Russia/CISRU – 127006 MoscowT +7 495 36 36 [email protected]/ru-ru
Spain
BUCHI Ibérica S.L.U.ES – 08960 BarcelonaT +34 936 06 [email protected]/es-es
United Kingdom
BUCHI UK Ltd.GB – Suffolk CB8 7SQT +44 161 633 1000F +44 161 633 [email protected]/gb-en
China
BUCHI ChinaCN – 200233 ShanghaiT +86 21 6280 3366F +86 21 5230 [email protected]/cn-zh
India
BUCHI India Private Ltd.IN – Mumbai 400 055 T +91 22 667 75400F +91 22 667 [email protected] www.buchi.com/in-en
Indonesia
PT. BUCHI IndonesiaID – Tangerang 15332T +62 21 2222 9478F +62 21 5568 [email protected]/id-in
Japan
Nihon BUCHI K.K. JP – Tokyo 110-0008 T +81 3 3821 4777F +81 3 3821 [email protected]/jp-ja
Korea
BUCHI Korea Inc.KR – Seoul 153-782T +82 2 6718 7500F +82 2 6718 [email protected]/kr-ko
Malaysia
BUCHI Malaysia Sdn. Bhd. MY – 47301 Petaling Jaya, Selangor T +60 3 7832 0310F +60 3 7832 [email protected]/my-en
Singapore
BUCHI Singapore Pte. Ltd. SG – Singapore 609919T +65 6565 1175F +65 6566 [email protected]/sg-en
Thailand
BUCHI (Thailand) Ltd. TH – Bangkok 10600T +66 2 862 08 51F +66 2 862 08 [email protected]/th-th
Asia
America
Brazil
BUCHI Brasil Ltda.BR – Valinhos SP 13271-200T +55 19 3849 1201 F +55 19 3849 [email protected]/br-pt
USA/Canada
BUCHI CorporationUS – New Castle, DE 19720T +1 877 692 8244 (Toll Free)T +1 302 652 3000F +1 302 652 [email protected]/us-en
NIR-Online
Germany
NIR-Online GmbHDE – 69190 Walldorf T +49 6227 73 26 60F +49 6227 73 26 [email protected]
South East Asia
BUCHI (Thailand) Ltd.TH-Bangkok 10600T +66 2 862 08 51F +66 2 862 08 [email protected]/th-th
Middle East
BÜCHI Labortechnik AGUAE – Dubai T +971 4 313 2860F +971 4 313 [email protected]
Latin America
BUCHI Latinoamérica S. de R.L. de C.V.MX – Mexico CityT +52 55 9001 5386 [email protected]/es-es