PTA J-Trader Quick Start User Guideline - RHB TradeSmart
31
PTA J-Trader Quick Start User Guideline STRICTLY PRIVATE & CONFIDENTIAL
-
Upload
khangminh22 -
Category
Documents
-
view
0 -
download
0
Transcript of PTA J-Trader Quick Start User Guideline - RHB TradeSmart

PTA J-Trader Quick Start User Guideline
STRICTLY PRIVATE & CONFIDENTIAL

Notice
Along with every effort has been made to ensure that the information given
in this PTA J-Trader Quick Start User Guideline is accurate, no legal
responsibility is accepted by RHB Investment Bank (“RHBIB”) for any
errors, omissions or statements.
The information set out in this quick guideline is provided at your sole risk
and RHBIB shall have no liability to you in the event that you suffer any
loss, whether in contract, tort or negligence, either directly or indirectly,
arising out of this guideline or the information contained herein.

CONTENTS
1. How to Install PTA J-Trader
2. How to Log In
3. Change Your Password
4. The Trading Platform Windows
5. How to Change System Settings
6. How to Add a Contract
7. Place a Trade or Working Order
8. Cancel or Amend a Trade or a Working Order
9. How to View Your Position
10. How to Retrieve Trade and Order History
11. Log Off

1. How to Install PTA J-Trader
Upon clicking on the download link, it will automatically
download the installation file. Click Keep to continue
Click on the downloaded file and the download
process will begin as follow.

2. How to Log In
To log in to PTA J-Trader, double click on
the PTA J-Trader icon as shown on the
left.
5
Then, a security
warning window will
appear. Click “Run” to
continue.

2. How to Log In
After that, the PTA J-Trader login screen
will appear. Click on Advanced tab. Under
Trade Settings, choose your location and
change Trade Type to “Manual”.

2. How to Log In
After that, Click the Login tab. Enter the
User Name and Password that has been
provided to you then click on „Login‟.
3. Change Your Password
If you wish to change your password, type in your User Name, click on the
icon beside the password field , then the following window will appear.
Enter your old password, and new
password twice and click „Login‟ to
change your password.
8

4. The Trading Platform Windows
When you have successfully logged on to PTA J-Trader, the system will
automatically open the Main Trading Window
The Main Trading Window
The main trading window contains various functions and table on next
slide describes each of the functions.
9

The Trading Platform Windows
Fields Description
Default Desktop Lists the “desktops” (trading environments) available, with the currently selected
desktop highlighted in yellow
About Provides installation information, for examples, its version number and build number
Settings Configures & customizes alerts, mouse behavior, default order types, fat finger limits,
and more.
Exit Click on this button to log off from PTA J-Trader
Host
Price Feed
Indicates the connection status of the host & Price Feed where:
Green = connected
Yellow = connecting
Grey = disconnected
Links Opens links to customer-defined websites
Tools Provides a menu of tools for displaying orders in a ticker style layout, creating &
calculating strategies, listings orders, submitting multiple orders, etc.
New Create a new Main Trading Window
Tile Horizontal
Tile Vertical
Aligns the windows horizontally or vertically
Minimize all Iconizes all open windows
10

5. How to Change System Settings
The settings menu allows you to change or adjust the settings according to
your preference. You can make changes to display, general, sounds, alerts,
trading settings, etc.
Click on „Settings‟ button on the Main Trading Windows to bring up the
„Settings‟ window.
11

How to Change System Settings
In the „Settings‟ window, there are 3 tabs which are „General‟, „Quoted
Instruments‟, and „Trading Tools‟. Each of these tabs allow you to edit settings
to various functions within the system.
12

How to Change System Settings
Below is the table that display the various type of settings you can change in
the window.
Once you have make the changes, click „OK‟ to confirm.
Tab Description
General Settings affecting styles: Eg. Spinner/Selection style
A checkbox for toolbar
To create shortcut keys on your keyboard you assign to commonly
performed tasks: for example, pressing F3 for the Instrument tree.
Quoted Instruments To view a list of quoted instruments and enabling low, high and volume for
each instrument.
Trading Tools Includes Depth of Market, Hot Quotes (changing colours), Matrix, Position,
Reflector and Status
Depth of Market To toggle “disable trading”
Hot Quotes To change the colour of font/cells when the price increased/decreased
Matrix To use price tick bars
Set Matrix layout
Position To show position in local currency
Reflector Edit settings to the reflector
13

6. How to Add a Contract
Step 1
On the main trading window, click the icon „New‟
Step 2
Click on „Add‟.
14

How to Add a Contract
Step 4
To add contract,
double click on
months that you
want to monitor.
If you wish to add few
contract months
simultaneously,
highlight the contract
you wish to add and
double click.
All the contracts will appear on „Hot Quotes‟ tab.
15

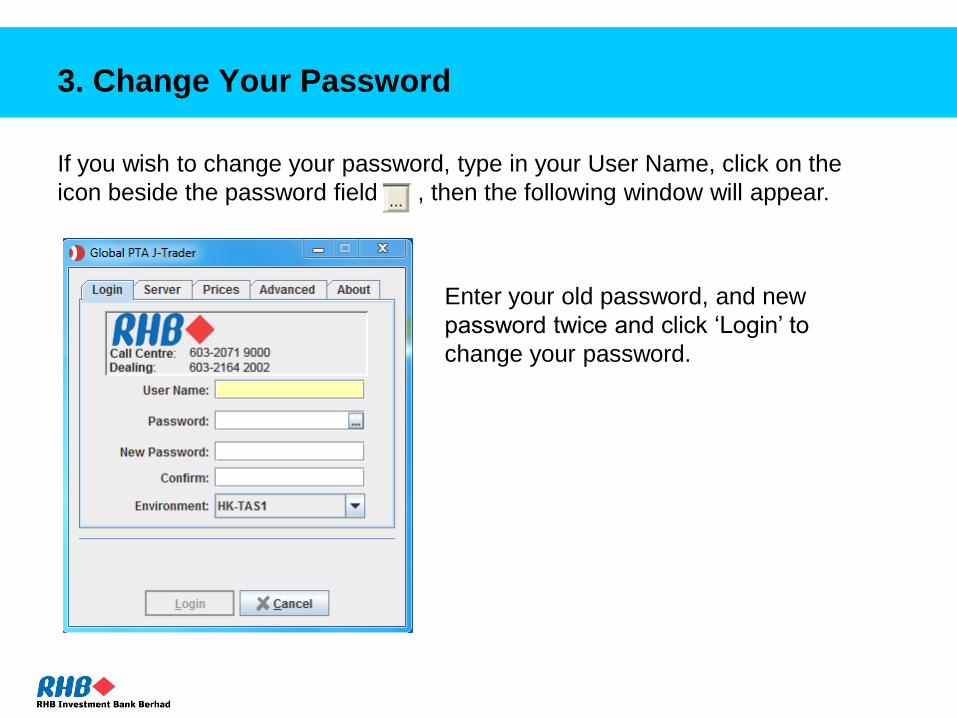
7. Place a Trade or Working Order
There are two ways in which you can place a trade. The first way is to use a
trade ticket. To bring up a trade ticket, click on the contract in which you wish to
place a trade and click on „Trade‟ in the „Hot Quotes‟ tab.
16
Place a Trade or Working Order
To place a trade:
Select the „Exchange‟,
„Commodity‟, „Contract date‟
and „Order type‟ field in which
you wish to place the trade in.
Key in the quantity under „Lots‟
Key in the trade price under
„Price‟
Click on „Buy‟ if you wish to
place a BUY order. if you wish
to place a SELL order, click on
„Change to Sell‟ and click on
„Sell‟
17

Place a Trade or Working Order
The second way in which you can place a trade is to use the reflector. The
reflector is a price ladder screen from which you can trade the full depth of
market for a contract, including inside prices (price without volume that are
between the bid and offer) to trade with reflector. It is best to use the reflector to
place the trade after the market opens.
To bring up the
reflector, click
on the contract
in which you
wish to place a
trade and click
on „Reflector‟
in the „Hot
Quotes‟ tab.
18

Place a Trade or Working Order
If you wish to place a Buy or Sell Market
order, click on ‘Buy Mkt’ or ‘Sell Mkt’.
Offer price
Offer
Quantity
Bid Quantity
Bid price
If you wish to place 1 lot sell order at price
1838.5, click the pink box.
If you wish to
place 1 lot
buy order at
price 1833,
click the blue
box.
W1
Best Offer Price
Best Bid Price
Last traded price
Offer lots
available
Bid lots
available Last traded volume
Working (W) and
filled (F) buy order
Working (W) and
filled (F) sell order
19
W2

Place a Trade or Working Order
The columns can be customized
in the „Hot quotes‟ Windows. To
customize the columns, right click
on the Main Heading and click
„Select Columns‟ option.
Select the
columns that
you want to
display by
ticking the
box then
click „OK‟.
20

8. Cancel or Amend a Trade or a Working Order
You can cancel trades or working orders through „Status‟ tab.
The „Status‟ tab shows you the status or all your trades and order, whether they
are working, filled or rejected.
Click on the „Status‟ tab and your working orders will be displayed on the top
section of the window.
21

Cancel or Amend a Trade or a Working Order
To cancel a particular order, select the order and click „Pull Order‟. To amend a
trade, click on „Amend‟.
22

Cancel or Amend a Trade or a Working Order
When you click on „Amend‟, a trade
ticket will appear and you can make
amendments to the lot size and
order price.
Click „Buy‟ (or „Sell‟ for a Sell order)
to confirm the amendment.
23

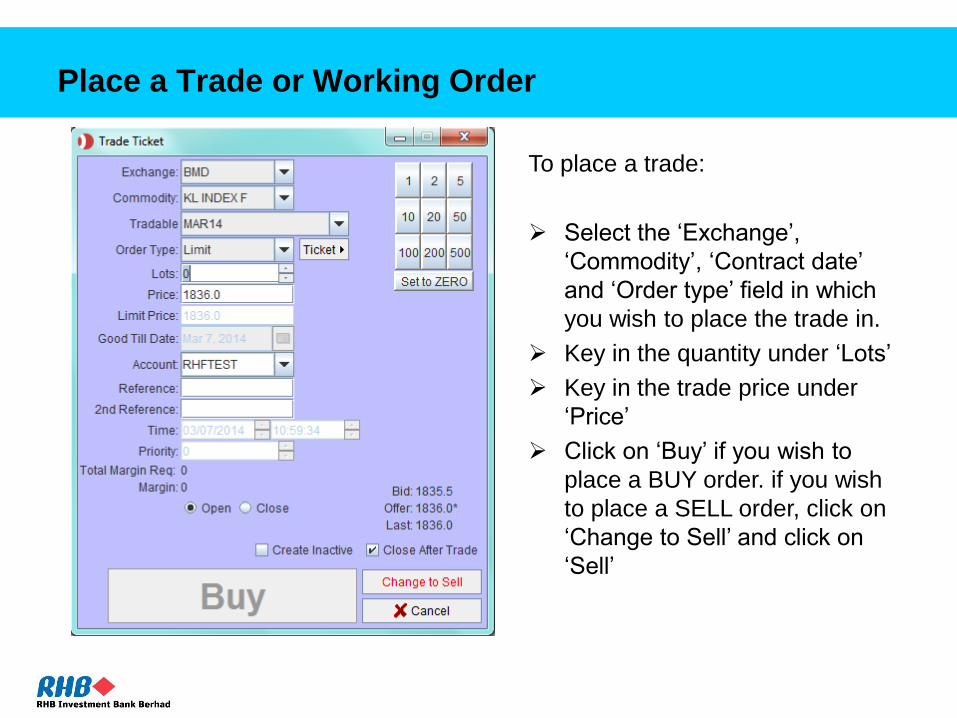
9. How to View Your Position
To view your positions, click on „Positions‟ tab.
The P&L for respective contract is shown in contract‟s settlement
currency. However, the total P&L is shown in USD.
24
How to View Your Position
Select the columns by
ticking the box & click „OK‟.
Columns can be customized in the „Position‟ tab.
To customize columns, right click on the Main
Heading and click on „Select Columns‟.
25

How to View Your P&L in Other Currencies
To view your P&L in other
currencies, check the box
for “Enable Local
Currency”
Then the drop down menu
will appear as follows.
26
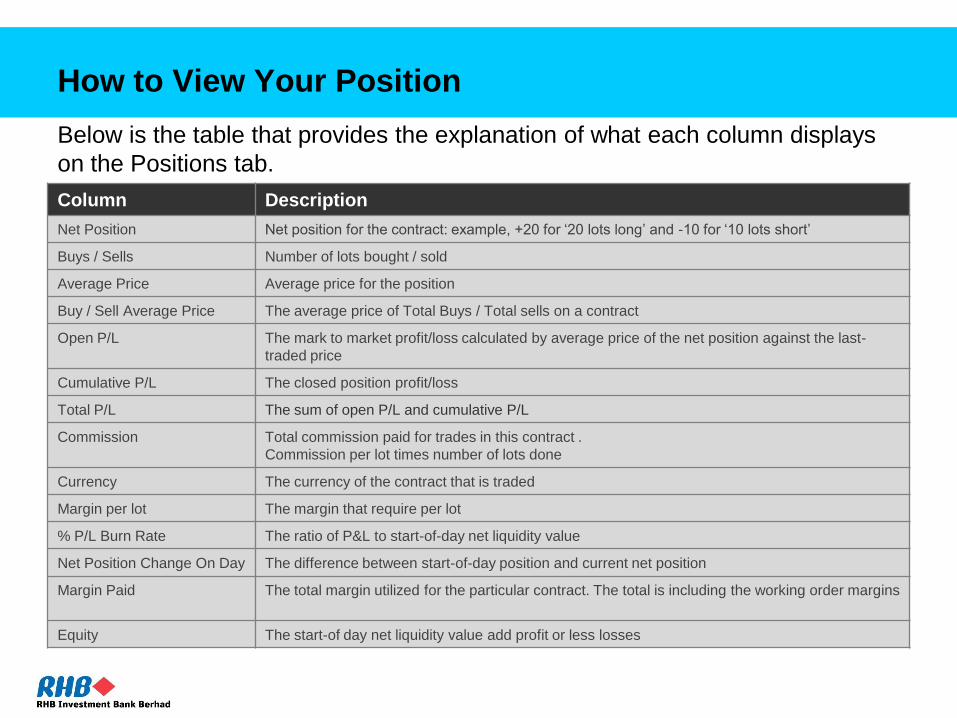
How to View Your Position
Below is the table that provides the explanation of what each column displays
on the Positions tab.
Column Description
Net Position Net position for the contract: example, +20 for „20 lots long‟ and -10 for „10 lots short‟
Buys / Sells Number of lots bought / sold
Average Price Average price for the position
Buy / Sell Average Price The average price of Total Buys / Total sells on a contract
Open P/L The mark to market profit/loss calculated by average price of the net position against the last-
traded price
Cumulative P/L The closed position profit/loss
Total P/L The sum of open P/L and cumulative P/L
Commission Total commission paid for trades in this contract .
Commission per lot times number of lots done
Currency The currency of the contract that is traded
Margin per lot The margin that require per lot
% P/L Burn Rate The ratio of P&L to start-of-day net liquidity value
Net Position Change On Day The difference between start-of-day position and current net position
Margin Paid The total margin utilized for the particular contract. The total is including the working order margins
Equity The start-of day net liquidity value add profit or less losses
27

10. How to Retrieve Trade And Order History
Go to „Status‟ tab which will show all your working and filled orders and trade.
If you wish to retrieve your orders in the futures, click on „Export‟ (for txt format
file) or „CSV Export‟ (for CSV format file).
28

How to Retrieve Trade And Order History
Save a copy of report in your computer
After click on „CSV Export‟, you will be able to save the export data in CSV
format as shown above and open CSV format file in excel spreadsheet.
29

11. Log Off
To log off from your PTA J-Trader, click on „Exit‟ button.
PTA J-Trader will save your current settings and all your products in „Hot
Quotes‟ tab will be loaded automatically when you log-in on next session.
30

The End
THANK YOU
31