
Project Plan and Timelines Task Name Duration
103
WESTERN GOVERNORS UNIVERSITY Submittal Cover Sheet Date: December 11, 2012, 2012 Student Name: Nava Elizabeth Renaud Student ID Number: 000164522 Student Degree Program: B.S, IT - Network Design and Management Emphasis Student Email: [email protected] Four Digit Assessment/Project Code: CPW1 Mentor Name: Bill Maasberg For Revisions Only Indicate Previous Grader: Submissions received with an altered, incomplete or missing cover sheet will be returned for resubmission. Submit to: Western Governors University Attn.: Assessment Delivery Department 4001 South 700 East, Suite 700 Salt Lake City, Utah 84107-2533 [email protected]
-
Upload
independent -
Category
Documents
-
view
0 -
download
0
Transcript of Project Plan and Timelines Task Name Duration
WESTERN GOVERNORS UNIVERSITY
Submittal Cover Sheet
Date: December 11, 2012, 2012
Student Name: Nava Elizabeth Renaud
Student ID Number: 000164522
Student Degree Program: B.S, IT - Network Design and Management Emphasis
Student Email: [email protected]
Four Digit Assessment/Project Code: CPW1
Mentor Name: Bill Maasberg
For Revisions Only Indicate Previous Grader:
Submissions received with an altered, incomplete or
missing cover sheet will be returned for resubmission.
Submit to:
Western Governors University
Attn.: Assessment Delivery Department
4001 South 700 East, Suite 700
Salt Lake City, Utah 84107-2533

Technical Writing Project Cover Sheet
Capstone Project Name: Using Microsoft Deployment Toolkit 2012 to Create, Deploy, and
Manage a customized Windows 7 Operating System Image in a Windows 2008 R2 Enterprise
Student Name: Nava Elizabeth Renaud
Degree Program: Bachelor of Science, IT - Network Design and Management Emphasis
Mentor Name: Bill Maasberg
Signature Block
Student’s Signature Nava Elizabeth Renaud
Mentor’s Signature

Table of Contents
Capstone Project Summary .................................................................................................................. 1
Goals and Objectives ............................................................................................................................ 7
Project Deliverables .............................................................................................................................. 9
Project Plan and Timelines................................................................................................................. 12
Project Development……………………………………………………………………………. 14
References ........................................................................................................................................... 18
Appendix 1: Competency Matrix ...................................................................................................... 20
Appendix 2: MDT 2012 Presentation: A High Level Overview.…...…...…...…...…...…...…... 23
Appendix 3: Install MDT 2012 on Server 2008 R2: Detailed Instructions.…...…...…...…...…. 40
Appendix 4: How To Create a Deployment Share……………………………………………... 52
Appendix5: Create, Customize, and Capture a Windows 7 Enterprise x64 Image…………….. 56
Appendix 6: How to Add Applications to a Deployment Share……………………………… .. 82

Page 1
Capstone Project Summary
My Capstone project was a proof of concept study using the newest version of Microsoft
Deployment Toolkit 2012 (MDT 2012) released in May 2012 to upgrade the Operating System
of computers with Windows XP SP3 installed to Sixty-four bit Windows 7 Enterprise with
Service Pack 1.
The Microsoft Deployment Toolkit is a set of tools and scripts written by Microsoft
Deployment Specialists to facilitate hardware independent Windows OS image creation,
centralized driver management and standardized OS deployment. MDT and the tools necessary
to work with it to accomplish Windows system image creation and deployment are available for
download free of charge from Microsoft and can run on either Windows 7 client or Windows
2008 R2 Server OS platforms.
I have used previous releases of MDT - MDT 2008 and MDT 2010 - for deploying
Windows client operating systems in small to medium sized business environments. In my
experiences, these older versions of the Microsoft Deployment Toolkit worked well for
organizations with less than five hundred computers in a few sites to image. Microsoft now
reports the newest version of Microsoft Deployment Toolkit, MDT 2012, has comprehensive
tools and guidance to most efficiently manage a large-scale deployment of Windows 7
(“Solution accelerators: Microsoft deployment toolkit”, 2012).
I am a currently employed as Microsoft Windows Deployment Subject Matter Expert and
Windows 7 Client Deployment Technical Lead and was chosen for this position because I have
over ten years experience in the design and creation of Windows customized images that comply
with operating system standards provided by Information Technology Infrastructure Services
(IT IS) Senior Leadership. I designed and created programs to automate Company Wide

Page 2
Windows Operating System and Application upgrade deployments beginning in 2002 with the
upgrade from Windows XP to Windows XP SP2 of over forty-five hundred client systems in two
hundred seventy six different locations.
The Windows 7 Upgrade Project architecture team, which consists of I.T. Senior
Leadership from both the manufacturer and the Information Technology Services firm, tasked
me with the creation of one customized hardware independent Windows 7 Enterprise x64 image
file that meets their agreed upon standards. I am also required to design, implement and manage
the automated deployment of the Operating System image and all necessary applications and
system configuration changes to over sixty-eight hundred existing HP, Dell and Lenovo
Windows client computers that have Windows XP Operating System SP3 installed. The
deployment plan must also include a method to back up user data and configurations so that
associates will not experience loss of valuable data or productive work time due to the system
upgrade.
The Windows 7 Upgrade Project Committee asked me to find the best method for their
IT Desktop support organization to use in the creation and automated deployment of a
customized Windows 7 Enterprise X64 image. This method had to incur no additional
deployment software licensing fees. Microsoft Deployment Toolkit 2012 is free and available for
download at the Microsoft Download Center. MDT 2012 also has new features meant to support
operating system deployments in large organizations. I can install and use MDT 2012 on any
Windows 7 or Server 2008 R2 OS computer and will not need to make any changes to the
current Active Directory environment to accomplish the enterprise wide upgrade. This project
timeline coincided with the timeline for me to research and write my capstone report and
Windows OS deployment is a high growth area of the IT Enterprise Management career field so

Page 3
I decided to complete a Project in the Intellectual Product or Service Form on the subject of
Microsoft Deployment Toolkit 2012.
As Microsoft mainstream support for Windows XP ended in April 2009 and extended
support ends in August 2014, one area of projected near-term job growth in the IT – Network
Design and Management career field is in Windows 7 Client deployment. Many companies have
waited to deploy a newer version of Windows because they have not had the money to spend on
new operating system licenses. A majority of business IT Managers did not find enough business
value in deploying Windows Vista and have also waited for the first service pack release of
Windows 7 to ensure the time and expense spent on deployment of a new client operating system
will result in a more stable and productive work environment for their clients. Businesses that
still use Microsoft XP desktops now find they need the capability to deploy customized versions
of Windows 7 and business critical applications throughout their information technology
enterprise quickly and efficiently while providing a positive, value added desktop upgrade
experience.
The ability to create and deploy standardized images is essential to efficient IT network
management. Installing an image on a pc that has become crippled due to malware or hardware
driver or any number of reasons can provide a permanent fix while saving many hours of work
on the part of an IT systems administrator. Using customized operating systems images means
that applications necessary for productivity are correctly configured and data is backed up and
restored automatically so the user can get back to work quickly and satisfied with the level of
service received from the company’s IT IS department.
Enterprise level tools like Microsoft System Center Configuration Manager can be useful
to accomplish automated deployments of completely customized images to clients throughout

Page 4
large enterprise networks. I have used SCCM for Operating System deployments and can vouch
for its ease of use as well as the power of the tool to accomplish automated deployment and
configuration tasks. SCCM 2012 site systems require install on a Windows 2008 R2 (64 bit)
server operating and to be most effective that server should have the most processor power and
hardware memory available. In addition to the cost of the server hardware, SCCM licensing is
very expensive, making it and other commercially available deployment tools not viable as a
deployment solution for many companies.
The Microsoft Deployment Toolkit is a set of tools and scripts written by Microsoft
Deployment Gurus that facilitate hardware independent Windows OS image creation, centralized
driver management and standardized OS deployment. MDT 2012 is Microsoft’s solution
accelerator for operating system and application deployment. MDT is offered free from the
Microsoft Download Site and can run on Windows 7client or Windows 2008 R2 server operating
system platforms. While previous releases of Microsoft Deployment Toolkit were created for use
by organizations with less than five hundred computer systems to deploy and manage. The new
version of Microsoft Deployment Toolkit, MDT 2012, has comprehensive tools and guidance to
manage large-scale deployments of Windows 7. (“Solution accelerators: Microsoft deployment
toolkit”, 2012)
As a contractor who must keep skills up to date in all areas of I.T. network design and
management in order to stay employed, I need to be able to adapt and use any approved tool
available for deployment and management of windows client systems. because operating system
deployments challenge all areas of Microsoft Windows Active Directory Systems Management
and Windows 7 client deployment to physical and virtual machines is a current growth area of
Page 5
the career field I have loved working in for over 24 years it was important to evaluate whether
customized Windows 7 Enterprise X64 deployment can be automated using MDT 2012.
To evaluate the efficacy of using Microsoft Deployment Toolkit to accomplish the
enterprise wide upgrade of Windows XP Professional SP3 client computers to a customized
version of Windows 7 Enterprise (x64) with SP1and necessary base applications I reviewed
technical references and case studies found on the internet at sites such as Microsoft’s TechNet
(technet.microsoft.com).
To begin my project I downloaded “Optional - MDT 2012 Print-Ready
Documentation.zip” from the Microsoft Download Center at the same time that I downloaded the
MDT 2012 software install package. This archive of print ready documentation contains nine
documents published by the Microsoft Solution Accelerators team. “Microsoft Deployment
Toolkit 2012 Quick Start Guide for Lite Touch Installation.doc” is a comprehensive guide
intended to assist Microsoft Windows Engineering professionals who are familiar with the
concepts of Operating System Image creation and deployment to evaluate the product and new
features as quickly as possible. I followed this document verbatim in creating my lab
environment to get the fastest possible results with MDT 2012. For more in depth knowledge and
for troubleshooting help, I referenced the remaining documents in the archive, including “Using
the Deployment Toolkit.docx”, “Troubleshooting Reference”, and “Toolkit Reference.docx”
(Microsoft Download Center)
I found and utilized a wealth of reliable technical information on the internet including
helpful in-depth information on Windows 7 deployment experiences with tips and best practices
for use of Microsoft Deployment Toolkit 2012. Microsoft’s Technet Website
(technet.microsoft.com) is a comprehensive, deep level technical reference on all things

Page 6
Microsoft created and maintained by Microsoft employees. TechNet’s “Microsoft Deployment
Guys” web blog site, created and maintained by Microsoft employees who are system
deployment specialists especially for deployment professionals, includes a MDT 2012 section
(“Microsoft Deployment Guys”, n.d.).
To deliver a step-by-step Word document that details steps to create and deploy a
customized Windows 7 Enterprise x64 image required a great deal of knowledge and research on
the subjects of operating system deployment and Microsoft Windows 7 installation,
configuration and management. The subject matter knowledge and experiences I gained in ten
years of previous operating system image creation and deployments was useful, as will all the
knowledge learned in the courses specific to my degree. For very in-depth Windows 7
deployment information turned to Mastering Windows 7 Deployment (Finn, Gibson, and van
Surksum, 2011) and TrueSec Deployment Fundamentals, Volume 1(Arwidmark and Nystrom,
2010). To review documentation on the installation and configuration of Windows 7 clients I
used the textbook for ABV1, Operating Systems: MCTS Self-Paced Training Kit (Exam 70-680):
Configuring Windows 7 (McLean and Thomas, 2010).
Finally, it was necessary to perform all the steps required to create and deploy the
Windows 7 image using MDT 2012 in order to document and validate those steps. To create and
deploy a customized Windows 7 image using MDT 2012 required the knowledge and use of
Windows Server 2008 R2 SP1 with the Hyper-V Role installed because it is best practice to
deploy a hardware independent customized Windows 7 image to and then capture from a virtual
machine. A source of good information for Windows Server 2008 R2 with Hyper-V was
Windows Server 2008 R2 Hyper-V: Insiders Guide to Microsoft's Hypervisor (Kelbley and
Sterling, 2010).

Page 7
Project Goals and Objectives
This project had the following goals:
Prepare a high-level overview of the capabilities and dependencies of MDT 2012
Detail the installation and configuration of MDT 2012 on Windows Server 2008
R2 (SP1)
Provide step by step instruction on the process of creating and deploying a
customized Windows 7 image using MDT 2012
My first objective, to prepare an overview of the capabilities and use of MDT 2012 for
presentation to Windows 7 Upgrade Project Team members and Senior Level Windows
Engineers required research on the subject of MDT 2012 operating system deployments and
knowledge and experiences gained with previous Operating System image creation and
deployments. This deliverable, a Microsoft Word document to inform the Windows 7 Upgrade
Project Team and to help them decide if MDT 2012 could meet the needs of the IT IS
department for the purpose of the Windows 7 deployment project. This document was finished
within the established Project timeline.
My second objective was to create a document to outline the installation and
configuration of Microsoft Deployment Toolkit 2012 on a virtual computer with Server 2008 R2
SP1 installed. The document also describes the method of creating deployment shares in various
locations. The expected audience of this document is the IT IS Windows Systems Engineering
Team. This team will manage this document along with the MDT 2012 environment and the
Windows 7 image once the initial Windows 7 upgrade project is completed so a significant
amount of time was spent in testing and validating the correct documentation of the steps.

Page 8
As a means of completing the third and final objective of my project, I accomplished and
recorded in detail the steps necessary to deploy, customize, and capture a Windows 7 operating
system image on a Microsoft Hyper-V hosted Virtual Machine. This document explains the steps
necessary to import hardware drivers and to create MDT 2012 application packages for a small
number of universally needed software applications for installation at the time of the Operating
system deployment. This third document is for use by IT Infrastructure Windows Systems
Engineers in the creation and deployment of future images using MDT 2012, to include the
backup and restoration of system files and user customized configurations. To create this
document required use of my exhaustive experience in computer systems hardware driver,
operating systems and applications installation configuration and management as well as in depth
knowledge of Microsoft Windows group policy and industry accepted security best practices to
create and customize image files to meet mandated standards.
I created these documents for my capstone project and delivered a nearly duplicate set of
documents to the project teams, I was afforded the opportunity to rewrite as needed based on
questions asked by site desktop engineers and in revelations that arose in the application of steps
outlined in the document to the real world Microsoft Enterprise. Once I completed the first round
of testing and created the two step-by step training documents, I sent them to site engineers who
followed them to create their own lab and MDT shares and asked for their feedback. Where any
confusion existed or if results were not consisted, the document was edited and retested. While
these additional steps added a great deal to the Project Timeline, the input of the other IT
engineers was invaluable, not only in creating these documents but also to my understanding of
successful Windows Operating System and application deployments.

Page 9
Project Deliverables
The following deliverables for my capstone report were also used as templates for
presentations and training given to assist IT IS Senior Leadership and Windows Infrastructure
Engineers on the Windows 7 Upgrade Project committee to make an informed decision of which
tool to use for the Windows 7 deployment.
Power Point Presentation with high level descriptions of the capabilities and use
of MDT 2012 including:
MDT 2012 Toolkit Installation
MDT 2012 operating system deployments
MDT 2012 hardware driver management
MDT 2012 application installation and updates
MS Word document detailing the Steps necessary to install and configure MDT
2012 and necessary deployment tools on a pc with Server 2008 R2 OS installed.
This document is for use by operating system deployment engineers to create an
environment in which they can deploy, customize and capture Windows 7 image
files.
o Install Microsoft Windows Server 2008 R2 on a Hyper-V hosted VM
o Install the .NET 3.5 feature and all necessary supporting features
o Download and install Microsoft Deployment Toolkit 2012
o Download and install Microsoft Windows Automated Installation Kit
(WAIK) for Windows 7
o Download and install WAIK supplement for Windows 7 SP1
Page 10
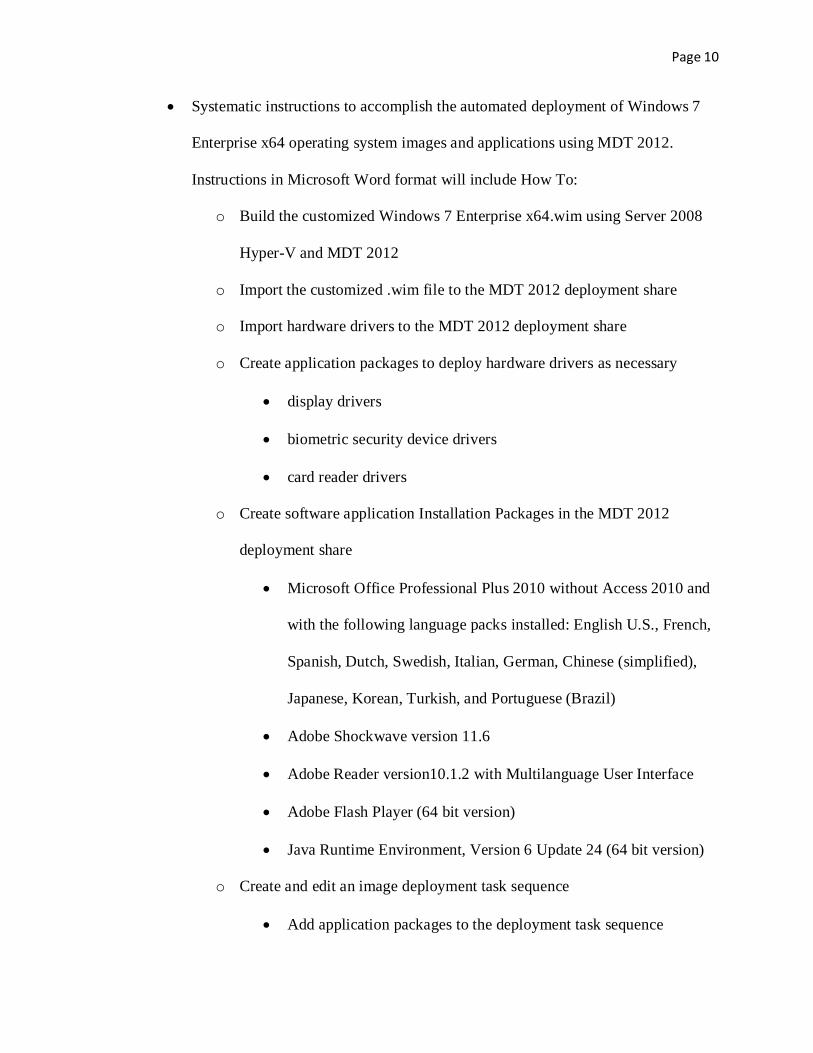
Systematic instructions to accomplish the automated deployment of Windows 7
Enterprise x64 operating system images and applications using MDT 2012.
Instructions in Microsoft Word format will include How To:
o Build the customized Windows 7 Enterprise x64.wim using Server 2008
Hyper-V and MDT 2012
o Import the customized .wim file to the MDT 2012 deployment share
o Import hardware drivers to the MDT 2012 deployment share
o Create application packages to deploy hardware drivers as necessary
display drivers
biometric security device drivers
card reader drivers
o Create software application Installation Packages in the MDT 2012
deployment share
Microsoft Office Professional Plus 2010 without Access 2010 and
with the following language packs installed: English U.S., French,
Spanish, Dutch, Swedish, Italian, German, Chinese (simplified),
Japanese, Korean, Turkish, and Portuguese (Brazil)
Adobe Shockwave version 11.6
Adobe Reader version10.1.2 with Multilanguage User Interface
Adobe Flash Player (64 bit version)
Java Runtime Environment, Version 6 Update 24 (64 bit version)
o Create and edit an image deployment task sequence
Add application packages to the deployment task sequence
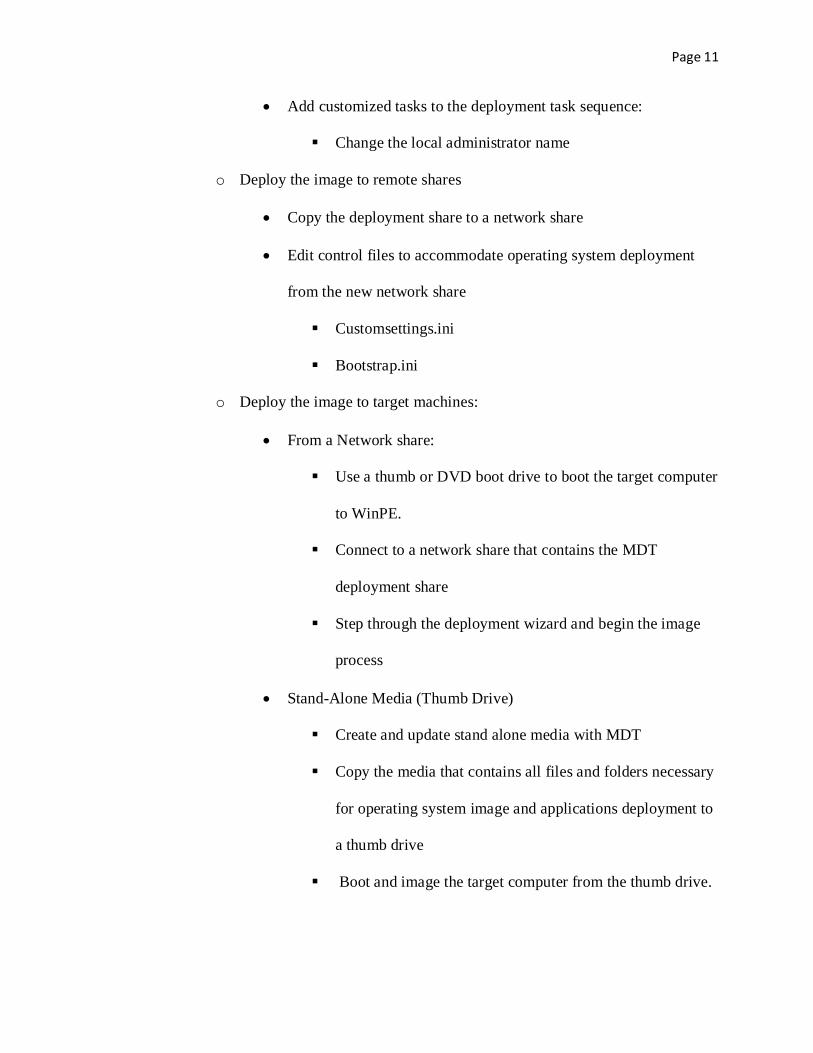
Page 11
Add customized tasks to the deployment task sequence:
Change the local administrator name
o Deploy the image to remote shares
Copy the deployment share to a network share
Edit control files to accommodate operating system deployment
from the new network share
Customsettings.ini
Bootstrap.ini
o Deploy the image to target machines:
From a Network share:
Use a thumb or DVD boot drive to boot the target computer
to WinPE.
Connect to a network share that contains the MDT
deployment share
Step through the deployment wizard and begin the image
process
Stand-Alone Media (Thumb Drive)
Create and update stand alone media with MDT
Copy the media that contains all files and folders necessary
for operating system image and applications deployment to
a thumb drive
Boot and image the target computer from the thumb drive.
Page 12
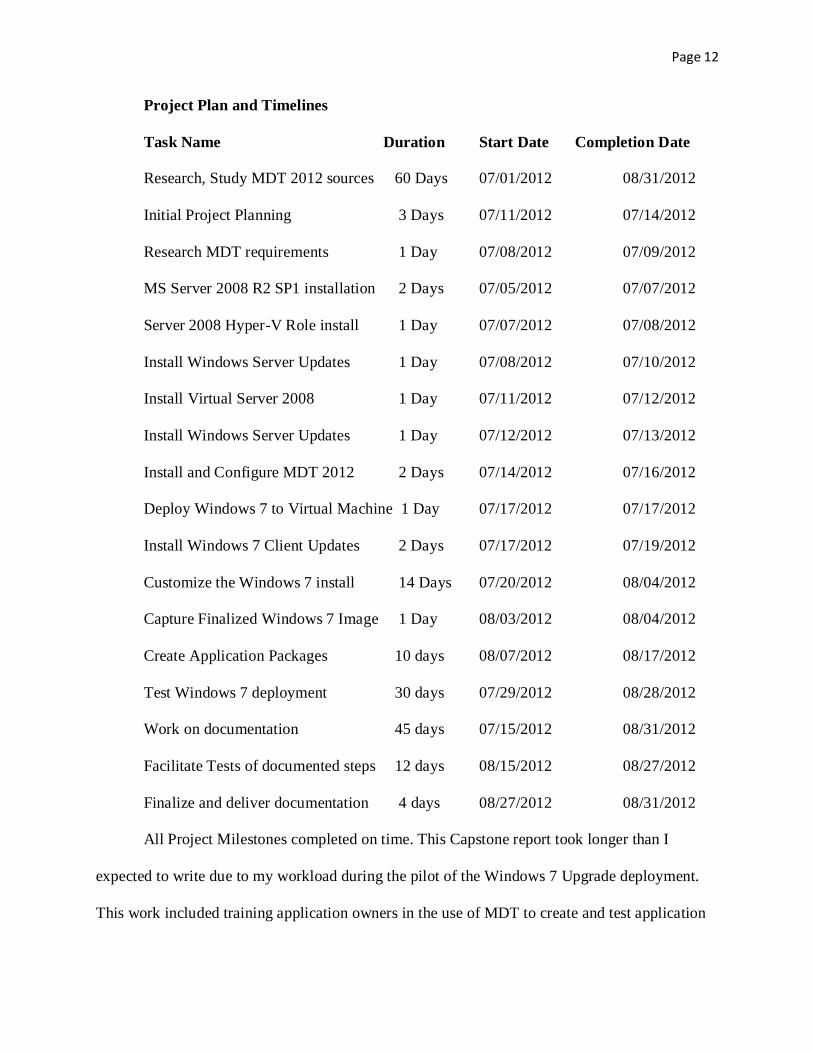
Project Plan and Timelines
Task Name Duration Start Date Completion Date
Research, Study MDT 2012 sources 60 Days 07/01/2012 08/31/2012
Initial Project Planning 3 Days 07/11/2012 07/14/2012
Research MDT requirements 1 Day 07/08/2012 07/09/2012
MS Server 2008 R2 SP1 installation 2 Days 07/05/2012 07/07/2012
Server 2008 Hyper-V Role install 1 Day 07/07/2012 07/08/2012
Install Windows Server Updates 1 Day 07/08/2012 07/10/2012
Install Virtual Server 2008 1 Day 07/11/2012 07/12/2012
Install Windows Server Updates 1 Day 07/12/2012 07/13/2012
Install and Configure MDT 2012 2 Days 07/14/2012 07/16/2012
Deploy Windows 7 to Virtual Machine 1 Day 07/17/2012 07/17/2012
Install Windows 7 Client Updates 2 Days 07/17/2012 07/19/2012
Customize the Windows 7 install 14 Days 07/20/2012 08/04/2012
Capture Finalized Windows 7 Image 1 Day 08/03/2012 08/04/2012
Create Application Packages 10 days 08/07/2012 08/17/2012
Test Windows 7 deployment 30 days 07/29/2012 08/28/2012
Work on documentation 45 days 07/15/2012 08/31/2012
Facilitate Tests of documented steps 12 days 08/15/2012 08/27/2012
Finalize and deliver documentation 4 days 08/27/2012 08/31/2012
All Project Milestones completed on time. This Capstone report took longer than I
expected to write due to my workload during the pilot of the Windows 7 Upgrade deployment.
This work included training application owners in the use of MDT to create and test application

Page 13
packages and working with Site Administrators at twelve sites throughout the world to increase
their understanding of the deployment process and to troubleshoot and resolve any issues that
arose during the pilot.

Page 14
Project Development
This project contributed a great deal to my knowledge and understanding of Windows
Operating System Deployments in general, and to my ability to effectively use the Microsoft
Deployment Toolkit to upgrade computers with Windows XP SP3 installed to the Windows 7
OS. A great benefit of this project was to the customer, as I trained more than twenty of their IT
department personnel in the use of MDT 2012 to deploy images and applications. More than one
Senior Leadership member cited my Power Point presentation as a useful tool in deciding to go
ahead with their deployment on schedule and within budget when the SCCM server
infrastructure was not available in time.
To begin my project and to prepare for my first deliverable Power Point overview of
MDT 2012, I researched MDT 2012 Operating System Deployments extensively. This research
included on line Microsoft documentation, free web training sessions and online blogs written by
Microsoft MVPs. I completed the first deliverable, a Power Point presentation titled “MDT 2012
Operational Documentation: A High Level Overview” from the fruits of this research. I
presented this document in person at a monthly meeting of the Windows 7 Upgrade Project
Team and, separately, by phone and web meeting to the IT IS Windows Engineers. This
presentation was well received and reviewed by these teams. These teams reached the decision to
proceed with a plan to pilot the Windows XP to Windows 7 Enterprise x64 Sp1 upgrade in
twelve sites throughout the world using MDT 2012.
An opportunity that arose as I gained knowledge of the project was to help the senior
administrators of the IT IS Desktop Services Delivery team to complete the work necessary to
create a document with exact customization specifications for the Windows 7 Client install.
Customizations included the use of the company approved desktop wallpaper and turning off

Page 15
windows security center notifications. The team submitted the document for approval by senior
level IT members of the Windows 7 Upgrade project team. The customizations were accepted
and this document was invaluable to me as a systems architecture tool.
I initially developed deployment solutions in the lab and then integrated that development
work into the real-world solutions required of the Windows 7 Upgrade Project team. When new
challenges presented themselves I utilized information from websites and weblogs of individuals
who hold Microsoft Most Valuable Professional awards in the category of Setup and
Deployment. These very generous and intelligent MVPs included Mikael Nystrom, (“The
Deployment Bunny”, n.d.), Chris Nackers (“Chris Nackers Blog”, n.d.), and Michael Niehaus
(“Michael Niehaus Windows and Office deployment ramblings”, n.d.), and I found the
information provided to be excellent resources for accelerated learning and to garner tips and
tricks for more efficient and successful large scale deployments.
For the development lab, I found I had a shortage of machines capable of supporting 64
Bit Windows 2008 R2 SP1 so created a second, 150 GB partition on a Lenovo ThinkCentre
Model M91p Desktop with Windows 7 Professional Operating System, 8 GB of RAM and
ability to boot to virtual machines. I followed “How to install Windows Server 2008 R2 with
Hyper-V and Windows 7 on the same partition” by Colin Smith found on the TechRepublic
weblog site (Smith, Colin. 2010). The steps called for preparation of the hard drive by using the
Windows built in DiskPart utility to create, attach and format a virtual disk file and then used the
one hundred eighty day trial version of Windows Server 2008 R2 Standard.iso downloaded from
Microsoft’s download site to install Windows Server 2008 R2 Standard with SP1. I named this
server MDT-VHost. Once the OS was installed on the new virtual hard drive, I rebooted the
computer and was automatically offered the choice to boot into the server OS.

Page 16
A virtual lab to test MDT 2012 as a deployment tool in a Windows 2008 R2 Active
Directory Environment required two virtual Windows servers and two virtual Windows Client
machines. Glad of the opportunity to work more with Virtual Machines, I configured MDT-
VHost to use an internal network for all of my virtual machines so that they would not be able to
communicate with the production network.
Networking services, including Domain Name System (DNS) and Dynamic Host
Configuration Protocol (DHCP) are required to use MDT2012. To provide these services for my
lab I created a new virtual machine named MDT-DC01 on MDT-VHost and installed Microsoft
Widows Server 2008 R2 Sp1. The network adapter for this server required a static IP address to
support the DHCP role. I installed the Microsoft Active Directory Directory Services Role using
the DCPromo command and created a new domain in a new forest with domain name
lab.testdomain.com. Once the domain was created I installed and configured the DNS and DHCP
roles on MDT-DC01. Thus the project succeeded in adding to my active directory management
experience.
On the second virtual server, I installed Server 2008 R2 SP1 and named this server MDT-
Master.lab.testdomain.com. I copied MicrosoftDeploymentToolkit2012_x64.msi, from \\MDT-
VHost.lab.testdomain.com\source$ to C:\Windows\Temp, right-clicked on the file, and then
clicked “Run as Administrator” to start the Microsoft Deployment Toolkit Installation Wizard.
Microsoft WAIK for Windows 7 SP1 was installed next on MDT-Master to create, edit, and
apply Windows operating system image (.wim) files. I found the installation on a virtual machine
is easily accomplished by mounting the downloaded Windows AIK distribution files to a virtual
DVD attached to the machine and then running startcd.exe. As with MDT 2012 the installation
wizard required that you accept the license agreement and default installation options.

Page 17
As I worked on this project I learned new technologies, including the User State
Migration Tool, which I had not used before in operating system deployments. The client had
used a name other than “administrator” for their local administrator account, and this username
was not changed during the upgrade so I had to omit backing up and restoring that account or it
was disabled and the password changed by USMT, which made it impossible to logon to the
computer as the local administrator.
The benefits of the project to my client are very great, who will save a great deal of time
and money using MDT 2012 to upgrade their enterprise from Windows XP to Windows 7
Enterprise 64 bit. An unexpected benefit of this project to my customer is that I left the virtual
MDT environment in tact so that the IT IS engineers I had trained during the project can
continue to perform development as needed without risking harm to the production domain.
Additionally, the training I supplied to the IT personnel will be invaluable to the customer. For
instance, the application owners can create their own application installation packages now, a
task that was outsourced in the past, incurring great expense and site administrators will be able
to create automated post image customizations that are specific to their site.
This project was a great success for me, as an IT professional. I was able to create a
customized multi-language Windows 7 image and MDT Task Sequence to automate the
deployment of the OS and a standard set of productivity applications to over eight thousand
computers and thirty different hardware models located throughout the world. The documents I
created and presented to the customer were very well received and I will be able to use them
repeatedly in future deployments.

Page 18
References
Arwidmark, Johan and Nystrom, Mikael. (2010). TrueSec Deployment Fundamentals, Volume 1.
Birmingham, AL, TrueSec
Finn, Aidan, Gibson, Darril, and van Surksum, Kenneth. (2011). Mastering Windows 7
Deployment. Indianapolis, IN. Wiley Publishing.
Kelbley, John and Sterling, Mike. (2010). Windows server 2008 r2 hyper-v: Insiders guide to
Microsoft's hypervisor. Indianapolis, IN. Wiley Publishing.
McLean, Ian and Thomas, Orin. (2010). MCTS self-paced training kit (Exam 70-680):
Configuring windows 7. Redmond, WA: Microsoft Press.
Niehaus, Michael. (2012). Inside a task sequence – Michael Niehaus’ Windows and Office
Deployment Ramblings. In Technet Blog. Retrieved from
http://blogs.technet.com/b/mniehaus/archive/2012/04/20/inside-a-task-sequence.aspx.
Optional - MDT 2012 print-ready documentation.zip. Archive of word documents. (April 2012).
In Microsoft Download Center. Retrieved from http://www.microsoft.com/en-
us/download/details.aspx?id=25175.
Prepare the windows environment for configuration manager. (March 1, 2012). In Microsoft
System Center. Retrieved from http://technet.microsoft.com/library/gg712264.aspx.
Smith, Colin. (2010). How to install Windows Server 2008 R2 with Hyper-V and Windows 7 on
the same partition. In TechRepublic Blog, Retrieved From
http://www.techrepublic.com/blog/networking/how-to-install-windows-server-2008-r2-
with-hyper-v-and-windows-7-on-the-same-partition/3375
Solution accelerators: Microsoft deployment toolkit. (Apr 13, 2012). In MS Technet Library.
Retrieved from
Page 19
http://technet.microsoft.com/library/ee376932.aspx?http://go.microsoft.com/fwlink/?Link
Id=217606.
The deployment guys. ( n.d.). Web Blog. Retrieved from
http://blogs.technet.com/b/deploymentguys/archive/tags/mdt+2012/.
The deployment bunny. (n.d.). Web Blog. Retrieved from http://deploymentbunny.com/.
User state migration tool 4.0 user’s guide. (Jun 29, 2010). In MS Technet Library. Retrieved
from http://technet.microsoft.com/en-us/library/dd560801(WS.10).aspx.

Page 20
Appendix 1: Competency Matrix
Domain/Subdomain Competency Explanation
Technology management
fundamentals
Upper division technology
management skills
Utilized skills in operating system
deployment and network
management fundamentals to
investigate and describe a free
alternative Windows 7 image
deployment method
Leadership and
Professionalism
Self-management skills Used my understanding of the
importance of completing tasks on
time as defined by a predetermined
timetable. Use self-management
skills to prioritize tasks and use
leadership skills to persuade others
of the need to adhere to the given
time table.
Language and
Communication
Written Communication Skills I demonstrated by the creation of
documentation detailing step-by-
step instructions to create,
customize, deploy, and manage a
Windows 7 image
Reasoning and Problem
Solving
Problem Solving I identified the problem that
SCCM will not be available in
time for the deployment through
research of SCCM prerequisites. I
then researched deployment
technologies to select the best tool
to use for the purpose of the
Windows 7 upgrade project. I used
upper level reasoning skills to
decide to use technology that is
free of cost and well supported by
the software manufacturer.
Quantitative Literacy Ability to understand data that
is presented in different ways
I demonstrated the ability to
understand and utilize information
given in various formats including
tables and charts and written by
different authors, even when
English is not the author’s native

Page 21
language.
Operating Systems Upper level knowledge of
Operating Systems
For this project I used advanced
knowledge of Windows Server
2008 R2 and Windows 7
Enterprise x64.
Reasoning and problem
solving
Upper level reasoning and
problem solving skills
In a project involving Operating
System deployments and new
technologies, many things can go
wrong or break in the middle of
testing. I used my deep
understanding of Windows Server
2008 R2, Windows 7 Client, tcp/ip
and network systems and how they
are meant to perform together in a
Microsoft Windows 2003 Active
Directory environment to
troubleshoot and resolve any
issues I encountered
Leadership and
Professionalism
Upper Level Leadership and
Professionalism
I demonstrated Professionalism as
well as leadership skills by
suggesting, researching, and
reporting on alternative methods to
deploy Windows 7 when it was
found SCCM would not be
available in time. I also trained and
mentored the client’s site
administrators so that they could
perform the work themselves once
my contract period ended.
Project Management Upper Division Project
Management Skills
Demonstrated through planning,
implementation, control and
management of MDT evaluation
project.
Network Operating
Systems Technologies
Install and configure Network
Operating Systems
Demonstrated through installing
Windows Server 2008 R2 and
Windows 7 Client and
configuration of network shares
Information Technology
Management
Ability to Manage Windows
Network Operating Systems
Demonstrated through my use of
Visual Basic, DOS and Powershell

Page 22
scripting to accomplish automated
remote tasks for this project,
including silent application
installation and configuration

Page 23
Appendix 2: MDT 2012 Presentation: A High Level Overview
MDT 2012 Operational Documentation: A High Level Overview
• Microsoft Deployment Toolkit (MDT)
• Windows XP to Windows 7 Migration
• MDT Application Deployment
MDT is a Set of tools and scripts written by Microsoft Deployment Gurus that facilitate
hardware independent Windows OS image creation, Centralized Driver management and
Standardized OS Deployment (“Solution accelerators: Microsoft deployment toolkit”, 2012)
• Download all necessary tools Free from Microsoft Download site
– Can be installed on any Windows Client or Server OS that has .NET 3.5 sp1 or
higher installed
• MDT is Microsoft’s Solution Accelerator for operating system and application
deployment.
– MDT was created in 2003 to help with the deployment of Windows XP. Each
release since then has added automation and tools such as the MMC and
Deployment Wizards.
– MDT 2012 was released April, 2012
• 2 versions of MDT 2012: 32 Bit (x86) and 64 Bit (x64). The version must
match the hardware of the MDT host server.
• Either the x86 or x64 version of MDT can be used to create and manage
x86 or x64 Windows 7 and Windows Server 2008 R2 images
• MDT is the recommended process and toolset for automating desktop and server
deployments. MDT provides the following benefits:

Page 24
– Unified tools and processes required for desktop and server deployment in a
common deployment console and collection of guidance.
– Reduced deployment time and standardized desktop and server images
– Improved security and ongoing configuration management.
– MDT uses Windows deployment tools for Lite Touch Installation deployments.
• Light Touch deployments are designed to be used by Desktop support or
Site administrators, who will boot the target machine with MDT boot
media, answer a few questions in the wizard, such as Computer Name,
Domain, and OU, OS Language and Time Zone, and then let the machine
continue with imaging while the support person works on other task
• Near Zero-Touch deployments can be achieved using MDT control files
including CustomSettings.ini and Bootstrap.ini to provide answers to the
MDT Deployment Wizard
– MDT can be used to create and deploy images to Virtual Machines and to create
VM Templates
– MDT 2012 supports Microsoft Configuration Manager 2007 R2 and
Configuration Manager 2012.
• Fully automated zero touch installation deployments can be achieved by
utilizing System Center Configuration Manager 2007 or SCCM 2012 and
Windows deployment tools.
MDT Deployment Tools:

Page 25
• .NET 3.5 sp1: software framework developed by Microsoft that includes a large library
and provides language interoperability (each language can use code written in other
languages) across several programming languages.
• Windows Automated Installation Kit: Starting with Windows Vista, Windows Setup
uses the WAIK API to install fresh as well as cloned installation of Windows. The
current version is WAIK for Windows 7 with supplements for Win 7 sp1 which
includes WinPE 3.0
• WAIK is Used to create Windows Image (.wim) Files from customized windows
installations. A Wim is a file-based disk image format. The primary advantages of it
being file-based include hardware independence and single-instance storage of a file
referenced multiple times in the filesystem tree. WAIK Includes:
– ImageX is the command-line tool used to create, edit and deploy Windows disk
images in the Windows Imaging Format. Uses include changing files and editing
the registry on an offline image
– The Deployment Image Service and Management Tool (DISM) is used to
retrieve or modify information within an image. With DISM, you can add drivers,
install applications, updates and patches on an offline image
– Windows System Image Manager creates and manages unattended Windows
Setup answer files in a graphical user interface (GUI).
– Windows Preinstallation Environment (Windows PE) 3.0: a minimal Win32
operating system with limited services. Win PE 3.0 is built on the Windows 7
kernel and used to prepare a computer for Windows installation, to copy disk
images from a network file server, and to initiate Windows Setup.
Page 26
– Win PE 3.0 Provides:
• Native support for the NTFS 5.x file system, including dynamic volume
creation and management.
• Native support for TCP/IP networking and file sharing (client only).
• Native support for 32-bit (or 64-bit) Windows device drivers.
• Native support for a subset of the Win32 Application Programming
Interface (API).
• Optional support for Windows Management Instrumentation (WMI),
Microsoft Data Access Component (MDAC) and HTML Application
(HTA).
• Ability to start from a number of media types, including CD, DVD, USB
flash drive (UFD), and a Remote Installation Services (RIS) server.
• Windows PE offline sessions are supported.
• Windows PE images can be serviced offline.
• Windows PE includes all Hyper-V™ drivers except display drivers. This
enables Windows PE to run in Hypervisor. Supported features include
mass storage, mouse integration, and network adapters.
– Windows PE has the following limitations:
• Windows PE includes only a subset of the available Win32 APIs. I/O
(disk and network) and core Win32 APIs are included.
• Distributed File System (DFS) name resolution is supported for standalone
roots only. Domain roots are not supported.

Page 27
• The supported methods of connecting to file servers are TCP/IP and
NetBIOS over TCP/IP. IPX\SPX is not supported
• Drive letters are assigned in consecutive order as you create partitions in
Windows PE.
• Windows PE does not support the Microsoft .NET framework or the
Common Language Runtime (CLR).
• Windows PE does not include Windows on Windows 32 (WOW32),
Windows on Windows 64 (WOW64), Virtual DOS Machine (VDM),
OS/2, or POSIX subsystems.
• Windows PE can be used to configure and to partition a computer's disks
before starting Windows Setup. If any hard disks are converted to dynamic
disks with Diskpart.exe before you start Windows Setup, then those hard
disks are recognized as foreign when the operating system is installed, and
any volumes on those hard disks will not be accessible.
• Windows PE does not support applications packaged with
Windows® Installer (.msi).
• Windows PE does not support 802.1x (wireless lan)
• Windows PE does not support booting from a target path that contains
non-English characters.
USMT 4.0
Windows User State Migration Tool (USMT) 4.0 is a scriptable command-line tool that provides
a highly-customizable user-profile migration experience for IT professionals. (“User State
Migration Tool 4.0 User’s Guide”, 2010)

Page 28
– Included in Windows Automated Installation Kit (WAIK) for Windows 7 with
SP1 supplements
– Includes two components, ScanState and LoadState
– Includes a set of modifiable .xml files: MigApp.xml, MigUser.xml, and
MigDocs.xml.
– If necessary, you can create and use custom .xml files to support your migration
needs.
– You can also create a Config.xml file to specify files or settings to include and
exclude from the migration.
• Benefits
– Safely migrates user accounts, operating system and application settings.
– Reduces end-user downtime required to customize desktops and find missing files
– Reduces help-desk calls
– Increases employee satisfaction with the migration experience.
• Limitations
– USMT is intended for administrators who are performing large-scale automated
deployments. Use a different method If you are only migrating the user states of a
few computers.
– There are some scenarios in which the use of USMT 4.0 is not recommended.
These include:
• Migrations that require end-user interaction.
• Migrations that require customization on a machine-by-machine basis.
Page 29
• Migrations between operating systems with different languages; the source
computer's operating-system language must match the destination
computer's operating-system language.
• Migration of operating system settings such as local printers, hardware
settings, permissions for shared folders
• Migration of network printers and firewall settings from XP
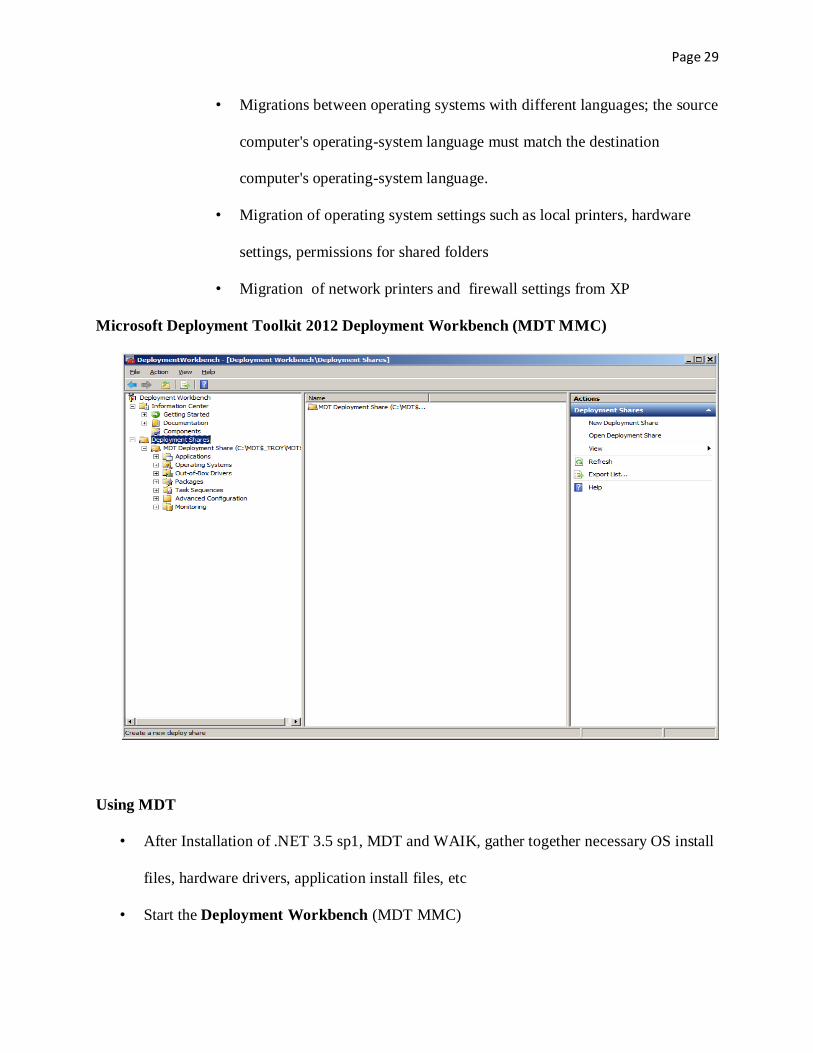
Microsoft Deployment Toolkit 2012 Deployment Workbench (MDT MMC)
Using MDT
• After Installation of .NET 3.5 sp1, MDT and WAIK, gather together necessary OS install
files, hardware drivers, application install files, etc
• Start the Deployment Workbench (MDT MMC)
Page 30
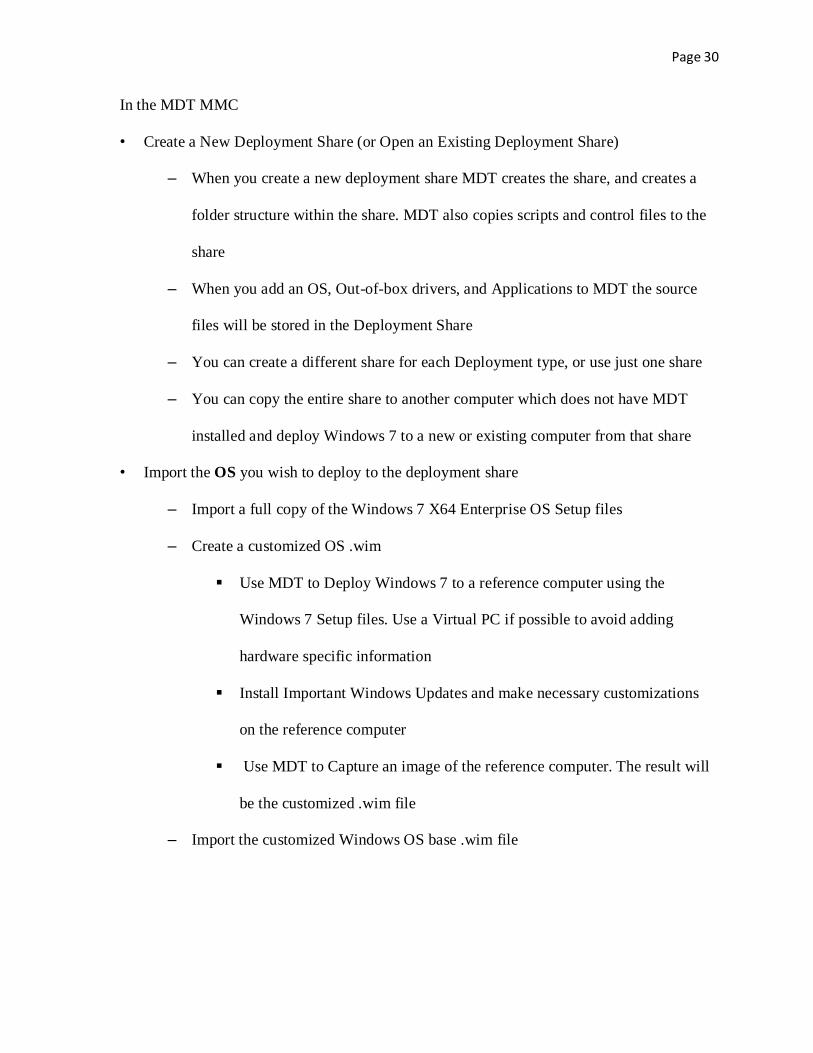
In the MDT MMC
• Create a New Deployment Share (or Open an Existing Deployment Share)
– When you create a new deployment share MDT creates the share, and creates a
folder structure within the share. MDT also copies scripts and control files to the
share
– When you add an OS, Out-of-box drivers, and Applications to MDT the source
files will be stored in the Deployment Share
– You can create a different share for each Deployment type, or use just one share
– You can copy the entire share to another computer which does not have MDT
installed and deploy Windows 7 to a new or existing computer from that share
• Import the OS you wish to deploy to the deployment share
– Import a full copy of the Windows 7 X64 Enterprise OS Setup files
– Create a customized OS .wim
Use MDT to Deploy Windows 7 to a reference computer using the
Windows 7 Setup files. Use a Virtual PC if possible to avoid adding
hardware specific information
Install Important Windows Updates and make necessary customizations
on the reference computer
Use MDT to Capture an image of the reference computer. The result will
be the customized .wim file
– Import the customized Windows OS base .wim file

Page 31
• Import the Out-of-Box Drivers for your target hardware models. Out-of-Box Drivers
are the type that can be installed manually using the “update driver” method in Device
Manager
– Right-click on the appropriate folder (see figure below) in the Out-of-Box Drivers
node and select “Import Drivers”
– Browse to and select the folders that contain the driver(s) you want to import.
MDT will recurse the folder tree and import any driver files it finds
– Drivers can be added and updated as needed by importing the drivers in the MMC
console on the MDT host, then copying the new driver files and updated control
files to your remote MDT shares

Page 32
MDT Managing Drivers
Organize Out-of Box drivers by putting them into groups to provide a few key benefits:
• The ability to manage drivers over time as new OS deployment drivers become available
from the manufacturer
• Ability to Remove redundant driver packs
• Manage drivers using a system and OS combination, rather than importing them into a
flat database.
The Deployment Workbench also allows direct importing of Driver .cab files instead of going
through the intermediate Extraction Process. Dell and HP offer Driver .cab files for download
from their support sites, Lenovo does not at the time of this writing.
Some Hardware Drivers, including Display Drivers, Card Reader and Fingerprint Reader
Drivers, must be installed as an application. When you install a Driver as an application, you can
use Windows Management Interface or Conditional Queries to indicate which Hardware
model(s) will run the driver install.
MDT Applications Install
1. Add Applications to the deployment share
• Under MDT Deployment Share right-click Applications and then click New
Application. The New Application Wizard opens to the Application Type page.
• On the Application Type page, make sure that Application with source files is selected,
and then click Next.
• On the Details page:
– Publisher: Enter the name of the application publisher (optional).
– Application Name: Enter a descriptive name for the application (required).

Page 33
– Version: Enter the application version (optional).
– Language: Enter the application language (optional).
– Click Next.
• On the Source page:
– Click Browse. In the Browse for Folder dialog box, locate and select the folder
that contains the setup files for the particular application, and then click OK.
Note: If you want to move the setup files instead of copying them, select the
check box that is next to Move the files to the deployment share instead of
copying them.
– Click Next.
– On the Destination page, accept or change the default destination folder (the
deployment share folder that will contain the application source files) that was
assigned by the wizard, and then click Next.
• On the Command Details page:
– Under Command line, type the command that you want to be run at the start of
the application installation.
• For many applications this would be setup.exe.
• For Applications that require use of the Microsoft Installer (.msi) run the
msiexec.exe command.
– You can customize both setup.exe and msiexec.exe commandlines
with switches depending on install options that were included in
the installation package
• To run vbscripts use cscript.exe or wscript.exe

Page 34
• To run PowerShell scripts use powershell.exe
– Powershell 2.0 must be installed on the target system
– Execution of Powershell scrips must be enabled (disabled by
default) on the target system
– Click Next.
– On the Summary page, click Next.
• The Progress page indicates that the share is being created. On the Confirmation page,
click Finish. The New Application Wizard finishes, and the application name that you
typed in the Application Name page appears in the Deployment Workbench details
pane.
• To make sure that certain applications are deployed ahead of other applications to
account for any deployment dependencies, you can create an application bundle. To
create an application bundle, enable the Application bundle checkbox in the New
Application Wizard and then edit the Application bundle properties to specify
Dependencies
Task Sequences
According to Michael Niehaus of Microsoft:
A task sequence contains a number of steps and groups that define the sequential process
that is going to be executed. This is actually converted into XML, where each step and
group becomes a series of XML entries that define:
– The command line to be executed.
– The variables that are expected by the step

Page 35
– The conditions for the step – if the conditions aren’t satisfied, the step won’t
run.
– The definition of success – a list of return codes that should be considered
“successful”, typically 0 and 3010. You can also say to ignore errors, which
means to ignore the return code.
Before the client computer begins to execute the task sequence, it receives (as part of the
task sequence policy) the entire XML blob. That XML blob is then processed by the Task
Sequence Manager, TSManager.exe, which is what actually starts the commands for each
step (at least those where it has decided the conditions have been met). (Niehaus, 2012)
Operating System Deployment Task Sequences
A Microsoft Deployment Toolkit Operating System Deployment Task Sequence automates the
steps of a Windows install, including an In Place Upgrade, where personalized data can be stored
on the system drive throughout the OS Installation and configuration process.

Page 36

Page 37
MDT 2012 OS Deployment Scenarios
• Migrate from Windows XP to Windows 7
– In Place upgrade is supported using USMT 4.0 hardlinks to store data on the local
drive while the OS is being upgraded and then update the locations of the data to
the new target destination
• Refresh a Windows 7 Image
– In this case, User Data can be captured to and restored from the Target System
Hard Drive using hardlinks
• Bare Metal Deployment

Page 38
– Target pc has no OS or has no data to be saved.
MDT OS Deployment Methods
• Stand Alone Media
– MDT Created.iso file which Contains all the folders and files in the MDT
Deployment Share
– Use the Windows 7 USB/DVD Download Tool, free download from the
Microsoft Store
http://www.microsoftstore.com/store/msstore/html/pbPage.Help_Win7_usbdvd_d
wnTool to Create and copy the MDT Deployment files to a bootable USB Thumb
Drive
– Log onto the current Operating System as a member of the Local Administrators
group
– Connect the USB/DVD Thumb drive to the target computer
– Start the Deployment Wizard from the Run command in the start menu or the
Command Prompt
– Media must remain connected to the target pc throughout the image process
• Network Share
– Log onto the current Operating System as a member of the Local Administrators
group
– Connect to Deployment Share
– Start the Deployment Wizard from the Run command in the start menu or the
Command Prompt
References

Page 39
• “Deliver and Deploy Windows 7” , MS Technet Library,
http://technet.microsoft.com/en-us/windows/dd641427.aspx, Retrieved Apr 27, 2012
• “Windows Imaging Format”, Wikipedia,
http://en.wikipedia.org/wiki/Windows_Imaging_Format, Retrieved Apr 27, 2012
• “What is Windows PE”, Technet, http://technet.microsoft.com/en-
us/library/dd799308(v=WS.10).aspx, Updated Oct 22,2009
• “Deploy Microsoft Office 2010 by using Microsoft Deployment Toolkit 2010”, Technet
Library, http://technet.microsoft.com/en-us/library/hh537943.aspx, Published Nov 15,
2011

Page 40
Appendix 3: Install MDT 2012 on Server 2008 R2: Detailed Instructions
Host Environment Preparation
1. Install Microsoft Windows Server 2008 R2 on a Hyper-V hosted VM
2. From Server Manaager on the Server 2008 R2 Host, Install the .NET 3.5.1 Feature and
all necessary supporting features
3. Run Microsoft Updates and Install .NET 4.0 Framework
Microsoft Deployment Toolkit Installation
1. Download The Installation File – MicrosoftDeploymentToolkit2012_x64.msi from
http://www.microsoft.com/en-us/download/details.aspx?id=25175

Page 41
2. Click on Save -> Save to Desktop
3. Double Click on MDT 2012 Install Icon
4. Click Next

Page 42
5. Click on “I Accept the Terms in the License Agreement” Click Next
6. Click Next

Page 43
7. Click on Install
8. Click on Finish
Windows Automated Installation Kit
Prerequisite – Must have “UltraIso or Pismo Mount” Installed
1.) Download the Installation File – KB3AIK_EN.ISO - from http://www.microsoft.com/en-
us/download/details.aspx?id=5753

Page 44
2.) Click on Save Save to Desktop
3.) Right Click on the KB3AIK_EN File
Page 45
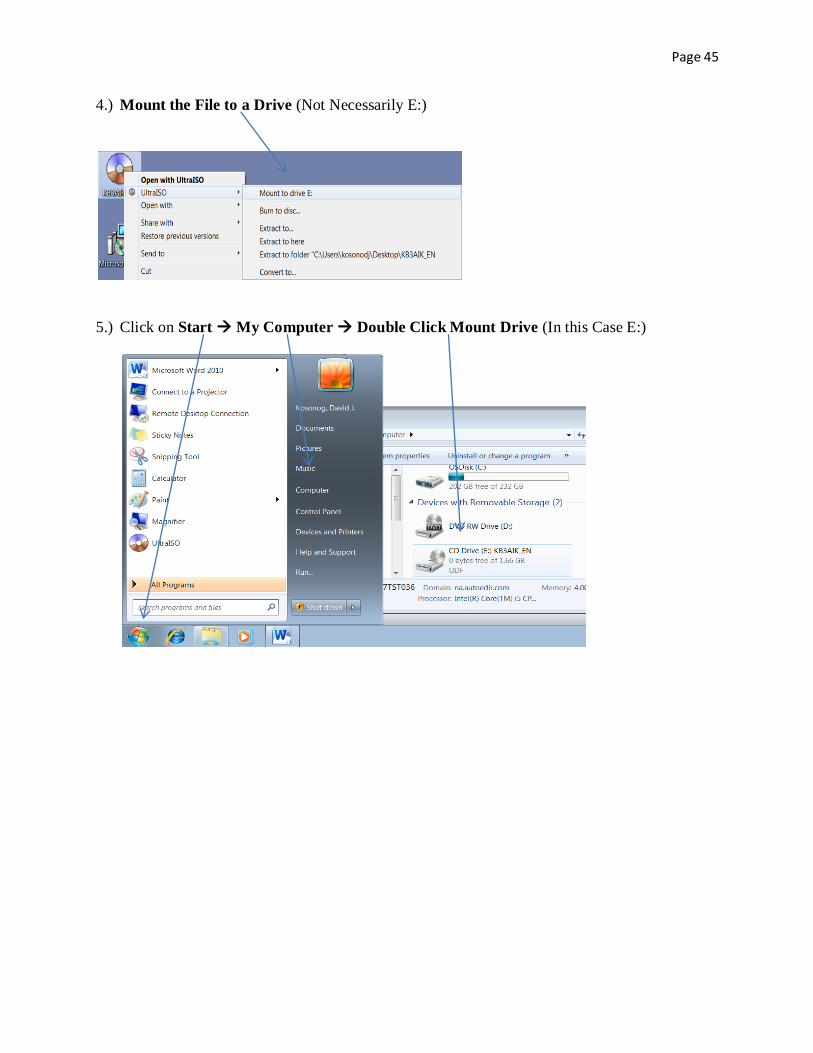
4.) Mount the File to a Drive (Not Necessarily E:)
5.) Click on Start My Computer Double Click Mount Drive (In this Case E:)
Page 46
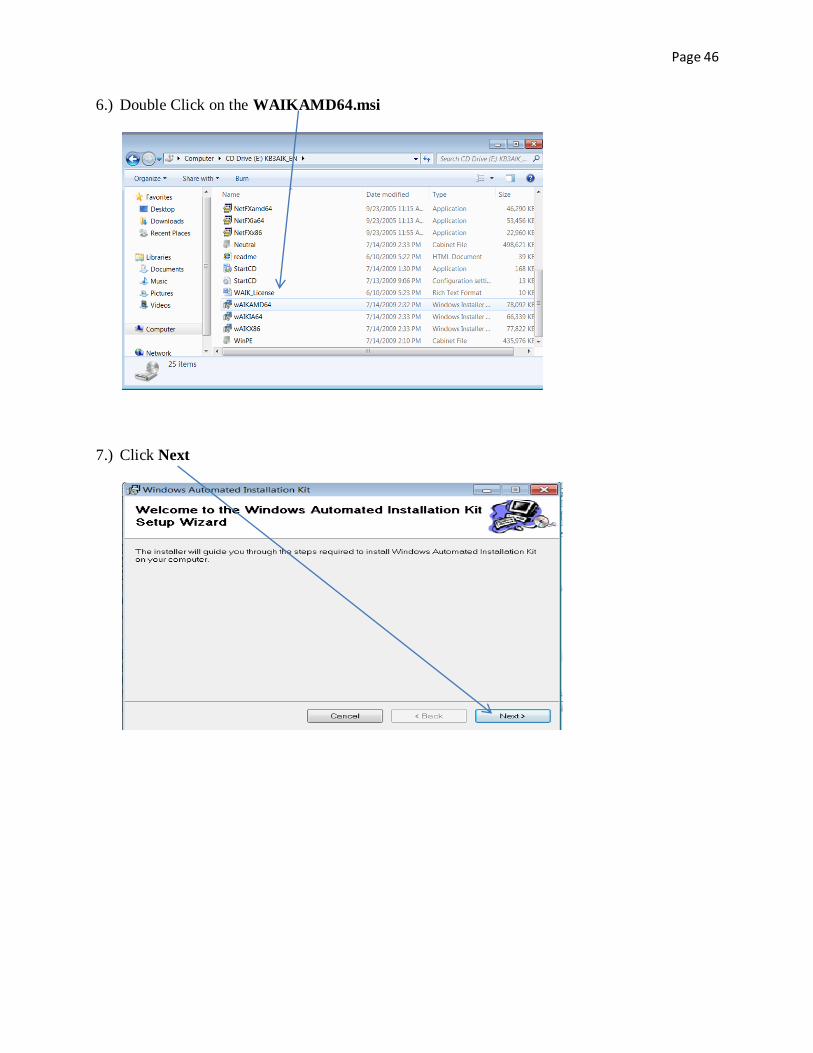
6.) Double Click on the WAIKAMD64.msi
7.) Click Next

Page 47
8.) Click on “I Agree” Click Next
9.) Click Next

Page 48
10.) Click Next
11.) Click Close
Windows Automated Installation Kit (AIK) Supplement
1.) Download the Installation File – waik_supplement_en-us.iso – From
http://www.microsoft.com/en-us/download/details.aspx?id=5188

Page 49
2.) Click on Download
3.) Click on Save Save to Desktop
4.) Right Click on the File Mount to Drive (Not Necessarily E:)

Page 50
5.) Click on Start My Computer Double Click on Mount Drive
6.) Copy all Contents of Mounted Drive

Page 51
7.) Overwrite Files on C:\Program Files\Windows AIK\Tools\PETools

Page 52
Appendix4: How To Create a Deployment Share
Create a Deployment Share
1.) Click on Start All Programs Microsoft Deployment Toolkit Deployment
Workbench
In Left Pane, Right Click Deployment Shares Click on New Deployment Share
Page 53
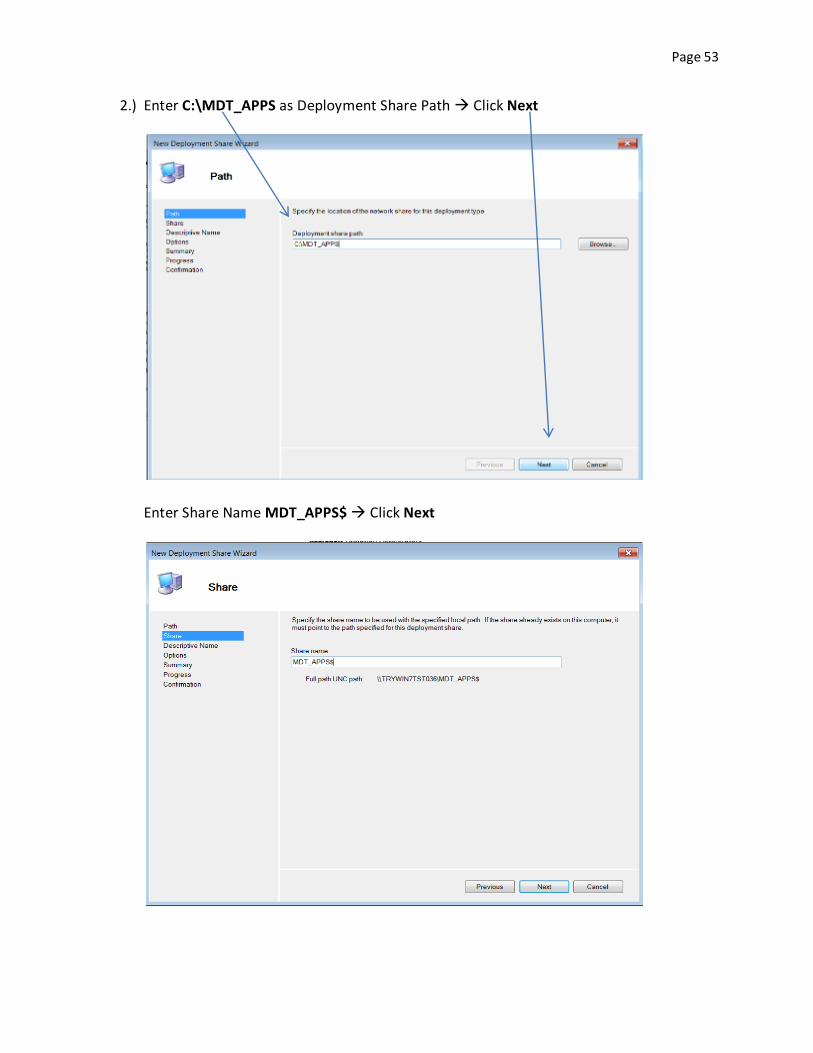
2.) Enter C:\MDT_APPS as Deployment Share Path Click Next
Enter Share Name MDT_APPS$ Click Next

Page 54
3.) Enter MDT Applications Click Next
o
Clear all Checkboxes Click Next

Page 55
4.) Click Next
5.) Click Finish

Page 56
Appendix5: Create, Customize, and Capture a Windows 7 Enterprise x64 Image
Meritor Windows 7 Enterprise X64 v1.0 Image Build Instructions
OS= Windows 7 Enterprise X64
Hyper-V Host:
Server 2008 R2 SP1 OS with at least 8GB Memory and 150 GB free hard drive space
Create Folders C:\VHD and C:\DiskImages
Add Hyper-V Role
Configure Hyper-V Virtual Network named “Local Area Connection - Virtual Network”
Connection Type = External selected
HYPER-V Host Ethernet (not wireless) Controller selected
“Allow management operating system to share this network adapter” checkbox enabled
Create Virtual Client Server 2008 R2 Sp1 named MDTDEV with imaging tools installed:
1. MDT 2012 RTM
2. WAIK for Windows 7 with sp1 supplement and WinPE 3.1
Prepare the environment
On MDTDEV Start the MDT 2012 Deployment Workbench
o Create a New Deployment Share, i.e. ’C:\deploymentshare$’ (%deployroot%)
o Create a folder in %deployroot% named ‘Logs’
o Make sure the Local Administrator has Read\Write\Modify rights to the
%deployroot%\Captures folder and the %deployroot%\Logs folder

Page 57
o Create a Standard Task Sequence Named “STEP-1” to deploy Windows 7 Enterprise (x64) to
a reference computer. Do Not Specify an Administrator username or password at this time
o Create a Second Task Sequence Named “STEP-2” to sysprep and capture the image after
customizations are applied. Again, do not specify an administrator password in this
sequence, as it will be supplied in a third, Deployment task sequence
o Customize %deployroot%\Control\CustomSettings.ini as required. (See Appendix A for
example)
o Customize %deployroot%\Control\Bootstrap.ini as required. (See Appendix B for example)
o Update the MDT2012 Share to add drivers and customized control files to the WinPE .wim
and .iso files which MDT created when it created the new deployment share
o Copy the LiteTouchPE_x64.iso file generated when you updated the deployment share from
%deployroot\boot to the Hyper-V Host C:\DiskImages folder
Deploy Windows 7 to the Reference Computer
From the Hyper-V Management Console
Create a Virtual machine and use these values to complete the wizard
o Name: W7Entx64_BASE
o Memory 1024 GB
o Connection: Local Areal Connection – Virtual Network
o Create a virtual hard disk
Name: Win7x64BASE.vhd
Location: C:\VHDs\
Size: 50 Gig Primary hdd

Page 58
o Install an operating system from a boot CD/DVD Boot the new Virtual machine from the
customized MDT 2012 LiteTouchPE_x64.iso file in C:\DiskImages to start the Deployment
Task Sequence named “STEP-1”
Wait for the Task Sequence to finish. If you used the lines “Skip Final Summary=YES” and
“FinishAction=RESTART” in CustomSettings.ini, the task sequence ends with a reboot.
Customize the Windows 7 Image
Block automatic installation of IE9:
o [HKLM\Software\Microsoft\Internet Explorer\Setup\9.0]
o Dword = “DoNotAllowIE90”
o Value = ‘1’
Configure Windows Update:
o Control Panel > System and Security > Turn automatic updating on or off
“Install updates automatically (recommended)” selected
“Give me recommended updates the same way I receive important updates”
checkbox enabled
“Allow all users to install updates on this computer” checkbox enabled
Install Important OS Updates:
o Control Panel > System and Security > Windows Update
o Click Check for updates and allow Windows Update to install important updates, rebooting
and rechecking for updates as required until sp1 is offered and installed
Shut down the Windows 7 machine and copy C:\Win7Entx64_BASE.vhd from the Hyper-V Host
server to a safe location for archiving. Rename this copy to Win7Entx64MUI_Base.vhd
Install Windows Updates and Language Packs:

Page 59
Control Panel > System and Security > Windows Updates
o Click Check for Updates and then on the optional updates tab select and install the
following language display packs (Install one or two packs at a time and clear important
updates if offered as language packs are large and take a relatively long time to download
and even longer to install):
Chinese (Simplified)
Dutch
French
German
Italian
Japanese
Korean
Portuguese (Brazil)
Spanish
Swedish
Turkish
o Delete the Korea language shortcuts from the desktop
o Allow all remaining Important updates to install
Back Up the .vhd file for future image development use:
o Shut down the Windows 7 machine and copy C:\Win7Entx64_BASE.vhd from the Hyper-V
Host server to a safe location for archiving. Rename this copy to Win7Entx64MUI_Base.vhd
Right-Click Taskbar and then Click Properties
o Taskbar Tab > Notification Area > Customize to open the Select which icons and
notifications appear on the taskbar dialog
Page 60
Action Center: ‘Hide icon and notifications’ selected
Click OK
o Start Menu Tab > Customize
‘Run command’ checkbox enabled (all others at default)
o Click OK
Click Apply and then Click OK to close the Taskbar and Start Menu Properties dialog
Click Start > Control Panel > System and Security >Action Center >Change Action Center settings to
open the Turn messages on or off dialog
o Click ‘Customer Experience Improvement Program settings’
Select ‘No, I don’t want to participate in the program.’
Click Save Changes
o Click ‘Problem Reporting Settings’
Select ‘Never check for solutions
Click ‘Change report settings for all users’
o Select ‘Never check for solutions’
o Click OK
o On the Turn messages on or off dialog, Disable the checkboxes for All Security and
Maintenance messages
o Click OK to save changes
Click OK to close the Control Panel > System and Security > Action Center Window
Add Meritor Image Information to the registry
o Create HKLM\Software\Meritor\ImageInformation Key
o Create New String Value Named ’ImageVersion’ with value=1.0.0 (versioning standard =
Major.Minor.Patch)

Page 61
Enable connection to older network shares:
(Reference: http://support.microsoft.com/kb/147706 and
http://support.microsoft.com/kb/297684#appliesto )
o Run Gpedit.msc
Computer configuration > Windows Settings > Security Settings > Local Policies >
Security Options
“Network security: LAN Manager authentication level Properties”: “Send LM
& NTLM – use NTLMv2 session security if negotiated” selected
Exit the Group Policy Editor
o Run regedit to verify the change in the registry
[HKEY_LOCAL_MACHINE\SYSTEM\CurrentControlSet\Control\Lsa]
"LmCompatibilityLevel"=dword:00000001
[HKEY_LOCAL_MACHINE\SYSTEM\CurrentControlSet\Control\Lsa\MSV1_0]
"NtlmMinClientSec"=dword:00000000
"NtlmMinServerSec"=dword:00000000
o Change the desktop background
Take ownership of, give the local administrator full rights to and then Rename the original
img0.jpg to img0_bak.jpg
Convert MeritorWallpaper.bmp to .jpg format and then Copy the Meritor Desktop
Background .jpg file to %SystemRoot%\Web\Wallpaper\Windows\img0.jpg
Verify all users have read and execute rights to the img0.jpg file
Right Click on the Desktop and then Click Personalize
Verify “Harmony” is the selected background, and the thumbnail displays the
Meritor background

Page 62
Double-Click Harmony to open the Desktop background dialog
o ‘Picture position:’ Stretch selected
Click Save Changes and then exit the Personalize dialog
Verify the Meritor Desktop Background displays and is correctly positioned (no
letters off the screen)
Remove these shortcuts from the start menu\All Programs folder:
o Games Folder
o XPS Viewer
o Windows Media Center
o Windows Fax and Scan
o Windows DVD Maker
o XPS Printer
o Windows Update
o Korea Messenger Center and Korea Media Player Center
o Default Programs
o Desktop Gadget Gallery
o Maintenance folder
o Accessories\Getting Started
o System Tools\Windows Easy Transfer
o System Tools\Windows Easy Transfer Reports
Disable the Windows Firewall Service:
o Gpedit.msc
Computer Configuration> Administrative Templates > Network > Network
Connections > Windows Firewall >Domain Profile

Page 63
Double-Click ‘Windows Firewall: Protect all network connections’ and select
Disabled
Click Apply then Click OK
Computer Configuration> Administrative Templates > Network > Network
Connections > Windows Firewall > Standard Profile
Double-Click ‘Windows Firewall: Protect all network connections’ and select
Disabled
Click Apply then Click OK
Exit Local Group Policy Editor
o Open Computer Management console
Expand Services and then Click on Services
In the Right pane, Double Click on Windows Firewall
In the “Service Status:” section Click the Stop button
Select “Disabled” from the “Startup type:” drop down list
Click Apply and then Click OK
Exit the Computer Management Console
Disable Auto-run on all drives/ devices (DVD / CD-ROM / USB Sticks / Flash drives)
o Gpedit.msc
Computer Configuration> Administrative Templates > Windows Components >
AutoPlay Policies
Double Click “Turn off Autoplay”
Select Enabled
In the Options: “Turn off Autoplay on:” section, verify All drives is selected
Click Apply and Then Click OK
Page 64
Exit the group policy editor
o Click Start > Control Panel > Hardware and Sound > AutoPlay
Clear the checkbox to Disable “Use AutoPlay for all media and devices” option
Click Save
Exit the Control Panel
Enable and Configure Account Auditing Policy
o Secpol.msc
Local Policies > Audit Policy
Double-Click to open “Audit account logon events”
o Select Success and Failure
o Click Apply and then Click OK
Double-Click to open “Audit account management”
o Select Success and Failure
o Click Apply and then Click OK
Double-Click to open “Audit directory service access”
o Select Failure
o Click Apply and then Click OK
Double-Click to open “Audit logon events”
o Select Success and Failure
o Click Apply and then Click OK
Double-Click to open “Audit object access”
o Select Success and Failure
o Click Apply and then Click OK
Double-Click to open “Audit policy change”

Page 65
o Select Success and Failure
o Click Apply and then Click OK
Double-Click to open “Audit privilege use”
o Select Failure
o Click Apply and then Click OK
Double-Click to open “Audit process tracking”
o Select Failure
o Click Apply and then Click OK
Double-Click to open “Audit system events”
o Select Failure
o Click Apply and then Click OK
Exit the Local Security Policy mmc
Event Log Service Policy:
o Gpedit.msc
o Computer Configuration > Administrative Templates > Windows Components > Event Log
Service >
o Application
Maximum log size (KB): Enabled and set to 20480 KB
Log Access: Not configured (all authenticated users and system services can
write/read/clear this log)
Retain old events: Disabled
o Security
Maximum log size (KB): Enabled and set to 20480 KB
Page 66
Log Access: Not configured (only system software and administrators can read/clear
this log. You cannot configure write access)
Retain old events: Disabled
o Event Log Service > Setup
Maximum log size (KB): Enabled and set to 20480 KB
Log Access: Not configured (all authenticated users and system services can
write/read/clear this log)
Retain old events: Disabled
o Event Log Service > System
Maximum log size (KB): Enabled and set to 20480 KB
Log Access: Not configured (only system software and administrators can read/clear
this log. You cannot configure write access)
Retain old events: Disabled
Deny Guest Account Event Log Access:
o HKEY_LOCAL_MACHINE\SYSTEM\CurrentControlSet\services\Eventlog\Application
“Restrict Guest Access” = dword: 1
o HKEY_LOCAL_MACHINE\SYSTEM\CurrentControlSet\services\Eventlog\Security
“Restrict Guest Access” = dword: 1
o HKEY_LOCAL_MACHINE\SYSTEM\CurrentControlSet\services\Eventlog\System
“Restrict Guest Access” = dword: 1
o Exit Windows Registry Editor
Interactive Logon Settings:
o Gpedit.msc
o Windows Settings > Security Settings > Local Policies > Security Options
Page 67
“Interactive logon: Do not display last user name”: Enabled
“Interactive logon: Do not require CTRL+ALT+DEL”: Disabled
Guest Account Settings:
o Computer management Console > Local Users and Groups > Users
Verify Local Guest Account Disabled
o Secpol.msc
o Security Settings > Local Policies > User Rights Assignment
“Deny access to this computer from the network” = “Guests” (Default)
“Deny log on locally” = “Guests” (Default)
Remote Takeover Settings
o Control Panel > System and Security > System > Remote Settings
Disable “Allow Remote Assistance connections to this computer” checkbox
Verify Remote Desktop: “Don’t allow connections to this computer” Selected
o Click Apply and then Click OK
Disable Remote Differential Compression
o Start > Control Panel > Programs > Turn Windows features on or off
Deselect the Checkbox for Remote Differential Compression
Disable “Autotuning”
o From an elevated command prompt execute: “netsh interface tcp set global
autotuning=disabled”
Disable Media Centre
o Start > Control Panel > Programs > Turn Windows features on or off
o Expand “Media Features” and Disable (clear) the checkbox for “Windows Media Center”
Click OK and then click OK to Restart when prompted

Page 68
Disable Indexing Service
o Start > Control Panel > Programs > Turn Windows features on or off
Verify “Indexing Service” checkbox Disabled
Enable Windows 7 Built-in Features
o Start > Control Panel > Programs > Turn Windows features on or off
o Enable the checkbox for the following features:
Internet Explorer 8
Media Features\Windows DVD Maker
Media Features\Windows Media Player
Microsoft .NET Framework 3.5.1 – Only (subfolders Windows Communication
Foundation HPPT Activation and Non-HTTP Activation disabled)
Windows Gadget Platform – All
Windows Search
Windows TIFF IFilter
Disable Windows 7 Built-In Features
o Start > Control Panel > Programs > Turn Windows features on or off
o Disable the checkbox for the following features:
Games – All
Indexing Service
Internet Information Services – All (ftp server, Web Management Tools, WWW
Services)
Internet Information Services Hostable Web Core – All
Microsoft Message Queue (MSMQ) Server - All
Print and Document Services

Page 69
Internet Printing Client
LPD Print Service
LPR Port Monitor
Scan Management
Windows Fax and Scan
Remote Differential Compression
RIP Listener
Services for NFS
Simple Network Management Protocol (SNMP)
Simple TCPIP services (i.e. echo, daytime etc)
Subsystem for UNIX-based Applications
Tablet PC Components
Telnet Client
Telnet Server
TFTP Client
Windows Process Activation Service
XPS Services
XPS Viewer
Disable BitLocker (Default)
o Start > Control Panel > System and Security > Manage BitLocker
Verify Status of BitLocker Drive Encryption for all HDDs is “Off”
Turn off Action Center Notifications, Error Reporting and Customer Experience Improvement
Program messages via gpo
o Gpedit.msc

Page 70
Computer Configuration > Administrative Templates > System > Internet
Communication Management > Internet Communication Settings
“Turn off Windows Customer Experience Improvement Program” : Enabled
“Turn off Windows Error Reporting”: Enabled
“Turn off the Windows Messenger Customer Experience Improvement
Program” : Enabled
User Configuration\Administrative Templates\Start Menu and Taskbar
“Remove the Action Center Icon” Enabled
Disable Windows Defender
o Open the Start Menu and type “Defender” then Press Enter to open Windows Defender
o Click Tools, and then click Options. Under Administrator options, Clear the “Use this
program” check box, and then click Save.
If you are prompted for an administrator password or confirmation, type the
password or provide confirmation.
o When you see the Windows Defender “This program is turned off” dialog, click OK
Back Up the .vhd file for future image development use:
o Shut down the Windows 7 machine and copy C:\Win7Entx64_BASE2.vhd from the Hyper-V
Host server to a safe location for archiving. Rename this copy to Win7Entx64MUI_Base.vhd
This will be the file you start with if you need to make changes to the MUI wim you capture
during the capture sequence, named BASE7.wim
Win7Entx64_BASE.vhd backed up as Win7Entx64MUI_BASE2.vhd 05.17.2012
Sysprep and Capture the Image
Click Start, right-click on Computer, and Click Map Network Drive

Page 71
o Drive: Z
o Folder: %deployroot%
o Enable the “Connect using different credentials checkbox and Click Finish
Enter the Windows Security credentials for a user that has at least read + write
permission to the %deployroot% share and subfolders
Open a Command Prompt with elevated privileges (Click Start, Type cmd, right-click
on the cmd shortcut and then click “Run as Administrator) and execute the
command: “Cscript.exe Z:\Scripts\LiteTouch.wsf” to launch the Windows
Deployment Wizard
On the Task Sequence Page
Click to Select the Task Sequence named “Step 2 of Customizing Default
User Profile – Sysprep and Capture”
Click Next
On the Specify whether to capture an image Page
Select “Capture an image of this reference computer”
Verify that the Location field is the Captures folder in the deployment share
on your MDT computer
Enter File name: = Base7.wim
Click Next
On the Credentials Page
Specify credentials for connecting to your deployment share. Use the same
credentials you used to map drive Z:\
Click Next
Click Begin
Page 72
o Wait for the Task Sequence to finish. If you used the lines “Skip Final Summary=YES” and
“FinishAction=RESTART” in Customsettings.ini, the task sequence ends with a reboot.
Deploy The Image:
Import the customized .wim file into the deployment workbench
o Right-Click on the Operating Systems Folder and then Select “Import Operating System”
o OS Type: Select “Custom Image”
o Image: Browse to select the captured, sysprepped and customized Windows 7 image, which
should be in the Captures folder of your deployment share
o Setup: Select “Setup and Sysprep Files are not needed”
o Destination: Accept the name the wizard proposes for the destination directory that will be
created for storing this image
o The image import process begins. Click “Finish” when complete to close the Wizard.
Create a new task sequence to deploy the Image
o Create a Standard Task Sequence Named “WIN7_BASE” to deploy the customized Windows
7 Enterprise (x64) Base7.Wim to Meritor Enterprise Computers. Do Not Specify an
Administrator username or password at this time
To Facilitate Copy of profile customizations; Edit the Unattend.xml file associated with the
Deployment task sequence. In MDT, each task sequence has an answer file (unattend.xml)
associated with it. To ensure that the customizations we made to the default user profile of our
imported, captured, sysprepped and customized image are properly deployed to the default user
profile of a target system, we need to edit the unattend.xml file of our task sequence and make sure
that the CopyProfile setting is set to True.

Page 73
o right-click on your new task sequence in Deployment Workbench and select Properties to
open the properties sheet of the task sequence. The first time you do this, MDT needs to
generate a catalog for the imported image. To do this, MDT first mounts the image and this
may take a few minutes:
o Once the task sequence properties are open, select the OS Info tab
o Click Edit Unattend.xml to open the answer file for this task sequence in Windows System
Image Manager (Windows SIM).
Expand the specialize pass section of the answer file and select the Microsoft-
Windows-Shell-Setup component
o in the Properties task pane change the CopyProfile setting to True
Click the Save button on the toolbar of Windows SIM, then close Windows SIM, and close the task
sequence properties.
Applications added to task sequence:
1. Office 2010:
32 Bit version installed, recommended by MS to ensure app compatibility
SP1 added to Updates folder
Language Packs - one for each OS language – added to installation folder
“outlook-x-none” Hot Fix for Windows XP Office 2003 to Windows 7 Office 2010 profile
migration saved to Updates folder
“MeritorInc.msp” file saved to Updates folder with the following Customizations:
License accepted

Page 74
Use KMS key checked
Silent install checked
Microsoft Access Not Installed
Disable Opt-in Wizard on first run: Enabled
Enable Customer Experience Improvement program: Disabled
Automatically receive small updates to improve reliability: Disabled
2. Adobe FlashPlayer x64 11.2.202.235
3. Adobe Reader 10.1.2
4. Adobe Shockwave 11.6
5. Dameware Client Agents Win 7 64 Bit
6. IE8 Meritor Customizations (provided by Derak Williams)
7. Java Version 6 Update 4
Driver Installation via Applications:
Lenovo S20 NVidia Display Driver v 296.35
Lenovo T91 Display Drivers
Lenovo W520 Display Drivers
Lenovo X220 Display Drivers
Page 75
Appendix A: Sample CustomSettings.ini
[Settings]
Priority=Default
Properties=MyCustomProperty
[Default]
OSInstall=YES
ScanStateArgs=/c /v:5 /ue:administrator /localonly
LoadStateArgs=/c /v:5 /lac:m1nimaly$t /ue:captain
HIDESHELL=YES
SkipAdminPassword=YES
AdminPassword=%Password%
SkipApplications=YES
SkipAppsOnUpgrade=YES
SkipBDDWelcome=YES
SkipBitLocker=YES
SkipCapture=YES

Page 76
SkipComputerName=NO
SkipComputerBackup=YES
SkipDeploymentType=NO
DeploymentType=Refresh
SkipDomainMembership=NO
SkipFinalSummary=YES
FinishAction=RESTART
SkipLocaleSelection=NO
SkipPackageDisplay=YES
SkipProductKey=YES
SkipSummary=NO
SkipTaskSequence=YES
TaskSequenceID=WIN7_BASE
SkipTimeZone=NO

Page 77
SkipUserData=NO
SLShareDynamicLogging=%DEPLOYROOT%\Logs\%OSDComputerName%
Page 78
Appendix B: Sample Bootstrap.ini
[Settings]
Priority=Default
[Default]
DeployRoot=\\MDTSvr\MDT$
SkipBDDWelcome=Yes

Page 79
Appendix C: Registry Edits added to Unattend.xml:
Enable connection to older network shares as well as use of the current Meritor Proxy Script
(Reference: http://support.microsoft.com/kb/147706 and
http://support.microsoft.com/kb/297684#appliesto )
o [HKEY_LOCAL_MACHINE\SYSTEM\CurrentControlSet\Control\Lsa]
"LmCompatibilityLevel"=dword:00000001
o [HKEY_LOCAL_MACHINE\SYSTEM\CurrentControlSet\Control\Lsa\MSV1_0]
"NtlmMinClientSec"=dword:00000000
Fix Local Host Errors on some web pages
o [HKEY_CURRENT_USER\SOFTWARE\Microsoft\Windows\CurrentVersion\Internet Settings]
“SecureProtocols” = dword:28

Page 80
Appendix D: ZTIUserState_Config.xml
(%deployroot%\scripts\ZTIUserState_Config.xml must be edited In order to move migrated users from the target
machine’s Local Administrators group to the Local Users group):
<?xml version="1.0" encoding="UTF-8"?>
<Configuration>
<Policies>
<ErrorControl>
<fileError>
<nonFatal errorCode="32">* [*]</nonFatal>
<nonFatal errorCode="33">* [*]</nonFatal>
<fatal errorCode="any">%PROFILESFOLDER%\* [*]</fatal>
</fileError>
<registryError>
<nonFatal errorCode="5">* [*]</nonFatal>
</registryError>
</ErrorControl>
<HardLinkStoreControl>
<fileLocked>
<createHardLink">%PROFILESFOLDER%\* [*]</createHardLink>
</fileLocked>
</Policies>
<ProfileControl>
<localGroups>

Page 81
<mappings>
<changeGroup from="Administrators" to="Users" appliesTo="AllUsers">
<include>
<pattern>*\*</pattern>
</include>
</changeGroup>
</mappings>
</localGroups>
</ProfileControl>
</Configuration>

Page 82
Appendix 6: How to Add Applications to a Deployment Share
Add New Applications to the Deployment Share
1.) In the Left Pane of MD, Expand Deployment Shares Expand MDT Applications
2.) Right Click Applications Click on New Applications
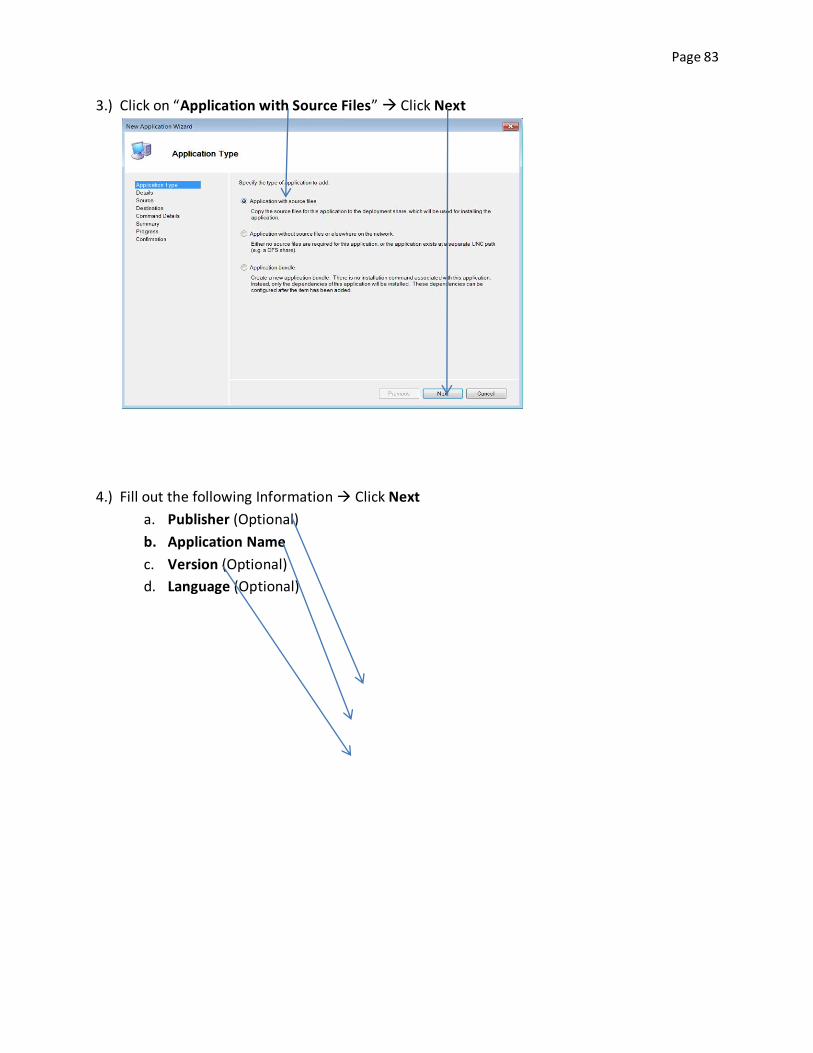
Page 83
3.) Click on “Application with Source Files” Click Next
4.) Fill out the following Information Click Next
a. Publisher (Optional)
b. Application Name
c. Version (Optional)
d. Language (Optional)

Page 84
5.) Click on Browse and point to Application executable Click on Next
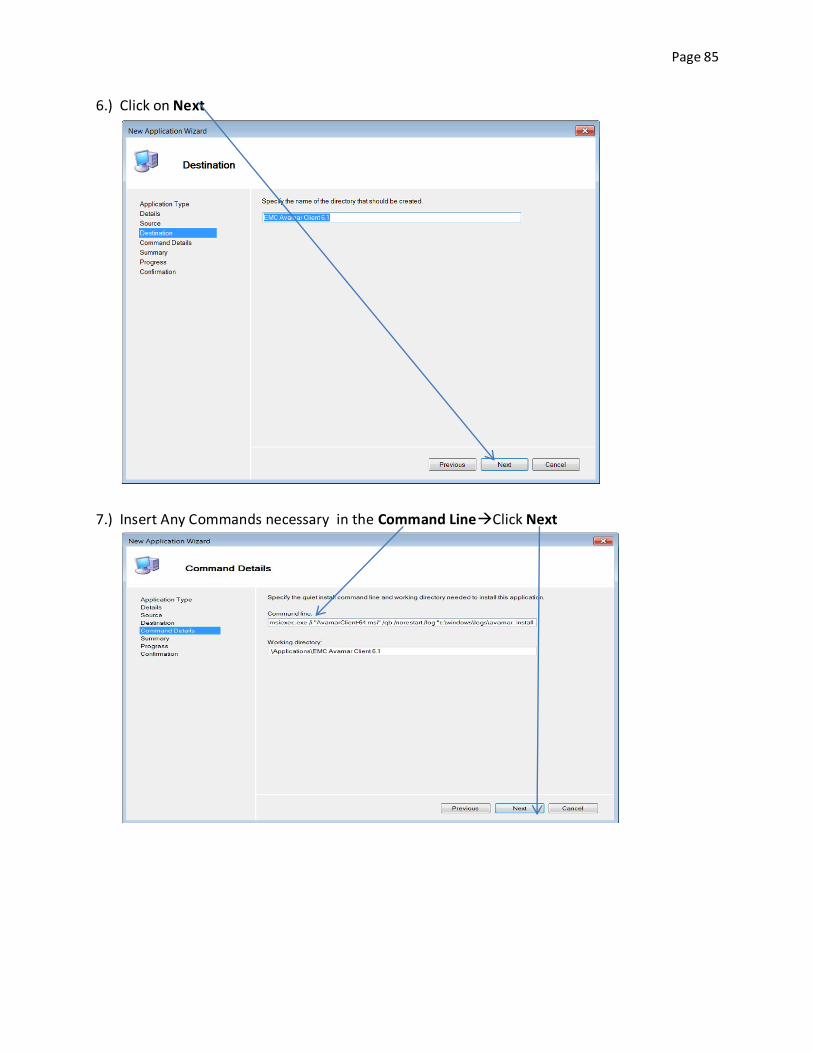
Page 85
6.) Click on Next
7.) Insert Any Commands necessary in the Command LineClick Next

Page 86
8.) Click Next
9.) Click Finish

Page 87
Create a Site Specific MDT Custom Task Sequence
1.) In the Left Pane of the MDT Deployment Workbench, Expand Deployment Shares
Expand MDT Applications
2.) Right Click on Task Sequences Click on New Task Sequence
3.) Enter the Required Field – (%SITE% is your Site Location)
a. Task Sequence ID - %SITE%APPS
b. Task Sequence Name - %SITE%Applications

Page 88
c. Task Sequence Comment – Any Comments
4.) Select Custom Task Sequence Click Next
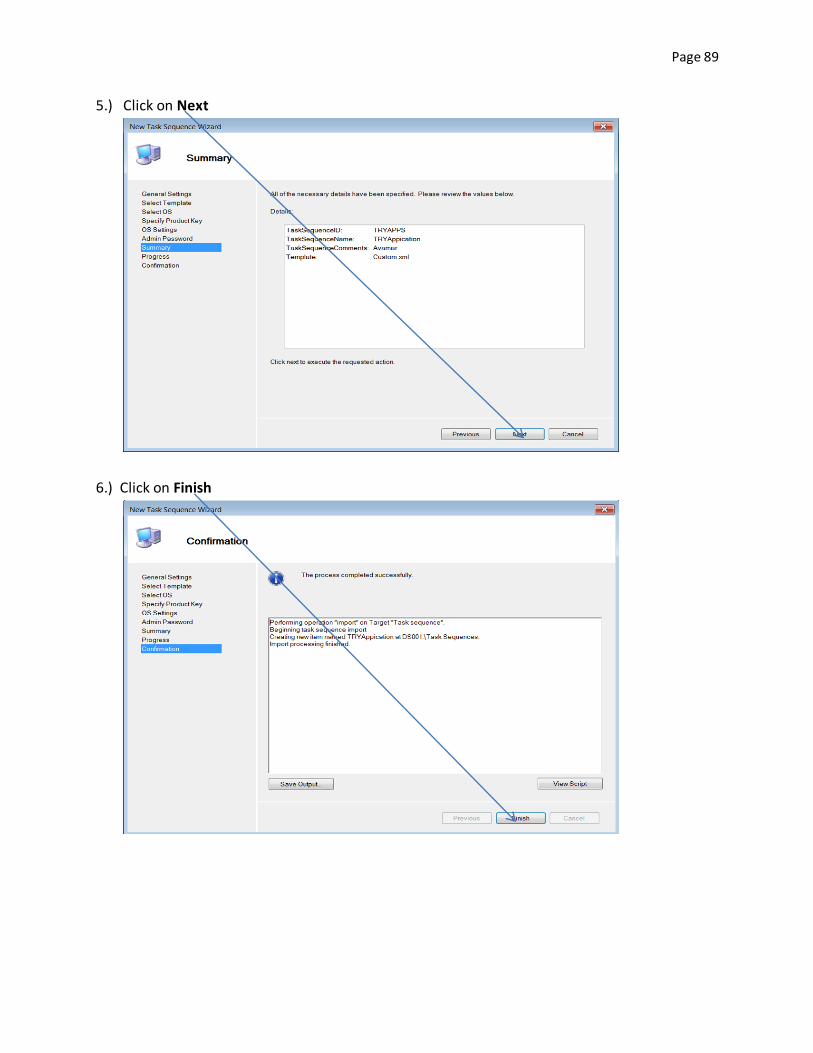
Page 89
5.) Click on Next
6.) Click on Finish

Page 90
Add Your Site Specific Application to the MDT Custom Task Sequence
1.) In the Left Pane of MDT Deployment Workbench, Expand Deployment Shares Expand
MDT Applications
2.) Click on Task Sequences In Left Pane – Double Click on %SITE%APPS

Page 91
3.) Click on Task Sequence Tab
4.) Click on Add General Install Application
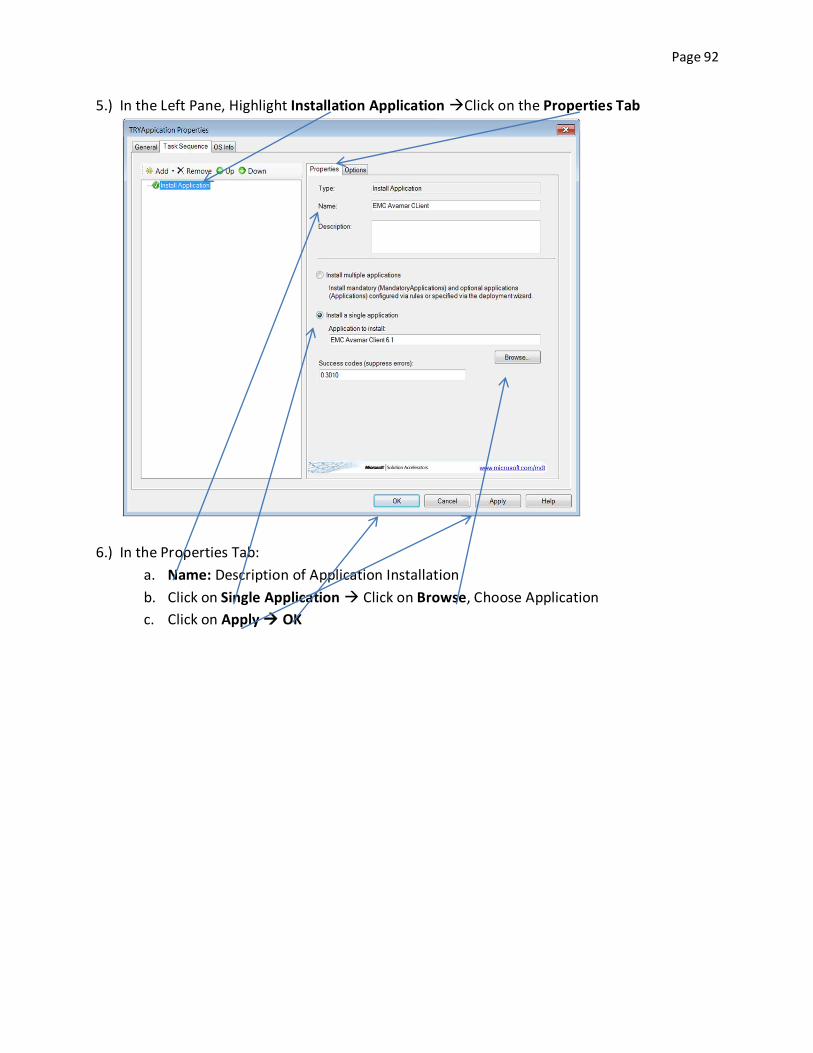
Page 92
5.) In the Left Pane, Highlight Installation Application Click on the Properties Tab
6.) In the Properties Tab:
a. Name: Description of Application Installation
b. Click on Single Application Click on Browse, Choose Application
c. Click on Apply OK

Page 93
Deploy and Test Your Application Task Sequence
1.) In the Left Pane of Deployment Workbench, Right Click MDT Application Click Update
Deployment Share
2.) Select “Optimize the Boot Image Updating Process” Click Next

Page 94
3.) Click on Next
4.) Click Finish
5.) On Technician PC, Enable Dynamic Logging:

Page 95
a.) Create folder: C:\MDT_APPS\Logs
b.) Use Notepad to Open C:\MDT_APPS\Control\CustomSettings.ini. **Do NOT use MS
Word or Wordpad**
c.) Add the following line to CustomSettings.ini so that a log of the MDT task sequence
results will be created and named for the target pc (omit the quotation marks):
“SLShareDynamicLogging=%DEPLOYROOT%$\Logs\%OSDComputerName%”
d.) Save and Close CustomSettings.ini
5.) On Technician PC, share the folder C:\MDT_APPS as “MDT_APPS$” and give the Everyone
security group Read, Write, and Execute permissions
6.) Logon to the Target pc as a user with normal user rights
7.) Launch a command prompt with elevated priveleges: Type cmd in the search box on the
Start Menu, then Right-Click on the cmd shortcut and then Click Run as Administrator. When
prompted by the User Account Control provide the user name and password of a user with
local administrator rights on the target pc to launch the command prompt.

Page 96
8.) Using the command window, map drive “B:” to the MDT_APPS$ share on your technician
computer. The example in the figure below maps drive B: to the MDT_APPS$ share on a
computer named “trytsthost”. Substitute your technician computername for “trytsthost” in this
command line and enter a username and password that has rights to connect to the share
when prompted.
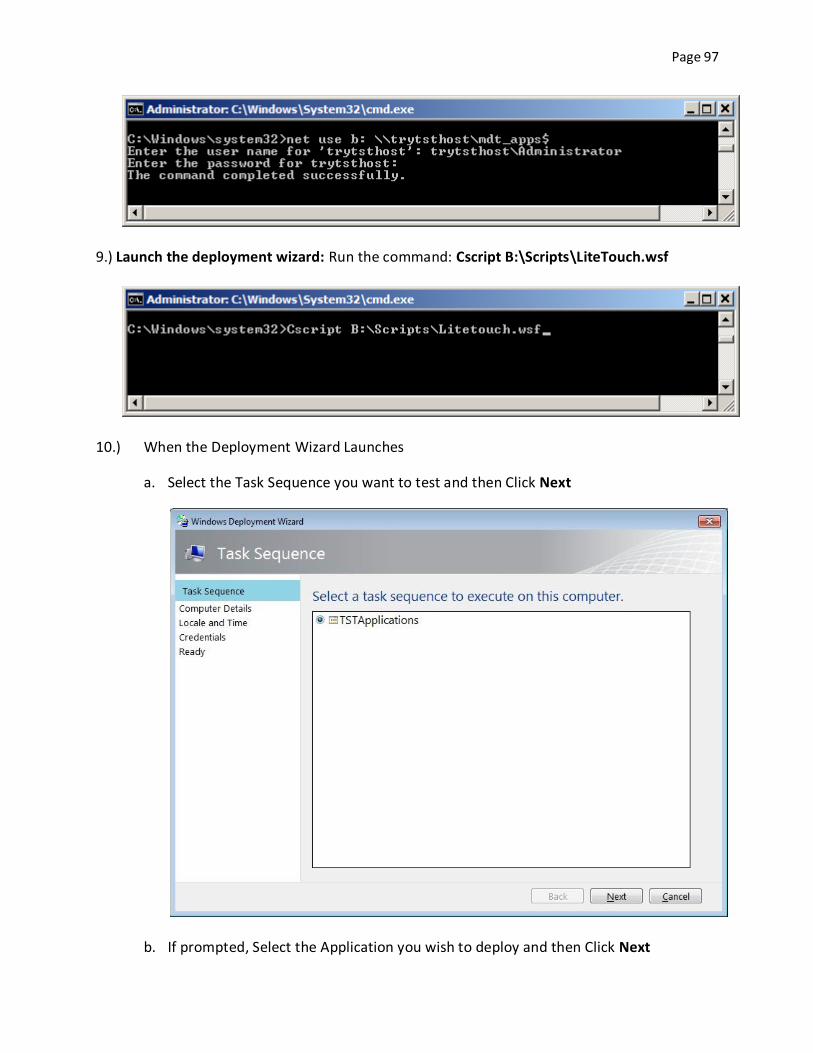
Page 97
9.) Launch the deployment wizard: Run the command: Cscript B:\Scripts\LiteTouch.wsf
10.) When the Deployment Wizard Launches
a. Select the Task Sequence you want to test and then Click Next
b. If prompted, Select the Application you wish to deploy and then Click Next
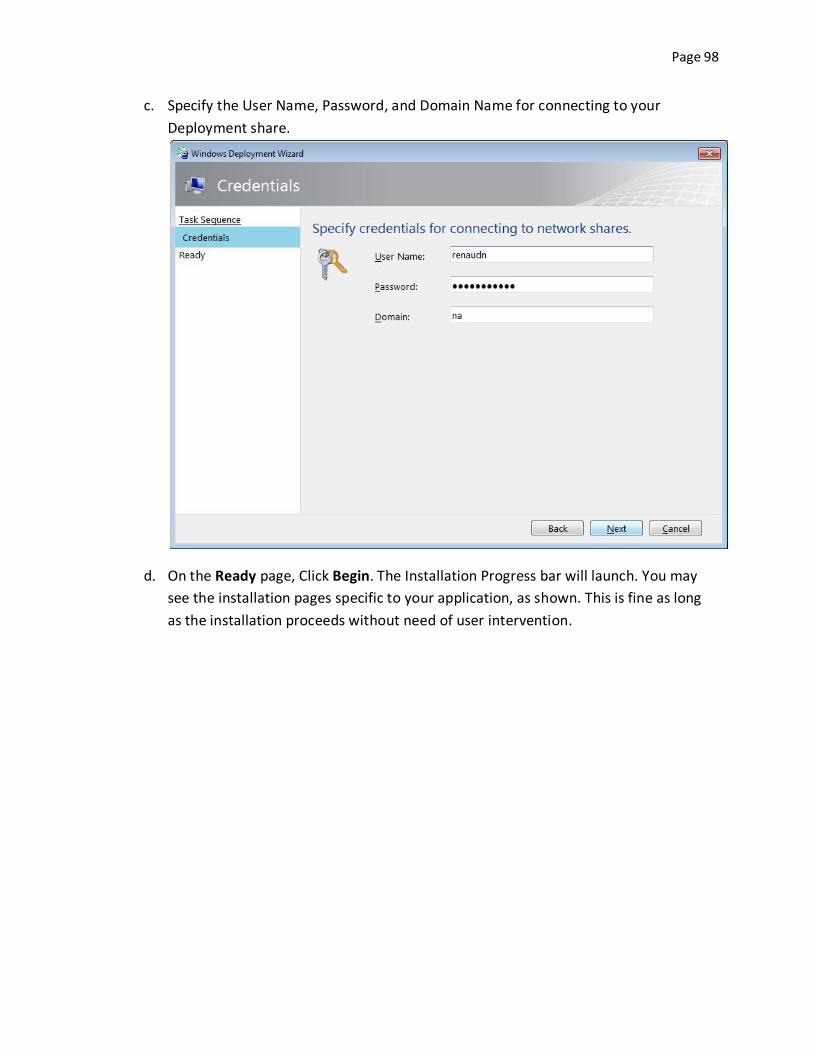
Page 98
c. Specify the User Name, Password, and Domain Name for connecting to your
Deployment share.
d. On the Ready page, Click Begin. The Installation Progress bar will launch. You may
see the installation pages specific to your application, as shown. This is fine as long
as the installation proceeds without need of user intervention.

Page 99

Page 100
7.) When the Task Sequence is complete you will see a summary page. Check for errors and
then Click Finish. You can read the log with the same name as the target computer in
C:\MDT_APPS\Logs