
Production of good quality budded plants - Rubber Research ...
14
1
-
Upload
khangminh22 -
Category
Documents
-
view
3 -
download
0
Transcript of Production of good quality budded plants - Rubber Research ...

1
2
Production of good quality budded plants An important factor
The productivity of most of the RRISL recommended clones is in the range of
1500 –3000 kg/ha/year. But what is harvested in most fields is far below than
this. One of the main reasons for this is the use of very poor quality plants in
almost all the planting programmes in the country. Productivity can be
increased only by using high quality plants along with adopting recommended
agromanagement practices, from the establishment of the clearing.
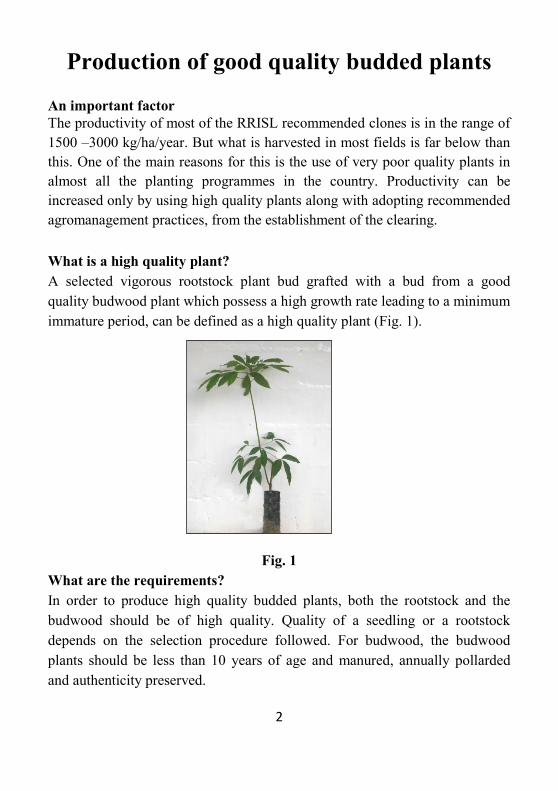
What is a high quality plant?
A selected vigorous rootstock plant bud grafted with a bud from a good
quality budwood plant which possess a high growth rate leading to a minimum
immature period, can be defined as a high quality plant (Fig. 1).
Fig. 1
What are the requirements?
In order to produce high quality budded plants, both the rootstock and the
budwood should be of high quality. Quality of a seedling or a rootstock
depends on the selection procedure followed. For budwood, the budwood
plants should be less than 10 years of age and manured, annually pollarded
and authenticity preserved.

3
Where to find the seeds?
Good quality seeds for rootstock nurseries are hardly found in wet areas such
as Kalutara, Ratnapura, Galle and Colombo districts. Therefore, for nurseries
in the wet region of the country, arrangements should be made to collect and
transport fresh seeds from Warakapola, Polgahawela, Kurunagala or Gampaha
areas, with the onset of the seed fall in July/August. It is also possible to
obtain seeds from Monaragala and Bibile areas in January/February. The most
important factor is to collect the total seed requirement at the beginning of the
seed fall.
Are the seeds good?
The only test available to date for nursery managers to check whether the
seeds are good or bad is to sow them in a sand bed or a germination bed and to
see whether they would germinate within 7-14 days.
What is a sand bed or a germination bed?
It is just a layer of pure river sand spread in a shady place to a thickness of 5
cm (2 inches) and width of 1 m (3 ft) (Fig. 2). One square metre area holds
about 1000 seeds (4 kg) and therefore the length of the bed should be made
according to the number of seeds to be sown. There should be only one layer
of seeds, slightly covered, with sand. The sand should be kept well moist
throughout by watering twice daily, for the seeds to germinate. Water logged
condition or sprinkler irrigation, throughout the day may cause pathogenic
problems.
Fig. 2
4
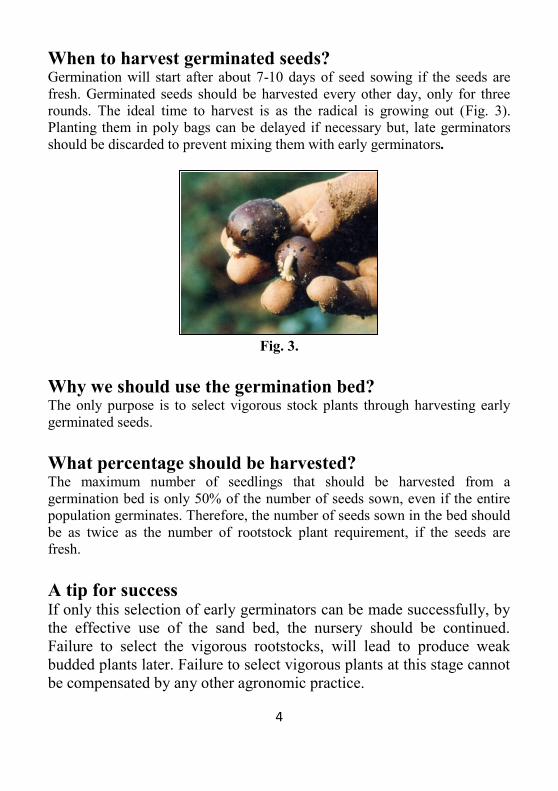
When to harvest germinated seeds? Germination will start after about 7-10 days of seed sowing if the seeds are
fresh. Germinated seeds should be harvested every other day, only for three
rounds. The ideal time to harvest is as the radical is growing out (Fig. 3).
Planting them in poly bags can be delayed if necessary but, late germinators
should be discarded to prevent mixing them with early germinators.
Fig. 3.
Why we should use the germination bed? The only purpose is to select vigorous stock plants through harvesting early
germinated seeds.
What percentage should be harvested? The maximum number of seedlings that should be harvested from a
germination bed is only 50% of the number of seeds sown, even if the entire
population germinates. Therefore, the number of seeds sown in the bed should
be as twice as the number of rootstock plant requirement, if the seeds are
fresh.
A tip for success If only this selection of early germinators can be made successfully, by
the effective use of the sand bed, the nursery should be continued.
Failure to select the vigorous rootstocks, will lead to produce weak
budded plants later. Failure to select vigorous plants at this stage cannot
be compensated by any other agronomic practice.
5
No more ground nurseries! Ground rootstock nurseries are no longer recommended to raise root stock
plants as the quality of the plants cannot be detected or guaranteed. Further,
the age of the budded plant can be kept below one year only through young
budding plants.
Polybag rootstock nursery 6” x 15” black polybags with gauge 300 for nurseries less than one year or 7”
x 15” gauge 500 for nurseries more than a year (Monaragala and Ampara
areas) are suitable for this purpose. Gusseted and perforated bags are available
in the market at a reasonable price. Recycled material is not suitable and
should not be used as there is no guarantee for their durability. Life span of
polybags should be guaranteed by the manufactures to be more than one year.
Soil for filling bags Where ever possible, top soil of loamy texture should be used. It is important
to add 50-100g of dry organic manure (compost) and 50 g of High Grade
Eppawala Rock Phosphate (HERP) per bag prior to filling.
Nursery site An open area away from mature rubber fields should be selected. Access to a
good source of water is a requirement. Lands with shallow soil are not
suitable.
Nursery layout Soil filled bags are placed in shallow trenches close to each other, as single
rows. The recommended distance between single rows is 1½’. Double rows
have may disadvantages.
Transplanting (Planting germinated seeds in bags) Seedlings should be planted in bags as they germinate. One germinated seed
should be planted in one bag. If the weather conditions are adverse, seedlings
should be shaded with bracken or alternatively transplanting can be delayed
until the shoot of the seedling is about 5-6 cm long.
6
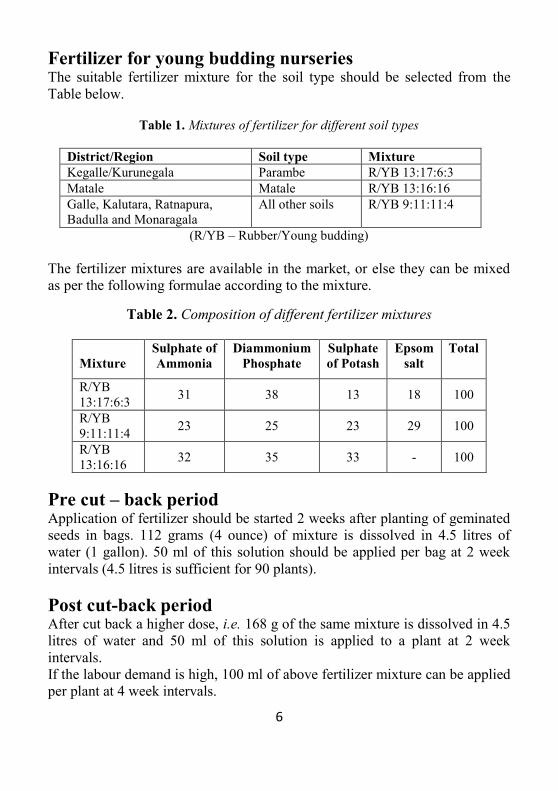
Fertilizer for young budding nurseries The suitable fertilizer mixture for the soil type should be selected from the
Table below.
Table 1. Mixtures of fertilizer for different soil types
District/Region Soil type Mixture
Kegalle/Kurunegala Parambe R/YB 13:17:6:3
Matale Matale R/YB 13:16:16
Galle, Kalutara, Ratnapura,
Badulla and Monaragala
All other soils R/YB 9:11:11:4
(R/YB – Rubber/Young budding)
The fertilizer mixtures are available in the market, or else they can be mixed
as per the following formulae according to the mixture.
Table 2. Composition of different fertilizer mixtures
Mixture
Sulphate of
Ammonia
Diammonium
Phosphate
Sulphate
of Potash
Epsom
salt
Total
R/YB
13:17:6:3 31 38 13 18 100
R/YB
9:11:11:4 23 25 23 29 100
R/YB
13:16:16 32 35 33 - 100
Pre cut – back period Application of fertilizer should be started 2 weeks after planting of geminated
seeds in bags. 112 grams (4 ounce) of mixture is dissolved in 4.5 litres of
water (1 gallon). 50 ml of this solution should be applied per bag at 2 week
intervals (4.5 litres is sufficient for 90 plants).
Post cut-back period After cut back a higher dose, i.e. 168 g of the same mixture is dissolved in 4.5
litres of water and 50 ml of this solution is applied to a plant at 2 week
intervals.
If the labour demand is high, 100 ml of above fertilizer mixture can be applied
per plant at 4 week intervals.
7
Important facts to remember in manuaring the plants The total quantity of the fertilizer should be completely dissolved in water
before applying. This is achieved by pre-soaking them for a few hours and
stirring throughout the manuaring process.
Management of nursery diseases It is recommended to apply fungicides regularly before symptoms of diseases
are seen. Prevention is always better than cure.
It is advisable to adhere strictly to RRISL recommendation on correct cultural
practices to prevent most of the maladies in nurseries. For further information,
please refer the pamphlet on “Maladies of Rubber Nurseries”.
Group A Mancozeb/ Propineb/ Ridomil/ Captan/ Antracol (3g per liter).
or carbendazium - *systemic fungicides (0.5-1.0g per litre).
Group B Copper containing Fungicides (3.0g per litre)
Spray one fungicide from each group alternatively at weekly intervals.
Frequency of application depends on the weather factors/stage of the
disease severity level.
During heavy rains, use a *systemic fungicide as contact fungicides
may easily get washed off.
Apart from the above applications, a sulphur containing fungicide at a
concentration of 3g/ litre is recommended only during the Oidium
season.
8
What about budwood? Presence of a budwood nursery adjoining to the stock nursery is a basic
requirement to produce good quality plants.
Quality of budwood Quality of budwood is equally important for the production of high quality
budded plants. If you do not use good quality budwood, the pain taken to
select vigorous rootstock plants will just be in vain.
The more juvenile the budwood the faster the growth rate of the budded plants
in the field.
Requirements need to be fulfilled in a budwood nursery
Age of the nursery should be below 10 years.
Age of budwood should be less than 3 months.
Budwood plants should be pollarded every year whether the budwood is
used or not.
Clones should be demarcated without mixing.
Manuring and disease control should be carried out according to the
recommendations.
Budwood nursery The spacing of the budwood nursery can be 4’ x 4’ or 3’ x 6’ according to the
bed size and the terrain. More number of buds can be obtained from 9-10
weeks old new shoots obtained by cutting the branches where the bark is
brown and just above a leaf whorl.
9
The axillary buds can also be used by cutting the leaves with a piece of petiole
attached, about 3 weeks before they are required.
It is very important to manure the budwood plants once they are pollarded.
This will not only increase the number of shoots but also of the healthiness of
the shoots.
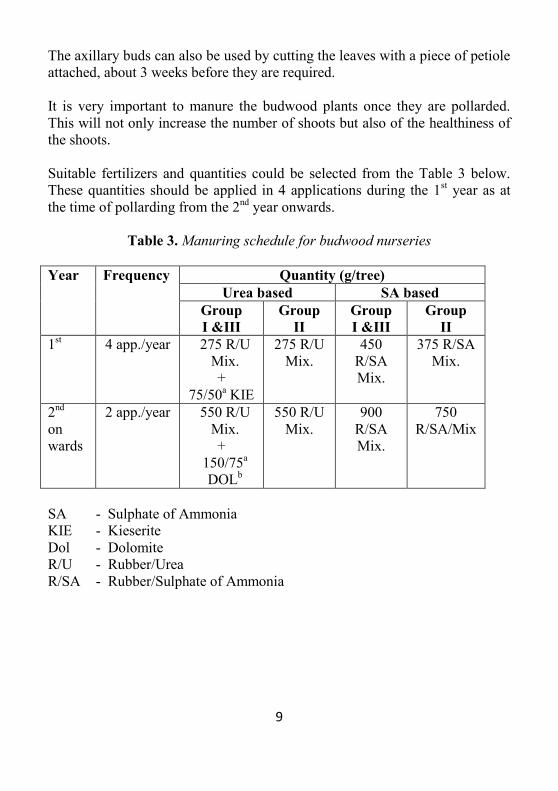
Suitable fertilizers and quantities could be selected from the Table 3 below.
These quantities should be applied in 4 applications during the 1st year as at
the time of pollarding from the 2nd
year onwards.
Table 3. Manuring schedule for budwood nurseries
Year Frequency Quantity (g/tree)
Urea based SA based
Group
I &III
Group
II
Group
I &III
Group
II
1st 4 app./year 275 R/U
Mix.
+
75/50a KIE
275 R/U
Mix.
450
R/SA
Mix.
375 R/SA
Mix.
2nd
on
wards
2 app./year 550 R/U
Mix.
+
150/75a
DOLb
550 R/U
Mix.
900
R/SA
Mix.
750
R/SA/Mix
SA - Sulphate of Ammonia
KIE - Kieserite
Dol - Dolomite
R/U - Rubber/Urea
R/SA - Rubber/Sulphate of Ammonia
10
Bud grafting Well maintained stock plants become buddable in 3-4 months. Plants should
be more than 6 mm in diameter at the time of bud grafting. Bud sticks of 9-10
weeks of age of similar size in diameter can be used.
Growth stage, i.e. whether they have a mature top whorl of leaves or not, of
the stock plant does not affect the success of bud grafting. Therefore, even the
plants with tender leaves can be budgrafted.
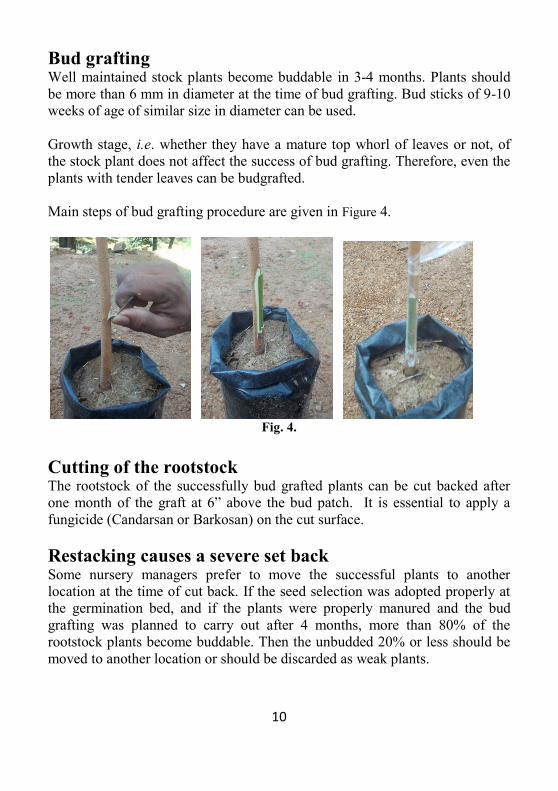
Main steps of bud grafting procedure are given in Figure 4.
Fig. 4.
Cutting of the rootstock The rootstock of the successfully bud grafted plants can be cut backed after
one month of the graft at 6” above the bud patch. It is essential to apply a
fungicide (Candarsan or Barkosan) on the cut surface.
Restacking causes a severe set back Some nursery managers prefer to move the successful plants to another
location at the time of cut back. If the seed selection was adopted properly at
the germination bed, and if the plants were properly manured and the bud
grafting was planned to carry out after 4 months, more than 80% of the
rootstock plants become buddable. Then the unbudded 20% or less should be
moved to another location or should be discarded as weak plants.
11
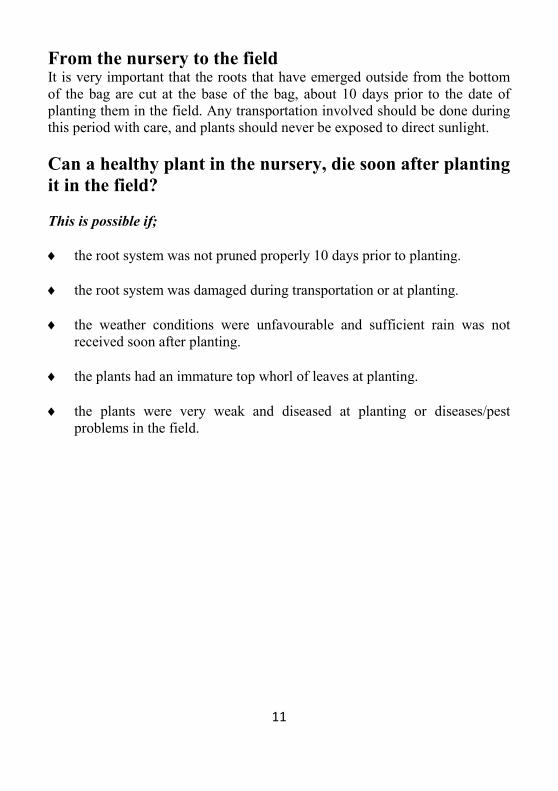
From the nursery to the field It is very important that the roots that have emerged outside from the bottom
of the bag are cut at the base of the bag, about 10 days prior to the date of
planting them in the field. Any transportation involved should be done during
this period with care, and plants should never be exposed to direct sunlight.
Can a healthy plant in the nursery, die soon after planting
it in the field?
This is possible if;
the root system was not pruned properly 10 days prior to planting.
the root system was damaged during transportation or at planting.
the weather conditions were unfavourable and sufficient rain was not
received soon after planting.
the plants had an immature top whorl of leaves at planting.
the plants were very weak and diseased at planting or diseases/pest
problems in the field.
12
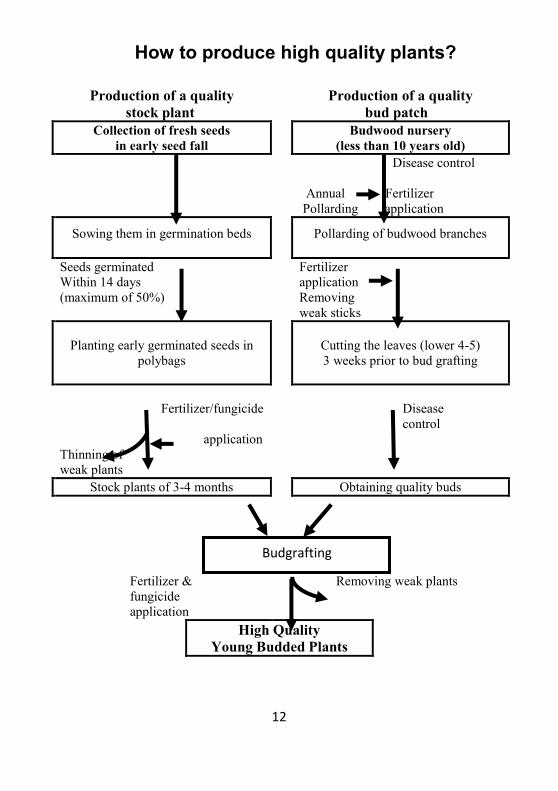
How to produce high quality plants?
Production of a quality Production of a quality
stock plant bud patch
Collection of fresh seeds
in early seed fall Budwood nursery
(less than 10 years old)
Disease control
Annual Fertilizer
Pollarding application
Sowing them in germination beds
Pollarding of budwood branches
Seeds germinated
Within 14 days
(maximum of 50%)
Fertilizer
application
Removing
weak sticks
Planting early germinated seeds in
polybags
Cutting the leaves (lower 4-5)
3 weeks prior to bud grafting
Fertilizer/fungicide
application
Thinning of
weak plants
Disease
control
Stock plants of 3-4 months Obtaining quality buds
Fertilizer &
fungicide
application
Removing weak plants
High Quality
Young Budded Plants
Budgrafting
13
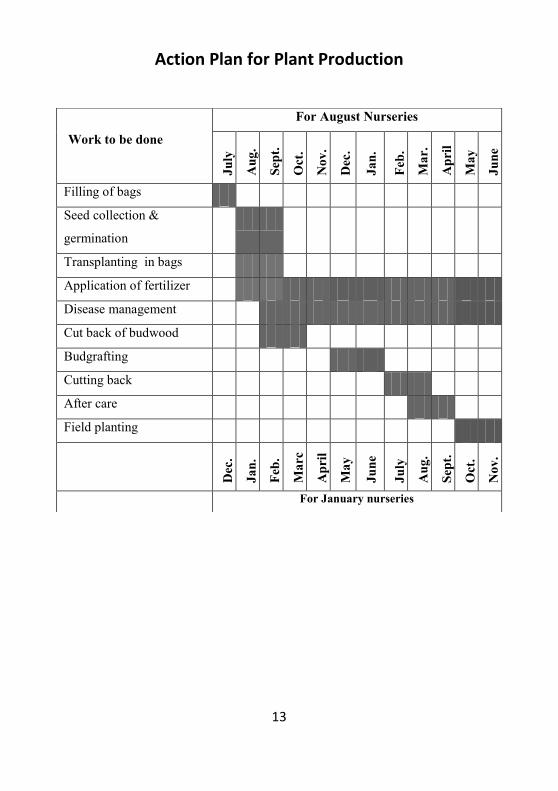
Action Plan for Plant Production
Work to be done
For August Nurseries
Ju
ly
Au
g.
Sep
t.
Oct
.
No
v.
Dec
.
Ja
n.
Feb
.
Ma
r.
Ap
ril
Ma
y
Ju
ne
Filling of bags
Seed collection &
germination
Transplanting in bags
Application of fertilizer
Disease management
Cut back of budwood
Budgrafting
Cutting back
After care
Field planting
Dec
.
Ja
n.
Feb
.
Ma
rc
h
Ap
ril
Ma
y
Ju
ne
Ju
ly
Au
g.
Sep
t.
Oct
.
No
v.
For January nurseries
14
Plant Science Department
Rubber Research Institute of Sri Lanka
Dartonfiled
Agalawatta
January 2016