
Everything Touches Everything: Matthew Rose’s Suicide Specials
Upload
khangminh22Category
view
1download
0
Practical Game AIProgramming
Create game AI and implement cutting edge AI algorithmsfrom scratch
Micael DaGraça
BIRMINGHAM - MUMBAI

Practical Game AI ProgrammingCopyright © 2017 Packt Publishing
All rights reserved. No part of this book may be reproduced, stored in a retrieval system, ortransmitted in any form or by any means, without the prior written permission of thepublisher, except in the case of brief quotations embedded in critical articles or reviews.
Every effort has been made in the preparation of this book to ensure the accuracy of theinformation presented. However, the information contained in this book is sold withoutwarranty, either express or implied. Neither the author, nor Packt Publishing, and itsdealers and distributors will be held liable for any damages caused or alleged to be causeddirectly or indirectly by this book.
Packt Publishing has endeavored to provide trademark information about all of thecompanies and products mentioned in this book by the appropriate use of capitals.However, Packt Publishing cannot guarantee the accuracy of this information.
First published: June 2017
Production reference: 1280617
Published by Packt Publishing Ltd.Livery Place35 Livery StreetBirminghamB3 2PB, UK.
ISBN 978-1-78712-281-9
www.packtpub.com

Credits
AuthorMicael DaGraça
Copy EditorSafis Editing
ReviewerDavide Aversa
Project CoordinatorRitika Manoj
Commissioning EditorAmarabhab Banerjee
ProofreaderSafis Editing
Acquisition EditorShweta Pant
IndexerTejal Daruwale Soni
Content Development EditorAditi Gour
GraphicsJason Monterio
Technical EditorLeena PatilAkansha Bathija
Production CoordinatorShraddha Falebhai
About the AuthorMicael DaGraça is a game designer and an AR developer living in Porto, Portugal. He hasworked for multiple game studios, contributing to the creation of different indie games andinteractive apps.
Micael grew up playing video games, and that passion never went away. So, later on in hislife, he decided to learn how to create games. Without any previous knowledge in coding or3D animation, he slowly started to create simple games, learning each time more with thoseexperiences. When the games started to work and the gameplay became enjoyable, hestarted to make plans to publish a game in collaboration with an old friend. Micael wasresponsible for the technical aspect of the game, making sure that the game worked asplanned, while his friend created all the artwork for the game. Finally, the game waspublished, and it received some positive feedback from other indie game developers. Sincethe game generated some revenue, the dream of becoming a game designer turned intoreality.
Today, Micael works for other studios, helping others to develop their game ideas, and hasalso integrated into a company that focuses on the creation of games and interactive appsfor health and well-being purposes. Even though he doesn't have the time to keep workingon personal projects, he has a few frozen game projects that are still under developmentwith the help of his friend.
“I would like to thank to my parents for the unconditional support throughout the years,because without them my life as a game designer would not have been possible; a warmthank you to my sister, Alexandrina, for all of your help when I needed it the most and forsharing your office with me so I could start working as a game designer. A thank you tomy old friend Vicente for the eternal rivalry, forcing me to always push my limits, makingme a better professional. I also would like to thank my girlfriend, Marta, for her smile,which always make me happy, and for taking care of everything so that I could focus on mywork. And finally, I would like to dedicate this book to my grandpa, who inspired me to bethe person that I am today.”

About the ReviewerDavide Aversa completed his masters in robotics and artificial intelligence and his Ph.D. incomputer science at La Sapienza University of Rome where he has been involved inresearch applied to pathfinding and decision making for digital games characters andcomputational creativity.

www.PacktPub.comFor support files and downloads related to your book, please visit www.PacktPub.com.
Did you know that Packt offers eBook versions of every book published, with PDF andePub files available? You can upgrade to the eBook version at www.PacktPub.com and as aprint book customer, you are entitled to a discount on the eBook copy. Get in touch with usat [email protected] for more details.
At www.PacktPub.com, you can also read a collection of free technical articles, sign up for arange of free newsletters and receive exclusive discounts and offers on Packt books andeBooks.
h t t p s ://w w w . p a c k t p u b . c o m /m a p t
Get the most in-demand software skills with Mapt. Mapt gives you full access to all Packtbooks and video courses, as well as industry-leading tools to help you plan your personaldevelopment and advance your career.
Why subscribe?Fully searchable across every book published by PacktCopy and paste, print, and bookmark contentOn demand and accessible via a web browser

Customer FeedbackThanks for purchasing this Packt book. At Packt, quality is at the heart of our editorialprocess. To help us improve, please leave us an honest review on this book's Amazon pageat www.amazon.com/dp/1787122816.
If you'd like to join our team of regular reviewers, you can e-mail us [email protected]. We award our regular reviewers with free eBooks andvideos in exchange for their valuable feedback. Help us be relentless in improving ourproducts!
Table of ContentsPreface 1
Chapter 1: Different Problems Require Different Solutions 6
A brief history of and solutions to game AI 6Enemy AI in video games 7From simple to smart and human-like AI 8Visual and audio awareness 11Summary 13
Chapter 2: Possibility and Probability Maps 14
Game states 15Possibility maps 15
How to use possibility maps 15Preparing a possibility map (FPS) 17Creating a possibility map (FPS) 18
Defining the states 20DEFENSIVE state 21AGGRESSIVE state 24Possibility map conclusion 27
Probability maps 27How to use probability maps 28Where to go from here 31
Summary 32
Chapter 3: Production System 33
Automated finite-state machines (AFSMs) 36Calculating chances 39
Utility-based functions 42Dynamic game AI balancing 53Summary 55
Chapter 4: Environment and AI 56
Visual interactions 57Basic environment interactions 59
Moving environment objects 60Obstructive environment objects 70Breaking down the environment by area 76

[ ii ]
Advanced environment interactions 79Adapting to unstable terrain 81Using raycast to evaluate decisions 83
Summary 85
Chapter 5: Animation Behaviors 86
2D animation versus 3D animation 862D animation - sprites 863D animation - bone structure 89
The main differences 89Animation state machines 90Smooth transitions 112Summary 114
Chapter 6: Navigation Behavior and Pathfinding 115
Navigation behavior 115Choosing a new direction 115
Avoid walking against walls 116Choosing an alternative path 121
Point to point movement 128Tower defense genre 128
Racing genre 136MOBA genre 145Point to point movement and avoiding dynamic objects 163
Summary 174
Chapter 7: Advanced Pathfinding 175
Simple versus advanced pathfinding 175A* search algorithm 178
How it works 178Disadvantages of using A* 180Going directly from A to B 181From point A to B with obstacles in the way 183Generating grid nodes 192Pathfinding implementation 197
Summary 208
Chapter 8: Crowd Interactions 209
What is crowd interaction 209Video games and crowd interactions 210
Assassin's Creed 210Grand Theft Auto (GTA) 212The Sims 213

[ iii ]
FIFA/Pro evolution soccer 214Planning crowd interactions 216
Group fight 216Communication (attention zones) 221Communication (talking to other AI characters) 225Team sports 228
Crowd collision avoidance 239Summary 242
Chapter 9: AI Planning and Collision Avoidance 243
Search 243Offensive search 244
Predicting opponent actions 254Collision avoidance 263
Summary 269
Chapter 10: Awareness 270
Stealth sub-genre 270About tactics 270About awareness 271Implementing vision awareness 271
Basic vision detection 274Advanced vision detection 287Realistic field of view effect 310
Summary 327
Index 328

PrefaceDeveloping games is a passion for some, and I believe that this is because we are able tocreate a world that is completely imagined by us; this is like being a god, and the AIcharacters that we place there are the habitants of that world that we have just created. Weare free to imagine how they will behave, we can create a society according to ourimagination, we are able to create a sweet and kind character, but also we can create themost devilish character that ever existed--the possibilities are endless, and that is why wewill always have new game ideas coming out. No matter what game genre we decide todevelop, the world and their characters will be the essence of our vision; this is what willmake our game unique, and ideally we should be able to create everything that we have inmind, just as we imagine. This book was conceived with that in mind, that all of us shouldbe able to create the ideas that we have and that we shouldn’t limit our imagination, so thisbook will cover the foundations of creating an artificial character, and after reading it, weshould be able to explore all the topics that you have learned, creating AI characters that fitperfectly with what we have imagined.
What this book coversChapter 1, Different Problems Require Different Solutions, is a brief introduction to the videogame industry and game AI.
Chapter 2, Possibility and Probability Maps, focuses on how to create and use probability andpossibility maps for AI characters.
Chapter 3, Production Systems, describes how to create a set of rules necessary for thecharacter AI to achieve their goals.
Chapter 4, Environment and AI, focuses on the interaction between the characters in thegame and their environment.
Chapter 5, Animation Behaviors, shows best practices to implement animations in our game.
Chapter 6, Navigation Behavior and Pathfinding, focuses on how to calculate the best optionsfor the AI to move in real time.
Chapter 7, Advanced Pathfinding, focuses on the use of theta algorithms to find short andrealistic-looking paths.

Preface
[ 2 ]
Chapter 8, Crowd Interactions, focuses on how the AI should behave when there are a lot ofcharacters on the same scene.
Chapter 9, AI Planning and Collision Avoidance, discusses the anticipation of the AI, knowingin advance what they will do when arriving at a position or facing a problem.
Chapter 10, Awareness, focuses on working with awareness systems to create stealth genremechanics.
What you need for this bookIt is recommended that you have install a game engine that uses C# (Unity3D has a freeversion, and it was used for the examples covered on the book).
Who this book is forThis book is intended for developers who have already created their first games in C# andseek to expand their capabilities with AI, creating crowds, enemies, or allies that can behaveautonomously.
ConventionsIn this book, you will find a number of text styles that distinguish between different kindsof information. Here are some examples of these styles and an explanation of their meaning.
Code words in text, database table names, folder names, filenames, file extensions,pathnames, dummy URLs, user input, and Twitter handles are shown as follows: "Thevariables that we'll be using for now are Health, statePassive, stateAggressive, andstateDefensive."
A block of code is set as follows:
if (playerPosition == "triggerM"){ transform.LookAt(playerSoldier); // Face the direction of the player transform.position = Vector3.MoveTowards(transform.position, buildingPosition.position, walkBack); backwardsFire();}
Preface
[ 3 ]
New terms and important words are shown in bold. Words that you see on the screen, forexample, in menus or dialog boxes, appear in the text like this: "In Unity we click under theLayers button to expand more options, and then we click where it says Edit Layers...."
Warnings or important notes appear in a box like this.
Tips and tricks appear like this.
Reader feedbackFeedback from our readers is always welcome. Let us know what you think about thisbook-what you liked or disliked. Reader feedback is important for us as it helps us developtitles that you will really get the most out of. To send us general feedback, simply [email protected], and mention the book's title in the subject of your message. Ifthere is a topic that you have expertise in and you are interested in either writing orcontributing to a book, see our author guide at www.packtpub.com/authors.
Customer supportNow that you are the proud owner of a Packt book, we have a number of things to help youto get the most from your purchase.
Downloading the example codeYou can download the example code files for this book from your account at h t t p ://w w w . p
a c k t p u b . c o m . If you purchased this book elsewhere, you can visit h t t p ://w w w . p a c k t p u b . c
o m /s u p p o r t and register to have the files e-mailed directly to you. You can download thecode files by following these steps:
Log in or register to our website using your e-mail address and password.1.Hover the mouse pointer on the SUPPORT tab at the top.2.Click on Code Downloads & Errata.3.Enter the name of the book in the Search box.4.Select the book for which you're looking to download the code files.5.

Preface
[ 4 ]
Choose from the drop-down menu where you purchased this book from.6.Click on Code Download.7.
Once the file is downloaded, please make sure that you unzip or extract the folder using thelatest version of:
WinRAR / 7-Zip for WindowsZipeg / iZip / UnRarX for Mac7-Zip / PeaZip for Linux
The code bundle for the book is also hosted on GitHub at h t t p s ://g i t h u b . c o m /P a c k t P u b l
i s h i n g /P r a c t i c a l - G a m e - A I - P r o g r a m m i n g . We also have other code bundles from our richcatalog of books and videos available at h t t p s ://g i t h u b . c o m /P a c k t P u b l i s h i n g /. Checkthem out!
Downloading the color images of this bookWe also provide you with a PDF file that has color images of the screenshots/diagrams usedin this book. The color images will help you better understand the changes in the output.You can download this file from h t t p s ://w w w . p a c k t p u b . c o m /s i t e s /d e f a u l t /f i l e s /d o w n
l o a d s /P r a c t i c a l G a m e A I P r o g r a m m i n g _ C o l o r I m a g e s . p d f .
ErrataAlthough we have taken every care to ensure the accuracy of our content, mistakes dohappen. If you find a mistake in one of our books-maybe a mistake in the text or the code-we would be grateful if you could report this to us. By doing so, you can save other readersfrom frustration and help us improve subsequent versions of this book. If you find anyerrata, please report them by visiting h t t p ://w w w . p a c k t p u b . c o m /s u b m i t - e r r a t a , selectingyour book, clicking on the Errata Submission Form link, and entering the details of yourerrata. Once your errata are verified, your submission will be accepted and the errata willbe uploaded to our website or added to any list of existing errata under the Errata section ofthat title. To view the previously submitted errata, go to h t t p s ://w w w . p a c k t p u b . c o m /b o o k
s /c o n t e n t /s u p p o r t and enter the name of the book in the search field. The requiredinformation will appear under the Errata section.

Preface
[ 5 ]
PiracyPiracy of copyrighted material on the Internet is an ongoing problem across all media. AtPackt, we take the protection of our copyright and licenses very seriously. If you comeacross any illegal copies of our works in any form on the Internet, please provide us withthe location address or website name immediately so that we can pursue a remedy. Pleasecontact us at [email protected] with a link to the suspected pirated material. Weappreciate your help in protecting our authors and our ability to bring you valuablecontent.
QuestionsIf you have a problem with any aspect of this book, you can contact us [email protected], and we will do our best to address the problem.

1Different Problems Require
Different Solutions
A brief history of and solutions to game AITo better understand how to overcome the problems that game developers are currentlyfacing, we need to dig a little bit into the history of video game development and take alook at the problems and their solutions that were so important at the time. Some of themwere so avant-garde that they actually changed the entire history of video game designitself, and we still use the same methods today to create unique and enjoyable games.
One of the first relevant marks that is always worth mentioning when talking about gameAI is computer chess programmed to compete against humans. It was the perfect game tostart experimenting with artificial intelligence, because chess usually requires a lot ofthought and planning ahead, something that a computer couldn't do at the time because itwas necessary to have human features in order to successfully play and win the game. So,the first step was to make it able for the computer to process the game rules and think foritself in order to make a good judgement of the next move that the computer should do toachieve the final goal, that is, winning by checkmating. The problem is that chess has manypossibilities; so, even if the computer had a perfect strategy to beat the game, it wasnecessary to recalculate that strategy, adapting it, changing, or even creating a new oneevery time something went wrong with the first strategy.

Different Problems Require Different Solutions
[ 7 ]
Humans can play differently every time; this makes it a huge task for the programmers toinput all the possible data into the computer in order to win the game. So, writing all thepossibilities that could exist wasn't a viable solution, and because of that, the programmersneeded to think again about the problem. Then, one day, they finally came out with a bettersolution, that is, to make the computer decide for itself every turn, choosing the mostplausible option for each turn; that way, the computer could adapt to any possibility in thegame. Yet, this involved another problem–the computer would only think the short-termmoves, and not create any plans to defeat the human in the future moves; so, it was easy toplay against it, but at least we started to have something going on. It was decades later thatsomeone defined the word Artificial Intelligence (AI) by solving the first problem thatmany researchers had by trying to create a computer that was capable of defeating a humanplayer. Arthur Samuel is the person responsible for creating a computer that could learn foritself and memorize all the possible combinations. That way, there wasn't necessarily anyhuman intervention and the computer could actually think on its own, and that was a hugestep that is still impressive even by today's standards.
Enemy AI in video gamesNow, let's move to the video game industry and analyze how the first enemies and gameobstacles were programmed; was it that different from what we are doing now? Let's findout.
Single-player games with AI enemies started to appear in the 1970s, and soon, some gamesstarted to elevate the quality and expectations of what defines a video game AI. Some ofthose examples were released for arcade machines, such as Speed Race from Taito (a racingvideo game), or Qwak (a duck hunting game using a light gun), and Pursuit (an aircraftfighter) both from Atari. Other notable examples are the text-based games released for thefirst personal computers, such as Hunt the Wumpus and Star Trek, which also had enemies.What made those games so enjoyable was precisely that the AI enemies that didn't reactedlike any other before because they had random elements mixed with the traditional storedpatterns, making them unpredictable, and hence providing a unique experience every timeyou played the game. However, that was only possible due to the incorporation ofmicroprocessors that expanded the capabilities of a programmer at that time. SpaceInvaders brought the movement patterns and Galaxian improved and added more variety,making the AI even more complex. PAC-MAN later on brought movement patterns to themaze genre.
Different Problems Require Different Solutions
[ 8 ]
The influence that the AI design in PAC-MAN had is just as significant as the influence ofthe game itself. This classic arcade game makes the player believe that the enemies in thegame are chasing him, but not in a crude manner. The ghosts are chasing the player (orevading the player) in a different way as if they have an individual personality. This givespeople the illusion that they are actually playing against four or five individual ghostsrather than copies of the same computer enemy.
After that, Karate Champ introduced the first AI fighting character and Dragon Questintroduced the tactical system for the RPG genre; over the years, the list of games thatexplored artificial intelligence and used it to create unique game concepts kept expanding,and all of that came from a single question, how can we make a computer capable ofbeating a human in a game?
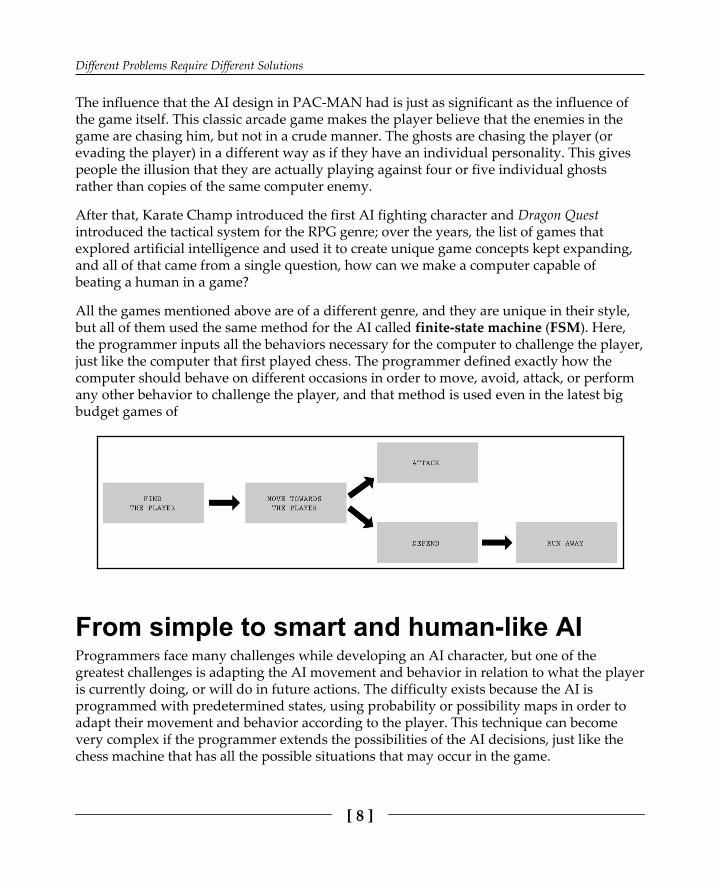
All the games mentioned above are of a different genre, and they are unique in their style,but all of them used the same method for the AI called finite-state machine (FSM). Here,the programmer inputs all the behaviors necessary for the computer to challenge the player,just like the computer that first played chess. The programmer defined exactly how thecomputer should behave on different occasions in order to move, avoid, attack, or performany other behavior to challenge the player, and that method is used even in the latest bigbudget games of
From simple to smart and human-like AIProgrammers face many challenges while developing an AI character, but one of thegreatest challenges is adapting the AI movement and behavior in relation to what the playeris currently doing, or will do in future actions. The difficulty exists because the AI isprogrammed with predetermined states, using probability or possibility maps in order toadapt their movement and behavior according to the player. This technique can becomevery complex if the programmer extends the possibilities of the AI decisions, just like thechess machine that has all the possible situations that may occur in the game.

Different Problems Require Different Solutions
[ 9 ]
It's a huge task for the programmer because it's necessary to determine what the player cando and how the AI will react to each action of the player, and that takes a lot of CPU power.To overcome that challenge, programmers started to mix possibility maps with probabilitiesand perform other techniques that let the AI decide for itself on how it should reactaccording to the player's actions. These factors are important to be considered whiledeveloping an AI that elevates the game quality as we are about to discover.
Games kept evolving and players got even more exigent, not only with the visual quality but also with the capabilities of the AI enemies and the allied characters. To deliver newgames that took into consideration the player expectations, programmers started to writeeven more states for each character, creating new possibilities and more engaging enemies,implementing important allied characters, which meant more things for the player to do,and creating a lot more features that helped redefine different genres and created new ones.Of course, this was also possible because technology kept improving, allowing developersto explore even more artificial intelligence in video games. A great example of this that isworth mentioning is Metal Gear Solid, the game that brought a new genre to the videogame industry by implementing stealth elements, instead of the popular straightforwardshooting. However, those elements couldn't be fully explored as Hideo Kojima intendedbecause of the hardware limitations at the time. Jumping forward from the third to the fifthgeneration of consoles, Konami and Hideo Kojima presented the same title, but this timewith a lot more interactions, possibilities, and behaviors from the AI elements of the game,making it so successful and important in video game history that it's easy to see itsinfluence in a large number of games that came after Metal Gear Solid:

Different Problems Require Different Solutions
[ 10 ]
Metal Gear Solid - Sony Playstation 1
Different Problems Require Different Solutions
[ 11 ]
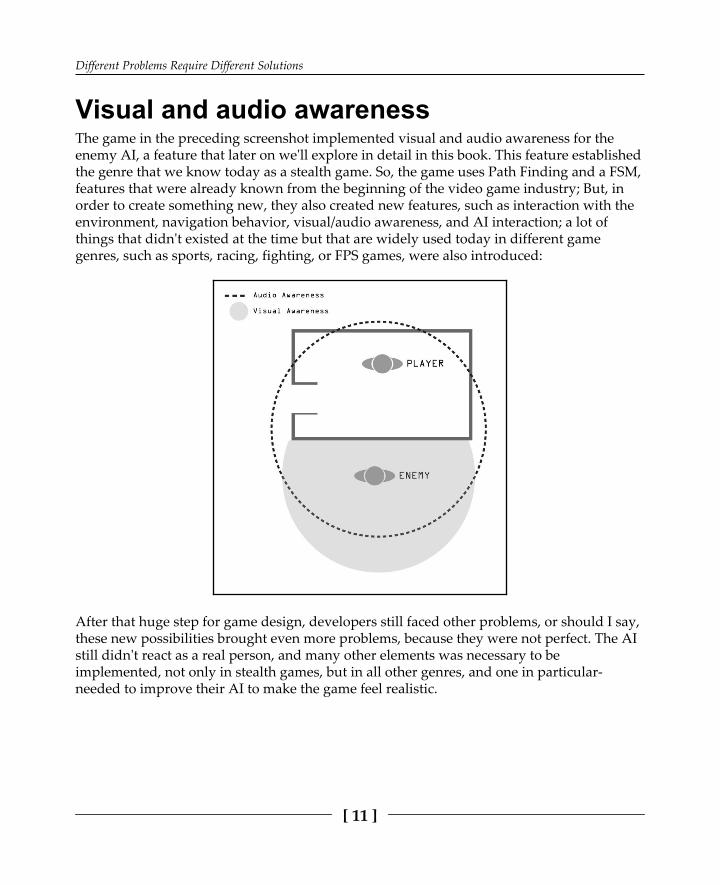
Visual and audio awarenessThe game in the preceding screenshot implemented visual and audio awareness for theenemy AI, a feature that later on we'll explore in detail in this book. This feature establishedthe genre that we know today as a stealth game. So, the game uses Path Finding and a FSM,features that were already known from the beginning of the video game industry; But, inorder to create something new, they also created new features, such as interaction with theenvironment, navigation behavior, visual/audio awareness, and AI interaction; a lot ofthings that didn't existed at the time but that are widely used today in different gamegenres, such as sports, racing, fighting, or FPS games, were also introduced:
After that huge step for game design, developers still faced other problems, or should I say,these new possibilities brought even more problems, because they were not perfect. The AIstill didn't react as a real person, and many other elements was necessary to beimplemented, not only in stealth games, but in all other genres, and one in particular-needed to improve their AI to make the game feel realistic.
Different Problems Require Different Solutions
[ 12 ]
We are talking about sports games, especially those that tried to simulate real-world teambehaviors, such as basketball or football. interaction with the player is not the only thingthat we need to care about; we left chess long time ago, where it was 1 versus 1. Now, wewant more, and watching other games get realistic AI behaviors, sport fanatics started toask for the same features in their
favorite games; after all, those games was based on real-world events, and for that reason,the AI should react as realistically as possible.
At this point, developers and game designers started to take into consideration AIinteraction with itself, and that just like the enemies from PAC-MAN, the player should getthe impression that each character in the game thinks for itself and reacts differently to theothers. If we analyze it closely, the AI that is present in a sports game is structured like anFPS or RTS game, using different animation states, general movements, interactions,individual decisions, and finally tactics and collective decisions. So, it shouldn't be asurprise that sports games could reach the same level of realism as the other genres that hadalready greatly evolved in terms of AI development. However, there are few problems thatonly sports games had at the time: how to make so many characters on the same screenreact differently but at the same time work together to achieve the same objective. With thisproblem in mind, developers started to improve the individual behaviors of each character,not only for the AI that was playing against the player but also for the AI that was playingalongside the player. Once again, Finite State Machines made up a crucial part of ArtificialIntelligence, but the special touch that helped to create a realistic approach in the sportsgenre was the anticipation and awareness used in stealth games. The computer needed tocalculate what the player was doing, where the ball was going, and coordinate all of that, aswell as give a false impression of a team mindset toward the same plan. Combining the newfeatures used in the new genre of stealth games with a vast number of characters on thesame screen, it was possible to innovate the sports genre by creating a sports simulationtype of game, which has gained so much popularity over the years. This helps us tounderstand that we can use almost the same methods for any type of game, even if it lookscompletely different; the core principles that we saw in the computer that played chess isstill valuable to the sports game released 30 years later.

Different Problems Require Different Solutions
[ 13 ]
Let's move on to our last example, which also has great value in terms of how an AIcharacter should behave to make it more realistic: the game is F.E.A.R., developed byMonolith Productions. What made this game so special in terms of Artificial Intelligencewas the dialog between the enemy characters. While it wasn't an improvement from atechnical point of view, it was definitely something that helped to showcase all of thedevelopment work that was put into the characters' AI, and this is so crucial because if theAI doesn't say it, it didn't happen. This is an important factor to take into considerationwhile creating a realistic AI character, giving the illusion that it's real; that means the falseimpression that the computer reacts like humans, and humans interact, so the AI should dothe same. Not only did the dialog help to create a human-like atmosphere, it also helped toexhale all of the development put on the character that otherwise the player wouldn't noticewas there. When the AI detects the player for the first time, it shouts that it found theplayer; when the AI loses sight of the player, it expresses that. When the squad of AI's aretrying to find the player or ambush him, they speak about that, leaving the playerimagining that the enemy is really capable of thinking and planning against him. Why isthis so important? Because if we only had numbers and mathematical equations for thecharacters, they will react that way, without any human features, just math, and to make itlook more human, it's necessary to input mistakes, errors, and dialog into the character AI,just to distract the player from the fact that he's playing against a machine.
The history of video game artificial intelligence is still far from perfect, and it's possible thatit will take us decades to improve just a little bit more from what we achieved between theearly 1950s and this present day, so don't be afraid of exploring what you are about to learn,combine, change, or delete some of the things to find different results, because great gamesdid it in the past and they had a lot of success with it.
SummaryIn this chapter, you learned about the impact of AI on the video game history, howeverything started from a simple idea to have a computer to compete against humans intraditional games, and how that naturally evolved into the world of video games. You alsolearned about the challenges and difficulties that were present since the day one, and howcoincidentally, programmers kept facing and still face the same problems. In the nextchapter, we'll start from that precise point, the most used technique and the technique thatcaused a lot of debate and evolution that was present on past games as well on present andfutures ones.

2Possibility and Probability Maps
In this chapter, we'll be talking about possibility and probability maps, understanding howand where they are used. We'll also be learning the best practices for creating an AI thatreacts to the player and that also chooses the best options, as we look to create a characterthat can make decisions as a human would.
As we saw previously, video games used to rely heavily on predetermining the behavior ofwhat the AI could do in different scenarios that were either created by the game itself or bythe player's actions. This method has been present since day one and is still being usedtoday, making it an extremely valuable method for creating quality AI characters. Beforeexplaining, in detail, what each of the maps do, and before demonstrating how to createthem in order to develop good AI behavior, it's always good to have a general idea of whatpossibility and probability maps are and where or when they are applied.
As gamers, we tend to enjoy the product as a whole, experiencing every part of the gamewith enthusiasm and dedication, forgetting about the technical aspects of the game. For thatreason, we sometimes forget that even simple things that happen while we play werealready destined to occur that way, and that there is a lot of thought and planning behindthat moment. Everything happens for a reason, as we often hear, and this can also beapplied to video games. From the moment you clicked the start button to begin the game tothe last awesome combo that you performed to defeat the final boss of the game, everythingwas planned to happen and it was necessary for a programmer to input all of thosepossibilities within the game. If you clicked the A button and your character jumped, thathappened because it was determined to be that way. The same thing is valid for AI enemiesor allies on the game; when they do something to defeat or help you, it was necessary forthat behavior to be programmed, and to do that we use states.

Possibility and Probability Maps
[ 15 ]
Game statesTo understand how to create possibility or probability maps we need to first acknowledgethe principle aspect necessary to create them, which is called game states, or simply states.We call game states to the actions that are predetermined throughout different occasions inthe game, and those actions can be applied to both the player or to the enemy character.Some examples can be simple behavior, such as run, jump, or attack, and those states can beexpanded a little more, for example when the character is in the air and cannot attack or ifthe character has low magical energy and cannot perform a magic attack. In these cases, thecharacter goes from one state to another or can't perform one if it's doing another.
Possibility mapsNow let's take a deeper look at the possibility maps that we encountered in the examples inthe first chapter, from the chess machine to the Metal Gear Solid video game. As we can see,it's a technique that is still being used today, and it is almost impossible to create a game AIwithout it.
As the name suggests, possibility maps allow the programmer to define the possibilitiesavailable to the player or the AI character within the game. Everything that is possibleinside the game needs to be planned and coded, but what happens when you allow thecharacter to do a lot of things–can they do them all at the same time? If played duringdifferent stages of the game, can they react in the same way at all of the stages? To allow,and restrain, the possible actions, we also need to think about the possible scenarios that canoccur in the game, and when you put all of that together it's called a possibility map.
How to use possibility mapsLet's take a look at a simple example of a common FPS game, and for that we'll be using thestates demonstrated in the preceding image.

Possibility and Probability Maps
[ 16 ]
Imagine that we are the enemy character of the game and our goal is to shoot and kill the player using only the states walk, run, cover, jump, fire, and defend. We need to take intoconsideration that the player will do his best to kill us, and therefore a lot of possiblescenarios may arrive. Let's start with the basics–we are walking from one point to anotherwhile protecting our space and as the player goes near that space, our goal changes fromprotecting our space to the definitive goal, that is, killing the player. What should we donext? Fire? Run towards the player and fire from close range? Cover and wait until theplayer is nearby? What if the player saw us first and is preparing to fire at us? A lot ofthings could happen, and a lot of things can be done with just a few states. So, let's mapevery possible situation and plan how we should act or react in each individual situation.Examples that I would choose for my game are as follows:
Walk slowly to a cover position, wait for the player, and shoot himRun for cover and then fire from that positionDefend (moving away from the bullets) while running to a cover positionFire against the player, running towards him, and keep firing
Depending on the type of game that we want to create, we can use the same states to shapeit into a different genre. We also need to take into consideration the personality of thecharacter that we are programming. If it's a robot, it probably won't be afraid to keep firingagainst the player, even if the chances of getting destroyed are 99%. On the other hand, ifit's an inexperienced soldier, it might feel reluctant to get shot and will run for coverinstantly. The list goes on and on just by changing the personality of the character.

Possibility and Probability Maps
[ 17 ]
Preparing a possibility map (FPS)At this point, we are able to understand what a possibility map is and how it can be used tocreate an AI character that behaves accordingly to different situations in the game. Nowthat we understand how to use a possibility map, let's create a practical example where weprogrammed our AI character to successfully defeat the player. For this example, I'll beusing two models, one represents the AI enemy that we are programming and the other onerepresents the player.
We'll create a common example, where the AI is protecting the entrance of a building thatthe player needs to enter in order to deactivate a bomb and complete the level. Let's imaginethat we already have the player fully programmed and that we now need to focus on our AIenemy, as shown in the following screenshot:
Before writing any line of code we need to think about the possible situations that can occurand how our AI will react to them. First, we'll be simplifying the situation by breakingdown our stages into a simple 2D visualization that will be used as a reference todeterminate distances and other relevant parameters.

Possibility and Probability Maps
[ 18 ]
After simplifying the situation, we are ready to start planning the possibilities. The player isallowed to move around the building. Note that there's only one entrance, and that entranceis protected by our enemy AI. The arrows represents the direction that the characters arefacing, and this will be an important aspect to our planning.
Creating a possibility map (FPS)We'll learn how to create an awareness behavior for the AI character later, so for now wewill just be using simple Boolean variables to determine if the player is near our positionand what direction it is facing. Taking that into consideration, let's break our image intotrigger zones to define when our enemy AI should react.

Possibility and Probability Maps
[ 19 ]
The YES zones represents the area that triggers our AI to change its behavior from thepassive to offensive state. The NO zones represent the area that doesn't have an impact onour AI behavior. I've divided the YES zones into three because we want our AI character toreact differently according to the player's position. If the player comes from the right side(YES R), the enemy has a wall that can be used for cover; if it comes from the left side (YESL), we can't use that wall anymore, and once the player is in the middle (YES M), the AI canonly move backwards inside of the building.
Let's prepare our script for the enemy AI. In this example, we will use the C# language, butyou can adapt the script to any programming language that you prefer, as the principlesremains the same. The variables that we'll be using for now are Health, statePassive,stateAggressive, and stateDefensive:
public class Enemy : MonoBehaviour {private int Health = 100;private bool statePassive;private bool stateAggressive;private bool stateDefensive;// Use this for initialisationvoid Start () {}// Update is called once per framevoid Update () {}}
Now that we know the basic information required for the AI, we need to think about whenthose states will be used and how the AI will choose between the three available options.For this, we'll use a possibility map. We already know the areas that trigger our character,and we have already chosen the three behavior states, so it's time to plan the transitions andreactions according to the player's position and behavior.

Possibility and Probability Maps
[ 20 ]
Our enemy AI can go from PASSIVE to DEFENSIVE or AGGRESSIVE, fromAGGRESSIVE to DEFENSIVE, and from DEFENSIVE to AGGRESSIVE, but once our AIknows that the player is around, it will never go back to the passive behavior.
Defining the statesLet's define what triggers each state and how the AI should choose the correct state indifferent scenarios. The PASSIVE state will be the default state, and the game will start inthat position until the player comes across our character. The DEFENSIVE state will be usedin two different situations–if the player comes from the right side and if he has alreadyconfronted the player and has low HP. Finally, the AGGRESSIVE state will be activated ifthe player comes from the left side or has already arrived at the middle area:
public class Enemy : MonoBehaviour {private int Health = 100;private bool statePassive;private bool stateAggressive;private bool stateDefensive;private bool triggerL;private bool triggerR;private bool triggerM;// Use this for initialisationvoid Start () { statePassive = true;}// Update is called once per framevoid Update () { // The AI will remain passive until an interaction with the player occurs if(Health == 100 && triggerL == false && triggerR == false && triggerM == false) { statePassive = true; stateAggressive = false; stateDefensive = false; } // The AI will shift to the defensive mode if player comes from the right side or if the AI is below 20 HP if(Health<= 100 && triggerR == true || Health<= 20) { statePassive = false; stateAggressive = false; stateDefensive = true; } // The AI will shift to the aggressive mode if player comes from the left side or it's on the middle and AI is above 20HP

Possibility and Probability Maps
[ 21 ]
if(Health> 20 && triggerL == true || Health> 20 && triggerM == true) { statePassive = false; stateAggressive = true; stateDefensive = false; } }}
We added the trigger variables triggerL, trigger, and triggerM and also defined whenthe AI should change from one behavior state to another. At this point, our enemy alreadyknows what to do in different situations that may occur during gameplay according to theplayer's position.
Now we just need to determine what will happen on each state, because that is whatdifferentiates a DEFENSIVE state from an AGGRESSIVE one. For this specific enemy,where his main function is to protect the entrance of the building, we want him to stay putat all times and to never run after the player. This is because the AI doesn't know that it isjust one person and can't take the risk of going after just one soldier if there's a possibility ofbeing greeted by several. This will help to give a little realism to the actions of the enemy.We'll also use the defensive behavior state for the moment where the enemy feels that it islosing the battle and is about to die, or when it has the advantage of using the building toprotect itself while the player doesn't. Finally, the aggressive state will be used when the AIsees a clear advantage to kill or if it doesn't have any other options.
DEFENSIVE stateSo, let's start with the situation where the player comes from the right side and our enemyhas already spotted him. We want our AI to take advantage of the wall that protects him,making it difficult for the player as well as demonstrating a human-like intention, ratherthan simply opening fire. The enemy will move towards the wall and stay there firing onthe corner until the player arrives to that position.

Possibility and Probability Maps
[ 22 ]
The enemy will change from the PASSIVE state into the DEFENSIVE state, instead ofOFFENSIVE, only because doing that gives him a slightly better advantage over the player.Being defensive on the first encounter shows some personality to the AI, which is veryimportant when making the behavior of the computer character believable. In futurechapters we'll learn how to use the environment to help define our AI character in depth:
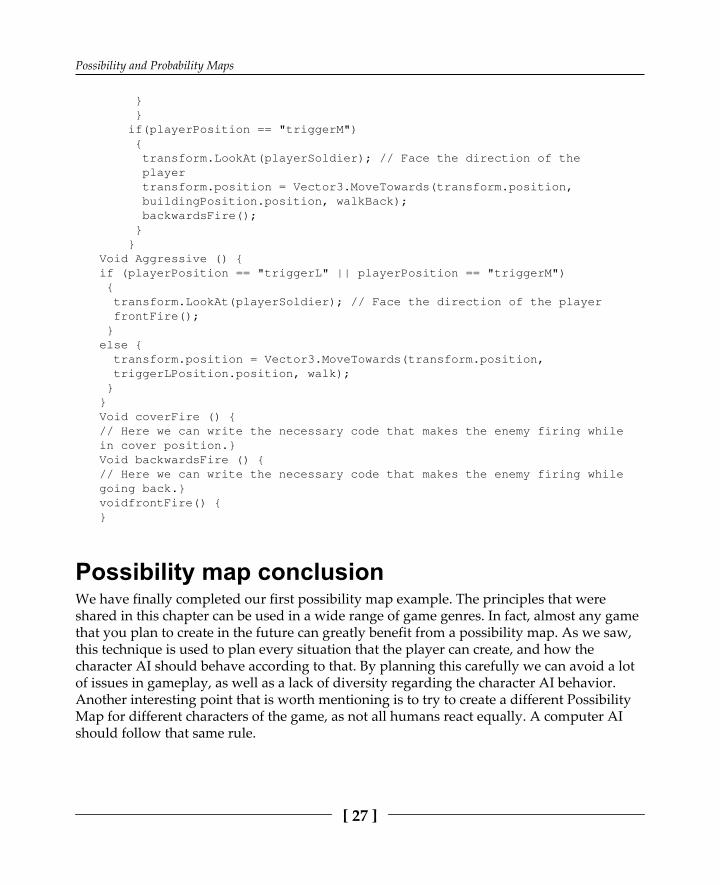
Void Defensive () {if(playerPosition == "triggerR"){// Check if player is currentlylocated on the triggerR positiontransform.LookAt(playerSoldier);// Face the direction of the playerif(cover == false) { transform.position = Vector3.MoveTowards(transform.position, wallPosition.position, walk); }if(cover == true) { coverFire();} }}

Possibility and Probability Maps
[ 23 ]
We added the core for the Defensive state that we want to implement on our enemy AIwhen the player is coming from the right side. We also added new variables, such as speed,cover, playerSoldier, and coverFire. First, we need to check if the player is currentlypositioned in the triggerR zone; if the result is positive, the character should movetowards the cover position. Once the enemy AI is at the cover position, he can start firingagainst the player (coverFire). Now let's input the following situation–if the player is stillalive, our enemy needs to move to another situation, otherwise it will be cornered, whichisn't a good scenario for the character we are creating. Let's add that situation to our script.
We want our character to walk back and get inside the building, while always facing theplayer and firing at the same time. We could use another tactic, or decide to be moreaggressive and confront the player directly, but for now let's stick to a simple strategy. Wecan add more complex behavior later:
if (playerPosition == "triggerM"){ transform.LookAt(playerSoldier); // Face the direction of the player transform.position = Vector3.MoveTowards(transform.position, buildingPosition.position, walkBack); backwardsFire(); }

Possibility and Probability Maps
[ 24 ]
In this part of the code we added a situation where the player comes from the right side andis still alive going to the middle, so we needed to change the previous behavior to a newone. Our AI character goes from the cover position to a newer position that is inside thebuilding, firing at the player the whole time. At this point, the enemy will keep getting backuntil one of the two characters die–either the player or the AI character. We close thesituation where the player comes from the right side. Now that we have completed thispart, we need to complete the scenario and add the last situation, which is where the playergoes around the building and comes from the left side. Our AI will need to adapt to thesecircumstances and behave differently, so let's work on that part and complete the example.
AGGRESSIVE stateBefore we started programming, we defined how many states we would need for thisenemy AI, and we chose three different states: PASSIVE, DEFENSIVE, and AGGRESSIVE.Now that we already have the two behavior states in place (passive and defensive), there isjust one more needed to complete our enemy AI, that is, to protect the building.
We previously decided that the character would only directly confront the player if hecouldn't use the wall as cover, and that moment is where the player comes from the left andthe enemy is surprised with its presence.

Possibility and Probability Maps
[ 25 ]
Once again, we need to first check if the player triggered the left area, as that will activateour enemy AI from the PASSIVE state into the AGGRESSIVE state we intended. Then, weneed to define what he should do in that case. Let's start writing it in our script:
Void Aggressive () {if(playerPosition == "triggerL" || playerPosition == "triggerM"){ transform.LookAt(playerSoldier); // Face the direction of the player frontFire();}else { transform.position = Vector3.MoveTowards(transform.position, triggerLPosition.position, walk);}}
This time we added our two possible situations when attacking a player that comes fromthe left; the first is if the player comes from the left and continues towards the enemy, orremains in the same position. The second situation that could occur is if the player soonretreats as soon as he sees the enemy, and in that scenario we have chosen to make theenemy search for the player, going towards the triggerL position where initially theplayer appeared.
This is the completed script, written using the possibility map example that we've beenworking on in this chapter. Let's take a look at the full script:
Private int Health = 100;Private bool statePassive;Private bool stateAggressive;Private bool stateDefensive;Private bool triggerL;Private bool triggerR;Private bool triggerM;public Transform wallPosition;public Transform buildingPosition;public Transform triggerLPosition;private bool cover;private float speed;private float speedBack;private float walk;private float walkBack;public Transform playerSoldier;staticstring playerPosition;

Possibility and Probability Maps
[ 26 ]
In the previous block of code, we can see all of the variables that have been used in our script so far. The rest of the script is as follows:
// Use this for initializationVoid Start () {statePassive = true;}// Update is called once per frameVoid Update () {// The AI will remain passive until an interaction with the player occursif(Health == 100 && triggerL == false && triggerR == false && triggerM ==false){ statePassive = true; stateAggressive = false; stateDefensive = false;}// The AI will shift to the defensive mode if player comes from the rightside or if the AI is below 20 HPif(Health<= 100 && triggerR == true || Health<= 20){ statePassive = false; stateAggressive = false; stateDefensive = true;}// The AI will shift to the aggressive mode if player comes from the leftside or it's on the middle and AI is above 20HPif(Health> 20 && triggerL == true || Health> 20 && triggerM == true){ statePassive = false; stateAggressive = true; stateDefensive = false;}walk = speed * Time.deltaTime; = speedBack * Time.deltaTime;}Void Defensive () { if (playerPosition == "triggerR") { // Check if player is currently located on the triggerR position transform.LookAt(playerSoldier); // Face the direction of the player if(cover == false) { transform.position = Vector3.MoveTowards(transform.position, wallPosition.position, walk); } if(cover == true) { coverFire();
Possibility and Probability Maps
[ 27 ]
} } if(playerPosition == "triggerM") { transform.LookAt(playerSoldier); // Face the direction of the player transform.position = Vector3.MoveTowards(transform.position, buildingPosition.position, walkBack); backwardsFire(); } }Void Aggressive () {if (playerPosition == "triggerL" || playerPosition == "triggerM") { transform.LookAt(playerSoldier); // Face the direction of the player frontFire(); }else { transform.position = Vector3.MoveTowards(transform.position, triggerLPosition.position, walk); }}Void coverFire () {// Here we can write the necessary code that makes the enemy firing whilein cover position.}Void backwardsFire () {// Here we can write the necessary code that makes the enemy firing whilegoing back.}voidfrontFire() {}
Possibility map conclusionWe have finally completed our first possibility map example. The principles that wereshared in this chapter can be used in a wide range of game genres. In fact, almost any gamethat you plan to create in the future can greatly benefit from a possibility map. As we saw,this technique is used to plan every situation that the player can create, and how thecharacter AI should behave according to that. By planning this carefully we can avoid a lotof issues in gameplay, as well as a lack of diversity regarding the character AI behavior.Another interesting point that is worth mentioning is to try to create a different PossibilityMap for different characters of the game, as not all humans react equally. A computer AIshould follow that same rule.
Possibility and Probability Maps
[ 28 ]
Probability mapsA probability map is a more complex and detailed version of a possibility map because itrelies on probabilities in order to change the behavior of the character, rather than a simpleon or off trigger. Its similarity with the possibility map is that it's also required for planningahead the possible states for our character. This time, however, we add to it a percentage,using which the AI will calculate what behavior he will be using. Imagine the next exampleusing the situation that we previously created for the possibility map–our enemy AI couldbe more aggressive in the daytime than at night. For that, we create a statement thatexplains to our enemy that if it's night time, there is a lesser chance of seeing the playercharacter, and for that reason it will choose a more defensive approach instead of anaggressive one. Or, simply, we could define that our enemy calculates the probability ofkilling the player simply based on the distance between the two characters. If the playergets closer to the enemy, the probability of the AI getting back and surviving are lesser thanif he keeps firing against the player, so we can add that equation into the AI.
Let's take a look at our human behavior, the choices we make; usually, we make ourdecision by taking into consideration past events and what we've done before. When wefeel hungry and we decide to go out for dinner, can our friend guess which restaurant wehave chosen? Our friend may have calculated the probability of our choice and given theiranswer by taking into consideration the higher percentage chance. That's exactly what weneed to do to our AI friend; we need to assign some probabilities to his choices, such aswhat's the probability of the AI character falling asleep while protecting the building duringthe day and during the night? What's the probability of the enemy running if he has lowhp? If we apply probability to our AI character, it helps to create that unpredictablebehavior that humans have and makes the game more engaging and natural.
How to use probability mapsIn this example, we'll continue using the same scenario that we created before, where ourAI guard is protecting a building that contains an atomic that the player needs to deactivate.The only entrance to the building is protected by our AI character.

Possibility and Probability Maps
[ 29 ]
Let's imagine that we are the guard and we have orders to stay there for 16 hoursstraight–we would probably need to eat, drink, and move a little bit to be able to stay activeand alert the whole time. We will therefore add that to our character, making it moreunpredictable for the player. If the AI decides to eat or drink, he will be inside the building,and if he decides to walk a little bit he will be patrolling from the triggerL to triggerRposition. Most of the time, he will be just standing on his guard position.
This is a probability map, and here we define the percentage of each state that our characterexists in. It means that every time the player sees the enemy AI, the enemy can be doing oneof those things. This will differ greatly when you take into consideration the time of day atwhich the player decided to appear. If the player arrives in the morning, it has an 0.87chance of finding the enemy in a guard position in front of the building, a 0.10 chance offinding him eating or drinking inside the building, and finally a 0.03 chance of finding himwalking outside from one point to another. If the player arrives in the afternoon, it has a0.48 chance of finding the enemy in a guard position in front of the building, a 0.32 chanceof finding him eating or drinking inside the building, and finally a 0.2 chance of finding himwalking around from one point to another. At night, the player has a 0.35 chance of findingthe enemy in the guard position, a 0.40 chance of finding him eating or drinking inside thebuilding, and a 0.25 chance of finding the enemy walking around.

Possibility and Probability Maps
[ 30 ]
This will help to create that unpredictable aspect to our character by not making it asobvious that he will be in the same position every time you play the level. We can alsoupdate this probability every five minutes or so, in case the player stays still, waiting forour enemy to change position. This technique is used in a lot of games, but especially instealth games, where observation is key. This is because the player has the opportunity tostay in a safe position and observe the enemy behavior, similar to heist movies, whereactors wait for the guards to change shifts before getting inside the bank. Because of thispopular behavior that we're used to seeing in movies, players like to feel that samesensation in games, and so probability maps have changed the way how we play.
An example of how probability can be used in a script is as follows. For this, I've used thePassive state and added the probability that we previously decided to use:
Void Passive () {rndNumber = Random.Range(0,100);If(morningTime == true && 13){// We have 87% of chancegoGuard();}if(morningTime == true && rndNumber =< 13 && rndNumber< 3){// We have 10% of chancegoDrink();}if(morningTime == true && rndNumber<= 3){// We have 3% of chancegoWalk();}if(afternoonTime == true && rndNumber> 52){// We have 48% of chancegoGuard();}if(afternoonTime == true && rndNumber =< 34 && rndNumber< 2){// We have 32% of chancegoDrink();}if(afternoonTime == true && rndNumber<= 2){// We have 2% of chancegoWalk();}if(nightTime == true && rndNumber> 65)

Possibility and Probability Maps
[ 31 ]
{// We have 35% of chancegoGuard();}if(nightTime == true && rndNumber =< 65 && rndNumber< 25){// We have 40% of chancegoDrink();}if(nightTime == true && rndNumber<= 25){// We have 25% of chancegoWalk();}}
To calculate the percentage, we first need to create a random number from 0 to 100, andthen we create a statement that will use that number to check to which statement it belongs.On the first statement, for example, we have an 87% chance of the AI staying in the guardposition, so if the random number is higher than 13, it fits within this category and thecharacter is made to stay in the guard position. A number higher than 3 and equal or lessthan 13, gives us a 10% of chance, and a number equal or less than 3 gives us a 3% chance.
Where to go from hereNow that we understand how to use a probability and possibility map, a pertinent questionthat we might question ourselves is, what can we do with this? Well we saw how importantis to use a possibility map to define the behaviors of a character and how the probabilityhelps to make those behaviors unpredictable, but we can do a lot more with what welearned depending on the type of game that we are creating or the type of AI that we want.Remember that flaws makes part of what we are as humans and we are surrounded byprobabilities, even if it's just 0,000001% the probability of happening the unexpected existsthat's why no one is perfect, so it's a fun fact to remember when creating an AI character,giving them some probability of human stuff happening, or simply making good or baddecisions, that builds a personality to the computer character that you are creating.

Possibility and Probability Maps
[ 32 ]
Another special thing that we can do with probability maps, is giving the AI theopportunity to learn from himself, making him smarter every time the player decides toplay the game. Both the player and the enemy AI will learn, making the challenge alwaysupdated according to the hours spent on the game. If the player has the tendency to use thesame weapon or coming from the same direction, the computer should update thatinformation and use it on future events. If the player confronted the computer 100 timesand 60% of those times he used a grenade, the AI should have that in mind and reactaccording to that probability. That will push the player to think in other strategies, also notbeing so obvious exploring other ways of defeating the enemy.
SummaryThis chapter has described possibility and probability maps and we have learned how to letthe AI take decisions for itself according to the player actions. Possibility and probabilitymaps is the foundation of an AI character and now we can explore this technique to createnew and unique artificial intelligence for our games. In the next chapter, we'll learn how theAI should behave according to the different options that it has on that moment instead ofusing a possibility map. We want the character to analyze the situation and think aboutwhat to do, taking in consideration many factors, such as health, distance, weapon, bullets,and any other relevant factors.
3Production System
In this chapter, we'll be talking about different ways to perfect our AI character and how toadapt the same techniques to work on different types of game that we want to create. We'llalso be discussing the following topics:
Automated finite-state machines (AFSMs)Calculating chanceUtility-based functionsDynamic gaming AI balance
After exploring possibility and probability maps, we need to understand how to use themin conjunction with other techniques and strategies to create a well-balanced and human-like AI character. Possibility maps or even probability maps can be used alone to createenjoyable and challenging games; in fact, many video games only relied on maps, and keptwith the same approach in order to create their AI enemies, and they became verysuccessful doing it that way. A perfect example would be a generic platform game, such asSuper Mario Bros from Nintendo. They don't need to create a complex AI system in order tomake enemies challenging and that is why for decades they kept using the same formula forenemies, because it works perfectly for the genre. So it's also important to remember that,depending on the game that we are creating, some techniques could work better than othersand it's up to us to decide to use, and when to use it. Now, the same should be applied tothe character that we are creating–it should know what to do and when to do it at everysingle second of the game.

Production System
[ 34 ]
Let's continue with the Super Mario Bros example and analyze what some common enemiesdo:
The enemy in the screenshot is called Goomba. As soon as he appears in the game, you willnotice that he moves from right to left, and only if he hits something (excluding the player)does he change his direction and move from left to right. If he's on a higher platform, hekeeps moving from right to left until he falls and on the lower platform he keeps movingfrom right to left. This enemy never tries to defeat the player and it's very predictable. So wecan determine that he only has one goal, that is, moving, and can be placed anywhere onthe stage as he will behave in exactly the same way in terms of position that he is in. Nowlet's MOVE TO our next enemy:
Production System
[ 35 ]
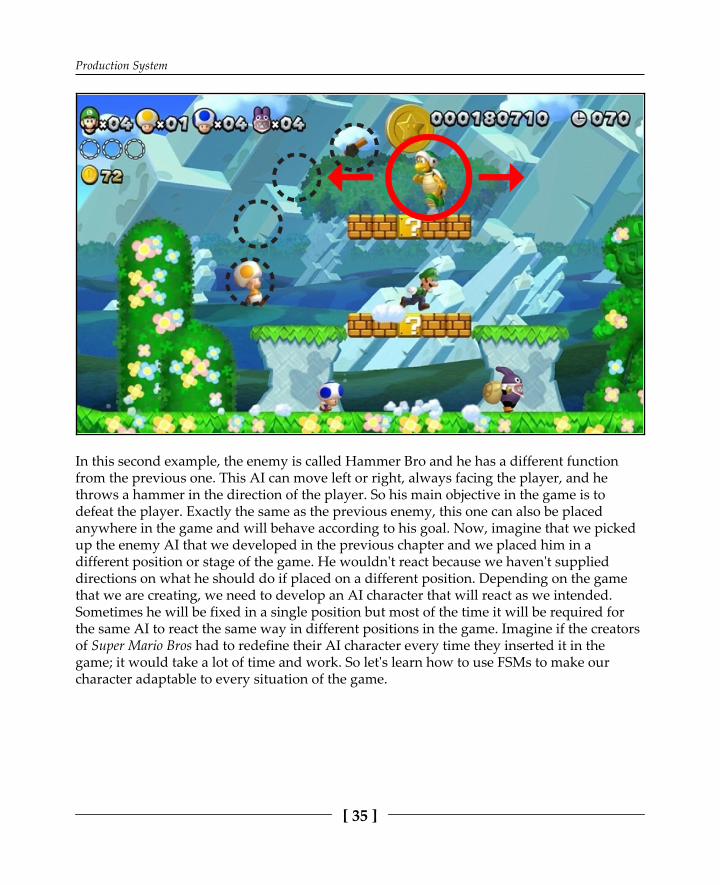
In this second example, the enemy is called Hammer Bro and he has a different functionfrom the previous one. This AI can move left or right, always facing the player, and hethrows a hammer in the direction of the player. So his main objective in the game is todefeat the player. Exactly the same as the previous enemy, this one can also be placedanywhere in the game and will behave according to his goal. Now, imagine that we pickedup the enemy AI that we developed in the previous chapter and we placed him in a different position or stage of the game. He wouldn't react because we haven't supplieddirections on what he should do if placed on a different position. Depending on the gamethat we are creating, we need to develop an AI character that will react as we intended.Sometimes he will be fixed in a single position but most of the time it will be required forthe same AI to react the same way in different positions in the game. Imagine if the creatorsof Super Mario Bros had to redefine their AI character every time they inserted it in thegame; it would take a lot of time and work. So let's learn how to use FSMs to make ourcharacter adaptable to every situation of the game.

Production System
[ 36 ]
Automated finite-state machines (AFSMs)As we observed in the Super Mario Bros example, enemies know how to react no matterwhat position they are placed in. Obviously, it is not required for them to perform complextasks or plan ahead what they will do, but it served perfectly as an example, especiallywhen compared with other video games with different genres. For example, we can see thesame principles being used on Halo with the Grunts (the small enemies). They simply movefrom one side to another and if they find the player they start shooting at him. It's the sameprinciple, where they simply added a personality to their character that would run awayevery time they lost the combat against the player. For that, they used a statement where,every time the character is below a certain number of HP, they start running away. FSMsare what we used to create our possibility and probability maps; this is also what thecharacter should do in different situations he is facing at the moment. Now let's createautomated finite-state machines (AFSMs), where the character will choose the best optionaccording to the factors that he will be able to calculate (position, player HP, currentweapon, and so on). This method is extremely useful if we plan to use the same character ondifferent stages or in games that involve an open world.
When planning AFSMs, it's a good start if we can break actions into two or three maincolumns; in one side of the column we put the main information, such as orientation, speed,or goals, and in the other columns we put actions that can be performed over the firstcolumn actions, such as moving, shooting, charging, finding cover, hiding, using the object,and so on. Doing that, we can ensure that our character can react according to our firstcolumn independently of the position in which he is currently placed. Imagine that the goalassigned to the AI is to guard the position that we defined. That goal is the primaryobjective so it will be placed on the first column. Now imagine that the character starts thegame far away from the position that he should be guarding. At that point, he will be usingthe second column actions to fulfill the first column objectives. What we should put in thesecond column to make that possible depends heavily on the type of game that we want tocreate. So let's create an example and chose the best options for it.
We'll continue using the FPS genre as the main stage for our example, but the sameprinciples can be used on almost any video game. That is why we've chosen Super MarioBros as a reference, to show that no matter the type of game that we want to create, AIdevelopment tends to follow the same process of creation:

Production System
[ 37 ]
So, in our example, the map will have six buildings and neither the player nor the enemycan get inside them but they are allowed to move anywhere else. The main goal of thisgame is to defeat the opponent as many times as possible in a limited time; bullets andhealth points will appear occasionally in the game. Now let's develop an AI that can reactthe same way on any map. For that, we need to assign the main goal to the character and lethim know about the possibilities available in order to fulfill that goal and also ensure thathe is doing something every second of the game.
On a basic form, we have two main goals for this AI character: DEFEAT PLAYER andSURVIVE. We need to make sure that we are able to kill the player when we have thechance and to survive when we don't. For now, let's simplify this formula and define goalsby taking into consideration the current HP of our character. If he's above 20% of his totalHP, the main goal will be defeating the player and, on the other hand, if he's below 20% ofhis HP, the main goal switches to surviving:

Production System
[ 38 ]
Once we have defined this, we can MOVE TO the second column and write the secondarygoals that our AI will choose in order to complete the first column goals. So for thisexample, we will give our character three secondary goals: FIND PLAYER, FIND COVER,and FIND POINTS. By using these three objectives, our AI will be able to fulfill the maingoals, will always have something to do, and will not wait for the player to do something,as follows:
Now that, we have already defined the secondary objectives, we'll write down all thepossible actions in the game, such as MOVE TO, FIRE, USING OBJECT, and CROUCH asfollows. Once again, all of the things that a player or enemy AI is able to do in the game aredefined while we think about the game design and all of that should be in this column. Thisis also an important strategy to analyze whether all the actions available to the characters ofthe game are relevant or not to the main or secondary goals. This will save us time in thefuture because there's no point in programming a complex action if that doesn't contributeto the success of the main goal, as with, Super Mario Bros, where they have chosen not toassign complex actions to their enemies because it wasn't necessary for the type of gamethat they were creating. For this example, the character has the possibility to move freely,fire the weapon, use objects (reload weapon or use health points) and crouch:
Now, we have the three columns filled with all of the information needed for our AI tochoose the best options according to his current situation. As we'll see in a moment, this is adifferent method from what we used in the previous chapter, because back then we usedthe map to give him instructions about what he should do and we assigned him ordersaccording to that position only. In this example, we want our character to decide the bestoption for himself no matter the map or position that he is placed on. This will move us tothe next level of developing an AI character because if we take a look at human behavior,we rarely make a decision according to a single criterion.

Production System
[ 39 ]
The same process will be applied to our current enemy: they will choose the best optionaccording to different criteria and we'll make sure that they choose the best option based ontheir decision. For example, it is more urgent being at 1% health than being down to only1% of ammunition or even completing the main goal of the game.
Once we have our three columns ready, we can move on to the next step and link everyaction in the third column to the second, and all of the behaviors in the second to the firstcolumn goals. While doing this, we need to think about what the AI should be doing if hewants to find the player, find cover position, or find points. Also, we need to define whenhe should be looking for points, cover position, or the player. To find the player, we need touse the MOVE TO action, so our character will be walking around until he finds the playerand ultimately fires at him. Then is, finding cover; once again, we'll be using the MOVE TOaction, so our character will walk until he is near to a wall that can serve as a cover position,then we can choose whether he is crouching or not depending on what he wants to achieve.Finally, to find points, we'll be using MOVE TO and after that, we'll make the AI decidewhether he will be using points or not (USE OBJECT). Now, let's think about what behavioror behaviors he should choose when he is trying to defeat the player and when he is tryingto survive. In order to defeat the player, our AI character needs to find him, so we'll use theFIND PLAYER behavior for this goal; also, we'll let him choose the FIND COVER behaviorif he has already found the player and they are close to a wall. For the SURVIVE goal, we'llbe choosing FIND COVER, in case he's being attacked by the player, and FIND POINTS, toregain more HP points.
Calculating chancesNow that we have everything set, we are ready to input all of this information into ourcode. We'll be using Booleans to define the main goals and then we'll create statements thatwill make the character AI choose between all of the other options. We already defined theprimary statement that will switch our goal from defeating the player to simply surviving,but now we'll be adding more details to our AI behavior because of this question; Whathappens if the enemy has enough HP to confront the player but doesn't have enoughbullets? What if he has enough bullets but his previous attempts to shoot the target havefailed? The character will need to prioritize his choices and for each choice that they will bemaking, they need to compare it to the other alternatives and choose the one that has morechance of success in that goal.
Production System
[ 40 ]
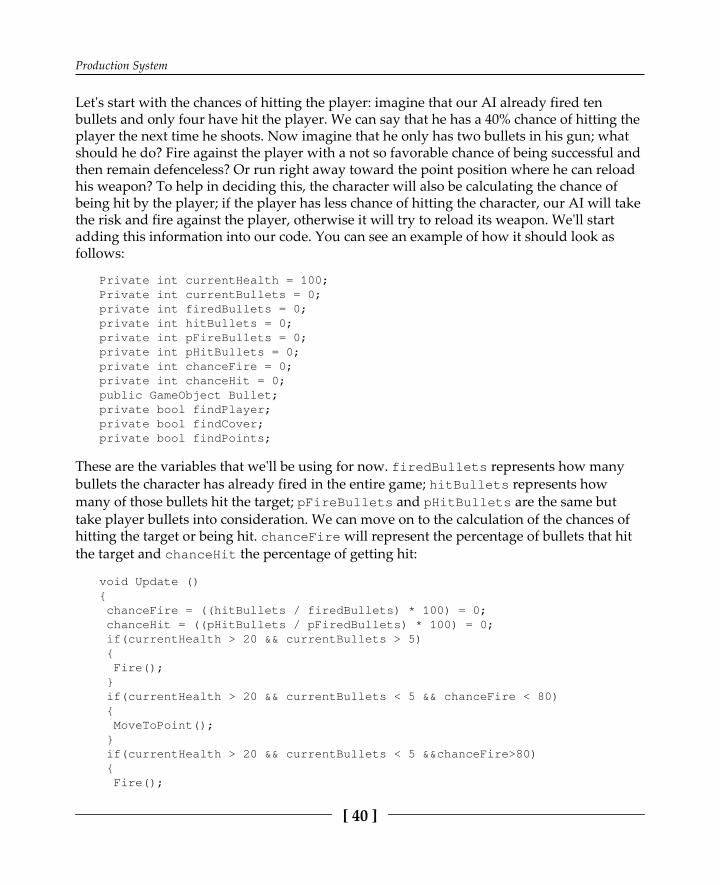
Let's start with the chances of hitting the player: imagine that our AI already fired tenbullets and only four have hit the player. We can say that he has a 40% chance of hitting theplayer the next time he shoots. Now imagine that he only has two bullets in his gun; whatshould he do? Fire against the player with a not so favorable chance of being successful andthen remain defenceless? Or run right away toward the point position where he can reloadhis weapon? To help in deciding this, the character will also be calculating the chance ofbeing hit by the player; if the player has less chance of hitting the character, our AI will takethe risk and fire against the player, otherwise it will try to reload its weapon. We'll startadding this information into our code. You can see an example of how it should look asfollows:
Private int currentHealth = 100;Private int currentBullets = 0;private int firedBullets = 0;private int hitBullets = 0;private int pFireBullets = 0;private int pHitBullets = 0;private int chanceFire = 0;private int chanceHit = 0;public GameObject Bullet;private bool findPlayer;private bool findCover;private bool findPoints;
These are the variables that we'll be using for now. firedBullets represents how manybullets the character has already fired in the entire game; hitBullets represents how many of those bullets hit the target; pFireBullets and pHitBullets are the same buttake player bullets into consideration. We can move on to the calculation of the chances ofhitting the target or being hit. chanceFire will represent the percentage of bullets that hitthe target and chanceHit the percentage of getting hit:
void Update (){ chanceFire = ((hitBullets / firedBullets) * 100) = 0; chanceHit = ((pHitBullets / pFiredBullets) * 100) = 0; if(currentHealth > 20 && currentBullets > 5) { Fire(); } if(currentHealth > 20 && currentBullets < 5 && chanceFire < 80) { MoveToPoint(); } if(currentHealth > 20 && currentBullets < 5 &&chanceFire>80) { Fire();

Production System
[ 41 ]
} if(currentHealth > 20 && currentBullets > 5 && chanceFire < 30&& chanceHit > 30) { MoveToCover(); } if(currentHealth < 20 && currentBullets > 0 && chanceFire > 90 && chanceHit < 50) { Fire(); }}
We have used the chances of hitting or being hit to determine what the AI should do incertain given situations. If he has more than 20 health points and has more than five bulletsin his gun, he is free to shoot against the player until one of those two conditions doesn'tmatch. Once when he only has five bullets, is it time to think about the next move, so in thisexample, if he has less than an 80% chance of being successful and hitting the player, he willdecide not to shoot and will move towards the point position where he can reload hisweapon. If he has more than an 80% chance, that means that he is being successful and he isfree to try his luck. If, in the middle of the combat, the AI has less than a 30% chance ofhitting the player and the player has more than a 30% chance, the character shouldimmediately look for cover. Finally, if the AI character has less than 20% of his total healthbut he has a 90% chance of hitting the player and less than a 50% chance of being hit, he willchoose to fire.
If we wanted to be even more precise about the percentages, we could add a time variableinto this equation, where the AI will take into consideration the last two minutes or soinstead of the whole time, or compare both percentages and analyze whether he has beenmore or less successful in the last two minutes in comparison with the rest of the game:
if(recentPercentage > wholePercentage)
By calculating chances, we give our AI enough methods to calculate his next step, where hecan freely decide which goal has more importance at that specific moment and choose hisaction according to that. Doing this will also give the AI the ability to choose between twoor more options that are available to him. We start developing a more intelligent character,that can think for itself, and we can define personalities by simply changing the percentagevalues to make him take more risks or carefully choose his possibilities.

Production System
[ 42 ]
Utility-based functionsNow that we know how to calculate chance and use AFSMs, it's time to explore them a littlemore and make our characters look smart. This time, we'll use an AI character that is set tobehave autonomously in a simulation game such as The Sims. This is a perfect environmentto test artificial intelligence because it mimics real-life needs and choices.
In the video game The Sims, the player has the opportunity to control a human-likecharacter and the main goal of the game is to make sure that the character is always in goodsituations and that their personal and professional life is always on a positive note.Meanwhile, time goes by, just like in real life, and the character gets older until he finallydies at the end. The player is responsible for the life of that being but if the player doesn'tgive any orders to the character, he will react autonomously to fulfill his needs. It wasrevolutionary the way that an AI character could behave in a video game; people couldrelate to that virtual character and look at him just as an independent living being. Thesecret is that we already know what is necessary to create a character that can behave exactly like characters in The Sims.
Without further ado, let's jump to our next example:

Production System
[ 43 ]
Let's give a name to the character in this example and call her Sophie. She is a virtualhuman being. She has a home with everything necessary to live: sofa, shower, television,bed, oven, and so on. Just like a human being, she has human-like necessities such ashunger, energy, comfort, hygiene, and fun. As time passes, she needs to fulfill hernecessities in order to stay healthy. Now that we have the problem, let's work on thesolution and make Sophie completely autonomous and able to decide for herself what sheneeds to do:
We can simplify and divide the objectives into two columns: on the left side, we put themain objectives of the game and on the right side, the actions the character perform. Forexample, if she is hungry, she needs to move towards the kitchen and interact with thefridge. This is exactly the same principle that we used to create the automated finite-statemachines in the FPS example. But this time we'll explore this concept even further.
Let's think for a minute about the hunger feeling. Let's say that when we eat breakfast, wefulfill our hunger need and we don't feel hungry anymore. At this point, we can say thatour hunger necessity is at 100%, right? Imagine that a few minutes have passed by and nowwe are at 98%; why we don't go right on to fulfill the 2% that is missing? We can say thatfeeling hungry is a state where we are no longer full and not necessarily that we are emptyand because of that we switch our priorities towards other necessities. So it's important toremember that when developing an autonomous AI character: he needs to have thatthought in mind and not go to eat soon as he loses 1% of food. That would not look likehuman behavior; we tend to balance everything, otherwise we would sleep five minutesand work five, not so healthy or productive perhaps because it's not enough to fall asleepand isn't enough to start working. So, we sleep a fair number of hours to compensate for theother time that we are awake, and we eat a fair number of food to remain fulfilled for a fewhours. We can make judgment decisions and decide that we are a little bit hungry but weneed to finish the work first. Also, we make comparative judgments, for example, I'mhungry but I'm tired even more. It is important to understand our behavior when creating avirtual human being like Sophie because otherwise it will act like a robot.

Production System
[ 44 ]
To help Sophie determine what is more important at any specific moment, we'll be usingpercentages and then she will be able to compare and decide what she wants to do. Beforecomplicating it too much, let's start writing the basic information in our code:
Private float Hunger = 0f;Private float Energy = 0f;Private float Comfort = 0f;Private float Hygiene = 0f;Private float Fun = 0f;private float Overall = 0f;public Transform Fridge;public Transform Oven;public Transform Sofa;public Transform Bed;public Transform TV;public Transform Shower;public Transform WC;void Start (){ Hunger = 100f; Energy = 100f; Comfort = 100f; Hygiene = 100f; Fun = 100f;}void Update (){ Overall = ((Hunger + Energy + Comfort + Hygiene + Fun)/5); Hunger -= Time.deltaTime / 9; Energy -= Time.deltaTime / 20; Comfort -= Time.deltaTime / 15; Hygiene -= Time.deltaTime / 11; Fun -= Time.deltaTime / 12;}
We wrote down the basic variables relating to the necessities of the character that we arecreating. As time goes by, those values will decrease, with different attributed valuesdepending on necessity. Also we have an Overall variable that serves to calculate theoverall situation of the character and could perfectly represent the mood of our virtualhuman being. That will be an important factor and will help Sophie to decide what is thebest option for her.

Production System
[ 45 ]
Now let's individualize each necessity and create a decision tree for all of them. To do so,we need to plan the process of decision-making that Sophie will think through beforechoosing any action. Let's start with the hunger necessity:
If Sophie feels hungry and she decides that is a priority, these would be the steps that shewill follow. First she feels hungry and then asks herself if she has enough food; to answerthat, she moves towards the fridge and checks whether she has. If the answer is yes, shemoves on, cooks, and finally eats. In the event any of the segments can't be accomplished,the process will be interrupted and she will move on to a different priority. Let's say thatshe only has food in her fridge if she goes to work and for every day of work she receives,for example, two days of food. So going to work will become a priority very soon if shewants to keep healthy and alive:
Private float Hunger = 0f;Private float Energy = 0f;Private float Comfort = 0f;Private float Hygiene = 0f;Private float Fun = 0f;private float Overall = 0f;public Transform Fridge;public Transform Oven;public Transform Sofa;public Transform Bed;public Transform TV;public Transform Shower;public Transform WC;private int foodQuantity;public float WalkSpeed;public static bool atFridge;void Start (){ Hunger = 100f; Energy = 100f; Comfort = 100f; Hygiene = 100f; Fun = 100f;}void Update (){

Production System
[ 46 ]
Overall = ((Hunger + Energy + Comfort + Hygiene + Fun)/5); Hunger -= Time.deltaTime / 9; Energy -= Time.deltaTime / 20; Comfort -= Time.deltaTime / 15; Hygiene -= Time.deltaTime / 11; Fun -= Time.deltaTime / 12;}void Hungry (){ transform.LookAt(Fridge); // Face the direction of the Fridge transform.position vector3.MoveTowards(transform.position. Fridge.position, walkSpeed); //checks if already triggered the fridge position if(atFridge == true) { //interact with fridge if(foodQuantity > 1) { Cook(); } else() { // calculate next priority } }}
In the preceding code we have an example of how the decision tree can be represented inour code. We'll continue writing what she will be doing for every necessity, and once wehave that done, we can determine how she will prioritize and decide which necessity needsto be taken care of first:
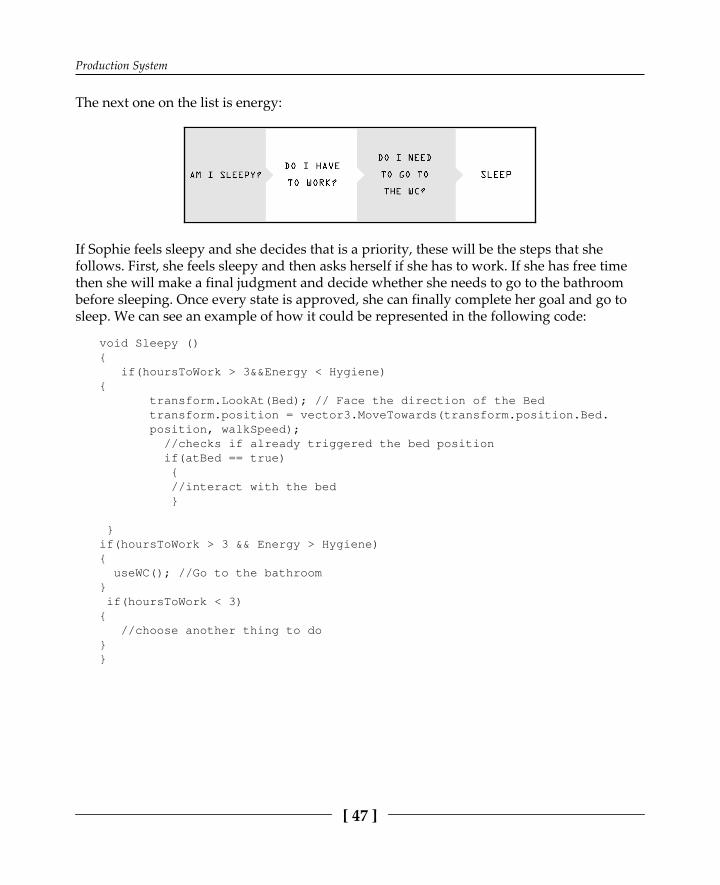
Production System
[ 47 ]
The next one on the list is energy:
If Sophie feels sleepy and she decides that is a priority, these will be the steps that shefollows. First, she feels sleepy and then asks herself if she has to work. If she has free timethen she will make a final judgment and decide whether she needs to go to the bathroombefore sleeping. Once every state is approved, she can finally complete her goal and go tosleep. We can see an example of how it could be represented in the following code:
void Sleepy (){ if(hoursToWork > 3&&Energy < Hygiene){ transform.LookAt(Bed); // Face the direction of the Bed transform.position = vector3.MoveTowards(transform.position.Bed. position, walkSpeed); //checks if already triggered the bed position if(atBed == true) { //interact with the bed }
}if(hoursToWork > 3 && Energy > Hygiene){ useWC(); //Go to the bathroom} if(hoursToWork < 3){ //choose another thing to do}}

Production System
[ 48 ]
Let's assume that, for every hour that Sophie sleeps, she gains +10 points of Energy butloses 10 points of Hygiene. She'll need to confirm first that she won't need to use thebathroom in the middle of her sleep and for that we compare the number of Energy pointsthat she needs with the number of Hygiene points:
Let's move on to the Comfort necessity. This one is a little bit special because we can assigntwo objectives at the same time while gaining Comfort points. For example, she will becapable of deciding whether she wants to eat sitting on a chair or not. The same can beapplied when she is watching TV. This is an important example that can be applied in manygames, where a character decides to do two things at the same time when he has theopportunity and understands that it is important to do so. In the example that follows, we'llbe taking that into consideration:

Production System
[ 49 ]
If Sophie feels uncomfortable, she will check first whether at that moment she is doingsomething. This question can only have two answers: yes or no. If the answer is yes, she'llneed to think whether it is possible for her to keep on doing it seated. Otherwise, she'llfinish what she is doing at that moment and then will start asking the same question. Ifpossible or available, she'll finally sit and get comfortable. We can check an example of howit should look in the following code:
private bool isEating;private bool isWatchingTV;private bool Busy;...void Uncomfortable (){ if(isEating == true || isWatchingTV == true) { transform.LookAt(Sofa); // Face the direction of the Sofa transform.position = vector3.MoveTowards(transform.position. Sofa.position, walkSpeed); //checks if already triggered the bed position if(atSofa == true) { //interact with the sofa } }else{ if(Comfort < Overall&& Busy == false){ transform.LookAt(Sofa); // Face the direction of the Sofa transform.position = vector3.MoveTowards(transform.position.Sofa.position, walkSpeed); //checks if already triggered the bed position
if(atSofa == true) { //interact with the sofa } } if(Busy == true && isEating == false && isWatchingTV == false) { //Keep doing what she is doing at that moment }}}
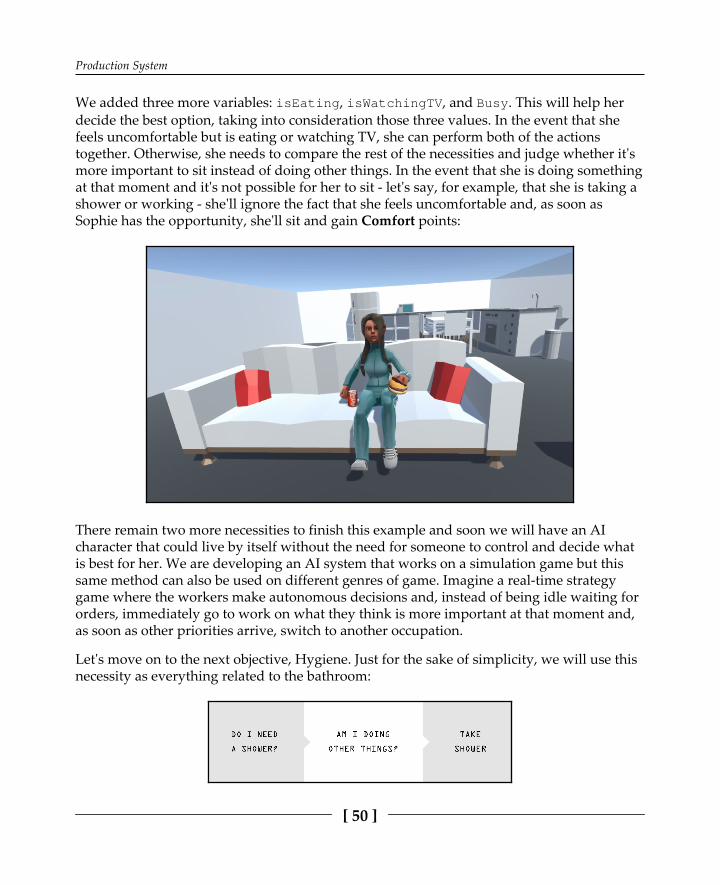
Production System
[ 50 ]
We added three more variables: isEating, isWatchingTV, and Busy. This will help herdecide the best option, taking into consideration those three values. In the event that shefeels uncomfortable but is eating or watching TV, she can perform both of the actionstogether. Otherwise, she needs to compare the rest of the necessities and judge whether it'smore important to sit instead of doing other things. In the event that she is doing somethingat that moment and it's not possible for her to sit - let's say, for example, that she is taking ashower or working - she'll ignore the fact that she feels uncomfortable and, as soon asSophie has the opportunity, she'll sit and gain Comfort points:
There remain two more necessities to finish this example and soon we will have an AIcharacter that could live by itself without the need for someone to control and decide whatis best for her. We are developing an AI system that works on a simulation game but thissame method can also be used on different genres of game. Imagine a real-time strategygame where the workers make autonomous decisions and, instead of being idle waiting fororders, immediately go to work on what they think is more important at that moment and,as soon as other priorities arrive, switch to another occupation.
Let's move on to the next objective, Hygiene. Just for the sake of simplicity, we will use thisnecessity as everything related to the bathroom:

Production System
[ 51 ]
The hygiene necessity is simpler than the previous ones; it's just a question of whether she isavailable or not to take a shower. The extra factor that we'll be using on this one is that, nomatter the circumstances, going to the bathroom is the most important one and she willimmediately pause what she is doing and go straight towards the bathroom.
The only things that she could possibly do while taking a shower are brushing her teeth orany other sub-segment of the hygiene criterion. But for now, let's stick with as few optionsas possible to test the AI; once we have the basic functions working properly, we then canstart adding more actions. For prototype purposes, that is also a good methodology tofollow: by first having the basic functions working, we can move on and gradually addmore details. Now let's take a look at an example of how the Hygiene function would look:
void useBathroom (){if(Hygiene<10){ transform.LookAt(Bathroom); // Face the direction of the Bathroom transform.position = vector3.MoveTowards(transform.position. Bathroom.position, walkSpeed); //checks if already triggered the bed positionif(atBathroom == true)
{
//choose randomly what to do in the bathroom
}
}
}

Production System
[ 52 ]
Let's jump right away into the next and last necessity, Fun. This one will have theopportunity to be the most flexible of them all, because we can eat and watch TV at thesame time, we can sit and watch TV at the same time, and we can eat sitting down while watching TV. We give the option to our AI to be able to do three distinct things at the sametime. At first glance, allowing our character to boost her points in three different necessitieslooks ideal, but we'll be discussing that later on. For now, let's just focus on the Fun factorand plan the steps that she'll be using to determine whether she needs to, and can, watchTV:
If Sophie feels bored, she'll start asking herself whether she can watch TV. First, if she isavailable, she's free to watch TV and, in the default state, she watches TV seated. But if sheis busy at that time, she needs to ask herself whether she can watch TV at the same time thatshe is doing whatever she's doing (in this example, that represents eating, sitting, or both atthe same time). Once again, for the sake of simplicity, let's assume that she doesn't need toreach the television in order to turn it on. We can see an example of how that could berepresented in our code as follows:
private bool isSeat;private bool televisionOn;void Bored (){if(Fun<Overall&& Busy == false){ televisionOn = true; // turns on the television transform.LookAt(TV); // Face the direction of the television transform.position = vector3.MoveTowards(transform.position. Sofa.position, walkSpeed); //checks if already triggered the bed position if(atSofa == true) { //interact with the sofa } }if(Fun < Overall && Busy == true){ f(isEating == true) { televisionOn = true; // turns on the television transform.LookAt(TV); // Face the direction of the television

Production System
[ 53 ]
}if(isSeat == true) { televisionOn = true; // turns on the television transform.LookAt(TV); // Face the direction of the television
}if(isSeat == true && isEating == true){ televisionOn = true; // turns on the television transform.LookAt(TV); // Face the direction of the television }}else(){ //continue doing what she is doing}}
Finally, we conclude the necessity behaviors using different approaches for each one. Doingthis, we can ensure that she will know what to do in different situations of the game andwill always be looking to do something. There are some flaws in the AI design that we'llneed to perfect; for example, she can't decide to continue watching TV even if she is hungryor tired. To make that possible, we would need to simply add a probability map and use theOverall variable to define whether she is happy or not; let's say that, in the event that she'sabove 50% for happiness, she can decide to watch TV even if she feels tired. All of those restrictions can now be assigned to the code and we can continuously add more details tothe behavior of our character. But, for now, we will just focus on two more details: AIbalance and dynamic problem-solving.

Production System
[ 54 ]
Dynamic game AI balancingAnother interesting and very useful topic to learn about AI development is game difficulty.If we play against a human player, the difficulty of the game will solely depend on theexperience of the player that is playing against us. If they are very skillful with that specificvideo game, obviously they will have a greater advantage against a player who is juststarting the game. Usually, video-games tend to increase the difficulty step by step, so theplayer can adapt to it and doesn't get frustrated too soon or simply bored because the gamedoesn't offer a challenge. Dynamic game difficulty balancing is used to solve this problem,by creating an interesting experience for each gamer. To balance the AI character using thismethod, we take into consideration some dynamic game elements that can be adjustedaccording to player experience; those attributes can be the following:
SpeedHealthMagicPower
Usually, we use these attributes to define the difficulty of the AI character, adjusting themto the difficulty desired. Another way to balance the difficulty is by adjusting the quantityof weapons and enemies that the player faces during the game. When adjusting thedifficulty, we also need to be careful to not create an enemy that behaves like a rubber band;for example, if the AI car is behind the player, it gets significantly faster in order to keepchallenging the player. When the player is behind the opponent car, that car will decreaseits speed and this method, if not moderated, can become uninteresting.
In a generic fighting game, developers usually define AI combat like this: if the player isreachable, the AI uses kicks or punches; if not, he goes towards the player. Then thedifficulty is adjusted by using percentages and time gaps between attacks.
In an FPS shooter, for example, the game AI is adjusted by taking into consideration theplayer performance while in the development stage, where the programmers input all theAI stat values and tactics that match the overall performance of the human players. Forexample, if the shoot rate of the player is about 70%, the AI characters will use that value tostay relatively close to a human performance.
Crash Bandicoot used Dynamic Game Difficulty Balancing not directly in the behavior of the AIcharacters themselves, but rather in the animation speed, making it slower if the player washaving difficulty passing the level. This difficulty adjustment takes place according to theplayers number of deaths. This is a smart and simple way to adjust the difficulty of the AIcharacter, by considering the number of times that the player died trying to beat the game.

Production System
[ 55 ]
Resident Evil 4, released in 2005 by Capcom, based the difficulty adjustment on the sameprinciple but employed a more complex system. The adjustment took into considerationplayer performance and, without notice, the player was rated by the game from one to ten,where one meant that they were not very successful in the game and ten that they werevery skillful. Taking those rates into consideration, enemies would behave differently, beingmore or less aggressive and taking more or less damage. The rating was constantly updatedand many things were taken into consideration to determine how good the player was, suchas how many bullets he needed to kill a zombie, how many hits he took, and so on.
Left 4 Dead also took into consideration how well the player was doing, but instead of onlyincreasing the difficulty of the enemies' AI, they decided to change where the enemieswould appear, creating a different challenge every time the player decided to play the samelevel. If the player just started the game, the enemies would appear in easier places; if theplayer had already passed that level, the enemies would appear in more difficult positions.
To summarize the choices that game developers are making while adjusting the difficulty ofcharacter AI, we need to mention that the difficulty not always is meant to be adjusted or toincrease or decrease taking into consideration player performance. One great example issimulation games, where it's crucial to meet real-life difficulties and not make them moredifficult or easier, otherwise it won't feel like a simulation. Other examples could be gamessuch as Ghosts'n Goblins or, more recently, Dark Souls, where developers explicitly chose tomake the game hard from start to finish without changing the AI behavior regarding thedifficulty.
SummaryIn this chapter, we discovered how to create AI characters that make their own decisions nomatter where we place them by using AFSMs. Then we learned how to calculate chance andhow to use it in conjunction with the previous techniques to create a character that couldcalculate a better option for his next step. Using all of the the set techniques, we moved onto how to use utility-based functions to create a human-like character that can behaveautonomously. Finally, we talked about different ways of adjusting the values that we inputin our characters to make them balanced compared to player performance. In the nextchapter, we'll be talking in depth about environment and AI, taking into considerationdifferent genres of video game and different types of AI, how the AI should use theavailable space on the map to create a challenge for the player, how to interact with theenvironment, how to use the environment in its favor, and a lot more.

4Environment and AI
When creating AI for video games, one of the most important aspects is its placement. Aswe discovered previously, the position of the AI character can completely change hisbehavior and future decisions. In this chapter, we'll be exploring how the environment ofthe game can influence our AI and how he should be using it properly, in-depth. This willcover a wide range of game genres with different map structures such as open world,arcade, and racing.
As a player, we like to have a vivid world to explore, with many things to do, and interactwith. As a game developer or game designer, that generally means a lot of work becauseeverything that the player is able to interact with has to be carefully planned and executedthe right way, to avoid bugs or any other unfortunate distractions from the gameplay. Thesame goes for the AI characters that we are creating. If we allow the character to interactwith the environment, that requires a lot of work, thought, planning, and coding to make itwork properly. The number of options available for the player or AI usually equals thenumber of issues that can occur, so we need to give special attention to the environmentwhile creating our games.
Not every game necessarily has a map or terrain, but perhaps the position where the actionis happening at the time still has importance for the gameplay, and the AI should have thatin mind. Also, sometimes, the environment or positioning has a subtle impact on thecharacters of the game that we don't notice while playing the game but, most of the time,those subtle changes contribute to a good and enjoyable experience. That is why theinteraction with the environment is an important aspect while creating a video gamebecause it is responsible for giving life to the characters and, without it, they would remainsimple 3D or 2D models.
Environment and AI
[ 57 ]
On the other hand, we can't forget the opposite, interaction with the environment by thecharacters of the game. If our life could be represented in a video game, the impact that wehave on the environment should be one of the aspects involved in the game. For example, ifwe throw a cigarette into a forest, it has a high probability of burning some leaves andcausing a fire, leaving all the animals that inhabit that forest with ailments, and theconsequences just keep growing. So, it's also interesting to look at how the environmentshould react according to what is happening in the game. During the game design process,we have the opportunity to choose if that interaction is relevant to the gameplay or if it'sonly there for visual purposes, but, either way, it certainly contributes to a rich environmentthat everybody loves. In this chapter, we'll have the opportunity to explore all of the optionsabove in depth and we'll start exploring the basic interactions that don't change thegameplay. We'll finish the chapter with advanced interactions that have a deep impact onthe game experience.
Visual interactionsVisual interactions are the basic ones that don't influence the gameplay directly but help topolish our video game and characters, making them part of the environment that we arecreating, contributing significantly to the immersion of the player in the game. There aremany examples of this subject and we can find them in almost any type of game. Thisshows us the importance of the environment being part of the game and not merely existingto help fill the screen. It's getting more usual to see these types of interaction in games andplayers expect them. If there's an object in the game, it should do something, important ornot. This makes the environment that we are creating more vibrant and alive, which isdefinitely a good thing.
We can find one of the first examples of environment interaction in the original Castlevania,released in 1986 for the Nintendo Entertainment System. Right from the start, the player canuse the whip to destroy the candles and fire pits that originally made up part of thebackground.

Environment and AI
[ 58 ]
This game and a few others released at the time, opened many doors and possibilities interms of the perception that we have in relation to the background or environment thatsurround the characters of the game. Obviously, because of the hardware limitations of thisgeneration of consoles, it was much harder to create simple things that we see as commonby today's standards. But every generation of consoles kept bringing more capabilities andcreators like us kept using that in our favor to create amazing games.
So, our first example of a visual interaction is the object in the background that can bedestroyed without interfering directly with the gameplay. This type of interaction can beseen in multiple games and is as simple as coding an object to animate when it's attacked.Then, we can decide if the object drops some points or collectibles just to reward the playerfor exploring the game. We'll now move on to our next example, the assets in the game thatare animated or which move when the characters pass through them. It's the same principleas the destroyable object but this time, a subtler interaction that requires the character tomove near the position where the asset is positioned. This can be applied to different thingsinside the game, from the grass moving, to dust or water, birds that fly away, or people thatperform a funny gesture; there are endless possibilities. When we analyze theseinteractions, we can easily determine that they don't necessarily have an artificialintelligence behind them, where most of the time, it is just a Boolean function that activatesaccording to some predetermined action. But they make up part of the environment and, forthat reason, they needs to be taken into consideration when we want a good integrationbetween environment and AI.

Environment and AI
[ 59 ]
Basic environment interactionsAs we saw previously, the environment became part of the video game experience and thatsparked many new concepts and ideas for future game titles. The next step was to integratethose slight changes into the gameplay and use them to shape the way characters behaveinside the game. This definitely had a positive contribution to video game history, whereeverything inside the scene started to gain life and the player became aware of those richsurroundings. Using the environment to achieve goals inside the game started to be part ofthe gameplay experience.
To demonstrate one example of an environment object that directly influences thegameplay, we have the Tomb Raider franchise that showcases this perfectly. In thisexample, our character, Lara Croft, needs to push the cube until it is positioned on top ofthe marked area. This will change the environment and unlock a new path that allows theplayer to move forward in the level. We can find this type of challenge in a number ofgames where it's necessary to trigger a specific position in the map in order to makesomething happen in another part, and this can be used to accomplish a specific objective inthe game. Usually we need to change the environment as it is, in order to progress on thatlevel. So, when we plan the map or stage, we take those interactions into consideration andthen we create all the rules that belong to each interaction. For example:
if(cube.transform.position == mark.transform.position){ openDoor = true;}
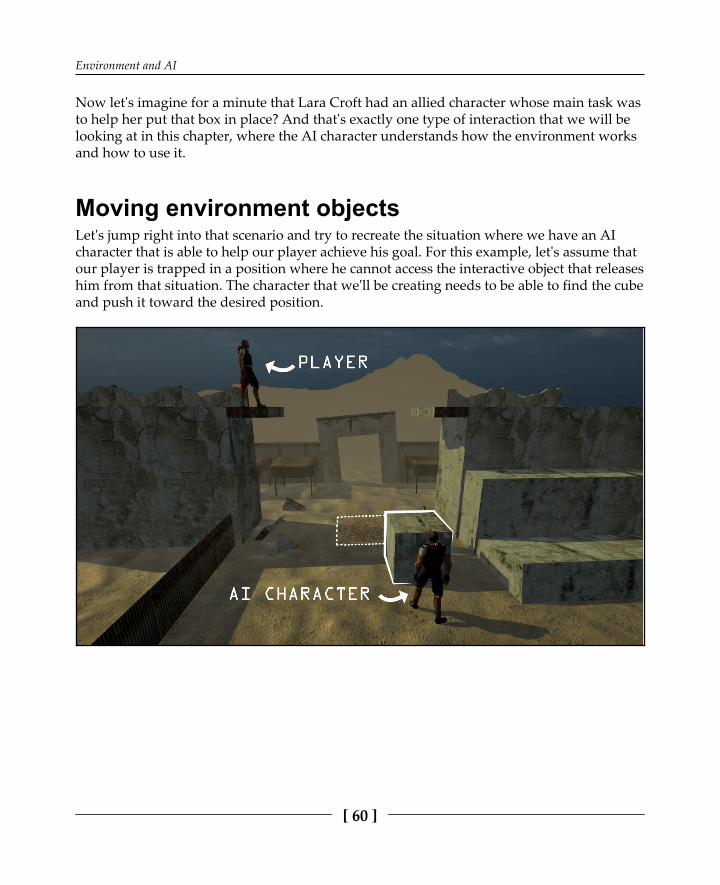
Environment and AI
[ 60 ]
Now let's imagine for a minute that Lara Croft had an allied character whose main task wasto help her put that box in place? And that's exactly one type of interaction that we will belooking at in this chapter, where the AI character understands how the environment worksand how to use it.
Moving environment objectsLet's jump right into that scenario and try to recreate the situation where we have an AIcharacter that is able to help our player achieve his goal. For this example, let's assume thatour player is trapped in a position where he cannot access the interactive object that releaseshim from that situation. The character that we'll be creating needs to be able to find the cubeand push it toward the desired position.

Environment and AI
[ 61 ]
So now that we have all the characters and objects set in our environment example, let'splan how the AI character should behave in this situation. First, he needs to see that theplayer is near so he can start searching and move the cube to the right position. Let'sassume that if the cube is on that mark, a new block will rise from the sand allowing theplayer to proceed in the level. The AI character can push the cube in four differentdirections, left, right, front, and back, making sure it aligns perfectly with the position mark.

Environment and AI
[ 62 ]
The AI character needs to question and validate every action demonstrated in the behaviortree previously. The first and most important thing in order to proceed with the objective isthe character needs to be sure that the player is positioned on his mark. If the player has notarrived yet, our character needs to wait and hold position. If the player has arrived already,the AI character proceeds and asks himself if he is near the cube object or not. If not, ourcharacter needs to go toward the cube, and once that action is validated, he will ask thesame question again. Once the answer is yes and the character is near the cube, he needs tocalculate in which direction the cube needs to be pushed first. Then he will be pushingtowards the Y AXIS or X AXIS until the cube is aligned with the MARK POSITION and theobjective gets completed.
public GameObject playerMesh; public Transform playerMark; public Transform cubeMark; public Transform currentPlayerPosition; public Transform currentCubePosition;
public float proximityValueX; public float proximityValueY; public float nearValue;
private bool playerOnMark;
void Start () {
}void Update () {
// Calculates the current position of the player currentPlayerPosition.transform.position = playerMesh.transform.position;
// Calculates the distance between the player and the player mark of the Xaxis proximityValueX = playerMark.transform.position.x -currentPlayerPosition.transform.position.x;
// Calculates the distance between the player and the player mark of the Yaxis proximityValueYplayerMark.transform.position.y -currentPlayerPosition.transform.position.y;
// Calculates if the player is near of his MARK POSITION if((proximityValueX + proximityValueY) < nearValue) { playerOnMark = true;
Environment and AI
[ 63 ]
}}
We start adding the information into our code that allows the character to validate if theplayer is near his marked position. For this, we create all the variables necessary to calculatethe distances of the player and the position that he needs to be in. playerMesh refers to the3D model of the player where we'll extract his position and use it ascurrentPlayerPosition. To know if he is near his mark, we need a variable thatrepresents the MARK POSITION and in this example, we created the playerMark variablewhere we can write down the position in which we want our player to be. Then we addedthree variables that allow us to know if the player is near. proximityValueX will calculatethe distance between the player and the mark on the X axis. proximityValueY willcalculate the distance between the player and the mark on the Y axis. Then we have thenearValue where we can define how far the player can be from the MARK POSITION sothat our AI character can start working on the objective. Once the player is near his mark,the playerOnMark Boolean changes to true.
To calculate the distance between the player and his mark, we used this:Distance between the player and his mark is the same as (mark.position -player.position).
Now, to discover if the AI character is near the cube, we will be doing the same equation,calculating the distance between the AI and the cube. Also, we completed the code, asfollows, with the positions of both marks (player and cube mark):
public GameObject playerMesh; public Transform playerMark; public Transform cubeMark; public Transform currentPlayerPosition; public Transform currentCubePosition;
public float proximityValueX; public float proximityValueY; public float nearValue;
public float cubeProximityX; public float cubeProximityY; public float nearCube;
private bool playerOnMark; private bool cubeIsNear;
void Start () {

Environment and AI
[ 64 ]
Vector3 playerMark = new Vector3(81.2f, 32.6f, -31.3f); Vector3 cubeMark = new Vector3(81.9f, -8.3f, -2.94f); nearValue = 0.5f; nearCube = 0.5f; }
void Update () {
// Calculates the current position of the player currentPlayerPosition.transform.position = playerMesh.transform.position;
// Calculates the distance between the player and the player mark of the Xaxis proximityValueX = playerMark.transform.position.x -currentPlayerPosition.transform.position.x;
// Calculates the distance between the player and the player mark of the Yaxis proximityValueY = playerMark.transform.position.y -currentPlayerPosition.transform.position.y;
// Calculates if the player is near of his MARK POSITION if((proximityValueX + proximityValueY) < nearValue) { playerOnMark = true; }
cubeProximityX = currentCubePosition.transform.position.x -this.transform.position.x; cubeProximityY = currentCubePosition.transform.position.y -this.transform.position.y;
if((cubeProximityX + cubeProximityY) < nearCube) { cubeIsNear = true; }
else { cubeIsNear = false; }}
Environment and AI
[ 65 ]
Now, our AI character knows if he is near the cube or not, this will answer the question anddetermine if he can proceed to the next branch that we have planned. But what happenswhen our character is not near the cube? He will need to walk toward the cube. So, we'lladd that into our code:
public GameObject playerMesh; public Transform playerMark; public Transform cubeMark; public Transform cubeMesh; public Transform currentPlayerPosition; public Transform currentCubePosition;
public float proximityValueX; public float proximityValueY; public float nearValue;
public float cubeProximityX; public float cubeProximityY; public float nearCube;
private bool playerOnMark; private bool cubeIsNear;
public float speed; public bool Finding;
void Start () {
Vector3 playerMark = new Vector3(81.2f, 32.6f, -31.3f); Vector3 cubeMark = new Vector3(81.9f, -8.3f, -2.94f); nearValue = 0.5f; nearCube = 0.5f; speed = 1.3f;}
void Update () {
// Calculates the current position of the player currentPlayerPosition.transform.position = playerMesh.transform.position;
// Calculates the distance between the player and the player mark of the Xaxis proximityValueX = playerMark.transform.position.x -currentPlayerPosition.transform.position.x;
// Calculates the distance between the player and the player mark of the Yaxis
Environment and AI
[ 66 ]
proximityValueY = playerMark.transform.position.y -currentPlayerPosition.transform.position.y;
// Calculates if the player is near of his MARK POSITION if((proximityValueX + proximityValueY) < nearValue) { playerOnMark = true; }
cubeProximityX = currentCubePosition.transform.position.x -this.transform.position.x; cubeProximityY = currentCubePosition.transform.position.y -this.transform.position.y;
if((cubeProximityX + cubeProximityY) < nearCube) { cubeIsNear = true; }
else { cubeIsNear = false; }
if(playerOnMark == true && cubeIsNear == false && Finding == false) { PositionChanging(); }
if(playerOnMark == true && cubeIsNear == true) { Finding = false; }
}
void PositionChanging () {
Finding = true; Vector3 positionA = this.transform.position; Vector3 positionB = cubeMesh.transform.position; this.transform.position = Vector3.Lerp(positionA, positionB,Time.deltaTime * speed); }

Environment and AI
[ 67 ]
So far, our AI character is able to calculate the distance between himself and the cube; ifthey are too far apart, he will go toward the cube. Once this quest is completed, he canmove on to the next phase and start pushing the cube. The last thing that he needs tocalculate is how far the cube is from the mark position and he then decides which sideneeds to be pushed first by taking into consideration how far it is from each side.
The cube can only be pushed on the X axis or Z axis and the rotation isn't relevant for nowas the button is activated once the cube is on top of it. Taking that into consideration, ourcharacter AI needs to calculate how far the cube is from the X MARK POSITION and ZMARK POSITION. Then he will compare the two different axis values and choose whichone is farther away from the desired position and start pushing from that one. The characterwill push in that direction until the cube is aligned with the marked position and thenswitch to the other side, and push it until it's completely on top of the MARK POSITION:
public GameObject playerMesh; public Transform playerMark; public Transform cubeMark; public Transform cubeMesh; public Transform currentPlayerPosition; public Transform currentCubePosition;
public float proximityValueX; public float proximityValueY; public float nearValue;
public float cubeProximityX; public float cubeProximityY; public float nearCube;
public float cubeMarkProximityX; public float cubeMarkProximityZ;

Environment and AI
[ 68 ]
private bool playerOnMark; private bool cubeIsNear;
public float speed; public bool Finding;
void Start () {
Vector3 playerMark = new Vector3(81.2f, 32.6f, -31.3f); Vector3 cubeMark = new Vector3(81.9f, -8.3f, -2.94f); nearValue = 0.5f; nearCube = 0.5f; speed = 1.3f; }
void Update () {
// Calculates the current position of the player currentPlayerPosition.transform.position = playerMesh.transform.position;
// Calculates the distance between the player and the player mark of the Xaxis proximityValueX = playerMark.transform.position.x -currentPlayerPosition.transform.position.x;
// Calculates the distance between the player and the player mark of the Yaxis proximityValueY = playerMark.transform.position.y -currentPlayerPosition.transform.position.y;
// Calculates if the player is near of his MARK POSITION if((proximityValueX + proximityValueY) < nearValue) { playerOnMark = true; }
cubeProximityX = currentCubePosition.transform.position.x -this.transform.position.x; cubeProximityY = currentCubePosition.transform.position.y -this.transform.position.y;
if((cubeProximityX + cubeProximityY) < nearCube) { cubeIsNear = true; }
else

Environment and AI
[ 69 ]
{ cubeIsNear = false; }
if(playerOnMark == true && cubeIsNear == false && Finding == false) { PositionChanging(); }
if(playerOnMark == true && cubeIsNear == true) { Finding = false; }
cubeMarkProximityX = cubeMark.transform.position.x -currentCubePosition.transform.position.x; cubeMarkProximityZ = cubeMark.transform.position.z -currentCubePosition.transform.position.z;
if(cubeMarkProximityX > cubeMarkProximityZ) { PushX(); }
if(cubeMarkProximityX < cubeMarkProximityZ) { PushZ(); }
}
void PositionChanging () {
Finding = true; Vector3 positionA = this.transform.position; Vector3 positionB = cubeMesh.transform.position; this.transform.position = Vector3.Lerp(positionA, positionB,Time.deltaTime * speed);
}
With the final actions added to our code, our AI character should be able to conclude itsobjective and find and push the cube to the desired position, so the player can proceed andfinish the level. In this example, we focused on how to calculate distances between objectsof the scene and characters. This will help create similar types of interactions where it'snecessary to put an object in the game in a certain position.

Environment and AI
[ 70 ]
The example demonstrates an allied AI character that helps the player, but the sameprinciples could be applied if we wanted the opposite effect (being an enemy) where thecharacter would need to find the cube as fast as possible to stop the player.
Obstructive environment objectsAs we saw previously, we can use or move objects in the game to fulfill an objective, butwhat happens if the character has an object obstructing his way? The object could be placedby the player or simply designed to be in that position of the map and either way, the AIcharacter should be able to determine what to do in that situation.
We can observe this behavior, for example, in a strategy game called Age of Empires IIdeveloped by Ensemble Studios. Every time the characters of the game can't access theenemy territory because of their surrounded fortified walls, the AI characters focus andstart destroying a portion of the wall so they can get in. This type of interaction is verysmart and important as well, because otherwise they would just be going around the wallsearching for an entry and that wouldn't look intelligent. Because the fortified wall iscreated by the player, it can be placed anywhere, with any shape or form and for thatreason, it is necessary to think about that when developing an AI opponent.
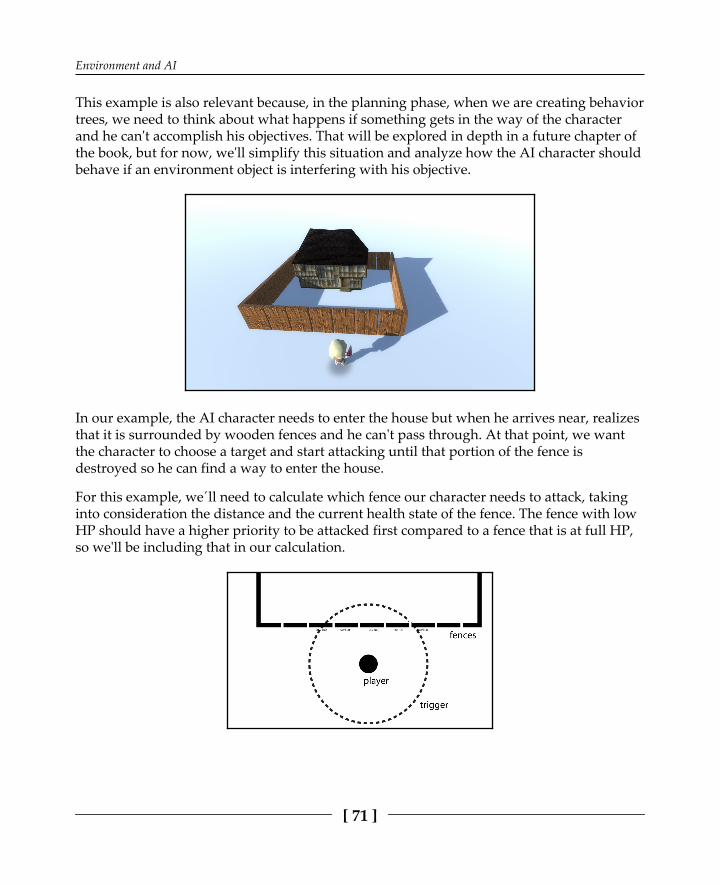
Environment and AI
[ 71 ]
This example is also relevant because, in the planning phase, when we are creating behaviortrees, we need to think about what happens if something gets in the way of the characterand he can't accomplish his objectives. That will be explored in depth in a future chapter ofthe book, but for now, we'll simplify this situation and analyze how the AI character shouldbehave if an environment object is interfering with his objective.
In our example, the AI character needs to enter the house but when he arrives near, realizesthat it is surrounded by wooden fences and he can't pass through. At that point, we wantthe character to choose a target and start attacking until that portion of the fence isdestroyed so he can find a way to enter the house.
For this example, we´ll need to calculate which fence our character needs to attack, takinginto consideration the distance and the current health state of the fence. The fence with lowHP should have a higher priority to be attacked first compared to a fence that is at full HP,so we'll be including that in our calculation.

Environment and AI
[ 72 ]
We want to define a circumference around the character where the closest fences give theirinformation to the AI so he can decide which one is the easiest to destroy. This can be donewith different methods, either by using collision detection on the fences that get triggeredby the player, or having them calculate the distance between fences/objects and the player;we define a distance value where the player perceives the condition of the fence. For thisexample, we'll be calculating the distance and use it to alert the character about the HP ofthe fences.
Let's start by creating the code that will be implemented on the fence object; all of themwill have the same script as follows:
public float HP; public float distanceValue; private Transform characterPosition; private GameObject characterMesh;
private float proximityValueX; private float proximityValueY; private float nearValue;
// Use this for initialization void Start () {
HP = 100f; distanceValue = 1.5f;
// Find the Character Mesh characterMesh = GameObject.Find("AICharacter"); }
// Update is called once per frame void Update () {
// Obtain the Character Mesh Position characterPosition = characterMesh.transform;
//Calculate the distance between this object and the AI Character proximityValueX = characterPosition.transform.position.x -this.transform.position.x; proximityValueY = characterPosition.transform.position.y -this.transform.position.y;
nearValue = proximityValueX + proximityValueY; }

Environment and AI
[ 73 ]
In this script, we added the basic information about the HP and distances that we'll be usingto connect with the AI character. This time, we are adding the script that calculates thedistances into the environment object instead of the character; this gives more dynamismto the object and allows us to create more things with it. As an example, if the characters ofthe game are the ones responsible for creating the fences, they will have different states,such as currently building, completed, and damaged; then the character will receive thatinformation and use it to his advantage.
Let's move forward and define our AI character to interact with the environment object.His primary objective is to access the house, but when he arrives near, he realizes that hecannot get inside because it's surrounded by the wood fences. After analyzing the situation,we want our character to destroy a fence so he can finally accomplish his objective and getinto the house.
In the character script, we'll be adding a static function, where the fences can input theirinformation about their current health; this will help the AI character choose a better fenceto destroy.
public static float fenceHP; public static float lowerFenceHP; public static float fencesAnalyzed; public static GameObject bestFence;
private Transform House;
private float timeWasted; public float speed;
void Start () {
fenceHP = 100f; lowerFenceHP = fenceHP; fencesAnalyzed = 0; speed = 0.8;
Vector3 House = new Vector3(300.2f, 83.3f, -13.3f);
}
void Update () {
timeWasted += Time.deltaTime;
if(fenceHP > lowerFenceHP)
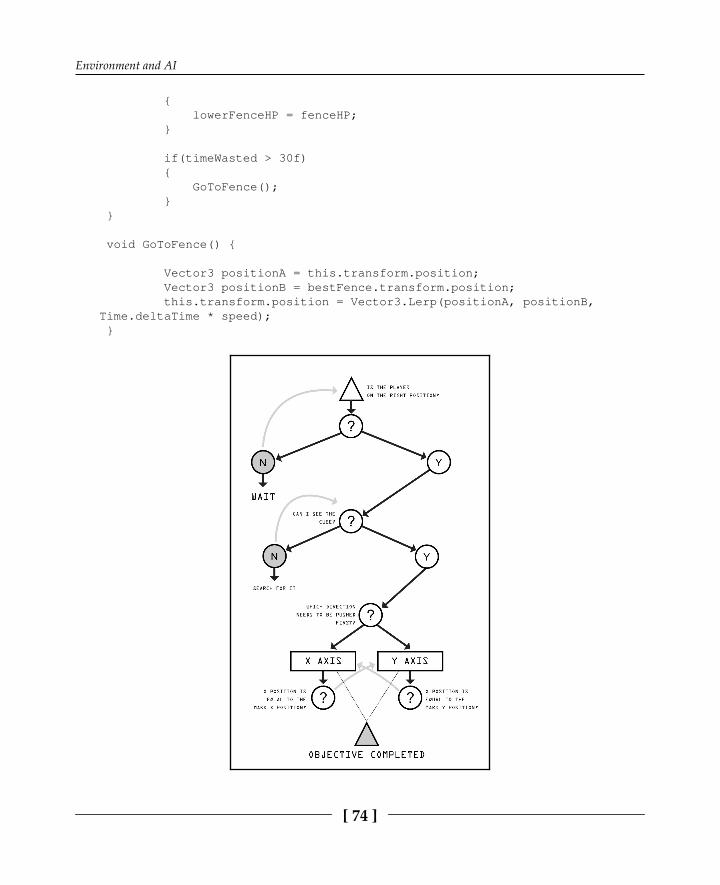
Environment and AI
[ 74 ]
{ lowerFenceHP = fenceHP; }
if(timeWasted > 30f) { GoToFence(); } }
void GoToFence() {
Vector3 positionA = this.transform.position; Vector3 positionB = bestFence.transform.position; this.transform.position = Vector3.Lerp(positionA, positionB,Time.deltaTime * speed); }
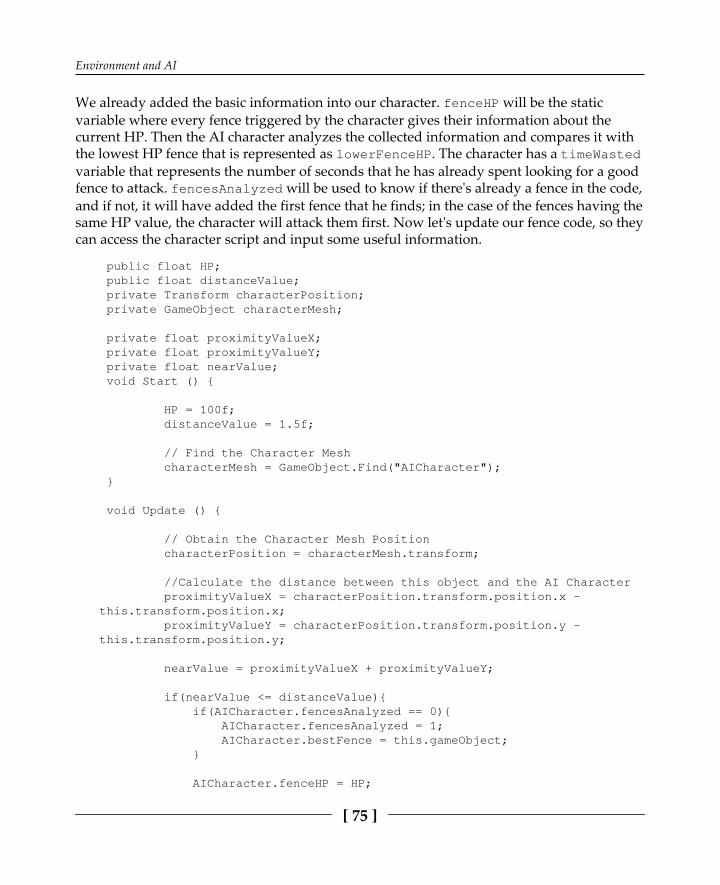
Environment and AI
[ 75 ]
We already added the basic information into our character. fenceHP will be the staticvariable where every fence triggered by the character gives their information about thecurrent HP. Then the AI character analyzes the collected information and compares it withthe lowest HP fence that is represented as lowerFenceHP. The character has a timeWastedvariable that represents the number of seconds that he has already spent looking for a goodfence to attack. fencesAnalyzed will be used to know if there's already a fence in the code,and if not, it will have added the first fence that he finds; in the case of the fences having thesame HP value, the character will attack them first. Now let's update our fence code, so theycan access the character script and input some useful information.
public float HP; public float distanceValue; private Transform characterPosition; private GameObject characterMesh;
private float proximityValueX; private float proximityValueY; private float nearValue; void Start () {
HP = 100f; distanceValue = 1.5f;
// Find the Character Mesh characterMesh = GameObject.Find("AICharacter"); }
void Update () {
// Obtain the Character Mesh Position characterPosition = characterMesh.transform;
//Calculate the distance between this object and the AI Character proximityValueX = characterPosition.transform.position.x -this.transform.position.x; proximityValueY = characterPosition.transform.position.y -this.transform.position.y;
nearValue = proximityValueX + proximityValueY;
if(nearValue <= distanceValue){ if(AICharacter.fencesAnalyzed == 0){ AICharacter.fencesAnalyzed = 1; AICharacter.bestFence = this.gameObject; }
AICharacter.fenceHP = HP;

Environment and AI
[ 76 ]
if(HP < AICharacter.lowerFenceHP){ AICharacter.bestFence = this.gameObject; } } }
We finally conclude this example, where the fence compares their current HP with the datathat the character has (lowerFenceHP) and if their HP is lower than the lowest value thatthe character has, that fence will be considered the bestFence.
This example demonstrates how to adapt the AI character to different dynamic objects ofthe game; the same principle can be expanded and used to interact with almost any object.It's also relevant and useful to use the objects to interact with the character as well, linkinginformation between the two.
Breaking down the environment by areaWhen we create a map, often we have two or more different areas that could be used tochange the gameplay, areas that could contain water, quicksand, flying zones, caves, andmuch more. If we wish to create an AI character that can be used in any level of our game,and anywhere, we need to take this into consideration and make the AI aware of thedifferent zones of the map. Usually that means that we need to input more information intothe character's behavior, including how to react according to the position in which he iscurrently placed, or a situation where he can choose where to go.

Environment and AI
[ 77 ]
Should he avoid some areas? Should he prefer others? This type of information is relevantbecause it makes the character aware of the surroundings, choosing or adapting and takinginto consideration his position. Not planning this correctly can lead to some unnaturaldecisions; for example, in Elder Scrolls V: Skyrim developed by Bethesda Softworks studio,we can watch some AI characters of the game simply turning back when they do not haveinformation about how they should behave in some parts of the map, especially onmountains or rivers.
Depending on the zones that our character finds, he might react differently or update hisbehavior tree to adapt to his environment. We have previously created a soldier thatchanged the way he would react according to his health, aim success, and player health,and now we are exploring the environment so the character can use it to better define whatto do. We could also use this to update one of our previous examples, the real-lifesimulation. If the Sofie character goes to one specific section of the house, she could use thatinformation to update her priorities and replenish all the necessities that are attached to thatportion of the house. Let's say that she was in the kitchen; once she is there, after preparingthe breakfast, she takes the opportunity to take out the garbage. As we see, the environmentthat surrounds our characters can redefine their priorities or completely change theirbehaviors.

Environment and AI
[ 78 ]
This is a little similar to what Jean-Jacques Rousseau said about humanity: "We are good bynature, but corrupted by society." As humans, we are a representation of the environment thatsurrounds us, and for that reason, artificial intelligence should follow the same principle.
Let's pick a previous character that we have already created and update his code to work ona different scenario. The chosen one for this example is the soldier and we want to changehis behavior according to three different zones, beach, river, and forest. So, we'll create threepublic static Boolean functions with the names Beach, Forest and River; then we definethe zones on the map that will turn them on or off.
public static bool Beach; public static bool River; public static bool Forest;
Because in this example, just one of them can be true at a time, we'll add a simple line ofcode that disables the other options once one of them gets activated.
if(Beach == true){ Forest = false; River = false; }
if(Forest == true){ Beach = false; River = false; }
if(River == true){ Forest = false; Beach = false; }
Once we have that done, we can start defining the different behaviors for each zone. Forexample, in the beach zone, the characters don't have a place to get cover, so that optionneeds to be taken away and updated with a new one. The river zone can be used to getacross to the other side, so the character can hide from the player and attack from thatposition. To conclude, we can define the character to be more careful and use the trees to getcover. Depending on the zones, we can change the values to better adapt to theenvironment, or create new functions that would allow us to use some specificcharacteristics of that zone.
if (Forest == true) {// The AI will remain passive until an interaction with the player occurs if (Health == 100 && triggerL == false && triggerR == false && triggerM ==false)

Environment and AI
[ 79 ]
{ statePassive = true; stateAggressive = false; stateDefensive = false; }
// The AI will shift to the defensive mode if player comes from the rightside or if the AI is below 20 HP if (Health <= 100 && triggerR == true || Health <= 20) { statePassive = false; stateAggressive = false; stateDefensive = true; }
// The AI will shift to the aggressive mode if player comes from the leftside or it's on the middle and AI is above 20HP if (Health > 20 && triggerL == true || Health > 20 && triggerM == true) { statePassive = false; stateAggressive = true; stateDefensive = false; }
walk = speed * Time.deltaTime; walk = speedBack * Time.deltaTime; }
This segment will be explored in depth later on when talking about AI Planning andDecision Making, as well as Tactics and Awareness.
Advanced environment interactionsAs the video game industry and the technology associated with it kept evolving, newgameplay ideas appeared, and rapidly, interaction between the characters of the game andthe environment became even more interesting, especially when using physics. This meansthat the outcome of the environment could be completely random, where it was requiredfor the AI characters to constantly adapt to different situations. One honorable mention onthis subject is the video game Worms developed by Team17, where the map can be fullydestroyed and the AI characters of the game are able to adapt and maintain smart decisions.
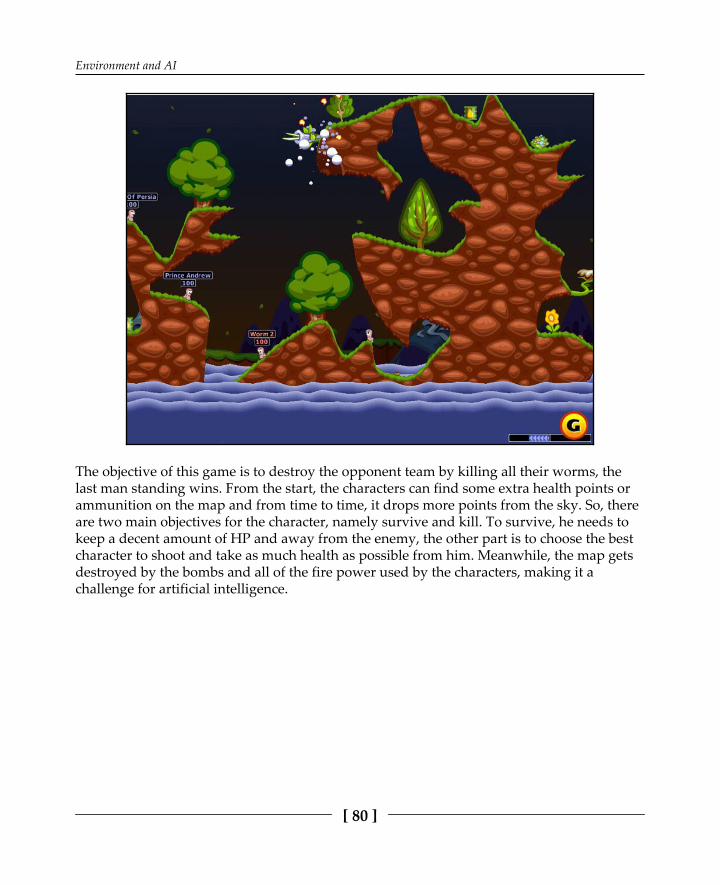
Environment and AI
[ 80 ]
The objective of this game is to destroy the opponent team by killing all their worms, thelast man standing wins. From the start, the characters can find some extra health points orammunition on the map and from time to time, it drops more points from the sky. So, thereare two main objectives for the character, namely survive and kill. To survive, he needs tokeep a decent amount of HP and away from the enemy, the other part is to choose the bestcharacter to shoot and take as much health as possible from him. Meanwhile, the map getsdestroyed by the bombs and all of the fire power used by the characters, making it achallenge for artificial intelligence.

Environment and AI
[ 81 ]
Adapting to unstable terrainLet's decompose this example and create a character that could be used in this game. We'llstart by looking at the map. At the bottom, there's water that automatically kills the worms.Then, we have the terrain where the worms can walk, or destroy if needed. Finally, there'sthe absence of terrain, specifically, the empty space that cannot be walked on. Then we havethe characters (worms) they are placed in random positions at the beginning of the gameand they can walk, jump, and shoot.
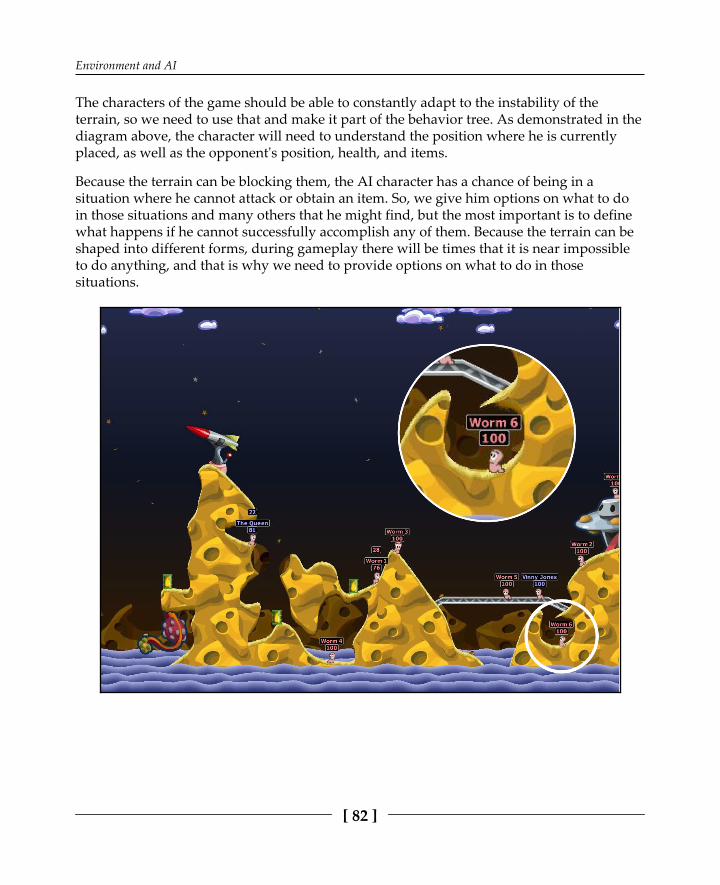
Environment and AI
[ 82 ]
The characters of the game should be able to constantly adapt to the instability of theterrain, so we need to use that and make it part of the behavior tree. As demonstrated in thediagram above, the character will need to understand the position where he is currentlyplaced, as well as the opponent's position, health, and items.
Because the terrain can be blocking them, the AI character has a chance of being in asituation where he cannot attack or obtain an item. So, we give him options on what to doin those situations and many others that he might find, but the most important is to definewhat happens if he cannot successfully accomplish any of them. Because the terrain can beshaped into different forms, during gameplay there will be times that it is near impossibleto do anything, and that is why we need to provide options on what to do in thosesituations.

Environment and AI
[ 83 ]
For example, in this situation where the worm doesn't have enough free space to move, aclose item to pick up, or an enemy that can be properly attacked, what should he do? It'snecessary to make information about the surroundings available to our character so he canmake a good judgment for that situation. In this scenario, we have defined our character toshoot anyway, against the closest enemy, or to stay close to a wall. Because he is too close tothe explosion that would occur from attacking the closest enemy, he should decide to stayin a corner and wait there until the next turn.
Using raycast to evaluate decisions
Ideally, at the start of the turn, the character has two raycasts, one for his left side andanother for the right side. This will check if there's a wall obstructing one of thosedirections. This can be used to determine what side the character should be moving towardif he wants to protect himself from being attacked. Then, we would use another raycast inthe aim direction, to see if there's something blocking the way when the character ispreparing to shoot. If there's something in the middle, the character should be calculatingthe distance between the two to determine if it's still safe to shoot.
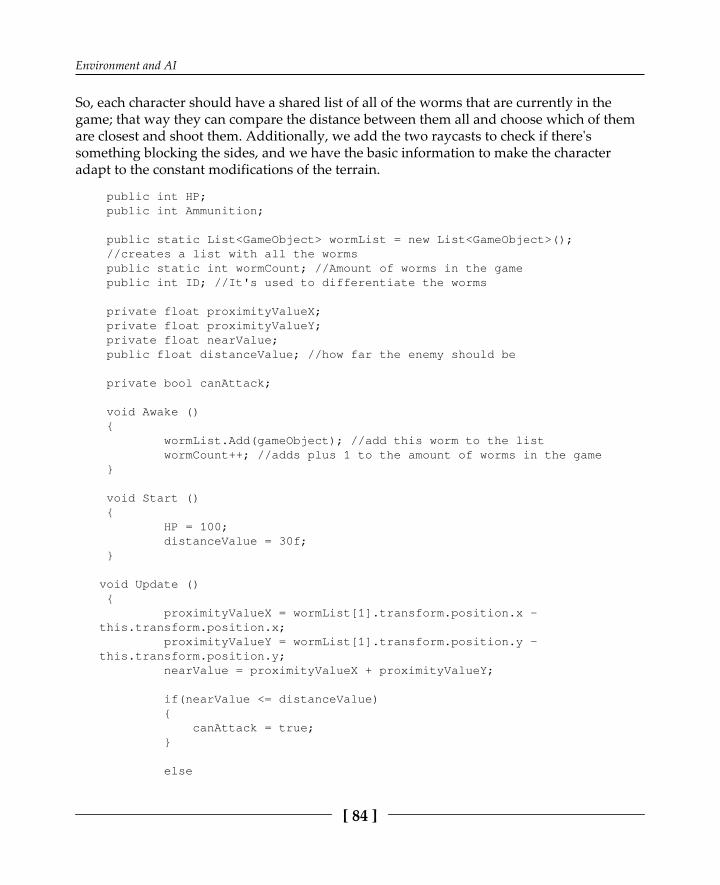
Environment and AI
[ 84 ]
So, each character should have a shared list of all of the worms that are currently in thegame; that way they can compare the distance between them all and choose which of themare closest and shoot them. Additionally, we add the two raycasts to check if there'ssomething blocking the sides, and we have the basic information to make the characteradapt to the constant modifications of the terrain.
public int HP; public int Ammunition;
public static List<GameObject> wormList = new List<GameObject>(); //creates a list with all the worms public static int wormCount; //Amount of worms in the game public int ID; //It's used to differentiate the worms
private float proximityValueX; private float proximityValueY; private float nearValue; public float distanceValue; //how far the enemy should be
private bool canAttack;
void Awake () { wormList.Add(gameObject); //add this worm to the list wormCount++; //adds plus 1 to the amount of worms in the game }
void Start () { HP = 100; distanceValue = 30f; }
void Update () { proximityValueX = wormList[1].transform.position.x -this.transform.position.x; proximityValueY = wormList[1].transform.position.y -this.transform.position.y; nearValue = proximityValueX + proximityValueY;
if(nearValue <= distanceValue) { canAttack = true; }
else

Environment and AI
[ 85 ]
{ canAttack = false; }
Vector3 raycastRight =transform.TransformDirection(Vector3.forward);
if (Physics.Raycast(transform.position, raycastRight, 10)) print("There is something blocking the Right side!");
Vector3 raycastLEft =transform.TransformDirection(Vector3.forward);
if (Physics.Raycast(transform.position, raycastRight, -10)) print("There is something blocking the Left side!"); }
SummaryIn this chapter, we explored different ways to interact with the environment. Thetechniques demonstrated in this chapter can be expanded to a wide range of game genresand used to accomplish basic to advanced interactions between the AI characters and theenvironment. Now we understand how to create interactive and dynamic objects that canbe used by the AI characters, it will make the game a new and different experience everytime we play. In addition, have lightly touched on some related topics that will be coveredin depth in the next chapters, such as the interaction with other AI characters of the gameand decision making.
In our next chapter, we'll be talking about animation behavior. Animations make up part ofthe visual perception that the player has of the artificially intelligent characters that wecreate, and it's very important to use that to demonstrate how realistic our AI behaves. Wewill be discussing animation graphs, gameplay and animation, animation behaviors, andanimation architecture.

5Animation Behaviors
When we think about AI, usually we imagine smart robots, mechanical objects thatperfectly perform a vast array of actions, and the same thought happens with video gameAI. We tend to think about opponents or allies that act, react, think, or do a lot of thingswith smart decisions, and that's correct, but one more important aspect is usually leftbehind, the animations. In order to create believable and realistic AI characters, theanimation is one of the most important aspects. Animations define the visual interaction,that is, what it looks like when the character is doing something. It's very important to havethe animations working as well as the functional mechanics in order for the character to bebelievable. In this chapter, we'll be looking at some useful techniques and solutions to use,re-use, and create animations that smoothly fit the characters' behaviors. The way we createand use animations are the same for the player as for the AI characters, but we'll be focusingon how to integrate animations with the techniques that we have already learned about tocreate AI.
2D animation versus 3D animationVideo game animation can be put into two genres, 2D and 3D animation. Both have distinctfeatures, and we need to take that into consideration and use them to our advantage whendeveloping a game. Let's take a look at some of the main differences between the two.
2D animation - spritesAs soon as consoles and computers allowed developers to integrate animation into thevideo games that they were making, games became much richer, relying on good-lookingvisuals to express the movement and actions of the characters. It also opened many doors tocreate new game genres or update older genres, making them more appealing, and sincethen, almost every game has started to implement animations.

Animation Behaviors
[ 87 ]
The process of 2D animation used on video games is similar to what Disney use to usecreate their movies. They would draw and paint every frame of the movie, and everysecond would have around 12 frames. Games couldn't use real-life drawings at the time,but they could use coordinates to paint every bit of the game to make it look like a person oran animal if they wanted. The rest of the process is about the same. They needed to use thatin order to create every frame of the animation, but because it was a hard and long process,they had a lot less detail and complexity. Now that they have all the frames needed toanimate a character, it is necessary to program the machine to read the frames in a specificorder, only using the ones that belong to the action that the character is doing.
In the preceding figure, we can see an example of the 8-bit era that shows every animationof the Super Mario Bros character called Mario. As we can see, there is the run animation,jump, swim, die, stop, and crouch, some of which are just a single frame. Smooth transitionsdidn't appear right away, and the animations were combined into the gameplay. So, if wewanted to include more animations in the game, it would be necessary to create moreframes. The same goes for the complexity of the animation; if we wanted the animation toinclude more detail, it would be necessary to create more frames and transitional frames.This makes the process of creating animations very long, but with the evolution ofhardware capabilities, this process has started to take less time to implement, and theresults are famous.

Animation Behaviors
[ 88 ]
One example of the 2D animation capabilities on video games is Prince of Persia, released in1989 (the following sprite sheet shows the character's animations in Prince of Persia). Byusing real-world references of a person doing the movements of the game, the quality,detail, and smooth transitions were stupendous, raising the bar even higher for the nextgeneration of games. So at this time, game developers started to worry about transitions,smooth animations, and how to create a lot of actions without it being necessary to addmore frames to the sprite sheet:

Animation Behaviors
[ 89 ]
Today, we still use the same process on 2D games, we have a sprite sheet with all the animations that we want, then we code to animate them at the same time the character isperforming an action. Working with sprite sheets is not as flexible as working with 3Danimations that use bone structures, but there are some useful tips that we can use to createsmooth transitions and separate the code animation from the gameplay code.
3D animation - bone structureUsing 3D models and 3D animations to create games is a very popular choice at themoment, and one of the main reasons is related to the time that it takes to create them. Weonly need to create the 3D model once, and then we can implement a bone structure toanimate it as we want. We can also use the same bone structure and skin it to another 3Dmodel and it will get the same animations as the previous one. Using 3D animations isobviously convenient for larger projects, saving hours of hard work and allowing us toupdate the character without the need to create it all over again. This is due to the bonestructure of the character, which helps us improve the quality of the animations, savingtime and resources. Because of this, we can decide to animate just one specific area andleave the rest of the body completely still or doing some other animation. It is very useful tosmoothly change from one animation to another, or to have two animations playing at thesame time:

Animation Behaviors
[ 90 ]
The main differencesSprite sheets versus bones structure are the two main differences between the two types ofanimation that will change the way we integrate the animations with the gameplay. Usingsprites, we stick to how many images we have available and we cannot change the waythey look in the code, whereas with the bone structure, we can define which portion of thecharacter we want to animate and we can use physics to shape the animation according tothe situation.
Recently, there are some new options that allow us to implement a similar technique asbone structure in the 2D models, but it's still a very limited option compared to what we cando in 3D.
Animation state machinesWe have already talked about behavior states, where we define the possible actions of acharacter and how to link them. Animation state machines is a very similar process, butinstead of defining the actions, we define the animations of a character. While developingthe character and creating the behavior states, we could assign the animations in the actioncode, defining at which point the character starts to run, and once that happens, the walkanimation stops and the run animation starts playing. This way of integrating theanimations with the gameplay code looks like an easier approach to do it, but it's not thebest way and it gets complicated if we want to update the code later on.
The solution to this problem is to create a separate state machine just for the animations.This will allow us to have better control of the animations without worrying aboutchanging our character's code. It is a good method to use between programmer andanimator as well, because the animator can add more animations to the animation statemachine without interfering with the code:

Animation Behaviors
[ 91 ]
In the preceding diagram, we can see a simple example of a behavior state machine, wherethe character can stay still, move, jump, and use a ladder. Once we have this partcompleted, we can start designing and implementing an animation state machine to workaccording to the behavior state machine principles:
As we can see, there are more animation states than behavior states, which is why the bestmethod to integrate the animations into our characters is to separate the gameplay from theanimation. When developing our game, we use statements and values, so the onlydifference between walk and run is the number that defines how fast our character ismoving. That is why we need to use the animation states to convert this information intovisual output, where the character is animated according to the gameplay states. Using thismethod does not necessarily mean that we cannot use the animations to interfere with thegameplay, because we can also do it by simply reporting that information back to ourgameplay code and changing the gameplay if we want to.
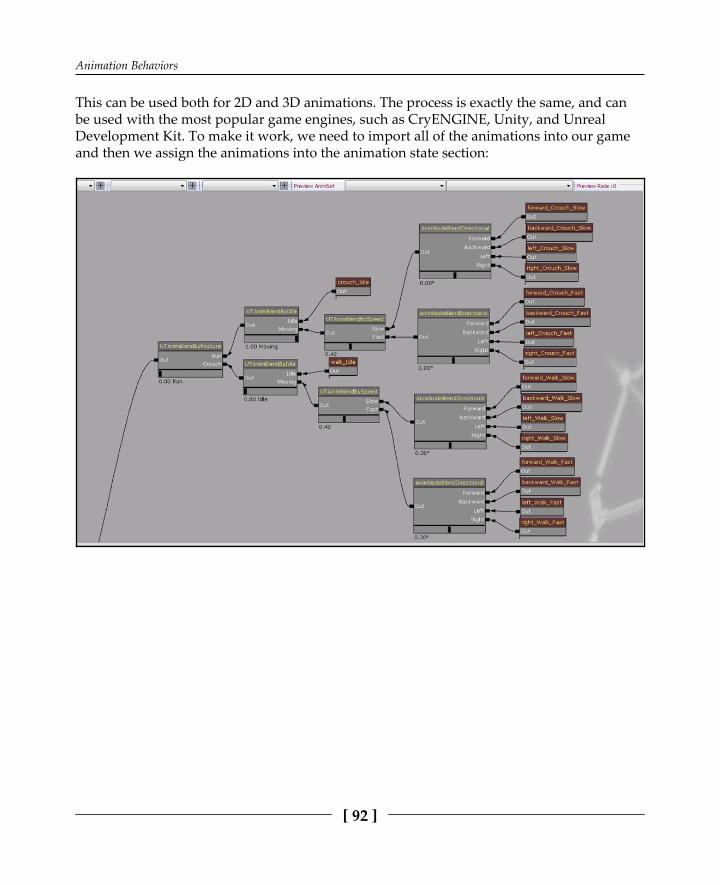
Animation Behaviors
[ 92 ]
This can be used both for 2D and 3D animations. The process is exactly the same, and canbe used with the most popular game engines, such as CryENGINE, Unity, and UnrealDevelopment Kit. To make it work, we need to import all of the animations into our gameand then we assign the animations into the animation state section:
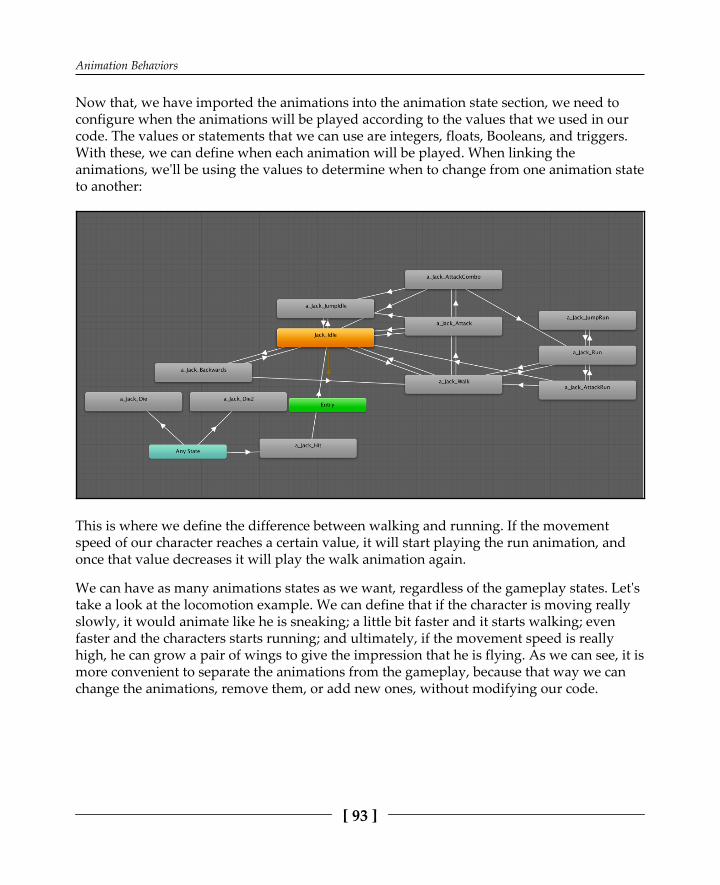
Animation Behaviors
[ 93 ]
Now that, we have imported the animations into the animation state section, we need toconfigure when the animations will be played according to the values that we used in ourcode. The values or statements that we can use are integers, floats, Booleans, and triggers.With these, we can define when each animation will be played. When linking theanimations, we'll be using the values to determine when to change from one animation stateto another:
This is where we define the difference between walking and running. If the movementspeed of our character reaches a certain value, it will start playing the run animation, andonce that value decreases it will play the walk animation again.
We can have as many animations states as we want, regardless of the gameplay states. Let'stake a look at the locomotion example. We can define that if the character is moving reallyslowly, it would animate like he is sneaking; a little bit faster and it starts walking; evenfaster and the characters starts running; and ultimately, if the movement speed is reallyhigh, he can grow a pair of wings to give the impression that he is flying. As we can see, it ismore convenient to separate the animations from the gameplay, because that way we canchange the animations, remove them, or add new ones, without modifying our code.

Animation Behaviors
[ 94 ]
Now let's move on to the example. Using all the topics that we have explored in theprevious chapters, we'll configure our character to animate according to the gameplaybehavior and the environment. We start by importing the model and all the animations intoour game. Then we create a new animation state machine; in this case it's called animator.After that, we just need to assign that animation state machine to our character:

Animation Behaviors
[ 95 ]
The model that we import into the game ideally should be in a neutral pose, such as the T-pose (demonstrated on the preceding screenshot). Then we import the animations and addthem into the Animator Controller.

Animation Behaviors
[ 96 ]
Now, if we click on the character and open the animation state machine that we created, itwill be empty. That is normal, because we need to manually add the animations that wewant to use:

Animation Behaviors
[ 97 ]
Once we have done this, we'll need to organize everything to make it easy to link theanimations:
So, we have separated the different animations taking in consideration gameplay statessuch as IDLE, ATTACK, JUMP, LOCOMOTION, and DAMAGE, as shown in precedingdiagram. We have two distinct animations for the IDLE state and another two forATTACK. We want them to play in a random order, and separate from the gameplay code,so we can add as many animations we want there to add more diversity. Inside of thelocomotion state, we have two separate groups, walking STRAIGHT and CROUCH. Wehave chosen to include both groups in the locomotion state because they will animateaccording to the position of the movement joystick.

Animation Behaviors
[ 98 ]
Now, we can start linking the animations, and at this point we can forget about how theanimations will be activated and focus only on the play order:
Once we have all the animations linked in the desired order, we can start defining how theywill be played. At this point, we need to take a look at the character code and use thevariables to change the animations. In our code, we have variables that accesses theanimation state machine. In this case, they are the Animator, Health and Stamina integervalues, movementSpeed, rotationSpeed, maxSpeed, jumpHeight, jumpSpeed andcurrentSpeed as float values, and finally a Boolean variable to check whether the player isalive:
public Animator characterAnimator; public int Health; public int Stamina; public float movementSpeed; public float rotationSpeed; public float maxSpeed; public float jumpHeight;
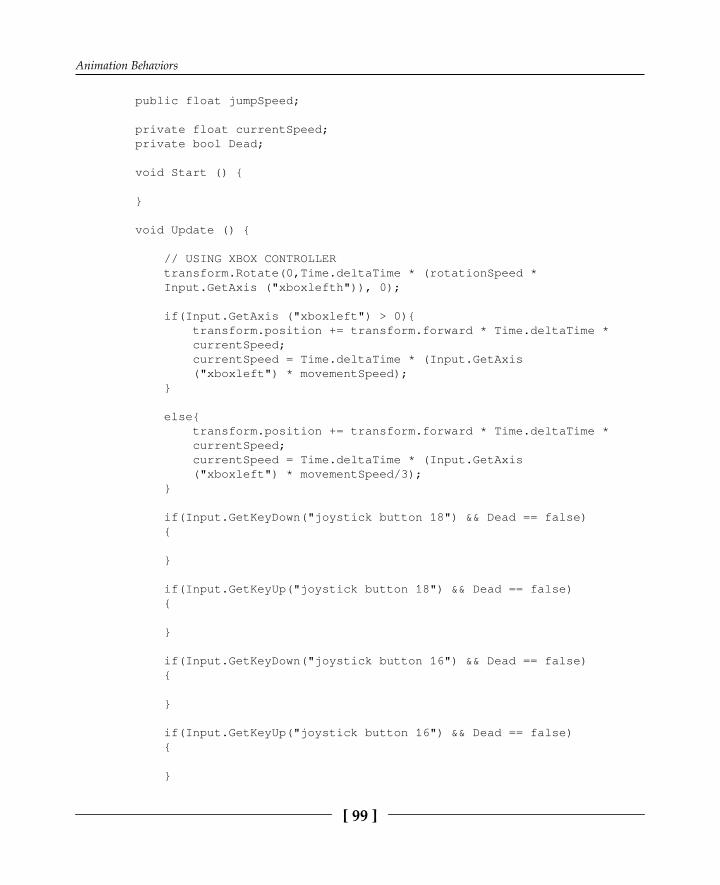
Animation Behaviors
[ 99 ]
public float jumpSpeed;
private float currentSpeed; private bool Dead;
void Start () {
}
void Update () {
// USING XBOX CONTROLLER transform.Rotate(0,Time.deltaTime * (rotationSpeed * Input.GetAxis ("xboxlefth")), 0);
if(Input.GetAxis ("xboxleft") > 0){ transform.position += transform.forward * Time.deltaTime * currentSpeed; currentSpeed = Time.deltaTime * (Input.GetAxis ("xboxleft") * movementSpeed); }
else{ transform.position += transform.forward * Time.deltaTime * currentSpeed; currentSpeed = Time.deltaTime * (Input.GetAxis ("xboxleft") * movementSpeed/3); }
if(Input.GetKeyDown("joystick button 18") && Dead == false) {
}
if(Input.GetKeyUp("joystick button 18") && Dead == false) {
}
if(Input.GetKeyDown("joystick button 16") && Dead == false) {
}
if(Input.GetKeyUp("joystick button 16") && Dead == false) {
}

Animation Behaviors
[ 100 ]
if(Health <= 0){ Dead = true; } }
Let's start passing these values into the animation state machine. The movement and thecurrentSpeed value of the character are controlled by the left analog joystick, so if wepush the joystick just a little bit, the character should play the walk animation. If we push itall the way it should play the run animation.
In the Animator section, we can choose between four parameters, and for the locomotion ofthe character we have chosen Float. We now need to link this value with the currentSpeedvariable that we have in our code. We will assign this at the beginning of the Updatefunction:
public Animator characterAnimator; public int Health; public int Stamina; public float movementSpeed; public float rotationSpeed; public float maxSpeed; public float jumpHeight; public float jumpSpeed;
private float currentSpeed; private bool Dead;
void Start () {
}
void Update () {
// Sets the movement speed of the animator, to change from idle to walk and walk to run characterAnimator.SetFloat("currentSpeed",currentSpeed);
// USING XBOX CONTROLLER transform.Rotate(0,Time.deltaTime * (rotationSpeed *

Animation Behaviors
[ 101 ]
Input.GetAxis ("xboxlefth")), 0);
if(Input.GetAxis ("xboxleft") > 0){ transform.position += transform.forward * Time.deltaTime * currentSpeed; currentSpeed = Time.deltaTime * (Input.GetAxis ("xboxleft") * movementSpeed); }
else{ transform.position += transform.forward * Time.deltaTime * currentSpeed; currentSpeed = Time.deltaTime * (Input.GetAxis ("xboxleft") * movementSpeed/3); }
if(Input.GetKeyDown("joystick button 18") && Dead == false) {
}
if(Input.GetKeyUp("joystick button 18") && Dead == false) {
}
if(Input.GetKeyDown("joystick button 16") && Dead == false) {
}
if(Input.GetKeyUp("joystick button 16") && Dead == false) {
}
if(Health <= 0){ Dead = true; } }
We've already connected the two parameters. This way, the animation state machine canuse the same value of the currentSpeed found in the code. We gave it exactly the samename in the Animator section that we have in the code. It's not necessary, but it makes iteasier to understand which values they represent.

Animation Behaviors
[ 102 ]
So at this point, we can start defining the values of the links that connect the locomotionanimations of the character. In this case, we can click on the link and a new window willopen so we can add the values that will change the animations from one state to another:

Animation Behaviors
[ 103 ]
We can also click on the animation that we want to configure, such as the IDLE animation,and then a new window opens with all the animations connected to this one. We can selectthe link that we want to allow the next animation to play. This is demonstrated in thefollowing screenshot:

Animation Behaviors
[ 104 ]
We have clicked on idle to walk and added the condition that we previously created,currentSpeed:
Here, we can choose if the value needs to be Greater or Less than the desired value that willstart playing the next animation. For this example, we have set the value to be greater than0.1, so as soon as the character starts moving, it will stop the IDLE animation and play theWALK animation. We don't need to write anything inside the code because the animationstate machine acts independently to the code:

Animation Behaviors
[ 105 ]
However, because we have another animation playing after the WALK animation, we needto set a limit value for the WALK animation. In this case, let's assume that our characterstarts running when the currentSpeed is at 5; this means that our character stops walkingat 4.9. So, we are going to add another condition here that tells to our character that he stopswalking once his currentSpeed reaches 4.9:
Now that we have defined when the character starts walking, we also need to do theinverse, to define when it's time to stop walking and play the IDLE animation. We need toremember that this does not affect the gameplay, so it means that if we start the game at thispoint, the character will start playing the WALK animation because we have already setthat to happen. But even if we hadn't, the character would move in the environment evenwithout the animation. We are simply using the values that are stored in our code toconnect with the animation states, and we need to define what animation will be played at acertain value. If we forget to set that value to all animations, the character will still performthe behavior, but without the correct animation. So with that said, we need to check if allthe links have conditions assigned to them.

Animation Behaviors
[ 106 ]
Now to make the character go back to the IDLE animation once he stops moving, we clickon the link that goes from the WALK to IDLE, and we add a new condition that expresses ifthe currentSpeed is Less than 0.1, he stops playing the WALK animation and starts playingthe IDLE animation:
Now we can do this for the rest of the animations that use the currentSpeed value andfinish the Locomotion states. Once we have all of that ready, we can move on to theCrouch animations. They use the currentSpeed value as well, but we need to have anadditional value that invalidates the WALK animation and enables the Crouch animation.There are two ways of doing this: by pressing a Crouch button at the same time that wemove forward, or to define zones on the map where the character goes directly to CROUCHmode. For this example, and because we are working on an AI character, we'll be using thesecond option and define zones on the map that will make the character enter CROUCHmode:
Animation Behaviors
[ 107 ]
In this example, let's assume that the character shouldn't be walking on the grass, and forthat reason he tries to hide by crouching. We could also choose a small location that isimpossible to enter if he was walking upright, and for that reason the characterautomatically starts to walk in the crouch position.
So, to do this we need to create trigger positions on our map that change the animationsaccording to the position that the character is currently in. In the code, we create a newBoolean variable and call it steppingGrass, right after the line where we connect thecurrentSpeed value with the animation state machine. We are going to add a new linethat connects this Boolean to a new parameter that we are going to create on the animationstate machine as well. We can start by creating the new parameter:
In our code, we are going to add collision detection that will turn on this value once ourcharacter is on the grass, and turn it off soon as he leaves that area:
public Animator characterAnimator; public int Health; public int Stamina; public float movementSpeed; public float rotationSpeed; public float maxSpeed; public float jumpHeight; public float jumpSpeed;
private float currentSpeed; private bool Dead; private bool steppingGrass;
void Start () {
}
void Update () {
// Sets the movement speed of the animator, to change from idle to walk and walk to run characterAnimator.SetFloat("currentSpeed",currentSpeed);
Animation Behaviors
[ 108 ]
// Sets the stepping grass Boolean to the animator value characterAnimator.SetBool("steppingGrass",steppingGrass);
// USING XBOX CONTROLLER transform.Rotate(0,Time.deltaTime * (rotationSpeed * Input.GetAxis ("xboxlefth")), 0);
if(Input.GetAxis ("xboxleft") > 0){ transform.position += transform.forward * Time.deltaTime * currentSpeed; currentSpeed = Time.deltaTime * (Input.GetAxis ("xboxleft") * movementSpeed); }
else{ transform.position += transform.forward * Time.deltaTime * currentSpeed; currentSpeed = Time.deltaTime * (Input.GetAxis ("xboxleft") * movementSpeed/3); }
if(Input.GetKeyDown("joystick button 18") && Dead == false) {
}
if(Input.GetKeyUp("joystick button 18") && Dead == false) {
}
if(Input.GetKeyDown("joystick button 16") && Dead == false) {
}
if(Input.GetKeyUp("joystick button 16") && Dead == false) {
}
if(Health <= 0){ Dead = true; } }
void OnTriggerEnter(Collider other) {

Animation Behaviors
[ 109 ]
if(other.gameObject.tag == "Grass") { steppingGrass = true; } }
void OnTriggerExit(Collider other) {
if(other.gameObject.tag == "Grass") { steppingGrass = false; } }
Now, we can proceed and add this new parameter to the CROUCH animations. We start bychoosing the link between the IDLE to CROUCH animation and set the currentSpeedvalue and the new steppingGrass parameter. Because we have a Crouch Idle animation,even if the character is not moving, it will play that animation instead of the normal IDLEanimation:
We have set the currentSpeed to be less than 0.1, which means that the character is notmoving, and the steppingGrass set to true, which stops the normal IDLE animation andstarts playing the Crouch Idle animation. The rest of the CROUCH animations follow thesame principles as the WALK and RUN animation. Once the character starts to move, thatrepresents the currentSpeed value, the Crouch Idle stops and the Crouch Walk plays. Atthe end, we link Crouch Idle to IDLE and Crouch Walk to WALK, making sure that if thecharacter is walking away from the grass, the WALK animation doesn't stop and thecharacter keeps walking upright.

Animation Behaviors
[ 110 ]
Regarding the attacks, we will be using integers to randomize a number between 1 to 10,and if the number is higher than 5 it will play the KICK animation. If the number is below 5it will play the PUNCH animation. So, when the character enters fight mode against anopponent, it will play different attacks. Once again, using this method allows us to addmore animations in the future, increasing the diversity of attacks.
Once again, we create a new parameter, and for this example we are going to create aninteger parameter and call it attackRandomNumber:
In our code, we are going to add a new variable and give it the same name (it is notnecessary to create it with the same name, but it does make everything organized). Rightafter the lines with which we previously connected the variables with the animation statemachine parameters, we are going to create a new one that connects to theattackRandomNumber value. Then we create a function that randomizes a number once thecharacter enters fight mode:
public Animator characterAnimator; public int Health; public int Stamina; public float movementSpeed; public float rotationSpeed; public float maxSpeed; public float jumpHeight; public float jumpSpeed;
private float currentSpeed; private bool Dead; private bool steppingGrass; private int attackRandomNumber;
void Start () {
}
void Update () {
// Sets the movement speed of the animator, to change from idle to walk and walk to run characterAnimator.SetFloat("currentSpeed",currentSpeed);

Animation Behaviors
[ 111 ]
// Sets the stepping grass Boolean to the animator value characterAnimator.SetBool("steppingGrass",steppingGrass);
// Sets the attackrandomnumber to the animator value characterAnimator.SetInteger("attackRandomNumber", attackRandomNumber);
// USING XBOX CONTROLLER transform.Rotate(0,Time.deltaTime * (rotationSpeed * Input.GetAxis ("xboxlefth")), 0);
if(Input.GetAxis ("xboxleft") > 0){ transform.position += transform.forward * Time.deltaTime * currentSpeed; currentSpeed = Time.deltaTime * (Input.GetAxis ("xboxleft") * movementSpeed); }
else{ transform.position += transform.forward * Time.deltaTime * currentSpeed; currentSpeed = Time.deltaTime * (Input.GetAxis ("xboxleft") * movementSpeed/3); }
if(Input.GetKeyDown("joystick button 18") && Dead == false) { fightMode(); }
if(Input.GetKeyUp("joystick button 18") && Dead == false) {
}
if(Input.GetKeyDown("joystick button 16") && Dead == false) {
}
if(Input.GetKeyUp("joystick button 16") && Dead == false) {
}
if(Health <= 0){ Dead = true; }

Animation Behaviors
[ 112 ]
}
void OnTriggerEnter(Collider other) {
if(other.gameObject.tag == "Grass") { steppingGrass = true; } }
void OnTriggerExit(Collider other) {
if(other.gameObject.tag == "Grass") { steppingGrass = false; } }
void fightMode () { attackRandomNumber = (Random.Range(1, 10)); }
After doing this, we need to assign the values to the animations. The process is the same asthe previous animations, only this time we are using a different value. IfattackRandomNumber is higher than 1, it means that he is attacking, and the attackanimations should start playing. Because we have two different attacks, we decided to usethem randomly, but if it was a player controlling the character, we could manually assignthe number inside the code, and when the player pressed a specific button on the gamepad,the character would punch or kick.
Smooth transitionsAnother important aspect that is worth mentioning is the smooth transition betweenanimations. It is very important to maintain the integrity of the animations, so that everyaction performed by the character looks fluid, helping the virtual immersion of the player.

Animation Behaviors
[ 113 ]
On this subject, 2D and 3D animations have considerable differences. If we are using 2Dsprites, we need to draw the necessary frames that will be used for every transition, andevery time we want the character to change from one animation to another, the transitionanimation will be played.
On the other hand, with 3D characters we can use the bone structure to create thetransitions automatically, where the coordinates for each bone will move from the previousanimation to the new one. Even if we choose to use the bone structure to help create thetransitions, sometimes it might be necessary, or it would be a better option, to manuallycreate new animations that will be used as transitions. This is a common process if thecharacter is using an object or weapon that needs to be saved before playing the nextanimation.

Animation Behaviors
[ 114 ]
To create a smooth transition, we need the first frame of the next animation to be equal tothe last frame of the current animation. We need to start the next animation from the sameposition of the current one. This is crucial to avoid noticing any cut in between thetransition. Then we can use the game engine to our advantage and use the transition systemfor the animations. This will help to create a smoother transition. As we can see on theimage above, we can adjust how long the transition will take, we can make a quicktransition or a longer one, always experimenting with what looks better for the results thatwe want.
Sometimes we would need to sacrifice a smoother transition in order to have a bettergameplay experience. One example of this is during a fighting game, where it’s moreimportant to have quick transitions rather than smooth ones, and for that reason we need totake in consideration the time that it takes for the character to change from one state toanother.
SummaryThis chapter has described how to use 2D or 3D animations to complement the actions of acharacter. Animations play an important part in the development of a believable AIcharacter, and by using them correctly, the character can transmit to the player a realsensation that the character is alive and that they react autonomously. Even if the characterhas limited actions, we can use animations to fake or hide some of them, giving theimpression that it is reacting that way because it thinks for itself.
In the next chapter, we'll be talking about navigation behavior and pathfinding, that is howto program the AI character to walk towards the desired position and choose the best route.

6Navigation Behavior and
PathfindingIn this chapter, we’ll be explaining in detail how the AI character moves around andunderstands where he can go and where he cannot. For different types of games, there aredifferent solutions and we’ll be addressing those solutions in this chapter, exploringcommon methods that can be used to develop a character that can move correctly on themap. Also we want our character to calculate the best trajectory to arrive at a certaindestination, avoiding obstacles and accomplishing goals while doing it. We will introducehow to create a simple navigation behavior, then we will move on to a point to pointmovement and finally explore in depth how to create a more complex point to pointmovement (RTS/RPG system).
Navigation behaviorWhen we talk about navigation behavior, we are referring to the actions of a character thatis confronted with a situation where they need to calculate where to go or what to do. A map can have many points where it is necessary to jump or climb stairs in order to arrive atthe final destination. The character should know how to use these actions to keep movingcorrectly; otherwise, he will fall down a hole or keep walking into a wall where he shouldbe climbing some stairs. To avoid that, we need to plan all of the possibilities available forthe character while he is moving, making sure that he can jump or perform any othermovement necessary to keep moving into the right direction.

Navigation Behavior and Pathfinding
[ 116 ]
Choosing a new directionOne important aspect that the AI character should have is choosing a new direction whenhe is confronted by an object that is blocking his way and that he cannot pass through. Thecharacter should be aware of the objects that are in front of him and, if he cannot keepmoving forward in that direction, he should be able to choose a new direction, avoidcolliding against the object and keep walking away from it.
Avoid walking against wallsIf our character is facing a wall, he will need to know that he cannot pass through that walland should choose another option. Unless we allow the character to climb the wall ordestroy it, the character will need to face a new direction that is not blocked and walk inthat new unblocked direction.
We will start with a simple approach that i can be often very useful, and is perhaps the bestoption, depending on the type of game that we are creating. In the example that we'll bedemonstrating, the character in question needs to keep moving around the level just like thePac-Man enemies. Starting with a basic example, we give our character the freedom tochoose which direction to move in, and later on we will add more information to ourcharacter's AI so he can pursue a specific objective on the map using this method.

Navigation Behavior and Pathfinding
[ 117 ]
We have created a grid and painted in black the squares where the character AI is notallowed to walk. Now we are going to program our character to move forward until hefinds a black square in front of him; then, he will need to choose to turn right or left, makingthat decision randomly. This will allow our character to move freely on the map withoutany specific pattern. The code for this is as follows:
public float Speed; public float facingLeft; public float facingRight; public float facingBack; public static bool availableLeft; public static bool availableRight;
public bool aLeft; public bool aRight;
void Start () {
}
void Update () {
aLeft = availableLeft; aRight = availableRight;
transform.Translate(Vector2.up * Time.deltaTime * Speed);
if(facingLeft > 270) { facingLeft = 0; }
if(facingRight < -270) { facingRight = 0; }
}
void OnTriggerEnter2D(Collider2D other) {
if(other.gameObject.tag == "BlackCube") { if(availableLeft == true && availableRight == false)

Navigation Behavior and Pathfinding
[ 118 ]
{ turnLeft(); }
if(availableRight == true && availableLeft == false) { turnRight(); }
if(availableRight == true && availableLeft == true) { turnRight(); }
if(availableRight == false && availableLeft == false) { turnBack(); } } }
void turnLeft () { facingLeft = transform.rotation.eulerAngles.z + 90; transform.localRotation = Quaternion.Euler(0, 0, facingLeft); }
void turnRight () { facingRight = transform.rotation.eulerAngles.z - 90; transform.localRotation = Quaternion.Euler(0, 0, facingRight); }
void turnBack () { facingBack = transform.rotation.eulerAngles.z + 180; transform.localRotation = Quaternion.Euler(0, 0, facingBack); }
For this example, we added colliders to the black squares to let the character know when heis touching them. This way, he will keep moving until colliding with a black square, and atthat point there will be three options: turn left, turn right, or go back. To know whichdirections are unblocked, we created two separate colliders and added them to ourcharacter. Each collider has a script that gives the information to the character to let it knowwhether that side is free or not.

Navigation Behavior and Pathfinding
[ 119 ]
The availableLeft Boolean corresponds to the left side, and availableRightcorresponds to the right side. If the left or right collider is in contact with the black square,the value is set to false. Otherwise, it is set to true. We are using aLeft and aRightsimply to check in real time if the values are working correctly. This way, we can seewhether there are any issues:
public bool leftSide; public bool rightSide;
void Start () { if(leftSide == true) { rightSide = false; }
if(rightSide == true) { leftSide = false; } } void Update () { }
void OnTriggerStay2D(Collider2D other) {
if(other.gameObject.tag == "BlackCube") { if(leftSide == true && rightSide == false) { Character.availableLeft = false; }
if(rightSide == true && leftSide == false) { Character.availableRight = false; } } }
void OnTriggerExit2D(Collider2D other) {
if(other.gameObject.tag == "BlackCube") { if(leftSide == true)

Navigation Behavior and Pathfinding
[ 120 ]
{ Character.availableLeft = true; }
if(rightSide == true) { Character.availableRight = true; } }}
When we start the game, we can see that the character AI starts moving around on thewhite tiles and turning left or right every time he faces a black tile:
But if we let the game run for a couple of minutes, we realize that the character keepsmaking the same decisions, and for that reason he will just be walking around a smallportion of the map. This is due to the fact that he only makes a decision when colliding witha black tile, ignoring the other opportunities to turn:

Navigation Behavior and Pathfinding
[ 121 ]
As we can see in the preceding image, the character always follows the same pattern, not anideal situation if we want him to constantly choose different paths.
Choosing an alternative pathOur character successfully chooses a new direction every time that he approaches a wall,and now we want him to be able to move around all over the map. To make that happen,we are going to add more information into the character to let him know that if there's anavailable option to turn to the left or right, even if the forward path is free, the character isfree to turn. We can use probabilities to determine whether the character is going to turn ornot, and for this example we have chosen to give a 90% chance of choosing a new directionif one is available. That way, we can see the results happening very quickly:
public float Speed; public float facingLeft; public float facingRight; public float facingBack; public static bool availableLeft; public static bool availableRight;
public static int probabilityTurnLeft; public static int probabilityTurnRight;public int probabilitySides;
public bool forwardBlocked;
public bool aLeft; public bool aRight;
After adding the variables we can move on to the Start method, everything that will becalled on the first frame of the game.
void Start () { availableLeft = false; availableRight = false; probabilityTurnLeft = 0; probabilityTurnRight = 0; }

Navigation Behavior and Pathfinding
[ 122 ]
Then we can move on the the Update method, everything that will be called every frame ofthe game.
void Update () { aLeft = availableLeft; aRight = availableRight;
transform.Translate(Vector2.up * Time.deltaTime * Speed);
if(facingLeft > 270) { facingLeft = 0; }
if(facingRight < -270) { facingRight = 0; }
if (forwardBlocked == false) { if (availableLeft == true && availableRight == false) { if (probabilityTurnLeft > 10) { turnLeft(); } }
if (availableLeft == false && availableRight == true) { if (probabilityTurnRight > 10) { turnRight(); } }
if (availableLeft == true && availableRight == true) { probabilityTurnLeft = 0; probabilityTurnRight = 0; } }
}

Navigation Behavior and Pathfinding
[ 123 ]
Here we add the trigger functions, what happens when he enters/collides against a 2Dobject:
void OnTriggerEnter2D(Collider2D other) {
if(other.gameObject.tag == "BlackCube") { forwardBlocked = true;
if(availableLeft == true && availableRight == false) { turnLeft(); }
if(availableRight == true && availableLeft == false) { turnRight(); }
if(availableRight == true && availableLeft == true) { probabilitySides = Random.Range(0, 1); if(probabilitySides == 0) { turnLeft(); }
if(probabilitySides == 1) { turnRight(); }
}
if(availableRight == false && availableLeft == false) { turnBack(); } } }
void OnTriggerExit2D(Collider2D other) { forwardBlocked = false; }

Navigation Behavior and Pathfinding
[ 124 ]
void turnLeft () { probabilityTurnLeft = 0; facingLeft = transform.rotation.eulerAngles.z + 90; transform.localRotation = Quaternion.Euler(0, 0, facingLeft); }
void turnRight () { probabilityTurnRight = 0; facingRight = transform.rotation.eulerAngles.z - 90; transform.localRotation = Quaternion.Euler(0, 0, facingRight); }
void turnBack () { facingBack = transform.rotation.eulerAngles.z + 180; transform.localRotation = Quaternion.Euler(0, 0, facingBack); }
We have added four new variables to our character AI script, the probabilityTurnLeftstatic variable, which calculates the probability of the character turning left;probabilityTurnRight, which calculates the probability of the character turning right; anew probability generator, probabilitySides, which will decide which way to turn whenboth are available and the forward path is blocked; and finally, a Boolean,forwardBlocked, to check whether the forward path is blocked or not. The character needsto check whether the forward path is blocked to know if he can turn or not. This willprevent the character from turning more than once when he is facing a black tile.

Navigation Behavior and Pathfinding
[ 125 ]
In the script that controls the side triggers, we added a new variable calledprobabilityTurn, which gives the character information about the probabilities. Everytime the trigger exits the collider, he calculates the probability and sends a message to thecharacter telling it that the side is free and he can make the decision to turn to that side:
public bool leftSide; public bool rightSide; public int probabilityTurn;
void Start () { if(leftSide == true) { rightSide = false; }
if(rightSide == true) { leftSide = false; } }
void Update () {
}
void OnTriggerEnter2D(Collider2D other) { if(other.gameObject.tag == "BlackCube") { if(leftSide == true && rightSide == false) { Character.availableLeft = false; probabilityTurn = 0; Character.probabilityTurnLeft = probabilityTurn; }
if(rightSide == true && leftSide == false) { Character.availableRight = false; probabilityTurn = 0; Character.probabilityTurnRight = probabilityTurn; } } }
Navigation Behavior and Pathfinding
[ 126 ]
void OnTriggerStay2D(Collider2D other) {
if(other.gameObject.tag == "BlackCube") { if(leftSide == true && rightSide == false) { Character.availableLeft = false; probabilityTurn = 0; Character.probabilityTurnLeft = probabilityTurn; }
if(rightSide == true && leftSide == false) { Character.availableRight = false; probabilityTurn = 0; Character.probabilityTurnRight = probabilityTurn; } } }
void OnTriggerExit2D(Collider2D other) {
if(other.gameObject.tag == "BlackCube") { if(leftSide == true) { probabilityTurn = Random.Range(0, 100); Character.probabilityTurnLeft = probabilityTurn; Character.availableLeft = true; }
if(rightSide == true) { probabilityTurn = Random.Range(0, 100); Character.probabilityTurnRight = probabilityTurn; Character.availableRight = true; } } }
If we play the game, we can see the new changes implemented to the character. Now he isunpredictable, choosing different paths every time and moving all around the map,contrary to what we had before. Once this is completed, we can create as many maps as wewish because the character will always find the right path and avoid colliding with thewalls.

Navigation Behavior and Pathfinding
[ 127 ]
Testing on a bigger map, the character reacts the same way, moving around the whole map.This means that our main objective has been completed and now we can easily create newmaps and use the character as the main enemy of the game so that he will always movedifferently and does not follow any pattern.
We can adjust the percentage values according to the way we want the character to react,and also implement more variables to make it unique to our game idea.

Navigation Behavior and Pathfinding
[ 128 ]
Point to point movementNow that we understand the basics of how to create a character that can move freely in amaze genre game, we will take a look at the opposite: how to create a movement patternfrom point to point. This is also an important aspect of AI movement, because later on wecan combine both techniques to create a character that goes from one point to another,avoiding walls and obstacles.
Tower defense genreOnce again, the principle that we will be using to make our character move from one pointto another can be applied to both 2D and 3D games. In this example, we'll explore how tocreate the main characteristic of a Tower Defense game: the enemy pattern. The objective isto have the enemies spawning at a start point and following a path so they can reach thefinal point. The enemies in a tower defense game usually just have this in mind, so it is aperfect example to test how to create point to point movement.
A Tower Defense game usually consists of two areas: the area where the enemies walk fromtheir start position to the final position, and the area where the player is allowed to buildtowers that attack the enemies, trying to stop them reaching the final position. Because theplayer is not allowed to build anything inside the path where the enemies will pass, the AIdoes not need to be aware of its surroundings because it will always be free to pass through,and because of that we only need to focus on the point to point movement of the characters.

Navigation Behavior and Pathfinding
[ 129 ]
After importing the map and characters that we'll be using in the game, we need toconfigure the waypoints that will be used by the character so they know where they need togo. We can do this by manually adding the coordinates into our code, but to simplify theprocess we'll create objects in the scene that will serve as waypoints and we delete the 3Dmesh because it won't be necessary.
Now we group all the waypoints that we have created and name the group waypoints.Once we have the waypoints in place and grouped together, we can start creating the codethat will tell our character how many waypoints it needs to follow. This code is very usefulbecause we can create different maps, using as many waypoints we need, without needingto update the character's code:
public static Transform[] points;
void Awake () { points = new Transform[transform.childCount]; for (int i = 0; i < points.Length; i++) { points[i] = transform.GetChild(i); } }
This code will be assigned to the group that we have created, and will count the number ofwaypoints that he has inside of it and ordering them.

Navigation Behavior and Pathfinding
[ 130 ]
The blue spheres that we can see in the preceding image represent the 3D meshes that wehave used as waypoints. For this example, the character will follow eight points until hefinishes the path. Now let's move on to the AI character code and see how we can make thecharacter move from point to point using the points that we have created.
We start by creating the basic functions of the character, the health and speed. Then we cancreate a new variable that will tell the character the next position that he needs to move to,and another variable that will be used show which waypoint it needs to follow:
public float speed; public int health;
private Transform target; private int wavepointIndex = 0;
Now we have the basic variables that are needed to make an enemy character move frompoint to point until he dies or reaches the end. Let's see how to use these to make itplayable:
public float speed; public int health;
private Transform target; private int wavepointIndex = 0;
void Start () { target = waypoints.points[0]; speed = 10f; }
void Update () { Vector3 dir = target.position - transform.position; transform.Translate(dir.normalized * speed * Time.deltaTime, Space.World);
if(Vector3.Distance(transform.position, target.position) <= 0.4f) { GetNextWaypoint(); } }
void GetNextWaypoint() {

Navigation Behavior and Pathfinding
[ 131 ]
if(wavepointIndex >= waypoints.points.Length - 1) { Destroy(gameObject); return; }
wavepointIndex++; target = waypoints.points[wavepointIndex]; }
In the Start function, the first waypoint that the characters needs to follow is the waypointnumber zero, that is, the first on the Transform list that we created in the waypoints code.Also, we have determined the velocity of the character, and for this example we havechosen 10f.
Then in the Update function the character will calculate the distance between the nextposition and the current position, using the Vector 3 dir. The character will constantly bemoving, so we have created a line of code that serves as movement for the character,transform.Translate in this case. Knowing the distance and the speed information, thecharacter will know how far it is from the next position, and once he reaches the desirabledistance from that point, he can then move on to the next point. To make this happen, wecreate an if statement that will tell to the character that, if he reaches 0.4f (for this example)from the point that he is moving towards, it means that he has already arrived at thatdestination and can start moving on to the next point, GetNextWaypoint().
In the GetNextWaypoint() function, the character will try to confirm if he has arrived atthe final destination. If the character has arrived at the final waypoint, then the object can bedestroyed; if not, it can continue to the next waypoint. Here, wavepointIndex++ will addone number to the index every time the character arrives at a waypoint, moving from0>1>2>3>4>5, and so on.

Navigation Behavior and Pathfinding
[ 132 ]
Now we assign the code to our character and place the character on the start position andtest the game to see if it is working properly:
Everything is working as expected: the character will move from one point to another untilhe arrives at the last one, and then he disappears from the game. However, there are stillsome improvements we need to make, because the character is facing always the samedirection; he does not rotate when he changes direction. Let's take the opportunity to alsocreate the instantiating code that will keep spawning enemies into the map.
In the same way we created an object to define the waypoint, we'll do the same for the startposition, creating an object that will simply serve as position, so we can spawn the enemiesfrom that point. To make that happen, we create a simple code just to test the gameplaywithout it being necessary to manually add the characters to the game:
public Transform enemyPrefab; public float timeBetweenWaves = 3f; public Transform spawnPoint;
private float countdown = 1f; private int waveNumber = 1;
void Update () { if(countdown <= 0f)

Navigation Behavior and Pathfinding
[ 133 ]
{ StartCoroutine(SpawnWave()); countdown = timeBetweenWaves; }
countdown -= Time.deltaTime; }
IEnumerator SpawnWave () { waveNumber++;
for (int i = 0; i < waveNumber; i++) { SpawnEnemy(); yield return new WaitForSeconds(0.7f); } }
void SpawnEnemy() { Instantiate(enemyPrefab, spawnPoint.position, spawnPoint.rotation); }
At this moment, we already have a wave spawner working as well, spawning a new waveof enemies every three seconds. This will help us visualize the gameplay that we arecreating for our AI character. We have five variables. enemyPrefab is the character that weare creating, so the code can spawn him. timeBetweenWaves represents the time that it willwait before spawning a new wave. The spawnPoint variable determines the positionwhere the character will appear, the start position. Here, countdown is the time that wewait before the first wave appears. waveNumber is the last variable, and serves to count thecurrent wave (usually, this is used to differentiate the enemy difficulty from one wave toanother).
If we run the game now, we can see that the number of characters appearing in the game ismuch more than just one, increasing every three seconds. Doing this at the same time as wedevelop our AI character is very useful, because if our characters have special abilities or ifthey have different speeds, we can fix it right away while we are developing them. Becausewe are just creating a small example, it is expected to work smoothly without any bugs.

Navigation Behavior and Pathfinding
[ 134 ]
Let's test it out now to see what happens:
It looks much more interesting now! We can see that the point to point movement isworking as intended, and all the characters spawned into the game know where they needto go, following the right path.
We can now update the character code so it can turn to face the next point position whilegoing around corners. To create this, we add a few more lines to the enemy code:
public float speed; public int health; public float speedTurn;
private Transform target; private int wavepointIndex = 0;
void Start () { target = waypoints.points[0]; speed = 10f; speedTurn = 0.2f; }
void Update ()

Navigation Behavior and Pathfinding
[ 135 ]
{ Vector3 dir = target.position - transform.position; transform.Translate(dir.normalized * speed * Time.deltaTime, Space.World);
if(Vector3.Distance(transform.position, target.position) <= 0.4f) { GetNextWaypoint(); }
Vector3 newDir = Vector3.RotateTowards(transform.forward, dir, speedTurn, 0.0F);
transform.rotation = Quaternion.LookRotation(newDir); }
void GetNextWaypoint() { if(wavepointIndex >= waypoints.points.Length - 1) { Destroy(gameObject); return; }
wavepointIndex++; target = waypoints.points[wavepointIndex]; }
As we can see in the preceding code, we have added a new variable called speedTurn,which will represent the velocity of our character when turning, and in the start functionwe have determined the speed value as 0.2f. Then, in the update function, we calculate thevelocity by multiplying this number by Time.deltaTime, giving a constant valueregardless of the FPS number that the player is experiencing. Then we have created a newVector3 variable called newDir, which will make our character turn towards the targetposition.
Navigation Behavior and Pathfinding
[ 136 ]
Now if we test the game once more, we can see that the characters turn towards their nextpoint position:
At this point, we can see that the AI characters are reacting correctly, moving from point topoint as intended and turning towards their next position. Now we have the basics of atower defense game and, we could add unique code to create a new and enjoyable game.
Racing genrePoint to point movement is a method that can be applied to practically any game genre andit has been extensively used over the years. Our next example is a racing game, where theAI drivers use point to point movement to compete against the player. To create this, wewould need a road and a driver and then we'll place the waypoints on the road and tell ourAI driver to follow that path. It's very similar to what we have done before but with somebehavior differences in our character because we don’t want it to look rigid when he isturning and also there will be other drivers on the same map and they cannot overlap oneon top of another.

Navigation Behavior and Pathfinding
[ 137 ]
Without further ado let’s start, first we need to establish the map, which in this case is therace track:
After designing our race track, we need to define every point position that our drivers needto go to, and because we have a lot of curves, we need to create more point positions thanwe had before so that the car follows the road smoothly.
We have done the same process as before, creating objects inside the game and using themas position references only:

Navigation Behavior and Pathfinding
[ 138 ]
This is our map with the waypoints in place, and as we can see, there are more points on thecurves. This is very important if we want to achieve a smooth transition from one point toanother.
Now let's group all the waypoints again, and this time we'll create a different code. Insteadof creating a code that manages the waypoints, we will be implementing that calculationinside of our AI driver code and creating a simple code to apply to each waypoint to specifythe next position to follow.
There are many ways that we can develop our code, and depending onour preferences or the game genre that we are working on, some methodscan work better than others. In this case, we have found that using thecode we developed for our Tower Defense character does not fit with thisgame genre.
Starting with the AI driver code, we have used ten variables, as shown in the followingcode block:
public static bool raceStarted = false;
public float aiSpeed = 10.0f; public float aiTurnSpeed = 2.0f; public float resetAISpeed = 0.0f; public float resetAITurnSpeed = 0.0f;
public GameObject waypointController; public List<Transform> waypoints; public int currentWaypoint = 0; public float currentSpeed; public Vector3 currentWaypointPosition;
The first one, raceStarted, is a static Boolean that will tell our driver whether the race hasstarted. This takes into consideration the fact that the race only begins when the green lightappears; if not, raceStarted is set to false. Next, we have aiSpeed, which represents thevelocity of the car. This is a simplified version for test proposes; otherwise, we would needspeed functions to determine how fast can the car is going according to the gear that is set.aiTurnSpeed represents the velocity of the car when he is turning, how fast we want thecar to steer when he is facing a new direction. Next, we have the waypointController,which will be linked to the waypoints group; and the waypoints list, which will be takenfrom that group.

Navigation Behavior and Pathfinding
[ 139 ]
Here, currentWaypoint will tell our driver which waypoint number he is currentlyfollowing. The currentSpeed variable will show the current velocity of the car. Finally,currentWaypointPosition is the Vector 3 position of the waypoint that the car will befollowing:
void Start () { GetWaypoints(); resetAISpeed = aiSpeed; resetAITurnSpeed = aiTurnSpeed; }
In our start function, we have only three lines of code: GetWaypoints(), which willaccess all of the waypoints that exist inside of the group, and resetAISpeed andresetAITurnSpeed, which reset the speed values because they will influence the rigidbody placed on the car:
void Update () { if(raceStarted) { MoveTowardWaypoints(); } }
In the update function, we have a simple if statement that checks whether the race hasstarted or not. If the race has started, then he can proceed to the next step, which is the mostimportant for our AI driver, MoveTowardWaypoints(). For this example, we have notstated anything while the car is waiting for the green light, but we could have implementedthe engine starting and the pre-acceleration of the car, for example:
void GetWaypoints() { Transform[] potentialWaypoints = waypointController. GetComponentsInChildren<Transform>();
waypoints = new List<Transform>();
for each(Transform potentialWaypoint in potentialWaypoints) { if(potentialWaypoint != waypointController.transform) { waypoints.Add(potentialWaypoint);

Navigation Behavior and Pathfinding
[ 140 ]
} } }
Next, we have GetWaypoints(), which was instantiated in the Start function. Here, weaccess the waypointController group and retrieve all the position information regardingthe waypoints that are stored inside it. Because we will be ordering the waypoints in adifferent code, we don't need to do that here:
void MoveTowardWaypoints() { float currentWaypointX = waypoints[currentWaypoint].position.x; float currentWaypointY = transform.position.y; float currentWaypointZ = waypoints[currentWaypoint].position.z;
Vector3 relativeWaypointPosition = transform. InverseTransformPoint (new Vector3(currentWaypointX, currentWaypointY, currentWaypointZ)); currentWaypointPosition = new Vector3(currentWaypointX, currentWaypointY, currentWaypointZ);
Quaternion toRotation = Quaternion.LookRotation (currentWaypointPosition - transform.position); transform.rotation = Quaternion.RotateTowards (transform.rotation, toRotation, aiTurnSpeed);
GetComponent<Rigidbody>().AddRelativeForce(0, 0, aiSpeed);
if(relativeWaypointPosition.sqrMagnitude < 15.0f) { currentWaypoint++;
if(currentWaypoint >= waypoints.Count) { currentWaypoint = 0; } }
currentSpeed = Mathf.Abs(transform. InverseTransformDirection (GetComponent<Rigidbody>().velocity).z);
float maxAngularDrag = 2.5f; float currentAngularDrag = 1.0f; float aDragLerpTime = currentSpeed * 0.1f;
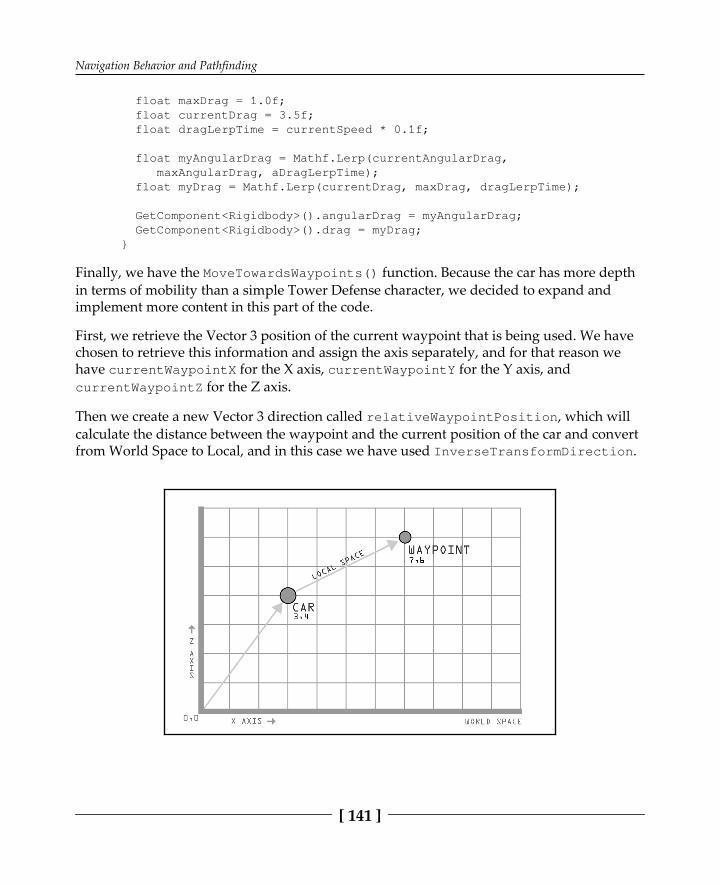
Navigation Behavior and Pathfinding
[ 141 ]
float maxDrag = 1.0f; float currentDrag = 3.5f; float dragLerpTime = currentSpeed * 0.1f;
float myAngularDrag = Mathf.Lerp(currentAngularDrag, maxAngularDrag, aDragLerpTime); float myDrag = Mathf.Lerp(currentDrag, maxDrag, dragLerpTime);
GetComponent<Rigidbody>().angularDrag = myAngularDrag; GetComponent<Rigidbody>().drag = myDrag; }
Finally, we have the MoveTowardsWaypoints() function. Because the car has more depthin terms of mobility than a simple Tower Defense character, we decided to expand andimplement more content in this part of the code.
First, we retrieve the Vector 3 position of the current waypoint that is being used. We havechosen to retrieve this information and assign the axis separately, and for that reason wehave currentWaypointX for the X axis, currentWaypointY for the Y axis, andcurrentWaypointZ for the Z axis.
Then we create a new Vector 3 direction called relativeWaypointPosition, which willcalculate the distance between the waypoint and the current position of the car and convertfrom World Space to Local, and in this case we have used InverseTransformDirection.

Navigation Behavior and Pathfinding
[ 142 ]
As we can see represented on the preceding graphic, we want to calculate the distance inlocal space between the car and the waypoint. This will tell to our driver if the waypoint isat his right or left side. This is recommended because the wheels command the car speedand they have an independent rotation value and if we kept working on this game, it wouldbe one feature that would still need to be developed.
To smooth the rotation between one waypoint to another, we have used the following code:
Quaternion toRotation = Quaternion.LookRotation (currentWaypointPosition - transform.position); transform.rotation = Quaternion.RotateTowards (transform.rotation, toRotation, aiTurnSpeed);
This is an updated version of what we used in the Tower Defense. It will make our carmove smoothly towards the waypoint that the car is traveling toward. This gives the effectof the car turning; otherwise, he would turn right away towards the waypoint and it wouldlook unrealistic:
As we can see, straight lines do not fit the genre that we are currently creating. It worksperfectly in other genres, like Tower Defense game, but for a racing game it is necessary toredefine the code to adjust to the situation that we are creating.
The rest of the code is exactly that, adjustments for the situation that we are creating, whichis a car moving on a race track. There are force elements such as drag, which is the frictionbetween the car and the road, represented in this code. When we turn the car, it will slideaccording to the velocity of the car at that moment, and these details are taken intoconsideration here, creating a more realistic point to point movement where we can see thatthe car is reacting according to physics.

Navigation Behavior and Pathfinding
[ 143 ]
This is the full code that we have used in our example:
public static bool raceStarted = false;
public float aiSpeed = 10.0f; public float aiTurnSpeed = 2.0f; public float resetAISpeed = 0.0f; public float resetAITurnSpeed = 0.0f;
public GameObject waypointController; public List<Transform> waypoints; public int currentWaypoint = 0; public float currentSpeed; public Vector3 currentWaypointPosition;
void Start () { GetWaypoints(); resetAISpeed = aiSpeed; resetAITurnSpeed = aiTurnSpeed; }
void Update () { if(raceStarted) { MoveTowardWaypoints(); } }
void GetWaypoints() { Transform[] potentialWaypoints = waypointController.GetComponentsInChildren<Transform>();
waypoints = new List<Transform>();
foreach(Transform potentialWaypoint in potentialWaypoints) { if(potentialWaypoint != waypointController.transform) { waypoints.Add(potentialWaypoint); } } }
void MoveTowardWaypoints()
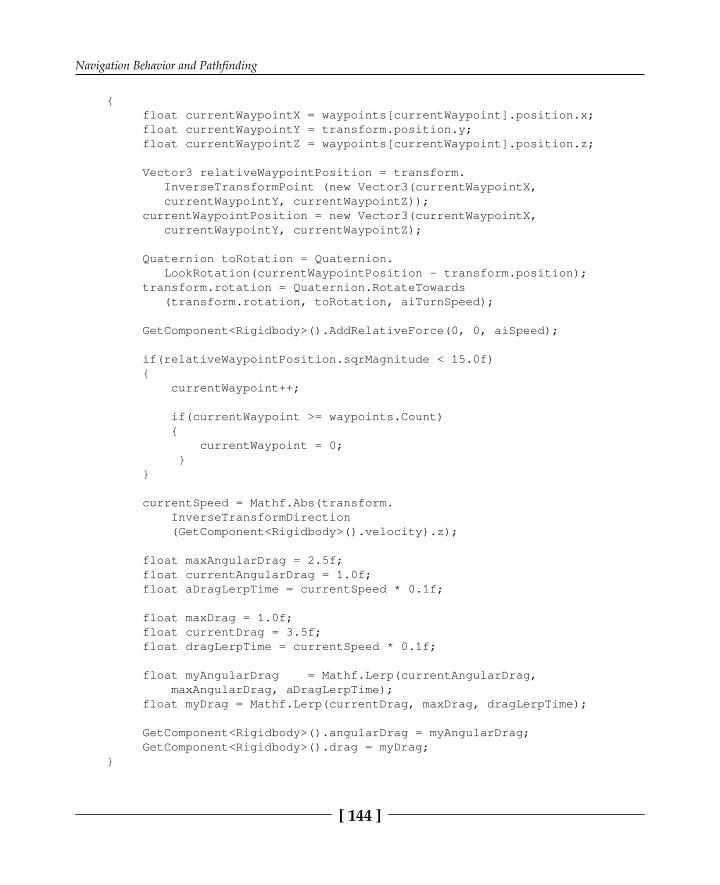
Navigation Behavior and Pathfinding
[ 144 ]
{ float currentWaypointX = waypoints[currentWaypoint].position.x; float currentWaypointY = transform.position.y; float currentWaypointZ = waypoints[currentWaypoint].position.z;
Vector3 relativeWaypointPosition = transform. InverseTransformPoint (new Vector3(currentWaypointX, currentWaypointY, currentWaypointZ)); currentWaypointPosition = new Vector3(currentWaypointX, currentWaypointY, currentWaypointZ);
Quaternion toRotation = Quaternion. LookRotation(currentWaypointPosition - transform.position); transform.rotation = Quaternion.RotateTowards (transform.rotation, toRotation, aiTurnSpeed);
GetComponent<Rigidbody>().AddRelativeForce(0, 0, aiSpeed);
if(relativeWaypointPosition.sqrMagnitude < 15.0f) { currentWaypoint++;
if(currentWaypoint >= waypoints.Count) { currentWaypoint = 0; } }
currentSpeed = Mathf.Abs(transform. InverseTransformDirection (GetComponent<Rigidbody>().velocity).z);
float maxAngularDrag = 2.5f; float currentAngularDrag = 1.0f; float aDragLerpTime = currentSpeed * 0.1f;
float maxDrag = 1.0f; float currentDrag = 3.5f; float dragLerpTime = currentSpeed * 0.1f;
float myAngularDrag = Mathf.Lerp(currentAngularDrag, maxAngularDrag, aDragLerpTime); float myDrag = Mathf.Lerp(currentDrag, maxDrag, dragLerpTime);
GetComponent<Rigidbody>().angularDrag = myAngularDrag; GetComponent<Rigidbody>().drag = myDrag; }

Navigation Behavior and Pathfinding
[ 145 ]
If we start the game and test it, we can see that he is working fine. The car drives by itself,turns smoothly, and completes the track as intended.
Now that we have the basic point to point movement completed, we could implement morefunctions for the AI driver and start developing the game as we want. It is alwaysrecommended to start with the main functions of the gameplay before developing anydetails. This will help identify any ideas that we had planned for the game that do not workas well as we thought.
MOBA genrePoint to point movement is one of the most commonly used methods to control themovement of a character. It is self-explanatory why it is widely used, because the charactermoves from one point to another and usually that's we want; we want the character toarrive at certain destination or follow another character. One game genre that also requiresthis type of movement is the Multiplayer Online Battle Arena (MOBA) games that havebecome very popular recently. Usually, there are NPC characters that spawn at the startposition and follow a predetermined path towards the enemy towers, similar to the TowerDefense enemies, but in this case the AI characters move in the same terrain as the playersand can interfere with each other.

Navigation Behavior and Pathfinding
[ 146 ]
The map is divided into two equal parts, where one side needs to fight the other, and foreach part it spawns a different platoon that is composed of small enemies called Minions orCreeps. When they are following their path, if one platoon finds the other, they stop movingforward and start attacking. After the battle, the survivors keep moving forward:
In this example we are going to re-create that portion of the game, where the platoonspawns at the start position, follows their path, stops when they find the enemies and keepmoving towards their next direction until they win the fight. Then we will create the basicmovement of the hero character that is controlled by the player or the computer: both havethe freedom to move around the map and the characters needs to follow the direction that isdirected by the player or computer while avoiding all obstacles.

Navigation Behavior and Pathfinding
[ 147 ]
We will start by importing the map into our game. We have chosen a generic MOBA stylemap, like we can see on the following screenshot:
The next step is to create waypoints in the map. Here we will have six different waypointsgroups, because each team has three different paths and each platoon can only follow onepath. We start from the base position and then we add more waypoints until we reach theenemy base. The following image shows an example of what we have created.

Navigation Behavior and Pathfinding
[ 148 ]
We need to create three different waypoint groups for each team, because there will bethree different spawn positions as well; they will work independently from one another.After setting the waypoints, we can group them and assign the code that will gather theposition information and the order that the platoon should follow. For this example, we canuse the same code that we used for the Tower Defense waypoints, because the way that theenemies follow their path is similar:
public static Transform[] points;
void Awake () { points = new Transform[transform.childCount]; for (int i = 0; i < points.Length; i++) { points[i] = transform.GetChild(i); } }
Because we have six different waypoint groups, it is necessary to duplicate the same codesix times and rename them accordingly. Our spawnable enemies will later access the rightpath for them, so it is recommended to rename the groups and codes so that we can easilyunderstand which group represents which lane, for example, 1_Top/1_Middle/1_Bottomand 2_Top/2_Middle/2_Bottom. The number represents their team and the position namerepresents the position. In this case, we change the name points in our code to the correctnames that represent each lane:
Lane Team 1 Top:
public static Transform[] 1_Top;
void Awake () { 1_Top = new Transform[transform.childCount]; for (int i = 0; i < 1_Top.Length; i++) { 1_Top[i] = transform.GetChild(i); } }

Navigation Behavior and Pathfinding
[ 149 ]
Lane Team 1 Middle:
public static Transform[] 1_Middle;
void Awake () { 1_Middle = new Transform[transform.childCount]; for (int i = 0; i < 1_Top.Length; i++) { 1_Middle[i] = transform.GetChild(i); } }
Lane Team 1 Bottom:
public static Transform[] 1_Bottom;
void Awake () { 1_Bottom = new Transform[transform.childCount]; for (int i = 0; i < 1_Top.Length; i++) { 1_Bottom[i] = transform.GetChild(i); } }
Lane Team 2 Top:
public static Transform[] 2_Top;
void Awake () { 2_Top = new Transform[transform.childCount]; for (int i = 0; i < 1_Top.Length; i++) { 2_Top[i] = transform.GetChild(i); } }

Navigation Behavior and Pathfinding
[ 150 ]
Lane Team 2 Middle:
public static Transform[] 2_Middle;
void Awake () { 2_Middle = new Transform[transform.childCount]; for (int i = 0; i < 2_Middle.Length; i++) { 2_Middle[i] = transform.GetChild(i); } }
Lane Team 2 Bottom:
public static Transform[] 2_Bottom;
void Awake () { 2_Bottom = new Transform[transform.childCount]; for (int i = 0; i < 2_Bottom.Length; i++) { 2_Bottom[i] = transform.GetChild(i); } }
Now that we have created all the groups and codes for each of them, we can move on to thecharacter AI that will follow their path towards the enemy base. We can choose to duplicatethe code for each team or integrate everything inside the same code, using if statements todecide which path the character should follow. For this example, we have chosen tointegrate everything in the same code. That way, we can update the character code onceand it will work for both teams at the same time. Once again, we can start by using the samecode that we used in the enemies from the Tower Defense game. We can change the code sohe will fit in the game that we are currently creating:
public float speed; public int health; public float speedTurn;
private Transform target; private int wavepointIndex = 0;
void Start ()

Navigation Behavior and Pathfinding
[ 151 ]
{ target = waypoints.points[0]; speed = 10f; speedTurn = 0.2f; }
void Update () { Vector3 dir = target.position - transform.position; transform.Translate(dir.normalized * speed * Time.deltaTime, Space.World);
if(Vector3.Distance(transform.position, target.position) <= 0.4f) { GetNextWaypoint(); }
Vector3 newDir = Vector3.RotateTowards(transform.forward, dir, speedTurn, 0.0F);
transform.rotation = Quaternion.LookRotation(newDir); }
void GetNextWaypoint() { if(wavepointIndex >= waypoints.points.Length - 1) { Destroy(gameObject); return; }
wavepointIndex++; target = waypoints.points[wavepointIndex]; }
With this code, we can make the character follow the path and turn smoothly whenchanging from one point to another. At this point we just need to change the code to makehim fit the game genre that we are creating. To do that the first thing we need to consider ischanging the name points to the names that we've previously created, and add ifstatements to choose which side the character needs to follow.
Let's start by adding the information that distinguish the characters of one team fromanother. To do that, we need to create two new Boolean variables:
public bool Team1; public bool Team2;

Navigation Behavior and Pathfinding
[ 152 ]
This will let us decide if the character is from Team1 or Team2, both cannot be true at thesame time. Now we can implement more details into the character code, to let him knowwhich lane he should walk on:
public bool Top; public bool Middle; public bool Bottom;
We have added three more Booleans that will indicate the lane that the character needs tofollow. After working out which team the character is spawning from, another if statementwill be added to determine the lane that the character will follow.
Once we have added those variables, we need to assign the waypoint groups that wecreated before according to the lane that the character will follow. We can implement thatright in the start function:
if(Team1 == true) { if(Top == true) { target = 1_Top.1_Top[0]; }
if(Middle == true) { target = 1_Middle.1_Middle[0]; }
if(Bottom == true) { target = 1_Bottom.1_Top[0]; } }
if(Team2 == true) { if(Top == true) { target = 2_Top.2_Top[0]; }
if(Middle == true) { target = 2_Middle.2_Middle[0]; }
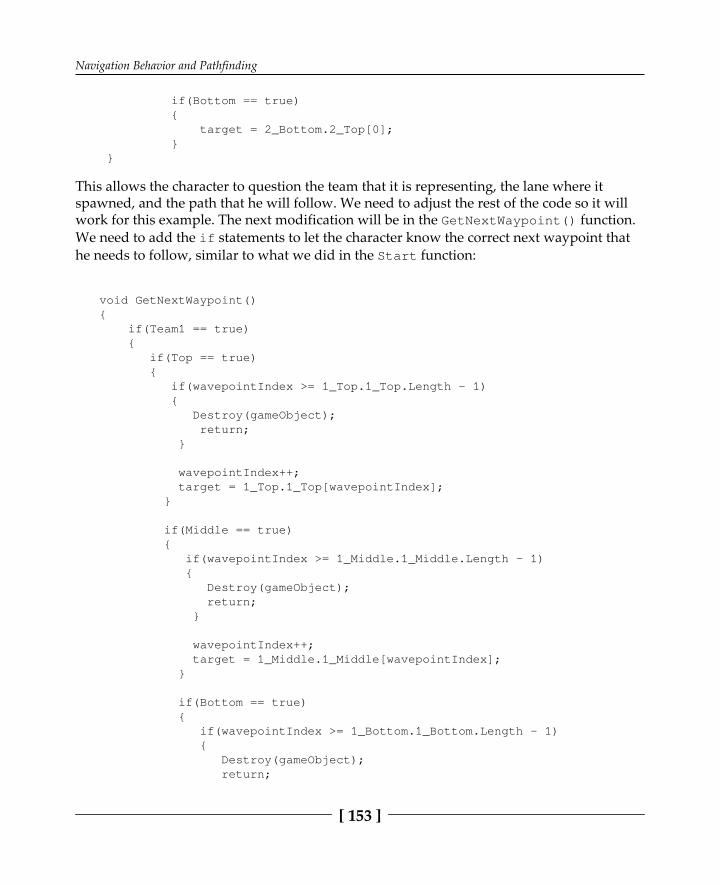
Navigation Behavior and Pathfinding
[ 153 ]
if(Bottom == true) { target = 2_Bottom.2_Top[0]; } }
This allows the character to question the team that it is representing, the lane where itspawned, and the path that he will follow. We need to adjust the rest of the code so it willwork for this example. The next modification will be in the GetNextWaypoint() function.We need to add the if statements to let the character know the correct next waypoint thathe needs to follow, similar to what we did in the Start function:
void GetNextWaypoint(){ if(Team1 == true) { if(Top == true) { if(wavepointIndex >= 1_Top.1_Top.Length - 1) { Destroy(gameObject); return; }
wavepointIndex++; target = 1_Top.1_Top[wavepointIndex]; }
if(Middle == true) { if(wavepointIndex >= 1_Middle.1_Middle.Length - 1) { Destroy(gameObject); return; }
wavepointIndex++; target = 1_Middle.1_Middle[wavepointIndex]; }
if(Bottom == true) { if(wavepointIndex >= 1_Bottom.1_Bottom.Length - 1) { Destroy(gameObject); return;
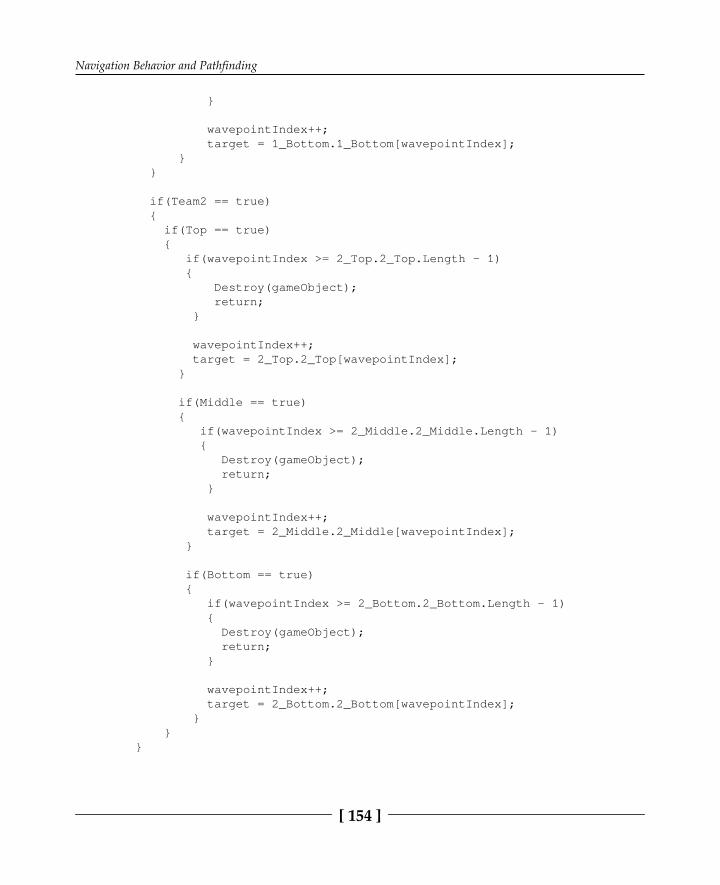
Navigation Behavior and Pathfinding
[ 154 ]
}
wavepointIndex++; target = 1_Bottom.1_Bottom[wavepointIndex]; } }
if(Team2 == true) { if(Top == true) { if(wavepointIndex >= 2_Top.2_Top.Length - 1) { Destroy(gameObject); return; }
wavepointIndex++; target = 2_Top.2_Top[wavepointIndex]; }
if(Middle == true) { if(wavepointIndex >= 2_Middle.2_Middle.Length - 1) { Destroy(gameObject); return; }
wavepointIndex++; target = 2_Middle.2_Middle[wavepointIndex]; }
if(Bottom == true) { if(wavepointIndex >= 2_Bottom.2_Bottom.Length - 1) { Destroy(gameObject); return; }
wavepointIndex++; target = 2_Bottom.2_Bottom[wavepointIndex]; } } }
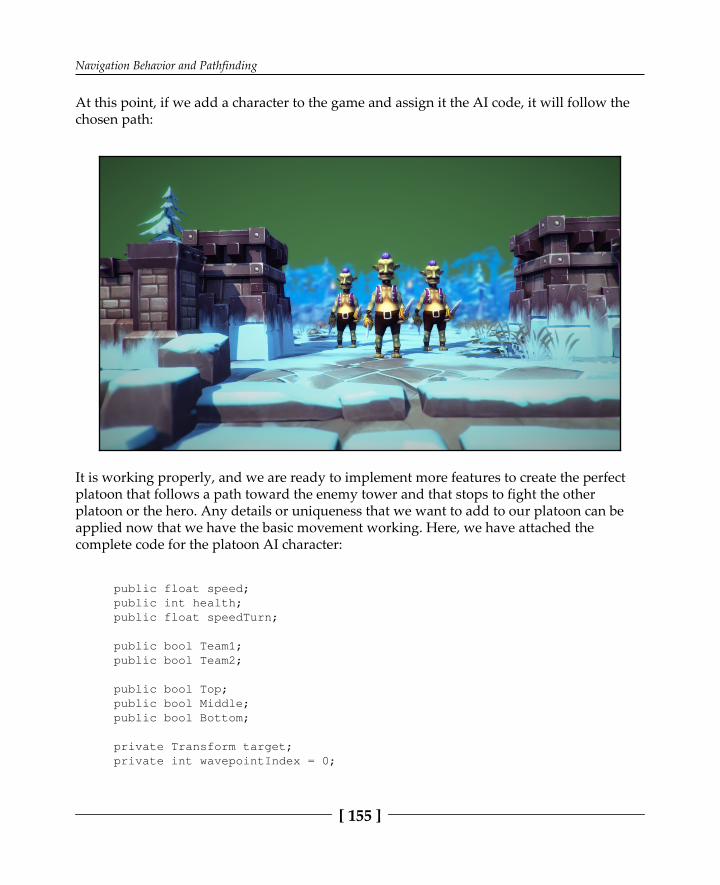
Navigation Behavior and Pathfinding
[ 155 ]
At this point, if we add a character to the game and assign it the AI code, it will follow thechosen path:
It is working properly, and we are ready to implement more features to create the perfectplatoon that follows a path toward the enemy tower and that stops to fight the otherplatoon or the hero. Any details or uniqueness that we want to add to our platoon can beapplied now that we have the basic movement working. Here, we have attached thecomplete code for the platoon AI character:
public float speed; public int health; public float speedTurn;
public bool Team1; public bool Team2;
public bool Top; public bool Middle; public bool Bottom;
private Transform target; private int wavepointIndex = 0;
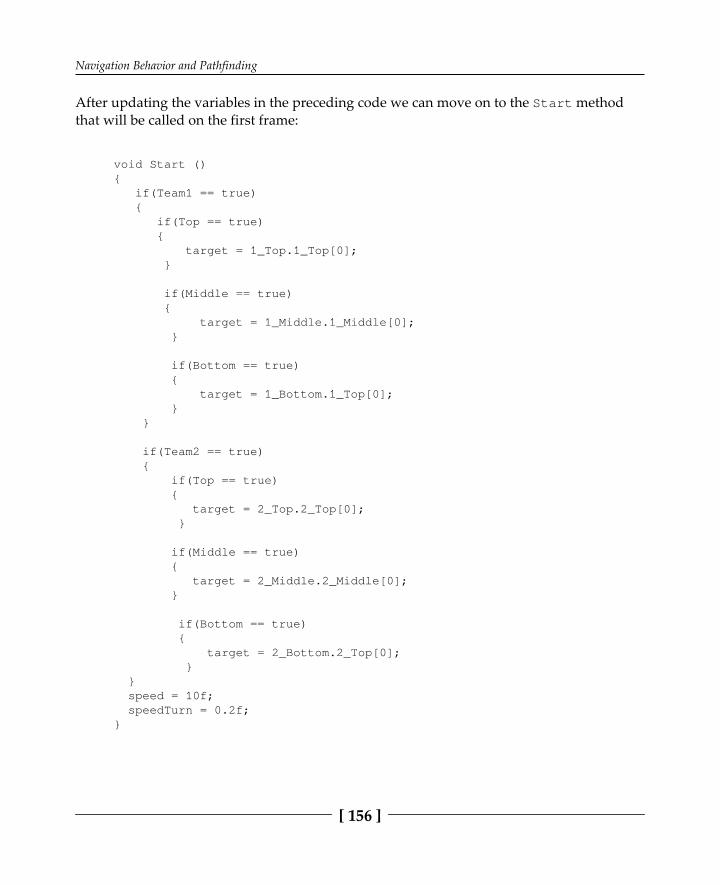
Navigation Behavior and Pathfinding
[ 156 ]
After updating the variables in the preceding code we can move on to the Start methodthat will be called on the first frame:
void Start () { if(Team1 == true) { if(Top == true) { target = 1_Top.1_Top[0]; }
if(Middle == true) { target = 1_Middle.1_Middle[0]; }
if(Bottom == true) { target = 1_Bottom.1_Top[0]; } }
if(Team2 == true) { if(Top == true) { target = 2_Top.2_Top[0]; }
if(Middle == true) { target = 2_Middle.2_Middle[0]; }
if(Bottom == true) { target = 2_Bottom.2_Top[0]; } } speed = 10f; speedTurn = 0.2f; }
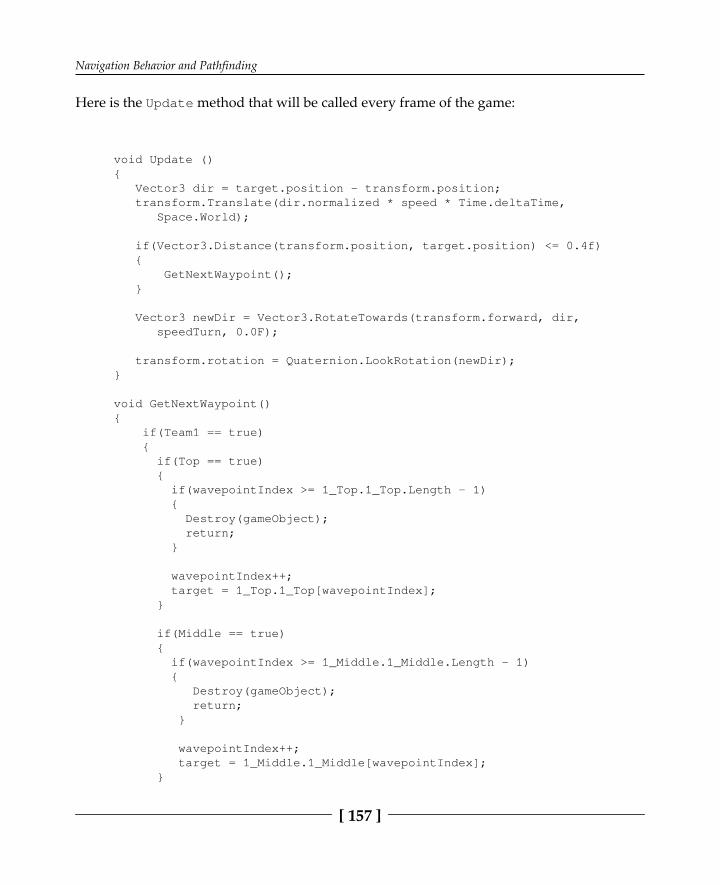
Navigation Behavior and Pathfinding
[ 157 ]
Here is the Update method that will be called every frame of the game:
void Update () { Vector3 dir = target.position - transform.position; transform.Translate(dir.normalized * speed * Time.deltaTime, Space.World);
if(Vector3.Distance(transform.position, target.position) <= 0.4f) { GetNextWaypoint(); }
Vector3 newDir = Vector3.RotateTowards(transform.forward, dir, speedTurn, 0.0F);
transform.rotation = Quaternion.LookRotation(newDir); }
void GetNextWaypoint() { if(Team1 == true) { if(Top == true) { if(wavepointIndex >= 1_Top.1_Top.Length - 1) { Destroy(gameObject); return; }
wavepointIndex++; target = 1_Top.1_Top[wavepointIndex]; }
if(Middle == true) { if(wavepointIndex >= 1_Middle.1_Middle.Length - 1) { Destroy(gameObject); return; }
wavepointIndex++; target = 1_Middle.1_Middle[wavepointIndex]; }

Navigation Behavior and Pathfinding
[ 158 ]
if(Bottom == true) { if(wavepointIndex >= 1_Bottom.1_Bottom.Length - 1) { Destroy(gameObject); return; }
wavepointIndex++; target = 1_Bottom.1_Bottom[wavepointIndex]; } }
if(Team2 == true) { if(Top == true) { if(wavepointIndex >= 2_Top.2_Top.Length - 1) { Destroy(gameObject); return; }
wavepointIndex++; target = 2_Top.2_Top[wavepointIndex]; }
if(Middle == true) { if(wavepointIndex >= 2_Middle.2_Middle.Length - 1) { Destroy(gameObject); return; }
wavepointIndex++; target = 2_Middle.2_Middle[wavepointIndex]; }
if(Bottom == true) { if(wavepointIndex >= 2_Bottom.2_Bottom.Length - 1) { Destroy(gameObject); return; }
wavepointIndex++;

Navigation Behavior and Pathfinding
[ 159 ]
target = 2_Bottom.2_Bottom[wavepointIndex]; } } }
Another important aspect of a MOBA game is the hero's movement. Even if it's controlledby the player, the character has AI to determine the path that he needs to follow in order toarrive at the chosen destination. To complete this task, we will introduce the point to pointmethod first; then we will continue the same example but using an advanced method thatwill make our character decide the best path to arrive at the final destination withoutimplementing any waypoints.
This example will also serve as an example of how to create a character that follows theplayer. To do this, we need to set all the possible paths that the character is allowed follow.We want the AI to avoid colliding with objects or passing through walls, for example:
Let's focus on this area of the map. As we can see, there are walls and trees blocking aportion of the map, and the characters should not be allowed to pass through them. Usingthe waypoints method, we will create points on the map that the character should follow ifhe wants to reach a certain destination. he won't have any specific order like the previousexamples that we have created, because the character can move in any direction, and forthat reason we cannot predict the path that it will choose.
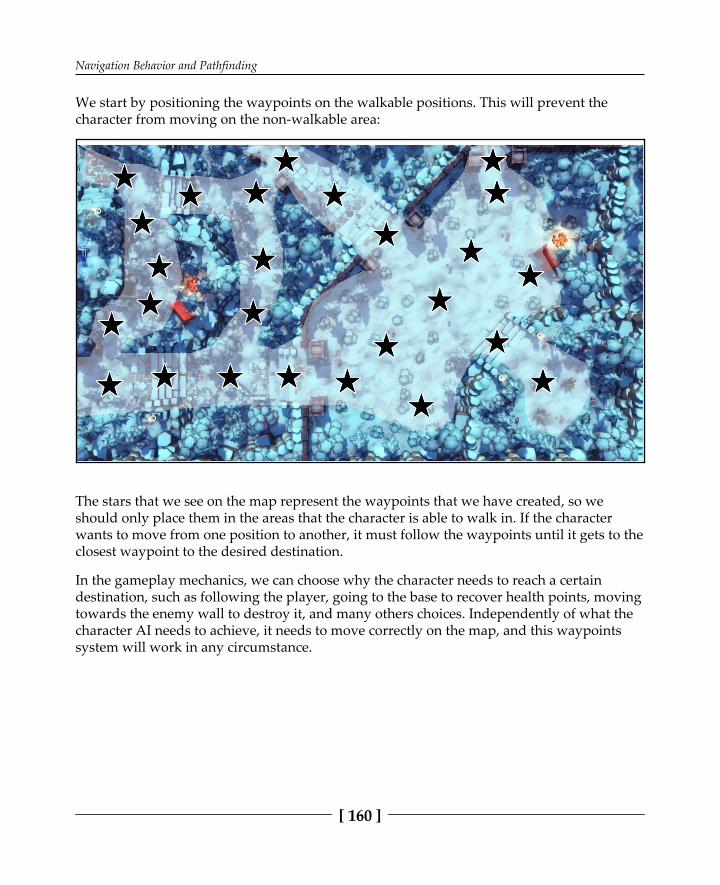
Navigation Behavior and Pathfinding
[ 160 ]
We start by positioning the waypoints on the walkable positions. This will prevent thecharacter from moving on the non-walkable area:
The stars that we see on the map represent the waypoints that we have created, so weshould only place them in the areas that the character is able to walk in. If the characterwants to move from one position to another, it must follow the waypoints until it gets to theclosest waypoint to the desired destination.
In the gameplay mechanics, we can choose why the character needs to reach a certaindestination, such as following the player, going to the base to recover health points, movingtowards the enemy wall to destroy it, and many others choices. Independently of what thecharacter AI needs to achieve, it needs to move correctly on the map, and this waypointssystem will work in any circumstance.

Navigation Behavior and Pathfinding
[ 161 ]
Here we can find the full code that will make this work. Then we'll explain everything indetail to better understand how to replicate this code so it can work in a different gamegenre:
public float speed; private List <GameObject> wayPointsList; private Transform target; private GameObject[] wayPoints;
void Start () {
target = GameObject.FindGameObjectWithTag("target").transform; wayPointsList = new List<GameObject>();
wayPoints = GameObject.FindGameObjectsWithTag("wayPoint");
for each(GameObject newWayPoint in wayPoints) { wayPointsList.Add(newWayPoint); } }
void Update () { Follow(); }
void Follow () { GameObject wayPoint = null;
if (Physics.Linecast(transform.position, target.position)) { wayPoint = findBestPath(); }
else { wayPoint = GameObject.FindGameObjectWithTag("target"); }
Vector3 Dir = (wayPoint.transform.position - transform.position).normalized; transform.position += Dir * Time.deltaTime * speed; transform.rotation = Quaternion.LookRotation(Dir); }
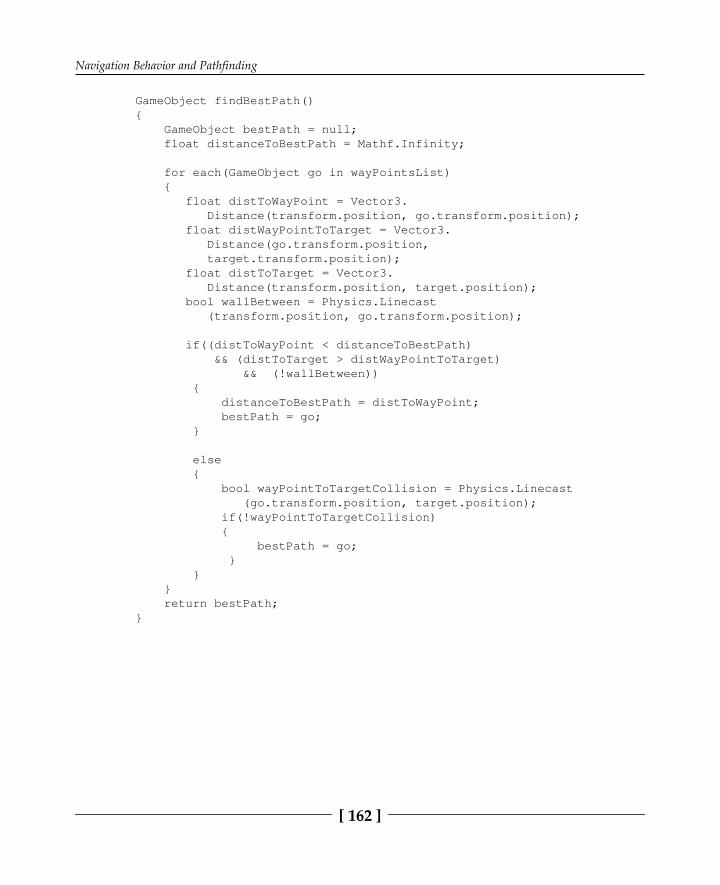
Navigation Behavior and Pathfinding
[ 162 ]
GameObject findBestPath() { GameObject bestPath = null; float distanceToBestPath = Mathf.Infinity;
for each(GameObject go in wayPointsList) { float distToWayPoint = Vector3. Distance(transform.position, go.transform.position); float distWayPointToTarget = Vector3. Distance(go.transform.position, target.transform.position); float distToTarget = Vector3. Distance(transform.position, target.position); bool wallBetween = Physics.Linecast (transform.position, go.transform.position);
if((distToWayPoint < distanceToBestPath) && (distToTarget > distWayPointToTarget) && (!wallBetween)) { distanceToBestPath = distToWayPoint; bestPath = go; }
else { bool wayPointToTargetCollision = Physics.Linecast (go.transform.position, target.position); if(!wayPointToTargetCollision) { bestPath = go; } } } return bestPath; }

Navigation Behavior and Pathfinding
[ 163 ]
If we assign this code into our character and hit the play button, we can test the game andsee that what we have created works perfectly. The character should use the waypointpositions to move across the map to reach the desired destination. This method can be usedfor NPC characters and playable characters as well, because for both cases the charactersneed to avoid colliding with the wall and obstacles:
If we continue the example and expand the waypoints across the whole map, we have abasic MOBA game working properly, with a platoon of monsters spawning at each baseand following the right path, and hero characters that can move freely on the map withoutcolliding with walls.
Point to point movement and avoiding dynamic objectsNow that we have characters that can follow the right path and avoid static objects, we areready to move on to the next level and make those characters avoid dynamic objects whilemoving from point to point. We will revise the three different examples created in thischapter and see how we can add the avoiding technique to the AI characters in thoseexamples.

Navigation Behavior and Pathfinding
[ 164 ]
Those three methods should cover almost every game genre that uses point to pointmovement as their primary method of locomotion, and we will be able to create new ideaswith these examples as a guideline:
Let's start with the racing game, where we have a car that drives around the track until hefinishes the race. If the car drives alone and there's nothing obstructing the path, it won't benecessary to avoid any obstacles, but usually obstacles make the game more interesting orchallenging, especially when they are spontaneous and we don't expect them. A greatexample of this is the Mario Kart game, where they throw bananas and other objects todestabilize the opposing players, and the objects don't have any pre-defined position so thecharacters can't predict where they're going to be. So it is important for the drivers to havethe necessary functions to avoid colliding with those objects and be able to do that in realtime.
Assuming that two objects appeared unexpectedly on the road while the AI character wasfollowing the next waypoint, we want the character to anticipate the collision and turnaround to avoid crashing against the object. The method that we will be using here is acombination of the waypoint movement with the maze movement. The character can onlyobey one order at a time, he can either respect the waypoint movement or the mazemovement, and that’s exactly what we need to add on to our code so the character AI canchoose the best option according the current situation that he is facing:
public static bool raceStarted = false;

Navigation Behavior and Pathfinding
[ 165 ]
public float aiSpeed = 10.0f; public float aiTurnSpeed = 2.0f; public float resetAISpeed = 0.0f; public float resetAITurnSpeed = 0.0f;
public GameObject waypointController; public List<Transform> waypoints; public int currentWaypoint = 0; public float currentSpeed; public Vector3 currentWaypointPosition;
public static bool isBlocked; public static bool isBlockedFront; public static bool isBlockedRight; public static bool isBlockedLeft;
After updating the preceding variables, we can move on to the Start method. This will becalled in the first frame:
void Start () { GetWaypoints(); resetAISpeed = aiSpeed; resetAITurnSpeed = aiTurnSpeed; }
Here is the Update method that will be called every frame of the game:
void Update () { if(raceStarted && isBlocked == false) { MoveTowardWaypoints(); }
if(raceStarted && isBlockedFront == true && isBlockedLeft == false && isBlockedRight == false) { TurnRight(); }
if(raceStarted && isBlockedFront == false && isBlockedLeft == true && isBlockedRight == false) { TurnRight(); }

Navigation Behavior and Pathfinding
[ 166 ]
if(raceStarted && isBlockedFront == false && isBlockedLeft == false && isBlockedRight == true) { TurnLeft(); } }
void GetWaypoints() { Transform[] potentialWaypoints = waypointController. GetComponentsInChildren<Transform>();
waypoints = new List<Transform>();
for each(Transform potentialWaypoint in potentialWaypoints) { if(potentialWaypoint != waypointController.transform) { waypoints.Add(potentialWaypoint); } } }
void MoveTowardWaypoints() { float currentWaypointX = waypoints[currentWaypoint].position.x; float currentWaypointY = transform.position.y; float currentWaypointZ = waypoints[currentWaypoint].position.z;
Vector3 relativeWaypointPosition = transform. InverseTransformPoint (new Vector3(currentWaypointX, currentWaypointY, currentWaypointZ)); currentWaypointPosition = new Vector3(currentWaypointX, currentWaypointY, currentWaypointZ);
Quaternion toRotation = Quaternion. LookRotation(currentWaypointPosition - transform.position); transform.rotation = Quaternion. RotateTowards(transform.rotation, toRotation, aiTurnSpeed);
GetComponent<Rigidbody>().AddRelativeForce(0, 0, aiSpeed);
if(relativeWaypointPosition.sqrMagnitude < 15.0f) { currentWaypoint++;
if(currentWaypoint >= waypoints.Count) {

Navigation Behavior and Pathfinding
[ 167 ]
currentWaypoint = 0; } }
currentSpeed = Mathf.Abs(transform. InverseTransformDirection(GetComponent<Rigidbody>(). velocity).z);
float maxAngularDrag = 2.5f; float currentAngularDrag = 1.0f; float aDragLerpTime = currentSpeed * 0.1f;
float maxDrag = 1.0f; float currentDrag = 3.5f; float dragLerpTime = currentSpeed * 0.1f;
float myAngularDrag = Mathf.Lerp(currentAngularDrag, maxAngularDrag, aDragLerpTime); float myDrag = Mathf.Lerp(currentDrag, maxDrag, dragLerpTime);
GetComponent<Rigidbody>().angularDrag = myAngularDrag; GetComponent<Rigidbody>().drag = myDrag; }
void TurnLeft() { //turning left function here }
void TurnRight() { //turning right function here }

Navigation Behavior and Pathfinding
[ 168 ]
We have added four new static variables to our code: isBlocked, isBlockedFront,isBlockedRight, and isBlockedLeft. This will check if the path in front of the car is freefrom obstacles or not. The car will continue following the waypoint path until somethingappears and the car needs to turn left or right to pass the obstacle. To make this work, weneed to add at least three sensors in front of the car. When they interact with some object,the sensor gives that information to the AI driver, and at this point it will choose the bestoption according to that information:
As we can see in the preceding image, the car now has three sensors attached to it. In thisexample, the right sensor will report that it is blocked by an obstacle and the driver willturn left until that side is free again. Once the three sensors report that nothing isobstructing the driver's path, the car will return to following the waypoint that it waspreviously moving towards. If we notice that the driver doesn't recognize some obstacles, itis recommended to increase the number of sensors to cover a larger area.
Now let's move on to the platoon characters that we created for the MOBA example. Here,we will need to create a different method, because the characters will move towards thenext waypoint until they find something, but this time we don't want them to move away.Instead, we want the character to move towards the character that they have found.

Navigation Behavior and Pathfinding
[ 169 ]
To create this, we will add a circular or spherical collider to our character. This will serve asdetection. If something triggers that zone, the character will stop moving towards itswaypoint and use the position of the hero that triggered the collider as a waypoint topursue:
public float speed; public int health; public float speedTurn;
public bool Team1; public bool Team2; public bool Top; public bool Middle; public bool Bottom;
private Transform target; private int wavepointIndex = 0;
static Transform heroTarget; static bool heroTriggered;

Navigation Behavior and Pathfinding
[ 170 ]
After updating the preceding variables, we can move on to the Start method, which willbe called on the first frame:
void Start () { if(Team1 == true) { if(Top == true) { target = 1_Top.1_Top[0]; }
if(Middle == true) { target = 1_Middle.1_Middle[0]; }
if(Bottom == true) { target = 1_Bottom.1_Top[0]; } }
if(Team2 == true) { if(Top == true) { target = 2_Top.2_Top[0]; }
if(Middle == true) { target = 2_Middle.2_Middle[0]; }
if(Bottom == true) { target = 2_Bottom.2_Top[0]; } } speed = 10f; speedTurn = 0.2f; }
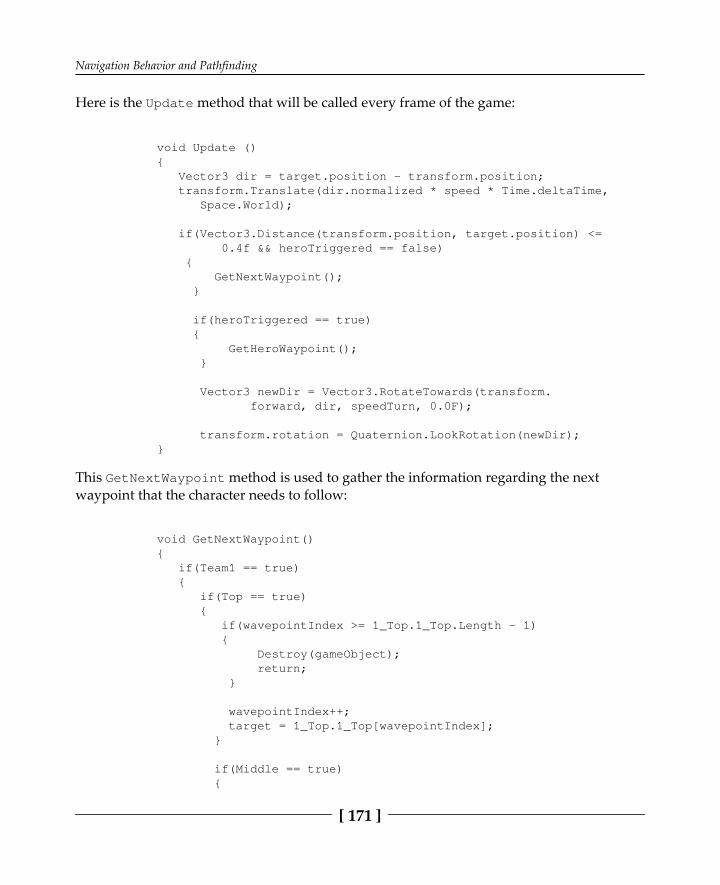
Navigation Behavior and Pathfinding
[ 171 ]
Here is the Update method that will be called every frame of the game:
void Update () { Vector3 dir = target.position - transform.position; transform.Translate(dir.normalized * speed * Time.deltaTime, Space.World);
if(Vector3.Distance(transform.position, target.position) <= 0.4f && heroTriggered == false) { GetNextWaypoint(); }
if(heroTriggered == true) { GetHeroWaypoint(); }
Vector3 newDir = Vector3.RotateTowards(transform. forward, dir, speedTurn, 0.0F);
transform.rotation = Quaternion.LookRotation(newDir); }
This GetNextWaypoint method is used to gather the information regarding the nextwaypoint that the character needs to follow:
void GetNextWaypoint() { if(Team1 == true) { if(Top == true) { if(wavepointIndex >= 1_Top.1_Top.Length - 1) { Destroy(gameObject); return; }
wavepointIndex++; target = 1_Top.1_Top[wavepointIndex]; }
if(Middle == true) {
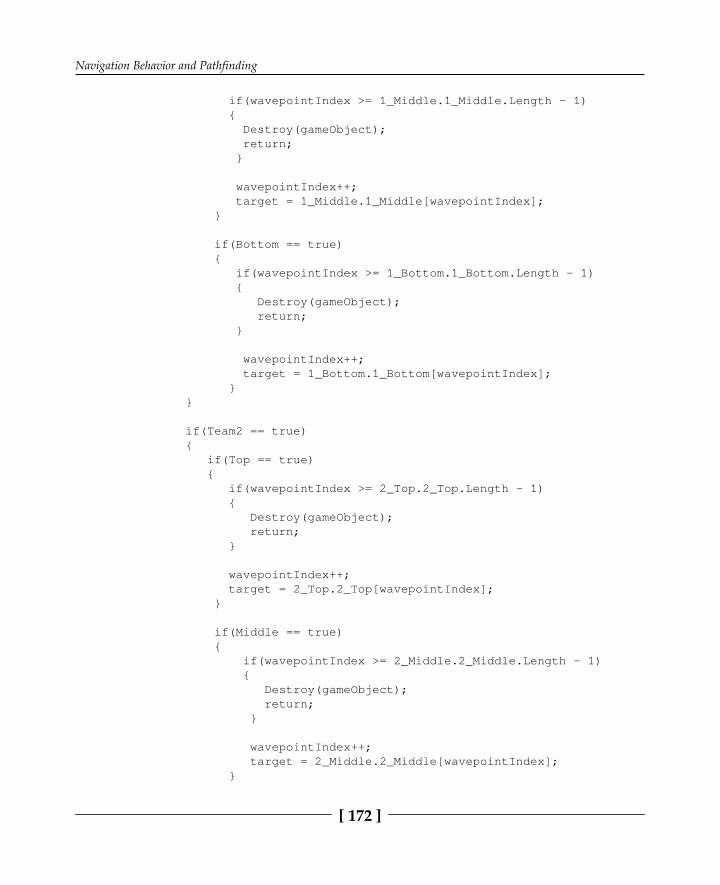
Navigation Behavior and Pathfinding
[ 172 ]
if(wavepointIndex >= 1_Middle.1_Middle.Length - 1) { Destroy(gameObject); return; }
wavepointIndex++; target = 1_Middle.1_Middle[wavepointIndex]; }
if(Bottom == true) { if(wavepointIndex >= 1_Bottom.1_Bottom.Length - 1) { Destroy(gameObject); return; }
wavepointIndex++; target = 1_Bottom.1_Bottom[wavepointIndex]; } }
if(Team2 == true) { if(Top == true) { if(wavepointIndex >= 2_Top.2_Top.Length - 1) { Destroy(gameObject); return; }
wavepointIndex++; target = 2_Top.2_Top[wavepointIndex]; }
if(Middle == true) { if(wavepointIndex >= 2_Middle.2_Middle.Length - 1) { Destroy(gameObject); return; }
wavepointIndex++; target = 2_Middle.2_Middle[wavepointIndex]; }
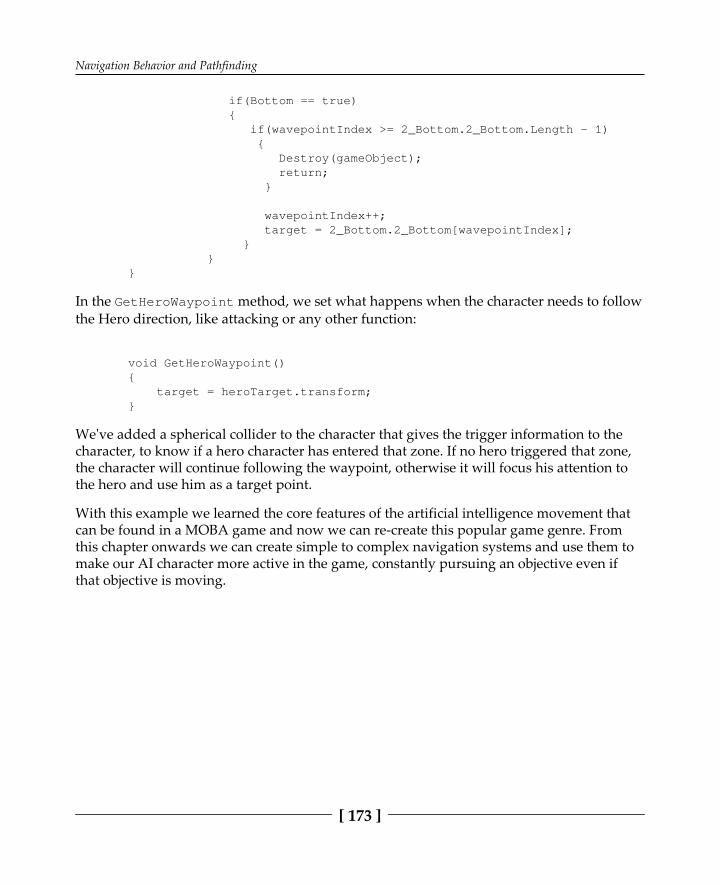
Navigation Behavior and Pathfinding
[ 173 ]
if(Bottom == true) { if(wavepointIndex >= 2_Bottom.2_Bottom.Length - 1) { Destroy(gameObject); return; }
wavepointIndex++; target = 2_Bottom.2_Bottom[wavepointIndex]; } } }
In the GetHeroWaypoint method, we set what happens when the character needs to followthe Hero direction, like attacking or any other function:
void GetHeroWaypoint() { target = heroTarget.transform; }
We've added a spherical collider to the character that gives the trigger information to thecharacter, to know if a hero character has entered that zone. If no hero triggered that zone,the character will continue following the waypoint, otherwise it will focus his attention tothe hero and use him as a target point.
With this example we learned the core features of the artificial intelligence movement thatcan be found in a MOBA game and now we can re-create this popular game genre. Fromthis chapter onwards we can create simple to complex navigation systems and use them tomake our AI character more active in the game, constantly pursuing an objective even ifthat objective is moving.
Navigation Behavior and Pathfinding
[ 174 ]
SummaryIn this chapter, we have introduced point to point movement, a method that is widely usedin many games today, and we can adapt the codes that we have created to work inpractically any game. At this point ,we are able to re-create many popular games and addour personal touch to them. In the next chapter, we'll continue talking about movement, butwe will be focusing on an advanced aspect called the Theta algorithm. This will serve as acontinuation of what we have learned in this chapter, and we will be able to create acharacter AI that, without any previous information or positions, will be able to find foritself the best path to follow in order to arrive at a certain destination.

7Advanced Pathfinding
In this chapter, we will take a look at the advanced pathfinding methods that can be used ina wide range of games. The main objective of this chapter is to learn the foundations of howto create an advanced AI element that can analyze the map and process all the necessaryinformation in order to decide the best path that needs to be taken. Advanced pathfindingmethods can be found in many popular game titles that require the AI character to choosethe best path in real time, and we will analyze some of the most famous examples and howcan we replicate the same results.
Simple versus advanced pathfindingAs we discovered in the previous chapter, pathfinding is used by AI characters to discoverthe direction that they need to move and how to do it correctly. Depending on the gamethat we are working on, we could use a simple pathfinding system or a complex one. Bothcan be very useful. There are situations where a simple pathfinding system is enough toaccomplish the task that we are looking for, but in other cases we need a differentalternative to the methods that we have covered before in order to achieve the complexityand realism that is necessary for our AI character.
Before talking about any advanced system of creating a pathfinding method, let's discoverwhy we need to use it and in what circumstances it is necessary to update our character andmake it more intelligent and aware. Using our previous examples, we will be looking at thelimitations that exist for a normal pathfinding method. Understanding the limitations of asimple pathfinding system will help us acknowledge what is missing and what challengeswe will face when we are about to create a more complex system. So it is a good start to firstlearn how we can set up a simple pathfinding system and then we can move on to a morecomplex one. Because games have evolved at the same rate as the technology available tocreate them, our first example will be an older game, and then we'll see how the same gamehas evolved, in particular AI pathfinding.

Advanced Pathfinding
[ 176 ]
Open world maps are now very common, and many games from different genres use this tocreate a rich experience, but it wasn't always like this. Let's take the first Grand Theft Auto(GTA) game as an example. Analyzing the pattern of the cars that are driving on the map,we can see that they don't have a complex system, and the drivers are stuck to thepredefined route or lap that each of them is assigned to follow. Obviously, this AIpathfinding system was very advanced at that time and even if we play it today, we don'tfeel discouraged by the AI characters because it works wonderfully for that game.
The AI drivers follow their path and stop every time the player is in their way. Thisdemonstrates that they have a collision detector in front of each car to tell them if there issomething blocking the path. If there is something in front of the car, the driver stopsimmediately, and until the path is unblocked, it won't drive again. This is a sign that thedrivers have some sort of pathfinding system that couldn't solve different situations whereit was not possible for them to keep driving in the same direction. For that reason and toavoid any errors or glitches in the game, the programmers have chosen to make the driversstop when that happens.

Advanced Pathfinding
[ 177 ]
The preceding case scenario, where the drivers stop when it's not possible for them to keepmoving forward, became one of the biggest strengths in their future games. Many thingshave evolved in the GTA games, and the AI is definitely one of them. They have refined theAI drivers, making them aware of the situation and their surroundings. Let's analyze GTASan Andreas, which is also available to play on mobile phones. In this game, if we stop ourcar in front of the AI driver, the results are completely different. Depending on thepersonality of the AI driver, it will react differently; for example, some of them will simplyhonk the horn and wait a little bit, and if the player keeps blocking their way, the driver willoutrun the player. Others might react more aggressively, getting out of the car to confrontthe player physically.
If the AI driver notices that the environment is getting dangerous by hearing shots, theyspeed up and choose the fastest path to get out of that situation. This type of behaviordemonstrates that the AI characters have a more complex and refined pathfinding system inconjunction with a possibility map, where the surrounding situation will reflect which paththey end up choosing.
As we can see, the drivers now have a presence that's much more noticeable than in the firstgame. In the previous chapter, we studied how to create a simple pathfinding system, verysimilar to what we analyzed in the first GTA game. Now, we'll look in depth at how tocreate an AI character that can get away from any unexpected situation.
Advanced Pathfinding
[ 178 ]
This is one of those things that still isn't perfect, and many developers are trying new waysof creating AI characters that can behave almost like a human person would if trapped inthe same situation. Some companies are getting close to that--one big example is RockstarGames with their GTA franchise, and for that reason we have chosen to start with theirexample.
A* search algorithmUnpredictable situations usually lead to a large amount of hours coding the extensivepossibilities that the characters have. For this reason, it was necessary to think on a newway to create a better pathfinding system, where the characters could analyze thesurroundings for themselves in real time and choose the best path to take. One method thathas become very popular for this effect is using theta algorithms, which allows thecharacters to constantly search for the best path without it being necessary to manually setwhich points they need to follow.
The Theta search algorithm (A*) is a widely used search algorithm that can be used to findsolutions for many problems and pathfinding is one of them. Using this algorithm to solvepathfinding problems is very common due to the uniform-cost search and heuristic search.The Theta search algorithm examines every corner of the map to help the characterdetermine if it is possible to use that location or not, while trying to reach the desireddestination.
How it worksThe map or scene of the game needs to be prepared or pre-analyzed before the thetaalgorithm can work. The environment that includes all the assets of the map will be handledas a graph. This means that the map will be broken into different points and locations,which are called nodes. These nodes are used to record all the progress of the search. Whilememorizing the map location, each individual node has other attributes, such as fitness,goal, and heuristic, usually represented by the letters f, g, and h. The purpose of the fitness,goal, and heuristic attributes is to put in order how good a path is according to the currentnode.

Advanced Pathfinding
[ 179 ]
Different values are assigned to the paths between the nodes. These values usuallyrepresent the distances between the nodes. The value between the nodes doesn't necessarilyhave to be distance. The value can also be time; this will help us find the fastest path insteadof the shortest one, for example. The Theta algorithm uses two lists, an open list and aclosed list. The open list contains the nodes that were totally explored. Marker arrays canalso be used to find out whether a state is in the open list or the closed list.
This means that the character will constantly be searching for the best nodes to follow inorder to achieve the fastest or shortest results. As we can see in the preceding screenshot,the map was pre-analyzed, the walkable area is represented by the small gray squares,while the big squares represent the area that is blocked by some object or environmentasset. The AI character represented by the black and white circle needs to move node bynode until it reaches the star object. If for some reason one of the nodes is blocked, thecharacter will rapidly switch to the closest one and then continue on its way.
As we can see, this pathfinding method's theory is very similar to what we have createdbefore, where the character follows point by point until it arrives at the final destination.The main difference is that with the Theta algorithm, the points are generated automaticallyby the AI, making it the best choice when developing big or complex scenes.

Advanced Pathfinding
[ 180 ]
Disadvantages of using A*The Theta algorithm is not the perfect solution that can be used everywhere or in everygame, and we should keep that thought in mind. Because the AI character is constantlysearching for the best path to follow, a significant portion of the CPU is being usedexclusively for that task. Because tablets and mobile devices are very popular gamingplatforms nowadays, it is worth mentioning that developing a game for these platformsrequires paying special attention to the CPU and GPU usage, and for that reason, A*pathfinding can be a disadvantage here.
But hardware limitation isn't the only disadvantage. When we let the AI assume all thework without any human control, bugs are highly likely. That is one reason why moderngames that prefer using open world maps encounter a lot of bugs and weird AI reactions,because it is extremely difficult to narrow down all the possible outcomes in a massivegameplay area.
" says bugs in the latest demo are natural for open world games"–Final Fantasy XV director

Advanced Pathfinding
[ 181 ]
The director of Final Fantasy XV commented about this issue, stating that bugs are expectedin every open world game. This summarizes perfectly why using theta algorithms for AIpathfinding is a popular and efficient approach when developing open world games, but itis not perfect and bugs will definitely occur.
Now that we have a basic understanding of the theta algorithm and the pros and cons of it,let's move on to the practical section.
Going directly from A to BWe are going to start with a simple example, without any obstacles between one point andanother. This will help us visualize how the algorithm finds the best path. Then we will beadding an obstacle and observing how the algorithm chooses the best path whencontouring the obstacle at the same time.
On this grid we have two points, A that is the starting point and B that is the end point. Wewant to find the shortest path between the two. To help us solve this problem, we will beusing the A* algorithm and we'll see how it manages to find the shortest path.

Advanced Pathfinding
[ 182 ]
So, the algorithm calculates every step to find the shortest one. To calculate this, thealgorithm uses two nodes, as we discovered before, the G node and the H node. Grepresents the distance from the starting point, so it calculates how far it is from the Aposition. H represents the distance from the end point, so it calculates how far it is from theB position. If we sum both nodes (G + H = F), we get the F node value, which represents theshortest path.
In this case, the shortest number is 42, so we can move to that position and calculate againevery available hypothesis.
Once again, the algorithm calculates the best options that are available from the positionthat we are in. We are getting close to B, and for that reason the values for the H nodes aregetting smaller while the values for the G nodes are getting bigger, and that is perfectly fine.From all the possibilities that we currently have, the number 42 is once again the lowestnumber and the best option to take. So the natural decision is to move towards thatposition.

Advanced Pathfinding
[ 183 ]
And finally, we have arrived at the B point. Once the algorithm finds that the H node valueis zero, that means that it has already arrived at the desired destination and there's no needto keep searching for a better path.
From point A to B with obstacles in the wayThis is exactly how the A* pathfinding works; it goes from point to point evaluating the bestoptions and pursuing the shortest path until it reaches the final destination. The earlierexample was simple, and now we are going to make it more interesting to see how it worksif we add obstacles to the map.
Using the same map, we have painted some squares in black, representing that thosepositions can't be used. Now, it starts getting slightly more interesting, because if we try toguess what the best path to take would be, we might be wrong. Once again, let's calculatewhat the best options are, as follows:

Advanced Pathfinding
[ 184 ]
The results that we get are exactly the same as the first test and this is normal, because noneof the points that are surrounding the A position are positioned on the black squares. Onceagain, we can move towards the lowest number that is 42.
Now that we have made our first move and calculated the best options that are availablefrom that point, we are in an interesting situation. At this moment, we have the three lowestnumbers and we have to choose one. We need to find the shortest path that leads us to the Bposition and because the three lowest numbers are the same, we need to make the decisionaccording to the H node only, which represents the distance between our current positionand the B position. Two of the positions have the H value of 38 while just one of them hasthe value of 24, making it the lowest H value of the three. So let's move on in that direction,which seems to be closer to the final destination.

Advanced Pathfinding
[ 185 ]
From now on we can notice that the F values are getting higher, which represents theshortest path value. This is due to the black squares that we have added to the map.Because of them, we need to go around, increasing the length of the path that we need totake. This is how the AI will perceive the walls; they know for a fact that the finaldestination is close, but in order to arrive there, they can't pass through the wall, so theyneed to go around until they find an open door or something similar.
Now, the lowest values are in the other direction, which means that we need to go back inorder to find a better path. This is a very important aspect of the algorithm, because if wehave the character walking around searching for the best path at the same time that it iswalking, we will have a more human-like result. It will look like that he is searching for thecorrect path to arrive at the desired destination, like a person would if they didn't know theright path. On the other hand, the character can be programmed to make all the calculationsbefore it starts moving, and in that case we would see a character going directly to the rightpath until it reaches the final point. Both methods are valid and can be used for differentpurposes and different games.
Continuing our pathfinding, we need to keep choosing the lowest value, so at this point weneed to go back and choose between the two lowest values, 48. Both have the same G and Hvalues, so the only way to find out which is the best path to take is to randomly choose oneof the points or pre-calculate them to see which of them will have the lowest value. So let'schoose one randomly to see the values that come up.

Advanced Pathfinding
[ 186 ]
After choosing one of the two shortest possibilities, we found that the values are gettinghigher, and for that reason we need to go back and calculate the other value as well to see ifthere is a lower value after that. Because we can already see the map and we already knowwhere the B point is placed, we know for a fact that the lowest value is actually furtheraway than the 68 value that appeared just now. But if we didn't know where the B pointwas, we still needed to check that 48 value, to see if the destination point was near thatposition or not. That is what the AI character will decide in the gameplay it will constantlycheck the lowest F value.
After choosing the new position, we can see that it didn't provide any better opportunities,and we need to keep searching for a better path, which in this case is going to be a pointthat we have already discovered, but whose outcomes we didn't calculate. Once again, wehave the two lowest F values and we will be choosing the lowest H value, that is, 20.

Advanced Pathfinding
[ 187 ]
After calculating the new possibilities, we notice that we need to choose 54 again to see ifthe final destination is closer to that point. This is exactly the process that will occur whenwe program the AI to find the shortest path that it will need to take in order to arrive at thefinal destination. The calculations need to be solved in real time, and as will start to notice,they can get very complex. This is why it consumes a significant portion of the CPU power,because it is the hardware component designated to this function (calculus).
Now, we will be selecting the number 54, because it is the lowest number on the map.
If we keep moving down, the values will get higher, which means that we are gettingfarther away from where we need to be. If we were the AI and didn't know that the finaldestination is at the top, we would need to check the number 60, because it is the mostpromising of them all at the moment. So, let's calculate the outcomes.

Advanced Pathfinding
[ 188 ]
Now, we can see that there are a lot of identical lowest numbers, which are 62, so we needto explore them all and keep calculating until the character finds the right path. For thepurposes of the example we will be moving to every lowest number that we can see on themap now.
After exploring all the lowest possibilities, we can see that we are getting closer to the finaldestination. At this point, the lowest value available is 68, and after that it will be easy toreach the final point.
Finally, we have arrived at the point B destination. This is the visual aspect of A* algorithm,where the darker gray area represents the positions that the computer has visited and thelighter gray area represents the outcome calculations of those areas that we visited.
The computer can calculate the best path in real time, or the developers can also choose tolet the AI calculate the best options before exporting the game. So the AI will automaticallyknow which path it needs to follow when the game starts, saving some CPU power.

Advanced Pathfinding
[ 189 ]
To explain how this works in the programming language, we will be using pseudo code todemonstrate this example. This way we can understand from start to finish how we cancreate the search method in any programming language and how we can adapt it ourselves:
OPEN // the set of nodes to be evaluatedCLOSED // the set of nodes already evaluated
Add the start node to OPEN
loop current = node in OPEN with the lowest f_cost remove current from OPEN add current to CLOSED
if current is the target node // path has been found return
foreach neighbor of the current node if neighbor is not traversable or neighbor is in CLOSED skip to the next neighbor
if new path to neighbor is shorter OR neighbor is not in OPEN set f_cost of neighbor set parent of neighbor to current if neighbor is not in OPEN add neighbor to OPEN
Let's analyze each line of code that we used to create the example. We have divided the gridmap into two different categories: OPEN and CLOSED. The OPEN ones are the squares that wehave already explored, represented on the image by the dark gray blocks. While the CLOSEDare the white blocks that we didn't explore yet. This will allow the AI to distinguishbetween the explored and not explored blocks, going from point to point finding the bestpath:
Add the start node to OPEN
Then we assigned the first block that is considered OPEN; this will set the starting point andit will automatically start calculating the best options from that position:
loop current = node in OPEN with the lowest f_cost remove current from OPEN add current to CLOSED

Advanced Pathfinding
[ 190 ]
After that, we need to create a loop, and inside our loop we have a temporary variablecalled current; this is equal to the node in the OPEN list that has the lowest F cost. Then itwill be removed from the OPEN list and added to the CLOSED list:
if current is the target node // path has been found return
Then, if the current node is the target node, the code assumes that the final destination hasbeen explored and we can just exit out of the loop:
foreach neighbor of the current node if neighbor is not traversable or neighbor is in CLOSED skip to the next neighbor
Otherwise, we must go through each of the neighbor nodes of the current node. If it is nottraversable, meaning that we cannot pass that position or if it was previously explored andis on the CLOSED list, the code can skip to the next neighbor. This part sets where it ispossible to move and also tells the AI to not take into consideration positions that werepreviously explored:
if new path to neighbor is shorter OR neighbor is not in OPEN set f_cost of neighbor set parent of neighbor to current if neighbor is not in OPEN add neighbor to OPEN
If it is not the case, then we can move on and check a couple of things. If the new path to theneighbor is shorter than the old path or if the neighbor is not on the OPEN list, then we setthe f_cost of the neighbor by calculating the g_cost and the h_cost. We see the newpossible blocks have children from the current block, so we can trace the steps that arebeing taken. And finally, if the neighbor is not on the OPEN list, we can add it.
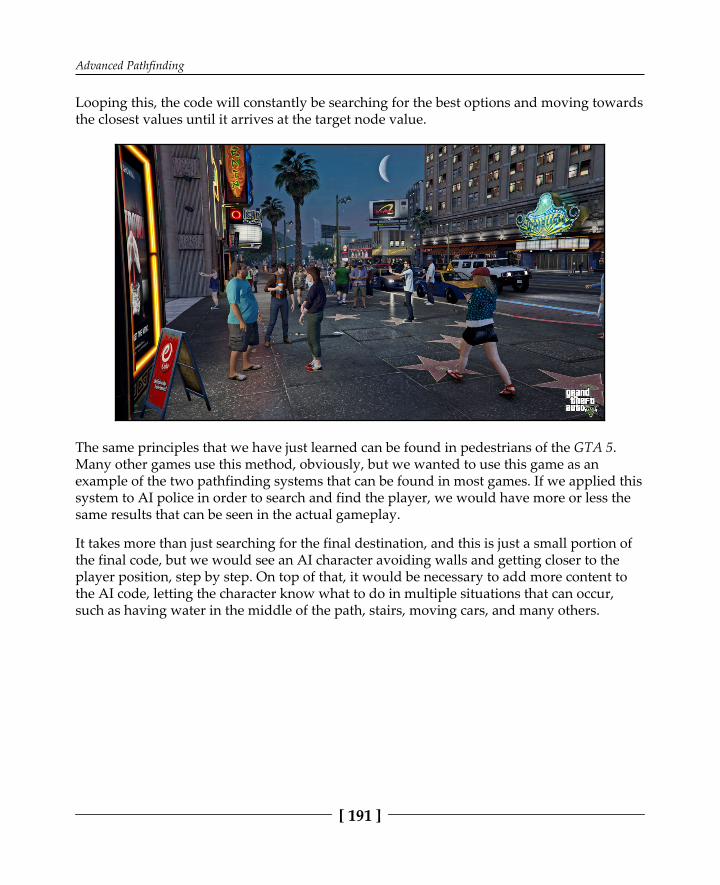
Advanced Pathfinding
[ 191 ]
Looping this, the code will constantly be searching for the best options and moving towardsthe closest values until it arrives at the target node value.
The same principles that we have just learned can be found in pedestrians of the GTA 5.Many other games use this method, obviously, but we wanted to use this game as anexample of the two pathfinding systems that can be found in most games. If we applied thissystem to AI police in order to search and find the player, we would have more or less thesame results that can be seen in the actual gameplay.
It takes more than just searching for the final destination, and this is just a small portion ofthe final code, but we would see an AI character avoiding walls and getting closer to theplayer position, step by step. On top of that, it would be necessary to add more content tothe AI code, letting the character know what to do in multiple situations that can occur,such as having water in the middle of the path, stairs, moving cars, and many others.

Advanced Pathfinding
[ 192 ]
Generating grid nodesNow we are going to implement what we have learned so far into a practical exercise. Let'sstart by creating or importing our scene into the game editor.
For this example, we are going to use buildings as non-walkable objects, but it can beanything that we choose, then we need to separate the objects that we just imported fromthe ground. To do this, we are going to assign them to a separate layer, and we are going tocall it unwalkable.
Then we can start creating our first class of the game, and we are going to start from thenode class:
public bool walkable; public Vector3 worldPosition; public Node(bool _walkable, Vector3 _worldPos, int _gridX, int _gridY) { walkable = _walkable; worldPosition = _worldPos;
We have seen that the nodes have two different states, either they are walkable or non-walkable, so we can start by creating a Boolean called walkable. Then we need to know inwhat point in the world the node represents, so we create a Vector 3 for theworldPosition. Now, we need some way to assign these values when we create a node, sowe create the Node variable that will contain all the important information regarding thenodes.

Advanced Pathfinding
[ 193 ]
After creating the essential part of this class, we can move on to the grid class:
Node[,] grid; public LayerMask unwalkableMask; public Vector2 gridWorldSize; publicfloatnodeRadius; void OnDrawGizmos() { Gizmos.DrawWireCube(transform.position,new Vector3(gridWorldSize.x,1,gridWorldSize.y)); }
First of all, we need a two-dimensional array of nodes that represents our grid, so let'screate a two-dimensional array of nodes, and we can call it grid. Then we can create aVector2 that will define the area in world coordinates that this grid covers and call itgridWorldSize. We also need a float variable to define how much space each individualnode covers, which in this class is called nodeRadius. Then we need to create a LayerMaskto define the area that is non-walkable and give it the name unwalkableMask.
In order to visualize the grid that we just created in our game editor, we decided to useOnDrawGizmos method; using this is useful but not mandatory:
public LayerMask unwalkableMask; public Vector2 gridWorldSize; public float nodeRadius; Node[,] grid;
float nodeDiameter; int gridSizeX, gridSizeY;
void Start() { nodeDiameter = nodeRadius*2; gridSizeX = Mathf.RoundToInt(gridWorldSize.x/nodeDiameter); gridSizeY = Mathf.RoundToInt(gridWorldSize.y/nodeDiameter); CreateGrid(); }
void CreateGrid(){ grid = new Node[gridSizeX,gridSizeY]; Vector3 worldBottomLeft = transform.position - Vector3.right * gridWorldSize.x/2 - Vector3.forward * gridWorldSize.y/2; }

Advanced Pathfinding
[ 194 ]
Let's create a Start method, and we are going to add some basic calculations. The mainthing that we need to figure out is how many nodes can we fit in to our grid. We start bycreating a new float variable called nodeDiameter and new int variables calledgridSizeX and gridSizeY. Then, inside of our Start method we are going to add thevalue of the nodeDiameter that is equal to nodeRadius*2. gridSizeX is equal togridWorldSize.x/nodeDiameter,and this will tell us how many nodes can fit in thegridWorldSize.x. Then we will be rounding the number to fit into an integer number, sowe will be using Mathf.RoundToInt to make this possible. After creating the calculus forthe x axis, we can duplicate the same code and change it to make it work for the y axis. Tofinalize our Start method, we create a new function, we are going to call CreateGrid():
public LayerMask unwalkableMask; public Vector2 gridWorldSize; public float nodeRadius; Node[,] grid;
float nodeDiameter; int gridSizeX, gridSizeY;
void Start(){ nodeDiameter = nodeRadius*2; gridSizeX = Mathf.RoundToInt(gridWorldSize.x/nodeDiameter); gridSizeY = Mathf.RoundToInt(gridWorldSize.y/nodeDiameter); CreateGrid(); }
void CreateGrid() { grid = new Node[gridSizeX,gridSizeY]; Vector3 worldBottomLeft = transform.position - Vector3.right * gridWorldSize.x/2 - Vector3.forward * gridWorldSize.y/2;
for (int x = 0; x < gridSizeX; x ++) { for (int y = 0; y < gridSizeY; y ++) { Vector3 worldPoint = worldBottomLeft + Vector3.right * (x * nodeDiameter + nodeRadius) + Vector3.forward * (y * nodeDiameter + nodeRadius); bool walkable = !(Physics.CheckSphere(worldPoint, nodeRadius,unwalkableMask)); grid[x,y] = new Node(walkable,worldPoint); } } }

Advanced Pathfinding
[ 195 ]
Here we add the value of the grid variable, grid = new Node[gridSizeX,gridSizeY];. Now we need to add collision detection that will establish the walkable andnon-walkable areas of the map. To do this, we create a loop that can be seen in the codedemonstrated previously. We simply added a new Vector3 variable to get the bottom leftcorner of the map, which is called worldBottomLeft. Then we assigned the collisiondetection, which will search for any objects that are colliding with the walkable area byusing Physics.Check:
void OnDrawGizmos() { Gizmos.DrawWireCube(transform.position,new Vector3(gridWorldSize.x,1,gridWorldSize.y));
if (grid != null) { foreach (Node n in grid) { Gizmos.color = (n.walkable)?Color.white:Color.red; Gizmos.DrawCube(n.worldPosition, Vector3.one * (nodeDiameter-.1f)); } } }
Before testing it out, we need to update our OnDrawGizmos function, so that we can see thegrid on top of the map. To make the grid visible, we assigned the colors red and white andthe form of the cubes by using the nodeDiameter value to set the dimension of each cube.If the node is walkable, the color will be set to white; otherwise, it will be set to red. Nowwe can test it out:

Advanced Pathfinding
[ 196 ]
The results are wonderful; now we have a grid that auto-analyses the map and indicates thewalkable and non-walkable areas. With this part completed, the rest will be easier toimplement. Before moving on to the next part, we need to add a method that will tell ourcharacter which node it is standing in. In our code, we will be adding a function calledNodeFromWorldPoint that will make this possible:
public LayerMask unwalkableMask; public Vector2 gridWorldSize; public float nodeRadius; Node[,] grid;
float nodeDiameter; int gridSizeX, gridSizeY;
void Start(){ nodeDiameter = nodeRadius*2; gridSizeX = Mathf.RoundToInt(gridWorldSize.x/nodeDiameter); gridSizeY = Mathf.RoundToInt(gridWorldSize.y/nodeDiameter); CreateGrid(); }
void CreateGrid() { grid = new Node[gridSizeX,gridSizeY]; Vector3 worldBottomLeft = transform.position - Vector3.right * gridWorldSize.x/2 - Vector3.forward * gridWorldSize.y/2;
for (int x = 0; x < gridSizeX; x ++) { for (int y = 0; y < gridSizeY; y ++) { Vector3 worldPoint = worldBottomLeft + Vector3.right * (x * nodeDiameter + nodeRadius) + Vector3.forward * (y * nodeDiameter + nodeRadius); bool walkable = !(Physics.CheckSphere(worldPoint, nodeRadius,unwalkableMask)); grid[x,y] = new Node(walkable,worldPoint); } } } public Node NodeFromWorldPoint(Vector3 worldPosition) { float percentX = (worldPosition.x + gridWorldSize.x/2) / gridWorldSize.x; float percentY = (worldPosition.z + gridWorldSize.y/2) / gridWorldSize.y; percentX = Mathf.Clamp01(percentX); percentY = Mathf.Clamp01(percentY);
int x = Mathf.RoundToInt((gridSizeX-1) * percentX);

Advanced Pathfinding
[ 197 ]
int y = Mathf.RoundToInt((gridSizeY-1) * percentY); return grid[x,y]; } void OnDrawGizmos() { Gizmos.DrawWireCube(transform.position,new Vector3(gridWorldSize.x,1,gridWorldSize.y));
if (grid != null) { foreach (Node n in grid) { Gizmos.color = (n.walkable)?Color.white:Color.red; Gizmos.DrawCube(n.worldPosition, Vector3.one * (nodeDiameter-.1f)); } } }
And we have finally completed the first part of our example. We have a code that can workin any scene–we just need to define the scale of the map in which we want the code tosearch for the walkable and non-walkable areas, and the dimensions of each node in casewe want to change the precision of the pathfinding remember that if we increase thenumber of nodes on the map, more CPU power will be required to calculate the pathfindingsystem).
Pathfinding implementationThe next step is to set the character to search for the final destination that we want. Let'sstart by creating a new class, which we will call pathfinding. This class will manage thesearch for the best path in order to reach the final destination. It will calculate in real timethe shortest path that the character needs to follow and it will be updated every second, soif the final destination is moving, it will keep following and recalculating the best path.

Advanced Pathfinding
[ 198 ]
We start by adding the AI character into our game editor that will eventually search foranother character of the game. For test purposes, we will simply add some basic functionsto our character that will let him move around the map, but we can also use a simple cubeto test whether the pathfinding system is working.
After importing our character into the game, we can start creating the class that will beassigned to it:
Grid grid;
void Awake(){ requestManager = GetComponent<PathRequestManager>(); grid = GetComponent<Grid>(); }
void FindPath(Vector3 startPos, Vector3 targetPos){Node startNode = grid.NodeFromWorldPoint(startPos); Node targetNode = grid.NodeFromWorldPoint(targetPos);}
We start by creating a function called FindPath that will store all the necessary values tocalculate the distance between the start position and the target position. Then we add aGrid variable that will have the same value as the grid that we have previously created.Then we used the Awake function to access to the grid values:
void FindPath(Vector3 startPos, Vector3 targetPos){Node startNode = grid.NodeFromWorldPoint(startPos);Node targetNode = grid.NodeFromWorldPoint(targetPos);
List<Node> openSet = new List<Node>();HashSet<Node> closedSet = new HashSet<Node>();openSet.Add(startNode);}
Then we need to create a list that will contain all of the nodes present in the game, as wehave demonstrated before. One list contains all the OPEN nodes, and another one willcontain all the CLOSED nodes:
public bool walkable;public Vector3 worldPosition;
public int gCost;public int hCost;public Node parent;public Node(bool _walkable, Vector3 _worldPos, int _gridX, int _gridY)

Advanced Pathfinding
[ 199 ]
{ walkable = _walkable; worldPosition = _worldPos;}
public int fCost{ get { return gCost + hCost; }}
Now we have opened the Node class, and we added new variables called gCost and hCost.The idea is that this class calculates the shortest path value, and as we saw previously, inorder to get the fCost that represents the shortest path, we need to sum the values of the gand h nodes.
f(n)=g(n)+h(n).
Once the Node class is edited, we can go back to our pathfinding class and continueimplementing the lines of code that will make our AI character search for the optimal path:
Grid grid;
void Awake(){ grid = GetComponent<Grid> ();}
void FindPath(Vector3 startPos, Vector3 targetPos){ Node startNode = grid.NodeFromWorldPoint(startPos); Node targetNode = grid.NodeFromWorldPoint(targetPos);
List<Node> openSet = new List<Node>(); HashSet<Node> closedSet = new HashSet<Node>(); openSet.Add(startNode);
while (openSet.Count > 0){ Node node = openSet[0]; for (int i = 1; i < openSet.Count; i ++) { if (openSet[i].fCost < node.fCost || openSet[i].fCost == node.fCost) {
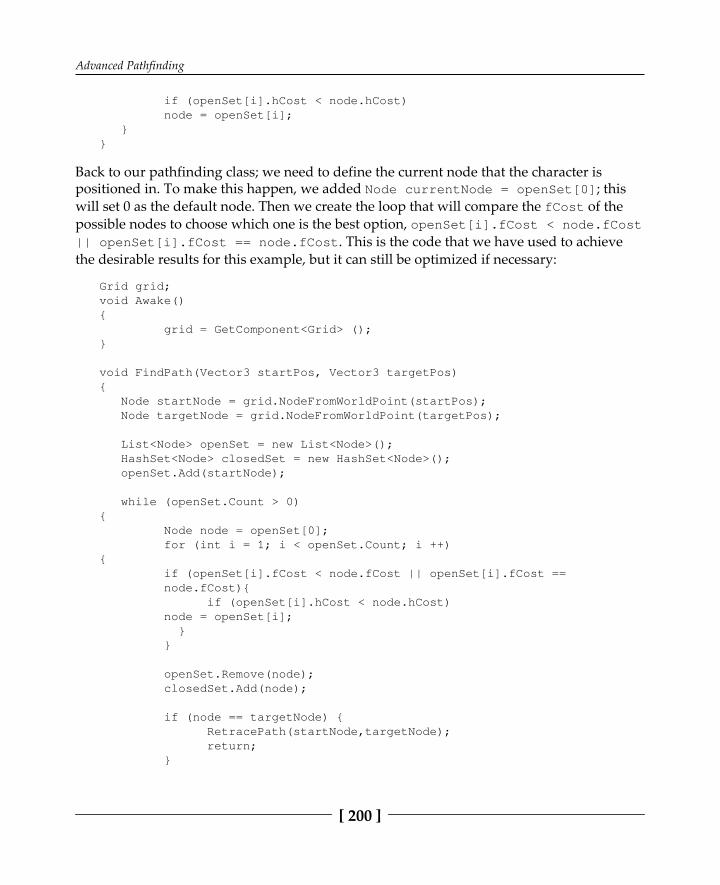
Advanced Pathfinding
[ 200 ]
if (openSet[i].hCost < node.hCost) node = openSet[i]; }}
Back to our pathfinding class; we need to define the current node that the character ispositioned in. To make this happen, we added Node currentNode = openSet[0]; thiswill set 0 as the default node. Then we create the loop that will compare the fCost of thepossible nodes to choose which one is the best option, openSet[i].fCost < node.fCost|| openSet[i].fCost == node.fCost. This is the code that we have used to achievethe desirable results for this example, but it can still be optimized if necessary:
Grid grid;void Awake(){ grid = GetComponent<Grid> ();}
void FindPath(Vector3 startPos, Vector3 targetPos){ Node startNode = grid.NodeFromWorldPoint(startPos); Node targetNode = grid.NodeFromWorldPoint(targetPos);
List<Node> openSet = new List<Node>(); HashSet<Node> closedSet = new HashSet<Node>(); openSet.Add(startNode);
while (openSet.Count > 0){ Node node = openSet[0]; for (int i = 1; i < openSet.Count; i ++){ if (openSet[i].fCost < node.fCost || openSet[i].fCost == node.fCost){ if (openSet[i].hCost < node.hCost) node = openSet[i]; } }
openSet.Remove(node); closedSet.Add(node);
if (node == targetNode) { RetracePath(startNode,targetNode); return; }

Advanced Pathfinding
[ 201 ]
Continuing our loop, we have now defined when the current node is set to OPEN or CLOSEDand established that if the current node value is equal to the target node value, it means thatthe character already has arrived at the final destination if (currentNode ==targetNode):
public List<Node> GetNeighbors(Node node){ List<Node> neighbors = new List<Node>();
for (int x = -1; x <= 1; x++) { for (int y = -1; y <= 1; y++) { if (x == 0 && y == 0) continue;
int checkX = node.gridX + x; int checkY = node.gridY + y;
if (checkX >= 0 && checkX < gridSizeX && checkY >= 0 && checkY < gridSizeY) { neighbors.Add(grid[checkX,checkY]); } } } }
Now we need to loop through each of the neighbor nodes of the current node. To dothis, we have decided to add this to our grid code, so we need to open the grid class thatwe created at the beginning of the example and add the List function demonstratedpreviously. Then we will be adding the necessary values to the Node class (gridX andgridY):
public bool walkable;public Vector3 worldPosition;public int gridX;public int gridY;
public int gCost;public int hCost;public Node parent;public Node(bool _walkable, Vector3 _worldPos, int _gridX, int _gridY){ walkable = _walkable; worldPosition = _worldPos; gridX = _gridX; gridY = _gridY;}

Advanced Pathfinding
[ 202 ]
public int fCost{ get{ return gCost + hCost; }}
Here, we have added the final content for the Node class that contains the gridX and gridYvalues that will be used by the grid code. This is the final look at the Node class. Now, wecan move on to the pathfinding class again:
foreach (Node neighbor in grid.GetNeighbors(node)) {if (!neighbor.walkable || closedSet.Contains(neighbor)){ continue;}}
Here, we have added a foreach loop that will loop through the neighbors to check if theyare walkable or non-walkable.
To better understand the next step that we are going to take, there will be some examplediagrams of what we want to achieve to complete the pathfinding system:
We first need to count along the X axis to know how many nodes away we are from thefinal position on the X axis, and then we count along the Y axis to find out how many nodesaway we are from the final position on the Y axis:

Advanced Pathfinding
[ 203 ]
In this example, we can see that in order to get to the B position we need to move upwardstwo points. Because we are always searching for the shortest path, at the same time we aregoing upwards, we move on the X axis:
To calculate how many either vertical or horizontal moves are necessary to reach the Bposition, we just subtract the lower number from the higher number. For example, beforegoing on a straight line to the B position, it is necessary to calculate 5-2 = 3, which gives ushow many horizontal moves we need to reach the final destination.
Now, we can get back to the pathfinding code and add the equation that we have justlearned:
int GetDistance(Node nodeA, Node nodeB){ int dstX = Mathf.Abs(nodeA.gridX - nodeB.gridX); int dstY = Mathf.Abs(nodeA.gridY - nodeB.gridY);
if (dstX > dstY) return 14*dstY + 10* (dstX-dstY); return 14*dstX + 10 * (dstY-dstX);}
Here, we just added the lines of code that will tell us how many horizontal and verticalsteps the AI needs to take in order to arrive at the target destination. Now, if we look backat the pseudo code that we created at the very beginning of this chapter to check what is leftto create, we can see that we have followed the same structure and that we are almostfinished. The pseudo code is as follows:
OPEN // the set of nodes to be evaluatedCLOSED // the set of nodes already evaluated
Add the start node to OPEN
loop current = node in OPEN with the lowest f_cost remove current from OPEN add current to CLOSED

Advanced Pathfinding
[ 204 ]
if current is the target node // path has been found return
foreach neighbor of the current node if neighbor is not traversable or neighbor is in CLOSED skip to the next neighbor
if new path to neighbor is shorter OR neighbor is not in OPEN set f_cost of neighbor set parent of neighbor to current if neighbor is not in OPEN add neighbor to OPEN
So, let's keep adding more important content into our code and keep moving towards theconclusion of the pathfinding class.
We need to set the neighbor's f_cost and as we already know, to calculate this value, weneed to use the g_Cost and h_Cost of the neighbor node:
foreach (Node neighbor in grid.GetNeighbors(node)){ if (!neighbor.walkable || closedSet.Contains(neighbor)) { continue; }
int newCostToNeighbor = node.gCost + GetDistance(node, neighbor); if (newCostToNeighbor < neighbor.gCost || !openSet.Contains(neighbor)) { neighbor.gCost = newCostToNeighbor; neighbor.hCost = GetDistance(neighbor, targetNode); neighbor.parent = node; }
In the pathfinding class we have added the following code, which will calculate theneighbor nodes to check for their f_cost:
void RetracePath(Node startNode, Node endNode) { List<Node> path = new List<Node>(); Node currentNode = endNode;
while (currentNode != startNode) { path.Add(currentNode); currentNode = currentNode.parent; } path.Reverse();
grid.path = path;}

Advanced Pathfinding
[ 205 ]
Before exiting from the loop, we will be calling a function called RetracePath,and we cangive it startNode and targetNode. Then we have to create that new function with thesame name and assign a list of the nodes that we have already explored. In order tovisualize the pathfinding to see if it is working properly or not, we also have a path that wewill be creating in the grid class:
public List<Node> path;void OnDrawGizmos(){Gizmos.DrawWireCube(transform.position,newVector3(gridWorldSize.x,1,gridWorldSize.y));
if (grid != null) { foreach (Node n in grid) { Gizmos.color = (n.walkable)?Color.white:Color.red; if (path != null) if (path.Contains(n)) Gizmos.color = Color.black; Gizmos.DrawCube(n.worldPosition, Vector3.one *(nodeDiameter-.1f)); } }}
This section of the grid class was updated, now containing the List, path, and a newgizmo that will show on the editor view, the path between the AI position and the targetposition:
public Transform seeker, target;
Grid grid;
void Awake(){ grid = GetComponent<Grid> ();}
void Update(){ FindPath (seeker.position, target.position);}
And finally, to conclude our example, we add a void Update() into our pathfinding classthat will make the AI constantly search for the target position.

Advanced Pathfinding
[ 206 ]
Now we can move on to our game editor and assign the code pathfinding that we havecreated to the grid. Then we simply assign the AI character and the target position that wewant:
If we test the pathfinding system, we can see that it is working perfectly. In the precedingscreenshot, the top left point is the AI character's position, and in the bottom right is thetarget destination. We can see that the character planned the shortest path and one thatavoids colliding with the buildings:

Advanced Pathfinding
[ 207 ]
Then we have disabled the mesh from the buildings to have a better look at the walkableand unwalkable areas of the map. We can see that the character only chooses the walkableareas and avoids any obstacles in its way. It is complicated to demonstrate it using stillimages, but if we change the target location in real time, we can see the pathfindingadjusting the route that the character needs to take, and it always chooses the shortest path.
The advanced pathfinding system that we have just created can be found in many populargames that everybody loves. Now that we have learned how to create a complexpathfinding system, we are able to re-create some parts of the most advanced AI charactersof modern games such as GTA or Assassins Creed. Talking about Assassins Creed, it will beour next game, reference for the next chapter because its AI characters link perfectlybetween A* pathfinding and realistic crowd interactions, as we can see in the precedingscreenshot.

Advanced Pathfinding
[ 208 ]
SummaryIn this chapter, we revisited how to create point-to-point movement, but instead of using asimple method, we have studied how huge and successful game studios manage to solveone of the most complicated features of a AI, pathfinding. Here, we have learned how touse theta algorithms to recreate an human feature that helps us search and move in theright direction in order to arrive at the desired destination.
In the next chapter, we will be talking about realistic crowd interactions, a very importantaspect when trying to make an AI character as realistic as possible. We will be studyingdifferent approaches used in different types of game, and also we will be looking at howhumans and animals interact in their environments and how we can use that in our AI code.

8Crowd Interactions
After understanding how to develop an AI character that can move freely around the map,searching for the best paths to arrive at certain destinations, we can start working on theinteraction between characters. In this chapter, we will be looking at realistic crowdinteractions, how to develop a believable crowd behavior, and how a character shouldperceive the rest of the group. The goal of this chapter is to keep giving information to ourAI character about the environment, and in this particular case, about the other intelligentagents of the game. On this chapter, we will be talking about AI coordination,communication and crowd collision avoidance.
What is crowd interactionCrowd interaction is a real-life subject that usually refers to multiple organisms sharing thesame space. One big example is the human life, how humans interact with other humansand also other species. The decisions that we make most of the time involve other people,from the simple decisions to the most advanced and complicated ones. Let's assume that wewant to buy a ticket for the cinema and the movie starts at 3pm. If we were the only onesinterested in watching that movie, we could arrive only 2 minutes before it starts to buy aticket and we would be on time to watch the movie. But if more than 100 people areinterested in watching that same movie, we need to anticipate that and arrive much earlierat the cinema so we have time to buy the ticket. Once we arrive at the cinema, there arerules about how we should wait until it is our turn to buy the ticket. Usually we waitbehind the last person that is in the line. This behavior is an example of crowd interactions.We live surrounded by other humans, and for that reason we need to adapt our goalsaccordingly.

Crowd Interactions
[ 210 ]
In video games, we also can find this type of interaction, and can go from simple behaviorsto advanced and complex ones. If we have more than one AI character in the game and theyshare the same space, there will be times where one will collide with another. It's up to thecreators to think about that, about what would happen if two characters try to do the samething at the same time, if it makes sense or if it will result in bugs. To solve these problems,we need to think about them and implement decisions that will help characters share thesame space together, avoiding errors and behaving more realistically.
Video games and crowd interactionsAs we have discovered before, crowd interactions are a real-life matter, but it can be foundin video games, especially those that relies on human-like aspects. Because of the popularityof open-world maps, crowd interactions became a very important aspect when developingthe game, because the AI agents of the game are constantly sharing the same space. Thismeans that almost every open world game has the necessity to plan a crowd interactionsystem.
Assassin's CreedA very popular case of crowd interaction system on a video game can be found in theAssassin's Creed series. The non-playable characters walk around the map in groups, and ina simple way they avoid collisions and interact with the environment. This helps create arealistic atmosphere to the game, a crucial point that can make the game believable andsubmerging the player into a virtual world:

Crowd Interactions
[ 211 ]
Not only can we see group interaction in the general population of the game, but also in theguards and especially in the combat. From time to time, the player needs to fight against afew guards, and usually there is more than one guard ready to attack the player. Oneinteresting point is that the guards don't attack at the same time; they evaluate the situationand wait for a better opportunity to attack.

Crowd Interactions
[ 212 ]
This concept gives a sense of interaction between the multiple non-playable characters:
Grand Theft Auto (GTA)The Grand Theft Auto game series is a source of many interesting lessons that we can learnwith it. The constant seek to keep improving the game every time by trying to make it morerealistic and believable changed the focus of the player to the surroundings, instead ofsimply looking at the main character. To make the surroundings more appealing andrealistic, the creators of the game started to spend more time developing AI agents, howthey move, how they react, and how they interact. The interaction between the AIcharacters was groundbreaking at the time.
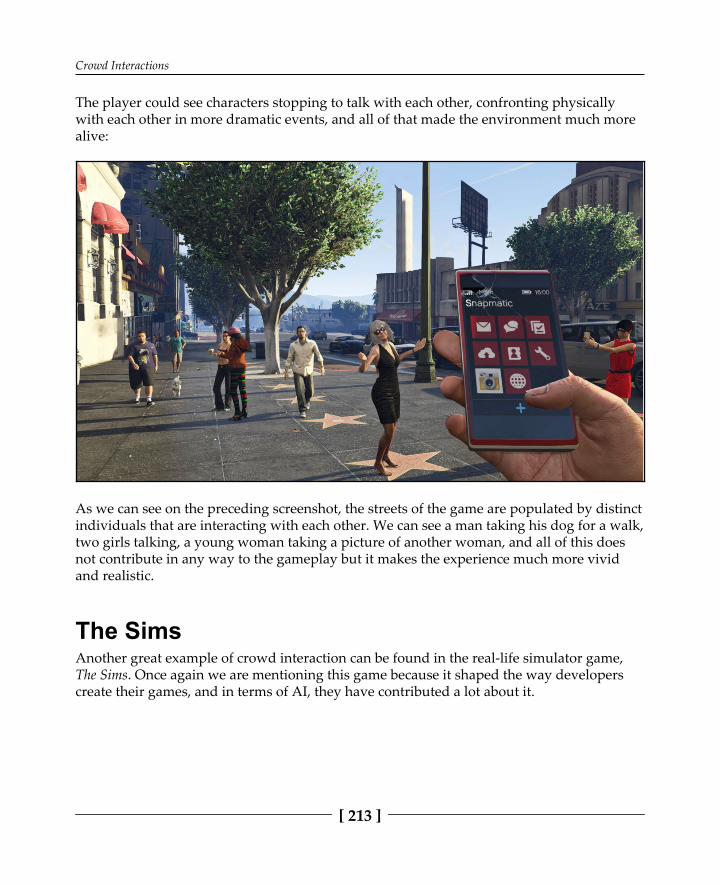
Crowd Interactions
[ 213 ]
The player could see characters stopping to talk with each other, confronting physicallywith each other in more dramatic events, and all of that made the environment much morealive:
As we can see on the preceding screenshot, the streets of the game are populated by distinctindividuals that are interacting with each other. We can see a man taking his dog for a walk,two girls talking, a young woman taking a picture of another woman, and all of this doesnot contribute in any way to the gameplay but it makes the experience much more vividand realistic.
The SimsAnother great example of crowd interaction can be found in the real-life simulator game,The Sims. Once again we are mentioning this game because it shaped the way developerscreate their games, and in terms of AI, they have contributed a lot about it.

Crowd Interactions
[ 214 ]
Non-playable characters do not mean that they simply need to be in idle position, waitingfor something to happen. Here we can see that all the characters have unique personalitiesand that they interact with each other. Even if the player sets aside the controller and justwatches the game, there will be many interesting things going on, and all of that comesfrom the AI characters:
Previously in this book we have analyzed the priorities of The Sims characters, and we knowthat they can decide not to do one thing if another is more important at the time. And nowthat we know how pathfinding works, we can even implement a more advanced systeminto the characters, for example, letting them organize their priorities, taking inconsideration the time that its necessary for them in order to reach the specific destinationthat lets them conclude the task. But all of that will be explored in a moment.
FIFA/Pro evolution soccerAnother example that is extremely important to mention is the AI character that can befound in multiple sports games. Even if from the outside it doesn't look a game genre that iscomplex, sports games are probably the most advanced in terms of AI development.

Crowd Interactions
[ 215 ]
The reason is that the games are based on real-life sports, and many of them are teamsports. The difficulties in developing a realistic and functional team sports game arenumerous, and for that reason it is a great case study:
The preceding screenshot shows gameplay footage of FIFA 17. Here we can see that onlyone character has the possession of the ball, while all the others are spread apart, eitherwaiting for the character to pass the ball or anticipating the character's position in order toattempt win the ball from him. In total, that makes one ball for twenty-two characters in thegame (eleven for each side). This is the reason why sports games require well-developed AIcharacters, because they are constantly working even if they don't have the ball.Individually, they have a position/role that they play, defending or attacking, left, right, ormiddle position, and many more. In the group, they all need to follow a strategy togetherand obey the rules of the game. If our teammate has the ball and is running forward, we cansupport him by running in the same direction, making it easy for him to pass, or we canstay behind because if that player loses the ball, someone needs to catch it back.
The interactions between the other characters are happening constantly, and it's not onlyabout running after the ball to see who can get it first, it's about sharing a lot of informationbetween them and trying to win the game.

Crowd Interactions
[ 216 ]
Planning crowd interactionsSometimes we put aside the planning phase while creating a game and think that all weneed to create an awesome game is to have an idea and everything will flow smoothly fromour head. Successful games are successful because every step of the development is plannedto the smallest detail, and we should remember that when creating our own games. At thispoint, we have a strong technical knowledge to develop a challenging and interesting gamewith plenty of AI features in it, so our next step is to combine the ability to create gameswith a plan to make them look better.
Now that we've analyzed some popular examples of crowd interaction systems in videogames, we can take a look at how to plan these types of interaction. We will follow theexamples from before and see how we can plan similar crowd interaction into our games.
Group fightLet's create a scenario where we have multiple AI characters fighting the player. We start byimplementing the combat features into the character code, such as attacking with one hand,attacking with two hands, defending, going after the player, and all of that. Once we havethat implemented, the character is able to fight the player and that's the starting point. If wedidn't plan anything and we had four characters fighting the player, they all would attack atthe same time to defeat the player.
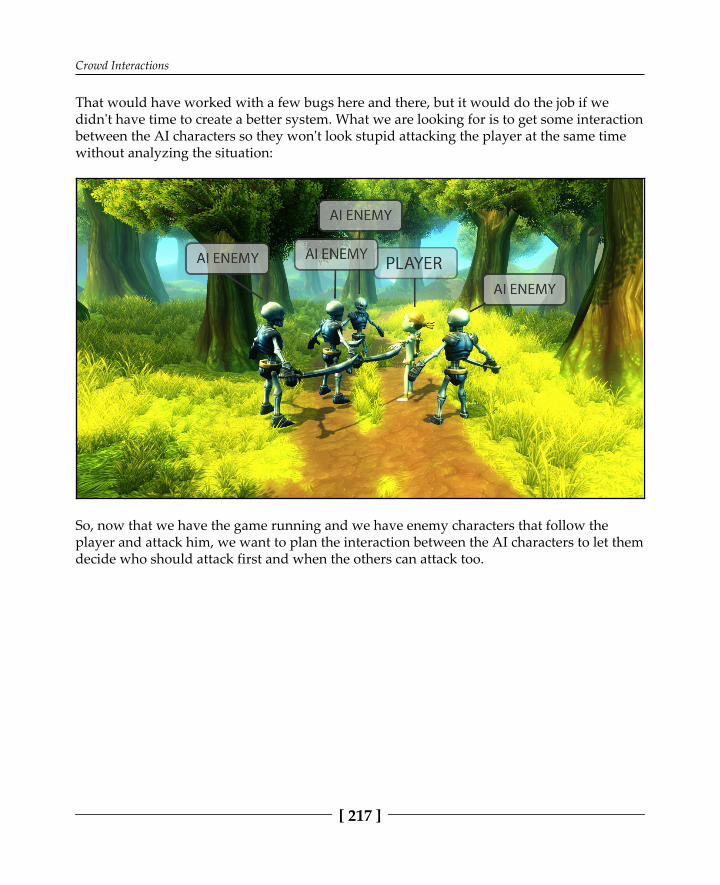
Crowd Interactions
[ 217 ]
That would have worked with a few bugs here and there, but it would do the job if wedidn't have time to create a better system. What we are looking for is to get some interactionbetween the AI characters so they won't look stupid attacking the player at the same timewithout analyzing the situation:
So, now that we have the game running and we have enemy characters that follow theplayer and attack him, we want to plan the interaction between the AI characters to let themdecide who should attack first and when the others can attack too.
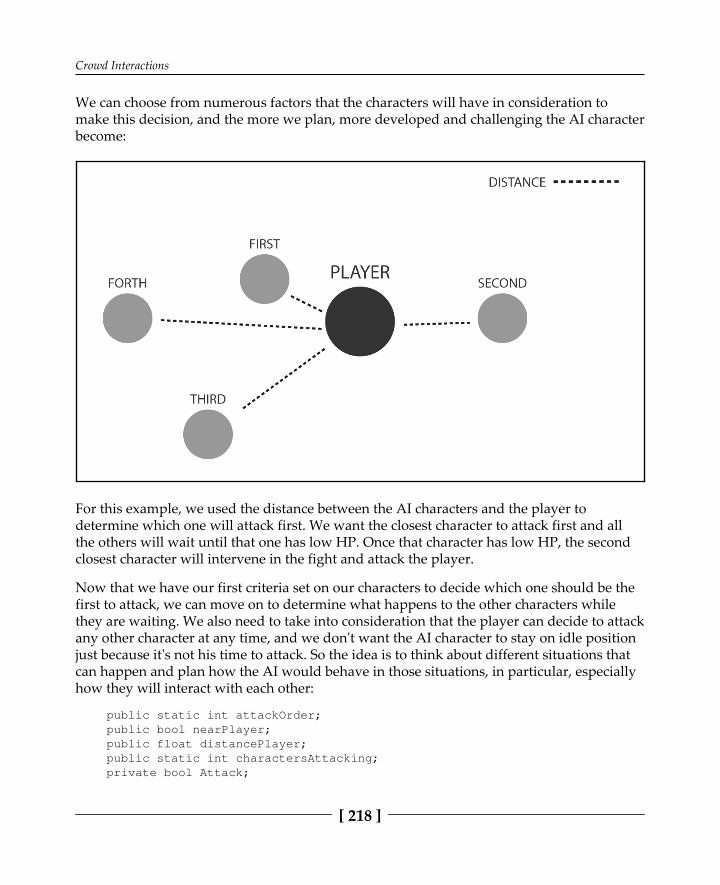
Crowd Interactions
[ 218 ]
We can choose from numerous factors that the characters will have in consideration tomake this decision, and the more we plan, more developed and challenging the AI characterbecome:
For this example, we used the distance between the AI characters and the player todetermine which one will attack first. We want the closest character to attack first and allthe others will wait until that one has low HP. Once that character has low HP, the secondclosest character will intervene in the fight and attack the player.
Now that we have our first criteria set on our characters to decide which one should be thefirst to attack, we can move on to determine what happens to the other characters whilethey are waiting. We also need to take into consideration that the player can decide to attackany other character at any time, and we don't want the AI character to stay on idle positionjust because it's not his time to attack. So the idea is to think about different situations thatcan happen and plan how the AI would behave in those situations, in particular, especiallyhow they will interact with each other:
public static int attackOrder; public bool nearPlayer; public float distancePlayer; public static int charactersAttacking; private bool Attack;

Crowd Interactions
[ 219 ]
private bool Defend; private bool runAway; private bool surpriseAttack;
void Update () {
if(distancePlayer < 30f) { nearPlayer = true; }
if(distancePlayer > 30f) { nearPlayer = false; }
if(nearPlayer == true && attackOrder == 1) { Attack = true; }
else { Defend = true; }
}
We can start with a simple code just to determine the behavior of the character according tothe situation that we are working with, and then we can keep adding more content asnecessary to make it work as we want to. For this example, we have created a static integercalled attackOrder that will contain the attack order of each character, so they know if it'stheir time to attack or not. After that, we have a public Boolean called nearPlayer, whichwill check whether the player is close the player character or not. We can have 30 characterson the map but we just want the closest ones to attack the characters. For this example, theothers will simply ignore the player. To determine whether the AI character is near or not,we have a public float called distancePlayer, which will be the result of the distancebetween the AI character and the player. Then we have added a public static int calledcharactersAttacking, where the number will increase each time a new character arrivesnear the player. We can use this to give information to the other characters about how manyskeletons are currently attacking the player.

Crowd Interactions
[ 220 ]
A small and simple code such as this one can make a huge difference for the crowdinteraction that we are working on, because we can use the information about how manycharacters are attacking the player to decide what they will do. For example, we candetermine that if there's only two characters attacking, one will constantly defend theplayer's attacks while the other attacks, and when the player switches from one character toanother, they will do the same thing and swap their roles, making it harder for the player todefeat the enemies:
This can be seen in the preceding screenshot, where one of the skeletons tells the other thatit will be defending and that the other one can attack the player from behind. This is exactlywhat crowd interaction is, one character giving information to another about what it can door how it should behave. The more information the characters share with the others, themore options they have of what they can do, and the more realistic their interactions willlook because they are not acting alone.
As we can see, even with simple codes we can achieve complex results, but it's necessary tothink about it and plan everything ahead, and obviously the code will get bigger every timewe add more details and options to it.
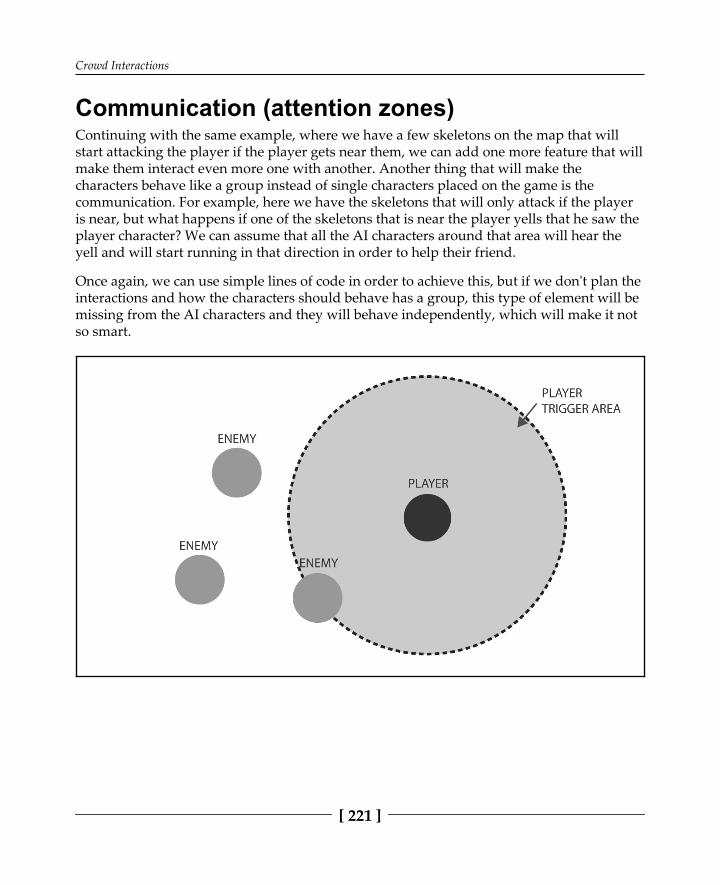
Crowd Interactions
[ 221 ]
Communication (attention zones)Continuing with the same example, where we have a few skeletons on the map that willstart attacking the player if the player gets near them, we can add one more feature that willmake them interact even more one with another. Another thing that will make thecharacters behave like a group instead of single characters placed on the game is thecommunication. For example, here we have the skeletons that will only attack if the playeris near, but what happens if one of the skeletons that is near the player yells that he saw theplayer character? We can assume that all the AI characters around that area will hear theyell and will start running in that direction in order to help their friend.
Once again, we can use simple lines of code in order to achieve this, but if we don't plan theinteractions and how the characters should behave has a group, this type of element will bemissing from the AI characters and they will behave independently, which will make it notso smart.

Crowd Interactions
[ 222 ]
As we can see, this is the system that we have right now. The AI characters don'tcommunicate with each other and so the only skeletons that are aware of the player'sposition are the ones that are close enough to the player. If we are trying to create a crowdsystem, we need to plan situations like this one. Just because the other ones don't see theplayer character, doesn't necessarily mean that they have to react like nothing is happening.
Let's think about a real-life situation. For example, we have one person inside a house andanother one outside. The person that is outside of the house sees an incredible beautiful birdwhile the person that is inside doesn't see it, so it will remain inside of the house. If theperson that saw the bird doesn't communicate with the other one, the person that is insidethe house will never know about it. So, normally what would happen is the person that seesthe bird will call the other one to come outside so it can see the beautiful bird as well. This isa realistic behavior that can be implemented in our crowd interaction system.
To change this non-interaction situation to a more realistic version, we need to add onemore feature to our characters that will make them communicate with each other. At thispoint, we just need simple communication, and we could use a similar code to what wehave used to determine if the character can see the player or not:

Crowd Interactions
[ 223 ]
So now we have a AI character that has entered on the player trigger area, and for thatreason he will yell so the others AI characters that are near are aware of the player's positionas well. In the preceding diagram, we can see that now not only the player has a triggerarea, but the enemy that has spotted the player has one as well. This new trigger area willserve to alert the other characters, and it's meant to represent a yell. So when we play thegame, and the enemy spots us, we will hear a yell that will give a sense of communicationbetween the AI characters:
public static int attackOrder; public bool nearPlayer; public bool nearEnemyAttacked; public float distancePlayer; public static int charactersAttacking; private bool Attack; private bool Defend; private bool runAway; private bool surpriseAttack;
void Update (){
if(distancePlayer < 30f) { nearPlayer = true; }
if(distancePlayer > 30f) { nearPlayer = false; }
if(nearPlayer == true && attackOrder == 1) { Attack = true; }
else { Defend = true; }
if(nearEnemyAttacked == true) { runPlayerDirection(); } }

Crowd Interactions
[ 224 ]
To make this happen, we simply added new Boolean called nearEnemyAttacked. Inconjunction with this, we add a trigger detection to check if there are some skeletons nearthat have spotted the player. If it's triggered, the Boolean turns true; otherwise, it willremain false.
Once it gets triggered, it's time for that same AI character to call for any other ones that arearound:
As we can see in the preceding diagram, due to the communication system we haveimplemented, we now have three characters that are fully aware of the player's position.The last character will also yell, trying to tell others about the player's position, but if thetrigger area doesn't overlap an AI character, nothing will happen:

Crowd Interactions
[ 225 ]
For example, ENEMY 4 is far too away to be affected by the trigger zone, so it will remainin that position until the player gets near his location; otherwise, he won't know what ishappening.
The trick of this example is to have characters talking to each other, yelling or trying to getthe attention of characters that are near. This will give a sense of communication turningsimple and individual actions into a more appealing group interaction.
Communication (talking to other AI characters)There are many other examples that can be shown in terms of communication, because it'salways possible to find new ways to communicate between characters; just like in real life,we are constantly finding new ways of communicating. But for now, we will stick to thebasic form of communication, talking.

Crowd Interactions
[ 226 ]
If we plan to have a lot of AI characters in the game, it will rapidly take a big part of thegame, where the focus of the player will be set directly or indirectly to them. Probably notevery game that we will be creating will have characters that react instantly to the presenceof the player, and maybe the player could be just one more character in the game, and forthat reason could be ignored. So in this section, will be excluding the player part and wewill exclusively plan the AI character interactions:
Let's create a city with a lot of people and assign a few details to them so they can behavelike a realistic crowd. We can start by adding basic movement information into ourcharacter, such as walking, running, idle, and pathfinding. With that implemented in ourcharacter, we have an individual character that can walk around the city that avoidscolliding with the buildings and walks on the sidewalk.
Now our first suggestion for this example is to add a simple trigger detection so thecharacters are aware when another characters passes nearby:

Crowd Interactions
[ 227 ]
After adding the trigger area to the characters, we can advance to the next step and work onthe interaction between them. Our plan here is to have a probability map to determine aprobability to find a known person that can start a conversation with:
If(probabilityFriendly > 13){ // We have 87% of chance talkWith();}
To make this work, we added an integer function that for this example we called itprobabilityFriendly. This refers to the probability of finding a friendly person. When anew character enters the trigger area, the calculation will be made randomly, and if thenumber fits our percentage, both characters will stop walking around and will start aconversation. After that, we can keep adding more details to this situation, such as whenthey end the conversation, we could make them walk side by side while talking, andendless other options that could derive from this small trigger detection and probabilitymap.

Crowd Interactions
[ 228 ]
The idea behind this is to have characters that can interact with each other randomly. Fromthe player's point of view, it would look like the characters are friends and they simply havestopped to talk because they know each other. This helps create a realistic atmosphere, andit's not so much about a technical point but instead about planning every possibleinteraction between characters.
Team sportsAs we saw previously while explaining some popular examples of crowd interactionsystems in video games, sports games have a well-developed AI system that worksspecifically well in team sports. Now we will take an in-depth look at some of the corefeatures of team sports video games and see how they have achieved some interestingresults, making the AI characters of those games very challenging and realistic.
If we analyze the real-life sport football, we have two teams each composed of elevenindividual players. In order to win the game, the team needs to score more goals than theopponent, so the game can be divided into two basic forms: attacking, where the focus isscoring goals; and defending, where the focus is avoiding conceding goals. There is just oneball in the game, so a lot of the players' time is spent without having the possession of theball, and that time can be very important to the end result of the game. Either the playertries to take the ball from the opponent or get in a good position to receive the ball. That'sthe two basic forms when the player doesn't have the possession of the ball.
The video game tries to mimic every detail of the sport, and because it is a team sport, thereis a lot of work on the development of the AI group interaction. The mindset of the AIcharacters needs to be more on team play and less on simple individual play. So they onlymake certain decisions, if those decisions follow the group objectives.
If we watch a football match, we can hear the players talking to each other to pass them theball, to move forward, to go backwards, and so on. The idea is to have that type ofcommunication inside of the video game as well. It does not necessarily need to be aboutverbal communication, but the rather about actions that makes the game much morerealistic.
Let's analyze step-by-step the basic AI decisions that the characters make while playing thegame. We will start by taking a look the organization of the characters on the field, asshown in the following diagram:

Crowd Interactions
[ 229 ]
This is one example of a simple formation of a football team on the field. At the bottom, wecan see just one circle, and that represents the goalkeeper, the one that is responsible fordefending the goal. This character is the only one that remains constantly around this area;all the others can move freely if they want to. Now that we have a visual representation ofhow a football team is distributed on the field, we can move on with the example.
Each character in the game has an individual objective. This may be passing the ball to theoffensive players, shooting as much as possible to try to score goals, simply staying behindto defend, and so on. While they have these individual objectives, they also need to thinkabout the team objectives and decide if one objective or another is more important at acertain point, and if the decision that they are making will help to achieve the objectivesuccessfully.
Let's move on to the creation of an individual player. We start from the basics, running afterthe ball. To create this, we can use techniques that were explained earlier in the book, suchas walking towards an object's position:
public float speed; public Transform ball; public bool hasBall;
void Start () { speed = 1f; }
void Update () {

Crowd Interactions
[ 230 ]
if(hasBall == false) { Vector3 positionA = this.transform.position; Vector3 positionB = ball.transform.position; this.transform.position = Vector3.Lerp(positionA, positionB, Time.deltaTime * speed); }
if(hasBall == true) {
} }
Here we have the code that makes the character running after the ball. At this moment, wewill be working on just one character and then we'll gradually add team interactions inorder to have at least a basic form of what we can see on a fully developed sports game. Soif we play the game with only this code, we can see that the character will move towards theball's position, and that is the basics of the football game, to reach the ball:
At the moment, we have an individual player working properly, and that is want weexpected for now. If we added more characters into the game, all of them would runtowards the ball, ignoring everything else, so no communication or interaction would behappening in the game:

Crowd Interactions
[ 231 ]
If we had all the characters in the game running towards the ball's position, as we can see inthe preceding diagram, it will be like the characters don't have a perception of the othersaround them. So to avoid this situation, we can get the character that is closest to the ball tocommunicate that to the other characters, so they don't need to run for the ball as well. Tocreate that, we can have a constant calculation between the distance of each character andthe ball:
public float speed; public Transform ball; public bool hasBall; public float ballDistance;
void Start () { speed = 1f; }
void Update (){
if(hasBall == false) { Vector3 positionA = this.transform.position; Vector3 positionB = ball.transform.position; this.transform.position = Vector3.Lerp(positionA,

Crowd Interactions
[ 232 ]
positionB, Time.deltaTime * speed); }
if(hasBall == true) {
}
ballDistance =Vector3.Distance(transform.position,ball.position);
}
To achieve this, we have used the distance calculation that we have explored previously onthe book. So now we have three new variables on the code, ballDistance that is a floatthat will be the measurement of how far the character is from the ball.
Now that we have this set we need to have the character verifying if he is the closest ofthem all from the ball and if so, he can then move on and run towards the ball position:
public float speed; public Transform ball; public bool hasBall; public float ballDistance; public static float teamDistance;
void Start () { speed = 1f; }
void Update () {
if(hasBall == false) { Vector3 positionA = this.transform.position; Vector3 positionB = ball.transform.position; this.transform.position = Vector3.Lerp(positionA, positionB, Time.deltaTime * speed); }
if(hasBall == true) {
}
ballDistance =Vector3.Distance(transform.position,ball.position);

Crowd Interactions
[ 233 ]
if(teamDistance < ballDistance) { teamDistance = ballDistance; }
}
For this example, we decided to simply add a variable that will be shared for all thecharacters, so we added a static float variable called teamDistance. This will store thevalue of the character that is closest to the ball. At this point, the characters will know ifthey are the ones that are closest to the ball. From this point, it is simple to move to the nextstep and have the character check if it is the closest one, and if so, it can run towards theball. This will be the first team element that we'll be adding to our AI characters. They willcheck with the others to see which one should get the ball, and as we planned, it makesmore sense to be the one that is closest to the ball, but we can break it down further so theycan check which one will get to the ball first. However, for this example we'll stick with theprinciple that all of the characters run at the same velocity:
public float speed; public Transform ball; public bool hasBall; public float ballDistance; public static float teamDistance; public bool nearTheBall;
public float teamdist;
void Start () { speed = 0.1f; teamDistance = 10; }
void Update () { teamdist = teamDistance;
if(hasBall == false && nearTheBall == true) { Vector3 positionA = this.transform.position; Vector3 positionB = ball.transform.position; this.transform.position = Vector3.Lerp(positionA, positionB, Time.deltaTime * speed); }
if(hasBall == true) {

Crowd Interactions
[ 234 ]
}
ballDistance =Vector3.Distance(transform.position,ball.position);
if(teamDistance > ballDistance) { teamDistance = ballDistance; }
if(teamDistance == ballDistance) { nearTheBall = true; }
if(teamDistance < ballDistance) { nearTheBall = false; }
}
Now if we test the game, we can see that only one character is running after the ball. All theother characters have the perception that one of their team is closer to the ball, so that onewill get the ball. At this moment, we already have a simple form of group interaction andwe are on the right track.

Crowd Interactions
[ 235 ]
The next thing that we need to work on is that the ball will be moving throughout the game,and our code works in a static scenario, but if the ball gets moved, the team distance checkshould be reset. The reason is that the value will be getting lower when the character AIgets closer to the ball, and that value never increases, so we need to update it. We start bycreating a new script for the ball:
public Vector2 curPos; public Vector2 lastPos;
public bool ballMoving;
void Update () {
curPos = transform.position;
if(curPos == lastPos) { ballMoving = false; }
else { ballMoving = true; characterAI.teamDistance = 10; }
lastPos = curPos; }
After adding this script to the ball, the distance check of the players will get updated everytime the ball get's moved. Now let's make sure that the ball moves. To make this happen,we need to allow the character to kick the ball.
First, we will update the ball script that we just created. We want to add a variable that willstore the position where the ball will land after the character shooting it:
public Vector2 curPos; public Vector2 lastPos; public static Transform characterPos; public float speed;
public bool ballMoving;
void Start () {

Crowd Interactions
[ 236 ]
characterPos = this.transform; speed = 2f; }
void Update () {
curPos = transform.position;
if(curPos == lastPos) { ballMoving = false; }
else { ballMoving = true; characterAI.teamDistance = 10; }
lastPos = curPos;
Vector2 positionA = this.transform.position; Vector2 positionB = characterPos.transform.position; this.transform.position = Vector2.Lerp(positionA, positionB, Time.deltaTime * speed); }
So, what we have done here is give information about the landing position of the ball. Tomake this happen, we added a public static Transform variable calledcharacterPos. We have chosen to have character positions here for the test, because wewant the characters to pass the ball and not simply kick it:
public float speed; public Transform ball; public bool hasBall; public float ballDistance; public static float teamDistance; public bool nearTheBall; public List<Transform> teamCharacters; public int randomChoice; public float teamdist;
Then we updated the variables of the character AI script. Here, we have a list that willcontain all the players' coordinates of the team. The idea is to have the character choosing afriendly teammate to pass the ball and shoot it in that direction.

Crowd Interactions
[ 237 ]
So for this example, we have chosen to use the coordinates of the characters as a waypointfor the ball. To make this feature more realistic, we can add more details about the trajectoryof the ball being affected by gravity or wind:
void Update (){ teamdist = teamDistance;
if(hasBall == false && nearTheBall == true) { Vector3 positionA = this.transform.position; Vector3 positionB = ball.transform.position; this.transform.position = Vector3.Lerp(positionA, positionB, Time.deltaTime * speed); }
if(ballDistance < 0.1) { hasBall = true; }
if(hasBall == true) { passBall(); hasBall = false; }
ballDistance =Vector3.Distance(transform.position,ball.position);
if(teamDistance > ballDistance) { teamDistance = ballDistance; }
if(teamDistance == ballDistance) { nearTheBall = true; }
if(teamDistance < ballDistance) { nearTheBall = false; }
}
void passBall (){

Crowd Interactions
[ 238 ]
randomChoice = Random.Range(0, 9); ballScript.characterPos = teamCharacters[randomChoice];}
Then we use the variables that we just added to our code to send the new direction to theball when the character AI gets close enough to the ball. void passBall () is the functionthat we created that will be called every time the character wants to pass the ball. At thismoment, we just want the characters to pass the ball to each other, so we have assigned arandom number to select a character from the list.
If we test the game, we can see that there is a lot more movement and interaction going on.So what we can see is that the closest character will get near the ball and when thathappens, he will pass the ball to another character. The ball will move towards the characterand the character will get closer to the ball so he can pass the ball to another character.Currently, this will happen forever in a loop, a character gets the ball, passes, another onegets the ball and passes, and so on.
Now we have the foundation of a simple football game, and we can simply keep addingmore features like the ones we just created to make them communicate to see who's goingto get the ball and pass the ball to the teammates.

Crowd Interactions
[ 239 ]
Crowd collision avoidanceTo finalize this chapter, we'll be talking about crowd collision avoidance. The idea of havinga lot of characters in the same map is becoming a standard for open world games. But thisoften brings a problem, collision avoidance:
We have already discovered how advanced pathfinding works, and we know that is apowerful system when developing AI movement. But if we have a lot of characters trying toreach the same position at the same time, it will cause them to collide with each other andthey will probably block the path that is needed to reach that destination. As we can see inthe preceding screenshot, everything is running smoothly and without any abnormalsituation because the characters are following different directions and rarely do theyinterfere with the others.
But what happens if all the characters try to access the same position at the same time, forexample trying to get inside the house. It is only possible for one character at a time to gothrough the door, and that means that plenty of other characters will wait in line to enter.

Crowd Interactions
[ 240 ]
The solution for this problem is still being explored, and there is not a definite answer, butthere are some ways to get around this.
Currently crowd dynamics solutions usually involve two different layers, one for thepathfinding and another one for the local collision avoidance. Using this approach, we havea few benefits, it will produce a high quality movement and also it will have avoidance on asmall scale, it is a very common method used on multiple games.
There are different alternatives to achieve this with a satisfactory result. A popular choicefor many games is the combination of the Theta Algorithm A* with the velocity obstacle.This allow us to calculate the distance between our character and the other one that willcollide against us.

Crowd Interactions
[ 241 ]
In high-density crowd situations, solely relying on local collision avoidance and idealizedpathfinding will cause agents to pile up at popular, shared path waypoints. Collisionavoidance algorithms only help to avoid local collisions in the pursuit of following the idealpath. Often, games rely on these algorithms to divert agents to less-congested, less-directroutes in high-density situations. In certain situations, collision avoidance can lead to thisdesired behavior, though it is always a side effect of the system and not a deliberateconsideration.
Work has been done in incorporating aggregate crowd movement and crowd density intopathfinding computations. Approaches that augment pathing via crowd density do not takeinto account the aggregate movement or direction of movement of the crowd, which leadsto overcorrection of the phenomenon, which can be seen in the following image:
Congestion maps are similar in many ways to existing cooperative pathfinding algorithms,such as Direction Maps (DMs), but they differ in a few key respects. DMs use averagecrowd motion over time to encourage agents to move with the crowd. Because of this, manyof the oscillations present in the congestion map approach are smoothly resolved.Conversely, this temporal smoothing prevents DMs from quickly and accurately reacting tochanges in the environment and crowd behavior. Both congestion maps and DMs apply theaggregate crowd movement information to the path planning process in much the sameway; however, congestion maps handle agents of varying size and shape, while DMstraditionally assume homogeneity.
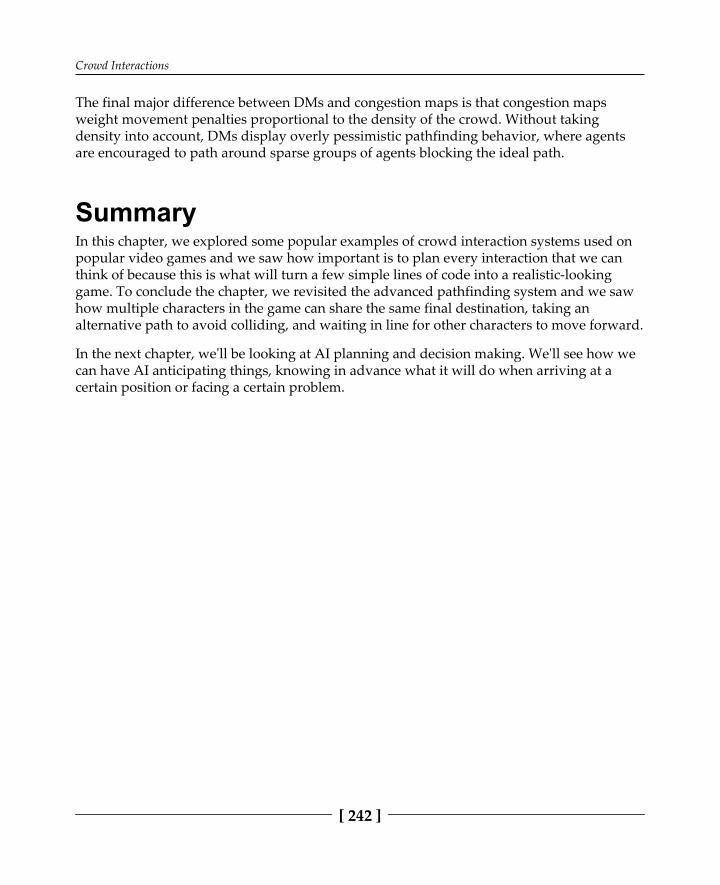
Crowd Interactions
[ 242 ]
The final major difference between DMs and congestion maps is that congestion mapsweight movement penalties proportional to the density of the crowd. Without takingdensity into account, DMs display overly pessimistic pathfinding behavior, where agentsare encouraged to path around sparse groups of agents blocking the ideal path.
SummaryIn this chapter, we explored some popular examples of crowd interaction systems used onpopular video games and we saw how important is to plan every interaction that we canthink of because this is what will turn a few simple lines of code into a realistic-lookinggame. To conclude the chapter, we revisited the advanced pathfinding system and we sawhow multiple characters in the game can share the same final destination, taking analternative path to avoid colliding, and waiting in line for other characters to move forward.
In the next chapter, we'll be looking at AI planning and decision making. We'll see how wecan have AI anticipating things, knowing in advance what it will do when arriving at acertain position or facing a certain problem.

9AI Planning and Collision
AvoidanceIn this chapter, we will cover topics that will help bring a higher complexity level to our AIcharacters. The idea of this chapter is to give the power of planning and deciding to thecharacters. We have already explored some of the technical knowledge required to achievethis in the previous chapters, and now we will explore in detail the process of creating an AIcharacter that can plan ahead their decisions.
SearchWe will start by talking about searching in video games. Search can be the first decision thatour characters make because in most of the times, we want the characters to search forsomething, either searching for the player or for something else that will lead the characterto their victory.
Having our characters be able to successfully find something is very useful and can behighly important as well. This is a feature that can be found in a large number of videogames, and for that reason, it is likely that we will need to use it as well.
As we saw in previous examples, most of the times we have a player who walks around themap and when they come across an enemy, that enemy changes from an idle to offensiveposition. Now, we want the enemy to be proactive and constantly searching for the playerinstead of waiting for him. In our heads, we can start thinking about the process that isrequired for the enemy to start searching for the player. That process that we have in ourheads needs to be planned, and that plan needs to be in the AI character's head. Basically,we want the AI thoughts to be the same as our thoughts because that will look realistic, andthat is exactly what we want.

AI Planning and Collision Avoidance
[ 244 ]
Other times, we might want the search to be secondary, where the main priority of thecharacter is something else. This is very common for real-time strategy games, where the AIcharacters start exploring the map, and at a certain point, they find an enemy base. Thesearching wasn't their priority, but even then it is a part of the game-exploring the map andgetting the opponent's location. After discovering the player's location, the AI character candecide whether exploring more of it becomes a priority or not and what would be their nextstep.
Also, we can create realistic animals for hunting games, for example, where the mainobjective of the animal is to eat and drink, so they have to constantly search for food orwater, and if they are not hungry or thirsty anymore, they can search for a warm place tostay. However, meanwhile if the animal finds a predator, their priority will changeimmediately, and the animal will start searching for a safe place to stay.
There are many decisions that can depend on a search system, and it is a feature thatmimics what real life humans or animals do. We will cover the most common types ofsearches on video games, and the objective is to turn the AI character able to search andsuccessfully find anything.
Offensive searchThe first type of search that we will create is an offensive search. By offensive search, wemean that this is set to be the primary objective of the AI character. The idea is that thecharacter of the game for some reason needs to find the player, similar to the hide and seekgame, where one of the players has to hide and the other one needs to find them.
We have a map where the character can walk freely, only taking in consideration thecollision avoidance that they have to make (trees, hills, and rocks):

AI Planning and Collision Avoidance
[ 245 ]
So, the first step is to create a system where the character can walk around the map. For thisexample, we have chosen to create a waypoint system where the character can move frompoint to point and explore the entire map.
After importing the map and characters that we'll use on the game, we need to configurethe waypoints that will be used by the character to know where they need to go. We can dothis manually adding the coordinates into our code, but to simplify the process, we'll createobjects on the scene that will serve as waypoints and delete the 3D mesh, because it won'tbe necessary.
Now, we group all the waypoints that we have created and name the group as waypoints.Once we have the waypoints in place and grouped together, we can start creating the codethat will tell our character how many waypoints they need to follow. This code is veryuseful because that way we can create different maps, using as many waypoints as we needwithout necessarily updating the character code:
public static Transform[] points;
void Awake () { points = new Transform[transform.childCount]; for (int i = 0; i < points.Length; i++)

AI Planning and Collision Avoidance
[ 246 ]
{ points[i] = transform.GetChild(i); } }
This code will be assigned to the group that we have created and will count the number ofwaypoints that has inside of it and ordering them.
The blue spheres that we can see in preceding image represent the 3D meshes that we haveused as waypoints. For this example, the character will follow eight points until they finishthe path. Now, let's move on to the AI character code and see how we can make the AIcharacter move from point to point using the points that we have created.
We will start by creating the basic functions of the character-the health and speed-then wewill create a new variable that will give them the next position and another variable thatwill be used to know which waypoint they need to follow:
public float speed; public int health;
private Transform target; private int wavepointIndex = 0;

AI Planning and Collision Avoidance
[ 247 ]
Now, we have the basic variables that are needed to make an enemy character move frompoint to point until they find the player. Let's see how to use these in order to make itplayable now:
private float speed; public int health;
private Transform target; private int wavepointIndex = 0;
void Start () { target = waypoints.points[0]; speed = 10f; }
void Update () { Vector3 dir = target.position - transform.position; transform.Translate(dir.normalized * speed * Time.deltaTime,Space.World);
if(Vector3.Distance(transform.position, target.position) <= 0.4f) { GetNextWaypoint(); } }
void GetNextWaypoint() { if(wavepointIndex >= waypoints.points.Length - 1) { Destroy(gameObject); return; }
wavepointIndex++; target = waypoints.points[wavepointIndex]; }
In the Start function, we assigned the first waypoint that the characters need to followthat is, the waypoint number zero, the first on the transform list that we have createdpreviously on the waypoint code. Also, we have determined the velocity of the character,and for this example, we have chosen 10f.

AI Planning and Collision Avoidance
[ 248 ]
Then, in the Update function, the character will calculate the distance between the nextposition and the current position, using the Vector3 dir. The character will constantly bemoving on, so we have created a line of code that serves as movement for the charactertransform.Translate in this case. Knowing the distance and the speed information, thecharacter will know how far it is from the next position, and once they reach the desirabledistance from that point, they can move on to the next point. To make this happen, we willcreate an if statement that will tell the character when they reach 0.4f (for this example)near from the point that he is moving into, that means that he already have arrived to thatdestination and he can start moving on to the next point GetNextWaypoint().
In the GetNextWaypoint() function, the character will start to confirm whether theyalready have arrived at the final destination; if they have, then the object can be destroyed,if not, they can follow the next waypoint. The wavepointIndex++ will add one number tothe index every time the character arrives at the waypoint position, moving from0>1>2>3>4>5 and so on.
Now, we assign the code to our character and place the character at the start position andtest the game to check whether it is working properly:

AI Planning and Collision Avoidance
[ 249 ]
Now, the character moves from one point to another, and this is the first and necessary stepwhen developing a search system-the character needs to move around the map. Now, wejust need to make it turn to the direction that they are facing and then we can start worryingabout the search feature:
public float speed; public int health; public float speedTurn;
private Transform target; private int wavepointIndex = 0;
void Start () { target = waypoints.points[0]; speed = 10f; speedTurn = 0.2f; }
void Update () { Vector3 dir = target.position - transform.position; transform.Translate(dir.normalized * speed * Time.deltaTime,Space.World);
if(Vector3.Distance(transform.position, target.position) <= 0.4f) { GetNextWaypoint(); }
Vector3 newDir = Vector3.RotateTowards(transform.forward, dir,speedTurn, 0.0F);
transform.rotation = Quaternion.LookRotation(newDir); }
void GetNextWaypoint() { if(wavepointIndex >= waypoints.points.Length - 1) { Destroy(gameObject); return; }
wavepointIndex++; target = waypoints.points[wavepointIndex];

AI Planning and Collision Avoidance
[ 250 ]
}
Now, we have the character facing the direction that they are moving on, and we are readyto add the searching system.
So, we have a character that is walking from point to point on the map, and at this momenteven if they find the player, they won't stop walking and nothing will happen. So, that'swhat we are going to do now.
The approach that we have chosen to achieve the desired results is to add a trigger zone inform of a circle around the character, as we can see in the preceding screenshot. Thecharacter will be walking around the map, and when that trigger zone detects the player,the character has found the primary objective. Let's add that into our character code:
public float speed; public int health; public float speedTurn; private Transform target; private int wavepointIndex = 0; private bool Found;
void Start () { target = waypoints.points[0]; speed = 10f; speedTurn = 0.2f;

AI Planning and Collision Avoidance
[ 251 ]
}
void Update () { Vector3 dir = target.position - transform.position; transform.Translate(dir.normalized * speed * Time.deltaTime, Space.World);
if(Vector3.Distance(transform.position, target.position) <= 0.4f) { GetNextWaypoint(); }
Vector3 newDir = Vector3.RotateTowards(transform.forward, dir, speedTurn, 0.0F);
transform.rotation = Quaternion.LookRotation(newDir); }
void GetNextWaypoint() { if(wavepointIndex >= waypoints.points.Length - 1) { Destroy(gameObject); return; }
wavepointIndex++; target = waypoints.points[wavepointIndex]; }
void OnTriggerEnter(Collider other) { if(other.gameObject.tag =="Player") { Found = true; } }
So, now we added a void OnTriggerEnter that verifies that the trigger zone gets in touchwith something else. To check whether the object that has entered on the trigger zone is theplayer, we have an if statement that checks whether the object of the game has the tagPlayer. If that is true, the Boolean variable Found is changed to true. This Boolean variablewill be very useful in a moment.
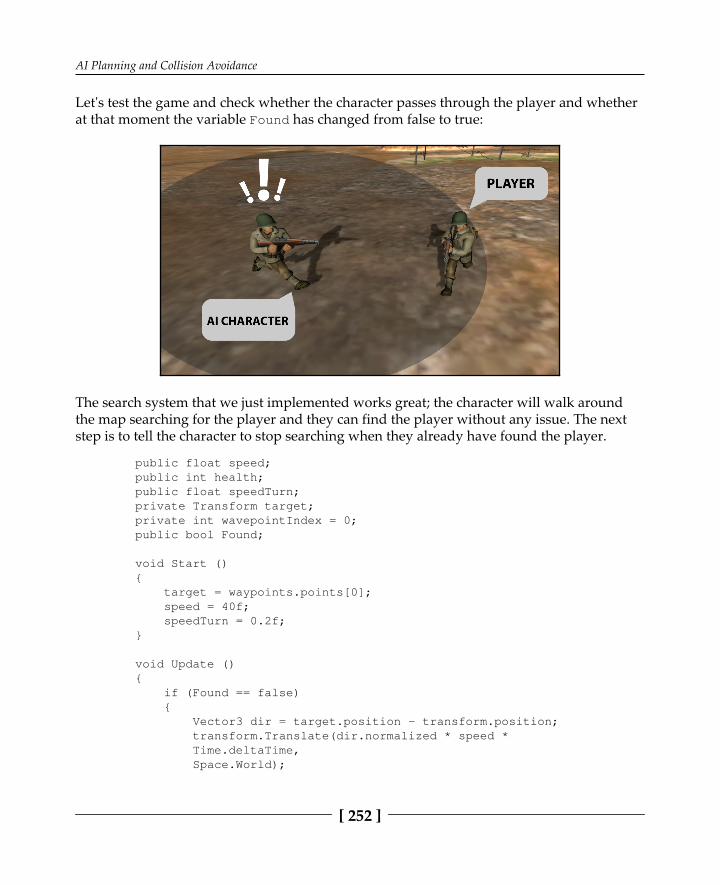
AI Planning and Collision Avoidance
[ 252 ]
Let's test the game and check whether the character passes through the player and whetherat that moment the variable Found has changed from false to true:
The search system that we just implemented works great; the character will walk aroundthe map searching for the player and they can find the player without any issue. The nextstep is to tell the character to stop searching when they already have found the player.
public float speed; public int health; public float speedTurn; private Transform target; private int wavepointIndex = 0; public bool Found;
void Start () { target = waypoints.points[0]; speed = 40f; speedTurn = 0.2f; }
void Update () { if (Found == false) { Vector3 dir = target.position - transform.position; transform.Translate(dir.normalized * speed * Time.deltaTime, Space.World);

AI Planning and Collision Avoidance
[ 253 ]
if (Vector3.Distance(transform.position, target.position) <= 0.4f) { GetNextWaypoint(); }
Vector3 newDir = Vector3.RotateTowards(transform.forward, dir, speedTurn, 0.0F);
transform.rotation = Quaternion.LookRotation(newDir); } }
void GetNextWaypoint() { if(wavepointIndex >= waypoints.points.Length - 1) { Destroy(gameObject); return; }
wavepointIndex++; target = waypoints.points[wavepointIndex]; }
void OnTriggerEnter(Collider other) { if(other.gameObject.tag == "Player") { Found = true; } }
With these last modifications, we have an AI character that goes around the map until theyfind the player and when they finally find them, they stop moving around and ready toplan what to do next.

AI Planning and Collision Avoidance
[ 254 ]
What we have done here is use the Found Boolean to determine whether the player shouldbe searching for the player or not.
The preceding image represents the state of our character at the moment, and we are readyto implement more features on it to make them plan and take the best decisions.
This searching system can be applied to a lot of different game genres, and we can set itfairly quickly, which makes it a perfect way to start planning the AI character. Now, let'smove on and work on the anticipation feature of the player character.
Predicting opponent actionsNow, let's make the character anticipate what is going to happen even before getting inconfrontation against the player. This is the part where the character AI starts to plan thebest options available to accomplish the objective.
Let's take a look at how we can implement an anticipation system into the character AI. Wewill continue to use the example mentioned in the preceding section, where we have asoldier searching for another one in the map. At the moment, we have a character thatmoves around the map and stops when they find the player.

AI Planning and Collision Avoidance
[ 255 ]
If our character AI has found the player, most likely situation is for the player to find thecharacter AI as well so that both characters are aware of each other. What are the chances ofthe player attacking the character AI? What are the chances of the player not having enoughbullets to fire against the character? All of that is very subjective and very unpredictable.However, we want our character to have that in mind and anticipate the possible moves ofthe player.
So, let's start with a simple question: is the player facing the character?. Having thecharacter to check this will help them to make a judgment about the possible outcomes. Toachieve this result, we will be adding a trigger Collider in the back and another in front ofeach character of the game, including the player as we can see in the following screenshot:
The idea of having two extra Colliders on each character is to help the other charactersidentify whether they are looking at the back or front side of the character. So, let's add thisto every character of the game and name the trigger Collider with the names back andfront.

AI Planning and Collision Avoidance
[ 256 ]
Now, let's make the character distinguish between the back and the front trigger. It can bedone in two different ways-the first way is by adding a stretched trigger collider in front ofthe character representing the observation range:
Alternatively, we can create a RAYCAST starting from the character's position and endingat the distance that we think is likely to be the vision range of our character as shown in thefollowing screenshot:

AI Planning and Collision Avoidance
[ 257 ]
Both methods have their advantages and disadvantages, and once again, we don'tnecessarily need to constantly use the most complicated methods to achieve great results.So, the advice here is to use the method that we are more comfortable with, and a goodchoice for this example would be the trigger Collider to represent the vision range of thecharacter.
Let's add the trigger Collider in front of the character, and then we can start working onthe code to make it detect the front or back side of the characters. The first thing we need tochange in our code is to make the character face the player's direction when they see him.The character wouldn't be able to anticipate anything if they are not looking at the player,so let's fix that first:
void Update () { if (Found == false) { Vector3 dir = target.position - transform.position; transform.Translate(dir.normalized * speed * Time.deltaTime, Space.World);
if (Vector3.Distance(transform.position, target.position) <= 0.4f)

AI Planning and Collision Avoidance
[ 258 ]
{ GetNextWaypoint(); }
Vector3 newDir = Vector3.RotateTowards(transform.forward, dir, speedTurn, 0.0F);
transform.rotation = Quaternion.LookRotation(newDir); }
if (Found == true) { transform.LookAt(target); } }
void GetNextWaypoint() { if(wavepointIndex >= waypoints.points.Length - 1) { Destroy(gameObject); return; }
wavepointIndex++; target = waypoints.points[wavepointIndex]; }
void OnTriggerEnter(Collider other) { if(other.gameObject.tag == "Player") { Found = true; target = other.gameObject.transform;
} }
Now, we have our AI character constantly facing the player when they see them. To makethis work, we added our first line of code inside the if (Found == true). Here, we usedthe transform.LookAt that makes the AI face the player character. When the player isspotted by our AI character, it automatically becomes the target:
AI Planning and Collision Avoidance
[ 259 ]
Now that, we have our AI character facing the player, we can check whether they arelooking at the back or front side of the player.
It might look illogical for us to think that the character doesn't know the difference, butwhen developing an AI character, everything needs to be written on the code, especiallydetails such as this one that can have a huge impact on anticipating, planning, and finallymaking a decision.
So, now we have to use the trigger Collider that we added previously to check whetherour AI character is facing the front or back side of the player that is in front of them. Let'sstart by adding the following two new variables:
public bool facingFront; public bool facingBack;
The variables that we added are the Boolean facingFront and facingBack. The triggerwill set one of these values to true, and that way, the character AI will know which sidethey are looking at. So, let's configure the trigger:
void Update () { if (Found == false) {

AI Planning and Collision Avoidance
[ 260 ]
Vector3 dir = target.position - transform.position; transform.Translate(dir.normalized * speed * Time.deltaTime, Space.World);
if (Vector3.Distance(transform.position, target.position) <= 0.4f) { GetNextWaypoint(); }
Vector3 newDir = Vector3.RotateTowards(transform.forward, dir, speedTurn, 0.0F);
transform.rotation = Quaternion.LookRotation(newDir); }
if (Found == true) { transform.LookAt(target); } }
void GetNextWaypoint() { if(wavepointIndex >= waypoints.points.Length - 1) { Destroy(gameObject); return; }
wavepointIndex++; target = waypoints.points[wavepointIndex]; }
void OnTriggerEnter(Collider other) { if(other.gameObject.tag == "Player") { Found = true; target = other.gameObject.transform; }
if(other.gameObject.name == "frontSide") { facingFront = true; facingBack = false;

AI Planning and Collision Avoidance
[ 261 ]
}
if(other.gameObject.name == "backSide") { facingFront = false; facingBack = true; } }
So, what we did was having the trigger checking whether was colliding against the back orfront side of the other character. To achieve this result, we have the trigger questioningwhether the collision that it has detected was the frontSide object or backSide object.Only one of them can be true at a time.
Now that, we have our character distinguishing the player's back side and front side, wewant him to be able to analyze the dangers of both situations. So, the first thing we will dois to have a very distinct difference of the situation when the character finds the playerfacing their back and when they are facing their front. When facing the front side, the playeris ready to shoot at our AI character, so it is an even more dangerous situation. We will becreating a danger meter and can start importing this situation into the equation:
public float speed; public int health; public float speedTurn; private Transform target; private int wavepointIndex = 0; public bool Found;
AI Planning and Collision Avoidance
[ 262 ]
public bool facingFront; public bool facingBack;
public int dangerMeter;
In the variables section, we add a new integer called dangerMeter. Now, we will add thevalues that will help determine whether the situation that our AI character is facing has ahigher or lower risk to be attacked:
void OnTriggerEnter(Collider other) { if(other.gameObject.tag == "Player") { Found = true; target = other.gameObject.transform; }
if(other.gameObject.name == "frontSide") { facingFront = true; facingBack = false; dangerMeter += 50; }
if(other.gameObject.name == "backSide") { facingFront = false; facingBack = true; dangerMeter += 5; } }
So, depending on the situation, we can add a small value that will represent a small risk or abig value that will represent a big risk. If the danger value is high, the AI character needs toanticipate a life-threatening situation, and for that reason, dramatic decisions probably willbe made. On the other hand, if our character is facing a lower-risk situation, they can startplanning something more precise and effective.
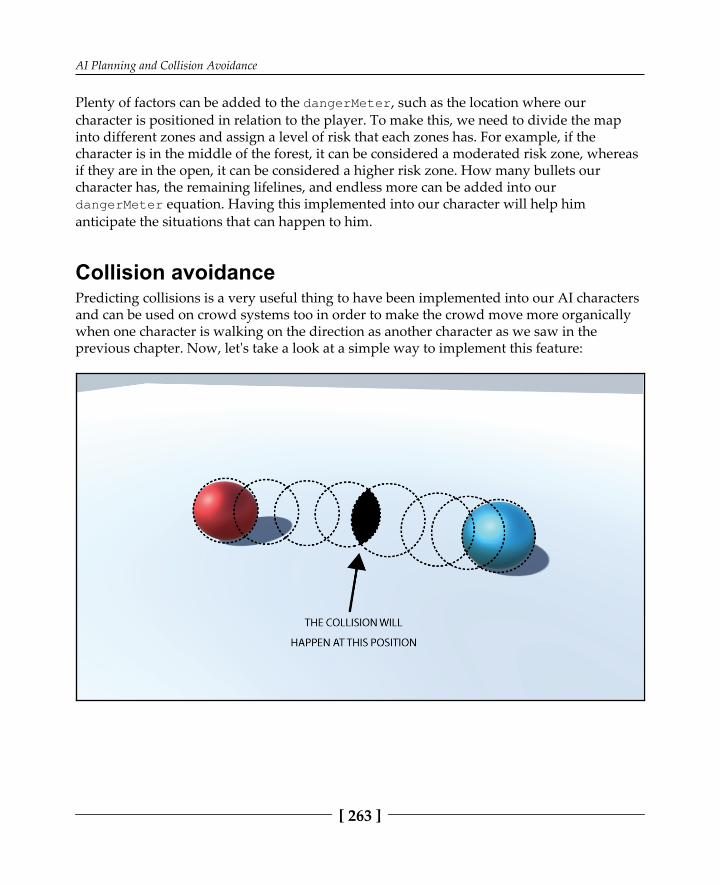
AI Planning and Collision Avoidance
[ 263 ]
Plenty of factors can be added to the dangerMeter, such as the location where ourcharacter is positioned in relation to the player. To make this, we need to divide the mapinto different zones and assign a level of risk that each zones has. For example, if thecharacter is in the middle of the forest, it can be considered a moderated risk zone, whereasif they are in the open, it can be considered a higher risk zone. How many bullets ourcharacter has, the remaining lifelines, and endless more can be added into ourdangerMeter equation. Having this implemented into our character will help himanticipate the situations that can happen to him.
Collision avoidancePredicting collisions is a very useful thing to have been implemented into our AI charactersand can be used on crowd systems too in order to make the crowd move more organicallywhen one character is walking on the direction as another character as we saw in theprevious chapter. Now, let's take a look at a simple way to implement this feature:

AI Planning and Collision Avoidance
[ 264 ]
To predict a collision, we need at least two objects or characters. In the preceding image, wehave two spheres representing two characters and the dashed lines represent theirmovement. If the blue sphere moves toward the red sphere, at a certain point, they willcollide with each other. The main objective here is to predict when that will happen andadjust the trajectory of the sphere so that it can avoid the collision.
In the preceding image, we can see the representation of what we need to do if we want ourcharacter to avoid colliding with the obstacle. We need to have the velocity vector that willindicate the direction of the character. This same vector will also be used to produce a newone called ahead, which is a copy of the velocity vector, but with a longer length. Thismeans that the ahead vector represents the line of sight of our character, and as soon theysee the obstacle, they will adjust their direction to avoid colliding with it. This is how wecalculate the ahead vector:
ahead = transform.position + Vector3.Normalize(velocity) * MAX_SEE_AHEAD;
The ahead is a Vector3 variable, velocity is a Vector3 variable, and MAX_SEE_AHEAD isa float variable that will tell how far ahead we can see. If we increase the MAX_SEE_AHEADvalue, the earlier the character will start adjusting his direction, as demonstrated on thefollowing diagram:

AI Planning and Collision Avoidance
[ 265 ]
To check for the collision, one solution that can be used is the line-sphere intersection,where the line is the ahead vector and the sphere is the obstacle. This method works, butwe'll be using a simplification of that, which is easier to understand and has identicalresults. So, the ahead vector will be used to produce another vector, and this vector will behalf of its length:
In the preceding image, we can see that ahead and ahead2 goes toward the same direction,the only difference is the length between them:
ahead = transform.position + Vector3.Normalize(velocity) * MAX_SEE_AHEAD;ahead2 = transform.position + Vector3.Normalize(velocity) * (MAX_SEE_AHEAD* 0.5);

AI Planning and Collision Avoidance
[ 266 ]
We need to check for a collision to know whether one of those two vectors is inside theOBSTACLE ZONE. To calculate that, we can compare the distance between the vectors andthe obstacle center. If the distance is less or equal to the OBSTACLE ZONE, then thatmeans that our vectors are inside of the OBSTACLE ZONE and a collision was found.
The ahead2 vector does not appear on the preceding diagram just to simplify it.
If either of the two ahead vectors get inside of the OBSTACLE ZONE, it means that theobstacle is blocking the path, and to solve our problem, we will calculate the distancebetween the two points:
public Vector3 velocity; public Vector3 ahead; public float MAX_SEE_AHEAD; public Transform a; public Transform b;
void Start (){
ahead = transform.position + Vector3.Normalize(velocity) *MAX_SEE_AHEAD; }
void Update () {
float distA = Vector3.Distance(a.position, transform.position);

AI Planning and Collision Avoidance
[ 267 ]
float distB = Vector3.Distance(b.position, transform.position);
if(distA > distB) { avoidB(); }
if(distB > distA) { avoidA(); } }
void avoidB() {
}
void avoidA() {
}}
In case of having more than one obstacle blocking the path, we'll need to check which one iscloser to our character, then we can start avoiding the closer obstacle first and then move onto the second obstacle:

AI Planning and Collision Avoidance
[ 268 ]
The closest obstacle, the most threatening, will be selected for calculation. Now, let's take alook at how we can calculate and perform the avoidance:
public Vector3 velocity; public Vector3 ahead; public float MAX_SEE_AHEAD; public float MAX_AVOID; public Transform a; public Transform b; public Vector3 avoidance;
void Start () {
ahead = transform.position + Vector3.Normalize(velocity) *MAX_SEE_AHEAD; }
void Update () {
float distA = Vector3.Distance(a.position, transform.position); float distB = Vector3.Distance(b.position, transform.position);
if(distA > distB) { avoidB(); }
if(distB > distA) { avoidA(); } }
void avoidB() { avoidance = ahead - b.position; avoidance = Vector3.Normalize(avoidance) * MAX_AVOID; }
void avoidA() { avoidance = ahead - a.position; avoidance = Vector3.Normalize(avoidance) * MAX_AVOID; }}

AI Planning and Collision Avoidance
[ 269 ]
After avoidance is calculated, it is normalized and scaled by MAX_AVOID, which is anumber that is used to define the avoidance length. The higher the MAX_AVOID value is,the stronger is the avoidance, pushing our character away from the obstacle.
The position of any entity can be set as vectors, so they can be used incalculations with other vectors and forces.
Now, we have the foundation to make our character predict and steer away from theobstacle position, avoiding collision with it. Using this in conjunction with a pathfinding,we can let our characters move freely in the game and enjoy the results.
SummaryWe have explored how to make our AI character create and follow a plan to execute adeterminate objective in this chapter. The idea is to think ahead what is going to happenand to prepare for that situation. To complete this, we have also explored how to make ourAI character predict a collision with an object or another character. This will be fundamentalnot only to make our character move freely on the map, but also it serves as a new equationto have in mind when planning what to do. In our next chapter, we will be talking aboutawareness, how to develop one of the most iconic features of stealth games, and make ourAI characters self-aware of what is happening around them with realistic field of view.

10Awareness
In our last chapter, we will be looking at how we can develop AI characters that use tacticsand awareness to accomplish their goals. Here we will be using everything that we haveexplored before, understanding how we can combine everything together to create artificialintelligent characters that can be used in stealth games or games that also rely on tactics orawareness.
Stealth sub-genreStealth games are a very popular sub-genre where the main objective of the player is to use stealth elements, being undetected by the opponents in order to complete the main goals.Even being a genre that is widely popular in military games it is possible to see this sub-genre being applied in almost any game. If we take a deep look, any game where the enemycharacter is triggered by noise or vision of the player, is using stealth elements. This meansthat at some point or another, having awareness or even tactics implemented on our AIcharacters can be very useful regardless of the game genre that we are working on.
About tacticsThe tactics is the process that the character or a group of characters take in order to achievecertain objectives. It usually means that the characters can use all of their abilities, choosingthe best ones depending on the situations, to defeat the opponent. The concept of tactics invideo games is to give to the AI the power of decision, making him behave smartly whiletrying to reach the main goal. We can compare this to the tactics that are used by thesoldiers or police officers in order to catch the bad guys of the real world.
Awareness
[ 271 ]
They have a wide array of technology and human resources to catch a bandit, but in orderto accomplish that task with success they need to choose wisely what they are going to do,step by step. The same principles can be applied to our AI characters; we can make themchoose the best options available in order to accomplish their objective.
To create this, we can use every topic that was covered before in this book and with that, weare able to develop an AI character capable of choosing the best tactic that takes down theplayer or achieving his goal.
About awarenessOne very important aspect that correlates with the tactics is the awareness of the character.Some common factors can make part of the awareness of an AI character such as audio,vision, and perception, for example. These factors are inspired on the human features thatwe all have, vision, audio, touch, and perception of what is happening around us.
Therefore, what we are looking for is to create artificial intelligent characters that canprocess all of that information at the same time that they are doing other things makingthem aware of the surroundings, making better judgment of what decisions should be takenon that given moment.
Implementing vision awarenessBefore starting out with the tactics, we will take a look at how we can implement anawareness system into our characters.
Let's start by implementing a vision awareness into our game character. The idea is tosimulate the human vision, where we can see very good at close range and not so goodwhen something is really far away. Many games have adopted this system and they allhave differences, some have a more complex system while others have a basic one. Thebasic example can be found especially on a more juvenile adventure game such as Zelda -Ocarina of Time for example, where the enemies will only appear or react when you reach acertain trigger zone as shown in the following screenshot:

Awareness
[ 272 ]
For example, in this situation if the player goes back and exits the enemy trigger zone, theenemy will stay in an idle position, even if he is clearly able to see the player. This is a basicsystem of awareness and we can include it in the vision section.
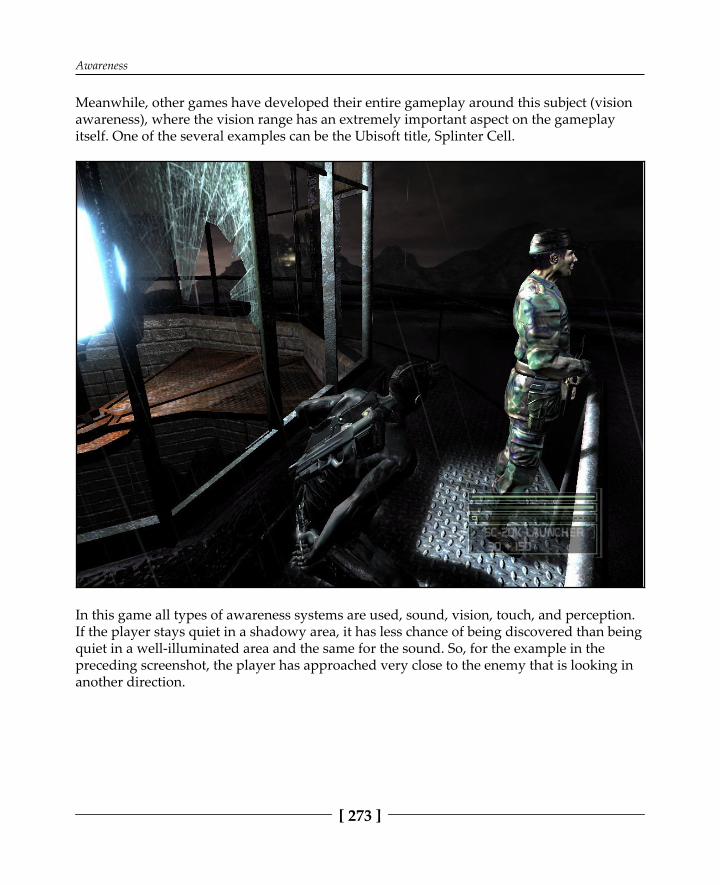
Awareness
[ 273 ]
Meanwhile, other games have developed their entire gameplay around this subject (visionawareness), where the vision range has an extremely important aspect on the gameplayitself. One of the several examples can be the Ubisoft title, Splinter Cell.
In this game all types of awareness systems are used, sound, vision, touch, and perception.If the player stays quiet in a shadowy area, it has less chance of being discovered than beingquiet in a well-illuminated area and the same for the sound. So, for the example in thepreceding screenshot, the player has approached very close to the enemy that is looking inanother direction.

Awareness
[ 274 ]
In order for the player to get this near, it was necessary to move very quietly and in theshadows. If the player was making noise or walking straight into illuminated areas, theenemy would have spotted him. This is a much more complex system than the Zelda game,but once again, it all depends on the game that we are creating and which system fits betteron the gameplay that we are looking for. We will be demonstrating basic examples and thenmoving on to more advanced ones.
Basic vision detectionFirst, we start by creating and adding a scene into our game, and then we add the player.

Awareness
[ 275 ]
We assign all the necessary codes into the player so it is possible for us to move and test thegame. For this example, we have quickly assigned some basic movement information intoour player, because that is the only interaction that will occur between the player and the AIcharacter.
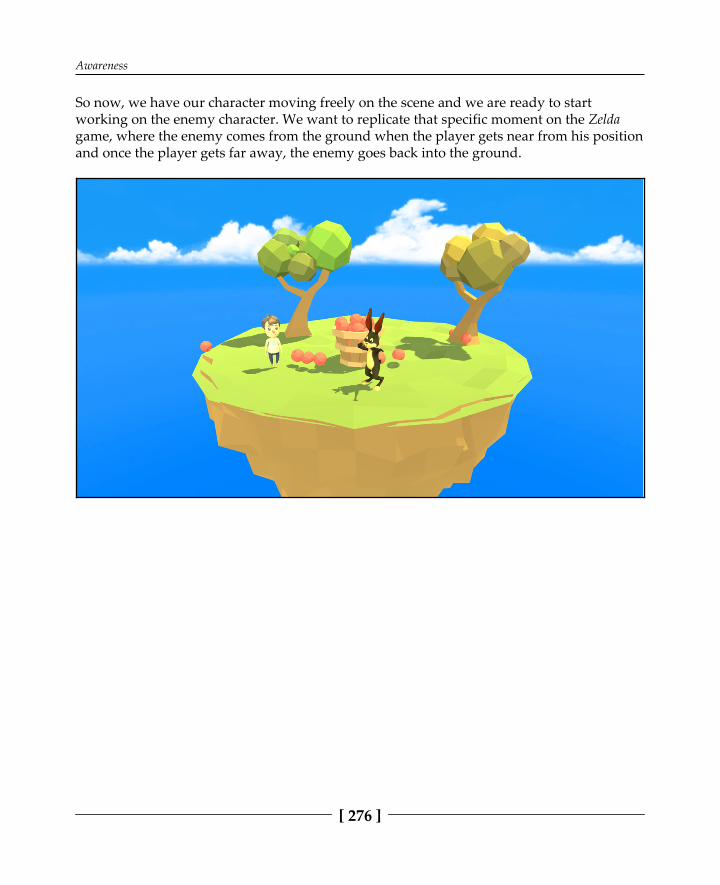
Awareness
[ 276 ]
So now, we have our character moving freely on the scene and we are ready to startworking on the enemy character. We want to replicate that specific moment on the Zeldagame, where the enemy comes from the ground when the player gets near from his positionand once the player gets far away, the enemy goes back into the ground.

Awareness
[ 277 ]
The rabbit that we can see in the screenshot is the AI character that we have just importedinto the game and now we need to define the area around him that will serve as awareness.Therefore, if the player gets near the rabbit he will detect the player and will eventually getout of his hole.
Let's say that we want the rabbit to be able to see from his hole the area that is representedby the dashed line. How can we proceed from now? We can do two things here, one isadding the trigger Collider into the hole object, where it will detect the player andinstantiate the rabbit from the hole position, two is adding the trigger Collider directly tothe rabbit that will be invisible (hypothetically inside the hole) and in the code we have astate for when the rabbit is inside the hole and another state for the moment when he isoutside.

Awareness
[ 278 ]
We decided for this example to use the hole as the main object for that moment where therabbit is hiding and at the moment that the player enters the trigger area, the hole objectinstantiates the AI character.
We transformed the rabbit into a prefab, so we can instantiate it later and then we removedhim from the scene. Then we have created a cube inside the game and we positioned it onthe hole position. Because we don't need the hole to be visible for this example, we will beturning off the mesh from this object.
Creating a cube instead of an empty object allow us to better visualize theobject inside the game editor in case we need to change something orsimply have a notion of where we have those objects.

Awareness
[ 279 ]
At this point, we need to make this object detect the player and so we will be adding atrigger with the dimension that we previously planned to use.
We deleted the default cube trigger that appears automatically when you create the cubeand then we assigned a new sphere trigger. Why are we not using the cube trigger? Wecould be using the cube trigger and technically it would work too, but the covered areawould be completely different from the circular area that we planned and for that reasonwe deleted the default trigger and assigned a new one that fits our purpose.
Now that we have the sphere trigger covering the area that we want, we need to make itdetect the player. For this, we need to create the script that will be assigned to the cube/hole:
void OnTriggerEnter (Collider other) {
if(other.gameObject.tag == "Player") { Debug.Log("Player Detected"); } }

Awareness
[ 280 ]
Inside the script, we add this line of code. It is a simple trigger check for when the objectgets inside the trigger area (we have used this to demonstrate previous examples). For nowwe simply have the trigger to check if the player gets detected using Debug.Log("PlayerDetected");. We assign this script to the cube/hole object and then we can test it.
If we move the player into the trigger area that we created, we can see the message PlayerDetected.
Well this is the first part of the basic example; we have the player moving around the mapand the hole that is capable of detecting the player when he is near.

Awareness
[ 281 ]
This method where we use the trigger Collider to detect something isn'tdirectly associated with any kind of awareness because this is just thetechnical part, the way we use it is what will determine if this is meant tobe the vision of our AI character or not.
Now, we can work on the rabbit, our AI character. We already have him created and set as aprefab, ready to appear in the game. So the next step is for the hole object to instantiate therabbit, transmitting the sensation to the player that the rabbit saw him and for that reasonhe decided to get out of the hole. On the hole object code we update the Player Detectedmessage to the instantiate:
public GameObject rabbit; public Transform startPosition; public bool isOut;
void Start () { isOut = false; } void OnTriggerEnter (Collider other) {
if(other.gameObject.tag == "Player" && isOut == false) { isOut = true; Instantiate(rabbit, startPosition.position, startPosition.rotation); } }
So what we have done is define what would be the instantiated object, which in this case isthe character AI rabbit. Then we added the startPosition variable that will set theposition where we want the character to appear, in alternative we could also use the holeobject position that would work just fine for this example. Finally, we added a simpleBoolean isOut to prevent the hole creating more than one rabbit at the same time.

Awareness
[ 282 ]
When the player gets inside the trigger zone, the rabbit gets instantiated and jumps out ofthe hole.
Now, we have a rabbit that jumps out of the hole when he sees the player. Our next step isto also add the same vision to the rabbit itself, but this time we want the rabbit to constantlycheck if the player is inside the trigger zone, this would represent that it can see the playerand if the player gets away from his vision, the rabbit cannot see him anymore and returnsto the hole.

Awareness
[ 283 ]
For the AI character, we can use a wider area than the hole.
So as we can see, that would be the area where the rabbit can see the player, if the playergets out of that area, the rabbit can't see the player no more.
Once again, let's add a sphere Collider, but this time to the rabbit.
Enable the Is Trigger option in order to turn the Collider into activationzones. Otherwise it won't work.
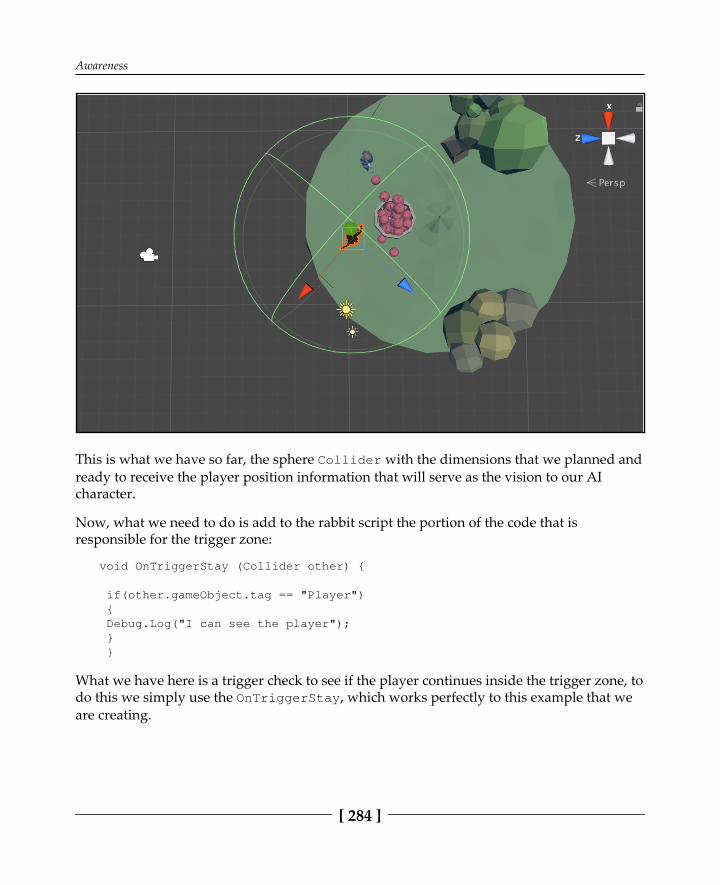
Awareness
[ 284 ]
This is what we have so far, the sphere Collider with the dimensions that we planned andready to receive the player position information that will serve as the vision to our AIcharacter.
Now, what we need to do is add to the rabbit script the portion of the code that isresponsible for the trigger zone:
void OnTriggerStay (Collider other) {
if(other.gameObject.tag == "Player") { Debug.Log("I can see the player"); } }
What we have here is a trigger check to see if the player continues inside the trigger zone, todo this we simply use the OnTriggerStay, which works perfectly to this example that weare creating.

Awareness
[ 285 ]
We use Debug.Log("I can see the player"); simply to test if this is working asintended.
We test the game and we can notice that when the player gets inside the rabbit area, wereceive the console message that we wrote and this means that it is working.
Now, let's add the second part of the rabbit vision, where the player gets out of the triggerzone and the rabbit can't see him no more. To do this we need to add another trigger check,which will serve to check if the player already left the area:
void OnTriggerStay (Collider other) {
if(other.gameObject.tag == "Player") { Debug.Log("I can see the player"); } }
void OnTriggerExit (Collider other){
if(other.gameObject.tag == "Player") { Debug.Log("I've lost the player"); } }
Following is the OnTriggerStay that we added into the AI character code, we add somenew lines of code that checks if the player has left the trigger zone. To do this we use theOnTriggerExit that does what the name says, checks the exit of the object that has enteredthe trigger zone. But to make this work we need to first set an OnTriggerEnter, otherwiseit won't count if the player entered the zone or not, it only knows if he is there or not:
void OnTriggerEnter (Collider other) {
if(other.gameObject.tag == "Player") { Debug.Log("I can see the player"); } }
void OnTriggerStay (Collider other){
if(other.gameObject.tag == "Player")

Awareness
[ 286 ]
{ Debug.Log("I can see the player"); } }
void OnTriggerExit (Collider other){
if(other.gameObject.tag == "Player") { Debug.Log("I've lost the player"); } }
Now, we have the trigger counting when the player gets inside the area, when he keepsinside the area, and also the moment that he exits that same area. This represents themoment that the rabbit starts seeing the player, when he keeps seeing him, and when heloses eye contact with the player.

Awareness
[ 287 ]
At this point, we can test the game and see if what we have done is working correctly ornot. When we start the game, we can confirm that by looking at the console messages thatwe wrote to see if everything is working as intended.
It is normal to see a higher number on the OnTriggerStay function because it is constantlychecking every frame for the player, so as we can see in the preceding screenshot, our AIcharacter now has the basic vision check working.
Advanced vision detectionNow that we understand how a basic vision detection that we can find in manyaction/adventure games works, we can move on and take a look at the advanced visiondetection that can be found in stealth games. Let's take a deep look into the Metal Gear gameand see how the AI characters have their vision developed.

Awareness
[ 288 ]
If we take a look at this screenshot, we notice that the enemy AI cannot see the player, butthe player is inside of the area where the enemy is well capable of seeing. So why doesn'tthe AI character turn to the player and start attacking him? Simply because the trigger areais set only to be in front of the enemy eyes.

Awareness
[ 289 ]
For that reason, if the player is behind the enemy, he won't notice the player.
As we can see in the second screenshot, everything that is in the darker area, the enemydoesn't have any way of getting information regarding the players presence, while the lightarea represents the vision of the character and there he can see everything that ishappening. Now we will be taking a look at how we can develop a similar system into ourAI characters.
Let's start by creating a test scenario. It can be simple cube meshes for now and later on wecan change them into a better looking object.

Awareness
[ 290 ]
We have created a few cube meshes and placed them randomly on top of a plane (that willbe the ground). The next step will be creating the character, we'll be using a capsule torepresent the character.

Awareness
[ 291 ]
We can place the newly created capsule anywhere on the map. Now, we need to createsome targets that will be spotted by our AI character.
We can distribute the target objects anywhere on the map as well. Now, we need to definetwo different layers, one for the obstacles and another one for the targets.
In Unity we click under the Layers button to expand more options, and then we click whereit says Edit Layers....
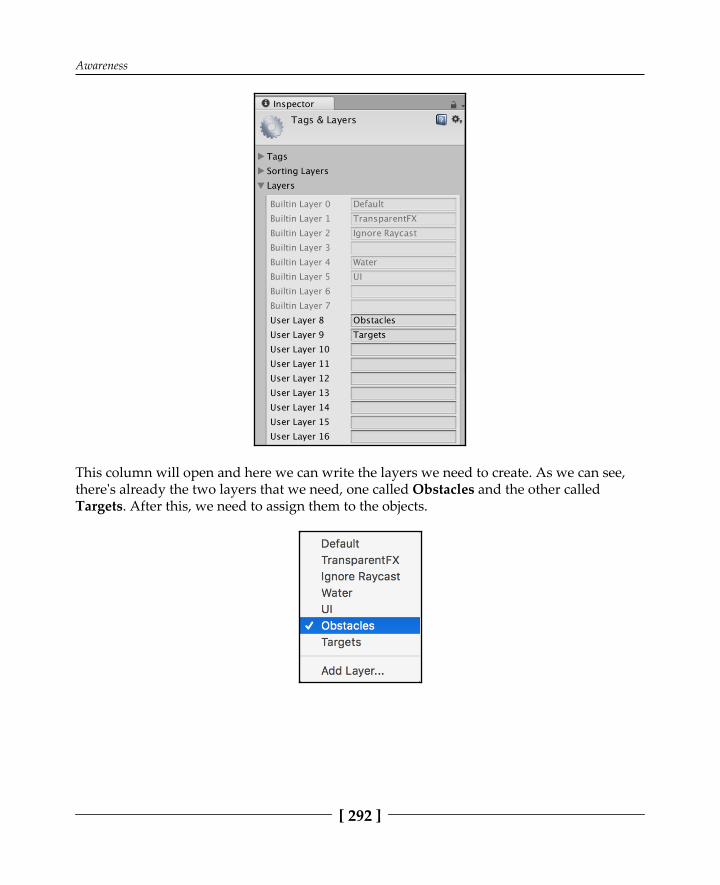
Awareness
[ 292 ]
This column will open and here we can write the layers we need to create. As we can see,there's already the two layers that we need, one called Obstacles and the other calledTargets. After this, we need to assign them to the objects.
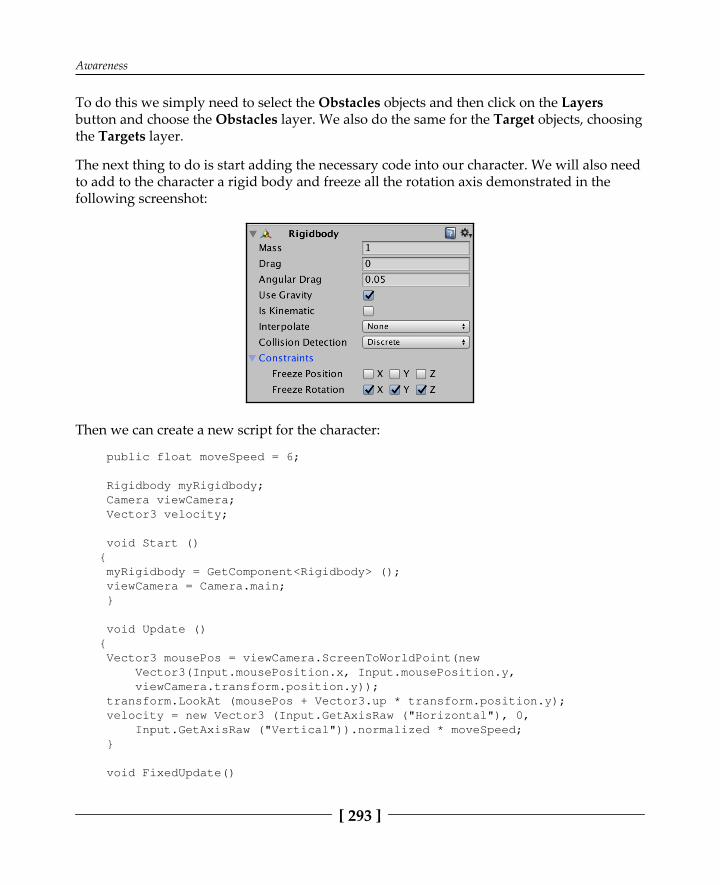
Awareness
[ 293 ]
To do this we simply need to select the Obstacles objects and then click on the Layersbutton and choose the Obstacles layer. We also do the same for the Target objects, choosingthe Targets layer.
The next thing to do is start adding the necessary code into our character. We will also needto add to the character a rigid body and freeze all the rotation axis demonstrated in thefollowing screenshot:
Then we can create a new script for the character:
public float moveSpeed = 6;
Rigidbody myRigidbody; Camera viewCamera; Vector3 velocity;
void Start (){ myRigidbody = GetComponent<Rigidbody> (); viewCamera = Camera.main; }
void Update (){ Vector3 mousePos = viewCamera.ScreenToWorldPoint(new Vector3(Input.mousePosition.x, Input.mousePosition.y, viewCamera.transform.position.y)); transform.LookAt (mousePos + Vector3.up * transform.position.y); velocity = new Vector3 (Input.GetAxisRaw ("Horizontal"), 0, Input.GetAxisRaw ("Vertical")).normalized * moveSpeed; }
void FixedUpdate()
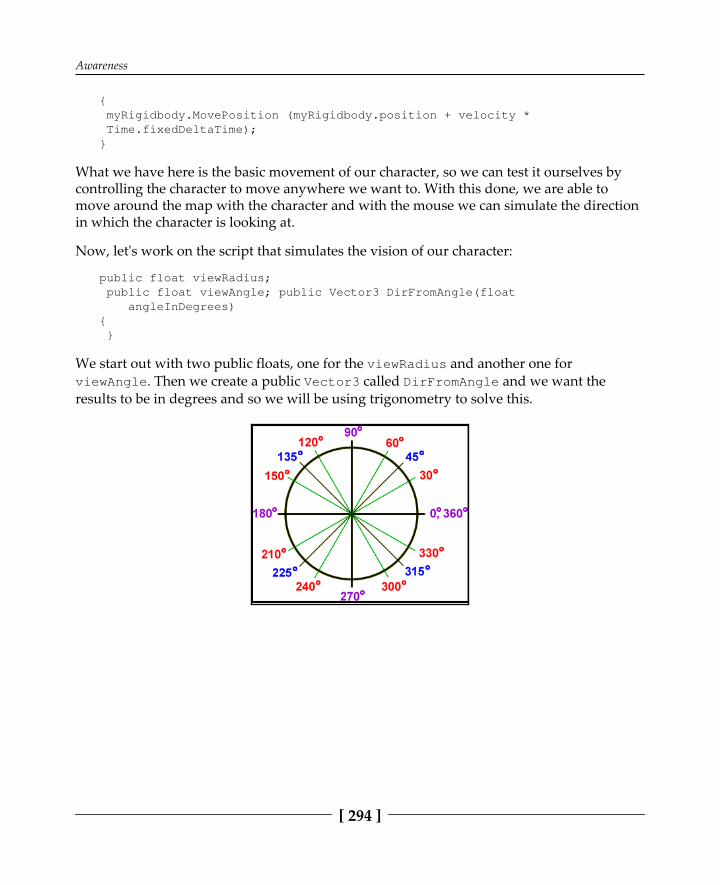
Awareness
[ 294 ]
{ myRigidbody.MovePosition (myRigidbody.position + velocity * Time.fixedDeltaTime);}
What we have here is the basic movement of our character, so we can test it ourselves bycontrolling the character to move anywhere we want to. With this done, we are able tomove around the map with the character and with the mouse we can simulate the directionin which the character is looking at.
Now, let's work on the script that simulates the vision of our character:
public float viewRadius; public float viewAngle; public Vector3 DirFromAngle(float angleInDegrees){ }
We start out with two public floats, one for the viewRadius and another one forviewAngle. Then we create a public Vector3 called DirFromAngle and we want theresults to be in degrees and so we will be using trigonometry to solve this.

Awareness
[ 295 ]
The preceding diagram represents the default trigonometry values in degrees, where itstarts from the right side with the number zero and the values will increase in a counter-clockwise way.
Because we are developing this example in Unity, we need to keep in mind that thetrigonometry values are in a different order, as we can see in the preceding diagram. Here,the zero number starts on the top and the value increase in a clockwise way.
With this information in mind, we can now proceed with the direction angle in which ourcharacter will be looking at:
public float viewRadius; public float viewAngle; public Vector3 DirFromAngle(float angleInDegrees) { return new Vector3(Mathf.Sin(angleInDegrees * Mathf.Deg2Rad), 0, Mathf.Cos(angleInDegrees * Mathf.Deg2Rad)); }
Now, we have the basic foundation of our exercise done, but in order to visually see it onthe game editor we need to create a new script that will show the radius of the charactervision:

Awareness
[ 296 ]
To do this, we go ahead and create a new folder in the project section:

Awareness
[ 297 ]
In order for the game engine to use this content that will appear in the game editor we needto name the folder as Editor. Everything inside this folder can be used/seen in the gameeditor, without clicking the play button, which can be very handy in many situations justlike the one we are creating.
Then inside of the Editor folder that we just created, we create a new script that will beresponsible for the visualization of the character field of view:
using UnityEngine; using System.Collections; using UnityEditor;
Because we want to use this script in editor mode, we need to specify that on the top of ourscript. To do that, we start by adding using UnityEditor.
Then after that we add one more line in which we will be connecting with the previousscript we created to be able to use that in editor mode:
using UnityEngine; using System.Collections; using UnityEditor;
[CustomEditor (typeof (FieldOfView))]
And now let's work on what is going to appear on the screen to represent the field of viewthat we created:
using UnityEngine; using System.Collections; using UnityEditor;
[CustomEditor (typeof (FieldOfView))] public class FieldOfViewEditor : Editor{
void OnSceneGUI(){ FieldOfView fow = (FieldOfView)target; } }

Awareness
[ 298 ]
We created a void OnSceneGUI() and this will contain all the information that we want tobe visible on our game editor. We start by adding the target of the field of view; this will getthe field of view object reference:
using UnityEngine; using System.Collections; using UnityEditor;
[CustomEditor (typeof (FieldOfView))] public class FieldOfViewEditor : Editor{
void OnSceneGUI(){ FieldOfView fow = (FieldOfView)target; Handles.color = color.white; } }
Next we define the color that we want to represent the vision of our character, to do this weadded the Handles.color and we have chosen the color to be white. This won't be visibleon the export version of our game, so we can choose the color that is easier for us to see inthe editor:
using UnityEngine; using System.Collections; using UnityEditor;
[CustomEditor (typeof (FieldOfView))] public class FieldOfViewEditor : Editor{
void OnSceneGUI(){ FieldOfView fow = (FieldOfView)target; Handles.color = color.white; Handles.DrawWireArc (fow.transform.position, Vector3.up, Vector3.forward, 360, fow.viewRadius); } }
What we have done now is give a form to the visualization that we are creating. The form isset to be in an arch and that is why we use DrawWireArc. Now, let's take a look at what wehave done so far:

Awareness
[ 299 ]
On the script that we created and assigned to the character, we need to change the value ofView Radius to any desired value.
When increasing that value, we will notice a circle growing around the character, thismeans that our script is working well so far. The circle is representing the vision of ourcharacter and now let's change a few things to make it look like the Metal Gear Solid imagethat we used as a reference.
Let's open the character FieldOfView script again to add new modifications:
public float viewRadius;[Range(0,360)]public float viewAngle;public Vector3 DirFromAngle(float angleInDegrees, bool angleIsGlobal) { if(!angleIsGlobal) { angleInDegrees += transform.eulerAngles.y;

Awareness
[ 300 ]
} return new Vector3(Mathf.Sin(angleInDegrees * Mathf.Deg2Rad), 0, Mathf.Cos(angleInDegrees * Mathf.Deg2Rad)); }
We added a range for the viewRadius so that way we can make sure that the circle doesnot surpass the 360 degrees mark. Then we added a Boolean parameter to publicVector3 DirFromAngle to check if the angle value is set to global, so that way we cancontrol the direction that our character is facing.
Then we are going to open the FieldOfViewEditor script once again to add theviewAngle information:
using UnityEngine; using System.Collections; using UnityEditor;
[CustomEditor (typeof (FieldOfView))] public class FieldOfViewEditor : Editor{ void OnSceneGUI() { FieldOfView fow = (FieldOfView)target; Handles.color = color.white; Handles.DrawWireArc (fow.transform.position, Vector3.up, Vector3.forward, 360, fow.viewRadius); Vector3 viewAngleA = fow.DirFromAngle(-fow.viewAngle/2, false); Handles.DrawLine(fow.transform.position, fow.transform.position + viewAngleA * fow.viewRadius); Handles.DrawLine(fow.transform.position, fow.transform.position + viewAngleB * fow.viewRadius); } }
Now, let's test it again to see the new modifications that we have done:

Awareness
[ 301 ]
On the View Angle option we are going to change the value from zero to any other to seewhat it is doing:
Now, if we look at the circle that is around the character, we will notice a triangular shapeinside. The size of that shape can be controlled precisely with the View Angle option, andthe triangle shape represents the vision of our character, so at this moment we can noticethat the character is looking slightly to the bottom right.

Awareness
[ 302 ]
Because we have set the angle value to be at a global angle, we can rotate the character andthe view angle will follow the character rotation.
Now let's work on the vision raycast, this part is responsible for detecting what exists in thedirection that our character is looking at. Once again, we are going to edit ourFieldOfView script that we created for our character:
public float viewRadius;[Range(0,360)]public float viewAngle;public LayerMask targetMask;public LayerMask obstacleMask;public List<Transform> visibleTargets = new List<Transform>();void FindVisibleTargets () { visibleTargets.Clear (); Collider[] targetInViewRadius = Physics.OverlapSphere(transform.position, viewRadius, targetMask); for (int i = 0; i < targetsInViewRadius.Length; i++) { Transform target = targetInViewRadius [i].transform; Vector3 dirToTarget = (target.position - transform.position).normalized; if (Vector3.Angle (transform.forward, dirToTarget) < viewAngle / 2)

Awareness
[ 303 ]
{ float dstToTarget = Vector3.Distance (transform.position, target.position); if (!Physics.Raycast(transform.position, dirToTarget, dstToTarget, obstacleMask)) { visibleTargets.Add (target); } } } public Vector3 DirFromAngle(float angleInDegrees, bool angleIsGlobal) { if(!angleIsGlobal) { angleInDegrees += transform.eulerAngles.y; } return new Vector3(Mathf.Sin(angleInDegrees * Mathf.Deg2Rad), 0, Mathf.Cos(angleInDegrees * Mathf.Deg2Rad));}
What we have done here, is add the Physics information into our script, detecting only theobjects that can be found inside of the character View Angle. To check if something is insight of our character, we use a Raycast to check if any object with the layerobstacleMask is detected. Now let's create an IEnumerator function to implement asmall delay for our character detecting new obstacles:
public float viewRadius; [Range(0,360)]public float viewAngle; public LayerMask targetMask;public LayerMask obstacleMask;[HideInInspector] public List<Transform> visibleTargets = newList<Transform>();void Start () { StartCoroutine("FindTargetsWithDelay", .2f); }IEnumerator FindTargetsWithDelay(float delay){while (true) { yield return new WaitForSeconds (delay); FindVisibleTargets (); }}void FindVisibleTargets () { visibleTargets.Clear (); Collider[] targetInViewRadius =Physics.OverlapSphere(transform.position,viewRadius, targetMask);

Awareness
[ 304 ]
for (int i = 0; i < targetsInViewRadius.Length; i++){ Transform target = targetInViewRadius [i].transform; Vector3 dirToTarget =(target.position - transform.position).normalized; if (Vector3.Angle (transform.forward, dirToTarget) < viewAngle / 2) {float dstToTarget = Vector3.Distance (transform.position, target.position); if (!Physics.Raycast(transform.position, dirToTarget, dstToTarget, obstacleMask)) { visibleTargets.Add (target); } } } public Vector3 DirFromAngle(float angleInDegrees, bool angleIsGlobal){if(!angleIsGlobal) { angleInDegrees += transform.eulerAngles.y; } return new Vector3(Mathf.Sin(angleInDegrees * Mathf.Deg2Rad), 0, Mathf.Cos(angleInDegrees * Mathf.Deg2Rad)); }
Now that, we have created an IEnumerator, the character has a small reaction time that inthis case is set to .2f to find targets inside of his vision zone. In order to test this we need tomake some new modifications inside of our FieldOfViewEditor script. So let's open itand add a few new lines of code:
using UnityEngine; using System.Collections; using UnityEditor;
[CustomEditor (typeof (FieldOfView))] public class FieldOfViewEditor : Editor{
void OnSceneGUI(){ FieldOfView fow = (FieldOfView)target; Handles.color = color.white; Handles.DrawWireArc (fow.transform.position, Vector3.up, Vector3.forward, 360, fow.viewRadius); Vector3 viewAngleA = fow.DirFromAngle(-fow.viewAngle/2, false);
Handles.DrawLine(fow.transform.position, fow.transform.position + viewAngleA * fow.viewRadius); Handles.DrawLine(fow.transform.position,fow.transform.position + viewAngleB * fow.viewRadius); Handles.color = Color.red; Foreach (Transform visibleTarget in fow.visibleTargets) { Handles.DrawLine(fow.transform.position, visibleTarget.position);

Awareness
[ 305 ]
} } }
With the new modifications on the code, we should be able to see when the character hasdetected an obstacle and when that obstacle get out of his vision zone.
To test this out we first need to select all the obstacles that we have inside of our game:
Then assign them the Obstacles layer:

Awareness
[ 306 ]
We also need to select all of the Targets inside of the game:
We then assign them the Targets layer. This step is very important so that our Raycast canidentify what is inside of the character field of view. Now, let's click on the character objectand define which layer represents the Targets and which layer represents the Obstacles:
We go to the Layer Mask option that can be found in the Field Of View script options:
And we choose the Targets layer:
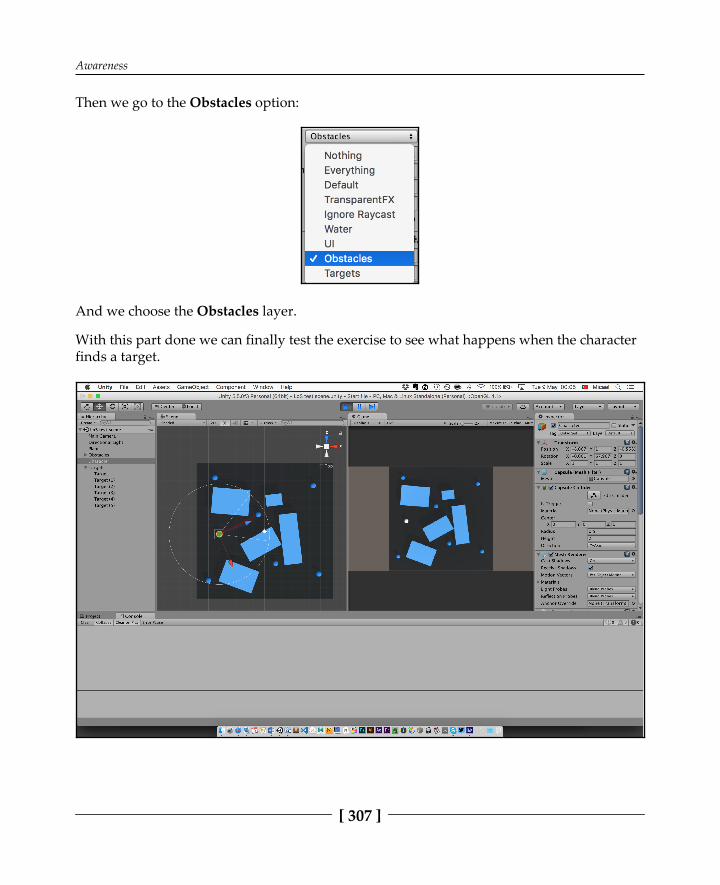
Awareness
[ 307 ]
Then we go to the Obstacles option:
And we choose the Obstacles layer.
With this part done we can finally test the exercise to see what happens when the characterfinds a target.

Awareness
[ 308 ]
When playing the exercise, we can see that a red line appears connecting the character andthe target, when a target gets inside of the vision zone. This represents that our characterhas spotted an enemy for example.

Awareness
[ 309 ]
But, when we move our character and we have an obstacle in front of a target, even if thetarget is inside the vision zone, the character cannot detect him because there is an object infront of him blocking his view. This is why we need to assign the Obstacle layer to everyobject that might block the character vision, that way he won't have any X-Ray vision.
We can also point our character to two targets that both of them will connect to, this meansthat our character is also able to detect more than one target at the same time, which is veryuseful to define better strategies and tactics.
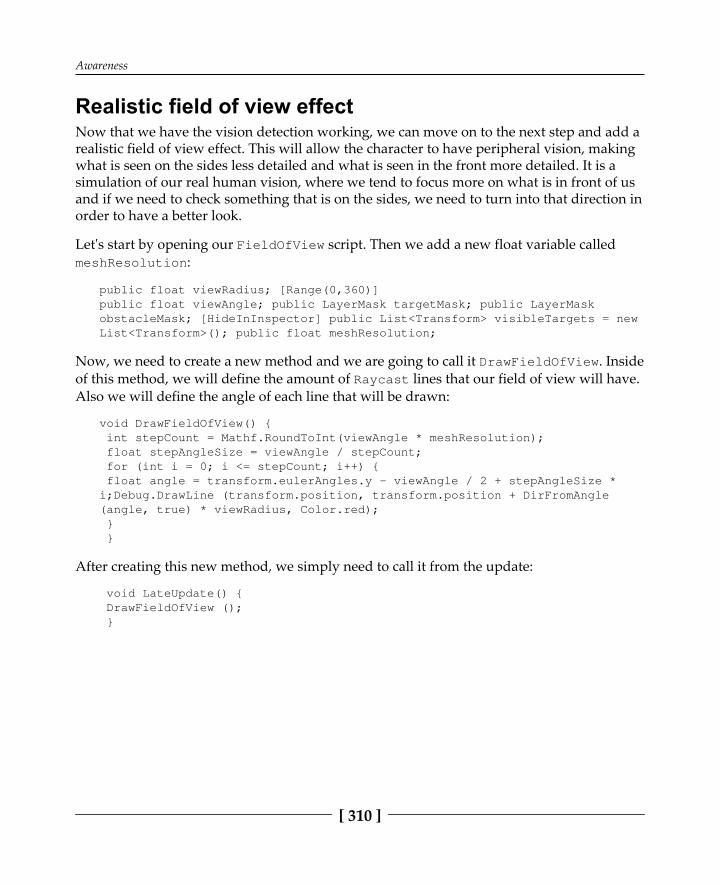
Awareness
[ 310 ]
Realistic field of view effectNow that we have the vision detection working, we can move on to the next step and add arealistic field of view effect. This will allow the character to have peripheral vision, makingwhat is seen on the sides less detailed and what is seen in the front more detailed. It is asimulation of our real human vision, where we tend to focus more on what is in front of usand if we need to check something that is on the sides, we need to turn into that direction inorder to have a better look.
Let's start by opening our FieldOfView script. Then we add a new float variable calledmeshResolution:
public float viewRadius; [Range(0,360)]public float viewAngle; public LayerMask targetMask; public LayerMaskobstacleMask; [HideInInspector] public List<Transform> visibleTargets = newList<Transform>(); public float meshResolution;
Now, we need to create a new method and we are going to call it DrawFieldOfView. Insideof this method, we will define the amount of Raycast lines that our field of view will have.Also we will define the angle of each line that will be drawn:
void DrawFieldOfView() { int stepCount = Mathf.RoundToInt(viewAngle * meshResolution); float stepAngleSize = viewAngle / stepCount; for (int i = 0; i <= stepCount; i++) { float angle = transform.eulerAngles.y - viewAngle / 2 + stepAngleSize *i;Debug.DrawLine (transform.position, transform.position + DirFromAngle(angle, true) * viewRadius, Color.red); } }
After creating this new method, we simply need to call it from the update:
void LateUpdate() { DrawFieldOfView (); }

Awareness
[ 311 ]
At this point, we can open the game editor and test it to visualize what we have created:
Right away when we press play to test our script, we won't see any difference between theold version and the new one. This is normal because we need to increase the MeshResolution of our character.

Awareness
[ 312 ]
As we can see in the preceding screenshot, we need to add a value in the Mesh Resolutionvariable in order to see the desirable results.
Adding 0.08 into the Mesh Resolution variable, we can notice already that on the gameeditor window, a few red lines appear and that's exactly what we wanted.
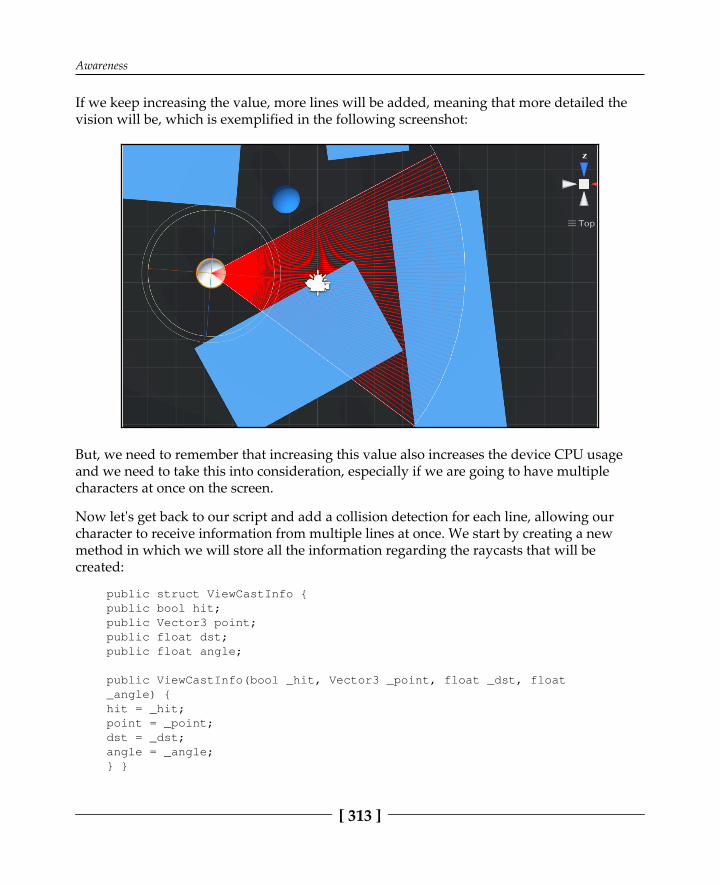
Awareness
[ 313 ]
If we keep increasing the value, more lines will be added, meaning that more detailed thevision will be, which is exemplified in the following screenshot:
But, we need to remember that increasing this value also increases the device CPU usageand we need to take this into consideration, especially if we are going to have multiplecharacters at once on the screen.
Now let's get back to our script and add a collision detection for each line, allowing ourcharacter to receive information from multiple lines at once. We start by creating a newmethod in which we will store all the information regarding the raycasts that will becreated:
public struct ViewCastInfo { public bool hit; public Vector3 point; public float dst; public float angle;
public ViewCastInfo(bool _hit, Vector3 _point, float _dst, float _angle) { hit = _hit; point = _point; dst = _dst; angle = _angle; } }

Awareness
[ 314 ]
Once this new method is created we can go back to our DrawFieldOfView() method andstart adding the raycasts that will detect the collisions for each line:
void DrawFieldOfView() { int stepCount = Mathf.RoundToInt(viewAngle * meshResolution); float stepAngleSize = viewAngle / stepCount; List<Vector3> viewPoints = new List<Vector3>(); for (int i = 0; i <= stepCount; i++) { float angle = transform.eulerAngles.y - viewAngle / 2 + stepAngleSize * i; ViewCastInfo newViewCast = ViewCast(angle); Debug.DrawLine(transform.position, transform.position + DirFromAngle(angle, true) * viewRadius, Color.red); viewPoints.Add(newViewCast.point); } }
To understand the next steps, let's see how a mesh is generated from a script:
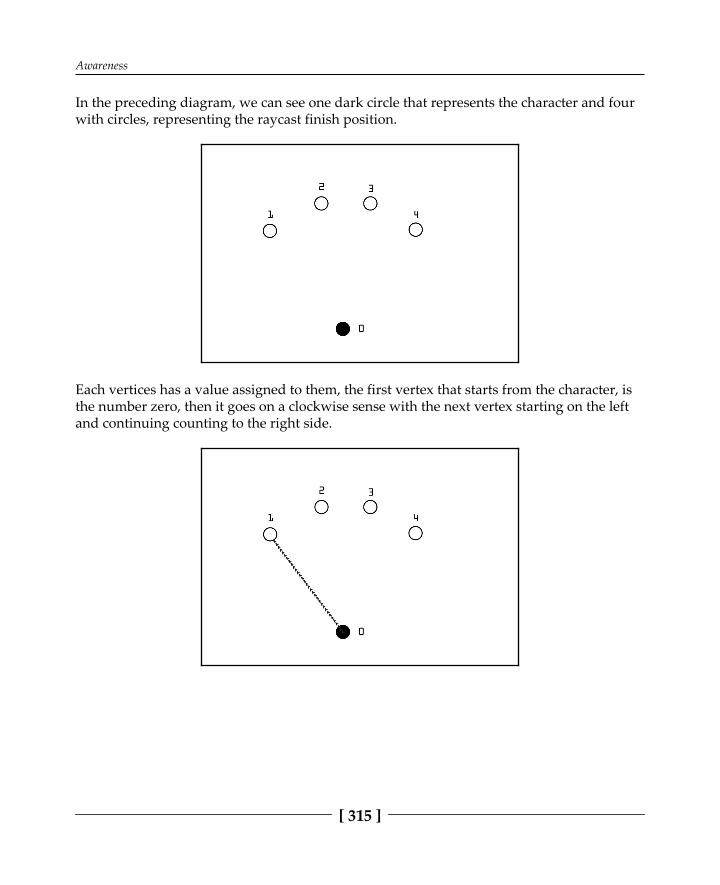
Awareness
[ 315 ]
In the preceding diagram, we can see one dark circle that represents the character and fourwith circles, representing the raycast finish position.
Each vertices has a value assigned to them, the first vertex that starts from the character, isthe number zero, then it goes on a clockwise sense with the next vertex starting on the leftand continuing counting to the right side.
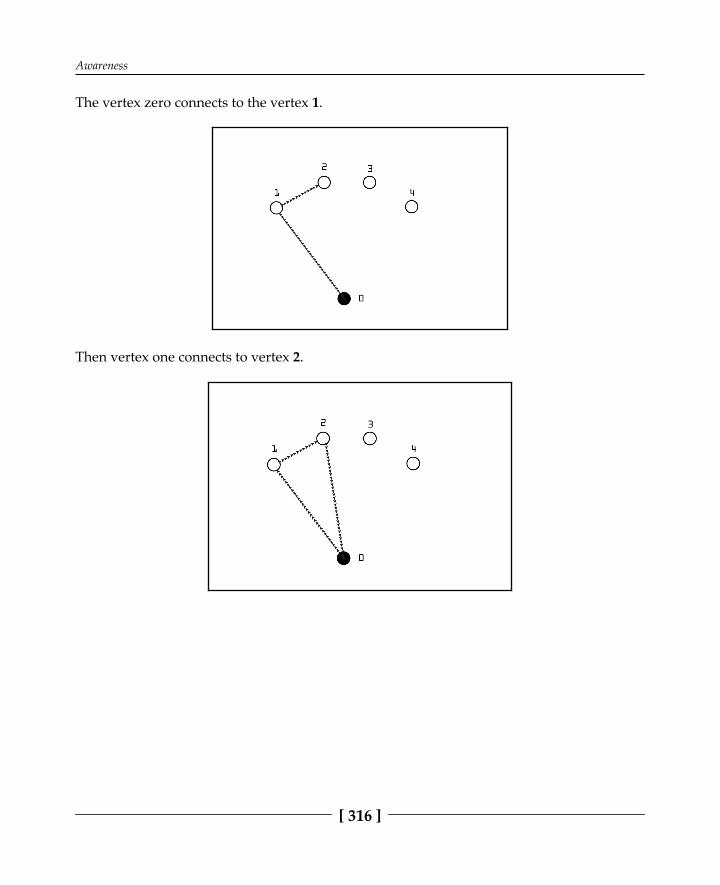
Awareness
[ 316 ]
The vertex zero connects to the vertex 1.
Then vertex one connects to vertex 2.

Awareness
[ 317 ]
And then vertex two connects back to vertex 0, creating a triangle mesh.
Once the first triangle mesh is created, it continues to the next one, starting from 0 > 2 > 3 > 0and the second triangle is also created. And finally the last one, 0 > 3 > 4 > 0. Now, we wantto transcribe this information into our code, so in this case the array of the field of view is:
[0,1,2,0,2,3,0,3,4]
The total number of vertices on this example is five:
v = 5
The total number of triangles created is three:
t = 3
So the number of triangles is:
t = v-2
That means that the length of our array will be:
(v-2)*3
Now let's get back to our script and add the information that we have solved here:
void DrawFieldOfView() {int stepCount = Mathf.RoundToInt(viewAngle * meshResolution);float stepAngleSize = viewAngle / stepCount; List<Vector3> viewPoints = new List<Vector3> (); ViewCastInfo oldViewCast = new ViewCastInfo ();

Awareness
[ 318 ]
for (int i = 0; i <= stepCount; i++) {float angle = transform.eulerAngles.y - viewAngle / 2 + stepAngleSize * i; ViewCastInfo newViewCast = ViewCast (angle); Debug.DrawLine(transform.position, transform.position +DirFromAngle(angle, true) * viewRadius, Color.red); viewPoints.Add (newViewCast.point); }
int vertexCount = viewPoints.Count + 1; Vector3[] vertices = new Vector3[vertexCount];int[] triangles = newint[(vertexCount-2) * 3];
vertices [0] = Vector3.zero;for (int i = 0; i < vertexCount - 1; i++) { vertices [i + 1] = viewPoints [i];
if (i < vertexCount - 2) { triangles [i * 3] = 0; triangles [i * 3 + 1] = i + 1; triangles [i * 3 + 2] = i + 2; } } }
Now, let's go to the top of our script and add two new variables, public MeshFilterviewMeshFilter and Mesh viewMesh:
publicfloat viewRadius; [Range(0,360)]publicfloat viewAngle;
public LayerMask targetMask;public LayerMask obstacleMask;
[HideInInspector]public List<Transform> visibleTargets = new List<Transform>();
publicfloat meshResolution;
public MeshFilter viewMeshFilter; Mesh viewMesh;
Next, we need to call those variables into our start method:
void Start() { viewMesh = new Mesh (); viewMesh.name = "View Mesh"; viewMeshFilter.mesh = viewMesh;

Awareness
[ 319 ]
StartCoroutine ("FindTargetsWithDelay", .2f); }
The next step is to select our Character object inside the game editor:
Go to the GameObejct section and select Create Empty Child:
Rename the object to View Visualization.

Awareness
[ 320 ]
With the same object selected, we go to: Component | Mesh | Mesh Filter, to add a meshfilter to our object.
Then we need to do the same for the Mesh Renderer, Component | Mesh | MeshRenderer.
We can turn off the Cast Shadows and Receive Shadows.
Awareness
[ 321 ]
Finally, we add the object that we just created into our script variable View Mesh Filter andchange the Mesh Resolution to any desirable value, in this case we have chosen 1.
Now, we can return to our script and add edit once again the DrawFieldOfView method:
void DrawFieldOfView() {int stepCount = Mathf.RoundToInt(viewAngle * meshResolution);float stepAngleSize = viewAngle / stepCount; List<Vector3> viewPoints = new List<Vector3> (); ViewCastInfo oldViewCast = new ViewCastInfo ();for (int i = 0; i <= stepCount; i++) {float angle = transform.eulerAngles.y - viewAngle / 2 + stepAngleSize * i; ViewCastInfo newViewCast = ViewCast (angle); viewPoints.Add (newViewCast.point); }
int vertexCount = viewPoints.Count + 1; Vector3[] vertices = new Vector3[vertexCount];int[] triangles = newint[(vertexCount-2) * 3];
vertices [0] = Vector3.zero;for (int i = 0; i < vertexCount - 1; i++) { vertices [i + 1] = viewPoints [i];
if (i < vertexCount - 2) { triangles [i * 3] = 0; triangles [i * 3 + 1] = i + 1; triangles [i * 3 + 2] = i + 2; } }
viewMesh.Clear ();
viewMesh.vertices = vertices; viewMesh.triangles = triangles; viewMesh.RecalculateNormals (); }
Let's test the game, to see what we have done here:
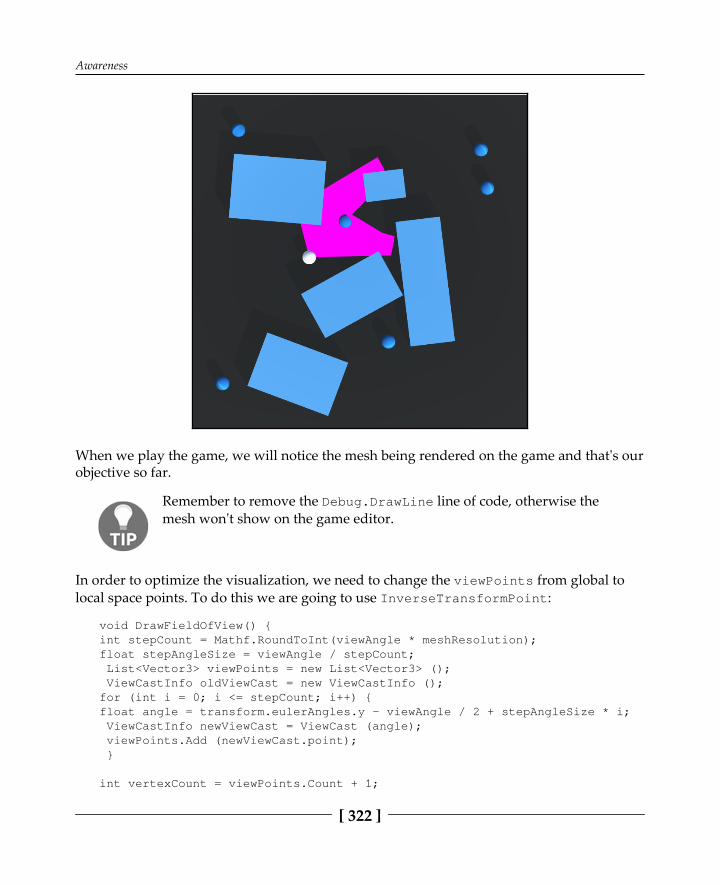
Awareness
[ 322 ]
When we play the game, we will notice the mesh being rendered on the game and that's ourobjective so far.
Remember to remove the Debug.DrawLine line of code, otherwise themesh won't show on the game editor.
In order to optimize the visualization, we need to change the viewPoints from global tolocal space points. To do this we are going to use InverseTransformPoint:
void DrawFieldOfView() {int stepCount = Mathf.RoundToInt(viewAngle * meshResolution);float stepAngleSize = viewAngle / stepCount; List<Vector3> viewPoints = new List<Vector3> (); ViewCastInfo oldViewCast = new ViewCastInfo ();for (int i = 0; i <= stepCount; i++) {float angle = transform.eulerAngles.y - viewAngle / 2 + stepAngleSize * i; ViewCastInfo newViewCast = ViewCast (angle); viewPoints.Add (newViewCast.point); }
int vertexCount = viewPoints.Count + 1;

Awareness
[ 323 ]
Vector3[] vertices = new Vector3[vertexCount];int[] triangles = newint[(vertexCount-2) * 3];
vertices [0] = Vector3.zero;for (int i = 0; i < vertexCount - 1; i++) { vertices [i + 1] = transform.InverseTransformPoint(viewPoints [i]) +Vector3.forward * maskCutawayDst;
if (i < vertexCount - 2) { triangles [i * 3] = 0; triangles [i * 3 + 1] = i + 1; triangles [i * 3 + 2] = i + 2; } }
viewMesh.Clear ();
viewMesh.vertices = vertices; viewMesh.triangles = triangles; viewMesh.RecalculateNormals (); }
Now, if we test it again it will be more accurate.

Awareness
[ 324 ]
It looks good already, but we can still improve it by changing from Update to LateUpdate:
void LateUpdate() { DrawFieldOfView (); }
Doing this the movement of our mesh will be smoother.
With this part of the script updated, we conclude our example, completing a realistic fieldof view system into our character.

Awareness
[ 325 ]
All we need is to change the values in order to fit the results that we are looking for, makingour character more or less aware of his surroundings.
For example, if we set the View Angle value to 360, that makes our character completelyaware of what is happening around and if we decrease the value, we will reach a morerealistic vision, just like it's used in a Metal Gear Solid game.

Awareness
[ 326 ]
At this point we are able to pick a stealth game and copy their most iconic features such asrealistic vision and audio awareness. We have learned the foundations and now we canstart from there and develop our own game.

Awareness
[ 327 ]
SummaryIn this chapter, we unveiled how stealth games work and how we can recreate that samesystem so we can use it in our games. We went from a simple approach to a complex one,allowing us to decide what fits better in the game that we are creating, if it relies heavily onstealth or if we simply need a basic system to make our character detect the player by visionor audio awareness. The features that we have learned in this chapter can also be expandedand used in practically any example that we have created before, amplifying the collisiondetection, the pathfinding, the decisions, animations, and many more features, turningthem from functional to realistic.
The way we create games is constantly updating, every game published brings a new ordifferent method to create something, which is only possible if we are willing to experimentand blend everything we know, adjusting our knowledge to achieve the results we want toeven if they look extremely complicated. Sometimes it is just a matter of exploring basicconcepts and expanding them, turning a simple idea into a complex system.

Index
22D animation sprites 86, 87, 89 versus 3D animation 86
33D animation bone structure 89
Aadvanced environment interactions about 79 adaption to unstable terrain 81, 82 ray cast, used for evaluating decisions 83advanced pathfinding versus simple pathfinding 175, 177advanced vision detection 287, 289, 291, 292,
294, 295, 297, 299, 301, 302, 304, 306, 308,309
AGGRESSIVE state 24, 25, 26AI drivers 176animation state machines 90, 91, 93, 96, 97, 98,
100, 102, 104, 105, 107, 109, 112Artificial Intelligence (AI) 7Assassin's Creed game 210, 211automated finite-state machines (AFSMs) about 36 chances, calculating 39, 40 planning 36, 37, 38awareness about 271 vision awareness 271
Bbasic environment interactions about 59
environment objects, moving 60, 61, 62, 63, 65,67, 70
environment, breaking down by area 76, 78 obstructive environment objects 70, 71, 72, 73,
75
basic vision detection 274, 276, 278, 279, 282,283, 285
bone structure, 3D animation 89
Ccollision avoidance 263, 264, 265, 266, 267, 269crowd collision avoiding 239, 241crowd interactions about 209 communication (attention zones) 221, 222, 223,
224
communication (talking to AI characters) 225,226, 228
group fight 216, 218, 219, 220 planning 216 team sports 228, 229, 230, 231, 233, 234, 236
DDEFENSIVE state 21, 22, 24dynamic game AI balancing 54, 55
EEnemy AI in video games 7, 8
FFIFA/Pro evolution soccer game 214, 215finite state machine (FSM) 8

[ 329 ]
Ggame AI solutions, history 6, 7game states about 15 AGGRESSIVE state 24, 25, 26 DEFENSIVE state 21, 22, 24 defining 20, 21Grand Theft Auto (GTA) game 176, 212
Hhuman-like AI 8, 9
Mmap 115
Nnavigation behavior about 115 alternative path, selecting 121, 122, 124, 125,
127
direction, selecting 116, 117, 118, 120 point to point movement 128
Ooffensive search creating 244, 245, 248, 250, 252 opponent actions, predicting 254, 256, 258,
259, 262open world maps 176
Ppathfinding 197point to point movement dynamic objects, avoiding 163, 164, 168, 170,
173
MOBA genre 145, 147, 148, 150, 152, 153,155, 156, 159, 160, 163
racing genre 136, 137, 138, 140, 142, 145 tower defense game 128, 129, 130, 133, 135possibility map (FPS) creating 18, 19 preparing 17possibility maps
about 15 conclusion 27 using 15, 16probability maps about 28 using 28, 29, 30, 31
Ssearch about 243 offensive search 244, 245, 247, 250, 252simple pathfinding versus advanced pathfinding 175, 177sleath games 270smooth transitions about 112 creating 114sprites, 2D animation 86, 87, 89stealth sub-genre 270Super Mario Bros example 34, 35
Ttactics 270The Sims example 42, 43, 45, 46, 47, 48, 50, 52,
53
The Sims game 213Theta search algorithm about 178 disadvantages 180, 181 example 181, 182, 183, 184, 185, 186, 187,
188, 189, 191 grid nodes, generating 192, 193, 195, 196 pathfinding implementation 197, 198, 200, 202,
203, 204, 206, 207 working 178tower defense game 128, 129, 130, 133, 135
Uutility-based functions 42
Vvideo game animation 2D animation 86 3D animation 86

video games, and crowd interactions about 210 Assassin's Creed 210, 211 FIFA/Pro evolution soccer 214, 215 Grand Theft Auto (GTA) 212 The Sims 213vision awareness advanced vision detection 287, 289, 291, 292,
294, 295, 297, 299, 301, 302, 304, 306, 308,309
basic vision detection 274, 276, 277, 279, 282,
283, 285 implementing 271, 273 view effect, realistic field 310, 311, 312, 314,
315, 316, 317, 318, 319, 320, 322, 324, 325visual interactions about 57 example 58visual/audio awareness 11, 12, 13
Wwaypoints 245
Copyright © 2022 FDOKUMEN