PPC's SMART Practice Aids User Guide - Thomson Reuters
323
-
Upload
khangminh22 -
Category
Documents
-
view
1 -
download
0
Transcript of PPC's SMART Practice Aids User Guide - Thomson Reuters

- 2 -
PROPRIETARY MATERIALS
No use of these proprietary materials is permitted without the express written consent of or license fromThomson Reuters. Altering, copying, distributing or reproducing any of these proprietary materials in anymanner is expressly prohibited.
DISCLAIMERS
The scenarios, examples, and content within this document are used strictly for instructional purposes only.Thomson Reuters shall not be responsible for any liability directly or indirectly resulting from any outcomes orconclusions drawn from individual research discussed during the class.
In response to IRS Circular 230 requirements, Thomson Reuters advises that any discussions of federal taxissues in its publications and products or in third-party publications and products on its platforms are notintended to be used andmay not be used to avoid any penalties under the Internal Revenue Code, or topromote, market, or recommend any transaction or subject addressed therein.
SOFTWARE LICENSE AGREEMENT
The right to use the software product described in this workbook is specifically conditioned upon yourexecution of and compliance with a Tax Software and Services Agreement with Thomson Reuters.
All contents are copyright 2015, Thomson Reuters.
All rights reserved.

TABLE OF CONTENTS
- 3 -
Table of Contents
Table of Contents 3
Welcome 14
What's New 16
New to SMART Practice Aids? 16
How to Use Help 17
Table of Contents 17
Index 17
Search 17
Related Topics 17
Glossary 18
Hyperlinks 18
Using SMART to Perform an Audit—The Big Picture 19
Product License Agreement 21
Helpful Resources 22
"How To" and Navigation Tips 22
Context-Sensitive Help 22
Quick Tour 22
Customer Help Center 22
About the Menu Bar 23
File Menu 24
Audit Essential Installed 25
Risk Assessment Installed 26
Internal Control Installed 26
Disclosure Installed 26
FieldWork Installed 26
Compilation and Review Installed 26
Edit Menu 28
Disclosure Installed 28
FieldWork Installed 28

TABLE OF CONTENTS
- 4 -
View Menu 29
Internal Control Installed 29
Disclosure Installed 29
FieldWork Installed 30
Insert Menu 31
Internal Control Installed 31
Disclosure Installed 31
FieldWork Installed 32
Tools Menu 33
Access From Virtual Office CS 34
Help Menu 35
Internal Control Menu 36
General Navigation 37
About the Toolbar 38
Enable the Full Navigation Pane 38
"How To" and Navigational Tips 40
Display Tips Any Time 40
About Engagement Setup Questions 41
Initial Audit Setup Question 42
If You Answer Yes 42
If You Answer No 43
Single Audit and Yellow Book Setup Questions 44
If You Select Yes 44
If You Select No 44
Employee Benefit Plans (EBP) Setup Questions 46
What type of employee benefit plan does this engagement cover? 46
Is the engagement a DOL limited-scope audit? 46
Do you need to obtain a service auditor’s SAS 70 report for this engagement? 46
PCAOB Interim Review Engagement Question 48
If You Select Yes 48

TABLE OF CONTENTS
- 5 -
If You Select No 48
Setting Up an Employee Benefit Plan (EBP) Engagement 49
Select a Disclosure Checklist 49
About Engagements 50
SMART Start and SMART Engagement Setup 51
Create a Client Engagement 51
Create a Master Engagement 52
Create a SMART Start Client Engagement 58
Create a SMART Start Master Engagement 60
Open a Saved Engagement 62
Edit Engagement Setup and View Engagement Properties 63
Transfer an Engagement 63
Files Created with the Transfer Engagement Tool 64
Delete Transfer Files 64
Receive an Engagement 65
Back Up an Engagement 66
Restore an Engagement 68
Delete Engagements and Clients 69
Finalize an Engagement 72
Enable Modules in Existing Engagements 73
Update SMART Engagement 74
About SMART Practice Aids – Risk Assessment 78
PPC's SMART Start Audit Tools 78
Add and Remove Forms 79
Step 1 – Identify Risk 80
Step 2 – Assess the Effects of Risk 80
Overall Financial Statement Risks 81
Step 3 – Review and Modify Your Audit Programs 81
Generate Diagnostics Report 83
Generate Planning Forms and Audit Programs 85

TABLE OF CONTENTS
- 6 -
About SMART Practice Aids – Internal Control 87
Navigate SMART Practice Aids – Internal Control 88
New Elements 88
New MenuOptions 88
Internal Control Flowchart 89
Enable SMART Practice Aids – Internal Controls 90
Understand Controls and Evaluating Design 92
ColumnHeading Questions 92
Control Activities – Significant Transaction Classes 93
Control Activities – Audit Areas 95
To view specific control activities related to the transaction class: 96
Apply a Risk-Based Approach 96
Sources of Information 97
Identified Risks 97
Control Activities – Financial Close and Reporting 98
Applying a Risk-Based Approach 98
Sources of Information 99
Identified Risks 99
Control Activities – General Computer Controls 100
Identified Risks 100
Summary of Design Effectiveness Evaluations 101
Add an Objective 102
Add a Control 103
Add a Test Procedure 104
Public Company Audit 105
Review and Modify Test Plans 106
Edit Test Procedures 106
Generate the Test Plan 106
Enter Test Exceptions 107
For a Financial Statement Audit 107

TABLE OF CONTENTS
- 7 -
For a Public Company Audit 108
Assess Control Risk 109
Generate Diagnostics Report 109
Generate Planning Forms for Internal Control 110
About SMART Practice Aids – Disclosure 111
Disclosure Keyword Search 111
Select Checklist Topics 113
Complete and Customize the Checklist 114
Set a Requirement's Disclosure Status 114
Edit Checklist Topics 117
Move Topics 117
Add, Edit, and DeleteTopic Comments 117
Update the Disclosure Checklist 119
View Firm Libraries in an Engagement 119
Disclosure Libraries Pane Toolbar 119
Maintain an Engagement Disclosure Note Library 121
Add a New Disclosure Note 123
Generate Diagnostics Report 124
Generate Planning Forms and Audit Programs 125
Generate Checklists or Notes 126
About Firm Libraries 127
General Navigation 128
Add and Delete Note Examples 128
Add and Delete Topics 129
Organizing Topics 129
Back up and Restore a Firm Library 131
Select/Change the Location of a Firm Library 132
Copy Note Examples from Another Library 133
Create a Firm Library 134
Delete a Firm Library 135

TABLE OF CONTENTS
- 8 -
Download PPC Libraries 135
Firm Library Navigation 136
File 136
Edit 136
View 136
Insert 137
Tools 137
Help 137
Generate a Report of Firm Library Disclosure Notes 139
Move a Firm Library to Another Database 140
Open a Firm Library 141
Rename a Firm Library 142
About SMART Practice Aids - Field Work 143
Enable SMART Practice Aids - Field Work 144
Engagement Setup – Field Work 146
Dynamic Data Flow Between SMART Workpapers 147
SMART Audit Program Design 148
Complete Audit Programs 148
Engagement Dashboard 152
Create SMART Docs 153
Insert Review Note Documents 154
Diagnostics - Field Work 155
Diagnostics Report 155
Workpaper Properties 156
Workpaper Status Report 157
Workpaper Tabs 158
Helpful Tips for Using SMART Practice Aids Field Work 159
Left Navigation Tree 161
SMART Navigator 163
Workpaper Tabs 164
TABLE OF CONTENTS
- 9 -
Engagement Management Software Integration 165
Synchronize Workpapers with SMART 166
Use SMART with your Engagement Management Software 167
Manage Your Entire Engagement in SMART 168
Add andmanage documents in SMART 168
Use SMART Without Engagement Management Software 168
Document Identified Risks 170
Add Risk 171
Risk Summary 174
How to Complete Procedures 175
How to Add Forms 177
How to Insert or Modify Procedure 179
ToModify a procedure 181
SMART Design View 186
SMART Analytical Procedures Documentation Form 187
How to Import Disclosure Information 189
About SMART Practice Aids - Audit Essential 191
Convert Engagement 192
ToConvert an Audit Essential Engagement to a full SMART Practice Aids Engagement: 192
To Convert a Risk Assessment Engagement to an Audit Essential Engagement: 194
Step 1 – Risk Identification 196
Step 2 – Risk Assessment 198
Overall Financial Statement Risks 199
Complete Step 2 199
Step 3 – Audit Program Preparation 200
Generate Diagnostics Report 204
Complete Audit Programs 204
Create SMART Docs 209
ToCreate SMART Docs: 209
About Common Procedures 211

TABLE OF CONTENTS
- 10 -
Add, Edit, Delete Comments 212
Use the Edit Text Icon 213
Use "Help Me Decide" Links 214
Use Spell Check 215
Remove Practical Considerations 216
About Engagement Rollforward 217
Types of Rollforward 218
Rollforward the Client Engagement to a New Client Engagement 218
Merge the Client Engagement with aMaster Engagement 218
Engagement Rollforward Best Practices 219
WhenCreating an Engagement Rollforward 219
Once the New Engagement is Created 219
Disclosure Notes and Unassigned Topics 220
Rollforward a Client Engagement to a New Client Engagement 221
Rollforward a Master Engagement to a New Master Engagement 223
Merge a Client Engagement with a Master Engagement 224
About Multi-user Controls 226
WhenMulti-User is Active 226
Multi-user in the DisclosureModule and Firm Library Application 226
Allow Multi-User 227
Edit a Form (Multi-users) 228
Option to Release Locks 228
Disable the "Maintain this setting for me" Option 228
Update Your Copy of the Engagement 229
Multi-user Messages 230
Provide a Username 232
To change your user name: 232
About Screen Overviews 233
Add Control 234
Add Exception 235

TABLE OF CONTENTS
- 11 -
Add New Transaction Class 236
Add Objective 237
Assess Control Risk 238
Assess Effects of Risks 238
Comments 240
Control Activities Form 241
Control Deficiency Evaluation and Aggregation Worksheet 242
Create a Client Engagement 243
Delete Engagement 244
Diagnostics Report 245
Edit Test Procedure 246
Edit Text 247
Create Client Engagement from Master 248
Engagement Acceptance and Continuance Form 249
Enter Test Exceptions 250
Entity-Level Control Form 251
General Planning Procedures 252
General Auditing and Completion Procedures 253
Generate Audit Programs 254
Generate Planning Forms 255
Go to/Link to Workpapers 256
"How To" and Navigational Tips 257
Identified Risk 257
Add a Document from the Insert Menu 259
Insert Review Note Documents 260
Open Client Engagement 261
Options Application Settings 262
General Tab 262
Multi-User Tab 263
Overall Financial Statement 264

TABLE OF CONTENTS
- 12 -
Receive Engagement 265
Reset Procedure 266
Restore Engagement 267
Rollforward Engagement 268
Significant Transaction Classes 269
SMART Engagement Setup Questions 270
View a Summary of Design Effectiveness 270
Transfer Engagement 272
Smart Engagement Setup 273
Workpaper Status Report 274
SMART Practice Aids Reference Links 275
Change ReferenceMaterial Location 275
SMART Practice Aids with Virtual Office CS 276
Integration of SMART Practice Aids with AdvanceFlow 277
Linking to AdvanceFlow Workpaper 280
Link to AdvanceFlow Workpaper 280
Uploading Documents to AdvanceFlow 284
Uploading Changed Docs to AdvanceFlow 287
Rollforward Integration 288
How Rollforward Integration works: 288
About Integration with Engagement CS 289
Launch SMART Practice Aids from Engagement CS 289
Insert a SMART Practice Aids Document into Engagement CS 290
Rollforward Integration 291
Step 1 – Open an Associated SMART Practice Aids Engagement or Associate and Launch anEngagement 294
If you have associated a SMART Practice Aids engagement with an Engagement CS engagement 294
If you have not associated a SMART Practice Aids engagement with an Engagement CSengagement 294
Step 2 – Complete the Steps in SMART Practice Aids 296

TABLE OF CONTENTS
- 13 -
Step 3 – Generate and File SMART Practice Aid Documents in the Associated EngagementCS Engagement 297
About Integration with Workpapers CS 298
Edit SMART Docs Properties in Workpapers CS 299
Rollforward Integration 301
Step 1 – Link SMART Practice Aids engagements to Workpapers CS binders 303
Link a binder to a SMART engagement fromWorkpapers CS 303
Step 2 – Complete the Steps in SMART Practice Aids 306
Step 3 – Generate and File SMART workpapers in the associated Workpapers CS binder 307
Create and File SMART Docs in the associatedWorkpapers CS binder 307
Support Overview 309
Technical Support Numbers 309
Information Needed 309
Training Resources 310
Index 311
WELCOME
- 14 -
WelcomeWelcome toPPC’s SMART Practice Aids®. These innovative tools bring advanced functionality to yourexisting PPC's Practice Aids products.
Click the links below to learnmore.
PPC’s SMART Practice Aids – Risk Assessment
Plan your audit in four easy steps:
l Identify risks – Complete planning forms and identify risks that could result in amaterialmisstatement of the financial statements.
l Assess effects of risks – Determine the extent of audit procedures necessary in light of identifiedrisks.
l Review andmodify audit programs – Review the suggested audit procedures andmodify as needed.
l Generate documents – Generate practice aid planning forms and audit programs.
PPC’s SMART Practice Aids – Internal Control
Optimize the overall planning process. Use this comprehensive, fully-integrated internal control evaluationand analysis tool with PPC’s SMART Practice Aids – Risk Assessment to:
l Obtain and document your understanding of internal control.
l Evaluate system design.
l Prepare internal control test plans (required, if performing a public company audit of internal control).
l Conclude on control effectiveness if performing a public company audit of internal control.
l Assess control risk.
PPC's SMART Practice Aids – Disclosure
Optimize financial statement disclosure preparation and review. Use this automated tool to:
l Prepare a customized checklist of applicable disclosure requirements.
l Quickly identify new or changed disclosure requirements.
l Create and save company-specific disclosures.
l Create and store firm-approved disclosures for use on any engagement.
l Research related authoritative literature on Checkpoint.
l Works alone, or integrated with PPC’s SMART Practice Aids - Risk Assessment, Audit Essential,and Compilation and Review.
PPC's SMART Practice Aids – Field Work
Plan and execute the entire PPC audit process within the SMART Suite, providing evenmore efficiency toyour audit workflow experience. Use this automated tool with PPC’s SMART Practice Aids – Risk

WELCOME
- 15 -
Assessment to:
l Place the PPC Practice Aids you need automatically into your SMART engagement.
l Add other PPC Practice Aids as needed.
l Share data and decision information automatically between PPC Practice Aids.
l Carry your planningmateriality, tolerable misstatement, and risk assessments throughout your auditengagement.
l Complete your audit work and sign off audit program steps within SMART and insert linkedworkpaper references.
l Provide diagnostics, rollforward, links to content on Checkpoint, multi-user capability, andmasterengagements.
PPC's SMART Practice Aids – Compilation and Review
Increase efficiency using automated, industry-tailored checklists and forms for the engagement planning andperformance of your compilation and review engagements:
l Interim and annual compilation, compilation for management use only, review
l Specialized industries – commercial, construction, nonprofit, andmore
l Rollforward to next year
l Multi-user capability
l Diagnostics identifying errors or inconsistencies
l Link to content specific guidance on Checkpoint
l Integration with SMART Disclosure
PPC’s SMART Practice Aids – Audit Essential
An easy to use workflow tool providing the basic features necessary to plan and complete any auditengagement.
l Document audit planning, assess risk, and tailor and complete audit programs
l Use pre-defined engagements for small, non-complex entities (SMART Start) or create your owncustom engagement
l Accumulate identified audit risks and relate them to relevant assertions
l SMART generation creates custom audit programs based on your risk assessments
l Rollforward the client engagement to the next period with changes flagged
Or, use the full PPC’s SMART Practice Aids Audit Suite to enjoy complete SMART functionality including fullmulti-user capability, engagement dashboard, SMART design and navigation features, andmore.

WELCOME
- 16 -
What's New
If you are a current user of SMART Practice Aids, see the Thomson Reuters Tax & Accounting CustomerHelp Center for an overview of the latest release features.
New to SMART Practice Aids?
If you are new to SMART Practice Aids, start with these topics to get familiar with the interface, see a high-level overview of the basic workflow steps, and view a topic on how to use the Help features.
l General Navigation
l The Big Picture
l How to Use Help

HOW TO USE HELP
- 17 -
How to Use HelpUsing this Help is easy as it follows the conventions of standard online Helps. The helpful features includeTable of Contents, Search, Index, Related Topics, Glossary, and hyperlinks.
Table ofContents
The Table ofContents appearsin the left pane andprovides anorganized hierarchyof books andtopics. You double-click a book toexpand it, and thensingle-click a topicto display it in theright pane. Thebooks areorganized byindividualSMART modulesand by subjectscommon to allmodules.
Index
Another way to find Help topics that contain a specific word or phrase is to click the Index tab at the top of theleft pane. The Index tab contains an alphabetical list of terms that you can click to jump to the associatedtopic.
Search
To quickly find a term or phrase in the Help, click theSearch tab at the top of the left pane. When the Searchtab opens, type the keyword you want to find and press Enter on your keyboard. To find a phrase, enter thephrase surrounded by quotationmarks and press Enter. The topics that contain your search criteria are listedin the left pane, where you can double-click each of them to display the associated topic.
Related Topics
At the bottom of each topic in the Help, you will see aRelated Topics link. Click this link to display a list oftopics that are associated with the topic you are viewing. Sometimes the topics are related by subject contentand sometimes by a common procedure.

HOW TO USE HELP
- 18 -
Glossary
TheGlossary appears at the bottom of the Table of Contents. Click this feature to view terms and theirdefinitions. Some terms are general financial terms and some are specific to SMART Practice Aids.
Hyperlinks
Throughout the Help, you will see hyperlinks, which are identified by blue, underlined text. When you click ahyperlink, the Help takes you to a related topic that contains associated content, helpful information, or awindow graphic. When you use a hyperlink to jump to another topic, you can return to the original topic byclicking theBack button in the toolbar at the top of the Help window.

USING SMART TO PERFORM AN AUDIT—THE BIG PICTURE
- 19 -
Using SMART to Perform an Audit—The Big PictureThis graphic illustrates a high-level overview of the basic workflow steps for using SMART Practice Aids toperform a SMART Audit. Even when you add the optional Disclosure and Internal Controlmodules to yourengagement, the basic workflow remains the same. The system just adds additional forms, features, andmenu options. However, when you add the Field Workmodule, the process workflow changes.
Click the components in the graphic to jump to the topics that contains detailed information. To return to thistopic, click theBack button at the top of the Help.

USING SMART TO PERFORM AN AUDIT—THE BIG PICTURE
- 20 -

PRODUCT LICENSE AGREEMENT
- 21 -
Product License AgreementThe Product License agreement can be found here.

HELPFUL RESOURCES
- 22 -
Helpful ResourcesThe primary documentation for using PPC’s SMART Practice Aids® is provided in this comprehensive Helpsystem. From any window in SMART Practice Aids, you can open this Help by pressing the F1 key. There arealso other helpful resources you can use while working in the SMART Practice Aids application.
"How To" and Navigation Tips
The “How-to” and Navigation Tips window appears automatically the first time you access a form, providinghelpful information specific to the form. You can access a form's “How-to” and Navigation Tips at any time byclicking the View Tip option on the toolbar.
Context-Sensitive Help
In certain SMART Practice Aids forms, you can click active blue links to open specific context-sensitive Helpdescriptions.
Examples of where these context sensitive links exist include:
l Blue headers in the Entity-Level Control Form and the Control Activities Form
l Blue links in the Assess Effects of Risks audit area forms
Quick Tour
Also available is a Quick Tour tutorial accessible from the Helpmenu. Please take some time to browse thishelpful resource.
Customer Help Center
Please visit our Customer Help Center at support.rg.thomsonreuters.com/smartpracticeaids for up-to-dateinstallation instructions, system requirements, FAQs, and best practices for using PPC's SMART PracticeAids. You can also sign up for training courses and learn how tomake themost of the product's features andfunctionality.

ABOUT THE MENU BAR
- 23 -
About the Menu BarSMART Practice Aids includes amenu bar at the top of the interface. You use this menu bar to performvarious activities involved in creating and working with engagements.
Themenu options are conditional upon which of the SMART Practice Aids modules you have installed. Thetopics in this section describe the purpose of the options and identify the associatedmodule.
Click the following links to learnmore about the options available on themenus:
l File Menu
l Edit Menu
l View Menu
l Insert Menu
l Tools Menu
l HelpMenu

FILE MENU
- 24 -
File MenuThese options are available from the Filemenu on themainmenu bar.
Name Description Shortcut
New
TheNew submenu has the following options.
Name Description Shortcut
ClientEngagement (fromPPC Title)
Create a new client engagementbased on a PPC Title. Ctrl + N
ClientEngagement (fromMaster)
Create a new master engagementbased on an existingmasterengagement.(Not available in SMART PracticeAids – Audit Essential)
N/A
MasterEngagement
Creates a new masterengagement.(Not available in SMART PracticeAids – Audit Essential)
N/A
Alt + F + N
Open
TheOpen submenu has the following options.
Name Description Shortcut
ClientEngagement
Select the client engagement youwant to open. Ctrl + O
MasterEngagement
Select themaster engagementyou want to open. N/A
Alt + F + O
Close Close the open engagement. Alt + F + C
Save Save the current engagement. Ctrl + S
Save As
TheSave As submenu has the following options.
Name Description Shortcut
ClientEngagement
Save the current engagementwith the client name andengagement name you enter.
N/A
MasterEngagement
Save the current masterengagement with themastergroup name andmasterengagement name you enter.(Not available in SMART PracticeAids – Audit Essential)
N/A
Alt + F + A

FILE MENU
- 25 -
Name Description Shortcut
Delete
TheDelete submenu has the following options.
Name Description Shortcut
Client orEngagement
Select either a client or anengagement to delete. N/A
Master Group orEngagement
Select either amaster group or amaster engagement to delete.(Not available in SMART PracticeAids – Audit Essential)
N/A
Alt + F + D
Backup
TheBackup submenu has the following options.
Name Description Shortcut
ClientEngagement
Select the engagement for whichyou want to create a backup file. N/A
MasterEngagement
Select themaster engagement forwhich you want to create abackup file.(Not available in SMART PracticeAids – Audit Essential)
N/A
Alt + F + B
Restore Restore an engagement from a backup. Alt + F + R
Finalize Finalize an engagement and change the engagement to a read-onlystatus. Alt + F + F
Reset to InProgress
Reset an engagement with a "Finalized" status to "In-Progress"which allows user modifications. Alt + F + I
Rollforward Create a new engagement based on a prior period engagement. Alt + F + W
Exit Exit the SMART Practice Aids application. Alt + F + X
Audit Essential Installed
Users who install SMART Practice Aids – Audit Essential and are licensed forSMART Practice Aids –Risk Assessment andSMART Practice Aids – Field Work, see the following additional option on the Filemenu.
Name Description Shortcut
Convert toSMART Practice AidsEngagement
Converts a SMART Practice Aids - Audit Essentialengagement to a full SMART Practice Aids engagement.
FILE MENU
- 26 -
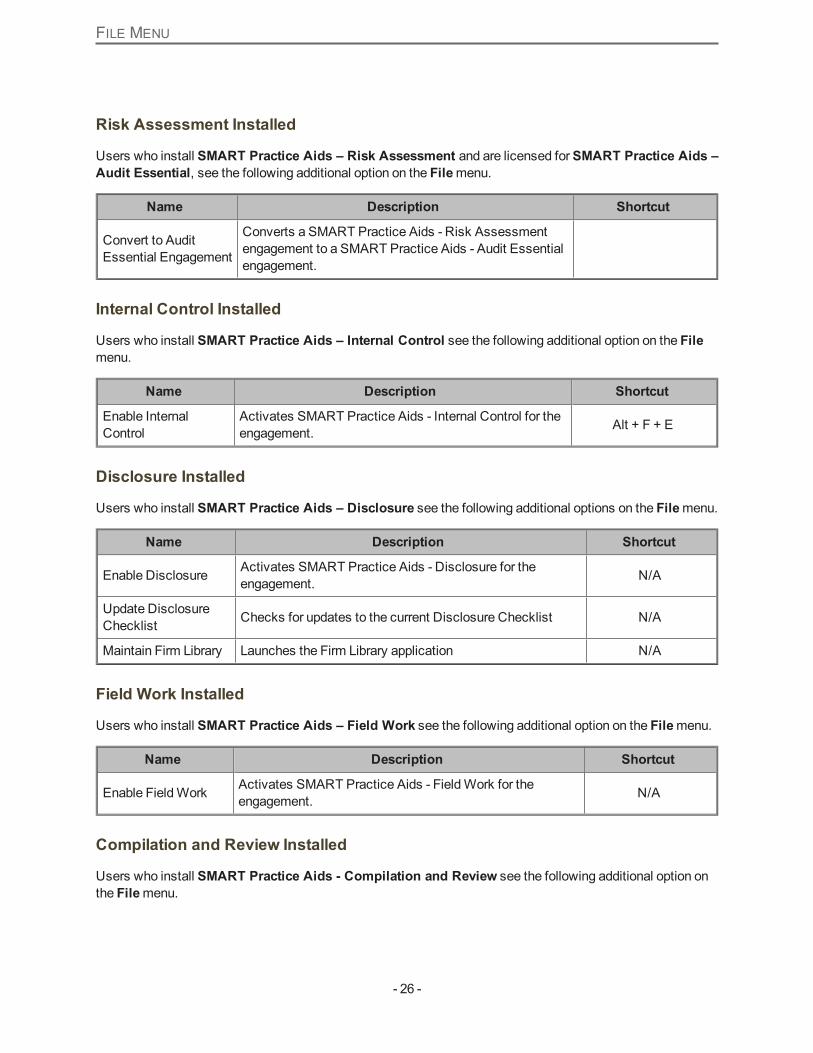
Risk Assessment Installed
Users who install SMART Practice Aids – Risk Assessment and are licensed forSMART Practice Aids –Audit Essential, see the following additional option on the Filemenu.
Name Description Shortcut
Convert to AuditEssential Engagement
Converts a SMART Practice Aids - Risk Assessmentengagement to a SMART Practice Aids - Audit Essentialengagement.
Internal Control Installed
Users who install SMART Practice Aids – Internal Control see the following additional option on the Filemenu.
Name Description Shortcut
Enable InternalControl
Activates SMART Practice Aids - Internal Control for theengagement. Alt + F + E
Disclosure Installed
Users who install SMART Practice Aids – Disclosure see the following additional options on the Filemenu.
Name Description Shortcut
Enable Disclosure Activates SMART Practice Aids - Disclosure for theengagement. N/A
Update DisclosureChecklist Checks for updates to the current Disclosure Checklist N/A
Maintain Firm Library Launches the Firm Library application N/A
Field Work Installed
Users who install SMART Practice Aids – Field Work see the following additional option on the Filemenu.
Name Description Shortcut
Enable FieldWork Activates SMART Practice Aids - FieldWork for theengagement. N/A
Compilation and Review Installed
Users who install SMART Practice Aids - Compilation and Review see the following additional option onthe Filemenu.

FILE MENU
- 27 -
Name Description Shortcut
Import DisclosureInformation Imports a disclosure checklist from another engagement N/A

EDIT MENU
- 28 -
Edit MenuThese options are available from theEditmenu on themainmenu bar.
Name Description Shortcut
Copy Copy the selected text. Alt + E + C
Paste Paste the selected text. Alt + E + P
Modify Edit a procedure, practical consideration, control, test procedure,objective, or exception. Alt + E + F
Delete Delete a custom procedure, category, control, test procedure,objective, or exception. Alt + E + D
Reset Procedure Reset a procedure to its original format and content. Alt + E + R
Edit Planning FormTitle/File Name Edit the name/file name of the selected form. (2007 and later titles) Alt + E + F
Insert Table Row Enabled when you are in a planning form that contains a table whereinserting/deleting table rows is supported. N/A
Delete Table Row Enabled when you are in a planning form that contains a table whereinserting/deleting table rows is supported. N/A
Smart EngagementSetup
Define general engagement options such as the included areas andfile properties (engagement name, client name). Alt + E + E
Deselect All Steps Deselects all steps in the center pane andmoves them to the rightpane. N/A
Disclosure Installed
Users who install SMART Practice Aids – Disclosure see the following additional option on theEditmenu.
Name Description Shortcut
Reset DisclosureItem Reset a disclosure item to its original format and text. N/A
Field Work Installed
Users who install SMART Practice Aids – Field Worksee the following additional options on theEditmenu.
Name Description Shortcut
WorkpaperProperties Opens Workpaper Properties. N/A
DeleteWorkpaper Deletes the current workpaper. N/A
Workpaper Sign-off Perform aworkpaper sign-off. N/A
VIEWMENU
- 29 -
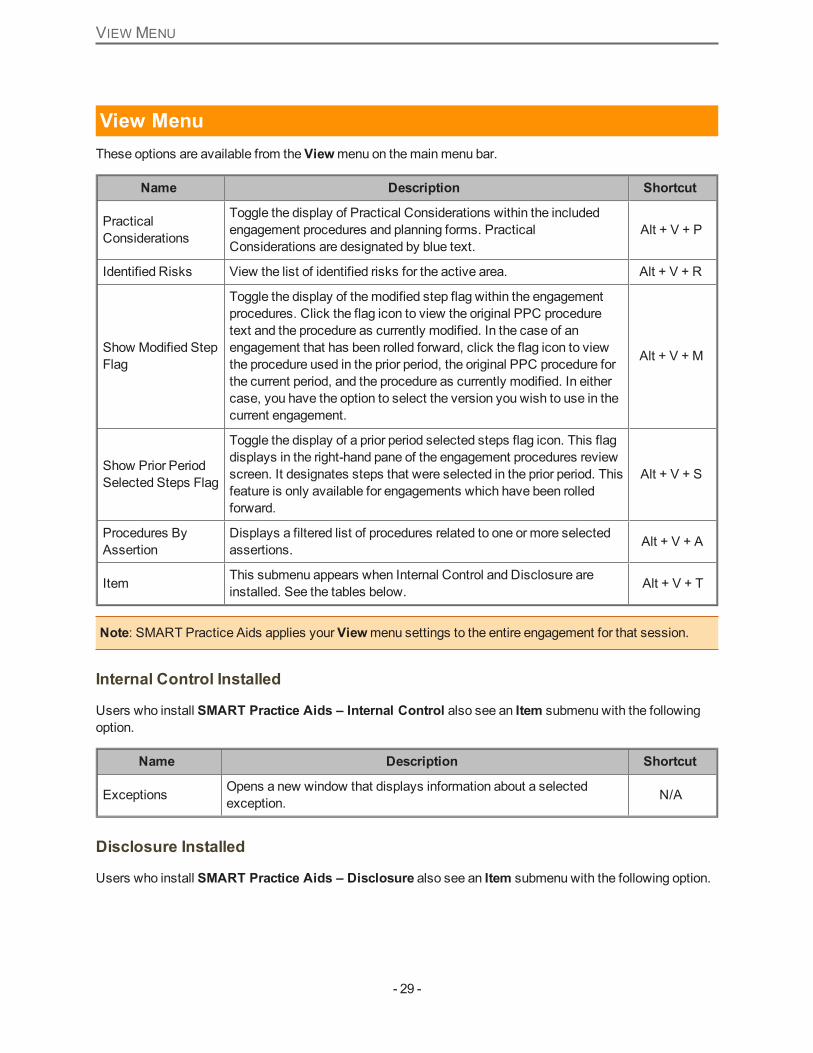
View MenuThese options are available from theViewmenu on themainmenu bar.
Name Description Shortcut
PracticalConsiderations
Toggle the display of Practical Considerations within the includedengagement procedures and planning forms. PracticalConsiderations are designated by blue text.
Alt + V + P
Identified Risks View the list of identified risks for the active area. Alt + V + R
Show Modified StepFlag
Toggle the display of themodified step flag within the engagementprocedures. Click the flag icon to view the original PPC proceduretext and the procedure as currently modified. In the case of anengagement that has been rolled forward, click the flag icon to viewthe procedure used in the prior period, the original PPC procedure forthe current period, and the procedure as currently modified. In eithercase, you have the option to select the version you wish to use in thecurrent engagement.
Alt + V + M
Show Prior PeriodSelected Steps Flag
Toggle the display of a prior period selected steps flag icon. This flagdisplays in the right-hand pane of the engagement procedures reviewscreen. It designates steps that were selected in the prior period. Thisfeature is only available for engagements which have been rolledforward.
Alt + V + S
Procedures ByAssertion
Displays a filtered list of procedures related to one or more selectedassertions. Alt + V + A
Item This submenu appears when Internal Control and Disclosure areinstalled. See the tables below. Alt + V + T
Note: SMART Practice Aids applies yourViewmenu settings to the entire engagement for that session.
Internal Control Installed
Users who install SMART Practice Aids – Internal Control also see an Item submenu with the followingoption.
Name Description Shortcut
Exceptions Opens a new window that displays information about a selectedexception. N/A
Disclosure Installed
Users who install SMART Practice Aids – Disclosure also see an Item submenu with the following option.

VIEWMENU
- 30 -
Name Description Shortcut
Disclosure Note Opens a new windows that displays information about a selectedDisclosure Note. N/A
Field Work Installed
Users who install and enableSMART Practice Aids – Field Work for their audit engagement see thefollowing additional option on theViewmenu.
Name Description Shortcut
SMART AuditProgram Design
Allows you to filter your audit program to display only auditprocedures, identified risks, and risk assessments related to one ormore selected assertions. The purpose is to help you isolate risks andaudit procedures for one or more assertions, helping you ensure thatyou are not over-auditing or under-auditing the assertion. You can viewidentified risks and edit audit program procedures in this view.
N/A

INSERT MENU
- 31 -
Insert MenuThese options are available from the Insertmenu on themainmenu bar.
Name Description Shortcut
Procedure AboveInsert a custom procedure above the highlighted text. Use this to defineyour own procedures and objectives. Highlight a procedure or partialtext in the center pane to activate this option.
Alt + I + P
Procedure BelowInsert a custom procedure below the highlighted text. Use this to defineyour own procedures and objectives. Highlight a procedure or partialtext in the center pane to activate this option.
Alt + I + R
Category AboveInsert a new procedure category above the highlighted text. Use this toadd custom procedure categories into your program. Highlight aprocedure or partial text in the center pane to activate this option.
Alt + I + C
Category BelowInsert a new procedure category below the highlighted text. Use this toadd custom procedure categories into your program. Highlight aprocedure or partial text in the center pane to activate this option.
Alt + I + A
Add Forms Addmultiple copies of forms to an engagement. (2007 and later titles)
Remove Form Remove a form from an engagement. (2007 and later titles)
Internal Control Installed
Users who install SMART Practice Aids – Internal Control see the following additional option on the Insertmenu.
Name Description Shortcut
Add Exception Specify a new exception to be added to the Exception Summary form. N/A
Disclosure Installed
Users who install SMART Practice Aids – Disclosure see the following additional options on the Insertmenu.
Name Description Shortcut
AddNew Note Add a new note to the selected disclosure topic. N/A
Topic Above Add a new topic above the selected disclosure topic. N/A
Topic Below Add a new topic below the selected disclosure topic. N/A
Topic Child Add a child topic to the selected disclosure topic. N/A
RequirementAbove Add a new disclosure requirement above the selected requirement. N/A
Requirement Add a new disclosure requirement below the selected requirement. N/A

INSERT MENU
- 32 -
Name Description Shortcut
Below
RequirementChild Add a child disclosure requirement to the selected requirement. N/A
Field Work Installed
Users who install SMART Practice Aids – Field Work see the following additional option on the Insertmenu.
Name Description Shortcut
Review NoteDocument
Opens Checkpoint Tools for PPC, where you can select a document fromthe list. N/A
Add Document
The Add Document submenu has the following options.
Name Description
PPC FormsOpens the Add PPC Formswindow, where you can add formsto the engagement.
External DocumentOpens theWindows Open window,where you can browse to select anexternal document.
Checkpoint Tools Document
Opens Checkpoint Tools for PPC,where you can select a PPCPractice Aids document from thelist.
Manual Document
Opens theWorkpaper Propertieswindow, where you can create aworkpaper as a document inSMART Practice Aids.
New Word Document
Opens theWorkpaper Propertieswindow, where you can create aworkpaper as a document inMicrosoft Word.
New Excel Document
Opens theWorkpaper Propertieswindow, where you can create aworkpaper as a document inMicrosoft Excel.
N/A
TOOLS MENU
- 33 -
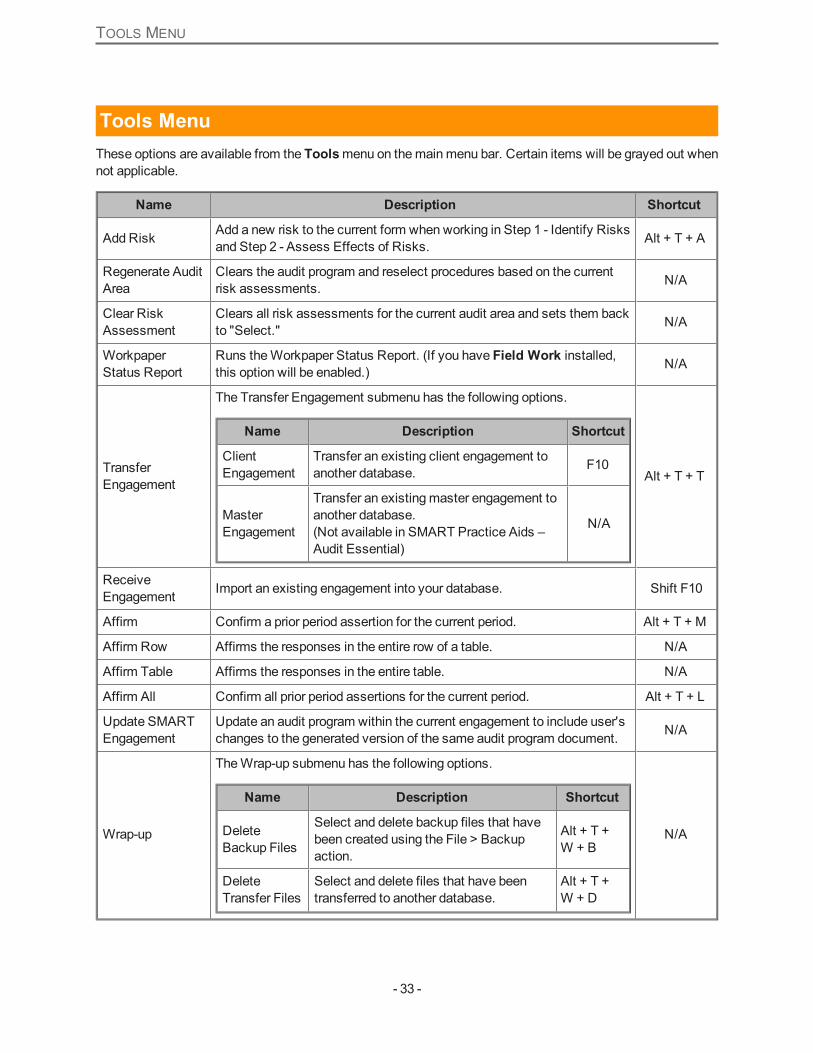
Tools MenuThese options are available from the Toolsmenu on themainmenu bar. Certain items will be grayed out whennot applicable.
Name Description Shortcut
AddRisk Add a new risk to the current form when working in Step 1 - Identify Risksand Step 2 - Assess Effects of Risks. Alt + T + A
Regenerate AuditArea
Clears the audit program and reselect procedures based on the currentrisk assessments. N/A
Clear RiskAssessment
Clears all risk assessments for the current audit area and sets them backto "Select." N/A
WorkpaperStatus Report
Runs theWorkpaper Status Report. (If you have Field Work installed,this option will be enabled.) N/A
TransferEngagement
The Transfer Engagement submenu has the following options.
Name Description Shortcut
ClientEngagement
Transfer an existing client engagement toanother database. F10
MasterEngagement
Transfer an existingmaster engagement toanother database.(Not available in SMART Practice Aids –Audit Essential)
N/A
Alt + T + T
ReceiveEngagement Import an existing engagement into your database. Shift F10
Affirm Confirm a prior period assertion for the current period. Alt + T + M
Affirm Row Affirms the responses in the entire row of a table. N/A
Affirm Table Affirms the responses in the entire table. N/A
Affirm All Confirm all prior period assertions for the current period. Alt + T + L
Update SMARTEngagement
Update an audit program within the current engagement to include user'schanges to the generated version of the same audit program document. N/A
Wrap-up
TheWrap-up submenu has the following options.
Name Description Shortcut
DeleteBackup Files
Select and delete backup files that havebeen created using the File > Backupaction.
Alt + T +W + B
DeleteTransfer Files
Select and delete files that have beentransferred to another database.
Alt + T +W + D
N/A

TOOLS MENU
- 34 -
Name Description Shortcut
Name Description Shortcut
Clear UnusedData Select and delete unnecessary data. Alt + T +
W + C
Options
TheOptions submenu has the following options.
Name Description Shortcut
FileLocations
Define default file locations for engagementbackups, transferred engagements, andgenerated Practice Aids.
Alt + T +O + F
ContentSettings
Set the location of referencematerials such asPPC Guidance and Checkpoint.
Alt + T +O + S
Point toDifferentDatabase
Change the database for your PPC's SMARTPractice Aids client.
Alt + T +O + P
Point toFirmLibraryDatabase
Set the database to use for loading your firmlibraries. (If you have the Disclosuremoduleinstalled, this option will be available.)
N/A
ApplicationSettings
Change your user name; remove practicalconsiderations; set multi-user options.
Alt + T +O + A
Alt + T + O
Access From Virtual Office CS
When you access SMART Practice Aids from Virtual Office CS, the followingmenu options becomeavailable on the Tools menu under theVO Options submenu. Thesemenu options are available only fromthe Virtual Office-launched version.
Name Description Shortcut
Set/Update LoginInformation
Set up initial login or update existing logininformation. N/A
Refresh ProductList
Refresh list of licensed product titles to ensureavailability via Virtual Office CS. N/A

HELP MENU
- 35 -
Help MenuThese options are available from theHelpmenu on themainmenu bar.
Name Description Shortcut
Smart PracticeAids Help Access the online help system. Alt + H + H
Quick Tour Launch the SMART Practice Aids multimedia tutorial. Alt + H + T
Documentation Access the SMART Practice Aids Documentation launch page on theCustomer Knowledgebase. Alt + H + D
Support on theWeb
Access the SMART Practice Aids Product Support page on theCustomer Help CenterWeb site. Alt + H + S
Frequently AskedQuestions
Access the SMART Practice Aids – Frequently AskedQuestionspage on the Customer Help CenterWeb site. Alt + H + F
SMART StartInformation
Find out more about SMART Start, which allows you to create yourengagement with a pre-populated set of planning content tailored for asmall, non-complex entity.
Alt + H + I
Reset All Tips Re-enable the "How to" and Navigational Tips if they have beendisabled. Alt + H + R
About View the Smart Practice Aids version and license information. Alt + H + A

INTERNAL CONTROLMENU
- 36 -
Internal Control MenuIf you have installedSMART Practice Aids – Internal Control, you will see special menu bar on specificInternal Control forms.
In the Understand Controls and Evaluate Design forms (Control Environment, Risk Assessment, Informationand Communication, Monitoring), you can click links to access the Entity-Level Control Form and ControlActivities Form. Both of these forms havemenus you can use for various Internal Control activities.
The Internal Control Editmenu contains the following options.
Name Description Shortcut
Modify Edit the description and related objectives for a selected control. Alt + E
Delete Delete custom objectives or custom controls. Alt + E
Assign TestProcedures Assign test procedures for a control. Alt + E
Reset Control Reset a control to its original format and content. Alt + E
The Internal Control Viewmenu contains the following options.
Name Description Shortcut
Objective Attributes Opens a new window that displays information about a selectedobjective. Alt + V
Control Attributes Opens a new window that displays information about a selectedcontrol. Alt + V
The Internal Control Insertmenu contains the following options.
Name Description Shortcut
AddObjective Specify a new objective to be added to a list of process levelcontrols or general computer controls. Alt + I
Add Control Specify a new control to be added to a list of controls. Alt + I

GENERAL NAVIGATION
- 37 -
General NavigationSMART Practice Aids uses an easy-to-navigate three-pane design. Take a few minutes to get familiar withthe names of the interface features. This will help you better understand the Help's step-by-step proceduresthat show you how to use SMART Practice Aids.
Navigation Pane
You can hide or display theNavigation pane and right pane using the "pin" icons that appear at the top of thepanes.

ABOUT THE TOOLBAR
- 38 -
About the ToolbarThe SMART Practice Aids toolbar lets you quickly access basic Windows tools, as well as tools specific tothe SMART Practice Aids application.
Click to create a new engagement.
Click to open an engagement.
Click the save an engagement.
Click to copy text.
Click to paste text.
Click to access the SMART Practice Aids Help.
Click to remove highlighting for the currently selected item.
Click to remove highlighting for the entire (active) form.
Click to open the "How to" & Navigational Tipswindow for the form you are currentlyviewing.
Click to update your copy of the engagement with saved changes from all other users inamulti-user environment.
Click to access theCheckpoint login window.
Click to see your engagement's status at a glance for the overall engagement and foreach audit area, including audit program steps not yet started, in progress, orcompleted. (FieldWork module)
Click to access a feature that guides you through the PPC engagement process in themost efficient manner. It also provides a visual status of each step in the engagement.(FieldWork module)
Click to launch the Internal Control interactive flowchart that provides an overview ofhow to apply a top-down, risk-based approach when evaluating internal control overfinancial reporting as part of a financial statement audit of a nonpublic entity. This optionappears on the toolbar only when you are viewing an Internal Control form.
Enable the Full Navigation PaneIf you indicate during engagement setup that you plan to use external engagement management software tomanage your engagement, SMART Practice Aids assumes that you will access documents in SMARTPractice Aids through your engagement management software. Thus, theNavigation pane in SMARTPractice Aids is disabled.

ENABLE THE FULL NAVIGATION PANE
- 39 -
However, to provide you with maximum flexibility, you have the option of enabling full Navigation panefunctionality, which allows you to easily view workpapers in the engagement. This will not affect the way inwhich SMART Practice Aids interacts with your engagement management software.
To enable the full Navigation pane functionality at any time, click Enable Full Navigation on theViewmenu.

"HOW TO" AND NAVIGATIONAL TIPS
- 40 -
"How To" and Navigational TipsWhen you first open certain SMART Practice Aids forms, the "How to" & Navigational Tips window opens,with helpful information specific to the section in which you are working.
The "Show tips" options at the bottom of the window let you control when the window appears:
l If you clear theShow tips for this section check box, the tip information that is currently displayedwill no longer appear during the current or future work sessions. Tips that appear in other sections arenot affected.
l If you clear theShow tips for all sections check box, this feature is disabled throughout all sectionsduring the current or future work sessions. No tips will appear.
Display Tips Any Time
You can display the tips at any time for any section in SMART Practice Aids. Click View Tip on the tool bar toopen the "How to" & Navigational Tipswindow for the section you are currently viewing.
To re-enable the tips for all sections, select Reset All Tips from theHelpmenu.

ABOUT ENGAGEMENT SETUP QUESTIONS
- 41 -
About Engagement Setup Questions
Note: For a discussion of setup questions for an engagement created with practice aids titles releasedNovember 2011 and later, see the SMART Engagement Setup Questions topic.
When setting up a new engagement in SMART Practice Aids, youmust provide the client name, anengagement name, and select a practice aid title in the Create Client Engagement window. The practice aidtitle that you select determines which setup questions appear in the remainder of the engagement setup.Setup questions determine which engagement procedures are selected and, in certain cases, which auditareas (or financial statement areas) are included.

INITIAL AUDIT SETUP QUESTION
- 42 -
Initial Audit Setup Question
Note: For a discussion of setup questions for an engagement created with practice aids titles releasedNovember 2011 and later, see the SMART Engagement Setup Questions topic.
The question "Is this an initial audit?" always appears on the Create Client Engagement window when youcreate a new engagement, regardless of the practice aid title selected.
The answer to this question determines whether the initial audit steps are included with the steps for eachaudit area. Initial audit steps are generally performed the first year or first time that the auditor performs anaudit for a company. The default answer is No.
If You Answer Yes
If you answerYes, the initial steps appear in the center pane for the audit areas on theReview and ModifyAudit Programswindow. The initial steps appear grayed out in theAll Audit Procedures pane on the rightto indicate that these steps are already included in the audit program.
Click to see an example of the initial steps in the center pane.

INITIAL AUDIT SETUP QUESTION
- 43 -
If You Answer No
If you answerNo to the initial audit question, the initial steps appear only in theAll Audit Procedures paneon the right. The steps are not grayed out, indicating that they are available for selection. You have the optionof dragging the steps to the center pane for use in the audit.
Click to see an example of the initial steps in the right pane.

SINGLE AUDIT AND YELLOW BOOK SETUP QUESTIONS
- 44 -
Single Audit and Yellow Book Setup Questions
Note: For a discussion of setup questions for an engagement created with practice aids titles releasedNovember 2011 and later, see the SMART Engagement Setup Questions topic.
Additional setup questions regarding single audits and Yellow Book appear on the Create Client Engagementwindow only when you select the following practice aid titles:
l Audits of Local Governments
l Audits of Nonprofit Organizations
l HUD Audits
If You Select Yes
SelectingYes to the first question "DoOMB Circular A-133 (Single Audit) requirements apply to thisengagement?" causes the answer to the second question “DoGovernment Auditing Standards (Yellow Book)apply to this engagement?” to default automatically toYes.
When you select Yes in response to the single audit question, specific audit procedures are included in theengagement. These audit procedures are not as identifiable under a category as are initial audit procedures.An auditor selecting this option should have knowledge of the government requirements regarding audits offederal awards administered by non-federal entities. These procedures aremore stringent in nature than a non-single audit engagement.
In addition, another audit area, Audit of Federal Award Programs, is added to the engagement. This audit areaappears only under theReview & Modify Audit Programs step. Risks cannot be added to this audit area.(The Audit of Federal Award Programs audit area does not appear when you select No.)
When you select Yes to the single audit question, the yellow book audit procedures (procedures based onGovernment Auditing Standards) are included in the engagement. Again, they are not identifiable in theengagement as are initial audit procedures.
If You Select No
If you select No to the single audit question, you will have the option to add the yellow book audit proceduresmanually.

SINGLE AUDIT AND YELLOW BOOK SETUP QUESTIONS
- 45 -
Note: A HUD engagement shows only the single audit question. However, when you select Yes to thisquestion, the yellow book procedures are automatically included along with single audit procedures.

EMPLOYEE BENEFIT PLANS (EBP) SETUP QUESTIONS
- 46 -
Employee Benefit Plans (EBP) Setup Questions
Note: For a discussion of setup questions for an engagement created with practice aids titles releasedNovember 2011 and later, see the SMART Engagement Setup Questions topic.
Additional questions appear on the Create Client Engagement window when you select the practice aid titleAudits of Employee Benefit Plans.
What type of employee benefit plan does this engagement cover?
The default answer to this question is Defined Contribution Plan. Selecting a plan determines which auditprocedures will be included in the engagement.
Is the engagement a DOL limited-scope audit?
SelectingYes to the limited-scope question provides certain audit areas that contain different auditprocedures than full scope audits. The limited scope audit areas are:
l Investments and Related Income –DOL Limited-scope Audit
l Contracts Insurance Companies and Similar Institutions – DOL Limited-scope Audit
If you select No to the limited-scope question, the engagement includes:
l Investments and Related Income – Full-scope Audit
l Contracts Insurance Companies and Similar Institutions – Full-scope Audit
Do you need to obtain a service auditor’s SAS 70 report for this engagement?
SelectingYes to this question places an audit area entitled Service Auditor’s SAS 70Reports into the leftnavigation pane under the Review andModify Audit Programs step.

EMPLOYEE BENEFIT PLANS (EBP) SETUP QUESTIONS
- 47 -
This audit area does not allow the addition of risks and so is not available under the Assess Effects of Risksstep. All audit steps for this audit area are selected in themiddle content pane by default.
If you select No to this question, the Service Auditor’s SAS 70Reports audit area does not appear in theengagement.

PCAOB INTERIM REVIEW ENGAGEMENT QUESTION
- 48 -
PCAOB Interim Review Engagement Question
Note: For a discussion of setup questions for an engagement created with practice aids titles releasedNovember 2011 and later, see the SMART Engagement Setup Questions topic.
When setting up aPCAOB engagement, in addition to the initial audit question, you need to answer thequestion “Is this an interim review engagement?”
If You Select Yes
If you select Yes, a message appears stating “Selecting interim review engagement will create anengagement containing only the disclosure checklist for Interim Disclosure Requirements for FinancialStatements of Issuers.” Selection of any other checklists is disabled.
If You Select No
If you select No, selection of non-interim checklists is available. Only one of the non-interim checklists maybe selected.
Note that Help me decide links are available to assist you with selection of the checklists.

SETTING UP AN EMPLOYEE BENEFIT PLAN (EBP) ENGAGEMENT
- 49 -
Setting Up an Employee Benefit Plan (EBP) EngagementAdditional questions appear on the Create Client Engagement window when setting up an Employee BenefitPlan (EBP).
When setting up an Employee Benefit Plan engagement, your selection of the employee benefit plan typedetermines the included audit areas, which the system will add automatically.
Select a Disclosure ChecklistWhile answering questions regarding theDisclosuremodule on the Create Client Engagement window, whenyou select a title that offers a selection of checklists, the question “Select the disclosure checklist type youwish to use in this engagement” is displayed, along with a list of checklists from which to choose. Youmayselect only one checklist.
To assist you in selecting a checklist, aHelp me decide link is displayed to the right of the checklist.Clicking this link displays helpful information about the checklist.

ABOUT ENGAGEMENTS
- 50 -
About EngagementsFor new engagements in SMART Practice Aids, you can create a regular engagement or a SMART Startengagement, depending on the practice aids titles you have installed. You can also create a regular masterengagement or a SMART Start master engagement. See the SMART Engagement Setup and SMART Starttopic for overview information on the SMART Start features.
One of the first tasks in creating a client engagement is to determine whether you want to create theengagement from a blank template or from amaster engagement template.
Once an engagement is created, it can be edited, transferred, or received. You can also back up, delete,restore, and finalize an engagement.
Click the following links to see step-by-step instructions for these tasks:
l Create a client engagement
l Create a SMART Start client engagement
l Create amaster engagement
l Create a SMART Start master engagement
l Open a saved engagement
l Edit engagement setup and view engagement properties
l Transfer an engagement
l Receive an engagement
l Back up an engagement
l Restore an engagement
l Delete engagements and clients
l Finalize engagements
l Enablemodules in existing engagements
l Update SMART Engagement

SMART START AND SMART ENGAGEMENT SETUP
- 51 -
SMART Start and SMART Engagement SetupPractice Aids titles that contain SMART Start data and/or SMART engagement setup questions provide:
l A new level of efficiency for audits of less complex entities
l A more efficient way of documenting the entity's controls over financial reporting
l Ability to filter out unnecessary information
After selecting a SMART Start practice aids title, you will see a new option on the Create Client Engagementwindow and CreateMaster Engagement window calledUse SMART Start?.
Note: Click theHelp me decide link for a summary of benefits, cautions, and other considerationsregarding using SMART Start.
l If you select Yes, you finish creating the engagement, and then the SMART Engagement SetupQuestions form is listed as the first form in the Navigation pane, and the form automatically opens inthe Content pane.
l If you select No, you complete your setup options, answer the SMART Engagement SetupQuestions in the Create Client Engagement window, and then finish creating the engagement.
The system automatically tailors your practice aids and audit programs based on your answers to the SMARTEngagement Setup questions.
Create a Client EngagementPPC’s SMART Practice Aids® is an innovative tool that brings advanced functionality to your licensed PPC’sPractice Aids products to optimize the overall engagement process.
You can create a client engagement from aPPC Title or from aMaster Engagement.
l Creating an engagement from a PPC Title creates a blank engagement based on the PPC title youselect.
l Creating an engagement from aMaster Engagement imports any information from the previouslygeneratedmaster engagement into the new client engagement.

CREATE A MASTER ENGAGEMENT
- 52 -
Create a Master Engagement
This topic covers the steps for creating a regular master engagement. To create a SMART Start masterengagement, see the Create a SMART Start Master Engagement topic.
Master engagements allow firms to use template engagements that are created andmaintained by the firm.Typically, when a firm chooses to createmaster engagements, staff are instructed to create new clientengagements based on the applicable master engagement rather than a PPC Tools title. Information the firmenters in themaster engagement is automatically inserted in the new client engagement.
When rolling forward a prior-period engagement, you have the option of merging the prior-period clientengagement with a selectedmaster engagement, as described in theMerge a Client Engagement with aMaster Engagement topic. This allows you to effectively usemaster engagements without losing thedocumentation you created in the prior-period engagement.
Note: Refer to the Engagement Setup Questions topics for helpful information about the engagement setupoptions.
Note: SMART Audit Essential does not provide the option to create amaster engagement.
To create a new master engagement:
1. On the Filemenu, click New.
2. Click Master Engagement.
The CreateMaster Engagement window appears.

CREATE A MASTER ENGAGEMENT
- 53 -
3. Enter the appropriate master engagement information.
l Select the database. (Use theBrowse button to locate a remotemachine/database.)
l Enter themaster group name (or select the name from the drop-down list).
l Enter a name for themaster engagement.
l Enter the engagement date, or click Date to select from a calendar.
l Select an engagement type from the drop down. Depending on your selection of theengagement type, another drop downmay appear.

CREATE A MASTER ENGAGEMENT
- 54 -
Note: The Select Review Type drop-down comes with aHelp me decide link to help youdecide what review type to choose.
Similar to theSelect Review Type drop-down, aSelect Compilation Type drop-downappears if you select the Compilation engagement type.
l In case of the Review engagement type or Compilation engagement type, select a review typeor compilation type as appropriate.
4. Click Next.
5. On the next window, select a practice aid title for this engagement. (Only licensed and installedpractice aid titles are listed.)

CREATE A MASTER ENGAGEMENT
- 55 -
If you select a practice aids title with SMART Start data, youmay see an option ‘Use SMART Start?’which you can answer with ‘Yes’ or ‘No’. (The default is set to ‘No’.)
Note: Click theHelp me decide link for a summary of benefits, cautions, and other considerationswhen using SMART Start.
6. Select theSMART Practice Aidsmodules you want to include in themaster engagement.
Note: Risk Assessmentmust be selected along with Internal Control or Field Work, butDisclosure can be selected on its own if needed.
Themodules available to include in the engagement depend on the engagement type you choose (inStep 3), and the system automatically selects modules, disables modules or provides the ability toenablemodules based on the practice aid title you choose (in Step 5) for the engagement. For example,in a Review or Compilation engagement type, only Compilation and Review andDisclosuremodules are available.

CREATE A MASTER ENGAGEMENT
- 56 -
7. Answer the question for Engagement Management Software. You can click on the 'Helpme decide'link for more information. (See Engagement Setup Fieldwork.)
8. Click Next.
9. On the next window, select the areas to include in themaster engagement by selecting the appropriatecheck boxes in the Include column.

CREATE A MASTER ENGAGEMENT
- 57 -
Note: You can add a new area by entering the name in the field at the bottom of the window and thenclicking theAdd Area button. To delete an area, right-click the area name and then click DeleteArea.
10. Click Next.
11. Answer the setup questions displayed by selecting ‘Yes’ or ‘No’ as appropriate. Youmay click on the
‘Explain’ link to help you answer the question or click on the icon to add a comment. (See SMARTEngagement Setup Questions.)

CREATE A SMART START CLIENT ENGAGEMENT
- 58 -
12. Click Finish.
13. Complete any information you want to include in themaster engagement. Information added to thisengagement will be imported into any client engagements created using themaster.
Create a SMART Start Client EngagementIf you select practice aids titles with SMART Start data, you will see a new option on theCreate ClientEngagementwindow that lets you enable SMART Start, an audit process for small, noncomplex entities.
To create a SMART Start client engagement:
1. On the Filemenu, click New.
2. Click Client Engagement (from PPC Title).
3. On the next window select a practice aid title for this engagement. (Only installed practice aids titlesare listed.)
If you select a practice aids title with SMART Start data, youmay see a new option called "UseSMART Start?."

CREATE A SMART START CLIENT ENGAGEMENT
- 59 -
Note: Click theHelp me decide link for a summary of benefits, cautions, and other considerationswhen using SMART Start.
The system automatically selects the Risk Assessment module. Then it disables and deselects theInternal Control module and provides the ability to enable Disclosure and FieldWork.
Note: Themodules available to include in the engagement depend on the engagement type youchoose (in Step 3), and the system automatically selects modules, disables modules or provides theability to enablemodules based on the practice aid title you choose (in Step 5) for the engagement.
The system creates a new client engagement, populates the engagement with SMART Start content, opensthe engagement to the first planning form in the engagement, and places the SMART Engagement SetupQuestions report in the engagement as the first form in the planning area (immediately before IdentifiedRisks).
CREATE A SMART START MASTER ENGAGEMENT
- 60 -
Create a SMART Start Master Engagement
This topic covers the steps for creating a SMART Start master engagement. To create a regular masterengagement see the CreateMaster Engagement topic.
If you select a practice aids title with SMART Start data, you will see a new option on theCreate MasterEngagementwindow that lets you enable SMART Start, an audit process for small, noncomplex entities.
To create a SMART Start master engagement:
1. On the Filemenu, click New.
2. Click Master Engagement.
The CreateMaster Engagement window appears.
3. Enter the appropriate master engagement information.
l Select the database. (Use theBrowse button to locate a remotemachine/database.)
l Enter themaster group name (or select the name from the drop-down list).
l Enter a name for themaster engagement.
l Enter the engagement date, or click Date to select from a calendar.
l Select an engagement type from the drop down. Depending on your selection of theengagement type, another drop downmay appear.
Note: A Select Review Type drop-down appears if you select the Review engagement type and aSelect Compilation Type drop-down appears if you select the Compilation engagement type.
The Select Review Type drop-down comes with aHelp me decide link to help you decide whatreview type to choose.
l In case of the Review engagement type or Compilation engagement type, select a reviewtype or compilation type as appropriate.
4. Click Next.
5. On the next window select a practice aid title for this engagement. (Only installed practice aid titlesare listed.)
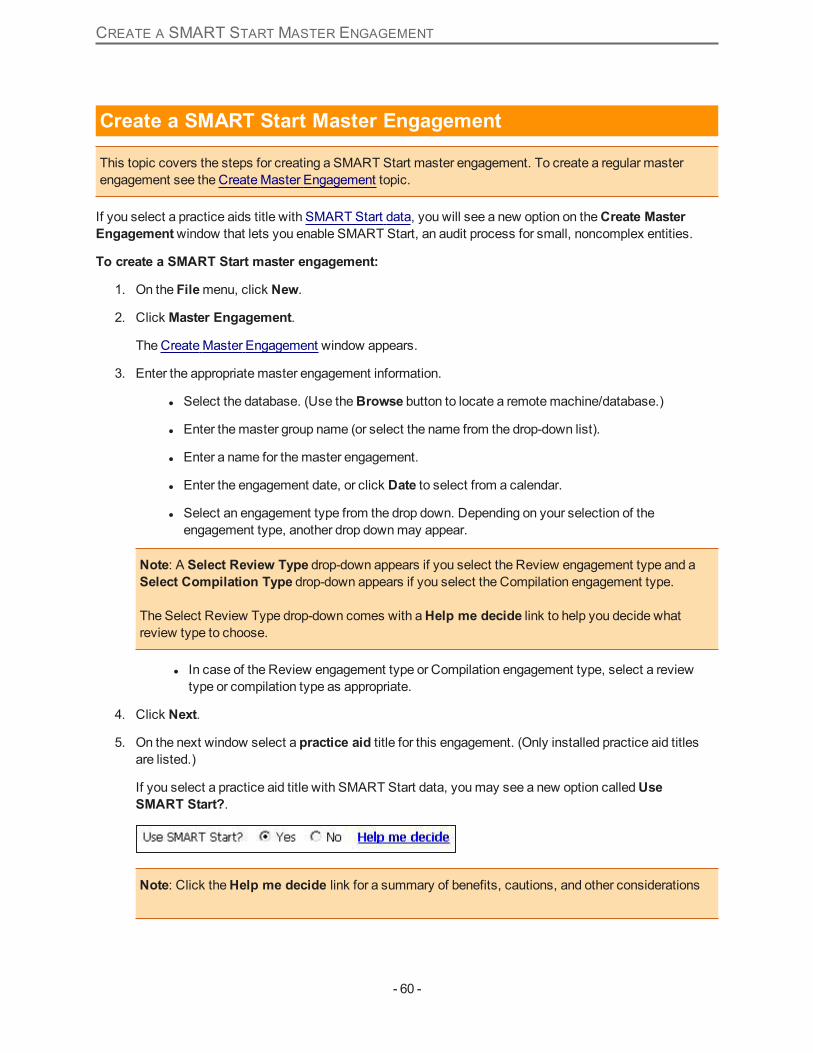
If you select a practice aid title with SMART Start data, youmay see a new option calledUseSMART Start?.
Note: Click theHelp me decide link for a summary of benefits, cautions, and other considerations
CREATE A SMART START MASTER ENGAGEMENT
- 61 -
when using SMART Start.
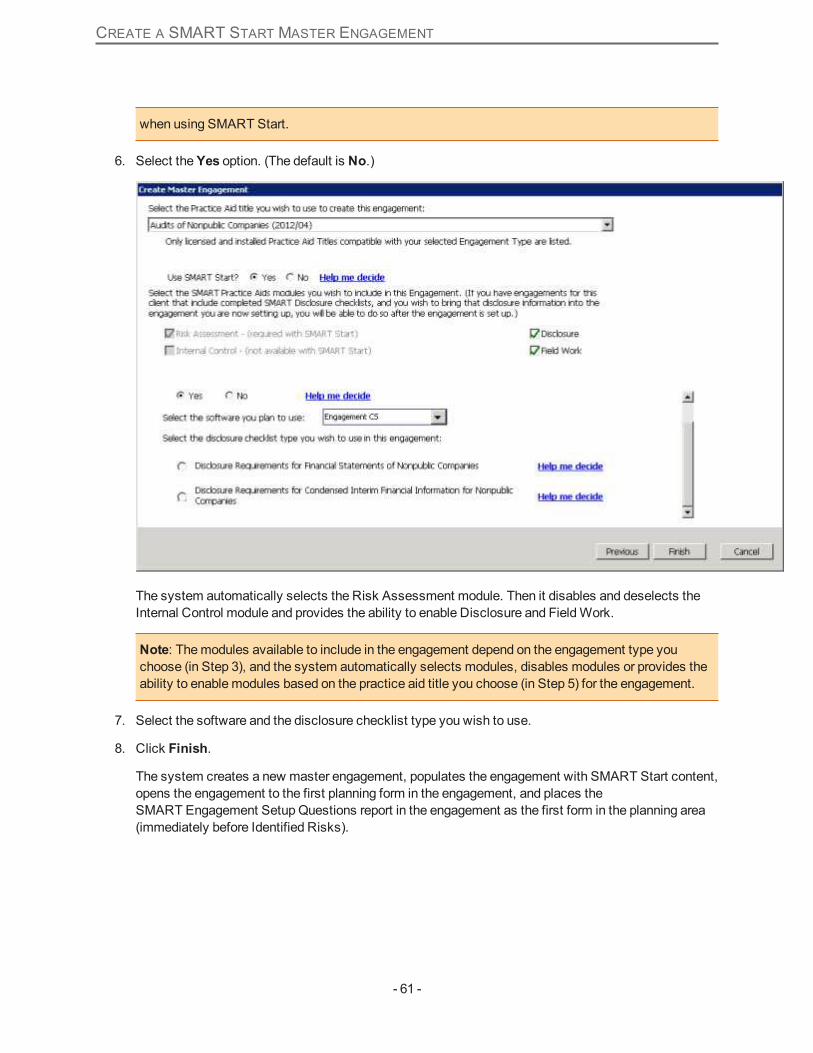
6. Select theYes option. (The default is No.)
The system automatically selects the Risk Assessment module. Then it disables and deselects theInternal Control module and provides the ability to enable Disclosure and FieldWork.
Note: Themodules available to include in the engagement depend on the engagement type youchoose (in Step 3), and the system automatically selects modules, disables modules or provides theability to enablemodules based on the practice aid title you choose (in Step 5) for the engagement.
7. Select the software and the disclosure checklist type you wish to use.
8. Click Finish.
The system creates a new master engagement, populates the engagement with SMART Start content,opens the engagement to the first planning form in the engagement, and places theSMART Engagement Setup Questions report in the engagement as the first form in the planning area(immediately before Identified Risks).

OPEN A SAVED ENGAGEMENT
- 62 -
Open a Saved EngagementYou can open any saved engagement from the Filemenu.
To open a saved client engagement:
1. On the Filemenu, click Open, and then click Client Engagement.
TheOpen Client Engagement window appears.
2. Select the database, client name, and engagement name that you want to open.
3. Click Open.
To open a saved master engagement:
1. On the Filemenu, click Open, and then click Master Engagement.
TheOpenMaster Engagement window appears.
2. Select the database, client name, and engagement name that you want to open.
3. Click Open.

EDIT ENGAGEMENT SETUP AND VIEW ENGAGEMENT PROPERTIES
- 63 -
Edit Engagement Setup and View Engagement PropertiesOnce you create an engagement, you can edit the setup or view the engagement properties.
To edit an engagement setup and view engagement properties:
1. Open the engagement inSMART Practice Aids.
2. On theEditmenu, click SMART Engagement Setup.
The Smart Engagement Setup window appears.
3. Click any of the tabs to view the engagement properties. (The tabs that appear on this window aredependent on themodules enabled in the engagement and the practice aid title used in theengagement.)
l Use theAudit Areas (or Financial Statement Areas) tab (available in the Risk Assessmentmodule only) to select the areas to include in the engagement by selecting the Include? columncheck box next to each title.
l Use theSetup Questions tab (available in engagements with practice aid titles that containSMART Engagement Setup Questions) to edit your answers to the SetupQuestions.
l TheProperties tab contains general information about the engagement, such as client nameand engagement name, status, date and time the file was last modified, and what modules areenabled. This information is not editable.
l Use the Locations tab (available in the Internal Control module only) to edit or change thelocations for an Internal Control enabled engagement.
4. On theAudit Areas (or Financial Statement Areas) tab, click the Edit button to add or delete areas.
5. On theSetup Questions tab, click the Edit button if you need to change your answers to the SMARTEngagement Setup Questions.
6. On the Locations tab, you can add a new location by typing the new location name in the field and thenclicking the Add Location button.
7. On theProperties tab, you can edit the client name, the engagement name, or the engagement date.
8. Click OK to save changes and close the window.
Transfer an EngagementYou can transfer a SMART Practice Aids engagement to other users using the Transfer Engagement tool.
To transfer an engagement:
1. On the Toolsmenu, click Transfer Engagement.
The Transfer Engagement window appears.
2. Select the database and client name for the engagement.

TRANSFER AN ENGAGEMENT
- 64 -
3. Select the engagement name you want to transfer.
4. Click Next.
5. On the next window, enter a name for the engagement transfer file.
6. Select theRead-Only check box to create a read-only copy of the engagement file.
Note: With Read-Only selected, other users will be able to review, but not edit the engagement. IfRead-Only is not selected, the engagement file is live andmay be edited by other users.
7. Enter the full path to the folder where you want to save the transfer file. Use theBrowse button tolocate the folder.
8. Select the Transfer by e-mail check box to attach the transfer file to an e-mail message.
9. Click Finish to complete the transfer.
Files Created with the Transfer Engagement Tool
Live engagement files (created with Read-Only not selected) differ from ReadOnly engagement files in twoways:
l Live files have a filename extension of sprtl, while read-only files have a filename extension of sprtr.
l The two file types also are represented by unique icons.
Delete Transfer Files
To delete a file created with the Transfer Engagement tool:
1. On the Toolsmenu, clickWrap-up.
2. From theWrap-up submenu, click Delete Transfer Files.
3. Browse to the folder that contains the file you want to delete.
TheDelete Transfer Fileswindow appears.
4. Select the check boxes next to the transfer files you want to delete.
5. Click Delete.

RECEIVE AN ENGAGEMENT
- 65 -
Receive an EngagementYou can receive a SMART Practice Aids engagement that another user has exported using the TransferEngagement tool. Received engagements can be edited and reviewed in SMART Practice Aids.
To receive an engagement:
1. On the Toolsmenu. click Receive Engagement.
The Receive Engagement window appears.
2. Enter the full path to the folder where the transferred engagement file is located. Use theBrowsebutton to locate the folder.
3. Select theOpen engagement when the receive process is complete check box to view theengagement in SMART Practice Aids when the receive process is complete.
4. Click Receive.
Once the receive operation has completed, you are prompted with the option to delete the transfer file.
Note: For most purposes, the transfer file is no longer needed once the engagement is successfullyreceived. ClickingYes safely cleans up the unneeded file without affecting the received engagement.You could also delete a transfer file later using Tools > Wrap-up > Delete Transfer Files.
5. Click Yes to delete the transfer file orNo to keep the file.

BACK UP AN ENGAGEMENT
- 66 -
Back Up an EngagementWhen necessary, you can back up an engagement in SMART Practice Aids using the Filemenu. Dependingon whether you are backing up a client engagement or amaster engagement, refer to the followingprocedures.
Note: An engagement must be closed before the engagement can be backed up.
Back Up a Client Engagement
1. On the Filemenu, click Backup.
2. On theBackup submenu, click Client Engagement.
The Backup Engagement window appears.
3. Select the engagement you want to back up.
4. Click Next.
Note: If you have the engagement open, you will see amessage telling you the engagement must beclosed before it can be backed up. You have the option to click Yes to close the engagement.
5. On the next window, enter a name for the backup file (the file extension is .sprb).
6. Enter the full path to the folder where you want the engagement backup file saved. Use theBrowsebutton to locate the folder.
7. Click Finish.
Back Up aMaster Engagement
1. On the Filemenu, click Backup.
2. On theBackup submenu, click Master Engagement.
The BackupMaster Engagement window appears.
3. Select themaster engagement you want to back up.
4. Click Next.
Note: If you have themaster engagement open, you will see amessage telling you the engagementmust be closed before it can be backed up. You have the option to click Yes to close themasterengagement.
5. On the next window, enter a name for the backup file (the file extension is .spmb).
6. Enter the full path to the folder where you want the engagement backup file saved. Use theBrowsebutton to locate the folder.
7. Click Finish.
Delete a Backup File

BACK UP AN ENGAGEMENT
- 67 -
1. On the Toolsmenu, clickWrap-up.
2. From theWrap-up submenu, click Delete Backup Files.
TheDelete Backup Fileswindow appears.
3. Select the check boxes next to the backup files you want to delete.
4. Click Delete.

RESTORE AN ENGAGEMENT
- 68 -
Restore an EngagementWhen necessary, you can restore a backed up engagement in SMART Practice Aids using the Filemenu.
To restore a backed up engagement:
1. On the Filemenu, click Restore.
The Restore Engagement window appears.
2. Use theBrowse button to navigate to the folder where you stored the backup file.
3. Select the engagement you want to restore.
4. Click Open.
TheRestore Engagementwindow appears.
5. Optionally, you can select theOpen engagement when the restore process is complete check boxto have the engagement automatically open when restored.
6. Click Restore.
If a matching engagement name already exists, you will get the following conflict message:
"A matching engagement already exists. Restoring this engagement will overwrite the existingengagement. Please compare the engagement properties above to determine if you want to overwritethe existing engagement. Select 'Restore' to proceed and overwrite the existing engagement. Select'Cancel' to stop restoring the engagement."
7. Click Restore to restore the engagement and overwrite the existing engagement.
A confirmationmessage appears stating that the engagement was successfully restored. Themessage also asked if you would like to delete the backup file.
8. Click Yes to delete the backup file orNo to keep the file.
If you selected to open the engagement when the restore process is complete, the engagement opens.

DELETE ENGAGEMENTS AND CLIENTS
- 69 -
Delete Engagements and ClientsWhen necessary, you can delete engagements or clients in SMART Practice Aids using the Filemenu.Depending on whether you want to delete a client, an engagement, a master group, or amaster engagement,refer to the following procedures.
Delete an Engagement
An engagement must be closed before the engagement can be deleted.
To delete an engagement:
1. On the Filemenu, click Delete.
2. On theDelete submenu, click Client or Engagement.
The Delete Engagement window appears.
3. Select the appropriate client name from the drop-down list.
4. Select the engagement you want to delete.
5. Click theDelete Engagement button.
A confirmationmessage appears stating the engagement name and informing you that all data for theengagement will be permanently deleted.
Note: If you have not closed the engagement you are deleting, you will see an error message tellingyou to close the engagements before deleting it.
6. Click Yes to confirm the deletion.
The engagement is deleted from SMART Practice Aids.
7. Click Close to close theDelete Engagementwindow.
Delete a Client
All engagements associated with a client must be deleted before the client can be deleted.
To delete a client:
1. On the Filemenu, click Delete.
2. On theDelete submenu, click Client or Engagement.
The Delete Engagement window appears.
3. Select the client you want to delete from the drop-down list.
4. Delete all engagements associated with the client. (See the previous procedure.)
5. Click Delete Client.

DELETE ENGAGEMENTS AND CLIENTS
- 70 -
A confirmationmessage appears stating the client name and informing you that all data for the clientwill be permanently deleted.
Note: If you have not deleted all engagements associated with the client, you will see an errormessage telling you to delete the engagements.
6. Click Yes to confirm the deletion.
The client is deleted from SMART Practice Aids.
7. Click Close to close theDelete Engagementwindow.
Delete aMaster Engagement
A master engagement must be closed before themaster engagement can be deleted.
To delete a master engagement:
1. On the Filemenu, click Delete.
2. On theDelete submenu, click Master Group or Engagement.
TheDelete Master Engagementwindow appears.
3. Select the appropriate master group name from the drop-down list.
4. Select themaster engagement you want to delete.
5. Click theDelete Master Eng. button.
A confirmationmessage appears stating themaster engagement name and informing you that all datafor themaster engagement will be permanently deleted.
Note: If you have not closed themaster engagement you are deleting, you will see an error messagetelling you to close themaster engagement before deleting it.
6. Click Yes to confirm the deletion.
Themaster engagement is deleted from SMART Practice Aids.
7. Click Close to close theDelete Master Engagementwindow.
Delete aMaster Group
All master engagements associated with amaster groupmust be deleted before themaster group can bedeleted.
To delete a master group:
1. From the Filemenu, click Delete.
2. From theDelete submenu, click Master Group or Engagement.
TheDelete Master Engagementwindow appears.

DELETE ENGAGEMENTS AND CLIENTS
- 71 -
3. Select themaster group you want to delete from the drop-down list.
4. Delete all master engagements associated with themaster group. (See the previous procedure.)
5. Click Delete Master Group.
A confirmationmessage appears stating themaster group name and informing you that all data for themaster group will be permanently deleted.
Note: If you have not deleted all master engagements associated with themaster group, you will seean error message telling you to delete themaster engagements.
6. Click Yes to confirm the deletion.
Themaster group is deleted from SMART Practice Aids.
7. Click Close to close theDelete Master Engagementwindow.

FINALIZE AN ENGAGEMENT
- 72 -
Finalize an EngagementThe Finalize feature places the engagement in a read-only state and prevents users frommaking furtherchanges. If an engagement is finalized, youmay restore it to In-Progress status. An open engagement mustbe saved before it can be finalized.
Note: An engagement which is not finalized can also be rolled forward.
To finalize an engagement:
1. Open the engagement you want to finalize.
2. On the Filemenu, click Finalize.
A message explains how the Finalize feature works and how you can restore a finalized engagementto In-Progress status.
3. Click Yes.
The engagement now has a read-only status, as shown in the SMART Practice Aids title bar.
4. You can scroll through and view the engagement, but you cannot make changes to it.
Note: You can view the status of an engagement when you open the engagement. The status appears in theStatus column of theOpen Client Engagementwindow orOpen Master Engagementwindow.
To reset a finalized engagement:
On the Filemenu, click Reset to In-Progress.

ENABLE MODULES IN EXISTING ENGAGEMENTS
- 73 -
Enable Modules in Existing EngagementsDuring the process of creating an engagement, one of the steps is to select themodules you want to be inyour engagement. (Youmust have amodule installed to be able to add it to your engagement.)
However, if you do not select amodule while creating the engagement, you have the option to enable amodule in an existing engagement at a later time.
Note: This feature applies to regular engagements, and not to SMART Start engagements.
To enable a module in an existing engagement:
1. With the engagement open, click the Filemenu.
2. Select themodule or modules you want to enable:
Choices areEnable Internal Control, Enable Disclosure, andEnable Field Work.
Note: The options are grayed out if they are already included in the open engagement.
Note: If you select Disclosure, you will be asked to select the disclosure checklist type you want touse in the engagement.
After making your choice, you will receive amessage asking you to confirm that themodule will bepermanently enabled in the engagement.
3. Click Yes.

UPDATE SMART ENGAGEMENT
- 74 -
Update SMART EngagementUse theUpdate SMART Engagement feature when you havemade changes to a Practice Aid audit programdocument generated by SMART Practice Aids, and you want the changes in your external version applied tothe version within SMART Practice Aids.
Note: This feature can be used only withSMART Practice Aids – Risk Assessment. For FieldWorkusers, refer to Create SMART Docs and SynchronizeWorkpapers with SMART (for information aboutselecting Open this Workpaper in SMART).
You can initiate the update from the document in Microsoft® Word or from SMART Practice Aids.
Update from within Microsoft Word
With this option, you can update a Risk Assessment audit program from within Microsoft Word.
To update a SMART engagement from within Microsoft Word:
1. Open the audit program document in Microsoft Word.
2. On thePPC menu, click Update SMART Engagement.
If your engagement is open, you will see amessage asking you to close it.
3. Click Yes to continue.
The program launches SMART Practice Aids and displays a report that compares the audit programversion in SMART Practice Aids with the changed Practice Aids version in Microsoft Word.
Note: This example of the comparison report includes a procedural step that has been added to theWord document, an invalid assertion that has been added to a step, and a step that has been edited.The invalid assertion appears in red text and is indicated by a yellow icon. You can roll your mousepointer over the icon for explanatory text.
4. Review the changes. If you want a hardcopy version, click Print. To proceed with updating theSMART Practice Aids version, click Continue.
5. When theContinue Updatewindow appears, click theUpdate button to verify your decision to

UPDATE SMART ENGAGEMENT
- 75 -
continue with the update.
All changes made in the Practice Aids Word document will be updated in the Risk Assessment auditprogram.
6. Upon completing the update, regenerate the Practice Aids document to ensure you are working withthe latest document.
Update from within SMART Practice Aids
With the Toolsmenu, you can update an audit program within the current engagement to include userchanges to the generated version of the same audit program document.
To update a SMART engagement in SMART Practice Aids:
1. Open the engagement from which the audit program document was generated in SMART PracticeAids.
2. On the Toolsmenu, click Update SMART Engagement.
TheOpenwindow appears.
3. Browse to the folder where you store your audit program documents.
4. Select the audit program document and click Open.
SMART Practice Aids displays a report that compares the audit program version in SMART PracticeAids with the changed Practice Aids version in Microsoft® Word. (See the graphic in the previousprocedure.)
Note: This example of the comparison report includes a procedural step that has been added to theWord document, an invalid assertion that has been added to a step, and a step that has been edited.The invalid assertion appears in red text and is indicated by a yellow icon. You can roll your mousepointer over the icon for explanatory text.
5. Review the changes. If you want a hardcopy version, click Print. To proceed with updating theSMART Practice Aids version, click Continue.
6. When theContinue Updatewindow appears, click theUpdate button to verify your decision tocontinue with the update.
All changes made in the Practice Aids Word document will be updated in the Risk Assessment auditprogram.
7. Upon completing the update, regenerate the Practice Aid document to ensure you are working with thelatest document.
Special considerations
Before selecting theUpdate SMART Engagement option, consider the following requirements:
l If you are using a version of Microsoft® Office earlier than 2007, youmust download theMicrosoftCompatibility Pack. Visit www.microsoft.com/downloads for more information.
l Youmust have access to the database from which the audit program document was generated.

UPDATE SMART ENGAGEMENT
- 76 -
l Multi-user locking rules will apply. For more information, see the Help topics Allow Multi-User andEdit a Form.
What is updated
Audit program documents are arranged in a table format with rows and columns. During the update, thesystem processes each row according to rules pertaining to the type of information (procedure step, practicalconsideration, certain headings, and so forth) in the row.
The following types of changes, when found in the audit program document in Microsoft® Word, are updatedin the SMART Practice Aids audit program:
l New custom steps added by the user (For helpful guidelines on how to insert new steps in a way thatwill prevent errors during the update process, see "Tips for editing an audit program document inMicrosoft® Word" at the end of this topic.)
l New headings or sub-headings added by the user within the list of steps
l Edited text of a step, including formatting changes that include boldfacing, italicizing, and underlining,changes to indention, and deleted text that leaves the row blank
l Edited text of a heading or subheading within the list of steps
l Deletion of a row that contained a step or practical consideration
l Valid additions or changes to assertions or objectives on custom steps
l Hyperlinks added by the user
Note: TheUpdate SMART Engagement feature preserves user sign-offs and workpaper references. Thesedo not appear online when you view the audit program but are inserted into the audit program during the nextgeneration. However, the program only supports up to 1024 characters in either the signoff or workpaperreference column. If more than 1024 characters are entered in either of these columns, the text will be droppedduring the update process and amessage stating that the limit was exceeded is displayed on the regeneratedaudit program.
What is not updated
The following types of changes are not updated:
l Changes to the indentation of practical consideration text
l New custom practical considerations added by the user
l Changes to objectives or assertions on PPC-provided steps
l Images and graphics inserted by the user
l Tables altered by merging columns
l Nested table added by the user within another table
Incomplete procedures
Incomplete procedures may be identified during Update SMART Engagement processing. Incompleteprocedures are those that aremissing assertions, procedure type, or certain attributes such as yellow book,

UPDATE SMART ENGAGEMENT
- 77 -
single audit, or analytical.
Incomplete procedures are flagged in the audit procedures pane within SMART Practice Aids. The proceduresare placed in theAll Audit Procedures right pane under Incomplete Data.
You canmodify an incomplete procedure in SMART Practice Aids by selecting the procedure, and thenselectingModify from theEditmenu. You also can right-click the procedure and click Modify on the shortcutmenu.
Tips for editing an audit program document in Microsoft Word
To help ensure a clean, error-free update of the audit program document in SMART Practice Aids, thefollowing practices are encouraged:
l To insert a new step, select the row of another step that is directly above or below the intendedposition of the new step. Then select Insert from the Tablemenu and click eitherRows Above orRows Below to specify the location.
This method inserts a row with the same properties as the selected row, which allows SMARTPractice Aids to recognize that it is a step when you use the Update SMART Engagement option.Other methods, including dragging a blank line into position, may result in the system not recognizingthat the row contains a step and not updating it in SMART Practice Aids.
l To insert a step that appears in the All Audit Procedures pane, but was not included in the auditprogram when it was originally generated, the best practice is to first use the Update SMARTEngagement option to preserve signoffs and workpaper references. Then, in SMART Practice Aids,add the step by dragging and dropping it into the center pane. You can then generate the auditprogram document with the step included.

ABOUT SMART PRACTICE AIDS – RISK ASSESSMENT
- 78 -
About SMART Practice Aids – Risk AssessmentRisk Assessment is the baselinemodule in SMART Practice Aids. Once you create an engagement, youperform your audit by working through the risk assessment process in four easy steps:
1. Identify risks that could result in amaterial misstatement of the financial statements.
2. Assess effects of risks by determining the extent of audit procedures necessary in light of identifiedrisks.
3. Review the suggested audit programs andmodify as needed.
4. Run a diagnostics report to identify inconsistencies or missing information; then generate practice aidplanning forms and audit programs.
See the following topics for step-by-step procedures for completing your audit.
l Step 1 – Identify risks
l Step 2 – Assess Effects of Risks
l Step 3 – Review andModify Audit Programs
l Generate Diagnostics Report
l Generate Planning Forms and Audit Programs
Note: To see a flowchart of the SMART Practice Aids process, see the The Big Picture.
Note: For an overview of the new SMART Start features, see the PPC's SMART Start Audit Tools topic.
PPC's SMART Start Audit ToolsFirms that use PPC's SMART Practice Aids – Risk Assessment have access to two features that helpincrease efficiency in the audit process for small, noncomplex entities:
l SMART Start
l SMART Engagement Setup
SMART Start helps you becomemore efficient when auditing small, noncomplex entities. You have theoption of beginning audits with a complete set of practice aids and audit programs that are pre-tailored for theunique characteristics of these types of clients. This saves time by allowing you to review the pre-definedplanning content and revise it where needed for your client rather than starting from blank forms.
SMART Engagement Setup automatically tailors your practice aids and audit programs based on youranswers to customized setup questions that appear at the beginning of your engagement.

ADD AND REMOVE FORMS
- 79 -
Add and Remove FormsYou can addmultiple copies of forms to an engagement or remove forms as needed.
To add forms to an engagement:
1. On the Insertmenu, click Add Forms.
2. Select the number of copies for each form you want to add.
3. Click Next.
4. If necessary, edit the file name for each title or file name.
5. Click Add to add the forms to your engagement.
To remove a form from an engagement:
1. Select the form in theNavigation pane.
2. On the Insertmenu, click Remove Form.
A confirmationmessage appears.
3. Click OK.
To remove a form using right-click in the Navigation pane:
1. In theNavigation pane, right-click the form you want to remove.
2. From the shortcut menu, click Remove Workpaper.
A confirmationmessage appears.
3. ClickOK.

STEP 1 – IDENTIFY RISK
- 80 -
Step 1 – Identify RiskTo add identified risks:
1. Users who have enabledSMART Practice Aids – Internal Control for the engagement will see anadditional option below the assertions list asking if you want to indicate transaction classes affected bythe risk.
2. The risks you identified appear in the Identified Risks area in the right pane.
A symbol appears next to any risk for which you opted not to select the transaction classesaffected by the risk.
Step 2 – Assess the Effects of Risk
The second step in completing an engagement is to assess how the risksthat you identified when completing the planning forms in Step 1 affect theaudit procedures you will perform. Each audit area is represented by anAssess Effects of Risks window that displays the identified risksorganized by affected assertion.
To access this window, from theNavigation pane, select any of the auditareas underRisk Assessment and Planning.

STEP 3 – REVIEW ANDMODIFY YOUR AUDIT PROGRAMS
- 81 -
As you complete each audit area's risk assessment, click Next to move to the next audit area.
Overall Financial Statement Risks
In the Overall Financial Statement risks form, review the planned audit response to identified risks andmakechanges if applicable.
All risks identified as affecting the financial statement in general are listed in the Identified Risks field. Forthe risk management override of controls, a response is provided. You can edit the planned audit responsetext, add procedures/comments, or make changes to the text as needed.
Step 3 – Review and Modify Your Audit ProgramsYou perform this step in theReview and Modify Audit Programs section in theNavigation pane. Here youaccess the suggested audit procedures for all audit area andmodify them if necessary.
Add an option on the Audit Program regenerationmessage to continue without regenerating the audit program.
Center Pane Contents
The center pane lists suggested audit procedures for the audit area. You can click a + icon to expand aselected category or procedure section.

STEP 3 – REVIEW ANDMODIFY YOUR AUDIT PROGRAMS
- 82 -
Right Pane Contents
The right pane lists all audit procedures present in the audit area selected in theAll Procedures dropdownmenu. Use the + and - icons to expand and collapse the different procedure sections. Procedures currentlyincluded in your audit program appear in light gray text. Other procedures available for selection appear in darktext.
Prior Period and Current Period Procedures
There are navigational aids to help identify differences between prior period and current period auditprocedures.
In the center pane amodified step flag icon is displayed next to each procedure that contains differencesbetween the current period and prior period.

GENERATE DIAGNOSTICS REPORT
- 83 -
Click the flag icon to display the Reset Procedure window. The prior period, original PPC procedure - currentperiod , andmodified current period versions of the procedure text are displayed for comparison. Select theversion of the procedure text that you want to use for the current period. Click OK to confirm the change.
A flag icon also appears in the right pane for each audit procedure step that was selected in the prior period.
Add, Modify, Delete Procedures
To add a procedure:
You can add pre-defined procedures or your own custom procedures.
l To add pre-defined procedures to your audit program, drag and drop a procedure in the right pane tothe center pane:
i. In the center pane, scroll to the location where you want to insert the procedure.
ii. From theAll Procedures dropdownmenu at the top of the right pane, select the audit area fromwhere you want to insert the procedure. All procedures in that audit area are displayed in the rightpane.
iii. Navigate within the right pane and click to select the procedure that you want to add to the centrepane.
iv. Drag and drop the selected procedure at the desired location.
Note: The copied procedures will be treated like custom procedures.
l To add your own custom procedures, select Procedure Above orProcedure Below (depending onwhere you want it to appear) from the Insertmenu.
To modify a procedure:
Double-click any procedure tomodify it. You can also selectModify from theEditmenu to edit a selectedprocedure. To assist reviewers, your changes appear in red.
To delete a procedure:
To delete a procedure you have added, highlight the procedure in the center pane and select Delete from theEditmenu.
You can also drag and drop unwanted procedures from the center pane to the right pane using your mouse toremove procedures from your audit program.
Note: The option toDeselect All Steps is available from theEditmenu. This is will remove all the stepsfrom the center pane and place them in the right pane.
Generate Diagnostics ReportAfter creating an engagement and completing all pertinent forms, you are ready to run theDiagnosticsReport. Review this report to discover inconsistencies or other conditions that you should consider beforegenerating your planning forms and audit programs.

GENERATE DIAGNOSTICS REPORT
- 84 -
To generate the Diagnostics Report:
On theNavigation pane, select Generation from theNavigation drop-down list.

GENERATE PLANNING FORMS AND AUDIT PROGRAMS
- 85 -
Generate Planning Forms and Audit ProgramsThe final step in the risk assessment process is to generate the engagement's planning forms and auditprograms.
When you click Generation on theNavigation pane drop-down list, SMART Practice Aids automatically runsa Diagnostics Report to alert you to inconsistencies or other conditions that you should consider beforegenerating your planning forms and audit programs. Complete the necessary information and then click Nexton theDiagnostics Report to go to the Planning Forms window where you can generate planning forms.
You can also access the document forms directly from theGenerateDocuments section in theNavigation pane as described in the followingprocedures.
To generate planning forms:
1. In theNavigation pane, select Generation from the drop-down list.
2. ExpandGenerate Documents and click Planning Forms.
TheGenerate Planning Forms window appears.
3. Select the check box for each planning form you want to generate.
4. Click Create Practice Aids to generate fully functional Practice Aidversions of the selected planning forms.
TheCreate Practice Aidswindow appears.
5. Either type in the directory path or use theBrowse button to locate the folder where you want to savethe planning forms.
Note: If you have set a default directory using Tools > Options > File Locations, that directory willbe selected as the default location when you generate and save your Practice aids. You can overridethe default location by designating a different directory in theBrowse for Folderwindow.
6. Click OK to generate and save the files.
Once generated, the planning forms in Practice Aids format can be opened usingMicrosoft® Word.
7. Click Next to go to the Generate Audit Programs window.
To generate audit programs:
1. In theNavigation pane, select Generation from the drop-down list.
2. ExpandGenerate Documents and click Audit Programs.
TheGenerate Audit Programs window appears.
3. Select the check box for each audit program you want to generate.
4. Click Create Practice Aids to generate fully functional Practice Aid versions of the selected audit

GENERATE PLANNING FORMS AND AUDIT PROGRAMS
- 86 -
programs.
TheCreate Practice Aidswindow appears.
5. Either type in the directory path or use theBrowse button to locate the folder where you want to savethe audit programs.
Note: If you have set a default directory using Tools > Options > File Locations, that directory willbe selected as the default location when you generate and save your Practice aids. You can overridethe default location by designating a different directory in theBrowse for Folderwindow.
6. Click OK to generate and save the files.
Once generated, the audit programs in Practice Aids format can be opened usingMicrosoft® Word.
Note: For older titles, the Planning Form, Audit Report, and Diagnostics Report generationfunctionality is accessed from Step 4 in theNavigation pane.
To use the print preview feature:
1. Click the print preview icon next to the form you want to preview.
The print preview opens in thePreviewwindow.
2. Scroll through the preview document to review how it will print.
3. When you are ready to close the document, click theX in the upper right corner.
To use the preview right-click feature:
Once you open a document or form in preview mode (see the previous procedure), you can right-clickanywhere in the document to bring up a shortcut menu. This menu has options that let you print the previeweddocument, add to favorites, create a shortcut, and export to Microsoft Excel.

ABOUT SMART PRACTICE AIDS – INTERNAL CONTROL
- 87 -
About SMART Practice Aids – Internal Control
If Internal Control is installed, when you create an engagement, youhave the option of selecting Internal Control to include its forms in theengagement.
When included in an engagement, the Internal Control forms areinstalled under Step 1 – Identify Risks.
Internal Control is a comprehensive, fully-integrated internal controlevaluation and analysis tool that you can use to:
l Obtain and document your understanding of internal control.
l Evaluate system design.
l Prepare internal control test plans (required if performing apublic company audit of internal control).
l Conclude on control effectiveness (required if performing apublic company audit of internal control).
l Assess control risk.

NAVIGATE SMART PRACTICE AIDS – INTERNAL CONTROL
- 88 -
Navigate SMART Practice Aids – Internal Control
Within a SMART Practice Aids engagement, Internal Control addsnew elements and new menu options.
New Elements
Internal Control adds new elements to Step 1 – Identify Risks andGenerate Planning Forms.
l Under Step 1–Identify Risks, a new Internal Control sub-stepappears in the Navigation pane. When you complete AssessControl Risk, the final section of Internal Control, you canadvance to Step 2.
l There are additional planning forms in the Generate PlanningForms sub-step, replacingmany of the optional planning formsprovided with Risk Assessment.
NewMenu Options
For information about new menu items associated with Internal Control,see the File, Edit, Insert, and View topics.

INTERNAL CONTROL FLOWCHART
- 89 -
Internal Control FlowchartThe Internal Control flowchart, accessed from the SMART Practice Aids toolbar, provides an overview ofhow to apply a top-down, risk-based approach when evaluating internal control over financial reporting as partof a financial statement audit. This approach is considered generally to be themost efficient and effectiveapproach for evaluating internal control.
The Internal Control option appears on the toolbar only when you are currently viewing one of the InternalControl forms.
To view the Internal Control flowchart, click Internal Control on the toolbar. When the flowchart opens, clickUsing This Flowchart in the upper right corner for a description of how to use this interactive feature.

ENABLE SMART PRACTICE AIDS – INTERNAL CONTROLS
- 90 -
Enable SMART Practice Aids – Internal ControlsIf Internal Control is installed, you can enable it for any engagement for which you intend to use the tool. Youcan enable Internal Control when you create a new engagement, and you can enable it for an existingengagement.
Note: Once you enable Internal Control for an engagement, you cannot disable it.
To enable Internal Control for a new engagement:
1. Click New on the Filemenu (or click theNew button on the tool bar).
2. Select the type of client engagement, either from PPC Title or from Master.
The Create Client Engagement window appears.
3. Complete the fields on theCreate Client Engagement window.
4. On the next window, select the Internal Control check box (if it is not already checked by default) andcomplete all pertinent fields.

ENABLE SMART PRACTICE AIDS – INTERNAL CONTROLS
- 91 -
To enable Internal Control for an existing engagement:
1. With the engagement open, click File on themenu bar.
2. Select Enable Internal Control.
Note: If the Enable Internal Control menu option is not active, then SMART Practice Aids – Internal Controleither has already been enabled for the engagement or is not available for the selected title.
Rollforward:
When using the Rollforward feature to create an engagement based on a prior period engagement, you havethe option to useSMART Practice Aids – Internal Controlwith the new engagement.

UNDERSTAND CONTROLS AND EVALUATING DESIGN
- 92 -
Understand Controls and Evaluating Design
After you complete all of the Risk Assessment forms in Step 1 – IdentifyRisks, you click Next to move to the Internal Control section, beginning withUnderstand Controls and Evaluate Design.
If you want to view a list of specific control activities related to the controlprinciple, click theView Entity-Level Control Form link.
Column Heading Questions
In both the Entity-Level Control Form and the Control Activities Form, the column headings contain questionsfor each control principle/objective and control activity.The questions are conditional and appear in blue text atthe top of the form.

CONTROL ACTIVITIES – SIGNIFICANT TRANSACTION CLASSES
- 93 -
Control Activities – Significant Transaction ClassesSignificant Transactions Classes is a subtopic of Control Activities in the Navigation pane. This form letsyou select the transaction classes for which you want to obtain an understanding of internal control anddetermine whether controls are properly designed and implemented (or effectively designed for publiccompanies).
To identify significant transaction classes by location:
1. In the Significant Transaction Classes window, click the + symbol next to an audit area to view itstransaction classes.
2. Under the appropriate location column, select the check box next to each transaction class that isconsidered significant to the financial statements.
Note: A red exclamation symbol ( ) appearing before an audit area indicates that a significant or fraudrisk is associated with the audit area. You can click the exclamationmark to view the risk.
Add Transaction Class
If you want to use a transaction class that is not listed, click theAdd Transaction Class button at the bottomof the Significant Transaction Classes window.
Edit or Delete Transaction Class
Once the new transaction class is added, you can edit or delete it from theSignificant Transaction Classeswindow, by clicking it with your right mouse button and selecting the edit or delete option.
Add Location
To add one or more company locations, click theAdd Location button at the bottom of the SignificantTransaction Classes window.
The new location provides an additional column for identifying transaction classes significant to the newlocation.

CONTROL ACTIVITIES – SIGNIFICANT TRANSACTION CLASSES
- 94 -
Delete a Location
1. Select SMART Engagement Setup from theEdit menu..
2. On the Locations tab of theSMART Engagement Setupwindow, right-click the location that youwant to delete.

CONTROL ACTIVITIES – AUDIT AREAS
- 95 -
Control Activities – Audit AreasA series of input fields are provided to describe the flow of information for each transaction class youpreviously selected as significant.
Previously, in the Significant Transaction Classes activity, you identified by location the transaction classesyou consider to be significant to the financial statements. Each audit area containing significant transactionclasses now appears on theNavigation pane.
If you expand an audit area in theNavigation pane, you see that the forms are broken down by location.
For each location within each transaction class, you can describe the flow of information or referencememosand other documentation about the flow of information.

CONTROL ACTIVITIES – AUDIT AREAS
- 96 -
To view specific control activities related to the transaction class:
1. Select an audit area location.
2. Expand theProcessing Disbursements section (see graphic above).
3. Click theView Control Activities Form link.
The Control Activities Form appears.
The Control Activities Form can be used to further document your understanding of controls and to indicatecontrols that you plan to test.
For more information about the Control Activities Form, see the Understand Controls and Evaluate Designtopic.
A question following the transaction class input fields prompts you to conclude whether the controls areproperly designed and implemented (or effectively designed for public companies). Select Yes orNo. Ifnecessary, click theComment icon to enter a comment.
Apply a Risk-Based Approach
Generally, you should focus on objectives related to the assertions you identified as potentially being higherrisk and the key controls for those objectives. Pay particular attention to controls that address risk of materialmisstatement due to fraud or management override. Controls that address these risks might include:
l Controls over significant, unusual transactions, particularly those that result in late or unusual journalentries
l Controls over journal entries and adjustments made in the period-end financial reporting process
l Controls over related party transactions
l Controls related to significant management estimates
l Controls that mitigate incentives for, and pressures on, management to falsify or inappropriatelymanage financial results
Also, consider the sources of potential misstatement that could occur within the transaction class, includingthe following:
l The points within the transaction class at which amisstatement (including amisstatement due tofraud) related to the relevant assertion could arise
l The controls implemented by management to address those identified points within the transactionclass
l The controls implemented by management over the prevention or timely detection of unauthorizedacquisition, use, or disposition of entity assets that could result in amaterial misstatement of thefinancial statements.

CONTROL ACTIVITIES – AUDIT AREAS
- 97 -
Sources of Information
In the Document Sources of Information section of the Audit Area - Control Activities, describe your sourcesand procedures for gaining your understanding of the flow of information. Ensure that your description satisfiesauditing standards regarding documentation (SAS No. 103 orPCAOB Auditing Std. No. 3).
Identified Risks
As you complete the form, consider whether any risks that could result in material misstatement of thefinancial statements exist. If so, enter the risk in the right-hand pane by clicking theAdd Risk button.

CONTROL ACTIVITIES – FINANCIAL CLOSE AND REPORTING
- 98 -
Control Activities – Financial Close and ReportingIn the Financial Close and Reporting subtopic underControl Activities, you can describe the flow ofinformation for each transaction class/process for each location.
Note: When performing a public company audit of internal control, ensure that you assess themattersdescribed in paragraph 27 of PCAOB Auditing Std. No. 5.
In each location form, expand theDescribe Flow of Information section, and then expand any of thetransactions. Under the transactions, click theView Control Activities Form link to view a list of specificcontrol activities related to the transaction class/process.
The Control Activities Form can be used to further document your understanding of controls and to indicatecontrols that you plan to test.
For more information about the Control Activities Form, see the Understand Controls and Evaluate Designtopic.
A question following the transaction class/process input fields prompts you to conclude whether the controlsare properly designed and implemented (or effectively designed for public companies). Select Yes orNo. Ifnecessary, click theComment icon to enter a comment.
Applying a Risk-Based Approach
Generally, you should focus on objectives related to the assertions you identified as potentially being higherrisk and the key controls for those objectives. Pay particular attention to controls that address risk of materialmisstatement due to fraud or management override. Controls that address these risks might include:
l Controls over significant, unusual transactions, particularly those that result in late or unusual journalentries
l Controls over journal entries and adjustments made in the period-end financial reporting process
l Controls over related party transactions
l Controls related to significant management estimates
l Controls that mitigate incentives for, and pressures on, management to falsify or inappropriatelymanage financial results.
Also, consider the sources of potential misstatement that could occur within the transaction class/process,including the following:
l The points within the transaction class/process at which amisstatement (including amisstatementdue to fraud) related to the relevant assertion could arise

CONTROL ACTIVITIES – FINANCIAL CLOSE AND REPORTING
- 99 -
l The controls implemented by management to address those identified points within the transactionclass/process
l The controls implemented by management over the prevention or timely detection of unauthorizedacquisition, use, or disposition of entity assets that could result in amaterial misstatement of thefinancial statements.
Sources of Information
In theDocument Sources of Information section of the Financial Close and Reporting location form,describe your sources and procedures for gaining your understanding of the flow of information. Ensure thatyour description satisfies auditing standards regarding documentation (SAS No. 103 orPCAOB Auditing Std.No. 3).
Identified Risks
As you complete the form, consider whether any risks that could result in material misstatement of thefinancial statements exist. If so, enter the risk in the right pane by clicking theAdd Risk button.

CONTROL ACTIVITIES – GENERAL COMPUTER CONTROLS
- 100 -
Control Activities – General Computer Controls
In theGeneral Computer Controls subtopic underControlsActivities, you can describe the Information Technology (IT)environment and general computer controls for each location. Thetable at the top of the form lets you provide additional details aboutsoftware applications.
In each location form, expand the Describe Flow of Informationsection, and then expand any of the transactions. Under thetransactions, click theView Control Activities Form link to view alist of specific control activities related to the IT environment.
The Control Activities Form can be used to further document yourunderstanding of controls and to indicate controls that you plan totest.
For more information about the Control Activities Form, see theUnderstand Controls and Evaluate Design topic.
Identified Risks
As you complete the form, consider whether any risks that couldresult in material misstatement of the financial statements exist. Ifso, enter the risk in the right pane by clicking theAdd Risk button.

SUMMARY OF DESIGN EFFECTIVENESS EVALUATIONS
- 101 -
Summary of Design Effectiveness Evaluations
The Summary of Design Effectiveness Evaluations under InternalControl summarizes your previous conclusions regarding designeffectiveness. This summary can help you assess whether:
l Client communications regarding design deficiencies arenecessary (for nonpublic entities)
l Design deficiencies indicate identified risks that should be listedin the right-hand pane
l Your conclusions about design effectiveness should be re-evaluated
l For a public company audit of internal control, whether you haveperformed sufficient tests of design effectiveness to address theassessed risk of misstatement to each relevant assertion ofeach significant account and disclosure.
The summary also contains a link you can click to view the ControlDeficiency Evaluation and AggregationWorksheet.
For a financial statement audit, you can use theControl DeficiencyEvaluation and Aggregation Worksheet to accumulate deficienciesand determine whether they represent significant deficiencies or materialweaknesses that must be communicated to the client.
For a public company audit of internal control, you can use theControl Deficiency Evaluation Form andAggregation Worksheet to summarize, accumulate, and evaluate deficiencies to determine whether they(alone or in combination) represent amaterial weakness or significant deficiency; and to form an overallconclusion on the effectiveness of internal control.
The Summary of Design Effectiveness Evaluations also lets you view the transaction classes for which youplan to test controls. Consider whether those plans are appropriate given design conclusions reached in eacharea. Generally, it is not effective to test controls over transaction classes that contain design deficiencies.
It alsomay not be effective to test controls if design deficiencies exist in related transaction classes for agiven assertion or in any of the first four COSO components (Control Environment, Risk Assessment,Information and Communication, andMonitoring).
You can print a copy of the Summary of Design Effectiveness Evaluations by clicking thePrint button at thebottom of the display area.

ADD AN OBJECTIVE
- 102 -
Add an ObjectiveControl activities listed on a Control Activities Form are organized within objectives. When working on aControl Activities Form, you can add a new objective to the list.
Note: You access the Control Activities Form from links on the Financial Close and Reporting andGeneralComputer Controls location forms, which are found under Control Activities on theNavigation pane.
To add an objective:
1. Click theView Control Activities Form link.
The Control Activities Form appears.
2. Select one of the already listed objectives.
3. Select Add Objective from the Insertmenu.
The AddObjective window appears.
4. Complete the information by describing the objective, applying the objective to a transaction class, andspecifying assertions.
5. Click OK to add the objective.

ADD A CONTROL
- 103 -
Add a ControlObjectives listed on a Control Activities Form consist of controls. When working on a Control Activities Form,you can add a new control to one or more objectives.
Note: You access the Control Activities Form from links on the Financial Close and Reporting andGeneralComputer Controls location forms, which are found under Control Activities on theNavigation pane.
To add a control:
1. Click theView Control Activities Form link.
The Control Activities Form appears.
2. Select an objective.
3. Select Add Control from the Insertmenu.
The Add Control window appears.
4. Complete the information by describing the control, assigning a control reference number, selecting therelated objectives, and specifying assertions.
5. In theSelect the Related Objectives scroll box, click the + symbols to drill down to the Objectiveslevel.
The objective you highlighted before opening theAdd Control window is already selected.
You can assign the new control to any objective listed on the Control Activities Form for any audit area,Financial Close and Reporting, andGeneral Computer Controls.
6. Select or clear check boxes to indicate your choices.
Note: If usingPPC’s Guide to PCAOB Audits, the assertions presented come from section AU 326of the PCAOB interim auditing standards rather than from SAS No. 106, Audit Evidence.
7. In the Indicate Assertions for which the Control Provides Assurance scroll box, select or clearthe applicable check boxes.
8. Click OK to add the control.

ADD A TEST PROCEDURE
- 104 -
Add a Test ProcedureWhenworking on a Control Activities Form, you can add a new test procedure to a control.
Note: You access the Control Activities Form from links on the Financial Close and Reporting andGeneralComputer Controls location forms, which are found under Control Activities on theNavigation pane.
To add a test procedure:
1. Click theView Control Activities Form link.
The Control Activities Form appears.
2. Expand the objective and right-click to select a control. Then click Test Procedure Options on theshortcut menu.
The Test Procedure Optionswindow appears with a list of all test procedures related to the selectedcontrol.
3. Click theAdd button.
TheAdd Test Procedurewindow appears.
4. Complete the information by describing the test procedure and selecting the related controls.
5. In theSelect the Related Controls scroll box, click the + symbols to drill down to the controls level.
6. Select the applicable check boxes to indicate your choices.
7. Click OK to add the test procedure.
Other options on the Test Procedure Optionswindow includeReassign andDelete.
To reassign test procedures:
1. On the Test Procedure Optionswindow, select a control.
2. Click theReassign button to assign an existing test procedure to the currently selected control.
TheReassign Test Procedure(s)window appears with all system-generated test procedures listed.
3. Select the check boxes associated with the test procedures you want to assign to the control. You alsocan clear check boxes associated with test procedures that you want to remove from the control.
4. Click OK to reassign the test procedure.
To delete test procedures:
You can delete only test procedures that you added to the control using theAdd button.
1. On the Test Procedure Optionswindow, select a test procedure.
2. Click theDelete button.
TheReassign Test Procedure(s)window appears with all system-generated test procedures listed.

ADD A TEST PROCEDURE
- 105 -
3. Select the check boxes associated with the test procedures you want to assign to the control. You alsocan clear check boxes associated with test procedures that you want to remove from the control.
4. Click OK to reassign the test procedure.
Note: You cannot delete a test procedure generated by SMART Practice Aids. To remove a system-generated test procedure, click theReassign button and clear the applicable check box.
Public Company Audit
When performing a public company audit of internal control, in order to form a conclusion about theeffectiveness of the company’s internal control, youmust perform sufficient tests of controls to address theassessed risk of misstatement to each relevant assertion of each significant account and disclosure.
In addition, when performing a public company integrated audit of internal control and the financial statements,you should test controls to simultaneously accomplish the objectives of both audits. In performing the audit ofinternal control, your opinion relates to the effectiveness of the company's internal control as of a point in time,and you should obtain evidence that internal control has operated effectively for a sufficient period of time,whichmay be less than the entire financial statement period (ordinarily a year). To assess control risk forspecific assertions at less than themaximum for the financial statement audit, however, you are required toobtain evidence that the relevant controls operated effectively during the entire period upon which you plan toplace reliance on those controls.

REVIEW ANDMODIFY TEST PLANS
- 106 -
Review and Modify Test PlansTheReview and Modify Test Plans section of Internal Control presents test procedures for the controlsthat you previously indicated you plan to test.
Edit Test Procedures
There are two ways you can edit a procedure:
l Select the procedure and then click Modify on theEditmenu.
l Right-click the procedure and select Edit from the shortcut menu.
You can also edit a test procedure without selecting amenu option. On the Test Procedures list, select thetest procedure you want to edit. Then click the area where you want to apply the edit and type your change.Any new text you type appears in red. A flag appears at the beginning of the text to indicate that it has beenmodified.
Generate the Test Plan
Once you review the test procedures for each area, generate the test plan (seeGenerate Planning Forms andAudit Programs). Test procedures can be performed and documented using the generated test plan along withPractice Aids such as CX-10.2 - Tests of Controls Sampling Planning and Evaluation Form or other controltest documentation that you create. You can enter any test exceptions in the Enter Test Exceptions section.

ENTER TEST EXCEPTIONS
- 107 -
Enter Test ExceptionsIf exceptions or control deficiencies are noted during control testing, enter them in theEnter Test Exceptionswindow.
To enter test exceptions:
1. On theNavigation pane, expandStep 1 - Identify Risks.
2. Expand Internal Control and click Enter Test Exceptions.
The Enter Test Exceptions window appears.
3. Click theAdd Exception button at the bottom of the window.
The Add Exceptions window appears.
4. Click the + symbol next toControl Environment to expand the list of controls
5. Select the check boxes for the applicable controls.
6. Type a description of the exception. You can also include a comment.
7. Click OK to save your changes.
For a Financial Statement Audit
For a financial statement audit, you can use the Control Deficiency Evaluation Form and AggregationWorksheet to determine whether the accumulated deficiencies represent significant deficiencies or material
ENTER TEST EXCEPTIONS
- 108 -
weaknesses that must be communicated to the client.
For a Public Company Audit
For a public company audit of internal control, you can use the Control Deficiency Evaluation Form tosummarize, accumulate, and evaluate deficiencies to determine whether they (alone or in combination)represent amaterial weakness or significant deficiency; and to form an overall conclusion on theeffectiveness of internal control.
Note: The exceptions that you list in the Enter Test Exceptions form carry forward to the Assess ControlRisk form.

ASSESS CONTROL RISK
- 109 -
Assess Control RiskIn the Internal Control Assess Control Risk form, document your control risk assessments for each COSOcomponent, audit area, and related assertions.
The control risk assessments that you enter in the Assess Control Risk section carry forward to theapplicable area in Step 2 - Assess the Effects of Risks.
Generate Diagnostics ReportAfter creating an engagement and completing all pertinent forms, you are ready to run theDiagnosticsReport. Review this report to discover inconsistencies or other conditions that you should consider beforegenerating your planning forms and audit programs.
To generate the Diagnostics Report:
On theNavigation pane, select Generation from theNavigation drop-down list.

GENERATE PLANNING FORMS FOR INTERNAL CONTROL
- 110 -
Generate Planning Forms for Internal ControlWhen Internal Control is enabled in an engagement, many of the optional planning forms that are generatedby the Risk Assessment module in the Generate Planning Forms and Audit Programs step are replaced byplanning forms generated by Internal Control.
Primarily changed are theCX-4 series andCX-5 series.
To use a filter for CX-5 forms:
1. Click theSet Filter icon next to the CX-5 series.
The Filter Controlswindow appears.
Note: When creating Internal Control documentation, generally you want to include only controls thathave beenmarked as having been implemented by the client (this is the default setting). If you preferto include all controls, you can change the filter setting.
2. Select the check boxes for the controls you want to display in the preview or generated document.
Choices areYes (default), No, N/A, andBlank.
3. Click OK.

ABOUT SMART PRACTICE AIDS – DISCLOSURE
- 111 -
About SMART Practice Aids – DisclosureSMART Practice Aids – Disclosure optimizes financial statement disclosure preparation and review.
Use this automated tool to:
l Prepare a customized checklist of applicable disclosure requirements.
l Quickly identify new or changed disclosure requirements.
l Create and save company-specific disclosures.
l Research related authoritative literature on Checkpoint.
l Create and store firm-approved disclosures (Firm Libraries) for use on any engagement.
Disclosure Keyword SearchYou can perform a keyword search of the Disclosure Libraries for the engagement you are working on.
To perform a keyword search:
1. Open theDisclosure Checklist for your engagement.
2. From the drop-downmenu in the right pane, select a library to search (PPC Commercial or FirmLibrary, for example).
3. Type a search term in the field provided (here: "license") and click Find.

DISCLOSURE KEYWORD SEARCH
- 112 -
Note: After you click Find, your search results are filtered so that only disclosure examples thatcontain your search term are displayed.
4. Select a disclosure example that you are interested in (such as Franchise Fee Revenue), and for thisexample, double-click FRANCHISING.
Notice that each occurrence of your search term is highlighted.
Note: In this example, your search term appears in 23 disclosure examples, this one being the 18th ofthe 23 examples.
5. Click thePrevious orNext button at the bottom of the window to look for your search term in otherdisclosure examples.

SELECT CHECKLIST TOPICS
- 113 -
Select Checklist TopicsThe first step in creating a disclosure checklist is selecting topics to add to the checklist.
Select Topics
To select checklist topics:
1. Select Disclosure from theNavigation drop-downmenu in the left pane.
2. Select option 1, Select Topics in the left pane.
The hierarchical list of available disclosure topics will display in the right pane
3. To select a topic to be included in the checklist, simply select the check box next to the topic name.You can expand and collapse the topic list by clicking the "+" and "-" icons next to each category.
Note: You can select an entire section of topics by clicking the check box for the parent categoryname.
Add Custom Topics
To add a custom topic to a checklist:
1. Select the topic in the checklist at the point you want to insert the new topic.
2. Open theAdd Topic window by selecting Topic Above or Topic Below from the Insert menu.
3. Enter the topic title and click OK.

COMPLETE AND CUSTOMIZE THE CHECKLIST
- 114 -
The new topic is visible in the checklist at the point you selected to add it.
Note: The Insert Topic menu actions are also available by right-clicking a topic in the checklist. Youcan also edit and delete custom topics.
If youmodify a default PPC checklist topic, themodified text will display in red and an orange flag will displayin the left margin of the checklist pane to indicate the topic has been changed from it's original value. Click theorange flag to see a comparison of the original topic and new topic. You can also revert back to the originalvalue.
Move Topics
Tomove topics within a checklist, simply select the topic and drag it to the new location in the checklist.
Add, Edit, and Delete Topic Comments
Complete and Customize the ChecklistAfter you have selected the checklist topics, the next step is to complete and customize the checklist. Selectoption 2 –Complete Disclosure Checklist from theNavigation pane, or click Next on the bottom of thecenter checklist pane.
Set a Requirement's Disclosure Status
Review and complete the checklist by updating the Disclosure status for each topic and requirement. This isdone by selecting one of the status options to the right of each requirement. Select Yes orNo to indicate if theDisclosure was made for this requirement or select N/A if the requirement is not applicable.
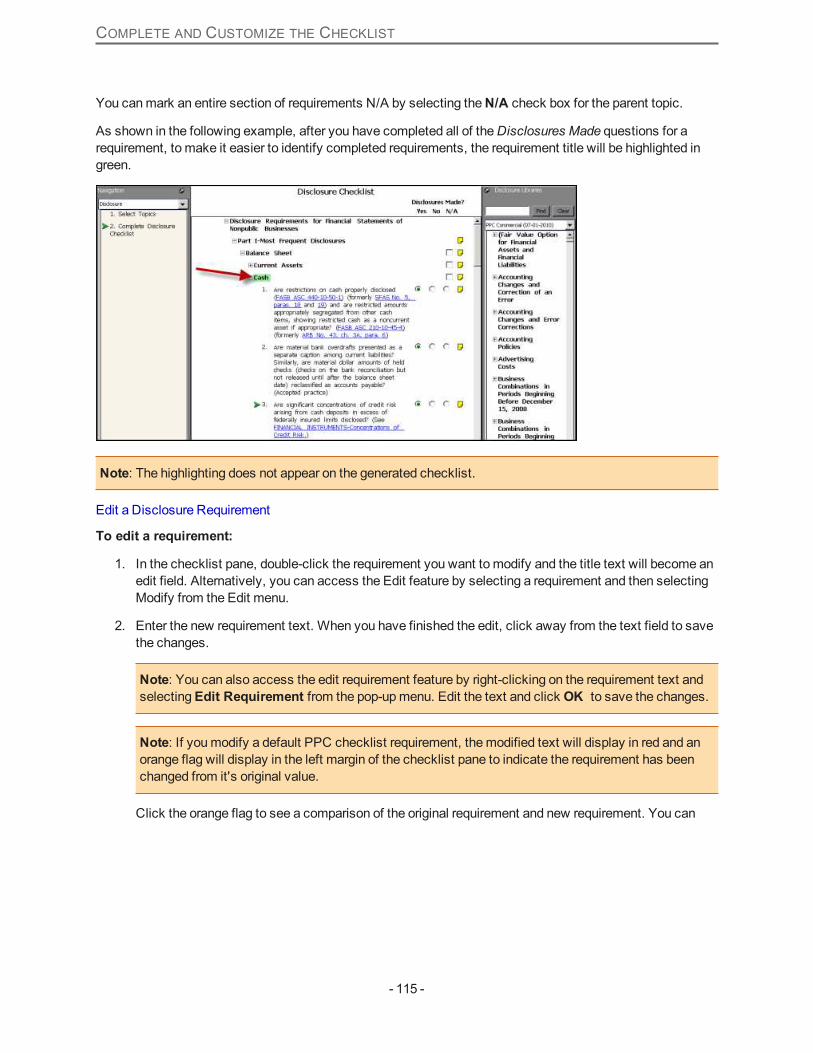
COMPLETE AND CUSTOMIZE THE CHECKLIST
- 115 -
You canmark an entire section of requirements N/A by selecting theN/A check box for the parent topic.
As shown in the following example, after you have completed all of theDisclosures Made questions for arequirement, to make it easier to identify completed requirements, the requirement title will be highlighted ingreen.
Note: The highlighting does not appear on the generated checklist.
Edit a Disclosure Requirement
To edit a requirement:
1. In the checklist pane, double-click the requirement you want to modify and the title text will become anedit field. Alternatively, you can access the Edit feature by selecting a requirement and then selectingModify from the Edit menu.
2. Enter the new requirement text. When you have finished the edit, click away from the text field to savethe changes.
Note: You can also access the edit requirement feature by right-clicking on the requirement text andselectingEdit Requirement from the pop-upmenu. Edit the text and click OK to save the changes.
Note: If youmodify a default PPC checklist requirement, themodified text will display in red and anorange flag will display in the left margin of the checklist pane to indicate the requirement has beenchanged from it's original value.
Click the orange flag to see a comparison of the original requirement and new requirement. You can

COMPLETE AND CUSTOMIZE THE CHECKLIST
- 116 -
also revert back to the original value.
Add a Disclosure Requirement
To add a requirement:
1. Select the requirement in the checklist at the point you want to insert the new requirement.
2. Select Requirement Above, Requirement Below, orRequirement Child from the Insert menu toopen theAdd Disclosure Requirement window.
Note: Adding a requirement via theChild Requirement option will create a sub-requirement underthe requirement you have selected in step 1.
3. Enter the requirement text and click OK. You can also set the requirement status toYes orNo beforesaving the new requirement.
The new requirement is visible in the checklist at the point you inserted it.
Note: The Insert Requirement menu actions are also available by right-clicking a requirement in thechecklist.
Delete a Disclosure Requirement
To delete a requirement from a checklist:
1. Select and right-click the requirement in the checklist.
2. Select Delete Requirement from the pop-upmenu.
3. Click OK in the confirmation window to remove the requirement from the checklist.
Move Requirements
Tomove requirements within a checklist, simply select the requirement and drag it to the new location in thechecklist. An arrow icon will display next to your cursor to indicate the new location of the requirement. Youcan also use this method tomove requirements to new topics.
Add, Edit and Delete Comments
Use the same procedure you used for checklist topics to add, edit or delete comments in requirements.

EDIT CHECKLIST TOPICS
- 117 -
Edit Checklist TopicsTo edit a checklist topic:
1. Select the topic you want to edit by clicking it in the checklist. (The title will be highlighted in thechecklist when it is selected.)
2. Click the selected topic and the title text will become an edit field.
3. Enter the new topic text. When you have finished the edit, click another topic in the checklist to savethe changes.
Note: If youmodify a default PPC checklist topic, themodified text will display in red and an orangeflag will display in the left margin of the checklist pane to indicate the topic has been changed from it'soriginal value. Click the orange flag to see a comparison of the original topic and new topic. You canalso revert back to the original value.
Move Topics
Tomove topics within a checklist, simply select the topic and drag it to the new location in the checklist.
Add, Edit, and DeleteTopic Comments
To add a topic comment:
1. Click the yellow page icon next to the topic title.
The Comment window opens. Enter the comment text in the provided field.
2. Click OK.
The yellow page icon next to the topic will change to indicate that there is a comment for that topic.
To edit a topic comment:

EDIT CHECKLIST TOPICS
- 118 -
1. Click the yellow page icon next to the topic title.
The Comment window opens. Edit the existing comment text.
2. Click OK.
The yellow page icon next to the topic will change to indicate that there is a comment for that topic.
3. Click the yellow page icon next to the topic title.
The Comment window opens.
4. Click OK.
The new comment is now saved for the topic.
To delete a topic comment:
1. Click the yellow page icon next to the topic title.
The Comment window opens. Delete the comment from the text field.
2. Click OK.
The comment has now been deleted and the yellow page icon will now be blank.

UPDATE THE DISCLOSURE CHECKLIST
- 119 -
Update the Disclosure ChecklistPeriodically you should check for an updated version of the PPC-provided disclosure checklists.
To update a checklist:
1. Click theUpdate Disclosure Checklist button at the bottom of the checklist pane.
2. In theCheck for Updates window, select theCheck for more current disclosure checklistsoption.
3. Click Next. If any updated versions are found, they will be displayed. You can then update thechecklist requirements to reflect the new version as necessary.
Note: To ensure you are considering all disclosure requirements, use the second option on theCheckfor Updateswindow to review (1) a list of the latest pronouncements considered in your currentchecklist and (2) a list of authoritative pronouncements that may have been issued subsequent to therelease of the current checklist. Disclosure requirements dictated by any subsequently issuedpronouncements should bemanually added to the checklist.
View Firm Libraries in an EngagementIf you have a Firm Library containing disclosure notes, you can view the contents of the library while workingwith a checklist in the center pane.
To view a Firm Library:
1. In the right pane of the interface (Disclosure Libraries) select the Firm Library name from the drop-downmenu.
2. The contents of the Firm Library will display in the right pane. You can then expand the categories toview the disclosure notes. You can add notes from the Firm Library to the Engagement Library fromthis view.
Disclosure Libraries Pane Toolbar
When viewing a disclosure note library in the right pane, there are a number of actions available from thebottom toolbar. These actions are context sensitive and somewill be disabled depending on if you have a notein the library selected or not.
View Note(s) – Highlight a note in the firm library and click theView Note(s) icon in the toolbar to displaythe note in the View Note pop-up window. You can page through all the notes in the library by clicking thePrevious andNext buttons.
Preview Engagement Library Notes – Display a preview of all the notes in the currently displayed firmlibrary.
Refresh Firm Libraries – Click theRefresh button at the bottom of the Disclosure Checklist window torefresh the list of firm libraries and get any available updates.

VIEW FIRM LIBRARIES IN AN ENGAGEMENT
- 120 -
Note: A best practice would be to utilize the shared database installationmethod. The location of the firmlibraries displayed in the Disclosure Libraries pane defaults to the same database where the engagement islocated. This location can be changed by selectingPoint to Firm Library Database from the Tools >Optionsmenu.
Note: Firm Libraries cannot be edited from theDisclosure Libraries pane. Youmust use the Firm Libraryapplication tomaintain your firm libraries.

MAINTAIN AN ENGAGEMENT DISCLOSURE NOTE LIBRARY
- 121 -
Maintain an Engagement Disclosure Note LibraryOne of the common tasks in maintaining a Disclosure checklist in an engagement is creating andmaintaininga collection of disclosure notes for the engagement. There are a number of actions you can perform tomaintain and update a disclosure note library. Most of these actions are available from a pop-upmenu,enabled by right-clicking in the right pane where the disclosure library is displayed. They are also availablefrom the toolbar below the right pane.
Hover your cursor over an icon to see the action.
Note: Some actions are contextual and will be grayed out (disabled), depending on the right pane contentsand selection.
Add a Note
To add a new disclosure note:
1. While viewing the Disclosure checklist requirements in themain content pane, select EngagementLibrary from the drop-downmenu in the right pane to view the disclosure note library for theengagement.
2. Right-click in the right pane to open the Disclosure Note actionmenu.
3. Select Add New Note to Engagement Library.
4. On the Add New Note window, type the title of the Disclosure in theEnter Disclosure Title field.

MAINTAIN AN ENGAGEMENT DISCLOSURE NOTE LIBRARY
- 122 -
Note:You can also add an optional summary of the note by clickingSummary Description. Thesummary will be visible when themouse cursor is hovered over the disclosure note title in the libraryview displayed in the right pane.
4. Select the topics you want to assign to the note by clicking in theAssigned Topics field. A selectionwindow will open.
5. Select the check box next to each topic you want to assign to the disclosure note.
6. Enter the text of the disclosure note in the provided field. Use the provided toolbar to format the notetext.
7. Click OK to save the note. The new note and assigned topics will display in the right pane with the restof the disclosure note library content.
Copy a Note from Another Library
To copy a disclosure note from another library to the engagement library:
1. Open the disclosure note library you want to copy from in the right pane by selecting it from the drop-downmenu.
2. Expand the topic sections to locate the note you want to copy.
3. Select and right-click on the note. From the pop-upmenu select Copy to Engagement Library.
4. On the Copy to Library pop-up window, select the topics to which the disclosure notemost relates byselecting the check boxes next to the topic names.
5. Return to the engagement disclosure note library in the right pane to see the copied note under thetopics you selected in step 4.
Edit a Note
To edit a disclosure note:
1. Locate the note you want to edit in the right pane.
2. Double-click the note title and theEdit Note window will display.
3. Modify the note text, title, summary description, or assigned topics and click OK to save the changes.
Note: The Edit Note action is also available by right-clicking a disclosure note title in the right paneand selectingEdit Note from the pop-upmenu.
Delete a Note
To delete a disclosure note:
1. Locate the note you want to delete in the right pane.
2. Right-click the note title and select Delete Note from Engagement Library from the pop-upmenu.
3. Click OK on the confirmation window.
Preview a List of Disclosure Notes

ADD A NEW DISCLOSURE NOTE
- 123 -
To preview a list of disclosure notes:
1. Locate the disclosure note library you want to review in the right pane by selecting it from the drop-downmenu.
2. Right-click a note or topic in the right pane.
3. Select View Note(s) from the pop-upmenu.
4. TheView Note window displays the selected note.
5. Use thePrevious andNext buttons to navigate through the disclosure notes.
6. Click Close when finished to close the View Note window.
Select Multiple Disclosure Notes
You can select multiple disclosure notes in the right-pane by holding the CTRL key and left clicking thedisclosure note titles. You can then access the selected notes by using theView Note(s) action (or toolbaricon). Only the selected notes will be visible when you use the Previous and Next buttons on the View Notewindow. Then you can review a specific set of notes within a larger note library without having to navigatethrough the entire collection of notes.
Disclosure Notes and "Unassigned" Topics
It is possible for a disclosure note's assigned topic to be removed as the result of rolling forward anengagement or updating a checklist to a later version. When this occurs, the disclosure notes assigned to theremoved topic are listed under a topic labeled "Unassigned." Resolve this issue by assigning these notes toother related topics or by deleting them from the disclosure note library.
Add a New Disclosure NoteWhile viewing the Disclosure checklist requirements in themain content pane, you can add a disclosure noteby selectingEngagement Library from the drop-downmenu in the right pane to view the disclosure notelibrary for the engagement. Then right-click in the right pane to open the Disclosure Note actionmenu andselect Add New Note to Engagement Library.
To copy a disclosure note from another library to the engagement library:
1. Open the disclosure note library you want to copy from in the right pane by selecting it from the drop-downmenu.

GENERATE DIAGNOSTICS REPORT
- 124 -
2. Expand the topic sections to locate the note you want to copy.
3. Select and right-click on the note. From the pop-upmenu select Copy to Engagement Library.
4. On the Copy to Library pop-up window, select the topics to which the disclosure notemost relates byselecting the check boxes next to the topic names.
5. Return to the engagement disclosure note library in the right pane to see the copied note under thetopics you selected in step 4.
Note: You can perform a keyword search here, and also edit or delete a disclosure note.
Preview a List of Disclosure Notes
To preview a list of disclosure notes:
1. Locate the disclosure note library you want to review in the right pane by selecting it from the drop-downmenu.
2. Right-click a note or topic in the right pane.
3. Select View Note(s) from the pop-upmenu.
4. TheView Note window displays the selected note.
5. Use thePrevious andNext buttons to navigate through the disclosure notes.
6. Click Close when finished to close the View Note window.
Select Multiple Disclosure Notes
You can select multiple disclosure notes in the right-pane by holding the CTRL key and left clicking thedisclosure note titles. You can then access the selected notes by using theView Note(s) action (or toolbaricon). Only the selected notes will be visible when you use the Previous and Next buttons on the View Notewindow. Then you can review a specific set of notes within a larger note library without having to navigatethrough the entire collection of notes.
Generate Diagnostics ReportAfter creating an engagement and completing all pertinent forms, you are ready to run theDiagnosticsReport. Review this report to discover inconsistencies or other conditions that you should consider beforegenerating your planning forms and audit programs.
To generate the Diagnostics Report:
On theNavigation pane, select Generation from theNavigation drop-down list.

GENERATE PLANNING FORMS AND AUDIT PROGRAMS
- 125 -
Generate Planning Forms and Audit ProgramsThe final step in the risk assessment process is to generate the engagement's planning forms and auditprograms.
When you click Generation on theNavigation pane drop-down list, SMART Practice Aids automatically runsa Diagnostics Report to alert you to inconsistencies or other conditions that you should consider beforegenerating your planning forms and audit programs. Complete the necessary information and then click Nexton theDiagnostics Report to go to the Planning Forms window where you can generate planning forms.
You can also access the document forms directly from theGenerateDocuments section in theNavigation pane as described in the followingprocedures.
To generate planning forms:
1. In theNavigation pane, select Generation from the drop-down list.
2. ExpandGenerate Documents and click Planning Forms.
TheGenerate Planning Forms window appears.
3. Select the check box for each planning form you want to generate.
4. Click Create Practice Aids to generate fully functional Practice Aidversions of the selected planning forms.
TheCreate Practice Aidswindow appears.
5. Either type in the directory path or use theBrowse button to locate the folder where you want to savethe planning forms.
Note: If you have set a default directory using Tools > Options > File Locations, that directory willbe selected as the default location when you generate and save your Practice aids. You can overridethe default location by designating a different directory in theBrowse for Folderwindow.
6. Click OK to generate and save the files.
Once generated, the planning forms in Practice Aids format can be opened usingMicrosoft® Word.
7. Click Next to go to the Generate Audit Programs window.
To generate audit programs:
1. In theNavigation pane, select Generation from the drop-down list.
2. ExpandGenerate Documents and click Audit Programs.
TheGenerate Audit Programs window appears.
3. Select the check box for each audit program you want to generate.
4. Click Create Practice Aids to generate fully functional Practice Aid versions of the selected audit
GENERATE CHECKLISTS OR NOTES
- 126 -
programs.
TheCreate Practice Aidswindow appears.
5. Either type in the directory path or use theBrowse button to locate the folder where you want to savethe audit programs.
Note: If you have set a default directory using Tools > Options > File Locations, that directory willbe selected as the default location when you generate and save your Practice aids. You can overridethe default location by designating a different directory in theBrowse for Folderwindow.
6. Click OK to generate and save the files.
Once generated, the audit programs in Practice Aids format can be opened usingMicrosoft® Word.
Note: For older titles, the Planning Form, Audit Report, and Diagnostics Report generationfunctionality is accessed from Step 4 in theNavigation pane.
To use the print preview feature:
1. Click the print preview icon next to the form you want to preview.
The print preview opens in thePreviewwindow.
2. Scroll through the preview document to review how it will print.
3. When you are ready to close the document, click theX in the upper right corner.
To use the preview right-click feature:
Once you open a document or form in preview mode (see the previous procedure), you can right-clickanywhere in the document to bring up a shortcut menu. This menu has options that let you print the previeweddocument, add to favorites, create a shortcut, and export to Microsoft Excel.
Generate Checklists or NotesWhen you have completed creating a disclosure checklist or a set of engagement disclosure notes, you cangenerate the checklist for the engagement, a document of the engagement notes, or a report of selected andunselected topics.
To generate checklists or notes:

ABOUT FIRM LIBRARIES
- 127 -
1. Select Generation from the left pane navigation drop-downmenu.
2. Select 2. Generate Documents in the left pane and then click Checklist and Disclosures.
The center pane will display the forms available for generation. The first item is the disclosurechecklist. The Topic Listing option will generate a report of the selected and unselected topics. TheNote Disclosures option generates aWord document containing the engagement disclosure notes.
3. Select the forms you want to generate by selecting the check boxes next to each title.
4. Click Create Practice Aids.
5. Enter a location to save the generated documents in theCreate Practice Aids window and click OK.The document generation process will begin. A progress meter will display how much of the generationprocess has been completed.
Note: For some older titles, the Disclosure Checklist/Note generation functionality is accessed fromStep 4 of the Risk Assessment module.
About Firm LibrariesUse the Firm Library application to create andmaintain databases of firm-approved disclosure examples(referred to as Firm Libraries). Disclosure examples in Firm Libraries are accessible to users working in anyengagement andmay be copied into the Engagement Library for use as a starting point when drafting notedisclosures for a specific entity. You can create any number of Firm Libraries. For example, youmight createone Firm Library for commercial entities, another for real estate entities, and another for nonprofitorganizations.
The Firm Library application is accessed separately from PPC's SMART Practice Aids. The icon on yourdesktop looks like this:
ADD AND DELETE NOTE EXAMPLES
- 128 -
General Navigation
The left pane of the Firm Library application lists the topics and related example disclosures contained in theopen Firm Library. Select a topic or note title in the left pane to view related disclosure examples in the centerpane. To edit a disclosure example in the open Firm Library, select the example in the center pane and chooseEdit Disclosure from the right-click menu or simply double-click the disclosure. To add a new disclosure,click theAdd Disclosure button at the bottom of the center pane. TheSave As function can also be used tosave an entire firm library under a different name.
In the right pane, you can view disclosures in any other Firm Library that is contained in the same database asthe open Firm Library. Select the Firm Library you want to view in the right pane from the drop-down box at thetop of the right pane. If you want, you can copy a disclosure from the right pane to the open Firm Library. To doso, click the disclosure in the right pane and select Copy to Open Firm Library from the right-click menu.
Note: You cannot edit disclosures in the right pane. Youmust open a Firm Library and use the left and centerpanes to edit its disclosures.
Add and Delete Note ExamplesOne of the primary functions of creating andmaintaining a Firm Library is adding disclosure note examples toa library and organizing them by topic.
To add a note to a Firm Library:
1. Open the Firm Library application from your desktop:
2. Use File > Open to open the Firm Library you want to work with ... (or create a new Library: File >New).
3. Click theAdd New Note button at the bottom of the center pane. (You can also select Add New Notefrom the Insertmenu.)
4. TheAdd New Notewindow opens. Type the title of the note in theEnter Disclosure Title field.
Note:You can also add an optional summary of the note by clickingSummary Description.
5. Select the topics you want to assign to the note by clicking in theAssigned Topics field. A selectionwindow will open.
6. Click the check box next to every topic you want to assign to the disclosure note.
7. Type the text of the disclosure note in the provided field. (Use the provided toolbar to format the notetext.)

ADD AND DELETE TOPICS
- 129 -
8. Click OK to save the note. The new note will display in the Navigation pane under the topics it wasassigned to.
To delete a note from a Firm Library:
1. Open the Firm Library application from your desktop.
2. Use File > Open to open the Firm Library you want to work with.
3. Locate the note you want to delete in the Navigation pane.
4. Right-click the note title and select Delete Note from the pop-upmenu.
5. Click OK on the confirmation window.
Add and Delete TopicsYou can add and delete topics from a Firm Library by using the Firm Library application.
To add a topic to a Firm Library:
1. Open the Firm Library application from your desktop:
2. Open the Firm Library you want to work with. Use File > Open (or create a new Library: File > New).
3. Select where you want to insert the new topic by selecting (left-clicking) and highlighting a topic in theleft Navigation pane.
4. From the Insert menu, select Topic Above or Topic Below to insert a new topic above or below thehighlighted topic in the Navigation pane.
5. On theAdd Topic pop-up window, type the topic description and click OK.
The new topic will be added to the Firm Library and will display in the Navigation pane.
Note: The Insert Topic Above and Topic Below actions are also available by right-clicking an existingtopic in the Navigation pane.
Organizing Topics
You can organize and arrange topics within the Firm Library by dragging and placing the topic where you wantit in the topic list. Click and drag the topic. (An arrow icon will indicate where the topic will be positioned.)
To delete a topic from a Firm Library:
1. Open the Firm Library application from your desktop.
2. Use File > Open to open the Firm Library you want to work with.

ADD AND DELETE TOPICS
- 130 -
3. Select the topic you want to delete and right-click the title in the Navigation pane.
4. Select Delete Topic from the pop-upmenu.
5. Click OK on the confirmation window.
The topic will be removed from the Firm Library.

BACK UP AND RESTORE A FIRM LIBRARY
- 131 -
Back up and Restore a Firm LibraryTo helpmanage your Firm Libraries, you can use the Firm Library application to back up a library you created(one library at a time) and restore a library from a previous backup.
To back up a firm library:
1. Open the Firm Library application from your desktop:
2. From the File menu, select Backup.
3. On theBackup Firm Library pop-up window, select the Firm Library you want to back up and clickNext.
4. On the second backup window, enter a name for the backup file.
5. Select the location where you want to save the backup file by entering the location in the provided fieldor by browsing for it with theBrowse button.
6. Click Finish.
The Firm Library backup file will be saved to the designated location.
To restore a Firm Library:
1. Open the Firm Library application from your desktop.
2. From the File menu, select Restore.
3. On theRestore Firm Library pop-up window, select the Firm Library backup file you want to restorefrom.
4. Click Restore.
The Firm Library backup file will be restored and added to the Firm Library list in the current database.
Note: If you attempt to restore a backup file with the same name as an existing Firm Library, youmust confirm that you want to overwrite the current library before the Restore action will complete.

SELECT/CHANGE THE LOCATION OF A FIRM LIBRARY
- 132 -
Select/Change the Location of a Firm LibraryTo select or change the location of a Firm Library to a different database or to a remote machine:
1. Click the Firm Library icon to open the Firm Library application from your desktop:
2. From the Tools menu, select Options and thenPoint to Firm Library Database.
3. Use theSelect Database Location window to select a new database. If the database is not visible inthe upper pane, locate or add themachine/server name in the bottom field.
4. When the database you want to point to has been located and is displayed in the top pane, click Selectto change the location of the Firm Library to the new database.

COPY NOTE EXAMPLES FROM ANOTHER LIBRARY
- 133 -
Copy Note Examples from Another LibraryThe Firm Library application provides a number of tools to help youmanage your library of disclosure notes.The Copy Note action copies a note example from another Library into the open Library. Using this feature,you can copy notes from other Firm Libraries and official PPC libraries.
To Copy a Note Example from Another Library:
1. Open the Firm Library application from your desktop:
2. Open the Firm Library you want to work with. Use File > Open (or create a new Library: File > New).
3. In theOther Libraries pane (to the right of the Firm Library interface), use the drop-downmenu toselect the Library from which you want to copy a note.
4. To locate the note you want to copy, use the "+" symbols to expand the topic listings.
5. Right-click the note you want to copy and select Copy to Open Library from the pop-upmenu.
6. On theCopy to Library pop-up window, select the topics you want to assign to the note by clickingthe check box next to the topic titles.
7. Click OK.
The note will be added to the open library in the topics specified.

CREATE A FIRM LIBRARY
- 134 -
Create a Firm LibraryTo create a new firm library:
1. Click the Firm Library icon to open the Firm Library application from your desktop:
2. From the File menu, select New.
3. On theCreate Firm Library pop-up window, select the database to add this Firm Library to and enter aname for the new Firm Library.
4. Click OK.
The new Firm Library will be generated and opened in the application.

DELETE A FIRM LIBRARY
- 135 -
Delete a Firm LibraryTo delete a firm library:
1. Click the Firm Library icon to open the Firm Library application from your desktop:
2. From the File menu, select Delete.
3. On theDelete Firm Library pop-up window, select the Firm Library you want to delete.
4. Click theDelete Firm Library button.
5. Click Yes on the confirmation window.
The Firm Library will be deleted from the database.
Download PPC LibrariesPPC has created firm libraries for commercial, nonprofit, and governmental entities, each containing hundredsof note disclosure examples. Depending on the Practice Aids titles you own, you are licensed to downloadone or more of these libraries for use in this application.
To download a PPC Firm Library:
1. Select Download PPC Disclosure Libraries from the File menu.
2. From the pop-up window, select the check box next to the Libraries you want to download.
3. Click Download.
The application will download the library and add it to theOther Libraries drop-down list in the rightpane. To access this library, select it from themenu.

FIRM LIBRARY NAVIGATION
- 136 -
Firm Library NavigationFollowing are the complete Firm Library navigation andmenu options by mainmenu category:
File
Name Description Shortcut
New Create a new firm library. Alt + F + N
Open Open an existing firm library. Alt + F + O
Close Close the open firm library. Alt + F + C
Save Save the current firm library. Alt + F + S
Save as Save the current firm library and specify a filename. Alt + F + A
Delete Delete a firm library. Alt + F + D
Backup Create a backup of a firm library. Alt + F + B
Restore Restore a firm library from a backup. Alt + F + R
Download PPC DisclosureLibrary
Download a PPC Disclosure Library via your network orInternet connection.
Exit Exit the program. Alt + F + X
Edit
Name Description Shortcut
Copy Copy the selected text. Alt + E + C
Paste Paste the selected text. Alt + E + P
Modify Edit a disclosure note or topic.
Delete Delete a disclosure note or topic. Alt + E + D
Firm Library Setup Edit the name of the current firm library. Alt + E + F
View
Name Description Shortcut
NoteView the selected note from the current firm libraryvisible in the Other Libraries pane (right side of theinterface.)

FIRM LIBRARY NAVIGATION
- 137 -
Insert
Name Description Shortcut
Topic Above Add a new topic above the selected disclosure topic.
Topic Below Add a new topic below the selected disclosure topic.
Add New Note Add a new note to the selected disclosure topic.
Tools
Name Description Shortcut
Transfer Transfer an existing firm library to another database. Alt + T +T
Receive Import an existing firm library into your database. Alt + T +R
Delete TransferFiles Select and delete files that have been transferred to another database. Alt + T +
W + D
Delete BackupFiles
Select and delete backup files that have been created using the File >Backup action.
Alt + T +W + B
Options
TheOptions sub-menu contains these actions:
Name Description Shortcut
File Locations Define default file locationsfor your firm libraries.
Alt + T + O +F
Point to Firm LibraryDatabase
Set the database to use forloading your firm libraries.
Alt + T + O +P
Application SettingsReview/Modify settingssuch as Username andMulti-user access.
Alt + T + O +A
Alt + T +O
Help
Name Description Shortcut
Smart PracticeAids Help Access the online help system. Alt + H +
H
Quick Tour (displaytutorial) Launch the SMART Practice Aids multimedia tutorial. Alt + H +
T
Documentation Access the SMART Practice Aids Documentation launch page on theCustomer Help Center website.
Alt + H +D
Support on the Access the SMART Practice Aids Product Support page on the Alt + H +

FIRM LIBRARY NAVIGATION
- 138 -
Name Description Shortcut
Web Customer Help Center website. S
Frequently AskedQuestions Edit the name of the current firm library. Alt + H +
F
Reset All Tips Re-enable the "How to" and Navigational Tips if they have beendisabled.
Alt + H +R
About... View the Firm Library version and license information. Alt + H +A

GENERATE A REPORT OF FIRM LIBRARY DISCLOSURE NOTES
- 139 -
Generate a Report of Firm Library Disclosure NotesYou can generate a report containing the disclosure notes for a specific Firm Library using the Firm Libraryapplication.
1. Open the Firm Library application from your desktop:
2. Select Generation from the left pane navigation drop-downmenu.
3. The center pane will display the Firm Library contents by topic. Indicate which topics you want toinclude in the report by expanding the categories and selecting the check boxes.
4. Click theCreate Practice Aids button at the bottom of the window.
5. Enter a location to save the generated documents on theCreate Practice Aids pop-up window andclick OK. The document generation process will begin, and a progress meter will display how much ofthe generation process has completed.

MOVE A FIRM LIBRARY TO ANOTHER DATABASE
- 140 -
Move a Firm Library to Another DatabaseFirm Libraries can bemoved to other databases using the Transfer and Receive functions within the FirmLibrary application. This makes it easy to share a Firm Library with remote users or locations.
To Create a Transfer file for a Firm Library:
1. Open the Firm Library application from your desktop:
2. From the Tools menu, select Transfer Library.
3. In the Transfer Firm Library select the Firm Library you want to transfer and click Next.
4. On the second screen of the transfer window, enter a name for the backup file.
5. Select the location where you want to save the transfer file by entering location in the provided field orbrowsing for it with theBrowse button. If you want to e-mail the transfer file, select the Transfer by e-mail check box. (When you click Finish, an email with the attached transfer file will be opened.)
6. Click Finish.
To Receive a Firm Library:
1. Open the Firm Library application from your desktop.
2. From the Tools menu, select Receive Library.
3. On theReceive Firm Library pop-up window, select the Firm Library transfer file you want to receive.
4. Click Receive.
The Firm Library transfer file will be restored and added to the Firm Library list in the current database.
Note: If you attempt to receive a transfer file with the same name as an existing Firm Library, youmust confirm that you want to overwrite the current library before the Receive Library action willcomplete.

OPEN A FIRM LIBRARY
- 141 -
Open a Firm LibraryTo open an existing firm library:
1. Click the Firm Library icon to open the Firm Library application from your desktop:
2. From the File menu, select Open.
3. On theOpen Firm Library pop-up window, select the Firm Library you want to open.
4. Click Open.
The Firm Library will be opened in the application.

RENAME A FIRM LIBRARY
- 142 -
Rename a Firm LibraryTo rename an existing firm library:
1. Click the Firm Library icon to open the Firm Library application from your desktop:
2. From theEdit menu, select Firm Library Setup.
3. On the Firm Library Setup pop-up window, enter the new name for the Firm Library.
4. Click OK.
The Firm Library name has been changed. Once you save the Firm Library (File > Save), the newnamewill display in the list of available Firm Libraries.

ABOUT SMART PRACTICE AIDS - FIELDWORK
- 143 -
About SMART Practice Aids - Field WorkSMART Practice Aids – Field Work is the newest addition to PPC’s SMART Audit Suite. You can nowplan and execute the entire PPC audit process within the SMART Suite, providing evenmore efficiency toyour audit workflow experience. For auditors who use external engagement management software, theinteraction with SMART will be evenmore seamless. SMART Practice Aids – FieldWork is designed to workin conjunction with SMART Practice Aids – Risk Assessment (separate license required).
Consider the advantages of using SMART Practice Aids – FieldWork:
l The PPC Practice Aids you need are automatically placed into your SMART engagement.
Note: A new SMART engagement will be populated with a set of default, blank PPC Practice Aidsthat are common tomost audit engagements, and the Practice Aids will be linked automatically toapplicable audit program steps.
l Other PPC Practice Aids can easily be added as needed.
l Data and decision information are shared automatically among the SMART Practice Aids.
l Your planningmateriality, tolerable misstatement, and risk assessments are carried throughout youraudit engagement.
l Easily complete your audit work and sign off audit program steps within SMART and insert linkedworkpaper references.
l Dynamic SMART functionality provides diagnostics, rollforward, links to content on Checkpoint,multi-user capability, andmaster engagements.
An engagement that was created by rolling forward a prior SMART engagement will be populated with thePractice Aids as defined in your rollforward settings. Regardless, you can easily remove or add any SMARTPractice Aids during your engagement.

ENABLE SMART PRACTICE AIDS - FIELDWORK
- 144 -
Enable SMART Practice Aids - Field WorkIf SMART Practice Aids – Field Work is installed, you can enable it for any engagement for which youintend to use the tool. You can enable it when you want to create a new engagement or for an existingengagement.
Once you enable SMART Practice Aids – FieldWork for an engagement, you cannot disable it.
To enable SMART Practice Aids – Field Work for a new engagement:
1. Select New from the File menu (or click theNew button on the tool bar).
2. Complete the fields on theCreate Client Engagement window.
3. Click Next.
4. Select the Field Work check box (if it is not already checked by default) and complete all pertinentfields.
To enable SMART Practice Aids – Field Work for an existing engagement:
1. With the engagement open, click File on themenu bar.
2. Select Enable Field Work.
If theEnable Field Work menu option is not active, then SMART Practice Aids - FieldWork has eitheralready been enabled for the engagement or it is not available for the selected title.
When using theRollforward tool to create a new engagement based on a prior-period engagement, you havethe option to useSMART Practice Aids – Field Work with the new engagement.
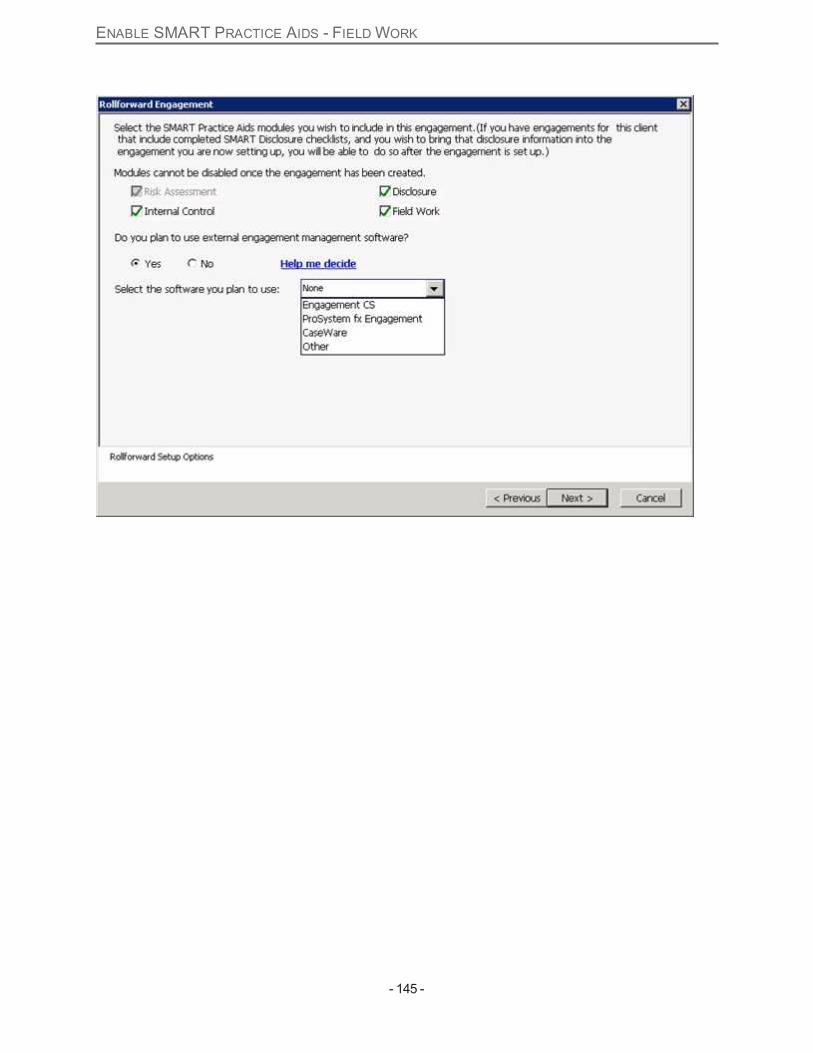
ENABLE SMART PRACTICE AIDS - FIELDWORK
- 145 -

ENGAGEMENT SETUP – FIELDWORK
- 146 -
Engagement Setup – Field WorkSome firms use document management software such as Engagement CS to organize andmanage theirengagement workpapers. With SMART Practice Aids – Field Work, you can achieve all of the benefits ofhaving your entire PPC engagement within SMART while continuing to use your document managementsoftware to organize andmanage your engagement workpapers.
Using external document management software:
l Blocks the ability to sign off (and finalize) documents in SMART since it is assumed that theseactivities will be done in your document management software.
l Allows you to add only PPC Forms that are SMART enabled for sharing of key data with other forms,since it is assumed that all other document types will bemanaged in your document managementsoftware.
l Provides automatic prompting at the beginning of your engagement to create SMART Docs forplacement in your document management software and subsequent prompting to update SMARTDocs when needed.
l Gives you the option of invoking full Navigation pane functionality so you can view your documents inSMART in a tree list view.

DYNAMIC DATA FLOW BETWEEN SMART WORKPAPERS
- 147 -
Dynamic Data Flow Between SMART WorkpapersSMART FieldWork brings the widely-used dynamic SMART functionality to all aspects of the audit, frombeginning to end. This means that conclusions reached in one area flow through to others so that you don’tneed tomanually input the same information in multiple documents. Data and information are automaticallyshared between practice aids. For example, your planningmateriality, tolerable misstatement, and riskassessments are carried throughout your audit engagement, and staff are alerted to any errors orinconsistencies. UsingMulti-user capability, different auditors can work on different parts of the auditsimultaneously.
Note: Tolerable misstatement is brought forward to areas throughout the engagement where sampling orother scope decisions aremade.

SMART AUDIT PROGRAM DESIGN
- 148 -
SMART Audit Program DesignSMART Audit Program Design (available from theView menu) enhances the standard design view byallowing you to filter your audit program to display only audit procedures, identified risks, and riskassessments related to one of more selected assertions. The purpose is to help you isolate risks and auditprocedures for one of more assertions, helping you ensure that you are not over-auditing or under-auditing theassertion. You can view identified risks and edit audit program procedures in this view.
Complete Audit ProgramsDouble-click any blue underlined PPC workpaper reference to add the workpaper to your engagement or tonavigate to the workpaper if it already exists in your engagement. You can also assign any workpaper to anaudit program step, which places a link to the workpaper in theWorkpaper Index column.
Sign off steps as they are completed by right-clicking the step and selectingStep Sign-off. Click the yellowcomment icon next to a step to add comments, as needed.

COMPLETE AUDIT PROGRAMS
- 149 -
Notice that the pop-upmenu gives you several other options, including inserting workpaper andmemoreferences, as well as hyperlinks.
Insert Workpaper Reference
To add a related workpaper, right-click an existing workpaper in theWorkpaper Index column and selectInsert Workpaper Reference from the pop-upmenu. On the Insert Workpaper Referencewindow, click theplus sign to expand a category.
Select the workpaper and click Select. The additional workpaper becomes available.
Insert a MemoReference
To add amemo related to a workpaper in theWorkpaper Index column, right-click and select Insert MemoReference from the pop-upmenu. Type your memo and click OK. Your memo appears below the relatedworkpaper.
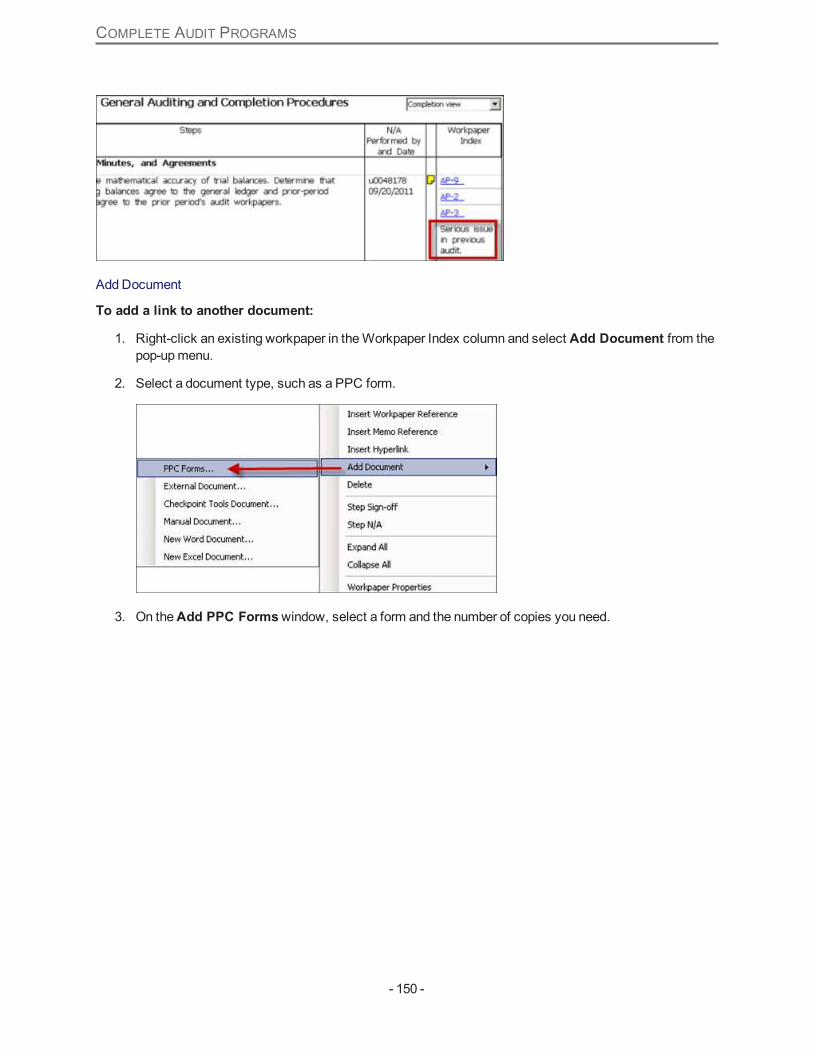
COMPLETE AUDIT PROGRAMS
- 150 -
Add Document
To add a link to another document:
1. Right-click an existing workpaper in theWorkpaper Index column and select Add Document from thepop-upmenu.
2. Select a document type, such as a PPC form.
3. On theAdd PPC Formswindow, select a form and the number of copies you need.

COMPLETE AUDIT PROGRAMS
- 151 -
Sign-Off Properties
For sign-off, you can determine what displays in thePerformed by and Date column: initials, date format,and the date you want to display. To access the Sign-off Properties window, select Sign-off Properties fromthe Toolsmenu:
Note: If you select Yes to use engagement management software, you will be able to add only SMART-enabled documents. (SMART- enabled documents are PPC forms that open in the center pane.)

ENGAGEMENT DASHBOARD
- 152 -
Engagement DashboardTheEngagement Dashboard lets you see your engagement's status at a glance–both for the overallengagement and for each engagement area, including program steps not yet started, in progress, orcompleted.
To open the Engagement Dashboard, click Dashboard in the toolbar at the top of the window.
In the Dashboard, you can see a visual display of your engagement status.

CREATE SMART DOCS
- 153 -
Create SMART DocsYou can create SMART image documents (SMART Docs) for any of the PPC workpapers in yourengagement for use outside of SMART Practice Aids, such as for storing them in your engagementmanagement software. Select Create SMART Docs from the Tools menu.
Tomake it easy to stay in synch with workpapers you have stored in your engagement software, a flag iconnext to the document name indicates that the document has never been created, or that it has changed sincethe last time it was created.

INSERT REVIEW NOTE DOCUMENTS
- 154 -
Insert Review Note DocumentsYou have the option to insert aReview Note Document, which adds a template to provide basic review notefunctionality. Firms can instead use their ownMicrosoft Word documents for review notes.
To insert aReview Note Document, select this option from the Insert menu. Then theWorkpaper Propertieswindow displays your Review Note reference and title.
On the Diagnostics Report, you are notified if you have any review note documents remaining in theengagement, so you can delete them.
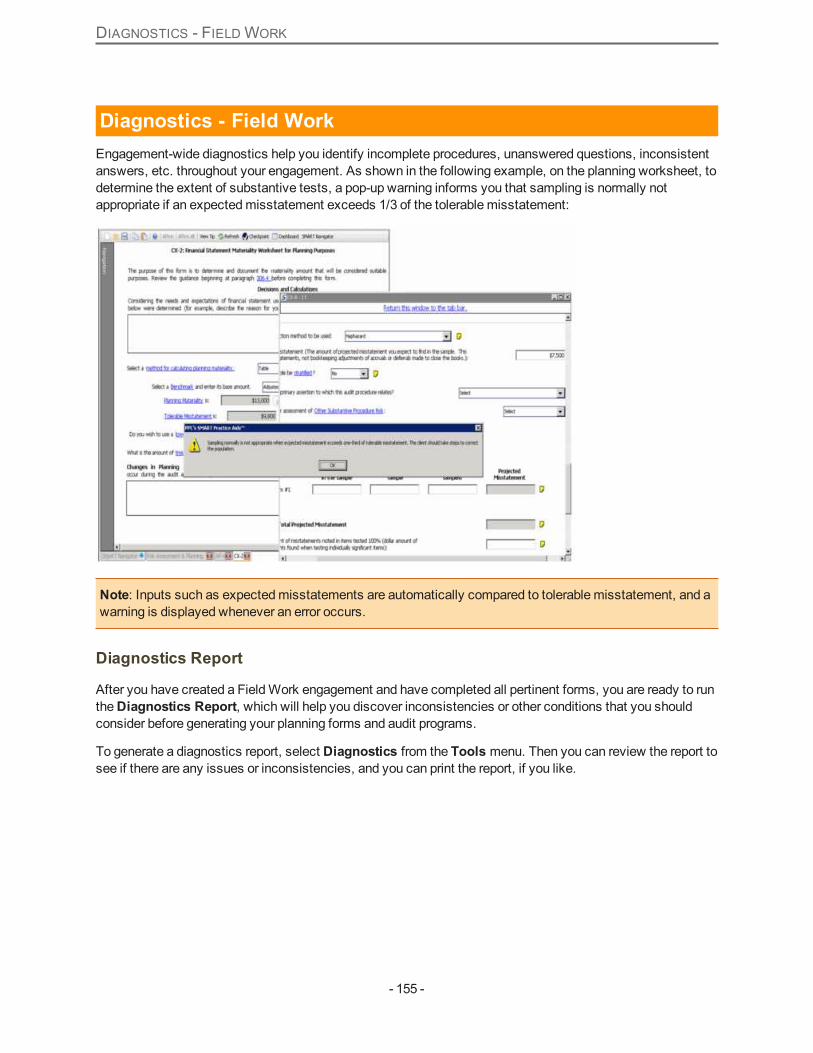
DIAGNOSTICS - FIELDWORK
- 155 -
Diagnostics - Field WorkEngagement-wide diagnostics help you identify incomplete procedures, unanswered questions, inconsistentanswers, etc. throughout your engagement. As shown in the following example, on the planning worksheet, todetermine the extent of substantive tests, a pop-up warning informs you that sampling is normally notappropriate if an expectedmisstatement exceeds 1/3 of the tolerable misstatement:
Note: Inputs such as expectedmisstatements are automatically compared to tolerable misstatement, and awarning is displayed whenever an error occurs.
Diagnostics Report
After you have created a FieldWork engagement and have completed all pertinent forms, you are ready to runtheDiagnostics Report, which will help you discover inconsistencies or other conditions that you shouldconsider before generating your planning forms and audit programs.
To generate a diagnostics report, select Diagnostics from the Tools menu. Then you can review the report tosee if there are any issues or inconsistencies, and you can print the report, if you like.
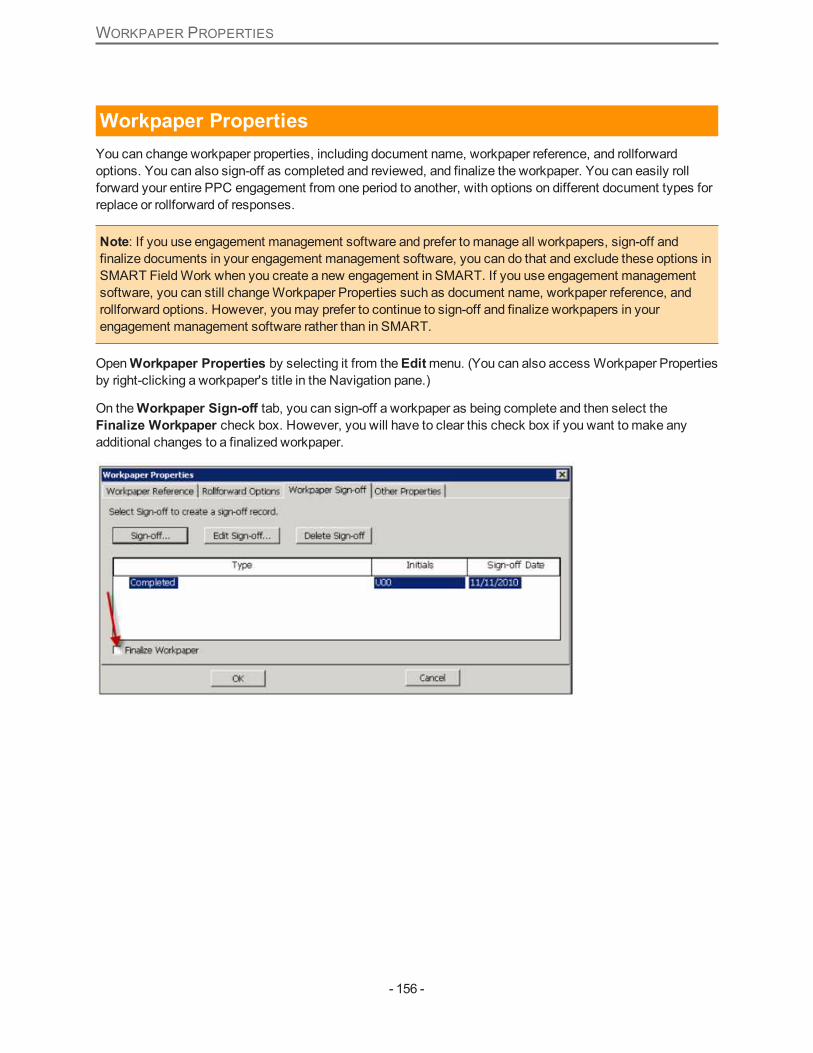
WORKPAPER PROPERTIES
- 156 -
Workpaper PropertiesYou can change workpaper properties, including document name, workpaper reference, and rollforwardoptions. You can also sign-off as completed and reviewed, and finalize the workpaper. You can easily rollforward your entire PPC engagement from one period to another, with options on different document types forreplace or rollforward of responses.
Note: If you use engagement management software and prefer to manage all workpapers, sign-off andfinalize documents in your engagement management software, you can do that and exclude these options inSMART FieldWork when you create a new engagement in SMART. If you use engagement managementsoftware, you can still changeWorkpaper Properties such as document name, workpaper reference, androllforward options. However, youmay prefer to continue to sign-off and finalize workpapers in yourengagement management software rather than in SMART.
OpenWorkpaper Properties by selecting it from theEditmenu. (You can also access Workpaper Propertiesby right-clicking a workpaper's title in the Navigation pane.)
On theWorkpaper Sign-off tab, you can sign-off a workpaper as being complete and then select theFinalize Workpaper check box. However, you will have to clear this check box if you want to make anyadditional changes to a finalized workpaper.

WORKPAPER STATUS REPORT
- 157 -
Workpaper Status ReportTheWorkpaper Status Report provides a summary of completed and reviewed workpapers. This feature isavailable from the Toolsmenuwhen the Field Work module is enabled.
Note: TheWorkpaper Status Report is also available from a tab on theEngagement Dashboardwindow.

WORKPAPER TABS
- 158 -
Workpaper TabsA tab for each workpaper that is open appears in the tab bar at the bottom of the screen. Quickly jump fromworkpaper to workpaper by clicking the tabs, or close a workpaper by clicking the red X on its tab. You canhavemultiple workpapers open on a single monitor or multiple monitors. Simply drag the tab off the tab bar. Asindicated by the red arrow below, you can return the workpaper to the tab bar by clickingReturn this windowto the tab bar.

HELPFUL TIPS FOR USING SMART PRACTICE AIDS FIELDWORK
- 159 -
Helpful Tips for Using SMART Practice Aids Field WorkHelpful Tips for Using SMART Practice Aids – FieldWork:
Workpaper Status: In SMART Navigator, if you chose to use SMART tomanage your engagement, you willalso see a status for each workpaper related to a step. Clicking this workpaper status opens the workpaper.
Workpaper Tabs: A tab for each workpaper that is open appears at the bottom of the window.
Quickly jump from workpaper to workpaper by clicking the tabs, or close a workpaper by clicking the red X onits tab. To view two documents simultaneously whenmultiple monitors are being used, you can open aworkpaper in a separate window by dragging its tab off the tab bar. To return the workpaper back to a tab in themain application, click Return this window to the tab bar. at the top of the window.
Signing Off and Finalizing Workpapers: If you chose tomanage your engagement using SMART, you cansign off workpapers as you complete or review them. To do so, select Edit | Workpaper Sign-off from themenu (or right-click the workpaper title in the Navigation pane and selectWorkpaper Sign-off).
From the sign-off window, you can also place the workpaper in a read-only state by selecting the FinalizeWorkpaper check box. Users cannot make changes to finalized workpapers without first clearing this checkbox.
Workpaper Properties: You can change various workpaper attributes including its title, workpaper reference,behavior during rollforward, and sign-offs. To do so, select Edit | Workpaper Properties from themenu orright-click the workpaper’s title in the Navigation pane.
Enable Full Navigation: If you indicated during engagement setup that you intend to use externalengagement management software tomanage your engagement, it is assumed that you will access

HELPFUL TIPS FOR USING SMART PRACTICE AIDS FIELDWORK
- 160 -
documents in SMART through your engagement management software. Consequently, the Navigation panein SMART is disabled by default. However, to provide you with maximum flexibility, you have the option ofenabling full Navigation pane functionality within SMART. You will easily be able to view workpapers in theengagement and not affect the way in which SMART interacts with your engagement management software.
After your engagement is created, you can enable Full Navigation pane functionality by selectingEnable FullNavigation from theView menu.

LEFT NAVIGATION TREE
- 161 -
Left Navigation TreeThe left Navigation tree appears in the left pane on themain application window.
It displays all of the steps in the engagement process and each form, procedure, and sub-step. Click aheading in this pane to navigate to a new section or step. Use the drop-downmenu to select audit areas for theengagement.
To close the Navigation pane, first click thePin icon.
Then click anywhere outside of the Navigation pane and it will collapse. To reopen the Navigation pane, clickinside the shaded Navigation area.

LEFT NAVIGATION TREE
- 162 -

SMART NAVIGATOR
- 163 -
SMART NavigatorSMART Navigator is designed to guide you through the PPC engagement process in themost efficientmanner, from beginning to end. It also provides a convenient visual status of each step in your engagement.
Note: Use of SMART Navigator is optional.
Depending on your needs and preferences, SMART Practice Aids – FieldWork gives you significant flexibilityin that you can navigate your engagement in a number of different ways, including SMART Navigator, the leftnavigation pane, audit programs, and tabs at the bottom of the window for each open workpaper.
If you want to utilize SMART Navigator as a guide for your PPC engagement process, begin at step 1 inGeneral Planning Procedures and proceed sequentially from there. In this way, your General PlanningProcedures serve as a roadmap for conducting your engagement and help you avoid completing unnecessaryworkpapers.
In addition to clicking the SMART Navigator tab at the bottom of the window, you can also click theSMARTNavigator button at the top.

WORKPAPER TABS
- 164 -
Workpaper TabsA tab for each workpaper that is open appears in the tab bar at the bottom of the window. Quickly jump fromworkpaper to workpaper by clicking the tabs, or close a workpaper by clicking the red X on its tab. You canhavemultiple workpapers open on a single monitor or multiple monitors. Simply drag the tab off the tab bar. Asindicated by the red arrow below, you can return the workpaper to the tab bar by clickingReturn this windowto the tab bar.

ENGAGEMENT MANAGEMENT SOFTWARE INTEGRATION
- 165 -
Engagement Management Software IntegrationWhether you are using Profx Engagement, Engagement CS or CaseWare as your engagement managementsoftware, SMART FieldWork helps you with your audit process by offering two options for documentmanagement:
Create SMART image documents (SMART Docs) that make staying in synch with your engagementmanagement softwaremore seamless.
OR
Manage all documents for your audit engagements within SMART.
Specify your preference to use engagement management software by clickingYES on the Create ClientEngagement screen.
While utilizing FieldWork, if you have created SMART Docs to store in your engagement software, when youopen a specific SMART Doc, you will see a read-only view of the workpaper as it existed at the time theSMART Doc was created. If you need to change that document or complete additional work in that area,select PPC>Open Workpaper in SMART Practice Aids from themenu inWord, which will launch youdirectly to that appropriate workpaper within SMART, ensuring that your PPC workpapers always stay insynch. Every time you use SMART, documents that have changed will be flagged so you can easily identifyin your engagement software which versions need to be updated.
Note: If you do not use engagement software, you do not have to create SMART Docs; you can store all ofyour documents in SMART.

SYNCHRONIZE WORKPAPERS WITH SMART
- 166 -
Synchronize Workpapers with SMARTWhen you open a SMART Doc that is stored in your engagement software, you will see a read-only view ofthe workpaper as it existed at the time the SMART Doc was created. This is a great feature for reviewers. Ifyou need to change that document or complete additional work in that area, select PPC > Open workpaperin SMART Practice Aids® from themenu inWord, which will launch you directly to the appropriateworkpaper within SMART, ensuring that your PPC workpapers always stay in synch.
After youmake changes in SMART, you will be prompted to update the documents that have changed in yourengagement management software.
Note: Youmay get an error message if you switch to a SMART database that does not contain theengagement from which the workpaper was generated.

USE SMART WITH YOUR ENGAGEMENT MANAGEMENT SOFTWARE
- 167 -
Use SMART with your Engagement Management SoftwareWhen using SMART in conjunction with your engagement management software:
l Youwill be able to continue using your engagement management software as you always have. Youwill also have the added value of critical engagement-level information dynamically shared throughoutyour PPC engagement. Diagnostics will alert you to errors or inconsistencies within yourengagement. And you will be able to take advantage of valuable engagement tools such as SmartNavigation, Engagement Dashboard, andSmart Procedures Design.
l SMART Docs generated by SMART will reside within your engagement management software, soyou will be able to open read-only versions of the workpapers for review. You will have the option tolaunch directly to the applicable workpaper in SMART for editing the live version.
l SMART will prompt you whenever the SMART Docs need to be initially created and will continue toprompt you whenever they need to be refreshed and updated. In this way, you can continue tomanage your engagement through your engagement management software, and your PPCworkpapers will always be in synch and up-to-date.
l When accessing workpapers within SMART, you will also be notified that youmay not have rights tothe workpaper within your engagement management software.
l If you select Yes to use engagement management software, you will be able to add only SMART-enabled documents.

MANAGE YOUR ENTIRE ENGAGEMENT IN SMART
- 168 -
Manage Your Entire Engagement in SMART
Add and manage documents in SMART
You can add andmanage PPC Practice Aids, Checkpoint Tools documents, external documents, manualdocument references, Word and Excel documents. Workpapers and schedules already created outside ofSMART can easily be added andmanaged in SMART. Create your ownWord and Excel documents andmanage them in SMART; they will open directly inWord or Excel for easy editing. You can link directly to anytype of document from workpaper references, and your information carries dynamically, where applicable, toSMART Practice Aids documents, creating efficiency in your audit engagement process.
Note: PPC Forms include forms that are specially managed in SMART for more efficient completion and toenable sharing of key data with other forms. These forms open as windows within SMART. CheckpointTools documents include any of the available Checkpoint Tools documents for the applicable title. Forediting, they open in their nativeWord or Excel formats.
To add a document in SMART, select Add Document from the Insert menu.
Note: Firms that choose to use engagement management software can still add andmanage otherdocument types such as external documents andWord and Excel documents in SMART, although they mayprefer to continue to do that in their engagement management software rather than in SMART. As noted,SMART Practice Aids – FieldWork provides great flexibility andmany options so that firms can choose theapproach that works best for them.
Use SMART Without Engagement Management SoftwareYou can create engagements without using external engagement management software. On the Create ClientEngagement window, click No to indicate this preference.

USE SMART WITHOUT ENGAGEMENT MANAGEMENT SOFTWARE
- 169 -
If you are creating a new SMART engagement, it will be populated with a set of default, blank PPCworkpapers, common tomost engagements, and the workpapers will be linked automatically to applicableprogram steps. If you created this engagement by rolling forward a prior SMART engagement, it will bepopulated with workpapers as defined in your rollforward settings. Regardless, you can easily remove or addany PPC workpaper during your engagement.
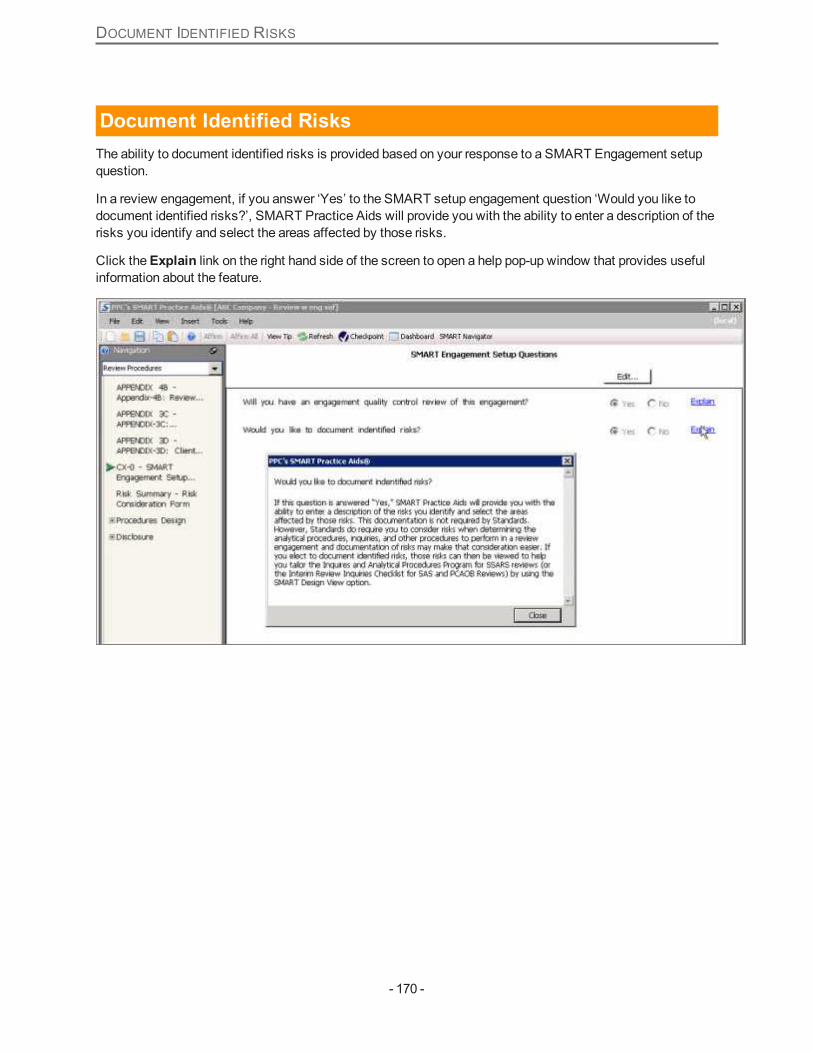
DOCUMENT IDENTIFIED RISKS
- 170 -
Document Identified RisksThe ability to document identified risks is provided based on your response to a SMART Engagement setupquestion.
In a review engagement, if you answer ‘Yes’ to the SMART setup engagement question ‘Would you like todocument identified risks?’, SMART Practice Aids will provide you with the ability to enter a description of therisks you identify and select the areas affected by those risks.
Click theExplain link on the right hand side of the screen to open a help pop-up window that provides usefulinformation about the feature.

ADD RISK
- 171 -
Add RiskIn your review engagement, once you answer yes to theSMART Setup Engagement Question to documentthe risk, you have the option to add a risk. You will not see this option unless you previously selected todocument identified risks.
Click theAdd Risk button in the Identified Risks pane on the right.
In the Identified Risk dialog, enter a description in the available field. Select any applicable FinancialStatement areas and click Finish.

ADD RISK
- 172 -
The new Identified Risk appears in the right hand pane.

ADD RISK
- 173 -

RISK SUMMARY
- 174 -
Risk SummaryAny risk that had been added will show up in theRisk Consideration Form. This information in the RiskConsideration Form can only be viewed and cannot be edited.

HOW TO COMPLETE PROCEDURES
- 175 -
How to Complete ProceduresWhen you finish creating a new engagement, or when you open an existing one, it opens in the SMARTNavigator by default.
Note: In addition to SMART Navigator, you can navigate your engagement through the left hand navigationpane or the tabs at the bottom of the screen. You can also navigate via the View Procedures link at the top ofthe screen.
To complete a procedure using the SMART Navigator view:
1. Click theMore... link beside the procedure to check if there is more information that needs to becompleted. TheProcedure Details for Review Procedureswindow opens with the information.
2. Click thePractical Considerations link. If there are any forms available in the practicalconsiderations, you can add them from here. (See Add Forms)
3. Once you have completed your form, return to the SMART Navigator by using themenu button at thetop or by clicking the SMART Navigator tab at the bottom of the screen.

HOW TO COMPLETE PROCEDURES
- 176 -
4. In the SMART Navigator view, click theStart button beside the step. The Review Procedures stepsopen up in the completion view.
5. You can add a comment beside each step by clicking the icon beside the step.
6. Right click in theDone by or N/A column. From the pop-upmenu select Step Sign-off. You can alsoselect Step Sign-off from the Insertmenu.
7. You can also insert aWorkpaper Reference if necessary. Right-click in the ‘Workpaper Reference’column and select Insert Workpaper Reference from the pop-upmenu.
Note: The pop-upmenu gives you several other options, including inserting workpaper andmemoreferences, as well as hyperlinks. (See Complete Audit Programs)
If you switch back to the SMART Navigator view, you will see aCompleted button beside the procedure youhave completed.

HOW TO ADD FORMS
- 177 -
How to Add FormsWhile completing a procedure, you can add additional forms that are available for that procedure fromPractical Considerations.To add a form:
1. In the review engagement, click theMore... link. TheProcedure Details for Review Procedureswindow opens.
2. Click Practical Considerations. The Practical Considerations window opens with details of anyadditional forms you can add to the procedure.
3. Double-click the link to the form. TheGo to/Link To Workpaperwindow opens.

HOW TO ADD FORMS
- 178 -
4. Select the required form and click Open to go to the form or click Add Link to add a link to the form inthat particular step.

HOW TO INSERT ORMODIFY PROCEDURE
- 179 -
How to Insert or Modify ProcedureGo to the Insertmenu or right click and select Insert Procedure. You can insert aProcedure Above orBelow.
Describe the procedure and click OK.

HOW TO INSERT ORMODIFY PROCEDURE
- 180 -
The changes youmake will show up in red.
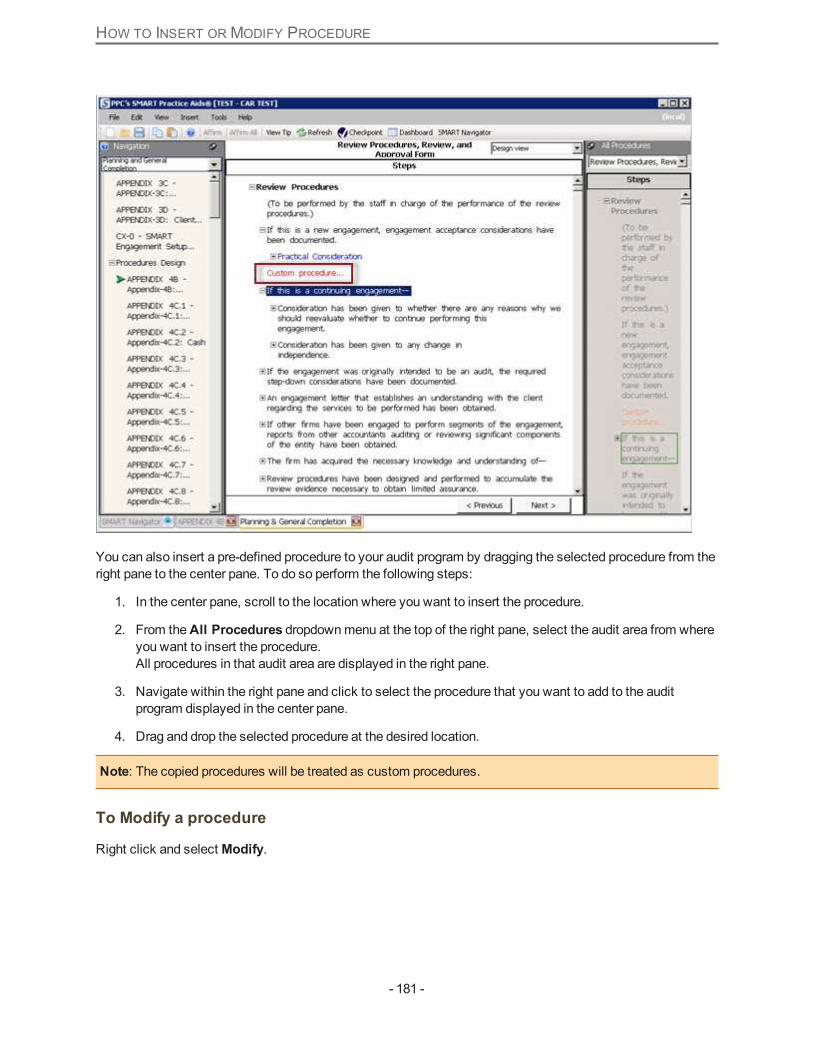
HOW TO INSERT ORMODIFY PROCEDURE
- 181 -
You can also insert a pre-defined procedure to your audit program by dragging the selected procedure from theright pane to the center pane. To do so perform the following steps:
1. In the center pane, scroll to the location where you want to insert the procedure.
2. From theAll Procedures dropdownmenu at the top of the right pane, select the audit area from whereyou want to insert the procedure.All procedures in that audit area are displayed in the right pane.
3. Navigate within the right pane and click to select the procedure that you want to add to the auditprogram displayed in the center pane.
4. Drag and drop the selected procedure at the desired location.
Note: The copied procedures will be treated as custom procedures.
To Modify a procedure
Right click and selectModify.
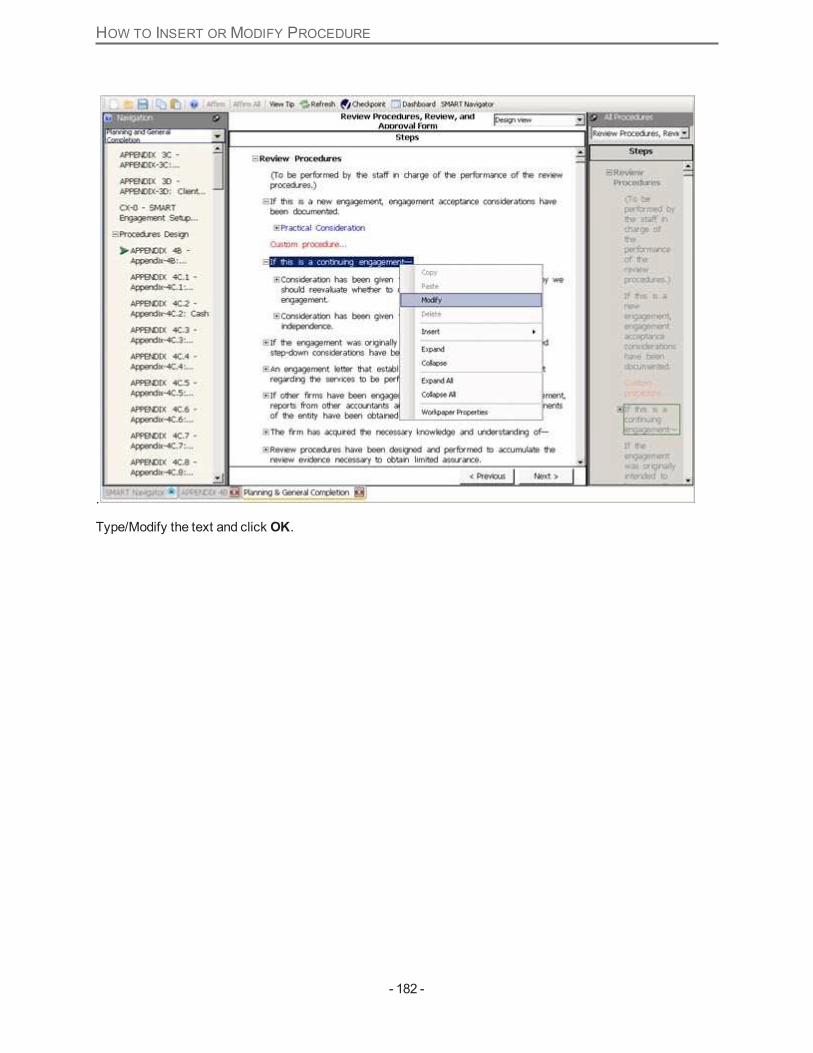
HOW TO INSERT ORMODIFY PROCEDURE
- 182 -
.
Type/Modify the text and click OK.

HOW TO INSERT ORMODIFY PROCEDURE
- 183 -
A flag icon appears next to themodified text, hovering over it tells you that the step has beenmodified.

HOW TO INSERT ORMODIFY PROCEDURE
- 184 -
Click the flag and theReset Procedurewindow opens. You have the option of selecting the previous optionor themodified version as needed.

HOW TO INSERT ORMODIFY PROCEDURE
- 185 -

SMART DESIGN VIEW
- 186 -
SMART Design View
Note:SMART design view will only appear if you have added a risk to the review engagement.
Select Procedures Design from the left hand navigation pane and select your procedure form. In the upperright hand corner of themain screen, select SMART design view.
You can edit your procedures and view the risk you had entered in one screen.
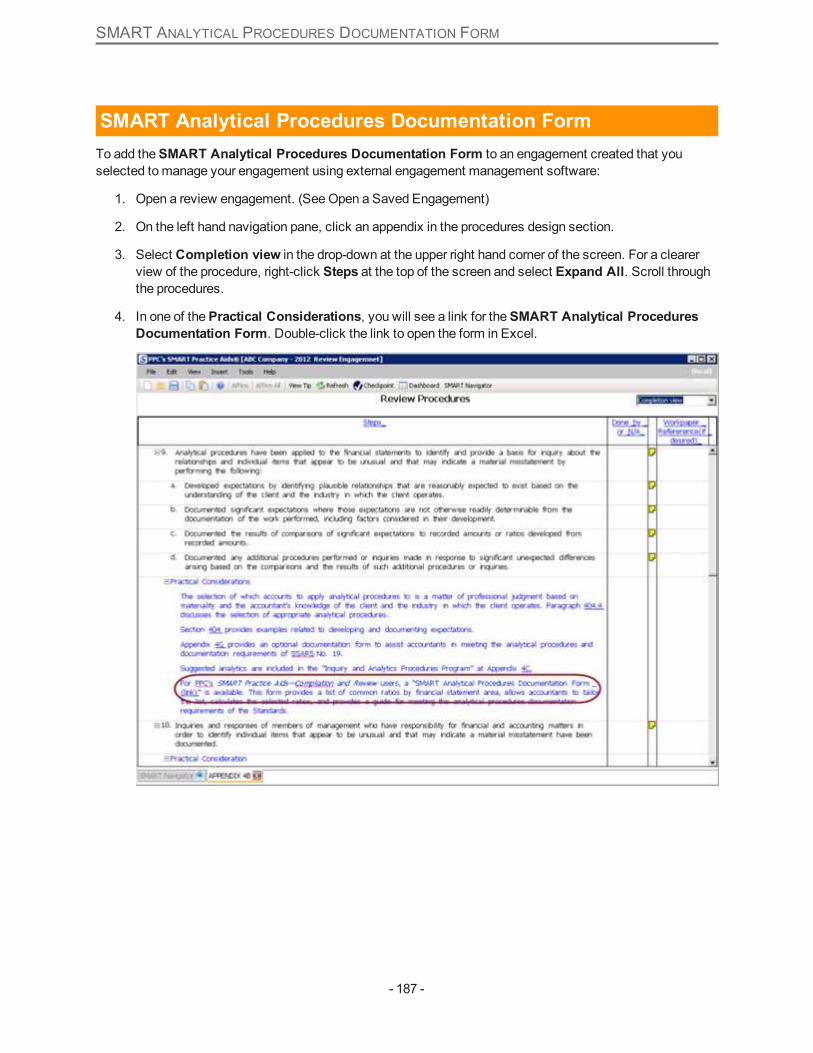
SMART ANALYTICAL PROCEDURES DOCUMENTATION FORM
- 187 -
SMART Analytical Procedures Documentation FormTo add theSMART Analytical Procedures Documentation Form to an engagement created that youselected tomanage your engagement using external engagement management software:
1. Open a review engagement. (SeeOpen a Saved Engagement)
2. On the left hand navigation pane, click an appendix in the procedures design section.
3. Select Completion view in the drop-down at the upper right hand corner of the screen. For a clearerview of the procedure, right-click Steps at the top of the screen and select Expand All. Scroll throughthe procedures.
4. In one of thePractical Considerations, you will see a link for theSMART Analytical ProceduresDocumentation Form. Double-click the link to open the form in Excel.

SMART ANALYTICAL PROCEDURES DOCUMENTATION FORM
- 188 -
5. Complete the form as required. Save and close.
Note: If you are using external management software, the only way to add theSMART AnalyticalProcedures Documentation Form is to link from a practical consideration.
To add theSMART Analytical Procedures Documentation Form to an engagement created that youselected not to manage your engagement using external engagement management software, from the Insertmenu, select Add Forms, PPC Forms.

HOW TO IMPORT DISCLOSURE INFORMATION
- 189 -
How to Import Disclosure InformationThe only module that works withCompilation and Review is Disclosure.
To import disclosure information from another client engagement, click File and select Import DisclosureInformation. The Import Disclosure Informationwindow opens.
.
Select the engagement that contains matching primary disclosure checklist to the current engagement. SelectNext. The disclosure checklist that matches your engagement will be imported.
Select an option for Rollforward Disclosure Checklist Responses. Click Import.

HOW TO IMPORT DISCLOSURE INFORMATION
- 190 -
Note: For Compilation and Review you will have to have a disclosure enabled engagement in order to import.

ABOUT SMART PRACTICE AIDS - AUDIT ESSENTIAL
- 191 -
About SMART Practice Aids - Audit EssentialDocument audit planning, assess risk, and tailor and complete audit programs in this easy to use workflowtool.
l Use pre-defined engagements for small, non-complex entities (SMART Start) or create your owncustom engagement.
l Accumulate identified audit risks and relate them to relevant assertions.
l SMART generation creates custom audit programs based on your risk assessments.
l Rollforward the client engagement to the next period with changes flagged.
PPC’s SMART Practice Aids - Audit Essential provides the basic features necessary to plan and completeany audit engagement. Upgrade to PPC’s SMART Practice Aids - Risk Assessment and PPC’s SMARTPractice Aids - Fieldwork for complete SMART functionality including full multi-user capability, engagementdashboard, SMART design and navigation features, andmore.
See the following topics for step-by-step procedures for completing your audit.
l Step 1 – Risk Identification
l Step 2 – Risk Assessment
l Step 3 – Audit Program Preparation
l Generate Diagnostics Report
l Create SMART Docs

CONVERT ENGAGEMENT
- 192 -
Convert EngagementSMART Practice Aids – Audit Essential provides you with amenu option to convert an Audit Essentialengagement to a full SMART Practice Aids engagement.
To Convert an Audit Essential Engagement to a full SMART Practice AidsEngagement:
1. On the Filemenu, click Convert to SMART Practice Aids Engagement.
TheConvert to Full SMART Engagement dialog box appears.

CONVERT ENGAGEMENT
- 193 -
2. Enter the client name and the engagement name in the respective fields.In case of unsaved changes, you will be prompted to save your changes.
3. Check theDelete original engagement after the copy with full/Audit Essential functionality iscreated checkbox if you wish to delete the old engagement once the conversion process is complete.
4. Click OK to continue.If you choose toCancel the conversion process, you will be returned to your document.
You also have the option to convert a SMART Practice Aids – Risk Assessment engagement to aSMART Practice Aids – Audit Essential engagement, if you are a user of Risk Assessment and are licensedfor Audit Essential.

CONVERT ENGAGEMENT
- 194 -
To Convert a Risk Assessment Engagement to an Audit Essential Engagement:
1. On the Filemenu, click Convert to Audit Essential Engagement.
TheConvert to Audit Essential Engagement dialog box appears.

CONVERT ENGAGEMENT
- 195 -
2. Enter the client name and the engagement name in the respective fields.In case of unsaved changes, you will be prompted to save your changes.
3. Check theDelete original engagement after the copy with full/Audit Essential functionality iscreated checkbox if you wish to delete the old engagement once the conversion process is complete.
4. Click OK to continue.If you choose toCancel the conversion process, you will be returned to your document.
Note: If the engagement being converted has content pertaining to amodule that you are not licensed for, thecontent related to that module will be removed as part of the conversion process if you choose to continue.
Note: Any unaffirmed responses in the original engagements will be unaffirmed in the new convertedengagement.
Note: If you choose to save unsaved changes, any unsaved changes will be saved in both the original andnew engagements.If you choose to not to save unsaved changes, any unsaved changes will not be saved in either the originalor the new engagements.

STEP 1 – RISK IDENTIFICATION
- 196 -
Step 1 – Risk IdentificationAfter you create an engagement, the first step in completing the engagement is identifying risks. You identifyrisks while answering questions in the planning forms you select from theNavigation pane.
As you complete the planning forms, you can add to the engagement any risks that could result in materialmisstatement of the financial statements. Significant risks require a specific audit response and generallyrelate to non-routine transactions and complex or judgmental matters. When you identify risks, your auditprogram will include extended, substantive procedures for the assertions affected by the risk.
To add identified risks:
1. Click theAdd Risk button in the Identified Risks pane on the right.
The Identified Risk window appears.
2. Enter information about the identified risk, including any audit areas affected by the risk.
3. Click Next.
4. On theAssertions for Identified Riskswindow, select any assertions affected by the risk for eachaudit area.
5. Click Finish.
6. When you have completed all step 1 planning forms, you are ready to go to Step 2 of the riskassessment process.
To edit or delete an existing risk:
You can edit or delete existing risks by highlighting the risk in the Identified Risk pane and then clicking theEdit Risk orDelete button.
To insert or delete rows in planning forms:
In the table areas of planning forms, you can add and delete rows by right-clicking inside a table field and

STEP 1 – RISK IDENTIFICATION
- 197 -
selecting Insert Row orDelete Row from the right-click menu.
To view factors to consider:
Each planning form contains guidance and additional factors for you to consider in the completion of the form.This information is shown in blue text.
Click Nextwhen you are ready tomove to the next form, or you can select a form from theNavigation pane.
When you have completed all planning forms, you are ready to continue to Step 2, where you will assess theeffects of risk.
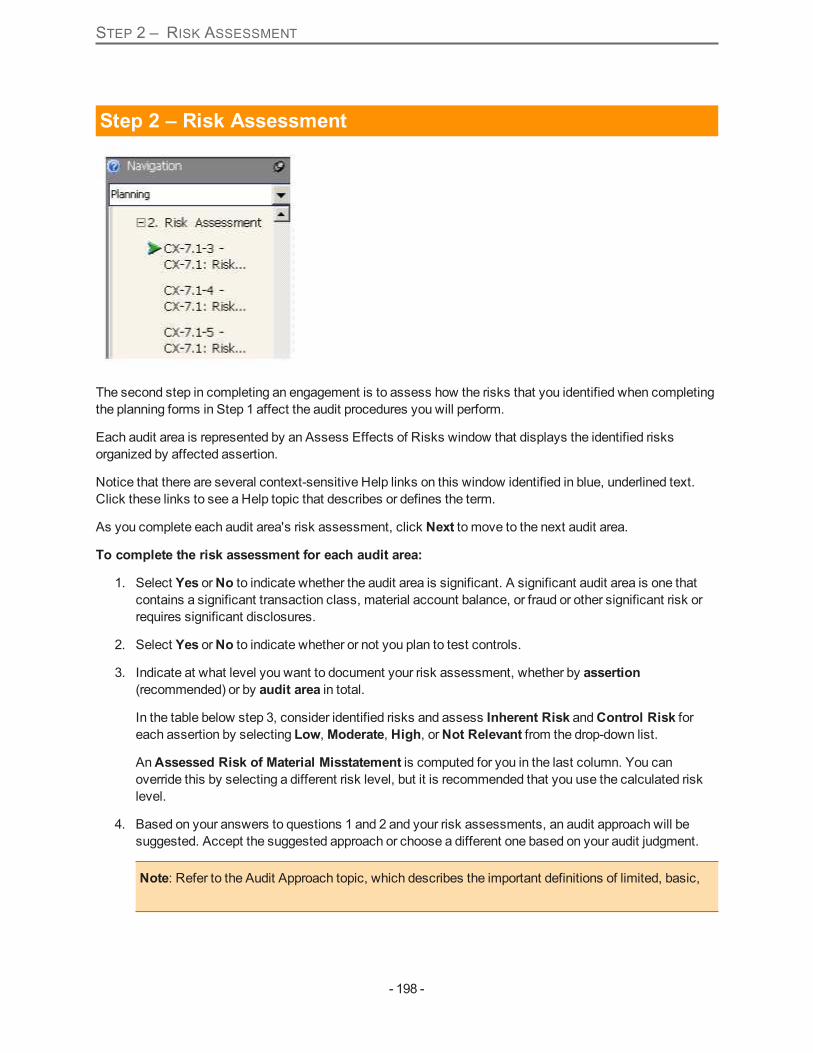
STEP 2 – RISK ASSESSMENT
- 198 -
Step 2 – Risk Assessment
The second step in completing an engagement is to assess how the risks that you identified when completingthe planning forms in Step 1 affect the audit procedures you will perform.
Each audit area is represented by an Assess Effects of Risks window that displays the identified risksorganized by affected assertion.
Notice that there are several context-sensitive Help links on this window identified in blue, underlined text.Click these links to see a Help topic that describes or defines the term.
As you complete each audit area's risk assessment, click Next to move to the next audit area.
To complete the risk assessment for each audit area:
1. Select Yes orNo to indicate whether the audit area is significant. A significant audit area is one thatcontains a significant transaction class, material account balance, or fraud or other significant risk orrequires significant disclosures.
2. Select Yes orNo to indicate whether or not you plan to test controls.
3. Indicate at what level you want to document your risk assessment, whether by assertion(recommended) or by audit area in total.
In the table below step 3, consider identified risks and assess Inherent Risk andControl Risk foreach assertion by selecting Low,Moderate, High, orNot Relevant from the drop-down list.
AnAssessed Risk of Material Misstatement is computed for you in the last column. You canoverride this by selecting a different risk level, but it is recommended that you use the calculated risklevel.
4. Based on your answers to questions 1 and 2 and your risk assessments, an audit approach will besuggested. Accept the suggested approach or choose a different one based on your audit judgment.
Note: Refer to the Audit Approach topic, which describes the important definitions of limited, basic,

STEP 2 – RISK ASSESSMENT
- 199 -
and extended approach.
5. After you finish the audit areas, click Next to go to theOverall Financial Statement form.
Overall Financial Statement Risks
In the Overall Financial Statement risks form, review the planned audit response to identified risks andmakechanges if applicable.
All risks identified as affecting the financial statement in general are listed in the Identified Risks field. Forthe risk management override of controls, a response is provided. You can edit the planned audit responsetext, add procedures/comments, or make changes to the text as needed.
Complete Step 2
When you complete all audit areas and theOverall Financial Statement risks form, click Next to move toStep 3 – Audit Program Preparation.

STEP 3 – AUDIT PROGRAM PREPARATION
- 200 -
Step 3 – Audit Program PreparationYou perform this step in theAudit Program Preparation section in theNavigation pane, by selectingDesign View in upper right drop down. Here you access the suggested audit procedures for all audit area andmodify them if necessary.
Youmay be able to respond to risks without performing all of the suggested procedures. Review thesuggested procedures and delete, modify, or add to them as necessary to ensure that, based on yourprofessional judgment, your audit adequately responds to audit risks.
Center Pane Contents
The center pane lists suggested audit procedures for the audit area based on your risk assessment andselected audit approach.
You can click a + icon to expand a selected category or procedure section.
In the column labeledAssertions, the letters indicate the assertion or objective for which the audit procedureprovides assurance. If the letter appears in a bracket, for example [E/O], the procedure only secondarilyprovides assurance about the assertion. If an asterisk (*) precedes a procedure, it is a preliminary step orfollow-up step.

STEP 3 – AUDIT PROGRAM PREPARATION
- 201 -
If during risk assessment, you chose to perform only basic procedures for the audit area, the proceduressuggested in the center pane will consist of primarily analytical procedures.
If you chose to perform extended procedures, the suggested procedures in the center pane will includeprimarily analytical procedures plus all extended procedures for assertions for which you indicated there is ahigh risk of material misstatement (or moderate risk of material misstatement if fraud or other significant risksexist).
Right Pane Contents
The right pane lists all audit procedures present in the audit area selected in theAll Procedures dropdownmenu. Use the + and - icons to expand and collapse the different procedure sections. Procedures currentlyincluded in your audit program appear in light gray text. Other procedures available for selection appear in darktext.
Click Next to review andmodify audit programs for other audit areas.
Prior Period and Current Period Procedures
There are navigational aids to help identify differences between prior period and current period auditprocedures.
In the center pane amodified step flag icon is displayed next to each procedure that contains differencesbetween the current period and prior period.
Note: You can toggle this icon on and off by selectingShow Modified Step Flag from theViewmenu.
Click the flag icon to display the Reset Procedure window. The prior period, original PPC procedure - currentperiod , andmodified current period versions of the procedure text are displayed for comparison. Select theversion of the procedure text that you want to use for the current period. Click OK to confirm the change.
Note: You can also access Reset Procedure from theEditmenuwhen you have a procedure highlighted inthe center pane. If you are working with a non-rollforward engagement, there are only two options available intheReset Procedurewindow: Original PPC Procedure andProcedure as Currently Modified.
A flag icon also appears in the right pane for each audit procedure step that was selected in the prior period.
Note: You can toggle this icon on and off by selectingPrior Period Selected Steps Flag in theViewmenu.The flag icons are only available in rollforward engagements. When working with a non-rollforwardengagement, thePrior Period Selected Steps Flag option and its associated flag icons are not available.

STEP 3 – AUDIT PROGRAM PREPARATION
- 202 -
To aid navigation, the green highlight box in the right frame always shows the location of the selectedprocedure text in the center pane.
Add, Modify, Delete Procedures
To add a procedure:
You can add pre-defined procedures or your own custom procedures.
l To add pre-defined procedures to your audit program, drag and drop a procedure in the right pane tothe center pane:
i. In the center pane, scroll to the location where you want to insert the procedure.
ii. From theAll Procedures dropdownmenu at the top of the right pane, select the audit areafrom where you want to insert the procedure. All procedures in that audit area are displayed inthe right pane.
iii. Navigate within the right pane and click to select the procedure that you want to add to thecentre pane.
iv. Drag and drop the selected procedure at the desired location.
Note: The copied procedures will be treated like custom procedures.
l To add your own custom procedures, select Procedure Above orProcedure Below (depending onwhere you want it to appear) from the Insertmenu.
Note: Custom procedures display hierarchically in the right pane.
To modify a procedure:
Double-click any procedure tomodify it. You can also selectModify from theEditmenu to edit a selectedprocedure. To assist reviewers, your changes appear in red.
Steps that have beenmodified aremarked with amodified step flag. Clicking the flag opens theResetProcedurewindow that shows the original PPC procedure and themodified version of the procedure. If theengagement has been rolled forward from a prior period, the procedure as used in the prior period is also

STEP 3 – AUDIT PROGRAM PREPARATION
- 203 -
displayed. You can select which version you want to select. Themodified step flag can be toggled betweendisplay and non-display by selectingShow Modified Step Flag from theViewmenu.
To delete a procedure:
To delete a procedure you have added, highlight the procedure in the center pane and select Delete from theEditmenu.
You can also drag and drop unwanted procedures from the center pane to the right pane using your mouse toremove procedures from your audit program.
Note: You can alsomodify, delete, and insert procedures and categories by right-clicking a selectedprocedure or category. Select an option from the short-cut menu to execute it.
Add or Delete Categories
Procedural categories can be helpful to organize your audit plans into logical hierarchies.
To add a category:
1. Highlight the procedure or category in the center pane where you want your new category to appear.
2. Select Category Above orCategory Below (depending on where you want it to appear) from theInsertmenu.
3. In the Add Category window, enter the category name or description in theEnter Category Text field.
4. Select the type of procedure for the new category.
5. Click OK.
The new category should be visible in the center pane.
To delete a category:
Highlight the category in the center pane and select Delete from theEditmenu.

GENERATE DIAGNOSTICS REPORT
- 204 -
Generate Diagnostics ReportAfter creating an engagement and completing all pertinent forms, you are ready to run theDiagnosticsReport. Review this report to discover inconsistencies or other conditions that you should consider beforegenerating your planning forms and audit programs.
To generate the Diagnostics Report:
1. On the Toolsmenu, select Diagnostics...
The system generates and displays the Diagnostics Report.
2. You can click the icon on theDiagnostics Report if you want to add comments.
3. If the report shows inconsistencies or missing information, complete the necessary information.
4. If you want to print the report, click thePrint button at the bottom of the window.
5. Click OK to close the report.
Complete Audit ProgramsYou perform this step in theAudit Program Preparation section in theNavigation pane, by selectingCompletion View in upper right drop down.
Double-click any blue underlined PPC workpaper reference to add the workpaper to your engagement or tonavigate to the workpaper if it already exists in your engagement. You can also assign any workpaper to anaudit program step, which places a link to the workpaper in theWorkpaper Index column.
Sign off steps as they are completed by right-clicking the step and selectingStep Sign-off. Click the yellowcomment icon next to a step to add comments, as needed.

COMPLETE AUDIT PROGRAMS
- 205 -
Notice that the pop-upmenu gives you several other options, including inserting workpaper andmemoreferences, as well as hyperlinks.
Insert Workpaper Reference
To add a related workpaper, right-click an existing workpaper in theWorkpaper Index column and selectInsert Workpaper Reference from the pop-upmenu. On the Insert Workpaper Referencewindow, click theplus sign to expand a category.
Select the workpaper and click Select. The additional workpaper becomes available.
Insert a MemoReference
To add amemo related to a workpaper in theWorkpaper Index column, right-click and select Insert MemoReference from the pop-upmenu. Type your memo and click OK. Your memo appears below the relatedworkpaper.

COMPLETE AUDIT PROGRAMS
- 206 -
Add Document
To add a link to another document:
1. Right-click an existing workpaper in theWorkpaper Index column and select Add Document from thepop-upmenu.
2. Select a document type, such as a PPC form.
3. On theAdd PPC Formswindow, select a form and the number of copies you need.
4. Click Next . The selected PPC workpaper is listed on theWorkpaper propertieswindow.
5. Click Finish.
6. Click Yes in the pop-up window that asks if you want to link to this document.

COMPLETE AUDIT PROGRAMS
- 207 -
Your added document is available for viewing from theWorkpaper Index column.
Sign-Off Properties
For sign-off, you can determine what displays in thePerformed by and Date column: initials, date format,and the date you want to display. To access the Sign-off Properties window, select Sign-off Properties fromthe Toolsmenu:
Note: If you select Yes to use engagement management software, you will be able to add only SMART-enabled documents. (SMART- enabled documents are PPC forms that open in the center pane.)
Make your changes on theSign-off Propertieswindow and click OK.
Go To/Link toWorkpaper
Whenever you double-click a blue underlined workpaper in an audit program step, the Go To/Link toWorkpaper window opens. If you click Add link to Step, that step will appear in theWorkpaper Index columnnext to that step.
If you click Go to Selected, the selected workpaper will open.
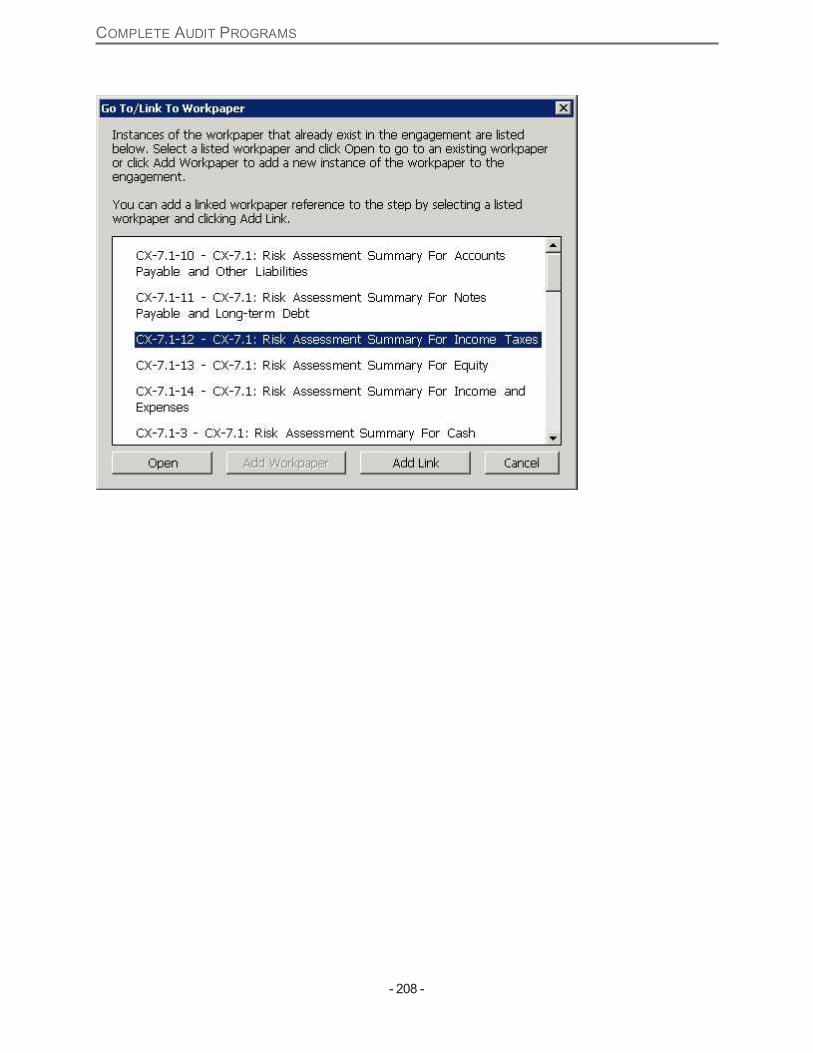
COMPLETE AUDIT PROGRAMS
- 208 -

CREATE SMART DOCS
- 209 -
Create SMART DocsYou can create SMART image documents (SMART Docs) for any of the PPC workpapers in yourengagement for use outside of SMART Practice Aids, such as for storing them in your engagementmanagement software. Select Create SMART Docs from the Tools menu.
Tomake it easy to stay in synch with workpapers you have stored in your engagement software, a flag iconnext to the document name indicates that the document has never been created, or that it has changed sincethe last time it was created.
To Create SMART Docs:
1. Click Create to begin the process.
2. Enter a path where generated SMART Docs should be stored, or click Browse to select the folderlocation.
3. Click OK.
You will then access the generated SMART Docs from that selected folder location, outside of SMART.

CREATE SMART DOCS
- 210 -

ABOUT COMMON PROCEDURES
- 211 -
About Common ProceduresThe following features are common to all SMART Practice Aids modules:
l Use spell check
l Add, edit, delete comments
l UseHelpMeDecide links
l Use the Edit text icon
Click the above links to see how to use these features.

ADD, EDIT, DELETE COMMENTS
- 212 -
Add, Edit, Delete CommentsWhenever you see aComment icon next to an element in SMART Practice Aids, you can click the icon toadd a comment that is associated with the element. Clicking the icon opens theCommentswindow, whereyou can type a comment and save it. After a comment is entered, the icon changes appearance.
To add a comment:
1. Click the icon next to the SMART element.
The Comments window appears.
2. Enter the comment text in the provided field. You can enter up to 20,000 characters.
3. Click OK.
The icon next to the element changes to indicate that there is a now a comment.
Note: You can view the text of your comment by hovering your mouse pointer over the icon. Thedisplay will include the first 2000 characters of the comment. To view the full text of amessagegreater than 2000 characters, click the icon to open theCommentswindow.
To edit a comment:
1. Click the icon next to the SMART element.
The Comments window appears.
2. Edit the existing comment text as needed.
3. Click OK.
The new comment is now saved for the topic.
To delete a comment:
1. Click the icon next to the SMART element.
The Comments window appears.
2. Delete the comment from the text field.
3. Click OK.
The comment is deleted and the icon changes to .

USE THE EDIT TEXT ICON
- 213 -
Use the Edit Text Icon
Youwill seeEdit icons throughout SMART Practice Aids forms. The icon is displayed to the right ofSMART fields that are editable. When clicked, the link opens theEdit Textwindow, where you can editexisting information.
To edit text:
1. Click theEdit icon beside the field whose text you want to edit.
The Edit Text window appears.
2. Make the necessary changes to the text.
3. Click OK to save the changes and close the window.

USE "HELP ME DECIDE" LINKS
- 214 -
Use "Help Me Decide" LinksYouwill seeHelp Me Decide links throughout SMART Practice Aids. The link is displayed to the right ofparticular SMART elements. When clicked, the link displays helpful information to help youmake choices anddecisions.

USE SPELL CHECK
- 215 -
Use Spell CheckSMART Practice Aids provides a spell check feature for engagement content input areas.
When typing in anEdit Textwindow, any misspelled words are automatically indicated by a red, wavyunderline. You can right-click amisspelled word to view a list of possible spellings. You can also selectIgnore All to make the spell checker ignore the selected word. Select Add to add a word to the spell checkdictionary.

REMOVE PRACTICAL CONSIDERATIONS
- 216 -
Remove Practical ConsiderationsTo remove practical considerations in generated documents, do the following:
1. Select Tools from theMenu bar.
2. Scroll down toOptions and from the drop down, click Application Settings. TheApplicationSettings dialog box is displayed.
3. On theGeneral tab select one or both of the checkboxes (Audit Programs and Procedures Programsand/orOther Checklists) in theRemove practical considerations from the following generateddocuments field, as required.
4. Click Close.
Note: Audit Programs and Procedures programs includes only audit programs (SPR, SPF, SPL) andprocedures checklists (SPC) andOther Checklists includes Traditional planning forms, Disclosurechecklists, SPF CX-10, SPI CX-4 series.
Note: The option to remove practical considerations from generated documents is not applicable forengagements created with pre-2012 Practice Aid titles.

ABOUT ENGAGEMENT ROLLFORWARD
- 217 -
About Engagement RollforwardEngagement Rollforward lets you create an engagement with the following features:
l Creates a new engagement based on a prior period engagement.
l Brings forward settings and customization from the prior period engagement.
l Brings forward the answers entered on various forms in the prior period engagement, including thefollowing (to the extent applicable to the type of engagement being rolled forward): planning formresponses, identified risks, risk assessments, and audit approaches.
l Lets you view significant PPC changes to planning form questions and engagement procedures.
l Lets you view differences between current period engagement procedures and procedures used in theprior period.
Depending on themodules you want to include in an engagement rollforward, the process offers manyoptions, so pay close attention as you select the options to build your new engagement based on a prior periodengagement.
Click the following links to learnmore about using theRollforward feature:
l Types of Rollforward
l Engagement Rollforward Best Practices
l Rollforward a Client Engagement to a New Client Engagement
l Rollforward aMaster Engagement to a New Master Engagement
l Merging a Client Engagement with aMaster Engagement
TYPES OF ROLLFORWARD
- 218 -
Types of RollforwardThe SMART Practice Aids Rollforward feature provides two ways to create a new client engagement andtransfer prior-period engagement answers and customizations into it:
l Rollforward to a new client engagement
l Merge with amaster engagement
Rollforward the Client Engagement to a New Client Engagement
This option is considered the typical rollforwardmethod. It creates a new engagement based on an equal ornewer version of the Practice Aid title used to create the original engagement, then transfers the selectedprior-period engagement data into it.
Merge the Client Engagement with a Master Engagement
This option is useful for firms that want to begin with amaster engagement (created andmaintained by thefirm), but want the new engagement to include responses and other data from the prior-period engagement. Itallows firms to effectively usemaster engagements without losing documentation that was created in the priorperiod client engagement. When this option is chosen, the selectedmaster engagement and prior-period clientengagement aremerged as follows to form the new client engagement.
Planning forms – Planning forms present in either themaster engagement or prior-period client engagementwill be included in the new engagement. If a planning form is present in both themaster and prior-periodengagement, the title of the form will be as it appears in themaster engagement unless youmodified theform’s title in the prior-period engagement. In that event, the form’s title will be the prior-period engagement’smodified form title.
Planning form responses – Any planning form responses contained in themaster engagement will appear inthe new engagement. However, if you choose the option to roll forward planning form responses from theprior-period engagement, themaster engagement responses will be replaced by the prior-period engagementresponses.
Identified risks – Identified risks from themaster engagement will appear in the new engagement. If youchoose the option to roll forward identified risks from the prior-period engagement, those risks also will appear.
Included audit (or financial statement) areas – Areas selected for inclusion in either themaster or prior-period engagement will be selected for inclusion in the new engagement. If youmodified the name of an areain the prior period, themodified namewill be used in the new engagement.
Responses to setup questions – Engagement setup questions, such as “Is the engagement a DOL limited-scope audit?” and “DoOMB Circular A-133 (Single Audit) requirements apply to this engagement?,” vary bytitle. Generally, the setup question responses for the prior-period client engagement and themasterengagement must match or themerge will not continue. An exception is that the “Is this an initial audit?” setupquestion responses may differ.
Best practice tip– If you wish tomaintain master engagements and use theMerge with Master Engagementrollforward feature, create separatemaster engagements for each type of engagement your firm’s clients mayneed. For example, create a defined benefit planmaster that is not a DOL limited-scope audit and another
ENGAGEMENT ROLLFORWARD BEST PRACTICES
- 219 -
defined benefit planmaster that is. Then rollforward the prior-period engagement by merging with theappropriate master engagement.
Risk assessments and audit programs – Youmust specify for each audit area how risk assessments andaudit programs in the new engagement will be determined.
Best Practice Tip– Typically, you would use theMerge with aMaster rollforward feature only if you intend touse theMaster Engagement’s programs for one or more areas.
Note: SMART Audit Essential does not provide the option tomerge a client engagement with amasterengagement.
Engagement Rollforward Best PracticesHere are some best practices to follow while rolling an engagement forward and once the new engagement iscreated.
When Creating an Engagement Rollforward
Use the following best practices when you create an engagement rollforward:
l Start with finalized engagement from prior period.
l Select the latest version of the Compliance Supplement issued by the OMB.
l You can only rollforward an engagement using an equal or newer version of the Practice Aid title usedto create the original engagement.
Once the New Engagement is Created
Use the following best practices once the new engagement is created:
l If rolling forward an engagement created with old assertions that will now be using the newassertions, review the assertions associated with the identified risks rolled forward and update asneeded.
l Update prior period information rolled forward (shownwith highlighting). By editing, the highlightingwill be removed.
l Use the Toolsmenu's Affirm orAffirm All functions to remove highlighting of prior periodinformation that is still applicable for the current period. These functions are also available on theright-click shortcut menu or as buttons on the toolbar.
l Diagnostics Report lists any responses not yet affirmed.
l Audit procedures in an audit engagement are selected based on risk assessments and audit approachselected (or rolled forward) for the applicable audit area.
l Procedures selected in the prior period are indicated with an indicator in theAll Procedures rightpane available when viewing a program.

ENGAGEMENT ROLLFORWARD BEST PRACTICES
- 220 -
l Responses to engagement setup questions cannot be changed in the new engagement once therollforward is completed.
l After Rollforward, those custom controls from the prior-year engagement that are not mapped to anycontrol for the current year can be found grouped together underPrinciple: Unassigned Controls intheEntity-Level Control Form. You canmap these controls to your current year Principles or deletethem.
l After Rollforward, the appearance of a flag next to a question on a planning form indicates that thequestion has changed.
l After Rollforward, the appearance of a flag next to a step in the center pane of a program indicatesthat the step has changed. Rolling your mouse pointer over the flag displays informational text aboutthe change.
l Clicking a flag opens the Reset Procedure window, where you can compare versions of theprocedure step and select the one you want to use.
Disclosure Notes and Unassigned Topics
It is possible for a disclosure note's assigned topic to be removed as the result of rolling forward anengagement or updating a checklist to a later version. When this occurs, the disclosure notes assigned to theremoved topic under a topic labeledUnassigned. You should resolve this by assigning these notes to otherrelated topics or deleting them from the disclosure note library.

ROLLFORWARD A CLIENT ENGAGEMENT TO A NEW CLIENT ENGAGEMENT
- 221 -
Rollforward a Client Engagement to a New Client EngagementEngagement Rollforward lets you create a new engagement based on a prior period engagement. When rollingan engagement forward, be sure to follow the best practice guidelines.
To rollforward a client engagement:
1. Open an engagement to be rolled forward.
2. On the Filemenu, click Rollforward.
The Rollforward Engagement window appears.
3. Select theRollforward this Client Engagement to a new Client Engagement option.
4. Click Next.
5. On the next window, enter a name for the new engagement.
6. Type the engagement date, or click Date to select from a calendar.
7. Select the Practice Aid edition you want to use for the new engagement from the drop-down list. (Seethe Rollforward Best Practice topic for tips on using an equal or newer version of the title.)
8. Click Next.
9. On the next window, complete the following information:
l Select the SMART Practice Aids modules you want to include in the engagement.
Note:Youmust select Risk Assessment with FieldWork and Internal Control; however Disclosuremay be selected by itself. Modules cannot be disabled once the engagement is created.
The external engagement software questions appear only if you have the Field Workmoduleselected.
The disclosure question appears only if you have theDisclosuremodule selected.
10. Click Next.
11. On the next window, select the check boxes for items that you want to be rolled forward.
12. Click Next.
13. Depending on your selections in step 11, you will follow one of several paths. Follow the onscreeninstructions to further indicate the items that you want to be rolled forward.
14. Click Next.
The next window states that the rollforward options have been saved.
ROLLFORWARD A CLIENT ENGAGEMENT TO A NEW CLIENT ENGAGEMENT
- 222 -
Note: SMART Engagement Setup questions are available to help you tailor this engagement to fit theunique facts and circumstances of your client. Review the SMART Engagement Setup questions byselectingSMART Engagement Setup from theEditmenu.
15. Click Rollforward.
A confirmationmessage states that the engagement has been successfully created.

ROLLFORWARD A MASTER ENGAGEMENT TO A NEWMASTER ENGAGEMENT
- 223 -
Rollforward a Master Engagement to a New Master EngagementEngagement Rollforward lets you create a new master engagement based on a prior periodmasterengagement. When rolling an engagement forward, be sure to follow the best practice guidelines.
To rollforward a master engagement:
1. Open themaster engagement to be rolled forward.
2. On the Filemenu, click Rollforward.
The Rollforward Engagement window appears.
3. Enter a name for the new master engagement.
4. Type the engagement date, or click Date to select from a calendar.
5. Select the Practice Aid edition to use for the new engagement from the drop-down list. (See theRollforward Best Practice topic for tips on using an equal or newer version of the title.)
6. On the next window, complete the following information:
l Select the SMART Practice Aids modules you want to include in the engagement. Youmustselect Risk Assessment with FieldWork and Internal Control; however Disclosuremay beselected by itself. Modules cannot be disabled once the engagement is created.
l The external engagement software questions appear only if you have the Field Workmoduleselected.
l The disclosure question appears only if you have theDisclosuremodule selected.
7. Click Next.
8. On the next window, select the check boxes for items that you want to be rolled forward.
9. Click Next, and depending on your previous selections, you will follow one of several paths. Follow theonscreen instructions to further indicate the items that you want to be rolled forward.
10. Click Next.
The next window states that the rollforward options have been saved.
Note: SMART Engagement Setup questions are available to help you tailor this engagement to fit theunique facts and circumstances of your client. Review the SMART Engagement Setup questions byselectingSMART Engagement Setup from theEditmenu.
11. Click Rollforward.
A confirmationmessage states that the engagement has been successfully created.

MERGE A CLIENT ENGAGEMENT WITH A MASTER ENGAGEMENT
- 224 -
Merge a Client Engagement with a Master EngagementThemerge option is useful for firms that want to always begin with amaster engagement (created andmaintained by the firm), but want the new engagement to include responses and other data from the prior-period engagement.
Note: SMART Audit Essential does not provide the option tomerge a client engagement with amasterengagement.
To merge a client engagement with a master engagement:
1. Open the prior-period engagement to be rolled forward.
2. On the Filemenu, click Rollforward.
The Rollforward Engagement window appears.
3. SelectMerge this Client Engagement with a selected Master Engagement.
4. Click Next.
5. On the next window, enter a name in theEnter a name for the new engagement field.
6. Enter the engagement date, or click Date to select from a calendar.
7. Select themaster engagement you want to merge with from the drop-down list.
Note: You can click theEngagement Setup Assumptions Comparisons link to see a list ofmaster and client engagement setup assumptions. After viewing the list, click Close to return to theRollforward Engagement window.
8. Click Next.
9. On the next window, complete the following information:
l Select the SMART Practice Aids modules you want to include in the engagement. Youmustselect Risk Assessment with FieldWork and Internal Control; however Disclosuremay beselected by itself. Modules cannot be disabled once the engagement is created.
l The disclosure question appears only if you have theDisclosuremodule selected.
10. Click Next.
11. On the next window, select the check boxes for the items you want to be carried forward.
12. If the engagement is an audit engagement, select Yes orNo to answer whether you want to use themaster engagement's risk assessments and audit programs for all audit areas.
l If you select No and click Next, another window appears where you indicate how you wantaudit programs in the new engagement to be determined. Select the appropriate options andcheck boxes. You can select to bring forward your risk assessments and audit programs intact(exactly as they appeared in the prior period engagement).You can also select to have audit

MERGE A CLIENT ENGAGEMENT WITH A MASTER ENGAGEMENT
- 225 -
programs regenerated (recreated based on your risk assessments). Go to step 13.
l If you select Yes, go to step 13.
13. Click Next.
The next window states that the rollforward options have been saved.
Note: SMART Engagement Setup questions are available to help you tailor this engagement to fit theunique facts and circumstances of your client. Review the SMART Engagement Setup questions byselectingSMART Engagement Setup from theEditmenu.
14. Click Rollforward to complete the process and rollforward the engagement.

ABOUT MULTI-USER CONTROLS
- 226 -
About Multi-user ControlsSMART Practice Aids' Multi-User feature allows more than one user to work on different parts of anengagement while protecting against conflicts such as those created by users attempting to edit the sameinput screens.
When you first open SMART Practice Aids, you are asked to provide a username, which is used in facilitatingamulti-user engagement. If necessary, you can later change your username by selecting an option from theTools > Options > Application Settingsmenu.
When Multi-User is Active
WhenMulti-User is active, each form is locked until one of the users chooses to edit the form. The user mustrespond to a prompt that asks "Would you like to Edit this form?" When leaving the form, the user is promptedto save changes and can specify whether to allow other users to edit the changed form.
Users can elect whether to activateMulti-User when opening an engagement. An option is also available fromthe Tools > Options > Application Settingsmenu that lets the user turnMulti-User on or off for anengagement that is already open.
For best results in establishing amulti-user environment, users should be pointed to a shared database. Forinstructions on installing a shared database, visit SMART Practice Aids Product Support and download thePPC's SMART Practice Aids Getting Started Kit.
Multi-user in the Disclosure Module and Firm Library Application
Multiple users are not available in engagements using only theDisclosuremodule. Only one user can havethis type of engagement open for editing at any given time. The same also applies to users working in a firmlibrary using the Firm Library application. Only one user can have a firm library open for editing at any giventime.
ALLOWMULTI-USER
- 227 -
Allow Multi-UserYou have the option, when opening an existing engagement, to allow multiple users to work on theengagement at the same time. Otherwise, other users who have access to the engagement will only be ableto open the engagement in read-only mode.
To set the option to allow multi-user:
1. On the Filemenu, click Open (or click theOpen button on the tool bar).
2. Select theAllow multi-user for this engagement check box. This option allows multiple users toedit parts of the engagement at the same time.
To unlock a locked engagement:
1. On the Toolsmenu, click Options, and then click Application Settings.
2. Click theMulti-User tab of theOptions – Application Settingswindow.

EDIT A FORM (MULTI-USERS)
- 228 -
Edit a Form (Multi-users)When you use SMART Practice Aids with themulti-user feature allowed, controls are in place to preventconflicts between users. When you first attempt to enter or edit information on a data entry screen, a promptappears that asks "Would you like to Edit this form?"
SelectingYes places a lock on the form. No other users are able to edit the form until you release the lock.
You can also bypass the above prompt by right-clicking the data entry screen and selectingEdit Form fromthe shortcut menu. SelectingEdit Form places a lock on the form. No other users are able to edit the formuntil you release the lock.
Note: While a lock generally applies to an entire form, theremay be situations where not all items on a formare locked, due to data being shared between two or more forms.
Option to Release Locks
The option to release locks appears whenever you attempt to save the engagement. You can save your workat any time by selectingSave orSave As from the Filemenu (or by clicking theSave icon in the toolbar). Ifyou attempt to access another form without first saving, you are prompted with amessage with options to"Save Now" or "Save Later."
When you elect to save the engagement, theSavingwindow appears, giving you the option to specifywhether to unlock the form.
l Click Release Locks to allow other users to edit the form. If you want to perform edits on the form inthe future, you will have to elect to edit the form again, as explained at the beginning of this topic.
l Click Keep Locks to keep other users from editing the form. You alone will continue to have theability to edit the form.
l Select theMaintain this setting for me check box if you want to continuing using Release Locks orKeep Locks as your selection while you continue editing and saving forms. This will automate thesetting you select and prevent this prompt from appearing whenever you save a form.
Disable the "Maintain this setting for me" Option
If you selected theMaintain this setting for me option on theSavingwindow, you can disable the option atany time.
To disable the "Maintain this setting option for me" option:
1. On the Toolsmenu, click Options and then click Application Settings.
TheOptions - Application Settings window appears.
2. Click theMulti-User tab.
3. Select theEnable prompt to keep or release locks after save check box.

EDIT A FORM (MULTI-USERS)
- 229 -
Note: Your current setting (either Release Locks or Keep Locks) is indicated below this check box.
4. Click Close.
TheSavingwindow again prompts you toRelease Locks orKeep Lockswhenever you save theengagement. Once you release locks for a form, another user can open and edit the form.
Update Your Copy of the Engagement
Use theRefresh button on the toolbar to update your copy of the engagement with changes from all otherusers in your multi-user environment.
ClickingRefresh lets you edit an engagement on onemachine and then allow someone on another machine tosee your changes. Refresh updates the engagement with themost current saved information from each user.

MULTI-USERMESSAGES
- 230 -
Multi-user MessagesThe following list describes multi-user relatedmessages youmay encounter.
Icon Message Scenario
Multi-user must be enabled since others arecurrently working in the engagement.
User attempts to get an engagement-level lock (duringCreate New, orOpenEngagement) but is unsuccessfulbecause other locks in the engagementprevent the user from getting therequested lock.
This is currently locked for editing by [UserID].
User attempts to edit or delete an item(or form) that is locked explicitly byanother user.
This item is currently locked for editing bysomeone else.
User attempts to edit something that islocked by another user.
This form cannot be edited at this time.[User ID] is making changes affecting theoverall engagement structure. Please tryagain after [User ID] has exited theengagement or saved his or her work andreleased forms for editing by others.
User attempts to get a lock onsomething in the engagement, but isunsuccessful because the entireengagement is temporarily locked toprocess engagement-level changes.
WARNING: Choosing this option willprevent other users from saving furtherchanges to the engagement until theengagement is opened again. Continue torelease all locks in the engagement?
User selects to perform a lock overrideand release all locks in the engagement.
Some items on this form are locked forediting by someone else and cannot beedited. Select the Refresh button in thetoolbar to get the latest changes to theengagement.
User is able to get a form-level lock, butsome shared items could not be locked.
Other users are working in this engagementand changes have beenmade that haven’tbeen saved. Continue with Save As?
User performs aSave As of anengagement while locks exist in theengagement by other users.
This function cannot be performed whileothers are working in the engagement.Please try again after other users haveexited the engagement or saved their workand released their forms for editing byothers.
User attempts to get an engagement-level lock (duringRollforward,Backup, Transfer, Finalize, Delete)but is unsuccessful because other locksin the engagement prevent the user fromgetting the requested lock.
Some responses on this form could not beaffirmed because they are locked for editingby someone else in the engagement.
User has selected theAffirm Alloption, but some items on the form arelocked by other users and cannot be

MULTI-USERMESSAGES
- 231 -
Icon Message Scenario
affirmed.
The item you were viewing was removedfrom the engagement by another user.
User is viewing a form and selectsRefresh or theEdit option, but adifferent user has deleted or removedthe item from the engagement.
PROVIDE A USERNAME
- 232 -
Provide a UsernameWhen you first open SMART Practice Aids, you are prompted to provide a username.
Type a username of your own choosing and click OK. Your usernamewill not be used for any purpose otherthan to communicate information in amulti-user engagement.
Note: To avoid confusion, make sure your username is unique and not likely to be selected by other users inyour engagement.
To change your user name:
1. Make sure that all engagements are closed.
2. On the Toolsmenu, click Options and then click Application Settings.
TheOptions – Application Settings window appears.
3. On theGeneral tab, you can specify a new user name by typing over the name you previouslyspecified.
4. Click Close to save the change.

ABOUT SCREEN OVERVIEWS
- 233 -
About Screen OverviewsTheScreen Overview section contains graphics of themajor windows in SMART Practice Aids. The purposeof this section is to provide a single location for a window graphic that can be linked to frommultiple topicsthroughout the Help.
In other topics in the Help, you will see hyperlinks that you can click to jump to a topic that contains a graphicexample of the window.
Each topic in theScreen Overview section provides a description of the window's purpose and explains theprimary way to access the window.
Once you view awindow graphic, you can click theBack button to return to the previous topic that containsthe hyperlink you clicked.

ADD CONTROL
- 234 -
Add ControlWhenworking on theControl Activities Form, you can add a new control to one or more objectives. Youaccess theControl Activities Form from links in the Financial Close and Reporting andGeneral ComputerControls forms.
To access theAdd Control window, select Add Control from the Insertmenu.
Click Back to return to the previous topic.

ADD EXCEPTION
- 235 -
Add ExceptionIf exceptions deficiencies are noted during control testing, you click theAdd Exception button at the bottomof theEnter Test Exceptionswindow to display theAdd Exceptionswindow, where you add theexceptions.
Click Back to return to the previous topic.

ADD NEW TRANSACTION CLASS
- 236 -
Add New Transaction ClassTo use a transaction class that is not listed, click theAdd Transaction Class button at the bottom of theSignificant Transaction Classes window.
On theAdd New Transaction Classwindow, enter the name of the new transaction class and select thecheck boxes for the applicable audit areas.
Click Back to return to the previous topic.

ADD OBJECTIVE
- 237 -
Add ObjectiveWhenworking on aControl Activities Form, you can add a new objective to the list.
To access this window, click theView Control Activities Form link on one of theUnderstand Controlsand Evaluate Design planning forms.
Click Back to return to the previous topic.

ASSESS CONTROL RISK
- 238 -
Assess Control RiskIn the Internal Control Assess Control Risk form, you document your control risk assessments for eachCOSO component, audit area, and related assertions.
To access this window, on theNavigation pane, expand Identify Risks, expand Internal Control, and clickAssess Control Risk.
Assess Effects of RisksThe second step in completing an engagement is to assess how the risks that you identified when completingthe planning forms in Step 1 affect the audit procedures you will perform. Each audit area is represented by anAssess Effects of Riskswindow that displays the identified risks organized by affected assertion.
To access this window, from theNavigation pane, select any of the audit areas underRisk Assessmentand Planning.

ASSESS EFFECTS OF RISKS
- 239 -

COMMENTS
- 240 -
CommentsWhenever you click aComment icon next to an element inSMART Practice Aids, theCommentswindow appears. Here you can type a comment and save it.
Click Back to return to the previous topic.

CONTROL ACTIVITIES FORM
- 241 -
Control Activities FormUse this form to view a list of specific control activities related to the control objective.
To access this form, go to Internal Control > Understand Controls and Evaluate Design > ControlActivities. In the Financial Reporting System Documentation forms, click theView Control Activities Formlink.
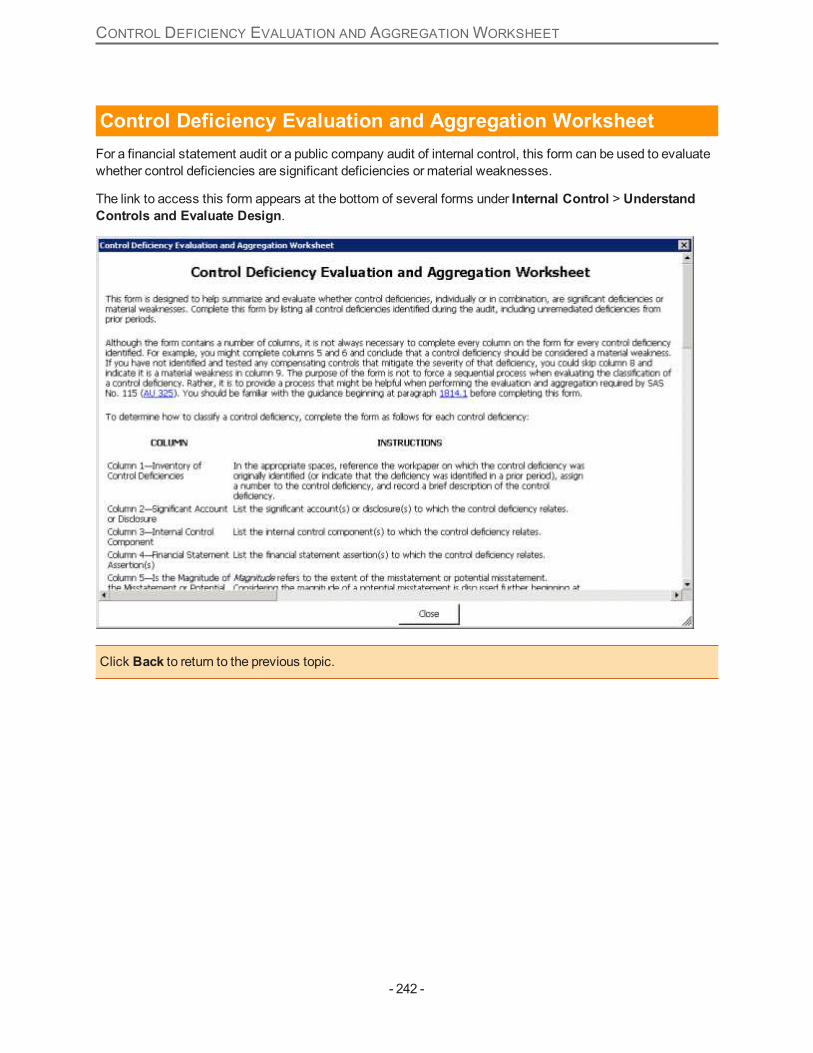
CONTROL DEFICIENCY EVALUATION AND AGGREGATIONWORKSHEET
- 242 -
Control Deficiency Evaluation and Aggregation WorksheetFor a financial statement audit or a public company audit of internal control, this form can be used to evaluatewhether control deficiencies are significant deficiencies or material weaknesses.
The link to access this form appears at the bottom of several forms under Internal Control > UnderstandControls and Evaluate Design.
Click Back to return to the previous topic.

CREATE A CLIENT ENGAGEMENT
- 243 -
Create a Client EngagementUse theCreate Client Engagementwindow to create a client engagement from a PPC title or from amasterengagement.
To access this window, from the Filemenu, click New. From theNew submenu, select Client Engagement(from PPC Title).
Click Back to return to the previous topic.

DELETE ENGAGEMENT
- 244 -
Delete EngagementUse this window to delete clients and engagements. Youmust delete all engagements associated with aclient before you can delete a client.
To access this window, on the Filemenu, click Delete, and then click Client or Engagement.
Click Back to return to the previous topic.

DIAGNOSTICS REPORT
- 245 -
Diagnostics ReportReview theDiagnostics Report to discover inconsistencies or other conditions that you should considerbefore generating your planning forms and engagement programs. You have options to add comments to thereport and to print the report.
Click Back to return to the previous topic.

EDIT TEST PROCEDURE
- 246 -
Edit Test ProcedureThere are two ways you can display this window to edit a procedure:
l Select the procedure and then click Modify on theEditmenu.
l Right-click the procedure and select Edit from the shortcut menu.
You edit the test procedure by clicking in theDescribe the Test Procedure area and typing your changes.Any new text you type appears in red.
Click Back to return to the previous topic.

EDIT TEXT
- 247 -
Edit Text
Whenever you click anEdit icon next to an editable field inSMART Practice Aids, theEdit Textwindowappears. Here you can edit the existing text and save it.
Click Back to return to the previous topic.

CREATE CLIENT ENGAGEMENT FROM MASTER
- 248 -
Create Client Engagement from MasterUse this screen to create an engagement based on amaster engagement.
To access the window, from the Filemenu, click New. From theNew submenu, select Client Engagement(from Master).
Click Back to return to the previous topic.

ENGAGEMENT ACCEPTANCE AND CONTINUANCE FORM
- 249 -
Engagement Acceptance and Continuance FormAfter you create an engagement, the first Step 1 - Identify Risks planning form, Engagement Acceptanceand Continuance Form, appears.
Click Back to return to the previous topic.

ENTER TEST EXCEPTIONS
- 250 -
Enter Test ExceptionsIf exceptions or control deficiencies are noted during control testing, you enter them in theEnter TestExceptionswindow.
To access this window, from theNavigation pane, select Step 1 - Identify Risks > Internal Control >Enter Test Exceptions.
Click Back to return to the previous topic.
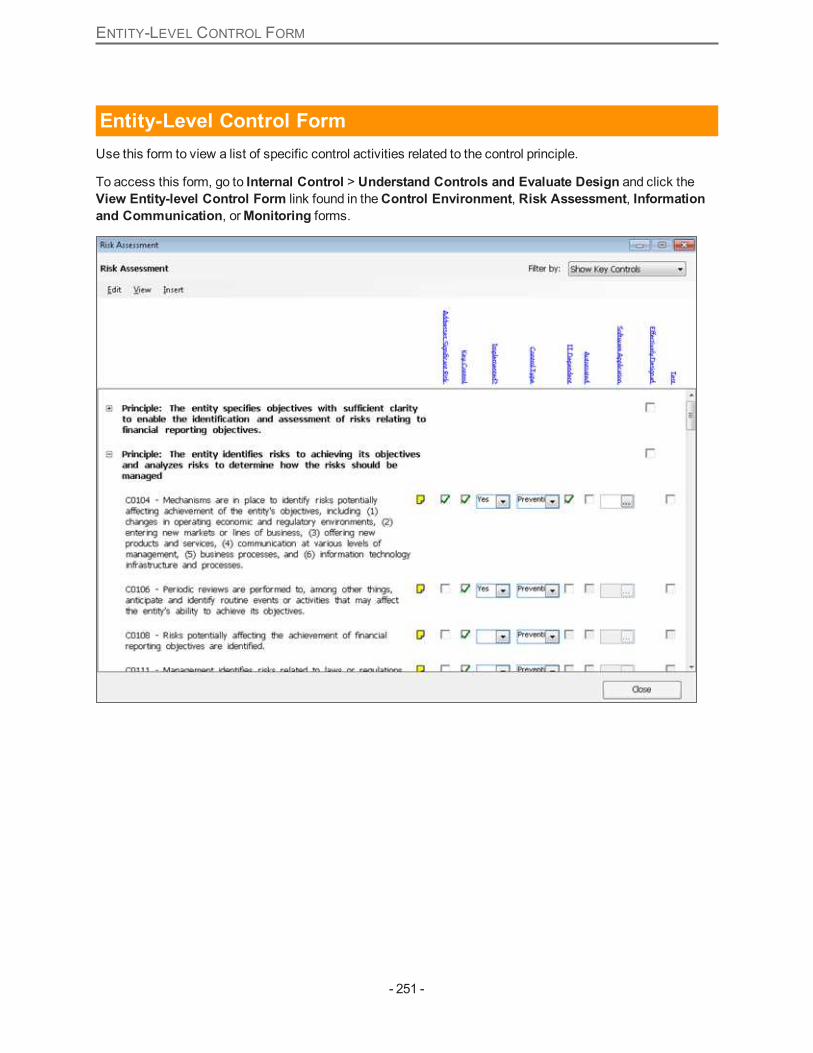
ENTITY-LEVEL CONTROL FORM
- 251 -
Entity-Level Control FormUse this form to view a list of specific control activities related to the control principle.
To access this form, go to Internal Control > Understand Controls and Evaluate Design and click theView Entity-level Control Form link found in theControl Environment, Risk Assessment, Informationand Communication, orMonitoring forms.

GENERAL PLANNING PROCEDURES
- 252 -
General Planning ProceduresThis window is part of Step 3 in the engagement process. Here you review the suggested general planningprocedures andmodify them if necessary.
Access this window by selectingReview and Modify Audit Programs > General Planning Procedures.
Click Back to return to the previous topic.

GENERAL AUDITING AND COMPLETION PROCEDURES
- 253 -
General Auditing and Completion ProceduresThis window is part of Step 3 in the engagement process. Here you review the suggested audit proceduresandmodify them if necessary.
Access this window by selectingReview and Modify Audit Programs > General Auditing andCompletion Procedures.
Click Back to return to the previous topic.

GENERATE AUDIT PROGRAMS
- 254 -
Generate Audit ProgramsThe final step in the risk assessment process is to generate the engagement's planning forms and auditprograms.
To access this window where you generate the audit programs, in theNavigation pane, select Generationfrom the drop-down list. ExpandGenerate Documents and click Audit Programs.

GENERATE PLANNING FORMS
- 255 -
Generate Planning FormsThe final step in the risk assessment process is to generate the engagement's planning forms and auditprograms.
To access this window where you generate the planning forms, in theNavigation pane, select Generationfrom the drop-down list. ExpandGenerate Documents and click Planning Forms.

GO TO/LINK TOWORKPAPERS
- 256 -
Go to/Link to WorkpapersWhenever you double-click a blue underlined workpaper in a program step, the Go To/Link toWorkpaperwindow opens:

"HOW TO" AND NAVIGATIONAL TIPS
- 257 -
"How To" and Navigational TipsWhen you first open a form, the "How to" & Navigational Tipswindow automatically appears, providinghelpful information specific to the section in which you are working. Subsequently, you can display a tip at anytime by clickingView Tip on the tool bar.
Click Back to return to the previous topic.
Identified RiskAs you complete the planning forms in Step 1 - Identify Risks, you can add to the engagement any risks thatcould result in material misstatement of the financial statements.
To access this window, click theAdd Risk button in the Identified Risks right pane.

IDENTIFIED RISK
- 258 -

ADD A DOCUMENT FROM THE INSERT MENU
- 259 -
Add a Document from the Insert MenuTo add a document in SMART, select Add Document from the Insert menu. Notice the various types ofdocuments shown on the sub-menu:
Click Back to return to the previous topic.

INSERT REVIEW NOTE DOCUMENTS
- 260 -
Insert Review Note DocumentsTo insert aReview Note Document, select this option from the Insert menu. Then theWorkpaperProperties screen displays your Review Note reference and title.
Click Back to return to the previous topic.

OPEN CLIENT ENGAGEMENT
- 261 -
Open Client EngagementYou can open any saved client engagement by selecting File > Open > Client Engagement.
Click Back to return to the previous topic.

OPTIONS APPLICATION SETTINGS
- 262 -
Options Application SettingsUse this window when opening an existing engagement to allow multiple users to work on the engagement atthe same time.
To access this window, click Tools > Options > Application Settings.
General Tab

OPTIONS APPLICATION SETTINGS
- 263 -
Multi-User Tab
Click Back to return to the previous topic.

OVERALL FINANCIAL STATEMENT
- 264 -
Overall Financial StatementIn this window, you review the planned audit response to identified risks andmake changes if applicable.
You access this form from theNavigation pane by selectingAssess Effects of Risks > Overall FinancialStatements.
Click Back to return to the previous topic.

RECEIVE ENGAGEMENT
- 265 -
Receive EngagementUse this window to receive aSMART Practice Aids engagement that another user has exported using theTransfer Engagement tool.
To access this window, on the Toolsmenu, click Receive Engagement.
Click Back to return to the previous topic.
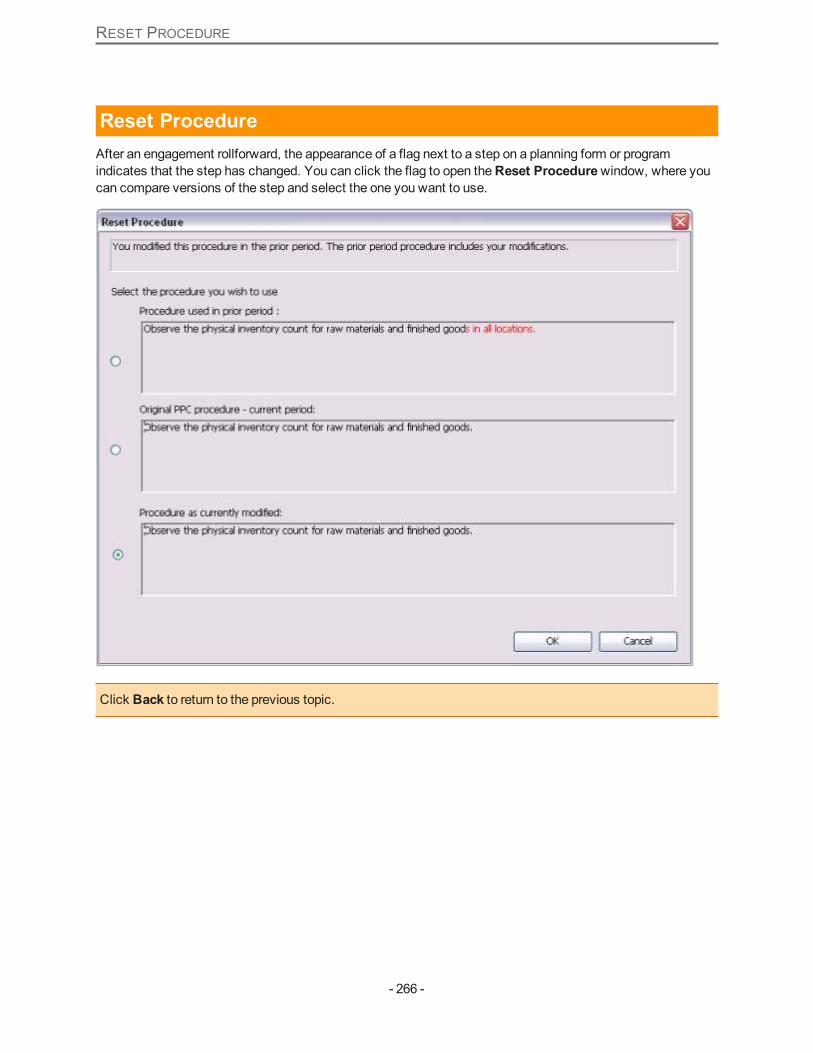
RESET PROCEDURE
- 266 -
Reset ProcedureAfter an engagement rollforward, the appearance of a flag next to a step on a planning form or programindicates that the step has changed. You can click the flag to open theReset Procedurewindow, where youcan compare versions of the step and select the one you want to use.
Click Back to return to the previous topic.

RESTORE ENGAGEMENT
- 267 -
Restore EngagementUse this window to restore a backed up engagement. To access this window, on the Filemenu, clickRestore.
Click Back to return to the previous topic.

ROLLFORWARD ENGAGEMENT
- 268 -
Rollforward EngagementThis window is the first in theEngagement Rollforward process where you create a new engagement basedon a prior period engagement.
Access this window by selecting File > Rollforward.
Click Back to return to the previous topic.

SIGNIFICANT TRANSACTION CLASSES
- 269 -
Significant Transaction ClassesThis window is where you select the transaction classes for which you want to obtain an understanding ofinternal control and determine whether controls are properly designed and implemented.
Access this window from theNavigation pane by selecting Identify Risks > Internal Control > UnderstandControls and Evaluate Design > Control Activities > Significant Transaction Classes.
Click Back to return to the previous topic.

SMART ENGAGEMENT SETUP QUESTIONS
- 270 -
SMART Engagement Setup QuestionsAnswer SMART Engagement Setup Questions to automatically streamline and tailor your practice aids andaudit programs based on your answers. You can click theExplain link next to each question for anexplanation. Planning questions not applicable to your client’s situation will be removed automatically, andaudit programs will be tailored automatically.
Note: A SMART Audit Essential Engagement will only display setup questions that include/exclude auditareas (including general audit areas) or disclosure checklists and whose answers cannot be changed duringa rollforward.
View a Summary of Design EffectivenessSelect theSummary of Design Effectiveness Evaluations section under Internal Control to view asummary of your previous conclusions regarding design effectiveness.
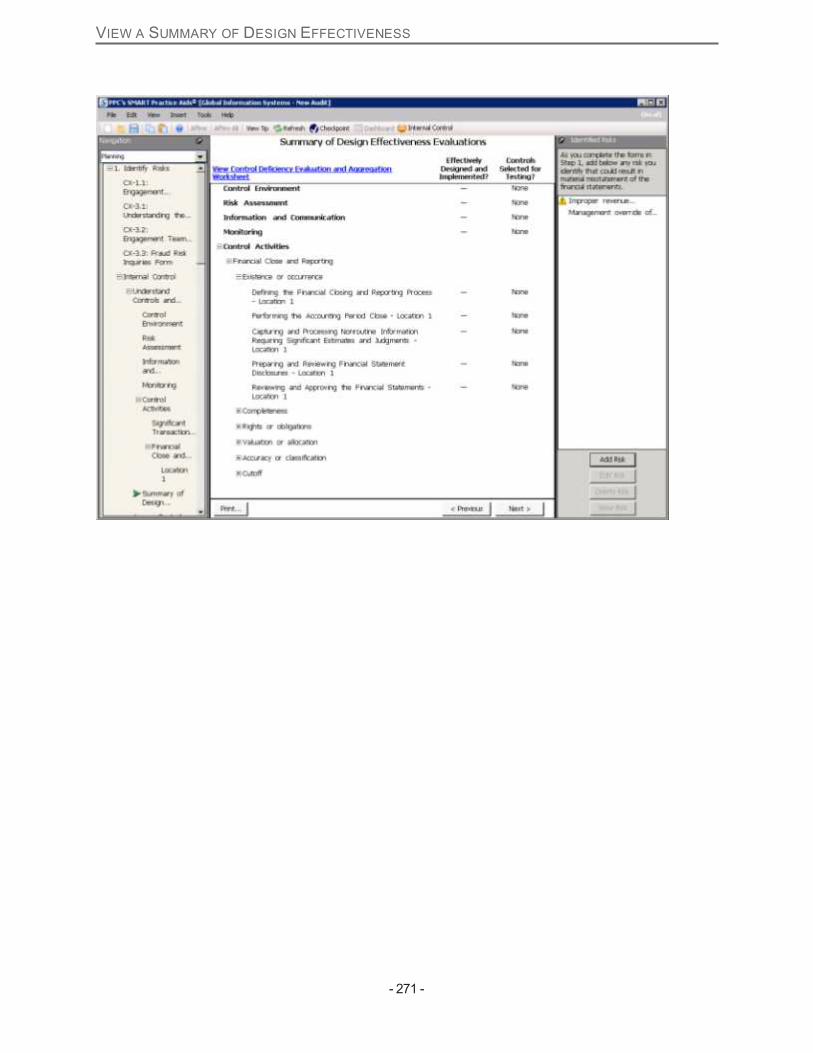
VIEW A SUMMARY OF DESIGN EFFECTIVENESS
- 271 -

TRANSFER ENGAGEMENT
- 272 -
Transfer EngagementUse this window to transfer an engagement to other users.
To access this window, on the Toolsmenu. click Transfer Engagement. On the submenu, select eitherClient Engagement orMaster Engagement.
Click Back to return to the previous topic.

SMART ENGAGEMENT SETUP
- 273 -
Smart Engagement SetupUse this window tomake edits to the settings of an engagement. (The engagement must be open to beedited.)
The window appears when you click Edit > Smart Engagement Setup.
Click Back to return to the previous topic.

WORKPAPER STATUS REPORT
- 274 -
Workpaper Status ReportUse this report to view the status of workpapers, including the date completed and the date reviewed.
To access this report, from the Toolsmenu, clickWorkpaper Status Report.
Click Back to return to the previous topic.

SMART PRACTICE AIDS REFERENCE LINKS
- 275 -
SMART Practice Aids Reference LinksSMART Practice Aids documents, including planning forms and engagement programs, provide links to PPCreferencematerials. Clicking a link opens the related referencematerial only if you have a valid ReferenceLibrary or Checkpoint subscription to thematerial.
The first time you select one of these links, you are prompted on the Set Location of ReferenceMaterialswindow to choose where you want the content to come from. Once your selection is made from the followingchoices, you will not be prompted again:
l Reference Library
l RIA Checkpoint
l None
If you choose Reference Library, you will receive an "Unlicensed Resource" message until you enter yourmaster password.
If you choose RIA Checkpoint, you will be prompted for your Checkpoint user ID and password on theCheckpoint login screen. Once you log in to Checkpoint, the referenced content is displayed in your browserwindow.
If you choose None, the content links selected in your documents will not link to referencematerials, and youwill not be prompted to set a preferred location again.
To set your master password:
1. In Reference Library, select Security Settings from theEdit menu.
2. Type a valid master password in the box.
Note: If you do not know themaster password, contact PPC Technical Support at 1-800-431-9025.
3. Select OK to close the window.
4. Return to the Tools document and re-click the link.
Reference Library will display the referenced content.
Note: Access to older versions of Reference Library content is not available through Virtual OfficeCS. Youmust access older content from your local machine.
Change Reference Material Location
If you want to change the location from where your referencematerials are retrieved, you can select Optionsfrom the SMART Practice Aids Tools menu and click Set Location. Or, when in aMicrosoft® Word or Exceldocument, you can select Content Settings from thePPC menu.
SMART PRACTICE AIDS WITH VIRTUAL OFFICE CS
- 276 -
SMART Practice Aids with Virtual Office CSVirtual Office CS is an Internet-based desktop application that provides access to various productivityapplications, including PPC's Tools and SMART Practice Aids. You can launch a product such as SMARTPractice Aids – Single Audit by clicking an icon. You can use this system to access the products you arelicensed to use without having to download and install them to a workstation.
If you use PPC’s SMART Practice Aids, you can request to have this product added to Virtual Office CS. CallCS Customer Service at (800) 968-0600 and press 1.
When you access SMART Practice Aids from Virtual Office CS, most functionality works the sameway itwould for a local installation, but a few minor differences exist:
l The option to point to another database is not available, since you will already be linked to a SMARTPractice Aids database that is set up for you.
l When you first log in to Virtual Office CS and select SMART Practice Aids, you are asked to verifywhich products (for example, SMART Practice Aids – Single Audit or SMART Practice Aids – RiskAssessment) you are licensed to use. First-time users are prompted to accept the End User ProductLicense Agreement.
l In subsequent launches of the product from Virtual Office CS, if newly licensed products are notavailable, you can refresh your licensed products list from theSMART Practice Aids Toolsmenuby clicking theVO Options submenu and thenRefresh Product List. This product licensingverification also determines which Practice Aids titles you will have access to while using SMARTPractice Aids.
l Youmay still be able to access SMART Practice Aids from Virtual Office CS after the expiration ofyour license, but you are prevented from creating new engagements. For example, functions such asRollforwardandSave As are disabled in unlicensed versions.
When you access SMART Practice Aids from Virtual Office CS, the followingmenu options become availableon the Tools menu under theVO Options submenu.
Name Description
Set/Update LoginInformation Set up initial login or update existing login information.
Refresh Product List Refresh list of licensed product titles to ensure availability via Virtual OfficeCS.
These SMART Practice Aids menu options are available only from the Virtual Office-launched version.

INTEGRATION OF SMART PRACTICE AIDS WITH ADVANCEFLOW
- 277 -
Integration of SMART Practice Aids with AdvanceFlowAdvanceFlow is a separately licensed product found at www.advanceflow.com. For AdvanceFlowintegration, select Yes to the external engagement management software question andAdvanceFlow fromthe drop downmenu on theCreate Client Engagement screen
Click Link Engagements. ThePPC's SMART Practice Aids - AdvanceFlow Login dialog box isdisplayed.
Enter theUser Name andPassword. Click Log In to link the engagement toAdvanceFlow.
Linking Smart Practice Aids to AdvanceFlow from the Tools Tab
Open a client engagement.
1. Go to Toolsmenu. Select Link to AdvanceFlow.

INTEGRATION OF SMART PRACTICE AIDS WITH ADVANCEFLOW
- 278 -
2. Enter your AdvanceFlow Login information.
3. Select the AdvanceFlow client to link. Click Next.

INTEGRATION OF SMART PRACTICE AIDS WITH ADVANCEFLOW
- 279 -
4. Select the engagement to link. Click Link.

LINKING TO ADVANCEFLOWWORKPAPER
- 280 -
Linking to AdvanceFlow Workpaper
Link to AdvanceFlowWorkpaper
In SMART, you have the ability to link to anAdvanceFlow Workpaper in a SMART Practice Aids planningform or audit program step.
Link a SMART Practice Aids Planning Form to an AdvanceFlow workpaper
Open a client engagement.
1. Right-click in a Planning Form entry field and select Insert Workpaper Reference from the right clickmenu.
2. Click Add WP RefThe Insert Workpaper Referencewindow is displayed.
3. Expand and select the desiredAdvanceFlow Workpaper and click Select.
4. Click the workpaper reference link to open the workpaper in AdvanceFlow.

LINKING TO ADVANCEFLOWWORKPAPER
- 281 -
5. This opens a read only workpaper in AdvanceFlow. Edit the workpaper by opening it fromAdvanceFlow in edit mode.
6. Click the pencil icon to open theEdit Textwindow.

LINKING TO ADVANCEFLOWWORKPAPER
- 282 -
Note: The pencil icon with the + sign indicates a linked workpaper
Link a SMART Practice Aids Audit Program to an AdvanceFlow Workpaper
Open a client engagement.
1. From an audit program, right-click in theWorkpaper Index column and select Insert WorkpaperReference from the right click menu.The Insert Workpaper Referencewindow is displayed.
2. Expand and select the desiredAdvanceFlow Workpaper and click Select.
3. Click the workpaper reference link once,to open the read only workpaper in AdvanceFlow. Edit theworkpaper by opening it from AdvanceFlow in edit mode.
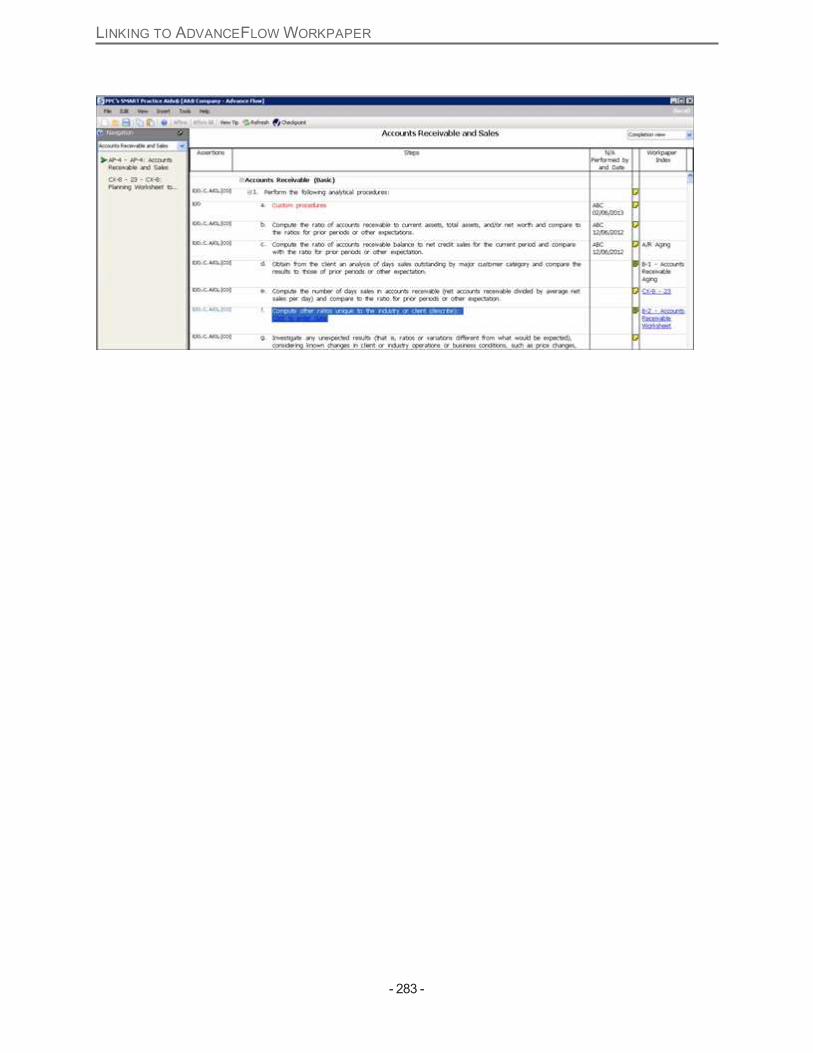
LINKING TO ADVANCEFLOWWORKPAPER
- 283 -

UPLOADING DOCUMENTS TO ADVANCEFLOW
- 284 -
Uploading Documents to AdvanceFlow
Note: Your SMART engagement must be linked to AdvanceFlow engagement before uploading documents
Go to Tools. Select Create SMART Docs. Select the document you wish to upload. First, the generationprocesses is performed.
After generation, SMART Docs are uploaded into linked client engagement in AdvanceFlow.

UPLOADING DOCUMENTS TO ADVANCEFLOW
- 285 -
When the documents are uploaded for the first time, you will be required to drag and drop SMART Docs to thedesired folder location.
SMART Docs can be opened and viewed from AdvanceFlow. If a change needs to bemade, use PPC'sOpen this Workpaper in SMART Practice Aids. You can also select Edit underWorkpapers inAdvanceFlow to open the SMART Doc directly in SMART Practice Aids for editing.

UPLOADING DOCUMENTS TO ADVANCEFLOW
- 286 -

UPLOADING CHANGED DOCS TO ADVANCEFLOW
- 287 -
Uploading Changed Docs to AdvanceFlowInSMART Practice Aids, when youmake changes and save and close the linked client engagement, thechanges are uploaded automatically into AdvanceFlow.
Make all the changes to PPC Forms in SMART.
When you close the SMART engagement after making a change, you are prompted to upload the changeddocuments to AdvanceFlow.
Select Yes to update all changed SMART Docs, No to update none of the changed documents, orSelectManually to select the documents to update, and the changed SMART Docs are automatically updated in theexisting location in AdvanceFlow.

ROLLFORWARD INTEGRATION
- 288 -
Rollforward IntegrationFor an engagement integrated with AdvanceFlow, SMART Practice Aids allows you to launch the SMARTPractice Aids Rollforward process from engagement rollforward in AdvanceFlow.
During the rollforward process in AdvanceFlow, two options are available for SMART workpapers—
l Replace from SMART - This is the default selection. When selected, a placeholder workpaper iscreated in the rolled forward engagement.
l Exclude - The workpaper is excluded from the rolled forward engagement.
How Rollforward Integration works:
1. When you choose to rollforward an engagement in AdvanceFlow, all workpapers in the engagementincluding SMART workpapers are listed on theWorkpaper Roll Forward Settings screen of the RollForward wizard. The action to be taken for each workpaper upon rollforward is listed under theRollForward column. To change the default/selected option:
i. Right-click the workpaper reference and selectWorkpaper Properties. TheWorkpaperProperties dialog box is displayed.
ii. Select the desired option (Replace from SMART orExclude).from theRoll Forward field dropdown on theGeneral tab.
iii. Click OK.
2. When you have selected the desired option for all your workpapers, click Next. TheNew WorkpaperProperties screen of the Roll Forward wizard is displayed with a list of all workpapers that will beincluded in the new engagement.
3. If you have no further changes, click OK. ThePPC's SMART Practice Aids Integration screen ofthe Roll Forward wizard is displayed with the linked SMART engagement information.
Note: TheRoll forward linked engagement option is checked by default. When checked, SMARTis launched with the appropriate roll forward information from AdvanceFlow. AdvanceFlow passes theoriginal workpaper ID with the corresponding new workpaper ID. Workpapers that are not rolledforward do not include a new workpaper ID.
Note: If a SMART engagement is not linked, thePPC's SMART Practice Aids Integration screenof the roll forwardWizard does not appear.
4. Click OK.
You will see that SMART workpapers with the Roll Forward optionReplace from SMART selected arereplaced with a placeholder type workpaper in the new engagement. Upon completion of the rollforwardprocess, workpapers can be uploaded to AdvanceFlow. Place holders are replaced with the newlycreated workpapers.
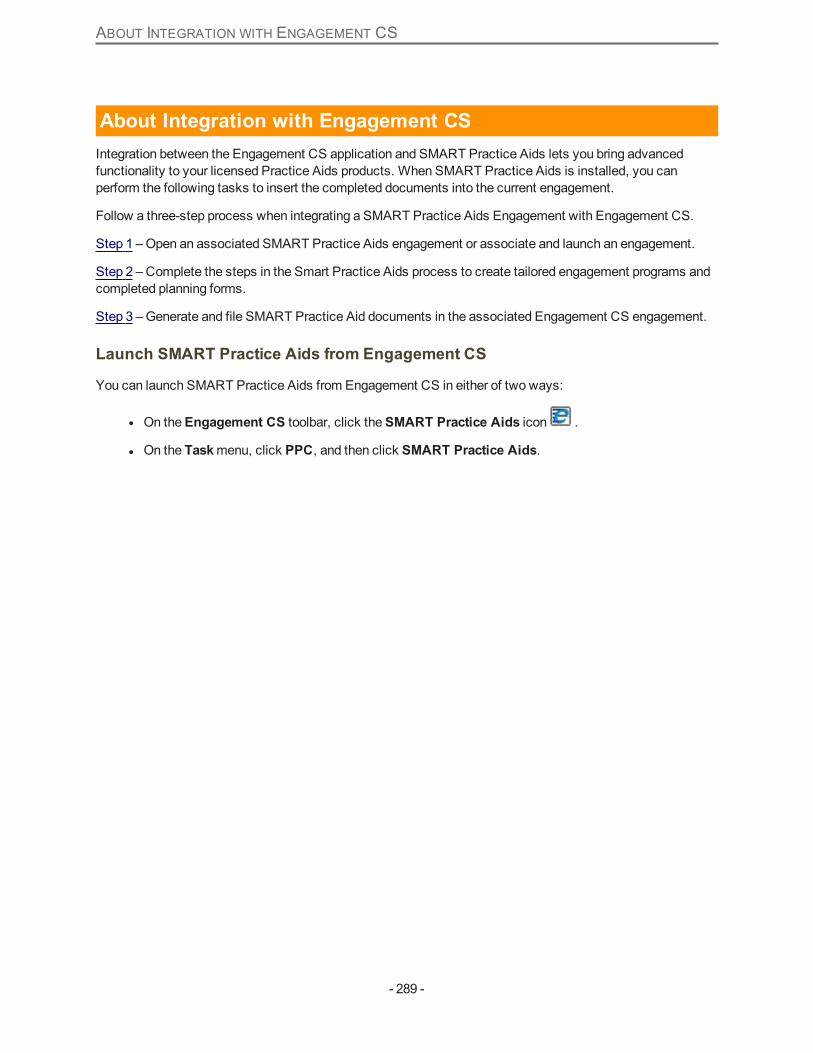
ABOUT INTEGRATION WITH ENGAGEMENT CS
- 289 -
About Integration with Engagement CSIntegration between the Engagement CS application and SMART Practice Aids lets you bring advancedfunctionality to your licensed Practice Aids products. When SMART Practice Aids is installed, you canperform the following tasks to insert the completed documents into the current engagement.
Follow a three-step process when integrating a SMART Practice Aids Engagement with Engagement CS.
Step 1 –Open an associated SMART Practice Aids engagement or associate and launch an engagement.
Step 2 – Complete the steps in the Smart Practice Aids process to create tailored engagement programs andcompleted planning forms.
Step 3 –Generate and file SMART Practice Aid documents in the associated Engagement CS engagement.
Launch SMART Practice Aids from Engagement CS
You can launch SMART Practice Aids from Engagement CS in either of two ways:
l On theEngagement CS toolbar, click theSMART Practice Aids icon .
l On the Taskmenu, click PPC, and then click SMART Practice Aids.

INSERT A SMART PRACTICE AIDS DOCUMENT INTO ENGAGEMENT CS
- 290 -
Insert a SMART Practice Aids Document into Engagement CSUse the following steps to insert a SMART Practice Aids document into an Engagement CS engagement.
To insert a SMART Practice Aids document into Engagement CS:
1. OpenEngagement CS.
2. On the Filemenu, click New, and then click Document.
TheNew Documentwindow appears.
3. Click thePPC tab.
4. Select theDocument from PPC's SMART Practice Aids(TM) option.
5. Click Continue.
6. Follow the prompts to insert theSMART Practice Aid document.
Note: You can insert only SMART Practice Aids that have been previously generated and saved in a user-specified location.
ROLLFORWARD INTEGRATION
- 291 -
Rollforward IntegrationIf you are a user of both SMART Practice Aids and Engagement CS, you can perform a rollforward of priorperiod engagements that are related between the two products using the following steps.
To perform a rollforward of prior-period engagement:
1. Open the engagement inEngagement CS.
2. On the Filemenu, click Roll Forward.
TheRoll Forward Optionswindow appears.
3. Optionally, select the appropriate check boxes to retain workpaper assignments and retain staffprivileges.
4. Click Continue.
TheRoll Forward - Engagement Propertieswindow appears.
5. Verify the Identification information and complete the information in theEngagement Dates andAudit Documentation Dates sections.
6. Click Next.
TheRoll Forward - Workpaper Settingswindow appears, listing each of the engagement'sworkpaper references and the applicableRoll Forward setting for each one.
7. To change the setting for a workpaper reference, select the reference setting.
A drop-down arrow appears in the cell containing the setting.
8. Click the drop-down arrow and select a setting from the list.
9. When you are satisfied with all settings, click Next.
TheRoll Forward - Replace Workpaperswindow appears.
10. Review the workpaper titles listed in theReplacement Workpaper column.
11. To change a replacement workpaper title, select the title from theReplacement Workpaper columnand click theSelect Replacement Workpaper button.
PPC's Toolswindow appears.
12. Select a new title from the list of tools by double-clicking the title you want.
The new title replaces the one listed on theRoll Forward - Replace Workpaperswindow.
13. When you have finished verifying the list of replacement workpapers, click Next.
TheRoll Forward - Rename Workpaperwindow appears.
14. To change a workpaper reference or workpaper name for any workpaper used by the engagement, clickin a field and edit or replace the reference or name.
15. Click Next.
ROLLFORWARD INTEGRATION
- 292 -
TheRoll Forward - Finishwindow appears.
You have three options on this window. You can click Finish to initiate the final steps of theRollforward process, or click theBack button to return to a previous window tomodify settings, or clickCancel to cancel the process.
16. Click Finish.
TheEngagement Propertieswindow appears.
17. Review the information on each tab andmake any applicable changes.
18. Click OK.
If the engagement includes Tool documents related to a SMART Practice Aids engagement, thesystem displays amessage asking whether you want to rollforward the SMART Practice Aidsengagement.
19. Click Yes orNo.
If you click Yes, the rollforward integration process begins. The system passes theEngagement CSengagement's Prior Period Indicator, Current Period Indicator, and Current Period document path fromEngagement CS toSMART Practice Aids.
The process now follows one of two paths, depending on whether the prior periodEngagement CSengagement andSMART Practice Aids engagement are linked. Refer to the following proceduresfor detailed instructions.
If the Engagement CS and SMART Practice Aids engagements are linked
If the engagements are linked, the system opens SMART Practice Aids and accesses the relatedengagement.
The SMART Practice Aids rollforward process commences. Complete the 4-pageRollforward Engagementform as you would normally when performing a rollforward inSMART Practice Aids. See EngagementRollforward for more details.
At the conclusion of the rollforward process, the current periodSMART Practice Aids engagement opens.You can now complete work on theSMART Practice Aids engagement. The forms that you generate fromSMART Practice Aids will be stored in the current periodEngagement CS engagement.
If the Engagement CS and SMART Practice Aids engagements are not linked
If the engagements are not linked, the system prompts you to select an existing engagement or create a newone.
If you choose to select an existing engagement, theOpen Engagementwindow appears. Here you canselect the applicable engagement. The system then prompts you to verify that you want to rollforward theselected engagement.
TheSMART Practice Aids rollforward process commences. Complete the 4-page Rollforward Engagementform as you would normally when performing a rollforward inSMART Practice Aids. See EngagementRollforward for more details

ROLLFORWARD INTEGRATION
- 293 -
At the conclusion of the rollforward process, the current periodSMART Practice Aids engagement opens.You can now complete work on theSMART Practice Aids engagement. The forms that you generate fromSMART Practice Aids will be stored in the current periodEngagement CS engagement.
Intelligent Document Storage
After you perform a rollforward, each prior periodSMART Practice Aids document inEngagement CS isreplaced by its current year version at the time it is generated from SMART Practice Aids. If a documentcannot bematched to a prior period version, or if the document is re-generated, it is placed in theNot yet filedfolder inEngagement CS.
You can then drag each document from theNot yet filed folder to the applicable folder location in theengagement.

STEP 1 – OPEN AN ASSOCIATED SMART PRACTICE AIDS ENGAGEMENT OR ASSOCIATE AND
- 294 -
Step 1 – Open an Associated SMART Practice Aids Engagementor Associate and Launch an EngagementThere are two possible procedures to follow depending on whether you have associated the SMART PracticeAids engagement with an Engagement CS engagement.
If you have associated a SMART Practice Aids engagement with an EngagementCS engagement
To open an associated SMART Practice Aids engagement:
1. Select an engagement from Engagement CS.
2. Click the SMART Practice Aids button on theEngagement CS toolbar. (You can also click PPCand then click SMART Practice Aids from the Taskmenu.)
If the Engagement CS engagement is already associated with an engagement in SMART PracticeAids, theOpen Engagementwindow appears with the associated engagement selected.
3. Click Open.
4. Next, go to Step 2 in the integration process.
If you have not associated a SMART Practice Aids engagement with anEngagement CS engagement
To associate and launch an engagement:
1. Select an engagement from Engagement CS.
2. Click the SMART Practice Aids button on the Engagement CS toolbar. (From the Taskmenu, youcan also click PPC and then click SMART Practice Aids.
If the Engagement CS engagement has not previously been associated with an engagement inSMART Practice Aids, theSelect New/Existing Engagementwindow appears with the following twooptions.
3. Select the appropriate option:
l If you have created an engagement in SMART Practice Aids, but the client name orengagement name is different than the corresponding engagement in Engagement CS, selecttheSelect an existing engagement option.
l If you have not created a SMART Practice Aids engagement corresponding to the engagementin Engagement CS, select Create a new engagement.

STEP 1 – OPEN AN ASSOCIATED SMART PRACTICE AIDS ENGAGEMENT OR ASSOCIATE AND
- 295 -
4. Click OK.
A new engagement will be created and automatically associated with the active Engagement CSengagement.
5. Next, go to Step 2 in the integration process.
STEP 2 – COMPLETE THE STEPS IN SMART PRACTICE AIDS
- 296 -
Step 2 – Complete the Steps in SMART Practice AidsAfter you have associated a SMART Practice Aids engagement with a corresponding engagement inEngagement CS, complete the SMART Practice Aids steps to generate tailored engagement programs andcompleted planning forms. For example, in an audit engagement:
1. Identify risks – Complete planning forms and identify risks that could result in material misstatement ofthe financial statements.
2. Assess effects of risks – Determine the extent of audit procedures necessary in light of identified risks.
3. Review andmodify audit programs – Review the suggested audit procedures andmodify as needed.
Next, go to step 3 in the integration process, where you will generate documents and file them in theassociated Engagement CS engagement.

STEP 3 – GENERATE AND FILE SMART PRACTICE AID DOCUMENTS IN THE ASSOCIATED
- 297 -
Step 3 – Generate and File SMART Practice Aid Documents inthe Associated Engagement CS EngagementWhen you have completed the steps in the SMART Practice Aids process, you are ready to generatedocuments (Diagnostic Report, Practice Aid planning forms, and engagement programs) and then file them inthe associated Engagement CS engagement.
You can automatically insert the documents into theNot yet filed folder of the engagement workspace. If youhave associated a SMART Practice Aids engagement with an Engagement CS engagement, the correctdefault path is displayed in theCreate Practice Aidswindow when saving the audit documents.
While in Engagement CS, you can drag and drop unfiled workpapers to the appropriate engagement folder, orclick File > Process Unfiled Workpapers to move items to an appropriate engagement folder and/or replaceexisting workpapers. Using the latter optionmakes it easier to replace existing documents in the engagement.
Note: You cannot import SMART Practice Aids documents whenmore than one staff member is in theengagement at a time as the current engagement is locked during the import process.

ABOUT INTEGRATION WITHWORKPAPERS CS
- 298 -
About Integration with Workpapers CSIntegration of SMART Practice Aids withWorkpapers CS lets you bring advanced functionality to yourlicensed Practice Aids products. Link Workpapers CS engagement binders to SMART Practice Aids andbring documents in from SMART to existing engagements.
Follow a three-step process when integrating a SMART Practice Aids Engagement withWorkpapers CS:
Step 1 – Link a SMART engagement toWorkpapers CS.
Step 2 – Complete the steps in the Smart Practice Aids process to create tailored engagement programs andcompleted planning forms.
Step 3 –Generate and file SMART Practice Aid workpapers in the associatedWorkpapers CS binder.
You can then Perform aRollforward of all linked prior period engagements.

EDIT SMART DOCS PROPERTIES INWORKPAPERS CS
- 299 -
Edit SMART Docs Properties in Workpapers CSYou can edit the properties of the generated SMART workpapers from withinWorkpapers CS.
To edit SMART document Properties from Workpaper CS:
1. Select Properties for a SMART doc to open theWorkpapers Properties dialog inWorkpapers CS.
2. In the open dialog box, you can edit theAssigned, Roll Forward, andDelete on Finalize options.
Note: Reference andName properties below Identification will be unavailable for editing. Also,enablingDelete on Finalize check box will delete the workpaper fromWorkpapers CS only. Thedeleted workpaper will still be available in SMART.
3. You can also set Roll Forward properties for the SMART workpaper. This will be useful when you rollforward a linked SMART engagement. The following two options are available in theRoll Forwarddrop down for a workpaper:
l Replace - SMART Practice Aids - Selecting this option will create a placeholderworkpaperin the rolled forward engagement inWorkpapers CS Engagement Binders screen. Uponcompleting and saving the rolled forward workpaper in SMART, the placeholder workpaper forthe rolled forward engagement inWorkpapers CS will be automatically replaced with theupdated SMART workpaper.

EDIT SMART DOCS PROPERTIES INWORKPAPERS CS
- 300 -
l Exclude - Selecting this option will exclude the workpaper paper from the rolled forwardengagement.
Note: Roll Forward properties for SMART workpapers can also be defined while Performing aRollforward in theRoll Forward Wizard of Workpapers CS.

ROLLFORWARD INTEGRATION
- 301 -
Rollforward IntegrationIf you are a user of both SMART Practice Aids andWorkpapers CS, you can perform a rollforward of priorperiod engagements that are related between the two products using the following steps.
To perform a rollforward of prior-period engagement:
1. Open the engagement binder inWorkpapers CS.
2. On the Filemenu, click Roll Forward.
TheRoll Forward Wizardwindow appears.
3. Here, define the settings for the rolled forward binder in theNew Binder Properties page.
4. In theWorkpapers Settings page, specify Roll Forward Settings for the SMART workpapers in yourengagement binder.
For a workpaper, select Replace - SMART Practice Aids setting to create a placeholderworkpaper inthe rolled forward engagement binder inWorkpapers CS. Upon completing and saving the rolledforward workpaper in SMART, the placeholderworkpaper inWorkpapers CS will be automaticallyreplaced with the updated SMART workpaper.
Note:You can also choose to not include a SMART workpaper in the rolled forward engagement byselecting theExclude option underRoll Forward Settings.
5. TheWorkpapers to Roll Forward page of the wizard will indicate the SMART workpapers selectedfor the roll forward.
6. Finally, PPC SMART Practice Aids Integration page of the wizard displays theWorkpapers CSengagements selected for the roll forward.

ROLLFORWARD INTEGRATION
- 302 -
Note: If you want to exclude an engagement from the roll forward process, enable the correspondingcheck box underExclude column.
7. Click Finish.
Workpapers CS will then pass on the prior-periodWorkpaper ID along with the newWorkpaper ID forthe selected rolled forward workpapers toSMART Practice Aids.
8. This will openRollForward Engagementwindow from SMART Practice Aids. Follow the prompts tofinish the Roll Forward process in SMART.
Note:See Engagement Rollforward Best Practices section for tips on how to best perform anengagement roll forward from SMART.
9. You can then update the rolled forward engagement workpapers inSMART Practice Aids. UponSaving the changes in the rolled forward documents, associated placeholderworkpapers inWorkpapers CS will be replaced with the updated SMART workpapers.

STEP 1 – LINK SMART PRACTICE AIDS ENGAGEMENTS TOWORKPAPERS CS BINDERS
- 303 -
Step 1 – Link SMART Practice Aids engagements to WorkpapersCS bindersThere are two possible procedures to follow depending on whether you want to link a binder to a new or anexistingSMART Practice Aids engagement fromWorkpapers CS.
Link a binder to a SMART engagement fromWorkpapers CS
1. From theEngagement Binders screen inWorkpapers CS, click PPC to openPPC SMART PracticeAids Integration tab.
2. Click icon below to launchCreate New Engagementwizard from within SMART.
If theWorkpapers CS binder has not previously been associated with your existing engagements inSMART Practice Aids, theSelect New/Existing Engagementwindow appears with the following twooptions.
3. Select the appropriate option:
l If you have created an engagement in SMART Practice Aids, but the client name orengagement name is different than the corresponding engagement inWorkpapers CS, selecttheSelect an existing engagement option.
l If you have not created a SMART Practice Aids engagement corresponding to the engagementbinder inWorkpapers CS, select Create a new engagement.
4. Click OK.
Depending on the option selected above, perform one of the following procedures:
Link a new SMART Practice Aids engagement toWorkpapers CS
If you selectedCreate a new engagement option, Create Client Engagementwizard from SMART will bedisplayed on the screen.

STEP 1 – LINK SMART PRACTICE AIDS ENGAGEMENTS TOWORKPAPERS CS BINDERS
- 304 -
1. On the first page of theCreate Client Engagementwizard, the client and engagement names will bepre-filled with the names of selected client/engagement binder inWorkpapers CS.
2. Enter anEngagement Date, select theEngagement Type and click Next.
3. You will see the below page in theCreate New Engagementwizard. Here, select thePractice AidTitle and thePractice Aids Modules that you wish to include in the engagement.
4. Click Next and follow the prompts to finish theCreate Client Engagement process in the wizard. Thenew SMART engagement will then be linked to your selectedWorkpapers CS engagement binder.
5. Next, go to Step 2 in the integration process.
Link an existingSMART Practice Aids engagement toWorkpapers CS
If you selectedSelect an existing engagement option, theOpen Engagementwindow from SMART will bedisplayed on the screen.
1. In theOpen Engagementwindow, select the existing client engagement that you wish to link to theWorkpapers CS binder.

STEP 1 – LINK SMART PRACTICE AIDS ENGAGEMENTS TOWORKPAPERS CS BINDERS
- 305 -
2. Click Open.
This will link the selected SMART client engagement to yourWorkpapers CS binder. The SMARTengagement will be visible in theEngagement Binders screen withinWorkpapers CS.
3. Next, go to Step 2 in the integration process.

STEP 2 – COMPLETE THE STEPS IN SMART PRACTICE AIDS
- 306 -
Step 2 – Complete the Steps in SMART Practice AidsAfter you have associated a SMART Practice Aids engagement with a corresponding engagement binder inWorkpapers CS, launch the engagement and complete the SMART Practice Aids steps to generate tailoredengagement programs and completed planning forms. For example, in an audit engagement:
1. Identify risks – Complete planning forms and identify risks that could result in material misstatement ofthe financial statements.
2. Assess effects of risks – Determine the extent of audit procedures necessary in light of identified risks.
3. Review andmodify audit programs – Review the suggested audit procedures andmodify as needed.
Next, go to step 3 in the integration process, where you will generate documents and file them in theassociatedWorkpapers CS engagement binder.

STEP 3 – GENERATE AND FILE SMART WORKPAPERS IN THE ASSOCIATEDWORKPAPERS
- 307 -
Step 3 – Generate and File SMART workpapers in the associatedWorkpapers CS binderWhen you have completed the steps in the SMART Practice Aids process, you are ready to create SMARTDocs (Diagnostic Report, Practice Aid planning forms, and engagement programs) and file them in theassociatedWorkpapers CS engagement binder.
Note: Your SMART engagement must be linked toWorkpapers CS engagement binder before generatingand filing the documents.
Create and File SMART Docs in the associated Workpapers CS binder
1. Click Create SMART Docs in the Toolsmenu from SMART Practice Aids. This will launchCreateSMART Docs dialog box. In the dialog, select the workpapers you want to create and send to yourWorkpapers CS binder.
2. Click Create. This will generate the selected SMART workpapers and display the followingmessageon the screen.
3. Click Close to upload the generated SMART workpapers to the associatedWorkpaper CSengagement binder. TheUpload Statuswill be displayed in theAdd Workpapers CS Documentswindow.

STEP 3 – GENERATE AND FILE SMART WORKPAPERS IN THE ASSOCIATEDWORKPAPERS
- 308 -
4. The generated SMART workpapers are shown in theEngagement Binders Treewindow ofWorkpapers CS.
5. If necessary, you can drag and drop generated workpapers to the appropriate engagement folderswithinWorkpapers CS.
Note: Selecting toOpen a SMART workpaper launches the workpaper within SMART. Any changes madeto the workpaper in SMART will automatically be updated in the associatedWorkpapers CS engagementbinder.

SUPPORT OVERVIEW
- 309 -
Support OverviewPPC maintains a staff of trained professionals to provide customers with solutions to technical issues andinformation about PPC's electronic products.
Technical Support Numbers
Telephone (800) 431-9025
Internet support.checkpoint.thomsonreuters.com
Information Needed
Please be at your computer when you call and be prepared to give the following information (when applicable):
l Application information
l The version number of the product you are using (available on theHelpmenu by clickingAbout)
l The exact wording of any messages that appeared on your screen
l What happened and what you were doing when the problem occurred
l How you tried to solve the problem
l System information
l Windows Operating System andOffice versions
l Network Operating System
l The type of hardware that you are using, including network hardware
Note: When submitting requests via e-mail, please be sure that the above information is included with theinquiry.

TRAINING RESOURCES
- 310 -
Training ResourcesPPC offers extensive training for many products including:
l On-site training classes
l Virtual training classes
l Training workbooks
Please visit support.checkpoint.thomsonreuters.com/training for more details.

INDEX
- 311 -
Index
A
About FieldWork 143
Add a category 203
Add a comment 212
Add a Control 103
Add a document 150, 206
Add a procedure 83, 202
Add custom topic to a checklist 113
Add documents 168
Add forms to engagement 79
Add identified risks 80, 196
Add location 93
AddObjective 102
Add Test Procedure 104
Add transaction class 93
Add, Edit, and Delete Topic Comments 117
Allow multi-users 227
Assess Control Risk 109
Assess effects of risk 80, 198
Audit Areas - Control Activities 95
Audit program design 148
Audit programs 85, 125
B
Back up a firm library 131
Backup Engagement 66
Big Picture 19
Blank PPC workpapers 169

INDEX
- 312 -
C
Categories 203
Change referencematerial location 275
Check for Updates 119
Client Engagement 51
Comments 212
Common Procedures Overview 211
Complete audit program 148, 204
Complete risk assessment for audit areas 198
Context-sensitive Help 22
Context Sensitive 22
Control Activities
Financial Close and Reporting 98
Control Activities - Audit Areas 95
Control Activities - General Computer Controls 100
Control Activities Form 36
Control Deficiency Evaluation Form and AggregationWorksheet 101
Create amaster engagement 52
Create a Transfer file for a firm library 140
Create Engagement 51
Create SMART Docs 153, 209
Create SMART Start Engagement 58
Create SMART Start Master Engagement 60
Customer Help Center 22
CX-5 forms 110
D
Dashboard 152
Delete a category 203
Delete a comment 212

INDEX
- 313 -
Delete a firm library 135
Delete a procedure 83, 203
Delete backup engagement 66
Delete client 69
Delete engagement 69
Delete location 94
Delete test procedures 104
Delete transfer engagement 63
Diagnostics Report 83, 109, 124, 154, 204
Disclosure Checklist 49, 114, 119
Disclosure Keyword Search 111
DisclosureModule 111, 123
Disclosure Notes 220
Display How To & Navigation Tips 40
Download a PPC Firm Library 135
Dynamic data flow between workpapers 147
Dynamic SMART functionality 147
E
Edit a comment 212
Edit Checklist Topics 117
Edit engagement setup 63
Edit form with multi-user allowed 228
Edit menu 28
Edit or delete existing risk 196
Edit or delete transaction class 93
Edit SMART Practice Aids Document Properties inWorkpapers CS 299
Edit text icon 213
Enable FieldWork 144
Enable full navigation 160
Enable full navigation pane 38

INDEX
- 314 -
Enable Internal Control 90
Enablemodules in existing engagments 73
Engagement
Backup 66
Create 51
Open 62
Receive 65
Restore 68
Transfer 63
Unlock 227
Engagement CS
Associate and launch a SMART engagement 294
Complete Steps 296
Generate & File Audit Documents 297
Insert SMART Practice Aids Document 290
Launch SMARTPractice Aids 289
Open associated SMART engagment 294
Rollforward Integration 291
Engagement CS Overview 289
Engagement dashboard 152
Engagement management software integration 165
Engagement properties 63
Engagement Rollforward overview 217
Engagement Setup 51
Disclosure Checklist 49
Disclosure EBP 49
Disclosure PCAOB 48
Employee Benefit Plans 46
Initial Audit Question 42
Single Audit & Yellow Book 44

INDEX
- 315 -
Engagement setup - FieldWork 146
Engagement Setup Questions 41
Engagements Overview 50
Enter Test Exceptions 107
Entify-Level Control Form 36
External document management software 146, 159
F
File menu 24
Filter CX-5 forms 110
Finalize engagement 72
Financial Close and Reporting 98
Firm Library 127
Firm Library navigation 136
Flag icon 82, 201
Flowchart 19
G
General Computer Controls 100
General Navigation 37
General Planning Procedures 163
Generate a firm library report 139
Generate audit programs 85, 125
Generate Checklists or Notes 126
Generate Diagnostics Report 83, 109, 124, 204
Generate planning forms 85, 125
Generate Planning Forms for Internal Control 110
Go to/Link to a workpaper 207
Green highlight box 202
INDEX
- 316 -
H
Helpme decide link 214
Helpmenu 35
Helpful Resources 22
Helpful tips - FieldWork 159
How To and Navigation Tips 22, 40
How to Use Help 17
I
Identify risk 80, 196
Identify Significant Transaction Class by Location 93
Initial Audit Setup Question 42
Insert a memo reference 149, 205
Insert menu 31
Insert or delete rows in planning forms 196
Insert SMART Practice Aids Document into Engagement CS 290
Insert workpaper reference 149, 205
Integration with Engagement CS 289
Integration withWorkpapers CS 298
Interface description 37
Internal Control
Add a Control 103
Add location 93
AddObjective 102
Add Test Procedure 104
Add transaction class 93
Assess Control Risk 109
Audit Areas 95
Control Activities 98
Delete Test Procedures 104

INDEX
- 317 -
Edit or delete transaction class 93
Enable for existing engagement 91
Enable for new engagement 90
Enable using Rollforward tool 91
Filter CX-5 forms 110
Financial Close and Reporting 98
Flowchart Non-public companies 89
Generate Planning Forms 110
Navigation pane 88
New steps andmenu options 88
Reassign Test Procedures 104
Significant Transaction Class 93
Summary Design Effectiveness Evaluation 101
Test Exceptions 107
Test Plans 106
Understanding Controls & Evaluating Design 92
Internal Control Menu 36
Internal Control Overview 87
Internal Controls
General Computer Controls 100
K
Keyword Search 111
L
Launch SMART Practice Aids from Engagement CS 289
Left navigation tree 161
License Agreement 21
Location
Add 93
Delete 94

INDEX
- 318 -
M
Maintain an Engagement Disclosure Note Library 121
Manage engagement 168
Master engagement 52
Menu Bar Overview 23
Merge client engagement with master 224
Messages related tomulti-users 230
Modify a procedure 83, 202
Modify Audit Program 81, 200
Move Topics 117
Multi-user
Change usre name 232
Provide a user name 232
Multi-user controls overview 226
Multi-user messages 230
Multi-users
Disable maintain setting option 228
Edit form 228
Option to release locks 228
set option 227
Multi-users allow 227
Multi-users in Disclosure 226
Multi-users in firm libraries 226
N
Navigate SMART interface 37
Navigation pane 37-38
Navigation tips 22, 40
Navigation tTps 22
New to SMARTPractice Aids 16

INDEX
- 319 -
O
Open a Firm Library 141
Open saved engagement 62
Overall Financial Statement 81, 199
P
Pencil icon 213
Planning forms 85, 125
Preview how a form will print 86, 126
Print preview 86, 126
Print preview right-click menu 86, 126
Product License Agreement 21
Provide a user name -multi-user 232
Q
Quick Tour 22
R
Reassign Test Procedures 104
Receive engagement 65
Referencematerial location 275
Refernce Library
Set master password 275
Remove forms from engagement 79
Rename a firm library 142
Resources 22
Restore engagement 68
Review & Modify Audit Programs 81, 200
Review andModify Test Plans 106
Review Note Documents 154
INDEX
- 320 -
Risk
Edit or delete 196
Risk Assessment
Add categories 203
Add procedure 83, 202
Assess effects of risk 80, 198
Delete category 203
Delete procedure 83, 203
Flag icon 82, 201
Green highlight navigation aid 202
Modify procedure 83, 202
Review & Modify Audit Programs 81, 200
Risk Assessment overview 78
Risks Assessment
Identify risk 80, 196
Rollforward 219, 224
Rollforward Best Practices 219
Rollforward client engagement 221
Rollforward Integration Engagement CS 291
Rollforward IntegrationWorkpapers CS 301
Rollforwardmaster engagement 223
Rollforward overview 217
Rollforward types 218
S
SAS 70 report 46
Saved engagement 62
ScreenOverviews 233
Select Checklist Topics 113
Set master password 275
Set multi-user option 227

INDEX
- 321 -
Sign-off properties 151, 207
Significant Transaction Class - Control Activities 93
SMART Docs 165, 167
SMART Engagement
Update 74
SMART Navigator 163
SMART Start 51
SMART Start engagement 58
SMART Start Overview 78
SMART w/o engagement management software 168
SMARTStart engagement 50
SMARTStart Master Engagement 60
Spell check 215
Step 1 - Identify Risk 80, 196
Step 2 - Assess Effects of Risk 80, 198
Step 3 - Review andModify Audit Program 81, 200
Streamlined engagement 58
Summary Design Effectiveness Evaluation 101
Support overview 309
Synchronize workpapers 166
T
Technical support numbers 309
Test Exceptions 107
Test Plans 106
Toolbar Overview 38
Tools menu 33
Training resources 310
Transaction Class 93
Add transaction class 93
Edit or Delete 93

INDEX
- 322 -
Identify 93
Transfer engagement 63
Types of Rollforward 218
U
Unassigned Topics 220
Understanding Controls & Evaluating Design 92
Unlock engagment 227
Update SMARTengagement 74
V
View engagement properties 63
View Entity-Level Control Form 92
View factors to consider 197
View menu 29
Virtual Office CS 276
W
Welcome 14
What's New 16
Workpaper properties 156
Workpaper Status Report 157
Workpaper tabs 158, 164
Workpapers CS
Complete Steps 306
Edit SMART Document Properties 299
Generate & File Audit Documents 307
Launch SMARTPractice Aids 298
Link New
Link Existing
SMART engagments from SMART Practice Aids 303

INDEX
- 323 -
Link SMART engagment fromWorkpapers CS 303
Rollforward Integration 301
Workpapers CS Overview 298