
PowerPoint 2010 - University of Wolverhampton
236
IT Services, University of Wolverhampton Microsoft ® Office P P o o w w e e r r P P o o i i n n t t 2 2 0 0 1 1 0 0
-
Upload
khangminh22 -
Category
Documents
-
view
0 -
download
0
Transcript of PowerPoint 2010 - University of Wolverhampton
IT Services, University of Wolverhampton
Microsoft® Office
PPoowweerrPPooiinntt 22001100
2 © 2010 CustomGuide, Inc.
© 2010 by CustomGuide, Inc. 3387 Brownlow Avenue, Suite 200; Saint Louis Park, MN 55426
This material is copyrighted and all rights are reserved by CustomGuide, Inc. No part of this publication may be reproduced, transmitted, transcribed, stored in a retrieval system, or translated into any language or computer language, in any form or by any means, electronic, mechanical, magnetic, optical, chemical, manual, or otherwise, without the prior written permission of CustomGuide, Inc.
We make a sincere effort to ensure the accuracy of the material described herein; however, CustomGuide makes no warranty, expressed or implied, with respect to the quality, correctness, reliability, accuracy, or freedom from error of this document or the products it describes. Data used in examples and sample data files are intended to be fictional. Any resemblance to real persons or companies is entirely coincidental.
The names of software products referred to in this manual are claimed as trademarks of their respective companies. CustomGuide is a registered trademark of CustomGuide, Inc.
IT Services, University of Wolverhampton 3
Table of Contents
Program Fundamentals ........................................................................................................................................ 10 Starting PowerPoint 2010 ..................................................................................................................................... 11 What’s New in PowerPoint 2010 .......................................................................................................................... 12 Understanding the PowerPoint Program Screen ................................................................................................. 13 Giving Commands ................................................................................................................................................ 14 Using Command Shortcuts................................................................................................................................... 16 Creating a New Presentation................................................................................................................................ 18 Opening a Presentation ........................................................................................................................................ 19 Previewing and Printing a Presentation ............................................................................................................... 20 Saving a Presentation .......................................................................................................................................... 21 Closing a Presentation ......................................................................................................................................... 23 Using Help ............................................................................................................................................................ 24 Exiting PowerPoint ............................................................................................................................................... 26
Program Fundamentals Review ............................................................................................................................ 27
Getting Started with Presentations ..................................................................................................................... 29 Inserting Slides and Deleting Slides ..................................................................................................................... 30 Selecting a Layout ................................................................................................................................................ 31 Navigating a Presentation .................................................................................................................................... 32 Organizing a Presentation .................................................................................................................................... 33
Getting Started with Presentations Review ......................................................................................................... 35
Inserting and Editing Text .................................................................................................................................... 36 Inserting Text ........................................................................................................................................................ 37 Inserting a Text Box .............................................................................................................................................. 38 Editing Text ........................................................................................................................................................... 39 Moving and Copying Text ..................................................................................................................................... 40 Controlling How Text is Moved or Copied ............................................................................................................ 42 Collecting Multiple Items to Move or Copy ........................................................................................................... 44 Using Undo, Redo and Repeat ............................................................................................................................ 45 Checking Your Spelling ......................................................................................................................................... 47 Finding and Replacing Text .................................................................................................................................. 49 Inserting Symbols and Special Characters .......................................................................................................... 51 Inserting Equations ............................................................................................................................................... 52
Inserting and Editing Text Review ........................................................................................................................ 53
Formatting Text ..................................................................................................................................................... 56 Changing Font Type ............................................................................................................................................. 57 Changing Font Size .............................................................................................................................................. 58 Changing Font Color ............................................................................................................................................ 59 Changing Font Style ............................................................................................................................................. 60 Using the Font Dialog Box .................................................................................................................................... 61 Copying Formatting .............................................................................................................................................. 62 Using WordArt ...................................................................................................................................................... 63
Formatting Text Review ......................................................................................................................................... 64
Viewing a Presentation ......................................................................................................................................... 66 Changing Views .................................................................................................................................................... 67 Using the Zoom Controls ...................................................................................................................................... 68 Using the Outline Pane......................................................................................................................................... 69 Working with the Presentation Window ................................................................................................................ 70 Working with Multiple Presentations..................................................................................................................... 71
4 © 2010 CustomGuide, Inc.
Viewing a Presentation Review ............................................................................................................................ 73
Formatting a Presentation .................................................................................................................................... 75 Using Document Themes ..................................................................................................................................... 76 Changing the Background of a Slide .................................................................................................................... 78 Rearranging Slides ............................................................................................................................................... 79 Adding Headers and Footers................................................................................................................................ 80 Using the Slide Master ......................................................................................................................................... 81 Working with Bulleted and Numbered Lists .......................................................................................................... 82 Formatting Paragraphs ......................................................................................................................................... 84 Working with Tabs and Indents ............................................................................................................................. 86 Changing Page Setup .......................................................................................................................................... 88
Formatting a Presentation Review ....................................................................................................................... 89
Working with Objects ............................................................................................................................................ 91 Inserting Clip Art ................................................................................................................................................... 92 Inserting Screenshots ........................................................................................................................................... 93 Inserting Pictures and Graphics Files ................................................................................................................... 94 Removing Backgrounds from Pictures and Graphics .......................................................................................... 95 Altering the Look of Pictures and Graphics .......................................................................................................... 96 Formatting Pictures and Graphics ........................................................................................................................ 98 Inserting Shapes ................................................................................................................................................... 99 Formatting Shapes ............................................................................................................................................. 101 Resize, Move, Copy and Delete Objects ............................................................................................................ 103 Positioning Objects ............................................................................................................................................. 104 Applying Special Effects ..................................................................................................................................... 106 Grouping Objects ................................................................................................................................................ 107 Aligning and Distributing Objects ....................................................................................................................... 108 Flipping and Rotating Objects ............................................................................................................................ 109 Layering Objects ................................................................................................................................................. 110
Working with Objects Review ............................................................................................................................. 111
Working with Tables ............................................................................................................................................ 114 Creating a Table.................................................................................................................................................. 115 Working with a Table........................................................................................................................................... 116 Adjusting Column Width and Row Height .......................................................................................................... 118 Inserting and Deleting Rows and Columns ........................................................................................................ 119 Merging and Splitting Cells ................................................................................................................................. 120 Working with Borders and Shading .................................................................................................................... 121 Applying a Table Style ........................................................................................................................................ 123
Working with Tables Review ............................................................................................................................... 124
Working with Charts and SmartArt ................................................................................................................... 126 Inserting a Chart ................................................................................................................................................. 127 Inserting Chart Data ........................................................................................................................................... 128 Resizing and Moving a Chart ............................................................................................................................. 129 Changing Chart Type .......................................................................................................................................... 130 Formatting a Chart .............................................................................................................................................. 131 Working with Labels ........................................................................................................................................... 132 Formatting Chart Elements ................................................................................................................................. 133 Creating a Chart Template .................................................................................................................................. 135 Inserting SmartArt ............................................................................................................................................... 136 Working with SmartArt Elements ........................................................................................................................ 138 Formatting SmartArt ........................................................................................................................................... 140 Converting Slide Text into SmartArt.................................................................................................................... 142
Working with Charts and SmartArt Review ....................................................................................................... 143
IT Services, University of Wolverhampton 5
Applying Transition and Animation Effects ...................................................................................................... 146 Applying a Transition Effect ................................................................................................................................ 147 Modifying a Transition Effect .............................................................................................................................. 149 Applying an Animation Effect .............................................................................................................................. 151 Modifying Animation Effects ............................................................................................................................... 153 Customizing Animation Effects ........................................................................................................................... 155 Copying Animation Effects .................................................................................................................................. 157 Previewing a Transition or Animation Effect ....................................................................................................... 158
Applying Transition and Animation Effects Review ......................................................................................... 159
Working with Multimedia .................................................................................................................................... 161 Inserting Audio .................................................................................................................................................... 162 Recording Audio Comments on a Slide .............................................................................................................. 164 Inserting Video from a File .................................................................................................................................. 165 Inserting Video from the Web ............................................................................................................................. 167 Editing Media Playback ...................................................................................................................................... 168 Inserting and Using Bookmarks ......................................................................................................................... 170 Using Action Buttons .......................................................................................................................................... 172 Compressing Media ............................................................................................................................................ 173
Working with Multimedia Review ....................................................................................................................... 174
Finalizing a Presentation .................................................................................................................................... 176 Setting Up a Slide Show ..................................................................................................................................... 177 Rehearsing Slide Show Timings ......................................................................................................................... 179 Adding Comments to a Slide .............................................................................................................................. 180 Hiding a Slide ..................................................................................................................................................... 181 Recording a Presentation ................................................................................................................................... 182 Marking a Presentation as Final ......................................................................................................................... 184
Finalizing a Presentation Review ....................................................................................................................... 185
Delivering a Presentation ................................................................................................................................... 187 Delivering a Presentation on a Computer .......................................................................................................... 188 Using the Laser Pointer, Pen, and Making Annotations ..................................................................................... 190 Creating a Presentation that Runs by Itself ........................................................................................................ 192 Using Presenter View ......................................................................................................................................... 194 Creating a Custom Show.................................................................................................................................... 196 Broadcasting Presentations................................................................................................................................ 197
Delivering a Presentation Review ....................................................................................................................... 199
Using Collaboration and Distribution Tools ..................................................................................................... 201 Comparing and Merging Presentations .............................................................................................................. 202 Packaging a Presentation................................................................................................................................... 204 Saving Presentations as Videos ......................................................................................................................... 206 Password Protecting a Presentation .................................................................................................................. 208 Publishing Slides ................................................................................................................................................ 210 Creating Handouts in Microsoft Word................................................................................................................. 212 Importing and Exporting an Outline .................................................................................................................... 213
Using Collaboration and Distribution Tools Review ........................................................................................ 215
Customizing PowerPoint .................................................................................................................................... 217 Customizing the Ribbon ..................................................................................................................................... 218 Customizing the Quick Access Toolbar .............................................................................................................. 220 Using and Customizing AutoCorrect .................................................................................................................. 221 Changing PowerPoint’s Default Options ............................................................................................................ 223
Customizing PowerPoint Review ....................................................................................................................... 224

6 © 2010 CustomGuide, Inc.
More Topics ......................................................................................................................................................... 225 Converting an Older Presentation to PowerPoint 2010 ..................................................................................... 226 Translating Text .................................................................................................................................................. 227 Viewing Document Properties and Finding a File .............................................................................................. 229 Recovering Your Presentations .......................................................................................................................... 231 Managing Versions ............................................................................................................................................. 233
More Topics Review ............................................................................................................................................ 235
IT Services, University of Wolverhampton 7
IInnttrroodduucciinngg
CCuussttoommGGuuiiddee
CCoouurrsseewwaarree
Thank you for choosing CustomGuide courseware as the
solution to your training needs. A proven leader in the
computer training industry, CustomGuide has been the
key to successful training for thousands of students and
instructors across the globe.
This manual is designed for computer users of all
experience levels. Novice users can use it to learn skills
such as formatting text, while advanced users can use it to
create their own master slides.
All this information is quickly accessible. Lessons are
broken down into basic step-by-step instructions that
answer “how-to” questions in minutes. You can print a
complete 300-page training manual or a single page of
instructions.
Here’s how a CustomGuide manual is organized:
Chapters Each manual is divided into several chapters. Aren't sure
if you're ready for a chapter? Look at the table of contents
that appears at the beginning of each chapter. It will tell
you the name of each lesson and subtopic included in the
chapter.
Lessons
Each chapter contains lessons on related topics. Each
lesson explains a new skill or topic and contains an
exercise and exercise file to give you hands-on-
experience. These skills can also be practiced using
CustomGuide Online Learning.
Review
A review is included at the end of the manual. Use these
quiz questions and answers to assess how much you've
learned.
What People Are Saying
“I have saved hundreds of hours of design
time by just picking and choosing what I want
from the courseware.”
— Stephanie Zimmerman
Lancaster County Library
“We have been able to customize our training
sessions on all Microsoft Office products, at
all levels. The ROI of these guides is great.”
— Dawn Calvin
Las Virgenes Municipal Water District
“All in all, the friendliest, most open and easy
to understand tutorial of its type that I’ve ever
seen.”
— W. Boudville
Amazon.com
“…curriculum that is of high quality, student
friendly, and adaptable to the audience.”
— Sherrill Wayland
St. Charles Community College
“…a nice training option for almost any need.
Their complete Microsoft Office package is
by far the best deal on the market.”
— Technical Assistance Program
Purdue University
“Any instructor teaching classes on Windows
or Microsoft Office will definitely want to
give serious consideration to this important
collection of titles that will definitely fit well
into their classroom learning.”
— Dale Farris
Golden Triangle PC Club
“The materials are exceptional – I am so
excited about using them! Thanks to you and
your team for doing this wonderful work!”
— Shannon Coleman
Learning Post Ltd.
8 © 2010 CustomGuide, Inc.
How It Works
1. Open Microsoft Word Our customizable courseware is provided as simple-to-
use, editable Microsoft Word documents—if you can use
Microsoft Word you can create your own training
materials in minutes!
2. Select Your Topics
Select the content you need from our award-winning
courseware library. You can even mix and match topics
between titles, such as Microsoft Outlook and Microsoft
Word.
3. Customize Arrange topics in the order you want—the courseware
automatically updates to reflect your changes. Add your
organization’s name and logo for a professional “in-
house” look.
4. Print and Distribute Print as many copies as you need at your site, without
paying any per-unit royalties or maintaining physical
inventories. You can print single-page handouts, a group
of related lessons, or a complete manual. It’s fast,
convenient, and very affordable.
5. Teach and Learn You’ll love having your own customized training
materials, and your users will appreciate the colorful
illustrations, down-to-earth writing style, and the
convenience of having a reference guide that they can
use in or out of the classroom.
3rd
Generation Courseware: What’s New?
CustomGuide is pleased to introduce 3rd generation courseware. Completely redesigned from years of customer feedback,
3rd generation courseware features a streamlined design that is easier to customize and use as a reference tool. Take a look at
the table below for more information regarding these features.
Streamlined design Featuring a professional-looking, easy-to-read design, 3rd
generation courseware appeals to instructors, students and individual users alike.
Exercise Notes A new Exercise Notes section appears at the top of each lesson. Rather than practicing the topic step by step through the lesson as in 2
nd generation courseware, the topic can be
practiced using the exercise file and exercise described here.
Table of Contents In addition to the Table of Contents found at the beginning of each courseware title, 3rd
generation courseware includes a Table of Contents at the beginning of each chapter, making it even easier to locate the lessons you need.
Smart Quizzes The Quiz section, located at the back of the book, automatically updates itself when the manual is customized. For example, if you remove a lesson regarding cutting and pasting text, there will be no questions in the Quiz section that relate to cutting and pasting text.
Easier customization The design of 3rd
generation is simplified, which makes it easier to customize. All you have to do is click and drag or copy and paste, or press the <Delete> key to remove a lesson, and voila; you’re done!
Use as a reference tool 3rd
generation courseware breaks tasks down into basic step-by-step instructions and can be used as a virtual help desk, answering “how-to” questions in minutes.
IT Services, University of Wolverhampton 9
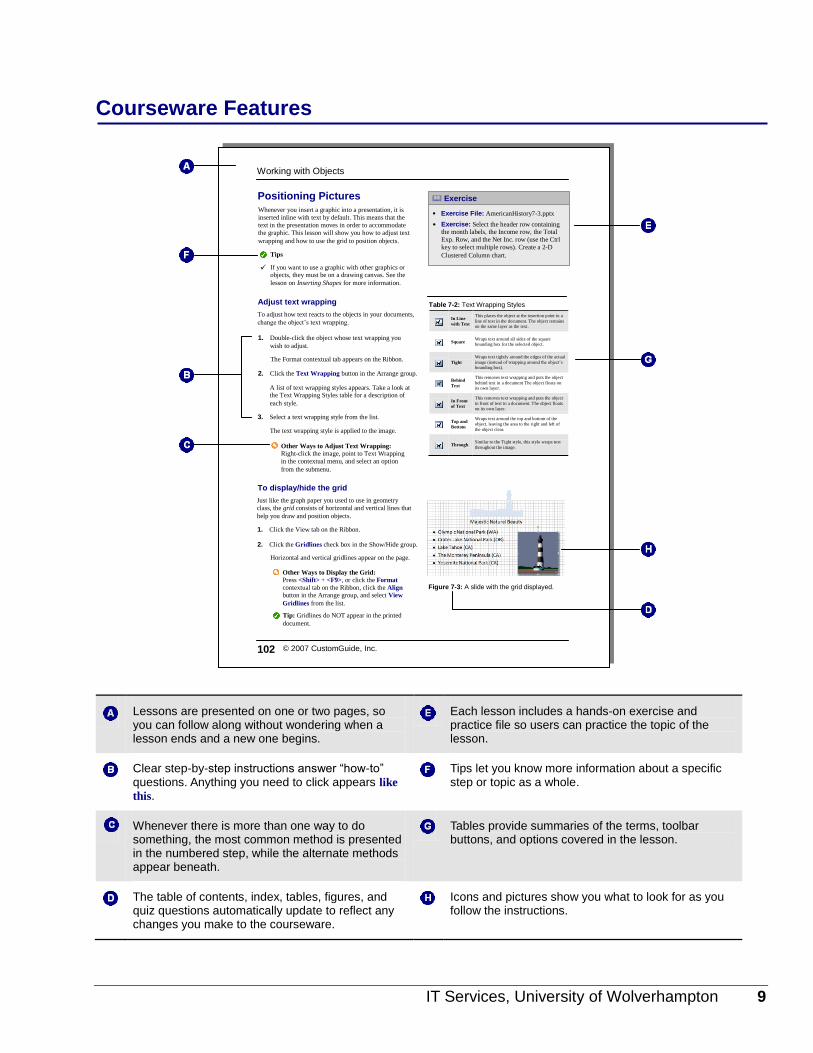
Courseware Features
Lessons are presented on one or two pages, so you can follow along without wondering when a lesson ends and a new one begins.
Each lesson includes a hands-on exercise and practice file so users can practice the topic of the lesson.
Clear step-by-step instructions answer “how-to” questions. Anything you need to click appears like
this.
Tips let you know more information about a specific step or topic as a whole.
Whenever there is more than one way to do something, the most common method is presented in the numbered step, while the alternate methods appear beneath.
Tables provide summaries of the terms, toolbar buttons, and options covered in the lesson.
The table of contents, index, tables, figures, and quiz questions automatically update to reflect any changes you make to the courseware.
Icons and pictures show you what to look for as you follow the instructions.
Working with Objects
Exercise
Exercise File: AmericanHistory7-3.pptx
Exercise: Select the header row containing the month labels, the Income row, the Total
Exp. Row, and the Net Inc. row (use the Ctrl
key to select multiple rows). Create a 2-D
Clustered Column chart.
© 2007 CustomGuide, Inc. 102
Whenever you insert a graphic into a presentation, it is
inserted inline with text by default. This means that the
text in the presentation moves in order to accommodate
the graphic. This lesson will show you how to adjust text
wrapping and how to use the grid to position objects.
Positioning Pictures
1. Double-click the object whose text wrapping you
wish to adjust.
2. Click the Text Wrapping button in the Arrange group.
3. Select a text wrapping style from the list.
The Format contextual tab appears on the Ribbon.
Horizontal and vertical gridlines appear on the page.
Tip: Gridlines do NOT appear in the printed
document.
Tips
If you want to use a graphic with other graphics or objects, they must be on a drawing canvas. See the
lesson on Inserting Shapes for more information.
Adjust text wrapping
To adjust how text reacts to the objects in your documents,
change the object’s text wrapping.
A list of text wrapping styles appears. Take a look at the Text Wrapping Styles table for a description of
each style.
The text wrapping style is applied to the image.
Other Ways to Adjust Text Wrapping: Right-click the image, point to Text Wrapping
in the contextual menu, and select an option
from the submenu.
Other Ways to Display the Grid: Press <Shift> + <F9>, or click the Format
contextual tab on the Ribbon, click the Align button in the Arrange group, and select View
Gridlines from the list.
1. Click the View tab on the Ribbon.
2. Click the Gridlines check box in the Show/Hide group.
To display/hide the grid
Just like the graph paper you used to use in geometry
class, the grid consists of horizontal and vertical lines that
help you draw and position objects.
Table 7-2: Text Wrapping Styles
In Line
with Text
This places the object at the insertion point in a
line of text in the document. The object remains
on the same layer as the text.
Square Wraps text around all sides of the square
bounding box for the selected object.
Tight
Wraps text tightly around the edges of the actual
image (instead of wrapping around the object’s
bounding box).
Behind
Text
This removes text wrapping and puts the object
behind text in a document The object floats on
its own layer.
In Front
of Text
This removes text wrapping and puts the object
in front of text in a document. The object floats
on its own layer.
Top and
Bottom
Wraps text around the top and bottom of the
object, leaving the area to the right and left of
the object clear.
Through Similar to the Tight style, this style wraps text
throughout the image.
Figure 7-3: A slide with the grid displayed.
10 © 2010 CustomGuide, Inc.
PPrrooggrraamm
FFuunnddaammeennttaallss
Starting PowerPoint 2010 ................................. 11 Windows Vista and Windows 7 ................ 11
What’s New in PowerPoint 2010 ...................... 12
Understanding the PowerPoint Program Screen ............................................................................. 13
Giving Commands ............................................. 14 Ribbon...................................................... 14 File tab ..................................................... 15 Quick Access Toolbar .............................. 15
Using Command Shortcuts .............................. 16 Keystroke shortcuts ................................. 16 Contextual menus .................................... 16 Mini Toolbar.............................................. 16 Key Tips ................................................... 17
Creating a New Presentation ............................ 18 Create a new blank presentation ............. 18 Create a presentation from a template .... 18
Opening a Presentation .................................... 19
Previewing and Printing a Presentation .......... 20
Saving a Presentation ....................................... 21 Save a new presentation ......................... 21 Save presentation changes ..................... 22 Save a presentation under a different name and/or location ......................................... 22 Save a presentation as a different file type ................................................................. 22
Closing a Presentation ...................................... 23
Using Help .......................................................... 24 Search for help ........................................ 24 Browse for help ........................................ 24 Choose the Help source .......................... 24
Exiting PowerPoint ............................................ 26
Microsoft PowerPoint is a presentation
program that helps you transform your
ideas into professional, convincing
presentations. Whether you’re delivering
annual sales statistics to a large audience
or creating a personal slide show of your
recent trip abroad, PowerPoint has all the
tools you need to get your message
across.
If you’re moving from PowerPoint 2003
or earlier to PowerPoint 2010, you’ll see
that PowerPoint has undergone a major
redesign. You’ll still be familiar with
much of the program’s functionality, but
you’ll notice a completely new user
interface and many new features that have
been added to make using PowerPoint
more efficient.
This chapter is an introduction to working
with PowerPoint. You’ll learn about the
main parts of the program screen, how to
give commands, use help, and about new
features in PowerPoint 2010.
1
IT Services, University of Wolverhampton 11
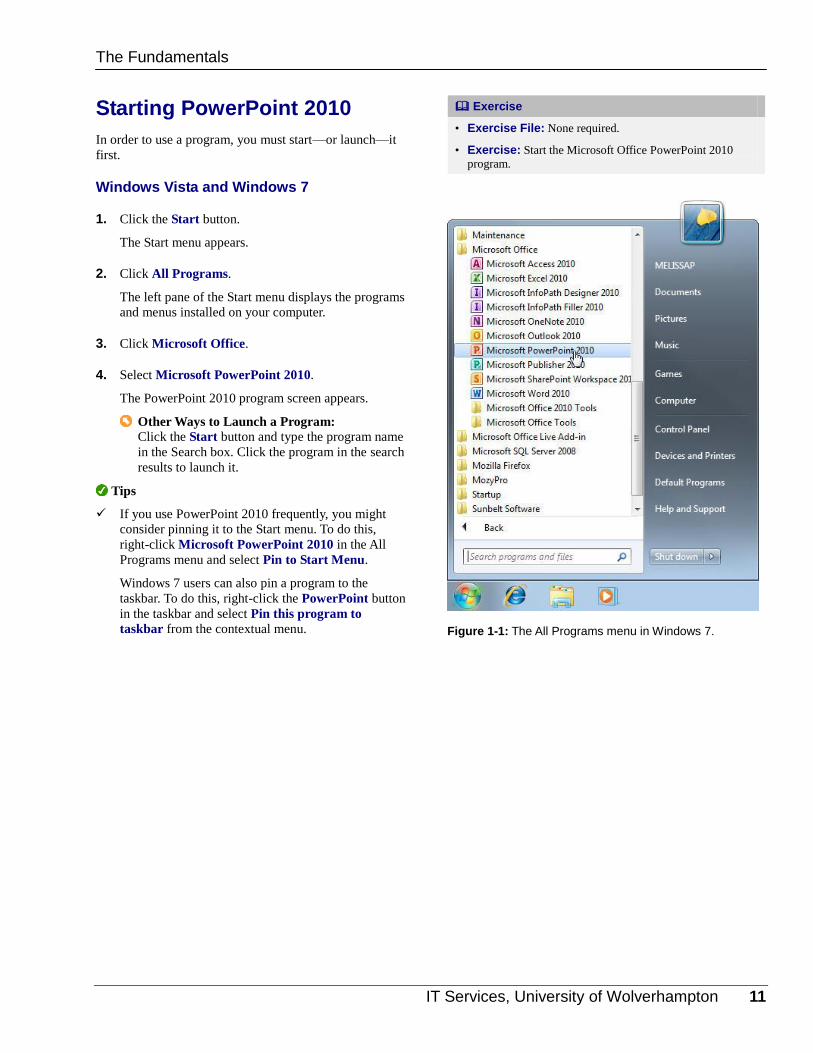
Starting PowerPoint 2010
In order to use a program, you must start—or launch—it
first.
Windows Vista and Windows 7
1. Click the Start button.
The Start menu appears.
2. Click All Programs.
The left pane of the Start menu displays the programs
and menus installed on your computer.
3. Click Microsoft Office.
4. Select Microsoft PowerPoint 2010.
The PowerPoint 2010 program screen appears.
Other Ways to Launch a Program: Click the Start button and type the program name
in the Search box. Click the program in the search
results to launch it.
Tips
If you use PowerPoint 2010 frequently, you might
consider pinning it to the Start menu. To do this,
right-click Microsoft PowerPoint 2010 in the All
Programs menu and select Pin to Start Menu.
Windows 7 users can also pin a program to the
taskbar. To do this, right-click the PowerPoint button
in the taskbar and select Pin this program to
taskbar from the contextual menu.
Exercise
• Exercise File: None required.
• Exercise: Start the Microsoft Office PowerPoint 2010
program.
Figure 1-1: The All Programs menu in Windows 7.
The Fundamentals
12 © 2010 CustomGuide, Inc.
What’s New in PowerPoint 2010
PowerPoint 2010 is very different from previous versions.
The table below gives you an overview of what to expect.
Table 1-1: What’s New in PowerPoint 2010
Improved Ribbon The Ribbon makes all the commands needed to work with a program readily available. The Ribbon was
introduced in PowerPoint 2007, but has been improved in PowerPoint 2010: now you can create your
own tabs and groups for the Ribbon. You can also rename or change the order of default tabs and groups.
Backstage View Backstage view is where you open, save, print, share, and manage your files and program options. To
access Backstage view, click the File tab on the Ribbon.
Presentation Management Three new tools help you manage, protect, and share your presentations: Recover previous versions lets
you revert to an earlier version of your presentation. Protected view helps protect your computer from
online attacks when opening files from the Internet. Trusted documents remembers which files you
trust so you aren’t prompted each time the file is opened.
Paste with Live Preview Allows you to preview how pasted content will look with various paste options before you paste it.
More Themes and Styles Predefined styles and themes let you change the overall look and feel of a presentation in just a few
clicks. Now Office 2010 has even more themes you can apply to your documents.
Improved Picture-Editing
Tools
There are many new ways to edit pictures and images in your presentations.
Insert screenshots: You can take a screenshot or screen clipping and add it to your presentations.
Improved SmartArt: Now you can add SmartArt that uses photographs.
Other tools: New picture editing tools let you refine the brightness, contrast, or sharpness of a picture;
add artistic effects; and control cropping and compression.
Accessibility Checker The Accessibility Checker lets you find and fix issues that can make it difficult for people with
disabilities to read or interact with your presentation.
Language Tools Improved language tools let multilingual users set preferences for language settings in Office 2010.
Organize Presentations Organize slides into sections for simplified editing and navigation.
Insert Equations PowerPoint 2010’s built-in Equation Tools make it easier to write and edit equations in your slides.
Improved Transition and
Animation Tools
The ability to apply and edit transition and animation effects has greatly improved in the new edition of
PowerPoint. Besides the addition of great new effects, animations and transitions now each have a
dedicated tab on the Ribbon. You can also apply copied animation effects with the use of the new
Animation Painter tool.
New Audio and Video Tools There are some great new features for using audio and video clips in your presentations. All audio and
video clips are automatically embedded in the file so you no longer have to manage multiple files. You
can now insert Web videos directly into your presentation so you no longer having to leave the
presentation to play Web-based videos. New editing tools allow you to trim the length of clips, fade in
and out, and use bookmarks to navigate clips or trigger animation effects.
Media File Size
Management
Inserting audio, video, and images into your presentation can make the file size unruly. The Compress
Media tool allows you to reduce the size of the media files to make sharing easier.
Broadcasting Presentations Have an off-site audience with whom you want to share your presentation? All they need is a Web
browser. You can now broadcast your presentation over the Internet using the PowerPoint Broadcast
Service through Windows Live, or another service.
Sharing Presentations Share presentations via e-mail in several different file formats, including video.
Collaboration Tools If you have a SharePoint 2010 server, you can save your presentation to a shared space where several
users can work on a presentation simultaneously. If that isn’t an option, you can use the new Compare
command to compare and merge different versions of the same presentation.
Laser Pointer Tool With a simple keystroke combination, you can turn your mouse pointer into a laser pointer.
Exercise
• Exercise File: None required.
• Exercise: Review the new features in Microsoft Office
PowerPoint 2010.
The Fundamentals
IT Services, University of Wolverhampton 13
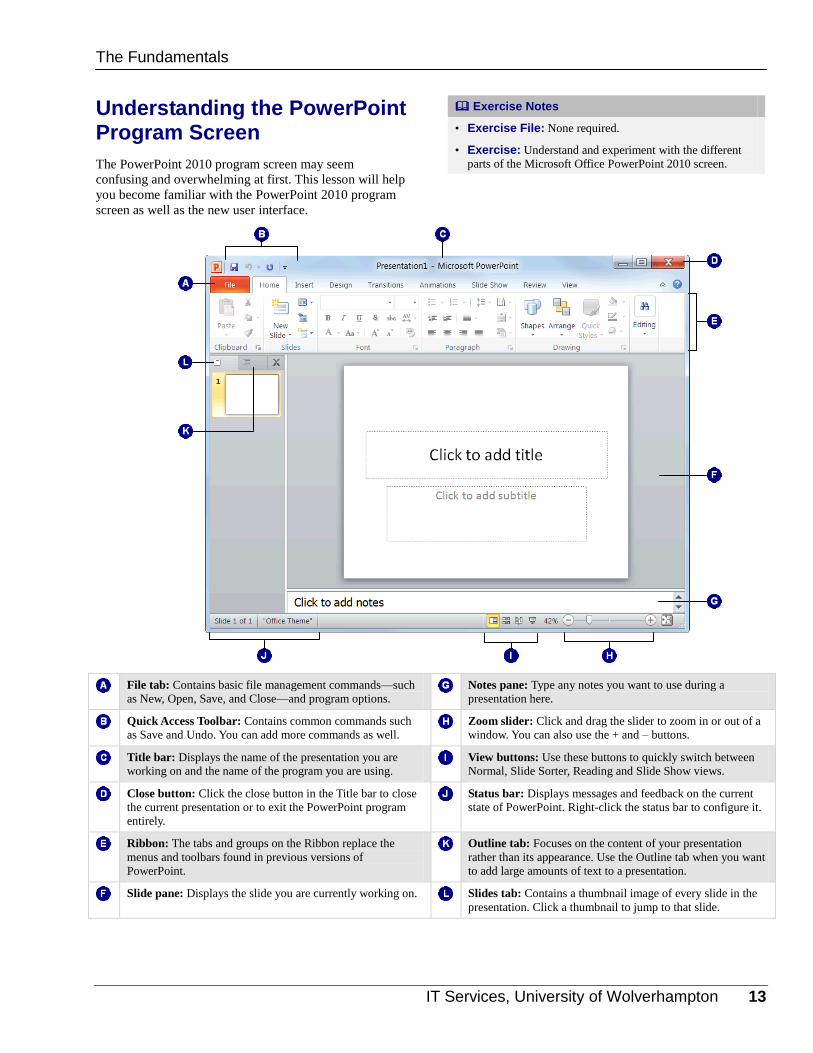
Understanding the PowerPoint Program Screen
The PowerPoint 2010 program screen may seem
confusing and overwhelming at first. This lesson will help
you become familiar with the PowerPoint 2010 program
screen as well as the new user interface.
File tab: Contains basic file management commands—such
as New, Open, Save, and Close—and program options. Notes pane: Type any notes you want to use during a
presentation here.
Quick Access Toolbar: Contains common commands such
as Save and Undo. You can add more commands as well. Zoom slider: Click and drag the slider to zoom in or out of a
window. You can also use the + and – buttons.
Title bar: Displays the name of the presentation you are
working on and the name of the program you are using. View buttons: Use these buttons to quickly switch between
Normal, Slide Sorter, Reading and Slide Show views.
Close button: Click the close button in the Title bar to close
the current presentation or to exit the PowerPoint program
entirely.
Status bar: Displays messages and feedback on the current
state of PowerPoint. Right-click the status bar to configure it.
Ribbon: The tabs and groups on the Ribbon replace the
menus and toolbars found in previous versions of
PowerPoint.
Outline tab: Focuses on the content of your presentation
rather than its appearance. Use the Outline tab when you want
to add large amounts of text to a presentation.
Slide pane: Displays the slide you are currently working on. Slides tab: Contains a thumbnail image of every slide in the
presentation. Click a thumbnail to jump to that slide.
Exercise Notes
• Exercise File: None required.
• Exercise: Understand and experiment with the different
parts of the Microsoft Office PowerPoint 2010 screen.
The Fundamentals
`
14 © 2010 CustomGuide, Inc.
Giving Commands
PowerPoint 2010 provides easy access to commands
through the Ribbon. The Ribbon keeps commands visible
while you work instead of hiding them under menus or
toolbars.
Ribbon
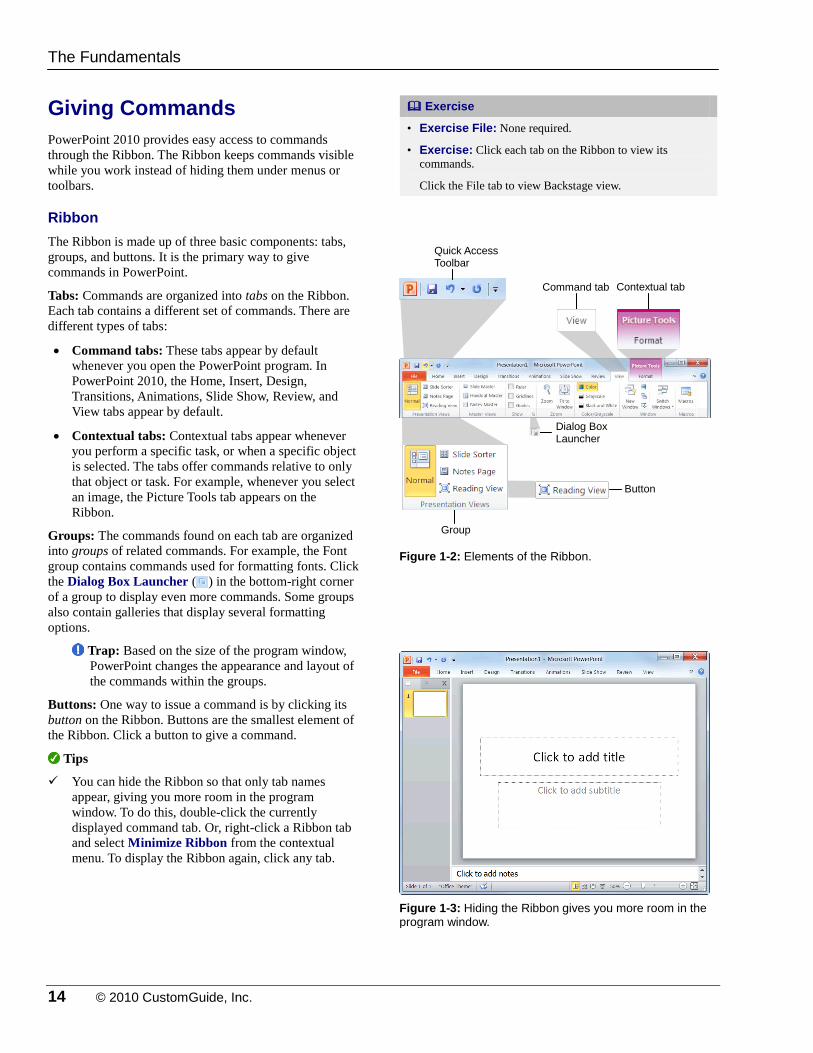
The Ribbon is made up of three basic components: tabs,
groups, and buttons. It is the primary way to give
commands in PowerPoint.
Tabs: Commands are organized into tabs on the Ribbon.
Each tab contains a different set of commands. There are
different types of tabs:
Command tabs: These tabs appear by default
whenever you open the PowerPoint program. In
PowerPoint 2010, the Home, Insert, Design,
Transitions, Animations, Slide Show, Review, and
View tabs appear by default.
Contextual tabs: Contextual tabs appear whenever
you perform a specific task, or when a specific object
is selected. The tabs offer commands relative to only
that object or task. For example, whenever you select
an image, the Picture Tools tab appears on the
Ribbon.
Groups: The commands found on each tab are organized
into groups of related commands. For example, the Font
group contains commands used for formatting fonts. Click
the Dialog Box Launcher ( ) in the bottom-right corner
of a group to display even more commands. Some groups
also contain galleries that display several formatting
options.
Trap: Based on the size of the program window,
PowerPoint changes the appearance and layout of
the commands within the groups.
Buttons: One way to issue a command is by clicking its
button on the Ribbon. Buttons are the smallest element of
the Ribbon. Click a button to give a command.
Tips
You can hide the Ribbon so that only tab names
appear, giving you more room in the program
window. To do this, double-click the currently
displayed command tab. Or, right-click a Ribbon tab
and select Minimize Ribbon from the contextual
menu. To display the Ribbon again, click any tab.
Exercise
• Exercise File: None required.
• Exercise: Click each tab on the Ribbon to view its
commands.
Click the File tab to view Backstage view.
Figure 1-2: Elements of the Ribbon.
Figure 1-3: Hiding the Ribbon gives you more room in the program window.
The Fundamentals
Command tab Contextual tab
Group
Button
Dialog Box Launcher
Quick Access Toolbar
IT Services, University of Wolverhampton 15
File tab
The File tab appears in the upper-left corner of the
program window. When clicked, it opens Backstage view,
which is where you find commands for basic file
management, including New, which creates a new file;
Open, which opens an existing file; Save, which saves the
currently opened file; and Close, which closes the
currently opened file. This is also where you find
commands for controlling program options and sharing.
Tips
The File tab replaces the File menu and Office Button
found in previous versions of PowerPoint.
Quick Access Toolbar
The Quick Access Toolbar appears above the File tab and
provides easy access to the commands you use most
frequently. By default, the Save, Undo and Redo buttons
appear on the toolbar; however, you can customize this
toolbar to meet your needs by adding or removing
buttons.
Figure 1-4: The Info tab in Backstage view.
Figure 1-5: The Quick Access Toolbar.
The Fundamentals
Save
Undo
Redo
Customize Quick Access Toolbar
16 © 2010 CustomGuide, Inc.
Using Command Shortcuts
Command shortcuts provide other ways to give
commands in PowerPoint. Shortcuts can be a time-saving
and efficient alternative to the Ribbon. Use shortcuts for
the commands you use most frequently.
Keystroke shortcuts
Without a doubt, keystroke shortcuts are the fastest way to
give commands in PowerPoint. They’re especially great
for issuing common commands, such as saving a
presentation.
In order to issue a command using a keystroke shortcut,
you simply press a combination of keys on your
keyboard. For example, rather than clicking the Copy
button on the Ribbon to copy a cell, you could press and
hold the copy keystroke shortcut, <Ctrl> + <C>.
Contextual menus
A contextual menu displays a list of commands related to
a specific object or area. To open a contextual menu:
1. Right-click an object or area of the slide or program
screen.
A contextual menu appears, displaying commands
that are relevant to the object or area that you right-
clicked.
2. Select an option from the contextual menu, or click
anywhere outside the contextual menu to close it
without selecting anything.
Mini Toolbar
The Mini Toolbar appears when you select text or right-
click an object, and contains common text or object
formatting commands.
1. Select text or right-click an object.
The Mini Toolbar appears above the text or object
you selected.
Trap: Sometimes the Mini Toolbar can be hard to
see due to its transparency. To make the Mini
Toolbar more visible, point to it.
Tip: To close the Mini Toolbar while text is still
selected, press <Esc>.
2. Click a button on the Mini Toolbar.
The command is given in PowerPoint.
Exercise
• Exercise File: None required.
• Exercise: Memorize some common keystroke shortcuts.
Open a contextual menu in the main part of the program
window.
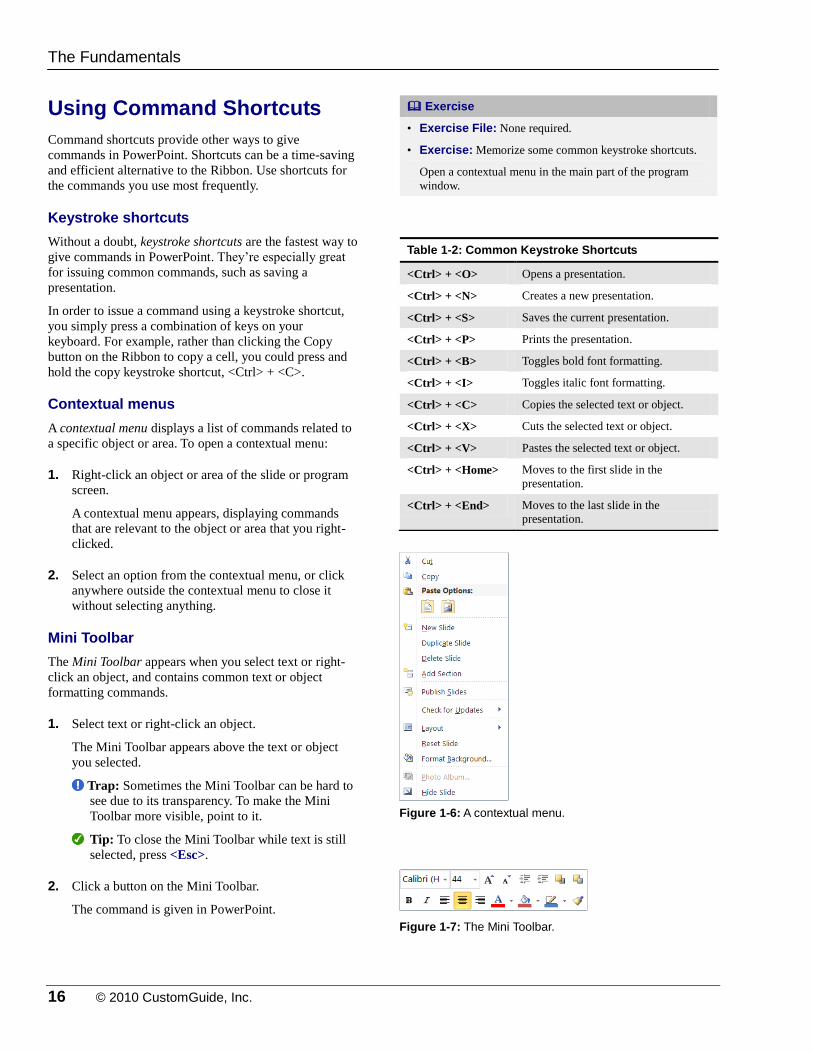
Table 1-2: Common Keystroke Shortcuts
<Ctrl> + <O> Opens a presentation.
<Ctrl> + <N> Creates a new presentation.
<Ctrl> + <S> Saves the current presentation.
<Ctrl> + <P> Prints the presentation.
<Ctrl> + <B> Toggles bold font formatting.
<Ctrl> + <I> Toggles italic font formatting.
<Ctrl> + <C> Copies the selected text or object.
<Ctrl> + <X> Cuts the selected text or object.
<Ctrl> + <V> Pastes the selected text or object.
<Ctrl> + <Home> Moves to the first slide in the
presentation.
<Ctrl> + <End> Moves to the last slide in the
presentation.
Figure 1-6: A contextual menu.
Figure 1-7: The Mini Toolbar.
The Fundamentals
IT Services, University of Wolverhampton 17
Tips
If you don’t want the Mini Toolbar to appear every
time you select text, click the File tab and click
Options. Click the General category, uncheck the
Show Mini Toolbar on selection check box, and
click OK.
A larger version of the Mini Toolbar and a contextual
menu appear when you right-click an object or area
of the slide window.
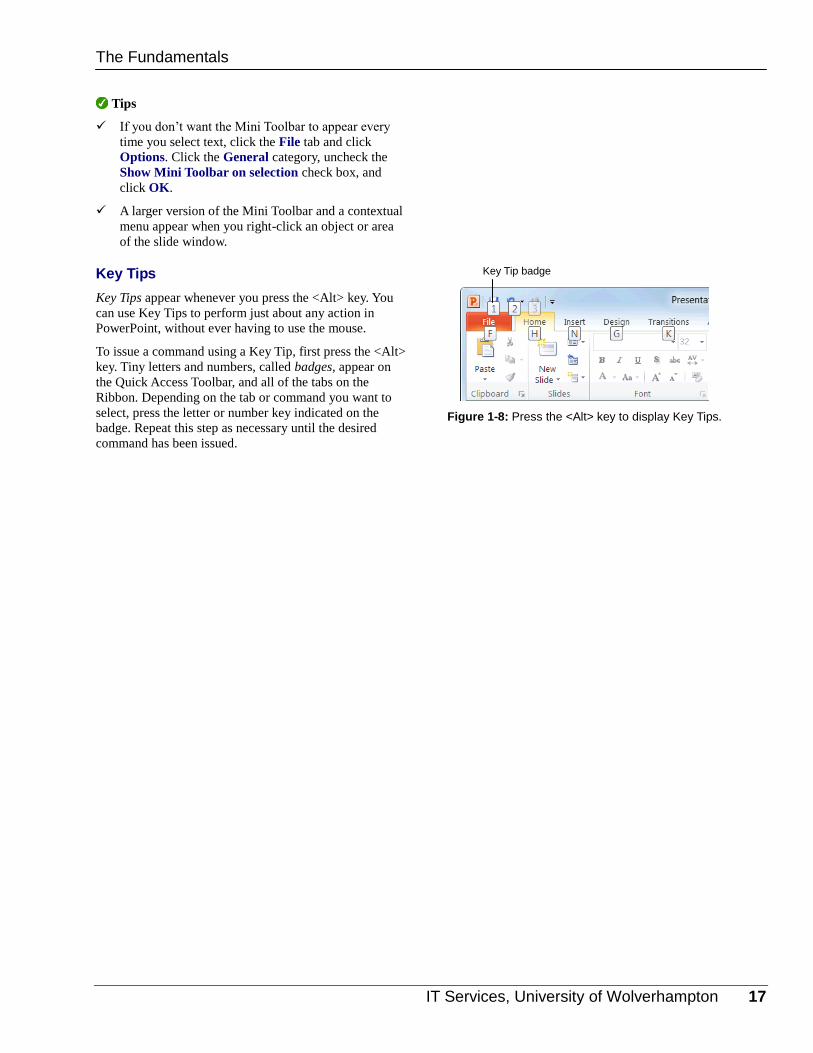
Key Tips
Key Tips appear whenever you press the <Alt> key. You
can use Key Tips to perform just about any action in
PowerPoint, without ever having to use the mouse.
To issue a command using a Key Tip, first press the <Alt>
key. Tiny letters and numbers, called badges, appear on
the Quick Access Toolbar, and all of the tabs on the
Ribbon. Depending on the tab or command you want to
select, press the letter or number key indicated on the
badge. Repeat this step as necessary until the desired
command has been issued.
Figure 1-8: Press the <Alt> key to display Key Tips.
The Fundamentals
Key Tip badge
18 © 2010 CustomGuide, Inc.
Creating a New Presentation
Creating a new presentation is one of the most basic
commands you need to know in PowerPoint. You can
create a blank new presentation, such as the one that
appears when you open PowerPoint, or you can create a
new presentation based on a template.
Create a new blank presentation
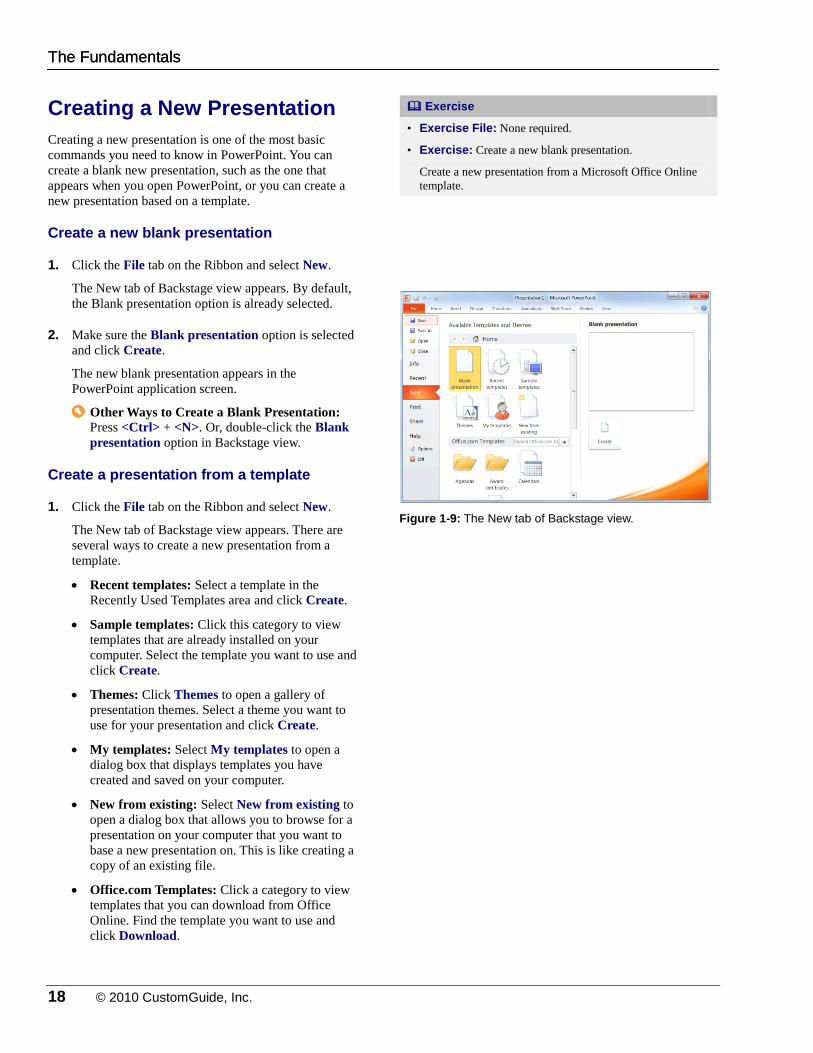
1. Click the File tab on the Ribbon and select New.
The New tab of Backstage view appears. By default,
the Blank presentation option is already selected.
2. Make sure the Blank presentation option is selected
and click Create.
The new blank presentation appears in the
PowerPoint application screen.
Other Ways to Create a Blank Presentation: Press <Ctrl> + <N>. Or, double-click the Blank
presentation option in Backstage view.
Create a presentation from a template
1. Click the File tab on the Ribbon and select New.
The New tab of Backstage view appears. There are
several ways to create a new presentation from a
template.
Recent templates: Select a template in the
Recently Used Templates area and click Create.
Sample templates: Click this category to view
templates that are already installed on your
computer. Select the template you want to use and
click Create.
Themes: Click Themes to open a gallery of
presentation themes. Select a theme you want to
use for your presentation and click Create.
My templates: Select My templates to open a
dialog box that displays templates you have
created and saved on your computer.
New from existing: Select New from existing to
open a dialog box that allows you to browse for a
presentation on your computer that you want to
base a new presentation on. This is like creating a
copy of an existing file.
Office.com Templates: Click a category to view
templates that you can download from Office
Online. Find the template you want to use and
click Download.
Exercise
• Exercise File: None required.
• Exercise: Create a new blank presentation.
Create a new presentation from a Microsoft Office Online
template.
Figure 1-9: The New tab of Backstage view.
The Fundamentals The Fundamentals
IT Services, University of Wolverhampton 19
Opening a Presentation
Opening a presentation lets you use a presentation that
you or someone else has previously created and then
saved. This lesson explains how to do this.
Open a presentation
You can locate presentation on your computer and simply
double-click it to open it, but you can also open a
presentation from within the PowerPoint program.
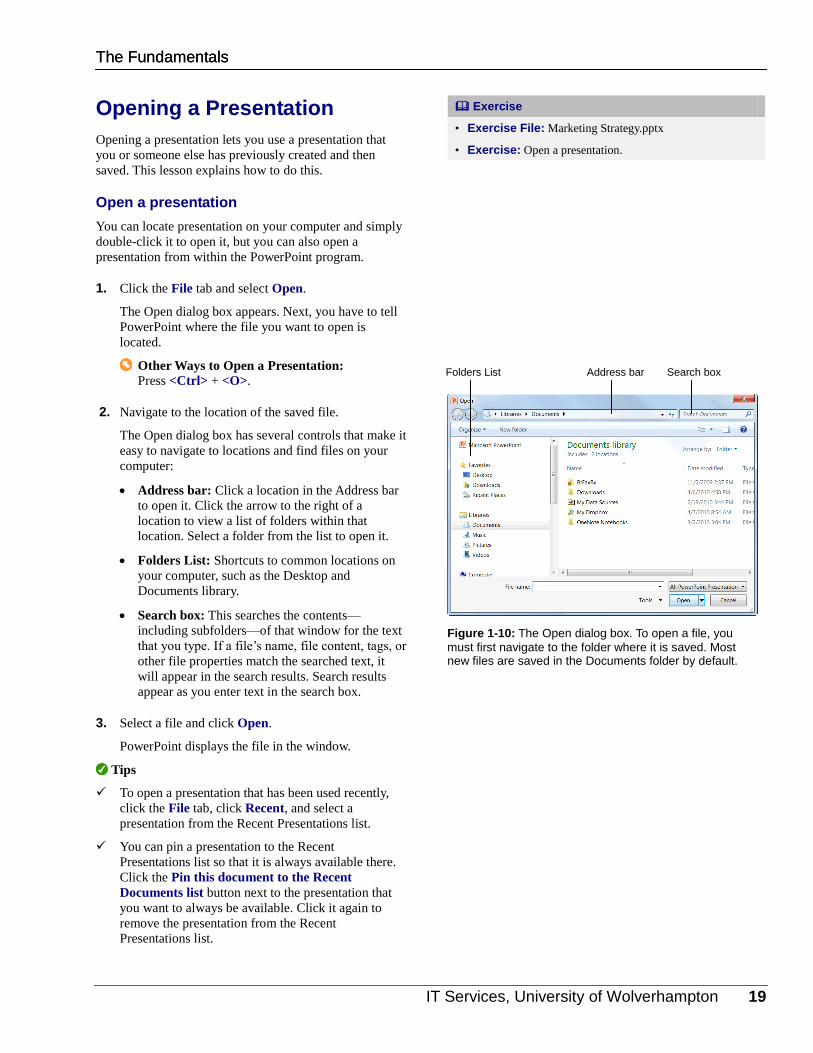
1. Click the File tab and select Open.
The Open dialog box appears. Next, you have to tell
PowerPoint where the file you want to open is
located.
Other Ways to Open a Presentation: Press <Ctrl> + <O>.
2. Navigate to the location of the saved file.
The Open dialog box has several controls that make it
easy to navigate to locations and find files on your
computer:
Address bar: Click a location in the Address bar
to open it. Click the arrow to the right of a
location to view a list of folders within that
location. Select a folder from the list to open it.
Folders List: Shortcuts to common locations on
your computer, such as the Desktop and
Documents library.
Search box: This searches the contents—
including subfolders—of that window for the text
that you type. If a file’s name, file content, tags, or
other file properties match the searched text, it
will appear in the search results. Search results
appear as you enter text in the search box.
3. Select a file and click Open.
PowerPoint displays the file in the window.
Tips
To open a presentation that has been used recently,
click the File tab, click Recent, and select a
presentation from the Recent Presentations list.
You can pin a presentation to the Recent
Presentations list so that it is always available there.
Click the Pin this document to the Recent
Documents list button next to the presentation that
you want to always be available. Click it again to
remove the presentation from the Recent
Presentations list.
Exercise
• Exercise File: Marketing Strategy.pptx
• Exercise: Open a presentation.
Figure 1-10: The Open dialog box. To open a file, you
must first navigate to the folder where it is saved. Most new files are saved in the Documents folder by default.
The Fundamentals The Fundamentals
Address bar Folders List Search box
20 © 2010 CustomGuide, Inc.
Previewing and Printing a Presentation
Once you have created a presentation, and your computer
is connected to a printer, you can print a copy. Before you
do this, it’s a good idea to preview how it’s going to look.
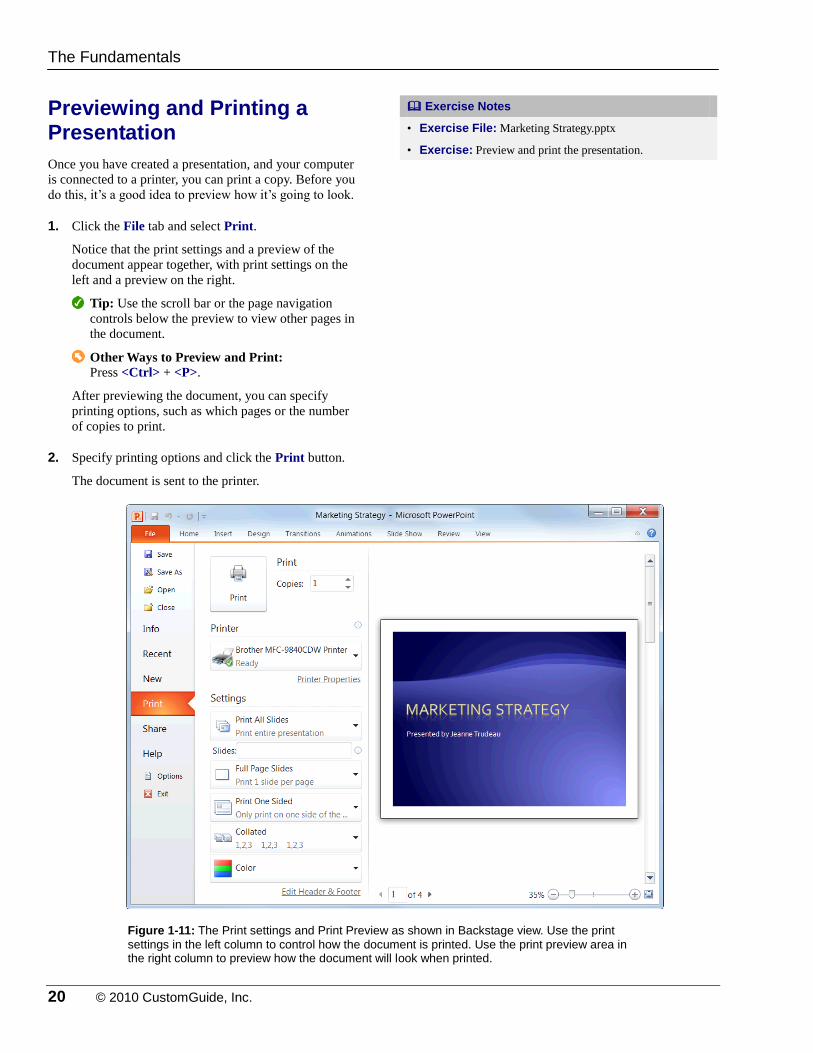
1. Click the File tab and select Print.
Notice that the print settings and a preview of the
document appear together, with print settings on the
left and a preview on the right.
Tip: Use the scroll bar or the page navigation
controls below the preview to view other pages in
the document.
Other Ways to Preview and Print: Press <Ctrl> + <P>.
After previewing the document, you can specify
printing options, such as which pages or the number
of copies to print.
2. Specify printing options and click the Print button.
The document is sent to the printer.
Exercise Notes
• Exercise File: Marketing Strategy.pptx
• Exercise: Preview and print the presentation.
Figure 1-11: The Print settings and Print Preview as shown in Backstage view. Use the print
settings in the left column to control how the document is printed. Use the print preview area in the right column to preview how the document will look when printed.
The Fundamentals
IT Services, University of Wolverhampton 21
Saving a Presentation
After you’ve created a presentation, you need to save it if
you want to use it again. Also, if you make changes to a
presentation you’ll want to save it. You can even save a
copy of an existing presentation with a new name, to a
different location, or using a different file type.
Save a new presentation
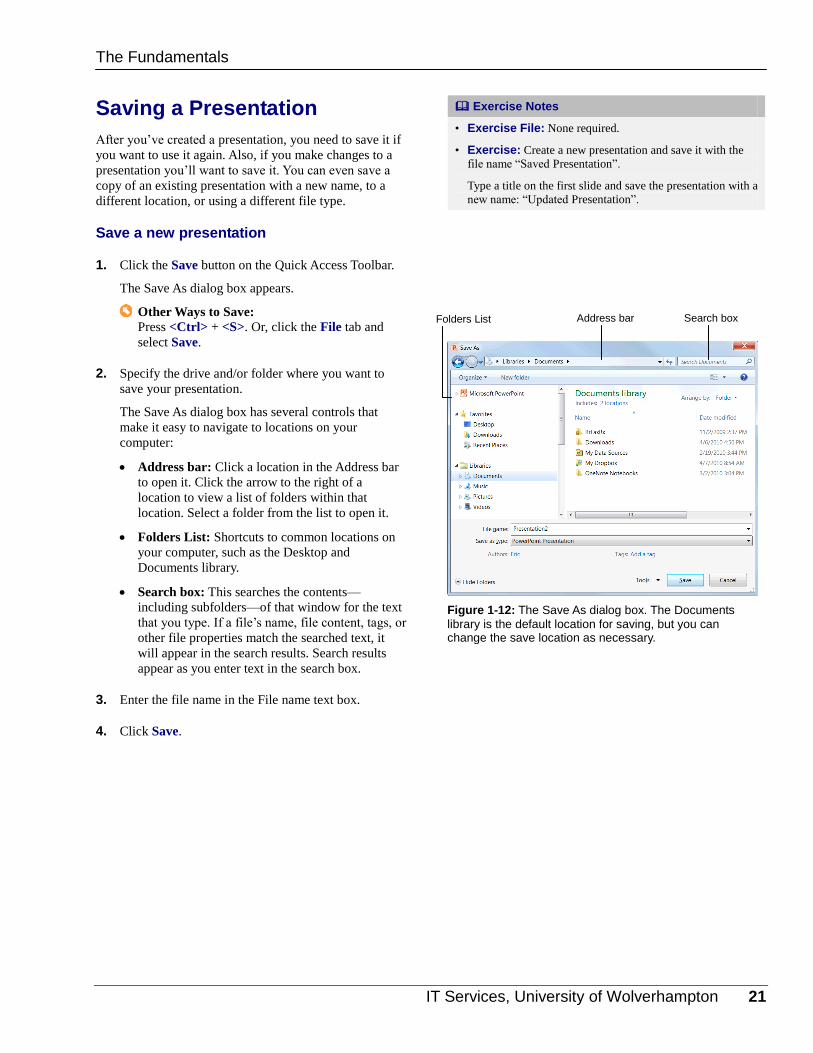
1. Click the Save button on the Quick Access Toolbar.
The Save As dialog box appears.
Other Ways to Save: Press <Ctrl> + <S>. Or, click the File tab and
select Save.
2. Specify the drive and/or folder where you want to
save your presentation.
The Save As dialog box has several controls that
make it easy to navigate to locations on your
computer:
Address bar: Click a location in the Address bar
to open it. Click the arrow to the right of a
location to view a list of folders within that
location. Select a folder from the list to open it.
Folders List: Shortcuts to common locations on
your computer, such as the Desktop and
Documents library.
Search box: This searches the contents—
including subfolders—of that window for the text
that you type. If a file’s name, file content, tags, or
other file properties match the searched text, it
will appear in the search results. Search results
appear as you enter text in the search box.
3. Enter the file name in the File name text box.
4. Click Save.
Exercise Notes
• Exercise File: None required.
• Exercise: Create a new presentation and save it with the
file name “Saved Presentation”.
Type a title on the first slide and save the presentation with a
new name: “Updated Presentation”.
Figure 1-12: The Save As dialog box. The Documents
library is the default location for saving, but you can change the save location as necessary.
The Fundamentals
Address bar Folders List Search box
22 © 2010 CustomGuide, Inc.
Save presentation changes
Once you make changes to a presentation you’ve saved
before, you need to save it again.
1. Click the Save button on the Quick Access Toolbar.
Any changes you have made to the presentation are
saved.
Other Ways to Save: Press <Ctrl> + <S>. Or, click the File tab and
select Save.
Save a presentation under a different name and/or location
You can save another copy of a saved document using a
new name or in a new location.
1. Click the File tab and select Save As.
The Save As dialog box appears.
2. Enter a different name for the file in the File name
text box
Navigate to a new location to save the file as
necessary.
3. Click Save.
Save a presentation as a different file type
Just as some people can speak several languages,
PowerPoint can read and write in other file formats,
making it easier to share information between programs.
1. Click the File tab and select Save As.
The Save As dialog box appears.
2. Click the Save as type list arrow and select a file
format.
3. Click Save.
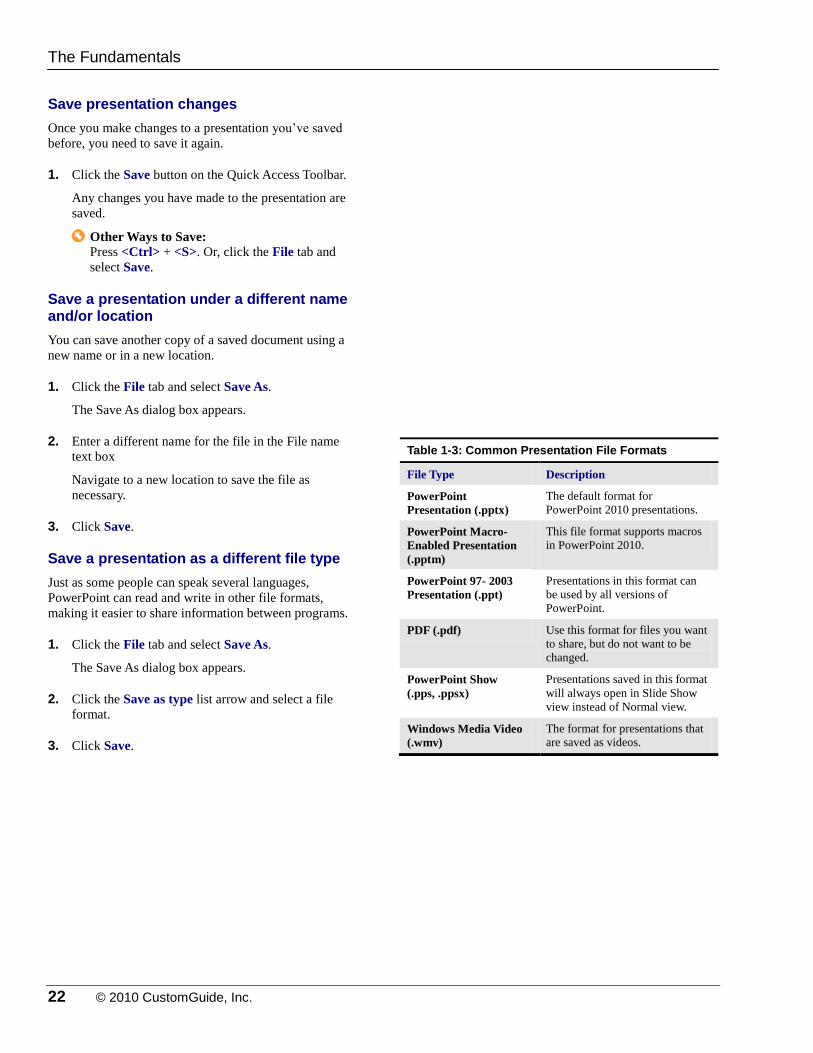
Table 1-3: Common Presentation File Formats
File Type Description
PowerPoint
Presentation (.pptx)
The default format for
PowerPoint 2010 presentations.
PowerPoint Macro-
Enabled Presentation
(.pptm)
This file format supports macros
in PowerPoint 2010.
PowerPoint 97- 2003
Presentation (.ppt)
Presentations in this format can
be used by all versions of
PowerPoint.
PDF (.pdf) Use this format for files you want
to share, but do not want to be
changed.
PowerPoint Show
(.pps, .ppsx)
Presentations saved in this format
will always open in Slide Show
view instead of Normal view.
Windows Media Video
(.wmv)
The format for presentations that
are saved as videos.
The Fundamentals
IT Services, University of Wolverhampton 23
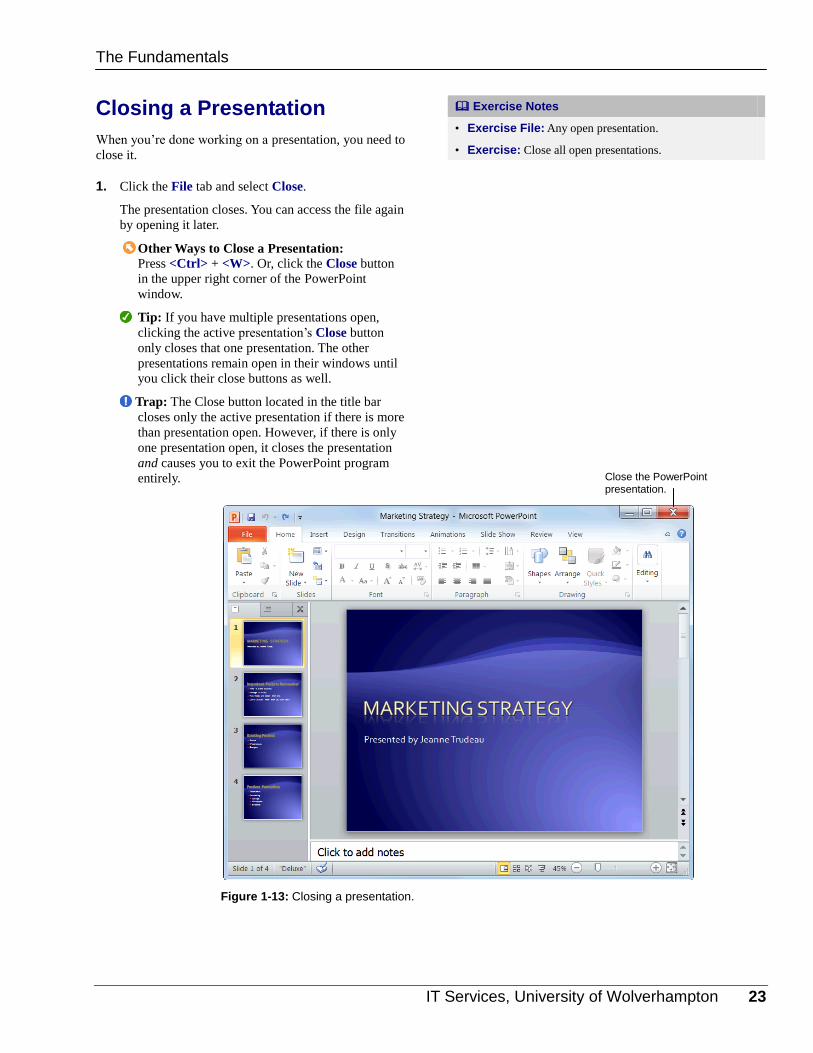
Closing a Presentation
When you’re done working on a presentation, you need to
close it.
1. Click the File tab and select Close.
The presentation closes. You can access the file again
by opening it later.
Other Ways to Close a Presentation: Press <Ctrl> + <W>. Or, click the Close button
in the upper right corner of the PowerPoint
window.
Tip: If you have multiple presentations open,
clicking the active presentation’s Close button
only closes that one presentation. The other
presentations remain open in their windows until
you click their close buttons as well.
Trap: The Close button located in the title bar
closes only the active presentation if there is more
than presentation open. However, if there is only
one presentation open, it closes the presentation
and causes you to exit the PowerPoint program
entirely.
Exercise Notes
• Exercise File: Any open presentation.
• Exercise: Close all open presentations.
Figure 1-13: Closing a presentation.
The Fundamentals
Close the PowerPoint presentation.
24 © 2010 CustomGuide, Inc.
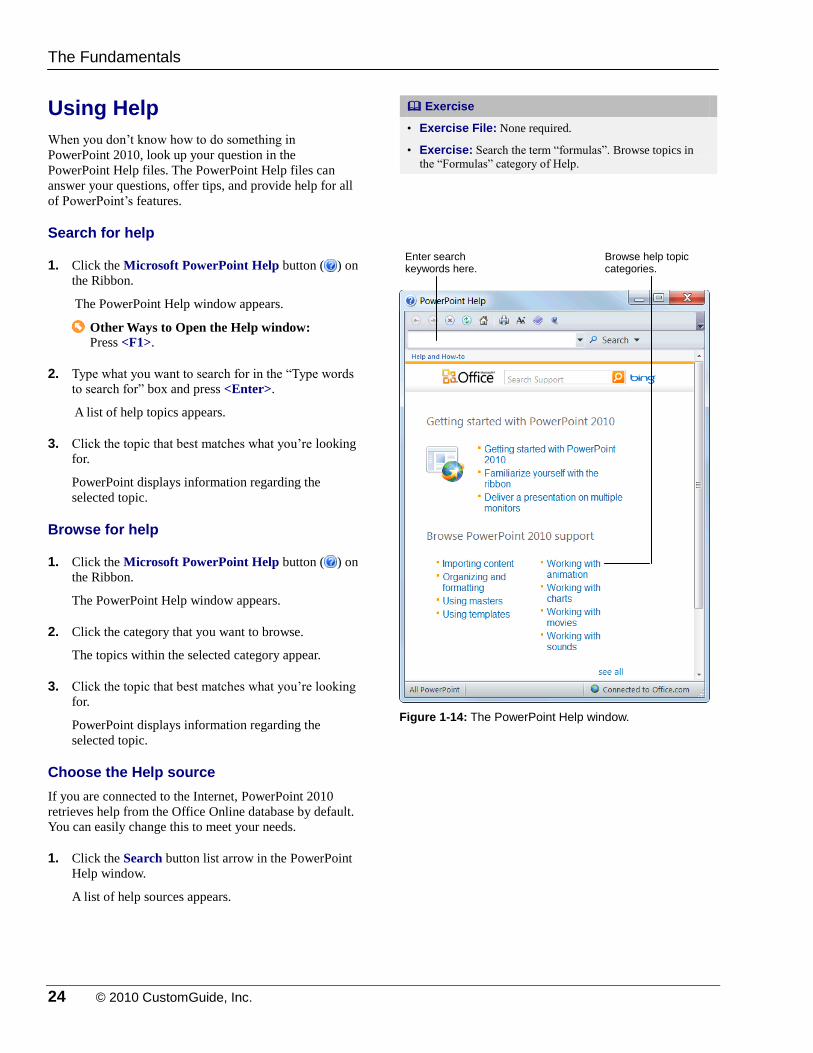
Using Help
When you don’t know how to do something in
PowerPoint 2010, look up your question in the
PowerPoint Help files. The PowerPoint Help files can
answer your questions, offer tips, and provide help for all
of PowerPoint’s features.
Search for help
1. Click the Microsoft PowerPoint Help button ( ) on
the Ribbon.
The PowerPoint Help window appears.
Other Ways to Open the Help window: Press <F1>.
2. Type what you want to search for in the “Type words
to search for” box and press <Enter>.
A list of help topics appears.
3. Click the topic that best matches what you’re looking
for.
PowerPoint displays information regarding the
selected topic.
Browse for help
1. Click the Microsoft PowerPoint Help button ( ) on
the Ribbon.
The PowerPoint Help window appears.
2. Click the category that you want to browse.
The topics within the selected category appear.
3. Click the topic that best matches what you’re looking
for.
PowerPoint displays information regarding the
selected topic.
Choose the Help source
If you are connected to the Internet, PowerPoint 2010
retrieves help from the Office Online database by default.
You can easily change this to meet your needs.
1. Click the Search button list arrow in the PowerPoint
Help window.
A list of help sources appears.
Exercise
• Exercise File: None required.
• Exercise: Search the term “formulas”. Browse topics in
the “Formulas” category of Help.
Figure 1-14: The PowerPoint Help window.
The Fundamentals
Enter search keywords here.
Browse help topic categories.
IT Services, University of Wolverhampton 25
2. Select an option from the list.
Now you can search from that source.
Tips
Office 2010 offers enhanced ScreenTips for many
buttons on the Ribbon. You can use these ScreenTips
to learn more about what a button does and, where
available, view a keystroke shortcut for the
command. If you see the message “Press F1 for more
help”, press <F1> to get more information relative to
that command.
When you are working in a dialog box, click the
Help button ( ) in the upper right-hand corner to get
help regarding the commands in the dialog box.
Table 1-4: Help buttons
Back Return to the previous help
topic.
Forward
Return to move forward to the
next help topic after clicking
Back.
Stop Stop the transfer of information
from the online Help database.
Refresh Refresh the page to correct page
layout or get the latest data.
Home
Click here to return to the Help
home page.
Click here to print the current
help topic.
Change Font Size
Click here to change the size of
the text in the Help window.
Show Table of
Contents
Click here to browse for help
using the Table of Contents.
Keep On Top
Click here to layer the Help
window so that it appears behind
all other Microsoft Office
programs.
The Fundamentals
26 © 2010 CustomGuide, Inc.
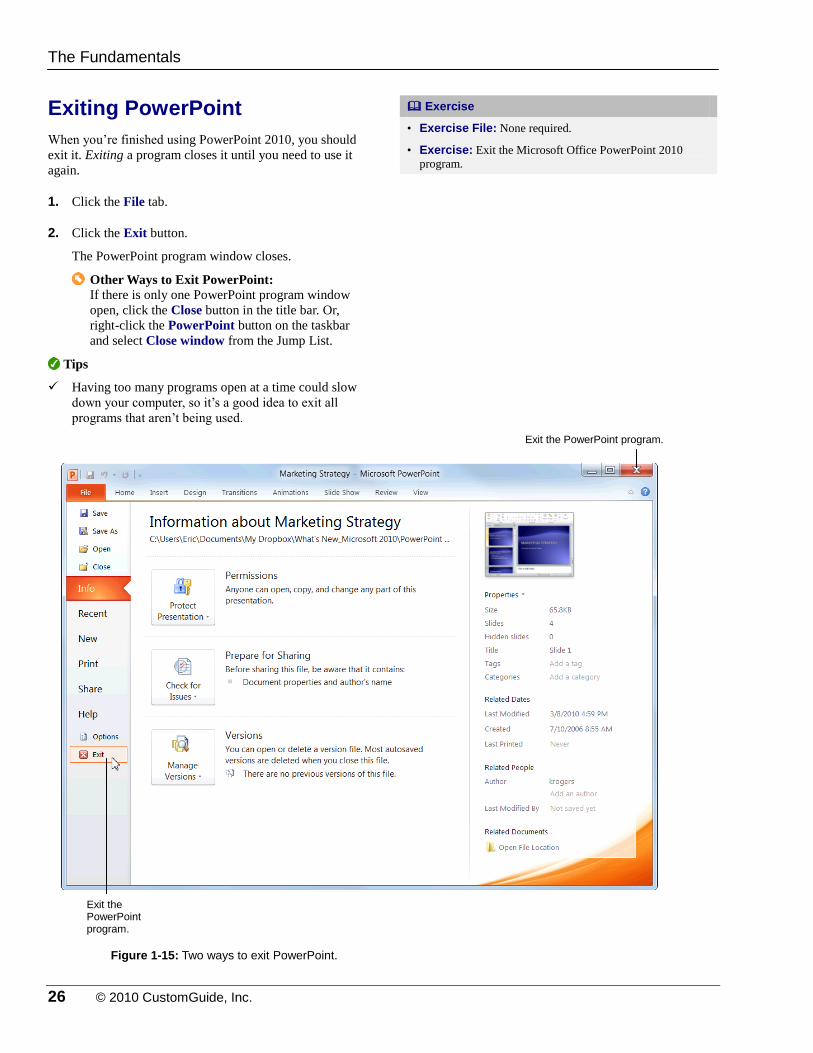
Exiting PowerPoint
When you’re finished using PowerPoint 2010, you should
exit it. Exiting a program closes it until you need to use it
again.
1. Click the File tab.
2. Click the Exit button.
The PowerPoint program window closes.
Other Ways to Exit PowerPoint: If there is only one PowerPoint program window
open, click the Close button in the title bar. Or,
right-click the PowerPoint button on the taskbar
and select Close window from the Jump List.
Tips
Having too many programs open at a time could slow
down your computer, so it’s a good idea to exit all
programs that aren’t being used.
Exercise
• Exercise File: None required.
• Exercise: Exit the Microsoft Office PowerPoint 2010
program.
Figure 1-15: Two ways to exit PowerPoint.
The Fundamentals
Exit the PowerPoint program.
Exit the PowerPoint program.
IT Services, University of Wolverhampton 27
PPrrooggrraamm FFuunnddaammeennttaallss RReevviieeww
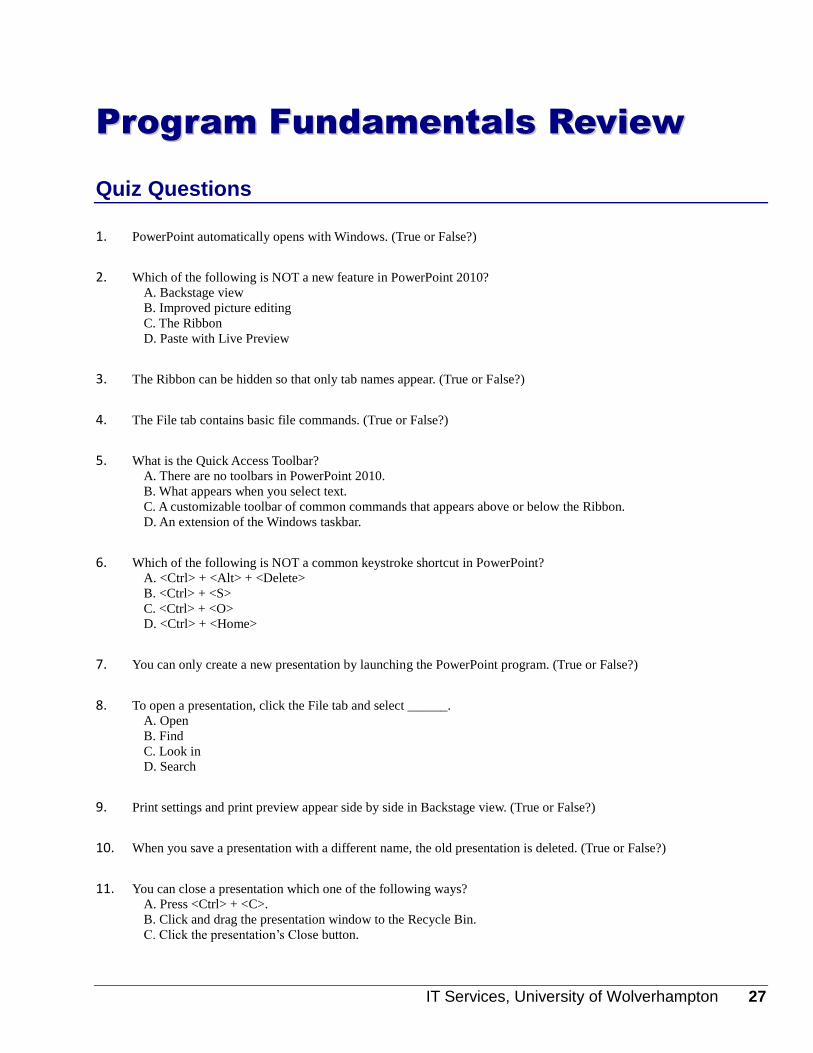
Quiz Questions
1. PowerPoint automatically opens with Windows. (True or False?)
2. Which of the following is NOT a new feature in PowerPoint 2010? A. Backstage view B. Improved picture editing C. The Ribbon D. Paste with Live Preview
3. The Ribbon can be hidden so that only tab names appear. (True or False?)
4. The File tab contains basic file commands. (True or False?)
5. What is the Quick Access Toolbar? A. There are no toolbars in PowerPoint 2010. B. What appears when you select text. C. A customizable toolbar of common commands that appears above or below the Ribbon. D. An extension of the Windows taskbar.
6. Which of the following is NOT a common keystroke shortcut in PowerPoint? A. <Ctrl> + <Alt> + <Delete> B. <Ctrl> + <S> C. <Ctrl> + <O> D. <Ctrl> + <Home>
7. You can only create a new presentation by launching the PowerPoint program. (True or False?)
8. To open a presentation, click the File tab and select ______. A. Open B. Find C. Look in D. Search
9. Print settings and print preview appear side by side in Backstage view. (True or False?)
10. When you save a presentation with a different name, the old presentation is deleted. (True or False?)
11. You can close a presentation which one of the following ways? A. Press <Ctrl> + <C>. B. Click and drag the presentation window to the Recycle Bin. C. Click the presentation’s Close button.
28 © 2010 CustomGuide, Inc.
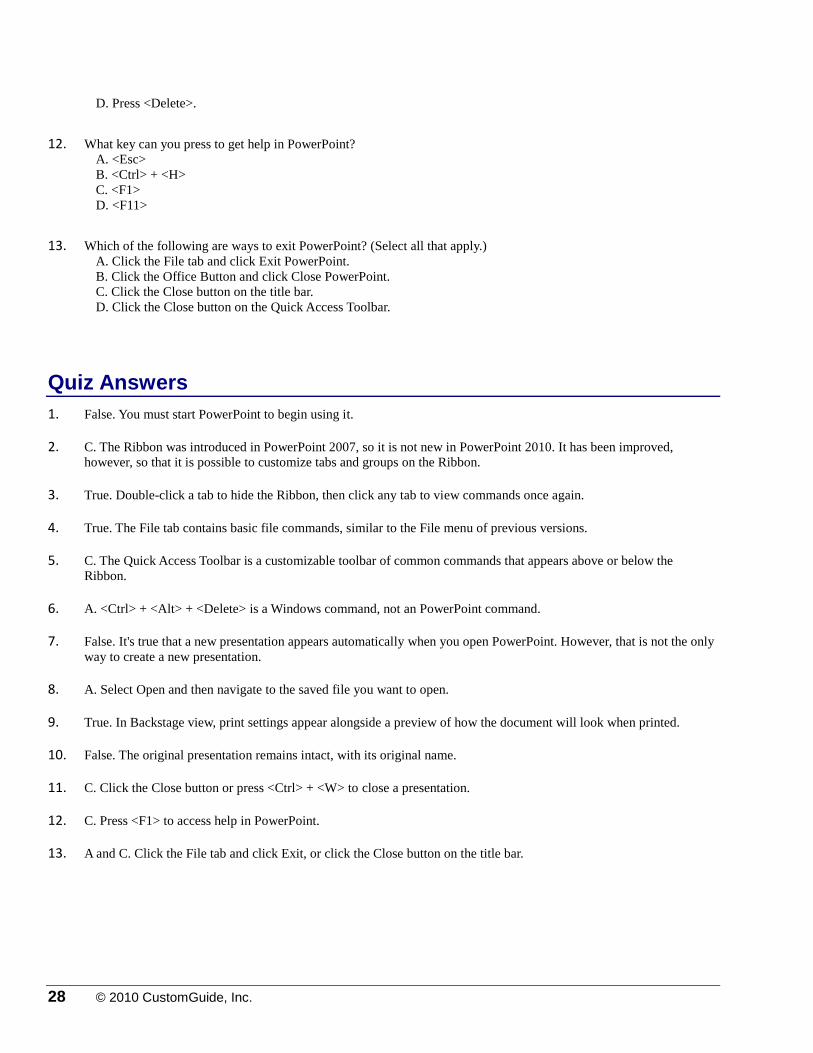
D. Press <Delete>.
12. What key can you press to get help in PowerPoint? A. <Esc> B. <Ctrl> + <H> C. <F1> D. <F11>
13. Which of the following are ways to exit PowerPoint? (Select all that apply.) A. Click the File tab and click Exit PowerPoint. B. Click the Office Button and click Close PowerPoint. C. Click the Close button on the title bar. D. Click the Close button on the Quick Access Toolbar.
Quiz Answers
1. False. You must start PowerPoint to begin using it.
2. C. The Ribbon was introduced in PowerPoint 2007, so it is not new in PowerPoint 2010. It has been improved,
however, so that it is possible to customize tabs and groups on the Ribbon.
3. True. Double-click a tab to hide the Ribbon, then click any tab to view commands once again.
4. True. The File tab contains basic file commands, similar to the File menu of previous versions.
5. C. The Quick Access Toolbar is a customizable toolbar of common commands that appears above or below the
Ribbon.
6. A. <Ctrl> + <Alt> + <Delete> is a Windows command, not an PowerPoint command.
7. False. It's true that a new presentation appears automatically when you open PowerPoint. However, that is not the only
way to create a new presentation.
8. A. Select Open and then navigate to the saved file you want to open.
9. True. In Backstage view, print settings appear alongside a preview of how the document will look when printed.
10. False. The original presentation remains intact, with its original name.
11. C. Click the Close button or press <Ctrl> + <W> to close a presentation.
12. C. Press <F1> to access help in PowerPoint.
13. A and C. Click the File tab and click Exit, or click the Close button on the title bar.
IT Services, University of Wolverhampton 29
GGeettttiinngg SSttaarrtteedd
wwiitthh
PPrreesseennttaattiioonnss
Inserting Slides and Deleting Slides ............... 30
Selecting a Layout ............................................. 31
Navigating a Presentation ................................ 32 Scroll bars ................................................ 32 Keystroke shortcuts ................................. 32 The Slides tab .......................................... 32
Organizing a Presentation ................................ 33 Add a section ........................................... 33 Rename a section .................................... 33 Jump to a section during a presentation.. 34 Remove a section .................................... 34
You can do many great things with a
presentation, but before you can get into
some of the more fun tasks, like
formatting and animation, you need to
learn the more basic tasks, like how to
insert a slide and choose a layout.
This chapter will teach you the most basic
commands and functions you can perform
in PowerPoint, such as how to navigate
and organize a slide show.
Using Exercise Files This chapter suggests exercises to practice
the topic of each lesson. There are two
ways you may follow along with the
exercise files:
Open the exercise file for a lesson,
perform the lesson exercise, and close
the exercise file.
Open the exercise file for a lesson,
perform the lesson exercise, and keep
the file open to perform the remaining
lesson exercises for the chapter.
The exercises are written so that you may
“build upon them”, meaning the exercises
in a chapter can be performed in
succession from the first lesson to the last.
2
30 © 2010 CustomGuide, Inc.
Inserting Slides and Deleting Slides
Slides are the building blocks of a presentation. This
lesson will show you how to insert a new slide and how to
delete a slide.
Insert a new slide
Inserting a new slide is quick and easy.
Click the Home tab on the Ribbon and click the New
Slide button in the Slides group.
A new slide is added to the presentation.
Other Ways to Insert a New Slide: Press <Ctrl> + <M>. Or, right-click a slide on the
Slides tab in the Outline pane and select New
Slide from the contextual menu.
Delete a slide
If you decide you don’t need a slide, delete it.
1. On the Slides tab in the Outline pane, select the slide
you want to delete.
2. Press <Delete>.
The slide is deleted.
Other Ways to Delete a Slide: On the Slides tab in the Outline pane, right-click
the slide you want to delete and select Delete
Slide.
Exercise
• Exercise File: None required.
• Exercise: Open a new blank presentation, if necessary.
Insert a new slide into the blank presentation, then delete it.
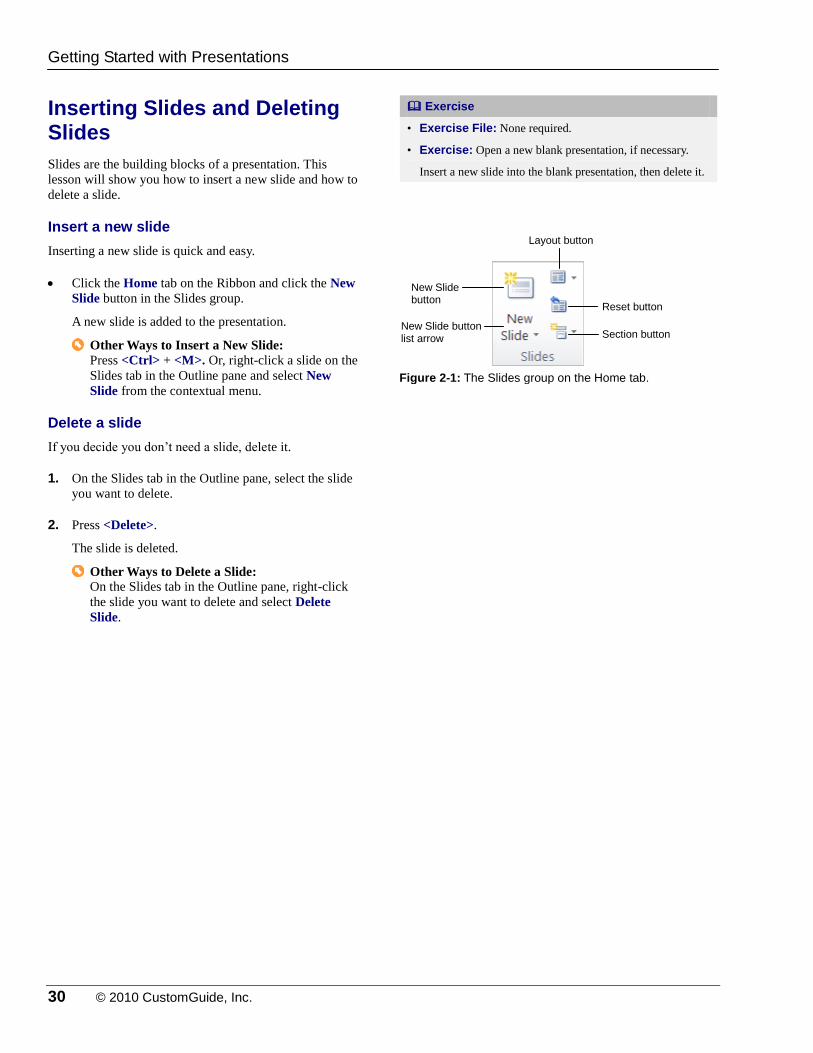
Figure 2-1: The Slides group on the Home tab.
Getting Started with Presentations
New Slide button
Layout button
New Slide button list arrow Section button
Reset button
IT Services, University of Wolverhampton 31
Selecting a Layout
If you don’t like the layout that has been assigned to the
new slide by default, choose a new one. PowerPoint 2010
gives you nine different layouts to choose from, and you
can even create your own custom layouts (more on this
later) .
The layout name tells you which types of text and/or
object placeholders are included in the layout; for
example, the Title and Content layout contains a title
placeholder and a body text placeholder.
Select a layout
1. Click the Home tab on the Ribbon and click the
Layout button in the Slides group.
The Layout gallery appears.
2. Select the layout you want to use.
The new layout is applied to the slide.
Other Ways to Select a Layout: On the Slides tab in the Outline pane, right-click
the slide whose layout you want to change. Select
Layout from the contextual menu and select a
layout from the list.
Tip: If you don’t find a layout that meets your
needs perfectly, don’t fret; you can always
modify, move, or delete placeholders.
Insert a new slide using the Layout gallery
You can insert a new slide and select a layout at the same
time using the Layout gallery.
1. Click the Home tab on the Ribbon and click the New
Slide button list arrow in the Slides group.
The Layout gallery appears, listing the available
layouts you have to choose from.
2. Select a layout from the list.
A new slide with the selected layout is inserted into
the presentation.
Exercise
• Exercise File: None required.
• Exercise: Open a new, blank presentation, if necessary.
Insert a new slide and select the Comparison layout.
Table 2-1: PowerPoint 2010 Slide Layouts
Title Slide
Title and Content
Section Header
Two Content
Comparison
Title Only
Blank
Content with Caption
Picture with Caption
Getting Started with Presentations
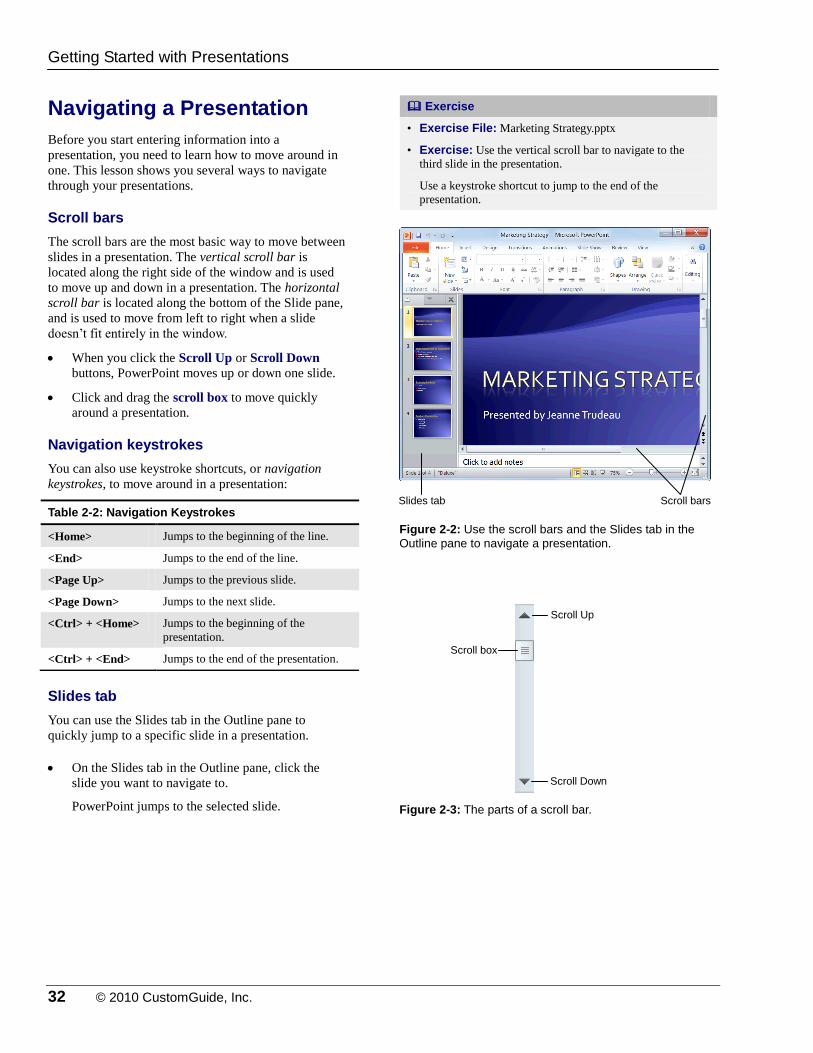
32 © 2010 CustomGuide, Inc.
Navigating a Presentation
Before you start entering information into a
presentation, you need to learn how to move around in
one. This lesson shows you several ways to navigate
through your presentations.
Scroll bars
The scroll bars are the most basic way to move between
slides in a presentation. The vertical scroll bar is
located along the right side of the window and is used
to move up and down in a presentation. The horizontal
scroll bar is located along the bottom of the Slide pane,
and is used to move from left to right when a slide
doesn’t fit entirely in the window.
When you click the Scroll Up or Scroll Down
buttons, PowerPoint moves up or down one slide.
Click and drag the scroll box to move quickly
around a presentation.
Navigation keystrokes
You can also use keystroke shortcuts, or navigation
keystrokes, to move around in a presentation:
Slides tab
You can use the Slides tab in the Outline pane to
quickly jump to a specific slide in a presentation.
On the Slides tab in the Outline pane, click the
slide you want to navigate to.
PowerPoint jumps to the selected slide.
Exercise
• Exercise File: Marketing Strategy.pptx
• Exercise: Use the vertical scroll bar to navigate to the
third slide in the presentation.
Use a keystroke shortcut to jump to the end of the
presentation.
Figure 2-2: Use the scroll bars and the Slides tab in the
Outline pane to navigate a presentation.
Table 2-2: Navigation Keystrokes
<Home> Jumps to the beginning of the line.
<End> Jumps to the end of the line.
<Page Up> Jumps to the previous slide.
<Page Down> Jumps to the next slide.
<Ctrl> + <Home> Jumps to the beginning of the
presentation.
<Ctrl> + <End> Jumps to the end of the presentation.
Figure 2-3: The parts of a scroll bar.
Getting Started with Presentations
Scroll Up
Scroll box
Scroll Down
Slides tab Scroll bars
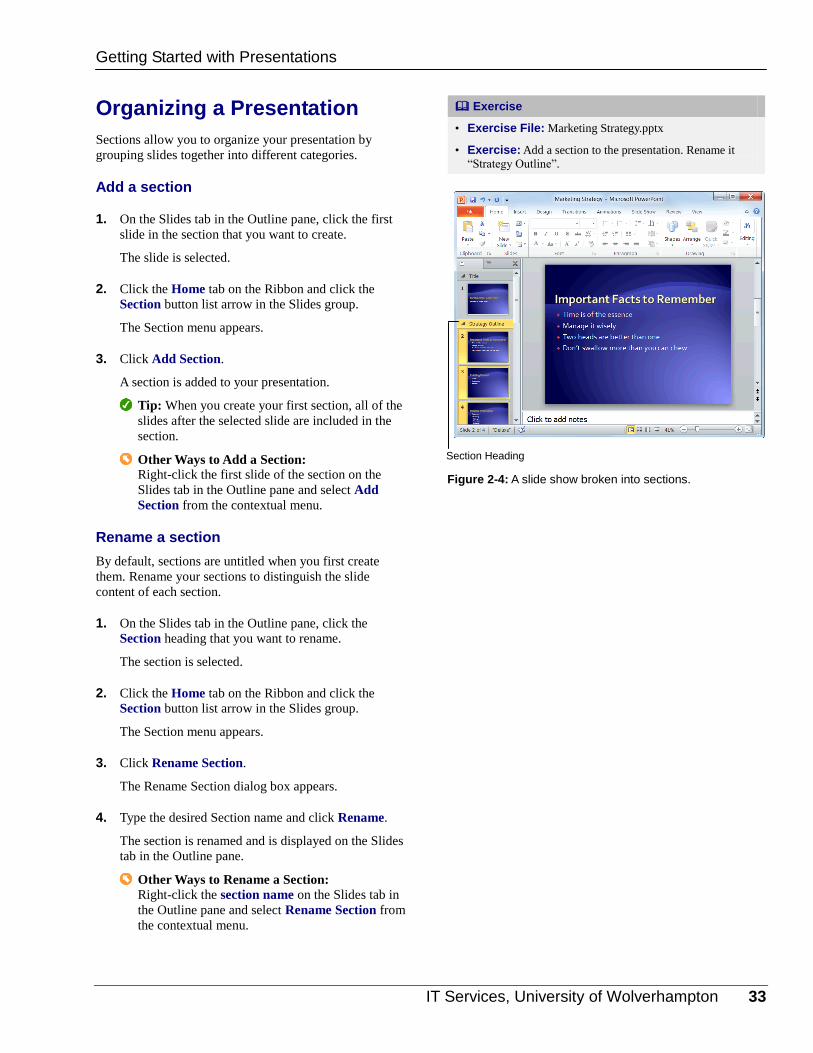
IT Services, University of Wolverhampton 33
Organizing a Presentation
Sections allow you to organize your presentation by
grouping slides together into different categories.
Add a section
1. On the Slides tab in the Outline pane, click the first
slide in the section that you want to create.
The slide is selected.
2. Click the Home tab on the Ribbon and click the
Section button list arrow in the Slides group.
The Section menu appears.
3. Click Add Section.
A section is added to your presentation.
Tip: When you create your first section, all of the
slides after the selected slide are included in the
section.
Other Ways to Add a Section: Right-click the first slide of the section on the
Slides tab in the Outline pane and select Add
Section from the contextual menu.
Rename a section
By default, sections are untitled when you first create
them. Rename your sections to distinguish the slide
content of each section.
1. On the Slides tab in the Outline pane, click the
Section heading that you want to rename.
The section is selected.
2. Click the Home tab on the Ribbon and click the
Section button list arrow in the Slides group.
The Section menu appears.
3. Click Rename Section.
The Rename Section dialog box appears.
4. Type the desired Section name and click Rename.
The section is renamed and is displayed on the Slides
tab in the Outline pane.
Other Ways to Rename a Section: Right-click the section name on the Slides tab in
the Outline pane and select Rename Section from
the contextual menu.
Exercise
• Exercise File: Marketing Strategy.pptx
• Exercise: Add a section to the presentation. Rename it
“Strategy Outline”.
Figure 2-4: A slide show broken into sections.
Getting Started with Presentations
Section Heading
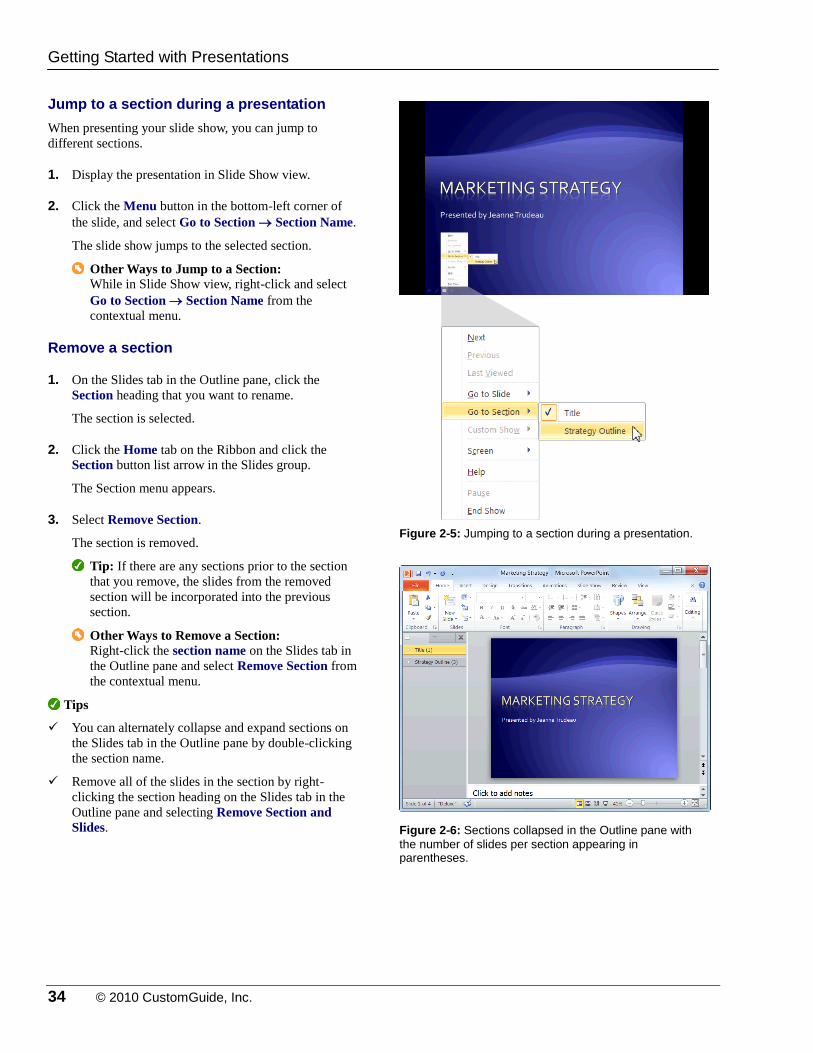
34 © 2010 CustomGuide, Inc.
Jump to a section during a presentation
When presenting your slide show, you can jump to
different sections.
1. Display the presentation in Slide Show view.
2. Click the Menu button in the bottom-left corner of
the slide, and select Go to Section Section Name.
The slide show jumps to the selected section.
Other Ways to Jump to a Section: While in Slide Show view, right-click and select
Go to Section Section Name from the
contextual menu.
Remove a section
1. On the Slides tab in the Outline pane, click the
Section heading that you want to rename.
The section is selected.
2. Click the Home tab on the Ribbon and click the
Section button list arrow in the Slides group.
The Section menu appears.
3. Select Remove Section.
The section is removed.
Tip: If there are any sections prior to the section
that you remove, the slides from the removed
section will be incorporated into the previous
section.
Other Ways to Remove a Section: Right-click the section name on the Slides tab in
the Outline pane and select Remove Section from
the contextual menu.
Tips
You can alternately collapse and expand sections on
the Slides tab in the Outline pane by double-clicking
the section name.
Remove all of the slides in the section by right-
clicking the section heading on the Slides tab in the
Outline pane and selecting Remove Section and
Slides.
Figure 2-5: Jumping to a section during a presentation.
Figure 2-6: Sections collapsed in the Outline pane with
the number of slides per section appearing in parentheses.
Getting Started with Presentations
IT Services, University of Wolverhampton 35
GGeettttiinngg SSttaarrtteedd wwiitthh PPrreesseennttaattiioonnss
RReevviieeww
Quiz Questions
14. What is the keystroke shortcut for inserting a new slide? A. <Ctrl> + <N> B. <Ctrl> + <M> C. <Ctrl> + <S> D. <Ctrl> + <V>
15. You cannot change the layout of a slide. (True or False?)
16. What is the navigation keystroke for jumping to the beginning of a presentation? A. <Ctrl> + <M> B. <Ctrl> +<End> C. <Ctrl> + <Up> D. <Ctrl> + <Home>
17. Organizing a presentation allows you to: A. Group your slides into sections. B. Quickly navigate to a section in Slide Show view. C. Apply editing to a group of common slides. D. All of the above.
Quiz Answers
14. B. Pressing <Ctrl> + <M> inserts a new slide into the presentation.
15. False. If you don’t like the layout that has been assigned to a slide by default, you can easily apply a different one.
16. D. Pressing <Ctrl> + <Home> will move you to the beginning of the presentation.
17. D. Organizing a presentation into sections allows you to group slides, navigate to sections quickly, and apply editing to
common slides.
36 © 2010 CustomGuide, Inc.
IInnsseerrttiinngg aanndd
EEddiittiinngg TTeexxtt
Inserting Text ..................................................... 37
Inserting a Text Box........................................... 38
Editing Text ........................................................ 39 Select text ................................................ 39 Replace text ............................................. 39 Delete text ................................................ 39
Moving and Copying Text ................................. 40
Controlling How Text is Moved or Copied ...... 42 Use paste options .................................... 42 Use Paste Special .................................... 42
Collecting Multiple Items to Move or Copy ..... 44
Using Undo, Redo and Repeat ......................... 45
Checking Your Spelling ..................................... 47
Finding and Replacing Text .............................. 49
Inserting Symbols and Special Characters .... 51
Inserting Equations ........................................... 52 Insert an equation template ..................... 52 Build an equation ..................................... 52
Now that you’re familiar with the
PowerPoint basics, you’re ready to move
on to inserting and editing text. This
chapter explains everything you need to
know about working with text, including
how to insert and edit text; how to cut,
copy, and paste text; and how to correct
spelling errors. You will also learn how to
find and replace text and insert special
characters, such as trademark and
copyright symbols.
Using Exercise Files This chapter suggests exercises to practice
the topic of each lesson. There are two
ways you may follow along with the
exercise files:
Open the exercise file for a lesson,
perform the lesson exercise, and close
the exercise file.
Open the exercise file for a lesson,
perform the lesson exercise, and keep
the file open to perform the remaining
lesson exercises for the chapter.
The exercises are written so that you may
“build upon them”, meaning the exercises
in a chapter can be performed in
succession from the first lesson to the last.
3
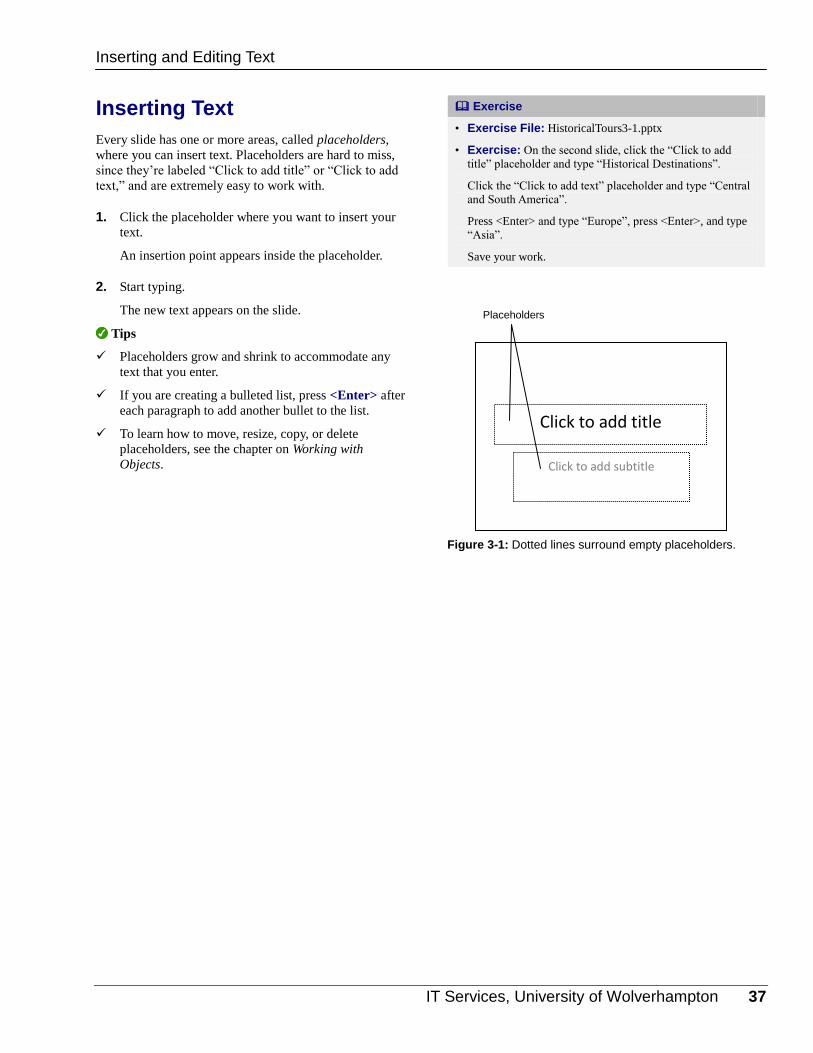
IT Services, University of Wolverhampton 37
Inserting Text
Every slide has one or more areas, called placeholders,
where you can insert text. Placeholders are hard to miss,
since they’re labeled “Click to add title” or “Click to add
text,” and are extremely easy to work with.
1. Click the placeholder where you want to insert your
text.
An insertion point appears inside the placeholder.
2. Start typing.
The new text appears on the slide.
Tips
Placeholders grow and shrink to accommodate any
text that you enter.
If you are creating a bulleted list, press <Enter> after
each paragraph to add another bullet to the list.
To learn how to move, resize, copy, or delete
placeholders, see the chapter on Working with
Objects.
Exercise
• Exercise File: HistoricalTours3-1.pptx
• Exercise: On the second slide, click the “Click to add
title” placeholder and type “Historical Destinations”.
Click the “Click to add text” placeholder and type “Central
and South America”.
Press <Enter> and type “Europe”, press <Enter>, and type
“Asia”.
Save your work.
Figure 3-1: Dotted lines surround empty placeholders.
Inserting and Editing Text
Click to add title
Click to add subtitle
Placeholders
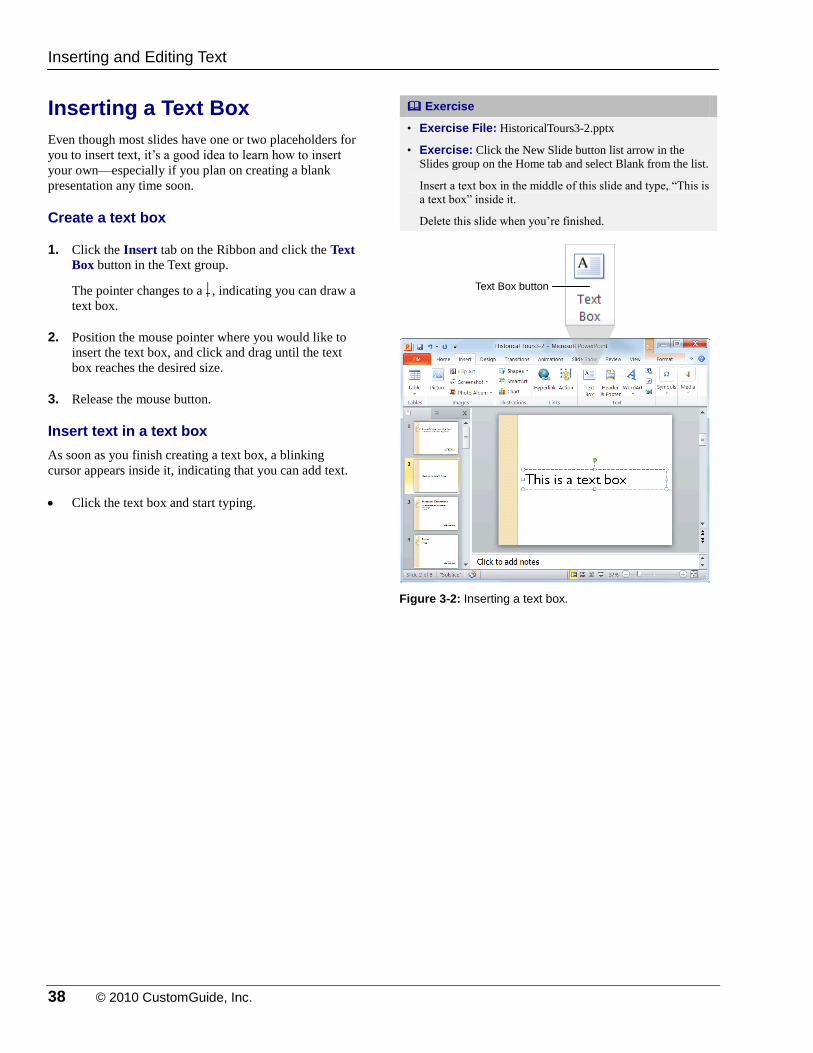
38 © 2010 CustomGuide, Inc.
Inserting a Text Box
Even though most slides have one or two placeholders for
you to insert text, it’s a good idea to learn how to insert
your own—especially if you plan on creating a blank
presentation any time soon.
Create a text box
1. Click the Insert tab on the Ribbon and click the Text
Box button in the Text group.
The pointer changes to a , indicating you can draw a
text box.
2. Position the mouse pointer where you would like to
insert the text box, and click and drag until the text
box reaches the desired size.
3. Release the mouse button.
Insert text in a text box
As soon as you finish creating a text box, a blinking
cursor appears inside it, indicating that you can add text.
Click the text box and start typing.
Exercise
• Exercise File: HistoricalTours3-2.pptx
• Exercise: Click the New Slide button list arrow in the
Slides group on the Home tab and select Blank from the list.
Insert a text box in the middle of this slide and type, “This is
a text box” inside it.
Delete this slide when you’re finished.
Figure 3-2: Inserting a text box.
Inserting and Editing Text
Text Box button
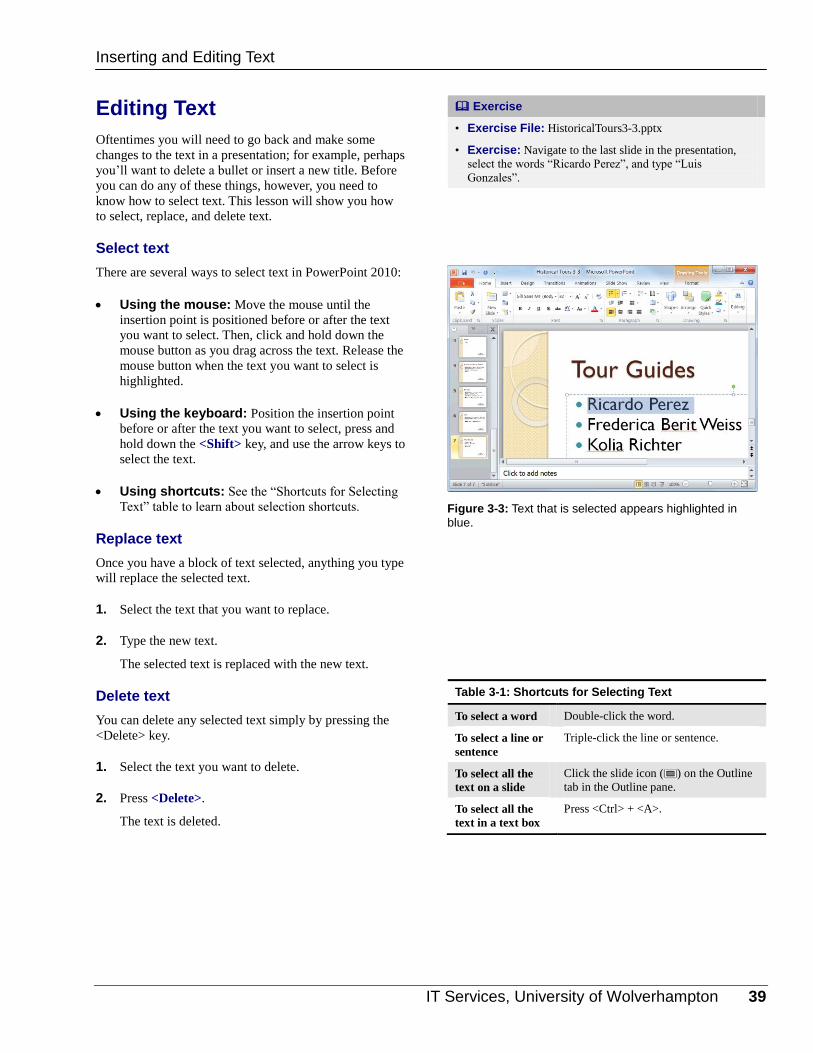
IT Services, University of Wolverhampton 39
Editing Text
Oftentimes you will need to go back and make some
changes to the text in a presentation; for example, perhaps
you’ll want to delete a bullet or insert a new title. Before
you can do any of these things, however, you need to
know how to select text. This lesson will show you how
to select, replace, and delete text.
Select text
There are several ways to select text in PowerPoint 2010:
Using the mouse: Move the mouse until the
insertion point is positioned before or after the text
you want to select. Then, click and hold down the
mouse button as you drag across the text. Release the
mouse button when the text you want to select is
highlighted.
Using the keyboard: Position the insertion point
before or after the text you want to select, press and
hold down the <Shift> key, and use the arrow keys to
select the text.
Using shortcuts: See the “Shortcuts for Selecting
Text” table to learn about selection shortcuts.
Replace text
Once you have a block of text selected, anything you type
will replace the selected text.
1. Select the text that you want to replace.
2. Type the new text.
The selected text is replaced with the new text.
Delete text
You can delete any selected text simply by pressing the
<Delete> key.
1. Select the text you want to delete.
2. Press <Delete>.
The text is deleted.
Exercise
• Exercise File: HistoricalTours3-3.pptx
• Exercise: Navigate to the last slide in the presentation,
select the words “Ricardo Perez”, and type “Luis
Gonzales”.
Figure 3-3: Text that is selected appears highlighted in
blue.
Table 3-1: Shortcuts for Selecting Text
To select a word Double-click the word.
To select a line or
sentence
Triple-click the line or sentence.
To select all the
text on a slide
Click the slide icon ( ) on the Outline
tab in the Outline pane.
To select all the
text in a text box
Press <Ctrl> + <A>.
Inserting and Editing Text
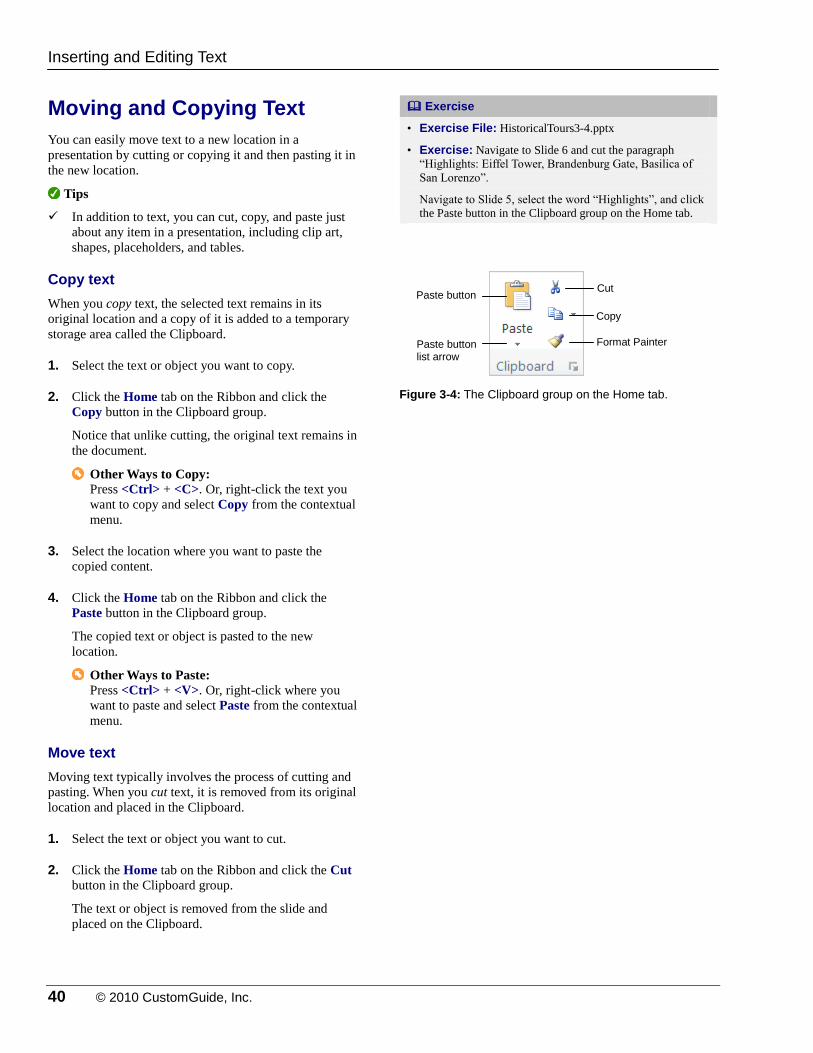
40 © 2010 CustomGuide, Inc.
Moving and Copying Text
You can easily move text to a new location in a
presentation by cutting or copying it and then pasting it in
the new location.
Tips
In addition to text, you can cut, copy, and paste just
about any item in a presentation, including clip art,
shapes, placeholders, and tables.
Copy text
When you copy text, the selected text remains in its
original location and a copy of it is added to a temporary
storage area called the Clipboard.
1. Select the text or object you want to copy.
2. Click the Home tab on the Ribbon and click the
Copy button in the Clipboard group.
Notice that unlike cutting, the original text remains in
the document.
Other Ways to Copy: Press <Ctrl> + <C>. Or, right-click the text you
want to copy and select Copy from the contextual
menu.
3. Select the location where you want to paste the
copied content.
4. Click the Home tab on the Ribbon and click the
Paste button in the Clipboard group.
The copied text or object is pasted to the new
location.
Other Ways to Paste: Press <Ctrl> + <V>. Or, right-click where you
want to paste and select Paste from the contextual
menu.
Move text
Moving text typically involves the process of cutting and
pasting. When you cut text, it is removed from its original
location and placed in the Clipboard.
1. Select the text or object you want to cut.
2. Click the Home tab on the Ribbon and click the Cut
button in the Clipboard group.
The text or object is removed from the slide and
placed on the Clipboard.
Exercise
• Exercise File: HistoricalTours3-4.pptx
• Exercise: Navigate to Slide 6 and cut the paragraph
“Highlights: Eiffel Tower, Brandenburg Gate, Basilica of
San Lorenzo”.
Navigate to Slide 5, select the word “Highlights”, and click
the Paste button in the Clipboard group on the Home tab.
Figure 3-4: The Clipboard group on the Home tab.
Inserting and Editing Text
Paste button Cut
Copy
Format Painter Paste button list arrow
IT Services, University of Wolverhampton 41
Other Ways to Cut: Press <Ctrl> + <X>. Or, right-click the text you
want to cut and select Cut from the contextual
menu.
3. Select the location where you want to paste the cut
content.
4. Click the Home tab on the Ribbon and click the
Paste button in the Clipboard group.
The copied text or object is pasted to the new
location.
Other Ways to Paste: Press <Ctrl> + <V>. Or, right-click where you
want to paste and select Paste from the contextual
menu.
Move and copy text using the mouse
Using the mouse to move and copy text is even faster and
more convenient than using the cut, copy and paste
commands.
1. Select the text or object you want to move.
2. Point to the new text or object.
3. Click and hold the mouse button.
4. Drag the pointer to where you want to move the
selected text or object and then release the mouse
button.
Tips
Press and hold the <Ctrl> key while clicking and
dragging to copy the selection.
Inserting and Editing Text
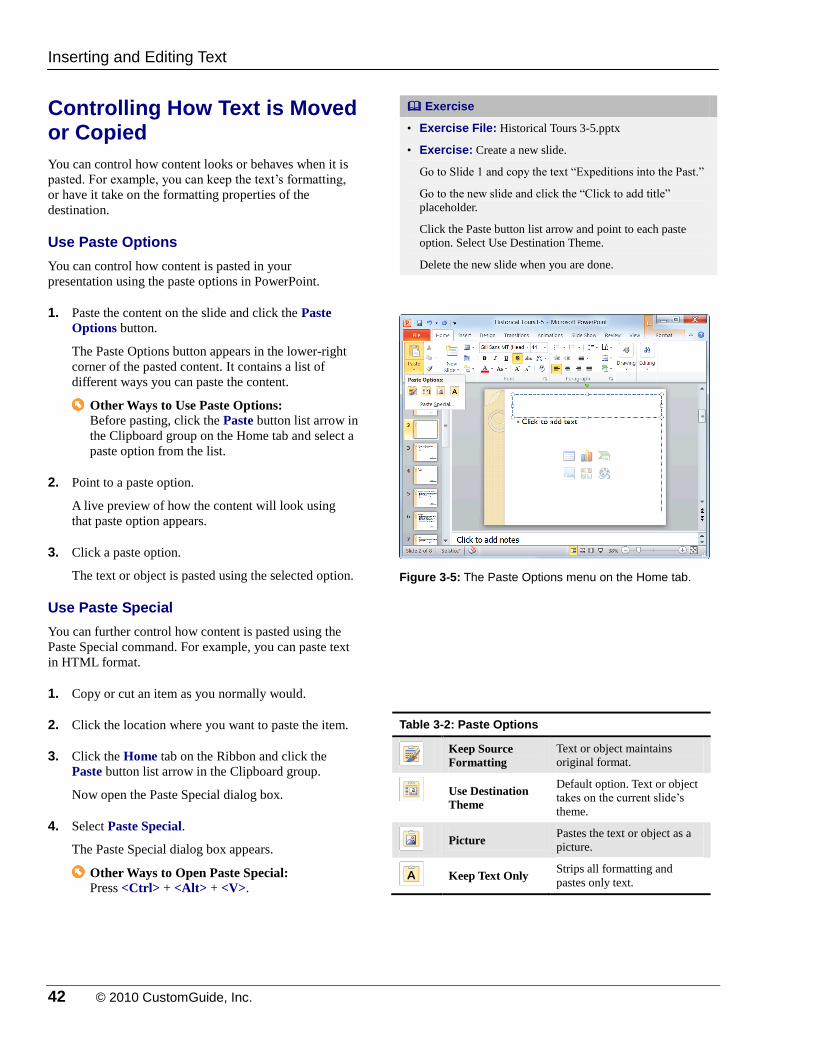
42 © 2010 CustomGuide, Inc.
Controlling How Text is Moved or Copied
You can control how content looks or behaves when it is
pasted. For example, you can keep the text’s formatting,
or have it take on the formatting properties of the
destination.
Use Paste Options
You can control how content is pasted in your
presentation using the paste options in PowerPoint.
1. Paste the content on the slide and click the Paste
Options button.
The Paste Options button appears in the lower-right
corner of the pasted content. It contains a list of
different ways you can paste the content.
Other Ways to Use Paste Options: Before pasting, click the Paste button list arrow in
the Clipboard group on the Home tab and select a
paste option from the list.
2. Point to a paste option.
A live preview of how the content will look using
that paste option appears.
3. Click a paste option.
The text or object is pasted using the selected option.
Use Paste Special
You can further control how content is pasted using the
Paste Special command. For example, you can paste text
in HTML format.
1. Copy or cut an item as you normally would.
2. Click the location where you want to paste the item.
3. Click the Home tab on the Ribbon and click the
Paste button list arrow in the Clipboard group.
Now open the Paste Special dialog box.
4. Select Paste Special.
The Paste Special dialog box appears.
Other Ways to Open Paste Special: Press <Ctrl> + <Alt> + <V>.
Exercise
• Exercise File: Historical Tours 3-5.pptx
• Exercise: Create a new slide.
Go to Slide 1 and copy the text “Expeditions into the Past.”
Go to the new slide and click the “Click to add title”
placeholder.
Click the Paste button list arrow and point to each paste
option. Select Use Destination Theme.
Delete the new slide when you are done.
Figure 3-5: The Paste Options menu on the Home tab.
Table 3-2: Paste Options
Keep Source
Formatting
Text or object maintains
original format.
Use Destination
Theme
Default option. Text or object
takes on the current slide’s
theme.
Picture
Pastes the text or object as a
picture.
Keep Text Only
Strips all formatting and
pastes only text.
Inserting and Editing Text
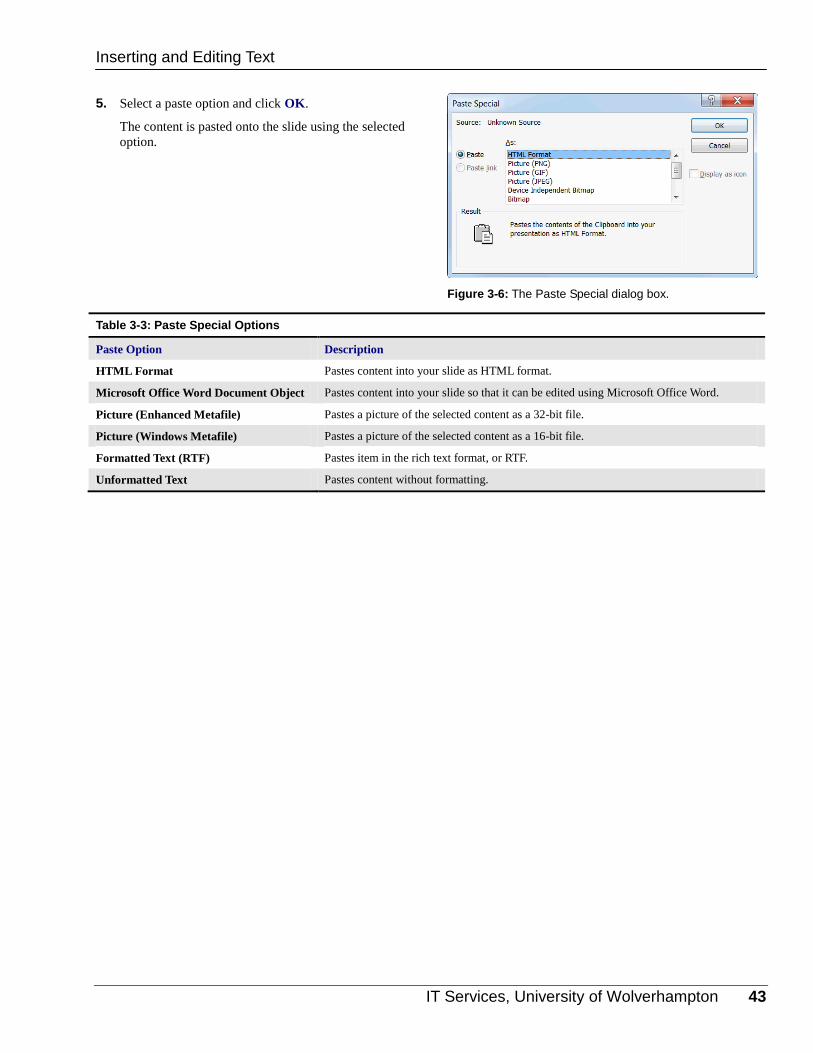
IT Services, University of Wolverhampton 43
5. Select a paste option and click OK.
The content is pasted onto the slide using the selected
option.
Table 3-3: Paste Special Options
Paste Option Description
HTML Format Pastes content into your slide as HTML format.
Microsoft Office Word Document Object Pastes content into your slide so that it can be edited using Microsoft Office Word.
Picture (Enhanced Metafile) Pastes a picture of the selected content as a 32-bit file.
Picture (Windows Metafile) Pastes a picture of the selected content as a 16-bit file.
Formatted Text (RTF) Pastes item in the rich text format, or RTF.
Unformatted Text Pastes content without formatting.
Figure 3-6: The Paste Special dialog box.
Inserting and Editing Text
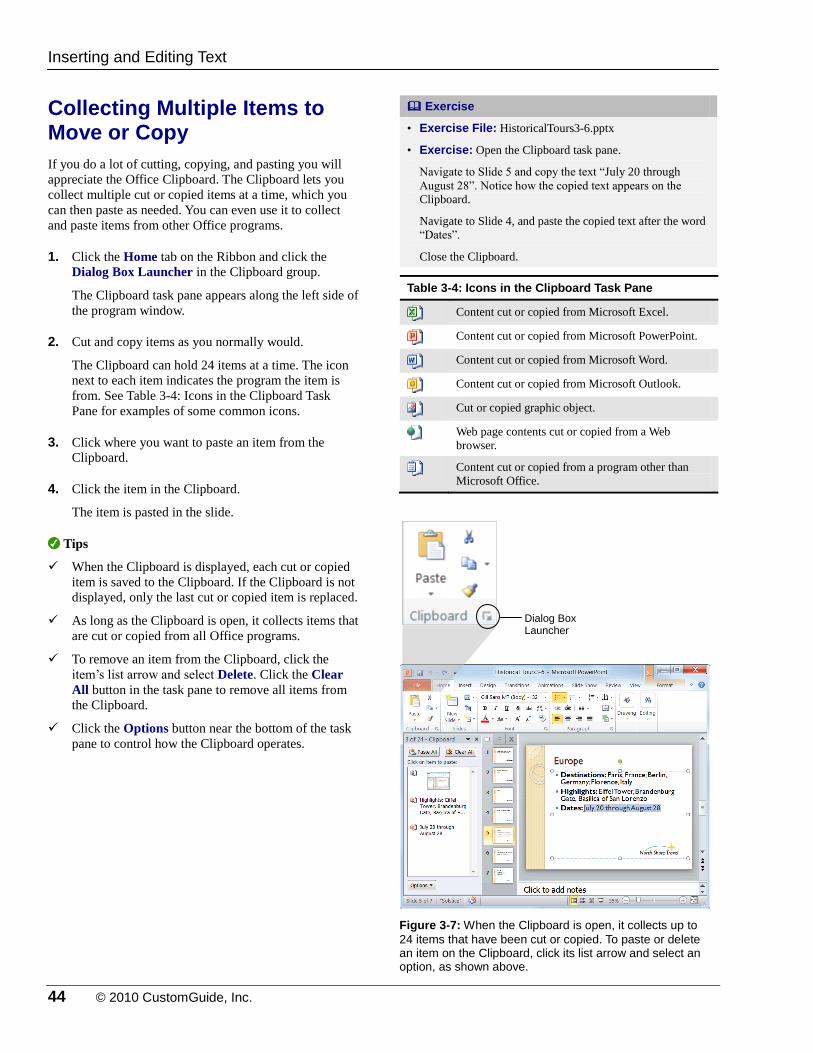
44 © 2010 CustomGuide, Inc.
Collecting Multiple Items to Move or Copy
If you do a lot of cutting, copying, and pasting you will
appreciate the Office Clipboard. The Clipboard lets you
collect multiple cut or copied items at a time, which you
can then paste as needed. You can even use it to collect
and paste items from other Office programs.
1. Click the Home tab on the Ribbon and click the
Dialog Box Launcher in the Clipboard group.
The Clipboard task pane appears along the left side of
the program window.
2. Cut and copy items as you normally would.
The Clipboard can hold 24 items at a time. The icon
next to each item indicates the program the item is
from. See Table 3-4: Icons in the Clipboard Task
Pane for examples of some common icons.
3. Click where you want to paste an item from the
Clipboard.
4. Click the item in the Clipboard.
The item is pasted in the slide.
Tips
When the Clipboard is displayed, each cut or copied
item is saved to the Clipboard. If the Clipboard is not
displayed, only the last cut or copied item is replaced.
As long as the Clipboard is open, it collects items that
are cut or copied from all Office programs.
To remove an item from the Clipboard, click the
item’s list arrow and select Delete. Click the Clear
All button in the task pane to remove all items from
the Clipboard.
Click the Options button near the bottom of the task
pane to control how the Clipboard operates.
Exercise
• Exercise File: HistoricalTours3-6.pptx
• Exercise: Open the Clipboard task pane.
Navigate to Slide 5 and copy the text “July 20 through
August 28”. Notice how the copied text appears on the
Clipboard.
Navigate to Slide 4, and paste the copied text after the word
“Dates”.
Close the Clipboard.
Table 3-4: Icons in the Clipboard Task Pane
Content cut or copied from Microsoft Excel.
Content cut or copied from Microsoft PowerPoint.
Content cut or copied from Microsoft Word.
Content cut or copied from Microsoft Outlook.
Cut or copied graphic object.
Web page contents cut or copied from a Web
browser.
Content cut or copied from a program other than
Microsoft Office.
Figure 3-7: When the Clipboard is open, it collects up to
24 items that have been cut or copied. To paste or delete an item on the Clipboard, click its list arrow and select an option, as shown above.
Inserting and Editing Text
Dialog Box Launcher
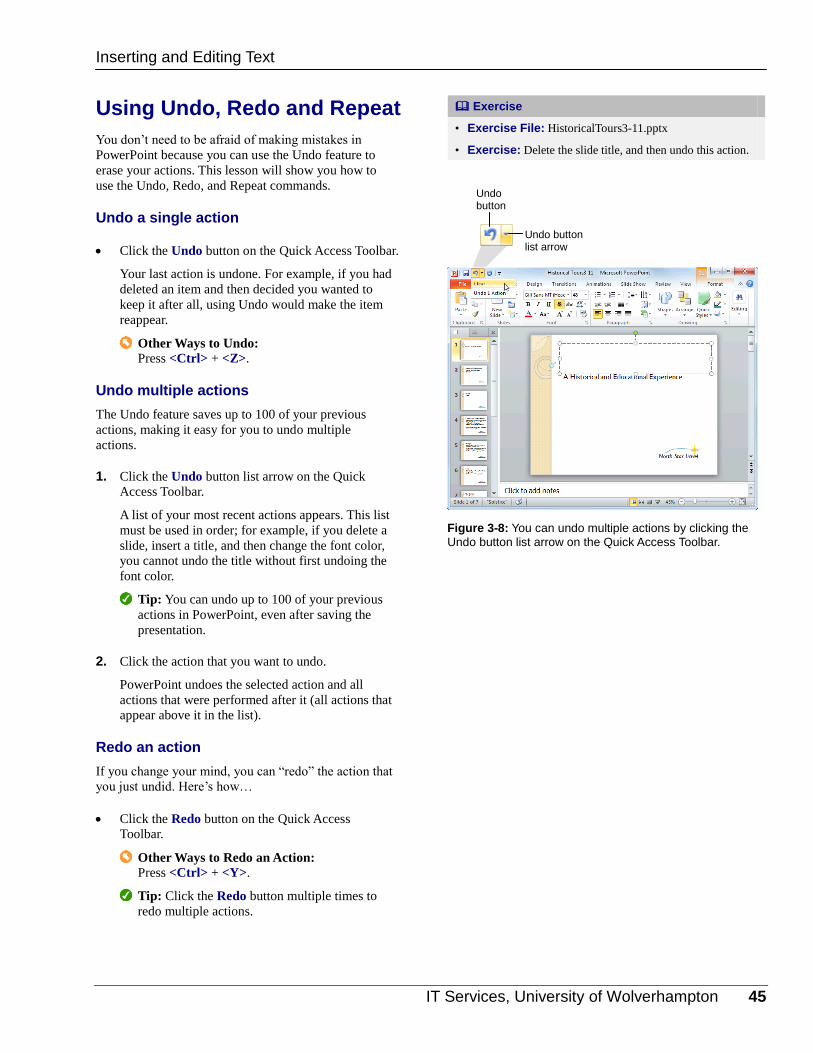
IT Services, University of Wolverhampton 45
Using Undo, Redo and Repeat
You don’t need to be afraid of making mistakes in
PowerPoint because you can use the Undo feature to
erase your actions. This lesson will show you how to
use the Undo, Redo, and Repeat commands.
Undo a single action
Click the Undo button on the Quick Access Toolbar.
Your last action is undone. For example, if you had
deleted an item and then decided you wanted to
keep it after all, using Undo would make the item
reappear.
Other Ways to Undo: Press <Ctrl> + <Z>.
Undo multiple actions
The Undo feature saves up to 100 of your previous
actions, making it easy for you to undo multiple
actions.
1. Click the Undo button list arrow on the Quick
Access Toolbar.
A list of your most recent actions appears. This list
must be used in order; for example, if you delete a
slide, insert a title, and then change the font color,
you cannot undo the title without first undoing the
font color.
Tip: You can undo up to 100 of your previous
actions in PowerPoint, even after saving the
presentation.
2. Click the action that you want to undo.
PowerPoint undoes the selected action and all
actions that were performed after it (all actions that
appear above it in the list).
Redo an action
If you change your mind, you can “redo” the action that
you just undid. Here’s how…
Click the Redo button on the Quick Access
Toolbar.
Other Ways to Redo an Action: Press <Ctrl> + <Y>.
Tip: Click the Redo button multiple times to
redo multiple actions.
Exercise
• Exercise File: HistoricalTours3-11.pptx
• Exercise: Delete the slide title, and then undo this action.
Figure 3-8: You can undo multiple actions by clicking the
Undo button list arrow on the Quick Access Toolbar.
Inserting and Editing Text
Undo button
Undo button list arrow
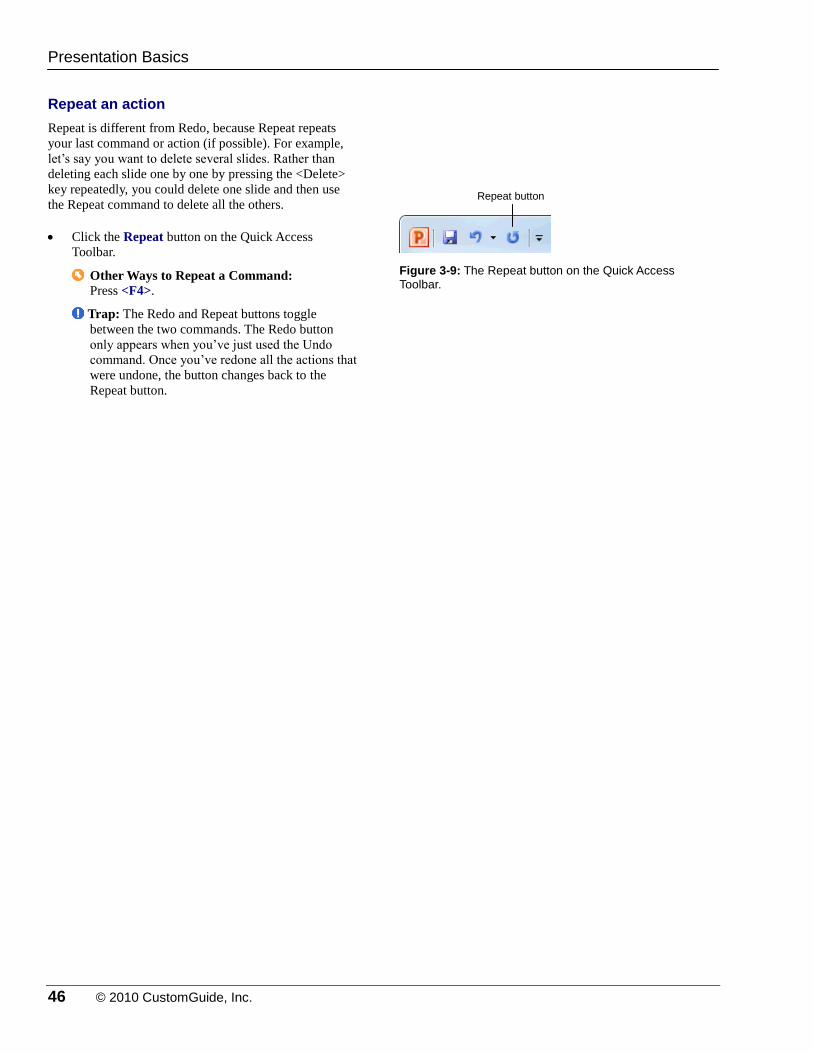
46 © 2010 CustomGuide, Inc.
Repeat an action
Repeat is different from Redo, because Repeat repeats
your last command or action (if possible). For example,
let’s say you want to delete several slides. Rather than
deleting each slide one by one by pressing the <Delete>
key repeatedly, you could delete one slide and then use
the Repeat command to delete all the others.
Click the Repeat button on the Quick Access
Toolbar.
Other Ways to Repeat a Command: Press <F4>.
Trap: The Redo and Repeat buttons toggle
between the two commands. The Redo button
only appears when you’ve just used the Undo
command. Once you’ve redone all the actions that
were undone, the button changes back to the
Repeat button.
Figure 3-9: The Repeat button on the Quick Access Toolbar.
Presentation Basics
Repeat button
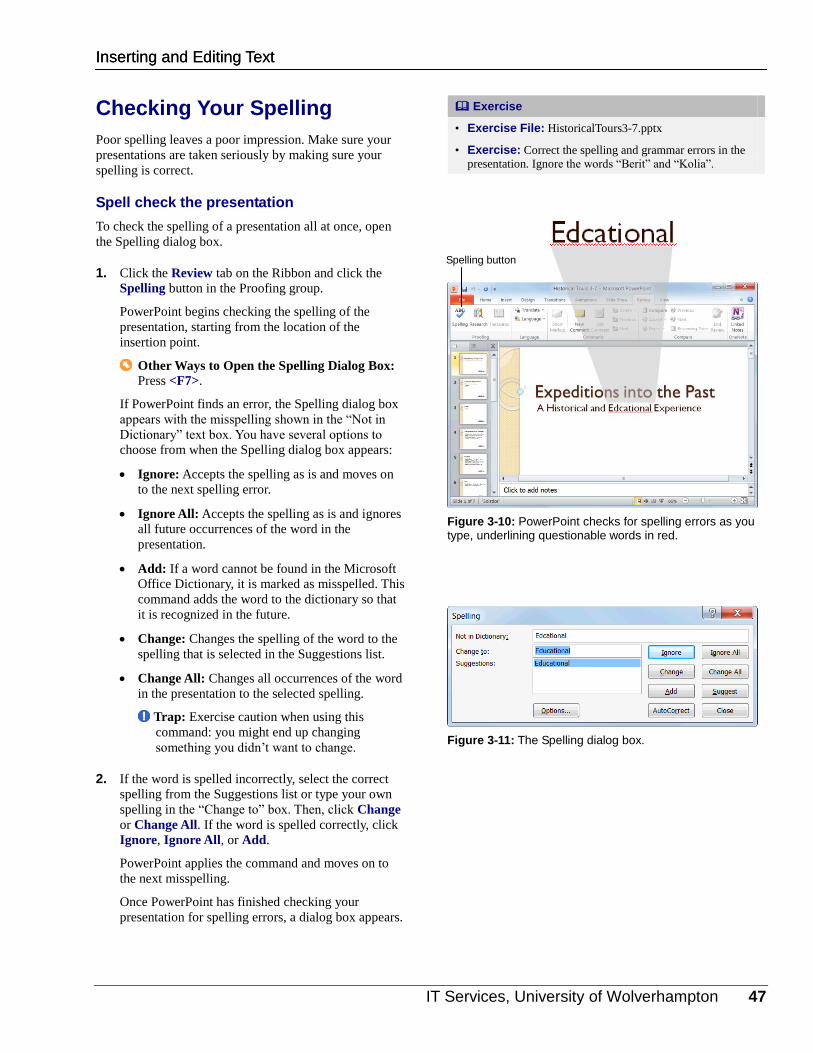
IT Services, University of Wolverhampton 47
Checking Your Spelling
Poor spelling leaves a poor impression. Make sure your
presentations are taken seriously by making sure your
spelling is correct.
Spell check the presentation
To check the spelling of a presentation all at once, open
the Spelling dialog box.
1. Click the Review tab on the Ribbon and click the
Spelling button in the Proofing group.
PowerPoint begins checking the spelling of the
presentation, starting from the location of the
insertion point.
Other Ways to Open the Spelling Dialog Box: Press <F7>.
If PowerPoint finds an error, the Spelling dialog box
appears with the misspelling shown in the “Not in
Dictionary” text box. You have several options to
choose from when the Spelling dialog box appears:
Ignore: Accepts the spelling as is and moves on
to the next spelling error.
Ignore All: Accepts the spelling as is and ignores
all future occurrences of the word in the
presentation.
Add: If a word cannot be found in the Microsoft
Office Dictionary, it is marked as misspelled. This
command adds the word to the dictionary so that
it is recognized in the future.
Change: Changes the spelling of the word to the
spelling that is selected in the Suggestions list.
Change All: Changes all occurrences of the word
in the presentation to the selected spelling.
Trap: Exercise caution when using this
command: you might end up changing
something you didn’t want to change.
2. If the word is spelled incorrectly, select the correct
spelling from the Suggestions list or type your own
spelling in the “Change to” box. Then, click Change
or Change All. If the word is spelled correctly, click
Ignore, Ignore All, or Add.
PowerPoint applies the command and moves on to
the next misspelling.
Once PowerPoint has finished checking your
presentation for spelling errors, a dialog box appears.
Exercise
• Exercise File: HistoricalTours3-7.pptx
• Exercise: Correct the spelling and grammar errors in the
presentation. Ignore the words “Berit” and “Kolia”.
Figure 3-10: PowerPoint checks for spelling errors as you type, underlining questionable words in red.
Figure 3-11: The Spelling dialog box.
Inserting and Editing Text Inserting and Editing Text
Spelling button
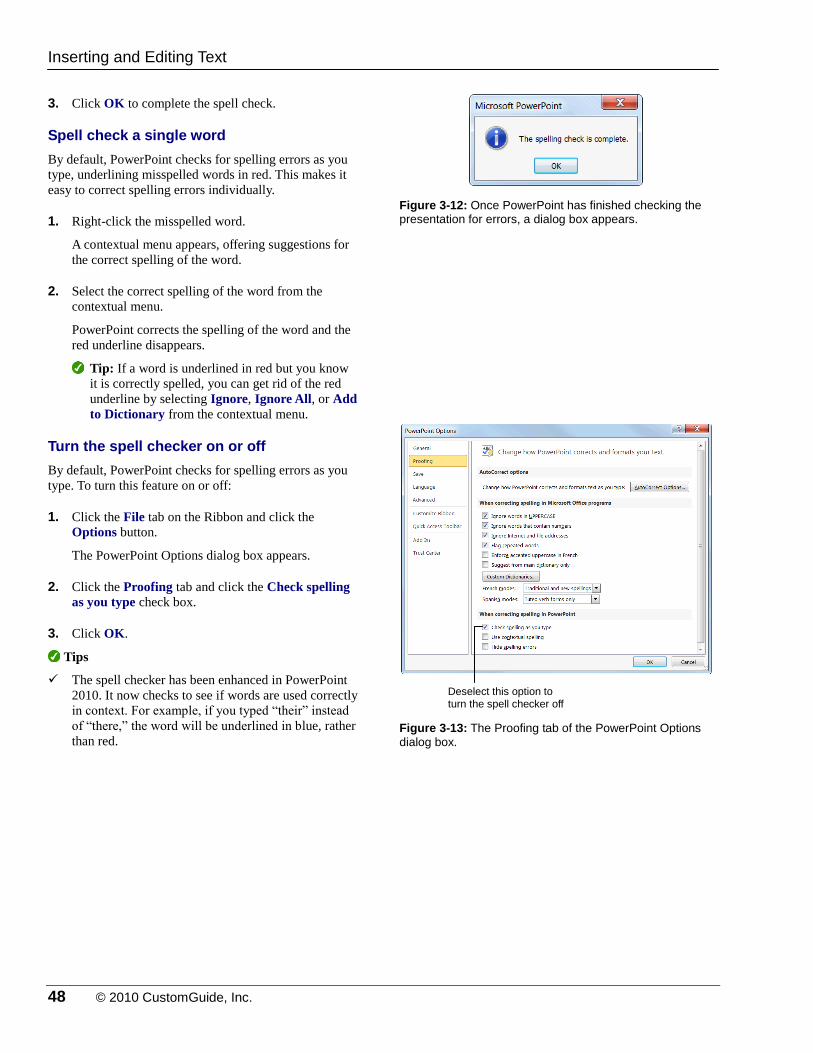
48 © 2010 CustomGuide, Inc.
3. Click OK to complete the spell check.
Spell check a single word
By default, PowerPoint checks for spelling errors as you
type, underlining misspelled words in red. This makes it
easy to correct spelling errors individually.
1. Right-click the misspelled word.
A contextual menu appears, offering suggestions for
the correct spelling of the word.
2. Select the correct spelling of the word from the
contextual menu.
PowerPoint corrects the spelling of the word and the
red underline disappears.
Tip: If a word is underlined in red but you know
it is correctly spelled, you can get rid of the red
underline by selecting Ignore, Ignore All, or Add
to Dictionary from the contextual menu.
Turn the spell checker on or off
By default, PowerPoint checks for spelling errors as you
type. To turn this feature on or off:
1. Click the File tab on the Ribbon and click the
Options button.
The PowerPoint Options dialog box appears.
2. Click the Proofing tab and click the Check spelling
as you type check box.
3. Click OK.
Tips
The spell checker has been enhanced in PowerPoint
2010. It now checks to see if words are used correctly
in context. For example, if you typed “their” instead
of “there,” the word will be underlined in blue, rather
than red.
Figure 3-12: Once PowerPoint has finished checking the presentation for errors, a dialog box appears.
Figure 3-13: The Proofing tab of the PowerPoint Options
dialog box.
Inserting and Editing Text
Deselect this option to turn the spell checker off
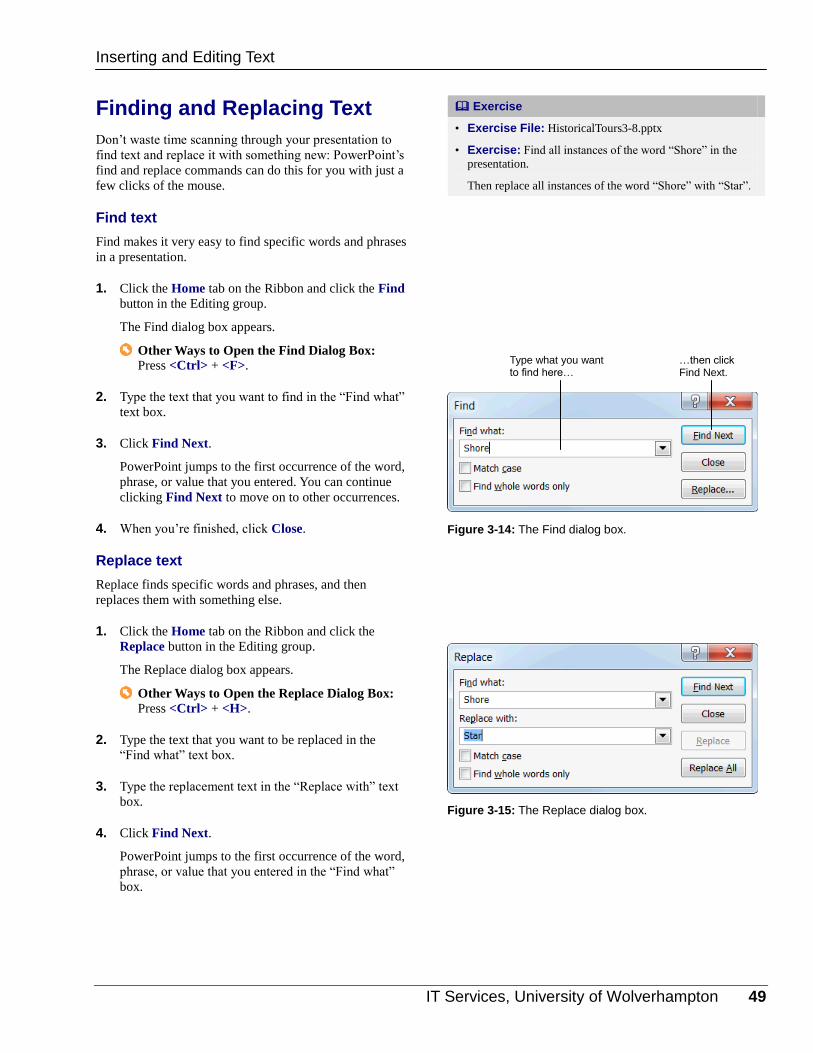
IT Services, University of Wolverhampton 49
Finding and Replacing Text
Don’t waste time scanning through your presentation to
find text and replace it with something new: PowerPoint’s
find and replace commands can do this for you with just a
few clicks of the mouse.
Find text
Find makes it very easy to find specific words and phrases
in a presentation.
1. Click the Home tab on the Ribbon and click the Find
button in the Editing group.
The Find dialog box appears.
Other Ways to Open the Find Dialog Box: Press <Ctrl> + <F>.
2. Type the text that you want to find in the “Find what”
text box.
3. Click Find Next.
PowerPoint jumps to the first occurrence of the word,
phrase, or value that you entered. You can continue
clicking Find Next to move on to other occurrences.
4. When you’re finished, click Close.
Replace text
Replace finds specific words and phrases, and then
replaces them with something else.
1. Click the Home tab on the Ribbon and click the
Replace button in the Editing group.
The Replace dialog box appears.
Other Ways to Open the Replace Dialog Box: Press <Ctrl> + <H>.
2. Type the text that you want to be replaced in the
“Find what” text box.
3. Type the replacement text in the “Replace with” text
box.
4. Click Find Next.
PowerPoint jumps to the first occurrence of the word,
phrase, or value that you entered in the “Find what”
box.
Exercise
• Exercise File: HistoricalTours3-8.pptx
• Exercise: Find all instances of the word “Shore” in the
presentation.
Then replace all instances of the word “Shore” with “Star”.
Figure 3-14: The Find dialog box.
Figure 3-15: The Replace dialog box.
Inserting and Editing Text
Type what you want to find here…
…then click Find Next.
50 © 2010 CustomGuide, Inc.
5. Click Replace to replace one occurrence. Click
Replace All to replace all occurrences.
PowerPoint replaces the found text with the
replacement text and moves on to the next
occurrence.
Tip: Click Replace All to replace all occurrences
in the presentation without seeing them first.
6. When you’re finished, click Close.
Inserting and Editing Text
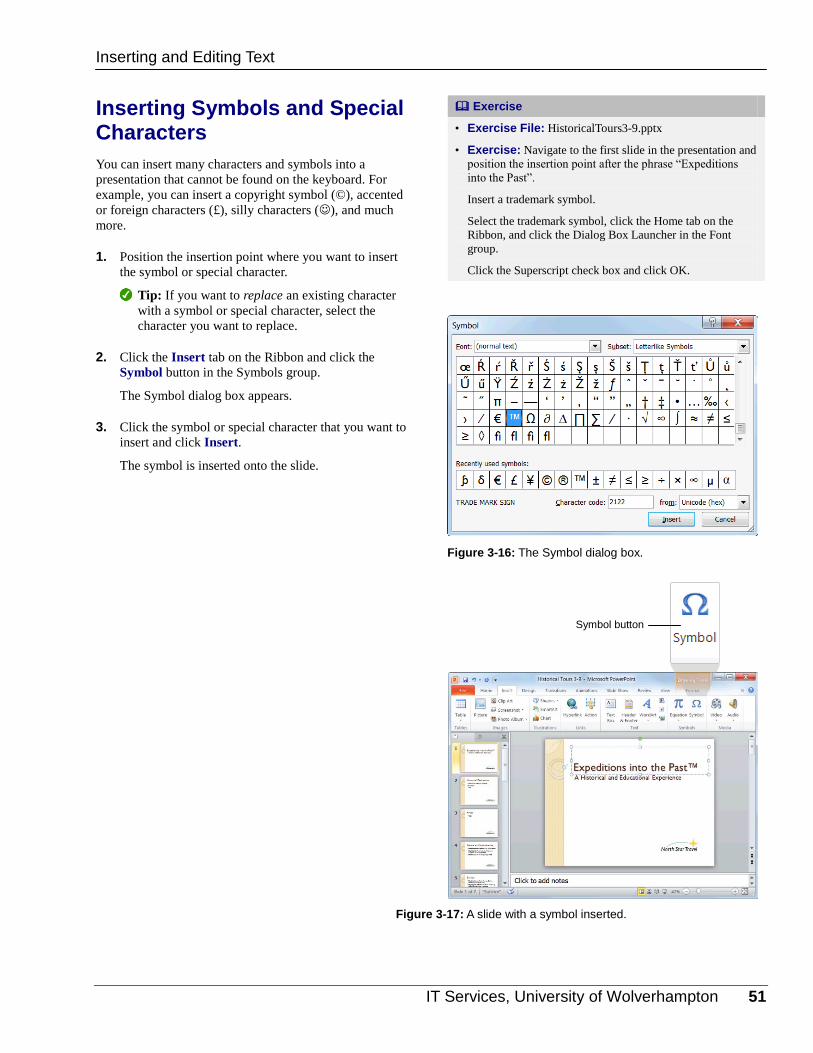
IT Services, University of Wolverhampton 51
Inserting Symbols and Special Characters
You can insert many characters and symbols into a
presentation that cannot be found on the keyboard. For
example, you can insert a copyright symbol (©), accented
or foreign characters (£), silly characters (), and much
more.
1. Position the insertion point where you want to insert
the symbol or special character.
Tip: If you want to replace an existing character
with a symbol or special character, select the
character you want to replace.
2. Click the Insert tab on the Ribbon and click the
Symbol button in the Symbols group.
The Symbol dialog box appears.
3. Click the symbol or special character that you want to
insert and click Insert.
The symbol is inserted onto the slide.
Exercise
• Exercise File: HistoricalTours3-9.pptx
• Exercise: Navigate to the first slide in the presentation and
position the insertion point after the phrase “Expeditions
into the Past”.
Insert a trademark symbol.
Select the trademark symbol, click the Home tab on the
Ribbon, and click the Dialog Box Launcher in the Font
group.
Click the Superscript check box and click OK.
Figure 3-16: The Symbol dialog box.
Figure 3-17: A slide with a symbol inserted.
Inserting and Editing Text
Symbol button

52 © 2010 CustomGuide, Inc.
Inserting Equations
PowerPoint 2010 has greatly simplified equation writing
with the development of Equation Tools. These tools give
you the ability to insert common equations, like the area
of a circle, or to build equations of your own design.
Insert an equation template
The easiest method for inserting equations is using one of
the templates. See Table 3-5: Available Equation
Templates for a list of all equation templates.
1. Click the Insert tab on the Ribbon and click the
Equation button list arrow in the Symbols group.
A list of equation templates appears.
2. Select an equation template from the list.
The equation is inserted into the slide.
3. Click on the equation.
The equation is selected. Areas shaded a darker gray
than the surrounding area may be edited.
4. Type to edit.
Build an equation
If the equation templates do not suit your needs, you can
build an equation of your own.
1. Click the Insert tab on the Ribbon and click the
Equation button in the Symbols group.
The Design tab under Equation Tools appears on the
Ribbon. A field appears on your slide indicating the
area in which to type the equation.
2. Type the equation.
The equation is entered.
You can also do one or both of the following:
Input a Symbol: Click on a symbol in the
Symbols group.
Input a Structure: Click on a structure button in
the Structures group and select a structure.
3. Type to edit.
Tip: To see more symbols, click the More button
in the Symbols group, click the down arrow in
the grey heading bar, and select a category.
Exercise
• Exercise File: Historical Tours3-10.pptx
• Exercise: Go to Slide 4. Click the area below the Fun
Facts bullet.
Click the Insert tab on the Ribbon. Click the Equation
button and select Insert New Equation.
Use the Bracket and Fraction commands on the Design tab
under Equation Tools to enter v = (1/3)lwh.
Table 3-5: Available Equation Templates
Area of a Circle
Binomial Theorem
Expansion of a Sum
Fourier Series
Pythagorean Theorem
Quadratic Formula
Taylor Expansion
Trig Identity I
Trig Identity II
Inserting and Editing Text
IT Services, University of Wolverhampton 53
IInnsseerrttiinngg aanndd EEddiittiinngg TTeexxtt RReevviieeww
Quiz Questions
18. Placeholders grow and shrink to accommodate any text that you enter. (True or False?)
19. How do you insert text in a text box? A. Click the Insert tab on the Ribbon and click the Insert Text button. B. Click in the text box and start typing. C. Right-click the text box and select Insert Text from the contextual menu. D. None of the above.
20. Once a block of text is selected, you can replace the selected text with new text by: A. Simply typing the new text. B. Clicking the Office Button and selecting Insert Text from the menu. C. Clicking the Replace button on the Ribbon. D. You can’t replace selected text with new text.
21. What is the keystroke shortcut for pasting text? A. <Ctrl> + <C> B. <Ctrl> + <P> C. <Ctrl> + <X> D. <Ctrl> + <V>
22. How do you paste an item from the Office Clipboard? A. Click the Paste Special button on the Ribbon. B. In the Clipboard task pane, click the item that you want to paste. C. Select the item that you want to paste from the Clipboard group. D. Click the View tab on the Ribbon and select the item that you want to paste.
23. The Office Clipboard collects up to 24 cut or copied items, even if the Clipboard is not displayed. (True or False?)
24. You can undo multiple actions in PowerPoint. (True or False?)
25. PowerPoint underlines spelling errors in blue. (True or False?)
26. What should you do if a word is marked as misspelled, but it is actually correct? A. Click Change. B. Click Correct. C. Click Correct All. D. Click Add.
27. What is the keystroke shortcut for finding text? A. <Ctrl> + <H> B. <Ctrl> + <F>
54 © 2010 CustomGuide, Inc.
C. <F7> D. There isn’t a keystroke shortcut for this comand
28. PowerPoint’s Replace command finds text and replaces it with text that you specify. (True or False?)
29. How do you insert a symbol onto a slide? A. Click the Insert tab on the Ribbon and click the Symbol button in the Text group. B. Press <Ctrl> + <Shift> + <S> C. Click the Copyright button on the Mini Toolbar. D. PowerPoint cannot display symbols.
30. How do you insert an equation? A. Press <Ctrl> + <Shift> + <E> B. Click the Design tab on the Ribbon and click the Math button in the Math group. C. Import the equation from the Web. D. Click the Insert tab on the Ribbon and click the Equation button in the Symbols group.
Quiz Answers
18. True. Placeholders resize themselves to accommodate any text that you enter into them.
19. B. To insert text in a text box, simply click inside the text box and start typing.
20. A. Simply typing the new text.
21. D. You would think <Ctrl> + <P> would paste text, but it’s actually <Ctrl> + <V>.
22. B. In the Clipboard task pane, click the item that you want to Paste.
23. False. The Office Clipboard task pane must be displayed in order to collect multiple items. Otherwise, each new cut or
copied item replaces the existing item.
24. True. You can undo up to 100 of your previous actions in PowerPoint.
25. False. PowerPoint underlines spelling errors in red.
26. D. Click Add to add the word to the dictionary. You can also click Ignore or Ignore All to simply ignore the word and
move on to the next.
27. B. <Ctrl> + <F> is the keystroke shortcut for finding text.
28. True. PowerPoint’s Replace command finds text and replaces it with text that you specify.
29. A. To insert a symbol or special character, click the Insert tab on the Ribbon and click the Symbol button in the Text
group.
30. D. To insert an equation, click the Insert tab on the Ribbon and click the Equation button in the Symbols group.

IT Services, University of Wolverhampton 55
56 © 2010 CustomGuide, Inc.
FFoorrmmaattttiinngg TTeexxtt
Changing Font Type .......................................... 57
Changing Font Size ........................................... 58
Changing Font Color ......................................... 59
Changing Font Style .......................................... 60
Using the Font Dialog Box ................................ 61
Copying Formatting .......................................... 62
Using WordArt ................................................... 63 Insert WordArt .......................................... 63 Modify WordArt ........................................ 63 Clear WordArt .......................................... 63
This chapter explains how to format text.
You will learn how to change the type,
style, size, and color of the text in your
presentations using the Ribbon, Mini
Toolbar, and Font dialog box. You will
also learn how to use the Format Painter
tool to copy formatting changes from one
block of text to another, and how to
emphasize the text in your presentations
using WordArt.
Using Exercise Files This chapter suggests exercises to practice
the topic of each lesson. There are two
ways you may follow along with the
exercise files:
Open the exercise file for a lesson,
perform the lesson exercise, and close
the exercise file.
Open the exercise file for a lesson,
perform the lesson exercise, and keep
the file open to perform the remaining
lesson exercises for the chapter.
The exercises are written so that you may
“build upon them”, meaning the exercises
in a chapter can be performed in
succession from the first lesson to the last.
4
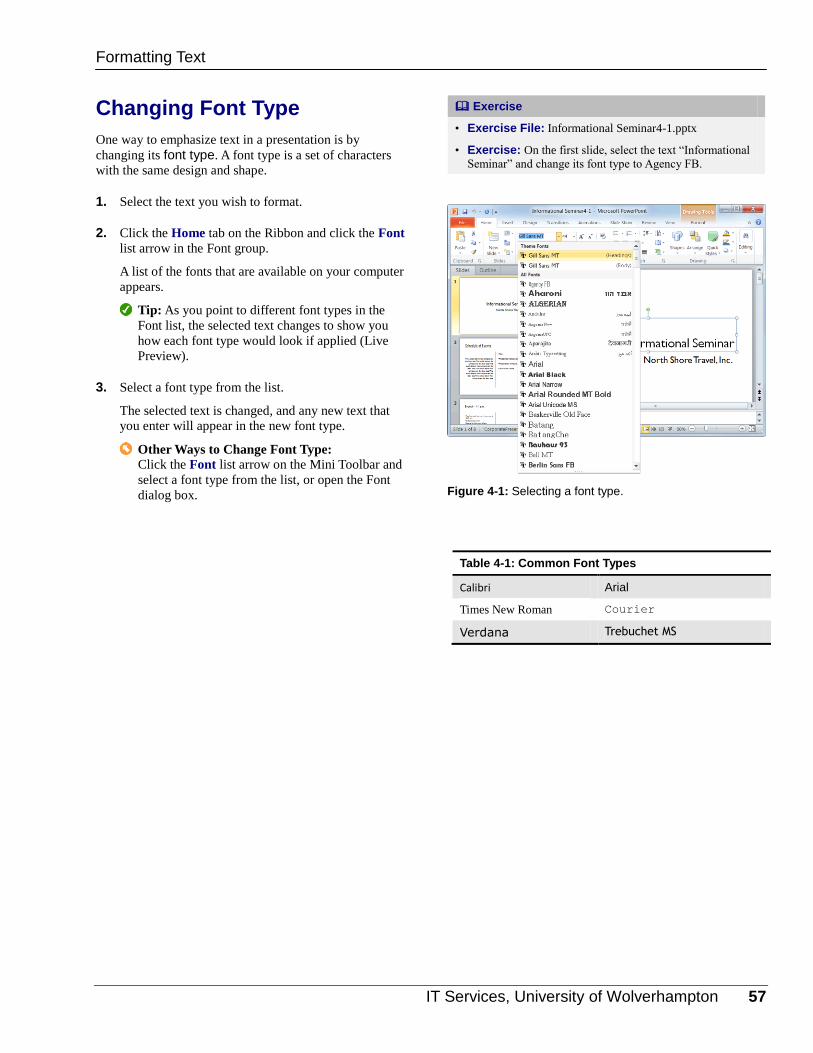
IT Services, University of Wolverhampton 57
Changing Font Type
One way to emphasize text in a presentation is by
changing its font type. A font type is a set of characters
with the same design and shape.
1. Select the text you wish to format.
2. Click the Home tab on the Ribbon and click the Font
list arrow in the Font group.
A list of the fonts that are available on your computer
appears.
Tip: As you point to different font types in the
Font list, the selected text changes to show you
how each font type would look if applied (Live
Preview).
3. Select a font type from the list.
The selected text is changed, and any new text that
you enter will appear in the new font type.
Other Ways to Change Font Type: Click the Font list arrow on the Mini Toolbar and
select a font type from the list, or open the Font
dialog box.
Exercise
• Exercise File: Informational Seminar4-1.pptx
• Exercise: On the first slide, select the text “Informational
Seminar” and change its font type to Agency FB.
Table 4-1: Common Font Types
Calibri Arial
Times New Roman Courier
Verdana Trebuchet MS
Figure 4-1: Selecting a font type.
Formatting Text
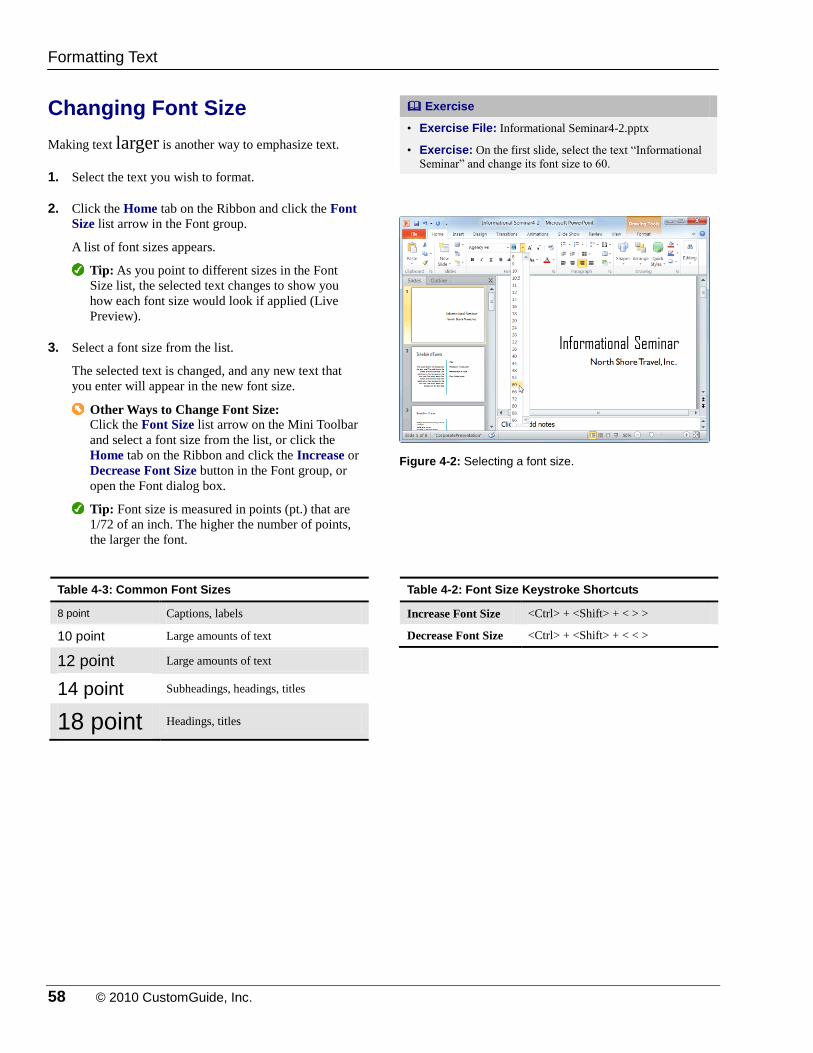
58 © 2010 CustomGuide, Inc.
Changing Font Size
Making text larger is another way to emphasize text.
1. Select the text you wish to format.
2. Click the Home tab on the Ribbon and click the Font
Size list arrow in the Font group.
A list of font sizes appears.
Tip: As you point to different sizes in the Font
Size list, the selected text changes to show you
how each font size would look if applied (Live
Preview).
3. Select a font size from the list.
The selected text is changed, and any new text that
you enter will appear in the new font size.
Other Ways to Change Font Size: Click the Font Size list arrow on the Mini Toolbar
and select a font size from the list, or click the
Home tab on the Ribbon and click the Increase or
Decrease Font Size button in the Font group, or
open the Font dialog box.
Tip: Font size is measured in points (pt.) that are
1/72 of an inch. The higher the number of points,
the larger the font.
Exercise
• Exercise File: Informational Seminar4-2.pptx
• Exercise: On the first slide, select the text “Informational
Seminar” and change its font size to 60.
Figure 4-2: Selecting a font size.
Table 4-2: Font Size Keystroke Shortcuts
Increase Font Size <Ctrl> + <Shift> + < > >
Decrease Font Size <Ctrl> + <Shift> + < < >
Table 4-3: Common Font Sizes
8 point Captions, labels
10 point Large amounts of text
12 point Large amounts of text
14 point Subheadings, headings, titles
18 point Headings, titles
Formatting Text
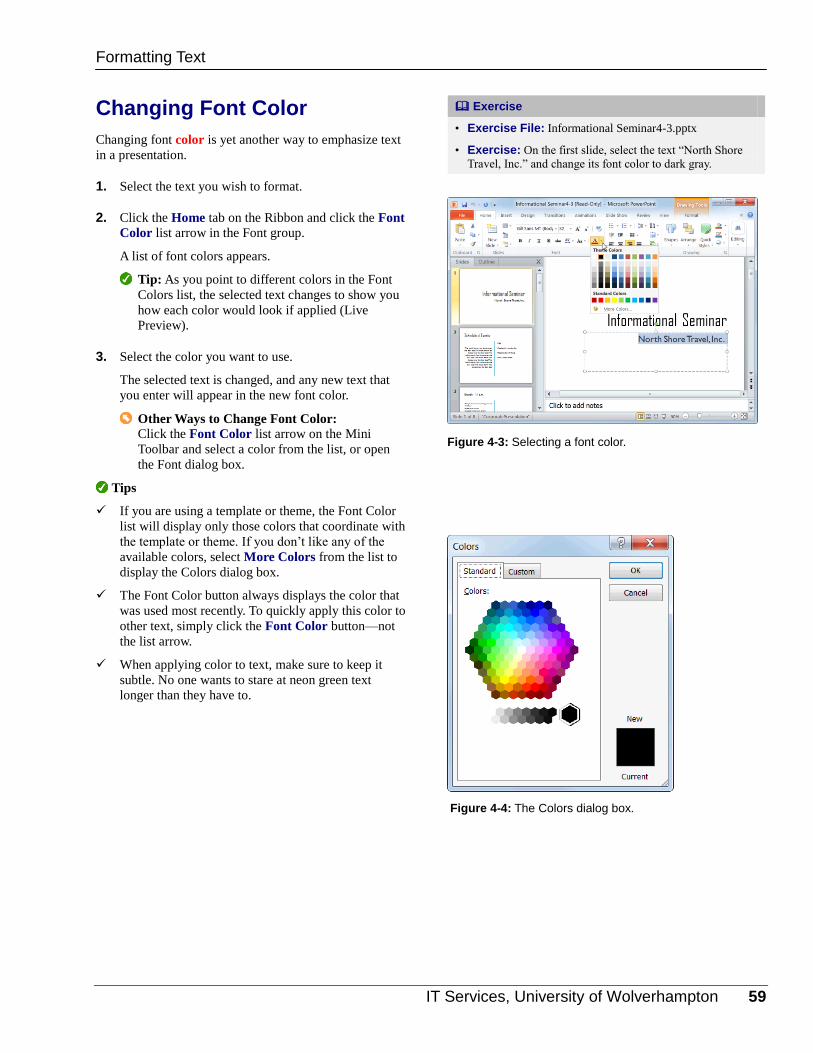
IT Services, University of Wolverhampton 59
Changing Font Color
Changing font color is yet another way to emphasize text
in a presentation.
1. Select the text you wish to format.
2. Click the Home tab on the Ribbon and click the Font
Color list arrow in the Font group.
A list of font colors appears.
Tip: As you point to different colors in the Font
Colors list, the selected text changes to show you
how each color would look if applied (Live
Preview).
3. Select the color you want to use.
The selected text is changed, and any new text that
you enter will appear in the new font color.
Other Ways to Change Font Color: Click the Font Color list arrow on the Mini
Toolbar and select a color from the list, or open
the Font dialog box.
Tips
If you are using a template or theme, the Font Color
list will display only those colors that coordinate with
the template or theme. If you don’t like any of the
available colors, select More Colors from the list to
display the Colors dialog box.
The Font Color button always displays the color that
was used most recently. To quickly apply this color to
other text, simply click the Font Color button—not
the list arrow.
When applying color to text, make sure to keep it
subtle. No one wants to stare at neon green text
longer than they have to.
Exercise
• Exercise File: Informational Seminar4-3.pptx
• Exercise: On the first slide, select the text “North Shore
Travel, Inc.” and change its font color to dark gray.
Figure 4-3: Selecting a font color.
Figure 4-4: The Colors dialog box.
Formatting Text
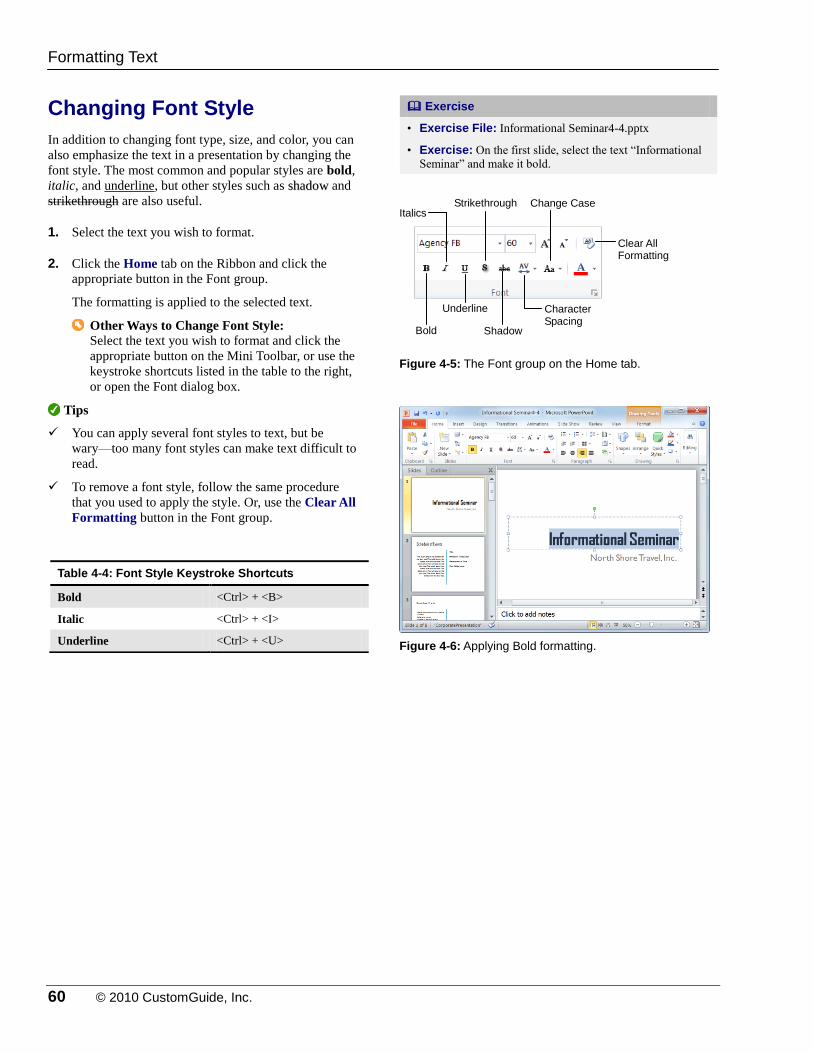
60 © 2010 CustomGuide, Inc.
Changing Font Style
In addition to changing font type, size, and color, you can
also emphasize the text in a presentation by changing the
font style. The most common and popular styles are bold,
italic, and underline, but other styles such as sshhaaddooww and
strikethrough are also useful.
1. Select the text you wish to format.
2. Click the Home tab on the Ribbon and click the
appropriate button in the Font group.
The formatting is applied to the selected text.
Other Ways to Change Font Style: Select the text you wish to format and click the
appropriate button on the Mini Toolbar, or use the
keystroke shortcuts listed in the table to the right,
or open the Font dialog box.
Tips
You can apply several font styles to text, but be
wary—too many font styles can make text difficult to
read.
To remove a font style, follow the same procedure
that you used to apply the style. Or, use the Clear All
Formatting button in the Font group.
Exercise
• Exercise File: Informational Seminar4-4.pptx
• Exercise: On the first slide, select the text “Informational
Seminar” and make it bold.
Figure 4-5: The Font group on the Home tab.
Table 4-4: Font Style Keystroke Shortcuts
Bold <Ctrl> + <B>
Italic <Ctrl> + <I>
Underline <Ctrl> + <U> Figure 4-6: Applying Bold formatting.
Formatting Text
Bold
Italics
Shadow
Change Case Strikethrough
Underline Character Spacing
Clear All Formatting
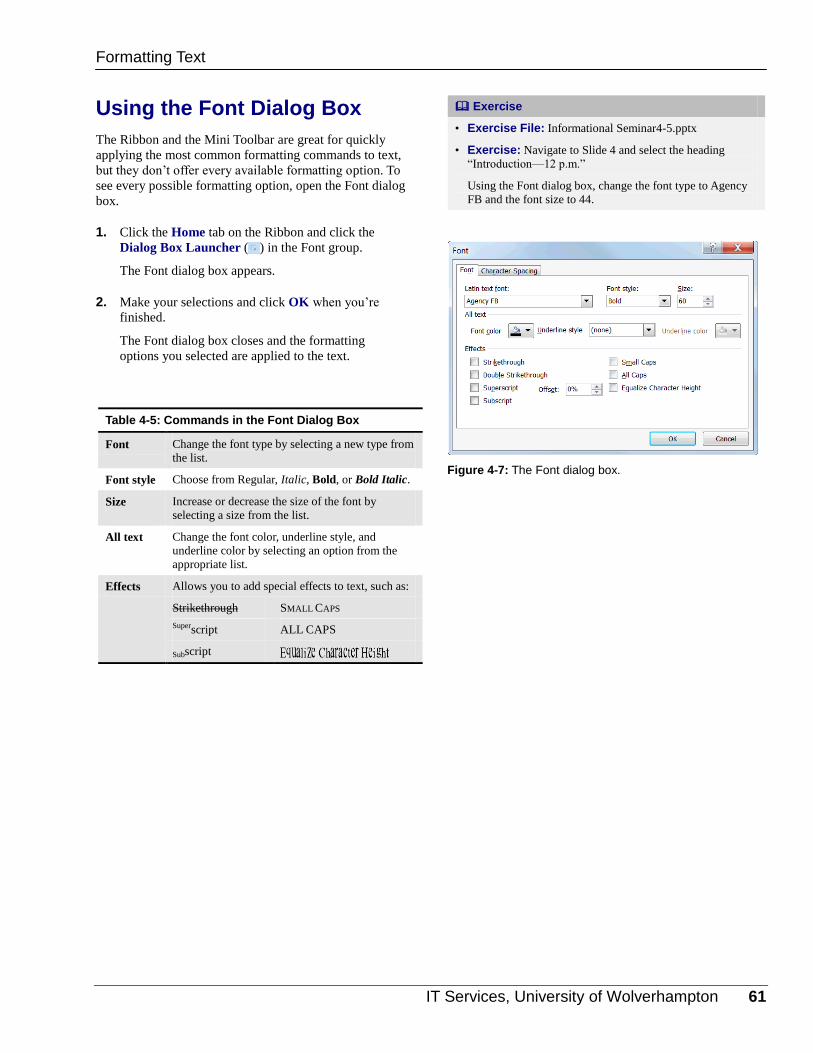
IT Services, University of Wolverhampton 61
Using the Font Dialog Box
The Ribbon and the Mini Toolbar are great for quickly
applying the most common formatting commands to text,
but they don’t offer every available formatting option. To
see every possible formatting option, open the Font dialog
box.
1. Click the Home tab on the Ribbon and click the
Dialog Box Launcher ( ) in the Font group.
The Font dialog box appears.
2. Make your selections and click OK when you’re
finished.
The Font dialog box closes and the formatting
options you selected are applied to the text.
Exercise
• Exercise File: Informational Seminar4-5.pptx
• Exercise: Navigate to Slide 4 and select the heading
“Introduction—12 p.m.”
Using the Font dialog box, change the font type to Agency
FB and the font size to 44.
Table 4-5: Commands in the Font Dialog Box
Font Change the font type by selecting a new type from
the list.
Font style Choose from Regular, Italic, Bold, or Bold Italic.
Size Increase or decrease the size of the font by
selecting a size from the list.
All text Change the font color, underline style, and
underline color by selecting an option from the
appropriate list.
Effects Allows you to add special effects to text, such as:
Strikethrough SMALL CAPS
Superscript ALL CAPS
Subscript
Figure 4-7: The Font dialog box.
Formatting Text
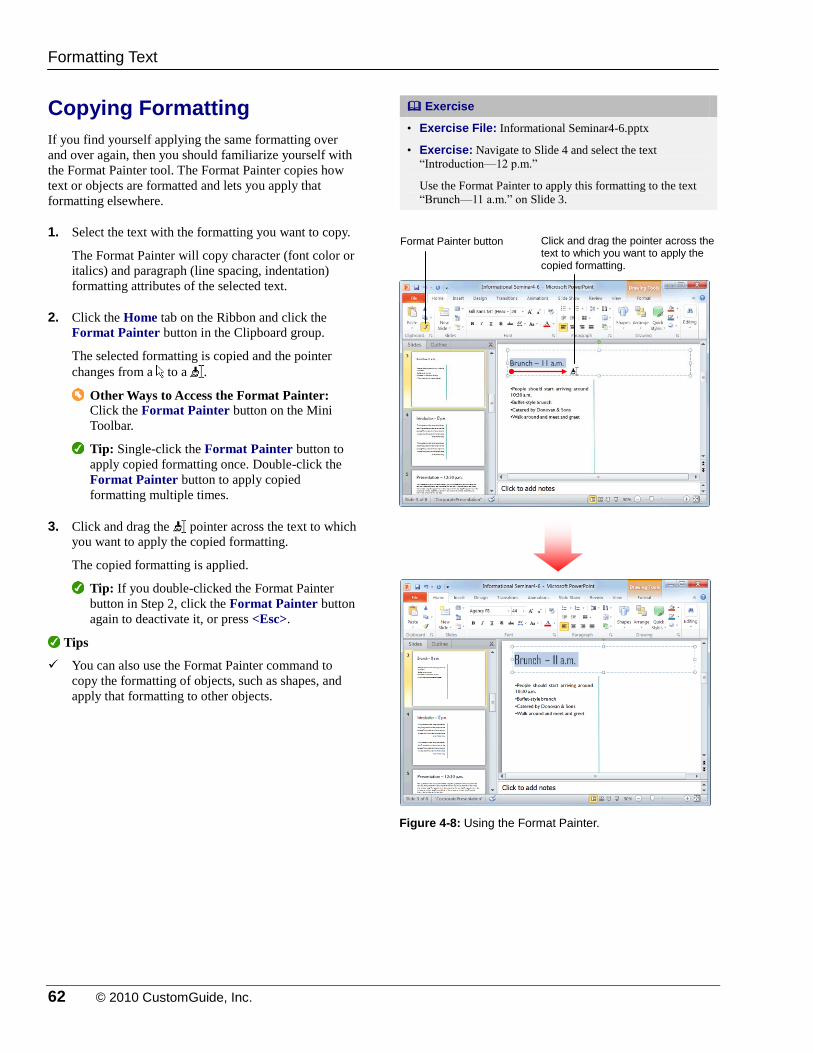
62 © 2010 CustomGuide, Inc.
Copying Formatting
If you find yourself applying the same formatting over
and over again, then you should familiarize yourself with
the Format Painter tool. The Format Painter copies how
text or objects are formatted and lets you apply that
formatting elsewhere.
1. Select the text with the formatting you want to copy.
The Format Painter will copy character (font color or
italics) and paragraph (line spacing, indentation)
formatting attributes of the selected text.
2. Click the Home tab on the Ribbon and click the
Format Painter button in the Clipboard group.
The selected formatting is copied and the pointer
changes from a to a .
Other Ways to Access the Format Painter: Click the Format Painter button on the Mini
Toolbar.
Tip: Single-click the Format Painter button to
apply copied formatting once. Double-click the
Format Painter button to apply copied
formatting multiple times.
3. Click and drag the pointer across the text to which
you want to apply the copied formatting.
The copied formatting is applied.
Tip: If you double-clicked the Format Painter
button in Step 2, click the Format Painter button
again to deactivate it, or press <Esc>.
Tips
You can also use the Format Painter command to
copy the formatting of objects, such as shapes, and
apply that formatting to other objects.
Exercise
• Exercise File: Informational Seminar4-6.pptx
• Exercise: Navigate to Slide 4 and select the text
“Introduction—12 p.m.”
Use the Format Painter to apply this formatting to the text
“Brunch—11 a.m.” on Slide 3.
Figure 4-8: Using the Format Painter.
Formatting Text
Format Painter button Click and drag the pointer across the text to which you want to apply the copied formatting.

IT Services, University of Wolverhampton 63
Using WordArt
Using PowerPoint’s WordArt feature is the fastest and
easiest way to add dramatic and colorful effects to the text
on your slides.
Insert WordArt
1. Click the Insert tab on the Ribbon and click the
WordArt button in the Text group.
The WordArt Styles gallery appears.
2. Select a WordArt style from the gallery.
A text box formatted using the WordArt style you
selected appears on the slide.
3. Type your text.
Modify WordArt
You can also modify WordArt once it has been inserted.
For example, you can change the text fill and outline
color, choose a new WordArt style, or apply a cool text
effect.
1. Select the text that you want to format and click the
Format contextual tab on the Ribbon.
2. Use the commands found in the WordArt Styles
group.
Tip: You might notice a little purple diamond ( )
next to some WordArt objects. This is called an
adjustment handle, and it is used to change the
angle at which some WordArt effects slant or
loop. Simply click and drag this adjustment
handle to adjust the effect.
Clear WordArt
If you decide you don’t like the WordArt effect(s) you
applied, you can clear the effects and start over.
1. Select the text formatted with the WordArt effect(s)
you wish to remove.
2. Click the Format contextual tab on the Ribbon, click
the More button in the WordArt Styles group, and
select Clear WordArt from the menu.
Tips
You can resize, move, copy and delete WordArt just
as you would any other object on a slide. See the
chapter on Working with Objects for more
information.
Exercise
• Exercise File: InformationalSeminar4-7.pptx
• Exercise: Navigate to the first slide in the presentation.
Open the WordArt Styles gallery, select a red style, and type
“Presenter Copy” in the text box that appears.
Move this text box above the Informational Seminar
heading.
Figure 4-9: Selecting a style from the WordArt Styles gallery.
Figure 4-10: As soon as WordArt has been inserted, the
Format tab appears on the Ribbon under Drawing Tools. You can use the commands on this tab to modify WordArt.
Formatting Text

64 © 2010 CustomGuide, Inc.
FFoorrmmaattttiinngg TTeexxtt RReevviieeww
Quiz Questions
31. What is NOT a procedure for changing font type? A. Click the Font list arrow in the Font group on the Home tab and select a font from the list. B. Click the Font button on the Formatting tab and select the desired font. C. Click the Font list arrow on the Mini Toolbar and select a font from the list. D. Open the Font dialog box and select a font from the Font list.
32. How is font size measured? A. Inches B. Spikes C. Pixels D. Points or pt.
33. The Font Color list displays colors that coordinate with the document theme. (True or False?)
34. You can apply bold formatting to text by pressing <Ctrl> + <D>. (True or False?)
35. The commands on the Ribbon and the commands in the Font dialog box are exactly the same. (True or False?)
36. To copy and apply formatting more than once, single-click the Format Painter button. (True or False?)
37. You cannot modify WordArt once it has been inserted. (True or False?)
Quiz Answers
31. B. You cannot change fonts by clicking the Font button on the Formatting tab.
32. D. Font sizes are measured in points or pt.
33. True. The Font Color list displays colors that coordinate with the document theme colors.
34. False. Press <Ctrl> + <B> to apply bold formatting.
35. False. The Ribbon offers the most common formatting commands; the Font dialog box offers more.
36. False. Double-click the Format Painter button to apply copied formatting more than once.
37. False. You can modify WordArt once it has been inserted.

IT Services, University of Wolverhampton 65
66 © 2010 CustomGuide, Inc.
VViieewwiinngg aa
PPrreesseennttaattiioonn
Changing Views ................................................. 67
Using the Zoom Controls .................................. 68 Zoom ........................................................ 68 Fit to Window ........................................... 68
Using the Outline Pane ..................................... 69 Resize the Outline pane .......................... 69 Demote a paragraph ................................ 69 Promote a paragraph ............................... 69
Working with the Presentation Window .......... 70 Maximize .................................................. 70 Minimize ................................................... 70 Resize ...................................................... 70 Create a new presentation window ......... 70
Working with Multiple Presentations ............... 71 Switch between presentations ................. 71 Arrange presentations ............................. 71
PowerPoint 2010 offers four views, each
of which allow you to focus on and work
with your presentation in different ways.
This chapter introduces you to
PowerPoint’s views. You will also learn
how to use the Zoom controls and the
presentation window to change how your
presentation appears onscreen.
Using Exercise Files This chapter suggests exercises to practice
the topic of each lesson. There are two
ways you may follow along with the
exercise files:
Open the exercise file for a lesson,
perform the lesson exercise, and close
the exercise file.
Open the exercise file for a lesson,
perform the lesson exercise, and keep
the file open to perform the remaining
lesson exercises for the chapter.
The exercises are written so that you may
“build upon them”, meaning the exercises
in a chapter can be performed in
succession from the first lesson to the last.
5
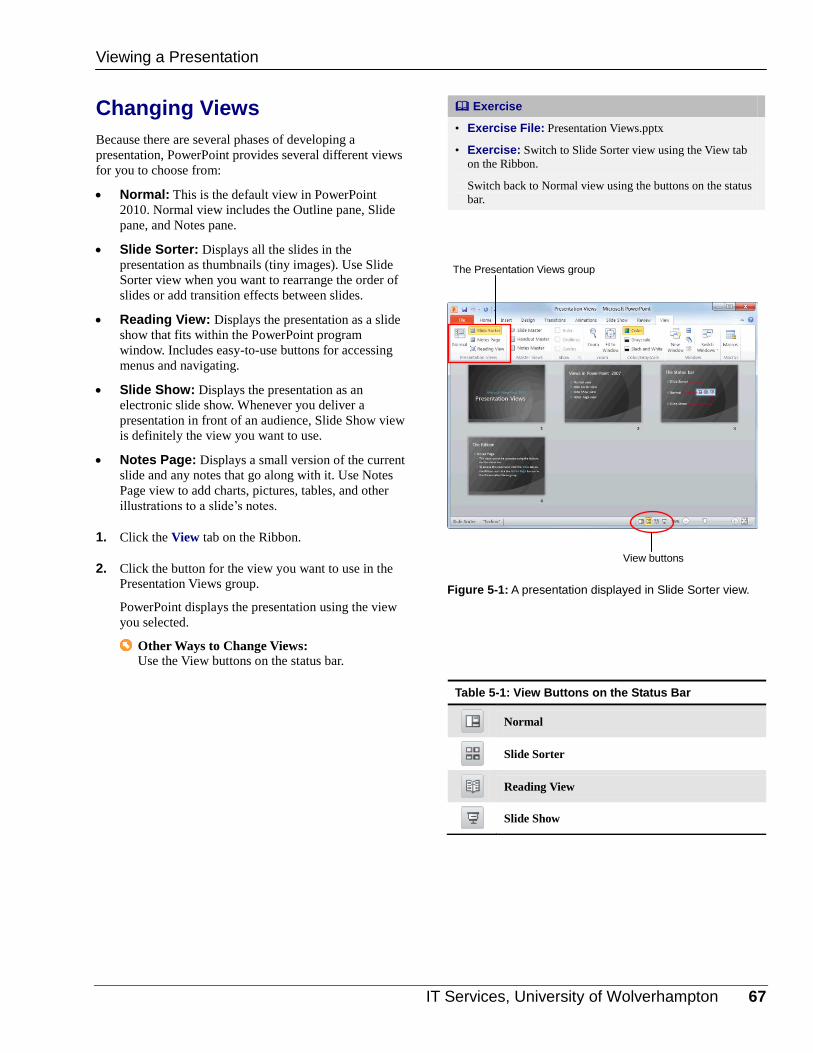
IT Services, University of Wolverhampton 67
Changing Views
Because there are several phases of developing a
presentation, PowerPoint provides several different views
for you to choose from:
Normal: This is the default view in PowerPoint
2010. Normal view includes the Outline pane, Slide
pane, and Notes pane.
Slide Sorter: Displays all the slides in the
presentation as thumbnails (tiny images). Use Slide
Sorter view when you want to rearrange the order of
slides or add transition effects between slides.
Reading View: Displays the presentation as a slide
show that fits within the PowerPoint program
window. Includes easy-to-use buttons for accessing
menus and navigating.
Slide Show: Displays the presentation as an
electronic slide show. Whenever you deliver a
presentation in front of an audience, Slide Show view
is definitely the view you want to use.
Notes Page: Displays a small version of the current
slide and any notes that go along with it. Use Notes
Page view to add charts, pictures, tables, and other
illustrations to a slide’s notes.
1. Click the View tab on the Ribbon.
2. Click the button for the view you want to use in the
Presentation Views group.
PowerPoint displays the presentation using the view
you selected.
Other Ways to Change Views: Use the View buttons on the status bar.
Exercise
• Exercise File: Presentation Views.pptx
• Exercise: Switch to Slide Sorter view using the View tab
on the Ribbon.
Switch back to Normal view using the buttons on the status
bar.
Figure 5-1: A presentation displayed in Slide Sorter view.
Table 5-1: View Buttons on the Status Bar
Normal
Slide Sorter
Reading View
Slide Show
Viewing a Presentation
The Presentation Views group
View buttons
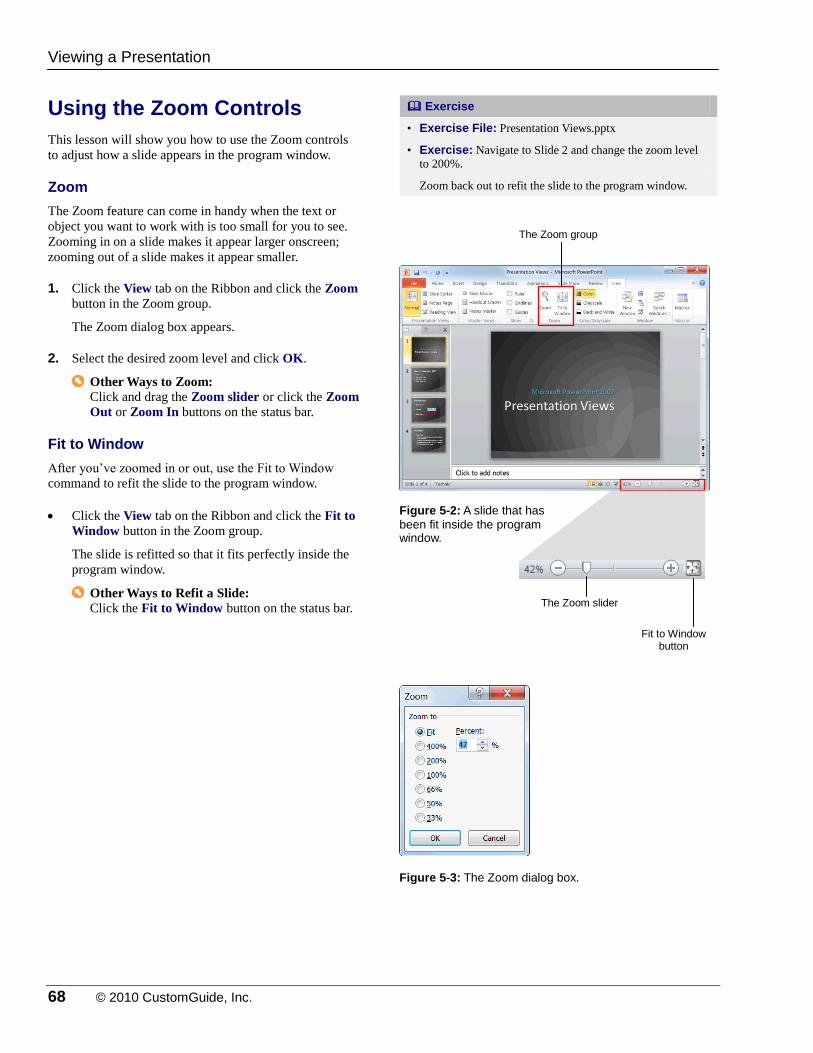
68 © 2010 CustomGuide, Inc.
Using the Zoom Controls
This lesson will show you how to use the Zoom controls
to adjust how a slide appears in the program window.
Zoom
The Zoom feature can come in handy when the text or
object you want to work with is too small for you to see.
Zooming in on a slide makes it appear larger onscreen;
zooming out of a slide makes it appear smaller.
1. Click the View tab on the Ribbon and click the Zoom
button in the Zoom group.
The Zoom dialog box appears.
2. Select the desired zoom level and click OK.
Other Ways to Zoom: Click and drag the Zoom slider or click the Zoom
Out or Zoom In buttons on the status bar.
Fit to Window
After you’ve zoomed in or out, use the Fit to Window
command to refit the slide to the program window.
Click the View tab on the Ribbon and click the Fit to
Window button in the Zoom group.
The slide is refitted so that it fits perfectly inside the
program window.
Other Ways to Refit a Slide: Click the Fit to Window button on the status bar.
Exercise
• Exercise File: Presentation Views.pptx
• Exercise: Navigate to Slide 2 and change the zoom level
to 200%.
Zoom back out to refit the slide to the program window.
Figure 5-2: A slide that has
been fit inside the program window.
Figure 5-3: The Zoom dialog box.
Viewing a Presentation
The Zoom group
The Zoom slider
Fit to Window button
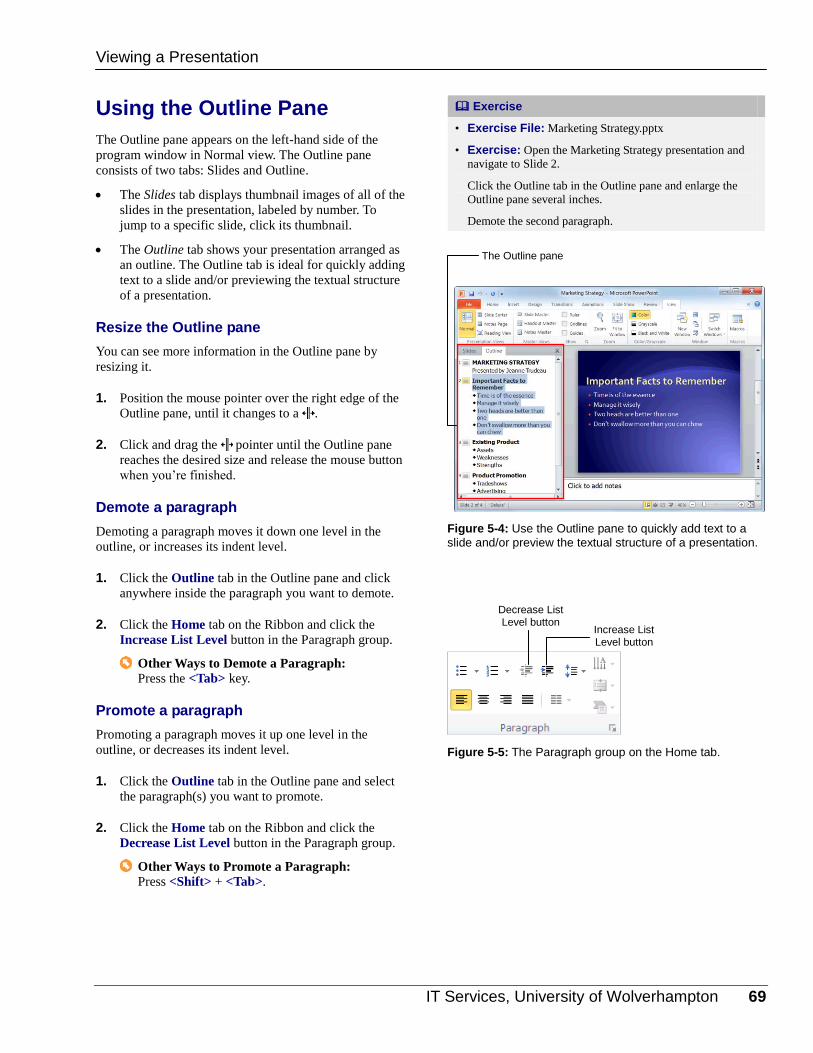
IT Services, University of Wolverhampton 69
Using the Outline Pane
The Outline pane appears on the left-hand side of the
program window in Normal view. The Outline pane
consists of two tabs: Slides and Outline.
The Slides tab displays thumbnail images of all of the
slides in the presentation, labeled by number. To
jump to a specific slide, click its thumbnail.
The Outline tab shows your presentation arranged as
an outline. The Outline tab is ideal for quickly adding
text to a slide and/or previewing the textual structure
of a presentation.
Resize the Outline pane
You can see more information in the Outline pane by
resizing it.
1. Position the mouse pointer over the right edge of the
Outline pane, until it changes to a .
2. Click and drag the pointer until the Outline pane
reaches the desired size and release the mouse button
when you’re finished.
Demote a paragraph
Demoting a paragraph moves it down one level in the
outline, or increases its indent level.
1. Click the Outline tab in the Outline pane and click
anywhere inside the paragraph you want to demote.
2. Click the Home tab on the Ribbon and click the
Increase List Level button in the Paragraph group.
Other Ways to Demote a Paragraph: Press the <Tab> key.
Promote a paragraph
Promoting a paragraph moves it up one level in the
outline, or decreases its indent level.
1. Click the Outline tab in the Outline pane and select
the paragraph(s) you want to promote.
2. Click the Home tab on the Ribbon and click the
Decrease List Level button in the Paragraph group.
Other Ways to Promote a Paragraph: Press <Shift> + <Tab>.
Exercise
• Exercise File: Marketing Strategy.pptx
• Exercise: Open the Marketing Strategy presentation and
navigate to Slide 2.
Click the Outline tab in the Outline pane and enlarge the
Outline pane several inches.
Demote the second paragraph.
Figure 5-4: Use the Outline pane to quickly add text to a
slide and/or preview the textual structure of a presentation.
Figure 5-5: The Paragraph group on the Home tab.
Viewing a Presentation
The Outline pane
Decrease List Level button
Increase List Level button
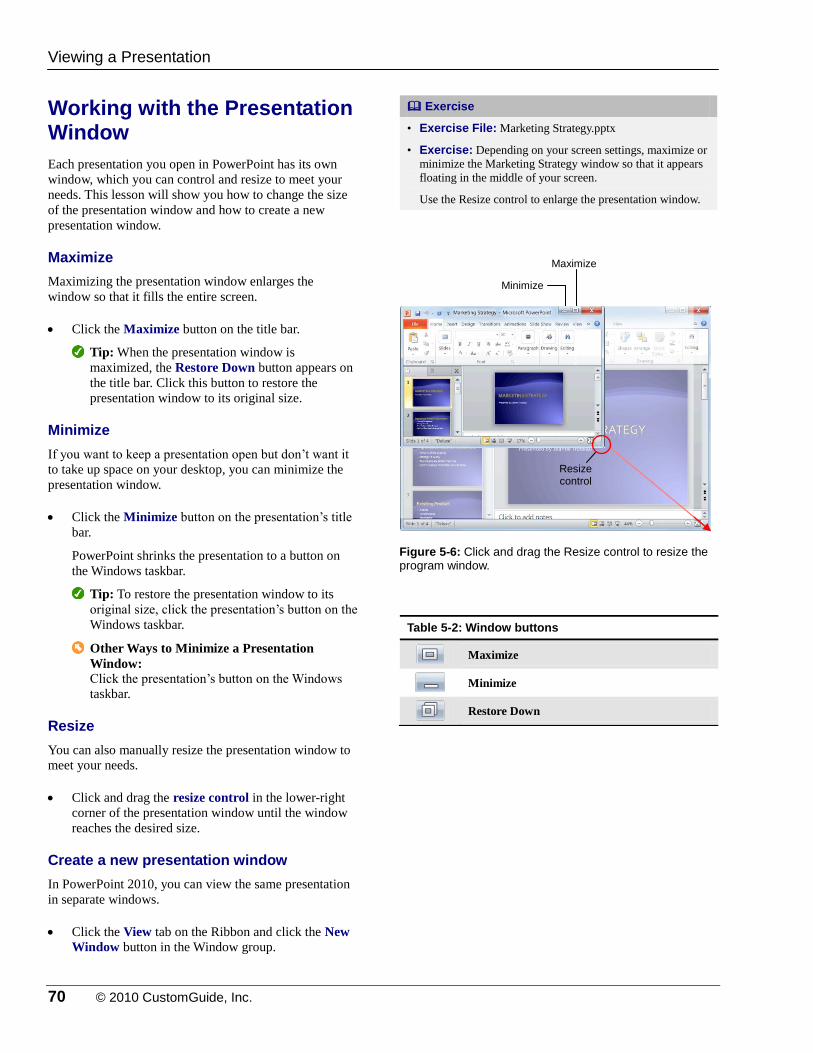
70 © 2010 CustomGuide, Inc.
Working with the Presentation Window
Each presentation you open in PowerPoint has its own
window, which you can control and resize to meet your
needs. This lesson will show you how to change the size
of the presentation window and how to create a new
presentation window.
Maximize
Maximizing the presentation window enlarges the
window so that it fills the entire screen.
Click the Maximize button on the title bar.
Tip: When the presentation window is
maximized, the Restore Down button appears on
the title bar. Click this button to restore the
presentation window to its original size.
Minimize
If you want to keep a presentation open but don’t want it
to take up space on your desktop, you can minimize the
presentation window.
Click the Minimize button on the presentation’s title
bar.
PowerPoint shrinks the presentation to a button on
the Windows taskbar.
Tip: To restore the presentation window to its
original size, click the presentation’s button on the
Windows taskbar.
Other Ways to Minimize a Presentation
Window: Click the presentation’s button on the Windows
taskbar.
Resize
You can also manually resize the presentation window to
meet your needs.
Click and drag the resize control in the lower-right
corner of the presentation window until the window
reaches the desired size.
Create a new presentation window
In PowerPoint 2010, you can view the same presentation
in separate windows.
Click the View tab on the Ribbon and click the New
Window button in the Window group.
Exercise
• Exercise File: Marketing Strategy.pptx
• Exercise: Depending on your screen settings, maximize or
minimize the Marketing Strategy window so that it appears
floating in the middle of your screen.
Use the Resize control to enlarge the presentation window.
Figure 5-6: Click and drag the Resize control to resize the program window.
Table 5-2: Window buttons
Maximize
Minimize
Restore Down
Viewing a Presentation
Minimize
Maximize
Resize control
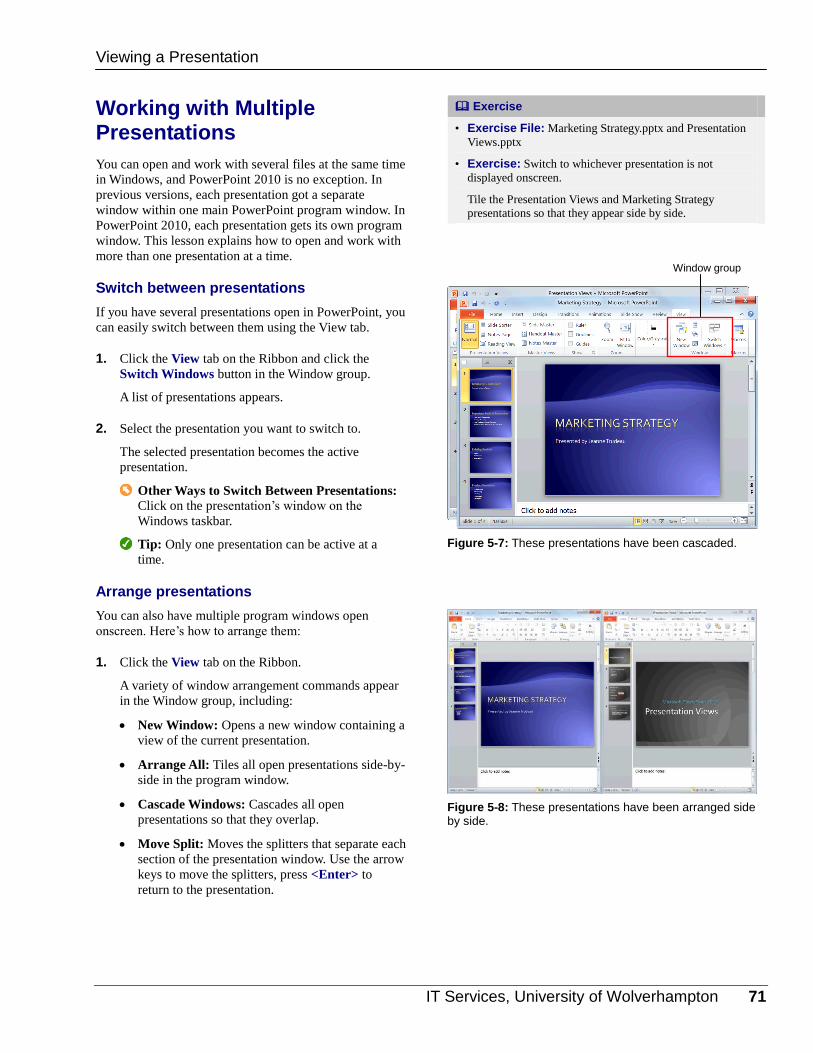
IT Services, University of Wolverhampton 71
Working with Multiple Presentations
You can open and work with several files at the same time
in Windows, and PowerPoint 2010 is no exception. In
previous versions, each presentation got a separate
window within one main PowerPoint program window. In
PowerPoint 2010, each presentation gets its own program
window. This lesson explains how to open and work with
more than one presentation at a time.
Switch between presentations
If you have several presentations open in PowerPoint, you
can easily switch between them using the View tab.
1. Click the View tab on the Ribbon and click the
Switch Windows button in the Window group.
A list of presentations appears.
2. Select the presentation you want to switch to.
The selected presentation becomes the active
presentation.
Other Ways to Switch Between Presentations: Click on the presentation’s window on the
Windows taskbar.
Tip: Only one presentation can be active at a
time.
Arrange presentations
You can also have multiple program windows open
onscreen. Here’s how to arrange them:
1. Click the View tab on the Ribbon.
A variety of window arrangement commands appear
in the Window group, including:
New Window: Opens a new window containing a
view of the current presentation.
Arrange All: Tiles all open presentations side-by-
side in the program window.
Cascade Windows: Cascades all open
presentations so that they overlap.
Move Split: Moves the splitters that separate each
section of the presentation window. Use the arrow
keys to move the splitters, press <Enter> to
return to the presentation.
Exercise
• Exercise File: Marketing Strategy.pptx and Presentation
Views.pptx
• Exercise: Switch to whichever presentation is not
displayed onscreen.
Tile the Presentation Views and Marketing Strategy
presentations so that they appear side by side.
Figure 5-7: These presentations have been cascaded.
Figure 5-8: These presentations have been arranged side by side.
Viewing a Presentation
Window group
72 © 2010 CustomGuide, Inc.
2. Click the button you want to use in the Window
group.
Tips
The number of presentation windows that can be
arranged on the screen at a time depends on your
screen resolution. A higher screen resolution can
accommodate more windows.
When viewing multiple presentations at a time, have
as few presentations open as possible. That way,
you’ll be able to view more of each presentation.
Viewing a Presentation
IT Services, University of Wolverhampton 73
VViieewwiinngg aa PPrreesseennttaattiioonn RReevviieeww
Quiz Questions
38. You can access all of PowerPoint’s views using the buttons on the status bar. (True or False?)
39. Use the Zoom slider to refit a slide to the program window. (True or False?)
40. Promoting a paragraph moves it down one level in the outline, or increases its indent level. (True or False?)
41. The Outline pane appears in ___________ view. A. Slide Sorter B. Slide Show C. Normal D. Notes Page
42. Which command shrinks the presentation to a button on the Windows taskbar? A. Minimize B. Maximize C. Restore D. Shrink
43. When you create a new presentation window, you create a copy of the presentation. (True or False?)
44. How do you switch between multiple presentations? A. You can only open one presentation at a time in Microsoft PowerPoint. B. Hook up another monitor to your computer. C. Click the Switch Windows button on the View tab and select the presentation you want to switch to. D. Right-click the Windows taskbar and select Arrange All.
45. Only one presentation can be active at a time. (True or False?)
Quiz Answers
38. False. Notes Page view must be accessed using the Views tab on the Ribbon.
39. False. Use the Fit to Window command to refit a slide to the program window.
40. False. Demoting a paragraph moves it down one level or increases its indent level. Promoting a paragraph moves it up
one level, or decreases its indent level.
41. C. The Outline pane appears in Normal view.

74 © 2010 CustomGuide, Inc.
42. A. Clicking the Minimize button on the title bar shrinks the presentation to a button on the Windows taskbar.
43. False. Creating a new presentation window is like opening the presentation in a different view: if a presentation is
open in multiple windows, changes made in any of the windows are applied to the same file.
44. C. Click the Switch Windows button on the View tab and select the presentation you want to switch to. Or, click the
presentation’s button on the Windows taskbar.
45. True. Even if you have more than one presentation open onscreen, only one presentation can be active at a time.
IT Services, University of Wolverhampton 75
FFoorrmmaattttiinngg aa
PPrreesseennttaattiioonn
Using Document Themes ................................. 76 Apply a document theme ......................... 76 Modify a document theme ....................... 76 Create new theme colors or fonts ............ 77 Create your own document theme .......... 77
Changing the Background of a Slide .............. 78 Apply a preset background ...................... 78 Format your own background .................. 78
Rearranging Slides ............................................ 79 Use the Slides tab .................................... 79 Use Slide Sorter view .............................. 79
Adding Headers and Footers ........................... 80
Using the Slide Master ...................................... 81
Working with Bulleted and Numbered Lists ... 82 Create a bulleted or numbered list .......... 82 Change the bullet character or number style.......................................................... 82 Customize the bullet character ................ 83
Formatting Paragraphs ..................................... 84 Alignment ................................................. 84 Line Spacing ............................................ 84 Spacing between paragraphs .................. 85
Working with Tabs and Indents ........................ 86 Set a tab stop ........................................... 86 Adjust or remove a tab stop ..................... 86 Indent a paragraph .................................. 87
Changing Page Setup ....................................... 88 Change slide orientation .......................... 88 Change the paper size ............................. 88
A presentation is always more effective
when it’s attractively designed and
formatted. Think about it: people would
rather buy expensive name-brand cereals
in flashy boxes than much more
affordable cereals in plain, generic
boxes—even though they are really the
same cereal!
This chapter explains how to format your
presentations to give them more impact
and make sure your message is delivered
effectively. You will learn how to apply
and modify a document theme or
background, as well as how to adjust page
setup, how to insert headers and footers,
and how to use the Slide Master to format
your presentations.
Using Exercise Files This chapter suggests exercises to practice
the topic of each lesson. There are two
ways you may follow along with the
exercise files:
Open the exercise file for a lesson,
perform the lesson exercise, and close
the exercise file.
Open the exercise file for a lesson,
perform the lesson exercise, and keep
the file open to perform the remaining
lesson exercises for the chapter.
The exercises are written so that you may
“build upon them”, meaning the exercises
in a chapter can be performed in
succession from the first lesson to the last.
6

76 © 2010 CustomGuide, Inc.
Using Document Themes
A theme is a set of unified design elements that you can
apply to a presentation to give it a consistent look and
feel. Each document theme consists of three design
elements:
Theme Colors: A set of eight coordinated colors
used in formatting text and objects in the
presentation.
Theme Fonts: A set of coordinated heading and body
font types.
Theme Effects: A set of coordinated formatting
properties for shapes and objects in the document.
Apply a document theme
Applying a document theme affects all elements of a
presentation: colors, fonts, and effects.
1. Click the Design tab on the Ribbon and click the
More button ( ) in the Themes group.
The Themes gallery appears. The default theme is
“Office,” which is highlighted in orange.
Tip: Click Browse for Themes to navigate to the
theme’s location on your computer or network.
2. Click the theme you want to apply.
The formatting associated with the selected theme is
applied to all of the slides in the presentation.
Tips
By default, PowerPoint applies the selected theme to
all of the slides in a presentation. To apply a theme to
a single slide, select the slide, right-click the theme
you want to apply, and select Apply to Selected
Slides from the contextual menu.
Modify a document theme
You are not bound to keep the colors, fonts, or effects that
are assigned to a document theme. You can mix and
match theme colors, theme fonts, and theme effects to
meet your needs.
1. Click the Design tab on the Ribbon.
2. Click the Theme Colors, Theme Fonts, or Theme
Effects button in the Themes group and select the
colors, fonts, or effects you want to use.
PowerPoint applies your changes to the presentation.
Exercise
• Exercise File: Proposal6-1.pptx
• Exercise: Apply the Flow theme to all of the slides in the
presentation.
Change the theme colors to Apex.
Figure 6-1: To preview how a theme will look in the current presentation, point to it to enable Live Preview.
Figure 6-2: A presentation with the Flow theme applied.
Formatting a Presentation Formatting a Presentation
Themes gallery
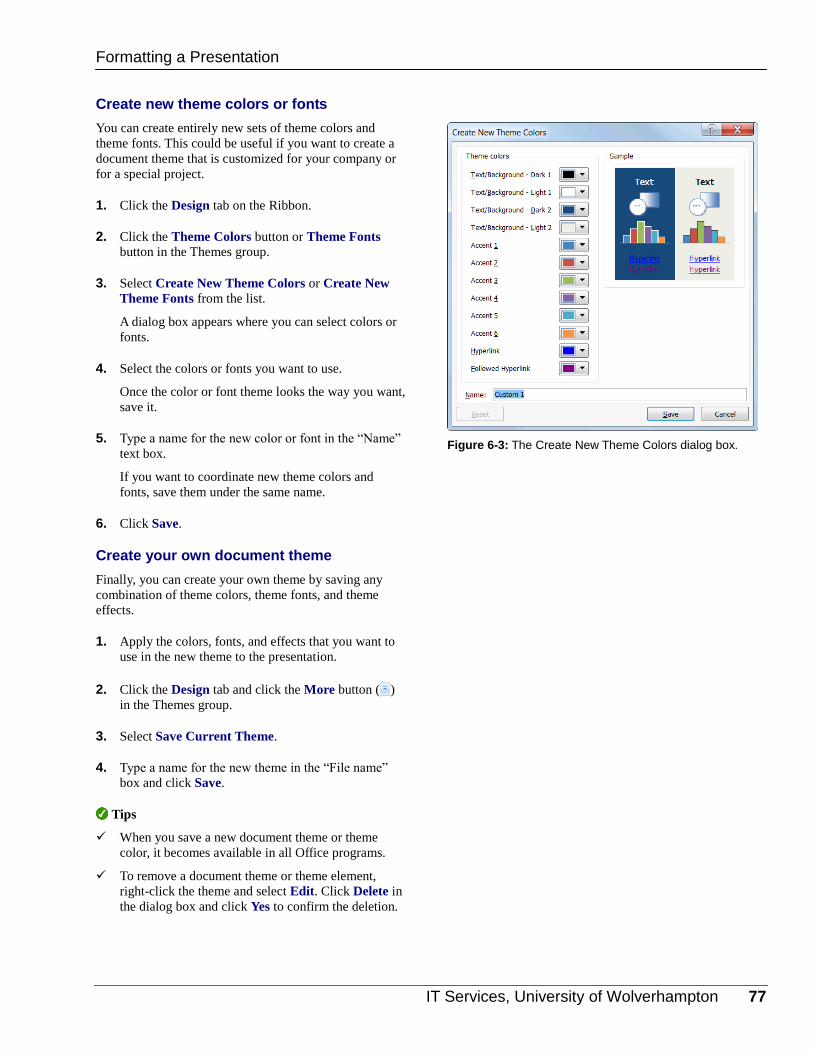
IT Services, University of Wolverhampton 77
Create new theme colors or fonts
You can create entirely new sets of theme colors and
theme fonts. This could be useful if you want to create a
document theme that is customized for your company or
for a special project.
1. Click the Design tab on the Ribbon.
2. Click the Theme Colors button or Theme Fonts
button in the Themes group.
3. Select Create New Theme Colors or Create New
Theme Fonts from the list.
A dialog box appears where you can select colors or
fonts.
4. Select the colors or fonts you want to use.
Once the color or font theme looks the way you want,
save it.
5. Type a name for the new color or font in the “Name”
text box.
If you want to coordinate new theme colors and
fonts, save them under the same name.
6. Click Save.
Create your own document theme
Finally, you can create your own theme by saving any
combination of theme colors, theme fonts, and theme
effects.
1. Apply the colors, fonts, and effects that you want to
use in the new theme to the presentation.
2. Click the Design tab and click the More button ( )
in the Themes group.
3. Select Save Current Theme.
4. Type a name for the new theme in the “File name”
box and click Save.
Tips
When you save a new document theme or theme
color, it becomes available in all Office programs.
To remove a document theme or theme element,
right-click the theme and select Edit. Click Delete in
the dialog box and click Yes to confirm the deletion.
Figure 6-3: The Create New Theme Colors dialog box.
Formatting a Presentation
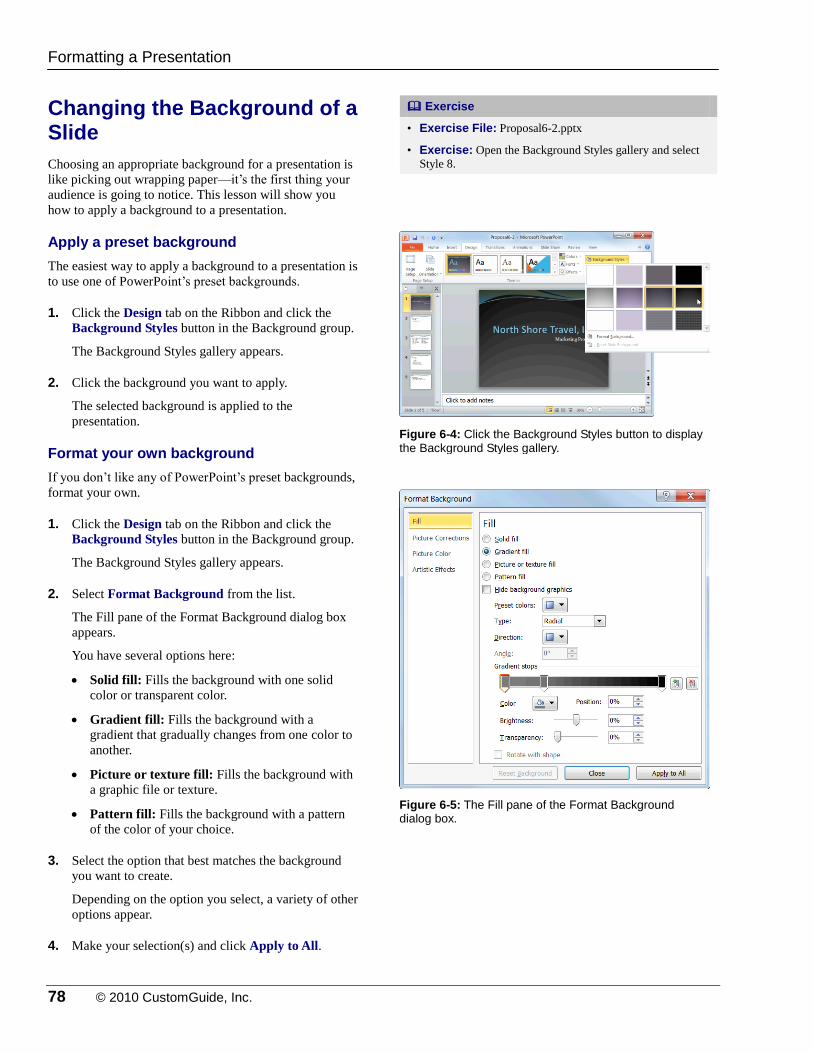
78 © 2010 CustomGuide, Inc.
Changing the Background of a Slide
Choosing an appropriate background for a presentation is
like picking out wrapping paper—it’s the first thing your
audience is going to notice. This lesson will show you
how to apply a background to a presentation.
Apply a preset background
The easiest way to apply a background to a presentation is
to use one of PowerPoint’s preset backgrounds.
1. Click the Design tab on the Ribbon and click the
Background Styles button in the Background group.
The Background Styles gallery appears.
2. Click the background you want to apply.
The selected background is applied to the
presentation.
Format your own background
If you don’t like any of PowerPoint’s preset backgrounds,
format your own.
1. Click the Design tab on the Ribbon and click the
Background Styles button in the Background group.
The Background Styles gallery appears.
2. Select Format Background from the list.
The Fill pane of the Format Background dialog box
appears.
You have several options here:
Solid fill: Fills the background with one solid
color or transparent color.
Gradient fill: Fills the background with a
gradient that gradually changes from one color to
another.
Picture or texture fill: Fills the background with
a graphic file or texture.
Pattern fill: Fills the background with a pattern
of the color of your choice.
3. Select the option that best matches the background
you want to create.
Depending on the option you select, a variety of other
options appear.
4. Make your selection(s) and click Apply to All.
Exercise
• Exercise File: Proposal6-2.pptx
• Exercise: Open the Background Styles gallery and select
Style 8.
Figure 6-4: Click the Background Styles button to display the Background Styles gallery.
Figure 6-5: The Fill pane of the Format Background dialog box.
Formatting a Presentation
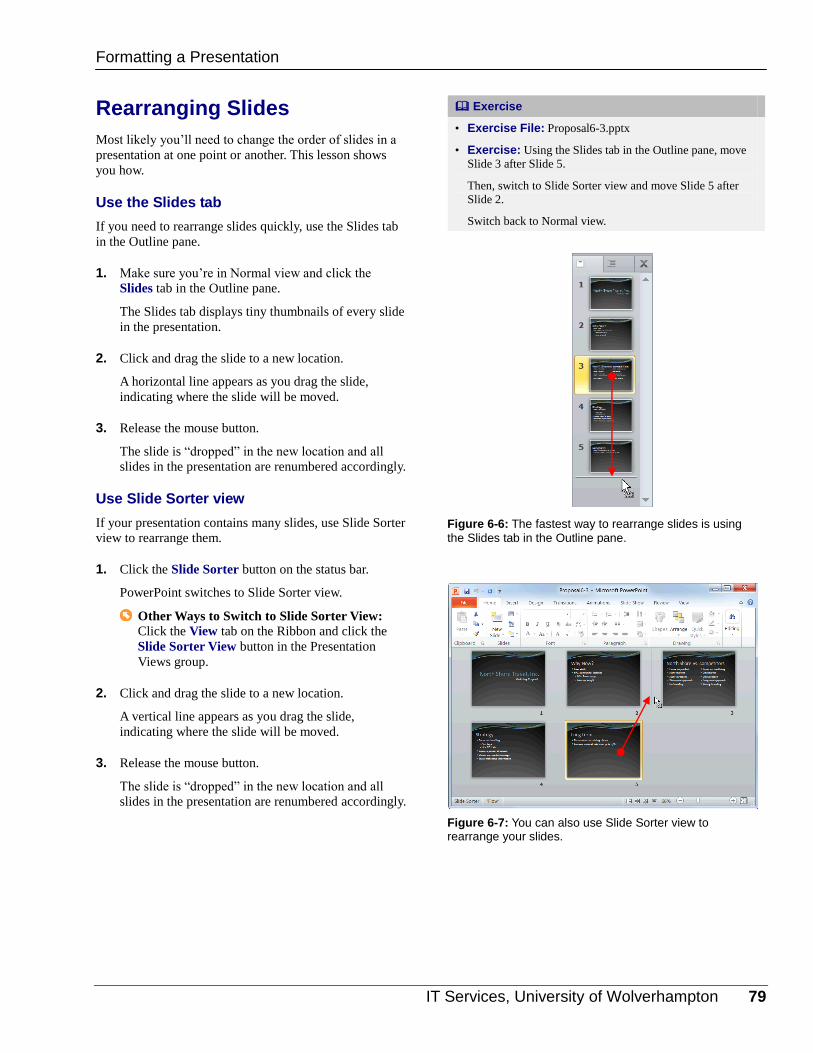
IT Services, University of Wolverhampton 79
Rearranging Slides
Most likely you’ll need to change the order of slides in a
presentation at one point or another. This lesson shows
you how.
Use the Slides tab
If you need to rearrange slides quickly, use the Slides tab
in the Outline pane.
1. Make sure you’re in Normal view and click the
Slides tab in the Outline pane.
The Slides tab displays tiny thumbnails of every slide
in the presentation.
2. Click and drag the slide to a new location.
A horizontal line appears as you drag the slide,
indicating where the slide will be moved.
3. Release the mouse button.
The slide is “dropped” in the new location and all
slides in the presentation are renumbered accordingly.
Use Slide Sorter view
If your presentation contains many slides, use Slide Sorter
view to rearrange them.
1. Click the Slide Sorter button on the status bar.
PowerPoint switches to Slide Sorter view.
Other Ways to Switch to Slide Sorter View: Click the View tab on the Ribbon and click the
Slide Sorter View button in the Presentation
Views group.
2. Click and drag the slide to a new location.
A vertical line appears as you drag the slide,
indicating where the slide will be moved.
3. Release the mouse button.
The slide is “dropped” in the new location and all
slides in the presentation are renumbered accordingly.
Exercise
• Exercise File: Proposal6-3.pptx
• Exercise: Using the Slides tab in the Outline pane, move
Slide 3 after Slide 5.
Then, switch to Slide Sorter view and move Slide 5 after
Slide 2.
Switch back to Normal view.
Figure 6-6: The fastest way to rearrange slides is using
the Slides tab in the Outline pane.
Figure 6-7: You can also use Slide Sorter view to rearrange your slides.
Formatting a Presentation
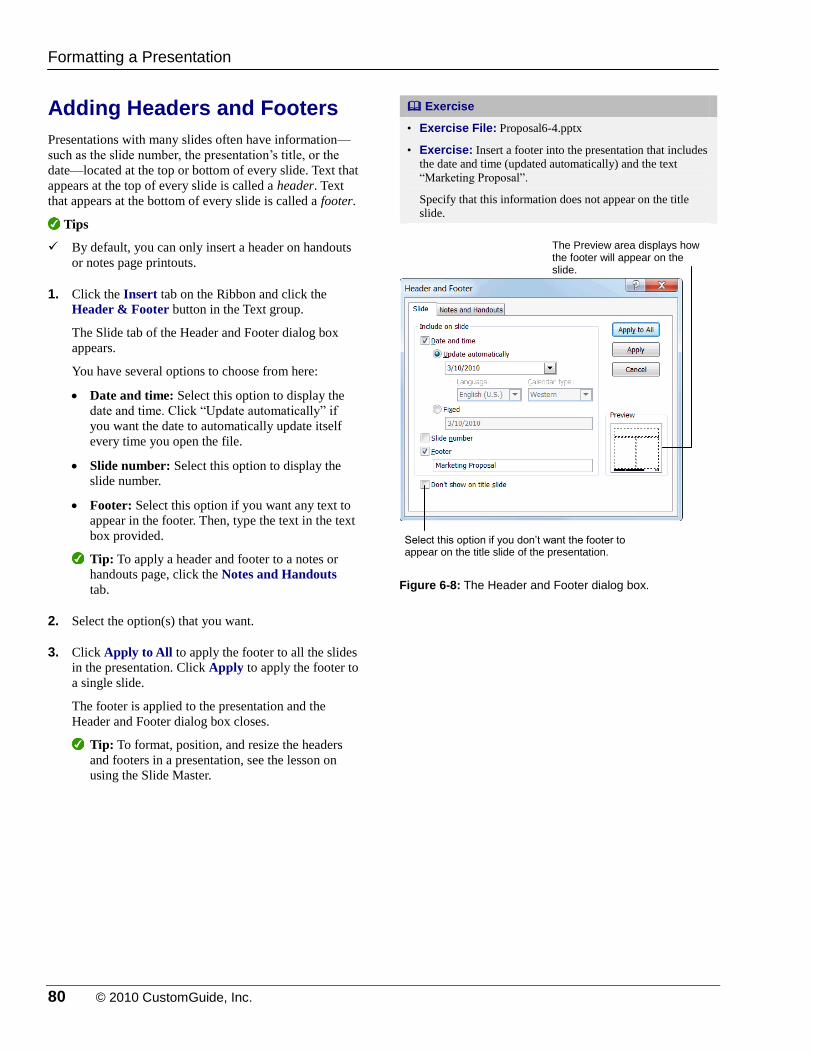
80 © 2010 CustomGuide, Inc.
Adding Headers and Footers
Presentations with many slides often have information—
such as the slide number, the presentation’s title, or the
date—located at the top or bottom of every slide. Text that
appears at the top of every slide is called a header. Text
that appears at the bottom of every slide is called a footer.
Tips
By default, you can only insert a header on handouts
or notes page printouts.
1. Click the Insert tab on the Ribbon and click the
Header & Footer button in the Text group.
The Slide tab of the Header and Footer dialog box
appears.
You have several options to choose from here:
Date and time: Select this option to display the
date and time. Click “Update automatically” if
you want the date to automatically update itself
every time you open the file.
Slide number: Select this option to display the
slide number.
Footer: Select this option if you want any text to
appear in the footer. Then, type the text in the text
box provided.
Tip: To apply a header and footer to a notes or
handouts page, click the Notes and Handouts
tab.
2. Select the option(s) that you want.
3. Click Apply to All to apply the footer to all the slides
in the presentation. Click Apply to apply the footer to
a single slide.
The footer is applied to the presentation and the
Header and Footer dialog box closes.
Tip: To format, position, and resize the headers
and footers in a presentation, see the lesson on
using the Slide Master.
Exercise
• Exercise File: Proposal6-4.pptx
• Exercise: Insert a footer into the presentation that includes
the date and time (updated automatically) and the text
“Marketing Proposal”.
Specify that this information does not appear on the title
slide.
Figure 6-8: The Header and Footer dialog box.
Formatting a Presentation
The Preview area displays how the footer will appear on the slide.
Select this option if you don’t want the footer to appear on the title slide of the presentation.
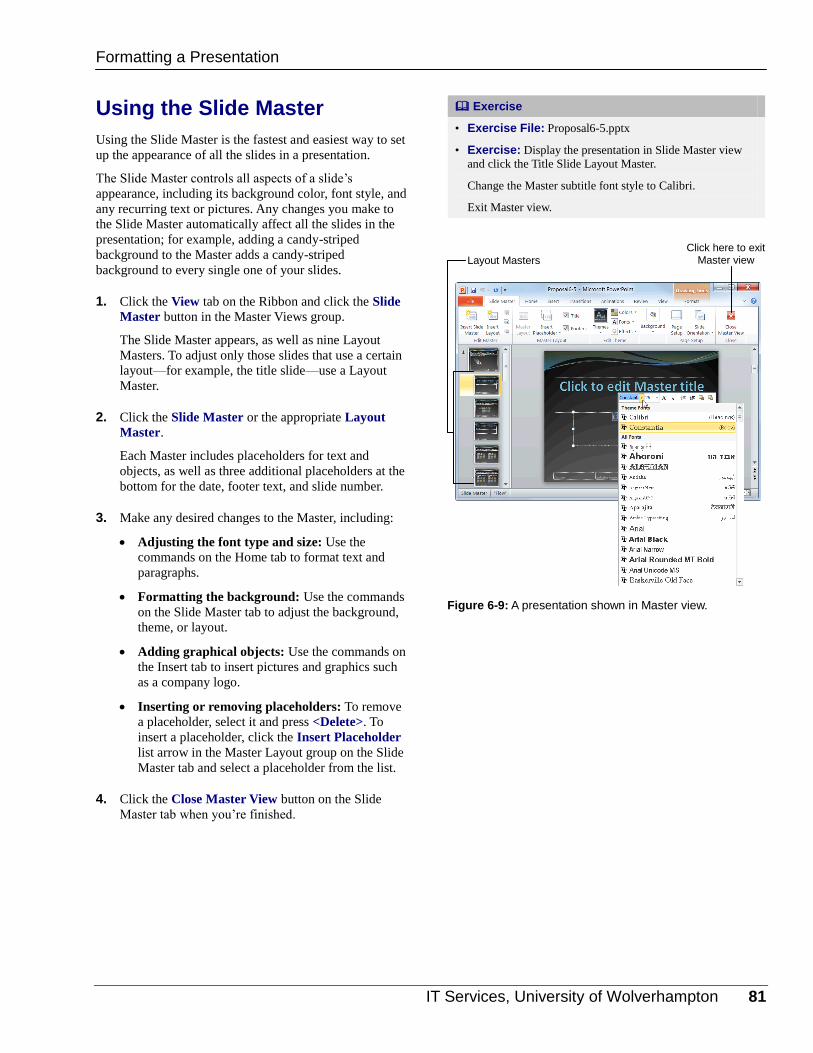
IT Services, University of Wolverhampton 81
Using the Slide Master
Using the Slide Master is the fastest and easiest way to set
up the appearance of all the slides in a presentation.
The Slide Master controls all aspects of a slide’s
appearance, including its background color, font style, and
any recurring text or pictures. Any changes you make to
the Slide Master automatically affect all the slides in the
presentation; for example, adding a candy-striped
background to the Master adds a candy-striped
background to every single one of your slides.
1. Click the View tab on the Ribbon and click the Slide
Master button in the Master Views group.
The Slide Master appears, as well as nine Layout
Masters. To adjust only those slides that use a certain
layout—for example, the title slide—use a Layout
Master.
2. Click the Slide Master or the appropriate Layout
Master.
Each Master includes placeholders for text and
objects, as well as three additional placeholders at the
bottom for the date, footer text, and slide number.
3. Make any desired changes to the Master, including:
Adjusting the font type and size: Use the
commands on the Home tab to format text and
paragraphs.
Formatting the background: Use the commands
on the Slide Master tab to adjust the background,
theme, or layout.
Adding graphical objects: Use the commands on
the Insert tab to insert pictures and graphics such
as a company logo.
Inserting or removing placeholders: To remove
a placeholder, select it and press <Delete>. To
insert a placeholder, click the Insert Placeholder
list arrow in the Master Layout group on the Slide
Master tab and select a placeholder from the list.
4. Click the Close Master View button on the Slide
Master tab when you’re finished.
Exercise
• Exercise File: Proposal6-5.pptx
• Exercise: Display the presentation in Slide Master view
and click the Title Slide Layout Master.
Change the Master subtitle font style to Calibri.
Exit Master view.
Figure 6-9: A presentation shown in Master view.
Formatting a Presentation
Layout Masters
Click here to exit Master view
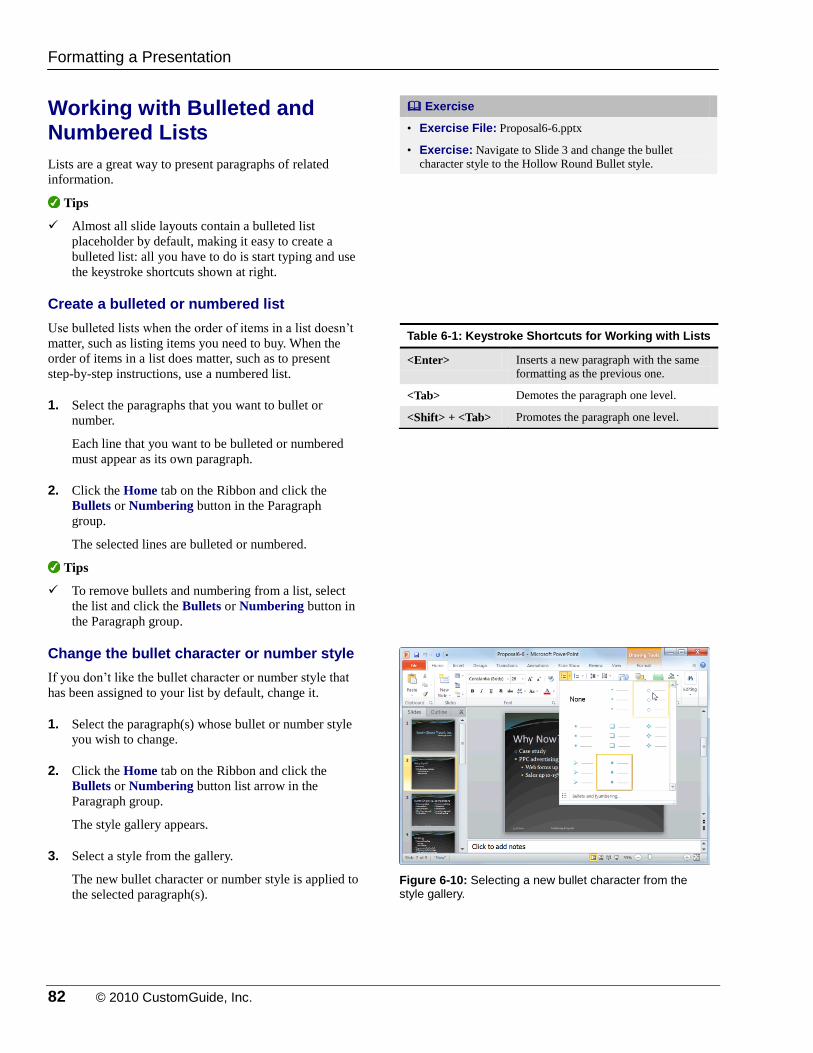
82 © 2010 CustomGuide, Inc.
Working with Bulleted and Numbered Lists
Lists are a great way to present paragraphs of related
information.
Tips
Almost all slide layouts contain a bulleted list
placeholder by default, making it easy to create a
bulleted list: all you have to do is start typing and use
the keystroke shortcuts shown at right.
Create a bulleted or numbered list
Use bulleted lists when the order of items in a list doesn’t
matter, such as listing items you need to buy. When the
order of items in a list does matter, such as to present
step-by-step instructions, use a numbered list.
1. Select the paragraphs that you want to bullet or
number.
Each line that you want to be bulleted or numbered
must appear as its own paragraph.
2. Click the Home tab on the Ribbon and click the
Bullets or Numbering button in the Paragraph
group.
The selected lines are bulleted or numbered.
Tips
To remove bullets and numbering from a list, select
the list and click the Bullets or Numbering button in
the Paragraph group.
Change the bullet character or number style
If you don’t like the bullet character or number style that
has been assigned to your list by default, change it.
1. Select the paragraph(s) whose bullet or number style
you wish to change.
2. Click the Home tab on the Ribbon and click the
Bullets or Numbering button list arrow in the
Paragraph group.
The style gallery appears.
3. Select a style from the gallery.
The new bullet character or number style is applied to
the selected paragraph(s).
Exercise
• Exercise File: Proposal6-6.pptx
• Exercise: Navigate to Slide 3 and change the bullet
character style to the Hollow Round Bullet style.
Table 6-1: Keystroke Shortcuts for Working with Lists
<Enter> Inserts a new paragraph with the same
formatting as the previous one.
<Tab> Demotes the paragraph one level.
<Shift> + <Tab> Promotes the paragraph one level.
Figure 6-10: Selecting a new bullet character from the style gallery.
Formatting a Presentation

IT Services, University of Wolverhampton 83
Customize the bullet character
Don’t like any of PowerPoint’s default bullet characters?
Create your own using the Bullets and Numbering dialog
box.
1. Select the paragraph(s) whose bullet you wish to
customize.
2. Click the Home tab on the Ribbon and click the
Bullets button list arrow in the Paragraph group.
3. Select Bullets and Numbering from the list and, if
necessary, click the Bulleted tab.
The Bulleted tab of the Bullets and Numbering dialog
box appears.
4. Click Customize.
The Symbol dialog box appears.
5. Select a character and click OK.
6. Click OK.
The new bullet is applied to the selected
paragraph(s).
Figure 6-11: The Bulleted tab of the Bullets and
Numbering dialog box.
Formatting a Presentation
Click here to use a picture that you have on file for the bullet.
Click here to choose a different bullet character.
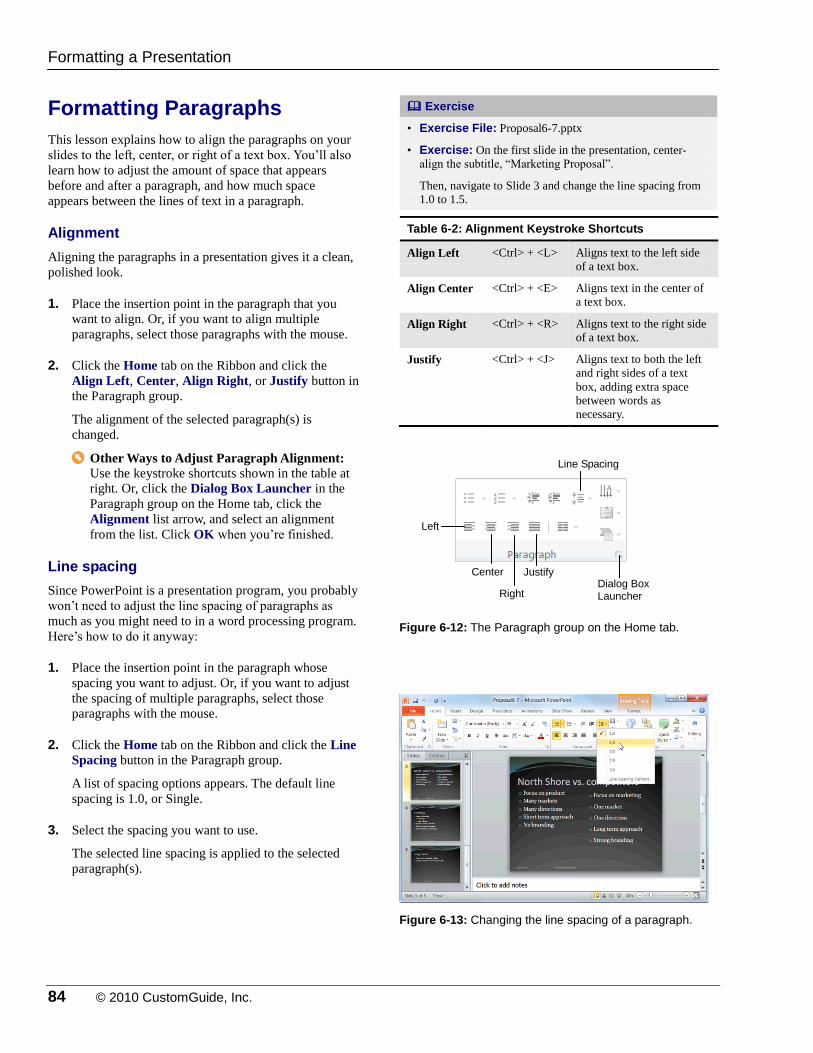
84 © 2010 CustomGuide, Inc.
Formatting Paragraphs
This lesson explains how to align the paragraphs on your
slides to the left, center, or right of a text box. You’ll also
learn how to adjust the amount of space that appears
before and after a paragraph, and how much space
appears between the lines of text in a paragraph.
Alignment
Aligning the paragraphs in a presentation gives it a clean,
polished look.
1. Place the insertion point in the paragraph that you
want to align. Or, if you want to align multiple
paragraphs, select those paragraphs with the mouse.
2. Click the Home tab on the Ribbon and click the
Align Left, Center, Align Right, or Justify button in
the Paragraph group.
The alignment of the selected paragraph(s) is
changed.
Other Ways to Adjust Paragraph Alignment: Use the keystroke shortcuts shown in the table at
right. Or, click the Dialog Box Launcher in the
Paragraph group on the Home tab, click the
Alignment list arrow, and select an alignment
from the list. Click OK when you’re finished.
Line spacing
Since PowerPoint is a presentation program, you probably
won’t need to adjust the line spacing of paragraphs as
much as you might need to in a word processing program.
Here’s how to do it anyway:
1. Place the insertion point in the paragraph whose
spacing you want to adjust. Or, if you want to adjust
the spacing of multiple paragraphs, select those
paragraphs with the mouse.
2. Click the Home tab on the Ribbon and click the Line
Spacing button in the Paragraph group.
A list of spacing options appears. The default line
spacing is 1.0, or Single.
3. Select the spacing you want to use.
The selected line spacing is applied to the selected
paragraph(s).
Exercise
• Exercise File: Proposal6-7.pptx
• Exercise: On the first slide in the presentation, center-
align the subtitle, “Marketing Proposal”.
Then, navigate to Slide 3 and change the line spacing from
1.0 to 1.5.
Table 6-2: Alignment Keystroke Shortcuts
Align Left <Ctrl> + <L> Aligns text to the left side
of a text box.
Align Center <Ctrl> + <E> Aligns text in the center of
a text box.
Align Right <Ctrl> + <R> Aligns text to the right side
of a text box.
Justify <Ctrl> + <J> Aligns text to both the left
and right sides of a text
box, adding extra space
between words as
necessary.
Figure 6-12: The Paragraph group on the Home tab.
Figure 6-13: Changing the line spacing of a paragraph.
Formatting a Presentation
Left
Center
Line Spacing
Dialog Box Launcher Right
Justify
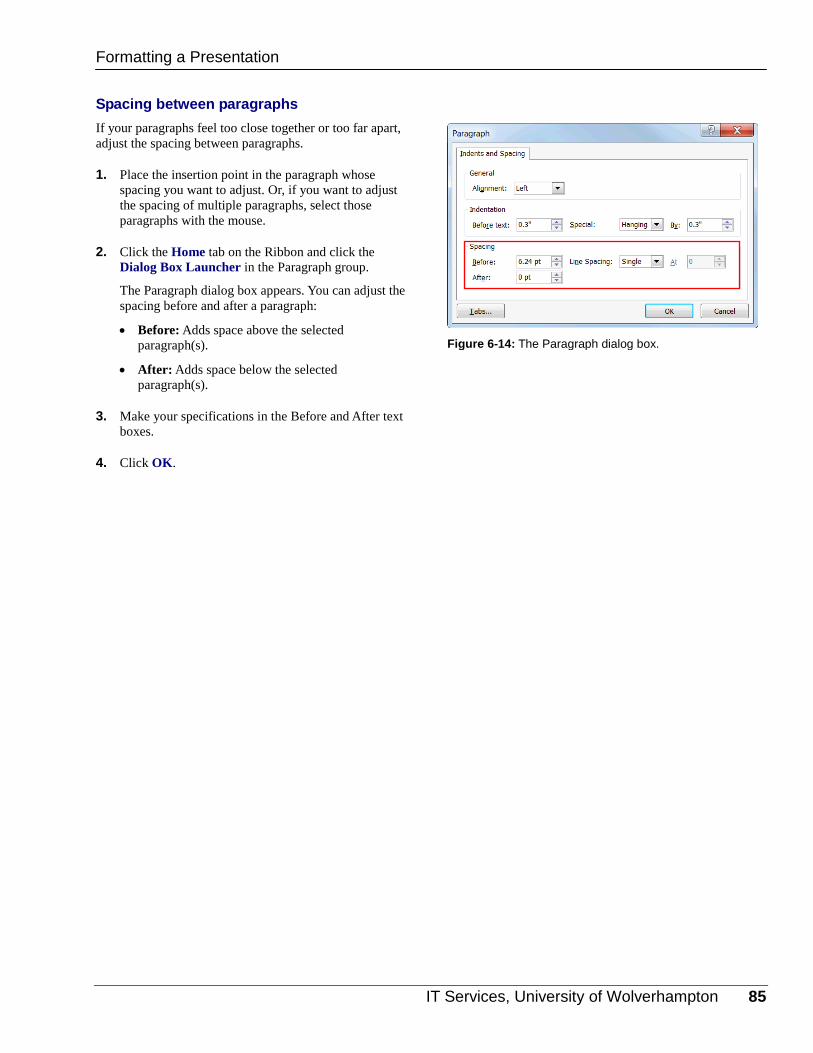
IT Services, University of Wolverhampton 85
Spacing between paragraphs
If your paragraphs feel too close together or too far apart,
adjust the spacing between paragraphs.
1. Place the insertion point in the paragraph whose
spacing you want to adjust. Or, if you want to adjust
the spacing of multiple paragraphs, select those
paragraphs with the mouse.
2. Click the Home tab on the Ribbon and click the
Dialog Box Launcher in the Paragraph group.
The Paragraph dialog box appears. You can adjust the
spacing before and after a paragraph:
Before: Adds space above the selected
paragraph(s).
After: Adds space below the selected
paragraph(s).
3. Make your specifications in the Before and After text
boxes.
4. Click OK.
Figure 6-14: The Paragraph dialog box.
Formatting a Presentation

86 © 2010 CustomGuide, Inc.
Working with Tabs and Indents
Since PowerPoint already indents each paragraph
according to its position in the outline, and the template or
theme determines the amount of indentation you can use,
you probably won’t need to mess with tab or indent
settings very often. If the need arises, however, this lesson
contains everything you need to know.
Set a tab stop
Tabs make it easy to align text. The easiest way to set a
tab stop is using the ruler.
1. If necessary, click the View tab on the Ribbon and
click the Ruler check box in the Show group.
The ruler appears.
2. Select the paragraph(s) to which you want the tab
stop to apply.
Any existing tab stops appear on the ruler.
3. Click the tab selector on the ruler until the type of
tab you want to use appears.
The left tab is the default and most common type of
tab. However, you can align text differently using
different tabs. See Table 6-4: Types of Tabs for
descriptions and examples of each type of tab stop.
4. Click on the ruler where you want to insert the tab
stop.
The tab is added to the ruler.
Other Ways to Set Tab Stops: Click inside the placeholder containing the text
you wish to format. Click the Home tab on the
Ribbon and click the Dialog Box Launcher in the
Paragraph group. Click Tabs to display the Tabs
dialog box. Enter the location for the tab stop in
the Tab stop position box, and then select an
alignment. Click Set, and then click OK.
Adjust or remove a tab stop
Tab stops are easy to adjust and remove:
To adjust a tab stop: Click and drag the tab stop to
the desired position on the ruler.
To remove a tab stop: Click and drag the tab stop
off the ruler.
Exercise
• Exercise File: Proposal6-8.pptx
• Exercise: If necessary, display the ruler.
Navigate to Slide 4, position the insertion point directly
after the text “New logo”, and press the <Tab> key.
Using the ruler, insert a right-aligned tab stop at the 8-inch
mark and type “January 15th”.
Remove the tab stop.
Figure 6-15: Setting a tab stop.
Formatting a Presentation
Tab selector Right-aligned tab stop
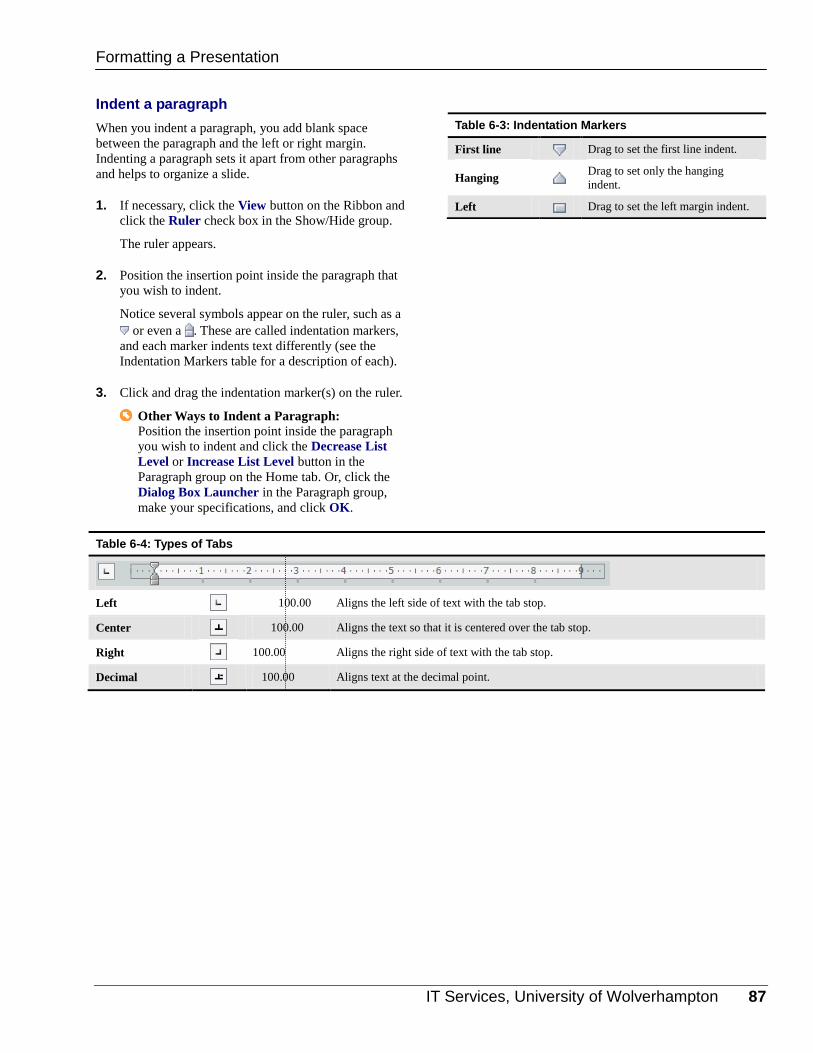
IT Services, University of Wolverhampton 87
Indent a paragraph
When you indent a paragraph, you add blank space
between the paragraph and the left or right margin.
Indenting a paragraph sets it apart from other paragraphs
and helps to organize a slide.
1. If necessary, click the View button on the Ribbon and
click the Ruler check box in the Show/Hide group.
The ruler appears.
2. Position the insertion point inside the paragraph that
you wish to indent.
Notice several symbols appear on the ruler, such as a
or even a . These are called indentation markers,
and each marker indents text differently (see the
Indentation Markers table for a description of each).
3. Click and drag the indentation marker(s) on the ruler.
Other Ways to Indent a Paragraph: Position the insertion point inside the paragraph
you wish to indent and click the Decrease List
Level or Increase List Level button in the
Paragraph group on the Home tab. Or, click the
Dialog Box Launcher in the Paragraph group,
make your specifications, and click OK.
Table 6-4: Types of Tabs
Left 100.00 Aligns the left side of text with the tab stop.
Center 100.00 Aligns the text so that it is centered over the tab stop.
Right 100.00 Aligns the right side of text with the tab stop.
Decimal 100.00 Aligns text at the decimal point.
Table 6-3: Indentation Markers
First line Drag to set the first line indent.
Hanging Drag to set only the hanging
indent.
Left Drag to set the left margin indent.
Formatting a Presentation
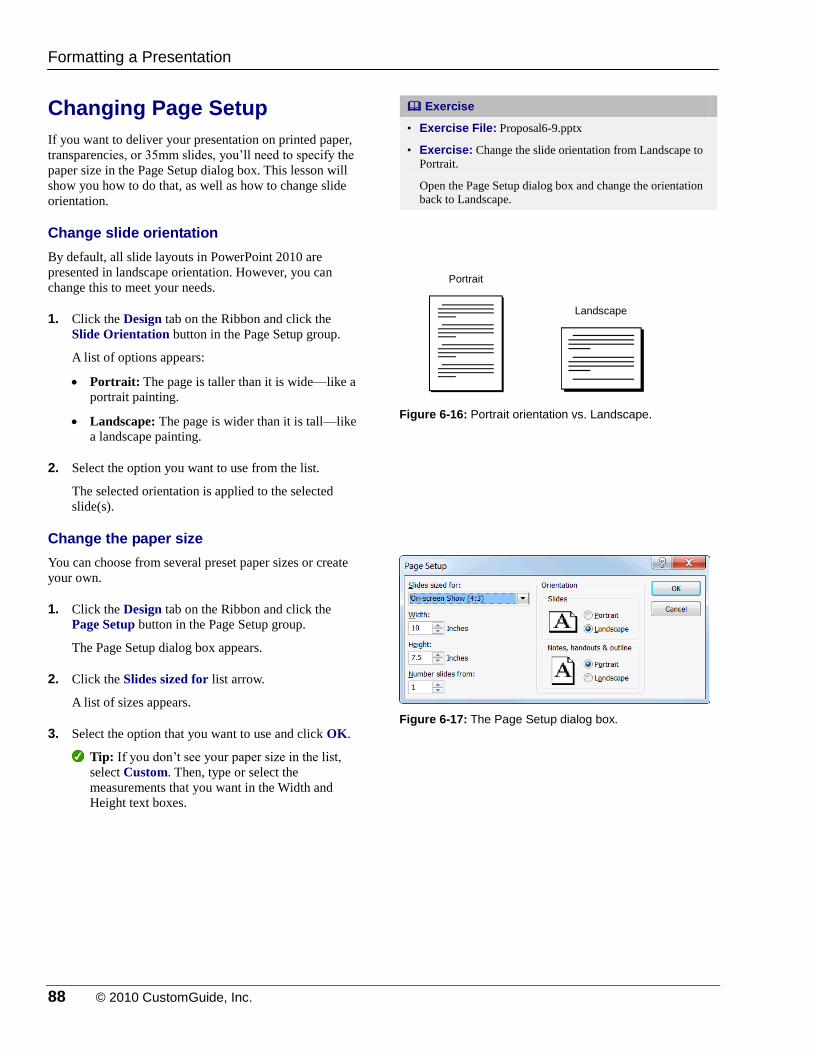
88 © 2010 CustomGuide, Inc.
Changing Page Setup
If you want to deliver your presentation on printed paper,
transparencies, or 35mm slides, you’ll need to specify the
paper size in the Page Setup dialog box. This lesson will
show you how to do that, as well as how to change slide
orientation.
Change slide orientation
By default, all slide layouts in PowerPoint 2010 are
presented in landscape orientation. However, you can
change this to meet your needs.
1. Click the Design tab on the Ribbon and click the
Slide Orientation button in the Page Setup group.
A list of options appears:
Portrait: The page is taller than it is wide—like a
portrait painting.
Landscape: The page is wider than it is tall—like
a landscape painting.
2. Select the option you want to use from the list.
The selected orientation is applied to the selected
slide(s).
Change the paper size
You can choose from several preset paper sizes or create
your own.
1. Click the Design tab on the Ribbon and click the
Page Setup button in the Page Setup group.
The Page Setup dialog box appears.
2. Click the Slides sized for list arrow.
A list of sizes appears.
3. Select the option that you want to use and click OK.
Tip: If you don’t see your paper size in the list,
select Custom. Then, type or select the
measurements that you want in the Width and
Height text boxes.
Exercise
• Exercise File: Proposal6-9.pptx
• Exercise: Change the slide orientation from Landscape to
Portrait.
Open the Page Setup dialog box and change the orientation
back to Landscape.
Figure 6-16: Portrait orientation vs. Landscape.
Figure 6-17: The Page Setup dialog box.
Formatting a Presentation
Portrait
Landscape
IT Services, University of Wolverhampton 89
FFoorrmmaattttiinngg aa PPrreesseennttaattiioonn RReevviieeww
Quiz Questions
46. You can modify a document theme in which of the following ways? A. Apply a new theme effect. B. Change theme colors. C. Choose a new theme font. D. All of the above.
47. You can only use one document theme in a presentation. (True or False?)
48. The easiest way to apply a background to a presentation is to format your own background. (True or False?)
49. If your presentation contains many slides, you should: A. Delete slides so that there aren’t as many. B. Use the Slides tab to rearrange them. C. Organize them into groups. D. Use Slide Sorter view to rearrange them.
50. By default, you can only insert a header on handouts or notes page printouts. (True or False?)
51. The Slide Master controls: A. Background color. B. Font type and style. C. Any recurring text or pictures. D. All aspects of a slide’s appearance.
52. Almost all slide layouts contain a bulleted list placeholder by default. (True or False?)
53. Which of the following is NOT an alignment option in Microsoft PowerPoint? A. Right B. Left C. Corner D. Center
54. Which of the following statements is NOT true? A. PowerPoint has tab stops set at every half-inch by default. B. You can cycle through the types of tab stops by clicking the tab selector on the ruler. C. You can add a tab stop simply by clicking on the ruler. D. Indenting a paragraph sets it apart from other paragraphs and helps to organize a slide.
55. The default orientation for slides is Landscape.
90 © 2010 CustomGuide, Inc.
56. Which of the following is NOT a slide size? A. 35mm B. Rectangular C. Overhead D. Custom
Quiz Answers
46. D. You can mix and match theme colors, theme fonts, and theme effects.
47. False. You can use more than one document theme in a presentation.
48. False. The easiest way to apply a background to a presentation is to use one of PowerPoint’s preset backgrounds.
49. D. If your presentation contains many slides, you should use Slide Sorter view to rearrange them.
50. True. By default, you can only insert a header on handouts or notes page printouts.
51. D. The Slide Master controls all aspects of a slide’s appearance, including background color, font type and style, and
any recurring text or pictures.
52. True. Almost all slide layouts contain a bulleted list placeholder by default, making it easy to create a bulleted list.
53. C. Corner is NOT an alignment in Microsoft PowerPoint 2010.
54. A. PowerPoint does have preset tab stops—but they are set at every inch by default.
55. True. The default orientation for slides is Landscape.
56. B. Rectangular is not a slide size.

IT Services, University of Wolverhampton 91
WWoorrkkiinngg wwiitthh
OObbjjeeccttss
Inserting Clip Art ................................................ 92
Inserting Screenshots ....................................... 93 Insert a screenshot of an open window ... 93 Insert a Screen Clipping .......................... 93
Inserting Pictures and Graphics Files ............. 94
Removing Backgrounds from Pictures and Graphics ............................................................. 95
Altering the Look of Pictures and Graphics ... 96 Apply Corrections .................................... 96 Adjust Color ............................................. 96 Apply Artistic Effects ................................ 97
Formatting Pictures and Graphics .................. 98 Crop a picture or graphic ......................... 98 Change the visual style of a picture or graphic ..................................................... 98
Inserting Shapes ................................................ 99 Draw a shape ........................................... 99 Adjust a shape ......................................... 99 Add text to a shape ................................ 100
Formatting Shapes .......................................... 101 Change the fill color of a shape ............. 101 Change the outline of a shape ............... 101 Change the visual style of a shape ........ 102
Resize, Move, Copy and Delete Objects ....... 103
Positioning Objects ......................................... 104 Display/hide the grid .............................. 104 Display/hide drawing guides .................. 104 Turn on/off the Snap to Grid feature ...... 105
Applying Special Effects ................................. 106
Grouping Objects ............................................ 107 Select multiple objects ........................... 107 Group objects ........................................ 107 Ungroup objects ..................................... 107
Aligning and Distributing Objects ................. 108
Flipping and Rotating Objects........................ 109
Layering Objects.............................................. 110
Presentations that include pictures,
drawings, and graphics can be much more
compelling and effective than
presentations that only contain boring
text. Once you know how to work with
pictures and graphics, you can create all
kinds of cool slides.
This chapter explains how to use
PowerPoint’s drawing tools to insert
shapes; how to insert pictures and clip art;
and how to format pictures, shapes and
clip art.
Using Exercise Files This chapter suggests exercises to practice
the topic of each lesson. There are two
ways you may follow along with the
exercise files:
Open the exercise file for a lesson,
perform the lesson exercise, and close
the exercise file.
Open the exercise file for a lesson,
perform the lesson exercise, and keep
the file open to perform the remaining
lesson exercises for the chapter.
The exercises are written so that you may
“build upon them,” meaning the exercises
in a chapter can be performed in
succession from the first lesson to the last.
7
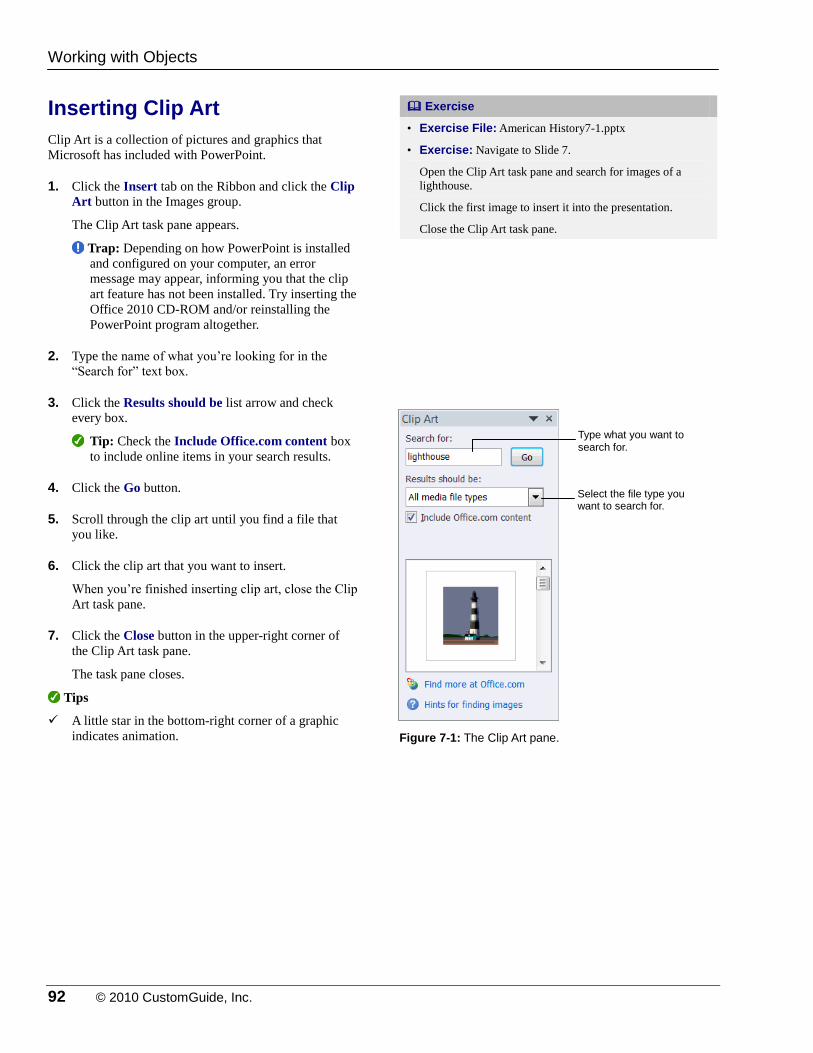
92 © 2010 CustomGuide, Inc.
Inserting Clip Art
Clip Art is a collection of pictures and graphics that
Microsoft has included with PowerPoint.
1. Click the Insert tab on the Ribbon and click the Clip
Art button in the Images group.
The Clip Art task pane appears.
Trap: Depending on how PowerPoint is installed
and configured on your computer, an error
message may appear, informing you that the clip
art feature has not been installed. Try inserting the
Office 2010 CD-ROM and/or reinstalling the
PowerPoint program altogether.
2. Type the name of what you’re looking for in the
“Search for” text box.
3. Click the Results should be list arrow and check
every box.
Tip: Check the Include Office.com content box
to include online items in your search results.
4. Click the Go button.
5. Scroll through the clip art until you find a file that
you like.
6. Click the clip art that you want to insert.
When you’re finished inserting clip art, close the Clip
Art task pane.
7. Click the Close button in the upper-right corner of
the Clip Art task pane.
The task pane closes.
Tips
A little star in the bottom-right corner of a graphic
indicates animation.
Exercise
• Exercise File: American History7-1.pptx
• Exercise: Navigate to Slide 7.
Open the Clip Art task pane and search for images of a
lighthouse.
Click the first image to insert it into the presentation.
Close the Clip Art task pane.
Figure 7-1: The Clip Art pane.
Working with Objects
Type what you want to search for.
Select the file type you want to search for.
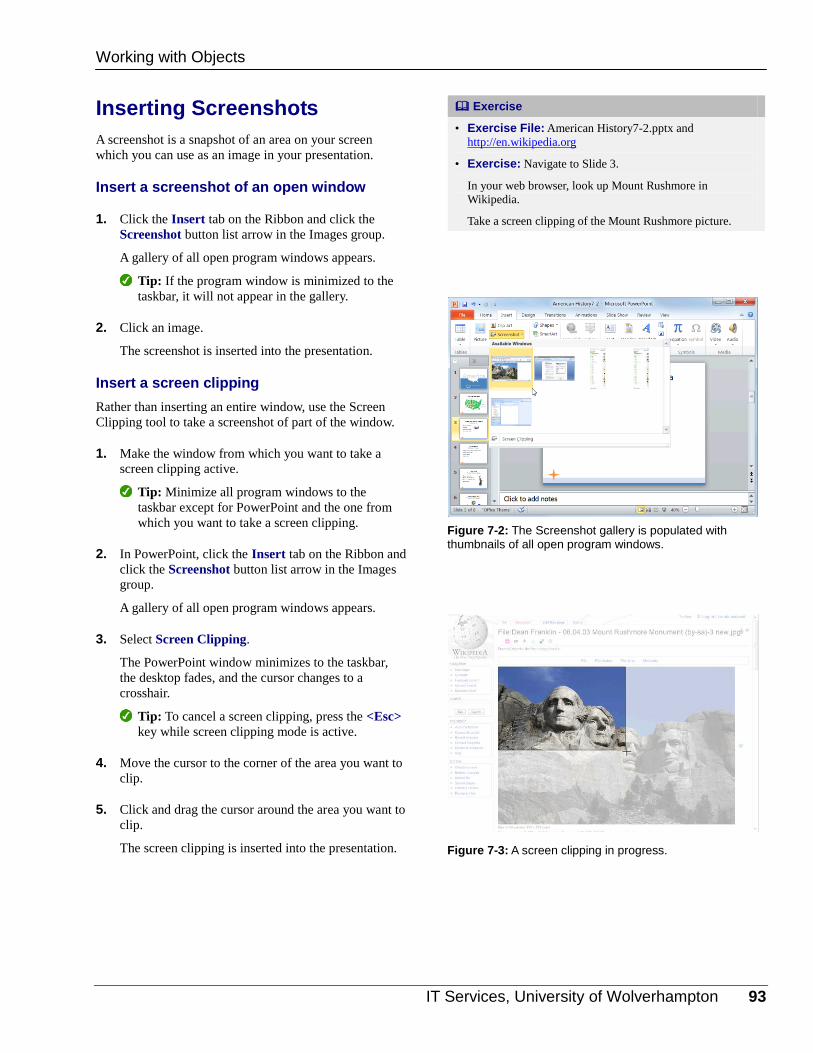
IT Services, University of Wolverhampton 93
Inserting Screenshots
A screenshot is a snapshot of an area on your screen
which you can use as an image in your presentation.
Insert a screenshot of an open window
1. Click the Insert tab on the Ribbon and click the
Screenshot button list arrow in the Images group.
A gallery of all open program windows appears.
Tip: If the program window is minimized to the
taskbar, it will not appear in the gallery.
2. Click an image.
The screenshot is inserted into the presentation.
Insert a screen clipping
Rather than inserting an entire window, use the Screen
Clipping tool to take a screenshot of part of the window.
1. Make the window from which you want to take a
screen clipping active.
Tip: Minimize all program windows to the
taskbar except for PowerPoint and the one from
which you want to take a screen clipping.
2. In PowerPoint, click the Insert tab on the Ribbon and
click the Screenshot button list arrow in the Images
group.
A gallery of all open program windows appears.
3. Select Screen Clipping.
The PowerPoint window minimizes to the taskbar,
the desktop fades, and the cursor changes to a
crosshair.
Tip: To cancel a screen clipping, press the <Esc>
key while screen clipping mode is active.
4. Move the cursor to the corner of the area you want to
clip.
5. Click and drag the cursor around the area you want to
clip.
The screen clipping is inserted into the presentation.
Exercise
• Exercise File: American History7-2.pptx and
http://en.wikipedia.org
• Exercise: Navigate to Slide 3.
In your web browser, look up Mount Rushmore in
Wikipedia.
Take a screen clipping of the Mount Rushmore picture.
Figure 7-2: The Screenshot gallery is populated with thumbnails of all open program windows.
Figure 7-3: A screen clipping in progress.
Working with Objects
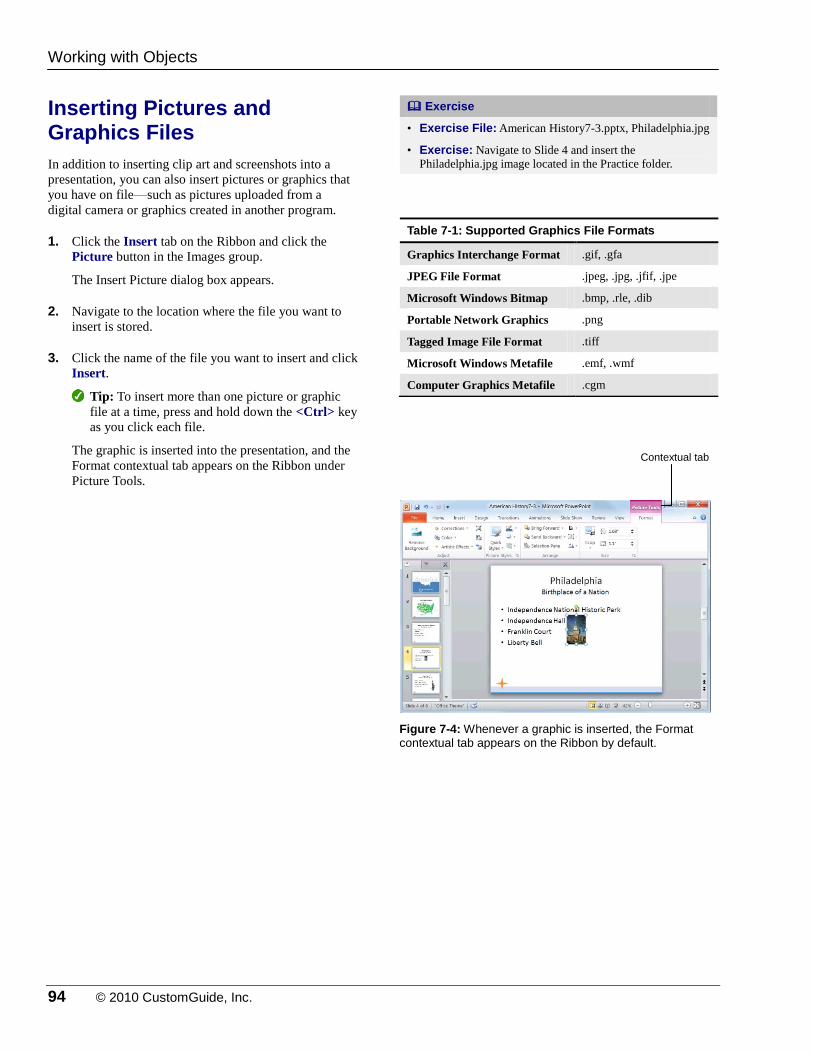
94 © 2010 CustomGuide, Inc.
Inserting Pictures and Graphics Files
In addition to inserting clip art and screenshots into a
presentation, you can also insert pictures or graphics that
you have on file—such as pictures uploaded from a
digital camera or graphics created in another program.
1. Click the Insert tab on the Ribbon and click the
Picture button in the Images group.
The Insert Picture dialog box appears.
2. Navigate to the location where the file you want to
insert is stored.
3. Click the name of the file you want to insert and click
Insert.
Tip: To insert more than one picture or graphic
file at a time, press and hold down the <Ctrl> key
as you click each file.
The graphic is inserted into the presentation, and the
Format contextual tab appears on the Ribbon under
Picture Tools.
Exercise
• Exercise File: American History7-3.pptx, Philadelphia.jpg
• Exercise: Navigate to Slide 4 and insert the
Philadelphia.jpg image located in the Practice folder.
Table 7-1: Supported Graphics File Formats
Graphics Interchange Format .gif, .gfa
JPEG File Format .jpeg, .jpg, .jfif, .jpe
Microsoft Windows Bitmap .bmp, .rle, .dib
Portable Network Graphics .png
Tagged Image File Format .tiff
Microsoft Windows Metafile .emf, .wmf
Computer Graphics Metafile .cgm
Figure 7-4: Whenever a graphic is inserted, the Format contextual tab appears on the Ribbon by default.
Working with Objects
Contextual tab
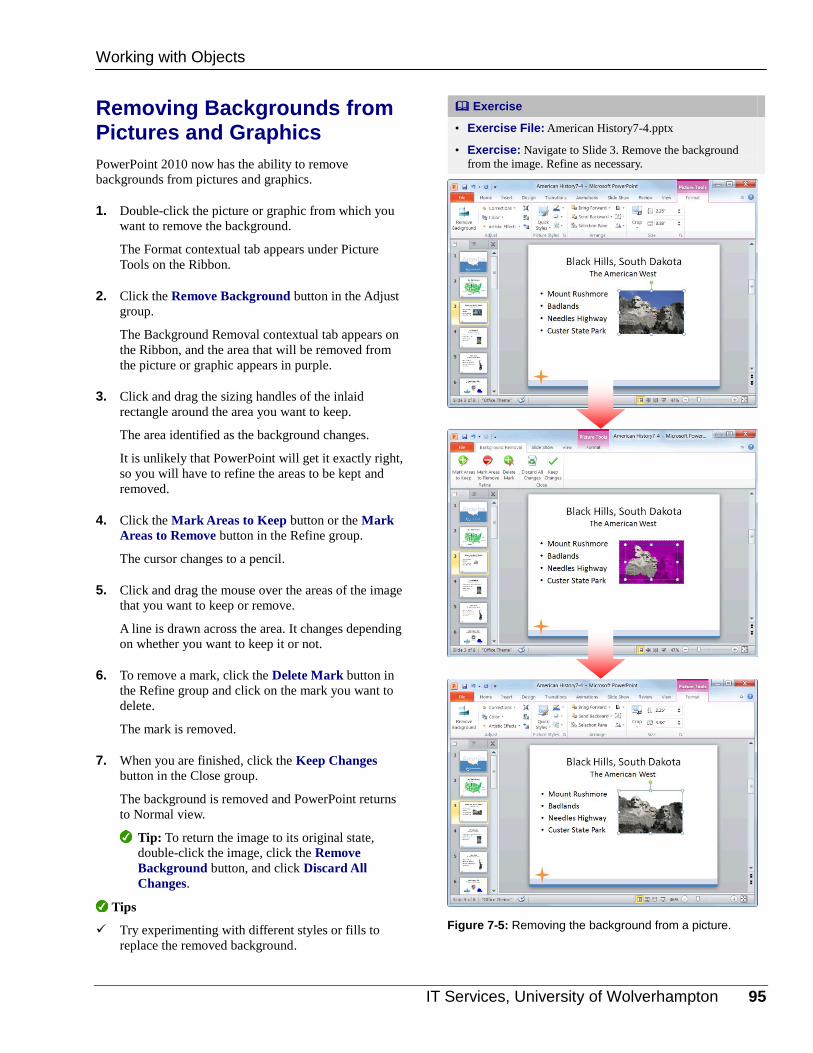
IT Services, University of Wolverhampton 95
Removing Backgrounds from Pictures and Graphics
PowerPoint 2010 now has the ability to remove
backgrounds from pictures and graphics.
1. Double-click the picture or graphic from which you
want to remove the background.
The Format contextual tab appears under Picture
Tools on the Ribbon.
2. Click the Remove Background button in the Adjust
group.
The Background Removal contextual tab appears on
the Ribbon, and the area that will be removed from
the picture or graphic appears in purple.
3. Click and drag the sizing handles of the inlaid
rectangle around the area you want to keep.
The area identified as the background changes.
It is unlikely that PowerPoint will get it exactly right,
so you will have to refine the areas to be kept and
removed.
4. Click the Mark Areas to Keep button or the Mark
Areas to Remove button in the Refine group.
The cursor changes to a pencil.
5. Click and drag the mouse over the areas of the image
that you want to keep or remove.
A line is drawn across the area. It changes depending
on whether you want to keep it or not.
6. To remove a mark, click the Delete Mark button in
the Refine group and click on the mark you want to
delete.
The mark is removed.
7. When you are finished, click the Keep Changes
button in the Close group.
The background is removed and PowerPoint returns
to Normal view.
Tip: To return the image to its original state,
double-click the image, click the Remove
Background button, and click Discard All
Changes.
Tips
Try experimenting with different styles or fills to
replace the removed background.
Exercise
• Exercise File: American History7-4.pptx
• Exercise: Navigate to Slide 3. Remove the background
from the image. Refine as necessary.
Figure 7-5: Removing the background from a picture.
Working with Objects
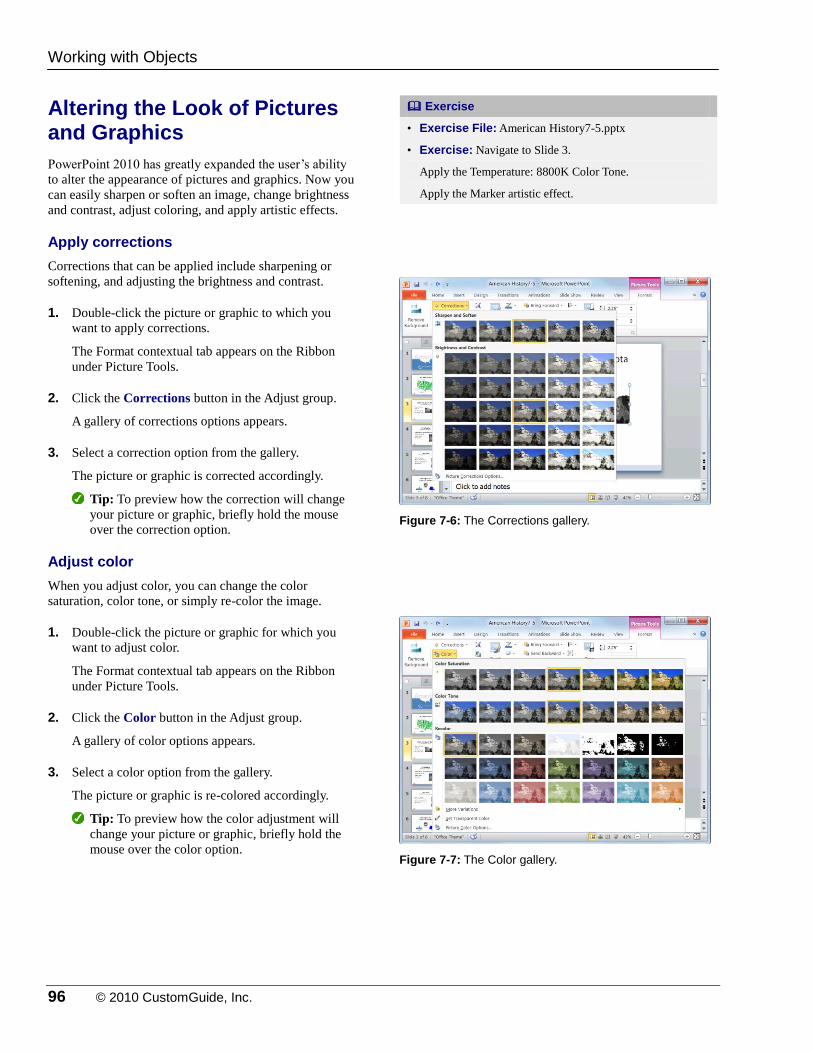
96 © 2010 CustomGuide, Inc.
Altering the Look of Pictures and Graphics
PowerPoint 2010 has greatly expanded the user’s ability
to alter the appearance of pictures and graphics. Now you
can easily sharpen or soften an image, change brightness
and contrast, adjust coloring, and apply artistic effects.
Apply corrections
Corrections that can be applied include sharpening or
softening, and adjusting the brightness and contrast.
1. Double-click the picture or graphic to which you
want to apply corrections.
The Format contextual tab appears on the Ribbon
under Picture Tools.
2. Click the Corrections button in the Adjust group.
A gallery of corrections options appears.
3. Select a correction option from the gallery.
The picture or graphic is corrected accordingly.
Tip: To preview how the correction will change
your picture or graphic, briefly hold the mouse
over the correction option.
Adjust color
When you adjust color, you can change the color
saturation, color tone, or simply re-color the image.
1. Double-click the picture or graphic for which you
want to adjust color.
The Format contextual tab appears on the Ribbon
under Picture Tools.
2. Click the Color button in the Adjust group.
A gallery of color options appears.
3. Select a color option from the gallery.
The picture or graphic is re-colored accordingly.
Tip: To preview how the color adjustment will
change your picture or graphic, briefly hold the
mouse over the color option.
Exercise
• Exercise File: American History7-5.pptx
• Exercise: Navigate to Slide 3.
Apply the Temperature: 8800K Color Tone.
Apply the Marker artistic effect.
Figure 7-6: The Corrections gallery.
Figure 7-7: The Color gallery.
Working with Objects
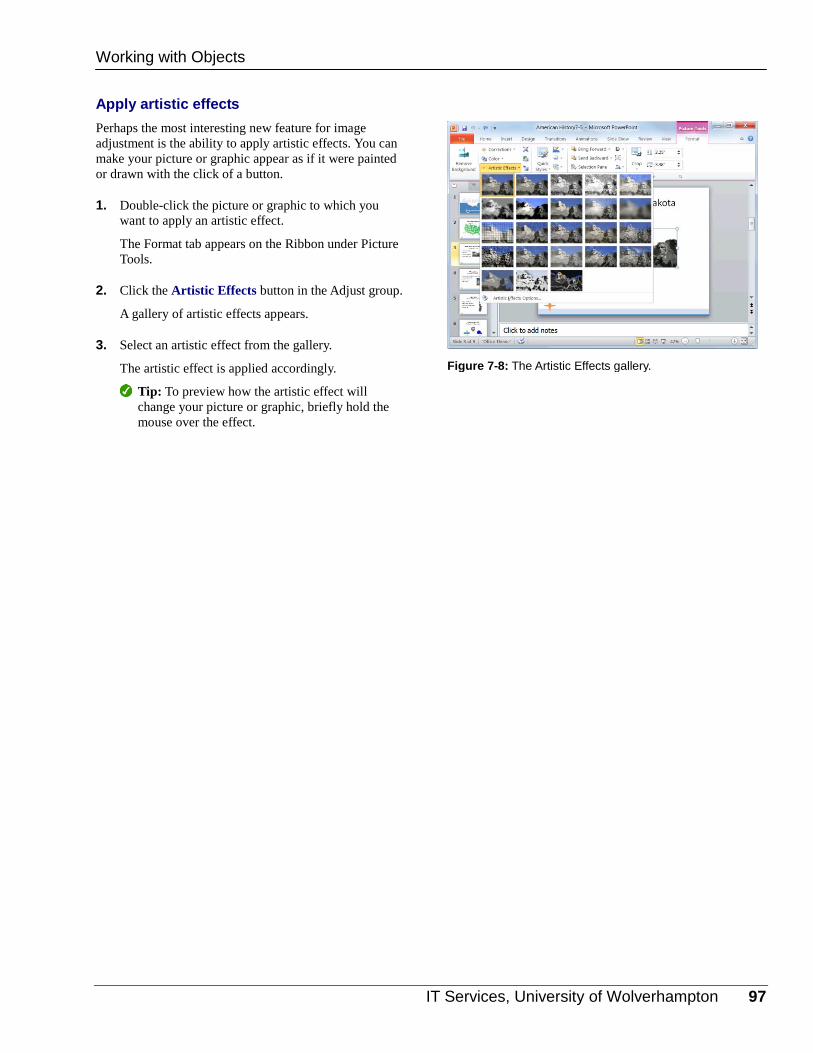
IT Services, University of Wolverhampton 97
Apply artistic effects
Perhaps the most interesting new feature for image
adjustment is the ability to apply artistic effects. You can
make your picture or graphic appear as if it were painted
or drawn with the click of a button.
1. Double-click the picture or graphic to which you
want to apply an artistic effect.
The Format tab appears on the Ribbon under Picture
Tools.
2. Click the Artistic Effects button in the Adjust group.
A gallery of artistic effects appears.
3. Select an artistic effect from the gallery.
The artistic effect is applied accordingly.
Tip: To preview how the artistic effect will
change your picture or graphic, briefly hold the
mouse over the effect.
Figure 7-8: The Artistic Effects gallery.
Working with Objects
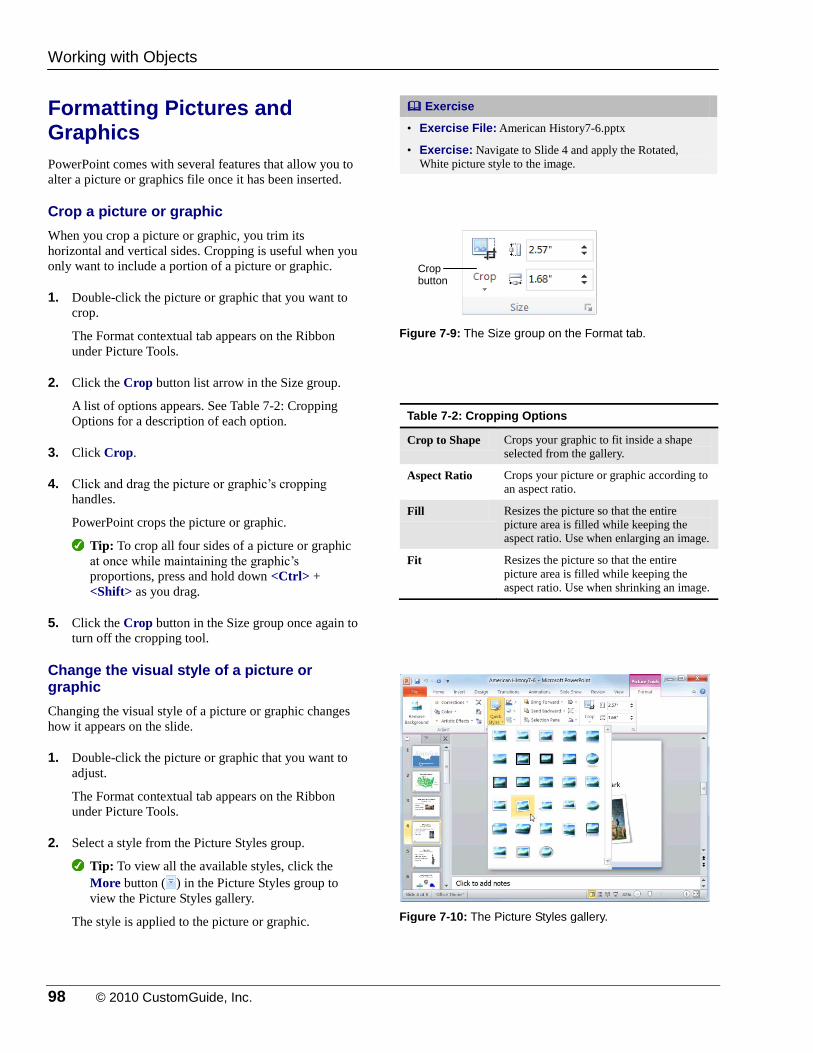
98 © 2010 CustomGuide, Inc.
Formatting Pictures and Graphics
PowerPoint comes with several features that allow you to
alter a picture or graphics file once it has been inserted.
Crop a picture or graphic
When you crop a picture or graphic, you trim its
horizontal and vertical sides. Cropping is useful when you
only want to include a portion of a picture or graphic.
1. Double-click the picture or graphic that you want to
crop.
The Format contextual tab appears on the Ribbon
under Picture Tools.
2. Click the Crop button list arrow in the Size group.
A list of options appears. See Table 7-2: Cropping
Options for a description of each option.
3. Click Crop.
4. Click and drag the picture or graphic’s cropping
handles.
PowerPoint crops the picture or graphic.
Tip: To crop all four sides of a picture or graphic
at once while maintaining the graphic’s
proportions, press and hold down <Ctrl> +
<Shift> as you drag.
5. Click the Crop button in the Size group once again to
turn off the cropping tool.
Change the visual style of a picture or graphic
Changing the visual style of a picture or graphic changes
how it appears on the slide.
1. Double-click the picture or graphic that you want to
adjust.
The Format contextual tab appears on the Ribbon
under Picture Tools.
2. Select a style from the Picture Styles group.
Tip: To view all the available styles, click the
More button ( ) in the Picture Styles group to
view the Picture Styles gallery.
The style is applied to the picture or graphic.
Exercise
• Exercise File: American History7-6.pptx
• Exercise: Navigate to Slide 4 and apply the Rotated,
White picture style to the image.
Figure 7-9: The Size group on the Format tab.
Table 7-2: Cropping Options
Crop to Shape Crops your graphic to fit inside a shape
selected from the gallery.
Aspect Ratio Crops your picture or graphic according to
an aspect ratio.
Fill Resizes the picture so that the entire
picture area is filled while keeping the
aspect ratio. Use when enlarging an image.
Fit Resizes the picture so that the entire
picture area is filled while keeping the
aspect ratio. Use when shrinking an image.
Figure 7-10: The Picture Styles gallery.
Working with Objects
Crop button
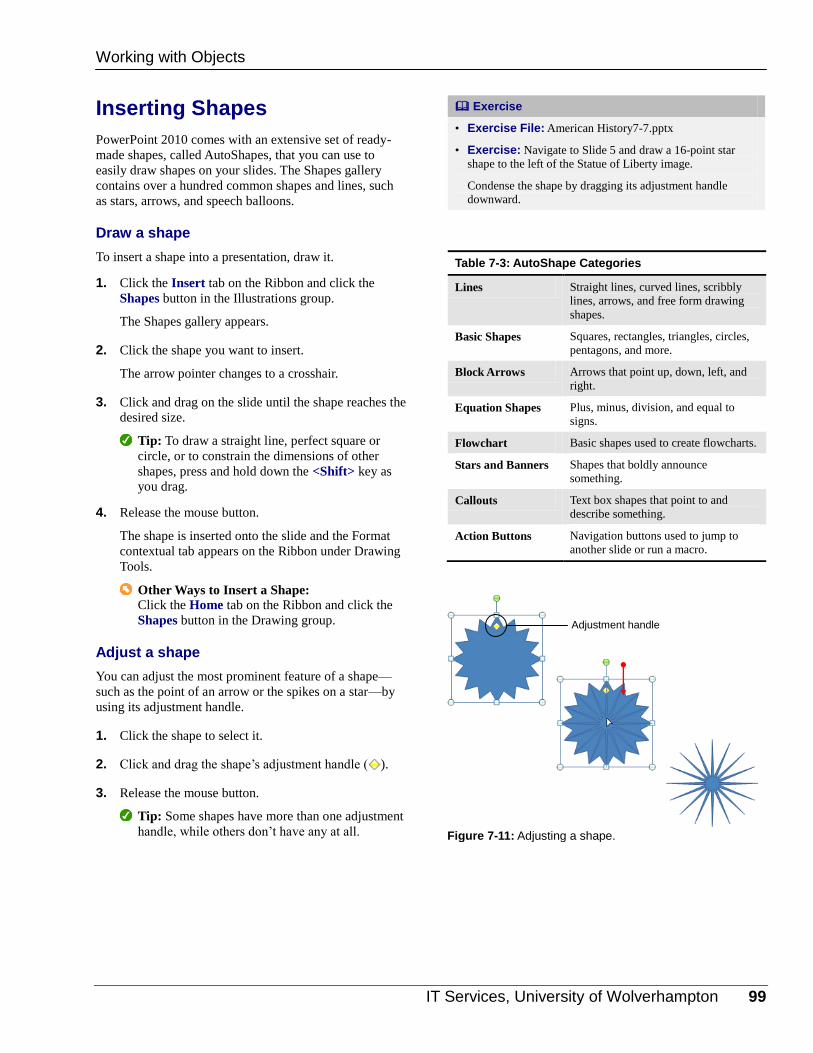
IT Services, University of Wolverhampton 99
Inserting Shapes
PowerPoint 2010 comes with an extensive set of ready-
made shapes, called AutoShapes, that you can use to
easily draw shapes on your slides. The Shapes gallery
contains over a hundred common shapes and lines, such
as stars, arrows, and speech balloons.
Draw a shape
To insert a shape into a presentation, draw it.
1. Click the Insert tab on the Ribbon and click the
Shapes button in the Illustrations group.
The Shapes gallery appears.
2. Click the shape you want to insert.
The arrow pointer changes to a crosshair.
3. Click and drag on the slide until the shape reaches the
desired size.
Tip: To draw a straight line, perfect square or
circle, or to constrain the dimensions of other
shapes, press and hold down the <Shift> key as
you drag.
4. Release the mouse button.
The shape is inserted onto the slide and the Format
contextual tab appears on the Ribbon under Drawing
Tools.
Other Ways to Insert a Shape: Click the Home tab on the Ribbon and click the
Shapes button in the Drawing group.
Adjust a shape
You can adjust the most prominent feature of a shape—
such as the point of an arrow or the spikes on a star—by
using its adjustment handle.
1. Click the shape to select it.
2. Click and drag the shape’s adjustment handle ( ).
3. Release the mouse button.
Tip: Some shapes have more than one adjustment
handle, while others don’t have any at all.
Exercise
• Exercise File: American History7-7.pptx
• Exercise: Navigate to Slide 5 and draw a 16-point star
shape to the left of the Statue of Liberty image.
Condense the shape by dragging its adjustment handle
downward.
Table 7-3: AutoShape Categories
Lines Straight lines, curved lines, scribbly
lines, arrows, and free form drawing
shapes.
Basic Shapes Squares, rectangles, triangles, circles,
pentagons, and more.
Block Arrows Arrows that point up, down, left, and
right.
Equation Shapes Plus, minus, division, and equal to
signs.
Flowchart Basic shapes used to create flowcharts.
Stars and Banners Shapes that boldly announce
something.
Callouts Text box shapes that point to and
describe something.
Action Buttons Navigation buttons used to jump to
another slide or run a macro.
Figure 7-11: Adjusting a shape.
Working with Objects
Adjustment handle
100 © 2010 CustomGuide, Inc.
Add text to a shape
Adding text to a shape is extremely easy—just click the
shape and start typing.
Click the shape you want to add text to and start
typing.
Other Ways to Add Text to a Shape: Right-click the shape you want to add text to,
select Edit Text from the contextual menu, and
type your text.
Working with Objects
IT Services, University of Wolverhampton 101
Formatting Shapes
The first thing you’ll probably want to do after inserting a
shape is change its fill color or outline. This lesson will
show you how to format a shape to meet your needs.
Change the fill color of a shape
You can add, adjust, or remove the fill color of the shapes
you create in PowerPoint.
1. Double-click the shape whose fill color you wish to
change.
The Format contextual tab appears on the Ribbon
under Drawing Tools.
2. Click the Shape Fill button in the Shape Styles
group.
The Shape Fill menu appears. You have several
options to choose from here, as shown in Table 7-4:
The Shape Fill Menu.
3. Select an option from the menu.
Other Ways to Change the Fill Color of a
Shape: Right-click the shape and select Format Shape
from the contextual menu. Click the Fill tab,
select your options, and click Close when you’re
finished.
Change the outline of a shape
You can add an outline to shapes or adjust or remove an
existing outline.
1. Double-click the shape whose outline you wish to
change.
The Format contextual tab appears on the Ribbon
under Drawing Tools.
2. Click the Shape Outline button in the Shape Styles
group.
The Shape Outline menu appears. You have several
options to choose from here, as shown in Table 7-5:
The Shape Outline Menu.
3. Select an option from the menu.
Other Ways to Change the Outline of a Shape: Right-click the shape and select Format Shape
from the contextual menu. Click the Line tab,
select your options, and click Close when you’re
finished.
Exercise
• Exercise File: American History7-8.pptx
• Exercise: Navigate to Slide 5 and apply a yellow fill color
to the star shape.
Apply an orange outline color to the shape.
Table 7-4: The Shape Fill Menu
Theme Colors Lets you select a fill color from the
colors in the current theme.
Standard Colors Lets you select a fill color from one of
the 10 standard colors.
No Fill Removes the fill color.
More Fill Colors Lets you select a fill color from one of
the thousands of colors in the Colors
dialog box.
Picture Fills the shape with a graphic you
have on file.
Gradient Fills the shape with a gradient that
gradually changes from one color to
another.
Texture Fills the shape with a texture.
Figure 7-12: The Shape Styles group on the Format tab.
Table 7-5: The Shape Outline Menu
Theme Colors Lets you select an outline color from
the colors in the current theme.
Standard Colors Lets you select an outline color from
one of the 10 standard colors.
No Outline Removes the outline.
More Outline Colors Lets you select an outline color from
one of the thousands of colors in the
Colors dialog box.
Weight Changes the thickness of an outline.
Dashes Changes the look of the outline.
Working with Objects
102 © 2010 CustomGuide, Inc.
Change the visual style of a shape
Changing the visual style of a shape is an easy way to
spice up its appearance. A visual style is a set of different
formatting commands that can be applied to a shape in
one single step.
1. Double-click the shape that you want to adjust.
The Format contextual tab appears on the Ribbon
under Drawing Tools.
2. Select a style from the Shape Styles group.
Tip: To view all the available styles, click the
More button ( ) in the Shape Styles group to
display the Styles gallery.
The visual style is applied to the shape.
Other Ways to Change the Visual Style of a
Shape: Click the Home tab on the Ribbon, click the
Quick Styles button in the Drawing group, and
select a style from the gallery. Figure 7-13: The Shape Styles gallery.
Working with Objects
IT Services, University of Wolverhampton 103
Resize, Move, Copy and Delete Objects
More often than not, the objects that you insert into your
presentations will need to be modified in order to coincide
with the other elements on a slide. This lesson will show
you how to resize, move, copy, and delete the shapes and
graphics in your presentations.
Resize an object
Make an object larger or smaller by resizing it.
1. Click the object to select it.
Sizing handles appear around the object once it is
selected. You can use these sizing handles to change
the size and proportion of the selected object.
2. Click and drag one of the object’s sizing handles.
Tip: To maintain the object’s proportions while
resizing, hold down the <Shift> key as you drag.
3. Release the mouse button.
Move an object
By simply clicking and dragging with the mouse, you can
move an object to a new location on the slide.
1. Click and drag the object to a new location.
2. Release the mouse button when the object is
positioned where you want it.
Copy an object
You can also copy an object by clicking and dragging—
simply press and hold the <Ctrl> key as you drag.
1. Click the object to select it.
2. Press and hold down the <Ctrl> key, and click and
drag the object to a new location.
3. Release the mouse button, and then release the
<Ctrl> key.
Delete an object
If you decide you don’t want an object, delete it.
Select the object that you want to delete and press the
<Delete> key.
The object is removed from the presentation.
Exercise
• Exercise File: American History7-9.pptx
• Exercise: Navigate to Slide 3 and enlarge the Mt.
Rushmore image.
Navigate to Slide 6 and make a duplicate of the Executive
image.
Delete the duplicate image.
Figure 7-14: To resize an object, simply click and drag one of its sizing handles.
Working with Objects
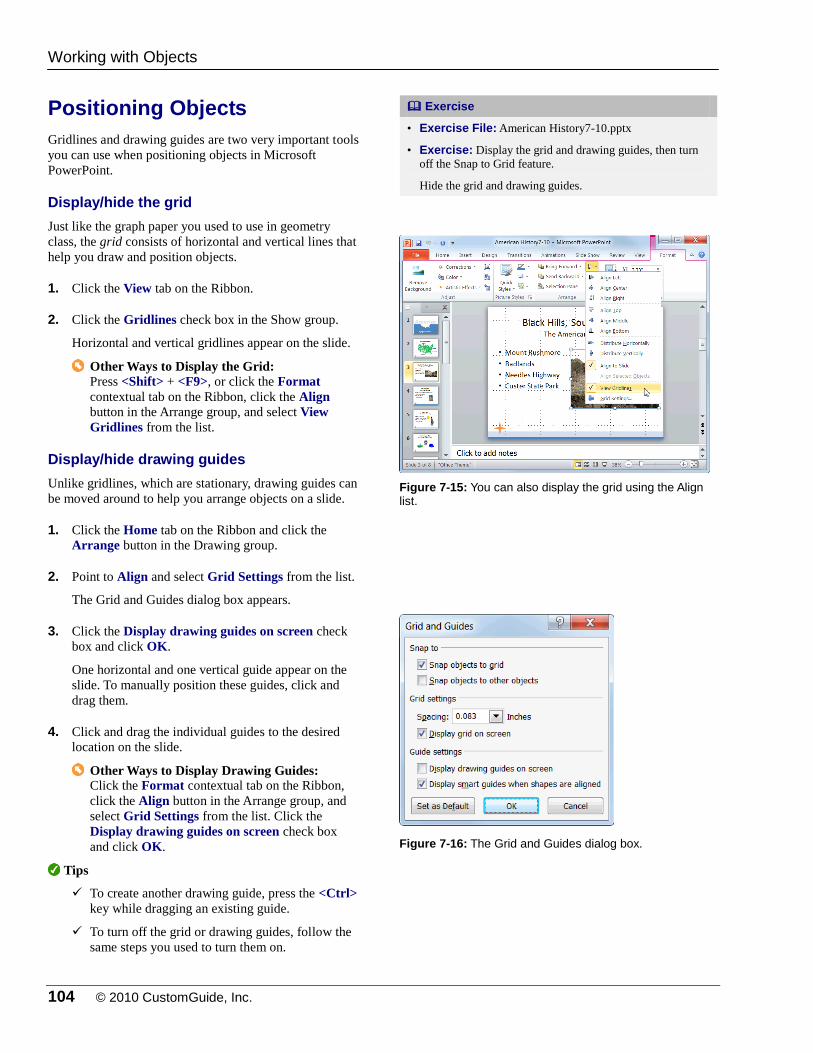
104 © 2010 CustomGuide, Inc.
Positioning Objects
Gridlines and drawing guides are two very important tools
you can use when positioning objects in Microsoft
PowerPoint.
Display/hide the grid
Just like the graph paper you used to use in geometry
class, the grid consists of horizontal and vertical lines that
help you draw and position objects.
1. Click the View tab on the Ribbon.
2. Click the Gridlines check box in the Show group.
Horizontal and vertical gridlines appear on the slide.
Other Ways to Display the Grid: Press <Shift> + <F9>, or click the Format
contextual tab on the Ribbon, click the Align
button in the Arrange group, and select View
Gridlines from the list.
Display/hide drawing guides
Unlike gridlines, which are stationary, drawing guides can
be moved around to help you arrange objects on a slide.
1. Click the Home tab on the Ribbon and click the
Arrange button in the Drawing group.
2. Point to Align and select Grid Settings from the list.
The Grid and Guides dialog box appears.
3. Click the Display drawing guides on screen check
box and click OK.
One horizontal and one vertical guide appear on the
slide. To manually position these guides, click and
drag them.
4. Click and drag the individual guides to the desired
location on the slide.
Other Ways to Display Drawing Guides: Click the Format contextual tab on the Ribbon,
click the Align button in the Arrange group, and
select Grid Settings from the list. Click the
Display drawing guides on screen check box
and click OK.
Tips
To create another drawing guide, press the <Ctrl>
key while dragging an existing guide.
To turn off the grid or drawing guides, follow the
same steps you used to turn them on.
Exercise
• Exercise File: American History7-10.pptx
• Exercise: Display the grid and drawing guides, then turn
off the Snap to Grid feature.
Hide the grid and drawing guides.
Figure 7-15: You can also display the grid using the Align list.
Figure 7-16: The Grid and Guides dialog box.
Working with Objects

IT Services, University of Wolverhampton 105
Drawing guides and gridlines do NOT appear in
Slide Show view or when the presentation is
printed.
Turn on/off the Snap to Grid feature
The Snap to Grid feature causes objects to “snap” to the
nearest gridline when you move them. This can either be
convenient or extremely inconvenient depending on your
personal preferences.
The Snap to Grid feature is turned on by default in
PowerPoint 2010, but you can easily turn it off if you
decide you don’t like it. Turning off this feature allows
you to position objects with greater precision.
1. Click the Home tab on the Ribbon and click the
Arrange button in the Drawing group.
2. Point to Align and select Grid Settings from the list.
The Grid and Guides dialog box appears.
3. Click the Snap objects to grid check box.
Tip: To set this as the default setting, click Set as
Default in the Grid and Guides dialog box.
4. Click OK.
Other Ways to Turn On/Off the “Snap to Grid”
feature: Click the Format contextual tab on the Ribbon,
click the Align button in the Arrange group, and
select Grid Settings from the list. Click the Snap
objects to grid check box and click OK.
Working with Objects

106 © 2010 CustomGuide, Inc.
Applying Special Effects
You can apply special effects such as reflection, glow, and
3-D rotation to clip art, shapes, and pictures.
1. Double-click the object that you want to apply
special effects to.
The Format contextual tab appears on the Ribbon.
2. Depending on the object, click the Picture Effects
button in the Picture Styles group or click the Shape
Effects button in the Shape Styles group.
A menu of different effects appears.
3. Point to the type of effect you want to use, then select
an option from the submenu.
The special effect is applied to the object.
Tip: As you point to different effects in the
submenu, the selected shape changes to show you
how it will look with the effect applied (Live
Preview).
Exercise
• Exercise File: American History7-11.pptx
• Exercise: Navigate to Slide 8 and apply a glow effect to
the first rectangle shape.
Apply the special effect of your choice to the second and
third rectangle shapes.
Figure 7-17: Selecting a special effect.
Working with Objects
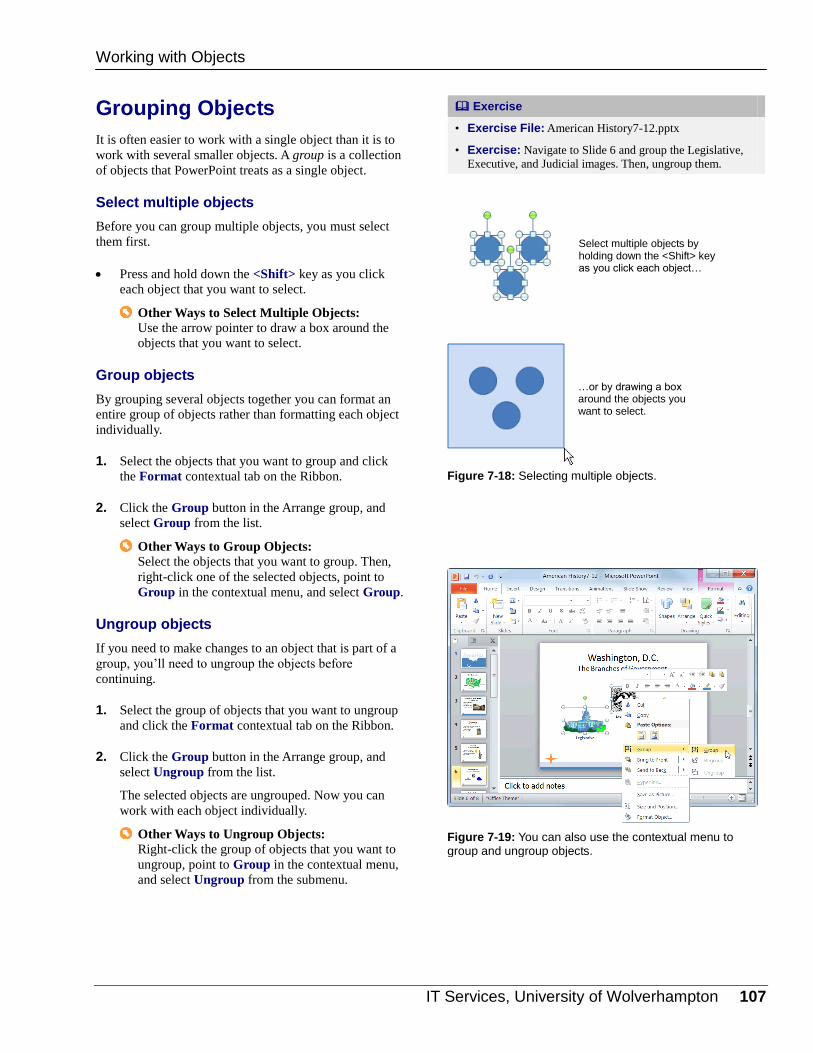
IT Services, University of Wolverhampton 107
Grouping Objects
It is often easier to work with a single object than it is to
work with several smaller objects. A group is a collection
of objects that PowerPoint treats as a single object.
Select multiple objects
Before you can group multiple objects, you must select
them first.
Press and hold down the <Shift> key as you click
each object that you want to select.
Other Ways to Select Multiple Objects: Use the arrow pointer to draw a box around the
objects that you want to select.
Group objects
By grouping several objects together you can format an
entire group of objects rather than formatting each object
individually.
1. Select the objects that you want to group and click
the Format contextual tab on the Ribbon.
2. Click the Group button in the Arrange group, and
select Group from the list.
Other Ways to Group Objects: Select the objects that you want to group. Then,
right-click one of the selected objects, point to
Group in the contextual menu, and select Group.
Ungroup objects
If you need to make changes to an object that is part of a
group, you’ll need to ungroup the objects before
continuing.
1. Select the group of objects that you want to ungroup
and click the Format contextual tab on the Ribbon.
2. Click the Group button in the Arrange group, and
select Ungroup from the list.
The selected objects are ungrouped. Now you can
work with each object individually.
Other Ways to Ungroup Objects: Right-click the group of objects that you want to
ungroup, point to Group in the contextual menu,
and select Ungroup from the submenu.
Exercise
• Exercise File: American History7-12.pptx
• Exercise: Navigate to Slide 6 and group the Legislative,
Executive, and Judicial images. Then, ungroup them.
Figure 7-18: Selecting multiple objects.
Figure 7-19: You can also use the contextual menu to group and ungroup objects.
Working with Objects
Select multiple objects by holding down the <Shift> key as you click each object…
…or by drawing a box around the objects you want to select.
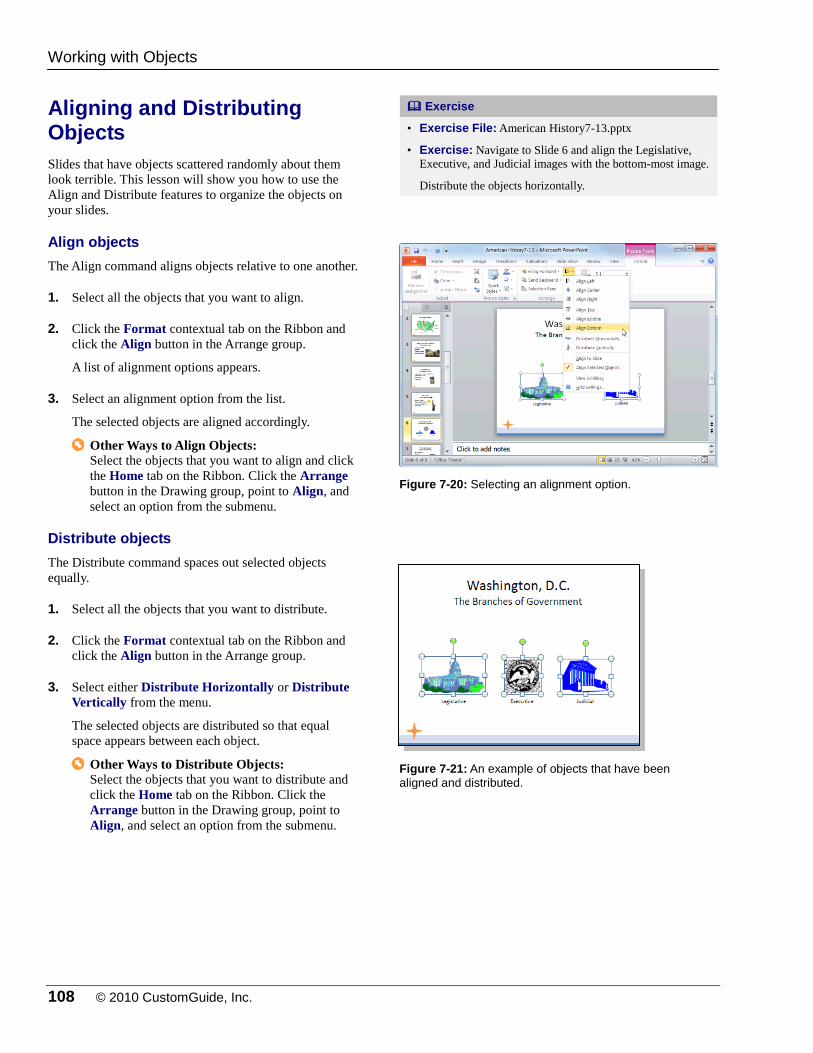
108 © 2010 CustomGuide, Inc.
Aligning and Distributing Objects
Slides that have objects scattered randomly about them
look terrible. This lesson will show you how to use the
Align and Distribute features to organize the objects on
your slides.
Align objects
The Align command aligns objects relative to one another.
1. Select all the objects that you want to align.
2. Click the Format contextual tab on the Ribbon and
click the Align button in the Arrange group.
A list of alignment options appears.
3. Select an alignment option from the list.
The selected objects are aligned accordingly.
Other Ways to Align Objects: Select the objects that you want to align and click
the Home tab on the Ribbon. Click the Arrange
button in the Drawing group, point to Align, and
select an option from the submenu.
Distribute objects
The Distribute command spaces out selected objects
equally.
1. Select all the objects that you want to distribute.
2. Click the Format contextual tab on the Ribbon and
click the Align button in the Arrange group.
3. Select either Distribute Horizontally or Distribute
Vertically from the menu.
The selected objects are distributed so that equal
space appears between each object.
Other Ways to Distribute Objects: Select the objects that you want to distribute and
click the Home tab on the Ribbon. Click the
Arrange button in the Drawing group, point to
Align, and select an option from the submenu.
Exercise
• Exercise File: American History7-13.pptx
• Exercise: Navigate to Slide 6 and align the Legislative,
Executive, and Judicial images with the bottom-most image.
Distribute the objects horizontally.
Figure 7-20: Selecting an alignment option.
Figure 7-21: An example of objects that have been
aligned and distributed.
Working with Objects
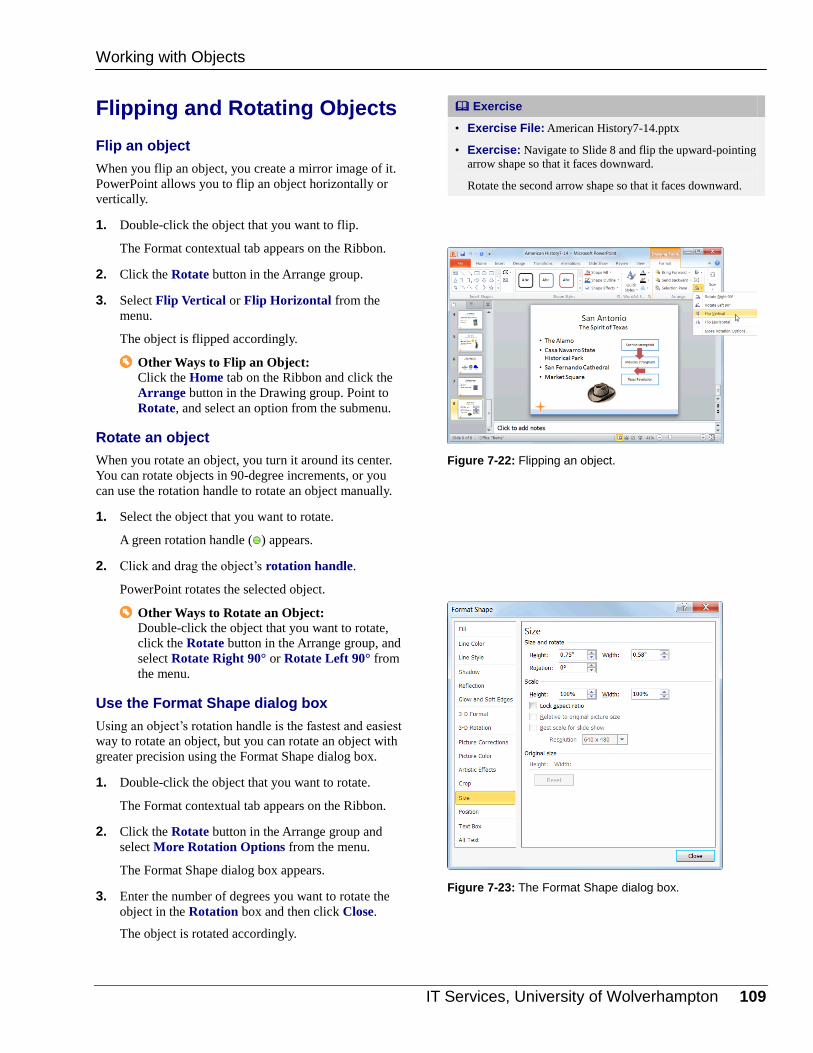
IT Services, University of Wolverhampton 109
Flipping and Rotating Objects
Flip an object
When you flip an object, you create a mirror image of it.
PowerPoint allows you to flip an object horizontally or
vertically.
1. Double-click the object that you want to flip.
The Format contextual tab appears on the Ribbon.
2. Click the Rotate button in the Arrange group.
3. Select Flip Vertical or Flip Horizontal from the
menu.
The object is flipped accordingly.
Other Ways to Flip an Object: Click the Home tab on the Ribbon and click the
Arrange button in the Drawing group. Point to
Rotate, and select an option from the submenu.
Rotate an object
When you rotate an object, you turn it around its center.
You can rotate objects in 90-degree increments, or you
can use the rotation handle to rotate an object manually.
1. Select the object that you want to rotate.
A green rotation handle ( ) appears.
2. Click and drag the object’s rotation handle.
PowerPoint rotates the selected object.
Other Ways to Rotate an Object: Double-click the object that you want to rotate,
click the Rotate button in the Arrange group, and
select Rotate Right 90° or Rotate Left 90° from
the menu.
Use the Format Shape dialog box
Using an object’s rotation handle is the fastest and easiest
way to rotate an object, but you can rotate an object with
greater precision using the Format Shape dialog box.
1. Double-click the object that you want to rotate.
The Format contextual tab appears on the Ribbon.
2. Click the Rotate button in the Arrange group and
select More Rotation Options from the menu.
The Format Shape dialog box appears.
3. Enter the number of degrees you want to rotate the
object in the Rotation box and then click Close.
The object is rotated accordingly.
Exercise
• Exercise File: American History7-14.pptx
• Exercise: Navigate to Slide 8 and flip the upward-pointing
arrow shape so that it faces downward.
Rotate the second arrow shape so that it faces downward.
Figure 7-22: Flipping an object.
Figure 7-23: The Format Shape dialog box.
Working with Objects
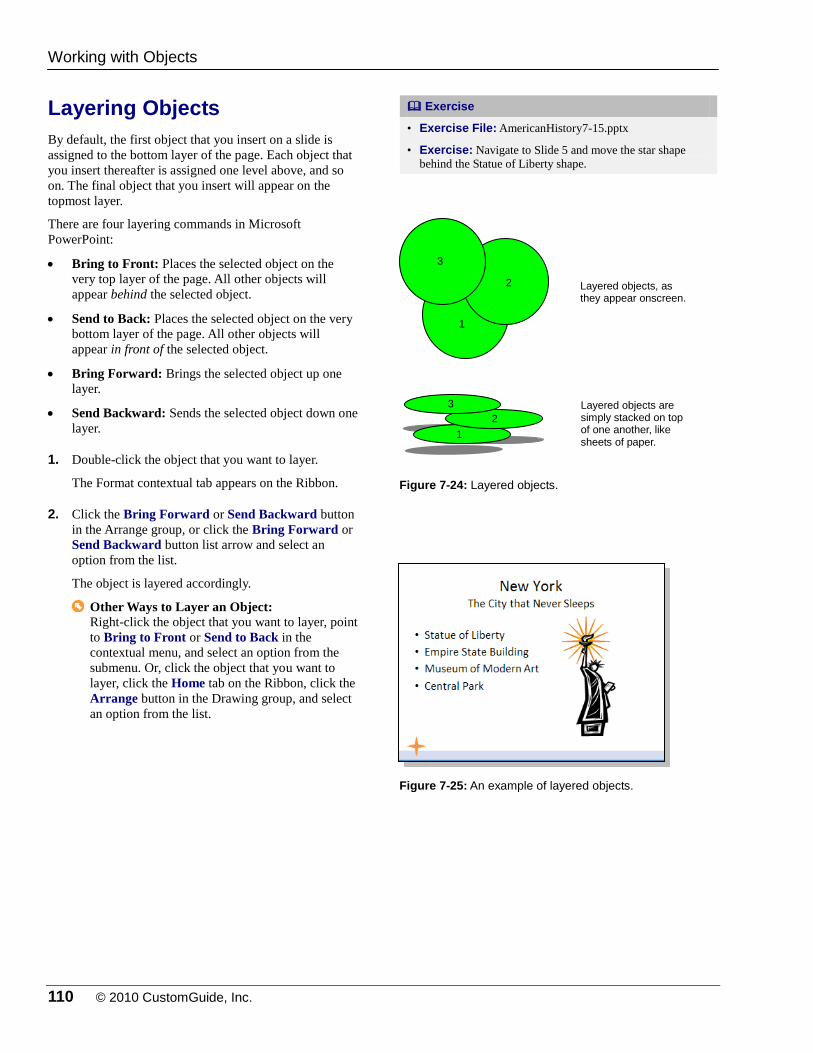
110 © 2010 CustomGuide, Inc.
Layering Objects
By default, the first object that you insert on a slide is
assigned to the bottom layer of the page. Each object that
you insert thereafter is assigned one level above, and so
on. The final object that you insert will appear on the
topmost layer.
There are four layering commands in Microsoft
PowerPoint:
Bring to Front: Places the selected object on the
very top layer of the page. All other objects will
appear behind the selected object.
Send to Back: Places the selected object on the very
bottom layer of the page. All other objects will
appear in front of the selected object.
Bring Forward: Brings the selected object up one
layer.
Send Backward: Sends the selected object down one
layer.
1. Double-click the object that you want to layer.
The Format contextual tab appears on the Ribbon.
2. Click the Bring Forward or Send Backward button
in the Arrange group, or click the Bring Forward or
Send Backward button list arrow and select an
option from the list.
The object is layered accordingly.
Other Ways to Layer an Object: Right-click the object that you want to layer, point
to Bring to Front or Send to Back in the
contextual menu, and select an option from the
submenu. Or, click the object that you want to
layer, click the Home tab on the Ribbon, click the
Arrange button in the Drawing group, and select
an option from the list.
Exercise
• Exercise File: AmericanHistory7-15.pptx
• Exercise: Navigate to Slide 5 and move the star shape
behind the Statue of Liberty shape.
Figure 7-24: Layered objects.
Figure 7-25: An example of layered objects.
Working with Objects
1
2
3
1
2
3
Layered objects, as they appear onscreen.
Layered objects are simply stacked on top of one another, like sheets of paper.
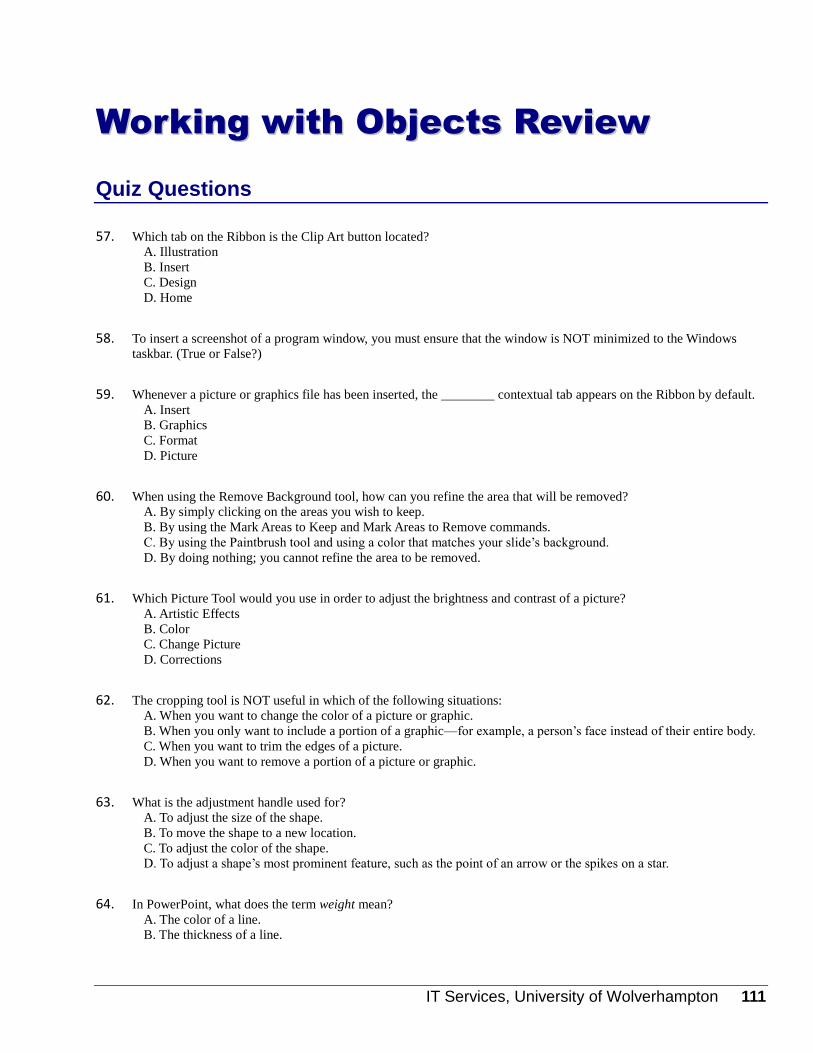
IT Services, University of Wolverhampton 111
WWoorrkkiinngg wwiitthh OObbjjeeccttss RReevviieeww
Quiz Questions
57. Which tab on the Ribbon is the Clip Art button located? A. Illustration B. Insert C. Design D. Home
58. To insert a screenshot of a program window, you must ensure that the window is NOT minimized to the Windows
taskbar. (True or False?)
59. Whenever a picture or graphics file has been inserted, the ________ contextual tab appears on the Ribbon by default. A. Insert B. Graphics C. Format D. Picture
60. When using the Remove Background tool, how can you refine the area that will be removed? A. By simply clicking on the areas you wish to keep. B. By using the Mark Areas to Keep and Mark Areas to Remove commands. C. By using the Paintbrush tool and using a color that matches your slide’s background. D. By doing nothing; you cannot refine the area to be removed.
61. Which Picture Tool would you use in order to adjust the brightness and contrast of a picture? A. Artistic Effects B. Color C. Change Picture D. Corrections
62. The cropping tool is NOT useful in which of the following situations: A. When you want to change the color of a picture or graphic. B. When you only want to include a portion of a graphic—for example, a person’s face instead of their entire body. C. When you want to trim the edges of a picture. D. When you want to remove a portion of a picture or graphic.
63. What is the adjustment handle used for? A. To adjust the size of the shape. B. To move the shape to a new location. C. To adjust the color of the shape. D. To adjust a shape’s most prominent feature, such as the point of an arrow or the spikes on a star.
64. In PowerPoint, what does the term weight mean? A. The color of a line. B. The thickness of a line.
112 © 2010 CustomGuide, Inc.
C. The style of a line. D. How heavy your computer is.
65. A visual style is a set of different formatting commands that can be applied to a shape in one single step. (True or
False?)
66. What happens if you hold down the <Shift> key as you click and drag an object’s sizing handles? A. PowerPoint copies the object. B. PowerPoint changes the color of the object. C. PowerPoint moves the object. D. PowerPoint maintains the objects proportions as it resizes the object.
67. Holding down the <Ctrl> key as you click and drag an object copies the object. (True or False?)
68. Drawing guides can be moved around to help you position objects on a slide. (True or False?)
69. To position objects on your slides with more precision: A. Turn off the Snap to Grid feature. B. Turn on the Snap to Grid feature. C. Press and hold down the <Shift> key as you position the objects. D. Use a ruler.
70. Which of the following is NOT a type of special effect in PowerPoint 2010? A. Reflection B. Glow C. Morph D. Bevel
71. Which of the following is the correct way to select more than one object on a slide? A. Click the Format contextual tab on the Ribbon and click the Select Object button in the Arrange group. B. Hold down the <Ctrl> key as you click each object. C. Hold down the <Shift> key as you click each object. D. You can only select one object at a time in PowerPoint 2010.
72. You cannot make changes to an individual object when it is grouped. (True or False?)
73. The Align command spaces out selected objects equally. (True or False?)
74. To rotate an object with greater precision, use the: A. Ribbon B. Format Shape dialog box C. rotation handle D. contextual menu
75. Which of the following is NOT a layering command in PowerPoint 2010? A. Send to Middle B. Send to Back C. Bring to Front D. Bring Forward
IT Services, University of Wolverhampton 113
Quiz Answers
57. B. The Clip Art button is located in the Illustrations group on the Insert tab.
58. True. To insert a screenshot of another program window, it must NOT be minimized to the Windows taskbar.
59. C. Whenever a picture or graphic has been inserted into a presentation, the Format contextual tab appears on the
Ribbon under Picture Tools.
60. B. By using the Mark Areas to Keep and Mark Areas to Remove commands you can refine the area to be removed
from the picture or graphic.
61. D. The Corrections command not only allows you to adjust the brightness and contrast of an image, but you can also
sharpen and soften an image.
62. A. The cropping tool is not useful when it comes to changing the color of a picture or graphic.
63. D. An adjustment handle is used to adjust a shape’s most prominent feature, such as the point of an arrow or the spikes
on a star.
64. B. In PowerPoint, the term weight refers to the thickness of a shape’s outline.
65. True. A visual style is a set of different formatting commands that can be applied to a shape in one single step.
66. D. Holding down the <Shift> key as you click and drag an object’s sizing handles maintains the object’s proportions.
67. True. Holding down the <Ctrl> key as you click and drag an object copies the object.
68. True. Unlike gridlines, which are stationary, drawing guides can be moved around to help you position objects on a
slide.
69. A. Turn off the Snap to Grid feature to position the objects on your slides with more precision.
70. C. Morph is not a type of special effect in PowerPoint 2010.
71. C. The correct way to select more than one object on a slide is to hold down the <Shift> key as you click each object.
72. True. In order to make changes to an object that is part of a group, you need to ungroup the object first.
73. False. The Distribute command spaces out selected objects equally.
74. B. To rotate an object with greater precision, use the Format Shape dialog box.
75. A. Send to Middle is not a layering command in PowerPoint 2010.
114 © 2010 CustomGuide, Inc.
WWoorrkkiinngg wwiitthh
TTaabblleess
Creating a Table ............................................... 115 Insert a table .......................................... 115 Add text to a table .................................. 115
Working with a Table ....................................... 116 Move around in a table .......................... 116 Select a row ........................................... 116 Select a column ..................................... 116 Select a single cell ................................. 116 Select several cells ................................ 117 Select the entire table ............................ 117 Delete the contents of a cell .................. 117 Delete a table ......................................... 117
Adjusting Column Width and Row Height .... 118
Inserting and Deleting Rows and Columns .. 119
Merging and Splitting Cells ............................ 120
Working with Borders and Shading............... 121 Add borders ........................................... 121 Remove borders .................................... 121 Draw your own borders.......................... 122 Shading table cells ................................. 122
Applying a Table Style..................................... 123 Apply a style .......................................... 123 Remove a style ...................................... 123
Tables can be used in place of tab stops to
organize and arrange information in an
attractive, effective manner. A table neatly
arranges text and data in a grid, organized
by columns and rows. Once you have
entered information in a table, you can do
all kinds of things with it. For example,
you can sort the information
alphabetically or numerically; add and
delete columns and/or rows; and make
your table stand out by formatting it with
border, shading, and color options.
As powerful as tables are, most people
don’t know how to use them effectively, if
at all. Tables are so important that this
entire chapter is devoted to helping you
become a table expert.
Using Exercise Files This chapter suggests exercises to practice
the topic of each lesson. There are two
ways you may follow along with the
exercise files:
Open the exercise file for a lesson,
perform the lesson exercise, and close
the exercise file.
Open the exercise file for a lesson,
perform the lesson exercise, and keep
the file open to perform the remaining
lesson exercises for the chapter.
The exercises are written so that you may
“build upon them”, meaning the exercises
in a chapter can be performed in
succession from the first lesson to the last.
8
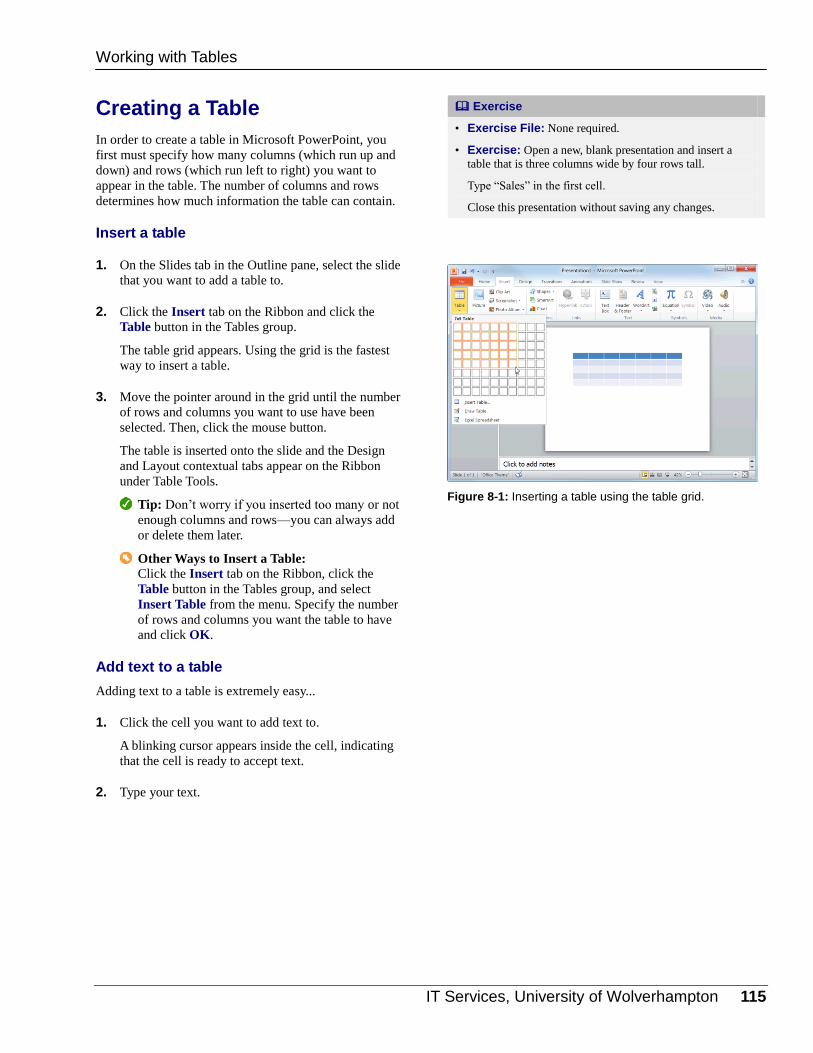
IT Services, University of Wolverhampton 115
Creating a Table
In order to create a table in Microsoft PowerPoint, you
first must specify how many columns (which run up and
down) and rows (which run left to right) you want to
appear in the table. The number of columns and rows
determines how much information the table can contain.
Insert a table
1. On the Slides tab in the Outline pane, select the slide
that you want to add a table to.
2. Click the Insert tab on the Ribbon and click the
Table button in the Tables group.
The table grid appears. Using the grid is the fastest
way to insert a table.
3. Move the pointer around in the grid until the number
of rows and columns you want to use have been
selected. Then, click the mouse button.
The table is inserted onto the slide and the Design
and Layout contextual tabs appear on the Ribbon
under Table Tools.
Tip: Don’t worry if you inserted too many or not
enough columns and rows—you can always add
or delete them later.
Other Ways to Insert a Table: Click the Insert tab on the Ribbon, click the
Table button in the Tables group, and select
Insert Table from the menu. Specify the number
of rows and columns you want the table to have
and click OK.
Add text to a table
Adding text to a table is extremely easy...
1. Click the cell you want to add text to.
A blinking cursor appears inside the cell, indicating
that the cell is ready to accept text.
2. Type your text.
Exercise
• Exercise File: None required.
• Exercise: Open a new, blank presentation and insert a
table that is three columns wide by four rows tall.
Type “Sales” in the first cell.
Close this presentation without saving any changes.
Figure 8-1: Inserting a table using the table grid.
Working with Tables
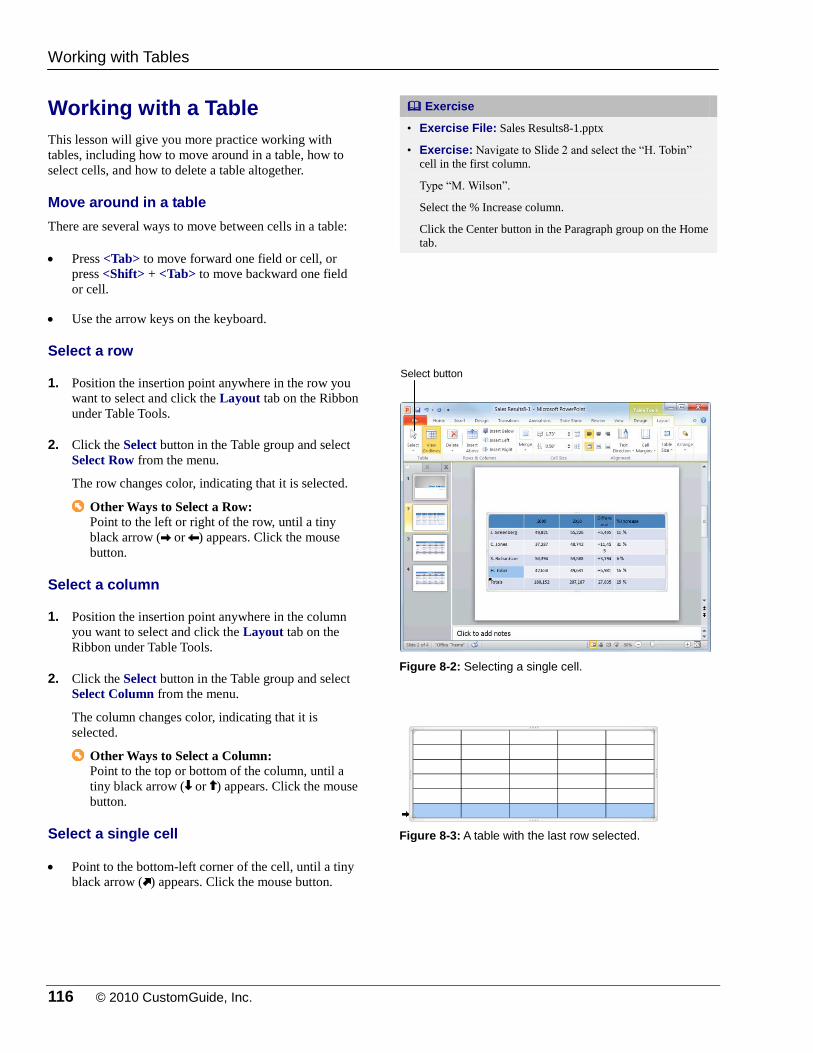
116 © 2010 CustomGuide, Inc.
Working with a Table
This lesson will give you more practice working with
tables, including how to move around in a table, how to
select cells, and how to delete a table altogether.
Move around in a table
There are several ways to move between cells in a table:
Press <Tab> to move forward one field or cell, or
press <Shift> + <Tab> to move backward one field
or cell.
Use the arrow keys on the keyboard.
Select a row
1. Position the insertion point anywhere in the row you
want to select and click the Layout tab on the Ribbon
under Table Tools.
2. Click the Select button in the Table group and select
Select Row from the menu.
The row changes color, indicating that it is selected.
Other Ways to Select a Row: Point to the left or right of the row, until a tiny
black arrow ( or ) appears. Click the mouse
button.
Select a column
1. Position the insertion point anywhere in the column
you want to select and click the Layout tab on the
Ribbon under Table Tools.
2. Click the Select button in the Table group and select
Select Column from the menu.
The column changes color, indicating that it is
selected.
Other Ways to Select a Column: Point to the top or bottom of the column, until a
tiny black arrow ( or ) appears. Click the mouse
button.
Select a single cell
Point to the bottom-left corner of the cell, until a tiny
black arrow ( ) appears. Click the mouse button.
Exercise
• Exercise File: Sales Results8-1.pptx
• Exercise: Navigate to Slide 2 and select the “H. Tobin”
cell in the first column.
Type “M. Wilson”.
Select the % Increase column.
Click the Center button in the Paragraph group on the Home
tab.
Figure 8-2: Selecting a single cell.
Figure 8-3: A table with the last row selected.
Working with Tables
Select button
IT Services, University of Wolverhampton 117
Select several cells
Click and drag the mouse pointer across the cells you
want to select.
Click the first cell you want to select, press and hold
down the <Shift> key, and click the last cell you
want to select.
Select the entire table
1. Click anywhere inside the table and click the Layout
tab on the Ribbon under Table Tools.
2. Click the Select button in the Table group and select
Select Table from the menu.
The table is selected.
Other Ways to Select the Entire Table: Right-click the table and select Select Table from
the contextual menu, or click the outermost
perimeter of the table.
Delete the contents of a cell
Deleting the contents of a cell is extremely easy…
Select the cell(s) whose contents you wish to delete
and press the <Delete> key.
Delete a table
If you decide you don’t want a table after all, delete it.
Select the table and press the <Delete> key.
Working with Tables
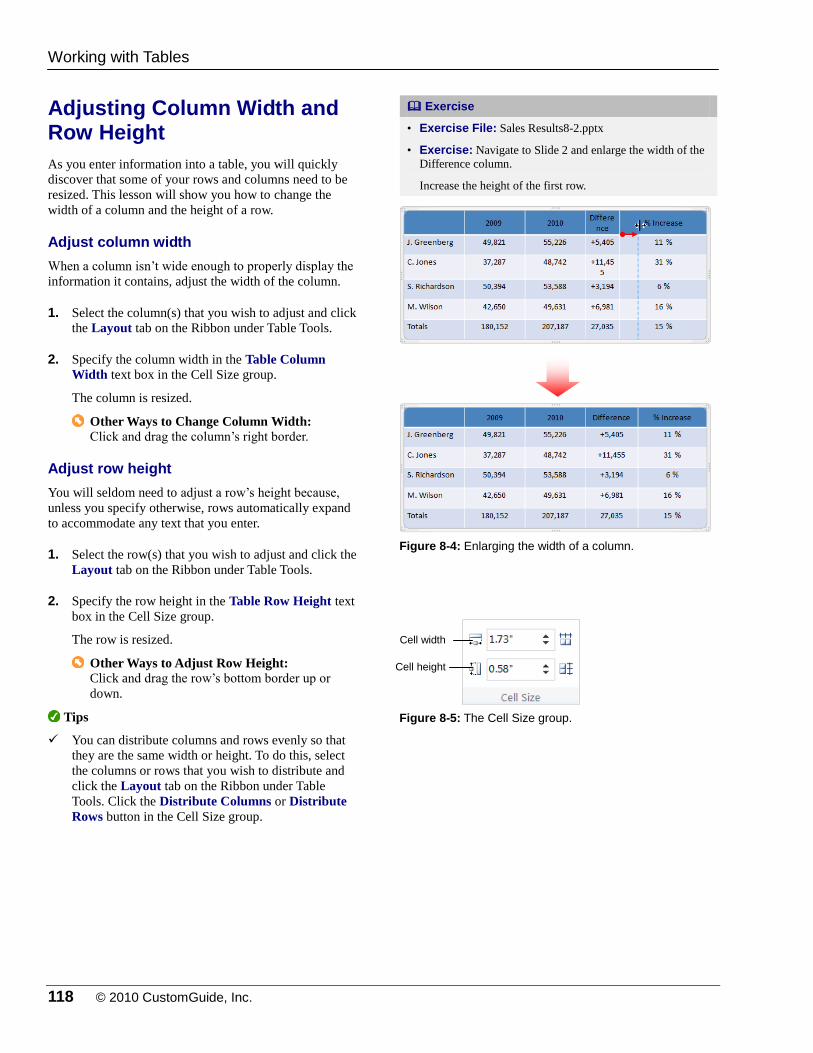
118 © 2010 CustomGuide, Inc.
Adjusting Column Width and Row Height
As you enter information into a table, you will quickly
discover that some of your rows and columns need to be
resized. This lesson will show you how to change the
width of a column and the height of a row.
Adjust column width
When a column isn’t wide enough to properly display the
information it contains, adjust the width of the column.
1. Select the column(s) that you wish to adjust and click
the Layout tab on the Ribbon under Table Tools.
2. Specify the column width in the Table Column
Width text box in the Cell Size group.
The column is resized.
Other Ways to Change Column Width: Click and drag the column’s right border.
Adjust row height
You will seldom need to adjust a row’s height because,
unless you specify otherwise, rows automatically expand
to accommodate any text that you enter.
1. Select the row(s) that you wish to adjust and click the
Layout tab on the Ribbon under Table Tools.
2. Specify the row height in the Table Row Height text
box in the Cell Size group.
The row is resized.
Other Ways to Adjust Row Height: Click and drag the row’s bottom border up or
down.
Tips
You can distribute columns and rows evenly so that
they are the same width or height. To do this, select
the columns or rows that you wish to distribute and
click the Layout tab on the Ribbon under Table
Tools. Click the Distribute Columns or Distribute
Rows button in the Cell Size group.
Exercise
• Exercise File: Sales Results8-2.pptx
• Exercise: Navigate to Slide 2 and enlarge the width of the
Difference column.
Increase the height of the first row.
Figure 8-4: Enlarging the width of a column.
Figure 8-5: The Cell Size group.
Working with Tables
Cell height
Cell width
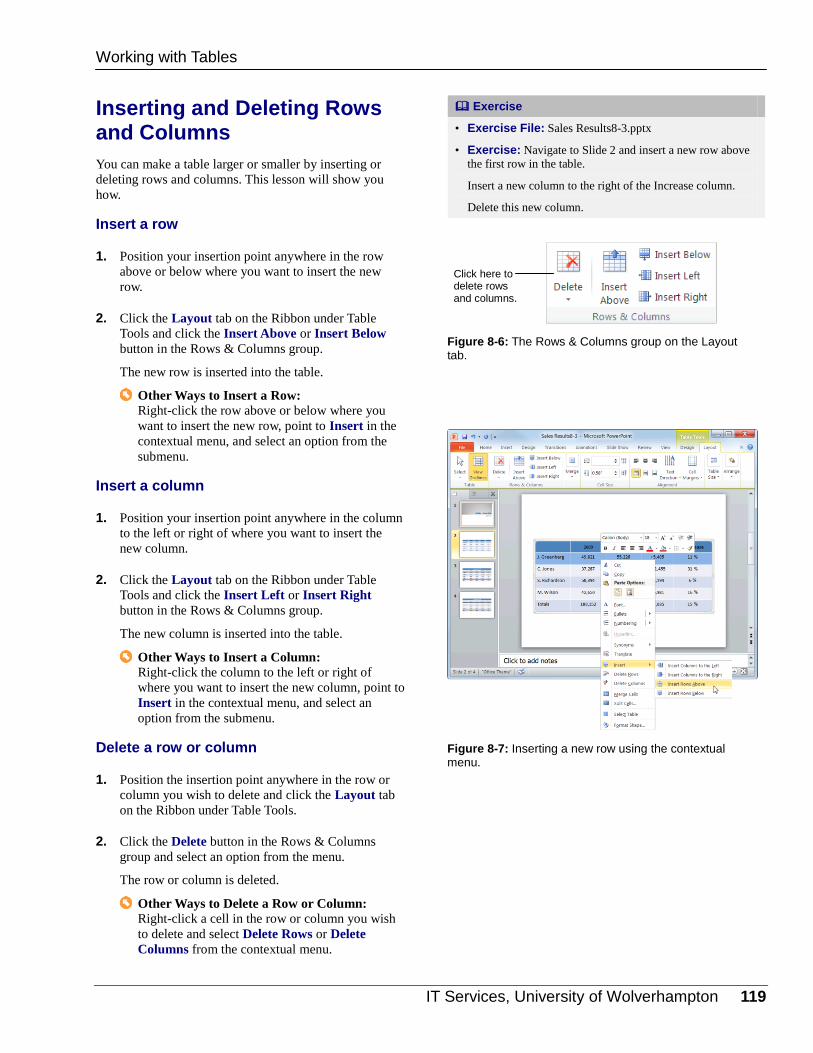
IT Services, University of Wolverhampton 119
Inserting and Deleting Rows and Columns
You can make a table larger or smaller by inserting or
deleting rows and columns. This lesson will show you
how.
Insert a row
1. Position your insertion point anywhere in the row
above or below where you want to insert the new
row.
2. Click the Layout tab on the Ribbon under Table
Tools and click the Insert Above or Insert Below
button in the Rows & Columns group.
The new row is inserted into the table.
Other Ways to Insert a Row: Right-click the row above or below where you
want to insert the new row, point to Insert in the
contextual menu, and select an option from the
submenu.
Insert a column
1. Position your insertion point anywhere in the column
to the left or right of where you want to insert the
new column.
2. Click the Layout tab on the Ribbon under Table
Tools and click the Insert Left or Insert Right
button in the Rows & Columns group.
The new column is inserted into the table.
Other Ways to Insert a Column: Right-click the column to the left or right of
where you want to insert the new column, point to
Insert in the contextual menu, and select an
option from the submenu.
Delete a row or column
1. Position the insertion point anywhere in the row or
column you wish to delete and click the Layout tab
on the Ribbon under Table Tools.
2. Click the Delete button in the Rows & Columns
group and select an option from the menu.
The row or column is deleted.
Other Ways to Delete a Row or Column: Right-click a cell in the row or column you wish
to delete and select Delete Rows or Delete
Columns from the contextual menu.
Exercise
• Exercise File: Sales Results8-3.pptx
• Exercise: Navigate to Slide 2 and insert a new row above
the first row in the table.
Insert a new column to the right of the Increase column.
Delete this new column.
Figure 8-6: The Rows & Columns group on the Layout tab.
Figure 8-7: Inserting a new row using the contextual menu.
Working with Tables
Click here to delete rows and columns.
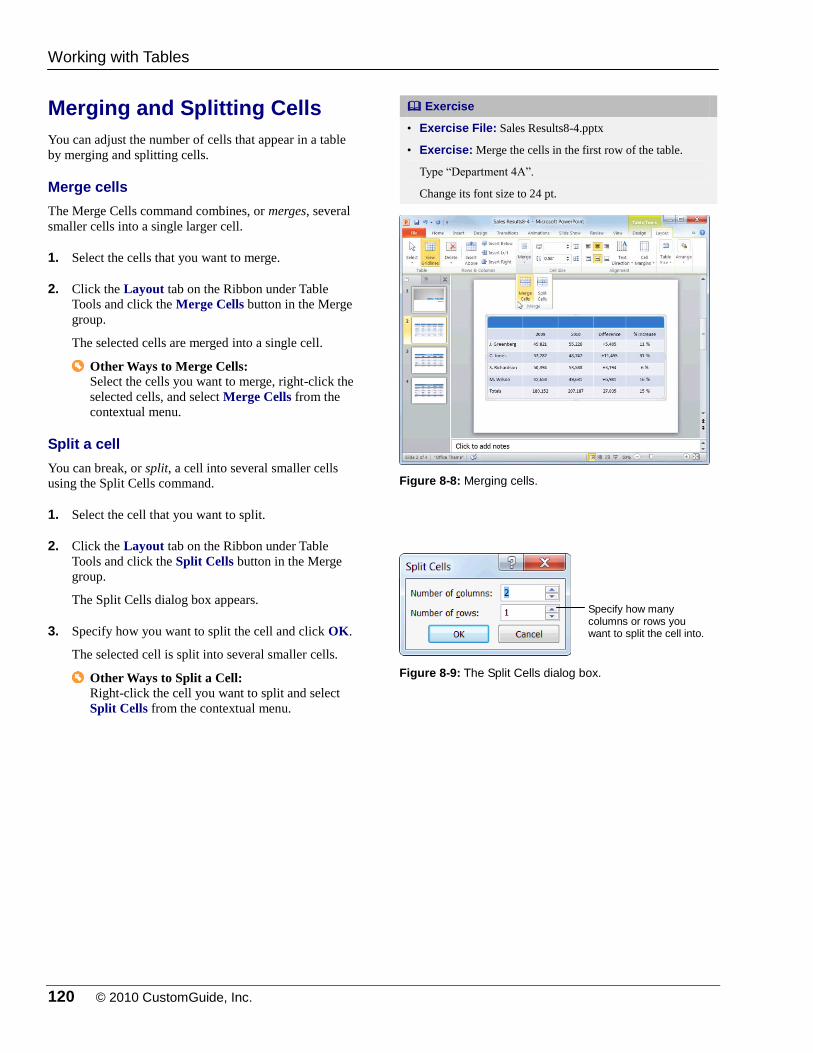
120 © 2010 CustomGuide, Inc.
Merging and Splitting Cells
You can adjust the number of cells that appear in a table
by merging and splitting cells.
Merge cells
The Merge Cells command combines, or merges, several
smaller cells into a single larger cell.
1. Select the cells that you want to merge.
2. Click the Layout tab on the Ribbon under Table
Tools and click the Merge Cells button in the Merge
group.
The selected cells are merged into a single cell.
Other Ways to Merge Cells: Select the cells you want to merge, right-click the
selected cells, and select Merge Cells from the
contextual menu.
Split a cell
You can break, or split, a cell into several smaller cells
using the Split Cells command.
1. Select the cell that you want to split.
2. Click the Layout tab on the Ribbon under Table
Tools and click the Split Cells button in the Merge
group.
The Split Cells dialog box appears.
3. Specify how you want to split the cell and click OK.
The selected cell is split into several smaller cells.
Other Ways to Split a Cell: Right-click the cell you want to split and select
Split Cells from the contextual menu.
Exercise
• Exercise File: Sales Results8-4.pptx
• Exercise: Merge the cells in the first row of the table.
Type “Department 4A”.
Change its font size to 24 pt.
Figure 8-8: Merging cells.
Figure 8-9: The Split Cells dialog box.
Working with Tables
Specify how many columns or rows you want to split the cell into.
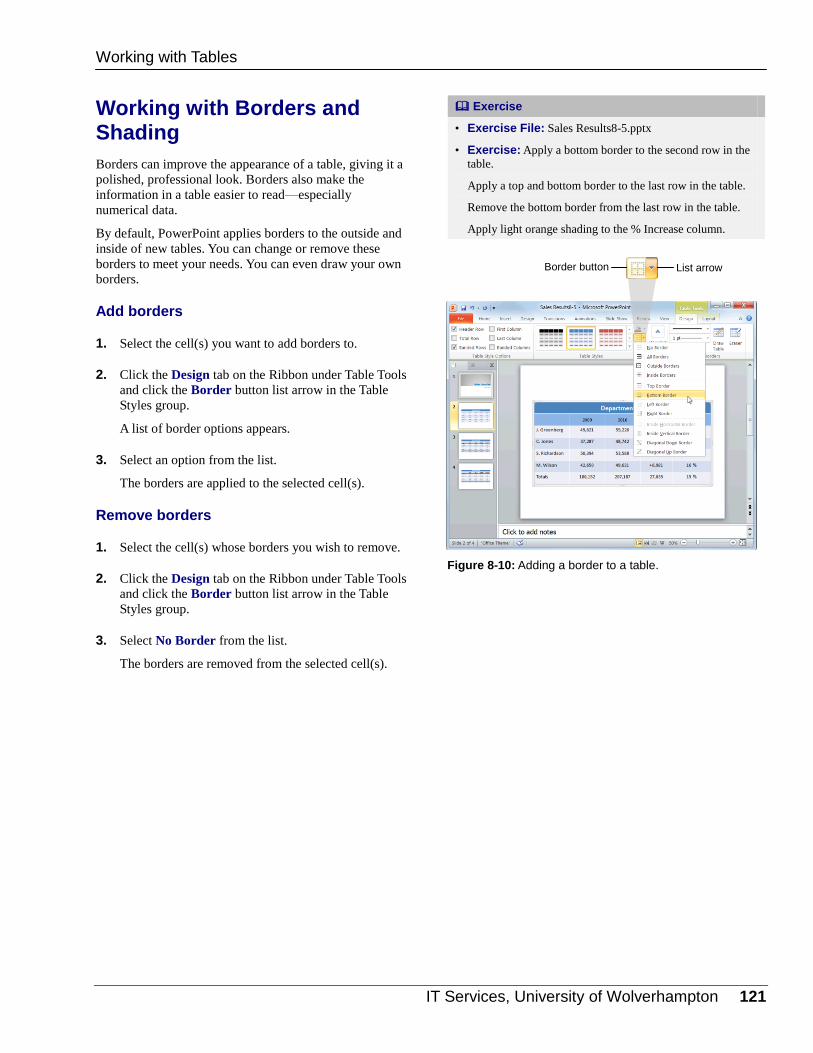
IT Services, University of Wolverhampton 121
Working with Borders and Shading
Borders can improve the appearance of a table, giving it a
polished, professional look. Borders also make the
information in a table easier to read—especially
numerical data.
By default, PowerPoint applies borders to the outside and
inside of new tables. You can change or remove these
borders to meet your needs. You can even draw your own
borders.
Add borders
1. Select the cell(s) you want to add borders to.
2. Click the Design tab on the Ribbon under Table Tools
and click the Border button list arrow in the Table
Styles group.
A list of border options appears.
3. Select an option from the list.
The borders are applied to the selected cell(s).
Remove borders
1. Select the cell(s) whose borders you wish to remove.
2. Click the Design tab on the Ribbon under Table Tools
and click the Border button list arrow in the Table
Styles group.
3. Select No Border from the list.
The borders are removed from the selected cell(s).
Exercise
• Exercise File: Sales Results8-5.pptx
• Exercise: Apply a bottom border to the second row in the
table.
Apply a top and bottom border to the last row in the table.
Remove the bottom border from the last row in the table.
Apply light orange shading to the % Increase column.
Figure 8-10: Adding a border to a table.
Working with Tables
Border button List arrow
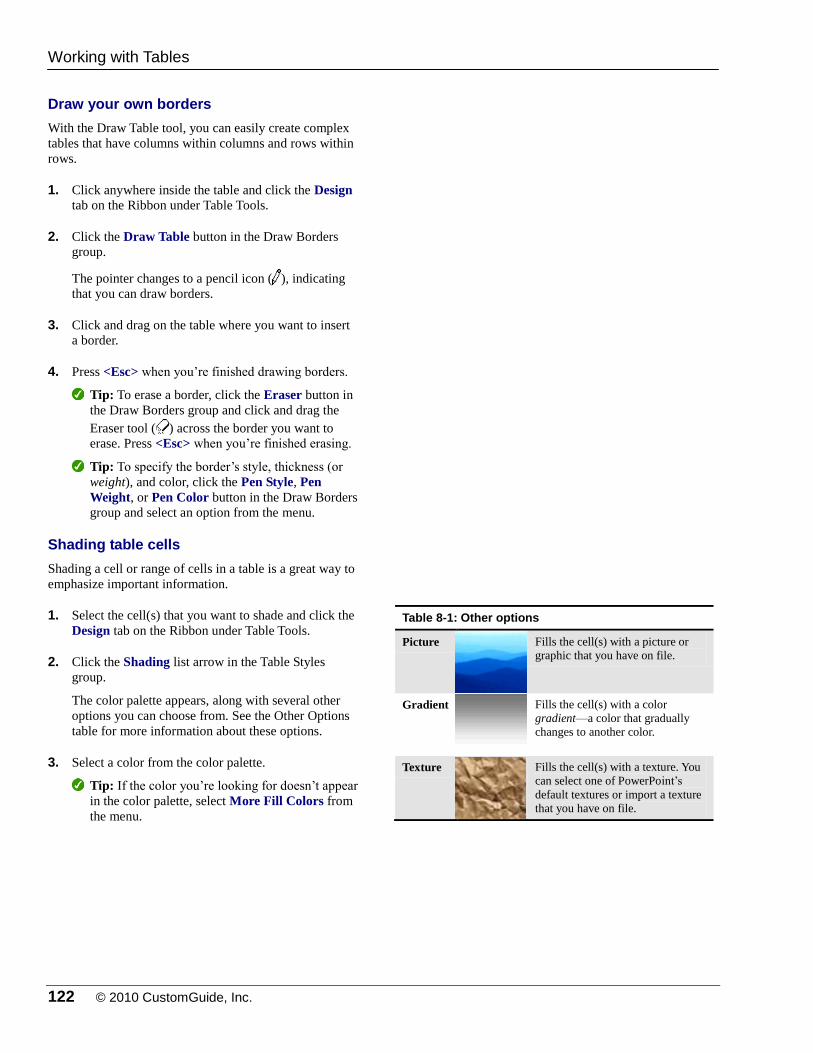
122 © 2010 CustomGuide, Inc.
Draw your own borders
With the Draw Table tool, you can easily create complex
tables that have columns within columns and rows within
rows.
1. Click anywhere inside the table and click the Design
tab on the Ribbon under Table Tools.
2. Click the Draw Table button in the Draw Borders
group.
The pointer changes to a pencil icon ( ), indicating
that you can draw borders.
3. Click and drag on the table where you want to insert
a border.
4. Press <Esc> when you’re finished drawing borders.
Tip: To erase a border, click the Eraser button in
the Draw Borders group and click and drag the
Eraser tool ( ) across the border you want to
erase. Press <Esc> when you’re finished erasing.
Tip: To specify the border’s style, thickness (or
weight), and color, click the Pen Style, Pen
Weight, or Pen Color button in the Draw Borders
group and select an option from the menu.
Shading table cells
Shading a cell or range of cells in a table is a great way to
emphasize important information.
1. Select the cell(s) that you want to shade and click the
Design tab on the Ribbon under Table Tools.
2. Click the Shading list arrow in the Table Styles
group.
The color palette appears, along with several other
options you can choose from. See the Other Options
table for more information about these options.
3. Select a color from the color palette.
Tip: If the color you’re looking for doesn’t appear
in the color palette, select More Fill Colors from
the menu.
Table 8-1: Other options
Picture Fills the cell(s) with a picture or
graphic that you have on file.
Gradient Fills the cell(s) with a color
gradient—a color that gradually
changes to another color.
Texture Fills the cell(s) with a texture. You
can select one of PowerPoint’s
default textures or import a texture
that you have on file.
Working with Tables
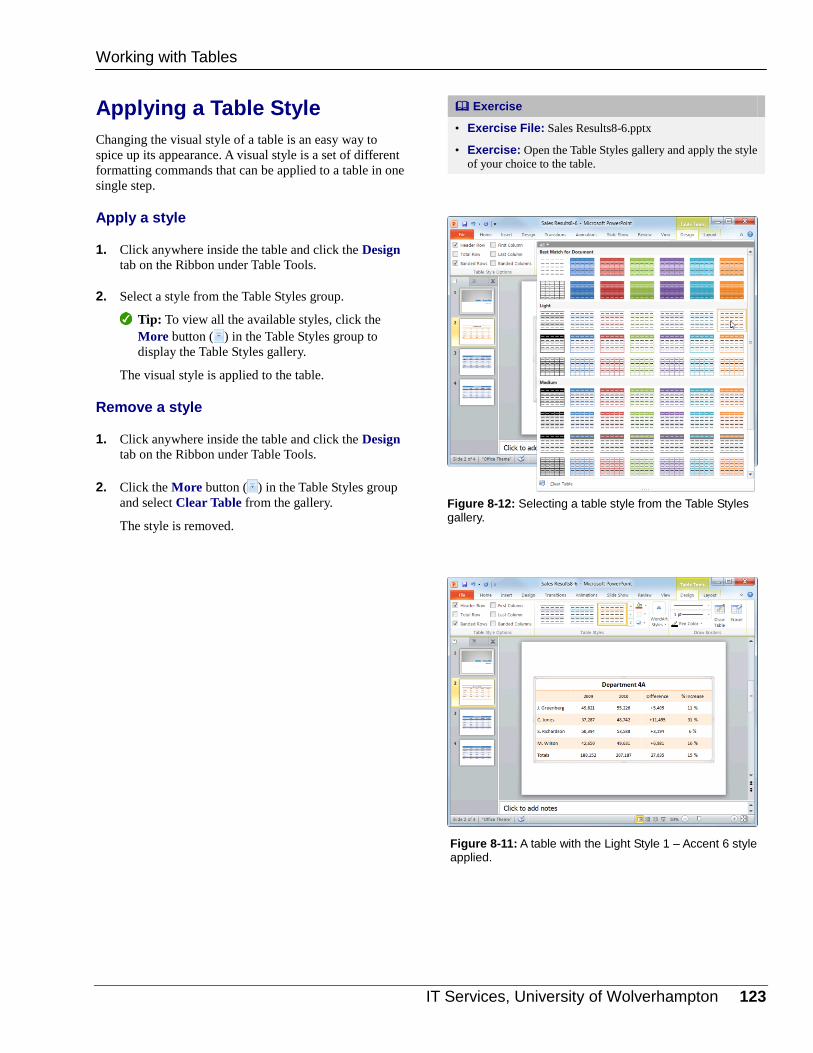
IT Services, University of Wolverhampton 123
Applying a Table Style
Changing the visual style of a table is an easy way to
spice up its appearance. A visual style is a set of different
formatting commands that can be applied to a table in one
single step.
Apply a style
1. Click anywhere inside the table and click the Design
tab on the Ribbon under Table Tools.
2. Select a style from the Table Styles group.
Tip: To view all the available styles, click the
More button ( ) in the Table Styles group to
display the Table Styles gallery.
The visual style is applied to the table.
Remove a style
1. Click anywhere inside the table and click the Design
tab on the Ribbon under Table Tools.
2. Click the More button ( ) in the Table Styles group
and select Clear Table from the gallery.
The style is removed.
Exercise
• Exercise File: Sales Results8-6.pptx
• Exercise: Open the Table Styles gallery and apply the style
of your choice to the table.
Figure 8-11: A table with the Light Style 1 – Accent 6 style applied.
Figure 8-12: Selecting a table style from the Table Styles gallery.
Working with Tables
124 © 2010 CustomGuide, Inc.
WWoorrkkiinngg wwiitthh TTaabblleess RReevviieeww
Quiz Questions
76. Tables include _________. A. rows B. columns C. cells D. all of these
77. To move around in a table, press the _______ key. A. <Ctrl> B. <Tab> C. <Enter> D. <Alt>
78. Table rows automatically expand to the accommodate any text that you enter. (True or False?)
79. You can insert a row above, but not below, a row you’ve selected. (True or False?)
80. Which of the following is NOT a button found in the Merge group on the Layout tab. A. Split Cells B. Split Table C. Merge Table D. Merge Cells
81. When you use the Draw Table tool, the mouse pointer changes to a pencil icon. (True or False?)
82. A visual style is a set of different formatting commands that can be applied to a table in one single step. (True or
False?)
Quiz Answers
76. D. Tables include rows, columns, and cells.
77. Use the <Tab> key to move around in a table.
78. True. Rows in a table automatically expand to accommodate any text that you enter.
79. False. You can insert a row above or below a row you’ve selected.
80. C. Merge Table is not a button found in the Merge group on the Layout tab.

IT Services, University of Wolverhampton 125
81. True. When you use the Draw Table tool, the mouse pointer changes to a pencil icon.
82. True. A visual style is a set of different formatting commands that can be applied to a table in one single step.
126 © 2010 CustomGuide, Inc.
WWoorrkkiinngg wwiitthh
CChhaarrttss aanndd
SSmmaarrttAArrtt
Inserting a Chart .............................................. 127
Inserting Chart Data ........................................ 128
Resizing and Moving a Chart ......................... 129 Resize a Chart ....................................... 129 Move a chart .......................................... 129
Changing Chart Type....................................... 130
Formatting a Chart .......................................... 131 Change chart layout ............................... 131 Change chart style ................................. 131
Working with Labels ........................................ 132 Insert or modify a label .......................... 132 Edit label text ......................................... 132
Formatting Chart Elements ............................ 133 Format a chart element.......................... 133 Delete a chart element ........................... 134
Creating a Chart Template .............................. 135
Inserting SmartArt ........................................... 136 Insert a SmartArt graphic ....................... 136 Add text to a SmartArt graphic .............. 136
Working with SmartArt Elements ................... 138 Add a shape ........................................... 138 Change a shape .................................... 138 Remove a shape .................................... 139
Formatting SmartArt ....................................... 140 Change layouts ...................................... 140 Change colors ........................................ 140 Change styles ........................................ 141 Discard all formatting changes .............. 141
Converting Slide Text into SmartArt .............. 142
In this chapter you will learn how to insert
charts and diagrams into your
presentations. One of the best ways to
present information is with a chart, and
PowerPoint 2010 makes it easy.
This chapter explains just about
everything you need to know about
charts—how to create dynamic-looking
charts, how to edit and format charts, and
how to work with different types of charts
and chart elements. You will also learn
how to use PowerPoint’s SmartArt tool, a
handy new feature that lets you create and
insert designer-quality diagrams.
Using Exercise Files This chapter suggests exercises to practice
the topic of each lesson. There are two
ways you may follow along with the
exercise files:
Open the exercise file for a lesson,
perform the lesson exercise, and close
the exercise file.
Open the exercise file for a lesson,
perform the lesson exercise, and keep
the file open to perform the remaining
lesson exercises for the chapter.
The exercises are written so that you may
“build upon them”, meaning the exercises
in a chapter can be performed in
succession from the first lesson to the last.
9
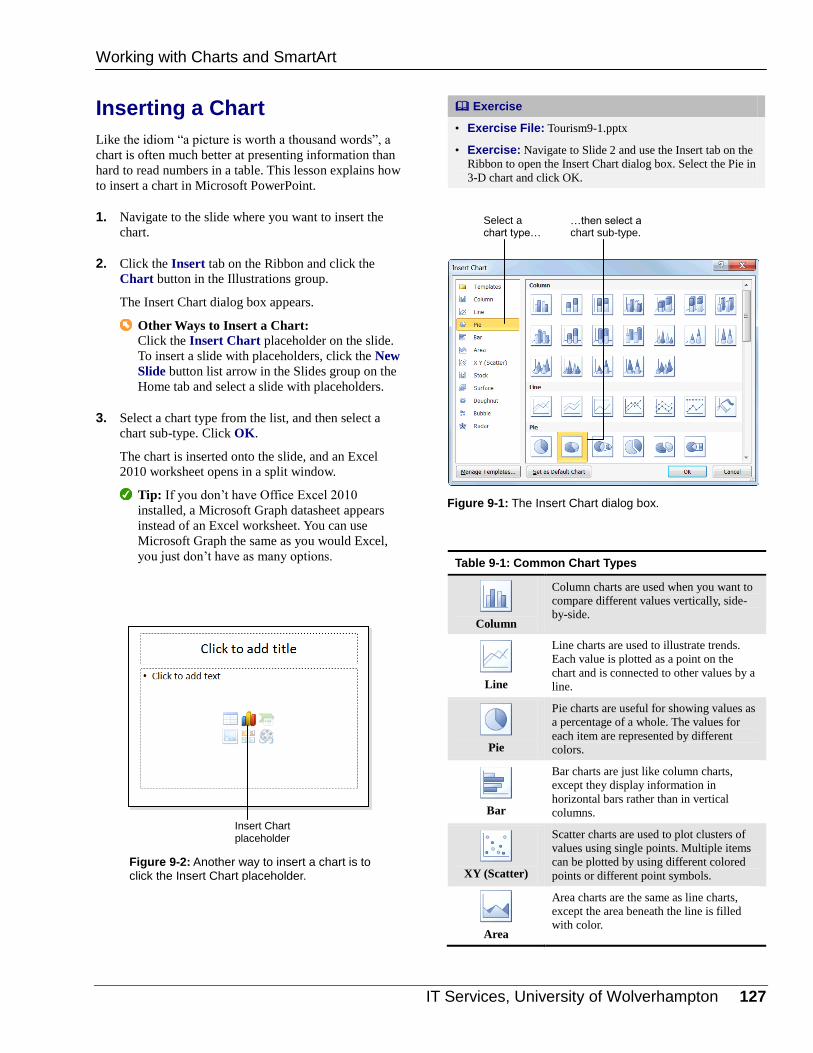
IT Services, University of Wolverhampton 127
Inserting a Chart
Like the idiom “a picture is worth a thousand words”, a
chart is often much better at presenting information than
hard to read numbers in a table. This lesson explains how
to insert a chart in Microsoft PowerPoint.
1. Navigate to the slide where you want to insert the
chart.
2. Click the Insert tab on the Ribbon and click the
Chart button in the Illustrations group.
The Insert Chart dialog box appears.
Other Ways to Insert a Chart: Click the Insert Chart placeholder on the slide.
To insert a slide with placeholders, click the New
Slide button list arrow in the Slides group on the
Home tab and select a slide with placeholders.
3. Select a chart type from the list, and then select a
chart sub-type. Click OK.
The chart is inserted onto the slide, and an Excel
2010 worksheet opens in a split window.
Tip: If you don’t have Office Excel 2010
installed, a Microsoft Graph datasheet appears
instead of an Excel worksheet. You can use
Microsoft Graph the same as you would Excel,
you just don’t have as many options.
Exercise
• Exercise File: Tourism9-1.pptx
• Exercise: Navigate to Slide 2 and use the Insert tab on the
Ribbon to open the Insert Chart dialog box. Select the Pie in
3-D chart and click OK.
Table 9-1: Common Chart Types
Column
Column charts are used when you want to
compare different values vertically, side-
by-side.
Line
Line charts are used to illustrate trends.
Each value is plotted as a point on the
chart and is connected to other values by a
line.
Pie
Pie charts are useful for showing values as
a percentage of a whole. The values for
each item are represented by different
colors.
Bar
Bar charts are just like column charts,
except they display information in
horizontal bars rather than in vertical
columns.
XY (Scatter)
Scatter charts are used to plot clusters of
values using single points. Multiple items
can be plotted by using different colored
points or different point symbols.
Area
Area charts are the same as line charts,
except the area beneath the line is filled
with color.
Figure 9-1: The Insert Chart dialog box.
Figure 9-2: Another way to insert a chart is to click the Insert Chart placeholder.
Working with Charts and SmartArt
Insert Chart placeholder
Select a chart type…
…then select a chart sub-type.
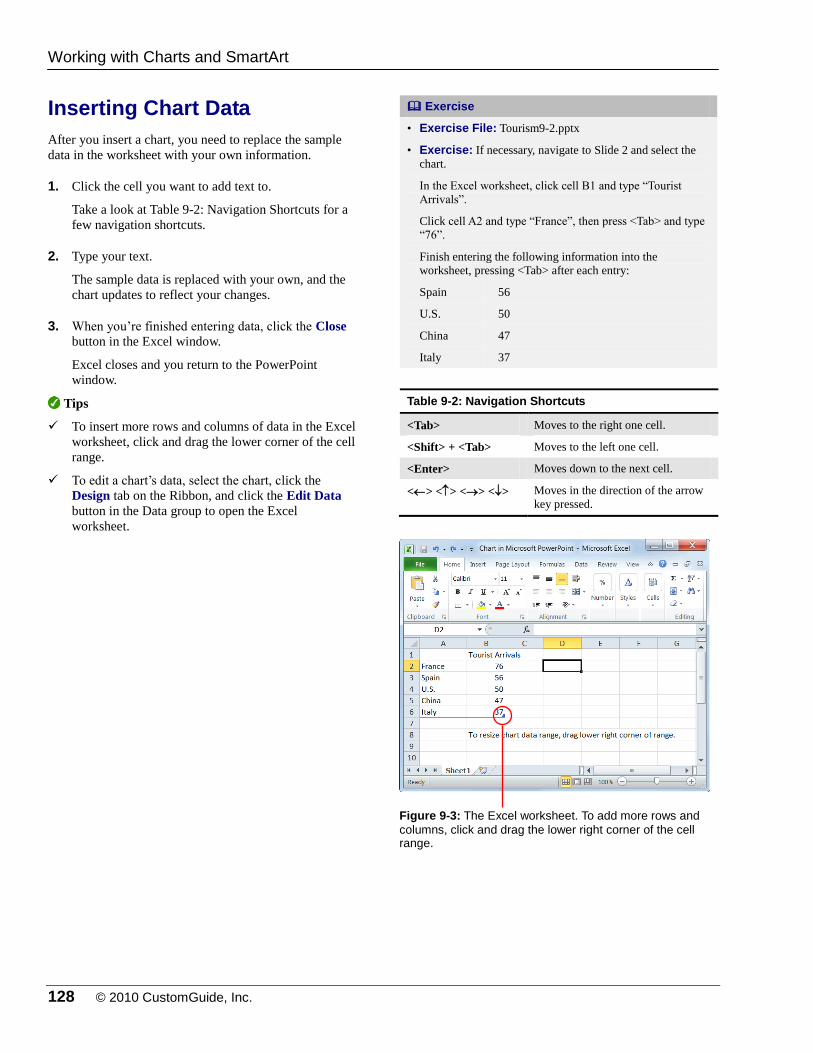
128 © 2010 CustomGuide, Inc.
Inserting Chart Data
After you insert a chart, you need to replace the sample
data in the worksheet with your own information.
1. Click the cell you want to add text to.
Take a look at Table 9-2: Navigation Shortcuts for a
few navigation shortcuts.
2. Type your text.
The sample data is replaced with your own, and the
chart updates to reflect your changes.
3. When you’re finished entering data, click the Close
button in the Excel window.
Excel closes and you return to the PowerPoint
window.
Tips
To insert more rows and columns of data in the Excel
worksheet, click and drag the lower corner of the cell
range.
To edit a chart’s data, select the chart, click the
Design tab on the Ribbon, and click the Edit Data
button in the Data group to open the Excel
worksheet.
Exercise
• Exercise File: Tourism9-2.pptx
• Exercise: If necessary, navigate to Slide 2 and select the
chart.
In the Excel worksheet, click cell B1 and type “Tourist
Arrivals”.
Click cell A2 and type “France”, then press <Tab> and type
“76”.
Finish entering the following information into the
worksheet, pressing <Tab> after each entry:
Spain
U.S.
China
Italy
56
50
47
37
Table 9-2: Navigation Shortcuts
<Tab> Moves to the right one cell.
<Shift> + <Tab> Moves to the left one cell.
<Enter> Moves down to the next cell.
<> <> <> <> Moves in the direction of the arrow
key pressed.
Figure 9-3: The Excel worksheet. To add more rows and
columns, click and drag the lower right corner of the cell range.
Working with Charts and SmartArt
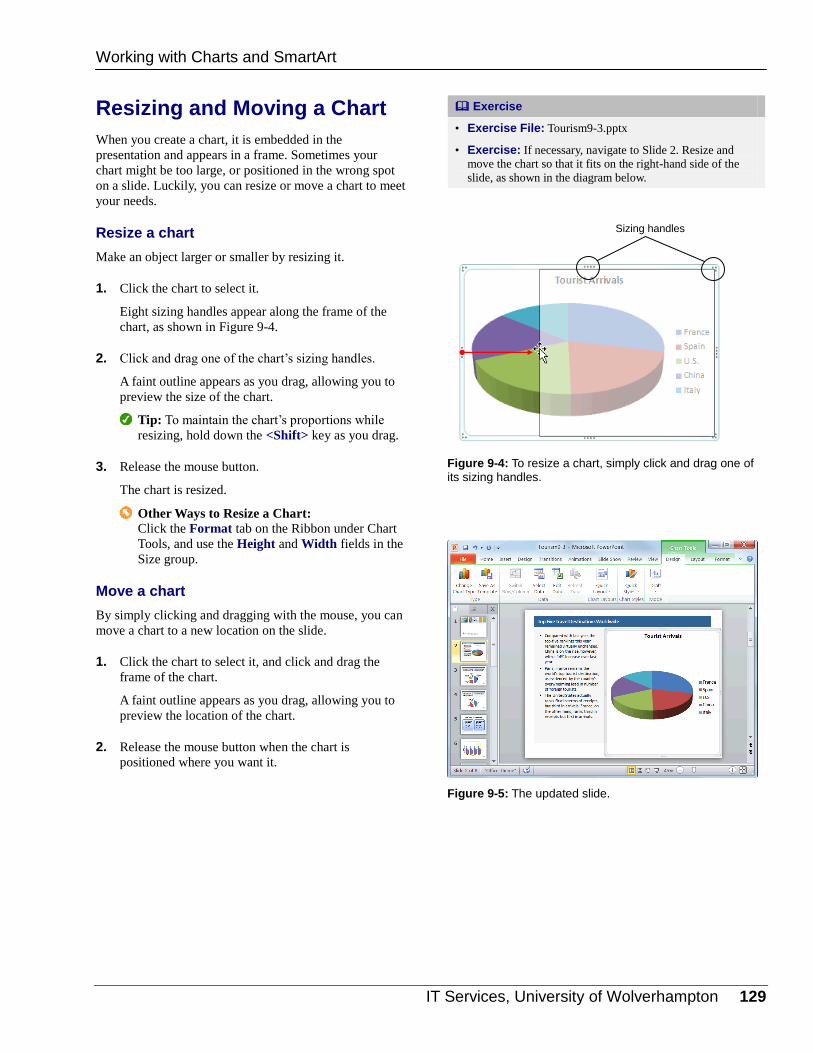
IT Services, University of Wolverhampton 129
Resizing and Moving a Chart
When you create a chart, it is embedded in the
presentation and appears in a frame. Sometimes your
chart might be too large, or positioned in the wrong spot
on a slide. Luckily, you can resize or move a chart to meet
your needs.
Resize a chart
Make an object larger or smaller by resizing it.
1. Click the chart to select it.
Eight sizing handles appear along the frame of the
chart, as shown in Figure 9-4.
2. Click and drag one of the chart’s sizing handles.
A faint outline appears as you drag, allowing you to
preview the size of the chart.
Tip: To maintain the chart’s proportions while
resizing, hold down the <Shift> key as you drag.
3. Release the mouse button.
The chart is resized.
Other Ways to Resize a Chart: Click the Format tab on the Ribbon under Chart
Tools, and use the Height and Width fields in the
Size group.
Move a chart
By simply clicking and dragging with the mouse, you can
move a chart to a new location on the slide.
1. Click the chart to select it, and click and drag the
frame of the chart.
A faint outline appears as you drag, allowing you to
preview the location of the chart.
2. Release the mouse button when the chart is
positioned where you want it.
Exercise
• Exercise File: Tourism9-3.pptx
• Exercise: If necessary, navigate to Slide 2. Resize and
move the chart so that it fits on the right-hand side of the
slide, as shown in the diagram below.
Figure 9-4: To resize a chart, simply click and drag one of its sizing handles.
Figure 9-5: The updated slide.
Working with Charts and SmartArt
Sizing handles
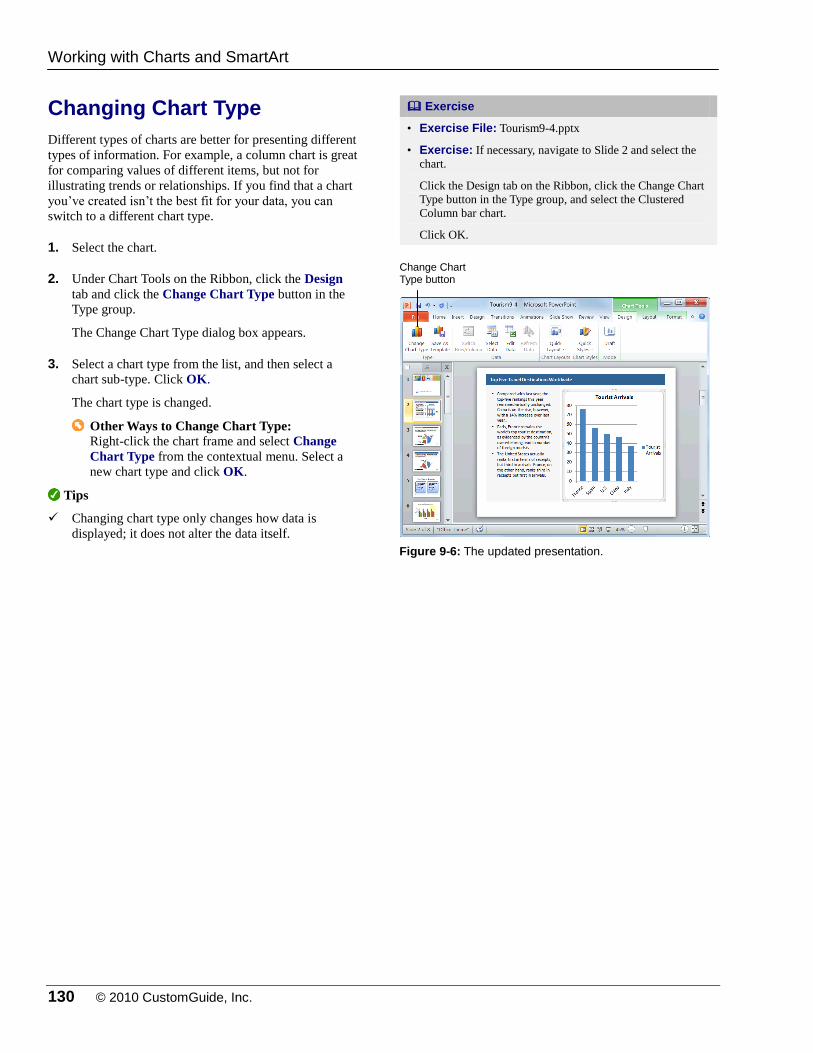
130 © 2010 CustomGuide, Inc.
Changing Chart Type
Different types of charts are better for presenting different
types of information. For example, a column chart is great
for comparing values of different items, but not for
illustrating trends or relationships. If you find that a chart
you’ve created isn’t the best fit for your data, you can
switch to a different chart type.
1. Select the chart.
2. Under Chart Tools on the Ribbon, click the Design
tab and click the Change Chart Type button in the
Type group.
The Change Chart Type dialog box appears.
3. Select a chart type from the list, and then select a
chart sub-type. Click OK.
The chart type is changed.
Other Ways to Change Chart Type: Right-click the chart frame and select Change
Chart Type from the contextual menu. Select a
new chart type and click OK.
Tips
Changing chart type only changes how data is
displayed; it does not alter the data itself.
Exercise
• Exercise File: Tourism9-4.pptx
• Exercise: If necessary, navigate to Slide 2 and select the
chart.
Click the Design tab on the Ribbon, click the Change Chart
Type button in the Type group, and select the Clustered
Column bar chart.
Click OK.
Figure 9-6: The updated presentation.
Working with Charts and SmartArt
Change Chart Type button
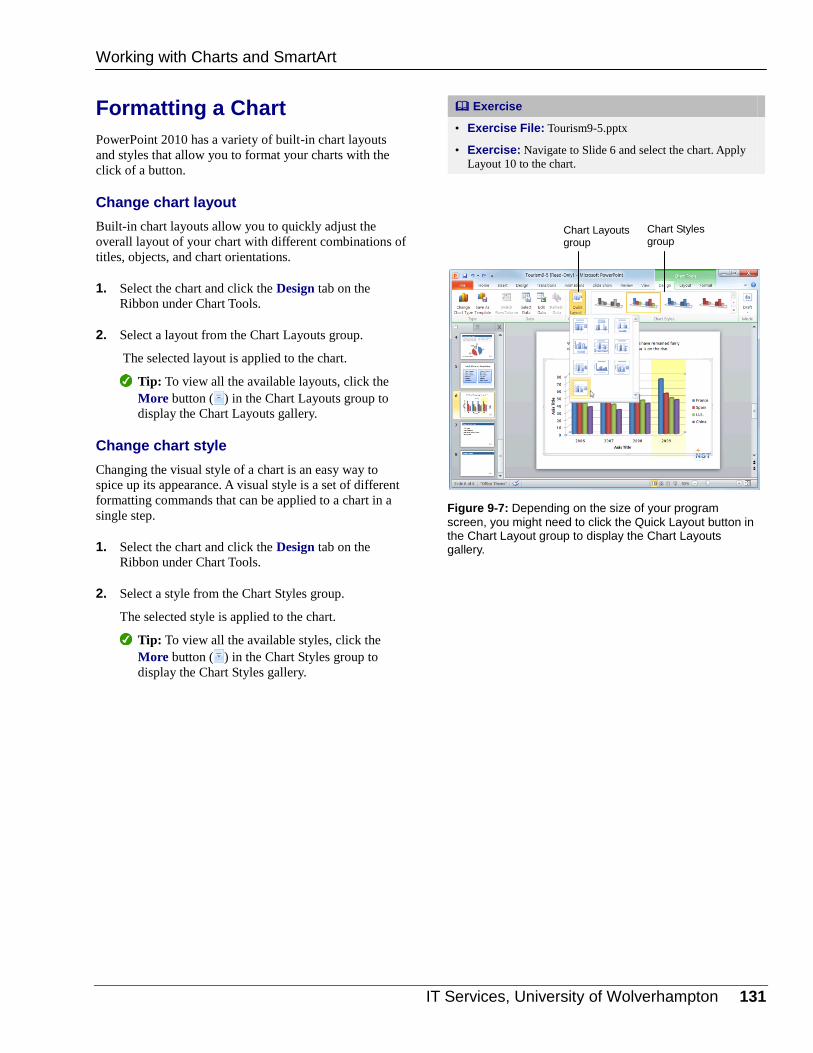
IT Services, University of Wolverhampton 131
Formatting a Chart
PowerPoint 2010 has a variety of built-in chart layouts
and styles that allow you to format your charts with the
click of a button.
Change chart layout
Built-in chart layouts allow you to quickly adjust the
overall layout of your chart with different combinations of
titles, objects, and chart orientations.
1. Select the chart and click the Design tab on the
Ribbon under Chart Tools.
2. Select a layout from the Chart Layouts group.
The selected layout is applied to the chart.
Tip: To view all the available layouts, click the
More button ( ) in the Chart Layouts group to
display the Chart Layouts gallery.
Change chart style
Changing the visual style of a chart is an easy way to
spice up its appearance. A visual style is a set of different
formatting commands that can be applied to a chart in a
single step.
1. Select the chart and click the Design tab on the
Ribbon under Chart Tools.
2. Select a style from the Chart Styles group.
The selected style is applied to the chart.
Tip: To view all the available styles, click the
More button ( ) in the Chart Styles group to
display the Chart Styles gallery.
Exercise
• Exercise File: Tourism9-5.pptx
• Exercise: Navigate to Slide 6 and select the chart. Apply
Layout 10 to the chart.
Figure 9-7: Depending on the size of your program
screen, you might need to click the Quick Layout button in the Chart Layout group to display the Chart Layouts gallery.
Working with Charts and SmartArt
Chart Layouts group
Chart Styles group
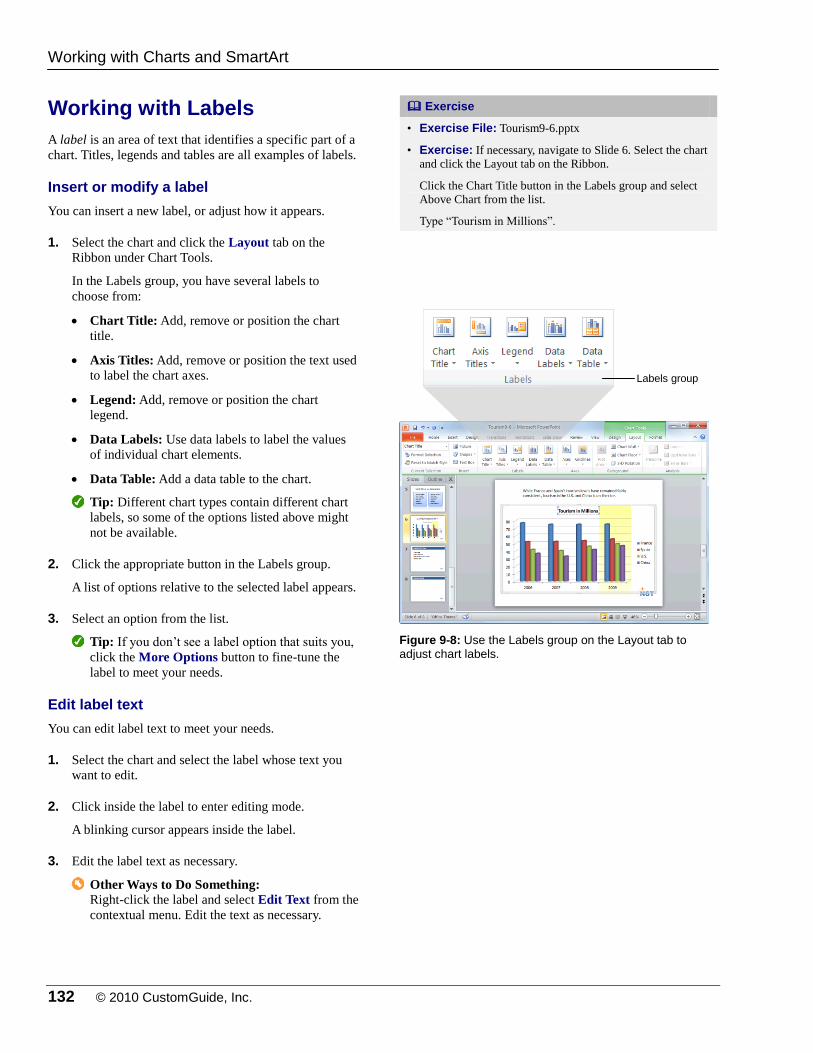
132 © 2010 CustomGuide, Inc.
Working with Labels
A label is an area of text that identifies a specific part of a
chart. Titles, legends and tables are all examples of labels.
Insert or modify a label
You can insert a new label, or adjust how it appears.
1. Select the chart and click the Layout tab on the
Ribbon under Chart Tools.
In the Labels group, you have several labels to
choose from:
Chart Title: Add, remove or position the chart
title.
Axis Titles: Add, remove or position the text used
to label the chart axes.
Legend: Add, remove or position the chart
legend.
Data Labels: Use data labels to label the values
of individual chart elements.
Data Table: Add a data table to the chart.
Tip: Different chart types contain different chart
labels, so some of the options listed above might
not be available.
2. Click the appropriate button in the Labels group.
A list of options relative to the selected label appears.
3. Select an option from the list.
Tip: If you don’t see a label option that suits you,
click the More Options button to fine-tune the
label to meet your needs.
Edit label text
You can edit label text to meet your needs.
1. Select the chart and select the label whose text you
want to edit.
2. Click inside the label to enter editing mode.
A blinking cursor appears inside the label.
3. Edit the label text as necessary.
Other Ways to Do Something: Right-click the label and select Edit Text from the
contextual menu. Edit the text as necessary.
Exercise
• Exercise File: Tourism9-6.pptx
• Exercise: If necessary, navigate to Slide 6. Select the chart
and click the Layout tab on the Ribbon.
Click the Chart Title button in the Labels group and select
Above Chart from the list.
Type “Tourism in Millions”.
Figure 9-8: Use the Labels group on the Layout tab to adjust chart labels.
Working with Charts and SmartArt
Labels group
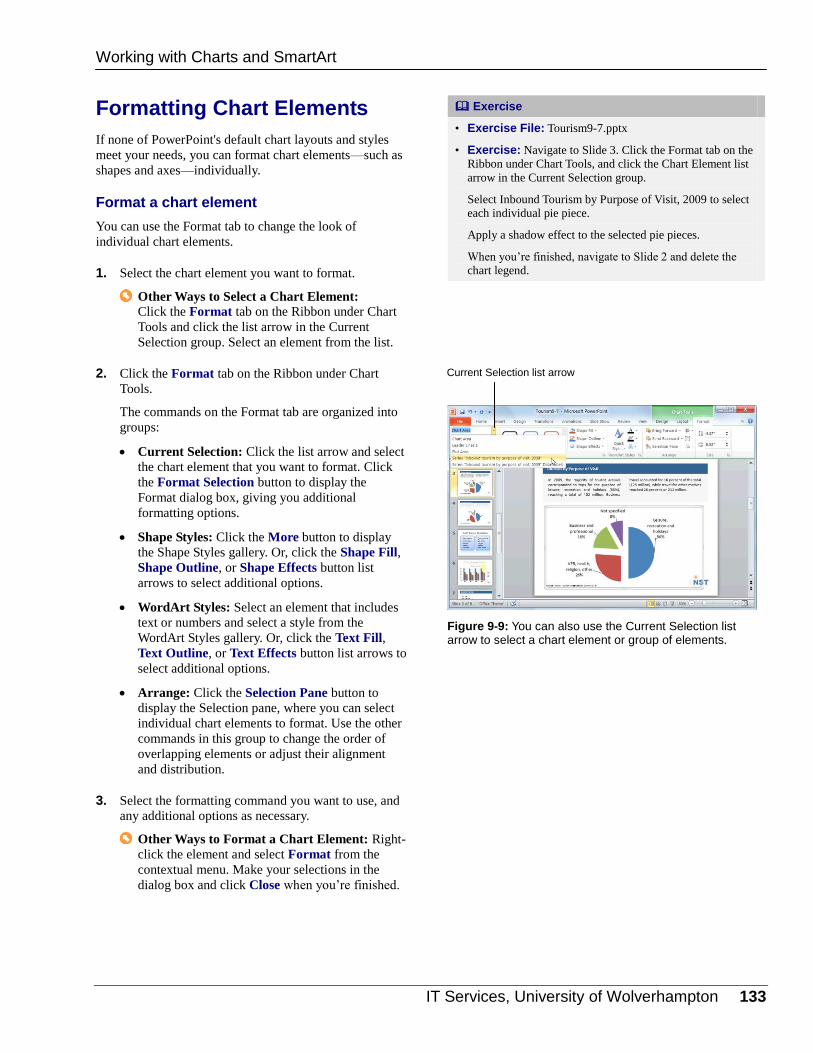
IT Services, University of Wolverhampton 133
Formatting Chart Elements
If none of PowerPoint's default chart layouts and styles
meet your needs, you can format chart elements—such as
shapes and axes—individually.
Format a chart element
You can use the Format tab to change the look of
individual chart elements.
1. Select the chart element you want to format.
Other Ways to Select a Chart Element: Click the Format tab on the Ribbon under Chart
Tools and click the list arrow in the Current
Selection group. Select an element from the list.
2. Click the Format tab on the Ribbon under Chart
Tools.
The commands on the Format tab are organized into
groups:
Current Selection: Click the list arrow and select
the chart element that you want to format. Click
the Format Selection button to display the
Format dialog box, giving you additional
formatting options.
Shape Styles: Click the More button to display
the Shape Styles gallery. Or, click the Shape Fill,
Shape Outline, or Shape Effects button list
arrows to select additional options.
WordArt Styles: Select an element that includes
text or numbers and select a style from the
WordArt Styles gallery. Or, click the Text Fill,
Text Outline, or Text Effects button list arrows to
select additional options.
Arrange: Click the Selection Pane button to
display the Selection pane, where you can select
individual chart elements to format. Use the other
commands in this group to change the order of
overlapping elements or adjust their alignment
and distribution.
3. Select the formatting command you want to use, and
any additional options as necessary.
Other Ways to Format a Chart Element: Right-
click the element and select Format from the
contextual menu. Make your selections in the
dialog box and click Close when you’re finished.
Exercise
• Exercise File: Tourism9-7.pptx
• Exercise: Navigate to Slide 3. Click the Format tab on the
Ribbon under Chart Tools, and click the Chart Element list
arrow in the Current Selection group.
Select Inbound Tourism by Purpose of Visit, 2009 to select
each individual pie piece.
Apply a shadow effect to the selected pie pieces.
When you’re finished, navigate to Slide 2 and delete the
chart legend.
Figure 9-9: You can also use the Current Selection list arrow to select a chart element or group of elements.
Working with Charts and SmartArt
Current Selection list arrow
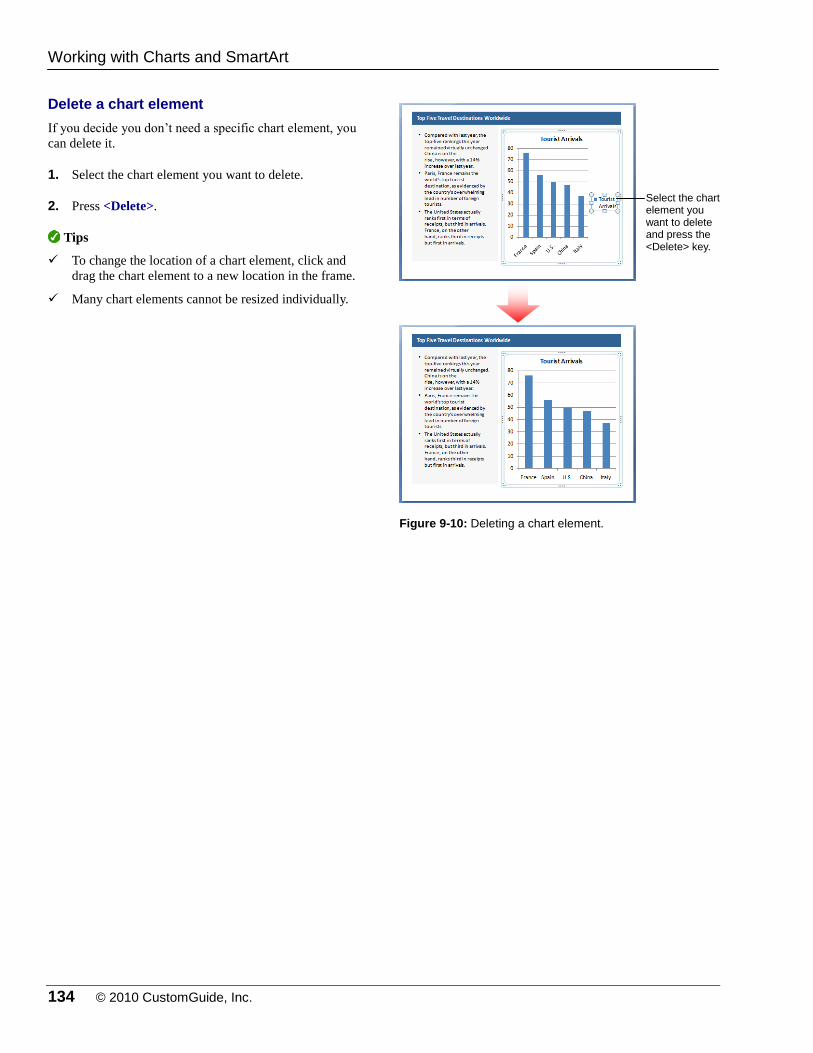
134 © 2010 CustomGuide, Inc.
Delete a chart element
If you decide you don’t need a specific chart element, you
can delete it.
1. Select the chart element you want to delete.
2. Press <Delete>.
Tips
To change the location of a chart element, click and
drag the chart element to a new location in the frame.
Many chart elements cannot be resized individually.
Figure 9-10: Deleting a chart element.
Working with Charts and SmartArt
Select the chart element you want to delete and press the <Delete> key.
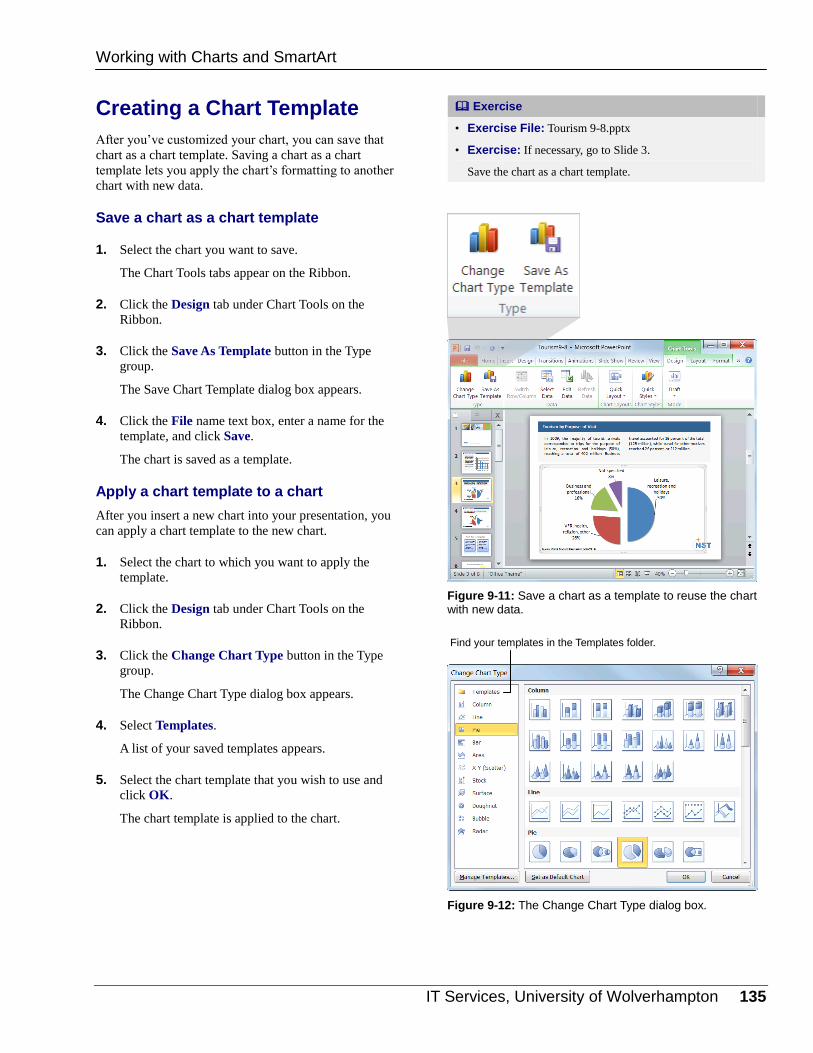
IT Services, University of Wolverhampton 135
Creating a Chart Template
After you’ve customized your chart, you can save that
chart as a chart template. Saving a chart as a chart
template lets you apply the chart’s formatting to another
chart with new data.
Save a chart as a chart template
1. Select the chart you want to save.
The Chart Tools tabs appear on the Ribbon.
2. Click the Design tab under Chart Tools on the
Ribbon.
3. Click the Save As Template button in the Type
group.
The Save Chart Template dialog box appears.
4. Click the File name text box, enter a name for the
template, and click Save.
The chart is saved as a template.
Apply a chart template to a chart
After you insert a new chart into your presentation, you
can apply a chart template to the new chart.
1. Select the chart to which you want to apply the
template.
2. Click the Design tab under Chart Tools on the
Ribbon.
3. Click the Change Chart Type button in the Type
group.
The Change Chart Type dialog box appears.
4. Select Templates.
A list of your saved templates appears.
5. Select the chart template that you wish to use and
click OK.
The chart template is applied to the chart.
Exercise
• Exercise File: Tourism 9-8.pptx
• Exercise: If necessary, go to Slide 3.
Save the chart as a chart template.
Figure 9-11: Save a chart as a template to reuse the chart with new data.
Figure 9-12: The Change Chart Type dialog box.
Working with Charts and SmartArt
Find your templates in the Templates folder.
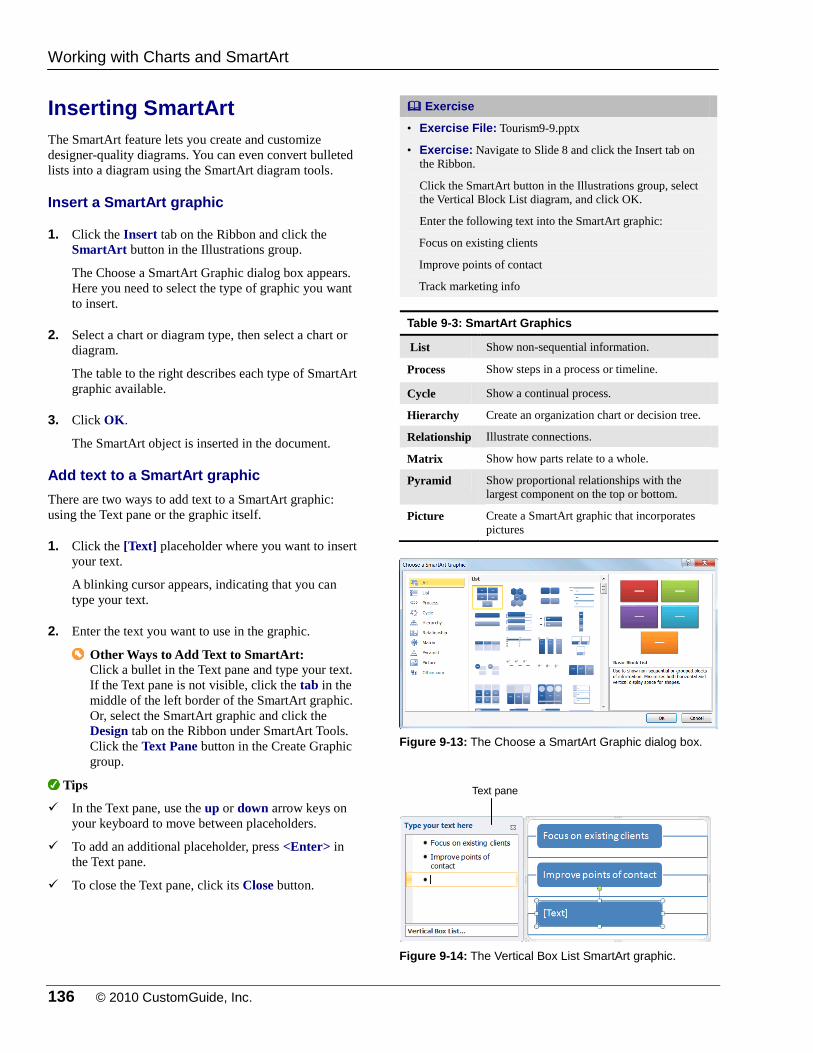
136 © 2010 CustomGuide, Inc.
Inserting SmartArt
The SmartArt feature lets you create and customize
designer-quality diagrams. You can even convert bulleted
lists into a diagram using the SmartArt diagram tools.
Insert a SmartArt graphic
1. Click the Insert tab on the Ribbon and click the
SmartArt button in the Illustrations group.
The Choose a SmartArt Graphic dialog box appears.
Here you need to select the type of graphic you want
to insert.
2. Select a chart or diagram type, then select a chart or
diagram.
The table to the right describes each type of SmartArt
graphic available.
3. Click OK.
The SmartArt object is inserted in the document.
Add text to a SmartArt graphic
There are two ways to add text to a SmartArt graphic:
using the Text pane or the graphic itself.
1. Click the [Text] placeholder where you want to insert
your text.
A blinking cursor appears, indicating that you can
type your text.
2. Enter the text you want to use in the graphic.
Other Ways to Add Text to SmartArt: Click a bullet in the Text pane and type your text.
If the Text pane is not visible, click the tab in the
middle of the left border of the SmartArt graphic.
Or, select the SmartArt graphic and click the
Design tab on the Ribbon under SmartArt Tools.
Click the Text Pane button in the Create Graphic
group.
Tips
In the Text pane, use the up or down arrow keys on
your keyboard to move between placeholders.
To add an additional placeholder, press <Enter> in
the Text pane.
To close the Text pane, click its Close button.
Exercise
• Exercise File: Tourism9-9.pptx
• Exercise: Navigate to Slide 8 and click the Insert tab on
the Ribbon.
Click the SmartArt button in the Illustrations group, select
the Vertical Block List diagram, and click OK.
Enter the following text into the SmartArt graphic:
Focus on existing clients
Improve points of contact
Track marketing info
Table 9-3: SmartArt Graphics
List Show non-sequential information.
Process Show steps in a process or timeline.
Cycle Show a continual process.
Hierarchy Create an organization chart or decision tree.
Relationship Illustrate connections.
Matrix Show how parts relate to a whole.
Pyramid Show proportional relationships with the
largest component on the top or bottom.
Picture Create a SmartArt graphic that incorporates
pictures
Figure 9-13: The Choose a SmartArt Graphic dialog box.
Figure 9-14: The Vertical Box List SmartArt graphic.
Working with Charts and SmartArt
Text pane
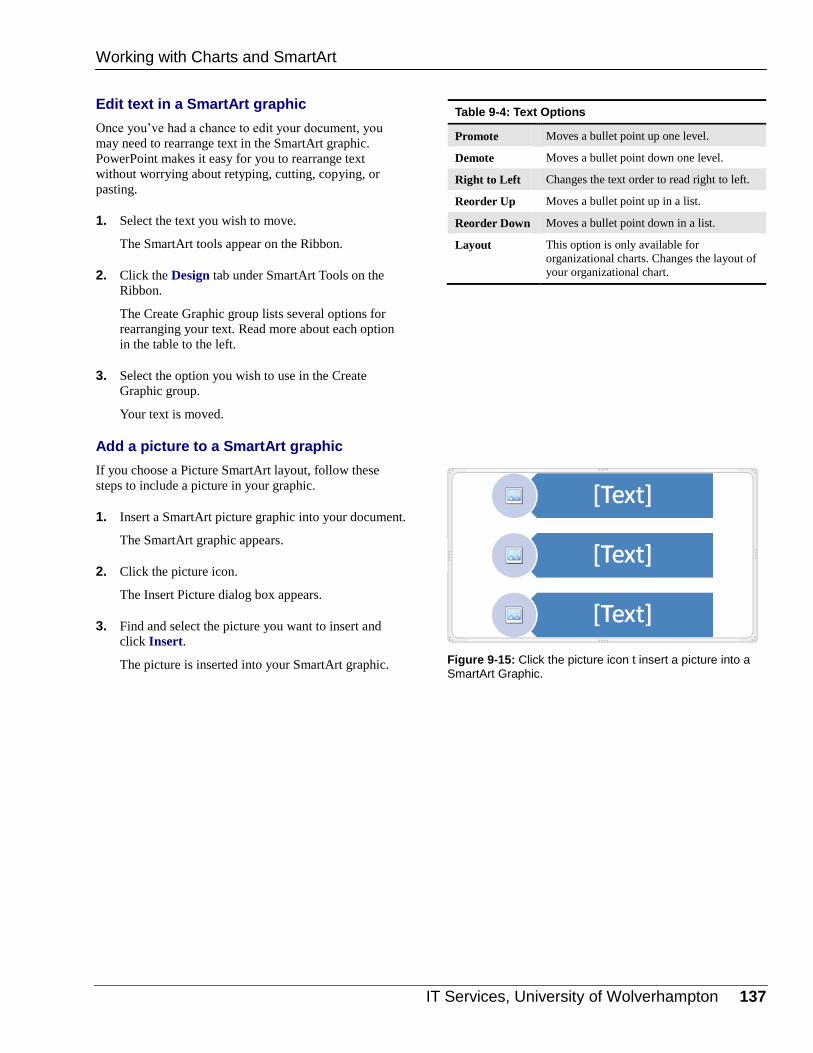
IT Services, University of Wolverhampton 137
Edit text in a SmartArt graphic
Once you’ve had a chance to edit your document, you
may need to rearrange text in the SmartArt graphic.
PowerPoint makes it easy for you to rearrange text
without worrying about retyping, cutting, copying, or
pasting.
1. Select the text you wish to move.
The SmartArt tools appear on the Ribbon.
2. Click the Design tab under SmartArt Tools on the
Ribbon.
The Create Graphic group lists several options for
rearranging your text. Read more about each option
in the table to the left.
3. Select the option you wish to use in the Create
Graphic group.
Your text is moved.
Add a picture to a SmartArt graphic
If you choose a Picture SmartArt layout, follow these
steps to include a picture in your graphic.
1. Insert a SmartArt picture graphic into your document.
The SmartArt graphic appears.
2. Click the picture icon.
The Insert Picture dialog box appears.
3. Find and select the picture you want to insert and
click Insert.
The picture is inserted into your SmartArt graphic.
Table 9-4: Text Options
Promote Moves a bullet point up one level.
Demote Moves a bullet point down one level.
Right to Left Changes the text order to read right to left.
Reorder Up Moves a bullet point up in a list.
Reorder Down Moves a bullet point down in a list.
Layout This option is only available for
organizational charts. Changes the layout of
your organizational chart.
Figure 9-15: Click the picture icon t insert a picture into a
SmartArt Graphic.
Working with Charts and SmartArt
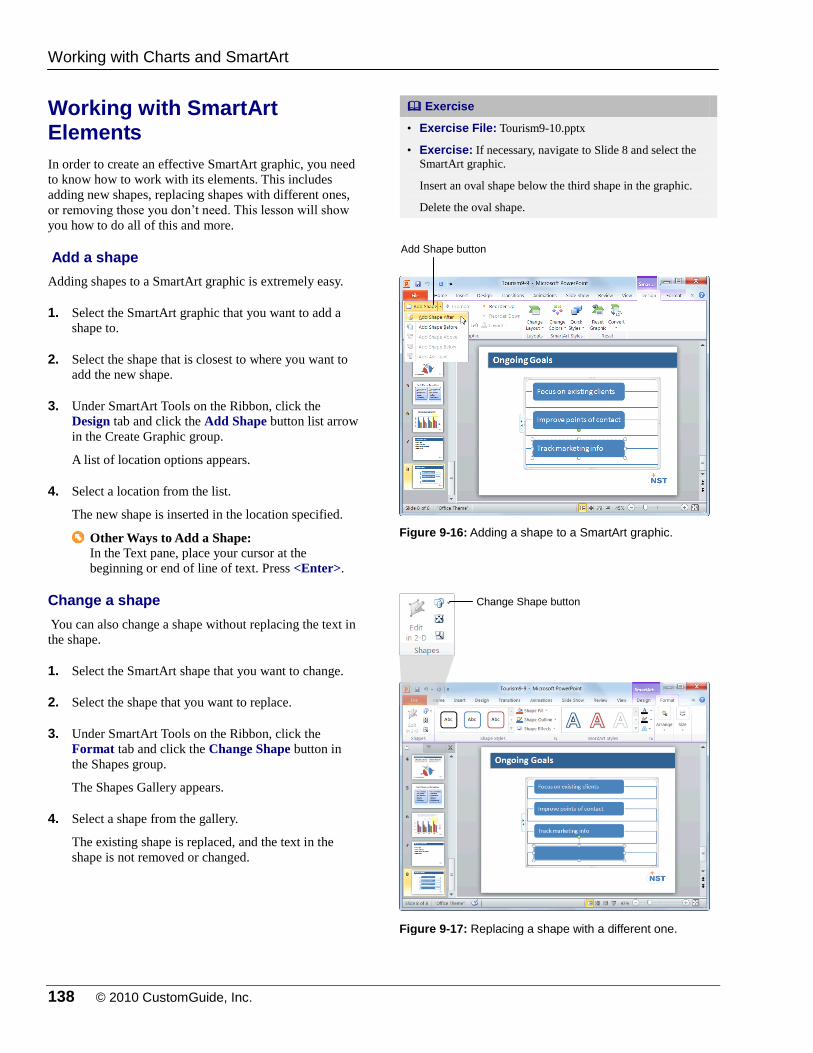
138 © 2010 CustomGuide, Inc.
Working with SmartArt Elements
In order to create an effective SmartArt graphic, you need
to know how to work with its elements. This includes
adding new shapes, replacing shapes with different ones,
or removing those you don’t need. This lesson will show
you how to do all of this and more.
Add a shape
Adding shapes to a SmartArt graphic is extremely easy.
1. Select the SmartArt graphic that you want to add a
shape to.
2. Select the shape that is closest to where you want to
add the new shape.
3. Under SmartArt Tools on the Ribbon, click the
Design tab and click the Add Shape button list arrow
in the Create Graphic group.
A list of location options appears.
4. Select a location from the list.
The new shape is inserted in the location specified.
Other Ways to Add a Shape: In the Text pane, place your cursor at the
beginning or end of line of text. Press <Enter>.
Change a shape
You can also change a shape without replacing the text in
the shape.
1. Select the SmartArt shape that you want to change.
2. Select the shape that you want to replace.
3. Under SmartArt Tools on the Ribbon, click the
Format tab and click the Change Shape button in
the Shapes group.
The Shapes Gallery appears.
4. Select a shape from the gallery.
The existing shape is replaced, and the text in the
shape is not removed or changed.
Exercise
• Exercise File: Tourism9-10.pptx
• Exercise: If necessary, navigate to Slide 8 and select the
SmartArt graphic.
Insert an oval shape below the third shape in the graphic.
Delete the oval shape.
Figure 9-16: Adding a shape to a SmartArt graphic.
Figure 9-17: Replacing a shape with a different one.
Working with Charts and SmartArt
Change Shape button
Add Shape button
IT Services, University of Wolverhampton 139
Remove a shape
It’s easy to remove a shape if you don’t want it in the
SmartArt graphic any longer.
1. Select the shape you want to remove.
2. Press the <Delete> key.
The shape is removed from the SmartArt graphic.
Other Ways to Remove a Shape: Remove the bullet in the Text pane of the
SmartArt graphic.
Tips
To resize a shape, click and drag one of its sizing
handles.
To move a shape, simply click and drag the shape to a
new location on the slide. However, the automatic
spacing is not applied when you move shapes.
Working with Charts and SmartArt

140 © 2010 CustomGuide, Inc.
Formatting SmartArt
PowerPoint 2010 has a variety of SmartArt layouts and
styles that allow you to format your SmartArt graphics
with the click of a button.
Change layouts
If you find that the layout you selected isn’t the best fit for
your data, you can easily switch to a different layout.
1. Select the SmartArt graphic.
2. Click the Design tab on the Ribbon under SmartArt
Tools.
3. Select a layout from the Layouts group.
The selected layout is applied.
Tip: To view more layouts, click the More button
( ) in the Layouts group; click More Layouts to
display the SmartArt Graphic dialog box.
Other Ways to Change Layouts: Right-click the SmartArt graphic and select
Change Layout from the contextual menu. Select
a new layout and click OK.
Change colors
If you don’t like the color that has been assigned to your
SmartArt graphic by default, change it.
1. Select the SmartArt graphic.
2. Click the Design tab on the Ribbon under SmartArt
Tools.
2. Click the Change Colors button in the SmartArt
Styles group.
The Color Gallery appears.
3. Select the color variation that you want to use.
PowerPoint updates the SmartArt graphic to reflect
your changes.
Exercise
• Exercise File: Tourism9-11.pptx
• Exercise: If necessary, navigate to Slide 8 and select the
SmartArt graphic.
Change the style of the graphic to the Polished 3-D style,
and then reset the graphic to its original style.
Figure 9-18: Changing the layout of a SmartArt graphic.
Figure 9-19: Several different color styles are available.
Working with Charts and SmartArt
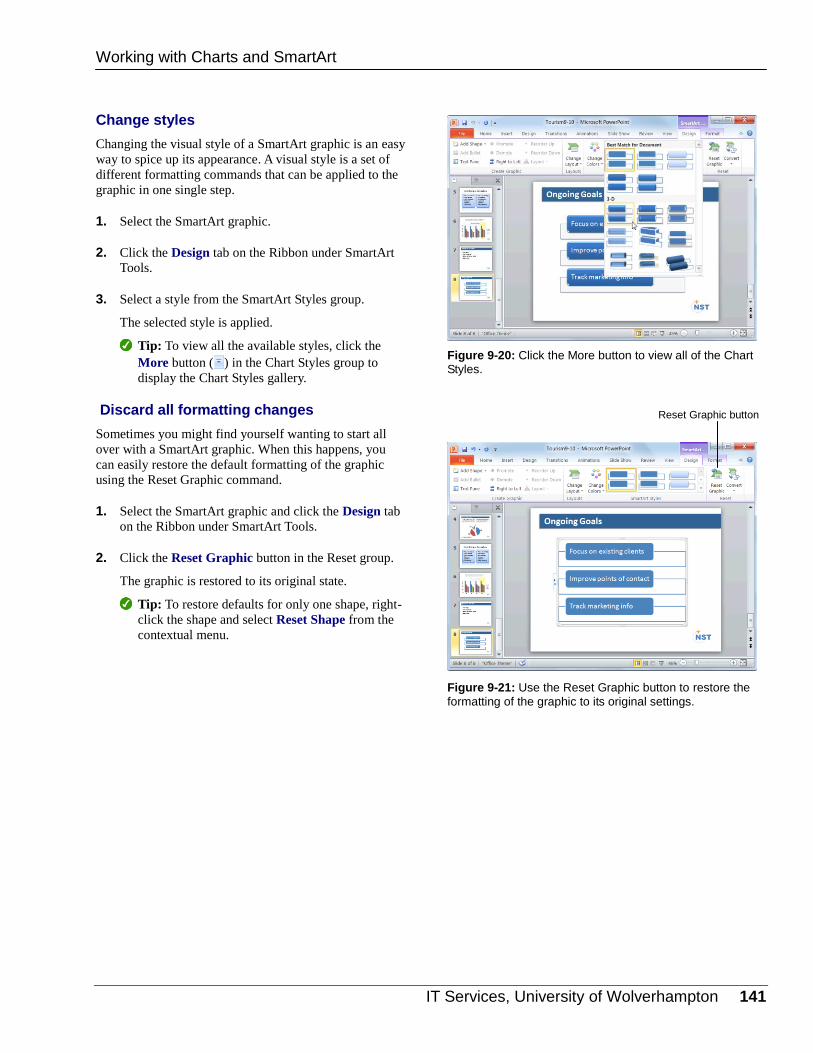
IT Services, University of Wolverhampton 141
Change styles
Changing the visual style of a SmartArt graphic is an easy
way to spice up its appearance. A visual style is a set of
different formatting commands that can be applied to the
graphic in one single step.
1. Select the SmartArt graphic.
2. Click the Design tab on the Ribbon under SmartArt
Tools.
3. Select a style from the SmartArt Styles group.
The selected style is applied.
Tip: To view all the available styles, click the
More button ( ) in the Chart Styles group to
display the Chart Styles gallery.
Discard all formatting changes
Sometimes you might find yourself wanting to start all
over with a SmartArt graphic. When this happens, you
can easily restore the default formatting of the graphic
using the Reset Graphic command.
1. Select the SmartArt graphic and click the Design tab
on the Ribbon under SmartArt Tools.
2. Click the Reset Graphic button in the Reset group.
The graphic is restored to its original state.
Tip: To restore defaults for only one shape, right-
click the shape and select Reset Shape from the
contextual menu.
Figure 9-20: Click the More button to view all of the Chart Styles.
Figure 9-21: Use the Reset Graphic button to restore the
formatting of the graphic to its original settings.
Working with Charts and SmartArt
Reset Graphic button
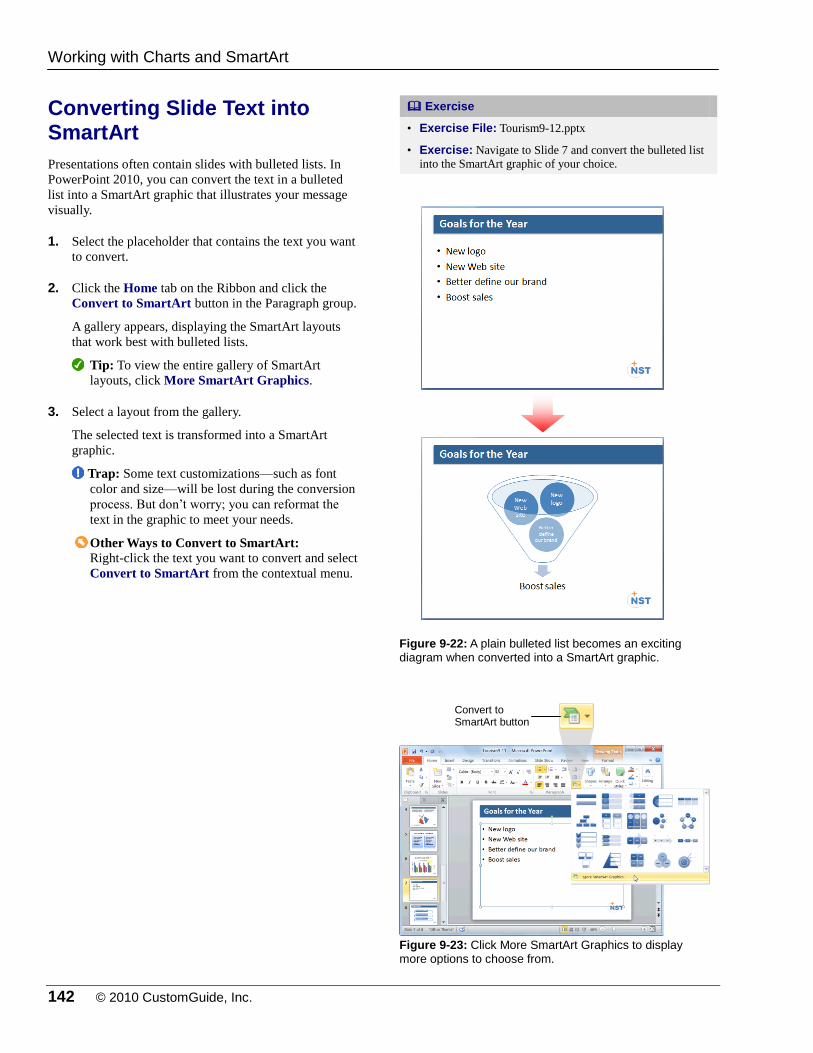
142 © 2010 CustomGuide, Inc.
Converting Slide Text into SmartArt
Presentations often contain slides with bulleted lists. In
PowerPoint 2010, you can convert the text in a bulleted
list into a SmartArt graphic that illustrates your message
visually.
1. Select the placeholder that contains the text you want
to convert.
2. Click the Home tab on the Ribbon and click the
Convert to SmartArt button in the Paragraph group.
A gallery appears, displaying the SmartArt layouts
that work best with bulleted lists.
Tip: To view the entire gallery of SmartArt
layouts, click More SmartArt Graphics.
3. Select a layout from the gallery.
The selected text is transformed into a SmartArt
graphic.
Trap: Some text customizations—such as font
color and size—will be lost during the conversion
process. But don’t worry; you can reformat the
text in the graphic to meet your needs.
Other Ways to Convert to SmartArt: Right-click the text you want to convert and select
Convert to SmartArt from the contextual menu.
Exercise
• Exercise File: Tourism9-12.pptx
• Exercise: Navigate to Slide 7 and convert the bulleted list
into the SmartArt graphic of your choice.
Figure 9-22: A plain bulleted list becomes an exciting diagram when converted into a SmartArt graphic.
Figure 9-23: Click More SmartArt Graphics to display more options to choose from.
Working with Charts and SmartArt
Convert to SmartArt button
IT Services, University of Wolverhampton 143
WWoorrkkiinngg wwiitthh CChhaarrttss aanndd SSmmaarrttAArrtt
RReevviieeww
Quiz Questions
83. Which of the following is the correct way to insert a chart? A. Click the Insert Chart button on the Home tab on the Ribbon. B. Click the Insert tab on the Ribbon and click the Chart button in the Illustrations group. Select a chart and click
OK. C. Right-click the slide and select Insert Chart from the contextual menu. D. Click the Insert tab on the Ribbon and click the Insert button in the Charts group. Select a chart and click OK.
84. Pressing the Tab key activates the cell to the left of the current cell. (True or False?)
85. To resize a chart, click anywhere on its frame and drag. (True or False?)
86. Which of the following is NOT a way to change chart type? A. Click the Layout tab on the Ribbon and click the Change Chart Type button in the Type group. Select a new chart
type and click OK. B. Click the Design tab on the Ribbon and click the Change Chart Type button in the Type group. Select a new chart
type, and click OK. C. Right-click the chart frame and select Change Chart Type from the contextual menu. Select a new chart type and
click OK. D. None of these are ways to change chart type.
87. Changing chart type does not alter the chart's data. (True or False?)
88. Built-in chart layouts allow you to: A. Change the type of chart B. Adjust the color of the chart. C. Apply a set of different formatting commands in one single step. D. Adjust the overall layout of a chart with different combinations of titles, objects, and chart orientations.
89. Which of the following is NOT an example of a label? A. Titles B. Legends C. Data Tables D. These are all examples of labels
90. Built-in chart layouts allow you to: A. Adjust the color of the chart. B. Adjust the overall layout of a chart with different combinations of titles, objects, and chart orientations. C. Change the type of chart. D. Apply a set of different formatting commands in one single step.
144 © 2010 CustomGuide, Inc.
91. A visual style is a set of different formatting commands that can be applied in a single step. (True or False?)
92. What is the easiest way to save a chart so you can use it in another document? A. Copy and paste the chart into the new document. B. Save the chart as a chart template. C. You cannot reuse a chart in a new document. D. Create a chart in Excel and link it to the new document.
93. The SmartArt feature lets you design your own clip art. (True or False?)
94. You can add text to a SmartArt graphic using the graphic itself or the _______ pane. A. Task B. Custom Animation C. Text D. Clip Art
95. In order to create an effective SmartArt graphic, you need to know how to work with its elements. (True or False?)
96. Changing layouts allows you to: A. Adjust the overall design of a SmartArt graphic. B. Apply a set of different formatting commands in one single step. C. Adjust the color of the SmartArt graphic. D. Change the file size of the presentation.
97. You can format converted SmartArt just like you would any other SmartArt graphic. (True or False?)
Quiz Answers
83. B. The correct way to insert a chart is to click the Insert tab on the Ribbon, click the Chart button in the Illustrations
group, select a chart from the dialog box and click OK.
84. False. Pressing the Tab key activates the cell to the right of the current cell.
85. False. To resize a chart, click and drag one of its sizing handles.
86. A. The Change Chart Type button is located on the Design tab, not the Layout tab.
87. True. Changing chart type only changes how data is displayed; it does not alter the data itself.
88. D. Chart layouts let you change the overall layout of a chart using different combinations of titles, objects and chart
orientations.
89. D. Titles, legends and data tables are all examples of labels.
90. B. Chart layouts let you change the overall layout of a chart using different combinations of titles, objects and chart
orientations.
IT Services, University of Wolverhampton 145
91. True. A visual style is a set of different formatting commands that can be applied in a single step.
92. You can save a chart as a chart template. This allows you to change the data, but reuse the chart’s formatting and
styles.
93. False. The SmartArt feature lets you create and customize designer-quality diagrams.
94. C. You can add text to a SmartArt graphic using the graphic itself or the Text pane.
95. True. In order to create an effective SmartArt graphic, you should know how to add and remove shapes, replace shapes
with different ones, etc.
96. A. Changing layouts allows you to adjust the overall design of a SmartArt graphic.
97. True. You can format converted SmartArt just like you would any other SmartArt graphic.
146 © 2010 CustomGuide, Inc.
AAppppllyyiinngg
TTrraannssiittiioonn aanndd
AAnniimmaattiioonn
EEffffeeccttss
Applying a Transition Effect ........................... 147 To a single slide ..................................... 147 To all slides ............................................ 147
Modifying a Transition Effect ......................... 149 Adjust transition speed .......................... 149 Add sound .............................................. 149 Remove a transition effect ..................... 150 Remove a sound .................................... 150
Applying an Animation Effect ........................ 151 Apply an animation effect ...................... 151 Trigger an animation .............................. 151
Modifying Animation Effects .......................... 153 Adjust when an animation starts ............ 153 Adjust the duration of an animation effect ............................................................... 153 Delay the start of an animation effect .... 154 Re-order animation effects .................... 154 Remove an animation effect .................. 154
Customizing Animation Effects ...................... 155 Customize effect options ....................... 155 Customize animation timing................... 155
Copying Animation Effects ............................. 157
Previewing a Transition or Animation Effect 158
PowerPoint 2010 offers a variety of tools
you can use to make your presentations
more effective. For example, you can add
exciting transition effects to your slides,
changing how PowerPoint advances from
one slide to the next. You can also
animate the text and objects on your
slides, making each paragraph on a slide
appear one at a time in succession.
This chapter will introduce you to
animation and transition effects and how
you can use them to enhance your
presentations.
Using Exercise Files This chapter suggests exercises to practice
the topic of each lesson. There are two
ways you may follow along with the
exercise files:
Open the exercise file for a lesson,
perform the lesson exercise, and close
the exercise file.
Open the exercise file for a lesson,
perform the lesson exercise, and keep
the file open to perform the remaining
lesson exercises for the chapter.
The exercises are written so that you may
“build upon them”, meaning the exercises
in a chapter can be performed in
succession from the first lesson to the last.
10
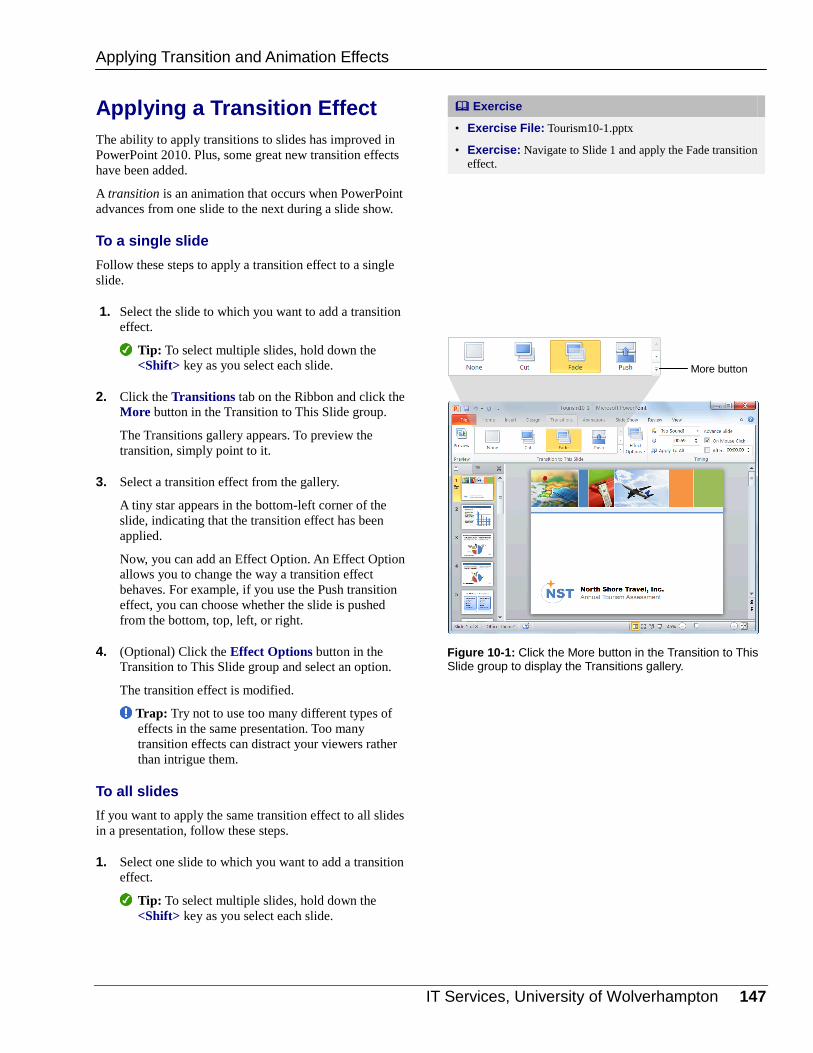
IT Services, University of Wolverhampton 147
Applying a Transition Effect
The ability to apply transitions to slides has improved in
PowerPoint 2010. Plus, some great new transition effects
have been added.
A transition is an animation that occurs when PowerPoint
advances from one slide to the next during a slide show.
To a single slide
Follow these steps to apply a transition effect to a single
slide.
1. Select the slide to which you want to add a transition
effect.
Tip: To select multiple slides, hold down the
<Shift> key as you select each slide.
2. Click the Transitions tab on the Ribbon and click the
More button in the Transition to This Slide group.
The Transitions gallery appears. To preview the
transition, simply point to it.
3. Select a transition effect from the gallery.
A tiny star appears in the bottom-left corner of the
slide, indicating that the transition effect has been
applied.
Now, you can add an Effect Option. An Effect Option
allows you to change the way a transition effect
behaves. For example, if you use the Push transition
effect, you can choose whether the slide is pushed
from the bottom, top, left, or right.
4. (Optional) Click the Effect Options button in the
Transition to This Slide group and select an option.
The transition effect is modified.
Trap: Try not to use too many different types of
effects in the same presentation. Too many
transition effects can distract your viewers rather
than intrigue them.
To all slides
If you want to apply the same transition effect to all slides
in a presentation, follow these steps.
1. Select one slide to which you want to add a transition
effect.
Tip: To select multiple slides, hold down the
<Shift> key as you select each slide.
Exercise
• Exercise File: Tourism10-1.pptx
• Exercise: Navigate to Slide 1 and apply the Fade transition
effect.
Figure 10-1: Click the More button in the Transition to This Slide group to display the Transitions gallery.
Applying Transition and Animation Effects
More button
148 © 2010 CustomGuide, Inc.
2. Click the Transitions tab on the Ribbon and click the
More button in the Transition to This Slide group.
The Transitions gallery appears. To preview the
transition, simply point to it.
3. Select a transition effect from the gallery.
A tiny star appears in the bottom-left corner of the
slide, indicating that the transition effect has been
applied.
Now, you have can add an effect option.
4. (Optional) Click the Effect Options button in the
Transition to This Slide group and select an option.
The transition effect is modified.
5. Click the Apply To All button in the Timing group.
The transition effect is applied to all of the slides in
the presentation.
Trap: Try not to use too many different types of
effects in the same presentation. Too many
transition effects can distract your viewers rather
than intrigue them.
Applying Transition and Animation Effects
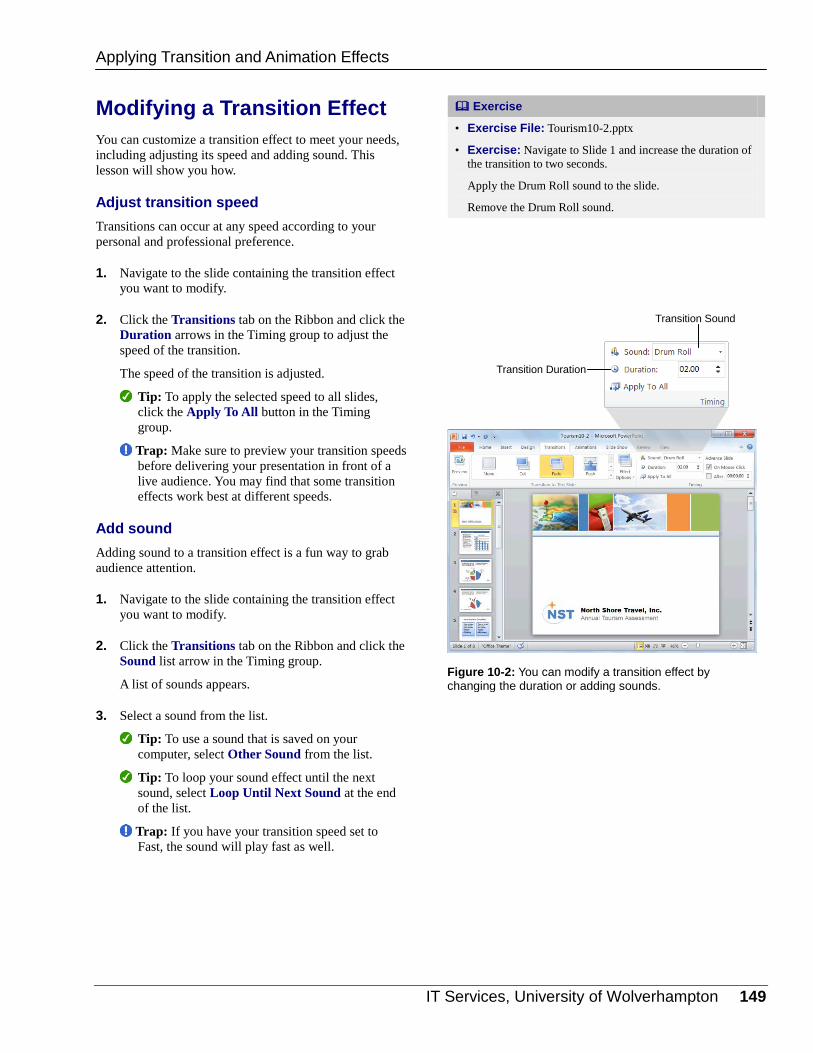
IT Services, University of Wolverhampton 149
Modifying a Transition Effect
You can customize a transition effect to meet your needs,
including adjusting its speed and adding sound. This
lesson will show you how.
Adjust transition speed
Transitions can occur at any speed according to your
personal and professional preference.
1. Navigate to the slide containing the transition effect
you want to modify.
2. Click the Transitions tab on the Ribbon and click the
Duration arrows in the Timing group to adjust the
speed of the transition.
The speed of the transition is adjusted.
Tip: To apply the selected speed to all slides,
click the Apply To All button in the Timing
group.
Trap: Make sure to preview your transition speeds
before delivering your presentation in front of a
live audience. You may find that some transition
effects work best at different speeds.
Add sound
Adding sound to a transition effect is a fun way to grab
audience attention.
1. Navigate to the slide containing the transition effect
you want to modify.
2. Click the Transitions tab on the Ribbon and click the
Sound list arrow in the Timing group.
A list of sounds appears.
3. Select a sound from the list.
Tip: To use a sound that is saved on your
computer, select Other Sound from the list.
Tip: To loop your sound effect until the next
sound, select Loop Until Next Sound at the end
of the list.
Trap: If you have your transition speed set to
Fast, the sound will play fast as well.
Exercise
• Exercise File: Tourism10-2.pptx
• Exercise: Navigate to Slide 1 and increase the duration of
the transition to two seconds.
Apply the Drum Roll sound to the slide.
Remove the Drum Roll sound.
Figure 10-2: You can modify a transition effect by changing the duration or adding sounds.
Applying Transition and Animation Effects
Transition Duration
Transition Sound
150 © 2010 CustomGuide, Inc.
Remove a transition effect
It’s easy to remove a transition effect if you decide you
don’t like it.
1. Navigate to the slide containing the transition effect
you want to remove.
2. Click the Transitions tab on the Ribbon and click the
More button in the Transition to This Slide group.
The Transitions gallery appears.
3. Select None from the gallery.
The transition effect is removed.
Remove a sound
You can easily remove a sound from a transition.
1. Navigate to the slide containing the transition sound
you want to remove.
2. Click the Transitions tab on the Ribbon and click the
Sound list arrow in the Timing group.
3. Select [No Sound] from the list.
The sound is removed.
Tips
It’s a good idea to preview any transition speeds or
sounds before you deliver your presentation in front
of an audience.
Applying Transition and Animation Effects
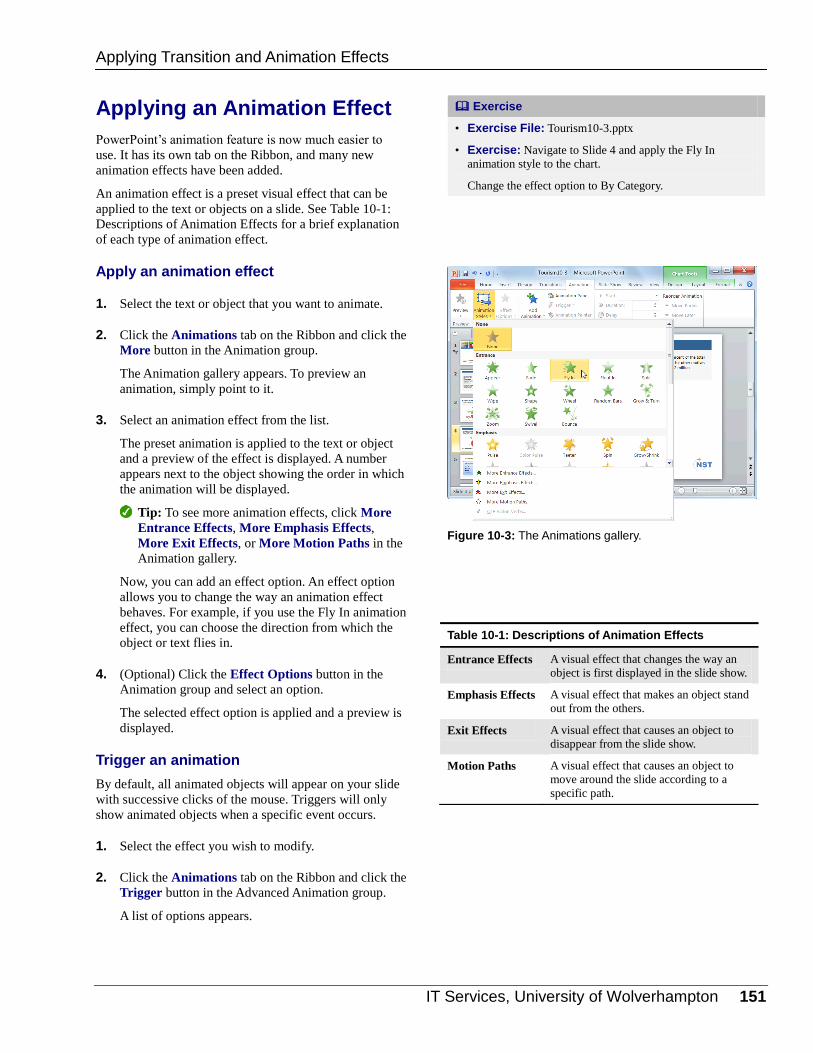
IT Services, University of Wolverhampton 151
Applying an Animation Effect
PowerPoint’s animation feature is now much easier to
use. It has its own tab on the Ribbon, and many new
animation effects have been added.
An animation effect is a preset visual effect that can be
applied to the text or objects on a slide. See Table 10-1:
Descriptions of Animation Effects for a brief explanation
of each type of animation effect.
Apply an animation effect
1. Select the text or object that you want to animate.
2. Click the Animations tab on the Ribbon and click the
More button in the Animation group.
The Animation gallery appears. To preview an
animation, simply point to it.
3. Select an animation effect from the list.
The preset animation is applied to the text or object
and a preview of the effect is displayed. A number
appears next to the object showing the order in which
the animation will be displayed.
Tip: To see more animation effects, click More
Entrance Effects, More Emphasis Effects,
More Exit Effects, or More Motion Paths in the
Animation gallery.
Now, you can add an effect option. An effect option
allows you to change the way an animation effect
behaves. For example, if you use the Fly In animation
effect, you can choose the direction from which the
object or text flies in.
4. (Optional) Click the Effect Options button in the
Animation group and select an option.
The selected effect option is applied and a preview is
displayed.
Trigger an animation
By default, all animated objects will appear on your slide
with successive clicks of the mouse. Triggers will only
show animated objects when a specific event occurs.
1. Select the effect you wish to modify.
2. Click the Animations tab on the Ribbon and click the
Trigger button in the Advanced Animation group.
A list of options appears.
Exercise
• Exercise File: Tourism10-3.pptx
• Exercise: Navigate to Slide 4 and apply the Fly In
animation style to the chart.
Change the effect option to By Category.
Figure 10-3: The Animations gallery.
Table 10-1: Descriptions of Animation Effects
Entrance Effects A visual effect that changes the way an
object is first displayed in the slide show.
Emphasis Effects A visual effect that makes an object stand
out from the others.
Exit Effects A visual effect that causes an object to
disappear from the slide show.
Motion Paths A visual effect that causes an object to
move around the slide according to a
specific path.
Applying Transition and Animation Effects
152 © 2010 CustomGuide, Inc.
On Click Of: Starts the animation effect when
you click the specified object on the slide.
On Bookmark: Starts the animation effect when
a video or audio clip hits a specific bookmark.
3. Select the trigger you wish to use.
The trigger is assigned to the animation.
Trap: If the triggering event does not occur, the
object will not animate.
Tips
You can add multiple animations to a single object by
selecting the text or object, clicking the Add
Animation button in the Advanced Animation group,
and selecting an option.
Don’t get too crazy with your animations. Animation
effects should be used to call attention to the main
points of your slide. Too many effects can detract
from your presentation.
Applying Transition and Animation Effects
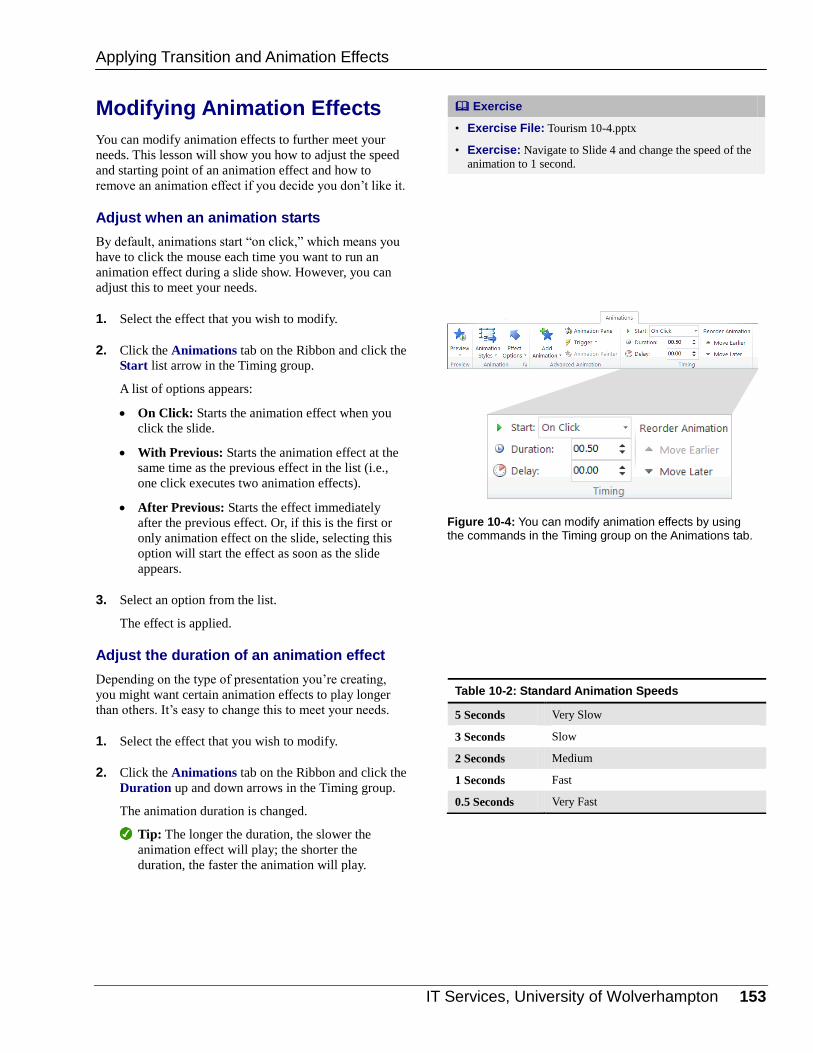
IT Services, University of Wolverhampton 153
Modifying Animation Effects
You can modify animation effects to further meet your
needs. This lesson will show you how to adjust the speed
and starting point of an animation effect and how to
remove an animation effect if you decide you don’t like it.
Adjust when an animation starts
By default, animations start “on click,” which means you
have to click the mouse each time you want to run an
animation effect during a slide show. However, you can
adjust this to meet your needs.
1. Select the effect that you wish to modify.
2. Click the Animations tab on the Ribbon and click the
Start list arrow in the Timing group.
A list of options appears:
On Click: Starts the animation effect when you
click the slide.
With Previous: Starts the animation effect at the
same time as the previous effect in the list (i.e.,
one click executes two animation effects).
After Previous: Starts the effect immediately
after the previous effect. Or, if this is the first or
only animation effect on the slide, selecting this
option will start the effect as soon as the slide
appears.
3. Select an option from the list.
The effect is applied.
Adjust the duration of an animation effect
Depending on the type of presentation you’re creating,
you might want certain animation effects to play longer
than others. It’s easy to change this to meet your needs.
1. Select the effect that you wish to modify.
2. Click the Animations tab on the Ribbon and click the
Duration up and down arrows in the Timing group.
The animation duration is changed.
Tip: The longer the duration, the slower the
animation effect will play; the shorter the
duration, the faster the animation will play.
Exercise
• Exercise File: Tourism 10-4.pptx
• Exercise: Navigate to Slide 4 and change the speed of the
animation to 1 second.
Figure 10-4: You can modify animation effects by using the commands in the Timing group on the Animations tab.
Table 10-2: Standard Animation Speeds
5 Seconds Very Slow
3 Seconds Slow
2 Seconds Medium
1 Seconds Fast
0.5 Seconds Very Fast
Applying Transition and Animation Effects
154 © 2010 CustomGuide, Inc.
Delay the start of an animation effect
If you don’t want an animation to start right away, you
can delay its start. This can be particularly useful when
spacing out multiple animation effects on the same slide.
1. Select effect that you wish to modify.
2. Click the Animations tab on the Ribbon and click the
Delay arrows in the Timing group.
The animation delay is set.
Re-order animation effects
If you want to adjust the order in which animation effects
play, you can simply re-order them.
1. Select the effect you wish to re-order.
2. Click the Animations tab on the Ribbon and click the
Move Earlier or Move Later button in the Timing
group.
The number next to the animation changes
accordingly.
Remove an animation effect
It’s easy to remove an animation if you decide you don’t
like it.
1. Select the effect that you wish to remove.
2. Click the Animations tab on the Ribbon and click the
More button in the Animation group.
A list of animation options appears.
3. Select None.
The animation effect is removed.
Other Ways to Remove an Animation Effect: In the Animation Pane, select the effect you want
to remove, click the effect’s list arrow, and select
Remove.
Applying Transition and Animation Effects
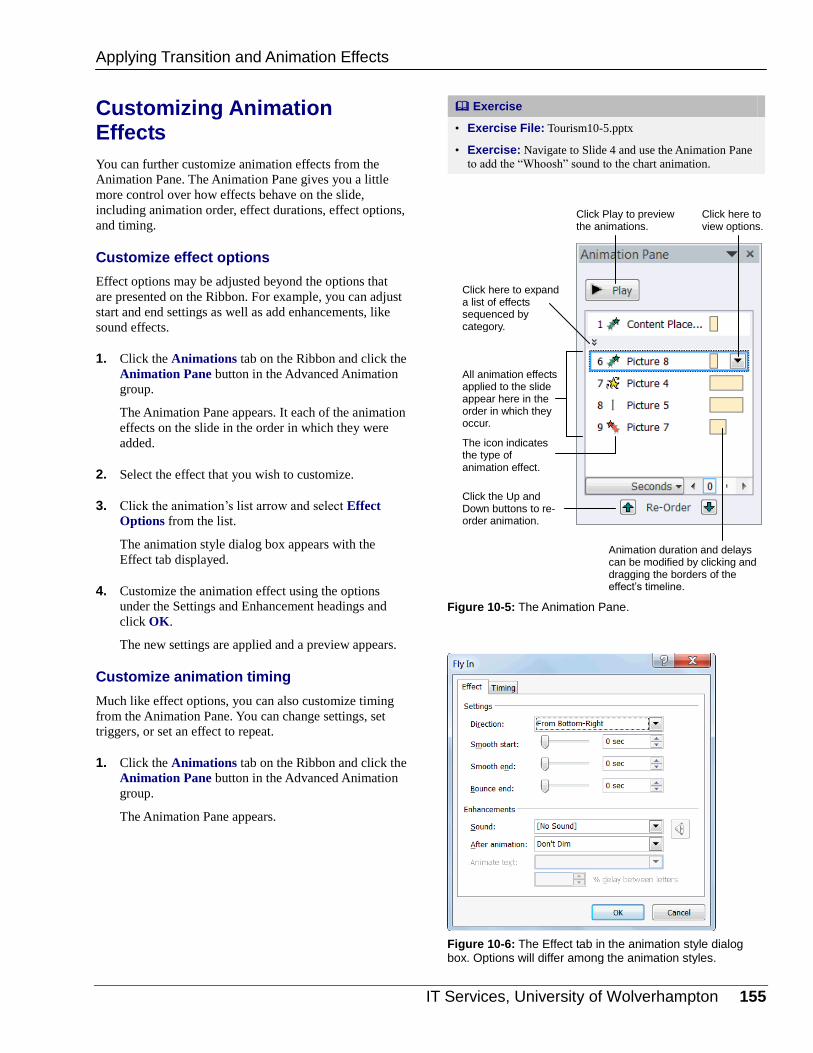
IT Services, University of Wolverhampton 155
Customizing Animation Effects
You can further customize animation effects from the
Animation Pane. The Animation Pane gives you a little
more control over how effects behave on the slide,
including animation order, effect durations, effect options,
and timing.
Customize effect options
Effect options may be adjusted beyond the options that
are presented on the Ribbon. For example, you can adjust
start and end settings as well as add enhancements, like
sound effects.
1. Click the Animations tab on the Ribbon and click the
Animation Pane button in the Advanced Animation
group.
The Animation Pane appears. It each of the animation
effects on the slide in the order in which they were
added.
2. Select the effect that you wish to customize.
3. Click the animation’s list arrow and select Effect
Options from the list.
The animation style dialog box appears with the
Effect tab displayed.
4. Customize the animation effect using the options
under the Settings and Enhancement headings and
click OK.
The new settings are applied and a preview appears.
Customize animation timing
Much like effect options, you can also customize timing
from the Animation Pane. You can change settings, set
triggers, or set an effect to repeat.
1. Click the Animations tab on the Ribbon and click the
Animation Pane button in the Advanced Animation
group.
The Animation Pane appears.
Exercise
• Exercise File: Tourism10-5.pptx
• Exercise: Navigate to Slide 4 and use the Animation Pane
to add the “Whoosh” sound to the chart animation.
Figure 10-5: The Animation Pane.
Figure 10-6: The Effect tab in the animation style dialog box. Options will differ among the animation styles.
Applying Transition and Animation Effects
Click Play to preview the animations.
All animation effects applied to the slide appear here in the order in which they occur.
Click the Up and Down buttons to re-order animation.
Click here to expand a list of effects sequenced by category.
Animation duration and delays can be modified by clicking and dragging the borders of the effect’s timeline.
Click here to view options.
The icon indicates the type of animation effect.
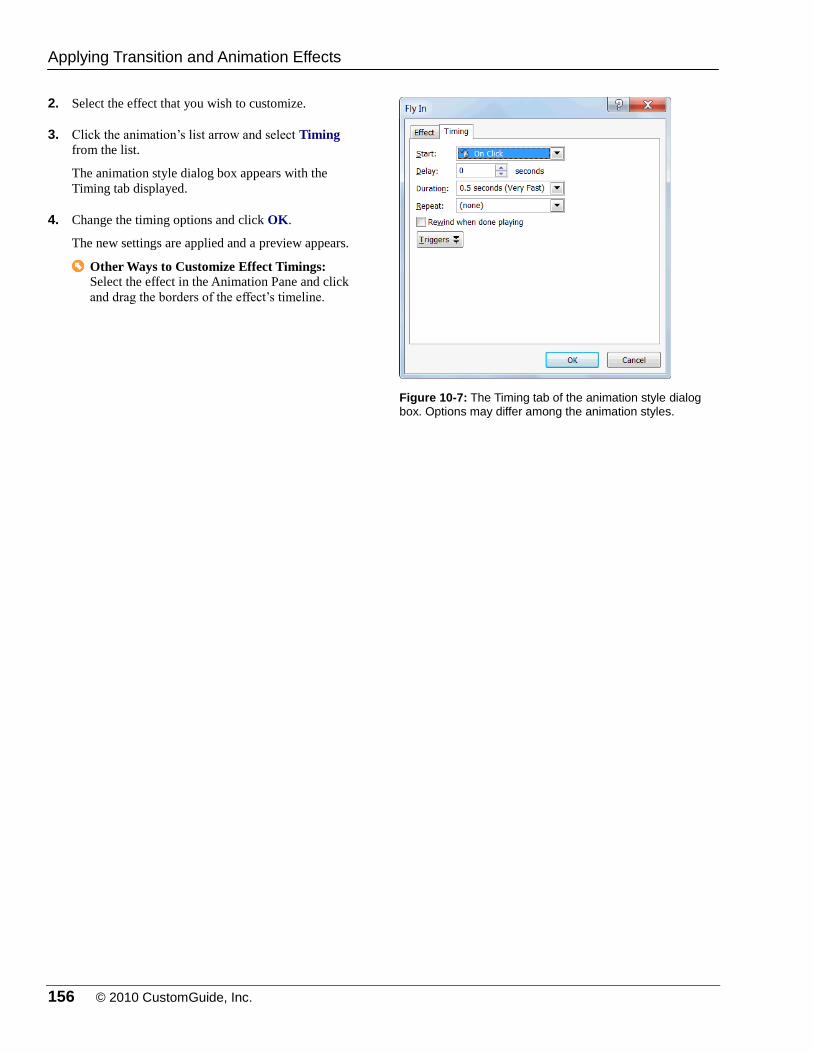
156 © 2010 CustomGuide, Inc.
2. Select the effect that you wish to customize.
3. Click the animation’s list arrow and select Timing
from the list.
The animation style dialog box appears with the
Timing tab displayed.
4. Change the timing options and click OK.
The new settings are applied and a preview appears.
Other Ways to Customize Effect Timings: Select the effect in the Animation Pane and click
and drag the borders of the effect’s timeline.
Figure 10-7: The Timing tab of the animation style dialog box. Options may differ among the animation styles.
Applying Transition and Animation Effects
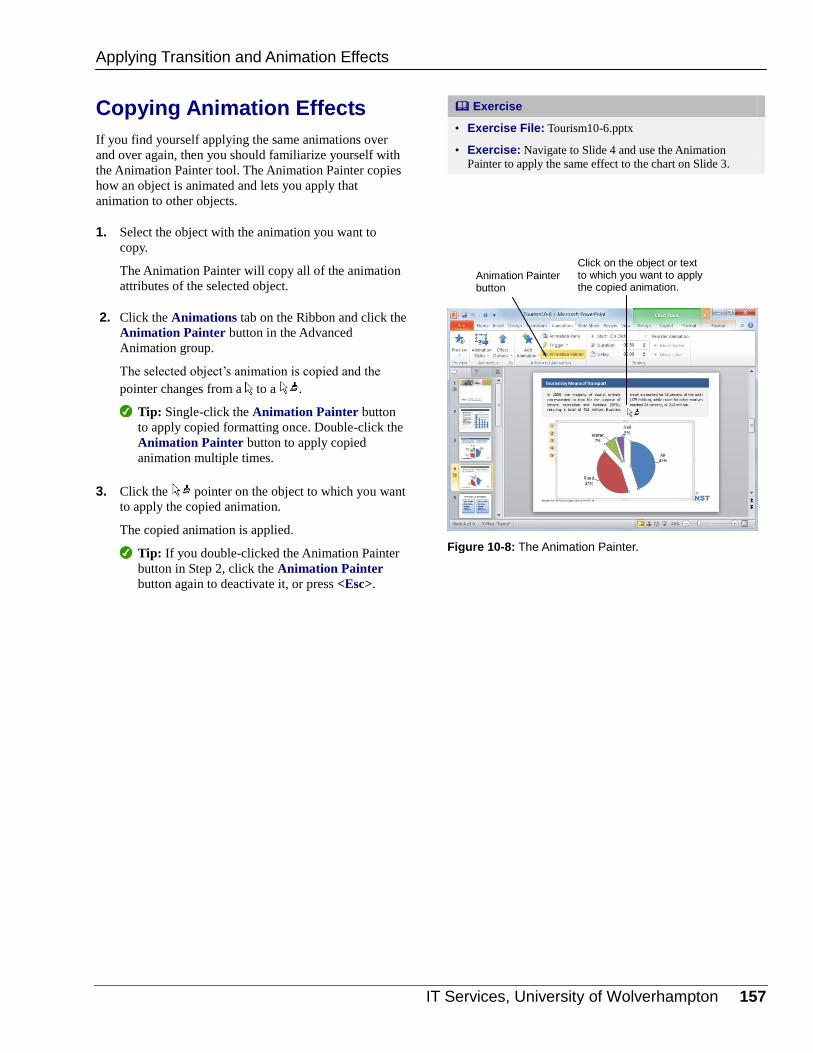
IT Services, University of Wolverhampton 157
Copying Animation Effects
If you find yourself applying the same animations over
and over again, then you should familiarize yourself with
the Animation Painter tool. The Animation Painter copies
how an object is animated and lets you apply that
animation to other objects.
1. Select the object with the animation you want to
copy.
The Animation Painter will copy all of the animation
attributes of the selected object.
2. Click the Animations tab on the Ribbon and click the
Animation Painter button in the Advanced
Animation group.
The selected object’s animation is copied and the
pointer changes from a to a .
Tip: Single-click the Animation Painter button
to apply copied formatting once. Double-click the
Animation Painter button to apply copied
animation multiple times.
3. Click the pointer on the object to which you want
to apply the copied animation.
The copied animation is applied.
Tip: If you double-clicked the Animation Painter
button in Step 2, click the Animation Painter
button again to deactivate it, or press <Esc>.
Exercise
• Exercise File: Tourism10-6.pptx
• Exercise: Navigate to Slide 4 and use the Animation
Painter to apply the same effect to the chart on Slide 3.
Figure 10-8: The Animation Painter.
Applying Transition and Animation Effects
Animation Painter button
Click on the object or text to which you want to apply the copied animation.
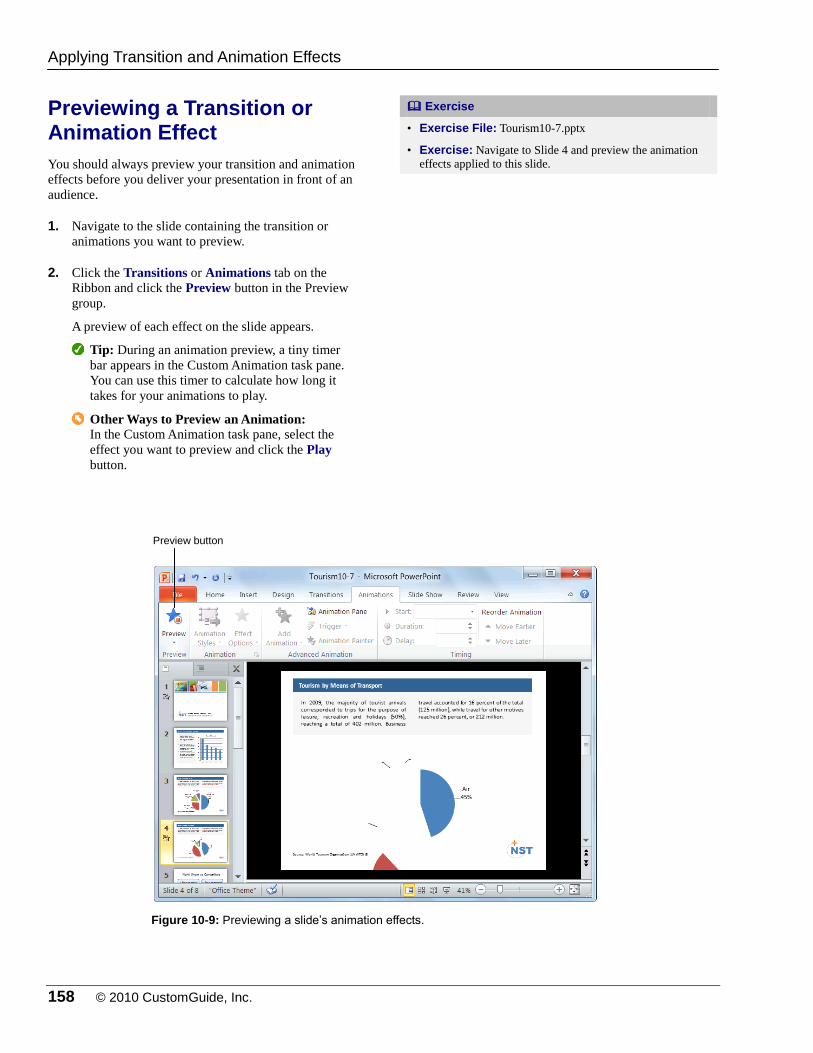
158 © 2010 CustomGuide, Inc.
Previewing a Transition or Animation Effect
You should always preview your transition and animation
effects before you deliver your presentation in front of an
audience.
1. Navigate to the slide containing the transition or
animations you want to preview.
2. Click the Transitions or Animations tab on the
Ribbon and click the Preview button in the Preview
group.
A preview of each effect on the slide appears.
Tip: During an animation preview, a tiny timer
bar appears in the Custom Animation task pane.
You can use this timer to calculate how long it
takes for your animations to play.
Other Ways to Preview an Animation: In the Custom Animation task pane, select the
effect you want to preview and click the Play
button.
Exercise
• Exercise File: Tourism10-7.pptx
• Exercise: Navigate to Slide 4 and preview the animation
effects applied to this slide.
Figure 10-9: Previewing a slide’s animation effects.
Applying Transition and Animation Effects
Preview button
IT Services, University of Wolverhampton 159
AAppppllyyiinngg TTrraannssiittiioonn aanndd AAnniimmaattiioonn
EEffffeeccttss RReevviieeww
Quiz Questions
98. What is a transition effect? A. A set of different formatting commands that can be applied to a slide in a single step. B. An animation that occurs when PowerPoint advances from one slide to the next during a slide show. C. Side effects that can occur as a result of creating PowerPoint presentations. D. A preset visual effect that can be applied to the text or objects on a slide.
99. You can only apply a transition speed one slide at a time. (True or False?)
100. An animation effect is a preset visual effect that can be applied to the text or objects on a slide. (True or False?)
101. The fastest way to apply an animation effect is to: A. Create a custom animation. B. Apply a Quick Animation. C. Apply a standard animation. D. Think really hard.
102. By default, animations start: A. On Click B. On Time C. After Previous D. With Previous
103. Which feature can you use in order to tweak and customize animation effects? A. Backstage View B. The Outline Pane C. The Notes Pane D. The Animation Pane
104. You can only use the Animation Painter to copy and paste animation effects to one object at a time. (True or False?)
105. Previewing your transition and animation effects is not important. (True or False?)
160 © 2010 CustomGuide, Inc.
Quiz Answers
98. B. A transition effect is an animation that occurs when PowerPoint advances from one slide to the next during a slide
show.
99. False. You can apply a transition speed to all slides in the presentation by clicking the Apply To All button on the
Ribbon.
100. True. An animation effect is a preset visual effect that can be applied to the text or objects on a slide.
101. C. The fastest way to apply an animation effect is to use one of PowerPoint's standard animations.
102. A. By default, animations start on click, which means you have to click the mouse each time you want to run an
animation effect during a slide show.
103. D. The Animation Pane gives you access to features that allow you to further customize animation effects.
104. False. Double-click the Animation Painter button to apply copied animation more than once.
105. False. You should always preview your transition and animation effects before delivering your presentation in front of
a live audience.
IT Services, University of Wolverhampton 161
WWoorrkkiinngg wwiitthh
MMuullttiimmeeddiiaa
Inserting Audio ................................................ 162 Insert audio you have on file .................. 162 Insert audio from the Clip Organizer ...... 162 Change audio options ............................ 163 Preview audio ........................................ 163 Remove audio ........................................ 163
Recording Audio Comments on a Slide ........ 164
Inserting Video from a File ............................. 165 Insert a video file .................................... 165 Add a poster frame ................................ 165 Change video options ............................ 166
Inserting Video from the Web ......................... 167
Editing Media Playback ................................... 168 Trim the length of a clip ......................... 168 Adjust the fade duration ......................... 168
Inserting and Using Bookmarks .................... 170 Add bookmarks ...................................... 170 Go to a bookmark .................................. 170 Remove bookmarks ............................... 171
Using Action Buttons ...................................... 172
Compressing Media ........................................ 173
Multimedia is a combination of audio,
video, animation, and graphics. Adding
multimedia to your presentations is a
great way to keep things interesting and
entertaining.
In this chapter you will learn how to insert
sounds and movie clips onto a slide. You
will also learn how to add narration to
your slides and how to insert and use
action buttons.
Using Exercise Files This chapter suggests exercises to practice
the topic of each lesson. There are two
ways you may follow along with the
exercise files:
Open the exercise file for a lesson,
perform the lesson exercise, and close
the exercise file.
Open the exercise file for a lesson,
perform the lesson exercise, and keep
the file open to perform the remaining
lesson exercises for the chapter.
The exercises are written so that you may
“build upon them”, meaning the exercises
in a chapter can be performed in
succession from the first lesson to the last.
11
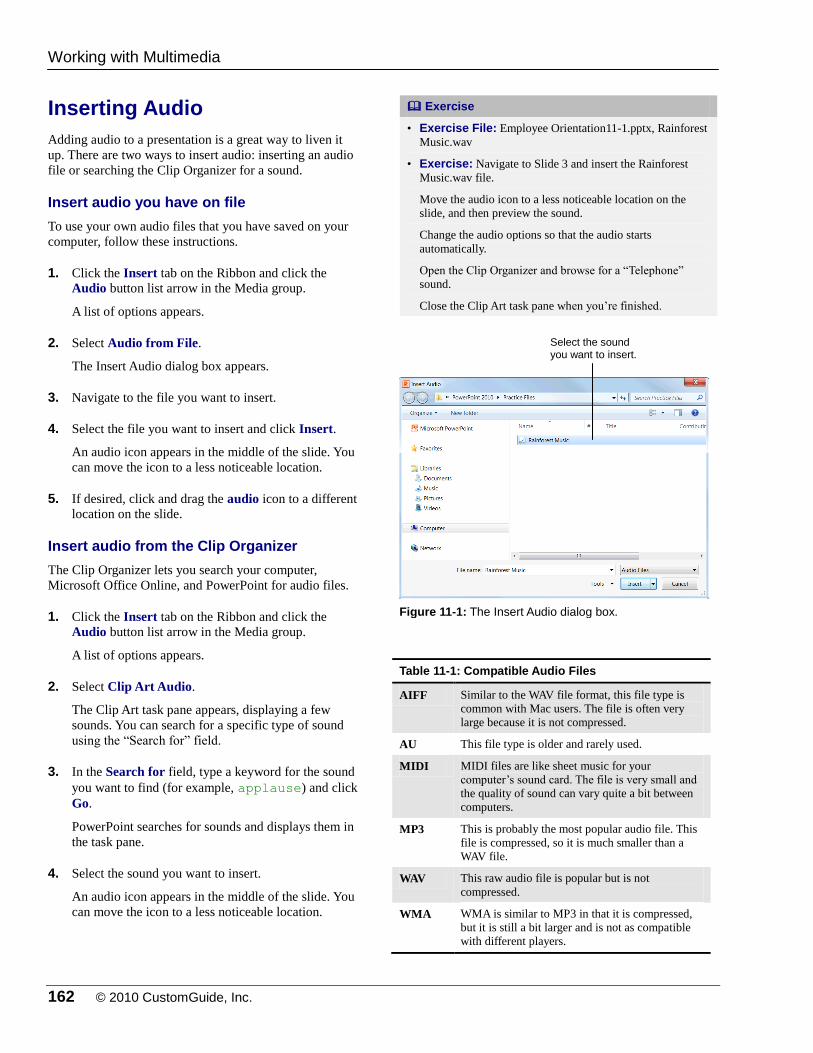
162 © 2010 CustomGuide, Inc.
Inserting Audio
Adding audio to a presentation is a great way to liven it
up. There are two ways to insert audio: inserting an audio
file or searching the Clip Organizer for a sound.
Insert audio you have on file
To use your own audio files that you have saved on your
computer, follow these instructions.
1. Click the Insert tab on the Ribbon and click the
Audio button list arrow in the Media group.
A list of options appears.
2. Select Audio from File.
The Insert Audio dialog box appears.
3. Navigate to the file you want to insert.
4. Select the file you want to insert and click Insert.
An audio icon appears in the middle of the slide. You
can move the icon to a less noticeable location.
5. If desired, click and drag the audio icon to a different
location on the slide.
Insert audio from the Clip Organizer
The Clip Organizer lets you search your computer,
Microsoft Office Online, and PowerPoint for audio files.
1. Click the Insert tab on the Ribbon and click the
Audio button list arrow in the Media group.
A list of options appears.
2. Select Clip Art Audio.
The Clip Art task pane appears, displaying a few
sounds. You can search for a specific type of sound
using the “Search for” field.
3. In the Search for field, type a keyword for the sound
you want to find (for example, applause) and click
Go.
PowerPoint searches for sounds and displays them in
the task pane.
4. Select the sound you want to insert.
An audio icon appears in the middle of the slide. You
can move the icon to a less noticeable location.
Exercise
• Exercise File: Employee Orientation11-1.pptx, Rainforest
Music.wav
• Exercise: Navigate to Slide 3 and insert the Rainforest
Music.wav file.
Move the audio icon to a less noticeable location on the
slide, and then preview the sound.
Change the audio options so that the audio starts
automatically.
Open the Clip Organizer and browse for a “Telephone”
sound.
Close the Clip Art task pane when you’re finished.
Figure 11-1: The Insert Audio dialog box.
Table 11-1: Compatible Audio Files
AIFF Similar to the WAV file format, this file type is
common with Mac users. The file is often very
large because it is not compressed.
AU This file type is older and rarely used.
MIDI MIDI files are like sheet music for your
computer’s sound card. The file is very small and
the quality of sound can vary quite a bit between
computers.
MP3 This is probably the most popular audio file. This
file is compressed, so it is much smaller than a
WAV file.
WAV This raw audio file is popular but is not
compressed.
WMA WMA is similar to MP3 in that it is compressed,
but it is still a bit larger and is not as compatible
with different players.
Working with Multimedia
Select the sound you want to insert.
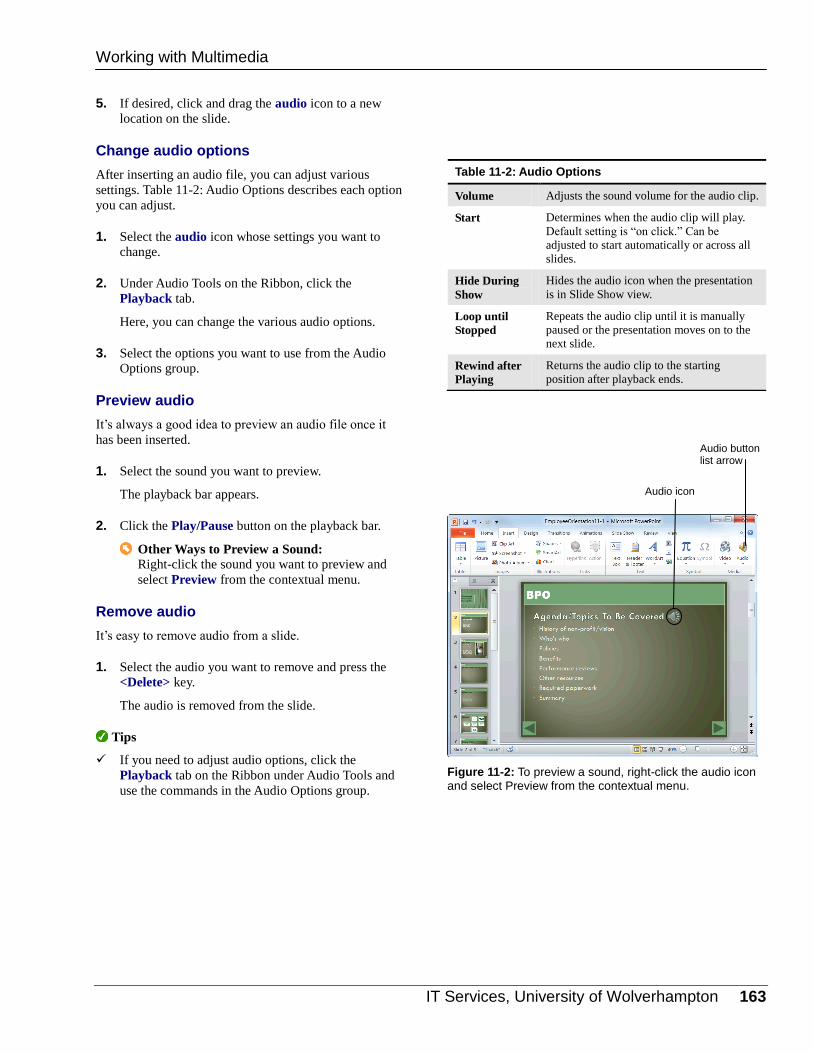
IT Services, University of Wolverhampton 163
5. If desired, click and drag the audio icon to a new
location on the slide.
Change audio options
After inserting an audio file, you can adjust various
settings. Table 11-2: Audio Options describes each option
you can adjust.
1. Select the audio icon whose settings you want to
change.
2. Under Audio Tools on the Ribbon, click the
Playback tab.
Here, you can change the various audio options.
3. Select the options you want to use from the Audio
Options group.
Preview audio
It’s always a good idea to preview an audio file once it
has been inserted.
1. Select the sound you want to preview.
The playback bar appears.
2. Click the Play/Pause button on the playback bar.
Other Ways to Preview a Sound: Right-click the sound you want to preview and
select Preview from the contextual menu.
Remove audio
It’s easy to remove audio from a slide.
1. Select the audio you want to remove and press the
<Delete> key.
The audio is removed from the slide.
Tips
If you need to adjust audio options, click the
Playback tab on the Ribbon under Audio Tools and
use the commands in the Audio Options group.
Table 11-2: Audio Options
Volume Adjusts the sound volume for the audio clip.
Start Determines when the audio clip will play.
Default setting is “on click.” Can be
adjusted to start automatically or across all
slides.
Hide During
Show
Hides the audio icon when the presentation
is in Slide Show view.
Loop until
Stopped
Repeats the audio clip until it is manually
paused or the presentation moves on to the
next slide.
Rewind after
Playing
Returns the audio clip to the starting
position after playback ends.
Figure 11-2: To preview a sound, right-click the audio icon and select Preview from the contextual menu.
Audio icon
Audio button list arrow
Working with Multimedia

164 © 2010 CustomGuide, Inc.
Recording Audio Comments on a Slide
Recording comments in your presentation can make your
slide show more accessible to individuals with
disabilities, or they can add a personal element to your
presentation.
Trap: A microphone is required to record audio
comments.
1. Click the Insert tab on the Ribbon and click the
Audio button list arrow in the Media group.
A list of options appears.
2. Select Record Audio.
The Record Sound dialog box appears.
3. Enter the name of the recorded sound in the Name
field.
Now you are ready to begin recording audio.
4. Click the Record button.
PowerPoint begins recording audio.
5. When finished, click the Stop button and click OK.
An audio icon appears on the slide. This icon appears
in the middle of the slide by default, but you can
change this to meet your needs.
6. If desired, click and drag the audio icon to a different
location on the slide.
Exercise
• Exercise File: None required.
• Exercise: Understand how to record audio commentary in
a slide show.
Figure 11-3: The Record Sound dialog box.
Working with Multimedia
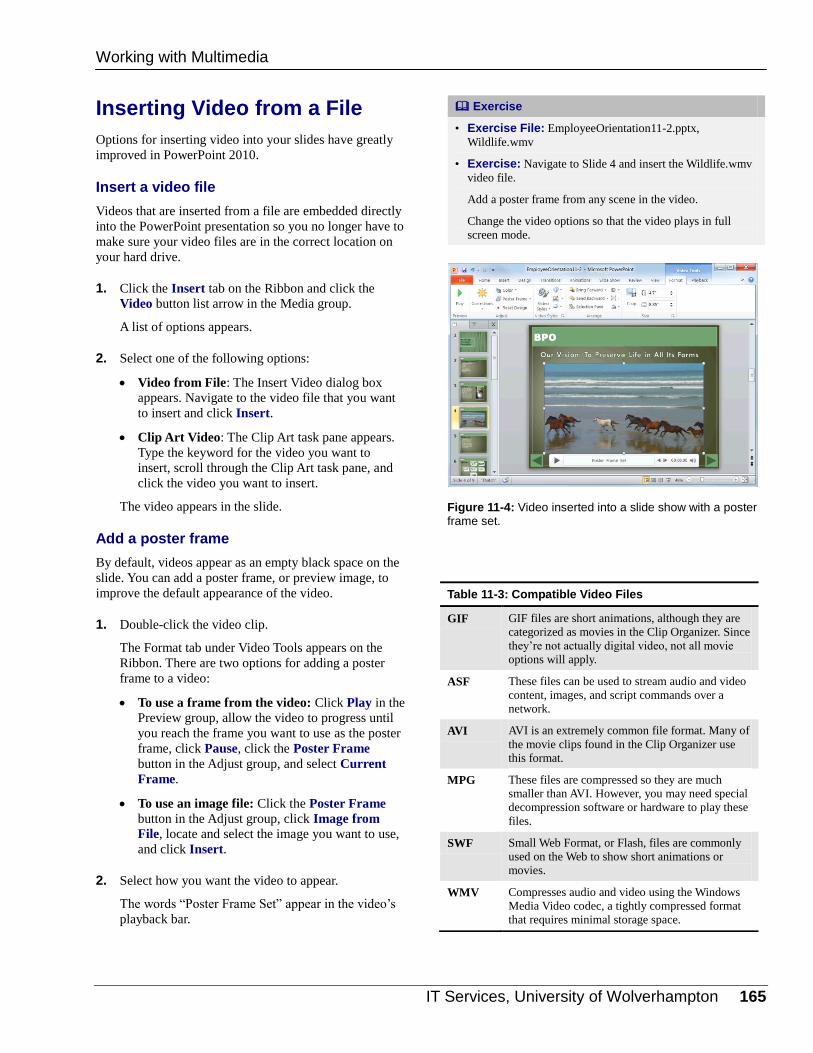
IT Services, University of Wolverhampton 165
Inserting Video from a File
Options for inserting video into your slides have greatly
improved in PowerPoint 2010.
Insert a video file
Videos that are inserted from a file are embedded directly
into the PowerPoint presentation so you no longer have to
make sure your video files are in the correct location on
your hard drive.
1. Click the Insert tab on the Ribbon and click the
Video button list arrow in the Media group.
A list of options appears.
2. Select one of the following options:
Video from File: The Insert Video dialog box
appears. Navigate to the video file that you want
to insert and click Insert.
Clip Art Video: The Clip Art task pane appears.
Type the keyword for the video you want to
insert, scroll through the Clip Art task pane, and
click the video you want to insert.
The video appears in the slide.
Add a poster frame
By default, videos appear as an empty black space on the
slide. You can add a poster frame, or preview image, to
improve the default appearance of the video.
1. Double-click the video clip.
The Format tab under Video Tools appears on the
Ribbon. There are two options for adding a poster
frame to a video:
To use a frame from the video: Click Play in the
Preview group, allow the video to progress until
you reach the frame you want to use as the poster
frame, click Pause, click the Poster Frame
button in the Adjust group, and select Current
Frame.
To use an image file: Click the Poster Frame
button in the Adjust group, click Image from
File, locate and select the image you want to use,
and click Insert.
2. Select how you want the video to appear.
The words “Poster Frame Set” appear in the video’s
playback bar.
Exercise
• Exercise File: EmployeeOrientation11-2.pptx,
Wildlife.wmv
• Exercise: Navigate to Slide 4 and insert the Wildlife.wmv
video file.
Add a poster frame from any scene in the video.
Change the video options so that the video plays in full
screen mode.
Figure 11-4: Video inserted into a slide show with a poster frame set.
Table 11-3: Compatible Video Files
GIF GIF files are short animations, although they are
categorized as movies in the Clip Organizer. Since
they’re not actually digital video, not all movie
options will apply.
ASF These files can be used to stream audio and video
content, images, and script commands over a
network.
AVI AVI is an extremely common file format. Many of
the movie clips found in the Clip Organizer use
this format.
MPG These files are compressed so they are much
smaller than AVI. However, you may need special
decompression software or hardware to play these
files.
SWF Small Web Format, or Flash, files are commonly
used on the Web to show short animations or
movies.
WMV Compresses audio and video using the Windows
Media Video codec, a tightly compressed format
that requires minimal storage space.
Working with Multimedia
166 © 2010 CustomGuide, Inc.
Change video options
After inserting a video file, you can adjust various
settings.
1. Select the video you want to change.
2. Under Video Tools on the Ribbon, click the Playback
tab.
Here you can change the various video options. Table
11-4: Video Options describes each option.
3. Select the options you want to use from the Video
Options group.
Tips
To resize a video clip, click and drag one of the
video’s sizing handles.
To move a video clip, click and drag the video to a
different location on the slide.
To delete a video clip, select the video on the slide
and press <Delete>.
Table 11-4: Video Options
Volume Adjusts the sound volume for the video
clip.
Start Determines when the video clip will play.
The default setting is “on click”, but you
can adjust the setting so the video starts
automatically.
Play Full Screen Expands the video to play in full screen.
Hide While Not
Playing
Hides the video frame when it is not
playing.
Loop until
Stopped
Repeats the video until it is manually
paused or the presentation moves on to
the next slide.
Rewind after
Playing
Returns the video clip to the starting
position after playback ends.
Working with Multimedia
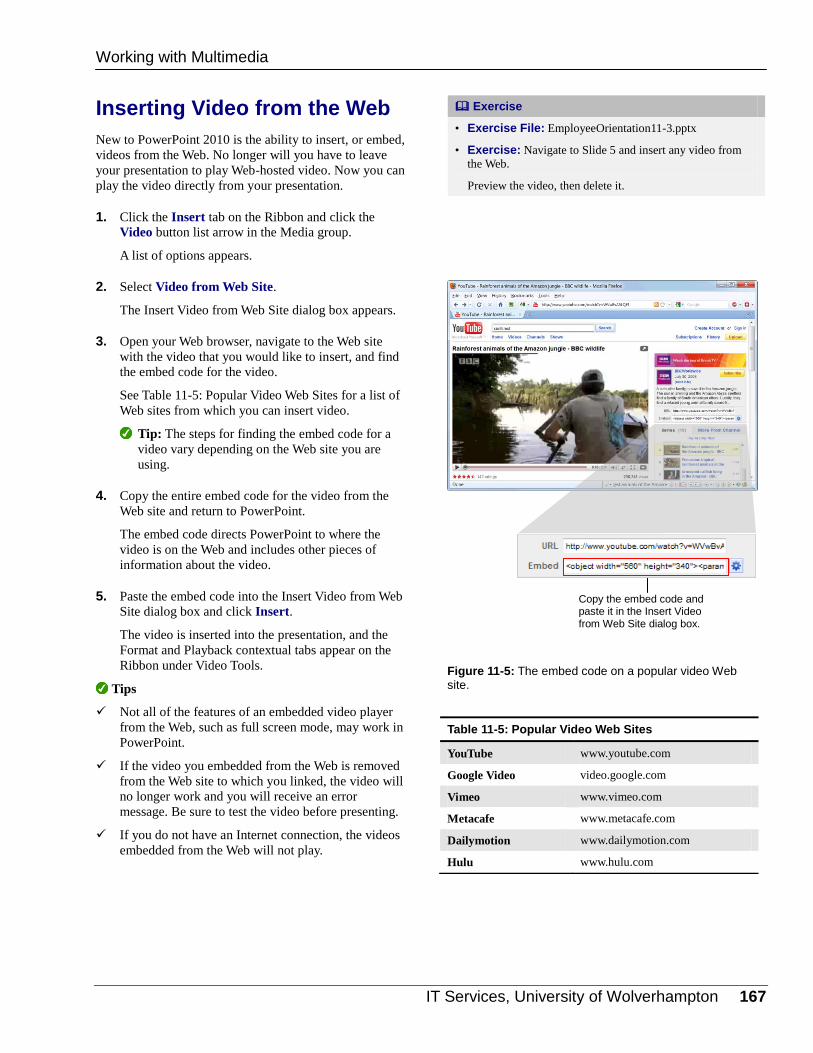
IT Services, University of Wolverhampton 167
Inserting Video from the Web
New to PowerPoint 2010 is the ability to insert, or embed,
videos from the Web. No longer will you have to leave
your presentation to play Web-hosted video. Now you can
play the video directly from your presentation.
1. Click the Insert tab on the Ribbon and click the
Video button list arrow in the Media group.
A list of options appears.
2. Select Video from Web Site.
The Insert Video from Web Site dialog box appears.
3. Open your Web browser, navigate to the Web site
with the video that you would like to insert, and find
the embed code for the video.
See Table 11-5: Popular Video Web Sites for a list of
Web sites from which you can insert video.
Tip: The steps for finding the embed code for a
video vary depending on the Web site you are
using.
4. Copy the entire embed code for the video from the
Web site and return to PowerPoint.
The embed code directs PowerPoint to where the
video is on the Web and includes other pieces of
information about the video.
5. Paste the embed code into the Insert Video from Web
Site dialog box and click Insert.
The video is inserted into the presentation, and the
Format and Playback contextual tabs appear on the
Ribbon under Video Tools.
Tips
Not all of the features of an embedded video player
from the Web, such as full screen mode, may work in
PowerPoint.
If the video you embedded from the Web is removed
from the Web site to which you linked, the video will
no longer work and you will receive an error
message. Be sure to test the video before presenting.
If you do not have an Internet connection, the videos
embedded from the Web will not play.
Exercise
• Exercise File: EmployeeOrientation11-3.pptx
• Exercise: Navigate to Slide 5 and insert any video from
the Web.
Preview the video, then delete it.
Figure 11-5: The embed code on a popular video Web site.
Table 11-5: Popular Video Web Sites
YouTube www.youtube.com
Google Video video.google.com
Vimeo www.vimeo.com
Metacafe www.metacafe.com
Dailymotion www.dailymotion.com
Hulu www.hulu.com
Working with Multimedia
Copy the embed code and paste it in the Insert Video from Web Site dialog box.
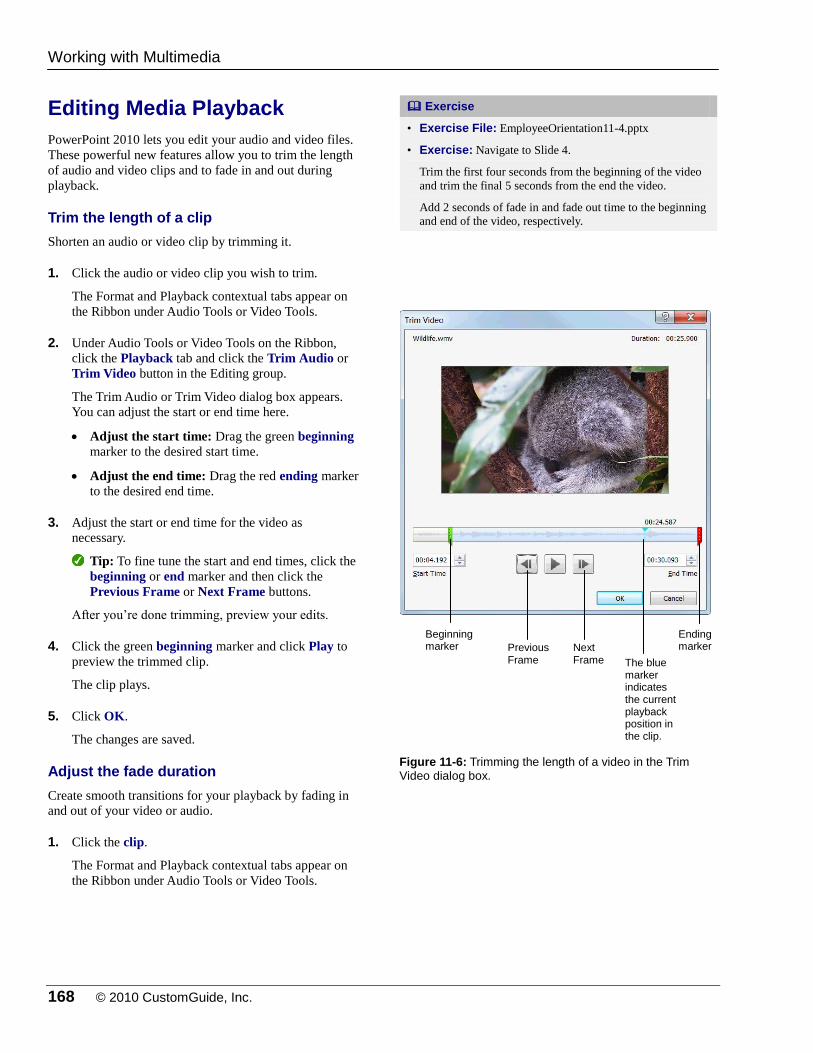
168 © 2010 CustomGuide, Inc.
Editing Media Playback
PowerPoint 2010 lets you edit your audio and video files.
These powerful new features allow you to trim the length
of audio and video clips and to fade in and out during
playback.
Trim the length of a clip
Shorten an audio or video clip by trimming it.
1. Click the audio or video clip you wish to trim.
The Format and Playback contextual tabs appear on
the Ribbon under Audio Tools or Video Tools.
2. Under Audio Tools or Video Tools on the Ribbon,
click the Playback tab and click the Trim Audio or
Trim Video button in the Editing group.
The Trim Audio or Trim Video dialog box appears.
You can adjust the start or end time here.
Adjust the start time: Drag the green beginning
marker to the desired start time.
Adjust the end time: Drag the red ending marker
to the desired end time.
3. Adjust the start or end time for the video as
necessary.
Tip: To fine tune the start and end times, click the
beginning or end marker and then click the
Previous Frame or Next Frame buttons.
After you’re done trimming, preview your edits.
4. Click the green beginning marker and click Play to
preview the trimmed clip.
The clip plays.
5. Click OK.
The changes are saved.
Adjust the fade duration
Create smooth transitions for your playback by fading in
and out of your video or audio.
1. Click the clip.
The Format and Playback contextual tabs appear on
the Ribbon under Audio Tools or Video Tools.
Exercise
• Exercise File: EmployeeOrientation11-4.pptx
• Exercise: Navigate to Slide 4.
Trim the first four seconds from the beginning of the video
and trim the final 5 seconds from the end the video.
Add 2 seconds of fade in and fade out time to the beginning
and end of the video, respectively.
Figure 11-6: Trimming the length of a video in the Trim Video dialog box.
Working with Multimedia
Beginning marker
Ending marker Previous
Frame Next Frame The blue
marker indicates the current playback position in the clip.
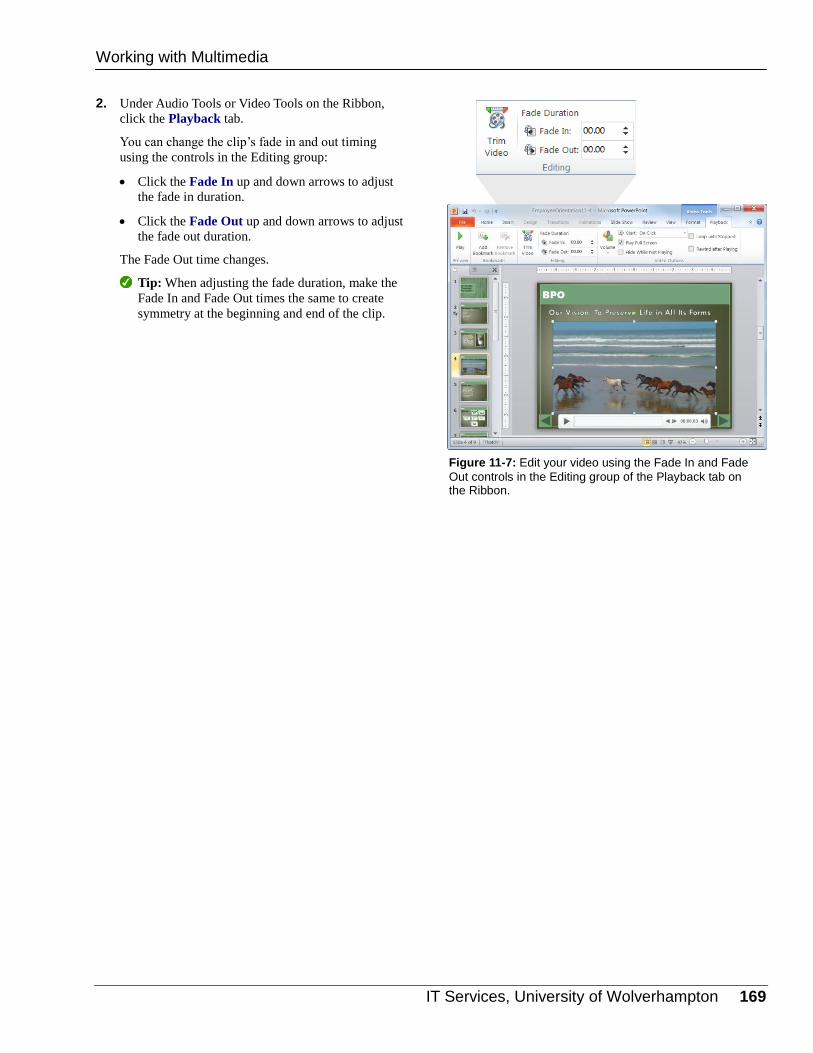
IT Services, University of Wolverhampton 169
2. Under Audio Tools or Video Tools on the Ribbon,
click the Playback tab.
You can change the clip’s fade in and out timing
using the controls in the Editing group:
Click the Fade In up and down arrows to adjust
the fade in duration.
Click the Fade Out up and down arrows to adjust
the fade out duration.
The Fade Out time changes.
Tip: When adjusting the fade duration, make the
Fade In and Fade Out times the same to create
symmetry at the beginning and end of the clip.
Figure 11-7: Edit your video using the Fade In and Fade
Out controls in the Editing group of the Playback tab on the Ribbon.
Working with Multimedia
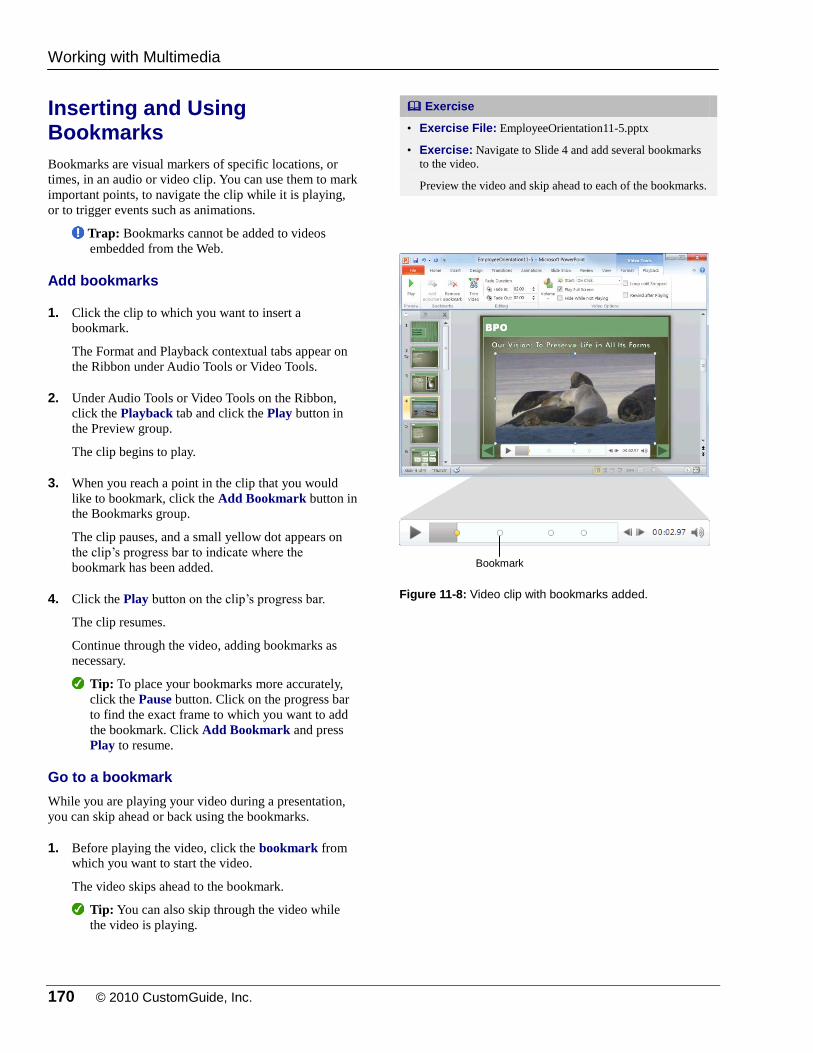
170 © 2010 CustomGuide, Inc.
Inserting and Using Bookmarks
Bookmarks are visual markers of specific locations, or
times, in an audio or video clip. You can use them to mark
important points, to navigate the clip while it is playing,
or to trigger events such as animations.
Trap: Bookmarks cannot be added to videos
embedded from the Web.
Add bookmarks
1. Click the clip to which you want to insert a
bookmark.
The Format and Playback contextual tabs appear on
the Ribbon under Audio Tools or Video Tools.
2. Under Audio Tools or Video Tools on the Ribbon,
click the Playback tab and click the Play button in
the Preview group.
The clip begins to play.
3. When you reach a point in the clip that you would
like to bookmark, click the Add Bookmark button in
the Bookmarks group.
The clip pauses, and a small yellow dot appears on
the clip’s progress bar to indicate where the
bookmark has been added.
4. Click the Play button on the clip’s progress bar.
The clip resumes.
Continue through the video, adding bookmarks as
necessary.
Tip: To place your bookmarks more accurately,
click the Pause button. Click on the progress bar
to find the exact frame to which you want to add
the bookmark. Click Add Bookmark and press
Play to resume.
Go to a bookmark
While you are playing your video during a presentation,
you can skip ahead or back using the bookmarks.
1. Before playing the video, click the bookmark from
which you want to start the video.
The video skips ahead to the bookmark.
Tip: You can also skip through the video while
the video is playing.
Exercise
• Exercise File: EmployeeOrientation11-5.pptx
• Exercise: Navigate to Slide 4 and add several bookmarks
to the video.
Preview the video and skip ahead to each of the bookmarks.
Figure 11-8: Video clip with bookmarks added.
Working with Multimedia
Bookmark

IT Services, University of Wolverhampton 171
2. Click the Play button on the video’s progress bar.
The video starts playing from the bookmark.
Other Ways to Use Bookmarks: Before playing the clip (or while the clip is
playing), press <Alt> + <Home> to skip to the
next bookmark. Press <Alt> + <End> to skip to
the previous bookmark.
Tip: Bookmarks can also be used to trigger
animation effects. For example, you could cause
text to appear at certain points in the video or
even create your own captions.
Remove bookmarks
Don’t like where you placed your bookmarks? You can
remove them.
1. Click the bookmark on the clip’s progress bar.
The bookmark is selected.
2. Under Audio Tools or Video Tools on the Ribbon,
click the Playback tab and click the Remove
Bookmark button in the Bookmarks group.
The bookmark is removed.
Working with Multimedia
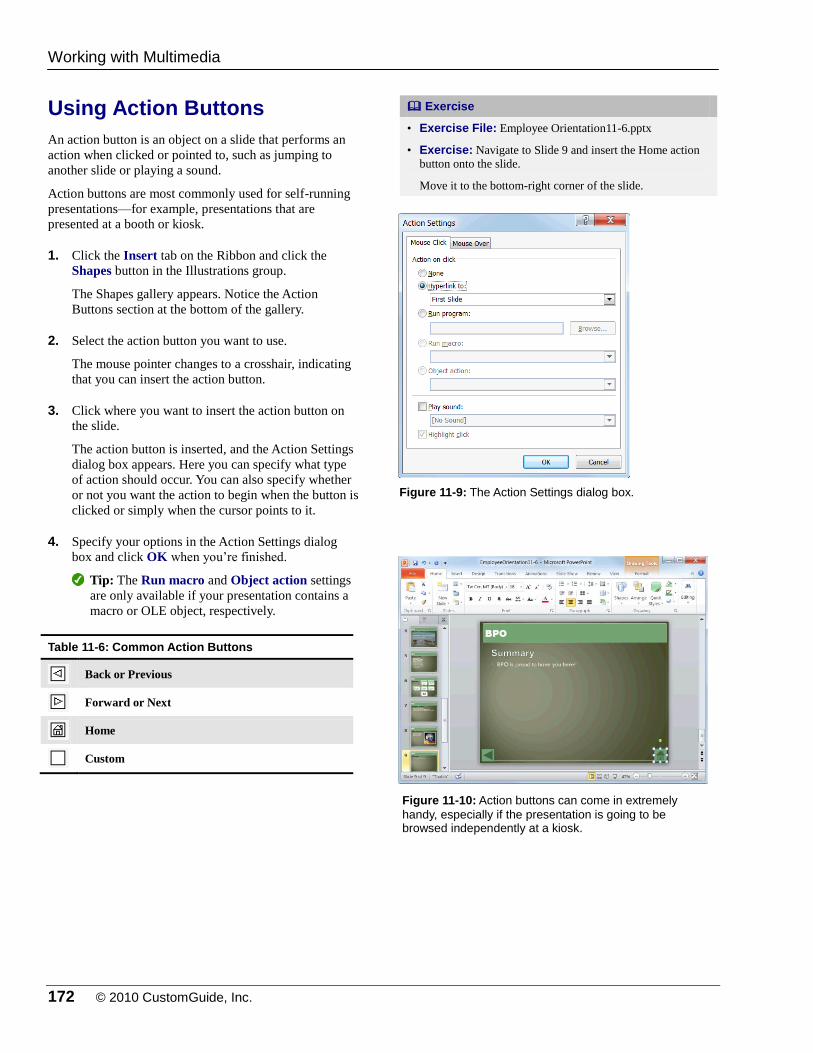
172 © 2010 CustomGuide, Inc.
Using Action Buttons
An action button is an object on a slide that performs an
action when clicked or pointed to, such as jumping to
another slide or playing a sound.
Action buttons are most commonly used for self-running
presentations—for example, presentations that are
presented at a booth or kiosk.
1. Click the Insert tab on the Ribbon and click the
Shapes button in the Illustrations group.
The Shapes gallery appears. Notice the Action
Buttons section at the bottom of the gallery.
2. Select the action button you want to use.
The mouse pointer changes to a crosshair, indicating
that you can insert the action button.
3. Click where you want to insert the action button on
the slide.
The action button is inserted, and the Action Settings
dialog box appears. Here you can specify what type
of action should occur. You can also specify whether
or not you want the action to begin when the button is
clicked or simply when the cursor points to it.
4. Specify your options in the Action Settings dialog
box and click OK when you’re finished.
Tip: The Run macro and Object action settings
are only available if your presentation contains a
macro or OLE object, respectively.
Table 11-6: Common Action Buttons
Back or Previous
Forward or Next
Home
Custom
Exercise
• Exercise File: Employee Orientation11-6.pptx
• Exercise: Navigate to Slide 9 and insert the Home action
button onto the slide.
Move it to the bottom-right corner of the slide.
Figure 11-9: The Action Settings dialog box.
Figure 11-10: Action buttons can come in extremely
handy, especially if the presentation is going to be browsed independently at a kiosk.
Working with Multimedia
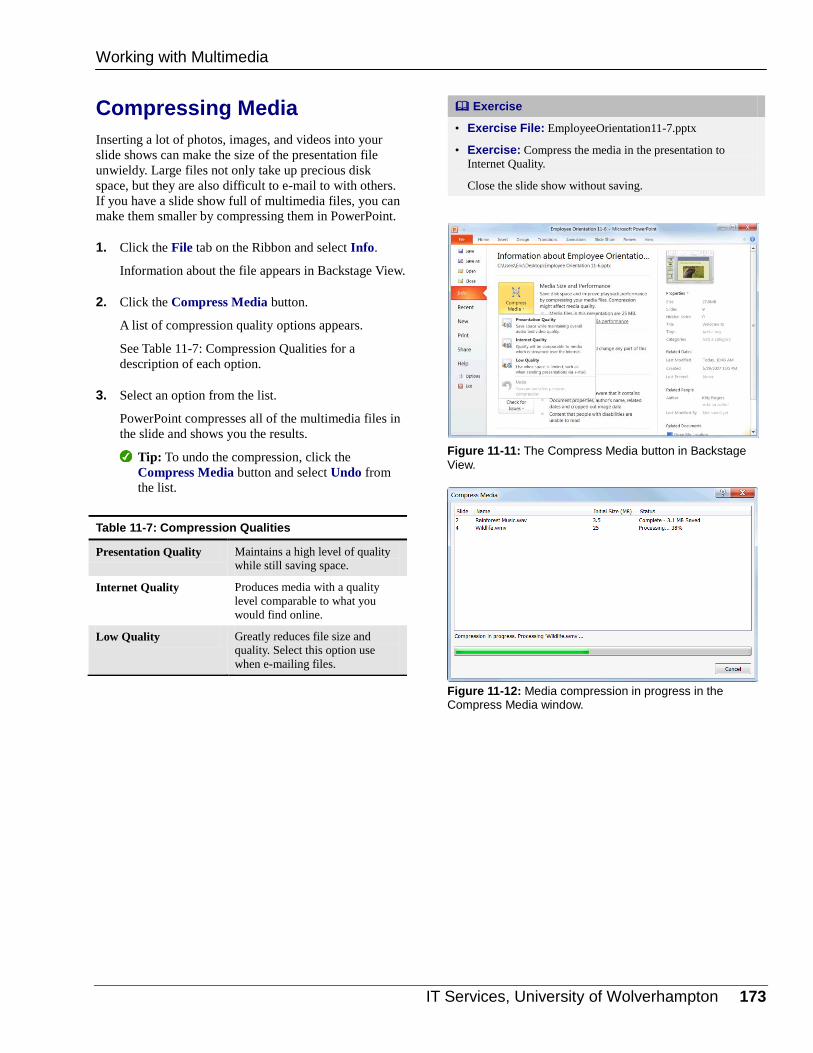
IT Services, University of Wolverhampton 173
Compressing Media
Inserting a lot of photos, images, and videos into your
slide shows can make the size of the presentation file
unwieldy. Large files not only take up precious disk
space, but they are also difficult to e-mail to with others.
If you have a slide show full of multimedia files, you can
make them smaller by compressing them in PowerPoint.
1. Click the File tab on the Ribbon and select Info.
Information about the file appears in Backstage View.
2. Click the Compress Media button.
A list of compression quality options appears.
See Table 11-7: Compression Qualities for a
description of each option.
3. Select an option from the list.
PowerPoint compresses all of the multimedia files in
the slide and shows you the results.
Tip: To undo the compression, click the
Compress Media button and select Undo from
the list.
Exercise
• Exercise File: EmployeeOrientation11-7.pptx
• Exercise: Compress the media in the presentation to
Internet Quality.
Close the slide show without saving.
Figure 11-11: The Compress Media button in Backstage
View.
Table 11-7: Compression Qualities
Presentation Quality Maintains a high level of quality
while still saving space.
Internet Quality Produces media with a quality
level comparable to what you
would find online.
Low Quality Greatly reduces file size and
quality. Select this option use
when e-mailing files.
Figure 11-12: Media compression in progress in the Compress Media window.
Working with Multimedia
174 © 2010 CustomGuide, Inc.
WWoorrkkiinngg wwiitthh MMuullttiimmeeddiiaa RReevviieeww
Quiz Questions
106. The Microsoft Clip Organizer lets you: A. Search the PowerPoint program for audio. B. Search the Microsoft’s online database for audio. C. Search your computer for audio. D. All of the above.
107. It’s always a good idea to preview an audio file once it has been inserted. (True or False?)
108. It is not possible to add your own audio comments to slides. (True or False?)
109. When you insert a video from a file: A. You can access it from any location via the Internet. B. You must ensure that you keep the video file in the correct Windows folder or else it won’t work. C. It is embedded into the presentation so you don’t have to worry about a separate file. D. None of the above.
110. What is a poster frame? A. A printable version of the presentation that you can mount on your wall. B. A preview image, usually from a frame in the video, that clues the viewer in to what the video is about. C. A border that you can insert around a picture. D. A black screen that appears where your video should be located on the slide.
111. What is the name of the code that must be inserted into PowerPoint in order to play video from the Web? A. Embed code B. JavaScript C. Python D. Insert Video code
112. Besides trimming video off of the beginning and end of a video, you can also trim out pieces from the middle of a
video. (True or False?)
113. What can you do with bookmarks? A. Mark important parts in the video. B. Navigate to different points in the video while it is playing. C. Trigger animation effects. D. All of the above.
114. What is an action button? A. A button that must be pressed when inserting any kind of multimedia. B. A type of transition effect. C. An embedded object on a slide. D. An object on a slide that performs an action when clicked or pointed to.
IT Services, University of Wolverhampton 175
115. Compressing media: A. Automatically cuts the length of video clips to two minutes. B. Always results in low quality media. C. Is accessible by clicking on the Slide Show tab and clicking the Compress Media button. D. Decreases the size of the media files, like video and audio clips, in your presentation.
Quiz Answers
106. D. The Clip Organizer lets you search your computer, Microsoft Office Online, and PowerPoint’s database for sounds.
107. True. It is always a good idea to preview an audio file once it has been inserted.
108. False. You can record audio comments using the Record Audio feature by clicking the Insert tab on the Ribbon,
clicking the Audio button list arrow, and selecting Record Audio.
109. C. If you insert a video from a file, it is embedded into the presentation so you don’t have to worry about managing
other files.
110. B. The poster frame is a preview image for the video that can either be from the video itself or from a separate image
file.
111. A. You must copy and paste the video’s Embed code into PowerPoint in order to play a Web-based video.
112. False. You can only trim off parts from the beginning and end of a video.
113. D. Bookmarks not only indicate important points in the video, but also let you navigate with bookmarks and trigger
animation effects.
114. D. An action button is an object on a slide that performs an action when clicked or pointed to.
115. D. Compressing media decreases the size of all of the audio and video files in your presentation, making the file size
more manageable and easier to e-mail.
176 © 2010 CustomGuide, Inc.
FFiinnaalliizziinngg aa
PPrreesseennttaattiioonn
Setting Up a Slide Show ................................. 177 Specify the show type ............................ 177 Specify show options ............................. 177 Specify which slides to include .............. 178 Specify how to advance slides ............... 178
Rehearsing Slide Show Timings .................... 179
Adding Comments to a Slide .......................... 180 Insert a comment ................................... 180 Edit a comment ...................................... 180 Delete a comment .................................. 180 Hide or show comments ........................ 180
Hiding a Slide ................................................... 181
Recording a Presentation ............................... 182 Record a slide show .............................. 182 Clear slide timings ................................. 183 Clear slide narration ............................... 183
Marking a Presentation as Final ..................... 184 Mark a presentation as final................... 184 Remove Mark as Final status ................ 184
In order to make sure a presentation is
audience-ready, there are several things
you need to consider. For example, are
you going to be presenting the
presentation in front of a live audience or
unattended at a tradeshow kiosk? And
how long do you want each slide to be
displayed?
This chapter will help you answer these
questions by showing you how to specify
show type, rehearse slide timings, and
more. By the time you have finished this
chapter, you’ll be ready to present your
presentation to the masses.
Using Exercise Files This chapter suggests exercises to practice
the topic of each lesson. There are two
ways you may follow along with the
exercise files:
Open the exercise file for a lesson,
perform the lesson exercise, and close
the exercise file.
Open the exercise file for a lesson,
perform the lesson exercise, and keep
the file open to perform the remaining
lesson exercises for the chapter.
The exercises are written so that you may
“build upon them”, meaning the exercises
in a chapter can be performed in
succession from the first lesson to the last.
12
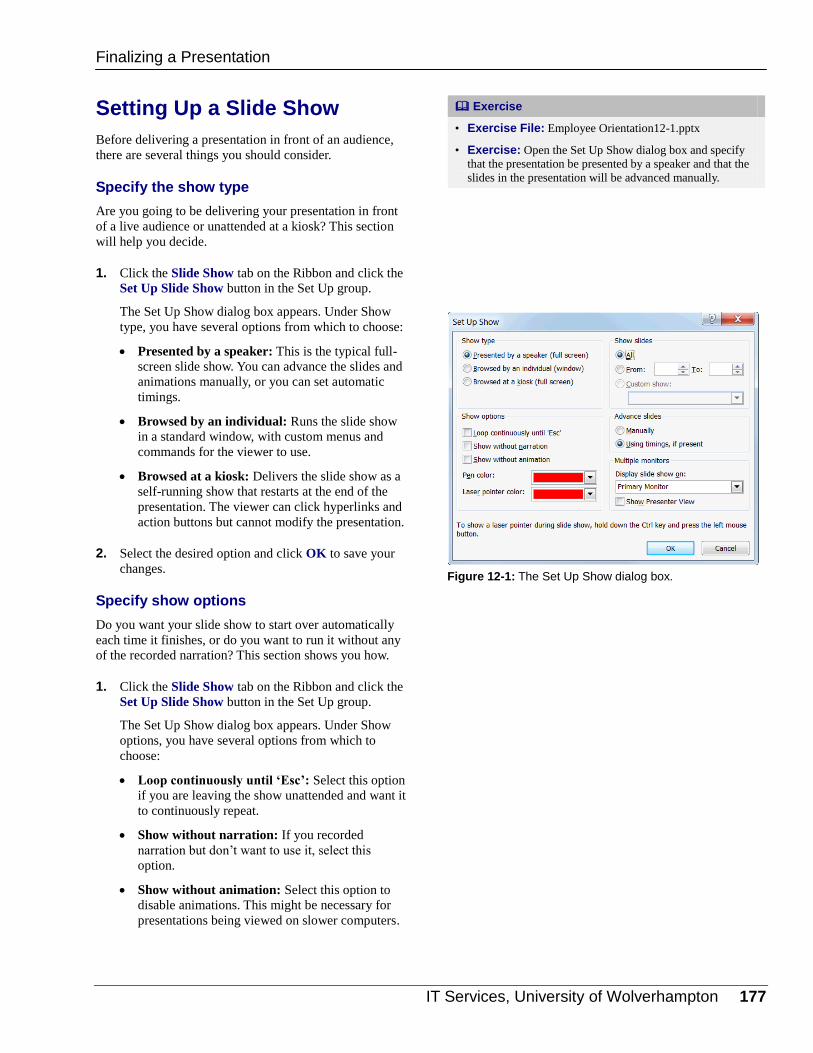
IT Services, University of Wolverhampton 177
Setting Up a Slide Show
Before delivering a presentation in front of an audience,
there are several things you should consider.
Specify the show type
Are you going to be delivering your presentation in front
of a live audience or unattended at a kiosk? This section
will help you decide.
1. Click the Slide Show tab on the Ribbon and click the
Set Up Slide Show button in the Set Up group.
The Set Up Show dialog box appears. Under Show
type, you have several options from which to choose:
Presented by a speaker: This is the typical full-
screen slide show. You can advance the slides and
animations manually, or you can set automatic
timings.
Browsed by an individual: Runs the slide show
in a standard window, with custom menus and
commands for the viewer to use.
Browsed at a kiosk: Delivers the slide show as a
self-running show that restarts at the end of the
presentation. The viewer can click hyperlinks and
action buttons but cannot modify the presentation.
2. Select the desired option and click OK to save your
changes.
Specify show options
Do you want your slide show to start over automatically
each time it finishes, or do you want to run it without any
of the recorded narration? This section shows you how.
1. Click the Slide Show tab on the Ribbon and click the
Set Up Slide Show button in the Set Up group.
The Set Up Show dialog box appears. Under Show
options, you have several options from which to
choose:
Loop continuously until ‘Esc’: Select this option
if you are leaving the show unattended and want it
to continuously repeat.
Show without narration: If you recorded
narration but don’t want to use it, select this
option.
Show without animation: Select this option to
disable animations. This might be necessary for
presentations being viewed on slower computers.
Exercise
• Exercise File: Employee Orientation12-1.pptx
• Exercise: Open the Set Up Show dialog box and specify
that the presentation be presented by a speaker and that the
slides in the presentation will be advanced manually.
Figure 12-1: The Set Up Show dialog box.
Finalizing a Presentation
178 © 2010 CustomGuide, Inc.
2. Select the desired option and click OK to save your
changes.
Specify which slides to include
Do you want to include all slides in a slide show or only
select ones? This section shows you how.
1. Click the Slide Show tab on the Ribbon and click the
Set Up Slide Show button in the Set Up group.
The Set Up Show dialog box appears. Under Show
slides, you have several options from which to
choose:
All: Select this option to include all slides in the
presentation (except for slides you’ve hidden).
From: Select this option to include a range of
slides that you specify.
Custom show: Select this option to pick and
choose any number or range of slides that you
wish.
2. Select the desired option and click OK to save your
changes.
Specify how to advance slides
Do you want to advance through the slides in a
presentation manually or let PowerPoint do it for you?
This section will help you decide.
1. Click the Slide Show tab on the Ribbon and click the
Set Up Slide Show button in the Set Up group.
The Set Up Show dialog box appears. Under
Advance slides, you have two options from which to
choose:
Manually: Selecting this option requires you to
click the mouse or use the keyboard to advance
slides.
Using timings, if present: Select this option to
move slides forward automatically based on the
timings you save when you rehearse.
2. Select the desired option and click OK to save your
changes.
Finalizing a Presentation
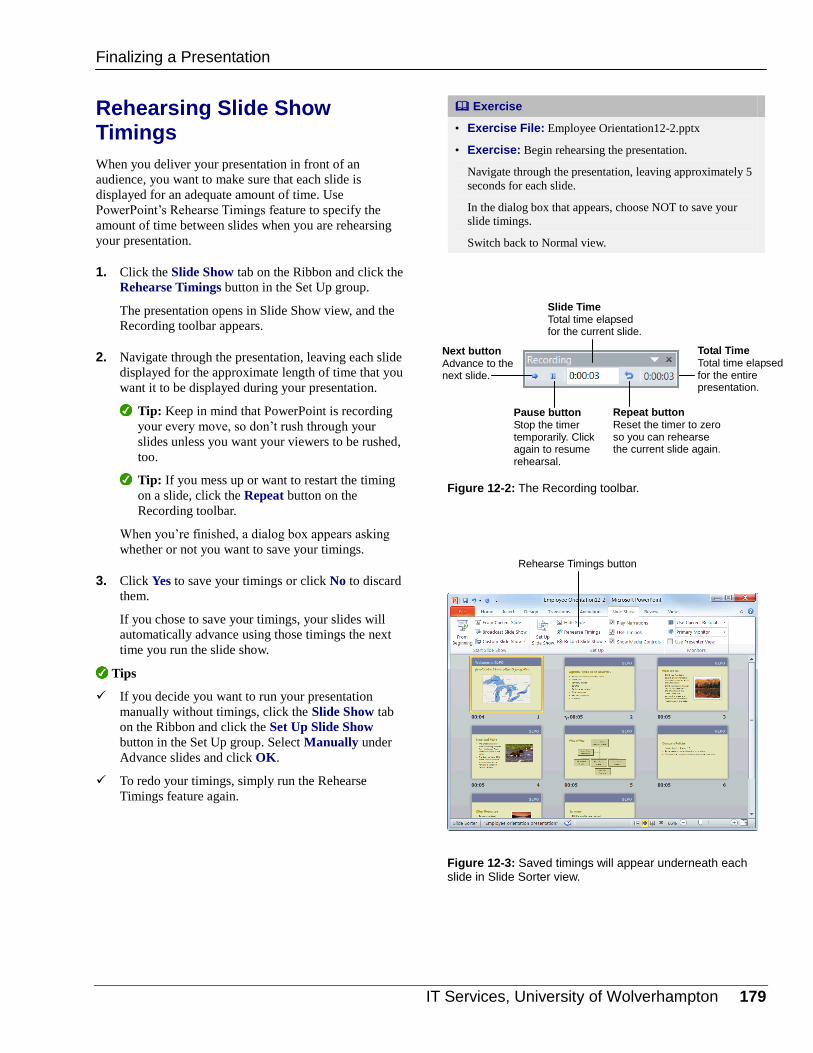
IT Services, University of Wolverhampton 179
Rehearsing Slide Show Timings
When you deliver your presentation in front of an
audience, you want to make sure that each slide is
displayed for an adequate amount of time. Use
PowerPoint’s Rehearse Timings feature to specify the
amount of time between slides when you are rehearsing
your presentation.
1. Click the Slide Show tab on the Ribbon and click the
Rehearse Timings button in the Set Up group.
The presentation opens in Slide Show view, and the
Recording toolbar appears.
2. Navigate through the presentation, leaving each slide
displayed for the approximate length of time that you
want it to be displayed during your presentation.
Tip: Keep in mind that PowerPoint is recording
your every move, so don’t rush through your
slides unless you want your viewers to be rushed,
too.
Tip: If you mess up or want to restart the timing
on a slide, click the Repeat button on the
Recording toolbar.
When you’re finished, a dialog box appears asking
whether or not you want to save your timings.
3. Click Yes to save your timings or click No to discard
them.
If you chose to save your timings, your slides will
automatically advance using those timings the next
time you run the slide show.
Tips
If you decide you want to run your presentation
manually without timings, click the Slide Show tab
on the Ribbon and click the Set Up Slide Show
button in the Set Up group. Select Manually under
Advance slides and click OK.
To redo your timings, simply run the Rehearse
Timings feature again.
Exercise
• Exercise File: Employee Orientation12-2.pptx
• Exercise: Begin rehearsing the presentation.
Navigate through the presentation, leaving approximately 5
seconds for each slide.
In the dialog box that appears, choose NOT to save your
slide timings.
Switch back to Normal view.
Figure 12-2: The Recording toolbar.
Figure 12-3: Saved timings will appear underneath each slide in Slide Sorter view.
Finalizing a Presentation
Next button Advance to the next slide.
Slide Time Total time elapsed for the current slide.
Total Time Total time elapsed for the entire presentation.
Repeat button Reset the timer to zero so you can rehearse the current slide again.
Pause button Stop the timer temporarily. Click again to resume rehearsal.
Rehearse Timings button
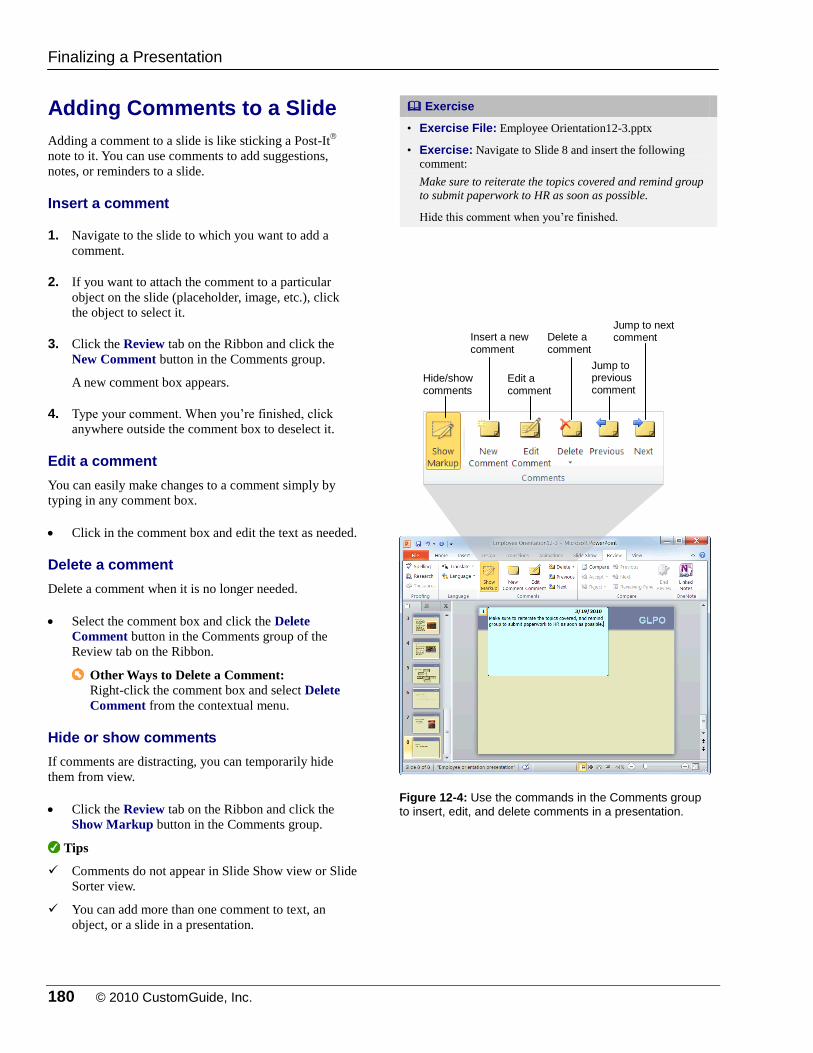
180 © 2010 CustomGuide, Inc.
Adding Comments to a Slide
Adding a comment to a slide is like sticking a Post-It
note to it. You can use comments to add suggestions,
notes, or reminders to a slide.
Insert a comment
1. Navigate to the slide to which you want to add a
comment.
2. If you want to attach the comment to a particular
object on the slide (placeholder, image, etc.), click
the object to select it.
3. Click the Review tab on the Ribbon and click the
New Comment button in the Comments group.
A new comment box appears.
4. Type your comment. When you’re finished, click
anywhere outside the comment box to deselect it.
Edit a comment
You can easily make changes to a comment simply by
typing in any comment box.
Click in the comment box and edit the text as needed.
Delete a comment
Delete a comment when it is no longer needed.
Select the comment box and click the Delete
Comment button in the Comments group of the
Review tab on the Ribbon.
Other Ways to Delete a Comment: Right-click the comment box and select Delete
Comment from the contextual menu.
Hide or show comments
If comments are distracting, you can temporarily hide
them from view.
Click the Review tab on the Ribbon and click the
Show Markup button in the Comments group.
Tips
Comments do not appear in Slide Show view or Slide
Sorter view.
You can add more than one comment to text, an
object, or a slide in a presentation.
Exercise
• Exercise File: Employee Orientation12-3.pptx
• Exercise: Navigate to Slide 8 and insert the following
comment:
Make sure to reiterate the topics covered and remind group
to submit paperwork to HR as soon as possible.
Hide this comment when you’re finished.
Figure 12-4: Use the commands in the Comments group
to insert, edit, and delete comments in a presentation.
Finalizing a Presentation
Hide/show comments
Insert a new comment
Edit a comment
Delete a comment
Jump to previous comment
Jump to next comment
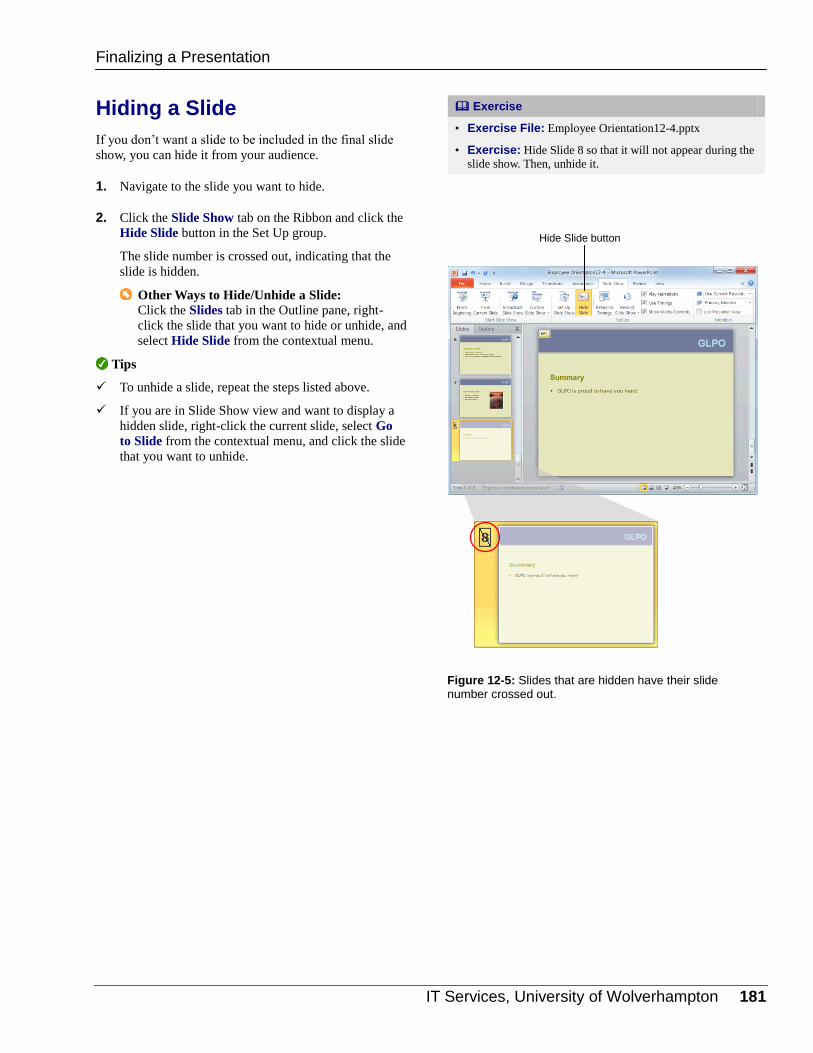
IT Services, University of Wolverhampton 181
Hiding a Slide
If you don’t want a slide to be included in the final slide
show, you can hide it from your audience.
1. Navigate to the slide you want to hide.
2. Click the Slide Show tab on the Ribbon and click the
Hide Slide button in the Set Up group.
The slide number is crossed out, indicating that the
slide is hidden.
Other Ways to Hide/Unhide a Slide: Click the Slides tab in the Outline pane, right-
click the slide that you want to hide or unhide, and
select Hide Slide from the contextual menu.
Tips
To unhide a slide, repeat the steps listed above.
If you are in Slide Show view and want to display a
hidden slide, right-click the current slide, select Go
to Slide from the contextual menu, and click the slide
that you want to unhide.
Exercise
• Exercise File: Employee Orientation12-4.pptx
• Exercise: Hide Slide 8 so that it will not appear during the
slide show. Then, unhide it.
Figure 12-5: Slides that are hidden have their slide number crossed out.
Finalizing a Presentation
Hide Slide button
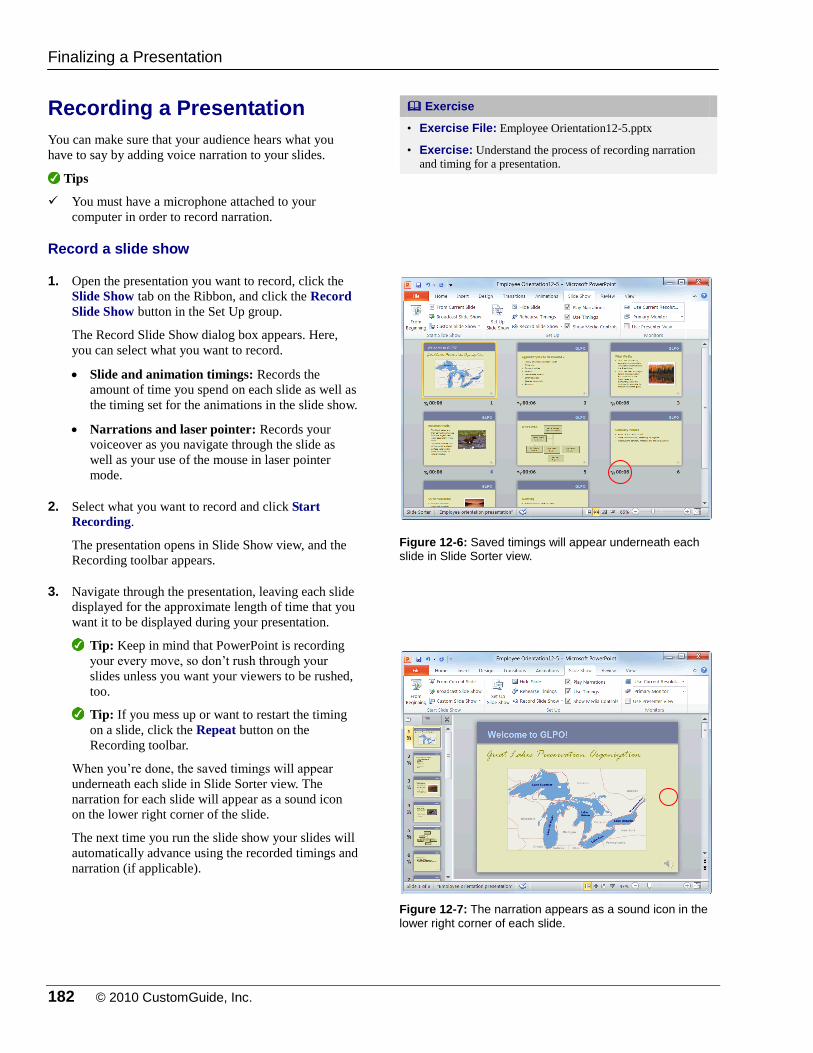
182 © 2010 CustomGuide, Inc.
Recording a Presentation
You can make sure that your audience hears what you
have to say by adding voice narration to your slides.
Tips
You must have a microphone attached to your
computer in order to record narration.
Record a slide show
1. Open the presentation you want to record, click the
Slide Show tab on the Ribbon, and click the Record
Slide Show button in the Set Up group.
The Record Slide Show dialog box appears. Here,
you can select what you want to record.
Slide and animation timings: Records the
amount of time you spend on each slide as well as
the timing set for the animations in the slide show.
Narrations and laser pointer: Records your
voiceover as you navigate through the slide as
well as your use of the mouse in laser pointer
mode.
2. Select what you want to record and click Start
Recording.
The presentation opens in Slide Show view, and the
Recording toolbar appears.
3. Navigate through the presentation, leaving each slide
displayed for the approximate length of time that you
want it to be displayed during your presentation.
Tip: Keep in mind that PowerPoint is recording
your every move, so don’t rush through your
slides unless you want your viewers to be rushed,
too.
Tip: If you mess up or want to restart the timing
on a slide, click the Repeat button on the
Recording toolbar.
When you’re done, the saved timings will appear
underneath each slide in Slide Sorter view. The
narration for each slide will appear as a sound icon
on the lower right corner of the slide.
The next time you run the slide show your slides will
automatically advance using the recorded timings and
narration (if applicable).
Exercise
• Exercise File: Employee Orientation12-5.pptx
• Exercise: Understand the process of recording narration
and timing for a presentation.
Figure 12-6: Saved timings will appear underneath each slide in Slide Sorter view.
Figure 12-7: The narration appears as a sound icon in the
lower right corner of each slide.
Finalizing a Presentation
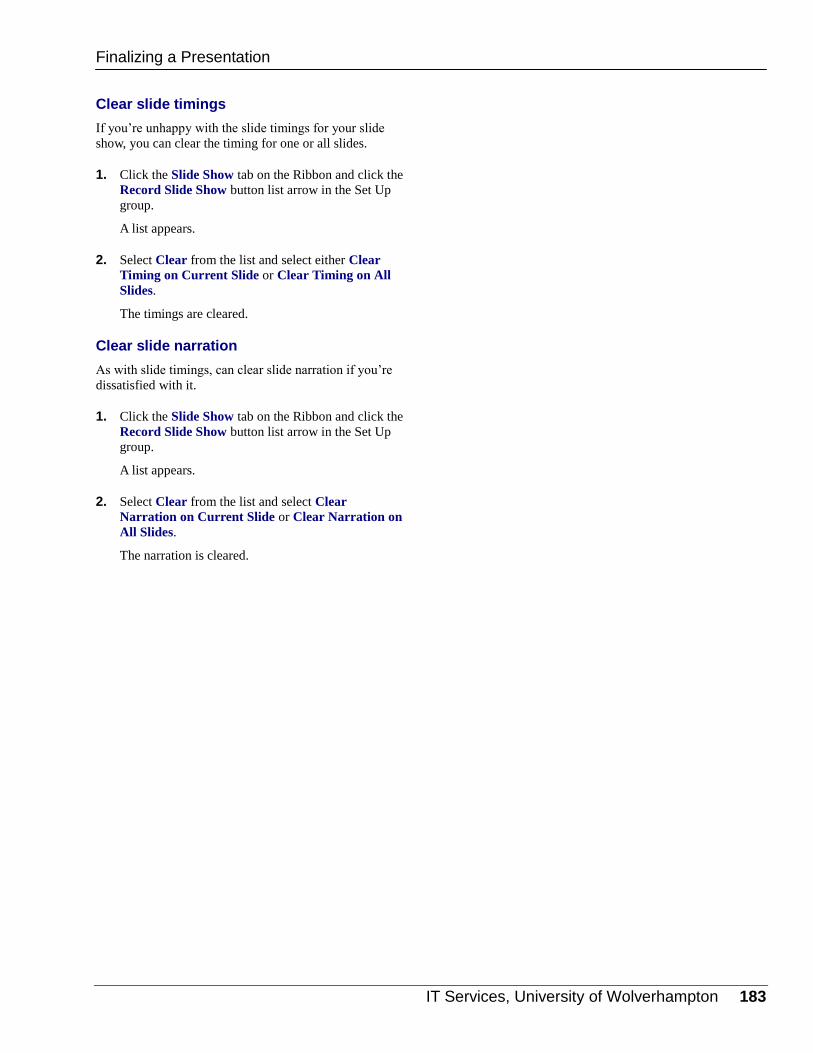
IT Services, University of Wolverhampton 183
Clear slide timings
If you’re unhappy with the slide timings for your slide
show, you can clear the timing for one or all slides.
1. Click the Slide Show tab on the Ribbon and click the
Record Slide Show button list arrow in the Set Up
group.
A list appears.
2. Select Clear from the list and select either Clear
Timing on Current Slide or Clear Timing on All
Slides.
The timings are cleared.
Clear slide narration
As with slide timings, can clear slide narration if you’re
dissatisfied with it.
1. Click the Slide Show tab on the Ribbon and click the
Record Slide Show button list arrow in the Set Up
group.
A list appears.
2. Select Clear from the list and select Clear
Narration on Current Slide or Clear Narration on
All Slides.
The narration is cleared.
Finalizing a Presentation
184 © 2010 CustomGuide, Inc.
Marking a Presentation as Final
Before you share a copy of your presentation with other
people, you can use the Mark as Final command to set the
presentation as “read-only,” preventing reviewers or
readers from making any inadvertent changes.
Mark a presentation as final
1. Click the File tab on the Ribbon.
The Info tab in Backstage view appears.
2. Click the Protect Presentation button and select
Mark as Final.
The Microsoft PowerPoint dialog box appears
notifying you that the presentation will be marked as
final and then saved.
3. Click OK.
The Microsoft PowerPoint dialog box appears
describing what happens when the document is
marked as final.
4. Click OK.
The presentation is marked as final. The Permissions
section of the Info tab moves to the top of the screen.
Trap: The Mark as Final command is not
supported in the 2003 and earlier versions of
PowerPoint. If your presentation is opened in an
earlier version, your reviewers and readers can
make changes.
Remove Mark as Final status
You can remove Mark as Final status the same way you
applied it.
1. Click the File tab on the Ribbon.
The file commands and Backstage view appears.
2. Click the Protect Presentation button and select
Mark as Final.
Mark as Final status is removed.
Tips
The Mark as Final command is not a security feature
and should not be used as one. Mark as Final status
can be removed at any time by anyone who receives
a copy of the presentation.
Exercise
• Exercise File: Employee Orientation12-6.pptx
• Exercise: Mark the presentation as final.
Figure 12-8: Mark your presentation as final in Backstage
view.
Figure 12-9: When a presentation is marked as final, the
Info bar notifies the user that the presentation is marked as final and the editing commands on the Ribbon are disabled.
Finalizing a Presentation

IT Services, University of Wolverhampton 185
FFiinnaalliizziinngg aa PPrreesseennttaattiioonn RReevviieeww
Quiz Questions
116. Which of the following is NOT an option for a type of slide show? A. Presented by a speaker: a show that can be advanced manually or automatically. B. Presented by a corporation: a show that pauses automatically for meetings and announcements. C. Browsed at a kiosk: a self-running show that looks continuously. D. Browsed by an individual: a show with custom menus and commands for the viewer.
117. When you set up a show to advance manually, you can use either the mouse or the keyboard to advance slides. (True
or False?)
118. If you mess up or want to restart the timing on a slide, click the _______ button on the Recording toolbar. A. Next B. Repeat C. Pause D. Slide Time
119. You can see how long the entire presentation will take by checking: A. Total Time on the Recording toolbar. B. Slide Time on the Recording toolbar. C. Full Show Time on the Slide Show toolbar. D. Any of these will who you how long the entire presentation will take.
120. Hiding a comment is the same thing as deleting a comment. (True or False?)
121. In Slide Show view: A. Comments will appear as normal. B. Comments fade to 50% opacity. C. Comments will not appear. D. Comments prevent Slide Show view from working.
122. You can display a hidden slide when in Slide Show view. (True or False?)
123. You never want to save the slide timings that are recorded during the narration process. (True or False?)
124. How do you make a change to a presentation that has been marked as final? A. You must remove the Mark as Final status first. B. Once a presentation has been marked as final, it is impossible to make a change to it. C. You can make changes by pressing the <Ctrl> key. D. You need to make changes in Slide Sorter view.
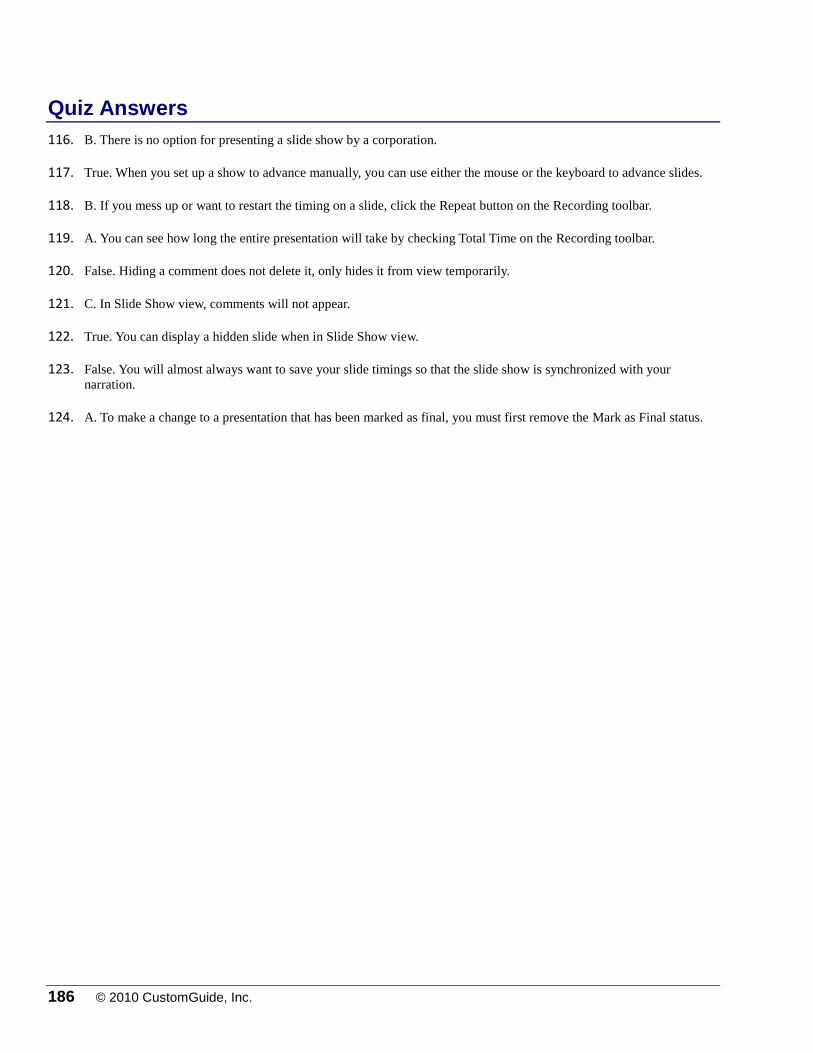
186 © 2010 CustomGuide, Inc.
Quiz Answers
116. B. There is no option for presenting a slide show by a corporation.
117. True. When you set up a show to advance manually, you can use either the mouse or the keyboard to advance slides.
118. B. If you mess up or want to restart the timing on a slide, click the Repeat button on the Recording toolbar.
119. A. You can see how long the entire presentation will take by checking Total Time on the Recording toolbar.
120. False. Hiding a comment does not delete it, only hides it from view temporarily.
121. C. In Slide Show view, comments will not appear.
122. True. You can display a hidden slide when in Slide Show view.
123. False. You will almost always want to save your slide timings so that the slide show is synchronized with your
narration.
124. A. To make a change to a presentation that has been marked as final, you must first remove the Mark as Final status.
IT Services, University of Wolverhampton 187
DDeelliivveerriinngg aa
PPrreesseennttaattiioonn
Delivering a Presentation on a Computer ..... 188 Start a slide show ................................... 188 Navigate a slide show ............................ 188 Pause a slide show ................................ 189 End a slide show .................................... 189
Using the Pen and Making Annotations ........ 190 Use the laser pointer.............................. 190 Make annotations .................................. 190 Change pen color .................................. 191
Creating a Presentation that Runs by Itself .. 192
Using Presenter View ...................................... 194 Turn on multiple monitor support ........... 194 Deliver the presentation in Presenter view ............................................................... 195
Creating a Custom Show ................................ 196 Compile a custom show ........................ 196 View a custom show .............................. 196
Broadcasting Presentations ........................... 197 Broadcast a presentation using Windows Live ........................................................ 197 Change the broadcast service ............... 198
It’s show time! This chapter explains what
PowerPoint is all about: delivering an
interesting presentation.
This chapter will tell you everything you need
to know about running a presentation,
including how to deftly navigate between
slides and how to impress your colleagues
with the Pen and Highlighter tools. You will
also learn several more advanced ways to
present a presentation, such as how to run a
presentation on several monitors and how to
create presentation that runs by itself.
Using Exercise Files This chapter suggests exercises to practice
the topic of each lesson. There are two
ways you may follow along with the
exercise files:
Open the exercise file for a lesson,
perform the lesson exercise, and close
the exercise file.
Open the exercise file for a lesson,
perform the lesson exercise, and keep
the file open to perform the remaining
lesson exercises for the chapter.
The exercises are written so that you may
“build upon them”, meaning the exercises
in a chapter can be performed in
succession from the first lesson to the last.
13
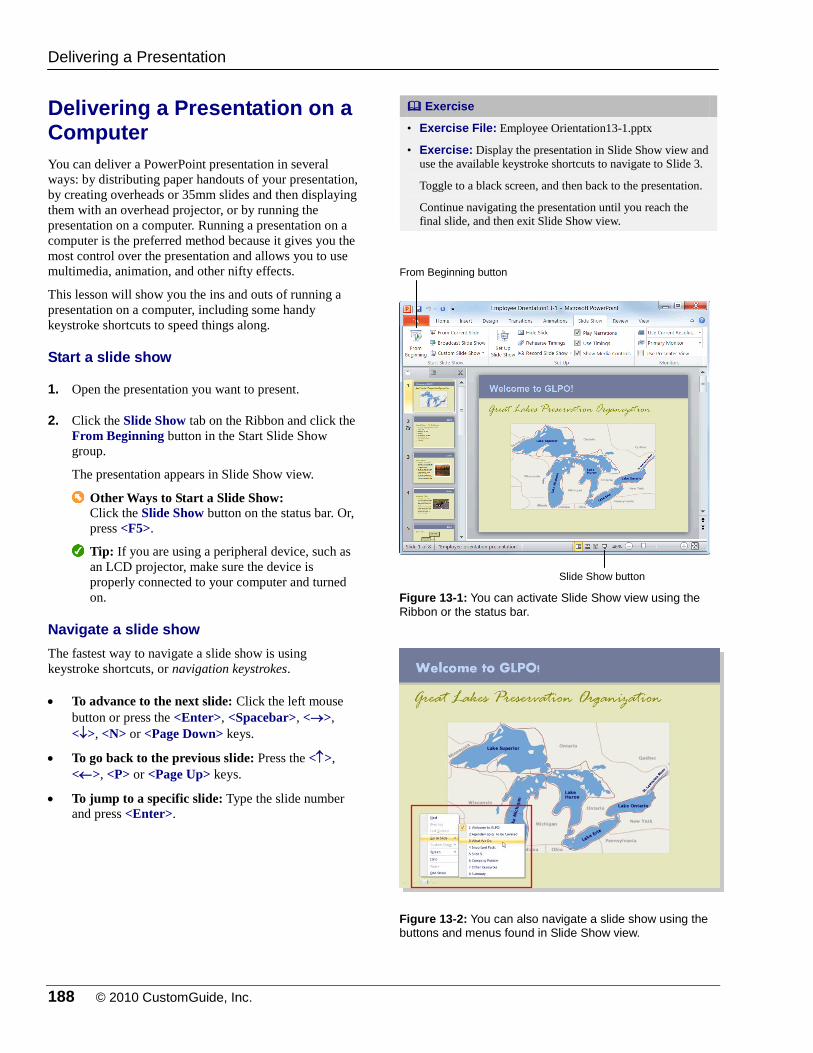
188 © 2010 CustomGuide, Inc.
Delivering a Presentation on a Computer
You can deliver a PowerPoint presentation in several
ways: by distributing paper handouts of your presentation,
by creating overheads or 35mm slides and then displaying
them with an overhead projector, or by running the
presentation on a computer. Running a presentation on a
computer is the preferred method because it gives you the
most control over the presentation and allows you to use
multimedia, animation, and other nifty effects.
This lesson will show you the ins and outs of running a
presentation on a computer, including some handy
keystroke shortcuts to speed things along.
Start a slide show
1. Open the presentation you want to present.
2. Click the Slide Show tab on the Ribbon and click the
From Beginning button in the Start Slide Show
group.
The presentation appears in Slide Show view.
Other Ways to Start a Slide Show: Click the Slide Show button on the status bar. Or,
press <F5>.
Tip: If you are using a peripheral device, such as
an LCD projector, make sure the device is
properly connected to your computer and turned
on.
Navigate a slide show
The fastest way to navigate a slide show is using
keystroke shortcuts, or navigation keystrokes.
To advance to the next slide: Click the left mouse
button or press the <Enter>, <Spacebar>, <>,
<>, <N> or <Page Down> keys.
To go back to the previous slide: Press the <>,
<>, <P> or <Page Up> keys.
To jump to a specific slide: Type the slide number
and press <Enter>.
Exercise
• Exercise File: Employee Orientation13-1.pptx
• Exercise: Display the presentation in Slide Show view and
use the available keystroke shortcuts to navigate to Slide 3.
Toggle to a black screen, and then back to the presentation.
Continue navigating the presentation until you reach the
final slide, and then exit Slide Show view.
Figure 13-1: You can activate Slide Show view using the
Ribbon or the status bar.
Figure 13-2: You can also navigate a slide show using the buttons and menus found in Slide Show view.
Delivering a Presentation
From Beginning button
Slide Show button
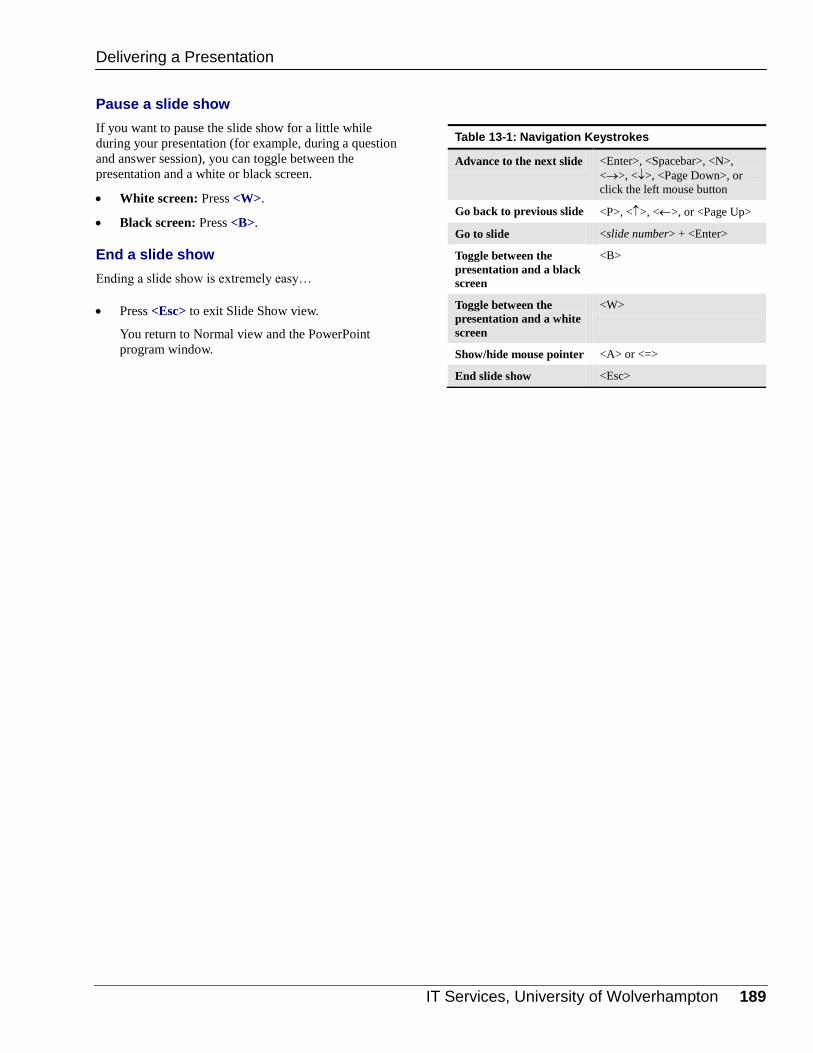
IT Services, University of Wolverhampton 189
Pause a slide show
If you want to pause the slide show for a little while
during your presentation (for example, during a question
and answer session), you can toggle between the
presentation and a white or black screen.
White screen: Press <W>.
Black screen: Press <B>.
End a slide show
Ending a slide show is extremely easy…
Press <Esc> to exit Slide Show view.
You return to Normal view and the PowerPoint
program window.
Table 13-1: Navigation Keystrokes
Advance to the next slide <Enter>, <Spacebar>, <N>,
<>, <>, <Page Down>, or
click the left mouse button
Go back to previous slide <P>, <>, <>, or <Page Up>
Go to slide <slide number> + <Enter>
Toggle between the
presentation and a black
screen
<B>
Toggle between the
presentation and a white
screen
<W>
Show/hide mouse pointer <A> or <=>
End slide show <Esc>
Delivering a Presentation
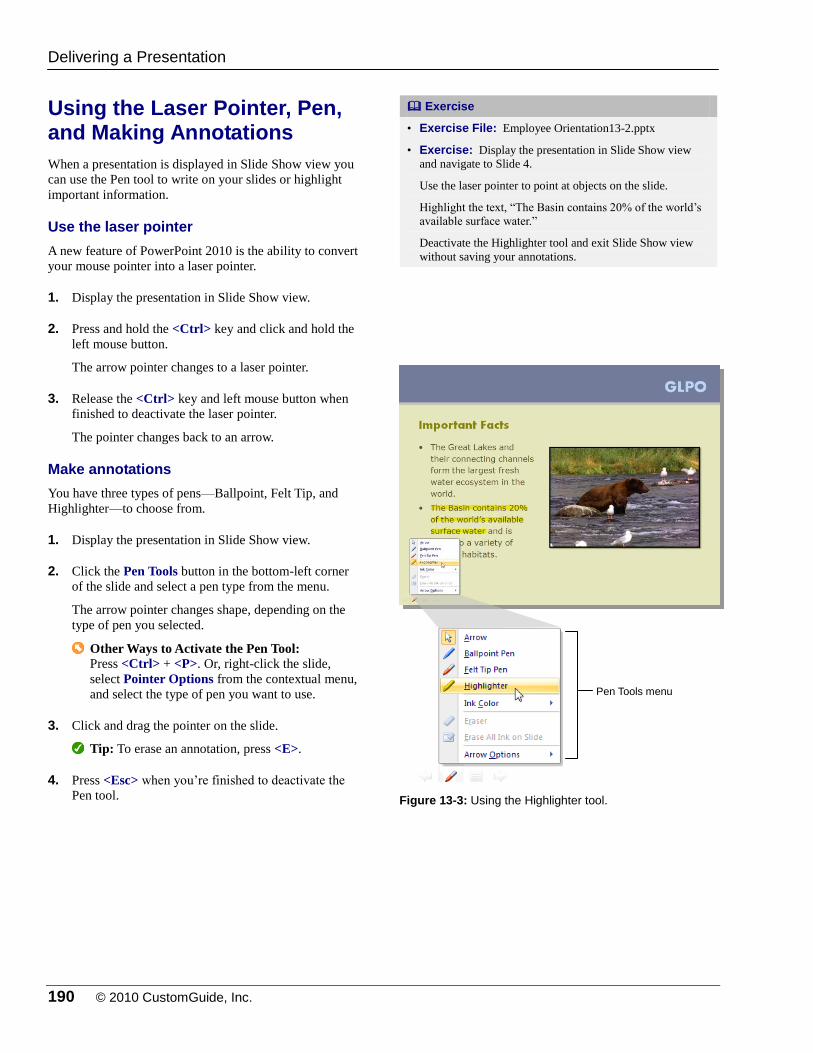
190 © 2010 CustomGuide, Inc.
Using the Laser Pointer, Pen, and Making Annotations
When a presentation is displayed in Slide Show view you
can use the Pen tool to write on your slides or highlight
important information.
Use the laser pointer
A new feature of PowerPoint 2010 is the ability to convert
your mouse pointer into a laser pointer.
1. Display the presentation in Slide Show view.
2. Press and hold the <Ctrl> key and click and hold the
left mouse button.
The arrow pointer changes to a laser pointer.
3. Release the <Ctrl> key and left mouse button when
finished to deactivate the laser pointer.
The pointer changes back to an arrow.
Make annotations
You have three types of pens—Ballpoint, Felt Tip, and
Highlighter—to choose from.
1. Display the presentation in Slide Show view.
2. Click the Pen Tools button in the bottom-left corner
of the slide and select a pen type from the menu.
The arrow pointer changes shape, depending on the
type of pen you selected.
Other Ways to Activate the Pen Tool: Press <Ctrl> + <P>. Or, right-click the slide,
select Pointer Options from the contextual menu,
and select the type of pen you want to use.
3. Click and drag the pointer on the slide.
Tip: To erase an annotation, press <E>.
4. Press <Esc> when you’re finished to deactivate the
Pen tool.
Exercise
• Exercise File: Employee Orientation13-2.pptx
• Exercise: Display the presentation in Slide Show view
and navigate to Slide 4.
Use the laser pointer to point at objects on the slide.
Highlight the text, “The Basin contains 20% of the world’s
available surface water.”
Deactivate the Highlighter tool and exit Slide Show view
without saving your annotations.
Figure 13-3: Using the Highlighter tool.
Delivering a Presentation
Pen Tools menu
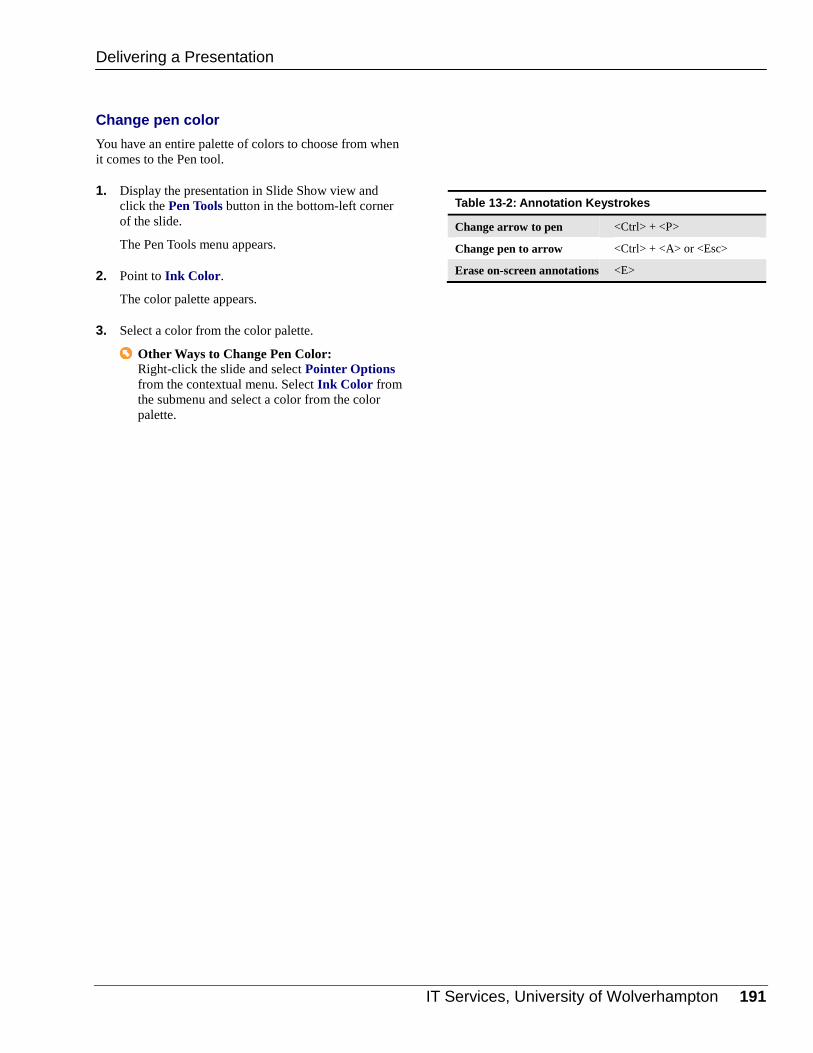
IT Services, University of Wolverhampton 191
Change pen color
You have an entire palette of colors to choose from when
it comes to the Pen tool.
1. Display the presentation in Slide Show view and
click the Pen Tools button in the bottom-left corner
of the slide.
The Pen Tools menu appears.
2. Point to Ink Color.
The color palette appears.
3. Select a color from the color palette.
Other Ways to Change Pen Color: Right-click the slide and select Pointer Options
from the contextual menu. Select Ink Color from
the submenu and select a color from the color
palette.
Table 13-2: Annotation Keystrokes
Change arrow to pen <Ctrl> + <P>
Change pen to arrow <Ctrl> + <A> or <Esc>
Erase on-screen annotations <E>
Delivering a Presentation
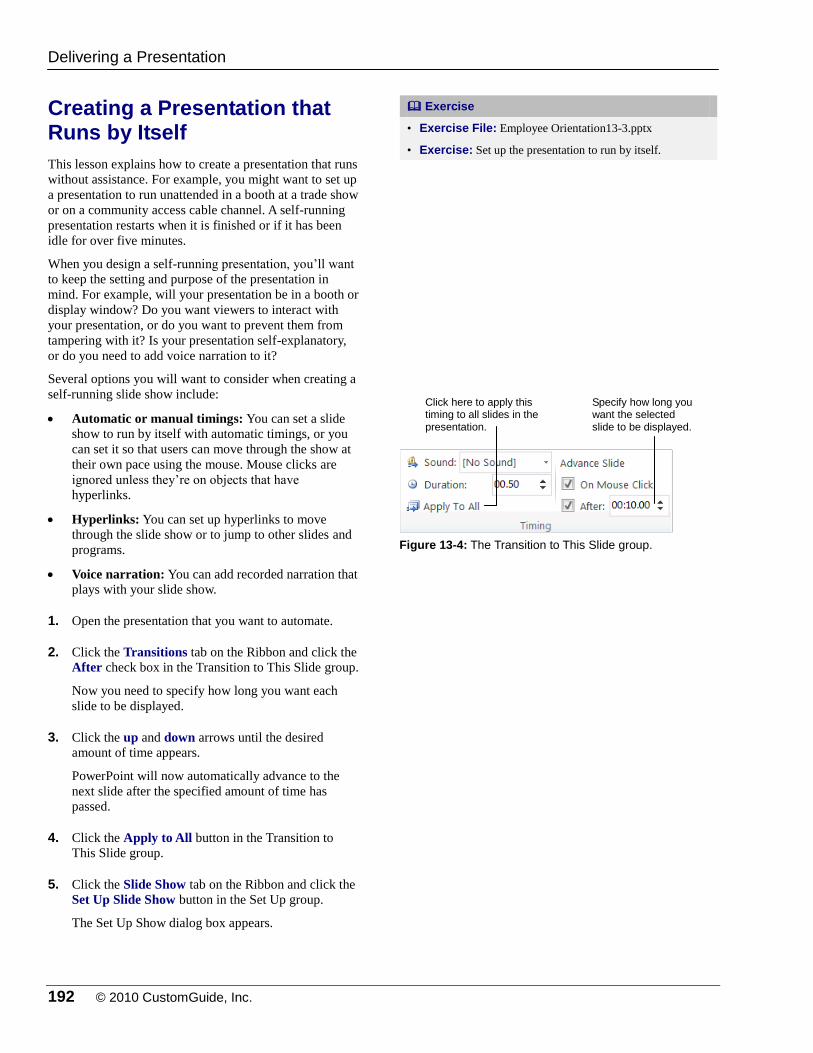
192 © 2010 CustomGuide, Inc.
Creating a Presentation that Runs by Itself
This lesson explains how to create a presentation that runs
without assistance. For example, you might want to set up
a presentation to run unattended in a booth at a trade show
or on a community access cable channel. A self-running
presentation restarts when it is finished or if it has been
idle for over five minutes.
When you design a self-running presentation, you’ll want
to keep the setting and purpose of the presentation in
mind. For example, will your presentation be in a booth or
display window? Do you want viewers to interact with
your presentation, or do you want to prevent them from
tampering with it? Is your presentation self-explanatory,
or do you need to add voice narration to it?
Several options you will want to consider when creating a
self-running slide show include:
Automatic or manual timings: You can set a slide
show to run by itself with automatic timings, or you
can set it so that users can move through the show at
their own pace using the mouse. Mouse clicks are
ignored unless they’re on objects that have
hyperlinks.
Hyperlinks: You can set up hyperlinks to move
through the slide show or to jump to other slides and
programs.
Voice narration: You can add recorded narration that
plays with your slide show.
1. Open the presentation that you want to automate.
2. Click the Transitions tab on the Ribbon and click the
After check box in the Transition to This Slide group.
Now you need to specify how long you want each
slide to be displayed.
3. Click the up and down arrows until the desired
amount of time appears.
PowerPoint will now automatically advance to the
next slide after the specified amount of time has
passed.
4. Click the Apply to All button in the Transition to
This Slide group.
5. Click the Slide Show tab on the Ribbon and click the
Set Up Slide Show button in the Set Up group.
The Set Up Show dialog box appears.
Exercise
• Exercise File: Employee Orientation13-3.pptx
• Exercise: Set up the presentation to run by itself.
Figure 13-4: The Transition to This Slide group.
Delivering a Presentation
Specify how long you want the selected slide to be displayed.
Click here to apply this timing to all slides in the presentation.
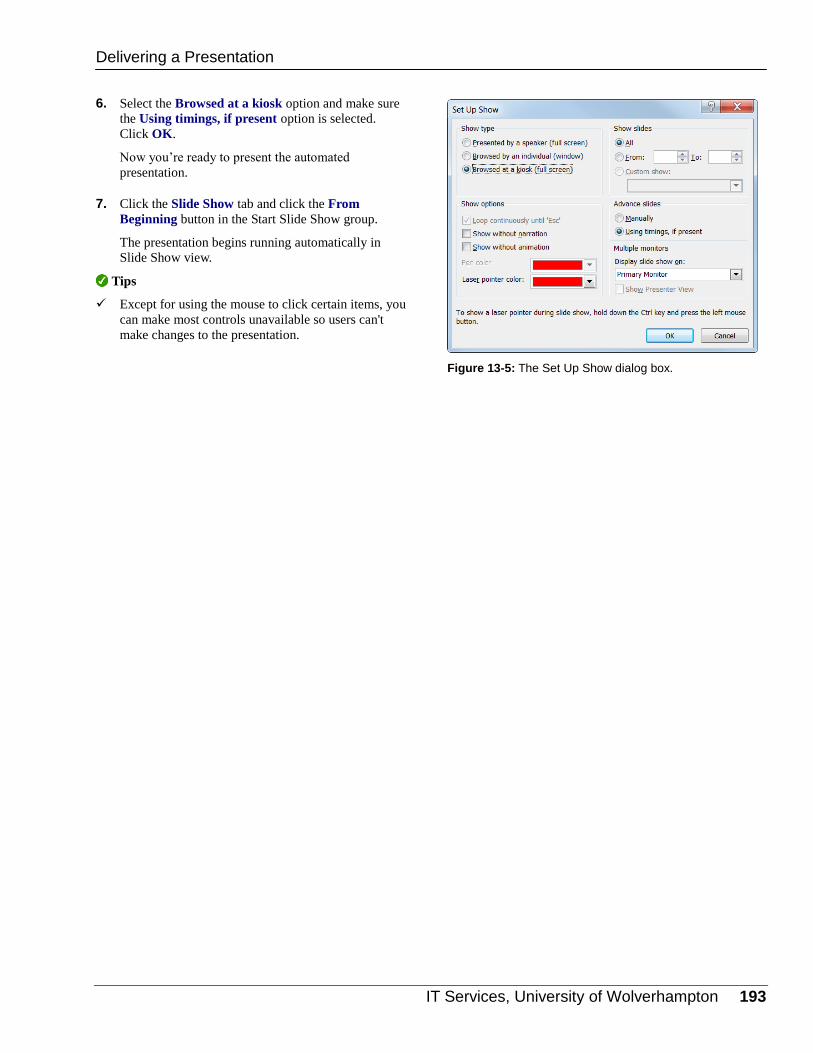
IT Services, University of Wolverhampton 193
6. Select the Browsed at a kiosk option and make sure
the Using timings, if present option is selected.
Click OK.
Now you’re ready to present the automated
presentation.
7. Click the Slide Show tab and click the From
Beginning button in the Start Slide Show group.
The presentation begins running automatically in
Slide Show view.
Tips
Except for using the mouse to click certain items, you
can make most controls unavailable so users can't
make changes to the presentation.
Figure 13-5: The Set Up Show dialog box.
Delivering a Presentation
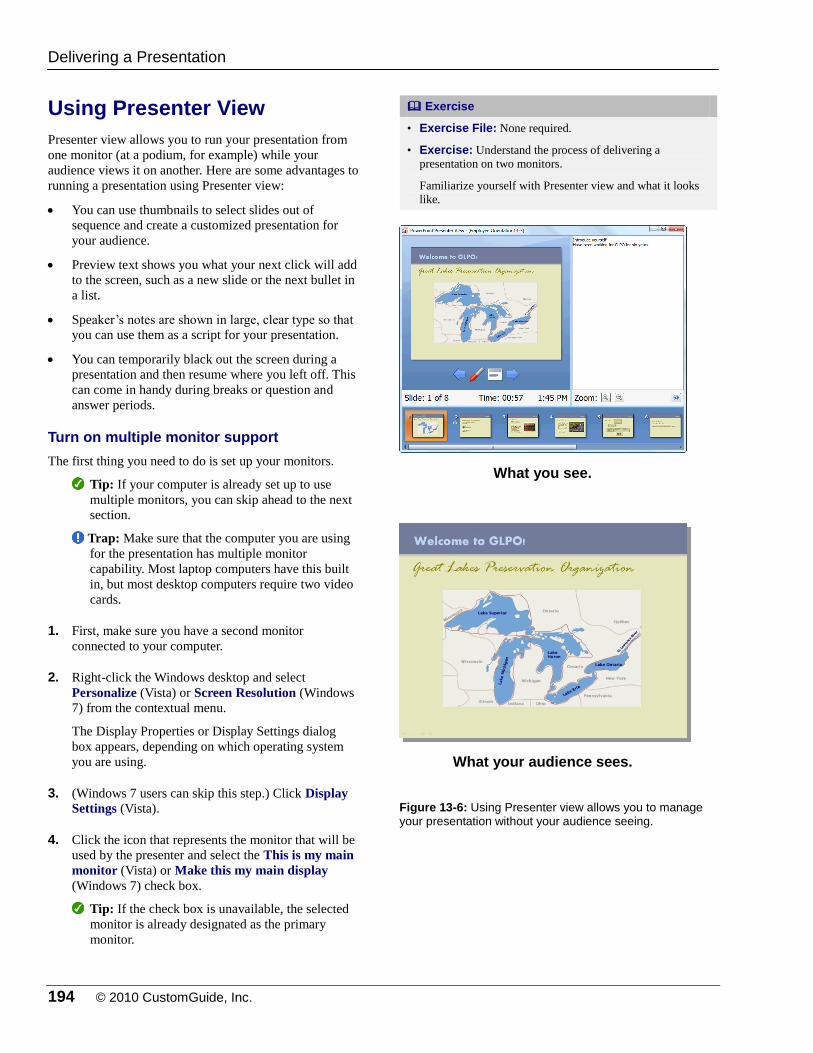
194 © 2010 CustomGuide, Inc.
Using Presenter View
Presenter view allows you to run your presentation from
one monitor (at a podium, for example) while your
audience views it on another. Here are some advantages to
running a presentation using Presenter view:
You can use thumbnails to select slides out of
sequence and create a customized presentation for
your audience.
Preview text shows you what your next click will add
to the screen, such as a new slide or the next bullet in
a list.
Speaker’s notes are shown in large, clear type so that
you can use them as a script for your presentation.
You can temporarily black out the screen during a
presentation and then resume where you left off. This
can come in handy during breaks or question and
answer periods.
Turn on multiple monitor support
The first thing you need to do is set up your monitors.
Tip: If your computer is already set up to use
multiple monitors, you can skip ahead to the next
section.
Trap: Make sure that the computer you are using
for the presentation has multiple monitor
capability. Most laptop computers have this built
in, but most desktop computers require two video
cards.
1. First, make sure you have a second monitor
connected to your computer.
2. Right-click the Windows desktop and select
Personalize (Vista) or Screen Resolution (Windows
7) from the contextual menu.
The Display Properties or Display Settings dialog
box appears, depending on which operating system
you are using.
3. (Windows 7 users can skip this step.) Click Display
Settings (Vista).
4. Click the icon that represents the monitor that will be
used by the presenter and select the This is my main
monitor (Vista) or Make this my main display
(Windows 7) check box.
Tip: If the check box is unavailable, the selected
monitor is already designated as the primary
monitor.
Exercise
• Exercise File: None required.
• Exercise: Understand the process of delivering a
presentation on two monitors.
Familiarize yourself with Presenter view and what it looks
like.
Figure 13-6: Using Presenter view allows you to manage your presentation without your audience seeing.
What you see.
What your audience sees.
Delivering a Presentation
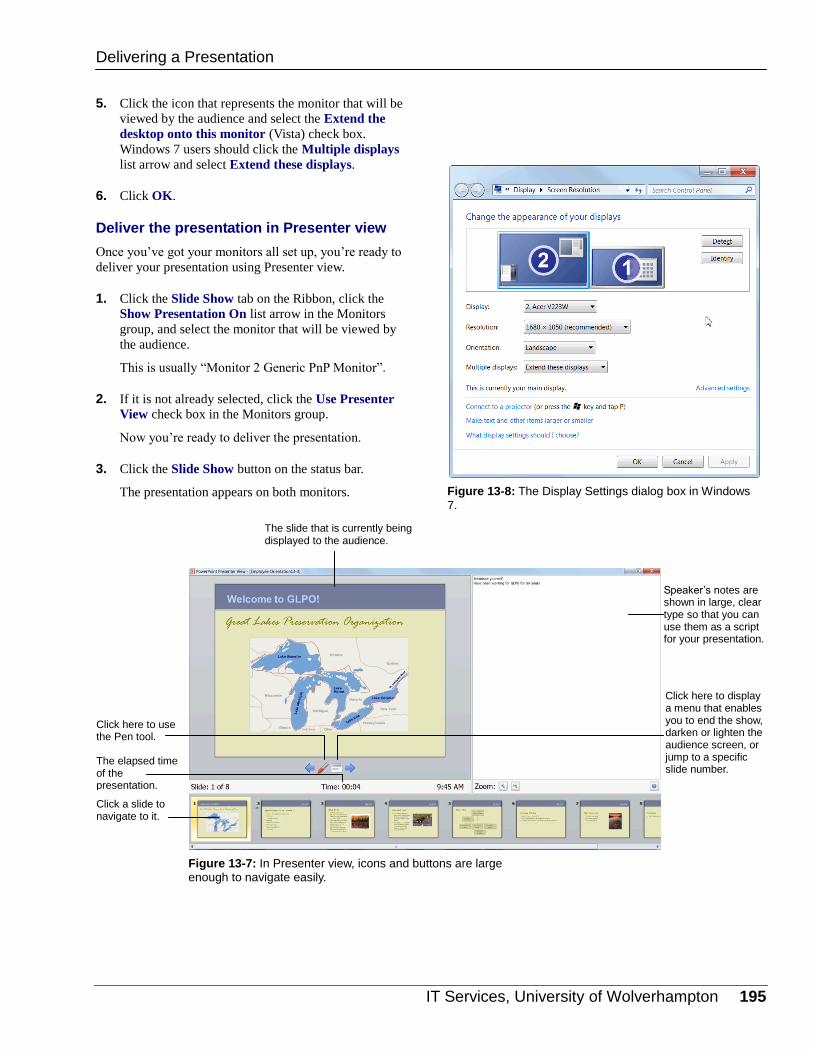
IT Services, University of Wolverhampton 195
5. Click the icon that represents the monitor that will be
viewed by the audience and select the Extend the
desktop onto this monitor (Vista) check box.
Windows 7 users should click the Multiple displays
list arrow and select Extend these displays.
6. Click OK.
Deliver the presentation in Presenter view
Once you’ve got your monitors all set up, you’re ready to
deliver your presentation using Presenter view.
1. Click the Slide Show tab on the Ribbon, click the
Show Presentation On list arrow in the Monitors
group, and select the monitor that will be viewed by
the audience.
This is usually “Monitor 2 Generic PnP Monitor”.
2. If it is not already selected, click the Use Presenter
View check box in the Monitors group.
Now you’re ready to deliver the presentation.
3. Click the Slide Show button on the status bar.
The presentation appears on both monitors.
Figure 13-7: In Presenter view, icons and buttons are large enough to navigate easily.
Figure 13-8: The Display Settings dialog box in Windows
7.
Speaker’s notes are shown in large, clear type so that you can use them as a script for your presentation.
Click here to display a menu that enables you to end the show, darken or lighten the audience screen, or jump to a specific slide number.
Click here to use the Pen tool.
The slide that is currently being displayed to the audience.
The elapsed time of the presentation.
Click a slide to navigate to it.
Delivering a Presentation
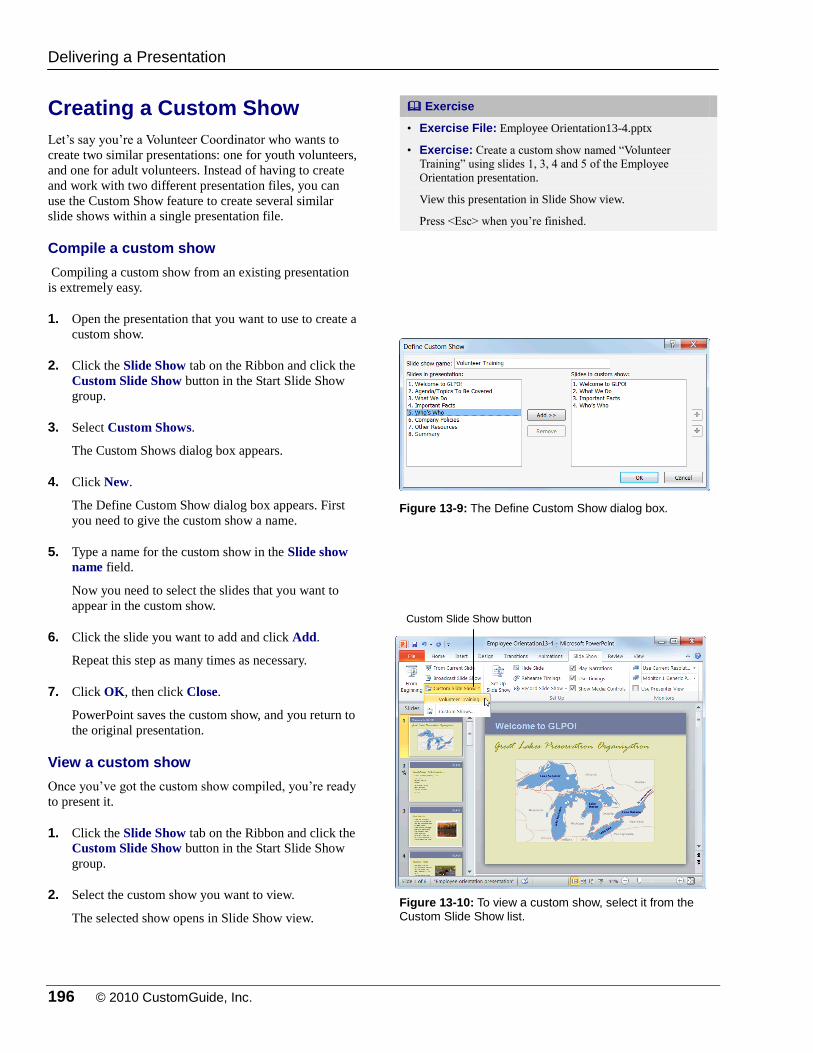
196 © 2010 CustomGuide, Inc.
Creating a Custom Show
Let’s say you’re a Volunteer Coordinator who wants to
create two similar presentations: one for youth volunteers,
and one for adult volunteers. Instead of having to create
and work with two different presentation files, you can
use the Custom Show feature to create several similar
slide shows within a single presentation file.
Compile a custom show
Compiling a custom show from an existing presentation
is extremely easy.
1. Open the presentation that you want to use to create a
custom show.
2. Click the Slide Show tab on the Ribbon and click the
Custom Slide Show button in the Start Slide Show
group.
3. Select Custom Shows.
The Custom Shows dialog box appears.
4. Click New.
The Define Custom Show dialog box appears. First
you need to give the custom show a name.
5. Type a name for the custom show in the Slide show
name field.
Now you need to select the slides that you want to
appear in the custom show.
6. Click the slide you want to add and click Add.
Repeat this step as many times as necessary.
7. Click OK, then click Close.
PowerPoint saves the custom show, and you return to
the original presentation.
View a custom show
Once you’ve got the custom show compiled, you’re ready
to present it.
1. Click the Slide Show tab on the Ribbon and click the
Custom Slide Show button in the Start Slide Show
group.
2. Select the custom show you want to view.
The selected show opens in Slide Show view.
Exercise
• Exercise File: Employee Orientation13-4.pptx
• Exercise: Create a custom show named “Volunteer
Training” using slides 1, 3, 4 and 5 of the Employee
Orientation presentation.
View this presentation in Slide Show view.
Press <Esc> when you’re finished.
Figure 13-9: The Define Custom Show dialog box.
Figure 13-10: To view a custom show, select it from the Custom Slide Show list.
Delivering a Presentation
Custom Slide Show button
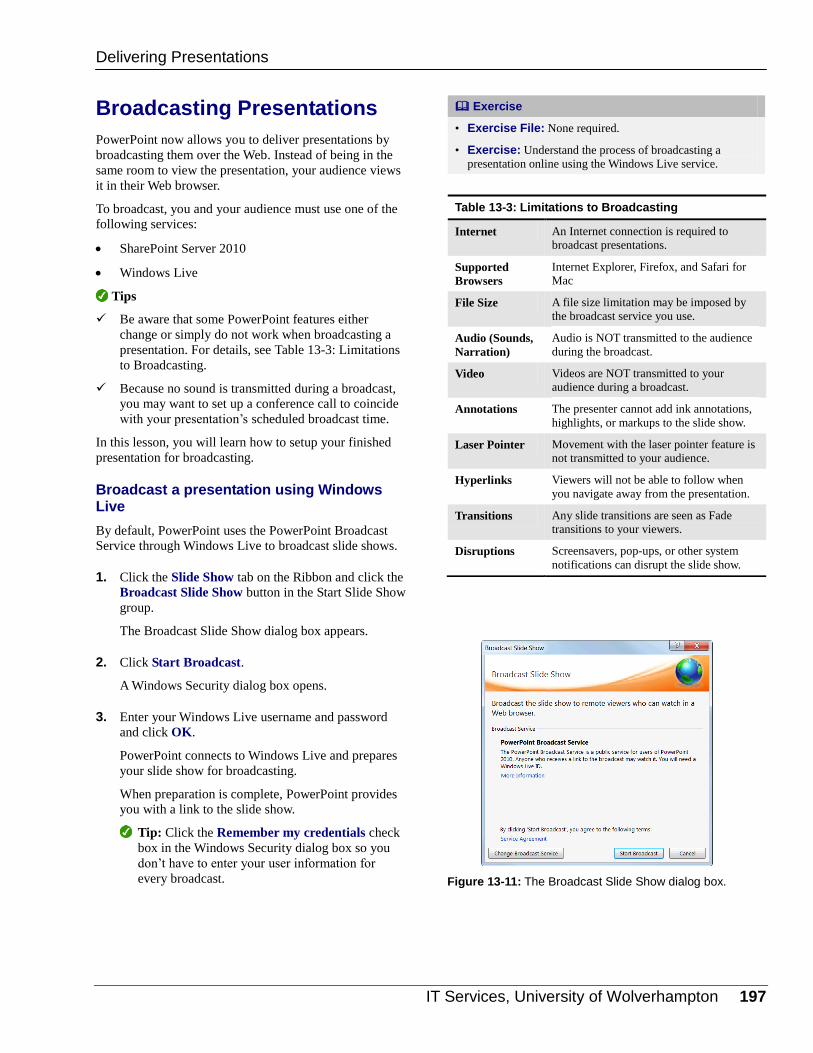
IT Services, University of Wolverhampton 197
Broadcasting Presentations
PowerPoint now allows you to deliver presentations by
broadcasting them over the Web. Instead of being in the
same room to view the presentation, your audience views
it in their Web browser.
To broadcast, you and your audience must use one of the
following services:
SharePoint Server 2010
Windows Live
Tips
Be aware that some PowerPoint features either
change or simply do not work when broadcasting a
presentation. For details, see Table 13-3: Limitations
to Broadcasting.
Because no sound is transmitted during a broadcast,
you may want to set up a conference call to coincide
with your presentation’s scheduled broadcast time.
In this lesson, you will learn how to setup your finished
presentation for broadcasting.
Broadcast a presentation using Windows Live
By default, PowerPoint uses the PowerPoint Broadcast
Service through Windows Live to broadcast slide shows.
1. Click the Slide Show tab on the Ribbon and click the
Broadcast Slide Show button in the Start Slide Show
group.
The Broadcast Slide Show dialog box appears.
2. Click Start Broadcast.
A Windows Security dialog box opens.
3. Enter your Windows Live username and password
and click OK.
PowerPoint connects to Windows Live and prepares
your slide show for broadcasting.
When preparation is complete, PowerPoint provides
you with a link to the slide show.
Tip: Click the Remember my credentials check
box in the Windows Security dialog box so you
don’t have to enter your user information for
every broadcast.
Exercise
• Exercise File: None required.
• Exercise: Understand the process of broadcasting a
presentation online using the Windows Live service.
Table 13-3: Limitations to Broadcasting
Internet An Internet connection is required to
broadcast presentations.
Supported
Browsers
Internet Explorer, Firefox, and Safari for
Mac
File Size A file size limitation may be imposed by
the broadcast service you use.
Audio (Sounds,
Narration)
Audio is NOT transmitted to the audience
during the broadcast.
Video Videos are NOT transmitted to your
audience during a broadcast.
Annotations The presenter cannot add ink annotations,
highlights, or markups to the slide show.
Laser Pointer Movement with the laser pointer feature is
not transmitted to your audience.
Hyperlinks Viewers will not be able to follow when
you navigate away from the presentation.
Transitions Any slide transitions are seen as Fade
transitions to your viewers.
Disruptions Screensavers, pop-ups, or other system
notifications can disrupt the slide show.
Figure 13-11: The Broadcast Slide Show dialog box.
Delivering Presentations
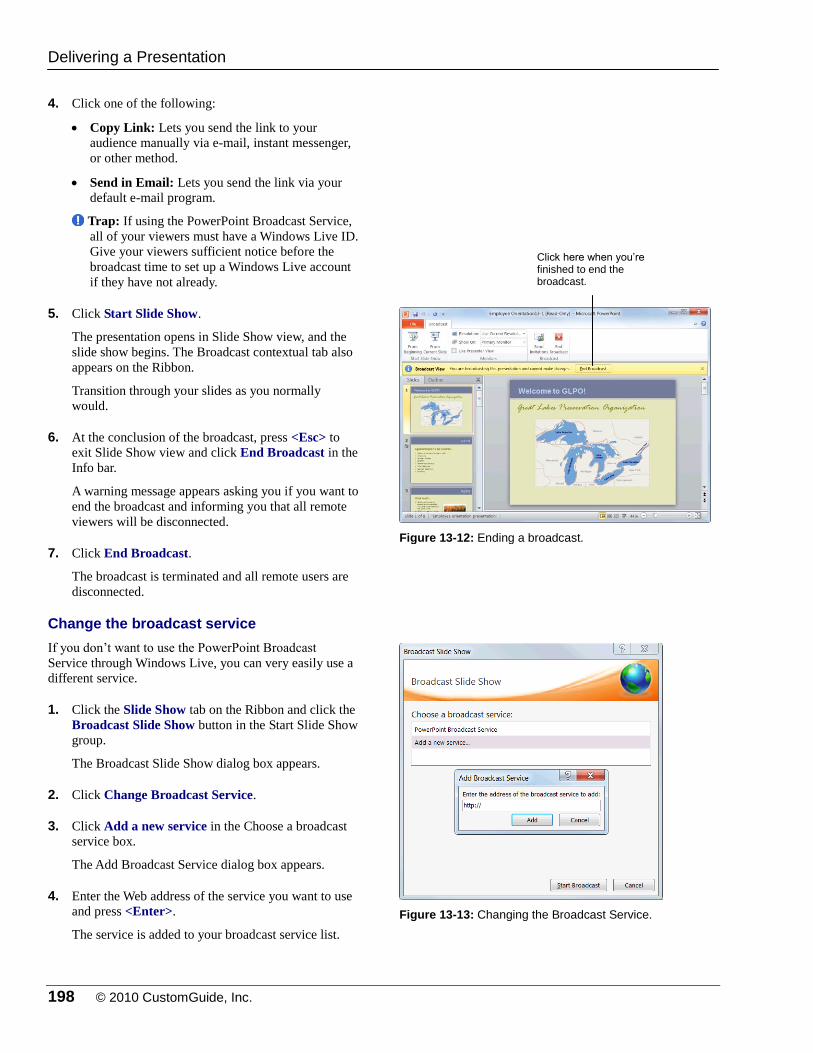
198 © 2010 CustomGuide, Inc.
4. Click one of the following:
Copy Link: Lets you send the link to your
audience manually via e-mail, instant messenger,
or other method.
Send in Email: Lets you send the link via your
default e-mail program.
Trap: If using the PowerPoint Broadcast Service,
all of your viewers must have a Windows Live ID.
Give your viewers sufficient notice before the
broadcast time to set up a Windows Live account
if they have not already.
5. Click Start Slide Show.
The presentation opens in Slide Show view, and the
slide show begins. The Broadcast contextual tab also
appears on the Ribbon.
Transition through your slides as you normally
would.
6. At the conclusion of the broadcast, press <Esc> to
exit Slide Show view and click End Broadcast in the
Info bar.
A warning message appears asking you if you want to
end the broadcast and informing you that all remote
viewers will be disconnected.
7. Click End Broadcast.
The broadcast is terminated and all remote users are
disconnected.
Change the broadcast service
If you don’t want to use the PowerPoint Broadcast
Service through Windows Live, you can very easily use a
different service.
1. Click the Slide Show tab on the Ribbon and click the
Broadcast Slide Show button in the Start Slide Show
group.
The Broadcast Slide Show dialog box appears.
2. Click Change Broadcast Service.
3. Click Add a new service in the Choose a broadcast
service box.
The Add Broadcast Service dialog box appears.
4. Enter the Web address of the service you want to use
and press <Enter>.
The service is added to your broadcast service list.
Figure 13-12: Ending a broadcast.
Figure 13-13: Changing the Broadcast Service.
Delivering a Presentation
Click here when you’re finished to end the broadcast.
IT Services, University of Wolverhampton 199
DDeelliivveerriinngg aa PPrreesseennttaattiioonn RReevviieeww
Quiz Questions
125. The fastest way to navigate a slide show is using: A. The Ribbon. B. The Office menu. C. The Pen Tools menu. D. Keystroke shortcuts.
126. You can pause a slide show by toggling between a white or black screen. (True or False?)
127. Annotations made with the Pen and Highlighter tools are permanent. (True or False?)
128. Which of the following are examples of instances where you’d want to create a presentation that runs by itself? A. In a booth at a tradeshow. B. Live in front of an audience. C. On a community access cable channel. D. At a kiosk in the mall.
129. When a presentation is set up using the Browsed at a kiosk show type, the presentation automatically loops. (True or
False?)
130. Presenter view lets you manage your presentation on one computer while your audience views it on another computer.
(True or False?)
131. You have a presentation that needs to be shown to two different audiences. You will need to create two separate
presentation files in order to accomplish this. (True or False?)
132. Which PowerPoint function would you use to transmit a presentation online? A. Presenter View B. Broadcast Presentation C. Insert Screenshot D. Custom Slide Show
Quiz Answers
125. D. The fastest way to navigate a slide show is using keystroke shortcuts.
126. True. You can pause a slide show; for example, during a question and answer session, by toggling between a white or
black screen.
127. False. You can erase annotations immediately after you make them or discard them when you exit Slide Show view.
200 © 2010 CustomGuide, Inc.
128. A, C and D. These are all examples of instances where you would want to create a presentation that runs by itself.
129. True. The Browsed at a kiosk show type loops the presentation so that it restarts when it reaches the last slide.
130. True. Presenter view lets you manage your presentation on one monitor while your audience views it on another.
131. False. You can use the Custom Show feature to create several similar slide shows within a single presentation.
132. B. You can transmit, or broadcast, a presentation online using the Broadcast Presentation function in PowerPoint.
IT Services, University of Wolverhampton 201
UUssiinngg
CCoollllaabboorraattiioonn
aanndd DDiissttrriibbuuttiioonn
TToooollss
Comparing and Merging Presentations ........ 202
Packaging a Presentation ............................... 204 Package a presentation ......................... 204 View a packaged presentation ............... 205
Saving Presentations as Videos .................... 206
Password Protecting a Presentation ............. 208 Require a password to open a presentation ............................................................... 208 Require a password to modify a presentation ........................................... 208
Publishing Slides ............................................. 210 Publish slides to a Slide Library ............. 210 Add a slide from a Slide Library to a presentation ........................................... 211
Creating Handouts in Microsoft Word ........... 212
Importing and Exporting an Outline .............. 213 Import an outline .................................... 213 Export an outline to Microsoft Word ...... 214
Like it or not, it’s likely that someday you
will have to create a presentation with a
team of individuals. For example, you
might post a Marketing Report
presentation onto a shared network, have
your manager review it, make changes to
it, and get it back. Then you go back to
the presentation, make the changes, and
then send the presentation to its final
destination.
The folks at Microsoft realized that
people often need to work together when
creating presentations, so they included a
whole slew of new features that enable
several people to work together to create
and update a single presentation.
In this chapter you will learn how to
prepare a presentation for distribution and
how to share a presentation with others,
whether that be via the Internet or a
SharePoint site.
Using Exercise Files This chapter suggests exercises to practice
the topic of each lesson. There are two
ways you may follow along with the
exercise files:
Open the exercise file for a lesson,
perform the lesson exercise, and close
the exercise file.
Open the exercise file for a lesson,
perform the lesson exercise, and keep
the file open to perform the remaining
lesson exercises for the chapter.
The exercises are written so that you may
“build upon them,” meaning the exercises
in a chapter can be performed in
succession from the first lesson to the last.
14
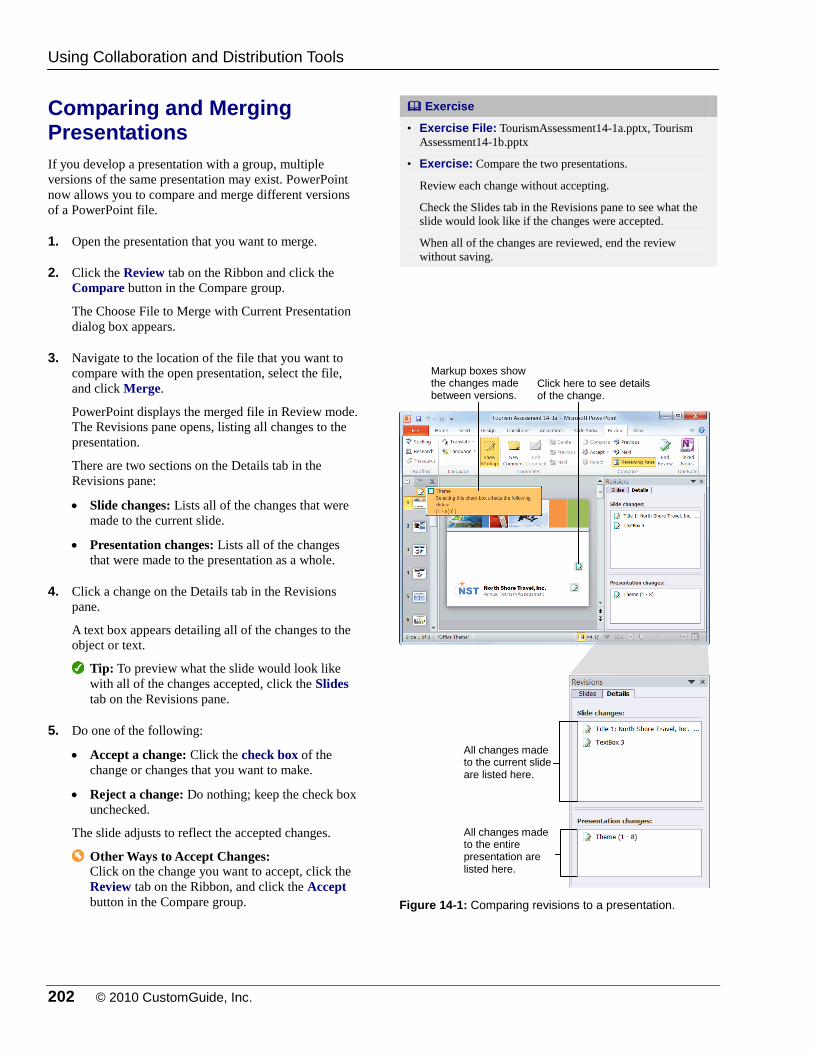
202 © 2010 CustomGuide, Inc.
Comparing and Merging Presentations
If you develop a presentation with a group, multiple
versions of the same presentation may exist. PowerPoint
now allows you to compare and merge different versions
of a PowerPoint file.
1. Open the presentation that you want to merge.
2. Click the Review tab on the Ribbon and click the
Compare button in the Compare group.
The Choose File to Merge with Current Presentation
dialog box appears.
3. Navigate to the location of the file that you want to
compare with the open presentation, select the file,
and click Merge.
PowerPoint displays the merged file in Review mode.
The Revisions pane opens, listing all changes to the
presentation.
There are two sections on the Details tab in the
Revisions pane:
Slide changes: Lists all of the changes that were
made to the current slide.
Presentation changes: Lists all of the changes
that were made to the presentation as a whole.
4. Click a change on the Details tab in the Revisions
pane.
A text box appears detailing all of the changes to the
object or text.
Tip: To preview what the slide would look like
with all of the changes accepted, click the Slides
tab on the Revisions pane.
5. Do one of the following:
Accept a change: Click the check box of the
change or changes that you want to make.
Reject a change: Do nothing; keep the check box
unchecked.
The slide adjusts to reflect the accepted changes.
Other Ways to Accept Changes: Click on the change you want to accept, click the
Review tab on the Ribbon, and click the Accept
button in the Compare group.
Exercise
• Exercise File: TourismAssessment14-1a.pptx, Tourism
Assessment14-1b.pptx
• Exercise: Compare the two presentations.
Review each change without accepting.
Check the Slides tab in the Revisions pane to see what the
slide would look like if the changes were accepted.
When all of the changes are reviewed, end the review
without saving.
Figure 14-1: Comparing revisions to a presentation.
Using Collaboration and Distribution Tools
Markup boxes show the changes made between versions.
All changes made to the current slide are listed here.
All changes made to the entire presentation are listed here.
Click here to see details of the change.
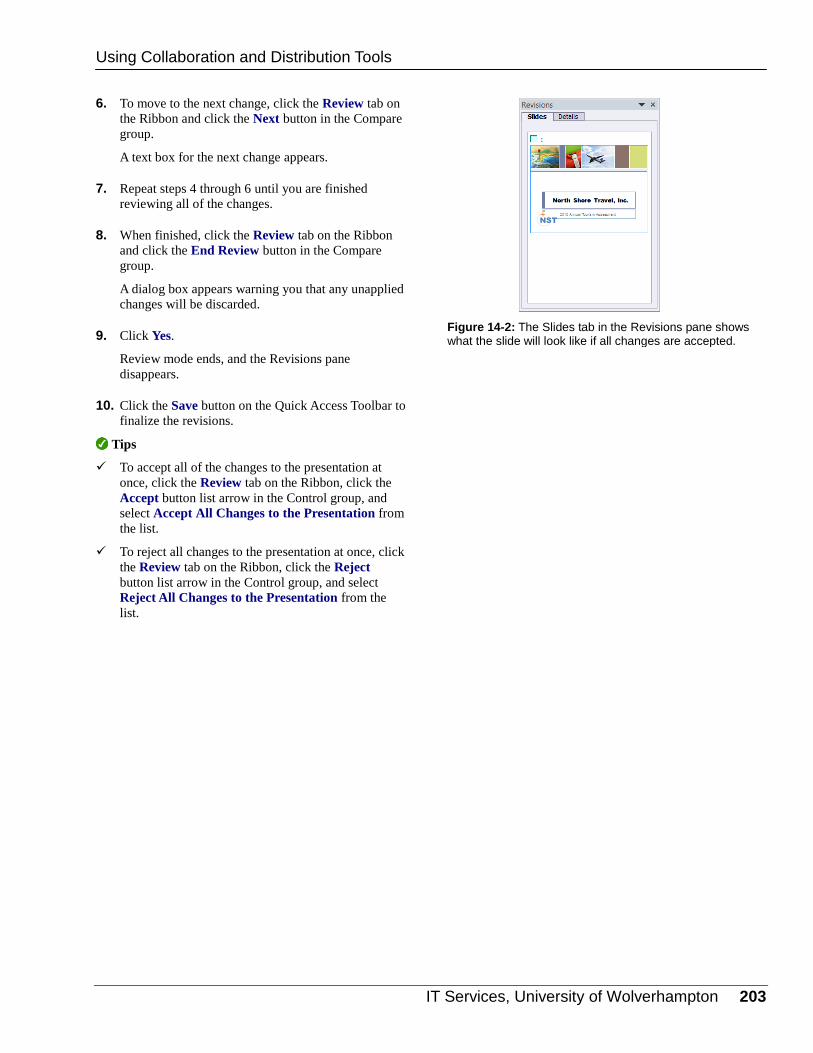
IT Services, University of Wolverhampton 203
6. To move to the next change, click the Review tab on
the Ribbon and click the Next button in the Compare
group.
A text box for the next change appears.
7. Repeat steps 4 through 6 until you are finished
reviewing all of the changes.
8. When finished, click the Review tab on the Ribbon
and click the End Review button in the Compare
group.
A dialog box appears warning you that any unapplied
changes will be discarded.
9. Click Yes.
Review mode ends, and the Revisions pane
disappears.
10. Click the Save button on the Quick Access Toolbar to
finalize the revisions.
Tips
To accept all of the changes to the presentation at
once, click the Review tab on the Ribbon, click the
Accept button list arrow in the Control group, and
select Accept All Changes to the Presentation from
the list.
To reject all changes to the presentation at once, click
the Review tab on the Ribbon, click the Reject
button list arrow in the Control group, and select
Reject All Changes to the Presentation from the
list.
Figure 14-2: The Slides tab in the Revisions pane shows what the slide will look like if all changes are accepted.
Using Collaboration and Distribution Tools
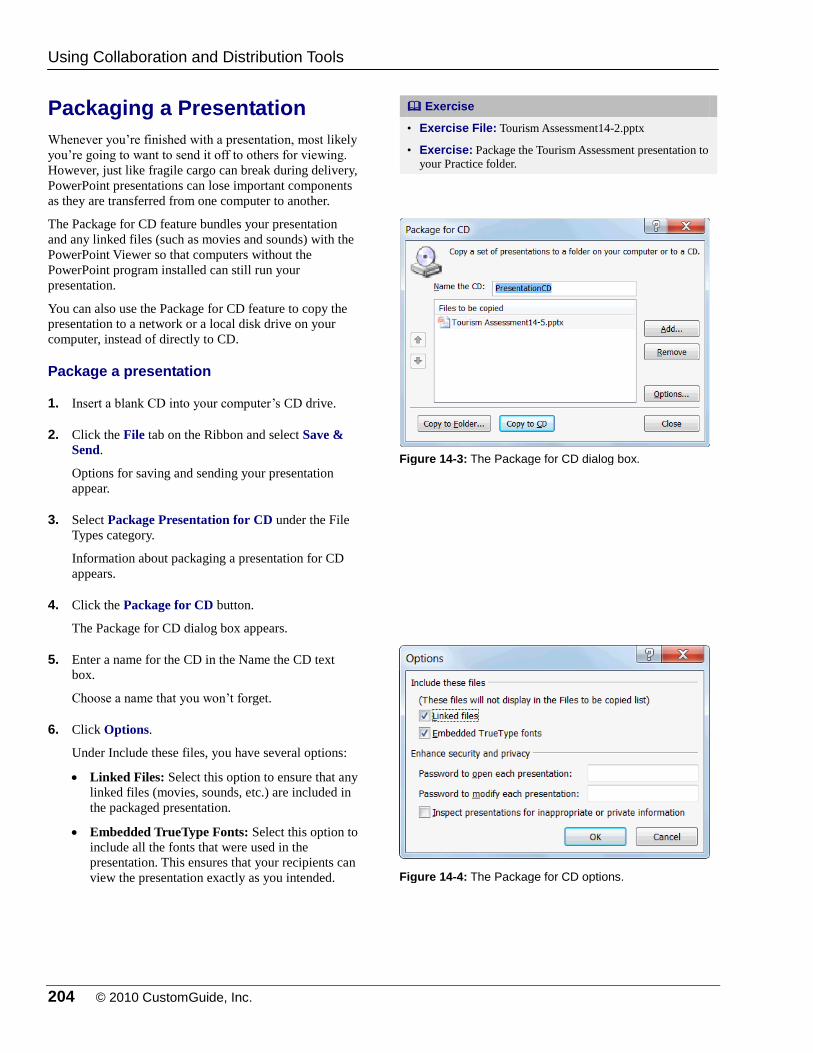
204 © 2010 CustomGuide, Inc.
Packaging a Presentation
Whenever you’re finished with a presentation, most likely
you’re going to want to send it off to others for viewing.
However, just like fragile cargo can break during delivery,
PowerPoint presentations can lose important components
as they are transferred from one computer to another.
The Package for CD feature bundles your presentation
and any linked files (such as movies and sounds) with the
PowerPoint Viewer so that computers without the
PowerPoint program installed can still run your
presentation.
You can also use the Package for CD feature to copy the
presentation to a network or a local disk drive on your
computer, instead of directly to CD.
Package a presentation
1. Insert a blank CD into your computer’s CD drive.
2. Click the File tab on the Ribbon and select Save &
Send.
Options for saving and sending your presentation
appear.
3. Select Package Presentation for CD under the File
Types category.
Information about packaging a presentation for CD
appears.
4. Click the Package for CD button.
The Package for CD dialog box appears.
5. Enter a name for the CD in the Name the CD text
box.
Choose a name that you won’t forget.
6. Click Options.
Under Include these files, you have several options:
Linked Files: Select this option to ensure that any
linked files (movies, sounds, etc.) are included in
the packaged presentation.
Embedded TrueType Fonts: Select this option to
include all the fonts that were used in the
presentation. This ensures that your recipients can
view the presentation exactly as you intended.
Exercise
• Exercise File: Tourism Assessment14-2.pptx
• Exercise: Package the Tourism Assessment presentation to
your Practice folder.
Figure 14-3: The Package for CD dialog box.
Figure 14-4: The Package for CD options.
Using Collaboration and Distribution Tools
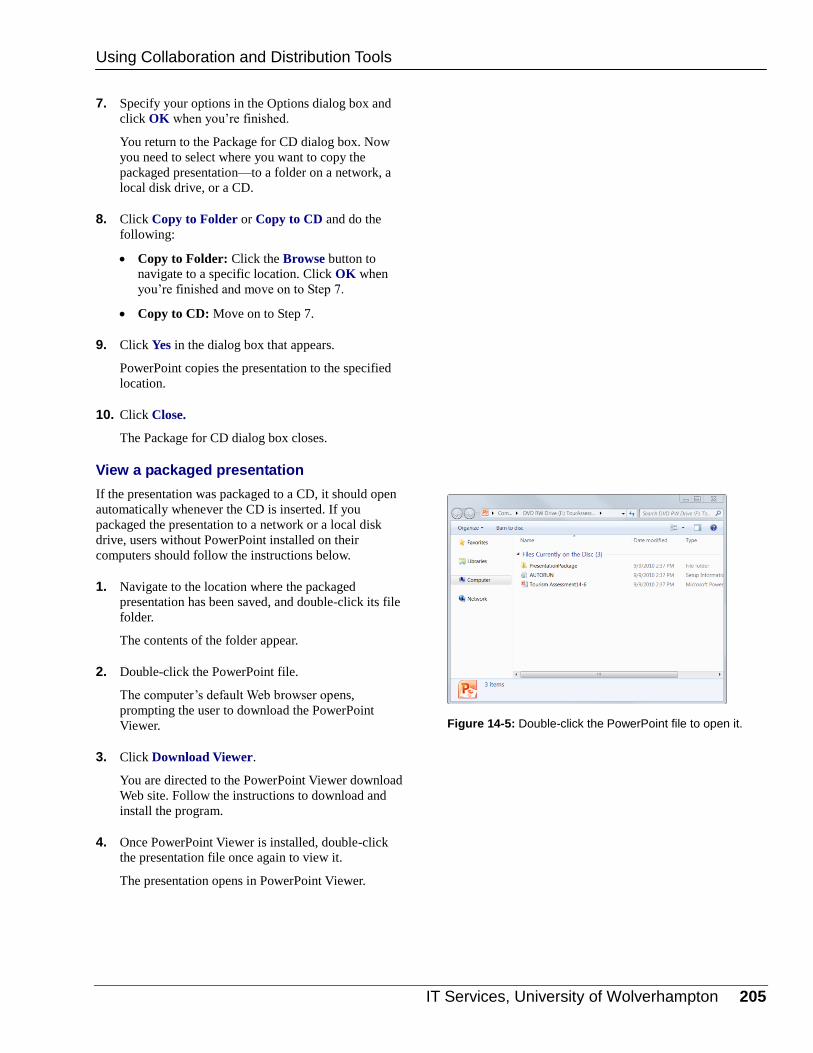
IT Services, University of Wolverhampton 205
7. Specify your options in the Options dialog box and
click OK when you’re finished.
You return to the Package for CD dialog box. Now
you need to select where you want to copy the
packaged presentation—to a folder on a network, a
local disk drive, or a CD.
8. Click Copy to Folder or Copy to CD and do the
following:
Copy to Folder: Click the Browse button to
navigate to a specific location. Click OK when
you’re finished and move on to Step 7.
Copy to CD: Move on to Step 7.
9. Click Yes in the dialog box that appears.
PowerPoint copies the presentation to the specified
location.
10. Click Close.
The Package for CD dialog box closes.
View a packaged presentation
If the presentation was packaged to a CD, it should open
automatically whenever the CD is inserted. If you
packaged the presentation to a network or a local disk
drive, users without PowerPoint installed on their
computers should follow the instructions below.
1. Navigate to the location where the packaged
presentation has been saved, and double-click its file
folder.
The contents of the folder appear.
2. Double-click the PowerPoint file.
The computer’s default Web browser opens,
prompting the user to download the PowerPoint
Viewer.
3. Click Download Viewer.
You are directed to the PowerPoint Viewer download
Web site. Follow the instructions to download and
install the program.
4. Once PowerPoint Viewer is installed, double-click
the presentation file once again to view it.
The presentation opens in PowerPoint Viewer.
Figure 14-5: Double-click the PowerPoint file to open it.
Using Collaboration and Distribution Tools

206 © 2010 CustomGuide, Inc.
Saving Presentations as Videos
One new feature in PowerPoint 2010 is the ability to save
presentations as videos. You can distribute a video by
burning it to a disc, publishing it on the Web, or sending it
in an e-mail. This works particularly well for an audience
that lacks PowerPoint, is off-site, or cannot attend live
presentations.
1. Click the File tab on the Ribbon and select Save &
Send.
Options for saving and sending your presentation
appear.
2. Click Create a video under the File Types category.
The available video options are displayed.
3. To choose the video quality, click the Computer and
HD Displays list arrow and select one of the
following from the list:
Computer and HD Displays: Select this if your
video will be displayed on computer monitors,
projectors, or high definition displays.
Internet and DVD: Select this option if your
video will be played online or if you are going to
burn it to a CD or DVD.
Portable Devices: Select this option if your video
will be played on portable devices like smart
phones, iPods, Zunes, or other small devices
capable of playing video.
Trap: If you choose to optimize your video for
portable devices, ensure that the text in your
presentation will be large enough to read on small
displays.
4. Click the Don’t Use Recorded Timings and
Narrations list arrow to select one of the following
timing and narration options:
Don’t Use Recorded Timings and Narrations: Select this option when you want to display the
slides themselves without any recorded voiceover
or timings.
Use Recorded Timings and Narrations: Select
this option when you have recorded timings and
narrations for your presentation.
Exercise
• Exercise File: Tourism Assessment14-3.pptx
• Exercise: Save the presentation as a video that can be
viewed on Computer & HD displays.
Don’t use recorded timings and narration.
Set up the video to spend 10 seconds on each slide.
Save the video to your Practice folder.
Figure 14-6: The Create a Video options in Backstage
View.
Figure 14-7: The list of available video quality options.
Figure 14-8: The list of available timing and narration
options.
Using Collaboration and Distribution Tools
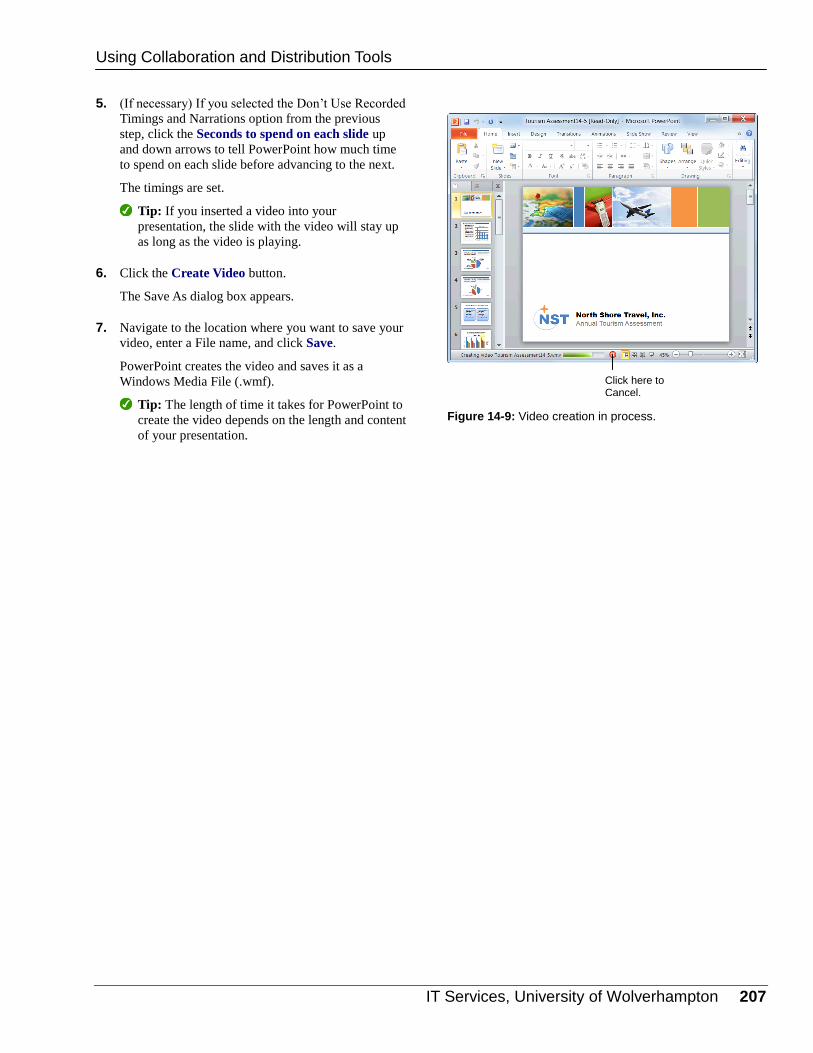
IT Services, University of Wolverhampton 207
5. (If necessary) If you selected the Don’t Use Recorded
Timings and Narrations option from the previous
step, click the Seconds to spend on each slide up
and down arrows to tell PowerPoint how much time
to spend on each slide before advancing to the next.
The timings are set.
Tip: If you inserted a video into your
presentation, the slide with the video will stay up
as long as the video is playing.
6. Click the Create Video button.
The Save As dialog box appears.
7. Navigate to the location where you want to save your
video, enter a File name, and click Save.
PowerPoint creates the video and saves it as a
Windows Media File (.wmf).
Tip: The length of time it takes for PowerPoint to
create the video depends on the length and content
of your presentation.
Figure 14-9: Video creation in process.
Using Collaboration and Distribution Tools
Click here to Cancel.
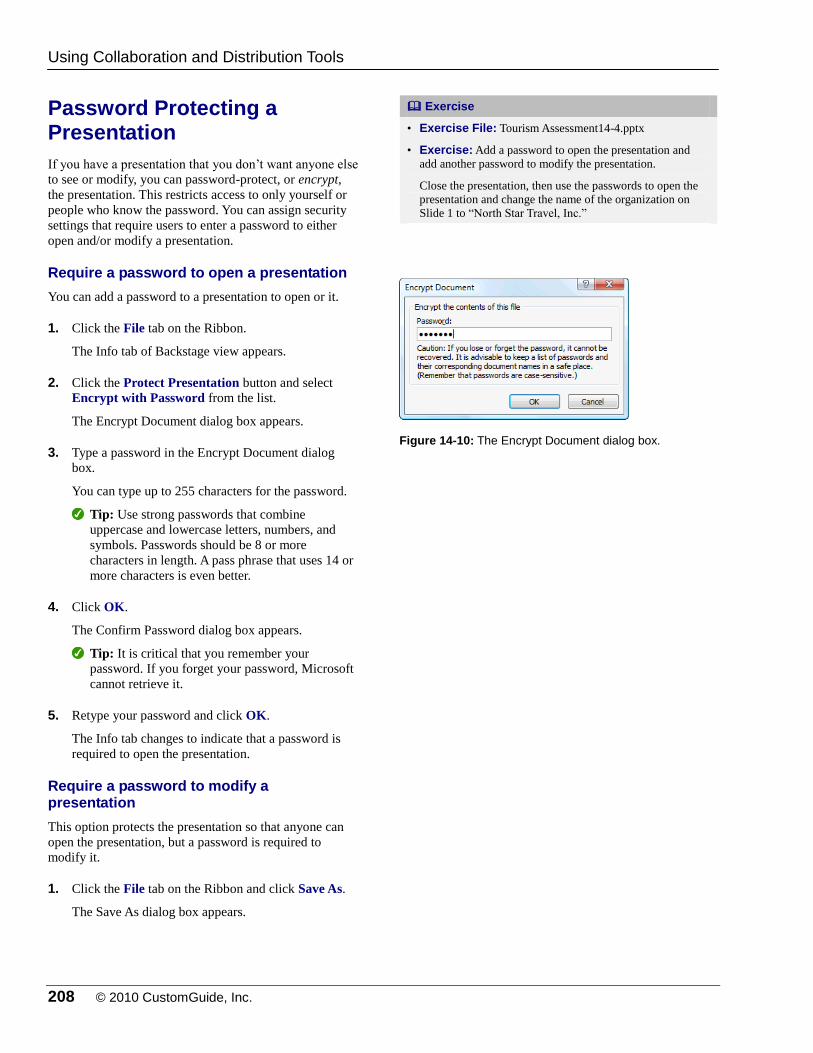
208 © 2010 CustomGuide, Inc.
Password Protecting a Presentation
If you have a presentation that you don’t want anyone else
to see or modify, you can password-protect, or encrypt,
the presentation. This restricts access to only yourself or
people who know the password. You can assign security
settings that require users to enter a password to either
open and/or modify a presentation.
Require a password to open a presentation
You can add a password to a presentation to open or it.
1. Click the File tab on the Ribbon.
The Info tab of Backstage view appears.
2. Click the Protect Presentation button and select
Encrypt with Password from the list.
The Encrypt Document dialog box appears.
3. Type a password in the Encrypt Document dialog
box.
You can type up to 255 characters for the password.
Tip: Use strong passwords that combine
uppercase and lowercase letters, numbers, and
symbols. Passwords should be 8 or more
characters in length. A pass phrase that uses 14 or
more characters is even better.
4. Click OK.
The Confirm Password dialog box appears.
Tip: It is critical that you remember your
password. If you forget your password, Microsoft
cannot retrieve it.
5. Retype your password and click OK.
The Info tab changes to indicate that a password is
required to open the presentation.
Require a password to modify a presentation
This option protects the presentation so that anyone can
open the presentation, but a password is required to
modify it.
1. Click the File tab on the Ribbon and click Save As.
The Save As dialog box appears.
Exercise
• Exercise File: Tourism Assessment14-4.pptx
• Exercise: Add a password to open the presentation and
add another password to modify the presentation.
Close the presentation, then use the passwords to open the
presentation and change the name of the organization on
Slide 1 to “North Star Travel, Inc.”
Figure 14-10: The Encrypt Document dialog box.
Using Collaboration and Distribution Tools
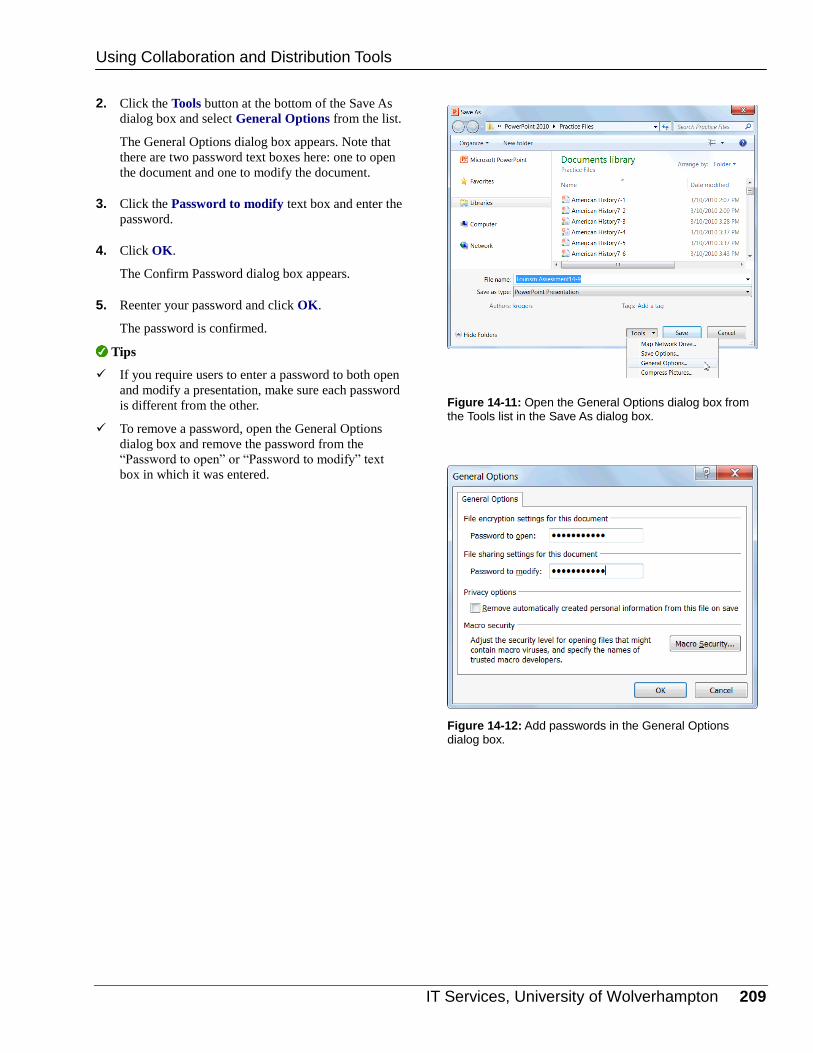
IT Services, University of Wolverhampton 209
2. Click the Tools button at the bottom of the Save As
dialog box and select General Options from the list.
The General Options dialog box appears. Note that
there are two password text boxes here: one to open
the document and one to modify the document.
3. Click the Password to modify text box and enter the
password.
4. Click OK.
The Confirm Password dialog box appears.
5. Reenter your password and click OK.
The password is confirmed.
Tips
If you require users to enter a password to both open
and modify a presentation, make sure each password
is different from the other.
To remove a password, open the General Options
dialog box and remove the password from the
“Password to open” or “Password to modify” text
box in which it was entered.
Figure 14-11: Open the General Options dialog box from the Tools list in the Save As dialog box.
Figure 14-12: Add passwords in the General Options dialog box.
Using Collaboration and Distribution Tools
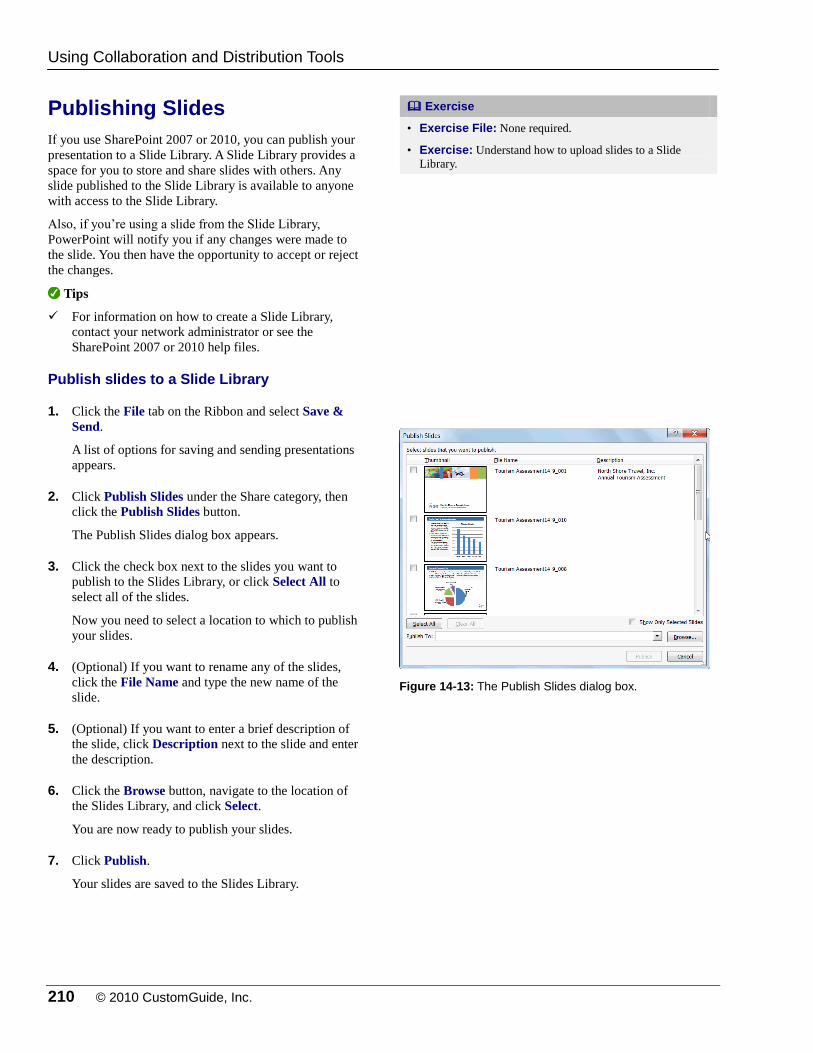
210 © 2010 CustomGuide, Inc.
Publishing Slides
If you use SharePoint 2007 or 2010, you can publish your
presentation to a Slide Library. A Slide Library provides a
space for you to store and share slides with others. Any
slide published to the Slide Library is available to anyone
with access to the Slide Library.
Also, if you’re using a slide from the Slide Library,
PowerPoint will notify you if any changes were made to
the slide. You then have the opportunity to accept or reject
the changes.
Tips
For information on how to create a Slide Library,
contact your network administrator or see the
SharePoint 2007 or 2010 help files.
Publish slides to a Slide Library
1. Click the File tab on the Ribbon and select Save &
Send.
A list of options for saving and sending presentations
appears.
2. Click Publish Slides under the Share category, then
click the Publish Slides button.
The Publish Slides dialog box appears.
3. Click the check box next to the slides you want to
publish to the Slides Library, or click Select All to
select all of the slides.
Now you need to select a location to which to publish
your slides.
4. (Optional) If you want to rename any of the slides,
click the File Name and type the new name of the
slide.
5. (Optional) If you want to enter a brief description of
the slide, click Description next to the slide and enter
the description.
6. Click the Browse button, navigate to the location of
the Slides Library, and click Select.
You are now ready to publish your slides.
7. Click Publish.
Your slides are saved to the Slides Library.
Exercise
• Exercise File: None required.
• Exercise: Understand how to upload slides to a Slide
Library.
Figure 14-13: The Publish Slides dialog box.
Using Collaboration and Distribution Tools
IT Services, University of Wolverhampton 211
Add a slide from a Slide Library to a presentation
If other users have published slides to a Slide Library, you
can use them in your presentations.
1. Open the presentation to which you want to add
shared slides.
2. Click the Home tab on the Ribbon, click the New
Slide button list arrow in the Slides group.
A list of options appears.
3. Select Reuse Slides from the list.
The Reuse Slides pane appears.
4. In the Reuse Slides pane, click Open a Slide
Library.
The Select a Slide Library dialog box appears.
5. Navigate to the location of the Slides Library and
click Select.
The All Slides list appears.
6. Click the slide you want to add to your presentation.
The slide is added to your presentation.
Tip: If you want to be notified whenever changes
occur to a slide that you added from the Slide
Library, click the slide in the Reuse Slides pane
and select the Tell me when this slide changes
check box.
Using Collaboration and Distribution Tools
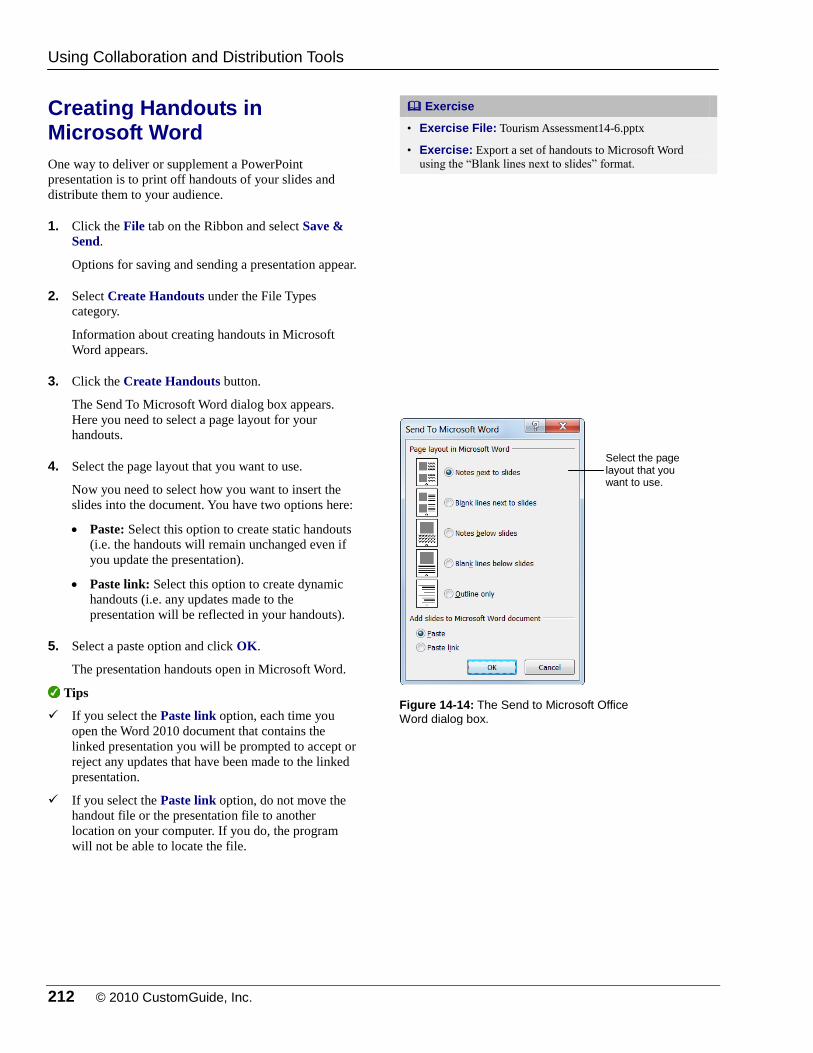
212 © 2010 CustomGuide, Inc.
Creating Handouts in Microsoft Word
One way to deliver or supplement a PowerPoint
presentation is to print off handouts of your slides and
distribute them to your audience.
1. Click the File tab on the Ribbon and select Save &
Send.
Options for saving and sending a presentation appear.
2. Select Create Handouts under the File Types
category.
Information about creating handouts in Microsoft
Word appears.
3. Click the Create Handouts button.
The Send To Microsoft Word dialog box appears.
Here you need to select a page layout for your
handouts.
4. Select the page layout that you want to use.
Now you need to select how you want to insert the
slides into the document. You have two options here:
Paste: Select this option to create static handouts
(i.e. the handouts will remain unchanged even if
you update the presentation).
Paste link: Select this option to create dynamic
handouts (i.e. any updates made to the
presentation will be reflected in your handouts).
5. Select a paste option and click OK.
The presentation handouts open in Microsoft Word.
Tips
If you select the Paste link option, each time you
open the Word 2010 document that contains the
linked presentation you will be prompted to accept or
reject any updates that have been made to the linked
presentation.
If you select the Paste link option, do not move the
handout file or the presentation file to another
location on your computer. If you do, the program
will not be able to locate the file.
Exercise
• Exercise File: Tourism Assessment14-6.pptx
• Exercise: Export a set of handouts to Microsoft Word
using the “Blank lines next to slides” format.
Figure 14-14: The Send to Microsoft Office
Word dialog box.
Using Collaboration and Distribution Tools
Select the page layout that you want to use.
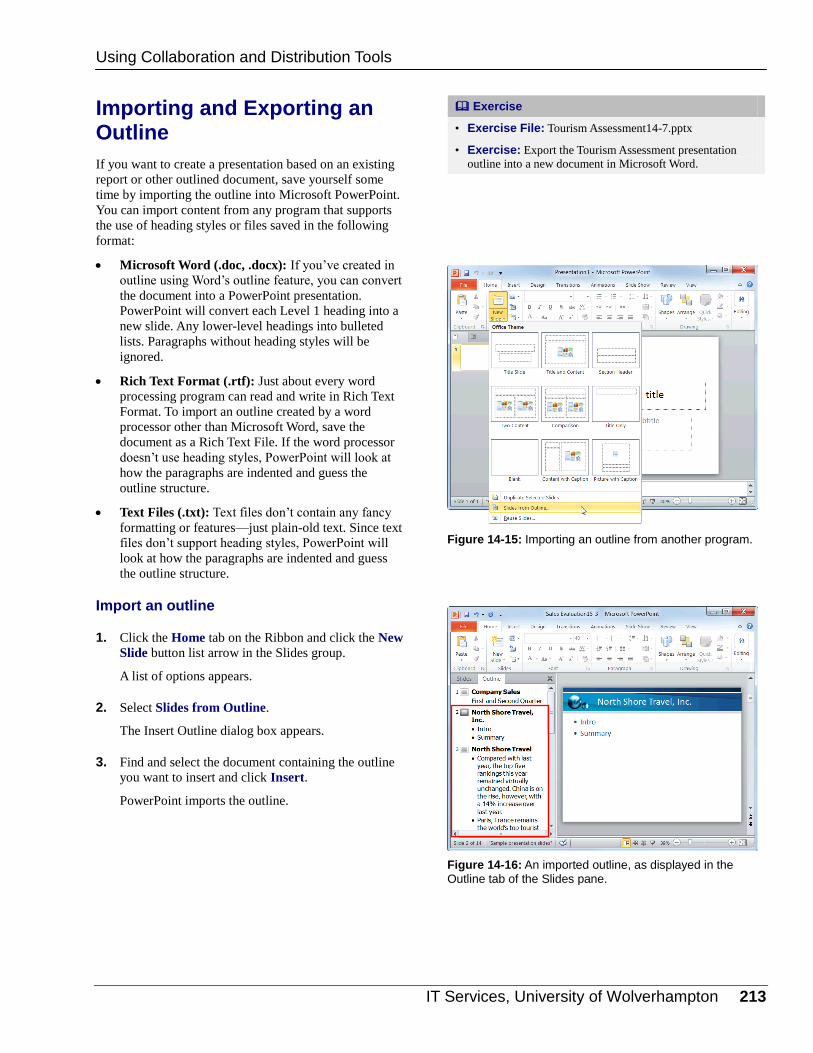
IT Services, University of Wolverhampton 213
Importing and Exporting an Outline
If you want to create a presentation based on an existing
report or other outlined document, save yourself some
time by importing the outline into Microsoft PowerPoint.
You can import content from any program that supports
the use of heading styles or files saved in the following
format:
Microsoft Word (.doc, .docx): If you’ve created in
outline using Word’s outline feature, you can convert
the document into a PowerPoint presentation.
PowerPoint will convert each Level 1 heading into a
new slide. Any lower-level headings into bulleted
lists. Paragraphs without heading styles will be
ignored.
Rich Text Format (.rtf): Just about every word
processing program can read and write in Rich Text
Format. To import an outline created by a word
processor other than Microsoft Word, save the
document as a Rich Text File. If the word processor
doesn’t use heading styles, PowerPoint will look at
how the paragraphs are indented and guess the
outline structure.
Text Files (.txt): Text files don’t contain any fancy
formatting or features—just plain-old text. Since text
files don’t support heading styles, PowerPoint will
look at how the paragraphs are indented and guess
the outline structure.
Import an outline
1. Click the Home tab on the Ribbon and click the New
Slide button list arrow in the Slides group.
A list of options appears.
2. Select Slides from Outline.
The Insert Outline dialog box appears.
3. Find and select the document containing the outline
you want to insert and click Insert.
PowerPoint imports the outline.
Exercise
• Exercise File: Tourism Assessment14-7.pptx
• Exercise: Export the Tourism Assessment presentation
outline into a new document in Microsoft Word.
Figure 14-15: Importing an outline from another program.
Figure 14-16: An imported outline, as displayed in the
Outline tab of the Slides pane.
Using Collaboration and Distribution Tools
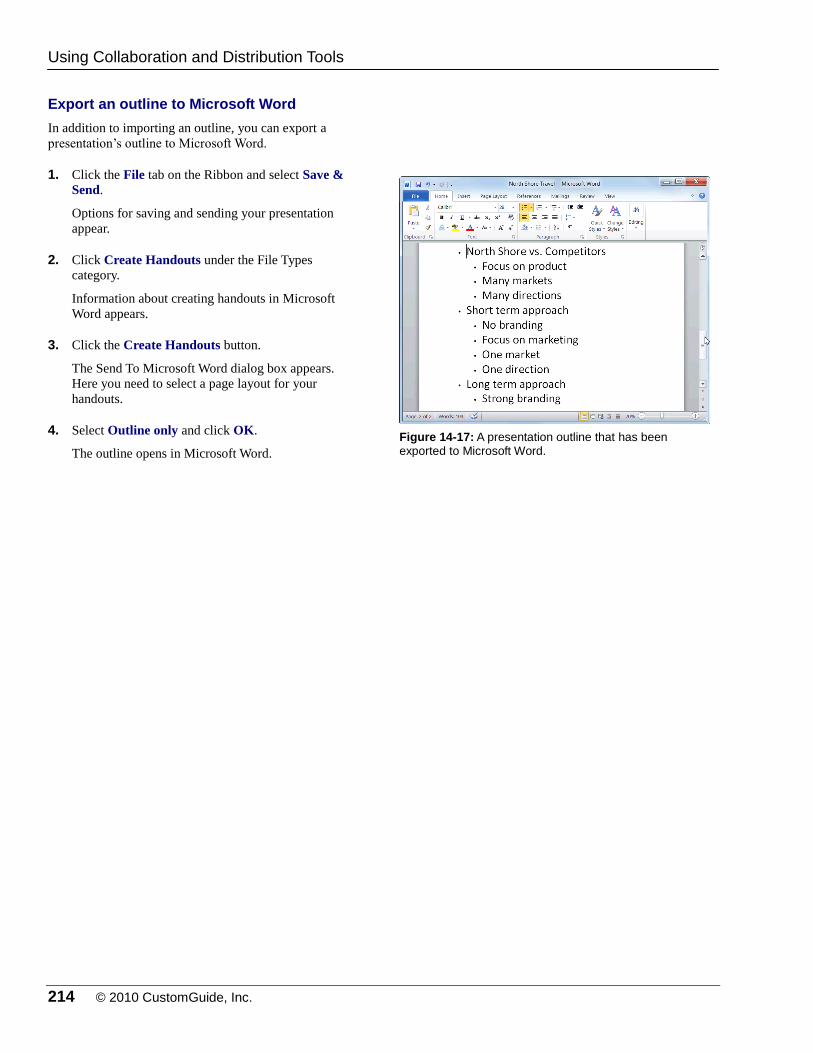
214 © 2010 CustomGuide, Inc.
Export an outline to Microsoft Word
In addition to importing an outline, you can export a
presentation’s outline to Microsoft Word.
1. Click the File tab on the Ribbon and select Save &
Send.
Options for saving and sending your presentation
appear.
2. Click Create Handouts under the File Types
category.
Information about creating handouts in Microsoft
Word appears.
3. Click the Create Handouts button.
The Send To Microsoft Word dialog box appears.
Here you need to select a page layout for your
handouts.
4. Select Outline only and click OK.
The outline opens in Microsoft Word.
Figure 14-17: A presentation outline that has been exported to Microsoft Word.
Using Collaboration and Distribution Tools
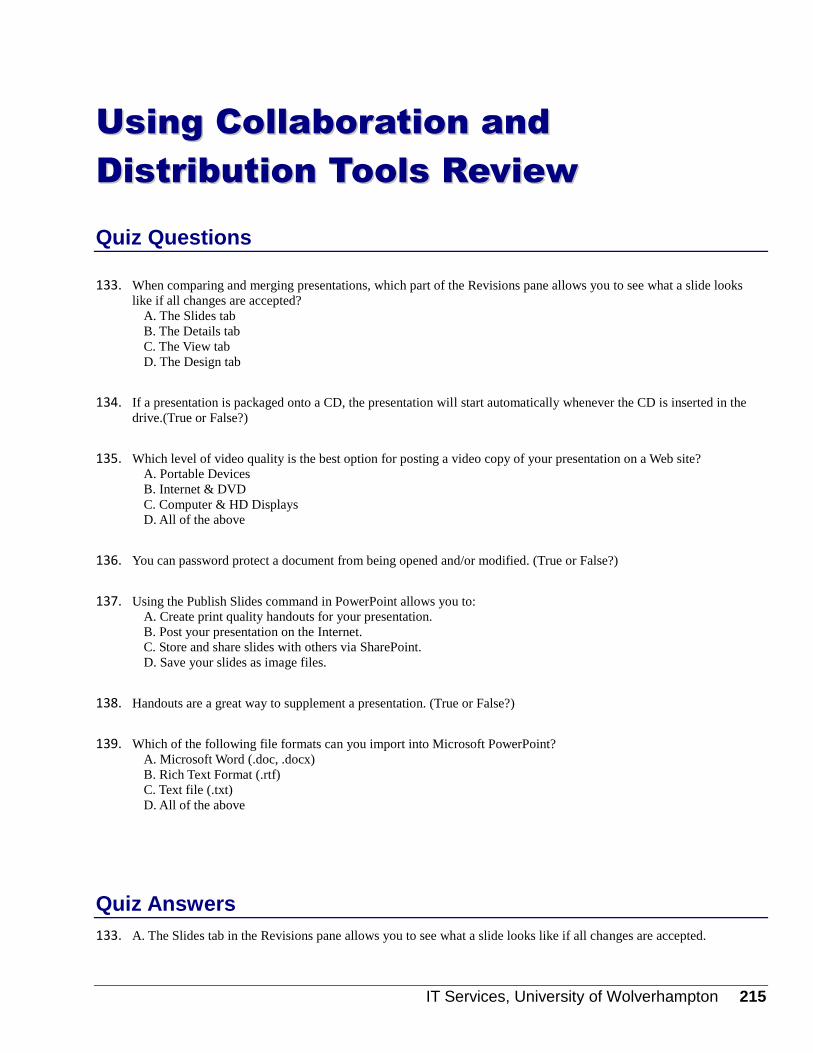
IT Services, University of Wolverhampton 215
UUssiinngg CCoollllaabboorraattiioonn aanndd
DDiissttrriibbuuttiioonn TToooollss RReevviieeww
Quiz Questions
133. When comparing and merging presentations, which part of the Revisions pane allows you to see what a slide looks
like if all changes are accepted? A. The Slides tab B. The Details tab C. The View tab D. The Design tab
134. If a presentation is packaged onto a CD, the presentation will start automatically whenever the CD is inserted in the
drive.(True or False?)
135. Which level of video quality is the best option for posting a video copy of your presentation on a Web site? A. Portable Devices B. Internet & DVD C. Computer & HD Displays D. All of the above
136. You can password protect a document from being opened and/or modified. (True or False?)
137. Using the Publish Slides command in PowerPoint allows you to: A. Create print quality handouts for your presentation. B. Post your presentation on the Internet. C. Store and share slides with others via SharePoint. D. Save your slides as image files.
138. Handouts are a great way to supplement a presentation. (True or False?)
139. Which of the following file formats can you import into Microsoft PowerPoint? A. Microsoft Word (.doc, .docx) B. Rich Text Format (.rtf) C. Text file (.txt) D. All of the above
Quiz Answers
133. A. The Slides tab in the Revisions pane allows you to see what a slide looks like if all changes are accepted.
216 © 2010 CustomGuide, Inc.
134. True. If a presentation is packaged onto a CD, the presentation will start automatically whenever the CD is inserted in
the drive.
135. B. When posting a video presentation online, the Internet and DVD video quality level is optimal.
136. True. You can password protect a document from being opened and/or modified.
137. C. Using the Publish Slides command allows you to store and share slides with others in a Slide Library in SharePoint.
138. True. Presentation handouts are a great way to supplement a presentation.
139. D. You can import content from any program that supports the use of heading styles, or files saved in Microsoft Word,
Rich Text, or Text file format.
IT Services, University of Wolverhampton 217
CCuussttoommiizziinngg
PPoowweerrPPooiinntt
Customizing the Ribbon ................................. 218 Create a new group ............................... 218 Rename a tab or group .......................... 218 Add a command to a group ................... 219 Restore the default Ribbon .................... 219 Remove a tab or group .......................... 219
Customizing the Quick Access Toolbar ........ 220
Using and Customizing AutoCorrect ............. 221 How AutoCorrect works ......................... 221 Create an AutoCorrect entry .................. 221
Changing PowerPoint’s Default Options ...... 223
Customization is a great asset in an
application. Customization lets you use a
particular mix of commands and shortcuts
that are best for your working style.
The lessons in this chapter focus on how
to customize the Ribbon, the Quick
Access Toolbar, and AutoCorrect. We’ll
also discuss how to access and review the
default options for a program.
15

218 © 2010 CustomGuide, Inc.
Customizing the Ribbon
One of the most useful features in Office 2010 is that you
can customize the Ribbon. Add your own tabs and groups,
or rearrange the Ribbon to better fit your work style.
Create a new tab or group
You can add new groups to tabs, or you can create new
tabs with new groups.
1. Click the File tab on the Ribbon and select Options.
The Options dialog box appears.
2. Click the Customize Ribbon tab.
The left column displays commands that you can add
to the Ribbon.
The right column displays the tabs on the Ribbon,
and the groups and commands in each tab.
Tip: Click the plus sign next to a tab or group to
expand it.
3. In the right column, select the tab where you wish to
add the new tab or group.
A new tab, which automatically includes a new
group, will be inserted below the selected tab.
A new group will be inserted within the selected tab.
4. Click the New Tab or the New Group button.
The new tab or group is added.
Rename a tab or group
Once you’ve created a tab or group, give it a name.
1. Select the tab or group you want to rename.
2. Click the Rename button.
The Rename dialog box appears.
3. Enter a name for the selected tab or group in the
Display Name text box.
The tab or group is renamed. For a group, also select
a symbol to represent the group.
4. Click OK.
The tab or group is renamed.
Exercise
• Exercise File: None required.
• Exercise: Create a new group on the Home tab called
“Printing” and include the command to Print Preview and
Print.
Restore the Ribbon defaults.
Figure 15-1: Use the
buttons in the Options dialog box to add a new tab or group to the Ribbon.
Figure 15-2: Adding commands to groups on the Ribbon.
Customizing PowerPoint
Click to view another group of commands.
Click to view all the tabs on the Ribbon.
Click to add the command on the left to the selected group on the right.
Click to create a new tab.
Click to create a new group.
Click to rename the selected tab or group.
Click to reorder the selected tab or group.
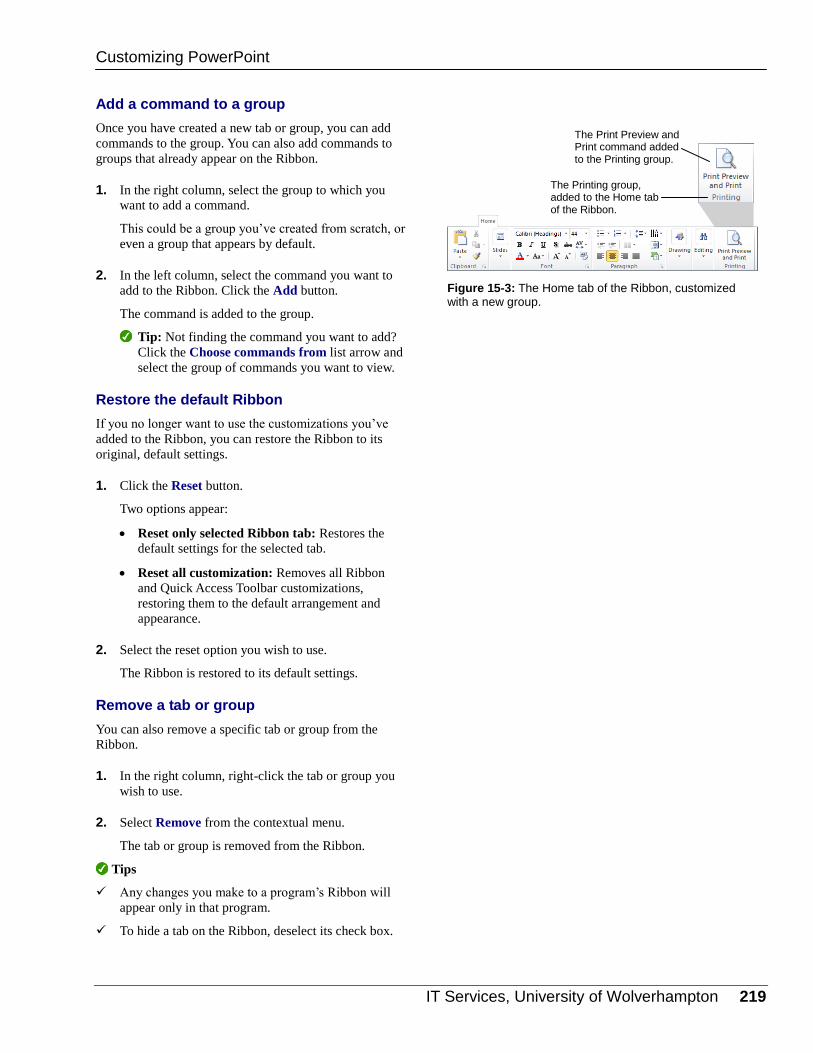
IT Services, University of Wolverhampton 219
Add a command to a group
Once you have created a new tab or group, you can add
commands to the group. You can also add commands to
groups that already appear on the Ribbon.
1. In the right column, select the group to which you
want to add a command.
This could be a group you’ve created from scratch, or
even a group that appears by default.
2. In the left column, select the command you want to
add to the Ribbon. Click the Add button.
The command is added to the group.
Tip: Not finding the command you want to add?
Click the Choose commands from list arrow and
select the group of commands you want to view.
Restore the default Ribbon
If you no longer want to use the customizations you’ve
added to the Ribbon, you can restore the Ribbon to its
original, default settings.
1. Click the Reset button.
Two options appear:
Reset only selected Ribbon tab: Restores the
default settings for the selected tab.
Reset all customization: Removes all Ribbon
and Quick Access Toolbar customizations,
restoring them to the default arrangement and
appearance.
2. Select the reset option you wish to use.
The Ribbon is restored to its default settings.
Remove a tab or group
You can also remove a specific tab or group from the
Ribbon.
1. In the right column, right-click the tab or group you
wish to use.
2. Select Remove from the contextual menu.
The tab or group is removed from the Ribbon.
Tips
Any changes you make to a program’s Ribbon will
appear only in that program.
To hide a tab on the Ribbon, deselect its check box.
Figure 15-3: The Home tab of the Ribbon, customized with a new group.
The Printing group, added to the Home tab of the Ribbon.
The Print Preview and Print command added to the Printing group.
Customizing PowerPoint
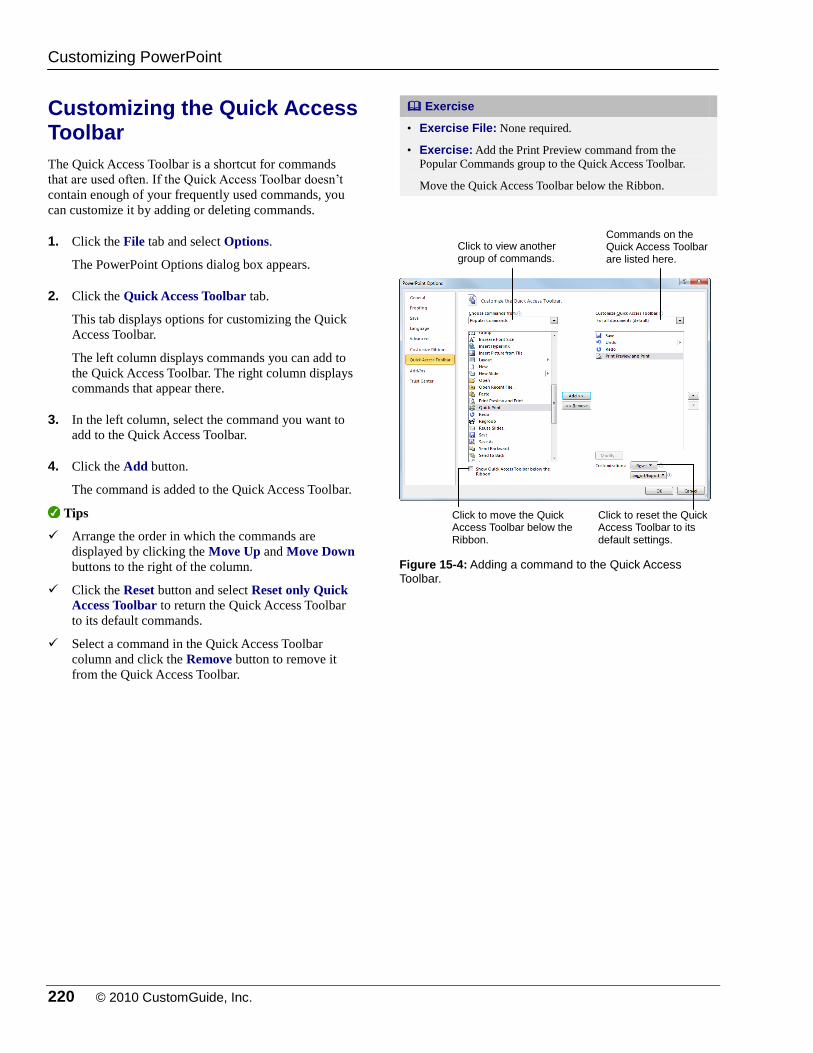
220 © 2010 CustomGuide, Inc.
Customizing the Quick Access Toolbar
The Quick Access Toolbar is a shortcut for commands
that are used often. If the Quick Access Toolbar doesn’t
contain enough of your frequently used commands, you
can customize it by adding or deleting commands.
1. Click the File tab and select Options.
The PowerPoint Options dialog box appears.
2. Click the Quick Access Toolbar tab.
This tab displays options for customizing the Quick
Access Toolbar.
The left column displays commands you can add to
the Quick Access Toolbar. The right column displays
commands that appear there.
3. In the left column, select the command you want to
add to the Quick Access Toolbar.
4. Click the Add button.
The command is added to the Quick Access Toolbar.
Tips
Arrange the order in which the commands are
displayed by clicking the Move Up and Move Down
buttons to the right of the column.
Click the Reset button and select Reset only Quick
Access Toolbar to return the Quick Access Toolbar
to its default commands.
Select a command in the Quick Access Toolbar
column and click the Remove button to remove it
from the Quick Access Toolbar.
Exercise
• Exercise File: None required.
• Exercise: Add the Print Preview command from the
Popular Commands group to the Quick Access Toolbar.
Move the Quick Access Toolbar below the Ribbon.
Figure 15-4: Adding a command to the Quick Access
Toolbar.
Customizing PowerPoint
Click to view another group of commands.
Commands on the Quick Access Toolbar are listed here.
Click to move the Quick Access Toolbar below the Ribbon.
Click to reset the Quick Access Toolbar to its default settings.
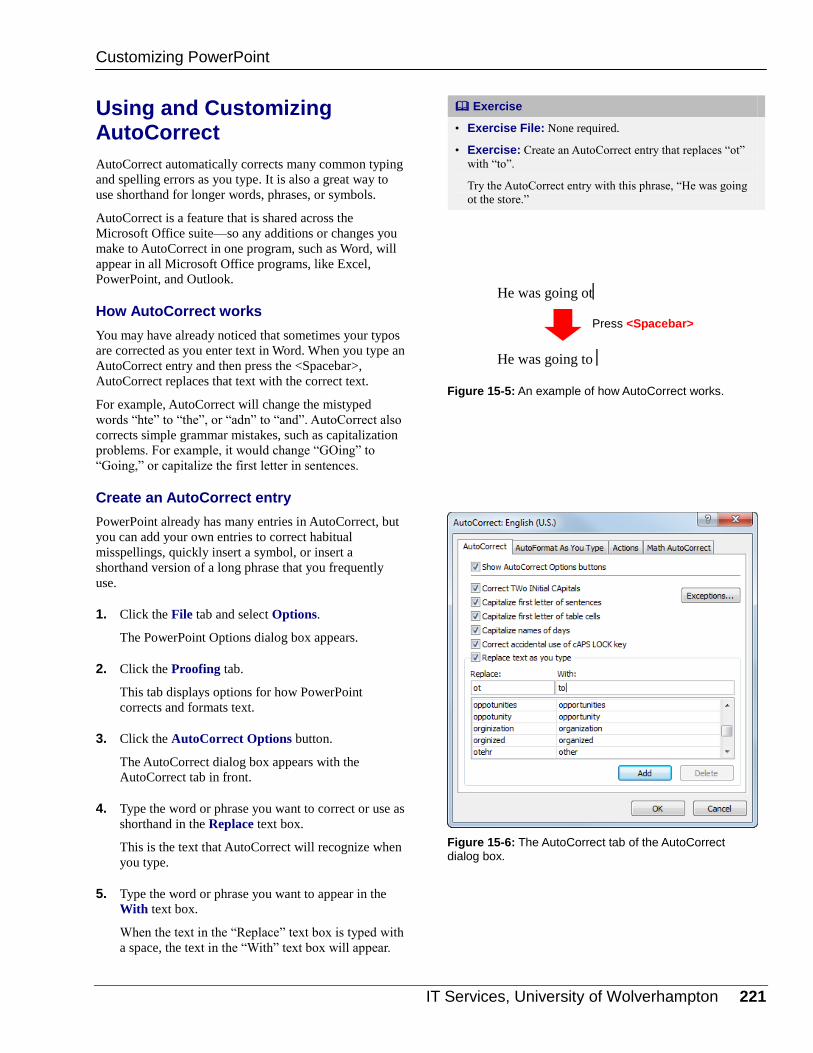
IT Services, University of Wolverhampton 221
Using and Customizing AutoCorrect
AutoCorrect automatically corrects many common typing
and spelling errors as you type. It is also a great way to
use shorthand for longer words, phrases, or symbols.
AutoCorrect is a feature that is shared across the
Microsoft Office suite—so any additions or changes you
make to AutoCorrect in one program, such as Word, will
appear in all Microsoft Office programs, like Excel,
PowerPoint, and Outlook.
How AutoCorrect works
You may have already noticed that sometimes your typos
are corrected as you enter text in Word. When you type an
AutoCorrect entry and then press the <Spacebar>,
AutoCorrect replaces that text with the correct text.
For example, AutoCorrect will change the mistyped
words “hte” to “the”, or “adn” to “and”. AutoCorrect also
corrects simple grammar mistakes, such as capitalization
problems. For example, it would change “GOing” to
“Going,” or capitalize the first letter in sentences.
Create an AutoCorrect entry
PowerPoint already has many entries in AutoCorrect, but
you can add your own entries to correct habitual
misspellings, quickly insert a symbol, or insert a
shorthand version of a long phrase that you frequently
use.
1. Click the File tab and select Options.
The PowerPoint Options dialog box appears.
2. Click the Proofing tab.
This tab displays options for how PowerPoint
corrects and formats text.
3. Click the AutoCorrect Options button.
The AutoCorrect dialog box appears with the
AutoCorrect tab in front.
4. Type the word or phrase you want to correct or use as
shorthand in the Replace text box.
This is the text that AutoCorrect will recognize when
you type.
5. Type the word or phrase you want to appear in the
With text box.
When the text in the “Replace” text box is typed with
a space, the text in the “With” text box will appear.
Exercise
• Exercise File: None required.
• Exercise: Create an AutoCorrect entry that replaces “ot”
with “to”.
Try the AutoCorrect entry with this phrase, “He was going
ot the store.”
Figure 15-5: An example of how AutoCorrect works.
Figure 15-6: The AutoCorrect tab of the AutoCorrect dialog box.
Customizing PowerPoint
He was going ot
He was going to
Press <Spacebar>
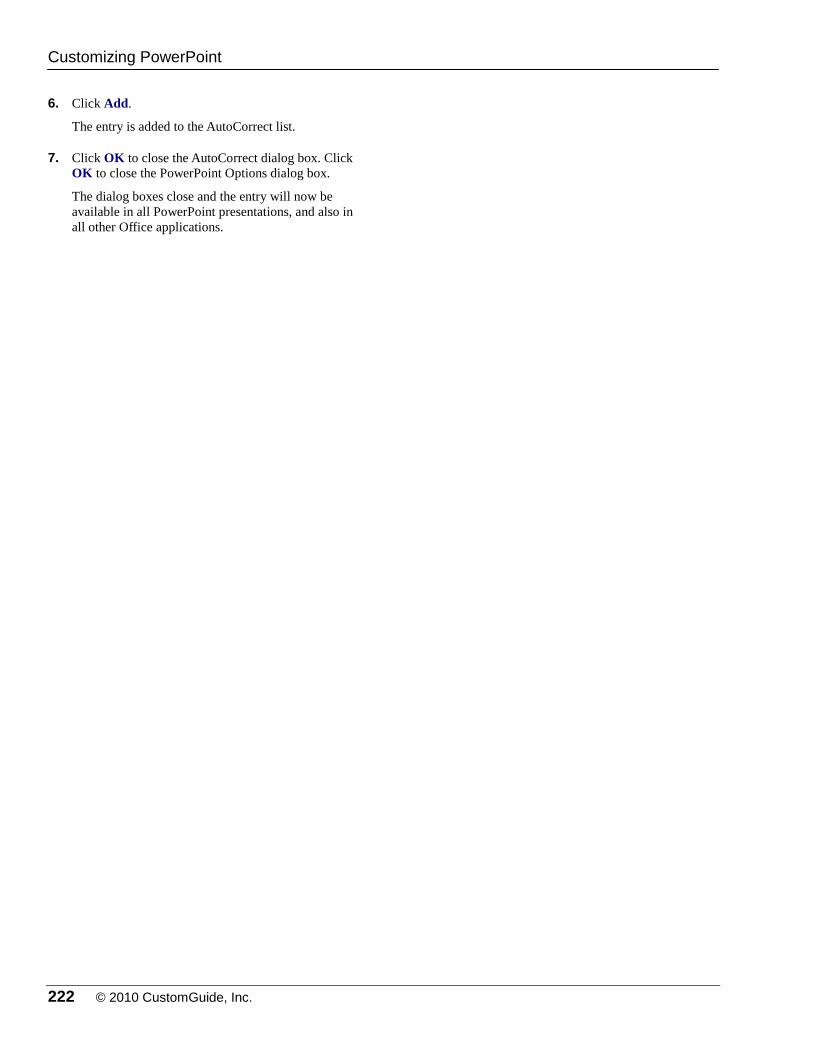
222 © 2010 CustomGuide, Inc.
6. Click Add.
The entry is added to the AutoCorrect list.
7. Click OK to close the AutoCorrect dialog box. Click
OK to close the PowerPoint Options dialog box.
The dialog boxes close and the entry will now be
available in all PowerPoint presentations, and also in
all other Office applications.
Customizing PowerPoint
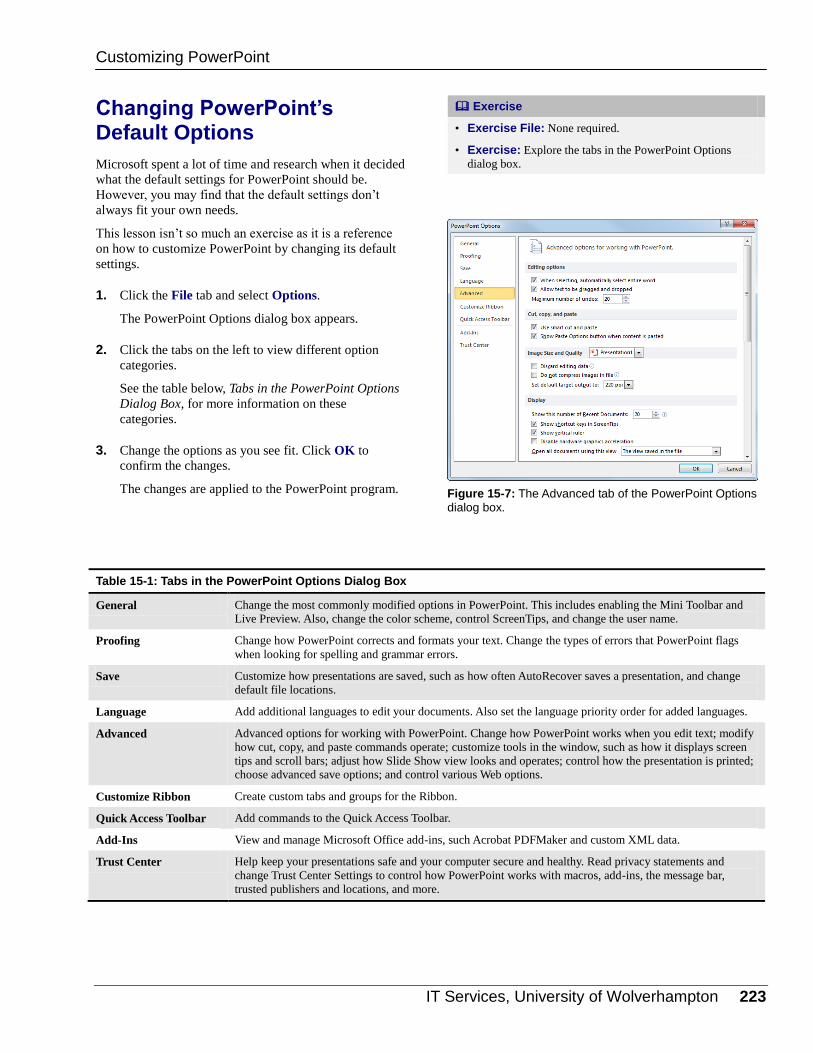
IT Services, University of Wolverhampton 223
Changing PowerPoint’s Default Options
Microsoft spent a lot of time and research when it decided
what the default settings for PowerPoint should be.
However, you may find that the default settings don’t
always fit your own needs.
This lesson isn’t so much an exercise as it is a reference
on how to customize PowerPoint by changing its default
settings.
1. Click the File tab and select Options.
The PowerPoint Options dialog box appears.
2. Click the tabs on the left to view different option
categories.
See the table below, Tabs in the PowerPoint Options
Dialog Box, for more information on these
categories.
3. Change the options as you see fit. Click OK to
confirm the changes.
The changes are applied to the PowerPoint program.
Table 15-1: Tabs in the PowerPoint Options Dialog Box
General Change the most commonly modified options in PowerPoint. This includes enabling the Mini Toolbar and
Live Preview. Also, change the color scheme, control ScreenTips, and change the user name.
Proofing Change how PowerPoint corrects and formats your text. Change the types of errors that PowerPoint flags
when looking for spelling and grammar errors.
Save Customize how presentations are saved, such as how often AutoRecover saves a presentation, and change
default file locations.
Language Add additional languages to edit your documents. Also set the language priority order for added languages.
Advanced Advanced options for working with PowerPoint. Change how PowerPoint works when you edit text; modify
how cut, copy, and paste commands operate; customize tools in the window, such as how it displays screen
tips and scroll bars; adjust how Slide Show view looks and operates; control how the presentation is printed;
choose advanced save options; and control various Web options.
Customize Ribbon Create custom tabs and groups for the Ribbon.
Quick Access Toolbar Add commands to the Quick Access Toolbar.
Add-Ins View and manage Microsoft Office add-ins, such Acrobat PDFMaker and custom XML data.
Trust Center Help keep your presentations safe and your computer secure and healthy. Read privacy statements and
change Trust Center Settings to control how PowerPoint works with macros, add-ins, the message bar,
trusted publishers and locations, and more.
Exercise
• Exercise File: None required.
• Exercise: Explore the tabs in the PowerPoint Options
dialog box.
Figure 15-7: The Advanced tab of the PowerPoint Options dialog box.
Customizing PowerPoint
224 © 2010 CustomGuide, Inc.
CCuussttoommiizziinngg PPoowweerrPPooiinntt RReevviieeww
Quiz Questions
140. You can only add custom groups to custom tabs. (True or False?)
141. What is the purpose of the Quick Access Toolbar? A. To provide quick access to the commands you use most frequently. B. To make PowerPoint 2010 look more like previous versions. C. To provide Microsoft Access commands in the PowerPoint program. D. To provide a backup in case the Ribbon fails
142. AutoCorrect changes: A. Spelling errors B. Grammar errors C. Capitalization errors D. All of these.
143. AutoCorrect entries created in PowerPoint will not appear in any other programs. (True or False?)
144. Which of the following is NOT a tab in the PowerPoint Options dialog box? A. Proofing, which changes how PowerPoint corrects your text. B. Display, which changes how content appears on the screen. C. General, which lists the most commonly modified options in PowerPoint. D. Trust Center, which changes your privacy options.
Quiz Answers
140. False. You can add custom groups to default tabs or to custom tabs.
141. A. The purpose of the Quick Access Toolbar is to provide quick access to the commands you use most frequently.
142. D. AutoCorrect changes spelling errors, grammar errors, and capitalization errors.
143. False. AutoCorrect entries created in PowerPoint will appear in all other Microsoft Office programs.
144. B. There is no Display tab in the PowerPoint Options dialog box.
IT Services, University of Wolverhampton 225
MMoorree TTooppiiccss
Converting an Older Presentation to PowerPoint 2010 .............................................. 226
Translating Text ............................................... 227 Select a translation language ................ 227 Translate selected text ........................... 227 Translate a single word .......................... 228
Viewing Document Properties and Finding a File ..................................................................... 229
View document properties ..................... 229 Show the Document Panel .................... 229 Find a file ............................................... 230
Recovering Your Presentations ..................... 231 Understand how AutoRecover works .... 231 Change AutoRecover settings ............... 232
Managing Versions .......................................... 233 Recover new presentations ................... 233 Recover previously saved presentations233 Restore earlier versions of the current presentation ........................................... 234
This chapter explains how to tailor
PowerPoint to work the way you do. In
this chapter, you will learn how to
customize many of PowerPoint’s settings
and options.
First, you’ll learn how to customize the
Quick Access Toolbar. You can customize
this toolbar by adding the commands you
use most frequently to it or changing its
location on the screen. You’ll also learn
how to work with AutoCorrect.
AutoCorrect is the feature that instantly
corrects common spelling and typing
errors, such as changing “teh” to “the.”
Additionally, you’ll learn more about how
to customize PowerPoint by changing its
default options, viewing document
properties, and recovering presentations
when PowerPoint crashes.
16

226 © 2010 CustomGuide, Inc.
Converting an Older Presentation to PowerPoint 2010
If you’ve got a bunch of old PowerPoint 97-2003
presentations that you’d like to revamp using PowerPoint
2010, you can convert them into PowerPoint 2010 format.
Converting saves the presentation as a PowerPoint 2010
file (.pptx) and allows you to use PowerPoint’s new
features.
Before you begin, however, it is important to note that
some features from earlier versions of PowerPoint are not
supported in PowerPoint 2010. Data associated with the
following features will be lost when converted to Office
2010 format:
Presentation Broadcast
Microsoft Script Editor
Publish and Subscribe
Send for Review
1. In PowerPoint 2010, open the presentation that you
want to convert.
2. Click the File tab on the Ribbon and select Info.
Information about your presentation appears.
3. Click the Convert button.
The Save As dialog box appears.
4. If necessary, rename the file, browse to the location
to which you want to save the file, and click Save.
PowerPoint converts the presentation to 2010 format.
Exercise
• Exercise File: Cholesterol.ppt
• Exercise: Convert the Cholesterol.ppt file to PowerPoint
2010 format.
Figure 16-1: When a presentation created in an earlier
version of PowerPoint is opened in PowerPoint 2010, it is opened in Compatibility Mode. To enable all features of PowerPoint 2010, you’ll need to convert it to PowerPoint 2010 format.
Figure 16-2: The Compatibility Mode section contains
information on how presentations made in previous versions of PowerPoint are affected by being converted to PowerPoint 2010.
More Topics
Click here to convert the file to the newest file format.
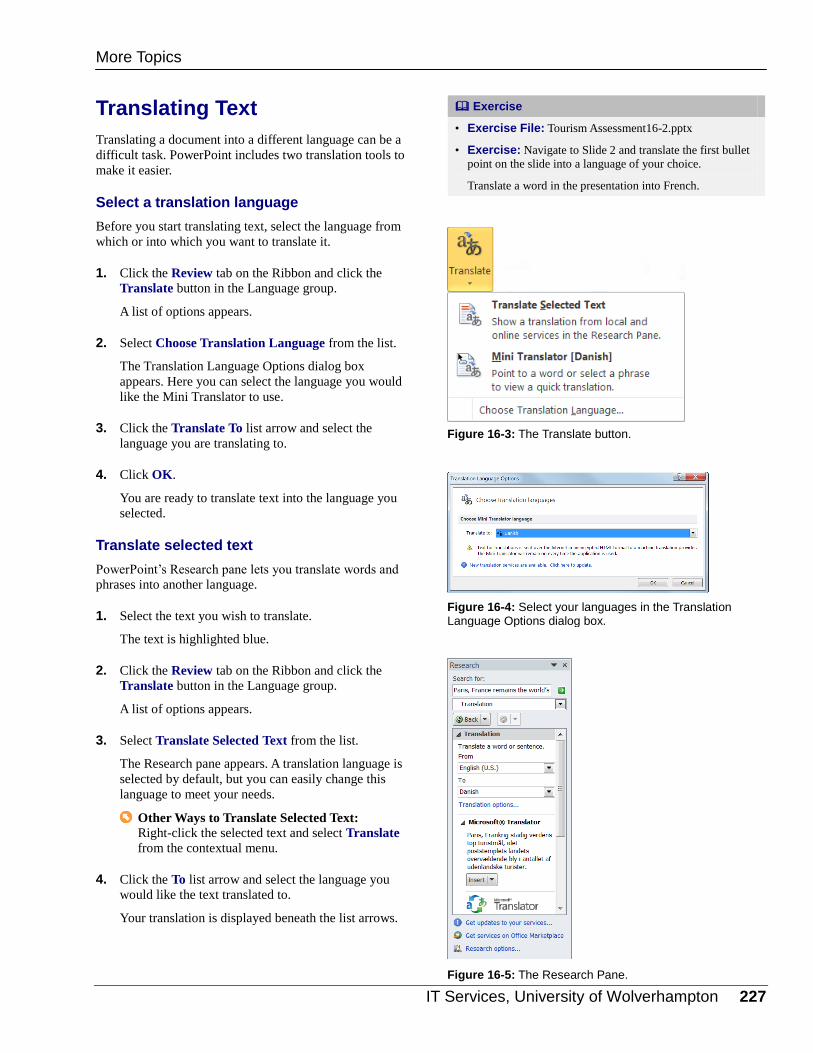
IT Services, University of Wolverhampton 227
Translating Text
Translating a document into a different language can be a
difficult task. PowerPoint includes two translation tools to
make it easier.
Select a translation language
Before you start translating text, select the language from
which or into which you want to translate it.
1. Click the Review tab on the Ribbon and click the
Translate button in the Language group.
A list of options appears.
2. Select Choose Translation Language from the list.
The Translation Language Options dialog box
appears. Here you can select the language you would
like the Mini Translator to use.
3. Click the Translate To list arrow and select the
language you are translating to.
4. Click OK.
You are ready to translate text into the language you
selected.
Translate selected text
PowerPoint’s Research pane lets you translate words and
phrases into another language.
1. Select the text you wish to translate.
The text is highlighted blue.
2. Click the Review tab on the Ribbon and click the
Translate button in the Language group.
A list of options appears.
3. Select Translate Selected Text from the list.
The Research pane appears. A translation language is
selected by default, but you can easily change this
language to meet your needs.
Other Ways to Translate Selected Text: Right-click the selected text and select Translate
from the contextual menu.
4. Click the To list arrow and select the language you
would like the text translated to.
Your translation is displayed beneath the list arrows.
Exercise
• Exercise File: Tourism Assessment16-2.pptx
• Exercise: Navigate to Slide 2 and translate the first bullet
point on the slide into a language of your choice.
Translate a word in the presentation into French.
Figure 16-3: The Translate button.
Figure 16-4: Select your languages in the Translation Language Options dialog box.
Figure 16-5: The Research Pane.
More Topics
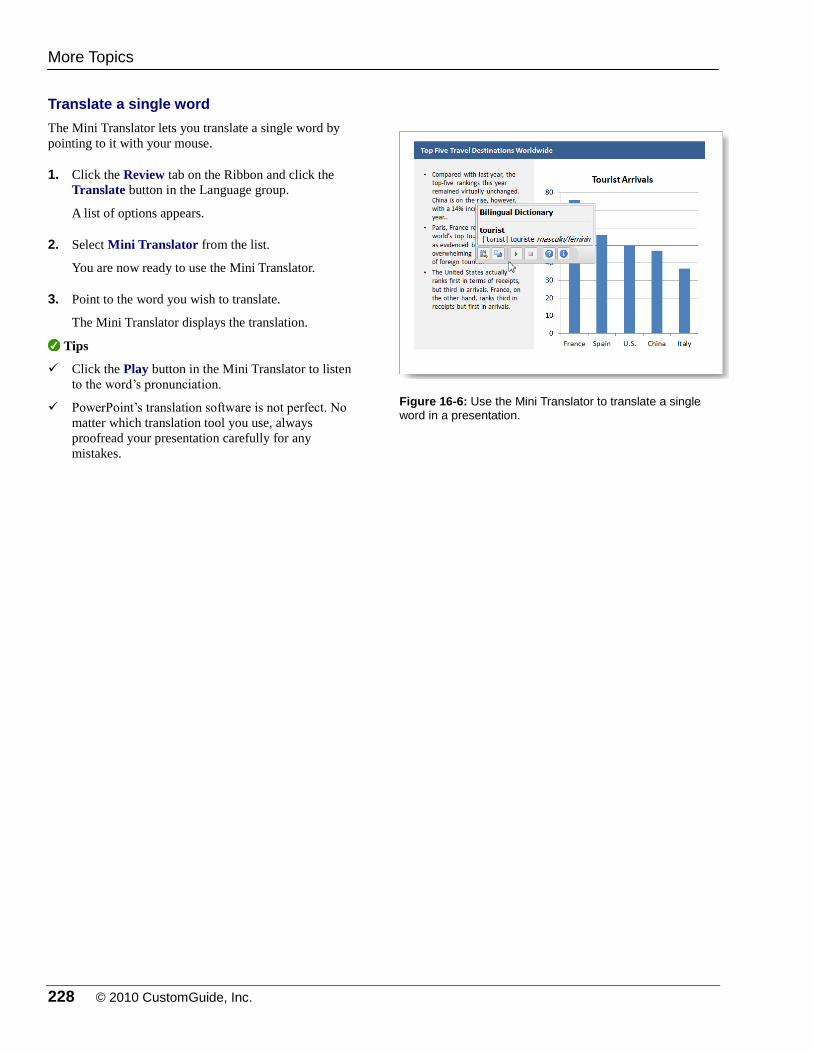
228 © 2010 CustomGuide, Inc.
Translate a single word
The Mini Translator lets you translate a single word by
pointing to it with your mouse.
1. Click the Review tab on the Ribbon and click the
Translate button in the Language group.
A list of options appears.
2. Select Mini Translator from the list.
You are now ready to use the Mini Translator.
3. Point to the word you wish to translate.
The Mini Translator displays the translation.
Tips
Click the Play button in the Mini Translator to listen
to the word’s pronunciation.
PowerPoint’s translation software is not perfect. No
matter which translation tool you use, always
proofread your presentation carefully for any
mistakes.
Figure 16-6: Use the Mini Translator to translate a single word in a presentation.
More Topics
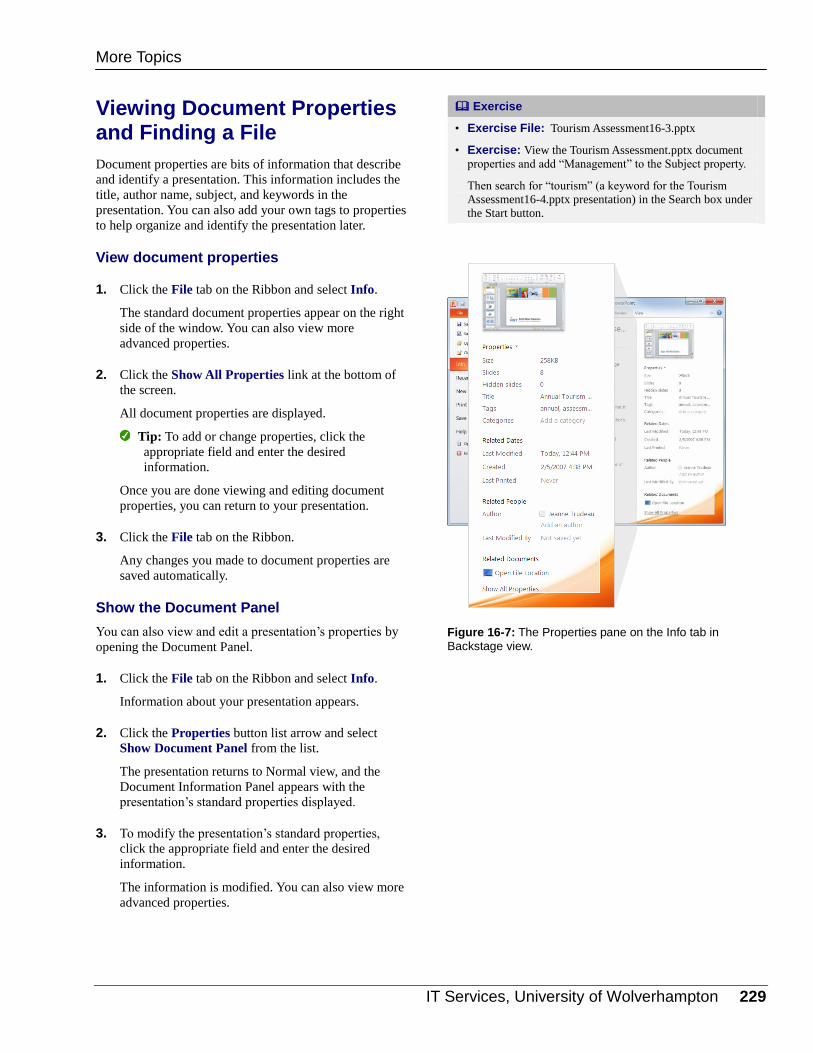
IT Services, University of Wolverhampton 229
Viewing Document Properties and Finding a File
Document properties are bits of information that describe
and identify a presentation. This information includes the
title, author name, subject, and keywords in the
presentation. You can also add your own tags to properties
to help organize and identify the presentation later.
View document properties
1. Click the File tab on the Ribbon and select Info.
The standard document properties appear on the right
side of the window. You can also view more
advanced properties.
2. Click the Show All Properties link at the bottom of
the screen.
All document properties are displayed.
Tip: To add or change properties, click the
appropriate field and enter the desired
information.
Once you are done viewing and editing document
properties, you can return to your presentation.
3. Click the File tab on the Ribbon.
Any changes you made to document properties are
saved automatically.
Show the Document Panel
You can also view and edit a presentation’s properties by
opening the Document Panel.
1. Click the File tab on the Ribbon and select Info.
Information about your presentation appears.
2. Click the Properties button list arrow and select
Show Document Panel from the list.
The presentation returns to Normal view, and the
Document Information Panel appears with the
presentation’s standard properties displayed.
3. To modify the presentation’s standard properties,
click the appropriate field and enter the desired
information.
The information is modified. You can also view more
advanced properties.
Exercise
• Exercise File: Tourism Assessment16-3.pptx
• Exercise: View the Tourism Assessment.pptx document
properties and add “Management” to the Subject property.
Then search for “tourism” (a keyword for the Tourism
Assessment16-4.pptx presentation) in the Search box under
the Start button.
Figure 16-7: The Properties pane on the Info tab in Backstage view.
More Topics
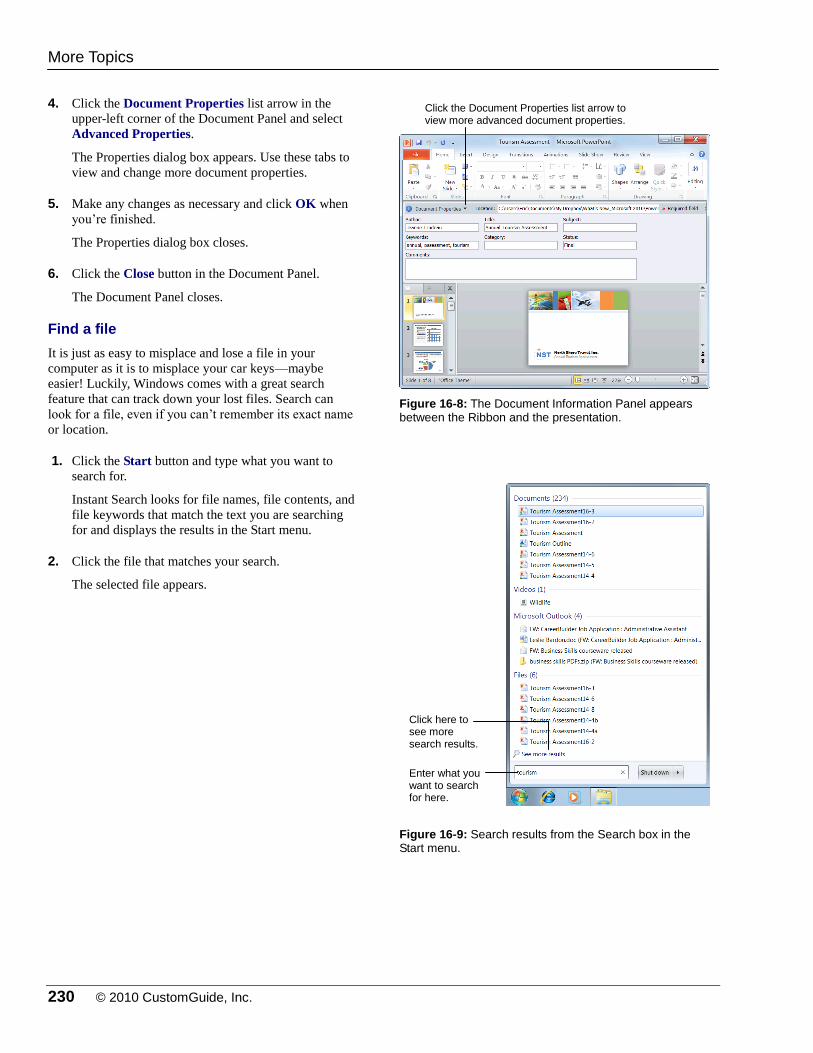
230 © 2010 CustomGuide, Inc.
4. Click the Document Properties list arrow in the
upper-left corner of the Document Panel and select
Advanced Properties.
The Properties dialog box appears. Use these tabs to
view and change more document properties.
5. Make any changes as necessary and click OK when
you’re finished.
The Properties dialog box closes.
6. Click the Close button in the Document Panel.
The Document Panel closes.
Find a file
It is just as easy to misplace and lose a file in your
computer as it is to misplace your car keys—maybe
easier! Luckily, Windows comes with a great search
feature that can track down your lost files. Search can
look for a file, even if you can’t remember its exact name
or location.
1. Click the Start button and type what you want to
search for.
Instant Search looks for file names, file contents, and
file keywords that match the text you are searching
for and displays the results in the Start menu.
2. Click the file that matches your search.
The selected file appears.
Figure 16-8: The Document Information Panel appears between the Ribbon and the presentation.
Figure 16-9: Search results from the Search box in the Start menu.
More Topics
Click the Document Properties list arrow to view more advanced document properties.
Enter what you want to search for here.
Click here to see more search results.
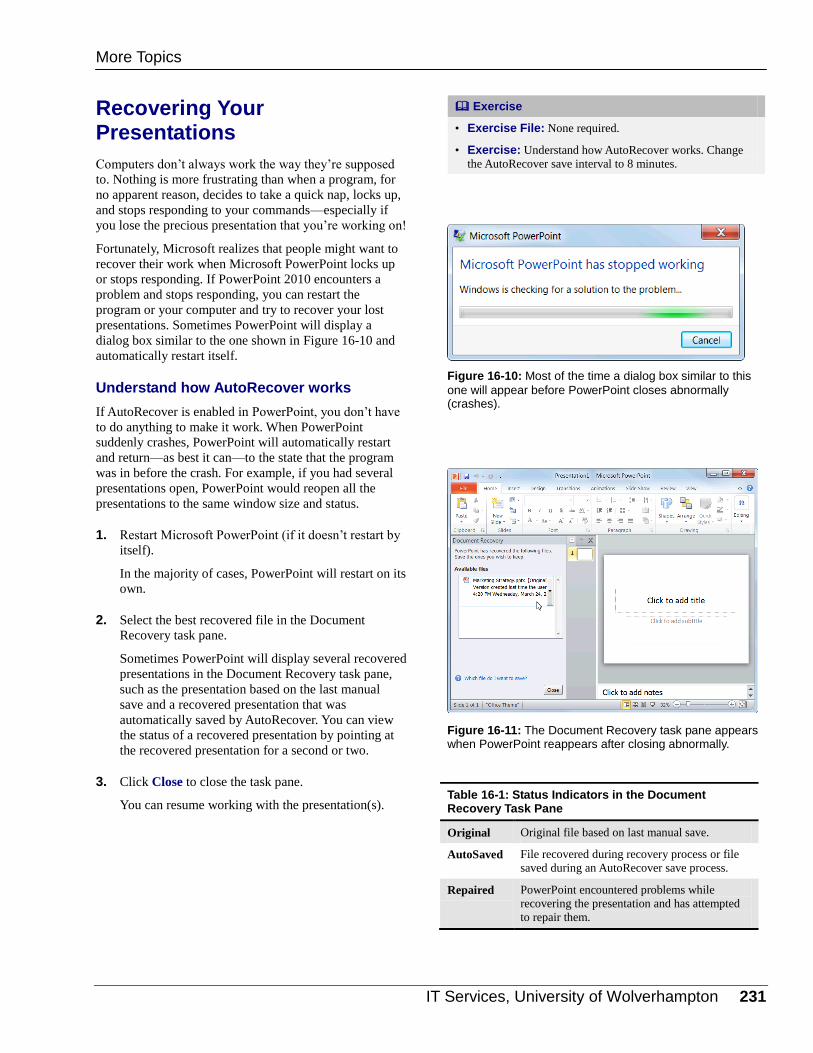
IT Services, University of Wolverhampton 231
Recovering Your Presentations
Computers don’t always work the way they’re supposed
to. Nothing is more frustrating than when a program, for
no apparent reason, decides to take a quick nap, locks up,
and stops responding to your commands—especially if
you lose the precious presentation that you’re working on!
Fortunately, Microsoft realizes that people might want to
recover their work when Microsoft PowerPoint locks up
or stops responding. If PowerPoint 2010 encounters a
problem and stops responding, you can restart the
program or your computer and try to recover your lost
presentations. Sometimes PowerPoint will display a
dialog box similar to the one shown in Figure 16-10 and
automatically restart itself.
Understand how AutoRecover works
If AutoRecover is enabled in PowerPoint, you don’t have
to do anything to make it work. When PowerPoint
suddenly crashes, PowerPoint will automatically restart
and return—as best it can—to the state that the program
was in before the crash. For example, if you had several
presentations open, PowerPoint would reopen all the
presentations to the same window size and status.
1. Restart Microsoft PowerPoint (if it doesn’t restart by
itself).
In the majority of cases, PowerPoint will restart on its
own.
2. Select the best recovered file in the Document
Recovery task pane.
Sometimes PowerPoint will display several recovered
presentations in the Document Recovery task pane,
such as the presentation based on the last manual
save and a recovered presentation that was
automatically saved by AutoRecover. You can view
the status of a recovered presentation by pointing at
the recovered presentation for a second or two.
3. Click Close to close the task pane.
You can resume working with the presentation(s).
Exercise
• Exercise File: None required.
• Exercise: Understand how AutoRecover works. Change
the AutoRecover save interval to 8 minutes.
Figure 16-10: Most of the time a dialog box similar to this
one will appear before PowerPoint closes abnormally (crashes).
Figure 16-11: The Document Recovery task pane appears when PowerPoint reappears after closing abnormally.
Table 16-1: Status Indicators in the Document Recovery Task Pane
Original Original file based on last manual save.
AutoSaved File recovered during recovery process or file
saved during an AutoRecover save process.
Repaired PowerPoint encountered problems while
recovering the presentation and has attempted
to repair them.
More Topics

232 © 2010 CustomGuide, Inc.
Change AutoRecover settings
You can further protect your work by using the
AutoRecover feature to periodically save a temporary
copy of the presentation you're working on. To recover
your work after a power failure or similar problem, you
must have turned on the AutoRecover feature before the
problem occurred. You can set the AutoRecover save
interval to occur more frequently than every 10 minutes
(the default setting). For example, if you set it to save
every 5 minutes, you'll recover more information than if
you set it to save every 10 minutes. Here’s how to change
the AutoRecover save interval…
1. Click the File tab on the Ribbon and select Options.
The PowerPoint Options dialog box appears.
2. Click the Save tab.
Options for how to customize save settings appear.
3. Ensure that the Save AutoRecover information
every check box is checked and specify the desired
interval, in minutes, in the minutes box.
You can’t specify the interval if the check box is not
selected.
4. Click OK when you’re finished.
PowerPoint will automatically save copies of your
presentations at regular intervals as you work on
them.
Tips
Even with PowerPoint’s document recovery features,
the best way to ensure that you don’t lose much
information if your computer freezes up is to save
your work regularly.
Figure 16-12: The AutoRecover options are located on the Save tab of the PowerPoint Options dialog box.
Figure 16-13: Change AutoRecover settings in the PowerPoint Options dialog box.
More Topics
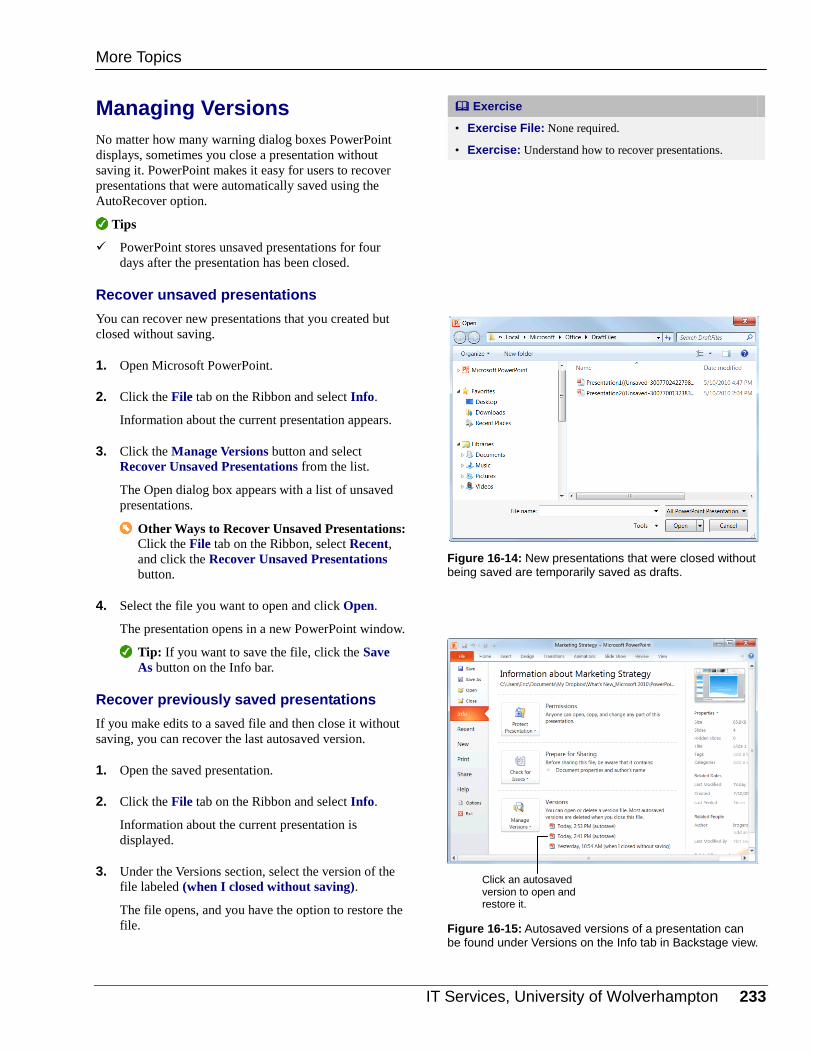
IT Services, University of Wolverhampton 233
Managing Versions
No matter how many warning dialog boxes PowerPoint
displays, sometimes you close a presentation without
saving it. PowerPoint makes it easy for users to recover
presentations that were automatically saved using the
AutoRecover option.
Tips
PowerPoint stores unsaved presentations for four
days after the presentation has been closed.
Recover unsaved presentations
You can recover new presentations that you created but
closed without saving.
1. Open Microsoft PowerPoint.
2. Click the File tab on the Ribbon and select Info.
Information about the current presentation appears.
3. Click the Manage Versions button and select
Recover Unsaved Presentations from the list.
The Open dialog box appears with a list of unsaved
presentations.
Other Ways to Recover Unsaved Presentations: Click the File tab on the Ribbon, select Recent,
and click the Recover Unsaved Presentations
button.
4. Select the file you want to open and click Open.
The presentation opens in a new PowerPoint window.
Tip: If you want to save the file, click the Save
As button on the Info bar.
Recover previously saved presentations
If you make edits to a saved file and then close it without
saving, you can recover the last autosaved version.
1. Open the saved presentation.
2. Click the File tab on the Ribbon and select Info.
Information about the current presentation is
displayed.
3. Under the Versions section, select the version of the
file labeled (when I closed without saving).
The file opens, and you have the option to restore the
file.
Exercise
• Exercise File: None required.
• Exercise: Understand how to recover presentations.
Figure 16-14: New presentations that were closed without being saved are temporarily saved as drafts.
Figure 16-15: Autosaved versions of a presentation can be found under Versions on the Info tab in Backstage view.
More Topics
Click an autosaved version to open and restore it.
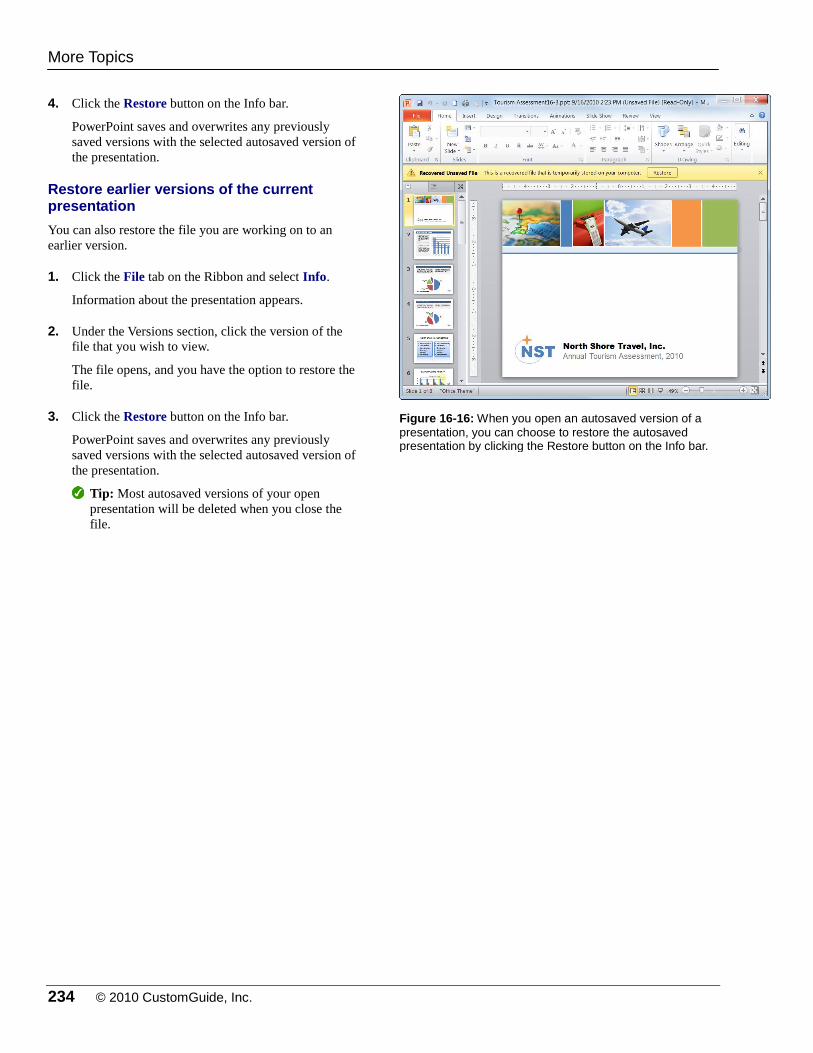
234 © 2010 CustomGuide, Inc.
4. Click the Restore button on the Info bar.
PowerPoint saves and overwrites any previously
saved versions with the selected autosaved version of
the presentation.
Restore earlier versions of the current presentation
You can also restore the file you are working on to an
earlier version.
1. Click the File tab on the Ribbon and select Info.
Information about the presentation appears.
2. Under the Versions section, click the version of the
file that you wish to view.
The file opens, and you have the option to restore the
file.
3. Click the Restore button on the Info bar.
PowerPoint saves and overwrites any previously
saved versions with the selected autosaved version of
the presentation.
Tip: Most autosaved versions of your open
presentation will be deleted when you close the
file.
Figure 16-16: When you open an autosaved version of a
presentation, you can choose to restore the autosaved presentation by clicking the Restore button on the Info bar.
More Topics

IT Services, University of Wolverhampton 235
MMoorree TTooppiiccss RReevviieeww
Quiz Questions
145. All features from earlier versions of PowerPoint are supported in PowerPoint 2010. (True or False?)
146. You can use the ____________ to translate a single word in a PowerPoint presentation. A. Mini Translator B. Spell Checker C. Grammar Checker D. You cannot translate text into another language in PowerPoint.
147. Document Properties like subject and category can only be changed by an administrator. (True or False?)
148. If you don’t know the name of a file, you can find it by searching for a file keyword. (True or False?)
149. You can see the status of any recovered presentation simply by pointing at it for a moment in the Document Recovery
task pane. (True or False?)
150. You can specify how often a presentation is automatically saved. (True or False?)
151. If you close a presentation before you save it, the presentation is lost forever. (True or False?)
Quiz Answers
145. False. Some features from earlier versions of PowerPoint are not supported in PowerPoint 2010, such as the
Presentation Broadcast feature.
146. A. You can use the Mini Translator to translate a single word in a PowerPoint presentation.
147. False. You can change a property by changing the text in its text box.
148. True. If you don’t know the name of a file, you can find it by searching for a file keyword.
149. True. You can see the status of any recovered presentation simply by pointing at it in the Document Recovery task
pane.
150. True. You can specify how often a presentation is automatically saved.
151. False. If you have the AutoRecover option enabled, you can recover unsaved presentations from Backstage view.

236 © 2010 CustomGuide, Inc.