Playful Teaching - sportanddev.org |
92
Playful Teaching Manual Move 4 New Horizons
-
Upload
khangminh22 -
Category
Documents
-
view
0 -
download
0
Transcript of Playful Teaching - sportanddev.org |

Playful TeachingManual
Move 4 New Horizons

2
This manual was prepared by the Swiss Academy for Development
(SAD) in collaboration with the Dalit Welfare Organisation (DWO),
Christoph Schwager and Daya Ram Sunar.
Translation into Nepali language: Pravash Pokhrel
Illustrations: Andrea Peter
Layout: Isabel Jost, PolyCrea
January 2011
The manual is available in English and Nepali language and can be
ordered from [email protected]
This work is licensed under the Creative Commons Attribution-Non-
Commercial-ShareAlike 2.5 Switzerland License. To view a copy of
this license, visit http://creativecommons.org/licenses/by-nc-sa/2.5/ch/
or send a letter to Creative Commons, 444 Castro Street, Suite 900,
Mountain View, California, 94041, USA.

3
Preface 4
1. Why use a playful teaching approach? 6
2. How do you teach in a playful way? 14
2.1 Subjects and timetable 14
2.2 “Cooking” a lesson 15
2.3 Adding variety to the teaching 24
2.4 Inclusion of all children 31
3. Game examples 47
3.1 Games for playful indoor teaching 48
3.2 Games for sport and play lessons outdoors 68
4. Local teaching and play materials 82
4.1 Material for playful indoor teaching 83
4.2 Material for sport and play lessons outdoors 87
References 89
Contents

4
Preface
“Move 4 New Horizons” is an educational pro-
gramme for disadvantaged out-of-school children in
the Dang district in the Mid-Western region of Nepal.
This programme has been implemented by the Swiss
Academy for Development (SAD) and the Nepalese
Dalit Welfare Organisation (DWO) since June 2008.
As a main project activity, 15 non formal educa-
tion (NFE)-classes are held in different villages. The
NFE classes target children aged 5–10 years who do
not have access to primary school education due to
discrimination on the basis of gender, caste, ethnicity,
disability, poverty and/or conflict. NFE-classes last for
nine months and are led by young facilitators who are
recruited from the village population. They teach the
participants basic reading, writing and mathematics
skills and offer them well-guided sport and play activi-
ties. After nine months, the participating children are
integrated into the public school system.
By systematically integrating playful activities,
the teaching approach of our NFE classes is adapted to
meet the needs of disadvantaged children by providing
them with educational opportunities and at the same
time strengthening their psychosocial development.
This rests on the conviction that children can only fully
develop their true potential if they have the necessary
self-confidence, inner strength and motivation to over-

5
come the multiple obstacles they face, to learn and to
advance in life.
This manual was developed to help the facilita-
tors in their NFE class-teaching and to complement the
trainings that they have received. The guidelines in this
manual incorporate the experiences and best practices
of the first two and a half project years. By sharing the
manual with a wider audience, we hope that it will serve
as a reference on playful teaching approaches, which
can be applied in pre-school and primary schools, and
in either non-formal or formal teaching settings.

6
Many teachers perceive the learning environment
as “efficient” if the children sit still and are quiet. How-
ever, for a child it is very difficult to sit still for hours and
to concentrate on what the teacher is saying. Research
has found that the maximum average duration for a six
year-old child to be able to remain concentrated is 15
minutes. Teaching methods, especially at pre-school
and primary school level need to take this into account.
If teaching is interrupted by active sequences, in which
the children can move or if the lessons are designed in
an interactive way, leaving the children room to explore
and practice what they have learnt in a playful way,
they will learn much more easily.
The M4NH project targets children from disad-
vantaged backgrounds in a rural area of Nepal. These
children often face even greater difficulties to adapt to
a classroom environment and to concentrate, because
they might not have been particularly supported in their
development at home and are not used to receiving
learning inputs. When these children enter school, they
have to adapt to an entirely new environment, which
can be a difficult experience for them. Constantly lag-
ging behind and receiving punishment for not being
concentrated leads these children to have a negative
attitude towards learning, which will also negatively
impact their learning chances later at school.
1. Why use a playful teaching approach?

7
It is not surprising that under these circum-
stances, school drop out and repetition rates are the
highest in the first two years at primary school level
in Nepal. Children from marginalised backgrounds are
those that are most at risk of dropping out early.
What can a teacher do to make sure that dis-
advantaged children are not left behind and drop out
early? How can the learning environment be adapted to
become more responsive to the specific learning needs
of these children?
The challenge for a teacher is to provide disad-
vantaged children with achievable and fun learning
opportunities and thereby help them to develop self-
confidence, trust in their teacher and a more positive
attitude towards learning. We therefore not only aim
at promoting children’s mental learning in our NFE
classes, but we want to support their development in
a holistic way. By “holistic”, we mean that the teach-
ing supports the development of the children on all four
dimensions, which are defined as the mental, physical,
emotional and social dimensions of child development.
We use the illustration below and the four symbols on
the right when we refer to these four dimensions of
child development later in the manual.

8
physical
4 di
men
sion
s of
chi
ld d
evel
opm
ent
mental
emotional
social

9
Physical dimension
Sport + play activities stimulate movements and help to develop physical abilities.
The body
is moving. – Physical: flexibility, strength, endurance,
resistance, speed
– Coordination: orientation, reaction, differen-
tiation, rhythm, balance
Mental dimension
Sport + play activities help to develop intellectual capacities.
The head
is thinking. – Ability to concentrate, to observe, to reflect, to
anticipate, etc.
– Ability to think logically, to put strategies in
place, to make decisions, etc.
Sport and play activities can be a powerful tool to
support the holistic development of children, because
they offer the children learning experiences on all four
levels. The illustration below explains how sport and
play activities support learning along the four dimen-
sions of child development.

10
Emotional dimension
Sport + play activities improve the awareness and management of emotions.
The heart
is feeling emotions. – Learning to cope with fears and frustrations
– Learning to manage aggression
– Experiencing joy, fun and motivation
– Learning to win and to lose
Social dimension
Sport + play activities help to strengthen social relations and to improve social skills.
The child acts within
a social environment. – Making friends
– Gain trust, empathy, respect and tolerance
for others
– Surrender stereotypes and prejudices
– Learn to cooperate, to manage conflicts, to
obey rules and to act within a team

11
Through movement and play, children can hence
explore and practice important competences and life
skills. Sport and play activities should therefore not
only be seen as a recreational and fun side-activity, but
as a crucial factor for the healthy growth and develop-
ment of children and a valuable tool to facilitate learn-
ing processes.
Our experiences from the Move 4 New Horizons-
project also suggest it was mainly thanks to the play-
ful teaching approach in our NFE classes that we have
succeeded in preparing disadvantaged children so well
for school. By including guided and independent play-
ful activities in- and outside the classroom, by mak-
ing the teaching more interactive and by offering the
children a stimulating learning environment, the NFE
classes have supported the children’s physical, emo-
tional, social and mental development at the same time
very effectively. For example, we have found that the
children have developed much brighter hopes for their
future thanks to the NFE classes. For an assessment
of the children’s self-perceptions and future hopes, we
had asked them, among others, to make drawings of
how they see themselves in the future. We did this with
all the children at the beginning and at the end of their
participation in the NFE classes. Below, there are two
examples highlighting how significantly these future
hopes have often changed.

12
A nine year-old boy from a NFE class in Pawannagar
made a drawing in October 2008 of himself serving in
the army and shooting a man.
In May 2009, the same boy had already a more opti-
mistic and peaceful view of himself in the future:
He was drawing himself as a doctor, treating a sick
patient.
13
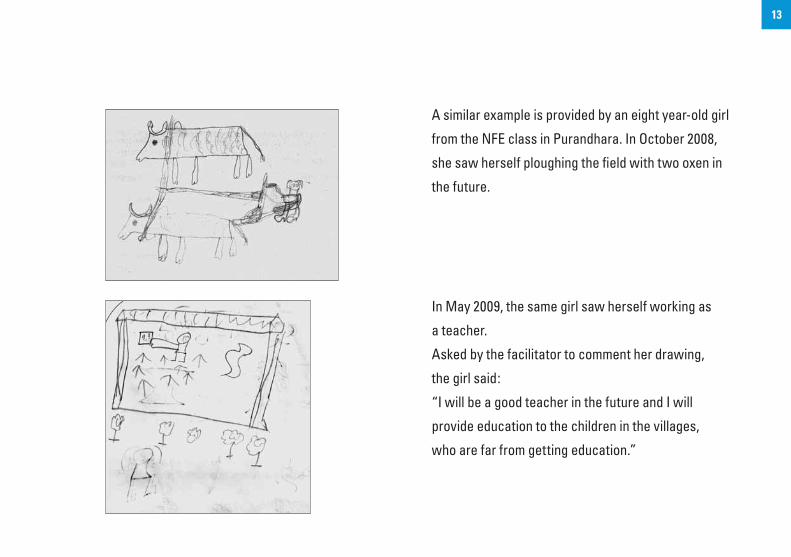
A similar example is provided by an eight year-old girl
from the NFE class in Purandhara. In October 2008,
she saw herself ploughing the field with two oxen in
the future.
In May 2009, the same girl saw herself working as
a teacher.
Asked by the facilitator to comment her drawing,
the girl said:
“I will be a good teacher in the future and I will
provide education to the children in the villages,
who are far from getting education.”

14
maths, Nepali, English and sports. Each lesson lasts 45
minutes. Sports lessons are being taught for at least
three hours per week on an outdoor playground (a vil-
lage square, a school yard or any other open space, like
an unused field).
The weekly timetable of our NFE classes can vary,
but as an example, it could look like this:
2. How do you teach in a playful way?
This chapter introduces some basic teaching prin-
ciples and describes how a playful teaching approach
can be systematically integrated into the teaching.
2.1 Subjects and timetableOur NFE classes last for nine months and chil-
dren are taught six days a week, 3 hours a day by local
facilitators. Four subjects are included into teaching:
Sunday Monday Tuesday Wednesday Thursday Friday
Maths Nepali Maths Maths Maths English
Nepali English Nepali Nepali Nepali Maths
English Sports English Sports English Sports

15
These five steps can be taken as a reference for a
teacher to prepare her or his lessons as well. The table
below shows how these five steps in the kitchen cor-
respond to the five steps of conducting a lesson.
KITCHEN LESSON
Step 1Decide on what you
want to cook
Setting a learning
objective
Step 2Choosing how to
cook the meal
Choosing suitable
teaching methods
Step 3
Preparation of
kitchen materials
and ingredients
Preparation of
classroom/play-
ground and
teaching materials
Step 4 Cooking the mealCarrying out
the lesson
Step 5 Taste the meal Evaluation
2.2 “Cooking” a lessonConducting a lesson can be compared with cook-
ing a meal. The actual “cooking” is only one part of the
work. Before starting to cook, it’s necessary to prepare:
decide what to cook, getting the ingredients ready, etc.
Every good cook knows that a good preparation is the
key for cooking a tasty meal. The same is true for car-
rying out an interesting lesson.
The following steps need to be considered for
preparing a meal:
Step 1 Decide on what you want to cook
Step 2 Choosing how to cook the meal
Step 3Preparation of kitchen materials and
ingredients
Step 4 Cooking the meal
Step 5 Tasting the meal

16
It is important not to mix up learning objectives
with teaching activities. Often, teachers define the
aims of their lessons according to what they as teach-
ers will do (teaching activities) and not according to
what the children should learn (learning objectives).
However, the achievement of the learning objective
is what really counts. The learning objective defines
what the children should know after the lesson (not
what the teacher should have done).
Example: children are
able to write the Eng-
lish alphabet in small
and capital letters
Example: Exercise
“Trace the letter” from
textbook; teacher tells
letter, children write
small + capital letter
into their notepads.
Learning objective
Teaching activities
This model can be applied to all subjects, includ-
ing sports. The five steps of preparing and conducting
a lesson will now be explained one by one.
Step 1: Setting a learning objective
KITCHEN LESSON
Step 1 Decide on what you want to cook Setting a learning objective
Step 2 Choosing how to cook the meal Choosing suitable teaching methods
Step 3Preparation of kitchen materials
and ingredients
Preparation of classroom/playground and
teaching materials
Step 4 Cooking the meal Carrying out the lesson
Step 5 Taste the meal Evaluation
An interesting and enriching lesson cannot be
“improvised” by the teacher when he/she is in the
classroom. The teacher needs to know which learning
objective he/she wants to achieve with the children. If
this learning objective is clear, the teacher should pre-
pare at least one day before what teaching activities
he/she is planning to do in the lesson.

17
Normally, teachers have to define the learning
objectives in line with a predefined annual curriculum.
The annual curriculum contains the learning objec-
tives, which should be attained with the children until
the end of the year.
In order to achieve these learning objectives by
the end of the school year, the teacher has to break
them down into monthly, weekly and daily learning
objectives and plan his/her teaching activities accord-
ingly. This planning activity serves as a tool to help
teachers prepare their lessons properly.
In the “Move 4 New Horizons” project, the facili-
tators use a weekly planning format, which is filled in
for every subject (one for maths, one for English, one
for Nepali and one for sports) beforehand. Below is one
example.
This format should always be filled in from left
to right. First, the learning objective, which should be
reached with the lesson, has to be defined. Only then
the teacher should think of the teaching activities that
he/she will do. This is then step 2 of “cooking” a lesson.
In order to manage the time properly, it is important to
also define the duration for each activity.

18

19
– They have to fit into the lesson structure
– They need to be varied in order to remain interest-
ing for the children
– They need to be adapted to the age and the spe-
cific learning capacities of the children
Since the two latter points are very important for
our playful teaching approach, we will treat them sepa-
rately in the chapters “Adding variety to the teaching”
and “Inclusion of all children”.
First and foremost, the teaching methods should
be suitable to reach the learning objective with the
children. This means that you should choose the meth-
ods that are most effective for the children in order to
achieve the learning objective.
In general, teachers spend too much time explain-
ing (teacher-centered method). However, the children
Step 2: Choosing suitable teaching methods
KITCHEN LESSON
Step 1 Decide on what you want to cook Setting a learning objective
Step 2 Choosing how to cook the meal Choosing suitable teaching methods
Step 3Preparation of kitchen materials
and ingredients
Preparation of classroom/playground and
teaching materials
Step 4 Cooking the meal Carrying out the lesson
Step 5 Taste the meal Evaluation
After having set the learning objective, the choice
of suitable teaching methods is probably the most
important part of preparing a lesson. The teaching
methods define the activities that you as a teacher do
in order to reach the learning objective with the chil-
dren. The following requirements should be met by the
chosen teaching methods:
– They should be suitable to achieve the learning
objective with the children

20
learn most effectively, if they can practice new knowl-
edge (child-centered method). There is a famous say-
ing which states:
Tell me, and I will forget;
teach me and I will remember;
involve me and I will learn.
This is especially true for children, who are very
good in “learning by doing”. If you as a teacher want to
introduce a new topic, it is necessary that you spend
sufficient time for explaining it, of course. But as a
general rule, the time in which children can practice
for themselves what they have learnt should always be
longer than the time in which they need to sit and listen
to the teacher.

21
As an example, the structure of a lesson could look like this:
Activity Duration Explanation
Welcome 5 min.The children need some time to “arrive” in class and to calm down before they are able to lis-ten. A welcoming ritual (e.g. a song, a dance or a game) can help the children to also mentally arrive in class, to feel at ease and to develop a feeling of belonging to the class.
Recapitula-tion 5 min.
Before the introduction of a new topic, the teacher should always repeat what has been taught during the last lesson. This should be done in an interactive way, with the children actively contributing. Like this, the teacher can also evaluate whether they remember what they had learnt last time.
Introduction of new topic 10 min.
If a new topic needs to be introduced, the teacher should not exceed the maximum concen-tration time of children at this age, which is 15 minutes. If real objects or games are used to demonstrate letters, numbers, words, etc., it will be much easier for the children to remem-ber (see chapters “Adding variety to the teaching” and “Example games”).
Children practice 15 min.
The main part of the lesson should provide the children with the opportunity to practice what they have learnt. The teacher should explain the exercises well and then let the children do it themselves. It is important that all children get the opportunity to practice. That is why it is not very effective to call only one child to the blackboard and let him/her solve an exercise there. Rather, all children should do the exercises in their textbooks or copies. Alternatively, the children can practise something among themselves in groups (see chapter “Adding vari-ety to the teaching”).
Evaluation 10 min. At the end of the lesson, there should always be an evaluation whether the learning objective has been fulfilled or not. See step 5 “Evaluation”.

22
Step 3: Preparation of classroom/playground
and teaching materials
KITCHEN LESSON
Step 1 Decide on what you want to cook Setting a learning objective
Step 2 Choosing how to cook the meal Choosing suitable teaching methods
Step 3Preparation of kitchen materials
and ingredients
Preparation of classroom/playground and
teaching materials
Step 4 Cooking the meal Carrying out the lesson
Step 5 Taste the meal Evaluation
The teacher should come to the classroom (for
indoor lessons) or playground (for outdoor sports les-
sons) early enough to prepare the classroom/play-
ground and the teaching materials before the children
arrive in. Since some materials might have to be organ-
ised beforehand, the teaching materials should already
be thought of when planning a lesson and thinking of
the teaching methods.
It is self-evident that you can only work in a
classroom/on a playground which is clean and tidy.
It can be a good learning opportunity for the children
if you involve them in the cleaning/tidying at the end
of a school day. In this way, they will learn to take
care of their learning environment and to leave it tidy.
For sports lessons on an outdoor playground, make
sure that there are no big stones, glass, cans or other
garbage lying on the playground on which children
could hurt themselves, wearing just slippers or run-
ning barefoot.
For both, indoor and outdoor lessons, you should
have drinking water available for the children in a ves-
sel with cups. Moreover, some basic first aid items
(disinfectant, bandages, patches) should always be
with you as a teacher (especially if you go outdoors
with the children to play games).
The chapter “Local teaching and play materials”
provides further suggestions on locally available mate-
rials you can use for teaching.

23
Step 4: Carrying out the lesson
KITCHEN LESSON
Step 1 Decide on what you want to cook Setting a learning objective
Step 2 Choosing how to cook the meal Choosing suitable teaching methods
Step 3Preparation of kitchen materials
and ingredients
Preparation of classroom/playground and
teaching materials
Step 4 Cooking the meal Carrying out the lesson
Step 5 Taste the meal Evaluation
If you have gone through the previous three steps,
you will be well prepared to conduct the lesson. How-
ever, there can always be difficulties that only appear
during the lessons. The chapter “Adding variety to the
teaching” will provide more tips on how to deal with
this.
Step 5: Evaluation
KITCHEN LESSON
Step 1 Decide on what you want to cook Setting a learning objective
Step 2 Choosing how to cook the meal Choosing suitable teaching methods
Step 3Preparation of kitchen materials
and ingredients
Preparation of classroom/playground and
teaching materials
Step 4 Cooking the meal Carrying out the lesson
Step 5 Taste the meal Evaluation
As we have seen in “step 2”, the evaluation of
whether the learning objective has been achieved or
not, should be part of every lesson.
It is important that the evaluation refers to the
learning objective and not to the teaching activities:
Evaluation
Learning objective
Teaching activities

24
You need to assess whether the children have
learnt what you had planned them to learn and not
whether you could conduct the teaching activities that
you had planned to conduct. Only by testing the newly
acquired knowledge and skills of the children, you can
assess whether you have really reached the learning
objective of the lesson or not.
This means that you have to test the children’s
learning achievements, e.g. by asking them questions
or by checking what they have written in their text-
books or copies at the end of the lesson. By doing this,
you should particularly focus on the weaker children in
your class. It is important to know whether they have
been able to reach the learning objective or not. If yes,
you can go on with something new in the next lesson. If
not, you have to come back to the same learning objec-
tive during the next lesson: Maybe you have to give the
children more time to practice the new knowledge and
skills or you have to explain it to them with other teach-
ing methods (see chapter “Inclusion of all children”).
This needs to be considered in the planning of the next
lesson. You should also give the children homework, so
that they can also practice at home.
2.3 Adding variety to the teachingAs a teacher, you are probably familiar with the
following kinds of problems:
– You are expecting the children to sit still and listen
to you, but they get impatient after some time, start
to move around, stand up, distract others, etc.
– You are out in the playground and do a game in
which two children are running against each other
at a time. The others have to wait until it is their
turn. But instead of waiting, they walk away or
start fighting with each other.

25
has finished the sentence and is sitting down again.
The teacher asks the class to read the sentence out
loud. But the children did not pay attention and are
now overwhelmed with the task. The teacher asks one
of the older children to come in front and read out the
sentence at the blackboard. While the child starts to
read it word by word, the fight between the two boys
starts again: One of them throws his pencil across the
room at the other boy, who starts crying. The teacher
looses his patience and gives the boy who had thrown
the pencil a slap in the face. As a consequence this
boy starts to cry as well and the whole class is in such
a chaotic state that the teacher has to stop the lesson
and send everybody home.
Case study
Imagine an NFE class some-
where in Dang district in Nepal.
The teacher is giving an English lesson. One girl is writ-
ing a sentence at the blackboard and the others have
to watch and wait. But the children get impatient. Two
girls in the front row are starting to chat with each
other, a boy at the back is hitting his neighbor with his
pencil, his neighbor is screaming, the other children
start to laugh and the concentration in the classroom
is gone. The teacher reminds the children to be quiet
and to concentrate on what the girl at the blackboard
is writing. The class becomes quiet for one minute, but
then, the boy who was hit by his neighbor hits him back
and the whole class gets distracted, again. The teacher
shouts at the two boys who were fighting, grabs one of
them by the arm and makes him sit in another corner of
the classroom. By that time, the girl at the blackboard

26
The case study might be an extreme example, but
it helps us to understand some basic principles on how
to deal with disturbances as a teacher. Let’s try to ana-
lyse the case study:
Why did the situation escalate?
The teacher thought the reason why the children
are distracted is a lack of discipline and so he took meas-
ures to reinstall discipline in the classroom and to make
the children sit still and listen again. The initial, “softer”
disciplinary measures of the teacher (reminding them to
be quiet) were not successful, as the children started to
fight and chat again. So the teacher adopted stricter dis-
ciplinary measures (changed seating of the two boys).
However, these were not successful either. This made
the teacher lose his patience and use physical punish-
ment. But the result was a class which was upset and
impossible to work with anymore.

27
this into consideration. A teacher must know e.g. that
the maximum average duration for a six year-old child
to be able to remain concentrated is 15 minutes. Then,
the teacher will understand that such reactions are
very natural for children at primary school age.
Therefore, trying to make the children disciplined
only by punishing them will not be effective. Such prob-
lems can be prevented much more effectively, if the
teacher tries to add variety to the teaching to integrate
all children into the lesson. Active sequences can be
used to interrupt a theory session and to help maintain
the children’s concentration. Moreover, variations in
teaching methods can help the children remain con-
centrated and interested in the lessons for a longer
time. In particular, if the children are given the oppor-
tunity to explore and practice what they have learnt
in a playful way, they will feel more involved and their
learning experience will be much more sustainable.
What would be alternative ways
to react for the teacher?
As a teacher, you should always ask yourself first:
Why are the children not concentrated? Children being
distracted, inattentive, undisciplined, etc. should be a
sign for you as a teacher. The children’s behaviour sig-
nals that they don’t feel involved enough in the lesson.
The feeling of not being involved can have different
reasons:
– The children cannot concentrate anymore (they
had to listen to the teacher for too long)
– The children feel bored (they have to do the same
exercise again and again or they have to wait for
too long without anything to do)
– The children feel overwhelmed (the level of teach-
ing is too difficult for them)
Undisciplined behaviour is only an expression of
such underlying reasons and the teacher must take
28
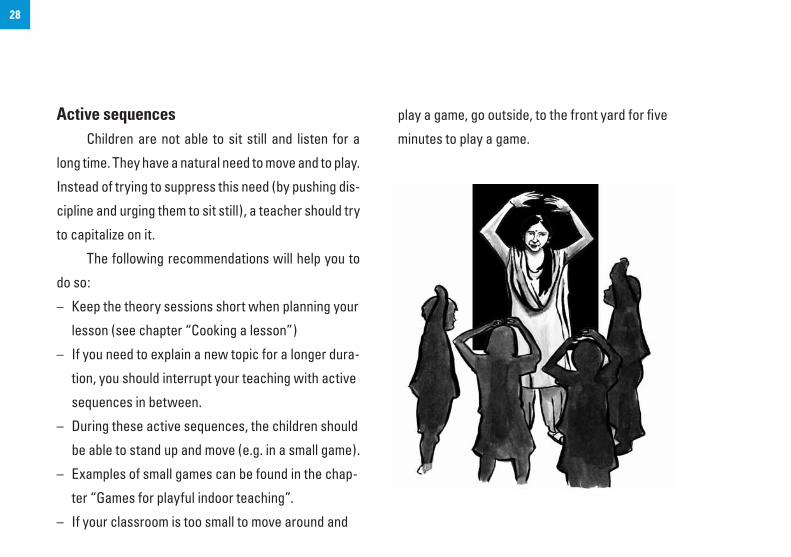
play a game, go outside, to the front yard for five
minutes to play a game.
Active sequences Children are not able to sit still and listen for a
long time. They have a natural need to move and to play.
Instead of trying to suppress this need (by pushing dis-
cipline and urging them to sit still), a teacher should try
to capitalize on it.
The following recommendations will help you to
do so:
– Keep the theory sessions short when planning your
lesson (see chapter “Cooking a lesson”)
– If you need to explain a new topic for a longer dura-
tion, you should interrupt your teaching with active
sequences in between.
– During these active sequences, the children should
be able to stand up and move (e.g. in a small game).
– Examples of small games can be found in the chap-
ter “Games for playful indoor teaching”.
– If your classroom is too small to move around and

29
– through pictures and observation (visual learner)
– by touching and feeling (bodily learner)
By applying different teaching methods, which
include verbal, visual and bodily learning experiences
(e.g. stories, drawings, real objects), you will thus facil-
itate the learning of all types of learners.
You can find some examples for playful “applied
learning” activities in the chapter “Games for playful
indoor teaching”.
Letting the children practice and explore things
by themselves doesn’t mean that the teacher has
nothing to do during that time. The teacher should
support the children when needed and help them if
necessary. Moreover, also while doing an exercise;
it is important to offer variations to the children, so
that they don’t have to do the same exercise for a long
time. Otherwise, they will feel bored and not work
properly by themselves.
VariationsThe children’s attention can also be improved by
adding variety to the teaching methods. If the same
content is taught in the same way again and again, it
is not surprising that the children get bored after some
time. Teachers should therefore think of a variety of
methods to teach the children.
The standard method of the teacher standing in
front and showing something on the blackboard or on a
chart and the children have to repeat it altogether might
also not be the best way to catch the children’s atten-
tion. Using teaching methods, in which the children can
get active themselves and learn things through prac-
tical exercises or games, will improve the children’s
attention and their learning success.
Not all children learn in the same way. There are
different “types of learners”, who learn best:
– by listening and speaking (verbal learner)

30
These principles should be applied to both, indoor
teaching and sport and play teaching outdoors. In the
table below, there are two examples showing along
Indoor Outdoor
Example: Learning the alphabet by using the chart
Kabaddi
What can be varied – Material (cards instead of chart)
– Roles (child in front instead of teacher, children learning by themselves in learning corners)
– Groups (split the class in groups)
– Oral/written (Let the children write into their notepads)
– Field (larger/smaller size) – Group position (line, circle, 2 circles,…) – Movement (jump, walk, run, forward/backward,…) – Material (several balls instead of only one) – Rules (children that are “out” can get back in with the
help of one of the “inside” children) – Time (more/less time) – Tasks/roles (one child is the referee, one child counts, …)
which criteria you can vary the same teaching con-
tents: One for indoor teaching and one for sport and
play teaching outdoors.

31
class (both: more and less advanced children) and the
teaching methods need to be adjusted accordingly.
The following two steps might serve as a refer-
ence for you in this regard:
1st step: Being aware of differences between children
As a first step, the teacher needs to be aware of
the differences between the children in his/her class.
These differences can be for example:
– Age-specific differences
– Different mental abilities
– Different physical abilities
– Differences in character, interest, etc.
2nd step: Dealing with differences and inclusion
In a second step, the teacher needs to find ways
to deal with these differences. It is important not to
value differences negatively. Children with different
2.4 Inclusion of all childrenIf some children are inattentive and undisciplined
in class, it can also be related to the fact that the level
of difficulty is too high for them.
It is a fact that the children in our NFE classes
are of very different ages, abilities and levels of under-
standing and this is a huge challenge for the teachers.
Nevertheless, teachers should try to involve all chil-
dren into their teaching and not leave anyone behind.
Adjusting the general learning objective to the
level of some slower learners, while not offering the
more advanced children new learning challenges, will
also not be a solution. The more advanced children
will then feel bored and possibly start to distract the
class.
That means that the teacher has to differentiate
his or her teaching: The learning objective has to be
adapted to the learning capacities of the children in

32
abilities or learning capacities should not be given the
feeling that they are inferior to the other children. Quite
the opposite: for these children, your encouragement
and support as a teacher is especially important!
Moreover, it is important that you are aware of
what these differences mean for your teaching. Once
you have identified the differences among the children
in your class, you need to think of different learning
objectives and teaching methods for these children.
The following sub-chapters will treat some of the
differences that you might recognise in your class more
specifically.

33
It is important that as a teacher, you understand
the age-specific capacities of the children, so that you
know what you can expect from them and what not yet.
This will allow you to adapt the learning objective to the
age of the children in your class and to think of differ-
ent learning objectives for younger and older children
if you have big variations in age in your class.
The table below summarizes the age-specific
developmental milestones of children between the
ages of 5 to 10. It is structured along the four dimen-
sions of child development (mental, emotional, social
and physical).
Age-specific differences1st step: Being aware of differences between children
In our NFE classes, the age of the participating
children ranges from 5 to 10 years. The learning capac-
ity and the interests of a five year old child are very
different from those of a ten year old child, of course.
It is a huge challenge for the facilitators to deal with
these differences and to meet the learning needs of all
children at the same time.

34
Age Cognitive Social Emotional Physical
5 years – can concentrate for 10 minutes
– talks clearly and in complete sentences
– comparison: sorting objects, putting things into relation (half, more, less)
– tells a familiar story while looking at pictures
– self-care skills: washes, dresses, eats by him/herself; usually doesn’t wet him/herself, but it may happen sometimes
– starts to build friendships with other children
– cooperation: takes turns, shares toys
– recognises authority
– self-control after an emotional outburst
– tolerates frustration and failure
– separates from parents without being upset
– likes making people laugh
– strong urge to move and play
– control of pencil – reproduces shapes and
letters – able to jump forward
and sideways – balances on either foot,
runs on tiptoe
6 years – can concentrate for 15 minutes
– understands time (today, tomorrow)
– fun with problem solving and sorting activities
– uses appropriate verb tenses, word order, and sentence structure, but still confuses certain letters
– counts up to 200 and counts backwards from 20
– talks a lot – finds slang and
profanity funny – does not understand
moral standards, but understands when something is thought to be “bad”
– needs and seeks adult approval, reassurance, and praise
– self-perceived failure can make the child easily disappointed and frustrated
– has trouble staying still – throwing, catching,
kicking and striking skills are developing

35
Age Cognitive Social Emotional Physical
7 years – organises belongings and school supplies
– proper spacing of words
– counts and writes numbers to 100
– addition and subtraction of numbers to 10
– appropriate verb tenses, word order, and sentence structure
– polite – cooperative,
less selfish – lying, cheating, and
stealing diminish – work in a small group – concerned with self
and others’ reactions (cheating, fairness)
– sometimes aggression to solve problems
– wants to finish things, has emotional outbursts when he/she cannot
– ashamed of mistakes – more introverted and
thoughtful
– satisfaction from using good motor skills in play
– dancing still clumsy, but better coordination
– able to kick a ball – restless
8 years – comprehension of text while reading
– addition and subtraction to 20, memorizes multiplication table
– distinguishes left-right
– analyses a story (characters, ideas)
– tells exact time
– knows right from wrong
– likes to be a member of a group
– has a best friend – concerned with
fairness – judgments about the
self in relation to others – personality affects
playing habits (some play alone, some prefer with others)
– blame someone else when something goes wrong
– if criticised, may burst into tears
– empathy for the suffering of others
– more control over small muscles: writes, draws better
– moves from one activity to another
– likes to be creative

36
Age Cognitive Social Emotional Physical
9 years – orders objects in a logical sequence
– thinks about a problem and plans how to solve it
– critical thinking: inference, prediction, summarising
– learns about different cultures and customs
– interest in reading
– continuing friendships, peer pressure
– understanding that other people may view things differently
– untidiness – fairness very important – tries to please parents,
teachers and peers – highly competitive
– confesses when something wrong was done
– shows responsibility for own actions
– easily disciplined, accepts punishment
– easily embarrassed – wants to do right, but
sometimes overreacts
– more physically active – good body control – likes more complicated
crafts
10 years – many interests – planning skills – works independently – fluency and
comprehension of complex text
– multiplication of whole numbers
– stable contact with children of same age
– careless with belongings and self-care
– submission to authority
– more independent from care-givers
– girls very jealous, possessive of their friends
– sense the emotions of others, read facial and body language
– balanced temperament – become extremely
angry with unfair punishment
– well-developed motor skills
– plays soccer – builds outdoor forts,
tree houses

37
ing and write the new sentences in the exercise
book.
• Example sport and play teaching outdoors: If you
do a relay with the children, split the children
into at least two groups according to their age or
physical performance. If you define a longer dis-
tance to run for the “faster” group than for the
“slower” group, the competition will be fairer
and the younger/physically weaker children will
feel more motivated to participate.
– Assign different roles to the children
• Example indoor teaching: An older/more
advanced child assumes the role of the teacher
and corrects exercises that have been written
down by the other children in their exercise
books. This will make the child feel proud of his/
her capacities, instead of getting bored and pos-
sibly distracting the class.
It is important to note that this table should serve
as a general reference, only. In reality, the development
of a child is never linear and deviations are normal to
some degree.
2nd step: Dealing with differences and inclusion
Below, some of the options are described, which
will allow you pursue different age-specific learning
objectives for younger/older children in your class at
the same time:
– Split the class into (two or more) groups and give
them different tasks to do, according to their age
and capacities
• Example indoor teaching: Task for the younger
group: there is a sentence on the blackboard.
Write the sentence carefully and without mistake
in your exercise book. Task for the older group:
Think of other sentences with the same mean-

38
in pairs of two. There should be an older and a
younger child in each pair and they have to run
together, holding each other’s hand. If they let go
of their hands, they have to start from the begin-
ning, again. Like this, the older children learn to
cooperate with the younger children, as well.
Different mental abilities1st step: Being aware of differences between children
You might identify children in your class who are
lagging behind significantly in their mental develop-
ment in comparison to the other children of their age.
This does not mean that these children are “stupid” or
less intelligent. There is always an underlying reason
for such learning problems and it is important for the
teacher to acknowledge this.
Psychological stress due to a difficult family situ-
ation or the past experience of traumatic events could
• Example sport and play teaching outdoors: A
younger child or a child who cannot run so fast
could assume the role of the referee while the
others play. This is a prestigious task and a
responsibility instead of sitting on the sidelines,
doing nothing.
– Let the older children help the younger ones (child-
to-child approach)
• Example indoor teaching: Let the children sit
together in pairs of two, with one older and
younger child in each pair. With picture cards,
the children practice English words together, the
older showing the card and the younger child
trying to find the description in English (“This is
a cat.”, “This is an apple”). If the younger child
doesn’t find the word, the older child can help.
• Example sport and play teaching outdoors: Dur-
ing a relay, you could also ask the children to run

39
different mental abilities describe their under-
standing of the question
– Provide a predictable and consistent daily routine.
Prepare the children early if the routine is inter-
rupted
– Present an outline of the lesson or unit of the day,
e.g. on the blackboard
– Reduce the amount of tasks for children with dif-
ferent mental abilities
– Don’t ask questions in a way that makes children
feel stupid, but gain confidence
– Repeat complicated tasks
– Use many different examples
– Reward children with different mental abilities with
praise, good words, smiles, etc. as often as you can
– Give children with different mental abilities extra
opportunities to ask questions
– Encourage their strengths, interests, and abilities
be a reason for children not being able to concentrate
and learn properly. Another reason could be malnutri-
tion as an unborn child or baby, which could have ham-
pered brain development. An accident can also have
such consequences. Or the child could have a learn-
ing disorder. Children with learning disorders receive
and handle information in a different way: They see,
hear, and understand things differently. A child with a
learning disorder can show a very good performance
in one subject (e.g. maths) but be very weak in another
subject (e.g. languages).
2nd step: Dealing with differences and inclusion
Children with different mental abilities require
special support on how to learn and how to use their
potential. Below are some guidelines on how this could
be done:
– Ask clear questions, and then let the children with

40
impairment and think the child is just inattentive “by
nature”. It is thus important that you are aware of the
possibility of such impairments and that you try to find
out about such different physical abilities in the inter-
action with the children.
It is not necessary to work out a special curriculum
for children with different physical abilities, but you should
make your teaching activities inclusive for all children.
2nd step: Dealing with differences and inclusion
Children with different physical abilities should
not be excluded from some activities due to their
impairments, quite the opposite: they should be par-
ticularly encouraged to participate. For example, it
can be very valuable for a child with different physical
activities to participate in sport and play activities and
there are many possibilities to support this, even if the
physical impairment is severe. The prerequisite is that
– Help them to develop self-esteem and to the ability
to see their own progress instead of simply com-
paring themselves with the others
– Tutoring assistance from a peer
– Extra mini-lessons in which you re-teach skills and
learning strategies
Different physical abilities 1st step: Being aware of differences between children
By different physical abilities we mean impair-
ments which limit the physical function of limbs or fine
or gross motor ability, as well as sensory impairments,
such as visual or hearing impairments.
Such impairments are not always immediately
recognisable, as the impairment can be more or less
severe. But already a slight hearing impairment for
example, can greatly affect a child’s ability to follow
your lessons. The teacher might not realise this hearing

41
– Take frequent one-to-one time with the child to make
sure that he/she is aware that you are there to help
– For children with hearing problems use signs when
talking to them
– Children with visual impairment should be seated
close to the blackboard. Special books with
embossed printing exist for children with visual
impairments to read
– Children with speaking problems should be able to
use alternative ways to express themselves (draw-
ings, pantomime, etc.)
Inclusive teaching valuesAs it was described above, it is important to adapt
your teaching activities and to differentiate them accord-
ing to the different levels of age, mental and physical abil-
ity of children in your class. However, it is equally impor-
tant not to create differences where it is not necessary.
the teacher designs his/her teaching activities in a way
that is inclusive for all children.
Below, you can find some suggestions on how such
an inclusive teaching approach could look like in practice:
– Introduce a buddy system: Let other children assist
the child with a physical disability
– Be flexible and accept suggestions
– Don’t be over supportive and provide assistance
only when it is really needed
– Focus on what the child can do – not what he/she
can’t do
– Never accept rude remarks, name calling or teas-
ing of other children. Sometimes other children
need to learn more about physical disabilities in
order to develop respect and understanding
– Talk to the child about what he or she likes to do
and can do. Maybe he or she can share that knowl-
edge with the class

42
backgrounds play together or not?
– Do all children get the same opportunity to be
called?
– How are children with different physical or mental
abilities treated?
As a teacher, you should not only refrain from
discriminating against children due to their gender,
caste, ethnicity, religion, etc., but you are also respon-
sible to prevent such discriminatory behaviours from
appearing among the children. If you realise that one or
several children in your class are being discriminated
against, you should address this issue immediately. You
can either talk to the other children individually and
make them aware that their discriminatory behaviour is
unjust or you can incorporate discrimination into your
teaching and conduct a lesson on this topic.
Ask students to treat each of their classmates
the way they would like to be treated, especially those
Emphasising differences among the children, e.g.
along their gender, caste, religion, social status or eth-
nicity and treating them differently is a discriminatory
practice and should be avoided by a teacher in any case.
It is unjust and can create much harm for an affected
child, as it will lead to social exclusion, a lowered self-
esteem and hampered learning outcomes.
Often we do not discriminate against others inten-
tionally. Discrimination mostly takes place on a rather
unconscious level. However, especially as a teacher,
you will be closely observed by the children and they
will receive signals from you that you might not even
be aware of. This applies to the classroom as well. Ask
yourself:
– Is the decoration neutral in terms of gender, caste,
ethnic groups or religion?
– What about the activities in and outside class? E.g.
do girls and boys or children from different caste-
43
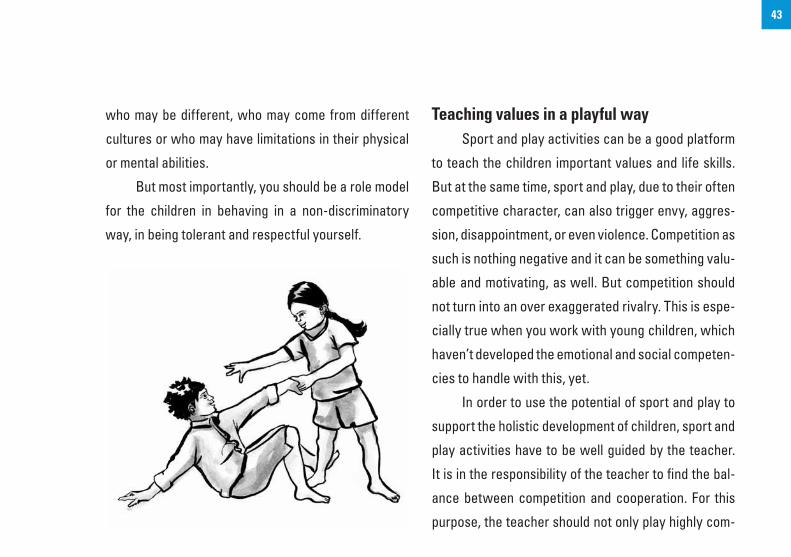
Teaching values in a playful waySport and play activities can be a good platform
to teach the children important values and life skills.
But at the same time, sport and play, due to their often
competitive character, can also trigger envy, aggres-
sion, disappointment, or even violence. Competition as
such is nothing negative and it can be something valu-
able and motivating, as well. But competition should
not turn into an over exaggerated rivalry. This is espe-
cially true when you work with young children, which
haven’t developed the emotional and social competen-
cies to handle with this, yet.
In order to use the potential of sport and play to
support the holistic development of children, sport and
play activities have to be well guided by the teacher.
It is in the responsibility of the teacher to find the bal-
ance between competition and cooperation. For this
purpose, the teacher should not only play highly com-
who may be different, who may come from different
cultures or who may have limitations in their physical
or mental abilities.
But most importantly, you should be a role model
for the children in behaving in a non-discriminatory
way, in being tolerant and respectful yourself.
44
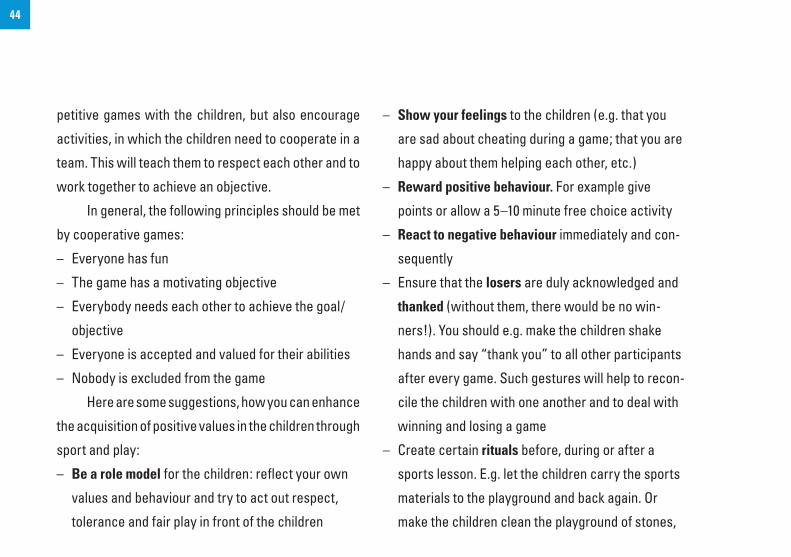
– Show your feelings to the children (e.g. that you
are sad about cheating during a game; that you are
happy about them helping each other, etc.)
– Reward positive behaviour. For example give
points or allow a 5–10 minute free choice activity
– React to negative behaviour immediately and con-
sequently
– Ensure that the losers are duly acknowledged and
thanked (without them, there would be no win-
ners!). You should e.g. make the children shake
hands and say “thank you” to all other participants
after every game. Such gestures will help to recon-
cile the children with one another and to deal with
winning and losing a game
– Create certain rituals before, during or after a
sports lesson. E.g. let the children carry the sports
materials to the playground and back again. Or
make the children clean the playground of stones,
petitive games with the children, but also encourage
activities, in which the children need to cooperate in a
team. This will teach them to respect each other and to
work together to achieve an objective.
In general, the following principles should be met
by cooperative games:
– Everyone has fun
– The game has a motivating objective
– Everybody needs each other to achieve the goal/
objective
– Everyone is accepted and valued for their abilities
– Nobody is excluded from the game
Here are some suggestions, how you can enhance
the acquisition of positive values in the children through
sport and play:
– Be a role model for the children: reflect your own
values and behaviour and try to act out respect,
tolerance and fair play in front of the children

45
certain “commitments”, which they want to follow.
These commitments should be written (or drawn
as pictures) on a big sheet of paper, which can then
be put on the wall in the classroom. Such commit-
ments could be e.g.: we include everybody in the
game, we respect everybody (including the oppo-
nent team), we don’t use violence and rude words,
we thank each other after the game, etc.
Gender
When conducting sport and play activities with
the children, it is particularly important to emphasise
gender equity.
In every society, there are certain norms that
determine what girls and boys should or shouldn’t do.
When it comes to sport and play, generally girls are
often thought to be less capable than boys and there
are some sports that are considered unacceptable
garbage, etc., which could cause injuries when the
children struggle over it. Symbolising mutual sup-
port and solidarity, such rituals improve the chil-
dren’s sense of identity and belonging to a group.
– Collect important values together with the chil-
dren in a discussion and define what these values
mean for their everyday behaviour in and outside
the classroom. All children should then agree on

46
– As a facilitator, you should treat boys and girls
equally. E.g. if you demonstrate something with a
child, choose a girl one time and a boy next time
– Be strict to avoid teasing, mobbing, etc. against the
opposite sex
– Be aware that as a facilitator (male and female),
you are a role model also in this regard
for girls to do. However: There are no girls and boys
sports! All sport and play activities are neutral and do
not show any restriction regarding the involvement of
girls or boys. These restrictions are stereotypes that
exist only in our minds.
The equal participation of girls should therefore be
facilitated in all activities. Especially if girls themselves
are not used to doing sports, an active participation
can be extremely valuable for them: It can give them
the opportunity to experience the capacity of their own
bodies and help to increase their self-confidence.
The following recommendations should be taken
into consideration:
– If participants need to split into groups, try to have
both, boys and girls in every group
– Let girls and boys do the same activities.
Don’t exclude any of them from a game because
of their sex

47
3. Game examples
The games presented here require no material
or material that is easily available in most places and
they are suited to the age of 5–10 year old children. The
games are divided into two chapters: one presenting
example games for playful indoor teaching and the
other example games for sport and play lessons out-
doors. Sub-chapters are made according to the specific
purposes of these games. On the upper right corner of
every game description, the icons of head (mental),
heart (emotional), body (physical) and group/environ-
ment (social development) can be found again. They
describe which of the dimensions of child development
are mostly supported through this game.
This chapter introduces some game examples
which can be used for playful teaching.
Children are usually very inventive and should be
left the freedom to develop their own preferred game
or game variation. But as a facilitator, you should be
able to provide the children with new ideas and guide
them through games that are well suited to support
their development on the four dimensions explained
in the first chapter of the manual. The example games
could serve as an inspiration for you, but you should
vary and supplement these games with your own and
the children’s ideas.

48
Cooperation and mutual trustThe games described in this sub-chapter can be
used to promote cooperation and mutual trust among
the children. Especially during the first months of the
NFE classes, these games can help the children to feel
at ease in the classroom and to develop a sense of
belonging to the class.
3.1 Games for playful indoor teachingThe games described below can be done after a
long theory session to interrupt the classroom teach-
ing and to get the children active for some minutes in
between. They can either be done inside the classroom
(if there is enough space) or in the front yard of the
classroom.

49
Blindman’s obstacle garden
Material: ribbons (to cover the eyes), obstacles (like schoolbags,
balls, pillows, etc.)
There are always two children together; one has his/her eyes cov-
ered and the other is guiding “the blind” through an obstacle gar-
den. When they are through, they start again with changed roles.
Variations:
– The “blind” child is guided in the same way through the obsta-
cle garden but without being touched: the guide is giving oral
instructions only.
– The “blind” child is guided by the guide orally again, but this
time the guide gives the instructions from outside the obstacle
garden.
– All the other pairs of children are in the obstacle garden at the same
time and need to sidestep each other. Special attention is required from
the guides in this situation.

50
Ball journey
Children play in pairs. They stand behind each other
and keep an object (e.g. a balloon) between the back
of the child in front and the waist of the child behind.
Now the child behind tries to navigate the other
through the room without any words. The front child
lets the partner control and tries to find out, where
the journey goes.
Variations:
The child in front closes the eyes and tries to find out,
where it stands in the end.

51
Talking stick
Material: A 30cm long stick (or stone, ball, etc.) which could be decorated nicely.
The facilitator tells the class that in some ethnic tribes when they come together to talk about something serious or
difficult they are using a “talking stick”.
Now, you do the same with the children. The stick is sent around from child to child, and only the child with the
stick in his/her hand can talk while the others are listening quietly. The stick is sent around until everybody had
a chance to say what s/he wanted to.
Begin with simple questions (e.g. “what did you do on their day off?”) until the children get used to using the
“talking stick”. After a while you can use this activity for more difficult situations, e.g. when a conflict between
two (groups of) children must be resolved or when you feel that the children are worried about something. Every
child should get the chance to say something. However, if a child doesn’t want to say anything, you should not
force him/her to do so.
The “talking stick” can be a nice ritual to start the day with.

52
Animal lottery
Material: 4 sets of the “animal lottery” each consisting of big
sheets of paper with illustrations of animals and little cards
showing one of the animals displayed in the big sheets.
The children learn to describe animals non-verbally (panto-
mime). Then these movements are used for a quiz game.
The children form four groups. Every group gets one of the
“animal lottery” sets. The groups spread their small cards on
the floor with the reverse side up. Then they sit at the oppo-
site side of the room around their big sheets. As soon as the
facilitator shouts “go!”, one child from each group runs and
fetches one of the small cards, shows a non-verbal demon-
stration of the animal and waits until the other children of his/
her group guess it right. Now, they are allowed to place the
animal on the same animal they have on their sheet and the
next child runs to get a card. The group which has covered all
the animals on the sheet first will win.

53
Hurricane
This is a very quick trick, good for getting the children to move around after a long theory session, and for
regrouping the participants, especially when there is a group sitting together that is whispering or disturbing the
others or to ensure that boys and girls play together. Every time the teacher calls out “hurricane!” everybody
has to run to another place and sit there. Make sure the children don’t start fighting for the same places. The
child that came first can sit there.

54
Concentration
The games which are described below help the
children to concentrate themselves well and to think
ahead before they act. They are well suited to help the
children “arrive” in class at the beginning of the day or
after an exciting sport and play lesson and to gain their
attention.
Name games
Material: one ball
All children sit in a circle. A ball is rolled from one child to the
other. Anyone who gets the ball has to say their own name out
loud and then roll it on.
Variations:
– The ball can be rolled in any direction. Before a child says
his/her own name, he/she has to repeat the two previously
mentioned names.
– The child who passes the ball calls the name of the child
who receives the ball.

55
Name games (continued from page 54)
Without ball:
– One after another, every child says his/her own name and makes a gesture, e.g. claps hands or demonstrates
something personal, e.g. favourite sport. After that, all other children repeat the name and the movement.
– All children sit in a circle. One child calls the others’ names. Children, who have been forgotten or called by a
wrong name, stand up. Then another child continues.
– The children stand in a circle, one is outside the circle. The one outside taps one child in the circle on the back
and each of them runs in the opposite direction around the circle. When they meet they must shake hands
and greet each other by name. After this, they continue to run in the same direction until they reach the next
empty space in the ring. The child that arrives later at the empty place has to start again by tapping another
child on the back.

56
Animal pairs
Material: Memory game: Cards with pairs of animals (the
total of cards should equal the number of children in your
class)
The cards are spread on the floor with the reverse side up.
All children at the same time take one card and mime the
animal which is on it. By doing this, the children have to find
their matching partner to form pairs of the same animal.
Variations:
Memory: Children sit two and two together. Each group
receives a “memory game” which is spread on the floor
with the reverse side up. Now, turn by turn, the children
uncover two cards and try to find the pairs. If the second
card they have uncovered doesn’t match the first one, they
have to imitate the second animal. After that the game con-
tinues.

57
Left-right
The children stand in a circle, one child is in the mid-
dle. The child in the middle addresses someone say-
ing “left” or “right” and moves slowly towards that
child. This child has to tell the name of the left or right
neighbour before the child from the middle reaches
him/her. If the child fails, the roles change and he/she
has to go into the middle of the circle.

58
Freezing dance
The facilitator sings or claps hands. The children move around freely.
As soon as the sound stops, they take a position which the facilitator
showed them before, e.g. standing on one foot, keep the bottom on the
floor, keep the legs higher than the head, lying on your front etc.
Variations:
– When the children stand still, the facilitator tells them how they
can start moving again, e.g. like a giant, like a witch, like happy
children, like stressed adults, like proud dancers, like soccer
players etc.
In pairs:
– One child leads the other through the room. As soon as the
sound stops, they freeze. When the sound goes on, the children
change their roles.
– Both partners run around freely. When the sound stops,
they catch eye-contact and take the same position.

59
Touch riddle
Material: Various small objects which the children
choose themselves. For the variation: 2–3 ribbons.
The children sit in a circle. Every child hides an object
in the hands which they start passing around behind
their backs. When the children hold their own objects
in their hands again, they lay it down hidden on the
ground behind their backs. Now, the children guess
the objects they identified by touching. When an
object was identified, the child to whom it belonged
presents it in front of them and then hides it behind
his/her back again. When all objects have been
identified, the children try to remember and name all
objects jointly.

60
Observer
Always two children are standing face to face. On
command, one of them closes the eyes and the other
child changes something in its appearance, e.g. folds
arms, takes off hair tie or necklace etc. When he/
she is finished, the other child can open the eyes and
guess what has changed. Then they change roles.
Variation:
The children move around freely in the room. The
facilitator tells them to pay attention to the other chil-
dren’s feet, heads or other body parts. On command,
the children close their eyes and the facilitator asks
for example: “What is the colour of A’s socks?” or
“How has B done her hair?”

61
Recognizing a sound
Material: Different things that create small sounds.
The facilitator tells the children to rest their heads on their arms, close their eyes, and be absolutely silent. After
a while the facilitator makes a small sound by scrunching up a piece of paper, or clicking a ball point pen etc. The
children guess what it was.

62
Trail of numbers
Material: Paper, scissors, coloured pens.
Write each of the numbers from 1–10 (or higher, if the children are more advanced), on a sheet of paper. Put
the papers on the floor in linear order. This is the “trail of numbers”. By stepping on the sheets, the children can
learn the order of numbers spatially, moving from 1 to 10.
Applied learningThese games engage the children into activities
in which they can practically apply and explore certain
learning contents. Like this, the children learn in an
active way and will remember things more easily than
by listening to the teacher only.

63
House of numbers
Material: Paper, scissors, coloured pens.
Cut different geometrical forms out of the paper as
illustrated on the left. They represent the “houses of
the numbers”. Write each of the numbers from 1–10,
into one of these forms. The number 1 “lives” in a circle,
number two in an ellipse, then it goes on with triangle,
rectangle, pentagon, hexagon, heptagon, octagon, non-
agon, and decagon.
Now, the children can learn the numbers by counting
the “corners” of the houses. At the same time, they
learn to link abstract numbers to geometrical forms,
which can be found in nature and in their everyday life.

64
Estimate and compare
Estimating a distance
The children estimate how many steps it takes to get
from one tree (or house, chair, etc.) to another. After
estimating, the steps are counted.
Estimating an amount of objects
– Each child takes a handful of maize kernels or small
stones or beans, etc. and guesses how many pieces
it holds in the hand. After estimating, the pieces are
counted.
– The teacher takes a handful of small objects in each
hand and lets the children estimate in which hand
most objects are. Then they count.

65
Combine numbers and amounts
Children like to collect things. Collecting is also a basis for
mathematical experience.
The facilitator tells the children to collect a certain
number of objects inside the classroom or (even better)
outside. This can be anything (pens, books, chalks, shoes,
stones, branches, etc.). Like this, the children learn to
count and to link numbers to amounts. Depending to the
learning progress, numbers can be higher or lower.
Variation:
– Change the movement: Children are only allowed
to jump/crawl/jump on one leg, etc. to gather their
objects.
– Children work in pairs. One of them is blindfolded; the
other has to guide the partner in getting the objects.

66
Learning corners
Learning corners are well suited to get the children active in learning independently and to explore teaching
content practically and independently. Teachers can also use this methodology to work with a smaller group of
children, which might need additional support in understanding the teaching contents, while the other children
(who have already understood) can engage in the learning corners independently.
The idea is that several thematic corners are defined in the classroom. These corners are then equipped with
materials for the children to practice and explore certain teaching contents in groups or individually.
Examples for learning corners:
– ABC/Spelling corner with alphabet charts, picture cards, letter cards, etc.
– Free reading corner with children’s books
– Numbers corner with objects (stones, beans, etc.) to count and with number cards, dices, etc. (see also
games ‘combine numbers and amounts’, ‘estimate and compare’, ‘house of numbers’ above)
– Art corner (with paper and coloured pens, natural objects e.g. leaves, wood, sand, etc. for drawing, doing
handicrafts, etc.)
– Storytelling corner (with puppets, drawings, etc. for the children to invent their own stories and develop their
imagination)
– etc.

67
Learning corners (continued from page 66)
There are no blueprints for learning corners. You should establish the learning corners creatively; the only cri-
teria should be that they match the interests and learning needs of the children. That is why the children should
be involved in creating these learning corners: they can help to collect materials, to decorate and to equip the
corners. Like this they will also enjoy to work in the corners much more.
If the space in your classroom is very congested, already, it doesn’t make sense to occupy space in addition with
the learning corners. Instead of having permanent learning corners, you could have “learning boxes”, with all
the equipment inside. Like this, the boxes can be stored on a tray or in another room when they are not in use.
Some additional tips:
– The learning corners should be given a title (written on a card which is placed centrally)
– Post a set of instructions (written or illustrated with drawings) in each corner explaining the activities that
the children can do there. Before the children start to work with the learning corners, you should explain the
instructions to them in class
– A variety of activities should be offered in each corner, including easier and more difficult activities, so that
the children can choose according to their level and interest
– Children should remain working in one learning corner only as long as they really have something to do there.
When they are finished, they should move on to another learning corner

68
Feet and hands on the ground
Work in groups. Someone decides how many feet or
hands may touch the ground in the group as a whole,
e.g. in a group of 3 children, 4 hands and 1 foot are
touching the ground (see drawing).
Make it increasingly difficult by reducing the number of
feet that are allowed to be on the ground.
3.2 Games for sport and play lessons outdoors
Cooperation and fairnessThese games can be used at the beginning of a
sport and play lesson to support the development of
team spirit within a group of children. Every single
member of the group is needed for the game to work.
In this way, the children experience how much they
can achieve if they organise themselves well within
the group. Because the games are fun and the children
get in touch with each other, they are also well suited
to reduce initial shyness of children who don’t know
each other well yet.

69
The endless chair
The children stand close behind each other. When the
teacher gives them a signal, they try to sit on the knees
of the child standing behind.
Variation:
When all children sit, they move according to the facili-
tator’s commands, e.g. left, right, rub the back, massage
shoulders, wave your hand and shout goodbye at the
end.

70
Wheel
The children form a circle and hold hands. Every sec-
ond child puts both his/her feet in the middle of the
circle on the ground. The children standing straight
are carrying the other half. The children with their
feet on the ground turn, so that the whole circle turns
like a wheel.
Variation: Instead of putting their feet in the middle,
every second child is sitting on the arms of the two
children next to him/her.

71
Knot
The children form a circle, reach out their arms to the
centre of the circle, close their eyes and walk towards
the centre. Each child’s hand has to grab someone
else’s, so that the children’s arms form a knot. Now, the
children try to form a circle again by disentangling their
arms without separating hands.

72
Cat and mouse
The children build a circle, three children are in the
center. One of them is the cat and is blindfolded, the
two others are mice. Now the “blind” cat has to catch
the mice who have to say “beep” recurrently so that the
cat knows where they are. When a mouse gets caught,
roles change: the caught mouse becomes the cat and
two other children from the circle become mice.

73
Hiding handkerchief
Material: Handkerchief
The children stand in a circle, facing the centre.
One of them goes around the circle and drops
the handkerchief behind the back of a child
inconspicuously and starts running. As soon as
the child in the circle notices that the handker-
chief lies behind his/her back, he/she has to try
to catch the child who placed the handkerchief.
If this child is not caught before he/she reaches
the empty space in the circle, he/she can close
the gap and take the other child’s place. The
other child repeats the handkerchief drop again.
If the child is caught, he/she has to do another
round.

74
Physical activity A sport and play lesson would not be fun for the
children, if they didn’t get the chance to run around and
be physically active. Especially after several hours of
sitting in the classroom, the children want to release
their energy and be able to move. Therefore, every
sport and play lesson should contain at least one game
of higher physical intensity. The games described
below could provide you with some ideas.
Tug of war without rope
The children form two groups which stand in a line
facing each other. The children in each group hold
each other around their waists. The two front children
who are facing each other grasp each other’s arms.
Then the two groups try to pull the opposite group
over a line between them.

75
Balance
The children stand in pairs, their backs touching or leaning
against each other. Now they try to unbalance each other.
The child who rises one foot first, loses. Change partners.
If one child says “Stop”, the fight must be interrupted. He/
she is not allowed to hurt his/her partner. Make sure that
the pairs consist of two children of roughly the same physi-
cal strength.
Variations:
– Both children fold their arms, jump on one foot and try to
unbalance each other by pushing the partner’s shoulder.
– Both children stand around an imaginary puddle (e.g.
marked by a rope, a tire, etc.) and join hands. They try to
pull each other into the puddle.
– One child lies on his/her back covering the ball under-
neath his/her back. The other child tries to get the ball.
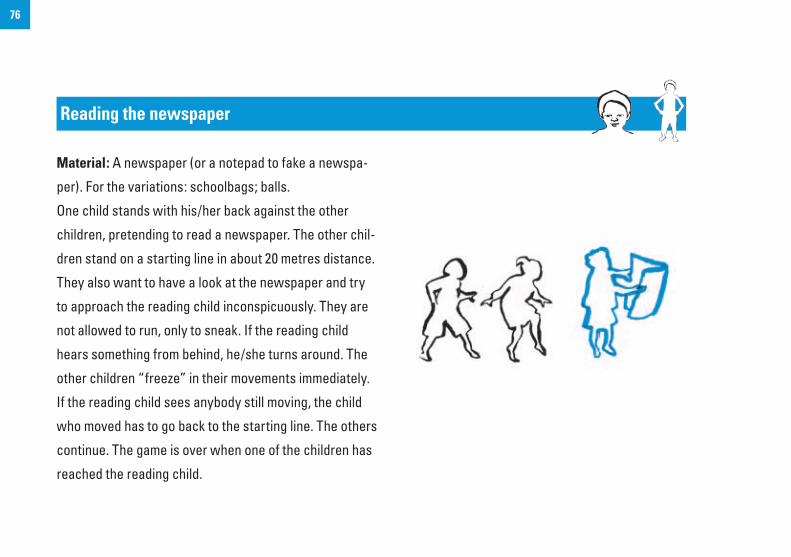
76
Reading the newspaper
Material: A newspaper (or a notepad to fake a newspa-
per). For the variations: schoolbags; balls.
One child stands with his/her back against the other
children, pretending to read a newspaper. The other chil-
dren stand on a starting line in about 20 metres distance.
They also want to have a look at the newspaper and try
to approach the reading child inconspicuously. They are
not allowed to run, only to sneak. If the reading child
hears something from behind, he/she turns around. The
other children “freeze” in their movements immediately.
If the reading child sees anybody still moving, the child
who moved has to go back to the starting line. The others
continue. The game is over when one of the children has
reached the reading child.

77
Reading the newspaper (continued from page 76)
Variations:
– The children who sneak up from behind are only
allowed to jump like rabbits or to crawl on all fours like
cats.
– The sneaking children have to balance their schoolbags
on their head, or they have to roll a ball in front of their
feet, which they have to stop when the reading child
turns around.
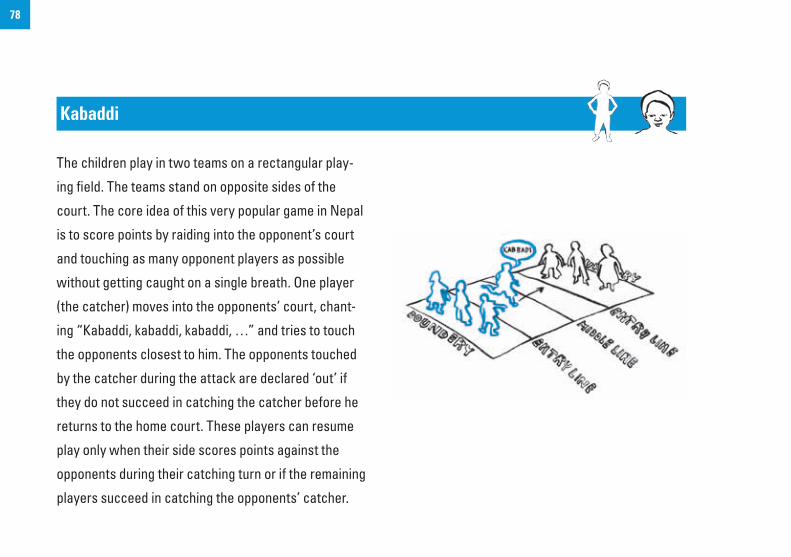
78
Kabaddi
The children play in two teams on a rectangular play-
ing field. The teams stand on opposite sides of the
court. The core idea of this very popular game in Nepal
is to score points by raiding into the opponent’s court
and touching as many opponent players as possible
without getting caught on a single breath. One player
(the catcher) moves into the opponents’ court, chant-
ing “Kabaddi, kabaddi, kabaddi, …” and tries to touch
the opponents closest to him. The opponents touched
by the catcher during the attack are declared ‘out’ if
they do not succeed in catching the catcher before he
returns to the home court. These players can resume
play only when their side scores points against the
opponents during their catching turn or if the remaining
players succeed in catching the opponents’ catcher.

79
Kabaddi (continued from page 78)
If the catcher loses his/her breath while still being in the court of the opposing team, he/she is out of the game.
After 20 to 30 minutes, the game is stopped and the children out of the playing field are counted. The team with
most children inside the field wins. They also win if there are no children of the opposing team left inside the
field.

80
Train relay
Material: Minimum two markers (e.g. empty bottles).
The children are instructed to run a course defined by two
markers. They have to stand behind the first marker in a row.
The first child of each group running the course is the “loco-
motive” who picks up a new child after every round around
the course. Hence, after each round a new “wagon” (child)
is added to the “train” until all children are running together.
Variation: You can split the children into two or more groups
of equal number and let them run their courses parallel.
Which group is the quickest to return?
Be careful that you don’t have the strongest children all
together in one group and the weakest children in another
one. The competition would not be fair like this. You should
mix stronger and weaker children in the groups or give the
weaker children a shorter course to run.

81
The fox and the hens
The children form a line of “hens” behind one child
called the “rooster”. Each “hen” is holding the front
one around its waist. The „fox“ tries to catch the last
„hen“ of the line. The chain of hens tries to protect
its last member by moving around without letting go.
If they let go or if the “rooster” has caught the last
“hen”, the last “hen” becomes “rooster” and the
“rooster” becomes the first “hen” in the line.

82
It is not necessary to buy expensive “child-
friendly teaching materials” in shops. Many suitable
materials can be found easily and for free in our every-
day life. Either you can use these materials directly for
your teaching or you can produce teaching materials
out of them with little effort. You have certainly many
good ideas for this yourself. In addition, the following
tips might provide you with some new ideas.
Local materials can be used to make the teaching
inside and outside of the classroom more interesting.
It is important that the newly taught knowledge is not
only told by the teacher or written on the blackboard in
an abstract way, but that the children understand the
concept behind it and are able to apply it in their eve-
ryday life. Using materials, which can be found by the
children in their daily environment makes the learning
experience for them more sustainable and helps them
to develop their imagination.
4. Local teaching and play materials

83
4.1 Material for playful indoor teaching
Picture cards
Material: Paper/cardboard, coloured pens, scissors
Draw pictures/pairs of pictures of animals, fruits, etc.
for memory games like “Animal pairs” (see “Example
games”) on paper or cardboard.
You can also use identical bottle caps or lids for
memory games and colour them differently on their
inner side.

84
Puppets
When you introduce a unit, use puppets to tell fun
facts or stories. Puppets can also be used to address
difficult situations or conflicts among the children in a
playful way.
Hand puppet
Material: strong fabric, sewing kit, drawing material
You can make a hand puppet out of strong fabric.
Trace your hand onto a piece of paper to define the
dimensions and draw a puppet (animal, child, teacher,
etc.) around it. Use this template to cut the shape out
of fabric. Sew it together and draw or stitch eyes,
mouth, nose, etc. on it.

85
Puppets (continued from page 84)
Finger puppet
Material: peanut shells, drawing material
You can make fun finger puppets using peanut shells:
Take one half of the peanut shell that fits onto your fin-
ger and draw a face on it.
Stick puppets
Material: wooden sticks, paper, drawing material, adhe-
sive tape/glue
Draw animals, persons, etc. on a sheet of paper and cut
them out. Glue a stick onto the back of the paper so that
you can use the paper animals/persons, etc. like pup-
pets.

86
Dice
Material: Paper, scissors, glue, coloured pens.
Draw the basic grid of a dice (as illustrated on the left) on a
large sheet of paper and cut it out. Then, fold the paper along the
line and glue it together. Instead of dots, numbers or symbols
can be drawn on the surface.
You can use the dice for various games in order to teach the chil-
dren the numbers:
– One child after the other throws the dice. When the number
on the dice is e.g. “3”, all children clap their hands three
times/jump up three times, for “5” they do it five times, etc.
– The children form groups or pairs. In each group there are
two teams. Every team gets, for example, 20 beans. Then,
the children throw the dice in turn. The number that has been
thrown may be taken from the opponent’s beans, for example
5 beans after the number five has been thrown. One team or
player has won, when the opponent has no more beans.

87
4.2 Material for sport and play lessons outdoors
Equipment to distinguish one team from another
Material:
– some fabric or plastic bags of different colours
– scissors
Cut out ribbons or triangles for scarves or head-bands. These can be used to distinguish one team from another
or to play games like “catch the mouse tail”.
Equipment to mark out the playing field
Material:
– Plastic bottles or stones
– Chalk powder
You can use objects to mark out the playing field: Plastic bottles should be filled with stones or sand, so that the
wind cannot blow them away. You can also use big stones and colour them to mark out the pitch.
Alternatively, you can grind up chalk and use the chalk powder to draw lines/circles, etc. on your playground.

88
Balls
Material: plastic bags/old fabric, string
You can make your own ball by collecting a bunch of plastic bags or old fabric and tying them into a ball with a
piece of string.
Tin-can race
Material: tin cans, string
Make two wholes in each tin can, thread a piece of string
roughly 1.50 m long through the holes and knot both ends inside
the tin. The children can use them like stilts to walk around on
them or to make races.

89
Education.com, Developmental Milestones Chart. <http://www.education.com/reference/article/Ref_Progress_Chart/>
Essortment, Teaching human values to children. <http://www.essortment.com/all/valuesteach-ing_psa.htm>
Federal Office of Sport (FOSPO), Kernlehrmittel Jugend+Sport, FOSPO, 2008.
Friedrich, Gerhard, Das Zahlenland – Mathematik spielerisch lernen im Vorschulalter, in: Das Familien-handbuch des Staatsinstituts für Frühpädagogik (IFP). <http://www.familienhandbuch.de/cmain/ f_Fachbeitrag/a_Erziehungsbereiche/s_2201.html>
Griede, Elise and Liesbeth Speelman, I DEAL, War Child Holland, 2007.
Hanson, Kirk O., Teaching Values in School: An Inter-view with Steve Johnson, Santa Clara University. <http://ww.scu.edu/ethics/publications/iie/v13n1/interview.html>
References
Becal, How to set about planning values teaching into your lessons. <http://www.becal.org.uk/toolkit/smrtvalues/howto.html>
Belson, Sarah Irvine‚ Physical Disabilities, Founda-tions of Special Education. <http://sped.wikidot.com/physical-disabilities>
Bhatta, Pramod (Ed.), Education in Nepal: Problems, Reforms and Social Change, Martin Chautari, 2009.
Child development info‚ About Learning Disabilities. <http://www.childdevelopmentinfo.com/learning/learning_disabilities.shtml>
Childparenting.about.com, Child Development. <http://childparenting.about.com/lr/child_develop-ment/42774/1/>
Dahle, Gabriele (Ed.), Mathe ist viel mehr als Zahlen, in: ‚Mathematik & Naturwissenschaften – Kreative Ideen und Materialien für den Kindergarten’. <http://www.olzog.de/imperia/md/content/olzog/edidact/musterbeitrag/1-04-02-10-2_mn2.pdf>

90
Luger-Linke, Sylvia, Spielend lernen – Erlebnis-mathematik im Outdoorbereich, 15. Fachtagung des Ersten Österreichischen Dachverbandes Legasthenie (EÖDL).<http://www.fachtagung.com/15nach/Luger-Linke.pdf>
McIntyre, T., Teaching Social Skills to Kids Who Don’t Have Them. <www.behavioradvisor.com>
Meier, Marianne, Gender equity, sport and develop-ment, Swiss Academy for Development (SAD), 2005.
Meuwly, Michelle and Jean-Pierre Heiniger, Laugh, run and move to develop together, Terre des Hommes, 2007.
PBS Parents, Child Development Tracker. <http://www.pbs.org/parents/childdevelopmenttracker/index.html>
Schaub Reisle, Maja and Anton Lehmann (Eds.), Right to Sport, Federal Office of Sport (FOSPO), 2008.
Swiss Academy for Development (SAD), Move 4 New Horizons, sport and play manual for facilitators, SAD, 2009.
Hartstrings Preschool Ideas, Teacher-Made Materi-als. <http://scruggle.tripod.com/hartstringspre-schoolideas/id4.html>
Helpguide‚ Learning Disabilities in Children. <http://www.helpguide.org/mental/learning_disabilities.htm>
Huber, Luzia, Sonja Lienert, Urs Müller, Jürg Baum-berger, Top-Bewegungsspiele. Band 1: für Kinder ab 5 Jahren, Verlag Baumberger & Müller, 2008.
Kemp, Ginam Jeanne Segal, Deborah Cutter, Learning Disabilities in Children. <http://helpguide.org/mental/learning_disabilities.htm>
Lauff, Jackie (Ed.), Sport and Physical Activity in Post-Disaster Intervention, International Council of Sport Science and Physical Education ICSSPE, 2007.
LD online, Supporting students in mathematics through the use of manipulatives. <http://www.ldonline.org>

91
Teaching Support Services, Teaching Students with a Physical Disability. University of Guelph. <http://www.tss.uoguelph.ca/resources/pdfs/Mobility2.pdf>
UNESCO: Stopping violence in Schools: A guide for teachers. <http://unesdoc.unesco.org/images/0018/001841/184162e.pdf>
Washington State Department of Social and Health Service, Child Development Guide. <http://www.dshs.wa.gov/ca/fosterparents/training/chidev/cd06.htm>
Watson, Sue, Physically Handicapped Students, About com: Special Education. <http://specialed.about.com/od/physicaldisabilities/a/physical.htm>
Watson, Sue, Teaching Social Skills, About com: Special Education. <http://specialed.about.com/cs/behaviordisorders/a/social.htm>
West Virginia University, Strategies for teaching students with learning disabilities. <http://www.as.wvu.edu/~scidis/learning.html#sect1a>

Bözingenstrasse 71 CH – 2505 Biel/Bienne Switzerland
Tel. +41 (0)32 344 30 50 Fax +41 (0)32 341 08 10 Web www.sad.ch www.sportanddev.org E-Mail [email protected]