Parallel Plaquettes - Rigging for Rescue
22
Parallel Plaquettes: A lightweight rope rescue system using common climbing equipment Presented to: Presented by: The International Technical Rescue Symposium Mike Gibbs November 6-8, 2009 Rigging for Rescue Pueblo, Colorado Ouray, Colorado USA USA Introduction : A current review of rope rescue systems reveals a wide variety of techniques, equipment and risk management philosophies relative to moving live loads over complex terrain. Some teams use a single main line and a separate belay line; others employ the use of two mainlines to support the load without a separate belay. Descent control device choices run the gamut and include brakeracks, cammed devices, 8 plates and belay tubes just to name a few; rescue belay devices/systems are also numerous and include Tandem Prusiks, the Traverse 540° Rescue Belay, the Petzl I’D as well as several other devices. While some teams may elect to employ the use of single rope technique in certain circumstances, others would rarely move a live load without the use of a backup belay system. The reasons for the diversity in all of these subject matters include terrain, regional influences, culture, typical number of respondents, skill and training levels, cost, weight, commonality of equipment, perceived levels of risk, type and size of agency and many other considerations. The nature of the task is improvisational. Because of that quality, the solutions will always require judgment and that alone will ensure a certain level of diversity amongst ‘common industry practices’. One ‘big picture’ theme that seems to be pretty well agreed upon amongst practitioners is: 1. having system-wide auto-stop in place (i.e. the system does not require a human operator to hold or grip something in order to maintain security) The Parallel Plaquettes system is currently being examined as a potential option to meet that key rope rescue principle. The system was not designed for all rope rescue groups for reasons discussed above. For example, it is not compatible with 12.5mm rope. However, for those operating in a mountain rescue environment using smaller diameter rope (≤ 11mm) it has the benefit of being constructed with ubiquitous gear that is likely already hanging from your harness. © 2009, Rigging for Rescue
-
Upload
khangminh22 -
Category
Documents
-
view
2 -
download
0
Transcript of Parallel Plaquettes - Rigging for Rescue

Parallel Plaquettes:
A lightweight rope rescue system using common climbing equipment
Presented to: Presented by: The International Technical Rescue Symposium Mike Gibbs November 6-8, 2009 Rigging for Rescue Pueblo, Colorado Ouray, Colorado USA USA
Introduction: A current review of rope rescue systems reveals a wide variety of techniques, equipment and risk management philosophies relative to moving live loads over complex terrain. Some teams use a single main line and a separate belay line; others employ the use of two mainlines to support the load without a separate belay. Descent control device choices run the gamut and include brakeracks, cammed devices, 8 plates and belay tubes just to name a few; rescue belay devices/systems are also numerous and include Tandem Prusiks, the Traverse 540° Rescue Belay, the Petzl I’D as well as several other devices. While some teams may elect to employ the use of single rope technique in certain circumstances, others would rarely move a live load without the use of a backup belay system. The reasons for the diversity in all of these subject matters include terrain, regional influences, culture, typical number of respondents, skill and training levels, cost, weight, commonality of equipment, perceived levels of risk, type and size of agency and many other considerations. The nature of the task is improvisational. Because of that quality, the solutions will always require judgment and that alone will ensure a certain level of diversity amongst ‘common industry practices’. One ‘big picture’ theme that seems to be pretty well agreed upon amongst practitioners is:
1. having system-wide auto-stop in place (i.e. the system does not require a human operator to hold or grip something in order to maintain security)
The Parallel Plaquettes system is currently being examined as a potential option to meet that key rope rescue principle. The system was not designed for all rope rescue groups for reasons discussed above. For example, it is not compatible with 12.5mm rope. However, for those operating in a mountain rescue environment using smaller diameter rope (≤ 11mm) it has the benefit of being constructed with ubiquitous gear that is likely already hanging from your harness.
© 2009, Rigging for Rescue

Parallel Plaquettes ITRS 2009 Mike Gibbs, Rigging for Rescue Page 2 of 10
© 2009, Rigging for Rescue
Background: The term plaquette is a colloquialism used generically for any auto-locking climbing belay plate. Plaquette is French for ‘small plate’. The original auto-locking belay plate was the New Alp Plaquette Magique (aka Plaquette or Magic Plate). The device was popularized by climbing guides on the European continent as a means of belaying two clients simultaneously on one device. Other similar devices have since come on the market and include the Kong GiGi, the Petzl Reverso, the Simond Toucan, the Black Diamond ATC Guide and others. They are all referred to generically by the brandnomer plaquette. The original device by New Alp was an excellent auto-locking device for belaying the second climber(s) on a hands-free top-rope belay, but was lacking as a lead climbing belay device. The modern devices incorporated some design changes to improve the performance as all-around lead climbing belay devices, while maintaining the auto-locking features. Our research project focused exclusively on this newest generation of plaquette devices. When rigged on an anchor in auto-locking mode, a plaquette device - in conjunction with a carabiner - acts as a one-way rope trap. The standing part of the rope pays through freely one direction (climber climbing up), but then auto-locks when tensioned in the opposite direction (climber falls). In principle it works similarly to a Garda hitch. In order to release the plaquette while under tension, a sling is rigged on to the carabiner that creates the rope trap; that sling is then re-directed to an anchor point behind so that a pull on the sling re-orients the device and rope then runs freely. The release can be quite ‘hair trigger’ for the untrained climber, which is a valid safety concern and training issue. The extra step to ‘defeat’ the lock-up has likely contributed to the relatively slow adoption of the plaquette amongst the general recreational climbing population – it has been a requisite piece of kit for climbing guides for many years now. Genesis of the System: At Rigging for Rescue we work with a wide variety of rope rescue practitioners and agencies. Some of these practitioners respond or work in remote, mountainous areas where weight as well as commonality and versatility of equipment are premium considerations (e.g. military special ops, NPS climbing rangers). Some of these groups are exploring the use of specialty ropes such as Dyneema core/Polyester sheath construction, as well as smaller diameters down to 8mm. Critically evaluating some of the current systems using smaller diameter rope revealed potential issues in the use of smaller diameter cordage to produce Prusik hitches (e.g. 6mm) and raised some concerns as to the integrity of the systems in specific circumstances.
Parallel Plaquettes ITRS 2009 Mike Gibbs, Rigging for Rescue Page 3 of 10
© 2009, Rigging for Rescue
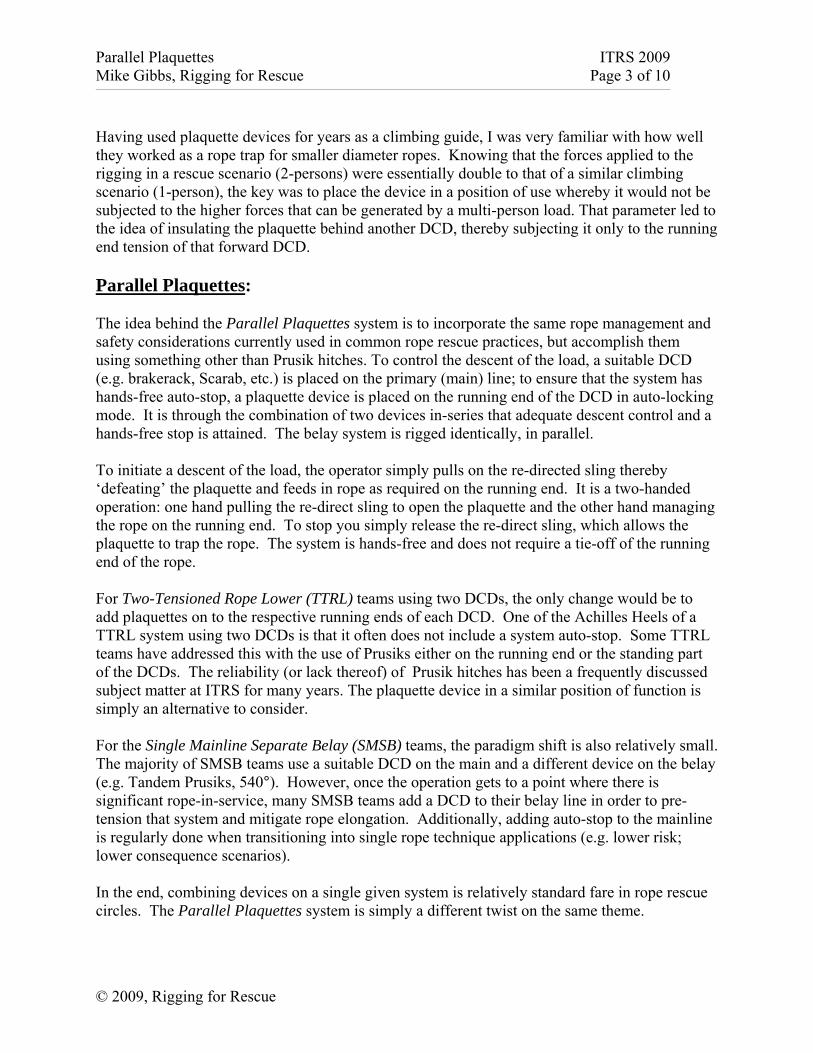
Having used plaquette devices for years as a climbing guide, I was very familiar with how well they worked as a rope trap for smaller diameter ropes. Knowing that the forces applied to the rigging in a rescue scenario (2-persons) were essentially double to that of a similar climbing scenario (1-person), the key was to place the device in a position of use whereby it would not be subjected to the higher forces that can be generated by a multi-person load. That parameter led to the idea of insulating the plaquette behind another DCD, thereby subjecting it only to the running end tension of that forward DCD. Parallel Plaquettes: The idea behind the Parallel Plaquettes system is to incorporate the same rope management and safety considerations currently used in common rope rescue practices, but accomplish them using something other than Prusik hitches. To control the descent of the load, a suitable DCD (e.g. brakerack, Scarab, etc.) is placed on the primary (main) line; to ensure that the system has hands-free auto-stop, a plaquette device is placed on the running end of the DCD in auto-locking mode. It is through the combination of two devices in-series that adequate descent control and a hands-free stop is attained. The belay system is rigged identically, in parallel. To initiate a descent of the load, the operator simply pulls on the re-directed sling thereby ‘defeating’ the plaquette and feeds in rope as required on the running end. It is a two-handed operation: one hand pulling the re-direct sling to open the plaquette and the other hand managing the rope on the running end. To stop you simply release the re-direct sling, which allows the plaquette to trap the rope. The system is hands-free and does not require a tie-off of the running end of the rope. For Two-Tensioned Rope Lower (TTRL) teams using two DCDs, the only change would be to add plaquettes on to the respective running ends of each DCD. One of the Achilles Heels of a TTRL system using two DCDs is that it often does not include a system auto-stop. Some TTRL teams have addressed this with the use of Prusiks either on the running end or the standing part of the DCDs. The reliability (or lack thereof) of Prusik hitches has been a frequently discussed subject matter at ITRS for many years. The plaquette device in a similar position of function is simply an alternative to consider. For the Single Mainline Separate Belay (SMSB) teams, the paradigm shift is also relatively small. The majority of SMSB teams use a suitable DCD on the main and a different device on the belay (e.g. Tandem Prusiks, 540°). However, once the operation gets to a point where there is significant rope-in-service, many SMSB teams add a DCD to their belay line in order to pre-tension that system and mitigate rope elongation. Additionally, adding auto-stop to the mainline is regularly done when transitioning into single rope technique applications (e.g. lower risk; lower consequence scenarios). In the end, combining devices on a single given system is relatively standard fare in rope rescue circles. The Parallel Plaquettes system is simply a different twist on the same theme.

Parallel Plaquettes ITRS 2009 Mike Gibbs, Rigging for Rescue Page 4 of 10
© 2009, Rigging for Rescue
Naturally, it would be great if there were a single device that accomplished both functions -adequate descent control and auto-stop - over a wide bandwidth of rope diameters (i.e. 8-11mm) while still being lightweight. However, to our knowledge that device does not yet exist. Other approaches that were considered included insulating a Petzl Gri Gri (i.e. Gri Gri on the running end of a DCD), but the device is only suitable for a relatively narrow bandwidth of rope diameter (10-11mm) and does not fit in the category of ‘lightweight non-specialized equipment’. System Analysis: At Rigging for Rescue, we have been experimenting with a plaquette on the running end of the mainline during training seminars for around one year now. During that time we have had the opportunity to observe operations, solicit feedback and simply get a general sense for the pros and cons of the system in a wide variety of rope rescue scenarios. Pros:
• the system auto-locks in a hands-free manner • no tie-off is required on the running end of the rope • eliminates a type of ‘mainline failure’ – namely, the loss of control of the running end of
the rope by the operator • eliminates the use of a Prusik hitch to safeguard the mainline in single rope technique • works with a wide bandwidth of rope diameter ranging from 8-11mm
Cons:
• increased system profile versus simply a stand-alone DCD • only allows for one hand on the running end of the rope • increased rope management when adding or removing friction on a variable friction DCD
(e.g. brakerack or Scarab) due to the second device in the system • longer release distance required of the release hitch during a knot-pass due to the
increased profile of the system (still less than 3m) • two devices in-series is simply ‘busier’ than one device and results in additional rigging
and inspection criteria
Anecdotally, the system works quite well on the mainline. Also, the addition of the plaquette safeguards that system against a failure due to loss of control of the running end of the rope (e.g. untying a loaded DCD and losing situational awareness as to which rope to grip). In parallel on the backup (belay) line in a lowering scenario, the system offers the benefit of creating a ‘mirror image’ of the primary (main) line system. This quality would simplify both training and operational considerations. The question then becomes: “Can the system be reliably used in parallel on the belay?”

Parallel Plaquettes ITRS 2009 Mike Gibbs, Rigging for Rescue Page 5 of 10
© 2009, Rigging for Rescue
This past summer, we attempted to answer this question by conducting two separate drop test series over a course of six days in total. A total of 94 drop tests were completed. Test Method: The tests were conducted in a ‘quick look’ exploratory style. The intentions were to confirm/refute certain suspicions as well as possibly identify further areas of study on the subject matter. Many variables were considered and as a result some combinations were only examined once. Further research on the subject matter is certainly warranted. One example of the relatively non-scientific nature of the test series was that we elected to conduct the fall-factor-zero tests with the mainline failing while the test mass was in motion – simulating a controlled lowering of the rescue package at which point the mainline failed due to rock fall, for example. This test method made the examination more relative to actual field conditions, but much less repeatable from a scientific standpoint (i.e. slightly different lowering speeds from one test to the next; the resulting different momentum values of the test mass itself; etc.). Four categories of mainline failure were addressed in the test series:
1. while lowering during the initial edge transition 2. while lowering following the initial edge transition 3. while raising with a snug top-belay 4. while raising with some inadvertent slack in the belay
In each of these scenarios, the mainline was intentionally failed via a quick release mechanism and the belay line rigged in Parallel Plaquettes mode was the fall arrest system. In July, 2009, we conducted three days of drop testing in Ouray, Colorado focusing exclusively on the scenario of failing the mainline during the initial edge transition in a high angle setting. The drop tests were set up using the British Columbia Council of Technical Rescue (BCCTR) Belay Competence Drop Test Method (BCDTM) of a 1m drop on 3m of rope with a 200kg test mass. As opposed to conducting the tests on a drop tower, we instead rigged the test series at a local crag with a 90° edge transition. This was not done in order to introduce an edge in the system, but rather due to the availability of a suitable testing site location. The edge was protected by a Russ Anderson edge roller. There was no human operator managing the belay device - the system was rigged, tensioned hand tight and then the drop test was conducted. Force over time measurements were taken separately on both the DCD and the Plaquette using electronic load cells set to 2400 Hz.

Parallel Plaquettes ITRS 2009 Mike Gibbs, Rigging for Rescue Page 6 of 10
© 2009, Rigging for Rescue
The variables examined were as follows: DCD:
• Conterra SS Scarab • Black Diamond ATC Guide • Petzl Reverso 3 • Simond Toucan
Plaquette: • Black Diamond ATC Guide • Petzl Reverso 3 • Simond Toucan
Rope (make, model, diameter): • New England, KM III, 11 mm • New England, KM III, 9.8 mm • PMI, EZ Bend, 11 mm
• PMI, EZ Bend, 10 mm • Sterling, HTP, 11 mm • Sterling, HTP, 10 mm
The DCDs chosen for the test series were selected as a result of their lighter weight and compact profile. The plaquettes selected included likely the two most popular devices (Reverso 3 and ATC Guide) along with the third one due to it’s unique releasing mechanism (Toucan). Finally, the ropes covered a Nylon/Polyester blend (KM III), an all Nylon model (EZ Bend) and an all Polyester model (HTP) in addition to the two different rope diameters. In September, 2009, we conducted an additional three days of drop testing this time focusing on the mainline failure scenarios involving a snug top-belay both in a lowering and in a raising mode. The drop tests in the September test series included 15m of rope-in-service and a human operator on the belay system. No force measurements were recorded. Results and Discussion: July, 2009 Test Series: The initial test series in July, 2009, was meant to address the scenario of failing the primary (main) line while transitioning the initial edge in a high angle setting. This system failure could be the result of a rigging error, an inspection error, poor command & communication, a toppled artificial high directional or simply a slip of the attendant managing the loaded stretcher, just to name a few scenarios. The drop tests were conducted using the BCCTR BCDTM of a 1 meter drop on 3 meters of rope. The 1 meter drop height is meant to simulate the belay rope being elevated off of the ground (at around equal to the bridle/stretcher profile height) in order to clear edge obstacles. Indicators were being sought on three matters:
1. Were the forces too high (i.e. > 15 kN)? 2. Was the stopping distance excessive (i.e. > 1 meter)? 3. Did the plaquette in use as the auto-stop fail to arrest the fall?

Parallel Plaquettes ITRS 2009 Mike Gibbs, Rigging for Rescue Page 7 of 10
© 2009, Rigging for Rescue
Forces: Total System MAF (kN) by rope diameter: Data Summary 9.8 & 10mm 11mm minimum 7.29 8.68maximum 13.65 14.41average 9.36 10.90
The maximum forces recorded were below the BCCTR BCDTM benchmark of 15kN regardless of rope type. Stop Distance: Stop Distance (cm) by rope diameter: Data Summary 9.8 & 10mm 11mm minimum 37 43maximum 50 77average 44 51
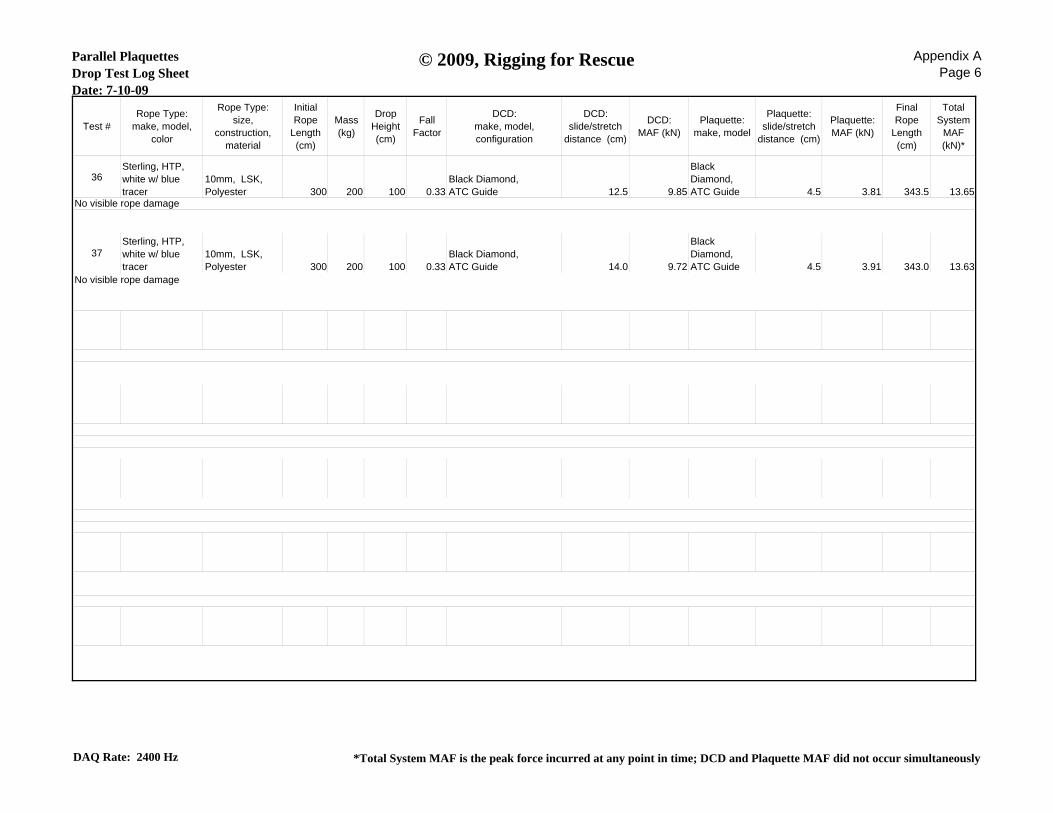
The maximum stop distances recorded were below the BCCTR BCDTM benchmark of 100cm regardless of rope type. The higher recorded stop distances on the larger diameter rope type were likely due to the differences in DCDs used for the drop tests on each given rope diameter. For example, all of the drops conducted with the 11mm ropes used a SS Scarab with 1 bar and 1 horn. Whereas, all of the drops conducted with 9.8 & 10mm rope used a climber-style DCD like a Black Diamond ATC Guide in lowering mode (i.e. not plaquette mode). System Failures: None of the drop tests conducted produced a failure to arrest the test mass by the plaquette device. However, Drop Test #21 (Appendix A) did produce a failure of the DCD; the device, a Simond Toucan, broke into two parts. However, the fall was still arrested by the plaquette which was also a Simond Toucan.

Parallel Plaquettes ITRS 2009 Mike Gibbs, Rigging for Rescue Page 8 of 10
© 2009, Rigging for Rescue
Additional observations:
• A human operator would cause maximum arrest forces to decline at the expense of an increase in stop distances due to reaction time in releasing the re-directed sling to the plaquette.
• The Petzl Reverso 3 was visually not as strong a performer as the Black Diamond ATC
Guide as a plaquette device. Specifically, on some drops the ropes appeared to be close to passing each other within the plaquette slot, thereby defeating the fall arrest.
• The Simond Toucan appears to be unsuitable for this application due to the nature of its
construction.
• Other DCDs not examined also may not be appropriate for this system set up.
• The Conterra Scarab as a DCD in this system requires 1 horn or 3 horns in order to bend the running end of the rope back towards the anchor side (i.e. it cannot be rigged with 2 or 4 horns).
September, 2009 Test Series: The second round of drop tests focused on the less severe event of failing the primary system (1) while lowering following the initial edge transition, (2) while raising with a snug top-rope and (3) while raising with some slack in the belay line. These scenarios eliminate the 1 meter freefall event associated with a primary system failure during the initial edge transition in a high angle setting. Excluding the drops incorporating intentional slack in the belay line, these are ‘fall factor zero’ events and the peak force can be expected to be around 2x the static load of 2kN (approximately 4-5 kN). This can be demonstrated with physics formulas as well as testing and has been addressed at ITRS in the past on several occasions. As a result we elected to not bother with measuring peak forces for the September drop tests. The primary focus of the September drop tests was the human factor. Namely:
1. Can the operator by virtue of a panic reaction or loss of situational awareness affect the integrity of the belay?
2. Does the belay self-actuate or does it require the operator to react in some manner? 3. How far does the load travel before fall arrest is achieved? 4. Would slack in the system during a raising event compromise the integrity of the belay
system using a stand-alone plaquette (e.g. an inattentive belayer not maintaining a snug top-rope)?

Parallel Plaquettes ITRS 2009 Mike Gibbs, Rigging for Rescue Page 9 of 10
© 2009, Rigging for Rescue
Observations- while lowering: In the drop tests, it was evident that the plaquette device would not necessarily self-actuate when the belay line accelerated. The operator had to recognize the rope accelerating through their hand and consciously release the re-directed sling to allow the plaquette to arrest the fall. This would be referred to as a ‘conditional belay’ in that it was conditional on the belayer acting in a specific manner – namely, releasing the sling and gripping only the running end of the rope. It is certainly possible for the belayer to defeat the belay by not releasing the re-directed sling. In a panic reaction you would likely increase the gripping force on whatever you had in your hands. An increase in grip on the running end of the belay line would aid in fall arrest; an increase in pulling on the re-directed sling to the plaquette would compromise fall arrest. Drop Test # 13 (Appendix B) was an example of the belayer not releasing the re-directed sling and causing excessive stopping distance as a result. Observations- while raising: During a raising scenario, the main line is configured as a pulley system and the belay line would be managed with a stand-alone plaquette device. Because the plaquette is not insulated by a DCD like in a lowering scenario, there was some concern that the device could be defeated by the 2-person load in a main line failure despite a snug top-rope. A total of 14 drop tests were conducted with a snug top-rope. There were no observable issues with the plaquette devices arresting the fall on any of the combinations examined. A total of 8 drop tests intentionally included an arbitrary 50cm of slack in the system. This was done in order to examine what affect inadvertent slack might have on the reliability of the fall arrest system. An example would be an inattentive belayer falling behind on taking up slack rope in a raising scenario. Drop Test # 53 (Appendix B) combined a 10mm Sterling HTP rope with the Petzl Reverso 3 plaquette device and 50cm of slack in the system. The ropes passed each other within the slot of the Reverso 3 and the load went to the ground. Clearly, maintaining a snug top-rope is an important safety consideration. On a longer raising operation with significant rope weight in service, an appropriate technique would be to configure the belay line as a simple 3:1 pulley system to aid in keeping the belay rope snug at all times. Future Research:
• A slow pull test series would provide some additional information on available margins for defeating a plaquette in a given scenario. Specifically, identifying at what force values the ropes pass each other on a given rope/plaquette combination.
• Possibly experimenting with different methods for re-directing the plaquette in a
lowering scenario that increase the likelihood of the system self-actuating.

Parallel Plaquettes ITRS 2009 Mike Gibbs, Rigging for Rescue Page 10 of 10
© 2009, Rigging for Rescue
Recommendations:
• To date, we have observed no compelling reasons to not include a plaquette on the running end of the main line system in a lowering scenario. The device provides a hands-free stop on the main line, which has numerous benefits in a variety of rope rescue scenarios.
• The current concern in using the plaquette in parallel on the belay line as a replacement
for a traditional rescue belay device (e.g. Tandem Prusiks or 540°) is that the system does not necessarily self-actuate. However, for the practitioner or team that is well-trained in the basic mechanics of a plaquette-releasing mechanism, the system offers a promising lightweight alternative that encompasses a wide bandwidth of rope diameters.
• All plaquettes are not created equally. Notable differences were observed in this ‘quick
look’ test series.
Key to Acronyms on Log Sheets
Item Description
FAS Fall Arrest System MAF Maximum Arrest Force
DCD Descent Control Device
LSK Low Stretch Kernmantle
HTP High Tenacity Polyester
PMI Pigeon Mountain Industries
SMC Seattle Manufacturing Corporation NE New England
SS Stainless Steel
DAQ Data Acquisition
SMSB Single Main Separate Belay
TTRL Two Tensioned Rope Lower
Thanks To:
Mark Miller, Kevin Koprek, Chris Jackson and Joanie Gibbs from Rigging for Rescue, Craig Holm, David Herr, Roy Legget, Bob Dunkel and Aaron Peavey from Rocky Mountain Fire Authority and Andy Nichols from the USAF PJs who all participated in the drop test series. Sterling Rope who generously donated rope for the testing. And the City of Ouray for the use of their bell tower as a drop testing structure.

Parallel PlaquettesDrop Test Log SheetDate: 7-9-09
© 2009, Rigging for Rescue Appendix APage 1
Test # Rope Type: make, model, color
Rope Type: size,
construction, material
Initial Rope
Length (cm)
Mass (kg)
Drop Height (cm)
Fall Factor
DCD: make, model, configuration
DCD: slide/stretch
distance (cm)
DCD: MAF (kN)
Plaquette: make, model
Plaquette: slide/stretch
distance (cm)
Plaquette: MAF (kN)
Final Rope Length (cm)
Total System MAF
(kN)*
1 NE, KMIII, red w/ white tracer
11mm, LSK, Poly/Nylon 300 200 100 0.33
Conterra, SS Scarab, 1 bar, 1 horn 47.0 5.81 Petzl, Reverso 3 26.0 3.00 377.0 8.68
2 NE, KMIII, red w/ white tracer
11mm, LSK, Poly/Nylon 300 200 100 0.33
Conterra, SS Scarab, 1 bar, 1 horn 22.0 6.51 Petzl, Reverso 3 11.5 2.93 352.0 9.37
3 NE, KMIII, red w/ white tracer
11mm, LSK, Poly/Nylon 300 200 100 0.33
Conterra, SS Scarab, 1 bar, 1 horn 26.5 5.65 Petzl, Reverso 3 11.0 3.84 357.0 9.51
4 NE, KMIII, red w/ white tracer
11mm, LSK, Poly/Nylon 300 200 100 0.33
Conterra, SS Scarab, 1 bar, 1 horn 21.0 6.50 Petzl, Reverso 3 8.5 2.96 350.5 9.27
5 NE, KMIII, red w/ white tracer
11mm, LSK, Poly/Nylon 300 200 100 0.33
Conterra, SS Scarab, 1 bar, 1 horn 17.0 6.75
Black Diamond, ATC Guide 5.5 3.19 350.5 9.79
6 NE, KMIII, red w/ white tracer
11mm, LSK, Poly/Nylon 300 200 100 0.33
Conterra, SS Scarab, 1 bar, 1 horn 17.0 6.51
Black Diamond, ATC Guide 6.0 3.14 349.0 9.55
7 NE, KMIII, red w/ white tracer
11mm, LSK, Poly/Nylon 300 200 100 0.33
Conterra, SS Scarab, 1 bar, 1 horn 17.0 6.59
Black Diamond, ATC Guide 5.5 3.10 350.0 9.64
Missed Russ Anderson Rollers, landed on canvas - only rope damage where contact canvas
Caught Scarab proximal horn on attaching carabinerNo visible rope damage
No visible rope damage
No visible rope damageAfter 4 drops Reverso 3 shows mild scoring from contact with rope capture carabiner
No visible rope damage
No visible rope damage
No visible rope damageBlack Diamond ATC Guide no visible damage after 3 drops
DAQ Rate: 2400 Hz *Total System MAF is the peak force incurred at any point in time; DCD and Plaquette MAF did not occur simultaneously

Parallel PlaquettesDrop Test Log SheetDate: 7-9-09
© 2009, Rigging for Rescue Appendix APage 2
Test # Rope Type: make, model, color
Rope Type: size,
construction, material
Initial Rope
Length (cm)
Mass (kg)
Drop Height (cm)
Fall Factor
DCD: make, model, configuration
DCD: slide/stretch
distance (cm)
DCD: MAF (kN)
Plaquette: make, model
Plaquette: slide/stretch
distance (cm)
Plaquette: MAF (kN)
Final Rope Length (cm)
Total System MAF
(kN)*
8Sterling, HTP, yellow w/ red tracer
11mm, LSK, Polyester 300 200 100 0.33
Conterra, SS Scarab, 1 bar, 1 horn 18.5 8.64
Black Diamond, ATC Guide 7.0 5.87 348.0 14.33
9Sterling, HTP, yellow w/ red tracer
11mm, LSK, Polyester 300 200 100 0.33
Conterra, SS Scarab, 1 bar, 1 horn 19.5 8.25
Black Diamond, ATC Guide 6.5 5.92 345.5 14.02
10Sterling, HTP, yellow w/ red tracer
11mm, LSK, Polyester 300 200 100 0.33
Conterra, SS Scarab, 1 bar, 1 horn 17.5 8.42
Black Diamond, ATC Guide 5.5 6.07 346.5 14.41
11Sterling, HTP, yellow w/ red tracer
11mm, LSK, Polyester 300 200 100 0.33
Conterra, SS Scarab, 1 bar, 1 horn 25.5 7.61 Petzl, Reverso 3 12.0 5.41 353.0 12.63
12Sterling, HTP, yellow w/ red tracer
11mm, LSK, Polyester 300 200 100 0.33
Conterra, SS Scarab, 1 bar, 1 horn 23.5 7.24 Petzl, Reverso 3 12.0 4.90 355.0 11.99
13Sterling, HTP, yellow w/ red tracer
11mm, LSK, Polyester 300 200 100 0.33
Conterra, SS Scarab, 1 bar, 1 horn 22.5 7.69 Petzl, Reverso 3 11.5 5.56 353.0 12.93
14 NE, KMIII, white w/blue tracer
9.8mm, LSK, Poly/Nylon 300 200 100 0.33
Black Diamond, ATC Guide 9.5 6.22
Black Diamond, ATC Guide 5.0 2.85 337.0 8.71
Black Diamond ATC Guide scored at rope capture carabiner interfaceNo visible rope damage
Rope damage visible: bight within Reverso 3 fused together distal to carabiner
No visible rope damage
No visible rope damage
Rope damage visible: mild chafing at bight through DCD
DAQ Rate: 2400 Hz *Total System MAF is the peak force incurred at any point in time; DCD and Plaquette MAF did not occur simultaneously

Parallel PlaquettesDrop Test Log SheetDate: 7-9-09 and 7-10-09
© 2009, Rigging for Rescue Appendix APage 3
Test #Rope Type:
make, model, color
Rope Type: size,
construction, material
Initial Rope
Length (cm)
Mass (kg)
Drop Height (cm)
Fall Factor
DCD: make, model, configuration
DCD: slide/stretch
distance (cm)
DCD: MAF (kN)
Plaquette: make, model
Plaquette: slide/stretch
distance (cm)
Plaquette: MAF (kN)
Final Rope Length (cm)
Total System
MAF (kN)*
15 NE, KMIII, white w/ blue tracer
9.8mm, LSK, Poly/Nylon 300 200 100 0.33
Black Diamond, ATC Guide 10.5 6.19
Black Diamond, ATC Guide 5.0 2.69 339.5 8.67
16 NE, KMIII, white w/ blue tracer
9.8mm, LSK, Poly/Nylon 300 200 100 0.33
Black Diamond, ATC Guide 13.0 6.03
Black Diamond, ATC Guide 5.5 2.54 341.0 8.72
17 NE, KMIII, white w/ blue tracer
9.8mm, LSK, Poly/Nylon 300 200 100 0.33
Black Diamond, ATC Guide 10.5 6.16
Black Diamond, ATC Guide 4.5 2.79 342.5 8.81
18 NE, KMIII, white w/ blue tracer
9.8mm, LSK, Poly/Nylon 300 200 100 0.33 Petzl Reverso 3 23.5 5.43
Petzl, Reverso 3 16.5 1.96 350.0 7.29
19 NE, KMIII, white w/ blue tracer
9.8mm, LSK, Poly/Nylon 300 200 100 0.33 Petzl Reverso 3 18.0 5.78
Petzl, Reverso 3 10.5 2.15 343.5 7.79
20 NE, KMIII, white w/ blue tracer
9.8mm, LSK, Poly/Nylon 300 200 100 0.33 Petzl Reverso 3 15.0 6.47
Petzl, Reverso 3 6.5 2.18 343.5 8.53
21 NE, KMIII, white w/ blue tracer
9.8mm, LSK, Poly/Nylon 300 200 100 0.33 Simond, Toucan Broke 6.03
Simond, Toucan 20.0 3.20 401.0 8.11
Rope damage visible: mild chafing at bight through DCDFirst test of 7-10-09
No visible rope damageAppeared that two ropes approaching passing within plaquette
Missed RA rollers, landed on side platesNo visible rope damage
No visible rope damage
No visible rope damage
DAQ Rate: 2400 Hz *Total System MAF is the peak force incurred at any point in time; DCD and Plaquette MAF did not occur simultaneously

Parallel PlaquettesDrop Test Log SheetDate: 7-10-09
© 2009, Rigging for Rescue Appendix APage 4
Test #Rope Type:
make, model, color
Rope Type: size,
construction, material
Initial Rope
Length (cm)
Mass (kg)
Drop Height (cm)
Fall Factor
DCD: make, model, configuration
DCD: slide/stretch
distance (cm)
DCD: MAF (kN)
Plaquette: make, model
Plaquette: slide/stretch
distance (cm)
Plaquette: MAF (kN)
Final Rope Length (cm)
Total System
MAF (kN)*
22 NE, KMIII, white w/blue tracer
9.8mm, LSK, Poly/Nylon 300 200 100 0.33
Black Diamond, ATC Guide 15.0 6.81
Black Diamond, ATC Guide 6.0 3.32 347.0 10.07
23PMI, EZ Bend, white w/ orange tracer
10mm, LSK, Nylon 300 200 100 0.33
Black Diamond, ATC Guide 16.5 6.80
Black Diamond, ATC Guide 6.0 3.63 344.5 10.37
24PMI, EZ Bend, white w/ orange tracer
10mm, LSK, Nylon 300 200 100 0.33
Black Diamond, ATC Guide 14.5 6.83
Black Diamond, ATC Guide 5.5 3.36 343.5 10.08
25PMI, EZ Bend, white w/ orange tracer
10mm, LSK, Nylon 300 200 100 0.33
Black Diamond, ATC Guide 15.0 7.09
Black Diamond, ATC Guide 4.5 3.56 343.5 10.53
26PMI, EZ Bend, white w/ orange tracer
10mm, LSK, Nylon 300 200 100 0.33 Petzl Reverso 3 24.0 6.05
Petzl, Reverso 3 14.0 2.14 349.8 8.10
27PMI, EZ Bend, white w/ orange tracer
10mm, LSK, Nylon 300 200 100 0.33 Petzl Reverso 3 19.0 5.77
Petzl, Reverso 3 10.5 1.97 346.0 7.74
28PMI, EZ Bend, white w/ orange tracer
10mm, LSK, Nylon 300 200 100 0.33 Petzl Reverso 3 22.5 6.30
Petzl, Reverso 3 14.5 2.19 348.5 8.37
Visible rope damage: mild chafing
Missed Russ Anderson Rollers, on metal side plates and quick links, mild chafe to rope at roller
No visible rope damage
Missed Russ Anderson Rollers, on metal side plates
Missed Russ Anderson Rollers, hit canvas
Visible rope damage: mild chafe Focal point carabiner on 5k load cell change vertical to horizontal (this drop only)
DAQ Rate: 2400 Hz *Total System MAF is the peak force incurred at any point in time; DCD and Plaquette MAF did not occur simultaneously

Parallel PlaquettesDrop Test Log SheetDate: 7-10-09
© 2009, Rigging for Rescue Appendix APage 5
Test #Rope Type:
make, model, color
Rope Type: size,
construction, material
Initial Rope
Length (cm)
Mass (kg)
Drop Height (cm)
Fall Factor
DCD: make, model, configuration
DCD: slide/stretch
distance (cm)
DCD: MAF (kN)
Plaquette: make, model
Plaquette: slide/stretch
distance (cm)
Plaquette: MAF (kN)
Final Rope
Length (cm)
Total System
MAF (kN)*
29PMI, EZ Bend, white w/ black tracer
11mm, LSK, Nylon 300 200 100 0.33
Conterra, SS Scarab, 1 bar, 1 horn 16.0 6.90
Black Diamond, ATC Guide 5.0 3.98 343.5 10.65
30PMI, EZ Bend, white w/ black tracer
11mm, LSK, Nylon 300 200 100 0.33
Conterra, SS Scarab, 1 bar, 1 horn 15.0 7.10
Black Diamond, ATC Guide 4.5 3.55 343.0 10.62
31PMI, EZ Bend, white w/ black tracer
11mm, LSK, Nylon 300 200 100 0.33
Conterra, SS Scarab, 1 bar, 1 horn 91.0 4.19
Petzl, Reverso 3 135.0 2.67 416.5 6.85
32PMI, EZ Bend, white w/ black tracer
11mm, LSK, Nylon 300 200 100 0.33
Conterra, SS Scarab, 1 bar, 1 horn 30.0 5.84
Petzl, Reverso 3 16.5 4.29 357.0 9.80
33PMI, EZ Bend, white w/ black tracer
11mm, LSK, Nylon 300 200 100 0.33
Conterra, SS Scarab, 1 bar, 1 horn 21.5 6.26
Petzl, Reverso 3 10.0 3.76 347.0 9.90
34PMI, EZ Bend, white w/ black tracer
11mm, LSK, Nylon 300 200 100 0.33
Conterra, SS Scarab, 1 bar, 1 horn 23.0 5.96
Petzl, Reverso 3 10.0 3.64 347.5 9.49
35PMI, EZ Bend, white w/ black tracer
11mm, LSK, Nylon 300 200 100 0.33
Conterra, SS Scarab, 1 bar, 1 horn 18.0 6.74
Black Diamond, ATC Guide 5.5 4.09 346.5 10.57
No visible rope damage
Measurement taken on relaxed rope (30 sec.) so rope could be removed from DCD, measure to x markPossible error in test setup: rope capture carabiner on plaquette in contact (pinned) w/ 10k load cell
No visible rope damage
No visible rope damage
No visible rope damage
No visible rope damage
No visible rope damage
DAQ Rate: 2400 Hz *Total System MAF is the peak force incurred at any point in time; DCD and Plaquette MAF did not occur simultaneously
Parallel PlaquettesDrop Test Log SheetDate: 7-10-09
© 2009, Rigging for Rescue Appendix APage 6
Test #Rope Type:
make, model, color
Rope Type: size,
construction, material
Initial Rope
Length (cm)
Mass (kg)
Drop Height (cm)
Fall Factor
DCD: make, model, configuration
DCD: slide/stretch
distance (cm)
DCD: MAF (kN)
Plaquette: make, model
Plaquette: slide/stretch
distance (cm)
Plaquette: MAF (kN)
Final Rope
Length (cm)
Total System
MAF (kN)*
36Sterling, HTP, white w/ blue tracer
10mm, LSK, Polyester 300 200 100 0.33
Black Diamond, ATC Guide 12.5 9.85
Black Diamond, ATC Guide 4.5 3.81 343.5 13.65
37Sterling, HTP, white w/ blue tracer
10mm, LSK, Polyester 300 200 100 0.33
Black Diamond, ATC Guide 14.0 9.72
Black Diamond, ATC Guide 4.5 3.91 343.0 13.63
No visible rope damage
No visible rope damage
DAQ Rate: 2400 Hz *Total System MAF is the peak force incurred at any point in time; DCD and Plaquette MAF did not occur simultaneously

Parallel PlaquettesDrop Test Log SheetDate: 9-14-09 and 9-15-09
© 2009, Rigging for Rescue Appendix BPage 1
Test #Rope Type:
make, model,color
Rope Type: size,
construction, material
Initial Rope
Length (cm)
Mass (kg)
Drop Height (cm)
Fall Factor
DCD: make, model, configuration
Plaquette: make, model
Final Rope
Length (cm)
Lowering Method
1 NE, KMIII, blue w/ white tracer
11mm, LSK, Poly/Nylon 1500 200 0 0
Conterra, SS Scarab, 1 bar, 1 horn
Black Diamond, ATC Guide 1550 TTRL
2 NE, KMIII, blue w/ white tracer
11mm, LSK, Poly/Nylon 1500 200 0 0
Conterra, SS Scarab, 1 bar, 1 horn
Black Diamond, ATC Guide 1590 TTRL
3PMI, EZ Bend, white w/ black tracer
11mm, LSK, Nylon 1500 200 0 0
Conterra, SS Scarab, 1 bar, 1 horn
Black Diamond, ATC Guide 1545 TTRL
4PMI, EZ Bend, white w/ black tracer
11mm, LSK, Nylon 1500 200 0 0
Conterra, SS Scarab, 1 bar, 1 horn
Black Diamond, ATC Guide 1525 TTRL
5 NE, KMIII, blue w/ white tracer
11mm, LSK, Poly/Nylon 1500 200 0 0
Conterra, SS Scarab, 1 bar, 1 horn
Black Diamond, ATC Guide 1585 TTRL
6 NE, KMIII, red w/ white tracer
11mm, LSK, Poly/Nylon 1500 200 0 0
Conterra, SS Scarab, 1 bar, 1 horn
Black Diamond, ATC Guide 1580 TTRL
7 NE, KMIII, red w/ white tracer
11mm, LSK, Poly/Nylon 1500 200 0 0
Conterra, SS Scarab, 1 bar, 1 horn
Black Diamond, ATC Guide 1590 TTRL
8 NE, KMIII, red w/ white tracer
11mm, LSK, Poly/Nylon 1500 200 0 0
Conterra, SS Scarab, 1 bar, 1 horn
Black Diamond, ATC Guide 1875
SMSB-Pretensioned Belay
9PMI, EZ Bend, white w/ black tracer
11mm, LSK, Poly/Nylon 1500 200 0 0
Conterra, SS Scarab, 1 bar, 1 horn
Black Diamond, ATC Guide 1535
SMSB-Pretensioned Belay
Baseline test w/ drop count "3-2-1-0"
Mainline Configuration-SS Scarab; 1 bar, 3 horns
Mainline Configuration-SS Scarab; 1 bar, 3 hornsBelay Configuration-SS Scarab; 1 bar, 1 hornFaulty drop: belayer was not gripping running end of rope (incorrect technique)
Belay Configuration-SS Scarab; 1 bar, 1 horn
First test of 9-15-09

Parallel PlaquettesDrop Test Log SheetDate: 9-15-09
© 2009, Rigging for Rescue Appendix BPage 2
Test #Rope Type:
make, model,color
Rope Type: size,
construction, material
Initial Rope
Length (cm)
Mass (kg)
Drop Height (cm)
Fall Factor
DCD: make, model, configuration
Plaquette: make, model
Final Rope
Length (cm)
Lowering Method
10PMI, EZ Bend, white w/ black tracer
11mm, LSK, Nylon 1500 200 0 0
Conterra, SS Scarab, 1 bar, 1 horn
Black Diamond, ATC Guide 1645
SMSB- Prestensioned Belay
11 NE, KMIII, blue w/ white tracer
11mm, LSK, Poly/Nylon 1500 200 0 0
Conterra, SS Scarab, 1 bar, 1 horn
Black Diamond, ATC Guide 1750
SMSB- Untensioned Belay
12 NE, KMIII, red w/ white tracer
11mm, LSK, Poly/Nylon 1500 200 0 0
Conterra, SS Scarab, 1 bar, 1 horn
Black Diamond, ATC Guide 1675
SMSB- Untensioned Belay
13Sterling, HTP, blue w/ yellow tracer
10mm, LSK, Polyester 1500 200 0 0
Conterra, SS Scarab, 1 bar, 1 horn
Black Diamond, ATC Guide ground TTRL
14Sterling, HTP, red w/ blue tracer
11mm, LSK, Polyester 1500 200 0 0
Conterra, SS Scarab, 1 bar, 1 horn
Black Diamond, ATC Guide 1550 TTRL
15Sterling, HTP, black w/ gold tracer
11mm, LSK, Polyester 1500 200 0 0
Conterra, SS Scarab, 1 bar, 1 horn
Black Diamond, ATC Guide 1650
SMSB- Untensioned Belay
16Sterling, HTP, red w/ blue tracer
11mm, LSK, Polyester 1500 200 0 0
Conterra, SS Scarab, 1 bar, 1 horn
Black Diamond, ATC Guide 1570
SMSB- Untensioned Belay
17Sterling, HTP, blue w/ yellow tracer
10mm, LSK, Polyester 1500 200 0 0
Conterra, SS Scarab, 1 bar, 1 horn
Black Diamond, ATC Guide 1610
SMSB- Untensioned Belay
18Sterling, HTP, red w/ blue tracer
11mm, LSK, Polyester 1500 200 0 0 Petzl, Reverso 3
Black Diamond, ATC Guide 1565 TTRL
Mainline Configuration-SS Scarab; 1 bar, 3 horns Belay Configuration-SS Scarab; 1 bar, 1 horn
Thought from the guy who dropped the load: "I found myself focused on trying to grab the rope and failed to release the plaquette."
Mainline Configuration-SS Scarab; 1 bar, 3 horns Belay Configuration-SS Scarab; 1 bar, 1 horn
and ultimately causing a more violent event
Mainline Configuration-SS Scarab; 1 bar, 3 horns Belay Configuration-SS Scarab; 1 bar, 1 horn
Mainline Configuration-SS Scarab; 1 bar, 3 horns;Belay Configuration-SS Scarab; 1 bar, 1 horn
Mainline Configuration-SS Scarab; 1 bar, 3 horns Belay Configuration-SS Scarab; 1 bar, 1 horn
Belayer was instructed to actively feed slack through the system which resulted in the plaquette migrating toward the change of direction
Pelican ring slightly caught
Mainline Configuration-SS Scarab; 1 bar, 3 horns Belay Configuration-SS Scarab; 1 bar, 1 horn

Parallel PlaquettesDrop Test Log SheetDate: 9-15-09
© 2009, Rigging for Rescue Appendix BPage 3
Test #Rope Type:
make, model,color
Rope Type: size,
construction, material
Initial Rope
Length (cm)
Mass (kg)
Drop Height (cm)
Fall Factor
DCD: make, model, configuration
Plaquette: make, model
Final Rope
Length (cm)
Lowering Method
19Sterling, HTP, red w/ blue tracer
11mm, LSK, Polyester 1500 200 0 0 Petzl, Reverso 3
Black Diamond, ATC Guide 1650 TTRL
20Sterling, HTP, white w/ black tracer
11mm, LSK, Polyester 1500 200 0 0
Petzl, Reverso 3 (low friction)
Black Diamond, ATC Guide 1550 TTRL
21 NE, KMIII, red w/ white tracer
11mm, LSK, Poly/Nylon 1500 200 0 0 Petzl, Reverso 3
Black Diamond, ATC Guide 1570 TTRL
22 NE, KMIII, blue w/ white tracer
11mm, LSK, Poly/Nylon 1500 200 0 0
Petzl, Reverso 3 (low friction)
Black Diamond, ATC Guide 1645 TTRL
23PMI, EZ Bend, white w/ black tracer
11mm, LSK, Nylon 1500 200 0 0 Petzl, Reverso 3
Black Diamond, ATC Guide 1590 TTRL
24PMI, EZ Bend, white w/ black tracer
11mm, LSK, Nylon 1500 200 0 0
Petzl, Reverso 3 (low friction)
Black Diamond, ATC Guide 1565 TTRL
25Sterling, HTP, red w/ blue tracer
11mm, LSK, Polyester 1500 200 0 0 Petzl, Reverso 3
Black Diamond, ATC Guide 1555
SMSB- Untensioned Belay
26Sterling, HTP, blue w/ yellow tracer
10mm, LSK, Polyester 1500 200 0 0
Petzl, Reverso 3 (low friction)
Black Diamond, ATC Guide 1750
SMSB- Untensioned Belay
27 NE, KMIII, red w/ white tracer
11mm, LSK, Poly/Nylon 1500 200 0 0 Petzl, Reverso 3
Black Diamond, ATC Guide 1625
SMSB- Untensioned Belay

Parallel PlaquettesDrop Test Log SheetDate: 9-15-09 and 9-16-09
© 2009, Rigging for Rescue Appendix BPage 4
Test #Rope Type:
make, model,color
Rope Type: size,
construction, material
Initial Rope
Length (cm)
Mass (kg)
Drop Height (cm)
Fall Factor
DCD: make, model, configuration
Plaquette: make, model
Final Rope
Length (cm)
Lowering Method
28 NE, KMIII, red w/ white tracer
11mm, LSK, Poly/Nylon 1500 200 0 0
Petzl, Reverso 3 (low friction)
Black Diamond, ATC Guide 1575
SMSB- Untensioned Belay
29PMI, EZ Bend, white w/ black tracer
11mm, LSK, Nylon 1500 200 0 0
Petzl, Reverso 3 (low friction) Totem 1750 TTRL
30PMI, EZ Bend, white w/ black tracer
11mm, LSK, Nylon 1500 200 0 0
Petzl, Reverso 3 (low friction) Totem 1720
SMSB- Prestensioned Belay
31NE, KM III, white w/ blue tracer
9.8 mm, LSK, Poly/Nylon 1500 200 0 0 Petzl, Reverso 3
Black Diamond, ATC Guide 1555 TTRL
32NE, KM III, white w/ blue tracer
9.8 mm, LSK, Poly/Nylon 1500 200 0 0 Petzl, Reverso 3
Black Diamond, ATC Guide n/a TTRL
33PMI, EZ Bend, white w/ orange tracer
10mm, LSK, Nylon 1500 200 0 0 Petzl, Reverso 3
Black Diamond, ATC Guide 1570 TTRL
34NE, KM III, white w/ blue tracer
9.8 mm, LSK, Poly/Nylon 1500 200 0 0 Petzl, Reverso 3
Black Diamond, ATC Guide 1550 TTRL
35NE, KM III, white w/ blue tracer
9.8 mm, LSK, Poly/Nylon 1500 200 0 0 Petzl, Reverso 3
Black Diamond, ATC Guide 1625 TTRL
36PMI, EZ Bend, white w/ black tracer
11mm, LSK, Nylon 1500 200 0 0 n/a: Raising Scenario
Black Diamond, ATC Guide 1570 n/a
Mainline-Black Diamond ATC Guide Belay-Totem
First Test of 9-16-09
Mainline-Black Diamond ATC Guide Belay-Just the Totem
Faulty drop due to rap ring catch

Parallel PlaquettesDrop Test Log SheetDate: 9-16-09
© 2009, Rigging for Rescue Appendix BPage 5
Test #Rope Type:
make, model,color
Rope Type: size,
construction, material
Initial Rope
Length (cm)
Mass (kg)
Drop Height (cm)
Fall Factor
DCD: make, model, configuration
Plaquette: make, model
Final Rope
Length (cm)
Lowering Method
37PMI, EZ Bend, white w/ black tracer
11mm, LSK, Nylon 1500 200 0 0 n/a: Raising Scenario Petzl, Reverso 3 1580 n/a
38PMI, EZ Bend, white w/ black tracer
11mm, LSK, Nylon 1500 200 0 0 n/a: Raising Scenario
Black Diamond, ATC Guide 1575 n/a
39PMI, EZ Bend, white w/ black tracer
11mm, LSK, Nylon 1500 200 0 0 n/a: Raising Scenario Petzl, Reverso 3 1580 n/a
40 NE, KMIII, blue w/ white tracer
11mm, LSK, Poly/Nylon 1500 200 0 0 n/a: Raising Scenario
Black Diamond, ATC Guide 1585 n/a
41 NE, KMIII, blue w/ white tracer
11mm, LSK, Poly/Nylon 1500 200 0 0 n/a: Raising Scenario Petzl, Reverso 3 1585 n/a
42 NE, KMIII, red w/ white tracer
11mm, LSK, Poly/Nylon 1500 200 0 0 n/a: Raising Scenario
Black Diamond, ATC Guide 1600 n/a
43 NE, KMIII, red w/ white tracer
11mm, LSK, Poly/Nylon 1500 200 0 0 n/a: Raising Scenario Petzl, Reverso 3 1585 n/a
44Sterling, HTP, red w/ blue tracer
11mm, LSK, Polyester 1500 200 0 0 n/a: Raising Scenario
Black Diamond, ATC Guide 1530 n/a
45Sterling, HTP, blue w/ yellow tracer
10mm, LSK, Polyester 1500 200 0 0 n/a: Raising Scenario Petzl, Reverso 3 1555 n/a
46 Sterling, HTP, black w/ green tracer
11mm, LSK, Polyester 1500 200 0 0 n/a: Raising Scenario
Black Diamond, ATC Guide 1555 n/a
47Sterling, HTP, white w/ black tracer
11mm, LSK, Polyester 1500 200 0 0 n/a: Raising Scenario Petzl, Reverso 3 1555 n/a

Parallel PlaquettesDrop Test Log SheetDate: 9-16-09
© 2009, Rigging for Rescue Appendix BPage 6
Test #Rope Type:
make, model,color
Rope Type: size,
construction, material
Initial Rope
Length (cm)
Mass (kg)
Drop Height (cm)
Fall Factor
DCD: make, model, configuration
Plaquette: make, model
Final Rope
Length (cm)
Lowering Method
48PMI, EZ Bend, white w/ black tracer
11mm, LSK, Nylon 1550 200 50 0.03 n/a: Raising Scenario
Black Diamond, ATC Guide 1630 n/a
49PMI, EZ Bend, white w/ black tracer
11mm, LSK, Nylon 1550 200 50 0.03 n/a: Raising Scenario Petzl, Reverso 3 1645 n/a
50 NE, KMIII, blue w/ white tracer
11mm, LSK, Poly/Nylon 1550 200 50 0.03 n/a: Raising Scenario
Black Diamond, ATC Guide 1635 n/a
51 NE, KMIII, blue w/ white tracer
11mm, LSK, Poly/Nylon 1550 200 50 0.03 n/a: Raising Scenario Petzl, Reverso 3 1640 n/a
52Sterling, HTP, red w/ blue tracer
11mm, LSK, Polyester 1550 200 50 0.03 n/a: Raising Scenario
Black Diamond, ATC Guide 1600 n/a
53Sterling, HTP, blue w/ yellow tracer
10mm, LSK, Polyester 1550 200 50 0.03 n/a: Raising Scenario Petzl, Reverso 3 ground n/a
54NE, KM III, white w/ blue tracer
9.8 mm, LSK, Poly/Nylon 1500 200 0 0 n/a: Raising Scenario
Black Diamond, ATC Guide 1580 n/a
55NE, KM III, white w/ blue tracer
9.8 mm, LSK, Poly/Nylon 1500 200 0 0 n/a: Raising Scenario Petzl, Reverso 3 1580 n/a
56NE, KM III, white w/ blue tracer
9.8 mm, LSK, Poly/Nylon 1550 200 50 0.03 n/a: Raising Scenario
Black Diamond, ATC Guide 1640 n/a
57NE, KM III, white w/ blue tracer
9.8 mm, LSK, Poly/Nylon 1550 200 50 0.03 n/a: Raising Scenario Petzl, Reverso 3 1665 n/a
some visible damage to sheath on rope