
Pacemaker 1.1 Configuration Explained - ClusterLabs
160
Pacemaker 1.1 Configuration Explained An A-Z guide to Pacemaker's Configuration Options Andrew Beekhof
-
Upload
khangminh22 -
Category
Documents
-
view
0 -
download
0
Transcript of Pacemaker 1.1 Configuration Explained - ClusterLabs

Pacemaker 1.1
Configuration ExplainedAn A-Z guide to Pacemaker's Configuration Options
Andrew Beekhof

Configuration Explained
Pacemaker 1.1 Configuration ExplainedAn A-Z guide to Pacemaker's Configuration OptionsEdition 1
Author Andrew Beekhof [email protected] Dan Frîncu [email protected]
Philipp Marek [email protected] Roth [email protected] Marowsky-Bree [email protected] Gao [email protected] Schraitle [email protected] Muhamedagic [email protected]
Copyright © 2009-2011 Andrew Beekhof.
The text of and illustrations in this document are licensed under a Creative Commons Attribution–Share Alike 3.0 Unported license ("CC-BY-SA")3.
In accordance with CC-BY-SA, if you distribute this document or an adaptation of it, you must providethe URL for the original version.
In addition to the requirements of this license, the following activities are looked upon favorably:1. If you are distributing Open Publication works on hardcopy or CD-ROM, you provide email
notification to the authors of your intent to redistribute at least thirty days before your manuscriptor media freeze, to give the authors time to provide updated documents. This notification shoulddescribe modifications, if any, made to the document.
2. All substantive modifications (including deletions) be either clearly marked up in the document orelse described in an attachment to the document.
3. Finally, while it is not mandatory under this license, it is considered good form to offer a free copyof any hardcopy or CD-ROM expression of the author(s) work.
The purpose of this document is to definitively explain the concepts used to configure Pacemaker. Toachieve this, it will focus exclusively on the XML syntax used to configure the CIB.
For those that are allergic to XML, there exist several unified shells and GUIs for Pacemaker. Howeverthese tools will not be covered at all in this document1, precisely because they hide the XML.
Additionally, this document is NOT a step-by-step how-to guide for configuring a specific clusteringscenario. Although such guides exist, the purpose of this document is to provide an understanding ofthe building blocks that can be used to construct any type of Pacemaker cluster. Try the Clusters fromScratch2 document instead.
3 An explanation of CC-BY-SA is available at http://creativecommons.org/licenses/by-sa/3.0/1 I hope, however, that the concepts explained here make the functionality of these tools more easily understood.2 http://www.clusterlabs.org/doc

iii
Table of ContentsPreface xv
1. Document Conventions .................................................................................................. xv1.1. Typographic Conventions ..................................................................................... xv1.2. Pull-quote Conventions ....................................................................................... xvi1.3. Notes and Warnings .......................................................................................... xvii
2. We Need Feedback! ..................................................................................................... xvii
1. Read-Me-First 11.1. The Scope of this Document ......................................................................................... 11.2. What Is Pacemaker? ..................................................................................................... 11.3. Types of Pacemaker Clusters ........................................................................................ 21.4. Pacemaker Architecture ................................................................................................ 3
1.4.1. Conceptual Stack Overview ................................................................................ 41.4.2. Internal Components .......................................................................................... 5
2. Configuration Basics 72.1. Configuration Layout ..................................................................................................... 72.2. The Current State of the Cluster .................................................................................... 82.3. How Should the Configuration be Updated? ................................................................... 92.4. Quickly Deleting Part of the Configuration ...................................................................... 92.5. Updating the Configuration Without Using XML ............................................................ 102.6. Making Configuration Changes in a Sandbox ............................................................... 102.7. Testing Your Configuration Changes ............................................................................ 112.8. Interpreting the Graphviz output ................................................................................... 12
2.8.1. Small Cluster Transition .................................................................................... 122.8.2. Complex Cluster Transition ............................................................................... 13
2.9. Do I Need to Update the Configuration on all Cluster Nodes? ........................................ 13
3. Cluster Options 153.1. Special Options ........................................................................................................... 153.2. Configuration Version .................................................................................................. 153.3. Other Fields ................................................................................................................ 153.4. Fields Maintained by the Cluster .................................................................................. 163.5. Cluster Options ........................................................................................................... 163.6. Available Cluster Options ............................................................................................ 163.7. Querying and Setting Cluster Options .......................................................................... 173.8. When Options are Listed More Than Once ................................................................... 18
4. Cluster Nodes 194.1. Defining a Cluster Node .............................................................................................. 194.2. Where Pacemaker Gets the Node Name ..................................................................... 194.3. Describing a Cluster Node ........................................................................................... 204.4. Corosync .................................................................................................................... 20
4.4.1. Adding a New Corosync Node .......................................................................... 204.4.2. Removing a Corosync Node ............................................................................. 214.4.3. Replacing a Corosync Node ............................................................................. 21
4.5. CMAN ........................................................................................................................ 214.5.1. Adding a New CMAN Node .............................................................................. 214.5.2. Removing a CMAN Node ................................................................................. 21
4.6. Heartbeat .................................................................................................................... 224.6.1. Adding a New Heartbeat Node ......................................................................... 224.6.2. Removing a Heartbeat Node ............................................................................. 224.6.3. Replacing a Heartbeat Node ............................................................................. 22

Configuration Explained
iv
5. Cluster Resources 255.1. What is a Cluster Resource ......................................................................................... 255.2. Supported Resource Classes ...................................................................................... 25
5.2.1. Open Cluster Framework .................................................................................. 265.2.2. Linux Standard Base ........................................................................................ 265.2.3. Systemd ........................................................................................................... 275.2.4. Upstart ............................................................................................................. 275.2.5. System Services .............................................................................................. 275.2.6. STONITH ......................................................................................................... 28
5.3. Resource Properties .................................................................................................... 285.4. Resource Options ....................................................................................................... 295.5. Setting Global Defaults for Resource Options ............................................................... 305.6. Instance Attributes ...................................................................................................... 305.7. Resource Operations .................................................................................................. 32
5.7.1. Monitoring Resources for Failure ....................................................................... 325.7.2. Setting Global Defaults for Operations ............................................................... 32
6. Resource Constraints 356.1. Scores ........................................................................................................................ 35
6.1.1. Infinity Math ..................................................................................................... 356.2. Deciding Which Nodes a Resource Can Run On .......................................................... 35
6.2.1. Options ............................................................................................................ 366.2.2. Asymmetrical "Opt-In" Clusters ......................................................................... 366.2.3. Symmetrical "Opt-Out" Clusters ......................................................................... 366.2.4. What if Two Nodes Have the Same Score ......................................................... 37
6.3. Specifying in which Order Resources Should Start/Stop ................................................ 376.3.1. Mandatory Ordering .......................................................................................... 386.3.2. Advisory Ordering ............................................................................................. 38
6.4. Placing Resources Relative to other Resources ............................................................ 386.4.1. Options ............................................................................................................ 396.4.2. Mandatory Placement ....................................................................................... 396.4.3. Advisory Placement .......................................................................................... 39
6.5. Ordering Sets of Resources ........................................................................................ 406.6. Ordered Set ................................................................................................................ 406.7. Two Sets of Unordered Resources .............................................................................. 416.8. Three Resources Sets ................................................................................................. 426.9. Collocating Sets of Resources ..................................................................................... 426.10. Another Three Resources Sets .................................................................................. 44
7. Receiving Notification for Cluster Events 457.1. Configuring SNMP Notifications ................................................................................... 457.2. Configuring Email Notifications .................................................................................... 457.3. Configuring Notifications via External-Agent .................................................................. 46
8. Rules 478.1. Node Attribute Expressions ......................................................................................... 478.2. Time/Date Based Expressions ..................................................................................... 48
8.2.1. Date Specifications ........................................................................................... 498.2.2. Durations ......................................................................................................... 49
8.3. Sample Time Based Expressions ................................................................................. 498.4. Using Rules to Determine Resource Location ............................................................... 51
8.4.1. Using score-attribute Instead of score ..................................................... 528.5. Using Rules to Control Resource Options .................................................................... 528.6. Using Rules to Control Cluster Options ........................................................................ 538.7. Ensuring Time Based Rules Take Effect ...................................................................... 53

v
9. Advanced Configuration 559.1. Connecting from a Remote Machine ............................................................................ 559.2. Specifying When Recurring Actions are Performed ....................................................... 569.3. Moving Resources ...................................................................................................... 56
9.3.1. Manual Intervention .......................................................................................... 569.3.2. Moving Resources Due to Failure ..................................................................... 589.3.3. Moving Resources Due to Connectivity Changes ............................................... 589.3.4. Resource Migration .......................................................................................... 61
9.4. Reusing Rules, Options and Sets of Operations ........................................................... 629.5. Reloading Services After a Definition Change ............................................................... 63
10. Advanced Resource Types 6510.1. Groups - A Syntactic Shortcut .................................................................................... 65
10.1.1. Group Properties ............................................................................................ 6610.1.2. Group Options ................................................................................................ 6610.1.3. Group Instance Attributes ............................................................................... 6610.1.4. Group Contents .............................................................................................. 6610.1.5. Group Constraints .......................................................................................... 6710.1.6. Group Stickiness ............................................................................................ 67
10.2. Clones - Resources That Get Active on Multiple Hosts ................................................ 6710.2.1. Clone Properties ............................................................................................. 6810.2.2. Clone Options ................................................................................................ 6810.2.3. Clone Instance Attributes ................................................................................ 6810.2.4. Clone Contents .............................................................................................. 6810.2.5. Clone Constraints ........................................................................................... 6810.2.6. Clone Stickiness ............................................................................................. 6910.2.7. Clone Resource Agent Requirements .............................................................. 69
10.3. Multi-state - Resources That Have Multiple Modes ...................................................... 7110.3.1. Multi-state Properties ...................................................................................... 7110.3.2. Multi-state Options .......................................................................................... 7110.3.3. Multi-state Instance Attributes ......................................................................... 7210.3.4. Multi-state Contents ........................................................................................ 7210.3.5. Monitoring Multi-State Resources .................................................................... 7210.3.6. Multi-state Constraints .................................................................................... 7210.3.7. Multi-state Stickiness ...................................................................................... 7310.3.8. Which Resource Instance is Promoted ............................................................ 7410.3.9. Multi-state Resource Agent Requirements ....................................................... 7410.3.10. Multi-state Notifications ................................................................................. 7410.3.11. Multi-state - Proper Interpretation of Notification Environment Variables ............ 75
11. Utilization and Placement Strategy 7911.1. Background ............................................................................................................... 7911.2. Utilization attributes ................................................................................................... 7911.3. Placement Strategy ................................................................................................... 8011.4. Allocation Details ....................................................................................................... 81
11.4.1. Which node is preferred to be chosen to get consumed first on allocatingresources? ................................................................................................................. 8111.4.2. Which resource is preferred to be chosen to get assigned first? ......................... 81
11.5. Limitations ................................................................................................................ 8211.6. Strategies for Dealing with the Limitations .................................................................. 82
12. Resource Templates 8312.1. Abstract .................................................................................................................... 8312.2. Configuring Resources with Templates ....................................................................... 8312.3. Referencing Templates in Constraints ........................................................................ 84

Configuration Explained
vi
13. Configure STONITH 8713.1. What Is STONITH ..................................................................................................... 8713.2. What STONITH Device Should You Use .................................................................... 8713.3. Configuring STONITH ................................................................................................ 8713.4. Example ................................................................................................................... 88
14. Status - Here be dragons 9114.1. Node Status .............................................................................................................. 9114.2. Transient Node Attributes .......................................................................................... 9214.3. Operation History ...................................................................................................... 92
14.3.1. Simple Example ............................................................................................. 9414.3.2. Complex Resource History Example ................................................................ 95
15. Multi-Site Clusters and Tickets 9715.1. Abstract .................................................................................................................... 9715.2. Challenges for Multi-Site Clusters .............................................................................. 9715.3. Conceptual Overview ................................................................................................ 97
15.3.1. Components and Concepts ............................................................................. 9815.4. Configuring Ticket Dependencies ............................................................................... 9915.5. Managing Multi-Site Clusters .................................................................................... 100
15.5.1. Granting and Revoking Tickets Manually ....................................................... 10015.5.2. Granting and Revoking Tickets via a Cluster Ticket Registry ........................... 10015.5.3. General Management of Tickets .................................................................... 102
15.6. For more information ............................................................................................... 102
A. FAQ 103Frequently Asked Questions ............................................................................................. 103
A.1. History .............................................................................................................. 103A.2. Setup ............................................................................................................... 103
B. More About OCF Resource Agents 105B.1. Location of Custom Scripts ....................................................................................... 105B.2. Actions ..................................................................................................................... 105B.3. How are OCF Return Codes Interpreted? .................................................................. 106B.4. OCF Return Codes ................................................................................................... 106B.5. Exceptions ................................................................................................................ 107
C. What Changed in 1.0 109C.1. New ......................................................................................................................... 109C.2. Changed .................................................................................................................. 109C.3. Removed .................................................................................................................. 110
D. Installation 111D.1. Choosing a Cluster Stack ......................................................................................... 111D.2. Enabling Pacemaker ................................................................................................. 111
D.2.1. For Corosync ................................................................................................. 111D.2.2. For Heartbeat ................................................................................................ 113
E. Upgrading Cluster Software 115E.1. Version Compatibility ................................................................................................ 115E.2. Complete Cluster Shutdown ...................................................................................... 116
E.2.1. Procedure ...................................................................................................... 116E.3. Rolling (node by node) .............................................................................................. 116
E.3.1. Procedure ...................................................................................................... 116E.3.2. Version Compatibility ...................................................................................... 116E.3.3. Crossing Compatibility Boundaries .................................................................. 117
E.4. Disconnect and Reattach .......................................................................................... 117

vii
E.4.1. Procedure ...................................................................................................... 117E.4.2. Notes ............................................................................................................. 118
F. Upgrading the Configuration from 0.6 119F.1. Preparation ............................................................................................................... 119F.2. Perform the upgrade ................................................................................................. 119
F.2.1. Upgrade the software ..................................................................................... 119F.2.2. Upgrade the Configuration .............................................................................. 119F.2.3. Manually Upgrading the Configuration ............................................................. 121
G. init-Script LSB Compliance 123
H. Sample Configurations 125H.1. Empty ...................................................................................................................... 125H.2. Simple ...................................................................................................................... 125H.3. Advanced Configuration ............................................................................................ 126
I. Further Reading 129
J. Revision History 131
Index 133

viii

ix
List of Figures1.1. Active/Passive Redundancy ................................................................................................... 21.2. Shared Failover .................................................................................................................... 31.3. N to N Redundancy .............................................................................................................. 31.4. Conceptual overview of the cluster stack ............................................................................... 41.5. The Pacemaker stack when running on Corosync .................................................................. 51.6. Subsystems of a Pacemaker cluster ...................................................................................... 56.1. Visual representation of the four resources' start order for the above constraints ..................... 406.2. Visual representation of the start order for two ordered sets of unordered resources ................ 416.3. Visual representation of the start order for the three sets defined above ................................. 426.4. Visual representation of a colocation chain where the members of the middle set have nointer-dependencies ..................................................................................................................... 44

x

xi
List of Tables3.1. Configuration Version Properties .......................................................................................... 153.2. Properties Controlling Validation .......................................................................................... 153.3. Properties Maintained by the Cluster ................................................................................... 163.4. Cluster Options ................................................................................................................... 165.1. Properties of a Primitive Resource ....................................................................................... 285.2. Options for a Primitive Resource ......................................................................................... 295.3. Properties of an Operation .................................................................................................. 326.1. Options for Simple Location Constraints ............................................................................... 366.2. Properties of an Ordering Constraint .................................................................................... 376.3. Properties of a Collocation Constraint .................................................................................. 397.1. Environment Variables Passed to the External Agent ............................................................ 468.1. Properties of a Rule ............................................................................................................ 478.2. Properties of an Expression ................................................................................................ 488.3. Properties of a Date Expression .......................................................................................... 488.4. Properties of a Date Spec ................................................................................................... 499.1. Environment Variables Used to Connect to Remote Instances of the CIB ............................... 559.2. Extra top-level CIB options for remote access ...................................................................... 559.3. Common Options for a ping Resource ................................................................................. 5910.1. Properties of a Group Resource ........................................................................................ 6610.2. Properties of a Clone Resource ......................................................................................... 6810.3. Clone specific configuration options ................................................................................... 6810.4. Environment variables supplied with Clone notify actions ..................................................... 7010.5. Properties of a Multi-State Resource .................................................................................. 7110.6. Multi-state specific resource configuration options ............................................................... 7110.7. Additional constraint options relevant to multi-state resources .............................................. 7310.8. Role implications of OCF return codes ............................................................................... 7410.9. Environment variables supplied with Master notify actions ................................................... 7414.1. Authoritative Sources for State Information ......................................................................... 9114.2. Node Status Fields ............................................................................................................ 9114.3. Contents of an lrm_rsc_op job ....................................................................................... 93B.1. Required Actions for OCF Agents ...................................................................................... 105B.2. Optional Actions for OCF Agents ....................................................................................... 106B.3. Types of recovery performed by the cluster ........................................................................ 106B.4. OCF Return Codes and their Recovery Types .................................................................... 106E.1. Summary of Upgrade Methodologies ................................................................................. 115E.2. Version Compatibility Table ............................................................................................... 116

xii

xiii
List of Examples2.1. An empty configuration ......................................................................................................... 72.2. Sample output from crm_mon ............................................................................................... 82.3. Sample output from crm_mon -n ........................................................................................... 82.4. Safely using an editor to modify the cluster configuration ........................................................ 92.5. Safely using an editor to modify a subsection of the cluster configuration ................................. 92.6. Searching for STONITH related configuration items ................................................................ 92.7. Creating and displaying the active sandbox .......................................................................... 102.8. Using a sandbox to make multiple changes atomically .......................................................... 113.1. An example of the fields set for a cib object ......................................................................... 163.2. Deleting an option that is listed twice ................................................................................... 184.1. Example Heartbeat cluster node entry ................................................................................. 194.2. Example Corosync cluster node entry .................................................................................. 194.3. The result of using crm_attribute to specify which kernel pcmk-1 is running ............................ 205.1. An example system resource .............................................................................................. 285.2. An example OCF resource .................................................................................................. 295.3. An LSB resource with cluster options ................................................................................... 305.4. An example OCF resource with instance attributes ............................................................... 315.5. Displaying the metadata for the Dummy resource agent template .......................................... 315.6. An OCF resource with a recurring health check .................................................................... 325.7. An OCF resource with custom timeouts for its implicit actions ................................................ 335.8. An OCF resource with two recurring health checks, performing different levels of checks -specified via OCF_CHECK_LEVEL. .............................................................................................. 335.9. Example of an OCF resource with a disabled health check ................................................... 346.1. Example set of opt-in location constraints ............................................................................ 366.2. Example set of opt-out location constraints .......................................................................... 366.3. Example of two resources that prefer two nodes equally ....................................................... 376.4. Example of an optional and mandatory ordering constraint .................................................... 386.5. A chain of ordered resources .............................................................................................. 406.6. A chain of ordered resources expressed as a set ................................................................. 406.7. A group resource with the equivalent ordering rules .............................................................. 416.8. Ordered sets of unordered resources ................................................................................... 416.9. Advanced use of set ordering - Three ordered sets, two of which are internally unordered ........ 426.10. A chain of collocated resources ......................................................................................... 426.11. The equivalent colocation chain expressed using resource_sets ..................................... 436.12. Using colocation sets to specify a common peer. ................................................................ 436.13. A colocation chain where the members of the middle set have no inter-dependencies andthe last has master status. ......................................................................................................... 447.1. Configuring ClusterMon to send SNMP traps ........................................................................ 457.2. Configuring ClusterMon to send email alerts ........................................................................ 467.3. Configuring ClusterMon to execute an external-agent ........................................................... 468.1. True if now is any time in the year 2005 .............................................................................. 498.2. Equivalent expression ......................................................................................................... 508.3. 9am-5pm, Mon-Friday ......................................................................................................... 508.4. 9am-6pm, Mon-Friday, or all day saturday ........................................................................... 508.5. 9am-5pm or 9pm-12pm, Mon-Friday .................................................................................... 508.6. Mondays in March 2005 ...................................................................................................... 508.7. A full moon on Friday the 13th ............................................................................................ 518.8. Prevent myApacheRsc from running on c001n03 .................................................................. 518.9. Prevent myApacheRsc from running on c001n03 - expanded version ..................................... 518.10. A sample nodes section for use with score-attribute ............................................................ 528.11. Defining different resource options based on the node name ............................................... 52

Configuration Explained
xiv
8.12. Change resource-stickiness during working hours ...................................................... 539.1. Specifying a Base for Recurring Action Intervals ................................................................... 569.2. An example ping cluster resource that checks node connectivity once every minute ................ 599.3. Don’t run on unconnected nodes ......................................................................................... 609.4. Run only on nodes connected to three or more ping nodes; this assumes multiplier isset to 1000: ............................................................................................................................... 609.5. Prefer the node with the most connected ping nodes ............................................................ 609.6. How the cluster translates the pingd constraint ..................................................................... 619.7. A more complex example of choosing a location based on connectivity .................................. 619.8. Referencing rules from other constraints .............................................................................. 629.9. Referencing attributes, options, and operations from other resources ..................................... 629.10. The DRBD Agent’s Control logic for Supporting the reload Operation ................................ 639.11. The DRBD Agent Advertising Support for the reload Operation ......................................... 639.12. Parameter that can be changed using reload ...................................................................... 6410.1. An example group ............................................................................................................. 6510.2. How the cluster sees a group resource .............................................................................. 6610.3. Example constraints involving groups ................................................................................. 6710.4. An example clone ............................................................................................................. 6710.5. Example constraints involving clones ................................................................................. 6910.6. Example notification variables ............................................................................................ 7010.7. Monitoring both states of a multi-state resource .................................................................. 7210.8. Example constraints involving multi-state resources ............................................................ 7310.9. Manually specifying which node should be promoted .......................................................... 7414.1. A bare-bones status entry for a healthy node called cl-virt-1 ......................................... 9114.2. Example set of transient node attributes for node "cl-virt-1" ................................................. 9214.3. A record of the apcstonith resource ................................................................................... 9314.4. A monitor operation (determines current state of the apcstonith resource) ............................. 9414.5. Resource history of a pingd clone with multiple jobs ........................................................... 95H.1. An Empty Configuration .................................................................................................... 125H.2. Simple Configuration - 2 nodes, some cluster options and a resource .................................. 125H.3. Advanced configuration - groups and clones with stonith .................................................... 126

xv
Preface
Table of Contents1. Document Conventions .......................................................................................................... xv
1.1. Typographic Conventions ............................................................................................. xv1.2. Pull-quote Conventions ............................................................................................... xvi1.3. Notes and Warnings .................................................................................................. xvii
2. We Need Feedback! ............................................................................................................. xvii
1. Document ConventionsThis manual uses several conventions to highlight certain words and phrases and draw attention tospecific pieces of information.
In PDF and paper editions, this manual uses typefaces drawn from the Liberation Fonts1 set. TheLiberation Fonts set is also used in HTML editions if the set is installed on your system. If not,alternative but equivalent typefaces are displayed. Note: Red Hat Enterprise Linux 5 and later includethe Liberation Fonts set by default.
1.1. Typographic ConventionsFour typographic conventions are used to call attention to specific words and phrases. Theseconventions, and the circumstances they apply to, are as follows.
Mono-spaced Bold
Used to highlight system input, including shell commands, file names and paths. Also used to highlightkeys and key combinations. For example:
To see the contents of the file my_next_bestselling_novel in your currentworking directory, enter the cat my_next_bestselling_novel command at theshell prompt and press Enter to execute the command.
The above includes a file name, a shell command and a key, all presented in mono-spaced bold andall distinguishable thanks to context.
Key combinations can be distinguished from an individual key by the plus sign that connects each partof a key combination. For example:
Press Enter to execute the command.
Press Ctrl+Alt+F2 to switch to a virtual terminal.
The first example highlights a particular key to press. The second example highlights a keycombination: a set of three keys pressed simultaneously.
If source code is discussed, class names, methods, functions, variable names and returned valuesmentioned within a paragraph will be presented as above, in mono-spaced bold. For example:
1 https://fedorahosted.org/liberation-fonts/

Preface
xvi
File-related classes include filesystem for file systems, file for files, and dir fordirectories. Each class has its own associated set of permissions.
Proportional Bold
This denotes words or phrases encountered on a system, including application names; dialog box text;labeled buttons; check-box and radio button labels; menu titles and sub-menu titles. For example:
Choose System → Preferences → Mouse from the main menu bar to launch MousePreferences. In the Buttons tab, select the Left-handed mouse check box and clickClose to switch the primary mouse button from the left to the right (making the mousesuitable for use in the left hand).
To insert a special character into a gedit file, choose Applications → Accessories→ Character Map from the main menu bar. Next, choose Search → Find… fromthe Character Map menu bar, type the name of the character in the Search fieldand click Next. The character you sought will be highlighted in the Character Table.Double-click this highlighted character to place it in the Text to copy field and then
click the Copy button. Now switch back to your document and choose Edit → Pastefrom the gedit menu bar.
The above text includes application names; system-wide menu names and items; application-specificmenu names; and buttons and text found within a GUI interface, all presented in proportional bold andall distinguishable by context.
Mono-spaced Bold Italic or Proportional Bold Italic
Whether mono-spaced bold or proportional bold, the addition of italics indicates replaceable orvariable text. Italics denotes text you do not input literally or displayed text that changes depending oncircumstance. For example:
To connect to a remote machine using ssh, type ssh [email protected] ata shell prompt. If the remote machine is example.com and your username on thatmachine is john, type ssh [email protected].
The mount -o remount file-system command remounts the named filesystem. For example, to remount the /home file system, the command is mount -oremount /home.
To see the version of a currently installed package, use the rpm -q packagecommand. It will return a result as follows: package-version-release.
Note the words in bold italics above — username, domain.name, file-system, package, version andrelease. Each word is a placeholder, either for text you enter when issuing a command or for textdisplayed by the system.
Aside from standard usage for presenting the title of a work, italics denotes the first use of a new andimportant term. For example:
Publican is a DocBook publishing system.
1.2. Pull-quote ConventionsTerminal output and source code listings are set off visually from the surrounding text.
Output sent to a terminal is set in mono-spaced roman and presented thus:

Notes and Warnings
xvii
books Desktop documentation drafts mss photos stuff svnbooks_tests Desktop1 downloads images notes scripts svgs
Source-code listings are also set in mono-spaced roman but add syntax highlighting as follows:
package org.jboss.book.jca.ex1;
import javax.naming.InitialContext;
public class ExClient{ public static void main(String args[]) throws Exception { InitialContext iniCtx = new InitialContext(); Object ref = iniCtx.lookup("EchoBean"); EchoHome home = (EchoHome) ref; Echo echo = home.create();
System.out.println("Created Echo");
System.out.println("Echo.echo('Hello') = " + echo.echo("Hello")); }}
1.3. Notes and WarningsFinally, we use three visual styles to draw attention to information that might otherwise be overlooked.
Note
Notes are tips, shortcuts or alternative approaches to the task at hand. Ignoring a note shouldhave no negative consequences, but you might miss out on a trick that makes your life easier.
Important
Important boxes detail things that are easily missed: configuration changes that only apply tothe current session, or services that need restarting before an update will apply. Ignoring a boxlabeled 'Important' will not cause data loss but may cause irritation and frustration.
Warning
Warnings should not be ignored. Ignoring warnings will most likely cause data loss.
2. We Need Feedback!

Preface
xviii
If you find a typographical error in this manual, or if you have thought of a way to make this manualbetter, we would love to hear from you! Please submit a report in Bugzilla2 against the productPacemaker.
When submitting a bug report, be sure to mention the manual's identifier: Pacemaker_Explained
If you have a suggestion for improving the documentation, try to be as specific as possible whendescribing it. If you have found an error, please include the section number and some of thesurrounding text so we can find it easily.
2 http://bugs.clusterlabs.org

Chapter 1.
1
Read-Me-First
Table of Contents1.1. The Scope of this Document ................................................................................................. 11.2. What Is Pacemaker? ............................................................................................................. 11.3. Types of Pacemaker Clusters ................................................................................................ 21.4. Pacemaker Architecture ........................................................................................................ 3
1.4.1. Conceptual Stack Overview ........................................................................................ 41.4.2. Internal Components .................................................................................................. 5
1.1. The Scope of this DocumentThe purpose of this document is to definitively explain the concepts used to configure Pacemaker. Toachieve this, it will focus exclusively on the XML syntax used to configure the CIB.
For those that are allergic to XML, there exist several unified shells and GUIs for Pacemaker. Howeverthese tools will not be covered at all in this document 1 , precisely because they hide the XML.
Additionally, this document is NOT a step-by-step how-to guide for configuring a specific clusteringscenario.
Although such guides exist, the purpose of this document is to provide an understanding of thebuilding blocks that can be used to construct any type of Pacemaker cluster.
1.2. What Is Pacemaker?Pacemaker is a cluster resource manager.
It achieves maximum availability for your cluster services (aka. resources) by detecting and recoveringfrom node and resource-level failures by making use of the messaging and membership capabilitiesprovided by your preferred cluster infrastructure (either Corosync2 or Heartbeat3.
Pacemaker’s key features include:
• Detection and recovery of node and service-level failures
• Storage agnostic, no requirement for shared storage
• Resource agnostic, anything that can be scripted can be clustered
• Supports STONITH4 for ensuring data integrity
• Supports large and small clusters
• Supports both quorate5 and resource driven6 clusters
1 I hope, however, that the concepts explained here make the functionality of these tools more easily understood.2 http://www.corosync.org/3 http://linux-ha.org/wiki/Heartbeat4 http://en.wikipedia.org/wiki/STONITH5 http://en.wikipedia.org/wiki/Quorum_(Distributed_Systems)6 http://devresources.linux-foundation.org/dev/clusters/docs/ResourceDrivenClusters.pdf

Chapter 1. Read-Me-First
2
• Supports practically any redundancy configuration7
• Automatically replicated configuration that can be updated from any node
• Ability to specify cluster-wide service ordering, colocation and anti-colocation
• Support for advanced services type
• Clones: for services which need to be active on multiple nodes
• Multi-state: for services with multiple modes (eg. master/slave, primary/secondary)
1.3. Types of Pacemaker ClustersPacemaker makes no assumptions about your environment, this allows it to support practically anyredundancy configuration8 including Active/Active, Active/Passive, N+1, N+M, N-to-1 and N-to-N.
Figure 1.1. Active/Passive Redundancy
Two-node Active/Passive clusters using Pacemaker and DRBD are a cost-effective solution for manyHigh Availability situations.
7 http://en.wikipedia.org/wiki/High-availability_cluster#Node_configurations8 http://en.wikipedia.org/wiki/High-availability_cluster#Node_configurations

Pacemaker Architecture
3
Figure 1.2. Shared Failover
By supporting many nodes, Pacemaker can dramatically reduce hardware costs by allowing severalactive/passive clusters to be combined and share a common backup node
Figure 1.3. N to N Redundancy
When shared storage is available, every node can potentially be used for failover. Pacemaker caneven run multiple copies of services to spread out the workload.
1.4. Pacemaker ArchitectureAt the highest level, the cluster is made up of three pieces:
• Core cluster infrastructure providing messaging and membership functionality (illustrated in red)
• Non-cluster aware components (illustrated in green).
In a Pacemaker cluster, these pieces include not only the scripts that knows how to start, stopand monitor resources, but also a local daemon that masks the differences between the differentstandards these scripts implement.

Chapter 1. Read-Me-First
4
• A brain (illustrated in blue)
This component processes and reacts to events from the cluster (nodes leaving or joining) andresources (eg. monitor failures) as well as configuration changes from the administrator. In responseto all of these events, Pacemaker will compute the ideal state of the cluster and plot a path toachieve it. This may include moving resources, stopping nodes and even forcing nodes offline withremote power switches.
1.4.1. Conceptual Stack Overview
Figure 1.4. Conceptual overview of the cluster stack
When combined with Corosync, Pacemaker also supports popular open source cluster filesystems.footnote:[ Even though Pacemaker also supports Heartbeat, the filesystems need to use the stack formessaging and membership and Corosync seems to be what they’re standardizing on.
Technically it would be possible for them to support Heartbeat as well, however there seems littleinterest in this. ]
Due to recent standardization within the cluster filesystem community, they make use of a commondistributed lock manager which makes use of Corosync for its messaging capabilities and Pacemakerfor its membership (which nodes are up/down) and fencing services.
Internal Components
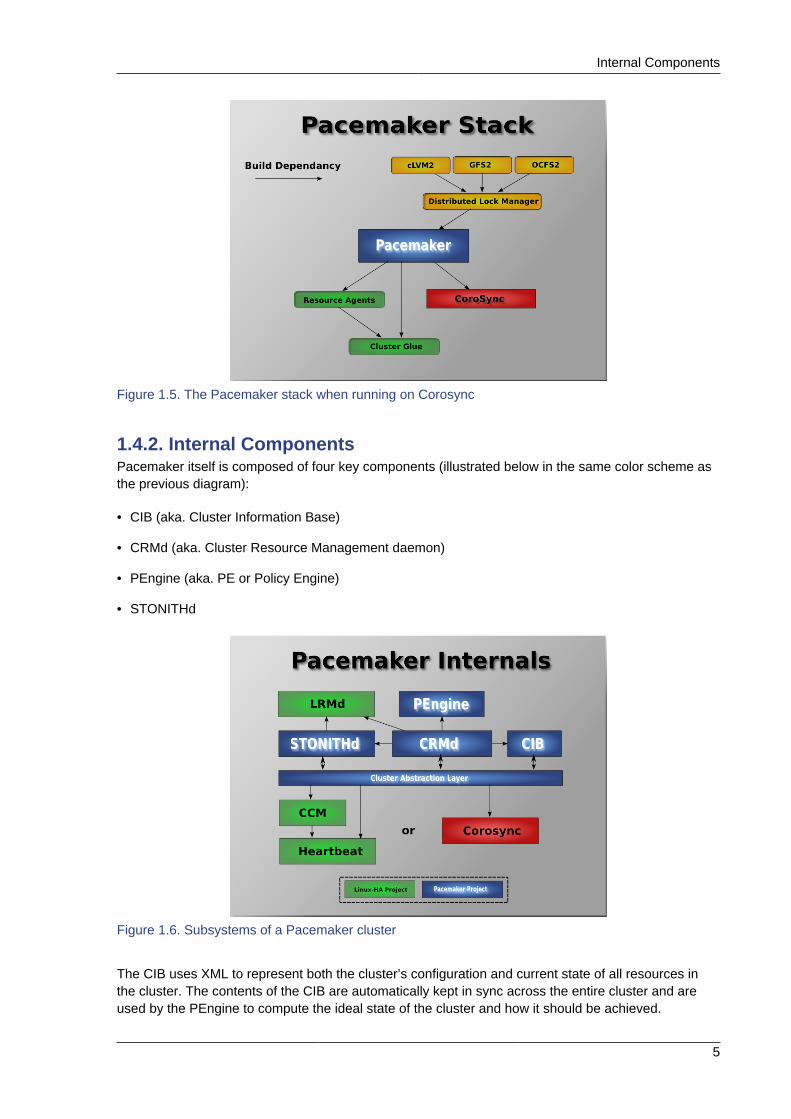
5
Figure 1.5. The Pacemaker stack when running on Corosync
1.4.2. Internal ComponentsPacemaker itself is composed of four key components (illustrated below in the same color scheme asthe previous diagram):
• CIB (aka. Cluster Information Base)
• CRMd (aka. Cluster Resource Management daemon)
• PEngine (aka. PE or Policy Engine)
• STONITHd
Figure 1.6. Subsystems of a Pacemaker cluster
The CIB uses XML to represent both the cluster’s configuration and current state of all resources inthe cluster. The contents of the CIB are automatically kept in sync across the entire cluster and areused by the PEngine to compute the ideal state of the cluster and how it should be achieved.

Chapter 1. Read-Me-First
6
This list of instructions is then fed to the DC (Designated Controller). Pacemaker centralizes all clusterdecision making by electing one of the CRMd instances to act as a master. Should the elected CRMdprocess (or the node it is on) fail… a new one is quickly established.
The DC carries out PEngine’s instructions in the required order by passing them to either the LRMd(Local Resource Management daemon) or CRMd peers on other nodes via the cluster messaginginfrastructure (which in turn passes them on to their LRMd process).
The peer nodes all report the results of their operations back to the DC and, based on the expectedand actual results, will either execute any actions that needed to wait for the previous one tocomplete, or abort processing and ask the PEngine to recalculate the ideal cluster state based on theunexpected results.
In some cases, it may be necessary to power off nodes in order to protect shared data or completeresource recovery. For this Pacemaker comes with STONITHd.
STONITH is an acronym for Shoot-The-Other-Node-In-The-Head and is usually implemented with aremote power switch.
In Pacemaker, STONITH devices are modeled as resources (and configured in the CIB) to enablethem to be easily monitored for failure, however STONITHd takes care of understanding the STONITHtopology such that its clients simply request a node be fenced and it does the rest.

Chapter 2.
7
Configuration Basics
Table of Contents2.1. Configuration Layout ............................................................................................................. 72.2. The Current State of the Cluster ............................................................................................ 82.3. How Should the Configuration be Updated? ........................................................................... 92.4. Quickly Deleting Part of the Configuration .............................................................................. 92.5. Updating the Configuration Without Using XML .................................................................... 102.6. Making Configuration Changes in a Sandbox ....................................................................... 102.7. Testing Your Configuration Changes .................................................................................... 112.8. Interpreting the Graphviz output ........................................................................................... 12
2.8.1. Small Cluster Transition ............................................................................................ 122.8.2. Complex Cluster Transition ....................................................................................... 13
2.9. Do I Need to Update the Configuration on all Cluster Nodes? ................................................ 13
2.1. Configuration LayoutThe cluster is written using XML notation and divided into two main sections: configuration and status.
The status section contains the history of each resource on each node and based on this data,the cluster can construct the complete current state of the cluster. The authoritative source for thestatus section is the local resource manager (lrmd) process on each cluster node and the cluster willoccasionally repopulate the entire section. For this reason it is never written to disk and administratorsare advised against modifying it in any way.
The configuration section contains the more traditional information like cluster options, lists ofresources and indications of where they should be placed. The configuration section is the primaryfocus of this document.
The configuration section itself is divided into four parts:
• Configuration options (called crm_config)
• Nodes
• Resources
• Resource relationships (called constraints)
Example 2.1. An empty configuration
<cib admin_epoch="0" epoch="0" num_updates="0" have-quorum="false"> <configuration> <crm_config/> <nodes/> <resources/> <constraints/> </configuration> <status/> </cib>

Chapter 2. Configuration Basics
8
2.2. The Current State of the ClusterBefore one starts to configure a cluster, it is worth explaining how to view the finished product. Forthis purpose we have created the crm_mon utility that will display the current state of an activecluster. It can show the cluster status by node or by resource and can be used in either single-shot ordynamically-updating mode. There are also modes for displaying a list of the operations performed(grouped by node and resource) as well as information about failures.
Using this tool, you can examine the state of the cluster for irregularities and see how it respondswhen you cause or simulate failures.
Details on all the available options can be obtained using the crm_mon --help command.
Example 2.2. Sample output from crm_mon
============ Last updated: Fri Nov 23 15:26:13 2007 Current DC: sles-3 (2298606a-6a8c-499a-9d25-76242f7006ec) 3 Nodes configured. 5 Resources configured. ============
Node: sles-1 (1186dc9a-324d-425a-966e-d757e693dc86): online 192.168.100.181 (heartbeat::ocf:IPaddr): Started sles-1 192.168.100.182 (heartbeat:IPaddr): Started sles-1 192.168.100.183 (heartbeat::ocf:IPaddr): Started sles-1 rsc_sles-1 (heartbeat::ocf:IPaddr): Started sles-1 child_DoFencing:2 (stonith:external/vmware): Started sles-1 Node: sles-2 (02fb99a8-e30e-482f-b3ad-0fb3ce27d088): standby Node: sles-3 (2298606a-6a8c-499a-9d25-76242f7006ec): online rsc_sles-2 (heartbeat::ocf:IPaddr): Started sles-3 rsc_sles-3 (heartbeat::ocf:IPaddr): Started sles-3 child_DoFencing:0 (stonith:external/vmware): Started sles-3
Example 2.3. Sample output from crm_mon -n
============ Last updated: Fri Nov 23 15:26:13 2007 Current DC: sles-3 (2298606a-6a8c-499a-9d25-76242f7006ec) 3 Nodes configured. 5 Resources configured. ============
Node: sles-1 (1186dc9a-324d-425a-966e-d757e693dc86): online Node: sles-2 (02fb99a8-e30e-482f-b3ad-0fb3ce27d088): standby Node: sles-3 (2298606a-6a8c-499a-9d25-76242f7006ec): online
Resource Group: group-1 192.168.100.181 (heartbeat::ocf:IPaddr): Started sles-1 192.168.100.182 (heartbeat:IPaddr): Started sles-1 192.168.100.183 (heartbeat::ocf:IPaddr): Started sles-1 rsc_sles-1 (heartbeat::ocf:IPaddr): Started sles-1 rsc_sles-2 (heartbeat::ocf:IPaddr): Started sles-3 rsc_sles-3 (heartbeat::ocf:IPaddr): Started sles-3 Clone Set: DoFencing child_DoFencing:0 (stonith:external/vmware): Started sles-3 child_DoFencing:1 (stonith:external/vmware): Stopped child_DoFencing:2 (stonith:external/vmware): Started sles-1

How Should the Configuration be Updated?
9
The DC (Designated Controller) node is where all the decisions are made and if the current DC failsa new one is elected from the remaining cluster nodes. The choice of DC is of no significance to anadministrator beyond the fact that its logs will generally be more interesting.
2.3. How Should the Configuration be Updated?There are three basic rules for updating the cluster configuration:
• Rule 1 - Never edit the cib.xml file manually. Ever. I’m not making this up.
• Rule 2 - Read Rule 1 again.
• Rule 3 - The cluster will notice if you ignored rules 1 & 2 and refuse to use the configuration.
Now that it is clear how NOT to update the configuration, we can begin to explain how you should.
The most powerful tool for modifying the configuration is the cibadmin command which talks to arunning cluster. With cibadmin, the user can query, add, remove, update or replace any part ofthe configuration; all changes take effect immediately, so there is no need to perform a reload-likeoperation.
The simplest way of using cibadmin is to use it to save the current configuration to a temporary file,edit that file with your favorite text or XML editor and then upload the revised configuration.
Example 2.4. Safely using an editor to modify the cluster configuration
# cibadmin --query > tmp.xml# vi tmp.xml# cibadmin --replace --xml-file tmp.xml
Some of the better XML editors can make use of a Relax NG schema to help make sure any changesyou make are valid. The schema describing the configuration can normally be found in /usr/lib/heartbeat/pacemaker.rng on most systems.
If you only wanted to modify the resources section, you could instead do
Example 2.5. Safely using an editor to modify a subsection of the cluster configuration
# cibadmin --query --obj_type resources > tmp.xml# vi tmp.xml# cibadmin --replace --obj_type resources --xml-file tmp.xml
to avoid modifying any other part of the configuration.
2.4. Quickly Deleting Part of the ConfigurationIdentify the object you wish to delete. Eg. run
Example 2.6. Searching for STONITH related configuration items
# cibadmin -Q | grep stonith
<nvpair id="cib-bootstrap-options-stonith-action" name="stonith-action" value="reboot"/> <nvpair id="cib-bootstrap-options-stonith-enabled" name="stonith-enabled" value="1"/>

Chapter 2. Configuration Basics
10
<primitive id="child_DoFencing" class="stonith" type="external/vmware"> <lrm_resource id="child_DoFencing:0" type="external/vmware" class="stonith"> <lrm_resource id="child_DoFencing:0" type="external/vmware" class="stonith"> <lrm_resource id="child_DoFencing:1" type="external/vmware" class="stonith"> <lrm_resource id="child_DoFencing:0" type="external/vmware" class="stonith"> <lrm_resource id="child_DoFencing:2" type="external/vmware" class="stonith"> <lrm_resource id="child_DoFencing:0" type="external/vmware" class="stonith"> <lrm_resource id="child_DoFencing:3" type="external/vmware" class="stonith">
Next identify the resource’s tag name and id (in this case we’ll choose primitive andchild_DoFencing). Then simply execute:
# cibadmin --delete --crm_xml '<primitive id="child_DoFencing"/>'
2.5. Updating the Configuration Without Using XMLSome common tasks can also be performed with one of the higher level tools that avoid the need toread or edit XML.
To enable stonith for example, one could run:
# crm_attribute --attr-name stonith-enabled --attr-value true
Or, to see if somenode is allowed to run resources, there is:
# crm_standby --get-value --node-uname somenode
Or, to find the current location of my-test-rsc, one can use:
# crm_resource --locate --resource my-test-rsc
2.6. Making Configuration Changes in a SandboxOften it is desirable to preview the effects of a series of changes before updating the configurationatomically. For this purpose we have created crm_shadow which creates a "shadow" copy of theconfiguration and arranges for all the command line tools to use it.
To begin, simply invoke crm_shadow and give it the name of a configuration to create 1 ; be sure tofollow the simple on-screen instructions.
Warning
Read the above carefully, failure to do so could result in you destroying the cluster’s activeconfiguration!
Example 2.7. Creating and displaying the active sandbox
# crm_shadow --create test
1 Shadow copies are identified with a name, making it possible to have more than one.

Testing Your Configuration Changes
11
Setting up shadow instance Type Ctrl-D to exit the crm_shadow shell shadow[test]: shadow[test] # crm_shadow --which test
From this point on, all cluster commands will automatically use the shadow copy instead of talkingto the cluster’s active configuration. Once you have finished experimenting, you can either committhe changes, or discard them as shown below. Again, be sure to follow the on-screen instructionscarefully.
For a full list of crm_shadow options and commands, invoke it with the <parameter>--help</parameter> option.
Example 2.8. Using a sandbox to make multiple changes atomically
shadow[test] # crm_failcount -G -r rsc_c001n01 name=fail-count-rsc_c001n01 value=0 shadow[test] # crm_standby -v on -n c001n02 shadow[test] # crm_standby -G -n c001n02 name=c001n02 scope=nodes value=on shadow[test] # cibadmin --erase --force shadow[test] # cibadmin --query <cib cib_feature_revision="1" validate-with="pacemaker-1.0" admin_epoch="0" crm_feature_set="3.0" have-quorum="1" epoch="112" dc-uuid="c001n01" num_updates="1" cib-last-written="Fri Jun 27 12:17:10 2008"> <configuration> <crm_config/> <nodes/> <resources/> <constraints/> </configuration> <status/> </cib> shadow[test] # crm_shadow --delete test --force Now type Ctrl-D to exit the crm_shadow shell shadow[test] # exit # crm_shadow --which No shadow instance provided # cibadmin -Q <cib cib_feature_revision="1" validate-with="pacemaker-1.0" admin_epoch="0" crm_feature_set="3.0" have-quorum="1" epoch="110" dc-uuid="c001n01" num_updates="551"> <configuration> <crm_config> <cluster_property_set id="cib-bootstrap-options"> <nvpair id="cib-bootstrap-1" name="stonith-enabled" value="1"/> <nvpair id="cib-bootstrap-2" name="pe-input-series-max" value="30000"/>
Making changes in a sandbox and verifying the real configuration is untouched
2.7. Testing Your Configuration ChangesWe saw previously how to make a series of changes to a "shadow" copy of the configuration. Beforeloading the changes back into the cluster (eg. crm_shadow --commit mytest --force), it isoften advisable to simulate the effect of the changes with crm_simulate, eg.
# crm_simulate --live-check -VVVVV --save-graph tmp.graph --save-dotfile tmp.dot

Chapter 2. Configuration Basics
12
The tool uses the same library as the live cluster to show what it would have done given the suppliedinput. It’s output, in addition to a significant amount of logging, is stored in two files tmp.graph andtmp.dot, both are representations of the same thing — the cluster’s response to your changes.
In the graph file is stored the complete transition, containing a list of all the actions, their parametersand their pre-requisites. Because the transition graph is not terribly easy to read, the tool alsogenerates a Graphviz dot-file representing the same information.
2.8. Interpreting the Graphviz output• Arrows indicate ordering dependencies
• Dashed-arrows indicate dependencies that are not present in the transition graph
• Actions with a dashed border of any color do not form part of the transition graph
• Actions with a green border form part of the transition graph
• Actions with a red border are ones the cluster would like to execute but cannot run
• Actions with a blue border are ones the cluster does not feel need to be executed
• Actions with orange text are pseudo/pretend actions that the cluster uses to simplify the graph
• Actions with black text are sent to the LRM
• Resource actions have text of the form rsc_action_interval node
• Any action depending on an action with a red border will not be able to execute.
• Loops are really bad. Please report them to the development team.
2.8.1. Small Cluster Transition
In the above example, it appears that a new node, node2, has come online and that the clusteris checking to make sure rsc1, rsc2 and rsc3 are not already running there (Indicated by the*_monitor_0 entries). Once it did that, and assuming the resources were not active there, it wouldhave liked to stop rsc1 and rsc2 on node1 and move them to node2. However, there appears tobe some problem and the cluster cannot or is not permitted to perform the stop actions which impliesit also cannot perform the start actions. For some reason the cluster does not want to start rsc3anywhere.
For information on the options supported by crm_simulate, use the --help option.

Complex Cluster Transition
13
2.8.2. Complex Cluster Transition
2.9. Do I Need to Update the Configuration on all ClusterNodes?No. Any changes are immediately synchronized to the other active members of the cluster.

Chapter 2. Configuration Basics
14
To reduce bandwidth, the cluster only broadcasts the incremental updates that result from yourchanges and uses MD5 checksums to ensure that each copy is completely consistent.

Chapter 3.
15
Cluster Options
Table of Contents3.1. Special Options ................................................................................................................... 153.2. Configuration Version .......................................................................................................... 153.3. Other Fields ........................................................................................................................ 153.4. Fields Maintained by the Cluster .......................................................................................... 163.5. Cluster Options ................................................................................................................... 163.6. Available Cluster Options .................................................................................................... 163.7. Querying and Setting Cluster Options .................................................................................. 173.8. When Options are Listed More Than Once .......................................................................... 18
3.1. Special OptionsThe reason for these fields to be placed at the top level instead of with the rest of cluster options issimply a matter of parsing. These options are used by the configuration database which is, by design,mostly ignorant of the content it holds. So the decision was made to place them in an easy to findlocation.
3.2. Configuration Version
When a node joins the cluster, the cluster will perform a check to see who has the best configurationbased on the fields below. It then asks the node with the highest (admin_epoch, epoch,num_updates) tuple to replace the configuration on all the nodes - which makes setting them, andsetting them correctly, very important.
Table 3.1. Configuration Version Properties
Field Description
admin_epoch Never modified by the cluster. Use this to make the configurationson any inactive nodes obsolete.
Never set this value to zero, in such cases the cluster cannot tellthe difference between your configuration and the "empty" oneused when nothing is found on disk.
epoch Incremented every time the configuration is updated (usually bythe admin)
num_updates Incremented every time the configuration or status is updated(usually by the cluster)
3.3. Other Fields
Table 3.2. Properties Controlling Validation
Field Description
validate-with Determines the type of validation being done on the configuration.If set to "none", the cluster will not verify that updates conform to

Chapter 3. Cluster Options
16
Field Descriptionthe DTD (nor reject ones that don’t). This option can be usefulwhen operating a mixed version cluster during an upgrade.
3.4. Fields Maintained by the ClusterTable 3.3. Properties Maintained by the Cluster
Field Description
cib-last-written Indicates when the configuration was last written to disk.Informational purposes only.
dc-uuid Indicates which cluster node is the current leader. Used by thecluster when placing resources and determining the order of someevents.
have-quorum Indicates if the cluster has quorum. If false, this may mean thatthe cluster cannot start resources or fence other nodes. See no-quorum-policy below.
Note that although these fields can be written to by the admin, in most cases the cluster will overwriteany values specified by the admin with the "correct" ones. To change the admin_epoch, for example,one would use:
# cibadmin --modify --crm_xml '<cib admin_epoch="42"/>'
A complete set of fields will look something like this:
Example 3.1. An example of the fields set for a cib object
<cib have-quorum="true" validate-with="pacemaker-1.0" admin_epoch="1" epoch="12" num_updates="65" dc-uuid="ea7d39f4-3b94-4cfa-ba7a-952956daabee">
3.5. Cluster OptionsCluster options, as you might expect, control how the cluster behaves when confronted with certainsituations.
They are grouped into sets and, in advanced configurations, there may be more than one. 1 For nowwe will describe the simple case where each option is present at most once.
3.6. Available Cluster OptionsTable 3.4. Cluster Options
Option Default Description
batch-limit 30 The number of jobs that the TE is allowed to executein parallel. The "correct" value will depend on the speedand load of your network and cluster nodes.
1 This will be described later in the section on Chapter 8, Rules where we will show how to have the cluster use different setsof options during working hours (when downtime is usually to be avoided at all costs) than it does during the weekends (whenresources can be moved to the their preferred hosts without bothering end users)

Querying and Setting Cluster Options
17
Option Default Description
migration-limit -1(unlimited)
The number of migration jobs that the TE is allowed toexecute in parallel on a node.
no-quorum-policy stop What to do when the cluster does not have quorum.Allowed values:
* ignore - continue all resource management
* freeze - continue resource management, but don’trecover resources from nodes not in the affected partition
* stop - stop all resources in the affected cluster partition
* suicide - fence all nodes in the affected cluster partition
symmetric-cluster TRUE Can all resources run on any node by default?
stonith-enabled TRUE Should failed nodes and nodes with resources that can’tbe stopped be shot? If you value your data, set up aSTONITH device and enable this.
If true, or unset, the cluster will refuse to start resourcesunless one or more STONITH resources have beenconfigured also.
stonith-action reboot Action to send to STONITH device. Allowed values:reboot, off. The value poweroff is also allowed, but is onlyused for legacy devices.
cluster-delay 60s Round trip delay over the network (excluding actionexecution). The "correct" value will depend on the speedand load of your network and cluster nodes.
stop-orphan-resources
TRUE Should deleted resources be stopped?
stop-orphan-actions
TRUE Should deleted actions be cancelled?
start-failure-is-fatal
TRUE When set to FALSE, the cluster will instead use theresource’s failcount and value for resource-failure-stickiness.
pe-error-series-max
-1 (all) The number of PE inputs resulting in ERRORs to save.Used when reporting problems.
pe-warn-series-max -1 (all) The number of PE inputs resulting in WARNINGs tosave. Used when reporting problems.
pe-input-series-max
-1 (all) The number of "normal" PE inputs to save. Used whenreporting problems.
You can always obtain an up-to-date list of cluster options, including their default values, by runningthe pengine metadata command.
3.7. Querying and Setting Cluster Options
Cluster options can be queried and modified using the crm_attribute tool. To get the current valueof cluster-delay, simply use:

Chapter 3. Cluster Options
18
# crm_attribute --attr-name cluster-delay --get-value
which is more simply written as
# crm_attribute --get-value -n cluster-delay
If a value is found, you’ll see a result like this:
# crm_attribute --get-value -n cluster-delay name=cluster-delay value=60s
However, if no value is found, the tool will display an error:
# crm_attribute --get-value -n clusta-deway`name=clusta-deway value=(null)Error performing operation: The object/attribute does not exist
To use a different value, eg. 30, simply run:
# crm_attribute --attr-name cluster-delay --attr-value 30s
To go back to the cluster’s default value you can delete the value, for example with this command:
# crm_attribute --attr-name cluster-delay --delete-attr
3.8. When Options are Listed More Than OnceIf you ever see something like the following, it means that the option you’re modifying is present morethan once.
Example 3.2. Deleting an option that is listed twice
# crm_attribute --attr-name batch-limit --delete-attr
Multiple attributes match name=batch-limit in crm_config:Value: 50 (set=cib-bootstrap-options, id=cib-bootstrap-options-batch-limit)Value: 100 (set=custom, id=custom-batch-limit)Please choose from one of the matches above and supply the 'id' with --attr-id
In such cases follow the on-screen instructions to perform the requested action. To determine whichvalue is currently being used by the cluster, please refer to Chapter 8, Rules.

Chapter 4.
19
Cluster Nodes
Table of Contents4.1. Defining a Cluster Node ...................................................................................................... 194.2. Where Pacemaker Gets the Node Name ............................................................................. 194.3. Describing a Cluster Node ................................................................................................... 204.4. Corosync ............................................................................................................................ 20
4.4.1. Adding a New Corosync Node .................................................................................. 204.4.2. Removing a Corosync Node ..................................................................................... 214.4.3. Replacing a Corosync Node ..................................................................................... 21
4.5. CMAN ................................................................................................................................ 214.5.1. Adding a New CMAN Node ...................................................................................... 214.5.2. Removing a CMAN Node ......................................................................................... 21
4.6. Heartbeat ............................................................................................................................ 224.6.1. Adding a New Heartbeat Node ................................................................................. 224.6.2. Removing a Heartbeat Node ..................................................................................... 224.6.3. Replacing a Heartbeat Node ..................................................................................... 22
4.1. Defining a Cluster NodeEach node in the cluster will have an entry in the nodes section containing its UUID, uname, and type.
Example 4.1. Example Heartbeat cluster node entry
<node id="1186dc9a-324d-425a-966e-d757e693dc86" uname="pcmk-1" type="normal"/>
Example 4.2. Example Corosync cluster node entry
<node id="101" uname="pcmk-1" type="normal"/>
In normal circumstances, the admin should let the cluster populate this information automatically fromthe communications and membership data. However for Heartbeat, one can use the crm_uuid tool toread an existing UUID or define a value before the cluster starts.
4.2. Where Pacemaker Gets the Node NameTraditionally, Pacemaker required nodes to be referred to by the value returned by uname -n. Thiscan be problematic for services that require the uname -n to be a specific value (ie. for a licence file).
Since version 2.0.0 of Pacemaker, this requirement has been relaxed for clusters using Corosync 2.0or later. The name Pacemaker uses is:
1. The value stored in corosync.conf under ring0_addr in the nodelist, if it does not contain anIP address; otherwise
2. The value stored in corosync.conf under name in the nodelist; otherwise
3. The value of uname -n

Chapter 4. Cluster Nodes
20
Pacemaker provides the crm_node -n command which displays the name used by a running cluster.
If a Corosync nodelist is used, crm_node --name-for-id $number is also available to display thename used by the node with the corosync nodeid of $number, for example: crm_node --name-for-id 2.
4.3. Describing a Cluster Node Beyond the basic definition of a node the administrator can also describe the node’s attributes,such as how much RAM, disk, what OS or kernel version it has, perhaps even its physical location.This information can then be used by the cluster when deciding where to place resources. For moreinformation on the use of node attributes, see Chapter 8, Rules.
Node attributes can be specified ahead of time or populated later, when the cluster is running, usingcrm_attribute.
Below is what the node’s definition would look like if the admin ran the command:
Example 4.3. The result of using crm_attribute to specify which kernel pcmk-1 is running
# crm_attribute --type nodes --node-uname pcmk-1 --attr-name kernel --attr-value `uname -r`
<node uname="pcmk-1" type="normal" id="101"> <instance_attributes id="nodes-101"> <nvpair id="kernel-101" name="kernel" value="2.6.16.46-0.4-default"/> </instance_attributes></node>
A simpler way to determine the current value of an attribute is to use crm_attribute commandagain:
# crm_attribute --type nodes --node-uname pcmk-1 --attr-name kernel --get-value
By specifying --type nodes the admin tells the cluster that this attribute is persistent. There arealso transient attributes which are kept in the status section which are "forgotten" whenever the noderejoins the cluster. The cluster uses this area to store a record of how many times a resource hasfailed on that node but administrators can also read and write to this section by specifying --typestatus.
4.4. Corosync
4.4.1. Adding a New Corosync Node
Adding a new node is as simple as installing Corosync and Pacemaker, and copying /etc/corosync/corosync.conf and /etc/corosync/authkey (if it exists) from an existing node. You may need to modifythe mcastaddr option to match the new node’s IP address.
If a log message containing "Invalid digest" appears from Corosync, the keys are not consistentbetween the machines.

Removing a Corosync Node
21
4.4.2. Removing a Corosync Node
Because the messaging and membership layers are the authoritative source for cluster nodes,deleting them from the CIB is not a reliable solution. First one must arrange for corosync to forgetabout the node (pcmk-1 in the example below).
On the host to be removed:
1. Stop the cluster: /etc/init.d/corosync stop
Next, from one of the remaining active cluster nodes:
1. Tell Pacemaker to forget about the removed host:
# crm_node -R pcmk-1
This includes deleting the node from the CIB
Note
This proceedure only works for versions after 1.1.8
4.4.3. Replacing a Corosync Node
The five-step guide to replacing an existing cluster node:
1. Make sure the old node is completely stopped
2. Give the new machine the same hostname and IP address as the old one
3. Install the cluster software :-)
4. Copy /etc/corosync/corosync.conf and /etc/corosync/authkey (if it exists) to the new node
5. Start the new cluster node
If a log message containing "Invalid digest" appears from Corosync, the keys are not consistentbetween the machines.
4.5. CMAN
4.5.1. Adding a New CMAN Node
4.5.2. Removing a CMAN Node

Chapter 4. Cluster Nodes
22
4.6. Heartbeat
4.6.1. Adding a New Heartbeat Node
Provided you specified autojoin any in ha.cf, adding a new node is as simple as installingheartbeat and copying ha.cf and authkeys from an existing node.
If you don’t want to use autojoin, then after setting up ha.cf and authkeys, you must usehb_addnode before starting the new node.
4.6.2. Removing a Heartbeat Node
Because the messaging and membership layers are the authoritative source for cluster nodes,deleting them from the CIB is not a reliable solution.
First one must arrange for Heartbeat to forget about the node (pcmk-1 in the example below).
On the host to be removed:
1. Stop the cluster: /etc/init.d/corosync stop
Next, from one of the remaining active cluster nodes:
1. Tell Heartbeat the node should be removed
# hb_delnode pcmk-1
1. Tell Pacemaker to forget about the removed host:
# crm_node -R pcmk-1
Note
This proceedure only works for versions after 1.1.8
4.6.3. Replacing a Heartbeat Node The seven-step guide to replacing an existing cluster node:
1. Make sure the old node is completely stopped
2. Give the new machine the same hostname as the old one
3. Go to an active cluster node and look up the UUID for the old node in /var/lib/heartbeat/hostcache
4. Install the cluster software
5. Copy ha.cf and authkeys to the new node

Replacing a Heartbeat Node
23
6. On the new node, populate it’s UUID using crm_uuid -w and the UUID from step 2
7. Start the new cluster node

24

Chapter 5.
25
Cluster Resources
Table of Contents5.1. What is a Cluster Resource ................................................................................................. 255.2. Supported Resource Classes .............................................................................................. 25
5.2.1. Open Cluster Framework .......................................................................................... 265.2.2. Linux Standard Base ................................................................................................ 265.2.3. Systemd ................................................................................................................... 275.2.4. Upstart ..................................................................................................................... 275.2.5. System Services ...................................................................................................... 275.2.6. STONITH ................................................................................................................. 28
5.3. Resource Properties ............................................................................................................ 285.4. Resource Options ............................................................................................................... 295.5. Setting Global Defaults for Resource Options ....................................................................... 305.6. Instance Attributes .............................................................................................................. 305.7. Resource Operations .......................................................................................................... 32
5.7.1. Monitoring Resources for Failure .............................................................................. 325.7.2. Setting Global Defaults for Operations ....................................................................... 32
5.1. What is a Cluster Resource
The role of a resource agent is to abstract the service it provides and present a consistent view to thecluster, which allows the cluster to be agnostic about the resources it manages.
The cluster doesn’t need to understand how the resource works because it relies on the resourceagent to do the right thing when given a start, stop or monitor command.
For this reason it is crucial that resource agents are well tested.
Typically resource agents come in the form of shell scripts, however they can be written using anytechnology (such as C, Python or Perl) that the author is comfortable with.
5.2. Supported Resource Classes
There are five classes of agents supported by Pacemaker:
• OCF
• LSB
• Upstart
• Systemd
• Fencing
• Service

Chapter 5. Cluster Resources
26
Version 1 of Heartbeat came with its own style of resource agents and it is highly likely that manypeople have written their own agents based on its conventions. 1
Although deprecated with the release of Heartbeat v2, they were supported by Pacemaker up until therelease of 1.1.8 to enable administrators to continue to use these agents.
5.2.1. Open Cluster Framework
The OCF standard 2 3 is basically an extension of the Linux Standard Base conventions for init scriptsto:
• support parameters,
• make them self describing and
• extensible
OCF specs have strict definitions of the exit codes that actions must return. 4
The cluster follows these specifications exactly, and giving the wrong exit code will cause the cluster tobehave in ways you will likely find puzzling and annoying. In particular, the cluster needs to distinguisha completely stopped resource from one which is in some erroneous and indeterminate state.
Parameters are passed to the script as environment variables, with the special prefix OCF_RESKEY_.So, a parameter which the user thinks of as ip it will be passed to the script as OCF_RESKEY_ip. Thenumber and purpose of the parameters is completely arbitrary, however your script should advertiseany that it supports using the meta-data command.
The OCF class is the most preferred one as it is an industry standard, highly flexible (allowingparameters to be passed to agents in a non-positional manner) and self-describing.
For more information, see the reference5 and Appendix B, More About OCF Resource Agents.
5.2.2. Linux Standard Base
LSB resource agents are those found in /etc/init.d.
Generally they are provided by the OS/distribution and, in order to be used with the cluster, they mustconform to the LSB Spec. 6
Many distributions claim LSB compliance but ship with broken init scripts. For details on how to checkif your init script is LSB-compatible, see Appendix G, init-Script LSB Compliance. The most commonproblems are:
• Not implementing the status operation at all
1 See http://wiki.linux-ha.org/HeartbeatResourceAgent for more information2 http://www.opencf.org/cgi-bin/viewcvs.cgi/specs/ra/resource-agent-api.txt?rev=HEAD - at least as it relates to resource agents.3 The Pacemaker implementation has been somewhat extended from the OCF Specs, but none of those changes areincompatible with the original OCF specification.4 Included with the cluster is the ocf-tester script, which can be useful in this regard.5 http://www.linux-ha.org/wiki/OCF_Resource_Agents6 See http://refspecs.linux-foundation.org/LSB_3.0.0/LSB-Core-generic/LSB-Core-generic/iniscrptact.html for the LSB Spec (asit relates to init scripts).

Systemd
27
• Not observing the correct exit status codes for start/stop/status actions
• Starting a started resource returns an error (this violates the LSB spec)
• Stopping a stopped resource returns an error (this violates the LSB spec)
5.2.3. Systemd
Some newer distributions have replaced the old SYS-V7 style of initialization daemons (and scripts)with an alternative called Systemd8.
Pacemaker is able to manage these services if they are present.
Instead of init scripts, systemd has unit files. Generally the services (or unit files) areprovided by the OS/distribution but there are some instructions for converting from init scripts at:http://0pointer.de/blog/projects/systemd-for-admins-3.html
Note
Remember to make sure the computer is not configured to start any services at boot time thatshould be controlled by the cluster.
5.2.4. Upstart
Some newer distributions have replaced the old SYS-V9 style of initialization daemons (and scripts)with an alternative called Upstart10.
Pacemaker is able to manage these services if they are present.
Instead of init scripts, upstart has jobs. Generally the services (or jobs) are provided by the OS/distribution.
Note
Remember to make sure the computer is not configured to start any services at boot time thatshould be controlled by the cluster.
5.2.5. System Services
7 http://en.wikipedia.org/wiki/Init#SysV-style8 http://www.freedesktop.org/wiki/Software/systemd9 http://en.wikipedia.org/wiki/Init#SysV-style10 http://upstart.ubuntu.com

Chapter 5. Cluster Resources
28
Since there are now many "common" types of system services (systemd, upstart, and lsb),Pacemaker supports a special alias which intelligently figures out which one applies to a given clusternode.
This is particularly useful when the cluster contains a mix of systemd, upstart, and lsb.
In order, Pacemaker will try to find the named service as:
1. an LSB (SYS-V) init script
2. a Systemd unit file
3. an Upstart job
5.2.6. STONITH
There is also an additional class, STONITH, which is used exclusively for fencing related resources.This is discussed later in Chapter 13, STONITH.
5.3. Resource PropertiesThese values tell the cluster which script to use for the resource, where to find that script and whatstandards it conforms to.
Table 5.1. Properties of a Primitive Resource
Field Description
id Your name for the resource
class The standard the script conforms to. Allowed values: ocf, service, upstart,systemd, lsb, stonith
type The name of the Resource Agent you wish to use. Eg. IPaddr or Filesystem
provider The OCF spec allows multiple vendors to supply the same ResourceAgent.To use the OCF resource agents supplied with Heartbeat, you should specifyheartbeat here.
Resource definitions can be queried with the crm_resource tool. For example
# crm_resource --resource Email --query-xml
might produce:
Example 5.1. An example system resource
<primitive id="Email" class="service" type="exim"/>
Note
One of the main drawbacks to system services (such as LSB, Systemd and Upstart) resources isthat they do not allow any parameters!

Resource Options
29
Example 5.2. An example OCF resource
<primitive id="Public-IP" class="ocf" type="IPaddr" provider="heartbeat"> <instance_attributes id="params-public-ip"> <nvpair id="public-ip-addr" name="ip" value="1.2.3.4"/> </instance_attributes></primitive>
5.4. Resource OptionsOptions are used by the cluster to decide how your resource should behave and can be easily setusing the --meta option of the crm_resource command.
Table 5.2. Options for a Primitive Resource
Field Default Description
priority 0 If not all resources can be active, the cluster will stop lowerpriority resources in order to keep higher priority ones active.
target-role
Started What state should the cluster attempt to keep this resource in?Allowed values:
* Stopped - Force the resource to be stopped
* Started - Allow the resource to be started (In the case of multi-state resources, they will not promoted to master)
* Master - Allow the resource to be started and, if appropriate,promoted
is-managed TRUE Is the cluster allowed to start and stop the resource? Allowedvalues: true, false
resource-stickiness
Calculated How much does the resource prefer to stay where it is?Defaults to the value of resource-stickiness in thersc_defaults section
requires Calculated Under what conditions can the resource be started. (Since1.1.8)
Defaults to fencing unless stonith-enabled is false orclass is stonith - under those conditions the default is quorum.Possible values:
* nothing - can always be started
* quorum - The cluster can only start this resource if a majorityof the configured nodes are active
* fencing - The cluster can only start this resource if a majorityof the configured nodes are active and any failed or unknownnodes have been powered off.
* unfencing - The cluster can only start this resource if amajority of the configured nodes are active and any failed orunknown nodes have been powered off and only on nodes thathave been unfenced indexterm: Option[requires,Resource]
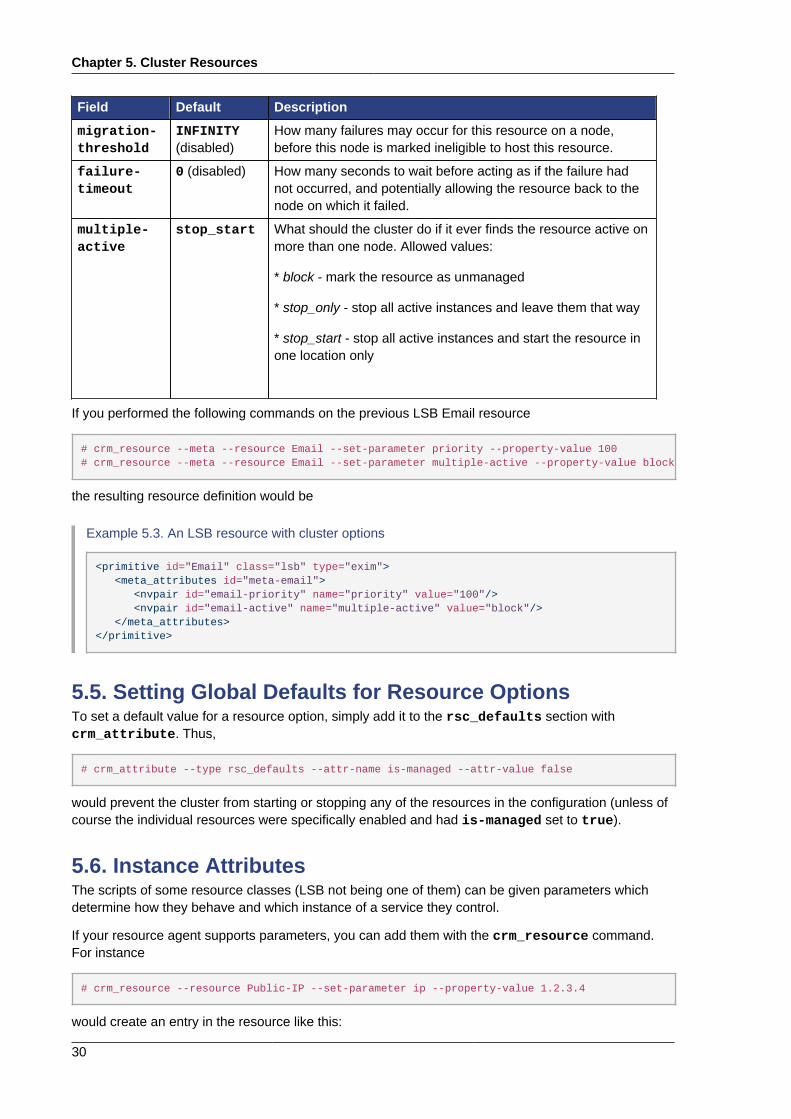
Chapter 5. Cluster Resources
30
Field Default Description
migration-threshold
INFINITY(disabled)
How many failures may occur for this resource on a node,before this node is marked ineligible to host this resource.
failure-timeout
0 (disabled) How many seconds to wait before acting as if the failure hadnot occurred, and potentially allowing the resource back to thenode on which it failed.
multiple-active
stop_start What should the cluster do if it ever finds the resource active onmore than one node. Allowed values:
* block - mark the resource as unmanaged
* stop_only - stop all active instances and leave them that way
* stop_start - stop all active instances and start the resource inone location only
If you performed the following commands on the previous LSB Email resource
# crm_resource --meta --resource Email --set-parameter priority --property-value 100# crm_resource --meta --resource Email --set-parameter multiple-active --property-value block
the resulting resource definition would be
Example 5.3. An LSB resource with cluster options
<primitive id="Email" class="lsb" type="exim"> <meta_attributes id="meta-email"> <nvpair id="email-priority" name="priority" value="100"/> <nvpair id="email-active" name="multiple-active" value="block"/> </meta_attributes></primitive>
5.5. Setting Global Defaults for Resource OptionsTo set a default value for a resource option, simply add it to the rsc_defaults section withcrm_attribute. Thus,
# crm_attribute --type rsc_defaults --attr-name is-managed --attr-value false
would prevent the cluster from starting or stopping any of the resources in the configuration (unless ofcourse the individual resources were specifically enabled and had is-managed set to true).
5.6. Instance AttributesThe scripts of some resource classes (LSB not being one of them) can be given parameters whichdetermine how they behave and which instance of a service they control.
If your resource agent supports parameters, you can add them with the crm_resource command.For instance
# crm_resource --resource Public-IP --set-parameter ip --property-value 1.2.3.4
would create an entry in the resource like this:

Instance Attributes
31
Example 5.4. An example OCF resource with instance attributes
<primitive id="Public-IP" class="ocf" type="IPaddr" provider="heartbeat"> <instance_attributes id="params-public-ip"> <nvpair id="public-ip-addr" name="ip" value="1.2.3.4"/> </instance_attributes></primitive>
For an OCF resource, the result would be an environment variable called OCF_RESKEY_ip with avalue of 1.2.3.4.
The list of instance attributes supported by an OCF script can be found by calling the resourcescript with the meta-data command. The output contains an XML description of all the supportedattributes, their purpose and default values.
Example 5.5. Displaying the metadata for the Dummy resource agent template
# export OCF_ROOT=/usr/lib/ocf# $OCF_ROOT/resource.d/pacemaker/Dummy meta-data
<?xml version="1.0"?> <!DOCTYPE resource-agent SYSTEM "ra-api-1.dtd"> <resource-agent name="Dummy" version="0.9"> <version>1.0</version>
<longdesc lang="en-US"> This is a Dummy Resource Agent. It does absolutely nothing except keep track of whether its running or not. Its purpose in life is for testing and to serve as a template for RA writers. </longdesc> <shortdesc lang="en-US">Dummy resource agent</shortdesc>
<parameters> <parameter name="state" unique="1"> <longdesc lang="en-US"> Location to store the resource state in. </longdesc> <shortdesc lang="en-US">State file</shortdesc> <content type="string" default="/var/run/Dummy-{OCF_RESOURCE_INSTANCE}.state" /> </parameter>
<parameter name="dummy" unique="0"> <longdesc lang="en-US"> Dummy attribute that can be changed to cause a reload </longdesc> <shortdesc lang="en-US">Dummy attribute that can be changed to cause a reload</shortdesc> <content type="string" default="blah" /> </parameter> </parameters>
<actions> <action name="start" timeout="90" /> <action name="stop" timeout="100" /> <action name="monitor" timeout="20" interval="10",height="0" start-delay="0" /> <action name="reload" timeout="90" /> <action name="migrate_to" timeout="100" /> <action name="migrate_from" timeout="90" /> <action name="meta-data" timeout="5" /> <action name="validate-all" timeout="30" />

Chapter 5. Cluster Resources
32
</actions> </resource-agent>
5.7. Resource Operations
5.7.1. Monitoring Resources for FailureBy default, the cluster will not ensure your resources are still healthy. To instruct the cluster to do this,you need to add a monitor operation to the resource’s definition.
Example 5.6. An OCF resource with a recurring health check
<primitive id="Public-IP" class="ocf" type="IPaddr" provider="heartbeat"> <operations> <op id="public-ip-check" name="monitor" interval="60s"/> </operations> <instance_attributes id="params-public-ip"> <nvpair id="public-ip-addr" name="ip" value="1.2.3.4"/> </instance_attributes></primitive>
Table 5.3. Properties of an Operation
Field Description
id Your name for the action. Must be unique.
name The action to perform. Common values: monitor, start, stop
interval How frequently (in seconds) to perform the operation. Default value: 0, meaningnever.
timeout How long to wait before declaring the action has failed.
on-fail The action to take if this action ever fails. Allowed values:
* ignore - Pretend the resource did not fail
* block - Don’t perform any further operations on the resource
* stop - Stop the resource and do not start it elsewhere
* restart - Stop the resource and start it again (possibly on a different node)
* fence - STONITH the node on which the resource failed
* standby - Move all resources away from the node on which the resource failed
The default for the stop operation is fence when STONITH is enabled andblock otherwise. All other operations default to stop.
enabled If false, the operation is treated as if it does not exist. Allowed values: true,false
5.7.2. Setting Global Defaults for OperationsTo set a default value for a operation option, simply add it to the op_defaults section withcrm_attribute. Thus,

Setting Global Defaults for Operations
33
# crm_attribute --type op_defaults --attr-name timeout --attr-value 20s
would default each operation’s timeout to 20 seconds. If an operation’s definition also includes avalue for timeout, then that value would be used instead (for that operation only).
5.7.2.1. When Resources Take a Long Time to Start/StopThere are a number of implicit operations that the cluster will always perform - start, stop and anon-recurring monitor operation (used at startup to check the resource isn’t already active). If one ofthese is taking too long, then you can create an entry for them and simply specify a new value.
Example 5.7. An OCF resource with custom timeouts for its implicit actions
<primitive id="Public-IP" class="ocf" type="IPaddr" provider="heartbeat"> <operations> <op id="public-ip-startup" name="monitor" interval="0" timeout="90s"/> <op id="public-ip-start" name="start" interval="0" timeout="180s"/> <op id="public-ip-stop" name="stop" interval="0" timeout="15min"/> </operations> <instance_attributes id="params-public-ip"> <nvpair id="public-ip-addr" name="ip" value="1.2.3.4"/> </instance_attributes></primitive>
5.7.2.2. Multiple Monitor OperationsProvided no two operations (for a single resource) have the same name and interval you can have asmany monitor operations as you like. In this way you can do a superficial health check every minuteand progressively more intense ones at higher intervals.
To tell the resource agent what kind of check to perform, you need to provide each monitor witha different value for a common parameter. The OCF standard creates a special parameter calledOCF_CHECK_LEVEL for this purpose and dictates that it is "made available to the resource agentwithout the normal OCF_RESKEY prefix".
Whatever name you choose, you can specify it by adding an instance_attributes block to the optag. Note that it is up to each resource agent to look for the parameter and decide how to use it.
Example 5.8. An OCF resource with two recurring health checks, performing different levels ofchecks - specified via OCF_CHECK_LEVEL.
<primitive id="Public-IP" class="ocf" type="IPaddr" provider="heartbeat"> <operations> <op id="public-ip-health-60" name="monitor" interval="60"> <instance_attributes id="params-public-ip-depth-60"> <nvpair id="public-ip-depth-60" name="OCF_CHECK_LEVEL" value="10"/> </instance_attributes> </op> <op id="public-ip-health-300" name="monitor" interval="300"> <instance_attributes id="params-public-ip-depth-300"> <nvpair id="public-ip-depth-300" name="OCF_CHECK_LEVEL" value="20"/> </instance_attributes> </op> </operations> <instance_attributes id="params-public-ip"> <nvpair id="public-ip-level" name="ip" value="1.2.3.4"/> </instance_attributes></primitive>

Chapter 5. Cluster Resources
34
5.7.2.3. Disabling a Monitor OperationThe easiest way to stop a recurring monitor is to just delete it. However, there can be times when youonly want to disable it temporarily. In such cases, simply add enabled="false" to the operation’sdefinition.
Example 5.9. Example of an OCF resource with a disabled health check
<primitive id="Public-IP" class="ocf" type="IPaddr" provider="heartbeat"> <operations> <op id="public-ip-check" name="monitor" interval="60s" enabled="false"/> </operations> <instance_attributes id="params-public-ip"> <nvpair id="public-ip-addr" name="ip" value="1.2.3.4"/> </instance_attributes></primitive>
This can be achieved from the command-line by executing
# cibadmin -M -X '<op id="public-ip-check" enabled="false"/>'
Once you’ve done whatever you needed to do, you can then re-enable it with

Chapter 6.
35
Resource Constraints
Table of Contents6.1. Scores ................................................................................................................................ 35
6.1.1. Infinity Math ............................................................................................................. 356.2. Deciding Which Nodes a Resource Can Run On .................................................................. 35
6.2.1. Options .................................................................................................................... 366.2.2. Asymmetrical "Opt-In" Clusters ................................................................................. 366.2.3. Symmetrical "Opt-Out" Clusters ................................................................................ 366.2.4. What if Two Nodes Have the Same Score ................................................................. 37
6.3. Specifying in which Order Resources Should Start/Stop ........................................................ 376.3.1. Mandatory Ordering .................................................................................................. 386.3.2. Advisory Ordering ..................................................................................................... 38
6.4. Placing Resources Relative to other Resources .................................................................... 386.4.1. Options .................................................................................................................... 396.4.2. Mandatory Placement ............................................................................................... 396.4.3. Advisory Placement .................................................................................................. 39
6.5. Ordering Sets of Resources ................................................................................................ 406.6. Ordered Set ........................................................................................................................ 406.7. Two Sets of Unordered Resources ...................................................................................... 416.8. Three Resources Sets ......................................................................................................... 426.9. Collocating Sets of Resources ............................................................................................. 426.10. Another Three Resources Sets .......................................................................................... 44
6.1. ScoresScores of all kinds are integral to how the cluster works. Practically everything from moving a resourceto deciding which resource to stop in a degraded cluster is achieved by manipulating scores in someway.
Scores are calculated on a per-resource basis and any node with a negative score for a resource can’trun that resource. After calculating the scores for a resource, the cluster then chooses the node withthe highest one.
6.1.1. Infinity MathINFINITY is currently defined as 1,000,000 and addition/subtraction with it follows these three basicrules:
• Any value + INFINITY = INFINITY
• Any value - INFINITY = -INFINITY
• INFINITY - INFINITY = -INFINITY
6.2. Deciding Which Nodes a Resource Can Run On There are two alternative strategies for specifying which nodes a resources can run on. One way is tosay that by default they can run anywhere and then create location constraints for nodes that are not

Chapter 6. Resource Constraints
36
allowed. The other option is to have nodes "opt-in"… to start with nothing able to run anywhere andselectively enable allowed nodes.
6.2.1. Options
Table 6.1. Options for Simple Location Constraints
Field Description
id A unique name for the constraint
rsc A resource name
node A node’s name
score Positive values indicate the resource should run on this node.Negative values indicate the resource should not run on this node.
Values of +/- INFINITY change "should"/"should not" to"must"/"must not".
6.2.2. Asymmetrical "Opt-In" Clusters
To create an opt-in cluster, start by preventing resources from running anywhere by default:
# crm_attribute --attr-name symmetric-cluster --attr-value false
Then start enabling nodes. The following fragment says that the web server prefers sles-1, thedatabase prefers sles-2 and both can fail over to sles-3 if their most preferred node fails.
Example 6.1. Example set of opt-in location constraints
<constraints> <rsc_location id="loc-1" rsc="Webserver" node="sles-1" score="200"/> <rsc_location id="loc-2" rsc="Webserver" node="sles-3" score="0"/> <rsc_location id="loc-3" rsc="Database" node="sles-2" score="200"/> <rsc_location id="loc-4" rsc="Database" node="sles-3" score="0"/></constraints>
6.2.3. Symmetrical "Opt-Out" Clusters
To create an opt-out cluster, start by allowing resources to run anywhere by default:
# crm_attribute --attr-name symmetric-cluster --attr-value true
Then start disabling nodes. The following fragment is the equivalent of the above opt-in configuration.
Example 6.2. Example set of opt-out location constraints
<constraints> <rsc_location id="loc-1" rsc="Webserver" node="sles-1" score="200"/> <rsc_location id="loc-2-dont-run" rsc="Webserver" node="sles-2" score="-INFINITY"/>

What if Two Nodes Have the Same Score
37
<rsc_location id="loc-3-dont-run" rsc="Database" node="sles-1" score="-INFINITY"/> <rsc_location id="loc-4" rsc="Database" node="sles-2" score="200"/></constraints>
Whether you should choose opt-in or opt-out depends both on your personal preference and themake-up of your cluster. If most of your resources can run on most of the nodes, then an opt-outarrangement is likely to result in a simpler configuration. On the other-hand, if most resources can onlyrun on a small subset of nodes an opt-in configuration might be simpler.
6.2.4. What if Two Nodes Have the Same ScoreIf two nodes have the same score, then the cluster will choose one. This choice may seem randomand may not be what was intended, however the cluster was not given enough information to knowany better.
Example 6.3. Example of two resources that prefer two nodes equally
<constraints> <rsc_location id="loc-1" rsc="Webserver" node="sles-1" score="INFINITY"/> <rsc_location id="loc-2" rsc="Webserver" node="sles-2" score="INFINITY"/> <rsc_location id="loc-3" rsc="Database" node="sles-1" score="500"/> <rsc_location id="loc-4" rsc="Database" node="sles-2" score="300"/> <rsc_location id="loc-5" rsc="Database" node="sles-2" score="200"/></constraints>
In the example above, assuming no other constraints and an inactive cluster, Webserver wouldprobably be placed on sles-1 and Database on sles-2. It would likely have placed Webserver based onthe node’s uname and Database based on the desire to spread the resource load evenly across thecluster. However other factors can also be involved in more complex configurations.
6.3. Specifying in which Order Resources Should Start/Stop The way to specify the order in which resources should start is by creating rsc_order constraints.
Table 6.2. Properties of an Ordering Constraint
Field Description
id A unique name for the constraint
first The name of a resource that must be started before the thenresource is allowed to.
then The name of a resource. This resource will start after the firstresource.
kind How to enforce the constraint. (Since 1.1.2)
* Optional - Just a suggestion. Only applies if both resources arestarting/stopping.
* Mandatory - Always. If first is stopping or cannot be started, thenmust be stopped.
* Serialize - Ensure that no two stop/start actions occurconcurrently for a set of resources.

Chapter 6. Resource Constraints
38
Field Description
symmetrical If true, which is the default, stop the resources in the reverse order.Default value: true
6.3.1. Mandatory OrderingWhen the then resource cannot run without the first resource being active, one should usemandatory constraints. To specify a constraint is mandatory, use scores greater than zero. This willensure that the then resource will react when the first resource changes state.
• If the first resource was running and is stopped, the then resource will also be stopped (if it isrunning).
• If the first resource was not running and cannot be started, the then resource will be stopped (ifit is running).
• If the first resource is (re)started while the then resource is running, the then resource will bestopped and restarted.
6.3.2. Advisory OrderingOn the other hand, when score="0" is specified for a constraint, the constraint is considered optionaland only has an effect when both resources are stopping and/or starting. Any change in state by thefirst resource will have no effect on the then resource.
Example 6.4. Example of an optional and mandatory ordering constraint
<constraints> <rsc_order id="order-1" first="Database" then="Webserver" /> <rsc_order id="order-2" first="IP" then="Webserver" score="0"/></constraints>
Some additional information on ordering constraints can be found in the document OrderingExplained1.
6.4. Placing Resources Relative to other Resources When the location of one resource depends on the location of another one, we call this colocation.
There is an important side-effect of creating a colocation constraint between two resources: it affectsthe order in which resources are assigned to a node. If you think about it, it’s somewhat obvious. Youcan’t place A relative to B unless you know where B is. 2
So when you are creating colocation constraints, it is important to consider whether you shouldcolocate A with B or B with A.
Another thing to keep in mind is that, assuming A is collocated with B, the cluster will also take intoaccount A’s preferences when deciding which node to choose for B.
1 http://www.clusterlabs.org/mediawiki/images/d/d6/Ordering_Explained.pdf2 While the human brain is sophisticated enough to read the constraint in any order and choose the correct one depending onthe situation, the cluster is not quite so smart. Yet.

Options
39
For a detailed look at exactly how this occurs, see the Colocation Explained3 document.
6.4.1. OptionsTable 6.3. Properties of a Collocation Constraint
Field Description
id A unique name for the constraint.
rsc The colocation source. If the constraint cannot be satisfied, thecluster may decide not to allow the resource to run at all.
with-rsc The colocation target. The cluster will decide where to put thisresource first and then decide where to put the resource in the rscfield.
score Positive values indicate the resource should run on the same node.Negative values indicate the resources should not run on the samenode. Values of +/- INFINITY change "should" to "must".
6.4.2. Mandatory PlacementMandatory placement occurs any time the constraint’s score is +INFINITY or -INFINITY. Insuch cases, if the constraint can’t be satisfied, then the rsc resource is not permitted to run. Forscore=INFINITY, this includes cases where the with-rsc resource is not active.
If you need resource1 to always run on the same machine as resource2, you would add thefollowing constraint:
An example colocation constraint
<rsc_colocation id="colocate" rsc="resource1" with-rsc="resource2" score="INFINITY"/>
Remember, because INFINITY was used, if resource2 can’t run on any of the cluster nodes (forwhatever reason) then resource1 will not be allowed to run.
Alternatively, you may want the opposite… that resource1 cannot run on the same machine asresource2. In this case use score="-INFINITY"
An example anti-colocation constraint
<rsc_colocation id="anti-colocate" rsc="resource1" with-rsc="resource2" score="-INFINITY"/>
Again, by specifying -INFINTY, the constraint is binding. So if the only place left to run is whereresource2 already is, then resource1 may not run anywhere.
6.4.3. Advisory PlacementIf mandatory placement is about "must" and "must not", then advisory placement is the "I’d prefer if"alternative. For constraints with scores greater than -INFINITY and less than INFINITY, the clusterwill try and accommodate your wishes but may ignore them if the alternative is to stop some of thecluster resources.
3 http://www.clusterlabs.org/mediawiki/images/6/61/Colocation_Explained.pdf

Chapter 6. Resource Constraints
40
Like in life, where if enough people prefer something it effectively becomes mandatory, advisorycolocation constraints can combine with other elements of the configuration to behave as if they weremandatory.
An example advisory-only colocation constraint
<rsc_colocation id="colocate-maybe" rsc="resource1" with-rsc="resource2" score="500"/>
6.5. Ordering Sets of ResourcesA common situation is for an administrator to create a chain of ordered resources, such as:
Example 6.5. A chain of ordered resources
<constraints> <rsc_order id="order-1" first="A" then="B" /> <rsc_order id="order-2" first="B" then="C" /> <rsc_order id="order-3" first="C" then="D" /></constraints>
6.6. Ordered Set
Figure 6.1. Visual representation of the four resources' start order for the above constraints
To simplify this situation, there is an alternate format for ordering constraints:
Example 6.6. A chain of ordered resources expressed as a set
<constraints> <rsc_order id="order-1"> <resource_set id="ordered-set-example" sequential="true"> <resource_ref id="A"/> <resource_ref id="B"/> <resource_ref id="C"/> <resource_ref id="D"/> </resource_set> </rsc_order></constraints>
Note
Resource sets have the same ordering semantics as groups.

Two Sets of Unordered Resources
41
Example 6.7. A group resource with the equivalent ordering rules
<group id="dummy"> <primitive id="A" .../> <primitive id="B" .../> <primitive id="C" .../> <primitive id="D" .../></group>
While the set-based format is not less verbose, it is significantly easier to get right and maintain. It canalso be expanded to allow ordered sets of (un)ordered resources. In the example below, rscA andrscB can both start in parallel, as can rscC and rscD, however rscC and rscD can only start onceboth rscA and rscB are active.
Example 6.8. Ordered sets of unordered resources
<constraints> <rsc_order id="order-1"> <resource_set id="ordered-set-1" sequential="false"> <resource_ref id="A"/> <resource_ref id="B"/> </resource_set> <resource_set id="ordered-set-2" sequential="false"> <resource_ref id="C"/> <resource_ref id="D"/> </resource_set> </rsc_order> </constraints>
6.7. Two Sets of Unordered Resources
Figure 6.2. Visual representation of the start order for two ordered sets of unordered resources
Of course either set — or both sets — of resources can also be internally ordered (by settingsequential="true") and there is no limit to the number of sets that can be specified.

Chapter 6. Resource Constraints
42
Example 6.9. Advanced use of set ordering - Three ordered sets, two of which are internallyunordered
<constraints> <rsc_order id="order-1"> <resource_set id="ordered-set-1" sequential="false"> <resource_ref id="A"/> <resource_ref id="B"/> </resource_set> <resource_set id="ordered-set-2" sequential="true"> <resource_ref id="C"/> <resource_ref id="D"/> </resource_set> <resource_set id="ordered-set-3" sequential="false"> <resource_ref id="E"/> <resource_ref id="F"/> </resource_set> </rsc_order></constraints>
6.8. Three Resources Sets
Figure 6.3. Visual representation of the start order for the three sets defined above
6.9. Collocating Sets of ResourcesAnother common situation is for an administrator to create a set of collocated resources. Previouslythis was possible either by defining a resource group (See Section 10.1, “Groups - A SyntacticShortcut”) which could not always accurately express the design; or by defining each relationship asan individual constraint, causing a constraint explosion as the number of resources and combinationsgrew.
Example 6.10. A chain of collocated resources
<constraints> <rsc_colocation id="coloc-1" rsc="B" with-rsc="A" score="INFINITY"/> <rsc_colocation id="coloc-2" rsc="C" with-rsc="B" score="INFINITY"/> <rsc_colocation id="coloc-3" rsc="D" with-rsc="C" score="INFINITY"/></constraints>
To make things easier, we allow an alternate form of colocation constraints using resource_sets.Just like the expanded version, a resource that can’t be active also prevents any resource that must

Collocating Sets of Resources
43
be collocated with it from being active. For example, if B was not able to run, then both C (+and byinference +D) must also remain stopped.
Example 6.11. The equivalent colocation chain expressed using resource_sets
<constraints> <rsc_colocation id="coloc-1" score="INFINITY" > <resource_set id="collocated-set-example" sequential="true"> <resource_ref id="A"/> <resource_ref id="B"/> <resource_ref id="C"/> <resource_ref id="D"/> </resource_set> </rsc_colocation></constraints>
Note
Resource sets have the same colocation semantics as groups.
A group resource with the equivalent colocation rules
<group id="dummy"> <primitive id="A" .../> <primitive id="B" .../> <primitive id="C" .../> <primitive id="D" .../></group>
This notation can also be used in this context to tell the cluster that a set of resources must all belocated with a common peer, but have no dependencies on each other. In this scenario, unlike theprevious, B would be allowed to remain active even if A or C (or both) were inactive.
Example 6.12. Using colocation sets to specify a common peer.
<constraints> <rsc_colocation id="coloc-1" score="INFINITY" > <resource_set id="collocated-set-1" sequential="false"> <resource_ref id="A"/> <resource_ref id="B"/> <resource_ref id="C"/> </resource_set> <resource_set id="collocated-set-2" sequential="true"> <resource_ref id="D"/> </resource_set> </rsc_colocation></constraints>
Of course there is no limit to the number and size of the sets used. The only thing that matters is thatin order for any member of set N to be active, all the members of set N+1 must also be active (andnaturally on the same node); and if a set has sequential="true", then in order for member M tobe active, member M+1 must also be active. You can even specify the role in which the members of aset must be in using the set’s role attribute.

Chapter 6. Resource Constraints
44
Example 6.13. A colocation chain where the members of the middle set have no inter-dependenciesand the last has master status.
<constraints> <rsc_colocation id="coloc-1" score="INFINITY" > <resource_set id="collocated-set-1" sequential="true"> <resource_ref id="A"/> <resource_ref id="B"/> </resource_set> <resource_set id="collocated-set-2" sequential="false"> <resource_ref id="C"/> <resource_ref id="D"/> <resource_ref id="E"/> </resource_set> <resource_set id="collocated-set-2" sequential="true" role="Master"> <resource_ref id="F"/> <resource_ref id="G"/> </resource_set> </rsc_colocation></constraints>
6.10. Another Three Resources Sets
Figure 6.4. Visual representation of a colocation chain where the members of the middle set have nointer-dependencies

Chapter 7.
45
Receiving Notification for ClusterEvents
Table of Contents7.1. Configuring SNMP Notifications ........................................................................................... 457.2. Configuring Email Notifications ............................................................................................ 457.3. Configuring Notifications via External-Agent ......................................................................... 46
A Pacemaker cluster is an event driven system. In this context, an event is a resource failure orconfiguration change (not exhaustive).
The ocf:pacemaker:ClusterMon resource can monitor the cluster status and triggers alerts oneach cluster event. This resource runs crm_mon in the background at regular intervals (configurable)and uses crm_mon capabilities to send emails (SMTP), SNMP traps or to execute an externalprogram via the extra_options parameter.
Note
Depending on your system settings and compilation settings, SNMP or email alerts might beunavailable. Check crm_mon --help output to see if these options are available to you. In anycase, executing an external agent will always be available, and you can have this agent to sendemails, SNMP traps, or whatever action you develop.
7.1. Configuring SNMP Notifications
Requires an IP to send SNMP traps to, and a SNMP community. Pacemaker MIB is found in /usr/share/snmp/mibs/PCMK-MIB.txt
Example 7.1. Configuring ClusterMon to send SNMP traps
<clone id="ClusterMon-clone"> <primitive class="ocf" id="ClusterMon-SNMP" provider="pacemaker" type="ClusterMon"> <instance_attributes id="ClusterMon-instance_attributes"> <nvpair id="ClusterMon-instance_attributes-user" name="user" value="root"/> <nvpair id="ClusterMon-instance_attributes-update" name="update" value="30"/> <nvpair id="ClusterMon-instance_attributes-extra_options" name="extra_options" value="-S snmphost.example.com -C public"/> </instance_attributes> </primitive></clone>
7.2. Configuring Email Notifications

Chapter 7. Receiving Notification for Cluster Events
46
Requires a user to send mail alerts to. "Mail-From", SMTP relay and Subject prefix can also beconfigured.
Example 7.2. Configuring ClusterMon to send email alerts
<clone id="ClusterMon-clone"> <primitive class="ocf" id="ClusterMon-SMTP" provider="pacemaker" type="ClusterMon"> <instance_attributes id="ClusterMon-instance_attributes"> <nvpair id="ClusterMon-instance_attributes-user" name="user" value="root"/> <nvpair id="ClusterMon-instance_attributes-update" name="update" value="30"/> <nvpair id="ClusterMon-instance_attributes-extra_options" name="extra_options" value="-T [email protected] -F [email protected] -P PACEMAKER -H mail.example.com"/> </instance_attributes> </primitive></clone>
7.3. Configuring Notifications via External-AgentRequires a program (external-agent) to run when resource operations take place, and an external-recipient (IP address, Email address, URI). When triggered, the external-agent is fed with dynamicallyfilled environnement variables describing precisely the cluster event that occurred. By making smartusage of these variables in your external-agent code, you can trigger any action.
Example 7.3. Configuring ClusterMon to execute an external-agent
<clone id="ClusterMon-clone"> <primitive class="ocf" id="ClusterMon" provider="pacemaker" type="ClusterMon"> <instance_attributes id="ClusterMon-instance_attributes"> <nvpair id="ClusterMon-instance_attributes-user" name="user" value="root"/> <nvpair id="ClusterMon-instance_attributes-update" name="update" value="30"/> <nvpair id="ClusterMon-instance_attributes-extra_options" name="extra_options" value="-E /usr/local/bin/example.sh -e 192.168.12.1"/> </instance_attributes> </primitive></clone>
Table 7.1. Environment Variables Passed to the External Agent
Environment Variable Description
CRM_notify_recipient The static external-recipient from the resource definition.
CRM_notify_node The node on which the status change happened.
CRM_notify_rsc The name of the resource that changed the status.
CRM_notify_task The operation that caused the status change.
CRM_notify_desc The textual output relevant error code of the operation (if any)that caused the status change.
CRM_notify_rc The return code of the operation.
CRM_notify_target_rc The expected return code of the operation.
CRM_notify_status The numerical representation of the status of the operation.

Chapter 8.
47
Rules
Table of Contents8.1. Node Attribute Expressions ................................................................................................. 478.2. Time/Date Based Expressions ............................................................................................. 48
8.2.1. Date Specifications ................................................................................................... 498.2.2. Durations ................................................................................................................. 49
8.3. Sample Time Based Expressions ........................................................................................ 498.4. Using Rules to Determine Resource Location ....................................................................... 51
8.4.1. Using score-attribute Instead of score ............................................................. 528.5. Using Rules to Control Resource Options ............................................................................ 528.6. Using Rules to Control Cluster Options ................................................................................ 538.7. Ensuring Time Based Rules Take Effect .............................................................................. 53
Rules can be used to make your configuration more dynamic. One common example is to set onevalue for resource-stickiness during working hours, to prevent resources from being movedback to their most preferred location, and another on weekends when no-one is around to notice anoutage.
Another use of rules might be to assign machines to different processing groups (using a nodeattribute) based on time and to then use that attribute when creating location constraints.
Each rule can contain a number of expressions, date-expressions and even other rules. The results ofthe expressions are combined based on the rule’s boolean-op field to determine if the rule ultimatelyevaluates to true or false. What happens next depends on the context in which the rule is beingused.
Table 8.1. Properties of a Rule
Field Description
role Limits the rule to apply only when the resource is in that role.Allowed values: Started, Slave, and Master. NOTE: A rule withrole="Master" can not determine the initial location of a cloneinstance. It will only affect which of the active instances will bepromoted.
score The score to apply if the rule evaluates to true. Limited to use inrules that are part of location constraints.
score-attribute The node attribute to look up and use as a score if the ruleevaluates to true. Limited to use in rules that are part of locationconstraints.
boolean-op How to combine the result of multiple expression objects. Allowedvalues: and and or.
8.1. Node Attribute Expressions
Expression objects are used to control a resource based on the attributes defined by a node or nodes.In addition to any attributes added by the administrator, each node has a built-in node attribute called#uname that can also be used.

Chapter 8. Rules
48
Table 8.2. Properties of an Expression
Field Description
value User supplied value for comparison
attribute The node attribute to test
type Determines how the value(s) should be tested. Allowed values:string, integer, version
operation The comparison to perform. Allowed values:
* lt - True if the node attribute’s value is less than value
* gt - True if the node attribute’s value is greater than value
* lte - True if the node attribute’s value is less than or equal tovalue
* gte - True if the node attribute’s value is greater than or equal tovalue
* eq - True if the node attribute’s value is equal to value
* ne - True if the node attribute’s value is not equal to value
* defined - True if the node has the named attribute
* not_defined - True if the node does not have the named attribute
8.2. Time/Date Based Expressions
As the name suggests, date_expressions are used to control a resource or cluster optionbased on the current date/time. They can contain an optional date_spec and/or duration objectdepending on the context.
Table 8.3. Properties of a Date Expression
Field Description
start A date/time conforming to the ISO8601 specification.
end A date/time conforming to the ISO8601 specification. Can beinferred by supplying a value for start and a duration.
operation Compares the current date/time with the start and/or end date,depending on the context. Allowed values:
* gt - True if the current date/time is after start
* lt - True if the current date/time is before end
* in-range - True if the current date/time is after start and beforeend
* date-spec - performs a cron-like comparison to the current date/time

Date Specifications
49
Note
As these comparisons (except for date_spec) include the time, the eq, neq, gte and lteoperators have not been implemented since they would only be valid for a single second.
8.2.1. Date Specifications
date_spec objects are used to create cron-like expressions relating to time. Each field can contain asingle number or a single range. Instead of defaulting to zero, any field not supplied is ignored.
For example, monthdays="1" matches the first day of every month and hours="09-17"matches the hours between 9am and 5pm (inclusive). However, at this time one cannot specifyweekdays="1,2" or weekdays="1-2,5-6" since they contain multiple ranges. Depending ondemand, this may be implemented in a future release.
Table 8.4. Properties of a Date Spec
Field Description
id A unique name for the date
hours Allowed values: 0-23
monthdays Allowed values: 0-31 (depending on month and year)
weekdays Allowed values: 1-7 (1=Monday, 7=Sunday)
yeardays Allowed values: 1-366 (depending on the year)
months Allowed values: 1-12
weeks Allowed values: 1-53 (depending on weekyear)
years Year according the Gregorian calendar
weekyears May differ from Gregorian years; Eg. 2005-001 Ordinal is also2005-01-01 Gregorian is also 2004-W53-6 Weekly
moon Allowed values: 0-7 (0 is new, 4 is full moon). Seriously, you canuse this. This was implemented to demonstrate the ease withwhich new comparisons could be added.
8.2.2. Durations
Durations are used to calculate a value for end when one is not supplied to in_range operations. Theycontain the same fields as date_spec objects but without the limitations (ie. you can have a durationof 19 months). Like date_specs, any field not supplied is ignored.
8.3. Sample Time Based ExpressionsA small sample of how time based expressions can be used.
Example 8.1. True if now is any time in the year 2005
<rule id="rule1">

Chapter 8. Rules
50
<date_expression id="date_expr1" start="2005-001" operation="in_range"> <duration years="1"/> </date_expression></rule>
Example 8.2. Equivalent expression
<rule id="rule2"> <date_expression id="date_expr2" operation="date_spec"> <date_spec years="2005"/> </date_expression></rule>
Example 8.3. 9am-5pm, Mon-Friday
<rule id="rule3"> <date_expression id="date_expr3" operation="date_spec"> <date_spec hours="9-16" days="1-5"/> </date_expression></rule>
Please note that the 16 matches up to 16:59:59, as the numeric value (hour) still matches!
Example 8.4. 9am-6pm, Mon-Friday, or all day saturday
<rule id="rule4" boolean_op="or"> <date_expression id="date_expr4-1" operation="date_spec"> <date_spec hours="9-16" days="1-5"/> </date_expression> <date_expression id="date_expr4-2" operation="date_spec"> <date_spec days="6"/> </date_expression></rule>
Example 8.5. 9am-5pm or 9pm-12pm, Mon-Friday
<rule id="rule5" boolean_op="and"> <rule id="rule5-nested1" boolean_op="or"> <date_expression id="date_expr5-1" operation="date_spec"> <date_spec hours="9-16"/> </date_expression> <date_expression id="date_expr5-2" operation="date_spec"> <date_spec hours="21-23"/> </date_expression> </rule> <date_expression id="date_expr5-3" operation="date_spec"> <date_spec days="1-5"/> </date_expression> </rule>
Example 8.6. Mondays in March 2005
<rule id="rule6" boolean_op="and"> <date_expression id="date_expr6-1" operation="date_spec"> <date_spec weekdays="1"/>

Using Rules to Determine Resource Location
51
</date_expression> <date_expression id="date_expr6-2" operation="in_range" start="2005-03-01" end="2005-04-01"/> </rule>
Note
Because no time is specified, 00:00:00 is implied.
This means that the range includes all of 2005-03-01 but none of 2005-04-01. You may wish towrite end="2005-03-31T23:59:59" to avoid confusion.
Example 8.7. A full moon on Friday the 13th
<rule id="rule7" boolean_op="and"> <date_expression id="date_expr7" operation="date_spec"> <date_spec weekdays="5" monthdays="13" moon="4"/> </date_expression></rule>
8.4. Using Rules to Determine Resource Location
If the constraint’s outer-most rule evaluates to false, the cluster treats the constraint as if it was notthere. When the rule evaluates to true, the node’s preference for running the resource is updatedwith the score associated with the rule.
If this sounds familiar, its because you have been using a simplified syntax for location constraint rulesalready. Consider the following location constraint:
Example 8.8. Prevent myApacheRsc from running on c001n03
<rsc_location id="dont-run-apache-on-c001n03" rsc="myApacheRsc" score="-INFINITY" node="c001n03"/>
This constraint can be more verbosely written as:
Example 8.9. Prevent myApacheRsc from running on c001n03 - expanded version
<rsc_location id="dont-run-apache-on-c001n03" rsc="myApacheRsc"> <rule id="dont-run-apache-rule" score="-INFINITY"> <expression id="dont-run-apache-expr" attribute="#uname" operation="eq" value="c00n03"/> </rule></rsc_location>
The advantage of using the expanded form is that one can then add extra clauses to the rule, suchas limiting the rule such that it only applies during certain times of the day or days of the week (this isdiscussed in subsequent sections).

Chapter 8. Rules
52
It also allows us to match on node properties other than its name. If we rated each machine’s CPUpower such that the cluster had the following nodes section:
Example 8.10. A sample nodes section for use with score-attribute
<nodes> <node id="uuid1" uname="c001n01" type="normal"> <instance_attributes id="uuid1-custom_attrs"> <nvpair id="uuid1-cpu_mips" name="cpu_mips" value="1234"/> </instance_attributes> </node> <node id="uuid2" uname="c001n02" type="normal"> <instance_attributes id="uuid2-custom_attrs"> <nvpair id="uuid2-cpu_mips" name="cpu_mips" value="5678"/> </instance_attributes> </node></nodes>
then we could prevent resources from running on underpowered machines with the rule
<rule id="need-more-power-rule" score="-INFINITY"> <expression id=" need-more-power-expr" attribute="cpu_mips" operation="lt" value="3000"/></rule>
8.4.1. Using score-attribute Instead of scoreWhen using score-attribute instead of score, each node matched by the rule has its scoreadjusted differently, according to its value for the named node attribute. Thus, in the previous example,if a rule used score-attribute="cpu_mips", c001n01 would have its preference to run theresource increased by 1234 whereas c001n02 would have its preference increased by 5678.
8.5. Using Rules to Control Resource OptionsOften some cluster nodes will be different from their peers; sometimes these differences (thelocation of a binary or the names of network interfaces) require resources to be configured differentlydepending on the machine they’re hosted on.
By defining multiple instance_attributes objects for the resource and adding a rule to each, wecan easily handle these special cases.
In the example below, mySpecialRsc will use eth1 and port 9999 when run on node1, eth2 and port8888 on node2 and default to eth0 and port 9999 for all other nodes.
Example 8.11. Defining different resource options based on the node name
<primitive id="mySpecialRsc" class="ocf" type="Special" provider="me"> <instance_attributes id="special-node1" score="3"> <rule id="node1-special-case" score="INFINITY" > <expression id="node1-special-case-expr" attribute="#uname" operation="eq" value="node1"/> </rule> <nvpair id="node1-interface" name="interface" value="eth1"/> </instance_attributes> <instance_attributes id="special-node2" score="2" > <rule id="node2-special-case" score="INFINITY"> <expression id="node2-special-case-expr" attribute="#uname" operation="eq" value="node2"/>

Using Rules to Control Cluster Options
53
</rule> <nvpair id="node2-interface" name="interface" value="eth2"/> <nvpair id="node2-port" name="port" value="8888"/> </instance_attributes> <instance_attributes id="defaults" score="1" > <nvpair id="default-interface" name="interface" value="eth0"/> <nvpair id="default-port" name="port" value="9999"/> </instance_attributes></primitive>
The order in which instance_attributes objects are evaluated is determined by their score(highest to lowest). If not supplied, score defaults to zero and objects with an equal score areprocessed in listed order. If the instance_attributes object does not have a rule or has arule that evaluates to true, then for any parameter the resource does not yet have a value for, theresource will use the parameter values defined by the instance_attributes object.
8.6. Using Rules to Control Cluster Options
Controlling cluster options is achieved in much the same manner as specifying different resourceoptions on different nodes.
The difference is that because they are cluster options, one cannot (or should not, becausethey won’t work) use attribute based expressions. The following example illustrates how to set adifferent resource-stickiness value during and outside of work hours. This allows resources toautomatically move back to their most preferred hosts, but at a time that (in theory) does not interferewith business activities.
Example 8.12. Change resource-stickiness during working hours
<rsc_defaults> <meta_attributes id="core-hours" score="2"> <rule id="core-hour-rule" score="0"> <date_expression id="nine-to-five-Mon-to-Fri" operation="date_spec"> <date_spec id="nine-to-five-Mon-to-Fri-spec" hours="9-16" weekdays="1-5"/> </date_expression> </rule> <nvpair id="core-stickiness" name="resource-stickiness" value="INFINITY"/> </meta_attributes> <meta_attributes id="after-hours" score="1" > <nvpair id="after-stickiness" name="resource-stickiness" value="0"/> </meta_attributes></rsc_defaults>
8.7. Ensuring Time Based Rules Take EffectA Pacemaker cluster is an event driven system. As such, it won’t recalculate the best place forresources to run in unless something (like a resource failure or configuration change) happens. Thiscan mean that a location constraint that only allows resource X to run between 9am and 5pm is notenforced.
If you rely on time based rules, it is essential that you set the cluster-recheck-interval option.This tells the cluster to periodically recalculate the ideal state of the cluster. For example, if you setcluster-recheck-interval=5m, then sometime between 9:00 and 9:05 the cluster would noticethat it needs to start resource X, and between 17:00 and 17:05 it would realize that X needed to bestopped.

Chapter 8. Rules
54
Note that the timing of the actual start and stop actions depends on what else needs to be performedfirst .

Chapter 9.
55
Advanced Configuration
Table of Contents9.1. Connecting from a Remote Machine .................................................................................... 559.2. Specifying When Recurring Actions are Performed ............................................................... 569.3. Moving Resources .............................................................................................................. 56
9.3.1. Manual Intervention .................................................................................................. 569.3.2. Moving Resources Due to Failure ............................................................................. 589.3.3. Moving Resources Due to Connectivity Changes ....................................................... 589.3.4. Resource Migration .................................................................................................. 61
9.4. Reusing Rules, Options and Sets of Operations ................................................................... 629.5. Reloading Services After a Definition Change ...................................................................... 63
9.1. Connecting from a Remote Machine
Provided Pacemaker is installed on a machine, it is possible to connect to the cluster even if themachine itself is not in the same cluster. To do this, one simply sets up a number of environmentvariables and runs the same commands as when working on a cluster node.
Table 9.1. Environment Variables Used to Connect to Remote Instances of the CIB
Environment Variable Description
CIB_user The user to connect as. Needs to be part of the haclustergroup on the target host. Defaults to $USER.
CIB_passwd The user’s password. Read from the command line if unset.
CIB_server The host to contact. Defaults to localhost.
CIB_port The port on which to contact the server; required.
CIB_encrypted Encrypt network traffic; defaults to true.
So, if c001n01 is an active cluster node and is listening on 1234 for connections, and someguy isa member of the hacluster group, then the following would prompt for someguy's password andreturn the cluster’s current configuration:
# export CIB_port=1234; export CIB_server=c001n01; export CIB_user=someguy;# cibadmin -Q
For security reasons, the cluster does not listen for remote connections by default. If you wish toallow remote access, you need to set the remote-tls-port (encrypted) or remote-clear-port(unencrypted) top-level options (ie., those kept in the cib tag, like num_updates and epoch).
Table 9.2. Extra top-level CIB options for remote access
Field Description
remote-tls-port Listen for encrypted remote connections on this port. Default:none
remote-clear-port Listen for plaintext remote connections on this port. Default:none

Chapter 9. Advanced Configuration
56
9.2. Specifying When Recurring Actions are PerformedBy default, recurring actions are scheduled relative to when the resource started. So if your resourcewas last started at 14:32 and you have a backup set to be performed every 24 hours, then the backupwill always run at in the middle of the business day - hardly desirable.
To specify a date/time that the operation should be relative to, set the operation’s interval-origin.The cluster uses this point to calculate the correct start-delay such that the operation will occur atorigin + (interval * N).
So, if the operation’s interval is 24h, it’s interval-origin is set to 02:00 and it is currently 14:32, thenthe cluster would initiate the operation with a start delay of 11 hours and 28 minutes. If the resource ismoved to another node before 2am, then the operation is of course cancelled.
The value specified for interval and interval-origin can be any date/time conforming to theISO8601 standard1. By way of example, to specify an operation that would run on the first Monday of2009 and every Monday after that you would add:
Example 9.1. Specifying a Base for Recurring Action Intervals
<op id="my-weekly-action" name="custom-action" interval="P7D" interval-origin="2009-W01-1"/>
9.3. Moving Resources
9.3.1. Manual InterventionThere are primarily two occasions when you would want to move a resource from it’s current location:when the whole node is under maintenance, and when a single resource needs to be moved.
Since everything eventually comes down to a score, you could create constraints for every resourceto prevent them from running on one node. While the configuration can seem convoluted at times, noteven we would require this of administrators.
Instead one can set a special node attribute which tells the cluster "don’t let anything run here". Thereis even a helpful tool to help query and set it, called crm_standby. To check the standby status of thecurrent machine, simply run:
# crm_standby --get-value
A value of true indicates that the node is NOT able to host any resources, while a value of falsesays that it CAN.
You can also check the status of other nodes in the cluster by specifying the --node-uname option:
# crm_standby --get-value --node-uname sles-2
To change the current node’s standby status, use --attr-value instead of --get-value.
# crm_standby --attr-value
1 http://en.wikipedia.org/wiki/ISO_8601

Manual Intervention
57
Again, you can change another host’s value by supplying a host name with --node-uname.
When only one resource is required to move, we do this by creating location constraints. However,once again we provide a user friendly shortcut as part of the crm_resource command, which createsand modifies the extra constraints for you. If Email was running on sles-1 and you wanted it movedto a specific location, the command would look something like:
# crm_resource -M -r Email -H sles-2
Behind the scenes, the tool will create the following location constraint:
<rsc_location rsc="Email" node="sles-2" score="INFINITY"/>
It is important to note that subsequent invocations of crm_resource -M are not cumulative. So, ifyou ran these commands
# crm_resource -M -r Email -H sles-2# crm_resource -M -r Email -H sles-3
then it is as if you had never performed the first command.
To allow the resource to move back again, use:
# crm_resource -U -r Email
Note the use of the word allow. The resource can move back to its original location but, dependingon resource-stickiness, it might stay where it is. To be absolutely certain that it moves back tosles-1, move it there before issuing the call to crm_resource -U:
# crm_resource -M -r Email -H sles-1# crm_resource -U -r Email
Alternatively, if you only care that the resource should be moved from its current location, try
# crm_resource -M -r Email`
Which will instead create a negative constraint, like
<rsc_location rsc="Email" node="sles-1" score="-INFINITY"/>
This will achieve the desired effect, but will also have long-term consequences. As the tool will warnyou, the creation of a -INFINITY constraint will prevent the resource from running on that node untilcrm_resource -U is used. This includes the situation where every other cluster node is no longeravailable!
In some cases, such as when resource-stickiness is set to INFINITY, it is possible that you willend up with the problem described in Section 6.2.4, “What if Two Nodes Have the Same Score”. Thetool can detect some of these cases and deals with them by also creating both a positive and negativeconstraint. Eg.
Email prefers sles-1 with a score of -INFINITY
Email prefers sles-2 with a score of INFINITY
which has the same long-term consequences as discussed earlier.

Chapter 9. Advanced Configuration
58
9.3.2. Moving Resources Due to FailureNew in 1.0 is the concept of a migration threshold. 2
Simply define migration-threshold=N for a resource and it will migrate to a new node after Nfailures. There is no threshold defined by default. To determine the resource’s current failure statusand limits, use crm_mon --failcounts.
By default, once the threshold has been reached, this node will no longer be allowed to run the failedresource until the administrator manually resets the resource’s failcount using crm_failcount (afterhopefully first fixing the failure’s cause). However it is possible to expire them by setting the resource’sfailure-timeout option.
So a setting of migration-threshold=2 and failure-timeout=60s would cause the resourceto move to a new node after 2 failures, and allow it to move back (depending on the stickiness andconstraint scores) after one minute.
There are two exceptions to the migration threshold concept; they occur when a resource either failsto start or fails to stop. Start failures cause the failcount to be set to INFINITY and thus always causethe resource to move immediately.
Stop failures are slightly different and crucial. If a resource fails to stop and STONITH is enabled, thenthe cluster will fence the node in order to be able to start the resource elsewhere. If STONITH is notenabled, then the cluster has no way to continue and will not try to start the resource elsewhere, butwill try to stop it again after the failure timeout.
Important
Please read Section 8.7, “Ensuring Time Based Rules Take Effect” before enabling this option.
9.3.3. Moving Resources Due to Connectivity ChangesSetting up the cluster to move resources when external connectivity is lost is a two-step process.
9.3.3.1. Tell Pacemaker to monitor connectivityTo do this, you need to add a ping resource to the cluster. The ping resource uses the system utilityof the same name to a test if list of machines (specified by DNS hostname or IPv4/IPv6 address) arereachable and uses the results to maintain a node attribute normally called pingd. 3
Note
Older versions of Heartbeat required users to add ping nodes to ha.cf - this is no longer required.
2 The naming of this option was perhaps unfortunate as it is easily confused with true migration, the process of moving aresource from one node to another without stopping it. Xen virtual guests are the most common example of resources that canbe migrated in this manner.3 The attribute name is customizable; that allows multiple ping groups to be defined.

Moving Resources Due to Connectivity Changes
59
Important
Older versions of Pacemaker used a custom binary called pingd for this functionality; this is nowdeprecated in favor of ping.
If your version of Pacemaker does not contain the ping agent, you can download the latestversion from https://github.com/ClusterLabs/pacemaker/tree/master/extra/resources/ping
Normally the resource will run on all cluster nodes, which means that you’ll need to create a clone. Atemplate for this can be found below along with a description of the most interesting parameters.
Table 9.3. Common Options for a ping Resource
Field Description
dampen The time to wait (dampening) for further changes to occur. Use this toprevent a resource from bouncing around the cluster when cluster nodesnotice the loss of connectivity at slightly different times.
multiplier The number of connected ping nodes gets multiplied by this value to get ascore. Useful when there are multiple ping nodes configured.
host_list The machines to contact in order to determine the current connectivitystatus. Allowed values include resolvable DNS host names, IPv4 and IPv6addresses.
Example 9.2. An example ping cluster resource that checks node connectivity once every minute
<clone id="Connected"> <primitive id="ping" provider="pacemaker" class="ocf" type="ping"> <instance_attributes id="ping-attrs"> <nvpair id="pingd-dampen" name="dampen" value="5s"/> <nvpair id="pingd-multiplier" name="multiplier" value="1000"/> <nvpair id="pingd-hosts" name="host_list" value="my.gateway.com www.bigcorp.com"/> </instance_attributes> <operations> <op id="ping-monitor-60s" interval="60s" name="monitor"/> </operations> </primitive></clone>
Important
You’re only half done. The next section deals with telling Pacemaker how to deal with theconnectivity status that ocf:pacemaker:ping is recording.

Chapter 9. Advanced Configuration
60
9.3.3.2. Tell Pacemaker how to interpret the connectivity data
Note
Before reading the following, please make sure you have read and understood Chapter 8, Rulesabove.
There are a number of ways to use the connectivity data provided by Heartbeat. The most commonsetup is for people to have a single ping node, to prevent the cluster from running a resource on anyunconnected node.
Example 9.3. Don’t run on unconnected nodes
<rsc_location id="WebServer-no-connectivity" rsc="Webserver"> <rule id="ping-exclude-rule" score="-INFINITY" > <expression id="ping-exclude" attribute="pingd" operation="not_defined"/> </rule></rsc_location>
A more complex setup is to have a number of ping nodes configured. You can require the cluster toonly run resources on nodes that can connect to all (or a minimum subset) of them.
Example 9.4. Run only on nodes connected to three or more ping nodes; this assumesmultiplier is set to 1000:
<rsc_location id="WebServer-connectivity" rsc="Webserver"> <rule id="ping-prefer-rule" score="-INFINITY" > <expression id="ping-prefer" attribute="pingd" operation="lt" value="3000"/> </rule></rsc_location>
Instead you can tell the cluster only to prefer nodes with the best connectivity. Just be sure to setmultiplier to a value higher than that of resource-stickiness (and don’t set either of them toINFINITY).
Example 9.5. Prefer the node with the most connected ping nodes
<rsc_location id="WebServer-connectivity" rsc="Webserver"> <rule id="ping-prefer-rule" score-attribute="pingd" > <expression id="ping-prefer" attribute="pingd" operation="defined"/> </rule></rsc_location>
It is perhaps easier to think of this in terms of the simple constraints that the cluster translates it into.For example, if sles-1 is connected to all 5 ping nodes but sles-2 is only connected to 2, then itwould be as if you instead had the following constraints in your configuration:

Resource Migration
61
Example 9.6. How the cluster translates the pingd constraint
<rsc_location id="ping-1" rsc="Webserver" node="sles-1" score="5000"/><rsc_location id="ping-2" rsc="Webserver" node="sles-2" score="2000"/>
The advantage is that you don’t have to manually update any constraints whenever your networkconnectivity changes.
You can also combine the concepts above into something even more complex. The examplebelow shows how you can prefer the node with the most connected ping nodes provided they haveconnectivity to at least three (again assuming that multiplier is set to 1000).
Example 9.7. A more complex example of choosing a location based on connectivity
<rsc_location id="WebServer-connectivity" rsc="Webserver"> <rule id="ping-exclude-rule" score="-INFINITY" > <expression id="ping-exclude" attribute="pingd" operation="lt" value="3000"/> </rule> <rule id="ping-prefer-rule" score-attribute="pingd" > <expression id="ping-prefer" attribute="pingd" operation="defined"/> </rule></rsc_location>
9.3.4. Resource MigrationSome resources, such as Xen virtual guests, are able to move to another location without loss of state.We call this resource migration; this is different from the normal practice of stopping the resource onthe first machine and starting it elsewhere.
Not all resources are able to migrate, see the Migration Checklist below, and those that can, won’t doso in all situations. Conceptually there are two requirements from which the other prerequisites follow:
• the resource must be active and healthy at the old location
• everything required for the resource to run must be available on both the old and new locations
The cluster is able to accommodate both push and pull migration models by requiring theresource agent to support two new actions: migrate_to (performed on the current location) andmigrate_from (performed on the destination).
In push migration, the process on the current location transfers the resource to the new location whereis it later activated. In this scenario, most of the work would be done in the migrate_to action and, ifanything, the activation would occur during migrate_from.
Conversely for pull, the migrate_to action is practically empty and migrate_from does most of thework, extracting the relevant resource state from the old location and activating it.
There is no wrong or right way to implement migration for your service, as long as it works.
9.3.4.1. Migration Checklist• The resource may not be a clone.
• The resource must use an OCF style agent.
• The resource must not be in a failed or degraded state.

Chapter 9. Advanced Configuration
62
• The resource must not, directly or indirectly, depend on any primitive or group resources.
• The resource must support two new actions: migrate_to and migrate_from, and advertisethem in its metadata.
• The resource must have the allow-migrate meta-attribute set to true (which is not the default).
If the resource depends on a clone, and at the time the resource needs to be move, the clone hasinstances that are stopping and instances that are starting, then the resource will be moved in thetraditional manner. The Policy Engine is not yet able to model this situation correctly and so takes thesafe (yet less optimal) path.
9.4. Reusing Rules, Options and Sets of OperationsSometimes a number of constraints need to use the same set of rules, and resources need to set thesame options and parameters. To simplify this situation, you can refer to an existing object using anid-ref instead of an id.
So if for one resource you have
<rsc_location id="WebServer-connectivity" rsc="Webserver"> <rule id="ping-prefer-rule" score-attribute="pingd" > <expression id="ping-prefer" attribute="pingd" operation="defined"/> </rule></rsc_location>
Then instead of duplicating the rule for all your other resources, you can instead specify:
Example 9.8. Referencing rules from other constraints
<rsc_location id="WebDB-connectivity" rsc="WebDB"> <rule id-ref="ping-prefer-rule"/></rsc_location>
Important
The cluster will insist that the rule exists somewhere. Attempting to add a reference to a non-existing rule will cause a validation failure, as will attempting to remove a rule that is referencedelsewhere.
The same principle applies for meta_attributes and instance_attributes as illustrated in theexample below:
Example 9.9. Referencing attributes, options, and operations from other resources
<primitive id="mySpecialRsc" class="ocf" type="Special" provider="me"> <instance_attributes id="mySpecialRsc-attrs" score="1" > <nvpair id="default-interface" name="interface" value="eth0"/> <nvpair id="default-port" name="port" value="9999"/> </instance_attributes> <meta_attributes id="mySpecialRsc-options"> <nvpair id="failure-timeout" name="failure-timeout" value="5m"/>

Reloading Services After a Definition Change
63
<nvpair id="migration-threshold" name="migration-threshold" value="1"/> <nvpair id="stickiness" name="resource-stickiness" value="0"/> </meta_attributes> <operations id="health-checks"> <op id="health-check" name="monitor" interval="60s"/> <op id="health-check" name="monitor" interval="30min"/> </operations></primitive><primitive id="myOtherlRsc" class="ocf" type="Other" provider="me"> <instance_attributes id-ref="mySpecialRsc-attrs"/> <meta_attributes id-ref="mySpecialRsc-options"/> <operations id-ref="health-checks"/></primitive>
9.5. Reloading Services After a Definition ChangeThe cluster automatically detects changes to the definition of services it manages. However, thenormal response is to stop the service (using the old definition) and start it again (with the newdefinition). This works well, but some services are smarter and can be told to use a new set of optionswithout restarting.
To take advantage of this capability, your resource agent must:
1. Accept the reload operation and perform any required actions. The steps required here dependcompletely on your application!
Example 9.10. The DRBD Agent’s Control logic for Supporting the reload Operation
case $1 in start) drbd_start ;; stop) drbd_stop ;; reload) drbd_reload ;; monitor) drbd_monitor ;; *) drbd_usage exit $OCF_ERR_UNIMPLEMENTED ;;esacexit $?
2. Advertise the reload operation in the actions section of its metadata
Example 9.11. The DRBD Agent Advertising Support for the reload Operation
<?xml version="1.0"?> <!DOCTYPE resource-agent SYSTEM "ra-api-1.dtd"> <resource-agent name="drbd"> <version>1.1</version>
<longdesc> Master/Slave OCF Resource Agent for DRBD </longdesc>

Chapter 9. Advanced Configuration
64
...
<actions> <action name="start" timeout="240" /> <action name="reload" timeout="240" /> <action name="promote" timeout="90" /> <action name="demote" timeout="90" /> <action name="notify" timeout="90" /> <action name="stop" timeout="100" /> <action name="meta-data" timeout="5" /> <action name="validate-all" timeout="30" /> </actions> </resource-agent>
3. Advertise one or more parameters that can take effect using reload.
Any parameter with the unique set to 0 is eligible to be used in this way.
Example 9.12. Parameter that can be changed using reload
<parameter name="drbdconf" unique="0"> <longdesc>Full path to the drbd.conf file.</longdesc> <shortdesc>Path to drbd.conf</shortdesc> <content type="string" default="${OCF_RESKEY_drbdconf_default}"/></parameter>
Once these requirements are satisfied, the cluster will automatically know to reload the resource(instead of restarting) when a non-unique fields changes.
Note
The metadata is re-read when the resource is started. This may mean that the resource will berestarted the first time, even though you changed a parameter with unique=0
Note
If both a unique and non-unique field are changed simultaneously, the resource will still berestarted.

Chapter 10.
65
Advanced Resource Types
Table of Contents10.1. Groups - A Syntactic Shortcut ........................................................................................... 65
10.1.1. Group Properties .................................................................................................... 6610.1.2. Group Options ........................................................................................................ 6610.1.3. Group Instance Attributes ....................................................................................... 6610.1.4. Group Contents ...................................................................................................... 6610.1.5. Group Constraints .................................................................................................. 6710.1.6. Group Stickiness .................................................................................................... 67
10.2. Clones - Resources That Get Active on Multiple Hosts ........................................................ 6710.2.1. Clone Properties ..................................................................................................... 6810.2.2. Clone Options ........................................................................................................ 6810.2.3. Clone Instance Attributes ........................................................................................ 6810.2.4. Clone Contents ...................................................................................................... 6810.2.5. Clone Constraints ................................................................................................... 6810.2.6. Clone Stickiness ..................................................................................................... 6910.2.7. Clone Resource Agent Requirements ...................................................................... 69
10.3. Multi-state - Resources That Have Multiple Modes .............................................................. 7110.3.1. Multi-state Properties .............................................................................................. 7110.3.2. Multi-state Options .................................................................................................. 7110.3.3. Multi-state Instance Attributes ................................................................................. 7210.3.4. Multi-state Contents ................................................................................................ 7210.3.5. Monitoring Multi-State Resources ............................................................................ 7210.3.6. Multi-state Constraints ............................................................................................ 7210.3.7. Multi-state Stickiness .............................................................................................. 7310.3.8. Which Resource Instance is Promoted .................................................................... 7410.3.9. Multi-state Resource Agent Requirements ............................................................... 7410.3.10. Multi-state Notifications ......................................................................................... 7410.3.11. Multi-state - Proper Interpretation of Notification Environment Variables ................... 75
10.1. Groups - A Syntactic Shortcut
One of the most common elements of a cluster is a set of resources that need to be located together,start sequentially, and stop in the reverse order. To simplify this configuration we support the conceptof groups.
Example 10.1. An example group
<group id="shortcut"> <primitive id="Public-IP" class="ocf" type="IPaddr" provider="heartbeat"> <instance_attributes id="params-public-ip"> <nvpair id="public-ip-addr" name="ip" value="1.2.3.4"/> </instance_attributes> </primitive> <primitive id="Email" class="lsb" type="exim"/> </group>

Chapter 10. Advanced Resource Types
66
Although the example above contains only two resources, there is no limit to the number of resourcesa group can contain. The example is also sufficient to explain the fundamental properties of a group:
• Resources are started in the order they appear in (Public-IP first, then Email)
• Resources are stopped in the reverse order to which they appear in (Email first, then Public-IP)
If a resource in the group can’t run anywhere, then nothing after that is allowed to run, too.
• If Public-IP can’t run anywhere, neither can Email;
• but if Email can’t run anywhere, this does not affect Public-IP in any way
The group above is logically equivalent to writing:
Example 10.2. How the cluster sees a group resource
<configuration> <resources> <primitive id="Public-IP" class="ocf" type="IPaddr" provider="heartbeat"> <instance_attributes id="params-public-ip"> <nvpair id="public-ip-addr" name="ip" value="1.2.3.4"/> </instance_attributes> </primitive> <primitive id="Email" class="lsb" type="exim"/> </resources> <constraints> <rsc_colocation id="xxx" rsc="Email" with-rsc="Public-IP" score="INFINITY"/> <rsc_order id="yyy" first="Public-IP" then="Email"/> </constraints></configuration>
Obviously as the group grows bigger, the reduced configuration effort can become significant.
Another (typical) example of a group is a DRBD volume, the filesystem mount, an IP address, and anapplication that uses them.
10.1.1. Group Properties
Table 10.1. Properties of a Group Resource
Field Description
id Your name for the group
10.1.2. Group OptionsOptions inherited from primitive resources: priority, target-role, is-managed
10.1.3. Group Instance AttributesGroups have no instance attributes, however any that are set here will be inherited by the group’schildren.
10.1.4. Group ContentsGroups may only contain a collection of Section 5.3, “Resource Properties” cluster resources. To referto the child of a group resource, just use the child’s id instead of the group’s.

Group Constraints
67
10.1.5. Group ConstraintsAlthough it is possible to reference the group’s children in constraints, it is usually preferable to use thegroup’s name instead.
Example 10.3. Example constraints involving groups
<constraints> <rsc_location id="group-prefers-node1" rsc="shortcut" node="node1" score="500"/> <rsc_colocation id="webserver-with-group" rsc="Webserver" with-rsc="shortcut"/> <rsc_order id="start-group-then-webserver" first="Webserver" then="shortcut"/></constraints>
10.1.6. Group Stickiness
Stickiness, the measure of how much a resource wants to stay where it is, is additive in groups. Everyactive resource of the group will contribute its stickiness value to the group’s total. So if the defaultresource-stickiness is 100, and a group has seven members, five of which are active, then thegroup as a whole will prefer its current location with a score of 500.
10.2. Clones - Resources That Get Active on Multiple Hosts
Clones were initially conceived as a convenient way to start N instances of an IP resource and havethem distributed throughout the cluster for load balancing. They have turned out to quite useful for anumber of purposes including integrating with Red Hat’s DLM, the fencing subsystem, and OCFS2.
You can clone any resource, provided the resource agent supports it.
Three types of cloned resources exist:
• Anonymous
• Globally Unique
• Stateful
Anonymous clones are the simplest type. These resources behave completely identically everywherethey are running. Because of this, there can only be one copy of an anonymous clone active permachine.
Globally unique clones are distinct entities. A copy of the clone running on one machine is notequivalent to another instance on another node. Nor would any two copies on the same node beequivalent.
Stateful clones are covered later in Section 10.3, “Multi-state - Resources That Have Multiple Modes”.
Example 10.4. An example clone
<clone id="apache-clone"> <meta_attributes id="apache-clone-meta"> <nvpair id="apache-unique" name="globally-unique" value="false"/> </meta_attributes> <primitive id="apache" class="lsb" type="apache"/></clone>

Chapter 10. Advanced Resource Types
68
10.2.1. Clone Properties
Table 10.2. Properties of a Clone Resource
Field Description
id Your name for the clone
10.2.2. Clone OptionsOptions inherited from primitive resources: priority, target-role, is-managed
Table 10.3. Clone specific configuration options
Field Description
clone-max How many copies of the resource to start. Defaults to thenumber of nodes in the cluster.
clone-node-max How many copies of the resource can be started on asingle node; default 1.
notify When stopping or starting a copy of the clone, tell allthe other copies beforehand and when the action wassuccessful. Allowed values: false, true
globally-unique Does each copy of the clone perform a different function?Allowed values: false, true
ordered Should the copies be started in series (instead of inparallel). Allowed values: false, true
interleave Changes the behavior of ordering constraints (betweenclones/masters) so that instances can start/stop as soonas their peer instance has (rather than waiting for everyinstance of the other clone has). Allowed values: false,true
10.2.3. Clone Instance AttributesClones have no instance attributes; however, any that are set here will be inherited by the clone’schildren.
10.2.4. Clone ContentsClones must contain exactly one group or one regular resource.
Warning
You should never reference the name of a clone’s child. If you think you need to do this, youprobably need to re-evaluate your design.
10.2.5. Clone ConstraintsIn most cases, a clone will have a single copy on each active cluster node. If this is not the case, youcan indicate which nodes the cluster should preferentially assign copies to with resource location

Clone Stickiness
69
constraints. These constraints are written no differently to those for regular resources except that theclone’s id is used.
Ordering constraints behave slightly differently for clones. In the example below, apache-stats willwait until all copies of the clone that need to be started have done so before being started itself. Onlyif no copies can be started apache-stats will be prevented from being active. Additionally, the clonewill wait for apache-stats to be stopped before stopping the clone.
Colocation of a regular (or group) resource with a clone means that the resource can run on anymachine with an active copy of the clone. The cluster will choose a copy based on where the clone isrunning and the resource’s own location preferences.
Colocation between clones is also possible. In such cases, the set of allowed locations for the clone islimited to nodes on which the clone is (or will be) active. Allocation is then performed as normally.
Example 10.5. Example constraints involving clones
<constraints> <rsc_location id="clone-prefers-node1" rsc="apache-clone" node="node1" score="500"/> <rsc_colocation id="stats-with-clone" rsc="apache-stats" with="apache-clone"/> <rsc_order id="start-clone-then-stats" first="apache-clone" then="apache-stats"/></constraints>
10.2.6. Clone Stickiness
To achieve a stable allocation pattern, clones are slightly sticky by default. If no value for resource-stickiness is provided, the clone will use a value of 1. Being a small value, it causes minimaldisturbance to the score calculations of other resources but is enough to prevent Pacemaker fromneedlessly moving copies around the cluster.
10.2.7. Clone Resource Agent RequirementsAny resource can be used as an anonymous clone, as it requires no additional support from theresource agent. Whether it makes sense to do so depends on your resource and its resource agent.
Globally unique clones do require some additional support in the resource agent. In particular, it mustonly respond with other probes for instances of the clone should result in they should return one of theother OCF error codes.
Copies of a clone are identified by appending a colon and a numerical offset, eg. apache:2.
Resource agents can find out how many copies there are by examining theOCF_RESKEY_CRM_meta_clone_max environment variable and which copy it is by examiningOCF_RESKEY_CRM_meta_clone.
You should not make any assumptions (based on OCF_RESKEY_CRM_meta_clone) about whichcopies are active. In particular, the list of active copies will not always be an unbroken sequence, noralways start at 0.
10.2.7.1. Clone NotificationsSupporting notifications requires the notify action to be implemented. Once supported, the notifyaction will be passed a number of extra variables which, when combined with additional context, canbe used to calculate the current state of the cluster and what is about to happen to it.

Chapter 10. Advanced Resource Types
70
Table 10.4. Environment variables supplied with Clone notify actions
Variable Description
OCF_RESKEY_CRM_meta_notify_type Allowed values: pre, post
OCF_RESKEY_CRM_meta_notify_operation Allowed values: start, stop
OCF_RESKEY_CRM_meta_notify_start_resource Resources to be started
OCF_RESKEY_CRM_meta_notify_stop_resource Resources to be stopped
OCF_RESKEY_CRM_meta_notify_active_resource Resources that are running
OCF_RESKEY_CRM_meta_notify_inactive_resource Resources that are not running
OCF_RESKEY_CRM_meta_notify_start_uname Nodes on which resources will bestarted
OCF_RESKEY_CRM_meta_notify_stop_uname Nodes on which resources will bestopped
OCF_RESKEY_CRM_meta_notify_active_uname Nodes on which resources arerunning
OCF_RESKEY_CRM_meta_notify_inactive_uname Nodes on which resources arenot running
The variables come in pairs, such as OCF_RESKEY_CRM_meta_notify_start_resource andOCF_RESKEY_CRM_meta_notify_start_uname and should be treated as an array of whitespaceseparated elements.
Thus in order to indicate that clone:0 will be started on sles-1, clone:2 will be started onsles-3, and clone:3 will be started on sles-2, the cluster would set
Example 10.6. Example notification variables
OCF_RESKEY_CRM_meta_notify_start_resource="clone:0 clone:2 clone:3"OCF_RESKEY_CRM_meta_notify_start_uname="sles-1 sles-3 sles-2"
10.2.7.2. Proper Interpretation of Notification Environment Variables
Pre-notification (stop):• Active resources: $OCF_RESKEY_CRM_meta_notify_active_resource
• Inactive resources: $OCF_RESKEY_CRM_meta_notify_inactive_resource
• Resources to be started: $OCF_RESKEY_CRM_meta_notify_start_resource
• Resources to be stopped: $OCF_RESKEY_CRM_meta_notify_stop_resource
Post-notification (stop) / Pre-notification (start):• Active resources
• $OCF_RESKEY_CRM_meta_notify_active_resource
• minus $OCF_RESKEY_CRM_meta_notify_stop_resource
• Inactive resources
• $OCF_RESKEY_CRM_meta_notify_inactive_resource

Multi-state - Resources That Have Multiple Modes
71
• plus $OCF_RESKEY_CRM_meta_notify_stop_resource
• Resources that were started: $OCF_RESKEY_CRM_meta_notify_start_resource
• Resources that were stopped: $OCF_RESKEY_CRM_meta_notify_stop_resource
Post-notification (start):• Active resources:
• $OCF_RESKEY_CRM_meta_notify_active_resource
• minus $OCF_RESKEY_CRM_meta_notify_stop_resource
• plus $OCF_RESKEY_CRM_meta_notify_start_resource
• Inactive resources:
• $OCF_RESKEY_CRM_meta_notify_inactive_resource
• plus $OCF_RESKEY_CRM_meta_notify_stop_resource
• minus $OCF_RESKEY_CRM_meta_notify_start_resource
• Resources that were started: $OCF_RESKEY_CRM_meta_notify_start_resource
• Resources that were stopped: $OCF_RESKEY_CRM_meta_notify_stop_resource
10.3. Multi-state - Resources That Have Multiple Modes
Multi-state resources are a specialization of Clone resources; please ensure you understand thesection on clones before continuing! They allow the instances to be in one of two operating modes;these are called Master and Slave, but can mean whatever you wish them to mean. The onlylimitation is that when an instance is started, it must come up in the Slave state.
10.3.1. Multi-state PropertiesTable 10.5. Properties of a Multi-State Resource
Field Description
id Your name for the multi-state resource
10.3.2. Multi-state OptionsOptions inherited from primitive resources: priority, target-role, is-managed
Options inherited from clone resources: clone-max, clone-node-max, notify, globally-unique, ordered, interleave
Table 10.6. Multi-state specific resource configuration options
Field Description
master-max How many copies of the resource can be promoted tomaster status; default 1.
master-node-max How many copies of the resource can be promoted tomaster status on a single node; default 1.

Chapter 10. Advanced Resource Types
72
10.3.3. Multi-state Instance AttributesMulti-state resources have no instance attributes; however, any that are set here will be inherited bymaster’s children.
10.3.4. Multi-state ContentsMasters must contain exactly one group or one regular resource.
Warning
You should never reference the name of a master’s child. If you think you need to do this, youprobably need to re-evaluate your design.
10.3.5. Monitoring Multi-State ResourcesThe normal type of monitor actions are not sufficient to monitor a multi-state resource in the Masterstate. To detect failures of the Master instance, you need to define an additional monitor action withrole="Master".
Important
It is crucial that every monitor operation has a different interval!
This is because Pacemaker currently differentiates between operations only by resourceand interval; so if eg. a master/slave resource has the same monitor interval for both roles,Pacemaker would ignore the role when checking the status - which would cause unexpectedreturn codes, and therefore unnecessary complications.
Example 10.7. Monitoring both states of a multi-state resource
<master id="myMasterRsc"> <primitive id="myRsc" class="ocf" type="myApp" provider="myCorp"> <operations> <op id="public-ip-slave-check" name="monitor" interval="60"/> <op id="public-ip-master-check" name="monitor" interval="61" role="Master"/> </operations> </primitive></master>
10.3.6. Multi-state ConstraintsIn most cases, a multi-state resources will have a single copy on each active cluster node. If this is notthe case, you can indicate which nodes the cluster should preferentially assign copies to with resourcelocation constraints. These constraints are written no differently to those for regular resources exceptthat the master’s id is used.
When considering multi-state resources in constraints, for most purposes it is sufficient to treat themas clones. The exception is when the rsc-role and/or with-rsc-role fields (for colocationconstraints) and first-action and/or then-action fields (for ordering constraints) are used.

Multi-state Stickiness
73
Table 10.7. Additional constraint options relevant to multi-state resources
Field Description
rsc-role An additional attribute of colocation constraints thatspecifies the role that rsc must be in. Allowed values:Started, Master, Slave.
with-rsc-role An additional attribute of colocation constraints thatspecifies the role that with-rsc must be in. Allowedvalues: Started, Master, Slave.
first-action An additional attribute of ordering constraints that specifiesthe action that the first resource must complete beforeexecuting the specified action for the then resource.Allowed values: start, stop, promote, demote.
then-action An additional attribute of ordering constraints that specifiesthe action that the then resource can only executeafter the first-action on the first resource hascompleted. Allowed values: start, stop, promote,demote. Defaults to the value (specified or implied) offirst-action.
In the example below, myApp will wait until one of the database copies has been started and promotedto master before being started itself. Only if no copies can be promoted will apache-stats beprevented from being active. Additionally, the database will wait for myApp to be stopped before it isdemoted.
Example 10.8. Example constraints involving multi-state resources
<constraints> <rsc_location id="db-prefers-node1" rsc="database" node="node1" score="500"/> <rsc_colocation id="backup-with-db-slave" rsc="backup" with-rsc="database" with-rsc-role="Slave"/> <rsc_colocation id="myapp-with-db-master" rsc="myApp" with-rsc="database" with-rsc-role="Master"/> <rsc_order id="start-db-before-backup" first="database" then="backup"/> <rsc_order id="promote-db-then-app" first="database" first-action="promote" then="myApp" then-action="start"/></constraints>
Colocation of a regular (or group) resource with a multi-state resource means that it can run onany machine with an active copy of the multi-state resource that is in the specified state (Masteror Slave). In the example, the cluster will choose a location based on where database is runningas a Master, and if there are multiple Master instances it will also factor in myApp's own locationpreferences when deciding which location to choose.
Colocation with regular clones and other multi-state resources is also possible. In such cases, the setof allowed locations for the rsc clone is (after role filtering) limited to nodes on which the with-rscmulti-state resource is (or will be) in the specified role. Allocation is then performed as-per-normal.
10.3.7. Multi-state Stickiness To achieve a stable allocation pattern, multi-state resources are slightly sticky by default. If no valuefor resource-stickiness is provided, the multi-state resource will use a value of 1. Being a smallvalue, it causes minimal disturbance to the score calculations of other resources but is enough toprevent Pacemaker from needlessly moving copies around the cluster.

Chapter 10. Advanced Resource Types
74
10.3.8. Which Resource Instance is PromotedDuring the start operation, most Resource Agent scripts should call the crm_master utility. This toolautomatically detects both the resource and host and should be used to set a preference for beingpromoted. Based on this, master-max, and master-node-max, the instance(s) with the highestpreference will be promoted.
The other alternative is to create a location constraint that indicates which nodes are most preferred asmasters.
Example 10.9. Manually specifying which node should be promoted
<rsc_location id="master-location" rsc="myMasterRsc"> <rule id="master-rule" score="100" role="Master"> <expression id="master-exp" attribute="#uname" operation="eq" value="node1"/> </rule></rsc_location>
10.3.9. Multi-state Resource Agent RequirementsSince multi-state resources are an extension of cloned resources, all the requirements of Clonesare also requirements of multi-state resources. Additionally, multi-state resources require two extraactions: demote and promote; these actions are responsible for changing the state of the resource.Like start and stop, they should return OCF_SUCCESS if they completed successfully or a relevanterror code if they did not.
The states can mean whatever you wish, but when the resource is started, it must come up in themode called Slave. From there the cluster will then decide which instances to promote to Master.
In addition to the Clone requirements for monitor actions, agents must also accurately report whichstate they are in. The cluster relies on the agent to report its status (including role) accurately anddoes not indicate to the agent what role it currently believes it to be in.
Table 10.8. Role implications of OCF return codes
Monitor Return Code Description
OCF_NOT_RUNNING Stopped
OCF_SUCCESS Running (Slave)
OCF_RUNNING_MASTER Running (Master)
OCF_FAILED_MASTER Failed (Master)
Other Failed (Slave)
10.3.10. Multi-state NotificationsLike clones, supporting notifications requires the notify action to be implemented. Once supportedthe notify action will be passed a number of extra variables which, when combined with additionalcontext, can be used to calculate the current state of the cluster and what is about to happen to it.
Table 10.9. Environment variables supplied with Master notify actions 1
Variable Description
OCF_RESKEY_CRM_meta_notify_type Allowed values: pre, post
OCF_RESKEY_CRM_meta_notify_operation Allowed values: start, stop
OCF_RESKEY_CRM_meta_notify_active_resource Resources the that are running

Multi-state - Proper Interpretation of Notification Environment Variables
75
Variable Description
OCF_RESKEY_CRM_meta_notify_inactive_resource Resources the that are notrunning
OCF_RESKEY_CRM_meta_notify_master_resource Resources that are running inMaster mode
OCF_RESKEY_CRM_meta_notify_slave_resource Resources that are running inSlave mode
OCF_RESKEY_CRM_meta_notify_start_resource Resources to be started
OCF_RESKEY_CRM_meta_notify_stop_resource Resources to be stopped
OCF_RESKEY_CRM_meta_notify_promote_resource Resources to be promoted
OCF_RESKEY_CRM_meta_notify_demote_resource Resources to be demoted
OCF_RESKEY_CRM_meta_notify_start_uname Nodes on which resources will bestarted
OCF_RESKEY_CRM_meta_notify_stop_uname Nodes on which resources will bestopped
OCF_RESKEY_CRM_meta_notify_promote_uname Nodes on which resources will bepromote
OCF_RESKEY_CRM_meta_notify_demote_uname Nodes on which resources will bedemoted
OCF_RESKEY_CRM_meta_notify_active_uname Nodes on which resources arerunning
OCF_RESKEY_CRM_meta_notify_inactive_uname Nodes on which resources arenot running
OCF_RESKEY_CRM_meta_notify_master_uname Nodes on which resources arerunning in Master mode
OCF_RESKEY_CRM_meta_notify_slave_uname Nodes on which resources arerunning in Slave mode
1 Emphasized variables are specific to Master resources and all behave in the same manner as described for Clone resources.
10.3.11. Multi-state - Proper Interpretation of NotificationEnvironment Variables
Pre-notification (demote):• Active resources: $OCF_RESKEY_CRM_meta_notify_active_resource
• Master resources: $OCF_RESKEY_CRM_meta_notify_master_resource
• Slave resources: $OCF_RESKEY_CRM_meta_notify_slave_resource
• Inactive resources: $OCF_RESKEY_CRM_meta_notify_inactive_resource
• Resources to be started: $OCF_RESKEY_CRM_meta_notify_start_resource
• Resources to be promoted: $OCF_RESKEY_CRM_meta_notify_promote_resource
• Resources to be demoted: $OCF_RESKEY_CRM_meta_notify_demote_resource
• Resources to be stopped: $OCF_RESKEY_CRM_meta_notify_stop_resource

Chapter 10. Advanced Resource Types
76
Post-notification (demote) / Pre-notification (stop):• Active resources: $OCF_RESKEY_CRM_meta_notify_active_resource
• Master resources:
• $OCF_RESKEY_CRM_meta_notify_master_resource
• minus $OCF_RESKEY_CRM_meta_notify_demote_resource
• Slave resources: $OCF_RESKEY_CRM_meta_notify_slave_resource
• Inactive resources: $OCF_RESKEY_CRM_meta_notify_inactive_resource
• Resources to be started: $OCF_RESKEY_CRM_meta_notify_start_resource
• Resources to be promoted: $OCF_RESKEY_CRM_meta_notify_promote_resource
• Resources to be demoted: $OCF_RESKEY_CRM_meta_notify_demote_resource
• Resources to be stopped: $OCF_RESKEY_CRM_meta_notify_stop_resource
• Resources that were demoted: $OCF_RESKEY_CRM_meta_notify_demote_resource
Post-notification (stop) / Pre-notification (start)• Active resources:
• $OCF_RESKEY_CRM_meta_notify_active_resource
• minus $OCF_RESKEY_CRM_meta_notify_stop_resource
• Master resources:
• $OCF_RESKEY_CRM_meta_notify_master_resource
• minus $OCF_RESKEY_CRM_meta_notify_demote_resource
• Slave resources:
• $OCF_RESKEY_CRM_meta_notify_slave_resource
• minus $OCF_RESKEY_CRM_meta_notify_stop_resource
• Inactive resources:
• $OCF_RESKEY_CRM_meta_notify_inactive_resource
• plus $OCF_RESKEY_CRM_meta_notify_stop_resource
• Resources to be started: $OCF_RESKEY_CRM_meta_notify_start_resource
• Resources to be promoted: $OCF_RESKEY_CRM_meta_notify_promote_resource
• Resources to be demoted: $OCF_RESKEY_CRM_meta_notify_demote_resource
• Resources to be stopped: $OCF_RESKEY_CRM_meta_notify_stop_resource
• Resources that were demoted: $OCF_RESKEY_CRM_meta_notify_demote_resource
• Resources that were stopped: $OCF_RESKEY_CRM_meta_notify_stop_resource

Multi-state - Proper Interpretation of Notification Environment Variables
77
Post-notification (start) / Pre-notification (promote)• Active resources:
• $OCF_RESKEY_CRM_meta_notify_active_resource
• minus $OCF_RESKEY_CRM_meta_notify_stop_resource
• plus $OCF_RESKEY_CRM_meta_notify_start_resource
• Master resources:
• $OCF_RESKEY_CRM_meta_notify_master_resource
• minus $OCF_RESKEY_CRM_meta_notify_demote_resource
• Slave resources:
• $OCF_RESKEY_CRM_meta_notify_slave_resource
• minus $OCF_RESKEY_CRM_meta_notify_stop_resource
• plus $OCF_RESKEY_CRM_meta_notify_start_resource
• Inactive resources:
• $OCF_RESKEY_CRM_meta_notify_inactive_resource
• plus $OCF_RESKEY_CRM_meta_notify_stop_resource
• minus $OCF_RESKEY_CRM_meta_notify_start_resource
• Resources to be started: $OCF_RESKEY_CRM_meta_notify_start_resource
• Resources to be promoted: $OCF_RESKEY_CRM_meta_notify_promote_resource
• Resources to be demoted: $OCF_RESKEY_CRM_meta_notify_demote_resource
• Resources to be stopped: $OCF_RESKEY_CRM_meta_notify_stop_resource
• Resources that were started: $OCF_RESKEY_CRM_meta_notify_start_resource
• Resources that were demoted: $OCF_RESKEY_CRM_meta_notify_demote_resource
• Resources that were stopped: $OCF_RESKEY_CRM_meta_notify_stop_resource
Post-notification (promote)• Active resources:
• $OCF_RESKEY_CRM_meta_notify_active_resource
• minus $OCF_RESKEY_CRM_meta_notify_stop_resource
• plus $OCF_RESKEY_CRM_meta_notify_start_resource
• Master resources:
• $OCF_RESKEY_CRM_meta_notify_master_resource
• minus $OCF_RESKEY_CRM_meta_notify_demote_resource

Chapter 10. Advanced Resource Types
78
• plus $OCF_RESKEY_CRM_meta_notify_promote_resource
• Slave resources:
• $OCF_RESKEY_CRM_meta_notify_slave_resource
• minus $OCF_RESKEY_CRM_meta_notify_stop_resource
• plus $OCF_RESKEY_CRM_meta_notify_start_resource
• minus $OCF_RESKEY_CRM_meta_notify_promote_resource
• Inactive resources:
• $OCF_RESKEY_CRM_meta_notify_inactive_resource
• plus $OCF_RESKEY_CRM_meta_notify_stop_resource
• minus $OCF_RESKEY_CRM_meta_notify_start_resource
• Resources to be started: $OCF_RESKEY_CRM_meta_notify_start_resource
• Resources to be promoted: $OCF_RESKEY_CRM_meta_notify_promote_resource
• Resources to be demoted: $OCF_RESKEY_CRM_meta_notify_demote_resource
• Resources to be stopped: $OCF_RESKEY_CRM_meta_notify_stop_resource
• Resources that were started: $OCF_RESKEY_CRM_meta_notify_start_resource
• Resources that were promoted: $OCF_RESKEY_CRM_meta_notify_promote_resource
• Resources that were demoted: $OCF_RESKEY_CRM_meta_notify_demote_resource
• Resources that were stopped: $OCF_RESKEY_CRM_meta_notify_stop_resource

Chapter 11.
79
Utilization and Placement Strategy
Table of Contents11.1. Background ....................................................................................................................... 7911.2. Utilization attributes ........................................................................................................... 7911.3. Placement Strategy ........................................................................................................... 8011.4. Allocation Details ............................................................................................................... 81
11.4.1. Which node is preferred to be chosen to get consumed first on allocatingresources? ......................................................................................................................... 8111.4.2. Which resource is preferred to be chosen to get assigned first? ................................ 81
11.5. Limitations ........................................................................................................................ 8211.6. Strategies for Dealing with the Limitations .......................................................................... 82
11.1. BackgroundPacemaker decides where to place a resource according to the resource allocation scores onevery node. The resource will be allocated to the node where the resource has the highest score.If the resource allocation scores on all the nodes are equal, by the default placement strategy,Pacemaker will choose a node with the least number of allocated resources for balancing the load. Ifthe number of resources on each node is equal, the first eligible node listed in cib will be chosen to runthe resource.
Though resources are different. They may consume different amounts of the capacities of the nodes.Actually, we cannot ideally balance the load just according to the number of resources allocated to anode. Besides, if resources are placed such that their combined requirements exceed the providedcapacity, they may fail to start completely or run with degraded performance.
To take these into account, Pacemaker allows you to specify the following configurations:
1. The capacity a certain node provides.
2. The capacity a certain resource requires.
3. An overall strategy for placement of resources.
11.2. Utilization attributesTo configure the capacity a node provides and the resource’s requirements, use utilizationattributes. You can name the utilization attributes according to your preferences and defineas many name/value pairs as your configuration needs. However, the attribute’s values must beintegers.
First, specify the capacities the nodes provide:
<node id="node1" type="normal" uname="node1"> <utilization id="node1-utilization"> <nvpair id="node1-utilization-cpu" name="cpu" value="2"/> <nvpair id="node1-utilization-memory" name="memory" value="2048"/> </utilization></node><node id="node2" type="normal" uname="node2">

Chapter 11. Utilization and Placement Strategy
80
<utilization id="node2-utilization"> <nvpair id="node2-utilization-cpu" name="cpu" value="4"/> <nvpair id="node2-utilization-memory" name="memory" value="4096"/> </utilization></node>
Then, specify the capacities the resources require:
<primitive id="rsc-small" class="ocf" provider="pacemaker" type="Dummy"> <utilization id="rsc-small-utilization"> <nvpair id="rsc-small-utilization-cpu" name="cpu" value="1"/> <nvpair id="rsc-small-utilization-memory" name="memory" value="1024"/> </utilization></primitive><primitive id="rsc-medium" class="ocf" provider="pacemaker" type="Dummy"> <utilization id="rsc-medium-utilization"> <nvpair id="rsc-medium-utilization-cpu" name="cpu" value="2"/> <nvpair id="rsc-medium-utilization-memory" name="memory" value="2048"/> </utilization></primitive><primitive id="rsc-large" class="ocf" provider="pacemaker" type="Dummy"> <utilization id="rsc-large-utilization"> <nvpair id="rsc-large-utilization-cpu" name="cpu" value="3"/> <nvpair id="rsc-large-utilization-memory" name="memory" value="3072"/> </utilization></primitive>
A node is considered eligible for a resource if it has sufficient free capacity to satisfy the resource’srequirements. The nature of the required or provided capacities is completely irrelevant forPacemaker, it just makes sure that all capacity requirements of a resource are satisfied before placinga resource to a node.
11.3. Placement StrategyAfter you have configured the capacities your nodes provide and the capacities your resourcesrequire, you need to set the placement-strategy in the global cluster options, otherwise thecapacity configurations have no effect.
Four values are available for the placement-strategy:
defaultUtilization values are not taken into account at all, per default. Resources are allocated accordingto allocation scores. If scores are equal, resources are evenly distributed across nodes.
utilizationUtilization values are taken into account when deciding whether a node is considered eligible if ithas sufficient free capacity to satisfy the resource’s requirements. However, load-balancing is stilldone based on the number of resources allocated to a node.
balancedUtilization values are taken into account when deciding whether a node is eligible to serve aresource; an attempt is made to spread the resources evenly, optimizing resource performance.
minimalUtilization values are taken into account when deciding whether a node is eligible to serve aresource; an attempt is made to concentrate the resources on as few nodes as possible, therebyenabling possible power savings on the remaining nodes.
Set placement-strategy with crm_attribute:

Allocation Details
81
# crm_attribute --attr-name placement-strategy --attr-value balanced
Now Pacemaker will ensure the load from your resources will be distributed evenly throughout thecluster - without the need for convoluted sets of colocation constraints.
11.4. Allocation Details
11.4.1. Which node is preferred to be chosen to get consumed firston allocating resources?• The node that is most healthy (which has the highest node weight) gets consumed first.
• If their weights are equal:
• If placement-strategy="default|utilization", the node that has the least number ofallocated resources gets consumed first.
• If their numbers of allocated resources are equal, the first eligible node listed in cib getsconsumed first.
• If placement-strategy="balanced", the node that has more free capacity gets consumedfirst.
• If the free capacities of the nodes are equal, the node that has the least number of allocatedresources gets consumed first.
• If their numbers of allocated resources are equal, the first eligible node listed in cib getsconsumed first.
• If placement-strategy="minimal", the first eligible node listed in cib gets consumed first.
11.4.1.1. Which node has more free capacity?This will be quite clear if we only define one type of capacity. While if we define multiple types ofcapacity, for example:
• If nodeA has more free cpus, nodeB has more free memory, their free capacities are equal.
• If nodeA has more free cpus, while nodeB has more free memory and storage, nodeB has morefree capacity.
11.4.2. Which resource is preferred to be chosen to get assignedfirst?• The resource that has the highest priority gets allocated first.
• If their priorities are equal, check if they are already running. The resource that has the highestscore on the node where it’s running gets allocated first (to prevent resource shuffling).
• If the scores above are equal or they are not running, the resource has the highest score on thepreferred node gets allocated first.
• If the scores above are equal, the first runnable resource listed in cib gets allocated first.

Chapter 11. Utilization and Placement Strategy
82
11.5. LimitationsThis type of problem Pacemaker is dealing with here is known as the knapsack problem1 and falls intothe NP-complete2 category of computer science problems - which is fancy way of saying "it takes areally long time to solve".
Clearly in a HA cluster, it’s not acceptable to spend minutes, let alone hours or days, finding anoptional solution while services remain unavailable.
So instead of trying to solve the problem completely, Pacemaker uses a best effort algorithm fordetermining which node should host a particular service. This means it arrives at a solution muchfaster than traditional linear programming algorithms, but by doing so at the price of leaving someservices stopped.
In the contrived example above:
• rsc-small would be allocated to node1
• rsc-medium would be allocated to node2
• rsc-large would remain inactive
Which is not ideal.
11.6. Strategies for Dealing with the Limitations• Ensure you have sufficient physical capacity. It might sounds obvious, but if the physical capacity of
your nodes is (close to) maxed out by the cluster under normal conditions, then failover isn’t goingto go well. Even without the Utilization feature, you’ll start hitting timeouts and getting secondaryfailures'.
• Build some buffer into the capabilities advertised by the nodes. Advertise slightly more resourcesthan we physically have on the (usually valid) assumption that a resource will not use 100% of theconfigured number of cpu/memory/etc all the time. This practice is also known as over commit.
• Specify resource priorities. If the cluster is going to sacrifice services, it should be the ones you care(comparatively) about the least. Ensure that resource priorities are properly set so that your mostimportant resources are scheduled first.
1 http://en.wikipedia.org/wiki/Knapsack_problem2 http://en.wikipedia.org/wiki/NP-complete

Chapter 12.
83
Resource Templates
Table of Contents12.1. Abstract ............................................................................................................................ 8312.2. Configuring Resources with Templates ............................................................................... 8312.3. Referencing Templates in Constraints ................................................................................ 84
12.1. AbstractIf you want to create lots of resources with similar configurations, defining a resource templatesimplifies the task. Once defined, it can be referenced in primitives or in certain types of constraints.
12.2. Configuring Resources with TemplatesThe primitives referencing the template will inherit all meta attributes, instance attributes, utilizationattributes and operations defined in the template. And you can define specific attributes andoperations for any of the primitives. If any of these are defined in both the template and the primitive,the values defined in the primitive will take precedence over the ones defined in the template.
Hence, resource templates help to reduce the amount of configuration work. If any changes areneeded, they can be done to the template definition and will take effect globally in all resourcedefinitions referencing that template.
Resource templates have a similar syntax like primitives. For example:
<template id="vm-template" class="ocf" provider="heartbeat" type="Xen"> <meta_attributes id="vm-template-meta_attributes"> <nvpair id="vm-template-meta_attributes-allow-migrate" name="allow-migrate" value="true"/> </meta_attributes> <utilization id="vm-template-utilization"> <nvpair id="vm-template-utilization-memory" name="memory" value="512"/> </utilization> <operations> <op id="vm-template-monitor-15s" interval="15s" name="monitor" timeout="60s"/> <op id="vm-template-start-0" interval="0" name="start" timeout="60s"/> </operations></template>
Once you defined the new resource template, you can use it in primitives:
<primitive id="vm1" template="vm-template"> <instance_attributes id="vm1-instance_attributes"> <nvpair id="vm1-instance_attributes-name" name="name" value="vm1"/> <nvpair id="vm1-instance_attributes-xmfile" name="xmfile" value="/etc/xen/shared-vm/vm1"/> </instance_attributes></primitive>
The new primitive vm1 is going to inherit everything from the vm-template. For example, theequivalent of the above two would be:
<primitive id="vm1" class="ocf" provider="heartbeat" type="Xen"> <meta_attributes id="vm-template-meta_attributes">

Chapter 12. Resource Templates
84
<nvpair id="vm-template-meta_attributes-allow-migrate" name="allow-migrate" value="true"/> </meta_attributes> <utilization id="vm-template-utilization"> <nvpair id="vm-template-utilization-memory" name="memory" value="512"/> </utilization> <operations> <op id="vm-template-monitor-15s" interval="15s" name="monitor" timeout="60s"/> <op id="vm-template-start-0" interval="0" name="start" timeout="60s"/> </operations> <instance_attributes id="vm1-instance_attributes"> <nvpair id="vm1-instance_attributes-name" name="name" value="vm1"/> <nvpair id="vm1-instance_attributes-xmfile" name="xmfile" value="/etc/xen/shared-vm/vm1"/> </instance_attributes></primitive>
If you want to overwrite some attributes or operations, add them to the particular primitive’s definition.
For instance, the following new primitive vm2 has special attribute values. Its monitor operation hasa longer timeout and interval, and the primitive has an additional stop operation.
<primitive id="vm2" template="vm-template"> <meta_attributes id="vm2-meta_attributes"> <nvpair id="vm2-meta_attributes-allow-migrate" name="allow-migrate" value="false"/> </meta_attributes> <utilization id="vm2-utilization"> <nvpair id="vm2-utilization-memory" name="memory" value="1024"/> </utilization> <instance_attributes id="vm2-instance_attributes"> <nvpair id="vm2-instance_attributes-name" name="name" value="vm2"/> <nvpair id="vm2-instance_attributes-xmfile" name="xmfile" value="/etc/xen/shared-vm/vm2"/> </instance_attributes> <operations> <op id="vm2-monitor-30s" interval="30s" name="monitor" timeout="120s"/> <op id="vm2-stop-0" interval="0" name="stop" timeout="60s"/> </operations></primitive>
The following command shows the resulting definition of a resource:
# crm_resource --query-xml --resource vm2
The following command shows its raw definition in cib:
# crm_resource --query-xml-raw --resource vm2
12.3. Referencing Templates in ConstraintsA resource template can be referenced in the following types of constraints:
• order constraints
• colocation constraints,
• rsc_ticket constraints (for multi-site clusters).
Resource templates referenced in constraints stand for all primitives which are derived from thattemplate. This means, the constraint applies to all primitive resources referencing the resource

Referencing Templates in Constraints
85
template. Referencing resource templates in constraints is an alternative to resource sets and cansimplify the cluster configuration considerably.
For example:
<rsc_colocation id="vm-template-colo-base-rsc" rsc="vm-template" rsc-role="Started" with-rsc="base-rsc" score="INFINITY"/>
is the equivalent of the following constraint configuration:
<rsc_colocation id="vm-colo-base-rsc" score="INFINITY"> <resource_set id="vm-colo-base-rsc-0" sequential="false" role="Started"> <resource_ref id="vm1"/> <resource_ref id="vm2"/> </resource_set> <resource_set id="vm-colo-base-rsc-1"> <resource_ref id="base-rsc"/> </resource_set></rsc_colocation>
Note
In a colocation constraint, only one template may be referenced from either rsc or with-rsc,and the other reference must be a regular resource.
Resource templates can also be referenced in resource sets.
For example:
<rsc_order id="order1" score="INFINITY"> <resource_set id="order1-0"> <resource_ref id="base-rsc"/> <resource_ref id="vm-template"/> <resource_ref id="top-rsc"/> </resource_set></rsc_order>
is the equivalent of the following constraint configuration:
<rsc_order id="order1" score="INFINITY"> <resource_set id="order1-0"> <resource_ref id="base-rsc"/> <resource_ref id="vm1"/> <resource_ref id="vm2"/> <resource_ref id="top-rsc"/> </resource_set></rsc_order>
If the resources referencing the template can run in parallel:
<rsc_order id="order2" score="INFINITY"> <resource_set id="order2-0"> <resource_ref id="base-rsc"/> </resource_set> <resource_set id="order2-1" sequential="false">

Chapter 12. Resource Templates
86
<resource_ref id="vm-template"/> </resource_set> <resource_set id="order2-2"> <resource_ref id="top-rsc"/> </resource_set></rsc_order>
is the equivalent of the following constraint configuration:
<rsc_order id="order2" score="INFINITY"> <resource_set id="order2-0"> <resource_ref id="base-rsc"/> </resource_set> <resource_set id="order2-1" sequential="false"> <resource_ref id="vm1"/> <resource_ref id="vm2"/> </resource_set> <resource_set id="order2-2"> <resource_ref id="top-rsc"/> </resource_set></rsc_order>

Chapter 13.
87
Configure STONITH
Table of Contents13.1. What Is STONITH ............................................................................................................. 8713.2. What STONITH Device Should You Use ............................................................................ 8713.3. Configuring STONITH ........................................................................................................ 8713.4. Example ........................................................................................................................... 88
13.1. What Is STONITHSTONITH is an acronym for Shoot-The-Other-Node-In-The-Head and it protects your data from beingcorrupted by rogue nodes or concurrent access.
Just because a node is unresponsive, this doesn’t mean it isn’t accessing your data. The only way tobe 100% sure that your data is safe, is to use STONITH so we can be certain that the node is trulyoffline, before allowing the data to be accessed from another node.
STONITH also has a role to play in the event that a clustered service cannot be stopped. In this case,the cluster uses STONITH to force the whole node offline, thereby making it safe to start the serviceelsewhere.
13.2. What STONITH Device Should You UseIt is crucial that the STONITH device can allow the cluster to differentiate between a node failure and anetwork one.
The biggest mistake people make in choosing a STONITH device is to use remote power switch (suchas many on-board IMPI controllers) that shares power with the node it controls. In such cases, thecluster cannot be sure if the node is really offline, or active and suffering from a network fault.
Likewise, any device that relies on the machine being active (such as SSH-based "devices" usedduring testing) are inappropriate.
13.3. Configuring STONITH1. Find the correct driver: stonith_admin --list-installed
2. Since every device is different, the parameters needed to configure it will vary. To find out theparameters associated with the device, run: stonith_admin --metadata --agent type
The output should be XML formatted text containing additionalparameter descriptions. We will endevor to make the output morefriendly in a later version.
3. Enter the shell crm Create an editable copy of the existing configuration cib new stonithCreate a fencing resource containing a primitive resource with a class of stonith, a type of typeand a parameter for each of the values returned in step 2: configure primitive …
4. If the device does not know how to fence nodes based on their uname, you may also need to setthe special pcmk_host_map parameter. See man stonithd for details.

Chapter 13. Configure STONITH
88
5. If the device does not support the list command, you may also need to set the specialpcmk_host_list and/or pcmk_host_check parameters. See man stonithd for details.
6. If the device does not expect the victim to be specified with the port parameter, you may also needto set the special pcmk_host_argument parameter. See man stonithd for details.
7. Upload it into the CIB from the shell: cib commit stonith
8. Once the stonith resource is running, you can test it by executing: stonith_admin --rebootnodename. Although you might want to stop the cluster on that machine first.
13.4. ExampleAssuming we have an chassis containing four nodes and an IPMI device active on 10.0.0.1, then wewould chose the fence_ipmilan driver in step 2 and obtain the following list of parameters
Obtaining a list of STONITH Parameters
# stonith_admin --metadata -a fence_ipmilan
<?xml version="1.0" ?><resource-agent name="fence_ipmilan" shortdesc="Fence agent for IPMI over LAN"><longdesc>fence_ipmilan is an I/O Fencing agent which can be used with machines controlled by IPMI. This agent calls support software using ipmitool (http://ipmitool.sf.net/).
To use fence_ipmilan with HP iLO 3 you have to enable lanplus option (lanplus / -P) and increase wait after operation to 4 seconds (power_wait=4 / -T 4)</longdesc><parameters> <parameter name="auth" unique="1"> <getopt mixed="-A" /> <content type="string" /> <shortdesc>IPMI Lan Auth type (md5, password, or none)</shortdesc> </parameter> <parameter name="ipaddr" unique="1"> <getopt mixed="-a" /> <content type="string" /> <shortdesc>IPMI Lan IP to talk to</shortdesc> </parameter> <parameter name="passwd" unique="1"> <getopt mixed="-p" /> <content type="string" /> <shortdesc>Password (if required) to control power on IPMI device</shortdesc> </parameter> <parameter name="passwd_script" unique="1"> <getopt mixed="-S" /> <content type="string" /> <shortdesc>Script to retrieve password (if required)</shortdesc> </parameter> <parameter name="lanplus" unique="1"> <getopt mixed="-P" /> <content type="boolean" /> <shortdesc>Use Lanplus</shortdesc> </parameter> <parameter name="login" unique="1"> <getopt mixed="-l" /> <content type="string" /> <shortdesc>Username/Login (if required) to control power on IPMI device</shortdesc> </parameter> <parameter name="action" unique="1">

Example
89
<getopt mixed="-o" /> <content type="string" default="reboot"/> <shortdesc>Operation to perform. Valid operations: on, off, reboot, status, list, diag, monitor or metadata</shortdesc> </parameter> <parameter name="timeout" unique="1"> <getopt mixed="-t" /> <content type="string" /> <shortdesc>Timeout (sec) for IPMI operation</shortdesc> </parameter> <parameter name="cipher" unique="1"> <getopt mixed="-C" /> <content type="string" /> <shortdesc>Ciphersuite to use (same as ipmitool -C parameter)</shortdesc> </parameter> <parameter name="method" unique="1"> <getopt mixed="-M" /> <content type="string" default="onoff"/> <shortdesc>Method to fence (onoff or cycle)</shortdesc> </parameter> <parameter name="power_wait" unique="1"> <getopt mixed="-T" /> <content type="string" default="2"/> <shortdesc>Wait X seconds after on/off operation</shortdesc> </parameter> <parameter name="delay" unique="1"> <getopt mixed="-f" /> <content type="string" /> <shortdesc>Wait X seconds before fencing is started</shortdesc> </parameter> <parameter name="verbose" unique="1"> <getopt mixed="-v" /> <content type="boolean" /> <shortdesc>Verbose mode</shortdesc> </parameter></parameters><actions> <action name="on" /> <action name="off" /> <action name="reboot" /> <action name="status" /> <action name="diag" /> <action name="list" /> <action name="monitor" /> <action name="metadata" /></actions></resource-agent>
from which we would create a STONITH resource fragment that might look like this
Sample STONITH Resource
# crm crm(live)# cib new stonithINFO: stonith shadow CIB createdcrm(stonith)# configure primitive impi-fencing stonith::fence_ipmilan \ params pcmk_host_list="pcmk-1 pcmk-2" ipaddr=10.0.0.1 login=testuser passwd=abc123 \ op monitor interval="60s"
And finally, since we disabled it earlier, we need to re-enable STONITH. At this point we should havethe following configuration.
Now push the configuration into the cluster.
crm(stonith)# configure property stonith-enabled="true"

Chapter 13. Configure STONITH
90
crm(stonith)# configure shownode pcmk-1node pcmk-2primitive WebData ocf:linbit:drbd \ params drbd_resource="wwwdata" \ op monitor interval="60s"primitive WebFS ocf:heartbeat:Filesystem \ params device="/dev/drbd/by-res/wwwdata" directory="/var/www/html" fstype="gfs2"primitive WebSite ocf:heartbeat:apache \ params configfile="/etc/httpd/conf/httpd.conf" \ op monitor interval="1min"primitive ClusterIP ocf:heartbeat:IPaddr2 \ params ip="192.168.122.101" cidr_netmask="32" clusterip_hash="sourceip" \ op monitor interval="30s"primitive ipmi-fencing stonith::fence_ipmilan \ params pcmk_host_list="pcmk-1 pcmk-2" ipaddr=10.0.0.1 login=testuser passwd=abc123 \ op monitor interval="60s"ms WebDataClone WebData \ meta master-max="2" master-node-max="1" clone-max="2" clone-node-max="1" notify="true"clone WebFSClone WebFSclone WebIP ClusterIP \ meta globally-unique="true" clone-max="2" clone-node-max="2"clone WebSiteClone WebSitecolocation WebSite-with-WebFS inf: WebSiteClone WebFSClonecolocation fs_on_drbd inf: WebFSClone WebDataClone:Mastercolocation website-with-ip inf: WebSiteClone WebIPorder WebFS-after-WebData inf: WebDataClone:promote WebFSClone:startorder WebSite-after-WebFS inf: WebFSClone WebSiteCloneorder apache-after-ip inf: WebIP WebSiteCloneproperty $id="cib-bootstrap-options" \ dc-version="1.1.5-bdd89e69ba545404d02445be1f3d72e6a203ba2f" \ cluster-infrastructure="openais" \ expected-quorum-votes="2" \ stonith-enabled="true" \ no-quorum-policy="ignore"rsc_defaults $id="rsc-options" \ resource-stickiness="100"crm(stonith)# cib commit stonithINFO: commited 'stonith' shadow CIB to the clustercrm(stonith)# quitbye

Chapter 14.
91
Status - Here be dragons
Table of Contents14.1. Node Status ...................................................................................................................... 9114.2. Transient Node Attributes .................................................................................................. 9214.3. Operation History .............................................................................................................. 92
14.3.1. Simple Example ..................................................................................................... 9414.3.2. Complex Resource History Example ........................................................................ 95
Most users never need to understand the contents of the status section and can be happy with theoutput from crm_mon.
However for those with a curious inclination, this section attempts to provide an overview of itscontents.
14.1. Node Status
In addition to the cluster’s configuration, the CIB holds an up-to-date representation of each clusternode in the status section.
Example 14.1. A bare-bones status entry for a healthy node called cl-virt-1
<node_state id="cl-virt-1" uname="cl-virt-2" ha="active" in_ccm="true" crmd="online" join="member" expected="member" crm-debug-origin="do_update_resource"> <transient_attributes id="cl-virt-1"/> <lrm id="cl-virt-1"/> </node_state>
Users are highly recommended not to modify any part of a node’s state directly. The cluster willperiodically regenerate the entire section from authoritative sources. So any changes should be donewith the tools for those subsystems.
Table 14.1. Authoritative Sources for State Information
Dataset Authoritative Source
node_state fields crmd
transient_attributes tag attrd
lrm tag lrmd
The fields used in the node_state objects are named as they are largely for historical reasons andare rooted in Pacemaker’s origins as the Heartbeat resource manager.
They have remained unchanged to preserve compatibility with older versions.
Table 14.2. Node Status Fields
Field Description
id Unique identifier for the node. Corosync based clusters use theuname of the machine, Heartbeat clusters use a human-readable(but annoying) UUID.

Chapter 14. Status - Here be dragons
92
Field Description
uname The node’s machine name (output from uname -n).
ha Flag specifying whether the cluster software is active on the node.Allowed values: active, dead.
in_ccm Flag for cluster membership; allowed values: true, false.
crmd Flag: is the crmd process active on the node? One of online,offline.
join Flag saying whether the node participates in hosting resources.Possible values: down, pending, member, banned.
expected Expected value for join.
crm-debug-origin Diagnostic indicator: the origin of the most recent change(s).
The cluster uses these fields to determine if, at the node level, the node is healthy or is in a failed stateand needs to be fenced.
14.2. Transient Node AttributesLike regular node attributes, the name/value pairs listed here also help to describe the node. Howeverthey are forgotten by the cluster when the node goes offline. This can be useful, for instance, whenyou want a node to be in standby mode (not able to run resources) until the next reboot.
In addition to any values the administrator sets, the cluster will also store information about failedresources here.
Example 14.2. Example set of transient node attributes for node "cl-virt-1"
<transient_attributes id="cl-virt-1"> <instance_attributes id="status-cl-virt-1"> <nvpair id="status-cl-virt-1-pingd" name="pingd" value="3"/> <nvpair id="status-cl-virt-1-probe_complete" name="probe_complete" value="true"/> <nvpair id="status-cl-virt-1-fail-count-pingd:0" name="fail-count-pingd:0" value="1"/> <nvpair id="status-cl-virt-1-last-failure-pingd:0" name="last-failure-pingd:0" value="1239009742"/> </instance_attributes> </transient_attributes>
In the above example, we can see that the pingd:0 resource has failed once, at Mon Apr 611:22:22 2009. 1 We also see that the node is connected to three "pingd" peers and that all knownresources have been checked for on this machine (probe_complete).
14.3. Operation History
A node’s resource history is held in the lrm_resources tag (a child of the lrm tag). The informationstored here includes enough information for the cluster to stop the resource safely if it is removed fromthe configuration section. Specifically the resource’s id, class, type and provider are stored.
1 You can use the standard date command to print a human readable of any seconds-since-epoch value: # date -d@<parameter>number</parameter>

Operation History
93
Example 14.3. A record of the apcstonith resource
<lrm_resource id="apcstonith" type="apcmastersnmp" class="stonith"/>
Additionally, we store the last job for every combination of resource, action and interval. Theconcatenation of the values in this tuple are used to create the id of the lrm_rsc_op object.
Table 14.3. Contents of an lrm_rsc_op job
Field Description
id
Identifier for the job constructed from the resource’s id,operation and interval.
call-id
The job’s ticket number. Used as a sort key to determine the orderin which the jobs were executed.
operation
The action the resource agent was invoked with.
interval
The frequency, in milliseconds, at which the operation will berepeated. A one-off job is indicated by 0.
op-status
The job’s status. Generally this will be either 0 (done) or -1(pending). Rarely used in favor of rc-code.
rc-code
The job’s result. Refer to Section B.4, “OCF Return Codes”for details on what the values here mean and how they areinterpreted.
last-run
Diagnostic indicator. Machine local date/time, in seconds sinceepoch, at which the job was executed.
last-rc-change
Diagnostic indicator. Machine local date/time, in seconds sinceepoch, at which the job first returned the current value of rc-code.
exec-time
Diagnostic indicator. Time, in milliseconds, that the job was runningfor.
queue-time
Diagnostic indicator. Time, in seconds, that the job was queued forin the LRMd.
crm_feature_set

Chapter 14. Status - Here be dragons
94
Field DescriptionThe version which this job description conforms to. Used whenprocessing op-digest.
transition-key
A concatenation of the job’s graph action number, the graphnumber, the expected result and the UUID of the crmd instancethat scheduled it. This is used to construct transition-magic(below).
transition-magic
A concatenation of the job’s op-status, rc-code andtransition-key. Guaranteed to be unique for the life of thecluster (which ensures it is part of CIB update notifications) andcontains all the information needed for the crmd to correctlyanalyze and process the completed job. Most importantly, thedecomposed elements tell the crmd if the job entry was expectedand whether it failed.
op-digest
An MD5 sum representing the parameters passed to the job.Used to detect changes to the configuration, to restart resources ifnecessary.
crm-debug-origin
Diagnostic indicator. The origin of the current values.
14.3.1. Simple Example
Example 14.4. A monitor operation (determines current state of the apcstonith resource)
<lrm_resource id="apcstonith" type="apcmastersnmp" class="stonith"> <lrm_rsc_op id="apcstonith_monitor_0" operation="monitor" call-id="2" rc-code="7" op-status="0" interval="0" crm-debug-origin="do_update_resource" crm_feature_set="3.0.1" op-digest="2e3da9274d3550dc6526fb24bfcbcba0" transition-key="22:2:7:2668bbeb-06d5-40f9-936d-24cb7f87006a" transition-magic="0:7;22:2:7:2668bbeb-06d5-40f9-936d-24cb7f87006a" last-run="1239008085" last-rc-change="1239008085" exec-time="10" queue-time="0"/></lrm_resource>
In the above example, the job is a non-recurring monitor operation often referred to as a "probe" forthe apcstonith resource.
The cluster schedules probes for every configured resource on when a new node starts, in order todetermine the resource’s current state before it takes any further action.
From the transition-key, we can see that this was the 22nd action of the 2nd graph produced bythis instance of the crmd (2668bbeb-06d5-40f9-936d-24cb7f87006a).
The third field of the transition-key contains a 7, this indicates that the job expects to find theresource inactive.
By looking at the rc-code property, we see that this was the case.
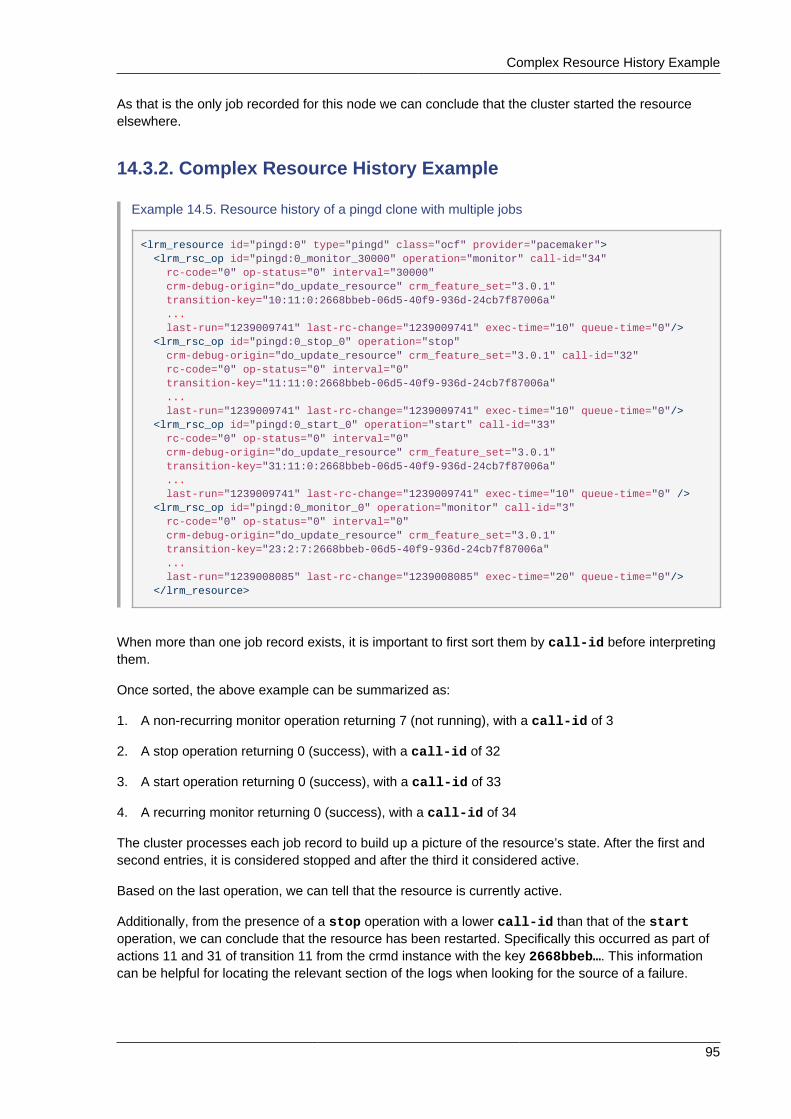
Complex Resource History Example
95
As that is the only job recorded for this node we can conclude that the cluster started the resourceelsewhere.
14.3.2. Complex Resource History Example
Example 14.5. Resource history of a pingd clone with multiple jobs
<lrm_resource id="pingd:0" type="pingd" class="ocf" provider="pacemaker"> <lrm_rsc_op id="pingd:0_monitor_30000" operation="monitor" call-id="34" rc-code="0" op-status="0" interval="30000" crm-debug-origin="do_update_resource" crm_feature_set="3.0.1" transition-key="10:11:0:2668bbeb-06d5-40f9-936d-24cb7f87006a" ... last-run="1239009741" last-rc-change="1239009741" exec-time="10" queue-time="0"/> <lrm_rsc_op id="pingd:0_stop_0" operation="stop" crm-debug-origin="do_update_resource" crm_feature_set="3.0.1" call-id="32" rc-code="0" op-status="0" interval="0" transition-key="11:11:0:2668bbeb-06d5-40f9-936d-24cb7f87006a" ... last-run="1239009741" last-rc-change="1239009741" exec-time="10" queue-time="0"/> <lrm_rsc_op id="pingd:0_start_0" operation="start" call-id="33" rc-code="0" op-status="0" interval="0" crm-debug-origin="do_update_resource" crm_feature_set="3.0.1" transition-key="31:11:0:2668bbeb-06d5-40f9-936d-24cb7f87006a" ... last-run="1239009741" last-rc-change="1239009741" exec-time="10" queue-time="0" /> <lrm_rsc_op id="pingd:0_monitor_0" operation="monitor" call-id="3" rc-code="0" op-status="0" interval="0" crm-debug-origin="do_update_resource" crm_feature_set="3.0.1" transition-key="23:2:7:2668bbeb-06d5-40f9-936d-24cb7f87006a" ... last-run="1239008085" last-rc-change="1239008085" exec-time="20" queue-time="0"/> </lrm_resource>
When more than one job record exists, it is important to first sort them by call-id before interpretingthem.
Once sorted, the above example can be summarized as:
1. A non-recurring monitor operation returning 7 (not running), with a call-id of 3
2. A stop operation returning 0 (success), with a call-id of 32
3. A start operation returning 0 (success), with a call-id of 33
4. A recurring monitor returning 0 (success), with a call-id of 34
The cluster processes each job record to build up a picture of the resource’s state. After the first andsecond entries, it is considered stopped and after the third it considered active.
Based on the last operation, we can tell that the resource is currently active.
Additionally, from the presence of a stop operation with a lower call-id than that of the startoperation, we can conclude that the resource has been restarted. Specifically this occurred as part ofactions 11 and 31 of transition 11 from the crmd instance with the key 2668bbeb…. This informationcan be helpful for locating the relevant section of the logs when looking for the source of a failure.

96

Chapter 15.
97
Multi-Site Clusters and Tickets
Table of Contents15.1. Abstract ............................................................................................................................ 9715.2. Challenges for Multi-Site Clusters ...................................................................................... 9715.3. Conceptual Overview ........................................................................................................ 97
15.3.1. Components and Concepts ..................................................................................... 9815.4. Configuring Ticket Dependencies ....................................................................................... 9915.5. Managing Multi-Site Clusters ........................................................................................... 100
15.5.1. Granting and Revoking Tickets Manually ............................................................... 10015.5.2. Granting and Revoking Tickets via a Cluster Ticket Registry ................................... 10015.5.3. General Management of Tickets ............................................................................ 102
15.6. For more information ....................................................................................................... 102
15.1. AbstractApart from local clusters, Pacemaker also supports multi-site clusters. That means you can havemultiple, geographically dispersed sites with a local cluster each. Failover between these clusters canbe coordinated by a higher level entity, the so-called CTR (Cluster Ticket Registry).
15.2. Challenges for Multi-Site ClustersTypically, multi-site environments are too far apart to support synchronous communication betweenthe sites and synchronous data replication. That leads to the following challenges:
• How to make sure that a cluster site is up and running?
• How to make sure that resources are only started once?
• How to make sure that quorum can be reached between the different sites and a split brain scenariocan be avoided?
• How to manage failover between the sites?
• How to deal with high latency in case of resources that need to be stopped?
In the following sections, learn how to meet these challenges.
15.3. Conceptual OverviewMulti-site clusters can be considered as “overlay” clusters where each cluster site corresponds toa cluster node in a traditional cluster. The overlay cluster can be managed by a CTR (ClusterTicket Registry) mechanism. It guarantees that the cluster resources will be highly availableacross different cluster sites. This is achieved by using so-called tickets that are treated as failoverdomain between cluster sites, in case a site should be down.
The following list explains the individual components and mechanisms that were introduced for multi-site clusters in more detail.

Chapter 15. Multi-Site Clusters and Tickets
98
15.3.1. Components and Concepts
15.3.1.1. Ticket"Tickets" are, essentially, cluster-wide attributes. A ticket grants the right to run certain resources ona specific cluster site. Resources can be bound to a certain ticket by rsc_ticket dependencies.Only if the ticket is available at a site, the respective resources are started. Vice versa, if the ticket isrevoked, the resources depending on that ticket need to be stopped.
The ticket thus is similar to a site quorum; i.e., the permission to manage/own resources associatedwith that site.
(One can also think of the current have-quorum flag as a special, cluster-wide ticket that is granted incase of node majority.)
These tickets can be granted/revoked either manually by administrators (which could be the default forthe classic enterprise clusters), or via an automated CTR mechanism described further below.
A ticket can only be owned by one site at a time. Initially, none of the sites has a ticket. Each ticketmust be granted once by the cluster administrator.
The presence or absence of tickets for a site is stored in the CIB as a cluster status. With regards to acertain ticket, there are only two states for a site: true (the site has the ticket) or false (the site doesnot have the ticket). The absence of a certain ticket (during the initial state of the multi-site cluster) isalso reflected by the value false.
15.3.1.2. Dead Man DependencyA site can only activate the resources safely if it can be sure that the other site has deactivatedthem. However after a ticket is revoked, it can take a long time until all resources depending on thatticket are stopped "cleanly", especially in case of cascaded resources. To cut that process short, theconcept of a Dead Man Dependency was introduced:
• If the ticket is revoked from a site, the nodes that are hosting dependent resources are fenced. Thisconsiderably speeds up the recovery process of the cluster and makes sure that resources can bemigrated more quickly.
This can be configured by specifying a loss-policy="fence" in rsc_ticket constraints.
15.3.1.3. CTR (Cluster Ticket Registry)This is for those scenarios where the tickets management is supposed to be automatic (instead of theadministrator revoking the ticket somewhere, waiting for everything to stop, and then granting it on thedesired site).
A CTR is a network daemon that handles granting, revoking, and timing out "tickets". The participatingclusters would run the daemons that would connect to each other, exchange information on theirconnectivity details, and vote on which site gets which ticket(s).
A ticket would only be granted to a site once they can be sure that it has been relinquished by theprevious owner, which would need to be implemented via a timer in most scenarios. If a site losesconnection to its peers, its tickets time out and recovery occurs. After the connection timeout plusthe recovery timeout has passed, the other sites are allowed to re-acquire the ticket and start theresources again.
This can also be thought of as a "quorum server", except that it is not a single quorum ticket, butseveral.

Configuring Ticket Dependencies
99
15.3.1.4. Configuration ReplicationAs usual, the CIB is synchronized within each cluster, but it is not synchronized across cluster sites ofa multi-site cluster. You have to configure the resources that will be highly available across the multi-site cluster for every site accordingly.
15.4. Configuring Ticket DependenciesThe rsc_ticket constraint lets you specify the resources depending on a certain ticket. Togetherwith the constraint, you can set a loss-policy that defines what should happen to the respectiveresources if the ticket is revoked.
The attribute loss-policy can have the following values:
fenceFence the nodes that are running the relevant resources.
stopStop the relevant resources.
freezeDo nothing to the relevant resources.
demoteDemote relevant resources that are running in master mode to slave mode.
An example to configure a rsc_ticket constraint:
<rsc_ticket id="rsc1-req-ticketA" rsc="rsc1" ticket="ticketA" loss-policy="fence"/>
This creates a constraint with the ID rsc1-req-ticketA. It defines that the resource rsc1 dependson ticketA and that the node running the resource should be fenced in case ticketA is revoked.
If resource rsc1 was a multi-state resource that can run in master or slave mode, you may want toconfigure that only rsc1's master mode depends on ticketA. With the following configuration,rsc1 will be demoted to slave mode if ticketA is revoked:
<rsc_ticket id="rsc1-req-ticketA" rsc="rsc1" rsc-role="Master" ticket="ticketA" loss-policy="demote"/>
You can create more rsc_ticket constraints to let multiple resources depend on the same ticket.
rsc_ticket also supports resource sets. So one can easily list all the resources in one rsc_ticketconstraint. For example:
<rsc_ticket id="resources-dep-ticketA" ticket="ticketA" loss-policy="fence"> <resource_set id="resources-dep-ticketA-0" role="Started"> <resource_ref id="rsc1"/> <resource_ref id="group1"/> <resource_ref id="clone1"/> </resource_set> <resource_set id="resources-dep-ticketA-1" role="Master"> <resource_ref id="ms1"/> </resource_set> </rsc_ticket>
In the example, there are two resource sets for listing the resources with different roles in onersc_ticket constraint. There’s no dependency between the two resource sets. And there’s no

Chapter 15. Multi-Site Clusters and Tickets
100
dependency among the resources within a resource set. Each of the resources just depends onticketA.
Referencing resource templates in rsc_ticket constraints, and even referencing them withinresource sets, is also supported.
If you want other resources to depend on further tickets, create as many constraints as necessary withrsc_ticket.
15.5. Managing Multi-Site Clusters
15.5.1. Granting and Revoking Tickets ManuallyYou can grant tickets to sites or revoke them from sites manually. Though if you want to re-distributea ticket, you should wait for the dependent resources to cleanly stop at the previous site before yougrant the ticket to another desired site.
Use the crm_ticket command line tool to grant and revoke tickets.
To grant a ticket to this site:
# crm_ticket --ticket ticketA --grant
To revoke a ticket from this site:
# crm_ticket --ticket ticketA --revoke
Important
If you are managing tickets manually. Use the crm_ticket command with great care as theycannot help verify if the same ticket is already granted elsewhere.
15.5.2. Granting and Revoking Tickets via a Cluster Ticket Registry
15.5.2.1. BoothBooth is an implementation of Cluster Ticket Registry or so-called Cluster TicketManager.
Booth is the instance managing the ticket distribution and thus, the failover process between the sitesof a multi-site cluster. Each of the participating clusters and arbitrators runs a service, the boothd. Itconnects to the booth daemons running at the other sites and exchanges connectivity details. Once aticket is granted to a site, the booth mechanism will manage the ticket automatically: If the site whichholds the ticket is out of service, the booth daemons will vote which of the other sites will get the ticket.To protect against brief connection failures, sites that lose the vote (either explicitly or implicitly bybeing disconnected from the voting body) need to relinquish the ticket after a time-out. Thus, it ismade sure that a ticket will only be re-distributed after it has been relinquished by the previous site.The resources that depend on that ticket will fail over to the new site holding the ticket. The nodesthat have run the resources before will be treated according to the loss-policy you set within thersc_ticket constraint.

Granting and Revoking Tickets via a Cluster Ticket Registry
101
Before the booth can manage a certain ticket within the multi-site cluster, you initially need to grant itto a site manually via booth client command. After you have initially granted a ticket to a site, thebooth mechanism will take over and manage the ticket automatically.
Important
The booth client command line tool can be used to grant, list, or revoke tickets. The boothclient commands work on any machine where the booth daemon is running.
If you are managing tickets via Booth, only use booth client for manual intervention insteadof crm_ticket. That can make sure the same ticket will only be owned by one cluster site at atime.
Booth includes an implementation of Paxos1 and Paxos Lease algorithm, which guarantees thedistributed consensus among different cluster sites.
Note
Arbitrator
Each site runs one booth instance that is responsible for communicating with the other sites.If you have a setup with an even number of sites, you need an additional instance to reachconsensus about decisions such as failover of resources across sites. In this case, add oneor more arbitrators running at additional sites. Arbitrators are single machines that run a boothinstance in a special mode. As all booth instances communicate with each other, arbitrators helpto make more reliable decisions about granting or revoking tickets.
An arbitrator is especially important for a two-site scenario: For example, if site A can no longercommunicate with site B, there are two possible causes for that:
• A network failure between A and B.
• Site B is down.
However, if site C (the arbitrator) can still communicate with site B, site B must still be up andrunning.
15.5.2.1.1. Requirements• All clusters that will be part of the multi-site cluster must be based on Pacemaker.
• Booth must be installed on all cluster nodes and on all arbitrators that will be part of the multi-sitecluster.
The most common scenario is probably a multi-site cluster with two sites and a single arbitrator on athird site. However, technically, there are no limitations with regards to the number of sites and thenumber of arbitrators involved.
1 http://en.wikipedia.org/wiki/Paxos_algorithm

Chapter 15. Multi-Site Clusters and Tickets
102
Nodes belonging to the same cluster site should be synchronized via NTP. However, timesynchronization is not required between the individual cluster sites.
15.5.3. General Management of TicketsDisplay the information of tickets:
# crm_ticket --info
Or you can monitor them with:
# crm_mon --tickets
Display the rsc_ticket constraints that apply to a ticket:
# crm_ticket --ticket ticketA --constraints
When you want to do maintenance or manual switch-over of a ticket, the ticket could be revokedfrom the site for any reason, which would trigger the loss-policies. If loss-policy="fence", thedependent resources could not be gracefully stopped/demoted, and even, other unrelated resourcescould be impacted.
The proper way is making the ticket standby first with:
# crm_ticket --ticket ticketA --standby
Then the dependent resources will be stopped or demoted gracefully without triggering the loss-policies.
If you have finished the maintenance and want to activate the ticket again, you can run:
# crm_ticket --ticket ticketA --activate
15.6. For more informationMulti-site Clustershttp://doc.opensuse.org/products/draft/SLE-HA/SLE-ha-guide_sd_draft/cha.ha.geo.html
Boothhttps://github.com/ClusterLabs/booth

103
Appendix A. FAQA.1. History
Q: Why is the Project Called Pacemaker?
A: First of all, the reason its not called the CRM is because of the abundance of terms1 that arecommonly abbreviated to those three letters.
The Pacemaker name came from Kham2, a good friend of mine, and was originally used bya Java GUI that I was prototyping in early 2007. Alas other commitments have prevented theGUI from progressing much and, when it came time to choose a name for this project, Larssuggested it was an even better fit for an independent CRM.
The idea stems from the analogy between the role of this software and that of the little devicethat keeps the human heart pumping. Pacemaker monitors the cluster and intervenes whennecessary to ensure the smooth operation of the services it provides.
There were a number of other names (and acronyms) tossed around, but suffice to say"Pacemaker" was the best
Q: Why was the Pacemaker Project Created?
A: The decision was made to spin-off the CRM into its own project after the 2.1.3 Heartbeat releasein order to• support both the Corosync and Heartbeat cluster stacks equally• decouple the release cycles of two projects at very different stages of their life-cycles• foster the clearer package boundaries, thus leading to• better and more stable interfaces
A.2. Setup
Q: What Messaging Layers are Supported?
A: • Corosync (http://www.corosync.org/)• Heartbeat (http://linux-ha.org/)
Q: Can I Choose which Messaging Layer to use at Run Time?
A: Yes. The CRM will automatically detect which started it and behave accordingly.
Q: Can I Have a Mixed Heartbeat-Corosync Cluster?
A: No.
Q: Which Messaging Layer Should I Choose?
A: This is discussed in Appendix D, Installation.
1 http://en.wikipedia.org/wiki/CRM2 http://khamsouk.souvanlasy.com/

Appendix A. FAQ
104
Q: Where Can I Get Pre-built Packages?
A: Official packages for most major .rpm and based distributions are available from the ClusterLabsWebsite3.
For Debian packages, building from source and details on using the above repositories, see ourinstallation page4.
Q: What Versions of Pacemaker Are Supported?
A: Please refer to the Releases page5 for an up-to-date list of versions supported directly by theproject.
When seeking assistance, please try to ensure you have one of these versions.
3 http://www.clusterlabs.org/rpm4 http://clusterlabs.org/wiki/Install5 http://clusterlabs.org/wiki/Releases

105
Appendix B. More About OCF ResourceAgents
Table of ContentsB.1. Location of Custom Scripts ............................................................................................... 105B.2. Actions ............................................................................................................................. 105B.3. How are OCF Return Codes Interpreted? .......................................................................... 106B.4. OCF Return Codes ........................................................................................................... 106B.5. Exceptions ........................................................................................................................ 107
B.1. Location of Custom Scripts OCF Resource Agents are found in /usr/lib/ocf/resource.d/provider.
When creating your own agents, you are encouraged to create a new directory under /usr/lib/ocf/resource.d/ so that they are not confused with (or overwritten by) the agents shipped with Heartbeat.
So, for example, if you chose the provider name of bigCorp and wanted a new resource namedbigApp, you would create a script called /usr/lib/ocf/resource.d/bigCorp/bigApp and define a resource:
<primitive id="custom-app" class="ocf" provider="bigCorp" type="bigApp"/>
B.2. ActionsAll OCF Resource Agents are required to implement the following actions
Table B.1. Required Actions for OCF Agents
Action Description Instructions
start Start the resource Return 0 on success and an appropriate errorcode otherwise. Must not report success until theresource is fully active.
stop Stop the resource Return 0 on success and an appropriate errorcode otherwise. Must not report success until theresource is fully stopped.
monitor Check theresource’s state
Exit 0 if the resource is running, 7 if it is stopped,and anything else if it is failed.
NOTE: The monitor script should test the state ofthe resource on the local machine only.
meta-data Describe theresource
Provide information about this resource as anXML snippet. Exit with 0.
NOTE: This is not performed as root.
validate-all Verify the suppliedparameters
Exit with 0 if parameters are valid, 2 if not valid, 6if resource is not configured.
Additional requirements (not part of the OCF specs) are placed on agents that will be used foradvanced concepts like clones and multi-state resources.

Appendix B. More About OCF Resource Agents
106
Table B.2. Optional Actions for OCF Agents
Action Description Instructions
promote Promote the local instance of a multi-state resourceto the master/primary state.
Return 0 on success
demote Demote the local instance of a multi-state resourceto the slave/secondary state.
Return 0 on success
notify Used by the cluster to send the agent pre and postnotification events telling the resource what hashappened and will happen.
Must not fail. Must exitwith 0
One action specified in the OCF specs is not currently used by the cluster:
• recover - a variant of the start action, this should try to recover a resource locally.
Remember to use ocf-tester to verify that your new agent complies with the OCF standardproperly.
B.3. How are OCF Return Codes Interpreted?The first thing the cluster does is to check the return code against the expected result. If the resultdoes not match the expected value, then the operation is considered to have failed and recoveryaction is initiated.
There are three types of failure recovery:
Table B.3. Types of recovery performed by the cluster
Type Description Action Taken by the Cluster
soft A transient error occurred Restart the resource or move it to a newlocation
hard A non-transient error that may bespecific to the current node occurred
Move the resource elsewhere andprevent it from being retried on thecurrent node
fatal A non-transient error that will becommon to all cluster nodes (eg. a badconfiguration was specified)
Stop the resource and prevent it frombeing started on any cluster node
Assuming an action is considered to have failed, the following table outlines the different OCF returncodes and the type of recovery the cluster will initiate when it is received.
B.4. OCF Return Codes
Table B.4. OCF Return Codes and their Recovery Types
RC OCF Alias Description RT
0 OCF_SUCCESS Success. The command completedsuccessfully. This is the expected resultfor all start, stop, promote and demotecommands.
soft
1 OCF_ERR_GENERIC Generic "there was a problem" errorcode.
soft

Exceptions
107
RC OCF Alias Description RT
2 OCF_ERR_ARGS The resource’s configuration is notvalid on this machine. Eg. refers to alocation/tool not found on the node.
hard
3 OCF_ERR_UNIMPLEMENTED The requested action is notimplemented.
hard
4 OCF_ERR_PERM The resource agent does not havesufficient privileges to complete thetask.
hard
5 OCF_ERR_INSTALLED The tools required by the resource arenot installed on this machine.
hard
6 OCF_ERR_CONFIGURED The resource’s configuration is invalid.Eg. required parameters are missing.
fatal
7 OCF_NOT_RUNNING The resource is safely stopped. Thecluster will not attempt to stop aresource that returns this for any action.
N/A
8 OCF_RUNNING_MASTER The resource is running in Mastermode.
soft
9 OCF_FAILED_MASTER The resource is in Master modebut has failed. The resource will bedemoted, stopped and then started(and possibly promoted) again.
soft
other NA Custom error code. soft
Although counterintuitive, even actions that return 0 (aka. OCF_SUCCESS) can be considered to havefailed.
B.5. Exceptions• Non-recurring monitor actions (probes) that find a resource active (or in Master mode) will not result
in recovery action unless it is also found active elsewhere
• The recovery action taken when a resource is found active more than once is determined by themultiple-active property of the resource
• Recurring actions that return OCF_ERR_UNIMPLEMENTED do not cause any type of recovery

108

109
Appendix C. What Changed in 1.0
Table of ContentsC.1. New ................................................................................................................................. 109C.2. Changed .......................................................................................................................... 109C.3. Removed .......................................................................................................................... 110
C.1. New• Failure timeouts. See Section 9.3.2, “Moving Resources Due to Failure”
• New section for resource and operation defaults. See Section 5.5, “Setting Global Defaults forResource Options” and Section 5.7.2, “Setting Global Defaults for Operations”
• Tool for making offline configuration changes. See Section 2.6, “Making Configuration Changes in aSandbox”
• Rules, instance_attributes, meta_attributes and sets of operations can be definedonce and referenced in multiple places. See Section 9.4, “Reusing Rules, Options and Sets ofOperations”
• The CIB now accepts XPath-based create/modify/delete operations. See the cibadmin help text.
• Multi-dimensional colocation and ordering constraints. See Section 6.5, “Ordering Sets ofResources” and Section 6.9, “Collocating Sets of Resources”
• The ability to connect to the CIB from non-cluster machines. See Section 9.1, “Connecting from aRemote Machine”
• Allow recurring actions to be triggered at known times. See Section 9.2, “Specifying When RecurringActions are Performed”
C.2. Changed• Syntax
• All resource and cluster options now use dashes (-) instead of underscores (_)
• master_slave was renamed to master
• The attributes container tag was removed
• The operation field pre-req has been renamed requires
• All operations must have an interval, start/stop must have it set to zero
• The stonith-enabled option now defaults to true.
• The cluster will refuse to start resources if stonith-enabled is true (or unset) and no STONITHresources have been defined
• The attributes of colocation and ordering constraints were renamed for clarity. See Section 6.3,“Specifying in which Order Resources Should Start/Stop” and Section 6.4, “Placing ResourcesRelative to other Resources”

Appendix C. What Changed in 1.0
110
• resource-failure-stickiness has been replaced by migration-threshold. SeeSection 9.3.2, “Moving Resources Due to Failure”
• The parameters for command-line tools have been made consistent
• Switched to RelaxNG schema validation and libxml2 parser
• id fields are now XML IDs which have the following limitations:
• id’s cannot contain colons (:)
• id’s cannot begin with a number
• id’s must be globally unique (not just unique for that tag)
• Some fields (such as those in constraints that refer to resources) are IDREFs.
This means that they must reference existing resources or objects in order for the configuration tobe valid. Removing an object which is referenced elsewhere will therefore fail.
• The CIB representation, from which a MD5 digest is calculated to verify CIBs on the nodes, haschanged.
This means that every CIB update will require a full refresh on any upgraded nodes until thecluster is fully upgraded to 1.0. This will result in significant performance degradation and itis therefore highly inadvisable to run a mixed 1.0/0.6 cluster for any longer than absolutelynecessary.
• Ping node information no longer needs to be added to ha.cf.
Simply include the lists of hosts in your ping resource(s).
C.3. Removed• Syntax
• It is no longer possible to set resource meta options as top-level attributes. Use meta attributesinstead.
• Resource and operation defaults are no longer read from crm_config. See Section 5.5, “SettingGlobal Defaults for Resource Options” and Section 5.7.2, “Setting Global Defaults for Operations”instead.

111
Appendix D. Installation
Table of ContentsD.1. Choosing a Cluster Stack ................................................................................................. 111D.2. Enabling Pacemaker ......................................................................................................... 111
D.2.1. For Corosync ......................................................................................................... 111D.2.2. For Heartbeat ........................................................................................................ 113
Warning
The following text may no longer be accurate in some places.
D.1. Choosing a Cluster Stack
Ultimately the choice of cluster stack is a personal decision that must be made in the context of youor your company’s needs and strategic direction. Pacemaker currently functions equally well with bothstacks.
Here are some factors that may influence the decision:
• SUSE/Novell, Red Hat and Oracle are all putting their collective weight behind the Corosync clusterstack.
• Using Corosync gives your applications access to the following additional cluster services
• distributed locking service
• extended virtual synchronization service
• cluster closed process group service
• It is likely that Pacemaker, at some point in the future, will make use of some of these additionalservices not provided by Heartbeat
D.2. Enabling Pacemaker
D.2.1. For CorosyncThe Corosync configuration is normally located in /etc/corosync/corosync.conf and an examplefor a machine with an address of 1.2.3.4 in a cluster communicating on port 1234 (without peerauthentication and message encryption) is shown below.
An example Corosync configuration file
totem { version: 2

Appendix D. Installation
112
secauth: off threads: 0 interface { ringnumber: 0 bindnetaddr: 1.2.3.4 mcastaddr: 239.255.1.1 mcastport: 1234 } } logging { fileline: off to_syslog: yes syslog_facility: daemon } amf { mode: disabled }
The logging should be mostly obvious and the amf section refers to the Availability ManagementFramework and is not covered in this document.
The interesting part of the configuration is the totem section. This is where we define how the nodecan communicate with the rest of the cluster and what protocol version and options (includingencryption 1 ) it should use. Beginners are encouraged to use the values shown and modify theinterface section based on their network.
It is also possible to configure Corosync for an IPv6 based environment. Simply configurebindnetaddr and mcastaddr with their IPv6 equivalents, eg.
Example options for an IPv6 environment
bindnetaddr: fec0::1:a800:4ff:fe00:20 mcastaddr: ff05::1
To tell Corosync to use the Pacemaker cluster manager, add the following fragment to a functionalCorosync configuration and restart the cluster.
Configuration fragment for enabling Pacemaker under Corosync
aisexec { user: root group: root}service { name: pacemaker ver: 0}
The cluster needs to be run as root so that its child processes (the lrmd in particular) have sufficientprivileges to perform the actions requested of it. After all, a cluster manager that can’t add an IPaddress or start apache is of little use.
The second directive is the one that actually instructs the cluster to run Pacemaker.
1 Please consult the Corosync website (http://www.corosync.org/) and documentation for details on enabling encryption andpeer authentication for the cluster.

For Heartbeat
113
D.2.2. For HeartbeatAdd the following to a functional ha.cf configuration file and restart Heartbeat:
Configuration fragment for enabling Pacemaker under Heartbeat
crm respawn

114

115
Appendix E. Upgrading ClusterSoftware
Table of ContentsE.1. Version Compatibility ........................................................................................................ 115E.2. Complete Cluster Shutdown .............................................................................................. 116
E.2.1. Procedure .............................................................................................................. 116E.3. Rolling (node by node) ...................................................................................................... 116
E.3.1. Procedure .............................................................................................................. 116E.3.2. Version Compatibility .............................................................................................. 116E.3.3. Crossing Compatibility Boundaries .......................................................................... 117
E.4. Disconnect and Reattach .................................................................................................. 117E.4.1. Procedure .............................................................................................................. 117E.4.2. Notes ..................................................................................................................... 118
E.1. Version CompatibilityWhen releasing newer versions we take care to make sure we are backwards compatible witholder versions. While you will always be able to upgrade from version x to x+1, in order to continueto produce high quality software it may occasionally be necessary to drop compatibility with olderversions.
There will always be an upgrade path from any series-2 release to any other series-2 release.
There are three approaches to upgrading your cluster software:
• Complete Cluster Shutdown
• Rolling (node by node)
• Disconnect and Reattach
Each method has advantages and disadvantages, some of which are listed in the table below, and youshould chose the one most appropriate to your needs.
Table E.1. Summary of Upgrade Methodologies
Type Availablebetween allsoftwareversions
ServiceOutageDuringUpgrade
ServiceRecoveryDuringUpgrade
ExercisesFailoverLogic/Configuration
Allowschange ofcluster stacktype 1
Shutdown yes always N/A no yes
Rolling no always yes yes no
Reattach yes only due tofailure
no no yes
1 For example, switching from Heartbeat to Corosync. Consult the Heartbeat or Corosync documentation to see if upgradingthem to a newer version is also supported.

Appendix E. Upgrading Cluster Software
116
E.2. Complete Cluster ShutdownIn this scenario one shuts down all cluster nodes and resources and upgrades all the nodes beforerestarting the cluster.
E.2.1. Procedure1. On each node:
a. Shutdown the cluster stack (Heartbeat or Corosync)
b. Upgrade the Pacemaker software. This may also include upgrading the cluster stack and/orthe underlying operating system.
c. Check the configuration manually or with the crm_verify tool if available.
2. On each node:
a. Start the cluster stack. This can be either Corosync or Heartbeat and does not need to be thesame as the previous cluster stack.
E.3. Rolling (node by node)In this scenario each node is removed from the cluster, upgraded and then brought back online until allnodes are running the newest version.
Important
This method is currently broken between Pacemaker 0.6.x and 1.0.x.
Measures have been put into place to ensure rolling upgrades always work for versions after1.0.0. Please try one of the other upgrade strategies. Detach/Reattach is a particularly goodoption for most people.
E.3.1. ProcedureOn each node: . Shutdown the cluster stack (Heartbeat or Corosync) . Upgrade the Pacemakersoftware. This may also include upgrading the cluster stack and/or the underlying operating system. ..On the first node, check the configuration manually or with the crm_verify tool if available. .. Startthe cluster stack.
+ This must be the same type of cluster stack (Corosync or Heartbeat) that the rest of the cluster isusing. Upgrading Corosync/Heartbeat may also be possible, please consult the documentation forthose projects to see if the two versions will be compatible.
+ .. Repeat for each node in the cluster.
E.3.2. Version Compatibility
Table E.2. Version Compatibility Table
Version being Installed Oldest Compatible Version
Pacemaker 1.0.x Pacemaker 1.0.0
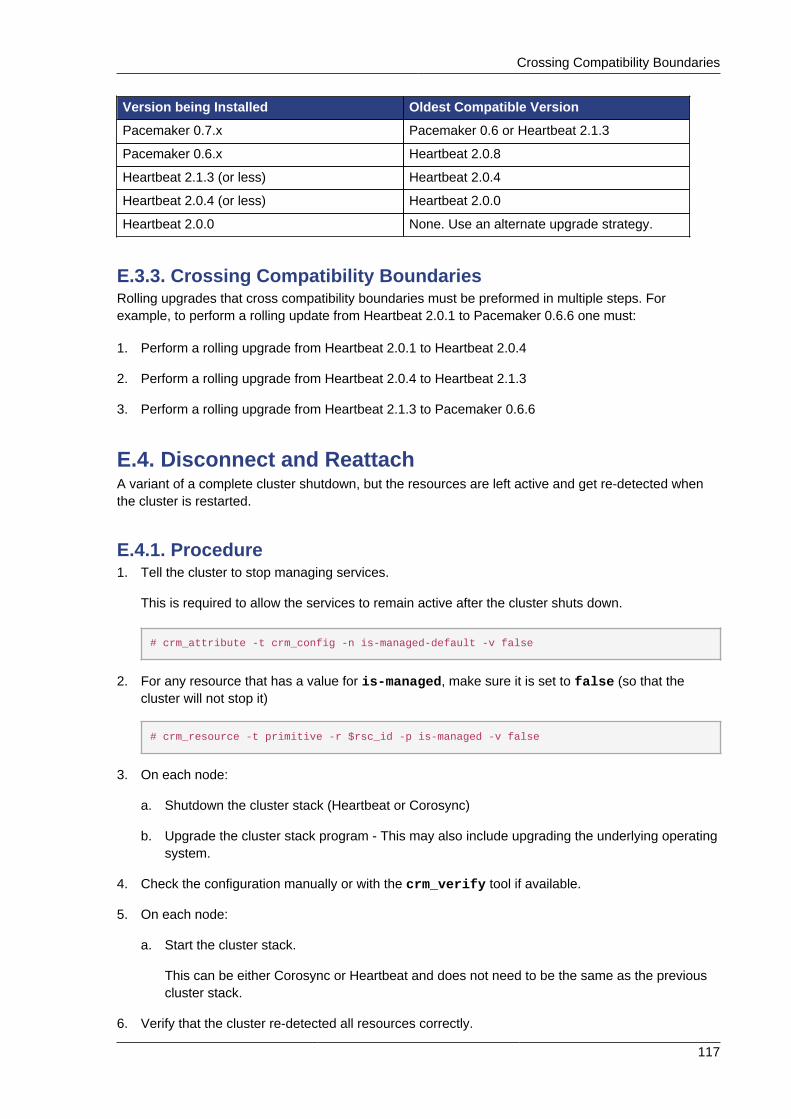
Crossing Compatibility Boundaries
117
Version being Installed Oldest Compatible Version
Pacemaker 0.7.x Pacemaker 0.6 or Heartbeat 2.1.3
Pacemaker 0.6.x Heartbeat 2.0.8
Heartbeat 2.1.3 (or less) Heartbeat 2.0.4
Heartbeat 2.0.4 (or less) Heartbeat 2.0.0
Heartbeat 2.0.0 None. Use an alternate upgrade strategy.
E.3.3. Crossing Compatibility BoundariesRolling upgrades that cross compatibility boundaries must be preformed in multiple steps. Forexample, to perform a rolling update from Heartbeat 2.0.1 to Pacemaker 0.6.6 one must:
1. Perform a rolling upgrade from Heartbeat 2.0.1 to Heartbeat 2.0.4
2. Perform a rolling upgrade from Heartbeat 2.0.4 to Heartbeat 2.1.3
3. Perform a rolling upgrade from Heartbeat 2.1.3 to Pacemaker 0.6.6
E.4. Disconnect and ReattachA variant of a complete cluster shutdown, but the resources are left active and get re-detected whenthe cluster is restarted.
E.4.1. Procedure1. Tell the cluster to stop managing services.
This is required to allow the services to remain active after the cluster shuts down.
# crm_attribute -t crm_config -n is-managed-default -v false
2. For any resource that has a value for is-managed, make sure it is set to false (so that thecluster will not stop it)
# crm_resource -t primitive -r $rsc_id -p is-managed -v false
3. On each node:
a. Shutdown the cluster stack (Heartbeat or Corosync)
b. Upgrade the cluster stack program - This may also include upgrading the underlying operatingsystem.
4. Check the configuration manually or with the crm_verify tool if available.
5. On each node:
a. Start the cluster stack.
This can be either Corosync or Heartbeat and does not need to be the same as the previouscluster stack.
6. Verify that the cluster re-detected all resources correctly.

Appendix E. Upgrading Cluster Software
118
7. Allow the cluster to resume managing resources again:
# crm_attribute -t crm_config -n is-managed-default -v true
8. For any resource that has a value for is-managed reset it to true (so the cluster can recover theservice if it fails) if desired:
# crm_resource -t primitive -r $rsc_id -p is-managed -v true
E.4.2. Notes
Important
Always check your existing configuration is still compatible with the version you are installingbefore starting the cluster.
Note
The oldest version of the CRM to support this upgrade type was in Heartbeat 2.0.4

119
Appendix F. Upgrading theConfiguration from 0.6
Table of ContentsF.1. Preparation ....................................................................................................................... 119F.2. Perform the upgrade ......................................................................................................... 119
F.2.1. Upgrade the software ............................................................................................. 119F.2.2. Upgrade the Configuration ...................................................................................... 119F.2.3. Manually Upgrading the Configuration ..................................................................... 121
F.1. Preparation
Download the latest DTD1 and ensure your configuration validates.
F.2. Perform the upgrade
F.2.1. Upgrade the softwareRefer to the appendix: Appendix E, Upgrading Cluster Software
F.2.2. Upgrade the ConfigurationAs XML is not the friendliest of languages, it is common for cluster administrators to have scriptedsome of their activities. In such cases, it is likely that those scripts will not work with the new 1.0syntax.
In order to support such environments, it is actually possible to continue using the old 0.6 syntax.
The downside is, however, that not all the new features will be available and there is a performanceimpact since the cluster must do a non-persistent configuration upgrade before each transition. Sowhile using the old syntax is possible, it is not advisable to continue using it indefinitely.
Even if you wish to continue using the old syntax, it is advisable to follow the upgrade procedure toensure that the cluster is able to use your existing configuration (since it will perform much the sametask internally).
1. Create a shadow copy to work with
# crm_shadow --create upgrade06
2. Verify the configuration is valid
1 http://hg.clusterlabs.org/pacemaker/stable-1.0/file-raw/tip/xml/crm.dtd

Appendix F. Upgrading the Configuration from 0.6
120
# crm_verify --live-check
3. Fix any errors or warnings
4. Perform the upgrade:
# cibadmin --upgrade
5. If this step fails, there are three main possibilities:
a. The configuration was not valid to start with - go back to step 2
b. The transformation failed - report a bug or email the project2
c. The transformation was successful but produced an invalid result 3
If the result of the transformation is invalid, you may see a number of errors from the validationlibrary. If these are not helpful, visit http://clusterlabs.org/wiki/Validation_FAQ and/or try theprocedure described below under Section F.2.3, “Manually Upgrading the Configuration”
6. Check the changes
# crm_shadow --diff
If at this point there is anything about the upgrade that you wish to fine-tune (for example, tochange some of the automatic IDs) now is the time to do so. Since the shadow configuration is notin use by the cluster, it is safe to edit the file manually:
# crm_shadow --edit
This will open the configuration in your favorite editor (whichever is specified by the standard$EDITOR environment variable)
7. Preview how the cluster will react
Test what the cluster will do when you upload the new configuration
# crm_simulate --live-check --save-dotfile upgrade06.dot -S# graphviz upgrade06.dot
Verify that either no resource actions will occur or that you are happy with any that arescheduled. If the output contains actions you do not expect (possibly due to changes to the scorecalculations), you may need to make further manual changes. See Section 2.7, “Testing YourConfiguration Changes” for further details on how to interpret the output of crm_simulate
8. Upload the changes
# crm_shadow --commit upgrade06 --force
2 mailto:[email protected]?subject=Transformation%20failed%20during%20upgrade3 The most common reason is ID values being repeated or invalid. Pacemaker 1.0 is much stricter regarding this type ofvalidation.

Manually Upgrading the Configuration
121
If this step fails, something really strange has occurred. You should report a bug.
F.2.3. Manually Upgrading the Configuration It is also possible to perform the configuration upgrade steps manually. To do this
Locate the upgrade06.xsl conversion script or download the latest version from Git4
1. Convert the XML blob:
# xsltproc /path/to/upgrade06.xsl config06.xml > config10.xml
2. Locate the pacemaker.rng script.
3. Check the XML validity:
# xmllint --relaxng /path/to/pacemaker.rng config10.xml
The advantage of this method is that it can be performed without the cluster running and any validationerrors should be more informative (despite being generated by the same library!) since they includeline numbers.
4 https://github.com/ClusterLabs/pacemaker/tree/master/xml/upgrade06.xsl

122

123
Appendix G. init-Script LSBComplianceThe relevant part of LSB spec1 includes a description of all the return codes listed here.
Assuming some_service is configured correctly and currently not active, the following sequence willhelp you determine if it is LSB compatible:
1. Start (stopped):
# /etc/init.d/some_service start ; echo "result: $?"
a. Did the service start?
b. Did the command print result: 0 (in addition to the regular output)?
2. Status (running):
# /etc/init.d/some_service status ; echo "result: $?"
a. Did the script accept the command?
b. Did the script indicate the service was running?
c. Did the command print result: 0 (in addition to the regular output)?
3. Start (running):
# /etc/init.d/some_service start ; echo "result: $?"
a. Is the service still running?
b. Did the command print result: 0 (in addition to the regular output)?
4. Stop (running):
# /etc/init.d/some_service stop ; echo "result: $?"
a. Was the service stopped?
b. Did the command print result: 0 (in addition to the regular output)?
5. Status (stopped):
# /etc/init.d/some_service status ; echo "result: $?"
a. Did the script accept the command?
b. Did the script indicate the service was not running?
1 http://refspecs.freestandards.org/LSB_3.1.0/LSB-Core-generic/LSB-Core-generic/iniscrptact.html

Appendix G. init-Script LSB Compliance
124
c. Did the command print result: 3 (in addition to the regular output)?
6. Stop (stopped):
# /etc/init.d/some_service stop ; echo "result: $?"
a. Is the service still stopped?
b. Did the command print result: 0 (in addition to the regular output)?
7. Status (failed):
This step is not readily testable and relies on manual inspection of the script.
The script can use one of the error codes (other than 3) listed in the LSB spec to indicate that it isactive but failed. This tells the cluster that before moving the resource to another node, it needs tostop it on the existing one first.
If the answer to any of the above questions is no, then the script is not LSB compliant. Your optionsare then to either fix the script or write an OCF agent based on the existing script.

125
Appendix H. Sample Configurations
Table of ContentsH.1. Empty .............................................................................................................................. 125H.2. Simple .............................................................................................................................. 125H.3. Advanced Configuration .................................................................................................... 126
H.1. Empty
Example H.1. An Empty Configuration
<cib admin_epoch="0" epoch="0" num_updates="0" have-quorum="false"> <configuration> <crm_config/> <nodes/> <resources/> <constraints/> </configuration> <status/></cib>
H.2. Simple
Example H.2. Simple Configuration - 2 nodes, some cluster options and a resource
<cib admin_epoch="0" epoch="1" num_updates="0" have-quorum="false" validate-with="pacemaker-1.0"> <configuration> <crm_config> <nvpair id="option-1" name="symmetric-cluster" value="true"/> <nvpair id="option-2" name="no-quorum-policy" value="stop"/> </crm_config> <op_defaults> <nvpair id="op-default-1" name="timeout" value="30s"/> </op_defaults> <rsc_defaults> <nvpair id="rsc-default-1" name="resource-stickiness" value="100"/> <nvpair id="rsc-default-2" name="migration-threshold" value="10"/> </rsc_defaults> <nodes> <node id="xxx" uname="c001n01" type="normal"/> <node id="yyy" uname="c001n02" type="normal"/> </nodes> <resources> <primitive id="myAddr" class="ocf" provider="heartbeat" type="IPaddr"> <operations> <op id="myAddr-monitor" name="monitor" interval="300s"/> </operations> <instance_attributes> <nvpair name="ip" value="10.0.200.30"/> </instance_attributes> </primitive> </resources> <constraints> <rsc_location id="myAddr-prefer" rsc="myAddr" node="c001n01" score="INFINITY"/>

Appendix H. Sample Configurations
126
</constraints> </configuration> <status/></cib>
In this example, we have one resource (an IP address) that we check every five minutes and will runon host c001n01 until either the resource fails 10 times or the host shuts down.
H.3. Advanced Configuration
Example H.3. Advanced configuration - groups and clones with stonith
<cib admin_epoch="0" epoch="1" num_updates="0" have-quorum="false" validate-with="pacemaker-1.0"> <configuration> <crm_config> <nvpair id="option-1" name="symmetric-cluster" value="true"/> <nvpair id="option-2" name="no-quorum-policy" value="stop"/> <nvpair id="option-3" name="stonith-enabled" value="true"/> </crm_config> <op_defaults> <nvpair id="op-default-1" name="timeout" value="30s"/> </op_defaults> <rsc_defaults> <nvpair id="rsc-default-1" name="resource-stickiness" value="100"/> <nvpair id="rsc-default-2" name="migration-threshold" value="10"/> </rsc_defaults> <nodes> <node id="xxx" uname="c001n01" type="normal"/> <node id="yyy" uname="c001n02" type="normal"/> <node id="zzz" uname="c001n03" type="normal"/> </nodes> <resources> <primitive id="myAddr" class="ocf" provider="heartbeat" type="IPaddr"> <operations> <op id="myAddr-monitor" name="monitor" interval="300s"/> </operations> <instance_attributes> <nvpair name="ip" value="10.0.200.30"/> </instance_attributes> </primitive> <group id="myGroup"> <primitive id="database" class="lsb" type="oracle"> <operations> <op id="database-monitor" name="monitor" interval="300s"/> </operations> </primitive> <primitive id="webserver" class="lsb" type="apache"> <operations> <op id="webserver-monitor" name="monitor" interval="300s"/> </operations> </primitive> </group> <clone id="STONITH"> <meta_attributes id="stonith-options"> <nvpair id="stonith-option-1" name="globally-unique" value="false"/> </meta_attributes> <primitive id="stonithclone" class="stonith" type="external/ssh"> <operations> <op id="stonith-op-mon" name="monitor" interval="5s"/> </operations> <instance_attributes id="stonith-attrs">

Advanced Configuration
127
<nvpair id="stonith-attr-1" name="hostlist" value="c001n01,c001n02"/> </instance_attributes> </primitive> </clone> </resources> <constraints> <rsc_location id="myAddr-prefer" rsc="myAddr" node="c001n01" score="INFINITY"/> <rsc_colocation id="group-with-ip" rsc="myGroup" with-rsc="myAddr" score="INFINITY"/> </constraints> </configuration> <status/></cib>

128

129
Appendix I. Further Reading• Project Website http://www.clusterlabs.org/• Project Documentation http://www.clusterlabs.org/wiki/Documentation• A comprehensive guide to cluster commands has been written by Novell1
• Heartbeat configuration: http://www.linux-ha.org/• Corosync Configuration: http://www.corosync.org/
1 http://www.suse.com/documentation/sle_ha/book_sleha/data/book_sleha.html

130

131
Appendix J. Revision HistoryRevision 1-1 19 Oct 2009 Andrew Beekhof [email protected]
Import from Pages.app
Revision 2-1 26 Oct 2009 Andrew Beekhof [email protected] and reformatting of docbook xml complete
Revision 3-1 Tue Nov 12 2009 Andrew Beekhof [email protected] book into chapters and pass validationRe-organize book for use with Publican1
Revision 4-1 Mon Oct 8 2012 Andrew Beekhof [email protected] to asciidoc2 (which is converted to docbook for use with Publican3)
1 https://fedorahosted.org/publican/2 http://www.methods.co.nz/asciidoc3 https://fedorahosted.org/publican/

132

133
IndexSymbols0
OCF_SUCCESS, 1061
OCF_ERR_GENERIC, 1062
OCF_ERR_ARGS, 1073
OCF_ERR_UNIMPLEMENTED, 1074
OCF_ERR_PERM, 1075
OCF_ERR_INSTALLED, 1076
OCF_ERR_CONFIGURED, 1077
OCF_NOT_RUNNING, 1078
OCF_RUNNING_MASTER, 1079
OCF_FAILED_MASTER, 107
AAction, 32
demote, 106meta-data, 105monitor, 105notify, 106promote, 106Property
enabled, 32id, 32interval, 32name, 32on-fail, 32timeout, 32
start, 105Status
call-id, 93crm-debug-origin, 94crm_feature_set, 93exec-time, 93id, 93interval, 93last-rc-change, 93last-run, 93op-digest, 94op-status, 93operation, 93queue-time, 93rc-code, 93
transition-key, 94transition-magic, 94
stop, 105validate-all, 105
Action Property, 32, 32, 32, 32, 32, 32Action Status, 93, 93, 93, 93, 93, 93, 93, 93, 93,93, 93, 94, 94, 94, 94active_resource, 70, 74
Notification Environment Variable, 70, 74active_uname, 70, 75
Notification Environment Variable, 70, 75Add Cluster Node, 20, 21, 22
CMAN, 21Corosync, 20Heartbeat, 22
admin_epoch, 15Cluster Option, 15
Asymmetrical Opt-In, 36Asymmetrical Opt-In Clusters, 36attribute, 20, 48
Constraint Expression, 48Attribute Expression, 47
attribute, 48operation, 48type, 48value, 48
Bbatch-limit, 16
Cluster Option, 16boolean-op, 47
Constraint Rule, 47
Ccall-id, 93
Action Status, 93Changing Cluster Stack, 115Choosing Between Heartbeat and Corosync, 111cib-last-written, 16
Cluster Property, 16CIB_encrypted, 55CIB_passwd, 55CIB_port, 55CIB_server, 55CIB_user, 55class, 25, 28
Resource, 28Clone
Optionclone-max, 68clone-node-max, 68globally-unique, 68interleave, 68
Index
134
notify, 68ordered, 68
Propertyid, 68
Clone Option, 68, 68, 68, 68, 68, 68Clone Property, 68Clone Resources, 67clone-max, 68
Clone Option, 68clone-node-max, 68
Clone Option, 68Clones, 67, 69Cluster, 15
Choosing Between Heartbeat and Corosync,111Option
admin_epoch, 15batch-limit, 16cluster-delay, 17Configuration Version, 15epoch, 15migration-limit, 17no-quorum-policy, 17num_updates, 15pe-error-series-max, 17pe-input-series-max, 17pe-warn-series-max, 17start-failure-is-fatal, 17stonith-action, 17stonith-enabled, 17stop-orphan-actions, 17stop-orphan-resources, 17symmetric-cluster, 17validate-with, 15
Propertycib-last-written, 16dc-uuid, 16have-quorum, 16
Querying Options, 17Remote administration, 55Remote connection, 55Setting Options, 17Setting Options with Rules, 53Switching between Stacks, 115
Cluster Option, 15, 15, 15, 15, 16, 17, 17, 17, 17,17, 17, 17, 17, 17, 17, 17, 17, 17, 17Cluster Property, 16, 16, 16Cluster Stack
Corosync, 111Heartbeat, 111
Cluster TypeAsymmetrical Opt-In, 36Symmetrical Opt-Out, 36
cluster-delay, 17
Cluster Option, 17CMAN, 21, 21
Add Cluster Node, 21Remove Cluster Node, 21
Colocation, 38id, 39rsc, 39score, 39with-rsc, 39
Colocation Constraints, 39, 39, 39, 39Configuration, 87, 119
Upgrade manually, 121Upgrading, 119Validate XML, 121Verify, 119
Configuration Version, 15Cluster, 15
ConstraintAttribute Expression, 47
attribute, 48operation, 48type, 48value, 48
Date Specification, 49hours, 49id, 49monthdays, 49months, 49moon, 49weekdays, 49weeks, 49weekyears, 49yeardays, 49years, 49
Date/Time Expression, 48end, 48operation, 48start, 48
Duration, 49Rule, 47
boolean-op, 47role, 47score, 47score-attribute, 47
Constraint Expression, 48, 48, 48, 48, 48, 48, 48Constraint Rule, 47, 47, 47, 47Constraints, 35
Colocation, 38id, 39rsc, 39score, 39with-rsc, 39
Location, 35id, 36

135
node, 36rsc, 36score, 36
Ordering, 37first, 37first-action, 73id, 37kind, 38rsc-role, 73then, 37then-action, 73with-rsc-role, 73
Controlling Cluster Options, 53Convert, 121Corosync, 20, 21, 21, 111, 111
Add Cluster Node, 20Remove Cluster Node, 21Replace Cluster Node, 21
crm-debug-origin, 92, 94Action Status, 94Node Status, 92
crmd, 92Node Status, 92
crm_feature_set, 93Action Status, 93
CRM_notify_desc, 46CRM_notify_node, 46CRM_notify_rc, 46CRM_notify_recipient, 46CRM_notify_rsc, 46CRM_notify_target_rc, 46, 46CRM_notify_task, 46
Ddampen, 59
Ping Resource Option, 59Date Specification, 49, 49, 49, 49, 49, 49, 49, 49,49, 49, 49, 49
hours, 49id, 49monthdays, 49months, 49moon, 49weekdays, 49weeks, 49weekyears, 49yeardays, 49years, 49
Date/Time Expression, 48end, 48operation, 48start, 48
dc-uuid, 16Cluster Property, 16
demote, 106OCF Action, 106
demote_resource, 75Notification Environment Variable, 75
demote_uname, 75Notification Environment Variable, 75
Determine by Rules, 51Determine Resource Location, 51Download, 119
DTD, 119DTD, 119
Download, 119Duration, 49, 49
Eenabled, 32
Action Property, 32end, 48
Constraint Expression, 48Environment Variable
CIB_encrypted, 55CIB_passwd, 55CIB_port, 55CIB_server, 55CIB_user, 55CRM_notify_desc, 46CRM_notify_node, 46CRM_notify_rc, 46CRM_notify_recipient, 46CRM_notify_rsc, 46CRM_notify_target_rc, 46, 46CRM_notify_task, 46OCF_RESKEY_CRM_meta_notify_
active_resource, 70, 74active_uname, 70, 75demote_resource, 75demote_uname, 75inactive_resource, 70, 75inactive_uname, 70, 75master_resource, 75master_uname, 75operation, 70, 74promote_resource, 75promote_uname, 75slave_resource, 75slave_uname, 75start_resource, 70, 75start_uname, 70, 75stop_resource, 70, 75stop_uname, 70, 75type, 70, 74
epoch, 15Cluster Option, 15
error

Index
136
fatal, 106hard, 106soft, 106
exec-time, 93Action Status, 93
expected, 92Node Status, 92
Ffailure-timeout, 30
Resource Option, 30fatal, 106
OCF error, 106feedback
contact information for this manual, xviifirst, 37
Ordering Constraints, 37first-action, 73
Ordering Constraints, 73
Gglobally-unique, 68
Clone Option, 68Group Property
id, 66Group Resource Property, 66Group Resources, 65Groups, 65, 67
Hha, 92
Node Status, 92hard, 106
OCF error, 106have-quorum, 16
Cluster Property, 16Heartbeat, 22, 22, 22, 25, 111, 111
Add Cluster Node, 22Remove Cluster Node, 22Replace Cluster Node, 22Resources, 25
host_list, 59Ping Resource Option, 59
hours, 49Date Specification, 49
Iid, 28, 32, 36, 37, 39, 49, 66, 68, 71, 91, 93
Action Property, 32Action Status, 93Clone Property, 68Colocation Constraints, 39Date Specification, 49
Group Resource Property, 66Location Constraints, 36Multi-State Property, 71Node Status, 91Ordering Constraints, 37Resource, 28
inactive_resource, 70, 75Notification Environment Variable, 70, 75
inactive_uname, 70, 75Notification Environment Variable, 70, 75
interleave, 68Clone Option, 68
interval, 32, 93Action Property, 32Action Status, 93
in_ccm, 92Node Status, 92
is-managed, 29Resource Option, 29
Jjoin, 92
Node Status, 92
Kkind, 38
Ordering Constraints, 38
Llast-rc-change, 93
Action Status, 93last-run, 93
Action Status, 93Linux Standard Base
Resources, 26Location, 35
Determine by Rules, 51id, 36node, 36rsc, 36score, 36
Location Constraints, 35, 36, 36, 36, 36Location Relative to other Resources, 38LSB, 26
Resources, 26
Mmaster-max, 71
Multi-State Option, 71master-node-max, 71
Multi-State Option, 71master_resource, 75
Notification Environment Variable, 75

137
master_uname, 75Notification Environment Variable, 75
Messaging Layers , 103meta-data, 105
OCF Action, 105migration-limit, 17
Cluster Option, 17migration-threshold, 30
Resource Option, 30monitor, 105
OCF Action, 105monthdays, 49
Date Specification, 49months, 49
Date Specification, 49moon, 49
Date Specification, 49Moving, 56
Resources, 56Multi-state, 71Multi-State, 73
Optionmaster-max, 71master-node-max, 71
Propertyid, 71
Multi-State Option, 71, 71Multi-State Property, 71Multi-state Resources, 71multiple-active, 30
Resource Option, 30multiplier, 59
Ping Resource Option, 59
Nname, 32
Action Property, 32no-quorum-policy, 17
Cluster Option, 17Node
attribute, 20Status, 91
crm-debug-origin, 92crmd, 92expected, 92ha, 92id, 91in_ccm, 92join, 92uname, 92
node, 36Location Constraints, 36
Node Status, 91, 92, 92, 92, 92, 92, 92, 92Notification, 45
SMTP, 45SNMP, 45
Notification Environment Variable, 70, 70, 70, 70,70, 70, 70, 70, 70, 70, 74, 74, 74, 75, 75, 75, 75,75, 75, 75, 75, 75, 75, 75, 75, 75, 75, 75notify, 68, 106
Clone Option, 68OCF Action, 106
num_updates, 15Cluster Option, 15
OOCF, 26
Actiondemote, 106meta-data, 105monitor, 105notify, 106promote, 106start, 105stop, 105validate-all, 105
errorfatal, 106hard, 106soft, 106
Resources, 26OCF Action, 105, 105, 105, 105, 105, 106, 106,106OCF error, 106, 106, 106OCF Resource Agents, 105ocf-tester, 106OCF_ERR_ARGS, 107, 107OCF_ERR_CONFIGURED, 107, 107OCF_ERR_GENERIC, 106, 106OCF_ERR_INSTALLED, 107, 107OCF_ERR_PERM, 107, 107OCF_ERR_UNIMPLEMENTED, 107, 107OCF_FAILED_MASTER, 74, 107, 107OCF_NOT_RUNNING, 74, 107, 107OCF_RESKEY_CRM_meta_notify_
active_resource, 70, 74active_uname, 70, 75demote_resource, 75demote_uname, 75inactive_resource, 70, 75inactive_uname, 70, 75master_resource, 75master_uname, 75operation, 70, 74promote_resource, 75promote_uname, 75slave_resource, 75slave_uname, 75

Index
138
start_resource, 70, 75start_uname, 70, 75stop_resource, 70, 75stop_uname, 70, 75type, 70, 74
OCF_RUNNING_MASTER, 74, 107, 107OCF_SUCCESS, 74, 106, 106on-fail, 32
Action Property, 32op-digest, 94
Action Status, 94op-status, 93
Action Status, 93Open Cluster Framework
Resources, 26operation, 48, 48, 70, 74, 93
Action Status, 93Constraint Expression, 48, 48Notification Environment Variable, 70, 74
Operation History, 92Option
admin_epoch, 15batch-limit, 16clone-max, 68clone-node-max, 68cluster-delay, 17Configuration Version, 15dampen, 59epoch, 15failure-timeout, 30globally-unique, 68host_list, 59interleave, 68is-managed, 29master-max, 71master-node-max, 71migration-limit, 17migration-threshold, 30multiple-active, 30multiplier, 59no-quorum-policy, 17notify, 68num_updates, 15ordered, 68pe-error-series-max, 17pe-input-series-max, 17pe-warn-series-max, 17priority, 29remote-clear-port, 55remote-tls-port, 55requires, 29resource-stickiness, 29start-failure-is-fatal, 17stonith-action, 17
stonith-enabled, 17stop-orphan-actions, 17stop-orphan-resources, 17symmetric-cluster, 17target-role, 29validate-with, 15
ordered, 68Clone Option, 68
Ordering, 37first, 37first-action, 73id, 37kind, 38rsc-role, 73then, 37then-action, 73with-rsc-role, 73
Ordering Constraints, 37, 37, 37, 37, 38, 38, 73,73, 73, 73
symmetrical, 38other, 107
PPacemaker
naming, 103pe-error-series-max, 17
Cluster Option, 17pe-input-series-max, 17
Cluster Option, 17pe-warn-series-max, 17
Cluster Option, 17Ping Resource
Optiondampen, 59host_list, 59multiplier, 59
Ping Resource Option, 59, 59, 59priority, 29
Resource Option, 29promote, 106
OCF Action, 106promote_resource, 75
Notification Environment Variable, 75promote_uname, 75
Notification Environment Variable, 75Property
cib-last-written, 16class, 28dc-uuid, 16enabled, 32have-quorum, 16id, 28, 32, 68, 71interval, 32name, 32

139
on-fail, 32provider, 28timeout, 32type, 28
provider, 28Resource, 28
QQuerying
Cluster Option, 17Querying Options, 17queue-time, 93
Action Status, 93
Rrc-code, 93
Action Status, 93Reattach, 115Reattach Upgrade, 115Remote administration, 55Remote connection, 55Remote Connection
Optionremote-clear-port, 55remote-tls-port, 55
Remote Connection Option, 55, 55remote-clear-port, 55
Remote Connection Option, 55remote-tls-port, 55
Remote Connection Option, 55Remove Cluster Node, 21, 21, 22
CMAN, 21Corosync, 21Heartbeat, 22
Replace Cluster Node, 21, 22Corosync, 21Heartbeat, 22
requires, 29Resource, 25, 28, 28, 28, 28
Action, 32class, 25Constraint
Attribute Expression, 47Date Specification, 49Date/Time Expression, 48Duration, 49Rule, 47
Constraints, 35Colocation, 38Location, 35Ordering, 37
Group Propertyid, 66
Heartbeat, 25Location
Determine by Rules, 51Location Relative to other Resources, 38LSB, 26Moving, 56Notification, 45
SMTP, 45SNMP, 45
OCF, 26Option
failure-timeout, 30is-managed, 29migration-threshold, 30multiple-active, 30priority, 29requires, 29resource-stickiness, 29target-role, 29
Propertyclass, 28id, 28provider, 28type, 28
Start Order, 37STONITH, 28System Services, 27Systemd, 27Upstart, 27
Resource Option, 29, 29, 29, 29, 30, 30, 30resource-stickiness, 29
Clones, 69Groups, 67Multi-State, 73Resource Option, 29
Resources, 25, 26, 26, 26, 26, 27, 27, 27, 28, 56Clones, 67Groups, 65Multi-state, 71
Return Code0
OCF_SUCCESS, 1061
OCF_ERR_GENERIC, 1062
OCF_ERR_ARGS, 1073
OCF_ERR_UNIMPLEMENTED, 1074
OCF_ERR_PERM, 1075
OCF_ERR_INSTALLED, 1076
OCF_ERR_CONFIGURED, 107

Index
140
7OCF_NOT_RUNNING, 107
8OCF_RUNNING_MASTER, 107
9OCF_FAILED_MASTER, 107
OCF_ERR_ARGS, 107OCF_ERR_CONFIGURED, 107OCF_ERR_GENERIC, 106OCF_ERR_INSTALLED, 107OCF_ERR_PERM, 107OCF_ERR_UNIMPLEMENTED, 107OCF_FAILED_MASTER, 74, 107OCF_NOT_RUNNING, 74, 107OCF_RUNNING_MASTER, 74, 107OCF_SUCCESS, 74, 106other, 107
role, 47Constraint Rule, 47
Rolling, 115Rolling Upgrade, 115rsc, 36, 39
Colocation Constraints, 39Location Constraints, 36
rsc-role, 73Ordering Constraints, 73
Rule, 47boolean-op, 47Controlling Cluster Options, 53Determine Resource Location, 51role, 47score, 47score-attribute, 47
Sscore, 36, 39, 47
Colocation Constraints, 39Constraint Rule, 47Location Constraints, 36
score-attribute, 47Constraint Rule, 47
SettingCluster Option, 17
Setting Options, 17Setting Options with Rules, 53Shutdown, 115Shutdown Upgrade, 115slave_resource, 75
Notification Environment Variable, 75slave_uname, 75
Notification Environment Variable, 75SMTP, 45SNMP, 45soft, 106
OCF error, 106start, 48, 105
Constraint Expression, 48OCF Action, 105
Start Order, 37start-failure-is-fatal, 17
Cluster Option, 17start_resource, 70, 75
Notification Environment Variable, 70, 75start_uname, 70, 75
Notification Environment Variable, 70, 75Status, 91
call-id, 93crm-debug-origin, 92, 94crmd, 92crm_feature_set, 93exec-time, 93expected, 92ha, 92id, 91, 93interval, 93in_ccm, 92join, 92last-rc-change, 93last-run, 93op-digest, 94op-status, 93operation, 93queue-time, 93rc-code, 93transition-key, 94transition-magic, 94uname, 92
Status of a Node, 91STONITH, 28
Configuration, 87Resources, 28
stonith-action, 17Cluster Option, 17
stonith-enabled, 17Cluster Option, 17
stop, 105OCF Action, 105
stop-orphan-actions, 17Cluster Option, 17
stop-orphan-resources, 17Cluster Option, 17
stop_resource, 70, 75Notification Environment Variable, 70, 75
stop_uname, 70, 75Notification Environment Variable, 70, 75
Switching between Stacks, 115symmetric-cluster, 17
Cluster Option, 17

141
symmetrical, 38Ordering Constraints, 38
Symmetrical Opt-Out, 36Symmetrical Opt-Out Clusters, 36System Service
Resources, 27System Services, 27Systemd, 27
Resources, 27
Ttarget-role, 29
Resource Option, 29then, 37
Ordering Constraints, 37then-action, 73
Ordering Constraints, 73Time Based Expressions, 48timeout, 32
Action Property, 32transition-key, 94
Action Status, 94transition-magic, 94
Action Status, 94type, 28, 48, 70, 74
Constraint Expression, 48Notification Environment Variable, 70, 74Resource, 28
Uuname, 92
Node Status, 92Upgrade
Reattach, 115Rolling, 115Shutdown, 115
Upgrade manually, 121Upgrading, 119Upgrading the Configuration, 119Upstart, 27
Resources, 27
VValidate Configuration, 121Validate XML, 121validate-all, 105
OCF Action, 105validate-with, 15
Cluster Option, 15value, 48
Constraint Expression, 48Verify, 119
Configuration, 119
Wweekdays, 49
Date Specification, 49weeks, 49
Date Specification, 49weekyears, 49
Date Specification, 49with-rsc, 39
Colocation Constraints, 39with-rsc-role, 73
Ordering Constraints, 73
XXML
Convert, 121
Yyeardays, 49
Date Specification, 49years, 49
Date Specification, 49

142