owners manual - Strumenti Musicali
24
D I G I T A L K E Y B O A R D S •English owners manual Prp700 Prp800
-
Upload
khangminh22 -
Category
Documents
-
view
2 -
download
0
Transcript of owners manual - Strumenti Musicali

D I G I T A L K E Y B O A R D S
•English
owners manual Prp700 Prp800

Technical specifi cations are subject to changeThe information contained in this manual is considered correct at the time of printing. Due to our continued R&D effort, Generalmusic reserves the right to change or modify any technical spec i fi ca tion with out prior notice or obligation to upgrade existing units.
IMPORTANT NOTES
IMPORTANT NOTE: To reduce the risk related to the correct and normal use of the instrument, all Generalmusic products are accurately tested in a safety laboratory. DO NOT modify the present unit, the safety standard and the correct instrument operativeness could be com pro mised, and as a further con se quence the warranty will be invalidated.
WARNING SYMBOLS:Generalmusic electronics prod ucts could present la bels sim i lar to these dis played in this section. Please follow ac cu rate ly the pre cau tions described in the safety instructions.
The exclamation mark within an equi lat er al triangle is intended to alert.
The lightning fl ash with arrowhead symbol, within an equi-lateral triangle, is intended to alert the user to the presence of un-insulated “dangerous voltage” within the product’s enclosure that may be of suffi cient magnitude to constitute a risk of electric shock to persons.
PLEASE SAVE THESE INSTRUCTIONS
Generalmusic cannot be held responsible for damage caused by improper use or mod i fi ca tions to the instrument, or for any data lost or destroyed
IMPORTANT SAFETY AND INSTALLATION INSTRUCTIONS
When using any electronic product, basic precautions should always be followed, including the following: 1. Read all the Safety and Installation instructions and explanations of graphic symbols before using the product. 2. This product must be earthed. In the unlikely malfunction or breakdown, grounding provides a path of least resistance for electric current to reduce the risk of electric shock. This product is equipped with a cord having an equipment-grounding conductor and a grounding plug. The plug must be connected to an appropriate outlet that is properly installed and earthed in accordance with all local codes and ordinances. DANGER: Improper connection of the equipment grounding conductor can result in a risk of electric shock. Check with a qualifi ed electrician or service professional if you are in doubt as to whether the product is properly grounded. Do not modify the plug provided with the product. If it will not fi t the outlet, have a proper outlet installed by a qualifi ed electrician. 3. To reduce the risk of injury, close supervision is necessary when this product is used, especially near children. 4. Do not use this product near water for example, near a bathtub, sink, in a wet basement, or near a swimming pool. 5. This product should only be used with the stand that is supplied & recommended by the manufacturer. 6. This product, either alone or in combination with an amplifi er and headphones or speakers, may be capable of producing sound levels that could cause permanent hearing loss. Do not operate for a long period of time at a high volume level, or at a level that is uncomfortable. 7. This product should be installed in a location that provides adequate ventilation. 8. This product should be located away from heat sources such as radiators, heat registers, or other products that produce heat. 9. The product should be connected to a power supply only of the type described in the operating instructions or as marked on the product. 10. For selected markets this product may be equipped with a polarized line plug (one blade wider than the other). This is a safety feature. If you are unable to insert the plug into the outlet, contact an electrician to update your outlet. Do not defeat the safety purpose of the plug. 11. The power-supply cord of the product should be unplugged from the outlet when left unused for a long period of time. When unplugging the power supply cord, do not pull on the cord but grasp it by the plug. 12. Care should be taken so that objects do not fall and liquids are not spilled into the enclosure through openings. 13. The product should only be serviced by qualifi ed service personnel when: A. The power-supply cord or the plug has been damaged B. Objects have fallen, or liquid has been spilled into the product C. The products has been exposed to rain or moisture D. The product does not appear to be operating normally, or exhibits a marked change in performance E. The product has been dropped, or the cabinet damaged. 14. Do not attempt to service the product beyond that described in the user-maintenance instructions. All other servicing should be referred to qualifi ed service personnel. 15. WARNING - Do not place objects on product, the power cord or place it in a position where anyone could trip over, walk on or roll anything over it. Do not allow the product, bench, or its pedal board to rest on or to be installed over power cords of any type. Improper installations of this type create the possibility of fi re hazard and/or personal injury. 16. Electromagnetic interference (RFI). This electronic product utilizes digital sampled wave processing technology (S.W.P.) and physical modeling technology that may adversely affect radio/tv reception. Read the FCC information (inside back) cover for additional information.
INSTRUCTION RELATING TO RISK OF FIRE, ELECTRIC SHOCK, OR INJURY TO PERSONS.
WARNING!

The illustrations and the screens of this manual are for instructional purposes only and may appear different from those on your instrument.
TABLE OF CONTENTSControl panel Page-1Starting instrument Page-2Main volume set up Page-2Connecting headphones Page-2Demo listening Page-2Presets selection Page-3Presets Variation Page-3Layering presets Page-3Layering presets and preset variations Page-4Split the keyboard Page-4BALANCE: Balancing the sounds volume in layer mode Page-4REVERB: Selecting or modifying a reverb in a preset Page-5Edit the reverb send value for a selected preset Page-5EFX: Selecting an effect in a preset Page-6Edit the effect send value for a selected preset Page-6TOUCH: Selecting dynamic curves Page-7Programming a Fix dynamic value Page-7TRANSPOSE: to change the instrument tranposition Page-7METRONOME: playing with a metronome guide Page-8Metronome parameters editing Page-8SONG PLAYER/REC: recording a song Page-9Playback mode Page-9Recording track 2 Page-9Erase the recorded tracks Page-10Erase the entire song Page-10Recording mode: overdub, replace Page-10Recording using the metronome guide Page-10The piano song library Page-11Song selection Page-11Selecting a song from the library using the piano keyboard Page-11Muting music parts in a song from the library Page-11Tempo speed editing in a song from the library Page-11Marker Loop play mode Page-11FUNCTIONS: Prp700/800 functions menu Page-12
F1- Temperaments Page-12F2- Global Tune Page-12F3- MIDI in Page-12F4- MIDI out Page-13F5- MIDI local control Page-13F6- MIDI Transpose Page-13F7- MIDI Filter Page-13F8- Start Up mode Page-14F9- Midi dump Page-14F10- USB port mode Page-14F11- Reverb Page-14F12- EFX Page-15F13- Equalizer Page-15F14- Damper physical model Page-15F15- Decay Envelope Page-15F16- Power Led Page-15
Rear Panel Page-16Preset and variation list Page-16Technical specifi cations Page-16Library song list Page-17Technology Page-18MIDI IMPLEMENTATION CHART Page-19

This manual is valid for both GEM portable Realpiano models: Prp700 and Prp800.
Prp700/800 package content
1 Pedal footswitch
Music Book
AC adapter
Owners Manual
Warranty certifi cate
Gem distributor list

Page1
owners manual Prp700-Prp800
Congratulations and thank you for purchasing a GEM new digital piano Prp700 or Prp800! Whether your a student, enjoy playing for recreation or professionally, these pianos will impress you with there’s musical quality and stylish design, providing years of enjoyment. Utilizing DRAKE™ technology developed in Italy, the pianos produce excellent tonal characteristics which we’re confi dent will continue to impress you for many years to come.
Control panelAll the digital piano functions can be easily controlled from the control panel.
VOLUME SLIDERAdjusts the piano general volume
DEMOStarts the demo se-quence
Sequencer area
METRONOMESwitches the metro-nome ON/OFF
PLAYExecutes a song, from the library or from the sequencer
TRACK 1/2
STOPStops the execution of a song
Selects the tracks to record or to play
RECORD
Enters the instrument in the recording status
LIBRARYEnables the internal song library
SELECT/TEMPO
DISPLAYShows the numeric value of the various parameters
Recalls the parameters in the various control menus and adjust the metronome speed
BALANCE/DATAAdjusts the balance between two sounds in a layer preset, al-lows you to input nu-meric data
FUNCTIONSProvides access to the instrument functions
PRESETSRecalls the piano sound presets
EFXSelects the different effects
SPLITDivides the keyboard in two parts and assigns a suitable bass sound for the left part
TRANSPOSEAllows you to trans-pose the piano global pitch (+/- 12 semi-tones)
VARIATION REVERB TOUCHRecalls the dynamic curves of the instru-ment
Selects the different reverb presets
Selects the presets variations

Page2
owners manual Prp700-Prp800
POWER
Main volume set up
Connecting headphones
• The headphones connection disables the internal speaker system (Prp800 only)• Main volume slider adjusts the headphones volume • The model Prp700 need to be connected to an esternal speaker system (or headphones).
Move the volume slider on the control panel to set the instrument volume. Moving the slider left the volume will be decreased, moving it right it will be increased. Warning! : Excessive volume (especially with headphones connected) can be harmful to your hearing.
In addition to the internal amplifi cation system (Prp800 only), it is possible to connect an headphones to the piano. The headphone inputs is located in the rear panel of the instrument. Using headphones will allow you to play the piano, without causing any disturbance.
Starting instrument
Demo listeningThe piano features 16 demo songs. This is a great way to become familiar with the variety of sounds of the instrument in a short and uncomplicated manner. To start a demo song, simply press the button corresponding to the demo song of your choice. It will begin within two seconds
Connect the instrument power supply to an appropriate AC outlet and switch it on using the ON/OFF button on the rear panel. It is normal for the piano to take a few moments to initialize. The default sound on startup is PIANO1.
Min. Max.
Whenever the DEMO button is pressed the preset selection button leds will start fl ashing. Selecting any of the buttons within 2 sec. The demo song assigned to that button will start.
PIANO2 Demo selection RHOD1 Demo selection
You may stop the Demo at anytime by pressing the demo button again. If no buttons are pressed while the demo song is playing, the entire demo sequence will be played from n.1 PIANO1 to N.16 GUITAR.

Page3
owners manual Prp700-Prp800
Presets selectionThe presets are the timbral (or sound) resource of the Prp700/800 digital pianos. These instruments offers 32 sounds which may be played separately, or in combinations of two. They have been se-lected & optimized with the associated effects and control parameters to provide you with many exciting combinations.
Default preset PIANO1, the button
led is on.
The presets selection is very easy. When you have located the presets selection buttons area on the control panel, just press the sound preset button you want to recall.
Selecting PIANO 2
The selected preset is indicated by an illuminated red led on the button
Presets Variation
Selecting STRINGS2
Each of the piano internal presets features one variation. To recall a preset variation press the but-ton VARIATION on the control panel.
Selecting PIANO 1 variation
Layering presets
The piano allows you to easily create layered sounds (i.e.: piano + strings). To layer sounds, simply press the preset buttons you want to layer simultaneously.
Layering PIANO1 and STRINGS1
Page4
owners manual Prp700-Prp800
DATA
BALANCE
Split the keyboard
BALANCE: Balancing the sounds volume in layer mode
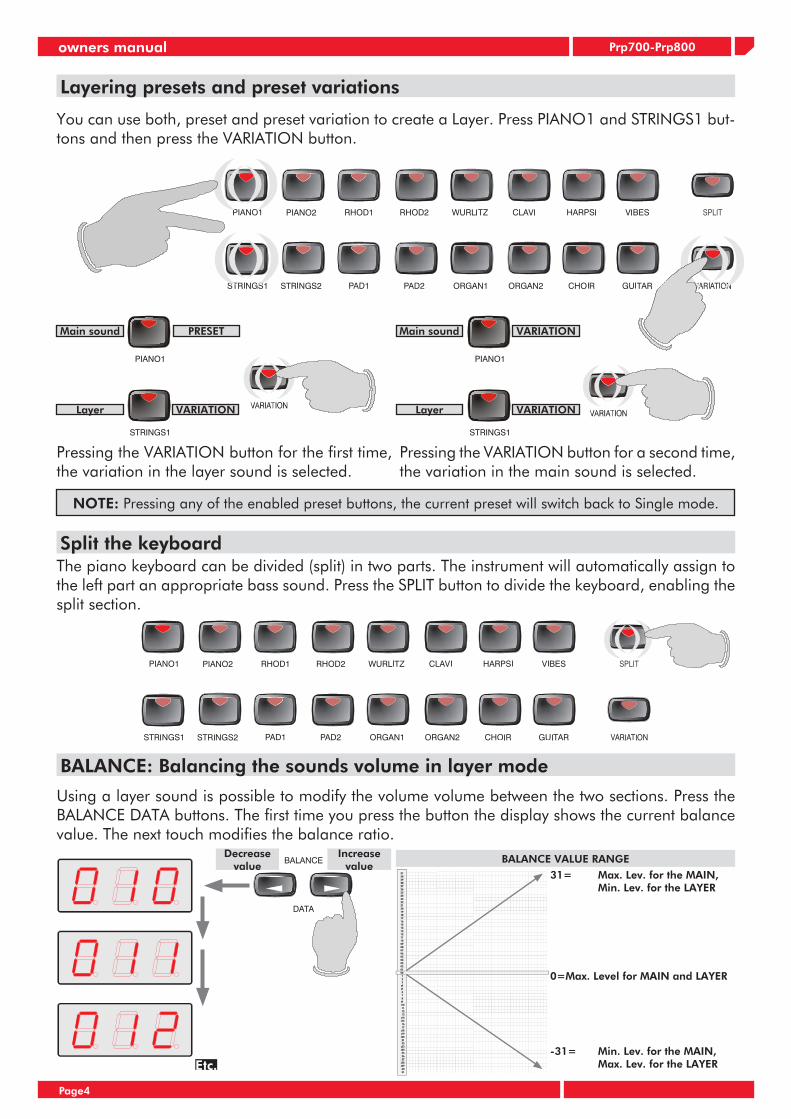
Layering presets and preset variations
You can use both, preset and preset variation to create a Layer. Press PIANO1 and STRINGS1 but-tons and then press the VARIATION button.
Main sound
Layer
PRESET
VARIATION
Pressing the VARIATION button for the fi rst time, the variation in the layer sound is selected.
Main sound
Layer VARIATION
VARIATION
Pressing the VARIATION button for a second time, the variation in the main sound is selected.
The piano keyboard can be divided (split) in two parts. The instrument will automatically assign to the left part an appropriate bass sound. Press the SPLIT button to divide the keyboard, enabling the split section.
Using a layer sound is possible to modify the volume volume between the two sections. Press the BALANCE DATA buttons. The fi rst time you press the button the display shows the current balance value. The next touch modifi es the balance ratio.
Increase value
Decrease value
NOTE: Pressing any of the enabled preset buttons, the current preset will switch back to Single mode.
Etc.
BALANCE VALUE RANGE
0=Max. Level for MAIN and LAYER
31= Max. Lev. for the MAIN, Min. Lev. for the LAYER
-31= Min. Lev. for the MAIN, Max. Lev. for the LAYER

Page5
owners manual Prp700-Prp800
DATA
BALANCE
DATA
BALANCE
REVERB: Selecting or modifying a reverb in a preset
Each of the piano recalled presets includes a reverb. The reverb type selection is indicated by the corresponding led on the panel. Press the reverb button to change the reverb type.
Reverb recalled by the PIANO1
preset .
Reverb OFF (all leds off)
Edit the "reverb send" value for a selected preset
It is possible to customize the default reverb level set from the factory. Keep the REVERB button pressed for more than two seconds. The section leds start fl ashing.
The display enters the reverb send edit mode showing:
At this point press the BALANCE/DATA buttons. The fi rst time you press the button the display shows the current send level value. To modify the value press the button a second time.
ETC.Increase
valueDecrease
value
If you're using a LAYER or SPLIT mode sound, it is possible to change the reverb send for any of the enabled sections. Enter the reverb send edit mode.
Press the SELECT/TEMPO button >. The display switches to the layer section
The editing procedure is the same as in the main sound section.
Pressing again the SELECT/TEMPO button >. The display switches to the split section.
In this way even reverb sends of the split section may be properly adjusted.

Page6
owners manual Prp700-Prp800
DATA
BALANCE
DATA
BALANCE
ETC.
EFX: Selecting an effect in a preset
Each of the piano presets can include an EFX. The effect type selection is notifi ed by the correspond-ing led on the panel. Press the EFX button to change the effect.
The preset PIANO1 has the effect OFF (all leds are off).
Edit the effect send value for a selected presetIt is possible to customize the default effect level set from the factory. Keep the EFX button pressed for more than two seconds. The section leds start fl ashing
The display enters the effect send edit mode showing:
At this point press the BALANCE/DATA button >. The fi rst time you press the button the display will show the current send level value, the next time you press the button, the value will be modifi ed.
Using a LAYER or SPLIT mode sound, is it possible to change the effect sends for any of the enabled sections. Enter in effect send edit mode.
Press the SELECT/TEMPO button >, the display switches to the layer section
The editing procedure is the same as in the main sound section.
Pressing the SELECT/TEMPO button > , the di-splay switches to the split section
In this way the effect send of the split section may be properly adjusted.
Increase value
Decrease value

Page7
owners manual Prp700-Prp800
DATA
BALANCE
DATA
BALANCE
TOUCH: Selecting dynamic curvesThe TOUCH parameter sets the response between the piano keyboard and the sound generator. In this way it is possible to adapt the instrument to the piano technique that best suits your playing style.
The piano default set up recall the NOR-MAL curve.
Programming a Fix dynamic valueSelect fi rst the TOUCH FIX mode
Keep the TOUCH button pressed for more than 2 sec. The three TOUCH leds start fl ashing and the display shows:
No light on
Now by pressing the BALANCE/DATA buttons you can set the dynamic value transmitted by the keyboard.
The fi rst time you press the button, the display shows the current fi x dynamic value,
Increase value
Decrease value
The next time you press the buttons the value is modifi ed.
NORMAL Request a medium action to reach high level dynamics and brilliance.
HARD A strong action is requested to reach high level dynamics and brilliance.
FIX The piano keyboard sends a fi x dynamic value (program-mable from 0 to 127).
SOFT A low action is requested to reach high level dynamics and brilliance of sound.
TRANSPOSE: to change the instruments tranpositionThe global piano transposition can be increased or decreased it by +/-12 .Keep the TRANSPOSE button on the control panel pressed for more than 2 sec. , the corresponding led blinks. The display enters the transpose edit mode.
Increase value
Decrease value
Press the BALANCE/DATA buttons to change the current value. The fi rst time you press the button the display will show the current value (default=0, C=C). The next time you press the buttons the value will be modifi ed.
ETC.
Press the TRANSPOSE button to exit the transpose edit status. The button led stops fl ashing but remains ON, to show the current transposed status of the piano.
Press the TRANSPOSE button again, to quit the transpose, restoring the normal piano status mode.

Page8
owners manual Prp700-Prp800
DATA
BALANCE
DATA
BALANCE
DATA
BALANCE
METRONOME: playing with a metronome guidePress the METRONOME button on the panel to en-able the metronome click. The led of the button will be turned on and the display will show the default metronome (120 BPM), in a range from 20 to 240 BPM.
Press the SELECT/TEMPO buttons to change the current beat value.
Increase value
Decrease value
Press again the METRONOME button to switch off the metronome click. ETC.
Metronome parameters editing
By depressing the METRONOME button pressed for more than 2 sec. the piano will enter the met-ronome parameters editing menu. The display shows the fi rst parameter: TIME SIGNATURE. Select the BALANCE/DATA button to set the time metrical subdivision you need.
The led blink in sync with the metronome
4/4 default value
Display Sign.2-4 2/43-4 3/4 4-4 4/4 5-4 5/4 6-4 6/4 7-4 7/43-8 3/8 6-8 6/89-8 9/8128 12/82-2 2/23-2 3/24-2 4/2
Selectable values
Press again the SELECT/TEMPO button to select the next parameter: ACCENT. Enable/disable the metronome accent by pressing the BALANCE/DATA buttons.
Default volume value
Increase value
Decrease value
Failing to select any button for about 5 sec. will signal the piano to automatically exit the edit menu.
ETC.
Press again the SELECT/TEMPO button to select the next parameter: metronome VOLUME. The metronome volume can be set in a range from 0 to 127.

Page9
owners manual Prp700-Prp800
SONG PLAYER/REC: recording a songThis section allows you to easily record and playback your performances using the digital piano presets
Press the RECORD button to prepare recording.
The STOP/PAUSE, TRACK1 and REC buttons led will begin to fl ash. The instrument is now ready to start recording on track num.1. At this point you can select any of the piano sound preset and play.Press the PLAY button to start recording.
The display shows the bar numbers, while the dots start blinking as a reference guide.
The recorder will record all of the events includ-ing playing the actual keys on the keyboard, the pedals, and changing the presets. Press the button STOP to stop recording. Then press PLAY to listen to your recording.
Recording the Track 2Once you have recorded the track number 1 using any of the piano's presets, it is possible to select another preset on track number 2. This is ideal for left & right hand piano practice.Once you have recorded on track 1, press the RECORD button again.
The track 2 button led fl ashes notifying the "ready to record" status of the track. The track 1 led is on, advising that the track is already recorded.Press the PLAY button to start recording the second track. During the recording you will hear the part already recorded on track 1
Press the button STOP to stop recording.
Current beat num-
ber
Next press the PLAY button, to listen to the play-back of both tracks.
the led stops fl ashing
During the playback, each track can be enabled or disabled by simply pressing the corresponding track button.Track PLAY Ena-
bled : led ONTrack PLAY Disa-
bled : led OFF
Playback modeOnce a track is already recorded in the sequencer, two Play/Stop modes are possible.
Song PLAY Press STOP once , the button led will begin to start fl ashing
Now press PLAY, the playback will begin from the same point where the song was stopped (Continue mode)
Led ON
Song PLAY Press STOP twice, the button led goes OFF
Now press PLAY, the playback starts from the begin of the song (Go to Start mode).
1
2

Page10
owners manual Prp700-Prp800
DATA
BALANCE
DATA
BALANCE
DATA
BALANCE
Erase the recorded tracks
Erase the entire song
Recording using the metronome guide
The piano sequencer enables you to erase a recorded track. Keep pressed for more than 2 sec. the track button you wish to delete. The display shows CLR (clear). Press the BALANCE/DATA buttons to confi rm.
Recording mode: overdub, replace
Keep pressed for more than 2 sec. the REC button to delete the entire song memory. The display shows RCA (Record Clear All), press the BALANCE/DATA buttons to confi rm the request.
The piano sequencer features two recording modes: overdub and replace. In overdub mode the new performance will be added to the existing song. In replace mode, the new song substitutes the existing one. The two modes can be set separately for each track. (i.e: TRACK1 overdub mode, TRACK2 replace mode or vice versa).
The fi rst menu parameter will appear, the display shows:
Now press the SELECT/TEMPO buttons, to select the recording mode menu.
The display enters the new screen showing:
REPLACE MODE
OVERDUB MODE
Now press the SELECT/TEMPO buttons again. The display shows the current recording mode:
Press BALANCE/DATA buttons to select overdub or replace mode.
REPLACE MODE
OVERDUB MODE
Display confi rm message
Display confi rm message
With the sequencer it is possible to record a song using a proper metronome guide. Set up the metronome parameter as already explained in the previous chapter, TIME SIGNATURE, ACCENT, VOLUME, SPEED. When these correspond to your needs, press the REC button on the control panel. They will be automatically memorized in the sequencer.
NOTE: Once the TIME SIGNATURE parameter is stored in the sequencer it is not be possible to change the setting.
Keep pressed for more than 2 sec. the track button where you want to modify the recording mode.

Page11
owners manual Prp700-Prp800
DATA
BALANCE
DATA
BALANCE
DATA
BALANCE
Marker Loop play mode
The piano song libraryThe piano sequencer featuring an internal piano library containing 50 popular piano songs is a useful learning and training tool.
Song selectionPress BALANCE DATA buttons to select another song. The display shows the song number you have selected.
NOTE: The entire song library is listed at the end of this manual. A piano score book is also included with the instrument with our compliments! Once a song has been selected press PLAY to execute.
Selecting a song from the library using the piano keyboard
Muting music part in a song from the library
The piano keyboard can be used to select any of the internal library songs, instead of using the selection buttons. Press the LIBRARY button to enter in the library mode. Press a key on the keyboard to start song.
NOTE: please refer to the complete library song title list at the end of this owner's manual.
Each of the songs in the library has been accurately performed separating the music parts played by the left and the right hands. In this way you can study each piece in a very accurate and effective way. Note that playing any of these songs the TRACK buttons leds are ON, this means that both tracks are employed.
Tempo speed editing in a song from the library
LEFT HAND disabling: press the TRACK 1 button, the led goes OFF
RIGHT HAND disabling: press the TRACK 2 button, the led goes OFF
While playing a song from the library it is possible to enable the metronome and to adjust its speed. This may assist you to analyze and study any piece of music at a tempo that you are comfortable with
Enable library Play a song Enable metronome Adjust tempo speed
During the song playback it is possible to set “on the fl y” two marker points (A and B). The sequencer will automatically loop between these two points. Press the STOP button two times to exit the loop mode.
MARKER "A" setting: Press the DATA - button keeping the PLAY button
pressed
MARKER "A"
MARKER "B" setting: Press the DATA + button keeping the PLAY button
pressed
MARKER "B"
The marker loop mode works also with a user song recorded in the sequencer.
By pressing the LIBRARY button on the panel, the piano will enter into the library mode.
The LIBRARY button led will be illuminated and the display will show the song library #1. Press the PLAY button to start this song.

Page12
owners manual Prp700-Prp800
DATA
BALANCE
DATA
BALANCE
DATA
BALANCE
DATA
BALANCE
FUNCTIONS: piano functions menu
Functions Function Lev. 2 Function Lev. 3 parameter range
F1 TemperamentsEqual, Piano 1, Piano 2, Meantone, Kirnberger, Tartini Vallotti
F2 Global tune - - from 427 to 452 Hz.F3 Midi In from 1 to 16, common - from 1 to 16 ,offF4 Midi Out from 1 to 16, common - from 1 to 16 ,offF5 Midi Local On/OffF6 Midi In Transpose - - On/OffF7 Midi Out Filters - - Off(0)/PrgChg(1)/CtrChg(2)/Both(3)F8 StartUp Mode -. - Factory/UserF9 Midi Dump - - Press data button to start MIDI dumpF10 USB PC mode - - PC1, PC2F11 Reverb (1) rev type Depth, Time, PredelayF12 Efx (1) efx type Depth, Par. 1, Par. 2F13 Equalizer On/OffF14 Damper Phys. Mod. On/Off F15 Decay Env. On/OffF16 Power Led On/Off
The piano functions menu allows you to fi ne adjust the instrument to different operating situations.
F2- Global TuneThis function allows you to fi ne adjust the piano's pitch.
+-
Press the Functions button
Pressing the DATA button the display shows the current tune value (standard pitch A=440 by
default).
Edit the value using BALANCE DATA
buttons, from 427 to 452 Hz.
F1- TemperamentsThis function allows you to select different temperaments
Press Functions button Select F1 using SELECT/TEMPO buttons
Pressing the DATA button the display shows the current temperament value (Equal by default). Edit the value using
the DATA buttons.
01 Equal02 Piano 103 Piano 204 Meantone05 Kirnberger
06Tartini Vallotti
F3- MIDI inThis function allows you to edit the piano MIDI IN confi guration.
Press the Functions button
Select F3 using the SELECT/TEMPO
buttons
The Functions button starts
blinking
Press the button again
Select a section using the SELECT TEMPO
buttons
MAIN
LAYER
SPLIT
COMMON
Edit MIDI channel number using the DATA
buttons
VALUE: From 1 - 16 to OFF
DISPLAY
Select F2 using SELECT/TEMPO buttons

Page13
owners manual Prp700-Prp800
DATA
BALANCE
DATA
BALANCE
DATA
BALANCE
DATA
BALANCE
F4- MIDI outThis function allows you to edit the MIDI OUT confi gurations of the piano.
Press the Functions button
Select F4 using the SELECT/
TEMPO buttons
Functions button starts
fl ashing
Press the button again
Select a section using the SELECT TEMPO buttons
MAIN
LAYER
SPLIT
COMMON
Edit MIDI channel number using the DATA
buttons
VALUE: From 1 - 16 to OFF
DISPLAY
SEQUENCER TRACK1
MAIN
LAYER
SPLIT
REALTIME SECTIONS
SEQUENCER TRACK2
MAIN
LAYER
SPLIT
F5- MIDI local controlThis function allows you to properly connect the piano to a computer MIDI network.
Press the Functions button
Select F5 using the SELECT/TEMPO buttons
Pressing the DATA button the display shows the current value (ON by default).
Set OFF using the DATA buttons.
F6- MIDI TransposeThis function allows you to edit the transmitted and/or receive MIDI note data.
Press the Functions button
Select F6 using the SELECT/TEMPO buttons
Pressing the DATA button the display shows the current value (OFF by default).
Set ON using the DATA buttons.
F7- MIDI FilterIf you are using the piano to control other instruments connected via MIDI, it may be necessary to fi lter the Control and Program change messages from the MIDI transmission.
Press the Functions button
Select F7 using the SELECT/TEMPO buttons
Pressing the DATA button the display shows the current value (OFF by default).
Set the fi lter type using the DATA buttons.
01 Program Chng.02 Control Chng.03 Program+Control

Page14
owners manual Prp700-Prp800
DATA
BALANCE
DATA
BALANCE
DATA
BALANCE
DATA
BALANCE
F8- Start Up mode
With this menu you can decide if the default start set up of the piano will be factory set or user set.
Press the Functions button
Select F8 using the SELECT/TEMPO buttons
Pressing the DATA button the display shows the current value (FACTORY by default).
Change the start up mode using the DATA
buttons.
F9- Midi dumpThis function allows you to save to an external MIDI sequencer the song data recorded by you in the piano.
Press the Functions button
Select F9 using the SELECT/TEMPO buttons
Pressing the DATA + button the Midi data bulk will start. The display will show a countdown until the data transmission is over.
F10- USB port mode
This menu sets the piano USB port mode: Pc1, Pc2.
Press the Functions button
Select F10 using the SELECT/TEMPO buttons
Pressing the DATA + button the display shows the current value (PC2 by default).
Change mode using the DATA +/-
buttons.
F11- ReverbThis menu allows you to edit the different reverb type parameters.
Press the functions button
Select F11 using the SELECT/TEMPO buttons
The function button fl ashes Press again
The display shows the current effect selected for editing (ROOM by default)
ROOM HALL 1
HALL 2
STAGE
Select reverb type using the SELECT buttonsThe functions
button fl ashesPress again
Select the parameter to edit using the SELECT
buttons
DEPTH
TIME
PREDELAYEdit parameter
value using the DATA +/-
buttons
VALUE RANGE

Page15
owners manual Prp700-Prp800
DATA
BALANCE
DATA
BALANCE
DATA
BALANCE
DATA
BALANCE
DATA
BALANCE
F13- EqualizerThis menu turns ON or OFF the piano internal equalizer.
Press the functions button
Select F13 using the SELECT/TEMPO buttons
Pressing the DATA button the display shows the current value (ON by default).
Set OFF using the DATA buttons.
F14- Damper physical modelThis menu enables or disables the piano internal Damper Physical Modeling.
Press the functions button
Select F14 using the SELECT/TEMPO buttons
Pressing the DATA button the display shows the current value (ON by default).
Set OFF using the DATA buttons.
F12- EFXThis menu allows you to edit the different effect type parameters.
Press the function button
Select F12 using the SELECT/TEMPO buttons
The function button fl ashes
Press againThe display shows the current effect selected
for editing (CHORUS by default)
CHORUS PHASER
TREMOLO
DELAY
Select effect type using the SELECT buttonsFunction button
fl ashesPress again
Select the parameter to edit using the SELECT
buttons
DEPTH
PARAM1
PARAM2
Edit the parameter value using DATA +/-
buttons
VALUE RANGE
F15- Decay Env.This new function enables you to select two different modes for the damper pedal for the decay of strings, pads, organs etc. sounds. If using dual sounds (piano+strings) for example, you can select DECAY ENV. ON (which is the factory default), allowing the non piano sound to decay at a pre de-termined decay envelope. By turning this feature to OFF, the Strings, (Pads, Organ etc.) will remain “held” until you release the damper pedal.
Press the functions button
Select F15 using the SELECT/TEMPO buttons
Pressing the DATA button the display shows the current value (ON by default).
Set OFF using the DATA buttons.
F16- Power LEDSet ON or OFF the power LED located under the piano music rack
Press the functions button
Select F16 using the SELECT/TEMPO buttons
Pressing the DATA button you can switch ON (default) or OFF the power led lighting
Selecting the DEMO button on the panel the
Power LED will be set ON

Page16
owners manual Prp700-Prp800
OUTPUT INPUT PEDALS
DAMPER PED2 PED1
MIDI USB PHONE POWERDC IN
Prg. # PRESET Prg. # VARIATION Prg. # SPLIT1 9’ Steinway® stereo 17 Stereo grand piano 3 65 Acoustic bass2 10’ Fazioli® stereo 18 Stereo grand piano 4 66 Electric bass3 Reference Rhodes® 19 Excited Rhodes® 67 Bass & Ride4 Steely Rhodes® 20 Thin Rhodes®5 Pop Wurlitzer® 21 Rock Wurlitzer®6 Clavinet® model 1 22 Clavinet model 27 Harpsichord 8’ 23 Harpsichord 8’+4’8 Vibraphone 24 Marimba9 Strings stereo 25 Strings mono10 Slow strings stereo 26 Slow strings mono11 Mellow pad 27 Warm pad12 Warm dream stereo 28 Brite dream13 Jazz organ 29 Theatre organ14 Pipe organ 30 Church organ15 Choir 31 Choir mix16 NylonGt 32 Steel guitar
PRESET AND VARIATION LIST
REAR PANEL
USB serial connection
Connect the instrument to an external speaker
system
Connect an instrument to the internal speaker
system
Socket to connect the pedals (see notes*)
Standard MIDI connec-tion
Technical Specifi cations
The trademarks above are the property of their respective owners.
keyboard 88 keys with graded hammer action
polyphony 80 notes max.
sounds 32 presets, (stereo/mono pcm samples, physical modelling sounds), with variation
operating mode single, split (progr.), layer
controls volume, demo, metronome, play, stop, track 1, track 2, rec, library, select/tempo, balance/data, functions, transpose, preset selection, split, variation, reverb, efx, touch (3 dynamic curves + fi x mode), temperament, global tune, Midi menu (receive/transmit channel progr., local control, Midi transpose, Midi fi lter, Midi dump), pc port mode, start up mode, reverb edit, efx edit, equalizer on/off, damper physical model on/off, decay env., power led
technology Stereo Damper Physical Model, Natural String Resonance, Advanced Release Technology, Filter Algorithm Dynamic Emulation
digital effects 4 reverbs and 4 effects, assignable with separate sends
Sequencer 2 tracks, 20.000 events, metronome, piano song library (50 songs), music book included
display led 3 digits
connections stereo in/out, damper, ped1, ped2, midi in/out/thru, USB, headphones, DC In
cabinet portable cabinet, silver fi nished, optional stand
amplifi cation 8W + 8W (Prp800 only)
dimensions (l x h x d) Prp700 1.300 x 280 x 140 mm/51 x 11 x 5,5'' Prp800 1.300 x 340 x 120 mm/51 x 13 x 4,7''
weight Prp700 18 Kg./39,6 lbs Prp800 20kg./44 lbs
Note 1: As you can see it is possible to connect to the instrument the three piano standard pedals: DAMPER SOFT, SOSTENUTO. The instru-ment package include the damper pedal only (single unit). To connect the three pedals simultaneously you have to purchase the optional Prp three pedal unit, prod. code 970418.
Note 2: the pedal connection socket has an auto detection system for pedal recognizing, this allow you to use both NORMALLY OPEN or NORMALLY CLOSED pedal switches.
Note 3: the "HALF PEDAl" piano features it is only allowed by purchasing and installing the optional 970418 three pedal unit, thanks to the special graded damper pedal installed in this device.
Headphone input
Power supply con-
nection
instrument Power On/Off

Page17
owners manual Prp700-Prp800
LIBRARY SONGS LIST
1. Menuet #1 J.S.Bach 2. Menuet #2 J.S.Bach 3. Menuet #3 J.S.Bach 4. Musette J.S.Bach 5. March J.S.Bach 6. Invention #1 J.S.Bach 7. Preludium #1in C maj (WTK 1) J.S.Bach 8. Preludium in C min J.S.Bach 9. Invention #4 J.S.Bach 10. Sonatina op.36 n.1 - Allegro M.Clementi11. Sonatina op.36 n.1 - Andante M.Clementi12. Sonatina op.36 n.1 - Vivace M.Clementi13. Sonatina op.36 n.2 - Allegretto M.Clementi14. Sonatina op.36 n.2 - Allegretto M.Clementi15. Sonatina op.36 n.2 - Allegro M.Clementi16. Sonatina op.36 n.3 - Spiritoso M.Clementi17. Sonatina op.36 n.3 - Un poco adagio M.Clementi18. Sonatina op.36 n.3 - Allegro M.Clementi19. Sonatina op.36 n.4 - Con spirito M.Clementi20. Sonatina op.36 n.4 - Andante M.Clementi21. Sonatina op.36 n.4 - Allegro vivace M.Clementi22. Sonatina op.36 n.5 - Presto M.Clementi23. Sonatina op.36 n.5 - Allegro moderato M.Clementi24. Sonatina op.36 n.5 - Allegro molto M.Clementi25. Sonatina op.36 n.6 - Allegro con spirito M.Clementi26. Sonatina op.36 n.6 - Allegro spiritoso M.Clementi27. Sonata n.15 K545 - Allegro W.A.Mozart28. Sonata n.15 K545 - Andante W.A.Mozart29. Sonata n.15 K545 - Rondò W.A.Mozart30. Rondò alla Turca - Allegretto W.A.Mozart31. Fur Elise - Poco moto L.V.Beethoven32. Sonata n.14 “Moonlight”- 1. Adagio L.V.Beethoven33. Sonata n.8 “Pathétique”- 2. Adagio L.V.Beethoven34. Prelude n.20 in C min F.F.Chopin 35. Valse op.69 n.1 F.F.Chopin 36. Valse op.64 n.2 F.F.Chopin 37. Nocturne op.9 n.2 F.F.Chopin 38. Davidsbundlertanze n.14 R.Schumann 39. Clair de lune C.A.Debussy 40. Doctor Gradus ad Parnassum C.A.Debussy 41. Golliwogg’s cake-walk C.A.Debussy 42. 1ere Gymnopédie E.Satie 43. 2éme Gymnopédie E.Satie 44. 3me Gymnopédie E.Satie 45. The Entertainer S.Joplin 46. Maple leaf rag S.Joplin Appendix47. Anatole G.Giudici 48. Petit Statues G.Giudici49. A minha saudade G.Giudici50. My gospel G.Giudici

Page18
owners manual Prp700-Prp800
TECHNOLOGYThe Prp700-800 digital pianos are powered by an advanced technology called DRAKE. DRAKE (Dsp-Risc-Advanced-Keyboard-Engine) we feel is the most advanced musical dsp in the world. It's 32-bit and 50-MIPS internal structure along with a totally programmable software architecture makes this processor so fast and powerful that any kind of algorithm, from Wavetable to Physical Modeling can be implemented in real time, either in generation or in post-processing. Using the Physical Modelling power offered by DRAKE, a number of new algorithms which replicate some of the world’s most famous vintage instruments like Rhodes™, Wurlitzer™ and Clavinet™ has been created. DRAKE has found unanimous, enthusiastic appraisal from many experts in these fi elds along with professional musicians around the globe.
Reproduction of the complex harmonic and dynamic changes which take place as you increase or de crease the velocity of a key-strike on a piano have always presented a serious problem for traditional sam ple-playback tech nol o gy. The only practical way to re pli ca te these changes has been to select three or four distinctly dif fer ent levels and switch between these according to the velocity with which the key is struck. This produces the unnatural effect of having clearly audible steps between different velocity levels, further diminishing the authenticity of the sound reproduction. Unlike the velocity-switching meth ods used in other elec tron ic pianos, unique FADE technology utilizes only one specially confi gured sound source per note. At the heart of the FADE engine is a extensive database which can provides the precise harmonic content of any note played at any velocity level. Whenever a note is played, the FADE engine analyzes the velocity of the key-strike and constructs, in real-time, a model of the nec es sary har mon ic con tent for that particular note played at that velocity. The note’s sound source is pro cessed by the FADE engine with appropriate harmonic content being added or subtracted ac cord ing ly. In practice, FADE tech nol o gy provides seamless transition from pianissimo all the way through to for tis si mo for each note without any audible switching.
Physical Modeling
Physical Modeling is a method of sound synthesis based upon a mathematical model which de scribes the physical construction of the instrument being simulated. Unlike sampling technology, in which an existing sound is simply recorded at a particular moment in time, (to remain the same for ev er), the sounds produced by a Physical Model continuously react and respond to the player’s input, maintaining all the small nuances and im per fec tions which produce the most reliable subconscious as sur ance that the in stru ment being played is the real thing. A sampled sound can be likened to a “snapshot” of a particular mo ment in time during which an instrument is being played. It’s like taking a photograph. The goal of Phys i cal Mod el ing is instead of recording the fi nal audible product of a in stru ment like an electric piano, we replicate all the elements which are incorporated into its con struc tion. If the physical model is constructed carefully and accurately with meticulous attention to detail, the re sult ing sound should be ex act ly like the real thing and, more importantly, the experience of playing and interacting with the in stru ment should be similarly convincing. In the Prp700-Prp800, all the acoustic piano sounds are created by combining sample playback with Natural String Resonance, Damper Phys i cal Model, Ad vanced Re lease and FADE tech nol o gies, (described below). Other instruments such as RHODES, WURLI and CLAVINET are created using pure Physical Modeling.
This physical modeling technology, allows all of the complex harmonics normally produced by a piano’s sound board to be faithfully re pro duced. This means that a note’s individual sound will always be slightly different depending upon which other notes are currently being held, (and consequently which strings are un-damped and free to resonate in sym pa thy with the note played). If you hold down a low C and let the note decay, the strings for that note are still un-damped for as long as the key remains depressed. If you now strike another C higher up the keyboard, (stac ca to), you will hear the sympathetic resonance of the low C strings in response to the new note played. This natural effect replicates exactly what hap pens inside a grand piano. If you experiment with different combinations of notes you will hear harmonic colors particular to each. Because this effect is produced by physical modeling and not by samples or DSP effects, the result is a musically and technically ac cu ra te simulation of a piano’s sound board and virtually infi nite combinations of har mon ics can be produced.
Another technology is the Damper Physical Model. Whenever the damper pedal is depressed, the damper physical model simulates the effect of sym pa thet ic resonance being produced by the strings which the action of the pedal has now left free to res o nate. Use the damper pedal to hear the effect of the Damper Phys i cal Model by comparing the sounds of notes played in the highest octave of the in stru ment with and with out the damper pedal de pressed.
The particular sound of a piano string being stopped by a damper while in motion is replicated by the unique Ad vanced Release Technology. Sample based electronic pi anos traditionally use a en ve lope generator to control what happens when a key is released. This easily allows the sample loop to continue playing for a set period of time until its amplitude is fi nally reduced to zero by the envelope generator. In an acoustic piano, vibrating strings are silenced when a felt damper comes into contact with the moving string. When this happens, depending on how hard the key was struck and the length of the string itself, certain frequencies are damped earlier than others while some other frequencies are even accentuated, (anyone who ever studied how to produce harmonics on a guitar will recognize this principle). This produces a distinctive harmonic “ring” as the different fre quen cies in the string’s tone dis si pa te through out the piano sound board. This Advanced Release Tech nol o gy in the Prp700-Prp800 simulates this phe nom e na with complete accuracy throughout the 88 note range.
Natural String Resonance
Damper Physical Model
Advanced Release Technology
FADE - Filter Algorithm Dynamic Emulation

Page19
owners manual Prp700-Prp800
Function Transmitted Recognized Remarks
BasicChannel
DefaultChanged
1 – 161 – 16
1 – 161 – 16
There are up to 3 Basic Channels and an Extra Common Channel
ModeDefaultMessagesAltered
Mode 3X
*************
Mode 3XX
NoteNumber True voice
0 – 127*************
0 – 1270 – 127
VelocityNote OnNote Off
OO
OO
AlterTouch
Key’sChannel
XX
XX
Pitch Bend X O
Control Change
0, 32(m) Bank Select
7(m) Volume11(m) Expression64(m) Damper66(m) Sostenuto67(m) Soft Pedal74(m) Filter Cutoff91(m) Send to Rev93(m) Send to Efx
0, 32(c) Bank Select7(c) Master Volume16, 48(c) Rev/Efx Select17, 49(c) Rev/Efx param118, 50(c) Rev/Efx param291(c) Rev Depth93(c) Efx Depth
0, 32(m) Bank Select1(m) Modulation Wheel7(m) Volume11(m) Expression64(m) Damper66(m) Sostenuto67(m) Soft Pedal74(m) Filter Cutoff91(m) Send to Rev93(m) Send to Efx
0, 32(c) Bank Select7(c) Master Volume16, 48(c) Rev/Efx Select17, 49(c) Rev/Efx param118, 50(c) Rev/Efx param291(c) Rev Depth93(c) Efx Depth
Modulation Wheel, Damper, Sostenuto and Soft Pedal on Common Channel are equal at Modulation Wheel, Damper, Sostenuto and Soft Pedal on all open Basic Channels
CtrlChg16 value: 0 = Reverb, 1 = EfxCtrlChg48 value: 1- 4 number Reverb / Efx
CtrlChg17 value: 0 = Reverb, 1 = EfxCtrlChg49 value: 0 – 127 Delay / Param 1
CtrlChg18 value: 0 = Reverb, 1 = EfxCtrlChg50 value: 0 – 127 Time / Param 2
Program Change
True Number
1 - 65(m) or 0 - 32(c)
*************
1 - 65(m) or 0 - 32(c)
1 – 65(m)
Program Change on a Basic Channel represents a change of sound, while a Program Change on the Common channel represents a change of performance
System Exclusive
O O Only Midi Dump
System Common
Song PositionSong SelectTune Request
XXX
XXX
SystemReal Time
ClockCommands
OO
OO
AuxMessages
All Sound OffReset All ContrLocal On/OffAll Notes OffActive SensingSystem Reset
XOXOOX
OOXOOX
Notes(m) one of Basic Channels(c) Common Channel
Mode 1: Omni On, PolyMode 3: Omni Off, Poly
Mode 2: Omni On, MonoMode 4: Omni Off, Mono
O : YesX : No
Models: Prp700/800
MIDI IMPLEMENTATION CHART
Technical specifi cations are subject to change
Version 1.0

STOCK CODE 271429Specifi cations are subject to change without prior notice.
PRINTED IN CHINA
Generalmusic S.p.A. Via delle Rose, 12
47842 S.Giovanni in Marignano (RN) - Italy
Tel. +39 0541 959511Fax +39 0541 957404 www.generalmusic.com