
Owner's Manual - Eagle
102
-
Upload
khangminh22 -
Category
Documents
-
view
0 -
download
0
Transcript of Owner's Manual - Eagle


Owner’s Manual
2
MANUAL PRESENTATION
EQUIPMENT MANUAL (OPERATING INSTRUCTIONS) Technical Name: Radiographic images scanner Business Name: EAGLE.PS Model: EAGLE.PS Brand: DABI ATLANTE
Supplier / Manufacturer:
Alliage S/A Indústrias Médico Odontológica Rod. Abrão Assed, Km 53+450m - Cx. Postal 782 CEP 14097- 500 Ribeirão Preto - S.P. - Brasil Telephone +55 (16) 2102-5000 - Fax +55 (16) 2102-5001 CNPJ: 55.979.736.0001/45
Technical Manager: Ricardo J. Ravaneli CREA-SP: 5060714523
ANVISA Register Nº: 10101139027
ATTENTION For more Safety: Read and understand all instructions contained in these operating instructions before installing or operating this equipment. Note: These operating instructions shall be read by all operators of this equipment.
Radiographic image scanner EAGLE.PS
3
INDEX 02 MANUAL PRESENTATION
04 EQUIPMENT IDENTIFICATION
04 Equipment Indication 04 Equipment Purpose 05 Principles and grounds applied to the operation of the product 05 Equipment Description
06 MODULES, ACCESSORIES, OPTIONALS AND CONSUMER MATERIALS
09 TECHNICAL SPECIFICATIONS
10 Packaging symbology 10 Product Symbology
12 EQUIPMENT INSTALLATION
17 EQUIPMENT OPERATION
71 CAUTIONS, RESTRICTIONS AND WARNINGS 71 Recommendations for equipment conservation 71 Transport, storage and operation conditions 71 Sensitivity to predictable environmental conditions under normal use 71 Cautions and Attention “during equipment installation” 72 Cautions and Attention “during equipment use” 72 Cautions and Attention “after” equipment use 72 Cautions and Attention during "cleaning and disinfection" of the equipment 73 Cautions in case of changes to equipment operation 73 Cautions to be adopted against predictable or unusual risks related to the deactivation and abandonment of equipment
73 CONSERVATION AND PREVENTIVE AND CORRECTIVE MAINTENANCE
73 Additional procedures for reuse 73 General cleaning 74 Disinfection 74 Preventive maintenance 74 Corrective maintenance
75 UNFORESEEN‐ TROUBLESHOOTING
91 EQUIPMENT WARRANTY
91 FINAL CONSIDERATIONS
92 APPENDIX A– WIA (WINDOWS IMAGE AQUISITION)
96 APPENDIX B – WINDOWS FIREWALL CONFIGURATION – SERVER MODE
Owner’s Manual
4
EQUIPMENT IDENTIFICATION Dear customer
Congratulations for your excellent choice. While purchasing "DABI ATLANTE" quality equipment, you can be sure you have Retrieved technology products compatible with the world’s best product in its class. This manual gives you an overview of your equipment. It describes important details that can guide you in its correct use, as well as in the solution of small problems that may occur. We advise you to read it completely and keep it for future reference.
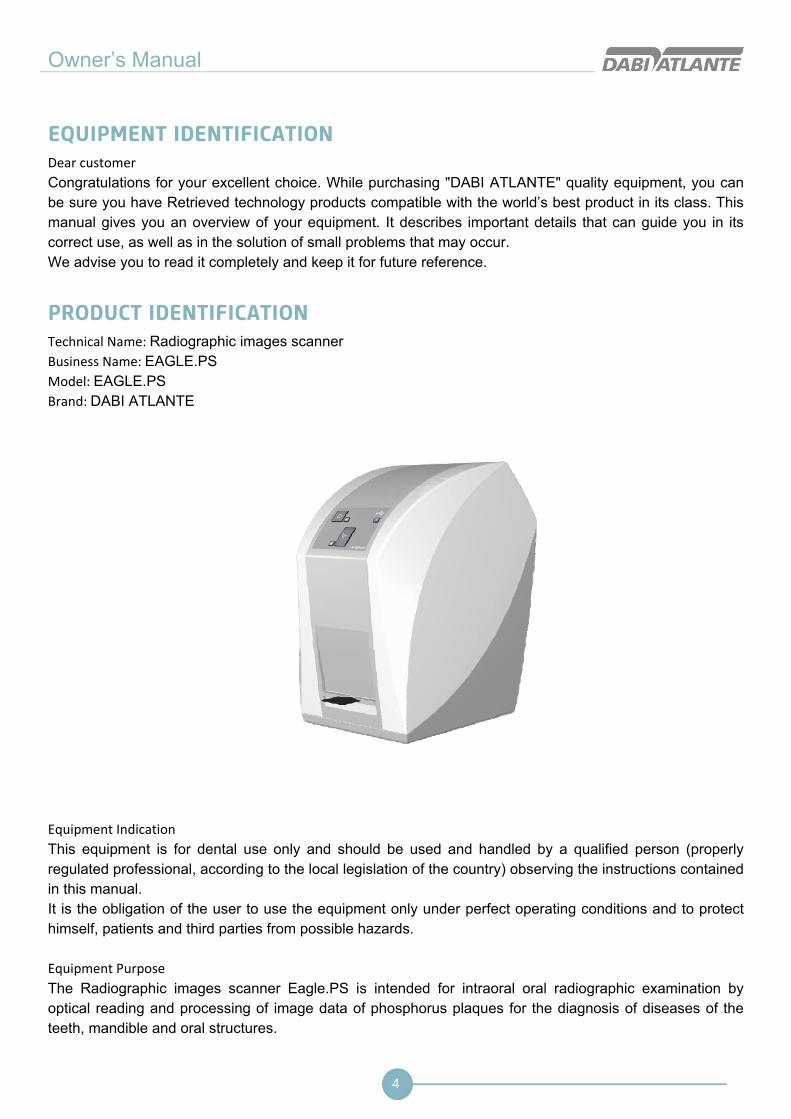
PRODUCT IDENTIFICATION Technical Name: Radiographic images scanner Business Name: EAGLE.PS Model: EAGLE.PS Brand: DABI ATLANTE
Equipment Indication
This equipment is for dental use only and should be used and handled by a qualified person (properly regulated professional, according to the local legislation of the country) observing the instructions contained in this manual. It is the obligation of the user to use the equipment only under perfect operating conditions and to protect himself, patients and third parties from possible hazards.
Equipment Purpose
The Radiographic images scanner Eagle.PS is intended for intraoral oral radiographic examination by optical reading and processing of image data of phosphorus plaques for the diagnosis of diseases of the teeth, mandible and oral structures.
Radiographic image scanner EAGLE.PS
5
EQUIPMENT IDENTIFICATION Principles and grounds applied to the operation of the product
The Radiographic images scanner Eagle.PS operates as a scanner, converting the image data stored on the phosphorous plate into a digital radiographic image. The retrieval process is performed by positioning the phosphorous plate in the inner part of the mouth, behind the structure to be to examined. The structure should be exposed to a dose of x-rays using an external source. Once exposed, the phosphorous plate should be inserted into the input compartment of the equipment to read the image data. Dental imaging software performs the interface between the Eagle.PS system and the user, allowing to view, enhance, store, send, print, among other functions.
Equipment description
The Radiographic images scanner Eagle PS, provides high resolution images that meet all Diagnosis needs Compact design, easy to handle, ideal for dental offices (General practice). Body injected in polycarbonate with anti-UV protection, which provides greater safety, resistance and durability to the set. Eagle.PS is compatible with any X-ray machine. Reusable and inexpensive replacement phosphorous plates, available in 4 formats (adult and child).

Owner’s Manual
6
MODULES, ACCESSORIES, OPTIONALS AND CONSUMER MATERIALS The contents of this page is for information, thus, the equipment may be different from the one illustrated. Therefore, when purchasing the product, check the technical compatibility between equipment, coupling and accessories
01 - Eagle PS Body 02 - Inlet enclosure 03 - On/Off key 04 - Green LED indicator On / Off 05 - Blue LED (status indication) 06 - “Turn Off phosphorous plate” key 07 - White or Orange LED (status indication) 08 - Power supply input 09 - USB port Status Indication LED’s - See page . 07

MODULES, ACCESSORIES, OPTIONALS AND CONSUMER MATERIALS
Status LED color
Blue White Orange Green Orange/White
Access Established communication with the Sof-tware.
Ready to start erasure.
Equipment switched on. Ready to re-ceive a new phosphorous plate and-make a new reading.
Blinking Performing data exchange with Software.
Erasing the Phosphorous Plate.
An error occurred.
Blinking alter-nating
Initializing the equipment.
Operating LED’s- Status Indication
Attention If the equipment shows any abnormality, check whether the problem is related to any of the items listed in the Unforeseen item (situation, cause and solution). If the problem cannot be solved, switch off the equipment and request a visit of an DABI ATLANTE service technician at the nearest reseller or call DABI ATLANTE Customer Service + 55 (16) 3512-1288.
Accessories the product
02
04 05
01
03
a b c d
7

8
MODULES, ACCESSORIES, OPTIONALS AND CONSUMER MATERIALS
Attention - Use of any part, accessory or material not specified or foreseen in these operating Instructions is entire responsibility of the user.
01. Image retrieval Software Eagle.PS system interface, responsible for image management.
02. Phosphorous plates*
The Phosphorous plate serves as a means of exposure to X-rays for image storage. Eagle.PS works with four plate dimensions: 0, 1, 2 and 3 (on request).a. For periapical examination (for pediatric use)b. For bitewing examination (for pediatric use)c. For periapical examination (for adult use)d. For bitewing examination (for adult use)
03. Protective covers*
For each plate size a single use disposable hygienic protection is used to prevent cross contami-nation. The transparent side allows you to see the point, while the opaque side protects the plate.
04. USB cableFor communication between PC / Eagle.PS.
05. Power cable 24V connection - provides power for equipment operation.
06. “Asepsi” cleaner*
Cleaner for sanitizing the phosphor plates.
07. Phosphor plates support*
Organizer support for phosphor plates.
0706
* Optional item

Radiographic image scanner EAGLE.PS
9
TECHNICAL SPECIFICATIONS
Power supply Supply Voltage
127/220V~ (100-240V~)
Frequency
50/60 Hz
Power consumption
<40W
Eagle.PS Supply Voltage
24 (V, CC)
Electric shock protection
Class I Equipment
Operation mode
Continuous
Protection against harmful penetration of water or particulate matter
IPX0
Net weight
5,3 Kg
Dimensions
A = 285 mm x L = 175 mm x P = 240 mm
General Framing according to Anvisa
Class I
Laser protection class
3B
Attention
Use caution when using this equipment in conjunction with other moving equipment to avoid collisions.
Warning
Manufacturing materials used for construction of this equipment are Biocompatible.

Owner’s Manual
10
TECHNICAL SPECIFICATIONS
Packaging symbology
Maximum Stacking, determines the maximum amount of boxes which can be stacked during transportation and storage
Determines that the packaging must be stored or transported with moisture protection ( Do not expose to rain, or water spills )
Determines that the packaging must be stored or transported with the arrow side up.
Determines that the packaging must be stored or transported with light protection.
Determines that the packaging must be stored and transported carefully (it should not suffer falls or receive impacts).
Determines the temperature limits among which the package must be stored or transported.
Product symbology
General Warning If instructions are not followed properly, use may cause damage to the product, the user or the patient.
Note: Indicates useful information for product operation.
ON/OFF button
Operational LED for status Indication.

Radiographic image scanner EAGLE.PS
11
TECHNICAL SPECIFICATIONS
Product Symbology
Use only one time. Do not reuse
It is mandatory to use protective gloves.
Dangerous electrical voltage.
Laser alert.
USB connection.
Erase phosphorous plate key

Owner’s Manual
12
EQUIPMENT INSTALLATION
Special Actions or Particular Conditions for Installation Environmental conditions of the room: See optimal conditions in "Transport, storage and operation conditions", page.71
System requirements The following components and accessories are required for proper operation of the equipment: Eagle.PS (Equipment responsible for scanning the image contained in the x-ray); Peripherals used to interact with the user: Keyboard: Accessory by which the characters (alphanumeric, mainly) are inserted for the interaction between the user and the computer. It can have varying patterns depending on the language used and desired features. Mouse: Data input device of a PC for software with graphical interface. Monitor: It is a computer output device whose function is to transmit information to the user through the image. Monitors designed for view of x-rays should have a higher intensity of light and wide range of contrast. Strong lights, sunlight and reflexes reduce the diagnostic ability of the x-ray examination Operational system: The system will work on the following operating systems: - Windows 7 (32 and 64 bits) or higher - Mac OS X v10.8 to v10.9.
General requirements: To ensure system security, access control to features is based on the user's profile on the system. The user registration will be done on the system itself. See page .32 - Include User. However, there is a possibility that the system will work with Single login, i.e., without the need for a registered user. In such case all features will be available. For Software configurations in server mode, the following requirements are needed: - Minimum application resolution 1280x768; Minimum hardware requirements: - Processor: 3GHz Dual Core - RAM memory 8Gb For Software Settings in client mode, the following requirements are required: - Minimum resolution 1280x768; Minimum hardware requirements: - Processor: 2GHz Dual Core - RAM memory 4Gb - Minimum disk space: 10GB Above requirements are needed to ensure maximum quality of the software image. If they are not followed, the quality of the image can be compromised. Whenever the monitor resolution used is smaller than the displayed image size, image quality may be impaired.

Radiographic image scanner EAGLE.PS
13
EQUIPMENT INSTALLATION
System Installation
Note
Before installing the system, make sure that the computer meets all of the above requirements.
To install the system, follow these steps: 1. Insert the Software DVD-ROM into the PC DVD-ROM drive. 2.The Select Language Configuration dialog box appears. Select the installation language and click OK.
3. Check if this is the version and software to be installed on the presentation screen:
4. This system is protected by an exclusive EAGLE license. Read the agreement and indicate whether or not you agree to continue:
Note
The installation will only continue if the agreement is accepted.

Owner’s Manual
14
EQUIPMENT INSTALLATION 5. Select destination location:
Note
On this installer screen, a default location that can be changed is suggested. However, for a standardization, t is suggested to remain in the indicated location. The disk space required for installation is also indicated. If you do not have this free space, cancel the installation and exclude some files to restart the procedure.
6. Select type of installation
Available installation types: Client: Where only the application is installed. Suggestion for network clients. In this case, you will need to Include the IP address of the database server For the application to work correctly. Server: Where client and database server are installed. Suggestion for Application Server or for single user.
7. Choose additional installation tasks
Additional types of icons: Create an icon on the desktop: Creates an icon on the user's desktop for easy access to the application. Single Sign-On: This option disables the use of Login and Password for the system.

Radiographic image scanner EAGLE.PS
15
EQUIPMENT INSTALLATION 8. Confirm the information selected in the Installation Summary:
9. Complete the installation of the System
To start System Installation the equipment must be disconnected from the computer. And it should only be connected to the end of the installation. The application should only be opened after confirmation of the installation of the FTDI Driver by the operating system.
Note
- Firewall port 5431 must be unlocked in order for the Database to be installed correctly, see section Appendix B – Windows Firewall Configuration – Server Mode. - If there is an error in the database installation, the process will be aborted and must be restarted. - If an error occurs in the installation of the FTDI Driver, the user will be warned. To continue with the installation, it must be checked whether the reader is not connected to the computer. - If the FTDI Driver is uninstalled incorrectly, it will not be automatically to reinstall. Therefore, always use the installation and un-installation of the system with the executables provided by EAGLE - If there is already an installation of the Postgres database the user must close all services to start the installation of the EAGLE.PS system

Owner’s Manual
16
EQUIPMENT INSTALLATION
Electrical connection Before starting, check that the 24 V DC voltage and the Supply Voltage 100 V - 240 V are consistent with the information on the identification plate. The connection ports are located on the back of the equipment.
Connections The installation procedure is simple. Follow the steps below to properly install the product. Eagle.PS is equipped with 2 connecting ports located on the rear of the equipment. - 24V (b) Connection: Provides power for operation of the equipment. - USB connection (a): Connects to the computer. - Cables enclosure (c)..
1. Remove the cover from the enclosure cables. 2. Connect the power supply cord (01) to the power supply Immediately plug the power supply into an electrical outlet. 3. Connect the USB cable (02) to the enclosed input, the free end, connect to the USB port on the computer. .

Radiographic image scanner EAGLE.PS
17
EQUIPMENT OPERATION
Phosphorous plates General guidelines:
Warnings Eagle.PS must only be used with EAGLE approved plates. Using other supplier's plates may influence the image quality.
Phosphorous plates are toxic: for this reason they should be wrapped in protective covers before being inserted into the patient's mouth. In case the patient swallows a plaque or part of it, a doctor should be consulted immediately. If the patient damages the protective cover by biting it, the patient's mouth should be flushed immediately with water.
Active side: The colored side (usually white or blue) is the active side of phosphorous plate. This side is also marked by a positioning symbol. Inactive side: The Inactive side is black. Some Manufacturers Mark this side as plate size (0, 1, 2, 3 or 4) and the text "Back" or "Reverse".
Working with Phosphorous plates The plates are sensitive to physical damage and, if necessary, must be replaced periodically. Pay attention for: Plates are flexible like an x-ray film. - Do not bend or press hard. - Do not scratch or get them dirty. - Do not place in autoclaves
Storage: - Store them in a dark place - Do not store in a hot or humid place. - Store them with protective covers using appropriate sizes - If an image is stored for more than 24 hours, it must be erased first before the next acquisition. - Protect from exposure to the sun and ultraviolet rays.
Protective cover For each size of the imaging plate a disposable, single use, hygienic protection is used to prevent cross contamination. The transparent side allows you to see the point, While the opaque side protects the Active side of the inserted plate to avoid image degradation.
The protective cap is a disposable product, thus, it should not be used again.

Owner’s Manual
18
EQUIPMENT OPERATION
Preparing to shoot the X-ray Insert a disinfected plate into the respective Protective cover with The Inactive side facing the adhesive strip, so that the number of the plate size is seen through the transparent side of the hygienic protection. Remove the tape and close the opening.
Warning The Protective cover should be disinfected with a disinfectant towel before placed in the patient's mouth. Alternatively it is possible to use a spray disinfectant on a soft, lint-free cloth.
The protective cover is a disposable product, it should not be used once more.
Select the appropriate positioner for the region of Interest and the size of the phosphorous plate. Perform the required X-ray procedure in accordance with the clinical procedure. Attention: Check that the Active side of the plate is facing the x-ray tube (as seen on the image)
Warning Infection risk Clean and sanitize the hygienic protection after each patient.
Wear gloves when removing the protective cap from the patient's mouth.
Starting image acquisition The process of image retrieval is controlled by software Installed on your computer. It is necessary to open the software, click on "Retrieve Image", Select patient / select dentist / click Retrieve.

Radiographic image scanner EAGLE.PS
19
EQUIPMENT OPERATION Open the protective cover of the phosphorous plate on the adhesive tab; Insert the phosphorous plate into the front opening to begin image retrieval. Remember to position downwards the Inactive side of the phosphorous plate. The equipment gets the mat started by pulling the phosphorous plate inside and the protective cover must be removed first for the correct release of the phosphorous plate. The progress of image retrieval should be monitored through software watching the monitoring screen. After the image retrieval is complete, the phosphorous plate is automatically switched off and expelled through the front opening.
Points of observation: No other phosphorous plate should be inserted until the reading process is completed. This action may damage improperly inserted phosphorous plates in the equipment. The image saved through the software has been erased from phosphorous plate, not being able to import again. If there is no need for a new image acquisition, the equipment must be switched off.
Retrieve Image The Retrieve Image screen allows the operator to import an image by associating it with the patient current. This image has a requester Dentist associated with it.
Figure 43 - Image retrieval Screen

Owner’s Manual
20
EQUIPMENT OPERATION Patient image retrieval is available through the following path: "Retrieve Image" icon in the Patient search result table. Icon in the View Image screen Image Menu - Retrieve Home Screen– Other Options – Retrieve Image In this screen the image retrieval is performed. Enables the operator to Retrieve an image of the phosphorous plate reader equipment. Patient *: Represents the name of the patient related to the image to be Retrieved. Applicant *: Represents the name of the requesting Dentist of the x Rays. CRO: Represents the CRO number of the requesting Dentist. It is automatically populated when the "Applicant" is selected. UF: Represents the federative unit issuing the CRO of the requesting Dentist Options are: ‘AC’, ‘AL’, ‘AM’, ‘AP’, ‘BA’, ‘CE’, ‘DF’, ‘ES’, ‘GO’, ‘MA’, ‘MG’, ‘MS’, ‘MT’, ‘PA’, ‘PB’, ‘PE’, ‘PI’, ‘PR’, ‘RJ’, ‘RN’, ‘RO’, ‘RR’, ‘RS’, ‘SC’, ‘SE’, ‘SP’, ‘TO’ e (empty) (default). It is automatically filled out when the "Applicant" Is filled in. Current User: Represents the option that, when selected, indicates that the requester is the user currently logged in. Quality: Represents the quality of the image to be Retrieved. Possible Options are: 'High' and 'Fast'. Image Type *: Represents the type of image to be obtained. Possible Options are: "Periapical" or "Interproximal". Region *: Represents the region to be X-rayed. The Options are in this field depending on the choice made in the "Image Type " field.
The system provides the following actions: Counter-clockwise rotation: Represents the rotation functionality in the counter-clockwise direction, on the Retrieved image. Clockwise rotation: Represents the rotation functionality in the clockwise direction, on the Retrieved image. Auto-adjust: Represents the option that, if selected, the system automatically adjusts the image brightness and contrast. This is enabled only if the image has already been Retrieved. View Image: Represents the option that, if selected, the system redirects to “View Image” (See page .45).
Information: An image Retrieved and exposed to light may contain an image that does not match the original. To Retrieve a new image it is necessary to wait finishing the retrieval of the first image. Remarks: The fields marked with (*) are mandatory; 'Auto Adjust', 'Rotate', 'Image Type', 'Region', 'Save' and 'Cancel’ functions will be only available after image acquisition. It is possible to select the dentist that requested the X-ray examination through the Search feature. When you click this button, the system will display a screen containing a list of previously saved applicants, with the 'Name', 'CRO' information and the fields (filters), if you wish to search for a specific applicant. After acquiring an image, the values contained in the 'Applicant *', 'CRO' and 'UF' fields will remain filled until the retrieval of the image is canceled, that is, until the operator exits the screen However, the operator can always select another applicant before acquiring an image.

Radiographic image scanner EAGLE.PS
21
EQUIPMENT OPERATION
Erasing the image in the Phosphorous plate After the image is Retrieved, the Phosphorous plates are automatically erased. However, it is suggested that the phosphorous plate is erased manually when: The image Retrieved exceeds the 24 hour period. The image was not properly Retrieved and there was an error during the erasure of the phosphorous plate. In case of doubt whether the phosphorous plate is clean or not. To erase a phosphorous plate through the Software, choose the option Erase Plate PSPL and proceed with the insertion of phosphorous plate into the equipment. To erase a phosphorous plate through the equipment, press the "Erase" button located in the center of the main panel. Wait for the White LED to remain constant to insert the phosphorous plate.
EAGLE.PS DICOM viewer operation - System Execution The EAGLE.PS DICOM Viewer executable is located in the directory where the image was exported in the portable folder with executable option for Windows and Mac.
View Image DICOM The option to open a DICOM file is available in the Toolbar
Figure 1 - Toolbar EAGLE.PS DICOM Viewer The user can select from 1 (one) to 10 images to be opened simultaneously in the EAGLE.PS DICOM Viewer
Figure 2 - EAGLE.PS Main Screen DICOM Viewer

Owner’s Manual
22
EQUIPMENT OPERATION The selected images are displayed in the Image List at the bottom of the EAGLE.PS DICOM Viewer.
Figure 3 - Images List Whenever the user selects a new image, it will be displayed in the display area
Compare DICOM Images It is possible to compare selected images in groups of 2, 3 or 4 images. To make this comparison it is necessary to select between 2 and 4 images in the place where the thumbnails of the images are and the user clicks the comparison button:
Figure 4 - Selection for Image Comparison
When comparing images, it is not possible to make any type of modification, annotation, zooming, exporting or printing.
Figure 5 - Comparison of two images

Radiographic image scanner EAGLE.PS
23
EQUIPMENT OPERATION
Figure 6 - Comparison of Three Images
Figure 7 - Comparison of Four Images
Printing DICOM Images The selected images can be printed with the changes that were made. To perform the print out the user must click the Print button in the Toolbar:
Figure 8 - EAGLE.PS Toolbar DICOM Viewer: Printing

Owner’s Manual
24
EQUIPMENT OPERATION Optionally, the Dentist can request to print the DICOM header. I.e. all DICOM tags forming the selected image.
Figure 9 - Confirmation Pop-up for Printing the Dicom Header Image printing follows the standard below, with or without the DICOM header:
Figure 10 - Print with the DICOM header

Radiographic image scanner EAGLE.PS
25
EQUIPMENT OPERATION
Figure 11 - Print without the DICOM header
Apply Transformations The zoom application is limited to four times the image size, for more or less.
Figure 12 - Transformation Toolbar: Zoom
For Rotation application (counter clockwise or clockwise), the user must select the rotation icons located in the Toolbar:
Figure 13 - Transformation Toolbar: Rotation Note: Changes to the image are not saved. To keep these changes in some other format, select Export to JPEG or Print the Image.

Owner’s Manual
26
EQUIPMENT OPERATION
Apply Filters The application of filters is available for better view of the image: Auto-Adjust: This manipulation automatically adjusts, without user intervention, the brightness and contrast values of the image; Brightness: Represents the maximum amount of light emission from a particular image source; Contrast: Represents the difference between the most white target and the most dense black that can be obtained in the image; Apply Blur: This filter softens the image, making it less sharp reducing noise; Apply Sharpen (Highlight): This filter enhances the edges, enhancing the sharpness of the image, can generate a little noise in it; To select filters, the user must select them through their icons in the Toolbar:
Figure 14 - Filters Toolbar
Figure 15 - Filters Toolbar: Available filters The application of filters can be undone by the buttons of UNDO (undo the last change), or RUBBER (undoes all changes)
Figure 16 - Toolbar: Undo / Rubber

Radiographic image scanner EAGLE.PS
27
EQUIPMENT OPERATION
Perform Measurements The application of measurements and calibrations in the image is available: Straight: This feature makes it possible to measure straight in any direction in the image. The unit of measure is 'mm' (millimeter), with precision of two decimal places. It is also possible to draw several consecutive lines, here called "Multiple Straight lines", in any direction in the image, where the system displays the total sum of the drawn lines; Angle: This feature makes it possible to perform angle measurements between two consecutive lines. The unit of measurement shall be 'degrees', to the accuracy of two decimal places; Calibrate Measurement: This feature enables to calibrate the image. The system will display a pop-up as shown In Figure 20, allowing the operator to calibrate the actual measure of the image. The value displayed in the measure in pixels, refers to the amount of pixels of the image, and therefore cannot have its value changed. To perform measurements and calibration, the user must select them through their icons in the Toolbar:
Figure 17 - Toolbar: Measure Picture Image
Figure 18 - Toolbar: Available Measurements
Figure 19 - Toolbar: Measurement Calibration
Figure 20 - Measurement Calibration Pop-up
Owner’s Manual
28
EQUIPMENT OPERATION
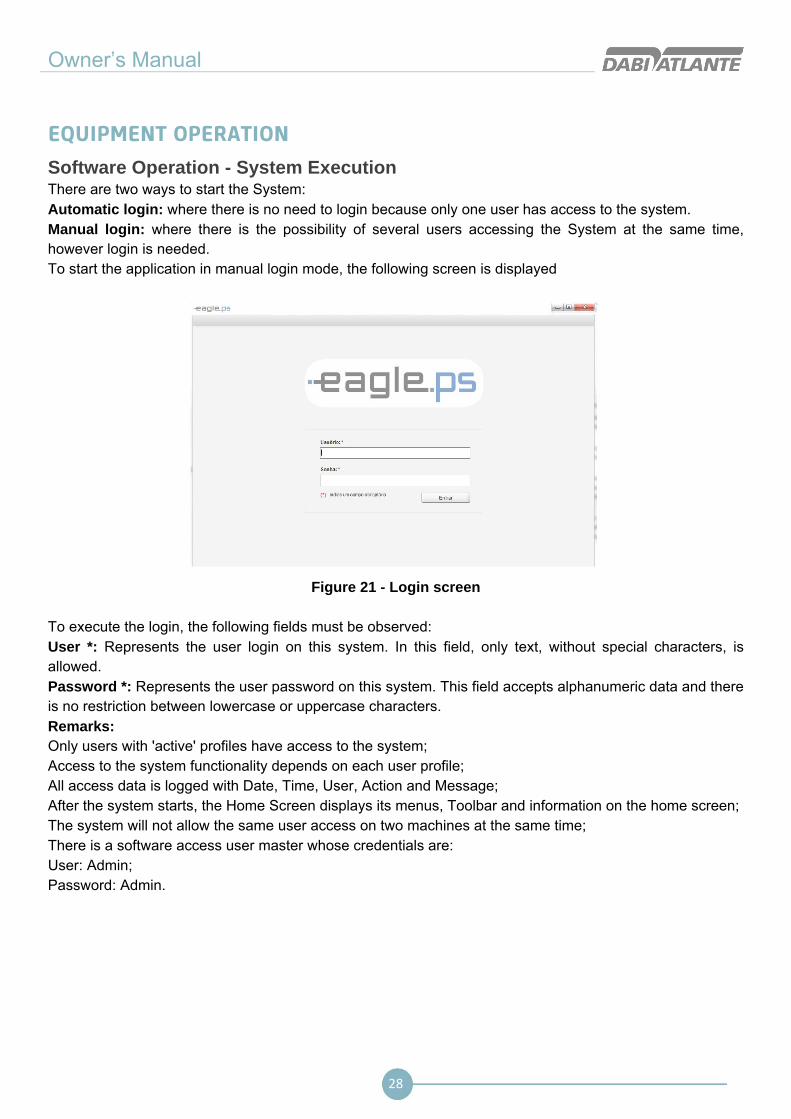
Software Operation - System Execution There are two ways to start the System: Automatic login: where there is no need to login because only one user has access to the system. Manual login: where there is the possibility of several users accessing the System at the same time, however login is needed. To start the application in manual login mode, the following screen is displayed
Figure 21 - Login screen
To execute the login, the following fields must be observed: User *: Represents the user login on this system. In this field, only text, without special characters, is allowed. Password *: Represents the user password on this system. This field accepts alphanumeric data and there is no restriction between lowercase or uppercase characters. Remarks: Only users with 'active' profiles have access to the system; Access to the system functionality depends on each user profile; All access data is logged with Date, Time, User, Action and Message; After the system starts, the Home Screen displays its menus, Toolbar and information on the home screen; The system will not allow the same user access on two machines at the same time; There is a software access user master whose credentials are: User: Admin; Password: Admin.

Radiographic image scanner EAGLE.PS
29
EQUIPMENT OPERATION
System Finalization To exit the application, some options are available when: Click Exit in the main application menu; Click Close (x) on the main screen; Click Close (x) on the Toolbar. For all the above Options it is necessary to confirm the system output as shown below
Figure 22 – Confirmation pop-up to exit the system
System logoff The System logoff procedure allows the user to disconnect and later he can connect with another user name without needing to restart the application. To do so, the following option is available: Click in Logoff on the main screen; For the above option it is necessary to confirm exiting the system as shown below:
Figure 23 – Confirmation pop-up for System logoff
Upon logging off, the system returns to the main login screen.

Owner’s Manual
30
EQUIPMENT OPERATION
System Menu Presentation The "System Menu" is displayed as shown below, according to permission issued to each user:
Figure 24 – Home System Screen Figure 24 – Home Screen, the following Options are displayed to make it easier to start using The system: Logo EAGLE; Name of current user; Greeting: "Welcome!" List of profiles associated with the current user Date and time of last user's current visit; Features available: Search and Include new Patient Search and Include New Agreement Search and Include new User Other Options: Change Language Perform audit Erase phosphorous plate Retrieve Image Menu display: Application Name Current Version Date of the last Version Full Screen Optionally, when the current user has the Administrator profile, the date of the last backup performed is displayed. If there is no backup, the following message is displayed: "No backup so far."

Radiographic image scanner EAGLE.PS
31
EQUIPMENT OPERATION
Figure 25 - Toolbar
Toolbar Indicative Colors: Red: Equipment switched off or disconnected Green: Equipment connected with the computer and communicating with the System.
Loss of password In case of loss of password of the administrator profile, it is necessary to contact DABI ATLANTE through the telephone + 55 (16) 3512-1288.
User Through the user screen, it is possible to include, search, edit, view, and exclude a user.
Search User The search screen allows the operator to search the users registered in the system.
Figure 26 - User Search Screen
Users search is available through the following paths: Home System Screen: Search button; User Menu Item – Search User;
The following fields must be filled to perform the search: Name: Represents the name of the person who was registered as system user; User: Represents the user name that will access the system; Profile: Represents the profile to which the user belongs. Multi-choice field that which can assume values: "Technician “,” Dentist “or” Administrator “. Status: Represents user status, such as “Active”, “Inactive” or optionally can be searched by “All”.
By clicking on the search icon, the results are populated in the columns below according to the search criteria.

Owner’s Manual
32
EQUIPMENT OPERATION
Name: Represents the name of the person who was registered as system user. User: Represents the name of the user that will be used to access the system. E-mail: Represents the user's contact email. Profile: Represents the profile to which the user belongs. If the user has more than one profile, they are displayed separated by a semicolon (;). Status: Represents user status, such as "active" or "inactive";
View relevant information concerning searched user
Edit searched user information
Exclude searched user
Forwards to the new user inclusion screen
Edit information for current user
Table 1 - Actions table for User
Include User Include screen allows the operator to include a user in the system.
Figure 27 - Include User screen

Radiographic image scanner EAGLE.PS
33
EQUIPMENT OPERATION
Figure 28 – Include User (Email Settings) Screen The insertion of a new user is made available through the following paths: System Home Screen: Include New Button User Menu Item- Include
The following fields are provided for insertion of a new user divided into four areas: Access data Personal Data Address Email Configuration
Access data Photo: User photo in registration. Capture Photo: Action regarding the capture of the user's photo through the webcam. Upload Photo: Action regarding uploading a new user photo. The photo can be loaded from a file stored on an internal or external media. View Photo: Action regarding the view of the photo, uploaded in full size by the user. Remove Photo: Action referring to the deletion of the user's photo; User *: Represents the name of the user that will be used to access the system. Password *: Represents the user password, which will be used to access the system. Confirm Password *: Represents the field to fill in the User Password Confirmation. * Profile: Represents the profile of the user. Options are possible: 'Administrator', 'Dentist' and 'Technical'.
Personal Data Name*: Represents the full name of the person who will be registered as a user. Sex *: Represents the gender of the user, being "F" for Female and "M" for Male. Birth date *: Represents the birth date of the user. (Validation is performed on this field, preventing invalid dates). RG: Represents the number of the User's identity document. Org. Exp .: Represents the issuing agency of the user identification document with the state of origin.

Owner’s Manual
34
EQUIPMENT OPERATION
CPF*: Represents the patient's Individual Taxpayer's Identification Number (CPF). (Validation of this field is done, only accepting valid CPF numbers CRO: Represents Dentist CRO number (Mandatory field for the Dentist profile). UF: Represents filling of the federative unit emitting the Dentist CRO number. Available Options are :‘AC’, ‘AL’, ‘AM’, ‘AP’, ‘BA’, ‘CE’, ‘DF’, ‘ES’, ‘GO’, ‘MA’, ‘MG’, ‘MS’, ‘MT’, ‘PA’, ‘PB’, ‘PE’, ‘PI’, ‘PR’, ‘RJ’, ‘RN’, ‘RO’, ‘RR’, ‘RS’, ‘SC’, ‘SE’, ‘SP’, ‘TO’ and ' ' (empty).(Mandatory field for the Dentist profile).
Address Address and Number: Represents user’s full address.(Mandatory field for the Dentist profile). Neighborhood: Represents user’s neighborhood. (Mandatory field for the Dentist profile). CEP: Represents user CEP (Mail ZIP code). UF: Represents filling of the federative unit of the user’s address. Options are: ‘AC’, ‘AL’, ‘AM’, ‘AP’, ‘BA’, ‘CE’, ‘DF’, ‘ES’, ‘GO’, ‘MA’, ‘MG’, ‘MS’, ‘MT’, ‘PA’, ‘PB’, ‘PE’, ‘PI’, ‘PR’, ‘RJ’, ‘RN’, ‘RO’, ‘RR’, ‘RS’, ‘SC’, ‘SE’, ‘SP’, ‘TO’ e ‘EX’(Mandatory field for the Dentist profile). City: Represents the City of the patient’s home address. Options must be loaded according to the selected UF. (Mandatory field for the Dentist profile). Telephone*: Represents the user’s phone. Cell: Represents the user’s cell phone. E-mail: Represents the email of the person who will be registered as user.(Mandatory field for all profiles).
Email settings Use Default E-mail: If selected, the system will use standard operating system e-mail. Ex .: Outlook. Manual Setup: If selected, the system will enable the following fields for Manual Setup E-mail Server: Displays the pre-configured servers for the system. Options are: 'BOL', 'Globo', 'Gmail', 'Hotmail', 'IG', 'Terra', 'UOL', 'Yahoo', ' Available from the Options are mentioned above). E-mail*: Represents the E-mail address to be configured. Name*: Represents the recipient’s name of the e-mail. Outgoing Server (SMTP): Represents the default protocol for sending e-mails over the internet. Port (SMTP): Represents the SMTP server's Configuration port. Encrypted Connection: Represents the Encrypted Connection Configuration or not. Encryption: Represents the type of encryption used in the connection. Possible values: "Automatic", "SSL", "TLS" or "-". Password: Represents the Password of the e-mail address to be configured. Observations: Photograph: Photos imported by the user can not be larger than 500 Kb; RG: For valid RG numbers must be observed and included when hyphens and periods are present. Profile Settings: Technical: For the technical profile, the following fields are mandatory: 'Name', 'CPF', 'Birth date', 'Sex', 'Telephone' and 'Email'; Administrator: For the administrator profile, the following fields are mandatory: 'Name', 'Telephone' and 'E-mail'; Dentist: For the Dentist profile, the following fields are mandatory: 'Name', 'CPF', 'Birth date', 'Sex', 'Telephone', 'Email', 'CRO with Federative Unit', ''Neighborhood', 'City' and 'State'

Radiographic image scanner EAGLE.PS
35
EQUIPMENT OPERATION It is not possible to include more than one user with the user name already registered in the system, ie: User name and CPF combinations are valid for the profiles of Technician, Dentist and Administrator. User name combinations are validated, CRO and UF for Dentist profiles It is not possible to include a user with different password and password confirmation. When choosing a default mail server, the system automatically populates the following fields: Outgoing Server (SMTP), Port (SMTP), Encrypted Connection, and Encryption. It is only necessary to inform the user's email, name and password.
Edit User The user edit screen is available through the edit icon located in the patient search.
Figure 29 - User Editing Screen All fields described in "Include User" are displayed for editing, maintaining their Validation rules, except the Name and Profile fields. In the Profile field, when the "Dentist" value is selected and there are patients associated with the user in question, It cannot be cleared.
Owner’s Manual
36
EQUIPMENT OPERATION
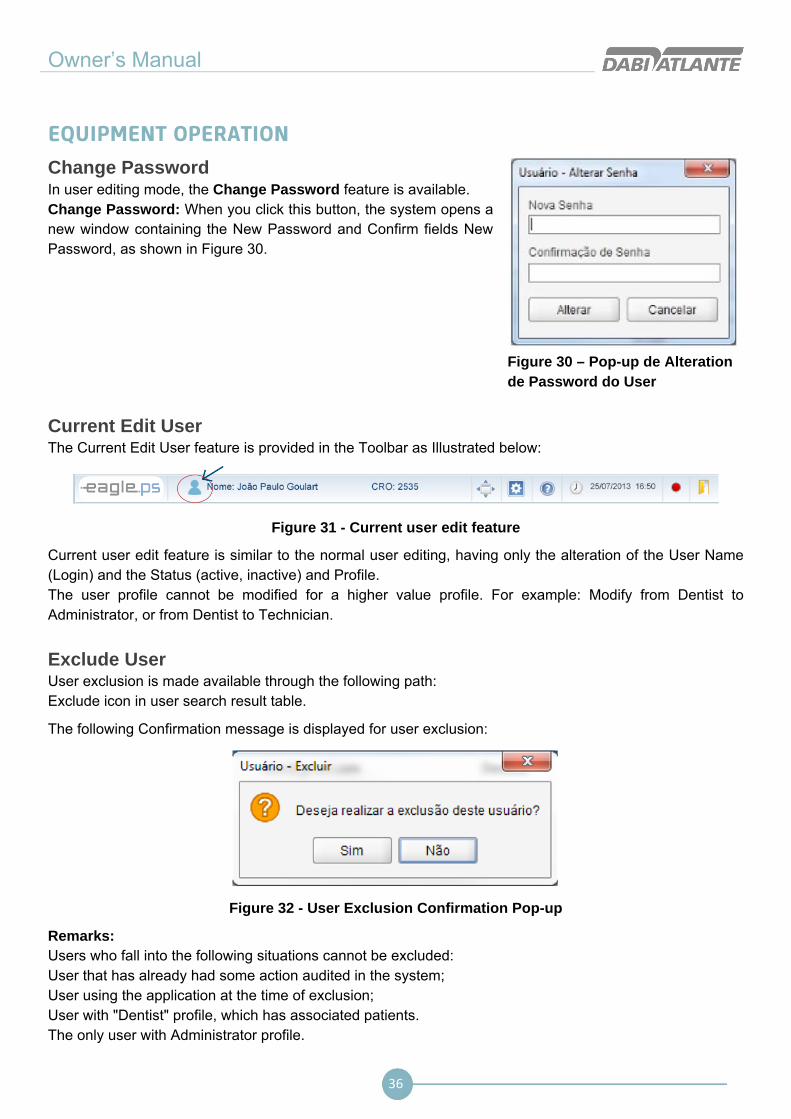
Change Password In user editing mode, the Change Password feature is available. Change Password: When you click this button, the system opens a new window containing the New Password and Confirm fields New Password, as shown in Figure 30.
Figure 30 – Pop-up de Alteration de Password do User
Current Edit User The Current Edit User feature is provided in the Toolbar as Illustrated below:
Figure 31 - Current user edit feature
Current user edit feature is similar to the normal user editing, having only the alteration of the User Name (Login) and the Status (active, inactive) and Profile. The user profile cannot be modified for a higher value profile. For example: Modify from Dentist to Administrator, or from Dentist to Technician.
Exclude User User exclusion is made available through the following path: Exclude icon in user search result table.
The following Confirmation message is displayed for user exclusion:
Figure 32 - User Exclusion Confirmation Pop-up
Remarks: Users who fall into the following situations cannot be excluded: User that has already had some action audited in the system; User using the application at the time of exclusion; User with "Dentist" profile, which has associated patients. The only user with Administrator profile.

Radiographic image scanner EAGLE.PS
37
EQUIPMENT OPERATION
View User The view screen allows the operator to see details of the user registered in the system. View of user data is made available through the following path: View icon in user search result table.
Figure 33 - User View Screen

Owner’s Manual
38
EQUIPMENT OPERATION
Setup Profile This is the User Profiles Configuration screen. It allows the operator to designate what type of access a user will have for a certain functionality, and can associate a profile with various functionalities. Profiles designate what kind of access a user has for a particular feature.The actions performed in the Profile Settings are audited, keeping track of the action, date, time and user. The Setup Profile feature should only be available if the system is configured for login execution via Perform Software Settings screen (See page .61) Software Configuration - Login Settings.
Edit profile This is the screen that allows the operator to perform editing the profiles, as well as the permission that may or may not be associated with the profile. Editing a user profile is available through the following path: User Menu Item- Setup Profile
Figure 34 - Profile Edit Screen
A Table with all permissions for each user profile (Administrator, Technician, Dentist) is displayed. Profile: Represents the name of the system profile. ("Administrator", "Dentist" and "Technical"); Permissions: Represents the list of permissions that can be associated with the profile. Status: Checkbox that informs whether or not the permission is associated with a particular profile. For each alteration, the new Configuration of Profiles must be saved.
Remarks: All profiles and permissions must have at least one associated permission or profile; Profile Settings have dependencies, i.e., if the user wants access to the Diagnostics, Patient and View Image permission must be given;

Radiographic image scanner EAGLE.PS
39
EQUIPMENT OPERATION Default Configuration: To return to the initial system configuration, the user must choose Default Configuration. For security feature, the system will display the Confirmation message, as shown in Figure 35: "This action will return the permissions to the Default Configuration. Do you wish to continue?"
Figure 35 - Confirmation Message for Default Configuration
Patient This is the patient register screen. Allows the operator to search, Include, view data, edit, exclude, import image, Retrieve Images, viewing patient’s Image. Patients are the main focus of the application, and all actions with the x-ray images are made from them. There is the possibility of associating one or more Dentists with this Patient, making them responsible for their images.
Search Patient The search screen allows the operator to Search the patients registered in the system.
Figure 36 - Patients Search Screen Patient Search is available through the following path: Patient Menu Item - Search Home screen: Button - Patients Search
The following fields must be filled to perform the search: Registration: Represents the Registration number or part of the Registration of the patient. Name: Represents the name or part of the name of the person who was registered as a patient. By clicking the search icon, the results are populated in the columns below according to the criteria given.

Owner’s Manual
40
EQUIPMENT OPERATION
Registration: Column representing the Registration of the person who was registered as a patient in the system; Name: Column representing the name of the person who was registered as a patient in the system; Birth date: Column representing the birth date of the patient;
View information about the Patient searched
Edit information about the Patient searched
Excludes the Patient searched
Forwards to the new Patient Insertion Screen
Forwards to the new image retrieval screen for the selected patient
Forwards to the New Image Import screen for the selected patient
View all images of selected Patient
Table 2 - Actions for Patient Table
Remarks: The system performs the search for patients according to the profile of the logged in user. For Profiles "Technician / Administrator", the system will display all the patients registered in the system. For the "Dentist" profile, the system will display only the patients associated with the user in question.
Include Patient Patient insertion is available through the following path: Menu Item Patient - Include Home Screen: Button - Include In Patients
Figure 37 - Patient Inclusion Screen

Radiographic image scanner EAGLE.PS
41
EQUIPMENT OPERATION The following fields are made available for insertion of a new patient split into five areas: Personal Data Agreement / Plan Data System Data Patient Documentation Address Personal Data: Photo: Represents loading the Patient's photo. Capture Photo: Represents icon relative to patient's photo capture via webcam. Upload Photo: Represents the icon for loading the patient's photo through the storage system or external media (HD, Pen Drive, etc). View Photo: Represents patient's photo visualization icon loaded in full size. Remove Photo: Represents icon relative to patient's photo deletion. Name*: Represents the full name of the person who will be registered as a patient. Birth date *: Represents the birth date of the patient. Age: Represents the patient's age in years and months, calculated based on current date and date of birth (current date - birth date). * Sex: Represents the patient. Possible Options are: 'M' for male or 'F' for female. Responsible: Represents the responsible name of the patient. Agreement / Plan Data: Agreement: Represents the name of the Agreement. The Agreements listed will be those that are registered in the system, present in the functionality 'Search Agreement' (See page .48). Agreement Number: Represents the patient covenant portfolio number. Completing it becomes mandatory when the 'Agreement' field is filled in. Dentist *: Represents the user's name with profile "Dentist" which will be associated with the patient. This choice is related to a search of all users with profile "Dentist" registered In the system. System Data: Registration*: Represents the registration number of the patient. Patient Documentation: RG: Represents the identity document number (General Registration) of the patient. Org. Exp .: Represents the name of the Issuing Body of the identity document (RG) and the UF (Fed. Unit) of the patient. CPF: Represents the CPF (Individual Personnel Record) number of the patient. Address: Address and Number: Represents the residence address of the patient. Neighborhood: Represents the Neighborhood of the residence address of the patient. CEP: Represents the zip code of the patient's residence address. UF: Represents the status of the patient. Possible Options are: ‘AC’, ‘AL’, ‘AM’, ‘AP’, ‘BA’, ‘CE’, ‘DF’, ‘ES’, ‘GO’, ‘MA’, ‘MG’, ‘MS’, ‘MT’, ‘PA’, ‘PB’, ‘PE’, ‘PI’, ‘PR’, ‘RJ’, ‘RN’, ‘RO’, ‘RR’, ‘RS’, ‘SC’, ‘SE’, ‘SP’, ‘TO’ and ‘EX’ (for foreign origin). City: Represents the City of the patient's Address. Options are displayed according to the status selected in the 'UF' field. Telephone *: Represents the telephone number of the patient. Mobile Phone: Represents the patient mobile number E-mail: Represents the patient's email. Remarks: The following points are checked when inserting or editing a Patient

Owner’s Manual
42
EQUIPMENT OPERATION Validation of birth date; Validation of CPF and Patient ID; E-mail Address Validation Required field completion Duplicate Patient Insertion Validation: Patients with the same CPF Patients with the same Registration Patients with equal combination of Name and Birth date. If the logged user has the 'Dentist' profile, the system automatically will fill out the "Dentist", Field on the patient's inclusion screen.
Edit Patient The editing screen allows the operator to edit the data of a patient already registered in the system.
Figure 38 - Patient Editing Screen
Patients editing is available through the following path: Edit icon in Patient's search result table.
All fields submitted for insertion and their validations are available for editing of Patient, except the "Registration" field.
Exclude Patient Exclusion of Patients is made available through following path: Exclude icon in the search result table of Patient. When requesting the exclusion of a Patient, confirmed through the Pop-up displayed next:
Figure 39 - Exclusion Confirmation Pop-up
Remarks: The following situations are observed in the exclusion of the patient: Patient with associated X-rays;

Radiographic image scanner EAGLE.PS
43
Patient with saved odontogram.

Owner’s Manual
44
EQUIPMENT OPERATION
View Patient The patient view screen allows the operator to view patient data details in the system. All fields displayed on the Patient View screen are in view mode and cannot be edited.
Figure 40 - Patient View Screen
The Patients view is available via the following path: View icon in Patient's search result table. Patient icon on the Patient Image Viewing screen.
Figure 41 - Patient view bar
Import Image The image import screen allows the operator to import one or more previously stored images to the system. All imported images are associated with a Patient and are sorted by Image Type and Region.
Figure 42 - Image Import Screen

Radiographic image scanner EAGLE.PS
45
EQUIPMENT OPERATION Patient Import images are available through the following path (s): Image Import Icon in Patient Search Result Table. View Image Icon Image Menu - Import The following fields are available for Import the image: Name *: Represents the name of the patient that is associated with the imported image. This field is displayed only as read, i.e., does not allow the user to fill / edit the information contained in that field. Possible Action: "Search Patient". Image Type *: Represents the type of image to be obtained. Possible Options are: "Periapical" (default),"Interproximal", "Occlusal", "Panoramic", "Lateral cephalometric", "Intraoral photo" and "Other". Region *: Represents the x-ray region. The Options in this field depend on the option selected in the "Image Type *" field. The system provides the following actions: Counter-clockwise rotation: Represents the counter-clockwise rotation feature in the image. Clockwise rotation: Represents the functionality of Clockwise rotation in the image. Auto Adjustment: Represents the automatic adjustment feature in the image. View Image: Represents the functionality that will redirect to the "View Image"(See page .45). Go to Next Image: Represents the action that allows the operator to go to the next image of the set of imported images. Go to Previous Image: Represents the action that allows the operator to go to the previous image of the current set of imported images. Remarks: Search Patient: This icon is only available if the import image functionality has been requested through the Image Import Image menu. The system verifies the following situation (s) in the Import of the image: Import Image without filling in at least the required fields (*); Import Image without associating a patient with import. The system will only allow import of files of type 'jpg', 'jpeg', 'png' and 'dcm'; When you apply a rotation or auto adjust to the image, the system will save the result of the rotation or auto adjust, i.e. the image rotated / auto adjusted.

Owner’s Manual
46
EQUIPMENT OPERATION
View Image The View Image screen allows the operator to view one or more x-ray images. In this image viewing screen you can also perform the main adjustments and Filters Application in the image. The Patient viewing images are available through the following path: View Image icon in Patient's search result table.
Figure 44 - Image View Screen
This screen is divided into tabs and areas as described below: Images section: Displays the images in thumbnails referring to previous exams performed by the patient. Optionally, the operator may request to view one of these images, compare or Exclude. Tab Selected Image: Displays the selected image in the Images Tab. Tab Full Periapical Image: Displays the patient images in periapical format. Complementary Document Tab: Displays the entire Patient Documentation. Tab Odontogram: Displays the standard Odontogram image.
The following actions to be applied to the image are available: Apply Zoom: Represents the zoom application through the following Options are: 'Select with Zoom', 'Zoom in', 'Zoom Out' and 'Full Screen'. Manipulate Image: Represents the image manipulation application through Options are: 'Rotation Anti-Clock ',' Clockwise rotation ',' Horizontal Mirror 'and' Vertical Mirroring '. In the case of Mirroring it is necessary to right click on the image and select the Options of Mirroring. Calibrate Image: Represents the Image Calibration functionality. It is only possible to perform Calibration, when the image has a Straight Measurement. Measure Image: Represents the application of Measurement in the image through the following Options are: 'Line' and 'Angle'. It is also possible to apply multiple lines, i.e. draw consecutive lines in any way or direction in the image. Perform Notes on the Image: Represents the application of notes in the image through the following options are: 'Free Hand', 'Straight', 'Curve', 'Rectangle', 'Ellipse', 'Arrow' and 'Text'. Apply Filters: Represents a Filters Application in the image through the following Options are: 'AutoFit', 'Apply Brightness',' Apply Contrast ',' Apply Sharpness', 'Apply Gamma', 'Apply Color / , 'Apply Blur', 'Apply Sharpen (Highlight)'. Perform Diagnosis: Represents the elaboration of a Diagnosis for an x-ray image. Patient Information: Represents the action that enables the operator to view the patient's data.

Radiographic image scanner EAGLE.PS
47
EQUIPMENT OPERATION Optionally, you can select one or more images and perform one of the following actions: Export to Recordable Media: By clicking this button, the system will redirect to the export screen, allowing the operator to export studies from a patient to a recordable media, such as HD, Pen Drive, flash drive, etc. E-mail: By clicking this button, the system will redirect to Email Sending Screen, allowing the operator to send electronic messages (e-mail) to various recipients containing images of x-rays, periapical images, periodontal Documentation and Diagnosis of the patient. Print Image: Clicking this button will redirect the system to the print screen, allowing the operator to print images from X-rays, Diagnosis, Odontogram and Header DICOM on conventional printers. Compare Image: When clicking this button, the operator must have selected at least 2 images and at most 4, where the system will distribute them in the 'Selected Image' tab, according to the number of images selected. Exclude Image: When you click this button, the system will display a Confirmation question for the exclusion of the image (s) that was selected (s). If the Confirmation of the exclusion question is confirmed, the image (s) will be deleted. It is checked during image exclusion if it has Diagnosis. If it has, you will not be able to delete it.
Remarks: In the 'Images' tab, the system will sort the list of images in descending order of the image's creation date, that is, the most recent image will be at the top. Each image has an indicative legend for its origin, being: Image retrieved by EAGLE.PS - Green Imported Image - Orange Edited Image - Red Only images belonging to the current Patient will be displayed.
Edit Image Properties It is possible to change the properties of the selected image by right-clicking:
Figure 45 - Image Properties Editing Screen
Patient Name *: Read-only field, Text-type, reserved for Patient name display to which the x-ray image belongs. The patient can be changed by clicking the "Search" button; Image Type *: Single selection type field, reserved for filling the type of image to be obtained. Options are: 'Periapical' (default), 'Dentition decidua', 'Interproximal', 'Occlusal', 'Panoramic', 'Lateral cephalometric', 'Intraoral' and 'Other'; Region *: Reserved field for single selection type, single selection type field, reserved for filling the x-ray exposed region. The Options in this field depend on the choice made in the field 'Image Type'
Remarks: After the operator has edited the desired fields and clicked 'Confirm', the system displays the Confirmation message as shown in Figure 46:

Owner’s Manual
48
EQUIPMENT OPERATION
Figure 46 – Image Properties Confirmation Pop-up
Modify Patient If you wish to modify the Patient owner of the image, a new Patient must be searched according to the image below:
Figure 47 - Patient Modification Screen
Radiographic image scanner EAGLE.PS
49
EQUIPMENT OPERATION
Agreement Section of the system responsible for the insertion, editing and exclusion of Agreements maintained by the system.
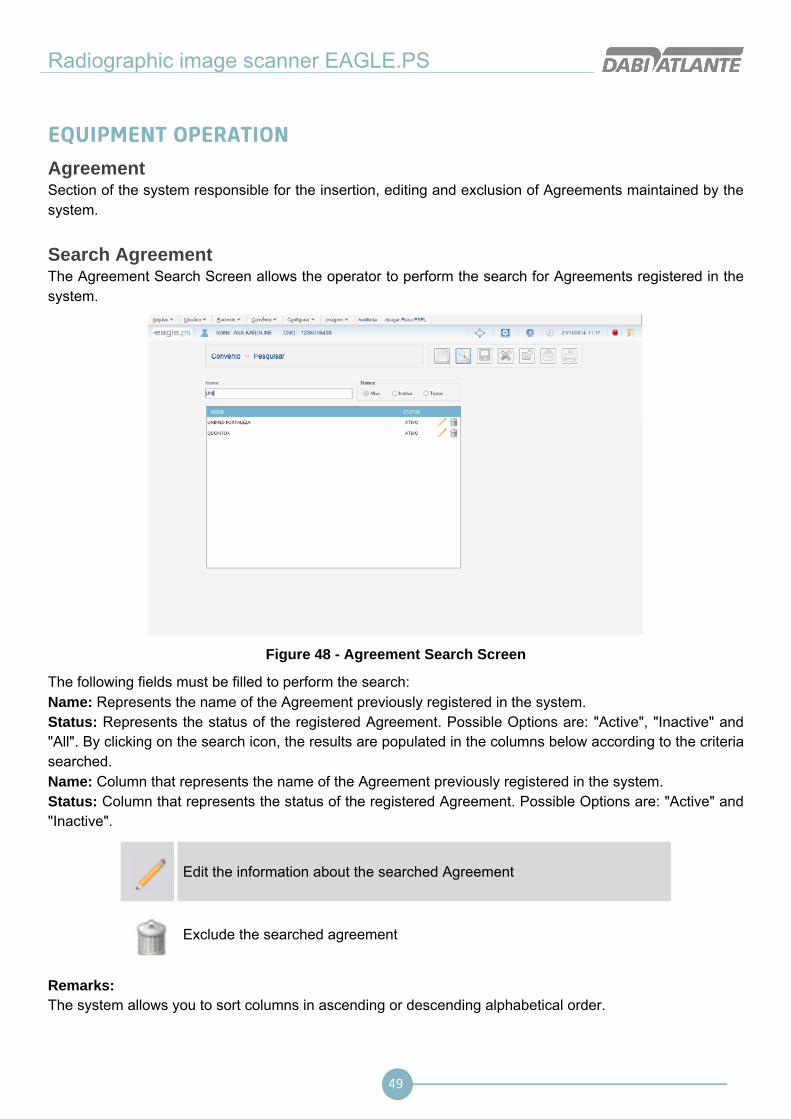
Search Agreement The Agreement Search Screen allows the operator to perform the search for Agreements registered in the system.
Figure 48 - Agreement Search Screen
The following fields must be filled to perform the search: Name: Represents the name of the Agreement previously registered in the system. Status: Represents the status of the registered Agreement. Possible Options are: "Active", "Inactive" and "All". By clicking on the search icon, the results are populated in the columns below according to the criteria searched. Name: Column that represents the name of the Agreement previously registered in the system. Status: Column that represents the status of the registered Agreement. Possible Options are: "Active" and "Inactive".
Edit the information about the searched Agreement
Exclude the searched agreement
Remarks: The system allows you to sort columns in ascending or descending alphabetical order.

Owner’s Manual
50
EQUIPMENT OPERATION
Include Agreement The insertion screen allows the operator to include a new Agreement in the system
Figure 49 - Agreement Insertion Screen
Agreements insertion is made available through the following path: Include Button - New Agreement on the Home Screen System Menu Agreement - New Agreement Agreement Search - New Agreement
The following field for entering the Agreement is displayed: Name *: Represents the name of the Agreement
Remarks: When including a new Agreement, its status is always "Active" and cannot be changed at the time of insertion.
Edit Agreement In the Agreement Editing Screen it is possible to change the data related to Agreements registered.
Figure 50 - Agreement Editing Screen

Radiographic image scanner EAGLE.PS
51
EQUIPMENT OPERATION Agreements editing is available through the following path: Edit icon in the Agreements search result table.
Remarks: The system checks if there is another Agreement with the same name; Only while editing an Agreement is it possible to deactivate an Agreement. Since this editing impacts on the Patients registry, i.e., Inactive Agreements are not displayed on the patients' insertion / editing screen. When an Agreement has associated patients and is deactivated, it will be displayed with a red highlight in the patient editing.
Exclude Agreement The Agreement exclusion screen allows the Exclude operator an Agreement registered in the system. The exclusion of Agreements is made available through the following path: Exclude icon in the Agreements search result table.
Figure 51 - Agreement Exclusion Confirmation Pop-up
Remarks: It is not possible to exclude an Agreement associated with a Patient.
Agreement Summary The Agreements Summary Screen allows the operator to view the number of patients associated with all Agreements registered in the system. The Agreements Summary is available through the following path: Menu Agreement Agreements Summary
Figure 52 - Agreements Summary Screen

Owner’s Manual
52
EQUIPMENT OPERATION
Perform Notes These are the features that enable the Include, Edit, and Exclude notes operator. Annotations are 'drawings' that the operator can insert into the image or Odontogram.
Figure 53 - Screen for writing Notes
The system provides the following types of notes to apply to the image: Free Hand: Icon that allows the operator to draw freehand in the image, that is, without any specific shape in the image. Straight: Icon that allows the operator to draw a line in any direction in the image. Curve: Icon that allows the operator to draw a curve at any angle in the image. Ellipse: Icon that allows the operator to draw an ellipse in the image. Rectangle: Icon that allows the operator to draw a rectangle in the image. Arrow: Icon that allows the operator to draw an arrow in any way or direction and direction in the image, where, the first point is the beginning of the arrow, and the second the point of the arrow. Text: Icon that allows the operator to insert text into the image. A text box is provided so that the text can be inserted.
For the notes mentioned above it is possible to make the following adjustments of: Source: Configuration that allows the operator to select font, font style and size before entering text, according to the Options that are available by the operating system. Affects only the notes of the "Text" type Color: Configuration that allows the operator to select the color of the note before inserting it. Possible Options are 'Black', 'White', 'Gray', 'Green', 'Blue', 'Yellow' and 'Red' Affects all types of notes, i.e., affects 'Freehand', 'Straight', 'Curve', 'Ellipse', 'Rectangle', 'Arrow' and 'Text' notes. Style: Configuration that allows the operator to select the straight line style of the note before inserting it. Possible style options: 'Dotted', 'Fine', 'Medium' and 'Wide'. It only affects 'Freehand', 'Straight', 'Curve', 'Ellipse' and 'Rectangle' notes.
The following actions can be performed to the notes: Move the note: When clicking on a note, it is allowed to move it in the area of the image; Hide the note: By clicking the Hide button, you can view the image without any changes made; View the note: By clicking on the View button, you can re-view the previously hidden changes; Undo Last note: This action excludes the last note made; Excludes All: This action erases all notes;

Radiographic image scanner EAGLE.PS
53
EQUIPMENT OPERATION
Remarks: 'Hide note', 'View note', 'Undo Last note' and 'Undo All Notes' icons are only available if at least one note is drawn in the image.
Manipulate Image These are features that enable the operator to manipulate an image by Rotation and Mirroring.
The following manipulations to be applied in the image are available: Counter-clockwise rotation: Represents the rotation in the image in a counterclockwise direction, with the angle variation between rotations of 90 °. Clockwise rotation: Represents the clockwise rotation of the image, with the angle variation between rotations of 90 °. Horizontal Mirror: Represents the Mirroring of the image, which reverses the same in the horizontal direction. Vertical Mirroring: Represents the Mirroring of the image, which reverses the same in the vertical direction.
Figure 54 - Manipulate Image: Mirroring
Functions “Horizontal Mirror” and “Vertical Mirroring” will be only accessible after clicking the mouse right button When combining notes actions with rotation: Rotate the image and leave it in the correct position Perform the desired notes, measurements, and filters. Attention to the fact that, only the image is mirrored and not its manipulations (notes, Measurements and filters), therefore, the above order of execution must be maintained.

Owner’s Manual
54
EQUIPMENT OPERATION
Apply Filters or Adjustments These features allow the operator to apply filters or adjustments to an image: Auto-Adjust, Apply Contrast, Apply Brightness, Apply Sharpness, Apply Gamma, Apply Color / Grayscale, Invert, Apply Blur and Apply Sharpen (Highlight).
Figure 55 - Filters Application
The following filters or adjustments to be applied to the image are available: Auto Adjust: Represents the automatic adjustment of the brightness and contrast values of the image based on the histogram of the image, without user intervention. Apply Brightness: Represents the maximum amount of light emission from the image. The brightness variation should be between 0 and 100 points, with the default being 50. Apply Contrast: Represents the difference between the most targeted white and the densest black of the image. The contrast variation should be between 0 and 100 points, with the default being 50. Apply Sharpness: Represents the clarity of image detail. The sharpness variation should be between 0 and 100 points, with the default being 50. Apply Gamma: Represents the split luminosity INDEX of the particles c of the image. The gamma variation should be between 0 and 100 points, with the default being 20. Apply Color / Shades of Gray: Represents the color of the image, where it is originally grayed out. This function allows you to colorize it being possible to return to the original grayscale. Invert: Represents the inversion of the image, where the pixels whites become black, and vice versa, just as the gray tones assume inverse tones. Apply Blur: Represents smoothing the image, making it less sharp and reducing noise. Apply Sharpen (Highlight): Represents highlighting at the edges of the image, improving its sharpness and may generate some noise.
Some Options can be executed by the operator: Hide: By clicking this icon, the system will hide the filters or adjustments made in the image, that is, they will not display the filters in the image. Display: Clicking this icon will display the filters or adjustments made to the image that were previously hidden. Undo: When you click this icon, the system undoes the last filter or adjustment made in the image. Erase All: By clicking this icon, the system undoes all filter applications or adjustments made to the image.

Radiographic image scanner EAGLE.PS
55
EQUIPMENT OPERATION
Important: A filter or adjustment can be applied to the image as necessary for its better visualization, being no restrictions to the amount applied.
Perform Measurements Measurement icons enable the operator to perform Line and Angle Measurements on an image.
Figure 56 - Measurement icons
Measurement types Line: Represents the Measurement of the distance straight in any way or direction in the image. The Measurement unit must be 'mm' (millimeter), with an accuracy of 2 (two) decimal places. It can also be drawn consecutive lines, here called "Multiple Reads". Angle: Represents the Measurement of an angle between two consecutive straight lines. The Measurement unit should be 'degrees', with an accuracy of 2 (two) decimal places.
Remarks: Edit Measurement: By clicking on this icon, the system will provide a tool that will allow the operator to move one of the Measurement points, migrating it to a new location, and in parallel, the new measured value will be displayed. Hide: By clicking on this icon, the system will hide the Measurements made in the image, that is, it will not display the Measurements that were drawn in the image. Display: Clicking this icon will display the Measurements that were drawn on the previously hidden image. Undo Last note: Clicking this icon will erase the last Measurement that was performed on the image. Exclude All: By clicking on this icon, the system will display a confirmation message and, if the operator confirms, erase all the Measurements that were performed on the image. Calibrate Measure: Clicking on this icon will pop up the system according to Figure 57, allowing the operator to calibrate the actual measurement and pixel measurement performed on the image. Erase Any Measure: When performing this action, the system will display a confirmation message and, if the operator confirms, Erase is the only Measurement selected. This action is performed only by selecting Measurement and pressing the "Delete" button on the Keyboard. Calibration: For imported images, Retrieved and edited the actual measurement is "Zero".

Owner’s Manual
56
EQUIPMENT OPERATION
Figure 57 - Measurements Calibration Pop-up
Remarks: The "Calibrate Measurement" functionality can only be performed when a Straight Measurement is selected.
Diagnosis This is the Diagnosis Screen that enables the Dentist to Include or edit a Diagnosis of a particular Patient x-ray.
Include Diagnosis The insertion screen allows the operator to include a new Diagnosis in the system for the selected image.
Figure 58 - Diagnosis Screen
Diagnosis of an image is available through the following path: Diagnosis icon displayed on the View Image screen; Diagnosis icon in the "Complete Periapical", "Complementary Documentation" and "Odontogram" tabs. For the 'Odontogram', the numbers corresponding to the position of the tooth are displayed in the periapical scheme, as shown in Figure 79.

Radiographic image scanner EAGLE.PS
57
EQUIPMENT OPERATION The following fields are displayed for completion: Date: Represents the current date. It is displayed as read only, i.e., not allowing the operator tofill / edit the field information in question. Responsible: Represents the name of the current user logged into the system. It should only be displayed as read, i.e. it should not allow the data contained in that field to be filled / edited. If the system is not configured to perform the login, this field will be filled with the name "Responsible Dentist", entered in the Software Settings - Login Option screen (See page .61 - Software Configuration – Login Settings). Diagnosis: Represents the Diagnosis elaborated by the Dentist referred to the patient's current image.
Remarks: During the Diagnosis filling out, it is possible to go to the Next Image and the Previous Image in order to facilitate the development of the Diagnosis. This sequence corresponds to the same one of the images presented in the Complete Periapical tab when starting a Diagnosis, it is checked whether previous information is already present. Then it can be edited and saved later. The image presented for Diagnosis can be viewed in larger size with the changes and adjustments made to the image by clicking the 'View Image' icon. If the operator wishes to perform Diagnosis on images with manipulations (notes, filters or measurements), he must perform such manipulations before the Diagnosis is issued, since after saved, it is only possible to edit the description of the Diagnosis and not the manipulations performed on the image With Diagnosis.
Perform Printing This is the print screen that allows the operator to print images of X-rays, DICOM Header, Diagnosis (provided availability in the image) and Odontogram.
Diagnosis Printing The print screen allows the operator to print documents and images on conventional printers.
The following options are available for printing: Images: Represents the option to choose print of the patient's x-ray image (s). DICOM Header: Represents the option to choose printing of the DICOM x-ray Image Headers which will be printed. Diagnosis: Represents the option to choose the images to be printed. Odontogram: Represents the option to choose print Patient's Odontogram.
Remarks: It should be noted that the operator has selected at least one printing option; The system will automatically select the printing option according to the origin of the call, following the rule: If it is called from the "View Image" tab, It will display the 'Images' option selected;
Figure 59 - Print Options

Owner’s Manual
58
EQUIPMENT OPERATION The option 'DICOM Header' is only available if the 'Images' option has been selected. If it is called from the tab "Odontogram", it will display the selected option, "Odontogram"
Figure 60 - Printing Model
Export to Recordable Media On this screen you can export to a Recordable media, such as flash drive, external HD, SD Card and others
Exporting an image is available through the following path: Image export icon in the Image view screen
The system provides the following functionalities for export: Export Location *: Represents the location where the Images will be exported. Example: Local Disk, HD, Pen Drive, etc. Location can be selected With the "Select Directory" button, which will display the default operating system screen for operator to select the location where the images will be exported. Export Image: Represents the image format to be exported. Possible Options are: "JPEG" and "PNG". If "JPEG" option is selected, the system displays the following fields:
Figure 61 - Image export screen
Quality: Represents the image quality that can be set between 0 and 100. Qt. Images: Represents the total sum of images to be exported. In this field it is also counted

Radiographic image scanner EAGLE.PS
59
EQUIPMENT OPERATION Also the "Periapical Image" and "Periodontal Documentation". Export DICOM: Represents the format of the image to be exported, in this case, DICOM. When selected, the system displays the "Export Viewer" field, where the operator can choose to send the viewer along with the exported images. For more information about the viewer, see section Operation of EAGLE.PS DICOM Viewer: The system also provides the Image Options to be exported: Image (s): Represents the image (s) selected for export through the thumbnail panel; Full Periapical: Image containing all periapical images in one; Complementary Documentation: Image containing the entire periodontal pattern.
Remarks: For correct operation of the export functionality to writable media, you must install: IMAPI2 for Windows XP NET Framework 4 for Windows 7 and 8 The DICOM option is only possible when an image is selected.
Send E-mail The Send E-mail screen allows the operator to send an image (in JPEG / PNG or DICOM format), the image of the complete periapical scheme, the periodontal documentation scheme, or Diagnosis of the selected image.
Sending E-mail is made available through the following path: E-mail icon on the Image View screen
The system provides the following features for sending the e-mail: Export Image: Represents the format of the image to be sent by e-mail. Possible options: "JPEG" and "PNG". If "JPEG" is selected, the system displays the following fields: Quality: Represents the image quality that can be set between 0 and 100.
Qt. Images: Represents the total sum of images to be exported. In this field, the "Periapical Image" and the "Periodontal Documentation" are also counted. Export DICOM: Represents the format of the image to be sent by e-mail, in this case, DICOM. The system offers the following image options to be sent by e-mail: Image (s): Image selected for export through thumbnail panel; Full Periapical: Image containing all periapical images in one; Complementary Documentation: Image containing the entire periodontal scheme; Diagnosis: Text referring to the Diagnosis of Selected images.
Figure 62 - E-mail Attachments screen

Owner’s Manual
60
EQUIPMENT OPERATION
Remarks: Sending an e-mail depends on the Configuration made in the user registry (See page .32 - Include User). If the Email Configuration is automatic, the system will run the default operating system email program, such as Outlook. If the Configuration is manual, the system will display the screen as shown in Figure 63, providing the following fields: To *: Represents the e-mail of one or more recipients who will receive the e-mail; Subject *: Represents the subject of the message to be sent by e-mail; Message *: Represents a message to be sent by e-mail to the recipient (s); Attach File: Represents the option that allows the operator to attach other files to be Sent by e-mail. Exclude Annex: Represents the option that allows the operator to delete an attachment. The supported versions of Outlook (Windows default e-mail) are 2007 and 2013. Internet access is required so that emails can be sent. The uploaded images have the default file name: Single image, Grouped images, Dicom Image, Complete Priapical and Complementary Documentation: <PATIENT_NAME>_<DDMMAAAAHHMMSS>_<sequential>.<selected_extension> where<DDMMAAAAHHMMSS> for: Single image, Grouped images, Dicom image= <generation date> Complete Priapical and Complementary Documentation= <delivery date>. Emails may be sent to 25 different e-mail addresses at a time. DICOM Viewer is not sent by email because its size would exceed the quota of sending emails of many standard servers.
Figure 63 - Email Sending Screen
Consult Audit This audit search screen enables the operator to query audits performed on the system, displaying insert, change, exclusion, and error operations. The audit query is available through the following path: Audit Menu Home Screen– Other Options –Perform Audit
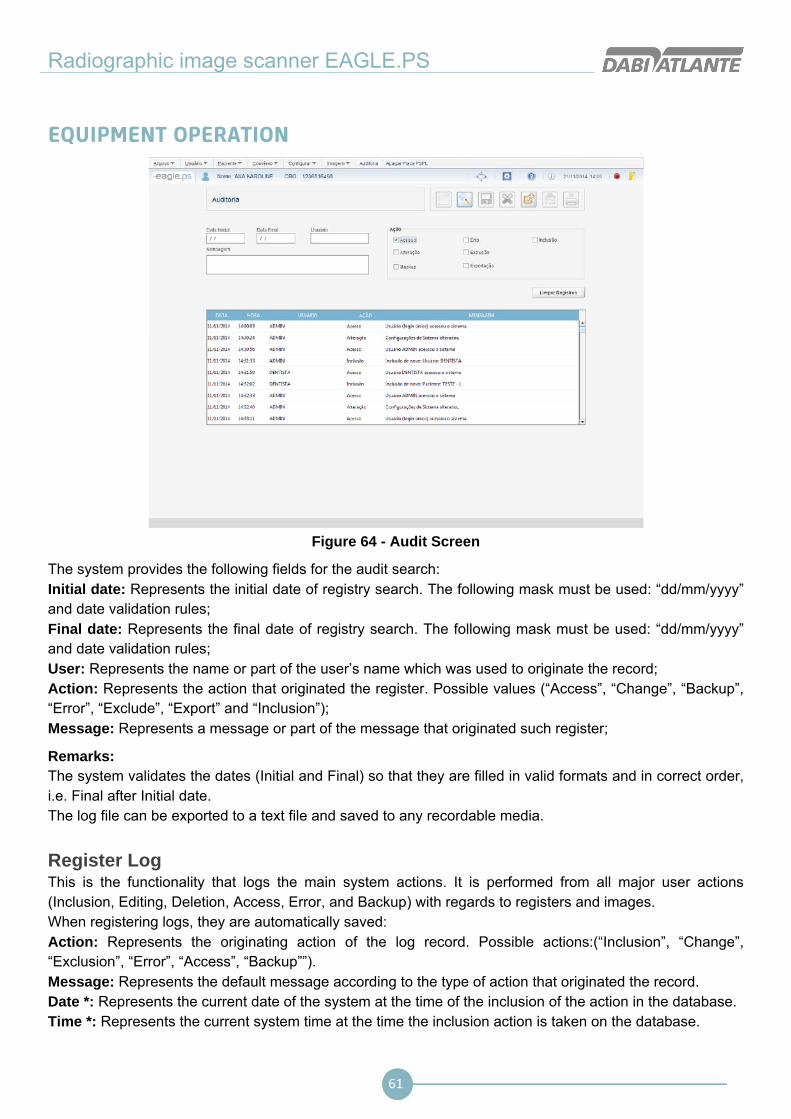
Radiographic image scanner EAGLE.PS
61
EQUIPMENT OPERATION
Figure 64 - Audit Screen
The system provides the following fields for the audit search: Initial date: Represents the initial date of registry search. The following mask must be used: “dd/mm/yyyy” and date validation rules; Final date: Represents the final date of registry search. The following mask must be used: “dd/mm/yyyy” and date validation rules; User: Represents the name or part of the user’s name which was used to originate the record; Action: Represents the action that originated the register. Possible values (“Access”, “Change”, “Backup”, “Error”, “Exclude”, “Export” and “Inclusion”); Message: Represents a message or part of the message that originated such register;
Remarks: The system validates the dates (Initial and Final) so that they are filled in valid formats and in correct order, i.e. Final after Initial date. The log file can be exported to a text file and saved to any recordable media.
Register Log This is the functionality that logs the main system actions. It is performed from all major user actions (Inclusion, Editing, Deletion, Access, Error, and Backup) with regards to registers and images. When registering logs, they are automatically saved: Action: Represents the originating action of the log record. Possible actions:(“Inclusion”, “Change”, “Exclusion”, “Error”, “Access”, “Backup””). Message: Represents the default message according to the type of action that originated the record. Date *: Represents the current date of the system at the time of the inclusion of the action in the database. Time *: Represents the current system time at the time the inclusion action is taken on the database.

Owner’s Manual
62
EQUIPMENT OPERATION
User *: Represents the name or part of the name of the user logged into the system at the time the inclusion action is originated in the database
Remarks: The system will apply the mask "dd / mm / yyyy" to the 'Date *' field. It will also validate it. The system will apply the mask "hh: mm: ss" to the 'Time *' field
Erase Phosphorous plate This feature allows the operator to format the phosphorous plate. To perform such procedure, the software will establish communication with EAGLE.PS. The user is allowed to erase the phosphorous plate at any time. It should be noted that this operation is not reversible, i.e., once the phosphorous plate is erased it will not be able to recover an image a new x-ray should be performed. Phosphorous plate erasure is available through the following path: Menu Erase plate Home Screen– Other Options – Erase plate
Remarks: If the user does not insert the phosphorous plate through the input plate in a maximum period of 120 seconds, the software will display a message that the phosphorous plate has not been inserted.
Software Configuration These are the features that enable the operator to perform the configurations on the software to log in, select the system language, configure the Diagnosis header and footer and configure the quality of the image of the EAGLE.PS equipment. Software configuration is available through the following path: Configure Menu – SW Configure Toolbar – System setup
Login Settings This is the Login Setup screen. Enables the operator to log in
Figure 65 - Software Settings: Login Option

Radiographic image scanner EAGLE.PS
63
EQUIPMENT OPERATION The system displays the following settings for Login Setup: Login Required: Represents the obligation or not of the login execution to gain access to the system. If "Yes" is selected, the system will require user login. If "No" is selected, the system will enable the following fields for Configuration: Dentist Responsible *: Represents the name of the Dentist responsible for the system. He should be informed when login is not required. CRO*: Represents the Dentist's CRO number. UF *: Represents the federation unit issuing the Dentist CRO. Use default email: Represents the choice of default operating system email usage. When this option is selected, the system automatically sends the e-mail using the default operating system email program. Manual Configuration: Represents the choice of using manual e-mail. Enables the "E-mail Server", "E-mail", "Name", "Outgoing Server (SMTP)", "SMTP Port", "Password", "Encrypted Connection" and "Encryption" fields. Follow the same rules and validations (See page .32 - Include User).
Language Configuration This is the System Language Configuration screen. Enables the operator to set the system language to Portuguese, English or Spanish.
Figure 66 - Software Settings: System Language
The system displays the following System Language Configuration possibility: Language: Represents the System Language. Possible Options are: 'Portuguese', 'English' and 'Spanish'

Owner’s Manual
64
EQUIPMENT OPERATION
Diagnosis Configuration This is the Diagnosis header and footer Configuration screen. Enables the operator to configure the information that will be displayed in the Diagnosis header and footer.
Figure 67 - Software Settings: Header and footer
The system displays the following Diagnostic Header and footer Configuration possibilities: Header: Logo brand *: Represents the logo brand of the clinic to be loaded from a file. Possible Options are 'Upload Photo', View Photo 'and' Remove Photo '. Clinic Name *: Represents the name of the clinic.
Footer: Address and Number*: Represents the Clinic Address. Telephone *: Represents the telephone number of the clinic. Contact Email *: represents the clinic's email.
X-ray Configurations This is the equipment configuration screen. Enables the operator to configure the equipment with 'High' and 'Fast' qualities
Figure 68 - Software Settings: X-Ray Information

Radiographic image scanner EAGLE.PS
65
EQUIPMENT OPERATION The system displays the following configuration option: Quality *: Represents the quality of the image to be obtained. Possible values: 'High' and 'Fast'.
Apply Zoom These are the features that enable the operator to zoom in on an image. Zoom Select, Zoom In, Zoom Out and Full Screen functions are available.
Figure 69 – Zoom Application Functionalities
The system provides the following types of zoom to apply to the image: Zoom Select: Represents the zoom application in a desired area by displaying the zoom located in the area around the mouse pointer. Zoom In: Represents the approximation of the image when it has not been approximated, reaching an approximation of up to 4 (four) times in relation to its original size. Decrease Zoom: Represents the distance of the image when it has not been distanced, reaching a distance of up to 4 (four) times in relation to its original size. Full Screen: Represents the image expansion to occupy the largest available space on the screen. Zoom: Represents the zooming or zooming or zooming located back to the initial aspect ratio of the viewer.
Remarks: Next image: When this action is triggered, the system will display the image following the current one, in the periodontal scheme. This option is available only when the system is in Full Screen mode. Previous image: When triggered this action, the system will display the previous image to the current one, in the periodontal scheme. This option is available only when the system is in "Full Screen" mode. The "Cancel Zoom" feature will only be accessible when you right-click; When the operator applies an "Zoom In" to an image that is already at its maximum (400%) approximation in relaction to its original size, the system will disable the zoom approximation icon When the operator applies a "Zoom Out" to an image that is already at maximum distancing (25%) relative to its original size, the system will disable the zoom-out icon. When the operator applies a "Select with Zoom", the system disables the "Zoom in", "Zoom out", "Full screen", "Counter-clockwise rotation", "Clockwise rotation", "Perform Calibration", "Measure Image "," Annotate Image "and" Apply Settings and Filters ". In the same way, when applying the "Zoom In" and "Zoom Out". When the operator applies a "Full Screen", the system will disable the "Select with Zoom" icons,

Owner’s Manual
66
EQUIPMENT OPERATION “Zoom In "," Zoom Out "," Measure Picture "and" Perform Calibration ". It is not allowed to save an image with previously mentioned zoom types
Full Periapical This is the periapical view screen. It allows the operator to view the most recent periapical images of Patient in Periapical Image format. You can send the periapical image by e-mail, export it to recordable media, change the position of an image to another of the same location, and view the Complementary Documentation and issue the Diagnosis.
View Image Full Periapical This is the Full Periapical, Full Image view screen.
Figure 70 - Full View Periapical Screen
The system displays images Retrieved according to the "Full Periapical" standard: Right Upper Quadrant: Right upper molars (18, 17, 16) Right upper right molars (55, 54) Right upper premolars (15, 14) Right upper canine (13) Deciduous Upper right canine (53)
Left Upper Quadrant: Left upper molars (28, 27, 26) Upper left superior molars (65, 64) Left upper premolars (25, 24) Upper left canine (23) Deciduous Upper left canine (63)
Left Lower Quadrant: Lower left molars (38, 37, 36) Lower left mandibles molars (75, 74) Left lower premolars (35, 34) Lower left canine (33) Deciduous Lower left canine(73)
Right Lower Quadrant: Right lower molars (48, 47, 46)

Radiographic image scanner EAGLE.PS
67
EQUIPMENT OPERATION Right lower molars deciduous (85, 84) Right lower premolars (45, 44) Right lower canine (43) Deciduous Right lower canine (83)
Incisors: Upper incisors (12, 11, 21, 22) Deciduous upper incisors (52, 51, 61, 62) Lower incisors (42, 41, 31, 32) Deciduous inferior incisors (82, 81, 71, 72)
Remarks: The system will display in each position only the most recent image, regardless of saddle it was "Imported", "Modified" or "Original"; If there is no image for a given position, the system will display the default image of the design; The 'Image Zoom', 'Manipulate Image', 'Perform Calibration', 'Measure Image', 'Annotate Image' and 'Apply Settings and Filters') will be disabled, ie the operator will not be able to apply These changes in the image. When asked to issue Diagnosis, the system will display the image contained in the Complete Periapical tab in Diagnosis Screen, where the operator will perform Diagnosis only for this image and not for all images that will be contained in Full Periapical.
Exchange Image To perform the exchange of images of the same position in the Full Periapical tab, the operator must click on the image with the right mouse button and change the following information, as shown in Figure 71:
Figure 71 –Image Exchange Pop-up

Owner’s Manual
68
EQUIPMENT OPERATION
Patient: Represents the patient to be selected for image exchange. Quadrant: Represents the position of the tooth that will be included. Other Images: Represents the images that can be exchanged for the image that is being displayed in Full Periapical. The images shown in this field belong to the same position of the image chosen to perform the exchange.
Remarks: Whenever the operator requests the Full Periapical view, all previous exchange images will not be displayed, since the image exchanges are intended for simultaneous visualization. This will follow the rule for displaying the most recent image.
View Complementary Documentation This is the view screen of the set of images that make up the Patient's Complementary Documentation. Complementary Documentation can be exported to writable media, send by e-mail, and issue Diagnostics.
Figure 72 - Complementary Documentation View Screen
In addition to periapical images, Complementary Documentation also displays the following images: 5 Intraoral Images (Frontal, Right Lateral, Left Lateral, Upper Occlusal and Occlusal Lower) 2 Occlusal X-ray Images (Upper and Lower) 1 Panoramic x-ray image 1 Image of Cephalometric X-ray
Remarks: Images from the Complementary Documentation, (Left Side Photo, Right Side Photo, Upper Occlusal Photo, Lower Occlusal Photo, Front View, Panoramic Rx, Cephalometric Rx) are imported, Not being retrieved through the EAGLE.PS equipment. The image exchanges functionality of the "Full Periapical" tab is not available on the tab "Complementary Documentation". When prompted to issue Diagnosis, the system displays the image contained in the "Complementary Documentation" in the Diagnosis Screen, where the operator performs the Diagnosis only for this image and not for all the images that will be contained in the Complementary Documentation.

Radiographic image scanner EAGLE.PS
69
EQUIPMENT OPERATION
Compare Images This feature is responsible for Comparison of two or more images selected, Dividing the screen in 2 to 4 equal parts for visualization.
Figure 73 - Image Comparison Screen: 2 images
Figure 74 - Image Comparison Screen:3 images
Figure 75 - Image Comparison Screen: 4 images

Owner’s Manual
70
EQUIPMENT OPERATION To perform the Comparison of images it is necessary to select from 2 to 4 images in the image thumbnails panel and click on the "Compare Images" button.
Remarks: The "Compare Images" function will be disabled only when 1 (one) image is selected and when more than 4 images are selected. The "Select with Zoom", "Full Screen", "Perform Calibration", "Measure Picture", "Annotate Picture" and "Apply Filters and Adjustments" icons will be disabled when the system is in Comparison mode. You cannot save an image being compared.
Perform Backup This feature enables the operator to perform and import backup data from the system. Backups are system security copies. Performing this procedure often decreases the chance of total loss of critical system data.
Perform Backup functionality is available at: Configure Menu - Perform Backup The system displays the following message: "The last backup performed was at <last backup date and time>. Confirm execution of a new backup? ", As shown in Figure 76:
Figure 76 – Confirmation Pop-up for Backup Execution
If no previous backup has been performed, the system displays the following message: "No previous backups were performed. Do you want to perform a new Backup? ":
Figure 77 – No Backup Made Previously Pop-up
To recover data, i.e., import a previous backup into the system; you must select the functionality from the following path: Configure Menu - Import Backup
The system displays the default file picker for the operating system so that the operator selects the backup file to be imported into the system. When the file is selected, the system will display the following message: "When restoring the data contained in the backup of this file, any modification made at a later date will be lost. Please log in again. Do you confirm the data restoration? ", As shown in Figure 78:

Radiographic image scanner EAGLE.PS
71
EQUIPMENT OPERATION
Figure 78 –Confirmation for Data Restoration Pop-up
Remarks: The backup file should follow the following pattern: "Backup_ <system name> _ <year> - <month> - <day> _ <time> - <minute> .dump". When there is more than one user logged into the application at the time a data import is performed, the system displays an expired access message to the other users. When there is more than one user logged into the application at the time a data import is performed, the system displays an expired access message to the other users. When an import is made, any data included in the system that is not in the backup to be imported will be lost. After the successful backup restore message, the system will be automatically closed to complete the process of importing the backup data.
Odontogram This is the Odontogram view screen. It enables the operator to perform notes, print and issue Diagnosis.
Figure 79 - Odontogram View Screen
Perform Notes in the Odontogram In the Odontogram view screen it is possible for the operator to insert notes (Freehand, Straight, Curve, Ellipse, Rectangle, Arrow and Text) in Odontogram. The notes can be added in the same way as in the x-ray image.
Remarks: If the Odontogram contains drawings that have been made, the system displays them. Otherwise, the system will not display any drawings; Only the image. If the position of a tooth has an X-ray image, the system will display it in the Green color, where, after clicking on the number that contains this color, it will be redirected to the Diagnosis Screen.

Owner’s Manual
72
The Diagnosis icon will be disabled when entering this tab, because the operator can access the Diagnosis by clicking on the tooth position

Radiographic image scanner EAGLE.PS
73
CAUTIONS, RESTRICTIONS AND WARNINGS
Recommendations for equipment conservation Your EAGLE.PS equipment has been designed and perfected within the standards of modern technology. All appliances require special care, which are often overlooked for various reasons and circumstances, here are some important reminders for your day to day. Try to respect these small rules that, incorporated into the work routine, will provide great time savings and avoid unnecessary expenses.
Transport, storage and operation conditions The equipment must be transported and stored with the following Remarks: - Be careful not to suffer falls or impacts. - With moisture protection, do not expose to rain, splashing water or moist soil. - Keep in a place protected from rain and direct sunlight and in its original packaging. - When transporting, do not move it on uneven surfaces and protect the packaging from direct rain and Respect the maximum stacking stated on the outside of the package.
Environmental conditions for transportation or storage: - Ambient temperature range for transport or storage -29ºC to + 60ºC. - Relative humidity range for transport or storage 20% to 90%. - Atmospheric pressure range 500hPa at 1060 hPa (375 mmHg to 795 mmHg).
Environmental conditions for operation: - Ambient operating temperature range + 10ºC to + 40ºC. - Recommended ambient temperature range + 21ºC to + 26ºC. - Operating relative humidity range 30% to 75%. - Atmospheric pressure range 700 hPa to 1060 hPa (525 mmHg to 795 mmHg). - Operation altitude: ≤2000m.
Attention The Equipment will maintain its safety and efficacy condition as long as it is kept (stored) as mentioned in this operating instruction. In this way, the equipment will not lose or alter its physical and dimensional characteristics.
Sensitivity to predictable environmental conditions under normal use - The equipment is designed not to be sensitive to interference such as magnetic fields, external electrical influences, electrostatic discharge, pressure or pressure variation, provided that the equipment is installed, maintained, cleaned, stored, transported and operated in accordance with this instruction manual.
Precautions and warnings “during equipment installation” - This equipment may only be unpacked and installed by an authorized DABI ATLANTE technician, otherwise the warranty will be forfeited, since only it has the information, the appropriate tools and the necessary training to perform this task. - DABI ATLANTE shall not be liable for damages or accidents caused by improper installation carried out by an unauthorized DABI ATLANTE technician. - Only after the equipment has been installed and properly tested by the authorized DABI ATLANTE representative, it will be ready to start the operations at work. - The equipment should be installed in a level and stable position. - Install the equipment in a place where it will not be damaged by pressure, temperature, humidity, direct sunlight, dust or salts.

Owner’s Manual
74
CAUTIONS, RESTRICTIONS AND WARNINGS - The equipment should not be subjected to inclination, excessive vibrations, or shocks (including during transportation and manipulation). - This equipment is not intended for use in an environment where vapors, flammable anesthetic mixtures with air, or oxygen and nitrous oxide can be detected. - Check the equipment voltage at the time of the electrical installation. - Check that the socket where the equipment will be switched on has a ground pin, essential for the perfect operation and safety of the equipment, according to ABNT standard. - The equipment must be correctly grounded. - Before first use and / or after long work interruptions such as vacations, clean and disinfect the equipment.
Cautions and Attentions “during equipment use - The equipment should be operated only by properly trained and qualified technicians (Dentists and Skilled Surgeons). - In the event of maintenance, use only authorized DABI ATLANTE service. - Do not use this equipment in conjunction with other devices that are very sensitive to interference or with devices that create high electromagnetic disturbances. - Do not subject the plastic parts to contact with chemical substances used in routine dental treatment. Such as: acids, mercury, acrylic liquids, amalgams, etc. - Avoid spilling water or other liquids inside the equipment, which could cause short circuits. - The EAGLE.PS equipment was developed only for the retrieval of X-ray images periapical sizes (0, 1, 2 or 3). - This equipment is not suitable for monitoring patients for long periods of time. - The EAGLE.PS equipment should preferably be used with EAGLE property image retrieval software. There is the possibility of connecting with other software through the WIA driver but EAGLE is not responsible for the results obtained in image retrieval by systems other than EAGLE.PS-SW.
EAGLE will not be responsible for: - Use of equipment other than that for which it is intended. - Damage caused to the equipment, the professional and / or the patient by incorrect installation and erroneous maintenance procedures, different from those described in these Operating Instructions accompanying the equipment or by incorrect operation of the same.
Precautions and warnings“after” equipment use - Disconnect the equipment's general switch when not in use for a long time. - Keep the equipment always clean for the next operation. - Do not modify any part of the equipment. Do not unplug the cable or other connections unnecessarily.
Precautions and warnings during “cleaning and disinfection” of the
equipment - Before cleaning the equipment, turn off the main switch. - Avoid spilling water or other liquids inside the equipment, which could cause short circuits. - Do not use micro abrasive material or steel wool for cleaning, do not use organic solvents or detergents containing solvents such as ether, stain remover, etc.

75
Cautions to be adopted against predictable or unusual risks, related to deac-tivation and abandonment of the equipmentTo avoid environmental contamination or improper use of the Equipment and its accessories / parts after scrapping, it should be discarded in appropriate place (according to local legislation of the country).- Observe the local legislation of the country for the conditions of installation and waste disposal
CAUTIONS, RESTRICTIONS AND WARNINGS
Cautions in case of changes to equipment operation- If the equipment has any abnormalities, check whether the problem is related to any item listed in the unplanned Issues (Failures, Causes, and Solutions) topic. If the problem cannot be solved, turn off the equipment, unplug the power cord, and contact your DABI ATLANTE dealer
Attention - The cleaning procedure below should be followed at the start of the procedure and after each Patient.- In order to eliminate safety risks or damages to the equipment, we recommend when cleaning avoid penetration of liquids inside the equipment.- To clean the equipment, use a cloth soaked in water with neutral soap.- The application of other solvent-based cleaning products or sodium hypochloride isn’t recommended, because they may damage the equipment.
General cleaningImportant: To carry out cleaning or any type of maintenance, make sure that the equipment is disconnected from the power supply system.
Additional procedures for reuseThe equipment is reusable in undetermined quantities, i.e., unlimited, requiring only cleaning and Disinfection.
CORRECTIVE AND PREVENTIVE MAINTENANCE AND MAINTENANCE
Disinfection- To carry out the Disinfection of the equipment use a clean and soft cloth moistened with alcohol 70%. (Except for protective film and radiographic phosphor plate).- Never use corrosive disinfectants or solvents.
WarningIn order to prevent contamination, wear gloves and other protective systems during Di-sinfection.Even if gloves are used during procedures, gloves should be washed after handling gloves.
NoteThe “Asepsi” Ministry of Health registration is carried out separately from the product described in this manual, as “Asepsi” is not manufactured by DABI ATLANTE
Phosphorous platesFor execution of the cleaning of your phosphorous plates, we recommend the use of the product "Asepsi" (Reg. MS: 253516197302017-86) or another that has similar characteristics:Product Composition: Tensoativo não iônico, solvente, acidificante e veículo.For more information on cleaning procedures, refer to the manufacturer's instructions on the product.

76
CORRECTIVE AND PREVENTIVE MAINTENANCE AND MAINTENANCE
Preventive maintenanceThe equipment must undergo routine measurements, according to the current legislation of the country. More never with more than 3 years.To protect your equipment, contact an DABI ATLANTE service representative for periodic reviews of Preventive maintenance.
Attention If the equipment has any abnormalities, check whether the problem is related to any of the items listed in the unpredicted item (situation, cause and solution). If the problem cannot be solved, switch off the equipment and request the presence of an DABI ATLANTE technician at the nearest reseller, or request an EAGLE Service Call: + 55 (16) 3512-1288.
Corrective maintenanceEAGLE declares that the provision of circuit diagrams, component lists or any other information that provides technical assistance by the user, may be requested, as long as previously agreed, between this and the Company.

Radiographic image scanner EAGLE.PS
77
UNFORESEEN- TROUBLESHOOTING
Should you find an operation problem, follow the instructions below to check and repair the problem, and / or contact your dealer.
Unforeseen Likely cause Solutions
− Inoperative Equipment. − Disconnected power plug − General Power switch off. − Power shortage in the network
− Plug power plug into outlet. − Turn on power switch. − Wait for power network
normalization
− Equipment switches off as soon as it gets started.
− Cables or plug not properly connected.
− Hardware failure. − Low voltage in power supply
network.
− Check power cables for proper wiring.
− Request a visit of an authorized DABI ATLANTE technician.
− Check the local voltage.
− Status or Operation LEDs fail to light.
− LED failure. − Request a visit of an authorized DABI ATLANTE technician.
− Too much noise after turning on the equipment
− If the noise persists for more than 30 seconds, there is a problem with the motor.
− Request a visit of an authorized DABI ATLANTE technician.
− EAGLE.PS image retrieval software does not recognize the equipment
− The Equipment is not connected. –The Equipment is not connected to the computer.
− Computer does not recognize the EAGLE.PS equipment.
− Hardware failure.
− Turn on the equipment. − Check the USB connection of
the equipment to the computer. - USB Driver (FTDI) is not installed or is inactive.
− Check the USB cable. - Inform DABI ATLANTE technical support
− Equipment does not respond when inserting a phosphorous plate.
− EAGLE.PS did not complete the startup process.
− Wait 20 - 30 seconds to finish boot.

Owner’s Manual
78
UNFORESEEN- TROUBLESHOOTING
System Messages Error and warning messages displayed by the system are listed below:
User Error and warning messages displayed by the system are listed below:
Message Error or warning grounds Solution
− There are unfilled mandatory fields.
− The system typically displays this Message when the mandatory fields on the screen in question are not filled out.
− All required fields must be filled in.
− There was an error accessing the database. If the problem persists contact the System Administrator.
− The system typically displays this Message when there is no connection to the database.
− Reestablish communication with the database.
− User not found with the reported criteria.
− The system typically displays this Message when trying to search for a user who is not registered in the database.
− Check the completion of the search filters and / or users registered in the system. In case Message is repeated, register the user in the system.
− An error occurred while accessing the photo, or a corrupted image. If the problem persists, contact the System Administrator.
− The system usually displays this Message when the system tries to access a corrupted image.
− Have at least one image that is not corrupted.
− All data entered will be lost. Do you wish to continue?
− The system usually displays this Message when the operator accesses another menu or wishes to exit the application before finalizing the registration or editing of the user.
− Save the user data record or edit.
− Communication error with the camera.
− The system generally displays this Message when the operator requests to use the webcam, but the webcam is unexpectedly disconnected from the computer.
− Do not disconnect the webcam from the computer until you have completed the function of including / editing a user picture.
− The selected User <User Name> cannot be deleted because it has already performed actions on the system.
− The system usually displays this Message when the operator requests to delete a user who has already performed actions on the system.
− Do not exclude user who has already taken any action (inclusion / change / deletion) on the system.
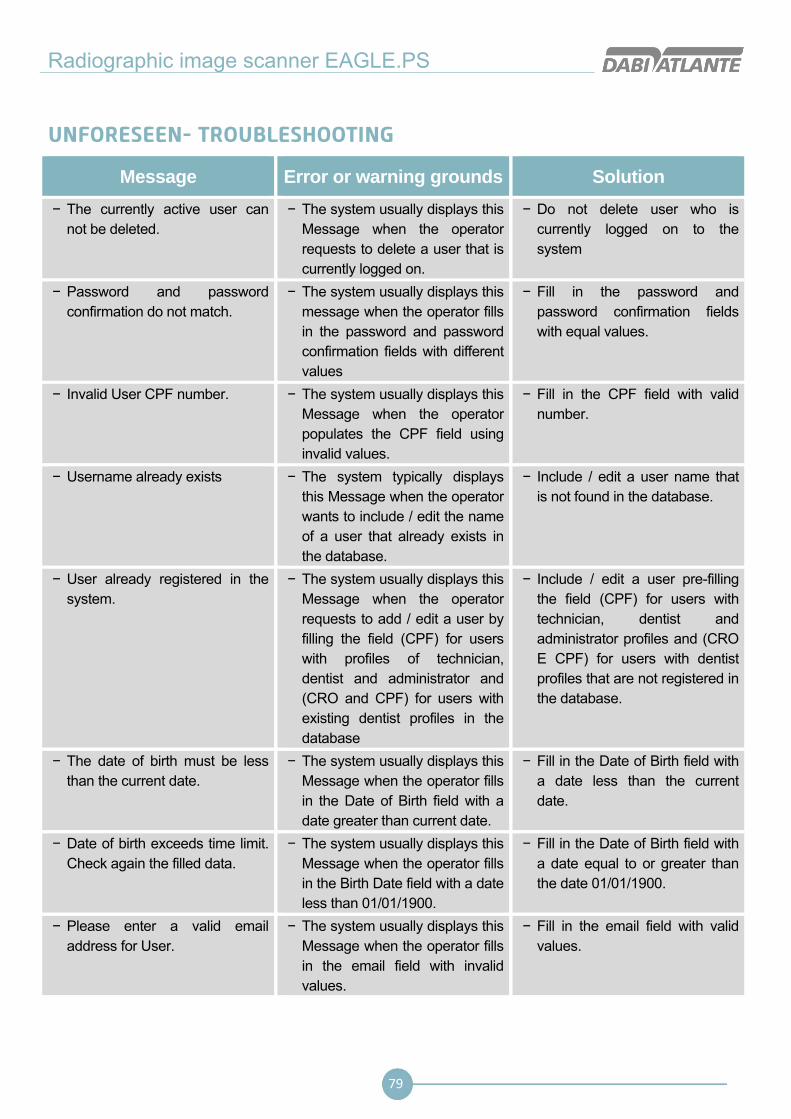
Radiographic image scanner EAGLE.PS
79
UNFORESEEN- TROUBLESHOOTING
Message Error or warning grounds Solution
− The currently active user can not be deleted.
− The system usually displays this Message when the operator requests to delete a user that is currently logged on.
− Do not delete user who is currently logged on to the system
− Password and password confirmation do not match.
− The system usually displays this message when the operator fills in the password and password confirmation fields with different values
− Fill in the password and password confirmation fields with equal values.
− Invalid User CPF number. − The system usually displays this Message when the operator populates the CPF field using invalid values.
− Fill in the CPF field with valid number.
− Username already exists − The system typically displays this Message when the operator wants to include / edit the name of a user that already exists in the database.
− Include / edit a user name that is not found in the database.
− User already registered in the system.
− The system usually displays this Message when the operator requests to add / edit a user by filling the field (CPF) for users with profiles of technician, dentist and administrator and (CRO and CPF) for users with existing dentist profiles in the database
− Include / edit a user pre-filling the field (CPF) for users with technician, dentist and administrator profiles and (CRO E CPF) for users with dentist profiles that are not registered in the database.
− The date of birth must be less than the current date.
− The system usually displays this Message when the operator fills in the Date of Birth field with a date greater than current date.
− Fill in the Date of Birth field with a date less than the current date.
− Date of birth exceeds time limit. Check again the filled data.
− The system usually displays this Message when the operator fills in the Birth Date field with a date less than 01/01/1900.
− Fill in the Date of Birth field with a date equal to or greater than the date 01/01/1900.
− Please enter a valid email address for User.
− The system usually displays this Message when the operator fills in the email field with invalid values.
− Fill in the email field with valid values.

Owner’s Manual
80
UNFORESEEN- TROUBLESHOOTING
Message Error or warning grounds Solution
− The photo cannot exceed the size of 500Kb.
− The system usually displays this Message when the operator requests to load a photo that exceeds the size of 500Kb.
− Operator to upload a photo with size smaller than 500Kb.
− The Password must contain at least 4 characters and a maximum of 8 characters.
− The system usually displays this Message when the operator fills in the password field with value less than 4 and over 8 characters.
− Fill in the Password field with value from 4 and less than 8 characters.
− This user cannot be deleted, sine he has one or more Patients associated with him.
− The system generally requires this Message when the operator requests to delete a user who is associated with a patient.
− − Do not exclude a user that is
associated with a patient.
− The User and Password fields must be filled in.
− The system typically displays this Message when the required user and password fields are not filled in the system login screen.
− All required fields must be filled in.
− Invalid User and/or Password. − The system typically displays this Message when the user and password fields are populated with invalid values on the system login screen.
− Fill in the user and password fields with valid values.
− This user is inactive. If you have any questions, please contact the System Administrator.
− The system usually displays this message when the user attempting to log in is an inactive user.
− Log in only users with active status on the system.
− Expired Session. Please log in again.
− The system typically displays this Message when the session expired.
− Login again to the system.
− There was an error opening the file. If the problem persists contact the System Administrator.
− The system typically displays this Message when there is no PDF reader installed on the computer.
− Install the PDF reader on your computer so that the Help document can be displayed successfully.

Radiographic image scanner EAGLE.PS
81
UNFORESEEN- TROUBLESHOOTING
Setup Profile
Message Error or warning grounds Solution
− There was an error accessing the database. If the problem persists contact the System Administrator.
− The system typically displays this Message when there is no connection to the database
− Reestablish communication with the database.
− The profile must have at least one associated permission, and each permission must be associated with at least one profile.
− The system usually displays this Message when the user requests to save a Profile without any permission selected or with permission not associated with any Profile.
− Save a Permitted Profile, that is, with a permission associated with at least one Profile.
− All changes made will be lost. Do you want to continue?
− The system usually displays this Message when the operator accesses another menu or wishes to exit the application while running a feature on the profile pop-up screen.
− Remain on the profile setup screen until you finish the desired functionality.
− Your profile does not have access to this feature. If in doubt, contact the System Administrator.
− The system usually displays this Message when the operator tries to access a feature in which the profile that it owns does not allow access to it.
− Associate the functionality you want to access to the user logged in profile.
− There have been changes in the access profile. Please enter the system once more.
− The system usually displays this Message when changes are made to the operator profile.
− Access the system once more.
Patient
Message Error or warning grounds Solution
− There are unfilled mandatory fields.
− The system usually displays this Message when the required fields of the screen in question are not filled in.
− All required fields must be filled in.
− There was an error accessing the database. If the problem persists contact the System Administrator.
− The system typically displays this Message when there is no connection to the database
− Reestablish communication with the database.

Owner’s Manual
82
UNFORESEEN- TROUBLESHOOTING
Message Error or warning grounds Solution
− An error occurred while accessing the photo, or a corrupted image. If the problem persists, contact your System Administrator.
− The system usually displays this Message when the system tries to access a corrupted image.
− Have at least one image that is not corrupted.
− All data entered will be lost. Do you wish to continue?
− The system typically displays this Message when the operator accesses another menu or wishes to exit the application while performing a feature on Patient's registration screen.
− Remain on the Patient screen until the desired functionality is completed.
− Communication error with the camera.
− The system generally displays this Message when the operator requests to use the webcam, but the webcam is unexpectedly disconnected from the computer.
− Do not disconnect the webcam from the computer until the function of adding / editing a user picture has been completed.
− Select at least one Dentist to associate with the Patient.
− The system usually displays this Message when the operator selects no dentists to associate with the Patient.
− Select at least one dentist to associate with the Patient.
− Patient <patient name> cannot be excluded since there are exams associated with him.
− The system usually displays this Message when the operator requests to exclude a Patient that is associated with an x-ray examination, a diagnostic or saved modifications in the patient’s odontogram.
− Do not exclude Patient associated with an x-ray examination and diagnosis.
− Invalid Patient CPF number − The system usually displays this Message when the operator populates the CPF field using invalid values.
− Fill in the CPF field with valid number.
− Duplicate patient. Please check the information entered.
− The system usually displays this Message when the operator fills in the field (CPF), (Enrollment), (Full Name and Date of Birth) with existing values in the database
− Fill in the field (CPF), (Enrollment), (Full Name and Date of Birth) with values that do not exist in the database.
− Please enter a valid email address for the Patient.
− The system usually displays this Message when the operator fills in the email field with invalid values.
− Fill in the email field with valid values.

Radiographic image scanner EAGLE.PS
83
UNFORESEEN- TROUBLESHOOTING
Message Error or warning grounds Solution
− The date of birth must be less than the current date.
− The system usually displays this Message when the operator fills in the Birth Date field with a date greater than the current date.
− Fill in the Date of Birth field with a date less than the current date.
− Date of Birth exceeds time limit. Check filled data.
− The system usually displays this Message when the operator fills in the Birth Date field with a date less than 01/01/1900.
− Fill in the Date of Birth field with a date equal to or greater than the date 01/01/1900.
− The photo cannot exceed the size of 500Kb.
− The system usually displays this Message when the operator requests to load a photo that exceeds the size of 500Kb.
− Operator to upload a photo with size smaller than 500Kb.
− Associated dentist does not have adequate profile. Choose a new dentist.
− The system usually displays this Message when the operator selects a dentist that for some reason has ceased to have the dentist profile and became administrator or technician during the registration of the Patient.
− Select a dentist with dentist profile.
Agreement
Message Error or warning grounds Solution
− There are unfilled mandatory fields.
− The system usually displays this Message when the required fields of the screen in question are not filled in.
− All required fields must be filled in.
− There was an error accessing the database. If the problem persists contact the System Administrator.
− The system usually displays this Message when there is no connection with the database.
− Reestablish communication with the database.
− All data entered will be lost. Do you wish to continue?
− The system typically displays this Message when the operator accesses another menu or wishes to exit the application while performing a feature on the agreement signup screen.
− Remain on the Patient screen until the desired functionality is completed.

Owner’s Manual
84
UNFORESEEN- TROUBLESHOOTING
Message Error or warning grounds Solution
− This agreement cannot be excluded because it is associated with a Patient
− The system typically displays this Message when the operator requests to delete an agreement that is associated with a Patient.
− Do not exclude agreement associated with a Patient.
− An agreement with this name already exists
− The system typically displays this Message when the operator fills in the agreement name field with a value already entered in the database.
− Inform the name of an agreement with a value that does not exist in the database.
Visualize Image
Message Error or warning grounds Solution
− There was an error accessing the database. If the problem persists contact the System Administrator.
− The system typically displays this Message when there is no connection to the database
− Reestablish communication with the database.
− The image cannot be excluded because it has a diagnosis associated with it.
− The system typically displays this Message when the operator requests to delete an image that has an associated diagnostic.
− Do not exclude a Message that has an associated diagnostic.
− This modification cannot be saved because the image does not belong to this Patient
− The system usually displays this Message when the operator tries to save an image that has its properties changed, belonging to another Patient
− Exit the Preview screen and enter again, so that the image (s) can be updated.
Measure Image
Message Error or warning grounds Solution
− There are unfilled mandatory fields.
− The system typically displays this Message when the mandatory fields on the screen in question are not filled out.
− All required fields must be filled in.
− There was an error accessing the database. If the problem persists contact the System Administrator.
− The system usually displays this Message when there is no connection to the database.
− Reestablish communication with the database.

Radiographic image scanner EAGLE.PS
85
UNFORESEEN- TROUBLESHOOTING
Message Error or warning grounds Solution
− Select a straight measurement. − The system usually displays this Message when the operator attempts to calibrate an image without selecting a measurement of the 'Straight' type.
− Draw and / or select a 'Straight' measurement.
Diagnosis
Message Error or warning grounds Solution
− There was an error accessing the database. If the problem persists contact the System Administrator.
− The system typically displays this Message when there is no connection to the database
− Reestablish communication with the database.
− All data entered will be lost. Do you wish to continue?
− The system usually displays this Message when the operator accesses another menu or wishes to exit the application while a feature is running on the Diagnosis screen.
− Stay on the diagnostic screen until the desired functionality is complete.
Export to Recordable Media
Message Error or warning grounds Solution
− There are unfilled mandatory fields.
− The system typically displays this Message when the required fields are not filled and they are prompted to export
− Fill in mandatory fields before confirming the export.
− There was an error accessing the image. Media cannot be recorded. If the problem persists contact the System Administrator
− The system typically displays this Message when the system tries to access a DICOM image that is in error.
− Have DICOM images that are not in error.
− An error occurred during the media recording process. It may not work properly.
− The system typically displays this Message when an error occurs during media recording process, that is, interrupt the recording process at the time of its execution.
− Do not interrupt the recording process at the time of its execution.

Owner’s Manual
86
UNFORESEEN- TROUBLESHOOTING
Message Error or warning grounds Solution
− There have been changes in the access profile. Please re-enter the system.
− The system typically displays this Message when loss of operator access to the export functionality for recordable media occurs
− Log in again on the system.
Send E-mail
Message Error or warning grounds Solution
− Cannot send a Message without attached files.
− The system usually displays this Message when the operator removes all attached files in the e-mail that will be sent.
− Do not remove all files in attachments from the email in question.
− The Message cannot be sent. Contact the System Administrator.
− The system usually displays this Message when it tries to send the email, but there is an error, such as a loss of connection to the Internet, for example.
− Check the internet settings and / or if you have a locking mechanism that is preventing the application from communicating with the internet and redo the procedure of sending email...
− There are unfilled mandatory fields.
− The system usually displays this Message when the required fields of the screen in question are not filled in
− All required fields must be filled in.
− There is no Diagnosis associated with this image.
− The system usually displays this Message when the operator requests to send a Diagnosis via email, but there is no Diagnosis associated with the x-rays in question.
− Have at least one diagnosis of an x-ray to be sent by email
− This content cannot be sent via e-mail.
− The system usually displays this Message when the operator tries to send content other than 'Image', 'Periapical Image', 'Periodontal Documentation', 'Diagnostics' and 'Medical Image Files'.
− Remove contents that do not belong to the categories listed above.
− Reported email is invalid. Please check and correct.
− The system usually displays this Message when e-mails are invalid.
− Enter valid emails.
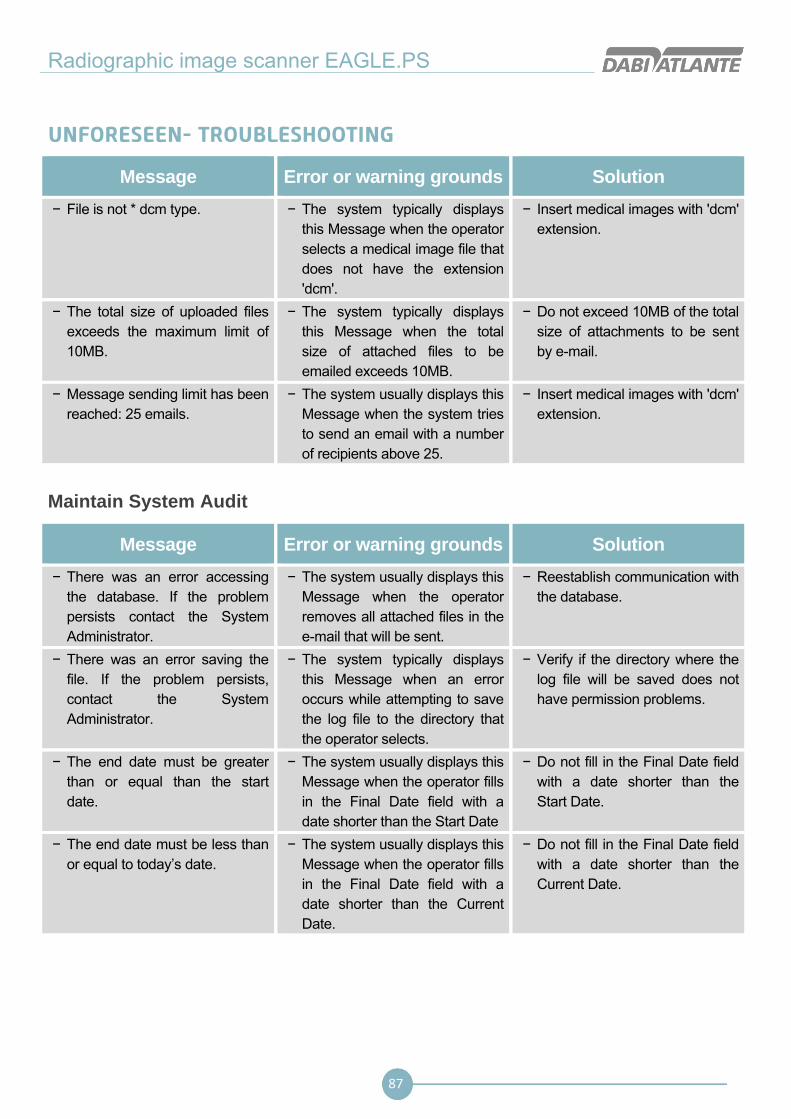
Radiographic image scanner EAGLE.PS
87
UNFORESEEN- TROUBLESHOOTING
Message Error or warning grounds Solution
− File is not * dcm type. − The system typically displays this Message when the operator selects a medical image file that does not have the extension 'dcm'.
− Insert medical images with 'dcm' extension.
− The total size of uploaded files exceeds the maximum limit of 10MB.
− The system typically displays this Message when the total size of attached files to be emailed exceeds 10MB.
− Do not exceed 10MB of the total size of attachments to be sent by e-mail.
− Message sending limit has been reached: 25 emails.
− The system usually displays this Message when the system tries to send an email with a number of recipients above 25.
− Insert medical images with 'dcm' extension.
Maintain System Audit
Message Error or warning grounds Solution
− There was an error accessing the database. If the problem persists contact the System Administrator.
− The system usually displays this Message when the operator removes all attached files in the e-mail that will be sent.
− Reestablish communication with the database.
− There was an error saving the file. If the problem persists, contact the System Administrator.
− The system typically displays this Message when an error occurs while attempting to save the log file to the directory that the operator selects.
− Verify if the directory where the log file will be saved does not have permission problems.
− The end date must be greater than or equal than the start date.
− The system usually displays this Message when the operator fills in the Final Date field with a date shorter than the Start Date
− Do not fill in the Final Date field with a date shorter than the Start Date.
− The end date must be less than or equal to today’s date.
− The system usually displays this Message when the operator fills in the Final Date field with a date shorter than the Current Date.
− Do not fill in the Final Date field with a date shorter than the Current Date.

Owner’s Manual
88
UNFORESEEN- TROUBLESHOOTING
Erase phosphorous plate
Message Error or warning grounds Solution
− Initializing equipment, please wait.
− The system typically displays this Message when the operator requests to erase the phosphorous plate at the time the machine is being initialized.
− Wait for the equipment to start up, i.e. when the blue LED becomes constant
− Check if the equipment is turned on and connected to the computer.
− The system usually displays this Message when the operator requests to erase the phosphorous plate and the equipment is turned off.
− Turn on the equipment, connect it to the computer, and wait for it to get started.
− Operating time exceeded. − The System usually displays this Message when the operator does not insert the phosphorous plate into the equipment within 120 seconds.
− Insert the phosphorus plate into the equipment within 120 seconds.
− Equipment busy. Wait until current process is finished.
− The system usually displays this Message when the operator requests to erase the phosphorous plate, however the equipment is performing another process.
− Wait until the equipment completes the process that is running.
Perform software configurations
Message Error or warning grounds Solution
− The changes you have made have not been saved, do you want to continue?
− The system typically displays this Message when the operator accesses another menu or wants to exit the application while running a feature on the system settings screen.
− Remain on the system settings screen until you have completed the desired functionality
− There are unfilled mandatory fields.
− The system usually displays this Message when the required fields of the screen in question are not filled in.
− All required fields must be filled in.
− There was an error accessing the database. If the problem persists contact the System Administrator.
− The system usually displays this Message when there is no connection with the database.
− Reestablish communication with the database.

Radiographic image scanner EAGLE.PS
89
UNFORESEEN- TROUBLESHOOTING
Message Error or warning grounds Solution
− Please enter a valid email address for contact.
− The system typically displays this Message when it fills in the email field with an invalid email.
− Fill in the e-mail field with a valid e-mail.
− The image size exceeds 500kb. Should you have any questions, please contact the System Administrator.
− The system usually displays this Message when the operator requests to load an image that exceeds the size of 500Kb.
− Operator to upload an image with size less than 500Kb.
Retrieve Image
Message Error or warning grounds Solution
− There are unfilled mandatory fields.
− The system usually displays this Message when the required fields of the screen in question are not filled in.
− All required fields must be filled in.
− Current User cannot be an X-Ray requestor since it is not classified as a Dentist.
− The system typically displays this Message when the operator attempts to select a user that does not have the 'Dentist' profile as the Requestor.
− The operator must select a user having "Dentist” profile
− Initializing equipment, please wait.
− The system typically displays this Message when the operator tries to retrieve an image when the machine is initializing.
− Wait for the equipment to start up, i.e. when the blue LED is lit steadily.
− There was an error accessing the database. If the problem persists contact the System Administrator.
− The system typically displays this Message when there is no connection with the data base.
− Reestablish communication with the database.
− All reported data will be lost. Do you want to continue?
− The system typically displays this Message when the retrieval procedure has not been completed and the operator clicks on any of the system menu items.
− Finish the entire image acquisition process before accessing other menu item.
− Communication failure with the equipment
− The system usually displays this Message when a communication problem occurs with the equipment
− Remove the cable and reconnect it again.

Owner’s Manual
90
UNFORESEEN- TROUBLESHOOTING
Message Error or warning grounds Solution
− Could not find image on phosphorous plate.
− The system usually displays this Message when the machine cannot find an image on the phosphorous plate.
− Check the phosphorous plate, ensure there is no trouble and, if possible, make a new X-ray.
− There is no requester that meets the search criteria.
− The system usually displays this Message when the system cannot find the user with the criteria entered by the operator.
− Check the search criteria that are being reported.
− No Patient was found. − The system usually displays this Message when the operator tries to search for a Patient that is not being found by the system.
− Check the criteria being informed for the applicant's search
− Operation time exceeded. − The system usually displays this Message when the operator does not insert the phosphor plate into the equipment within 120 seconds.
− Insert the phosphor plate into the equipment within 120 seconds, after the retrieval request.
− Busy equipment Wait until the current process is finished.
− The system usually displays this Message when the operator requests the image acquisition but the equipment is performing another process.
− Wait until the machine completes the current process.
− Do you want to cancel the image retrieval?
− The system usually displays this Message when an image was retrieved and the operator clicked the "Preview Image" button without saving the image.
− Save the retrieved image and then click the "Display Image" button.
Periapical Image
Message Error or warning grounds Solution
− There was an error accessing the database. If the problem persists contact the System Administrator.
− The system typically displays this Message when there is no connection to the database
− Reestablish communication with the database.

Radiographic image scanner EAGLE.PS
91
UNFORESEEN- TROUBLESHOOTING
Message Error or warning grounds Solution
− Image does not belong to this position. Select another image.
− The system usually displays this Message when the operator attempts to exchange an image that no longer belongs to the requested position.
− Cancel the image exchange and execute the entire procedure again.
Import Image
Message Error or warning grounds Solution
− There was an error accessing the file. If the problem persists, contact your System Administrator.
− The system typically displays this Message when the imported image contains an error.
− Import image without error.
− There was an error accessing the database. If the problem persists contact the System Administrator.
− The system typically displays this Message when there is no connection to the database
− Reestablish communication with the database.
− There is an error in the medical image type. If the problem persists, contact the System Administrator.
− The system usually displays this Message when it detects an error in the image format contained in the DICOM file.
− Select a DICOM file that has no error in the image format.
− Select a Patient to associate with x-rays.
− The system usually displays this Message when no Patient is selected in the Patient search.
− Select at least one Patient in Patient Search.
− The image cannot exceed 10MB.
− The system usually requires this Message when the operator tries to import a Dicom image that is larger than 10MB in size.
− Select an image with size less than 10MB.
− The image cannot exceed 2MB. − The system usually displays this Message when the operator tries to import a JPEG / PNG image with a size greater than 2MB.
− Select an image with size less than 2MB.
− The number of images should not be larger than 40.
− The system usually displays this Message when the operator tries to import more than 40 images.
− Select less than 40 images for import.

Owner’s Manual
92
UNFORESEEN- TROUBLESHOOTING
Message Error or warning grounds Solution
− The images will be discarded. Do you want to continue?
− The system usually displays this Message when an image has been imported and the user has clicked the ‘Preview Image’ button without saving the imported image.
− Save the imported image and then click the ‘Image Viewer’ button.
Compare Image
Message Error or warning grounds Solution
− There was an error accessing the database. If the problem persists contact the System Administrator.
− The system typically displays this Message when there is no connection to the database
− Reestablish communication with the database.
Provide Backup
Message Error or warning grounds Solution
− There was an error accessing the database. If the problem persists contact the System Administrator.
− The system typically displays this Message when there is no connection to the database.
− Reestablish communication with the database.
− There was an error accessing the file. If the problem persists, contact the System Administrator.
− The system typically displays this Message when an error occurs in accessing the file system.
− Verify if the directory where the backup will be performed contains no errors, if it is not protected, etc.
− Backup not performed. Could not identify backup program. Please contact the System Administrator.
− The system typically displays this Message when an error occurs in accessing the file system.
− Verify if the directory where the backup will be performed contains no errors, if it is not protected, etc.
− No file was selected to import Backup.
− The system typically displays this Message when no backup file is selected for the pro-system backup import.
− Select at least one backup file to be imported into the system.
− No previous backups performed. Do you want to perform a new backup?
− The system usually displays this Message when no previous backup was performed.
− - Back up the system.

Radiographic image scanner EAGLE.PS
93
UNFORESEEN- TROUBLESHOOTING
Keep Odontogram
Message Error or warning grounds Solution
− There was an error accessing the database. If the problem persists contact the System Administrator.
− The system typically displays this Message when there is no connection to the database
− Reestablish communication with the database.
EQUIPMENT WARRANTY This equipment is covered by the warranty periods and standards contained in the Warranty Certificate supplied with the product.
FINAL CONSIDERATIONS Among the care that you must follow with your equipment, the most important is when it comes to replacement parts. To ensure the life of your device, replace only with genuine DABI ATLANTE parts. They are guaranteed by the standards and meet the TECHNICAL SPECIFICATIONS required by the DABI ATLANTE representative. We call your Attention to our network of authorized resellers. We will keep your equipment permanently new, since we have trained technical assistants and specific tools for the correct maintenance of your device. Whenever you need it, ask for the presence of an DABI ATLANTE representative at the nearest reseller, or call DABI ATLANTE Customer Service at + 55 (16) 3512-1288.

Owner’s Manual
94
APPENDIX A – WIA (WINDOWS IMAGE AQUISITION)
WIA Driver Installation The installation consists of running the EAGLE.PS_WIA_driver_ <version> .exe file. Originally, Windows 8 does not allow installation of drivers not certified by Microsoft, so to install the WIA driver in Windows 8, it is necessary to disable verification by the operating system, as follows: 1 – In Windows 8 access PROMPT command as ADMIN and type shutdown / r / o.
Press ENTER and windows exiting message will appear 2 – When restarting, the BOOT Options will be displayed, choose TROUBLESHOOTING.

Radiographic image scanner EAGLE.PS
95
APPENDIX A – WIA (WINDOWS IMAGE AQUISITION)
3 – Choose ADVANCED OPTIONS.
4 – Choose INITIALIZATION SETTINGS.

Owner’s Manual
96
APPENDIX A – WIA (WINDOWS IMAGE AQUISITION)
5 - Click RESTART
6 – When restarting, the Options will be displayed, enter option 7 - Disable Drivers Subscription imposition.
Therefore the driver signature will be disabled. At the end of the above steps, you can perform the installation
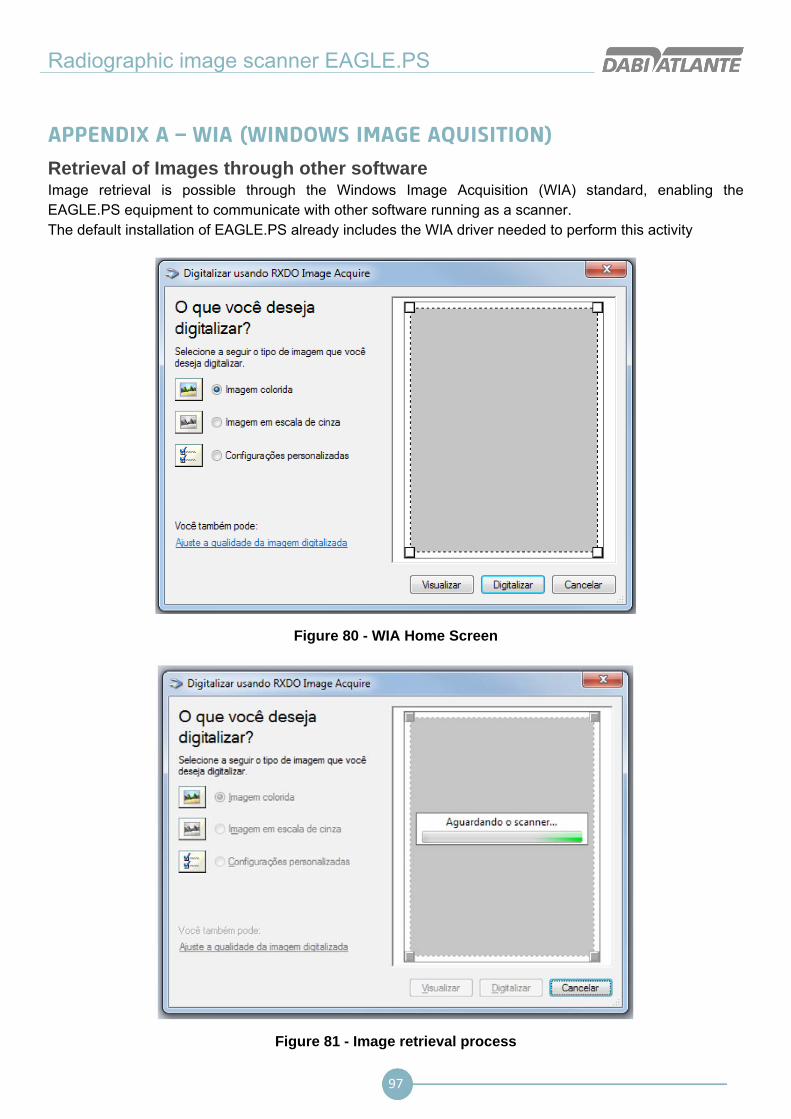
Radiographic image scanner EAGLE.PS
97
APPENDIX A – WIA (WINDOWS IMAGE AQUISITION)
Retrieval of Images through other software Image retrieval is possible through the Windows Image Acquisition (WIA) standard, enabling the EAGLE.PS equipment to communicate with other software running as a scanner. The default installation of EAGLE.PS already includes the WIA driver needed to perform this activity
Figure 80 - WIA Home Screen
Figure 81 - Image retrieval process

Owner’s Manual
98
APPENDIX A – WIA (WINDOWS IMAGE AQUISITION)
Figure 82 - Viewing the X - Ray Image
Remarks: The WIA Driver is only compatible with Windows 7 and 8 operating systems. It may require authentication for Windows 8. The image generated by the EAGLE.PS equipment is grayscale, so it is not possible to get it colored.
APPENDIX B – WINDOWS FIREWALL CONFIGURATION– SERVER MODE
These are the steps to open 5431 port on the windows firewall so that client-mode software can be connected to the server. ATTENTION: Client mode installation must be done after performing this procedure on the server.
Note The procedure was performed with Windows 7.
1. To open Windows Firewall, click the Start button, and then click Control Panel. In the search box, type firewall, then click Windows Firewall.
2. In the left panel, click Advanced Settings. Administrator permission is required. If you are prompted for an Administrator Password or Confirmation, enter the Password or provide Confirmation.
3. In the Windows Firewall, Advanced Security dialog box, in the left panel, click In Entry Rules, and in the right panel, click New Rule.
4. Follow the assistant instructions for New Entry Rule.

Radiographic image scanner EAGLE.PS
99
APPENDIX B – WINDOWS FIREWALL CONFIGURATION– MODO
SERVIDOR
- Click "port" for the rule type / move forward / "TCP" - Enter 5431 in "specific local ports" / move forward - "Allow connection" / move forward / move forward / name: EAGLE.PS / conclude. . 5. After completing the rule creation, restarting windows is required to apply the new rule

Owner’s Manual
100

Radiographic image scanner EAGLE.PS
101