Oracle Real-Time Scheduler
251
Oracle Real-Time Scheduler Server Application User Guide Release 2.2.0 Service Pack 3 E60111-02 May 2015
-
Upload
khangminh22 -
Category
Documents
-
view
2 -
download
0
Transcript of Oracle Real-Time Scheduler

Oracle Real-Time SchedulerServer Application User Guide
Release 2.2.0 Service Pack 3E60111-02
May 2015

2
Oracle Real-Time Scheduler Server Application User Guide
Release 2.2.0 Service Pack 3
E60111-02
May 2015
Documentation build: 5.25.2015 15:43:11 [M1_1432582991000]
Copyright © 2015, Oracle and/or its affiliates. All rights reserved.
This software and related documentation are provided under a license agreement containing restrictions on use and disclosure and are protected
by intellectual property laws. Except as expressly permitted in your license agreement or allowed by law, you may not use, copy, reproduce,
translate, broadcast, modify, license, transmit, distribute, exhibit, perform, publish, or display any part, in any form, or by any means. Reverse
engineering, disassembly, or decompilation of this software, unless required by law for interoperability, is prohibited.
If this is software or related documentation that is delivered to the U.S. Government or anyone licensing it on behalf of the U.S. Government, then
the following notice is applicable:
U.S. GOVERNMENT END USERS: Oracle programs, including any operating system, integrated software, any programs installed on the
hardware, and/or documentation, delivered to U.S. Government end users are "commercial computer software" pursuant to the applicable Federal
Acquisition Regulation and agency-specific supplemental regulations. As such, use, duplication, disclosure, modification, and adaptation of the
programs, including any operating system, integrated software, any programs installed on the hardware, and/or documentation, shall be subject to
license terms and license restrictions applicable to the programs. No other rights are granted to the U.S. Government.
This software or hardware is developed for general use in a variety of information management applications. It is not developed or intended for
use in any inherently dangerous applications, including applications that may create a risk of personal injury. If you use this software or hardware
in dangerous applications, then you shall be responsible to take all appropriate fail-safe, backup, redundancy, and other measures to ensure its
safe use. Oracle Corporation and its affiliates disclaim any liability for any damages caused by use of this software or hardware in dangerous
applications.
Oracle and Java are registered trademarks of Oracle and/or its affiliates. Other names may be trademarks of their respective owners.Intel and Intel
Xeon are trademarks or registered trademarks of Intel Corporation. All SPARC trademarks are used under license and are trademarks or registered
trademarks of SPARC International, Inc. AMD, Opteron, the AMD logo, and the AMD Opteron logo are trademarks or registered trademarks of
Advanced Micro Devices. UNIX is a registered trademark of The Open Group.
This software or hardware and documentation may provide access to or information about content, products, and services from third parties.
Oracle Corporation and its affiliates are not responsible for and expressly disclaim all warranties of any kind with respect to third-party content,
products, and services unless otherwise set forth in an applicable agreement between you and Oracle. Oracle Corporation and its affiliates will not
be responsible for any loss, costs, or damages incurred due to your access to or use of third-party content, products, or services, except as set forth
in an applicable agreement between you and Oracle.

3
Contents
What's New...................................................................................................................................................... 10Getting Started................................................................................................................................................ 13
About Oracle Real-Time Scheduler................................................................................................................................... 13Starting the Application...................................................................................................................................................... 14Understanding the User Interface...................................................................................................................................... 14
Menus and Navigation.................................................................................................................................................... 14Menu Options..................................................................................................................................................................15About Time Zones.......................................................................................................................................................... 17
User Documentation....................................................................................................................................... 19Resource Management...................................................................................................................................................... 19
Understanding Resource Management.......................................................................................................................... 19About Mobile Workers................................................................................................................................................. 19About Vehicles.............................................................................................................................................................20About Crews and Crew Shifts.....................................................................................................................................21About Breaks............................................................................................................................................................... 25About Non-Productive Tasks (NPTs).......................................................................................................................... 26About Periods of Unavailability (POUs) and POU Templates.................................................................................... 26About Shift Templates and Shift Weekly Templates.................................................................................................. 28
About Working with Draft and Original Templates.................................................................................................. 29About MDT, SMS, and Non-MDT Crews....................................................................................................................30
SMS Message Reference........................................................................................................................................ 31About Location Based Services.................................................................................................................................. 32About Procedures........................................................................................................................................................ 32About Resource Route Replay....................................................................................................................................33About Dispatchers and Dispatcher Shifts................................................................................................................... 33About Timesheets........................................................................................................................................................34
Working with Mobile Workers.........................................................................................................................................35Creating Mobile Workers.............................................................................................................................................35Mobile Worker Search.................................................................................................................................................35Maintaining Mobile Workers........................................................................................................................................ 35Viewing Missing or Expired Worker Capabilities for a Mobile Worker........................................................................36Viewing the Mobile Worker Calendar..........................................................................................................................36Viewing My Calendar.................................................................................................................................................. 36
Working with Vehicles.....................................................................................................................................................36Creating Vehicles.........................................................................................................................................................36Vehicle Search.............................................................................................................................................................37Maintaining Vehicles....................................................................................................................................................37Viewing Missing Equipment for a Vehicle...................................................................................................................37
Working with Crews........................................................................................................................................................ 38Creating Crews............................................................................................................................................................ 38Maintaining Crews....................................................................................................................................................... 38Viewing Shift Weekly Templates for a Crew.............................................................................................................. 38
Working with Crew Shifts .............................................................................................................................................. 39Creating Crew Shifts................................................................................................................................................... 39Crew Shift Search....................................................................................................................................................... 39Maintaining Existing Crew Shifts.................................................................................................................................40Changing the Shift Cost Profile for a Crew Shift........................................................................................................41Changing the Resource Allocation for a Crew Shift................................................................................................... 41Viewing a Crew Shift Schedule...................................................................................................................................41Viewing Crew Shift Capabilities.................................................................................................................................. 42
Working with Shift Weekly Templates and Crew Shift Templates................................................................................. 42Creating Shift Weekly Templates and Crew Shift Templates.....................................................................................42Shift Weekly Template Search....................................................................................................................................43Maintaining Shift Weekly Templates and Crew Shift Templates................................................................................ 43Viewing Overridden Shifts........................................................................................................................................... 44Displaying Differences Between Draft and Original Templates.................................................................................. 44Navigating Between Original and Draft Templates.....................................................................................................45Viewing the Capabilities for a Crew Shift Template................................................................................................... 45

4
Reviewing Shifts to Be Generated..............................................................................................................................45Working with Common Weekly Templates.....................................................................................................................45
Subscribing Crews to a Common Shift Weekly Template.......................................................................................... 45Unsubscribing Crews from a Common Shift Template...............................................................................................46Changing Subscription Effective Period......................................................................................................................46
Working with Breaks....................................................................................................................................................... 47Adding Breaks to Crew Shifts..................................................................................................................................... 47Viewing and Editing Break Tasks for a Specific Crew Shift....................................................................................... 47
Working with Non Productive Tasks.............................................................................................................................. 47Adding Non Productive Tasks to Crew Shifts.............................................................................................................47Viewing and Editing Non Productive Tasks for a Specific Crew Shift........................................................................ 48Non Productive Task Tasks........................................................................................................................................ 48
Working with Periods of Unavailability........................................................................................................................... 49Creating Periods of Unavailability (POUs).................................................................................................................. 49Period of Unavailability (POU) Search........................................................................................................................49Maintaining POUs and POU Templates..................................................................................................................... 50Viewing Overridden POUs...........................................................................................................................................50
Working with Resource Route Replay............................................................................................................................50Using Resource Route Replay....................................................................................................................................50
Working with Dispatchers............................................................................................................................................... 51Creating Dispatchers................................................................................................................................................... 51Dispatcher Search....................................................................................................................................................... 51Maintaining Dispatchers.............................................................................................................................................. 51
Working with Dispatcher Shifts.......................................................................................................................................52Logging on to Start a Dispatcher Shift....................................................................................................................... 52Dispatcher Shift Search...............................................................................................................................................52Maintaining Dispatcher Shifts......................................................................................................................................52
Service Management..........................................................................................................................................................53Understanding Service Management..............................................................................................................................53
About Activities............................................................................................................................................................ 53About Capabilities........................................................................................................................................................57About Resource Restrictions.......................................................................................................................................58About Bound Work...................................................................................................................................................... 59About Complex Activities.............................................................................................................................................60About Activity Time Windows......................................................................................................................................62About Override Time Windows................................................................................................................................... 63About Assignments......................................................................................................................................................63About Forced Recall....................................................................................................................................................64About Field-Referenced Activities (FRAs)...................................................................................................................65About Activity Attachments..........................................................................................................................................65About Alerts................................................................................................................................................................. 66
How Alerts are Generated....................................................................................................................................... 67How Alerts are Distributed.......................................................................................................................................68Alert Actions............................................................................................................................................................. 68
About Alert Areas........................................................................................................................................................ 68About Remote Messages............................................................................................................................................ 69
Working with Activities.................................................................................................................................................... 70Creating Assist Activities............................................................................................................................................. 70Viewing Activity Dependencies....................................................................................................................................70Activity Search............................................................................................................................................................. 70Editing Activities...........................................................................................................................................................70Validating Activities......................................................................................................................................................71Viewing Captured Content on an Activity................................................................................................................... 71Adding an Attachment to an Activity...........................................................................................................................71Viewing or Opening Attachments................................................................................................................................72Editing Attachments.....................................................................................................................................................72Replacing an Attachment File..................................................................................................................................... 72Deleting Attachments...................................................................................................................................................73Activity Actions.............................................................................................................................................................73
Allocating Activities...................................................................................................................................................73Allocating an Activity Using the Chooser................................................................................................................ 74Fix an Activity to a Crew......................................................................................................................................... 74Cancelling Activities................................................................................................................................................. 75Completing Activities with Concurrent Assignments................................................................................................75

5
Declining Activities................................................................................................................................................... 75Deferring Activities................................................................................................................................................... 75Dispatching Activities............................................................................................................................................... 76Putting Activities on Hold.........................................................................................................................................77Rescheduling Activities.............................................................................................................................................77Unassigning Activities...............................................................................................................................................77Removing Allocation.................................................................................................................................................78Requesting an Assisting Crew.................................................................................................................................78Excluding Contractor................................................................................................................................................ 78Reverting to Company............................................................................................................................................. 78
Viewing Activity Schedule Information........................................................................................................................ 78Viewing and Updating Assignments for an Activity.................................................................................................... 79
Working with Alerts......................................................................................................................................................... 80Viewing and Processing Alerts....................................................................................................................................80Alert Search................................................................................................................................................................. 80Defining Alert Areas.................................................................................................................................................... 80Defining Map Areas on Alert Areas............................................................................................................................ 81
Working with Override Time Windows........................................................................................................................... 81Creating Override Time Windows............................................................................................................................... 81Override Time Window Search................................................................................................................................... 82Maintaining Existing Override Time Windows.............................................................................................................82
Working with Remote Messages.................................................................................................................................... 82Remote Message Search............................................................................................................................................82Viewing, Editing, and Retrying Remote Messages.....................................................................................................83
Dispatcher Functions (CDI)................................................................................................................................................83Understanding Dispatcher Functions..............................................................................................................................83
About the CDI Portal................................................................................................................................................... 83About the Scope of Data......................................................................................................................................... 84About the KPI Summary.......................................................................................................................................... 85About the Scheduling Gantt.....................................................................................................................................85About the Activity Search Zone............................................................................................................................... 90About the KPI-Specific CDI......................................................................................................................................91About the CDI Map.................................................................................................................................................. 91About the CDI Shift Tab.......................................................................................................................................... 92About the CDI Contractor Capacity Tab..................................................................................................................92About the Alert Queue............................................................................................................................................. 92
Managing your Dispatcher Shift..................................................................................................................................... 93Logging On to Start a Dispatcher Shift.......................................................................................................................93Changing the Date Range for Dispatch Monitoring.................................................................................................... 93Changing the Dispatch Areas to Monitor....................................................................................................................93Backing Up Another Dispatcher.................................................................................................................................. 94Logging Off a Dispatcher Shift....................................................................................................................................94
Managing Tasks and Crews using the CDI................................................................................................................... 94Using the Scheduling Gantt........................................................................................................................................ 94
Viewing Task Details from the Scheduling Gantt.................................................................................................... 94Viewing the Crew Shift Details from the Scheduling Gantt..................................................................................... 94Customizing Columns in the Scheduling Gantt....................................................................................................... 94Displaying Colors in the Scheduling Gantt..............................................................................................................95Filtering the Scheduling Gantt................................................................................................................................. 95Filtering the Scheduling Gantt by KPI..................................................................................................................... 95Setting the Display Date for the Scheduling Gantt View.........................................................................................95Zooming In and Out in the Scheduling Gantt View.................................................................................................95
Using the Activity List..................................................................................................................................................96Activity Search..........................................................................................................................................................96Filtering the Activity List by KPI...............................................................................................................................96
Using the CDI Map......................................................................................................................................................96Launching the CDI Map...........................................................................................................................................96Displaying Activities on the Map..............................................................................................................................97Displaying Routes on the Map................................................................................................................................ 97Displaying Crews on the Map..................................................................................................................................97Clearing All Routes.................................................................................................................................................. 98
Monitoring KPIs...............................................................................................................................................................98Mail Management............................................................................................................................................................98
About Mail Management............................................................................................................................................. 98

6
About the My Mail Portal............................................................................................................................................ 99Working with Mail...................................................................................................................................................... 100
Creating a New Mail Message from a Mail Template........................................................................................... 100Creating a New Free Form Mail Message............................................................................................................ 100Archiving Messages............................................................................................................................................... 100Reviewing Mail Messages......................................................................................................................................101
Transfer of Goods............................................................................................................................................................ 101Understanding Transfer of Goods................................................................................................................................ 101
About the Transfer of Goods.................................................................................................................................... 101About Depots and Depot Runs................................................................................................................................. 102About Depot Cutoff....................................................................................................................................................103
Working with Depots.....................................................................................................................................................104Viewing Depot Runs..................................................................................................................................................104Closing a Depot Run.................................................................................................................................................104Opening a Depot Run............................................................................................................................................... 104Overriding Depot Time Windows.............................................................................................................................. 105Initiating a Depot Cutoff Event Manually.................................................................................................................. 105
Contractor Management...................................................................................................................................................105Understanding Contractor Management.......................................................................................................................105
About Contracting Models......................................................................................................................................... 105About Resource Groups............................................................................................................................................106About Capacity.......................................................................................................................................................... 107About Capacity Templates........................................................................................................................................ 107Allowing Contractors to Work Activities.................................................................................................................... 108About Contractor Eligibility Rules..............................................................................................................................108Committing Work to Contractors............................................................................................................................... 109About the Contractor Work Management Portal.......................................................................................................109About the CDI and Contractor Capacities.................................................................................................................110
Working With Contractor Work Management...............................................................................................................110Defining Resource Groups........................................................................................................................................ 110Defining Capacity Weekly Templates....................................................................................................................... 110Defining Capacity Templates.....................................................................................................................................110Entering Capacity...................................................................................................................................................... 111Defining Contractor Eligibility.....................................................................................................................................111Viewing Contractor Work...........................................................................................................................................111Viewing Contractor Work (Company Users)............................................................................................................. 111
System Administration................................................................................................................................. 113Resource Management Administration............................................................................................................................ 113
Understanding Resource Management Setup and Administration...............................................................................113About Locations......................................................................................................................................................... 113About Worker Capabilities, Skills, and Attributes......................................................................................................113About Vehicle Equipment.......................................................................................................................................... 115About Mobile Worker Types......................................................................................................................................115About Vehicle Types................................................................................................................................................. 115About Crew Type.......................................................................................................................................................115About Crew Shift Type.............................................................................................................................................. 116About Crew Hierarchies.............................................................................................................................................116About Shift Cost Profiles........................................................................................................................................... 116About POU Types..................................................................................................................................................... 117About Dispatcher Types............................................................................................................................................ 117About Procedure Types.............................................................................................................................................117About Timesheet Types............................................................................................................................................ 118
Defining Locations.........................................................................................................................................................119Defining Equipment.......................................................................................................................................................119Defining Worker Capabilities, Skills, and Attributes..................................................................................................... 120Defining Mobile Worker Types..................................................................................................................................... 120Defining Vehicle Types................................................................................................................................................. 121Defining Crew Types.................................................................................................................................................... 121Creating Crew Hierarchies............................................................................................................................................122Uploading a Crew Hierarchy Using a Spreadsheet..................................................................................................... 122Adding Crews to Hierarchies........................................................................................................................................122Defining Period of Unavailability Types........................................................................................................................123Defining Shift Cost Profiles...........................................................................................................................................123Defining Shift Types......................................................................................................................................................124

7
Defining Dispatcher Types............................................................................................................................................124Defining Procedure Types............................................................................................................................................ 124Defining Timesheet Types............................................................................................................................................ 125
Service Management Administration................................................................................................................................125Understanding Service Management Setup and Administration.................................................................................. 125
About Task Types..................................................................................................................................................... 125About Activity Types..................................................................................................................................................126About Priority Profiles................................................................................................................................................130About Work Profiles...................................................................................................................................................131About Appointment Booking Groups.........................................................................................................................131About Auto-Dispatching............................................................................................................................................. 132About Service Classes.............................................................................................................................................. 133About Service Areas..................................................................................................................................................134About Service Area Hierarchies................................................................................................................................ 135About Dispatch Areas................................................................................................................................................135About Alert Types......................................................................................................................................................135About Key Performance Indicators (KPIs)................................................................................................................ 136About Geographic Areas........................................................................................................................................... 137
Defining Task Types..................................................................................................................................................... 137Defining Activity Types.............................................................................................................................................. 137Defining a Period of Unavailability Task Type..........................................................................................................138Defining Break Types................................................................................................................................................ 138Defining Non Productive Task Types........................................................................................................................138
Adding an Attachment to an Activity Type................................................................................................................... 139Defining Priority Profiles............................................................................................................................................... 139Defining Work Profiles.................................................................................................................................................. 139Defining Appointment Booking Groups........................................................................................................................ 140Defining Service Classes..............................................................................................................................................140Defining Service Areas................................................................................................................................................. 141Creating Service Area Hierarchies............................................................................................................................... 141Uploading a Service Area Hierarchy Using a Spreadsheet......................................................................................... 141Adding Service Areas to Hierarchies............................................................................................................................142Defining Dispatch Areas............................................................................................................................................... 142Defining Alert Types..................................................................................................................................................... 143Defining Key Performance Indicators (KPIs)................................................................................................................143Defining Remark Types................................................................................................................................................ 143Defining Geographic Areas...........................................................................................................................................144Defining Map Areas on Geographic Areas.................................................................................................................. 144
Mail Management Administration..................................................................................................................................... 144Understanding Mail Management................................................................................................................................. 144
About Mailing Lists.................................................................................................................................................... 145About Mail Templates................................................................................................................................................145
Defining Mailing Lists....................................................................................................................................................145Adding Users to a Mailing List..................................................................................................................................... 145Removing Users from a Mailing List............................................................................................................................ 146Defining Mail Templates............................................................................................................................................... 146
Transfer of Goods Administration.................................................................................................................................... 146Understanding Transfer of Goods Management.......................................................................................................... 146
About Depots............................................................................................................................................................. 146About Depot Profiles................................................................................................................................................. 147About Depot Related Activity Types......................................................................................................................... 147About Depot Task Types...........................................................................................................................................148About Vehicle Maximum Capacity............................................................................................................................ 148
Defining Depot Profiles................................................................................................................................................. 148Defining Depots.............................................................................................................................................................149Defining Depot Task Types.......................................................................................................................................... 149
Contractor Management Administration...........................................................................................................................150Understanding Contractor Management Administration...............................................................................................150
About Resource Group Types...................................................................................................................................150About Capacity Types............................................................................................................................................... 150
Defining Resource Group Types.................................................................................................................................. 150Defining Capacity Types...............................................................................................................................................151
Device Management Administration.................................................................................................................................151Understanding Device Management.............................................................................................................................151

8
About MDTs and MDT Types................................................................................................................................... 151About Mobile Application Connection Modes........................................................................................................... 152About Deployments, Deployment Types and Deployment Parts.............................................................................. 153About Data Encryption.............................................................................................................................................. 155
Defining Deployment Types..........................................................................................................................................155Defining Deployment Parts........................................................................................................................................... 156Defining MDT Types..................................................................................................................................................... 156Defining MDTs.............................................................................................................................................................. 157Activating and Deactivating MDTs................................................................................................................................157Getting the MDT Log Files........................................................................................................................................... 157Changing the Mobile Device Log Level....................................................................................................................... 157Reviewing Log Files from an MDT...............................................................................................................................158Creating Deployments...................................................................................................................................................158Activating and Inactivating Deployments......................................................................................................................158Verifying Whether a Deployment is Current.................................................................................................................159
Scheduler Administration..................................................................................................................................................159Understanding Scheduler Setup and Administration....................................................................................................159
About the Scheduling Process.................................................................................................................................. 159About Schedulers...................................................................................................................................................... 161About Monitoring Schedulers.................................................................................................................................... 162About Scheduler Areas............................................................................................................................................. 163About Scheduler Configurations................................................................................................................................163About Short Term and Long Term Booking..............................................................................................................163About Cost Profiles....................................................................................................................................................164About Speed Profiles.................................................................................................................................................164About Scheduler Parameters.................................................................................................................................... 165
Parameter Types....................................................................................................................................................165Understanding Cost Parameters............................................................................................................................166
About the Scheduler Registry................................................................................................................................... 167Defining Scheduler Parameters.................................................................................................................................... 168Defining Schedulers...................................................................................................................................................... 168Starting or Shutting Down Schedulers......................................................................................................................... 168Defining Scheduler Areas............................................................................................................................................. 169Defining Scheduler Configurations............................................................................................................................... 169Publishing a Scheduler Configuration.......................................................................................................................... 171Defining Speed Profiles................................................................................................................................................ 171Viewing the Scheduler Registry....................................................................................................................................171
Batch Control Global View...............................................................................................................................................172About the Batch Control Global View...........................................................................................................................172Working With the Batch Control Global View.............................................................................................................. 172
Viewing Scheduler Status in the Batch Control Global View....................................................................................172Monitoring Batch Jobs in the Batch Control Global View.........................................................................................172
BI Configuration Administration........................................................................................................................................173About BI Configuration..................................................................................................................................................173
Reference Topics.......................................................................................................................................... 174Glossary............................................................................................................................................................................174
Glossary........................................................................................................................................................................ 174Standard Actions.............................................................................................................................................................. 186
Viewing and Adding Log Entries.................................................................................................................................. 186Standard Actions for Data Maintenance.......................................................................................................................186Standard Actions for Admin-Level Data Maintenance..................................................................................................188
Oracle Real-Time Scheduler Base Package Business Objects...................................................................................... 188Base Package Resource Management Business Objects........................................................................................... 188
Base Package Crew Business Objects.....................................................................................................................189Base Package Crew Shift Business Objects............................................................................................................ 190Base Package Period of Unavailability Business Objects........................................................................................ 195Base Package General Resource Business Objects................................................................................................197Base Package Mobile Worker Resource Business Objects..................................................................................... 198Base Package Vehicle Business Objects................................................................................................................. 199Base Package Timesheet Business Objects............................................................................................................ 201Base Package Location Business Objects............................................................................................................... 202Base Package Procedure Business Objects............................................................................................................ 202
Base Package Service Management Business Objects.............................................................................................. 203Base Package Activity Business Objects..................................................................................................................203

9
Base Package Complex Activity Business Objects.................................................................................................. 210Base Package Alert Business Objects......................................................................................................................214Base Package Break Business Objects....................................................................................................................215Base Package Non Productive Task Business Objects........................................................................................... 216Base Package Hierarchy Business Objects..............................................................................................................217Base Package KPI Business Objects....................................................................................................................... 218Base Package Dispatcher Business Objects............................................................................................................218Base Package Geographic Area Business Objects..................................................................................................220
Base Package Device Management Business Objects............................................................................................... 221Base Package Deployment Business Objects..........................................................................................................222Base Package MDT Business Objects..................................................................................................................... 223
Base Package Scheduler Business Objects................................................................................................................ 225Base Package Scheduler Business Objects.............................................................................................................225
Base Package Mail Management Business Objects....................................................................................................231Base Package Mail Objects...................................................................................................................................... 231
Base Package Transfer of Goods Business Objects................................................................................................... 233Base Package Transfer of Goods Business Objects................................................................................................233Base Package Depot Objects................................................................................................................................... 240
Base Package Contractor Management Business Objects..........................................................................................243Base Package Contractor Business Objects............................................................................................................ 243
FAQs............................................................................................................................................................... 247How do I ... ?................................................................................................................................................................... 247What's the Difference Between ... ?................................................................................................................................ 249Can I ... ?......................................................................................................................................................................... 251

Oracle Real-Time Scheduler Server Application User Guide • 10
Chapter 1
What's New
This section outlines the new features in Oracle Real-Time Scheduler that are documented in this guide.
New in Release 2.2.0 Service Pack 3
Feature For More Information
Displaying Custom Colors in the Scheduling Gantt. Custom colors
can now be applied to Gantt task bars, with colors based on field
values in the Task, Task Type, and Task Schedule tables. Multiple
color rules can be defined, and the user can toggle between them
when viewing the Gantt. Custom icons that appear in the task bar can
also be defined for all users for activity types and POU tasks.
With this release dispatchers may now set up their own preference
as to whether or not to show the task type description inside the task
bar. A new Plan View mode is also introduced to the Gantt to show the
scheduled tasks irrespective of time. This, along with the Color Rule
feature, provide dispatchers and resource planners with a better view
of schedule conditions.
Displaying Colors in the Scheduling Gantt
Worker Capabilities (Skills and Attributes). Skills (personal
proficiency) are now managed in the Skill List on the new Worker
Capability portal, along with Attributes (things a person has been
granted, such as a building access badge). Worker capabilities can
now be used for security purposes, such as restricting access to site
buildings or restricting activities to workers who possess only specified
skills and security clearances.
In prior releases, all capabilities (worker- and vehicle-related) were
required. Now, capabilities for an Activity Type or Activity can
be designated as required or preferred. Preferred means that the
Scheduler will do its best to find a Mobile Worker with the preferred
capability. If no match is found, it will schedule the work to a worker
Skills are now defined through the new Worker Capability page
(accessible from the Admin menu), which is also where worker
Attributes are defined. For additional details see About Worker
Capabilities, Skills, and Attributes and About Capabilities.

Oracle Real-Time Scheduler Server Application User Guide • 11
Feature For More Informationpossessing only the required capabilities. Preferred skills can be set up
for Skill Levels.
In addition, a capability of any type can now be defined as required
to be possessed by all members of the crew. If such a capability is
defined as required for an activity, then the scheduler will only consider
a crew for the activity if all members of the crew on a shift possess the
capability.
Capabilities, except for skills, can also be designated as not allowed;
when this designation is detected, the scheduler will not schedule the
activity for a crew that possesses the capability.
In prior releases, skills on an activity overrode the skills specified on
the activity type. Now worker capabilities (both skills and attributes) can
either override or add to (extend) the worker capabilities on the activity
type. For example, the host can send in an activity for a customer who
prefers a mobile worker who speaks Spanish; this preferred skill is in
addition to the worker capabilities specified on the activity type.
Shift Auto-Completion. To accommodate cases in which Oracle Real-
Time Scheduler is used only for scheduling purposes, a new auto-
completion feature can be applied to mark crew shifts as completed.
This feature automatically "works" the shift just as if a real crew worked
it, completing activities based on scheduled times without the need for
manual intervention.
About the Scheduling Process
Complex Activity Chains. Complex Activities can now be part of
a chain of activities, and can be preceded or followed by regular or
complex activities.
About Complex Activities
Resource Restrictions. Mobile Workers can now be excluded from a
specific activity, and contractors (both shift-based and capacity-based)
can be allowed on an activity. This enables activities to be assigned to
specific capacity contractors.
Undispatch Threshold and Sequence Lock. In prior releases,
dispatched work may have been undispatched as a result of an out-of-
sequence event, such as a crew working its activities out of planned
order. Once activities were dispatched to a crew shift in standard drip
mode, their sequence was locked and newly arrived activities would
not get dispatched to the crew, even if it yielded a more optimal route.
Oracle Real-Time Scheduler now supports the ability to configure a
shift to allow or disallow route changes in the form of undispatching or
changing the order of the activities.
About Crews and Crew Shifts
Mobile Contractor Tagging and Completion. Capacity Contractors
can now complete their assigned activities on a mobile device, rather
than using the Contractor Work Management portal. Specific
activities can be assigned to workers using either a User ID or a free-
form text tag.
The new mobile application for capacity contractor workers is available
in either connected or disconnected mode. The application displays the
activities assigned to the capacity contract worker (based on the tag)
and enables them to enter completion information and mark the activity
as complete. If using connected mode, mobile workers must use their
own User ID (which is also their tag). Disconnected mode supports
both an individual user for a worker as well as use of a shared User ID

Oracle Real-Time Scheduler Server Application User Guide • 12
Feature For More Informationfor the capacity contractor company, along with a unique tag for each
worker.
Inbound Web Services (IWS). All existing XAI Inbound Services
have been duplicated as Inbound Web Services as Oracle Real-Time
Scheduler moves toward deprecation of XAI and full transition to IWS
in the next release. The duplicated services are designed to work
seamlessly in this release, and customers providing custom services
are encouraged to migrate to IWS to take full advantage of the new,
more efficient Web service technology.
To view all duplicated services, choose Admin > I > Inbound Web
Services, then enter "%" in the Name field and choose Refresh.
For more information on migrating from XAI to IWS, refer to Migrating
from XAI to IWS Oracle Utilities Application Framework (Doc ID
1644914.1) on My Oracle Support.
Windows 8.1 Support. Two new features have been added to support
Windows 8.1 on tablets and other devices.
• The ability to open the Tablet/Laptop Runtime (MSI) in full screen
mode on tablets. The window is now also resizeable on laptop and
PC environments.
• Automatic popup of the touch keyboard when the user is entering
any text in an editable field (input text boxes, text areas, etc.) for
devices using Windows 8.1.
LDAP Configuration for Mobile Applications. Customers can now
use their own enterprise centralized external LDAP server to manage
their user database and authenticate MDT users.
MWM-NMS Integration. Oracle Utilities Network Management System
activity business objects have been added for Damage Assessment
and Trouble. If Damage Assessment is part of a Trouble event,
information is exposed in a crews' Activity screen as Damage Found
Details (Trouble Details, Restoration Update, Outage Conditions,
Trouble Location, Trouble Customers, Restoration Completion,
and Failed Equipment) under Activity Assignment Completion
Details. Network Management System Damage Assessment and
NMS Trouble Activity Types can be viewed on the Main > Service
Management > Activity page.
In addition, network map layers can be displayed on the CDI map or on
the mobile map, and sample NMS themes have been added to the CDI
map as well as the mobile map.
WAM Integration. A new questionnaire-style form is available through
the Activity business object Item Inspection Activity. The form (a
series of questions and corresponding response types) is is entirely
sent in from the host. The form can be split into sections, and each
section can contain multiple questions. A question can either have
a yes/no answer, a lookup/multiple choice selection (dropdown), or
a free-form text answer (with no edits). Each section may be set as
repeatable, providing a way for the user to enter multiple responses.
Additional base package object references within the system. Refer to
the links on various topics for more information.
Base Package Objects

Oracle Real-Time Scheduler Server Application User Guide • 13
Chapter 2
Getting Started
This section provides an overview of Oracle Real-Time Scheduler.
About Oracle Real-Time Scheduler
Oracle Real-Time Scheduler simplifies and optimizes the scheduling, dispatching, and tracking of field activities and mobileservice crews.
The application includes the following major functional components:
• Resource planning and scheduling: Supports resource planners and service managers in managing resources, planningshifts, and scheduling work. This component is comprised of the following user functions:
• Resource management: Setting up mobile workers, vehicles, crews, shift procedures, gathering timesheet information,etc.
• Service management: Interfacing activities, setting up service areas, service classes, generating exception alerts, etc.
• Transfer of Goods management: Setting up depots, handling cutoffs, etc.
• Scheduler: Automatic scheduling of activities to shifts
• Contractor management: Managing external (contracted) work resources
• Common dispatching functionality: Supports dispatchers as they handle exceptions throughout the day, and enablescontext-based decision making at the dispatcher level. The system can be configured to automatically dispatch allactivities or limit auto-dispatching to certain activity types or shifts. The system maintains real-time communication withmobile resources, tracks the location of crews and vehicles, and allows dispatchers to monitor and manage activities,crews, alerts, and key performance indicators. Common dispatching functionality is provided through the CommonDispatching Interface (CDI) portal.
• Mobile communications platform: Supports mobile crews as they perform service work, facilitating communicationwith the dispatcher, providing GPS-based mapping services, and processing activity status updates and work completiondetails. Mobile communications platform functionality is provided through the Oracle Real-Time Scheduler mobileapplication.

Oracle Real-Time Scheduler Server Application User Guide • 14
Starting the Application
Use this procedure to start Oracle Real-Time Scheduler.
1. Click the Desktop icon or Program menu option to start the server application.
2. Log in using your user ID and password.
3. If prompted, select a language.
4. Use the toolbar or menu bar (on the left edge of the screen) to select the function you want to perform.
Understanding the User Interface
For information about the application's main toolbar, menu system, user setup and security, and user interface standards, seethe System Wide Standards topic in the Framework Business Processes help.
Menus and NavigationThis topic describes the Oracle Real-Time Scheduler menus and general rules for navigating the system.
The menu displays on the left-hand side of the application screen. The menu is configurable, so the options that appear mayvary based on your user profile and your system's configuration.
Main Menu and Admin MenuBy default, the system provides two menus: the Admin menu and the Main menu. The Admin menu provides access tofunctions used for setup and administration. Only users who have administrative privileges will be able to see this menu.The Main menu provides access to all other functions. The options displayed on each menu are based on the settingsdefined in your user profile. Your user profile also controls your access to different portals and dashboard zones.
The Main Menu is displayed by default. Click the Menu icon in the main toolbar to display a list of available menus, thenselect the menu you want to use. The selected menu appears on the left-side of the screen.
Functional and Alphabetical MenusThe system supports two different menu styles: alphabetical and functional.The functional menu groups menu options by the function, such as Service Management, Device Management, andResource Management. Thus, to add a new crew, you would first click the Resource Management submenu, and thenselect the Crew option.
The Alphabetical menu groups menu options by the first letter of the option name. Thus, to add a new crew, you wouldfirst click the C submenu, and then select the Crew option.
NOTE: Switching the way that the menus are sorted is a change that affects all users through Admin InstallationOptions.
The procedures in this documentation assume that you are using the functional menus. If you are using alphabetical menusinstead, simply replace the functional submenu with the Alphabetical submenu. For example, if the procedure instructs youto select:
Main Menu > Resource Management > Crew
then you would instead select:
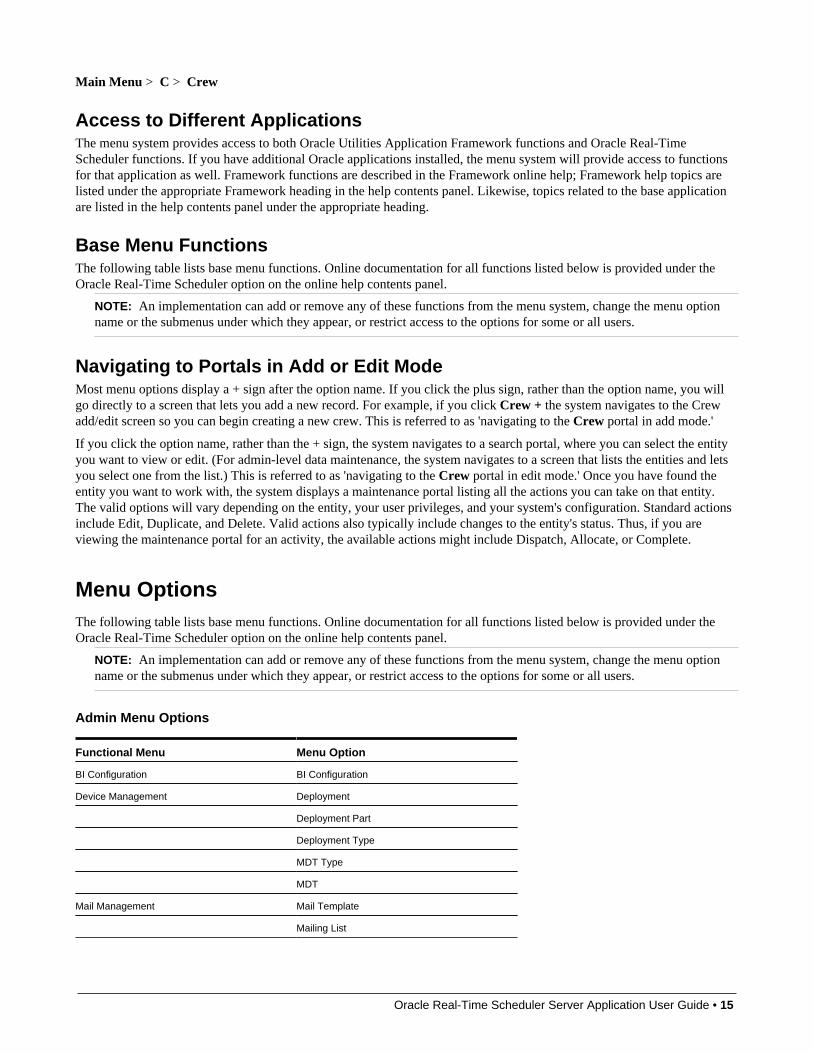
Oracle Real-Time Scheduler Server Application User Guide • 15
Main Menu > C > Crew
Access to Different ApplicationsThe menu system provides access to both Oracle Utilities Application Framework functions and Oracle Real-TimeScheduler functions. If you have additional Oracle applications installed, the menu system will provide access to functionsfor that application as well. Framework functions are described in the Framework online help; Framework help topics arelisted under the appropriate Framework heading in the help contents panel. Likewise, topics related to the base applicationare listed in the help contents panel under the appropriate heading.
Base Menu FunctionsThe following table lists base menu functions. Online documentation for all functions listed below is provided under theOracle Real-Time Scheduler option on the online help contents panel.
NOTE: An implementation can add or remove any of these functions from the menu system, change the menu optionname or the submenus under which they appear, or restrict access to the options for some or all users.
Navigating to Portals in Add or Edit ModeMost menu options display a + sign after the option name. If you click the plus sign, rather than the option name, you willgo directly to a screen that lets you add a new record. For example, if you click Crew + the system navigates to the Crewadd/edit screen so you can begin creating a new crew. This is referred to as 'navigating to the Crew portal in add mode.'
If you click the option name, rather than the + sign, the system navigates to a search portal, where you can select the entityyou want to view or edit. (For admin-level data maintenance, the system navigates to a screen that lists the entities and letsyou select one from the list.) This is referred to as 'navigating to the Crew portal in edit mode.' Once you have found theentity you want to work with, the system displays a maintenance portal listing all the actions you can take on that entity.The valid options will vary depending on the entity, your user privileges, and your system's configuration. Standard actionsinclude Edit, Duplicate, and Delete. Valid actions also typically include changes to the entity's status. Thus, if you areviewing the maintenance portal for an activity, the available actions might include Dispatch, Allocate, or Complete.
Menu OptionsThe following table lists base menu functions. Online documentation for all functions listed below is provided under theOracle Real-Time Scheduler option on the online help contents panel.
NOTE: An implementation can add or remove any of these functions from the menu system, change the menu optionname or the submenus under which they appear, or restrict access to the options for some or all users.
Admin Menu Options
Functional Menu Menu Option
BI Configuration BI Configuration
Device Management Deployment
Deployment Part
Deployment Type
MDT Type
MDT
Mail Management Mail Template
Mailing List

Oracle Real-Time Scheduler Server Application User Guide • 16
Functional Menu Menu Option
Resource Management Capacity Type
Crew Hierarchy
Crew Type
Depot
Dispatcher Type
Equipment
Location
Mobile Worker Type
Period of Unavailability Type
Procedure Type
Resource Group Type
Shift Cost Profile
Shift Type
Status Reason
Timesheet Type
Vehicle Type
Scheduler Parameter Definition
Scheduler
Scheduler Area
Scheduler Configuration
Scheduler Registry
Speed Profile
Service Management Alert Type
Appointment Booking Group
Dispatch Area
Display Icon Reference
Geographic Area
KPI
Priority Profile
Remark Type
Service Area
Service Area Hierarchy
Service Class
Task Type
Work Calendar
Work Capability
Work Profile
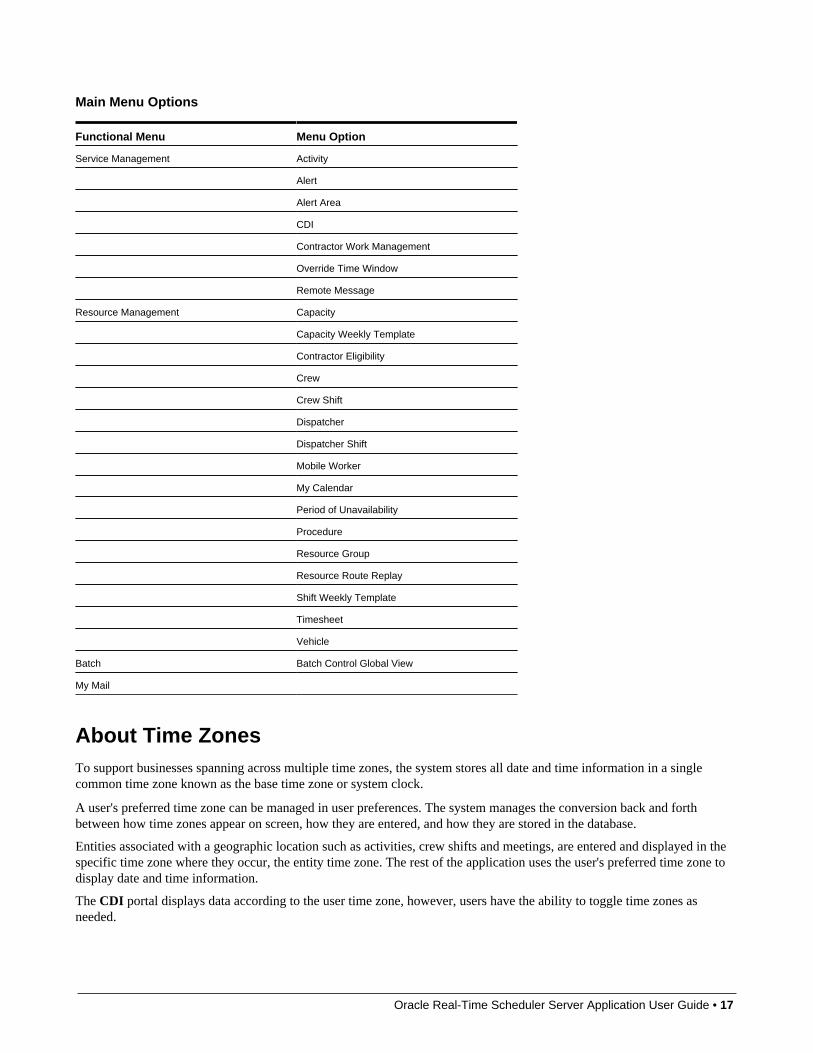
Oracle Real-Time Scheduler Server Application User Guide • 17
Main Menu Options
Functional Menu Menu Option
Service Management Activity
Alert
Alert Area
CDI
Contractor Work Management
Override Time Window
Remote Message
Resource Management Capacity
Capacity Weekly Template
Contractor Eligibility
Crew
Crew Shift
Dispatcher
Dispatcher Shift
Mobile Worker
My Calendar
Period of Unavailability
Procedure
Resource Group
Resource Route Replay
Shift Weekly Template
Timesheet
Vehicle
Batch Batch Control Global View
My Mail
About Time ZonesTo support businesses spanning across multiple time zones, the system stores all date and time information in a singlecommon time zone known as the base time zone or system clock.
A user's preferred time zone can be managed in user preferences. The system manages the conversion back and forthbetween how time zones appear on screen, how they are entered, and how they are stored in the database.
Entities associated with a geographic location such as activities, crew shifts and meetings, are entered and displayed in thespecific time zone where they occur, the entity time zone. The rest of the application uses the user's preferred time zone todisplay date and time information.
The CDI portal displays data according to the user time zone, however, users have the ability to toggle time zones asneeded.

Oracle Real-Time Scheduler Server Application User Guide • 18
Crews using the mobile application work their schedule using their local device time zone. The system handles theconversion of the data to and from the server time zone.
The system handles daylight saving time by displaying and allowing entry in “legal time” or the time affected by daylightsaving time. All date/time information is stored throughout the system in base time zone standard time, with no userpreferences or daylight saving time settings applied.
Please refer to the configuration guide for more detailed information on how daylight saving time is handled and howsystem and user time zone preferences affect the system.
Oracle Real-Time Scheduler Server Application User Guide • 19
Chapter 3
User Documentation
This section describes the application functions that support day-to-day operations. These functions are available from theOracle Real-Time Scheduler application Main Menu.
Resource Management
This section describes concepts and procedures related to managing mobile workers, vehicles, crews and crew shifts,dispatchers and dispatcher shifts, shift weekly templates and crew shift templates, break, non productive tasks, periods ofunavailability, location based services, and resource route replay.
Understanding Resource ManagementThis section describes concepts related to resource management.
About Mobile WorkersA mobile worker is an individual workforce resource that performs work as part of a crew.
A mobile worker is associated with a mobile worker type that defines attributes of the mobile worker's job description. Forexample, a mobile worker type can define the assumed worker capabilities and skills of all mobile workers of that type. Youcan override these settings if an individual mobile worker possesses more or fewer skills.
If a mobile worker lacks assumed skills, the system lists them as missing skills on the Mobile Worker maintenance portal.If you attempt to allocate an activity to a crew's shift, the system warns you if a mobile worker currently allocated to thatshift lacks the required skills and/or skill level.
Some skills have effective periods. For example, a skill might require a license that must be renewed every year. If a skillhas an effective period, you will be required to enter an effective date and an expiration date when you assign that skill to amobile worker.
Oracle Real-Time Scheduler Server Application User Guide • 20
Worker capabilities can also describe activity or customer-specific requirements such as the need for a security clearance,building access, drug testing, permits, language proficiency, etc. Worker capabilities and skills can also be associated withactivity types, indicating that they are required or preferred to perform this type of activity.
Mobile workers are assigned to crew shifts. When scheduling work, the system matches the requirements of each activity tothe capabilities of available crew shifts. The scheduler considers the skills and equipment of all mobile workers and vehiclesallocated to a crew shift to determine which activities the crew can work on a particular shift.
A mobile worker may be associated with one or more base service areas within which they typically work. A mobile workermay be part of only one crew shift at any time.
Planned Leave for Mobile WorkersIf a period of unavailability (POU), such as vacation time, has been entered for a mobile worker, the system also takes intoaccount whether or not the leave period overlaps with any planned shift and factors this in when determining whether themobile worker is available to be scheduled for a shift. If the leave overlaps with the shift for any amount of time, the mobileworker is considered unavailable, even if the overlap is only for a very short duration of time.
Leave time periods are displayed on the resource calendar so that it is easy for the resource planner to determine theavailability of all resources.
My Calendar PortalThe My Calendar portal can be used by any user that is defined as mobile worker, company or contractor users. Thisallows them to easily access their shifts and to review their activities to enter completion information. This can also be set asthe home page for these users.
Navigating to the Mobile Worker PortalYou can access the Mobile Worker portal in any of the following ways
• Select Main Menu > Service Management > Mobile Worker to display the Mobile Worker Query portal, thensearch for and select the mobile worker you want to allocate.
• From the Crew Shift and Crew Shift Template portals, click the Mobile Worker link displayed in the Current CrewAllocation section.
About VehiclesA vehicle is a workforce resource used by a crew to perform work.
A vehicle is associated with a vehicle type that defines attributes common to all vehicles of that type. For example, it candefine the assumed equipment of all vehicles of that type. You can override these settings if a specific vehicle possessesmore or fewer pieces of equipment. If a vehicle lacks assumed equipment, the system lists it as missing equipment on thevehicle maintenance portal.
Vehicle equipment can be associated with activity types, indicating that the equipment is required to perform this type ofactivity.
Like mobile workers, vehicles are assigned to crew shifts. When scheduling work, the system matches the requirements ofeach activity to the capabilities of the available crew shifts. The scheduler considers the capabilities of all mobile workersand vehicles assigned to a crew shift to determine which activities the crew can work on a particular shift. If you attemptto allocate an activity to a crew's shift, the system warns you if a vehicle currently allocated to that shift lacks the requiredequipment.
A vehicle can only be part of one crew shift at any time.

Oracle Real-Time Scheduler Server Application User Guide • 21
Planned Unavailability for VehiclesIf a period of unavailability, such as for maintenance, has been entered for a vehicle, the system also takes into accountwhether or not the leave period overlaps with any planned shift and factors this in when determining whether the vehicleis available to be scheduled for a shift. If the leave overlaps with the shift for any amount of time, the vehicle is consideredunavailable, even if the overlap is only for a very short duration of time.
Leave time periods are displayed on the resource calendar so that it is easy for the resource planner to determine theavailability of all resources.
Navigating to the Vehicle PortalYou can access the Vehicle portal in any of the following ways:
• Select Main Menu > Service Management > Vehicle to display the Vehicle Query portal, then search for and selectthe vehicle you want to allocate.
• From the Crew Shift and Crew Shift Template portals, click the Vehicle link displayed in the Current CrewAllocation section.
About Crews and Crew ShiftsThis section describes details about crews and crew shifts.
CrewsA crew is a uniquely named group of mobile workers and vehicles that perform work in shifts. The specific mobile workersand vehicles that make a crew may be typically constant, like single person crews, or they can vary by day of week fromshift to shift. A crew might also perform different types of work and cover different service areas on different shifts.Therefore, crew allocation is defined for crew shifts, not for crews. Likewise, activities are scheduled to crew shifts, not tocrews.
Crew ShiftsA crew shift is a planned period of time in which a crew (one or more mobile workers and vehicles) is scheduled to performwork. For example, a crew shift might be defined as Crew A, consisting of Jack and his van, working on a specific datefrom 9 am – 5 pm.
A crew shift is associated with a shift type which defines attributes common to all crew shifts of that type. This includesthe shift start time and duration of the shift. For example, night shifts would have a different start time and duration thanmorning shifts, so they would have different shift types.
Other attributes that may be defined for a shift include the primary service class of work to be performed, service areas to becovered, breaks to be taken during the shift, logon and logoff locations, shift-based cost factors, and auto-dispatch settings.
Typically, crew shifts are automatically generated from crew shift templates that define the basic characteristics of theshifts. Shifts can also be manually created to address special situations on particular days.
If your organization uses depots, there are special considerations for crews and shifts. Refer to About Depots and DepotRuns for more information.
Logon / Logoff LocationsA crew shift must either reference a service center location record for their logon / logoff location or indicate it is the mobileworker’s home. The latter is only applicable when the shift is for a single worker. Other than the home option the shiftcannot reference an address and has to reference a common location record for the address.

Oracle Real-Time Scheduler Server Application User Guide • 22
You may specify a maximum travel time the crew is expected to spend traveling from/to the logon/logoff location on theirown time. You can also reserve time at the beginning and/or end of the shift for performing review and preparation work.
This information is used by the scheduler to properly plan the schedule or tasks assigned to the crew on that specific shift.
Covered AreasThe Covered Areas section displays a listing of the service areas where the shift is allowed to perform work. Preferredservice areas are areas in which the crew is allowed to perform work and which are given priority during scheduling. A shiftmust be associated with at least one service area, either allowed or preferred.
Controlling the Type of Work Assigned to the ShiftA crew shift may be associated with one service class of work that is defined as the primary function of the crew on thatshift. This is considered the preferred service class. The scheduler is encouraged to assign work of the preferred type overnon-preferred work to a crew shift.
A crew shift may also be associated with one or more services classes it is not allowed to perform. This association is usedto discourage the scheduler from assigning certain classes of work to the shift; however, a dispatcher can allocate any classof work to any crew. A crew shift can designate one service class for which a percentage of its capacity is reserved.
Advance DispatchingDispatching is an action that locks a task's sequence in the shift schedule so no further optimization takes place and marks itas ready to be sent to the crew.
Once a crew starts their shift, you can configure the scheduler to automatically dispatch to the crew none, all or a subset oftheir work without requiring dispatcher intervention. The number of tasks to dispatch at any point in time, referred to as thedrip horizon, may be controlled on the crew shift.
Regardless of the automatic dispatching setting, you can also configure the system to dispatch a number of tasks in advanceof the shift start. This would ensure the schedule of these tasks is locked for various business needs. For example, it allowsthe crew to preview the first few tasks of their schedule before starting their shift. The amount of time prior to start that theshift is locked is set by the value in the Advanced Dispatch Offset field on the shift. You can also indicate that at that timethe shift should be closed and all the tasks should be dispatched using the Advance Dispatch Mode field. This might alsobe referred to as "shift cutoff".
Crew Undispatch and Sequence LockSome business practices require the dispatched route to be completely locked, while others may allow it to change for asignificantly more optimal route and respond to real-time exceptions. Oracle Real-Time Scheduler supports the ability toconfigure a shift to allow or disallow route changes in the form of undispatching or changing the order of the activities.
The Undispatch Option and Change Sequence fields are available on the Crew Shift portal.
Standby ShiftsStandby shifts can be planned as potential shifts that can be activated only when needed. For example, a crew may beplanned to have a stand by shift on Sundays to handle emergencies. Stand by shifts are not considered as available capacity,and are therefore scheduled until the crew actually starts the shift or the dispatcher changes its status to "open". If the crewis indeed called on that Sunday and starts that shift, it becomes an active shift as usual and gets sent to the scheduler. A shiftis typically marked as "stand by" when created, but it can also be changed to standby while this shift is still in pending state.
Variable ShiftsWhen crews work on appointments, there may be a lot of idle time between the time they start their shift and their firstappointment. To help with more efficient scheduling, in these cases, shifts can be set as "variable shifts" to provide the crewwith some flexibility on when they can start and end work. If the Variable Shift field on a shift is set to Yes you must then

Oracle Real-Time Scheduler Server Application User Guide • 23
enter a Shift Duration to establish the total amount of time allotted for the shift. The scheduler sets the start work time asthe start time of the first task scheduled to the shift, minus any travel time. The estimated start time is rounded down basedon the setting of the Round Start Time option. The start time is locked at some point prior to the earliest start time so thatthe schedule does not change without giving the crew enough time to know about the change. Once the estimated start timeis locked, the shift is sent to the scheduler as a fixed shift. The amount of time prior to start that the shift is locked is set bythe value in the Advanced Dispatch Offset field.
For example, a variable shift with a range of 8:00 AM to 8:00 PM and a duration of 9 hours can start anytime between 8:00AM to 11:00 AM (the start window is defined as the earliest shift start time to the latest end time, minus the duration - athree hour offset in this example). Depending on the shift start time, the shift will end 9 hours later for an end time between5:00PM and 8:00PM. If the first activity is scheduled after the latest shift start time, the shift will start at 11:00AM to ensurethat the requirement for a 9 hour duration is met.
Closed ShiftsClosing a shift locks its current schedule and does not allow the scheduler to add more tasks to it.
Shifts can be closed in the following ways:
• If the crew goes offline, then all scheduled tasks are dispatched to the crew and the shift is closed.
• A dispatcher can close a shift so as to finalize its schedule. When this is done, the crew cannot receive more work. Thedispatcher can re-open the shift at any time.
• A custom process might also be configured in implementation to close a shift prior to the start of the shift so that all ofthe activities are allocated to the crew. In this case, the crew has the opportunity to review the shift before its start. This isuseful for non-MDT crews.
Planned Unavailability for CrewsThe following circumstances may mean that a crew has a planned unavailability:
• Crews are entitled to take planned breaks after working for some time on their shift. Refer to About Breaks for moreinformation.
• Crews may need to restock their vehicles or perform other administrative tasks at the beginning of their shift or sometimeafter. Refer to About Non-Productive Tasks for more information.
• Crews may need to attend work related events such as training sessions, meetings etc also known as periods ofunavailability (POUs). If a period of unavailability has been entered for a crew, the system also takes into accountwhether or not the unavailability period overlaps with any of their planned shift and factors this in the event as part of theshift route. For example, the crew can be out for work in the field, attend their meeting and then resume work in the fieldafterwards. Refer to About Periods of Unavailability (POUs) and POU Templates for more information.
Crew HierarchyDepending on your business practices, crews might be organized within a reporting hierarchy. Using crew hierarchy canhelp with reporting and also allows for advanced searching and/or filtering crews in the Gantt and from related records.
Refer to About Crew Hierarchies for more information.
Crew CalendarShifts and periods of unavailability are displayed on the resource calendar so that it is easy for the resource planner todetermine the availability of all resources.

Oracle Real-Time Scheduler Server Application User Guide • 24
Shift Time ZonesThe time zone on a shift indicates the time zone in which the crew is planned to be working. All date and time informationon the Shift portal, including set up of breaks and non productive tasks for the shift, is entered and displayed in that timezone.
ProceduresCrews performing a certain primary function may be required to complete a set of procedures before they are allowed tostart their shift or change their primary function mid shift. These procedures may be defined on the service class used forprimary function purposes.
Crews utilizing certain types of vehicles may be required to complete a set of procedures before they are allowed to use thevehicle. These procedures may be defined on such vehicle types.
Crews performing certain types of work may be required to complete a set of procedures on site before they are allowed tostart the work. These procedures may be defined on such activity types.
Before the shift starts the shift portal lists a preview of all the procedures planned for the crew to complete. Once started thezone lists all the actual procedures performed.
Refer to About Procedures for more information.
Shift TimekeepingRefer to About Timesheets if your organization uses timekeeping functionality.
Route ReplayYou can use the Route tab on the Crew Shift portal to view a geographic map which shows the planned route for thecrew on the specific shift. Once the shift is started, the route is based on the sequence of task locations the crew has visitedwhether they completed the task or not. If GPS reports are available for the crew during this shift, an additional actual routeis displayed. The display shows the crew's current location if the shift is in progress.
The actual route is shown in one color and the planned route in a different color. Hover over icons to reveal additionalinformation about the shift or task. For example, if the task was postponed or worked out of sequence etc.
An Action link displays on the main record allows users to toggle the display of planned and actual routes. The user canalso request detailed directions for the route of a planned shift.
Depot RestrictionsThe Depot Restrictions section on the Crew record indicates the specific depots that the crew is allowed to visit. If depotrestrictions are indicated on a crew, the crew's schedule is restricted to the specific depots indicated. If no depots arespecified, the crew can travel to any depot as part of their schedule. A shift can be scheduled to work at any depots that areallowed on the crew.
Note that the depot restriction section on the shift is an override for exception handling. If for some reason a crew on aspecific shift should not be allowed to visit a depot then this can be manually overridden on the shift. A depot section isonly displayed on shifts if there are any such overrides.
Refer to About Depots and Depot Runs for more information.
Navigating to the Crew Shift PortalYou can access the Crew Shift portal in any of the following ways:
• Select Main Menu > Resource Management > Crew Shift, then search for and select the crew shift.
• Click the Crew Shift link from the Scheduling Gantt on the CDI portal.

Oracle Real-Time Scheduler Server Application User Guide • 25
• Click the Crew Shift link on the Scheduling tab of the Activity portal (if the activity has been scheduled to a shift).
• Click the Allocated Shift link from the Activity portal (if the activity has been allocated to a crew shift).
• Click the Crew Shift link from the Calendar zone on the Crew portal, Mobile Worker portal, or Vehicle portal.
• From the Alert Queue, click on a crew shift associated with the alert (shift-related alerts only).
• From the Alert Search portal for a shift-related alert, click the Shift link.
About BreaksA break is a planned period of time during which a crew is entitled to take a break during their shift.
Shift breaks allow you to plan for nonworking time within a shift. For example, a shift might include two 15-minute breaks,one in the morning and one in the afternoon. The morning break could be taken anytime from 9:00 am to 11:00 am, and theafternoon break could be taken anytime from 1:00 pm to 4:00 pm.
Each break is associated with a break type, which defines the duration of the break and the duration of the break window(the period of time during which the break can be taken). When you create a crew shift or crew shift template, you canadd one or more break types to the shift. When the shifts are generated, the system automatically creates break tasks andincorporates them into the crew shift's schedule.
Breaks are planned to be performed during a time window starting at an offset relative to shift start time. If the crew startstheir shift earlier or later than planned the break's schedule is adjusted accordingly. For example, if the offset is 2 hours andthe shift starts at 8am, the break cannot start before 10am. If the shift starts at 9am with the same 2 hour offset, then the taskcan start as early as 11am. Alternatively, you may specify the offset using an actual window start date and time. Here, thesystem calculates the offset of that time from the shift start.
Activity types and activities include an Allow Breaks indicator which specifies whether or not the activity can includebreak time. This is used automatically on complex activities.
Breaks are displayed at the end of a crew shift's schedule until they have been scheduled.
Breaks created for a variable shift must specify an offset.
Navigate to a Break Tasks
• Navigate to the Break Task maintenance portal in any of the following ways:
• From the Scheduling Gantt in the CDI portal, right-click the break and select View Details from the pop-up menu.
• • From the Breaks / Non Productive Tasks zone on the shift maintenance portal
• Click the appropriate button in the Actions zone.
Action Button Description
Start Indicates that the crew is starting the break.
Complete Indicates that the crew has completed the break and is ready for thenext assignment.
Cancel Indicates the crew is not going to take the break. This action cancelsthe break task and removes it from the crew shift schedule.

Oracle Real-Time Scheduler Server Application User Guide • 26
About Non-Productive Tasks (NPTs)A non productive task (NPT) is a period of time during which a crew must perform a task other than regular work as partof their shift, such as replenishing stock. Such tasks are built into a crew's schedule and are always associated to a locationwhere the task is performed.
Non-productive tasks allow schedulers to plan for non-working time during a shift. For example, a shift might start with atask to replenish supplies on the truck in the morning, and to check tire pressure in the afternoon. The morning task mighttake place anytime from 6:00am to 9:00 am, and the afternoon task might take place any time between 1:00pm and 3:00pm.
Unlike a meeting the non-productive task is not planned to start on a specific fixed time but rather is planned to beperformed during a time window starting at an offset relative to shift start time. If the crew starts their shift earlier or laterthan planned the task's schedule is adjusted accordingly. For example, if the offset is 2 hours and the shift starts at 8am, thetask cannot start before 10am. If the shift starts at 9am with the same 2 hour offset, then the task can start as early as 11am.Alternatively, you may specify the offset using an actual window start date and time. Here, the system calculates the offsetof that time from the shift start.
Each non-productive task is associated with a task type which defines the duration of the task, and the duration of the taskwindow. When you create a crew shift or crew shift template, you can add one or more non productive task types to theshift. When the shifts are generated, the system automatically creates non productive task tasks and incorporates them intothe crew shift's schedule.
The location of an NPT may be a reference to a common location or a specific address. A crew may be affiliated witha specific NPT location defined on the crew record. When creating an NPT if its location is not explicitly specified, thesystem defaults it from the shift's crew record if any is defined.
NPTs are displayed at the end of a crew shift's schedule until they have been scheduled.
Non productive tasks cannot be created on variable shifts.
About Periods of Unavailability (POUs) and POU TemplatesA period of unavailability (POU) is a specific period of time during which one or more resources are not available toperform work. For example, mobile workers or dispatchers may be unavailable due to vacation, personal appointments,meetings or training sessions etc. Vehicles may be unavailable for maintenance reasons. Crews may need to attendingmeetings or participating in training sessions and hence not available to perform work during these events.
Leave POUsAn individual resource POU is used to capture an individual’s leave time such as vacation time or a vehicle’s unavailabilitydue to maintenance. Such POUs reference a single resource only and do not specify a location.
If a leave POU has been entered for a mobile worker or a vehicle the system also takes into account whether or not the leaveperiod overlaps with any of their planned shifts and factors this in when determining whether the resource is available to bescheduled for a shift. If the leave overlaps with the shift for any amount of time the resource is considered unavailable, evenif the overlap is only for a very short duration of time.
Crew POUsA crew POU represents a meeting or an event to which one or more crews are invited. In addition to the event time,duration, location and the list of invited crews it may also specify one or more service areas. This instructs the scheduler toincorporate the POU in the invited crews’ shift only if they are planned to work in the specified service areas. (This is usedto discourage the incorporation of the POU event into a crew's shift schedule if the crew happens to work too far from theevent that day.) If no service areas are specified, the POU will apply to all service areas. A crew POU is always associatedwith a location so that travel time to and from the POU location is taken into account when optimizing the crew shift's route.

Oracle Real-Time Scheduler Server Application User Guide • 27
POUs can be managed for multiple crews at one time using the Invited Crews and Crew Search zones. The Invited Crewszone displays a list of crews that are currently allocated to the POU. You can also remove invited crews from this zone. Usethe Crew Search zone to search for and select crews to add.
Crew POU TasksA POU task is a tool for tracking crew attendance of a POU event. The system automatically creates a POU task for everycrew associated with a crew POU, and then incorporates it into the crew's shift schedule. A POU task is dispatched to acrew, just like an activity, and its status is updated and tracked in the same way.
• Navigate to the Period of Unavailability Task maintenance portal in any of the following ways:
• From the Scheduling Gantt in the CDI portal, right-click the POU and select View Details from the pop-up menu.
• Navigate to the Crew Shift portal and search for the crew shift to which the POU is scheduled. On the Crew Shiftportal, click the Schedule tab and then click the POU link in the Scheduled Tasks zone. You can also click the POUin the Crew Shift Scheduling Gantt and then select View Details from the pop-up menu.
• Use the buttons in the Actions zone of the Period of Unavailability Task maintenance portal to perform valid actionson POUs.
The actions that are valid at any time depend on the current status of the POU and your system's configuration. The tablebelow describes a set of standard actions.
Action Button Description
Edit Allows you to enter comments and add standard completion remarks.
En Route Indicates that the crew is currently on its way to the POU.
On Site Indicates that the crew has arrived at the POU location.
Complete Indicates that the crew has completed the POU and is ready for thenext task.
Cancel Indicates the crew is not going to attend the event. This action cancelsthe POU task and removes it from the crew shift schedule.
POU TemplatesPOUs are either recurring or non-recurring. For recurring POUs, you define a template POU from which the actual POUsare generated. For example, if you create a template POU for a regular weekly staff meeting, the system will automaticallygenerate individual POUs for each meeting.
To indicate that the POU template should repeat, check the Recurring box when creating the template. You also specify thenumber of occurrences and the expiration date.
POU templates support the following recurrence patterns:
• Daily: the POU can recur every x days.
• Weekly: the POU can recur on a specific day every x weeks. If you want the POU to occur on Tuesday and Thursdayevery week, create two POU templates; one that occurs on Tuesday every week and one that occurs on Thursday everyweek.
• Monthly: the POU can recur every x months on an exact date or a relative date (a day in a specific week). For example,the POU can occur on the 21st of every month or the last Friday every three months.
• Yearly: the POU can recur every x years on an exact date or a relative date (a day in a specific week in a specificmonth). For example, the POU can occur the 4th of July every year or the first Monday of January every two years.
In a situation where POU details differ from their template on a particular date, you can generate the POU initially fromthe template and then manually adjust it to override the template settings. For example, circumstances might require that aweekly staff meeting, typically held on a Monday morning, be held on Friday during one particular week. In this situation,POUs for every meeting would be generated automatically from the template, and then you would manually modifythe POU for the special meeting. Modified POUs are called overridden POUs, as they no longer match the template

Oracle Real-Time Scheduler Server Application User Guide • 28
from which they were generated. The Overridden POUs zone on the Period of Unavailability portal displays a list ofoverridden POUs linked to the current template.
A generated POU maintains a reference to the template that generated it, so any changes made to a template areautomatically applied to all future POUs generated from that template. If you modify a POU template after POUs have beengenerated from it, the system notifies you that all previously generated POUs will be deleted and regenerated, and that anymanual overrides will be lost.
When a POU Template is activated, the system automatically generates the POUs based on the effective date and yoursystem's planning horizon.
Holidays and POU CreationWork calendars define holidays within a period of time. They are optional for POU templates, however if the start date/time for a POU falls on a non-workday or a holiday as defined by the calendar, the POU will not be generated. If a POUTemplate is defined as daily, then a POU will be created for every day of the week, Monday through Friday, excluding anyholidays.
The number of occurrences defined on a POU Template only counts the actual POUs that are generated. For example, if aPOU Template is defined as the first Monday of every month for 10 occurrences, presumably January through October, buttwo of those Mondays are holidays, the POUs will be created from February through November, skipping the two holidaydays.
Time ZonesIf a POU is associated with a geographic location, like a meeting, all date and time information on the Period ofUnavailability portal is entered and displayed in that location's time zone.
About Shift Templates and Shift Weekly TemplatesTemplates provide a tool for quickly generating large numbers of shifts based on pre-defined parameters.
A shift weekly template defines a cyclical weekly pattern made up of crew shift templates. Shift weekly templates areeither:
• effective for a specified number of weeks starting from their effective date, or
• perpetual, which means they have an effective date but no end date. The global planning horizon parameter (defined inthe master configuration) controls the number of day’s worth of shifts to generate for perpetual templates.
Each shift template defines the attributes for the corresponding recurring shift. For example, a weekly shift template mightuse a different crew shift template on Fridays than the one used on other days. Attributes on a shift template include theshift's planned start date and time, covered service areas, breaks, etc. The system generates actual crew shifts automaticallyfrom the crew shift templates. Shift weekly templates may be:
• Crew specific - These templates are defined for a single crew and are fully defined with everything that the shiftgenerator needs to generate the shift. They reference the crew that they are defined for and how the resources areallocated on the shift.
• Common - These templates can be shared across multiple crews via subscription. As such they cannot define crewspecific details such as the crew itself or its resource allocation. These details are therefore defined on the crew entityitself. Shift generation combines crew details on top of template details to generate shifts. Any crew that is subscribed toa common template must have these types of details defined.
In a situation where crew shift details should differ from their template on a particular date, generate the shift initiallyfrom the template and then you can manually adjust it to override the template settings. These modified shifts are calledoverridden shifts, as they no longer match the template from which they were generated. The Overridden Shifts zone onthe Shift Weekly Template portal displays a list of overridden shifts linked to the current template.

Oracle Real-Time Scheduler Server Application User Guide • 29
A generated crew shift maintains a reference to the template that generated it, so any changes made to a template areautomatically applied to all future shifts that were generated from that template. If you modify a shift weekly template aftercrew shifts have been generated from it, all previously generated crew shifts will be regenerated, and any manual overrideswill be lost.
Common Weekly TemplatesResource planners can set up common weekly templates which can be shared across multiple crews. This is helpful forthe efficient generation of shifts in organizations where there are sometimes hundreds or possibly even thousands of crewsthat follow the same weekly shift pattern. The resource planner can subscribe crews to the common template, then shiftsgenerated from the common template are exactly the same and follow the same timing in the rotation except for crewspecific details such as allocated resources.
Subscription to a common template is effective dated so that resources can subscribe to follow a common template as of agiven date and this relationship can expire. Each resource can subscribe at different times but their shifts are generated inthe same rotation timing as all other subscribed resources, regardless of when they subscribed.
The planner can also unsubscribe a crew from the common template at any time or change effective dates to affect thecreation of future shifts for those crews.
Changes made to the common template affect future shifts of all subscribed crews. Since a common template may involvea large number of subscriptions, such changes are NOT applied right away to all these shifts but rather they take effect thenext time the shift generation batch process runs. If you want to apply the recent changes to a specific crew without waitingfor the next scheduled batch run you can select the Process Now button next to the crew on the subscription list.
Similarly subscriptions and requests to unsubscribe may involve multiple crews. Therefore these requests are applied thenext time the shift generation batch runs or by clicking the Process Now button for a specific crew.
In a typical workflow, the resource planner would create a common weekly template then subscribe multiple crews to thetemplate bearing the following in mind:
• Subscriptions require an effective date and allow an expiry date
• A crew’s subscriptions and specific templates cannot overlap
About Working with Draft and Original TemplatesIf you attempt to modify a template from which shifts have already been generated, the system automatically creates a draftcopy of the template. This allows you to make your changes to the draft, then preview the shifts that would be generated ifyou applied the draft.
You can also see if any manual edits were made to previously generated shifts. (Such manual overrides will be lost whenthe draft is applied and shifts are regenerated). When you have reviewed this information and are sure you want to make theproposed changes, you can apply the draft and be confident that you understand the impact of your action.
It is helpful to understand the following rules that apply when working with draft and original templates:
Initial Creation
• When you create a new shift weekly template, its status is pending.
• When you apply the pending template, its status changes to “Applied”. The system will generate future shiftsautomatically from the template's effective date through the earliest of the planning horizon or the expiration date (ifany). A background process manages the generation of shifts going forward.
Making Changes to an Applied Template
• If you attempt to update an applied template, the system will automatically create a draft template. The updates will bestored in the draft and the original template will remain unchanged.

Oracle Real-Time Scheduler Server Application User Guide • 30
• If you attempt to update an original template for which a draft already exists, the system will notify you that you mustenter your changes in the existing draft.
• If you apply a draft (for which an original template exists), the system notifies you that any future shifts generated fromthe original template will be deleted and regenerated. At this point, you can continue or cancel the operation. If youcontinue, the following occurs:
• The draft template's status changes to applied.
• The original template is updated to match the draft.
• All future shifts generated from the original template are either updated (if those shifts' templates also exist inthe draft) or deleted (if those shifts' templates were deleted from the draft). New shifts are generated for any shifttemplates that were added to the draft.
• Any additional changes made to this template will result in a new draft.
Setting an Applied Template Back to Pending Status
• If you attempt to set an applied template back to pending status, the system notifies you that any future shifts generatedfrom the template will be deleted. If you confirm the action, the following occurs:
• The original template's status changes to pending (no draft exists).
• All future shifts that were previously generated from the original template are deleted.
• If a draft template exists, it is deleted.
About MDT, SMS, and Non-MDT CrewsThe application supports dispatching directly to mobile devices including laptops, tablets and other mobile devicesinterfacing with the system via the mobile application.
The mobile application can run locally on the device in a disconnected mode or accessed on the server through a browser ina connected mode.
Communication with cellular phones is done using SMS (short messaging system).
MDT CrewsMDT crews use the mobile application to log on and receive their assigned tasks. A crew must be connected (eitherwirelessly or over a wired network) to log on to their shift and receive dispatched activities. Once activities have beendispatched, the crew can work disconnected if wireless communication is not available. As they work each task, theyenter status updates (en route, started, etc.) and completion details on the mobile device. They can also receive new tasksand updates to existing tasks throughout their shift. The system regularly checks the connection to the mobile device, anddisplays the connection status to the dispatcher on the CDI Dispatcher portal.
Offline Mobile CrewsCrews may operate in areas with poor or no connectivity coverage. In this situation the entire work schedule for the dayneeds to be dispatched to the crew at shift start time as they cannot get additional work during their shift.
Moreover, since the crew cannot provide status updates the scheduler does not have a way to validate whether or not thecrew is on schedule and therefore incorrectly pushes the schedule back.
To prevent scheduling discrepancies the crew must notify the scheduler that they are offline by selecting the option on theirmobile device. When the crew goes offline, the shift is also closed and their entire schedule is dispatched to them notifyingthe crew when the process is complete. Once the activities assigned to the crew have been dispatched, the crew can workoffline if wireless communication is not available. The crew can also request to be online again, as needed.

Oracle Real-Time Scheduler Server Application User Guide • 31
SMS CrewsSMS crews communicate via text messages sent from their cell phone. For example, a text message of "Logon" logs thecrew shift on and tells the server to send the first task. The system responds by sending a message with the details of thefirst assignment. Details include the activity type, arrival time, customer name and address.
As the crew works the assignment, they send simple messages to communicate their progress: a crew message of "1"indicates that the crew is traveling (en route) to the task; "2" indicates arrival at the task location; "3" indicates that work isdone and the crew is ready for a new task.
The system also sends non productive tasks, POUs and breaks to the crew in the same way that it sends activities. At theend of a shift, the crew sends a "Logoff" message. Typically, an SMS crew enters completion details at the end of their shiftwhen they return to their office.
Logic to interpret and process SMS messages is handled by a plug-in. Refer to the configuration guide for information aboutcustomizing this plug-in.
Non-MDT CrewsIf a crew does not have a compatible mobile device (including SMS), the dispatcher can start the crew shift from the CrewShift maintenance portal on the server and communicate details of each task directly to crew. The dispatcher can alsoupdate the status of a task (using the task's maintenance portal) and enter activity completion details when the crew hascompleted work. Typically, the shifts of non-MDT crews are closed some time before their shift is planned to start. If a non-MDT crew's shift is closed then it is also set to offline. Non-MDT crews can also call in the dispatcher, and request them todecline the activity on their behalf, so crew does not get the activity again.
SMS Message ReferenceThis topic describes the messages that an SMS user can send to the server application.
Messages from the Crew to the ServerThe following SMS messages are supported from crew members in the field.
Message Description
Logon Finds the next shift for the user associated with the mobile phone and
starts it. Starting a shift causes the first task to be sent to the crew. The
system validates the phone number and uses it to retrieve the mobile
worker's current shift and send the first task. The cell phone number
must be associated with an active SMS-enabled mobile worker record
on the server.
1 If the current task is associated with a geographic location, this
indicates that the crew is traveling to the task location. If the current
task is a break, this starts the break.
2 If the current task is associated with a geographic location, this
indicates arrival at the task location. This is invalid for breaks.
3 If the current task is associated with a geographic location, this
completes the task. If the current task is a break, this completes the
break. Once the current task is completed, the next task (if any) is sent
to the crew.
9 Postpones the current task for a specified duration of time (in minutes)
or until the end of shift.
0 Toggles the state of the current shift from In Service to Out of Service.

Oracle Real-Time Scheduler Server Application User Guide • 32
Message Description
Return Sent in response to an SMS recall. This indicates that the crew accepts
the recall. The system then updates the assignment status to Returned.
Logoff This message ends the current shift and returns any unfinalized
activities.
Sample Messages from the Server to the CrewThe following table provides examples of the messages sent to crews when tasks are dispatched.
Message Example
Activity Details MREAD at 12.00.00 for Swetha Paspuleti at 6284 dressler Road NW,
North Canton
POU Details STATUS MEETING at 6284 dressler Road NW,North Canton from
14.00.00 to 14.30.00
Break Details COFFEE from 13.00.00 to 13.30.00
About Location Based ServicesLocation Based Services (LBS) refers to crew location and tracking services that utilize Global Positioning System (GPS)data obtained from a mobile resource. GPS data is used to display the location of resources on the map and to track crewsand routes on the map.
LBS allows dispatchers and the scheduler to know the precise whereabouts of crews and vehicles in relation to:
• Activities being performed in the field
• Log on and log off locations
• Other crews and vehicles
• The underlying map geography (street names, landmarks, etc.)
• Hazard or other alert areas
LBS services can only be provided if GPS data is obtained for a mobile resource. Data may be captured via the crew'smobile device (MDT) or independent of it via an external GPS system embedded in the vehicle.
Sending of GPS data from the mobile device can be enabled or disabled at the shift level using the GPS Data Enabledattribute.
Vehicles equipped with an external GPS system can be configured to transmit GPS data independently. If the shift is notconfigured to send GPS data, the system uses GPS sent from the vehicle if any.
If GPS data is not available or is too old (as defined in your system's global configuration), then the system estimates thecrew's current location based on its last known location.
About ProceduresProcedures represent steps or tasks that crews may need to complete prior to starting a business activity such as startingtheir shift, using a vehicle or starting work on an activity. Usually procedures relate to safety precautions or regulatoryrequirements. For example, the mobile worker may need to complete a vehicle inspection at the beginning of a shift, orreview safety instructions for a hazardous task. A procedure associated to the activity or vehicle type would guide thecompletion of the inspection or safety check.
Procedures functionality is only available to crews using mobile devices.

Oracle Real-Time Scheduler Server Application User Guide • 33
Typically, procedures consist of simple questionnaires with predetermined expected answers (yes/no, text, a number, etc).The base product is shipped with business objects to supports this type of procedure but you may customize your procedurebusiness object to meet your business needs.
If the person answering the questions enters one incorrect answer, the entire procedure fails. The procedure may or maynot be set to allow the crew to override a failed procedure as passed. If override is disabled, the next business activity isprevented from starting with a failed procedure. Your business practices will determine how the crew should proceed incases where the procedure fails and there is no override allowed. You may also specify for each procedure whether or notattendance is taken of all crew members who were present during completion of the procedure. These details as well as thespecific procedure steps are defined by the procedure type.
Procedures can be shift based or activity based:
• Shift based procedures must be completed based on a shift event such as the start of the shift, change of primaryfunction, change of vehicle, and so on. In this case, whenever a shift event occurs, the crew is notified on their mobiledevice that they are required to complete a procedure. These procedures are determined by the service class or vehicletype associated with the shift. Shift based procedures can be viewed on the Shift Actions menu on the mobile device.
• Activity based procedures must be completed on site before the crew starts the activity. These procedures are determinedon the activity type and are sent to the crew’s mobile device when the activity is dispatched. Activity based procedurescan be viewed on the Activity Actions menu on the mobile device.
As procedures are created, processed and completed, the system creates a Procedure record to track the information,attendance (if applicable), and results. Procedures cannot be manually created in this portal. Procedure records indicatewhether or not the procedure was passed successfully, and the crew shift details related to the procedure.
Before the shift starts the list of planned procedures is displayed on the shift portal. Once the shift has started, actualprocedure records are displayed.
About Resource Route ReplayResource Route Replay shows a replay of a crew's actual route during a specific period of time based on GPS coordinatehistory. This feature can be used to analyze route patterns and for auditing purposes.
A crew's mobile device may be configured to transmit GPS location data throughout the day. A vehicle's GPS data may beinterfaced to the system from an external system. You can review resource routes for crews and/or vehicles, viewing themone at a time or adding multiple routes (up to 12) to the map at once. Multiple routes are displayed by representing eachroute in a different color.
When successive routes are displayed, route points are marked with a sequence number so that it is clear in which order thepoints were visited. Hover the mouse pointer over any route point to display the GPS details for that route point.
Click the Clear All button to remove all resources from the map and start again.
You can use the Route tab on Crew Shifts to view a geographic map which shows the planned route for a crew on aspecific shift. Refer to the About Crews and Crew Shifts for more information.
About Dispatchers and Dispatcher ShiftsA dispatcher is a person within your organization responsible for monitoring crews and crew shifts within certain dispatchareas.
A dispatcher record defines the dispatch areas and key performance indicators (KPIs) that the dispatcher is allowed tomonitor. (Dispatch areas identify a set of service areas and service classes.) The dispatcher record also specifies the defaultdate range for activities to be monitored and indicates whether the dispatcher will be allowed to modify that date rangewhen they log on to their shift.
A dispatcher shift record controls the scope of data to be monitored by the dispatcher for a particular shift. When adispatcher logs on to start their shift, the system creates the dispatcher shift record at that time. The dispatcher can select

Oracle Real-Time Scheduler Server Application User Guide • 34
which dispatch areas (of those specified in the dispatcher record) they want to monitor for the shift. They can also changethe date range of activities to monitor for the shift, if allowed (based on settings defined in the dispatcher record).
A dispatcher can log off and log on again at any time. Whenever a dispatcher logs off a shift, the system finalizes thatdispatcher shift record. Whenever a dispatcher logs on to a shift, the system creates a new dispatcher shift record. Frombusiness perspective, a dispatcher's shift may be an 8-hour period from 9:00 to 5:00, but from a system standpoint, the shiftlasts from logon to logoff.
NOTE: For a dispatcher to be "logged on," the dispatcher shift itself must be logged on. This is not completed by justlogging in to the application.
Refer to Dispatcher Functions (CDI) for more information.
About TimesheetsTimesheets allow your organization to more easily use the time information which is collected within the application asshifts are completed. This information can be exported to external timekeeping systems as needed.
This functionality also allows mobile workers to review, accept, and sometimes change their reported time for work,travel, or non-work events (such as breaks, non-productive tasks and periods of unavailability) for their shifts. Timesheetfunctionality is optional. Global master configuration parameters must be specified to enable this functionality.
Timesheets are created automatically at the end of the related shift for each period of time the resource was part of theshift. The summary of time is presented to the crew or resource for acceptance and completion as part of shift completionprocessing. Time is grouped in into usage “time buckets” providing a breakdown of total durations for the different types oftime utilization categories, or buckets, such as travel, work, etc.
Time spent traveling to and working various types of tasks can be configured to be grouped into custom time “buckets” aspat of the task type definition.
Time "buckets" are calculated automatically by the system, but might be adjusted by the crew or resource depending onyour business practices and settings. Use the master global configuration option to allow or not allow crews to adjust thesystem calculated times.
MDT crews may complete their timesheet verification on the mobile device. If the mobile worker does not agree with theirtimesheet report or cannot correct the data, they can choose not to mark it reviewed on the device and complete it later inoffice.
Non MDT crews can complete timesheets "in office" as part of their general shift completion workflow using the timesheetzone on the shift portal. The mobile worker may click on the Process Crew Timesheets Now button to generate thetimesheet record for each individual resource that worked this shift or wait for the next timesheet batch process to do so.
Timesheets cannot be manually created, but can be maintained or duplicated for correction purposes in the Timesheetportal.
Review and CorrectionsActions in the Record Actions section allow for further processing of the timesheet based on your business requirements.
The New button is used to correct a timesheet for the overall time period. A timesheet is created for each period of time aresource is known to the system to work as part of a shift, and these calculated time frames are strictly based on recordedsystem events. If for some reason the system times do not accurately reflect actual events, users can create a new timesheet.For example, if a mobile worker joined the shift at noon but the crew leader recorded the crew allocation change at 1 PM,then the system generated timesheet would show that the worker joined at 1 PM.
After the timesheet is reviewed in the application, the user can only correct the amount of time in each time bucket or addnew time buckets. In this example, the only way to adjust the time frame is to create a new timesheet within the application.The mobile worker or crew leader would have to make the correction after returning from the field. When a new timesheetis created, the timesheet is overwritten.

Oracle Real-Time Scheduler Server Application User Guide • 35
Additional actions allow users to confirm that the timesheet has been reviewed and the mobile worker agrees to the reportedtime, or rejects the time. This can also be completed from the mobile device. Your organization may or may not allowmobile workers to correct the reported time as configured on the master global configuration option.
Working with Mobile WorkersThis section describes common tasks related to working with mobile workers.
Creating Mobile WorkersUse this procedure to create a new mobile worker.
Prerequisites: You must define the mobile worker type, worker capabilities (skills and attributes), and service areas beforeyou can associate them to a mobile worker. The mobile worker must have a valid system user ID.
1. Select Main Menu > Resource Management > Mobile Worker+.
2. Select the mobile worker type and click OK.
3. Enter the mobile worker's system user ID or click the search icon to search the user list.
4. Enter contact information for the mobile worker.
5. Review the list of assumed worker capabilities. Remove any capabilities this worker does not have, and add anycapabilities the worker has that are not listed.
If skill has an effective period, you must enter the effective and expiration dates.
6. Select the service areas in which this mobile worker typically works.
7. Click Save.
Mobile Worker SearchUse this procedure to search for a mobile worker on the Mobile Worker Query portal.
1. Select Main Menu > Resource Management > Mobile Worker.
2. Select one of the following query options in the Mobile Worker Query zone.
3. Click Refresh.
4. In the search results list, click the link for the mobile worker you want to view or edit.
Maintaining Mobile WorkersUse this procedure to maintain an existing mobile worker.
1. Navigate to the Mobile Worker portal in edit mode.
2. Click a button in the Actions zone to edit, delete, duplicate, or activate/deactivate the mobile worker.
3. Click Save.
If you add or remove worker capabilities from a mobile worker, all non-finalized shifts to which the mobile worker iscurrently allocated are resent to the scheduler. The scheduler then re-evaluates the shift schedules accordingly, and mayadd or remove tasks as a result. If a task has already been dispatched or marked for dispatch, it remains on the shift; it isthe responsibility of the crew to suspend an activity if they cannot perform the work. If a task is still being scheduled, it isrescheduled to another qualified crew.

Oracle Real-Time Scheduler Server Application User Guide • 36
Viewing Missing or Expired Worker Capabilities for a Mobile WorkerUse this procedure to view missing or expired worker capabilities for a mobile worker:
1. Navigate to the Mobile Worker portal in edit mode.
If the mobile worker is missing any of the assumed worker capabilities defined for its mobile worker type, thosecapabilities are listed in theWorker Capabilitiessection. If any of the mobile worker's capabilities are expired, theexpiration date is displayed in red next to the capabilities.
2. To add a missing worker capability:
• Click the Add button next to the missing worker capability.
• If the worker capability has an effective period (as defined in the worker capability type), enter the effective andexpiration date for the worker capability.
• Click Save.
3. To change the expiration date for a worker capability, click the Edit button, then enter the new expiration date and clickSave.
Viewing the Mobile Worker CalendarUse this procedure to view events and other items occupying time on the mobile worker's schedule for the current month.
1. Navigate to the Mobile Worker portal.
2. In the Mobile Worker Calendar zone, do any of the following:
• Use the toolbar buttons to change the view (Day, Week, Month, or List) and to display the calendar for the previousor next viewing period.
• Click an object in the calendar to navigate to its maintenance portal.
Viewing My CalendarUse this procedure to view events and other items in a user's scope of data.
1. Navigate to the My Calendar portal.
2. In the Calendar zone, do any of the following:
• Use the zone's toolbar buttons to change the view (Day, Week, Month, and List) and to display the calendar for theprevious or next viewing period.
• Click an object in the calendar to navigate to its maintenance portal.
Working with VehiclesThis section describes common tasks related to working with vehicles.
Creating VehiclesUse this procedure to create a new vehicle.
Prerequisites: You must define equipment before you can associate it to a vehicle.

Oracle Real-Time Scheduler Server Application User Guide • 37
1. Select Main Menu > Resource Management > Vehicle+.
2. Select the vehicle type and click OK.
3. Enter a tag or license plate number to identify the vehicle and complete all other required fields.
4. Review the list of assumed equipment. Remove any equipment this vehicle does not have, and add any equipment thevehicle has that are not listed.
If equipment has an effective period, enter the effective and expiration dates.
5. Click Save.
Vehicle SearchUse this procedure to filter and search for vehicles.
1. Select Main Menu > Resource Management > Vehicle.
2. Enter your search criteria.
You can search by any combination of vehicle type, vehicle tag, and license plate. You can also exclude all inactivevehicles from the search results.
3. Click Refresh.
4. In the search results list, click the link for the vehicle you want to view or edit.
Maintaining VehiclesUse this procedure to maintain an existing vehicle.
If you add or remove equipment from a vehicle, all non-finalized shifts to which the vehicle is allocated are resent to thescheduler. The scheduler then reevaluates the shift schedules accordingly, and may add or remove tasks as a result. If a taskhas already been dispatched or marked for dispatch, it remains on the shift; it is the responsibility of the crew to suspend anactivity if they cannot perform the work. If a task is still being scheduled, it is rescheduled to another qualified crew.
1. Navigate to the Vehicle portal in edit mode.
2. Click a button in the Actions zone to edit, delete, duplicate, or activate/deactivate the vehicle.
3. Click Save.
Viewing Missing Equipment for a VehicleUse this procedure to view missing or expired equipment for a vehicle.
1. Navigate to the Vehicle portal in edit mode.
If the vehicle is missing any of the assumed equipment defined for its vehicle type, those items will be listed in theEquipment section. If any of the vehicle's equipment is expired, the expiration date is displayed in red next to theequipment.
2. To add a missing piece of equipment:
• Click the Add button next to the missing equipment.
• If the equipment has an effective period, enter the effective and expiration date.
• Click Save.

Oracle Real-Time Scheduler Server Application User Guide • 38
3. To change the expiration date for a piece of equipment, click the Edit button, then enter the new expiration date andclick Save.
Working with CrewsThis section describes common tasks related to working with crews.
Creating CrewsUse this procedure to create a new crew.
Prerequisites: You must define the crew type before you can create crews of that type.
1. Select Main Menu > Resource Management > Crew+.
2. Select the crew type and click OK.
3. Enter a unique crew name and fill in the remaining fields according to your business requirements.
4. Click Save.
You can now create crew shifts for this crew.
Maintaining CrewsUse this procedure to maintain an existing crew.
1. Navigate to the Crew portal in edit mode.
2. Click a button in the Actions zone to edit, delete, duplicate, or activate/deactivate the crew.
3. Click Save.
Viewing Shift Weekly Templates for a CrewUse this procedure to view the shift weekly templates associated with a particular crew.
1. Navigate to the Crew portal in edit mode.
If one or more shift weekly templates have been defined for this crew, they are displayed in the Shift WeeklyTemplates zone. By default, only non-expired templates are displayed. To include expired templates, click the Filtericon in the zone title bar, then check the Include History checkbox and click Refresh.
2. Click on a template to navigate to the template's maintenance portal.

Oracle Real-Time Scheduler Server Application User Guide • 39
Working with Crew ShiftsThis section describes common tasks related to working with crew shifts.
Creating Crew ShiftsUse this procedure to create a new crew shift. Typically, crew shifts are generated automatically by the system from crewshift templates. However, you can create individual crew shifts to meet special situations.
Prerequisites: Crew, shift type, service classes, break types, non productive tasks, mobile workers, vehicles, service areas,and logon/off locations must have been previously defined.
1. Select Main Menu > Resource Management > Crew Shift+.
2. Select the crew shift type and click OK.
3. Complete the fields in the Main section.
Note that the shift can be created as fixed or variable. A variable shift will allow the scheduler more flexibility indetermining when the shift can be worked.
4. Add each mobile worker and vehicle that will be working this crew shift. (Optionally, you can save the crew shiftwithout selecting any resources, and then use the Maintain Crew Allocation feature, which recommends a list ofappropriate crews.)
5. Add each service area that the shift will cover, then select either Allowed or Preferred.
6. Specify any service classes of work that are not allowed on this shift.
7. Enter logon and logoff information.
8. Click Save.
The Crew Shift maintenance portal is displayed. Note that the crew shift status is pending. Review the shift details atthis time and make any final updates:
• To add breaks or non productive tasks to the shift, click the Add link in the Breaks/Non Productive Tasks zonetitle, then select each break or non productive tasks you want added to the shift.
• If you want the system to recommend appropriate resources, click the Maintain Crew Allocation link.
• If you want the system to recommend an appropriate shift cost profile (by matching the service area and service classcombination defined in existing profiles to this crew shift's service areas and service classes), click the RecommendChange link next to the Shift Cost Profile field.
9. When you ready for the system to begin scheduling tasks to this shift, click the Plan button in the Actions zone.
The shift is sent to the scheduler for planning.
Crew Shift SearchUse this procedure to filter and search for crew shifts.
1. Select Main Menu > Resource Management > Crew Shift.
2. From the Crew Shift Search zone, select the Query Option to use.
3. Click Refresh.
4. Click a shift in the search results to navigate to the Crew Shift portal.

Oracle Real-Time Scheduler Server Application User Guide • 40
Maintaining Existing Crew ShiftsUse this procedure to maintain existing shifts. You can change crew shift details, such as the primary function or shift costprofile. You can also update the crew shift's status and log a crew shift off the system.
Once a crew shift is started, the crew is in full control of the shift's status. If the status of the shift is changed on the serverafter the crew has control, subsequent crew status updates may fail. A dispatcher should only update crew shifts for non-MDT crews.If you change shift details for a logged on shift, the shift details are resent to the scheduler. If any tasks previouslyscheduled to the shift are no longer appropriate for it, they are rescheduled automatically, unless they have already beendispatched. If a task has already been dispatched to a crew, it will remain on the shift; the crew or dispatcher will berequired to resolve the situation manually.
1. Access the Crew Shift portal in edit mode.
2. Use the buttons in the Actions zone to maintain the crew shift.
In addition to the standard Edit, Duplicate, and Delete buttons, the Actions zone displays buttons you can use tochange the status of the crew shift. The buttons that are displayed at any time vary depending on the crew shift's currentstatus and your system's configuration. Action buttons supported in the base system are described below.
Button Description
Plan Tells the system to begin scheduling tasks to this shift (whenthe shift start date falls within the planning horizon).
Cancel Cancels the crew shift. If any tasks are currently scheduled tothe shift, they will be rescheduled to another shift.
Start Starts a crew shift. This applies only to crew shifts that are ina planned status. This effectively logs the crew shift on to thesystem so that scheduled tasks can be dispatched and worked.
In Service Indicates that the crew is currently working (traveling to anactivity location, working an activity, idle between activities,etc.).
Out of Service Indicates that the crew is not currently working or availablefor work. The crew may be attending a meeting or may haveexperienced a vehicle breakdown, for example. You will beprompted to provide a reason for going out of service and anestimated duration.
Force Logoff Forcibly logs the crew shift off. This may be required if a logged-on crew's mobile device is not working and they need to receivedata on a new device. This is not the same as logoff at the endof a shift. Force logoff is used to disconnect a crew shift from adevice. Force logoff does not disassociate the crew shift from itscrew leader. For security purposes, the system maintains a linkbetween the crew shift and the last user who logged on to thecrew shift. Only that user can log back on to the shift on the newdevice and retrieve the shift details.
Allocate All Allocates all of the activities scheduled to the selected shift thathave not yet been dispatched . Allocating all does not close theshift.
Open Opens the shift's schedule allowing the scheduler to schedulermore activities to the shift as needed. If the shift was a stand byshift it becomes fully available for scheduling.
Close Closes the shift and allocates all scheduled activities to the shift.The scheduler is prevented from removing any of the allocatedactivities or adding more activities to the current shift. The shiftplanner is also provided with the opportunity to dispatch theallocated activities also as part of closing the shift.
Complete Indicates that the crew is done working. This is also referred toas End of Shift.

Oracle Real-Time Scheduler Server Application User Guide • 41
The system validates the action and displays an error message if the validation failed. Otherwise, the updated status isdisplayed.
Changing the Shift Cost Profile for a Crew ShiftUse this procedure to view a list of recommended shift cost profiles for the current shift. The system finds appropriate shiftcost profiles by matching the service area and service class combination defined in the profile to the current crew shift'sservice areas and service classes. You can select one of the recommended profiles or specify any profile you wish.
1. Navigate to the Crew Shift portal in edit mode.
2. Click the Recommend Change link next to the Shift Cost Profile field.
The Recommend Change link is only displayed for crew shifts that are in pending or planned state.
3. Click the Search icon in the pop-up window to display the profile list.
4. Review and select a profile from the list (or cancel if you do not wish to select one).
5. Click Save.
Changing the Resource Allocation for a Crew ShiftUse this procedure to view a list of recommended resources from which you can choose when updating resource allocationfor a crew shift.
1. Navigate to the Crew Shift portal in edit mode.
2. In the Current Crew Allocation section, click the Maintain Crew Allocation link.
The Recommended Crew Allocation portal is displayed. The Recommended Mobile Worker zone displays alist of mobile workers that have been identified as appropriate for this crew shift, based on the shift's attributes. TheRecommended Vehicle zone displays a list of vehicles identified as appropriate for the shift.
3. To add a recommended mobile worker or vehicle, click the Add button displayed next to the resource.
4. To remove a resource that is currently allocated, click the Remove button.
5. To filter or search for additional resources, enter your search criteria and click Refresh.
Viewing a Crew Shift ScheduleUse the Schedule tab on the Crew Shift portal to view the tasks currently assigned to a crew shift.
1. Navigate to the Crew Shift portal in edit mode.
2. Click the Schedule tab.
The Crew Shift Schedule Gantt zone displays the schedule in a graphical time line. The crew shift is listed on theleft, and all tasks scheduled to it are displayed in the task area to right. The Scheduled Tasks zone displays a list of allscheduled tasks in work order sequence.
3. To take action on a scheduled task, right-click the activity in the Schedule Gantt zone and choose an option from thepop-up menu. Options may vary depending on your system's configuration. Standard options allow you to allocate,dispatch, defer, and unassign a task from the Gantt.
4. To view summary details for a scheduled task, right-click the task in the Schedule Gantt zone. Details are displayed atthe top of the pop-up menu.

Oracle Real-Time Scheduler Server Application User Guide • 42
To navigate to the task's maintenance portal, right-click the task and then select View Details from the pop-up menu.You can also click the link for the task in the Scheduled Tasks zone.
Viewing Crew Shift CapabilitiesUse the Capabilities tab on the Crew Shift portal to view a list of all capabilities currently allocated to this shift. Thisincludes all distinct skills and attributes for allocated mobile workers and all distinct equipment for allocated vehicles.
1. Navigate to the Crew Shift portal in edit mode.
2. Click the Capabilities tab.
You cannot change any information on this tab. To change crew allocation, click the Maintain Crew Allocation linkon the Main tab of the Crew Shift portal.
Working with Shift Weekly Templates and Crew Shift TemplatesThis section describes common tasks related to working with shift weekly templates and the crew shift templates associatedwith them.
Creating Shift Weekly Templates and Crew Shift TemplatesUse this procedure to create a shift weekly template and a set of crew shift templates that make up the weekly template.
Prerequisites: Crew, shift type, service classes, break types, mobile workers, vehicles, service areas, and logon/offlocations must have been previously defined.
1. Select Main Menu > Resource Management > Shift Weekly Template+.
2. Select the shift weekly template type and click OK.
Types of templates you might create include: common shift template, a shift template for a specific crew, and a crew'ssubscription to a common template.
3. Complete the fields in the Main section.
4. Click Save.
The Shift Weekly Template portal is displayed. The status of the new shift weekly template is pending.
5. Click the Add Shift Template link in the Shift Weekly Template Calendar zone title bar to add the first crew shifttemplate.
The Crew Shift Template add/edit screen is displayed.
6. Complete the fields as appropriate.
7. Click Save.
The system returns you to the Shift Weekly Template portal.
8. Repeat the steps for each shift template you want to add.
Alternatively, you can select the crew shift template you just created and click the Duplicate icon in the Shift WeeklyTemplate Calendar toolbar. Modify the copy and save.)
9. Click the Review tab to display a month's worth of potential shifts that would be generated if you applied the template.
Use the scroll buttons to view the previous or next month. Click the Broadcast icon next to a shift to display its detailsin the Crew Shift Preview zone.

Oracle Real-Time Scheduler Server Application User Guide • 43
10. When you are satisfied with the shift weekly template, click the Apply button in the Actions zone of the Shift WeeklyTemplate portal.
The status of the template is set to Applied. The system will generate future shifts immediately for the period beginningwith the shift's effective date through the earliest of either the global planning horizon or the shift's expiration date, ifspecified. A shift weekly template monitor background process is responsible for generating shifts going forward.
Shift Weekly Template SearchUse this procedure to filter and search for shift weekly templates.
1. Select Main Menu > Resource Management > Shift Weekly Template.
2. Enter your search criteria on the Shift Weekly Template Search zone.
You can search by crew ID and/or effective date. The system will find all templates effective on or after the date youenter.
3. Click on a template in the search results to navigate to the Shift Weekly Template portal.
You can also click in the Crew column for any template listed to navigate to the Crew portal.
Maintaining Shift Weekly Templates and Crew Shift TemplatesUse this procedure to view, edit, duplicate, or delete an existing shift weekly template and also to add and maintain thecrew shift templates that make up the weekly template. To maintain a shift template, you must first access the shift weeklytemplate from which it was created.
1. Select Main Menu > Resource Management > Shift Weekly Template.
2. Search for and select the shift weekly template you want to maintain.
If the shift weekly template has an existing draft, the system automatically displays the draft, rather than the original. Toget to the original, you must click on the original template link from the draft.
3. Note the status of the template.
• If the status is Applied and the Pending Draft Exists link appears next to the status, you must enter your changesin the existing draft. Click the link to open the existing draft for editing. Use the Show Differences button to see thedifferences between the draft and the applied versions. You can also set the status back to Pending, which deletes thedraft.
• If the status is Applied and no draft exists, the system will automatically create a new draft template to store any newchanges you make.
• If the status is Pending, your changes will be made to the current pending template.
4. To edit shift weekly template details, click the Edit button in the Actions zone, then make your changes and save.
To add and maintain shift templates, continue with the next step.
5. Review the Shift Weekly Template Calendar zone.
This zone displays a calendar that covers the weekly template period. Any crew shift templates already defined forthis weekly template are displayed as colored bars spanning one or more days (the period of time covered by the shifttemplate).
6. Click on the colored bar for the shift template you want to maintain.
When you click a shift template, a set of toolbar icons is displayed above the calendar. (Hover the mouse over an icon toview a brief description.)
7. Click the icon for the action you want to take:

Oracle Real-Time Scheduler Server Application User Guide • 44
Edit Navigates to the Crew Shift Template add/edit screen forthe selected crew shift template. Make any desired changesand click Save. The system returns you to the Shift WeeklyTemplate portal.To associate a break type with this template, click the Add linkin the Break zone title. (When the template is applied and shiftsare generated, the system creates breaks for the break typesassociated with the template.)
Duplicate Makes a copy of the selected crew shift template. and thennavigates to the add/edit screen for the copy. Make any desiredchanges to the copy and click Save. The system returns you tothe Shift Weekly Template portal.
Delete Deletes the selected crew shift template. You will be promptedto confirm the deletion.
Go To Navigates to the Crew Shift Template portal. From there youcan view the template details or use the buttons in the Actionszone to edit, duplicate, or delete the template. When you aredone, return to the Shift Weekly Template portal.
8. Repeat steps 5-7 to maintain another crew shift template, or click the Add Shift Template link in the zone title bar tocreate a new one.
9. When you have made all necessary changes, click the Review tab to preview the shifts that would be generated if youapplied your changes.
10. Check the Overridden Shifts zone to see if any shifts generated from this template have been modified manually andno longer match the template from which they were generated. These manual overrides will be lost if you apply thistemplate.
11. If you are updating a draft shift weekly template, use the Show Difference button in the Actions zone to view a list ofthe differences between the applied and draft version of this template before you apply the template.
12. To apply your changes, click the Apply button in the Actions zone of the draft template's Shift Weekly Templateportal.
Viewing Overridden ShiftsAn overridden shift is a shift that has been modified manually and no longer matches the template from which it wasgenerated. The Overridden Shifts zone on the Shift Weekly Template portal displays a list of all overridden shifts for thistemplate. If you apply the template, these shifts will be regenerated and any manual overrides will be lost.
To view details for an overridden shift, click the Shift link in the Overridden Shifts zone on the Shift Weekly Templateportal.
Displaying Differences Between Draft and Original TemplatesWhen you make changes to a template that has already been applied, the system automatically creates a new draft version ofthe template. It puts your changes in the draft version and leaves the original applied version unchanged until you manuallyapply the draft. Before you apply a draft template, you should view the differences between the draft and the original tomake sure you want all changes applied.
To view differences, click the Show Differences button in the Actions zone of the Shift Weekly Template portal. Thesystem displays a pop-up window listing each template that has been changed and the type of change (Deleted, Updated, orNew). You may also want to preview the shifts that will be generated if the draft is applied. Use the Review tab on the ShiftWeekly Template portal to preview shifts.

Oracle Real-Time Scheduler Server Application User Guide • 45
Navigating Between Original and Draft TemplatesWhen the shift weekly template you are working with has an original version and a pending draft, you can navigate betweenthem as follows:
• When viewing a draft template, click the Original Template ID link to navigate to the original template's maintenanceportal.
• When viewing an original template, click the Pending Draft Exists link to navigate to the draft's maintenance portal.
Viewing the Capabilities for a Crew Shift TemplateUse the Capabilities tab on the Crew Shift Template portal to view a list of all capabilities currently allocated to this shift.This includes all skills and attributes for allocated mobile workers and all equipment for allocated vehicles.
You cannot change any information on this tab. To change crew allocation, click the Maintain Crew Allocation link on theMain tab of the Crew Shift portal.
Reviewing Shifts to Be GeneratedUse the Review tab on the Shift Weekly Template portal to review the shifts that would be generated if the currenttemplate is applied.
The Shift Weekly Template Preview Calendar zone displays the shift weekly template calendar for the current monthbased on the changes you have made but not yet applied.
• Use the scroll buttons to view the previous or next month's calendar.
• Click the Broadcast button next to a shift to displays its shift details in the Crew Shift Preview zone.
You cannot make changes from this tab. To make any changes, return to the Main tab.
Working with Common Weekly TemplatesThis section describes common tasks related to working with common weekly templates.
Subscribing Crews to a Common Shift Weekly TemplateUse this procedure to subscribe crews to a common shift weekly template.
Prerequisites: Common shift weekly template, crew, shift type, service classes, break types, mobile workers, vehicles,service areas, and logon/off locations must have been previously defined.
1. 1. Select Main Menu > Resource Management > Shift Weekly Template.
Alternately, you can select Shift Weekly Template+ and create a new Subscription Shift Weekly Template tosubscribe one crew at a time.
2. Search for and select the appropriate common weekly template.
3. In the New Subscriptions zone, select a crew or multiple crews.
4. Click Subscribe.
5. Enter the Effective Date and Expiration Date for the subscription.

Oracle Real-Time Scheduler Server Application User Guide • 46
6. Click OK.
The system lists the crew shift in the Subscriptions zone with options to process the subscription now, unsubscribe, orchange the dates of the subscription.
7. Click Process Now next to each crew for which you want to immediately generate shifts for this crew.
If you do not click Process Now, the crew shifts are automatically generated next time the shift generation batchprocessing is scheduled to run.
Unsubscribing Crews from a Common Shift TemplateUse this procedure to remove crews from a common shift weekly template.
1. Select Main Menu > Resource Management > Shift Weekly Template.
2. Search for and select the appropriate Common Weekly Template.
3. In the Subscriptions zone, select a crew or multiple crews.
4. Click Unsubscribe.
The selected crews are removed from the Subscribed list.
5. Click Process Now next to each crew for which you want to immediately delete all future shifts that may have beengenerated by the subscription.
If you do not click Process Now, the crew shifts are automatically deleted next time the shift generation batchprocessing is scheduled to run.
Changing Subscription Effective PeriodUse this procedure to change the effective period on crew subscriptions to common templates.
Prerequisites: Common template must be created.
1. Select Main Menu > Resource Management > Shift Weekly Template.
2. Search for and select the appropriate common weekly template.
3. Select the subscription you want to change in the Subscriptions zone.
4. Click Change Dates.
5. Enter the new Effective Date and Expiration Date for the subscription.
6. Click OK.
The system lists the crew shift in the Subscriptions zone with options to process the subscription now, unsubscribe, orchange the dates of the subscription.
7. Click Process Now next to each crew for which you want to immediately generate shifts for this crew.
If you do not click Process Now, the dates are automatically updated the next time the shift generation batch processingis scheduled to run.

Oracle Real-Time Scheduler Server Application User Guide • 47
Working with BreaksThis section describes common tasks related to working with breaks.
Adding Breaks to Crew ShiftsYou can add breaks to existing crew shifts.
Prerequisites: The crew shift must have been previously defined. (If you are creating a new crew shift, you must save thecrew shift and then add breaks.) The break type must have been previously defined.
1. Navigate to the Crew Shift portal in edit mode.
2. Click the Add link in the Breaks/Non Productive Tasks zone title.
3. Select the break type and click OK.
4. Enter the start time for the break.
5. Click Save.
Viewing and Editing Break Tasks for a Specific Crew ShiftUse this procedure to view break tasks associated with a particular crew shift and edit the window start date and time for abreak. (This is the only field you can edit.)
1. Navigate to the crew shift for which you want to view or edit breaks.
All breaks defined for this crew shift are listed in the Breaks zone. You can also view scheduled breaks on theSchedule tab and on the Scheduling Gantt zone in the CDI portal.
2. Click the break in the Breaks zone.
3. Click Edit.
4. Enter the desired start date and time for the break window and click Save.
Working with Non Productive TasksThis section describes common tasks related to working with non productive tasks.
Adding Non Productive Tasks to Crew ShiftsYou can add non productive tasks to existing crew shifts.
Prerequisites: The crew shift must have been previously defined. (If you are creating a new crew shift, you must save thecrew shift and then add non productive tasks.) The non productive task type must have been previously defined.
1. Navigate to the Crew Shift portal in edit mode.
2. Click the Add link in the Breaks/Non Productive Tasks zone title.
3. Select a non productive task type and click OK
4. Enter the offset or window start time.
These values determine the earliest time that the non-productive task can be scheduled to start after the start of the shift.

Oracle Real-Time Scheduler Server Application User Guide • 48
5. Select the location or specify address as applicable where the non productive task will occur. If not specified location isdefaulted from the shift's crew if any.
6. Click Save.
Viewing and Editing Non Productive Tasks for a Specific Crew ShiftUse this procedure to view non productive task tasks associated with a particular crew shift and edit the window start dateand time for a non productive task. (This is the only field you can edit.)
1. Navigate to the crew shift for which you want to view or edit non productive tasks. All non productive tasks defined forthis crew shift are listed in the Breaks/Non Productive Tasks zone. You can also view scheduled non productive taskson the Schedule tab and on the Scheduling Gantt zone in the CDI portal.
Note: Since they represent a type of period of unavailability, NPTs are displayed on the map using the same genericPOU icon. A POU is resource oriented and fixed in time whereas NPT is shift related and is offset based. However theyboth mark time not available to perform work and therefore use same icon.
2. Click the non productive task in the Breaks/Non Productive Tasks zone.
3. Click Edit.
4. Enter the desired offset or start date and time and location for the non productive task window. Adjust the addressdetails as needed.
5. Click Save.
Non Productive Task TasksUse this procedure to start, complete or cancel a scheduled non productive task.
Prerequisites: To start a non productive task, it must have been dispatched to the crew and the previous task must havebeen finalized. To complete a non productive task, it must have been started.
1. Navigate to the Non Productive Task maintenance portal in any of the following ways
• From the Scheduling Gantt in the CDI portal, right-click the non productive task and select View Details from thepop-up menu
• Select Main Menu > Resource Management > Crew Shift and search for the crew shift to which the NPT isscheduled.
• On the Crew Shift portal, click the Schedule tab and then click the non productive task link in the ScheduledTasks zone. You can also click the non productive task in the Crew Shift Schedule Gantt and then select ViewDetails from the pop-up menu.
2. Click the appropriate button in the Actions zone.
Action Button Description
Start Indicates that the crew is starting the NPT.
Complete Indicates that the crew has completed the NPT and is ready forthe next assignment.
Cancel Indicates the crew is not going to take the NPT. This actioncancels the NPT task and removes it from the crew shiftschedule.

Oracle Real-Time Scheduler Server Application User Guide • 49
Working with Periods of UnavailabilityThis section describes common tasks related to working with periods of unavailability (POUs).
Creating Periods of Unavailability (POUs)Use this procedure to create a recurring or non-recurring period of unavailability.
Prerequisites: The POU type must have been previously defined.
1. Select Main Menu > Resource Management > Period of Unavailability+.
If your system supports more than one period of unavailability type, the system prompts you to select a type beforecontinuing.
2. If the selected POU type supports recurring POUs, indicate whether or not this POU is recurring and click OK.
For example, if you are creating a POU for a regular weekly meeting, check the Recurring check box. If you arecreating a POU for a one-time event, leave the box unchecked.If you select Recurring, the system displays the Period of Unavailability Template screen; otherwise, the systemdisplays the Period of Unavailability screen.
3. Complete the fields in the Main and Address sections.
For template POUs, specify how often the POU occurs (every so many weeks) or the total number of occurrences of thePOU within the effective period. (You cannot specify both.) For non-recurring POUs, these fields are not displayed.
4. Add the resources to which this POU applies.
The POU type defines which class of resource can be associated with this POU.
5. Add all service areas to which this POU applies.
This is applicable to crew POUs only (that is, POUs for which the resource class is defined as Crew). Service areasselections are used to discourage the inclusion of this POU into a crew's shift schedule if the crew is working too farfrom the event that day. If you specify service areas, the scheduler will include the POU only in the schedule of crewscovering these areas at the time of the event. If you do not specify any service areas, the POU applies to all serviceareas.
6. Click Save.
Period of Unavailability (POU) SearchUse this procedure to filter and search for an activity POU.
1. Select Main Menu > Resource Management > Period of Unavailability.
2. From the Period of Unavailability Query zone, enter your search criteria and click Refresh.
You can search by any combination of scheduled by POU type, start date/time, resource class or ID, or POU location. Ifyou enter multiple criteria, the system will search for POUs that match all search criteria.
3. In the search results list, click a POU to display the Period of Unavailability portal.

Oracle Real-Time Scheduler Server Application User Guide • 50
Maintaining POUs and POU TemplatesUse this procedure to view or edit POUs and POU templates.
1. Select Main Menu > Resource Management > Period of Unavailability.
2. Search for and select the POU you want to maintain.
To maintain a POU, click the link in the Period of Unavailability column. To maintain a POU template, click the linkin the Generated by Template column.
3. Use the buttons in the Actions zone to update the object. The buttons that appear may vary depending on the POU'scurrent status and your system's configuration. Standard action buttons are described below:
Action Description
Cancel Applies only to POUs (not POU templates). This action cancelsthe POU and any associated non-cancelled POU tasksgenerated from this POU. You cannot cancel a POU if any of itscorresponding POU tasks are completed.
Delete Deletes the POU or POU template. If you delete a POUtemplate, the system deletes all POUs generated from it. If youdelete a POU, the system deletes all its POU tasks, if any.
Expire Only applies to POU templates. This action sets the expirationdate for a POU template to the current date and sets the statusto expired. POUs will no longer be generated from this template.All future POUs that were generated from this template after theexpiration date will be deleted.
Activate Only applies to POU templates. This action sets the status foran expired POU template to Active and sets the effective dateto the current date. Once the POU is activated, the system willgenerate POUs from the template automatically, based on itseffective date and your system's planning horizon.
4. Click Save.
The system validates the action and displays an error if validation fails.
Viewing Overridden POUsAn overridden POU is one has been modified manually and no longer matches the template from which it was generated.The Overridden POUs zone on the Period of Unavailability Template portal displays a list of all overridden POUs forthe current template. If you apply the template, these POUs will be deleted and regenerated, and any manual overrides willbe lost.
To view details for an overridden POU, click the shift link in the Overridden POUs zone.
Working with Resource Route ReplayThis section describes common tasks related to working with resource route replay.
Using Resource Route ReplayFollow these steps to use Resource Route Replay to monitor crew shift routes.
1. Select Main Menu > Resource Management > Resource Route Replay.

Oracle Real-Time Scheduler Server Application User Guide • 51
2. Search for and broadcast the appropriate crews and/or vehicles.
If you want to see routes for multiple resources, select the Broadcast button for all of the resources you want to see.You can select up to 12 crews/vehicles.
3. Fill in Date fields and click the Show on Map button.
The route of the resource you selected is shown on the map for the selected date range. If you selected multipleresources, each is shown in a different color on the map.
Working with DispatchersThis section describes common tasks related to working with dispatcher records.
Creating DispatchersUse this procedure to create a dispatcher record.
Prerequisites: Dispatcher type, dispatch areas, key performance indicators must have been previously defined.
1. Select Main Menu > Resource Management > Dispatcher+.
2. Select the dispatcher type and click OK.
3. Complete the fields in the Main.
4. Add all the dispatch areas that this dispatcher is allowed to monitor during their shifts.
The dispatcher can select from this list when they log on to a shift.
5. Add all key performance indicators this dispatcher can monitor during their dispatcher shifts.
6. Click Save.
Dispatcher SearchUse this procedure to filter and search for dispatcher records.
1. Select Main Menu > Resource Management > Dispatcher.
2. From the Dispatcher Query zone, enter your search criteria and click Refresh.
You can search by first name and/or last name.
3. Click a dispatcher in the search results to navigate to the Dispatcher portal.
Maintaining DispatchersUse this procedure to edit, delete, duplicate or activate/deactivate an existing dispatcher record.
1. Select Main Menu > Resource Management > Dispatcher.
2. Search for and select the dispatcher record you want to maintain.
3. Use the buttons in the Actions zone to perform the desired action.
4. Click Save.

Oracle Real-Time Scheduler Server Application User Guide • 52
Working with Dispatcher ShiftsThis section describes common tasks related to working with dispatcher shifts.
Logging on to Start a Dispatcher ShiftUse this procedure to log on to start a dispatcher shift.
You do not need to create a dispatcher shift in advance. The system creates a new dispatcher shift automatically when anauthorized dispatcher logs on to the system from the CDI portal.
1. Select Main Menu > Service Management > CDI.
If you are already logged on to a dispatcher shift, the CDI portal is displayed and is populated with data you areresponsible for monitoring during the current shift. Otherwise, the Logon button is displayed.
2. Click the Logon button.
3. Specify the settings to use for this shift, such as the date range for monitoring activities. The available settings may varydepending on your dispatcher profile.
4. Select which dispatch areas you want to monitor.
The list of dispatch areas from which you can choose is predefined; you can only select dispatch areas you areauthorized to monitor, based on your dispatcher profile. For each shift you work, you can select one, some, or all ofthese dispatch areas.
5. Click Save.
The system logs you on to the shift and displays the CDI tab for the current shift. You can now begin monitoring andmanaging tasks and crew shifts.
Dispatcher Shift SearchUse this procedure to filter and search for dispatcher shifts.
1. Select Main Menu > Resource Management > Dispatcher Shift.
2. If prompted, select the dispatcher shift business object and click OK.
3. Enter your search criteria.
You can search by dispatcher and/or logged on date.
4. Click Refresh.
5. In the search results list, click the link for the dispatcher shift you want to view or edit.
Maintaining Dispatcher ShiftsDispatchers can manage their current dispatcher shift directly from the CDI portal. Other authorized users can view andmanage dispatcher shifts starting from the main menu.
If a dispatcher shift's status is Logged On, you can edit the shift details or change the status to Logged Off. If the status isLogged Off, you cannot modify the shift or its status.
1. To access the Dispatch Shift portal, do one of the following:
Oracle Real-Time Scheduler Server Application User Guide • 53
• Select Main Menu > Resource Management > Dispatcher Shift, then search for and select the dispatcher shift youwant to maintain.
• From the CDI portal, click the Shift tab.
2. Use the buttons in the Actions zone to modify the shift:
• Click Edit to edit the shift details, including the dispatcher areas to monitor during this shift. Enter your changes andclick Save.
• Click Log Off to change the status of this shift to logged off.
Service Management
This section describes concepts and procedures related to viewing and maintaining activities, tasks, alerts, override timewindows, and remote messages.
Understanding Service ManagementThis section describes concepts related to service management.
About ActivitiesAn activity is a task performed at a particular geographic location. Activities can be received from a host system or createdin the base application. Each activity is defined by an activity type that identifies the skills, attributes, and equipmentrequired to work activities of that type and specifies how the activities should be dispatched, prioritized, scheduled andmore.
Activity DetailsThe following details are relevant for activities:
• An activity must specify the site address, which is the address of the actual entrance to the site of service. This may bedifferent than the service address, where the work is performed. The scheduler uses the site address to optimize schedulesand routes, and attempts to assign activities at the same site to the same crew. Depending on your system's configuration,valid geo-coordinates may be required for the site address.
• An activity must specify at least one time window during which the activity should be scheduled. If the activity is anappointment, it specifies the time during which the appointment should be scheduled. When applicable a work profileassociated with the activity type may also affect the time frame in which the activity is allowed to be worked. Refer toAbout Work Profiles for more information.
• An activity must also provide customer contact information.
• An activity may include worker capabilities that either add to (extend) or replace the worker capabilities defined on theactivity type.
• An activity may specify one or more mobile workers so the activity is assigned only to someone on that list, or it mayspecify one or more workers to exclude from being assigned that activity.
• For activities that are eligible to be worked by capacity contractors, the activity can specify one or more capacitycontractors so the activity is assigned only to a company on that list.
• For depot related work, the activity specifies the list of items that are delivered in the activity. Refer to About DepotRelated Activity Types for more information.
• Other requirements may exist, depending on your system's configuration.

Oracle Real-Time Scheduler Server Application User Guide • 54
Activity Work FlowWhen an activity is received from the host (or created on the server), it is validated by the system. If critical errors arefound, the activity is rejected or, if created locally, the activity will not be saved until the errors are corrected. If errors arefound that can be corrected within Oracle Real-Time Scheduler, the activity is saved in an Issues Detected state. Once theissues are corrected, the activity will be available for scheduling.
Activities are typically assigned automatically to crew shifts by the scheduler. However, a dispatcher or other authorizeduser can override virtually any scheduling decisions made by the system, as long as this is permitted by your system'sconfiguration.
Some activities have appointments, indicating that the activity must be scheduled within an agreed-upon appointmentperiod.
Before a crew starts their shift, they may preview their first few tasks for the day on their mobile device. The maximumnumber of tasks to preview is defined on their shift. Previewed tasks may be viewed, but no modifications are allowed.
When a crew starts their shift, they receive one or more of their scheduled tasks as per their shift drip mode configuration.
As the crew works each assignment, they update its status (from en route to on site, for example). The crew can also adjustthe scheduled duration of an activity, from the field, if the activity takes much more or much less time than what wasestimated. This type of update is sent back to the server so that the scheduler can adjust the crew's schedule accordingly.
If the crew captures digital content while in the field, it is sent to the server as an attachment of the activity which can beviewed in the Attachment zone of the Activity portal.
When the crew is finished working and they enter completion details, they update the status to “completed”. The crew mayalso provide interim completion details and send them right away to the server even before fully completing the assignment.
Completion details are then sent back to the requesting host system. Activity completion details can be viewed in theActivity Assignment Completion Details zone of the Activity portal.
Activity SchedulingThe scheduler carefully matches the location, required ore preferred skills, and scheduling time window of each activity tothe location, capabilities, and availability of crews to find the most optimal time to schedule the activity. The goal of thescheduling process is to produce the most cost-effective schedule, or the most efficient schedule based on your schedulerconfiguration and business practices.
Factors such as travel time, idle time, site delay, activity dependencies, breaks and other non-working time are scheduled inon the shift.
In some cases, activities might need to be scheduled where they are in the same area (site), but have different addresses(locations). For example, a campus, an apartment complex or an office park would have various units with differentaddresses but are in close proximity. Your implementation can include a site ID on these activities, and this will prompt thescheduler to schedule them one after the other, with the scheduler considering the arrival, starting, and completion timesfor each individual activity. This allows the scheduler to allocate the activity to the same crew shift as necessary. Likewise,breaks can be scheduled between stops at the same site. When activities with the same site have different locations, travelbetween locations is calculated with resource relative speed and speed time windows taken into consideration.
Please refer to About the Scheduling Process for more information on scheduling.
Site DelaySite delay is where the scheduler factors in additional time immediately after the activity start time. For example, to a crewmay need time to park or gain access to a locked building after they travel to the site, but before they actually start working.
NOTE:Site delay cannot be used with complex activities.

Oracle Real-Time Scheduler Server Application User Guide • 55
Crew Procedures Before Starting WorkThe activity type may specify procedure types that must be completed before a crew shift can start work on an activity. Ifthis is the case, the crew will have to complete a form or questionnaire on their mobile device prior to starting the activity.Refer to About Procedures for more information.
Taking a Break While On SiteBy default, breaks are never planned to be taken while the crew is on site performing work. However, some type of workmay be too long to be performed straight without a break. If the activity type is set up to allow breaks to be planned whileon site the scheduler plans such breaks accordingly. The crew is provided with a visual cue on the mobile device Task Listas to whether an activity is scheduled with some break time while on site.
Activity Time TrackingThe system tracks important events related to an activity on the activity and assignment logs. This information can beused to summarize how much time was spent by the crew on travel, actual work, taking breaks on site and whether therewas any wait time on site. You can configure the activity type to summarize that information and present it to the crew atactivity completion time so they can review and adjust them as needed. Note that this feature is independent from timesheetfunctionality however if the crew has made adjustments to reported times they are included in the timesheet total adjustedtimes summary.
This feature is automatically enabled for complex activities as they tend to be long tasks during which a crew may havetaken breaks on site and it is very important to keep track of an accurately reported work time to be subtracted from theoverall complex activity.
Creating Activities in the FieldDepending on settings on the activity type, crews have the ability to create new activities which may or may not be relatedto any existing activity on their schedule. This is useful when the crew is out in the field and come across an issue. The crewcan choose to work the activity or send it in to the server to have it assigned to a crew.
Emergency ActivitiesEmergency activities must be scheduled as soon as possible, as such they must be sent to the scheduler as mandatory.Typically, such activities would be of an emergency activity type properly referencing a mandatory priority profile. If asituation arises where an activity’s state is changed to become an emergency, the system ignores the parameters set onthe activity type and sends the activity to the scheduler as mandatory emergency. The scheduler then allocates crew shiftresources for the emergency activity irrespective of cost.
NOTE: Emergency activities are not eligible for capacity contractors.
Activity PriorityThe scheduler prioritizes activities based on their scheduling priority. The Scheduling Priority field provides a numericalvalue from 0.01 to 10 that establishes the importance of the activity type relative to other activities. 10 is the highestpriority. Activities with a higher priority are scheduled vs. not scheduled, scheduled to an earlier shift, or scheduled earlierin the shift.
For example, if there are two connect activities, one at a hospital with a high higher priority and one at an seldom usedwarehouse with a lower priority, and multiple shifts, the higher priority hospital activity will get scheduled today and earlierin the day (whereas the lower priority one may not get scheduled on that day at all).
Typically an activity’s scheduling priority is determined and posted onto the activity by the application but it may be sent inalong with the activity if known to the host system. If not provided the system uses the activity’s type configuration as wellas a Business Priority Number if provided on the activity to determine the activity scheduling priority. Refer to DetermineActivity Priority for more information.

Oracle Real-Time Scheduler Server Application User Guide • 56
When requests to add or update activities are sent from the host system, the business priority and scheduling priority canbe included as part of the request. This also applies for appointment booking requests. If both values are included, thescheduling priority overrides the business priority number.
The scheduler applies a factor onto the activity’s scheduling priority to calculate its priority over time. This factor is definedby a Priority Profile as a function over the activity’s broad time window. The activity’s type references the appropriatePriority Profile. Refer to About Priority Profiles for more information.
In the CDI portal, activities are sorted by their priority then by sort order. Emergency activities are still prioritized over allother activities, regardless of priority.
Sequence LockingWhen the crew’s shift uses Drip Mode set to Standard activities are worked on a route in sequence and once the activityis dispatched, the sequence is locked. The scheduler would not dispatch next activities before an activity that is alreadydispatched.
In situations where a user would want to allow a new task to be dispatched before tasks that have already been dispatchedthe Ignore Sequence Locking field can be set to "Yes". This allows the scheduler if needed to dispatch the activity beforeany other activities that are already dispatched. This is defaulted from the activity type when the activity is created but maybe overridden on the activity as needed.
IMPORTANT:Oracle Real-Time Scheduler supports the ability to configure a shift to allow or disallow route changes in the form ofundispatching or changing the order of the activities.
The Undispatch Threshold and Change Sequence options are available on the Crew Shift portal.
Expired ActivitiesTypically, if an activity has not been worked by the time its last effective time window expires, the scheduler stopsattempting to schedule it. Depending on your configuration and business practices, activities of certain types may beconfigured to handle the situation as follows:
• Incorporate built in automatic extensions so that the scheduler will continue to try and schedule expired activities beyondthe original effective time window by a set number of days or hours.
• If automatic extension is not allowed or exhausted the activity could be automatically canceled
• If automatic extension is not allowed or exhausted create a To Do for a user to make the necessary changes. Businessrules handling expired activities reside in a plug-in associated with the activity's business object and is thereforecustomizable.
Please refer to the configuration guide and the Activity Expiration algorithm for more information.
Handling KeysIf a key or card is needed to gain access to a work site or facility, the crew cannot start an assigned activity without it. Thesetypes of activities need to specify a Key Identifier and Key Location Depot in order to provide information about wherethe crew can pick up keys to gain access to the work site. Key pick up and drop off are handled using depots so that thesystem can incorporate into activities these additional tasks and travel. Handling keys using depots also allows the systemto present crews with a list of keys or access cards to pick up before they start traveling to a work location. Once the crewhas the key or card, the activity should not be assigned to another crew or resource. If a dispatcher attempts to change theassigned crew, he or she receives a warning.
The system creates a depot task to pick up the key as part of scheduling such activity. If the same crew has multipleactivities that require them to pick up keys at the same location, the system is designed to create one task to pick up allof those keys when possible. The depot task will list for the mobile worker all of the activities that need keys and thedescription of each key to pick up.

Oracle Real-Time Scheduler Server Application User Guide • 57
Activities that require keys are restricted to shifts that have the same logoff location as the location where keys are pickedup. This is assumed to occur as part of the shift practices. The system does not validate whether or not a key was actuallydropped off.
Activities already associated with depot to pick up or drop goods cannot use keys since an activity can only be in a singledepot run. This means that there cannot be depot activities that require “goods” to be picked up from depot A and “keys”picked up from depot B. Then the activity would have to be in two depot runs to pick up both goods and keys. Refer to About Depots and Depot Runs for more information.
NOTE: Depot-based activities are not eligible for capacity contractors.
Time ZonesThe activity's time zone is the time zone of its geographic location, i.e. where work needs to be performed. All date and timeinformation on the activity and its assignment portals is entered and displayed in that time zone.
Navigating to the Activity PortalYou can access the Activity portal in any of the following ways:
• Select Main Menu > Service Management > Activity to display the Activity Query portal, then search for and selectthe activity you want to allocate.
• From the CDI portal, search for and select an activity in the Activity List.
• From the CDI portal, right-click on an activity displayed in the Scheduling Gantt and select View Details from the pop-up menu.
• From the To Do List, click in the Message column for a To Do entry associated with an activity.
• From the Schedule tab on the Crew Shift portal, do one of the following:
• Right-click an activity in the Crew Shift Schedule Gantt and select View Details from the pop-up menu.
• Click on an activity link in the Scheduled Tasks zone or Rogue Assignments zone.
• From the Alert Queue, click on an activity associated with the alert (activity-related alerts only).
• From the Alert Search portal for an activity-related alert, click the Activity link.
About CapabilitiesA capability is a skill, equipment, or other attribute of a crew which makes the crew qualified to perform work. Typically,activities specify a list of capabilities that are required or preferred of any crew that will be scheduled to work the activity.The scheduler uses capabilities along with location, the scheduling time window of each activity to the current location, andavailability of crews to determine which crew shift can perform the work.
An activity's required or preferred capabilities are typically defined on the activity type. A crew shift must possess arequired capability to be assigned the activity; the scheduler will attempt to find a crew shift that also possesses a preferredcapability, but if no match is found, it will schedule the activity to a crew shift possessing only the required capabilities. Insome instances it is necessary to specify the list of capabilities and equipment on the activity. The capabilities on the activitycan either extend (add to) or replace those specified on the activity type. For example, if a business is installing thousandsof products, yet the skills and equipment needed to install product A is different from the skill needed to install product B.Rather than having to separate these products into different installation activity types, it would be efficient to simply definea generic "Install Product" activity type and specify the capabilities needed to install the specific product on the individualactivity. Another example is a specific customer that requires a mobile worker that has security clearance and prefers amobile worker that speaks Spanish; those capabilities are additive to the capabilities listed on the activity type.
The Crew Shift and Crew Shift Template portals include a Capabilities tab which lists all capabilities currently allocatedto a shift via its resources. This includes all distinct skills for allocated mobile workers and all distinct equipment forallocated vehicles.

Oracle Real-Time Scheduler Server Application User Guide • 58
About Resource RestrictionsBy default activities are assigned to any available compatible resource. The following describes various options affectingthe resources the scheduler considers for an activity.
• Allowed Crews. An activity can be restricted so that it can only be scheduled to a specific list of crews. This listmight be sent from the host system or entered in the maintenance view of the activity. If there are no crews listed, allcompatible crews are considered by the scheduler as usual. When specified, the scheduler selects only from this list,still considering all the usual service area and worker capability restrictions, when determining candidates to work theactivity.
• Allowed Contractors. An activity can be restricted so that is can only be scheduled to a specific list of contractors. Thislist might be sent from the host system or entered in the maintenance view of the activity. If there are no contractorslisted, all compatible contractors are considered by the scheduler as usual. When specified, the scheduler selects onlyfrom this list, still considering all the usual service area, worker capability, and contractor eligibility restrictions, whendetermining candidates to work the activity.
• Excluded Mobile Worker. One or more mobile workers can be prevented from being assigned an activity. This listmight be sent from the host system or entered in the maintenance view of the activity. If there are no mobile workerslisted, all compatible crews are considered by the scheduler as usual. When specified, the scheduler will not assign theactivity to a crew that contains a mobile worker on this list.
• Excluded Shifts and Contractor Capacities. Shows the list of crew shifts and contractor capacities that are not allowedto be assigned to this activity. Shifts are excluded from performing the activity either when the crew declines it or adispatcher decides to unassign the work from the crew or the contractor capacity.
• Base package reason codes include:
• Crew cannot reach the activity today.
• Crew does not have the capability to work the activity. The crew would also be required to enter free-formcomments to explain the capability mismatch. A to do is created for an administrative user to update the resource'scapabilities to reflect actual capabilities. This ensures that future activities of this type are not assigned to the crew.
• Excluded Contractors. Lists any contractors that have declined the activity or are no longer allowed to perform theactivity because they have failed to approve their commitment on time or were manually excluded by a user. Refer toUnderstanding Contractor Management for more information.
• Fix to Crew. Click the Fix to Crew button to restrict the activity to a specific crew. This overrides the allowed crew, ifany. This would be used, for example, if a crew does not finish an activity but they want to retain the activity for futureshifts. If, for instance, the activity is suspended and the crew has the parts or keys to complete the job, they can requestto keep the activity with them so that they can work on it the next day or during a future shift. The crew can make thisrequest when postponing, suspending or declining an assignment. At the end of their shift, each crew receives a reminderto review and mark activities they want to keep with them.Dispatchers can also use the Fix to Crew action on the maintenance screen of the activity for the same purpose.
Activities that are fixed to a crew are also highlighted in the CDI. The CDI also warns the dispatcher if he or she attemptsto allocate to another crew an activity that has been retained. Note that this functionality is not applicable to emergencyactivities or complex activities.
If one activity in a job is fixed to a crew, all other activities are also fixed to same crew. In a partially completed job, onlyremaining non-worked activities remain in the job so that they can be rescheduled. The Job Activities zone displays all ofthe activities that were part of the original job.

Oracle Real-Time Scheduler Server Application User Guide • 59
About Bound WorkA group of activities that have dependencies is referred to as "bound work". This includes jobs, chains, and assist activities.This section describes the various types of bound work and the dependencies created when activities are tied to each other.
JobsA job is a group of activities that need to be performed by a single crew during a single shift. Because of that functionsperformed on any activity that belongs to a job that may cause it to be rescheduled from its currently assigned shift affectthe entire job. Examples include:
• Allocation to a shift
• unassigning from current shift
• deferring the schedule
• locking to depot
• booking
• rebooking
Similarly, If there is any scheduling issue for one activity on a job, all of the activities are disabled from scheduling until theissue is resolved. After resolution, all of the activities are rescheduled automatically by the scheduler.
The order in which the activities in a job should be performed is established as usual by their time windows. A schedulingorder number may be specified to achieve a more explicit order. Notice that ordering should not contradict the timewindows ordering.
The CDI provides a visual cue to indicate that an activity is part of a job and therefore has dependencies. This helps thedispatcher to be able to easily see how each activity is related.
In the Activity portal, if the activity belongs to a job, the Job zone lists all activities in the job in the order they should beperformed, highlighting the current activity in that list.
The base product supports the interface of jobs from the host system. It does not provide means to compose such jobs in theapplication itself.
ChainsA chain represents linked activities where each activity is dependent upon the start or completion of another activity withdependency defined in terms of timing and assigned resource. Chains differ from jobs in that the activities and are notbound to a specific shift, they are bound in time and can span multiple shifts. They are set up so that each activity dependsupon the completion of the prior activity before it can start. In some cases the activity must be done within a certain amountof time after the completion of the prior activity and/or within a specified time window. For example, if there is a project todig a trench, lay pipes, and fill the trench, chain might be set up as follows:
• A surveyor is scheduled to lay out the plan before the start of work
• Only after the surveyor is finished can the digging begin
• The pipes cannot be laid out until the trench is complete
• The trench cannot be filled until the pipe is laid
• and so on
A dependent activity can start within an offset range relative to the start or finish time of the parent activity. An activity canalso be restricted so that it can only be worked by a crew other than its immediate parent activity or by a crew other than anyof those assigned to activities in the entire chain.
The CDI provides a visual cue to indicate that an activity is part of a chain and therefore has dependencies. The user canthen navigate to the special Activity Dependency portal for an overview of the entire project to which the current activity

Oracle Real-Time Scheduler Server Application User Guide • 60
belongs. The portal provides a schematic view of the dependency hierarchy as well as a Gantt view of the scheduled activityin the chain supporting the main activity related dispatcher functions enabled on the main CDI portal.
If an activity belongs to a chain you can also navigate to the Activity Dependency portal from the Dependencies section ofthe Activity portal.
The following considerations apply for chains:
• An activity can only be immediately dependent on one other activity.
• A circular dependency is not supported, i.e. the activity cannot be dependent on itself even indirectly . (Example: A->B->C->A)
• Appointment booking, conditional booking and chooser requests can only be used for an activity in a chain if the activitydoes not have any other activities dependent on it.
• The time windows for a dependent activity must be wide enough to support its timing dependency constraints, includingoffsets, with its parent activity. This has to take into account potential early or later start of the parent activity. Forexample, assume activity B is scheduled to start an hour after activity A starts. Since activity A may start earlier thanplanned by more than one hour, activity B should be defined with time windows wide enough to accommodate areasonable early start of activity A. In other words that applying an offset towards the actual start of activity A would stillbe within the time window for activity B.
If the scheduler finds conflicts because these considerations have not been followed, the whole chain (non-started part of it)is disabled and not scheduled.
The base product supports the interface of chain dependencies from the host system. It does not provide a means tomanually compose such chains in the application itself, with the exception of assist activities.
Assist ActivitiesWhen a crew is unable to complete an activity and requires additional help from another crew, the dispatcher can create anassist activity and have it dispatched to another crew. The assist activity must be scheduled at the same time as the originalactivity so that both crews are on site at the same time. In addition it must be scheduled to a crew other than the originalactivity's crew. The original and assist activities are an example of a small chain dependency.
The scheduler will attempt to assign the assist activity to a suitable crew. However the dispatcher can also manually allocateit to any specific crew as needed. To do that the dispatcher could take advantage of the shift chooser query option whichconsults the scheduler for a cost based recommended list of shifts to choose from.
It is recommended that your organization set up assist activities to require manual acknowledgment by the assisting crew.This serves as notification that they are aware of the fact that they have been assigned to assist another crew.
Only specific activity types, as determined by configuration settings, can be created as assist activities.
About Complex ActivitiesActivities that require multiple shifts to complete are referred to as "complex activities" or "multi shift tasks" and are typicalof, but not limited to, construction work.
The scheduler handles complex activities in the following ways:
• The activity is split into several crew visits to the site and progress is tracked per visit. Each visit is assigned to a shift.Work can be limited to the same crew, or multiple crews may be allowed. If the Same Crew value is set to “Yes” onecrew should work the job from start to finish. This means that all visits for the complex activity would be planned to beperformed by one crew.
• Visits are scheduled sequentially, one visit per shift, unless a user manually allocates them differently. Visits can overlapfor a certain amount of time (for example to allow time for one crew to pass on or debrief another crew that is takingover the activity). This is set on the Max. overlap between Visits value under Optimizer Behavior in schedulerconfiguration. All crew visit assignments as well as a list of all remaining visits are listed on the complex activity portal.

Oracle Real-Time Scheduler Server Application User Guide • 61
• The type of complex activity sets the average and minimum site time per visit. The scheduler splits the long task intovisits of average length when possible but no less than the minimum requirement which may be used, for example, toallow the crew some time for setup and tear down.
• When a crew completes a visit, the crew or dispatcher can indicate whether the work is complete or adjust the remainingtime if it is not complete. As a result, the scheduler re-optimizes the whole complex activity, and may add or subtractfuture visits and/or adjust their length. If more time is needed to complete the activity, the scheduler simply createsanother visit or appends to an existing visit.
• Future planned visits are adjusted based on the remaining time indicated.
• Once the activity is complete, remaining visits are removed from the schedule and the activity cannot be extended.
• The host system is updated upon each visit and when the entire project is complete.
• Complex activities are considered mandatory work.
As an example, a complex activity might be set up with a task duration of 20 hours with the with the minimum visit time setas 3 hours and the average visit duration set as 6 hours. Typically, scheduling for the complex activity would also includetravel time and breaks. Consider these parameters for this example:
• Travel time = 30 minutes each way = 60 minutes travel time.
• Break time = Two 30 minute breaks per shift (visit) = 60 minutes of break time.
• Since the average duration is 6 hours, the scheduler splits the complex activity into 4 visits, and uses 4 hours for visits 3and 4 because the minimum visit duration must be at least 3 hours.
In this example, the scheduler would allot scheduler hours per visit as:
• Visit 1: Average daily duration (6 hours) + Travel time (60 minutes/visit) + Break time (60 minutes/visit) = 8 scheduledhours
• Visit 2: Remaining duration = 14 hours (20 hours - 6 hours from visit 1)Average daily duration (6 hours) + Travel time (60 minutes/visit) + Break time (60 minutes/visit) = 8 scheduled hours
• Visit 3: Remaining duration = 8 hours (14 hours - 6 hours from visit 2)Average daily duration (4 hours) + Travel time (60 minutes/visit) + Break time (60 minutes/visit) = 6 scheduled hours
• Visit 4: Remaining duration = 0 hours (8 hours - 4 hours from visit 3)Average daily duration (4 hours) + Travel time (60 minutes/visit) + Break time (60 minutes/visit) = 6 scheduled hours
Since the scheduler factors in any non-work time as well as the total task duration to derive the total scheduled hours, thetotal scheduled hours for the activity with all visits calculated in is 28 hours. This is the amount of scheduled hours thatwill show on the Gantt. The system would also factor into the “remaining duration” and scheduled hours any actual hoursworked above the scheduled hours, or when fewer hours were worked.
NOTE: Transfer of goods, appointment booking, conditional booking and site delay cannot be used with complexactivities. They can also not be used for emergency work and are not eligible for capacity contracting.
Complex Activity ChainsComplex Activities can be part of a chain of activities, and can be preceded or followed by regular or complex activities.In an activity chain containing both regular and complex activities, you can click View Activity to display the dependencyhierarchy for the activities within the chain. Refer to About Bound Work for more information.
Complex Activity Time TrackingComplex activities always allow the crew to review and adjust time spent on each visit. They also allow breaks to be takenwhile on site. Refer to Taking a Break While On Site and Activity Time Tracking in About Activities for more information.

Oracle Real-Time Scheduler Server Application User Guide • 62
About Activity Time WindowsThis section describes the different time windows related to activities.
• Effective Time Window (ETW): The time period within which an activity can be scheduled. This is typically sent fromthe host.
• Preferred Time Window (PTW): The time period within which it is ideal to schedule an activity. This is typically sentfrom the host.
• Arrival Time Window (ATW): A period of time within an activity's effective time window during which the activity isallowed to be scheduled, based on applicable rules, restrictions, or conditions.
• Service Time Window (STW): A period of time within an activity's arrival time window during which it is preferable toschedule the activity.
• Override Time Window (OTW): A period of time during which the default arrival time window for activities of aparticular type is overridden.
• Time Window Mode: The time window mode establishes the definition of a late activity. When set to “start time” theactivity is considered late if it is started after the end of the effective time window. When set to “completion time” theactivity is considered late if it is completed after the end of the effective time window. For instance, if it is critical thatthe work not continue beyond the time window, this would be set to "completion time”.
The system uses time windows in the scheduling process in the following ways:
• Typically, an activity's effective time windows and preferred time windows are sent from the host and establish thebroadest scheduling window. The activity type may allow effective time windows to be extended as per your businessrules. Refer to Expired Activities for more information.
• Since some types of work may be restricted to certain times, each activity's effective time window is further brokendown to one or more arrival time windows, representing a time period when the activity is allowed to be scheduled basedon applicable restrictions.Override time windows, work profiles and public holidays can be used to define such restrictions. Refer to About WorkProfiles for more information.
Work Profiles define weekdays and times during which a specific type of work is allowed to be performed. Workcalendar defines public holidays preventing work of a certain type. Both work profile and work calendar are specified onthe activity type.
In addition to these predefined restrictions, if at least one of an activity's effective time windows overlaps with anoverride time window defined for the activity type and activity service area, then the scheduling restrictions defined inthe override time window are applied to the activity. Refer to About Override Time Windows for more information.
NOTE: The logic to calculate an activity's arrival and service time windows is defined in the activity businessobject's Update Time Windows plug-in, and is therefore customizable.
• The scheduler will honor an override as long as the activity has not been dispatched yet. If dispatching has not occurred,it will not schedule the activity to start or complete within an override time window. The activity may be scheduled late,but only as far as it does not overlap with an override time window.
• Dispatched activities that overlap with an override require manual intervention. The system provides a KPI algorithm toreport these so that a dispatcher can recall them as needed.
• The arrival time windows are further broken down to one or more service time windows, representing the overlapbetween an arrival time window and a preferred time window.
The scheduler only considers an activity's arrival time window and service time window.

Oracle Real-Time Scheduler Server Application User Guide • 63
About Override Time WindowsAn override time window defines a period of time during which activities of a particular type are allowed or not allowedto be scheduled, overriding the default arrival time window for the activity itself. The override may be further restricted toactivities within specific service areas.
For example, you might prohibit disconnects or deliveries from being performed during certain periods of time.
When you define an override time window, you specify the time period during which the override applies, the service areasto which it applies (if you do not specify any, then it applies to all), and whether the activity type is allowed or not allowedduring the override period.
The override is applied to all activities for which at least one their effective time windows overlaps with this override timewindow. Consider this example:
• Due to a backlog in repair and installation work, you want to limit the number of routine inspections performed for thenext week.
• Due to a snowstorm expected to hit the area the following Monday, you want to limit the number of regular deliveriesperformed that Monday.
• You create an override window that disallows inspection activities in all service areas between Monday at 8 am andWednesday at 5 pm of the following week.
• An activity is received from the host for an inspection. Its effective time windows are Monday through Friday between 9am and 2 pm on each day. The arrival time window is Monday through Friday between 9 am and 2 pm.
• When the override is applied, the activity is eligible to be scheduled only on Thursday or Friday between 9 am and 2 pm.
You can also use override time windows to allow an activity type to be scheduled during a holiday when it would otherwisenot be allowed.
When an override window is added to an activity type, the Scheduler will re-evaluate existing activities and apply theoverride where the dates are applicable, unless the activity has already been dispatched. Dispatched activities that overlapwith an override require manual intervention.
About AssignmentsAn assignment is a copy of an activity created by the system to track the assigned crew's progress in accomplishing thework. When the crew's shift has started, assignments are created by the system on the server and sent to the mobile device.An assignment is only created on the mobile device when the crew's shift has already started. Assignments are sent to thecrew as a copy of the activity. The crew works on the copy and any updates made by them are updated on the activity.
If the crew uses an MDT, the assignment is also sent to the crew when the activity is dispatched and appears on the crew'stask list.
As the crew works each task, they update the assignment's status. When they are finished working, they enter completionsdetails and update the status to completed. When the assignment is completed by the crew, the associated activity isautomatically completed on the server, unless concurrent assignments exist.
Typically, an activity is completed by the assigned crew. However, if the assigned crew does not complete the activity bythe end of their shift, the assignment is automatically returned and the activity is rescheduled.
A dispatcher can update a crew's assignment if the crew is out of range or is not using an MDT.
The dispatcher or crew can also decline an assignment if the crew is unable to complete it for some reason. If an activity isdeclined because there is a capability mismatch or a missing capability, To-Do is created and assigned to the dispatcher. Adeclined activity cannot be rescheduled to the crew’s current shift.

Oracle Real-Time Scheduler Server Application User Guide • 64
If your organization works with external capacity contractors, the system creates assignment records for contractorcompanies, as it would for a typical crew, when an activity is committed to the contractor company. Refer to UnderstandingContractor Management for more information.
About Forced RecallIf a dispatcher attempts to take certain actions on an activity that is already dispatched to a crew, the system allows theuser to proceed with the action and forcibly recall the activity from the crew. Forced recall applies to actions such as defer,allocate, and unassign.
For example, if a dispatcher allocates an already dispatched activity to another crew, the system warns that this action wouldresult in a forced recall. If the dispatcher confirms the action, the system sends a recall message to the current crew andproceeds with allocating the activity to the other crew.
When the recall message is received on a crew's mobile device, the system determines whether the assignment is in a statethat allows it to be recalled.
• If recall is possible, the assignment is returned on the device, removed from the crew's task list, and then returned on theserver.
• If the recall is not possible because, for example, the assignment is already completed, then the assignment is notreturned on the device and remains completed. This also means that the assignment is not returned on the server, soconcurrent assignments now exist for the activity.To avoid this situation, the dispatcher will typically contact the crew by phone or radio to make sure they do not performthe work. However, it is possible that both assignments could be completed. (For example, the first crew might arrive atthe location, see that the work was already done, and then complete their assignment with no work details).
When an SMS crew receives a recall, they can either ignore it (if it's too late to recall, for example) or confirm the recall bysending a recall confirmation message back to the server. The recall message causes the assignment to be returned.
For a non-MDT crew, there is no method of confirming a recall. The system assumes that the dispatcher has contacted thecrew and confirmed the recall verbally. The system does not wait for confirmation to return the assignment of a non-MDTcrew.
Concurrent AssignmentsIf multiple assignments exist for the same activity, they are referred to as concurrent assignments.
Typically, only one crew is assigned to work an activity at any point in time. However, it is possible that multipleassignments could be created for the same activity if, for example, an activity has already been dispatched to a crew and thedispatcher needs to assign it to a different crew.
When the dispatcher allocates an already dispatched activity to another crew, the system warns the dispatcher that thisaction would result in a forced recall. If the dispatcher confirms the action, the system sends a recall message to the currentcrew and proceeds with allocating the activity to the other crew. If recall succeeds, the assignment is returned and noconcurrent assignments exist. If the recall is not possible because, for example, the assignment is already completed, thenthe assignment is not returned on the device and concurrent assignments now exist.
Although the dispatcher will typically contact the crew by phone or radio to make sure they do not perform work for arecalled assignment, it is possible that both assignments could be completed. For example, the first crew might arrive at thelocation, see that the work was already done, and then complete their assignment with no work details.
If the system receives two finalized assignments for the same activity, the status of the activity changes to CollisionDetected and a To Do entry is raised. The dispatcher (or who ever is assigned to resolve such issues ) must review theassignments and choose which one to use to complete the activity.

Oracle Real-Time Scheduler Server Application User Guide • 65
About Field-Referenced Activities (FRAs)If the system is unable to dispatch an assignment to a crew (typically due to poor connectivity), the dispatcher can contactthe crew and verbally communicate the key details of the activity. The crew can create a field-referenced activity (FRA) ontheir MDT. The crew uses the field referenced activity to record status updates and completion details.
The procedure works as follows:
1. The dispatcher receives an alert when the synchronization of an assignment to the crew's mobile device takes too longor fails.
2. The dispatcher clicks the Voice button on the Alert Queue. The system updates the status of the assignment toDispatched and sets the status reason to Voiced. This action also cancels any further attempts to send the assignment tothe crew, so the assignment won't exist twice on the device once the field referenced activity is created.
3. The system navigates to the Activity portal and displays a message instructing the dispatcher to voice-dispatch theactivity to the specified crew. To simplify the voice-dispatch, the system generates a relatively short alternate ID for thecrew to use when creating the field referenced activity.
4. The dispatcher communicates the information to the crew (typically via phone), and the crew creates a field-referencedactivity on the mobile device using the alternate ID.
5. The crew works the activity, updating its status as work progresses through completion, just like any other assignment.
6. When the crew's connectivity is reestablished, the system automatically matches the field referenced activity to thecorresponding activity using the alternate ID.
About Activity AttachmentsAttachments provide additional information to support records within the system.
An attachment can be any file, such as a photo, a document with instructions or specifications, a spreadsheet, or anyother supporting documentation. Several standard attachment file types are supported such as PDF, Word, Excel, or otherdocument types.
Attachments might be linked to activity types for the purpose of providing supporting information and guidelines to crewswhen performing the type of work. A common use for attachments to activity types would be a set of instructions on how toperform the work or safety guidelines. Attachments that are created in the Attachments portal and attached to one or moreactivity types are referred to as “common attachments.” These attachments cannot be edited and are not sent back to the hostsystem with activity completion details.
Links to these attachments are sent to the crew’s mobile device along with a dispatched activity of this type so they candownload their content on demand provided they are connected (to save bandwidth, time and storage space, etc.). Commonattachments your organization prefers to always be available on the device can be explicitly added to the mobile applicationdeployment as a designated deployment part that includes attachments. This way the crew does not need to manuallydownload them each time.
A dispatcher can use the Attachments zone on the activity portal to attach files that are specific to an activity for thepurpose of making it available to the assigned crew for any other purpose. If an attachment is added to an activity that hasalready been dispatched, the system sends that attachment to the mobile device when the attachment is saved.
Crews using the mobile application can capture content or attach documents related to a specific activity in the field. Theseattachments are later on synchronized and uploaded to the server.
The Attachments zone on activities lists all attachments specific for the activity including those captured by crews in thefield. If the activity is a complex activity, then attachments related to all its visit assignments are displayed.
The Send to Crew indicator allows you to determine whether or not the attachment is presented to the crew on the mobiledevice with the activity. For example, an attachment may not be required for work or of any interest to the crew in the field.

Oracle Real-Time Scheduler Server Application User Guide • 66
Links to all activity specific attachments, regardless of whether they were created in office or by a crew in the field, aremade available to crews when the activity is dispatched so they can download their content on demand.
By default, any attachments created in the field are always sent back to the host. Any other attachments added to theactivity within the system, must be marked explicitly in order to be sent to the host. An example scenario where thiswould be necessary is if the host sends an activity to investigate a possible electricity diversion by a customer. Duringthe investigation, the mobile worker confirms the electricity diversion and takes a picture of the evidence. That picture isreturned to the host application along with the investigation activity completion information. On a subsequent disconnectservice activity resulting from the investigation, the host sends in the picture taken during the investigation to aid the mobileworker in the disconnection activity. The picture would not be returned to the host again.
Activity Attachments on Mobile DevicesIn the field, mobile users can upload and download attachments as needed to support their work. Assignments withattachments show a paperclip icon next to their entry in the mobile device Task List to indicate that an attachment ispresent.
Upload functionality is only available for laptops. For Windows Mobile and Android mobile devices, pictures or audio files(considered “captures”) can still be attached and viewed, but not other types of files. Files that are uploaded in support ofactivities are included in the Attachments zone for the activity.
All attachments can be downloaded on all devices, however if the file type is not supported on the device, it cannot beopened or viewed.
The Attachments zone on Activities lists all attachments for the activity including those captured by crews in the field. Ifthe activity is a complex activity, then attachments related to all its visit assignments are displayed. When created in thefield, attachments are added to the Attachments zone after the attachment is uploaded back to the server.
If an attachment is added in the Activity portal to an activity that has already been dispatched, the system sends thatattachment to the mobile device when the attachment is saved.
The Send to Crew indicator allows you to determine whether or not the attachment is presented to the crew on the mobiledevice with the activity. For example, an attachment might not be required for work or of any interest to the crew in thefield.
About AlertsAn alert is a situation in which predefined condition(s) have been met that require user intervention. An alert is alwaysrelated to either an activity or a shift that caused the condition.
The alert type defines the attributes and behavior associated with all alerts of that type, including:
• how the alert is raised
• how the system determines if the underlying issue has been resolved and the alert can be closed
• the threshold which causes the alert to trigger, such as the number of minutes the crew has to acknowledge an emergencyalert before the alert triggers.
• how long before the alert expires (closes automatically after a period of time) or is recycled (is directed to anotherdispatcher if not acknowledged after a period of time)
• whether or not it can be closed manually
• whether the snooze feature is enabled for the alert and, if enabled, the length of the snooze period (snoozing removes analert from the queue for a period of time and then re-issues it when the snooze period expires)You can also indicate whether the dispatcher can adjust the snooze time when assigned an alert of this type.
• e-mail address to be notified when alerts of this type cannot be assigned to a dispatcher

Oracle Real-Time Scheduler Server Application User Guide • 67
• whether or not the alert makes a sound when appears on the dispatcher's alert queue to help get the attention of thedispatcher. When the alert is displayed elsewhere, such as in the Alert portal, it does not make a sound. Sounds are onlyenabled in the alert queue.
Alert QueueWhen an alert is raised, it appears on the Alert Queue of the dispatcher assigned to the alert. Refer to About the Alert Queuefor more information.
Typical AlertsBelow are some examples of typical alerts:
• Missed appointment alerts are generated when an appointment has been missed.
• Unacknowledged emergency alerts are generated when a crew does not acknowledge an emergency alert within aspecified period of time.
• Crew Idle Alerts are generated when the crew shift is idle for a specified period of time.
• Synchronization Alerts are generated when the crew does not receive a dispatched activity's assignment from theserver within a specified period of time. The dispatcher can choose to cancel the synchronization process and voice theassignment details to the crew.
• Cancel Activity Alert is generated on an attempt, typically initiated by the host system, to cancel an activity that hasbeen dispatched to the crew. This alert supports a special Force Cancel action that cancels the activity and closes the alert
• Crew On Site For Too Long Alerts are generated when the crew has been on site for "x" minutes since the estimatedcompletion time.
• Panic Alerts are generated when a crew in distress presses the Panic button on their mobile device. These alerts areimmediately assigned to an available dispatcher and should be given attention right away. If the mobile device has thecapability, the alert is sent with the GPS location of the crew at the time that the panic alert was issued to better locate thecrew on the map.
• Timed Event alerts are generated when a crew has created an event with an expiration date to indicate that the dispatchershould check on them if the event expires. This is used if the crew feels they may be in a dangerous or hazardoussituation and would like higher visibility from the dispatcher. The alert only becomes in effect and shows up on adispatcher's alert queue once expired. If the crew manages to close the event before it has expired the alert is closed anddoes not appear on any dispatcher's alert queue.
How Alerts are GeneratedAn alert is associated with an alert type, which defines the behavior of alerts of that type. Each alert type represents a uniquebusiness condition to be checked and establishes a threshold used to generate alerts of this type.
For example, your system might generate an alert if an emergency activity is not acknowledged by a crew within 5 minutes.
Most alerts are generated when a monitoring process determines that the conditions for the alert have been met. For criticalconditions, such as gas leaks or downed power lines, alerts can be generated in advance and set to become effective somenumber of minutes in the future.
An alert reports a problem related to an activity, a crew shift or a resource at a specific location.

Oracle Real-Time Scheduler Server Application User Guide • 68
How Alerts are DistributedAlerts are distributed to users based on a set of business rules.
NOTE: This topic describes the alert distribution rules configured for the base system. These rules can be customizedduring implementation to meet your organization's business requirements.
The system directs each alert to the most appropriate user currently available based on the following priority order:
1. A logged-on dispatcher who is currently monitoring a dispatch area covering the shift or activity related to the alert*
2. A logged-on dispatcher who is eligible to monitor a dispatch area covering the alert related entity
3. Any logged-on dispatcher*
4. If no logged-on dispatcher is found, an alert is issued to a supervisor, typically via email (using the email addressspecified in the alert type)
* If multiple dispatchers are eligible to receive the alert, the one with the least number of open alerts is preferred.
Alert ActionsThe available actions for an alert vary depending on the alert type and its current state.
Common alert actions include the following:
• Acknowledge: Indicates that you have viewed the alert. If the Minutes to Snooze value for the alert type is greater thanzero, the system removes the alert from the alert queue for this number of minutes and then reissues it.If an alert is not acknowledged within the time specified in the alert type, the system recycles it.
• Close: Closes the alert and removes it from the queue. This is only supported if the alert type supports manual close.
• Voice: For synchronization alerts only, this indicates that you want to voice-dispatch the activity. The system updates theactivity status and then navigates to the Activity portal and displays a message instructing you how to voice-dispatch theactivity.
• Force Cancel: Cancels the associated activity and removes the alert from the queue. This is only supported for cancelactivity alerts.
About Alert AreasAlert areas set up geographic areas that can be displayed on a map and that trigger an alert when resources enter or leavedesignated areas.
Such alerts are sent to the dispatcher monitoring the resource or closest service area to the alert location.
Select the Map tab to draw an area on the map to define the map boundaries of the alert area. Set alert areas to active orinactive as needed throughout the course of business by clicking the related action buttons in the Record Actions section.Active hazard areas appear as a layer on the CDI map.
Hazard AreasHazard areas establish a boundary or zone that, if entered, triggers an alert. If the most recent actual location of a crew orvehicle shows that they have entered the area, the system generates an alert. The hazard area supports an optional list ofcrew primary functions allowing you to limit the alert to crews performing certain types of work, as necessary.
An alert is generated when crews currently working these listed functions, if any, or any vehicles that are not part of anystarted shift enter the area. For example supervisors or other company workers might drive around, but are not identified in
Oracle Real-Time Scheduler Server Application User Guide • 69
the system associated to a shift. These would trigger an alert if they enter a hazard area. If no restrictions are indicated, anycrew that enters the area will cause the system to generate an alert.
Vehicle Leave AreasVehicle leave areas establish a boundary or zone where vehicles are prohibited from leaving. This type of alert area supportsan optional list of vehicle types, or vehicle primary functions, allowing you to limit the alert to vehicles of a certain typeonly, as necessary.
An alert is generated when a vehicle of the listed types, if any, leave this area. This is typically used to track stolen vehiclesor to make sure that crews are not using vehicles outside of designated work areas. If no specific vehicle types are defined,the alert applies for vehicles of any type.
Excluded ResourcesThe Excluded Resources zone lists all resources that have been manually excluded from alert processing for the specificalert area. Once presented an alert for a resource entering or exiting an alert area, a dispatcher may decide that the resourceis allowed to be where it is and hence manually close that alert. Manually closing an alert adds the resource to this list whichexcludes the resource from getting additional alerts for that area. However, if for some reason alerts should be created againfor that resource, click the Remove button to take that resource off of the exclusion list.
About Remote MessagesRemote messages are used to transmit data to/from the crew in the field from/to the main application on the server. Thisdata includes:
• Crew to Server: Shift and task completion details as well as shift and task status updates.
• Server to Crew: Assignment and task dispatch details.
For crew to server messages, remote message processing ensures against data loss by saving or 'persisting' all data sent fromthe device so nothing is lost when the application closes or another user logs on to a new shift. This is important becausedevices may be shared by multiple mobile workers -- one crew may send data and then leave for the day, and another crewmay use the same device on a subsequent shift.
Messages from the crew are received continually throughout the day. If message processing fails at any time, a To Do entryis created for a user to review and resolve the problem. You can view the XML content of any message, try to reprocess themessage as is, or edit the message content and then reprocess.
NOTE: Some errors may arise due to a concurrent attempt to update the same entity by another process and may resolveon their own when the system tries to process the message again. It is important to schedule the remote message monitorbatch process to retry failed messages periodically. For example every 5 minutes or so.
For server to crew messages, remote message processing allows for managing messages that have been queued for a longtime or have been processed with error by the crew.
NOTE: Callback and Error scripts may exist for these kinds of messages. It is important to schedule the remote messagemonitor batch process to periodically monitor messages that may need callback or error script executions. For exampleevery 5 minutes or so.

Oracle Real-Time Scheduler Server Application User Guide • 70
Working with ActivitiesThis section describes concepts and common tasks related to working with activities.
Creating Assist ActivitiesUse this procedure to create an activity for an alternate crew to provide assistance on an existing activity.
1. Open the Activity portal to the appropriate activity.
2. Click the Assist button.
3. Select an Activity Type for the assist activity and click OK.
The system creates the assist activity and navigates to the Activity portal so that you can add a note to the crew ifneeded.
You can either allow the scheduler to it to an available crew or you can manually allocate the activity to a specific crew.
If the original activity has already started, which is typical in assist situations, the scheduler attempts to dispatch it rightaway. You can also manually dispatch the activity as needed.
Viewing Activity DependenciesActivities that have been created as part of bound work such as assist activities, jobs or chains, are dependent upon otheractivities. In the same way, a complex activity schedule is made of multiple visit tasks. There are different ways in whichyou can find out how an activity fits into a bound work structure or which other activities it is related to. Use the followingmethods to review activity dependencies.
1. Look for visual cues in the CDI for job or chain dependencies.
2. If an activity belongs to a job, you can view the entire job on the Activity portal.
3. If an activity belongs to a chain you can view the entire chain on the Activity Dependency portal which you cannavigate to from CDI or Activity portal
4. View the entire complex activity schedule on the Schedule tab of the Complex Activity portal
Activity SearchUse this procedure to filter and search for an existing activity.
1. Select Main Menu > Service Management > Activity.
2. From the Activity Search zone, select the Query Option to use.
3. Enter your search criteria and click Refresh.
4. In the search results list, click in the Activity column of the activity you want to work with. To view an assignmentassociated with this activity, click an assignment in the Assignments History zone.
Editing ActivitiesUse this procedure to edit the details of an existing activity.
Some fields may not be editable, based on the activity's current status and your system's configuration.
Oracle Real-Time Scheduler Server Application User Guide • 71
1. Navigate to the Activity portal and display the activity you want to edit.
2. Click the Edit button in the Actions zone.
3. Enter your changes and click Save.
If you change the address, the system recalculates the geocode coordinates.
If any errors are encountered while saving, the system displays the error messages at the top of the screen. You must resolvethese errors before the changes can be saved.
If the activity is saved but issues are detected, the Activity portal is displayed and these issues are listed at the top of theActivity zone. You must resolve these issues in order for the activity. To resolve the issues, edit the activity to provide thenecessary information, then click the Validate button.
Validating ActivitiesIf an activity has issues that prevent it from being scheduled, you must correct them and then validate the activity.
You can only validate an activity if the system has detected issues.
1. Navigate to the Activity portal and display the activity you want to validate.
2. If you have not already corrected the condition causing the issues, do so now. (Click the Edit button in the Actionszone, then edit the activity details and save. Upon successful save, you are returned to the Activity portal.)
3. Click the Validate button in the Actions zone.
The system will attempt to validate the activity. If validation succeeds, its status is updated and the activity is readyfor scheduling. If the system still detects issues with the activity, the issues are displayed for your review. Repeat thisprocess to resolve the issues and then revalidate.
Viewing Captured Content on an ActivityUse this procedure to review digital content that was captured or attached to the activity on a mobile device andsynchronized to the server.
Prerequisites: Content must have already been captured on the device and synchronized to the server.
1. Select Main > Service Management > Activity
2. Search for and select the appropriate activity.
3. Select the attachment you want to open from the Attachment zone.
The attachment opens in the viewer needed to view the content. For example, if you are opening an image file, an imagefile viewer opens on your computer.
Adding an Attachment to an ActivityUse this procedure to add an attachment to an activity. Attachments that are added to activities can be sent to the crewwhether or not the shift has already started.
You must have created the attachment and know its file location.
1. Navigate to the appropriate Activity record.
2. Click the Add link in the Attachments zone.
3. Choose the attachment format by selecting from the Attachment Business Object field and click Ok.

Oracle Real-Time Scheduler Server Application User Guide • 72
This allows you to indicate whether the attachment is a spreadsheet, an image, video or audio, a text document, or anyother file type available.
4. Enter the file name and description.
5. Indicate whether or not the attachment should be sent to the crew by setting the Send to Crew indicator.
This is defaulted to Yes on add. You can edit the attachment and change it to No, if needed.
6. Click Save.
7. Select the file to upload.
Make sure that you select a file with the appropriate file type.
8. Click Ok .
Viewing or Opening AttachmentsUse this procedure to view an attachment that has been added to an individual activity or in the Attachments portal.
1. Navigate to the record where the attachment was added.
This could be the Attachments portal or an individual activity.
2. Click the Open button next to the attachment to directly open the file, or you can click the link for the attachment toopen the Attachment record.
If you open the Attachment record using the link you can edit, delete, view, or upload a new version of the attachment.
Editing AttachmentsUse this procedure to edit an attachment that has been added to an individual activity or in the Attachments portal. Whenyou edit an attachment you can only change the file name, description, and whether or not it is sent to the crew on anactivity. If you need to replace the attachment file select the Upload button and browse to select a different file.
1. Navigate to the record where the attachment was added.
This could be the Attachments portal or an individual activity.
2. Click the link for the attachment.
3. Click the Edit button.
4. Modify the attachment file name and description as needed.
You can also modify the Send to Crew indicator as needed.
Replacing an Attachment FileUse this procedure to replace an attachment file that has been added to an individual activity or in the Attachments portal.If you need to edit the attachment file name select the Edit button.
1. Navigate to the record where the attachment was added.
This could be the Attachments portal or an individual activity or activity type.
2. Click the link for the attachment.
3. Click the Upload button.
4. Browse to and select the new file then click Upload.

Oracle Real-Time Scheduler Server Application User Guide • 73
The new file is updated anywhere the attachment is referenced.
Deleting AttachmentsUse this procedure to delete an attachment that has been added to an individual activity or in the Attachments portal.
1. Navigate to the record where the attachment was added.
This could be the Attachments portal or an individual record such as an activity or activity type.
2. Click the link to the Attachment record or click the delete icon.
If you are accessing the Attachments portal, you have to navigate to the Attachment record to delete. Click the Deletebutton on this screen.
3. Confirm that you want to delete the attachment.
Activity ActionsThis section describes the actions you can take to update an activity's status.
The actions available at any time depend on the activity's status, your user privileges, and your system's configuration. Allvalid actions can be performed from the Activity maintenance portal. Some actions, such as Chooser, Allocate, Dispatch,Defer, and Unassign can also be performed directly from the CDI portal. The following topics provide instructions forperforming all standard activity actions.
Allocating ActivitiesUse this procedure to lock an activity to a particular crew's shift. Once an activity has been allocated, the scheduler cancontinue to optimize its scheduled time, but cannot assign the activity to another crew shift.
You can only allocate an activity if its current status supports it.
You can allocate an activity in several different ways, as described below.
Starting from: You can:
CDI Scheduling Gantt zone or the Scheduling Gantt on the Crew
Shift portal's Schedule tab
Do one of the following:
• Right-click the activity in the task area and select Allocate from the
pop-up menu. When prompted, specify the crew shift to which you
want the activity allocated.
• Click on an activity that is currently scheduled to one crew shift and
drag it to another crew shift. This is not available if you are viewing
a single shift (such as from the Crew Shift portal).
• Select a shift then select Allocate All to allocate to the shift all
activities that have been scheduled but not yet dispatched. This
action does not close the shift.
CDI Activity Search zone Do one of the following:
• Click the check box to the left of one or more activities you want to
allocate, then click the Allocate button. When prompted, specify
the crew shift to which you want the selected activities allocated. (If
you selected multiple activities, they will all be allocated to the same
crew shift.)
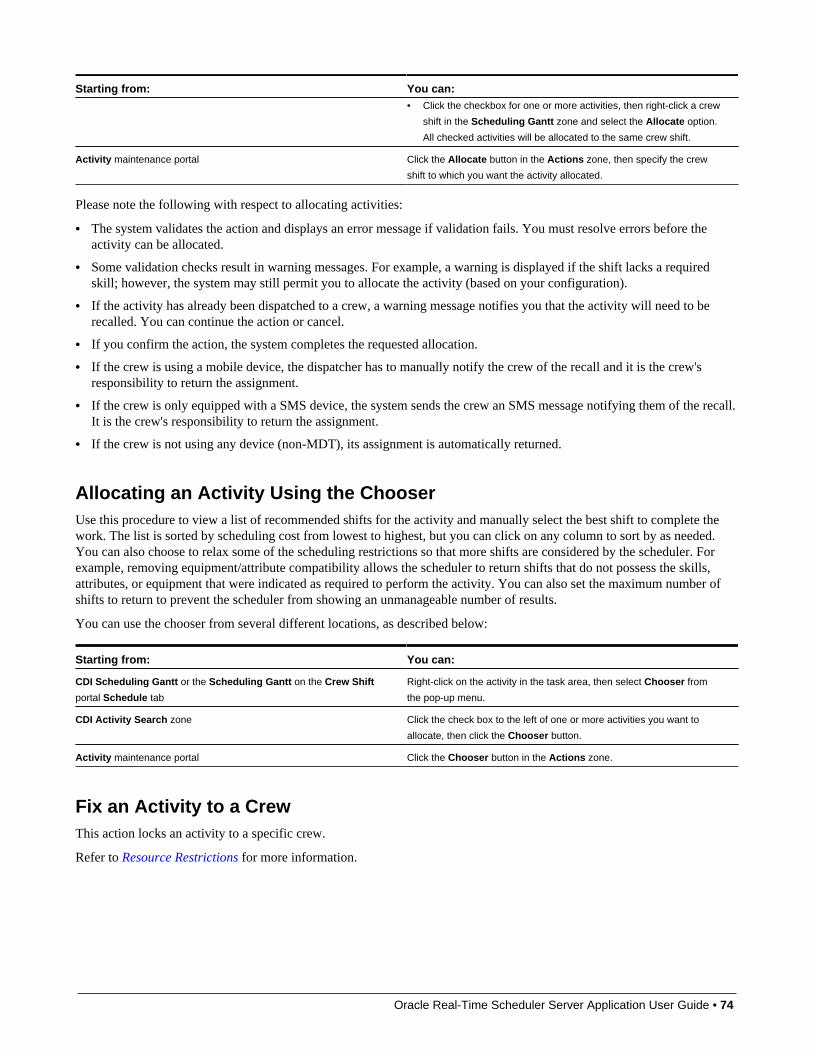
Oracle Real-Time Scheduler Server Application User Guide • 74
Starting from: You can:• Click the checkbox for one or more activities, then right-click a crew
shift in the Scheduling Gantt zone and select the Allocate option.
All checked activities will be allocated to the same crew shift.
Activity maintenance portal Click the Allocate button in the Actions zone, then specify the crew
shift to which you want the activity allocated.
Please note the following with respect to allocating activities:
• The system validates the action and displays an error message if validation fails. You must resolve errors before theactivity can be allocated.
• Some validation checks result in warning messages. For example, a warning is displayed if the shift lacks a requiredskill; however, the system may still permit you to allocate the activity (based on your configuration).
• If the activity has already been dispatched to a crew, a warning message notifies you that the activity will need to berecalled. You can continue the action or cancel.
• If you confirm the action, the system completes the requested allocation.
• If the crew is using a mobile device, the dispatcher has to manually notify the crew of the recall and it is the crew'sresponsibility to return the assignment.
• If the crew is only equipped with a SMS device, the system sends the crew an SMS message notifying them of the recall.It is the crew's responsibility to return the assignment.
• If the crew is not using any device (non-MDT), its assignment is automatically returned.
Allocating an Activity Using the ChooserUse this procedure to view a list of recommended shifts for the activity and manually select the best shift to complete thework. The list is sorted by scheduling cost from lowest to highest, but you can click on any column to sort by as needed.You can also choose to relax some of the scheduling restrictions so that more shifts are considered by the scheduler. Forexample, removing equipment/attribute compatibility allows the scheduler to return shifts that do not possess the skills,attributes, or equipment that were indicated as required to perform the activity. You can also set the maximum number ofshifts to return to prevent the scheduler from showing an unmanageable number of results.
You can use the chooser from several different locations, as described below:
Starting from: You can:
CDI Scheduling Gantt or the Scheduling Gantt on the Crew Shift
portal Schedule tab
Right-click on the activity in the task area, then select Chooser from
the pop-up menu.
CDI Activity Search zone Click the check box to the left of one or more activities you want to
allocate, then click the Chooser button.
Activity maintenance portal Click the Chooser button in the Actions zone.
Fix an Activity to a CrewThis action locks an activity to a specific crew.
Refer to Resource Restrictions for more information.

Oracle Real-Time Scheduler Server Application User Guide • 75
Cancelling ActivitiesUse this procedure to cancel an activity that has not been finalized.
You can only cancel an activity if its current status supports it.
1. Navigate to the Activity portal and display the activity you want to cancel.
2. Click the Cancel button in the Actions zone.
The system validates the action and displays an error message if the action cannot be completed. The activity is removedfrom consideration for scheduling and, if already assigned to a crew shift, will be removed from the crew shift's schedule.
Completing Activities with Concurrent AssignmentsIf multiple completed assignments are received for the same activity, the system will not automatically complete theassociated activity. The dispatcher must decide which assignment to accept, and then complete the activity from thatassignment's maintenance portal.
Prerequisites: Before you begin this procedure, make sure you have reviewed all assignments and have determined thecorrect one to use to complete the associated activity.
To complete an activity from an assignment, follow these steps:
1. Navigate to the Activity portal and display the activity you want to complete.
2. In the Concurrent Assignments section, click on the assignment you want to use to complete this activity.
3. Click the Complete Activity button in the Actions zone of the Assignment portal.
The system validates the action and displays an error if it cannot complete the activity.
Declining ActivitiesUse this procedure to decline an activity's current assignment on the server on behalf of a non MDT crew.
This procedure is only applicable for non-MDT crews. The dispatcher must act on behalf of the crew.
Starting from the ... You can ...
Select the Current Assignment link on the activity. Click the check box to the left of one or more activities you want to
remove, then click the Decline button.
The system opens the Decline Assignment pop-up window where you
enter a decline reason and provide comments as needed.
A copy of the activity is sent to crew in the form of an assignment, so the crew works on the copy and any updates made bythem are updated on the activity.
Deferring ActivitiesUse this procedure to put off the scheduling of an activity to a later date. When you defer an action, you change its originaleffective time window. This differs from the hold action, which puts an activity on hold and removes it from considerationfor scheduling until you manually remove the hold.
You can only defer an activity if its current status supports it.
You can defer an activity in several different ways, as described below.

Oracle Real-Time Scheduler Server Application User Guide • 76
Starting from the ... You can ...
CDI Scheduling Gantt zone Click the Defer button in the Actions zone. When prompted, enter the
deferment
CDI Activity Search zone Right-click on the activity in the task area, then select Defer from the
pop-up menu.
Activity's maintenance portal Click the checkbox to the left of one or more activities you want to
defer, then click the Defer button.
Please note the following with respect to deferring activities:
• When prompted, enter the date to which you want the activity deferred, the reason for the deferment, and any otherrelevant remarks, then click OK. The system validates the action and displays an error message if the action cannot becompleted.
• If the activity is successfully deferred, its status is updated, indicating that the activity is ready for scheduling based on itsadjusted arrival time window.
• If the activity has already been dispatched to a crew, a warning message notifies you that the activity will need to berecalled. You can continue the action or cancel it.
• If you confirm the action, the system completes the requested allocation.
• If the crew is using a mobile device, the system attempts to recall the activity.
• If the crew is only equipped with a SMS device, the system sends the crew an SMS message notifying them of the recall.It is the crew's responsibility to return the assignment.
• If the crew is not using any device (non-MDT), its assignment is automatically returned.
• To un-defer an activity, click the Defer button in the Actions zone and leave the date field blank.
Dispatching ActivitiesUse this procedure to lock an activity's sequence in the shift schedule and mark it as ready to be sent to the crew.
You can only dispatch an activity if its current status supports it.
You can dispatch an activity in several different ways, as described below.
Starting from the ... You can ...
CDI Scheduling Gantt zone or the Scheduling Gantt on the Crew
Shift maintenance portal's Schedule tab
Right-click on the activity in the task area, then select Dispatch from
the pop-up menu.
CDI Activity Search zone Click the check box to the left of one or more activities you want to
dispatch, then click the Dispatch button.
Activity's maintenance portal Click the Dispatch button in the Actions zone.
The system validates the action and displays an error message if the action cannot be completed. If the action is successfullycompleted, the activity will be queued for dispatch to the crew's mobile device.
Please also note the following regarding dispatching activities:
• Activities are not actually dispatched until the assigned crew's shift has started. Until then, the activity is consideredqueued for dispatch.
• For an mobile crew, an activity is considered dispatched only upon receipt of acknowledgement from the crew's mobiledevice.
• For SMS crews, an activity is considered dispatched once it is sent. For a non-MDT crew, queued activities areconsidered dispatched when the crew shift starts.

Oracle Real-Time Scheduler Server Application User Guide • 77
Putting Activities on HoldUse this procedure to place an activity on hold if something needs to be done before work can be started. Putting a hold onan activity removes it from consideration for scheduling until you manually remove the hold.
You can only put an activity on hold if its current status supports it.
1. Navigate to the Activity portal and display the activity you want to put on hold.
2. Click the Hold button in the Actions zone.
3. Enter a reason for the hold and click OK.
The system validates the action and displays an error message if the action cannot be completed.
When you are ready to remove the hold on this activity, navigate back to the Activity portal and click the Schedule buttonin the Actions zone.
Rescheduling ActivitiesUse this procedure to reschedule an activity that is currently queued for dispatch. This action effectively reverses a dispatchaction taken on an activity, and indicates to the scheduler that the activity is no longer locked to its current location in theschedule.
If the activity was manually allocated, the scheduler cannot schedule the activity to a different crew shift but can stilloptimize its location in the schedule. If the activity was not manually allocated, the activity can now be scheduled to anycrew.You can only reschedule an activity if its current status supports it.
1. Navigate to the Activity portal and display the activity you want to reschedule.
2. Click the Reschedule button in the Actions zone.
The system validates the action and displays an error if it cannot complete the action. If the status is successfully updated, itis sent to the scheduler to be rescheduled.
Unassigning ActivitiesUse this procedure if you want to unassign an activity and send it back to the scheduling pool. If the activity is currentlymanually allocated, it becomes available for scheduling to any crew. If it is currently dispatched to a crew, the crew must benotified of the recall. Once an activity is unassigned from its current crew's shift, the activity is never given back to the sameshift. In addition to excluding the shift, unassigning also removes manual allocation to the shift.
You can only unassign an activity if its current status supports it.
You can unassign an activity in several different ways, as described below.
Starting from the ... You can ...
CDI Scheduling Gantt zone or the Scheduling Gantt on the
Schedule tab of the Crew Shift portal
Right-click on the activity in the task area, then select Unassign from
the pop-up menu.
CDI Activity Search zone Click the checkbox to the left of one more activities you want to
unassign, then click the Unassign button.
Maintenance portal for the activity Click the Unassign button in the Actions zone.
Please note the following with respect to unassigning activities:

Oracle Real-Time Scheduler Server Application User Guide • 78
• The system validates the action and displays an error message if the action cannot be completed. If the activity issuccessfully unassigned, it will be available for rescheduling. You can manually allocate the activity to another crewshift or let the scheduler assign it.
• If the activity has already been dispatched to a crew, a warning message notifies you that the activity will need to berecalled. You can continue the action or cancel.
• If you confirm the action, the system completes the requested action.
• If the crew is using a mobile device, the dispatcher has to manually notify the crew of the recall and it is the crew'sresponsibility to return the assignment.
• If the crew is only equipped with a SMS device, the system sends the crew an SMS message notifying them of the recall.It is the crew's responsibility to return the assignment.
• If the crew is not using any device (non-MDT), its assignment is automatically returned.
Removing AllocationSelect the Remove Allocation button to make sure that the activity is no longer allocated to any shift. Notice that unlikethe unassign action, this action does not impact an already dispatched activity and therefore does not issue any recall. If theactivity is already dispatched then this would only affect its schedule if the crew has not performed the work and it is lateron returned and rescheduled.
Requesting an Assisting CrewThis action requests an assisting crew to help with the work of an activity. A new activity is created for the assisting crew ofa specific activity type. The current activity and the assisting crew’s activity are bound as a chain so that the scheduler planstheir arrival accordingly.
Refer to About Bound Work for more information on activity dependency.
The list of activity types to use for the assisting activity shows only activity types marked as allowed to be used as such.
Excluding ContractorThis action excludes the currently assigned contractor group from working the activity.
Refer to Resource Restrictions for more information.
Reverting to CompanyThis action marks an activity as allowed to be performed only by company resources. This action may be used when anactivity is eligible for contracting but for some reason the dispatcher needs to revert it back to company only crews.
Viewing Activity Schedule InformationUse the Schedule tab on the Activity portal to view current scheduling details for an activity.
These values cannot be changed.
When scheduled, the Schedule tab displays the crew shift to which this activity is currently scheduled, as well as thesequence in which this activity is expected to be worked with respect to other tasks currently assigned to the scheduled shift.Additional schedule details include the calculated travel time and distance from the previous task on the shift schedule, andthe calculated or actual arrival, start, and completion times. If there are any scheduling warnings or errors associated withthis activity, they are also displayed.

Oracle Real-Time Scheduler Server Application User Guide • 79
If the activity should be scheduled but is not the system displays the reason.
Viewing and Updating Assignments for an ActivityUse this procedure to view and update assignments associated with an activity.
1. Navigate to the Activity portal and display the activity you want to work with.
The current assignment is displayed in the Main section of the Activity portal. The Activity Display zone also displaysthe following:
• A link to the assignment used to complete the activity, if applicable
• Any concurrent assignments, if applicable
• A list of completed assignments, if the activity's status is collision detected
All assignments associated with this activity are also listed in the Assignments History zone.
2. Click the assignment you want to view or edit.
3. Use the buttons in the Actions zone of the Assignment maintenance portal to perform valid actions on an assignment.
The buttons that are displayed at any time depend on the current status of the assignment and your system'sconfiguration. The table below describes a set of standard action buttons.These actions apply when the assignment is for a crew shift:
Button Description
En Route Indicates that the crew is currently on its way to the activity.
Arrived Indicates that the crew has arrived at the activity address buthas not yet started work. This can be used if there is somedelay for the crew in starting.
Started Indicates that the crew has started work.
Postpone Indicates that the crew has not yet arrived on site to thelocation and must postpone work on the assignment. After youclick Postpone, you will be prompted to enter the reason forpostponing and the date and time to which the work will bepostponed. The activity remains assigned to the crew, allowingthem to return to it later on. . At this time the system providesyou with the option to also keep the activity with you for a futureshift if you are not able to complete it during your current shift.
Suspend Indicates that the crew arrived on site and started work, butwas unable to complete it. After you click Suspend, you willbe prompted to enter the reason for suspending and the dateand time to which the work will be postponed. You must alsoindicate how much time is still required to complete the work.The activity remains assigned to the crew, allowing them toreturn to it later on. At this time the system provides you with theoption to also keep the activity with you for a future shift if youare not able to complete it during your current shift.
Work Done Indicates that the crew completed work, but completion detailshave not been entered yet. (This is typically used by an SMScrew or by a dispatcher on behalf of a non-MDT crew.) Whencompletion details are available, you can enter them and thencomplete the activity.
Complete Indicates that the crew has completed work and all completiondetails have been entered. Enter completion details beforeclicking the Complete button. If there is no collision withanother assignment, the activity is also completed.
Complete Activity Use this action to complete an activity using the completioninformation contained in this assignment. This action isonly available if an activity has more than one completedassignment. The dispatcher must first choose which assignment

Oracle Real-Time Scheduler Server Application User Guide • 80
Button Descriptionto accept and then click the Complete Activity button from thatassignment's maintenance portal.
Decline Use this action to return this assignment so it can berescheduled. During rescheduling the system provides you withthe option to also keep the activity with you for a future shift ifyou are not able to complete it during your current shift.
These actions apply when the assignment is for a contractor capacity:
Button Description
Approve Indicates that the contractor has agreed to take on this activity.
Complete Indicates that the contractor has completed work and allcompletion details have been entered. Enter completion detailsbefore clicking the Complete button. If there is no collision withanother assignment, the activity is also completed.
Decline Indicates that the contractor has either declined taking on theactivity committed to them or failed to approve their commitmentis a timely manner.
Working with AlertsThis section describes concepts and common tasks related to working with alerts.
Viewing and Processing AlertsYou can manage alerts using the Dashboard Alert Queue or the Alert maintenance portal.
Alert SearchUse this procedure to filter and search for a particular alert.
The Alert portal is used only on an as-needed basis for investigating a particular alert or for audit purposes. The AlertQueue is the primary tool for viewing and managing alerts.
1. Select Main Menu > Service Management > Alert .
2. Enter your search criteria in the Alert Query zone.
You can enter any combination of alert type, creation date, dispatcher, activity, or shift. You can also limit the search toinclude or exclude finalized alerts.
3. Click Refresh.
4. From the search results, do one of the following:
• Click the Alert link to navigate to the Alert maintenance portal.
• Click on the related entity column to navigate to the corresponding portal.
Defining Alert AreasUse this procedure to define an area that can be represented on a map.
1. Navigate to the Main Menu > Service Management > Alert Area+.
You can also navigate to the portal and click the Add link.

Oracle Real-Time Scheduler Server Application User Guide • 81
If your organization has configured any custom skill business objects, you may need to select one.
2. Select the appropriate value for the Alert Area Business Object field and click OK.
For example, you may select whether this is a hazard area or a vehicle leave area.
3. Enter a unique descriptive name and a description.
4. Complete the remaining fields according to your business processes.
5. Click Save.
Next you can select the Map tab to draw an area on the map to define the map boundaries of the alert area. Refer toDefining Map Areas on Alert Areas for more information.
Note you must also create a corresponding alert type for the alert area.
Defining Map Areas on Alert AreasUse this procedure to draw, on a map, the area represented by the defined alert area.
1. Navigate to the appropriate alert area.
2. Click the Map tab.
3. Draw a shape on the map to define the geographic boundaries of the area.
Click the Draw button and select a shape to begin drawing.
Click the Edit Text button to modify the geocoded coordinates, as needed. You can also zoom in and out on the map orpan around the map using the tools on the left.
4. Click Save.
Working with Override Time WindowsThis section describes common tasks related to working with override time windows.
Creating Override Time WindowsUse this procedure to create an override time window.
Prerequisites: The activity type and service areas must have been previously defined.
1. Select Main Menu > Service Management > Override Time Window+.
2. Select the type of activity to which the override applies.
3. Enter the start and end time for the time window.
4. Indicate whether activities of this type should be allowed or not allowed during this time period. (Use the Allowedoption if you want activities of a particular type to be scheduled on a holiday, when they would otherwise not beallowed.)
5. Select one or more service areas to which the override applies.
If you do not select any, the override applies to all service areas.
6. Click Save.
The system checks to see if any existing activities would be affected by this override time window. (The override affectsall activities for which at least one of their effective time windows overlaps with the override time window.) If any such

Oracle Real-Time Scheduler Server Application User Guide • 82
activities exist, the system notifies you how many activities would be affected and asks if you want to continue. If youconfirm the action, the system saves the override time window, recalculates the time windows for all affected activities, andresends the activities to the scheduler if necessary. If you cancel the action, the override time window is not saved.
Override Time Window SearchUse this procedure to filter and search for existing override time windows.
1. Select Main Menu > Service Management > Override Time Window.
2. Enter your search criteria in the Override Time Window Query zone.
You can enter any combination of activity type, start date/time, end date/time or service area.
3. Click Refresh.
4. Click the override time window you want to work with from the search results.
Maintaining Existing Override Time WindowsUse the buttons in the Actions zone of the Override Time Window portal to maintain existing override time windows.
1. Select Main Menu > Service Management > Override Time Window.
2. Search for and select the override time window you want to maintain.
3. Use standard actions to edit, delete, and cancel the time window.
Working with Remote MessagesThis section describes tasks related to working with remote messages used to transmit data from the crew in the field to themain application on the server.
Remote Message SearchUse this procedure to filter and search for crew messages.
1. Select Main Menu > Service Management > Remote Message.
2. Enter your search criteria and click Refresh.
You must enter a processing date and time for the search. The system will search for all messages processed on or afterthat date. You can also search by the user, mobile device associated with the message, or by message class.
3. Click on a message in the search results to navigate to the Remote Message maintenance portal.
Note: Selecting Message Class Crew Message will display crew to server messages only. Selecting Message ClassOutbound Message will display server to crew messages only.

Oracle Real-Time Scheduler Server Application User Guide • 83
Viewing, Editing, and Retrying Remote MessagesUse this procedure to view remote messages.
For Crew to Server MessagesIf an error occurred while processing the message, you can retry the message. You can also edit the XML content beforeresending. You cannot create a new remote message.
1. Select Main Menu > Service Management > Remote Message.
2. Search for and select a message.
The Remote Message portal displays the message content is in XML format.
3. Click the Edit button in the Actions zone to modify the XML content of the message.
Be sure to maintain the integrity of the message structure and conform to the message's schema.
4. Click the Retry button to reprocess the message.
The system will attempt to reprocess the message. If the action is successful, the message's status changes to Processedand the Retry button is removed from the screen; otherwise, the status Error status remains unchanged and the Retrybutton is displayed again.
For Server to Crew MessagesYou cannot create a new remote message, nor can you edit or delete an existing one. Retry functionality is not available forserver to crew messages.
Dispatcher Functions (CDI)
This section describes concepts and procedures related to the dispatching functionality. Most dispatcher functions areperformed from the Common Dispatching Interface (CDI) portal, which provides a single point of interaction formonitoring and managing tasks, crew shifts, and KPIs. You can also view and manage alerts and To Do entries fromdashboard zones without ever leaving the CDI portal.
Understanding Dispatcher FunctionsThis section describes concepts related to dispatcher functions.
About the CDI PortalThe CDI portal helps dispatchers effectively manage day-to-day operations and facilitates communication with crews inthe field. The CDI supports context-based decision making for handling exceptions that arise during the day. Althoughthe system automatically schedules and dispatches tasks to available and qualified crews (based on your system's businessrules), a dispatcher can override virtually any decision made by the system to handle special situations.
The system provides two versions of the CDI portal:
• The main CDI portal that is displayed after you log into your dispatcher shift.
• The KPI-Specific CDI portal that is displayed when you click on an actionable KPI from the KPI Summary zone onthe main CDI portal.

Oracle Real-Time Scheduler Server Application User Guide • 84
Both CDI portals contain the same zones and look similar, but the data represented in each portal is different.
About the Scope of DataThe scope of data refers to the crew shifts and tasks for which data is displayed in the CDI portal.
When a dispatcher logs on to a shift, they select which dispatch areas to monitor and, depending on their user privileges,they may also be able to set the range of dates to monitor. These settings determine which tasks and crew shifts will bedisplayed on the CDI portal and also which alerts will be directed to the dispatcher for situations requiring attention ormanual intervention. If the dispatcher changes these shift settings during a shift, the scope of data changes.
Crew Shift Data ScopeA crew shift is considered within the dispatcher's data scope when its service areas and service classes are covered by atleast one of the dispatch areas currently being monitored and one of the following is true:
• The crew shift is currently logged on
• The crew shift's status is planned and its planned time window falls within the dispatcher shift's monitoring period
Contractor Capacity Data ScopeIf your organization uses contractor management functionality dispatchers can also monitor contractors as part of theirscope of data. Any contractor capacity is considered within the dispatcher's data scope when its service areas and serviceclasses are covered by at least one of the dispatch areas currently being monitored and it overlaps with the monitoringperiod for that dispatcher shift. Only non canceled contractor capacities are considered. Refer to Understanding ContractorManagement for more information.
Activity Data ScopeAn activity is considered within the dispatcher's data scope if its service area and service classes are covered by at least oneof the dispatch areas currently being monitored and at least one of its arrival time windows is within the monitoring daterange for the dispatcher shift. In addition, any activity scheduled to a shift or a contractor capacity in the dispatcher's datascope, regardless of dispatch area eligibility, is also considered in scope.
KPI-Specific CDI Data ScopeThe dispatcher can further limit the scope of data by clicking a KPI link in the KPI Summary zone. The system displaysthe KPI-Specific CDI, which shows crew shifts and tasks related to the selected KPI. For example, if you were to click onan Appointments in Jeopardy KPI, the KPI-Specific CDI might display all appointment tasks that were in danger of beingmissed. (The logic used to narrow down tasks and shifts for a KPI is defined in the KPI's calculation algorithm KPI and canbe customized.)
Map Data ScopeThe map's scope of data is the same as the scope of data for the portal from which it was launched (either the main CDI orthe KPI-Specific CDI).
To Do In ScopesDispatchers can also use the To Do In Scope dashboard zone to find information related to their work responsibilities. Thiszone that summarizes open To Do entries related to entities in the dispatcher’s data scope, sorted by To Do Type. Userscan also drill-down to the Dispatcher To Do List portal to review issues of a specific type. Refer to Dispatcher Functions(CDI) or About Dispatchers and Dispatcher Shifts for more information.
Time ZonesOn the CDI date/time information of all shifts and tasks is displayed in the user's time zone, by default. The user can toggleto display in other time zones as needed.

Oracle Real-Time Scheduler Server Application User Guide • 85
About the KPI SummaryThe KPI Summary zone on the CDI portal displays a summary of key performance indicators (KPIs) that the dispatcher isresponsible for monitoring.
Key performance indicators (KPIs) are quantifiable measurements that support dispatcher decision making and in-dayexception handling. KPIs are associated with either activities or crew shifts. For example, an activity-related KPI mightindicate the number of appointments in jeopardy of being missed. A shift-related KPI might indicate the number of out-of-service crews.
If action is required to resolve a KPI, you can navigate to the KPI-specific CDI portal, which displays only tasks and crewshifts related to the KPI. The KPI-specific CDI portal displays the Scheduling Gantt and Activity Search zones as on themain CDI, but with a potentially narrower scope of data. From the KPI-Specific portal, you can take action on specific tasksand crews to resolve the underlying problem.
For example, if you clicked on a Crews Out of Service KPI in the KPI Summary, a KPI-Specific CDI portal would show alist of out-of-service crew shifts. You could then view and change the shift status or reallocate activities as needed.
The KPI Summary uses colors and icons to help dispatchers easily identify KPIs that need their attention. Color coding isfully customizable. Typically, green indicates normal KPI values; red is used for values that fall outside a pre-defined rangeand require immediate attention; yellow is used for warnings and to indicate a potential problem.
About the Scheduling GanttThe Scheduling Gantt zone on the CDI portal displays a graphical representation of the crew shift schedules you aremonitoring, and allows you to take action on scheduled tasks.
This zone displays monitored crews and tasks in a time line. Crew shifts appear on the left. Their schedule of tasks appearsin the Gantt view on the right. A vertical line down the Gantt indicates the current date and time.
Right click on any element within the Gantt display to reveal detailed information, available actions and options such asShow on Map, View Details, Allocate, Task View and so on. Right click options change depending on the element thatyou click and/or based on your system configuration.
View and change the information that you see in the Gantt display using the following:
Left and Right Panes in the GanttIn the basic / non-customized display, the crew and shift date and time are indicated on the left, and the schedule of tasksappears on the right. You can add information to view on the left panel by selecting Customize Columns in the toolbar.You can also filter the crew and shifts that you see by selecting Filter. On the shift schedule, icons, colors, symbols, andother graphical elements provide visual cues to information available regarding the crew’s shifts and activities. Refer toAbout the Scheduling Gantt Left Pane or About the Task Schedule Area for more detailed information.
Column SortClick column headings to sort by multiple columns and reorder the columns as necessary.
The ToolbarUse the toolbar to perform functions such as zooming in and out on the scheduler, jumping to a date or time, opening theCDI map, customizing columns, or changing the time zone. These tools are described below:
• Zoom In/Zoom Out: Adjusts the task area to show a narrower/broader time frame.
• Go To Date Time: Scrolls the Gantt view to a selected date and time.
• Go to Now: Scrolls the Gantt view to the current date and time.

Oracle Real-Time Scheduler Server Application User Guide • 86
• Show Map: Launches the CDI Map (or switches focus to it). Symbols displayed on the map provide informationabout the type of task or crew. The definitions of the icons are described on the map legend.
• Filter: Refines the crew and shifts that are displayed in the schedule view according to any criteria such as; by activityinformation, by capability, by coverage, by resource, by emergencies, or by custom filters that you save. You can test afilter before applying it into your Gantt. These filters can be saved to a list that you can easily select to toggle the displaybased on different filters and preferences that you have defined. Select Save Current to store your filter to your list offilters which you can refer back to later. Filters cannot be saved as your default view since it is a best practice to reviewall the information in your scope of data before applying filters.Note that filtering does not affect the underlying scope of data the dispatcher monitors, and as such does not affect thedata displayed on CDI map, only the Gantt display.
• Customize Columns: Change the look and organization of your Gantt view by selecting Customize Columns thenChange Display. Select which columns you want to see on the left hand panel or sort and filter by field resources, crewsand shifts. Select the Color Rule Set you want to see in that view. After the display is changed, you can use the otherCustomize Columns options to save the display for easy access later (Save Display) or make that display the defaultview that opens whenever you open the CDI portal (Set as Default). Access your listing of saved displays by selectingMy Displays. Note that saved columns and colors and saved filters work independently. Filters that are applied whenyou save a column layout will not be saved with that column layout.
• Plan View: Toggles the Plan View mode on or off. When on, all scheduled tasks are displayed, irrespective of time.
• Expand All Shifts: A toggle to expand shift information. When toggled on with the Plan View mode enabled, all shiftinformation is displayed irrespective of time.
• Time Zone: When applicable, you can change the time zone by selecting from the dropdown list.
• Rule Set: Choose a defined color rule set from this dropdown list.
Contractor Crew Symbol
The symbol next to the crew name indicates that this is a contractor crew.
Shift States, Tasks Types and Activity InformationInformation such as whether a task is scheduled or clustered, representation of administrative tasks, breaks or depot visits,and activity dependencies are represented with icons on the schedule.
• Scheduled task: Uses a preceding travel time line from previous task.
• Task fixed to a crew
• Activity allocated to current shift contractor capacity
• Activity dependent on another activity
• Depot visit
• Break
• Administrative tasks
• Clustered tasks: Tasks of the same class and state with minimal or no idle time in between. Activities
requiring special attention are never clustered. You cannot perform actions on clustered tasks; expand them first usingthe + icon in the Shift column.

Oracle Real-Time Scheduler Server Application User Guide • 87
In addition, an implementation may configure an icon for each activity type that appears in the task bar.
General notes about the task bar, sing the default Color Rule Set (colors by activity status):
• A fixed shift that has not yet started is displayed using a frame in the planned color.
• If the shift is variable and has not yet become fixed, the variable broad shift duration is displayed as an underlay to theplanned duration in the variable time color.
• The planned start/end of a shift is displayed as an underlay on started shifts in the same color as the planned shift.
• If the shift enters overtime, the remainder of the shift is drawn using the configured overtime color.
• A thick black line around the shift time frame represents a closed shift.
• The length of the task bar represents the task's duration.
• The line preceding a task represents the travel time for the crew to get to the task.
• The color of the task indicates its status (in the default Color Rule Set).
• An implementation can include an icon in the task bar; the icon is specified on the activity type
• If you right-click a task, detailed information about the task is displayed at the top of the pop-up menu, followed bya list of available options. Options may vary depending on the class and status of the selected task and your system'sconfiguration. Clustered tasks do not have a popup menu.
• To select multiple contiguous tasks, hold down the shift key and select the tasks. Refer to About the Task Schedule Areato see standard options.
Colors and Frame BordersIn the default Color Rule Set, task bars are colored based on the state of the task. (An implementation may color the taskbars based on a number of other activity/crew shift attributes. ) The underlying shift time period is also colored, based onthe shift state.
In Tasks View mode, the following colors are used to indicate the task time windows:
• Override: A period where work is not allowed by an override.
• Allowed: A period where work is allowed by an override.
An activity may be enclosed in a frame that conveys additional information:
Emergency: An emergency activity.

Oracle Real-Time Scheduler Server Application User Guide • 88
Regular: A non-emergency activity.Appointment: An appointment activity.Scheduled: The task is considered scheduled when the scheduler places it in a specific work sequence on a crew shiftschedule. Scheduled tasks may be clustered.Non-Scheduled: The task is allocated to the crew, but has not been incorporated by the scheduler into the crew'sschedule. When a user manually allocates an activity to another crew, the scheduler must find a place on the new crew'sschedule. During the time it takes to do that, the task is stacked at the end of the new crew's schedule, with no traveltime from the previous task (since it is not yet sequenced in the route and the previous task is not know yet). Likewise,if a break is added to a crew shift but has not yet been incorporated into the schedule yet, the break is stacked at the endof the schedule.Deferred: This indicates that the activity was deferred to a future time, and the scheduler has not yet processed thedeferment and provided a new schedule for the task.
About the Scheduling Gantt Left PaneIn the default view, the left hand pane on the Scheduling Gantt zone displays the crew name and the associated shift startdate and time. It also displays an icon indicating whether the crew is using a mobile device to work their shift and thecurrent state of the crew, i.e. whether they are out of range, enroute to an activity, working on site out of service, etc.). Ifany of the tasks for a shift are clustered, an Expand Shift button is also displayed.
This pane supports the following actions:
• Alter the display to filter by field resources, crew, shift and so on. Click the Customize Columns icon to alter the pane.
• Click on a crew shift to navigate to its maintenance portal.
• Click the Expand Shift (+) button to expand all clustered tasks for this crew shift.
• Right-click a crew shift to display detailed information about the crew shift, such as its primary function and crewallocation. This information is displayed at the top of the pop-up menu, followed by a list of available options. Theavailable options may vary depending on the selected shift and your system's configuration. Standard options include:
Crew Menu Option Description
Allocate Allocates the activities currently selected in the Activity Search zone
to this crew shift.
Allocating an activity locks it to a particular crew shift. Once an
activity has been allocated, the scheduler can continue to optimize its
scheduled time, but cannot assign the activity to another crew shift.
Allocate All Allocates all of the activities scheduled to the selected shift that have
not yet been dispatched . Allocating all does not close the shift.
Chooser Allows you to access the Chooser directly to view a list of
recommended shifts for the selected activity.
Close Closing a shift allocates to the shift all activities that have been
scheduled to it but not yet dispatched. Once the shift is closed the
scheduler cannot add any more work nor remove any allocated work
from the shift. The dispatcher is also provided with the opportunity to
dispatch the entire schedule of the shift also as part of closing the shift.
Open Opening the crew shift allows the scheduler to add more work to the
shift again. However, it does not remove the existing allocations.
Send Mail Sends a message to the selected crew using the internal messaging
system.

Oracle Real-Time Scheduler Server Application User Guide • 89
Crew Menu Option Description
Expand Shift Expands (unclusters) all clustered tasks for this crew shift, and re-
clusters any previously expanded shift. Only displays if the shift
contains clustered tasks.
Tasks View Toggles the Gantt display to present the tasks scheduled to a single
shift. Refer to About the Tasks View for more detailed information.
Show Crew on Map Displays the location of this crew in the open map window. (The map
window must have already been launched. This action switches to the
map window and focuses on the selected crew.) The crew's location
is determined by the latest GPS data or its last known or estimated
location.
Show Route on Map Draws the route for this crew shift in the map window. (The map
window must have already been launched.)
Hide Route on Map Removes the route for this crew shift from the map. (The map window
must have already been launched.)
View Details Navigates to the maintenance portal for this crew shift.
About the Task Schedule AreaThe task schedule area of the Scheduling Gantt zone displays all scheduled tasks for each crew shift listed in the Crewpane. Tasks appear across a time line. A red vertical line indicates the current date/time.
Each task bar uses visual cues to convey information about the task.
Color Rule Sets can be created to define color rules based on different activity and crew shift information. For example,color tasks based on the activity type, how close the activity is to its end time window, its service area, etc. The user cantoggle between the Color Rule Sets.
NOTE: The default colors, shapes, borders, and icons used to convey information are customizable. You can refer to theembedded help for the Scheduling Gantt zone for a list and descriptions of the actual cues used in your system if yourimplementation has updated the embedded help to reflect how these elements were configured. For options delivered inthe base package, refer to About the Scheduling Gantt .
To select multiple contiguous tasks, hold down the shift key and select the tasks.
Standard options include:
Task Menu Option Description
Dispatch Marks all selected tasks as ready for dispatched. If the shift is not
started, the tasks will remain queued for dispatch. If the shift has
started, the system attempts to dispatch the selected tasks to the crew.
Allocate Prompts you for the crew shift to which you want the selected activities
allocated, then allocates them. Allocating an activity locks it to a
particular crew shift. Once an activity has been allocated, the scheduler
can continue to optimize its scheduled time, but cannot assign the
activity to another crew shift.
Chooser Allows you to access the Chooser directly to view a list of
recommended shifts for the selected activity.
Defer Prompts you for the reason for the deferment, the date to which the
selected activities should be deferred, and any relevant comments.
Deferring an activity modifies its arrival time window to a future date.

Oracle Real-Time Scheduler Server Application User Guide • 90
Task Menu Option Description
Unassign Unassigns the activity and sends it back to the scheduling pool. If
the activity is currently manually allocated, it becomes available for
scheduling to any crew. If it is currently dispatched to a crew, then the
system attempts to recall it from that crew.
Show on Map Displays the selected task on the map. (The map window must have
already been launched. This action switches to the map window and
focuses on the selected task.)
View Details Navigates to the maintenance portal for the selected task.
Clustered TasksIf a crew shift contains multiple tasks of the same class and status, and those tasks have a short period of idle betweenthem so they can be viewed as "back to back," then the system collapses the individual tasks into one clustered task in theScheduling Gantt task area.
NOTE: Other business rules apply that may prevent a task from being clustered. For example, an emergency activity isnever clustered, nor is an activity in the KPI-Specific CDI that contributes to a KPI. Clustering rules are customizable.
You cannot perform actions on clustered tasks; you must expand them first using the Expand (+) icon in the Shift columnon the crew pane or right-click the shift and select Expand Shift. When you expand clustered tasks for one shift, the systemunclusters all tasks for that shift and clusters tasks for all other shifts (where applicable).
About the Tasks ViewThe Tasks View displays time windows for each activity. This can help the dispatcher to easily visualize tasks to makescheduling decisions, monitor crew progress, and identify tasks that are in jeopardy. Activities are shown horizontally withtime windows and disallowed times drawn along the activity.
The task list displays:
• A list of all tasks for the shift including the shift time windows and any active overrides.
• A list of important information about each task (such as task type and arrival time)
• The restrictions on each task such as override time windows as well as the available windows in which each task can bescheduled (effective and arrival time windows).
About the Activity Search ZoneThe Activity Search zone on the CDI portal displays a list of activities within the current scope of data, and allows you tosearch, sort, and filter the list. You can perform standard dispatching functions on one or more selected activities displayedin the list or navigate to the maintenance portal of any activity listed.
Click one of the displayed results to highlight that item in the Scheduling Gantt zone.
When the CDI portal is initially displayed (after logon), the Activity Search zone displays a list of activities that are withinthe dispatcher's data scope and that require attention. This list includes all non-finalized emergencies and all unassignedactivities that are due on or before today's date. Activities are displayed in the following order:
1. Emergencies
2. Priority Profile Sort Sequence
3. Creation Date/Time
Other tools in the Activity Search zone include:

Oracle Real-Time Scheduler Server Application User Guide • 91
• Filtering: You can filter by information such as general activity information including hierarchy levels for the involvedcrews or service areas, activity type, service area, etc; activity due date; activity scheduled date; other activity identifiersand so on.
NOTE: Note that the filters in the Activity Search do not affect the filters or display in the Scheduling Gantt view.
• Highlight Scheduled Activity: Use the binoculars icon to highlight an activity in the Gantt if it is scheduled to a crew.
• Actions: Once you have a listing of the appropriate activities according to your search, you can use the buttons toperform actions on one or more selected activities such as Allocate, use the Chooser, Defer, Dispatch, Unassign, orRemove Allocation.
• Navigation: Click on an activity in the list to navigate to that specific activity.
• Map: Use the map icon to show an activity on the map.
About the KPI-Specific CDIKey performance indicators (KPIs) are quantifiable measurements that support dispatcher decision making and exceptionhandling. KPIs are associated with either activities or crew shifts.
The KPI-Specific CDI portal is similar in appearance to the general CDI portal, but only displays data related to a particularKPI. This is useful for troubleshooting the underlying conditions that contribute to the KPI. This portal is displayed whenyou click on an actionable KPI. (Actionable KPIs display as hyperlinks in the KPI Summary zone.)
From the KPI-Specific CDI portal, you can view and manage crew shifts and activities just as you would from the generalCDI portal.
About the CDI MapThe CDI Map allows you to view the location of activities, meetings and non productive tasks, crews, and vehicles on amap. You can also view the route a crew will travel during its shift, based on the shift's currently scheduled tasks.
The location of a vehicle is determined based on its last known GPS location if any. The location of a crew is determined byits last known or estimated location Each task uses it own specified location for display on the map.
For consistency, the CDI map shows the same route as used by the scheduler when creating the schedule. This allows thedispatcher to see an accurate depiction of the crew's actual work route.
The map is started from the Show Map toolbar button in the CDI portal. A box in the upper right hand corner of the mapwindow displays a set of checkboxes, representing the different types of objects that can be displayed on the map. Each typeis referred to as a map layer. You can display or hide layers by checking or unchecking these boxes. For example, if youcheck the administrative box, the map displays all meetings and other non productive tasks within the current data scope.(The map's scope of data is the same as the scope of data for the portal from which it was launched (either the main CDIor the KPI Specific CDI). Some layers are initially checked, and thus displayed, by default. The layers that are displayedinitially by default vary depending on where the map was launched from, i.e main Gantt display or KPI Gantt. All CDI maplayers are defined using CDI Map Layer extendable lookup which also includes a customizable indication as to whetherthe layer is displayed by default when applicable.
• The Clear All button clears all route lines, if any are displayed, and also clears the latest marker of a crew or task shownon map
• The Refresh button updates the map with the latest available data.
• The Legend icon in the lower right-hand corner of the map window can be expanded to show the icons used to representdifferent objects on the map.
The map interface works similar to other common mapping programs. You can pan and zoom using the icons in the upperleft-hand corner of the map window. You can also click and drag any point on the map to move its position within the mapwindow.

Oracle Real-Time Scheduler Server Application User Guide • 92
When you hover over a point on the map that is related to a shift or task, the system displays detailed information about theobject in a context window.
About the CDI Shift TabUse the Shift tab on the CDI portal to log on or off a dispatcher shift and select which dispatcher areas to monitor for theshift. Depending on how your system in configured, you may also be able to select the dates of tasks to monitor.
Occasionally, as part of the shift, a dispatcher might be responsible for backing up another dispatcher by monitoring thatdispatcher's alerts. Any dispatcher shift can be configured with a list of user IDs that the current dispatcher is backing upwhen these users are away. Alerts assigned to these dispatchers also appear on the current dispatcher's backup alert queue.
About the CDI Contractor Capacity TabThis tab is displays activities by contractor and according to status such as committed, completed, and remaining capacity.
Capacities represent an external contracting company's agreement to take on a certain amount of work of a certain typein specific service areas for a period of time. The tab is only accessible if your company uses contractor functionalityand the dispatcher's data scope includes contractor capacities. Refer to Understanding Contractor Management for moreinformation.
About the Alert QueueThe Alert Queue is a dashboard zone where users can view and manage alerts. When an alert is raised, it appears on theAlert Queue of the logged on dispatcher assigned to handle the alert.
The Alert Queue appears on the dashboard area when at least one alert is assigned to the current user. As a dashboardzone it is guaranteed to always be present regardless of where a user has navigated in the system. When an alert is raised, itappears on the Alert Queue of the dispatcher assigned to the alert. If no logged on dispatcher is found, an email is sent tothe address defined on the alert type. From the Alert Queue, users can take action on the alert (acknowledge or close it, forexample) and can also navigate to the maintenance portal of the related shift or activity.
The queue is sorted by priority as defined on the alert type, and then by time so that more important types of alerts showbefore others irrespective of time.
Users can also manage alerts directly from the Alert maintenance portal. about alerts. Refer to About Alerts for moreinformation.
In the same way, the Backup Alert Queue appears in the dashboard area when at least one alert exists for another user thecurrent logged on dispatcher is backing up. Refer to About the CDI Shift Tab for more information.
Example Functions of the Alert Queue
• For shift related alerts, you can click on a crew shift associated with the alert to navigate to the Crew Shift portal.
• For activity related alerts, you can click on the activity associated with the alert to navigate to the Activity portal.
• Depending on the alert type setting, alerts may make a sound (audible alert), when they come in to your Alert Queue.
• Depending on the alert type setting, alerts may allow you to snooze the alert. The system removes the alert from thequeue for the defined number of minutes then reissues it.
• If a dispatcher is assigned to back up another dispatcher, the primary dispatchers alerts appear on the backup dispatcher'sbackup alert queue.
Dispatchers can also use the To Do In Scope dashboard zone to find information related to their work responsibilities. Thiszone summarizes open To Do entries related to entities in the dispatcher’s data scope, sorted by To Do Type. Users can alsodrill-down to the Dispatcher To Do List portal to review issues of a specific type. Refer to Dispatcher Functions (CDI) orAbout Dispatchers and Dispatcher Shifts for more information.
Oracle Real-Time Scheduler Server Application User Guide • 93
Managing your Dispatcher ShiftThis section describes common tasks related to managing your dispatcher shift.
Logging On to Start a Dispatcher ShiftYou can log on to start a dispatcher shift directly from the CDI portal.
You do not need to create a dispatcher shift in advance. The system creates a new dispatcher shift automatically when anauthorized dispatcher logs on to the system from the CDI portal.
1. Select Main Menu > Service Management > CDI.
If you are already logged on to a dispatcher shift, the CDI portal is displayed and is populated with data you areresponsible for monitoring during the current shift. Otherwise, the Logon button is displayed.
2. Click the Logon button.
3. Specify the settings to use for this shift, such as the date range for monitoring activities. The available settings may varydepending on your dispatcher profile.
4. Select which dispatch areas you want to monitor.
The list of dispatch areas from which you can choose is predefined; you can only select dispatch areas you areauthorized to monitor, based on your dispatcher profile. For each shift you work, you can select one, some, or all ofthese dispatch areas.
5. Click Save.
The system logs you on to the shift and displays the CDI tab for the current shift. You can now begin monitoring andmanaging tasks and crew shifts.
Changing the Date Range for Dispatch MonitoringUse the Shift tab on the CDI portal to view and change the initial date and the date range of activities and crew shifts tomonitor during your current dispatcher shift.
NOTE: One or more fields on this tab may be set to read-only, indicating that you are not allowed to change thesesettings.
When you change any date settings, the system automatically updates the scope of data for the CDI portal and all its zones.
Changing the Dispatch Areas to MonitorUse the Shift tab on the CDI portal to add or remove dispatch areas to monitor during the current shift.
NOTE: The list of dispatch areas from which you can choose is predefined; you can only select dispatch areas you areauthorized to monitor, based on your dispatcher profile. For each shift you work, you can select to monitor one, some, orall of these dispatch areas.
When you change the dispatch area selections, the system automatically updates the scope of data for the CDI portal basedon your selections. These selections also determine which alerts and To Do entries you will receive during your shift.

Oracle Real-Time Scheduler Server Application User Guide • 94
Backing Up Another DispatcherUse the Shift tab on the CDI portal to back up another dispatcher.
1. From the CDI portal, click the Shift tab.
2. Click Edit.
3. Search for or enter the User ID of each dispatcher you will back up during your shift.
4. Click Save.
Alerts assigned to these dispatchers will also appear on your backup alert queue.
Logging Off a Dispatcher ShiftUse the Shift tab on the CDI portal to log off a dispatcher shift.
1. From the CDI portal, click the Shift tab.
Although dispatchers access their current shift directly from the CDI portal, other authorized users can access adispatcher shift by selecting Main Menu > Resource Management > Dispatcher Shift, then searching for andselecting the logged-on dispatcher shift they want to maintain.
2. Click Logoff.
The system logs off the shift and redistributes any open alerts to another eligible dispatcher.
Managing Tasks and Crews using the CDIThis topic describes procedures related to managing tasks and crews using the CDI.
Using the Scheduling GanttThis section describes tasks related to using the Scheduling Gantt zone on the CDI portal.
Viewing Task Details from the Scheduling GanttTo view summary details about a task, right-click the task in the task schedule area. Detailed information displays for theselected task(s) at the top of the pop-up menu. To navigate to the task's maintenance portal, right-click the task and thenselect View Details from the pop-up menu.
Viewing the Crew Shift Details from the Scheduling GanttTo view summary details about a shift, right-click the shift in the Crew pane. Detailed information displays for the selectedshifts(s) at the top of the pop-up menu. To navigate to the crew shift's maintenance portal, click the Shift link. You can alsoright-click the shift in the Crew pane and then select View Details from the pop-up menu.
Customizing Columns in the Scheduling GanttThis task describes how to change the look and organization of your Gantt view.

Oracle Real-Time Scheduler Server Application User Guide • 95
1. Select Customize Columns, then Change Display.
2. Select which columns you want to see on the left hand panel, or sort and filter by field resources, crews, and shifts.
3. Select which Color Rule Set you want to see in this view.
4. After the display is changed, you can use the other Customize Columns options to save the display for easy access later(Save Display) or make that display the default view that opens whenever you open the CDI portal (Set as Default).
5. Access your listing of saved displays by selecting My Displays.
Note that saved columns and colors and saved filters work independently. Filters that are applied when you save acolumn layout will not be saved with that column layout.
Displaying Colors in the Scheduling GanttThis task describes how to display custom colors in the Gantt.
1. From the Main menu, choose Service Management > CDI.
2. Currently available Color Rule Sets are contained in a dropdown list above the Gantt. You can toggle between theColor Rule Sets to color the task bars differently, based on the type of visual cues you want. A Color Rule Set can besaved along with customized columns, and/or a default Color Rule Set.
Filtering the Scheduling GanttClick the Filter icon to refine the list of crews and shifts that are displayed in the schedule view according to any criteriasuch as; by activity information, by capability, by coverage, by resource, by emergencies, or by custom filters that you save.Select Save Current to store your filter to your list of filters which you can refer back to later. Filters cannot be saved asyour default view since it is a best practice to review all the information in your scope of data before applying filters.
Filtering the Scheduling Gantt by KPITo see only those crew shifts and tasks that are related to a KPI, click the link for the KPI in the KPI Summary zone onthe CDI portal. The KPI-Specific CDI portal is displayed, and its Scheduling Gantt zone is filtered by the selected KPI.
Setting the Display Date for the Scheduling Gantt ViewYou can jump directly to any date (within the period of time you are monitoring) and display crew shifts and tasksbeginning with that date. To scroll the Scheduling Gantt view to a specific date and time, click the Go to Date Timetoolbar icon, then enter the desired date.
To scroll to the current date, click the Go to Now toolbar icon.
Zooming In and Out in the Scheduling Gantt ViewUse the Zoom In and Zoom Out buttons on the Scheduling Gantt toolbar to adjust the time frame.
Zoom In: Adjusts the task area to show a narrower time frame (for example, from 12 hours to 6 hours), thus expanding thetask bars.Zoom Out: Adjusts the task area to show a wider time frame (for example, from 3 hours to 6 hours), thus compressing thetask bars.

Oracle Real-Time Scheduler Server Application User Guide • 96
Using the Activity ListThe Activity Search zone on the CDI portal allows you to search for activities and take action on them.
From the Activity Search zone, you can:
• Find the activities you want to work with.
• Use the action buttons to update the status of selected activities. (Check the box to the left of each activity you want toupdate before you click the action button.) The available actions may vary depending on your system's configuration.
• Click the Activity link to navigate to the activity's maintenance portal.
• Click the Show on Map icon to display the selected activity on the CDI Map. (You must have already launched the mapusing the Show Map button. Show on Map switches to the map window and focuses on the selected activity.)
Activity SearchUse this procedure to filter and search for activities in the CDI portal.
1. Access the CDI portal for a logged on dispatcher shift.
2. From the Activity Search zone, select the Query Option to use.
You can only search for activities within the current scope of data.
3. Enter your search criteria and click Refresh.
Filtering the Activity List by KPITo see only activities related to a particular KPI, select the link for the KPI in the KPI Summary zone on the CDI portal.The KPI-Specific CDI portal is displayed, and its Activity list is filtered by the selected KPI.
Using the CDI MapThis section describes common tasks related to using the CDI Map.
Launching the CDI MapThe CDI Map can only be launched from the Scheduling Gantt zone. Click the Show Map toolbar icon on the SchedulingGantt zone to start the map.
The map opens in a separate window. When initially loaded, the scope of data displayed in the map is the full scope of datayou are monitoring in the CDI portal. Use the check boxes in the upper right-hand corner of the map window to include orexclude specific layers (types of objects) from the map display.
NOTE: You must launch the map before you can use the Show on Map options to display specific crews, activities,or routes on the map. After launching the map, leave the map window open and return to the CDI portal to use theseoptions.
The map's scope of data is the same as the scope of data for the portal from which it was launched, either the main CDI orthe KPI-Specific CDI.

Oracle Real-Time Scheduler Server Application User Guide • 97
Displaying Activities on the MapYou can display all activities within the current scope of data on the map, or choose a particular activity to display. You canalso display only activities related to a particular KPI.
1. If the map window is not already open, click the Show Map toolbar icon on the CDI portal to launch the map.
By default, the map shows all activities for the dispatch areas and dates you are monitoring.
2. To focus the map on a particular activity:
• Leave the map window open and then return to the CDI portal.
• Right-click on an activity in the Scheduling Gantt task area, then select Show on Map.
3. To display only activities related to a particular KPI:
• Click the KPI link in the KPI Summary zone to display the KPI-Specific CDI.
• Click the Show Map button on the Scheduling Gantt toolbar (in the KPI-Specific CDI portal, not the general CDIportal). The map window is displayed with data filtered by the selected KPI.
4. To display detailed information about the object in a context window
When you hover over a point on the map that is related to a task (or a crew shift), the system displays detailed informationabout the object in a context window.
Displaying Routes on the MapUse this procedure to display the route for a crew shift on the map.
1. If the map window is not already open, click the Show Map toolbar icon on the CDI portal to launch the map.
2. To focus the map on the route for a particular crew shift:
• Leave the map window open and then return to the CDI portal.
• Right-click on a crew in the Scheduling Gantt crew pane, then select Show Route on Map.
3. Use the Clear All Routes button in the map window to remove the route display.
Displaying Crews on the MapYou can display all crews within the current scope of data on the map, or choose a particular crew to display. You can alsodisplay only crew shifts related to a particular KPI.
1. If the map window is not already open, click the Show Map toolbar icon on the CDI portal to launch the map.
2. Check the Crews box. The map displays all crews within the current scope of data.
3. To focus the map on a particular crew:
• Leave the map window open and return to the CDI portal.
• Right-click on a crew in the Crew pane, then select Show Crew on Map.
• Select Show on Map. The map window is displayed showing the location of the crew or the activity related to thealert.
4. To display only crews related to a particular KPI:
• Click the KPI link in the KPI Summary zone to display the KPI-Specific CDI.

Oracle Real-Time Scheduler Server Application User Guide • 98
• Click the Show Map button on the Scheduling Gantt toolbar (in the KPI-Specific CDI portal, not the general CDIportal). The map window is displayed, and the data is filtered by the selected KPI.
When you hover over a point on the map that is related to a crew shift (or a task), the system displays detailed informationabout the object in a context window.
Clearing All RoutesUse the Clear all Routes button on the CDI Map page to clear all route lines from the map. This button is displayed only ifroute lines are currently drawn on the map.
Monitoring KPIsUse the KPI Summary on the CDI portal to view and manage the KPIs you are responsible for monitoring.
1. Review the KPIs listed in the KPI Summary zone.
2. Click a KPI link to view the KPI-Specific CDI portal, which displays only tasks and crew shifts related to the selectedKPI.
3. Review the information and take action as needed.
• Right-click a task in the Scheduling Gantt task area, then select the desired option from the pop-up menu. Tonavigate to the task's maintenance portal, select View Details from the pop-up menu or click the activity link in theActivity zone.
• Right-click a crew in the Scheduling Gantt crew pane area, then select the desired option from the pop-up menu. Tonavigate to the crew shift's maintenance portal, select View Details from the pop-up menu or click the shift link inthe Crew pane.
Mail ManagementThis section describes concepts and procedures related to managing mail messages.
About Mail ManagementThe main purpose of the mail management system is to allow dispatchers to communicate with crews without leaving theapplication. Crews can respond to and communicate with dispatchers from their mobile device.
Messaging is context driven, providing dispatchers control over communication with crews based on their shift, availability,and whether or not they are logged on. For example, dispatchers can send one mail to all of the crews that he or shemonitors.
Mail messaging also provides control over message behavior. For example, an emergency message sent to a crew's mobiledevice, pops up over the mobile device screen to grab the user's attention. Messages can also be tracked to show whether ornot they have been acknowledged.
Users receive notifications of new messages via the Mail Summary zone on their dashboard. They can also review all ofthe messages that they have sent or received using the My Mail portal.
Message CreationUsers have the option of selecting from a mail template to send preset mail content for specific situations, or they can createunique messages from scratch.

Oracle Real-Time Scheduler Server Application User Guide • 99
Mailing lists are also available so that a predefined list of users can be selected quickly and easily.
Dispatchers can choose to send messages as normal delivery, as emergency mail, or with other special handling such assetting the message to require manual acknowledgement or setting the message to expire after a certain amount of timewithout being acknowledged.
Dispatchers can send mail to:
• Their monitored crews
• All crews
• Another user, typically a mobile user
• A list of predefined users in a mailing list
Crews can send mail to:
• All logged on dispatchers monitoring them
• All logged on dispatchers
• Another user, typically their supervisor(s)
About the My Mail PortalThe My Mail portal provides access to view mail you have received or sent.
Any user with a valid login can use this portal to see their messages. This is also useful for non-MDT or SMS crewmembers who do not have access to mail from a portable device.
You can create new mail, reply, acknowledge mail you received and archive your mail using this portal.
Users can also receive notifications of new messages via the Mail Summary zone on their dashboard.
Archive your messages to remove them from your sent or received folder for a clean work space, but to still have access tothem.
Some mail messages include a Voiced button which allows dispatchers a way to manually relay messages to crews. Thisonly applies when an alert is sent to the dispatcher because the system has failed to dispatch an activity to the crew in atimely manner. The dispatcher can respond to the alert situation by reassigning the work to another crew or by contactingthe current crew by radio. When communicating the message by radio, the message is relayed by "voice" rather than bydispatch. The dispatcher can click the Voiced button and the system navigates to the activity portal so they can read thedetails to the crew.
Mail SummaryYou can also manage your mail using the Mail Summary Dashboard zone. The zone includes the following features:
• Refer to the zone for notifications whenever you receive a new message.
• Select the Mail link on the toolbar to open the My Mail portal directly from the dashboard.
• Click the New button to start a new mail message directly from the dashboard.

Oracle Real-Time Scheduler Server Application User Guide • 100
Working with MailThis section describes common tasks related to working with mail messages.
Creating a New Mail Message from a Mail TemplateUse this procedure to create a new mail message from a mail template.
Prerequisites: Mailing Template must be configured.
You can start a new message in one of several ways:
• Dispatchers can right-click on a shift to send mail to the entire crew from the CDI portal.
• General users and dispatchers can also click the New button on the Mail Summary Dashboard zone or click the Maillink on the same zone to navigate to the My Mail portal. They can also access the My Mail portal directly by selectingMain Menu > My Mail+
After navigating to where you can create a new message, the general message creation steps are the same:
1. Click the Use Template button.
2. Select the appropriate template.
3. Verify that all of the message details are as you would like them to apply for the message. Make changes as appropriate.
4. Click Send.
Creating a New Free Form Mail MessageUse this procedure to create a new mail message.
Prerequisites: None.
You can start a new message in one of several ways:
• Dispatchers can right-click on a shift to send mail to the entire crew from the CDI portal.
• General users and dispatchers can also click the New button on the Mail Summary Dashboard zone or click the Maillink on the same zone to navigate to the My Mail portal. They can also access the My Mail portal directly by selectingMain Menu > My Mail+
After navigating to where you can create a new message, the general message creation steps are the same:
1. Enter a subject and message body in the appropriate fields.
2. Select additional message options, as applicable.
3. Select a message group, user or mailing list for where the message will be sent, as appropriate.
4. Click Send.
Archiving MessagesUse this procedure to archive your sent or received messages.
Prerequisites: You must have existing received or sent messages.
1. Access the My Mail portal.

Oracle Real-Time Scheduler Server Application User Guide • 101
Click the Mail link on the Mail Summary Dashboard zone to navigate to the My Mail portal. You can also access theMy Mail portal directly by selecting Main Menu > My Mail+
2. Search for and open the appropriate message.
3. Click the Archive button.
Archiving a message removes it from your received or sent box, but allows you to search for it in the Archived folder.
Reviewing Mail MessagesUse this procedure to filter and search for mail messages.
Prerequisites: None.
1. Access the My Mail portal.
Click the Mail link on the Mail Summary dashboard zone to navigate to the My Mail portal. You can also access theMy Mail portal directly by selecting Main Menu > My Mail+
2. Enter search criteria.
To see the messages that have been sent to you, select Received as the Query option. Additionally, you can search bymessages that you sent or that you archived. You can also enter additional criteria to filter the list of messages further.
3. Click Refresh.
In the search results list, click the link for the message you want to view or edit.
Transfer of Goods
This section describes concepts and procedures related to the transfer of goods.
Understanding Transfer of GoodsThis section describes concepts related to the transfer of goods.
About the Transfer of GoodsTransfer of goods involves the process of transporting goods from one location to another. The system provides a way tomanage goods, restrictions and vehicle load limits related to the transfer of goods.
Transfer of goods functionality creates activities and vehicle types that answer the questions: What are the goods? What canand cannot be shipped with these goods? and What are the vehicle capacities for these goods?
The goods being transferred are specified on activities. All goods being delivered must be both picked up and dropped offso that at the end of the day the net pick ups and deliveries are balanced. For example, you might have a job with 2 activitiesin it - one to pick up 1 item from location A and one to deliver 1 item to location B. The total goods being transferred mustbe 0 at the end of the job, 1 picked up – 1 delivered = 0 on board at the end of that job.
Businesses might also take managing transfer of goods one step further and also manage locations where the goods arepicked up and dropped off by incorporating the use of depots.

Oracle Real-Time Scheduler Server Application User Guide • 102
About the Goods Being HandledActivities that handle goods specify information about the transferred goods such as the list of items being delivered, loadcapacities (weight, volume, size, etc) and restrictions relative to other goods on board. For example, an activity wouldindicate if hazardous load combinations should be avoided.
About Vehicle Maximum CapacityFor some types of goods being transported it is important to know how much of a load the transport vehicle can handle suchas maximum weight, maximum volume, maximum size or any other measurement as needed.
Maximum capacity of vehicles is defined on the vehicle type, not the crew shift. Any shift that references the vehicle type isbound by those capacity restrictions. However this can be overridden on a specific shift to handle exceptions. For exampleif a dispatcher is aware that a truck has low tire pressure, he might override the maximum capacity to indicate that the truckcannot carry such a heavy load.
NOTE: The types of vehicle capacity limits to consider such as weight, volume, size etc. must be configured beforevehicle limits functionality can be used. Refer to the configuration guide for more information.
About Depots and Depot RunsIf transferred goods are loaded or unloaded at a particular centralized location, your organization can set up depots tocapture the information related to these locations. Details such as whether the depot is a pick up or drop off location, whattypes of goods the depot can handle, the physical address and the days and times that it is open are all specified.
Two types of depot operations are supported:
• Distribution - a depot where crews pick up goods for delivery.
• Collection - a depot where crews drop off goods picked up from customers.
Crews are scheduled to drop off and pick up goods at depots based on time windows, crew availability, and depot details.Crews can be configured to be affiliated with one or many specific depots, or they might be allowed to visit any depotsas needed. The crew's depot affiliation is defined on the crew record. As with any task they perform, crews can providestatus updates related to each depot visit. Likewise, dispatchers have visibility into the location of depots via the CDI map.Dispatchers can also indicate restrictions to limit which depots a shift can visit.
NOTE: The depot layer on the map is only available when there are depots defined in the system.
Activities, Tasks and RunsA crew's interaction with a depot is managed in terms of activities, tasks and runs:
• Depot based activities involve either picking up goods from a customer location and returning them to a depot center, orloading/collecting goods at a depot center and delivering them to a customer location.
• Depot tasks represent a scheduled visit to a depot, with a task duration for loading or off-loading the goods. Thescheduler automatically creates these depot tasks to handle activities as needed.
• Depot runs represent the entire trip or travel to visit a depot, including the depot task and one or more depot activities. Asingle run never mixes distribution and collection operations, so a run would only consist of the activity to pick up goodsat a distribution depot and a second run would consist of the activity to drop off goods at a collection depot.
Depot BreaksThe system can also be configured to designate breaks which can only be taken at a depot. If a shift is not scheduled fordepot work, the break is scheduled as a standard break.

Oracle Real-Time Scheduler Server Application User Guide • 103
Depot Time WindowsDepot time windows define when the depot is open. They are used by the scheduler to determine when depot tasks to visit aspecific depot should be scheduled.
The access time window defines the time frame that the depot is open. Each access time window also has an associatedwindow cost and late cost. The window cost indicates the cost of using the time window, whereas the late cost indicates thecost of being late and arriving at the depot outside of the allotted time frame.
The service time window defines the preferred time windows within the normal operational hours. Lower cost is associatedwith scheduling work during preferred service time.
Access times and service times cannot overlap, so if there is a preferred service time defined, the general access timesshould be defined during time frames outside of the defined service times.
Multiple depots can share this information by referring to a depot profile which also has these values defined. If there are notimes specified, there is no restriction on when the depot is available.
Maximum capacities might also be specified for a time window to indicate limits such as maximum weight, maximumvolume, or any other measurement as configured by your implementation applicable during that time window.
NOTE: The types of maximum capacity limits to consider such as weight, volume, size etc. must be configured beforelimits can be specified for a depot time window. Refer to the configuration guide for more information.
Depot Time Window OverridesAn override time window is used to redefine a depot's access or service time window as originally defined on the depot. Forexample, if the dispatcher knows that the depot will be open later than usual on a particular day, he can override the defaulttime window and adjust for the later time. The override will apply to a specific day and time for the depot rather than thegeneralized weekly schedule defined by the default time windows.
An override can also be used to completely remove a specific time window or to adjust the maximum capacities defined onthe time window such as the maximum size or weight of distribution that the depot can handle.
Crews Can Be Restricted To Specific DepotsSince crews typically logon and logoff from their base depots in depot based operations, crews can be configured so thatthey are restricted to specific depots. This is done on the crew record. This may be necessary, for example, if the crew'svehicle is too large to visit some depots. In these cases, the scheduler is limited to only scheduling the crews to visit depotswhere the crew is allowed. If a crew is not limited to specific depots, it is assumed that they are allowed at any depot.Moreover, a dispatcher can override the list of depots a crew is restricted to on a specific shift. A shift is allowed to bescheduled work to any and all depots that a crew is allowed to work.
About Depot CutoffA depot cutoff event closes all distribution depot runs that are planned to depart from the depot before a specifiedcutoff time, and instructs the scheduler to build new runs for the depot to depart after that cutoff time. The depot cutoffautomatically locks all such runs from the distribution depot.
As an example, think of depot cutoff functionality applied for grocery delivery. All deliveries for a given day must be onthe truck and ready to go by 10 am to make the “early run”. With depot cutoff, the scheduler enforces that orders must beprocessed before a certain trigger date and time, say 5pm, on the previous day. The runs would be locked after 5 pm and anyorders processed after that time would be pushed to later runs.
Cutoff events for a depot can be configured to be automatically generated in advance based on a template defined onthe depot or the depot profile it uses, initiated by the host system, or initiated manually by a user. Cutoffs only apply fordistribution depots.

Oracle Real-Time Scheduler Server Application User Guide • 104
Cutoffs that are scheduled in advance are set up on the depot or depot profile with set time windows. Cutoffs that areinitiated manually for single date and time are set by using the Cutoff action on the depot.
Depot configuration can also indicate whether or not a scheduling manifest should be sent back to the host when the cutoffis processed. The manifest includes information about all shifts that are associated with "runs" closed by the depot cutoffrequest. When a cutoff is processed all depot tasks scheduled to depart on or before the cutoff time are automatically closedthus locking their schedule.
The Cutoff History zone in the Depot portal shows a history of cutoff requests that have been processed for the depot.You can select a cutoff request and navigate to the Depot Cutoff portal. The Closed Depot Runs zone lists the depot tasksclosed by the cutoff event. Navigate to one of these depot tasks to see the current state.
Working with DepotsThis section describes common tasks related to working with depots.
NOTE: Depot activities are not delivered with the base package and must be configured by your implementation teambefore you have access to these functions.
Viewing Depot RunsUse this procedure to view the entire run that a depot activity belongs to.
Prerequisites: None.
1. Navigate to the Activity portal in edit mode.
Alternately, dispatchers can review the run on the CDI portal by clicking on Show Run on the run's correspondingdepot task.
2. Search for and select the appropriate activity.
Look in the Activities In Depot Run zone to see all of the activities in the run and where the current activity falls insequence with the others.
Closing a Depot RunUse this procedure to close a depot run. You would close a depot run to prevent the scheduler from making further changesto the set of activities in the run.
You can also complete this process from the Depot Task portal.
1. Navigate to the CDI portal.
2. Locate the depot task related to the run.
3. Right click and select Close.
Opening a Depot RunUse this procedure to open a depot run. You would open a depot run to allow the scheduler to further optimize the run andmake changes to the set of activities in it.
You can also complete this process from the Depot Task portal.
1. Navigate to the CDI portal.
Oracle Real-Time Scheduler Server Application User Guide • 105
2. Locate the depot task related to the run.
3. Right click and select Open.
Overriding Depot Time WindowsUse this procedure to change or remove the time windows on a depot.
1. Navigate to the Depot portal in edit mode.
2. Search for and select the appropriate Depot record.
3. Click the Add link in the Override Time Windows zone.
4. Follow the prompts to add a new override.
Initiating a Depot Cutoff Event ManuallyUse this procedure to manually execute a depot cutoff event. For information in setting up template cutoff events for a depotrefer to Defining Depots.
1. Navigate to Depot portal in edit mode.
2. Select a distribution depot.
3. Click the Cutoff button.
4. Enter the cutoff date and time.
Optionally, you can set the trigger to to start processing the cutoff. If this is not specified it is processed immediately.
The cutoff date/time on the depot is set to the new cutoff time. The scheduler automatically closes all depot runs to thisdepot planned to depart on or before the date and time mentioned.
Contractor Management
This section describes concepts and procedures related to contractor management.
Understanding Contractor ManagementSome companies use third-party contractor companies to help them to complete their work. If your organization usescontractors, or non-company resources, to work activities, you might use contractor management functionality to assign,schedule and complete this work.
This section describes concepts related to contractor management functionality.
About Contracting ModelsContractor management functionality incorporates two models for contractor resources: A shift based model and a capacitybased model. You might use both models since each contractor is set up and managed on an individual basis.
Shift Based ModelIn the shift based model, contractor mobile resources, i.e. mobile workers, vehicles, crews and their shifts, are set up,configured, and scheduled as if they are internal employees. The contractor company is defined as a resource group then

Oracle Real-Time Scheduler Server Application User Guide • 106
the resource group is referenced on all associated resources. For example, all contractor mobile workers, vehicles and crewsmust reference their company's resource group. Aside from these resources, all other user roles such as dispatchers, resourceplanners, etc. are assumed to be company employees.
Capacity ModelIn the capacity model, external contractor companies are assigned work based on an agreed upon capacity. Contractorcompanies are defined as resource groups within the system while individual resources are fully managed and scheduledoutside of your system. The contractor companies receive work from your organization then manage all activities on theirown until they provide completion information.
NOTE: Emergency and depot-based activities are not eligible for capacity contractors.
Instead of working shifts, contractor companies agree to provide a certain capacity of work to your company. Capacitiesare expressed in terms of number of hours or a number of activities over a period of time. Each Capacity record specifiesa period of time during which the contractor company agrees to take on work of a certain type in specific areas. Similar tothe notion of crew shifts, Capacity records may be generated based on templates or created manually as needed to reflectagreements between your company and the contractor company. Refer to About Capacities for more information.
The contractor company may need to be notified in advance of work your company commits to them so they can planaccordingly. A Notification Horizon specifies the amount of lead time prior to the beginning of the contractor’s capacityperiod, that the contractor must be notified of activities committed to them for the specific capacity. Once the notificationhorizon begins, no additional activities can be added to the specific contractor’s capacity. For example, if the capacityperiod begins on Thursday at 8:00 am, and the notification horizon is set to 72 hours, the capacity is closed on Monday at8:00 am and the contractor is notified of all committed work booked to the capacity. Notification horizon is specified on thecontractor’s Resource Group record but may be overridden on the Capacity record.
Once activities are committed and sent to the contractor, they have to approve or reject each activity within a specifiedamount of time. The required amount of approval time is also specified on the contractor’s Resource Group record. If thecontractor has not responded by the close of this time window, the activity is returned to your organization and considereddeclined.
If the contracting company is integrated with your company system via web services then approval and rejection isautomatically handled by message exchanges between the systems. The system sends messages to the external systemreferenced on the resource group definition for the contracting company.
Smaller contracting companies that do not use an integrated system, can access the Contractor Work Management portalwithin your company’s application to manage their work. Refer to About the Contractor Work Management Portal for moreinformation.
Aside from contractor users managing their committed work via the Contractor Work Management portal, all other userroles such as dispatchers, resource planners, etc are assumed to be company employees.
About Resource GroupsResource groups define information about the contractor companies doing work for your organization. This informationincludes name, contact information and the base service area where they work.
Your organization must also be defined as a resource group of class “company” if you need to establish schedulingpreference ranks between contractor companies and your own company using contractor eligibility rules. Refer to AboutContractor Eligibility Rules for more information.
The contracting model as well as whether this is your own company is defined on the resource group type. Only oneresource group can be defined as your company.
The following also apply for defining resource groups:
• Contractor companies may be associated with a list of service areas that they are eligible to work in.

Oracle Real-Time Scheduler Server Application User Guide • 107
• If the capacity contractor company’s system is integrated with your company’s system, their external system definitionhas to be referenced on their resource group definition.
• If the contracting model is shift based then all contractor mobile workers, vehicles and crews must reference theircompany’s resource group.
NOTE: Regardless of the contracting model used, any individual who will need to access the system as a contractorneeds to be set up as a user within the system. This user must reference the resource group defined for the contractingcompany they work for. The User record includes a field to note the contractor company associated with a user.
About CapacityCapacities represent an external contracting company’s agreement to take on work of a certain type in specific service areasfor a period of time.
The capacity type defines whether the capacity is expressed as a number of activities or number of hours. If specified as anumber of hours then the capacity must be defined for a specific activity type. If it is expressed as number of activities, thenit can be for an activity type or a broader service class. A capacity has to be offered in one or more service areas eligible ofthe contracting company. The capacity also states the amount of time the contractor company needs for advance notice forwork booked to the capacity.
The scheduler considers capacities as well as internal crew shifts when scheduling a particular activity based on the whetheror not the activity is allowed to be worked by a contractor and other preference options.
The scheduler may assign or unassign work to and from a capacity as part of the optimization process up to when thenotification time specified on the capacity has been reached. Notification time is defaulted from the contractor company’sresource group but may be overridden on the capacity. Contractor companies receive activities for approval or rejectionwhen the end of the notification horizon. At this time, the capacity is considered closed and all work currently assigned tothe capacity is allocated and committed to the contractor. If the contractor company does not accept the activities by thespecified acceptance horizon, then the activities revert back to your company. Activities can also be reverted manually asnecessary. The company can always pull back activities and allocate them elsewhere (with the risk that the contractor hasalready done the work). Standard alerts are used for activities that are in jeopardy or missed, regardless of whether they areassigned to internal resources or a contractor company.
An activity can also be manually allocated to a capacity by using the chooser action. This can be used to request that thescheduler recommend capacities where the activity can be allocated.
In addition, an activity can be assigned to one or more specific contractors (either capacity or shift-based) by supplying a listof Allowed Contractors on the activity.
Capacities are assumed to be set up by your company based on agreements made with the contractor company usingcapacity templates and/or creating them adhoc as needed.
Refer to Committing Work to Contractors for more information.
About Capacity TemplatesCapacity templates provide a tool for quickly generating large numbers of shifts based on pre-defined parameters.
A capacity weekly template defines a recurring weekly pattern for generating capacities for a specific external capacitycontractor. The capacity template defines the information to be used when creating capacities based on this template. Thecapacity establishes the time period that the contractor company is available to work, it does not establish any time limits forcompleting assigned work.
Capacity weekly templates are either:
• effective for a specified period of time
• perpetual with an effective date but no end date

Oracle Real-Time Scheduler Server Application User Guide • 108
The global planning horizon parameter (defined in master configuration) controls the number of day’s worth ofcapacities to generate for perpetual templates.
A weekly template may reference a work calendar to state public holidays for which capacities should not be generated.Each contracting company may be associated with multiple effective dated capacity weekly templates representing theiragreements with your company over time.
In a situation where capacity details should differ from their template on a particular date, generate the capacity initiallyfrom the template and then manually adjust the capacity to override the template settings. These modified capacities arecalled “overridden capacities”, as they no longer match the template from which they were generated. The OverriddenCapacities zone on the Capacity Weekly Template portal displays a list of overridden capacities linked to thetemplate.
A generated capacity maintains a reference to the template that generated it, so any changes made to a template areautomatically applied to all future capacities that were generated from that template. If you modify a capacity weeklytemplate after capacities have been generated from it, all previously generated capacities will be regenerated, and anymanual overrides will be lost.
Allowing Contractors to Work ActivitiesSettings on activities indicate whether or not the activity is eligible to be worked by a contractor. This is defaulted from theactivity type, but can be overwritten on the activity itself.
The Eligible For Contracting field indicates whether the activity should be worked by a company resource only, anyinternal crew (company or contractor), or any resource. If this is not specified, the activity is not eligible for contracting.Activities that are eligible for contracting can be re-set as not eligible for contracting using the Revert To Company action.
NOTE: Emergency and depot-based activities are not eligible for capacity contractors.
About Contractor Eligibility RulesContractor eligibility rules define scheduling prioritization between your company and contractor companies. Thisdetermines how your organization wants to schedule work for a particular service area and service class.
Defining contractor eligibility rules is optional, so if not specified the scheduler automatically gives preference to internalcrews, company and shift based contractors, over external contractor capacities.
Eligibility rules specify an overall preference between company and shift-based contractors, vs. external capacitycontractors. The eligibility rule can also provide a ranked list of resource groups, company and contractors, to be assignedwork in the specified order of preference. If multiple groups are assigned the same rank then they are equally preferred. If aresource group is not listed it is assumed to be least preferred.
These preferences are stamped onto activities that are eligible to be worked by contractors when the activity is created orrescheduled. If the system detects a change to the eligibility rules while the activity is still being scheduled it stamps thepreferences to reflect the change.
Eligibility preferences are used by the scheduler when scheduling the activity. Scheduling cost is associated with nothonoring this preference option. For example, if your preference is capacity, then it would be less expensive to use acapacity over an internal resource.
Activities can further limit which contractors are eligible to work the activity by specifying one or more AllowedContractors on the activity. The scheduler will only assign the activity to a company in that list.
NOTE: Emergency and depot-based activities are not eligible for capacity contractors.

Oracle Real-Time Scheduler Server Application User Guide • 109
Committing Work to ContractorsContractors, irrespective of their contracting model, can only view and act upon work committed to them. Once committedto a contractor the scheduler cannot change the activity’s assignment. This means that the activity is locked to thatcontractor. Company users can view and act upon any activity committed or not.
If an activity is scheduled to a capacity contractor, it is committed to the capacity contractor company when the notificationtime specified on the capacity is reached. An activity is also automatically committed to a capacity contractor when it isallocated to any of the contractor’s capacities.
Once committed to a capacity contractor, the activity appears on the contractor’s work management portal. If thecontractor’s system is integrated with your system then for each committed activity an outbound message is sent tocontractor with the activity details.
The capacity contractor company has to approve or reject work committed to them by the agreed upon approval timespecified on the contractor resource group record. If they explicitly reject the work or do not approve in a timely mannerthe activity is no longer committed to them, the contractor company is excluded from performing the specific activity andthe activity is rescheduled. A contractor user may use the contractor work management portal to approve and reject work.Alternatively, if the contractor’s system is integrated with your system this may be achieved via web services.
If the activity is scheduled to a crew shift, for either a company crew or a shift based contractor crew, it is committed to theassociated contractor company at either allocation or dispatch time. No approval or rejection is needed. When committedthe contractor’s resource group is stamped on the activity and is key to ensuring contractors access their committed workonly.
About the Contractor Work Management PortalContractor companies that do not have a system integration with Oracle Real-Time Scheduler use the Contractor WorkManagement Portal to manually manage committed work.
NOTE: If your company does have a system integration with Oracle Real-Time Scheduler it is not necessary to use thisportal as work management is completed directly in your system.
Committed work must reviewed and either approved or declined in a timely manner. Failing to respond to work causes thesystem to automatically remove that work from your backlog, handling it as if it has been declined.
Search for capacities based on the various criteria and click the Refresh button to display results.
Once results are displayed, click the broadcast icon next to the capacity for the appropriate date range to display the workdetails in the Committed Work zone. This zone lists all activities that are currently committed to a capacity. Clicking theApprove or Decline button to accept or reject work committed to your company. Failing to do so in a timely manner wouldresult in the system automatically removing that work from your company and handling it as if it has been declined.
You can also download the list of committed activities and their key information to an excel spreadsheet by clicking theExplorer Zone Menu icon in the toolbar.
When using this portal, a contractor can only see their work; they cannot see other contractor’s information or the sourcecompany's information.
NOTE: Any individual who will need to access the Contractor Management portal or requires other access to thesystem as a contractor needs to be set up as a user within the system. The User record includes a field to note theContractor ID defined in the Resource Group portal.
Once approved activities are worked, the contractor can enter the completion information here in the Contractor WorkManagement Portal or via a mobile application.

Oracle Real-Time Scheduler Server Application User Guide • 110
About the CDI and Contractor CapacitiesContractor crews are highlighted on the Scheduling Gantt, and activity search supports filtering by contracting relatedcriteria. The Contractor Capacity tab provides a summary of contractor capacities monitored by the dispatcher.
Working With Contractor Work ManagementThis section describes common tasks related to working with contractor work management.
Defining Resource GroupsUse this procedure to define a contractor or your company resource group.
1. Navigate to the Main Menu > Resource Management > Resource Group +.
You can also navigate to the portal and click the Add link.
2. Select the appropriate value for the Resource Group Type field and click OK.
If you are creating the one company resource group for your organization, make sure to select the Company resourcegroup type that was created to indicate that this is the designated resource group type for your organization.
3. Enter a unique descriptive name and a description.
4. Specify whether the company will use tags to tag specific activities to contract workers; if so, they can either use a freeform tag or specific user IDs. If using User IDs, those User IDs must be set up as Users.
5. Complete the remaining fields according to your business processes.
6. Click Save.
Defining Capacity Weekly TemplatesUse this procedure to create a capacity weekly template.
Prerequisites: You must have configured contractors in the Resource Group portal.
1. Navigate to the Main Menu > Resource Management > Capacity Weekly Template +.
You can also navigate to the portal and click the Add link.
2. Complete the fields according to your business processes.
3. Click Save.
4. Click the Add Capacity Template link in the Capacity Templates section.
5. Select a Capacity Type and click OK.
6. Complete the fields according to your business processes.
7. Click Save.
Defining Capacity TemplatesUse this procedure to create a capacity template. Capacity templates define a set of parameters to create capacities.
1. Navigate to the appropriate Capacity Weekly Template.
Oracle Real-Time Scheduler Server Application User Guide • 111
2. Click the Add Capacity Template link in the Capacity Templates section.
3. Select a Capacity Type and click OK.
4. Complete the fields according to your business processes.
5. Click Save.
Entering CapacityUse this procedure to enter parameters used to determine what type of work contractors can perform and when. Capacitiesare typically generated using templates, however this procedure can be used to manually enter them.
1. Select Main Menu > Resource Management > Capacity+.
2. Select a capacity type.
Capacity types determine whether the capacity is defined by number of hours or number of activities.
3. Complete the fields according to your business processes.
4. Click Save.
Defining Contractor EligibilityUse this procedure to define scheduling prioritization between your company and contractors.
1. Select Main Menu > Resource Management > Contractor Eligibility+.
2. Complete the fields according to your business processes.
3. Click Save.
Viewing Contractor WorkUse this procedure to view work committed to a capacity contractor. If you are a contractor user, the portal is restricted toyour company only. If you are a company user, navigate to this portal from the contractor’s resource group to review theircommitted work.
1. Select Main Menu > Service Management > Contractor Work Management.
2. Search for and select the contractor capacity and click Refresh.
3. Click the link for the appropriate contractor work/capacity.
If you are a company user, navigate to this portal from the contractor’s resource group to review their committed work.Please refer to Viewing Contractor Work (Company Users) for instructions.
Viewing Contractor Work (Company Users)If you are a company user, navigate to this portal from the contractor’s resource group to review their committed work.
1. Select Admin Menu > Resource Management > Resource Group.
2. Search for and select the contractor.
3. Click the “+” next to Record Information.
4. Click the Context Menu next to Contractor ID.

Oracle Real-Time Scheduler Server Application User Guide • 112
5. Select Contractor Work Management.
Information is only displayed for the contractor selected.

Oracle Real-Time Scheduler Server Application User Guide • 113
Chapter 4
System Administration
This section provides conceptual information and instructions for performing various setup and administration tasks.
Resource Management Administration
This section describes concepts and common tasks related to resource management administration.
Understanding Resource Management Setup and AdministrationThis section describes entities used to support the management of resources and shifts.
About LocationsYou can predefine a set of common locations, such as service centers or business offices that can be selected and referencedlater. For example, predefined locations can be used as logon and logoff locations for crew shifts or as meeting locations forperiods of unavailability.
About Worker Capabilities, Skills, and AttributesSkills define an ability or talent needed to perform certain types of work.
Worker Capability is defined in terms of Skills and Attributes.
Skills define an ability or talent needed to perform certain types of work.
An activity may require the assigned mobile worker to posses certain skills and/or attributes to complete or be consideredfor an activity. Required or preferred skills are typically defined on the activity type but may also be extended or overriddenon the activity.

Oracle Real-Time Scheduler Server Application User Guide • 114
Attributes can be set up on the Activity Type or on a specific Activity and are used to define special access (securityclearance or physical building access), permits, drug tests, etc. that may be required for an activity type or for a specificcustomer.
Skills and Attributes coming in from the host can either replace the Skills or Attributes on the Activity Type or be additive(extend) to the Skills or Attributes on the Activity Type (e.g., all specified skills plus a certain security clearance).
Mobile worker types define a list of worker capabilities assumed to be possessed by all mobile workers in that jobdescription, and each mobile worker record lists the individual mobile worker's capabilities.
When the system schedules work it matches the requirements of each activity to the capabilities of available crew shifts.The scheduler validates the worker capabilities and equipment of all mobile workers and vehicles allocated to a crew shift todetermine which activities the crew can work on a particular shift.
Some worker capabilities have effective periods. For example, a worker capability might require a license that must berenewed every year. If a worker capability has an effective period, as defined in the Limited Time attribute for the workercapability, users will be required to enter an effective date and an expiration date when they assign that worker capability toa mobile worker.
Preferred Skills and AttributesSkills or Attributes for an Activity Type or Activity can be designated as required or preferred. Preferred means that theScheduler will do its best to find a Mobile Worker with the preferred worker capability. If no match is found, it willschedule the work to a worker possessing only the required worker capabilities. Preferred skills can be set up for SkillLevels (see description below). For example, an activity type may require a novice level electrician, but would prefer anintermediate level electrician.
Skill LevelsA skill set defines relationships between similar skills of different skill levels, where each skill within the set represents aspecific level of expertise.
In the following example, the listed skills represent levels of expertise within a skill set. They are grouped together byreferencing the same set number:
• Novice Inspector = Level 1
• Standard Inspector = Level 2
• Expert Inspector = Level 3
Skill levels are used to make sure that skilled resources are being used as efficiently as possible. Schedules can assign crewmembers to an activity based on their level of skill so as not to waste more experienced resources on simple task, or to besure to have a worker with a high level of skill where needed. If an activity requires a Novice Inspector skill the schedulerwould first look for novice inspector crews before considering standard or expert inspectors. This can be left blank if theskill does not require levels.
NOTE: Adding a new skill level to an existing skill set is achieved by duplicating an existing skill level of the skill set.Refer to Defining Skills for more information.
Skill EfficiencyA skill level can also specify an efficiency, or numerical value which quantifies the relative speed or competency of the skilllevel. For example a worker at “expert” skill level probably works faster than a worker at “novice” level. The higher thenumber, the more efficient the worker.
The skill efficiency value affects how the scheduler determines the scheduled duration for activities where skillrequirements are specified. Efficiency only applies for skills with levels. Refer to About Activity Types for moreinformation.

Oracle Real-Time Scheduler Server Application User Guide • 115
About Vehicle EquipmentEquipment is any device or apparatus used to perform certain types of work.
An activity may require the crew to posses certain equipment. The list of required equipment is typically defined on theactivity type but may also be overridden on the activity.
Each vehicle record lists the equipment that the vehicle is equipped with. Vehicle type may define a list of equipmentassumed to be on all vehicles of this type.
Like mobile workers, vehicles can be assigned to crew shifts. When scheduling work, the system matches the requirementsof each activity to the capabilities of available crew shifts. The scheduler considers the skills and equipment of all mobileworkers and vehicles allocated to a crew shift to determine which activities the crew can work on a particular shift.
About Mobile Worker TypesA mobile worker is an individual workforce resource that performs work as part of a crew. Mobile worker types define theattributes for a mobile worker of a particular type.
A mobile worker is associated with a mobile worker type that defines attributes of the mobile worker's job description.For example, a mobile worker type can define the assumed skills or attributes of all mobile workers of that type. You canoverride these settings if an individual mobile worker possesses more or fewer skills or attributes. If a mobile worker lacksassumed skills or attributes, the system lists them as missing on the Mobile Worker maintenance portal.
About Vehicle TypesA vehicle is a workforce resource used by a crew to perform work.
A vehicle is associated with a vehicle type that defines attributes common to all vehicles of that type. For example, it candefine the assumed equipment of all vehicles of that type. You can override these settings if a specific vehicle possessesmore or fewer pieces of equipment. If a vehicle lacks assumed equipment, the system lists it as missing equipment on thevehicle maintenance portal.
If your organization transfers goods and vehicle capacity limits should be considered refer to About Vehicle MaximumCapacityunder Transfer of Goods for more information.
Vehicle Utilization ProceduresThe vehicle type may specify procedures that the crew must perform each time they utilize a vehicle of that type. Thecrew is not allowed to start their shift or change their vehicle mid shift until these procedures are passed. Depending onyour business practices, the procedure type may or may not be configured to allow the crew to override or bypass a failedprocedure as necessary. Refer to About Procedure Types for more information.
The completion and status of procedures is tracked in the Procedures zone of the Crew Shift as well as in the Procedureportal.
About Crew TypeA crew is a uniquely named group of mobile workers and vehicles that perform work in shifts. The actual resourcesallocated to the crew on a specific shift may be fixed or vary daily depending on your business practices.
Crew type defines attributes common to all crews of this type. For example it defines the business object that controls thestructure and business rules of crews created by this type.
Refer to About Crews and Crew Shifts in the Resource Management section for details about crews and crew shifts.

Oracle Real-Time Scheduler Server Application User Guide • 116
About Crew Shift TypeA crew is a uniquely named group of mobile workers and vehicles that perform work in shifts.
Crew shifts are typically generated by shift templates but may also created online as needed. A shift type defines attributescommon to all crew shifts and shift templates of this type, for example their typical start and end times, duration etc.
Refer to About Crews and Crew Shifts in the Resource Management section for details about crews and crew shifts.
If your organization transfers goods and vehicle capacity limits should be considered refer to About Vehicle MaximumCapacityunder Transfer of Goods for more information.
About Crew HierarchiesCrew hierarchies organize crews into logical structures of up to three levels that represent their position in relationship toother crews.
For example, your business practices may require crew hierarchy levels of Business Unit, Department, and Office withdifferent crews belonging to each level.
The portal defines the name, description, and level of the selected hierarchy. Fields also indicate the parent hierarchy level,or the level that this level reports to. The meaning and usage of hierarchy levels is entirely dependent upon your businesspractices, however hierarchies can facilitate easier searching and/or filtering in related records such as crew, crew shift,period of unavailability search for crews, common weekly templates, override time window search and in the CDI.
You can download and upload hierarchies to and from a spreadsheet. Download a hierarchy from the info zone usingstandard Export functionality, make changes, then upload it back into the system.
Load a hierarchy into the application by clicking the Upload Hierarchy link in the toolbar and uploading a properlyformatted spreadsheet file. During the upload, records are created in the order that they are listed in the spreadsheet. Thismeans that if a crew is referenced as a higher level than another crew, the higher level should be listed first in the sheet.
NOTE:All hierarchy nodes must be unique across the system, regardless of their hierarchy and level.
About Shift Cost ProfilesShift cost profiles define shift-based scheduling cost factors that are used as multipliers against global scheduling costs.
For example, a shift-based overtime cost of 3 means that overtime for all crew shifts associated with this profile is threetimes more than the overtime cost defined globally. Note that small changes to shift-based factors may result in significantschedule changes.
Global and shift-based costs are used by the scheduler to evaluate and compare possible schedule solutions. A less costlyschedule is preferred over a most costly one.
When you define a shift cost profile, you can associate it to specific service classes and/or service areas. For example,you might set up a shift cost profile to discourage the scheduler from utilizing overtime for shifts covering certain areas orperforming certain types of work. The service classes and service areas associated with a shift cost profile do not restrict theuse of the shift cost profile in any way; you can associate any shift cost profile to any shift. Rather, the system uses theseservice class and service area associations to recommend appropriate shift cost profiles when you are defining crew shifts.(If you click the Recommend Change link next to the shift cost profile field on the Crew Shift portal, the system displays alist of shift cost profiles that match the current shift's service area and service class combination.)
You can assign a shift cost profile to one or more shift templates or to individual shifts. Each shift is associated with a singleshift cost profile.

Oracle Real-Time Scheduler Server Application User Guide • 117
About POU TypesA period of unavailability (POU) is a specific period of time during which one or more resources are not available toperform work, for example, meetings or training sessions crews attend as part of their shift, a mobile worker's vacationleave, a vehicle's planned maintenance time, etc.
A POU type defines basic characteristics of all POUs of a particular type. For example, a POU type specifies whether ornot POUs of that type can be recurring. Recurring POU types are used for events such as regular weekly staff meetings. If aPOU type supports recurring POUs, it also specifies the POU template business object used to create recurring POUs of thattype.
POU type also identifies the class of resource (crew, mobile worker, vehicle, etc.) that can be associated with POUs of thattype. .
POU Tasks and POU Task TypesCrew POUs are events to which multiple crews may be invited. A POU task is automatically created by the system for eachinvited crew in order to incorporate the POU event into each crew’s shift schedule at the appropriate time and track eachcrew’s attendance individually. It is therefore only relevant to crew-related POUs (POUs for which the resource class isCrew).
A POU task does not bear specific event details; these are defined on the POU itself. The system uses a single type of POUtask, which is defined on the master configuration, to generate all POU tasks.
A POU task is dispatched to a crew, just like an activity, and its status is updated and tracked in the same way. If a POUis modified, the system automatically adds, updates, or deletes any related POU tasks, based on the type of change and thePOU task's status.
About Dispatcher TypesA dispatcher record identifies a user as a dispatcher. Dispatcher type defines attributes common to all dispatchers of thistype. Typically there should be one dispatcher type to be used for all your dispatcher records.
About Procedure TypesProcedure types define the details associated with procedures of a particular type. This includes whether the procedure ofthat type is for an activity type, a vehicle type or a primary function, effective dates, and other requirements of completingthe procedure.
Procedures represent steps or tasks that a crew may need to complete before starting their shift, utilizing a vehicle or startingan activity. Usually they relate to safety precautions or regulatory requirements.
Note: Procedure functionality is embedded into the mobile application and as such is only enforced for crews using themobile application.
• Service class procedures: Procedure types entered on service classes determine the procedures required when a shifttakes on a certain primary function role defined by this service class. This may be at shift start or when there is a changein primary function mid shift.
• Vehicle procedures: Procedure types entered on vehicle types determine the procedures required when a vehicle of thistype is used or changed on a shift.
• Activity procedures: Procedure types entered on activity types determine that procedures required before the crew canstart work on the activity. If the crew has previously suspended the activity and resumes work, they are required to fillout these procedures again.

Oracle Real-Time Scheduler Server Application User Guide • 118
Procedure types also establish the following for procedures of that type:
• Whether or not crews are required to take attendance of who was present during completion of the procedure.
• Whether or not the procedure can be overridden.The system does not allow the business activity to commence until all required procedures are passed. If procedureoverride is allowed, the crew is can bypass a failed procedure so it is considered as passed.
• Whether or not the procedure is effective dated (meaning they are only required at certain periods).
Disable the procedure type by selecting the Deactivate button in the Record Actions section.
Procedure StepsThe procedure type defines the procedure business object to be used to create and manage procedures of that type. Thiscan be a base business object or a custom business object implemented to address specific business requirements. The baseproduct’s procedure type and procedure business objects implement a simple questionnaire form.
If your organization is using the base procedure business object the Procedure Steps section defines the specific questionsor steps that need to be followed to complete the procedure. These can be in the form of yes or no questions, text ornumerical values that must be entered, valid ranges, etc.
Message categories are used for the text messages for all steps in the procedure. It is recommended that you designate oneor more message categories for procedure related messages. For example, you may have a message category for vehicleinspection or activity safety checklist. The Sequence field indicates the order in which the steps s are presented to thecrew and must be completed. This can be used if the steps need to be re-ordered or if any steps need to be inserted inbetween existing steps. The procedure steps also include values to determine whether or not the step is required to pass theprocedure, as well as the expected pass value and answer types.
These steps are created on the procedure type for the procedure and cannot be altered on the procedure record.
NOTE: Procedure message categories need to be included as part of your deployment type configuration. When addingor changing step messages you need to create a new mobile application deployment to reflect your recent changes.
About Timesheet TypesTimesheet types define attributes common to timesheet records of the same type. For example, you can designate whetherthe timesheet is for a mobile worker or a crew.
A timesheet summarizes the time a mobile worker spent on various types of tasks and other work related activities whileworking a shift. This functionality is optional. When enabled, the system automatically creates timesheet records for eachmobile worker that worked a shift at shift completion time. If the crew uses the mobile application, then timesheets arecalculated on the server and sent to the mobile device for each mobile worker to review and approve their timesheet. If thecrew uses the main application in the office to complete their shift they have an option to request timesheets to be calculatedon demand or wait for the next timesheet monitor to calculate the timesheets.
Timesheet Time TypesTimesheet types define attributes common to timesheet records of the same type. For example, you can designate whetherthe timesheet created by this type is for a mobile worker or a process managing the creation of timesheet records for allmobile workers that were part of the shift’s crew.
Timesheet type for a mobile worker can specify a percent deviation value which defines the maximum percentage allowedfor corrections of a timesheet to deviate from the actual time calculated by the system. This is the difference between thetotal actual shift time and the total shift time as entered by the user as the corrected shift time. If the total corrections exceedthe percentage entered here, the user can override the validation by checking the Override box, and continue with thecorrections.

Oracle Real-Time Scheduler Server Application User Guide • 119
Timesheet ConfigurationTo enable timesheet functionality, set up a timesheet type for the crew process and a timesheet type for the mobile workerand reference them in the Resource Management section on Master Configuration under Global Configuration.
NOTE: If these Global Configuration values are not filled in, timesheet functionality is not enabled for yourorganization.
The Timesheet Correction field sets whether or not the timesheet time calculations that are automatically created can beadjusted by the mobile worker. If this is allowed, the system presents the worker with the option to change values such astheir travel time, work time, break times etc. when they verify and accept the timesheet. System values are kept for auditpurposes.
Mobile workers complete timesheet verification on their mobile device while non-mobile workers can complete timesheets"in office" as part of their general shift completion workflow. Include the timesheet process type and the mobile workertimesheet type to your deployment. This sends the timekeeping settings to the mobile devices including what is neededto start generating timesheets. Also ensure that the M1-TIMSHT batch control is running periodically such as everyfew hours. The batch is mainly needed mainly to handle situations where timesheet calculation is waiting for some taskcompletion information errors to be resolved.
Defining LocationsUse this procedure to define physical locations, such as service centers.
Prerequisites: None
To maintain existing locations, select Admin Menu > Resource Management > Location, then use standard actions toedit, duplicate, or delete a location.
To define a new location:
1. Select Admin Menu > Resource Management > Location+.
If your system supports more than one location type business object, you will be prompted to select a business object forthis location.
2. Enter the location name and a meaningful description.
3. Provide the address of the location.
The system will attempt to find the geocode coordinates from the address you provide. If it cannot, you may be requiredto enter the geocode coordinates, depending on your system configuration.
4. Click Save.
You can now select this location as a shift logon or logoff location on the Crew Shift maintenance portal or select it as aPOU location on the POU maintenance portal.
Defining EquipmentUse this procedure to define equipment needed to perform certain types of work.
Prerequisites: None
To maintain existing equipment, select Admin Menu > Resource Management > Equipment, then use standard actionsto edit, duplicate, or delete the equipment.
To define a new equipment record:

Oracle Real-Time Scheduler Server Application User Guide • 120
1. Select Admin Menu > Resource Management > Equipment+.
If your system supports more than one equipment type business object, you will be prompted to select a business objectfor this equipment.
2. Enter a name and a meaningful description for the equipment.
3. Click Save.
You can now associate this equipment with an activity type, indicating that the equipment is required to work this type ofactivity. You can also associate it with a vehicle or a vehicle type (as assumed equipment).
Defining Worker Capabilities, Skills, and AttributesUse this procedure to define a human ability or talent needed to perform certain types of work.
1. Navigate to Worker Capability in the Admin menu.
You can also navigate to the portal and click the Add link.
If your organization has configured any custom worker capability business objects, you may need to select one.
2. Skills (personal proficiencies) are entered in the Skill list and Attributes (things a person has been granted, such as asecurity clearance or building access badge) are entered in the Attribute list.
3. Enter a unique descriptive name and a description.
4. Complete the remaining fields according to your business processes.
5. Click Save.
Defining Mobile Worker TypesUse this procedure to define a classification of mobile worker and identify the worker capabilities typically associated withmobile workers of that type.
Prerequisites: You must define worker capabilities before you can associate them with a mobile worker type.
To maintain existing mobile worker types, select Admin Menu > Resource Management > Mobile Worker Type, thenuse standard actions to edit, duplicate, or delete a record.
To define a new mobile worker type:
1. Select Admin Menu > Resource Management > Mobile Worker Type+.
If your system supports more than one mobile worker type business object, you will be prompted to select a businessobject for this mobile worker type.
2. Enter a name and meaningful description.
3. Select the business object to use when creating mobile workers of this type.
4. To add or remove worker capabilities for this mobile worker type, click the + or – sign in the Assumed WorkerCapabilities section and select a worker capability from the dropdown list.
Assumed worker capabilities can be overridden for an individual mobile worker.
5. Click Save.
You can now create new mobile workers of this type.

Oracle Real-Time Scheduler Server Application User Guide • 121
Defining Vehicle TypesUse this procedure to define a classification of vehicles and identify the equipment typically associated with vehicles of thattype.
Prerequisites: You must define equipment before you can associate it with a vehicle type.
To maintain existing vehicle types, select Admin Menu > Resource Management > Vehicle Type, then use standardactions to edit, duplicate, or delete a record.
To define a new vehicle type:
1. Select Admin Menu > Resource Management > Vehicle Type+.
If your system supports more than one vehicle type business object, you will be prompted to select a business object forthis vehicle type.
2. Enter a name and meaningful description.
3. Select the business object to use when creating vehicles of this type.
4. To add or remove equipment for this vehicle type, click the + or – sign in the Assumed Equipment section and selectthe equipment from the drop-down.
Assumed equipment can be overridden for an individual vehicle.
5. As applicable, enter any procedure types that should apply for vehicles of this type.
The procedure type will determine what procedures must be completed before crew shifts can use vehicles of this type.
6. Click Save.
You can now create vehicles of this type.
Defining Crew TypesUse this procedure to define a classification of crew.
Prerequisites: None
To maintain existing crew types, select Admin Menu > Resource Management > Crew Type, then use standard actionsto edit, duplicate, or delete a record.
To define a new crew type:
1. Select Admin Menu > Resource Management > Crew Type+.
If your system supports more than one crew type business object, you will be prompted to select a business object forthis crew type.
2. Enter a name and meaningful description.
3. Select the business object to use when creating crews of this type.
4. Click Save.
You can now create crews of this type.

Oracle Real-Time Scheduler Server Application User Guide • 122
Creating Crew HierarchiesUse this procedure to define a level in your organization's hierarchical structure for crews.
Prerequisites: Your organization must have established hierarchy levels according to the guidelines in the configurationguide.
1. Select Admin Menu > Resource Management > Crew Hierarchy +.
You can also navigate to the portal and click the Add link.
2. Select the appropriate value for the Crew Hierarchy Business Object field and click OK.
If your organization has not configured any custom crew hierarchy business objects, this step is skipped.
3. Select the appropriate level for the hierarchy and indicate the parent node, if applicable.
If you are defining the top level of the hierarchy, there will not be a parent.
4. Complete additional fields according to your business processes.
Note: All hierarchy nodes must be unique across the system, regardless of their hierarchy and level.
5. Click Save.
Once the hierarchy level is created, navigate to the appropriate crews to associate them with the level as needed.
You can also upload your full hierarchy structure using a spreadsheet.
Uploading a Crew Hierarchy Using a SpreadsheetUse this procedure to define a full crew hierarchy.
1. Select Admin Menu > Resource Management > Crew Hierarchy.
2. Click the Upload Hierarchy link.
3. If your system supports more than one crew hierarchy business object, you will be prompted to select a business objectto define the base attributes for the hierarchy.
4. Verify that the spreadsheet you want to upload includes the columns indicated in the upload dialog box.
Note: All hierarchy nodes must be unique across the system, regardless of their hierarchy and level.
5. Click the CSV File to Upload button.
6. Browse to the appropriate file and click the Submit button.
During the upload, records are created in the order that they are listed in the spreadsheet. This means that if an entity isreferenced as a higher level to another entity, the higher level should be listed first in the sheet.
Once the hierarchy is created, navigate to the appropriate crews to associate them with the lowest level as needed.
Adding Crews to HierarchiesUse this procedure to add a crew to a hierarchy.
The hierarchy levels must be defined.
1. Navigate to the Crew portal.
2. Search for and select the appropriate Crew.

Oracle Real-Time Scheduler Server Application User Guide • 123
3. Populate the Reporting Hierarchy field with the lowest level of the hierarchy that it belongs to.
4. Click Save.
Defining Period of Unavailability TypesUse the Period of Unavailability Type portal to define a type of period of unavailability (POU), such as a meeting ortraining session for crews, maintenance for vehicles, or leave time for mobile workers.
Prerequisites: None
To maintain existing period of unavailability types, select Admin Menu > Resource Management > Period ofUnavailability Type, then use standard actions to edit, duplicate, or delete a record.
To define a new period of unavailability type:
1. Select Admin Menu > Resource Management > Period of Unavailability Type +.
If your system supports more than one period of unavailability type business object, you will be prompted to select abusiness object for this POU type.
2. Enter the POU type name and a meaningful description.
3. Select the resource class associated with this POU.
The resource class selection determines which resources can be associated with POUs of this type. For example, if youselect Mobile Worker as the resource class, then you will be able to associate one or more mobile workers with POUsof this type and the system will automatically incorporate POU tasks into the schedules of those mobile workers at theappropriate time.
4. Select the business object to use when creating POUs of this type.
5. Select the business object to use when creating POU templates of this type.
POU templates are used to create recurring POUs.
6. Click Save.
You can now create periods of unavailability based on this type.
Defining Shift Cost ProfilesUse this procedure to define shift-based scheduling cost factors that serve as multipliers against global costs.
Prerequisites: You must define service areas and service classes before you can associate them to a shift cost profile.
To maintain existing shift cost profiles, select Admin Menu > Resource Management > Shift Cost Profile, then usestandard actions to edit, duplicate, or delete a record.
To define a new shift cost profiles:
1. Select Admin Menu > Resource Management > Shift Cost Profile+.
2. Enter a name and meaningful description.
3. Specify the shift-based cost factors that will be used as multipliers against global costs.
4. Select the service areas to which the profile applies.
If you do not select any, the profile will apply to all service areas.
5. Select the service classes to which the profile applies.
If you do not select any, the profile will apply to all service classes.

Oracle Real-Time Scheduler Server Application User Guide • 124
6. Click Save.
You can now associate this shift cost profile with a crew shift template, so that it will be applied to all crew shifts generatedfrom the template.
Defining Shift TypesUse this procedure to define basic attributes associated with a type of crew shift, such as its start time and duration.
Prerequisites: None
To maintain existing shift types, select Admin Menu > Resource Management > Shift Type, then use standard actions toedit, duplicate, or delete a record.
To define a new shift type:
1. Select Admin Menu > Resource Management > Shift Type+.
If your system supports more than one shift type business object, you will be prompted to select a business object forthis shift type.
2. Enter a name and meaningful description.
3. Enter the start date and duration for all shifts of this type.
4. Select the business object to use when creating shifts of this type.
5. Select the business object to use when creating shift templates of this type.
6. Click Save.
You can now create crew shifts and crew shift templates based on this type.
Defining Dispatcher TypesUse this procedure to define a type of dispatcher resource.
Prerequisites: None
To maintain existing dispatcher types, select Admin Menu > Resource Management > Dispatcher Type, then usestandard actions to edit, duplicate, or delete a record.
To define a new dispatcher type:
1. Select Admin Menu > Resource Management > Dispatcher Type+.
If your system supports more than one dispatcher type business object, you will be prompted to select a business objectfor this dispatcher type.
2. Select the business object to use when creating dispatcher records of this type.
3. Click Save.
You can now create new dispatchers of this type.
Defining Procedure TypesUse this procedure to define the attributes associated with a particular type of procedure.
1. Navigate to the Admin Menu > Resource Management > Procedure Type +.

Oracle Real-Time Scheduler Server Application User Guide • 125
You can also navigate to the portal and click the Add link.
2. Select the appropriate value for the Procedure Type Business Object field and click OK.
If your organization has not configured any custom procedure type business objects, this step is skipped.
3. Enter a unique descriptive name and a description.
4. Complete the remaining fields according to your business processes.
5. Click Save.
Once you define the procedure type, you will need to add the procedure steps that are required for procedures of thattype by clicking the Edit button and filling in the steps.
You can now add this procedure type to service classes, activity types and vehicle types to establish procedurerequirements.
Defining Timesheet TypesUse this procedure to define attributes common to timesheet records of the same type. For example, you can designatewhether the timesheet is for a mobile worker or a crew.
1. Navigate to the Admin Menu > Resource Management > Timesheet Type +.
You can also navigate to the portal and click the Add link.
2. Select the appropriate value for the Timesheet Type Business Object field and click OK.
In the base package, you are determining whether timesheets of this type are for crew processes or resources such asmobile workers.
3. Enter a unique descriptive name and a description.
4. Complete the remaining fields according to your business processes.
5. Click Save.
Service Management Administration
This section describes concepts and common tasks related to service management administration.
Understanding Service Management Setup and AdministrationThis section describes the entities used to support service management and dispatcher functions.
About Task TypesA task type defines default attributes for all tasks of a particular type. A task is any activity, period of unavailability (POU),or break that occupies time on a crew shift's schedule.
Task TypesThe following sections describe the various classes of task types supported by the product:

Oracle Real-Time Scheduler Server Application User Guide • 126
Activity TypeAn activity is a task to be performed at a specific location. The activity's type controls how such activities should bedispatched, prioritized, scheduled and more. Refer to About Activity Types for more information.
Break TypeBreak type specifies the duration of the break and duration of the break window (period of time during which the break canbe taken).
If your organization uses depots the system can also be configured to designate breaks which can only be taken at a depot.Refer to About Breaks at Depots under Transfer of Goods for more information.
Non Productive Task TypeSpecifies the duration of the non productive task and duration of the task window (period of time during which the taskshould be scheduled ).
Depot Task TypeDepot task is a tool for tracking the crew's travel, arrival and completion of the depot visit. Refer to About Depot RelatedActivity Types for more information.
Timesheet Time TypesTimesheets are generated at end of shift to summarize how much time the crew spent on various work related tasks andeffort. By default travel and work time is summarized across all task types. If your business requires that travel and work aresummarized separately for specific types of work you may introduce new timesheet time types and reference them on thecorresponding task types. Refer to About Timesheets for more information on timesheets.
About Activity TypesThis section describes various features controlled by activity type configuration.
If activities are used to transfer goods refer to About Depot Related Activity Types for more information.
General Work DescriptionActivity types describe requested work, usually referencing the host system that requested the work and the identifier of theactivity type in the host system.
The activity type also specifies an average time that it takes to perform activities of the type, which skills, equipment andcrew size are required to perform the work, and other settings. These default requirements can be overridden on specificactivities.
Sometimes a dispatcher may need to call in a crew to assist another crew with their work. For example, clearing out a treefrom the site location. In this situation the dispatcher creates an assisting activity related to another activity. Not all types ofwork may be used for that purpose. Based on your business practice you can limit the list of activity types that are allowedto be created for the purpose of assisting another crew.
When completing an activity the crew can provide additional information in the form of standard remarks defined as validfor this type of work. The crew might also create a follow up activity if additional or related work is needed, as allowed bysettings on the activity type.

Oracle Real-Time Scheduler Server Application User Guide • 127
When Can Work Be PerformedCertain types of work may only be performed on specific days and business hours. You may specify a work profile on theactivity type that describes the business hours during which this type of work is allowed to be performed. In addition youmay specify a work calendar that lists applicable public holidays during which work should not be performed.
When the host system sends in an activity without a due date the system can default it if such option is configured on theactivity type. The activity type may state a number of days or hours within which the activity should completed. Days andhours may refer to calendar or business days and hours, respectively.
You must specify a work profile if choosing to default due date by business days or business hours. This is because thesystem relies on the work profile definition of business days and hours for this type of work. For example, a work profile iscreated specifying that work can be performed between 9 AM and 4 PM Monday through Thursday and 9 AM and 1 PM onFriday.
The activity type references this work profile and also indicates that work must be performed within 24 business hours. If anactivity of this type comes in from the host with a time window that starts on a Thursday at 3 PM with no end time window,the default due date and time is set to the following Wednesday at 2 PM (1 hour on Thursday, 4 hours on Friday, 7 hours onMonday and Tuesday, and 5 hours on Wednesday).
Regardless of whether due date is defaulted or provided by the host the system generates time windows based on the workprofile if specified.
If the activity is an appointment then the activity type defines the appropriate appointment booking group to use whenoffering appointment time windows. You may specify an appointment group as well as a work profile. In this situation thescheduler would offer appointment times available by the both the work profile and the appointment booking group. Referto About Work Profiles for more information.
Activity PriorityThe activity type states whether such activity is an emergency or not. This may also be overridden on the activity level.
For non emergency work the activity type defines the scheduling priority for this type of work relative to other types. Thismay be a single value or it may be determined based on stepped ranges of a business priority number provided on theactivity itself. Using stepped ranges allows you to set same type of work activities with different scheduling priorities basedon business needs.
For example, collection activities can be prioritized by highest overdue amount first. The host system would include abusiness priority number equal to the amount overdue. Given this, the activity type logic would derive the schedulingpriority based on ranges of amounts overdue:
• Up to business priority of $100 might convert to a scheduling Priority of 1
• Up to business priority of $1000 might convert to a scheduling priority of 5
• Up to business priority of $999,999,999 might convert to a scheduling priority of 10
• (with other ranges in between)
Another example is for the host to include a business priority number equal to the number of customers impacted so thatthe activity that impacts the most customers is prioritized higher. The activity type logic would convert the number ofcustomers impacted into a scheduling priority of 1 to 10. Note that when determining priority, the system attempts to use theranges first, based on information from the activity, however if the priority cannot be determined from the range, the valuein the Scheduling Priority field is used.
Activities with a higher priority are scheduled vs. not scheduled, scheduled to an earlier shift, or scheduled earlier in theshift. For example, if there are two connect activities, one at a hospital with a high higher priority and one at an seldom usedwarehouse with a lower priority, and multiple shifts, the higher priority hospital activity will get scheduled today and earlierin the day (whereas the lower priority one may not get scheduled on that day at all).

Oracle Real-Time Scheduler Server Application User Guide • 128
Note that the scheduler only acts upon activity scheduling priority. When an activity is created, the priority is defaulted fromthe activity type unless it is specified by the host. However, the priority on the activity itself is what the scheduler ultimatelyconsiders.
NOTE: If your organization needs to maintain the concept of priority based on activity type but allow activities ofsame type to prioritize differently then it is important to keep scheduling priority ranges allocated to specific typesof work and let the stepped list be a further list of ranges within the range designated for the activity type. This waythe scheduling priority will represent the preference between one type of work to other types as well as the preferencewithin activities of one type of work.
The scheduler applies a factor onto the activity’s scheduling priority to calculate its priority over time. This factor is definedby a Priority Profile as a function over the activity’s broad time window. The activity’s type references the appropriatePriority Profile. Refer to About Priority Profiles for more information.
Scheduled DurationThe activity specifies the estimated amount of time it should take the work to be completed by a resource possessing therequired skills. This estimated duration represents the amount of time allotted for the activity on the schedule.
When an activity that requires a single minimum skill level and a skill efficiency is associated with each level, the scheduleradjusts the scheduled duration based on the assigned resource’s skill level relative to the level that is required by theactivity. As a result, if a more efficient resource is assigned, work may be completed faster.
The percentage of the scheduled duration that is impacted by skill efficiency might also be specified on the activity type.
For example, an activity specifies an estimated duration of 60 minutes and at minimum requires an electrician ofintermediate skill level. Assume that 30 minutes of the duration time is required for set up and clean up, and 30 minutesis required for electrical work if performed by a worker with intermediate electrical skills. This means that the efficiencyduration impact percentage would be set at 50% (only half of the 60 minutes requires skilled work).
With the skill efficiency set at 2 on the expert level worker skill, it is assumed that the expert only needs 15 minutes for theelectrical work portion of the activity. Depending on the worker the activity would be scheduled to the scheduled durationwould be calculated as:
• Intermediate worker = 60 minutes scheduled duration
• Expert worker = 45 minutes scheduled duration
If this value is not populated, the value is assumed to be 100% meaning that the skill efficiency impacts the entire scheduledduration.
NOTE: This functionality is ignored when the activity references more than one required skill as well as when multiperson crews are used. It is not available for complex activities.
Concurrent BreaksBy default, breaks are planned to be taken in between activities. However, some activities may require the crew to remainon site for a long time. In this situation the crew may be entitled to a planned break on site. The activity type indicateswhether breaks may be scheduled to be taken while the crew is on site.
Contracting WorkBy default, work can only be performed by company resources. However, certain types of work can be allowed to beperformed by contractors. The activity type indicates whether activities are allowed to be performed by contractors.Likewise, work can be restricted to be worked only by company or shift based contractor crews managed by yourorganization (internal resources). This information can be overridden on the activity.
Oracle Real-Time Scheduler Server Application User Guide • 129
Advance AllocationCertain types of work might need to be locked to their currently assigned crew at some time before the planned start timeof the shift. When allocation is done in advance, dispatchers and planners can know in advance which crew is slated toperform the work. This information can be useful for planning purposes as per your business needs.
Dispatching and AcknowledgementBy default an activity is automatically dispatched by the scheduler. Certain types of work may require a user to approvetheir dispatch to a crew. You can achieve that by not allowing automatic dispatch on this type of activity.
A dispatched activity is automatically acknowledged when received on the mobile device. Certain types of work, typicallyemergency work, require that a crew member manually acknowledge take it on. You can require manual acknowledgmenton the activity type.
When the crew’s shift uses Drip Mode set to Standard, activities are worked on a route in sequence and once the activityis dispatched, the sequence is locked. The scheduler would not dispatch next activities before an activity that is alreadydispatched. You may want to allow certain types of work to break that order and get dispatched before already dispatchedactivities. You do that by setting the Ignore Sequence Locking field to "Yes". This is defaulted onto the activity when it iscreated and allows the scheduler to dispatch such activity before any other activities that are already dispatched if needed.
Activity TimesheetsThe activity type may indicate whether a summary of the time the crew spent traveling and working the activity should becalculated and presented to the crew for review at completion time. If this option is used the summary including originalcalculated times and any corrections made by the crew are sent back to the host system as part of the activity completioninformation.
Service ClassEach activity type must belong to at least one service class. The scheduler uses this classification when scheduling workto shifts based on their primary function and the type of work they are allowed to perform. Dispatchers also use thisclassification when they choose to monitor work by their service class association. An activity type can belong to multipleservice classes. Refer to About Service Classes for more information.
Service TypeIf your company provides multiple service types and divides your service territory into different service areas for thedifferent service types you should state the service type associated with each activity type.
For the same reason, your service areas should also be associated with the corresponding service type. This information isused by the system when determining the service area an activity belongs to. Since service areas for different service typescan overlap for a specific location, the system considers the activity type’s service type to determine the appropriate servicearea. Refer to About Service Areas for more information.
Gantt DisplayActivities can specific an icon to display in the task bar in the Scheduling Area of the Gantt by selecting an icon in theGantt Display Icon field.
Reporting OptionsActivities extracted to the Business Intelligence (BI) data warehouse are associated with the Reporting Service Category aswell as the Response time SLA specified on the activity type for filtering and reporting purposes.
ProceduresCertain types of work require the crew to follow and successfully complete business procedures on site prior to performingwork. The activity type can be configured to list the procedure types a crew has to perform each time they are about to start
Oracle Real-Time Scheduler Server Application User Guide • 130
work. Work cannot start until these procedures are passed. If the Procedure Clearance Required option is set to Yes,then the crew cannot start working on activities of that type that they have created in field without them being verified forrequired procedures. This means that the crew has to be connected to work on these activities
AttachmentsThe crew might need supplemental documentation related to some times of work. You can attach this type of documentationto the activity type using the Attachments zone. The crew can download these attachments as needed when workingsuch activities using the mobile application. The crew must be connected to download attachments. If you want specificattachments to be available to the crew even when they are not connected, consider adding them directly to the deployment.This option increases the total size of the mobile application deployment so it should be used sparingly. Refer to AboutActivity Attachments for more information.
Related ActivitiesAs required by your business practices, crews can be allowed or disallowed from creating related activities for activities ofthis type. A related activity is an activity worked at the same location. In addition, the list of activities that can be created asrelated activities when working an activity of a specific type can be further restricted.
An example scenario where this might be used would be where connects or disconnects can be worked when dispatched aspart of the shift schedule but never created in the field.
Exception HandlingThe system creates a To Do entry for errors that requires user intervention. The activity type defines the To Do type and roleto use for the following exceptions:
• Reporting various data issues related to the activity.
• Reporting collision situation where more than one crew completed the activity.
• Requesting a user to review and handle an expired activity.
Complex Activity TypesA complex activity is an activity that is too long to be performed during a single crew’s shift. Its activity type configurationis similar to a regular activity type with the following exceptions:
• In addition to the average duration of the overall activity it also define the minimal and average amount of time thesystem should use to split the long activity into smaller parts known as crew visits.
• The activity type indicates whether the same crew should be scheduled to perform the entire work.
• Complex activities are never emergencies.
• Complex activities can not be scheduled to external contractor capacities.
• Complex activities always allow breaks to be planned on site.
• Complex activities require the crew to be able to correct how much time they spent working on the activity as it impactsthe calculation of remaining time left to schedule. Hence the crew is always presented with time usage summary.
About Priority ProfilesPriority profiles define factors used to prioritize the scheduling of activities. Activity type defines the priority profile to usefor all activities of that type.
The priority profile defines the following attributes:
• The sequence in which activities will be displayed in application screens.

Oracle Real-Time Scheduler Server Application User Guide • 131
• Whether or not work is mandatory or optional. If mandatory the activity will be scheduled by its due date regardless ofcost. If optional, scheduling the activity is considered optional and is driven by costs. Note that emergencies are alwaysconsidered mandatory.
• The scheduling priority profile section defines the function that the scheduler uses to calculate a factor applied to theactivity’s scheduling priority over time to make it stronger, weaker or unchanged as needed. For example, short-cycle,SLA-oriented work is critical at the beginning of the window and diminishes after that. Long-cycle work, such as meterinspections, is low priority in the beginning of the window and becomes critical toward the end.
About Work ProfilesWork profiles define operational time windows and other time restrictions regarding when certain types of work can beperformed.
Typically work profiles represent a regulatory restriction that does not allow an activity to be scheduled outside of thesewindows. With a work profile properly defined for the activity type, the system ensures that the activity is not scheduledoutside of the established time window.
One work profile can be referenced on multiple activity types.
On the work profile you designate a Minimum Business Day value to establish the minimum duration, in minutes, thatcan be considered as a business day when defaulting an activity’s due date using the Business Days option on the activitytype. This ensures that only time windows that are long enough are considered. For example, if this is set at 5 hours and theactivity must be completed within 3 business days on the activity type, but one of the days is a 4 hour day, that day will notbe considered a full business day for the purpose of defaulting the activity due date. This is only used if the activity type isconfigured to default the due date by business days and the due date is not sent from the host.
You can also define a Minimum Late Time to establish the maximum duration, in minutes, that the activity can be startedlate. Setting this to zero indicates that no lateness is allowed. If this value is not specified, lateness is not restricted.
The values entered in the Time Windows section establish the operational days and times during which work may beperformed. For example, if this work profile is establishing a restriction for work that can only be completed during agraveyard shift or during the weekend between Friday and Monday, the time window should be set between Friday 9:00pmto Monday 4:00am. You can create multiple time windows to establish non-consecutive blocks of time.
NOTE: Changes to work profiles after they have been established and added to activity types, do not impact existingactivities, only activities created after the change.
About Appointment Booking GroupsSome activities require an appointment to be made with the customer to ensure that to ensure that the crew will have properaccess to the service location, that someone is available to accept a delivery, or that someone is present for whatever otherreason as needed. Appointment booking groups define valid time windows for appointment booking.
When the system receives an appointment booking request from the host, it uses the appointment booking groupspecified on the request to identify the actual time windows during which appointments are allowed to be scheduled. If noappointment booking group is supplied by the host, the system uses the activity type's default appointment booking group.
The host system uses the Appointment Booking XAI inbound service to request a list of available appointments for anactivity prior to interfacing it.

Oracle Real-Time Scheduler Server Application User Guide • 132
About Auto-DispatchingThis topic describes the auto-dispatch process.
Dispatching is an action that locks a task's sequence in the shift schedule so no further optimization takes place and marks itas ready to be sent to the crew. Dispatching can be either manual (initiated by a dispatcher) or automatic (performed by thesystem without user initiation).
Note the following regarding auto-dispatching:
• Automatic dispatching applies only to a started shift. Until the crew starts their shift, the system does not automaticallymark any task as ready to be dispatched.
• Manual dispatching applies to activities only. Breaks and POU tasks are always automatically dispatched.
• A dispatcher may manually request to dispatch an activity at any time. If a crew's shift has not started yet, then theactivity remains queued for dispatch until the crew starts the shift.
You can enable or disable automatic dispatching of activities globally or for specific crew shifts or activity types.
Setting Auto Dispatch GloballyTo enable or disable auto dispatching globally, set the Enable Auto Dispatch scheduler parameter to True or False inthe scheduler configuration. (This is listed under Real Time parameters on the Scheduler Configuration portal.) If set toTrue (checked), auto dispatching of activities is enabled globally, but can be disabled at the activity or shift level. If False(unchecked), auto dispatching is disabled and cannot be enabled at the shift or activity level.
Setting Auto Dispatch for Crew ShiftsTo enable or disable auto dispatching at the crew shift level, set the following attributes for a particular crew shift or crewshift template:
• Drip Mode: Indicates how the system should handle dispatching of activities to the crew shift. Valid options are:None: Automatic dispatching is disabled. All scheduled activities must be manually dispatched to the crew by thedispatcher or by another system-invoked process.All: All scheduled activities are automatically dispatched to the crew and any additional activities scheduledthroughout the shift are also auto-dispatched. This excludes any activities where the Auto Dispatch attribute is set toNo on their Activity Type.Standard: Only a fixed number of scheduled activities are automatically dispatched to the crew at any given pointof time. The fixed number is specified in the Drip Horizon. Note that if an activity's type does not allow automaticdispatching, the activity will not be assigned to shifts that are set to Standard drip mode.
• Drip Horizon: Number of activities that can be dispatched to a crew at any time. Valid only if Drip Mode is set toStandard.
Setting Auto Dispatch for Activity TypesTo enable or disable auto dispatching for a particular activity type, set the Auto-Dispatch attribute at the activity type level.If set to Yes, activities of this type will be automatically dispatched to the assigned crew. If set to No, activities of this typewill not be automatically dispatched, overriding the global or shift-based auto-dispatch settings.
NOTE: Preventing certain types of activities from being automatically dispatched is applicable only if auto-dispatch isenabled globally and the Drip Mode of the crew shift is set to All. Manual dispatching is not allowed if a shift is beingdrip fed tasks (Drip Mode of Standard).

Oracle Real-Time Scheduler Server Application User Guide • 133
Scheduler Configuration SettingsThe scheduler configuration defines additional scheduler parameters affecting auto dispatching. These are typically definedat implementation and should not need to be changed. These additional parameters are listed below (and described in theConfiguration Guide and in the embedded help available from the Scheduler Configuration maintenance portal):
• Break Dispatch Mode
• POU Dispatch Mode
• Auto Dispatch Stability Period
• Auto Dispatch Interval
• Auto Dispatch On Completion
• Auto Dispatch Time Horizon
• Emergency Dispatch Mode
About Service ClassesA service class is a broad categorization of activity types. A shift may be associated with one or more service classes tolimit the scheduler in assigning certain types of activities to be performed by the crew. Activity types can belong to morethan one service class.
Service classes are associated with the following objects:
• Crew Shifts:A crew shift may be associated with one service class of work that is defined as the primary function of the crew on thatshift. This is considered the preferred service class. The scheduler is encouraged to assign work of the preferred typeover non-preferred work to a crew shift.
A crew shift may also be associated with one or more services classes it is not allowed to perform. This association isused to discourage the scheduler from assigning certain classes of work to the shift; however, a dispatcher can allocateany class of work to any crew.
For example, the system sends a shift to the scheduler specifying class A as the preferred service class and classes C andD as not allowed. Activities belonging to service class A, B, or E are all allowed on the shift, but an activity belonging toclass A is preferred.
A crew shift can designate one service class for which a percentage of its capacity is reserved.
• Contractor Capacities: A contractor capacity specified a service class to limit the type of work to be assigned to thecontractor by the scheduler.
• Shift Cost Profiles: A shift cost profile can be associated to specific service classes and/or service areas. Theseassociations do not restrict the use of the shift cost profile in any way; you can associate any shift cost profile to anyshift. Rather, the system uses these associations to recommend appropriate shift cost profiles when you are defining crewshifts.
• Dispatch Areas: A dispatch area is a predefined set of service areas and service classes that determine which activitiesand crew shifts a dispatcher is responsible for monitoring.
• Procedure Types: When a service class represents a primary function, it may reference a list of the Procedure Typesa crew has to perform when they start a shift assigned that primary function or change their primary function midshift.Refer to About Procedure Types for more information.

Oracle Real-Time Scheduler Server Application User Guide • 134
About Service AreasA service area is a logical boundary of an organization’s territory that may or may not be based on geography.
Service areas are associated with the following objects:
• Activities: Each activity is associated with a single service area.
• Mobile Workers: Mobile workers may typically work in specific service areas, which comprise their base service areas.
• Crews: Each crew shift is defined with a list of service areas in which its crew is allowed to work and service areas inwhich it is preferred to work. Lower costs are typically associated with preferred service areas.
• Shift Cost Profiles: A shift cost profile can be associated to specific service classes and/or service areas. Theseassociations do not restrict the use of the shift cost profile in any way; you can associate any shift cost profile to anyshift. Rather, the system uses these associations to recommend appropriate shift cost profiles when you are defining crewshifts.
• Periods of Unavailability (POUs): If a crew-related POU is associated with a service area, the scheduler will include atask for that POU in the schedules of associated crews that are covering any of these areas at the time of the POU event.
• Dispatch Areas: A dispatch area is a predefined set of service areas and service classes that determine which activitiesand crew shifts a dispatcher is responsible for monitoring.
• Scheduler Areas: A scheduler area is a predefined set of service areas, or subsets of them, covered by a particularscheduler.
• Override Time Windows: An override time window applies to a specific activity type and may be further restricted tospecific service areas.
Service TypesIf your company provides multiple types of services and divides the service territory differently for each type of service,you should indicate the Service Type associated with each service area. For the same reason your activity types should alsobe associated with the corresponding service type. This information is used by the system when determining the service areafor an activity. Since service areas for different service types may overlap for a specific location, the system considers theactivity type’s service type to determine the appropriate service area. Service areas of the same service type cannot overlap.
Services might include:
• Utilities: gas, electric, water
• Non-Utility: grocery, appliances, commercial goods
• and so on...
Service Area HierarchyAssociate service areas with the territory hierarchy structure, as defined by your organization, by populating the ServiceArea Hierarchy field with the immediate hierarchy unit belonging to each service area. You must use the Service AreaHierarchy portal to define the hierarchy before you can associate service areas with it. Using hierarchies can help withreporting and also allows for advanced searching and/or filtering in the Gantt and from related records. Refer to AboutService Area Hierarchies for more information.
Service Area MapsSelect the Map tab to upload and view the geographic boundaries of the service area. Geographic boundaries must be drawnin an external Geographic Information System (GIS) tool. The resulting ordinates can then be copied and pasted by clickingon the Edit Text button and entering them as the Polygon Definition. Ordinates must be entered as comma delimited inlongitude, latitude order.

Oracle Real-Time Scheduler Server Application User Guide • 135
If you have uploaded the geographic boundaries of your service areas the CDI map can show the dispatcher's service areasand service territories when those layers are selected.
The portal may also include a Covering Schedulers zone which indicates the list of schedulers that cover the service area.
About Service Area HierarchiesService Area hierarchies organize service areas into logical structures of up to three levels that represent their position inrelationship to other service areas.
For example, your business practices may require service area hierarchy levels of Division, District, and County.
The portal defines the name, description, and level of the selected hierarchy. They also indicate the parent hierarchy level,or the level that this level reports up to. The meaning and usage of hierarchy levels is entirely dependent upon your businesspractices, however hierarchies can facilitate easier searching and/or filtering in related records.
You can download and upload hierarchies to and from a spreadsheet. Download a hierarchy from the info zone usingstandard Export functionality, make changes, then upload it back into the system.
Load a hierarchy into the application by clicking the Upload Hierarchy link in the toolbar and uploading a properlyformatted spreadsheet file. During the upload, records are created in the order that they are listed in the spreadsheet. Thismeans that if a service area is referenced as a higher level than another service area, the higher level should be listed first inthe sheet.
NOTE:All hierarchy nodes must be unique across the system, regardless of their hierarchy and level.
About Dispatch AreasA dispatch area is a predefined set of service areas and service classes that can be monitored by one or more dispatchers.
Dispatch areas are associated to dispatcher records, indicating which areas the dispatchers are allowed to monitor. Whendispatchers log on to start their shift, they can select which of the authorized dispatch areas they will monitor during thatshift.
The system determines which activities and crews the dispatcher is responsible for monitoring during their shift based onthe selected dispatch areas:
• A crew's shift matches a dispatch area if at least one of the shift’s service areas and at least one of its allowed serviceclasses are included in the dispatch area definition.
• An activity matches a dispatch area if its service area and at least one of its service classes are included in the dispatcharea definition.
• It is enough for an activity or shift to match one of the monitored dispatcher areas to be monitored by the dispatcher.
• A single dispatch area may be monitored by multiple dispatchers.
Dispatch areas are also used when forwarding alerts, to ensure that alerts are sent to the proper dispatchers.
About Alert TypesAlert types define common attributes and behavior associated with conditions that require human attention, or alerts.
The alert type can specify a creation algorithm that monitors system data and raises an alert if needed. A creation algorithmis not required if there is another mechanism that raises alerts of this type.

Oracle Real-Time Scheduler Server Application User Guide • 136
NOTE: The alert creation algorithm is called by the alert type batch monitor process. This process should be scheduledto run frequently to ensure that alerts are raised in a timely manner.
The alert type can also specify an evaluation algorithm that checks to see whether the underlying condition for an alert ofthis type has been resolved so the alert can be automatically closed.
NOTE: The alert evaluation algorithm is called by the alert batch monitor, which should be scheduled frequentlyenough to ensure that alerts are evaluated and recycled in a timely manner.
The alert type can also be defined with the following:
• A priority level for an alert type, which controls the order in which the alerts of this type are displayed in the alert queue.
• A creation threshold time, in minutes. For example, a crew idle alert is raised if a crew is idle more than the amount oftime specified in the creation threshold.
• The length of time before the alert automatically expires or is recycled to another dispatcher. If the currently assigneddispatcher does not respond to the alert within this number of minutes, the system reassigns the alert to anotherdispatcher.
• A snooze feature, similar to the snooze on an alarm clock. You can set the length of time to snooze (stop issuing alerts)before redisplaying alerts of this type in the alert queue. You can also indicate whether the dispatcher may choose asnooze time in the alert queue. Snoozing is not available for some alerts, such as those for missed appointments or otherevents that happened in the past.
• Enable or disable the manual close option for an alert type. If manual close is not enabled, then the condition that raisedthe alert must be cleared in order for the alert to be closed.
• Whether or not a sound is played when the alert appears in the dispatcher's queue to better attract the dispatcher'sattention. A sound is only played if a sound file and parameters are set up on the master configuration.
• An e-mail address where messages will be sent if an alert is raised and no available dispatcher can be found to address it.
• A restricted list of activity types for which this type of alert would be raised. If no activity types are specified alerts ofthis type are raised for any type of activity.
About Key Performance Indicators (KPIs)Key performance indicators (KPIs) are quantifiable measurements used to monitor and evaluate performance.
KPIs are displayed on the KPI Summary zone on the CDI portal and support dispatcher decision making and in-dayexception handling. A KPI is either crew shift-oriented (for example, the number of idle crews) or activity-oriented (thenumber of appointments in jeopardy). The user can click a KPI to narrow the scope of data to better address those shifts oractivities contributing to the KPI. Clicking a shift-oriented KPI typically impacts only the data displayed in the SchedulingGantt zone, while clicking an activity-oriented KPI impacts both the Scheduling Gantt and the Activity Search.
If a KPI is actionable, the KPI will appear as a link on the KPI Summary zone. This allows the dispatcher to drill in to aKPI specific CDI portal where actions can be taken to address the underlying condition. If a KPI is not actionable, the KPIappears as plain text for information purposes only.
Each KPI has an associated plug-in (algorithm) that defines how the KPI is calculated. The plug-in also identifies whichshifts to include in the Scheduling Gantt and which activities to include in the Activity Search when the user drills in tothe KPI specific CDI portal.
Alert Based KPIsWhen you define a KPI, you must specify the algorithm used to calculate the KPI and indicate whether or not the KPI isalert-related. If a KPI is alert-related, you must also specify the corresponding alert type. (If the KPI is alert-related, an alertcondition is associated with the same underlying conditions as the KPI.) The KPI record also defines the normal, warning

Oracle Real-Time Scheduler Server Application User Guide • 137
and severe thresholds values for the KPI. If the KPI value is less than the normal threshold, the KPI will not be presented tothe dispatcher, even if it is actionable.
KPIs and DispatchersKPIs are associated to dispatcher records, indicating which KPIs will be monitored during the dispatcher shifts. Adispatcher is not allowed to choose which KPIs to monitor when they start their shift. Instead the list of KPIs that they areassigned to monitor is defined on the dispatcher record.
Alert based KPIs count the number of related alerts for activities/shifts that the dispatcher actively monitors regardless ofwhether or not they are assigned to that dispatcher in the alert queue. For example, if there are multiple dispatchers coveringthe same dispatch area the KPI counts would appear for all of these dispatchers even though the alerts would not necessarilybe assigned to all of them.
About Geographic AreasGeographic areas define areas that can be represented on a map. Using a general geographic area, you can represent regionssuch as the entire company territory, certain dense population areas and so on.
Speed profile geographic areas represent the specific region on the map that is impacted by a speed profile. Configuringthese geographic areas allows the scheduler to calculate more accurate travel times by adjusting the average travel speedswithin the map area. Refer to About Speed Profiles for more information.
These areas can be configured to appear as custom layers in the CDI similar to alert areas. Associate your geographicarea with a specific custom usage to represent its category or the broad purpose you use it for. The scheduler factors in thegeographic areas that overlap a scheduler area. Next you can select the Map tab to draw an area on the map to define themap boundaries of the geographic area. Draw a shape on the map to define the geographic boundaries of the area. Click theDraw button and select a shape to begin drawing. Click the Edit Text button to modify the geocoded coordinates or uploadthem from an external system, as needed. You can also zoom in and out on the map or pan around the map using the toolson the left.
Defining Task TypesA task type defines the attributes of a particular type of activity, period of unavailability, break or non-productive task. Thefollowing sections provide information on defining these various task types.
Defining Activity TypesUse this procedure to define activity type attributes.
To maintain existing activity types, select Admin Menu > Service Management > Task Type, then use standard actionsto edit, duplicate, or delete an activity type record.
To define a new activity type:
1. Select Admin Menu > Service Management > Task Type+.
If your system supports more than one activity type business object, you will be prompted to select a business object forthis activity type.
2. Complete the fields and sections according to your business practices.
3. Click Save.
You can now create new activities of this type. You can also associate this activity type with one or more shift cost profiles,dispatch areas, or crew shifts.

Oracle Real-Time Scheduler Server Application User Guide • 138
Defining a Period of Unavailability Task TypeUse this procedure to define a type of POU task used for tracking crew attendance of a POU event.
The system uses a single POU task type, specified in the master configuration, to create all POU tasks. This POU task typeis typically defined during implementation and should not need to be changed. The POU task type does not contain anyspecific attributes; the attributes of the POU are defined in the POU record.
Prerequisites: None
To maintain existing POU types, select Admin Menu > Service Management > Task Type, then use standard actions toedit, duplicate, or delete a POU task type record.
To define a new POU task type:
1. Select Admin Menu > Service Management > Task Type +.
If your system supports more than one POU task type business object, you will be prompted to select a business objectfor this task type.
2. Enter the task type name and a meaningful description.
3. Select the business object to use when creating POU tasks of this type.
4. Click Save.
Defining Break TypesUse this procedure to define types of breaks that can be added to crew shift schedules.
Prerequisites: None
To maintain existing break types, select Admin Menu > Service Management > Task Type, then use standard actions toedit, duplicate, or delete a break type record.
To define a new break type, follow these steps:
1. Select Admin Menu > Service Management > Task Type+.
If your system supports more than one break business object, you will be prompted to select a business object beforecontinuing.
2. Enter a name and meaningful description for the break type.
3. Enter the break window duration and the break duration.
4. Select the business object to use when creating breaks of this type.
5. Click Save.
You can now add breaks of this type to crew shifts.
Defining Non Productive Task TypesUse this procedure to define types of non productive tasks that can be added to crew shift schedules.
Prerequisites: None
To maintain existing non productive task types, select Admin Menu > Service Management > Task Type, then usestandard actions to edit, duplicate, or delete a non productive task type record.
To define a new non productive task type:

Oracle Real-Time Scheduler Server Application User Guide • 139
1. Select Admin Menu > Service Management > Task Type+.
2. Select a business object for the non productive task type.
3. Enter a name and meaningful description for the non productive task type.
4. Enter the scheduling window duration and the duration of the non productive task
5. Select the business object to use when creating non productive tasks of this type.
6. Click Save.
You can now add non productive tasks of this type to crew shifts.
Adding an Attachment to an Activity TypeUse this procedure to add an attachment to an activity type. Attachments that are added to activity types are included withall activities of that type.
You must already have created the attachment in the Attachments portal. You cannot add attachments to activity types “onthe fly”.
1. Navigate to the appropriate Activity Type record.
2. Click the Attach link in the Attachments zone.
3. Enter or search for the appropriate Attachment ID and click OK.
Defining Priority ProfilesUse this procedure to define a set of allocation factors used by the scheduler to prioritize the scheduling of an activityrelative to other activities.
Prerequisites: None
To maintain existing priority profiles, select Admin Menu > Service Management > Priority Profile, then use standardactions to edit, duplicate, or delete a record.
To define a new profile, follow these steps:
1. Select Admin Menu > Service Management > Priority Profile+.
If your system supports more than one priority profile business object, you will be prompted to select a business objectfor this priority profile.
2. Complete the fields according to your business practices.
3. Click Save.
You can now associate this priority profile with one or more activity types.
Defining Work ProfilesUse this procedure to establish date and time restrictions that can be associated to activity types.
1. Navigate to the Admin Menu > Service Management > Work Profile+.
You can also navigate to the portal and click the Add link.
2. Select the appropriate value for the Work Profile Business Object field and click OK.

Oracle Real-Time Scheduler Server Application User Guide • 140
If your organization has not configured any custom work profile business objects, this step is skipped.
3. Enter a unique descriptive name and a description.
4. Complete the remaining fields according to your business processes.
5. In the Time Windows section, use the + and – signs to add and remove time windows. Enter the beginning and endingday and time for each time window that is valid for this appointment booking group.
6. Click Save.
Once you define the work profiles, you can associate them to activity types as appropriate.
Defining Appointment Booking GroupsUse this procedure to define a set of valid time windows for scheduling appointments.
Prerequisites: None
To maintain existing appointment booking groups, select Admin Menu > Service Management > Appointment BookingGroups, then use standard actions to edit, duplicate, or delete a record.
To define a new appointment booking group:
1. Select Admin Menu > Service Management > Appointment Booking Group+.
2. Select the business object that provides the best base definition for the appointment booking group that you need tocreate.
3. Create a unique appointment booking group name and enter a description.
4. Complete the additional fields, if any, according to your business practices.
5. In the Time Windows section, use the + and – signs to add and remove time windows. Enter the beginning and endingday and time for each time window that is valid for this appointment booking group.
6. Click Save.
You can now associate this appointment booking group to one or more activity types as appropriate.
Defining Service ClassesUse this procedure to define a broad categorization of activity types that can be used to restrict a crew shift to performingcertain types of work.
Prerequisites: You must define activity types before you can associate them with a service class.
To maintain existing service classes, select Admin Menu > Service Management > Service Class, then use standardactions to edit, duplicate, or delete a record.
To define a new service class:
1. Select Admin Menu > Service Management > Service Class+.
If your system supports more than one service class business object, you will be prompted to select a business object forthis service class.
2. Enter a name and meaningful description for the service class.
3. Select one or more activity types that belong to this service class.
4. If this service class is used as a primary function, enter any procedure types that should be completed by the crew whenassigned this primary function.

Oracle Real-Time Scheduler Server Application User Guide • 141
5. Click Save.
You can now associate this service class with one or more shift cost profiles, dispatch areas, or crew shifts.
Defining Service AreasUse this procedure to define a logical boundary of an organization’s territory that may or may not be based on geography.
Prerequisites: None
To maintain existing service areas, select Admin Menu > Service Management > Service Area, then use standard actionsto edit, duplicate, or delete a record.
To define a new service area:
1. Select Admin Menu > Service Management > Service Area+.
If your system supports more than one service area business object, you will be prompted to select a business object forthis service area.
2. Enter the service area name and a meaningful description.
3. Click Save.
You can now associate this service area with one or more mobile workers, dispatch areas, shift cost profiles, schedulerareas, or crew shifts.
Creating Service Area HierarchiesUse this procedure to define a level in your organization's hierarchical structure for service areas.
Prerequisites: Your organization must have established hierarchy levels according to the guidelines in the configurationguide.
1. Select Admin Menu > Resource Management > Service Area Hierarchy +.
You can also navigate to the portal and click the Add link.
2. Select the appropriate value for the Service Area Hierarchy Business Object field and click OK.
If your organization has not configured any custom service area hierarchy business objects, this step is skipped.
3. Complete the fields according to your business processes.
Note: All hierarchy nodes must be unique across the system, regardless of their hierarchy and level.
4. Click Save.
Once the hierarchy level is created, navigate to the appropriate service areas to associate them with the level as needed.
Uploading a Service Area Hierarchy Using a SpreadsheetUse this procedure to define a full service area hierarchy.
1. Select Admin Menu > Service Management > Service Area Hierarchy.
2. Click the Upload Hierarchy link.
3. If your system supports more than one crew hierarchy business object, you will be prompted to select a business objectto define the base attributes for the hierarchy.
4. Verify that the spreadsheet you want to upload includes the columns indicated in the upload dialog box.

Oracle Real-Time Scheduler Server Application User Guide • 142
Note: All hierarchy nodes must be unique across the system, regardless of their hierarchy and level.
5. Click the CSV File to Upload button.
6. Browse to the appropriate file and click the Submit button.
During the upload, records are created in the order that they are listed in the spreadsheet. This means that if an entity isreferenced as a higher level to another entity, the higher level should be listed first in the sheet.
Once the hierarchy is created, navigate to the appropriate service areas to associate them with the lowest level as needed.
Adding Service Areas to HierarchiesUse this procedure to add a service area to a hierarchy.
The hierarchy levels must be defined.
1. Navigate to the Service Area portal.
2. Search for and select the appropriate Service Area.
3. Populate the Service Area Hierarchy field with the lowest level of the hierarchy that it belongs to.
4. Click Save.
Once the hierarchy is created, navigate to the appropriate service areas to associate them with the lowest level as needed.
Defining Dispatch AreasUse this procedure to define a set of service areas and service classes that determine which activities and crews a dispatcheris responsible for monitoring.
Prerequisites: You must define service areas and service classes before you can associate them to a dispatch area.
To maintain existing dispatch areas, select Admin Menu > Service Management > Dispatch Area, then use standardactions to edit, duplicate, or delete a record.
To define a new dispatch area, follow these steps:
1. Select Admin Menu > Service Management > Dispatch Area+.
If your system supports more than one dispatch area business object, you will be prompted to select a business objectfor this dispatch area.
2. Enter a name and meaningful description.
3. Select the service areas to be monitored by this dispatch area.
If you do not select any, the dispatch area will cover all service areas.
4. Select the service classes of work to be monitored by this dispatch area.
If you do not select any, the dispatch area will cover all service classes.
5. Click Save.
You can now associate this dispatch area with one or more dispatcher records.

Oracle Real-Time Scheduler Server Application User Guide • 143
Defining Alert TypesUse this procedure to define common attributes and behavior associated with alerts of a given type.
Prerequisites: None
To maintain existing alert types, select Admin Menu > Service Management > Alert Type, then use standard actions toedit, duplicate, or delete a record.
To define a new alert type:
1. Select Admin Menu > Service Management > Alert Type+.
If your system supports more than one alert type business object, you will be prompted to select a business object forthis alert type.
2. Complete the fields in the Main section.
3. Click Save.
You can now create alerts of this type. You can also associate this alert type to key performance indicators (KPIs).
Defining Key Performance Indicators (KPIs)Use this procedure to define a quantifiable measurement that supports dispatcher decision making and in-day exceptionhandling.
Prerequisites: If a KPI is alert-related, you must define alert types before you can associate them to KPIs. Each KPI isassociated to a plug-in that determines how the KPI is calculated. The plug-in and the calculation algorithm must have beenpreviously defined.
To maintain existing KPIs, select Admin Menu > Service Management > KPI, then use standard actions to edit,duplicate, or delete a record.
To define a new KPI, follow these steps:
1. Select Admin Menu > Service Management > >KPI+.
If your system supports more than one KPI business object, you will be prompted to select a business object for thisKPI.
2. Complete the fields in the Main section.
3. Click Save.
You can now associate this KPI with dispatchers, so they will be able to monitor the KPI during their shifts.
Defining Remark TypesUse this procedure to define a particular type of comment that can be entered when an activity is completed.
Prerequisites: None
To maintain existing remark types, select Admin Menu > Service Management > Remark Type, then use standardactions to edit, duplicate, or delete a record.
To define a new remark type:
1. Select Admin Menu > Service Management > Remark Type+.

Oracle Real-Time Scheduler Server Application User Guide • 144
If your system supports more than one remark type business object, you will be prompted to select a business object forthis re mark type.
2. Enter a name and meaningful description for the remark type.
3. Click Save.
You can now associate this remark type with an activity type, indicating that remarks of this type can be entered by a crewwhen the activity is completed.
Defining Geographic AreasUse this procedure to define an area that can be represented on a map. Geographic areas appear in the CDI similar to alertareas, and can be configured to represent any map area.
1. Navigate to Admin Menu > Service Management > Geographic Area+.
You can also navigate to the portal and click the Add link.
2. Select the appropriate value for the Geographic Area Business Object field and click OK.
You can create a generic geographic area or a speed profile geographic area.
3. Enter a unique descriptive name and a description.
4. Complete the remaining fields according to your business processes.
5. Click Save.
Next you can select the Map tab to draw an area on the map to define the map boundaries of the geographic area.
Defining Map Areas on Geographic AreasUse this procedure to draw, on a map, the area represented by the defined geographic area.
1. Navigate to the appropriate geographic area.
2. Click the Map tab.
3. Draw a shape on the map to define the geographic boundaries of the area.
Click the Draw button and select a shape to begin drawing.
Click the Edit Text button to modify the geocoded coordinates, as needed. You can also zoom in and out on the map orpan around the map using the tools on the left.
4. Click Save.
Mail Management Administration
This section describes concepts and common tasks related to mail management administration.
Understanding Mail ManagementThis section describes entities used to support the management of mail messages.

Oracle Real-Time Scheduler Server Application User Guide • 145
About Mailing ListsMailing lists define a list of users for mail distribution purposes. When mail is sent to the list, each user receives a copy.
Mailing lists have a status of active or inactive. Mail cannot be sent to inactive lists.
About Mail TemplatesMail message templates establish standard settings for the fast creation of mail messages. Users can then select the templatewhen creating new mail and the pre-defined subject, message and other settings are automatically copied to the newmessage from the template.
The following options can be included on the mail template:
• Queue: The queue setting specifies how the message should be delivered: emergency or normal. If set as Emergency, thesystem delivers the mail on the emergency queue which is faster than the normal queue.
• Acknowledgement Required: The acknowledgement required value determines whether or not the message recipientis required to respond to the message. The system notifies the sender if the acknowledgement is not returned within aspecified time limit.
• Deliver Now: The deliver now setting tells the system whether or not to send the message immediately. If this is set toYes but the recipient cannot be contacted, the message sending fails. This could occur if the crew does not have a deviceor if they have not started their shift yet. If this is set to No, the system attempts to send the message immediately but ifsend is not possible, the system attempts to send the message later. For example, it waits until the crew starts their shift.
• Time Limit: The time limit establishes the amount of time the system waits before stopping delivery attempts. If themail requires acknowledgement, then the system only alerts the sender of unacknowledged mail while in this timelimit. For example, if the dispatcher has sent a message that is only relevant for today, he or she can set the time on themessage to expire at the end of the day. If the crew connects for the first time after the expiration time, the expired mailis not sent to their device. If this value is not specified the system assumes there is no time limit and continues to try andsend the message indefinitely.
• Group, User, Mailing List: Distribution options for the mail including sending it to a mailing group, a predefined list ofusers (mailing list) or a single user.Mailing Lists differ from Groups in that a group is dynamic. For example, a mailing group changes based on the loggedon or logged off status of members of the group.
Defining Mailing ListsUse this procedure to create a new mailing list.
Prerequisites: None.
1. Select Admin Menu > Mail Management > Mailing List+.
2. Enter a descriptive mailing list name and a description of the list.
3. Click Save.
Adding Users to a Mailing ListUse this procedure to add users to a mailing list.
Prerequisites: Mailing List must be configured.

Oracle Real-Time Scheduler Server Application User Guide • 146
1. Select Admin Menu > Mail Management > Mailing List.
2. Click the Broadcast icon for the appropriate mailing list.
3. In the Add User's Zone, enter selection criteria and click Refresh.
4. Click the Add button next to the name of the person to add.
Removing Users from a Mailing ListUse this procedure to remove users from a mailing list.
Prerequisites: Mailing List must be configured with users added.
1. Select Admin Menu > Mail Management > Mailing List.
2. Click the Broadcast icon for the appropriate mailing list.
3. Click the Remove button next to the name of the person to remove in the Mailing List Users zone.
Defining Mail TemplatesUse this procedure to create a new mail template.
Prerequisites: None.
1. Select Admin Menu > Mail Management > Mail Template+.
2. Enter a descriptive template name and a description.
3. Enter template body text as appropriate.
4. Enter details appropriate to defining the mail template.
5. Click Save.
Transfer of Goods Administration
This section describes concepts and common tasks related to transfer of goods administration.
Understanding Transfer of Goods ManagementTransfer of goods management refers to the creation of depots and all aspects of depot functions such as; depot profiles,depot task types, depot time windows and depot override time windows.
About DepotsA depot is a central location where goods are loaded for delivery or collected goods are unloaded. Depot functionalityenables the scheduling of drop-off or pick-up activities tied to specific depot locations.
Two types of depot operations are supported:
• Distribution - a depot where crews pick up goods for delivery.
• Collection - a depot where crews drop off goods picked up from customers.

Oracle Real-Time Scheduler Server Application User Guide • 147
NOTE: If a Depot location can function as both a distribution and a collection depot, one depot of each type should becreated to refer to the same location.
The Depot Class indicates whether the depot is for distribution or collection. A depot can only perform one of thesefunctions, not both. The Task Type indicates the type of task the system should use when creating tasks to visit this depot.Only depot task types can be selected. For example, you might have a task type to pick up keys, to pick up hazardous goods,or to drop off goods. Using a designated task type allows the description of the depot task everywhere in the system itis displayed to more clearly convey the purpose of the visit to the depot. Depot Site Delay indicates a fixed delay timeinvolved in transferring goods in this depot. For example the amount of time needed to access the depot center on each visitregardless of specific goods being transferred.
Depots can also be configured with depot cutoff time windows which establish specific dates and times when alldistribution depot runs that are planned to depart from the depot are cut off. Refer toAbout Depot Cutoff for moreinformation.
A depot may refer to a Depot Profile for shared settings of certain details. Refer to for more information.
Breaks at DepotsThe system can be configured to designate breaks which can only be taken at a depot. If a shift is not scheduled for depotwork, the break is scheduled as a standard break. To configure the system in this way, your implementation must the breaktype with the appropriate business object.
About Depot ProfilesDepot profiles can be set up to establish common settings for site delay, access time windows and service time windowsacross multiple depots. All other details are defined on each individual depot.
If a depot refers to a profile, the settings established by the profile cannot be overwritten. However, anything that is changedon the depot profile is also changed on any depot that references the profile.
The access time windows define time slots during which the depot is accessible for work. They also establish capacity limitswhich represent metrics such as maximum weight, maximum volume, or any other measurement.
The service time windows define preferred time windows within the normal operational hours. Lower cost is associatedwith scheduling work during preferred service time. Multiple depots can share this information by referring to a depotprofile which also has these values defined.
Depot profiles can also be configured with depot cutoff time windows which establish specific dates and times that whenall distribution depot runs that are planned to depart from the depot are cut off. Refer to About Depot Cutoff for moreinformation.
About Depot Related Activity TypesDepot based activities involve either picking up goods from a customer location and returning them to a depot center, orloading/collecting goods at a depot center and delivering them to a customer location.
Whether the activity is picking up goods or dropping them off is defined on the activity’s type. These activity type recordsneed to be defined using the depot related activity type business object.
Any task type record defines which business object to use when the system creates a task of this type. Depot related activitytypes should reference the depot related activity business object to leverage depot functionality.

Oracle Real-Time Scheduler Server Application User Guide • 148
About Depot Task TypesDepot task is used to track the crew's travel, arrival and completion of the depot visit. The system generates depot tasks asneeded when planning depot runs to and from depot centers.
The system uses the depot task type specified on the depot or depot profile level and, if not specified, it uses the depottask type defined on the master configuration, to generate the depot tasks. A depot task is dispatched to a crew, just like anactivity, and its status is updated and tracked in the same way.
About Vehicle Maximum CapacityAs some types of goods are transported, it is important to know how much of a load the transport vehicle can handle such asmaximum weight, maximum volume, maximum size or any other measurement as needed.
Maximum capacity of vehicles is defined on the vehicle type, not the crew shift. To specify these limits on a vehicle typeyour implementation must use the vehicle type business object that supports vehicle capacities.
Any shift that references the vehicle type is bound by those capacity restrictions. However this can be overridden on aspecific shift to handle exceptions. For example, if a dispatcher is aware that a truck has low tire pressure, he might overridethe maximum capacity to indicate that the truck cannot carry such a heavy load. Your implementation must use the baseshift business object that supports override vehicle capacities to enable this functionality.
NOTE: The types of vehicle capacity limits to consider such as weight, volume, size etc must be configured beforevehicle limits functionality can be used. Refer to the configuration guide for more information.
Defining Depot ProfilesUse this procedure to define depot profiles that will be used to establish common settings for site delay, access timewindows and service time windows across multiple depots.
To maintain existing depot profiles, select Admin Menu > Resource Management > Depot, then use standard actions.To define a new depot profile:
1. Select Admin Menu > Resource Management > Depot+.
You will be prompted to select a depot profile business object before continuing.
2. Enter a name and meaningful description for the depot profile.
3. Select the depot class to determine whether this is a profile for a distribution deport or a collection depot.
4. Enter a numerical value to indicate the site delay.
Site delay is a fixed delay involved in transferring goods in the depot. For example the amount of time needed to accessthe depot center on each visit regardless of specific goods being transferred.
5. Enter start and end dates and time to determine the Access Time Windows and Service Time Windows.
6. Select the business object to use when creating depots of this type.
7. Complete the additional sections according to your business practices and Save.

Oracle Real-Time Scheduler Server Application User Guide • 149
Defining DepotsUse this procedure to define depots that will indicate distribution or collection locations for crew shifts.
Prerequisites: The depot location is specified by referencing a common location.
To maintain existing depots, select Admin Menu > Resource Management > Depot, then use standard actions.
To define a new depot, follow these steps:
1. Select Admin Menu > Resource Management > Depot+
You will be prompted to select a depot business object before continuing.
2. Enter a name and meaningful description for the depot.
3. Select the depot class to determine whether this is a profile for a distribution deport or a collection depot.
4. Select a depot profile if you want the depot to use predefined values for the site delay and time windows depotconfiguration.
5. Enter an expiration date, if applicable.
The expiration date indicates if the depot will not be available after a certain date.
6. If you have not referenced a depot profile, enter or modify date and time values for the time windows.
7. Complete the additional sections according to your business practices and Save.
Defining Depot Task TypesUse this procedure to define the type of depot task the scheduler would use to create depot tasks. There should only be onesuch task type and it needs to be referenced on master configuration.
Prerequisites: None
To maintain existing depots, select Admin Menu > Service Management > Task Type, then use standard actions .
To define a new depot:
1. Select Admin Menu > Service Management > Task Type+
If your system supports more than one depot business object, you will be prompted to select a business object beforecontinuing.
2. Enter a name and meaningful description for the depot type.
3. Enter the depot window duration and the depot duration.
4. Select the business object to use when creating depots of this type.
5. Click Save.
You can now add depot tasks of this type to crew shifts.

Oracle Real-Time Scheduler Server Application User Guide • 150
Contractor Management Administration
This section describes concepts and common tasks related to contractor management administration.
Understanding Contractor Management AdministrationThis section describes concepts related to contractor management administration. This is only applicable if your companyutilizes the contractor functionality.
Contractor management administration involves defining resource group types and capacity types.
Any contractors that require access to the application must be set up as users in the User portal and their record mustreference the resource group of the company they work with. These users must only be allowed access to the certifiedapplication components for contractor users to ensure they have access to data related to their company only. Refer to theconfiguration guide for more information.
Refer to Understanding Contractor Management for more information.
About Resource Group TypesResource group types define classifications for various types of contractor companies doing work with your organization.
The group class indicates the nature of the contracting relationship with contractors of the type; whether they are shift basedor capacity based. When a contractor is shift based, their work is managed within the system like any other worker, vehicleor crew. When a contractor is capacity based, their work and resources are managed outside of the system and the contractoronly interacts with the system to approve, decline or complete work they have committed to take. Refer to About ResourceGroups for more information.
NOTE:Your organization must define a resource group with the “company” class if there is a requirement to prioritize workbetween your company and contractors. Prioritization is defined using Contractor Eligibility.
Only one company resource group type and one company resource group can be created for your company. Refer toDefining Resource Group Types for more information.
About Capacity TypesCapacities represent an external contracting company’s agreement to take on a certain amount of work of a certain type inspecific service areas for a period of time.
Capacity types define the capacities of a certain type. For example whether the committed amount of work specified in thecapacity is defined as number of hours or as number of activities. When capacities are defined, the capacity type determineswhether there is an Hours field or a Number of Activities field to establish the parameters of the capacity.
Contractors commit to capacities over time and work is booked based on those commitments.
Defining Resource Group TypesUse this procedure to define a classification for a resource, usually a contractor.
1. Navigate to the Admin Menu > Resource Management > Resource Group Type +.

Oracle Real-Time Scheduler Server Application User Guide • 151
You can also navigate to the portal and click the Add link.
2. Select the appropriate value for the Resource Group Type Business Object field and click OK.
If your organization has not configured any custom resource group type business objects, this step is skipped.
3. Enter a unique descriptive name and a description.
4. Complete the remaining fields according to your business processes.
If you are creating the one company resource group type for your organization, make sure to select the Companybusiness object to indicate that this is the designated resource group type for your organization.
5. Click Save.
Defining Capacity TypesUse this procedure to define capacity types.
Prerequisites: None.
1. Navigate to the Admin Menu > Resource Management > Capacity Type +.
You can also navigate to the portal and click the Add link.
2. Select the appropriate value for the Capacity Type Business Object field and click OK.
If your organization has not configured any custom capacity type business objects, this step is skipped.
3. Enter a unique descriptive name and a description.
4. Complete the remaining fields according to your business processes.
5. Click Save.
Device Management Administration
This section describes concepts and common tasks related to device management administration.
Understanding Device ManagementDevice management refers to the packaging and delivery of mobile application components to a mobile device terminal(MDT).
About MDTs and MDT TypesMobile data terminals (MDTs) or mobile devices such as laptops, cellular phones, tablets and other mobile devices may beused to interface with the system via the mobile application.
An MDT Type defines attributes common to mobile devices of a certain type such as the communication platformapplicable to that type, capabilities, logging, ports, attachment maximum size and so on.
Connection ModesThe mobile application can be used in a disconnected or connected mode. This determines whether or not the applicationcan be used through a browser, or if the data and application are stored locally on the mobile device. Please refer to AboutConnection Modes for more information.

Oracle Real-Time Scheduler Server Application User Guide • 152
CapabilitiesThe capabilities section on the MDT Type allows you to define the various features or functions supported by mobiledevices of this type, such as capturing photo or sound, attaching supporting documents or launching a geographic map.
Each capability is performed or carried out on the device using algorithms that are executed in the sequence indicated.When enabled, mobile users can capture digital content such as pictures and voice recordings related to an activity theywork which are then sent to the server as an attachment linked to the activity.
In the same way, when enabled mobile users can attach supporting documents that exist on their local device and are relatedto the activity they work. Content sent from the device, whether captured or simply attached, may be viewed on the deviceas well as the Activity portal when synchronized to the server.
The ability to view attachments also applies to attachments sent to the crew along with the activity from the server.
NOTE: If a capability is not explicitly enabled on the MDT Type, the corresponding function is not available on thedevice. Also, enabled function has to represent true device capabilities.
AttachmentsThe MDT Type also controls the types of attachments that can be opened on a device, and sets a limit for the attachmentsize. The Attachment Storage Size (MB) field indicates the document size limit, in megabytes, for attachments onmobile devices of the type. When a user attempts to download an attachment, the system validates that the total size of thedownload plus what is already on the mobile device will not exceed the maximum for the mobile device.
If you want the MDT Type to be able to open attachments, each attachment file type must be included in the Capabilitiessection as a capability of that MDT Type.
About Mobile Application Connection ModesThe mobile application can be used in a disconnected or connected mode. This determines whether or not the applicationcan be used through a browser, or if the data and application are stored locally on the mobile device.
Disconnected ModeIn disconnected mode the mobile application and data reside locally on the mobile device allowing the crew to work offlineas needed. This means the physical device has to be compatible with the mobile application requirements it runs locally.You must create an MDT record for each physical device that will communicate with the main server application. The typedefined for the mobile device has to be of a compatible mobile communication platform.
Mobile application users log on to a mobile device using the mobile application. The first time a mobile user runs themobile application, they will be required to register their mobile device. The system will ask for the Device Tag (assignedwhen the mobile device record (MDT) is created on the server) and the URL of the server application. As part of theregistration process, the system creates a unique registration ID and saves it in the MDT record. Once the device isregistered, the mobile user will be able to log on to the application from that device without further prompting.
Connected ModeIn connected mode neither data nor the mobile application reside locally on the accessing mobile device. Instead the dataand mobile application reside on the server and the user must be connected to the server at all times using their standardbrowser to access the mobile application.
NOTE: This should not be confused with the server application. This is the mobile application presented in a regularinternet browser.

Oracle Real-Time Scheduler Server Application User Guide • 153
The actual physical device used to access the mobile application in a connected mode is irrelevant since the applicationis not run locally and therefore registering the specific device in the system is not needed. The system still needs an MDTrecord for the mobile application to work properly, but it is not related to the physical accessing device.
To access the mobile application in connected mode the user needs to reference your organization's mobility server URLin a browser, as they would any website, and enter their username and password. After the user is authenticated the systemallocates an MDT record of a connected platform MDT Type from a pool of available records to the user. If all connectedmobile devices are already in use by other users the system duplicates an existing connected MDT record to create a newMDT record and allocates it to the user.
It is possible to log on with the same user from multiple devices. The first login is considered the “primary” user, has read/write abilities and receives any alerts or notifications delivered during login. All other logins with that same user can alsoedit and update data but do not receive notifications and alerts. Since all data is shared on the server in connected mode, allusers have access to the same data. An icon on the navigation bar allows users to take over as the primary user as needed ona given device.
NOTE: In connected mode, the system ignores the display option value configured on the MDT Type for the mobiledevice and instead dynamically changes the display option based on the available screen resolution (once per login).This means that for iPads and newer Android devices, which typically use 1024x768, the system recognizes them asXVGA (laptop). This is important when you are selecting a deployment, for these devices they should select a laptopdeployment.
Once allocated to a user, the mobile device is stamped with that user and is not available to another user. The systemgenerates new MDT records upon request but it requires at least one to be defined manually. To speed up the mobile deviceallocation process it is recommended to define a pool of connected MDT records in advance for as many crews that accessin that mode daily.
Regardless of the connection mode, when a mobile worker starts a shift from the mobile application the mobile device theyhave used is stamped on the started shift. If connected mode was used and the user closes the browser and logs in again, thesystem re-assignes the same mobile device stamped on the started shift to which the user belongs. Moreover, any user thatis part of that started shift and uses connected mode to access the mobile application would be assigned the same mobiledevice so they can all share data associated with working their shift.
When the shift is completed and all messages are processed transactional data is cleared from the connected mobile devicedata store on the server and the mobile device it is made available to all.
NOTE: As with all mobile device specific data, log files are also stored on the server and uniquely identified by mobiledevice.
The following functionality is not supported when accessing the mobile application in connected mode: GPS data is notcaptured or sent to the server, attachments, capture picture and capture sound functionality.
About Deployments, Deployment Types and Deployment PartsA deployment refers to a specific cut or build of a mobile application of a specific deployment type configuration and for aspecific language. It is a packaged set of application components needed to carry out mobile application functions using amobile data terminal (MDT).
Creating A DeploymentDeveloping mobile application components, such as business objects, UI maps, and service scripts, is done using the samedevelopment tools used for the main application. Once the mobile application components have been developed and tested,they must be gathered together and packaged for delivery. This is referred to as creating a deployment.
Each deployment is created based on a configuration defined by a deployment type which includes the authorized usergroups (user groups associated with a deployment type have access to all modules and functions in that deployment type),

Oracle Real-Time Scheduler Server Application User Guide • 154
supported MDT Types, messages used, and application objects included. The deployment type specifies which applicationobjects by referencing one or more deployment parts.
A deployment part is a collection of application components, such as business objects, UI maps, service scripts, etc.Deployment parts provide a way to create reusable groups of application components. To create a deployment part, youmust first gather the application components together into a bundle and then upload the bundle entities to the deploymentpart.
A deployment can only be created using the Create Deployment batch process. Use the New Deployment link onthe deployment type zone to submit the batch process for the current deployment type. Once the batch job runs and thedeployment has been created, it has to be manually activated before it can be deployed to any devices. Use the Deploymentportal to view existing deployments and change the status (activate or inactivate).
Deployment Selection on the Mobile DeviceOnce a deployment has been activated, it is available for download to mobile devices. When the mobile user logs on, thesystem looks for the most recent version of all active, qualified deployments based on the user's user group, language, andMDT Type.
• If no deployments are found, the system displays an authorization error message and prevents the user from continuing.
• If only one deployment is found and it is newer than the one currently deployed or there is none currently deployed, thenthe deployment is downloaded to the mobile device.
• If only one deployment is found and it is the same as the one currently deployed, then the deployment is not downloaded.
• If more than one deployment is found, the user can select the one they want to download. Once the applicationcomponents defined in the deployment are downloaded to the mobile device, the user can begin using the system.
NOTE: The new deployment will not be downloaded if unprocessed data from a previous shift still exist on the device.If the user is authorized to use the deployment currently on the device, it will be used; otherwise, an authorization errorwill be displayed.
Out of Date DeploymentsDeployments become out of date when a new mobile application version is released, the deployment type configurationchanges, or any underlying application component that is part of the configuration changes.
The Deployment Evaluation and Purge batch process evaluates existing deployment records and marks those that are outof date and purges out of date deployments that are older than a specified number of days. The number of days is specifiedon the batch control.
As a general part of accepting a new product release, new deployments are required. When the release is applied, allexisting deployments are marked as out of date so that it is clear which deployments need to be recreated.
When the system marks an active deployment as out of date it also creates a To Do entry in order for a user to create a newdeployment as needed. Creating a new deployment for the same deployment type and language automatically closes anyremaining ToDos for out of date deployments.
The Deployment portal displays an indicator message when the deployment is out of date while the Out of Date Itemszone list the out of date information. Mobile users are warned at login to their mobile device when they are use an outof date deployment. The user is allowed to continue but is advised to contact their administrator to synchronize theirdeployment.
Mobile Application VersioningThe mobile application communication architecture involves both client side and server side elements. These must becompatible or else errors will occur. To enforce compatibility, the system validates the mobile application version asfollows:
• When the mobile device attempts to connect to the server, the system versioning check validates whether or not themobile application version on the mobile device is compatible with the mobile application version on the server. If the

Oracle Real-Time Scheduler Server Application User Guide • 155
versions are not compatible, the device is not allowed to work online and no communication is sent to/from the server.In this situation, the mobile device must be upgraded to the correct version before it can work online again. If there wasdata on the mobile device, the user can continue offline and manually collect any data they need before the mobile deviceis upgraded. If a user tries to log on with an incompatible mobile application on their device, they receive a message.
• When a deployment is created on the server, it is marked with the version number of the server side mobile applicationcomponents that created it. Then when a mobile device logs on to download a deployment, only deployments withcompatible mobile application versions can be downloaded. This prevents the incompatible version situation describedabove.
Before the server is upgraded, all mobile devices should end their shift and be allowed to logoff. This will prevent the needfor manual data copying. Also, with each new product version existing deployments stamped with the older version aremarked as out of date.
The About screen on the mobile device shows the mobile application version number. This version is also marked on theMDT record on the online mobile device screen. Deployments show the mobile application version as well on the onlineuser interface.
About Data EncryptionYou have the option of enabling or disabling data encryption by altering the master configuration setting, Data Encryption,to either On or Off.
Each MDT Type also has a Data Encryption setting which you can set to "Default," "On," or "Off." If this is set to"Default" the mobile application uses the setting from master configuration. Otherwise the MDT Type takes the localizedsetting of on or off.
Encryption is not applicable when accessing the mobile application in connected mode.
Defining Deployment TypesUse this procedure to define attributes of an application to be deployed, including all deployment parts, authorized usergroups, supported MDT Types, and associated message categories.
Prerequisites: You must define all deployment parts, user groups, MDT Types, and message categories before you canassociate them to a deployment type.
To maintain existing deployment types, select Admin Menu > Device Management > Deployment Type, then usestandard actions to edit, duplicate, or delete a record.
To define a deployment type, follow these steps:
1. Select Admin Menu > Device Management > Deployment Type+.
2. If prompted, select the deployment type business object and click OK.
3. Enter a unique name for the deployment type and provide meaningful descriptions.
4. Select the service script to be executed when application starts.
5. Add all deployment parts, MDT Types, message categories, and user groups associated with this deployment type.
6. Click Save.
You can now create deployments of this type by clicking the New Deployment link. This submits the create deploymentbatch process to create the deployment.

Oracle Real-Time Scheduler Server Application User Guide • 156
Defining Deployment PartsUse this procedure to define a collection of deployment items, such as maintenance objects, business objects, UI maps,service scripts, business object schemas, algorithms, etc. A deployment type is made of deployment parts.
Prerequisites: You must define the export bundle containing the items that comprise this deployment part before you canupload them to the deployment part.
To maintain existing deployment parts, select Admin Menu > Device Management > Deployment Part, then usestandard actions to edit, duplicate, or delete a record.
To define a new deployment part, follow these steps:
1. Select Admin Menu > Device Management > Deployment Part+.
2. If prompted, select the deployment part business object and click OK.
3. Enter a name and meaningful description.
4. Select the bundle containing the items that comprise this deployment part.
5. Click Upload to upload the items in the bundle.
The bundle items are displayed in the Entities list. When you upload bundle entities, the system replaces all existingentities with the uploaded entities from the bundle.
6. If you want to remove an entity from this Deployment Part list, click the - sign to the left of the object in the Entitieslist.
7. Click Save.
You can now add this deployment part to a deployment.
Create a deployment part with the implementation specific objects needed for your business, such as task types, lookupvalues, etc. Add this deployment part to the deployment type used to create the deployment.
Defining MDT TypesUse this procedure to define the attributes associated with a particular type of mobile device, such as the display type andGPS settings.
Prerequisites: None
To maintain existing MDT Types, select Admin Menu > Device Management > MDT Type, then use standard actions toedit, duplicate, or delete a record.
To define a new MDT Type:
1. Select Admin Menu > Device Management > MDT Type+.
2. If prompted, select the MDT type business object and click OK.
3. Enter a unique name for the MDT type and provide meaningful descriptions.
4. Select the display type and GPS settings, then enter interval and timeout values.
5. Select the business object to use when creating mobile devices of this type.
6. Click Save.
You can now create mobile devices of this type.
Oracle Real-Time Scheduler Server Application User Guide • 157
Defining MDTsUse this procedure to define mobile data terminals that will communicate with the base application to send and receive workorder information.
Prerequisites: You must define the MDT Type before you can create mobile devices of that type.
To maintain existing MDTs, select Admin Menu > Device Management > MDT, then use standard actions to edit,duplicate, or delete a record.
To define a new MDT:
1. Select Admin Menu > Device Management > MDT+.
2. If prompted, select the MDT Type and click OK.
3. Enter a unique ID for the device in theDevice Tag field.
4. Enter the serial number of the device.
5. Enter values for logging and update intervals.
6. Click Save.
Make note of the Device Tag value. The first time a user logs onto the mobile application from this device, the system willprompt for this value. The Device Tag is required to register the mobile application to the MDT.
Activating and Deactivating MDTsWhen an MDT record is created, its status is set to Active. Use the Inactivate action button on the MDT portal to set thestatus to Inactive. The system will not allow users to log on to the mobile application from an inactive device. Use theActivate button on the MDT portal to set the status from Inactive to Active.
Getting the MDT Log FilesLog files are not sent to the server automatically; they are only sent on demand, usually for debugging or tracing purposes.
To send log files from a device to the server, click the Get MDT Log Files button on the MDT portal. This initiates arequest to the device to send the active log files to the server. Refer to the configuration guide for more information aboutMDT logging.Use the Log Files tab to view the contents of the log files.
Changing the Mobile Device Log LevelTo change the logging level for a mobile device, click the Set Current Log Level button on the MDT portal and then selectthe desired logging level (such as INFO or ERROR). An asynchronous request is sent to the device to update its logginglevel. Once the mobile device is updated, it will send a response back to the server to update the Current Log Level for thedevice on the server.

Oracle Real-Time Scheduler Server Application User Guide • 158
Reviewing Log Files from an MDTUse the Log Files tab on the MDT portal to view log files that were sent from the MDT to the server.
Prerequisites: The log files must have been previously sent to the server using the Get MDT Log Files button on the MDTportal.
To view log files for an MDT:
1. Select Admin Menu > Device Management > MDT.
2. Click the Log Files tab.
3. Enter the dates for which you want to see log files and click Refresh.
4. Click a log file in the search results to view the log contents.
Creating DeploymentsUse this procedure to create a new deployment using the batch deployment process.
Prerequisites: You must have already created the deployment type and any deployment parts, MDT Types, messagecategories, service scripts, and user groups associated with the deployment type.Note, the deployment can also be created more simply by clicking the New Deployment link from the Deployment Type.
1. Select Main Menu > Batch > Batch Job Submission+.
2. Do not enter a value in the Batch Job ID field. This will be assigned automatically by the system.
3. In the Batch Code field, select the batch control ID of the deployment creation batch control. (The base systemprovides batch control M1-DPLOY for this purpose.)
4. Enter batch control settings as desired.
The Desired Execution Date/Time defaults to the current date and time. If you want the batch job to run immediately,accept the default. If you want the job to execute at a future date, enter the date and time you want the job to start.
5. In the Deployment Type Parameter Value, enter the Deployment Type ID for this deployment. The deployment typedetermines which application components will be included in the deployment.
6. Click Save.
The batch job will run automatically at the Desired Execution Date/Time.
7. To check the progress or view the results of the batch job, select Main Menu > Batch > Batch Run Tree.
8. Search for the batch control ID ( M1-DPLOY ), then select it in the search results list.
Note the time at which the job ran, the status, and any processing details.
The status of the new deployment is Created. You must manually activate the deployment before it can be deployed to anymobile devices.
Activating and Inactivating DeploymentsUse this procedure to activate a deployment so that it can be downloaded to mobile devices. You can also inactivate adeployment so that it can no longer be deployed.
Prerequisites: The deployment must be created using the batch deployment creation process.

Oracle Real-Time Scheduler Server Application User Guide • 159
1. Select Admin Menu > Device Management > Deployment.
2. Use the Deployment Search zone to find the deployment you want to activate.
3. On the Deployment Portal, click the Activate or Inactive button in the Actions zone.
Once a deployment has been activated, it is available for download to mobile devices that logon on from the mobileapplication. When the mobile user logs on, the system looks for all qualified deployments and downloads the appropriateone. If more than one eligible deployment exists, the system prompts the user to select one. If the user's current shift is notcomplete, no downloads are performed.Once a deployment has been inactivated, it is no longer available for download to mobile devices.
Verifying Whether a Deployment is CurrentUse this procedure to verify whether or not a deployment is up to date.
Deployments become out of date when there is a change to any of the data that supports the deployment. If the servicedetects a mismatch between what has been deployed and the most current deployment data, a flag is displayed to indicatethat the mobile application version is out of date.
1. Select Admin Menu > Device Management > Deployment .
2. Search for and select the deployment you want to verify.
3. If it is not already marked as out of date by another process, expand the Out of Date Items zone to request the systemto evaluate the deployment now.
If determined as out of date the deployment is marked as such and the zone lists the out of date information.
Scheduler Administration
This section describes concepts and common tasks related to scheduler administration.
Understanding Scheduler Setup and AdministrationThis section describes concepts related to scheduler setup and administration.
About the Scheduling ProcessThe scheduling process automatically assigns tasks to crew shifts, matching field work requirements to crew capabilitiesand optimizing the routes traveled by crews. The goal of the scheduling process is to produce the most cost-effectiveschedule. The scheduling process considers a large number of configurable factors to arrive at the optimum schedule.
The scheduling process has the following basic inputs:
• Tasks: Tasks represent the types of "things" the crew might have to do during their shift. They can be any one of thefollowing, all of which are incorporated into the schedule as needed.
• Activities indicate the type of work, required skills, task duration, service location, time windows, and task-based costfactors.
• Periods of Unavailability tasks (POUs) indicate a fixed period of time as well as a location where the crew must toattend to some task unrelated to shift work, such as a meeting.

Oracle Real-Time Scheduler Server Application User Guide • 160
• Non productive tasks (NPTs) indicate a window of time as well as location where the crew must attend to some taskunrelated to shift work. The start time for a NPT is defined as an offset period so that it must start within a certainamount of time after the start of a shift, but is not scheduled for a particular time.
• Breaks indicate a broad window during which the crew may take their break, as well as the allowed break duration.
• Crew Shifts: Shift data includes crew capabilities, covered service areas and service classes, logon and logoff location,and shift-based cost factors.
• Map Data: All locations within the service territory are represented in the map data.
• Static Control Data: This includes global cost controls and appointment booking groups.
The scheduling process assigns each task a scheduled date/time on a particular shift of a crew. As part of the optimizationprocess, a task may be assigned, unassigned, and reassigned any number of times until its current scheduled shift starts. Thishappens when a crew logs on to the shift and the task is dispatched.
Dispatchers can manually override virtually all scheduling decisions made by the system.
About the Appointment Booking ProcessAppointment booking refers to how the host system (such as a customer relationship management or customer informationsystem) handles requests from the host for appointments and how it responds with available appointment windows. Theappointment booking process receives appointment requests from the host that specify the time periods for which thescheduler should return a list of available appointment windows. The process generates a set of possible appointmentwindows from which customers can choose.
If the activity being booked is part of a job, the request must include all of the activities in the job. The possible timewindows returned reflects available times for the target activity as well as all of the other activities in the job. Refer to AboutTime Windows for more information.
Appointment booking, conditional booking and chooser requests cannot be used for activities that have dependent activities.
Conditional BookingWhen an appointment is booked from an outside application, the host requests a list of available appointment windows fromthe scheduler. By the time the user makes a selection for a specific appointment window there is a chance that the selectedwindow may no longer be available. Therefore the booking is sent as "conditional" pending the availability of the selectedappointment window. If the activity is still available, it is created as per usual. However, if it is no longer available, then theactivity is not created.
If the activity being booked is part of a job, the request must include all of the activities in the job.
Conditional booking cannot be used for activities that have dependent activities.
Re-BookingThe system allows users to change an existing appointment in the host application. When the user requests a change to theappointment, similar to requesting an appointment for the first time, the host system reconciles with the base application topresent the user with a new set of available appointment windows to match the new booking details. Typically the requestto rebook an existing appointment is sent from the host as conditional upon the ability to accommodate the new bookinginstead of the original booking. As such, if the new booking is no longer available or the old booking can no longer becanceled, the rebooking attempt fails and the user is notified of the situation. Once rebooking is confirmed, the systemcancels the original booking and schedules the new one instead.
If the original booking is already dispatched to a crew, the system cannot guarantee its successful recall from the crew asthis requires human intervention. If the rebooking request states that it must be fully guaranteed then the rebooking attemptfails and the user is notified of the reason. If however the rebooking request can tolerate it not being guaranteed, then thesystem alerts a dispatcher to follow up with the crew on the cancellation of the original appointment but at the same timealso schedules the new booking. If the dispatcher manages to cancel the original appointment in time then it is canceled. If it
Oracle Real-Time Scheduler Server Application User Guide • 161
is not canceled in time then both the original and the new booking are scheduled temporarily until the dispatcher cancels thenew one.
If the activity was manually allocated to a specific shift or locked to its depot run by a dispatcher then a subsequentrebooking change frees the activity from these allowing it to be fully rescheduled.
When rebooking activities that are part of a job, the new job composition must fully replace the old job composition so thatany activity that used to be in the old job and is no longer part of the new one is canceled.
Shift Auto-CompletionTo accommodate cases in which Oracle Real-Time Scheduler is used only for scheduling purposes, crew shifts can beautomatically marked as as completed. This capability automatically "works" the shift just as if a real crew worked it,completing activities based on scheduled times without the need for manual intervention.
To enable shift auto-complete, open Master Configuration from the Admin and broadcast the Global Configuration.Note that this is a global indicator and impacts all Crew Shifts in the application.
Once enabled you can configure your shifts by turning on auto completion for the shift using standard shift and shifttemplate edit functionality.
About SchedulersThe term scheduler refers to the system component that manages a single scheduling process. An implementation typicallyruns at least two schedulers to provide for backup, but may run additional sets of schedulers if required for scalability.
Each uniquely named scheduler is configured to manage a single scheduling process. Scheduling process responsibilitiesinclude:
• Holding
• Request Handler Only
• Optimization
• Optimization and Request
A holding scheduler does not schedule shifts or tasks. It is designed to capture tasks and shifts that cannot be assigned toany online scheduler. One and only one holding scheduler should exist. Any task or shift attached to a holding scheduler isevidence of a scheduling error.
A scheduler that handles requests can handle the following request types:
• chooser – returns a list of recommended shifts for an activity
• appointment booking - returns a list of valid possible appointments for an activity. Refer to About Short Term and LongTerm Booking for more information.
• conditional booking - confirms the schedule of an activity
• crew route and directions – returns the street level route as well as driving directions for a list of tasks in a crew shift'sschedule
Each scheduler is associated with a scheduler configuration that defines the scheduling parameters to be used by thatscheduler during the scheduling process. These parameters include cost controls, performance and optimization settings, andsettings to control logging, auto-dispatching, and other scheduler functions. Refer to About Scheduler Configurations formore information.
Each scheduler is also configured to cover a specific geographic area called a scheduling area. Multiple schedulers may beused to handle high task loads. Refer to About Scheduler Areas for more information.
Since schedulers are processes intended to continuously run without interruption it is important to always be able to knowif a scheduler is running or not (without requiring that users look at the server logs). Refer to About Monitoring Schedulersfor more information.

Oracle Real-Time Scheduler Server Application User Guide • 162
About Monitoring SchedulersSince schedulers are processes intended to continuously run without interruption, it is important to always be able to knowwhether or not a scheduler is running without having to review server logs.
Each scheduler record must be associated with a unique batch control that runs continuously without interruption. Thisbatch control manages and handles the execution of the scheduler. At run time the batch process determines the schedulerrecord associated with its batch control and handles operations requested on behalf of the scheduler. If marked online thenthe batch process starts the corresponding scheduler and if requested to be offline it instructs the scheduler to properlyterminate.
As standard batch processes, scheduler batch processes may be visible by an enterprise management console as well asstarted and monitored by an enterprise batch scheduler.
NOTE: Your implementation must configure a dedicated batch control for each scheduler as described in theConfiguration Guide for schedulers to work properly.
If necessary, a scheduler can be brought on or offline by using the Boot or Shut Down buttons, respectively.
NOTE:This does not cancel or start the scheduler’s batch process but rather guides the batch process to start or terminate itsassociated scheduler process. If you no longer need to use a certain scheduler you need to shut it down and contact yoursystem administrator to terminate the corresponding batch process and ensure it is not automatically started again.
The Scheduler Runtime Details section in the Scheduler portal provides information about the status of the scheduler,including the following:
• Running – The scheduler is online and running
• Requested Offline - The scheduler status was manually set to Offline
• Not Running – The scheduler is meant to be online but is not running. Typically a system administrator shouldinvestigate when this status is present.
• Unknown - The scheduler is not associated with a dedicated batch control so status monitoring is not possible. This is aninvalid configuration as all schedulers must be associated with their own unique batch control.
The scheduler also periodically reports various statistical measurements related to its current operation such as total numberof activities and shifts it manages, average cycle time, etc. If enabled on the scheduler’s batch control, the system uses thisinformation to evaluate how well the scheduler currently works and rate its level of service accordingly. You can referencethe Level of Service algorithm defined on the scheduler‘s batch control for more information on how scheduler level ofservice is determined.
Access the Batch Control portal to review information about the control, or you can find even more information about therunning state and level of service of all your schedulers by accessing the Batch Control Global View portal.
The Service Area portal may also include a Covering Schedulers zone which indicates the list of schedulers that cover theservice area. Service areas are added for scheduler coverage as an option on the scheduler itself.
In addition, the Schedule tab on activities shows a scheduling status message as to why an activity is not scheduled. Forexample, there is no running scheduler covering the activity location, there is no shift with the appropriate skills, the activityis out of the scheduling horizon, there are activity data errors, etc.

Oracle Real-Time Scheduler Server Application User Guide • 163
About Scheduler AreasA scheduler area is a predefined set of service areas or geographic subsets of service areas, referred to as optimization areas,covered by this scheduler. Each scheduler has one scheduler area.
A scheduler is limited to scheduling tasks within its scheduler area. A scheduler area may comprise one or more serviceareas. If a scheduler area has too many tasks for a single scheduler, it may be broken down into smaller segments calledoptimization areas. Optimization areas are defined by a geocode pairs.
The Optimization Area field indicates whether coverage is specified in optimization areas or in entire service areas. Whenthe scheduling load for a service area is more than a single scheduler can manage, optimization may be further limited tosmaller subsets of that area. If enabled, these areas are defined in the Optimization Sets section.
The Service Area section indicates the service areas that make up the scheduler area, and the Service Area Tree zonedisplays a hierarchical representation of the scheduler area and the service areas that comprise the scheduler area.
Access the Scheduler Area Map tab to review the geographic boundaries of the scheduler area.
Oracle provides guidelines for planning and designing scheduler areas and optimization areas. Refer to the configurationguide for more information.
About Scheduler ConfigurationsA scheduler configuration is a predefined set of parameters and settings that control scheduler behavior.
This includes a defining the number of days in the future for which data should be for scheduling as well as long termbooking requests. Refer to About Short Term and Long Term Booking for more information.
All schedulers that have a scheduler area associated with the same service area must use the same scheduler configuration.
Cost profiles are a type of scheduler configuration that define your organization's scheduling cost preferences. Eachscheduler configuration record references a cost profile to define its scheduling cost parameters. Cost control parametersmay be shared by multiple scheduler configurations. Refer to About Cost Profiles for more information.
For a complete list and description of all scheduling parameters, see the Configuration Guide. (The system providesa description of each scheduler parameter in the embedded help available from the Scheduler Configuration portal.Descriptions are also displayed on the Parameter Definition portal.)
About Short Term and Long Term BookingThe scheduler uses a scheduling horizon to determine the number of days into the future to consider when scheduling crewshifts and activities.
Appointments that would be set outside of the scheduling horizon are considered by the scheduler as "long term"appointments. A scheduler configured to handle requests may be restricted to handle short term requests only (i.e. those setwithin the scheduling horizon), long term requests only or both.
The scheduler uses a long term horizon to determine the number of days into the future to consider for long term requests.The long term horizon must be same or larger than the scheduling horizon. Both horizons are defined on the schedulerconfiguration record.

Oracle Real-Time Scheduler Server Application User Guide • 164
About Cost ProfilesA cost profile is a type of scheduler configuration that establishes a pre-defined set of cost controls which can be referencedon multiple scheduler configurations.
Cost profiles can be defined to handle different situations then users can actively switch between cost profiles withoutshutting down the scheduler. This is done by changing the cost profile on the scheduler configuration. When the cost profileis changed, the scheduler responds immediately by optimizing work according to the changed cost profile.
Example situations which may cause you to switch cost profiles include:
• Time of year - winter work, summer work, etc.
• Strong thunderstorms - where different types of work may be preferred
• Sudden drop in temperature - where regulations prohibit turning off power to customers for non-pay
• Sudden high temperatures - where regulations prohibit turning off water to customers for non-pay
• A large backlog of certain types of work, where it has been determined it is ok to work more overtime
• and so on.
Defining cost profiles in the system involves creating the cost profile as a type of scheduler configuration. It is thenreferenced on the general scheduler configurations that are then applied to schedulers.
When you change a cost profile that is currently used by online schedulers, the schedulers are notified and acquire the newcost profile values automatically. The same applies to changing the cost profile reference on a scheduler configuration usedby online schedulers. There is no need to restart the schedulers to reflect cost control changes.
Refer to About Scheduler Configurations for more information.
About Speed ProfilesSpeed profiles define a collection of daily templates which delineate 24 hour speed factors that are associated with a type ofday (default, rush hour on a weekday, holiday, weekend and so on).
In regions where traffic issues have a significant impact on mobile worker travel times and schedules, it is beneficial for thescheduler to be able to factor in these traffic patterns when scheduling shifts and calculating travel. Your implementationcan set up speed profiles; templates that define specific days and times where travel speeds are impacted. For example,the speed profile for weekday rush hour would indicate slower speeds than the profile for a week day at mid day or on theweekends. Once the speed profiles are defined, you can draw the related geographic areas to show the specific regionswhere the speed profiles apply. This information improves the scheduler’s travel time estimates by taking into accounttraffic patterns based on day of the week and time of day. The scheduler factors in the speed areas that overlap the schedulerarea. Note that these are indications of relative speeds, not time.
The speed profile does not impact which road or route the scheduler selects or adjust the travel speeds in real time based onthe geographic area of the destination. Rather, it allows the scheduler to make a more precise travel time calculation withthe expected traffic conditions taken into account.
Speed Profile OverridesOn any speed profile geographic area, you have the option to override the speed profile on a specific date. For example, ifyou know that there is a major event which will slow down traffic during a time frame which would normally be consideredoff hours, you can apply an override and either enter the speed factors manually or use a daily template to define theoverride.

Oracle Real-Time Scheduler Server Application User Guide • 165
About Scheduler ParametersScheduler parameters control how a particular scheduler will schedule tasks, optimize routes, and dispatch activities tocrews.
Parameters are typically defined as part of the implementation process. The Parameter Definition portal allows adminusers to set the minimum, maximum, and default values for each scheduler parameter. This portal also displays detaileddescriptions of all parameters.
Most scheduler parameters are associated with a scheduler configuration and their values are maintained on the SchedulerConfiguration portal. Entity parameters are associated with other objects in the system, such as shifts or activity types, andare maintained on the maintenance portals for those objects.
For a complete list and description of all scheduling parameters, see the Configuration Guide.
Parameter TypesThis topic describes the different types of scheduler parameters.
You can view scheduler parameter definitions and their default values on the Parameter Definition portal. You can alsofilter by parameter type.
Parameter Type Description
appointment generation Controls how appointment booking requests from the host are
processed.
connection Controls how the scheduler sends and receives data to/from client
applications.
cost control Defines how to calculate and apply costs used to build the most cost-
effective schedule.
entity Defines shift-based and task-based parameters that are applied
against global parameters.
general administration Defines system-wide scheduling parameters.
logging Controls how and where the scheduler creates log files.
map configuration Defines mapping parameters used to build and optimize routes.
optimization behavior Defines parameters that affect optimization of the scheduler.
optimization performance Defines parameters that affect system performance.
real time Controls the scheduler's real-time functionality.
reference time Controls how and when reference time is updated. (Reference time is
the time used by the scheduler as input to cost-calculations that are
sensitive to the current time.)
site Defines the default (UTC) Coordinated Universal Time and the error
translation file used to translate error messages at initialization.
scheduler manager Defines defaults and settings for the scheduler manager process.
Oracle Real-Time Scheduler Server Application User Guide • 166
Understanding Cost ParametersThe system uses cost control parameters to encourage or discourage particular actions within the system. Applying costcontrols allows the system to produce the most cost-effective schedule while adhering to your business rules and processes.
Cost Parameters are of two types:
• Relative: Cost factors that work as multipliers against global costs. For example, consider that an organization has full-time crews and contractors that may be called on to handle excess work. In order to encourage the system to schedulework to contractors only when no full-time crew is available, you could apply a relative cost of ten to contractor shifts,indicating that these shifts would cost ten times as much to use in the schedule as a full-time crew shift. Examples ofrelative cost parameters are Relative Shift Cost, Relative Late Cost. Relative costs factors default to a value of 1.0.
• Global: Costs that are applied globally at a base level within the schedule. Examples of global cost settings are LateCost, Shift Cost, Travel Time Cost, and Travel Distance Cost.
Global costs can be of various types:
• Flat: Costs that are applied once, when the object is activated, and removed when the object is no longer being used. Thecost for using this object does not go up over time but stays at a standard or flat cost. For example, the global Shift Costis the flat cost of utilizing a shift. The Relative Shift Cost parameter can be used as a multiplier against the flat cost.
• Variable: Costs that are applied per use or per unit. These are also referred to as running costs. Travel Time Cost andTravel Distance Cost parameters fall into this category.
• Complex: Costs that increase exponentially and are nonlinear in nature. Complex costs are determined by mathematicalfunctions controlled by a group of three cost control parameters:
Cost Value a represents the initial slope for x>=0 (at x=0).Cost Value b represents the doubling rate (the slope of the function doubles every x_B).Cost Value c represents a flat additional cost, creating an initial step.
For more information about complex costs, see the Configuration Guide.
• Time-Dependent: Factors that adjust shift-based costs based on when a shift begins. Six independent variables (TDCValues A-F) are used to define time-depending costs:
• TDC Value A: Initial value for the time-dependent cost factor. This value must be greater than or equal to zero.
• TDC Value B: Controls how long the initial TDC Value A applies, in hours.
• TDC Value C: Controls the shape of the curve between the initial value and the final slope, referred to as thetransition curve. The valid range is 0.1 to 10.
• TDC Value D: Number of hours after which the function changes from curved to linear. This value must be greaterthan TDC Value B.
• TDC Value E: Factor at the point at which the function changes from curved to linear. (This the final factor for thetransition curve and the initial factor for the final curve.) This value must be greater than or equal to zero.
• TDC Value F: Controls the gradient of the final slope (units/hour).
For more information and examples of time-depending costs, see the Configuration Guide.

Oracle Real-Time Scheduler Server Application User Guide • 167
About the Scheduler RegistryThe scheduler registry contains a record for each task, shift, appointment booking group, and scheduler configuration that isused by a scheduler.
Registry ObjectsAll objects associated with the scheduling process register themselves to the scheduler registry.
• An activity is registered with all schedulers that host its geographic location or at least its service area. (If a scheduler'sscheduler area is defined using optimization areas, then the activity registers itself to that scheduler only if the schedulercovers the activity location's geocode. If a scheduler is defined using service areas only, then the activity registers itselfto that scheduler if it covers its service area.)
• A shift is registered with all schedulers that host any of its service areas.
• A break is registered with all schedulers that host its shift.
• A POU task is registered with all schedulers that have a shift for the POU resource and covers any of the POU servicesareas, if any.
• Every appointment booking group is registered with all schedulers.
• A scheduler configuration and its cost profile are registered with all schedulers linked to that configuration.
Online scheduler monitoring processes update the scheduler registry automatically to remove shifts and tasks that no longerbelong to any of the scheduler's optimization areas (if used) or service areas (if no optimization areas are used), and toadd tasks and shifts that belong to one of the scheduler's service areas/optimization areas but are not already linked to thescheduler. This could happen if a scheduler's service areas/optimization areas are altered while the scheduler is running .
Posting ActionsThe system notifies scheduler managers about a change that was made to an entity by posting a change action onto eachscheduler’s registry record for the entity. Each scheduler manager then communicates this information to its schedulerprocess. Posting actions in the registry include:
Send: An entity has changed and the entire entity needs to be sent to the scheduler.Send Status: An entity's state has changed and state-related details for the entity, rather than the entire entity, need to besent to the scheduler.Send Schedule: Another scheduler manager has made a schedule change to an entity and schedule-related details needto be sent to the scheduler.Processed: The registry record has been processed by the scheduler. For example, an object that needed to be sent to thescheduler process was delivered.Remove: The system has deleted or cancelled an entity (or changed it so that it is no longer relevant to the scheduler)and the entity needs to be removed from the scheduling process (that is, it should no longer be considered forscheduling). After removing the object, the scheduler deletes the registry entry.
ErrorsIf any errors or warnings resulted from the posting action, they appear in the registry record. Depending on yourconfiguration, To Do entries may also be generated for scheduler registry errors. Verify that the M1-SCHED SchedulerMonitor batch process runs periodically to generate and manage these to do entries.
Read Plug-InsRead plug-ins are used to read registered objects and package them for transfer between the scheduler manager and thescheduling process. Read plug-ins are enabled for tasks, shifts, appointment booking groups, and scheduler configurations.For more information, see the Configuration Guide.

Oracle Real-Time Scheduler Server Application User Guide • 168
Defining Scheduler ParametersUse this procedure to view scheduler parameter definitions and edit the minimum, maximum, and default values that can beentered by the user for each parameter. Scheduling parameters are typically defined during system implementation.
Prerequisites: None
NOTE: Most scheduling parameters are associated with scheduler configurations and control how the schedulerprocesses tasks and shifts to arrive at the most cost-effective schedule. Use the Scheduler Configuration portal tospecify the parameter values for a particular scheduler.Some scheduling parameters are associated with crew shifts, activity types, or resources. Use the appropriatemaintenance portal to set these parameter values.
To view descriptions of all scheduler parameters and determine where each parameter value is set, see the SchedulerParameter table in the Reference Topics. Descriptions are also displayed on the Parameter Definition portal.
To maintain scheduling parameter definitions:
1. Select Admin Menu > Scheduler > Parameter Definition.
2. Select the parameter you want to maintain and click the Edit icon.
3. In the Value section, edit the default and, if appropriate, minimum and maximum values for this parameter.
4. Click Save.
Defining SchedulersUse this procedure to add or maintain an individual scheduler. Scheduler attributes include the application server (node),scheduler configuration, scheduler area, and process type.
Prerequisites: You must define the scheduler configuration and scheduler area before you can associate them to ascheduler.
To maintain existing schedulers, select Admin Menu > Scheduler > Scheduler, then use standard actions to edit,duplicate, or delete a record.
To define a new scheduler, follow these steps:
1. Select Admin Menu > Scheduler > Scheduler+.
If your system supports more than one scheduler business object, you will be prompted to select a business object forthis scheduler.
2. Complete all fields in the Main section.
3. Click Save.
When you create a new scheduler, its status is set to Offline. Use the Boot action to bring an offline scheduler online.
Starting or Shutting Down SchedulersUse this start a scheduler that is currently offline or shut down a scheduler that is currently online.
1. Select Admin Menu > Scheduler > Scheduler.
2. Select and broadcast the desired scheduler.
Oracle Real-Time Scheduler Server Application User Guide • 169
3. Click Boot to bring an offline scheduler online; click Shut Down to take an online scheduler offline.
Note: This does not cancel or start the scheduler’s batch process but rather guides the batch process to start or terminateits associated scheduler process. If you no longer need to use a certain scheduler you need to shut it down and contactyour system administrator to terminate the corresponding batch process and ensure it is not automatically started again.
Defining Scheduler AreasUse this procedure to define geographic areas to be scheduled by one or more cooperating schedulers.
Prerequisites: Before you create a scheduler area, identify its service areas and count the number of tasks expected tobe scheduled within the service areas. If the count exceeds the threshold for a single scheduler, then you should plan anddesign optimization areas within the service areas.
To maintain existing scheduler areas, select Admin Menu > Scheduler > Scheduler Area, then use standard actions toedit, duplicate, or delete a record.
To define a new scheduler area, follow these steps:
1. Select Admin Menu > Scheduler > Scheduler Area+.
If your system supports more than one scheduler area business object, you will be prompted to select a business objectfor this scheduler area.
2. Enter a name and meaningful descriptions.
3. If you want to define optimization areas for this scheduler, select Enabled from the Optimization Area drop-down.
4. Select one or more service areas to be managed by this scheduler.
5. If you enabled optimization areas in step 4, continue with the next step; if you will not be defining optimization areasfor this scheduler, click Save and exit this procedure.
6. Provide a name and meaningful descriptions for the first optimization set.
7. Enter the NW and SE longitude and latitude boundaries for this optimization set.
8. Enter the NW and SE longitude and latitude boundaries for the first optimization area within this optimization set.
9. Click the + sign next to the optimization area and repeat step 8 for each optimization area you want to define.
10. Click the + sign next to the optimization set and repeat steps 6- 9 for each optimization set you want to define.
11. Click Save.
Use the Map tab to review your optimization sets and area on a geographic map.
You can now assign this scheduler area to one or more schedulers.
Defining Scheduler ConfigurationsUse this procedure to configure a set of parameters that can be used by one or more schedulers.
Prerequisites: All parameters used by a scheduler configuration must have been previously defined. Parameters aretypically defined as part of the implementation process.
To maintain existing scheduler configurations, select Admin Menu > Scheduler > Scheduler Configuration, thenuse standard actions to edit, duplicate, or delete a record. (Refer to the Scheduler Configuration Actions below forinformation about additional actions.)
To define a new scheduler configuration:
1. Select Admin Menu > Scheduler > Scheduler Configuration+.

Oracle Real-Time Scheduler Server Application User Guide • 170
2. If prompted, select the scheduler configuration business object.
Based on the business object that is selected, you either create a cost profile or a scheduler configuration. You shouldalways create cost profiles first so that they can be referenced on scheduler configurations.
3. Complete the fields in the Main section and click Save.
You can now set the parameter values for the configuration and perform other actions, as described below.
Scheduler Configuration ActionsThe following table describes the additional actions you can perform from the Scheduler Configuration maintenanceportal.
To... Do this...
View parameters of a particular type Expand the parameter type section.
Edit the value of a parameter Expand the parameter type section and then click the Edit button to
the right of the parameter name. Enter the values on the Scheduler
Configuration Parameter screen and click Save.
Complete a scheduler configuration that is in a Pending state Click the Complete button in the Actions zone to indicate that the
scheduler configuration is complete.
Only complete configurations can be associated with online schedulers.
When a scheduler configuration is in the Complete state, you cannot
change any of its parameter values.
To change a completed scheduler configuration, you must set the
status back to Pending first.
If you need to change a scheduler configuration that is being used by
one or more online schedulers, you will need to duplicate it first, then
edit the copy and change its status to Complete. You can publish the
configuration as described below.
Changing a complete scheduler configuration When a scheduler configuration is in the Complete state, you cannot
change any of its parameter values, except its reference to a cost
profile.
The referenced cost profile can be changed at any time as described
below.
For all other changes to a completed scheduler configuration, you
must set the status back to Pending first. If the scheduler configuration
is being used by one or more online schedulers, you will need to
duplicate it first, then edit the copy and change its status to Complete.
You can publish the configuration as described below.
Publish a configuration The publishing action replaces an existing configuration with an
updated one. This has the advantage of keeping the previous
configuration intact. Refer to Publishing Scheduler Configurations for
instructions.
Change the cost profile If you need to switch any scheduler to use a different cost profile,
change the scheduler configuration to reference the new cost profile.
You can complete this action at any time, including when the scheduler
configuration is being used by online schedulers.
The change takes effect automatically without the need to stop and
restart the scheduler.
If you want to adjust a cost control parameter on an existing cost profile
edit the profile and save.

Oracle Real-Time Scheduler Server Application User Guide • 171
To... Do this...All schedulers using the profile reflect the change automatically, also
without the need to stop and restart the scheduler.
Assign a scheduler configuration to a scheduler Navigate to the Scheduler maintenance portal in add or edit mode. In
the Scheduler Configuration field, select the configuration you want
to assign to this scheduler and click Save.
Publishing a Scheduler ConfigurationUse this process to publish a scheduler configuration.
1. Identify the existing scheduler configuration you want to replace, and navigate to its maintenance portal.
2. Make a copy of this configuration using the Duplicate action. When prompted, enter a name for the new configuration.
3. Enter your changes to the configuration and save, then click Complete.
4. Navigate back to the original configuration (the one you are replacing).
The Scheduler List zone on the Scheduler Configuration shows the status of all schedulers linked to thisconfiguration. The publish action will only update offline schedulers.If any of the listed schedulers are currently online, you must take them offline. Navigate to the Scheduler portal, locateeach scheduler, and click Shut Down.
5. Navigate to the new configuration, and click Publish. When prompted, select the original configuration you want toreplace.
The new configuration will now be linked to every scheduler the old configuration was previously linked to. You can putthe schedulers back online from the Scheduler portal.
Defining Speed ProfilesUse this procedure to define a speed profile.
Prerequisites: None
1. Navigate to the Admin Menu > Scheduler > Speed Profile+ .
You can also navigate to the portal and click the Add link.
2. Select the appropriate Speed Profile Business Object.
You must create daily speed templates first, then these can be referenced on your speed profile templates.
3. Complete the fields as appropriate to your business practices and save.
Next you can navigate to the Geographic Areas portal to define the region on the map to which the speed profileapplies.
Viewing the Scheduler RegistryUse this procedure to view the scheduler registry, which contains a record for each object (task, shift, appointment bookinggroup, or scheduler configuration) that is currently owned by a scheduler.
Prerequisites: None
1. Select Admin Menu > Scheduler > Scheduler Registry.

Oracle Real-Time Scheduler Server Application User Guide • 172
2. Use the Scheduler Registry Search zone to find the registry record.
3. Click an entry in the Scheduler Registry search results to view the registry record.
The information displayed in the Scheduler Read section describes the details that would be sent to the scheduler. Thisinformation varies depending on the type of registry object.
Registry records are view only.
Batch Control Global View
This section describes concepts and common tasks related to using the Batch Control Global View portal.
About the Batch Control Global ViewThe Batch Control Global View portal provides an "at a glance" view of the current running state of any batch process.The portal is mainly useful to assess the level of service of your schedulers as well as to monitor batch processes.
Use the portal to find out if a batch process currently runs and how well it runs. This information is only provided ifthebatch control is associated with a level of service algorithm.
The portal provides a Level of Service column which indicates the health of the batch process. Users can refer to the levelof service on the batch control to better understand the business rules applied to assess the batch process. The portal alsoprovides more detailed information about the batch control in the Current State zone.
Working With the Batch Control Global ViewThis section describes common tasks related to working with the batch control global view.
Viewing Scheduler Status in the Batch Control Global ViewUse this procedure to monitor a scheduler using the Batch Control Global View.
Prerequisites: Your organization must have the necessary batch controls configured to use this feature.
1. Navigate to the Main Menu > Batch > Batch Control Global View.
2. Set the Query Option to “Schedulers” and fill in any other search fields as applicable.
3. Click Refresh.
4. Broadcast the appropriate scheduler.
The view provides runtime details and other information about the state of the scheduler.
Monitoring Batch Jobs in the Batch Control Global ViewUse this procedure to monitor any batch job using the Batch Control Global View.
Prerequisites: Your organization must have the necessary batch controls configured to use this feature.
1. Navigate to the Main Menu > Batch > Batch Control Global View.
2. Set the Query Option to “All Batch Controls” and fill in any other search fields as applicable.
3. Click Refresh.

Oracle Real-Time Scheduler Server Application User Guide • 173
4. Broadcast the appropriate batch control.
The view provides runtime details and other information about the state of the scheduler.
BI Configuration Administration
BI configuration administration involves creating, maintaining and working with Oracle Utilities Analytics configurations.
About BI ConfigurationThe BI Configuration portal holds information about the configuration tasks related to Oracle Utilities Analytics.
This is a display-only portal that provides a bird's eye view of the configuration for Oracle Utilities Analytics. The portalalso provides links and guidelines for the areas that need configuration to successfully run the extract transfer and loadprocesses from Oracle Utilities Analytics.
Users can leverage the reporting capabilities of Oracle Utilities Analytics to monitor and measure the crew optimization,and also measure the activity response time and route effectiveness etc.

Oracle Real-Time Scheduler Server Application User Guide • 174
Chapter 5
Reference Topics
This section provides reference information to support tasks.
Glossary
Definitions of commonly used terms.
GlossaryCommonly used terms throughout the system. For detailed information on the related functionality, please refer to thespecific sections for these objects throughout this guide.
A-E D-G H-K L-O P-R S-U V-Z
Acknowledgement Required Indicates that the crew is required to manually confirm receipt of
activities of this type.
activity time window The time period during which an activity can be scheduled. See also
effective time window (ETW), preferred time window (PTW), arrival
time window (ATW), and service time window (STW)
activity type Defines the nature of the task to be performed at a specific location.
alert A situation in which predefined condition(s) have been met that require
user attention or intervention.
algorithm A set of rules for solving a problem in a finite number of steps.
allocate A user-initiated action that locks an activity to a particular crew shift.
See also assign and unassign.
allocation priority profile See priority profile

Oracle Real-Time Scheduler Server Application User Guide • 175
Allow Crew Time Some activity types include an Allow Crew Time field that indicates
whether the crew is allowed to review and correct time usage reports
for activities of that type. If this value is set to Yes, the mobile worker
is presented, at activity completion, with an Activity Completion
Times screen which displays a list of times spent on the activity such
as travel, wait time, work, and breaks. The mobile worker can then
review and adjust the times, as necessary, to align the reported time
with actual time spent on each "time bucket". Also, If the value is set to
Yes, this feature is active whether or not your organization uses the full
timekeeping functionality.
This feature is automatically used for complex activities so that mobile
users always see the Activity Completion Times verification screen at
activity completion time. Since it is always used, the Allow Crew Time
field is not shown on complex activities or complex activity types.
alternate ID A different way of uniquely identifying an activity, in addition to its
system-generated primary key. A short and simple alternate ID is
typically used if an activity is dispatched to a crew by voice and the
activity’s system-generated key is too long to communicate verbally.
application service Defines the actions (access modes) supported by a securable function
in the system. An application service exists for every transaction
and zone in the system, and every business object must reference
an application service. Application security is defined by granting or
denying user groups access to specific application services.
appointment An activity for which an arrival time window has been set in advance.
Appointment Booking Group Defines valid time windows for appointment booking.
arrival time window A period of time within an activity's effective time window (ETW) during
which the activity is allowed to be scheduled, based on applicable
restrictions or conditions. See also effective time window (ETW),
preferred time window (PTW), and service time window (STW)
arrived A task status indicating that the crew is at the service site or event
location site but has not yet started work.
assign An action, performed by the scheduler, that links an activity to a
particular crew shift. Assigning is done only by the system. A user can
unassign an activity, which unlinks it from its current crew shift and
makes it available for rescheduling to any other crew shift, and then the
user can allocate it to a different shift; however, a user cannot assign
activities.
assignment A crew's copy of an activity. It is used by the crew to record status
changes and completion information. If the crew uses a mobile data
terminal (MDT) to work their schedule, a copy of the assignment is
dispatched to the crew's mobile device.
assignment in progress An activity status indicating that a copy of the activity, referred to as an
assignment, has been created. The activity remains in this status until
the crew completes the assignment or returns it.
assist activity An activity created to address a situation where a crew needs
assistance with an activity.
assumed equipment Equipment (capabilities) typically associated with vehicles of a
particular type.
assumed worker capabilities Worker capabilities (skills and attributes) typically associated with
mobile workers of a particular type.

Oracle Real-Time Scheduler Server Application User Guide • 176
attributes Qualifying worker capabilities such as special access (security
clearance or physical building access), permits, drug tests, etc. that
may be required for an activity type or for a specific customer. Mobile
workers have skills and attributes; mobile worker types have assumed
skills and attributes; activity types require or prefer skills and attributes.
auto dispatch A system feature that provides automatic dispatching of activities
to crews once they are logged on. Also refers to an Activity Type
attribute that enables or disables auto dispatch for specific activity
types. The Drip Mode attribute defines auto dispatch settings at the
crew shift level.
base service areas Service areas within which a mobile worker typically works.
base time The Time zone defined on installation options, which is typically the
Server Time zone.
being scheduled An activity status indicating that the activity has been sent to the
scheduler and is in the process of being scheduled. An activity also
transitions back to this status if its current assignment to a crew has
been recalled or returned.
BPA Business Process Assistant. See BPA script.
BPA script A set of commands that run on the client's browser and guide a user
through a business process.
break A planned time period within a crew shift during which the crew is
eligible for taking a break. During a break, the crew may not carry out
work or travel.
break duration Duration of the break.
break window duration Duration of the period of time during which the actual break can be
taken. For example, a 15-minute morning break might have a 60
minute window during which the break can be taken.
calculated Computed; arrived at or determined by mathematical calculation.
cancel An action that typically terminates the lifecycle of a business entity.
For example, canceling an activity stops the effort of scheduling and
performing it.
cancelled (status) The status resulting from a cancel action. This is typically a final state.
For activities, a cancelled status indicates that the host system or
the dispatcher has cancelled the activity and it is no longer being
considered for scheduling. For crew shifts, a cancelled status indicates
that the shift was manually cancelled.
capability An ability associated with a resource that qualifies the resource for a
certain type of work.
capability type A type of ability that qualifies a resource for a certain type of work.
Capability types may define human skills or equipment.
chain A number of activities that are dependent upon each other.
chooser A scheduler tool that returns a list of recommended shifts for an activity
and allows you to manually select the best shift to complete the work.
class A broad grouping or categorization.
clustered tasks If a crew shift contains multiple tasks of the same class and status
that are back-to-back (with only a short period of idle between), then
the system collapses the individual tasks into one clustered task in

Oracle Real-Time Scheduler Server Application User Guide • 177
the Scheduling Gantt task area. You cannot take action on clustered
tasks; you must first expand the shift to uncluster the tasks.
collision A clash; a conflict; a meeting of objects that causes an adverse impact.
See collision detected.
collision detected An activity status that occurs when more than one completed
assignment is received by the server for the same activity.
Common Dispatching Functionality A component of the application that provides functionality for
dispatchers to effectively monitor and manage workforces and
activities.
Common Dispatching Interface The primary point of user interaction for the Common Dispatching
Functionality (CDF).
complete An action that finalizes the processing of a business entity and ends its
lifecycle.
complete (activity status) An activity status indicating that the requested work has been done
and completion details are available to be sent back to the requesting
host system. A completed assignment has been received (one and
only one) for an activity and all other assignments for that activity
are finalized. The activity remains on the mobile device until logoff. If
an activity was in a Collision Detected status and the dispatcher has
identified which completed assignment to use, the activity transitions to
the Completed status.
complete (shift status) A crew shift status indicating that the crew is done working. This is also
known as the End Of Shift. A shift cannot be completed if any of its
tasks are not completed or returned.
completion remarks Comments typically entered by a crew when an activity is completed.
crew A uniquely named group of resources (mobile workers and vehicles)
scheduled to perform work.
crew allocation The specific mobile worker(s) and vehicle(s) assigned to a crew on a
particular shift.
crew shift A planned period of time in which a crew is available to work.
crew shift template A tool for quickly generating crew shifts based on pre-defined
parameters.
crew size The minimum number of mobile workers needed to perform activities of
a particular type.
dashboard A portal that always appears on the desktop. Its zones contain tools
and data used to complete common tasks.
deadreckoning A method of estimating the current position of a moving vehicle where
GPS is not available or updates are received infrequently.
dependent activity An activity that depends on another activity either by time or resource.
The dependent activity may also have other activities dependent on it
to form a chain. Such dependency may span resources and shifts.
deployment Refers to the set of application components (maintenance objects,
business objects, UI maps, service scripts, etc.) that are delivered to
mobile device terminals to define the function of the mobile application
on the mobile device.

Oracle Real-Time Scheduler Server Application User Guide • 178
deployment part A collection of deployment items, such as maintenance objects,
business objects, UI maps, etc.
deployment type Defines attributes of an application to be deployed, including authorized
user groups, supported MDT Types, messages used, and objects
included.
depot A central location where goods are loaded for delivery, or collected
goods are unloaded.
depot run When a crew makes a trip to a depot.
detected Discovered; found.
disable To make unavailable or inactive.
dispatch An action, either system- or user-initiated, that locks an activity’s
sequence in the shift schedule and marks it as ready to be sent to the
crew. See dispatched status.
dispatched (status) An assignment status indicating that the assignment has been
synchronized to the crew and the activity is now locked to its assigned
crew shift and sequence. If required, manual acknowledgement has
been given.
dispatch area A predefined set of service areas and service classes monitored by one
or more dispatchers.
dispatcher An individual responsible for monitoring and managing day-to-day field
operations.
drip mode A Crew Shift attribute that indicates how the system should handle
dispatching of activities to that crew shift. Valid options are:
None: Automatic dispatching is disabled. All scheduled activities must
be manually dispatched to the crew’s shift by the dispatcher or by
another system-invoked process.
Auto All: All scheduled activities are automatically dispatched to a
shift once it has started. This applies to any additional activities being
scheduled throughout the duration of that shift. This excludes any
activities where the Auto Dispatch attribute is set to No for the Activity
Type.
Standard (Drip Mode): Only a fixed number of scheduled activities are
dispatched to the crew at any given point of time. The fixed number is
specified as the Drip Horizon.
drip horizon The number of activities to dispatch when drip mode is set to Standard
or Hybrid.
effective date The date on which a characteristic, parameter value, or other element
becomes effective. See also arrival time window (ATW), preferred time
window (PTW), and service time window (STW)
effective time window The time period within which an activity should be scheduled, based on
values sent from the host.
emergency task A task of highest priority, indicating that its scheduling takes
precedence over all non-emergency tasks.
en route An assignment or POU status indicating that the crew is on its way to
the service address or meeting address.
enable To make available or active.
end odometer The final odometer reading (total distance traveled by the vehicle)
recorded at shift logoff.

Oracle Real-Time Scheduler Server Application User Guide • 179
equipment Device or equipment used to perform certain types of work. In ORS,
equipment is a capability that can be associated with one or more
vehicles (resources).
ERT Encoder Receiver Transmitter or Electronic Radio Transponder devices
that allow utilities to remotely read meters by using a handheld or
vehicle-based radio device, or by a fixed network system.
estimated duration The approximate length of time it should take to complete an activity.
field referenced activity An activity created by a crew when connectivity problems prevent
the crew from receiving an activity and require the dispatcher to
voice dispatch it. The FRA references the original activity and, when
connectivity is re-established, the FRA is synchronized with that activity
on the server.
finalized Indicates that an object's current status represents the end of its
defined lifecycle. For example, in the base system an activity is
finalized if it is in a canceled or completed state.
foreign key A referential constraint between two tables. The foreign key identifies
a column or a set of columns in one (referencing) table that refers to a
column or set of columns in another (referenced) table.
foreign key reference Defines the program used to construct a maintenance object's info
string. It may also define the transaction used to display, add, and
update instances of the maintenance object.
Gantt A tool that allows dispatchers to view shifts in a timeline and perform
actions on activities for those shifts.
Geocode The longitude and latitude associated with an address, which is used
for optimizing routes and displaying crews and activities on a map.
Global Positioning System A navigation system based on a network of satellites that send out
radio signals to pinpoint an entity's location.
holding scheduler A holding scheduler is not associated with a schedule manager and
therefore does not schedule shifts or tasks. It is designed to capture
tasks and shifts that cannot be assigned to any online scheduler. One
and only one holding scheduler should exist. Any task or shift attached
to a holding scheduler is evidence of a scheduling error.
host external system A computer system external to the base application that sends work
orders (activities) to and receives updated information from the server.
idle time cost A scheduling factor that indicates whether or not crew idle time cost
should be considered by the scheduler.
Ignore Sequence Locking In most situations activities are worked on a route in sequence and
once the activity is dispatched, the sequence is locked. If another
activity comes in and is dispatched, it would typically not be dispatched
before an activity that is already dispatched. In situations where a user
would want to allow a new task to be dispatched before tasks that have
already been dispatched this value can be set to “Yes”. This allows
the scheduler to dispatch the activity before any other activities that
are already dispatched. This is only relevant for shifts where the Drip
Mode is set to Standard.
in service A crew shift status indicating that the crew is considered to be
performing work. The crew may be traveling to an activity location,
working an activity, or idle between activities. The crew status

Oracle Real-Time Scheduler Server Application User Guide • 180
transitions to In Service automatically when an activity is started or a
POU or break is ended. The user can manually transition to this status.
issue A situation, problem, or potential problem requiring attention or
resolution.
issues detected An activity status indicating that the activity is not valid and processing
cannot proceed. Manual dispatcher intervention is required to resolve
the issue. Once the problem has been fixed, the status of the activity
can transition to Being Scheduled.
job Multiple activities that must be all performed by the same crew on a
single shift.
key performance indicators Quantifiable measurements that support dispatcher decision making
and in-day exception handling. A KPI may apply to activities and crew
shifts that dispatchers are responsible for in their current shift.
late cost A scheduling factor that defines a cost associated with late arrival to
an activity. It is used to discourage scheduling of the activity outside its
time window.
lead time Number of minutes before a shift is planned to start that the reserved
capacity is released.
limited time Indicates an entity or capability that has an effective and expiration
date.
location A predefined physical location, such as a service center.
logoff delay Number of minutes before the end of the shift that the scheduler should
stop scheduling work. This is used to reserve time at the end of the
shift for any end-of-shift work.
logon delay Number of minutes after start of the shift that the scheduler should
begin scheduling tasks to the shift. This is used to reserve some time at
the beginning of the shift for performing review and preparation work.
location based services Crew location and tracking services that utilize GPS data obtained from
a mobile resource.
maintenance object A group of tables maintained together within the system.
manual Occurring as a result of a user action, rather than automatically by the
system.
manual acknowledgement See acknowledgement required.
MapViewer A tool, based on Oracle Application Server MapViewer, that provides
a visual representation of monitored activities, crews, and routes on a
map in the Common Dispatch Interface.
MCP Mobile communications platform. Essentially this refers to the mobile
application.
MDT Mobile data terminal (mobile device)
message category A set of application messages.
metadata Data about data. Metadata may define formatting, validation, possible
values, data type, etc.
missing equipment Equipment typically associated with the vehicle type but missing from
this vehicle.

Oracle Real-Time Scheduler Server Application User Guide • 181
missing skills Skills that a mobile worker of the specific job type is assumed to have,
but this mobile worker does not have.
mobile data terminal A computerized device typically used to communicate with a central
dispatch office.
mobile worker Refers to any individual, crew member, field resource, field technician,
contract resource or any other person or resource completing activities,
tasks, or other work.
odometer An instrument that indicates distance traveled by a vehicle.
non-productive task Non-work related activities that are planned as part of a shift. For
example, replenish stock on a vehicle for 1 hour at the beginning of a
shift.
on hold An activity status indicating that the activity was placed on hold, either
by the dispatcher or by the system based on a business rule. An
activity may be placed on hold because something needs to be done
before the order can be worked (e.g., parts, permit, etc.). An activity
cannot be put on hold once an assignment has been created (unless
the assignments are returned). The activity will remain in this status
until a user removes the hold manually or a condition occurs that
prompts the system to remove the hold, at which time it will return to its
previous status.
optimization area/set An optimization area is a geographic sub-region within a scheduler
area. An optimization set is the group of sub-regions in one scheduler
area. When the scheduling load for a service area is more than a
single scheduler can manage, such as too many tasks, optimization
may be further limited to these smaller subsets of that service area.
Optimization sets are configured on the scheduler area using longitude
and latitude coordinates to define the boundaries.
out of service A crew shift status indicating that the crew is not performing work. The
crew may be attending a meeting, taking a break or having a vehicle
breakdown, etc. When a crew goes out of service, they provide a
reason and an estimated duration. At logon, a shift is Out of Service
until a task is started and then it switches to In Service. Starting a POU
or break automatically sets the crew status to Out of Service. The user
may manually transition to this status.
overridden POU A POU that has been modified manually and no longer matches the
POU template from which it was generated.
overridden shift A crew shift that has been modified manually and no longer matches
the template from which it was generated.
overtime cost A scheduling factor that defines the cost of exceeding the planned shift
duration.
pending (shift status) A shift's initial status when it is first created, before it is considered
planned and ready to be started.
pending dispatch An assignment status indicating that the assignment has not yet
been synchronized to the crew's mobile device or has not been
manually acknowledged by the crew, if the activity requires manual
acknowledgement.

Oracle Real-Time Scheduler Server Application User Guide • 182
period of unavailability A period of time in which a crew is planned not to perform work, such
as while attending a meeting.
pickup activity An activity that is created by mobile workers in the field.
planning horizon The number of days into the future to plan for crew shifts and periods
of unavailability. For example, if the planning horizon is set to 60, the
system generates crew shifts and periods of unavailability (POU) sixty
days into the future. Generation occurs in a sliding window in that each
day generates data for the last day incrementally. At any given time,
the number of days of planned shifts and periods of unavailability is
equal to this value. Planning horizon should be equal to or greater than
the scheduling horizon.
portal A page in an application that contains one or more zones.
posting action A posting action is associated with every scheduler registry entry. It
identifies the type of change made to an entity that impacts scheduling,
and is used to communicate this information to the scheduler manager.
postpone An user-initiated action that occurs when a crew has not yet started
work on an activity but must postpone the scheduled work.
postponed An activity status resulting from the postpone action.
preferred time window The time period within which it is ideal to schedule an activity, based
on values sent from the host. See also effective time window (ETW),
arrival time window (ATW), and service time window (STW)
preview calendar Calendar based on the changes that have been entered but not yet
applied.
primary key A single column or set of columns in a table that uniquely identifies
each row in the table.
priority profile A predefined set of allocation factors used by the scheduler to prioritize
the scheduling of an activity relative to other activities.
queue A list of items, such as activities, that are awaiting processing.
queued for dispatch An activity status indicating that the activity has been successfully
scheduled to a particular crew shift and is no longer eligible for
rescheduling during optimization, but has not yet been synchronized to
the crew’s mobile device.
rebooking A request to reschedule an activity because the activity details, typically
requested time, have changed.
recall An action, typically initiated by a dispatcher, that requests the return of
an assignment from its assigned crew.
recommended allocation One or more mobile workers and/or vehicles identified as appropriate
or desirable for a crew shift.
recycle (alert) An action that reassigns an alert to another dispatcher if the currently
assigned dispatcher does not respond to it within a configurable
amount of time.
reference time) Time used by the scheduler as input to cost-calculations that are
sensitive to the current time. Applies only to time-dependent costs.
relative efficiency Scheduling factor that defines a mobile worker’s efficiency as a
percentage of the expected efficiency for mobile workers of this type.
relative speed Scheduling factor that defines a vehicle's speed as a percentage of the
expected speed for vehicles of this type.

Oracle Real-Time Scheduler Server Application User Guide • 183
reserve capacity A scheduling concept allowing shifts to reserve a portion of their time
for a specific service class of work.
reserve capacity percentage Percentage of shift time to be reserved for work associated with the
reserve capacity service class.
reserve capacity type Service class for which a percentage of the crew shift's capacity is
reserved.
resource A workforce resource, such as a crew, vehicle, mobile worker, or
dispatcher.
resource class A broad classification of resource. Resource classes include mobile
worker, vehicle, crew, and dispatcher, and may include additional user-
defined classes.
resource planner An individual responsible for allocating workforce resources to perform
work across multiple shifts.
Resource Planning and Scheduling A component of Oracle Real-Time Scheduler system that handles
resource planning, resource management, service management, and
scheduling.
returned An assignment status indicating that the crew has returned the
assignment or the assignment was recalled. This is the end of the
assignment’s lifecycle; the activity will be rescheduled.
scheduler A component of the Oracle Real-Time Scheduler system that assigns
tasks to crew shifts in such a way as to optimize the use of resources
and reduce overall costs. An implementation typically runs multiples
schedulers in parallel for performance and backup.
scheduler area A predefined set of service areas that are designated to be scheduled
by a particular scheduler or a number of cooperating schedulers.
Scheduler areas can be further segmented by optimization sets. These
sub-regions in the scheduler area are used when the scheduler area
has too many tasks for a single scheduler to manage.
scheduler configuration Defines parameters used to control the scheduler.
scheduler registry Contains a record for each object currently owned by a scheduler.
scheduling horizon The number of days into the future the scheduler will consider when
scheduling crew shifts and activities. Only shifts that have already
started or are planned to start within that time frame, as well as
activities that may be scheduled during that time, are considered. For
example, if the scheduling horizon is set to 21, the scheduler considers
shifts and activities for the next 21 days. Oracle recommends that the
scheduling horizon be kept as short as is practical while still meeting
customer business requirements. The optimum value for scheduling
horizon strikes a balance between long term planning and short term
flexibility.
service area A logical boundary of an organization’s territory that may or may not be
based on geography.
service class A broad categorization of activity types, such as Meter Work or
Emergency Work.
service level agreement A part of a service contract where the level of service is formally
defined.

Oracle Real-Time Scheduler Server Application User Guide • 184
service time window A period of time within an activity's arrival time window (ATW) during
which it is preferable to schedule the activity. See also effective time
window (ETW), preferred time window (PTW), and arrival time window
(ATW).
shift Short version of crew shift.
shift cost A scheduling factor that defines the cost of utilizing a shift.
shift cost profile A preconfigured set of shift cost-based factors that affect scheduling
decisions.
shift promotion cost A scheduling factor that specifies the multiplier by which the shift
promotion cost for an activity type is increased or decreased. This is
used to discourage creation of additional shifts.
shift weekly template A tool used to define a cyclical weekly pattern made up of crew shift
templates.
site address The address of the actual entrance to the site of service, which may be
different than the service address.
site delay The delay involved in arriving at this site.
Short Messaging Service A service that allows the interchange of short text messages between
mobile telephone devices.
shuffler A shuffler changes the current solution (schedule). The scheduler
operates by repeatedly calling a shuffler to change the current solution
and calculating the new solution cost to determine whether the change
was beneficial or not. The scheduler employs many shufflers, each with
its own specialization.
skill A worker capability that indicates the ability to perform certain types of
work. Mobile workers have skills and attributes; mobile worker types
have assumed skills and attributes; activity types require or prefer skills
and attributes.
SLA Service level agreement.
SLA Flexibility A scheduling factor that defines the period of time within which an
activity must be scheduled to avoid incurring the SLA Priority cost.
SLA service level agreement
SLA Priority A scheduling factor that defines the fixed cost that will be applied for
working an activity outside its service time window's SLA Flexibility
period.
snooze (alert) To stop (sleep) for a certain amount of time before reissuing the alert.
solution The scheduler (activity-to-shift assignments) generated by the
scheduler.
solution cost The value calculated by the objective function for a schedule. This
value is indicative of how well the schedule attains its cost goals. The
lower the value, the better.
sort sequence The order in which items appear in a list.
speed profile Speed profiles define a collection of daily templates which delineate 24
hour speed factors that are associated with a type of day (default, rush
hour on a weekday, holiday, weekend and so on).
start odometer The initial odometer reading (total distance traveled by the vehicle)
recorded at shift logon.

Oracle Real-Time Scheduler Server Application User Guide • 185
started A task status indicating that the crew is at the service site or event
location site and has started work.
status reason The reason why an entity transitioned to its current state.
suspend A user-initiated action that occurs when a crew has started work on
an activity but cannot complete the work due to time, material or other
resource constraints. When the crew suspends an order, they must
provide an estimate of the time required to complete the work.
suspended An assignment status resulting from the suspend action. The
assignment's life cycle is not terminated and remains on a crew shift
until the assignment is completed, a dispatcher re-assigns the activity
to another shift (a new assignment is created), or the crew logs off the
shift and the assignment is returned. When a crew is ready to resume
work on a suspended activity, it transitions to En Route status.
synchronize To communicate data between the server and the mobile device so
that both have the same up-to-date information.
task Any activity, POU, or break that occupies time on a crew shift's
schedule.
task class A classification of task. Task classes include activity, POU, and break.
Within each task class, there can be any number of task types.
task type Defines the attributes of a particular type of activity task, POU task,
or break. Examples of activity tasks are Meter Read or Equipment
Installation.
template A pre-defined model or example used as a guide to make other
objects. POU templates are used to generate actual POUs. Crew shift
templates are used to generate crew shifts.
travel time cost A scheduling factor that defines a cost associated with crew travel time.
UI map An entity that contains predefined HTML for building a map zone. Its
schema defines the fields whose values are inserted into the map at
run time.
unassign A user-initiated action that unlinks an activity from the crew shift to
which it has been assigned by the scheduler.
user-defined Configured or set by a user rather than being assigned by the system.
vehicle A non-human mobile resource used by a crew.
window cost A scheduling factor that defines the preference of an activity's time
window relative to other time windows.
work calendar Defines work holidays within a specified time frame.
work done An assignment status indicating that the crew completed the work but
has not entered the completion details yet. The crew may enter the
details later in the day. This is typical to crews using SMS to work their
schedule. This is the end of the assignment’s lifecycle. The activity
remains in the Assignment in Progress status while waiting for the
completion details to be entered.
work profile Work profiles establish a date and time restriction that can be
associated to an activity type. With a work profile properly defined for
the activity type, the system ensures that the activity is not scheduled
outside of the established time window.

Oracle Real-Time Scheduler Server Application User Guide • 186
work sequence The task's sequence within the crew shift.
worker capabilities A combination of skills and attributes typically associated with mobile
workers of a particular type.
zone A section of a portal. Examples of zones include Query zones, List
zones, and Actions zones.
Standard Actions
This section provides standard actions for maintaining both user and administrative data as well as information aboutworking with logs.
Viewing and Adding Log EntriesUse the Log tab to view or add log entries for the current object.
The log displays a list of user and system actions associated with an object, such as when it was created, last updated, ortransitioned to different status. For each log entry, the system displays the date and time the action occurred, the user/systemthat initiated the action, the type of action, and related object, if any.
To create a new log entry, click the Add Log Entry link in the zone title, then enter log entry details and click Save. Youruser ID is saved with the log entry.
Standard Actions for Data MaintenanceThis topic provides the basic steps for performing standard actions on data maintained from the Main Menu.
NOTE: The system displays buttons for all valid actions, based on the object's current status, your user privileges, andyour system's configuration. The following table provide instructions for performing all standard actions.
Action Steps
Edit From the Main Menu:
1. Select the option for the object you want to maintain. A query
portal is displayed.
2. Enter search criteria to locate the object. The maintenance portal
is displayed.
3. Click the Edit button in the Actions zone.
4. Enter your changes. Click to display field descriptions.
5. Click Save.
Cancel From the Main Menu:
1. Select the option for the object you want to cancel. A query portal
is displayed.
2. Enter search criteria to locate the object. The maintenance portal
is displayed.
3. Click the Cancel button in the Actions zone.
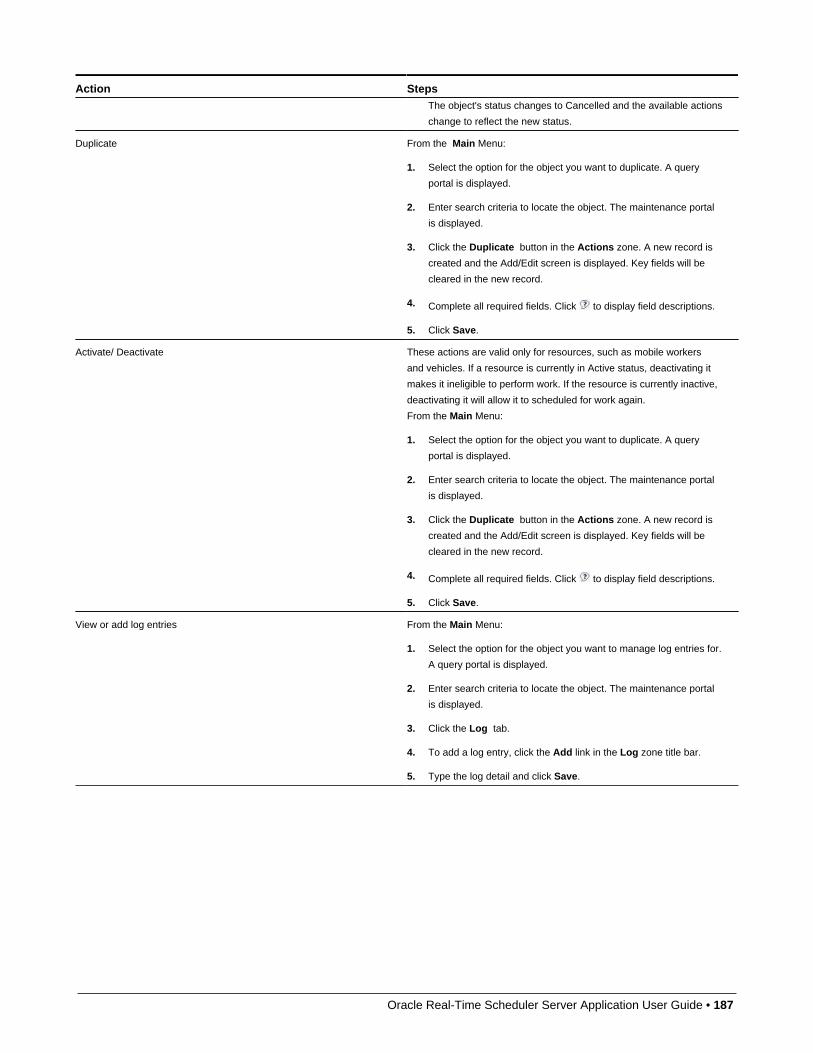
Oracle Real-Time Scheduler Server Application User Guide • 187
Action StepsThe object's status changes to Cancelled and the available actions
change to reflect the new status.
Duplicate From the Main Menu:
1. Select the option for the object you want to duplicate. A query
portal is displayed.
2. Enter search criteria to locate the object. The maintenance portal
is displayed.
3. Click the Duplicate button in the Actions zone. A new record is
created and the Add/Edit screen is displayed. Key fields will be
cleared in the new record.
4. Complete all required fields. Click to display field descriptions.
5. Click Save.
Activate/ Deactivate These actions are valid only for resources, such as mobile workers
and vehicles. If a resource is currently in Active status, deactivating it
makes it ineligible to perform work. If the resource is currently inactive,
deactivating it will allow it to scheduled for work again.
From the Main Menu:
1. Select the option for the object you want to duplicate. A query
portal is displayed.
2. Enter search criteria to locate the object. The maintenance portal
is displayed.
3. Click the Duplicate button in the Actions zone. A new record is
created and the Add/Edit screen is displayed. Key fields will be
cleared in the new record.
4. Complete all required fields. Click to display field descriptions.
5. Click Save.
View or add log entries From the Main Menu:
1. Select the option for the object you want to manage log entries for.
A query portal is displayed.
2. Enter search criteria to locate the object. The maintenance portal
is displayed.
3. Click the Log tab.
4. To add a log entry, click the Add link in the Log zone title bar.
5. Type the log detail and click Save.

Oracle Real-Time Scheduler Server Application User Guide • 188
Standard Actions for Admin-Level Data MaintenanceA standard set of maintenance portals are used to define objects that are maintained from the Admin menu. These portalsuse a common interface and support a set of standard actions for creating and maintaining objects. The following quickreference table provides the basic steps for performing any of the standard actions.
Action Steps
Add Click the Add link in the list or search zone title bar. Provide allnecessary information and click Save.
Edit Select the object you want to edit from the List zone, then click theEdit icon. Enter your changes and click Save.
Delete Select the object you want to delete from the List zone, then click theDelete icon. Confirm the deletion.
Duplicate Select the object you want to duplicate from the List zone, thenclick the Duplicate icon. Key fields will be cleared in the new record.Complete all required fields and click Save.
Broadcast Select the object you want to broadcast from the List zone, then clickthe Broadcast icon. The details and available actions for the selectedobject are displayed in the appropriate zones.
Activate or Deactivate Select the object you want to activate or deactivate from the List zone,then click the Broadcast icon. Click Activate or Deactivate in theActions zone.
NOTE: These actions only apply to objects that support an Activeand Inactive status, such as resource types, task types, and alerttypes. When such an object is deactivated, no new objects of thistype can be created
.
Sort Click a column header in the List zone to resort by the values in thatcolumn. Click again to reverse the order (from ascending to descendingor descending to ascending).
Filter If a list zone supports filtering, a Filter icon is displayed in the List zonetitle bar (on the far right). Click the Filter icon, then select the field bywhich you want to filter and click Refresh.
View or add log entries Click the Log tab to view log entries. To add an entry, click the Add linkin the List zone title bar and provide the requested information.
Oracle Real-Time Scheduler Base Package BusinessObjects
The following sections provide descriptions of the base attributes for the main functional areas within the application. Theseattributes are based upon the maintenance objects which define these portals.
For detailed information on the related functionality, please refer to the specific sections for these objects in the main bodyof this guide.
Base Package Resource Management Business ObjectsThis section provides descriptions of the base package objects used by resource management functionality throughout thesystem.
For detailed information on the related functionality, please refer to the specific sections for these objects in the main bodyof this guide.

Oracle Real-Time Scheduler Server Application User Guide • 189
Base Package Crew Business ObjectsA crew is a uniquely named group of mobile workers and vehicles that perform work in shifts.
The following business objects support crew functionality within the application:
CrewDefines a uniquely named group of resources (mobile workers and vehicles) scheduled to perform work.
Field Description
Crew Name A unique name for this crew.
Reporting Hierarchy Indicates the categorization that this crew falls under according to the hierarchical structure established by your
organization in the Crew Hierarchy portal.
Locations Defines a physical location, such as a service center, the crew is affiliated with for a specific purpose. For example
the crew's logon, logoff or non-productive task location etc. You may select a common location or specify the
address of location.
Defining a logon / logoff location for a crew means that their standard location is static and typically does not
change by weekday. If the crew location does tend to change it should be specified on the shift weekly template.
Status Current status of the crew. Valid options include:
• Active
• Inactive
Crew ID A unique identifier for this crew.
Business Object The business object used to create this crew.
Crew Type The type of crew.
Address 1-4 Physical address of the location. Longitude and latitude are used for geocoding purposes. If not provided, the
system determines the address's geocode.
Contractor Indicates the crew ID if a contractor is used on the crew.
Business Object: M1-Crew
Crew TypeDefines a classification of crew.
Field Description
Crew Type A unique name of the crew type.
Description Descriptive text about this crew type.
Status Current status of the object. Valid options include:
• Active
• Inactive
Crew Business Object This is the business object used to add a crew of this type.
Business Object: M1-CrewType

Oracle Real-Time Scheduler Server Application User Guide • 190
Single Person CrewDefines a crew with a single person.
Field Description
Crew Type The type of crew, in this example, a single person crew.
Crew Name The name of the single person crew
Reporting Hierarchy Indicates the categorization that this crew falls under according to the hierarchical structure established by your
organization in the Crew Hierarchy portal.
Contractor Indicates the crew ID if a contractor is used on the crew.
Locations Defines a physical location, such as a service center, the crew is affiliated with for a specific purpose. For example
the crew's logon, logoff or non-productive task location etc. You may select a common location or specify the
address of location.
Defining a logon / logoff location for a crew means that their standard location is static and typically does not
change by weekday. If the crew location does tend to change it should be specified on the shift weekly template.
Address Physical address of the location. Longitude and latitude are used for geocoding purposes. If not provided, the
system determines the address's geocode.
Resources Mobile workers and vehicles associated with the crew.
Default Shift Information Defines default shift details used when a shift is created online or by the shift generation process. By default details
are only used when not specified by the shift template. Logic handling use of this data resides in the 'Prepare Shift
Data' algorithm associated with the crew business object.
Business Object: M1-SinglePersonCrew
Base Package Crew Shift Business ObjectsA crew shift is a planned period of time in which a crew (one or more mobile workers and vehicles) is scheduled to performwork.
The following business objects support crew shift functionality within the application:
Crew ShiftA planned period of time in which a crew (one or more mobile workers and vehicles) is scheduled to perform work.
Field Description
Status The current status of the object. Valid statuses include:
• Pending
• Planned
• Started
• Out of Service
• In Service
• Canceled
• Completed
Planned Date/Time The applicable dates and times for the standby shift.

Oracle Real-Time Scheduler Server Application User Guide • 191
Field Description
Variable Shift Shifts can be set as variable to provide the crew with some flexibility on when they can start and end work. Set to
Yes to indicate that the shift is not fixed then enter a Shift Duration to establish the total amount of time allotted for
the shift. The scheduler sets the start work time as the start time of the first task scheduled to the shift, minus any
travel time. The estimated start time is rounded down if the Round Start Time option is specified.
Shift Duration (variable shift
only)
Establishes the total amount of time allotted for the shift if the shift is variable.
Round Start Time (variable
shift only)
Establishes whether or not the scheduler should round down the estimated start time for the shift if the shift is
variable.
Primary Function The preferred service class of work to be performed by the crew.
Business Status Date/Time Date and time the transition to the current status occurred on the crew's mobile device. Display only when
applicable.
Shift Cost Profile Shift cost profile to use for this shift. The profile defines shift-based cost factors that affect scheduling decisions.
Drip Mode Indicates how the system should handle dispatching of activities to the crew. Valid options include:
• None: Automatic dispatching is disabled. All scheduled activities must be manually dispatched to the crew by
the dispatcher or by another system-invoked process.
• Auto All: All scheduled activities are automatically dispatched to the crew and any additional activities
scheduled throughout the shift are also auto-dispatched. This excludes any activities where the Auto Dispatch
attribute is set to No on their Activity Type.
• Standard (Drip Mode): Only a fixed number of scheduled activities are automatically dispatched to the crew at
any given point of time. The fixed number is specified as the Drip Horizon.
Drip Horizon Number of activities to dispatch when Drip Mode is set to Standard or Hybrid.
Advanced Dispatch Offset The amount of time before the shift is planned to start that tasks are set as ready to be dispatched. This allows the
tasks to be previewed by the crew on their mobile device. In addition a variable shift becomes a fixed shift at this
time.
Advanced Dispatch Mode Indicates whether or not the shift or contractor capacity should be closed and all scheduled work dispatched /
committed at the advance offset time.
Advanced Dispatch Tasks The number of tasks allowed to be previewed by the crew on their mobile device prior to actually starting their shift.
Number of Activities This value places a limit on the number of activities that can be assigned to the shift. For example, if this is set to 3,
the scheduler will not attempt to assign more than 3 activities to the shift.
GPS Data Enabled Indicates whether or not sending global positioning system (GPS) data from the crew's mobile device is enabled.
Time Zone Indicates the applicable time zone for the crew.
Current Crew Allocation Displays the mobile workers and vehicles currently allocated to this shift.
Covered Areas Service areas where the shift is allowed to perform work. Preferred service areas are areas in which the crew is
allowed to perform work and which are given priority during scheduling. A shift must be associated with at least one
service area, either allowed or preferred.
Service Class Defines service class information for this crew shift.
Reserve Capacity Type Service class for which a percentage of the shift's capacity is reserved. The percentage is specified in the Reserve
Capacity field. For example, you might reserve 20% of a shift's time for emergency work. Activities within this
service class will be included in the specified Reserve Capacity %.
Reserve Capacity Percentage of shift time to be reserved for work associated with the specified Reserve Capacity Type.
Lead Time Number of minutes before the shift is planned to start that the reserve capacity is released.
Not Allowed Service classes this crew shift is not allowed to perform.
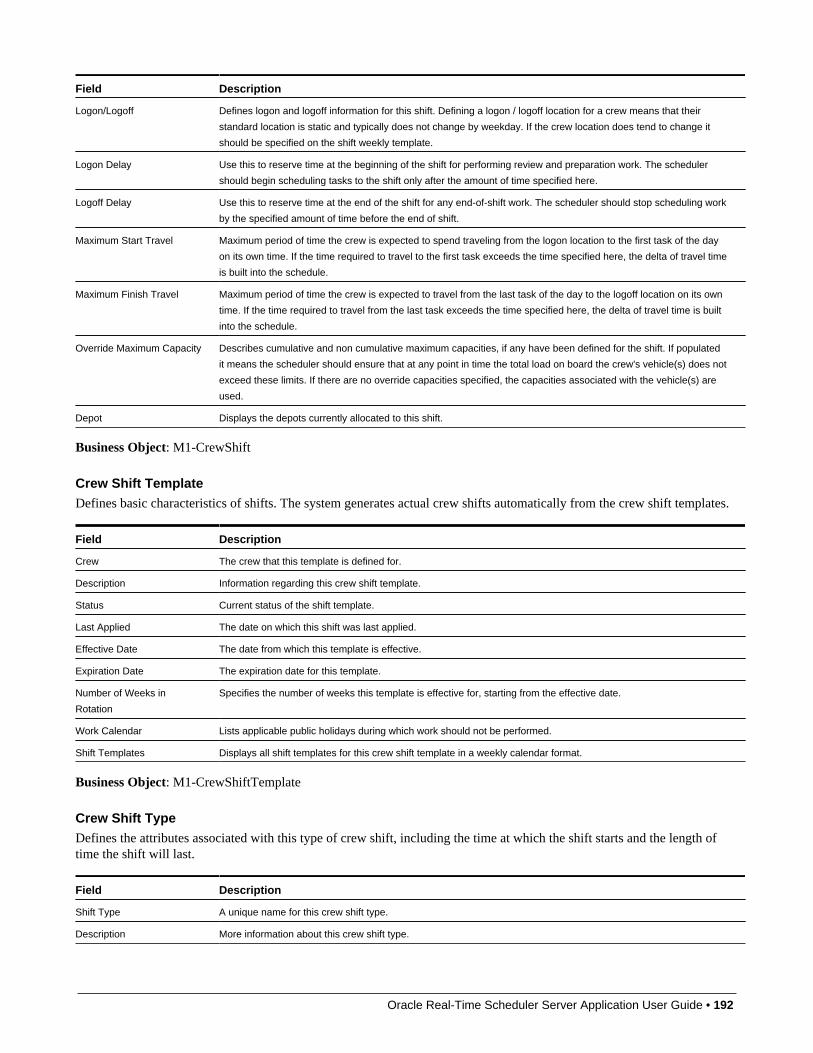
Oracle Real-Time Scheduler Server Application User Guide • 192
Field Description
Logon/Logoff Defines logon and logoff information for this shift. Defining a logon / logoff location for a crew means that their
standard location is static and typically does not change by weekday. If the crew location does tend to change it
should be specified on the shift weekly template.
Logon Delay Use this to reserve time at the beginning of the shift for performing review and preparation work. The scheduler
should begin scheduling tasks to the shift only after the amount of time specified here.
Logoff Delay Use this to reserve time at the end of the shift for any end-of-shift work. The scheduler should stop scheduling work
by the specified amount of time before the end of shift.
Maximum Start Travel Maximum period of time the crew is expected to spend traveling from the logon location to the first task of the day
on its own time. If the time required to travel to the first task exceeds the time specified here, the delta of travel time
is built into the schedule.
Maximum Finish Travel Maximum period of time the crew is expected to travel from the last task of the day to the logoff location on its own
time. If the time required to travel from the last task exceeds the time specified here, the delta of travel time is built
into the schedule.
Override Maximum Capacity Describes cumulative and non cumulative maximum capacities, if any have been defined for the shift. If populated
it means the scheduler should ensure that at any point in time the total load on board the crew's vehicle(s) does not
exceed these limits. If there are no override capacities specified, the capacities associated with the vehicle(s) are
used.
Depot Displays the depots currently allocated to this shift.
Business Object: M1-CrewShift
Crew Shift TemplateDefines basic characteristics of shifts. The system generates actual crew shifts automatically from the crew shift templates.
Field Description
Crew The crew that this template is defined for.
Description Information regarding this crew shift template.
Status Current status of the shift template.
Last Applied The date on which this shift was last applied.
Effective Date The date from which this template is effective.
Expiration Date The expiration date for this template.
Number of Weeks in
Rotation
Specifies the number of weeks this template is effective for, starting from the effective date.
Work Calendar Lists applicable public holidays during which work should not be performed.
Shift Templates Displays all shift templates for this crew shift template in a weekly calendar format.
Business Object: M1-CrewShiftTemplate
Crew Shift TypeDefines the attributes associated with this type of crew shift, including the time at which the shift starts and the length oftime the shift will last.
Field Description
Shift Type A unique name for this crew shift type.
Description More information about this crew shift type.

Oracle Real-Time Scheduler Server Application User Guide • 193
Field Description
Status The current status of the crew shift type.
Start Time The time at which this shift starts.
Duration Establishes the total amount of time allotted for the shift if the shift is variable.
Variable Shift Shifts can be set as variable to provide the crew with some flexibility on when they can start and end work. Set to
Yes to indicate that the shift is not fixed then enter a Shift Duration to establish the total amount of time allotted for
the shift.
Business Object The business object used to create a shift of this type.
Shift Template Business
Object
The business object used to create shift templates of this type.
Business Object: M1-CrewShiftType
Crew Shift ScheduleDescribes the structure of a shift scheduler record. The scheduler solely maintains this entity.
Field Description
Crew Shift ID A unique id for this record.
Shift Scheduler Status The current status of the shift scheduler.
Estimated Duration The amount of time allotted for the activity on the schedule.
Start Work Date/Time The start time of the first task scheduled to the shift, minus any travel time.
Started Date/Time The date/time details when this record was started.
Completed Date/Time The date/time details when this record was completed.
Logon Geocode Latitude/
Longitude
The longitude and latitude associated with the logon address of this crew shift record.
Logoff Geocode Latitude/
Longitude
The longitude and latitude associated with the logoff address of this crew shift record.
Actual Geocode Latitude/
Longitude
The actual longitude and latitude associated with the address of this crew shift schedule.
Calculated Geocode
Latitude/Longitude
The longitude and latitude calculated by the scheduler.
Actual Gps Date/Time The date/time details as sent by the Global Positioning System (GPS) system.
Calculated Gps Date/Time The date/time details as calculated by the scheduler based on the details sent by the Global Positioning System
(GPS) system.
Update Date/Time The date/time when this record was updated.
Shift Class Shift classes to which this crew shift schedule applies.
Business Object: M1-CrewShiftSchedule
Common Shift Weekly TemplateA template used to generate shifts on a weekly basis that can be shared across shifts.
Field Description
Template Name Unique name for this common shift weekly template.

Oracle Real-Time Scheduler Server Application User Guide • 194
Field Description
Description A description of the template being created.
Template Class Flag Identifies the type of template being created. Possible options include:
• Capacity
• Common
• Crew Specific
• Subscription
Status Current status of this template.
Initial Rotation Date The date from which work rotation cycles begin.
Number Of Weeks In
Rotation
Number of weeks comprising a single cycle of the shift weekly template.
Work Calendar Specifies the list of holidays during which work of this type is not allowed to be scheduled.
External ID A unique identifier used by an external system to identify common shift weekly template.
Business Object: M1-CommonShiftWeeklyTemplate
Shift Weekly TemplateA template used to generate shifts on a weekly basis.
Field Description
Template Class Flag Identifies the type of template being created. Possible options include:
• Capacity
• Common
• Crew Specific
• Subscription
Description A description of the template being created.
Status Current status of this template.
Number Of Weeks In
Rotation
Number of weeks comprising a single cycle of the shift weekly template.
Work Calendar Specifies the list of holidays during which work of this type is not allowed to be scheduled.
Resource ID A unique identifier used by an external system to identify common shift weekly template.
Effective Date The date from when this template is in effect.
Expiration Date The end date for this template.
Business Object: M1-ShiftWeeklyTemplate
Subscription Shift Weekly TemplateA template used to generate shifts on a weekly basis that crews can subscribe to.
Field Description
Shift Weekly Template ID A unique identifier for this template.
Template Class Flag Identifies the type of template being created. Possible options include:

Oracle Real-Time Scheduler Server Application User Guide • 195
Field Description• Capacity
• Common
• Crew Specific
• Subscription
Status Current status of this template.
Status Date/Time The date/time when the status last changed.
Effective Date The date from when this template is in effect.
Expiration Date The end date for this template.
Crew The name of the crew which is subscribed to this template.
Common Template A template that can be shared across multiple crews. Common templates cannot define crew specific details such
as the crew itself or its resource allocation.
Applied Version Represents the version of the template which is currently active.
Common Initial Date The initial creation date for the template (before it is applied).
Number Of Weeks In
Rotation
Number of weeks comprising a single cycle of the shift weekly template.
Last Applied Date Indicates when the template was last applied. The system will generate future shifts automatically from the
template's effective date through the earliest of the planning horizon or the expiration date (if any).
Business Object: M1-SubscriptionShiftWeeklyTemp
Base Package Period of Unavailability Business ObjectsA period of unavailability (POU) is a specific period of time during which one or more resources are not available toperform work. For example, mobile workers or dispatchers may be unavailable due to vacation, personal appointments,meetings or training sessions etc. Vehicles may be unavailable for maintenance reasons. Crews may need to attendingmeetings or participating in training sessions and hence not available to perform work during these events.
The following business objects support POU functionality within the application:
Period of UnavailabilityIndicates the details for the planned leave of a mobile worker, vehicle or other resource.
Field Description
Status The current status of this POU. Valid options include:
• Created
• Canceled
Period of Unavailability Type The business object used to create this POU.
Start Date/Time /Duration
and End Date/Time
Leave can be set for a single day or span multiple days of leave depending on the values entered for Start Date/
Time and Duration or End Date/Time.
Time Zone The time zone in which this POU is defined.
Comment More details about this POU.
Address Address of the POU location where the latter is not a common location.

Oracle Real-Time Scheduler Server Application User Guide • 196
Field Description
Resources Resources associated with this POU, based on the resource class (crew, mobile worker, vehicle, or dispatcher)
specified for the POU type.
Service Areas Service areas associated with this POU. Applicable only to crew POUs, it is used to discourage the inclusion of this
POU event into a crew's shift schedule if the crew is working too far from the event that day. If service areas are
specified, the scheduler will include the POU event only in the schedule of crews that are covering these areas at
the time of the event. If not specified, the POU event applies to all service areas.
Business Object: M1-RealPOU
Period Of Unavailability TypeDefines attributes common to POUs of a specific type.
Field Description
Period Of Unavailability
Type
A unique name for this POU type.
Description Detailed information about this POU type.
Business Object The business object used to create this POU type.
Status Current status of this POU type. Valid statuses include
• Active
• Inactive
Valid Resource Class The type of resource this POU type applies to: for e.g. mobile worker.
Period of Unavailability
Business Object
Business object used to create a POU of this type.
Template Business Object Business object used to create a template POU of this type. A template POU defines a recurring POU.
Business Object: M1-POUType
Period Of Unavailability TaskA tool for tracking crew attendance of a POU event.
Field Description
POU Task ID A unique identifier for this POU task.
Status The current status of this POU task.
Status Date/Time The date and time of the last status change.
Create Date/Time The date and time that the task was created.
Business Status Date/Time Date and time the transition to the current status occurred on the crew's mobile device.
Status Reason The reason why the task moved to its current state.
Task Type The task type corresponding to this task.
Time Zone The time zone in which this POU task is defined.
Queue The queue setting specifies how the message should be delivered: emergency or normal.
Shift ID A unique identifier of the shift this task belongs to.
Comment Extra information.
Location Indicates where the task will take place.

Oracle Real-Time Scheduler Server Application User Guide • 197
Field Description
Address Applicable Address fields. Longitude and latitude are used for geocoding purposes. If not provided, the system
determines the address geocode.
Planned Start Date/Time The date/time when this task is planned to start.
Planned End Date/Time The date/time when this task is planned to end.
Work Sequence The sequence of this task with respect to other tasks currently assigned to the scheduled shift.
Calculated Travel Time Estimated travel time from the previous task on the shift schedule.
Calculated Travel Distance Estimated travel distance, in meters, from previous task on the shift schedule.
Arrival Date/Time Date and time at which the crew is estimated to arrive at the location or actually arrived.
Start Date/Time Date and time at which work is estimated to start or actually started for the task.
Completion Date/Time Date and time the work is estimated to complete or was actually completed.
Depot The name of the depot where the work is to take place.
Depot Task ID The unique identifier for the task.
Distance Unit Abbreviation Specifies the unit of measure used for distance such as foot, meter, mile, and so on.
Updated ETA Estimated arrival time as it is recalculated based on actual updates from the crew.
Business Object: M1-POUTask
Period of Unavailability Task TypeDefines attributes common to POU tasks of a specific type.
Field Description
Period Of Unavailability
Task Type
Unique name for this task type.
Description Description of the task type.
Business Object Business Object used to create this task type.
Status Current status of this task type.
Period Of Unavailability
Task BO
The business object used to create a POU task of this type.
Travel Timesheet Time Type Indicates the type of timesheet to use to track travel to the location.
POU Timesheet Time Type Indicates the type of timesheet to use to track time at the location.
Late Cost Indicates the cost of being late to the POU.
Business Object: M1-POUTaskType
Base Package General Resource Business ObjectsA resource is any workforce resource, such as a crew, vehicle, mobile worker, or dispatcher. Resources can havecapabilities, which indicate the ability to perform certain types of work.
The following business object supports resource functionality within the application.
ResourceDefines a workforce resource- such as a crew, vehicle, mobile worker, or dispatcher.

Oracle Real-Time Scheduler Server Application User Guide • 198
Field Description
Resource ID A unique identifier for the resource.
Business Object The business object used to create this resource.
Status The current status of the resource.
Resource Type The type of resource being created.
Capability Type The capability types associated with this resource.
Effective Date The effective start date for the resource’s capability.
Expiration Date The end date for the resource’s capability.
Business Object: M1-Resource
Resource LeaveDefines the period of time for a resource time off.
Field Description
Period of Unavailability Type The type of POU type being used to create a resource leave.
Description A description of the resource leave.
Status The current status of the resource leave.
Valid Resource Class The type of resource this leave applies to: for e.g. mobile worker.
POU Business Object The business object being used to create a leave.
Template Business Object The POU template object.
Business Object: M1-ResourceLeave
Resource TypeDefines attributes common to resources of a specific type.
Field Description
Resource Type Unique name of the resource type being created.
Business Object The business object used to create resources of this type.
Status Current status of the object. Valid statuses include:
• Active
• Inactive
Capability Type The capabilities associated with this resource type by default.
Business Object: M1-ResourceType
Base Package Mobile Worker Resource Business ObjectsA mobile worker is an individual workforce resource that performs work as part of a crew.
The following business objects support mobile worker functionality within the application:

Oracle Real-Time Scheduler Server Application User Guide • 199
Mobile WorkerDefines an individual performing work as part of a crew. A mobile worker is a resource.
Field Description
Mobile Worker ID A unique identifier of this mobile worker.
Mobile Worker Type The business object to be used when creating a new mobile worker of this type. Thus, it dictates the business rules
governing content and behavior common to all mobile workers of this type.
User The user corresponding to this mobile worker.
Employee ID A unique identifier of this mobile worker.
Contractor If the mobile worker is a contractor, the unique id for the contractor.
Contact Information Defines contact information for this mobile worker including their physical address, city, phone numbers etc. The
combination of User ID and Mobile Phone must be unique across the system.
SMS Enabled SMS Enabled indicates whether or not this mobile worker is allowed to use the specified mobile phone to work their
daily schedule via SMS communication. (Only displayed if set to Yes.).
Worker Capabilities Worker capabilities (skills and attributes) associated with this mobile worker, along with the effective and expiration
dates for each worker capability. This list defaults to the list of assumed worker capabilities defined for the mobile
worker type, but can be modified.
Base Service Areas Service areas where this mobile worker typically works.
Relative Efficiency Defines a mobile worker's efficiency relative to expected efficiency for mobile workers of this type. For example, if
a mobile worker is twice as efficient as other mobile workers of this type, the Relative Efficiency is 2. A crew shift's
relative efficiency is the average of all its allocated mobile workers' relative efficiencies.
Business Object: M1-MobileWorker
Mobile Worker TypeDefines the attributes of a mobile worker of a certain type.
Field Description
Mobile Worker Type A unique name for the mobile worker type being created.
Description More information about this mobile worker type.
Status Current status of this object. Valid options include:
• Active
• Inactive
Mobile Worker Business
Object
The business object used to add a mobile worker of this type.
Assumed Worker
Responsibilities
Skills and other worker attributes typically associated with mobile workers of this type. These can be overridden for
an individual mobile worker.
Business Object: M1-MobileWorkerType
Base Package Vehicle Business ObjectsA vehicle is a workforce resource used by a crew to perform work.
The following business objects support vehicle functionality within the application:

Oracle Real-Time Scheduler Server Application User Guide • 200
VehicleDefines a non-human mobile resource used by the crew.
Field Description
Vehicle Tag A unique identifier for the vehicle.
License Plate A unique license number pertaining to this vehicle.
Relative Speed Defines a vehicle's speed relative to the expected speed for vehicles of this type. For example, if a vehicle is twice
as fast as the expected speed for vehicles of its type, the Relative Speed is 2. A crew shift's relative speed is the
lowest of all its allocated vehicles' relative speeds.
Equipment Equipment associated with this vehicle and the effective period for the equipment, if applicable. This list defaults to
the assumed equipment defined for the vehicle type.
Effective Date Effective start date for the equipment associated with this vehicle, if any.
Expiration Date Expiration date for the equipment associated with this vehicle, if any.
Business Object: M1-Vehicle
Vehicle TypeDefines attributes for vehicles of a certain type.
Field Description
Vehicle Type The name for the type you are creating.
Description An information string describing the vehicle type.
Status Current status of this object. Valid status include:
• Active
• Inactive
Vehicle Business Object The business object used to add a vehicle of this type.
Assumed Equipment Equipment typically associated with vehicles of this type. Assumed equipment can be overridden for an individual
vehicle.
Procedures List of procedure types the crew must perform each time they utilize a vehicle of this type. The crew cannot start
their shift or change their vehicle mid shift until these procedures are passed.
Business Object: M1-VehicleType
Vehicle Type with CapacitiesDefines attributes for vehicles of a certain type with capacities included.
Field Description
Vehicle Type The name for the type you are creating.
Description An information string describing the vehicle type.
Status Current status of this object. Valid status include:
• Active
• Inactive
Vehicle Business Object The business object used to add a vehicle of this type.

Oracle Real-Time Scheduler Server Application User Guide • 201
Field Description
Assumed Equipment Equipment typically associated with vehicles of this type. Assumed equipment can be overridden for an individual
vehicle.
Procedures List of procedure types the crew must perform each time they utilize a vehicle of this type. The crew cannot start
their shift or change their vehicle mid shift until these procedures are passed.
Maximum Capacities Maximum Cumulative and Non Cumulative Capacities for this Vehicle Type.
Business Object: M1-VehicleTypeWithCapacity
Base Package Timesheet Business ObjectsTimesheets allow your organization to more easily use the time information which is collected within the application asshifts are completed. This information can be exported to external timekeeping systems as needed.
The following business objects support timesheet functionality within the application:
Crew Process Timesheet TypeDefines attributes for a crew process timesheet of a particular type.
Field Description
Timesheet Type Unique name for the crew process timesheet type being created.
Description Description of this timesheet type.
Timesheet Business Object The business object used to create a new timesheet of this type.
Business Object: M1-CrPTimesheetTyp
Resource Timesheet TypeDefines attributes common to timesheet records of the same type. For example, you can designate whether the timesheet isfor a mobile worker or a crew.
Field Description
Timesheet Type Unique name for the resource timesheet type being created.
Description Description of the resource timesheet type.
Timesheet Business Object The business object used to create a new timesheet of this type.
Percentage Deviation Defines the maximum percentage allowed for corrections on a timesheet. This is the difference between the total
actual shift time and the total shift time entered by the user as the corrected shift time. If the total corrections
exceed the percentage entered here, the user can override the validation (by checking the Override box),
and continue with the corrections. Whether or not users are allowed to make corrections is defined on Master
Configuration under Global Configuration in the Resource Management section.
Business Object: M1-ResTimesheetTyp

Oracle Real-Time Scheduler Server Application User Guide • 202
Base Package Location Business ObjectsYou can predefine a set of common locations, such as service centers or business offices that can be selected and referencedlater. For example, predefined locations can be used as logon and logoff locations for crew shifts or as meeting locations forperiods of unavailability.
LocationDefines a physical location, such as a service center.
Field Description
Location Unique name for this location.
Description More information about this location.
Location Class Type of location being created, for e.g. service center.
Address 1 – 4 Basic address attributes for this location.
Cross Street, Suburb, City,
County
Various attributes used to uniquely define this location.
Postal, State, Country, Time
Zone
More attributes used to define this location.
Geocode Latitude /longitude Latitude and longitude are used for geocoding purposes. If not provided, the system determines the address's
geocode.
Business Object: M1–Location
Base Package Procedure Business ObjectsProcedures represent steps or tasks that crews may need to complete prior to starting a business activity such as startingtheir shift, using a vehicle or starting work on an activity. Usually procedures relate to safety precautions or regulatoryrequirements. For example, the mobile worker may need to complete a vehicle inspection at the beginning of a shift, orreview safety instructions for a hazardous task. A procedure associated to the activity or vehicle type would guide thecompletion of the inspection or safety check.
The following business objects support procedure functionality within the application:
ProcedureProcedures represent steps or tasks that crews may need to complete prior to starting a business activity such as startingtheir shift, using a vehicle or starting work on an activity. Usually they relate to safety precautions or regulatoryrequirements. As procedures are created, processed and completed, the system creates a Procedure record to track theinformation, attendance (if applicable), and results. Procedures cannot be manually created in this portal.
Business Object: M1-SimpleProcedure
Procedure TypeDefines the attributes associated with procedures of a certain type.
Field Description
Procedure Type The unique name for the type of procedure being defined.
Procedure Business Object The business object used to create a new procedure of this type.

Oracle Real-Time Scheduler Server Application User Guide • 203
Field Description
Related Entity Determines the type of entity that the procedure is applicable to. For example, it may be for an activity type, a
vehicle type or a primary function.
Effective Date and
Expiration Date
Valid period during which the procedure type is in effect.
Allow Override Indicates whether or not the crew can override and accept a failed procedure. An overridden procedure is handled
as if it was successfully completed and allows to crew to proceed with the intended business activity.
Take Attendance Indicates whether or not the crew is required to take attendance of those present for the procedure run-through.
Business Object: M1-ProcedureType
Base Package Service Management Business ObjectsThis section provides descriptions of the base package objects used by service management functionality throughout thesystem.
For detailed information on the related functionality, please refer to the specific sections for these objects in the main bodyof this guide.
Base Package Activity Business ObjectsAn activity is a task performed at a particular geographic location. Activities can be received from a host system or createdin the base application. Each activity is defined by an activity type that identifies the skills, attributes, and equipmentrequired to work activities of that type and specifies how the activities should be dispatched, prioritized, scheduled andmore.
The following business objects support activity functionality within the application:
ActivityA task performed at a particular geographic location.
Field Description
Estimated Duration Length of time estimated to complete this activity. Defaults to the Average Duration defined for the activity type.
Acknowledgement Required Indicates whether the crew is required to manually confirm receipt of this activity. Typically set to Yes for emergency
activities. (Only displayed if set to Yes.)
Queue Synchronization queue into which this activity should be placed, such as Emergency or Normal.
Scheduling Priority Defaulted from the activity type, the scheduling priority determines the importance of the activity relative to other
activities. Activities of a higher priority are scheduled first or earlier. Scheduling Priority is always 1 to 10 with 10
being the highest priority.
Scheduled Time Window The time window during which this activity has been (or will be) scheduled.
Arrival Date/Time Date and time at which the crew is estimated to arrive or actually arrived at the location.
Complete Within Days Establishes the number of days within which the activity must be completed.
Same Crew Indicates whether or not activities of this type are restricted to a single crew to finish the work. If this value is set to
Yes, one crew must work the job from start to finish. i.e., all visits for the complex activity would be performed by
one crew. (Complex Activities only).
Ignore Sequence Locking In most situations activities are worked on a route in sequence and once the activity is dispatched, the sequence
is locked. If another activity comes in and is dispatched, it would typically not be dispatched before an activity that

Oracle Real-Time Scheduler Server Application User Guide • 204
Field Descriptionis already dispatched. In situations where a user would want to allow a new task to be dispatched before tasks
that have already been dispatched this value can be set to "Yes". This allows the scheduler to dispatch the activity
before any other activities that are already dispatched. This is only relevant for shifts where the Drip Mode is set to
Standard.
Host External ID Unique identifier of the activity in the host external system.
Eligible for Contracting Indicates whether or not the activity can be worked by a contractor.
Site Address Address of the actual entrance to the site of service, which may be different than the service address. The
scheduler uses this to optimize schedules and routes, and attempts to assign activities at the same site to the same
crew.
Site Delay An explicit site ID to be used by the scheduler for site matching. This value is typically populated by the host. If not
specified the system computes the site ID based on the "Site ID" feature configuration.
Instructions Any special instructions related to the activity location.
Service Address Service area and time zone where service is provided.
Key Details When applicable to the activity, the Key Identifier and Key Location Depot fields provide information about where
the crew can pick up keys to gain access to the work site. Since this indicates the location where the keys will be
picked up, the key location depot can only be a distribution depot. The drop-off location is assumed to be the same
as the pick up location and also where the crew logs off.
Customer Information Customer name and contact information associated with this activity.
Time Windows Defines time windows used by the scheduler to determine when the activity should be scheduled.
Appointment Indicates whether the activity's time window represents an appointment. (Edit mode only).
Effective Time Window Starting and ending date and time of the effective time window (ETW). The ETW is the time period within which an
activity should be scheduled, based on values sent from the host.
Preferred Time Window Starting and ending date and time of the preferred time window (PTW). The PTW is the time period within which it is
ideal to schedule an activity.
Arrival Time Window The period of time within an activity's effective time window (ETW) during which the activity is allowed to be
scheduled, based on applicable restrictions or conditions. (Display only)
Capabilities Shows the required capabilities, i.e. skills and equipment, needed to perform the activity. If the defaults are not
overridden the capabilities defined on the activity type are displayed. If the defaults are overridden, the screen
shows the overridden values.
Override Capabilities Users can also override an activity type so that NO capabilities are required by setting the Override Capabilities
field to "Yes" then leaving the remaining fields blank.
Allowed Crews Defines a list of crews that can accept the activity assignment. If this list is blank, all valid crews are considered
when the scheduler makes assignments.
Excluded Contractor Lists any contractors that should not be considered to work the activity.
Business Object: M1-Activity
Activity DefermentActivity Deferment is used to put off the scheduling of an activity to a later date.
Field Description
Activity ID The unique id of the activity that is to be scheduled for later.
Task Start Date/Time Enter the date/time to which you want this activity deferred.
Deferment Reason The reason for deferring this activity.

Oracle Real-Time Scheduler Server Application User Guide • 205
Field Description
Deferment Comments Any relevant remarks about the deferment.
Business Object: M1-ActivityDeferment
Activity TypeDefines the nature of the task to be performed at a specific location.
Field Description
Activity Type A unique name for the activity type.
Description A description of this activity type.
Status Current status of this activity type. Valid options include:
• Active
• Inactive
Host System Host system requesting to perform activities of this type.
Host Reference The unique identifier of the activity type in the host external system.
Average Duration Average length of time required to complete activities of this type.
Efficiency Duration Impact
(%)
When an activity type includes a skill requirement, the value of this field specifies the percentage of the scheduled
duration that is impacted by skill efficiency. Refer to the online help for more information and an example.
Advanced Allocation Indicates whether or not activities of this type are to be pre-allocated to the assigned crew some time before the
shift starts. Time can be set by days or by time. If it is set by days, you must also fill in the Allocation Days field. If it
is by time, you must also fill in the Advanced Allocation Offset field.
Auto Dispatch Indicates whether activities of this type should be automatically dispatched to the assigned crew. Preventing certain
types of activities from being automatically dispatched is only applicable if the Dispatch Mode of the crew's shift is
set to All.
Acknowledgement Required Indicates that the crew is required to manually confirm receipt of activities of this type. Typically set to Yes for
emergency activities.
Appointment Booking Group Default appointment booking group to be used for activities of this type. The appointment booking group defines
valid time windows for appointment booking.
Work Profile When specified, the work profile defines a specific period of time wherein the activity must be completed.
Work Calendar Defines public holidays to consider when generating schedules using this template.
Complete Within Option Indicates whether or not a timeframe is set for when the activity should be completed. If this is set to Days or Time
an additional field is displayed to indicate the number of days or hours, respectively.
Eligible For Assist Indicates whether or not activities of this type can be dispatched to another crew.
Eligible For Contracting Indicates whether or not activities of this type can be worked by a contractor.
Allow Breaks Indicates whether or not activities of this type can include break time.
Allow Crew Time Indicates whether or not activities of this type are tracked for timekeeping.
Service Type Indicates the service type associated to the activity type. If your business process divides service territories into
service types, the service area for activities of this type would be further refined by the service type indicated. In
terms of viewing service areas on a geocoded map and/or determining the service area for activities of this type,
service types segment the service areas into more finite areas where activities would take place.
Reporting Service Category Categorization used for reporting purposes.
Response Time SLA Defines the overall expected response time for an activity of this type.
Travel Timesheet Time Type Indicates the timesheet type to track travel time for activities of this type.

Oracle Real-Time Scheduler Server Application User Guide • 206
Field Description
Work Timesheet Time Type Indicates the timesheet type to track work time for activities of this type.
Activity Business Object The business object used to create a new activity of this type.
Queue Indicates priority queue of activity.
Preferred Time Factor Desired Time Factor.
Ignore Sequence Locking In situations where a user would want to allow a new task to be dispatched before tasks that have already been
dispatched the Ignore Sequence Locking field can be set to "Yes". This allows the scheduler if needed to dispatch
the activity before any other activities that are already dispatched. This is defaulted from the activity type when the
activity is created but may be overridden on the activity as needed.
Priority Profile Defines allocation factors used to prioritize the scheduling of activities.
Scheduling Priority A numerical value from 1 to 10 that establishes the importance of the activity type relative to others. 10 is the
highest priority.
Scheduling Priority List The Scheduling Priority List defines a range used to convert business priority number to a 1 to 10 scheduling
priority.
Crew Size Minimum number of mobile workers needed to perform activities of this type.
Skill Skills required to complete an activity of this type.
Count Indicates how many members of the crew are required to possess the skill. Value must be greater than zero.
Equipment Equipment required to complete an activity of this type.
Valid Remark Types Completion remark types that can be associated with this type of activity.
Sort Sequence Order in which remarks of this type will be displayed in application screens.
Auto Extension Indicates whether or not expired activities of this type are allowed to be automatically extended and if so whether
extension is in business days, any week days, or in hours.
Extension Days/Duration If allowed to be extended by days or hours this indicates the number of days or hours by which to extend the
activity's time window. Neither of these fields is shown if the Auto Extension field is set to No.
Extension Limit The maximum number of automatic extensions that are allowed.
Auto Cancel Indicates whether or not expired activities of this type should be automatically canceled and if so whether to wait a
few business days, any week days, or hours before cancellation.
After Days/Duration If allowed to be automatically canceled this indicates the number of days or hours to wait before automatically
canceling the activity.
Procedures List of procedure types a crew has to perform each time they are onsite and about to start work of this type. Work
would not be allowed to commence until these procedures are passed.
Procedure Clearance
Required
If the Procedure Clearance Required option is set to Yes, the crew or resource will not be allowed to start work on
the shift until the procedure is passed.
Procedure Type Establishes the attributes associated with the procedure requirements that apply for the activity type, if any.
To Do Setup The To Do Types and Roles associated with activities of this type when certain predefined conditions occur.
Business Object: M1-ActivityType
Activity Type Override Activity Time WindowDefines a time window during which the default arrival time window (ATW) for activities of a particular type is overridden.This override is applied to all activities for which at least one of their effective time windows (ETW) overlaps with thisoverride time window.

Oracle Real-Time Scheduler Server Application User Guide • 207
Field Description
Activity Type The type of activity for which the override time window is being applied.
Start Date/Time The start date and time for the time window.
End Date/Time The end date and time for the time window.
Time Usage Indicates whether this time window represents a period of time when activities of this type should or should not be
allowed to be scheduled.
Service Areas Specific areas to which this override time window applies.
Business Object: M1-ActivityTypeOverrideATW
Appointment Booking GroupUsed by the scheduler to identify available time windows during which appointments can be scheduled.
Field Description
Appointment Booking Group A unique name for the appointment booking group being created.
Description A description of appointment booking group being created.
Time Windows Defines the valid dates and times where appointments in this booking group can be scheduled.
Business Object: M1-AppointmentBookingGroup
AssignmentA copy of an activity created by the system to track the assigned crew's progress in accomplishing the work. An assignmentrecord is created each time an activity is dispatched to a crew. It is first created on the server, then the dispatching processsends a copy of it to the crew's mobile device. The crew uses the assignment to capture completion information.
Field Description
Customer Contact Type The customer’s preference for being contacted.
Contact Comments Additional comments applicable to the contact.
Review Required Indicates whether the crew must review the assignment.
Comments Additional information about this assignment.
Status Reason The reason for the current change in status of this object.
Remark Type Type of assignment completion remark.
Assigned to Engineer The engineer who worked on this assignment.
Arrival Date/Time Date and time at which the crew is estimated to arrive at the location or actually arrived.
Actual Start Time The actual time at which the work started.
Actual Completion Time The time at which the work was completed.
Travel Time Duration
(minutes)
The time in minutes that the crew took to arrive at the location.
Travel Distance The actual distance covered by the crew to arrive at the location.
Distance Unit The default setting for the unit used to display distance globally throughout the system (i.e., kilometers, miles).
Break Time (minutes) The time in minutes allowed for a break for this assignment.
Crew Time Usage The time spent by the crew on this assignment.
Calculated Duration The estimated duration of the task as calculated by the scheduler after applying various factors, such as crew
efficiency, to the estimated duration on the task.

Oracle Real-Time Scheduler Server Application User Guide • 208
Field Description
Adjusted Duration The difference between the calculated duration for the assignment and the actual time taken by the crew to
complete the assignment.
Business Object: M1-Assignment
EquipmentA device or apparatus used to perform certain types of work.
Field Description
Equipment A unique name for the equipment being created.
Description A description of the equipment being created.
Business Object Business object used to create this equipment.
Business Object: M1-Equipment
Priority ProfileA predefined set of allocation factors used by the scheduler to prioritize the scheduling of an activity relative to otheractivities.
Field Description
Priority Profile Defines allocation factors used to prioritize the scheduling of activities. The activity type defines the priority profile to
use for all activities of that type.
Description Description of the priority profile.
Sort Sequence Order in which activities associated with this priority profile will be displayed in application screens.
Allocation Rule Indicates whether allocation is mandatory or optional. If Mandatory, the activity will be allocated regardless of the
cost. If Optional, allocation is considered optional and driven by costs.
Offset Option Indicates whether the allocation priority window exactly covers the overall activity arrival time window (ATW) or
represents a time window relative to the ATW's start or end boundaries.
Valid values are:
No Offset: Use this if the activity's priority remains constant throughout the window. This applies to appointment
work.
Start Window: Use this if the activity's priority is critical at the beginning of the window and diminishes after that.
This applies to short-cycle, SLA-oriented work. The number of days for the offset is specified in Start Offset in Days.
End Window: Use this if the activity's priority is low in the beginning of the window and then becomes critical
toward the end. This applies to long-cycle work, such as Meter Inspections. The number of days for the offset is
specified in End Offset in Days.
Scheduling Priority Profile Defines the priority window boundaries and their priority values. The fields displayed in this section vary depending
on the Offset Option selected.
Start Offset Defines the allocation priority window as starting this number of days after the ATW start date if Offset Option is
Start Window or this number of days before ATW end date if Offset Option is End Window. For example, if Offset
Option is Start Window, the ATW start date is 1/10/2010 and this value is set to 2, then the allocation priority
window starts on 1/12/2010.
Initial Value Initial priority. Activities are associated with this priority value until the priority window starts.
End Offset Defines the allocation priority window as ending this number of days after the ATW start date if Offset Option is
Start Window or this number of days before ATW end date if Offset Option is End Window. For example, if Offset

Oracle Real-Time Scheduler Server Application User Guide • 209
Field DescriptionOption is Start Window, the ATW start date is 1/10/2010 and this value is set to 5, then the allocation priority
window ends on 1/15/2010.
Final Value Final priority. Activities are associated with this priority value once their priority window ends. During the priority
window itself, priority is calculated as a linear function between the initial and final values.
Business Object: M1-PriorityProfile
Remark TypeDefines a common activity completion remark. When you define an activity type, you can select one or more predefinedremark types that are valid for activities of that type.
Field Description
Remark Type Defines a common activity completion remark.
Description More information about this remark type.
Business Object The business object being used to create a remark of this type.
Business Object: M1-RemarkType
SkillDefines the skill that is required to complete a task. You can associate skills with an activity type, indicating that the skill isrequired to work this type of activity.
You can also associate skills to mobile workers and to mobile worker types (as assumed skills).
Field Description
Skill A unique name for the skill being defined.
Description A description of this skill.
Limited Time Indicates whether this skill has an effective period. For example if it only valid within a licensed period. If Yes, you
will be required to enter effective and expiration dates when you assign this skill to a resource.
Skill Set A skill set defines relationships between similar skills of different skill levels, where each skill within the set
represents a specific level of expertise. The skill set that this skill belongs to.
Skill Efficiency Associates an efficiency to this skill level. For example a worker at “expert” skill level probably works faster than a
worker at “novice” level. The skill efficiency assigns a numerical value to quantify that level of work.
Business Object The business object used to create this skill.
Business Object: M1-Skill
Worker AttributeDefines a human property needed to perform certain types of work such as a security badge or certain test clearing etc. Youcan associate attributes with an activity type, indicating that the attribute is required to work this type of activity. You canalso associate attributes to mobile workers and to mobile worker types (as assumed attributes).
Field Description
Attribute Defines the attribute that is required to complete a task.
Description More details about this worker attribute.
Limited Time Indicates whether this attribute has an effective period. For example if it only valid within a licensed period. If Yes,
you will be required to enter effective and expiration dates when you assign this attribute to a resource.

Oracle Real-Time Scheduler Server Application User Guide • 210
Field Description
Required by All Indicates whether all workers on the shift must possess this attribute in order for the shift to be considered having
this attribute.
Business Object: M1-WorkerAttribute
Work ProfileDefine operational time windows and other time restrictions regarding when certain types of work can be performed.
Field Description
Work Profile A unique name for the work profile.
Description A description of this work profile.
Minimum Business Day Establishes the minimum duration, in minutes, that can be considered as a business day when scheduling the
activity. For example, if this is set at 5 hours and the activity must be completed within 3 days, but one of the days is
a 4 hour day, that day will not be considered a full business day and the scheduler cannot schedule on that day.
Maximum Late Time Establishes the maximum duration, in minutes that the activity can be started late. Setting this to zero indicates that
no lateness is allowed.
Time Windows Establishes the operational days and times during which work can be performed. For example, if this work profile
is establishing a restriction for work that can only be completed during a graveyard shift or during the weekend
between Friday and Monday, the time window should be set between Friday 9:00pm to Monday 4:00am. You can
create multiple time windows to establish non-consecutive blocks of time.
Business Object: M1-WorkProfile
Base Package Complex Activity Business ObjectsActivities that require multiple shifts to complete are referred to as "complex activities" or "multi shift tasks" and are typicalof, but not limited to, construction work.
The following business objects support complex activity functionality within the application:
Complex ActivityDefines a type of activity that is scheduled over multiple days and requires multiple shifts to complete.
Field Description
Activity Type The business object used to create this complex activity.
Estimated Duration Length of time estimated to complete this activity. Defaults to the Average Duration defined for the activity type.
Complete Within Days Establishes the number of days within which the activity must be completed.
Same Crew If the Same Crew value is set to "Yes" one crew should work the job from start to finish. i.e., all visits for the
complex activity would be planned to be performed by one crew.
Acknowledgement Required Indicates whether the crew is required to manually confirm receipt of this activity. Typically set to Yes for emergency
activities. (Only displayed if set to Yes.)
Activity Comments More details about this complex activity type.
Scheduled Time Window The time window during which this activity has been (or will be) scheduled.
Arrival Date/Time Date and time at which the crew is estimated to arrive or actually arrived at the location.
Host External ID Unique identifier of the activity in the host external system.

Oracle Real-Time Scheduler Server Application User Guide • 211
Field Description
Eligible For Contracting Indicates whether or not the activity can be worked by a contractor.
Site Address Displays the address of the actual entrance to the site of service, which may be different than the service address.
The scheduler uses this to optimize schedules and routes, and attempts to assign activities at the same site to the
same crew.
Instructions Any special instructions related to the activity location.
Service Address Service area and time zone where service is provided.
Key Details When applicable to the activity, the Key Identifier and Key Location Depot fields provide information about where
the crew can pick up keys to gain access to the work site. The Key Location Depot can only be a distribution depot.
Key Identifier/Key Location
Depot
When applicable to the activity, the Key Identifier and Key Location Depot fields provide information about where
the crew can pick up keys to gain access to the work site.
Customer Information Customer name and contact information associated with this activity.
Time Windows Defines time windows used by the scheduler to determine when the activity should be scheduled.
Effective Time Window Starting and ending date and time of the effective time window (ETW). The ETW is the time period within which an
activity should be scheduled, based on values sent from the host.
Preferred Time Window Starting and ending date and time of the preferred time window (PTW). The PTW is the time period within which it is
ideal to schedule an activity.
Worker Capabilities Skills and attributes required or preferred to complete an activity of this type. If the defaults are not overridden, the
worker capabilities defined on the Activity Type are displayed. If the defaults are overridden, the screen shows the
overridden values.
Override Capabilities Overriding the Defaults To override the defaults, the user can set the override to Yes and then specify the skills
and/or equipment, if any. This is done on the Activity Maintenance portal.
Users can also override an activity type so that NO capabilities are required by setting the Override Capabilities
field to "Yes" then leaving the remaining fields blank.
The value under the count column represents the minimum number of crew members that must possess the
capability. The value must be greater than zero.
Resource Restrictions Displays the list of crews that are allowed to work the activity and/or shifts that are not allowed to work the activity
as defined by either the host system or though manual entry.
Excluded Mobile Workers Defines a list of mobile workers that are not allowed to work the activity. This list might be sent from the host system
or entered in the maintenance view of the activity.
Allowed Crews Defines a list of crews that are allowed to work the activity. This list might be sent from the host system or entered
in the maintenance view of the activity. If there are no crews listed, all valid crews are considered when the
scheduler makes assignments.
Preferred Resource Groups Lists contractor companies as well as your company in order of preference for scheduling the activity to their
resources. Only applicable to activities that are eligible for contracting. This information is determined and captured
periodically by a monitor algorithm associated with the activity business object.
Allowed Contractors Defines a list of contractor companies that are allowed to work the activity. This list might be sent from the host
system or entered in the maintenance view of the activity. If there are no crews listed, all valid crews are considered
when the scheduler makes assignments.
Excluded Contractors Lists any contractors that have declined the activity or are no longer allowed to perform the activity because they
have failed to approve their commitment on time or were manually excluded by a user.
Excluded Shifts Shows the list of crew shifts that have declined the activity. Once a shift has declined an activity the activity cannot
be re-assigned to that shift. Shifts are excluded from performing the activity either when the crew declines it or a
dispatcher decides to unassign the work from the crew.
Business Object: M1-ComplexActivity

Oracle Real-Time Scheduler Server Application User Guide • 212
Complex Activity TypeDefines a type of activity that is scheduled over multiple days and requires multiple shifts to complete.
Field Description
Activity Type A unique name for this complex activity type.
Description A detailed description of the type.
Host System Host system requesting to perform activities of this type.
Host Reference The unique identifier of the activity type in the host external system.
Average Duration Average length of time required to complete complex activities of this type.
Duration Extension Limit Percentage restricting the amount that the duration can be manually updated.
Minimum Visit Duration Minimum length of time to be scheduled for a visit for this type.
Average Visit Duration Average length of time to be scheduled for a visit for this type.
Same Crew Indicates whether or not activities of this type are restricted to a single crew to finish the work. If this value is set to
Yes, one crew must work the job from start to finish.
Advanced Allocation Indicates whether or not activities of this type are to be pre-allocated to the assigned crew some time before the
shift starts. Time can be set by days or by time. If it is set by days, you must also fill in the Allocation Days field. If it
is by time, you must also fill in the Advanced Allocation Offset field.
Auto Dispatch Indicates whether activities of this type should be automatically dispatched to the assigned crew. Preventing certain
types of activities from being automatically dispatched is only applicable if the Dispatch Mode of the crew’s shift is
set to All.
Acknowledgement Required Indicates that the crew is required to manually confirm receipt of activities of this type. Typically set to Yes for
emergency activities.
Work Profile When specified, the work profile defines a specific period of time wherein the activity must be completed.
Work Calendar Defines public holidays to consider when generating schedules using this template.
Complete Within Option Indicates whether or not a timeframe is set for when the activity should be completed. If this is set to Days or Time
an additional field is displayed to indicate the number of days or hours, respectively.
Eligible For Contracting Indicates whether or not activities of this type can be worked by a contractor.
Allow Earning Time Indicates whether the crew is allowed to capture unusual labor earning times at activity completion. These would
typically be overtime related but may also relate to times when the worker was called in from a day off, working in
dangerous area etc.
Service Type If your business divides service territories into overlapping service areas for different types of service, your service
areas should indicate which service type they belong to further refined by the service type indicated. Service types
segment service areas into more finite areas where activities take place. This affects viewing service areas on
geocoded maps and/or determining the service area for activities of this type.
Reporting Service Category Categorization used for reporting purposes.
Response Time SLA Defines the overall response time for an activity of this type.
Travel and Work Timesheet
Time Type
Indicates the timesheet type to track travel and work times for activities of this type.
Activity Business Object The business object used to create a new activity of this type.
Priority Priority Related Fields for an activity of this type.
Queue Indicates priority queue of activity.
Preferred Time Factor This is the fixed cost that will be applied for working an activity outside of the preferred time window.

Oracle Real-Time Scheduler Server Application User Guide • 213
Field Description
Ignore Sequence Locking In most situations activities are worked on a route in sequence and once the activity is dispatched, the sequence
is locked. If another activity comes in and is dispatched, it would typically not be dispatched before an activity that
is already dispatched. In situations where a user would want to allow a new task to be dispatched before tasks
that have already been dispatched this value can be set to “Yes”. This allows the scheduler to dispatch the activity
before any other activities that are already dispatched. This is only relevant for shifts where the Drip Mode is set to
Standard.
Priority Profile The priority profile used by this activity type. A priority profile is a pre-defined set of scheduling factors that may be
shared by multiple activity types.
Scheduling Priority The default scheduling priority for activities of this type. A numerical value from 1 to 10 that establishes the
importance of the activity type relative to others. 10 is the highest priority.
Scheduling Priority Steps By
Business Priority
Allows activities of the same type to be assigned a scheduling priority based on their business value (Business
Priority Number) such as cost or other currency amount, number of customers, relative customer importance etc. If
not specified of the business value exceeds the highest step the default scheduling priority is used.
Scheduling Priority List Scheduling Priority based on Business Priority Number.
Crew Size Minimum number of mobile workers needed to perform activities of this type.
Worker Capabilities Skills and attributes required or preferred to complete an activity of this type. If the defaults are not overridden, the
worker capabilities defined on the Activity Type are displayed. If the defaults are overridden, the screen shows the
overridden values.
Count Indicates how many members of the crew are required to possess the skill. Value must be greater than zero.
Equipment Equipment required to complete an activity of this type.
Valid Remark Types Completion remark types that can be associated with this type of activity.
Sort Sequence Order in which remarks of this type will be displayed in application screens.
Activity Expiration Defines parameters for expiring an activity.
Auto Extension Indicates whether or not expired activities of this type are allowed to be automatically extended and if so whether
extension is in business days, any week days, or in hours.
Extension Days/Duration If allowed to be extended by days or hours this indicates the number of days or hours by which to extend the
activity’s time window. Neither of these fields is shown if the Auto Extension field is set to No.
Extension Limit The maximum number of automatic extensions that are allowed.
Auto Cancel Indicates whether or not expired activities of this type should be automatically canceled and if so whether to wait a
few business days, any week days, or hours before cancellation.
After Days/Duration If allowed to be automatically canceled this indicates the number of days or hours to wait before automatically
canceling the activity.
Procedures Allows you to establish a requirement that the crew or resource complete a set of procedural steps or answer
questions prior to working on activities of this type. If the Procedure Clearance Required option is set to Yes, the
crew or resource will not be allowed to start work on the shift until the procedure is passed. The completion and
status of procedures is tracked in the Procedure zone of the Activity as well as in the Procedure portal.
Activities Creation Defines settings for whether or not related or unrelated activities can be created in the field. A related activity is an
activity at the same location.
Create by Crew Controls whether or not crews can create activities of this type in the field. If the value is set as "Related Activities
Only" then an activity of this type can be created as a related activity but not as an unrelated activity.
Allow Related Activities Controls whether or not crews can create related activities when working activities of this type.
Related Activity Types If Allow Related Activities is set to Yes you may use this list to restrict the list of activity types that can be created
as related activities when working activities of this type. If this list is left blank, any activity type that is allowed to be

Oracle Real-Time Scheduler Server Application User Guide • 214
Field Descriptioncreated as a related activity can be created as a related activity when working an activity of this type. Any activity
type listed here should be defined with Create by Crew set to "Yes" or "Related Activities Only".
To Do Setup The To Do Types and Roles associated with activities of this type when certain predefined conditions occur.
Business Object: M1-ComplexActivityType
Base Package Alert Business ObjectsAn alert is a situation in which predefined condition(s) have been met that require user intervention. An alert is alwaysrelated to either an activity or a shift that caused the condition.
The following business object supports alert functionality within the application:
Alert TypeStores information common to alerts of a specific type. An alert is any situation in which predefined condition(s) have beenmet and require user attention or intervention.
Field Description
Alert Type A unique name for this alert type.
Description Additional information about this alert type.
Priority Priority level of alerts of this type. Controls the order in which alerts are displayed in the alert queue.
Alert Creation Algorithm Algorithm used to create alerts of this type.
Alert Creation Threshold Any integer which represents when an alert should be triggered. This is used by the algorithm creating alerts of this
type. This can be expressed in time, percentage, distance, or any other value that would trigger an alert.
Alert Evaluation Algorithm Algorithm used to evaluate alerts of this type. If the condition that raised the alert no longer exists, the alert is
closed.
Minutes to Expire Number of minutes until alerts of this type expire.
Minutes to Recycle Number of minutes until alerts of this type are recycled. If the currently assigned dispatcher does not respond to the
alert within this number of minutes, the system reassigns the alert to another dispatcher.
Adjustable Snooze Time Indicates whether or not the dispatcher can change the snooze time for alerts of this type.
Minutes to Snooze Number of minutes to snooze (stop issuing alerts) before re-displaying alerts of this type in the alert queue.
Allow Manual Close Switch Indicates whether or not a user should be able to manually close this type of alert. If set to Not Allowed, then the
condition that raised the alert must be cleared in order for the alert to be closed.
Audible Alert Indicates whether or not alerts of this type are delivered with sound. This can be helpful to assist the dispatcher if
he or she is not looking at the screen.
E-Mail Address An e-mail is sent to this address when an alert of this type is raised and no available dispatcher is found to address
it.
Alert Business Object The business object used to create an alert of this type.
Valid Activity Types Establishes a listing of activity types that restrict alerts of this type so that these alerts are only raised for activity
types listed. If no activity types are specified alerts of this type are raised for any type of activity.
Business Object: M1-AlertType

Oracle Real-Time Scheduler Server Application User Guide • 215
Cancel Activity AlertAlerts raised when an external system tries to cancel an activity that can't be cancelled automatically and requires manualintervention.
Field Description
Information The information string showing the details of the alert.
Alert Type The alert type corresponding to this alert.
Status The current status of the cancel activity alert.
• Pending
• Waiting User Action
• Acnkowledged
• Closed
• Force Cancel
Effective Date/Time Indicates the date and time that the alert appears in the assigned user's queue.
Assigned To The user who must be notified when this alert occurs.
Alert Location The physical address at which the alert occurred.
Business Object: M1-CancelActivityAlert
Base Package Break Business ObjectsA break is a planned period of time during which a crew is entitled to take a break during their shift.
The following business object supports break task functionality within the application:
BreakA planned period of time during which a crew is entitled to take a break during their shift.
Field Description
Offset From Shift Start Indicates the earliest amount of time the break can be scheduled to start after the start of the shift. For example, if
the offset is 2 hours and the shift starts at 8 a.m., the break cannot start before 10 a.m. If the shift starts at 9 a.m.
with the same 2 hour offset, then the break can start as early as 11 a.m.
Window Start Date/Time Another way to indicate the earliest time the break can start is by providing the actual time. In this case, the system
would calculate the offset from shift start.
Business Object: M1-BreakTask
Break Task TypeDefines break tasks of a certain type.
Field Description
Break Type The name to identify the break type.
Break Business Object The business object used to create a break of this type.
Task Class Identifies the breaks of this type to the activity.

Oracle Real-Time Scheduler Server Application User Guide • 216
Field Description
Break Window Duration Defined amount of time during which breaks of this type can be taken. For example, a 15 minute morning break
might have a 60 minute window during which the break can occur.
Break Duration Defined amount of time allotted for breaks of this type.
Break Timesheet Time Type Timesheet type to track time for breaks of this type.
Business Object: M1-BreakTaskType
Base Package Non Productive Task Business ObjectsA non productive task (NPT) is a period of time during which a crew must perform a task other than regular work as partof their shift, such as replenishing stock. Such tasks are built into a crew's schedule and are always associated to a locationwhere the task is performed.
The following business objects support non productive task functionality within the application:
Non Productive TaskDefines a period of time during which a crew must perform a task other than regular work as part of their shift, such asreplenishing stock. Such tasks are built into a crew's schedule and are always associated to a location where the task isperformed.
Field Description
Non Productive Task ID A unique identifier for this task.
Status The current status of the object.
Time Zone Indicates the applicable time zone for the crew.
Status Date/Time The date and time of the last status change.
Business Status Date/Time Date and time the transition to the current status occurred on the crew's mobile device.
Status Reason The reason why the non productive task moved to its current state.
Task Type The type of non productive task.
Queue Indicates how the message should be delivered: emergency or normal. If set as Emergency, the system delivers
the mail on the emergency queue which is faster than the normal queue.
Shift The shift that this task belongs to.
Window Start Date/Time Another way to indicate the earliest time the task can start is by providing the actual time. In this case the system
would calculate the offset from shift start.
Location Indicates where the non-productive task will take place.
Address Applicable Address fields. Longitude and latitude are used for geocoding purposes. If not provided, the system
determines the address's geocode.
Creation Date/Time The date and time that the task was created.
Work Sequence The sequence of this task with respect to other tasks currently assigned to the scheduled shift.
Calculated Travel Time Estimated travel time from the previous task on the shift schedule.
Calculated Travel Distance Estimated travel distance, in meters, from previous task on the shift schedule.
Arrival Date/Time Date and time at which the crew is estimated to arrive at the location or actually arrived.
Start Date/Time Date and time at which work is estimated to start or actually started for the task.
Completion Date/Time Date and time the work is estimated to complete or was actually completed.

Oracle Real-Time Scheduler Server Application User Guide • 217
Field Description
Depot The name of the depot where the work is to take place.
Depot Task ID The unique identifier for the task.
Distance Unit Abbreviation Specifies the unit of measure used for distance such as foot, meter, mile, and so on.
Updated ETA Estimated arrival time as it is recalculated based on actual updates from the crew.
Business Object: M1-NonPrdTask
Non Productive Task TypeDefines the attributes for a non productive task of a certain type. Specifies the duration of the non productive task andduration of the task window (period of time during which the task should be scheduled).
Field Description
Task Type A unique name for this task type.
Description Additional information on this task type.
Status Current status of this task type.
Non Productive Task Business
Object
The business object used to create a non productive task of this type.
Auto Dispatch Indicates whether activities of this type should be automatically dispatched to the assigned crew.
Acknowledgement Required Indicates that the crew is required to manually confirm receipt of activities of this type.
Queue Indicates how the message should be delivered: emergency or normal.
Window Duration Duration of the period of time during which the actual break can be taken.
Duration Duration of the non productive task itself.
Travel Timesheet Time Type Indicates the type of timesheet to use to track travel to the location.
NPT Timesheet Time Type Indicates the type of timesheet to use to track time spent at the location.
Business Object: M1-NonPrdTaskType
Base Package Hierarchy Business ObjectsHierarchies organize crews and service areas into logical structures of up to three levels that represent their position inrelationship to other crews or service areas.
The following business objects support hierarchy functionality within the application:
Crew HierarchyA reporting categorization of an organization's crews.
Field Description
Hierarchy Node Name Unique name for this node.
Description More information about this node.
Hierarchy Level The level of the selected crew hierarchy node representing a specific organization unit within the entire hierarchy.
Parent Hierarchy Node Indicates the parent hierarchy node that this crew node belongs to, it indicates the level that this level reports up to.
Business Object: M1-CrewHierarchy

Oracle Real-Time Scheduler Server Application User Guide • 218
Service Area HierarchyA categorization of an organization's service areas.
Field Description
Hierarchy Node Name Unique name for this node.
Description More information about this node.
Hierarchy Level The level of the selected service area hierarchy node representing a specific organization unit within the entire
hierarchy.
Parent Hierarchy Node Indicates the parent hierarchy node that this service area node belongs to, it indicates the level that this level
reports up to.
Business Object: M1-ServiceAreaHierarchy
Base Package KPI Business ObjectsKey performance indicators (KPIs) are quantifiable measurements that support dispatcher decision making and exceptionhandling. KPIs are associated with either activities or crew shifts.
The following business object supports KPI functionality within the application:
KPIA key performance indicator (KPI) is a quantifiable measurement that supports dispatcher decision making and in-dayexception handling.
Field Description
Key Performance Indicator Unique name for this KPI.
Description Information regarding this KPI.
Detailed Description Detailed information regarding this KPI.
Alert Related Indicates whether an alert condition is associated with the same underlying conditions as this KPI.
Alert Type Alert type associated with this KPI (if alert related).
Calculation Algorithm Algorithm used to calculate this KPI.
Normal Threshold Beginning of the normal range for this KPI. If the KPI value is less than the normal threshold, the KPI will not be
presented to the dispatcher.
Warning Threshold Beginning of the warning range for this KPI.
Severe Threshold Beginning of the severe range for this KPI. If the warning threshold is lower than the normal threshold, this value
must be equal to or lower than the warning threshold. Similarly, if the warning threshold is greater than the normal
threshold, this value must be equal to or greater than the warning threshold.
Business Object: M1-KPI
Base Package Dispatcher Business ObjectsA dispatcher is a person within your organization responsible for monitoring crews and crew shifts within certain dispatchareas.
The following business objects support dispatcher functionality within the application:

Oracle Real-Time Scheduler Server Application User Guide • 219
Dispatcher
Field Description
Status The current status of the dispatcher. Valid options include:
• Active
• Inactive
Dispatcher ID A unique identifier of this dispatcher.
Dispatcher Type The business object used to create this dispatcher.
User The user login associated with this dispatcher.
Allowed to Set Initial Date Indicates whether this dispatcher is allowed to choose a specific date from which to monitor activities and crews. By
default, the current date is used.
Allowed to Set Date Range Indicates whether this dispatcher is allowed to specify how many days' worth of data to monitor. The number
of days specified by the dispatcher must be within the Minimum and Maximum Date Range specified here. The
Default Date Range is used by default.
Minimum Date Range Minimum number of days allowed for monitoring.
Maximum Date Range Maximum number of days allowed for monitoring.
Default Date Range Default number of days to monitor.
Dispatch Area Dispatch areas this dispatcher is allowed to monitor. A dispatch area is a predefined set of service areas and
service classes that determine which activities and crews a dispatcher is responsible for monitoring.
Key Performance Indicator Key performance indicators this dispatcher is allowed to monitor. KPIs are quantifiable measurements that support
dispatcher decision making and in-day exception handling.
Business Object: M1-Dispatcher
Dispatcher TypeDefines information common to dispatchers of a specific type.
Field Description
Dispatcher Type Unique name for this type.
Description A description of this dispatcher type.
Status Current status of the object. Valid statuses include:
• Active
• Inactive
Dispatcher Business Object This is the business object used to create a dispatcher of this type.
Business Object: M1-DispatcherType
Dispatch AreaA pre-configured set of service areas and service classes a dispatcher monitors.
Field Description
Dispatch Area Unique code for this dispatch area.
Description A description of this dispatch area.

Oracle Real-Time Scheduler Server Application User Guide • 220
Field Description
Service Areas One or more dispatcher areas this dispatcher is allowed to monitor.
Service Classes One or more service classes this dispatcher is allowed to monitor.
Business Object: M1-DispatchArea
Dispatcher ShiftControls the scope of data to be monitored by the dispatcher for a particular shift.
Field Description
Status The current status of this dispatcher shift. The possible options are:
• Logged On
• Logged Off
Initial Date Initial date for monitoring activities and crews.
Date Range Number of days to monitor activities and crews, starting from the Initial Date.
Dispatch Areas Dispatch areas monitored by this dispatcher shift. A dispatch area is a predefined set of service areas and service
classes that determine which activities and crew shifts a dispatcher shift is responsible for monitoring.
Users to Back Up A list of user IDs that the current dispatcher is backing up when these users are away. Alerts assigned to these
dispatchers also appear on the current dispatcher's alert queue.
Business Object: M1-DispatcherShift
Base Package Geographic Area Business ObjectsGeographic areas define areas that can be represented on a map. Using a general geographic area, you can represent regionssuch as the entire company territory, certain dense population areas and so on.
The following business objects support Geographic Area functionality within the application:
Geographic AreaDefines an area that can be represented on a map. Geographic areas appear in the CDI similar to alert areas, and can beconfigured to represent any map area. For example, you may want to represent the entire company territory, certain densepopulation areas and so on.
Field Description
Area Name Unique name for this area.
Description Information regarding this area.
Area Usage Select an option for the Area Usage field such as "Alert on Entry" or "Alert on Leave" so that the system creates an
alert when crews enter or leave this area.
Business Object: M1-GeographicArea
Hazard AreaA hazard area is a dangerous area for which alerts are raised when crews enter that area.

Oracle Real-Time Scheduler Server Application User Guide • 221
Field Description
Area Name Unique name for this area.
Description Information regarding this area.
Resource Restrictions Establishes the list of service classes that are restricted by this alert area. If no restrictions are indicated,
establishes the list of service classes that are restricted by this alert area. The restriction applies to any GPS enable
resource that enters or exits the area and any active started shift. If no restrictions are indicated, any crew that
enters the area will cause the system to generate an alert.
Business Object: M1-HazardArea
Vehicle Leave AreaDefines an area for which alerts are raised when company vehicles leave it. This is mainly used to track stolen vehicles.
Field Description
Status Current status of this object. Valid statuses include:
• Active
• Inactive
Area Name Defines an Alert Area with a unique name and description. This sets up a geographic area such as a boundary
within which vehicles should stay during the course of work.
Description More information about this area.
Primary Functions Establishes the list of vehicle types that are restricted by this alert area.
Business Object: M1-VehicleLeaveArea
PolygonGeographic areas, alert areas, and service areas include drawn map functionality which allows users to draw map areas todefine boundaries or zones on a map. Polygon shapes are used to draw these map areas.
Field Description
Polygon Definition Used to define the polygon shape. For a Polygon or a Rectangle shape, enter a comma delimited list of longitude
and latitude ordinates representing an ordered list of geocode coordinates where the initial point is repeated also as
the last point. For a Circle shape, enter the longitude and latitude ordinates of the center of the circle as well as its
radius in meters. For a Postal Code based shape, enter a comma delimited list of postal codes.
Business Object: M1-Polygon
Base Package Device Management Business ObjectsThis section provides descriptions of the base package objects used by device management functionality throughout thesystem.
For detailed information on the related functionality, please refer to the specific sections for these objects in the main bodyof this guide.

Oracle Real-Time Scheduler Server Application User Guide • 222
Base Package Deployment Business ObjectsA deployment refers to a specific cut or build of a mobile application of a specific deployment type configuration and for aspecific language. It is a packaged set of application components needed to carry out mobile application functions using amobile data terminal (MDT).
The following business objects support deployment functionality within the application:
DeploymentA build of metadata that is delivered to mobile devices to define the function of the mobile application on the device.
Field Description
Deployment Type Defined in the Deployment Type portal, this establishes attributes for a type of deployment.
Language Language for this deployment. Each deployment is language-specific.
Status The current status of the deployment. Valid statuses include:
• Created: Deployment is not yet available for use.
• Active: Deployment is manually approved for use.
The deployment evaluation batch process evaluates active deployments and if deemed out of date such indication
is displayed.
• Inactive: Deployment has been manually marked as no longer available for use.
Deployment Date/Time The date/time at which this deployment was created.
Created By User The login of the user who created this deployment.
Deployment ID Unique number to identify this deployment.
MCP Client Version Refers to the mobile application components on both the server and device side. Each deployment that is created
is stamped with the client version of the server side mobile application component that created it. When any mobile
device attempts to download that deployment, the system verifies that the mobile application client version is
compatible with the client version indicated on the deployment. A mobile device can only download a deployment
that was generated with a version compatible to the MDT. If the versions are incompatible an error is displayed and
transaction data cannot be sent to the server until the mobile device is updated.
Release Version Denotes the Oracle Utilities Mobile Workforce Management release number that was installed when the
deployment batch created the deployment. This is for informational purposes only.
Out of Date Items Deployments become out of date when a new mobile application version is released, the deployment type
configuration changes, or any other data that supports the deployment changes. This zone provides a real time
assessment and listing of items that are out of date for the deployment.
Business Object: M1-Deployment
Deployment TypeDefines attributes for a type of deployment.
Field Description
Deployment Type Unique name for this deployment type.
Description A description of this deployment type being created.
Detailed Description A longer description of this deployment type being created.
Initial Service Script The script to be executed when the application starts.

Oracle Real-Time Scheduler Server Application User Guide • 223
Field Description
Deployment Part A pre-configured collection of deployment items, such as maintenance objects, business objects, UI maps, service
scripts, business object schemas, algorithms to be included in the application.
MDT Type MDT Types that can run this application.
Message Category Message categories containing the messages for this application.
User Group User groups that can access this application.
Business Object: M1-DeploymentType
Deployment PartA pre-configured collection of deployment items, such as maintenance objects, business objects, UI maps, service scripts,business object schemas, algorithms, etc.
A deployment type is made of deployment parts.
Field Description
Deployment Part Unique name for this deployment part.
Description Description of this deployment part.
Detailed Description Detailed description of this deployment part.
Bundle ID The ID of the bundle this deployment part belongs to.
Entities Deployment items for this deployment part. An item is identified by its maintenance object and key.
Business Object: M1-DeploymentPart
Base Package MDT Business ObjectsMobile data terminals (MDTs) or mobile devices such as laptops, cellular phones, tablets and other mobile devices may beused to interface with the system via the mobile application.
The following business objects support mobile functionality within the application:
Mobile Device Terminal
Field Description
Device Tag The unique name of the mobile device.
Serial Number A unique identifier for Windows laptops or tablets.
Log File Size The maximum size in kilobytes of a log file.
Log Archival Days The number of days after which to purge archived device log files.
Default Log Level Default logging level for this device:
• DEBUG: Logs verbose entries on all events.
• INFO: Logs brief entries on most events.
• WARN: Logs entries on warnings, errors, and fatal events.
• ERROR: Logs entries on errors and fatal events.
• FATAL: Logs entries on fatal events only.
• DISABLE: No logging is done.

Oracle Real-Time Scheduler Server Application User Guide • 224
Field Description• PERF: Performance-level logging. Logs details of start/end times for all components of mobile application
processing. Typically used by developers to see how long scripts (or parts of scripts) are taking to run.
IP Update Interval The mobile device informs the server of its IP address on each application message exchange. If no communication
is made within this number of hours the device actively informs the server of its IP address.
Data Encryption Flag Flag for encrypting the transaction data on the mobile device. If the flag value is 'Default', value from the global
configuration will be used.
Business Object: M1-MobileDeviceTerminal
Mobile Device Terminal TypeDefines attributes for a mobile device terminal of a particular type.
Field Description
MDT Type Unique name for this type.
Description Information about this type.
Detailed Description Additional information about this type.
Display Option Classifies the user interface option devices of this type support.
Mobile Client Platform Specifies which mobile framework is used on devices of this type. Various fields are dependent on this value.
GPS Supported Indicates whether or not GPS is supported on the device.
GPS Port If GPS is supported on the device, this specifies the communications endpoint on which the GPS hardware is
active.
GPS Logging Interval The frequency in minutes the mobile application polls the GPS receiver for the current location.
GPS Synchronization
Interval
Defines how often to synchronize the GPS log files to the server. Specified in minutes.
Synchronization Interval This is the interval in seconds in which the mobile data terminal (MDT) will synchronize remote script invocation
messages to the server.
Maximum Batched Requests Defines the maximum number of remote script invocation requests to be processed in a single batch.
Synchronous Call Timeout Default timeout in seconds for a synchronous remote script invocation (RSI) request.
Device Listener Minimum
Port/ Device Listener
Maximum Port
The port range to use when listening for signals from the server. The device listener will use the first free port within
this range.
Attachment Storage Size
(MB)
The document size limit for attachments on MDTs of this type.
Mobile Data Terminal
Business Object
The business object used to create MDTs of this type.
Capabilities Defines the various features or functions supported by mobile devices of this type such as capturing photo or
sound or launching a geographic map. Each capability is performed or carried out on the device using one or more
algorithms that are executed in the sequence indicated. If you want the MDT Type to be able to open attachments,
each attachment file type must be included here as a capability of that MDT type.
Business Object: M1-MobileDeviceTerminalType

Oracle Real-Time Scheduler Server Application User Guide • 225
Deployment Restful ServicesA deployment is a packaged set of metadata of a specific deployment type configuration, for a specific language at aparticular point in time. It’s a snapshot of the metadata defined in the deployment type at the time the deployment wascreated.
Field Description
Deployment Type A unique name that establishes attributes for a type of deployment.
Language Language for this deployment. Each deployment is language-specific.
Deployment Date/Time The date/time at which this deployment was created.
Created by User The login of the user who created this deployment.
MCP Client Version Refers to the MCP components on both the server and device side. When the mobile device attempts to connect
to the server, the system versioning check validates whether or not the mobile application version on the mobile
device is compatible with the mobile application version on the server. If the versions are not compatible, the device
is not allowed to work online and no communication is sent to/from the server.
Release Version Denotes the application release number that was installed when the deployment batch created the deployment.
This is for informational purposes only.
Business Object: M1-DeploymentRestfulServices
Deployment Type Restful ServicesDefines attributes of the restful services deployment type.
Field Description
Deployment Type A unique name for the deployment type.
Description Information about this deployment type.
Detailed Description More information about this deployment type.
Deployment Parts Indicates the collection of metadata information to be included in the deployment.
Messages Message categories containing the messages for this application.
MDT Types MDT types that can run this application.
User Groups User groups that can access this application.
Business Object: M1-DeploymentTypeRestfulSvc
Base Package Scheduler Business ObjectsThis section provides descriptions of the base package objects used by scheduler functionality throughout the system.
For detailed information on the related functionality, please refer to the specific sections for these objects in the main bodyof this guide.
Base Package Scheduler Business ObjectsThe term scheduler refers to the system component that manages a single scheduling process. An implementation typicallyruns at least two schedulers to provide for backup, but may run additional sets of schedulers if required for scalability.
The following business objects support scheduler functionality within the application:

Oracle Real-Time Scheduler Server Application User Guide • 226
Cost ProfileA predefined set of cost parameters that may be reused by multiple scheduler configurations. Rather than definingcost controls on the scheduler configuration, the cost profile establishes a pre-defined set of cost controls which can bereferenced on multiple scheduler configurations. Different cost profiles should be defined to handle different situations orcircumstances.
Field Description
Cost Profile Name of the cost profile.
Description Description of the cost profile.
Status Whether the profile is active or inactive.
Business Object: M1-CostProfile
Holding SchedulerA scheduler that is designed to capture tasks and shifts that cannot be assigned to any online scheduler.
Field Description
Scheduler Name of the holding scheduler.
Description Information pertaining to this scheduler.
Detailed Description More information pertaining to this holding scheduler.
Process Type Defines the processing roles that the scheduler can perform. Valid values include:
• Holding: A holding scheduler is not associated with a schedule manager and therefore does not schedule shifts
or tasks. It is designed to capture tasks and shifts that cannot be assigned to any online scheduler. Only one
holding scheduler should exist. Any task or shift attached to a holding scheduler is evidence of a scheduling
error.
• Request Handler Only: Scheduler does not schedule tasks but rather only responds to ad-hoc scheduling
requests such as appointment booking, conditional booking, shift chooser, etc.
• Optimization: Scheduler only schedules tasks to crews to form schedule routs and it keeps optimizing these
routes. When set to optimization only the scheduler does not respond to any ad hoc scheduling requests.
• Optimization and Request: Scheduler schedules tasks as well as responds to ad-hoc scheduling requests.
Business Object: M1-HoldingScheduler
Parameter DefinitionThe scheduler parameters that make up a scheduler configuration.
Field Description
Parameter Definition Name of the parameter being defined.
Business Object The business object being used to create this scheduler parameter.
Description A description of the parameter being defined.
Detailed Description A detailed description of the parameter being defined.
Parameter Value UI Map UI map used to enter parameter values for this parameter during scheduler configuration maintenance.
Parameter Type Broad category of the parameter.
Parameter Data Type Data type for this parameter, such as Integer, Real, Boolean, String, etc.

Oracle Real-Time Scheduler Server Application User Guide • 227
Field Description
Cost Unit Type Unit of measure for this parameter, such as meters, feet, seconds, or instances.
Characteristic Type References a characteristic that contains a list of valid values for this parameter. Applies only if Parameter Type is
Characteristic.
Default Variable Value Default value of the scheduling parameter
Allow TDC Indicates whether time-dependent cost factors are associated with this parameter. Applies only to cost parameter
factors.
Business Object: M1-ParameterDefinition
SchedulerThe scheduler process automatically assigns tasks to crew shifts, matching field work requirements to crew capabilities andoptimizing the routes traveled by crews.
Fields Description
Batch Control Indicates the batch control managing this scheduler.
Node A unique identifier of the application server where the manager process for the scheduler should be started. Refer
to the Installation Guide for more information on where the application server identifier is defined.
Scheduler Configuration A predefined set of scheduling parameters to be used by this scheduler.
Scheduler Area A predefined set of service areas, or subsets of areas covered by this scheduler.
Process Type Defines the processing roles that the scheduler can perform. Valid values include:
• Holding: A holding scheduler is not associated with a schedule manager and therefore does not schedule shifts
or tasks. It is designed to capture tasks and shifts that cannot be assigned to any online scheduler. Only one
holding scheduler should exist. Any task or shift attached to a holding scheduler is evidence of a scheduling
error.
• Request Handler Only: Scheduler does not schedule tasks but rather only responds to ad-hoc scheduling
requests such as appointment booking, conditional booking, shift chooser, etc.
• Optimization: Scheduler only schedules tasks to crews to form schedule routs and it keeps optimizing these
routes. When set to optimization only the scheduler does not respond to any ad hoc scheduling requests.
• Optimization and Request: Scheduler schedules tasks as well as responds to ad-hoc scheduling requests.
Request Option Defines the time frame considered by schedulers supporting ad-hoc scheduling requests. Based on this option they
may consider the short term horizon only, the long term horizon only, or both. The definition of what is considered
short or long term is set in the scheduler configuration, but in general short term falls within the optimization horizon
whereas long term falls outside of the horizon.
Scheduling Horizon Date/
Time
The date and time used by the scheduler to determine the number of days into the future to consider when
scheduling the crew shifts and activities.
Long Term Horizon Date/
Time
The date and time used by the scheduler to determine the number of days into the future to consider for long term
requests. The long term horizon must be same or larger than the scheduling horizon.
Optimization Areas Defines the optimization sets and optimization areas associated with this scheduler. Optimization areas are used
when a scheduler area has too many tasks for a single scheduler to manage. An optimization area defines a
geographic region within a scheduler area, and may include one or more sub-regions, called optimization areas.
Optimization Set The Optimization Set drop-down displays a list of all optimization sets previously defined for the currently selected
Scheduler Area.
Optimization Area The Optimization Area drop-down displays a list of all optimization areas previously defined for the currently
selected optimization set.

Oracle Real-Time Scheduler Server Application User Guide • 228
Business Object: M1-Scheduler
Scheduler AreaA predefined set of service areas or geographic subsets of service areas, referred to as optimization areas, covered by thisscheduler. Each scheduler has one scheduler area.
Field Description
Scheduler Area Name of the area.
Description A description of the scheduler area.
Business Object The business object used to create this scheduler area.
Optimization Area Optimization Area indicates whether coverage is specified in optimization areas or in entire service areas.
Detailed Description More information about the scheduler area.
Service Areas Indicates the service areas that make up the scheduler area.
Optimization Set When the scheduling load for a service area is more than a single scheduler can manage, optimization may be
further limited to smaller subsets of that area. If enabled, these areas are defined in the Optimization Sets section.
Scheduler Area Tree Displays a hierarchical representation of the scheduler area and the service areas that comprise the scheduler
area.
Business Object: M1-SchedulerArea
Scheduler ConfigurationA predefined set of parameters that define scheduler settings such as optimization settings and real-time processingparameters.
Field Description
Scheduler Configuration The name of the scheduler configuration being created.
Business Object The business object used to create the scheduler configuration.
Description A description of the scheduler configuration.
Detailed Description A longer description of the scheduler configuration.
Scheduling Horizon (days) Specifies the number of days in the future for which data should be sent to the scheduler for optimization. This
should be less than or equal to the Planning Horizon defined in the global configuration.
Long Term Horizon (days) Specifies the number of days worth of data the scheduler uses to process long term booking requests.
Cost Profile Establishes a pre-defined set of cost controls which can be used on multiple scheduler configurations.
Business Object: M1-SchedulerConfiguration
Scheduler Configuration ParametersDefines the scheduling parameters to be used by that scheduler during the scheduling process. These parameters includecost controls, performance and optimization settings, and settings to control logging, auto-dispatching, and other schedulerfunctions.
Field Description
Scheduler Configuration The name of the configuration that these parameters belong to.
Business Object The business object used to create these parameters.
Description A descriptive text about the parameters.

Oracle Real-Time Scheduler Server Application User Guide • 229
Field Description
Detailed Description A detailed description about the parameters.
Parameter Definition Individual parameters definition.
Parameter Value A-C Values of the parameters.
TDC Val A- F Time-dependent cost factors.
Value Time-dependant cost values corresponding to factors.
Business Object: M1-SchedulerConfigParmList
Service AreaDefines the logical boundary of an organization’s territory.
Field Description
Service Area Service Area defines a logical boundary of an organization's territory that may or may not be based on geography.
Mobile workers may typically work in specific service areas, which comprise their base service areas.
Service Type Indicates the categorization for the service area such as gas, electric, or other areas. Activity types can also define
a service type so that the scheduler can match the types to determine which activity types to assign in particular
service areas. This simply adds an additional way to cause the scheduler to hone in on specific areas when
determining how to allocate and schedule activities.
Service Area Hierarchy Indicates the categorization that this crew falls under according to the hierarchical structure established by your
organization in the Service Area Hierarchy portal.
Business Object: M1-ServiceArea
Service ClassDefines a broad categorization of activity types.
Field Description
Service Class You can also specify a preferred service class for a shift and reserve a percentage of a shift's capacity for
performing a particular service class of work.
Description A description of the service class being created.
Activity Type Activity types associated with this service class. Activity types can belong to more than one service class.
Procedure Type Procedure types added to the service class indicate which procedures must be completed when the primary
function on a shift changes. This applies for shifts that are associated with this service class.
Business Object: M1-ServiceClass
Speed Profile TemplateDefines a collection of daily templates which delineate 24 hour speed factors that are associated with a type of day (default,rush hour on a weekday, holiday, weekend and so on).
Field Description
Speed Profile Template Unique code for this speed profile template.
Description: Description for the speed template.
Work Calendar Work Calendar for this template. This is used to determine dates for the holiday templates sent to the scheduler.
Daily Templates Defines a collection of daily templates associated with day types.

Oracle Real-Time Scheduler Server Application User Guide • 230
Field Description
Day Type Day Type comprising of Monday, Tuesday, Wednesday, Thursday, Friday, Saturday, Sunday. The special day
types are:
• Default - Which will be substituted for any missing days when calculating travel times
• Holiday - Which is used for days designated as holidays by the work calendar (required if a work calendar is
specified)
Daily Template Daily template defining 24 hour period of speed factors that is associated with this day type.
Business Object: M1-SpeedProfileTemplate
Daily Speed TemplateDefines the structure and rules of a daily speed template which represents a 24 hour period of 15 minute speed factors. A listof daily speed templates are defined on a speed profile template to define speed factors for weekdays and holidays as wellas a default daily template. A speed profile template is associated with geographic areas and used by the scheduler to adjustcalculated travel time based on location and time.
Field Description
Daily Template Unique code for the daily template.
Description Description for the daily template.
Speed Factors Defines 96 speed factors (one every 15 minutes) for a 24 hour period.
The values are between .1 and 2 - Where .1 indicates speed a tenth and 2 indicates a speed twice that of the
average.
Business Object: M1-DailySpeedTemplate
Override Daily Speed TemplateDefines the structure and rules of a daily speed override for a geographic area on a specific date. An override may referencea daily speed template or define a 24 hour period of 15 minute speed factors.
Field Description
Description Description for the override.
Override Date Override Date. Specifies the date that is to be overridden.
Area Name Speed profile geographic area the override applies to.
Daily Template Optionally a daily template can be specified which will be used for the override date.
Business Object: M1-OverrideDailySpeedTemplate
Shift Cost ProfileA shift cost profile is a predefined set of scheduler cost factors used to affect scheduling decisions for a crew shift.
Field Description
Shift Cost Profile A unique name for the shift cost profile.
Status Current status of this object. Valid status include:
• Active
• Inactive
Description Description of the shift cost profile.

Oracle Real-Time Scheduler Server Application User Guide • 231
Field Description
Shift Cost Global cost of utilizing a shift.
Time Cost Global cost of time spent travelling, includes time contributions by site delay.
Overtime Cost Exponential cost as a function of the number of seconds of over-time for a crew's shift.
Distance Cost Global cost of time spent travelling, includes time contributions by site delay.
Idle Cost Global cost of a crew being idle.
Service Areas Service areas to which this shift cost profile applies. If none are specified, the profile applies to all service areas.
Service Classes Service classes to which this shift cost profile applies. If none are specified, the profile applies to all service classes.
Business Object: M1-ShiftCostProfile
Speed Profile AreaDefines a geographic boundary associated with speed factors referenced by a speed profile. The scheduler uses these areasto adjust travel time calculations based on time of day, day of week and type of day.
Field Description
Area Name Unique code for the speed profile area.
Description Description for the area.
Speed Profile Template The speed profile which provides the speed factors for this area.
Time Zone The time zone that this speed profile area corresponds to.
Business Object: M1-SpeedProfileGeoArea
Base Package Mail Management Business ObjectsThis section provides descriptions of the base package objects used by mail management functionality throughout thesystem.
For detailed information on the related functionality, please refer to the specific sections for these objects in the main bodyof this guide.
Base Package Mail ObjectsThe main purpose of the mail management system is to allow dispatchers to communicate with crews without leaving theapplication. Crews can respond to and communicate with dispatchers from their mobile device.
The following objects support electronic mail functionality within the application:
Mailing ListDefines a list of users for mail distribution purposes. When mail is sent to the list, each user receives a copy.
Field Description
Mailing List Indicates the name of the mailing list.
Description Provides a description of the list such as what it is used for.
Status Indicates whether the list is active or inactive. Mail cannot be sent to inactive lists.

Oracle Real-Time Scheduler Server Application User Guide • 232
Business Object: M1-MailingList
Main MailE-mail messages sent to users of the system.
Field Description
Main Mail ID A unique identifier for the mail message.
Status Indicates the current state of the message. Valid statuses include:
• Sent
• Error
Creation Date/Time The date and time when the message was created.
Subject The subject of the message.
Message The message body of the message.
Acknowledgement Required Indicates whether or not the message recipient is required to respond to the message. The system notifies the
sender or dispatcher if the acknowledgement is not returned within a specified time limit.
Queue Indicates how the message should be delivered: emergency or normal. If set as Emergency, the system delivers
the mail on the emergency queue which is faster than the normal queue.
Deliver Now Indicates whether or not the message must be sent immediately when the Send button is clicked. If this is set to
Yes but the recipient cannot be contacted, the message sending fails. This could occur if the crew does not have
a device or if they have not started their shift yet. If this is set to No, the system attempts to send the message
immediately but if send is not possible, the system attempts to send the message later. For example, it waits until
the crew starts their shift.
Time Limit Specifies the amount of time the system waits before stopping delivery attempts. If the mail requires
acknowledgement, then the system only alerts the sender of unacknowledged mail while in this time limit. For
example, if the dispatcher has sent a message that is only relevant for today, he or she can set the time on the
message to expire at the end of the day. If the crew is first time connected after the expiration time, the expired mail
is not sent to their device. If this value is not specified the system assumes there is no time limit and continues to try
and send the message indefinitely.
Mail Class Indicates the classification for the message such as template, recipient copy or main.
Folder Indicates the folder where the message is stored. Options include sent, inbox, or archive.
Error Message If the message is in error, this indicates the associated error message.
Business Object: M1-MainMail
Crew MessageMessages sent to a specific crew.
Business Object: M1-CrewMessage
Crew Shift MailE-mail message sent to a specific crew on a specific shift. Fields on crew shift mail are the same as on main mail.
Business Object: M1-CrewShiftMail
Message to DeviceMessages sent from the server to a mobile device.
Business Object: M1-MessageToDevice

Oracle Real-Time Scheduler Server Application User Guide • 233
Recipient MailDescribes mail messages that are received by users. Fields on recipient mail are the same as on main mail.
Business Object: M1-RecipientMail
Template MailContains common information or attributes that can be used while sending a mail. Fields on recipient mail are the same ason main mail.
Business Object: M1-TemplateMail
Base Package Transfer of Goods Business ObjectsThis section provides descriptions of the base package objects used by transfer of goods functionality throughout thesystem.
For detailed information on the related functionality, please refer to the specific sections for these objects in the main bodyof this guide.
Base Package Transfer of Goods Business ObjectsTransfer of goods involves the process of transporting goods from one location to another. The system provides a way tomanage goods, restrictions and vehicle load limits related to the transfer of goods.
The following business objects support transfer of goods functionality within the application:
Depot Related ShiftA crew shift designated to load/collect goods at a depot center to deliver them to a customer location.
Field Description
Status The current state of the depot related shift. Valid statuses include:
• Pending
• Planned
• Started
• Out of Service
• In Service
• Canceled
• Completed
Start Date/Time The date and time when this depot shift was started.
Shift Type Shift type defines the attributes for the shift, including the time at which the shift starts and the length of time the
shift will last. the type of shift.
Shift Cost Profile Shift cost profile to use for this shift. The profile defines shift-based cost factors that affect scheduling decisions.
Drip Mode Indicates how the system should handle dispatching of activities to the crew. Valid options include:
• None: Automatic dispatching is disabled. All scheduled activities must be manually dispatched to the crew by
the dispatcher or by another system-invoked process.

Oracle Real-Time Scheduler Server Application User Guide • 234
Field Description• Auto All: All scheduled activities are automatically dispatched to the crew and any additional activities
scheduled throughout the shift are also auto-dispatched. This excludes any activities where the Auto Dispatch
attribute is set to No on their Activity Type.
• Standard (Drip Mode): Only a fixed number of scheduled activities are automatically dispatched to the crew at
any given point of time. The fixed number is specified as the Drip Horizon.
Drip Horizon Number of activities to dispatch when Drip Mode is set to Standard or Hybrid.
Logon Location Type Indicates the type of location where the crew logs on such as the office, home, etc.
Logon Location Indicates the specific location where the shift is expected to log on.
Logon Delay Use this to reserve time at the beginning of the shift for performing review and preparation work. The scheduler
should begin scheduling tasks to the shift only after the amount of time specified here.
Maximum Start Travel Maximum period of time the crew is expected to spend traveling from the logon location to the first task of the day
on its own time. If the time required to travel to the first task exceeds the time specified here, the delta of travel time
is built into the schedule.
Logoff Location Type Indicates the type of location where the crew logs off such as the office, home, etc.
Logoff Location Indicates the specific location where the shift is expected to log off.
Logoff Delay Use this to reserve time at the end of the shift for any end-of-shift work. The scheduler should stop scheduling work
by the specified amount of time before the end of shift.
Maximum Finish Travel Maximum period of time the crew is expected to travel from the last task of the day to the logoff location on its own
time. If the time required to travel from the last task exceeds the time specified here, the delta of travel time is built
into the schedule.
Reserve Capacity Type Service class for which a percentage of the shift's capacity is reserved. The percentage is specified in the Reserve
Capacity field. For example, you might reserve 20% of a shift's time for emergency work. Activities within this
service class will be included in the specified Reserve Capacity %
Reserve Capacity Percentage of shift time to be reserved for work associated with the specified Reserve Capacity Type.
Lead Time Number of minutes before the shift is planned to start that the reserve capacity is released.
GPS Data Enabled Indicates whether or not sending global positioning system (GPS) data from the crew's mobile device is enabled.
Time Zone Indicates the applicable time zone for the crew.
Advanced Dispatch Offset The amount of time before the shift is planned to start that tasks are set as ready to be dispatched. This allows the
tasks to be previewed by the crew on their mobile device. In addition a variable shift becomes a fixed shift at this
time.
Advanced Dispatch Mode Indicates whether or not the shift or contractor capacity should be closed and all scheduled work dispatched /
committed at the advance offset time.
Advanced Dispatch Tasks The number of tasks allowed to be previewed by the crew on their mobile device prior to actually starting their shift.
Number of Activities This value places a limit on the number of activities that can be assigned to the shift. For example, if this is set to 3,
the scheduler will not attempt to assign more than 3 activities to the shift.
Variable Shift Shifts can be set as variable to provide the crew with some flexibility on when they can start and end work. Set to
Yes to indicate that the shift is not fixed then enter a Shift Duration to establish the total amount of time allotted for
the shift.
Shift Duration Establishes the total amount of time allotted for the shift if the shift is variable.
Round Start Time Option Establishes whether or not the scheduler should round down the estimated start time for the shift if the shift is
variable.
Crew Name of the crew assigned to work the activity.
Business Status Date/Time Date and time the transition to the current status occurred on the crew's mobile device.

Oracle Real-Time Scheduler Server Application User Guide • 235
Field Description
Status Reason The reason why the depot related shift moved to its current state.
Planned Start/ End Date/
Time
The time at which this depot related shift has been planned to start or end.
Crew Name The name of the crew working on this shift.
Schedule Option Indicates whether this is a standby shift or a closed shift.
Closed by Advanced
Dispatch
Indicates whether or not the shift has been closed and all scheduled work dispatched at the defined advance offset
time. This allows tasks to be previewed by the crew on their mobile device.
Started By User Indicates the user who started the shift.
Mobile Phone Number Indicates the phone number for the crew's mobile device, as applicable.
Forced Logoff Indicates whether or not the crew had to log off due to unexpected circumstances.
Forced Logoff Reason Indicates the reason why the crew was forced to log off such as device failure, dead battery, etc.
GPS Resource ID References the resource, crew or vehicle, representing the GPS data source for determining the shift's crew
location.
Template Shift Indicates the crew shift template used to create the shift, if applicable.
Subscription ID Indicates the crew shift template subscription ID. Crews are subscribed to specific templates to indicate that they
are set to work shifts created from such templates.
Overridden Indicates whether or not the shift template has been overridden.
Estimated Duration Estimated length of time the crew will remain out of service.
Timed Event Expiration Date
Time
Timed events indicate that the crew has a specified amount of time to leave the work area or complete the task.
This is typically used in hazardous areas or critical work situations. This field indicates the date and time when
this time is up. Typically the dispatcher receives an alert to check on the crew if the time expires before the crew
indicates that they have left the area.
Resource Identifier Type Indicates the type of identification for a resource such as a vehicle license plate number or a mobile worker ID
badge.
Procedure Status Indicates the status of any procedures needed to start the shift such as in progress, overridden, or processed.
Business Object: M1-DepotRelatedShift
Depot TaskDepot task is used to track the crew's travel, arrival and completion of the depot visit. Depot tasks also show the activities inthe depot run and the activities are displayed in the load order specified in the depot task type.
Field Description
Depot Task ID A unique identifier for the depot task.
Status The current state of the depot task. Valid statuses include:
• Pending
• Queued for Dispatch
• Dispatched
• En Route
• Arrived
• Started
• Completed

Oracle Real-Time Scheduler Server Application User Guide • 236
Field Description• Canceled
Status Date/Time The date and time of the last status change.
Create Date/Time The date and time that the depot task was created
Business Status Date/Time Date and time the transition to the current status occurred on the crew's mobile device.
Status Reason The reason why the depot task moved to its current state.
Depot Task Type The type of depot task.
Manually Allocated To Indicates the crew, shift and other details of how the task was manually allocated, as applicable.
Depot Run Closed Indicates whether or not changes or additions to the run are still allowed. Whether or not the depot has been “cut
off”.
Cutoff Date/Time Indicates the specific date and time that scheduling changes or additions to a run must end and all runs planning
to depart on or before this time are closed. For example, with any delivery, the system locks down the shift this
amount of time prior to run to give enough time to load trucks with delivery items.
Previous Cutoff Date/Time Indicates the specific date and time of any previous depot cutoffs.
Address Fields Indicate the street address, city, state, and other address details for the depot location.
Work Sequence The sequence of this task with respect to other tasks currently assigned to the scheduled shift.
Calculated Travel Time Estimated travel time from the previous task on the shift schedule.
Calculated Travel Distance Estimated travel distance, in meters, from previous task on the shift schedule.
Arrival Date/Time Date and time at which the crew is estimated to arrive at the location or actually arrived.
Start Date/Time Date and time at which work is estimated to start or actually started for the task.
Completion Date/Time Date and time the work is estimated to complete or was actually completed.
Depot The name of the depot where the work is to take place.
Depot Task ID The unique identifier for the task.
Distance Unit Abbreviation Specifies the unit of measure used for distance such as foot, meter, mile, and so on.
Updated ETA Estimated arrival time as it is recalculated based on actual updates from the crew.
Business Object: M1-DepotTask
Depot Task ItemIndicates a line item on a depot task. Depot Task Items uses the same fields as Depot Task.
Business Object: M1-DepotTaskItems
Depot Related ActivityDepot based activities involve loading/collecting goods at a depot center and delivering them to a customer location.
Field Description
Activity Type The classification for the activity.
Estimated Duration Length of time estimated to complete this activity. Defaults to the Average Duration defined for the activity type.
Acknowledgement Required Indicates whether the crew is required to manually confirm receipt of this activity. Typically set to Yes for emergency
activities.
Queue Synchronization queue into which this activity should be placed, such as Emergency or Normal.
Scheduling Priority Defaulted from the activity type, the scheduling priority determines the importance of the activity relative to other
activities. Activities of a higher priority are scheduled first or earlier.

Oracle Real-Time Scheduler Server Application User Guide • 237
Field Description
Override Allocation Rule Indicates whether priority allocation is mandatory or optional. If set to Mandatory, the activity will be scheduled by its
due date regardless of the cost. If set to Optional, scheduling the activity is considered optional and driven by costs.
Ignore Sequence Locking In most situations activities are worked on a route in sequence and once the activity is dispatched, the sequence is
locked. If another activity comes in and is dispatched, it would typically not be dispatched before an activity that is
already dispatched.
Activity Comments Extra information regarding this depot activity.
Host External ID Unique identifier of the activity in the host external system.
Eligible for Contracting Indicates whether or not the activity can be worked by a contractor.
Address 1–4 Applicable address fields.
Site Delay An explicit site ID to be used by the scheduler for site matching. This value is typically populated by the host. If not
specified the system computes the site ID based on the "Site ID" feature configuration.
Instructions Any special instructions related to the activity location.
Service Address Service area and time zone where service is provided.
Key Details When applicable to the activity, the Key Identifier and Key Location Depot fields provide information about where
the crew can pick up keys to gain access to the work site. Since this indicates the location where the keys will be
picked up, the key location depot can only be a distribution depot. The drop-off location is assumed to be the same
as the pick up location and also where the crew logs off.
Customer Information Customer name and contact information associated with this activity.
Time Windows Defines time windows used by the scheduler to determine when the activity should be scheduled.
Capabilities Shows the required capabilities, i.e. skills and equipment, needed to perform the activity.
Allowed Crews Defines a list of crews that can accept the activity assignment. If this list is blank, all valid crews are considered
when the scheduler makes assignments.
Excluded Contractor Any contractors that have been excluded from performing the activity.
Goods Describes various aspects of goods being handled when an activity is used to transfer goods.
Depot Defines one or more valid depot centers where goods might be distributed.
Depot Delay Defines estimated time it should take the crew to load or unload the goods in the depot.
Load Instructions Information describing the goods being handled, as applicable. This may also be used to indicate a key identifier
or access card needed to gain access to the facility or instructions on how to gain entry to complete work for the
activity.
Transportation Restriction Defines special restrictions related to other activities. Values are Single Item and Contiguous Job.
Lifespan Defines the maximum transport time until goods reach their destination. For example, this would be important for
items that require refrigeration or that are otherwise perishable or volatile.
Goods one or more items being transported.
Must Not Have A list of other types of goods that must not be on board with this activity's goods.
Prefer Not Have A list of other types of goods that preferably should not be on board with this activity's goods.
Business Object: M1-DepotRelatedActivity
Depot Related Activity TypeHandles types of activities to be performed at a depot such as delivery and collection.
Field Description
Activity Type Unique name for this activity type.

Oracle Real-Time Scheduler Server Application User Guide • 238
Field Description
Description Description of this activity type.
Depot Activity Class Defines whether the depot is for pickup or drop off.
Status Current status of the object. Valid statuses include:
• Active
• Inactive
Host System and Reference Host system requesting to perform activities of this type. Host Reference is the unique identifier of the activity type
in the host external system.
Average Duration Average length of time required to complete activities of this type.
Efficiency Duration Impact
(%)
When an activity type includes a skill requirement, this value specifies the percentage of the scheduled duration that
is impacted by skill efficiency. Refer to the online help for more information and an example.
Advanced Allocation Indicates whether or not activities of this type are to be pre-allocated to the assigned crew some time before the
shift starts. Time can be set by days or by time.
Auto Dispatch Indicates whether activities of this type should be automatically dispatched to the assigned crew. Preventing
automatic dispatched is only applicable for shifts using Dispatch Mode set to All.
Acknowledgement Required Indicates that the crew is required to manually confirm receipt of activities of this type. Typically set to Yes for
emergency activities.
Ignore Sequence Locking An activity would typically not be dispatched before already dispatched activities. Set this to "Yes" to allow that. This
is only relevant for shifts set up with standard drip mode.
Appointment Booking Group Default appointment booking group to be used for activities of this type.
Work Profile Specific periods of time during which the activity can be worked.
Work Calendar Public holidays to consider when generating schedules using this template.
Complete Within Option Indicates whether or not to default the due by date if not provided by the host system. Can be set by days or time.
Eligible For Assist Whether or not activities of this type can be dispatched to another crew.
Eligible For Contracting Whether or not activities of this type can be worked by a contractor.
Allow Breaks Whether or not activities of this type can include break time.
Allow Crew Time Indicates whether the crew is allowed to review and correct time usage reports for activities of this type. If set to
Yes, the crew is presented, at activity completion, with a list of times spent on the activity such as travel, wait time,
work, and breaks. The crew can then adjust the times as necessary to align the reported time with actual time spent
on each "time bucket". If set to Yes, this feature is active whether or not your organization uses the full timekeeping
functionality.
Allow Earning Time Indicates whether the crew is allowed to capture unusual labor earning times at activity completion. These would
typically be overtime related but may also relate to times when the worker was called in from a day off, working in
dangerous area etc.
Service Type If your business divides service territories into overlapping service areas for different types of service, your service
areas should indicate which service type they belong to further refined by the service type indicated. Service types
segment service areas into more finite areas where activities take place. This affects viewing service areas on
geocoded maps and/or determining the service area for activities of this type.
Reporting Service Category Categorization used for reporting purposes.
Response Time SLA Overall response time for an activity of this type.
Activity Business Object The business object used to create a new activity of this type.
Travel and Work Timesheet
Time Type
Timesheet type to track travel and work times for activities of this type.

Oracle Real-Time Scheduler Server Application User Guide • 239
Field Description
Priority Establishes the parameters to prioritize this activity type over activity types. Priority can also be set for individual
activities on the activity record.
Preferred Time Factor This is the fixed cost that will be applied for working an activity outside of the preferred time window.
Ignore Sequence Locking In most situations activities are worked on a route in sequence and once the activity is dispatched, the sequence
is locked. If another activity comes in and is dispatched, it would typically not be dispatched before an activity that
is already dispatched. In situations where a user would want to allow a new task to be dispatched before tasks
that have already been dispatched this value can be set to "Yes". This allows the scheduler to dispatch the activity
before any other activities that are already dispatched. This is only relevant for shifts where the Drip Mode is set to
Standard.
Priority Profile Created in the Priority Profile portal, this establishes the criteria used to prioritize one activity or activity type over
another.
Scheduling Priority A numerical value from 1 to 10 that establishes the importance of the activity type relative to others. 10 is the
highest priority.
Scheduling Priority Steps By
Business Priority
Allows activities of the same type to be assigned a scheduling priority based on their business value (Business
Priority Number) such as cost or other currency amount, number of customers, relative customer importance etc. If
not specified of the business value exceeds the highest step the default scheduling priority is used.
Crew Size Minimum number of mobile workers needed to perform activities of this type.
Worker Capability Worker capabilities as well as vehicle equipment the crew is required to possess, preferably possesses or not
allowed to possess in order to complete an activity of this type.
Count Indicates how many members of the crew are required to possess the skill. Value must be greater than zero.
Equipment Equipment required to complete an activity of this type.
Valid Remark Types Completion remark types that can be associated with this type of activity.
Sort Sequence Order in which remarks of this type will be displayed in application screens.
Activity Expiration Defines parameters for expiring an activity.
Auto Extension Indicates whether or not expired activities of this type are allowed to be automatically extended and if so whether
extension is in business days, any week days, or in hours.
Extension Days/ Duration If allowed to be extended by days or hours this indicates the number of days or hours by which to extend the
activity's time window. Neither of these fields is shown if the Auto Extension field is set to No.
Extension Limit The maximum number of automatic extensions that are allowed.
Auto Cancel Indicates whether or not expired activities of this type should be automatically canceled and if so whether to wait a
few business days, any week days, or hours before cancellation.
After Days/Duration If allowed to be automatically canceled this indicates the number of days or hours to wait before automatically
canceling the activity.
Procedures List of procedure types a crew has to perform each time they are onsite and about to start work of this type. Work
would not be allowed to commence until these procedures are passed. If the Procedure Clearance Required option
is set to Yes, then the crew would not be able to start working on activities of this type that they have created in field
without them being verified for required procedures. This means that the crew has to be connected to work on these
activities.
Create by Crew Controls whether or not crews can create activities of this type in the field. If the value is set as "Related Activities
Only" then an activity of this type can be created as a related activity but not as an unrelated activity.
Allow Related Activities Controls whether or not crews can create related activities when working activities of this type.
Related Activity Types If Allow Related Activities is set to Yes you may use this list to restrict the list of activity types that can be created
as related activities when working activities of this type. If this list is left blank, any activity type that is allowed to be

Oracle Real-Time Scheduler Server Application User Guide • 240
Field Descriptioncreated as a related activity can be created as a related activity when working an activity of this type. Any activity
type listed here should be defined with Create by Crew set to "Yes" or "Related Activities Only".
To Do Setup The To Do Types and Roles associated with activities of this type when certain predefined conditions occur.
Business Object: M1-DepotRelatedActivityType
Depot Related AssignmentA copy of the depot related activity created by the system to track the assigned crew's progress in accomplishing the work.An assignment record is created each time an activity is dispatched to a crew. It is first created on the server, then thedispatching process sends a copy of it to the crew's mobile device. The crew uses the assignment to capture completioninformation.
Business Object: M1-DepotRelatedAssignment
Depot Task AssignmentDepot task assignments manage loading of items at the depot. This type of assignment is only created when the crewperforms the loading process.
Business Object: M1-DepotTaskAssignment
Base Package Depot ObjectsA depot is a central location where goods are loaded for delivery or collected goods are unloaded. Depot functionalityenables the scheduling of drop-off or pick-up activities tied to specific depot locations.
The following objects support depot functionality within the application:
DepotCentralized locations where transferred goods are loaded.
Field Description
Depot Unique name
Description Description of the depot
Business Object The business object used to create this depot.
Status The current status of the depot.
Status Date/Time The date/time at which the status was last changed.
Status Reason More details about the status change.
Depot Profile A predefined depot configuration governing this depot's parameters and time windows. Only visible on an actual
depot.
Depot Class Defines whether this is a distribution or a collection center.
Depot Site Delay A fixed delay involved in transferring goods in this depot. For example the amount of time needed to access the
depot center on each visit regardless of specific goods being transferred.
From and To Week Day/
Time
The start and end times of the weekly time window.
Window Cost Indicates the cost of using the access time window.
Late Cost Indicates the cost of being late to the access time window.

Oracle Real-Time Scheduler Server Application User Guide • 241
Field Description
SLA Flexibility The period of time before and after the SLA time window allowed before incuring a cost. (i.e. how much earlier or
later arrival is allowed).
Cutoff Horizon (Days) Indicates the number of days into the future that depot cutoff records should be generated.
Send Scheduling Manifest Indicates whether or not the system will send a manifest back to the host when a cutoff is processed. This might be
system generated or requested by the host.
External System The external system the manifest is to be sent to. This is only needed if Send Scheduling Manifest is set to Yes.
Weekday, Cutoff Time and
Trigger Offset
The combination of these fields establishes the schedule of cutoff times for the depot. For example, the cutoffs for
week days might differ from what is required for weekends, so you have the ability to define a different schedule for
each day. Cutoff Time indicates the exact time for the cutoff while the Trigger Offset indicates the amount of time
prior to the Cutoff Time that the cutoff should be processed. When a cutoff is processed all depot tasks scheduled
to depart on or before the cutoff time are automatically closed thus locking their schedule.
Location Physical location of the depot.
Work Calendar Indicates the work calendar used to define public holidays during which the depot is closed.
Expiration Date Date that the depot is no longer available for use.
Task Type Indicates the task type used for tasks created for visiting this depot. For example, you might have a task type to pick
up keys, to pick up hazardous goods, or to drop off goods. The task type description indicated here is displayed on
the mobile device when the crew or mobile worker receives the task to visit the depot.
Business Object: M1-Depot
Depot ProfileDefines a standard set of parameters for depots.
Business Object: M1-DepotProfile
Depot Task TypeA type of task that can only be created for a depot.
Field Description
Depot Task Type A unique name for this task type.
Description More information about this depot task type.
Business Object The business object used to create a depot task of this type.
Status The current status of this task type.
Travel Timesheet Time Type Indicates the type of timesheet to use to track travel to the depot.
Depot Timesheet Time Type Indicates the type of timesheet to use to track time at the depot.
Business Object: M1-DepotTaskType
Depot Break TypeDefines attributes common to breaks which can only be taken at a depot.
Field Description
Break Type A unique name for this depot break type.
Description More information about this depot break type.

Oracle Real-Time Scheduler Server Application User Guide • 242
Field Description
Break Window Duration Amount of time allotted for the period of time during which the actual break can be taken. For example, a 15-minute
morning break might have a 60 minute window during which the break can be taken.
Break Duration Amount of time allotted for the break itself.
Break Business Object The business object used to create a break of this type.
Break Timesheet Time Type Indicates the type of timesheet to use to track break tasks of this type.
Business Object: M1-DepotBreakType
Depot Single Person CrewHandles single person crews that operate from a depot.
Field Description
Crew Name A unique name for this crew
Reporting Hierarchy Indicates the hierarchy node the crew reports to according to the hierarchical structure established by your
organization.
Locations Defines a physical location, such as a service center, the crew is affiliated with for a specific purpose. For example
the crew’s logon, logoff or non-productive task location etc. You may select a common location or specify the
address of location. Defining a logon / logoff location for a crew means that their standard location is static and
typically does not change by weekday. If the crew location does tend to change it should be specified on the shift
weekly template.
Address Physical address of the location. Latitude and longitude are used for geocoding purposes. If not provided, the
system determines the address's geocode.
Resources Mobile workers and vehicles associated with the crew.
Default Shift Information Defines default shift details used when a shift is created online or by the shift generation process. By default details
are only used when not specified by the shift template. Logic handling use of this data resides in the 'Prepare Shift
Data' algorithm associated with the crew business object.
Depot Restrictions Defines details for the depots related to the crew.
Maximum Run Length Specifies a time limit on how long depot runs can take. This is the time span from the depot visit until last item is
delivered for a distribution run or from first pickup until the unloading visit to the depot. If nothing is specified here,
depot runs for the crew are unlimited.
Depot List Specifies a list of depots which shifts for this crew will be restricted to, if no depots are specified on the shift.If no
depots are specified here or on the shift then activities related to any depot are considered valid.
Business Object: M1-DepotSinglePersonCrew
Depot Cut OffAn event that closes all distribution depot runs that are planned to depart from the depot before a specified cutoff time, andinstructs the scheduler to build new runs for the depot to depart after that cutoff time.
Business Object: M1-DepotCutoff
Depot Override Time WindowA transaction used to override generated time windows for a period of time.
Business Object: M1-DepotOverrideTimeWindow

Oracle Real-Time Scheduler Server Application User Guide • 243
Base Package Contractor Management Business ObjectsThis section provides descriptions of the base package objects used by contractor management functionality throughout thesystem.
For detailed information on the related functionality, please refer to the specific sections for these objects in the main bodyof this guide.
Base Package Contractor Business ObjectsSome companies use third-party contractor companies to help them to complete their work. If your organization usescontractors, or non-company resources, to work activities, you might use contractor management functionality to assign,schedule and complete this work.
The following business objects support contractor functionality within the application:
Additional User InfoDefines additional information related to the user.
Field Description
Contractor If this user is a contractor working with your organization, for example, this section should reference the contractor
company the user belongs to.
Business Object: M1-AdditionalUserInfo
ContractorDefines the information for contractors doing work for your organization. A contractor is either a shift based or a capacitybased contractor depending on the contracting model with the company.
Field Description
Status The current status of the object. Valid statuses include:
• Active
• Inactive
Contractor Name Name of the contractor entity.
Work Calendar Defines the business days and holidays applicable to your business practices.
Address / Contact details Defines the contractor’s address and contact details.
Base Service Areas Indicates the service areas where the contractor is designated to work.
Business Object: M1-Contractor
Contractor EligibilityDefines a prioritization for how your organization wants to schedule capacity contractors for a particular service area andservice class.
Field Description
Service Area The area where the contractor is eligible to work.

Oracle Real-Time Scheduler Server Application User Guide • 244
Field Description
Service Class The service class where this contractor is eligible to work on.
Detailed Description Detailed text about the contractor eligibility rule.
Capacity Preferred The capacities that the contractors prefers to work with.
Preferences Provides a ranked list of contractors that are eligible to work in the service area, in order of preference.
Business Object: M1-ContractorEligibility
Contractor TypeDefines a classification of contractor.
Field Description
Contractor Type A unique name for the contractor type being created.
Description Information about the contractor type being created.
Status The current status of the object. Valid statuses include:
• Active
• Inactive
Group Class States the contracting nature of contractors of this type.
Contractor Business Object The business object used to create contractors of this type.
Business Object: M1-ContractorType
CapacityDefines parameters used to determine what type of work contractors can perform and when.
Capacities are defined in terms of the number of hours or the number of activities that the contractor is available to work.
Field Description
Status Valid options include:
• Pending
• Planned
• Canceled
• Expired
Contractor The contractor entity for which the capacity is being defined.
Capacity Type The type of capacity the contractor company can provide.
Capacity Date/Time Specifies a period of time/date during which the contractor company agrees to take on work.
Activity Type The type of activities that the contractors can perform.
Time Zone The time zone in which this capacity has been defined.
Notification Horizon Option Valid options include:
• By Time
• By Days
• By Business Days

Oracle Real-Time Scheduler Server Application User Guide • 245
Field Description
Notification Horizon A Notification Horizon specifies the amount of lead time prior to the beginning of the contractor’s capacity period,
that the contractor must be notified of activities committed to them for the specific capacity. Once the notification
horizon begins, no additional activities can be added to the specific contractor’s capacity. For example, if the
capacity period begins on Thursday at 8:00 am, and the notification horizon is set to 72 hours, the capacity is
closed on Monday at 8:00 am and the contractor is notified of all committed work booked to the capacity.
Service Area Indicates the service areas that can be worked by this capacity. This helps the scheduler to determine how to
assign activities to contractors.
Business Object: M1-Capacity
Capacity TemplateDefines a set of parameters to create capacities.
Field Description
Notification Horizon Option
and Horizon
Indicates the window of lead time, prior to the established capacity period for the contractor, required for the
contractor to receive notification of activities to be assigned to them. Once the beginning of the notification horizon
begins, no additional activities can be assigned to the contractor. For example, if the capacity period begins on
Thursday at 8:00am, and the notification window is set to 72 hours, the period where activities can be sent to the
contractor ends on Monday at 8am.
Capacity Weekly Template Defines a recurring weekly pattern for generating capacities for a specific external capacity contractor.
From Week/ Day/Time – To
Week/Day/Time
The time period that the contractor company is available to work.
Activity Type The types of activity that can be worked by this capacity.
Time Zone Indicates the applicable time zone for the capacity template.
Service Areas Indicates the service areas that can be worked by this capacity. This helps the scheduler to determine how to
assign activities to contractors.
Business Object: M1-CapacityTemplate
Capacity TypeDefines capacities of a particular type. A capacity can be determined by the number of hours that the resource is availableto work, or by the number activities that the resource can work. Contractors commit to a capacity of hours or activities andwork can be assigned to them based on that commitment.
This definition is only needed if your company utilizes the contractor’s functionality.
Field Description
Capacity Type A unique name for this type.
Description More detail about this capacity type.
Status• Active
• Inactive
Capacity Unit Defines how the capacity’s unit of work is defined: e.g. as number of hours or as number of activities.
Capacity Business Object The businesses object to use to create a capacity of this type.
Capacity Template Business
Object
The capacity template business object business object used to create this capacity type.

Oracle Real-Time Scheduler Server Application User Guide • 246
Business Object: M1-CapacityType
Capacity Weekly TemplateDefines a weekly work template for a specific contractor.
Field Description
Contractor The contractor for whom this template is being defined.
Contractor Description A text describing the contractor whose weekly template is being defined.
Number Of Weeks In
Rotation/Effective Date/
Expiration Date
Establish the amount of time that the template is active.
Work Calendar Work Calendars defined in the Work Calendar portal establish which days define a work week and indicate
applicable holidays. A work calendar can be referenced here to establish these details for the contractor.
Business Object: M1-CapacityWeeklyTemplate
Company Type (Resource Group Type)Defines your organization as a resource group for contractor functionality. A company resource group and type are onlyneeded if your organization needs to prioritize work between your company and contractors (using Contractor Eligibility).Only one Company Resource Group Type can be defined and only one Company Resource Group can be created for yourcompany (based on the Company Resource Group Type).
Field Description
Company Type Your company as a resource group type.
Description Description of your company as a resource group type.
Status Whether the company record is active or inactive.
Company Business Object M1-Company
Business Object: M1-CompanyType
Company (Resource Group)Defines your organization as a resource group for contractor functionality. A company resource group and type are onlyneeded if your organization needs to prioritize work between your company and contractors (using Contractor Eligibility).Only one Company Resource Group Type can be defined and only one Company Resource Group can be created for yourcompany (based on the Company Resource Group Type).
Field Description
Company Name Your company name.
Status Whether the company record is active or inactive.
Business Object: M1-Company

Oracle Real-Time Scheduler Server Application User Guide • 247
Chapter 6
FAQs
This section provides answers to commonly asked questions.
How do I ... ?
This topic answers questions about how to perform day-to-day functions.
Q. How do I reassign all work assigned to a mobile worker if he calls in sick?A. You can do this in two ways:
• If you want to allocate all of the tasks to a specific crew shift, use the drag-and-drop allocate feature from the SchedulingGantt zone in the CDI portal. Click and drag the tasks from the current crew and drop them on the new crew.
You can also accomplish this by checking the box to the left of each task in CDI Activity Search zone. Then, in theScheduling Gantt zone, right-click the crew shift to which you want the tasks allocated and select Allocate from thepop-up menu. (You can also use the Allocate button in the Activity Search zone and then specify the crew shift.)
• If you want to send the tasks back to the scheduler to be rescheduled, use the Unassign action. From the CDI ActivitySearch, click the check box to the left of each task, then click the Unassign button.
Q. How do I determine whether all mobile workers have logged on to their shift on time?A. The Crew pane on the Scheduling Gantt zone in the CDI portal displays the current status of each crew shift within thescope of data. If the crew has started their shift, the crew state is displayed as In Service and the shift start time is displayed.
Q. How do I determine if a mobile resource is out of range?A. The system monitors the connection between the server and the mobile devices, and displays a connection status icon tothe left of each crew on the Crew pane of the Scheduling Gantt zone on the CDI portal.
Q. How do I change the snooze time for alerts?A. The snooze time for an alert, as well as the recycle and expire time, are controlled by the settings in the alert type record.If you have appropriate administrative privileges, you can change this value on the Alert Type maintenance portal. The

Oracle Real-Time Scheduler Server Application User Guide • 248
alert type associated with an alert is displayed on the alert's maintenance portal. Note that if you change the setting for alerttype, it will affect all alerts of this type.
Q. How do I disable Auto Dispatching for a particular shift?A. If automatic dispatching is enabled globally for your system (on the scheduler configuration), you can disable it at theshift level by changing the Drip Mode setting on the Crew Shift or Crew Shift Template maintenance portal to None.
Q. How does reserve capacity work?A. Reserve capacity is a scheduling concept that allows you to reserve a portion of a crew shift's time for a specific serviceclass of work. For example, consider that your business is entering a seasonal busy cycle, and you want to reserve moretime for emergency work during this period. You can also disallow certain types of work during the same period, if youlike. Reserve capacity settings are defined on the Crew Shift and Crew Shift Template portals. Select the reserved class ofwork in the Reserve Capacity Type field. Then specify the percentage of time you want reserved for this type of work inthe Reserve Capacity field, and enter the amount of lead time before the shift starts that unused reserved time is releasedand made available to any class of work. Setting the lead time to zero releases the reserve capacity at shift start. Leavingthe lead time blank enables you to keep the reserve capacity on the shift after it starts. Note that you can only specify onereserve capacity class per crew shift.
Q. How do I change the dispatch areas, KPIs, and dates of activities I can monitor in the CDI?A. The scope of data for the CDI is controlled by the dispatcher shift settings. The dispatcher initially sets the scopeat logon, and can change it at any time during a shift using the Shift tab on the CDI portal. The list of dispatch areas adispatcher is allowed to monitor is predefined on the dispatcher record. For any particular shift, a dispatcher can choose tomonitor one, some, or all of these authorized dispatch areas. The KPIs that appear in the KPI Summary are also defined inthe dispatcher record, and these cannot be changed for an individual shift. The dispatcher record also determines the defaultdate range for monitoring and specifies whether or not the dispatcher can change the date range for an individual shift.
Q. When is an activity actually dispatched to a crew shift?
A. If auto-dispatch is enabled, an assigned activity will be dispatched to the mobile device when the crew is logged on andthe activity is within the crew shift’s drip horizon. Here's an overview of how the process works:
• An activity is sent to the scheduler to be considered for scheduling.
• The scheduler assigns the activity to a crew shift or, alternatively, a dispatcher allocates the activity to a crew shift.
• The scheduler continues to optimize a crew shift's schedule up until the time the crew shift starts.
• Based on auto-dispatch drip-feed settings or following a manual dispatch action performed by the dispatcher, theactivity is queued for dispatch. This means that the activity is no longer eligible for rescheduling, but has not yet beensynchronized to the crew’s mobile device.
• Once the crew starts their shift, the dispatch process differs depending on the type of device (if any) the crew is using:
• For an MDT crew, all Queued for Dispatch tasks are sent to the crew's mobile data terminal (MDT). An activity isconsidered dispatched only upon receipt of acknowledgement from the crew’s MDT.
• For an SMS crew, the system sends one task at a time via SMS and that task is considered dispatched once it is sent.
• For non-MDT crew, queued activities are immediately set to dispatched.
Q. How does the system decide which activities to schedule to a crew shift?A. The scheduler matches the requirements and location of each activity to the capabilities and availability of scheduledresources. It considers a large number of configurable parameters to produce the most cost-effective schedule possible.These include cost factors, which can be set globally as well as at the shift or activity type level. Global parameters aretypically established when the system is implemented, and should not need to be changed. Shift-based cost factors aredefined in shift cost profiles and then assigned to crew shifts and crew shift templates. Task-based cost factors are definedfor an activity type, and apply to all activities of that type. For more information, see the following topics:

Oracle Real-Time Scheduler Server Application User Guide • 249
• About the Scheduling Process
• About Scheduling Parameters
• Understanding Cost Parameters
• About Shift Cost Profiles
Q. If a crew has back-to-back shifts, do they need to log out after the first shift and then log in again forthe next one?A. Yes. If a crew has a 1:00 - 4:00 PM shift and then a 4:00 - 6:00 PM shift directly following it, the system will log thecrew off the application at end of shift. The crew will need to log on again to start the second shift.
Q. What happens if a mobile worker's device breaks or is lost during a shift?A. If a mobile device breaks or is lost during a shift, the dispatcher can forcibly log the crew leader (the last user to log on tothe shift) off the shift. The crew leader can then log in from another device and request shift details from the server.
The system provides security measures to ensure that only one device at a time can have the shift data. When a crew logs onto a shift, the system links both the mobile device and the user to the crew shift. The system will allow any member of thecrew to log on to the shift from this MDT, but will only allow the crew leader to log on from a different device. The forcelogoff action can be used to unlink the mobile device from the crew shift (so the crew leader can log on using a differentdevice), but it does not unlink the user from the shift.
If a device dies and the crew leader is unavailable to log back on, then a user with administrative privileges must revoke thecrew leader's password and create a new one, then communicate the new password to another crew member so they can login from a different device.
Q. How do I know if a deployment is current?A. Batch processing monitors deployments to determine when they become out of date. Refer to the topic AboutDeployments, Deployment Types and Deployment Parts for more information.
Q. How do I generate a POU from a POU Template?A. When you activate a POU Template, the system automatically generates the POUs based on the effective date and yoursystem's planning horizon.
Q. How can I tell if a scheduler is running or find other scheduler diagnostics?A. Refer to the Monitoring Schedulers for information on viewing scheduler diagnostics.
What's the Difference Between ... ?
This topic describes the difference between terms and concepts that are closely related.
Q. What's the difference between an activity and an assignment?A. An activity is a task that must be performed at a particular geographical location. Activities can be received from a hostsystem, or created within the application or initiated by crews in the field.
An assignment is a copy of an activity created by the system to track the assigned crew's progress in accomplishing thework. An assignment is only created when the crew's shift has already started. If the crew uses an MDT, the assignment isalso sent to the crew when the activity is dispatched and appears on the crew's task list.
The crew enters status updates and completion details for the assignment on their MDT, and the system communicates thisinformation back to the server, where the original activity is updated. A dispatcher can create multiple assignments for thesame activity if, for example, the original crew has gone out of range and an attempt to recall the original activity has failed.For more information, see:

Oracle Real-Time Scheduler Server Application User Guide • 250
Concurrent Assignments
About Forced Recall
Q. What's the difference between a task and an activity?A. A task is any activity, period of unavailability (POU), or break that occupies time on a crew shift schedule. An activityis a task that must be performed at a particular geographic location.
Q. What's the difference between allocating and assigning an activity?A. Allocate is an action performed by a user that manually locks an activity to a particular crew shift. Once allocated, thescheduler can optimize the activity's scheduled time, but cannot assign it to another crew shift.
Assign is an action performed by the scheduler that assigns an activity to a particular crew shift. Assigning is done onlyby the system. A user can unassign an activity, which unlinks it from its current crew shift and makes it available forrescheduling, and then the user can allocate it to a different shift; however, a user cannot assign an activity.
Q. What's the difference between Postpone, Suspend, Defer, and Hold?A. Hold and Defer are dispatcher actions, whereas Postpone and Suspend are crew actions that can be performed by thedispatcher on behalf of a non-MDT crew. Here's a brief description of each term and how they differ:
Use the Suspend action if a crew has arrived on site to an activity and cannot complete it. The system will prompt for areason for the postponement, the time to which the activity should be postponed (within the current crew shift), and theestimated length of time that will be required to finish the work once it is resumed. This causes the scheduler to re-optimizethe position of that activity within the crew's route on that shift based on the estimated postponed time.
Use the Postpone action if a crew has not yet arrived to an activity location and wants to postpone the start of workuntil a later time. The system will prompt for a reason for the postponement and the time to which the activity should bepostponed, which should be within the current crew shift. This causes the scheduler to re-optimize the position of thatactivity within the crew's route on that shift based on the estimated postponed time.
Use the Hold action if an activity has not yet been dispatched to a crew (or if it has been dispatched and returned) and youwant to hold the activity from being scheduled. This is useful if something needs to be done before the order can be worked,like acquiring parts or permits. When you are ready for the activity to be worked, you can update its status accordingly (toallocate or dispatch, for example).
Use the Defer action to modify an activity's arrival time window to a future date. Unlike the Hold action, which applies anindefinite hold, the Defer action causes the activity to be automatically rescheduled based on its new arrival time window.
Q. What's the difference between a POU and a POU task?A. A POU is a period of time during which a crew is planned not to perform work, for example, while attending meetingsor training. A POU task is a way of tracking a specific crew's attendance of a POU event.
To define the attributes of a POU, you create either a Template POU (for recurring POUs) or a Real POU (for non-recurringPOUs). You can specify the resources (crews, mobile workers, vehicles, dispatchers, etc.) that will be attending the POUevent, and also specify one or more service areas.
If the resource type is set to crew for the POU type, the system will automatically generate POU tasks for all crewsassociated with the POU event. Tasks for crews that happen to be working in the specified service areas at the time of thePOU event are incorporated into the crew's shift schedule.
Q. What's the difference between unassigning and rescheduling an activity?A. Both actions cause the activity to be rescheduled. The Unassign action tells the schedule to deallocate an activity if it wasmanually allocated to a crew shift. The Reschedule action retains the manual allocation if one exists.

Oracle Real-Time Scheduler Server Application User Guide • 251
Can I ... ?
This topic answers questions about whether certain actions are permitted.
Q. Can I change the capabilities of a resource if that resource is currently logged on to an active shift?A. Yes. Whenever you update a resource to add or remove capabilities, all non-finalized shifts to which that resource isallocated are resent to the scheduler. The scheduler then reevaluates the shift schedule accordingly, and may add or removetasks as a result. If an activity has already been dispatched or marked for dispatch, it remains there; it is the responsibilityof the crew to suspend the activity if they cannot perform the work and cannot contact the dispatcher. If an activity is stillbeing scheduled when required capabilities are removed, the task is rescheduled to another qualified crew.
Q. Can I change shift details (crew allocation, covered areas, service classes) for a logged on shift?A. Yes. Any activities that are still being scheduled are rescheduled accordingly. If a task is already dispatched to the shift,it remains there; it is the responsibility of the crew or the dispatcher to resolve the issue manually.
Q. Can I manually dispatch activities if auto dispatching is enabled?A. Yes. A dispatcher can manually override virtually any scheduler decision. If the scheduler has already assigned anactivity to a crew shift, the dispatcher can reallocate it and mark it for dispatch to a different crew shift.
What happens if...?
Q. What happens if a crew doesn't take a scheduled break?If the crew does not intend to take the break they should cancel it. This allows the scheduler to release the reserved time forthe break and better optimize the remainder of the shift schedule. Otherwise, the mobile worker could take the break at anytime within its defined window.
Q. What happens if a mobile worker's device breaks or is lost during a shift?A. If an mobile device breaks or is lost during a shift, the dispatcher can forcibly log the crew leader (the last user to log onto the shift) off the shift. The crew leader can then log in from another device and request shift details from the server.
The system provides security measures to ensure that only one device at a time can have the shift data. When a crew logson to a shift, the system links both the MDT and the user to the crew shift. The system will allow any member of the crewto log on to the shift from this MDT, but will only allow the crew leader to log on from a different device. The force logoffaction can be used to unlink the mobile device from the crew shift (so the crew leader can log on using a different device),but it does not unlink the user from the shift.
If a device dies and the crew leader is unavailable to log back on, then a user with administrative privileges must revoke thecrew leader's password and create a new one, then communicate the new password to another crew member so they can login from a different device.
Q. What happens if a crew doesn't attend a POU event?A. If the crew did not attend a POU and the event has already ended, the crew would need to cancel it before starting theirnext task. This allows the scheduler to release the reserved time for the event and better optimize the remaining of the shiftschedule.
What happens if a crew shift does not finish all assigned tasks by the end of the shift?When the crew completes it shift, the system automatically returns any unfinalized activities so they can be rescheduled.