
Oracle Linux 8 - Managing Shared File Systems
42
Oracle Linux 8 Managing Shared File Systems F29522-07 April 2022
-
Upload
khangminh22 -
Category
Documents
-
view
1 -
download
0
Transcript of Oracle Linux 8 - Managing Shared File Systems
Oracle Linux 8Managing Shared File Systems
F29522-07April 2022

Oracle Linux 8 Managing Shared File Systems,
F29522-07
Copyright © 2020, 2022, Oracle and/or its affiliates.

Contents
Preface
Conventions v
Documentation Accessibility v
Access to Oracle Support for Accessibility v
Diversity and Inclusion v
1 About Shared File System Management in Oracle Linux
2 Managing the Network File System in Oracle Linux
About NFS 2-1
Supported Versions of NFS 2-1
About NFS Services 2-2
Configuring an NFS Server 2-3
Configuring an NFS Server by Editing the /etc/exports File 2-3
Configuring an NFS Server by Using the exportfs Command 2-6
Mounting an NFS File System 2-6
3 Managing the Oracle Cluster File System Version 2 in Oracle Linux
About OCFS2 3-1
Maximum File System Size Requirements for OCFS2 3-2
Installing and Configuring an OCFS2 Cluster 3-3
Preparing a Cluster for OCFS2 3-3
Configuring the Firewall for the Cluster 3-4
Configuring the Cluster Software 3-4
Creating the Configuration File for the Cluster Stack 3-5
Configuring the Cluster Stack 3-8
Configuring the Kernel for Cluster Operation 3-10
Commands for Administering the Cluster Stack 3-11
Administering OCFS2 Volumes 3-11
Commands for Creating OCFS2 Volumes 3-11
iii
Suggested Cluster Size Settings 3-12
Creating OCFS2 Volumes 3-13
Mounting OCFS2 Volumes 3-13
Querying and Changing Volume Parameters 3-14
Creating a Local OCFS2 File System 3-14
Troubleshooting OCFS2 Issues 3-15
Recommended Debugging Tools and Practices 3-15
Mounting the debugfs File System 3-15
Configuring OCFS2 Tracing 3-16
Commands for Tracing OCFS2 Issues 3-16
OCFS2 Tracing Methods and Examples 3-16
Debugging File System Locks 3-17
Configuring the Behavior of Fenced Nodes 3-19
OCFS2 Use Cases 3-19
Load Balancing Use Case 3-19
Oracle Real Application Cluster Use Case 3-19
Oracle Database Use Case 3-19
4 Managing Samba in Oracle Linux
About Samba 4-1
About Samba Services 4-1
About the Samba Configuration File 4-2
Configuring and Using Samba 4-3
Testing Samba Configuration by Using the testparm Command 4-3
Configuring a Samba Stand-Alone Server 4-3
Configuring a Samba Stand-Alone Server Within a Workgroup 4-4
Adding a Samba Server as a Member of an AD Domain 4-6
Accessing Samba Shares 4-7
Accessing Samba Shares From a Windows Client 4-7
Accessing Samba Shares From an Oracle Linux Client 4-7
iv

Preface
Oracle® Linux 8: Managing Shared File Systems provides information about managingshared file systems in Oracle Linux 8.
ConventionsThe following text conventions are used in this document:
Convention Meaning
boldface Boldface type indicates graphical userinterface elements associated with an action,or terms defined in text or the glossary.
italic Italic type indicates book titles, emphasis, orplaceholder variables for which you supplyparticular values.
monospace Monospace type indicates commands within aparagraph, URLs, code in examples, text thatappears on the screen, or text that you enter.
Documentation AccessibilityFor information about Oracle's commitment to accessibility, visit the Oracle AccessibilityProgram website at https://www.oracle.com/corporate/accessibility/.
For information about the accessibility of the Oracle Help Center, see the Oracle AccessibilityConformance Report at https://www.oracle.com/corporate/accessibility/templates/t2-11535.html.
Access to Oracle Support for AccessibilityOracle customers that have purchased support have access to electronic support through MyOracle Support. For information, visit https://www.oracle.com/corporate/accessibility/learning-support.html#support-tab.
Diversity and InclusionOracle is fully committed to diversity and inclusion. Oracle respects and values having adiverse workforce that increases thought leadership and innovation. As part of our initiative tobuild a more inclusive culture that positively impacts our employees, customers, andpartners, we are working to remove insensitive terms from our products and documentation.We are also mindful of the necessity to maintain compatibility with our customers' existingtechnologies and the need to ensure continuity of service as Oracle's offerings and industry
v
standards evolve. Because of these technical constraints, our effort to removeinsensitive terms is ongoing and will take time and external cooperation.
Preface
vi
1About Shared File System Management inOracle Linux
This chapter includes a brief description of shared files systems and includes informationabout the types of shared file systems that are provided in Oracle Linux 8 and how they areused. The subsequent chapters of this guide describe how to manage each of the shared filesystems types that are described in this chapter.
For information about managing local file systems in Oracle Linux, see Oracle® Linux 8:Managing Local File Systems.
A shared file system is a type of file system that enables multiple users to access the samefiles across different operating systems or over a network at the same time. The shared filesystem approach provides many benefits. Most notably, using shared file systems canimprove performance and scalability and greatly reduce the time that administrators spendmanaging data.
Oracle Linux 8 includes support for several file systems types, including the followingdistributed and shared file systems:
Network File System (NFS)Is a distributed file system that enables users and client systems to access files over anetwork, as though the files were on local storage. An NFS server can share directoryhierarchies in its local file systems with remote client systems over an IP-based network.For more information about NFS, see Managing the Network File System in Oracle Linux.
Oracle Cluster File System Version 2 (OCFS2)Is a general-purpose, shared-disk file system that is intended for use with clusters. OCFS2offers high performance, as well as high availability. When you use clustered file systems, allof the nodes understand the file system structure and the full file system is shared across allof the nodes.For more information about OCFS2, see Managing the Oracle Cluster File System Version 2in Oracle Linux.
SambaIs an open-source implementation of the Server Message Block (SMB) protocol that providesthe capability for Oracle Linux systems to interoperate with Microsoft Windows systems, asboth a server and a client. You can use Samba for file sharing across different operatingsystems over a network.For more information about Samba, see Managing Samba in Oracle Linux.
1-1
2Managing the Network File System in OracleLinux
This chapter includes information about managing the Network File System (NFS) in OracleLinux 8, including tasks for configuring, administering, and using NFS.
For information about local file system management in Oracle Linux, see Oracle® Linux 8:Managing Local File Systems.
About NFSNFS (Network File System) is a distributed file system that enables a client system to accessfiles over a network, as though the files were on local storage.
An NFS server can share directory hierarchies in its local file systems with remote clientsystems over an IP-based network. After an NFS server exports a directory, and then NFSclients mount this directory, if they have been granted the appropriate permissions. To theclient systems, the directory appears as if it were a local directory. Benefits of using NFSinclude centralized storage provisioning, improved data consistency , and reliability.
Supported Versions of NFSThe following versions of NFS are supported in Oracle Linux 8:
• NFS version 3 (NFSv3), specified in RFC 1813.
• NFS version 4 (NFSv4), specified in RFC 7530.
• NFS version 4 minor version 1 (NFSv4.1), specified in RFC 5661.
• NFS version 4 minor version 2 (NFSv4.2), specified in RFC 7862 .
Note:
NFSv2 is no longer supported.
NFSv3 provides safe, asynchronous writes and efficient error handling. NFSv3 also supports64-bit file sizes and offsets, which enable clients to access more than 2 GB of file data.
NFSv3 relies on Remote Procedure Call (RPC) services, which are controlled by the rpcbindservice. The rpcbind service responds to requests for an RPC service and then sets upconnections for the requested service. In addition, separate services are used to handlelocking and mounting protocols, as configuring a firewall to cope with the various ports thatare used by all these services can be complex and error-prone.
2-1

Note:
In previous Oracle Linux releases, NFSv3 was able to also use the UserDatagram Protocol (UDP). However, in Oracle Linux 8, NFS over UDP is nolonger supported. Further, UDP is disabled in the NFS server by default inthis release.
NFSv4 is capable of working through firewalls, as well as the Internet. Also, NFSv4does not require the rpcbind service. In addition, NFSv4 supports access Control Lists(ACLs), and uses stateful operations.
NFSv4 requires the Transmission Control Protocol (TCP) running over an IP network.As mentioned, NFSv4 does not use rpcbind; as such, the NFS server listens on TCPport 2049 for service requests. The mounting and locking protocols are also integratedinto the NFSv4 protocol, which means that separate services are also not required forthese protocols. These refinements make firewall configuration for NFSv4 no moredifficult than for a service such as HTTP.
Note that in Oracle Linux 8, NFS clients attempt to mount by using NFSv4.2 (thedefault version), but fall back to NFSv4.1 when the server does not support NFSv4.2.The mount later falls back to NFSv4.0 and then to NFSv3.
About NFS ServicesIn Oracle Linux 8, NFS versions rely on Remote Procedure Calls (RPC) betweenclients and servers. To share or mount NFS file systems, the following requiredservices work together, depending on which version of NFS is implemented. Note thatall of these services are started automatically:
nfsdIs the server kernel module that services requests for shared NFS file systems.
rpcbindIs a service that accepts port reservations from local RPC services, which are madeavailable or advertised so that the corresponding remote RPC services can accessthem and also hat the client is allowed to access it.
rpc.mountdIs a process that is used by an NFS server to process mount requests from NFSv3clients. The service checks that the requested NFS share is currently exported by theNFS server.
rpc.nfsdIs a process that enables explicit NFS versions and protocols the server advertises tobe defined.
lockdIs a kernel thread that runs on both clients and servers. The lockd processimplements the Network Lock Manager (NLM) protocol, which enables NFSv3 clientsto lock files on the server. The daemon is started automatically whenever the NFSserver is run and whenever an NFS file system is mounted.
Chapter 2About NFS
2-2
rpc-statdIs a process that implements the Network Status Monitor (NSM) RPC protocol, which notifiesNFS clients when an NFS server is restarted without being gracefully brought down. Therpc-statd service is automatically started by the nfs-server service. This service does notrequire configuration by the user and is not used with NFSv4.
rpc-idmapdIs a process that provides NFSv4 client and server upcalls, which map between on-the-wireNFSv4 names (strings in the form of user@domain) and local UIDs and GIDs. Note that forthe idmapd process to function with NFSv4, you must configure the /etc/idmapd.conf file.Note that only NFSv4 uses the rpc-idmapd process.
Note:
The mounting and locking protocols are incorporated into the NFSv4 protocol. Also,the server listens on TCP port 2049. For this reason, NFSv4 does not need tointeract with the rpcbind, lockd, and rpc-statd services. However, the nfs-mountdservice is still required to set up exports on the NFS server; but, the service is notinvolved in any over-the-wire operations.
The rpc-idmapd service only handles upcalls from the kernel and is not itselfdirectly involved in any over-the-wire operations. The service, however, might makenaming service calls, which do result in over-the-wire lookups.
Configuring an NFS ServerThere are two ways in which you can configure an NFS server in Oracle Linux 8:
• By editing the /etc/exports file manually.
Exports can also be added to files that you create in the /etc/exports.d directory.
• By using the exportfs command.
The following procedures describe both of these methods.
Configuring an NFS Server by Editing the /etc/exports FileThe following steps describe how to configure an NFS server by editing the /etc/exportsfile.
Note:
You can also add exports to files that you create in the /etc/exports.d directory ina similar fashion.
1. Check that the nfs-utils package is installed on the system. If necessary, install thepackage as follows:
sudo dnf install nfs-utils
Chapter 2Configuring an NFS Server
2-3

2. Edit the /etc/exports file to define the directories that the server will makeavailable for clients to mount, for example:
/var/folder 192.0.2.102(rw,async)/usr/local/apps *(all_squash,anonuid=501,anongid=501,ro)/var/projects/proj1 192.168.1.0/24(ro) mgmtpc(rw)
Each entry includes the local path to the exported directory, followed by a list ofclients that can mount the directory, with client-specific exports options inparentheses.
The information in the previous example is as follows:
• The client system with the IP address 192.0.2.102 can mount the /var/folder directory with read and write permissions. All writes to the disk areasynchronous, which means that the server does not wait for write requests tobe written to disk before responding to further requests from the client.
Note:
No other clients are allowed to mount the /var/folder directory.
• All of the clients can mount the /usr/local/apps directory as read-only. Allconnecting users, including root users, are mapped to the local, unprivilegeduser with UID 501 and GID 501.
• All of the clients on the 192.168.1.0/24 subnet can mount the /var/projects/proj1 directory as read-only and the client system named mgmtpccan mount the directory with read-write permissions.
Note:
There is no space between a client specifier and the parenthesized list ofoptions that apply to that client.
For more information, see the exports(5) manual page.
3. If the server will serve NFSv4 clients, edit the /etc/idmapd.conf file's definition forthe Domain parameter to specify the DNS domain name of the server:
Domain = mydom.com
This setting prevents the owner and group from being unexpectedly listed as theanonymous user or group (nobody or nogroup) on NFS clients when theall_squash mount option has not been specified.
4. If you need to enable access through the firewall for NFSv4 clients only, use thefollowing commands:
sudo firewall-cmd --zone=zone --add-service=nfs
sudo firewall-cmd --permanent --zone=zone --add-service=nfs
This configuration assumes that rpc.nfsd listens for client requests on TCP port2049, which it does by default.
Chapter 2Configuring an NFS Server
2-4

5. If you need to enable access through the firewall for NFSv3 and NFSv4 clients, do thefollowing:
a. Edit the /etc/nfs.conf file to create port settings for handling network mountrequests and status monitoring, as well as set the TCP port on which the networklock manager should listen, for example:
# Ports that various services should listen on.
[mountd]port = 892
[statd]port = 662
[lockd]port = 32803
If any port is in use, use the lsof -i command to locate an unused port and thenamend the setting in the /etc/nfs.conf file, as appropriate.
b. Restart the firewall service and configure the firewall to allow NFSv3 connections:
sudo firewall-cmd --permanent --zone=zone \ --add-port=2049/tcp --add-port=111/tcp --add-port=32803/tcp --add-port=892/tcp --add-port=662/tcp
c. Shut down and then reboot the server.
sudo systemctl reboot
Note that NFS fails to start if one of the specified ports is in use and reports an errorin /var/log/messages. Edit the /etc/nfs.conf file to use a different port number forthe service that was unable to start, and then attempt to restart the nfs-serverservice. You can use the rpcinfo -p command to confirm on which ports RPCservices are listening.
6. Start the nfs-server service and configure the service to start following a system reboot:
sudo systemctl enable --now nfs-server7. Display a list of the exported file systems by running the showmount -e command, for
example:
sudo showmount -e
Export list for host01.mydom.com/var/folder 192.0.2.102/usr/local/apps */var/projects/proj1 192.168.1.0/24 mgmtpc
You can also use the exportfs command on the server to display this information, forexample:
sudo /usr/sbin/exportfs -v
Use the showmount -a command to display all of the current clients, as well as all ofthe file systems that they have mounted:
sudo showmount -a
Chapter 2Configuring an NFS Server
2-5
Note:
To enable use of the showmount command from NFSv4 clients,MOUNTD_PORT must be defined in the /etc/nfs.conf file and a firewallrule must enable access on this TCP port.
Configuring an NFS Server by Using the exportfs CommandYou can also export or unexport directories by using the exportfs command. Usingthe exportfs command enables the root user to export or unexport directoriesselectively, and eliminates the need to restart the NFS service. By providing theappropriate options, the exportfs command writes the exported file systems tothe /var/lib/nfs/etab file. Changes to the list of exported file systems are effectiveimmediately because the nfs-mountd service refers to the etab file for determiningaccess privileges to a file system.
The following are some of the options that you can specify with the exportfscommand. Note that using the exportfs without any options displays a list ofcurrently exported file systems:
-rEnables all of the directories listed in the /etc/exports file that are to be exported byconstructing a new export list in the /var/lib/nfs/etab file. The -r option refreshesthe export list with changes that are made to the /etc/exports file.
-aEnables all directories to be exported or unexported, which is dependent on otheroptions that are passed to the exportfs command. If no other options are specified,the command exports all of the file systems that are specified in the /etc/exports file.
-uUnexports all of the shared directories.
Note:
The exportfs -ua command suspends NFS file sharing, but keeps allNFS services running. To re-enable NFS sharing, use the exportfs -rcommand.
-vSpecifies a verbose operation of the exportfs command, which displays informationabout the file systems that are being exported or unexported in greater detail.
For more information, see the exportfs(8), exports(5), and showmount(8) manualpages.
Mounting an NFS File SystemTo mount an NFS file system on an Oracle Linux 8 client:
Chapter 2Mounting an NFS File System
2-6

1. Check whether the nfs-utils package is installed on the system. If necessary, install thepackage as follows:
sudo dnf install nfs-utils2. Use the showmount -e command to display the file systems that the NFS server
exports, for example:
sudo showmount -e host01.mydom.com
The output of the previous command would be similar to the following:
Export list for host01.mydom.com/var/folder 192.0.2.102/usr/local/apps */var/projects/proj1 192.168.1.0/24 mgmtpc
Note:
Be aware that some servers do not allow querying of this information, but theserver may still be exporting NFS file systems.
3. Use the mount command to mount an exported NFS file system on an available mountpoint:
sudo mount -r -o nosuid host01.mydoc.com:/usr/local/apps /apps
Note that in most cases, when mounting an NFS file system, the -t nfs option can beomitted.
This example mounts the /usr/local/apps directory that is exported byhost01.mydoc.com with read-only permissions on /apps. The nosuid option preventsremote users from gaining higher privileges by running a setuid program.
4. To configure the system to mount an NFS file system at boot time, add an entry for thefile system to the /etc/fstab file, as shown in the following example:
host01.mydoc.com:/usr/local/apps /apps nfs ro,nosuid 0 0For more information, see the mount(8), nfs(5), and showmount(8) manual pages.
Chapter 2Mounting an NFS File System
2-7
3Managing the Oracle Cluster File SystemVersion 2 in Oracle Linux
This chapter includes information about managing the Oracle Cluster File System Version 2(OCFS2) in Oracle Linux 8. The chapter includes tasks for configuring, administering, andtroubleshooting OCFS2.
Note:
In Oracle Linux 8, the OCFS2 file system type is supported on UnbreakableEnterprise Kernel (UEK) releases only, starting with Unbreakable Enterprise KernelRelease 6 (UEK R6).
For information about local file system management in Oracle Linux, see Oracle® Linux 8:Managing Local File Systems.
About OCFS2OCFS2 (Oracle Cluster File System Version 2) is a general-purpose shared-disk file systemthat is intended for use with clusters. OCFS2 offers high performance, as well as highavailability. It is also possible to mount an OCFS2 volume on a standalone, non-clusteredsystem.
Although it might appear that the ability to mount an ocfs2 file system locally has no benefits,when compared to alternative file systems such as Ext4 or Btrfs, you can use the reflinkcommand with OCFS2 to create copy-on-write clones of individual files. You can also use thecp --reflink command in a similar way that you would on a Btrfs file system. Typically,such clones enable you to save disk space when storing multiple copies of very similar files,such as virtual machine (VM) images or Linux Containers. In addition, mounting a localOCFS2 file system enables you to subsequently migrate it to a cluster file system withoutrequiring any conversion. Note that when using the reflink command, the resulting filesystem behaves like a clone of the original files ystem, which means that their UUIDs areidentical. When using the reflink command to create a clone, you must change the UUIDby using the tunefs.ocfs2 command. See Querying and Changing Volume Parameters.
Almost all applications can use OCFS2 as it provides local file-system semantics.Applications that are cluster-aware can use cache-coherent parallel I/O from multiple clusternodes to balance activity across the cluster, or they can use of the available file-systemfunctionality to fail over and run on another node in the event that a node fails.
The following are examples of some typical use cases for OCFS2:
• Oracle VM to host shared access to virtual machine images.
• Oracle VM and VirtualBox to enable Linux guest machines to share a file system.
• Oracle Real Application Cluster (RAC) in database clusters.
3-1
• Oracle E-Business Suite in middleware clusters.
The following OCFS2 features that make it a suitable choice for deployment in anenterprise-level computing environment:
• Support for ordered and write-back data journaling that provides file systemconsistency in the event of power failure or system crash.
• Block sizes ranging from 512 bytes to 4 KB, and file-system cluster sizes rangingfrom 4 KB to 1 MB (both in increments of powers of 2). The maximum supportedvolume size is 16 TB, which corresponds to a cluster size of 4 KB. A volume sizeas large as 4 PB is theoretically possible for a cluster size of 1 MB, although thislimit has not been tested.
• Inclusion of nowait support for OCFS2 in Unbreakable Enterprise Kernel Release6 (UEK R6).
When the nowait flag is specified, -EAGAIN is returned if the following checks failfor direct I/O: cannot get related locks immediately or blocks are not allocated atthe write location, which triggers block allocation and subsequently blocks I/Ooperations.
• Extent-based allocations for efficient storage of very large files.
• Optimized allocation support for sparse files, inline-data, unwritten extents, holepunching, reflinks, and allocation reservation for high performance and efficientstorage.
• Indexing of directories to allow efficient access to a directory even if it containsmillions of objects.
• Metadata checksums for the detection of corrupted inodes and directories.
• Extended attributes to allow an unlimited number of name:value pairs to beattached to file system objects such as regular files, directories, and symboliclinks.
• Advanced security support for POSIX ACLs and SELinux in addition to thetraditional file-access permission model.
• Support for user and group quotas.
• Support for heterogeneous clusters of nodes with a mixture of 32-bit and 64-bit,little-endian (x86, x86_64, ia64) and big-endian (ppc64), architectures.
• An easy-to-configure, in-kernel cluster-stack (O2CB) with the Linux DistributedLock Manager (DLM) for managing concurrent access from the cluster nodes.
• Support for buffered, direct, asynchronous, splice, and memory-mapped I/O.
• A toolset that uses similar parameters as the ext3 file system.
For more information about OCFS2, visit https://www.kernel.org/doc/html/latest/filesystems/ocfs2.html.
Maximum File System Size Requirements for OCFS2Starting with the Oracle Linux 8.2 release, the OCFS2 file system is supported onsystems that are running the Unbreakable Enterprise Kernel Release 6 (UEK R6)kernel.
The maximum file size and maximum file system size requirements for OCFS2 are asfollows:
Chapter 3Maximum File System Size Requirements for OCFS2
3-2

• Maximum file size:
4 PiB
• Maximum file system size:
4 PiB
Installing and Configuring an OCFS2 ClusterThe following procedures describe how to set up a cluster to use OCFS2.
Preparing a Cluster for OCFS2For the best performance, each node in the cluster should have at least two networkinterfaces. The first interface is connected to a public network to allow general access to thesystems, while the second interface is used for private communications between the nodesand the cluster heartbeat. This second interface determines how the cluster nodes coordinatetheir access to shared resources and how they monitor each other's state.
Note:
Both network interfaces must be connected through a network switch. Additionally,you must ensure that all of the network interfaces are configured and workingbefore configuring the cluster.
You can choose from the following two cluster heartbeat configurations:
• Local heartbeat thread for each shared device (default heartbeat mode).
In this mode, a node starts a heartbeat thread when it mounts an OCFS2 volume andstops the thread when it unmounts the volume. There is a large CPU overhead on nodesthat mount a large number of OCFS2 volumes as each mount requires a separateheartbeat thread. Note that a large number of mounts also increases the risk of a nodefencing itself out of the cluster due to a heartbeat I/O timeout on a single mount.
• Global heartbeat on specific shared devices.
This mode enables you to configure any OCFS2 volume as a global heartbeat device,provided that it occupies a whole disk device and not a partition. In this mode, theheartbeat to the device starts when the cluster comes online and stops when the clustergoes offline. This mode is recommended for clusters that mount a large number ofOCFS2 volumes. A node fences itself out of the cluster if a heartbeat I/O timeout occurson more than half of the global heartbeat devices. To provide redundancy against failureof one of the devices, you should configure at least three global heartbeat devices.
The following figure shows a cluster of four nodes that are connected by using a networkswitch to a LAN and a network storage server. The nodes and storage server are alsoconnected by using a switch to a private network that is used for the local cluster heartbeat.
Cluster Configuration by Using a Private Network
Chapter 3Installing and Configuring an OCFS2 Cluster
3-3
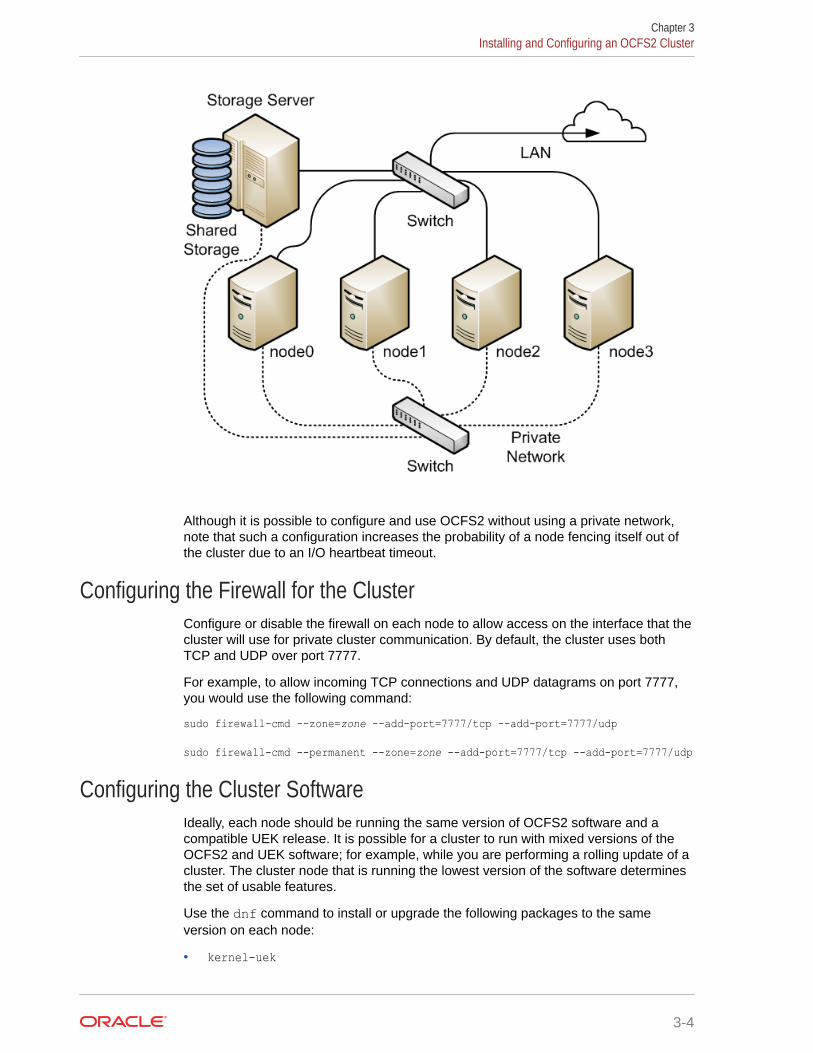
Although it is possible to configure and use OCFS2 without using a private network,note that such a configuration increases the probability of a node fencing itself out ofthe cluster due to an I/O heartbeat timeout.
Configuring the Firewall for the ClusterConfigure or disable the firewall on each node to allow access on the interface that thecluster will use for private cluster communication. By default, the cluster uses bothTCP and UDP over port 7777.
For example, to allow incoming TCP connections and UDP datagrams on port 7777,you would use the following command:
sudo firewall-cmd --zone=zone --add-port=7777/tcp --add-port=7777/udp
sudo firewall-cmd --permanent --zone=zone --add-port=7777/tcp --add-port=7777/udp
Configuring the Cluster SoftwareIdeally, each node should be running the same version of OCFS2 software and acompatible UEK release. It is possible for a cluster to run with mixed versions of theOCFS2 and UEK software; for example, while you are performing a rolling update of acluster. The cluster node that is running the lowest version of the software determinesthe set of usable features.
Use the dnf command to install or upgrade the following packages to the sameversion on each node:
• kernel-uek
Chapter 3Installing and Configuring an OCFS2 Cluster
3-4
• ocfs2-tools
Note:
If you want to use the global heartbeat feature, you need to install the ocfs2-tools-1.8.0-11 or later package.
Creating the Configuration File for the Cluster StackYou create the configuration file by using the o2cb command or by using a text editor.
To configure the cluster stack by using the o2cb command:
1. Create a cluster definition by using the following command:
sudo o2cb add-cluster cluster_name
For example, you would define a cluster named mycluster with four nodes as follows:
sudo o2cb add-cluster mycluster
The previous command creates the /etc/ocfs2/cluster.conf configuration file, if itdoes not already exist.
2. For each node, define the node as follows:
sudo o2cb add-node cluster_name node_name --ip ip_address
The name of the node must be same as the value of system's HOSTNAME that is configuredin the /etc/sysconfig/network file. The IP address will be used by the node for privatecommunication in the cluster.
For example, you would use the following command to define a node named node0, withthe IP address 10.1.0.100, in the cluster mycluster:
sudo o2cb add-node mycluster node0 --ip 10.1.0.100
Note:
OCFS2 only supports IPv4 addresses.
3. If you want the cluster to use global heartbeat devices, run the following commands:
sudo o2cb add-heartbeat cluster_name device1...sudo o2cb heartbeat-mode cluster_name global
Chapter 3Installing and Configuring an OCFS2 Cluster
3-5
Important:
You must configure the global heartbeat feature to use whole diskdevices. You cannot configure a global heartbeat device on a diskpartition.
For example, you would use /dev/sdd, /dev/sdg, and /dev/sdj as globalheartbeat devices by using the following commands:
sudo o2cb add-heartbeat mycluster /dev/sdd
sudo o2cb add-heartbeat mycluster /dev/sdg
sudo o2cb add-heartbeat mycluster /dev/sdj
sudo o2cb heartbeat-mode mycluster global4. Copy the cluster /etc/ocfs2/cluster.conf file to each node in the cluster.
5. Restart the cluster stack for the changes you made to the cluster configuration fileto take effect.
The following is a typical example of the /etc/ocfs2/cluster.conf file. This particularconfiguration defines a 4-node cluster named mycluster, with a local heartbeat:
node: name = node0 cluster = mycluster number = 0 ip_address = 10.1.0.100 ip_port = 7777
node: name = node1 cluster = mycluster number = 1 ip_address = 10.1.0.101 ip_port = 7777
node: name = node2 cluster = mycluster number = 2 ip_address = 10.1.0.102 ip_port = 7777
node: name = node3 cluster = mycluster number = 3 ip_address = 10.1.0.103 ip_port = 7777
cluster: name = mycluster heartbeat_mode = local node_count = 4
Chapter 3Installing and Configuring an OCFS2 Cluster
3-6
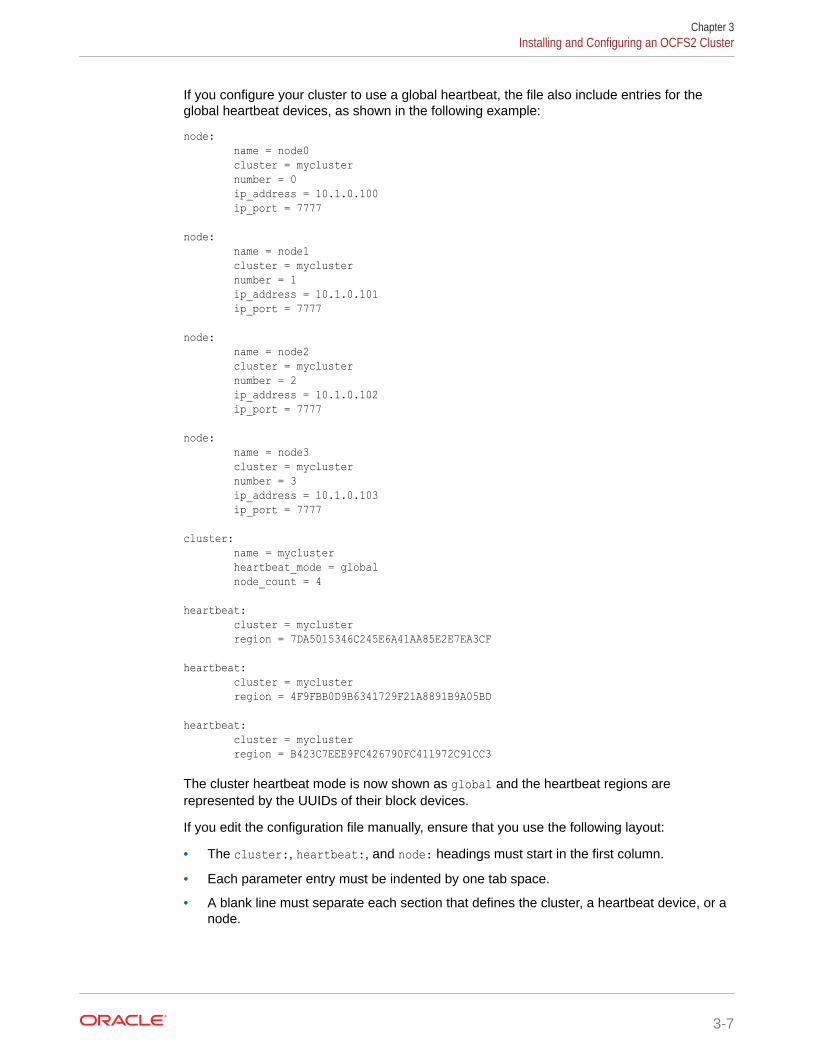
If you configure your cluster to use a global heartbeat, the file also include entries for theglobal heartbeat devices, as shown in the following example:
node: name = node0 cluster = mycluster number = 0 ip_address = 10.1.0.100 ip_port = 7777
node: name = node1 cluster = mycluster number = 1 ip_address = 10.1.0.101 ip_port = 7777
node: name = node2 cluster = mycluster number = 2 ip_address = 10.1.0.102 ip_port = 7777
node: name = node3 cluster = mycluster number = 3 ip_address = 10.1.0.103 ip_port = 7777
cluster: name = mycluster heartbeat_mode = global node_count = 4
heartbeat: cluster = mycluster region = 7DA5015346C245E6A41AA85E2E7EA3CF
heartbeat: cluster = mycluster region = 4F9FBB0D9B6341729F21A8891B9A05BD
heartbeat: cluster = mycluster region = B423C7EEE9FC426790FC411972C91CC3
The cluster heartbeat mode is now shown as global and the heartbeat regions arerepresented by the UUIDs of their block devices.
If you edit the configuration file manually, ensure that you use the following layout:
• The cluster:, heartbeat:, and node: headings must start in the first column.
• Each parameter entry must be indented by one tab space.
• A blank line must separate each section that defines the cluster, a heartbeat device, or anode.
Chapter 3Installing and Configuring an OCFS2 Cluster
3-7
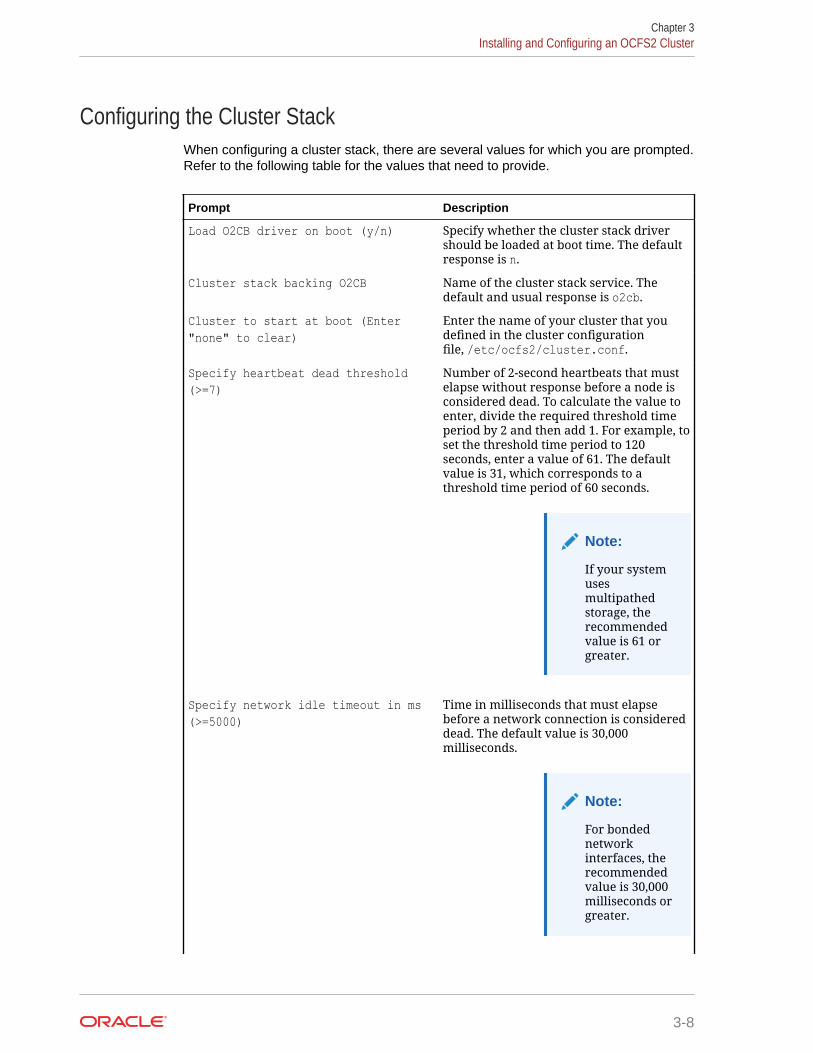
Configuring the Cluster StackWhen configuring a cluster stack, there are several values for which you are prompted.Refer to the following table for the values that need to provide.
Prompt Description
Load O2CB driver on boot (y/n) Specify whether the cluster stack drivershould be loaded at boot time. The defaultresponse is n.
Cluster stack backing O2CB Name of the cluster stack service. Thedefault and usual response is o2cb.
Cluster to start at boot (Enter"none" to clear)
Enter the name of your cluster that youdefined in the cluster configurationfile, /etc/ocfs2/cluster.conf.
Specify heartbeat dead threshold(>=7)
Number of 2-second heartbeats that mustelapse without response before a node isconsidered dead. To calculate the value toenter, divide the required threshold timeperiod by 2 and then add 1. For example, toset the threshold time period to 120seconds, enter a value of 61. The defaultvalue is 31, which corresponds to athreshold time period of 60 seconds.
Note:
If your systemusesmultipathedstorage, therecommendedvalue is 61 orgreater.
Specify network idle timeout in ms(>=5000)
Time in milliseconds that must elapsebefore a network connection is considereddead. The default value is 30,000milliseconds.
Note:
For bondednetworkinterfaces, therecommendedvalue is 30,000milliseconds orgreater.
Chapter 3Installing and Configuring an OCFS2 Cluster
3-8
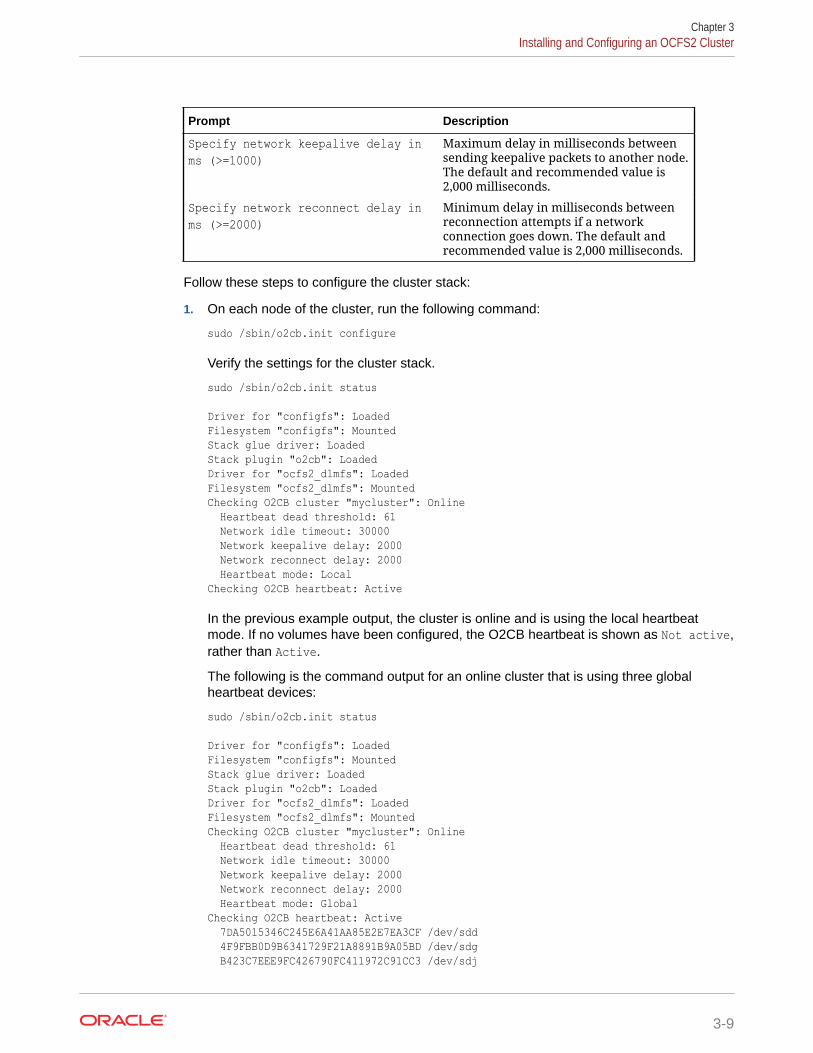
Prompt Description
Specify network keepalive delay inms (>=1000)
Maximum delay in milliseconds betweensending keepalive packets to another node.The default and recommended value is2,000 milliseconds.
Specify network reconnect delay inms (>=2000)
Minimum delay in milliseconds betweenreconnection attempts if a networkconnection goes down. The default andrecommended value is 2,000 milliseconds.
Follow these steps to configure the cluster stack:
1. On each node of the cluster, run the following command:
sudo /sbin/o2cb.init configure
Verify the settings for the cluster stack.
sudo /sbin/o2cb.init status
Driver for "configfs": LoadedFilesystem "configfs": MountedStack glue driver: LoadedStack plugin "o2cb": LoadedDriver for "ocfs2_dlmfs": LoadedFilesystem "ocfs2_dlmfs": MountedChecking O2CB cluster "mycluster": Online Heartbeat dead threshold: 61 Network idle timeout: 30000 Network keepalive delay: 2000 Network reconnect delay: 2000 Heartbeat mode: LocalChecking O2CB heartbeat: Active
In the previous example output, the cluster is online and is using the local heartbeatmode. If no volumes have been configured, the O2CB heartbeat is shown as Not active,rather than Active.
The following is the command output for an online cluster that is using three globalheartbeat devices:
sudo /sbin/o2cb.init status
Driver for "configfs": LoadedFilesystem "configfs": MountedStack glue driver: LoadedStack plugin "o2cb": LoadedDriver for "ocfs2_dlmfs": LoadedFilesystem "ocfs2_dlmfs": MountedChecking O2CB cluster "mycluster": Online Heartbeat dead threshold: 61 Network idle timeout: 30000 Network keepalive delay: 2000 Network reconnect delay: 2000 Heartbeat mode: GlobalChecking O2CB heartbeat: Active 7DA5015346C245E6A41AA85E2E7EA3CF /dev/sdd 4F9FBB0D9B6341729F21A8891B9A05BD /dev/sdg B423C7EEE9FC426790FC411972C91CC3 /dev/sdj
Chapter 3Installing and Configuring an OCFS2 Cluster
3-9
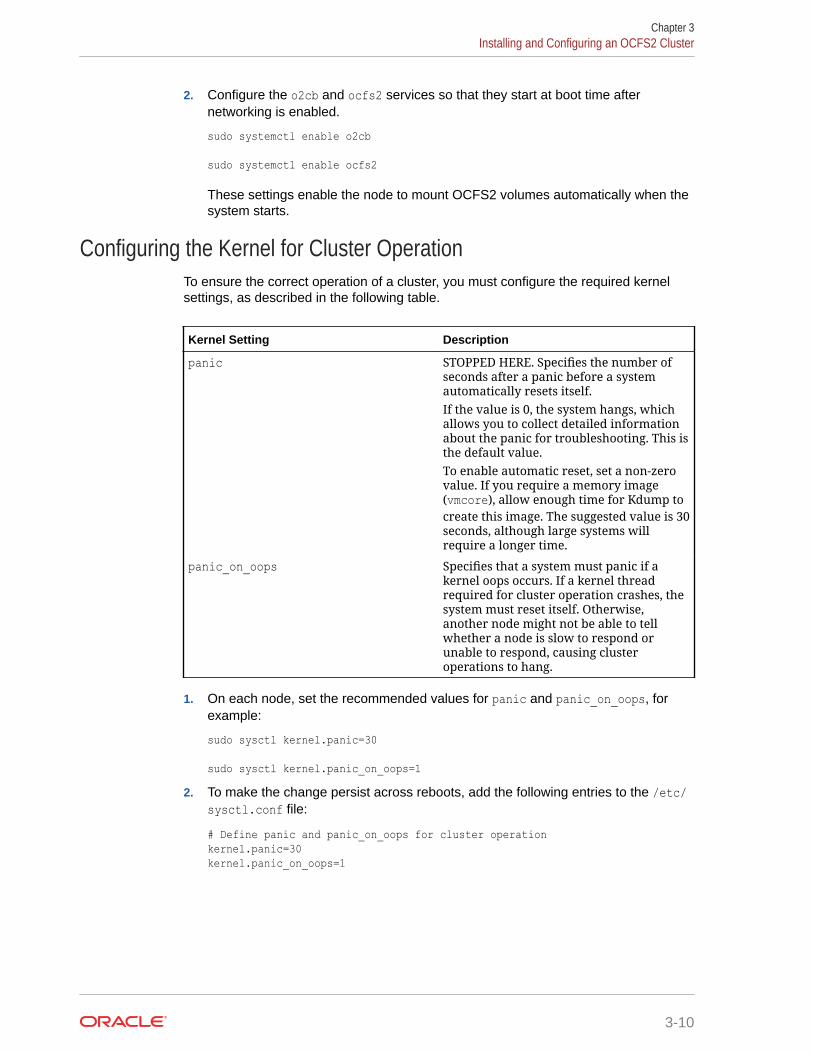
2. Configure the o2cb and ocfs2 services so that they start at boot time afternetworking is enabled.
sudo systemctl enable o2cb
sudo systemctl enable ocfs2
These settings enable the node to mount OCFS2 volumes automatically when thesystem starts.
Configuring the Kernel for Cluster OperationTo ensure the correct operation of a cluster, you must configure the required kernelsettings, as described in the following table.
Kernel Setting Description
panic STOPPED HERE. Specifies the number ofseconds after a panic before a systemautomatically resets itself.If the value is 0, the system hangs, whichallows you to collect detailed informationabout the panic for troubleshooting. This isthe default value.To enable automatic reset, set a non-zerovalue. If you require a memory image(vmcore), allow enough time for Kdump tocreate this image. The suggested value is 30seconds, although large systems willrequire a longer time.
panic_on_oops Specifies that a system must panic if akernel oops occurs. If a kernel threadrequired for cluster operation crashes, thesystem must reset itself. Otherwise,another node might not be able to tellwhether a node is slow to respond orunable to respond, causing clusteroperations to hang.
1. On each node, set the recommended values for panic and panic_on_oops, forexample:
sudo sysctl kernel.panic=30
sudo sysctl kernel.panic_on_oops=12. To make the change persist across reboots, add the following entries to the /etc/
sysctl.conf file:
# Define panic and panic_on_oops for cluster operationkernel.panic=30kernel.panic_on_oops=1
Chapter 3Installing and Configuring an OCFS2 Cluster
3-10
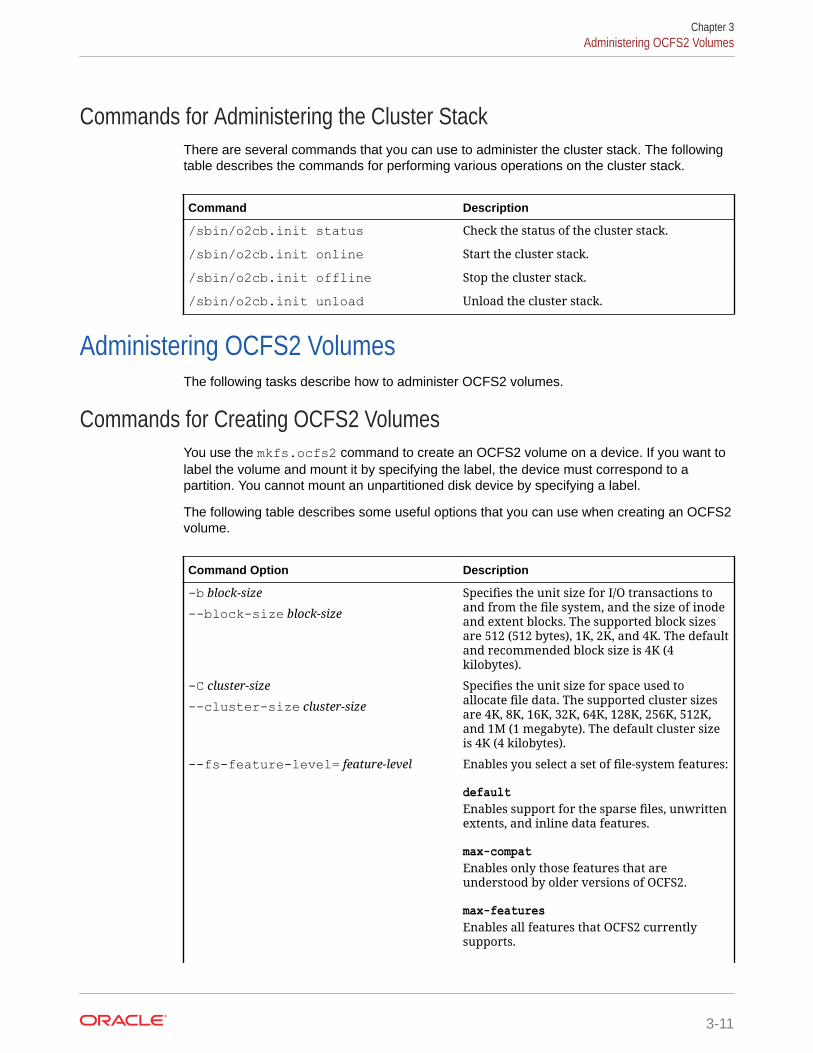
Commands for Administering the Cluster StackThere are several commands that you can use to administer the cluster stack. The followingtable describes the commands for performing various operations on the cluster stack.
Command Description
/sbin/o2cb.init status Check the status of the cluster stack.
/sbin/o2cb.init online Start the cluster stack.
/sbin/o2cb.init offline Stop the cluster stack.
/sbin/o2cb.init unload Unload the cluster stack.
Administering OCFS2 VolumesThe following tasks describe how to administer OCFS2 volumes.
Commands for Creating OCFS2 VolumesYou use the mkfs.ocfs2 command to create an OCFS2 volume on a device. If you want tolabel the volume and mount it by specifying the label, the device must correspond to apartition. You cannot mount an unpartitioned disk device by specifying a label.
The following table describes some useful options that you can use when creating an OCFS2volume.
Command Option Description
-b block-size
--block-size block-size
Specifies the unit size for I/O transactions toand from the file system, and the size of inodeand extent blocks. The supported block sizesare 512 (512 bytes), 1K, 2K, and 4K. The defaultand recommended block size is 4K (4kilobytes).
-C cluster-size
--cluster-size cluster-size
Specifies the unit size for space used toallocate file data. The supported cluster sizesare 4K, 8K, 16K, 32K, 64K, 128K, 256K, 512K,and 1M (1 megabyte). The default cluster sizeis 4K (4 kilobytes).
--fs-feature-level= feature-level Enables you select a set of file-system features:
defaultEnables support for the sparse files, unwrittenextents, and inline data features.
max-compatEnables only those features that areunderstood by older versions of OCFS2.
max-featuresEnables all features that OCFS2 currentlysupports.
Chapter 3Administering OCFS2 Volumes
3-11

Command Option Description
--fs_features= feature Enables you to enable or disable individualfeatures such as support for sparse files,unwritten extents, and backup superblocks.For more information, see the mkfs.ocfs2(8)manual page.
-J size= journal-size
--journal-options size= journal-size
Specifies the size of the write-ahead journal. Ifnot specified, the size is determined from thefile system usage type that you specify to the -T option, and, otherwise, from the volumesize. The default size of the journal is 64M (64MB) for datafiles, 256M (256 MB) for mail,and 128M (128 MB) for vmstore.
-L volume-label
--label volume-label
Specifies a descriptive name for the volumethat allows you to identify it easily on differentcluster nodes.
-N number
--node-slots number
Determines the maximum number of nodesthat can concurrently access a volume, whichis limited by the number of node slots forsystem files such as the file-system journal. Forbest performance, set the number of nodeslots to at least twice the number of nodes. Ifyou subsequently increase the number of nodeslots, performance can suffer because thejournal will no longer be contiguously laid outon the outer edge of the disk platter.
-T file-system-usage-type Specifies the type of usage for the file system:
datafilesDatabase files are typically few in number,fully allocated, and relatively large. Such filesrequire few metadata changes, and do notbenefit from having a large journal.
mailMail server files are typically many innumber, and relatively small. Such filesrequire many metadata changes, and benefitfrom having a large journal.
vmstoreVirtual machine image files are typically fewin number, sparsely allocated, and relativelylarge. Such files require a moderate number ofmetadata changes and a medium sizedjournal.
Suggested Cluster Size SettingsThe following table provides suggested recommendations for minimum cluster sizesettings for different file system size ranges.
Chapter 3Administering OCFS2 Volumes
3-12

File System Size Suggested Minimum Cluster Size
1 GB - 10 GB 8K
10GB - 100 GB 16K
100 GB - 1 TB 32K
1 TB - 10 TB 64K
10 TB - 16 TB 128K
Creating OCFS2 VolumesWhen creating OCFS2 volumes, keep the following additional points in mind:
• Do not create an OCFS2 volume on an LVM logical volume, as LVM is not cluster-aware.
• You cannot change the block and cluster size of an OCFS2 volume after you havecreated it. You can use the tunefs.ocfs2 command to modify other settings for the filesystem, with certain restrictions. For more information, see the tunefs.ocfs2(8) manualpage.
• If you intend that the volume store database files, do not specify a cluster size that issmaller than the block size of the database.
• The default cluster size of 4 KB is not suitable if the file system is larger than a fewgigabytes.
The following examples show some of the ways in which you can create an OCFS2 volume.
Create an OCFS2 volume on /dev/sdc1 labeled myvol using all of the default settings forgeneric usage on file systems that are no larger than a few gigabytes. The default values area 4 KB block and cluster size, eight node slots, a 256 MB journal, and support for default file-system features:
sudo mkfs.ocfs2 -L "myvol" /dev/sdc1
Create an OCFS2 volume on /dev/sdd2 labeled as dbvol for use with database files. In thiscase, the cluster size is set to 128 KB and the journal size to 32 MB.
sudo mkfs.ocfs2 -L "dbvol" -T datafiles /dev/sdd2
Create an OCFS2 volume on /dev/sde1, with a 16 KB cluster size, a 128 MB journal, 16node slots, and support enabled for all features except refcount trees.
sudo mkfs.ocfs2 -C 16K -J size=128M -N 16 --fs-feature-level=max-features \ --fs-features=norefcount /dev/sde1
Mounting OCFS2 VolumesSpecify the _netdev option in the /etc/fstab file if you want the system to mount an OCFS2volume at boot time after networking is started and unmount the file system beforenetworking is stopped, as shown in the following example:
myocfs2vol /dbvol1 ocfs2 _netdev,defaults 0 0
Chapter 3Administering OCFS2 Volumes
3-13
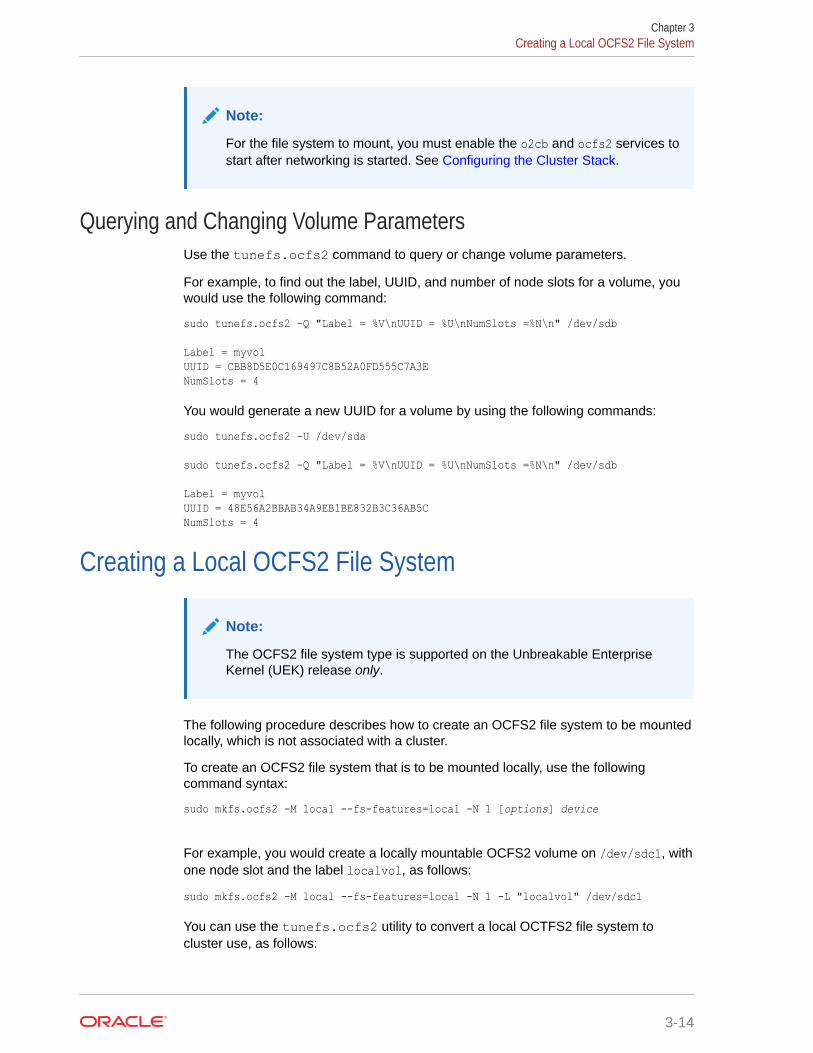
Note:
For the file system to mount, you must enable the o2cb and ocfs2 services tostart after networking is started. See Configuring the Cluster Stack.
Querying and Changing Volume ParametersUse the tunefs.ocfs2 command to query or change volume parameters.
For example, to find out the label, UUID, and number of node slots for a volume, youwould use the following command:
sudo tunefs.ocfs2 -Q "Label = %V\nUUID = %U\nNumSlots =%N\n" /dev/sdb
Label = myvolUUID = CBB8D5E0C169497C8B52A0FD555C7A3ENumSlots = 4
You would generate a new UUID for a volume by using the following commands:
sudo tunefs.ocfs2 -U /dev/sda
sudo tunefs.ocfs2 -Q "Label = %V\nUUID = %U\nNumSlots =%N\n" /dev/sdb
Label = myvolUUID = 48E56A2BBAB34A9EB1BE832B3C36AB5CNumSlots = 4
Creating a Local OCFS2 File System
Note:
The OCFS2 file system type is supported on the Unbreakable EnterpriseKernel (UEK) release only.
The following procedure describes how to create an OCFS2 file system to be mountedlocally, which is not associated with a cluster.
To create an OCFS2 file system that is to be mounted locally, use the followingcommand syntax:
sudo mkfs.ocfs2 -M local --fs-features=local -N 1 [options] device
For example, you would create a locally mountable OCFS2 volume on /dev/sdc1, withone node slot and the label localvol, as follows:
sudo mkfs.ocfs2 -M local --fs-features=local -N 1 -L "localvol" /dev/sdc1
You can use the tunefs.ocfs2 utility to convert a local OCTFS2 file system tocluster use, as follows:
Chapter 3Creating a Local OCFS2 File System
3-14
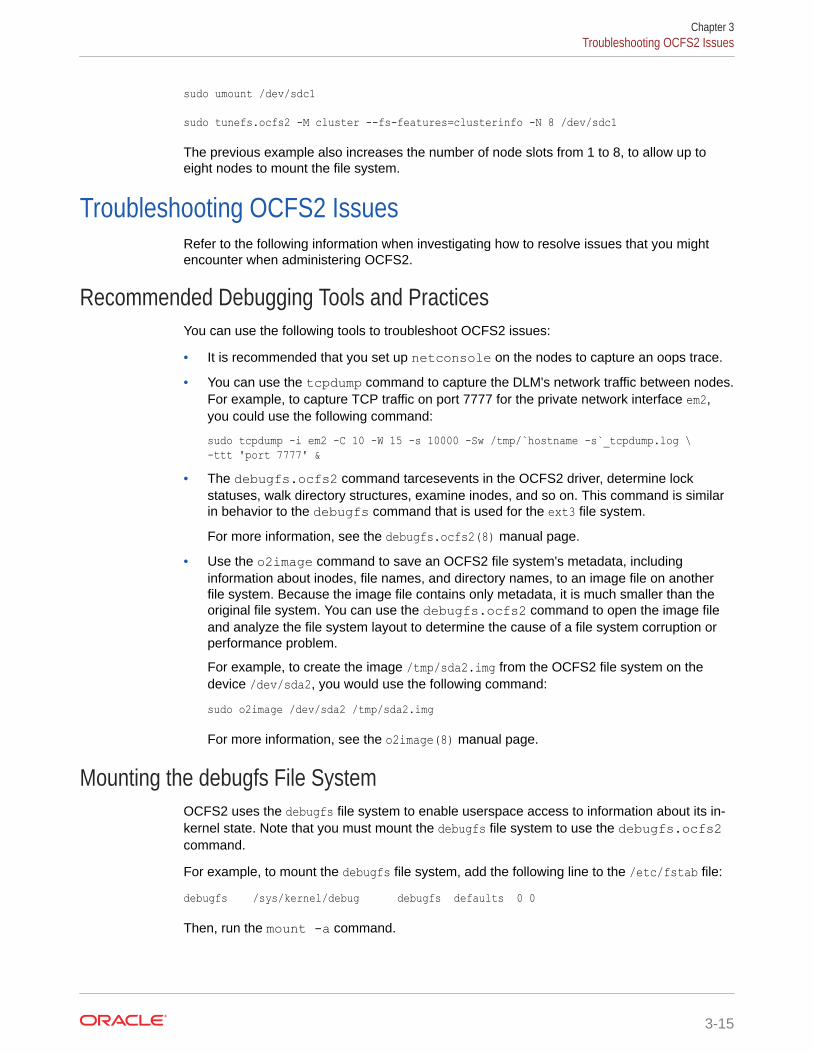
sudo umount /dev/sdc1
sudo tunefs.ocfs2 -M cluster --fs-features=clusterinfo -N 8 /dev/sdc1
The previous example also increases the number of node slots from 1 to 8, to allow up toeight nodes to mount the file system.
Troubleshooting OCFS2 IssuesRefer to the following information when investigating how to resolve issues that you mightencounter when administering OCFS2.
Recommended Debugging Tools and PracticesYou can use the following tools to troubleshoot OCFS2 issues:
• It is recommended that you set up netconsole on the nodes to capture an oops trace.
• You can use the tcpdump command to capture the DLM's network traffic between nodes.For example, to capture TCP traffic on port 7777 for the private network interface em2,you could use the following command:
sudo tcpdump -i em2 -C 10 -W 15 -s 10000 -Sw /tmp/`hostname -s`_tcpdump.log \-ttt 'port 7777' &
• The debugfs.ocfs2 command tarcesevents in the OCFS2 driver, determine lockstatuses, walk directory structures, examine inodes, and so on. This command is similarin behavior to the debugfs command that is used for the ext3 file system.
For more information, see the debugfs.ocfs2(8) manual page.
• Use the o2image command to save an OCFS2 file system's metadata, includinginformation about inodes, file names, and directory names, to an image file on anotherfile system. Because the image file contains only metadata, it is much smaller than theoriginal file system. You can use the debugfs.ocfs2 command to open the image fileand analyze the file system layout to determine the cause of a file system corruption orperformance problem.
For example, to create the image /tmp/sda2.img from the OCFS2 file system on thedevice /dev/sda2, you would use the following command:
sudo o2image /dev/sda2 /tmp/sda2.img
For more information, see the o2image(8) manual page.
Mounting the debugfs File SystemOCFS2 uses the debugfs file system to enable userspace access to information about its in-kernel state. Note that you must mount the debugfs file system to use the debugfs.ocfs2command.
For example, to mount the debugfs file system, add the following line to the /etc/fstab file:
debugfs /sys/kernel/debug debugfs defaults 0 0
Then, run the mount -a command.
Chapter 3Troubleshooting OCFS2 Issues
3-15
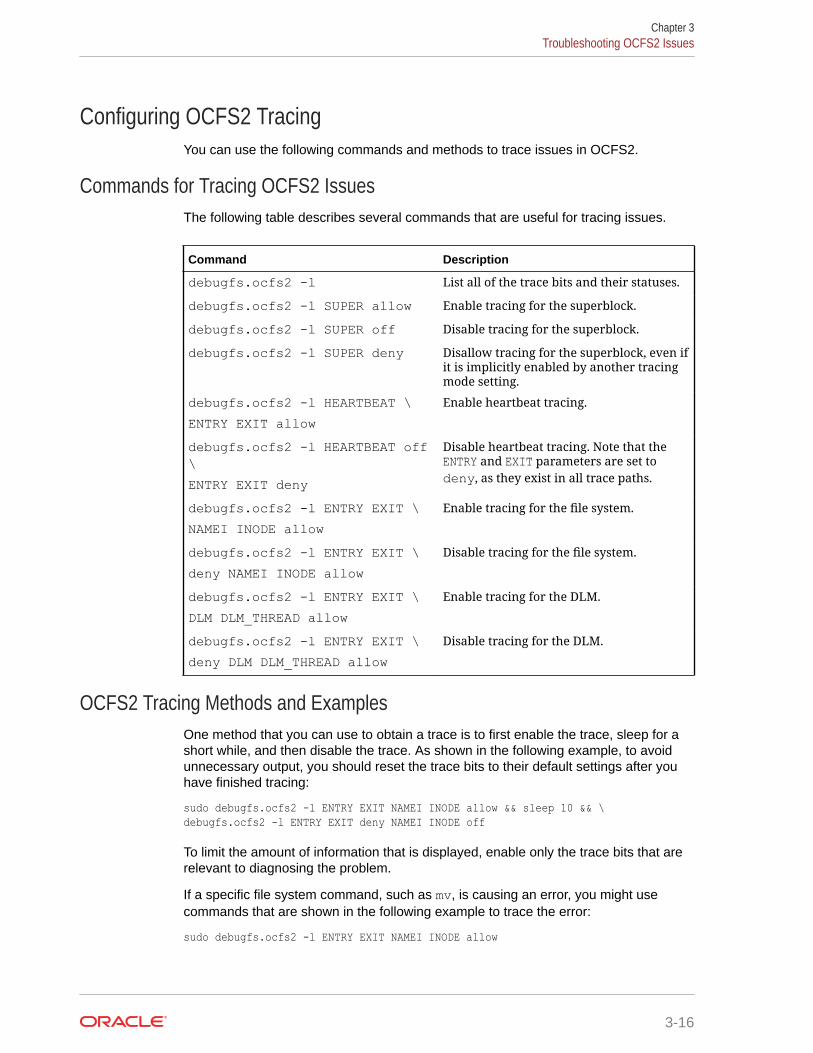
Configuring OCFS2 TracingYou can use the following commands and methods to trace issues in OCFS2.
Commands for Tracing OCFS2 IssuesThe following table describes several commands that are useful for tracing issues.
Command Description
debugfs.ocfs2 -l List all of the trace bits and their statuses.
debugfs.ocfs2 -l SUPER allow Enable tracing for the superblock.
debugfs.ocfs2 -l SUPER off Disable tracing for the superblock.
debugfs.ocfs2 -l SUPER deny Disallow tracing for the superblock, even ifit is implicitly enabled by another tracingmode setting.
debugfs.ocfs2 -l HEARTBEAT \ENTRY EXIT allow
Enable heartbeat tracing.
debugfs.ocfs2 -l HEARTBEAT off\ENTRY EXIT deny
Disable heartbeat tracing. Note that theENTRY and EXIT parameters are set todeny, as they exist in all trace paths.
debugfs.ocfs2 -l ENTRY EXIT \NAMEI INODE allow
Enable tracing for the file system.
debugfs.ocfs2 -l ENTRY EXIT \deny NAMEI INODE allow
Disable tracing for the file system.
debugfs.ocfs2 -l ENTRY EXIT \DLM DLM_THREAD allow
Enable tracing for the DLM.
debugfs.ocfs2 -l ENTRY EXIT \deny DLM DLM_THREAD allow
Disable tracing for the DLM.
OCFS2 Tracing Methods and ExamplesOne method that you can use to obtain a trace is to first enable the trace, sleep for ashort while, and then disable the trace. As shown in the following example, to avoidunnecessary output, you should reset the trace bits to their default settings after youhave finished tracing:
sudo debugfs.ocfs2 -l ENTRY EXIT NAMEI INODE allow && sleep 10 && \debugfs.ocfs2 -l ENTRY EXIT deny NAMEI INODE off
To limit the amount of information that is displayed, enable only the trace bits that arerelevant to diagnosing the problem.
If a specific file system command, such as mv, is causing an error, you might usecommands that are shown in the following example to trace the error:
sudo debugfs.ocfs2 -l ENTRY EXIT NAMEI INODE allow
Chapter 3Troubleshooting OCFS2 Issues
3-16
mv source destination & CMD_PID=$(jobs -p %-)
echo $CMD_PID
sudo debugfs.ocfs2 -l ENTRY EXIT deny NAMEI INODE off
Because the trace is enabled for all mounted OCFS2 volumes, knowing the correct processID can help you to interpret the trace.
For more information, see the debugfs.ocfs2(8) manual page.
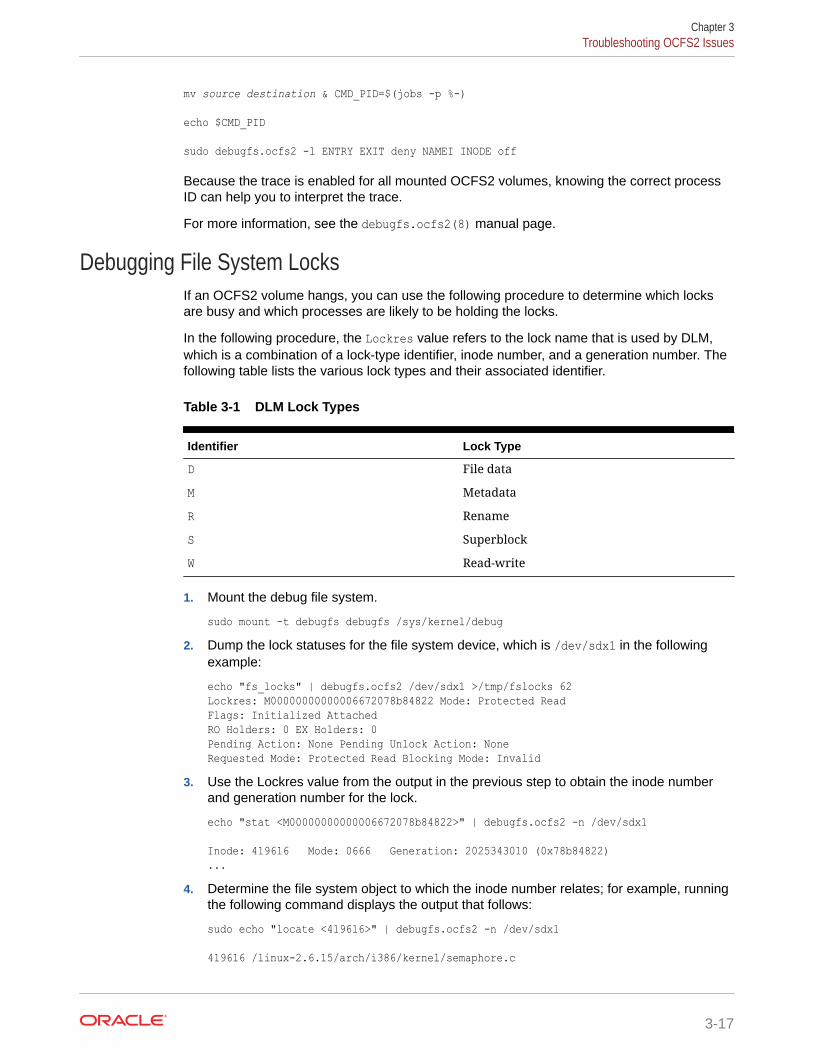
Debugging File System LocksIf an OCFS2 volume hangs, you can use the following procedure to determine which locksare busy and which processes are likely to be holding the locks.
In the following procedure, the Lockres value refers to the lock name that is used by DLM,which is a combination of a lock-type identifier, inode number, and a generation number. Thefollowing table lists the various lock types and their associated identifier.
Table 3-1 DLM Lock Types
Identifier Lock Type
D File data
M Metadata
R Rename
S Superblock
W Read-write
1. Mount the debug file system.
sudo mount -t debugfs debugfs /sys/kernel/debug2. Dump the lock statuses for the file system device, which is /dev/sdx1 in the following
example:
echo "fs_locks" | debugfs.ocfs2 /dev/sdx1 >/tmp/fslocks 62Lockres: M00000000000006672078b84822 Mode: Protected ReadFlags: Initialized AttachedRO Holders: 0 EX Holders: 0Pending Action: None Pending Unlock Action: NoneRequested Mode: Protected Read Blocking Mode: Invalid
3. Use the Lockres value from the output in the previous step to obtain the inode numberand generation number for the lock.
echo "stat <M00000000000006672078b84822>" | debugfs.ocfs2 -n /dev/sdx1
Inode: 419616 Mode: 0666 Generation: 2025343010 (0x78b84822)...
4. Determine the file system object to which the inode number relates; for example, runningthe following command displays the output that follows:
sudo echo "locate <419616>" | debugfs.ocfs2 -n /dev/sdx1
419616 /linux-2.6.15/arch/i386/kernel/semaphore.c
Chapter 3Troubleshooting OCFS2 Issues
3-17
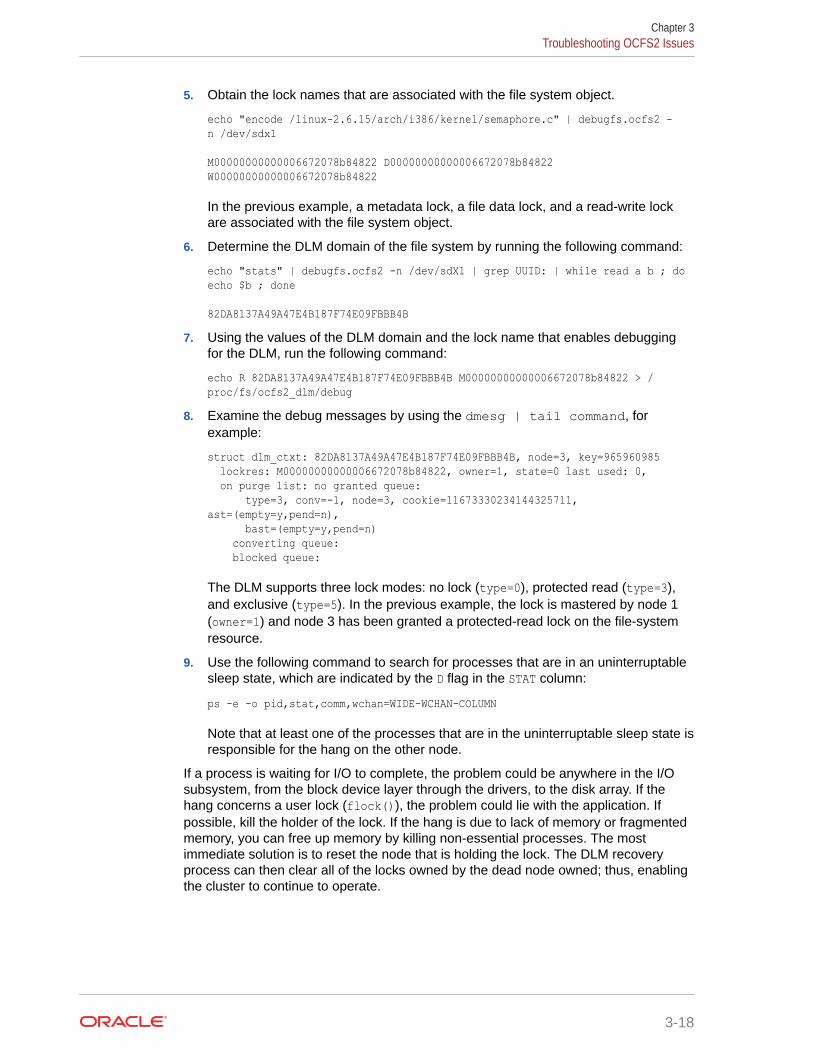
5. Obtain the lock names that are associated with the file system object.
echo "encode /linux-2.6.15/arch/i386/kernel/semaphore.c" | debugfs.ocfs2 -n /dev/sdx1
M00000000000006672078b84822 D00000000000006672078b84822 W00000000000006672078b84822
In the previous example, a metadata lock, a file data lock, and a read-write lockare associated with the file system object.
6. Determine the DLM domain of the file system by running the following command:
echo "stats" | debugfs.ocfs2 -n /dev/sdX1 | grep UUID: | while read a b ; do echo $b ; done
82DA8137A49A47E4B187F74E09FBBB4B 7. Using the values of the DLM domain and the lock name that enables debugging
for the DLM, run the following command:
echo R 82DA8137A49A47E4B187F74E09FBBB4B M00000000000006672078b84822 > /proc/fs/ocfs2_dlm/debug
8. Examine the debug messages by using the dmesg | tail command, forexample:
struct dlm_ctxt: 82DA8137A49A47E4B187F74E09FBBB4B, node=3, key=965960985 lockres: M00000000000006672078b84822, owner=1, state=0 last used: 0, on purge list: no granted queue: type=3, conv=-1, node=3, cookie=11673330234144325711, ast=(empty=y,pend=n), bast=(empty=y,pend=n) converting queue: blocked queue:
The DLM supports three lock modes: no lock (type=0), protected read (type=3),and exclusive (type=5). In the previous example, the lock is mastered by node 1(owner=1) and node 3 has been granted a protected-read lock on the file-systemresource.
9. Use the following command to search for processes that are in an uninterruptablesleep state, which are indicated by the D flag in the STAT column:
ps -e -o pid,stat,comm,wchan=WIDE-WCHAN-COLUMN
Note that at least one of the processes that are in the uninterruptable sleep state isresponsible for the hang on the other node.
If a process is waiting for I/O to complete, the problem could be anywhere in the I/Osubsystem, from the block device layer through the drivers, to the disk array. If thehang concerns a user lock (flock()), the problem could lie with the application. Ifpossible, kill the holder of the lock. If the hang is due to lack of memory or fragmentedmemory, you can free up memory by killing non-essential processes. The mostimmediate solution is to reset the node that is holding the lock. The DLM recoveryprocess can then clear all of the locks owned by the dead node owned; thus, enablingthe cluster to continue to operate.
Chapter 3Troubleshooting OCFS2 Issues
3-18

Configuring the Behavior of Fenced NodesIf a node with a mounted OCFS2 volume assumes that it is no longer in contact with the othercluster nodes, it removes itself from the cluster. This process is called fencing. Fencingprevents other nodes from hanging when attempting to access resources that are held by thefenced node. By default, a fenced node restarts instead of panicking so that it can quicklyrejoin the cluster. Under some circumstances, you might want a fenced node to panic insteadof restarting. For example, you might want to use the netconsole command to view theoops stack trace or diagnose the cause of frequent reboots.
To configure a node to panic when it next fences, run the following command on the nodeafter the cluster starts:
echo panic > /sys/kernel/config/cluster/cluster_name/fence_method
In the previous command, cluster_name is the name of the cluster.
To set the value after each system reboot, add this line to the /etc/rc.local file. To restorethe default behavior, use the reset value instead of the panic value.
OCFS2 Use CasesThe following are some typical use cases for OCFS2.
Load Balancing Use CaseYou can use OCFS2 nodes to share resources between client systems. For example, thenodes could export a shared file system by using Samba or NFS. To distribute servicerequests between the nodes, you can use round-robin DNS, a network load balancer; or, youcan specify which node should be used on each client.
Oracle Real Application Cluster Use CaseOracle Real Application Cluster (RAC) uses its own cluster stack, Cluster SynchronizationServices (CSS). You can use O2CB in conjunction with CSS, but note that each stack isconfigured independently for timeouts, nodes, and other cluster settings. You can use OCFS2to host the voting disk files and the Oracle cluster registry (OCR), but not the gridinfrastructure user's home, which must exist on a local file system on each node.
Because both CSS and O2CB use the lowest node number as a tie breaker in quorumcalculations, ensure that the node numbers are the same in both clusters. If necessary, editthe O2CB configuration file, /etc/ocfs2/cluster.conf, to make the node numberingconsistent. Then, update this file on all of the nodes. The change takes effect when thecluster is restarted.
Oracle Database Use CaseSpecify the noatime option when mounting volumes that host Oracle datafiles, control files,redo logs, voting disk, and OCR. The noatime option disables unnecessary updates to theaccess time on the inodes.
Specify the nointr mount option to prevent signals interrupting I/O transactions that are inprogress.
Chapter 3OCFS2 Use Cases
3-19
By default, the init.ora parameter filesystemio_options directs the database toperform direct I/O to the Oracle datafiles, control files, and redo logs. You should alsospecify the datavolume mount option for volumes that contain the voting disk andOCR. Do not specify this option for volumes that host the Oracle user's home directoryor Oracle E-Business Suite.
To prevent database blocks from becoming fragmented across a disk, ensure that thefile system cluster size is at minimum as large as the database block size, which istypically 8KB. If you specify the file system usage type as datafiles when using themkfs.ocfs2 command, the file system cluster size is set to 128KB.
To enable multiple nodes to maximize throughput by concurrently streaming data to anOracle datafile, OCFS2 deviates from the POSIX standard by not updating themodification time (mtime) on the disk when performing non-extending direct I/O writes.The value of mtime is updated in memory. However, OCFS2 does not write the valueto disk unless an application extends or truncates the file or performs a operation tochange the file metadata, such as using the touch command. This behavior leads toresults with different nodes reporting different time stamps for the same file. Use thefollowing command to view the on-disk timestamp of a file:
sudo debugfs.ocfs2 -R "stat /file_path" device | grep "mtime:"
Chapter 3OCFS2 Use Cases
3-20
4Managing Samba in Oracle Linux
This chapter including information about managing Samba in Oracle Linux 8, including tasksfor configuring Samba and accessing Samba shares on different platforms.
For information about local file system management in Oracle Linux, see Oracle® Linux 8:Managing Local File Systems.
About SambaSamab is an open-source implementation of the Server Message Block (SMB) protocol thatenables Oracle Linux to interoperate with Microsoft Windows systems, as both a server and aclient.
Samba implements the Distributed Computing Environment Remote Procedure Call (DCERPC) protocol that is used by Microsoft Windows to provision file and print services forWindows clients. Samba also enables Oracle Linux users to access files on Windowssystems and includes capability for integrating with a Windows workgroup, NT4 domain, andan Active Directory (AD) domain.
Samba uses the NetBIOS over TCP/IP protocol, which allows computer applications thatdepend on the NetBIOS API to work on TCP/IP networks.
About Samba ServicesThe Samba server consists of three important daemons: smbd, nmbd, and winbindd.
• The smb service enables file sharing and printing services by using the SMB protocol.This service is also responsible for resource locking and for authenticating connectingusers. The smb systemd service starts and stops the smbd daemon.
• The nmbd service provides host name and IP resolution by using the NetBIOS over IPv4protocol. The nmbd service also enables browsing of the SMB network to locate domains,workgroups, hosts, file shares, and printers. The nmb systemd service starts and stopsthe nmbd daemon.
• The winbindd daemon is a Name Service Switch (NSS) daemon for resolving AD Usersand Groups. The daemon enables AD Users to securely access services that are hostedon the Samba server. The winbind systemd service starts and stops the winbindddaemon.
To use the smbd and nmbd services, you need to install the samba package on your system. Touse the winbindd service, install the samba-winbind package.
Note that if you are setting up Samba as a domain member, you must start the winbinddservice before starting the smbd service. Otherwise, domain users and groups are notavailable to the local system.
4-1

About the Samba Configuration FileSamba uses the /etc/samba/smb.conf file to manage Samba configuration. This fileconsists of several sections that you can configure to support the required services fora specific Samba configuration, for example:
[global]security = ADSrealm = MYDOM.REALMpassword server = krbsvr.mydom.comload printers = yesprinting = cupsprintcap name = cups
[printers]comment = All Printerspath = /var/spool/sambabrowseable = noguest ok = yeswritable = noprintable = yesprinter admin = root, @ntadmins, @smbprintadm
[homes]comment = User home directoriesvalid users = @smbusersbrowsable = nowritable = yesguest ok = no
[apps]comment = Shared /usr/local/apps directorypath = /usr/local/appsbrowsable = yeswritable = noguest ok = yes
• [global]Contains settings for the Samba server. In the previous example, the server isassumed to be a member of an AD domain that is running in native mode. Sambarelies on tickets issued by the Kerberos server to authenticate clients who want toaccess local services.
• [printers]Specifies support for print services. The path parameter specifies the location of aspooling directory that receives print jobs from Windows clients before submittingthem to the local print spooler. Samba advertises all locally configured printers onthe server.
• [homes]Provides a personal share for each user in the smbusers group. The settings forbrowsable and writable prevent other users from browsing home directories,while allowing full access to valid users.
• [apps]
Chapter 4About Samba
4-2

Specifies a share named apps, which grants Windows users browsing and read-onlypermission to the /usr/local/apps directory.
Configuring and Using SambaThe following tasks describe how to configure and use Samba in Oracle Linux 8.
Testing Samba Configuration by Using the testparm CommandAfter configuring the /etc/samba/smb.conf file, per the information that is provided in Aboutthe Samba Configuration File, you can verify your Samba configuration by using thetestparm command. The testparm command detects invalid parameters and values, aswell as any incorrect settings such as incorrect ID mapping. If the testparm command doesnot report any problems, the Samba services successfully load the configuration that isspecified in the /etc/samba/smb.conf file. Note that the testparm command is not capableof testing whether configured services will be available or work as expected. You should usethe testparm command every time you make a change to your Samba configuration.
The following example shows the type of output that might be displayed when you run thetestparm command:
Load smb config files from /etc/samba/smb.confLoaded services file OK.WARNING: The 'netbios name' is too long (max. 15 chars).
Server role: ROLE_STANDALONE
Press enter to see a dump of your service definitions...
If the testparm command reports any errors or misconfiguration in the /etc/samba/smb.conf file, fix the problem, then re-run the command.
For more information, see the testparm(1) manual page.
Configuring a Samba Stand-Alone ServerTo configure a Samba stand-alone server:
1. Install the samba and samba-winbind packages:
sudo dnf install samba samba-winbind2. Edit the /etc/samba/smb.conf file and configure the various sections to support the
services that are required for your specific configuration.
For general information, see About the Samba Configuration File
For specific instructions on configuring a Samba stand-alone server within a workgroup,see Configuring a Samba Stand-Alone Server Within a Workgroup.
For specific instructions on adding a Samba server as a member of an AD domain, see Adding a Samba Server as a Member of an AD Domain.
3. (Optional) Configure file system sharing, as needed.
See Accessing Samba Shares From a Windows Client and Accessing Samba SharesFrom an Oracle Linux Client for instructions.
Chapter 4Configuring and Using Samba
4-3
4. Test the configuration by running the testparm command.
If the command returns any errors or reports a misconfiguration, manually fix theerrors in the /etc/samba/smb.conf file and then re-run the command. See TestingSamba Configuration by Using the testparm Command for more information.
5. Configure the system firewall to enable incoming TCP connections to ports 139and 445 and incoming UDP datagrams to ports 137 and 138:
sudo firewall-cmd --zone=zone --add-port=139/tcp --add-port=445/tcp --add-port=137-138/udp
sudo firewall-cmd --permanent --zone=zone --add-port=139/tcp --add-port=445/tcp --add-port=137-138/udp
The nmdb daemon services NetBIOS Name Service requests on UDP port 137 andNetBIOS Datagram Service requests on UDP port 138.
The default ports are 139 (used for SMB over NetBIOS over TCP) and port 445(used for plain SMB over TCP).
6. (Optional) Add similar rules for other networks from which Samba clients canconnect, as required.
7. Start and enable the smb service so the service starts following a system reboot:
sudo systemctl start smb
sudo systemctl enable smb
Note:
If you make changes to the /etc/samba/smb.conf file and any files that thisfile references, the smb service reloads the configuration automatically, aftera delay of up to one minute. If necessary, you can force the smb service toreload the new configuration by sending a SIGHUP signal to the servicedaemon:
sudo killall -SIGHUP smbd
Making the smb service reload its configuration has no effect on anyestablished connections. You must restart the smb service. Otherwise, anyexisting users of the service must disconnect and then reconnect.
For more information, see the smb.conf(5) and smbd(8) manual pages. See also http://www.samba.org/samba/docs/.
Configuring a Samba Stand-Alone Server Within a WorkgroupWindows systems that are on an enterprise network usually belong to either aworkgroup or a domain.
Workgroups are usually only configured on networks that connect a small number ofcomputers. A workgroup environment is a peer-to-peer network, where the systems donot rely on each other for services and there is no centralized management. Useraccounts, access control, and system resources are configured independently of each
Chapter 4Configuring and Using Samba
4-4
system. Note that such systems can share resources only if they are configured to do so.
A Samba server can act as a stand-alone server within a workgroup. To configure a stand-alone Samba server within a workgroup, follow the instructions inConfiguring a Samba Stand-Alone Server. For Step 2 of the procedure, configure the settings in the /etc/samba/smb.conf file as follows:
Configure the [global] section by using share-level security, as follows:
[global]security = shareworkgroup = workgroup_namenetbios name = netbios_name
The client provides only a password to the server, and not a user name. Typically, each shareis associated with a valid users parameter. The server validates the password against thehashed passwords that are stored in the /etc/passwd and /etc/shadow files, NIS, or LDAPfor the listed users. Note that user-level security is preferred over share-level security, asshown in the following example:
[global]security = userworkgroup = workgroup_namenetbios name = netbios_name
In the user security model, a client must supply a valid user name and a password. Thismodel supports encrypted passwords. If the server successfully validates the client's username and password, the client can mount multiple shares without being required to specify apassword.
Use the smbpasswd command to create an entry for a user in the Samba password file, forexample:
smbpasswd -a guest
New SMB password: passwordRetype new SMB password: passwordAdded user guest.
Note:
The user must already exist on the system. If permitted to log in to the server, theuser can use the smbpasswd command to change his or her password.
If a Windows user has a user name that is different from the user name on the Samba server,create a mapping between these names in the /etc/samba/smbusers file, for example:
root = admin administrator rootnobody = guest nobody pcguest smbguesteddie = ejonesfiona = fchau
In the previous example, the first entry for each line is the user name on the Samba server.The entries that appear after the equal sign (=) are the equivalent to Windows user names.
Chapter 4Configuring and Using Samba
4-5
Note:
Only the user security model uses Samba passwords.
The server security model, where the Samba server relies on another server toauthenticate user names and passwords, is deprecated. This model has numeroussecurity and interoperability issues.
Adding a Samba Server as a Member of an AD DomainTypically, corporate networks configure domains to enable large numbers of networkedsystems to be administered centrally. A domain is a group of trusted computers thatshare security and access control. Systems that are known as domain controllersprovide centralized management and security. Windows domains are usuallyconfigured to use AD, which uses the Lightweight Directory Access Protocol (LDAP) toimplement versions of Kerberos and DNS by providing authentication, access controlto domain resources, and name services. Some Windows domains use Windows NT4security, which does not use Kerberos to perform authentication.
Note:
A Samba server can be a member of an AD or NT4 security domain, but itcannot operate as a domain controller. As a domain member, a Sambaserver must authenticate itself with a domain controller; thus, it is controlledby the security rules of the domain. The domain controller authenticatesclients, while the Samba server controls access to printers and networkshares.
In the Activity Directory Server (ADS) security model, Samba acts as a domainmember server in an ADS realm. Clients use Kerberos tickets for AD authentication.You must first configure Kerberos and then join the server to the domain, whichcreates a machine account for your server on the domain controller.
To add a Samba server to an AD domain:
1. Edit /etc/samba/smb.conf and configure the [global] section to use ADS, forexample:
[global]security = ADSrealm = KERBEROS.REALM
You might also have to specify the password server explicitly if different serverssupport AD services and Kerberos authentication:
password server = kerberos_server.your_domain 2. Install the krb5-workstation package:
sudo dnf install krb5-workstation3. Create a Kerberos ticket for the Administrator account in the Kerberos domain,
for example:
Chapter 4Configuring and Using Samba
4-6

sudo kinit [email protected]
This command creates the Kerberos ticket that is required to join the server to the ADdomain.
4. Join the server to the AD domain:
sudo net ads join -S winads.mydom.com -U Administrator%password
In the previous example, the AD server is winads.mydom.com and password is thepassword for the Administrator account.
The command creates an machine account in Active Directory for the Samba server andenables it to join the domain.
5. Restart the smb service:
sudo systemctl restart smb
Accessing Samba SharesThe following tasks describe how to access Samba shares from a Windows client and anOracle Linux client.
Accessing Samba Shares From a Windows ClientTo access a share on a Samba server from Windows, open Computer or Windows Explorer,and enter the host name of the Samba server and the share name using the following format:
\\server_name\share_name
If you enter \\server_name , Windows displays the directories and printers that the server issharing. You can also use the same syntax to map a network drive to a share name.
Accessing Samba Shares From an Oracle Linux Client
Note:
To use the following commands, the samba-client and cifs-utils packages mustbe installed on the system.
You can use the findsmb command to query a subnet for Samba servers. The commanddisplays the IP address, NetBIOS name, workgroup, operating system and version for eachserver that it finds.
Alternatively, you can use the smbtree command, which is a text-based SMB networkbrowser that displays the hierarchy of known domains, the servers in those domains, and theshares on those servers.
The GNOME desktop provides browser-based file managers that you can use to viewWindows shares on the network. Enter smb: in the location bar of a file manager to browsenetwork shares.
Chapter 4Accessing Samba Shares
4-7
To connect to a Windows share by using the command line, use the smbclientcommand:
sudo smbclient //server_name/share_name [-U username]
After logging in, enter help at the smb:\> prompt to display a list of availablecommands.
To mount a Samba share, use a command similar to the following:
sudo mount -t cifs //server_name/share_name mountpoint -o credentials=credfile
In the previous command, the credentials file contains settings for username, password,and domain:
username=eddiepassword=clydenwdomain=MYDOMWKG
The argument to domain can be the name of a domain or a workgroup.
Caution:
Because the credentials file contains a plain-text password, use chmod tomake it readable by only you, for example:
sudo chmod 400 credfile
If the Samba server is a domain member server in an AD domain, and your currentlogin session was authenticated by the Kerberos server in the domain, you can useyour existing session credentials by specifying the sec=krb5 option instead of acredentials file:
sudo mount -t cifs //server_name/share_name mountpoint -o sec=krb5
For more information, see the findsmb(1), mount.cifs(8), smbclient(1), andsmbtree(1) manual pages.
Chapter 4Accessing Samba Shares
4-8