Oracle Database 12c: Backup and ... - 1 File Download
278
Learn more from Oracle University at oracle.com/education/ Oracle Database 12c: Backup and Recovery Workshop Student Guide – Volume 2 D78850GC20 Edition 2.0 | March 2015 | D90709 Oracle University and Error : You are not a Valid Partner use only THESE eKIT MATERIALS ARE FOR YOUR USE IN THIS CLASSROOM ONLY. COPYING eKIT MATERIALS FROM THIS COMPUTER IS STRICTLY PROHIBITED
-
Upload
khangminh22 -
Category
Documents
-
view
0 -
download
0
Transcript of Oracle Database 12c: Backup and ... - 1 File Download

Learn more from Oracle University at oracle.com/education/
Oracle Database 12c: Backup and Recovery Workshop
Student Guide – Volume 2
D78850GC20
Edition 2.0 | March 2015 | D90709
Ora
cle
Uni
vers
ity a
nd E
rror :
You
are
not
a V
alid
Par
tner
use
onl
y
THES
E eK
IT M
ATER
IALS
AR
E FO
R Y
OU
R U
SE IN
TH
IS C
LASS
RO
OM
ON
LY.
CO
PYIN
G e
KIT
MAT
ERIA
LS F
RO
M T
HIS
CO
MPU
TER
IS S
TRIC
TLY
PRO
HIB
ITED

Copyright © 2015, Oracle and/or it affiliates. All rights reserved.
Disclaimer
This document contains proprietary information and is protected by copyright and other intellectual property laws. You may copy and print this document solely for your own use in an Oracle training course. The document may not be modified or altered in any way. Except where your use constitutes "fair use" under copyright law, you may not use, share, download, upload, copy, print, display, perform, reproduce, publish, license, post, transmit, or distribute this document in whole or in part without the express authorization of Oracle.
The information contained in this document is subject to change without notice. If you find any problems in the document, please report them in writing to: Oracle University, 500 Oracle Parkway, Redwood Shores, California 94065 USA. This document is not warranted to be error-free.
Restricted Rights Notice
If this documentation is delivered to the United States Government or anyone using the documentation on behalf of the United States Government, the following notice is applicable:
U.S. GOVERNMENT RIGHTSThe U.S. Government’s rights to use, modify, reproduce, release, perform, display, or disclose these training materials are restricted by the terms of the applicable Oracle license agreement and/or the applicable U.S. Government contract.
Trademark Notice
Authors
Maria Billings
Donna Keesling
Technical Contributors and Reviewers
Chris Andrews
Tim Chien
Donna Cooksey
Raluca Constantin
Stefan Dolea
Gerlinde Frenzen
Joel Goodman
Daniela Hansell
Dominique Jeunot
Sean Kim
Gwen Lazenby
Naoki Kato
Olga Krakovna
Cris Pedregal
Pavan Nisankara Rao
Puneet Sangar
Ron SoltaniOracle and Java are registered trademarks of Oracle and/or its affiliates. Other names may be trademarks of their respective owners.Jim Spiller
Branislav Valny
Harald van Breederode
Lachlan Williams
EditorsArijit Ghosh
Malavika Jinka
Smita Kommini
Graphic Designer
Maheshwari Krishnamurthy
Publishers
Glenn Austin
Jayanthy Keshavamurthy
Srividya Rameshkumar
Ora
cle
Uni
vers
ity a
nd E
rror :
You
are
not
a V
alid
Par
tner
use
onl
y
THES
E eK
IT M
ATER
IALS
AR
E FO
R Y
OU
R U
SE IN
TH
IS C
LASS
RO
OM
ON
LY.
CO
PYIN
G e
KIT
MAT
ERIA
LS F
RO
M T
HIS
CO
MPU
TER
IS S
TRIC
TLY
PRO
HIB
ITED

iii
Contents 1 Introduction
Objectives 1-2
Curriculum Context 1-3
Suggested Schedule 1-4
Oracle Database Innovation 1-5
Enterprise Cloud Computing 1-6
Assessing Your Recovery Requirements 1-7
Categories of Failure 1-10
Data Failures 1-11
Oracle Data Protection Solutions 1-12
Assisting with Overview and Advice 1-13
Complete Oracle Backup Solution 1-14
Integrated Oracle Recovery Manager (RMAN) 1-15
Oracle Secure Backup 1-16
Oracle Secure Backup Cloud Module 1-17
Oracle Data Guard: Overview 1-18
Physical Standby Database: Redo Apply Architecture 1-20
Oracle Active Data Guard 1-21
Logical Standby Database: SQL Apply Architecture 1-22
Oracle Maximum Availability Architecture: Robust and Integrated Data
Protection 1-23
Basic Workshop Architecture 1-24
Quiz 1-25
Summary 1-26
Practice Overview: Exploring the Course Environment 1-27
2 Getting Started
Objectives 2-2
Naming the Core Components of an Oracle Database Server 2-3
Oracle Database Server Architecture: Overview 2-4
What You Already Know About Database Storage Architecture 2-6
Naming Logical and Physical Database Structures 2-8
What You Already Know About Process Architecture 2-10
Process Structures 2-11
Reviewing Processes 2-13
Ora
cle
Uni
vers
ity a
nd E
rror :
You
are
not
a V
alid
Par
tner
use
onl
y
THES
E eK
IT M
ATER
IALS
AR
E FO
R Y
OU
R U
SE IN
TH
IS C
LASS
RO
OM
ON
LY.
CO
PYIN
G e
KIT
MAT
ERIA
LS F
RO
M T
HIS
CO
MPU
TER
IS S
TRIC
TLY
PRO
HIB
ITED

iv
Reviewing Database Writer Process (DBWn) 2-14
Reviewing Log Writer Process (LGWR) 2-15
Reviewing Checkpoint Process (CKPT) 2-17
Reviewing System Monitor Process (SMON) 2-18
Reviewing Process Monitor (PMON) 2-19
Reviewing Archiver Processes (ARCn) 2-20
Adding Process Names 2-21
Database Log Mode 2-23
ORCL Database in ASM 2-24
Facilitating Database Management with Oracle Restart 2-26
Oracle DBA Tools 2-28
Separation of DBA Duties 2-30
Connecting to RMAN and a Target Database 2-31
Using SQL in RMAN 2-32
Quick Start: A Problem-Solution Approach 2-33
Performing Restore and Recovery of a Database in NOARCHIVELOG Mode 2-34
Quiz 2-35
Summary 2-36
Practice Overview: Getting Started 2-37
3 Configuring for Recoverability
Objectives 3-2
Types of RMAN Commands 3-3
Job Commands: Example 3-4
Configuring Persistent Settings for RMAN 3-5
Viewing Persistent Settings 3-6
Managing Persistent Settings 3-7
Specifying a Retention Policy 3-8
Recovery Window Retention Policy: Example 3-10
Quiz 3-11
Using a Fast Recovery Area 3-12
Configuring the Fast Recovery Area 3-14
Sizing the Fast Recovery Area 3-16
Fast Recovery Area Space Management 3-18
Multiplexing Control Files 3-20
Control File Autobackups 3-21
Best Practice: Multiplexing Redo Log Files 3-23
Multiplexing the Redo Log 3-24
Creating Archived Redo Log Files 3-25
Configuring ARCHIVELOG Mode 3-26
Quiz 3-27
Ora
cle
Uni
vers
ity a
nd E
rror :
You
are
not
a V
alid
Par
tner
use
onl
y
THES
E eK
IT M
ATER
IALS
AR
E FO
R Y
OU
R U
SE IN
TH
IS C
LASS
RO
OM
ON
LY.
CO
PYIN
G e
KIT
MAT
ERIA
LS F
RO
M T
HIS
CO
MPU
TER
IS S
TRIC
TLY
PRO
HIB
ITED

v
Summary 3-28
Practice Overview: Configuring for Recoverability 3-29
4 Using the RMAN Recovery Catalog
Objectives 4-2
RMAN Repository Data Storage: Comparison of Options 4-3
Storing Information in the Recovery Catalog 4-4
Reasons to Use a Recovery Catalog 4-5
Creating the Recovery Catalog: Three Steps 4-6
Configuring the Recovery Catalog Database 4-7
Creating the Recovery Catalog Owner 4-8
Creating the Recovery Catalog 4-9
Managing Target Database Records in the Recovery Catalog 4-10
Registering a Database in the Recovery Catalog 4-11
Unregistering a Target Database from the Recovery Catalog 4-13
Recovery Catalog Resynchronization: Concepts 4-14
Manually Resynchronizing the Recovery Catalog 4-16
Using RMAN Stored Scripts 4-17
Executing RMAN Stored Scripts 4-18
Maintaining RMAN Stored Scripts 4-19
Backing Up the Recovery Catalog 4-20
Creating and Using Virtual Private Catalogs 4-21
Creating a Virtual Private Catalog (12.1.0.1) 4-22
Managing Virtual Private Catalogs 4-23
Creating a Virtual Private Catalog (12.1.0.2) 4-24
Upgrading Virtual Private Catalogs for 12.1.0.2 4-26
Quiz 4-27
Summary 4-29
Practice Overview: Using the RMAN Catalog 4-30
Practice Overview: Preparing Your Training Environment 4-31
5 Backup Strategies and Terminology
Lesson Objectives 5-2
Backup Solutions: Overview 5-3
Backup Terminology 5-4
Balancing Backup and Restore Requirements 5-5
Comparing Backup Strategies 5-7
Option 1: Full and Incremental Backups 5-8
Option 2: Incrementally Updated Disk Backups 5-9
Option 3: Offloading Backups to Physical Standby Database in Data Guard
Environment 5-10
Ora
cle
Uni
vers
ity a
nd E
rror :
You
are
not
a V
alid
Par
tner
use
onl
y
THES
E eK
IT M
ATER
IALS
AR
E FO
R Y
OU
R U
SE IN
TH
IS C
LASS
RO
OM
ON
LY.
CO
PYIN
G e
KIT
MAT
ERIA
LS F
RO
M T
HIS
CO
MPU
TER
IS S
TRIC
TLY
PRO
HIB
ITED

vi
Backing Up Read-Only Tablespaces 5-11
Data Warehouse Backup and Recovery: Best Practices 5-12
Additional Backup Terminology 5-13
Creating Backup Sets 5-14
Creating Image Copies 5-15
Creating a Whole Database Backup 5-16
Quiz 5-18
Summary 5-21
Practice Overview: Developing a Backup Strategy 5-22
Case Study 1: How to Protect an OLTP Database 5-23
Case Study 2: How to Protect a DSS Database 5-24
Case Study 3: How to Protect the Recovery Catalog Database 5-25
6 Performing Backups
Objectives 6-2
RMAN Backup Types 6-3
Incrementally Updated Backups 6-5
Incrementally Updated Backups: Example 6-6
Fast Incremental Backup 6-7
Maintaining Block Change Tracking File 6-8
Monitoring Block Change Tracking 6-9
Automatic Disk-to-Disk Backup and Recovery 6-10
Oracle-Suggested Backup 6-11
Reporting on Backups 6-12
Using Dynamic Views 6-13
Managing Backups: Cross-Checking and Deleting 6-14
Quiz 6-15
Summary 6-17
Practice Overview: Creating Incremental Backups 6-18
7 Improving Your Backups
Lesson Objectives 7-2
Saving Backup Space with Unused Block Compression 7-3
Compressing Backups 7-4
Using RMAN Backup Compression 7-5
Quiz 7-6
Using a Media Manager 7-7
Configuring Backup and Restore for Very Large Files 7-9
Backing Up and Restoring Very Large Files 7-10
Creating RMAN Multisection Backups 7-11
Creating Proxy Copies 7-12
Ora
cle
Uni
vers
ity a
nd E
rror :
You
are
not
a V
alid
Par
tner
use
onl
y
THES
E eK
IT M
ATER
IALS
AR
E FO
R Y
OU
R U
SE IN
TH
IS C
LASS
RO
OM
ON
LY.
CO
PYIN
G e
KIT
MAT
ERIA
LS F
RO
M T
HIS
CO
MPU
TER
IS S
TRIC
TLY
PRO
HIB
ITED

vii
Creating Duplexed Backup Sets by Using BACKUP COPIES 7-13
Creating Backups of Backup Sets 7-14
Archival Backups: Concepts 7-15
Creating Archival Backups with RMAN 7-17
Managing Archival Database Backups 7-18
Backing Up Recovery Files 7-19
Backing Up the Control File to a Trace File 7-20
Cataloging Additional Backup Files 7-21
Backing Up ASM Disk Group Metadata 7-22
Quiz 7-23
Summary 7-25
Practice Overview: Backing Up Additional Files 7-26
8 Using RMAN-Encrypted Backups
Objectives 8-2
RMAN-Encrypted Backups 8-3
Comparing OSB and RMAN Encryption 8-4
Creating RMAN-Encrypted Backups 8-5
What Is TDE? 8-6
Using Transparent-Mode Encryption 8-7
Backing Up the Keystore 8-9
Configuring RMAN Encryption 8-10
Using Password-Mode Encryption 8-11
Using Dual-Mode Encryption 8-12
RMAN-Encrypted Backups: Considerations 8-13
Restoring Encrypted Backups 8-14
Quiz 8-15
Summary 8-16
Practice Overview: Using RMAN-Encrypted Backups 8-17
9 Diagnosing Failures
Objectives 9-2
Reducing Problem Diagnosis Time 9-3
Automatic Diagnostic Workflow 9-4
Automatic Diagnostic Repository 9-5
ADR Command-Line Tool (ADRCI) 9-6
V$DIAG_INFO View 9-7
Interpreting RMAN Message Output 9-8
DEBUG Option 9-9
Interpreting RMAN Error Stacks 9-10
Data Recovery Advisor 9-11
Ora
cle
Uni
vers
ity a
nd E
rror :
You
are
not
a V
alid
Par
tner
use
onl
y
THES
E eK
IT M
ATER
IALS
AR
E FO
R Y
OU
R U
SE IN
TH
IS C
LASS
RO
OM
ON
LY.
CO
PYIN
G e
KIT
MAT
ERIA
LS F
RO
M T
HIS
CO
MPU
TER
IS S
TRIC
TLY
PRO
HIB
ITED

viii
Data Failure: Examples 9-14
Data Recovery Advisor RMAN Command-Line Interface 9-15
Listing Data Failures 9-16
Advising on Repair 9-18
Executing Repairs 9-19
Classifying (and Closing) Failures 9-20
Data Recovery Advisor Views 9-21
Quiz 9-22
What Is Block Corruption? 9-25
Block Corruption Symptoms: ORA-01578 9-26
How to Handle Corruption 9-27
Setting Parameters to Detect Corruption 9-28
Block Media Recovery 9-29
Prerequisites for Block Media Recovery 9-30
Recovering Individual Blocks 9-31
Best Practice: Proactive Checks 9-32
Checking for Block Corruption 9-33
Automatic Block Repair: Primary Database 9-34
Automatic Block Repair: Physical Standby Database 9-35
Summary 9-36
Practice Overview: Diagnosing Database Failure 9-37
10 Restore and Recovery Concepts
Objectives 10-2
Understanding File Loss 10-3
Data Repair Techniques 10-4
Restoring and Recovering 10-6
Using RMAN RESTORE and RECOVER Commands 10-7
Instance Failure 10-8
Understanding Instance Recovery 10-9
Phases of Instance Recovery 10-10
Tuning Instance Recovery 10-11
Using the MTTR Advisor 10-12
Media Failure 10-13
Comparing Complete and Incomplete Recovery 10-14
Complete Recovery Process 10-15
Point-in-Time Recovery Process 10-16
Recovery with RESETLOGS Option 10-18
Quiz 10-19
Summary 10-23
Practice Overview: Determining Recovery Procedures 10-24
Ora
cle
Uni
vers
ity a
nd E
rror :
You
are
not
a V
alid
Par
tner
use
onl
y
THES
E eK
IT M
ATER
IALS
AR
E FO
R Y
OU
R U
SE IN
TH
IS C
LASS
RO
OM
ON
LY.
CO
PYIN
G e
KIT
MAT
ERIA
LS F
RO
M T
HIS
CO
MPU
TER
IS S
TRIC
TLY
PRO
HIB
ITED

ix
Case Study 1 10-25
Case Study 2 10-26
Case Study 3 10-27
11 Performing Recovery I
Objectives 11-2
Ensuring Backups Are Available 11-3
Restoring in NOARCHIVELOG Mode 11-4
Recovery with Incremental Backups in NOARCHIVELOG Mode 11-5
Performing Complete Recovery 11-6
Restoring ASM Disk Groups 11-8
Restoring ASM Disk Groups: Examples 11-9
What You Already Know About Recovering Image Copies 11-10
Recovering Image Copies: Example 11-11
Performing a Fast Switch to Image Copies 11-12
Using SET NEWNAME for Switching Files 11-13
Using Restore Points 11-14
Performing Point-in-Time Recovery 11-15
Quiz 11-17
Summary 11-18
Practice Overview: Recovering from Media Failure 11-19
12 Performing Recovery II
Objectives 12-2
Recovery from Loss of Server Parameter File 12-3
Restoring the Server Parameter File from the Control File Autobackup 12-4
Loss of a Control File 12-5
Recovering from the Loss of All Control File Copies: Overview 12-6
Restoring the Control File from Autobackup 12-7
Restoring the SPFILE and the Control File 12-8
Quiz 12-9
Recovering NOLOGGING Database Objects 12-10
Loss of a Redo Log File 12-11
Log Group Status: Review 12-13
Recovering from the Loss of a Redo Log Group 12-14
Clearing a Log File 12-15
Re-creating a Password Authentication File 12-16
Recovering from a Lost Index Tablespace 12-18
Recovering a Read-Only Tablespace 12-19
Automatic Tempfile Recovery 12-20
Restoring and Recovering the Database on a New Host 12-21
Ora
cle
Uni
vers
ity a
nd E
rror :
You
are
not
a V
alid
Par
tner
use
onl
y
THES
E eK
IT M
ATER
IALS
AR
E FO
R Y
OU
R U
SE IN
TH
IS C
LASS
RO
OM
ON
LY.
CO
PYIN
G e
KIT
MAT
ERIA
LS F
RO
M T
HIS
CO
MPU
TER
IS S
TRIC
TLY
PRO
HIB
ITED

x
Preparing to Restore the Database to a New Host 12-22
Restoring the Database to a New Host 12-23
Performing Disaster Recovery 12-27
Restoring Encrypted Backups 12-29
Quiz 12-30
Summary 12-31
Practice Overview: Performing Recoveries 12-32
Practice Overview: Using RMAN Encryption 12-33
13 RMAN and Oracle Secure Backup
Objectives 13-2
Oracle Secure Backup: Overview 13-3
Oracle Secure Backup Interface Options 13-4
Managing Data to Be Protected 13-5
Backup Pieces and Backup Images 13-6
RMAN and Oracle Secure Backup: Overview 13-7
RMAN and Oracle Secure Backup Basic Process Flow 13-8
Quiz 13-9
Starting with Oracle Secure Backup 13-10
Performing Installation Tasks 13-11
Verifying Your Installation 13-12
Securing Data and Access to the Backup Domain 13-13
Preauthorization 13-14
Defining Retention for RMAN Backups 13-15
Media Management Expiration Policies for Automated Tape Recycling 13-16
Database Backup Storage Selector 13-17
Setting Media Management Parameters in RMAN 13-18
Summary of OSB Configuration for RMAN 13-19
Backing Up the Fast Recovery Area to Tape 13-20
Oracle Secure Backup Jobs 13-21
Displaying Log Files and Transcripts 13-22
Common obtool Commands 13-23
Quiz 13-24
Summary 13-28
Practice Overview: Performing RMAN Tape Backup and Restore 13-29
14 Using Flashback Technologies
Objectives 14-2
Flashback Technologies Error Detection and Correction 14-3
What You Already Know About Transactions and Undo 14-4
Flashback Technology 14-5
Ora
cle
Uni
vers
ity a
nd E
rror :
You
are
not
a V
alid
Par
tner
use
onl
y
THES
E eK
IT M
ATER
IALS
AR
E FO
R Y
OU
R U
SE IN
TH
IS C
LASS
RO
OM
ON
LY.
CO
PYIN
G e
KIT
MAT
ERIA
LS F
RO
M T
HIS
CO
MPU
TER
IS S
TRIC
TLY
PRO
HIB
ITED

xi
Preparing Your Database for Flashback 14-7
Guaranteeing Undo Retention 14-8
Quiz 14-9
Using Flashback Technology to Query Data 14-10
Flashback Query 14-11
Flashback Version Query 14-12
Flashback Table: Overview 14-13
Flashback Table 14-14
Flashback Table: Considerations 14-15
Flashback Transaction Query 14-16
Flashback Transaction Query: Considerations 14-17
Flashback Transaction Backout 14-18
Flashing Back a Transaction 14-19
Best Practices: Undo-based Flashback Flashback Query, Flashback Table 14-20
Flashback Drop and the Recycle Bin 14-21
Recycle Bin 14-22
Bypassing the Recycle Bin 14-23
Using Flashback Data Archives 14-24
Creating a Temporal History and Enabling Archiving 14-25
How the Flashback Data Archive Works 14-26
Collecting User Context in Temporal History 14-27
Transparent Schema Evolution 14-28
Full Schema Evolution 14-29
Temporal Validity and History 14-30
Using the PERIOD FOR Clause 14-31
Filtering on Valid-Time Columns: Example 1 14-32
Filtering on Valid-Time Columns: Example 2 14-33
Using DBMS_FLASHBACK_ARCHIVE 14-34
Quiz 14-35
Summary 14-37
Practice Overview: Using Flashback Technologies 14-38
15 Flashback Database
Objectives 15-2
Flashback Database: Continuous Data Protection 15-3
Flashback Database 15-4
Flashback Database Architecture 15-5
Configuring Flashback Database 15-6
Flashback Database: Examples 15-7
Flashback Database Considerations 15-8
Monitoring Flashback Database Information 15-9
Ora
cle
Uni
vers
ity a
nd E
rror :
You
are
not
a V
alid
Par
tner
use
onl
y
THES
E eK
IT M
ATER
IALS
AR
E FO
R Y
OU
R U
SE IN
TH
IS C
LASS
RO
OM
ON
LY.
CO
PYIN
G e
KIT
MAT
ERIA
LS F
RO
M T
HIS
CO
MPU
TER
IS S
TRIC
TLY
PRO
HIB
ITED

xii
Guaranteed Restore Points 15-11
Flashback Database and Guaranteed Restore Points 15-12
Best Practices: Flashback Database 15-14
Quiz 15-16
Summary 15-18
Practice Overview: Flashback Database 15-19
16 Transporting Data
Objectives 16-2
Transporting Data Across Platforms 16-3
Transporting Data with Minimum Down Time 16-4
Transporting a Tablespace with Image Copies 16-5
Determining the Endian Format of a Platform 16-6
Using the RMAN CONVERT Command 16-7
Quiz 16-8
Transporting Data with Backup Sets 16-9
Process Steps: 1 16-11
Process Steps: 2 16-12
Database Transport: Using Data Files 16-13
Database Transportation Procedure 16-14
Database Transportation: Conversion 16-15
Database Transportation: Example 1 16-16
Database Transportation: Example 2 16-17
Database Transportation: Considerations 16-18
Database Transport with Backup Sets: 1 16-19
Database Transport with Backup Sets: 2 16-20
Transporting Inconsistent Tablespaces 16-21
Quiz 16-22
Summary 16-24
Practice Overview 16-25
17 Performing Point-in-Time Recovery
Objectives 17-2
Point-in-Time Recovery 17-3
When to Use TSPITR 17-4
PITR Terminology 17-5
Tablespace Point-in-Time Recovery: Architecture 17-6
Preparing for PITR 17-8
Determining the Correct Target Time 17-9
Determining the Tablespaces for the Recovery Set 17-10
Identifying Objects That Will Be Lost 17-11
Ora
cle
Uni
vers
ity a
nd E
rror :
You
are
not
a V
alid
Par
tner
use
onl
y
THES
E eK
IT M
ATER
IALS
AR
E FO
R Y
OU
R U
SE IN
TH
IS C
LASS
RO
OM
ON
LY.
CO
PYIN
G e
KIT
MAT
ERIA
LS F
RO
M T
HIS
CO
MPU
TER
IS S
TRIC
TLY
PRO
HIB
ITED

xiii
Performing RMAN TSPITR 17-12
Performing Fully Automated TSPITR 17-13
Improving TSPITR Performance 17-14
Performing RMAN TSPITR with an RMAN-Managed Auxiliary Instance 17-15
Performing RMAN TSPITR by Using Your Own Auxiliary Instance 17-16
Troubleshooting RMAN TSPITR 17-17
Quiz 17-18
Recovering Tables from Backups 17-19
Table Recovery: Graphical Overview 17-20
Prerequisites and Limitations 17-21
Specifying the Recovery Point in Time 17-22
Process Steps of Table Recovery: 1 17-23
Process Steps of Table Recovery: 2 17-24
Quiz 17-25
Summary 17-26
Practice Overview 17-27
18 Duplicating a Database
Objectives 18-2
Using a Duplicate Database 18-3
Choosing Database Duplication Techniques 18-4
Duplicating an Active Database with “Push” 18-5
“Push” Versus “Pull” Methods of Duplication 18-6
Duplicating a Database with a Target Connection 18-7
Duplicating a Database with Recovery Catalog Without Target Connection 18-8
Duplicating a Database Without Recovery Catalog or Target Connection 18-9
Creating a Backup-Based Duplicate Database 18-10
Creating an Initialization Parameter File for the Auxiliary Instance 18-11
Specifying New Names for Your Destination 18-12
Using the SET NEWNAME Clauses 18-13
Substitution Variables for SET NEWNAME 18-14
Specifying Parameters for File Naming 18-15
Starting the Instance in NOMOUNT Mode 18-17
Ensuring That Backups and Archived Redo Log Files Are Available 18-18
Allocating Auxiliary Channels 18-19
Understanding the RMAN Duplication Operation 18-20
Specifying Options for the DUPLICATE Command 18-22
Using Additional DUPLICATE Command Options 18-23
Substitution Variables for SET NEWNAME 18-24
Quiz 18-25
Ora
cle
Uni
vers
ity a
nd E
rror :
You
are
not
a V
alid
Par
tner
use
onl
y
THES
E eK
IT M
ATER
IALS
AR
E FO
R Y
OU
R U
SE IN
TH
IS C
LASS
RO
OM
ON
LY.
CO
PYIN
G e
KIT
MAT
ERIA
LS F
RO
M T
HIS
CO
MPU
TER
IS S
TRIC
TLY
PRO
HIB
ITED

xiv
Summary 18-26
Practice Overview: Duplicating a Database 18-27
19 RMAN Troubleshooting and Tuning
Objectives 19-2
Interpreting RMAN Message Output 19-3
Using the DEBUG Option 19-4
Interpreting RMAN Error Stacks 19-5
Processing an RMAN Command 19-6
Troubleshooting with RMAN 19-7
Is There a Problem? 19-8
Diagnosing Performance Bottlenecks 19-9
Diagnosing Performance Bottlenecks: Read Phase 19-10
Is There a “Write” Problem? 19-11
Diagnosing Performance Bottlenecks: Write or Copy Phase 19-12
Using Dynamic Views to Diagnose RMAN Performance 19-13
Monitoring RMAN Job Progress 19-14
Identifying Backup and Restore Bottlenecks 19-16
Asynchronous I/O Bottlenecks 19-17
Synchronous I/O Bottlenecks 19-18
Tuning RMAN Backup Performance 19-19
Parallelization of Backup Sets 19-20
Setting LARGE_POOL_SIZE 19-22
RMAN Multiplexing 19-23
Restore and Recovery Performance: Best Practices 19-25
Quiz 19-26
Summary 19-27
No Practice 19-28
20 Workshop Overview
Objectives 20-2
Workshop Structure and Approach 20-3
Business Requirements for the Workshop Database 20-5
Diagnosing the Failures 20-6
Summary 20-7
A Your Learning
Overview A-2
Enterprise Manager Database Express Menus A-5
Request Handling in EM Express A-6
Oracle SQL Developer: Connections A-7
Ora
cle
Uni
vers
ity a
nd E
rror :
You
are
not
a V
alid
Par
tner
use
onl
y
THES
E eK
IT M
ATER
IALS
AR
E FO
R Y
OU
R U
SE IN
TH
IS C
LASS
RO
OM
ON
LY.
CO
PYIN
G e
KIT
MAT
ERIA
LS F
RO
M T
HIS
CO
MPU
TER
IS S
TRIC
TLY
PRO
HIB
ITED

xv
Oracle SQL Developer: DBA Actions A-8
Continuing Your Learning A-9
Further Information A-10
Suggested Oracle University ILT Courses A-11
B Using Enterprise Manager Cloud Control
Objectives B-2
Key Challenges for Administrators B-3
Enterprise Manager Cloud Control B-4
Cloud Control Components B-6
Components and Communication Flow B-7
Oracle Management Repository B-8
Controlling the Enterprise Manager Cloud Control Framework B-9
Starting the Enterprise Manager Cloud Control Framework B-10
Stopping the Enterprise Manager Cloud Control Framework B-11
Different Target Types B-12
Target Discovery B-13
Enterprise Manager Cloud Control B-14
User Interface B-15
Security: Overview B-16
Managing Securely with Credentials B-17
Distinguishing Credentials B-18
Quiz B-20
Practice Overview: Using Enterprise Manager Cloud Control B-21
C Cloud Computing
Cloud Based? C-2
Cloud Computing Explained C-3
Cloud Computing: Essential Characteristics C-7
Cloud Computing Service Models C-8
Cloud Computing Deployment Models C-10
Sharing the Benefits of Cloud Computing C-11
Why Implement a Cloud? C-13
Oracle’s Cloud Offerings C-15
Enterprise Manager Cloud Control 12c Clouds C-16
Cloud Management Life Cycle C-18
Quiz C-20
Ora
cle
Uni
vers
ity a
nd E
rror :
You
are
not
a V
alid
Par
tner
use
onl
y
THES
E eK
IT M
ATER
IALS
AR
E FO
R Y
OU
R U
SE IN
TH
IS C
LASS
RO
OM
ON
LY.
CO
PYIN
G e
KIT
MAT
ERIA
LS F
RO
M T
HIS
CO
MPU
TER
IS S
TRIC
TLY
PRO
HIB
ITED

Ora
cle
Uni
vers
ity a
nd E
rror :
You
are
not
a V
alid
Par
tner
use
onl
y
THES
E eK
IT M
ATER
IALS
AR
E FO
R Y
OU
R U
SE IN
TH
IS C
LASS
RO
OM
ON
LY.
CO
PYIN
G e
KIT
MAT
ERIA
LS F
RO
M T
HIS
CO
MPU
TER
IS S
TRIC
TLY
PRO
HIB
ITED

RMAN and Oracle Secure Backup
Copyright © 2015, Oracle and/or its affiliates. All rights reserved.
Ora
cle
Uni
vers
ity a
nd E
rror :
You
are
not
a V
alid
Par
tner
use
onl
y
THES
E eK
IT M
ATER
IALS
AR
E FO
R Y
OU
R U
SE IN
TH
IS C
LASS
RO
OM
ON
LY.
CO
PYIN
G e
KIT
MAT
ERIA
LS F
RO
M T
HIS
CO
MPU
TER
IS S
TRIC
TLY
PRO
HIB
ITED

Objectives
After completing this lesson, you should be able to:
• Identify Oracle Secure Backup components
• Describe RMAN and OSB integration
• Configure for RMAN tape backups and restores
• Perform RMAN backup to tape
• Perform database recovery from tape
• Manage tape backups
Note: Oracle Secure Backup and the Oracle database have different release numbers. OSB 10.4 is the correct version for Oracle Database 12c. For up-to-date information, check OTN.
Note that Oracle Secure Backup releases do not follow the same numbering as the database releases. So, Oracle Secure Backup 10.4 is the correct release for Oracle Database 12c.
• The product home page can be accessed via the Oracle Technology Network (OTN): http://www.oracle.com/technetwork/products/secure-backup/overview/index.html.
• Product documentation can be downloaded from OTN: http://www.oracle.com/technetwork/products/secure-backup/documentation/index.html.
Oracle Database 12c: Backup and Recovery Workshop 13 - 2
Copyright © 2015, Oracle and/or its affiliates. All rights reserved.
Ora
cle
Uni
vers
ity a
nd E
rror :
You
are
not
a V
alid
Par
tner
use
onl
y
THES
E eK
IT M
ATER
IALS
AR
E FO
R Y
OU
R U
SE IN
TH
IS C
LASS
RO
OM
ON
LY.
CO
PYIN
G e
KIT
MAT
ERIA
LS F
RO
M T
HIS
CO
MPU
TER
IS S
TRIC
TLY
PRO
HIB
ITED

Oracle Secure Backup: Overview
Components or host roles:
• Administrative server – Maintains configuration
settings and backup history catalog
• Media server – Transfers data to or from
attached devices
• Client– Contains data to be
backed up, such as: — Oracle database
— File system
Administrativeserver
Client
NETWORK
OSB catalog
Mediaserver
Data to backup
AdministrativeDomain
Storage device
An administrative domain is a group of machines on your network that you manage as a common unit to perform backup and restore operations. An administrative domain has one administrative server, one or more clients, and one or more media servers.
• The administrative server is a machine in your administrative domain that contains a full installation of the Oracle Secure Backup software. This host maintains the backup catalog files and other files for configuration settings and administrative data. The administrative server runs the scheduler, which starts and monitors jobs within the administrative domain. You need one administrative server for each administrative domain at your site. To configure an administrative server, choose an administrative server installation when installing Oracle Secure Backup on the host.
• A media server is a machine that has one or more secondary storage devices, such as a tape library, connected to it. A media server transfers data to and from its attached storage devices. During installation, you can configure multiple secondary storage devices on media servers.
• A client is a machine whose locally accessed data is backed up by Oracle Secure Backup. The data can be one or more Oracle databases or file systems.
Oracle Database 12c: Backup and Recovery Workshop 13 - 3
Copyright © 2015, Oracle and/or its affiliates. All rights reserved.
Ora
cle
Uni
vers
ity a
nd E
rror :
You
are
not
a V
alid
Par
tner
use
onl
y
THES
E eK
IT M
ATER
IALS
AR
E FO
R Y
OU
R U
SE IN
TH
IS C
LASS
RO
OM
ON
LY.
CO
PYIN
G e
KIT
MAT
ERIA
LS F
RO
M T
HIS
CO
MPU
TER
IS S
TRIC
TLY
PRO
HIB
ITED

Oracle Secure Backup Interface Options
Oracle Secure Backup
Database operations File-system operations
RMAN
Web toolEM
SBTobtool
As shown in the slide, you can access Oracle Secure Backup in four different ways depending on what you want to do:
• Enterprise Manager provides a graphical interface for database tape backup and restore operations through integration with RMAN. It includes a link to the Oracle Secure Backup web tool for performing file-system backup and restore operations.
• Use RMAN to back up your databases directly to tape. RMAN can be accessed either through the RMAN command-line client or through the graphical Enterprise Manager. RMAN communicates with Oracle Secure Backup through the system backup to tape(SBT) interface.
• The web tool is a GUI application for OSB-related tasks. It enables you to configure administrative domains, manage operations, browse the backup catalog, and back up and restore data. It provides a graphical and interactive interface to access the obtoolutility. You should use this interface when making backups of file-system data.
• The obtool utility provides a command-line interface to Oracle Secure Backup.
Oracle Database 12c: Backup and Recovery Workshop 13 - 4
Copyright © 2015, Oracle and/or its affiliates. All rights reserved.
Ora
cle
Uni
vers
ity a
nd E
rror :
You
are
not
a V
alid
Par
tner
use
onl
y
THES
E eK
IT M
ATER
IALS
AR
E FO
R Y
OU
R U
SE IN
TH
IS C
LASS
RO
OM
ON
LY.
CO
PYIN
G e
KIT
MAT
ERIA
LS F
RO
M T
HIS
CO
MPU
TER
IS S
TRIC
TLY
PRO
HIB
ITED

Managing Data to Be Protected
Oracle database File-system data
Defining what data to back up
RMAN backup sets User-defined datasets: based on hosts, files, or directories
Backup options Use RMAN backup levels: full and incremental
Multilevel backups: full, incremental, or off-site
Frequency of backups Recurring or on-demand backups
Recurring or on-demand backups
Managing the backup infrastructure of file-system data and Oracle database data is easily administered with Oracle Secure Backup and RMAN. Defining what data to back up is conceptually similar for file-system and database data. Both require that you define what to include in the backup.
• For the database, you use the RMAN backup sets.
• When backing up file-system data, OSB uses the “dataset” definition, which describes the actual data from the file system, which is being backed up. You can use either the web tool or the obtool utility to define the dataset for Oracle Secure Backup.
After defining what data to back up, you must determine what type of backup is most appropriate to meet your backup and restore requirements. For the Oracle database, RMAN offers full and incremental backup levels that are backed up to tape by Oracle Secure Backup.
For file-system backups, OSB offers multiple levels including full backup, multiple incremental, and an off-site backup. The off-site level is a full backup performed without interfering with any incremental backup strategies.
Schedule your database backups through RMAN or EM and your file-system backups through Oracle Secure Backup.
After you have defined what, how, and how often to back up your data through scheduling, Oracle Secure Backup can automatically implement your backup schedules, only requiring manual intervention for hardware errors or media needs.
Oracle Database 12c: Backup and Recovery Workshop 13 - 5
Copyright © 2015, Oracle and/or its affiliates. All rights reserved.
Ora
cle
Uni
vers
ity a
nd E
rror :
You
are
not
a V
alid
Par
tner
use
onl
y
THES
E eK
IT M
ATER
IALS
AR
E FO
R Y
OU
R U
SE IN
TH
IS C
LASS
RO
OM
ON
LY.
CO
PYIN
G e
KIT
MAT
ERIA
LS F
RO
M T
HIS
CO
MPU
TER
IS S
TRIC
TLY
PRO
HIB
ITED

Backup Pieces and Backup Images
Use RMAN for the management of RMAN backup pieces.
Oracledatabase
files
RMAN backup set
RMANbackuppiece
RMANbackuppiece
…
Backupimage
Backupimage
Oracle Secure Backup images
The backup of an Oracle database, created by RMAN, results in a backup set (an RMAN-specific logical structure), which contains at least one backup piece (an RMAN-specific physical file containing the backed-up data).
Oracle Secure Backup backs up and maintains backup metadata for each RMAN backup piece written to tape within its own catalog. You can browse backup pieces with the obtoolcommand-line or Oracle Secure Backup web tool.
Note: The best practice is for backup pieces to be updated through RMAN, not manually by the use of Oracle Secure Backup.
If you manage the backup pieces stored on tape by using Oracle Secure Backup utilities instead of RMAN, the Oracle Secure Backup catalog and the RMAN repository can become unsynchronized. If that were to happen, use the RMAN CROSSCHECK command before you take additional corrective actions.
Oracle Database 12c: Backup and Recovery Workshop 13 - 6
Copyright © 2015, Oracle and/or its affiliates. All rights reserved.
Ora
cle
Uni
vers
ity a
nd E
rror :
You
are
not
a V
alid
Par
tner
use
onl
y
THES
E eK
IT M
ATER
IALS
AR
E FO
R Y
OU
R U
SE IN
TH
IS C
LASS
RO
OM
ON
LY.
CO
PYIN
G e
KIT
MAT
ERIA
LS F
RO
M T
HIS
CO
MPU
TER
IS S
TRIC
TLY
PRO
HIB
ITED

Volume
Volume set
Media family
Library
Media family. . .
Volume Volume
Volume Volume Volume
OS RMAN OSB
Data file 3
Data file 4
File-systemfile
Backuppiece
Backuppiece
Imagecopy
Backupimage
Backupimage
Backupimage
Backupimage
BACKUP ASBACKUPSET
BACKUPAS COPY
Backup set
(filesperset 3)
Data file 2
Data file 1
RMAN and Oracle Secure Backup: Overview
Backupimagesection
Backupimagesection
Backupimagesection
Backupimagesection
Backupimagesection
Backupimagesection
This slide provides an overview over RMAN and OSB components. On the left side it shows data files on the OS level, how they relate to RMAN image copies and backup pieces, and how these relate to OSB backup images. File-system files, which of course do not have an RMAN equivalent, relate directly to OSB backup images.
The right side depicts that OSB backup images are stored as backup image section on a volume, within a volume set, which belongs to a media family in a tape library.
Oracle Database 12c: Backup and Recovery Workshop 13 - 7
Copyright © 2015, Oracle and/or its affiliates. All rights reserved.
Ora
cle
Uni
vers
ity a
nd E
rror :
You
are
not
a V
alid
Par
tner
use
onl
y
THES
E eK
IT M
ATER
IALS
AR
E FO
R Y
OU
R U
SE IN
TH
IS C
LASS
RO
OM
ON
LY.
CO
PYIN
G e
KIT
MAT
ERIA
LS F
RO
M T
HIS
CO
MPU
TER
IS S
TRIC
TLY
PRO
HIB
ITED

RMAN and Oracle Secure BackupBasic Process Flow
OSB client:Database server
Administrative server
Media serverData beingbacked up
4
3
1RMAN
EM
2
5
1. RMAN initiates backup and passes the database backup storage selector to OSB. If RMAN is started from the Enterprise Manager (EM) interface, you must configure the administrative server in EM (a one-time task).
2. Oracle Secure Backup creates the backup job. Typically, the OS namespace associated with the Oracle Secure Backup user of the current session is used.
3. Oracle Secure Backup executes the job (transfers data from client to media).
4. Oracle Secure Backup updates its own catalog.
5. RMAN updates its repository.
The following pages explain the basic flow and relevant parts in more detail.
Oracle Database 12c: Backup and Recovery Workshop 13 - 8
Copyright © 2015, Oracle and/or its affiliates. All rights reserved.
Ora
cle
Uni
vers
ity a
nd E
rror :
You
are
not
a V
alid
Par
tner
use
onl
y
THES
E eK
IT M
ATER
IALS
AR
E FO
R Y
OU
R U
SE IN
TH
IS C
LASS
RO
OM
ON
LY.
CO
PYIN
G e
KIT
MAT
ERIA
LS F
RO
M T
HIS
CO
MPU
TER
IS S
TRIC
TLY
PRO
HIB
ITED

Quiz
The best way to manage Oracle backup pieces (database data) on tape when your configuration includes Oracle Secure Backup (OSB) is with:
a. OSB
b. RMAN
c. OSB or RMAN
d. RMAN or SQL
Answer: b
Oracle Database 12c: Backup and Recovery Workshop 13 - 9
Copyright © 2015, Oracle and/or its affiliates. All rights reserved.
Ora
cle
Uni
vers
ity a
nd E
rror :
You
are
not
a V
alid
Par
tner
use
onl
y
THES
E eK
IT M
ATER
IALS
AR
E FO
R Y
OU
R U
SE IN
TH
IS C
LASS
RO
OM
ON
LY.
CO
PYIN
G e
KIT
MAT
ERIA
LS F
RO
M T
HIS
CO
MPU
TER
IS S
TRIC
TLY
PRO
HIB
ITED

Starting with Oracle Secure Backup
Set up tasks:
• Install Oracle Secure Backup software.
• Define host roles for administrative server, media server(s), and clients (done as part of the installation).
• Determine your security requirements and configure accordingly, for example, set up preauthorization for RMAN and OSB interactions.
• Define database backup storage selector at least for database name or ID, host unique name, and content type.
• Determine and define retention:– Content-managed RMAN retention
– Time-managed file system OSB retention
This slide provides an overview of the initial setup tasks, discussed on the following pages. The tasks are executed by a high-privileged user.
You should determine the host roles before beginning an installation because you can use the OSB installation process for the initial host role configuration.
Oracle Database 12c: Backup and Recovery Workshop 13 - 10
Copyright © 2015, Oracle and/or its affiliates. All rights reserved.
Ora
cle
Uni
vers
ity a
nd E
rror :
You
are
not
a V
alid
Par
tner
use
onl
y
THES
E eK
IT M
ATER
IALS
AR
E FO
R Y
OU
R U
SE IN
TH
IS C
LASS
RO
OM
ON
LY.
CO
PYIN
G e
KIT
MAT
ERIA
LS F
RO
M T
HIS
CO
MPU
TER
IS S
TRIC
TLY
PRO
HIB
ITED

Performing Installation Tasks
1. Log in as the root user.
2. Create an Oracle Secure Backup home directory.3. Change your directory to the <OSB_Home> directory.
4. Run the setup program from your <OSB_Home> directory and respond to the prompts.
[stage] $ su - root Password: oracle [[** not displayed **]][stage]# mkdir -p /usr/local/oracle/backup[stage]# cd /usr/local/oracle/backup[backup]# /stage/osb_installmedia/setup
The recommended directory for installing the Oracle Secure Backup software is /usr/local/oracle/backup. This lesson refers to it as OSB_Home.
Note: There is no default OSB_Home environment variable, which is used to refer to this directory, unlike the ORACLE_HOME variable used with Oracle Database installations.
After your OSB_Home directory is created, change your current directory to the OSB_Homedirectory, and execute the setup program from your staging area, which in this training example is the /stage/osb_installmedia directory.
Oracle Database 12c: Backup and Recovery Workshop 13 - 11
Copyright © 2015, Oracle and/or its affiliates. All rights reserved.
Ora
cle
Uni
vers
ity a
nd E
rror :
You
are
not
a V
alid
Par
tner
use
onl
y
THES
E eK
IT M
ATER
IALS
AR
E FO
R Y
OU
R U
SE IN
TH
IS C
LASS
RO
OM
ON
LY.
CO
PYIN
G e
KIT
MAT
ERIA
LS F
RO
M T
HIS
CO
MPU
TER
IS S
TRIC
TLY
PRO
HIB
ITED

Verifying Your Installation
Some examples:
• View Oracle Secure Backup processes in Linux:
• Use obtool commands to view Oracle Secure Backup users and default media family:
$ ps -e | grep ob
$ obtoolob> lsuserob> lsmf --long
The installation process creates default objects. In the slide are some examples of how you can verify your installation with obtool commands:
ob> lsuser
admin admin
oracle oracle
ob> lsmf --long
OSB-CATALOG-MF:
Write window: 7 days
Keep volume set: 14 days
Appendable: yes
Volume ID used: unique to this media family
Comment: OSB catalog backup media family
RMAN-DEFAULT:
Keep volume set: content manages reuse
Appendable: yes
Volume ID used: unique to this media family
Comment: Default RMAN backup media family
ob> logout
Oracle Database 12c: Backup and Recovery Workshop 13 - 12
Copyright © 2015, Oracle and/or its affiliates. All rights reserved.
Ora
cle
Uni
vers
ity a
nd E
rror :
You
are
not
a V
alid
Par
tner
use
onl
y
THES
E eK
IT M
ATER
IALS
AR
E FO
R Y
OU
R U
SE IN
TH
IS C
LASS
RO
OM
ON
LY.
CO
PYIN
G e
KIT
MAT
ERIA
LS F
RO
M T
HIS
CO
MPU
TER
IS S
TRIC
TLY
PRO
HIB
ITED

Securing Data and Access to the Backup Domain
• User-level access control– Users assigned to a set of privileges, called classes
– Consistent user identity mapping OS privileges to Oracle Secure Backup user, called preauthorized access
• Host authentication– Two-way server authentication
• Encryption– Oracle Secure Backup encryption for data in transport and
on tape
– For database backups: choice of RMAN or OSB encryption
– For file-system backups: OSB encryption
• To access the Oracle Secure Backup software, you must enter a username and password or use preauthorization. Each Oracle Secure Backup user is assigned to a class, which defines the actions that are permitted for that user.
• All hosts in the administrative domain use SSL and X.509 certificates for identity verification and authentication. Sensitive data is encrypted before transmittal over the network. The web server requires a signed X.509 certificate and associated public and private keys to establish an SSL connection with a client browser. The X.509 certificate for the web server is self-signed by the installation script when you install OSB on the administrative server.
Note: Currently, the Network Data Management Protocol (NDMP) does not include a mechanism to accommodate the negotiation of an SSL connection to NDMP filers.
• For your database backups, you have a choice of RMAN and OSB encryption. For your file-system backups, use OSB encryption. Your choices for database encryption:
- RMAN backup encryption, which encrypts data within the database
- Oracle Secure Backup encryption, which encrypts data after RMAN has passed the data through the SBT to Oracle Secure Backup
Oracle Database 12c: Backup and Recovery Workshop 13 - 13
Copyright © 2015, Oracle and/or its affiliates. All rights reserved.
Ora
cle
Uni
vers
ity a
nd E
rror :
You
are
not
a V
alid
Par
tner
use
onl
y
THES
E eK
IT M
ATER
IALS
AR
E FO
R Y
OU
R U
SE IN
TH
IS C
LASS
RO
OM
ON
LY.
CO
PYIN
G e
KIT
MAT
ERIA
LS F
RO
M T
HIS
CO
MPU
TER
IS S
TRIC
TLY
PRO
HIB
ITED

Preauthorization
run { …allocate channel oem_sbt_backup1 type 'SBT_TAPE' format '%U';…}
RMAN script:
Preauthorized users do not log in explicitly.
Oracle Secure Backup verifies:
• RMAN preauthorization
• Matching OS and database identity
• Backup and/or restore class rights
You can preauthorize Oracle Secure Backup users for the use of the obtool command line (cmdline), rman, or both.
Preauthorization for file-system backups is primarily used to avoid logging in to Oracle Secure Backup when running custom scripts. Without cmdline preauthorization, the script would fail, because access to Oracle Secure Backup is not granted without user login.
RMAN preauthorization is required to successfully back up or restore the Oracle database. Oracle database backups are invoked from RMAN or Enterprise Manager. When Oracle Secure Backup receives communication from RMAN (through sbt), Oracle Secure Backup verifies that an OSB user meets the following requirements:
1. RMAN preauthorization on that host
2. Matching the OS user identity of the Oracle instance associated with the database (which is, for example, oracle)
3. Assignment to a class with rights to back up or restore Oracle database, OSB class:
- access Oracle backups (set to owner, class, or all)
- perform Oracle backups and restores
If these three criteria are not successfully met, Oracle Secure Backup does not perform the RMAN backup or restore requests.
Oracle Database 12c: Backup and Recovery Workshop 13 - 14
Copyright © 2015, Oracle and/or its affiliates. All rights reserved.
Ora
cle
Uni
vers
ity a
nd E
rror :
You
are
not
a V
alid
Par
tner
use
onl
y
THES
E eK
IT M
ATER
IALS
AR
E FO
R Y
OU
R U
SE IN
TH
IS C
LASS
RO
OM
ON
LY.
CO
PYIN
G e
KIT
MAT
ERIA
LS F
RO
M T
HIS
CO
MPU
TER
IS S
TRIC
TLY
PRO
HIB
ITED

Defining Retention for RMAN Backups
• Achieving retention policy with both disk and tape backups• Defining an RMAN RECOVERY WINDOW retention policy
• Using the RMAN DELETE OBSOLETE command:
– Deleting obsolete files on disk
– Notifying Oracle Secure Backup of backup pieces that are no longer needed
• Defining content-managed media families for RMAN and Oracle Secure Backup (recommendation)
NowFile1File2
Seven-day retentionRMAN recovery window
By defining retention periods within RMAN, a combination of disk and tape backups is used to meet your recovery requirements. When using the fast recovery area and Oracle Secure Backup, the recommended RMAN retention policy is the user-defined RECOVERY WINDOWoption. This means that you define a period of time within which point-in-time recovery must be possible. When defining this recovery window, also consider the following:
• Base retention of recovery needs
• Size the fast recovery area based on desired disk recovery capability
• Scheduling of disk and tape backups (frequency and scope)
If your recovery plan allows for restoration from disk for a certain number of hours each day, the fast recovery area should be of sufficient size to hold the recovery-related files for this time period. The length of time in which backups remain in the fast recovery area is determined by the amount of available disk space, not by a specific time setting.
Sample obtool command to create a media family for RMAN backups:
ob> mkmf --vidunique --writewindow forever content-man-family
Oracle Database 12c: Backup and Recovery Workshop 13 - 15
Copyright © 2015, Oracle and/or its affiliates. All rights reserved.
Ora
cle
Uni
vers
ity a
nd E
rror :
You
are
not
a V
alid
Par
tner
use
onl
y
THES
E eK
IT M
ATER
IALS
AR
E FO
R Y
OU
R U
SE IN
TH
IS C
LASS
RO
OM
ON
LY.
CO
PYIN
G e
KIT
MAT
ERIA
LS F
RO
M T
HIS
CO
MPU
TER
IS S
TRIC
TLY
PRO
HIB
ITED

Media Management Expiration Policiesfor Automated Tape Recycling
Volume setcreation
Write window Retention duration
Volume setclosed
Updates allowed Updates forbidden
Recycling time-managed volumesOSB Ready for reuse:The day after volume expiration
Backupimage
Volume set
Media family
Library
Backupimagesection
Volume
Backupimagesection
Volume
Backupimagesection
Volume
OS OSB
File-systemfile
For file-system backups, not for RMAN
Oracle Secure Backup automates tape recycling, reusing tapes after the backups or volumes have expired, depending on their user-defined recycling method.
Time-managed expiration policies: The expiration time is associated at the volume level for time-managed media families. When the volume expiration date is reached, the volume becomes eligible to be overwritten. Each volume in a volume set will have an expiration date,which is determined as follows:
• The user-defined Write window determines how long the tape may be appended to after the first tape write event (optional).
• The user-defined retention time determines how long the volume must be retained after the Write window has closed or after the first tape write event, if a Write window is not defined. If a Write window is not defined, the volume will be appended to, until it is full.
• The expiration time is the Write window time plus the retention time.
In short, time-managed volumes for file-system backups have a user-defined expiration period associated with the volume, not content of volume. (This policy is not for RMAN.)
Oracle Database 12c: Backup and Recovery Workshop 13 - 16
Copyright © 2015, Oracle and/or its affiliates. All rights reserved.
Ora
cle
Uni
vers
ity a
nd E
rror :
You
are
not
a V
alid
Par
tner
use
onl
y
THES
E eK
IT M
ATER
IALS
AR
E FO
R Y
OU
R U
SE IN
TH
IS C
LASS
RO
OM
ON
LY.
CO
PYIN
G e
KIT
MAT
ERIA
LS F
RO
M T
HIS
CO
MPU
TER
IS S
TRIC
TLY
PRO
HIB
ITED
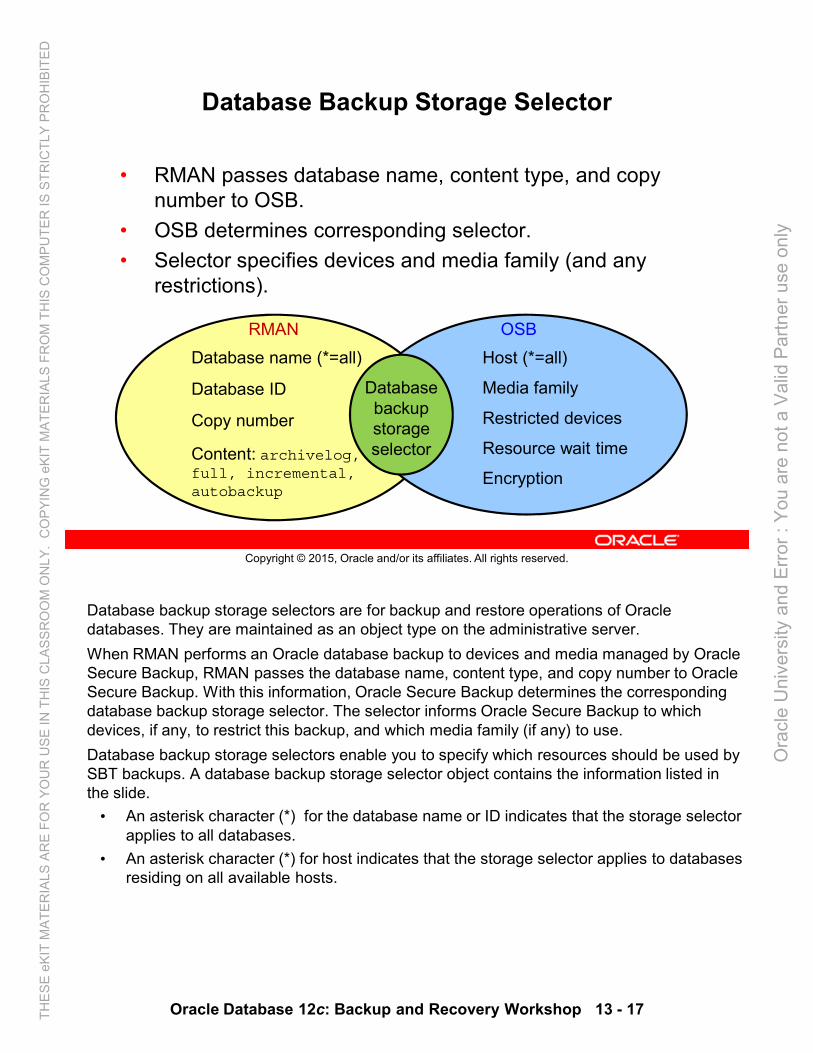
Database Backup Storage Selector
• RMAN passes database name, content type, and copy number to OSB.
• OSB determines corresponding selector.
• Selector specifies devices and media family (and any restrictions).
Databasebackupstorageselector
Database name (*=all)
Database ID
Copy number
Content: archivelog,full, incremental, autobackup
Host (*=all)
Media family
Restricted devices
Resource wait time
Encryption
RMAN OSB
Database backup storage selectors are for backup and restore operations of Oracle databases. They are maintained as an object type on the administrative server.
When RMAN performs an Oracle database backup to devices and media managed by Oracle Secure Backup, RMAN passes the database name, content type, and copy number to Oracle Secure Backup. With this information, Oracle Secure Backup determines the corresponding database backup storage selector. The selector informs Oracle Secure Backup to whichdevices, if any, to restrict this backup, and which media family (if any) to use.
Database backup storage selectors enable you to specify which resources should be used by SBT backups. A database backup storage selector object contains the information listed in the slide.
• An asterisk character (*) for the database name or ID indicates that the storage selector applies to all databases.
• An asterisk character (*) for host indicates that the storage selector applies to databases residing on all available hosts.
Oracle Database 12c: Backup and Recovery Workshop 13 - 17
Copyright © 2015, Oracle and/or its affiliates. All rights reserved.
Ora
cle
Uni
vers
ity a
nd E
rror :
You
are
not
a V
alid
Par
tner
use
onl
y
THES
E eK
IT M
ATER
IALS
AR
E FO
R Y
OU
R U
SE IN
TH
IS C
LASS
RO
OM
ON
LY.
CO
PYIN
G e
KIT
MAT
ERIA
LS F
RO
M T
HIS
CO
MPU
TER
IS S
TRIC
TLY
PRO
HIB
ITED

Setting Media Management Parameters in RMAN
Using the ENV parameter of the parms option:
• OB_MEDIA_FAMILY[_n] for media to be used
• OB_DEVICE[_n] for tape drives
• OB_RESOURCE_WAIT_TIME for resource availability
• OB_ENCRYPTION for OSB encryption
• OB_RESTORE_DEVICE for restore operation
• OB_IGNORE_NUMA for non-uniform memory access (NUMA)
run {
allocate channel c1 device type sbt parms 'ENV=(OB_MEDIA_FAMILY=my_mf)';
backup database include current controlfile;
backup archivelog all not backed up;
}
If you use Oracle Secure Backup database storage selectors, you are not required to set media management parameters in RMAN. In some circumstances, however, you might want to override the database storage selectors by setting RMAN parameters.
You can specify media management parameters with:
• Environment variables, which are specified with the ENV parameter of the PARMS option on the CONFIGURE or ALLOCATE CHANNEL commands
• The RMAN SEND command
You can use the OSB parameters listed in the slide in RMAN backup and restore jobs.
The OB_IGNORE_NUMA parameter (new to OSB 10.4) controls NUMA-awareness. Its default value is 1, thereby enabling NUMA.
Oracle Database 12c: Backup and Recovery Workshop 13 - 18
Copyright © 2015, Oracle and/or its affiliates. All rights reserved.
Ora
cle
Uni
vers
ity a
nd E
rror :
You
are
not
a V
alid
Par
tner
use
onl
y
THES
E eK
IT M
ATER
IALS
AR
E FO
R Y
OU
R U
SE IN
TH
IS C
LASS
RO
OM
ON
LY.
CO
PYIN
G e
KIT
MAT
ERIA
LS F
RO
M T
HIS
CO
MPU
TER
IS S
TRIC
TLY
PRO
HIB
ITED
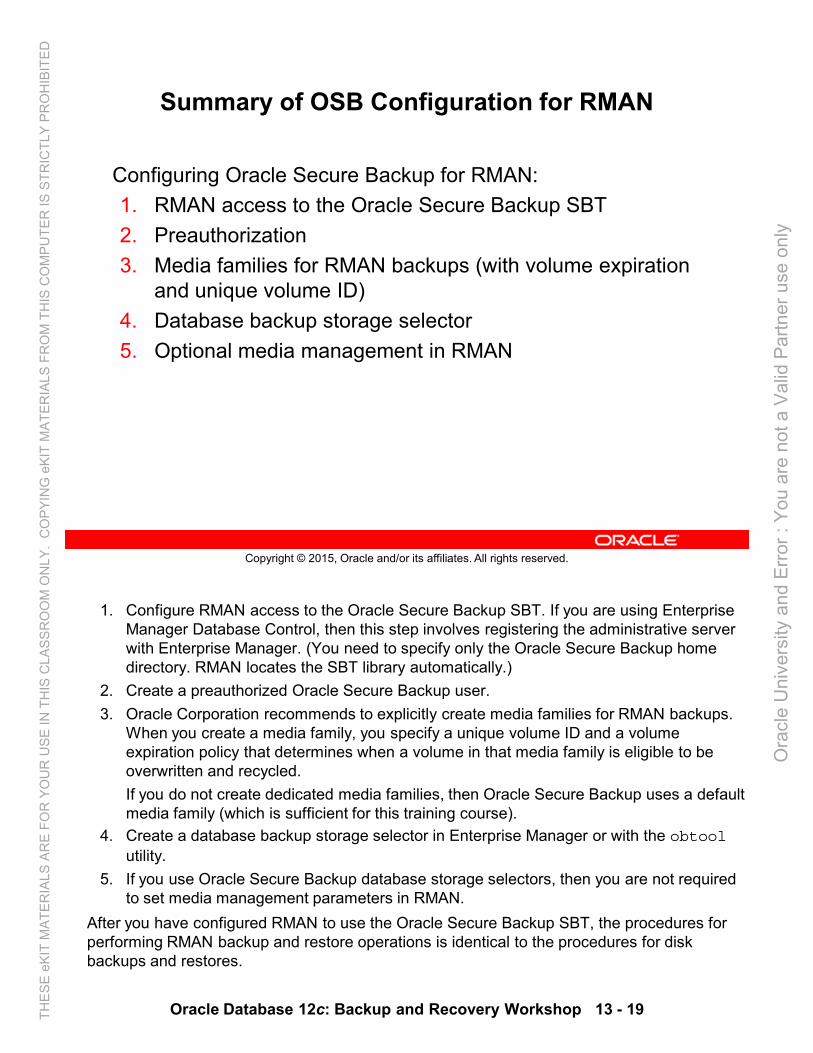
Summary of OSB Configuration for RMAN
Configuring Oracle Secure Backup for RMAN:
1. RMAN access to the Oracle Secure Backup SBT
2. Preauthorization
3. Media families for RMAN backups (with volume expiration and unique volume ID)
4. Database backup storage selector
5. Optional media management in RMAN
1. Configure RMAN access to the Oracle Secure Backup SBT. If you are using Enterprise Manager Database Control, then this step involves registering the administrative server with Enterprise Manager. (You need to specify only the Oracle Secure Backup home directory. RMAN locates the SBT library automatically.)
2. Create a preauthorized Oracle Secure Backup user.
3. Oracle Corporation recommends to explicitly create media families for RMAN backups. When you create a media family, you specify a unique volume ID and a volume expiration policy that determines when a volume in that media family is eligible to be overwritten and recycled.
If you do not create dedicated media families, then Oracle Secure Backup uses a default media family (which is sufficient for this training course).
4. Create a database backup storage selector in Enterprise Manager or with the obtoolutility.
5. If you use Oracle Secure Backup database storage selectors, then you are not required to set media management parameters in RMAN.
After you have configured RMAN to use the Oracle Secure Backup SBT, the procedures for performing RMAN backup and restore operations is identical to the procedures for disk backups and restores.
Oracle Database 12c: Backup and Recovery Workshop 13 - 19
Copyright © 2015, Oracle and/or its affiliates. All rights reserved.
Ora
cle
Uni
vers
ity a
nd E
rror :
You
are
not
a V
alid
Par
tner
use
onl
y
THES
E eK
IT M
ATER
IALS
AR
E FO
R Y
OU
R U
SE IN
TH
IS C
LASS
RO
OM
ON
LY.
CO
PYIN
G e
KIT
MAT
ERIA
LS F
RO
M T
HIS
CO
MPU
TER
IS S
TRIC
TLY
PRO
HIB
ITED

Backing Up the Fast Recovery Area to Tape
• One simple RMAN command: RMAN> BACKUP DEVICE TYPE SBT RECOVERY AREA;
• Advantages of using the fast recovery area to tape:– Performing optimized backups to tape
– First restoring from fast recovery area for maximum performance and then using tape (if needed)
– Reducing I/O on databases (separate disk group)
To back up the fast recovery area to tape with Oracle Secure Backup, you issue one RMAN command: BACKUP DEVICE TYPE SBT RECOVERY AREA. Using this disk-to-tape backup method (instead of performing a separate backup of the production database to tape) provides a few distinct advantages:
• Saves tape resources with optimized backups of the fast recovery area. It eliminates unnecessary backup of files, which are already on tape.
• Enables RMAN to use better restore intelligence, first from disk, then from tape, as needed. Otherwise, RMAN uses the most recent backup regardless of the storage media.
• Reduces I/O (important for production databases) because the fast recovery area uses a separate disk group
Oracle Database 12c: Backup and Recovery Workshop 13 - 20
Copyright © 2015, Oracle and/or its affiliates. All rights reserved.
Ora
cle
Uni
vers
ity a
nd E
rror :
You
are
not
a V
alid
Par
tner
use
onl
y
THES
E eK
IT M
ATER
IALS
AR
E FO
R Y
OU
R U
SE IN
TH
IS C
LASS
RO
OM
ON
LY.
CO
PYIN
G e
KIT
MAT
ERIA
LS F
RO
M T
HIS
CO
MPU
TER
IS S
TRIC
TLY
PRO
HIB
ITED

Oracle Secure Backup Jobs
Transcript: Job details
Job
ID
Type
Backup
Restore
Job summaries: Text files for file-system operations
Log: High-level events
Each backup and restore operation creates a corresponding job. Each job has a unique ID, log, and transcript (as shown in the graphic).
• Job logs describe high-level events, such as:
- Job creation
- Job dispatch
- Completion times
• Job transcripts describe the job details, such as:
- Created at the time of dispatch
- Updated as the job progresses
- Input requests, such as “operator assistance required”
There are two different job types:
• Dataset jobs for file-system backup or restore operations
• Oracle backup jobs for database backup or restore operations
A job summary is a text file report produced by Oracle Secure Backup that describes the status of selected file-system backup and restore jobs. Job summaries may be generated on a regular, repeating basis and sent via email to users.
Oracle Database 12c: Backup and Recovery Workshop 13 - 21
Copyright © 2015, Oracle and/or its affiliates. All rights reserved.
Ora
cle
Uni
vers
ity a
nd E
rror :
You
are
not
a V
alid
Par
tner
use
onl
y
THES
E eK
IT M
ATER
IALS
AR
E FO
R Y
OU
R U
SE IN
TH
IS C
LASS
RO
OM
ON
LY.
CO
PYIN
G e
KIT
MAT
ERIA
LS F
RO
M T
HIS
CO
MPU
TER
IS S
TRIC
TLY
PRO
HIB
ITED

Displaying Log Files and Transcripts
DIAGNOSTIC_DEST=<ADR base>- <ADR home>
- /trace/sbtio.log
admin/log/scheduler/log
Media Manager (third-party or Oracle)
Oracle Secure Backup(<OSB_Home> directory)
If an error occurs during an SBT session, Oracle Secure Backup tries to send the error description to the administrative server to be saved in the job transcript. RMAN records the error in the trace file named sbtio.log, unless the user has configured a different file to be used by RMAN. The initialization parameter DIAGNOSTIC_DEST specifies the location of the ADR base, which is the directory that contains one or more ADR homes. By default, the sbtio.log file is in the trace subdirectory.
All SBT errors contain the following information:
• The location (function) where the failure occurred (for example, sbtbackup)
• The operation that was being performed (for example, “creating a backup piece”)
• A brief description of the problem (for example, “unable to contact admin server”)
• If applicable, a brief description of the remedy that the user may apply
• If applicable, the name of the trace or debug file where additional information about the problem can be found
You can get more trace information by using the TRACE option of the ALLOCATE CHANNELcommand. For example: ALLOCATE CHANNEL c1 TYPE sbt TRACE 5 …
Trace levels range from 0 (errors only) to 6 (verbose debugging).
Oracle Database 12c: Backup and Recovery Workshop 13 - 22
Copyright © 2015, Oracle and/or its affiliates. All rights reserved.
Ora
cle
Uni
vers
ity a
nd E
rror :
You
are
not
a V
alid
Par
tner
use
onl
y
THES
E eK
IT M
ATER
IALS
AR
E FO
R Y
OU
R U
SE IN
TH
IS C
LASS
RO
OM
ON
LY.
CO
PYIN
G e
KIT
MAT
ERIA
LS F
RO
M T
HIS
CO
MPU
TER
IS S
TRIC
TLY
PRO
HIB
ITED

Common obtool Commands
Category obtool Command
Hosts lshost -l
Devices lsdev
Storage selectors lsssel
User info id, lsuser, lsclass
Jobs and schedules lsjob (-a | -c | -p)lsbw (backup windows)lssched
Backups lsds (for dataset information)lspiece (for RMAN backup pieces)lsbackup (for file-system backups)lssection (for backup image sections)
Media families lsmf --long
Volumes lsvol --all or lsvol --library <libname>
The slide lists some of the common obtool commands that you can use to query the Oracle Secure Backup administrative and catalog data. Depending on the information you want to retrieve, you may use additional options to specify the amount of information returned, such as listing all the volumes for a particular media family or listing only completed jobs.
For details of all command options, see the Oracle Secure Backup Reference.
These commands can assist you with troubleshooting your OSB installation and configuration. For example, the lshost command shows the current roles of a host. If you want to add a device to your OSB domain, the host must have the mediaserver role, which is not installed by default.
Oracle Database 12c: Backup and Recovery Workshop 13 - 23
Copyright © 2015, Oracle and/or its affiliates. All rights reserved.
Ora
cle
Uni
vers
ity a
nd E
rror :
You
are
not
a V
alid
Par
tner
use
onl
y
THES
E eK
IT M
ATER
IALS
AR
E FO
R Y
OU
R U
SE IN
TH
IS C
LASS
RO
OM
ON
LY.
CO
PYIN
G e
KIT
MAT
ERIA
LS F
RO
M T
HIS
CO
MPU
TER
IS S
TRIC
TLY
PRO
HIB
ITED

Quiz
Which are the parameters that RMAN passes via a database storage selector to OSB?
a. Database name or ID
b. Copy number
c. Host unique name
d. Content type
Answer: a, b, d
Oracle Database 12c: Backup and Recovery Workshop 13 - 24
Copyright © 2015, Oracle and/or its affiliates. All rights reserved.
Ora
cle
Uni
vers
ity a
nd E
rror :
You
are
not
a V
alid
Par
tner
use
onl
y
THES
E eK
IT M
ATER
IALS
AR
E FO
R Y
OU
R U
SE IN
TH
IS C
LASS
RO
OM
ON
LY.
CO
PYIN
G e
KIT
MAT
ERIA
LS F
RO
M T
HIS
CO
MPU
TER
IS S
TRIC
TLY
PRO
HIB
ITED

Quiz
Which types of content may be associated with a storage selector?
a. Archivelog
b. Tablespace
c. Datafile
d. Autobackup
e. Incremental
Answer: a, d, e
Oracle Database 12c: Backup and Recovery Workshop 13 - 25
Copyright © 2015, Oracle and/or its affiliates. All rights reserved.
Ora
cle
Uni
vers
ity a
nd E
rror :
You
are
not
a V
alid
Par
tner
use
onl
y
THES
E eK
IT M
ATER
IALS
AR
E FO
R Y
OU
R U
SE IN
TH
IS C
LASS
RO
OM
ON
LY.
CO
PYIN
G e
KIT
MAT
ERIA
LS F
RO
M T
HIS
CO
MPU
TER
IS S
TRIC
TLY
PRO
HIB
ITED

Quiz
The recommended retention policy for RMAN backups with OSB is:
a. RMAN recovery window
b. OSB management of time-based retention
Answer: a
Oracle Database 12c: Backup and Recovery Workshop 13 - 26
Copyright © 2015, Oracle and/or its affiliates. All rights reserved.
Ora
cle
Uni
vers
ity a
nd E
rror :
You
are
not
a V
alid
Par
tner
use
onl
y
THES
E eK
IT M
ATER
IALS
AR
E FO
R Y
OU
R U
SE IN
TH
IS C
LASS
RO
OM
ON
LY.
CO
PYIN
G e
KIT
MAT
ERIA
LS F
RO
M T
HIS
CO
MPU
TER
IS S
TRIC
TLY
PRO
HIB
ITED

Quiz
Where can RMAN record the errors returned from OSB over the SBT interface: a. To $ORACLE_HOME/trace/sbtio.log by default
b. To /usr/local/oracle/sbtio.log by default
c. To another location specified by the DBAd. To $ORACLE_HOME/rdbms/log/sbtio.log by default
Answer: c, d
Oracle Database 12c: Backup and Recovery Workshop 13 - 27
Copyright © 2015, Oracle and/or its affiliates. All rights reserved.
Ora
cle
Uni
vers
ity a
nd E
rror :
You
are
not
a V
alid
Par
tner
use
onl
y
THES
E eK
IT M
ATER
IALS
AR
E FO
R Y
OU
R U
SE IN
TH
IS C
LASS
RO
OM
ON
LY.
CO
PYIN
G e
KIT
MAT
ERIA
LS F
RO
M T
HIS
CO
MPU
TER
IS S
TRIC
TLY
PRO
HIB
ITED

Summary
In this lesson, you should have learned how to:
• Identify Oracle Secure Backup components
• Describe RMAN and OSB integration
• Configure for RMAN tape backups and restores
• Perform RMAN backup to tape
• Perform database recovery from tape
• Manage tape backups
Oracle Database 12c: Backup and Recovery Workshop 13 - 28
Copyright © 2015, Oracle and/or its affiliates. All rights reserved.
Ora
cle
Uni
vers
ity a
nd E
rror :
You
are
not
a V
alid
Par
tner
use
onl
y
THES
E eK
IT M
ATER
IALS
AR
E FO
R Y
OU
R U
SE IN
TH
IS C
LASS
RO
OM
ON
LY.
CO
PYIN
G e
KIT
MAT
ERIA
LS F
RO
M T
HIS
CO
MPU
TER
IS S
TRIC
TLY
PRO
HIB
ITED

Practice Overview:Performing RMAN Tape Backup and Restore
This practice covers the following topics:
• Performing an RMAN backup to tape
• Restoring a data file from a tape backup
Oracle Database 12c: Backup and Recovery Workshop 13 - 29
Copyright © 2015, Oracle and/or its affiliates. All rights reserved.
Ora
cle
Uni
vers
ity a
nd E
rror :
You
are
not
a V
alid
Par
tner
use
onl
y
THES
E eK
IT M
ATER
IALS
AR
E FO
R Y
OU
R U
SE IN
TH
IS C
LASS
RO
OM
ON
LY.
CO
PYIN
G e
KIT
MAT
ERIA
LS F
RO
M T
HIS
CO
MPU
TER
IS S
TRIC
TLY
PRO
HIB
ITED

Ora
cle
Uni
vers
ity a
nd E
rror :
You
are
not
a V
alid
Par
tner
use
onl
y
THES
E eK
IT M
ATER
IALS
AR
E FO
R Y
OU
R U
SE IN
TH
IS C
LASS
RO
OM
ON
LY.
CO
PYIN
G e
KIT
MAT
ERIA
LS F
RO
M T
HIS
CO
MPU
TER
IS S
TRIC
TLY
PRO
HIB
ITED

Using Flashback Technologies
Copyright © 2015, Oracle and/or its affiliates. All rights reserved.
Ora
cle
Uni
vers
ity a
nd E
rror :
You
are
not
a V
alid
Par
tner
use
onl
y
THES
E eK
IT M
ATER
IALS
AR
E FO
R Y
OU
R U
SE IN
TH
IS C
LASS
RO
OM
ON
LY.
CO
PYIN
G e
KIT
MAT
ERIA
LS F
RO
M T
HIS
CO
MPU
TER
IS S
TRIC
TLY
PRO
HIB
ITED

Objectives
After completing this lesson, you should be able to:
• Understand how to use flashback technologies to protect against and recover from various types of errors
• Configure your database to use flashback technologies
• Perform flashback operations
• Distinguish temporal validity and temporal history
Oracle Database 12c: Backup and Recovery Workshop 14 - 2
Copyright © 2015, Oracle and/or its affiliates. All rights reserved.
Ora
cle
Uni
vers
ity a
nd E
rror :
You
are
not
a V
alid
Par
tner
use
onl
y
THES
E eK
IT M
ATER
IALS
AR
E FO
R Y
OU
R U
SE IN
TH
IS C
LASS
RO
OM
ON
LY.
CO
PYIN
G e
KIT
MAT
ERIA
LS F
RO
M T
HIS
CO
MPU
TER
IS S
TRIC
TLY
PRO
HIB
ITED

Flashback TechnologiesError Detection and Correction
• Flashback makes error recovery much easier by:– Enabling you to view data as of a past point in time
– “Rewinding” unwanted data changes
– Minimizing the time it takes to correct an error
• Flashback is easy to use and includes simple commands, with no complex procedures.
0
20
40
60
80
Re
cove
ry T
ime
Traditional RecoveryFlashback
Oracle Database Flashback technologies are a set of data recovery solutions that provide capabilities to correct human errors by selectively and efficiently undoing the effects of a mistake. Flashback technologies support recovery at all levels including row, transaction, table, and the entire database.
Oracle Database 12c: Backup and Recovery Workshop 14 - 3
Copyright © 2015, Oracle and/or its affiliates. All rights reserved.
Ora
cle
Uni
vers
ity a
nd E
rror :
You
are
not
a V
alid
Par
tner
use
onl
y
THES
E eK
IT M
ATER
IALS
AR
E FO
R Y
OU
R U
SE IN
TH
IS C
LASS
RO
OM
ON
LY.
CO
PYIN
G e
KIT
MAT
ERIA
LS F
RO
M T
HIS
CO
MPU
TER
IS S
TRIC
TLY
PRO
HIB
ITED

What You Already KnowAbout Transactions and Undo
Undo “old” datain undo tablespace
DML operations
Original data in
buffer cache
When a transaction starts, it is assigned to an undo segment. Throughout the life of the transaction, when data is changed, the original “old” values are copied into the undo segment. You can see which transactions are assigned to which undo segments by checking the V$TRANSACTION view.
Undo segments are specialized segments that are automatically created by the instance as needed to support transactions. Like all segments, undo segments are made up of extents, which, in turn, consist of data blocks. Undo segments automatically grow and shrink as needed, acting as a circular storage buffer for their assigned transactions.
When transactions fill the blocks in their current undo segment extent, they are assigned another block in the same extent. If no free blocks remain in that extent, the transaction acquires a block from the next extent in the segment. If all extents are in use, the transaction either wraps around back into the first extent or requests that a new extent be allocated to the undo segment.
The diagram in the slide shows on the left a table icon with original data arriving from a DML operation. The original data is kept in the buffer cache (if not aged out) and then written to the undo tablespace (shown in circular form on the right).
Note: Parallel DML operations can actually cause a transaction to use more than one undo segment. To learn more about parallel DML execution, see the Oracle Database VLDB and Partitioning Guide.
Oracle Database 12c: Backup and Recovery Workshop 14 - 4
Copyright © 2015, Oracle and/or its affiliates. All rights reserved.
Ora
cle
Uni
vers
ity a
nd E
rror :
You
are
not
a V
alid
Par
tner
use
onl
y
THES
E eK
IT M
ATER
IALS
AR
E FO
R Y
OU
R U
SE IN
TH
IS C
LASS
RO
OM
ON
LY.
CO
PYIN
G e
KIT
MAT
ERIA
LS F
RO
M T
HIS
CO
MPU
TER
IS S
TRIC
TLY
PRO
HIB
ITED

Flashback Technology
Using Flashback technology:
• Viewing past states of data
• Winding data back and forth in time
• Assisting users in error analysis and recovery
For error analysis:Oracle Flashback Query
Oracle Flashback Version Query
Oracle Flashback Transaction Query For error recovery:Oracle Flashback Transaction Backout
Oracle Flashback Table
Oracle Flashback Drop
Oracle Flashback Database
Oracle Flashback technology is a group of features that support viewing past states of data—and winding data back and forth in time—without requiring restoring the database from backup. With this technology, you help users analyze and recover from errors.
• Flashback Query: View committed data as it existed at some point in the past. The SELECT command with the AS OF clause references a time in the past through a time stamp or system change number (SCN).
• Flashback Version Query: View committed historical data for a specific time interval. Use the VERSIONS BETWEEN clause of the SELECT command (for performance reasons with existing indexes).
• Flashback Transaction Query: View changes made at the transaction level.
• Flashback Transaction Backout: Roll back a specific transaction and dependent transactions.
• Flashback Table: Rewind one or more tables to their contents at a previous time without affecting other database objects.
• Flashback Drop: Reverse the effects of dropping a table by returning the dropped table from the recycle bin to the database along with dependent objects such as indexes and triggers.
• Flashback Database: Return the database to a past time or SCN.
Oracle Database 12c: Backup and Recovery Workshop 14 - 5
Copyright © 2015, Oracle and/or its affiliates. All rights reserved.
Ora
cle
Uni
vers
ity a
nd E
rror :
You
are
not
a V
alid
Par
tner
use
onl
y
THES
E eK
IT M
ATER
IALS
AR
E FO
R Y
OU
R U
SE IN
TH
IS C
LASS
RO
OM
ON
LY.
CO
PYIN
G e
KIT
MAT
ERIA
LS F
RO
M T
HIS
CO
MPU
TER
IS S
TRIC
TLY
PRO
HIB
ITED

Flashback Technology
Object Level
Scenario Examples FlashbackTechnology
Depends On
AffectsData
Database Truncate table; undesired multitable changes made
Database Flashback logs
TRUE
Table Drop table. Drop Recycle bin TRUE
Update with the wrong WHERE clause.
Table Undo data TRUE
Compare current data with data from the past.
Query Undo data FALSE
Compare versions of a row.
Version Query Undo data FALSE
Transaction Investigate and back out suspect transactions.
Transaction Query
Undo/redo from archive logs
TRUE
Table and transaction
Audit, compliance, historical reports, ILM
Data Archive (Temporal)
Tablespace FALSE
You can use Flashback technology when a logical corruption occurs in the Oracle database and you need to recover data quickly and easily. As with human errors, it is difficult to identify the objects and rows that are affected by an erroneous transaction. With Flashback technology, you can diagnose how errors were introduced into the database, and then repair the damage. You can view the transactions that have contributed to specific row modifications, view the entire set of versions of a given row during a specific time period, or just view data as it appeared at a specific time in the past. The table in the slide shows typical uses of Flashback technology. Flashback Database depends on the flashback logs to perform the Flashback Database operation. Flashback Drop uses the recycle bin. All other techniques use undo data.
Not all flashback features modify the database. Some are simply methods to query other versions of data. You can use these features to investigate a problem and aid in recovery:
• Determine the type of flashback operation to use to correct the problem.
• Use the result of the query in an INSERT, UPDATE, or DELETE that enables you to repair the erroneous data.
Oracle Database 12c: Backup and Recovery Workshop 14 - 6
Copyright © 2015, Oracle and/or its affiliates. All rights reserved.
Ora
cle
Uni
vers
ity a
nd E
rror :
You
are
not
a V
alid
Par
tner
use
onl
y
THES
E eK
IT M
ATER
IALS
AR
E FO
R Y
OU
R U
SE IN
TH
IS C
LASS
RO
OM
ON
LY.
CO
PYIN
G e
KIT
MAT
ERIA
LS F
RO
M T
HIS
CO
MPU
TER
IS S
TRIC
TLY
PRO
HIB
ITED

Preparing Your Database for Flashback
• Grant FLASHBACK privileges.
• Relevant undo settings:– UNDO_TABLESPACE='UNDOTBS1'
– UNDO_MANAGEMENT='AUTO'
– UNDO_RETENTION=900
– Guaranteeing undo retention
To enable flashback features for an application, you must:
• Grant flashback privileges to users, roles, or applications that need to use flashback features.
• Have an undo tablespace with enough space to keep the required data for flashback operations. The more often users update the data, the more space is required.
For an automatically extensible undo tablespace (default), the Oracle database retains undo data to satisfy at a minimum, the retention periods needed by the longest-running query and the threshold of undo retention, specified by the UNDO_RETENTION parameter. You can query V$UNDOSTAT.TUNED_UNDORETENTION to determine the amount of time for which undo is retained for the current undo tablespace. Setting the UNDO_RETENTION parameter does not guarantee that unexpired undo data is not overwritten. The default undo behavior is to overwrite committed transactions that have not yet expired rather than to allow an active transaction to fail because of lack of undo space. In case of conflict, transactions have precedence over queries. This behavior can be changed by guaranteeing retention.
Oracle Database 12c: Backup and Recovery Workshop 14 - 7
Copyright © 2015, Oracle and/or its affiliates. All rights reserved.
Ora
cle
Uni
vers
ity a
nd E
rror :
You
are
not
a V
alid
Par
tner
use
onl
y
THES
E eK
IT M
ATER
IALS
AR
E FO
R Y
OU
R U
SE IN
TH
IS C
LASS
RO
OM
ON
LY.
CO
PYIN
G e
KIT
MAT
ERIA
LS F
RO
M T
HIS
CO
MPU
TER
IS S
TRIC
TLY
PRO
HIB
ITED

Guaranteeing Undo Retention
Undo data in undo
tablespace
Retention guarantee:15 minutes
SELECT statements running 15 minutes or less are satisfied default.
A transaction generating more undo than what there is space for will fail.
SQL> ALTER TABLESPACE undotbs1 RETENTION GUARANTEE;
With guaranteed retention, undo retention settings are enforced even if they cause transactions to fail. (So in case of conflict, queries have precedence over transactions, as shown in the graphic of this slide.)
Specify the RETENTION GUARANTEE clause for the undo tablespace to ensure that unexpired undo data is not discarded. Note that by configuring retention guarantee, ongoing operations that need undo space in the segments of the tablespace may fail as the result of a lack of space. RETENTION GUARANTEE is a tablespace attribute rather than an initialization parameter. An example is shown in the slide. To return a guaranteed undo tablespace to its normal setting:SQL> ALTER TABLESPACE undotbs1 RETENTION NOGUARANTEE;
To satisfy long retention requirements, create a Temporal History.
Oracle Database 12c: Backup and Recovery Workshop 14 - 8
Copyright © 2015, Oracle and/or its affiliates. All rights reserved.
Ora
cle
Uni
vers
ity a
nd E
rror :
You
are
not
a V
alid
Par
tner
use
onl
y
THES
E eK
IT M
ATER
IALS
AR
E FO
R Y
OU
R U
SE IN
TH
IS C
LASS
RO
OM
ON
LY.
CO
PYIN
G e
KIT
MAT
ERIA
LS F
RO
M T
HIS
CO
MPU
TER
IS S
TRIC
TLY
PRO
HIB
ITED

Quiz
Which of the following flashback technologies use undo data?
a. Flashback Database
b. Flashback Drop
c. Flashback Table
d. Flashback Query
e. Flashback Version Query
f. Flashback Transaction Query
Answer: c, d, e, f
Oracle Database 12c: Backup and Recovery Workshop 14 - 9
Copyright © 2015, Oracle and/or its affiliates. All rights reserved.
Ora
cle
Uni
vers
ity a
nd E
rror :
You
are
not
a V
alid
Par
tner
use
onl
y
THES
E eK
IT M
ATER
IALS
AR
E FO
R Y
OU
R U
SE IN
TH
IS C
LASS
RO
OM
ON
LY.
CO
PYIN
G e
KIT
MAT
ERIA
LS F
RO
M T
HIS
CO
MPU
TER
IS S
TRIC
TLY
PRO
HIB
ITED

Using Flashback Technologyto Query Data
• Flashback Query– Query all data at a specified point in time.
• Flashback Version Query– See all versions of a row between two times.
– See the transactions that changed the row.
• Flashback Transaction Query– See all changes made by a transaction.
11:00 11:10
Flashback - Query
- Versions- Table- Transaction- Drop- Data Archive
Flashback technology provides the capability to query past versions of schema objects, query historical data, and perform change analysis. Every transaction logically generates a new version of the database. With Flashback technology, you can navigate through these versions to find an error and its cause:
• Flashback Query: Query all data as it existed at a specific point in time.
• Flashback Version Query: See all versions of rows between two times and the transactions that changed the row.
• Flashback Transaction Query: See all changes made by a transaction and, if needed, roll back a transaction with “undo” SQL commands.
Oracle Database 12c: Backup and Recovery Workshop 14 - 10
Copyright © 2015, Oracle and/or its affiliates. All rights reserved.
Ora
cle
Uni
vers
ity a
nd E
rror :
You
are
not
a V
alid
Par
tner
use
onl
y
THES
E eK
IT M
ATER
IALS
AR
E FO
R Y
OU
R U
SE IN
TH
IS C
LASS
RO
OM
ON
LY.
CO
PYIN
G e
KIT
MAT
ERIA
LS F
RO
M T
HIS
CO
MPU
TER
IS S
TRIC
TLY
PRO
HIB
ITED

Flashback Query
Use to query all data at a specified point in time or SCN.
T2
SELECT employee_id, salary FROM employees
AS OF TIMESTAMP <T1>
WHERE employee_id = 200
Unwantedupdates
T1
With the Flashback Query feature, you can perform queries as of a certain time. By using the AS OF clause of the SELECT statement, you can specify the time stamp for which to view the data. This is useful for analyzing a data discrepancy.
Note: TIMESTAMP and SCN are valid options for the AS OF clause.
Oracle Database 12c: Backup and Recovery Workshop 14 - 11
Copyright © 2015, Oracle and/or its affiliates. All rights reserved.
Ora
cle
Uni
vers
ity a
nd E
rror :
You
are
not
a V
alid
Par
tner
use
onl
y
THES
E eK
IT M
ATER
IALS
AR
E FO
R Y
OU
R U
SE IN
TH
IS C
LASS
RO
OM
ON
LY.
CO
PYIN
G e
KIT
MAT
ERIA
LS F
RO
M T
HIS
CO
MPU
TER
IS S
TRIC
TLY
PRO
HIB
ITED

Flashback Version Query
The VERSIONS clause:
• Retrieves all the versions of the rows that exist between two points in time or two SCNs
• Retrieves only committed data
• Cannot be used to query external tables, temporary tables, fixed tables, or views
• Can be used to create views
• Cannot span DDL commands
• Filters out segment shrink operations
SELECT versions_xid, salary FROM employees
VERSIONS BETWEEN TIMESTAMP <t1> and <t2>
WHERE employee_id = 200;
Flashback- Query
- Versions- Table- Transaction- Drop- Data Archive
The Flashback Version Query feature enables you to use the VERSIONS clause to retrieve all the versions of the rows that exist between two points in time or two SCNs. The rows returned represent a history of changes for the rows across transactions.
Flashback Version Query retrieves only committed data. Uncommitted row versions within a transaction are not shown. The rows returned also include deleted and subsequently reinserted versions of the rows.
Use row history to audit the rows of a table and retrieve information about the transactions that affected the rows. You can then use the returned transaction identifier (the VERSIONS_XID pseudocolumn) to perform transaction mining by using LogMiner or to perform a Flashback Transaction Query.
• The VERSIONS clause cannot be used to query external tables, temporary tables, fixed tables, or views. But you can create a view with the VERSIONS clause.
• The VERSIONS clause in a SELECT statement cannot produce versions of rows across the DDL statements that change the structure of the corresponding tables. This means that the query stops producing rows after it reaches a time in the past when the table structure was changed.
• Certain maintenance operations, such as a segment shrink, may move table rows across blocks. In this case, the version query filters out such phantom versions because the row data remains the same.
Oracle Database 12c: Backup and Recovery Workshop 14 - 12
Copyright © 2015, Oracle and/or its affiliates. All rights reserved.
Ora
cle
Uni
vers
ity a
nd E
rror :
You
are
not
a V
alid
Par
tner
use
onl
y
THES
E eK
IT M
ATER
IALS
AR
E FO
R Y
OU
R U
SE IN
TH
IS C
LASS
RO
OM
ON
LY.
CO
PYIN
G e
KIT
MAT
ERIA
LS F
RO
M T
HIS
CO
MPU
TER
IS S
TRIC
TLY
PRO
HIB
ITED

Flashback Table: Overview
• Flashback Table recovers tables to a specific
point in time.
• Flashback Table is an in-place operation.
• The database stays online.
UserErroneous
DMLsFlashed back
tables
Flashback- Query- Versions
- Table- Transaction- Drop- Data Archive
With Flashback Table, you can recover a set of tables to a specific point in time without having to perform traditional point-in-time recovery operations.
A Flashback Table operation is done in place, while the database is online, by rolling back only the changes that are made to the given tables and their dependent objects.
A Flashback Table statement is executed as a single transaction. All tables must be flashed back successfully, or the entire transaction is rolled back.
Note: You can use Flashback Version Query and Flashback Transaction Query to determine the appropriate flashback time.
Oracle Database 12c: Backup and Recovery Workshop 14 - 13
Copyright © 2015, Oracle and/or its affiliates. All rights reserved.
Ora
cle
Uni
vers
ity a
nd E
rror :
You
are
not
a V
alid
Par
tner
use
onl
y
THES
E eK
IT M
ATER
IALS
AR
E FO
R Y
OU
R U
SE IN
TH
IS C
LASS
RO
OM
ON
LY.
CO
PYIN
G e
KIT
MAT
ERIA
LS F
RO
M T
HIS
CO
MPU
TER
IS S
TRIC
TLY
PRO
HIB
ITED

Flashback Table
• Recovering a table or tables with associated objects to a specific point in time without restoring a backup
• Using data from the undo tablespace
• Prerequisites: – The FLASHBACK ANY TABLE or the FLASHBACK object
privilege on the specific table.– SELECT, INSERT, DELETE, and ALTER privileges on the
table
– Enabled row movement
• Interfaces: Cloud Control and SQL*Plus
FLASHBACK TABLE hr.departments TO TIMESTAMPTO_TIMESTAMP('2013-01-25 21:00:00','YYYY-MM-DD HH24:MI:SS');
With Flashback Table, you can recover a table or tables to a specific point in time without restoring a backup. When you use this feature, the data in tables and their associated objects (indexes, constraints, triggers, and so on) is restored. The data used to satisfy a Flashback Table request is retrieved from the undo tablespace. You can use Flashback Version Query and Flashback Transaction Query to determine the appropriate flashback time.
Flashback Table provides a way for users to easily and quickly recover from accidental modifications without a database administrator’s involvement. You must grant the FLASHBACK TABLE or FLASHBACK ANY TABLE system privilege to any user that uses the Flashback Table feature. In addition, you must grant the SELECT, INSERT, DELETE, and ALTER object privileges to the user.
You can use Enterprise Manager or SQL*Plus to flash back a table. The wizard guides you through the process.
You must enable row movement on a table to be able to flash back the table. When you enable row movement, the Oracle server can move a row in the table. You can enable row movement by using Enterprise Manager or by using the ALTER TABLE command.
Oracle Database 12c: Backup and Recovery Workshop 14 - 14
Copyright © 2015, Oracle and/or its affiliates. All rights reserved.
Ora
cle
Uni
vers
ity a
nd E
rror :
You
are
not
a V
alid
Par
tner
use
onl
y
THES
E eK
IT M
ATER
IALS
AR
E FO
R Y
OU
R U
SE IN
TH
IS C
LASS
RO
OM
ON
LY.
CO
PYIN
G e
KIT
MAT
ERIA
LS F
RO
M T
HIS
CO
MPU
TER
IS S
TRIC
TLY
PRO
HIB
ITED

Flashback Table: Considerations
• The FLASHBACK TABLE command executes as a single transaction, acquiring exclusive DML locks.
• Statistics are not flashed back.
• Current indexes and dependent objects are maintained.
• Flashback Table operations:– Cannot be performed on system tables
– Cannot span DDL operations
– Generate undo and redo data
• The entire FLASHBACK TABLE statement is executed within a single transaction. All or none of the specified tables are flashed back.
• Flashback Table acquires exclusive data manipulation language (DML) locks on all tables that are specified in the statement over the period of time the operation is in progress.
• Statistics of impacted objects are not flashed back.
• All existing indexes are maintained. Dropped indexes are not re-created. Dependent on-commit materialized views are also maintained automatically.
• Tables specified in the FLASHBACK TABLE statement are flashed back, provided that none of the table constraints are violated. If any constraints are violated during flashback execution, the operation is aborted and the tables are left in the same state as they were just before the FLASHBACK TABLE statement invocation.
• You cannot perform Flashback Table to a particular time that is older than the time of the execution of a data definition language (DDL) operation that altered the structure of or shrunk a table that would be involved in the flashback operation. This restriction does not apply to DDL statements that only change storage attributes of the tables.
• Flashback Table cannot be performed on system tables, remote tables, and fixed tables.
Oracle Database 12c: Backup and Recovery Workshop 14 - 15
Copyright © 2015, Oracle and/or its affiliates. All rights reserved.
Ora
cle
Uni
vers
ity a
nd E
rror :
You
are
not
a V
alid
Par
tner
use
onl
y
THES
E eK
IT M
ATER
IALS
AR
E FO
R Y
OU
R U
SE IN
TH
IS C
LASS
RO
OM
ON
LY.
CO
PYIN
G e
KIT
MAT
ERIA
LS F
RO
M T
HIS
CO
MPU
TER
IS S
TRIC
TLY
PRO
HIB
ITED

Flashback Transaction Query
UndoSQL
DBA
User
ErroneousDML
Flashback- Query- Versions- Table
- Transaction- Drop- Data Archive
FLASHBACK_TRANSACTION_QUERYFlashback Version QueryFlashback Transaction Backout
Flashback Transaction Query is a diagnostic tool that you can use to view changes made to the database at the transaction level. This enables you to diagnose problems in your database and perform analysis and audits of transactions (as shown in the graphic).
You can use the FLASHBACK_TRANSACTION_QUERY view to determine all the necessary SQL statements that can be used to undo the changes made either by a specific transaction or during a specific period of time.
This feature is used in conjunction with the Flashback Version Query feature with the help of the Perform Recovery Wizard.
Oracle Database 12c: Backup and Recovery Workshop 14 - 16
Copyright © 2015, Oracle and/or its affiliates. All rights reserved.
Ora
cle
Uni
vers
ity a
nd E
rror :
You
are
not
a V
alid
Par
tner
use
onl
y
THES
E eK
IT M
ATER
IALS
AR
E FO
R Y
OU
R U
SE IN
TH
IS C
LASS
RO
OM
ON
LY.
CO
PYIN
G e
KIT
MAT
ERIA
LS F
RO
M T
HIS
CO
MPU
TER
IS S
TRIC
TLY
PRO
HIB
ITED

Flashback Transaction Query: Considerations
• DDL commands are seen as dictionary updates.
• Flashback Transaction Query on a transaction underlying a DDL command displays the data dictionary changes.
• Dropped objects appear as object numbers.
• Dropped users appear as user identifiers.
Within the database, DDL operations are nothing but a series of space management operations and changes to the data dictionary. Flashback Transaction Query on a transaction underlying a DDL command displays the changes made to the data dictionary.
When Flashback Transaction Query involves tables that have been dropped from the database, the table names are not reflected. Instead, object numbers are used.
If the user who executed a transaction is dropped, Flashback Transaction Query of that transaction displays the corresponding user ID only, and not the username.
Note: When there is not enough undo data for a specific transaction, a row with a value of UNKNOWN in the OPERATION column of FLASHBACK_TRANSACTION_QUERY is returned.
Oracle Database 12c: Backup and Recovery Workshop 14 - 17
Copyright © 2015, Oracle and/or its affiliates. All rights reserved.
Ora
cle
Uni
vers
ity a
nd E
rror :
You
are
not
a V
alid
Par
tner
use
onl
y
THES
E eK
IT M
ATER
IALS
AR
E FO
R Y
OU
R U
SE IN
TH
IS C
LASS
RO
OM
ON
LY.
CO
PYIN
G e
KIT
MAT
ERIA
LS F
RO
M T
HIS
CO
MPU
TER
IS S
TRIC
TLY
PRO
HIB
ITED

Flashback Transaction Backout
• Use Flashback Transaction to reverse a transaction and dependant transactions.
• Oracle Database determines the dependencies between transactions and, in effect, creates a compensating transaction that reverses the unwanted changes.
• Supplemental logging must be enabled.• SELECT, FLASHBACK, and DML privileges on all affected
tables must be granted.
With Flashback Transaction, you can reverse a transaction and dependant transactions. Oracle Database determines the dependencies between transactions and, in effect, creates a compensating transaction that reverses the unwanted changes. The database rewinds to a state as if the transaction, and any transactions that could be dependent on it, never occurred.
You can use the Flashback Transaction functionality from within Enterprise Manager or by using PL/SQL packages.
To flash back or back out a transaction—that is, to create a compensating transaction—you must have the SELECT, FLASHBACK, and DML privileges on all affected tables.
Oracle Database 12c: Backup and Recovery Workshop 14 - 18
Copyright © 2015, Oracle and/or its affiliates. All rights reserved.
Ora
cle
Uni
vers
ity a
nd E
rror :
You
are
not
a V
alid
Par
tner
use
onl
y
THES
E eK
IT M
ATER
IALS
AR
E FO
R Y
OU
R U
SE IN
TH
IS C
LASS
RO
OM
ON
LY.
CO
PYIN
G e
KIT
MAT
ERIA
LS F
RO
M T
HIS
CO
MPU
TER
IS S
TRIC
TLY
PRO
HIB
ITED

Flashing Back a Transaction
• Use Enterprise Manager or the DBMS_FLASHBACK. TRANSACTION_BACKOUT procedure.
• If the PL/SQL call finishes successfully, it means that the transaction does not have any dependencies and a single transaction is backed out successfully.
• After choosing your back-out option, the dependency report is generated in the DBA_FLASHBACK_TXN_STATEand DBA_FLASHBACK_TXN_REPORT views.
• Review the dependency report that shows all transactions that were backed out.
• Commit the changes to make them permanent. Or:
• Roll back to discard the changes.
The Flashback Transaction Wizard in Enterprise Manager calls the DBMS_FLASHBACK.TRANSACTION_BACKOUT procedure with the NOCASCADE option.
Usage Notes
• Transaction back-out is not supported across conflicting DDL.
• Transaction back-out inherits data type support from LogMiner.
• When you discover the need for transaction back-out, performance is better if you start the back-out operation sooner. Large redo logs and high transaction rates result in slower transaction back-out operations.
• Provide a transaction name for the back-out operation to facilitate later auditing. If you do not provide a transaction name, it will be automatically generated for you.
The DBA_FLASHBACK_TXN_STATE view contains the current state of a transaction: whether it is alive in the system or effectively backed out. This table is atomically maintained with the compensating transaction. For each compensating transaction, there could be multiple rows, where each row provides the dependency relationship between the transactions that have been compensated by the compensating transaction.
The DBA_FLASHBACK_TXN_REPORT view provides detailed information about all compensating transactions that have been committed in the database. Each row in this view is associated with one compensating transaction.
Oracle Database 12c: Backup and Recovery Workshop 14 - 19
Copyright © 2015, Oracle and/or its affiliates. All rights reserved.
Ora
cle
Uni
vers
ity a
nd E
rror :
You
are
not
a V
alid
Par
tner
use
onl
y
THES
E eK
IT M
ATER
IALS
AR
E FO
R Y
OU
R U
SE IN
TH
IS C
LASS
RO
OM
ON
LY.
CO
PYIN
G e
KIT
MAT
ERIA
LS F
RO
M T
HIS
CO
MPU
TER
IS S
TRIC
TLY
PRO
HIB
ITED

Best Practices: Undo-based FlashbackFlashback Query, Flashback Table
• Use Undo Advisor in Enterprise Manager to obtain recommendations on available undo retention for various sizes.
• Use fixed size undo: Undo retention is automatically tuned for the best possible retention based on tablespace size and current system load.
• Be aware of DDL restrictions: Not possible to query in the past if table structure is modified.
Some DDL commands that alter the structure of a table invalidate any existing undo data for the table. Commands that drop and modify columns, move tables, drop partitions, and truncate table/partition fall into this category. It is not possible to retrieve data from a point before the execution of these DDL commands. An attempt to do so results in an ORA-1466error. Note that this restriction does not apply to DDL operations that alter the storage attributes of a table, such as PCTFREE, INITRANS, and MAXTRANS.
Oracle Database 12c: Backup and Recovery Workshop 14 - 20
Copyright © 2015, Oracle and/or its affiliates. All rights reserved.
Ora
cle
Uni
vers
ity a
nd E
rror :
You
are
not
a V
alid
Par
tner
use
onl
y
THES
E eK
IT M
ATER
IALS
AR
E FO
R Y
OU
R U
SE IN
TH
IS C
LASS
RO
OM
ON
LY.
CO
PYIN
G e
KIT
MAT
ERIA
LS F
RO
M T
HIS
CO
MPU
TER
IS S
TRIC
TLY
PRO
HIB
ITED

Flashback Dropand the Recycle Bin
DROP TABLE employees; FLASHBACK TABLEemployeesTO BEFORE DROP;
By mistake
RECYCLEBIN=ON1
2 3
Flashback- Query- Versions- Table- Transaction
- Drop- Data Archive
Using the FLASHBACK TABLE command, you can undo the effects of a DROP TABLEstatement without having to use point-in-time recovery (as shown in the graphic of this slide).
1. The RECYCLEBIN initialization parameter is used to control whether the Flashback Drop capability is turned ON or OFF. If the parameter is set to OFF, then dropped tables do not go into the recycle bin.
2. If this parameter is set to ON (default), the dropped tables go into the recycle bin.
3. Dropped tables can be recovered with the FLASHBACK TABLE …TO BEFORE DROPcommand.
Oracle Database 12c: Backup and Recovery Workshop 14 - 21
Copyright © 2015, Oracle and/or its affiliates. All rights reserved.
Ora
cle
Uni
vers
ity a
nd E
rror :
You
are
not
a V
alid
Par
tner
use
onl
y
THES
E eK
IT M
ATER
IALS
AR
E FO
R Y
OU
R U
SE IN
TH
IS C
LASS
RO
OM
ON
LY.
CO
PYIN
G e
KIT
MAT
ERIA
LS F
RO
M T
HIS
CO
MPU
TER
IS S
TRIC
TLY
PRO
HIB
ITED

Recycle Bin
1
DROP TABLE employees;
EMPLOYEES_PK
EMPLOYEES
Recyclebin
BIN$zbjrBdpw==$0 EMPLOYEESBIN$zbjra9wy==$0 EMPLOYEES_PK
4
3
BIN$zbjra9wy==$0
DBA_FREE_SPACE
BIN$zbjrBdpw==$0
Objects are:– Renamed– Not moved
2
If the recycle bin is not enabled and you drop a table, the space can immediately be used for other objects. If the recycle bin is enabled and you drop a table, the space associated with the table and its dependent objects is not immediately reclaimable, even though it does appear in DBA_FREE_SPACE. Instead, the dropped objects are referenced in the recycle bin and still belong to their owner. The space used by recycle bin objects is never automatically reclaimed unless there is space pressure. This enables you to recover recycle bin objects for the maximum possible duration.
When a dropped table is “moved” to the recycle bin, the table and its associated objects and constraints are renamed using system-generated names. The renaming convention is: BIN$unique_id$version, where unique_id is a 26-character globally unique identifier for this object making the recycle bin name unique across all databases and version is a version number assigned by the database.
The recycle bin itself is a data dictionary table that maintains the relationships between the original names of dropped objects and their system-generated names. You can query the recycle bin by using the DBA_RECYCLEBIN view. The diagram illustrates this behavior:
1. You have created a table called EMPLOYEES in your tablespace.
2. You drop the EMPLOYEES table.
3. The extents occupied by EMPLOYEES are now considered as free space.
4. EMPLOYEES is renamed and the new name is recorded into the recycle bin.
Oracle Database 12c: Backup and Recovery Workshop 14 - 22
Copyright © 2015, Oracle and/or its affiliates. All rights reserved.
Ora
cle
Uni
vers
ity a
nd E
rror :
You
are
not
a V
alid
Par
tner
use
onl
y
THES
E eK
IT M
ATER
IALS
AR
E FO
R Y
OU
R U
SE IN
TH
IS C
LASS
RO
OM
ON
LY.
CO
PYIN
G e
KIT
MAT
ERIA
LS F
RO
M T
HIS
CO
MPU
TER
IS S
TRIC
TLY
PRO
HIB
ITED

Bypassing the Recycle Bin
Security considerations for the recycle bin:
DROP TABLESPACE <ts_name> [INCLUDING CONTENTS] ;
DROP USER <user_name> [CASCADE] ;
DROP TABLE <table_name> [PURGE] ;
ALTER SYSTEM SET RECYCLEBIN=OFF SCOPE=SPFILE;
• You can use the DROP TABLE PURGE command to permanently drop a table and its dependent objects from the database. When you use this command, the corresponding objects are not moved to the recycle bin.
• When you issue the DROP TABLESPACE ... INCLUDING CONTENTS command, the objects in the tablespace are not placed in the recycle bin. Moreover, objects in the recycle bin belonging to the tablespace are purged. When you issue the same command without the INCLUDING CONTENTS clause, the tablespace must be empty for the command to succeed. However, there can be objects belonging to the tablespace in the recycle bin. In this case, these objects are purged.
• When you issue the DROP USER ... CASCADE command, the user and all the objects owned by the user are permanently dropped from the database. Any objects in the recycle bin belonging to the dropped user are purged.
For increased security, you may decide to not allow the use of the recycle bin (for example, if the current object is encrypted, but the dropped object is in clear text, potentially showing sensitive data). Connected as SYSDBA, you can:
• View the recycle bin status with: SHOW PARAMETER RECYCLEBIN
• Disable the use of the recycle bin with: ALTER SYSTEM SET RECYCLEBIN=OFF SCOPE=SPFILE; after issuing this command, you need to restart the database.
Oracle Database 12c: Backup and Recovery Workshop 14 - 23
Copyright © 2015, Oracle and/or its affiliates. All rights reserved.
Ora
cle
Uni
vers
ity a
nd E
rror :
You
are
not
a V
alid
Par
tner
use
onl
y
THES
E eK
IT M
ATER
IALS
AR
E FO
R Y
OU
R U
SE IN
TH
IS C
LASS
RO
OM
ON
LY.
CO
PYIN
G e
KIT
MAT
ERIA
LS F
RO
M T
HIS
CO
MPU
TER
IS S
TRIC
TLY
PRO
HIB
ITED

Using Flashback Data Archives
Automated tracking of historical database changes:
• Enable at the table level with your specified retention period.
• All subsequent changes are transparently stored and tamper proof.
• Records older than retention period are automatically removed.
• Use Flashback technologies to retrieve history.SELECT … AS OF TIMESTAMP…SELECT … VERSIONS BETWEEN TIMESTAMP and TIMESTAMP…
updates history queriesBase Table
Temporal History
Use cases for Flashback request: Audit, compliance, historical reports, ILM
Flashback- Query- Versions- Table- Transaction- Drop
- Data Archive
Flashback data archives provide a mechanism for tracking changes to production databases that is secure, efficient, easy to use, and application transparent.
With this technology, you can automatically track and store the data in tables enabled for flashback data archive (FDA). This ensures that flashback queries obtain SQL-level access to the versions of database objects without getting a snapshot-too-old error.
A flashback data archive provides the ability to track and store all transactional changes to a “tracked” table over its lifetime. It is no longer necessary to build this intelligence into your application. You can use this technology for compliance, audit reports, data analysis, and decision-support systems.
Oracle Database 12c: Backup and Recovery Workshop 14 - 24
Copyright © 2015, Oracle and/or its affiliates. All rights reserved.
Ora
cle
Uni
vers
ity a
nd E
rror :
You
are
not
a V
alid
Par
tner
use
onl
y
THES
E eK
IT M
ATER
IALS
AR
E FO
R Y
OU
R U
SE IN
TH
IS C
LASS
RO
OM
ON
LY.
CO
PYIN
G e
KIT
MAT
ERIA
LS F
RO
M T
HIS
CO
MPU
TER
IS S
TRIC
TLY
PRO
HIB
ITED

Creating a Temporal Historyand Enabling Archiving
1. Create a new tablespace to hold the history data.
2. Create a flashback data archive, assign it to the tablespace, and specify its retention period. (It requires the FLASHBACK ARCHIVE ADMINISTER system privilege.)
3. Alter the base tables to enable archiving and assign it to a flashback archive. (It requires the FLASHBACK ARCHIVEobject privilege.)ALTER TABLE HR.EMPLOYEES FLASHBACK ARCHIVE fda1;
CREATE FLASHBACK ARCHIVE fda1 TABLESPACE fda_tbs1 OPTIMIZE DATA QUOTA 10M RETENTION 1 YEAR;
Temporal HistoryBase table
Non-default FDA optimization with compression and deduplication
A flashback data archive consists of one or more tablespaces. You can have multiple flashback data archives. They are configured with retention duration. Based on your retention duration requirements, you should create different archives—for example, one for all records that must be kept for two years, another for all records that must be kept for five years. The database server will automatically purge all historical information on the day after the retention period expires.
1. Create a tablespace for your FDA. The size depends on the base table and the expected DML and DDL activity.
2. Create a flashback data archive with retention time, by default with duplication and without compression. Data archived in FDA is retained for the retention time. This task requires the FLASHBACK ARCHIVE ADMINISTER system privilege. If different retention periods are needed, different archives must be created. With the OPTIMIZE DATAclause, the flashback data archive is created with compression and deduplication.
3. Enable flashback archiving (and then disable it again) for a (whole) table. This task requires the FLASHBACK ARCHIVE object privilege. Although flashback archiving is enabled for a table, some DDL statements are not allowed on that table. By default, flashback archiving is off for any table.
Oracle Database 12c: Backup and Recovery Workshop 14 - 25
Copyright © 2015, Oracle and/or its affiliates. All rights reserved.
Ora
cle
Uni
vers
ity a
nd E
rror :
You
are
not
a V
alid
Par
tner
use
onl
y
THES
E eK
IT M
ATER
IALS
AR
E FO
R Y
OU
R U
SE IN
TH
IS C
LASS
RO
OM
ON
LY.
CO
PYIN
G e
KIT
MAT
ERIA
LS F
RO
M T
HIS
CO
MPU
TER
IS S
TRIC
TLY
PRO
HIB
ITED

How the Flashback Data Archive Works
• Partitions automatically created based on time and volume
• Unrelated partitions skipped by queries
Original data in buffer cache
. . .
EMPLOYEES FDA1
DM
LD
ML
Undodata
undo
fbda background process help
history data
• Storage by default non-optimized
• With the OPTIMIZE DATAclause: compressed and deduplicated
fbda slaves (as needed)
History data:
• Row captured asynchronously by background processes at self-tuned intervals (default: 5 min)
• Automatically purged per retention policy
History data is captured from undo (and buffer cache) by the fdba background process at self-tuned intervals. The default is every five minutes. The entire base table row that is updated is stored, no matter how many columns are updated.
• With the OPTIMIZE DATA clause, table and LOB compression and LOB deduplication are automatically turned on, using any of the following features: Advanced Row table compression, SecureFiles Intelligent Compression, SecureFiles Intelligent Deduplication, and segment-level and row-level ILM compression. ILM is enabled to allow new data to be archived as uncompressed and over time is compressed in the background.Note: If the base table is compressed with Hybrid Columnar compression, the table cannot be enabled for flashback data archiving.
• FDA history tables already compressed and deduplicated in releases prior to 12.1 are not changed. Their storage continues compressed and deduplicated.
• To stop optimization on FDA history tables, execute the following statement:SQL> ALTER FLASHBACK ARCHIVE fla1 NO OPTIMIZE DATA;
• Each flashback archive partition is at least 1 day and 1 MB of data, partitioned on ENDSCN. Flashback queries to the archives avoid unrelated partitions.
• Up to ten flashback archiver slaves can be called upon by the fbda process.• If the flashback archive process and slaves are too busy, archiving may be performed
inline, which significantly affects the user’s response time.
Oracle Database 12c: Backup and Recovery Workshop 14 - 26
Copyright © 2015, Oracle and/or its affiliates. All rights reserved.
Ora
cle
Uni
vers
ity a
nd E
rror :
You
are
not
a V
alid
Par
tner
use
onl
y
THES
E eK
IT M
ATER
IALS
AR
E FO
R Y
OU
R U
SE IN
TH
IS C
LASS
RO
OM
ON
LY.
CO
PYIN
G e
KIT
MAT
ERIA
LS F
RO
M T
HIS
CO
MPU
TER
IS S
TRIC
TLY
PRO
HIB
ITED

Collecting User Context in Temporal History
• Collection level: NONE (default), TYPICAL, ALL
– Set with DBMS_FLASHBACK_ARCHIVE.SET_CONTEXT_LEVEL
– TYPICAL collecting database user ID, global user ID, client identifier, service name, module name, and host name
• Obtained from GET_SYS_CONTEXT (USERENV)
SQL> EXEC DBMS_FLASHBACK_ARCHIVE.SET_CONTEXT_LEVEL('TYPICAL')PL/SQL procedure successfully completed
SQL> SELECT DBMS_FLASHBACK_ARCHIVE.GET_SYS_CONTEXT2 (VERSIONS_XID, 'USERENV','SESSION_USER'), 3 VERSIONS_XID,VERSIONS_STARTTIME,VERSIONS_ENDTIME,4 employee_id, salary 5 FROM hr.employees VERSIONS BETWEEN SCN MINVALUE 6 AND MAXVALUE ;
• The user context of a transaction executed on a table with Temporal History is collected and retrievable. The parameters of the namespace USERENV describe the current session. The user context is obtained from DBMS_FLASHBACK_ARCHIVE.GET_SYS_CONTEXT.
• The user context collection is controlled by a parameter, set by DBMS_FLASHBACK_ARCHIVE.SET_CONTEXT_LEVEL whose values can be NONE, TYPICAL, or ALL. By default no user context is collected. Some examples of information, which are collected in the TYPICAL case, are database user ID, global user ID, client identifier, service name, module name, or host name.
• Rows in these tables are purged when the commit time is older than the retention of the flashback archive with the longest retention.
• Each row of the user context can by read by only the DBA or the owner of the transaction.
Oracle Database 12c: Backup and Recovery Workshop 14 - 27
Copyright © 2015, Oracle and/or its affiliates. All rights reserved.
Ora
cle
Uni
vers
ity a
nd E
rror :
You
are
not
a V
alid
Par
tner
use
onl
y
THES
E eK
IT M
ATER
IALS
AR
E FO
R Y
OU
R U
SE IN
TH
IS C
LASS
RO
OM
ON
LY.
CO
PYIN
G e
KIT
MAT
ERIA
LS F
RO
M T
HIS
CO
MPU
TER
IS S
TRIC
TLY
PRO
HIB
ITED

Transparent Schema Evolution
• DDL support for:– Add, drop, rename, and modify column
– Drop and truncate partition
– Rename and truncate table
• Flashback queries work across the preceding DDLchanges.
• All other DDL is not automatically supported.
Flashback Version Query
Drop
Col
umn
time
Add
colu
mn
1
2
12
3
3
The most common DDL commands are possible with flashback data archives. When a schema has evolved in any of the ways listed in the slide, Temporal History technology automatically keeps track of the changes. Flashback query appropriately returns the row or rows with the corresponding schema (as shown in the diagram).
Oracle Database 12c: Backup and Recovery Workshop 14 - 28
Copyright © 2015, Oracle and/or its affiliates. All rights reserved.
Ora
cle
Uni
vers
ity a
nd E
rror :
You
are
not
a V
alid
Par
tner
use
onl
y
THES
E eK
IT M
ATER
IALS
AR
E FO
R Y
OU
R U
SE IN
TH
IS C
LASS
RO
OM
ON
LY.
CO
PYIN
G e
KIT
MAT
ERIA
LS F
RO
M T
HIS
CO
MPU
TER
IS S
TRIC
TLY
PRO
HIB
ITED

Full Schema Evolution
Disassociate or associate procedures in the DBMS_FLASHBACK_ARCHIVE package:
• Disable Flashback Archive on specified tables and allow more complex DDL (upgrades, split tables, and so on).
• Enforce schema integrity during association. (Base table and history table must be the same schema.)
Note: This function should be used with care and with the understanding that the archive can no longer be guaranteed to be immutable because the history could have been altered during the time of disassociation.
associate
disassociate
HistoryTable History
Table
Base TableAlter schema
Alter schema
4
1 2
3
All DDL changes that are not automatically supported can be executed through the DBMS_FLASHBACK_ARCHIVE package.
Note: This function should be used with care and with the understanding that the archive can no longer be guaranteed to be immutable, because the history could have been altered during the time of disassociation. The system catalog has a note when the disassociation occurred.
The diagram in the slide shows the following workflow:
1. If you have the FLASHBACK ARCHIVE ADMINISTER privilege, you can disassociate the archive from the base table with the DISASSOCIATE_FBA procedure.
2. Make the necessary changes to the base table.
3. Make the necessary changes to the corresponding archive.
4. Then, associate the table with the archive within the same schema with the RESASSOCIATE_FBA procedure. Temporal History validates that the schemas are the same upon association.
There is no transportability of history tables. Some DDL statements cause error ORA-55610when used on a table enabled for FDA, for example:
• ALTER TABLE …with UPGRADE TABLE clause
• ALTER TABLE statement that moves or exchanges a partition or subpartition operation
• DROP TABLE statement
Oracle Database 12c: Backup and Recovery Workshop 14 - 29
Copyright © 2015, Oracle and/or its affiliates. All rights reserved.
Ora
cle
Uni
vers
ity a
nd E
rror :
You
are
not
a V
alid
Par
tner
use
onl
y
THES
E eK
IT M
ATER
IALS
AR
E FO
R Y
OU
R U
SE IN
TH
IS C
LASS
RO
OM
ON
LY.
CO
PYIN
G e
KIT
MAT
ERIA
LS F
RO
M T
HIS
CO
MPU
TER
IS S
TRIC
TLY
PRO
HIB
ITED

Emp IDc
Job Hire Date
100 Clerk 22-Apr-11
200 Developer 12-Dec-11
400 Salesman 22-Mar-12
Insert history queriesBase Table
Flashback Data ArchiveFlashback Request
23-Mar-12
Temporal Validity and History
Distinguish active from nonactive rows:
• Temporal validity: User-managed effective date in the same table
• Temporal History: System-managed transaction time in a separate tablespace
Flashback- Query- Versions- Table- Transaction- Drop
- Data Archive
Applications often annotate the validity of a fact recorded in a table with dates or time stamps that are relevant to the underlying business; for example, the hire date of an employee in HR applications and the effective date of coverage in the insurance industry. This temporal attribute is called temporal validity, and is usually controlled by the user who defines the valid-time dimension at table creation.
Temporal validity dates or time stamps are different than the dates or time stamps annotated when the fact was recorded in the database. The date or time stamp when the fact was recorded in the database are attributes of Temporal History (also known as flashback data archive) and are system-managed.
In the slide, employee 400 was hired on March 22, but the row was entered in the HR.EMP table on March 23. 22-MAR-12 is the valid time temporal date and 23-MAR-12 is the transaction time temporal date.
By using the valid time temporal implicit filter on the valid-time dimension, queries can show rows that are currently valid or that will be valid in the future. The query is able to hide rows whose facts are not currently valid.
Bi-temporal queries can use both valid time temporal and transaction time temporal date.
Oracle Database 12c: Backup and Recovery Workshop 14 - 30
Copyright © 2015, Oracle and/or its affiliates. All rights reserved.
Ora
cle
Uni
vers
ity a
nd E
rror :
You
are
not
a V
alid
Par
tner
use
onl
y
THES
E eK
IT M
ATER
IALS
AR
E FO
R Y
OU
R U
SE IN
TH
IS C
LASS
RO
OM
ON
LY.
CO
PYIN
G e
KIT
MAT
ERIA
LS F
RO
M T
HIS
CO
MPU
TER
IS S
TRIC
TLY
PRO
HIB
ITED

• Insert rows by explicitly naming the valid-time columns.
SQL> CREATE TABLE emp 2 ( empno number, salary number, deptid number, 3 name VARCHAR2(100), 4 user_time_start DATE, user_time_end DATE, 5 PERIOD FOR user_time (user_time_start,user_time_end));
Using the PERIOD FOR Clause
• Keep both active and nonactive data in the same table.
• Define one valid-time dimension at table creation.– Explicitly define the two date-time columns.
– Or: automatic valid-time columns are created.
SQL> CREATE TABLE emp22 ( empno number, salary number, deptid number, 3 name VARCHAR2(100), 3 PERIOD FOR user_time);
A valid-time dimension, represented by the new PERIOD FOR clause, consists of two date-time columns that can be specified in the table definition, as shown in the first example or that are automatically created, as shown in the second example.
To hide valid-time dimension columns, just specify a PERIOD FOR clause name without any date columns. Oracle creates two hidden columns using the name of the valid-time dimension as a prefix for the names of the two columns. The valid-time dimension name is used to drop the dimension if required. As shown in the second example, you defined user_time as the name of the valid-time dimension and user_time is used as the prefix for the two date columns automatically created: USER_TIME_START and USER_TIME_END.
To insert rows into a table with a valid-time dimension, you would name the two valid-time date columns as follows:
SQL> INSERT INTO emp2 (empno, salary, deptid, name, user_time_start, user_time_end) VALUES (1,1000,20, 'John', SYSDATE, NULL);
SQL> select EMPNO, user_time_start, user_time_end from emp2;
EMPNO USER_TIME_START USER_TIME_END
---------- ----------------------------------- ------------------
1 17-AUG-12 09.58.03.000000 AM +00:00
Oracle Database 12c: Backup and Recovery Workshop 14 - 31
Copyright © 2015, Oracle and/or its affiliates. All rights reserved.
Ora
cle
Uni
vers
ity a
nd E
rror :
You
are
not
a V
alid
Par
tner
use
onl
y
THES
E eK
IT M
ATER
IALS
AR
E FO
R Y
OU
R U
SE IN
TH
IS C
LASS
RO
OM
ON
LY.
CO
PYIN
G e
KIT
MAT
ERIA
LS F
RO
M T
HIS
CO
MPU
TER
IS S
TRIC
TLY
PRO
HIB
ITED

Filter on valid-time columns to access active data only
SQL> select * from hr.emp as of PERIOD FOR user_time 2 to_date('01-DEC-1992', 'dd-mon-yyyy') ;
Filtering on Valid-Time Columns: Example 1
01-JAN-90 31-DEC-10
ADAM
01-JAN-91 31-DEC-11
SCOTT
01-JAN-92 31-DEC-12
JEAN
31-DEC-13JIM
01-JAN-93
01-JAN-94
MARIA
TOM
30-JUN-94
KIM
How do you filter on valid-time columns? Use the SELECT statement with the PERIOD FOR clause or use the DBMS_FLASHBACK_ARCHIVE procedure.
• There is one set of data that is “valid” based on its valid-start and valid-end times and the query time (AS OF or undecorated).
• On the other hand, there is the other set of rows where the query time falls outside the valid-start and valid-end times.
Both sets of rows data reside in the same table. However, by controlling the visibility of data to the valid rows, you can limit what queries and DMLs affect. Until now, you could do as-of and versions queries for transaction time. Now you can do as-of and versions queries for valid time.
For each new employee that you inserted in the table, you included the hire dates, valid-time start dates, and valid end dates. The dates represent the activeness of each row. These dates are entered by the application and correspond to valid dates. The time that the rows were inserted and committed in the table corresponds to the transaction date.
You can filter the active employees by using the following new PERIOD FOR clause. The query displays all active employees who were valid at the explicit date of '01-DEC-1992', which is the date that belongs to the valid period; that is, between USER_TIME_START and USER_TIME_END.
Oracle Database 12c: Backup and Recovery Workshop 14 - 32
Copyright © 2015, Oracle and/or its affiliates. All rights reserved.
Ora
cle
Uni
vers
ity a
nd E
rror :
You
are
not
a V
alid
Par
tner
use
onl
y
THES
E eK
IT M
ATER
IALS
AR
E FO
R Y
OU
R U
SE IN
TH
IS C
LASS
RO
OM
ON
LY.
CO
PYIN
G e
KIT
MAT
ERIA
LS F
RO
M T
HIS
CO
MPU
TER
IS S
TRIC
TLY
PRO
HIB
ITED

SQL> SELECT * FROM hr.emp VERSIONS PERIOD FOR user_time 2 BETWEEN to_date('31-DEC-2011','DD-MON-YYYY') 3 AND to_date('31-DEC-2012','DD-MON-YYYY');
Filtering on Valid-Time Columns: Example 2Use versions queries for valid-time.
01-JAN-90 31-DEC-10
ADAM
01-JAN-91 31-DEC-11
SCOTT
01-JAN-92 31-DEC-12
JEAN
31-DEC-13JIM
01-JAN-93
01-JAN-94
MARIA
TOM
30-JUN-94
KIM
You can filter the active employees by using the VERSIONS PERIOD FOR BETWEEN clause:
select * from hr.emp VERSIONS PERIOD FOR user_time
BETWEEN to_date('31-DEC-2011', 'dd-mon-yyyy')
AND to_date('31-DEC-2012', 'dd-mon-yyyy') ;
The query displays all employees whose VALID_TIME_START is less than or equal to '31-DEC-2011' and VALID_TIME_END greater than or equal to '31-DEC-2012'.
Queries that mix valid-time and transaction-time dimensions are called “bi-temporal queries.”
The example shows rows as of the specified transaction time that are valid now.
select * from hr.emp
as of period for user_time to_date('31-DEC-1992', 'dd-mon-yyyy')
as of timestamp to_date ('30-mar-2012','dd-mon-yyyy');
Oracle Database 12c: Backup and Recovery Workshop 14 - 33
Copyright © 2015, Oracle and/or its affiliates. All rights reserved.
Ora
cle
Uni
vers
ity a
nd E
rror :
You
are
not
a V
alid
Par
tner
use
onl
y
THES
E eK
IT M
ATER
IALS
AR
E FO
R Y
OU
R U
SE IN
TH
IS C
LASS
RO
OM
ON
LY.
CO
PYIN
G e
KIT
MAT
ERIA
LS F
RO
M T
HIS
CO
MPU
TER
IS S
TRIC
TLY
PRO
HIB
ITED

Using DBMS_FLASHBACK_ARCHIVE
• Visibility control applies to queries and DML.
• Full visibility applies to DDL.• Visibility set with DBMS_FLASHBACK_ARCHIVE:
– Set the visibility to data valid as of the given time.
– Set the visibility to data currently valid within the valid time period at the session level.
– Set the visibility to data to the full table level.
DBMS_FLASHBACK_ARCHIVE.ENABLE_AT_VALID_TIME('CURRENT')
DBMS_FLASHBACK_ARCHIVE.ENABLE_AT_VALID_TIME('ASOF',(to_timestamp('29-SEP-10 05.44.01 PM'))
DBMS_FLASHBACK_ARCHIVE.ENABLE_AT_VALID_TIME('ALL')
Users can modify visibility within a session via the new DBMS_FLASHBACK_ARCHIVEpackage. Visibility control applies to all SQL SELECT and DML statements.
DDLs will default to getting full visibility to the table data. For example, CTAS, online redefinition and ALTER TABLE MOVE operations will have full visibility of the table data. Hidden columns are also visible to the DDL operations, resulting in preservation of those columns and their data.
The first example sets the valid time visibility to ‘29-SEP-2010’, showing only rows overlapping the given date.
The second example sets the visibility to data currently valid within the period time at the session-level.
The third example sets the visibility to the full table, which is the default temporal table visibility.
Oracle Database 12c: Backup and Recovery Workshop 14 - 34
Copyright © 2015, Oracle and/or its affiliates. All rights reserved.
Ora
cle
Uni
vers
ity a
nd E
rror :
You
are
not
a V
alid
Par
tner
use
onl
y
THES
E eK
IT M
ATER
IALS
AR
E FO
R Y
OU
R U
SE IN
TH
IS C
LASS
RO
OM
ON
LY.
CO
PYIN
G e
KIT
MAT
ERIA
LS F
RO
M T
HIS
CO
MPU
TER
IS S
TRIC
TLY
PRO
HIB
ITED

Quiz
To use Temporal History, you must enable flashback archiving for which of the following?
a. The entire database
b. A specific tablespace
c. A specific table
Answer: c
Oracle Database 12c: Backup and Recovery Workshop 14 - 35
Copyright © 2015, Oracle and/or its affiliates. All rights reserved.
Ora
cle
Uni
vers
ity a
nd E
rror :
You
are
not
a V
alid
Par
tner
use
onl
y
THES
E eK
IT M
ATER
IALS
AR
E FO
R Y
OU
R U
SE IN
TH
IS C
LASS
RO
OM
ON
LY.
CO
PYIN
G e
KIT
MAT
ERIA
LS F
RO
M T
HIS
CO
MPU
TER
IS S
TRIC
TLY
PRO
HIB
ITED

Quiz
Choose the correct statement regarding the Temporal Validity feature.
a. Temporal Validity and temporal history cannot be used in the same query.
b. Temporal Validity visibility control can be set at session-level.
c. Temporal Validity columns are automatically updated byOracle.
Answer: b
Oracle Database 12c: Backup and Recovery Workshop 14 - 36
Copyright © 2015, Oracle and/or its affiliates. All rights reserved.
Ora
cle
Uni
vers
ity a
nd E
rror :
You
are
not
a V
alid
Par
tner
use
onl
y
THES
E eK
IT M
ATER
IALS
AR
E FO
R Y
OU
R U
SE IN
TH
IS C
LASS
RO
OM
ON
LY.
CO
PYIN
G e
KIT
MAT
ERIA
LS F
RO
M T
HIS
CO
MPU
TER
IS S
TRIC
TLY
PRO
HIB
ITED
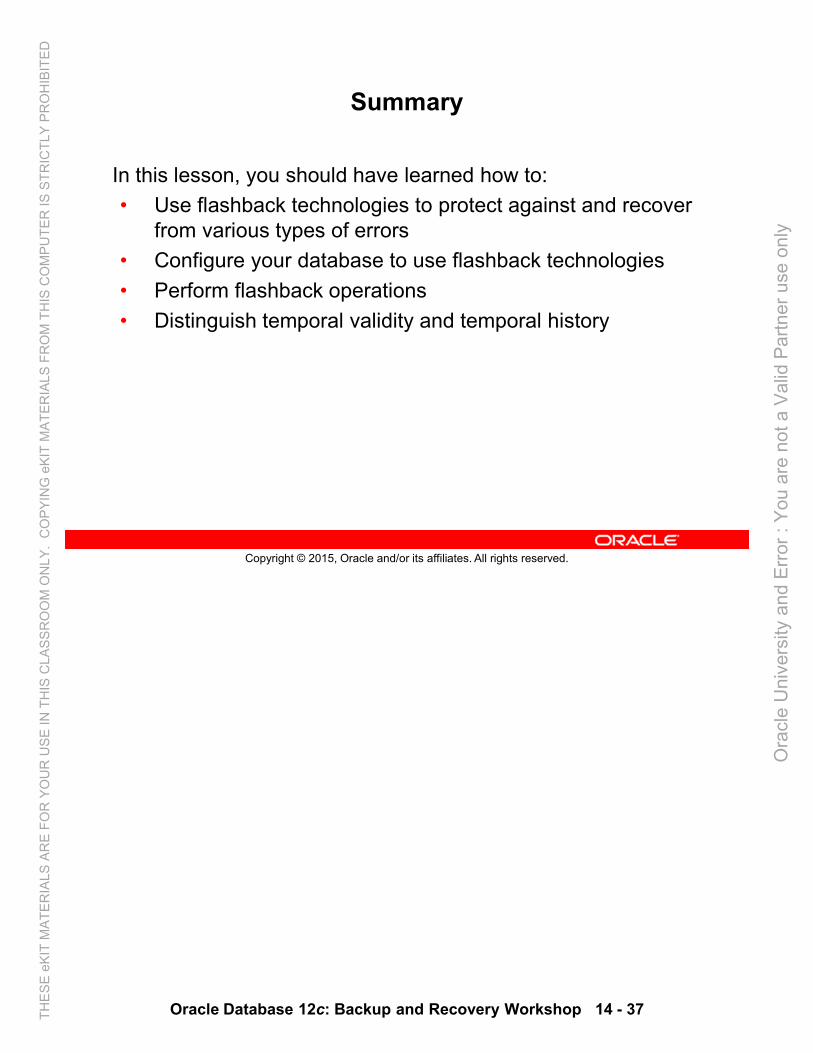
Summary
In this lesson, you should have learned how to:
• Use flashback technologies to protect against and recover from various types of errors
• Configure your database to use flashback technologies
• Perform flashback operations
• Distinguish temporal validity and temporal history
Oracle Database 12c: Backup and Recovery Workshop 14 - 37
Copyright © 2015, Oracle and/or its affiliates. All rights reserved.
Ora
cle
Uni
vers
ity a
nd E
rror :
You
are
not
a V
alid
Par
tner
use
onl
y
THES
E eK
IT M
ATER
IALS
AR
E FO
R Y
OU
R U
SE IN
TH
IS C
LASS
RO
OM
ON
LY.
CO
PYIN
G e
KIT
MAT
ERIA
LS F
RO
M T
HIS
CO
MPU
TER
IS S
TRIC
TLY
PRO
HIB
ITED

Practice Overview: Using Flashback Technologies
This practice covers the following topics:
1. Preparing to use Flashback technologies– Configuring undo retention– Verifying the value of the RECYCLEBIN parameter
2. Restoring a dropped table
3. Using Flashback Table to reverse a transaction
4. Collecting User Context in Temporal History Tables (optional)
Additional learning: There are several Flashback videos on YouTube and OLL.
Oracle Database 12c: Backup and Recovery Workshop 14 - 38
Copyright © 2015, Oracle and/or its affiliates. All rights reserved.
Ora
cle
Uni
vers
ity a
nd E
rror :
You
are
not
a V
alid
Par
tner
use
onl
y
THES
E eK
IT M
ATER
IALS
AR
E FO
R Y
OU
R U
SE IN
TH
IS C
LASS
RO
OM
ON
LY.
CO
PYIN
G e
KIT
MAT
ERIA
LS F
RO
M T
HIS
CO
MPU
TER
IS S
TRIC
TLY
PRO
HIB
ITED
Flashback Database
Copyright © 2015, Oracle and/or its affiliates. All rights reserved.
Ora
cle
Uni
vers
ity a
nd E
rror :
You
are
not
a V
alid
Par
tner
use
onl
y
THES
E eK
IT M
ATER
IALS
AR
E FO
R Y
OU
R U
SE IN
TH
IS C
LASS
RO
OM
ON
LY.
CO
PYIN
G e
KIT
MAT
ERIA
LS F
RO
M T
HIS
CO
MPU
TER
IS S
TRIC
TLY
PRO
HIB
ITED

Objectives
After completing this lesson, you should be able to:
• Describe Flashback Database architecture
• Configure your database to support Flashback Database
• Perform Flashback Database
Oracle Database 12c: Backup and Recovery Workshop 15 - 2
Copyright © 2015, Oracle and/or its affiliates. All rights reserved.
Ora
cle
Uni
vers
ity a
nd E
rror :
You
are
not
a V
alid
Par
tner
use
onl
y
THES
E eK
IT M
ATER
IALS
AR
E FO
R Y
OU
R U
SE IN
TH
IS C
LASS
RO
OM
ON
LY.
CO
PYIN
G e
KIT
MAT
ERIA
LS F
RO
M T
HIS
CO
MPU
TER
IS S
TRIC
TLY
PRO
HIB
ITED

Flashback Database: Continuous Data Protection
• Fast point-in-time recovery strategy
• Eliminates the need to restore a whole database backup
• Provides continuous data protection for the database
• Optimized: Before-change block logging
• Restores just changed blocks
• Replays log to restore the database to the desired time
• Provides fast recovery: Minutes, not hours
• Requires a single command to restore:FLASHBACK DATABASE TO '2:05 PM'
Data Files FlashbackLog
New BlockVersion
Disk Write
Old BlockVersion
Flashback Database is a unique database point-in-time recovery capability, which enables the database to be quickly “rewound” to a previous point in time. Flashback Database restores the database more quickly than traditional restore and recovery methods, because only the affected data blocks are restored and recovered.
Flashback Database uses flashback logs, which record old block versions. The diagram in the slide illustrates how the old block version is written to the flashback log and the new block version is written to the data file when writes are issued to disk and Flashback Database is enabled. When the FLASHBACK DATABASE command is issued, only the changed blocks are retrieved from the flashback logs. The blocks are then recovered with the appropriate archived logs to the required point in time.
Oracle Database 12c: Backup and Recovery Workshop 15 - 3
Copyright © 2015, Oracle and/or its affiliates. All rights reserved.
Ora
cle
Uni
vers
ity a
nd E
rror :
You
are
not
a V
alid
Par
tner
use
onl
y
THES
E eK
IT M
ATER
IALS
AR
E FO
R Y
OU
R U
SE IN
TH
IS C
LASS
RO
OM
ON
LY.
CO
PYIN
G e
KIT
MAT
ERIA
LS F
RO
M T
HIS
CO
MPU
TER
IS S
TRIC
TLY
PRO
HIB
ITED

Flashback Database
The Flashback Database operation:
• Works like a rewind button for the database
• Can be used in cases of logical data corruptions made by users
The database is corrupted.
The database is “rewound.”
"Press the rewind button"(FLASHBACK DATABASE).
Errors are generated.
With Flashback Database, you can quickly bring your database to an earlier point in time by undoing all the changes that have taken place since that time. This operation is fast because you do not need to restore backups. You can use this feature to undo changes that have resulted in logical data corruptions.
When you use Flashback Database, the Oracle Database server uses past block images to back out changes to the database. During normal database operation, the Oracle Database server occasionally logs these block images in flashback logs. Flashback logs are written sequentially and are not archived. The Oracle Database server automatically creates, deletes, and resizes flashback logs in the fast recovery area. You need to be aware of flashback logs only for monitoring performance and deciding how much disk space to allocate for them in the fast recovery area.
The time it takes to rewind a database with Flashback Database is proportional to how far back in time you need to go and the amount of database activity after the target time. The time it would take to restore and recover the whole database could be much longer. The before images in the flashback logs are used only to restore the database to a point in the past, and forward recovery is used to bring the database to a consistent state at some time in the past.
Oracle Database 12c: Backup and Recovery Workshop 15 - 4
Copyright © 2015, Oracle and/or its affiliates. All rights reserved.
Ora
cle
Uni
vers
ity a
nd E
rror :
You
are
not
a V
alid
Par
tner
use
onl
y
THES
E eK
IT M
ATER
IALS
AR
E FO
R Y
OU
R U
SE IN
TH
IS C
LASS
RO
OM
ON
LY.
CO
PYIN
G e
KIT
MAT
ERIA
LS F
RO
M T
HIS
CO
MPU
TER
IS S
TRIC
TLY
PRO
HIB
ITED

Flashback Database Architecture
Flashbackbuffer
Redo logbuffer
SGA
LGWR
RVWRFlashbacklogs
Redologs
… …
Buffer cache
1
Periodically log block-before
images.
Back out changesto database using
before images.
Do forward media recovery.
Everychange
Not everychange!
2
When you enable Flashback Database, the RVWR (Flashback Writer) background process is started. This background process sequentially writes Flashback Database data from the flashback buffer to the Flashback Database logs, which are circularly reused. Subsequently, when a FLASHBACK DATABASE command is issued, the flashback logs are used to restore to the blocks’ before images, and then redo data is used to roll forward to the desired flashback time.
The overhead of enabling Flashback Database depends on the read/write mix of the database workload. Because queries do not need to log any flashback data, the more write-intensive the workload, the higher the overhead of turning on Flashback Database.
Oracle Database 12c: Backup and Recovery Workshop 15 - 5
Copyright © 2015, Oracle and/or its affiliates. All rights reserved.
Ora
cle
Uni
vers
ity a
nd E
rror :
You
are
not
a V
alid
Par
tner
use
onl
y
THES
E eK
IT M
ATER
IALS
AR
E FO
R Y
OU
R U
SE IN
TH
IS C
LASS
RO
OM
ON
LY.
CO
PYIN
G e
KIT
MAT
ERIA
LS F
RO
M T
HIS
CO
MPU
TER
IS S
TRIC
TLY
PRO
HIB
ITED

Configuring Flashback Database
1. Configure the FRA. 3. Enable Flashback Database.
2. Set the retentiontarget.
SQL> ALTER SYSTEM SET2 DB_FLASHBACK_RETENTION_TARGET=2880 SCOPE=BOTH;
SQL> ALTER DATABASE FLASHBACK ON;
You can configure Flashback Database as follows:
1. Configure the fast recovery area.
2. Set the retention target with the DB_FLASHBACK_RETENTION_TARGET initialization parameter. You can specify an upper limit, in minutes, on how far back you want to be able to flash back the database. The example uses 2,880 minutes, which is equivalent to two days. This parameter is only a target and does not provide any guarantee. Your flashback time interval depends on how much flashback data has been kept in the fast recovery area.
3. Enable Flashback Database with the following command:ALTER DATABASE FLASHBACK ON;
Before you can issue the command to enable Flashback Database, the database must be configured for archiving. You can enable Flashback Database when the database is open.
You can determine whether Flashback Database is enabled with the following query:SELECT flashback_on FROM v$database;
You can disable Flashback Database with the ALTER DATABASE FLASHBACK OFF command. As a result, all existing Flashback Database logs are deleted automatically.
Oracle Database 12c: Backup and Recovery Workshop 15 - 6
Copyright © 2015, Oracle and/or its affiliates. All rights reserved.
Ora
cle
Uni
vers
ity a
nd E
rror :
You
are
not
a V
alid
Par
tner
use
onl
y
THES
E eK
IT M
ATER
IALS
AR
E FO
R Y
OU
R U
SE IN
TH
IS C
LASS
RO
OM
ON
LY.
CO
PYIN
G e
KIT
MAT
ERIA
LS F
RO
M T
HIS
CO
MPU
TER
IS S
TRIC
TLY
PRO
HIB
ITED

Flashback Database: Examples
• To flash back: Mount (in exclusive mode) the database.RMAN> FLASHBACK DATABASE TO TIME =
2> "TO_DATE('2009-05-27 16:00:00',3> 'YYYY-MM-DD HH24:MI:SS')";
SQL> FLASHBACK DATABASE 2 TO TIMESTAMP(SYSDATE-1/24);
SQL> FLASHBACK DATABASE TO SCN 53943;SQL> FLASHBACK DATABASE TO RESTORE POINT b4_load;
• To review changes: Open in read-only mode.• To finalize: Open in read/write mode with RESETLOGS.
RMAN> FLASHBACK DATABASE TO SCN=23565;
RMAN> FLASHBACK DATABASE 2> TO SEQUENCE=223 THREAD=1;
You can use the RMAN FLASHBACK DATABASE command to execute the Flashback Database operation. You can use SEQUENCE and THREAD to specify a redo log sequence number and thread as a lower limit. RMAN selects only files that can be used to flash back to, but not including, the specified sequence number.
Alternatively, you can use the SQL FLASHBACK DATABASE command to return the database to a past time or SCN. If you use the TO SCN clause, you must provide a number. If you specify TO TIMESTAMP, you must provide a time stamp value. You can also specify a restore point name.
You can monitor the Flashback Database progress with the V$SESSION_LONGOPS view.
Note: The database must be mounted in exclusive mode to issue the FLASHBACK DATABASEcommand and opened read-only to review changes. The database must be opened read/write with the RESETLOGS option when finished.
Oracle Database 12c: Backup and Recovery Workshop 15 - 7
Copyright © 2015, Oracle and/or its affiliates. All rights reserved.
Ora
cle
Uni
vers
ity a
nd E
rror :
You
are
not
a V
alid
Par
tner
use
onl
y
THES
E eK
IT M
ATER
IALS
AR
E FO
R Y
OU
R U
SE IN
TH
IS C
LASS
RO
OM
ON
LY.
CO
PYIN
G e
KIT
MAT
ERIA
LS F
RO
M T
HIS
CO
MPU
TER
IS S
TRIC
TLY
PRO
HIB
ITED

Flashback Database Considerations
• When the Flashback Database operation completes, open the database:– In read-only mode to verify that the correct target time or
SCN was used– With a RESETLOGS operation to allow DML
• You cannot use Flashback Database in the following situations:– The control file has been restored or re-created.
– A tablespace has been dropped.
– A data file has been reduced in size.
• Use the TO BEFORE RESETLOGS clause to flash back to before the last RESETLOGS operation.
In situations where you cannot use the Flashback Database feature, you should use an incomplete recovery operation to return the database to a specific time. After the Flashback Database operation is complete, you can open the database in read-only mode to verify that the correct target time or SCN was used. If not, you can flash back the database again, or perform a recovery to roll forward the database.
You cannot use Flashback Database to recover a data file that was dropped during the span of time you are flashing back. The dropped data file is added to the control file and marked offline, but it is not flashed back. Flashback Database cannot flash back a data file to a time after its creation and before the resize operation. If a file was resized during the span of time to which you are going to flash back the database, then you should take the file offline before beginning the Flashback Database operation. This is applicable for files that are shrunk rather than expanded. You can use Flashback Database with data files that you have configured for automatic extension. You can flash back to just before the last RESETLOGS operation by supplying the TO BEFORE RESETLOGS clause in the FLASHBACK DATABASE command.
Note: The flashback retention target is not an absolute guarantee that flashback will be available. If space is needed for required files in the fast recovery area, flashback logs may be deleted automatically.
Oracle Database 12c: Backup and Recovery Workshop 15 - 8
Copyright © 2015, Oracle and/or its affiliates. All rights reserved.
Ora
cle
Uni
vers
ity a
nd E
rror :
You
are
not
a V
alid
Par
tner
use
onl
y
THES
E eK
IT M
ATER
IALS
AR
E FO
R Y
OU
R U
SE IN
TH
IS C
LASS
RO
OM
ON
LY.
CO
PYIN
G e
KIT
MAT
ERIA
LS F
RO
M T
HIS
CO
MPU
TER
IS S
TRIC
TLY
PRO
HIB
ITED

Monitoring Flashback Database Information
To monitor the ability to meet your retention target:
• View the fast recovery area disk quota:
• Determine the current flashback window:
•
• Monitor logging in the Flashback Database logs:
SQL> SELECT estimated_flashback_size, 2 flashback_size3 FROM V$FLASHBACK_DATABASE_LOG;
SQL> SELECT *2 FROM V$FLASHBACK_DATABASE_STAT;
SQL> SELECT oldest_flashback_scn, 2 oldest_flashback_time3 FROM V$FLASHBACK_DATABASE_LOG;
It is important for you to monitor space usage of the fast recovery area so that you know how well you are meeting your retention target. Use the V$FLASHBACK_DATABASE_LOG view to monitor the Flashback Database retention target:
• ESTIMATED_FLASHBACK_SIZE uses previously logged flashback data to provide an estimate of how much disk space is needed in the fast recovery area for flashback logs to meet the current flashback retention target. The estimate is based on the workload since the instance was started, or during the most recent time interval equal to the flashback retention target, whichever is shorter.
• FLASHBACK_SIZE gives you the current size, in bytes, of the flashback data.
• OLDEST_FLASHBACK_SCN and OLDEST_FLASHBACK_TIME display the approximate lowest SCN and time to which you can flash back your database. CURRENT_SCN in V$DATABASE gives you the current database SCN.
Use the V$FLASHBACK_DATABASE_STAT view to monitor the overhead of logging flashback data in the Flashback Database logs. This view contains 24 hours of information, with each row representing a one-hour time interval. You can use this view to determine rate changes in the flashback data generation.
Oracle Database 12c: Backup and Recovery Workshop 15 - 9
Copyright © 2015, Oracle and/or its affiliates. All rights reserved.
Ora
cle
Uni
vers
ity a
nd E
rror :
You
are
not
a V
alid
Par
tner
use
onl
y
THES
E eK
IT M
ATER
IALS
AR
E FO
R Y
OU
R U
SE IN
TH
IS C
LASS
RO
OM
ON
LY.
CO
PYIN
G e
KIT
MAT
ERIA
LS F
RO
M T
HIS
CO
MPU
TER
IS S
TRIC
TLY
PRO
HIB
ITED

SQL> SELECT begin_time, end_time, flashback_data, db_data,
2 redo_data, estimated_flashback_size AS EST_FB_SZE
3 FROM V$FLASHBACK_DATABASE_STAT;
BEGIN_TIM END_TIME FLASHBACK_DATA DB_DATA REDO_DATA EST_FB_SZE--------- --------- -------------- ---------- ---------- ----------12-FEB-09 12-FEB-09 16384 0 24576 012-FEB-09 12-FEB-09 6594560 7471104 1533440 81592320012-FEB-09 12-FEB-09 17235968 12361728 5150920 83946700812-FEB-09 12-FEB-09 311648256 37249024 10272768 855195648
Based on this information, you may need to adjust the retention time or the fast recovery area size.
FLASHBACK_DATA and REDO_DATA represent the number of bytes of flashback data and redodata written, respectively, during the time interval, and DB_DATA gives the number of bytes of data blocks read and written. This view also contains the estimated flashback space needed for the interval.
You can query V$RECOVERY_FILE_DEST to view information regarding the fast recovery area. The column descriptions are:
• NAME: Fast recovery area name, indicating location string
• SPACE_LIMIT: Disk limit specified in the DB_RECOVERY_FILE_DEST_SIZE parameter
• SPACE_USED: Space used by fast recovery area files (in bytes)
• SPACE_RECLAIMABLE: Amount of space that can be reclaimed by deleting obsolete, redundant, and other low-priority files through the space management algorithmredundant, and other low priority files through the space management algorithm
• NUMBER_OF_FILES: Number of files
SQL> SELECT name, space_limit AS quota,2 space_used AS used,3 space_reclaimable AS reclaimable,4 number_of_files AS files5 FROM v$recovery_file_dest;
NAME QUOTA USED RECLAIMABLE FILES------------------------ ---------- ---------- ----------- -----/u01/flash_recovery_area 5368707120 2507809104 203386880 226
Oracle Database 12c: Backup and Recovery Workshop 15 - 10
Ora
cle
Uni
vers
ity a
nd E
rror :
You
are
not
a V
alid
Par
tner
use
onl
y
THES
E eK
IT M
ATER
IALS
AR
E FO
R Y
OU
R U
SE IN
TH
IS C
LASS
RO
OM
ON
LY.
CO
PYIN
G e
KIT
MAT
ERIA
LS F
RO
M T
HIS
CO
MPU
TER
IS S
TRIC
TLY
PRO
HIB
ITED

Guaranteed Restore Points
A guaranteed restore point ensures that you can perform a FLASHBACK DATABASE command to that SCN at any time.
SQL> CREATE RESTORE POINT before_upgrade2 GUARANTEE FLASHBACK DATABASE;
Like normal restore points, guaranteed restore points can be used as aliases for SCNs in recovery operations. A principal difference is that guaranteed restore points never age out of the control file and must be explicitly dropped. However, they also provide specific functionality related to the use of the Flashback Database feature.
Creating a guaranteed restore point at a particular SCN enforces the requirement that you can perform a Flashback Database operation to return your database to its state at that SCN, even if flashback logging is not enabled for your database. If flashback logging is enabled, creating a guaranteed restore point enforces the retention of flashback logs required for Flashback Database back to any point in time after the creation of the earliest guaranteed restore point.
A guaranteed restore point can be used to revert a whole database to a known good state days or weeks ago, as long as there is enough disk space in the fast recovery area to store the needed logs. As with normal restore points, guaranteed restore points can be used to specify a point in time for RECOVER DATABASE operations.
Note: Limitations that apply to Flashback Database also apply to guaranteed restore points. For example, shrinking a data file or dropping a tablespace can prevent flashing back the affected data files to the guaranteed restore point.
Oracle Database 12c: Backup and Recovery Workshop 15 - 11
Copyright © 2015, Oracle and/or its affiliates. All rights reserved.
Ora
cle
Uni
vers
ity a
nd E
rror :
You
are
not
a V
alid
Par
tner
use
onl
y
THES
E eK
IT M
ATER
IALS
AR
E FO
R Y
OU
R U
SE IN
TH
IS C
LASS
RO
OM
ON
LY.
CO
PYIN
G e
KIT
MAT
ERIA
LS F
RO
M T
HIS
CO
MPU
TER
IS S
TRIC
TLY
PRO
HIB
ITED

Flashback Database and Guaranteed Restore Points
To use guaranteed restore points, the database must satisfy the following prerequisites:• The COMPATIBLE initialization parameter must be set to
10.2 or greater.• The database must be in ARCHIVELOG mode.
• FLASHBACK DATABASE requires the use of archived redo logs starting from around the time of the restore point.
• A fast recovery area must be configured.
To support the use of guaranteed restore points, the database must satisfy the following prerequisites:
• The COMPATIBLE initialization parameter must be set to 10.2 or greater.
• The database must be running in ARCHIVELOG mode.
• To rewind the database to a guaranteed restore point, the FLASHBACK DATABASEcommand needs the archived redo logs starting from around the time of the restore point.
• A fast recovery area must be configured because the Oracle Database server stores the required logs in the fast recovery area.
• If Flashback Database is not enabled, the database must be mounted, not open, when creating the first guaranteed restore point (or if all previously created guaranteed restore points have been dropped).
Oracle Database 12c: Backup and Recovery Workshop 15 - 12
Copyright © 2015, Oracle and/or its affiliates. All rights reserved.
Ora
cle
Uni
vers
ity a
nd E
rror :
You
are
not
a V
alid
Par
tner
use
onl
y
THES
E eK
IT M
ATER
IALS
AR
E FO
R Y
OU
R U
SE IN
TH
IS C
LASS
RO
OM
ON
LY.
CO
PYIN
G e
KIT
MAT
ERIA
LS F
RO
M T
HIS
CO
MPU
TER
IS S
TRIC
TLY
PRO
HIB
ITED

Logging for Flashback Database and guaranteed restore points involves capturing images of data file blocks before changes are applied. The FLASHBACK DATABASE command can use these images to return the data files to their previous state. The chief differences between normal flashback logging and logging for guaranteed restore points are related to when blocks are logged and whether the logs can be deleted in response to space pressure in the fast recovery area. These differences affect space usage for logs and database performance.
If you enable Flashback Database and define one or more guaranteed restore points, then the database performs normal flashback logging. In this case, the recovery area retains the flashback logs required to flash back to any arbitrary time between the present and the earliest currently defined guaranteed restore point. Flashback logs are not deleted in response to space pressure if they are required to satisfy the guarantee.
Oracle Database 12c: Backup and Recovery Workshop 15 - 13
Ora
cle
Uni
vers
ity a
nd E
rror :
You
are
not
a V
alid
Par
tner
use
onl
y
THES
E eK
IT M
ATER
IALS
AR
E FO
R Y
OU
R U
SE IN
TH
IS C
LASS
RO
OM
ON
LY.
CO
PYIN
G e
KIT
MAT
ERIA
LS F
RO
M T
HIS
CO
MPU
TER
IS S
TRIC
TLY
PRO
HIB
ITED

Best Practices: Flashback Database
• Tune fast recovery area storage.– Use ASM, configure enough disk spindles, and so forth.
• Use physical standby database to test flashback logging.• Use V$FLASHBACK_DATABASE_LOG to size log space,
after running workload that runs longer than the flashback retention period.
• Create guaranteed restore point (GRP) without enabling flashback logging.– Saves disk space for workloads where the same blocks are
repeatedly updated
– Drop GRP to immediately reclaim space.
To achieve good performance for large production databases by using Flashback Database, Oracle recommends the following:
• Use a fast file system for your fast recovery area, preferably without operating system file caching. Files that are stored in the fast recovery area, including flashback logs, are typically large. Operating system file caching is typically not effective for these files, and may actually add CPU overhead due to reading from and writing to these files. Use a file system such as ASM.
• Configure enough disk spindles for the file system that will hold the fast recovery area. Multiple disk spindles may be needed to support the disk throughput required for the Oracle Database server to write the flashback logs effectively.
• If the storage system used to hold the fast recovery area does not have non-volatile RAM, try to configure the file system on top of striped storage volumes with a relatively small stripe size such as 128 K. This enables each write to the flashback logs to be spread across multiple spindles, thereby improving performance.
• Set the LOG_BUFFER initialization parameter to at least 8 MB. This ensures that the Oracle Database server allocates the maximum amount of memory (typically 16 MB) for writing flashback database logs.
Oracle Database 12c: Backup and Recovery Workshop 15 - 14
Copyright © 2015, Oracle and/or its affiliates. All rights reserved.
Ora
cle
Uni
vers
ity a
nd E
rror :
You
are
not
a V
alid
Par
tner
use
onl
y
THES
E eK
IT M
ATER
IALS
AR
E FO
R Y
OU
R U
SE IN
TH
IS C
LASS
RO
OM
ON
LY.
CO
PYIN
G e
KIT
MAT
ERIA
LS F
RO
M T
HIS
CO
MPU
TER
IS S
TRIC
TLY
PRO
HIB
ITED

Flashback retention should be set to at least 60 minutes. The Oracle Database server writes a metadata marker into the flashback logs approximately every 30 minutes. If the flashback retention is set to less than 60 minutes, a needed marker could be deleted if there is space pressure in the flashback log.
A restore point is a user-defined name that is associated with a database point in time. It is used with Flashback Database, Flashback Table, and RMAN. A guaranteed restore point (GRP) is a special type of restore point that ensures flashback logs are kept until the restore point is used or deleted. When flashback logging is enabled, flashback logs are generally created in proportion to archived redo logs generated during the same retention period. When flashback logging is disabled and a GRP is created, each changed block is logged only once to maintain the GRP. There is continuous logging of blocks when flashback logging is enabled. To save space, you can create a GRP for fast recovery of a specific set of transactions such as a batch job, then delete the GRP to reclaim the space.
Oracle Database 12c: Backup and Recovery Workshop 15 - 15
Ora
cle
Uni
vers
ity a
nd E
rror :
You
are
not
a V
alid
Par
tner
use
onl
y
THES
E eK
IT M
ATER
IALS
AR
E FO
R Y
OU
R U
SE IN
TH
IS C
LASS
RO
OM
ON
LY.
CO
PYIN
G e
KIT
MAT
ERIA
LS F
RO
M T
HIS
CO
MPU
TER
IS S
TRIC
TLY
PRO
HIB
ITED

Quiz
To use Flashback Database, you must enable it for which of the following?
a. The entire database
b. A specific tablespace
c. A specific table
Answer: a
Oracle Database 12c: Backup and Recovery Workshop 15 - 16
Copyright © 2015, Oracle and/or its affiliates. All rights reserved.
Ora
cle
Uni
vers
ity a
nd E
rror :
You
are
not
a V
alid
Par
tner
use
onl
y
THES
E eK
IT M
ATER
IALS
AR
E FO
R Y
OU
R U
SE IN
TH
IS C
LASS
RO
OM
ON
LY.
CO
PYIN
G e
KIT
MAT
ERIA
LS F
RO
M T
HIS
CO
MPU
TER
IS S
TRIC
TLY
PRO
HIB
ITED

Quiz
Guaranteed restore points do not age out of the control file and must be explicitly dropped.
a. True
b. False
Answer: a
Oracle Database 12c: Backup and Recovery Workshop 15 - 17
Copyright © 2015, Oracle and/or its affiliates. All rights reserved.
Ora
cle
Uni
vers
ity a
nd E
rror :
You
are
not
a V
alid
Par
tner
use
onl
y
THES
E eK
IT M
ATER
IALS
AR
E FO
R Y
OU
R U
SE IN
TH
IS C
LASS
RO
OM
ON
LY.
CO
PYIN
G e
KIT
MAT
ERIA
LS F
RO
M T
HIS
CO
MPU
TER
IS S
TRIC
TLY
PRO
HIB
ITED

Summary
In this lesson, you should have learned how to:
• Describe Flashback Database architecture
• Configure your database to support Flashback Database
• Perform Flashback Database
Oracle Database 12c: Backup and Recovery Workshop 15 - 18
Copyright © 2015, Oracle and/or its affiliates. All rights reserved.
Ora
cle
Uni
vers
ity a
nd E
rror :
You
are
not
a V
alid
Par
tner
use
onl
y
THES
E eK
IT M
ATER
IALS
AR
E FO
R Y
OU
R U
SE IN
TH
IS C
LASS
RO
OM
ON
LY.
CO
PYIN
G e
KIT
MAT
ERIA
LS F
RO
M T
HIS
CO
MPU
TER
IS S
TRIC
TLY
PRO
HIB
ITED

Practice Overview: Flashback Database
This practice covers the following topics:
1. Configuring your database for Flashback Database
2. Using Flashback Database
Additional learning: There are several flashback videos on YouTube and OLL.
Oracle Database 12c: Backup and Recovery Workshop 15 - 19
Copyright © 2015, Oracle and/or its affiliates. All rights reserved.
Ora
cle
Uni
vers
ity a
nd E
rror :
You
are
not
a V
alid
Par
tner
use
onl
y
THES
E eK
IT M
ATER
IALS
AR
E FO
R Y
OU
R U
SE IN
TH
IS C
LASS
RO
OM
ON
LY.
CO
PYIN
G e
KIT
MAT
ERIA
LS F
RO
M T
HIS
CO
MPU
TER
IS S
TRIC
TLY
PRO
HIB
ITED

Ora
cle
Uni
vers
ity a
nd E
rror :
You
are
not
a V
alid
Par
tner
use
onl
y
THES
E eK
IT M
ATER
IALS
AR
E FO
R Y
OU
R U
SE IN
TH
IS C
LASS
RO
OM
ON
LY.
CO
PYIN
G e
KIT
MAT
ERIA
LS F
RO
M T
HIS
CO
MPU
TER
IS S
TRIC
TLY
PRO
HIB
ITED

Transporting Data
Copyright © 2015, Oracle and/or its affiliates. All rights reserved.
Ora
cle
Uni
vers
ity a
nd E
rror :
You
are
not
a V
alid
Par
tner
use
onl
y
THES
E eK
IT M
ATER
IALS
AR
E FO
R Y
OU
R U
SE IN
TH
IS C
LASS
RO
OM
ON
LY.
CO
PYIN
G e
KIT
MAT
ERIA
LS F
RO
M T
HIS
CO
MPU
TER
IS S
TRIC
TLY
PRO
HIB
ITED

Objectives
After completing this lesson, you should be able to:
• Transport tablespaces between databases by using image copies or backup sets
• Transport databases by using data files or backup sets
Oracle Database 12c: Backup and Recovery Workshop 16 - 2
Copyright © 2015, Oracle and/or its affiliates. All rights reserved.
Ora
cle
Uni
vers
ity a
nd E
rror :
You
are
not
a V
alid
Par
tner
use
onl
y
THES
E eK
IT M
ATER
IALS
AR
E FO
R Y
OU
R U
SE IN
TH
IS C
LASS
RO
OM
ON
LY.
CO
PYIN
G e
KIT
MAT
ERIA
LS F
RO
M T
HIS
CO
MPU
TER
IS S
TRIC
TLY
PRO
HIB
ITED

Transporting Data Across Platforms
Transporting databases, data files, and tablespaces across platforms:
• Cross-platform transport (with different endian formats)
• Based on image copies and backup sets
• Use of inconsistent tablespace backups
Benefits:
• Reduced down time for platform migrations
• Choice of compression and multisection
• Not cataloged in control file, not used for regular restore operations
RMAN enables you to transport databases, data files, and tablespaces across platforms. This includes transporting tablespaces across platforms with different endian formats (byte ordering). You can convert a database on the destination host or source host. For platforms that have the same endian format, no conversion is needed.
• Cross-platform data transport can be based on image copies or on backup sets.
• You can also create cross-platform inconsistent tablespace backups by using image copies and backup sets. An inconsistent tablespace backup is one that is created when the tablespace is not in read-only mode.
With the use of backup sets, you can choose compression and multisection options, which reduce the overall transport time.
Note: RMAN does not catalog backup sets created for cross-platform transport in the control file. This ensures that backup sets created for cross-platform transportation are not used during regular restore operations.
Oracle Database 12c: Backup and Recovery Workshop 16 - 3
Copyright © 2015, Oracle and/or its affiliates. All rights reserved.
Ora
cle
Uni
vers
ity a
nd E
rror :
You
are
not
a V
alid
Par
tner
use
onl
y
THES
E eK
IT M
ATER
IALS
AR
E FO
R Y
OU
R U
SE IN
TH
IS C
LASS
RO
OM
ON
LY.
CO
PYIN
G e
KIT
MAT
ERIA
LS F
RO
M T
HIS
CO
MPU
TER
IS S
TRIC
TLY
PRO
HIB
ITED

Transporting Data with Minimum Down Time
Consider the required database open mode and endian format:
• Database transport: READ ONLY, same endian format
• Tablespace transport: READ WRITE, different endian format
Example:
1. Create a database incremental level 0 backup and apply it to the destination.
2. Create incremental backups and apply them to the destination.
3. Repeat: Create and apply incremental backups.4. Perform the final incremental backup in READ ONLY mode,
apply it, and open both databases consistent with each other.
Backups should get smaller and smaller.
When you develop a database transport strategy, you need to consider the endian format of the platforms and the database open mode.
• Transport at the database level requires the same endian format (on source and destination) and READ ONLY mode of the source database (which is not desirable for a database that users need to update frequently).
• Tablespaces and backup sets can be transported across platforms of different endian format, while the source database remains online (in READ WRITE mode).
The slide shows a sample workflow that considers these requirements. It is a strategy to minimize down time by performing most of the work when the database is open in READ WRITE mode. Only for the final step (a small incremental backup) is the database in READ ONLY mode, which is required so that both databases can be opened in a completely consistent state.
Note: MyOracle Support Note 1389592.1 provides information on how this use case can be implemented for Oracle databases release 11.2.
Oracle Database 12c: Backup and Recovery Workshop 16 - 4
Copyright © 2015, Oracle and/or its affiliates. All rights reserved.
Ora
cle
Uni
vers
ity a
nd E
rror :
You
are
not
a V
alid
Par
tner
use
onl
y
THES
E eK
IT M
ATER
IALS
AR
E FO
R Y
OU
R U
SE IN
TH
IS C
LASS
RO
OM
ON
LY.
CO
PYIN
G e
KIT
MAT
ERIA
LS F
RO
M T
HIS
CO
MPU
TER
IS S
TRIC
TLY
PRO
HIB
ITED

Transporting a Tablespace with Image Copies
Make tablespaces read-only.
Yes
Targetuses the same endian format?
Use Data Pump to extract metadata.
Convert data filesby using RMAN.
Ship data files and dump file to target.
Use Data Pump to import metadata.
Make tablespaces read/write.
No
Source
Target
To transport a tablespace from one platform to another (source to target), data files belonging to the tablespace set must be converted to a format that can be understood by the target or destination database. Although with Oracle Database, disk structures conform to a common format, it is possible for the source and target platforms to use different endian formats (byte ordering). When going to a different endian platform, you can use the CONVERT command of the RMAN utility to convert the byte ordering. This operation can be performed on either the source or the target platforms. For platforms that have the same endian format, no conversion is needed.
The slide graphic depicts the possible steps to transport tablespaces from a source platform to a target platform. However, it is possible to perform the conversion after shipping the files to the target platform. The last two steps must be executed on the target platform.
Basically, the procedure is the same as when using previous releases of the Oracle database server except when both platforms use different endian formats. It is assumed that both platforms are cross-transportable compliant.
Oracle Database 12c: Backup and Recovery Workshop 16 - 5
Copyright © 2015, Oracle and/or its affiliates. All rights reserved.
Ora
cle
Uni
vers
ity a
nd E
rror :
You
are
not
a V
alid
Par
tner
use
onl
y
THES
E eK
IT M
ATER
IALS
AR
E FO
R Y
OU
R U
SE IN
TH
IS C
LASS
RO
OM
ON
LY.
CO
PYIN
G e
KIT
MAT
ERIA
LS F
RO
M T
HIS
CO
MPU
TER
IS S
TRIC
TLY
PRO
HIB
ITED

Determining the Endian Format of a Platform
• Cross-platform transportable tablespaces:– Simplify moving data between data warehouse and data
marts
– Allow database migration from one platform to another
– Same character set on source and target platform
• List of supported platforms and their endian formats:
SQL> SELECT * FROM V$TRANSPORTABLE_PLATFORM;
• Determine the endian format of source and target platforms:
SELECT tp.endian_formatFROM v$transportable_platform tp, v$database spWHERE tp.platform_name = sp.platform_name;
Using transportable tablespaces, Oracle data files (containing table data, indexes, and almost every other Oracle database object) can be directly transported from one database to another. Transportable tablespaces also provide a mechanism for transporting metadata.
You can use the transportable tablespace feature to move data across platform boundaries (with the same character set). This simplifies the distribution of data from a data warehouse environment to data marts, which often run on smaller platforms. It also allows a database to be migrated from one platform to another by rebuilding the dictionary and transporting the user tablespaces.
Moving data by using transportable tablespaces is much faster than performing either an export/import or unload/load of the same data. This is because the data files containing all of the actual data are just copied to the destination location, and you use Data Pump to transfer only the metadata of the tablespace objects to the new database.
To be able to transport data files from one platform to another, you must ensure that both the source system and the target system are running on one of the supported platforms. Query V$TRANSPORTABLE_PLATFORM to determine whether the endian ordering is the same on both platforms. V$DATABASE has two columns that can be used to determine your own (source) platform name and platform identifier.
Oracle Database 12c: Backup and Recovery Workshop 16 - 6
Copyright © 2015, Oracle and/or its affiliates. All rights reserved.
Ora
cle
Uni
vers
ity a
nd E
rror :
You
are
not
a V
alid
Par
tner
use
onl
y
THES
E eK
IT M
ATER
IALS
AR
E FO
R Y
OU
R U
SE IN
TH
IS C
LASS
RO
OM
ON
LY.
CO
PYIN
G e
KIT
MAT
ERIA
LS F
RO
M T
HIS
CO
MPU
TER
IS S
TRIC
TLY
PRO
HIB
ITED

Using the RMAN CONVERT Command
RMAN:
• Converts tablespaces, data files, or databases to the format of a destination platform
• Does not change input files
• Writes converted files to output destination
• Can convert on source or destination platform
• Assumes you initiate the data transfer
rman target sys@orclRMAN> ALTER TABLESPACE bartbs READ ONLY;
RMAN> CONVERT TABLESPACE bartbsTO PLATFORM 'Solaris Operating System (x86-64)'FORMAT '/tmp/transport/%U';
You use the RMAN CONVERT command to convert a tablespace, data file, or database to the format of a destination platform in preparation for transport across different platforms:
• CONVERT DATAFILE
• CONVERT TABLESPACE
• CONVERT DATABASE
Input files are not altered by CONVERT because the conversion is not performed in place. Instead, RMAN writes converted files to a specified output destination.
When you use the RMAN CONVERT command to convert data, you can either convert the data on the source platform after running Data Pump export, or you can convert it on the target platform before running Data Pump import. In either case, you must transfer the data files from the source system to the target system.
Restrictions: The CONVERT command does not process user data types that require endian conversions. To transport objects between databases that are built on underlying types that store data in a platform-specific format, use the Data Pump Import and Export utilities.
For detailed prerequisites, usage, restrictions, and syntax, see the Oracle Database Backup and Recovery Reference and the Oracle Database Administrator’s Guide.
Oracle Database 12c: Backup and Recovery Workshop 16 - 7
Copyright © 2015, Oracle and/or its affiliates. All rights reserved.
Ora
cle
Uni
vers
ity a
nd E
rror :
You
are
not
a V
alid
Par
tner
use
onl
y
THES
E eK
IT M
ATER
IALS
AR
E FO
R Y
OU
R U
SE IN
TH
IS C
LASS
RO
OM
ON
LY.
CO
PYIN
G e
KIT
MAT
ERIA
LS F
RO
M T
HIS
CO
MPU
TER
IS S
TRIC
TLY
PRO
HIB
ITED

Quiz
Select the statements that are true:a. The RMAN CONVERT command performs an in-place
conversion, so your input files are changed before they are transported to the destination.
b. Read/write tablespaces need to be in read-only mode at the time of an endian conversion.
c. You can transport databases into a data warehouse environment.
Answer: b, c
Oracle Database 12c: Backup and Recovery Workshop 16 - 8
Copyright © 2015, Oracle and/or its affiliates. All rights reserved.
Ora
cle
Uni
vers
ity a
nd E
rror :
You
are
not
a V
alid
Par
tner
use
onl
y
THES
E eK
IT M
ATER
IALS
AR
E FO
R Y
OU
R U
SE IN
TH
IS C
LASS
RO
OM
ON
LY.
CO
PYIN
G e
KIT
MAT
ERIA
LS F
RO
M T
HIS
CO
MPU
TER
IS S
TRIC
TLY
PRO
HIB
ITED

Transporting Data with Backup Sets
Data transport
Destination?
TO PLATFORM
Endian conversion
Source Database
Backup data
Endian conversionFOR TRANSPORT
Metadata
Backup data
Destination Database
Prerequisites
• COMPATIBLE=12.0 (or greater)• READ ONLY mode for creation of cross-platform database backup• Database in READ WRITE mode for creation of cross-platform
tablespace backup
1
2
4
3
5Metadata
The graphic in the slide illustrates transporting data with backup sets:1. Before you create a backup set that can be used for cross-platform data transportation,
the following prerequisites must be met:
- COMPATIBLE parameter must be set to 12.0 or greater.
- To transport an entire database, the source database must be open in read-only mode, because the SYS and SYSAUX tablespaces participate in the transport.
- When you use the DATAPUMP clause, the database must be open in read/write mode, so that Data Pump can access the metadata.
2. There are two alternatives that affect the location of the endian conversion (if needed).The FOR TRANSPORT clause indicates that the backup set can be transported to any destination database. If the destination database uses an endian format that is different from that of the source database, the endian format conversion is performed on the destination database. The TO PLATFORM clause indicates that the conversion performs on the source database. The DATAPUMP clause indicates that an export dump file for the tablespaces must be created. In this case, the database must be opened in read/write mode. The export can be performed after the last incremental backup.
Oracle Database 12c: Backup and Recovery Workshop 16 - 9
Copyright © 2015, Oracle and/or its affiliates. All rights reserved.
Ora
cle
Uni
vers
ity a
nd E
rror :
You
are
not
a V
alid
Par
tner
use
onl
y
THES
E eK
IT M
ATER
IALS
AR
E FO
R Y
OU
R U
SE IN
TH
IS C
LASS
RO
OM
ON
LY.
CO
PYIN
G e
KIT
MAT
ERIA
LS F
RO
M T
HIS
CO
MPU
TER
IS S
TRIC
TLY
PRO
HIB
ITED

3. A tablespace indicates metadata and backup data of the source database.
4. The grey arrow indicates the data transport.
5. Backup data and metadata and a tablespace are transported in the destination database.
Oracle Database 12c: Backup and Recovery Workshop 16 - 10
Ora
cle
Uni
vers
ity a
nd E
rror :
You
are
not
a V
alid
Par
tner
use
onl
y
THES
E eK
IT M
ATER
IALS
AR
E FO
R Y
OU
R U
SE IN
TH
IS C
LASS
RO
OM
ON
LY.
CO
PYIN
G e
KIT
MAT
ERIA
LS F
RO
M T
HIS
CO
MPU
TER
IS S
TRIC
TLY
PRO
HIB
ITED

Process Steps: 1
1. Verify the prerequisites.
2. Start an RMAN session in the source database.
3. Query the exact name of the destination platform.
4. Change the tablespace to read-only.
5. Perform a cross-platform transportable backup and a Data Pump export.– Conversion on the destination host
– Conversion on the source host
RMAN> BACKUP FOR TRANSPORT FORMAT '/bkp/test.bck' DATAPUMP FORMAT '/bkp/test.dmp' TABLESPACE test;
Metadata
SourceDatabase
RMAN> ALTER TABLESPACE test READ ONLY;
RMAN> BACKUP TO PLATFORM 'HP Tru64 UNIX' FORMAT '/bkp/test.bck' DATAPUMP FORMAT '/bkp/test.dmp' TABLESPACE test;
1. Verify the prerequisites: The source database must be opened in read/write mode.
2. Start an RMAN session and connect to the target instance.
3. To transport tablespaces across platforms, query the exact name of the destination platform.
4. Change the tablespace to read-only.
5. Back up the source tablespace by using the BACKUP command with the TO PLATFORMor FOR TRANSPORT clause to indicate where the conversion takes place. Use the DATAPUMP clause to indicate the need for an export dump file of the tablespace metadata.
Note: The ALLOW INCONSISTENT clause of the BACKUP command enables you to back up tablespaces that are not in read-only mode. Although the backup is created, you cannot plug these tablespaces directly in to the target database because they are inconsistent. You must later create an incremental backup of the tablespaces when they are in read-only mode. This incremental backup must contain the DATAPUMP clause that creates an export dump file of the tablespace metadata.
Oracle Database 12c: Backup and Recovery Workshop 16 - 11
Copyright © 2015, Oracle and/or its affiliates. All rights reserved.
Ora
cle
Uni
vers
ity a
nd E
rror :
You
are
not
a V
alid
Par
tner
use
onl
y
THES
E eK
IT M
ATER
IALS
AR
E FO
R Y
OU
R U
SE IN
TH
IS C
LASS
RO
OM
ON
LY.
CO
PYIN
G e
KIT
MAT
ERIA
LS F
RO
M T
HIS
CO
MPU
TER
IS S
TRIC
TLY
PRO
HIB
ITED

Process Steps: 2
6. Move the backup sets and the Data Pump export
dump file to the destination host.7. Connect to the destination host as TARGET.
8. Restore the cross-transportable backup and the Data Pump export.
RMAN> RESTORE FOREIGN TABLESPACE test FORMAT '/oracle/test.dbf'FROM BACKUPSET '/bkp/test.bck'DUMP FILE FROM BACKUPSET '/bkp/test.dmp' ;
Meta data
Destination Database
6. Disconnect from the source database and move the backup sets and the Data Pump export dump file to the destination host. You can use operating system utilities for this task.
7. Connect to the destination host, to which the tablespace is transported, as TARGET. Ensure that the destination database is opened in read-write mode.
8. Use the RESTORE command in the destination database as shown in the slide. TheFOREIGN TABLESPACE clause points to the HP source data file. The FORMAT clause indicates the destination location. The DUMP FILE FROM BACKUPSET clause restores the required metadata from the dump file.
An additional example:
1. Create cross-platform, inconsistent, incremental backups with the ALLOW INCONSISTENT clause:
BACKUP INCREMENTAL FROM SCN=2720649 FOR TRANSPORT ALLOW INCONSISTENT FORMAT '/home/u_inc1.bkp' TABLESPACE users;
2. Restore the inconsistent cross-platform tablespace backup with the RESTORE FOREIGN TABLESPACE command.
3. Recover the restored data files copies with cross-platform incremental backups with theRECOVER FOREIGN DATAFILECOPY command.
Oracle Database 12c: Backup and Recovery Workshop 16 - 12
Copyright © 2015, Oracle and/or its affiliates. All rights reserved.
Ora
cle
Uni
vers
ity a
nd E
rror :
You
are
not
a V
alid
Par
tner
use
onl
y
THES
E eK
IT M
ATER
IALS
AR
E FO
R Y
OU
R U
SE IN
TH
IS C
LASS
RO
OM
ON
LY.
CO
PYIN
G e
KIT
MAT
ERIA
LS F
RO
M T
HIS
CO
MPU
TER
IS S
TRIC
TLY
PRO
HIB
ITED

Database Transport: Using Data Files
• Generalize the transportable tablespace feature.
• Data can easily be distributed from a data warehousing environment to data marts, which are usually on smaller platforms.
• A database can be migrated from one platform to another very quickly.
Platform X Platform Y
Database files transfer
Same “endianness”
Existing database New database
With the transportable tablespace feature, moving data across different platforms becomes much faster. However, metadata still needs to be unloaded, because the system tablespace cannot be transported.
The purpose of the database transport feature is to provide a fast and easy way to transport a database across different platforms with the same endian format. However, the source platform and the target platform can have different disk alignments. For example, HP-UX and Solaris both have big endian, but the disk alignment is eight on HP-UX and four on Solaris.
To transport databases from one platform to another, you must ensure that both the source system and the target system are running on one of the platforms that are listed in V$TRANSPORTABLE_PLATFORM and that both of them have the same endian format.
For example, you can transport a database running on Linux IA (32-bit) to one of the Windows platforms.
Unlike transportable tablespace, where there is a target database to plug data into, this feature creates a new database on the target platform. The newly created database contains the same data as the source database. Except for things such as database name, instance name, and location of files, the new database also has the same settings as the source database.
Note: Transporting database is faster than using Data Pump to move data.
Oracle Database 12c: Backup and Recovery Workshop 16 - 13
Copyright © 2015, Oracle and/or its affiliates. All rights reserved.
Ora
cle
Uni
vers
ity a
nd E
rror :
You
are
not
a V
alid
Par
tner
use
onl
y
THES
E eK
IT M
ATER
IALS
AR
E FO
R Y
OU
R U
SE IN
TH
IS C
LASS
RO
OM
ON
LY.
CO
PYIN
G e
KIT
MAT
ERIA
LS F
RO
M T
HIS
CO
MPU
TER
IS S
TRIC
TLY
PRO
HIB
ITED

Database Transportation Procedure
Sourcesystem
Read-only
Open database in READ ONLY modeand COMPATIBLE=10.0.0
Targetsystem
Read-onlyCONVERT
DATABASETO PLATFORM
Read-only
Read-only
CONVERTDATABASEON TARGET
Shipfiles
Read-only
Read-only
Read-only
Shipfiles
OR
Read-only
Before you can transport your database, you must open it in READ ONLY mode. Then use RMAN to convert the necessary data files of the database.
When you do the conversion on the source platform, the RMAN command CONVERT DATABASE generates a script containing the correct CREATE CONTROLFILE RESETLOGScommand that is used on the target system to create the new database. The CONVERT DATABASE command then converts all identified data files so that they can be used on the target system. You then ship the converted data files and the generated script to the target platform. By executing the generated script on the target platform, you create a new copy of your database.
For conversion on the target platform, the CONVERT DATABASE command (which is executed on the source system) generates only two scripts for the target system to convert the data files, and to re-create the control files for the new database. Then, you ship the identified data files and both scripts to the target platform. The first script uses the existing CONVERT DATAFILE RMAN command to perform the conversion. The second script issues the CREATE CONTROLFILE RESETLOGS SQL command with the converted data files to create the new database.
Note: The source database must be running with the COMPATIBLE initialization parameter set to 10.0.0 or higher. All identified tablespaces must have been READ WRITE at least once since COMPATIBLE was set to 10.0.0 or higher.
Oracle Database 12c: Backup and Recovery Workshop 16 - 14
Copyright © 2015, Oracle and/or its affiliates. All rights reserved.
Ora
cle
Uni
vers
ity a
nd E
rror :
You
are
not
a V
alid
Par
tner
use
onl
y
THES
E eK
IT M
ATER
IALS
AR
E FO
R Y
OU
R U
SE IN
TH
IS C
LASS
RO
OM
ON
LY.
CO
PYIN
G e
KIT
MAT
ERIA
LS F
RO
M T
HIS
CO
MPU
TER
IS S
TRIC
TLY
PRO
HIB
ITED

Database Transportation: Conversion
Tempfiles
Backupfiles
Controlfiles
Redologfiles
BFILEsdirectories
external tablespassword file
spfile pfile
Undo TBS
SYSTEM
SYSAUX
TBS1
TBSn
…
Undo TBS
SYSTEM
SYSAUX
TBS1
TBSn
…
Trace files
RMAN generates transportscript to re-create them.
RMAN converts data files(reformats undo). RMAN creates a pfile.
RMAN asks you to redefine:
The diagram shows how different parts of a database are transported to the target platform or re-created on the target platform.
Redo and undo information of the source database are discarded. Undo segments contain change vectors, which currently cannot be converted. This is the reason why you must cleanly shut down the instance before you open the database in read-only mode.
To ensure that undo records cannot be accessed (for consistent reads or flashback) after the database is transported to its target platform, undo segment headers are converted so that any attempt to access the undo records receives the “ORA-01555 Snapshot too old” error.
Oracle Database 12c: Backup and Recovery Workshop 16 - 15
Copyright © 2015, Oracle and/or its affiliates. All rights reserved.
Ora
cle
Uni
vers
ity a
nd E
rror :
You
are
not
a V
alid
Par
tner
use
onl
y
THES
E eK
IT M
ATER
IALS
AR
E FO
R Y
OU
R U
SE IN
TH
IS C
LASS
RO
OM
ON
LY.
CO
PYIN
G e
KIT
MAT
ERIA
LS F
RO
M T
HIS
CO
MPU
TER
IS S
TRIC
TLY
PRO
HIB
ITED

Database Transportation: Example 1
$ sqlplus / as sysdbaSQL> startup mount;SQL> alter database open read only;SQL> host rman target=/RMAN> CONVERT DATABASE TRANSPORT SCRIPT 'crdb.sql' NEW DATABASE 'newdb' TO PLATFORM 'Microsoft Windows IA (32-bit)' FORMAT '/tmp/%U';
Source
$ sqlplus / as sysdbaSQL> @crdb.sql
Target
Ship data files, pfile, and crdb.sql
5
4
3
2
1
DBMS_TDB.CHECK_DB('Microsoft Windows IA (32 bits)')
To transport a database on Linux IA (32-bit) to Windows platform and rename the new database to newdb, perform the following steps if the conversion of the data files is done on the source platform:
1. Open the source database in read-only mode.
2. Run the PL/SQL function: DBMS_TDB.CHECK_DB('Microsoft Windows IA (32 bits)'). This procedure checks whether the database can be transported to the target platform.
3. Issue the following RMAN command:
convert database transport script 'crdb.sql' new database 'newdb' to platform 'Microsoft Windows IA (32 bits)' format '/tmp/%U';
RMAN generates the data files and a pfile for the new database, and a script called crdb.sql in the /tmp directory. crdb.sql creates a database called newdb.
4. Ship all the data files, the pfile, and the script to the target platform.
5. Run crdb.sql to create the database on the target platform.
Oracle Database 12c: Backup and Recovery Workshop 16 - 16
Copyright © 2015, Oracle and/or its affiliates. All rights reserved.
Ora
cle
Uni
vers
ity a
nd E
rror :
You
are
not
a V
alid
Par
tner
use
onl
y
THES
E eK
IT M
ATER
IALS
AR
E FO
R Y
OU
R U
SE IN
TH
IS C
LASS
RO
OM
ON
LY.
CO
PYIN
G e
KIT
MAT
ERIA
LS F
RO
M T
HIS
CO
MPU
TER
IS S
TRIC
TLY
PRO
HIB
ITED

Database Transportation: Example 2
$ sqlplus / as sysdbaSQL> startup mount;SQL> alter database open read only;SQL> host rman target=/RMAN> CONVERT DATABASE ON TARGET PLATFORM CONVERT SCRIPT 'cnvt.sql' TRANSPORT SCRIPT 'crdb.sql' NEW DATABASE 'newdb' FORMAT '/tmp/%U';
$ sqlplus / as sysdbaSQL> host rman target=/RMAN> @cnvt.sqlRMAN> exit;SQL> @crdb.sql
Ship data files, pfile, cnvt.sql, crdb.sql
5
4
3
12
DBMS_TDB.CHECK_DB('Microsoft Windows IA (32 bits)')
6
Perform the following steps if the conversion of the data files is done on the target platform:
1. Open the source database in read-only mode.
2. Run the following PL/SQL function: DBMS_TDB.CHECK_DB('Microsoft Windows IA (32 bits)')This procedure checks whether the database can be transported to the target platform.
3. Issue the following RMAN command:convert database on target platform convert script 'cnvt.sql' transport script 'crdb.sql' new database 'newdb' format '/tmp/%U';
RMAN generates the data files and a pfile for the new database, a script called cnvt.sql to convert the data files on the target platform, and a script called crdb.sqlto create the new database called newdb on the target platform. The name of the target platform is not needed because the command puts the name of the source platform in the cnvt.sql script. This script contains the RMAN command: convert datafile <list of data files> from platform 'Linux IA (32-bit)';
4. Ship all the data files, the pfile, and the scripts to the target platform.
5. Run the cnvt.sql script in RMAN to convert the data files on the target platform.
6. Run crdb.sql to create a database on the target platform.
Oracle Database 12c: Backup and Recovery Workshop 16 - 17
Copyright © 2015, Oracle and/or its affiliates. All rights reserved.
Ora
cle
Uni
vers
ity a
nd E
rror :
You
are
not
a V
alid
Par
tner
use
onl
y
THES
E eK
IT M
ATER
IALS
AR
E FO
R Y
OU
R U
SE IN
TH
IS C
LASS
RO
OM
ON
LY.
CO
PYIN
G e
KIT
MAT
ERIA
LS F
RO
M T
HIS
CO
MPU
TER
IS S
TRIC
TLY
PRO
HIB
ITED

Database Transportation: Considerations
• Create the password file on the target platform.• Transport the BFILEs used in the source database.
• The generated PFILE and transport script use OMF.• Use DBNEWID to change the DBID.
Redo logs, control files, and tempfiles are not transported. They are re-created for the new database on the target platform. As a result, the new database on the target platform must be opened with the RESETLOGS option.
If a password file is used, it is not transported and you need to create it on the target platform. This is because the types of file names allowed for the password file are OS specific. However, the output of the CONVERT DATABASE command lists all the usernames and their system privileges, and advises to re-create the password file and add entries for these users on the target platform.
The CONVERT DATABASE command lists all the directory objects and objects that use BFILEdata types or external tables in the source database. You may need to update these objects with new directory and file names. If BFILEs are used in the database, you have to transport the BFILEs.
The generated PFILE and transport script use Oracle Managed Files (OMF) for database files. If you do not want to use OMF, you must modify the PFILE and transport script.
The transported database has the same DBID as the source database. You can use the DBNEWID utility to change the DBID. In the transport script as well as the output of the CONVERT DATABASE command, you are prompted to use the DBNEWID utility to change the database ID.
Oracle Database 12c: Backup and Recovery Workshop 16 - 18
Copyright © 2015, Oracle and/or its affiliates. All rights reserved.
Ora
cle
Uni
vers
ity a
nd E
rror :
You
are
not
a V
alid
Par
tner
use
onl
y
THES
E eK
IT M
ATER
IALS
AR
E FO
R Y
OU
R U
SE IN
TH
IS C
LASS
RO
OM
ON
LY.
CO
PYIN
G e
KIT
MAT
ERIA
LS F
RO
M T
HIS
CO
MPU
TER
IS S
TRIC
TLY
PRO
HIB
ITED

Database Transport with Backup Sets: 1
1. Verify the prerequisites: – COMPATIBLE: Greater or equal 12.0
– OPEN_MODE: Read only
2. Start an RMAN session to connect to the source database.
3. Query the exact name of the destination platform in V$TRANSPORTABLE_PLATFORM.
4. Back up the source database:
Or:RMAN> BACKUP FOR TRANSPORT FORMAT '/bkp_dir/trans_U%'
DATABASE;
RMAN> BACKUP TO PLATFORM='HP Tru64 UNIX'FORMAT '/bkp_dir/trans_U%' DATABASE;
RMAN> CONNECT TARGET sys/p@orcl
Metadata
SourceDatabase
1. Verify the prerequisites (the source database must be open in read-only mode if the whole database is transported).
2. Start an RMAN session and connect to the target instance.
3. For performing cross-platform database transport, you may need the exact name of the destination platform to which you are transporting data.
SELECT PLATFORM_ID, PLATFORM_NAME, ENDIAN_FORMAT
FROM V$TRANSPORTABLE_PLATFORM
WHERE UPPER(PLATFORM_NAME) LIKE '%LINUX%';
4. Back up the source database using the BACKUP command with TO PLATFORM or FOR TRANSPORT. The FORMAT clause indicates the directory where the backup sets containing the data required for cross-platform database transportation are stored on the source host. In the first example, the conversion will take place on the source host and the files stored in the /bk directory are already converted for HP Tru64 UNIX platform.In the second example, the conversion takes place on the destination host during the restore command and the files stored in the /bk directory on the source host are not converted yet.
Oracle Database 12c: Backup and Recovery Workshop 16 - 19
Copyright © 2015, Oracle and/or its affiliates. All rights reserved.
Ora
cle
Uni
vers
ity a
nd E
rror :
You
are
not
a V
alid
Par
tner
use
onl
y
THES
E eK
IT M
ATER
IALS
AR
E FO
R Y
OU
R U
SE IN
TH
IS C
LASS
RO
OM
ON
LY.
CO
PYIN
G e
KIT
MAT
ERIA
LS F
RO
M T
HIS
CO
MPU
TER
IS S
TRIC
TLY
PRO
HIB
ITED

Database Transport with Backup Sets: 2
5. Disconnect from the source database.
6. Move the backup sets and the Data Pump export
dump file to the destination host.7. Connect to the destination host as TARGET.
8. Restore the full backup set with the RESTORE command.
Metadata
Destination Database
RMAN> RESTORE FOREIGN DATABASE TO NEW FROM BACKUPSET '/bkp_dir/trans_U%';
RMAN> CONNECT TARGET sys/p@orcl2
5. Disconnect from the source database.
6. Move the backup sets created by the BACKUP command and the Data Pump export dump file to the destination host. You can use operating system utilities to move the backup sets from the source host to the destination host.
7. Connect to the destination host, to which the database must be transported, as TARGET. Ensure that the destination database is not mounted.
8. Use the RESTORE command to restore the data in the destination database. RESTORE FOREIGN DATABASE TO NEW
FROM BACKUPSET '/bkp_dir/U%';
where FOREIGN DATABASE is the source data files and NEW specifies that the restored foreign data files must use new OMF-specified names in the destination database. The backup set U% is stored in the /bkp_dir directory of the destination host.
Oracle Database 12c: Backup and Recovery Workshop 16 - 20
Copyright © 2015, Oracle and/or its affiliates. All rights reserved.
Ora
cle
Uni
vers
ity a
nd E
rror :
You
are
not
a V
alid
Par
tner
use
onl
y
THES
E eK
IT M
ATER
IALS
AR
E FO
R Y
OU
R U
SE IN
TH
IS C
LASS
RO
OM
ON
LY.
CO
PYIN
G e
KIT
MAT
ERIA
LS F
RO
M T
HIS
CO
MPU
TER
IS S
TRIC
TLY
PRO
HIB
ITED

Transporting Inconsistent Tablespaces
Modification of the previous workflow:
• Create cross-platform inconsistent incremental backups with the ALLOW INCONSISTENT clause.
• Restore the inconsistent cross-platform tablespace backup with the RESTORE FOREIGN TABLESPACE command.
• Recover restored data files copies with cross-platform incremental backups with the RECOVER FOREIGN DATAFILECOPY command.
Oracle Database 12c: Backup and Recovery Workshop 16 - 21
To use inconsistent tablespaces in a workflow like the one described on the previous pages:
• Create a cross-platform inconsistent incremental backup with the ALLOW INCONSISTENT clause:
BACKUP INCREMENTAL FROM SCN=2720649 FOR TRANSPORT ALLOW INCONSISTENT FORMAT '/u01/backup/inc1.bkp' TABLESPACE users;
• Restore the inconsistent cross-platform tablespace backup with the RESTORE FOREIGN TABLESPACE command.
• Recover restored data file copies with cross-platform incremental backups by using theRECOVER FOREIGN DATAFILECOPY command.
Note: The ALLOW INCONSISTENT clause enables you to back up tablespaces that are not in read-only mode. Although the backup is created, you cannot plug these tablespaces directly in to the target database because they are inconsistent. You must later create an incremental backup of the tablespaces when they are in read-only mode. This incremental backup must contain the DATAPUMP clause that creates an export dump file of the tablespace metadata.
Copyright © 2015, Oracle and/or its affiliates. All rights reserved.
Ora
cle
Uni
vers
ity a
nd E
rror :
You
are
not
a V
alid
Par
tner
use
onl
y
THES
E eK
IT M
ATER
IALS
AR
E FO
R Y
OU
R U
SE IN
TH
IS C
LASS
RO
OM
ON
LY.
CO
PYIN
G e
KIT
MAT
ERIA
LS F
RO
M T
HIS
CO
MPU
TER
IS S
TRIC
TLY
PRO
HIB
ITED

Quiz
Identify the correct statements about transporting databases.
a. Both the source system and the target system must be on one of the platforms that are listed inV$TRANSPORTABLE_PLATFORM.
b. Source and target can have different endian formats.
c. The source database must be read-only.
d. Redo logs, control files, and tempfiles are not transported.
Answer: a, c, d
Oracle Database 12c: Backup and Recovery Workshop 16 - 22
Copyright © 2015, Oracle and/or its affiliates. All rights reserved.
Ora
cle
Uni
vers
ity a
nd E
rror :
You
are
not
a V
alid
Par
tner
use
onl
y
THES
E eK
IT M
ATER
IALS
AR
E FO
R Y
OU
R U
SE IN
TH
IS C
LASS
RO
OM
ON
LY.
CO
PYIN
G e
KIT
MAT
ERIA
LS F
RO
M T
HIS
CO
MPU
TER
IS S
TRIC
TLY
PRO
HIB
ITED

Quiz
When you transport data across platforms in Oracle Database 12c, you can use only image copies, not backup sets.
a. True
b. False
Oracle Database 12c: Backup and Recovery Workshop 16 - 23
Answer: b
Copyright © 2015, Oracle and/or its affiliates. All rights reserved.
Ora
cle
Uni
vers
ity a
nd E
rror :
You
are
not
a V
alid
Par
tner
use
onl
y
THES
E eK
IT M
ATER
IALS
AR
E FO
R Y
OU
R U
SE IN
TH
IS C
LASS
RO
OM
ON
LY.
CO
PYIN
G e
KIT
MAT
ERIA
LS F
RO
M T
HIS
CO
MPU
TER
IS S
TRIC
TLY
PRO
HIB
ITED

Summary
In this lesson, you should have learned how to:
• Transport tablespaces between databases by using image copies or backup sets
• Transport databases by using data files or backup sets
Oracle Database 12c: Backup and Recovery Workshop 16 - 24
Copyright © 2015, Oracle and/or its affiliates. All rights reserved.
Ora
cle
Uni
vers
ity a
nd E
rror :
You
are
not
a V
alid
Par
tner
use
onl
y
THES
E eK
IT M
ATER
IALS
AR
E FO
R Y
OU
R U
SE IN
TH
IS C
LASS
RO
OM
ON
LY.
CO
PYIN
G e
KIT
MAT
ERIA
LS F
RO
M T
HIS
CO
MPU
TER
IS S
TRIC
TLY
PRO
HIB
ITED

Practice Overview
Practice 16-1 covers transporting a tablespace by using backup sets.
Oracle Database 12c: Backup and Recovery Workshop 16 - 25
This practice shows how to perform a cross-platform tablespace transport (although the practice environment has only one host and platform).
Product demonstrations show the transfer across platforms.
Copyright © 2015, Oracle and/or its affiliates. All rights reserved.
Ora
cle
Uni
vers
ity a
nd E
rror :
You
are
not
a V
alid
Par
tner
use
onl
y
THES
E eK
IT M
ATER
IALS
AR
E FO
R Y
OU
R U
SE IN
TH
IS C
LASS
RO
OM
ON
LY.
CO
PYIN
G e
KIT
MAT
ERIA
LS F
RO
M T
HIS
CO
MPU
TER
IS S
TRIC
TLY
PRO
HIB
ITED

Ora
cle
Uni
vers
ity a
nd E
rror :
You
are
not
a V
alid
Par
tner
use
onl
y
THES
E eK
IT M
ATER
IALS
AR
E FO
R Y
OU
R U
SE IN
TH
IS C
LASS
RO
OM
ON
LY.
CO
PYIN
G e
KIT
MAT
ERIA
LS F
RO
M T
HIS
CO
MPU
TER
IS S
TRIC
TLY
PRO
HIB
ITED

Performing Point-in-Time Recovery
Copyright © 2015, Oracle and/or its affiliates. All rights reserved.
Ora
cle
Uni
vers
ity a
nd E
rror :
You
are
not
a V
alid
Par
tner
use
onl
y
THES
E eK
IT M
ATER
IALS
AR
E FO
R Y
OU
R U
SE IN
TH
IS C
LASS
RO
OM
ON
LY.
CO
PYIN
G e
KIT
MAT
ERIA
LS F
RO
M T
HIS
CO
MPU
TER
IS S
TRIC
TLY
PRO
HIB
ITED

Objectives
After completing this lesson, you should be able to:
• Distinguish and describe point-in-time recovery (PITR) of table, tablespace, and database
• Identify the circumstances where PITR is a good solution and where it cannot be used
• List what operations occur when you perform a point-in-time recovery
• Determine the correct target time for the point-in-time recovery
• Perform automated TSPITR
• Perform table recovery from backups
Oracle Database 12c: Backup and Recovery Workshop 17 - 2
Copyright © 2015, Oracle and/or its affiliates. All rights reserved.
Ora
cle
Uni
vers
ity a
nd E
rror :
You
are
not
a V
alid
Par
tner
use
onl
y
THES
E eK
IT M
ATER
IALS
AR
E FO
R Y
OU
R U
SE IN
TH
IS C
LASS
RO
OM
ON
LY.
CO
PYIN
G e
KIT
MAT
ERIA
LS F
RO
M T
HIS
CO
MPU
TER
IS S
TRIC
TLY
PRO
HIB
ITED

Point-in-Time Recovery
Point-in-time recovery benefits:
• Quick recovery of one or more objects to an earlier time
• No effect on other objects
Recovery scope:
• Table Point-in-Time Recovery (TPITR)
• Tablespace Point-in-Time Recovery (TSPITR)
• Database Point-in-Time Recovery (DBPITR)
A benefit of PITR is that you can recover one or more objects—for example, tablespaces—to an earlier time, without affecting the state of the other tablespaces and objects in the database.
With Oracle Database 12c (and higher), point-in-time recovery has three different levels or recovery scopes:
• Table Point-in-Time Recovery (TPITR) to recover one or more tables or table partitions to an earlier point-in-time
• Tablespace Point-in-Time Recovery (TSPITR) to recover one or more contained tablespaces to an earlier point-in-time
• Database Point-in-Time Recovery (DBPITR) to migrate a database to a different platform by creating a new database on the destination platform and performing a transport of all the user tablespaces, but excluding the SYSTEM tablespace
Oracle Database 12c: Backup and Recovery Workshop 17 - 3
Copyright © 2015, Oracle and/or its affiliates. All rights reserved.
Ora
cle
Uni
vers
ity a
nd E
rror :
You
are
not
a V
alid
Par
tner
use
onl
y
THES
E eK
IT M
ATER
IALS
AR
E FO
R Y
OU
R U
SE IN
TH
IS C
LASS
RO
OM
ON
LY.
CO
PYIN
G e
KIT
MAT
ERIA
LS F
RO
M T
HIS
CO
MPU
TER
IS S
TRIC
TLY
PRO
HIB
ITED

When to Use TSPITR
TSPITR can be used in the following situations:• To recover data lost after an erroneous TRUNCATE TABLE
statement
• To recover from logical corruption of a table
• To undo the effects of a batch job or DML statements that have affected only a part of the database
• To recover a logical schema to a different point from the rest of the physical database
• To recover a dropped tablespace
• Can be performed repeatedly to points-in-time before the tablespace was brought online without requiring a recovery catalog
RMAN TSPITR can be used to:
• Recover data lost after an erroneous TRUNCATE TABLE statement
• Recover from logical corruption of a table
• Undo the effects of an incorrect batch job or another data manipulation language (DML) statement that has affected only a subset of the database
• Recover a logical schema to a different point in time than other parts of the physical database
Starting with Oracle Database 11g Release 2, TSPITR uses transportable tablespaces and Data Pump. Because of this technology, TSPITR can be used to recover a dropped tablespace. In addition, TSPITR can be performed repeatedly to different points in time without the need for a recovery catalog.
Oracle Database 12c: Backup and Recovery Workshop 17 - 4
Copyright © 2015, Oracle and/or its affiliates. All rights reserved.
Ora
cle
Uni
vers
ity a
nd E
rror :
You
are
not
a V
alid
Par
tner
use
onl
y
THES
E eK
IT M
ATER
IALS
AR
E FO
R Y
OU
R U
SE IN
TH
IS C
LASS
RO
OM
ON
LY.
CO
PYIN
G e
KIT
MAT
ERIA
LS F
RO
M T
HIS
CO
MPU
TER
IS S
TRIC
TLY
PRO
HIB
ITED

PITR Terminology
• Target time: The point in time or SCN that an object will be recovered to
• Recovery set: For tablespaces, the data files to be recovered
• Auxiliary set: Required data files that are not part of the recovery set. It typically includes:– SYSTEM tablespace
– Undo segment tablespaces
– Temporary tablespace
• Auxiliary destination: Disk location to store files
The following terminology is used when discussing PITR:
• Target time: The point in time or system change number (SCN) that the object will be recovered to
• Recovery set: For example, data files composing the tablespaces to be recovered
• Auxiliary set: Required data files (for metadata and dependencies) that are not themselves part of the recovery set. The auxiliary set typically includes:
- A copy of the SYSTEM tablespace
- Data files that contain undo segments from the target instance
- In some cases, a temporary tablespace, used during the export of database objects from the auxiliary instance
• Auxiliary destination: A location on disk that can be used to store any of the auxiliary set data files, control files, and online logs of the auxiliary instance during PITR. Files stored in the auxiliary destination can be deleted after PITR is complete.
Oracle Database 12c: Backup and Recovery Workshop 17 - 5
Copyright © 2015, Oracle and/or its affiliates. All rights reserved.
Ora
cle
Uni
vers
ity a
nd E
rror :
You
are
not
a V
alid
Par
tner
use
onl
y
THES
E eK
IT M
ATER
IALS
AR
E FO
R Y
OU
R U
SE IN
TH
IS C
LASS
RO
OM
ON
LY.
CO
PYIN
G e
KIT
MAT
ERIA
LS F
RO
M T
HIS
CO
MPU
TER
IS S
TRIC
TLY
PRO
HIB
ITED

Tablespace Point-in-Time Recovery: Architecture
Target database
Auxiliary instance
RMAN
Data filebackups
Archived redo log files Recovered tablespace
3
5
Control file
Restore
Recover
Restore
1
2
4
6
In the diagram, the following TSPITR entities are shown:
• Target database: Contains the tablespace to be recovered
• Control file: Provides backup information to RMAN
• Backup sets: Come from the target database and are the source of the reconstructed tablespace
• Archived redo logs: Come from the target database and are the source of the reconstructed tablespace
• Auxiliary instance: Is the Oracle database instance used during the recovery process to perform the recovery
RMAN performs the following steps:
1. Creates the auxiliary instance, starts it, and connects to it
2. Takes the tablespaces that will be recovered offline
3. Restores a backup control file from a point in time before the target time to the auxiliary instance
4. Restores the data files from the recovery set and the auxiliary set to the auxiliary instance
5. Recovers the restored data files to the specified time
6. Opens the auxiliary database with the RESETLOGS option
Oracle Database 12c: Backup and Recovery Workshop 17 - 6
Copyright © 2015, Oracle and/or its affiliates. All rights reserved.
Ora
cle
Uni
vers
ity a
nd E
rror :
You
are
not
a V
alid
Par
tner
use
onl
y
THES
E eK
IT M
ATER
IALS
AR
E FO
R Y
OU
R U
SE IN
TH
IS C
LASS
RO
OM
ON
LY.
CO
PYIN
G e
KIT
MAT
ERIA
LS F
RO
M T
HIS
CO
MPU
TER
IS S
TRIC
TLY
PRO
HIB
ITED

Tablespace Point-in-Time Recovery: Architecture
Target database
Auxiliaryinstance
RMAN
Recoveredtablespace
7
Exportfile
Control file
9
ExportmetadataPoint to recovered tablespace
Import metadata
10
8
RMAN processing steps (continued):
7. Exports the dictionary metadata about objects in the recovered tablespaces to the target database
8. Shuts down the auxiliary instance. (Issues SWITCH commands on the target database so that the target database control file points to the data files in the recovery set that were recovered on the auxiliary instance)
9. Imports the dictionary metadata from the auxiliary instance to the target instance
10. Deletes all auxiliary set files
Oracle Database 12c: Backup and Recovery Workshop 17 - 7
Copyright © 2015, Oracle and/or its affiliates. All rights reserved.
Ora
cle
Uni
vers
ity a
nd E
rror :
You
are
not
a V
alid
Par
tner
use
onl
y
THES
E eK
IT M
ATER
IALS
AR
E FO
R Y
OU
R U
SE IN
TH
IS C
LASS
RO
OM
ON
LY.
CO
PYIN
G e
KIT
MAT
ERIA
LS F
RO
M T
HIS
CO
MPU
TER
IS S
TRIC
TLY
PRO
HIB
ITED

Preparing for PITR
To prepare for PITR, perform the following steps:
• Determine the correct target time.
• Determine what is needed in the recovery set.
• Identify and preserve objects that will be lost after PITR.
Before performing PITR, you need to determine the correct target time for your recovery. You need to determine whether you need additional tablespaces in your recovery set. You should evaluate what objects will be lost as a result of the PITR operation and determine how you want to preserve those objects.
Each of these steps is discussed in more detail in this lesson.
Oracle Database 12c: Backup and Recovery Workshop 17 - 8
Copyright © 2015, Oracle and/or its affiliates. All rights reserved.
Ora
cle
Uni
vers
ity a
nd E
rror :
You
are
not
a V
alid
Par
tner
use
onl
y
THES
E eK
IT M
ATER
IALS
AR
E FO
R Y
OU
R U
SE IN
TH
IS C
LASS
RO
OM
ON
LY.
CO
PYIN
G e
KIT
MAT
ERIA
LS F
RO
M T
HIS
CO
MPU
TER
IS S
TRIC
TLY
PRO
HIB
ITED

Determining the Correct Target Time
• After you perform TSPITR and bring the tablespace online, you cannot use a backup from an earlier time (unless youare using a recovery catalog).
• Use the following methods to determine the correct target time:– Flashback Query
– Flashback Transaction Query
– Flashback Version Query
• Simple alternative to TSPITR: Flash back data (if still available as undo)
It is extremely important that you choose the right target time or SCN for TSPITR. After you perform TSPITR and bring a tablespace online, you cannot use any backup from a time earlier than the moment you brought the tablespace online. In practice, this means that you cannot make a second attempt at TSPITR if you choose the wrong target time the first time, unless you are using a recovery catalog. However, if you have a recovery catalog, you can perform repeated TSPITR operations to different target times.
The current control file does not contain a record of an older incarnation of the recovered tablespace if you do not use a recovery catalog. Recovery with a current control file that involves the tablespace cannot use a backup taken prior to the time when you brought the tablespace online. However, you can perform incomplete recovery of the whole database to any time prior to or equal to the time when you brought the tablespace online if you can restore a backup control file from before that time.
You can use Oracle Flashback Query, Oracle Flashback Transaction Query, and Oracle Flashback Version Query to investigate changes to your database and to help determine the correct target time for TSPITR.
Note: With the Flashback tools and the data still available as undo data, it is usually much simpler to use the Flashback tools for undoing unwanted changes (rather than TSPITR).
Oracle Database 12c: Backup and Recovery Workshop 17 - 9
Copyright © 2015, Oracle and/or its affiliates. All rights reserved.
Ora
cle
Uni
vers
ity a
nd E
rror :
You
are
not
a V
alid
Par
tner
use
onl
y
THES
E eK
IT M
ATER
IALS
AR
E FO
R Y
OU
R U
SE IN
TH
IS C
LASS
RO
OM
ON
LY.
CO
PYIN
G e
KIT
MAT
ERIA
LS F
RO
M T
HIS
CO
MPU
TER
IS S
TRIC
TLY
PRO
HIB
ITED

Determining the Tablespaces for the Recovery Set
• If objects in the tablespace that you are recovering have relationships with objects in other tablespaces, you can:– Add the tablespace that contains the related objects to the
recovery set
– Suspend the relationship for the duration of TSPITR
– Remove the relationship
• Use the DBMS_TTS.TRANSPORT_SET_CHECK procedure to determine whether the tablespaces in the recovery set are self-contained.
DBMS_TTS.TRANSPORT_SET_CHECK ('USERS,EXAMPLE');SELECT * FROM TRANSPORT_SET_VIOLATIONS;
To identify relationships between objects that span the recovery set boundaries, use the DBMS_TTS.TRANSPORT_SET_CHECK procedure and query the TRANSPORT_SET_VIOLATIONS view.
Note: RMAN TSPITR automatically executes the DBMS_TTS.TRANSPORT_SET_CHECKprocedure for the recovery set tablespaces and verifies that the query against TRANSPORT_SET_VIOLATIONS returns no rows. If the query returns rows, RMAN stops TSPITR processing and any tablespace containment violations must be resolved before TSPITR can proceed. You can execute the procedure and query the view as described in the slide as a precautionary measure.
Oracle Database 12c: Backup and Recovery Workshop 17 - 10
Copyright © 2015, Oracle and/or its affiliates. All rights reserved.
Ora
cle
Uni
vers
ity a
nd E
rror :
You
are
not
a V
alid
Par
tner
use
onl
y
THES
E eK
IT M
ATER
IALS
AR
E FO
R Y
OU
R U
SE IN
TH
IS C
LASS
RO
OM
ON
LY.
CO
PYIN
G e
KIT
MAT
ERIA
LS F
RO
M T
HIS
CO
MPU
TER
IS S
TRIC
TLY
PRO
HIB
ITED

Identifying Objects That Will Be Lost
• Objects created in the tablespace after the target recovery time are lost.
• Query TS_PITR_OBJECTS_TO_BE_DROPPED to determine which objects will be lost after TSPITR.
• Use Export before TSPITR and Import after TSPTIR to preserve and re-create the lost objects.
Query the TS_PITR_OBJECTS_TO_BE_DROPPED view to determine whether there are any objects that will be lost as a result of performing tablespace point-in-time recovery.
As an example, you are performing TSPITR for the USERS and EXAMPLE tablespaces to the target time of April 3, 2006 at 8:30:00 AM. Issue the following query to determine whether there are any objects that will be lost after your TSPITR:SELECT OWNER, NAME, TABLESPACE_NAME,
TO_CHAR(CREATION_TIME, 'YYYY-MM-DD:HH24:MI:SS')
FROM TS_PITR_OBJECTS_TO_BE_DROPPED
WHERE TABLESPACE_NAME IN ('USERS','EXAMPLE')
AND CREATION_TIME >
TO_DATE('2006-APR-03:08:30:00','YY-MON-DD:HH24:MI:SS')
ORDER BY TABLESPACE_NAME, CREATION_TIME;
Oracle Database 12c: Backup and Recovery Workshop 17 - 11
Copyright © 2015, Oracle and/or its affiliates. All rights reserved.
Ora
cle
Uni
vers
ity a
nd E
rror :
You
are
not
a V
alid
Par
tner
use
onl
y
THES
E eK
IT M
ATER
IALS
AR
E FO
R Y
OU
R U
SE IN
TH
IS C
LASS
RO
OM
ON
LY.
CO
PYIN
G e
KIT
MAT
ERIA
LS F
RO
M T
HIS
CO
MPU
TER
IS S
TRIC
TLY
PRO
HIB
ITED

Performing RMAN TSPITR
• Fully automated TSPITR: – Specify an auxiliary destination.
– RMAN manages all aspects of TSPITR.
– This is the recommended method.
• Customized TSPITR with an automatic auxiliary instance:– This is based on fully automated TSPITR.
– Customize the location of files.
– Specify initialization parameters.
– Specify channel configurations.
• TSPITR using your own auxiliary instance:– Configure and manage the auxiliary instance.
You have the following options when performing TSPITR:
• Fully automated TSPITR: Specify an auxiliary destination, and RMAN manages all aspects of the TSPITR operation. This is the simplest way to perform TSPITR, and is recommended unless you specifically need more control over the location of recovery set files after TSPITR, or auxiliary set files during TSPITR, or control over the channel configurations, or some other aspect of your auxiliary instance.
• Customized TSPITR with an automatic auxiliary instance: TSPITR is based on the behavior of fully automated TSPITR, possibly still using an auxiliary destination. You can customize one or more aspects of the behavior, such as the location of auxiliary set or recovery set files. You can specify initialization parameters or channel configurations for the auxiliary instance created and managed by RMAN.
• TSPITR with your own auxiliary instance: Set up, start, stop, and clean up the auxiliary instance used in TSPITR. In addition, you can manage the TSPITR process by using some of the methods available in customized TSPITR with an automatic auxiliary instance.
Oracle Database 12c: Backup and Recovery Workshop 17 - 12
Copyright © 2015, Oracle and/or its affiliates. All rights reserved.
Ora
cle
Uni
vers
ity a
nd E
rror :
You
are
not
a V
alid
Par
tner
use
onl
y
THES
E eK
IT M
ATER
IALS
AR
E FO
R Y
OU
R U
SE IN
TH
IS C
LASS
RO
OM
ON
LY.
CO
PYIN
G e
KIT
MAT
ERIA
LS F
RO
M T
HIS
CO
MPU
TER
IS S
TRIC
TLY
PRO
HIB
ITED

Performing Fully Automated TSPITR
1. Configure channels required for TSPITR on the target instance.
2. Specify the auxiliary destination by using the AUXILIARY DESTINATION option.
3. Back up the recovered tablespaces and bring them online.
RMAN> CONNECT TARGETRMAN> RECOVER TABLESPACE users, example
> UNTIL TIME '2007-06-29:08:00:00'> AUXILIARY DESTINATION > '/u01/app/oracle/oradata/aux';
In addition to the preparation requirements discussed earlier in the lesson, when you perform fully automated TSPITR, you must:
• Configure any channels required for TSPITR on the target instance
• Specify a destination for RMAN to use for the auxiliary set of data files and other auxiliary instance files
After TSPITR has completed, back up the recovered tablespaces and bring them online. You cannot use backups of any tablespaces that participate in TSPITR taken before TSPITR after you perform TSPITR.
Note: This time format assumes that NLS_DATE_FORMAT is set to 'yyyy-mm-dd:hh24:mi:ss' and NLS_LANG is set to AMERICAN_AMERICA.WE8MSWIN1252.
Oracle Database 12c: Backup and Recovery Workshop 17 - 13
Copyright © 2015, Oracle and/or its affiliates. All rights reserved.
Ora
cle
Uni
vers
ity a
nd E
rror :
You
are
not
a V
alid
Par
tner
use
onl
y
THES
E eK
IT M
ATER
IALS
AR
E FO
R Y
OU
R U
SE IN
TH
IS C
LASS
RO
OM
ON
LY.
CO
PYIN
G e
KIT
MAT
ERIA
LS F
RO
M T
HIS
CO
MPU
TER
IS S
TRIC
TLY
PRO
HIB
ITED

Improving TSPITR Performance
• CONFIGURE AUXNAME for a persistent alternative location for an auxiliary set data file image copy
• SET NEWNAME for an alternative location for the duration of a RUN command
RUN{SET NEWNAME FOR DATAFILE
'$ORACLE_BASE/oradata/orcl/users01.dbf'TO ‘/u01/backup/users01.dbf';
RECOVER TABLESPACE users UNTIL SEQUENCE 1300 THREAD 1;}
You can improve TSPITR performance by directing RMAN to use the existing image copies of the recovery set and auxiliary set data files. This technique enables RMAN to skip restoring the data files from a backup.
The CONFIGURE AUXNAME command sets a persistent alternative location for an auxiliary set data file image copy, whereas the SET NEWNAME command sets an alternative location for the duration of a RUN command.
Oracle Database 12c: Backup and Recovery Workshop 17 - 14
Copyright © 2015, Oracle and/or its affiliates. All rights reserved.
Ora
cle
Uni
vers
ity a
nd E
rror :
You
are
not
a V
alid
Par
tner
use
onl
y
THES
E eK
IT M
ATER
IALS
AR
E FO
R Y
OU
R U
SE IN
TH
IS C
LASS
RO
OM
ON
LY.
CO
PYIN
G e
KIT
MAT
ERIA
LS F
RO
M T
HIS
CO
MPU
TER
IS S
TRIC
TLY
PRO
HIB
ITED

Performing RMAN TSPITR with an RMAN-Managed Auxiliary Instance
• Rename or relocate your recovery set data files.
• Specify a location other than the auxiliary destination for some or all of the auxiliary set data files.
• Create image copy backups of your data files before TSPITR.
• Use a different channel configuration for the auxiliary instance.
• Specify different initialization parameters for your RMAN-managed auxiliary instance.
If you want to customize RMAN TSPITR, you can use an RMAN-managed auxiliary instance and make the following changes:
• Rename the recovery set data files by using SET NEWNAME so that they are not restored and recovered in their original locations.
• Control the location of your auxiliary set data files by specifying new names for individual files with SET NEWNAME and using DB_FILE_NAME_CONVERT to provide rules for converting data file names in the target database to data file names for the auxiliary database.
• Use existing image copies of the recovery set and auxiliary set data files on disk rather than restoring them from backup for faster RMAN TSPITR performance.
Note: Refer to the Oracle Database Backup and Recovery User’s Guide for additional information.
Oracle Database 12c: Backup and Recovery Workshop 17 - 15
Copyright © 2015, Oracle and/or its affiliates. All rights reserved.
Ora
cle
Uni
vers
ity a
nd E
rror :
You
are
not
a V
alid
Par
tner
use
onl
y
THES
E eK
IT M
ATER
IALS
AR
E FO
R Y
OU
R U
SE IN
TH
IS C
LASS
RO
OM
ON
LY.
CO
PYIN
G e
KIT
MAT
ERIA
LS F
RO
M T
HIS
CO
MPU
TER
IS S
TRIC
TLY
PRO
HIB
ITED

Performing RMAN TSPITR by UsingYour Own Auxiliary Instance
• Not recommended, but supported
• Perform the following steps:1. Create an Oracle password file for the auxiliary instance.
2. Create an initialization parameter file for the auxiliary instance.
3. Verify Oracle Net connectivity to the auxiliary instance.4. Start the auxiliary instance in NOMOUNT mode.
5. Connect the RMAN client to the target and auxiliary instances.
6. Execute the RECOVER TABLESPACE command.
Oracle recommends that you allow RMAN to manage the creation and destruction of the auxiliary instance used during RMAN TSPITR. However, creating and using your own auxiliary instance is supported.
To create an Oracle instance suitable for use as an auxiliary instance, perform the following steps:
1. Create an Oracle password file for the auxiliary instance by using the orapwd utility.
2. Create a text initialization parameter file for the auxiliary instance.
3. Verify Oracle Net connectivity to the auxiliary instance by using a valid net service name.
To perform TSPITR, execute the following steps:
4. Start the auxiliary instance in NOMOUNT mode.
5. Connect the RMAN client to target and auxiliary instances.
6. Execute the RECOVER TABLESPACE command.
Refer to the Oracle Database Backup and Recovery User’s Guide for a detailed example.
Oracle Database 12c: Backup and Recovery Workshop 17 - 16
Copyright © 2015, Oracle and/or its affiliates. All rights reserved.
Ora
cle
Uni
vers
ity a
nd E
rror :
You
are
not
a V
alid
Par
tner
use
onl
y
THES
E eK
IT M
ATER
IALS
AR
E FO
R Y
OU
R U
SE IN
TH
IS C
LASS
RO
OM
ON
LY.
CO
PYIN
G e
KIT
MAT
ERIA
LS F
RO
M T
HIS
CO
MPU
TER
IS S
TRIC
TLY
PRO
HIB
ITED

Troubleshooting RMAN TSPITR
• File name conflicts: Ensure that there are no name conflicts when using SET NEWNAME, CONFIGURE AUXNAME, and DB_FILE_NAME_CONVERT.
• RMAN cannot identify tablespaces with undo segments: Use the UNDO TABLESPACE clause.
• Restarting a manual auxiliary instance after TSPITR failure: Shut down and restart in NOMOUNT mode.
File name conflicts: If your use of SET NEWNAME, CONFIGURE AUXNAME, and DB_FILE_NAME_CONVERT causes multiple files in the auxiliary or recovery sets to have the same name, you receive an error during TSPITR. To correct the problem, specify different values for these parameters to eliminate the duplicate name.
RMAN cannot identify tablespaces with undo segments: During TSPITR, RMAN needs information about which tablespaces had undo segments at the TSPITR target time. This information is usually available in the recovery catalog, if one is used. If there is no recovery catalog, or if the information is not found in the recovery catalog, RMAN proceeds assuming that the set of tablespaces with undo segments at the target time is the same as the set of tablespaces with undo segments at the present time. If this assumption is not correct, the TSPITR operation fails and an error is reported. To prevent this from happening, provide a list of tablespaces with undo segments at the target time in the UNDO TABLESPACE clause.
Restarting manual auxiliary instance after TSPITR failure: If you are managing your own auxiliary instance and there is a failure in TSPITR, then before you can retry TSPITR, you must shut down the auxiliary instance, correct the problem, and put the auxiliary instance back in NOMOUNT mode.
Oracle Database 12c: Backup and Recovery Workshop 17 - 17
Copyright © 2015, Oracle and/or its affiliates. All rights reserved.
Ora
cle
Uni
vers
ity a
nd E
rror :
You
are
not
a V
alid
Par
tner
use
onl
y
THES
E eK
IT M
ATER
IALS
AR
E FO
R Y
OU
R U
SE IN
TH
IS C
LASS
RO
OM
ON
LY.
CO
PYIN
G e
KIT
MAT
ERIA
LS F
RO
M T
HIS
CO
MPU
TER
IS S
TRIC
TLY
PRO
HIB
ITED

Quiz
Identify situations when it is recommended to use TSPITR for recovering tablespaces.
a. To recover a dropped tablespace
b. To recover one table to a different point from the rest of the physical database
c. To recover a logical schema to a different point from the rest of the physical database
d. When you need to perform repeated recoveries to points-in-time before the tablespace was brought online without requiring a recovery catalog
Answer: a, c, d
Oracle Database 12c: Backup and Recovery Workshop 17 - 18
Copyright © 2015, Oracle and/or its affiliates. All rights reserved.
Ora
cle
Uni
vers
ity a
nd E
rror :
You
are
not
a V
alid
Par
tner
use
onl
y
THES
E eK
IT M
ATER
IALS
AR
E FO
R Y
OU
R U
SE IN
TH
IS C
LASS
RO
OM
ON
LY.
CO
PYIN
G e
KIT
MAT
ERIA
LS F
RO
M T
HIS
CO
MPU
TER
IS S
TRIC
TLY
PRO
HIB
ITED

Recovering Tables from Backups
When to recover tables and table partitions from RMAN backups:
• Small number of tables (no TSPITR)
• Not in a self-contained tablespace (no TSPITR)
• Purged tables (no Flashback drop)
• Beyond the available undo (no Flashback Table)
• After a structural DDL change (no Flashback Table)
In Oracle Database 12c and higher, RMAN enables you to recover one or more tables or table partitions to a specified point in time without affecting the remaining database objects. Recovering tables and table partitions is useful in the following situations:
• You need to recover a very small number of tables to a particular point in time. In this situation, TSPITR is not the most effective solution because it moves all the objects in the tablespace to a specified point in time.
• You need to recover a tablespace that is not self-contained to a particular point in time. TSPITR can be used only if the tablespace is self-contained.
• You need to recover tables that have either been corrupted or deleted with the PURGEoption, so you cannot use the Flashback Drop functionality.
• You enabled logging for a Flashback Table, but the flashback target time or SCN is beyond the available undo.
• You want to recover data that is lost after a data definition language (DDL) operation has changed the structure of tables. You cannot use Flashback Table to rewind a table to before the point of a structural change, such as a truncate table operation.
Oracle Database 12c: Backup and Recovery Workshop 17 - 19
Copyright © 2015, Oracle and/or its affiliates. All rights reserved.
Ora
cle
Uni
vers
ity a
nd E
rror :
You
are
not
a V
alid
Par
tner
use
onl
y
THES
E eK
IT M
ATER
IALS
AR
E FO
R Y
OU
R U
SE IN
TH
IS C
LASS
RO
OM
ON
LY.
CO
PYIN
G e
KIT
MAT
ERIA
LS F
RO
M T
HIS
CO
MPU
TER
IS S
TRIC
TLY
PRO
HIB
ITED

Table Recovery: Graphical Overview
Auxiliary instance
4
Dump file
56
3
Prerequisites OK
1
COMPATIBLE=12.0 (or greater)ARCHIVELOG modeREAD WRITE open mode
Backup data
2
Target Database
Name?Time?Import?
1. RMAN uses backups that were previously created to recover tables and table partitions to a specified point in time. The prerequisites are fulfilled and you provide the following input with the RECOVER command:
- Names of tables or table partitions to be recovered
- Point in time to which the tables or table partitions need to be recovered
- Whether the recovered tables or table partitions must be imported into the target database
- RMAN uses your input to automate the process of recovering the specified tables or table partitions.
2. RMAN determines the backup based on your specification.
3. RMAN creates an auxiliary instance.
4. RMAN recovers your tables or table partitions, up to the specified point in time, into this auxiliary instance.
5. RMAN creates a Data Pump export dump file that contains the recovered objects.
6. RMAN imports the recovered objects into the target database.
You can customize this process as you will see in the following slides.
Oracle Database 12c: Backup and Recovery Workshop 17 - 20
Copyright © 2015, Oracle and/or its affiliates. All rights reserved.
Ora
cle
Uni
vers
ity a
nd E
rror :
You
are
not
a V
alid
Par
tner
use
onl
y
THES
E eK
IT M
ATER
IALS
AR
E FO
R Y
OU
R U
SE IN
TH
IS C
LASS
RO
OM
ON
LY.
CO
PYIN
G e
KIT
MAT
ERIA
LS F
RO
M T
HIS
CO
MPU
TER
IS S
TRIC
TLY
PRO
HIB
ITED
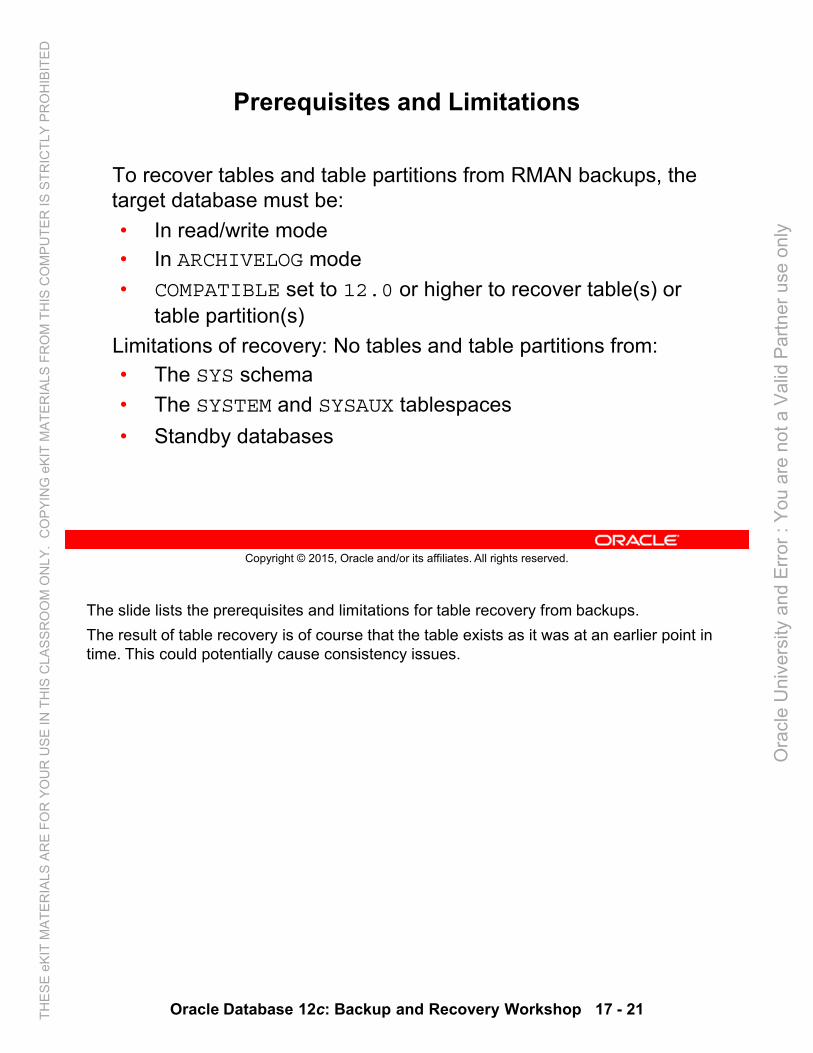
Prerequisites and Limitations
To recover tables and table partitions from RMAN backups, the target database must be:
• In read/write mode• In ARCHIVELOG mode
• COMPATIBLE set to 12.0 or higher to recover table(s) or table partition(s)
Limitations of recovery: No tables and table partitions from: • The SYS schema
• The SYSTEM and SYSAUX tablespaces
• Standby databases
The slide lists the prerequisites and limitations for table recovery from backups.
The result of table recovery is of course that the table exists as it was at an earlier point in time. This could potentially cause consistency issues.
Oracle Database 12c: Backup and Recovery Workshop 17 - 21
Copyright © 2015, Oracle and/or its affiliates. All rights reserved.
Ora
cle
Uni
vers
ity a
nd E
rror :
You
are
not
a V
alid
Par
tner
use
onl
y
THES
E eK
IT M
ATER
IALS
AR
E FO
R Y
OU
R U
SE IN
TH
IS C
LASS
RO
OM
ON
LY.
CO
PYIN
G e
KIT
MAT
ERIA
LS F
RO
M T
HIS
CO
MPU
TER
IS S
TRIC
TLY
PRO
HIB
ITED

Specifying the Recovery Point in Time
Recover table and table partitions to the state they were in by specifying:• UNTIL SCN integer: The system change number
(SCN)• UNTIL TIME 'date_string’: The time in the date
format:– Of the NLS_LANG and NLS_DATE_FORMAT environment
variables, or– Date constants, for example, SYSDATE – 5
• UNTIL SEQUENCE integer (THREAD integer): The log sequence number and thread number
• RMAN recovers tables or table partitions to the state that they were in at the time specified by the SCN. The SCN is an upper, noninclusive limit.
• RMAN recovers tables or table partitions to the state they were in at the specified time. Use the date format specified in the NLS_LANG and NLS_DATE_FORMAT environment variables. You can also use data constants such as SYSDATE to specify the time. (SYSDATE – 5 means 5 days earlier than the system date).
• RMAN recovers tables or table partitions to the state they were at the time specified by the log sequence number and thread number. RMAN selects only files that it can use to restore or recover up to but not including the specified sequence number.
Oracle Database 12c: Backup and Recovery Workshop 17 - 22
Copyright © 2015, Oracle and/or its affiliates. All rights reserved.
Ora
cle
Uni
vers
ity a
nd E
rror :
You
are
not
a V
alid
Par
tner
use
onl
y
THES
E eK
IT M
ATER
IALS
AR
E FO
R Y
OU
R U
SE IN
TH
IS C
LASS
RO
OM
ON
LY.
CO
PYIN
G e
KIT
MAT
ERIA
LS F
RO
M T
HIS
CO
MPU
TER
IS S
TRIC
TLY
PRO
HIB
ITED

Note: If a file with the name specified by DUMP FILE exists in the location in which the dump file must be created, then the export fails.
Process Steps of Table Recovery: 1
1. Perform the planning tasks and start an RMAN session with the CONNECT TARGET command.
2. Enter the RECOVER TABLE command.
3. RMAN determines the backup based on your specification.
4. RMAN creates an auxiliary instance by using the AUXILIARY DESTINATION clause, if specified.
5. RMAN recovers your tables or table partitions, up to the specified point in time, into this auxiliary instance.
6. RMAN creates a Data Pump export dump file that contains the recovered objects with the DUMP FILE=name and DATAPUMP DESTINATION=<OS path>.
1. After verifying the prerequisites, start an RMAN session and connect to the target instance.
2. Enter the RECOVER TABLE command with your required clauses.3. RMAN determines the backup that contains the data that needs to be recovered, based
on the point in time specified for recovery.4. RMAN creates an auxiliary instance. Optionally, you can specify the location of the
auxiliary instance files with the AUXILIARY DESTINATION or SET NEWNAME clauses of the RECOVER command. AUXILIARY DESTINATION is the recommended clause, because if you use SET NEWNAME and you forget just one data file name, the recovery would not happen.
5. RMAN recovers the specified tables or table partitions, up to the specified point in time, into this auxiliary instance.
6. RMAN creates a Data Pump export dump file that contains the recovered objects. You can optionally specify the name of the export dump file (with the DUMP FILE clause, default OS-specific name) that is used to store the metadata from the source database. You can also specify the location in which the export dump file is created with the DATAPUMP DESTINATION clause. The location is typically the path of the OS directory that stores the dump file. If omitted, the dump file is stored in the AUXILIARY DESTINATION location. If that is not specified, then the dump file is stored in a default OS-specific location.
Oracle Database 12c: Backup and Recovery Workshop 17 - 23
Copyright © 2015, Oracle and/or its affiliates. All rights reserved.
Ora
cle
Uni
vers
ity a
nd E
rror :
You
are
not
a V
alid
Par
tner
use
onl
y
THES
E eK
IT M
ATER
IALS
AR
E FO
R Y
OU
R U
SE IN
TH
IS C
LASS
RO
OM
ON
LY.
CO
PYIN
G e
KIT
MAT
ERIA
LS F
RO
M T
HIS
CO
MPU
TER
IS S
TRIC
TLY
PRO
HIB
ITED

Process Steps of Table Recovery: 2
7. RMAN imports the recovered objects into the target database unless you specified NOTABLEIMPORT.
8. RMAN optionally renames the recovered tables or table partitions with the REMAP TABLE and the REMAP TABLESPACE clauses. (Existing objects are not changed.)
Note: If you remap a table, the dependent objects are excluded from the import. You must re-create indexes and constraints.
7. By default, RMAN imports the recovered objects that are stored in the export dump file into the target database. However, you can choose not to import the recovered objects by using the NOTABLEIMPORT clause of the RESTORE command.
If you choose not to import the recovered objects, RMAN recovers the tables or table partitions to the specified point and then creates the export dump file. However, this dump file is not imported into the target database. You must manually import this dump file into your target database, when required, by using the Data Pump Import utility.
8. RMAN optionally renames the recovered tables or table partitions in the target database with the REMAP TABLE option.
- If a table already exists and the REMAP option is not specified, then the table recovery generates an error.
- If the REMAP option is specified, then the indexes and constraints are not imported. You must create dependent objects yourself.
To import the recovered objects into a tablespace that is different from the one in which the objects originally existed, use the REMAP TABLESPACE clause of the RECOVERcommand. Only the tables or table partitions that are being recovered are remapped, the existing objects are not changed.
Oracle Database 12c: Backup and Recovery Workshop 17 - 24
Copyright © 2015, Oracle and/or its affiliates. All rights reserved.
Ora
cle
Uni
vers
ity a
nd E
rror :
You
are
not
a V
alid
Par
tner
use
onl
y
THES
E eK
IT M
ATER
IALS
AR
E FO
R Y
OU
R U
SE IN
TH
IS C
LASS
RO
OM
ON
LY.
CO
PYIN
G e
KIT
MAT
ERIA
LS F
RO
M T
HIS
CO
MPU
TER
IS S
TRIC
TLY
PRO
HIB
ITED

Quiz
When you perform table recovery from backup sets in Oracle Database 12c or higher, RMAN automatically creates, uses, and deletes an auxiliary database instance.
a. True
b. False
Answer: a
Oracle Database 12c: Backup and Recovery Workshop 17 - 25
Copyright © 2015, Oracle and/or its affiliates. All rights reserved.
Ora
cle
Uni
vers
ity a
nd E
rror :
You
are
not
a V
alid
Par
tner
use
onl
y
THES
E eK
IT M
ATER
IALS
AR
E FO
R Y
OU
R U
SE IN
TH
IS C
LASS
RO
OM
ON
LY.
CO
PYIN
G e
KIT
MAT
ERIA
LS F
RO
M T
HIS
CO
MPU
TER
IS S
TRIC
TLY
PRO
HIB
ITED

Summary
In this lesson, you should have learned how to:
• Distinguish and describe point-in-time recovery (PITR) of table, tablespace, and database
• Identify the circumstances where PITR is a good solution and where it cannot be used
• List what operations occur when you perform a PITR
• Determine the correct target time for the PITR
• Perform automated TSPITR
• Perform table recovery from backups
Oracle Database 12c: Backup and Recovery Workshop 17 - 26
Copyright © 2015, Oracle and/or its affiliates. All rights reserved.
Ora
cle
Uni
vers
ity a
nd E
rror :
You
are
not
a V
alid
Par
tner
use
onl
y
THES
E eK
IT M
ATER
IALS
AR
E FO
R Y
OU
R U
SE IN
TH
IS C
LASS
RO
OM
ON
LY.
CO
PYIN
G e
KIT
MAT
ERIA
LS F
RO
M T
HIS
CO
MPU
TER
IS S
TRIC
TLY
PRO
HIB
ITED

Practice Overview
Practice 17-1 covers recovering a table from backups.
Oracle Database 12c: Backup and Recovery Workshop 17 - 27
This practice shows functionality introduced with Oracle Database 12c, how to recover a table from a backup with the use of an automatic auxiliary instance.
Optionally, see OLL and YouTube videos on this topic.
Copyright © 2015, Oracle and/or its affiliates. All rights reserved.
Ora
cle
Uni
vers
ity a
nd E
rror :
You
are
not
a V
alid
Par
tner
use
onl
y
THES
E eK
IT M
ATER
IALS
AR
E FO
R Y
OU
R U
SE IN
TH
IS C
LASS
RO
OM
ON
LY.
CO
PYIN
G e
KIT
MAT
ERIA
LS F
RO
M T
HIS
CO
MPU
TER
IS S
TRIC
TLY
PRO
HIB
ITED

Ora
cle
Uni
vers
ity a
nd E
rror :
You
are
not
a V
alid
Par
tner
use
onl
y
THES
E eK
IT M
ATER
IALS
AR
E FO
R Y
OU
R U
SE IN
TH
IS C
LASS
RO
OM
ON
LY.
CO
PYIN
G e
KIT
MAT
ERIA
LS F
RO
M T
HIS
CO
MPU
TER
IS S
TRIC
TLY
PRO
HIB
ITED

Duplicating a Database
Copyright © 2015, Oracle and/or its affiliates. All rights reserved.
Ora
cle
Uni
vers
ity a
nd E
rror :
You
are
not
a V
alid
Par
tner
use
onl
y
THES
E eK
IT M
ATER
IALS
AR
E FO
R Y
OU
R U
SE IN
TH
IS C
LASS
RO
OM
ON
LY.
CO
PYIN
G e
KIT
MAT
ERIA
LS F
RO
M T
HIS
CO
MPU
TER
IS S
TRIC
TLY
PRO
HIB
ITED
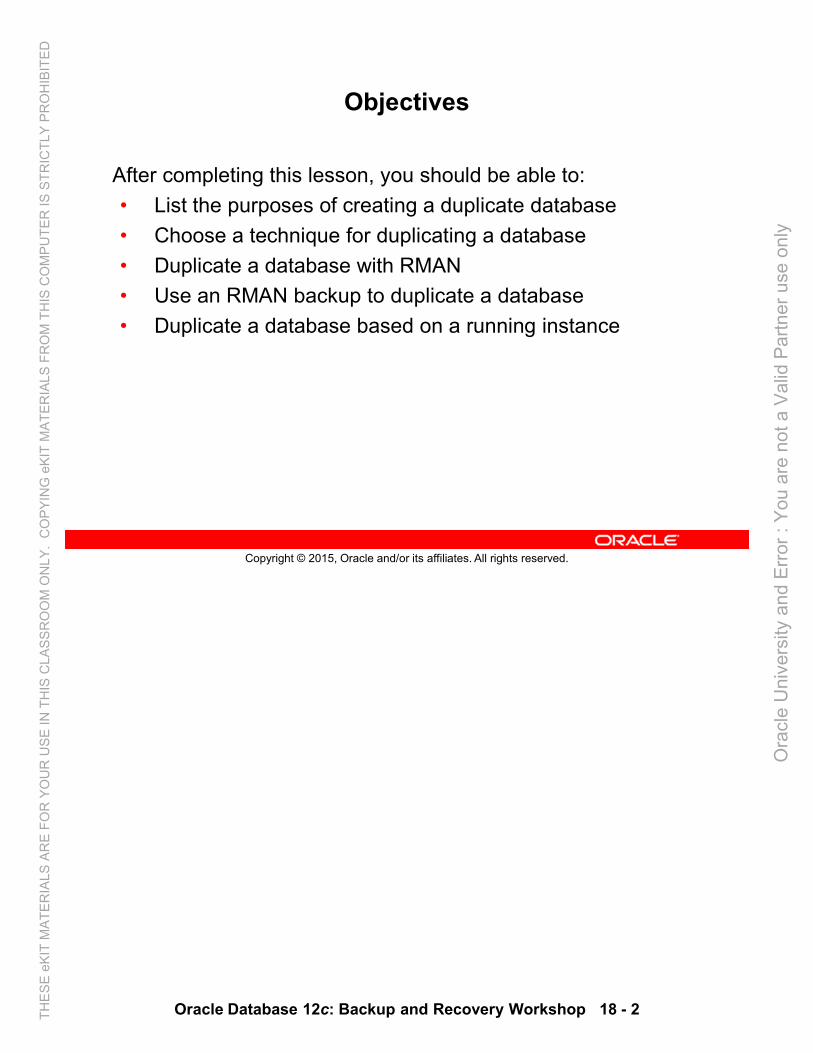
Objectives
After completing this lesson, you should be able to:
• List the purposes of creating a duplicate database
• Choose a technique for duplicating a database
• Duplicate a database with RMAN
• Use an RMAN backup to duplicate a database
• Duplicate a database based on a running instance
Oracle Database 12c: Backup and Recovery Workshop 18 - 2
Copyright © 2015, Oracle and/or its affiliates. All rights reserved.
Ora
cle
Uni
vers
ity a
nd E
rror :
You
are
not
a V
alid
Par
tner
use
onl
y
THES
E eK
IT M
ATER
IALS
AR
E FO
R Y
OU
R U
SE IN
TH
IS C
LASS
RO
OM
ON
LY.
CO
PYIN
G e
KIT
MAT
ERIA
LS F
RO
M T
HIS
CO
MPU
TER
IS S
TRIC
TLY
PRO
HIB
ITED

Using a Duplicate Database
• Use a duplicate database to:– Test backup and recovery procedures
– Recover objects by creating an export and importing the objects into the production database
• Create a duplicate database:– With the RMAN DUPLICATE command
– On the same or separate hosts
– With the identical content, or subset of source
– Performed by auxiliary channels for backup-based duplication
A duplicate database is a copy of your target database. With the FOR STANDBY clause, it keeps the same unique database identifier (DBID); if FOR STANDBY is not specified, it creates a new DBID. You can operate it independently of the target database to:
• Test backup and recovery procedures
• Recover objects that were inadvertently dropped from the target database by creating an export containing the objects in the duplicate database and importing them into the production database. Although you will probably find that Flashback Query, Flashback Drop, Flashback Table, and table recovery from backup are much easier and faster solutions to recover objects.
To create a duplicate database, you can use the RMAN DUPLICATE command.
• The duplicate database can include the same content or only a subset from the source database. It can be in the same host or separate hosts.
• The principal work of the duplication is performed by the auxiliary channels. These channels correspond to a server session on the auxiliary instance on the destination host for backup-based duplication.
• For active database duplication, the target channels perform the work of pushing data file copies to the auxiliary instance (if number of allocated target channels is greater than the number of allocated auxiliary channels).
Oracle Database 12c: Backup and Recovery Workshop 18 - 3
Copyright © 2015, Oracle and/or its affiliates. All rights reserved.
Ora
cle
Uni
vers
ity a
nd E
rror :
You
are
not
a V
alid
Par
tner
use
onl
y
THES
E eK
IT M
ATER
IALS
AR
E FO
R Y
OU
R U
SE IN
TH
IS C
LASS
RO
OM
ON
LY.
CO
PYIN
G e
KIT
MAT
ERIA
LS F
RO
M T
HIS
CO
MPU
TER
IS S
TRIC
TLY
PRO
HIB
ITED

Choosing Database Duplication Techniques
Choosing a technique to duplicate your database—always with connection to the auxiliary instance:
From an active database
From backups
With target connection
Without target connection
With recoverycatalog connection
Without recovery catalog connection
“ push” process based on image copies
“ pull” process based on backup sets (12 and higher )
Via RMAN command line or Enterprise Manager Cloud Control
You can duplicate a source database to a destination database, which can be on the same or different computers. The database instance associated with the duplicate database is called the auxiliary instance. All duplication techniques require a connection to the auxiliary instance. The diagram shows you the following techniques for database duplication:
• From an active database, connected to the target and auxiliary instances:
- With Oracle Database 12c (and higher), a “pull” (or restore) process is based on backup sets.
- Before Oracle Database 12c, a “push” process is based on image copies.
• From backup, connected to the target and auxiliary instances
• From backup, connected to the auxiliary instance, not connected to the target, but with recovery catalog connection
• From backup, connected to the auxiliary instance, not connected to the target and the recovery catalog
You can duplicate databases with the RMAN command line or with Cloud Control.
Oracle Database 12c: Backup and Recovery Workshop 18 - 4
Copyright © 2015, Oracle and/or its affiliates. All rights reserved.
Ora
cle
Uni
vers
ity a
nd E
rror :
You
are
not
a V
alid
Par
tner
use
onl
y
THES
E eK
IT M
ATER
IALS
AR
E FO
R Y
OU
R U
SE IN
TH
IS C
LASS
RO
OM
ON
LY.
CO
PYIN
G e
KIT
MAT
ERIA
LS F
RO
M T
HIS
CO
MPU
TER
IS S
TRIC
TLY
PRO
HIB
ITED

Duplicating an Active Database with “Push”
• “Push” method based on image copies
• Via Enterprise Manager or RMAN command line• With network (use the FROM ACTIVE DATABASE clause)
• With a customized SPFILE
RMAN client
Connecttarget
Connectauxiliary
Sourceinstance
Sourcedatabase
Source host
Backup data
Auxiliaryinstance
Duplicatedatabase
Destination host
• Data files• Control files• SPFILE• Archive log copies
You can instruct the source database to send a “clone” of itself directly to the auxiliary instance by using Enterprise Manager or the FROM ACTIVE DATABASE clause of the RMAN DUPLICATE command.
Pre-existing backups are neither needed nor used for this operation. The online image copies are created by the source database and directly transmitted via Oracle Net (they are not written to disk) when using the FROM ACTIVE DATABASE clause of the RMAN DUPLICATEcommand. The source database can be open or mounted.
RMAN connects as TARGET to the source database instance and as AUXILIARY to the auxiliary instance (as shown in the slide).
The required files (data files, control files, SPFILE, and archive log copies) are copied from the source to an auxiliary instance via an inter-instance network connection. RMAN then uses a “memory script” (one that is contained only in memory) to complete recovery and open the database.
This method of active database duplication is referred to as the “push”-based method (and was the only method for Oracle Database 11g).
Oracle Database 12c: Backup and Recovery Workshop 18 - 5
Copyright © 2015, Oracle and/or its affiliates. All rights reserved.
Ora
cle
Uni
vers
ity a
nd E
rror :
You
are
not
a V
alid
Par
tner
use
onl
y
THES
E eK
IT M
ATER
IALS
AR
E FO
R Y
OU
R U
SE IN
TH
IS C
LASS
RO
OM
ON
LY.
CO
PYIN
G e
KIT
MAT
ERIA
LS F
RO
M T
HIS
CO
MPU
TER
IS S
TRIC
TLY
PRO
HIB
ITED

“Push” Versus “Pull” Methods of Duplication
• The push process is based on image copies.
• The pull process is based on backup sets.– RMAN uses the pull method when it finds:
— USING BACKUPSET
— SECTION SIZE
— Encryption
— Compression
– The pull method requires connections to target and auxiliary instances.
RMAN> SET ENCRYPTION …;RMAN> DUPLICATE TARGET DATABASE TO orcl2
FROM ACTIVE DATABASE[USING BACKUPSET] [SECTION SIZE …] [USING COMPRESSED BACKUPSET] …;
Data is encrypted on the source database, before transmission.
The “pull” (or restore) process: A connection is first established with the source database. The auxiliary instance then retrieves the required database files from the source database as backup sets. A restore operation is performed from the auxiliary instance. Therefore, fewer resources are used on the source database. Both TNS connections are required on target and auxiliary instances.
Based on the DUPLICATE clauses, RMAN dynamically determines which process to use (push or pull). This ensures that existing customized scripts continue to function.
• When you specify USING BACKUPSET, RMAN uses the pull method.
• When you specify SET ENCRYPTION before the DUPLICATE command, RMAN automatically uses the pull method and creates backup sets. The backups sent to the destination are encrypted.
• The SECTION SIZE clause divides data files into subsections that are restored in parallel across multiple channels on the auxiliary database. For an effective use of parallelization, allocate more AUXILIARY channels.
• With the USING COMPRESSED BACKUPSET clause, the files are transferred as compressed backup sets. RMAN uses unused block compression while creating backups, thus reducing the size of backups that are transported over the network.
Oracle Database 12c: Backup and Recovery Workshop 18 - 6
Copyright © 2015, Oracle and/or its affiliates. All rights reserved.
Ora
cle
Uni
vers
ity a
nd E
rror :
You
are
not
a V
alid
Par
tner
use
onl
y
THES
E eK
IT M
ATER
IALS
AR
E FO
R Y
OU
R U
SE IN
TH
IS C
LASS
RO
OM
ON
LY.
CO
PYIN
G e
KIT
MAT
ERIA
LS F
RO
M T
HIS
CO
MPU
TER
IS S
TRIC
TLY
PRO
HIB
ITED

Duplicating a Database with a Target Connection
• Connecting to the target (source database)• Connecting to the auxiliary instance• Optionally, connecting to the recovery catalog (or using
target control file)Source
instance
Sourcedatabase
RMAN client
Source host
Auxiliaryinstance
Duplicatedatabase
Destination host
Connecttarget
Connectauxiliary
RMANbackups
When you duplicate a database with a target database connection, RMAN can obtain metadata about backups either from the target database control file or from the recovery catalog.
The diagram illustrates backup-based duplication with a target connection. RMAN connects to the source database instance and the auxiliary instance. Optionally, RMAN can connect to a recovery catalog database (not shown in the graphic). The destination host must have access to the RMAN backups required to create the duplicate database.
Oracle Database 12c: Backup and Recovery Workshop 18 - 7
Copyright © 2015, Oracle and/or its affiliates. All rights reserved.
Ora
cle
Uni
vers
ity a
nd E
rror :
You
are
not
a V
alid
Par
tner
use
onl
y
THES
E eK
IT M
ATER
IALS
AR
E FO
R Y
OU
R U
SE IN
TH
IS C
LASS
RO
OM
ON
LY.
CO
PYIN
G e
KIT
MAT
ERIA
LS F
RO
M T
HIS
CO
MPU
TER
IS S
TRIC
TLY
PRO
HIB
ITED

Duplicating a Database with Recovery Catalog Without Target Connection
• Connecting to a recovery catalog for backup metadata
• Connecting to the auxiliary instance, which must have access to the RMAN backups
RMAN client
Auxiliaryinstance
Duplicatedatabase
Destination host
Connectcatalog
Connectauxiliary
RMANbackups
Cataloginstance
Recoverycatalog
database
Recovery catalog host
When you duplicate a database without a target database connection, but with a recovery catalog, RMAN uses the recovery catalog to obtain metadata about the backups.
The diagram illustrates backup-based duplication without a target connection. RMAN connects to a recovery catalog database instance and the auxiliary instance. The destination host must have access to the RMAN backups required to create the duplicate database.
Oracle Database 12c: Backup and Recovery Workshop 18 - 8
Copyright © 2015, Oracle and/or its affiliates. All rights reserved.
Ora
cle
Uni
vers
ity a
nd E
rror :
You
are
not
a V
alid
Par
tner
use
onl
y
THES
E eK
IT M
ATER
IALS
AR
E FO
R Y
OU
R U
SE IN
TH
IS C
LASS
RO
OM
ON
LY.
CO
PYIN
G e
KIT
MAT
ERIA
LS F
RO
M T
HIS
CO
MPU
TER
IS S
TRIC
TLY
PRO
HIB
ITED

Duplicating a Database Without Recovery Catalog or Target Connection
Connecting to the auxiliary instance, which must have access to a disk BACKUP LOCATION
RMAN client
Auxiliaryinstance
Duplicatedatabase
Destination host
Connectauxiliary
Backup location
When you duplicate a database without a target database connection and without a recovery catalog, RMAN uses a BACKUP LOCATION where all necessary backups and copies reside.
The diagram illustrates backup-based duplication without connections to the target or to the recovery catalog database instance. A disk backup location containing all the backups or copies for duplication must be available to the destination host.
Oracle Database 12c: Backup and Recovery Workshop 18 - 9
Copyright © 2015, Oracle and/or its affiliates. All rights reserved.
Ora
cle
Uni
vers
ity a
nd E
rror :
You
are
not
a V
alid
Par
tner
use
onl
y
THES
E eK
IT M
ATER
IALS
AR
E FO
R Y
OU
R U
SE IN
TH
IS C
LASS
RO
OM
ON
LY.
CO
PYIN
G e
KIT
MAT
ERIA
LS F
RO
M T
HIS
CO
MPU
TER
IS S
TRIC
TLY
PRO
HIB
ITED

Creating a Backup-Based Duplicate Database
1. Create an Oracle password file for the auxiliary instance.
2. Establish Oracle Net connectivity to the auxiliary instance.
3. Create an initialization parameter file for the auxiliary instance.
4. Start the auxiliary instance in NOMOUNT mode.
5. Mount or open the target database.
6. Ensure that backups and archived redo log files are available.
7. Allocate auxiliary channels if needed.8. Execute the DUPLICATE command.
It is important to understand these basic steps and the RMAN database duplication process.
If you are using the Enterprise Manager interface, wizards can perform most steps for you. If you are creating a duplicate database with the command-line interface, you need to perform the steps manually. You can also use the EM interface as a test or sample, and use the output log as a basis for scripting your own database duplication.
The basic steps for creating a duplicate database are outlined in the slide. More details are provided in this lesson for some of the steps.
Oracle Database 12c: Backup and Recovery Workshop 18 - 10
Copyright © 2015, Oracle and/or its affiliates. All rights reserved.
Ora
cle
Uni
vers
ity a
nd E
rror :
You
are
not
a V
alid
Par
tner
use
onl
y
THES
E eK
IT M
ATER
IALS
AR
E FO
R Y
OU
R U
SE IN
TH
IS C
LASS
RO
OM
ON
LY.
CO
PYIN
G e
KIT
MAT
ERIA
LS F
RO
M T
HIS
CO
MPU
TER
IS S
TRIC
TLY
PRO
HIB
ITED

Creating an Initialization Parameter File for the Auxiliary Instance
Specify parameters as follows:• DB_NAME (required)
– If the duplicate database is in the same Oracle home as the target database, names must be different.
– Use the same value in the DUPLICATE command.
• CONTROL_FILES (only required without the SET NEWNAME option and OMF)
You must create a text initialization parameter file for the auxiliary instance. The text initialization parameter file must reside on the same host as the RMAN client that you use to execute the DUPLICATE command.
Take note of the requirements for each of the following parameters:
• DB_NAME: If the target database and the duplicate database are in the same Oracle home, you must set DB_NAME to a different name. If they are in different Oracle homes, you must ensure that the name of the duplicate database differs from the other names in its Oracle home. Be sure to use the same database name that you set for this parameter when you execute the DUPLICATE command.
• CONTROL_FILES: This parameter is required when you are not using the SET NEWNAME option and Oracle Managed Files (OMF).
Note: Be sure to verify the settings of all initialization parameters that specify path names. Verify that all specified paths are accessible on the duplicate database host.
Oracle Database 12c: Backup and Recovery Workshop 18 - 11
Copyright © 2015, Oracle and/or its affiliates. All rights reserved.
Ora
cle
Uni
vers
ity a
nd E
rror :
You
are
not
a V
alid
Par
tner
use
onl
y
THES
E eK
IT M
ATER
IALS
AR
E FO
R Y
OU
R U
SE IN
TH
IS C
LASS
RO
OM
ON
LY.
CO
PYIN
G e
KIT
MAT
ERIA
LS F
RO
M T
HIS
CO
MPU
TER
IS S
TRIC
TLY
PRO
HIB
ITED

Specifying New Names for Your Destination
Available techniques:• SET NEWNAME command
• CONFIGURE AUXNAME command (deprecated for recovery set data files)
• DB_FILE_NAME_CONVERT parameter with the DUPLICATE command
You can use the following techniques to specify new names for data files:
• Include the SET NEWNAME FOR DATAFILE command within a RUN block to specify new names for the data files.
• Use the CONFIGURE AUXNAME command.
CONFIGURE AUXNAME is an alternative to SET NEWNAME. The difference is that after you configure the auxiliary name the first time, additional DUPLICATE commands reuse the configured settings. In contrast, you must reissue the SET NEWNAME command every time you execute the DUPLICATE command.
Note: SET NEWNAME replaces CONFIGURE AUXNAME for recovery set data files.
• Specify the DB_FILE_NAME_CONVERT parameter with the DUPLICATE command.
Oracle Database 12c: Backup and Recovery Workshop 18 - 12
Copyright © 2015, Oracle and/or its affiliates. All rights reserved.
Ora
cle
Uni
vers
ity a
nd E
rror :
You
are
not
a V
alid
Par
tner
use
onl
y
THES
E eK
IT M
ATER
IALS
AR
E FO
R Y
OU
R U
SE IN
TH
IS C
LASS
RO
OM
ON
LY.
CO
PYIN
G e
KIT
MAT
ERIA
LS F
RO
M T
HIS
CO
MPU
TER
IS S
TRIC
TLY
PRO
HIB
ITED

Using the SET NEWNAME Clauses
• SET NEWNAME clauses enable you to specify a default name format for all files in a database or in a named tablespace.
• The default name is used for DUPLICATE, RESTORE, and SWITCH commands in the RUN block.
• It enables you to set file names with a single command rather than setting each file name individually.
SET NEWNAME FOR DATABASETO {NEW|'formatSpec'};
You can use SET NEWNAME to specify the default name format for all data files in a named tablespace and all data files in the database.
The order of precedence for the SET NEWNAME command is as follows:1. SET NEWNAME FOR DATAFILE and SET NEWNAME FOR TEMPFILE2. SET NEWNAME FOR TABLESPACE
3. SET NEWNAME FOR DATABASE
Example:RUN
{
SET NEWNAME FOR DATABASE TO '/u01/app/oracle/oradata/dupldb/%b';
DUPLICATE TARGET DATABASE TO dupldb
LOGFILE
GROUP 1 ('/u01/app/oracle/oradata/dupldb/redo01a.log',
'/u01/app/oracle/oradata/dupldb/redo01b.log') SIZE 50M REUSE,
GROUP 2 ('/u01/app/oracle/oradata/dupldb/redo02a.log',
'/u01/app/oracle/oradata/dupldb/redo02b.log') SIZE 50M REUSE,
GROUP 3 ('/u01/app/oracle/oradata/dupldb/redo03a.log',
'/u01/app/oracle/oradata/dupldb/redo03b.log') SIZE 50M REUSE;
}
Oracle Database 12c: Backup and Recovery Workshop 18 - 13
Copyright © 2015, Oracle and/or its affiliates. All rights reserved.
Ora
cle
Uni
vers
ity a
nd E
rror :
You
are
not
a V
alid
Par
tner
use
onl
y
THES
E eK
IT M
ATER
IALS
AR
E FO
R Y
OU
R U
SE IN
TH
IS C
LASS
RO
OM
ON
LY.
CO
PYIN
G e
KIT
MAT
ERIA
LS F
RO
M T
HIS
CO
MPU
TER
IS S
TRIC
TLY
PRO
HIB
ITED

Substitution Variables for SET NEWNAME
Syntax Element
Description
%b Specifies the file name without the directory path
%f Specifies the absolute file number of the data file for which the new name is generated
%I Specifies the DBID
%N Specifies the tablespace name
%U Specifies a system-generated file name of the format:data-D-%d_id-%I_TS-%N_FNO-%f
When issuing SET NEWNAME FOR DATABASE or SET NEWNAME FOR TABLESPACE, you must specify substitution variables in the TO <filename> clause to avoid name collisions. Specify at least one of the following substitution variables: %b, %f, and %U. %I and %N are optional variables.
Oracle Database 12c: Backup and Recovery Workshop 18 - 14
Copyright © 2015, Oracle and/or its affiliates. All rights reserved.
Ora
cle
Uni
vers
ity a
nd E
rror :
You
are
not
a V
alid
Par
tner
use
onl
y
THES
E eK
IT M
ATER
IALS
AR
E FO
R Y
OU
R U
SE IN
TH
IS C
LASS
RO
OM
ON
LY.
CO
PYIN
G e
KIT
MAT
ERIA
LS F
RO
M T
HIS
CO
MPU
TER
IS S
TRIC
TLY
PRO
HIB
ITED

Specifying Parameters for File Naming
Alternatively, specify the following parameters to explicitly control the naming of the files of your auxiliary database:• CONTROL_FILES
• DB_FILE_NAME_CONVERT
• LOG_FILE_NAME_CONVERT
CONTROL_FILES='/u01/app/oracle/oradata/aux/control01.ctl', '/u01/app/oracle/oradata/aux/control02.ctl','/u01/app/oracle/oradata/aux/control03.ctl'
DB_FILE_NAME_CONVERT='/u01/app/oracle/oradata/orcl','/u01/app/oracle/oradata/aux'
LOG_FILE_NAME_CONVERT='/u01/app/oracle/oradata/orcl','/u01/app/oracle/oradata/aux'
RMAN generates names for the required database files when you execute the DUPLICATEcommand. You can control the naming of the files by specifying the following initialization parameters in the auxiliary instance initialization parameter file:
• CONTROL_FILES: Specify the names of the control files in this parameter. If you do not set the names via this parameter, the Oracle server creates an Oracle-managed control file in a default control destination. Refer to the SQL CREATE CONTROLFILE command in the SQL Reference manual for specific information.
• DB_FILE_NAME_CONVERT: This parameter is used to specify the names of data files for the auxiliary database. It has the format DB_FILE_NAME_CONVERT = 'string1’, 'string2', where string1 is the pattern of the target database file name and string2 is the pattern of the auxiliary database file name. You can also specify the DB_FILE_NAME_CONVERT parameter as an option to the DUPLICATE DATABASEcommand.
• LOG_FILE_NAME_CONVERT: This parameter is used to specify the names of the redo log files for the auxiliary database. It has the format LOG_FILE_NAME_CONVERT ='string1', 'string2', where string1 is the pattern of the target database file name and string2 is the pattern of the auxiliary database file name. You can also use the LOGFILE clause of the DUPLICATE DATABASE command to specify redo log file names.
Oracle Database 12c: Backup and Recovery Workshop 18 - 15
Copyright © 2015, Oracle and/or its affiliates. All rights reserved.
Ora
cle
Uni
vers
ity a
nd E
rror :
You
are
not
a V
alid
Par
tner
use
onl
y
THES
E eK
IT M
ATER
IALS
AR
E FO
R Y
OU
R U
SE IN
TH
IS C
LASS
RO
OM
ON
LY.
CO
PYIN
G e
KIT
MAT
ERIA
LS F
RO
M T
HIS
CO
MPU
TER
IS S
TRIC
TLY
PRO
HIB
ITED

As an alternative to using the initialization parameters to control the naming of the files, you can use the following techniques to rename the redo log files:
• Use the LOGFILE clause of the DUPLICATE command.
• Set the Oracle Managed Files initialization parameters: DB_CREATE_FILE_DEST, DB_CREATE_ONLINE_DEST_n, or DB_RECOVERY_FILE_DEST.
Oracle Database 12c: Backup and Recovery Workshop 18 - 16
Ora
cle
Uni
vers
ity a
nd E
rror :
You
are
not
a V
alid
Par
tner
use
onl
y
THES
E eK
IT M
ATER
IALS
AR
E FO
R Y
OU
R U
SE IN
TH
IS C
LASS
RO
OM
ON
LY.
CO
PYIN
G e
KIT
MAT
ERIA
LS F
RO
M T
HIS
CO
MPU
TER
IS S
TRIC
TLY
PRO
HIB
ITED

Starting the Instance in NOMOUNT Mode
• Start the auxiliary instance in NOMOUNT mode.
• RMAN can create an SPFILE.SQL> startup nomount pfile='$HOME/auxinstance/initAUX.ora'ORACLE instance started.
Total System Global Area 285212672 bytesFixed Size 1218992 bytesVariable Size 92276304 bytesDatabase Buffers 188743680 bytesRedo Buffers 2973696 bytes
SQL> create spfile 2 from pfile='$HOME/auxinstance/initAUX.ora';
File created.
Not needed in course practice
After you have created the text initialization parameter file, invoke SQL*Plus to start the auxiliary instance in NOMOUNT mode.
RMAN creates a default server parameter file for the auxiliary instance if the following conditions are true:
• Duplication does not involve a standby database.
• Server parameter files are not being duplicated.
• The auxiliary instance was not started with a server parameter file.
If these conditions are not met, create a server parameter file (SPFILE) from your text initialization parameter file. You can execute CREATE SPFILE before or after you have started the instance.
Oracle Database 12c: Backup and Recovery Workshop 18 - 17
Copyright © 2015, Oracle and/or its affiliates. All rights reserved.
Ora
cle
Uni
vers
ity a
nd E
rror :
You
are
not
a V
alid
Par
tner
use
onl
y
THES
E eK
IT M
ATER
IALS
AR
E FO
R Y
OU
R U
SE IN
TH
IS C
LASS
RO
OM
ON
LY.
CO
PYIN
G e
KIT
MAT
ERIA
LS F
RO
M T
HIS
CO
MPU
TER
IS S
TRIC
TLY
PRO
HIB
ITED

Ensuring That Backups and Archived Redo Log Files Are Available
• Backups of all target database data files must be accessible on the duplicate host.
• Backups can be a combination of full and incremental backups.
• Archived redo log files needed to recover the duplicate database must be accessible on the duplicate host.
• Archived redo log files can be:– Backups on a media manager
– Image copies
– Actual archived redo log files
The backups needed to restore the data files must be accessible on the duplicate host. You do not need a whole database backup. RMAN can use a combination of full and incremental backups of individual data files during the duplication process.
Archived redo logs required to recover the duplicate database to the desired point in time must also be accessible. The archived redo log files can be backups, image copies, or the actual archived redo logs. The backups or copies can be transferred to the local disk of the duplicate database node or mounted across a network by some means such as network file system (NFS).
Oracle Database 12c: Backup and Recovery Workshop 18 - 18
Copyright © 2015, Oracle and/or its affiliates. All rights reserved.
Ora
cle
Uni
vers
ity a
nd E
rror :
You
are
not
a V
alid
Par
tner
use
onl
y
THES
E eK
IT M
ATER
IALS
AR
E FO
R Y
OU
R U
SE IN
TH
IS C
LASS
RO
OM
ON
LY.
CO
PYIN
G e
KIT
MAT
ERIA
LS F
RO
M T
HIS
CO
MPU
TER
IS S
TRIC
TLY
PRO
HIB
ITED

Allocating Auxiliary Channels
• Auxiliary channels specify a connection between RMAN and an auxiliary database instance.
• If automatic channels are not configured, allocate auxiliary channels:– Start RMAN with a connection to the target database
instance, the auxiliary instance, and recovery catalog if applicable.
– Allocate at least one auxiliary channel within the RUN block.
$ rman target sys/oracle_4U@trgt auxiliary sys/oracle_4U@auxdb
RMAN> RUN{ALLOCATE AUXILIARY CHANNEL aux1 DEVICE TYPE DISK;ALLOCATE AUXILIARY CHANNEL aux2 DEVICE TYPE DISK;…DUPLICATE TARGET DATABASE to auxdb; . . .
If you do not have automatic channels configured, manually allocate at least one auxiliary channel before issuing the DUPLICATE command. The ALLOCATE AUXILIARY CHANNELcommand must be within the same RUN block as the DUPLICATE command.
The channel type specified on the ALLOCATE AUXILIARY CHANNEL command must match the media where the backups of the target database are located.
• If the backups reside on disk, you can allocate more than one channel to reduce the time it takes for the duplication process.
• For tape backups, you can specify the number of channels that correspond to the number of devices available.
The auxiliary instance must be started with the NOMOUNT option and the target database must be mounted or open.
Oracle Database 12c: Backup and Recovery Workshop 18 - 19
Copyright © 2015, Oracle and/or its affiliates. All rights reserved.
Ora
cle
Uni
vers
ity a
nd E
rror :
You
are
not
a V
alid
Par
tner
use
onl
y
THES
E eK
IT M
ATER
IALS
AR
E FO
R Y
OU
R U
SE IN
TH
IS C
LASS
RO
OM
ON
LY.
CO
PYIN
G e
KIT
MAT
ERIA
LS F
RO
M T
HIS
CO
MPU
TER
IS S
TRIC
TLY
PRO
HIB
ITED

Understanding the RMAN Duplication Operation
When you execute the DUPLICATE command, RMAN performs the following operations:
1A. Creates a control file server parameter file for the auxiliary instance (for active and for backup-based duplication with target connection), or
1B. Restores from backup (for standby database and for backup-based duplication without target connection)
2. Mounts the backup control file
3. For backup-based duplication: Selects the backups for restoring the data files to the auxiliary instance
4. Restores the target data files to the duplicate database
5. Performs incomplete recovery using all available incremental backups and archived redo log files
When you execute the DUPLICATE command, RMAN performs the operations listed in the slide.
1A.RMAN creates a default server parameter file for the auxiliary instance if the following conditions are true:
- Duplication does not involve a standby database.
- Server parameter files are not being duplicated.
- The auxiliary instance was not started with a server parameter file.1B.RMAN restores from backup—always for the standby database, and for backup-based
duplication without target connection. 2. RMAN mounts the restored or the copied backup control file from the active database. 3. For backup-based duplication: RMAN uses the RMAN repository to select the backups
for restoring the data files to the auxiliary instance. 4. RMAN restores and copies the duplicate data files.5. RMAN recovers the data files with incremental backups and archived redo log files to a
noncurrent point in time. RMAN must perform database point-in-time recovery, even when no explicit point in time is provided for duplication. Point-in-time recovery is required because the online redo log files in the source database are not backed up and cannot be applied to the duplicate database. The farthest point of recovery of the duplicate database is the most recent redo log file archived by the source database.
Oracle Database 12c: Backup and Recovery Workshop 18 - 20
Copyright © 2015, Oracle and/or its affiliates. All rights reserved.
Ora
cle
Uni
vers
ity a
nd E
rror :
You
are
not
a V
alid
Par
tner
use
onl
y
THES
E eK
IT M
ATER
IALS
AR
E FO
R Y
OU
R U
SE IN
TH
IS C
LASS
RO
OM
ON
LY.
CO
PYIN
G e
KIT
MAT
ERIA
LS F
RO
M T
HIS
CO
MPU
TER
IS S
TRIC
TLY
PRO
HIB
ITED

Understanding the RMAN Duplication Operation
When you execute the DUPLICATE command, RMAN performs the following operations:6. Shuts down and restarts the auxiliary instance in NOMOUNT
mode
7. Creates a new control file, which then creates and stores the new DBID in the data files
8. Opens the duplicate database with the RESETLOGS option
9. Creates the online redo log files for the duplicate database
Note: The database duplication process attempts to resume from the point-of-failure upon re-execution.
6. RMAN shuts down and restarts the database instance in NOMOUNT mode.
7. RMAN creates a new control file, which then creates and stores the new, unique database identifier DBID in the data files of the duplicated database.
8. RMAN opens the duplicate database with the RESETLOGS option.
9. RMAN creates the online redo log files for the duplicate database.
Note: If the DUPLICATE DATABASE command fails, you can re-execute the DUPLICATE DATABASE command and the duplication process attempts to resume from the point of failure.
Oracle Database 12c: Backup and Recovery Workshop 18 - 21
Copyright © 2015, Oracle and/or its affiliates. All rights reserved.
Ora
cle
Uni
vers
ity a
nd E
rror :
You
are
not
a V
alid
Par
tner
use
onl
y
THES
E eK
IT M
ATER
IALS
AR
E FO
R Y
OU
R U
SE IN
TH
IS C
LASS
RO
OM
ON
LY.
CO
PYIN
G e
KIT
MAT
ERIA
LS F
RO
M T
HIS
CO
MPU
TER
IS S
TRIC
TLY
PRO
HIB
ITED

Specifying Options for the DUPLICATE Command
You can specify the following options with the DUPLICATE command:
command:Option Purpose
SKIP READONLY Excludes read-only tablespaces
SKIP TABLESPACE Excludes named tablespaces
TABLESPACE Includes named tablespaces
NOFILENAMECHECK Prevents checking of file names
OPEN RESTRICTED Enables RESTRICTED SESSION automatically
NOOPEN Leaves duplicate database in MOUNT mode
Specify additional options when executing the DUPLICATE command as appropriate.• SKIP READONLY: Use to exclude read-only tablespace data files. • SKIP TABLESPACE: Use to exclude tablespaces from the target database. You cannot
exclude the SYSTEM tablespace or tablespaces containing undo or rollback segments.• TABLESPACE: Use to include tablespaces from the target database. • NOFILENAMECHECK: Use to prevent RMAN from checking whether target database
data files with the same name as duplicate database data files are in use. You must specify this option when the target database and duplicate database data files and redo log files use the same names. You would typically use this when you create a duplicate database on a host that has the same disk configuration, directory structure, and file names as the target database host. If you do not specify NOFILENAMECHECK in this situation, RMAN returns an error.
• OPEN RESTRICTED: Use to enable RESTRICTED SESSION automatically after the database is opened.
• NOOPEN: Use to finish with the duplicate database in MOUNT mode. Use this option before:
- Modifying block change tracking- Configuring fast incremental backups or flashback database settings- Moving the location of the database (for example, to ASM)- Upgrading a database
Oracle Database 12c: Backup and Recovery Workshop 18 - 22
Copyright © 2015, Oracle and/or its affiliates. All rights reserved.
Ora
cle
Uni
vers
ity a
nd E
rror :
You
are
not
a V
alid
Par
tner
use
onl
y
THES
E eK
IT M
ATER
IALS
AR
E FO
R Y
OU
R U
SE IN
TH
IS C
LASS
RO
OM
ON
LY.
CO
PYIN
G e
KIT
MAT
ERIA
LS F
RO
M T
HIS
CO
MPU
TER
IS S
TRIC
TLY
PRO
HIB
ITED

Using Additional DUPLICATE Command Options
Option Purpose
NOREDO Signals RMAN that the application of redo logs should be suppressed during recoveryMust be used with targetless DUPLICATE when target database is in NOARCHIVELOG mode at backup time
Can also be used to explicitly state that no archived redo log files should be applied
UNDO TABLESPACE Must be specified when target database is not open and there is no recovery catalog connection so that RMAN does not check the tablespace for SYS-owned objects
The following additional options for the DUPLICATE command are introduced with Oracle Database 11g Release 2:
• NOREDO: The NOREDO option is used to signal RMAN that redo logs should not be applied during the recovery phase of the duplication operation. This option should be specified when the database was in NOARCHIVELOG mode at the time of the backup or when the archived redo log files are not available for use during the duplication operation. This option is appropriate if a database that is currently in ARCHIVELOGmode is being duplicated to a point in time when it was in NOARCHIVELOG mode.
If you are planning a targetless DUPLICATE operation and the database is in NOARCHIVELOG mode, you must use the NOREDO option to inform RMAN of the database mode. Without a connection to the target database, RMAN cannot determine the mode.
• UNDO TABLESPACE: RMAN checks that there are no objects belonging to the SYS user in any of the duplicated tablespaces during non-whole database duplication. The SYSTEM, SYSAUX, and undo segment tablespaces are excluded from this check. However, if the target database is not open and a recovery catalog is not being used during the duplication, RMAN cannot obtain the undo tablespace names. So you must use the UNDO TABLESPACE option to provide the names of undo segment tablespaces.
Oracle Database 12c: Backup and Recovery Workshop 18 - 23
Copyright © 2015, Oracle and/or its affiliates. All rights reserved.
Ora
cle
Uni
vers
ity a
nd E
rror :
You
are
not
a V
alid
Par
tner
use
onl
y
THES
E eK
IT M
ATER
IALS
AR
E FO
R Y
OU
R U
SE IN
TH
IS C
LASS
RO
OM
ON
LY.
CO
PYIN
G e
KIT
MAT
ERIA
LS F
RO
M T
HIS
CO
MPU
TER
IS S
TRIC
TLY
PRO
HIB
ITED

Substitution Variables for SET NEWNAME
Syntax Element Description
%b Specifies the file name without the directory path *NEW*
%f Specifies the absolute file number of the data file for which the new name is generated
%I Specifies the DBID
%N Specifies the tablespace name
%U Specifies a system-generated file name of the format:data-D-%d_id-%I_TS-%N_FNO-%f
RUN{ SET NEWNAME FOR DATAFILE 1 TO '/oradata1/system01.dbf';SET NEWNAME FOR DATAFILE 2 TO '/oradata2/sysaux01.dbf';SET NEWNAME FOR DATAFILE 3 TO '/oradata3/undotbs01.dbf';SET NEWNAME FOR DATAFILE 4 TO '/oradata4/users01.dbf';SET NEWNAME FOR TABLESPACE example TO '/oradata5/%b';DUPLICATE TARGET DATABASE TO dupldb; }
To avoid possible name collisions when restoring to another location, use the substitution variables of the SET NEWNAME command. Specify at least one of the following substitution variables: %b, %f, and %U. %I and %N are optional variables.
The example shows the SET NEWNAME FOR TABLESPACE command to set default names with a substitution variable, together with explicit SET NEWNAME clauses.
Oracle Database 12c: Backup and Recovery Workshop 18 - 24
Copyright © 2015, Oracle and/or its affiliates. All rights reserved.
Ora
cle
Uni
vers
ity a
nd E
rror :
You
are
not
a V
alid
Par
tner
use
onl
y
THES
E eK
IT M
ATER
IALS
AR
E FO
R Y
OU
R U
SE IN
TH
IS C
LASS
RO
OM
ON
LY.
CO
PYIN
G e
KIT
MAT
ERIA
LS F
RO
M T
HIS
CO
MPU
TER
IS S
TRIC
TLY
PRO
HIB
ITED

Quiz
Select all statements that are true about database duplication.
a. You can duplicate a database with or without connection to the auxiliary instance.
b. You can duplicate a database with or without connection to the recovery catalog.
c. You can duplicate a database with or without target connection.
d. You can duplicate a database only when you have RMAN backups.
e. You always have to manually re-create control files on the auxiliary instance.
Answer: b, c
Oracle Database 12c: Backup and Recovery Workshop 18 - 25
Copyright © 2015, Oracle and/or its affiliates. All rights reserved.
Ora
cle
Uni
vers
ity a
nd E
rror :
You
are
not
a V
alid
Par
tner
use
onl
y
THES
E eK
IT M
ATER
IALS
AR
E FO
R Y
OU
R U
SE IN
TH
IS C
LASS
RO
OM
ON
LY.
CO
PYIN
G e
KIT
MAT
ERIA
LS F
RO
M T
HIS
CO
MPU
TER
IS S
TRIC
TLY
PRO
HIB
ITED

Summary
In this lesson, you should have learned how to:
• List the purposes of creating a duplicate database
• Choose a technique for duplicating a database
• Duplicate a database with RMAN
• Use an RMAN backup to duplicate a database
• Duplicate a database based on a running instance
Oracle Database 12c: Backup and Recovery Workshop 18 - 26
Copyright © 2015, Oracle and/or its affiliates. All rights reserved.
Ora
cle
Uni
vers
ity a
nd E
rror :
You
are
not
a V
alid
Par
tner
use
onl
y
THES
E eK
IT M
ATER
IALS
AR
E FO
R Y
OU
R U
SE IN
TH
IS C
LASS
RO
OM
ON
LY.
CO
PYIN
G e
KIT
MAT
ERIA
LS F
RO
M T
HIS
CO
MPU
TER
IS S
TRIC
TLY
PRO
HIB
ITED

Practice Overview: Duplicating a Database
Practice 18-1 covers duplicating a database.
rcat
Sample schema
Oracle Net
File system
orcl
Sample schema
dbtest
DUPLICATE TARGET DATABASE TO dbtest FROM ACTIVE DATABASESPFILE PARAMETER_VALUE_CONVERT'/u01/app/oracle/oradata/orcl','/u01/app/oracle/oradata/dbtest','/u01/app/oracle/fast_recovery_area','/u01/app/oracle/dbtest_fra', 'ORCL','DBTEST'SET DB_RECOVERY_FILE_DEST_SIZE='10g‘;.
This practice covers cloning a database and using utilities to complete the setup of a functioning duplicated database.
Oracle Database 12c: Backup and Recovery Workshop 18 - 27
Copyright © 2015, Oracle and/or its affiliates. All rights reserved.
Ora
cle
Uni
vers
ity a
nd E
rror :
You
are
not
a V
alid
Par
tner
use
onl
y
THES
E eK
IT M
ATER
IALS
AR
E FO
R Y
OU
R U
SE IN
TH
IS C
LASS
RO
OM
ON
LY.
CO
PYIN
G e
KIT
MAT
ERIA
LS F
RO
M T
HIS
CO
MPU
TER
IS S
TRIC
TLY
PRO
HIB
ITED

Ora
cle
Uni
vers
ity a
nd E
rror :
You
are
not
a V
alid
Par
tner
use
onl
y
THES
E eK
IT M
ATER
IALS
AR
E FO
R Y
OU
R U
SE IN
TH
IS C
LASS
RO
OM
ON
LY.
CO
PYIN
G e
KIT
MAT
ERIA
LS F
RO
M T
HIS
CO
MPU
TER
IS S
TRIC
TLY
PRO
HIB
ITED

RMAN Troubleshooting and Tuning
Copyright © 2015, Oracle and/or its affiliates. All rights reserved.
Ora
cle
Uni
vers
ity a
nd E
rror :
You
are
not
a V
alid
Par
tner
use
onl
y
THES
E eK
IT M
ATER
IALS
AR
E FO
R Y
OU
R U
SE IN
TH
IS C
LASS
RO
OM
ON
LY.
CO
PYIN
G e
KIT
MAT
ERIA
LS F
RO
M T
HIS
CO
MPU
TER
IS S
TRIC
TLY
PRO
HIB
ITED

Objectives
After completing this lesson, you should be able to:
• Interpret the RMAN message output
• Apply best practice tuning principles
• Diagnose RMAN performance issues
Oracle Database 12c: Backup and Recovery Workshop 19 - 2
Copyright © 2015, Oracle and/or its affiliates. All rights reserved.
Ora
cle
Uni
vers
ity a
nd E
rror :
You
are
not
a V
alid
Par
tner
use
onl
y
THES
E eK
IT M
ATER
IALS
AR
E FO
R Y
OU
R U
SE IN
TH
IS C
LASS
RO
OM
ON
LY.
CO
PYIN
G e
KIT
MAT
ERIA
LS F
RO
M T
HIS
CO
MPU
TER
IS S
TRIC
TLY
PRO
HIB
ITED

Interpreting RMAN Message Output
RMAN troubleshooting information can be found in:
• RMAN command output
• RMAN trace file
• Alert log
• Oracle server trace file• sbtio.log file
The RMAN command output contains actions that are relevant to the RMAN job as well as error messages that are generated by RMAN, the server, and the media vendor. RMAN error messages have an RMAN-nnnn prefix. The output is displayed to the terminal (standard output) but can be written to a file by defining the LOG option or by shell redirection.
The RMAN trace file contains the DEBUG output and is used only when the TRACE command option is used.
The alert log contains a chronological log of errors, nondefault initialization parameter settings, and administration operations. Because it records values for overwritten control file records, it can be useful for RMAN maintenance when operating without a recovery catalog. In Cloud Control navigate from the database home page > Oracle Database > Logs > Alert Logs Content > Switch to Text Alert Log Contents, and optionally, enter search criteria. Click Go to view the content of the alert log.
The Oracle trace file contains detailed output that is generated by Oracle server processes. This file is created when an ORA-600 or ORA-3113 (following an ORA-7445) error message occurs, whenever RMAN cannot allocate a channel, and when the Media Management Library fails to load. It can be found in USER_DUMP_DEST.
The sbtio.log file contains vendor-specific information that is written by the media management software and can be found in USER_DUMP_DEST. Note that this log does not contain Oracle server or RMAN errors.
Oracle Database 12c: Backup and Recovery Workshop 19 - 3
Copyright © 2015, Oracle and/or its affiliates. All rights reserved.
Ora
cle
Uni
vers
ity a
nd E
rror :
You
are
not
a V
alid
Par
tner
use
onl
y
THES
E eK
IT M
ATER
IALS
AR
E FO
R Y
OU
R U
SE IN
TH
IS C
LASS
RO
OM
ON
LY.
CO
PYIN
G e
KIT
MAT
ERIA
LS F
RO
M T
HIS
CO
MPU
TER
IS S
TRIC
TLY
PRO
HIB
ITED

Using the DEBUG Option
• The DEBUG option is used to:
– View the PL/SQL that is generated
– Determine precisely where an RMAN command is hanging or faulting
• The DEBUG option is specified at the RMAN prompt or within a run block.
• The DEBUG option creates an enormous amount of output, so redirect the output to a trace file:
$ rman target / catalog rman/rman debug trace trace.log
The DEBUG option displays all SQL statements that are executed during RMAN compilations and the results of these executions. Any information that is generated by the recovery catalog PL/SQL packages is also displayed. In the following example, the DEBUG output is written during the backup of data file 3, but not data file 4:RMAN> run {
debug on;
allocate channel c1 type disk;
backup datafile 3;
debug off;
backup datafile 4; }
Remember that the DEBUG output can be voluminous, so make sure that you have adequate disk space for the trace file. This simple backup session that does not generate any errors creates a trace file that is almost half a megabyte in size:$ rman target / catalog rman/rman debug trace sample.log
RMAN> backup database;
RMAN> host "ls –l sample.log";
-rw-r--r-- 1 user02 dba 576270 Apr 6 10:38 sample.log
host command complete
Oracle Database 12c: Backup and Recovery Workshop 19 - 4
Copyright © 2015, Oracle and/or its affiliates. All rights reserved.
Ora
cle
Uni
vers
ity a
nd E
rror :
You
are
not
a V
alid
Par
tner
use
onl
y
THES
E eK
IT M
ATER
IALS
AR
E FO
R Y
OU
R U
SE IN
TH
IS C
LASS
RO
OM
ON
LY.
CO
PYIN
G e
KIT
MAT
ERIA
LS F
RO
M T
HIS
CO
MPU
TER
IS S
TRIC
TLY
PRO
HIB
ITED

Interpreting RMAN Error Stacks
• Read the stack from bottom to top.• Look for Additional information.
• RMAN-03009 identifies the failed command.
RMAN-00571: ===========================================RMAN-00569: ======= ERROR MESSAGE STACK FOLLOWS =======RMAN-00571: ===========================================RMAN-03009: failure of backup command on c1 channel at
09/04/2001 13:18:19ORA-19506: failed to create sequential file,
name="07d36ecp_1_1", parms=""ORA-27007: failed to open fileSVR4 Error: 2: No such file or directoryAdditional information: 7005Additional information: 1ORA-19511: Error from media manager layer,error text:
Because of the amount of data that RMAN logs, you may find it difficult to identify the useful messages in the RMAN error stack. Note the following tips and suggestions:
• Because many of the messages in the error stack are not meaningful for troubleshooting, try to identify the one or two errors that are most important.
• Check for a line that says Additional information followed by an integer. This line indicates a media management error. The integer that follows refers to code that is explained in the text of the error message.
• Read the messages from bottom to top because this is the order in which RMAN issues the messages. The last one or two errors that are displayed in the stack are often informative.
• Look for the RMAN-03002 or RMAN-03009 message immediately following the banner. RMAN-03009 is the same as RMAN-03002 but includes the channel ID. If the failure is related to an RMAN command, then these messages indicate which command failed. The syntax errors generate an RMAN-00558 error.
Oracle Database 12c: Backup and Recovery Workshop 19 - 5
Copyright © 2015, Oracle and/or its affiliates. All rights reserved.
Ora
cle
Uni
vers
ity a
nd E
rror :
You
are
not
a V
alid
Par
tner
use
onl
y
THES
E eK
IT M
ATER
IALS
AR
E FO
R Y
OU
R U
SE IN
TH
IS C
LASS
RO
OM
ON
LY.
CO
PYIN
G e
KIT
MAT
ERIA
LS F
RO
M T
HIS
CO
MPU
TER
IS S
TRIC
TLY
PRO
HIB
ITED

Processing an RMAN Command
During the compilation phase, RMAN:
• Identifies files
• Constructs job step(s) made up of instructions
During the execution phase, RMAN:
• Submits each job step to an available channel– Separate OCI connection to target
– Oracle foreground processes performing data movement— Read data: I/O from disk or tape
— Process data: Copy buffer, validate, encrypt, and compress
— Write data: I/O to disk or tape
• Monitors the execution
These letters are referenced on the next pages.
I) During the compilation phase, RMAN identifies the files that will participate in the command by querying the backup repository (which is either the recovery catalog or the target database control file).
J) With this information, RMAN constructs one or more job steps. Each job step consists of a set of instructions from the RMAN client to the target instance to perform specific data movement operations on one or more files.
C) During the execution phase, RMAN submits each job step to an available channel. M) RMAN monitors the channels that process work in parallel. After the completion of each
job step, RMAN submits the next job step to that channel. When all job steps have completed, the command is complete.
• Each RMAN channel contains a separate OCI connection to the target database. So each channel also represents one Oracle foreground process that performs the data movement tasks requested by the RMAN client.
• The RMAN client does not perform I/O operations; those tasks are performed by the Oracle processes which:
R) Read (A channel reads data from disk or tape into I/O input buffers.)P) Process using CPU (A channel copies blocks from input buffers to output buffers
and performs additional processing on the blocks: block validation, encryption, and/or compression.)
W) Write (A channel writes the blocks from output buffers to storage media, that is to disk or tape.)
Oracle Database 12c: Backup and Recovery Workshop 19 - 6
Copyright © 2015, Oracle and/or its affiliates. All rights reserved.
Ora
cle
Uni
vers
ity a
nd E
rror :
You
are
not
a V
alid
Par
tner
use
onl
y
THES
E eK
IT M
ATER
IALS
AR
E FO
R Y
OU
R U
SE IN
TH
IS C
LASS
RO
OM
ON
LY.
CO
PYIN
G e
KIT
MAT
ERIA
LS F
RO
M T
HIS
CO
MPU
TER
IS S
TRIC
TLY
PRO
HIB
ITED

sbttest
Troubleshooting with RMAN
Image copies
Backup pieces
Backup data
Data files
Target database
Archive log files
Controlfile
RMAN
Backup to disk
Media Management(Example: Oracle Secure Backup)
Backup to Tape
Backup to SBT channel
Backup with third-party media
manager
Recovery Catalog
VALIDATERMAN
On some platforms, Oracle provides a diagnostic tool called sbttest. This utility performs a simple test of the media management software by acting as the Oracle database server and attempting to communicate with the media manager.
Use sbttest to perform a quick test of the media manager.
$ORACLE_HOME/bin/sbttest backup_file_name
When you type sbttest without the mandatory backup_file_name, the online documentation is displayed.
If sbttest returns 0, then the test ran without error, which means that the media manager is correctly installed and can accept a data stream and return the same data when requested. If sbttest returns a nonzero value, then either the media manager is not installed or it is not configured correctly.
Oracle Database 12c: Backup and Recovery Workshop 19 - 7
Copyright © 2015, Oracle and/or its affiliates. All rights reserved.
Ora
cle
Uni
vers
ity a
nd E
rror :
You
are
not
a V
alid
Par
tner
use
onl
y
THES
E eK
IT M
ATER
IALS
AR
E FO
R Y
OU
R U
SE IN
TH
IS C
LASS
RO
OM
ON
LY.
CO
PYIN
G e
KIT
MAT
ERIA
LS F
RO
M T
HIS
CO
MPU
TER
IS S
TRIC
TLY
PRO
HIB
ITED

Is There a Problem?
• Know the performance of each of your components.• Analyze the read and process steps with the BACKUP
VALIDATE command.
• Analyze the read and process steps with the RESTORE VALIDATE command.
The first step in tuning is analysis. Do you actually have a problem that can be addressed by tuning RMAN operations? To find out, you need to:
• Know the performance of each of your components. For example, if you think of the speed of a tape drive, you compare the actual data rate of a backup with the documented maximum speed of that tape drive.
• For backups, analyze the read and process steps with the BACKUP VALIDATEcommand. It causes RMAN to perform all steps of the backup up to the point of writing the data to the output device, then the data is discarded and nothing is written. Note that VALIDATE does perform compression if specified on the backup command, but not encryption. If compression was specified on the backup command, then BACKUP VALIDATE should be first run without compression, to measure the speed at which RMAN can read the input files, then again with compression to see the effects of the compression itself.
• The VALIDATE option for restoration causes RMAN to perform all the steps of a restore, up to the point where it is about to write the restored data to disk, then the data is discarded and nothing is written. This is often used to validate the integrity of backup media, but is also useful to diagnose performance problems with the read and processing operations of a RESTORE command. RESTORE VALIDATE performs both decryption and decompression if the backup was created with those options.
Oracle Database 12c: Backup and Recovery Workshop 19 - 8
Copyright © 2015, Oracle and/or its affiliates. All rights reserved.
Ora
cle
Uni
vers
ity a
nd E
rror :
You
are
not
a V
alid
Par
tner
use
onl
y
THES
E eK
IT M
ATER
IALS
AR
E FO
R Y
OU
R U
SE IN
TH
IS C
LASS
RO
OM
ON
LY.
CO
PYIN
G e
KIT
MAT
ERIA
LS F
RO
M T
HIS
CO
MPU
TER
IS S
TRIC
TLY
PRO
HIB
ITED

Diagnosing Performance Bottlenecks
1. Query the EFFECTIVE_BYTES_PER_SECOND column in V$BACKUP_ASYNC_IO or V$BACKUP_SYNC_IO for the AGGREGATE row.
2. If the value in EFFECTIVE_BYTES_PER_SECOND < storage media throughput, execute the BACKUP VALIDATEcommand to obtain additional information.
1. You can use the BACKUP VALIDATE command to help you determine whether your bottleneck is in the read or write phase. Start by querying the EFFECTIVE_BYTES_PER_SECOND column of V$BACKUP_ASYNC_IO or V$BACKUP_SYNC_IO.
2. If the value in EFFECTIVE_BYTES_PER_SECOND is less than the expected throughput from your storage media, execute the BACKUP VALIDATE command. BACKUPVALIDATE performs the same disk reads as a backup, but does not perform I/O to an output device. So by comparing the time of your backup operations with the time taken by the BACKUP VALIDATE command, you should be able to determine whether the bottleneck is due to reads or writes.
Oracle Database 12c: Backup and Recovery Workshop 19 - 9
Copyright © 2015, Oracle and/or its affiliates. All rights reserved.
Ora
cle
Uni
vers
ity a
nd E
rror :
You
are
not
a V
alid
Par
tner
use
onl
y
THES
E eK
IT M
ATER
IALS
AR
E FO
R Y
OU
R U
SE IN
TH
IS C
LASS
RO
OM
ON
LY.
CO
PYIN
G e
KIT
MAT
ERIA
LS F
RO
M T
HIS
CO
MPU
TER
IS S
TRIC
TLY
PRO
HIB
ITED

Diagnosing Performance Bottlenecks:Read Phase
• If BACKUP VALIDATE time ~= actual backup time, the read phase is the likely bottleneck.
• Implement appropriate RMAN multiplexing and buffer usage guidelines.
• Investigate “slow” performing files: Find the data file with the highest LONG_WAITS/IO_COUNT ratio.
– If ASM, add disk spindles and/or rebalance disks.
– Move the file to a new disk or multiplex with another “slow” file.
If the execution time of the BACKUP VALIDATE command approximates the actual backup time, the read phase is most likely the bottleneck.
You can improve backup performance by adjusting the multiplexing level.
Note: Refer to My Oracle Support note 1072545.1 for additional information about tuning by using buffer memory parameters.
Oracle Database 12c: Backup and Recovery Workshop 19 - 10
Copyright © 2015, Oracle and/or its affiliates. All rights reserved.
Ora
cle
Uni
vers
ity a
nd E
rror :
You
are
not
a V
alid
Par
tner
use
onl
y
THES
E eK
IT M
ATER
IALS
AR
E FO
R Y
OU
R U
SE IN
TH
IS C
LASS
RO
OM
ON
LY.
CO
PYIN
G e
KIT
MAT
ERIA
LS F
RO
M T
HIS
CO
MPU
TER
IS S
TRIC
TLY
PRO
HIB
ITED

Is There a “Write” Problem?
To analyze a write process to disk:
• Create a data file on the disk and time the operation.
• Invoke the write by calling the DBMS_BACKUP_RESTORE.SETPARMS function.
To analyze a write process to disk (for both backup and restore), create a new tablespace with a data file on the disk and time the operation. If the same issues occur, general Oracle performance to this device should be tuned, not RMAN-specific parameters.
If this technique is not suitable, a write I/O driver can be used. The write driver is invoked by calling the DBMS_BACKUP_RESTORE.SETPARMS function with parameters:
• p0 => 6
• p1 => buffer size in bytes (specify NULL or 0 to use default)
• p2 => number of buffers (specify NULL or 0 to use default)
• p3 => number of blocks to write
• p4 => block size in bytes (must be specified, 8192 is a good choice)
• p5 => file name to write
• p6 => 1
The write I/O driver is also helpful when you are tuning disk channel output by executing commands with varying buffer sizes and counts.
Oracle Database 12c: Backup and Recovery Workshop 19 - 11
Copyright © 2015, Oracle and/or its affiliates. All rights reserved.
Ora
cle
Uni
vers
ity a
nd E
rror :
You
are
not
a V
alid
Par
tner
use
onl
y
THES
E eK
IT M
ATER
IALS
AR
E FO
R Y
OU
R U
SE IN
TH
IS C
LASS
RO
OM
ON
LY.
CO
PYIN
G e
KIT
MAT
ERIA
LS F
RO
M T
HIS
CO
MPU
TER
IS S
TRIC
TLY
PRO
HIB
ITED

Diagnosing Performance Bottlenecks:Write or Copy Phase
• If BACKUP VALIDATE time is less than the actual backup time, buffer copy or write to storage is the likely bottleneck.
• Implement backup compression and encryption guidelines:– Verify that uncompressed backup performance scales
properly, as channels are added.– Use the LOW or MEDIUM setting.
– Use the AES128 encryption algorithm.
• If tape backup, check media management (MML) settings:– TCP/IP buffer size
– Media management client/server buffer size
– Client/socket timeout
– Media server hardware, connectivity to tape
– Enable tape compression (but not RMAN compression)
If the execution time for the BACKUP VALIDATE command is significantly less than the actual backup time, writing to the output device is most likely the bottleneck.
If you are using compression, set the compression to LOW or MEDIUM.
Use the AES128 encryption algorithm because it is the least CPU-intensive.
Oracle Database 12c: Backup and Recovery Workshop 19 - 12
Copyright © 2015, Oracle and/or its affiliates. All rights reserved.
Ora
cle
Uni
vers
ity a
nd E
rror :
You
are
not
a V
alid
Par
tner
use
onl
y
THES
E eK
IT M
ATER
IALS
AR
E FO
R Y
OU
R U
SE IN
TH
IS C
LASS
RO
OM
ON
LY.
CO
PYIN
G e
KIT
MAT
ERIA
LS F
RO
M T
HIS
CO
MPU
TER
IS S
TRIC
TLY
PRO
HIB
ITED

Using Dynamic Viewsto Diagnose RMAN Performance
Use the following views to determine where RMAN backup and restore operations are encountering performance issues:
View Use
V$SESSION_LONGOPS Monitoring the progress of backups and restore jobs
V$BACKUP_SYNC_IO Identifying bottlenecks
Determining whether the tape is streaming when the I/O is synchronous
Viewing detailed progress of backup jobs
V$BACKUP_ASYNC_IO Identifying bottlenecks
Determining the rate of asynchronous I/O
If you experience performance issues with backup and restore jobs, you may begin diagnosing your issues by using the views listed in the slide. Additional information about each view follows in the lesson.
Oracle Database 12c: Backup and Recovery Workshop 19 - 13
Copyright © 2015, Oracle and/or its affiliates. All rights reserved.
Ora
cle
Uni
vers
ity a
nd E
rror :
You
are
not
a V
alid
Par
tner
use
onl
y
THES
E eK
IT M
ATER
IALS
AR
E FO
R Y
OU
R U
SE IN
TH
IS C
LASS
RO
OM
ON
LY.
CO
PYIN
G e
KIT
MAT
ERIA
LS F
RO
M T
HIS
CO
MPU
TER
IS S
TRIC
TLY
PRO
HIB
ITED

Monitoring RMAN Job Progress
Monitor the progress of backup and restore operations by querying V$SESSION_LONGOPS.
SQL> SELECT SID,SERIAL#,CONTEXT,SOFAR,TOTALWORK,2 ROUND(SOFAR/TOTALWORK*100,2) "%_COMPLETE"3 FROM V$SESSION_LONGOPS4 WHERE OPNAME LIKE 'RMAN%'5 AND OPNAME NOT LIKE '%aggregate%'6 AND TOTALWORK != 07 AND SOFAR <> TOTALWORK;
SID SERIAL# CONTEXT SOFAR TOTALWORK %_COMPLETE--- ------- ------- ------- --------- ----------13 75 1 9470 15360 61.6512 81 1 15871 28160 56.36
Monitor the progress of backups, copies, and restores by querying the V$SESSION_LONGOPSview. RMAN uses detail and aggregate rows in V$SESSION_LONGOPS. Detail rows describe the files that are being processed by one job step. Aggregate rows describe the files that are processed by all job steps in an RMAN command. A job step is the creation or restoration of one backup set or data file copy. The detail rows are updated with every buffer that is read or written during the backup step, so their granularity of update is small. The aggregate rows are updated when each job step is completed, so their granularity of update is large.
Note: Set the STATISTICS_LEVEL parameter to TYPICAL (the default value) or ALL to populate the V$SESSION_LONGOPS view.
The relevant columns in V$SESSION_LONGOPS for RMAN include:
• OPNAME: A text description of the row. Detail rows include RMAN:datafile copy, RMAN:full datafile backup, and RMAN:full datafile restore.
• CONTEXT: For backup output rows, the value of this column is 2. For all the other rows except proxy copy (which does not update this column), the value is 1.
Oracle Database 12c: Backup and Recovery Workshop 19 - 14
Copyright © 2015, Oracle and/or its affiliates. All rights reserved.
Ora
cle
Uni
vers
ity a
nd E
rror :
You
are
not
a V
alid
Par
tner
use
onl
y
THES
E eK
IT M
ATER
IALS
AR
E FO
R Y
OU
R U
SE IN
TH
IS C
LASS
RO
OM
ON
LY.
CO
PYIN
G e
KIT
MAT
ERIA
LS F
RO
M T
HIS
CO
MPU
TER
IS S
TRIC
TLY
PRO
HIB
ITED

SOFAR:
• For image copies, the number of blocks that have been read
• For backup input rows, the number of blocks that have been read from the files that are being backed up
• For backup output rows, the number of blocks that have been written to the backup piece
• For restores, the number of blocks that have been processed to the files that are being restored in this one job step
• For proxy copies, the number of files that have been copied
TOTALWORK:
• For image copies, the total number of blocks in the file
• For backup input rows, the total number of blocks to be read from all files that are processed in this job step
• For backup output rows, the value is 0 because RMAN does not know how many blocks it will write into any backup piece
• For restores, the total number of blocks in all files restored in this job step
• For proxy copies, the total number of files to be copied in this job step
Oracle Database 12c: Backup and Recovery Workshop 19 - 15
Ora
cle
Uni
vers
ity a
nd E
rror :
You
are
not
a V
alid
Par
tner
use
onl
y
THES
E eK
IT M
ATER
IALS
AR
E FO
R Y
OU
R U
SE IN
TH
IS C
LASS
RO
OM
ON
LY.
CO
PYIN
G e
KIT
MAT
ERIA
LS F
RO
M T
HIS
CO
MPU
TER
IS S
TRIC
TLY
PRO
HIB
ITED

Identifying Backup and Restore Bottlenecks
• The following views can be used to determine the source of bottlenecks and to view backup job progress:– V$BACKUP_SYNC_IO
– V$BACKUP_ASYNC_IO
• The following rows exist for a backup or restore:– One row for each data file
– One aggregate data file row
– One row for each backup piece
The maximum backup speed is limited by the available hardware. It is not possible to back up any faster than the aggregate tape bandwidth. One exception to this is if there are many empty blocks in the data files that need not be backed up.
One of the components of the backup system will be a bottleneck—which one depends on the relative speeds of the disk, tape drive, and any other transport components such as the network. As an example, if the bottleneck is the tape drive, and the tape is streaming, then the backup cannot possibly proceed any faster.
Oracle Database 12c: Backup and Recovery Workshop 19 - 16
Copyright © 2015, Oracle and/or its affiliates. All rights reserved.
Ora
cle
Uni
vers
ity a
nd E
rror :
You
are
not
a V
alid
Par
tner
use
onl
y
THES
E eK
IT M
ATER
IALS
AR
E FO
R Y
OU
R U
SE IN
TH
IS C
LASS
RO
OM
ON
LY.
CO
PYIN
G e
KIT
MAT
ERIA
LS F
RO
M T
HIS
CO
MPU
TER
IS S
TRIC
TLY
PRO
HIB
ITED

Asynchronous I/O Bottlenecks
• Use V$BACKUP_ASYNC_IO to monitor asynchronous I/O.
• The file that has the largest ratio of LONG_WAITS to IO_COUNT is probably the bottleneck.– IO_COUNT: Number of I/Os performed on the file
– LONG_WAITS: Number of times the backup/restore process directed the OS to wait until I/O was complete
• Wait times should be zero to avoid bottlenecks.– SHORT_WAIT_TIME_TOTAL
– LONG_WAIT_TIME_TOTAL
You can use V$BACKUP_ASYNC_IO to monitor asynchronous I/O. The LONG_WAITS column shows the number of times the backup or restore process directed the operating system to wait until an I/O was complete. The SHORT_WAITS column shows the number of times the backup/restore process made an operating system call to poll for I/O completion in nonblocking mode. On some platforms, the asynchronous I/O implementation may cause the calling process to wait for the I/O to complete while performing a nonblocking poll for I/O.
The simplest way to identify the bottleneck is to query V$BACKUP_ASYNC_IO for the data file that has the largest ratio for LONG_WAITS divided by IO_COUNT.
Oracle Database 12c: Backup and Recovery Workshop 19 - 17
Copyright © 2015, Oracle and/or its affiliates. All rights reserved.
Ora
cle
Uni
vers
ity a
nd E
rror :
You
are
not
a V
alid
Par
tner
use
onl
y
THES
E eK
IT M
ATER
IALS
AR
E FO
R Y
OU
R U
SE IN
TH
IS C
LASS
RO
OM
ON
LY.
CO
PYIN
G e
KIT
MAT
ERIA
LS F
RO
M T
HIS
CO
MPU
TER
IS S
TRIC
TLY
PRO
HIB
ITED

Synchronous I/O Bottlenecks
• Synchronous I/O is considered to be a bottleneck.• Query the DISCRETE_BYTES_PER_SECOND column from
V$BACKUP_SYNC_IO to view the I/O rate.
– Compare this rate with the device’s maximum rate.
– If the rate is lower than what the device specifies, this is a tuning opportunity.
When using synchronous I/O, it can easily be determined how much time the backup jobs require because devices perform only one I/O task at a time. Oracle I/O uses a polling mechanism rather than an interrupt mechanism to determine when each I/O request completes. Because the backup or restore process is not immediately notified of I/O completion by the operating system, you cannot determine the duration of each I/O.
Use V$BACKUP_SYNC_IO to determine the source of backup or restore bottlenecks and to determine the progress of backup jobs. V$BACKUP_SYNC_IO contains rows when the I/O is synchronous to the process (or thread, on some platforms) that is performing the backup.
Oracle Database 12c: Backup and Recovery Workshop 19 - 18
Copyright © 2015, Oracle and/or its affiliates. All rights reserved.
Ora
cle
Uni
vers
ity a
nd E
rror :
You
are
not
a V
alid
Par
tner
use
onl
y
THES
E eK
IT M
ATER
IALS
AR
E FO
R Y
OU
R U
SE IN
TH
IS C
LASS
RO
OM
ON
LY.
CO
PYIN
G e
KIT
MAT
ERIA
LS F
RO
M T
HIS
CO
MPU
TER
IS S
TRIC
TLY
PRO
HIB
ITED

Tuning RMAN Backup Performance
To tune RMAN backup performance, follow these steps:1. Remove RATE settings from configured and allocated
channels.2. Set the DBWR_IO_SLAVES parameter if you use
synchronous disk I/O.3. Set the LARGE_POOL_SIZE initialization parameter.
4. Tune the RMAN read, write, and copy phases.
1. Remove RATE settings from configured and allocated channels. The RATE parameter is used to set the maximum number of bytes (default), kilobytes (K), megabytes (M), or gigabytes (G) that RMAN reads each second on the channel. It sets an upper limit for bytes read so that RMAN does not consume too much disk bandwidth and degrade performance. If your backup is not streaming to tape, ensure that the RATE parameter is not set on the ALLOCATE CHANNEL or CONFIGURE CHANNEL command.
2. Set DBWR_IO_SLAVES if you use synchronous disk I/O. If your disk does not support asynchronous I/O, try setting the DBWR_IO_SLAVES initialization parameter to a nonzero value. Any nonzero value for DBWR_IO_SLAVES causes a fixed number (four) of disk I/O slaves to be used for backup and restore, simulating asynchronous I/O. If I/O slaves are used, I/O buffers are obtained from the SGA. The large pool is used if configured. Otherwise, the shared pool is used.
Note: By setting DBWR_IO_SLAVES, the database writer processes will use slaves as well. You may need to increase the value of the PROCESSES initialization parameter.
3. If there is failure in shared memory allocation, set the LARGE_POOL_SIZE initialization parameter as described on the next page.
4. Tune RMAN read, write, and copy phases.
Oracle Database 12c: Backup and Recovery Workshop 19 - 19
Copyright © 2015, Oracle and/or its affiliates. All rights reserved.
Ora
cle
Uni
vers
ity a
nd E
rror :
You
are
not
a V
alid
Par
tner
use
onl
y
THES
E eK
IT M
ATER
IALS
AR
E FO
R Y
OU
R U
SE IN
TH
IS C
LASS
RO
OM
ON
LY.
CO
PYIN
G e
KIT
MAT
ERIA
LS F
RO
M T
HIS
CO
MPU
TER
IS S
TRIC
TLY
PRO
HIB
ITED

Parallelization of Backup Sets
For performance, allocate multiple channels and assign files to specific channels.
Data file 4
Data file 1
Data file 5 Channel
MML Backuppiece 1
Backuppiece 2
Data file 2
Data file 3
Data file 9 Channel
MML
Data file 6
Data file 7
Data file 8
Backuppiece 3
Channel
MML
You can configure parallel backups by setting the PARALLELISM option of the CONFIGUREcommand to greater than 1 or by manually allocating multiple channels. RMAN parallelizes its operation and writes multiple backup sets in parallel. The server sessions divide the work of backing up the specified files.
ExampleRMAN> RUN {
2> ALLOCATE CHANNEL c1 DEVICE TYPE sbt;
3> ALLOCATE CHANNEL c2 DEVICE TYPE sbt;
4> ALLOCATE CHANNEL c3 DEVICE TYPE sbt;
5> BACKUP
6> INCREMENTAL LEVEL = 0
7> (DATAFILE 1,4,5 CHANNEL c1)
8> (DATAFILE 2,3,9 CHANNEL c2)
9> (DATAFILE 6,7,8 CHANNEL c3);
10> SQL 'ALTER SYSTEM ARCHIVE LOG CURRENT';
11> }
Oracle Database 12c: Backup and Recovery Workshop 19 - 20
Copyright © 2015, Oracle and/or its affiliates. All rights reserved.
Ora
cle
Uni
vers
ity a
nd E
rror :
You
are
not
a V
alid
Par
tner
use
onl
y
THES
E eK
IT M
ATER
IALS
AR
E FO
R Y
OU
R U
SE IN
TH
IS C
LASS
RO
OM
ON
LY.
CO
PYIN
G e
KIT
MAT
ERIA
LS F
RO
M T
HIS
CO
MPU
TER
IS S
TRIC
TLY
PRO
HIB
ITED

When backing up data files, you can specify the files to be backed up by either their path name or their file number. For example, the following two commands perform the same action:BACKUP DEVICE TYPE sbt DATAFILE '/home/oracle/system01.dbf';
BACKUP DEVICE TYPE sbt DATAFILE 1;
When you create multiple backup sets and allocate multiple channels, RMAN automatically parallelizes its operation and writes multiple backup sets in parallel. The allocated server sessions share the work of backing up the specified data files, control files, and archived redo logs. You cannot stripe a single backup set across multiple channels.
Parallelization of backup sets is achieved by:
• Configuring PARALLELISM to greater than 1 or allocating multiple channels
• Specifying many files to back up
Example
• There are nine files that need to be backed up (data files 1 through 9).
• Assign the data files to a backup set so that each set has approximately the same number of data blocks to back up (for efficiency).
- Data files 1, 4, and 5 are assigned to backup set 1.
- Data files 2, 3, and 9 are assigned to backup set 2.
- Data files 6, 7, and 8 are assigned to backup set 3.
Note: You can also use the FILESPERSET parameter to limit the number of data files that are included in a backup set.
Oracle Database 12c: Backup and Recovery Workshop 19 - 21
Ora
cle
Uni
vers
ity a
nd E
rror :
You
are
not
a V
alid
Par
tner
use
onl
y
THES
E eK
IT M
ATER
IALS
AR
E FO
R Y
OU
R U
SE IN
TH
IS C
LASS
RO
OM
ON
LY.
CO
PYIN
G e
KIT
MAT
ERIA
LS F
RO
M T
HIS
CO
MPU
TER
IS S
TRIC
TLY
PRO
HIB
ITED

Setting LARGE_POOL_SIZE
• If LARGE_POOL_SIZE is not set, the Oracle server tries to get memory from the shared pool.
• If LARGE_POOL_SIZE is not big enough, the server does not allocate buffers from the shared pool.
• If the server cannot get enough memory, it allocates buffers from the local process memory.
• The Oracle server writes a message to the alert log indicating that synchronous I/O is used for this backup.
ksfqxcre: failure to allocate shared memory means sync I/O will be used whenever async I/O to file notsupported natively
The requests for contiguous memory allocations from the shared pool are small, usually under 5 KB in size. It is possible that a request for a large contiguous memory allocation can fail or require significant memory housekeeping to release the required contiguous memory. The large pool may be able to satisfy the memory request. The large pool does not have a least recently used list, so Oracle does not attempt to age memory out of the large pool.
Use the LARGE_POOL_SIZE initialization parameter to configure the large pool. Query V$SGASTAT.POOL to see in which pool (shared pool or large pool) the memory for an object resides. The suggested value for LARGE_POOL_SIZE is calculated as:
#_of_allocated_channels * (16 MB + (4*size_of_tape_buffer ))
For backups to disk, the tape buffer is obviously 0, so set LARGE_POOL_SIZE to 16 MB. For tape backups, the size of a single tape buffer is defined by the RMAN channel parameter BLKSIZE, which defaults to 256 KB. Assume a case in which you are backing up to two tape drives. If the tape buffer size is 256 KB, set LARGE_POOL_SIZE to 34 MB. If you increase BLKSIZE to 512 KB, then increase LARGE_POOL_SIZE to 36 MB.
Note: The large pool is used only for disk buffers when DBWR_IO_SLAVES > 0 and for tape buffers when BACKUP_TAPE_IO_SLAVES = TRUE. If you are using Automatic Shared Memory Management, the large pool is sized automatically in response to system workload.
Oracle Database 12c: Backup and Recovery Workshop 19 - 22
Copyright © 2015, Oracle and/or its affiliates. All rights reserved.
Ora
cle
Uni
vers
ity a
nd E
rror :
You
are
not
a V
alid
Par
tner
use
onl
y
THES
E eK
IT M
ATER
IALS
AR
E FO
R Y
OU
R U
SE IN
TH
IS C
LASS
RO
OM
ON
LY.
CO
PYIN
G e
KIT
MAT
ERIA
LS F
RO
M T
HIS
CO
MPU
TER
IS S
TRIC
TLY
PRO
HIB
ITED

RMAN Multiplexing
• Multiplexing level: Maximum number of files read by one channel, at any time, during backup– Min (MAXOPENFILES, FILESPERSET)– Default for MAXOPENFILES is 8.– Default for FILESPERSET default is 64.
• MAXOPENFILES determines the number and size of input buffers– All buffers allocated from PGA, unless
disk or tape I/O slaves, are enabled.
RMAN uses two different types of buffers for I/O: disk and tape. RMAN multiplexing determines how RMAN allocates disk buffers. RMAN multiplexing is the number of files in a backup read simultaneously and then written to the same backup piece.
The degree of multiplexing depends on the FILESPERSET parameter of the BACKUPcommand as well as the MAXOPENFILES parameter of the CONFIGURE CHANNEL or ALLOCATE CHANNEL command.
Note: RMAN multiplexing is set at the channel level. For ASM or RAID1, set MAXOPENFILESto 1 or 2.
Oracle Database 12c: Backup and Recovery Workshop 19 - 23
Copyright © 2015, Oracle and/or its affiliates. All rights reserved.
Ora
cle
Uni
vers
ity a
nd E
rror :
You
are
not
a V
alid
Par
tner
use
onl
y
THES
E eK
IT M
ATER
IALS
AR
E FO
R Y
OU
R U
SE IN
TH
IS C
LASS
RO
OM
ON
LY.
CO
PYIN
G e
KIT
MAT
ERIA
LS F
RO
M T
HIS
CO
MPU
TER
IS S
TRIC
TLY
PRO
HIB
ITED

RMAN Multiplexing
• For reads:
• For writes, each channel is allocated four output buffers of 1 MB each.
1 MB buffers are allocated so that the total buffer size for all input files is 16 MB.
Level <= 4
RMAN allocates four 128 KB disk buffers per channel for each file, so that the total size is 512 KB per channel for each file.
Level > 8
4 < Level <= 8
Multiplexing Level
512 KB are allocated so that the total buffer size for all files is less than 16 MB.
Allocation Rule
For example, assume that you back up two data files with one channel. You set FILESPERSET to 3 and MAXOPENFILES to 8. In this case, the number of files in each backup set is 2 (the lesser of FILESPERSET and the files read by each channel) and the level of multiplexing is 2 (the lesser of MAXOPENFILES and the number of files in each backup set). When RMAN backs up from disk, it uses the algorithm that is described in the table shown in the slide.
For writing, each channel allocates four output buffers of size 1 MB each.
These buffers are allocated from the PGA unless DBWR_IO_SLAVES is set to a nonzero value.
Note: For best recovery performance, do not set FILESPERSET to a value greater than 8.
Oracle Database 12c: Backup and Recovery Workshop 19 - 24
Copyright © 2015, Oracle and/or its affiliates. All rights reserved.
Ora
cle
Uni
vers
ity a
nd E
rror :
You
are
not
a V
alid
Par
tner
use
onl
y
THES
E eK
IT M
ATER
IALS
AR
E FO
R Y
OU
R U
SE IN
TH
IS C
LASS
RO
OM
ON
LY.
CO
PYIN
G e
KIT
MAT
ERIA
LS F
RO
M T
HIS
CO
MPU
TER
IS S
TRIC
TLY
PRO
HIB
ITED
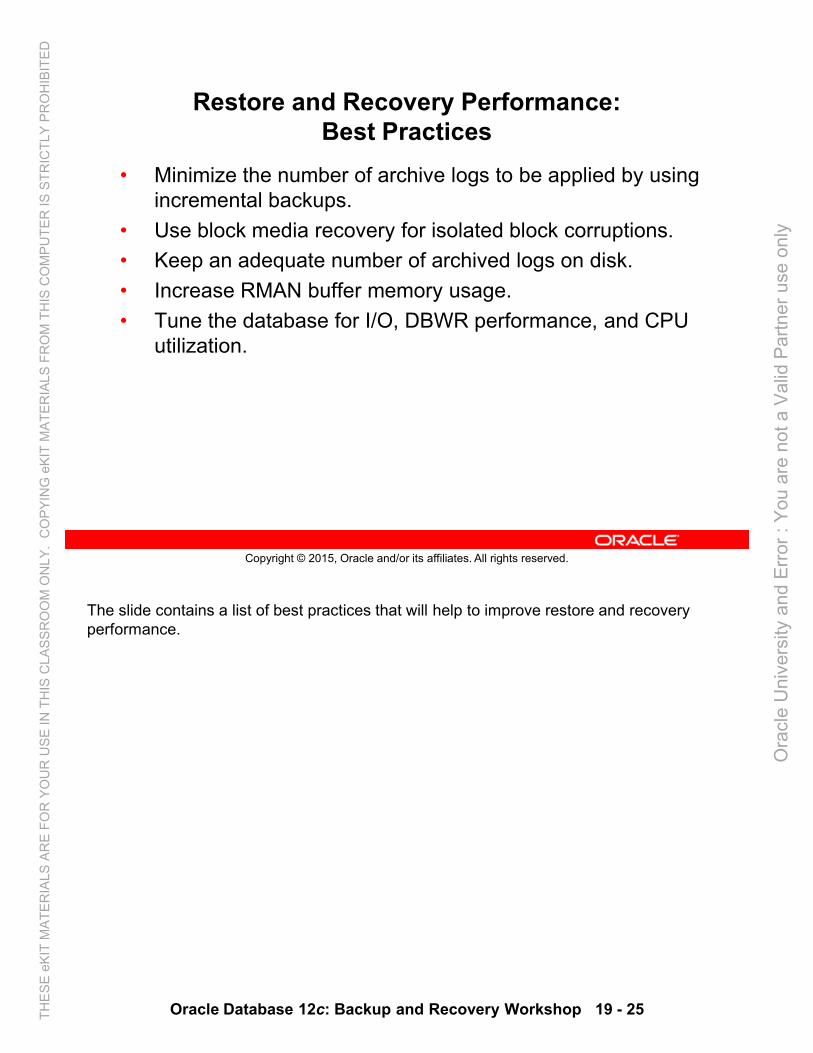
Restore and Recovery Performance:Best Practices
• Minimize the number of archive logs to be applied by using incremental backups.
• Use block media recovery for isolated block corruptions.
• Keep an adequate number of archived logs on disk.
• Increase RMAN buffer memory usage.
• Tune the database for I/O, DBWR performance, and CPU utilization.
The slide contains a list of best practices that will help to improve restore and recovery performance.
Oracle Database 12c: Backup and Recovery Workshop 19 - 25
Copyright © 2015, Oracle and/or its affiliates. All rights reserved.
Ora
cle
Uni
vers
ity a
nd E
rror :
You
are
not
a V
alid
Par
tner
use
onl
y
THES
E eK
IT M
ATER
IALS
AR
E FO
R Y
OU
R U
SE IN
TH
IS C
LASS
RO
OM
ON
LY.
CO
PYIN
G e
KIT
MAT
ERIA
LS F
RO
M T
HIS
CO
MPU
TER
IS S
TRIC
TLY
PRO
HIB
ITED

Quiz
Which of the following are true about RMAN multiplexing?
a. RMAN multiplexing is the number of files in a backup read simultaneously and then written to the same backup piece.
b. The degree of multiplexing depends on the FILESPERSETparameter of the BACKUP command and the MAXOPENFILES parameter of the CONFIGURE CHANNELor ALLOCATE CHANNEL command.
c. RMAN multiplexing is not at the channel level.
Answer: a, b
Oracle Database 12c: Backup and Recovery Workshop 19 - 26
Copyright © 2015, Oracle and/or its affiliates. All rights reserved.
Ora
cle
Uni
vers
ity a
nd E
rror :
You
are
not
a V
alid
Par
tner
use
onl
y
THES
E eK
IT M
ATER
IALS
AR
E FO
R Y
OU
R U
SE IN
TH
IS C
LASS
RO
OM
ON
LY.
CO
PYIN
G e
KIT
MAT
ERIA
LS F
RO
M T
HIS
CO
MPU
TER
IS S
TRIC
TLY
PRO
HIB
ITED

Summary
In this lesson, you should have learned how to:
• Diagnose RMAN performance issues
• Apply best practice tuning principles
Oracle Database 12c: Backup and Recovery Workshop 19 - 27
Copyright © 2015, Oracle and/or its affiliates. All rights reserved.
Ora
cle
Uni
vers
ity a
nd E
rror :
You
are
not
a V
alid
Par
tner
use
onl
y
THES
E eK
IT M
ATER
IALS
AR
E FO
R Y
OU
R U
SE IN
TH
IS C
LASS
RO
OM
ON
LY.
CO
PYIN
G e
KIT
MAT
ERIA
LS F
RO
M T
HIS
CO
MPU
TER
IS S
TRIC
TLY
PRO
HIB
ITED

No Practice
Preparing for the workshop
rcat
Oracle Secure Backup: Virtual
Tape Library
orcl
Sample schema
Oracle Net
filesystem
emrep Enterprise Manager
Cloud Control
There is no practice for this lesson, but your instructor will explain what needs to be done in preparation for the workshop.
Oracle Database 12c: Backup and Recovery Workshop 19 - 28
Copyright © 2015, Oracle and/or its affiliates. All rights reserved.
Ora
cle
Uni
vers
ity a
nd E
rror :
You
are
not
a V
alid
Par
tner
use
onl
y
THES
E eK
IT M
ATER
IALS
AR
E FO
R Y
OU
R U
SE IN
TH
IS C
LASS
RO
OM
ON
LY.
CO
PYIN
G e
KIT
MAT
ERIA
LS F
RO
M T
HIS
CO
MPU
TER
IS S
TRIC
TLY
PRO
HIB
ITED

Workshop Overview
Copyright © 2015, Oracle and/or its affiliates. All rights reserved.
Ora
cle
Uni
vers
ity a
nd E
rror :
You
are
not
a V
alid
Par
tner
use
onl
y
THES
E eK
IT M
ATER
IALS
AR
E FO
R Y
OU
R U
SE IN
TH
IS C
LASS
RO
OM
ON
LY.
CO
PYIN
G e
KIT
MAT
ERIA
LS F
RO
M T
HIS
CO
MPU
TER
IS S
TRIC
TLY
PRO
HIB
ITED

Objectives
After completing this workshop, you should be able to:
• Configure your database to support stated business requirements
• Perform backups as required to support stated business needs
• Recover from various failure scenarios
To assist you with these tasks, use this course material, videos, your own notes, as well as the documentation, especially:
• Oracle Database Backup and Recovery User’s Guide
• Oracle Database Backup and Recovery Reference
Oracle Database 12c: Backup and Recovery Workshop 20 - 2
Copyright © 2015, Oracle and/or its affiliates. All rights reserved.
Ora
cle
Uni
vers
ity a
nd E
rror :
You
are
not
a V
alid
Par
tner
use
onl
y
THES
E eK
IT M
ATER
IALS
AR
E FO
R Y
OU
R U
SE IN
TH
IS C
LASS
RO
OM
ON
LY.
CO
PYIN
G e
KIT
MAT
ERIA
LS F
RO
M T
HIS
CO
MPU
TER
IS S
TRIC
TLY
PRO
HIB
ITED

Workshop Structure and Approach
• Group-oriented, interactive structure
• Variety of failure scenarios
• Intensive hands-on diagnosis and problem resolution– Use tools and views to determine the state of the database
and obtain needed information to resolve failure.
– Review log files and trace files as necessary.
• Only solution outlines
Group-Oriented, Interactive Structure
The workshop is structured to allow individuals to work in groups to perform database backup, restore, and recovery operations. Each group is encouraged to share their approach to resolving database failures with other groups in the classroom.
Failures Scenarios
During the workshop, the instructor introduces a variety of failures to your database. The types of failures that you may experience include:
• Loss of a redo log group
• Loss of data files
• Loss of control files
• Media failures
• Corrupted data blocks
• User errors
Oracle Database 12c: Backup and Recovery Workshop 20 - 3
Copyright © 2015, Oracle and/or its affiliates. All rights reserved.
Ora
cle
Uni
vers
ity a
nd E
rror :
You
are
not
a V
alid
Par
tner
use
onl
y
THES
E eK
IT M
ATER
IALS
AR
E FO
R Y
OU
R U
SE IN
TH
IS C
LASS
RO
OM
ON
LY.
CO
PYIN
G e
KIT
MAT
ERIA
LS F
RO
M T
HIS
CO
MPU
TER
IS S
TRIC
TLY
PRO
HIB
ITED

Intensive Hands-On Diagnosis and Problem Resolution
The intent of the workshop portion of this course is to provide you with as much hands-on experience as possible while working through a number of failure and recovery scenarios. Experience and knowledge gained from the first two days of this course will aid you in diagnosing the failure scenarios in the workshop and successfully recovering your database.
Use the various diagnostic tools, data dictionary views, and V$ views as appropriate to determine the state of your database and diagnose the failures.
Solution Outlines
This workshop simulates a real-world environment by providing only cursory instructions for recovering from the various failure scenarios. You may refer to the information in the course lessons, the Oracle documentation, and Oracle Worldwide Support bulletins as necessary to restore and recover your database.
Oracle Database 12c: Backup and Recovery Workshop 20 - 4
Ora
cle
Uni
vers
ity a
nd E
rror :
You
are
not
a V
alid
Par
tner
use
onl
y
THES
E eK
IT M
ATER
IALS
AR
E FO
R Y
OU
R U
SE IN
TH
IS C
LASS
RO
OM
ON
LY.
CO
PYIN
G e
KIT
MAT
ERIA
LS F
RO
M T
HIS
CO
MPU
TER
IS S
TRIC
TLY
PRO
HIB
ITED
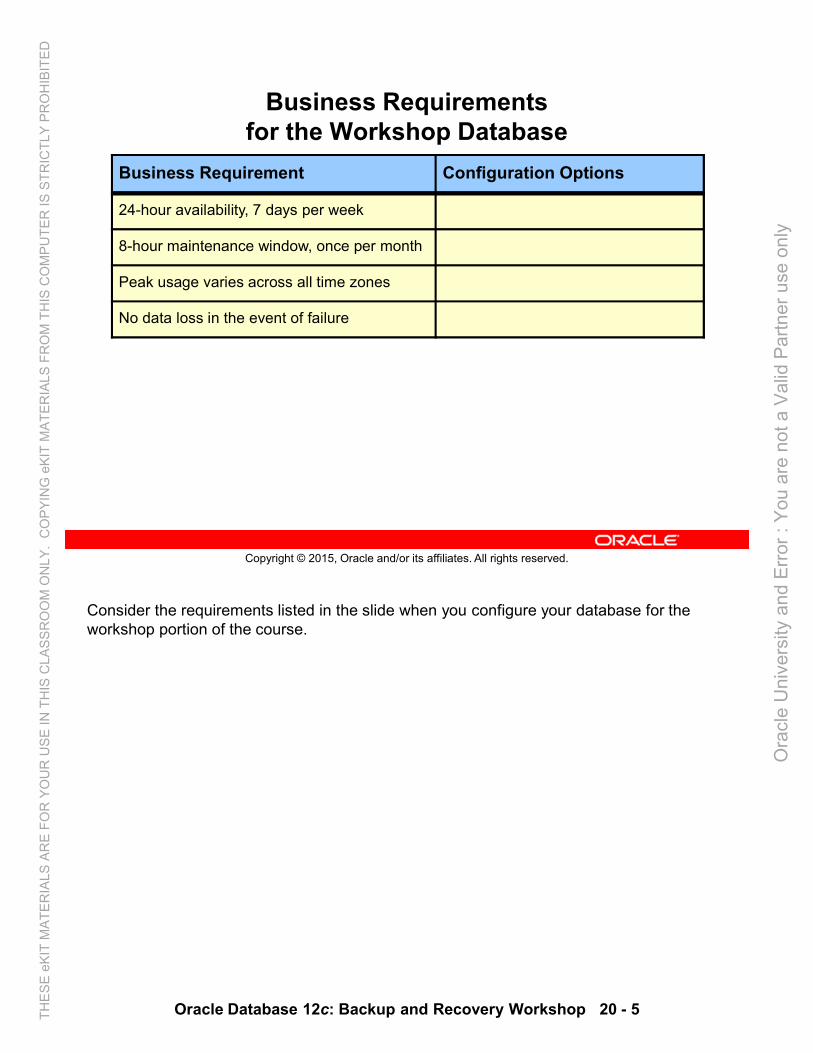
Business Requirementsfor the Workshop Database
Business Requirement Configuration Options
24-hour availability, 7 days per week
8-hour maintenance window, once per month
Peak usage varies across all time zones
No data loss in the event of failure
Consider the requirements listed in the slide when you configure your database for the workshop portion of the course.
Oracle Database 12c: Backup and Recovery Workshop 20 - 5
Copyright © 2015, Oracle and/or its affiliates. All rights reserved.
Ora
cle
Uni
vers
ity a
nd E
rror :
You
are
not
a V
alid
Par
tner
use
onl
y
THES
E eK
IT M
ATER
IALS
AR
E FO
R Y
OU
R U
SE IN
TH
IS C
LASS
RO
OM
ON
LY.
CO
PYIN
G e
KIT
MAT
ERIA
LS F
RO
M T
HIS
CO
MPU
TER
IS S
TRIC
TLY
PRO
HIB
ITED

Diagnosing the Failures
1. Research the nature of the failure by using views, trace and log files, operating system commands, and Enterprise Manager.
2. Determine whether the database instance is available and whether the database is open.
3. Attempt to start the database instance.
4. Check the alert log file and trace files.
5. Determine the appropriate recovery method.
6. Refer to the appropriate failure scenario solution outline in the Activity Guides for additional information.
The steps in the slide provide you with a general methodology to use when diagnosing the failures in your database. After you have determined what may have gone wrong in your database, you may refer to the failure scenario solution outlines provided in the Activity Guides for more detailed information.
Oracle Database 12c: Backup and Recovery Workshop 20 - 6
Copyright © 2015, Oracle and/or its affiliates. All rights reserved.
Ora
cle
Uni
vers
ity a
nd E
rror :
You
are
not
a V
alid
Par
tner
use
onl
y
THES
E eK
IT M
ATER
IALS
AR
E FO
R Y
OU
R U
SE IN
TH
IS C
LASS
RO
OM
ON
LY.
CO
PYIN
G e
KIT
MAT
ERIA
LS F
RO
M T
HIS
CO
MPU
TER
IS S
TRIC
TLY
PRO
HIB
ITED

Summary
In this workshop, you should have learned how to:
• Configure your database to support stated business requirements
• Perform backups as required to support stated business needs
• Recover from various failure scenarios
Oracle Database 12c: Backup and Recovery Workshop 20 - 7
Copyright © 2015, Oracle and/or its affiliates. All rights reserved.
Ora
cle
Uni
vers
ity a
nd E
rror :
You
are
not
a V
alid
Par
tner
use
onl
y
THES
E eK
IT M
ATER
IALS
AR
E FO
R Y
OU
R U
SE IN
TH
IS C
LASS
RO
OM
ON
LY.
CO
PYIN
G e
KIT
MAT
ERIA
LS F
RO
M T
HIS
CO
MPU
TER
IS S
TRIC
TLY
PRO
HIB
ITED

Ora
cle
Uni
vers
ity a
nd E
rror :
You
are
not
a V
alid
Par
tner
use
onl
y
THES
E eK
IT M
ATER
IALS
AR
E FO
R Y
OU
R U
SE IN
TH
IS C
LASS
RO
OM
ON
LY.
CO
PYIN
G e
KIT
MAT
ERIA
LS F
RO
M T
HIS
CO
MPU
TER
IS S
TRIC
TLY
PRO
HIB
ITED

Your Learning
Copyright © 2015, Oracle and/or its affiliates. All rights reserved.
Ora
cle
Uni
vers
ity a
nd E
rror :
You
are
not
a V
alid
Par
tner
use
onl
y
THES
E eK
IT M
ATER
IALS
AR
E FO
R Y
OU
R U
SE IN
TH
IS C
LASS
RO
OM
ON
LY.
CO
PYIN
G e
KIT
MAT
ERIA
LS F
RO
M T
HIS
CO
MPU
TER
IS S
TRIC
TLY
PRO
HIB
ITED

Overview
This appendix provides:
• Cheat sheets: – DOS/ Unix Commands
– vi Editor
• Further training options
• Personalized additional resources
This appendix provides a few “cheat sheets” that might be helpful during the course.
It also adds details about further training options.
Your instructor might suggest additional resources for your learning.
See also Appendix B for more information about Using Enterprise Manager Cloud Control.
Oracle Database 12c: Backup and Recovery Workshop A - 2
Copyright © 2015, Oracle and/or its affiliates. All rights reserved.
Ora
cle
Uni
vers
ity a
nd E
rror :
You
are
not
a V
alid
Par
tner
use
onl
y
THES
E eK
IT M
ATER
IALS
AR
E FO
R Y
OU
R U
SE IN
TH
IS C
LASS
RO
OM
ON
LY.
CO
PYIN
G e
KIT
MAT
ERIA
LS F
RO
M T
HIS
CO
MPU
TER
IS S
TRIC
TLY
PRO
HIB
ITED

DOS/UNIX Commands: A Brief Starter
DOS UNIX English
dir ll list long (name, date, size, owner, and so on)
dir/w ls list wide (no details)
dir/s locate find a file anywhere
del rm delete or remove files
copy cp copy file1 to file2
move mv move file1 to file2
ren mv rename file1 to file2
cd pwd print working directory
cd .. cd .. change directory UP one level
cd \ cd / change directory to TOP level (root)
C-A-D ps -ef process statistics (often used with grep)
top dynamic list of top processes by percent
md mkdir make directory
rd rmdir remove directory
edit vi full-screen character-based editor (see below)
more more list a file and pause (space/enter to continue)
tail -20 file1 list the last 20 lines of a file
type cat list a file and do not pause
strings same as cat but for files with binary charsstrings same as cat but for files with binary chars
set set display all environment variables such as $HOME
help man manual (help) pages
find grep find a word in a line in a larger list of lines
prompt PS1='$PWD >' change the prompt to include current dir
logoff su - switch user (usually to Super User)
chkdsk df -h how much free space is left on disk (in GB)
(n/a) which file1 finds executables along pathsver uname –a version of operating system software
Remember: Everything in UNIX is case-sensitive.
To change to a “ReallyLongDirectoryName,” type “cd Rea*.”
Oracle Database 12c: Backup and Recovery Workshop A - 3
Ora
cle
Uni
vers
ity a
nd E
rror :
You
are
not
a V
alid
Par
tner
use
onl
y
THES
E eK
IT M
ATER
IALS
AR
E FO
R Y
OU
R U
SE IN
TH
IS C
LASS
RO
OM
ON
LY.
CO
PYIN
G e
KIT
MAT
ERIA
LS F
RO
M T
HIS
CO
MPU
TER
IS S
TRIC
TLY
PRO
HIB
ITED
Gedit
gedit is a visual wysiwyg editor. The first time gedit runs, it needs the &:
gedit filename &
then you can use:
gedit filename
Vi CommandsCommand Description
:wq write, quit
:q! quit, no save
[esc] get out of current mode back to command mode
a append mode
A append mode at end of current line
dd delete current line
i insert mode (can also insert line feeds)
o insert blank line below cursor
p paste buffer after cursor
r replace single character
:s/a/b/ substitute (change) “a” to “b”
. repeat last substitution
u undo last change
Y yank (copy) current line
x delete single character
dd delete whole line
Oracle Database 12c: Backup and Recovery Workshop A - 4
Ora
cle
Uni
vers
ity a
nd E
rror :
You
are
not
a V
alid
Par
tner
use
onl
y
THES
E eK
IT M
ATER
IALS
AR
E FO
R Y
OU
R U
SE IN
TH
IS C
LASS
RO
OM
ON
LY.
CO
PYIN
G e
KIT
MAT
ERIA
LS F
RO
M T
HIS
CO
MPU
TER
IS S
TRIC
TLY
PRO
HIB
ITED

Enterprise Manager Database Express Menus
http://<hostname>:<port>em
Enter your URL, then a valid Oracle username and password.
• To display the host name in Linux: hostname --long
• The port is by default 5500.
• In Oracle classrooms, you may use SYS as username, the password provided by the instructor, and select as sysdba.
The slide shows Enterprise Manager Database Express (EM Express) menus for:
• Configuration
• Storage
• Security
• Performance
Oracle Database 12c: Backup and Recovery Workshop A - 5
Copyright © 2015, Oracle and/or its affiliates. All rights reserved.
Ora
cle
Uni
vers
ity a
nd E
rror :
You
are
not
a V
alid
Par
tner
use
onl
y
THES
E eK
IT M
ATER
IALS
AR
E FO
R Y
OU
R U
SE IN
TH
IS C
LASS
RO
OM
ON
LY.
CO
PYIN
G e
KIT
MAT
ERIA
LS F
RO
M T
HIS
CO
MPU
TER
IS S
TRIC
TLY
PRO
HIB
ITED

Request Handling in EM Express
EM Express Servlet
• Authenticates and validates the request
• Serves the request by executing queries inside the database
• Writes the output to the response stream
Request Listener
Shared Servers
Dispatcher
Oracle Web Server
EM ExpressServletWeb browser
This slide provides an overview of how EM Express handles requests.
Oracle Database 12c: Backup and Recovery Workshop A - 6
Copyright © 2015, Oracle and/or its affiliates. All rights reserved.
Ora
cle
Uni
vers
ity a
nd E
rror :
You
are
not
a V
alid
Par
tner
use
onl
y
THES
E eK
IT M
ATER
IALS
AR
E FO
R Y
OU
R U
SE IN
TH
IS C
LASS
RO
OM
ON
LY.
CO
PYIN
G e
KIT
MAT
ERIA
LS F
RO
M T
HIS
CO
MPU
TER
IS S
TRIC
TLY
PRO
HIB
ITED

Oracle SQL Developer: Connections
Perform DBA operations in the DBA navigator by using DBA connections:
Oracle SQL Developer is a tool that allows stand-alone graphical browsing and development of database schema objects, as well as execution of database administrative tasks. SQL Developer enables users with database administrator privileges to view and edit certain information relevant to DBAs and perform DBA operations. To perform DBA operations, use the DBA navigator, which is similar to the Connections navigator in that it has nodes for all defined database connections. If the DBA navigator is not visible, select View, then DBA. You should add only connections for which the associated database user has DBA privileges or at least privileges for the desired DBA navigator operations on the specified database.
Oracle Database 12c: Backup and Recovery Workshop A - 7
Copyright © 2015, Oracle and/or its affiliates. All rights reserved.
Ora
cle
Uni
vers
ity a
nd E
rror :
You
are
not
a V
alid
Par
tner
use
onl
y
THES
E eK
IT M
ATER
IALS
AR
E FO
R Y
OU
R U
SE IN
TH
IS C
LASS
RO
OM
ON
LY.
CO
PYIN
G e
KIT
MAT
ERIA
LS F
RO
M T
HIS
CO
MPU
TER
IS S
TRIC
TLY
PRO
HIB
ITED

Oracle SQL Developer: DBA Actions
Performing DBA tasks through DBA navigator:
The DBA operations that can be performed are the following:
• Pluggable database startup/shutdown
• Database configuration: Initialization Parameters, Automatic Undo Management, Current Database Properties, Restore Points, View Database Feature Usage
• Database status view
• Data Pump Export and Import jobs
• RMAN Backup/Recovery actions
• Resource Manager configuration
• Scheduler setting
• Security configuration like audit settings, profiles, roles, users
• Storage configuration for archive logs, control files, data files, redo log groups, tablespaces, temporary tablespace groups
Oracle Database 12c: Backup and Recovery Workshop A - 8
Copyright © 2015, Oracle and/or its affiliates. All rights reserved.
Ora
cle
Uni
vers
ity a
nd E
rror :
You
are
not
a V
alid
Par
tner
use
onl
y
THES
E eK
IT M
ATER
IALS
AR
E FO
R Y
OU
R U
SE IN
TH
IS C
LASS
RO
OM
ON
LY.
CO
PYIN
G e
KIT
MAT
ERIA
LS F
RO
M T
HIS
CO
MPU
TER
IS S
TRIC
TLY
PRO
HIB
ITED

Continuing Your Learning
• Documentation
• Oracle Technology Network (OTN)– Oracle Database > High Availability
– Oracle communities on Social Applications
• Oracle University training courses
• Oracle University self studies
• Oracle Learning Library (OLL)
• My Oracle Support (MOS)
• YouTube videos on the Oracle Leaning channel
Documentation:
• Oracle Database Backup and Recovery User’s Guide
• Oracle Database Backup and Recovery Reference
Oracle Technology Network (OTN): http://www.oracle.com/technetwork/index.html
Oracle University training courses:
• Oracle Database 12c: Managing Multitenant Architecture
• Oracle Database 12c: RAC Administration
• Oracle Database 12c: Data Guard Administration
• Oracle Database 12c: Security
• Oracle Enterprise Manager Cloud Control 12c: Advanced Configuration Workshop
• Oracle Database 12c: Performance Tuning
Oracle University self studies: Oracle Database 12c New Features series
Oracle Learning Library (OLL): https://www.oracle.com/goto/oll
Search with “backup” or any other topic that interests you, such as Maximum Availability Architecture (MAA).
Oracle Database 12c: Backup and Recovery Workshop A - 9
Copyright © 2015, Oracle and/or its affiliates. All rights reserved.
Ora
cle
Uni
vers
ity a
nd E
rror :
You
are
not
a V
alid
Par
tner
use
onl
y
THES
E eK
IT M
ATER
IALS
AR
E FO
R Y
OU
R U
SE IN
TH
IS C
LASS
RO
OM
ON
LY.
CO
PYIN
G e
KIT
MAT
ERIA
LS F
RO
M T
HIS
CO
MPU
TER
IS S
TRIC
TLY
PRO
HIB
ITED

Further Information
For more information about topics that are not covered in this course, refer to the following:
• Other Oracle University Oracle Database 12c ILT courses
• Oracle Database 12c: New Features Self Studies– A comprehensive series of self-paced online courses covering
all new features in detail
– Demonstrations for all topics covered in self-paced online courses:http://www.oracle.com/goto/oll
• Oracle By Example series: Oracle Database 12c– http://www.oracle.com/technology/obe/demos/admin/demos.html
– http://www.oracle.com/technology/obe/start/index.html
• Oracle OpenWorld events– http://www.oracle.com/openworld/index.html
For more information about topics that are not covered in this course, refer to the following:
• Oracle University Oracle Database 12c instructor-led courses
• Oracle Database 12c: New Features self-paced online courses
• Oracle By Example series: Oracle Database 12c
• Oracle OpenWorld events
Oracle Database 12c: Backup and Recovery Workshop A - 10
Copyright © 2015, Oracle and/or its affiliates. All rights reserved.
Ora
cle
Uni
vers
ity a
nd E
rror :
You
are
not
a V
alid
Par
tner
use
onl
y
THES
E eK
IT M
ATER
IALS
AR
E FO
R Y
OU
R U
SE IN
TH
IS C
LASS
RO
OM
ON
LY.
CO
PYIN
G e
KIT
MAT
ERIA
LS F
RO
M T
HIS
CO
MPU
TER
IS S
TRIC
TLY
PRO
HIB
ITED

Suggested Oracle University ILT Courses
• Enterprise Manager Cloud Control– Using Oracle Enterprise Manager Cloud Control 12c
– Oracle Enterprise Manager Cloud Control 12c: Install and Upgrade
– Oracle Enterprise Manager Cloud Control 12c: Advanced Configuration
– Oracle Enterprise Manager Cloud Control 12c: Cloud Management workshop
• Installation and Upgrade – Oracle Database 12c: Install and Upgrade workshop
Suggested Additional Courses
To obtain more information about the key cloud computing technologies used by the Oracle products and other new Oracle Database features, follow additional training from Oracle University.
Oracle Database 12c: Backup and Recovery Workshop A - 11
Copyright © 2015, Oracle and/or its affiliates. All rights reserved.
Ora
cle
Uni
vers
ity a
nd E
rror :
You
are
not
a V
alid
Par
tner
use
onl
y
THES
E eK
IT M
ATER
IALS
AR
E FO
R Y
OU
R U
SE IN
TH
IS C
LASS
RO
OM
ON
LY.
CO
PYIN
G e
KIT
MAT
ERIA
LS F
RO
M T
HIS
CO
MPU
TER
IS S
TRIC
TLY
PRO
HIB
ITED

Suggested Oracle University ILT Courses
• Real Application Cluster– Oracle Database 12c: High Availability New Features Ed 1.
– Oracle Database 12c: Manage Clusterware Workshop
– Oracle Database 12c: Manage ASM Workshop
– Oracle Database 12c: RAC Administration Workshop
• Security– Oracle Database 12c: Security
• Performance– Oracle Database 12c: Performance Tuning Workshop
• Exadata– Exadata Database Machine Administration Workshop Ed1
Suggested Additional Courses
To obtain more information about the key cloud computing technologies used by the Oracle products and other new Oracle Database features, follow additional training from Oracle University.
Oracle Database 12c: Backup and Recovery Workshop A - 12
Copyright © 2015, Oracle and/or its affiliates. All rights reserved.
Ora
cle
Uni
vers
ity a
nd E
rror :
You
are
not
a V
alid
Par
tner
use
onl
y
THES
E eK
IT M
ATER
IALS
AR
E FO
R Y
OU
R U
SE IN
TH
IS C
LASS
RO
OM
ON
LY.
CO
PYIN
G e
KIT
MAT
ERIA
LS F
RO
M T
HIS
CO
MPU
TER
IS S
TRIC
TLY
PRO
HIB
ITED

Using Enterprise Manager Cloud Control
Copyright © 2015, Oracle and/or its affiliates. All rights reserved.
Ora
cle
Uni
vers
ity a
nd E
rror :
You
are
not
a V
alid
Par
tner
use
onl
y
THES
E eK
IT M
ATER
IALS
AR
E FO
R Y
OU
R U
SE IN
TH
IS C
LASS
RO
OM
ON
LY.
CO
PYIN
G e
KIT
MAT
ERIA
LS F
RO
M T
HIS
CO
MPU
TER
IS S
TRIC
TLY
PRO
HIB
ITED

Objectives
After completing this lesson, you should be able to:
• Describe the different components of Cloud Control
• Explain the architecture of Cloud Control
• List the target types managed by Cloud Control
• Explore the Oracle Enterprise Manager Cloud Control interface
Note: For a complete understanding of Oracle Enterprise Manager Cloud Control and Database Express installation and usage, refer to the following guides in the Oracle documentation:
• Oracle Enterprise Manager Cloud Control Basic Installation Guide 12c Release 1
• Oracle Enterprise Manager Cloud Control Advanced Installation and Configuration Guide 12c Release 1
• Oracle Enterprise Manager Cloud Control Administrator’s Guide 12c Release 1
• Oracle Enterprise Manager Licensing Information 12c Release 1
Oracle Database 12c: Backup and Recovery Workshop B - 2
Copyright © 2015, Oracle and/or its affiliates. All rights reserved.
Ora
cle
Uni
vers
ity a
nd E
rror :
You
are
not
a V
alid
Par
tner
use
onl
y
THES
E eK
IT M
ATER
IALS
AR
E FO
R Y
OU
R U
SE IN
TH
IS C
LASS
RO
OM
ON
LY.
CO
PYIN
G e
KIT
MAT
ERIA
LS F
RO
M T
HIS
CO
MPU
TER
IS S
TRIC
TLY
PRO
HIB
ITED

Key Challenges for Administrators
As the composition of the data center broadens into the cloud environment, the challenges to manage it also increase. The key challenges for managing a data center include:
• Monitoring performance and availability
• Resolving problems quickly
• Containing operating costs
• Aligning IT with business priorities
As the data center grows with the growth in business, so do the challenges. An administrator is faced with challenges that include:
• Monitoring high levels of performance and availability of applications
• Identifying and resolving problems quickly and effectively
• Enabling IT professionals to use resources effectively, thereby reducing costs
• Aligning IT with business priorities to ensure that businesses are agile enough to meet the changing needs
Oracle Database 12c: Backup and Recovery Workshop B - 3
Copyright © 2015, Oracle and/or its affiliates. All rights reserved.
Ora
cle
Uni
vers
ity a
nd E
rror :
You
are
not
a V
alid
Par
tner
use
onl
y
THES
E eK
IT M
ATER
IALS
AR
E FO
R Y
OU
R U
SE IN
TH
IS C
LASS
RO
OM
ON
LY.
CO
PYIN
G e
KIT
MAT
ERIA
LS F
RO
M T
HIS
CO
MPU
TER
IS S
TRIC
TLY
PRO
HIB
ITED

Enterprise Manager Cloud Control
Applications Management
Enterprise-Ready Framework
Cloud Management
Chargeback and Capacity Planning
Middleware Management
Database Management
Application Quality Management
Configuration Management
Exadata and Exalogic Management
Provisioning and Patching
All the topics are covered in the Oracle Enterprise Manager Cloud Control New Features self-study series.
This course uses some of the Oracle Enterprise Manager Cloud Control features.
Key Objectives in Enterprise Manager Cloud Control Design• Designing a management framework that is capable of providing next-generation
functionality
• Enhancing application-to-disk manageability
• Providing a complete enterprise private cloud solution
Enterprise Manager Cloud Control includes the following features:
• Enterprise-Ready Framework: Provides modular and extensible architecture, target plug-ins, self-updateable entities, integrated Support Workbench, and centralized incident console
• Cloud Management: Provides complete cloud lifecycle management
• Chargeback and Capacity Planning: Provides chargeback based on target types, and uses Automatic Workload Repository (AWR) Warehouse to consolidate AWR reports from multiple databases across the enterprise
• Exadata and Exalogic Management: Provides an integrated view of the hardware and software in an Exadata machine, and complete lifecycle management for Exalogic systems
• Configuration Management: Provides an integrated set of tools, agent-less discovery, integration with My Oracle Support, and custom configuration capabilities
Oracle Database 12c: Backup and Recovery Workshop B - 4
Copyright © 2015, Oracle and/or its affiliates. All rights reserved.
Ora
cle
Uni
vers
ity a
nd E
rror :
You
are
not
a V
alid
Par
tner
use
onl
y
THES
E eK
IT M
ATER
IALS
AR
E FO
R Y
OU
R U
SE IN
TH
IS C
LASS
RO
OM
ON
LY.
CO
PYIN
G e
KIT
MAT
ERIA
LS F
RO
M T
HIS
CO
MPU
TER
IS S
TRIC
TLY
PRO
HIB
ITED

• Provisioning and Patching: Provides profiles for provisioning known configurations, user-defined deployment procedures, and a software library integrated with self-updating capabilities
• Application and Quality Management: Database Replay, Application Server Replay, Real Application Testing integrated with Data Masking, and test database management including Application Data Model
• Database Management: Provides management of Oracle Database systems, including performance management and change lifecycle management. Some aspects of Database Management are covered in detail in this course.
• Middleware Management: Provides management of Fusion Middleware systems
• Applications Management: Provides management of Fusion Applications
Note: For a complete understanding of Oracle Enterprise Manager Cloud Control usage, refer to the following sources of information:
• Using Oracle Enterprise Manager Cloud Control course
• Oracle Enterprise Manager Cloud Control: Install and Upgrade course
• Oracle Enterprise Manager Cloud Control New Features Self-Study series
• Oracle Enterprise Manager 12c demonstrations under Oracle Learning Library (URL www.oracle.com/goto/oll)
Oracle Database 12c: Backup and Recovery Workshop B - 5
Ora
cle
Uni
vers
ity a
nd E
rror :
You
are
not
a V
alid
Par
tner
use
onl
y
THES
E eK
IT M
ATER
IALS
AR
E FO
R Y
OU
R U
SE IN
TH
IS C
LASS
RO
OM
ON
LY.
CO
PYIN
G e
KIT
MAT
ERIA
LS F
RO
M T
HIS
CO
MPU
TER
IS S
TRIC
TLY
PRO
HIB
ITED

Cloud Control Components
Oracle Management Repository
Oracle Management Service
Cloud Control Console
Target-specific plug-in
Oracle Management Agent
Managed hosts
Enterprise Manager Cloud Control is composed of four main components as illustrated:
• Oracle Management Repository (OMR)
• Oracle Management Service (OMS)
• Oracle Management Agent (OMA or agent) with target-specific plug-ins
• Cloud Control Console
The Oracle Management Agent runs on hosts, gathering metric data about those host environments as well as using plug-ins to monitor availability, configuration, and performance and to manage targets running on the host. The agents communicate with the Oracle Management Service to upload metric data collected by them and their plug-ins. In turn, the OMS stores the data it collects in the Oracle Management Repository where it can be accessed by the OMS for automated and manual reporting and monitoring. The OMS also communicates with the agents to orchestrate the management of their monitored targets. As well as coordinating the agents, the OMS runs the Cloud Control Console webpages that are used by administrators and users to report on, monitor, and manage the computing environment that is visible to Cloud Control via the agents and their plug-ins.
Oracle Database 12c: Backup and Recovery Workshop B - 6
Copyright © 2015, Oracle and/or its affiliates. All rights reserved.
Ora
cle
Uni
vers
ity a
nd E
rror :
You
are
not
a V
alid
Par
tner
use
onl
y
THES
E eK
IT M
ATER
IALS
AR
E FO
R Y
OU
R U
SE IN
TH
IS C
LASS
RO
OM
ON
LY.
CO
PYIN
G e
KIT
MAT
ERIA
LS F
RO
M T
HIS
CO
MPU
TER
IS S
TRIC
TLY
PRO
HIB
ITED

Components and Communication Flow
3872 / 3872
4889 / 4900
HTTP / HTTPS
JDBC 1521
OMA
7788 / 7801
HTTP / HTTPS
Cloud Control Application
WebLogic Server
OMS
Push via SSH
Administrator
Oracle Management Repository
Oracle Management Agent(s)
OMR
The communication flow between the Cloud Control components is illustrated using directional arrows. Communication between the Agent and the OMS, and the OMS and the console is bi-directional. All the ports shown and listed in the slide are default values that can be changed during installation, either by the installer as it searches for available ports, or explicitly by you. You can also change ports after installation.
• The Agent uploads data to the OMS via HTTP on port 4889 or via HTTPS on port 4900. (Designed to be able to work with WAN.)
• The OMS communicates with the Agent via HTTP or HTTPS on port 3872.
• The reason for the separate ports for OMS to OMA communications is that they can communicate asynchronously and simultaneously to one another.
• The OMS communicates with the OMR via JDBC on port 1521. Although the OMR will return data to the OMS, this is not considered to be a separate communication between the two; hence, the flow is shown to be unidirectional from OMS to OMR.
• Cloud Control console users access the Cloud Control webpages via HTTPS on port 7801 or via HTTP on port 7788.
Knowing the ports used in your Cloud Control installation is important, especially if you are managing hosts behind firewalls or where other network restrictions apply, because communication will need to be allowed on these ports and in the directions shown.
Oracle Database 12c: Backup and Recovery Workshop B - 7
Copyright © 2015, Oracle and/or its affiliates. All rights reserved.
Ora
cle
Uni
vers
ity a
nd E
rror :
You
are
not
a V
alid
Par
tner
use
onl
y
THES
E eK
IT M
ATER
IALS
AR
E FO
R Y
OU
R U
SE IN
TH
IS C
LASS
RO
OM
ON
LY.
CO
PYIN
G e
KIT
MAT
ERIA
LS F
RO
M T
HIS
CO
MPU
TER
IS S
TRIC
TLY
PRO
HIB
ITED

Oracle Management Repository
The Oracle Management Repository (OMR):
• Resides in an Oracle database• Includes schema objects belonging to SYSMAN
• Must be installed in a pre-existing database
• Can be installed in a RAC database
Note: Uses a restricted-use license of the Oracle Database
The OMR is installed in an Oracle database as a group of approximately 4,000 schema objects belonging to the SYSMAN user stored in three tablespaces: MGMT_ECM_DEPOT_TS, MGMT_TABLESPACE, and MGMT_AD4J_TS. These schema objects contain information about Enterprise Manager Cloud Control users and administrators, targets and applications that are monitored and managed by Enterprise Manager Cloud Control, and groups, systems, incidents, and other Enterprise Manager Cloud Control artifacts. The OMR is created during installation in a pre-existing database, and for scalability requirements can be installed in a Real Application Clusters (RAC) database. In this case, customers must license the second node for the database, and both nodes require an Oracle Real Application Clusters license.
The database used to house the OMR should not be used for any other applications for the following reasons:
• Enterprise Manager Cloud Controls usage of the database should not have to compete with any other usage.
• Using the OMR database for other applications may restrict your ability to upgrade and patch the OMR schema and database as required
• Enterprise Manager Cloud Control includes a restricted-use database license that can be used for the OMR only
Note: Refer to Oracle Enterprise Manager Licensing Information 12c Release 1, SectionEnterprise Manager Restricted-Use License.
Oracle Database 12c: Backup and Recovery Workshop B - 8
Copyright © 2015, Oracle and/or its affiliates. All rights reserved.
Ora
cle
Uni
vers
ity a
nd E
rror :
You
are
not
a V
alid
Par
tner
use
onl
y
THES
E eK
IT M
ATER
IALS
AR
E FO
R Y
OU
R U
SE IN
TH
IS C
LASS
RO
OM
ON
LY.
CO
PYIN
G e
KIT
MAT
ERIA
LS F
RO
M T
HIS
CO
MPU
TER
IS S
TRIC
TLY
PRO
HIB
ITED

Controlling the Enterprise Manager Cloud Control Framework
WebLogicEM
OMSAgentsRepository
Component Control Utilities
Repository OMS Agent
sqlplus or srvctl emctl emctl
lsnrctl
Each component of the Enterprise Manager Cloud Control framework has its own utility or utilities that can be used to monitor, start, and stop the component. In many cases, these utilities also provide some capability to configure the component beyond the simple start-and-stop functionality.
RAC databases require the use of the Server Control commands; for single instances, there is a choice between SQL*Plus and Server Control. Server Control is usable when Oracle Restart is installed and the database is registered with the OLR.
To start and stop the listener, either use the Server Control utility or the lsnrctl command.
Examples:
srvctl stop database -d orcl -o immediate
srvctl start database -d orcl -o open
Oracle Database 12c: Backup and Recovery Workshop B - 9
Copyright © 2015, Oracle and/or its affiliates. All rights reserved.
Ora
cle
Uni
vers
ity a
nd E
rror :
You
are
not
a V
alid
Par
tner
use
onl
y
THES
E eK
IT M
ATER
IALS
AR
E FO
R Y
OU
R U
SE IN
TH
IS C
LASS
RO
OM
ON
LY.
CO
PYIN
G e
KIT
MAT
ERIA
LS F
RO
M T
HIS
CO
MPU
TER
IS S
TRIC
TLY
PRO
HIB
ITED

Starting the Enterprise ManagerCloud Control Framework
To start the Cloud Control framework, perform the following steps:
1. Start the repository database listener.
2. Start the repository database instance.
3. Start the OMS.
4. Start the agent on the OMS/repository server.
5. Start the agents on the managed servers.
OHS
WebLogicEM
OMSAgentsRepository
To start the whole Enterprise Manager Cloud Control framework, perform the following steps:
1. Start the repository listener:$ORACLE_HOME/bin/lsnrctl start
2. Start the repository database instance:$ORACLE_HOME/bin/sqlplus / as sysdba
SQL> startup
3. Start the OMS (including OHS and WebLogic Managed Server):$OMS_HOME/bin/emctl start oms
4. Start the agent (on the OMS/repository host):$AGENT_HOME/bin/emctl start agent
5. Start the agent on the managed servers:$AGENT_HOME/bin/emctl start agent
Note: Use the SRVCTL command if you have a RAC instance for the repository.
Oracle Database 12c: Backup and Recovery Workshop B - 10
Copyright © 2015, Oracle and/or its affiliates. All rights reserved.
g
Ora
cle
Uni
vers
ity a
nd E
rror :
You
are
not
a V
alid
Par
tner
use
onl
y
THES
E eK
IT M
ATER
IALS
AR
E FO
R Y
OU
R U
SE IN
TH
IS C
LASS
RO
OM
ON
LY.
CO
PYIN
G e
KIT
MAT
ERIA
LS F
RO
M T
HIS
CO
MPU
TER
IS S
TRIC
TLY
PRO
HIB
ITED

Stopping the Enterprise ManagerCloud Control Framework
To stop the Enterprise Manager Cloud Control framework, perform the following steps:
1. Stop the agents on managed servers.
2. Stop the agent on the OMS/repository server.
3. Stop the OMS.
4. Stop the repository database instance.
OHS
WebLogicEM
OMS RepositoryAgents
To stop the whole Enterprise Manager Cloud Control framework, perform the following steps:
1. Stop the agent on the managed servers:$AGENT_HOME/bin/emctl stop agent
2. Stop the agent (on the OMS/repository host):$AGENT_HOME/bin/emctl stop agent
3. Stop the OMS (including OHS and WebLogic Managed Server):$OMS_HOME/bin/emctl stop oms
4. Stop the repository database instance:$ORACLE_HOME/bin/sqlplus / as sysdba
SQL> shutdown immediate
Note: Use the SRVCTL command if you have a RAC instance for the repository.
Oracle Database 12c: Backup and Recovery Workshop B - 11
Copyright © 2015, Oracle and/or its affiliates. All rights reserved.
Ora
cle
Uni
vers
ity a
nd E
rror :
You
are
not
a V
alid
Par
tner
use
onl
y
THES
E eK
IT M
ATER
IALS
AR
E FO
R Y
OU
R U
SE IN
TH
IS C
LASS
RO
OM
ON
LY.
CO
PYIN
G e
KIT
MAT
ERIA
LS F
RO
M T
HIS
CO
MPU
TER
IS S
TRIC
TLY
PRO
HIB
ITED
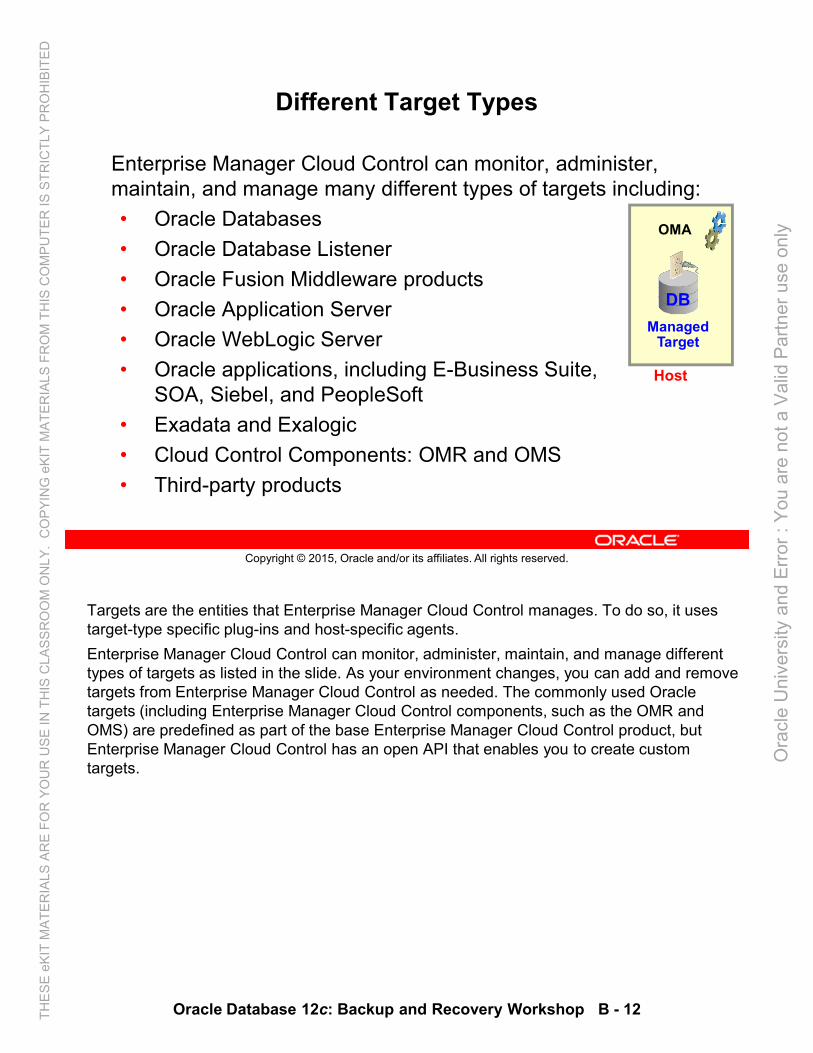
Different Target Types
Enterprise Manager Cloud Control can monitor, administer, maintain, and manage many different types of targets including:
• Oracle Databases
• Oracle Database Listener
• Oracle Fusion Middleware products
• Oracle Application Server
• Oracle WebLogic Server
• Oracle applications, including E-Business Suite, SOA, Siebel, and PeopleSoft
• Exadata and Exalogic
• Cloud Control Components: OMR and OMS
• Third-party products
OMA
Managed Target
DB
Host
Targets are the entities that Enterprise Manager Cloud Control manages. To do so, it uses target-type specific plug-ins and host-specific agents.
Enterprise Manager Cloud Control can monitor, administer, maintain, and manage different types of targets as listed in the slide. As your environment changes, you can add and remove targets from Enterprise Manager Cloud Control as needed. The commonly used Oracle targets (including Enterprise Manager Cloud Control components, such as the OMR and OMS) are predefined as part of the base Enterprise Manager Cloud Control product, but Enterprise Manager Cloud Control has an open API that enables you to create custom targets.
Oracle Database 12c: Backup and Recovery Workshop B - 12
Copyright © 2015, Oracle and/or its affiliates. All rights reserved.
Ora
cle
Uni
vers
ity a
nd E
rror :
You
are
not
a V
alid
Par
tner
use
onl
y
THES
E eK
IT M
ATER
IALS
AR
E FO
R Y
OU
R U
SE IN
TH
IS C
LASS
RO
OM
ON
LY.
CO
PYIN
G e
KIT
MAT
ERIA
LS F
RO
M T
HIS
CO
MPU
TER
IS S
TRIC
TLY
PRO
HIB
ITED
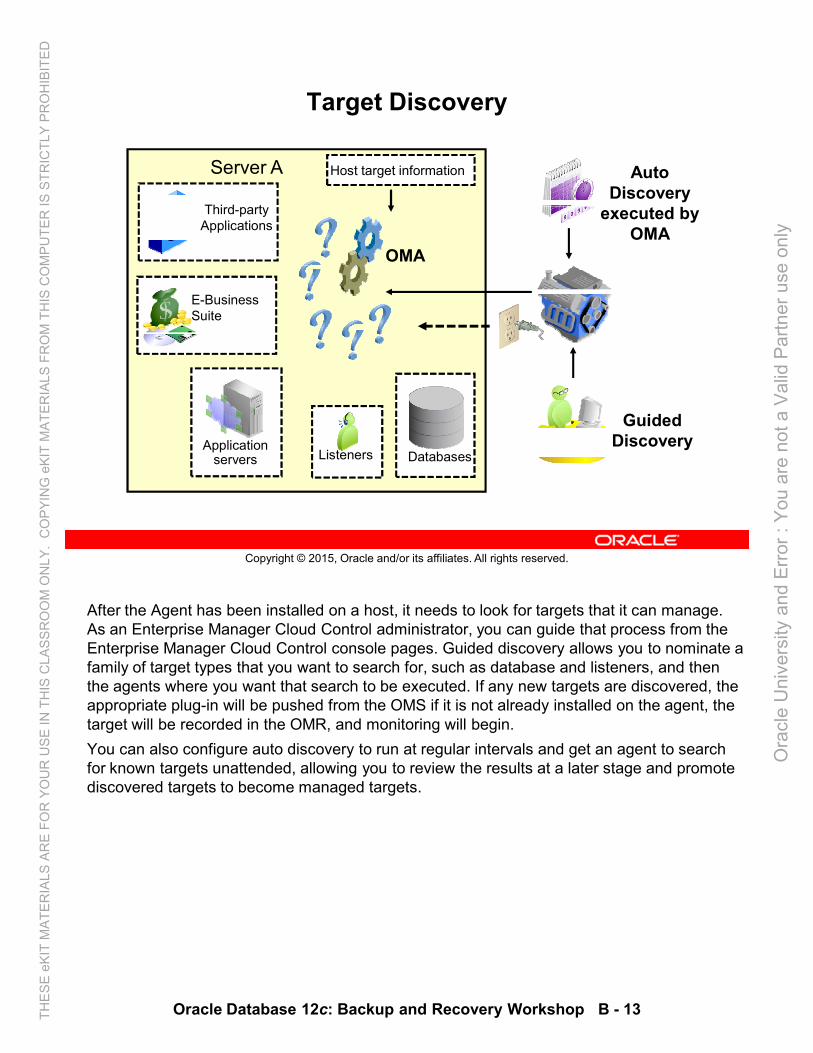
Target Discovery
Auto Discovery
executed by OMA
DatabasesListenersApplication
servers
Host target informationServer A
Third-party Applications
E-Business Suite
OMA
Guided Discovery
After the Agent has been installed on a host, it needs to look for targets that it can manage. As an Enterprise Manager Cloud Control administrator, you can guide that process from the Enterprise Manager Cloud Control console pages. Guided discovery allows you to nominate a family of target types that you want to search for, such as database and listeners, and then the agents where you want that search to be executed. If any new targets are discovered, the appropriate plug-in will be pushed from the OMS if it is not already installed on the agent, the target will be recorded in the OMR, and monitoring will begin.
You can also configure auto discovery to run at regular intervals and get an agent to search for known targets unattended, allowing you to review the results at a later stage and promote discovered targets to become managed targets.
Oracle Database 12c: Backup and Recovery Workshop B - 13
Copyright © 2015, Oracle and/or its affiliates. All rights reserved.
Ora
cle
Uni
vers
ity a
nd E
rror :
You
are
not
a V
alid
Par
tner
use
onl
y
THES
E eK
IT M
ATER
IALS
AR
E FO
R Y
OU
R U
SE IN
TH
IS C
LASS
RO
OM
ON
LY.
CO
PYIN
G e
KIT
MAT
ERIA
LS F
RO
M T
HIS
CO
MPU
TER
IS S
TRIC
TLY
PRO
HIB
ITED

Enterprise Manager Cloud Control
The image in the slide is of the Enterprise Summary page of Oracle Enterprise Manager Cloud Control. The user interface (UI) functionality includes:
• Information displayed in graphs and tables
• Summary information with drilldown capability to relevant details
• User-selected home page from a predefined set, or based on any page in the console
• Menu-driven navigation
• Global target search
• History and favorites
• Customizable target home pages (per-user basis)
Oracle Database 12c: Backup and Recovery Workshop B - 14
Copyright © 2015, Oracle and/or its affiliates. All rights reserved.
Ora
cle
Uni
vers
ity a
nd E
rror :
You
are
not
a V
alid
Par
tner
use
onl
y
THES
E eK
IT M
ATER
IALS
AR
E FO
R Y
OU
R U
SE IN
TH
IS C
LASS
RO
OM
ON
LY.
CO
PYIN
G e
KIT
MAT
ERIA
LS F
RO
M T
HIS
CO
MPU
TER
IS S
TRIC
TLY
PRO
HIB
ITED

User Interface
Setting your home page:
• Predefined home page based on roles
• Any page
Menu-based navigation:
• Make any page a favorite for quick access.
User Interface Enhancements
The user interface in Enterprise Manager Cloud Control has been rewritten in Application Development Framework (ADF). When you log in to the new UI, use drop-down menus to navigate from one place to another in the product.
• Choose your own home page: When you first log in to Enterprise Manager, you are provided with a selection of pre-defined home pages based on roles. If you are managing databases, you can choose the database home page. If those are not suitable, you can select any page in the UI to be your home page instead.
• Mark any page as a “favorite” for quick access. Because you manage certain targets frequently, you mark these target home pages as favorites in much the same way as you mark a favorite in a browser. However, because the favorites you mark in Enterprise Manager are stored in the repository, you can move from client machine to client machine and your favorites are still available to you.
For information about how to customize your Enterprise Manager Cloud Control console, follow the demonstration Oracle Enterprise Manager 12c: Console Overview and Customization under Oracle Learning Library.
Oracle Database 12c: Backup and Recovery Workshop B - 15
Copyright © 2015, Oracle and/or its affiliates. All rights reserved.
Ora
cle
Uni
vers
ity a
nd E
rror :
You
are
not
a V
alid
Par
tner
use
onl
y
THES
E eK
IT M
ATER
IALS
AR
E FO
R Y
OU
R U
SE IN
TH
IS C
LASS
RO
OM
ON
LY.
CO
PYIN
G e
KIT
MAT
ERIA
LS F
RO
M T
HIS
CO
MPU
TER
IS S
TRIC
TLY
PRO
HIB
ITED

Security: Overview
Target Authentication
Enterprise Manager Cloud Control Authorization
Enterprise Manager Cloud Control Authentication
Credential Management
Enterprise Manager
Enterprise Ready Framework: Security
The Enterprise Manager security system can be divided into four parts (as shown in the graphic):
• Enterprise Manager Cloud Control authentication
• Enterprise Manager Cloud Control authorization and privileges
• Credential management (host credentials can be defined here)
• Target authentication (host credentials can be used here)
Oracle Database 12c: Backup and Recovery Workshop B - 16
Copyright © 2015, Oracle and/or its affiliates. All rights reserved.
Ora
cle
Uni
vers
ity a
nd E
rror :
You
are
not
a V
alid
Par
tner
use
onl
y
THES
E eK
IT M
ATER
IALS
AR
E FO
R Y
OU
R U
SE IN
TH
IS C
LASS
RO
OM
ON
LY.
CO
PYIN
G e
KIT
MAT
ERIA
LS F
RO
M T
HIS
CO
MPU
TER
IS S
TRIC
TLY
PRO
HIB
ITED

Managing Securely with Credentials
• Centralized credential store for ease of management
• Support for managing passwordless and strong authentication credentials– Kerberos tickets– SSH keys
• Reuse and sharing among users (without disclosing the sensitive content of credentials)
• Controlled and protected access• Support for sudo/powerbroker
EM User1
EM User2
EM Users
Privileges
Security with Credentials
As a management tool that handles a lot of scripts and powerful actions like patching, Enterprise Manager has to work with a lot of credentials for hosts, databases, and a range of other objects. Managing all these credentials can be a real challenge.
• The centralized store facilitates this task because you can name and store credentials there.
• Passwordless and strong authentication credentials are supported, such as the Kerberos tickets and SSH key pairs.
• Credentials can be reused and shared among users (without disclosing the sensitive content like a password). Users are granted access to these credentials by the use of privileges, and so they can be reused without knowing what the contents of the credentials themselves are.
• Access to the credentials is controlled and protected by privileges.
• The Enterprise Manager credential subsystem enables you to securely store credentials as preferences or operation credentials, which can then be used to perform different system management activities. Enterprise Manager also supports sudo/powerbroker–based impersonation.
Oracle Database 12c: Backup and Recovery Workshop B - 17
Copyright © 2015, Oracle and/or its affiliates. All rights reserved.
Ora
cle
Uni
vers
ity a
nd E
rror :
You
are
not
a V
alid
Par
tner
use
onl
y
THES
E eK
IT M
ATER
IALS
AR
E FO
R Y
OU
R U
SE IN
TH
IS C
LASS
RO
OM
ON
LY.
CO
PYIN
G e
KIT
MAT
ERIA
LS F
RO
M T
HIS
CO
MPU
TER
IS S
TRIC
TLY
PRO
HIB
ITED

Distinguishing Credentials
• Named credentials
• Preferred credentials
• Default credentials
• Access level:– View: Access to use the credential
– Edit: To change the credential (including changing its name and password)
– Full: For complete access (including the ability to delete the credential)
• Usage classification: Job, collection, and monitoring
Types of Credentials
As the Enterprise Manager administrator, you can also store credentials (username/password, a public key-private key pair, or an X509v3 certificate) as named credentials in Enterprise Manager to use when performing operations like running jobs, patching, and other system management tasks. Objects refer or point to named credentials. They are “placeholders” to facilitate, for example, the changing of passwords.
You can store, access, and modify a fixed number of username/password–based credentials as preferred credentials to simplify access to managed targets by storing target login credentials in the Management Repository.
Default credentials can be set for a particular target type and will be available for all the targets of the target type.
The three levels of access that can be granted are:
• View access: To use the credentials
• Edit access: To change the credentials, including changing its name and password
• Full access: For complete access, including the ability to delete the named credential
Credentials can also be classified by their usage, such as job credentials (used by the job system), collection credentials, and monitoring credentials (used by OMA).
Oracle Database 12c: Backup and Recovery Workshop B - 18
Copyright © 2015, Oracle and/or its affiliates. All rights reserved.
Ora
cle
Uni
vers
ity a
nd E
rror :
You
are
not
a V
alid
Par
tner
use
onl
y
THES
E eK
IT M
ATER
IALS
AR
E FO
R Y
OU
R U
SE IN
TH
IS C
LASS
RO
OM
ON
LY.
CO
PYIN
G e
KIT
MAT
ERIA
LS F
RO
M T
HIS
CO
MPU
TER
IS S
TRIC
TLY
PRO
HIB
ITED

Core concepts and definitions:
• Credential type is the type of authentication supported by a target type. For example, a host can support a username/password–based authentication, public key authentication, or Kerberos authentication. Various authentication schemes are supported, including native agent authentication and SSH.
• Credential set is a placeholder for a credential. Credential sets can be used to decouple credentials from the system that uses a credential. A credential set enables you to change its mapping to named credentials for a target without editing the system that uses the credential. For example, you could have a credential set for patching tasks.
• Credential store is a logical store for all the named credentials of an Enterprise Manager administrator.
Defining credentials by:
• Credential name: The credential is referenced by using the name of the credential in the credential store.
• Credential set: The credential is referenced by using the credential set name and the target name. The lookup gets the credential associated with the credential set name and target name.
• Direct value: The credential is specified by providing the values of the attributes. This reference does not refer to a credential in the credential store.
For information about how to set credentials, follow the demonstrations:
• Oracle Enterprise Manager 12c: Create and Use Named Credentials under Oracle Learning Library
• Oracle Enterprise Manager 12c: Create SSH Key Named Credentials under Oracle• Oracle Enterprise Manager 12c: Create SSH Key Named Credentials under Oracle Learning Library
• OBE Enterprise Ready Framework: Create and Use Credentials
Oracle Database 12c: Backup and Recovery Workshop B - 19
Ora
cle
Uni
vers
ity a
nd E
rror :
You
are
not
a V
alid
Par
tner
use
onl
y
THES
E eK
IT M
ATER
IALS
AR
E FO
R Y
OU
R U
SE IN
TH
IS C
LASS
RO
OM
ON
LY.
CO
PYIN
G e
KIT
MAT
ERIA
LS F
RO
M T
HIS
CO
MPU
TER
IS S
TRIC
TLY
PRO
HIB
ITED

Quiz
Which targets can be managed by using Enterprise Manager Cloud Control?
a. Hosts
b. Databases
c. Application servers
d. Web applications
e. OMS and OMR
f. All of the above
Answer: f
Oracle Database 12c: Backup and Recovery Workshop B - 20
Copyright © 2015, Oracle and/or its affiliates. All rights reserved.
Ora
cle
Uni
vers
ity a
nd E
rror :
You
are
not
a V
alid
Par
tner
use
onl
y
THES
E eK
IT M
ATER
IALS
AR
E FO
R Y
OU
R U
SE IN
TH
IS C
LASS
RO
OM
ON
LY.
CO
PYIN
G e
KIT
MAT
ERIA
LS F
RO
M T
HIS
CO
MPU
TER
IS S
TRIC
TLY
PRO
HIB
ITED

Practice Overview: Using Enterprise Manager Cloud Control
These videos cover the following topics:
• Accessing Enterprise Manager Cloud Control
• Setting the Summary page as the home page
• Adding a database instance as a new target monitored by EM CC
• Creating a new named credential
• Using the named credential
View the “Oracle Enterprise Manager 12c: Console Overview and Customization” demonstration (unless your instructor just demonstrated those topics) (8 minutes).
Optional demonstrations about related topics are available:
• Oracle Enterprise Manager 12c: Create an Enterprise Manager Administrator (6 minutes)
• Oracle Enterprise Manager 12c: Create and Use Named Credentials (6 minutes)
• Oracle Enterprise Manager 12c: Create SSH Key Named Credentials (3 minutes)
• Oracle Enterprise Manager 12c: Discover and Promote Unmanaged Hosts and Targets
Optional Oracle By Example (OBEs) about related topics are available:
• Oracle Enterprise Manager 12c Enterprise Ready Framework: Create and Use Credentials (60 minutes)
• Oracle Enterprise Manager 12c Enterprise Ready Framework: Create a Super Administrator Account (5 minutes)
Oracle Database 12c: Backup and Recovery Workshop B - 21
Copyright © 2015, Oracle and/or its affiliates. All rights reserved.
Ora
cle
Uni
vers
ity a
nd E
rror :
You
are
not
a V
alid
Par
tner
use
onl
y
THES
E eK
IT M
ATER
IALS
AR
E FO
R Y
OU
R U
SE IN
TH
IS C
LASS
RO
OM
ON
LY.
CO
PYIN
G e
KIT
MAT
ERIA
LS F
RO
M T
HIS
CO
MPU
TER
IS S
TRIC
TLY
PRO
HIB
ITED

Ora
cle
Uni
vers
ity a
nd E
rror :
You
are
not
a V
alid
Par
tner
use
onl
y
THES
E eK
IT M
ATER
IALS
AR
E FO
R Y
OU
R U
SE IN
TH
IS C
LASS
RO
OM
ON
LY.
CO
PYIN
G e
KIT
MAT
ERIA
LS F
RO
M T
HIS
CO
MPU
TER
IS S
TRIC
TLY
PRO
HIB
ITED

Cloud Computing
Copyright © 2015, Oracle and/or its affiliates. All rights reserved.
Ora
cle
Uni
vers
ity a
nd E
rror :
You
are
not
a V
alid
Par
tner
use
onl
y
THES
E eK
IT M
ATER
IALS
AR
E FO
R Y
OU
R U
SE IN
TH
IS C
LASS
RO
OM
ON
LY.
CO
PYIN
G e
KIT
MAT
ERIA
LS F
RO
M T
HIS
CO
MPU
TER
IS S
TRIC
TLY
PRO
HIB
ITED

Cloud Based?
Lost on a Sea of Clouds?
Cloud computing has become the ubiquitous buzz phrase of enterprise IT in the 21st century and is now filtering down into the consumer technology arena. Navigating the world of cloud computing can be daunting; however, it can also be argued that it represents a return to the roots of computing when hardware resources were prohibitively expensive and hence, by necessity, were usually a shared resource about which end users knew very little.
Oracle Database 12c: Backup and Recovery Workshop C - 2
Copyright © 2015, Oracle and/or its affiliates. All rights reserved.
Ora
cle
Uni
vers
ity a
nd E
rror :
You
are
not
a V
alid
Par
tner
use
onl
y
THES
E eK
IT M
ATER
IALS
AR
E FO
R Y
OU
R U
SE IN
TH
IS C
LASS
RO
OM
ON
LY.
CO
PYIN
G e
KIT
MAT
ERIA
LS F
RO
M T
HIS
CO
MPU
TER
IS S
TRIC
TLY
PRO
HIB
ITED

Cloud Computing Explained
• The cloud is a metaphor for obfuscated service provision.
• The cloud metaphor is neither new nor exclusive to IT.– Consider the phone call then and now.
1
3
2“Then”
“Now”1
We Consume Cloud Services Every Day
The cloud metaphor is invoked whenever the details of an implementation or provision of a service are obfuscated from the perspective of the end consumer. There are many examples of cloud-based services in everyday life, such as a phone call between two parties. Before the advent of the automated exchange, making a phone call involved multiple steps of which you were cognizant of:
1. Call the operator and ask for a connection to the other party.
2. Wait for the operator to connect you to the other party.
3. Converse with the other party (with the possibility of the operator sniffing all voice traffic).
Hence, when making a phone call, you were aware of how the call was routed to the other party, and could possibly even trace the phone lines along which the call had been transmitted.
These days, making a phone call only requires access to a phone service and knowledge of the other party’s phone number. How your call is actually connected to the other party is obscured within the telecommunications cloud, and in this era of voice-over-IP, mobile communication, and global roaming, the means of communication is further obfuscated.
Oracle Database 12c: Backup and Recovery Workshop C - 3
Copyright © 2015, Oracle and/or its affiliates. All rights reserved.
Ora
cle
Uni
vers
ity a
nd E
rror :
You
are
not
a V
alid
Par
tner
use
onl
y
THES
E eK
IT M
ATER
IALS
AR
E FO
R Y
OU
R U
SE IN
TH
IS C
LASS
RO
OM
ON
LY.
CO
PYIN
G e
KIT
MAT
ERIA
LS F
RO
M T
HIS
CO
MPU
TER
IS S
TRIC
TLY
PRO
HIB
ITED

Other cloud services in your daily life could include:
• Your milk supply. Once, you would have known what dairy produced your milk, but today that information is obscured by large milk producers and their distribution network.
• The electricity supply grid. The power you consume may have been generated in another country.
• Mail delivery network. Whereas once your post could be guaranteed to be collected, sorted, and delivered by a single government agency, now there could be multiple independent contractors between the sender and recipient.
In all of these examples, the service or product you consume has not altered, only the way in which it is provided has changed.
To further illustrate how the cloud is already part of our everyday life, consider one more example:
• Browsing a website. You are typically unaware of the route taken by the HTTP packets between your browser and the site’s web servers, or even where the web server is physically located.
Oracle Database 12c: Backup and Recovery Workshop C - 4
Ora
cle
Uni
vers
ity a
nd E
rror :
You
are
not
a V
alid
Par
tner
use
onl
y
THES
E eK
IT M
ATER
IALS
AR
E FO
R Y
OU
R U
SE IN
TH
IS C
LASS
RO
OM
ON
LY.
CO
PYIN
G e
KIT
MAT
ERIA
LS F
RO
M T
HIS
CO
MPU
TER
IS S
TRIC
TLY
PRO
HIB
ITED

Cloud Computing Explained
• From the consumers’ perspective:– It is an IT capability or service.
– Its implementation is both unknown and unimportant.
– It is available anytime, from anywhere.
• From the providers’ perspective:– It allows them to use computing resources efficiently,
wherever, and however possible.
– It allows for flexibility in resource allocation to meet varying consumer demand.
– Meeting agreed service levels is more important than anything else.
The US National Institute of Standards and Technology (NIST) defines cloud computing as “a model for enabling ubiquitous, convenient, on-demand network access to a shared pool of configurable computing resources (for example, networks, servers, storage, applications, and services) that can be rapidly provisioned and released with minimal management effort or service provider interaction.”
Every Cloud Has a Silver Lining
Cloud computing takes on a different aspect depending upon your perspective. However, all aspects present views of benefits that can be derived from cloud computing.
From the perspective of a consumer of cloud-based resources, the cloud is simply a capability or service that is used without having knowledge of how or where it is implemented. In fact, knowledge of how the consumable product is provided is obscured by the very nature of it being accessed via “the cloud.” Because implementation details are of no concern to the consumer, their primary interest is availability and usability.
Oracle Database 12c: Backup and Recovery Workshop C - 5
Copyright © 2015, Oracle and/or its affiliates. All rights reserved.
Ora
cle
Uni
vers
ity a
nd E
rror :
You
are
not
a V
alid
Par
tner
use
onl
y
THES
E eK
IT M
ATER
IALS
AR
E FO
R Y
OU
R U
SE IN
TH
IS C
LASS
RO
OM
ON
LY.
CO
PYIN
G e
KIT
MAT
ERIA
LS F
RO
M T
HIS
CO
MPU
TER
IS S
TRIC
TLY
PRO
HIB
ITED

From the perspective of a provider of cloud-based resources, the cloud allows them to service consumer demand by using whatever computing resources are available. This loosens the ties of physical resources to application topologies and gives the provider the flexibility and agility to deploy resources in the most efficient and timely manner possible. Like consumers of cloud-based resources, providers are also primarily interested in the availability and usability as the efficacy of their offering will be determined by the consumers’ satisfaction with that offering, typically defined and measured through service-level agreements.
Oracle Database 12c: Backup and Recovery Workshop C - 6
Ora
cle
Uni
vers
ity a
nd E
rror :
You
are
not
a V
alid
Par
tner
use
onl
y
THES
E eK
IT M
ATER
IALS
AR
E FO
R Y
OU
R U
SE IN
TH
IS C
LASS
RO
OM
ON
LY.
CO
PYIN
G e
KIT
MAT
ERIA
LS F
RO
M T
HIS
CO
MPU
TER
IS S
TRIC
TLY
PRO
HIB
ITED

Cloud Computing: Essential Characteristics
• On-demand self service– Anytime, no human involvement is required
• Broad network access– Anywhere, from any device
• Resource pooling– Shared resources to meet many demands
• Rapid elasticity– Seamless response to meet changing demands
• Measured service– Metering of and reporting on usage
Five Essential Characteristics of Cloud Computing
The NIST definition of cloud computing includes five essential characteristics:
• On-demand self service
Consumers can request and receive computing resources as required without human intervention by a provider.
• Broad network access
The resources and self service portals provided by the cloud can be accessed through standard network-connected devices (for example, mobile phones, tablets, laptops, and workstations).
• Resource pooling
Providers use their computing resources to serve the demands of many customers in a multi-tenancy model. All customers can then benefit from the dynamic allocation of resources from the pool to meet their demands. Examples of resources include storage, processing, memory, and network bandwidth.
• Rapid elasticity
Capacity of the cloud can be scaled up or down in response to consumer demand in a manner that appears to the consumer to provide unlimited capabilities.
Oracle Database 12c: Backup and Recovery Workshop C - 7
Copyright © 2015, Oracle and/or its affiliates. All rights reserved.
Ora
cle
Uni
vers
ity a
nd E
rror :
You
are
not
a V
alid
Par
tner
use
onl
y
THES
E eK
IT M
ATER
IALS
AR
E FO
R Y
OU
R U
SE IN
TH
IS C
LASS
RO
OM
ON
LY.
CO
PYIN
G e
KIT
MAT
ERIA
LS F
RO
M T
HIS
CO
MPU
TER
IS S
TRIC
TLY
PRO
HIB
ITED

Cloud Computing Service Models
• Infrastructure as a Service (IaaS)
• Platform as a Service (PaaS)
• Software as a Service (SaaS)
Infrastructure
Platform
Application
IaaS
Customizations
SaaS
PaaS
Three Cloud Computing Service Models
The NIST definition of cloud computing includes three service models.
Infrastructure as a Service (IaaS)
The cloud computing provider makes available resources such as processing, networking, and storage that can be requested by consumers. Typically, the infrastructure that is provisioned in an IaaS cloud is virtualized, although this is not necessarily apparent to the consumer. The consumer is responsible for providing an application platform and applications to deploy upon that platform, and can of course customize those applications as required.
An example of an IaaS cloud request is an Oracle Linux 5 Update 7 x86-64 virtual machine with 16 GB of RAM and 250 GB of storage.
Platform as a Service (PaaS)
The cloud computing provider makes available platforms onto which consumers can deploy their own applications, and then customize those applications as required.
Examples of platforms that might be available in a PaaS cloud are Oracle Database (both single instance and RAC) and Oracle WebLogic Server.
Oracle Database 12c: Backup and Recovery Workshop C - 8
Copyright © 2015, Oracle and/or its affiliates. All rights reserved.
Ora
cle
Uni
vers
ity a
nd E
rror :
You
are
not
a V
alid
Par
tner
use
onl
y
THES
E eK
IT M
ATER
IALS
AR
E FO
R Y
OU
R U
SE IN
TH
IS C
LASS
RO
OM
ON
LY.
CO
PYIN
G e
KIT
MAT
ERIA
LS F
RO
M T
HIS
CO
MPU
TER
IS S
TRIC
TLY
PRO
HIB
ITED

Software as a Service (SaaS)
The cloud computing provider makes available an application that consumers can use and customize.
Examples of the software that might be available in a SaaS cloud are Oracle Fusion Applications and Oracle Social Network.
Oracle Database 12c: Backup and Recovery Workshop C - 9
Ora
cle
Uni
vers
ity a
nd E
rror :
You
are
not
a V
alid
Par
tner
use
onl
y
THES
E eK
IT M
ATER
IALS
AR
E FO
R Y
OU
R U
SE IN
TH
IS C
LASS
RO
OM
ON
LY.
CO
PYIN
G e
KIT
MAT
ERIA
LS F
RO
M T
HIS
CO
MPU
TER
IS S
TRIC
TLY
PRO
HIB
ITED

Cloud Computing Deployment Models
• Private– For exclusive use by a single organization
• Community– A common environment for use by a group of related
organizations
• Public– Separate environments for use by multiple organizations
(multi-tenancy)
• Hybrid– A combination of private and public clouds for a single
organization
Four Cloud Computing Deployment Models
The NIST definition of cloud computing includes four deployment models:
Private Cloud
The hosting and operation of private clouds may also be outsourced to a third-party service provider, but a private cloud remains for the exclusive use of one organization.
Community Cloud
Examples of communities are all the different branches of the military, all the universities in a given region, or all the suppliers to a large manufacturer.
Public Cloud
All underlying infrastructure is owned and operated by the public cloud provider.
Hybrid Cloud
This may be to implement a “cloud bursting” scenario, where an organization might run the steady-state workload of an application on a private cloud. But when a spike in workload occurs (such as at the end of the financial quarter or during the holiday season), the application can burst out to use computing capacity from a public cloud, and then return those resources to the public pool when they are no longer needed.
Oracle Database 12c: Backup and Recovery Workshop C - 10
Copyright © 2015, Oracle and/or its affiliates. All rights reserved.
Ora
cle
Uni
vers
ity a
nd E
rror :
You
are
not
a V
alid
Par
tner
use
onl
y
THES
E eK
IT M
ATER
IALS
AR
E FO
R Y
OU
R U
SE IN
TH
IS C
LASS
RO
OM
ON
LY.
CO
PYIN
G e
KIT
MAT
ERIA
LS F
RO
M T
HIS
CO
MPU
TER
IS S
TRIC
TLY
PRO
HIB
ITED

Sharing the Benefits of Cloud Computing
• Separation of the provisioning and usage of resources– Consumers can focus on their business needs.
– Providers can focus on the resources to meet those needs.
• Allows maximum flexibility for all parties– Consumers use as much or as little of the cloud as they
need.
– Providers need to only meet demand, not exceed it.
• Consumers’ capital expenses become operating expenses.– Hardware purchase and maintenance, machine room cooling
and lighting, networking, and so on
• Providers can recoup setup costs from multiple consumers.
The Cloud Is a Win-Win Scenario for IT Providers and Consumers
The benefits of the cloud are equally distributed between providers and consumers of IT infrastructure and services.
• Resource providers:
- Can manage the underlying infrastructure in any manner they choose provided they meet their service-level agreements
- Deploy resources where they are needed, as they are needed
- Pool resources to provide scalability and multi-tenant capabilities
- Use IT hardware to ensure optimum return on investment
• Resource consumers:
- Need only focus on their area of interest and expertise
- Can leave provisioning and management of underlying infrastructure to the resource providers
- Consume as much or as little resources as needed, when needed
Oracle Database 12c: Backup and Recovery Workshop C - 11
Copyright © 2015, Oracle and/or its affiliates. All rights reserved.
Ora
cle
Uni
vers
ity a
nd E
rror :
You
are
not
a V
alid
Par
tner
use
onl
y
THES
E eK
IT M
ATER
IALS
AR
E FO
R Y
OU
R U
SE IN
TH
IS C
LASS
RO
OM
ON
LY.
CO
PYIN
G e
KIT
MAT
ERIA
LS F
RO
M T
HIS
CO
MPU
TER
IS S
TRIC
TLY
PRO
HIB
ITED

An inherent benefit to IT service consumers is that the cloud is a consolidation of all the hardware, network, and software infrastructure they would otherwise be required to own to service their requirements. On the other hand, cloud setup necessitates that IT service providers acquire an amount of adequately sized hardware resources, network components, and base software. However, the silver lining is that the provider can monitor resource usage and charge the consumer accordingly.
Cloud computing allows IT service providers to offer capabilities that may be far beyond each consumer’s current reach by consolidating and sharing infrastructure across the needs and requirements of many consumers. Conversely, by servicing a wider group of consumers, the cloud service provider can offer a greater range and depth of resources by recouping the requisite IT infrastructure costs through metering and chargeback.
Oracle Database 12c: Backup and Recovery Workshop C - 12
Ora
cle
Uni
vers
ity a
nd E
rror :
You
are
not
a V
alid
Par
tner
use
onl
y
THES
E eK
IT M
ATER
IALS
AR
E FO
R Y
OU
R U
SE IN
TH
IS C
LASS
RO
OM
ON
LY.
CO
PYIN
G e
KIT
MAT
ERIA
LS F
RO
M T
HIS
CO
MPU
TER
IS S
TRIC
TLY
PRO
HIB
ITED

Why Implement a Cloud?
• Standardization
• Consolidation
• Centralization
• Optimization
• Abstraction
• Flexibility
• Self-service
A Cloud Over Your Head Is Not Always Bad
The move to a computing cloud can be compelling for an organization on many fronts:
• Standardization
- The cloud model naturally lends itself to the adoption of standards including hardware, application platforms, and integration technologies.
• Consolidation
- Combining physical infrastructure and IT budgets across multiple departments
- More efficient purchasing, installation, maintenance, and operation processes
- Reduced operational overhead with fewer physical pieces of infrastructure to manage
- Potential gains per application deployment in terms of available compute resources
• Centralization
- Consolidation may result in co-location of previously distributed infrastructure
- Simplification of operations through the reduction of infrastructure
Oracle Database 12c: Backup and Recovery Workshop C - 13
Copyright © 2015, Oracle and/or its affiliates. All rights reserved.
Ora
cle
Uni
vers
ity a
nd E
rror :
You
are
not
a V
alid
Par
tner
use
onl
y
THES
E eK
IT M
ATER
IALS
AR
E FO
R Y
OU
R U
SE IN
TH
IS C
LASS
RO
OM
ON
LY.
CO
PYIN
G e
KIT
MAT
ERIA
LS F
RO
M T
HIS
CO
MPU
TER
IS S
TRIC
TLY
PRO
HIB
ITED

• Optimization
- Taking advantage of all available computing resources on any given server
- Potential for reduced workload on operations or systems staff with fewer resources to manage
• Abstraction
- The host and application platforms in a cloud deployment become an abstraction of physical servers with installed software, breaking ties to specific physical resources.
• Flexibility
- As long as any service-level agreements that are in place are not breached, IT resources can be deployed and used in whatever configuration and manner is desired.
- Applications can be deployed on any environments that meet their current resource needs.
• Self-service
- Where suitable, allow end users (for example, developers) to request resources and have the cloud management system provide those resources, thereby freeing system administrators and operations teams from servicing such requests.
- End users need only be concerned with any quotas and other restrictions imposed upon them, not where they might be able to find the resources they need because these will be provided by the private cloud.
Oracle Database 12c: Backup and Recovery Workshop C - 14
Ora
cle
Uni
vers
ity a
nd E
rror :
You
are
not
a V
alid
Par
tner
use
onl
y
THES
E eK
IT M
ATER
IALS
AR
E FO
R Y
OU
R U
SE IN
TH
IS C
LASS
RO
OM
ON
LY.
CO
PYIN
G e
KIT
MAT
ERIA
LS F
RO
M T
HIS
CO
MPU
TER
IS S
TRIC
TLY
PRO
HIB
ITED

Oracle’s Cloud Offerings
• Public cloud solutions– Oracle Cloud
– Oracle on third-party public clouds
– Powering third-party public clouds
• Private cloud solutions– IaaS
– PaaS
– Private Database Cloud
• Private cloud systems– Enterprise Manager Cloud Control 12c
– Ops Center 12c
– Cloud platforms: Exadata Database Machine, Exalogic Elastic Cloud, and Oracle SPARC SuperCluster
Oracle Clouds
Oracle offers a number of cloud solutions by using combinations of different technologies.
You can learn more by visiting the following sites:
• http://cloud.oracle.com
• http://www.oracle.com/goto/cloud
• http://www.oracle.com/technetwork/topics/cloud/index.html
Oracle Database 12c: Backup and Recovery Workshop C - 15
Copyright © 2015, Oracle and/or its affiliates. All rights reserved.
Ora
cle
Uni
vers
ity a
nd E
rror :
You
are
not
a V
alid
Par
tner
use
onl
y
THES
E eK
IT M
ATER
IALS
AR
E FO
R Y
OU
R U
SE IN
TH
IS C
LASS
RO
OM
ON
LY.
CO
PYIN
G e
KIT
MAT
ERIA
LS F
RO
M T
HIS
CO
MPU
TER
IS S
TRIC
TLY
PRO
HIB
ITED

Enterprise Manager Cloud Control 12c Clouds
• IaaS– Built on Oracle VM for x86 virtualization platform
– User requests create virtual machines.
• PaaS– Database as a Service using Oracle Single Instance, RAC,
and RAC 1-Node
– Middleware as a Service using WebLogic Server
• Metering and chargeback
• Self-service portal
• Use Cloud Control’s standard security model to enforce multi-tenancy boundaries
Enterprise Manager Cloud Control 12c: Private Clouds
Enterprise Manager Cloud Control 12c is shipped with all the management, provisioning, metering, and self-service tools needed to provide the five essential characteristics of cloud computing:
• On-demand self-service
The self-service portal of Enterprise Manager Cloud Control 12c allows self-service users to review and perform maintenance tasks on IaaS and PaaS requests that have already been provisioned, schedule new requests, and report on usage and any associated charges.
• Broad network access
Self-service users only need access to the Enterprise Manager Cloud Control 12c self-service portal. By leveraging Cloud Control’s proven topology of a centralized Oracle Management Service and distributed managed hosts, self-service users can effectively use any cloud resources to which they have been granted access.
Oracle Database 12c: Backup and Recovery Workshop C - 16
Copyright © 2015, Oracle and/or its affiliates. All rights reserved.
Ora
cle
Uni
vers
ity a
nd E
rror :
You
are
not
a V
alid
Par
tner
use
onl
y
THES
E eK
IT M
ATER
IALS
AR
E FO
R Y
OU
R U
SE IN
TH
IS C
LASS
RO
OM
ON
LY.
CO
PYIN
G e
KIT
MAT
ERIA
LS F
RO
M T
HIS
CO
MPU
TER
IS S
TRIC
TLY
PRO
HIB
ITED

• Resource pooling
Enterprise Manager Cloud Control 12c can manage many IaaS and PaaS infrastructures, and apply a unified security model across all clouds. Thus ensuring that the boundaries of a multi-tenancy model are honored while distributing available resources according to demands.
• Rapid elasticity
Self-service users can define rules to automatically scale their services based upon various metrics. Enterprise Manager Cloud Control 12c will respond to changes in demand and implement those rules as required.
• Metering
The Chargeback capability of Enterprise Manager Cloud Control 12c allows cloud administrators to define general and fine-grained rules for calculating charges. Those charges are then allocated to a cost center hierarchy, and usage and cost reports are made available to both self-service users and administrators.
Oracle Database 12c: Backup and Recovery Workshop C - 17
Ora
cle
Uni
vers
ity a
nd E
rror :
You
are
not
a V
alid
Par
tner
use
onl
y
THES
E eK
IT M
ATER
IALS
AR
E FO
R Y
OU
R U
SE IN
TH
IS C
LASS
RO
OM
ON
LY.
CO
PYIN
G e
KIT
MAT
ERIA
LS F
RO
M T
HIS
CO
MPU
TER
IS S
TRIC
TLY
PRO
HIB
ITED

Cloud Management Life Cycle
Enterprise Manager Cloud Control 12c supports the entire cloud management life cycle.
Plan
Setup
Build
Test
DeployMonitor
Manage
Meter &Charge
Optimize
Managing the Cloud from Start to Finish and Back Again
Oracle Enterprise Manager Cloud Control 12c assists with the administration and management of all phases of your clouds’ life cycle.
Plan
Consolidation Planner helps you to examine the “what-if” scenarios involved in the early stages of considering infrastructure consolidation or acquisition. By using metric data gathered from your currently managed hosts, you can explore system load and assess if there is merit in giving further consideration to consolidating applications onto existing or new hardware, physical, or virtualized platforms.
Setup
Cloud Control 12c provides tools for setting up the foundations of IaaS, DBaaS, and PaaS clouds. By using Cloud Control 12c, you can define the hardware and software resources that will be available in your cloud, as well as establish the security and resource quota models to be applied to your cloud.
Build
Deployable artifacts such as database provisioning profiles or assemblies can be prepared and published in Cloud Control 12c.
Oracle Database 12c: Backup and Recovery Workshop C - 18
Copyright © 2015, Oracle and/or its affiliates. All rights reserved.
Ora
cle
Uni
vers
ity a
nd E
rror :
You
are
not
a V
alid
Par
tner
use
onl
y
THES
E eK
IT M
ATER
IALS
AR
E FO
R Y
OU
R U
SE IN
TH
IS C
LASS
RO
OM
ON
LY.
CO
PYIN
G e
KIT
MAT
ERIA
LS F
RO
M T
HIS
CO
MPU
TER
IS S
TRIC
TLY
PRO
HIB
ITED

Test
The self-service portal allows your artifact developers to test their deployable components easily, in a controlled manner, before exposing them to self-service users.
Deploy
As well as being able to request as many deployments as possible within any resource quotas that may apply, your cloud end users can also nominate the amount of computing resources such as CPU and memory that should be assigned to those deployments, thereby scaling predefined templates to suit their needs.
Monitor and Manage
As well as being able to monitor the performance of the underlying cloud infrastructure, artifacts that are created by end-user requests become managed targets in Enterprise Manager Cloud Control 12c. This allows administrators to monitor and manage the performance of the cloud as a single entity by using the standard tools and Incident Management framework.
Meter & Charge
Charge plans can be assigned to cloud resources and deployments, allowing usage to be tracked and reported on a per-user basis. Cloud resources and users can also be assigned to a reporting hierarchy to allow charges to be determined at departmental, regional, or other levels.
Optimize
Resources can be allocated to or reallocated between clouds in response to performance monitoring and demand.
Oracle Database 12c: Backup and Recovery Workshop C - 19
Ora
cle
Uni
vers
ity a
nd E
rror :
You
are
not
a V
alid
Par
tner
use
onl
y
THES
E eK
IT M
ATER
IALS
AR
E FO
R Y
OU
R U
SE IN
TH
IS C
LASS
RO
OM
ON
LY.
CO
PYIN
G e
KIT
MAT
ERIA
LS F
RO
M T
HIS
CO
MPU
TER
IS S
TRIC
TLY
PRO
HIB
ITED

Quiz
What are five essential characteristics of cloud computing?
a. Rapid elasticity
b. Power conditioning
c. On-demand self-service
d. Resource pooling
e. Hot swappable storage devices
f. Measured service
g. Reliability
h. Broad network access
Answer: a, c, d, f, h
Although power conditioning, hot swappable storage devices, and reliability are desirable characteristics of any data center, according to the National Institute of Standards and Technology, five essential characteristics of cloud computing are focused on services rather than physical devices.
Oracle Database 12c: Backup and Recovery Workshop C - 20
Copyright © 2015, Oracle and/or its affiliates. All rights reserved.
Ora
cle
Uni
vers
ity a
nd E
rror :
You
are
not
a V
alid
Par
tner
use
onl
y
THES
E eK
IT M
ATER
IALS
AR
E FO
R Y
OU
R U
SE IN
TH
IS C
LASS
RO
OM
ON
LY.
CO
PYIN
G e
KIT
MAT
ERIA
LS F
RO
M T
HIS
CO
MPU
TER
IS S
TRIC
TLY
PRO
HIB
ITED

Quiz
What clouds can you create with Enterprise Manager Cloud Control 12c? (Select all that apply.)
a. Platform as a Service (PaaS)
b. Cirrus
c. Stratus
d. Software as a Service (SaaS)
e. Cumulonimbus
f. Infrastructure as a Service (IaaS)
Answer: a, f
Enterprise Manager Cloud Control 12c does not provide the tools required to implement SaaS, where the infrastructure, platform, and application are made available to self-service users. One could argue that IaaS could be used to allow end users to request a complete stack of infrastructure, platform, and application. However, strictly speaking, SaaS is an application service rather than the ability to request provisioning of an application service.
Oracle Database 12c: Backup and Recovery Workshop C - 21
Copyright © 2015, Oracle and/or its affiliates. All rights reserved.
Ora
cle
Uni
vers
ity a
nd E
rror :
You
are
not
a V
alid
Par
tner
use
onl
y
THES
E eK
IT M
ATER
IALS
AR
E FO
R Y
OU
R U
SE IN
TH
IS C
LASS
RO
OM
ON
LY.
CO
PYIN
G e
KIT
MAT
ERIA
LS F
RO
M T
HIS
CO
MPU
TER
IS S
TRIC
TLY
PRO
HIB
ITED

Ora
cle
Uni
vers
ity a
nd E
rror :
You
are
not
a V
alid
Par
tner
use
onl
y
THES
E eK
IT M
ATER
IALS
AR
E FO
R Y
OU
R U
SE IN
TH
IS C
LASS
RO
OM
ON
LY.
CO
PYIN
G e
KIT
MAT
ERIA
LS F
RO
M T
HIS
CO
MPU
TER
IS S
TRIC
TLY
PRO
HIB
ITED