Operation Manual - Hire-Express
68
EPL151 Original Instruction Part No.508000003010 V3 09/2020 Operation Manual WPL201 RPL201/RPL201H RPL202 HPL152
-
Upload
khangminh22 -
Category
Documents
-
view
2 -
download
0
Transcript of Operation Manual - Hire-Express

EPL151
Original Instruction Part No.508000003010V3 09/2020
Operation Manual
WPL201RPL201/RPL201H
RPL202
HPL152

EP EQUIPMENT CO.,LTD. is one of the world’s leading companies manufacture, design material handling equipment and provide related service. With over 100,000 square metres plant it produces over 100,000 trucks per year, and provides professional, effective and optimized material handling solutions worldwide, until now it has developed three major kinds of business: Material handling equipment: Focus on electric forklift and warehouse equipment OEM parts: Global parts supply Imow industry,online: One-stop industrial products supply
Guided by our customer-oriented concept, EP has developed service centers in more than 30 countries around the world, from which customers are able to receive timely local service. Moreover, 95% of warranty parts can be shipped out within 24 hours after been ordered. Through our online after-sales service system, customers can process their warranty claims, order spare parts and consult the operation manuals, maintenance materials and spare parts catalogs.
With business all over the world, EP has thousands of employees and hundreds of agents worldwide to provide our global customers with prompt local service.
Based on the concept of sharing economy , EP also offer rental service for various logistics equipment. Adhering to the idea “Making the leasing of logistic equipment more simple”, EP is devoted to providing customized one-stop leasing solutions for our customers with our high quality, reasonable price and prompt rental service.
EP’s mission&vision is “ Let more people apply the electrical material handling equipment to relieve the intensity of labour” and “Let’s grow together”.
•
••
EP EQUIPMENT CO., LTDAddress: No.1 Xiaquan Village, Lingfeng Street, Anji, Huzhou, ZhejiangTel: + 86-0571-28023920Website: www.ep-ep.comEmail: [email protected]

Thank you for buying our products.
The manual will show you the way of correctly using the truck as well as relevant preventive maintenance and safety operation. The truck should be operated only by well-trained professionals and by no means by non-working personnel. Operators are supposed to read through the manual before actually operating the truck.
With the continuous upgradation and improvement of our company’s products, you may find a slight difference existing between your carrier and some introductions in the manual.
All the information, specifications and illustrations in the manual are effective in times of printing and our company maintains the right to modify the specification (s) or design (s) of our products at any time without any beforehand notification.
Means that failure to comply can cause risk to life and/or major damage to property.
Please strictly adhere to these safety instructions to avoid personal injury or major damage to equipment.
Please pay attention to the important safety instructions.
Pay attention to Instruction.
CAUTION
NOTE
WARNING
DANGER
Explanations on the manual
Safety signs and corresponding esplations
Preface
Internet address and QR code of Parts manual
By entering the address http://www.ep-care.com in a web browser or byscanning the QR code, Login after registration, Select “Parts purchase"function and input part number or model name to find the truck.
Note: After registration, please send email to info@ ep-care.com to activate your account
i

NOTE
Intended use
i
The lift truck is designed for transporting and stacking the loads stated in the nameplate.In particular we refer to:• the safety rules of your trade association.• In accordance with the special provisions for driving on public roads specified by national specifications.• Other local regulations.The rules for the intended and approved use of industrial trucks must be followed under all circumstances by the responsible persons, especially by the operator and service personnel. The user, and not EP, is responsible for any danger arising from applications not authorised by the manufacturer.If you want to use the truck for applications not mentioned in this manual, please first contact your authorised dealer.No changes, particularly no modifications and additions, may be made to the truck without the approval of the manufacturer.Technical description These trucks consists of robust steel chassis and is driving on a traction wheel and 2 load wheels. Caster wheels provide for good stability even with high loads. The truck will be stopped by a regenerative service brake and hold by an automatic electromagnetic parking brake in it’s parking position.
The load is lifted by a hydraulic cylinder that activates a lifting shaft that transmits the lifting movement by a push-rod to the load wheels.
The control handle is used for smooth steering and control of drive speed, lifting and lowering, braking and the horn without changing the position of the hand. The long tiller shaft allows effortless steering and a safe distance to the truck. A gas spring returns the control handle always into a vertical position that activates the brake automatically.
An emergency reverse switch on the control head protects the operator from being squeezed by the truck in confined spaces.
An electronic controller operates all electric functions and guaranties safety.
A key switch secures the truck from unauthorized use.
The ergonomic design of the truck guaranties safe and easy operation.
•This manual is used for operation and maintenance , the detail parameters, size and specifications in context is only for reference , the real parameters will depend on sale files.•Manual pictures for reference only, the real car shall prevail, and shall not affect the manual use.•Manual pictures only sign for one of the models in this series models.

In the manual, “equipment user” refers to any natural person or legal person directly using or appointing or authorizing others to use the carrier. In such special situations as renting or sales, the “equipment user” represents the interested parties supposed to bear operation obligations as specified by the contractual terms concluded between equipment owner and corresponding users. Equipment users must ensure the use of the carrier only for purposes specified and timely eliminate all the dangers that may threaten the life and health of the users themselves or any other third party, in addition to which they must also strictly abide by accident prevention provisions, other safety technology provisions and equipment operation, maintenance and repair guidelines, and ensure that all the operators seriously read and completely understand the contents of the operation instruction.
Should any violation of the operation instruction occur, the quality guarantee of our company will be invalid automatically, and our company will assume none of the responsibilities for losses resulting from any nonstandard operation of the equipment implemented by any client, equipment user or any third party without the authorization of the client service department of our company.
Any installation or retrofitting of any additional device that may influence or enhance the functions of the carrier must be approved by our company in writing beforehand.
Obligations and responsibilities of equipment user
Equipment refit

DeclarationEP EQUIPMENT CO., LTD. Address: No.1 Xiaquan Village, Lingfeng Street, Anji, Huzhou, Zhejiang
We declare that the machine
Industrial truck: according to this operation manual
Type: according to this operation manual
complies with the most recent version of Machinery Directive 2006/42/EC.
Personnel authorised to compile the technical documents:
See EC/EU Declaration of Conformity
EP EQUIPMENT CO., LTD.
EC/EU Declaration of ConformityThe manufacturer declares that this industrial truck complies with the EC Machinery Directive and the provisions of other applicable EC/EU directives effective at the time of sale. This can be verified by means of the EC/EU Declaration of Conformity and the relevant certification label on the nameplate.
The industrial truck is supplied with the EC/EU Declaration of Conformity document. This declaration proves that this truck complies with the requirements of the EC Machinery Directive. Unauthorised modification or additional installation of equipment to the structure of the industrial truck may affect its safety, and will therefore invalidate the EC/EU Declaration of Conformity.
The EC/EU Declaration of Conformity must be carefully stored and made available to be presented to the relevant authorities when necessary. If this industrial truck is sold, this declaration document must be handed over to the new owner.
Legal requirements for marketing

A Nameplates and alarming labels ..........................................................................................A1B Operation .............................................................................................................................B12.1Utilization safety specification..............................................................................................B12.1.1 EN standards ...................................................................................................................B22.1.2 Conditions for application ...............................................................................................B22.1.3 Stability ...........................................................................................................................B22.2 Display and manipulation ...................................................................................................B32.2.1 Control handle .................................................................................................................B32.2.2 Key switch ......................................................................................................................B42.2.3 Display instrument ...........................................................................................................B52.3 Truck use and operation .....................................................................................................B82.3.1 Preparation for use ..........................................................................................................B82.3.2 Truck starting .................................................................................................................B102.3.3 Running, swerving and braking .....................................................................................B112.3.4 Goods picking ................................................................................................................B142.3.5 Parking the truck securely .............................................................................................B152.3.6 Drive directions ..............................................................................................................B162.3.7 Loading ..........................................................................................................................B172.3.8 Using the truck on a slope .............................................................................................B182.3.9 Truck transport...............................................................................................................B192.3.10 Operating the truck without its own drive system ........................................................B20C Storage battery use and maintenance .................................................................................C13.1 Safety and warning .............................................................................................................C13.2 Storage battery charging ....................................................................................................C23.2.1 Precautions......................................................................................................................C23.2.2 Charging the battery with internal charger.......................................................................C23.2.3 Charging the battery with external charger......................................................................C33.2.4 Battery type & dimensions&Charging time ......................................................................C43.3 Handling of the lithium-ion battery .....................................................................................C53.3.1 Information on the conformity of lithium-ion batteries .....................................................C53.3.2 Special lithium-ion safety rules .......................................................................................C53.3.3 Transportation .................................................................................................................C63.3.4 Scrapping lithium-ion batteries .......................................................................................C63.3.5 Storage ...........................................................................................................................C73.3.6 Scrapping lithium-ion batteries .......................................................................................C73.3.7 Disposal of Used Battery Packs .....................................................................................C73.4 Battery removal and installation .........................................................................................C6D Maintenance ........................................................................................................................D14.1 Truck maintenance .............................................................................................................D14.2 Maintenance table ..............................................................................................................D2E Technical data .......................................................................................................................E1F Lithium batteries ....................................................................................................................F11 Information on the conformity of lithium-ion batteries ...........................................................F22 It is necessary to respect the following guidelines................................................................F23 Intended use .........................................................................................................................F24 Reasonably foreseeable misuse ..........................................................................................F25 Accessories ..........................................................................................................................F36 BMS (Battery Management System) ....................................................................................F3
Table of contents Pg.

7 Nameplate ............................................................................................................................F37.1Safety and warning ..............................................................................................................F38 Transportation......................................................................................................................F58.1 Shipping faulty batteries .....................................................................................................F59 Instructions for disposal ......................................................................................................F610 Storage ...............................................................................................................................F611 Common Problems and Solutions ......................................................................................F7G Lead-acid batteries ...............................................................................................................G11 Safety and Warnings ...........................................................................................................G22 Use of Battery .......................................................................................................................G32.1 Pre-use Checks ..................................................................................................................G32.2 Discharging.........................................................................................................................G32.3 Charging .............................................................................................................................G32.4 Temperature .......................................................................................................................G43 Maintenance & Care ............................................................................................................G43.1 Daily Maintenance ..............................................................................................................G43.2 Weekly Maintenance ..........................................................................................................G43.3 Monthly Maintenance .........................................................................................................G53.4 Care ....................................................................................................................................G64 Storage ..................................................................................................................................G65 Troubleshooting .....................................................................................................................G6

REV. 09/20201A
Have the nameplates of a truck fixed its main body and alarming labels pasted on its outer cover.
Should any nameplate or alarming label lose or be damaged, please conduct replacement immediately or contact with the sales department or corresponding agent of our company when necessary.
Such truck-related information as product model, serial number, manufacturing date, rated load lifting capacity, lifting height, load centre distance and dead weight are all shown in the nameplates.
Nameplates and alarming labelsA
Nameplate
Instructions labelAnti-pinch label Do not rest on the pallet label
Lithium label
Battery nameplate

REV. 09/2020 2A
Hoisting Remove the load before hoisting the pallet truck.Disconnect the power supply.Attach slings in the positions identified by the hook symbol.
WPL201
Personnel must not stand below or near the truck when the pallet truck is being lifted.DANGER
HPL152
Do not rest on the side arms

REV. 09/20203A
RPL201/ RPL201H/RPL202
EPL151

REV. 09/20201B
2.1Utilization safety specification
The ruck can by no means be used under the temperature lower than 5 °C for a long time, or in refrigeratory or under the condition that such environmental factor as temperature or humidity changes extremely before special equipment is additionally installed and the permit of the manufacturer is acquired.
OperationB
Applicable environment temperature: -10 °C - 40 °C
Don’t use the truck in rainwater.
Don’t use the truck in non-position.
Avoid the use of the truck by non-working personnel.Don’t ride on the truck.Don’t carry or lift people by the truck.
Don’t use the truck on slippery road surfaces.(such as road surfaces with oil stain or residual snow or those frozen ones )
Don’t carry goods on steep slope to prevent goods from sliding off.
Conditions of operation road surface: the truck should run on solid, flat, level and paved road surfaces (including both running and lifting)
i NOTE
i NOTE

REV. 09/2020 2B
Don’t place any part of your body in any moving part of the truck to avoid being clamped.
Don’t leave the truck beforeit is parked as regulated.
Don’t use the truck when any non-working personnel is in the dangerous area. Don’t be distracted when using the truck.Don’t be distracted when using the truck.
2.1.1 EN standards
Continuous sound level: < 74 dB(A) according to EN 12053 as stipulated in ISO 4871
The continuous sound level is a value averaged according to standard regulations, taking the sound pressure level into account when driving, lifting and idling. The sound pressure level is measured at the ear.
Electromagnetic compatibility (EMC)
The manufacturer confirms compliance with the limit values for electromagnetic emission and interference immunity as well as testing of static electricity discharge according to EN 12895 and the references to other standards contained therein.
Electrical or electronic components and their arrangement may only be modified after written approval by the manufacturer has been obtained.

REV. 09/20203B
2.1.2 Conditions for application
Working condition requirements: - Indoor use and outdoor use.- The walking, lifting and lowering devices, harness and components are IP55 dust and water- resistant- The truck's maximum operation altitude is up to 2000m.- Trucks can only be operated in adequately illuminated working areas to avoid injuries. In case of insufficient light, an additional lighting equipment is needed to ensure that the driver can see properly.- If you must travel on an incline, the gradients should be below A% at full load, or below B% without a load.(For the value of A and B, refer to the Gradability in technical data)
2.1.3 Stability
Stability is guaranteed if your truck is used properly in accordance with its intendedpurpose. Common reasons for a loss of truck stability include:• Emergency stops or sharp turns• Driving with a raised load or a load handling device• Turning the vehicle around on or driving across a slope• Driving up or down a slope with the load pointing downhill• Driving with a wide load• Carrying a swinging load• Driving near the edge of a ramp or up steps• Tilting the mast forward while carrying araised load• Driving on uneven surfaces• Overloading the truck• Carrying bulky loads in strong winds• When carrying liquid, its centre of mass inside the container may shift due to inertial force (such as when pulling away, braking or turning)

REV. 09/2020 4B
2.2.1 Control handle
2.2Display and manipulation
1.Control handle A
Lowering buttonLower loading parts
Lifting buttonLift loading parts
Horn buttonSend out sound warning signalsDriving switchControls travel direction and speed
Emergency reverse buttonThrough touching the button, truck drives away from operator.
Tortoise speed button(Not for RPL201/RPL201H)
Display instrument (Not for RPL201/RPL201H/RPL202)Display the electric quantity of the truck
Key switch Connect and interrupt control current
Tortoise speed button
Key switchConnect and interrupt control current
Emergency reverse buttonThrough touching the button, truck drives away from operator.
Driving switchControls travel direction and speed
Horn buttonSend out sound warning signals
Display instrumentDisplay the electric quantity of the truck
Lowering buttonLower loading parts
Lifting buttonLift loading parts
WPL201
EPL151/RPL201/RPL201H
2.Control handle B

REV. 09/20205B
1.Key switch A
Connect and interrupt control current.
• When the key rotates to gear “OFF”, the control current of the truck will be interrupted;
• When the key rotates to gear “ON”, the control current of the truck will be connected.
2.2.2 Key switch
RPL201/RPL201H/RPL202/EPL151
HPL152
Lowering lever
Power switch button
"Horn" button
Emergency reverse switch
Drive switch
Pull and hold the manual lower switch (2).The forks will lower to the minimum height until they stop by themselves.
Start the truck
Activates the horn.
Press the emergency reverse switch. Thevehicle will begin to travel in the oppositedirection.
Select the required driving direction and speed.
3.Control handle C

REV. 09/2020 6B
2.Key switch B
Connect and interrupt the control current.
• When pulling out the induction key, the control current of the truck will be interrupt- ed;• When inserting the induction key, the control current of the truck will be connected.
Pulling out the key switch of a forklift before leaving can prevent the forklift from starting accidentally.
• LED (1) displays the remaining charge;• LED (2) displays remaining charge percentage;• LED (3) displays Interlock switch status indication; • LED (4) displays the total running time normally. If fault, display the fault code.
1 2
3 470%
EPL151
WPL201
i NOTE
2.2.3 Display instrument
RPL201/RPL201H/RPL202
• LED (1) displays the remaining charge.when 1st block and 2nd block blinks alternatively, it indicates low power needs to be charged• LED (2) displays remaining charge percentage;• LED (3) flashing, it indicates travel forward properly; • LED (4) flashing, it indicates travel backward properly;• LED (5) flashing, it indicates lifting properly; • LED (6) flashing, it indicates lowering properly;• LED (7) always on, it indicates interlock switch opened, LED(7) flashing, it indicates interlock switch closed, the display start timing.• LED (8) displays the total running time normally. If fault, display the fault code.

REV. 09/20207B
1
23
4
56
7WPL201
右视图Right
1 2LCD (1) displays the state of charge; DISPLAY DESCRIPTIONContinuous red Charge is chargingContinuous green Battery charging is
complete
The LCD (2) remain green light lit under normal, flashing show the failure state of truck.
Error Code
1 Controller number
2 = Traction controller
6 = Steering controller
2 Error code note
Note: Consult the service manual
8
9
Low Voltage ProtectionThe car has low voltage protection function.When the battery power of forklift truck is 7%-15%, the display screen shows L1. At this time, the forklift truck can not lift goods, but it can run normally. When the battery power is less than 7%, the display screen shows L2. At this time, the forklift can not be lifted and the driving speed becomes slower.
i NOTE
• LED (1) displays the remaining charge;• LED (9) indicate the the acceleration status of the accelerator.• LED (2) indicate fault warning;• LED (3) indicate charging status,when charging, it turns into a battery; • LED (4) indicate emergency reverse switch status;• LED (5) indicate truck stop or walk, if the truck stop display"P", if the truck travel display"N"; • LED (6) indicate turtle speed status;• LED (7) indicate rise and fall indication.• LED (8) indicate the operating hours.
HPL152

REV. 09/2020 8B
If the controller detects a battery failure, flashes of LCD(3) represent battery failure information until the failure is remedied. Details of failure information are shown as below:
Under-voltage of single cell battery: The green light repeats in a cycle of flashing once in 1 second, pausing for 2 seconds and then flashing twice, pausing for 3 seconds.Over-voltage of single cell battery: The green light repeats in a cycle of flashing once in 1 second, pausing for 2 seconds and then flashing three times, pausing for 3 seconds.Short circuit protection: The green light repeats in a cycle of flashing once in 1 second, pausing for 2 seconds and then flashing four times, pausing for 3 seconds.
Over-current protection: The green light repeats in a cycle of flashing once in 1 second, pausing for 2 seconds and then flashing five times, pausing for 3 seconds. Battery temperature is too high: The green light repeats in a cycle of flashing twice in 1 second, pausing for 2 seconds and then flashing three times, pausing for 3 seconds.
Battery temperature is too low: The green light repeats in a cycle of flashing twice in 1 second, pausing for 2 seconds and then flashing four times, pausing for 3 seconds.
Contactor-related failures: The green light repeats in a cycle of flashing three times in 1 second, pausing for 2 seconds and then flashing four times, pausing for 3 seconds.The yellow light flashes rapidly in 1 second when other failures happen.
•
•
•
•
•
•
•
•
When powered off, if the green light of power indicator is always on, it means that the battery is in a balanced state, which is a normal phenomenon.
The LCD display (3) show battery residual capacity. The color of the LCD (3) represent the following conditions:
HPL152
Component LCD colorResidual capacity
Standard battery residual capacity
Green 30-100%Continuous
Yellow 15-30%
Slowflashing red light(Flashing period 2s)
7-15%
Quick flashing red light (Flashing period 1s)
0-7%
After the red light starts flashing, the battery will enter the low-voltage protection state. According to the battery state, The truck will appear accidental power-off protection. Please charge the battery after restarting to avoid damage to the battery.
i
3
NOTE
CAUTION

REV. 09/20209B
2.3 Truck use and operation
2.3.1 Preparation for use
The following are inspection and preparation operations that must be implemented before the truck is put into daily use.
Operator's Daily Checklist
Date
Truck No.
Department
RuntimeMeter Reading
Operator
No.
Daily Check Items O.K.(√) Remark
Check for Fluid Leakage
Check for scratches, deformation or cracks.
Check Decal Condition
Check the smooth movement of the wheels.
Check the function of the emergency brakeby activating the emergency stop switch.
Check, the tiller arm- switch braking function
Check the lifting and lowering functions byoperating the buttons.Check if all bolts and nuts are tightenedfirmly.Check the vertical creep of the truck.(if equipped)
Check the lithium-ion installation, makingsure not to damage the battery cables.
Recharge the lithium-ion battery
Table 1. Table of daily inspections by operators

REV. 09/2020 10B
Table 1: Table of Daily Inspections by Operators is only a sample table for the daily inspections of operators, and it can be adjusted according to specific requirements.
The truck should be regularly maintained by qualified maintenance engineers or technicians that have passed the training of and also been authorized by the manufacturer.
Precautions in the run-in period
After being put into use, the truck should operate under a low load at the initial stage and satisfy the following requirements, especially before its operation time reaches 100h:
•Prevent the new storage battery from discharging excessively during its initial use.
•Implement complete preventive maintenance as specified.
•Avoid emergency braking, starting or swerving during the use of the truck.
•Implement oil fluid replacement and lubrication before the time specified.
•Limit the loading weight at 70%-80% of the rated loading.
Should it be necessary to repair the truck for any fault or the truck be found with any unsafe condition, please immediately report to designated competent department, and please don’t use the truck before potential faults or hazards are eliminated. All the repairs or adjustments should be implemented under authorization, and all the services must be executed by qualified maintenance technicians.
WARNING
WARNING
i NOTE

REV. 09/202011B
2.3.2 Truck starting
1. Release the emergency stop switch
2.Press the button to start the truck
HPL152

REV. 09/2020 12B
2.Open the key switch to start the truck
WPL201 RPL201/RPL201H/RPL202/EPL151
1.RunningRunning area
Running area
Rotary buttonControl the running direction andspeed of the truck using the driveswitch (1). (the large the rotary angle,the faster corresponding speed)
2.3.3 Running, swerving and braking
1Forward
Backward
When using the truck on a ramp or a uneven road, please lift the leg of the forklift to prevent its bottom from colliding with the road surface.
i NOTE

REV. 09/202013B
2.Swerving
Rotate the operation hand shank leftward or rightward as required.
Rightward swerving
Leftward swerving
1
Keep the handle in the vertical state, and press tortoise speed button (1) and drive switch(2) at the same time, then the vehicle will move at a low speed.
WPL201 EPL151/RPL202
2 2
i NOTE
We distinguish between two travel modes for RPL202/RPL201/RPL201H:Pedestrian mode: Push the side arms in, fold up the operator platform. Operate the drive switch and press creep speed button(for RPL202) at the same time. The truck can travel at the low speed.
CAUTIONIn pedestrian mode make sure you have sufficient distance from the truck.
Rider mode: Push the side arms out, fold down the operator platform. The truck can be operated at maximum travel speed.
It's forbidden to operate the truck which you don't push the side arm out at the rider mode.
i NOTE

REV. 09/2020 14B
Emegency reverse switchBraking can be accomplished by changingthe direction of travel.Press the reverse switch in the oppositedirection until the truck comes to a stop,then release the drive switch.
Emergency stop switchPress the emergency stop switch, and then all the electrically propelled functions will be interrupted.
Braking area
3.Braking
Mechanical operating brake The truck is braked when the operating handle is released.The mechanical brake engages when the tilleris positioned in Braking area.
Braking area

REV. 09/202015B
1.Lifting
2.3.4 Goods picking
Keep pressing the lifting button untilreaching the required lifting height
WPL201 RPL201/RPL201H/EPL151/RPL202
2.Lowering
Lower the pallet forks to the bottom through pressing the lowering button.

REV. 09/2020 16B
2.3.5 Parking the truck securely
Lower the forks to the bottom;
Goods failing to be arranged and fixed may result in accidents.
To avoid shortening the service life of the oil cylinder, try not to lift the pallet forks to the highest state for every lifting operation.
WARNING
NOTEi
LiftingPress lowering lever(2) to the bottom. Lift the forks by moving the control shaft (1) up and down until the desired lifting height is achieved.Reset the lowering lever(2).
LoweringSet forks to the lowest position by pulling lowering lever(2) upward.
HPL152

REV. 09/202017B
Turn off the key switch or pull out the key;
Press the emergency stop switch to cut off storage battery connection;
•Should it be necessary for operators to leave the truck, even for just a moment, the truck should also be well parked as specified.•Never park the truck on a slope;•The forks must be lowered to the bottom.
WARNING
2.3.6 Drive directions
The drive directions of the truck are forward (1) and reverse (2).
12

REV. 09/2020 18B
2.3.7 Loading
•Approach the load carefully.•Adjust the height of the forks until they can be easily inserted into the pallet. •Insert the forks under the load. •If the load is shorter than the forks, position the forks so that the front of the load overhangs them by a few centimeters, to avoid interference with the load immediately ahead. •Raise the load a few centimeters above its support. •Back the truck away from the stack or any neighbouring loads, gently and in a straight line.
Transporting loadsAlways carry loads in the forward direction of travel (R) in order to have the best visibility.
RF
UnloadingCarefully drive the truck to the desired location. Carefully drive the truck to the unloading area. Lower the load until the fork arms are free from the pallet.Back the truck away in a straight line.Raise the forks to proper height.
If the field of vision is poor, ask a guide for assistance.
CAUTION
WARNING
Since visibility is reduced when travelling in this direction, drive only at very slow speed.
When carrying a load on a slope, always ascend or descend with the load uphill. Never drive sideways across a slope or perform a U-turn.
i NOTE

REV. 09/202019B
Be particularly careful near slopes:Never attempt a slope with a gradient greater than that specified in the truck’s data sheet. Make sure that the ground is dry with a non-slip surface and that the route is clear.
Ascending slopesAlways ascend slopes travelling in the reverse direction, with the load facing uphill. Without a load, it is recommend to ascend slopes forwards.
Descending slopesTravel down slopes must always be forwards, with the load uphill. Without a load, it is recommended to descend slopes forwards. In all cases, travel at a very low speed and brake very gradua-lly.
2.3.8 Using the truck on a slope
Incorrect use of the truck on slopes places stress on the traction motor, brakes and battery.
Risk to life and/or risk of major equipment damage.Never park the truck on a slope. Never make a U-turn or take shortcuts on a slope. On a slope, the operator must drive very slowly.
Starting on a slopeIf you have to stop and then start on slope, proceed as follows:•Stop on the slope by pressing the accelerator in the opposite direction until the machine comes to a standstill. •Return the accelerator to the neutral position, then release the accelerator control button to apply the parking brake. •To restart, press the accelerator button for the desired direction. •The truck will move.
i NOTE
DANGER

REV. 09/2020 20B
2.3.9 Truck transport
•The load weight includes the net weight of the truck(including battery weight) and the wooden pallet.•The pallet or wooden box should be large and strong enough to withstand the weightof the truck.• Pay attention to the fork blades when lifting the truck onto the pallet, to prevent injuries caused by the forks.
Follow the prescribed steps and park the vehicle correctly.
Make sure the forks are aligned with the pallet, move slowly and stop after inserting the forks as far into the pallet as possible.
Operate on open, level ground and pay attention to ground conditions when lifting and lowering the pallet to prevent the truck from tipping.
When transporting the truck, make sure it is fully secured and take precautionary measures against bad weather.
•Place the truck on a wooden pallet.
Only use haulage equipment with sufficient load capacity.
Incorrect use of the truck on slopes places stress on the traction motor, brakes and battery.
CAUTION
i NOTE
i NOTE
•Fix the truck to the pallet to prevent loosening.

REV. 09/202021B
2.3.10 Operating the truck without its own drive system
If the truck has to be moved after a failure has rendered it immobile, proceed as follows:Set the emergency stop switch “OFF”.Set the key switch “OFF” and remove the key.Prevent the truck from rolling away.Remove the cover.Screw in two screws(1), M4*35mm)until the truckcan be moved (no braking action).
Tighten two screws(1), the truck can be moved (no braking action) for RPL201/RPL201H/RPL202.
After setting down the truck at the destination, unscrew two screws(1). Braking action is restored.
• • •
This operating mode is not permitted when negotiating inclines and gradients.
WARNING
RPL201/RPL201H/RPL202
WPL201/HPL152/EPL151

REV. 09/20201C
Battery use and maintenanceC 3.2 Battery charging
•The truck must be parked within a shady and ventilated room;•Avoid the existence of any metal object in the surface of the storage battery;•All the cable and plug connection parts should be inspected in terms of obvious damages before charging;•The charger to be connected or disconnected must be under the state of not connecting to the circuit;•The safety provisions related to the storage battery and the manufacturer of charging station must be strictly abode by.
Charging environment:
3.2.2 Charging the battery with internal charger
Charge maintenance-free or lithium battery through a built-in charger •Inspect whether relevant charging requirements are satisfied according to “3.2.1 precautions”;•Park the truck securely as described 2.3.5;•Connect the specialized connector(1) to a proper power supply outlet, then plug it into the socket on the truck to start charging.
The charging voltage is single-phase, ranging from 100V to 240V, please don’t exceed the voltage range mentioned above.
3.2.1 Precautions
Lithium battery must be charged above 0°C, as excessively low charging temperature is likely to result in the short circuit of battery cell.
power plug
WPL201/EPL151/HPL152
WPL201
1
i NOTE

REV. 09/2020 2C
Charging indicator(1)NO. LED status Phenomenon Cause Remedy Description
1 Red light is on Trouble free / Charging
2 Green light is on Trouble free / End of charging
3
Noindicator light
Current/voltage changes
Indicator failure Return to factory maintenance Charger failure
4 No change in current/voltage
The power input line is in good contact with the socket and the charger
Charger failure,returnto factory maintenance
Charger failure
5 Red light flashes
The power input cable is not in good contact with the socket
Check if the input power line is in good contact
6
Yellow light is on
Storage battery fails.(battery reverse connection)
Eliminate battery failure
7Storage battery fails.(battery is not connected)
Eliminate battery failure
8
Yellow light flashes
Ambient temperature is too high
Ambient temperaturedrops to normal
9
Storage battery voltage exceeds 32.5V(65V for WPL201)
Eliminate battery failure
10 Charger failure return to factory maintenance
REV. 09/20203C
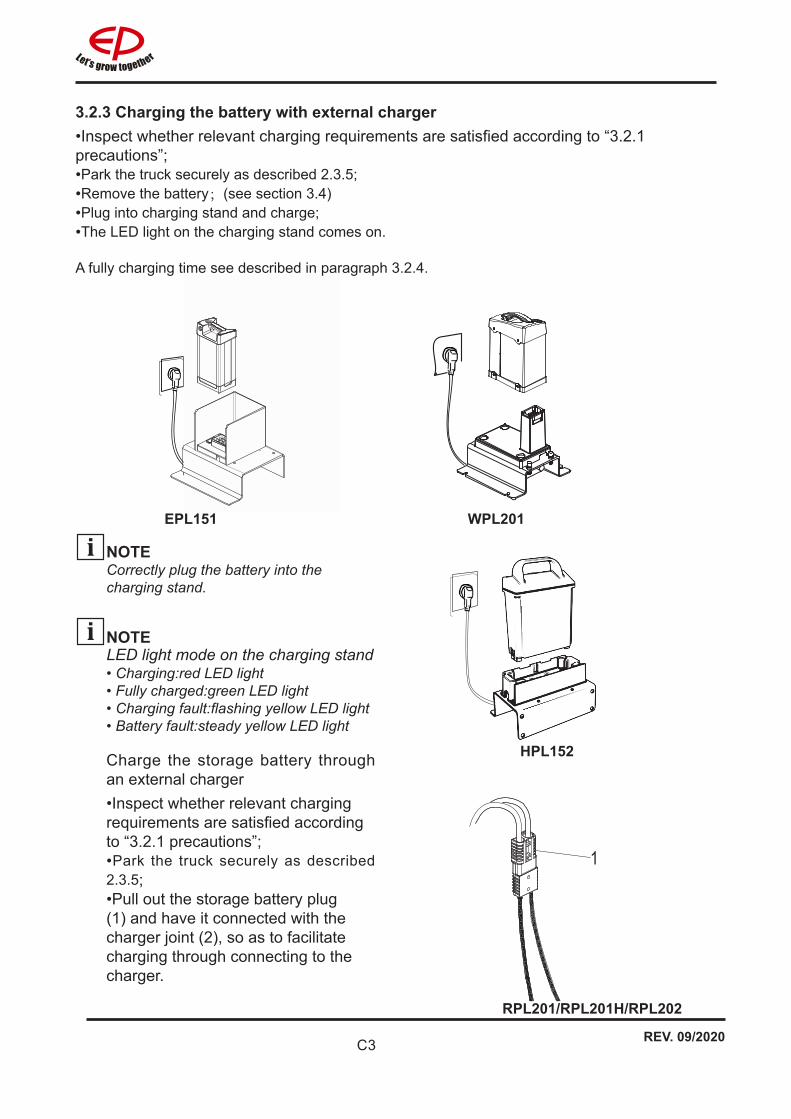
3.2.3 Charging the battery with external charger•Inspect whether relevant charging requirements are satisfied according to “3.2.1 precautions”;•Park the truck securely as described 2.3.5;•Remove the battery;(see section 3.4)•Plug into charging stand and charge;•The LED light on the charging stand comes on.
A fully charging time see described in paragraph 3.2.4.
EPL151 WPL201
Charge the storage battery through an external charger•Inspect whether relevant charging requirements are satisfied according to “3.2.1 precautions”;•Park the truck securely as described 2.3.5;•Pull out the storage battery plug (1) and have it connected with the charger joint (2), so as to facilitate charging through connecting to the charger.
LED light mode on the charging stand• Charging:red LED light• Fully charged:green LED light• Charging fault:flashing yellow LED light• Battery fault:steady yellow LED light
Correctly plug the battery into the charging stand.
RPL201/RPL201H/RPL202
HPL152
i NOTE
i NOTE

REV. 09/2020 4C
3.2.4 Battery type & dimensions&Charging timeAll the batteries are maintenance free.Battery types & dimensions are as follows:
Tuck type battery type Voltage/ Rated capacity Dimensions
Charger Charging timeInternal External
WPL201 Li-ion 48V/30Ah 245×160×380 15A 15A 2h
RPL201/RPL201H Li-ion 24V/160Ah 550×190×500 / 50A/100A 3h/1.6h
EPL151 Li-ion 24V/55Ah 175×124×407 10A 20A 5.5h/2.5h
HPL152 Li-ion 24/20AH 193x81x300 10A 10A 2h
RPL202 Li-ion(optional) 24V/160Ah 550 x 190 x 500 / 50A/100A 3h/1.6h
RPL202 lead-acid 24V/280Ah 621 x 281 x 625 / 30A/50A 9.5h/6h

REV. 09/20205C
3.3 Battery removal and installation
Park the truck securely as descirbed in paragraph 2.3.5 and turn off the power before removal and installation of the battery.
Battery removal and installation steps:• Just hold the handle and pull the battery out.• Install in reverse order.
• Open the battery cover;• Unplug the battery;• Attach the hooks to the battery handle or strap;• Carefully lift the battery out of the truck;• Install the battery in reverse order.
WPL201, EPL151
RPL201/RPL201H/RPL202
Before removing the battery, make sure the vehicle is completely powered off.
WARNING
HPL152
• Just hold the handle and pull the battery out.• Install in reverse order.
REV. 12/20191D
Only through regularly implementing truck maintenance work can the sustainable and reliable use of the forklift be ensured.Only those receiving professional training and approved as qualified can be competent in various equipment care maintenance operations. If you intend to independently implement maintenance, you are recommended to have your maintenance personnel receive on-site training from the service representative of the equipment supplier.
Safety announcement:• Tyre replacement: please implement tire replacement using the tires designated by the manufacturer, as unqualified tires may influence the properties and stability of the products.• It is improper to clean the truck using inflammable liquid.• Ensure that the power supply has been completely disconnected before actual maintenance operation.
Long-term parking:• If required to be parked for over one month, the truck must be placed in a dry and frost-free environment.• Clean the truck carefully.• Coat any unpainted metal parts with a thin layer of oil or grease.• In case that the truck is out of use for a long time, the storage battery should better be taken out.• Recharge the lithium-ion battery every 2 months. Please observe the above instructions.• Raise and chock the truck: the wheels must not touch the ground in order to prevent irreversible deformation of the tyres.
Maintenance
4.1 Truck maintenanceD
Discharge can damage the batteryIf the battery is not used for a long period of time, it can become damaged through discharge.• Before a long period of inactivity, the battery must be fully charged.• To ensure a long battery life, we recommend charging the battery every 14 days when it is not being used.Restoring the truck to operation•Thoroughly clean the truck.•Clean the battery. Grease the pole screws using pole grease and reconnect the battery.•Recharge the battery.•Check if the hydraulic oil contains condensed water and change if necessary. •Follow the daily checklist.

REV. 09/2020 2D
If the fault cannot be rectified after carrying out the remedial procedure, notify the Manfacture's se-vice department, as any further troubleshooting can only be performed by specially trained and qualified service personnel.
Fault Probable Cause Action
Truck doesnot start.
–Battery connector not plugged in–Key switch in “0” position–Incorrect CanCode code–Battery charge too low–Faulty fuse–Truck in charge mode
–Check the battery connector and connect if necessary.–Set key switch to “I”–Check code–Check battery charge, charge battery if necessary–Check fuses. –Interrupt charging
Load cannot be lifted
–Charging capacity below 15%–Truck not operational–Hydraulic oil level too low–Faulty fuse
–Charging the battery–Carry out all measures listed under “Truck does not start”–Check the hydraulic oil level–Check fuses.
Troubleshooting
Spare parts:Only original spare parts have been certified by our quality assurance department. To ensure safe and reliable operation of the Pallet truck, use only the manufacturer's spare parts. Used parts, oils and fuels must be disposed of in accordance with the relevant environmental protection regulations. For oil changes, contact the manufacturer’s specialist department.
Safety tests to be performed at intervals and after unusual incidentsThe truck must be inspected at least annually (refer to national regulations) or after any unusual event by a qualified inspector. The manufacturer offers a safety inspection service which is performed by personnel specifically trained for this purpose.A complete test must be carried out on the technical condition of the truck with regard to safety. The truck must also be examined thoroughly for damage.The operating company is responsible for ensuring that faults are rectified immediately.
Tyre replacementAny repairs or maintenance to the truck must be performed only by trained and authorized techni-cians. Remove and install the tyre see the service manual.

REV. 12/20193D
4.2 Maintenance table50-hour/7-Day maintenanceCheck the functions of the operation switches and displayCheck alarm system functionsCheck the emergency switch functionsCheck steering system functionsCheck the drive wheel and load wheel for worn or damageCheck the functions of hydraulic system250-hour/2-month maintenance8 Inspect where there is any damage in the cables and whether the
terminals are reliable9 Inspect whether there is any screw losing or slipping out10 Inspect whether there is any abrasion or damage in the oil pipes11 Inspect where is any leakage in the hydraulic oil500-hour/3-month maintenanceAfter operating for 500 hours in total, the truck should also be maintained according to the following procedures in addition to the 250-hour maintenance mentioned above12L Inspect or add the gear grease(for WPL201 and EPL151)13L Inspect and lubricate using the lithium-based lubrication grease the
lubrication mouths in moving parts 14 Inspect and lubricate using the lithium-based lubrication grease the
bearing between the driving engine and the gear boxAfter operating for 1000 hours in total, the truck should also be maintained according to the following procedures in addition to the 250-hour maintenance and 500-hour maintenance mentioned above15 Inspect and fasten the controller and other electrical apparatus elements16 Inspect whether there is any abnormal sound or disclosure of the gear
box17 Inspect the abrasion situations of the driving wheel/bearing wheel/
universal wheel and please timely replace seriously abraded ones18 Inspect whether all the oil pipes, pipelines and joints are reliably
connected and whether all the sealing elements are reliable19L Inspect the level of the oil liquid, and if the level fails to reach the
minimum one as required, please timely add hydraulic oil with the same specifications
20 Inspect the air gap of the electromagnetic brake, and if the air gap is larger than 0.4mm, please replace the friction plates.
21 Inspect where is any abrasion or damage in the link mechanism

REV. 09/2020 4D
After operating for 1000 hours in total, the truck should also be maintained according to the following procedures in addition to the 250-hour maintenance, 500-hour maintenance and 1000-hour maintenance mentioned above22 Inspect the running, lifting and lowering speed, braking distance and other
operation performances of the truck Inspect and add gearbox lubrication grease 23L Inspect and replace gearbox gear oil (for RPL201/ RPL201H、RPL202
WPL201)24 Inspect where there is any damage in the oil cylinders and whether
corresponding installations are reliable25L Clean the oil tank and replace the hydraulic oil26 Inspect and replace the hydraulic filter27 Inspect whether the bearing capacity reaches the rated load and implement
corresponding adjustment through the flood valve adopted in the hydraulic station
28 Inspect whether all the labels are clear and intact
Table 1 Lubricants
Code Type Specification Amount Position
AAnti-wear hydraulic oil L-HM32 0.48 L((WPL201/EPL151/
HPL152)1.25(RPL201/RPL201H/RPL202)
Hydraulic SystemLow temperature anti-wear
hydraulic oil (cold storage) L-HV32
C Grease 3#(MoS2) - 110 grams(EPL151/HPL152/WPL201) Gearbox
D Heavy duty gear oil 85W-90 GL-5 1500ml(RPL201/RPL201H/RPL202) Gearbox
D
WPL201
RPL201/RPL201H/RPL202 EPL151
RPL201/RPL201H/RPL202
EPL151/HPL152/WPL201
HPL152

REV. 09/20201E
Technical dataEStandard Version SpecificationsTechnical specification details in accordance with VDI 2198. Technical modifications and additions reserved.
Performance data for standard trucks
Distinguishing mark1.1 Manufacturer EP EP EP
1.2 Model designation RPL201H RPL201 RPL202
1.3 Drive unit Electrics Electrics Electrics1.4 Operator type standing Pedestrian Pedestrian1.5 rated capacity Q kg 2000 2000 20001.6 Load center
distancec mm 600 600 600
1.8 Load distance x mm 916/982 937/1003 916/982 937/1003 980
1.9 Wheelbase y mm 1418 1418 1438
Weight
2.1 Service weight (include battery)
kg 630 630 755
2.2 Axle loading, laden driving side/loading side
kg 1020/1610 1020/1610 1090 / 1665
2.3 Axle loading, unladen driving side/loading side
kg 500/130 500/130 620 / 135
Types,Chassis
3.1 "Tyre type driving wheels/loading wheels"
Polyurethane Polyurethane Polyurethane
1531
1000
15511438

REV. 09/2020 2E
3.2 Tyre size, driving wheels(diameter×width)
mm Ф230x75 Ф230x75 Ф230 x 75
3.3 Tyre size, loading wheels(diameter×width)
mm Ф85x70 / Ф83x115
Ф85x70 / Ф83x115
Ф85 x 70 / Ф83 x 115
3.4 Tyre size, caster wheels(diameter×width)
mm Ф130x55 Ф130x55 Ф130 x 55
3.5 Wheels, number driving, caster/loading (x=drive wheels)
mm 1x,2/4(1x,2/2) 1x,2/4(1x,2/2) 1 x +2 / 4
3.6 Track width, front,driving side b10 mm 510 510 510
3.7 Track width,rear,loading side b11 mm 370/430/515 370/430/515 370 / 515
Dimensions4.4 Lift height h3 mm 120 120 120
4.9 Height drawbar in driving position min./max.
h14 mm 1150 / 1470 1150 / 1470 1170
4.15 Lowered height h13 mm 85 85 85
4.19 Overall length l1 mm 1860 1860 1930
4.20 Length to face of forks l2 mm 710 710 804
4.21 Overall width b 1 / b2
mm 730 730 730
4.22 Fork dimensions s/ e/ l mm 55×170×1170 55x170x1150
55x170x1220
4.25 Distance between fork-arms b5 mm 540/600/685 540/600/685 540 / 685
4.32 Ground clearance, center of wheelbase
m2 mm 30 30 30
4.34.1 Aisle width for pallets 1000 × 1200 crossways
Ast mm 2523 1984 2590
4.34.2 Aisle width for pallets 800 × 1200 lengthways
Ast mm 2372 2184 2448
4.35 Turning radius Wa mm 1700 1700 1790
Performance data
5.1 Travel speed, laden/ unladen km/ h km/h 9.0 / 12.0 5.5 / 6 5.5 / 6
5.2 Lifting speed, laden/ unladen m/ s 0.050/0.054 0.050 / 0.054 0.050 / 0.054
1954
55 x 170 x 1150
55 x 170 x 1220
20241930
55×170×1220

REV. 09/20203E
5.3 Lowering speed, laden/ unladen
fpm m/ s 0.067 / 0.054 0.067 / 0.054 0.067 / 0.054
5.8 Max. gradeability, laden/unladen
% 8 / 16 8 / 16 8 / 16
5.10 Service brake type Electromagnetic
Electromagnetic
Electromagnetic
Electric-engine6.1 Drive motor rating S2 60 min hp kW 2.5 1.6 1.6
6.2 Lift motor rating at S3 15% hp kW 2.2 2.2 2.2
6.3 The maximum allowed size battery
in. mm 550×190×500 550×190×500 621 x 281 x 625
6.4 Battery voltage/nominal capacity K5
V/ Ah 24 / 210 24 / 160 24 / 280
6.5 Battery weight lb. kg 70 70 255
Addition data
8.1 Type of drive control AC AC AC
10.5 Steering type electronic electronic electronic
10.7 Sound pressure level at the driver’s ear
dB (A)
<74 <74 74

REV. 09/2020 4E
RPL201/RPL201H

REV. 09/20205E
RPL202

REV. 09/2020 6E
Distinguishing mark1.1 Manufacturer EP EP EP
1.2 Model designation EPL151 HPL152 WPL201
1.3 Drive unit Electrics Electrics Electrics
1.4 Operator type Pedestrian Pedestrian Pedestrian
1.5 rated capacity Q kg 1500 1500 2000
1.6 Load center distance
c mm 600 600 600
1.8 Load distance x mm 883/946 883/946 1000
1.9 Wheelbase y mm 1105/1168 1105/1168 1268
Weight
2.1 Service weight (include battery)
kg 165 130 250
2.2 Axle loading, laden driving side/loading side
kg 574/1091 558/1172 685/1565
2.3 Axle loading, unladen driving side/loading side
kg 130/35 84/46 185/65
Types,Chassis
3.1 "Tyre type driving wheels/loading wheels"
PU/ PU PU/ PU Polyurethane

REV. 09/20207E
3.2 Tyre size, driving wheels(diameter×width)
mm Ф210x70 Ф210x70 Ф250x102
3.3 Tyre size, loading wheels(diameter×width)
mm 2x Ф78x60(Ф78x88)
2x Ф78x60(Ф78x88)
2×Ф82x85/ Ф82×115
3.4 Tyre size, caster wheels(diameter×width)
mm Ф74x48 / Ф74x48
3.5 Wheels, number driving, caster/loading (x=drive wheels)
mm 1×,2/4(1× 2/2) 1x,4(1x,2) 1×,2/4(1× 2/2)
3.6 Track width, front,driving side b10 mm 438 / 441
3.7 Track width,rear,loading side b11 mm 390 390 370/(515)
Dimensions4.4 Lift height h3 mm 115 115 140
4.9 Height drawbar in driving position min./max.
h14 mm 700 / 1170 638/ 1275 716 / 1240
4.15 Lowered height h13 mm 80 80 82.5
4.19 Overall length l1 mm 1523 1518 1592
4.20 Length to face of forks l2 mm 375 381 423
4.21 Overall width b 1 / b2
mm 600 548 645 / 625
4.22 Fork dimensions s/ e/ l
mm 50/150/1150 50/150/1150 55×170×1170
4.25 Distance between fork-arms b5 mm 540 540 540(685)
4.32 Ground clearance, center of wheelbase
m2 mm 30 30 27
4.34.1 Aisle width for pallets 1000 × 1200 crossways
Ast mm 1584 1612 1850
4.34.2 Aisle width for pallets 800 × 1200 lengthways
Ast mm 1784 1812 2050
4.35 Turning radius Wa mm 1330 1358 1428
Performance data
5.1 Travel speed, laden/ unladen km/ h
km/h 4/4.5 3.5/4 5 / 5.5
5.2 Lifting speed, laden/ unladen m/ s 0.022/0.025 100mm/per time
0.028/0.04

REV. 09/2020 8E
5.3 Lowering speed, laden/ unladen
fpm m / s
0.034/0.023 Hand down 0.04 / 0.022
5.8 Max. gradeability, laden/unladen
% 5/16 5 / 10 8 / 16
5.10 Service brake type Electromagnetic
Electromagnetic
Electromagnetic
Electric-engine6.1 Drive motor rating S2 60
minhp kW 0.65 0.75 0.75
6.2 Lift motor rating at S3 15% hp kW 0.8 man-up 0.84
6.3 The maximum allowed size battery
in. mm 175*124*407 193*81*300 245×160×380
6.4 Battery voltage/nominal capacity K5
V/ Ah 24V*1/40Ah 24 / 20AH 48/30(Li-ion)
6.5 Battery weight lb. kg 13*1 5*1 14
Addition data8.1 Type of drive control DC DC DC
10.5 Steering type mechanical mechanical mechanical
10.7 Sound pressure level at the driver’s ear
d B (A)
<74 <74 <74

REV. 09/20209E
EPL151

REV. 09/2020 10E
HPL152

REV. 09/202011E
WPL201

REV. 09/20201F
Lithium-ion battery

REV. 09/2020 2F
1 Information on the conformity of lithium-ion batteriesThe manufacturer of the lithium-ion battery declares that: the lithium-ion batteryconforms with the provisions of the following EU directive 2014/30/EUin accordance with EN12895.These batteries has been certified according to EN 62619:2017 for safe use and according to UN38.3 for safe transport.
2 It is necessary to respect the following guidelines:•Read the documents provided with the battery carefully.•Only persons who have been trained to work with lithium-ion technology are permitted to work on the batteries (for example After-Sales Service Centre technicians).•Do not drop it or allow anything to fall on it.•Do not expose the battery unit to humidity or water (> 80%).•Protect the battery from solar irradiation.•Do not physically machine or modify the battery.•Do not open the battery. Electrical risk. Only the After-Sales Service Centre technicians can open the battery.•Do not place lithium-ion batteries on or near flames or hot heat sources (> 65°C). This may cause the batteries to overheat or burst into flames. This type of use also impairs the performance of the batteries and reduces their service life.•It is forbidden to take out the battery in the charging state state.•It is forbidden to use and store the battery at low power (the use and storage of power loss will cause the early loss of battery system capacity and accelerate the service life of the battery pack);•During the charging process, liquid and metal substances are not allowed on the charger, and it is forbidden to use the charger in a high temperature and high humidity environment;•It is forbidden for unqualified personnel to dismantle and overhaul the battery system and supporting charger and other devices; the battery system is a dangerous product, and maintenance and replacement can only be performed by professionals;•Before the vehicle is started, power on through the button switch. After the vehicle is stopped, the battery system must be powered off and stopped through the button switch, which can be judged by the state of the display screen. If the time is too long, the battery will be over-discharged. In severe cases, it will affect the battery performance);• The battery should be fully charged for the first time;• After each use, it should be charged in time (the initial state of charging should keep the battery system temperature below 40° C to ensure the smoothness of charging);• Have class D fire extinguishers or inert gas, carbon dioxide, powder or foam fire extinguishers near the zone in which the lithium-ion batteries are used.• Do only use in trucks manufactured by EP and if the battery type is released for that truck.

REV. 09/20203F
3 Intended use• Operational application temperature 0° C-40° C, humidity< 80%;• Charging application temperature 5° C-40° C;• The battery's maximum operation altitude is up to 2000m;• Do not pull out the battery for emergency stopping, use instead the emergency switch (see page B14).• The truck shall not be used in a potentially explosive atmosphere or in an especially dusty environment.
4 Reasonably foreseeable misuse•Never short circuit the battery terminals.•Do not reverse the battery polarity.•Do not overcharge.
Should such issues as failing to abide by the operation manual, failing to use the original parts for maintenance or damaging caused by users themselves occur, the quality guarantee will be invalid automatically!
WARNING
5.Accessories
6.BMS (Battery Management System)The battery is permanently monitored by the BMS (Battery Management System).This provides the communication with the truck.The BMS continually monitors items such as the cell temperature, the voltage and the charge status of the cells.
Failure to comply with these safety instructions can result in fire and explosion or the leakage of harmful materials.
DANGER
Do not use a charger that is not released by EP for lithium-ion battery.

REV. 09/2020 4F
7.1Safety and warning
•Abide by the operation manual!•All the operations related to the storage battery must be implemented under the instruction of professionals!
Always wear protective clothing (e.g. safety goggles and safetygloves) when working on cells and batteries.
•No smoke and fire!•Avoid the existence of open fire, fiery metal wire or sparks around the storage battery, otherwise explosion or fire disaster may occur!
•Don’t trample on the battery to prevent it from fierce shaking or shacking!
•Explosion or fire disaster is likely to occur; avoid short circuit!•Keep the battery away from all fire sources, heat sources and flammable or explosive materials.
•Don’t knock over the storage battery!•Using lifting and delivery devices as specified. Prevent the storage battery cell, interface and connection cable from being damaged by the lifting hook!•If the materials leak out, do not inhale the fumes. Wear safetygloves.
•Dangerous voltage!•Avoid hot plugging!•Notice: the metal part of the storage battery cell is electrified, so don’t place any external object or tool on the battery cell!
Do not place the battery on top of conductive objects.

REV. 09/20205F
For UN3480 Lithium Ion Batteries
For UN3481 Lithium Ion Batteries packed with Equipment or Lithium batteries built into Equipment
TransportationBefore transporting any lithium-ion battery, check the current regulations on the transport of dangerous goods. Comply with these when preparing the packaging and transport. Train authorised staff to dispatch lithium-ion batteries.
NOTEIt is recommended that the original packaging is kept for any subsequent dispatch.A lithium-ion battery is a special product.Special precautions should be taken when:Transporting a truck equipped with alithium-ion batteryTransporting only the lithium batteryA class 9 danger label must be affixed to the packaging for transport.It is different if the battery is transported on its own or in a truck. An example of a label appears in this supplement(see figure below). Refer to the latest current regulations before dispatch as the information might have changed since this supplement was written.Special documents must be sent with the battery. Refer to the applicable standards or regulations.
NOTERecharge the lithium-ion battery before transporting it taking account of the transport mode ( boat, road). Excessive discharge on arrival could damage the performance of thebattery.
i
i
• •
Shipping faulty batteriesTo transport these faulty lithium-ion batteries, contact the manufacturer's customer service department. Faulty lithium-ion batteries must not be transported independently.
8
8.1
NOTE"Overpack" is the name for the outer packaging of the dangerous goods.
i
Do not pack higher than 1.2 m above the floor of the container and secure properly.WARNING

REV. 09/2020 6F
9
StorageBefore a long period of inactivity, the battery must be fully charged.We recommend that batteries are stored at a height between 60 and 120 cm.•Store the battery in a dry place at a temperaturebetween 0 and 40° to preserve its service life. This area must not be hermetically sealed to allow air renewal;•If the battery system needs to be placed on hold for a long time, it would better keep the battery in the semi-electric state and charge the battery every 2 months to ensure that the battery system is in the semi-electric state; •The positive and negative terminals of the battery system are prohibited from contacting with metal objects during storage.
10
Instructions for disposal• Lithium ion batteries must be disposed of in accordance with the relevant environmental protection regulations.• Used cells and batteries are recyclable economic goods. In accordance with themark showing a crossed rubbish bin, these batteries may not be disposed of asdomestic waste. Return and / or recycling must be ensured as required by theBatteries Legislation.• The method of battery recovery and reuse can be discussed with our company.We reserve the right to change the technology.

REV. 09/20207F
Common Problems and SolutionsDuring the use and maintenance of the lithium-ion battery, the battery or battery system may have one or more of the following abnormal conditions, please organize the professional engineers and technicians to perform the necessary processing according to the instructions in this manual; if you have any questions about the status or solutions, please contact ep dealer or after-sales service department of the company to obtain professional technical support.If the battery is found to have abnormal mechanical characteristics such as swelling, cracked casing, melted casing, and distortion of the casing before and during installation, stop using the battery immediately, place it in open and well-ventilated space, and contact the after-sales service. If abnormalities such as looseness, cracks, cracks in the insulation layer, burn marks, etc. of the battery's pole pressing bolts, conductive strips, main circuit wires and connectors are found before and during the installation, stop using the battery immediately, check the reason for analysis and give it a fix;If the polarity of the positive and negative terminals of the battery is found not match the polarity identification before installation, please stop using the battery immediately and contact the after-sales service department to replace the battery or obtain other solutions;If there is fire or smoke happens to the battery, move it to the open air immediately, evacuate people in time, and pour a large amount of cold water onto the battery to cool it down and put out the fire.If the battery is found to emit smoke before and during installation, immediately stop using the battery and bury it with sand, and notify the after-sales service department of the company for record and obtain technical support;
•
•
•
•
•
11

REV. 09/20201G
Lead-acid battery

REV. 09/2020 2G
Accessories•Do not use a charger that is not released by EP for lead-acid battery.
1 Safety and WarningsWhen operating on battery, you must wear protective glasses and protective clothing!Electrolyte contains sulfuric acid and is highly corrosive. If it accidentally comes into contact with the skin, wash immediately with plenty of water, if the situation is serious, immediately seek medical advice.The battery will produce hydrogen during charging, which may produce an explosive mixture. Smoking or ignition is prohibited near the battery that is being charged or just completes charging, there should not be flame or a hot wire, otherwise there may be fire or explosion hazards!
To avoid accumulation of hydrogen gas, keep the battery cover open during charging, charge the battery at a cool, well-ventilated place.
Dumping of battery is prohibited. Only use proper lifting equipment to lift or transport the battery.
•It is necessary to add water regularly, other-wise may cause damage to the battery due to water loss.•The water must be added after the battery is fully charged, adding water before charging can cause electrolyte overflow.•The amount of water to be added must be strictly controlled, excessive adding of water may lead to electrolyte overflow.•Only distilled water can be added, the adding of tap water or mineral water is prohibited.
•As for the decrease of battery capacity, or even damage to the battery due to failure to comply with the above provisions, the quality assurance will automatically void.
As for failure to comply with instructions for use, maintenance without using original parts, user corruption, or viola-tion of provisions when adding electrolyte and other circumstances, the quality assurance will automatically void.
CAUTION
WARNING

REV. 09/20203G
2.1 Pre-use ChecksCheck if the battery status is normal and also check for mechanical failures;Connect the battery connectors, make sure the contact is solid, the electrodes are connected properly, otherwise may cause damage to the battery, truck or charger;Check if the electrode bolt of each battery interface is tightened;Check electrolyte fluid level. It must be ensured that the electrolyte level is higher than the upper edge of overflow outlet or separator;Charge the battery according to the instructions on the operation manual;Refill the electrolyte with distilled water to make the electrolyte level reach standard level.
2 Use of Battery
2.2 DischargingDo not close or cover the ventilation openings with objects;When connecting or disconnecting the battery connector (such as, plug), the power supply must be disconnected first;In order to meet or exceed the rated batt-ery service life, the battery should avoid excessive discharge during runtime (capacity less than 20% of the rated capacity);Re-charge the battery immediately after discharging without delay.
2.3 ChargingWhen charging, only DC can be used. Connect the battery with proper charger for specification and size to avoid overload of circuit and interface, and to avoid electrolyte foaming or overflow from the cell;The charger purchased separately must be checked by the after-sales service department of our company before it can be used;When connecting the battery with the charg-er, the circuit switch should be at “OFF” position, make sure the connection is correct. It is prohibited to connect the battery with live charger.Before battery charging, make sure the elec-trolyte temperature is within the range of 10 ° C~ 45 ° C;When charging, the cover or cover plate of the battery compartment must be opened or removed to ensure that the gas generated during charging can be smoothly discharged.When the concentration of the electrolyte and battery voltage remain constant (for more than 2 hours), it indicates that the charging is completed.

REV. 09/2020 4G
2.4 TemperatureRated temperature of electrolyte is 30 °C.If the temperature is too high, it will reduce the service life of the battery; too low may reduce the battery capacity.When the temperature reaches the limit temperature of 55 ° C, it is prohibited to run the battery.
3.1 Daily Maintenance
3 Maintenance & Care
Charge the discharged battery;Visual inspection for excessive dirtiness and mechanical damage after the charging.
3.2 Weekly MaintenanceControl the electrolyte fluid level. Check the electrolyte fluid level when the charging is about to complete. If necessary, add distilled water into the electrolyte when the charging is about to complete to make the fluid level reach the rated standard.
Lower fluid level may reduce the battery capacity, and thus reduce the service life of battery.Higher liquid level may lead to electrolyte overflow when charging, which may cause corrosion to the battery compartment or even the vehicle.
Checking the battery condition,electrolyte level and specific gravity
Inspect battery for cracks, raised plates and electrolyte leaks.Unscrew the battery cover and check the electrolyte level.If the battery has an inspection tube, then the electrolyte level should be at the base of the tube. If there is no inspection pipe, then the electrolyte level should be 10-15 mm higher than the plate.If the electrolyte level is excessively low, it can only be filled up with distilled water.Remove any sediment from the electrodes and lubricate with non-acidic lubricating grease.Retighten the electrode holder.Use a hydrometer to check the electrolytes.The specific gravity should be between1.24-1.28.
•
•
•
•
•
••
CAUTION

REV. 09/20205G
合适的电
解液液位
电瓶
There are two types of battery filler cap used on battery cell:1) Filler cap with buoy
proper electrolyte liquid leveL
BatteryAdd distilled water, red buoy will float until while rod appears under the red scale.
Add only distilled water.Before adding distilled water, check if the buoy can move up and down properly to prevent the buoy from failing to float up and resulting in excessive filling.
2) Filler cap without buoyWhen adding water, stop filling when the electrolyte level is higher than the protective plate for 15~20 mm.
Please operate the electric watering device in accordance with its operating manual.
3.3 Monthly MaintenanceBefore the charging is completed (while the charger is still energized), measure and record the voltage of battery cell the entire battery;After the charging is completed, measure and record the electrolyte concentration and temperature of the battery cell.
How to tell if the battery is normalAs for a normal set of fully charged batteries, the voltage of each of the battery cell should be around 2.08V, specific gravity of electrolyte should be around 1.28;
After being fully charged, if the voltage of battery cell is lower than 1.85V or the specific gravity of electrolyte is less than 1.05, then that battery cell has been damaged and needs to be replaced.
And you can identify if the battery is fully discharged according to the specific gravity of battery electrolyte when the instrument alarms, and identify if the capacity indicated on the instrument is accurate.
As for a group of normal batteries, when the battery is discharged for 80% (the instrument alarms and prompts low battery, you should recharge in a timely manner), the open circuit voltage should be around 1.93V, specific gravity of electrolyte (under 30°C) should be around 1.14.
WARNING
CAUTION
CAUTION
CAUTION

REV. 09/2020 6G
3.4 Care
Battery surface should be clean and dry to prevent the occurrence of leakage currents;Battery cables, terminals and connectors mu-st be tightened and clean, a small amount of special grease should also be applied.
1. Keep it clean
•Do not use a dry cloth or fabric to clean the surface of the battery, so that to prevent the occurrence of static electricity, resulting in explosion;•Unplug the power plug;•Wipe clean with a damp cloth;•Please wear goggles, rubber boots and rubber gloves.
2.Make sure that the cable insulation is not da-maged and the connection layer has no signs of heating.3. Make sure that the "+" and "-" output terminals are not sulfated (with white salt).
Slight sulfation: clean top of the element with a damp cloth.Severe sulfation: the battery must be remov-ed for powerful cleaning; the battery base should also be cleaned.Very severe sulfation (or a large amount of electrolyte overflow): please contact the after-sales service department as soon as possible.DO NOT arbitrarily discharge acidic wast-ewater after cleaning, dispose such water in accordance with national laws and regulations!
4 StorageWhen the battery is not used for a long time, the battery should be filled up and stored in a dry, frost-free space.Regular equalizing charge may help extend the service life of battery and ensure that the capacity won't be reduced.
5 TroubleshootingUpon battery or charger failure, please promptly notify the after-sales service department.Refer to battery failure analysis to facilitate troubleshooting and elimination.
WARNING

REV. 09/20207G
Battery Fault Analysis
Fault Negative Phenomena Cause Handling Methods
Insufficient Battery Charge
1. Low static voltage2. Low density, cannot meet the requirements after being charged3. Short working time4. When running, the instrume- nt displays quick drop of capacity
1. Charger voltage and current are set too low2. Insufficient initial charge3. Charger failure
1. Adjust and repair the charger2. Battery supplemental charge3. Battery needs to be replaced in severe situations
Electrolyte has been improperly added to the battery
- In case of high intensity:1. Electrolyte density is not less than 1.300g/cm3 after charging2. Battery static voltage is higher3. Initial capacity is good, but reduced after a period of use4. Electrolyte is turbid
- Low density:1. Electrolyte density is still lower than the specified value after charging2. Battery capacity is low
- Adding impure liquid:1. Battery capacity is low2. Electrolyte is turbid and of abnormal color3. Battery with severe self- discharge
1. Initial adding of electrolyte with excessive high or low density2. Liquid level reduces, adding errors, failed to add pure water in accordance with provisions, but mistakenly adding dilute acid3. Initial adding of liquid is impure (containing impurities and with odor)
1. Replace the battery electrolyte2. Battery needs to be replaced in severe situations

REV. 09/2020 8G
Battery Fault Analysis
Fault Negative Phenomena Cause Handling Methods
Electrode plate sulfation
1. Battery capacity drops during normal discharge2. Density drops to be lower than normal value3. Voltage drops quickly when discharging4. Start charging under high voltage5. Bubbles generated during charging6. Coarse crystallization of PbSO4
1. Insufficient initial charge2. Long time of storage under the state of discharge3. Long-term insufficient charged4. Electrolyte density is too high5. Electrolyte level is too low, the upper part of electrode plate is exposed outside of the electrolyte6. Impure electrolyte7. Internal short circuit
1. Over-discharge method2. Repeated charging method3. Water treatment method
Excessive shedding of active substances
1. There is gray-brown substance rising from the bottom when charging2. Battery capacity reduced
1. Brown precipitation is due to excessive large charging current2. White sediment is due to over-discharge3. Battery electrolyte is impure
1. Clean up the precipitation2. Adjust the density3. Battery needs to be replaced if necessary
Battery overcharged
1. Color of battery filling cap becomes yellow, and then red2. Battery casing deformation3. Battery spacers carbonization, deformation4. Positive electrode corrosion, broken5. Electrode pole rubber bushing raised, aged and cracked6. Frequent water-adding, electrolytic turbidity during charging7. Evenly shedding of active substances from electrode plate8. Positive electrode plate detonation
1. Charger voltage and current are set too high2. Charging time is too long3. Frequent charging4. Less discharging, but much charging5. Charger failure
1. Adjust and repair the charger2. Adjust the charging system3. Battery needs to be replaced in severe situations
Battery Over-discharge
1. Low static voltage2. Electrolyte density is still low after charging3. Positive and negative electrode plates curved or fractured
1. Go on using the battery despite of insufficient charge2. Battery pack short circuit3. Small current long time discharge
1. Supplementary charging2. Repair the vehicle3. Battery needs to be replaced in severe situations

REV. 09/20209G
Battery Fault Analysis
Fault Negative Phenomena Cause Handling Methods
Battery Short Circuit
1. Low static voltage below 2V2. Electrolyte density is too low3. High temperature during charging4. Truck is with short working time
1. Electrode plate deformed and short circuit2. Spacer missing or broken during assembly3. Positive electrode active substances shedding, short circuit at bottom
Battery needs to be replaced
Broken circuits
1. Abnormal and unstable voltage upon external connection with load2. Current fails to input when charging
1. Poor welding during assembly of electrode pole or electrode plate2. External short circuit3. Large current discharge4. Poor wiring connection or disconnected5. Electrode plate corrosion
1. Battery needs to be repaired2. Battery needs to be replaced if necessary
Battery Reverse Electrodes
1. Negative voltage values2. Electrolyte density is lower than 1.20g/cm3 after charging3. Positive and negative electrode lugs, colors of electrode plates are reversed
Wrong connections of positive and negative electrodes during charging
1. Reverse charging is allowable2. Battery needs to be replaced in severe situations
Battery Leaks
1. Filling hole leaks2. Leaks at sealing seams of tank and filling cap3. Drainage4. Marks of bumps on external surface of tank
1. Tank, filling cap with poor heat sealing2. Electrode lug rubber ring problems3. Sealing compound cracked4 External impact due to negligence during use
1. Repair2. Battery needs to be replaced if necessary