One Voice Operations Center IOM Manual Ver. 8.0
368
Installation, Operation and Maintenance Manual AudioCodes One Voice Operations Center OVOC Installation, Operation and Maintenance Version 8.0.3000
-
Upload
khangminh22 -
Category
Documents
-
view
0 -
download
0
Transcript of One Voice Operations Center IOM Manual Ver. 8.0

Installation, Operation and Maintenance ManualAudioCodes One Voice Operations Center
OVOC
Installation, Operation and Maintenance
Version 8.0.3000

Notice OVOC | IOM
Notice
Information contained in this document is believed to be accurate and reliable at the timeof printing. However, due to ongoing product improvements and revisions, AudioCodescannot guarantee accuracy of printed material after the Date Published nor can it acceptresponsibility for errors or omissions. Updates to this document can be downloadedfrom https://www.audiocodes.com/library/technical-documents.
This document is subject to change without notice.
Date Published: March-02-2022
WEEE EU DirectivePursuant to the WEEE EU Directive, electronic and electrical waste must not be disposed of withunsorted waste. Please contact your local recycling authority for disposal of this product.
Customer SupportCustomer technical support and services are provided by AudioCodes or by an authorizedAudioCodes Service Partner. For more information on how to buy technical support forAudioCodes products and for contact information, please visit our website athttps://www.audiocodes.com/services-support/maintenance-and-support.
Documentation FeedbackAudioCodes continually strives to produce high quality documentation. If you have anycomments (suggestions or errors) regarding this document, please fill out the DocumentationFeedback form on our website at https://online.audiocodes.com/documentation-feedback.
Stay in the Loop with AudioCodes
Document Name
OVOC Documents
Migration from EMS and SEM Ver. 7.2 to One Voice Operations Center
One Voice Operations Center IOM Manual
One Voice Operations Center Product Description
- ii -

Notice OVOC | IOM
Document Name
One Voice Operations Center User’s Manual
Device Manager Pro Administrator's Manual
One Voice Operations Center Alarms Monitoring Guide
One Voice Operations Center Performance Monitoring Guide
One Voice Operations Center Security Guidelines
One Voice Operations Center Integration with Northbound Interfaces
Device Manager for Third-Party Vendor Products Administrator's Manual
Device Manager Agent Installation and Configuration Guide
ARM User’s Manual
Documents for Managed Devices
Mediant 500 MSBR User's Manual
Mediant 500L MSBR User's Manual
Mediant 500Li MSBR User's Manual
Mediant 500L Gateway and E-SBC User's Manual
Mediant 800B Gateway and E-SBC User’s Manual
Mediant 800 MSBR User’s Manual
Mediant 1000B Gateway and E-SBC User’s Manual
Mediant 1000B MSBR User’s Manual
Mediant 2600 E-SBC User's Manual
Mediant 3000 User’s Manual
Mediant 4000 SBC User's Manual
Mediant 9000 SBC User's Manual
Mediant Software SBC User's Manual
Microsoft Teams Direct Routing SBA Installation and Maintenance Manual
- iii -

Notice OVOC | IOM
Document Name
Mediant 800B/1000B/2600B SBA for Skype for Business Installation and MaintenanceManual
Fax Server and Auto Attendant IVR Administrator's Guide
Voca Administrator's Guide
VoiceAI Connect Installation and Configuration Manual
Document Revision Record
LTRT Description
94179 Updated Section: Managed VoIP Equipment; Hardware and SoftwareSpecifications; OVOC Capacities; Viewing Process Statuses; Before EnablingCloud Architecture Mode; Upgrading OVOC Server on Amazon AWS andMicrosoft Azure; Full Restore; OVOC License; Configuring the Firewall; Updateto HTTPS SSL TLS Security diagram
"Specifications for Service Provider Cluster Mode" merged with Section"OVOC Capacities"
Added Section: Before Upgrading on Microsoft Azure; AWS Post Upgradeprocedure; Step 4 Registering Microsoft Teams Application; Step 5 ConfiguringMicrosoft Graph Permissions; Step 6 Configuring AudioCodes Azure ActiveDirectory
94180 Update to the OVOC Capacities table
94181 Sections Updated: Configure OVOC Server with Public or IP Address;Configuring the Cloud Architecture Mode; Establishing Devices - OVOCConnections; OVOC Capacities; Server IP Address; Ethernet Interfaces; StaticRoutes; Network Configuration; Firewall table; Step 3 Configuring AudioCodesAzure Active Directory (Operator Authentication)
Section Added: Step 4 Defining OVOC FQDN and Loading Certificate; Changingthe Cloud Tunnel Service Password (merged into Section "Setting Up MicrosoftTeams Subscriber Notifications Services Connection")
94182 Added Section: Registering OVOC Applications on Azure; Configuring OVOCWeb Azure Settings; Firewall Settings for OVOC Server Provider (Single Node);Guacamole RDP Gateway; Add New Cloud Architecture Mode User; ChangeCloud Architecture Mode Password; Trust Store Configuration; Cloud UpgradeProcedure
Updated Section: Managed VoIP Equipment; Hardware and SoftwareRequirements; OVOC Capacities; Integrity Testing; Step 5: Configure HTTPS
- iv -

Notice OVOC | IOM
LTRT Description
Parameters on Device; SBC HTTPS Authentication Mode; Upgrading OVOCServer on VMware and Microsoft Hyper-V Virtual Machines; integrated Step 2:Connect the OVOC Server to Network in Run the Server Upgrade Script
94183 Updated Section: Supported VoIP Equipment; Configure OVOC Server withNAT IP per Interface (name change); Establishing OVOC Devices Connections;General Status Information; Configure OVOC Cloud Architecture Mode(WebSocket Tunnel); Guacamole RDP Gateway
Added Section: Configure OVOC Server with NAT IP per Tenant; DisableClient's IP Address Validation; License
Removed Section: Firewall Rules for Service Provider Cluster Mode
94184 Updates to Sections: OVOC Server Minimum Requirements: Removed supportfor Service Provider clusters; Updates to "Multitenancy Registration"; Updateto "Analytics API".
- v -

Content OVOC | IOM
Table of Contents
1 Overview 1Part I 2Pre-installation Information 22 Managed VoIP Equipment 33 Hardware and Software Specifications 8
OVOC Server Minimum Requirements 8OVOC Client Requirements 10Bandwidth Requirements 11
OVOC Bandwidth Requirements 11Voice Quality Bandwidth Requirements 11
OVOC Capacities 12Skype for Business Monitoring SQL Server Prerequisites 14
4 OVOC Software Deliverables 15Part II 17OVOC Server Installation 175 Files Verification 18
Windows 18Linux 18OVOC Server Users 18
6 Installing OVOC Server on Virtual Machines on Cloud-based Platforms 20Launching Public OVOC Image on AmazonWeb Services (AWS) 20
Launching Public Image on AWS 20Configuring AWS SES Service 25
Creating OVOC Virtual Machine on Microsoft Azure 28
7 Installing OVOC Server on VMware Virtual Machine 35Deploying OVOC Image with VMware vSphere Hypervisor (ESXi) 35
Deploying OVOC Image with VMware vSphere Hypervisor (ESXi) in Service Provider Cluster37Step 1 Upgrade Existing Virtual Machine 37Step 2 Install Service Provider Cluster on Management Server 39Step 3 Install VQM Server 40Step 4 Install PM Server 40
Configuring the Virtual Machine Hardware Settings 41Configuring OVOC Virtual Machines (VMs) in a VMware Cluster 43
VMware Cluster Site Requirements 43Cluster Host Node Failure on VMware 46
Connecting OVOC Server to Network on VMware 46
8 Installing OVOC Server on Microsoft Hyper-V Virtual Machine 49Configuring the Virtual Machine Hardware Settings 54
- vi -
Content OVOC | IOM
Expanding Disk Capacity 56Changing MAC Addresses from 'Dynamic' to 'Static' 61Configuring OVOC Virtual Machines in a Microsoft Hyper-V Cluster 62
Hyper-V Cluster Site Requirements 62Add the OVOC VM in Failover Cluster Manager 63Cluster Host Node Failure on Hyper-V 65
Connecting OVOC Server to Network on HyperV 65
9 Installing OVOC Server on Dedicated Hardware 68DVD1: Linux CentOS 68
Installing DVD1 without a CD-ROM 71DVD2: Oracle DB Installation 76DVD3: OVOC Server Application Installation 78
Part III 82Post Installation 8210 Registering OVOC Applicatons on Azure 83
Registering Single Tenant in Organizational Directory 83Configuring OVOCWeb Azure Settings - Single Tenant Setup 93
Registering Multitenant Support 96Configuring OVOCWeb Azure Settings - Multitenant Setup 110
Upgrading from Single Tenant to Multitenant 114Configuring OVOCWeb Azure Settings - Multitenant Upgrade 124
Create Azure Groups and Assign Members 126Add External Tenant Operators and Assign Roles 131
Troubleshooting - Granting Admin Consent 137
11 Setting Up Microsoft Teams Subscriber Notifications ServicesConnection 139
Register Microsoft Teams Application 139Configure Microsoft Graph API Permissions 143Define OVOC FQDN and Load Certificate 146
12 Managing Device Connections 149Establishing OVOC-Devices Connections 149
Configure OVOC Server with NAT IP per Interface 150Configure OVOC Server with NAT IP per Tenant 151
Establishing Devices - OVOC Connections 153Automatic Detection 153Configure OVOC Cloud Architecture Mode (WebSocket Tunnel) 154
Before Enabling Cloud Architecture Mode 155Configuring Cloud Architecture Mode (WebSocket Tunnel) 156
Connecting Mediant Cloud Edition (CE) Devices on Azure 158Option 1: Connecting Mediant Cloud Edition (CE) SBC Devices to OVOC on Azure usingPublic IP Address 158
Configuring the OVOC Server Manager on Azure (Public IP) 159
- vii -

Content OVOC | IOM
Configuring Mediant Cloud Edition (CE) SBC Devices on Azure (Public IP) 160Option 2 Connecting Mediant Cloud Edition (CE) Devices to OVOC on Azure using InternalIP Address 162
Configuring the OVOC Server Manager on Azure (Internal IP) 163Configuring Mediant Cloud Edition (CE) SBC Devices on Azure (Internal IP) 164
Connecting Mediant Cloud Edition (CE) SBC Devices on AWS 166Step 2-1 Configuring the OVOC Server (OVOC Server Manager) on AWS 167Step 2-2 Configuring Mediant Cloud Edition (CE) SBC Devices on AWS 167
Step 2-2-1: Configuring Mediant CE SNMP Connection with OVOC in Cloud using StackManager 168Step 2-2-2 Configuring Mediant CE Communication Settings Using Web Interface 168
Part IV 170OVOC Server Upgrade 17013 Upgrading OVOC Server on Amazon AWS and Microsoft Azure 171
Before Upgrading on Microsoft Azure 171Cloud Upgrade Procedure 171After Upgrading on AWS 173
14 Upgrading OVOC Server on VMware and Microsoft Hyper-V VirtualMachines 174
Run the Server Upgrade Script 174Option 1: Standard Upgrade Script 174Option 2: Service Provider Cluster Upgrade Scripts 177
Upgrade Management Server 177Upgrade VQM Server 179Upgrade PM Server 182
15 Upgrading OVOC Server on Dedicated Hardware 185Upgrading the OVOC Server-DVD 185Upgrading the OVOC Server using an ISO File 187
16 Installation and Upgrade Troubleshooting of the OperationalEnvironment 190Part V 193OVOC Server Machine Backup and Restore 19317 OVOC Server Backup Processes 194
Change Schedule Backup Time 195
18 OVOC Server Restore 196Configuration Restore 196Full Restore 198
Part VI 200OVOC Server Manager 200
- viii -

Content OVOC | IOM
19 Getting Started 201Connecting to the OVOC Server Manager 201
Using the OVOC Server Manager 202OVOC Server Manager Menu Options Summary 202
20 Viewing Process Statuses 206Viewing Process Statuses in Service Provider Cluster Mode 208
21 Viewing General Information 211Viewing General Information in Service Provider Cluster Mode 212
22 Collecting Logs 21623 Application Maintenance 218
Start or Restart the Application 218Start and Restart in Service Provider Cluster Mode 219
Stop the Application 220Web Servers 220Change Schedule Backup Time 221License 221
OVOC License 222Analytics API 226Guacamole RDP Gateway 227Service Provider Cluster 228
Remove PM or VQM Server from Cluster 230Force Remove PM or VQM Server from Cluster 231Synchronize Cluster Node Servers 232
Shutdown the OVOC Server Machine 233Reboot the OVOC Server Machine 233
24 Network Configuration 234Server IP Address 235Ethernet Interfaces 236
Add Interface 237Remove Interface 238Modify Interface 239
Ethernet Redundancy 240Add Redundant Interface 240Remove Ethernet Redundancy 242Modify Redundant Interface 242
DNS Client 243Static Routes 243Proxy Settings 245SNMP Agent 246
SNMP Agent Listening Port 247Linux System Trap Forwarding Configuration 248
- ix -

Content OVOC | IOM
Server SNMPv3 Engine ID 248NFS 249
25 NTP & Clock Settings 250NTP 250
Stopping and Starting the NTP Server 252Restrict Access to NTP Clients 253Activate DDoS Protection 253Authorizing Subnets to Connect to OVOC NTP 253
Timezone Settings 253Date and Time Settings 255
27 Security 256OVOC User 257SSH 257
SSH Log Level 258SSH Banner 258SSH on Ethernet Interfaces 259
Add SSH to All Ethernet Interfaces 260Add SSH to Ethernet Interface 260Remove SSH from Ethernet Interface 260
Enable/Disable SSH Password Authentication 261Enable SSH IgnoreUserKnownHosts Parameter 261SSH Allowed Hosts 262
Allow ALL Hosts 262Deny ALL Hosts 262Add Hosts to Allowed Hosts 263Remove Host/Subnet from Allowed Hosts 264
Oracle DB Password 264Cassandra Password 265OS Users Passwords 266
General Password Settings 266Operating System User Security Extensions 267
File Integrity Checker 269Software Integrity Checker (AIDE) and Pre-linking 270USB Storage 270Network Options 271Auditd Options 272HTTPS SSL TLS Security 272
Server Certificates Update 273OVOC Voice Quality Package - SBC Communication 278HTTP Security Settings 279
TLS Version 1.0 280TLS Version 1.1 280Show Allowed SSL Cipher Suites 281
- x -

Content OVOC | IOM
Edit SSL Cipher Suites Configuration String 281Restore SSL Cipher Suites Configuration Default 282Manage HTTP Service Port (80) 282Manage IPP Files Service Port (8080) 282Manage IPPs HTTP Port (8081) 283Manage IPPs HTTPS Port (8082) 283OVOC Rest (Port 911) 283Floating License (Port 912) 283OVOCWebSocket (Port 915) 284QoE Teams Server REST (Port 5010) 284Trust Store Configuration 284SBC HTTPS Authentication Mode 284Enable Device Manager Pro and NBIF Web Pages Secured Communication 285Change HTTP/S Authentication Password for NBIF Directory 286Disable Client's IP Address Validation 286
28 Diagnostics 288Server Syslog Configuration 288Devices Syslog Configuration 290Devices Debug Configuration 291Server Logger Levels 292Network Traffic Capture 293
Part VII 296Configuring the Firewall 29629 Configuring the Firewall 297
Cloud Architecture Mode (WebSocket Tunnel) Firewall Settings 308Firewall Settings for NAT Deployment 309Firewall Rules for Service Provider with Single Node 309Firewall Settings for Service Provider Cluster 315
Part VIII 320Appendix 32030 Configuring OVOC as the Email Server on Microsoft Azure 321
Configuring OVOC as the Email Server on Microsoft Azure using Microsoft Office 365 321Configuring OVOC as the Email Server on Microsoft Azure using SMTP Relay 322
31 Configuring RAID-0 for AudioCodes OVOC on HP ProLiant DL360pGen10 Servers 325
RAID-0 Prerequisites 325RAID-0 Hardware Preparation 325Configuring RAID-0 325
Step 1 Create Logical Drive 325Step 2 Set Logical Drive as Bootable Volume 326
- xi -

Content OVOC | IOM
32 Managing Clusters 328Migrating OVOC Virtual Machines in a VMware Cluster 328Moving OVOC VMs in a Hyper-V Cluster 329
33 Supplementary Security Procedures 333Installing Custom Certificates on OVOC Managed Devices 333
Gateways and SBC Devices 333Step 1: Generate a Certificate Signing Request (CSR) 333Step 2: Receive the New Certificates from the CA 335Step 3: Update Device with New Certificate 335Step 4: Update Device’s Trusted Certificate Store 336Step 5: Configure HTTPS Parameters on the Device 337Step 6: Reset Device to Apply the New Configuration 340
MP-1xx Devices 340Step 1: Generate a Certificate Signing Request (CSR) 340Step 2: Receive the New Certificates from the CA 341Step 3: Update Device with New Certificate 342Step 4: Update Device’s Trusted Certificate Store 342Step 5: Configure HTTPS Parameters on Device 345Step 6: Reset Device to Apply the New Configuration 345
Cleaning up Temporary Files on OVOC Server 345
34 Transferring Files 34635 Verifying and Converting Certificates 34736 Self-Signed Certificates 348
Mozilla Firefox 348Google Chrome 348Microsoft Edge 349
37 Datacenter Disaster Recovery 350Introduction 350Solution Description 350Initial Requirements 351New Customer Configuration 351Data Synchronization Process 351Recovery Process 352
- xii -

This page is intentionally left blank.
Content OVOC | IOM
- xiii -

CHAPTER 1 Overview OVOC | IOM
1 OverviewThe One Voice Operations Center (OVOC) provides customers with the capability to easily andrapidly provision, deploy and manage AudioCodes devices and endpoints. Provisioning,deploying and managing these devices and endpoints with the OVOC are performed from auser-friendly Web Graphic User Interface (GUI). This document describes the installation of theOVOC server and its components. It is intended for anyone responsible for installing andmaintaining AudioCodes’ OVOC server and the OVOC server database.
- 1 -

Part I
Pre-installation Information
This part describes the OVOC server components, requirements and deliverables.

CHAPTER 2 Managed VoIP Equipment OVOC | IOM
2 Managed VoIP EquipmentThe following products (and product versions) can be managed by this OVOC release:
Table 2-1: Managed VoIP Equipment
Product Supported Software Version
Gateway, SBC and MSBR Devices
Mediant 9000 SBC 7.4.200, 7.4.100, 7.4, 7.2 (includingsupport for MTC ), 7.0, 6.8
Mediant 4000 SBC 7.4.200, 7.4.100, 7.4, , 7.2, 7.0 and 6.8
Mediant 4000B SBC 7.4.200, 7.4.100, 7.4 , 7.2, 7.0
Mediant 2600 E-SBC 7.4.200, 7.4.100, 7.4 , 7.2, 7.0 and 6.8
Mediant 2600B E-SBC 7.4.200, 7.4.100 , 7.4, 7.2 and 7.0
Mediant Software (Server Edition) SBC 7.4.200, 7.4.100, 7.4, 7.2, 7.0 and 6.8
Mediant Software(Virtual Edition) SBC 7.4.200, 7.4.100, 7.4, 7.2 (includingsupport for MTC), 7.0 and 6.8
Mediant3000 (TP-8410 and TP-6310) 7.0 and 6.6
Mediant 3100 SBC 7.4.200, 7.4
Mediant Cloud Edition 7.4.200, 7.4.100 , 7.4, 7.2
Mediant 2000 Media Gateways 6.6
1Mediant 1000 Gateway 6.6 (SIP)
Mediant 1000B Gateway and E-SBC 7.4.200, 7.4.100 , 7.4, 7.2, 7.0, 6.8 and 6.6
Mediant 800B Gateway and E-SBC 7.4.200, 7.4.100 ,7.4, 7.2, 7.0, 6.8 and 6.6
Mediant 800C 7.4.200, 7.4.100 , 7.4, 7.2
Mediant 1000B MSBR 6.6
Mediant800 MSBR 7.24.xx, 7.2, 6.8 and 6.6
Mediant500 MSBR 7.24.xx, 7.2 and 6.8
1This product does not support Voice Quality Management.
- 3 -

CHAPTER 2 Managed VoIP Equipment OVOC | IOM
Product Supported Software Version
Mediant 500L MSBR 7.24.xx, 7.2 and 6.8
Mediant 500Li MSBR 7.24.xx, 7.20.x.x
Mediant 800Ci MSBR 7.24.xx
Mediant 500 E-SBC 7.4.200, 7.4.100 ,7.4, 7.2
Mediant 500L E-SBC 7.4.200, 7.4.100, 7.4, 7.2
1Mediant 600 6.6
MediaPack MP-11x series 6.6 (SIP)
MediaPack MP-124 Rev. D and E – version 6.6 (SIP)
MP-202 4.4.9 Rev. B, D and R
MP-204 4.4.9 Rev. B, D and R
MP-1288 7.4.200, 7.4.100, 7.4, 7.2
SBA2
Microsoft Lync Server
Mediant800B SBA Lync Server SBA version 1.1.12.x and later andgateway Version 6.8
Mediant 1000B SBA Lync Server SBA version 1.1.12.x and later andgateway Version 6.8
Mediant 2000B SBA devices Lync Server SBA version 1.1.12.x and later andgateway Version 6.8
Skype for Business
Mediant 800B SBA Skype for Business SBA version 1.1.12.x and later andgateway Version 7.2
Mediant 800C SBA Skype for Business SBA version 1.1.12.x and later andgateway Version 7.2
Mediant 1000B SBA Skype for Business SBA version 1.1.12.x and later and
1As above2As above
- 4 -

CHAPTER 2 Managed VoIP Equipment OVOC | IOM
Product Supported Software Version
gateway Version 7.2
Mediant 2600B SBA Skype for Business SBA version 1.1.12.x and later andgateway Version 7.0
CloudBond1
CloudBond 365 Pro Edition Version 7.6 with MediantServer version7.2.100 and later
CloudBond 365 Enterprise Edition Version 7.6 with MediantServer version7.2.100 and later
CloudBond 365 Standard+ Edition Version 7.6 with Mediant800BMediant800CGX-800C version 7.2.100 and later
CloudBond 365 Standard Edition Version 7.6 with Mediant 800B version7.2.100 and later
User Management Pack 365 ENT Version 8.0.0
User Management Pack 365 Version 7.8
CloudBond 365 Version 8.0.0 (Skype for Business 2019and Microsoft Teams)
User Management Pack 365 SP Version 8.0.220, 8.0.200 8.0.100
Voice AI
SmartTAP 360 ° Live Recording 5.5, 5.4, 5.3 , 5.2, 5.1, 5.0, 4.3
Voice AI Connect Version 2.6
Meeting Insights 2.0.44.27
Generic Devices
Microsoft Teams Direct Routing
Mediant 800B DR-SBA DR-SBA SBA 1.0.1xx and later, 1.0.22 and1.0.21 with SBC certified by Microsoft
1To support Voice Quality Management for these devices, customers must add the SBC/MediaGateway platform of these products as standalone devices to OVOC. Once this is done, theSBC/Gateway calls passing through the CloudBond 365 /CCE Appliances can be monitored.
- 5 -

CHAPTER 2 Managed VoIP Equipment OVOC | IOM
Product Supported Software Version
Mediant 800C DR-SBA DR-SBA 1.0.1xx, 1.1.112x and later, 1.0.22and 1.0.21 with SBC certified by Microsoft
Mediant 1000B DR-SBA DR-SBA 1.0.1xx, 1.1.112x and later, 1.0.22and 1.0.21 with SBC certified by Microsoft
Mediant 2600B DR-SBA DR-SBA 1.0.1xx, 1.1.112x and later withSBC certified by Microsoft
Mediant DR-SBA Virtual Appliance 149
Device Management
400HD Series Lync server From Version 2.0.13: 420HD, 430HD440HD
Generic SIP server ■ From Version 2.2.2: 420HD, 430HD440HD, 405HD and 405
■ From Version 3.4.3: C450HD, 450HD,445HD and RX50
400HD Series Skype for Business From Version 3.0.0: 420HD, 430HD 440HDand 405HD
From Version 3.0.1: 420HD, 430HD 440HD,405HD and 450HD
From Version 3.0.2: HRS 457 (with Jabrafirmware support)
From Version 3.1.0: 445HD, 430HD 440HD,405HD, 450HD and HRSFrom
From Version 3.2.0: C450HD
From Version 3.2.1: C450HD, 445HD,430HD 440HD, 405HD,450HD, HRS 457Dand HRS 458
■ From Version 3.4.2: RX50 ConferencePhone
Native Teams (Android-based) ■ From Version 1.5: C448HD andC450HD
■ From Version 1.12.33: C435HD
- 6 -

CHAPTER 2 Managed VoIP Equipment OVOC | IOM
Product Supported Software Version
■ From Version 1.8: C470HD
■ From Version 1.9: RXV80 VideoCollaboration Bar
■ From Version 1.15: C455HD
■ From Version xxx: MTRfW/RXV90meeting room solution
■ From Version xxx: MTRfW/RXV100meeting room solution
Third-party Vendor Devices
Spectralink Spectralink 8440
Polycom Polycom Trio 8800Polycom VVX 410CCX 500/600 phones
Jabra Headset Support Jabra BIZ, Jabra Coach, Jabra DIAL, JabraEclipse, Jabra Elite, Jabra Engage, JabraEvolve, Jabra Handset, Jabra LINK, JabraMotion, Jabra Pro, Jabra Pulse, Jabra SPEAK,Jabra Sport, Jabra STEALTH, Jabra Steel,Jabra SUPREME. For a complete list ofsupported Jabra phones, see documentDevice Manager for Third-Party VendorProducts Administrator's Manual.
EPOS For a list of supported devices, see thefollowing:
https://cdw-prod.adobecqms.net/content/dam/cdw/on-domain-cdw/brands/epos/fact-sheet-epos-manager-en.pdf
Note: The Device Manager supports all theEPOS devices supported by the EPOSManager.
● All versions VoIP equipment work with the SIP control protocol.● Bold refers to new product support and version support.
- 7 -

CHAPTER 3 Hardware and Software Specifications OVOC | IOM
3 Hardware and Software SpecificationsThis section describes the hardware and software specifications of the OVOC server.
OVOC Server Minimum RequirementsThe table below lists the minimum requirements for running the different OVOC serverplatforms.
ResourcesVirtualPlatform
MemoryRecommended
Disk Space
MinimumDisk Space
(OS +Data)
Processors
Low Profile
VMWare ■ VMware:ESXi 6.7
■ VMwareHAcluster:VMwareESXi 6.5
24 GiBRAM
500 GB 320 GiB ■ 1 corewith atleast 2.5GHz
■ 2 coreswith atleast 2.0GHz
HyperV ■ MicrosoftHyper-VServer2016
■ MicrosoftHyper-VServer2016 HACluster
24 GiBRAM
500 GB 320 GiB ■ 1 corewith atleast 2.5GHz
■ 2 coreswith atleast 2.0GHz
Azure Size: D8ds_v4 32 GiB 500 GB SSD 320 GiB 8 vCPUs
AWS InstanceSize:m5.2xlarge
32 GiB AWS EBS:GeneralPurpose SSD(GP2) 500 GB
320 GiB 8 vCPUs
High Profile
VMWare ■ VMware: 40 GiB 1.2 TB 520 GiB 6 cores with
- 8 -

CHAPTER 3 Hardware and Software Specifications OVOC | IOM
ResourcesVirtualPlatform
MemoryRecommended
Disk Space
MinimumDisk Space
(OS +Data)
Processors
ESXi 6.7
■ VMwareHAcluster:VMwareESXi 6.5
RAM at least 2 GHz
HyperV ■ MicrosoftHyper-VServer2016
■ MicrosoftHyper-VServer2016 HACluster
40 GiBRAM
1.2 TB 520 GiB) 6 cores withat least 2 GHz
Azure Size: D16ds_v4
64 GiB 2 TB SSD 520 GiB 16 vCPUs
AWS InstanceSize:m5.4xlarge
64 GiB AWS EBS:GeneralPurpose SSD(GP2) 2TB
520 GiB 16 vCPUs
Bare Metal (HP DL360p Gen10)
- 64 GiBRAM
Disk: 2x 1.92TB SSDconfigured inRAID 0
■ Intel®Xeon®CascadeGold6226R (16cores 2.6GHz each)
■ Intel®Xeon ®Gold 6126(12 cores
- 9 -

CHAPTER 3 Hardware and Software Specifications OVOC | IOM
ResourcesVirtualPlatform
MemoryRecommended
Disk Space
MinimumDisk Space
(OS +Data)
Processors
2.60 GHzeach)
SP Single
■ VMware:ESXi 6.7
■ VMwareHAcluster:VMwareESXi 6.5
■ Ethernetports:10GBports
256 GB Standalonemode: SSD 6TB
~1.25T SSD 24 cores at2.60 GHz
OVOC Client RequirementsThe table below lists the minimum requirements for running an OVOC web client.
Table 3-1: OVOC Client Minimum Requirements
Resource OVOC Client
Hardware Screen resolution: 1280 x 1024
Operating System Windows 7 or later
Memory 8 GB RAM
Disk Space -
Processor -
Web Browsers ■ Mozilla Firefox version 56 and higher
■ Google Chrome version 79 and higher
■ Microsoft Edge Browser version 80 and higher
Scripts ■ PHP Version 7.4
- 10 -

CHAPTER 3 Hardware and Software Specifications OVOC | IOM
Resource OVOC Client
■ Angular 10.0
Bandwidth RequirementsThis section lists the OVOC bandwidth requirements.
OVOC Bandwidth Requirements
The bandwidth requirement is for OVOC server <- > Device communication. The networkbandwidth requirements per device is 500 Kb/sec for faults, performance monitoring andmaintenance actions.
Voice Quality Bandwidth Requirements
The following table describes the upload bandwidth speed requirements for Voice Quality forthe different devices. The bandwidth requirement is for OVOC server <- > Devicecommunication.
Table 3-2: Voice Quality Bandwidth Requirements
DeviceSBC Sessions
(each session has two legs)Required Kbits/sec or Mbit/sec
SBC
MP-118 _ _
MP-124 _ _
Mediant 800 Mediant850
60 135 Kbits/sec
Mediant 1000 150 330 Kbits / sec
Mediant 2000 _ _
Mediant 2600 600 1.3 Mbit/sec
Mediant 3000 1024 2.2 Mbit/sec
Mediant 4000 4,000 8.6 Mbit/sec
Gateway
MP-118 8 15 Kbits/sec
- 11 -

CHAPTER 3 Hardware and Software Specifications OVOC | IOM
DeviceSBC Sessions
(each session has two legs)Required Kbits/sec or Mbit/sec
MP-124 24 45 Kbits/sec
Mediant 800 Mediant850
60 110 Kbits/sec
Mediant 1000 120 220 Kbits/sec
Mediant 2000 480 880 Kbits/sec
Mediant 2600 _ _
Mediant 3000 2048 3.6 Mbit/sec
Mediant 4000 _ _
Endpoints _ 56 Kbits/sec
OVOC CapacitiesThe following table shows the performance and data storage capabilities for the OVOC man-aged devices and endpoints.
Table 3-3: OVOC Capacities
Machine Specifications Low Profile High Profile Bare MetalService Provider
Single Server
OVOC Management Capacity
Managed devices 100 5,000 5,000 10,000
Links 200 10,000 10,000 10,000
Operators 25
Device Manager Pro
Managed devices 1,000 ■ 30,000 MicrosoftLync/Skype for Businessand third-party vendordevices 1
■ 10,000 MicrosoftLync/Skype for Businessand third- party vendordevices2
■ 30,000Skype forBusinessdevices
1In normal operation (when devices are remotely managed) 30,000 devices send Keep-alivemessages at five minute intervals; however, when managing devices behind a firewall or NATusing the Device Manager agent, a 10% factor (3,000 devices) is deducted for the allocation forthese devices. In this case, 90% of the configuration (27,000) is checked every 15 minutes (forremotely managed devices)and 10% is checked every five minutes (for devices managed behinda firewall or NAT).
2Including phones, headsets and Conference Suite devices
- 12 -

CHAPTER 3 Hardware and Software Specifications OVOC | IOM
Machine Specifications Low Profile High Profile Bare MetalService Provider
Single Server
■ 4,000 Microsoft Teamsdevices
■ 4,000 Microsoft Teamsdevices
■ 4,000Teamsdevice
Disk space allocated forfirmware files
5 GB 10 GB
Alarm and Journal Capacity
History alarms Up to 12 months or 10,000,000 million alarms
Journal logs Up to 12 months
Steady state 20 alarms per second 50 alarms persecond
Performance Monitoring
Polled parameters per pollinginterval per OVOC- manageddevice
50,000 100,000 100,000 500,000
Polled parameters per pollinginterval per OVOC instance
50,000 500,000 500,000 1,000,000
Storage time One year
QoE Call Flow (for SBC calls only)
Maximum managed deviceswith QoE call flows
10 100 100 300
CAPS (calls attempts per second)per OVOC instance
6 25 100 300
Maximum number of calls 1,000,000 1,000,000 1,000,000 10,000,000
OVOC QoE for Devices
QoE for managed devices 100 1,200 3,000 10,000
CAPS (calls attempts per second)per device
30 120 300 1,000
CAPS per OVOC instance (SBCand SFB/Teams and RFC SIPPublish 6035)
30
TeamsCAPS=301
120
Teams CAPS=1202300 1,000
Teams CAPS=3
QoE concurrent sessions 3,000 12,000 30,000 100,000
Call Details Storage - detailedinformation per call
Up to oneyear or6,000,000
Up to one year or 80,000,000 Up to one year or 80,000,000 Up to one yearor 250,000,000
Calls Statistics Storage - statisticsinformation storage
Up to oneyear or12,000,000
Up to one year or 150,000,000 Up to one year or 150,000,000 Up to one yearor 500,000,000
QoE Capacity with SBC Floating License Capability
CAPS (calls attempts per second)per OVOC instance with SIP callflow.
5 22 90 -
1The TEAMS CAPS estimation is based on round trip delay of 500 milliseconds to MicrosoftAzure.2As above3Please contact AudioCodes OVOC Product Manager
- 13 -

CHAPTER 3 Hardware and Software Specifications OVOC | IOM
Machine Specifications Low Profile High Profile Bare MetalService Provider
Single Server
CAPS (calls attempts per second)per OVOC instance without SIPcall flow.
27 108 270 -
Managed devices with floatinglicense.
100 500 1,000 -
Lync and AD Servers– applicable for QoE license only
MS Lync servers Up to 2
AD Servers for Users sync Up to 2
Users sync Up to 150,000
TEAMS Customer up to 71
Skype for Business Monitoring SQL Server PrerequisitesThe following are the Skype for Business Monitoring SQL Server prerequisites:
The server must be defined to accept login in 'Mix Authentication' mode.
■ The server must be configured to collect calls before the OVOC can connect to it andretrieve Skype for Business calls.
■ Call Detail Records (CDRs) and Quality of Experience (QoE) Data policies must be configuredto capture data.
■ Network administrators must be provisioned with the correct database permissions (referto the One Voice Operations Center User's Manual).
■ Excel macros must be enabled so that the SQL queries and reports can be run; tested withExcel 2010.
■ Detailed minimum requirements for Skype for Business SQL Server can be found in thefollowing link:
http://technet.microsoft.com/en-us/library/gg412952.aspx
1For additional support, contact AudioCodes Product Manager
- 14 -

CHAPTER 4 OVOC Software Deliverables OVOC | IOM
4 OVOC Software DeliverablesThe following table describes the OVOC software deliverables.
Table 4-1: OVOC Software Deliverables
Installation/UpgradePlatform
Media
Installation
Dedicated ■ DVD1-Linux CentOS Operating System
■ DVD2-Oracle Installation
■ DVD3-OVOC Software Installation
VMware ■ Standard mode: DVD5-OVOC Software Installation OVA file
■ Service Provider Cluster mode:
✔ Option 1:
● Management: DVD1-DVD2-DVD3
● VQM/PM: DVD1-DVD3
✔ Option 2:
● Management: DVD5-Management-OVA
● VQM: DVD5-VQM-OVA
● PM: DVD5-PM-OVA
HyperV ■ DVD5-OVOC Software Installation 7z file
Amazon AWS ■ Create OVOC instance from Public AMI image provided byAudioCodes
Microsoft Azure ■ Create OVOC virtual machine from Azure Marketplace.
Upgrade
Dedicated ■ DVD3-OVOC Server Application DVD
OR
■ DVD3-OVOC Server Application ISO file
VMware ■ DVD3-OVOC Server Application ISO file (including separatescripts for Management, VQM and PM servers)
Microsoft HyperV ■ DVD3-OVOC Server Application ISO file
- 15 -

CHAPTER 4 OVOC Software Deliverables OVOC | IOM
Installation/UpgradePlatform
Media
Amazon AWS ■ DVD3-OVOC Server Application ISO file
Note the following
■ DVD1: Operating System DVD (OVOC server and Client Requirements):
■ DVD2: Oracle Installation: Oracle installation version 12.1.0.2 DVD.
■ DVD3: Software Installation and Documentation DVD:
The DVD ‘SW Installation and Documentation’ DVD comprises the following folders:
● 'EmsServerInstall' – OVOC server software (including Management server, PM serverand VQM server) to install on the dedicated OVOC server machine.
● Documentation – All documentation related to the present OVOC version. Thedocumentation folder includes the following documents and sub-folders:
◆ OVOC Release Notes Document – includes the list of the new features introducedin the current software version as well as version restrictions and limitations.
◆ OVOC Server IOM Manual – Installation, Operation and Maintenance Guide.
◆ OVOC Product Description
◆ OVOC User's Manual
◆ OVOC Integration with Northbound Interfaces
◆ OVOC Security Guidelines
◆ OVOC Alarms Monitoring Guide
◆ OVOC Performance Monitoring Guide
Installation and upgrade files can also be downloaded from the Website by registered cus-tomers at https://www.audiocodes.com/services-support/maintenance-and-support.
- 16 -

Part II
OVOC Server Installation
This part describes the testing of the installation requirements and the installation ofthe OVOC server.

CHAPTER 5 Files Verification OVOC | IOM
5 Files VerificationYou need to verify the contents of the ISO file received from AudioCodes using an MD5checksum. As an Internet standard (RFC 1321), MD5 has been used in a wide variety of securityapplications, and is also commonly used to check the integrity of file, and verify download.Perform the following verifications on the relevant platform:
■ Windows (Windows below)
■ Linux ( Linux below)
WindowsUse the WinMD5 tool to calculate md5 hash or checksum for the file:
■ Verify the checksum with WinMD5 (see www.WinMD5.com)
LinuxCopy the checksum and the files to a Linux machine, and then run the following command:
md5sum -c filename.md5
The “OK” result should be displayed on the screen (see figure below).
Figure 5-1: ISO File Integrity Verification
OVOC Server UsersOVOC server OS user permissions vary according to the specific application task. This feature isdesigned to prevent security breaches and to ensure that a specific OS user is authorized toperform a subset of tasks on a subset of machine directories. The OVOC server includes thefollowing OS user permissions:
■ 'root' user: User permissions for installation, upgrade, maintenance using OVOC ServerManagerand OVOC application execution.
■ acems user: The only available user for login through SSH/SFTP tasks.
■ emsadmin user: User with permissions for mainly the OVOC Server Manager and OVOCapplication for data manipulation and database access.
- 18 -

CHAPTER 5 Files Verification OVOC | IOM
■ oracle user: User permissions for the Oracle database access for maintenance such asinstallation, patches upgrade, backups and other Oracle database tasks.
■ oralsnr user: User in charge of oracle listener startup.
In addition the OVOC server includes the following DB operator permissions:
■ Analytics user: User used to connect to Northbound DB access clients
- 19 -

CHAPTER 6 Installing OVOC Server on Virtual Machines on Cloud-based Platforms OVOC | IOM
6 Installing OVOC Server on Virtual Machines onCloud-based PlatformsThis section describes how to install the OVOC server on the following Cloud-based platforms:
■ Launching Public OVOC Image on Amazon Web Services (AWS) below
■ Creating OVOC Virtual Machine on Microsoft Azure on page 28
Launching Public OVOC Image on Amazon Web Services (AWS)This chapter describes how to create the OVOC virtual machine in an AWS cloud deployment,including the following procedures:
■ Launching Public Image on AWS below
■ Configuring AWS SES Service on page 25
Before proceeding, ensure that the minimum platform requirements are met (seeHardware and Software Specifications on page 8).
Launching Public Image on AWS
This section describes how to setup and load the AWS image.
➢ To setup and load the AWS image:
1. Log into your AWS account.
2. Choose one of the following regions:
● eu-central-1 (Frankfurt)
● us-east-1 (N. Virginia)
● ap-southeast-1 (Singapore)
See https://aws.amazon.com/premiumsupport/knowledge-center/copy-ami-region/for instructions on how to copy AMIs from one of the provided regions above to anyother region that the customer requests.
For verifying AMI IDs, refer to https://services.AudioCodes.com..
- 20 -

CHAPTER 6 Installing OVOC Server on Virtual Machines on Cloud-based Platforms OVOC | IOM
Figure 6-1: Select Region
3. In the “Services” menu, choose EC2.
- 21 -

CHAPTER 6 Installing OVOC Server on Virtual Machines on Cloud-based Platforms OVOC | IOM
Figure 6-2: Services Menu - EC2
4. In the Dashboard, navigate to IMAGES > AMIs.
- 22 -

CHAPTER 6 Installing OVOC Server on Virtual Machines on Cloud-based Platforms OVOC | IOM
Figure 6-3: Images
5. In the search bar, choose Public images and apply the following filter:
AMI ID : ami-00000000000 replacing ami-00000000000 with the AMI ID you received fromAudioCodes according to the region you have chosen.
6. Right-click the AMI and choose Launch.
- 23 -

CHAPTER 6 Installing OVOC Server on Virtual Machines on Cloud-based Platforms OVOC | IOM
Figure 6-4: Launch Public Images
7. Choose an Instance type according to the requirements specified in OVOC Server MinimumRequirements on page 8.
8. Configure Instance (Optional). Using this option, you can edit network settings, forexample, placement.
9. Configure a Security Group; you should select an existing security group or create a newone according to the firewall requirements specified in the table below:
Table 6-1: Firewall for Amazon AWS
Protocol Port Description
UDP 162 SNMP trap listening port on the OVOC server.
UDP 1161 Keep-alive - SNMP trap listening port on the OVOC server used forNAT traversal.
TCP 5000 Communication for control, media data reports and SIP call flowmessages
TCP (TLS) 5001 TLS secured communication for control, media data reports andSIP call flow messages
NTP 123 NTP server port (also configure the AWS IP address/Domain Nameas the NTP server on both the managed device and OVOC server;see relevant procedures in Connecting Mediant Cloud Edition (CE)SBC Devices on AWS on page 166
10. Click Review and Launch > Review > Launch.
- 24 -

CHAPTER 6 Installing OVOC Server on Virtual Machines on Cloud-based Platforms OVOC | IOM
11. In the dialog shown in the figure below, from the drop-down list, choose Proceed without akey pair, check the “I acknowledge …” check box, then click Launch Instances.
Figure 6-5: Select an Existing Key Pair
12. Click View Instances and wait for the instance to change the state to “running” and thestatus checks to complete. In the description, note the Public IP address of the instance ashighlighted in the figure below.
Figure 6-6: Instance State and Status Checks
Note the AWS public IP address as its later configured in Step 2-1 Configuring theOVOC Server (OVOC Server Manager) on AWS on page 167
Configuring AWS SES Service
This section describes how to configure the OVOC server as the Email server on Amazon AWS.These steps are necessary in to overcome Amazon security restrictions for sending emails
- 25 -

CHAPTER 6 Installing OVOC Server on Virtual Machines on Cloud-based Platforms OVOC | IOM
outside of the AWS domain.
If AWS Simple Email Service (SES) runs in Sandbox mode, both sender and recipientaddresses should be verified (seehttps://docs.aws.amazon.com/ses/latest/DeveloperGuide/request- production-access.html)
➢ To configure OVOC as email server on AWS SES:
1. Login to the OVOC server with root permissions.
2. Open file /root/.muttrc:
cat.muttrc
3. Replace "[email protected]" with authenticated source email.
4. Open file /etc/exim/exim.conf and using a text editor, find the respective "begin …"statements and paste the below configuration accordingly
● Replace : AWS_SES_LOGIN : AWS_SES_PASSWORD with the credentials received fromAWS
● Replace : SOURCE_EMAIL with an authenticated source email address
● Replace: HOSTNAME with the VM hostname
===================================================
begin routers
send_via_ses:
driver = manualroute
domains = ! +local_domains
transport = ses_smtp
route_list = * email-smtp.eu-central-1.amazonaws.com;
- 26 -

CHAPTER 6 Installing OVOC Server on Virtual Machines on Cloud-based Platforms OVOC | IOM
===================================================
begin transports
ses_smtp:
driver = smtp
port = 587
hosts_require_auth = *
hosts_require_tls = *
===================================================
begin authenticators
ses_login:
driver = plaintext
public_name = LOGIN
client_send = : AWS_SES_LOGIN : AWS_SES_PASSWORD
===================================================
begin rewrite
^root@HOSTNAME SOURCE_EMAIL SFfrs
===================================================
5. Remove old unsent emails from buffer and restart exim service:
systemctl restart exim
- 27 -

CHAPTER 6 Installing OVOC Server on Virtual Machines on Cloud-based Platforms OVOC | IOM
exim -bp | exiqgrep -i | xargs exim-Mrm
rm -rf /var/spool/exim/db/*
6. Send test email using mutt:
echo "Hello!" > ~/message.txt
mutt -s "Test Mail from OVOC" -F /root/.muttrc EMAIL_ADDRESS <~/message.txt
7. Verify in the exim log in /var/log/exim/main.log to check that the email was sent correctly.
Creating OVOC Virtual Machine on Microsoft AzureThis chapter describes how to install the OVOC server on a virtual machine in a Cloud-baseddeployment from the Microsoft Azure Marketplace, including the following procedures:
Before proceeding, ensure that the minimum platform requirements are met (seeHardware and Software Specifications on page 8).
➢ To install OVOC from the Microsoft Azure Marketplace:
1. In the Azure Marketplace, search for "AudioCodes One Voice Operations Center (OVOC)"and click Get It Now.
- 28 -

CHAPTER 6 Installing OVOC Server on Virtual Machines on Cloud-based Platforms OVOC | IOM
Figure 6-7: Get it Now
2. Click Continue.
Figure 6-8: Create this App in Azure
3. You are now logged in to the Azure portal; click Create.
Figure 6-9: Create Virtual Machine
- 29 -

CHAPTER 6 Installing OVOC Server on Virtual Machines on Cloud-based Platforms OVOC | IOM
4. Configure the following:
a. Choose your Subscription.
b. Choose your Resource Group or create a new one
c. Enter the name of the new Virtual Machine.
d. Choose the Region.
e. Choose the VM Size (see Hardware and Software Requirements).
f. Choose Authentication Type "Password" and enter username and user-definedpassword or SSH Public Key.
Figure 6-10: Virtual Machine Details
5. Click Next until Networking section to configure the network settings,
- 30 -

CHAPTER 6 Installing OVOC Server on Virtual Machines on Cloud-based Platforms OVOC | IOM
Figure 6-11: Network Settings
a. From the Virtual Network and Subnet drop-down lists, select an existing virtualnetwork/subnet or click Createnew to create a new virtual network/subnet.
b. From the Public IP drop-down list, configure "none", use the existing Public IP or createa new Public IP.
If you do not wish the public IP address to change whenever the VM isstopped/started, choose StaticSKU or BasicSKU+ Static.
c. Under Configure network security group, click Create new to configure a NetworkSecurity Group. Configure this group according to the Firewall rules shown in the tablebelow.
- 31 -

CHAPTER 6 Installing OVOC Server on Virtual Machines on Cloud-based Platforms OVOC | IOM
By default, only ports 22 and 443 are open for inbound traffic; open other ports formanaging devices behind a NAT (outside the Azure environment) as described in thetable below.
Table 6-2: Microsoft Azure Firewall
Protocol Port Description
UDP 162 SNMP trap listening port on the OVOC server.
UDP 1161 Keep-alive - SNMP trap listening port on the OVOC server used forNAT traversal.
This rule is required if Auto-detection is used to add devices inOVOC. See Option 1: Connecting Mediant Cloud Edition (CE) SBCDevices to OVOC on Azure using Public IP Address on page 158
TCP 5000 Communication for control, media data reports and SIP call flowmessages sent from Mediant Cloud Edition (CE) SBC.
TCP (TLS) 5001 TLS secured communication for control, media data reports andSIP call flow messages sent from Mediant Cloud Edition (CE) SBC.
This rule is used if the OVOC Server and managed devices (spe-cifically Mediant CE devices) are deployed in separate Azure Virtualnetworks communicating behind a firewall. See Option1: Connecting Mediant Cloud Edition (CE) SBC Devices to OVOC onAzure using Public IP Address on page 158
NTP 123 NTP server port (set the Microsoft Azure site IP address/DomainName(where the OVOC server is installed) as the NTP server clocksource. Referenced in procedures in Connecting Mediant Cloud Edi-tion (CE) Devices on Azure on page 158
6. Click Next until Review+Create tab, make sure all the settings are correct and click Create.
- 32 -

CHAPTER 6 Installing OVOC Server on Virtual Machines on Cloud-based Platforms OVOC | IOM
Figure 6-12: Review and Create
7. Navigate to the "Virtual machines" section, where you can, for example, monitor theVirtual Machine creation process and find the Public or Private (Internal) IP addresses toaccess the Virtual Machine.
Note the public or private (Internal) IP addresses as you need to configure them inConfiguring the OVOC Server Manager on Azure (Public IP) on page 159 andConfiguring the OVOC Server Manager on Azure (Internal IP) on page 163respectively.
- 33 -

CHAPTER 6 Installing OVOC Server on Virtual Machines on Cloud-based Platforms OVOC | IOM
Figure 6-13: Azure Deployment Process Complete
- 34 -

CHAPTER 7 Installing OVOC Server on VMware Virtual Machine OVOC | IOM
7 Installing OVOC Server on VMware VirtualMachineThis describes how to install the OVOC server on a VMware vSphere machine. This proceduretakes approximately 30 minutes. This time is estimated on the HP DL 360 G8 platform (withCPU, disk and memory as specified in Configuring the Virtual Machine Hardware Settings onpage 54). The upgrade time depends on the hardware machine where the VMware vSphereplatform is installed.
● Before proceeding, ensure that the minimum platform requirements are met (seeHardware and Software Specifications on page 8). Failure to meet theserequirements will lead to the aborting of the installation.
● For obtaining the installation files, see OVOC Software Deliverables on page 15✔ Note that you must verify this file, see Files Verification on page 18
Deploying OVOC Image with VMware vSphere Hypervisor(ESXi)This section describes how to deploy the OVOC image with the VMware ESXi Web client. Thisprocedure is run using the VMware OVF tool that can be installed on any Linux machine.
● This procedure describes how to deploy the image using the OVF tool, which canbe downloaded from: https://www.vmware.com/support/developer/ovf/
● The OVOC image can also be deployed using the vSphere web client GUI.
➢ To run VMware OVF tool:
1. Transfer the 7z file containing the VMware Virtual Machine installation package that youreceived from AudioCodes to your PC (see Transferring Files on page 346 for instructions onhow to transfer files).
2. Open the VMware OVF tool.
3. Enter the following commands and press Enter:
ovftool --disableVerification --noSSLVerify --name=$VMname --datastore=$DataStore -dm=thin --acceptAllEulas --powerOn $ovaFilePathvi://$user:$password@$vCenterIP/$dataCenterName/host/$clusterName/$ESXIHostName
Where:
● $VMname(--name): is the name of the deployed machine
● $DataStore: data store for deployment
- 35 -

CHAPTER 7 Installing OVOC Server on VMware Virtual Machine OVOC | IOM
● $user:$password is the user and password of the VMware Host machine
● $vCenterIP: vCenter IP Address
● $dataCenterName: data center name inside the vCenter
● $clusterName: cluster name under data center tree
● $ESXIHostName: deployed ESXI IP Address
Example:
ovftool --disableVerification --noSSLVerify --name=ovoctest --datastore=Netapp04.lun1 -dm=thin --acceptAllEulas --powerOnc:\tmp\OVOC_VMware_7.8.2241.ovavi://vmware:P@[email protected]/QASWDatacenter/host/qaswCluster01/10.3.180.211
Figure 7-1: OVF Example
The following progress is displayed:
Opening OVA source: /data1/ 8.0.3098/DVD5/ 8.0.3098.xxxx/OVOC-VMware-8.0.3098.xxxx.ovaOpening VI target: vi://[email protected]:443/Deploying to VI: vi://[email protected]:443/Disk progress: 10%
Transfer CompletedThe manifest validatesPowering on VM: FirstDeployTask CompletedWarning:- No manifest entry found for: 'OVOC-VMware- 8.0.3098.xxxx-disk1.vmdk'.Completed successfully
- 36 -

CHAPTER 7 Installing OVOC Server on VMware Virtual Machine OVOC | IOM
Deploying OVOC Image with VMware vSphere Hypervisor (ESXi) inService Provider Cluster
This procedure describes how to deploy the OVOC image with VMware vSphere Hypervisor(ESXi) in Service Provider Cluster. The procedure requires you to perform the following steps:
1. On existing OVOC server VM, perform full backup and upgrade to version 8.0.3098 (seeStep 1 Upgrade Existing Virtual Machine below)
2. On a new VM, install version 8.0.3098 Service Provider ClusterManagement OVA andrestore the backup created in step 1 (seeStep 2 Install Service Provider Cluster onManagement Server on page 39)
3. On a new VM, install version 8.0.3098 Service Provider Cluster VQM OVA (seeStep 3 InstallVQM Server on page 40)
4. On a new VM, install version 8.0.3098 Service Provider Cluster PM OVA (see Step 4 InstallPM Server on page 40)
Networking between cluster nodes is over IPv4 (IPv6 is not supported).
Step 1 Upgrade Existing Virtual Machine
Before installing the Service Provider Cluster, you must upgrade your existing virtual machine toOVOC Version 8.0.3098
Before starting the installation, it is highly recommended to configure the SSH client(e.g. Putty application) to save the session output into a log file.
➢ To upgrade existing OVOC server VM:
1. Using the WinSCP utility (see Transferring Files on page 346), copy the DVD3.ISO file forOVOC Version 8.0.3098 that you saved to your PC in Step 1: Setup the Virtual Machine tothe OVOC server acems user home directory: /home/acems
2. Open an SSH connection or the VM console.
3. Login into the OVOC server as ‘acems’ user with password acems (or customer definedpassword).
4. Switch to 'root' user and provide root password (default password is root):
su – root
5. Mount the CDROM to make it available:
mount /home/acems/DVD3_OVOC_ 8.0.3098.iso /mnt
- 37 -

CHAPTER 7 Installing OVOC Server on VMware Virtual Machine OVOC | IOM
cd /mnt/EmsServerInstall/
6. Run the installation script from its location:
./install
Figure 7-2: OVOC server Installation Script
7. Enter y, and then press Enter to accept the License agreement.
Figure 7-3: OVOC server Upgrade – License Agreement
- 38 -

CHAPTER 7 Installing OVOC Server on VMware Virtual Machine OVOC | IOM
8. The upgrade process installs OS packages updates and patches. After the patch installation,reboot might be required:
● If you are prompted to reboot, press Enter to reboot the OVOC server and then repeatsteps 2-7 (inclusive).
● If you are not prompted to reboot, proceed to step Wait for the installation tocomplete and reboot the OVOC server by typing reboot. below
Figure 7-4: OVOC Server Installation Complete
9. Wait for the installation to complete and reboot the OVOC server by typing reboot.
10. Schedule full backup of the OVOC server to the nearest possible time (see Change ScheduleBackup Time on page 195) and then verify that all necessary files have been generated (seeOVOC Server Backup Processes on page 194).
Step 2 Install Service Provider Cluster on Management Server
This procedure describes how to deploy the OVOC image with VMware vSphere Hypervisor(ESXi) in a Service Provider Cluster configuration on the new virtual machine that is designatedas the Management server. The procedure describes how to deploy the OVOC image with theVMware ESXi Web client using the OVF tool, which can be downloadedfrom: https://www.vmware.com/support/developer/ovf/ and installed on any Linux machine.
● The OVOC image can also be deployed using the vSphere web client GUI.● You must install the Management server prior to installing the VQM and
PM servers.● Refer to OVOC Software Deliverables on page 15 for information on media
deliverables.
➢ To install Service Provider Cluster (Management server):
1. On the new virtual machine: Transfer the 7z file containing the VMware Virtual MachineManagement installation package that you received from AudioCodes to your PC (seeTransferring Files on page 346 for instructions on how to transfer files).
2. Run the VMware OVF tool (see Deploying OVOC Image with VMware vSphere Hypervisor(ESXi) on page 35
3. After the VM has been created, Inflate Thin Virtual Disk. ForInstructions: https://docs.vmware.com/en/VMware-vSphere/6.0/com.vmware.vsphere.storage.doc/GUID-C371B88F-C407-4A69-8F3B-FA877D6955F8.html
4. Restore the backup that you created in Step 1 Upgrade Existing Virtual Machine on page 37(see OVOC Server Restore on page 196).
- 39 -

CHAPTER 7 Installing OVOC Server on VMware Virtual Machine OVOC | IOM
5. Configure Service Provider Cluster mode (see Service Provider Cluster on page 228).
6. Install VQM and PM servers (see Step 3 Install VQM Server below and Step 4 Install PMServer below).
Step 3 Install VQM Server
This procedure describes how to install the Service Provider Cluster mode on the new virtualmachine that is designated for the VQM Server.
● The OVOC image can also be deployed using the vSphere web client GUI.● Refer to OVOC Software Deliverables on page 15 for information on media
deliverables.● You must install the Management server prior to installing the VQM server (see
Step 2 Install Service Provider Cluster on Management Server on the previouspage).
➢ To install VQM server:
1. On the new virtual machine: Transfer the 7z file containing the VMware Virtual MachineVQM installation package that you received from AudioCodes to your PC (see AppendixTransferring Files on page 346 for instructions on how to transfer files).
2. Run the VMware OVF tool (see Deploying OVOC Image with VMware vSphere Hypervisor(ESXi) on page 35
3. After the VM has been created, Inflate Thin Virtual Disk. ForInstructions: https://docs.vmware.com/en/VMware-vSphere/6.0/com.vmware.vsphere.storage.doc/GUID-C371B88F-C407-4A69-8F3B-FA877D6955F8.html
Step 4 Install PM Server
This procedure describes how to install the Service Provider Cluster mode on the new virtualmachine that is designated for the PM Server.
● The OVOC image can also be deployed using the vSphere web client GUI.● Refer to OVOC Software Deliverables on page 15 for information on media
deliverables.● You must install the Management server prior to installing the PM server
(seeStep 2 Install Service Provider Cluster on Management Server on theprevious page)
➢ To install the PM server:
1. On the new virtual machine: Transfer the 7z file containing the VMware Virtual MachinePM installation package that you received from AudioCodes to your PC (see AppendixTransferring Files on page 346 for instructions on how to transfer files).
- 40 -

CHAPTER 7 Installing OVOC Server on VMware Virtual Machine OVOC | IOM
2. Run the VMware OVF tool (see Deploying OVOC Image with VMware vSphere Hypervisor(ESXi) on page 35).
3. After the VM has been created, Inflate Thin Virtual Disk. ForInstructions: https://docs.vmware.com/en/VMware-vSphere/6.0/com.vmware.vsphere.storage.doc/GUID-C371B88F-C407-4A69-8F3B-FA877D6955F8.html
Configuring the Virtual Machine Hardware Settings
This section shows how to configure the Virtual Machine’s hardware settings. Before startingthis procedure, select the required values for your type of installation (high or low profile) andnote them in the following table for reference. For the required VMware Disk Space allocation,CPU, and memory, see Hardware and Software Requirements.
Table 7-1: Virtual Machine Configuration
Required Parameter Value
Disk size
Memory size
CPU cores
➢ To configure the virtual machine hardware settings:
1. Before powering up the machine, go to the virtual machine Edit Settings option.
- 41 -

CHAPTER 7 Installing OVOC Server on VMware Virtual Machine OVOC | IOM
Figure 7-5: Edit Settings option
2. In the CPU, Memory and Hardware tabs set the required values accordingly to the desiredOVOC server VMware Disk Space allocation. ( Hardware and Software Specifications onpage 8), and then click OK.
Figure 7-6: CPU, Memory and Hard Disk Settings
● Once the hard disk space allocation is increased, it cannot be reduced to a loweramount.
- 42 -

CHAPTER 7 Installing OVOC Server on VMware Virtual Machine OVOC | IOM
● If you wish to create OVOC VMs in a cluster environment supporting High Availabilityand you are using shared network storage, then ensure you provision a VM hard driveon the shared network storage on the cluster (Configuring OVOC Virtual Machines(VMs) in a VMware Cluster below).
3. Wait until the machine reconfiguration process has completed.
Figure 7-7: Recent Tasks
Configuring OVOC Virtual Machines (VMs) in a VMware ClusterThis section describes how to configure OVOC VMs in a VMware cluster.
VMware Cluster Site Requirements
Ensure that your VMware cluster site meets the following requirements:
■ The configuration process assumes that you have a VMware cluster that contains at leasttwo ESXi servers controlled by vCenter server.
■ The clustered VM servers should be connected to a shared network storage of type iSCSI orany other types supported by VMware ESXi.
For example, a datastore “QASWDatacenter” which contains a cluster named“qaswCluster01” and is combined of two ESXi servers ( figure below).
■ Verify that Shared Storage is defined and mounted for all cluster members:
Figure 7-8: Storage Adapters
■ Ensure that the 'Turn On vSphere HA' check box is selected:
- 43 -

CHAPTER 7 Installing OVOC Server on VMware Virtual Machine OVOC | IOM
Figure 7-9: Turn On vSphere HA
■ Ensure that HA is activated on each cluster node:
Figure 7-10: Activate HA on each Cluster Node
■ Ensure that the networking configuration is identical on each cluster node:
- 44 -

CHAPTER 7 Installing OVOC Server on VMware Virtual Machine OVOC | IOM
Figure 7-11: Networking
■ Ensure that the vMotion is enabled on each cluster node. The recommended method is touse a separate virtual switch for vMotion network (this should be defined in all clusternodes and interconnected):
Figure 7-12: Switch Properties
■ A VM will be movable and HA protected only when its hard disk is located on sharednetwork storage on a cluster. You should choose an appropriate location for the VM harddisk when you deploy the OVOC VM. If your configuration is performed correctly, a VMshould be marked as “protected” as is shown in the figure below:
- 45 -

CHAPTER 7 Installing OVOC Server on VMware Virtual Machine OVOC | IOM
Figure 7-13: Protected VM
If you wish to manually migrate the OVOC VMs to another cluster node, see Managing Clusterson page 328.
Cluster Host Node Failure on VMware
In case a host node where the VM is running fails, the VM is restarted on the redundant clusternode automatically.
When one of the cluster nodes fail, the OVOC VM is automatically migrated to theredundant host node. During this process, the OVOC VM is restarted andconsequently any active OVOC process is dropped. The migration process may takeseveral minutes.
Connecting OVOC Server to Network on VMwareAfter installation, the OVOC server is assigned a default IP address that will most likely beinaccessible from the customer's network. This address is assigned to the first virtual networkinterface card connected to the 'trusted' virtual network switch during the OVOC serverinstallation. You need to change this IP address to suit your IP addressing scheme.
➢ To connect to the OVOC server:
1. Power on the machine; in the vCenter tree, right-click the AudioCodes One VoiceOperations Center node (vOC) and in the drop-down menu, choose Power > Power On.Upon the initial boot up after reconfiguring the disk space, the internal mechanismconfigures the server installation accordingly to version specifications (Hardware andSoftware Specifications on page 8).
- 46 -

CHAPTER 7 Installing OVOC Server on VMware Virtual Machine OVOC | IOM
Figure 7-14: Power On
2. Wait until the boot process has completed, and then connect the running server throughthe vSphere client console.
3. Login into the OVOC server by SSH, as ‘acems’ user and enter acems password.
4. Switch to 'root' user and provide root password (default password is root):
su - root
5. Proceed to the network configuration using the OVOC Server Manager.
6. Type the following command and press Enter.
# EmsServerManager
7. Verify that all processes are up and running (Viewing Process Statuses on page 206) andverify login to OVOC Web client is successful.
8. Set the OVOC server network IP address to suit your IP addressing scheme (Server IPAddress on page 235).
9. If you are installing the Service Provider Cluster mode, see Service Provider Cluster onpage 228
10. Perform other configuration actions as required using the OVOC Server Manager (GettingStarted on page 201).
- 47 -

This page is intentionally left blank.
CHAPTER 7 Installing OVOC Server on VMware Virtual Machine OVOC | IOM
- 48 -

CHAPTER 8 Installing OVOC Server on Microsoft Hyper-V Virtual Machine OVOC | IOM
8 Installing OVOC Server on Microsoft Hyper-VVirtual MachineThis section describes how to install the OVOC server on a Microsoft Hyper-V virtual machine.
● Before proceeding, ensure that the minimum platform requirements are met (see.Hardware and Software Specifications on page 8). Failure to meet theserequirements will lead to the aborting of the installation.
● For obtaining the installation files, see OVOC Software Deliverables on page 15✔ Note that you must also verify the ISO file, see Files Verification on page 18
➢ To install the OVOC server on Microsoft Hyper-V:
1. Transfer the ISO file containing the Microsoft Hyper-V Virtual Machine installation packagethat you received from AudioCodes to your PC (see Appendix Transferring Files on page 346for instructions on how to transfer files).
2. Open Hyper-V Manager by clicking Start > Administrative Tools > Hyper-V Manager; thefollowing screen opens:
Figure 8-1: Installing the OVOC server on Hyper-V – Hyper-V Manager
3. Start the Import Virtual Machine wizard: click the Action tab, and then select ImportVirtual Machine from the menu; the Import Virtual Machine screen shown below opens:
- 49 -

CHAPTER 8 Installing OVOC Server on Microsoft Hyper-V Virtual Machine OVOC | IOM
Figure 8-2: Installing OVOC server on Hyper-V – Import Virtual Machine Wizard
4. Click Next; the Locate Folder screen opens:
- 50 -

CHAPTER 8 Installing OVOC Server on Microsoft Hyper-V Virtual Machine OVOC | IOM
Figure 8-3: Installing OVOC server on Hyper-V – Locate Folder
5. Enter the location of the VM installation folder (extracted from the ISO file), and then clickNext; the Select Virtual Machine screen opens.
6. Select the virtual machine to import, and then click Next; the Choose Import Type screenopens:
- 51 -

CHAPTER 8 Installing OVOC Server on Microsoft Hyper-V Virtual Machine OVOC | IOM
Figure 8-4: Installing OVOC server on Hyper-V – Choose Import Type
7. Select the option ''Copy the virtual machine (create a new unique ID)'', and then click Next;the Choose Folders for Virtual Machine Files screen opens:
- 52 -

CHAPTER 8 Installing OVOC Server on Microsoft Hyper-V Virtual Machine OVOC | IOM
Figure 8-5: Installing OVOC server on Hyper-V – Choose Destination
8. Select the location of the virtual hard disk, and then click Next; the Choose Storage Foldersscreen opens:
- 53 -

CHAPTER 8 Installing OVOC Server on Microsoft Hyper-V Virtual Machine OVOC | IOM
Figure 8-6: Installing OVOC server on Hyper-V – Choose Storage Folders
9. Select the Storage Folder for the Virtual Hard Disk, and then click Next; the Summaryscreen opens.
10. Click Finish to start the creation of the VM; a similar installation progress indicator isshown:
Figure 8-7: File Copy Progress Bar
This process may take approximately 30 minutes to complete.
11. Proceed to Configuring the Virtual Machine Hardware Settings below.
Configuring the Virtual Machine Hardware SettingsThis section shows how to configure the Virtual Machine’s hardware settings.
Before starting this procedure, select the required values for your type of installation (high orlow profile) and note them in the following table for reference. For the required VMware DiskSpace allocation, CPU, and memory, see Hardware and Software Requirements.
- 54 -

CHAPTER 8 Installing OVOC Server on Microsoft Hyper-V Virtual Machine OVOC | IOM
Table 8-1: Virtual Machine Configuration
Required Parameter Value
Disk size
Memory size
CPU cores
➢ To configure the VM for OVOC server:
1. Locate the new OVOC server VM in the tree in the Hyper-V Manager, right-click it, and thenselect Settings; the Virtual Machine Settings screen opens:
Figure 8-8: Adjusting VM for OVOC server – Settings - Memory
2. In the Hardware pane, selectMemory, as shown above, enter the 'Startup RAM’ parameteras required, and then click Apply.
- 55 -

CHAPTER 8 Installing OVOC Server on Microsoft Hyper-V Virtual Machine OVOC | IOM
3. In the Hardware pane, select Processor; the Processor screen shown in the figure belowopens.
Figure 8-9: Adjusting VM for OVOC server - Settings - Processor
4. Set the 'Number of virtual processors' parameters as required.
5. Set the 'Virtual machine reserve (percentage)' parameter to 100%, and then click Apply.
● Once the hard disk space allocation is increased, it cannot be reduced.
● If you wish to create OVOC VMs in a Cluster environment that supports HighAvailability and you are using shared network storage, then ensure you provision a VMhard drive on the shared network storage on the cluster (Configuring OVOC VirtualMachines in a Microsoft Hyper-V Cluster on page 62).
Expanding Disk Capacity
The OVOC server virtual disk is provisioned by default with a minimum volume. In case a highercapacity is required for the target OVOC server then the disk can be expanded.
- 56 -

CHAPTER 8 Installing OVOC Server on Microsoft Hyper-V Virtual Machine OVOC | IOM
➢ To expand the disk size:
1. Make sure that the target OVOC server VM is not running - Off state.
2. Select the Hard Drive, and then click Edit.
Figure 8-10: Expanding Disk Capacity
The Edit Virtual Disk Wizard is displayed as shown below.
- 57 -

CHAPTER 8 Installing OVOC Server on Microsoft Hyper-V Virtual Machine OVOC | IOM
Figure 8-11: Edit Virtual Hard Disk Wizard
3. Click Next; the Choose Action screen is displayed:
- 58 -

CHAPTER 8 Installing OVOC Server on Microsoft Hyper-V Virtual Machine OVOC | IOM
Figure 8-12: Edit Virtual Hard Disk Wizard-Choose Action
4. Select the Expand option, and then click Next; the Expand Virtual Hard Disk screen opens.
- 59 -

CHAPTER 8 Installing OVOC Server on Microsoft Hyper-V Virtual Machine OVOC | IOM
Figure 8-13: Edit Virtual Hard Disk Wizard-Expand Virtual Hard Disk
5. Enter the required size for the disk, and then click Next; the Summary screen is displayed.
- 60 -

CHAPTER 8 Installing OVOC Server on Microsoft Hyper-V Virtual Machine OVOC | IOM
Figure 8-14: Edit Virtual Hard Disk Wizard-Completion
6. Verify that all of the parameters have been configured, and then click Finish. The settingswindow will be displayed.
7. Click OK to close.
Changing MAC Addresses from 'Dynamic' to 'Static'By default, the MAC addresses of the OVOC server Virtual Machine are set dynamically by thehypervisor. Consequently, they might be changed under certain circumstances, for example,after moving the VM between Hyper-V hosts. Changing the MAC address may lead to an invalidlicense.
To prevent this from occurring, MAC Addresses should be changed from 'Dynamic' to 'Static'.
➢ To change the MAC address to 'Static' in Microsoft Hyper-V:
1. Shutdown the OVOC server ( Shutdown the OVOC Server Machine on page 233).
2. In the Hardware pane, select Network Adapter and then Advanced Features.
3. Select the MAC address 'Static' option.
4. Repeat steps 2 and 3 for each network adapter.
- 61 -

CHAPTER 8 Installing OVOC Server on Microsoft Hyper-V Virtual Machine OVOC | IOM
Figure 8-15: Advanced Features - Network Adapter – Static MAC Address
Configuring OVOC Virtual Machines in a Microsoft Hyper-VClusterThis section describes how to configure OVOC VMs in a Microsoft Hyper-V cluster for HA.
Hyper-V Cluster Site Requirements
Ensure that your Hyper-V cluster site meets the following requirements:
■ The configuration process assumes that your Hyper-V failover cluster contains at least twoWindows nodes with installed Hyper-V service.
■ The cluster should be connected to a shared network storage of iSCSI type or any othersupported type. For example, “QAHyperv” contains two nodes.
- 62 -

CHAPTER 8 Installing OVOC Server on Microsoft Hyper-V Virtual Machine OVOC | IOM
Figure 8-16: Hyper-V-Failover Cluster Manager Nodes
■ The OVOC VM should be created with a hard drive which is situated on a shared clusterstorage.
Add the OVOC VM in Failover Cluster Manager
After you create the new OVOC VM, you should add the VM to a cluster role in the FailoverCluster Manager.
➢ To add the OVOC VM in Failover Cluster Manager:
1. Right-click “Roles” and in the pop up menu, choose Configure Role:
Figure 8-17: Configure Role
2. In the Select Role window, select the Virtual Machine option and then click Next.
- 63 -

CHAPTER 8 Installing OVOC Server on Microsoft Hyper-V Virtual Machine OVOC | IOM
Figure 8-18: Choose Virtual Machine
A list of available VMs are displayed; you should find the your new created OVOC VM:
Figure 8-19: Confirm Virtual Machine
- 64 -

CHAPTER 8 Installing OVOC Server on Microsoft Hyper-V Virtual Machine OVOC | IOM
3. Select the check box, and then click Next.
At the end of configuration process you should see the following:
Figure 8-20: Virtual Machine Successfully Added
4. Click Finish to confirm your choice.
Now your OVOC VM is protected by the Windows High Availability Cluster mechanism.
If you wish to manually move the OVOC VMs to another cluster node, see AppendixManaging Clusters on page 328.
Cluster Host Node Failure on Hyper-V
In case a host node where the VM is running fails, then the VM is restarted on the redundantcluster host node automatically.
When one of the cluster hosts fails, the OVOC VM is automatically moved to theredundant server host node. During this process, the OVOC VM is restarted andconsequently any running OVOC process are dropped. The move process may takeseveral minutes.
Connecting OVOC Server to Network on HyperVAfter installation, the OVOC server is assigned, a default IP address that will most likely beinaccessible from the customer's network. This address is assigned to the first virtual network
- 65 -

CHAPTER 8 Installing OVOC Server on Microsoft Hyper-V Virtual Machine OVOC | IOM
interface card connected to the 'trusted' virtual network switch during the OVOC serverinstallation. You need to change this IP address to suit your IP addressing scheme.
➢ To reconfigure the OVOC server IP address:
1. Start the OVOC server virtual machine, on the Hyper-V tree, right-click the OVOC server,and then in the drop-down menu, choose Start.
Figure 8-21: Power On Virtual Machine
2. Connect to the console of the running server by right-clicking the OVOC server virtualmachine, and then in the drop-down menu, choose Connect.
Figure 8-22: Connect to OVOC server Console
3. Login into the OVOC server by SSH, as ‘acems’ user and enter password acems.
- 66 -

CHAPTER 8 Installing OVOC Server on Microsoft Hyper-V Virtual Machine OVOC | IOM
4. Switch to 'root' user and provide root password (default password is root):
su - root
5. Start the OVOC Server Manager utility by specifying the following command:
# EmsServerManager
6. Verify that all processes are up and running (Viewing Process Statuses on page 206) andverify login to OVOC Web client is successful.
7. Set the OVOC server network IP address to suit your IP addressing scheme (Server IPAddress on page 235).
8. Perform other configuration actions as required using the OVOC Server Manager (GettingStarted on page 201).
- 67 -

CHAPTER 9 Installing OVOC Server on Dedicated Hardware OVOC | IOM
9 Installing OVOC Server on Dedicated HardwareThe OVOC server installation process supports the Linux platform. The installation includes fourseparate components, where each component is supplied on a separate DVD:
■ DVD1: OS installation: OS installation DVD
■ DVD2: Oracle Installation: Oracle installation DVD platform
■ DVD3: OVOC application: OVOC server application installation DVD
● Ensure that the minimum platform requirements are met (see Hardware andSoftware Specifications on page 8). Failure to meet these requirements will leadto the aborting of the installation.
● Installation of OVOC Version 7.8 and later must be performed on HP DL Gen10machines. Installation on HP DL G8 machines is not supported.
● For obtaining the installation files, see OVOC Software Deliverables on page 15✔ Note that you must verify this file, see Files Verification on page 18
DVD1: Linux CentOSThe procedure below describes how to install Linux CentOS. This procedure takesapproximately 20 minutes.
Before commencing the installation, you must configure RAID-0 (see ConfiguringRAID- 0 for AudioCodes OVOC on HP ProLiant DL360p Gen10 Servers onpage 325).
➢ To perform DVD1 installation:
1. Insert the DVD1 into the DVD ROM.
2. Connect the OVOC server through the serial port with a terminal application and login with'root' user. Default password is root.
3. Perform OVOC server machine reboot by specifying the following command:
reboot
4. Press Enter; you are prompted whether you which to start the installation through the RS-232 console or through the regular display.
5. Press Enter to start the installation from the RS-232 serial console or type vga, and thenpress Enter to start the installation from a regular display.
- 68 -

CHAPTER 9 Installing OVOC Server on Dedicated Hardware OVOC | IOM
Figure 9-1: Linux CentOS Installation
Figure 9-2: CentOS
6. Wait for the installation to complete.
- 69 -

CHAPTER 9 Installing OVOC Server on Dedicated Hardware OVOC | IOM
Figure 9-3: CentOS Installation
7. Reboot your machine by pressing Enter.
Do not forget to remove the Linux installation DVD from the DVD-ROM before reboot-ing your machine.
Figure 9-4: Linux CentOS Installation Complete
- 70 -

CHAPTER 9 Installing OVOC Server on Dedicated Hardware OVOC | IOM
8. Login as 'root' user with password root.
9. Type network-config, and then press Enter; the current configuration is displayed:
Figure 9-5: Linux CentOS Network Configuration
This script can only be used during the server installation process. Any additionalNetwork configuration should later be performed using the OVOC Server Manager.
10. You are prompted to change the configuration; enter y.
11. Enter your Hostname, IP Address, Subnet Mask and Default Gateway.
12. Confirm the changes; enter y.
13. You are prompted to reboot; enter y.
Installing DVD1 without a CD-ROM
This section describes how to install DVD1 without a CD-ROM.
- 71 -

CHAPTER 9 Installing OVOC Server on Dedicated Hardware OVOC | IOM
➢ To install DVD1 without a CD-ROM:
1. Login to ILO 5 with “Administrator” privileges.
2. Launch the Integrated Remote Console.
Figure 9-6: Information-iLO Overview
3. On your PC insert the OVOC DVD1 to the drive and note the drive letter.
4. From Integrated Remote Console, click Virtual Drives and select the appropriate driveletter.
Figure 9-7: iLO Integrated Remote Console
5. From Integrated Remote Console, click Power Switch >Momentary Press, the server isshutdown. ClickMomentary Press to power the server back on.
- 72 -

CHAPTER 9 Installing OVOC Server on Dedicated Hardware OVOC | IOM
Figure 9-8: Momentary Press
After server boot process has commenced, press F11 to enter the boot menu.
Figure 9-9: Boot Menu
6. On boot menu, scroll down by mouse or arrows keys and select the “iLO Virtual USB 3 : iLOVirtual CD-ROM” to start the boot sequence.
- 73 -

CHAPTER 9 Installing OVOC Server on Dedicated Hardware OVOC | IOM
Figure 9-10: Boot Sequence
7. The following screen appears, select “Install CentOS …” and press Enter.
Figure 9-11: Install CentOS
8. After a while the CentOS installation commences:
- 74 -

CHAPTER 9 Installing OVOC Server on Dedicated Hardware OVOC | IOM
Figure 9-12: Start CentOS
9. Wait for the installation to finish, from “Virtual Drives” menu deselect the selected driveand press Enter, the server is rebooted.
Figure 9-13: Server Rebooted
10. After server has restarted, press F11 to enter boot menu.
- 75 -
CHAPTER 9 Installing OVOC Server on Dedicated Hardware OVOC | IOM
Figure 9-14: Boot Menu
DVD2: Oracle DB InstallationThe procedure below describes how to install the Oracle database. This procedure takesapproximately 30 minutes.
Before starting the installation, it is highly recommended to configure the SSH client(e.g. Putty application) to save the session output into a log file.
➢ To perform DVD2 installation:
1. Insert DVD2-Oracle DB installation into the DVD ROM.
2. Login into the OVOC server by SSH, as ‘acems’ user, and enter password acems.
3. Switch to ‘root’ user and provide root password (default password is root):
su - root
4. Mount the CDROM to make it available:
mount /home/acems/DVD2_EMS_.iso /mnt
5. Run the installation script from its location:
- 76 -

CHAPTER 9 Installing OVOC Server on Dedicated Hardware OVOC | IOM
./install
Figure 9-15: Oracle DB Installation
6. Enter y, and then press Enter to accept the License agreement.
Figure 9-16: Oracle DB Installation - License Agreement
7. Type the 'SYS' user password, type sys and then press Enter.
Figure 9-17: Oracle DB Installation (cont)
- 77 -

CHAPTER 9 Installing OVOC Server on Dedicated Hardware OVOC | IOM
8. Wait for the installation to complete; reboot is not required at this stage.
Figure 9-18: Oracle DB Installation
DVD3: OVOC Server Application InstallationThe procedure below describes how to install the OVOC server application. This proceduretakes approximately 20 minutes.
➢ To perform DVD3 installation:
1. Insert DVD3-OVOC Server Application Installation into the DVD ROM.
2. Login into the OVOC server by SSH, as 'acems' user, and enter the password acems.
3. Switch to 'root' user and provide root password (default password is root):
su - root
4. Mount the CDROM to make it available:
mount /home/acems/DVD3_EMS_.iso /mnt/EmsServerInstall/
cd /mnt/EmsServerInstall/
5. Run the installation script from its location:
./install
- 78 -

CHAPTER 9 Installing OVOC Server on Dedicated Hardware OVOC | IOM
Figure 9-19: OVOC server Application Installation
6. Enter y, and then press Enter to accept the License agreement.
Figure 9-20: OVOC server Application Installation – License Agreement
7. When you are prompted to change the acems and root passwords, enter new passwords orenter existing passwords. You are then prompted to reboot the OVOC server machine;press Enter.
- 79 -

CHAPTER 9 Installing OVOC Server on Dedicated Hardware OVOC | IOM
Figure 9-21: OVOC server Application Installation (cont)
8. The installation process verifies whether CentOS that you installed from DVD1 includes thelatest OS patch updates; do one of the following:
● If OS patches are installed, press Enter to reboot the server.
● If there are no OS patches to install, proceed to step Wait for the installation tocomplete and reboot the OVOC server by typing reboot. below
After the OVOC server has rebooted, repeat steps Login into the OVOC server bySSH, as ‘acems’ user and enter password acems (or customer defined password). onpage 185 to Enter y, and then press Enter to accept the License agreement. onpage 186.
Figure 9-22: OVOC server Installation Complete
9. Wait for the installation to complete and reboot the OVOC server by typing reboot.
10. When the OVOC server has successfully restarted, login into the OVOC server by SSH, as‘acems’ user and enter password acems.
11. Switch to 'root' user and provide root password (default password is root):
- 80 -

CHAPTER 9 Installing OVOC Server on Dedicated Hardware OVOC | IOM
su - root
12. Type the following command:
# EmsServerManager
13. Verify that all processes are up and running (Viewing Process Statuses on page 206) andverify login to the OVOC Web client is successful.
14. Verify that the Date and Time are set correctly (Date and Time Settings on page 255).
15. Configure other settings as required (Getting Started on page 201).
- 81 -

Part III
Post Installation
This part describes how to restore the OVOC server machine from a backup.

CHAPTER 10 Registering OVOC Applicatons on Azure OVOC | IOM
10 Registering OVOC Applicatons on AzureThe OVOC application on Azure can be registered under one of the following scenarios. Foreach procedure the corresponding OVOC setup is described:
■ Allow access to operators from Single Organization tenant where operators are mapped toAzure groups(Registering Single Tenant in Organizational Directory below
■ Allow access to operators from multiple organizational tenants external where operatorsare assigned roles.(Registering Multitenant Support on page 96)
■ Upgrade from Single Organization tenant to Multitenant (Upgrading from Single Tenant toMultitenant on page 114
Registering Single Tenant in Organizational DirectoryThis section describes how to register access to OVOC for operators from a single organizationaltenant in the Organizational directory. For this deployment operators retrieve their securitylevel from OVOC through a mapped Azure security group. A security group must be defined onAzure for each required security level. You must then assign operators to the relevant groupaccordingly. After performing this procedure, add the Azure groups and their operator mem-bers (see Create Azure Groups and Assign Members on page 126). These groups are mapped toOVOC for retrieving the operators security levels.
➢ Do the following:
1. Login to the Azure portal with tenant admin permissions.
2. In the Navigation pane, select App registrations and then click New registration.
Figure 10-1: App registrations
3. Enter the name of the OVOC registration tenant.
4. Select Accounts in this organizational directory only (Tenant name- Single tenant).
- 83 -

CHAPTER 10 Registering OVOC Applicatons on Azure OVOC | IOM
Figure 10-2: Single Organizational Tenant
5. Enter the HTTPS Redirect URI (REST endpoint) for connecting to OVOC Web in the followingformat:
https://x.x.x.x/ovoc/v1/security/actions/login
Figure 10-3: Register an application
6. Click Register.
The new registered application is displayed.
- 84 -

CHAPTER 10 Registering OVOC Applicatons on Azure OVOC | IOM
Figure 10-4: New Registered Application
7. Double-click the new application i.e. OVOCApplication (in this example) to configure it.
8. In the navigation pane, select Certificates & secrets.
Figure 10-5: Certificates & secrets
9. Click New client secret.
- 85 -

CHAPTER 10 Registering OVOC Applicatons on Azure OVOC | IOM
Figure 10-6: New client secret
10. Enter a description and from the drop-down list select 24 months.
11. Click Add.
Figure 10-7: Client Secret Generated
12. Copy the secret Value to clipboard as its required in later configuration and cannot beretrieved once you leave this screen.
13. In the navigation pane, select Authentication.
- 86 -

CHAPTER 10 Registering OVOC Applicatons on Azure OVOC | IOM
Figure 10-8: Authentication
14. Under Implicit grant and hybrid flows select the following:
● Access tokens (used for implicit flows)
● ID tokens (used for implicit and hybrid flows)
15. Click Save.
16. In the navigation pane, select Token configuration.
Figure 10-9: Token configuration
17. Select Add optional claim.
18. Under Token Type, select ID.
19. Under Claims, select the upn check box.
20. Click Add.
- 87 -

CHAPTER 10 Registering OVOC Applicatons on Azure OVOC | IOM
Figure 10-10: Add Optional claim
21. Select the Turn on the Microsoft Graph profile permission check box and then click Add.This adds the Profile permission to the API permissions list.
The new claim is displayed.
Figure 10-11: New UPN Claim
22. Right-click the newly added token and select Edit.
- 88 -

CHAPTER 10 Registering OVOC Applicatons on Azure OVOC | IOM
Figure 10-12: Edit Optional Claim
23. Under Edit UPN (ID token), select Yes to Externally authenticate guest users (users that arenot members of the organization's Azure defined groups).
Figure 10-13: Edit UPN (ID token)
24. Click Save.
25. In the Navigation pane, select API permissions.
- 89 -

CHAPTER 10 Registering OVOC Applicatons on Azure OVOC | IOM
Figure 10-14: API Permissions
26. Click Add a permission and then click theMicrosoft Graph link.
Figure 10-15: Delegated permissions
27. Click Delegated permissions.
- 90 -

CHAPTER 10 Registering OVOC Applicatons on Azure OVOC | IOM
Figure 10-16: Microsoft Graph Permissions
28. Select Group.Read.All for OVOC to read permissions from all user groups defined for thetenant, and then click Add permissions.
29. Add another Delegated permission User.Read.All and then click Add permissons.
Figure 10-17: Delegated permissions
The configured API permissions are displayed.
- 91 -

CHAPTER 10 Registering OVOC Applicatons on Azure OVOC | IOM
Figure 10-18: Configured API Permissions
Figure 10-19:
30. Click Grant admin consent for <Tenant_Name> link to grant consent for the requestedpermissions for all accounts for this tenant, and then click Yes to confirm.
Figure 10-20: Grant Admin Consent for all Accounts
Figure 10-21:
31. In the Navigation pane, select the Overview page for the application.
- 92 -

CHAPTER 10 Registering OVOC Applicatons on Azure OVOC | IOM
Figure 10-22: Overview Page
32. Note the following values as they must later be configured in Configuring OVOC Web AzureSettings - Single Tenant Setup below
● Application (client) ID
● Directory (tenant) ID
33. Add Main Tenant Azure groups and add members as described in Create Azure Groups andAssign Members on page 126
34. Configure Azure settings in OVOC Web as described in Configuring OVOC Web AzureSettings - Single Tenant Setup below
Configuring OVOC Web Azure Settings - Single Tenant Setup
This section describes how to configure Azure authentication in the OVOC Web interface for theMain Tenant. When an Azure-authenticated operator logs into the OVOC, they are assigned anOVOC security levels, e.g., 'Operator' based on their Group mapping on Azure.
➢ To configure OVOC operators :
1. In the OVOC Web, open the Authentication page (System > Administration > Security >Authentication), and then from the 'Authentication Type' drop-down, select AZURE.
- 93 -

CHAPTER 10 Registering OVOC Applicatons on Azure OVOC | IOM
Figure 10-23: Azure Main Tenant Authentication Settings
2. From the 'Azure AD Path Type File' drop-down, select Tenant.
3. Enter the 'Azure Tenant ID' field. Extract value from the Overview page in the applicationregistration for your Single Tenant.
4. In the 'Azure Client ID' field, enter the ID of the Azure AD client for your Single Tenant.
5. In the 'Azure Client Secret' field, enter the shared secret (password) that you generated andsaved for your Single Tenant.
6. In the screen section 'GW / SBC / MSBR Authentication', select the option 'Use ADCredentials for Device Page Opening' for the OVOC to sign operators in to AudioCodesdevices using the same credentials they used to sign in to OVOC. The AudioCodes devicewill then perform authentication with the Azure AD and login to the device is attemptedwith same AD user name / password instead of the local device user name / password.Note that the device must be also be configured to authenticate with the same AD.
When a Main Tenant operator attempts to connect to OVOC, OVOC verifies the mappedAzure User Group to which the operator is a member.
● In the Tenant Details screen under the Operators tab, the parameter ADAuthentication: Group Name points to the Azure group which includes the Tenantoperators who are authorized to login to OVOC using this method.
● If the Azure AD successfully validates that the operator belongs to the ADAuthentication group (see highlighted group in the example below), its and allowedaccess.
- 94 -

CHAPTER 10 Registering OVOC Applicatons on Azure OVOC | IOM
Figure 10-24: AD Authentication Group Name
Figure 10-25: Matching Group on Azure
7. In the screen section Authorization Level Settings, configure the user group names exactlyas defined on Azure in Create Azure Groups and Assign Members on page 126. When anoperator is not assigned to a group on Azure, the parameter 'Default Operator Type andSecurity Level' is applied.
- 95 -

CHAPTER 10 Registering OVOC Applicatons on Azure OVOC | IOM
Figure 10-26: Authorization Level Settings
Figure 10-27: Matching Groups on Azure
Registering Multitenant SupportThis procedure describes how to allow access to OVOC for operators from multiple Azure ten-ants. This procedure describes how to register the Main Tenant which include the OVOC systemoperators that belong to mapped Azure Groups. After performing this procedure, add operatorsfor external tenants and assign roles to those operators you wish to allow access to OVOC (AddExternal Tenant Operators and Assign Roles on page 131):
● Registered Service Provider Tenants
- 96 -

CHAPTER 10 Registering OVOC Applicatons on Azure OVOC | IOM
● Registered Channels
● Registered Customers
Guest user login is not supported for both Main Tenant and external tenant guestusers once multitenancy is enabled in this procedure.
➢ To configure OVOC multitenancy:
1. Login to Azure portal as Global Administrator.
2. In the Navigation pane, select App registrations and then click New registration.
Figure 10-28: App Registrations
Figure 10-29: New Registration
3. Enter the name of the OVOC registration tenant.
4. Under Implicit grant and hybrid flows, select Accounts in any organizational directory (AnyAzure AD Directory- Multitenant)
- 97 -

CHAPTER 10 Registering OVOC Applicatons on Azure OVOC | IOM
5. Click Register.
The newly registered application is displayed.
Figure 10-30: New Registered Application
6. Double-click the new application i.e. OVOCAdmin (in this example) to configure it.
7. In the navigation pane, select Certificates & secrets.
Figure 10-31: Certificates & secrets
8. Click New client secret.
- 98 -

CHAPTER 10 Registering OVOC Applicatons on Azure OVOC | IOM
Figure 10-32: New client secret
9. Enter a description and from the drop-down list select 24 months.
10. Click Add.
Figure 10-33: Client Secret Generated
11. Copy the secret Value to clipboard as its required in later configuration and cannot beretrieved once you leave this screen.
12. In the navigation pane, select Authentication.
- 99 -

CHAPTER 10 Registering OVOC Applicatons on Azure OVOC | IOM
Figure 10-34: Authentication
13. Under Implicit grant and hybrid flows, select “ID tokens”
14. Click Save.
15. In the Navigation pane, select Token configuration
Figure 10-35: Token Configuration-Add
16. Click Add optional claim, choose ID type then upn optional claim and click Add to confirm.
- 100 -

CHAPTER 10 Registering OVOC Applicatons on Azure OVOC | IOM
Figure 10-36: Turn on Profile Permission
17. Select the Turn on the Microsoft Graph profile permission check box and then click Add.This adds the Profile permission to the API permissions list.
Figure 10-37: Optional claims Added
18. In the Navigation pane, select API permissions.
Figure 10-38: API Permissions
- 101 -

CHAPTER 10 Registering OVOC Applicatons on Azure OVOC | IOM
19. Click Add a permission and then click theMicrosoft Graph link.
Figure 10-39: Delegated permissions
Figure 10-40:
20. Click Delegated permissions.
21. Select permission User.Read.All and then click Add permissons.
Figure 10-41: Delegated permissions
The configured API permissions are displayed.
- 102 -

CHAPTER 10 Registering OVOC Applicatons on Azure OVOC | IOM
Figure 10-42: Configured API Permissions
22. Click Grant admin consent for <Tenant_Name> link to grant consent for the requestedpermissions for all accounts for this tenant, and then click Yes to confirm.
Figure 10-43: Grant Admin Consent for all Accounts
Figure 10-44:
23. In the Navigation pane, select the Overview page for the application.
24. In the Navigation pane, select App roles.
- 103 -

CHAPTER 10 Registering OVOC Applicatons on Azure OVOC | IOM
Figure 10-45: App roles
25. Create an app role with Admin permissions:
a. In the Display Name field, enter "Administrators" or "Admins"
b. Select Users/Groups check box
c. Enter value "OVOCAdmin"
d. Select the do you want to enable this app role check box.
e. Click Apply
- 104 -

CHAPTER 10 Registering OVOC Applicatons on Azure OVOC | IOM
Figure 10-46: Admin Role
26. Repeat the above steps to create an App role with Operator permissions with value'OVOCOperator".
- 105 -

CHAPTER 10 Registering OVOC Applicatons on Azure OVOC | IOM
Figure 10-47: Operator Role
27. Repeat the steps described for adding "Admin" role above to create an app role withMonitor permissions with value "OVOCMonitor".
- 106 -

CHAPTER 10 Registering OVOC Applicatons on Azure OVOC | IOM
Figure 10-48: Operator Role
28. Repeat the steps described for adding "Admin" role above to create an app role withMonitor permissions with value "OVOCOperatorLite".
- 107 -

CHAPTER 10 Registering OVOC Applicatons on Azure OVOC | IOM
Figure 10-49: OVOC Operator Lite
The new roles are displayed:
- 108 -

CHAPTER 10 Registering OVOC Applicatons on Azure OVOC | IOM
Figure 10-50: App roles
Figure 10-51:
29. In the Navigation pane, select the Overview page for the application.
Figure 10-52: Overview Page
30. Note the following values as they must later be configured in Configuring OVOC Web AzureSettings - Multitenant Setup on the next page
● Application (client) ID
● Directory (tenant) ID
31. Add Main Tenant Azure groups and add members as described in Create Azure Groups andAssign Members on page 126
32. Add operators of external tenants and assign them roles as described in Add ExternalTenant Operators and Assign Roles on page 131
33. Configure Azure settings in OVOC Web as described in Configuring OVOC Web AzureSettings - Multitenant Setup on the next page
- 109 -

CHAPTER 10 Registering OVOC Applicatons on Azure OVOC | IOM
Configuring OVOC Web Azure Settings - Multitenant Setup
This section describes how to configure Azure authentication in the OVOC Web interface formultitenant deployments. When operators login to OVOC, they're assigned with an OVOC secur-ity level, i.e. Admin, Operator or Monitor' based on their assigned role on Azure and their Ten-ant ID which reflects their tier permissions i.e. Tenant, Channel or Customer operatorpermissions. These details are sent to OVOC Azure via the Token authentication mechanism.
➢ To configure authentication of OVOC operators using Azure AD:
1. In the OVOC Web, open the Authentication page (System > Administration > Security >Authentication), and then from the 'Authentication Type' drop-down, select AZURE.
Figure 10-53: Azure Authentication
2. From the 'Azure AD Path Type File' drop-down, select Organizations (default). OVOC canaccess Azure AD in the enterprise network if a standard service is purchased.
3. In the 'Azure Tenant ID' field, enter the Tenant ID of theMain Tenant.
4. In the 'Azure Client ID' field, enter the ID of the Azure AD client of theMain Tenant.
5. In the 'Azure Client Secret' field, enter the client secret of theMain Tenant.
6. In the screen section 'GW / SBC / MSBR Authentication', select the option 'Use ADCredentials for Device Page Opening' for the OVOC to sign operators in to AudioCodesdevices using the same credentials they used to sign in to OVOC. The AudioCodes devicewill then perform authentication with the Azure AD and login to the device is attemptedwith same AD user name / password instead of the local device user name / password.Note that the device must be also be configured to authenticate with the same AD.
When a Main Tenant operator attempts to connect to OVOC, OVOC verifies the mappedAzure User Group to which the operator is a member.
● In the Tenant Details screen under the Operators tab, the parameter ADAuthentication: Group Name points to the Azure group which includes theMainTenant operators who are authorized to login to OVOC using this method.
- 110 -

CHAPTER 10 Registering OVOC Applicatons on Azure OVOC | IOM
● If the Azure AD successfully validates that the operator belongs to the ADAuthentication group (see highlighted group in the example below), its and allowedaccess.
Figure 10-54: AD Authentication Group Name
Figure 10-55: Matching Group on Azure
Figure 10-56:
7. In the screen section Authorization Level Settings, configure the user group names exactlyas defined on Azure in Create Azure Groups and Assign Members on page 126. When anoperator is not assigned to a group on Azure, the parameter 'Default Operator Type andSecurity Level' is applied.
- 111 -

CHAPTER 10 Registering OVOC Applicatons on Azure OVOC | IOM
Figure 10-57: Authorization Level Settings
Figure 10-58: Matching Groups on Azure
8. In the Tenant Details, enter the "Azure Tenant ID" of the external managed tenant asshown in the screen below.
- 112 -

CHAPTER 10 Registering OVOC Applicatons on Azure OVOC | IOM
Figure 10-59: Tenant Details
9. If you are managing channels, in the Channels Details, enter the "Azure Tenant ID" of theexternal managed tenant as shown in the screen below
- 113 -

CHAPTER 10 Registering OVOC Applicatons on Azure OVOC | IOM
Figure 10-60: Channel Details
Upgrading from Single Tenant to MultitenantThis procedure describes how to upgrade from Single tenant to Multitenant setup.
Guest user login is not supported for both Main Tenant and external tenant guestusers once multitenancy is enabled in this procedure.
➢ To reconfigure a single tenant setup to multitenant:
1. Login to the Azure portal as Global Administrator.
2. In the Navigation pane, select App registrations and select the registered OVOC application(the example used in this section "OVOCApplication" is selected below).
- 114 -

CHAPTER 10 Registering OVOC Applicatons on Azure OVOC | IOM
Figure 10-61: App registrations
3. In the Navigation pane, select Authentication.
Figure 10-62: OVOC Application
- 115 -

CHAPTER 10 Registering OVOC Applicatons on Azure OVOC | IOM
Figure 10-63: Authentication Screen
4. Under account types, select Accounts in any organizational directory (Any Azure ADdirectory - Multitenant) and then click Save.
5. In the Navigation pane, select Token configuration
Figure 10-64: Token Configuration-Add
6. Click Add optional claim, choose ID type then upn optional claim and click Add to confirm.
- 116 -

CHAPTER 10 Registering OVOC Applicatons on Azure OVOC | IOM
Figure 10-65: Turn on Profile Permission
7. Select the Turn on the Microsoft Graph profile permission check box and then click Add.This adds the Profile permission to the API permissions list.
Figure 10-66: Optional claims Added
8. In the Navigation pane, select API permissions.
Figure 10-67: API Permissions
- 117 -

CHAPTER 10 Registering OVOC Applicatons on Azure OVOC | IOM
9. Click Add a permission and then click theMicrosoft Graph link.
Figure 10-68: Delegated permissions
10. Click Delegated permissions.
Figure 10-69: Microsoft Graph Permissions
11. Select permission Group.Read.All and then click Add permission.
12. Add another Delegated permission User.Read.All and then click Add permissons.
- 118 -

CHAPTER 10 Registering OVOC Applicatons on Azure OVOC | IOM
Figure 10-70: Delegated permissions
13. Click Grant admin consent for <Tenant_Name> link to grant consent for the requestedpermissions for all accounts for this tenant, and then click Yes to confirm.
Figure 10-71: Grant Admin Consent for all Accounts
Figure 10-72:
14. In the Navigation pane, select App roles and then click Create app role.
- 119 -

CHAPTER 10 Registering OVOC Applicatons on Azure OVOC | IOM
Figure 10-73: Create App Roles
15. Create an app role with Admin permissions:
a. In the Display Name field, enter "Administrators" or "Admins"
b. Select Users/Groups check box
c. Enter value "OVOCAdmin"
d. Select the do you want to enable this app role check box.
e. Click Apply
- 120 -

CHAPTER 10 Registering OVOC Applicatons on Azure OVOC | IOM
Figure 10-74: Admin Role
16. Repeat the above steps to create an App role with Operator permissions with value'OVOCOperator".
- 121 -

CHAPTER 10 Registering OVOC Applicatons on Azure OVOC | IOM
Figure 10-75: Operator Role
17. Repeat the steps described for creating "Admin" role above to create an app role withMonitor permissions with value "OVOCMonitor".
- 122 -

CHAPTER 10 Registering OVOC Applicatons on Azure OVOC | IOM
Figure 10-76: Operator Role
The new roles are displayed:
- 123 -

CHAPTER 10 Registering OVOC Applicatons on Azure OVOC | IOM
Figure 10-77: App roles Configured
Figure 10-78:
18. In the Navigation pane, select the Overview page for the application.
Figure 10-79: Overview Page
19. Note the Directory (tenant) ID value as it must later be configured inConfiguring OVOC WebAzure Settings - Multitenant Upgrade below
20. Add External tenant operators and assign roles as described in Add External TenantOperators and Assign Roles on page 131
21. Configure Azure settings in OVOC Web as described in Configuring OVOC Web AzureSettings - Multitenant Upgrade below
Configuring OVOC Web Azure Settings - Multitenant Upgrade
This section describes how to configure Azure settings in OVOC Web when upgrading from aSingle Tenant configuration.
- 124 -

CHAPTER 10 Registering OVOC Applicatons on Azure OVOC | IOM
➢ To upgrade from a Single Tenant configuration:
1. In the Tenant Details, enter the "Azure Tenant ID" of the external managed tenant asshown in the screen below.
Figure 10-80: Tenant Details
2. If you are managing channels, in the Channel Details, enter the "Azure Tenant ID" of theexternal managed tenant as shown in the screen below
- 125 -

CHAPTER 10 Registering OVOC Applicatons on Azure OVOC | IOM
Figure 10-81: Channel Details
Figure 10-82:
Create Azure Groups and Assign MembersThis section describes how to create groups on Azure and assign them member operators. Youshould define a separate group for each required security level. These group names areconfigured in OVOC Azure Authentication Settings screen from where they are mapped to therelevant security level; see the list of security groups that are defined below. Identical groupnames must be configured on Azure. For example, for System Administrator User Group Name,configure "OVOC_Admin" string in OVOC and as the group name on Azure.
Table 10-1: OVOC Security Groups
Security Group OVOC (Parameter Name)
Description
System AdministratorUser Group Name
The name of the User Group of the 'System' type operatorwhose security level is 'Administrator'.
System Operator UserGroup Name
The name of the User Group of the 'System' type operatorwhose security level is 'Operator'.
System Monitor UserGroup Name
The name of the User Group of the 'System' type operatorwhose security level is 'Monitor'.
Tenant Administrator The name of the name of the User Group of the 'Tenant' type
- 126 -

CHAPTER 10 Registering OVOC Applicatons on Azure OVOC | IOM
Security Group OVOC (Parameter Name)
Description
User Group Name operator whose security level is 'Administrator'.
Tenant Operator UserGroup Name
The name of the User Group of the 'Tenant' type operatorwhose security level is 'Operator'.
Tenant Monitor UserGroup Name
The name of the name of the User Group of the 'Tenant' typeoperator whose security level is 'Monitor'.
Tenant Monitor LinksUser Group Name
The name of the User Group of the 'Tenant' type operatorwhose security level is 'Monitor Links'.
Tenant Endpoints GroupUser Group Name
The name of the User Group of the 'Tenant' type operator
➢ To assign groups on Azure:
1. Login to the Azure portal as Global Administrator.
2. Navigate to the Tenant Overview page.
Figure 10-83: Tenant Overview Page
3. In the Navigation pane, select Groups.
- 127 -

CHAPTER 10 Registering OVOC Applicatons on Azure OVOC | IOM
Figure 10-84: Create New Group
4. Click New group.
Figure 10-85: New Group
5. Enter the details of the new group and then click Create.
The same groups that you define must be configured in OVOC in the Authenticationscreen (see Configuring OVOC Web Azure Settings - Single Tenant Setup onpage 93)
- 128 -

CHAPTER 10 Registering OVOC Applicatons on Azure OVOC | IOM
Figure 10-86: Created Group
6. Select the new group.
7. In the Navigation pane, selectMembers.
Figure 10-87: Add Members to Group
8. Click Add members to add new members to the group.
9. Select the members to add to the Group.
- 129 -

CHAPTER 10 Registering OVOC Applicatons on Azure OVOC | IOM
Figure 10-88: Select Group Members
The new members are added to the group.
- 130 -

CHAPTER 10 Registering OVOC Applicatons on Azure OVOC | IOM
Figure 10-89: New Group Members
10. Proceed to Configuring OVOC Web Azure Settings - Single Tenant Setup on page 93.
Add External Tenant Operators and Assign RolesWhen you login to OVOC for the first time, a connection is established with Azure and theApplication Registration for the main tenant, for example, ‘OVLAdmin’ is added under theEnterprise applications for your registered tenant on Azure. You must then login to the Azureportal, navigate to this application and assign the ‘admin’ role to the designated operators.Thisprocedure is relevant for adding non-system service provider operators to OVOC.
➢ Do the following:
1. Login to OVOC interface with the appropriate Admin permissions for the Azure tenant(login with Admin operators that you defined in Create Azure Groups and Assign Memberson page 126.
Figure 10-90: Initial Operator Login
- 131 -

CHAPTER 10 Registering OVOC Applicatons on Azure OVOC | IOM
The Azure authentication and Permissions request dialog is displayed:
Figure 10-91: Permissions requested
2. Select the Consent on behalf of your organization check box and then click Accept.
If for any reason, you did not select "Consent on behalf of your organization" or do nothave ‘Admin’ permissions for this tenant, then this operation cannot be successfullyapplied until approved by Service Provider Admin, see Troubleshooting - GrantingAdmin Consent on page 137.
3. Login to the Azure portal with Tenant ‘Admin’ permissions and navigate to the newlycreated OVOC application (Enterprise applications > OVOCApplication).
- 132 -

CHAPTER 10 Registering OVOC Applicatons on Azure OVOC | IOM
Figure 10-92: OVOC Application
4. In the Navigation pane, select Users and groups.
Figure 10-93: Users and Groups
Figure 10-94:
5. Do one of the following:
● Assign role to a new user
● Assign role to existing user
Figure 10-95: Assign Role to New User /Existing User
➢ To assign a role to an existing user:
1. Choose a particular user in the list and then click Edit.
- 133 -

CHAPTER 10 Registering OVOC Applicatons on Azure OVOC | IOM
Figure 10-96: Edit Assignment
2. In the left pane, under “Select a role” click None Selected.
3. In the right pane, choose the relevant role and then click Select.
Figure 10-97: Add Assignment
- 134 -

CHAPTER 10 Registering OVOC Applicatons on Azure OVOC | IOM
4. Confirm by clicking Assign.
Figure 10-98: Existing User Defined with "Admin" Role
➢ To Assign a role to a new user:
1. In the left pane under Users, click None Selected.
2. In the right pane, choose the relevant user and then click Select.
Figure 10-99: Choose User
- 135 -

CHAPTER 10 Registering OVOC Applicatons on Azure OVOC | IOM
Figure 10-100:User Selected
3. In the left pane under Select a role, click None Selected.
Figure 10-101:Select a Role
4. In the right pane, choose the relevant role and then click Select.
- 136 -

CHAPTER 10 Registering OVOC Applicatons on Azure OVOC | IOM
Figure 10-102:Assign Role to New User
5. Confirm by clicking Assign.
Figure 10-103:New User Assigned "Operator" Role
6. Do one of the following:
● If configuring a Multitenant setup for the first time proceed to Configuring OVOC WebAzure Settings - Multitenant Setup on page 110.
● If upgrading from a Single Tenant setup proceed to Configuring OVOC Web AzureSettings - Multitenant Upgrade on page 124
Troubleshooting - Granting Admin Consent
This procedure describes the actions required for granting admin consent for the OVOC applic-ation.
➢ To grant admin consent:
1. Login to Azure portal with “admin” of Azure channel tenant.
- 137 -

CHAPTER 10 Registering OVOC Applicatons on Azure OVOC | IOM
2. In the Navigation pane, select Active Directory > Enterprise applications > OVOCApplication
3. Select Security > Permissions.
Figure 10-104:Permissions
4. Click Grant admin consent for OVOC. The following screen is displayed:
Figure 10-105:Permissions Requested
5. Click Accept.
- 138 -

CHAPTER 11 Setting Up Microsoft Teams Subscriber Notifications Services Connection OVOC | IOM
11 Setting Up Microsoft Teams SubscriberNotifications Services ConnectionThis section describes how to setup the connection between the OVOC server and theMicrosoft Teams Subscriber service on Office 365/Microsoft 365/Microsoft Azure. In order toconnect to Teams, the OVOC server Public IP should be accessible from the Global Internet andthe OVOC server should have access to the Global Internet. In addition, the Directory(tenant) ID and the Client (application) ID are required to establish the connection. This sectionincludes the following procedures:
■ Register Microsoft Teams Application below
■ Configure Microsoft Graph API Permissions on page 143
■ Define OVOC FQDN and Load Certificate on page 146
Register Microsoft Teams ApplicationThis procedure describes how to register the Microsoft Teams application that is used forretrieving Call Notifications for the managed Microsoft Teams tenant.
➢ To register the application:
1. Open the Azure Portal, the Overview page is displayed with the Tenant ID of the managedTeams tenant.
Figure 11-1: Tenant ID
2. In the Navigation pane, select App registrations.
- 139 -

CHAPTER 11 Setting Up Microsoft Teams Subscriber Notifications Services Connection OVOC | IOM
Figure 11-2: App Registrations
3. Click New registration.
Figure 11-3: New registration
4. Enter the name of the application and then click Register.
- 140 -

CHAPTER 11 Setting Up Microsoft Teams Subscriber Notifications Services Connection OVOC | IOM
Figure 11-4: Name the application
Figure 11-5: Successful Registration
5. In the Navigation pane select Certificate & Secrets.
- 141 -

CHAPTER 11 Setting Up Microsoft Teams Subscriber Notifications Services Connection OVOC | IOM
Figure 11-6: Certificate & Secrets
6. Click New client secret.
Figure 11-7: New Client Secret
7. Click Add.
The newly added client secret is added as shown in the figure below.
- 142 -

CHAPTER 11 Setting Up Microsoft Teams Subscriber Notifications Services Connection OVOC | IOM
Figure 11-8: Add a client secret
8. The client secret is added as shown in the screen below. Copy it to the clipboard as you willbe required to enter it in later configuration.
Figure 11-9: Added Certificates & Secrets
Configure Microsoft Graph API PermissionsThis procedure describes how to configure the appropriate permissions to connect to MicrosoftGraph API that is used to interface with Microsoft Teams to retrieve the Call Notifications.
➢ To configure Microsoft Graph permissions:
1. In the Navigation pane, select API permissions.
- 143 -

CHAPTER 11 Setting Up Microsoft Teams Subscriber Notifications Services Connection OVOC | IOM
Figure 11-10: API Permissions
2. Click Add a permission.
Figure 11-11: Add a permission
3. Select Grant Admin Consent for .... and select Yes.
If the App hasn't been granted admin consent, users are prompted to grant consentthe first time they use the App.
4. Select Microsoft Graph.
- 144 -

CHAPTER 11 Setting Up Microsoft Teams Subscriber Notifications Services Connection OVOC | IOM
Figure 11-12: Request API Permissions
5. Select Application permissions.
Figure 11-13: Application permissions
6. Search for Permission Call Records.
Figure 11-14: Call Records
7. Set permission CallRecords.Read.All to enable access to retrieved call notifications.
- 145 -

CHAPTER 11 Setting Up Microsoft Teams Subscriber Notifications Services Connection OVOC | IOM
Figure 11-15: API Permissions
8. You can optionally set permission User.Read to display caller details in retrieved callrecords.
Figure 11-16: User Read Permissions
Define OVOC FQDN and Load CertificateYou need to define the OVOC server with an FQDN that binds to the OVOC Server PublicIP address. This FQDN should bind to the OVOC server public IP address and be defined in thepublic DNS server – each request from every PC connected to the internet should be able toreach the OVOC Public IP address from the FQDN.
➢ Do the following:
1. Verify that the DNS resolving for the OVOC FQDN is successful, for example Google.com(include example with OVOC Hostname):
- 146 -

CHAPTER 11 Setting Up Microsoft Teams Subscriber Notifications Services Connection OVOC | IOM
C:\Users\enterprise1user>nslookupwww.google.com
Server: tlc-ovoc.trunkpack.com
Address: 10.1.1.10
Non-authoritative answer:
Name: www.google.com
Addresses: 2a00:1450:4006:801::2004
172.217.18.36
2. In the OVOC Web, open the OVOC Server Configuration screen (System menu> Administration tab > OVOC Server folder > Configuration)
Figure 11-17: OVOC Server Configuration
3. Generate a server certificate with a known Certificate Authority with the OVOC FQDNdefined in the CN (or alternatively in SAN) and then import it to the OVOC server
- 147 -

CHAPTER 11 Setting Up Microsoft Teams Subscriber Notifications Services Connection OVOC | IOM
(overriding default server certificate) using "Option 3 Import Server Certificates fromCertificate Authority (CA)" in the Server Certificates Update menu (see Server CertificatesUpdate on page 273
4. On the device Web interface, open the Network Settings screen (Setup menu > IP Networktab > Advanced folder).
Figure 11-18: Network Settings
5. Configure the Host Name of the SBC. This hostname is retrieved by the User ManagementPack (in Live Cloud for Teams setup) and is used to secure the connection with MicrosoftTeams.
- 148 -

CHAPTER 12 Managing Device Connections OVOC | IOM
12 Managing Device ConnectionsWhen the connections between the OVOC server and the managed devices traverse a NAT orfirewall, direct connections cannot be established (both for OVOC > Device connections and forDevice > OVOC connections). OVOC provides methods for overcoming this issue. These meth-ods can be used for both initial setup and Second-Day management:
■ Establishing OVOC-Devices Connections below
■ Establishing Devices - OVOC Connections on page 153
The table below describes the different connection scenarios.
Table 12-1: Device Connection Scenarios
ConfigurationOption/Deployment Scenario
OVOC Devices
AWS AzureOn-
PremisesPublicNetwork
AWS AzureOn-
Premises
AudioCodes SBC Devices
Cloud Archi-tecture Mode
√ √ - √ √ √
OVOC Server Con-figured withPublic IP
√ √ √ √ √ √ √
Phones
Device ManagerAgent
- - √ - - - √
● For OVOC Managed devices: All remote connections for OVOCmanageddevices require a configured WAN interface on the managed device.
● For more information for phone and Jabra/Third-party vendor deviceconnections, refer to theOVOC Security Guidelines and to the Device ManagerAgent Installation and Configuration Guide/Device Manager for Third-PartyVendor Products Administrator's Manual.
Establishing OVOC-Devices ConnectionsWhen OVOC is deployed behind a firewall or NAT in the cloud or in a remote network, it cannotestablish a direct connection with managed devices using its private IP address. Consequently,you must configure the OVOC Server IP address as follows:
■ For OVOC Cloud deployments: Configure the OVOC server public IP address.
- 149 -

CHAPTER 12 Managing Device Connections OVOC | IOM
■ For OVOC deployments in a remote public network: Configure the IP address of the NATrouter.
SeeConfigure OVOC Server with NAT IP per Interface below
If your deployment implements multitenancy, separate NAT applicative interfaces can be con-figured for each tenant. See Configure OVOC Server with NAT IP per Tenant on the next page
Configure OVOC Server with NAT IP per Interface
This option configures the OVOC server with a physical NAT interface for connecting to devicesthat are deployed behind a NAT in a remote Enterprise or Cloud network.
● When the "Cloud Architecture" mode is enabled, this option is removed from theOVOC Server Manager " Network Configuration" menu.
● NAT configuration supports IPv4 only.
➢ To configure OVOC Server with Public IP address:
1. From the Network Configuration menu, choose NAT, and then press Enter.
Figure 12-1: Configure NAT IP
2. Choose option NAT Per Interface Configuration.
Figure 12-2: NAT Per Interface Configuration
➢ To add a NAT interface:
1. Choose option 1.
- 150 -

CHAPTER 12 Managing Device Connections OVOC | IOM
Figure 12-3: Add NAT
2. Enter the NAT interface that you wish to add.
3. Enter the NAT IP address, and then press Enter.
4. Type y to confirm the changes.
5. Stop and start the OVOC server for the changes to take effect.
➢ To edit a NAT interface:
1. Choose option 2.
2. Enter the NAT interface that you wish to edit.
3. Enter the IP address of the NAT interface, and then press Enter.
4. Type y to confirm the changes.
5. Stop and start the OVOC server for the changes to take effect.
➢ To remove a NAT interface:
1. Choose Option 3.
2. Enter the NAT interface that you wish to remove.
3. Type y to confirm the changes.
4. Stop and start the OVOC server for the changes to take effect.
Configure OVOC Server with NAT IP per Tenant
This option can be configured when OVOC is deployed behind a different NAT to customer ten-ants. It allows the configuration of an applicative level NAT interface for each tenant domain;Devices’ incoming communication like SNMP traps, license reports and file upload/downloadwill communicate via the tenants’ NAT interface.
- 151 -

CHAPTER 12 Managing Device Connections OVOC | IOM
➢ To configure NAT IP addresses per tenant:
1. From the Network Configuration menu, choose NAT, and then press Enter.
Figure 12-4: NAT Configuration per Tenant
2. Choose option NAT Per Tenant Configuration.
3. Enter the number corresponding to the tenant that you wish to configure.
Figure 12-5: NAT IP Address
4. Enter the NAT IP address of the Tenant. Restart is required to apply changes.
- 152 -

CHAPTER 12 Managing Device Connections OVOC | IOM
Figure 12-6: Configure WAN
➢ to change the NAT IP address:
■ Choose option 1.
➢ to delete the NAT IP address:
■ Choose option 2
➢ To restart the server:
■ Choose option 3.
Establishing Devices - OVOC ConnectionsWhen devices are deployed behind a firewall or NAT in the cloud or in a remote network, theycannot connect establish a direct connection with the OVOC server. Consequently, the fol-lowing methods can be used to overcome this issue:
■ Automatic Detection: devices are connected automatically to OVOC through sendingSNMP Keep-alive messages. See Automatic Detection below.
■ OVOC Cloud Architecture Mode: Communication between OVOC deployed in the AWS andAzure Cloud and devices deployed either in the AWS Cloud or in a remote network aresecured over an HTTP/S tunnel overlay network. See Configure OVOC Cloud ArchitectureMode (WebSocket Tunnel) on the next page
Automatic Detection
The Automatic Detection feature enables devices to be automatically connected to OVOC overSNMP. When devices are connected to the power supply in the enterprise network and/or arerebooted and initialized, they're automatically detected by the OVOC and added by default tothe AutoDetection region. For this feature to function, devices must be configured with theOVOC server's IP address and configured to send keep-alive messages. OVOC then connects tothe devices and automatically determines their firmware version and subnet. Devices are then
- 153 -

CHAPTER 12 Managing Device Connections OVOC | IOM
added to the appropriate tenant/region according to the best match for subnet address. Whena default tenant exists, devices that cannot be successfully matched with a subnet are added toan automatically created AutoDetection Region under the default tenant. When a default ten-ant does not exist and the device cannot be matched with a subnet, the device isn't added toOVOC.
For more information, refer to Section "Adding AudioCodes Devices Automatically" intheOVOC User's Manual.
Configure OVOC Cloud Architecture Mode (WebSocket Tunnel)
When OVOC is deployed in a public cloud and managed devices are either deployed in theCloud or in an enterprise network, an automatic mechanism can be enabled to secure theOVOC server > SBC/UMP-365 Management Pack/SmartTAP 360° Live device communicationthrough binding to a dedicated HTTP/S tunnel through a generic WebSocket server connection.This mechanism binds several different port connections including SNMP, HTTP, syslog anddebug recording into an HTTP/S tunnel overlay network. This eliminates the need for admin-istrators to manually manage firewall rules for these connections and to lease third-partyVPN services. When operating in this mode, Single Sign-on can also be performed from theDevices Page link in the OVOC Web interface to devices deployed behind a NAT. The figurebelow illustrates the OVOC Cloud Architecture.
Figure 12-7: Cloud Architecture
Figure 12-8:
● This mode is supported on Microsoft Azure, Amazon AWS, VMware and HyperVplatforms for all SBC devices Version 7.2.256 and later; SmartTAP Version 5.5and later and UMP 365 Management Pack Version 8.0.220 and later.
● This mode is only supportsed for IPv4 networkingaddresses.
This section includes the following:
■ Before Enabling Cloud Architecture Mode on the next page
- 154 -

CHAPTER 12 Managing Device Connections OVOC | IOM
■ Configuring Cloud Architecture Mode (WebSocket Tunnel) on the next page
■ Change the Cloud Architecture Mode Service Password on page 157
Before Enabling Cloud Architecture Mode
Before enabling Cloud Architecture mode, ensure the following:
■ Ensure HTTP port 80 or HTTPS port 443 are open on the Enterprise firewall.
● For maximum security, its advised to implement this connection over HTTPS port443 with One-way authentication. Mutual authentication is not supported for thismode.
● This connection can be secured using either AudioCodes certificates or customcertificates.
● Port 915 used for WebSocket Client and OVOC Server communication (internal)see Configuring the Firewall on page 297
■ Ensure that all managed devices have been upgraded to the software version that supportsthis feature (refer to SBC-Gateway Series Release Notes for Latest Release Versions 7.2)
If devices are not appropriately upgraded then they cannot be managed in OVOC.
■ Ensure that the following parameters have been configured for the managed devices (seeConfiguring SBC for Tunnel Mode):
■ In the OVOC Web interface, the SBC Devices Communication parametermust be set toIP Based in the Configuration screen (System tab > Administrationmenu > OVOC Serverfolder > Configuration)
Configuring OVOC Web Interface for Tunnel Mode
This section describes how to configure the OVOC Web SBC device communication.
➢ To configure SBC devices communication:
1. Open the OVOC Server Configuration screen.
- 155 -

CHAPTER 12 Managing Device Connections OVOC | IOM
Figure 12-9: SBC Devices Communication
Figure 12-10:
2. Set parameter SBC Devices Communication to IP Based.
3. Ensure that the OVOC Hostname is configured with IP address.
Configuring Cloud Architecture Mode (WebSocket Tunnel)
This option configures the OVOC server in a cloud topology. When configured, a "secure tun-nel“ overlay network” is established between the connected devices and the OVOC server. Thisconnection is secured over a WebSocket connection. The Tunnel Status indicates the status forall sub-processes running for this architecture.
➢ To setup cloud architecture:
1. From the Network Configuration menu, choose Cloud Architecture.
Figure 12-11: Cloud Architecture
2. Select option Enable Cloud Architecture.
3. Select the IPv4 interface for which to enable this mode and then press Enter.
- 156 -

CHAPTER 12 Managing Device Connections OVOC | IOM
Figure 12-12: Choose IP Interface
The OVOC server is restarted.
When this option is configured, the NAT configuration option is disabled.
Add New Cloud Architecture Mode User
This option allows you to create new users for the Cloud Architecture mode.
➢ To create new users:
1. Select option 2 Add New User
Figure 12-13: Create New Cloud Architecture User
2. Enter the name of the new user and the password.
Change the Cloud Architecture Mode Service Password
This section describes how to change the password for a Cloud Architecture mode user.
➢ To change the password:
1. Select Option 3 Edit User Password.
- 157 -

CHAPTER 12 Managing Device Connections OVOC | IOM
Figure 12-14: Edit User Password
2. Select the desired user whose password you wish to change and confirm.
3. Enter the new password and confirm.
Connecting Mediant Cloud Edition (CE) Devices on AzureThis section describes how to connect Mediant Cloud Edition (CE) devices to OVOC using one ofthe following options:
■ Option 1: Connecting Mediant Cloud Edition (CE) SBC Devices to OVOC on Azure usingPublic IP Address below
■ Option 2 Connecting Mediant Cloud Edition (CE) Devices to OVOC on Azure using Internal IPAddress on page 162
Option 1: Connecting Mediant Cloud Edition (CE) SBC Devices toOVOC on Azure using Public IP Address
This section describes how to establish a secure connection between the OVOC server andMediant Cloud Edition (CE) SBC devices which are both deployed in the Azure Cloud in separateVirtual networks. Communication between OVOC and Mediant CE SBC devices is carried overthe public IP addresses on both sides, requiring NAT translation from internal to public IPaddresses. This is performed by configuring the OVOC server with the public IP address of theAzure platform where the OVOC server is installed (see Configure OVOC Server with NAT IP perInterface on page 150). The figure below illustrates this topology.
The Mediant CE SBC devices must be added to OVOC using Automatic Detection.Refer to Section "Adding AudioCodes Devices Automatically" in theOVOC User'sManual.
- 158 -

CHAPTER 12 Managing Device Connections OVOC | IOM
Figure 12-15: Microsoft Azure Topology
This section includes the following procedures:
1. Configuring the OVOC Server Manager on Azure (Public IP) below
2. Configuring Mediant Cloud Edition (CE) SBC Devices on Azure (Public IP) on the next page
Configuring the OVOC Server Manager on Azure (Public IP)
This section describes the required configuration actions on the OVOC server deployed in theAzure Cloud.
Restart the OVOC server where specified in the referenced procedures for changesto take effect.
➢ To configure the OVOC server:
1. Login to the OVOC Server Manager (see Connecting to the OVOC Server Manager onpage 201).
2. Change the following default passwords:
● acems OS user (see OS Users Passwords on page 266)
● root OS user (see OS Users Passwords on page 266)
Unless you have made special configurations, the Azure instance is in the publiccloud and therefore is accessible over the Internet. Consequently, it is highlyrecommended to change theses default passwords to minimize exposure topassword hacking.
3. Load the OVOC license (see License on page 221).
- 159 -

CHAPTER 12 Managing Device Connections OVOC | IOM
4. Configure the OVOC server with Azure Public IP address to enable devices deployed behinda NAT to connect to OVOC (see Configure OVOC Server with NAT IP per Interface onpage 150). See the setup of the virtual machine to find the Azure Public IP (see CreatingOVOC Virtual Machine on Microsoft Azure on page 28
5. Configure the Azure IP address/Domain Name (where OVOC is installed) as the externalNTP clock source (see NTP on page 250).
The same clock source should be configured on the managed devices (seeConfiguring Mediant CE OVOC Public IP Connection Settings using Web Interfaceon the next page).
Configuring Mediant Cloud Edition (CE) SBC Devices on Azure (Public IP)
This step describes the following configuration procedures on the Mediant CE to connect to theOVOC server that is deployed in the Azure Cloud:
1. Configuring Mediant CE SNMP Public IP Connection using Stack Manager below
2. Configuring Mediant CE OVOC Public IP Connection Settings using Web Interface on thenext page
Configuring Mediant CE SNMP Public IP Connection using Stack Manager
This step describes how to configure the SNMP communication between the OVOC serverdeployed in the Azure Cloud and the Mediant CE using the Stack Manager.
➢ To configure the Stack Manager:
1. Log in to the Web interface of the Stack Manager that was used to create Mediant CloudEdition (CE) SBC. Refer to Stack Manager for Mediant CE SBC User's Manual.
2. Click the "Mediant CE stack".
3. Click theModify button and append 161/udp port (for SNMP traffic) to "ManagementPorts" parameter.
4. Click Update to apply the new configuration.
- 160 -

CHAPTER 12 Managing Device Connections OVOC | IOM
Figure 12-16: Modify Stack
Configuring Mediant CE OVOC Public IP Connection Settings using Web Interface
This section describes how to configure the communication settings between the Mediant CEdevice and the OVOC server deployed in the Azure Cloud.
The following procedure describes the required configuration for a single CE SBCdevice. For mass deployment, you can load configuration files to multiple devicesusing 'Full' or 'Incremental' INI file options (refer to the relevant SBC User's Manualfor more information).
➢ To configure the Mediant Cloud Edition (CE) SBC :
1. Login to the Mediant Cloud Edition (CE) SBC Web interface or connect from the Devicespage in the OVOC Web interface.
2. Open the Quality of Experience Settings screen (Setup Menu > Signaling & Media tab> Media folder > Quality of Experience > Quality of ExperienceSettings).
3. Click Edit and configure the Keep-Alive Time Interval to 1.
4. Click Apply to confirm the changes.
- 161 -

CHAPTER 12 Managing Device Connections OVOC | IOM
5. Open the TIME & DATE page (Setup menu > Administration tab ) and in the NTP ServerAddress field, set the Microsoft Azure site IP address/Domain Name(where theOVOC server is installed) as the NTP server clock source.
6. Click Apply to confirm the changes.
7. Open the SNMP Community Settings Page (Setup menu > Administration tab> SNMP folder).
8. Set parameter SNMP Disable to No ('Yes' by default).
9. Click Apply to confirm changes.
10. Open the Mediant Cloud Edition (CE) SBC AdminPage (deviceIPaddress/AdminPage) andconfigure the following ini parameters:
HostName = <Load Balancer IP>SendKeepAliveTrap = 1KeepAliveTrapPort = 1161SNMPManagerIsUsed_0 = 1SNMPManagerTableIP_0 = <OVOC Public IP Address>
11. Reset the device for your settings to take effect (Setup menu > Administration tab> Maintenance folder > Maintenance Actions).
Option 2 Connecting Mediant Cloud Edition (CE) Devices to OVOC onAzure using Internal IP Address
This section describes how to establish a secure connection between the OVOC server andMediant CE devices which are both deployed in the Azure Cloud in the same Virtual network.Communication between OVOC and Mediant CE SBC devices is carried over internal IPaddresses (Private IP addresses) on both sides. The figure below illustrates this topology.
The Mediant CE SBC devices must be added manually to OVOC. Refer to Section"Adding AudioCodes Devices Manually " in theOVOC User's Manual.
- 162 -

CHAPTER 12 Managing Device Connections OVOC | IOM
Figure 12-17: Internal IP Connection
This section includes the following procedures:
■ Configuring the OVOC Server Manager on Azure (Internal IP) below
■ Configuring Mediant Cloud Edition (CE) SBC Devices on Azure (Internal IP) on the next page
The Mediant CE SBC devices must be added to OVOCmanually. Refer to Section"Adding AudioCodes Devices Manually" in theOVOC User's Manual.
Configuring the OVOC Server Manager on Azure (Internal IP)
This section describes the required configuration actions on the OVOC server deployed in theAzure Cloud when CE devices are deployed in the same Virtual network.
Restart the OVOC server where specified in the referenced procedures for changesto take effect.
➢ To configure the OVOC server:
1. Login to the OVOC Server Manager (see Connecting to the OVOC Server Manager onpage 201).
2. Change the following default passwords:
● acems OS user (see OS Users Passwords on page 266)
● root OS user (see OS Users Passwords on page 266)
- 163 -

CHAPTER 12 Managing Device Connections OVOC | IOM
Unless you have made special configurations, the Azure instance is in the publiccloud and therefore is accessible over the Internet. Consequently, it is highlyrecommended to change theses default passwords to minimize exposure topassword hacking.
3. Load the OVOC license (see License on page 221).
4. Configure the OVOC server with its internal (private) IP address to enable devices deployedin the same Azure Virtual network to connect to OVOC (see Server IP Address on page 235).See the setup of the virtual machine Step 1: Creating Virtual Machine on Azure to find theAzure Internal IP.
5. Configure the Azure IP address/Domain Name (where OVOC is installed) as the externalNTP clock source (see NTP on page 250).
The same clock source should be configured on the managed devices (seeConfiguring Mediant CE OVOC Internal IP Connection Settings using Web Interfaceon the next page
Configuring Mediant Cloud Edition (CE) SBC Devices on Azure (Internal IP)
This step describes the following configuration procedures on the Mediant CE to connect to theOVOC server that is deployed in the Azure Cloud in the same Virtual network by connectingthrough internal IP addresses on both sides:
■ Configuring Mediant CE SNMP Internal IP Connection with OVOC using Stack Managerbelow
■ Configuring Mediant CE OVOC Internal IP Connection Settings using Web Interface on thenext page
Configuring Mediant CE SNMP Internal IP Connection with OVOC using Stack Manager
This step describes how to configure the SNMP communication between the OVOC server andMediant CE devices using the Stack Manager when both are deployed in the same Azure Virtualnetwork.
➢ To configure the Stack Manager:
1. Log in to the Web interface of the Stack Manager that was used to create Mediant CloudEdition (CE) SBC. Refer to Stack Manager for Mediant CE SBC User's Manual.
2. Click the "Mediant CE stack".
3. Click theModify button and append 161/udp port (for SNMP traffic) to "ManagementPorts" parameter.
4. Click Update to apply the new configuration.
- 164 -

CHAPTER 12 Managing Device Connections OVOC | IOM
Figure 12-18: Modify Stack
Configuring Mediant CE OVOC Internal IP Connection Settings using Web Interface
This section describes how to configure the connection settings between the Mediant CE deviceand the OVOC server deployed in the Azure Cloud in the same Virtual network.
The following procedure describes the required configuration for a single CE SBCdevice. For mass deployment, you can load configuration files to multiple devicesusing 'Full' or 'Incremental' INI file options (refer to the relevant SBC User's Manualfor more information).
- 165 -

CHAPTER 12 Managing Device Connections OVOC | IOM
➢ To configure the Mediant Cloud Edition (CE) SBC:
1. Login to the Mediant Cloud Edition (CE) SBC Web interface or connect from the Devicespage in the OVOC Web interface.
2. Open the TIME & DATE page (Setup menu > Administration tab ) and in the NTP ServerAddress field, set the Microsoft Azure site IP address/Domain Name(where theOVOC server is installed) as the NTP server clock source.
3. Click Apply to confirm the changes.
4. Open the SNMP Community Settings Page (Setup menu > Administration tab> SNMP folder).
5. Set parameter SNMP Disable to No ('Yes' by default).
6. Click Apply to confirm changes.
7. Open the Mediant Cloud Edition (CE) SBC AdminPage (deviceIPaddress/AdminPage) andconfigure the following ini parameters:
HostName = <Load Balancer IP>SNMPManagerIsUsed_0 = 1SNMPManagerTableIP_0 = <OVOC Server Internal IP>
8. Reset the device for your settings to take effect (Setup menu > Administration tab> Maintenance folder > Maintenance Actions).
Connecting Mediant Cloud Edition (CE) SBC Devices on AWSThis section describes the procedure for establishing a secure connection between the OVOCserver which is installed in the AWS Cloud and Mediant Cloud Edition (CE) SBC devices whichare also deployed in the AWS Cloud. Communication between OVOC and Mediant CE SBCdevices is carried over the public IP addresses on both sides, requiring NAT translation frominternal to public IP addresses. This can be performed by either configuring the OVOC serverwith the public IP address of the AWS platform where the OVOC server is deployed (see Con-figure OVOC Server with NAT IP per Interface on page 150) or by configuring OVOC Cloud Archi-tecture mode (seeConfigure OVOC Cloud Architecture Mode (WebSocket Tunnel) on page 154
The Mediant CE SBC devices must be added to OVOC using Automatic Detection.Refer to Section "Adding AudioCodes Devices Automatically" in theOVOC User'sManual.
This section includes the following procedures:
■ Step 2-1 Configuring the OVOC Server (OVOC Server Manager) on AWS on the next page
■ Step 2-2 Configuring Mediant Cloud Edition (CE) SBC Devices on AWS on the next page
- 166 -

CHAPTER 12 Managing Device Connections OVOC | IOM
Step 2-1 Configuring the OVOC Server (OVOC Server Manager) on AWS
This section describes the required configuration actions on the OVOC server deployed in theAWS Cloud.
Restart the OVOC server where specified in the referenced procedures for changesto take effect.
➢ To configure the OVOC server:
1. Login to the OVOC Server Manager (see Connecting to the OVOC Server Manager onpage 201).
2. Change the following default passwords:
● acems OS user (see OS Users Passwords on page 266)
● root OS user (see OS Users Passwords on page 266)
Unless you have made special configurations, the AWS instance is in the public cloudand therefore is accessible over the Internet. Consequently, it is highly recommendedto change theses default passwords to minimize exposure to password hacking.
3. Load OVOC license (see License on page 221).
4. Configure the OVOC server with AWS Public IP address to enable devices deployed behind aNAT to connect to OVOC server (see Configure OVOC Server with NAT IP per Interface onpage 150). See the setup of the virtual machine Launching Public Image on AWS on page 20to find the AWS Public IP.
5. Configure the AWS Public IP address/Domain Name (where OVOC is installed) as theexternal NTP clock source (see NTP on page 250).
The same clock source should be configured on the managed devices (see Step 2-2-2 Configuring Mediant CE Communication Settings Using Web Interface on the nextpage).
Step 2-2 Configuring Mediant Cloud Edition (CE) SBC Devices on AWS
This step describes the following configuration procedures on the Mediant CE SBC devices toconnect them to the OVOC server that is deployed in the AWS Cloud:
■ Step 2-2-1: Configuring Mediant CE SNMP Connection with OVOC in Cloud using StackManager on the next page
■ Step 2-2-2 Configuring Mediant CE Communication Settings Using Web Interface on thenext page
- 167 -

CHAPTER 12 Managing Device Connections OVOC | IOM
Step 2-2-1: Configuring Mediant CE SNMP Connection with OVOC in Cloud usingStack Manager
This step describes how to configure the SNMP communication between the OVOC serverdeployed in the Azure Cloud and the Mediant CE using the Stack Manager.
➢ To configure the Stack Manager:
1. Log in to the Web interface of the Stack Manager that was used to create Mediant CloudEdition (CE) SBC. Refer to Stack Manager for Mediant CE SBC User's Manual.
2. Click the "Mediant CE stack".
3. Click theModify button and append 161/udp port (for SNMP traffic) to "ManagementPorts" parameter.
4. Click Update to apply the new configuration.
Figure 12-19: Modify Stack
Step 2-2-2 Configuring Mediant CE Communication Settings Using Web Interface
This section describes how to configure the communication settings between the Mediant CEdevice and the OVOC server deployed in the AWS Cloud.
- 168 -

CHAPTER 12 Managing Device Connections OVOC | IOM
The following procedure describes the required configuration for a single CE SBCdevice. For mass deployment, you can load configuration files to multiple devicesusing 'Full' or 'Incremental' INI file options (refer to the relevant SBC User's Manualfor more information).
➢ To configure the Mediant Cloud Edition (CE) SBC for AWS:
1. Login to the Mediant Cloud Edition (CE) SBC Web interface or connect from the Devicespage in the OVOC Web interface.
2. Open the Quality of Experience Settings screen (Setup Menu > Signaling & Media tab> Media folder > Quality of Experience > Quality of ExperienceSettings).
3. Click Edit and configure the Keep-Alive Time Interval to 1.
4. Click Apply to confirm changes.
5. Open the TIME & DATE page (Setup menu > Administration tab ) and configure the AWSsite IP address/FQDN Domain Name(where the OVOC server is installed) as the NTP serverclock source.
6. Click Apply to confirm changes.
7. Open the SNMP Community Settings Page (Setup menu > Administration tab> SNMP folder).
8. Set parameter SNMP Disable to No ('Yes' by default).
9. Click Apply to confirm changes.
10. Open the Mediant Cloud Edition (CE) SBC AdminPage (deviceIPaddress/AdminPage) andconfigure the following ini parameters:
HostName = <Load Balancer IP>SendKeepAliveTrap = 1KeepAliveTrapPort = 1161SNMPManagerIsUsed_0 = 1SNMPManagerTableIP_0 = <OVOC Public IP Address>
11. Reset the device for your settings to take effect (Setup menu > Administration tab> Maintenance folder > Maintenance Actions).
- 169 -

Part IV
OVOC Server Upgrade
This part describes the upgrade of the OVOC server on dedicated hardware and onvirtual and cloud platforms.

Content OVOC | IOM
13 Upgrading OVOC Server on Amazon AWS andMicrosoft AzureThis section describes how to upgrade the OVOC server on the Amazon AWS and MicrosoftAzure platforms.
● Before proceeding, it is highly recommended to backup the OVOC server files toan external location (seeOVOC Server Backup Processes on page 194).
● Before proceeding, ensure that the minimum platform requirements are met (seeHardware and Software Specifications on page 8). Failure to meet theserequirements will lead to the aborting of the upgrade.
● For obtaining the upgrade file, see OVOC Software Deliverables on page 15✔ Note that you must verify this file, see Files Verification on page 18
● For pre-upgrade actions, see Before Upgrading on Microsoft Azure below● For post-upgrade actions, see After Upgrading on AWS on page 173
Before Upgrading on Microsoft AzureThis procedure describes the actions required before upgrading to OVOC version 8.0 instancewith updated memory requirements.
➢ Do the following:
1. Stop your OVOC instance (see Stop the Application on page 220
2. Change Instance type to the following:
● Low Profile: D8ds_v4
● High Profile: D16ds_v4
3. Start new OVOC instance.
4. Upgrade OVOC Software to the new OVOC software version as described in UpgradingOVOC Server on Amazon AWS and Microsoft Azure above.
Cloud Upgrade ProcedureThis section describes how to upgrade OVOC on the Azure and AWS platforms.
➢ To upgrade the OVOC server on Azure and AWS:
1. Copy the DVD3 ISO file that you received from AudioCodes to your PC.
2. Using WinSCP utility (see Transferring Files on page 346), copy the .ISO file to the OVOCserver acems user home directory: /home/acems
3. Open an SSH connection.
- 171 -

Content OVOC | IOM
4. Login into the OVOC server as acems user with password acems (or customer definedpassword).
5. Switch to 'root' user
su - root
6. Mount the DVD3.iso file to the /mnt directory:
mount /home/acems/DVD3_EMS_ 8.0.3098.iso /mnt
cd /mnt/EmsServerInstall
7. Run the installation script:
./install
8. Enter y, and then press Enter to accept the License agreement.
Figure 13-1: OVOC server Upgrade – License Agreement
9. The upgrade process installs OS packages updates and patches. After the patch installation,reboot might be required:
● If you are prompted to reboot, press Enter to reboot the OVOC server and then repeatsteps 4-9 (inclusive).
● If you are not prompted to reboot, proceed to step Wait for the installation tocomplete and reboot the OVOC server by typing reboot. on the next page
- 172 -

Content OVOC | IOM
Figure 13-2: OVOC server Installation Complete
10. Wait for the installation to complete and reboot the OVOC server by typing reboot.
11. When the OVOC server has successfully restarted, login into the OVOC server by SSH, as‘acems’ user and enter password acems.
12. Switch to 'root' user and provide root password (default password is root):
su - root
13. Type the following command:
# EmsServerManager
14. Verify that all processes are up and running (see Viewing Process Statuses on page 206) andthat you can login to OVOC Web client.
After Upgrading on AWSThis procedure below describes the required actions on AWS following the upgrade to versionOVOC Version 8.0.
➢ Do the following:
1. Run full OVOC backup (see OVOC Server Backup Processes on page 194
2. Create new AWS instance on m5.4xlarge (High Profile) machine with OVOC Softwareversion 8.0.
3. Restore OVOC data from the backup (see OVOC Server Restore on page 196
The OVOC version from where the backup is taken must be identical to the OVOCversion on which the restore is run.
- 173 -

CHAPTER 14 Upgrading OVOC Server on VMware and Microsoft Hyper-V Virtual Machines OVOC | IOM
14 Upgrading OVOC Server on VMware andMicrosoft Hyper-V Virtual MachinesThis chapter describes how to upgrade the OVOC server on VMware and Microsoft Hyper-VVirtual machines.
● Before proceeding, it is highly recommended to backup the OVOC server files toan external location (OVOC Server Backup Processes on page 194).
● If you are upgrading from Version 7.2.3000, you can optionally migrate OVOCtopology to Version 7.4 and later (see documentMigration from EMS and SEMVersion 7.2.3000 to One Voice Operations Center).
● Ensure that the minimum platform requirements are met (see Hardware andSoftware Specifications on page 8). Failure to meet these requirements will leadto the aborting of the upgrade.
● For obtaining the upgrade file, see OVOC Software Deliverables on page 15✔ Note that you must verify this file, see Files Verification on page 18
● VMware platform only: If you are installing the Service Provider Cluster mode, aseparate upgrade image is provided for each of the following components:Management server, VQM server and PM server. Therefore, you must run theupgrade script separately for each of these images.
Run the Server Upgrade ScriptThis section describes how to run the OVOC server upgrade script:
■ Option 1: Standard Upgrade Script below
■ Option 2: Service Provider Cluster Upgrade Scripts on page 177
Option 1: Standard Upgrade Script
Once you have setup the virtual machines, you can run the OVOC Server upgrade script.
Before starting the installation, it is highly recommended to configure the SSH client(e.g. Putty application) to save the session output into a log file.
➢ To run the OVOC Server upgrade:
1. Using the WinSCP utility (see Transferring Files on page 346), copy the DVD3 .ISO file thatyou saved to your PC in Step 1: Setup the Virtual Machine to the OVOC server acems userhome directory: /home/acems
2. Open an SSH connection or the VM console.
3. Login into the OVOC server as ‘acems’ user with password acems (or customer definedpassword).
4. Switch to 'root' user and provide root password (default password is root):
- 174 -

CHAPTER 14 Upgrading OVOC Server on VMware and Microsoft Hyper-V Virtual Machines OVOC | IOM
su – root
5. Mount the CDROM to make it available:
mount /home/acems/DVD3_OVOC_ 8.0.3098.iso /mnt
cd /mnt/EmsServerInstall/
6. Run the installation script from its location:
./install
Figure 14-1: OVOC server Installation Script
7. Enter y, and then press Enter to accept the License agreement.
- 175 -
CHAPTER 14 Upgrading OVOC Server on VMware and Microsoft Hyper-V Virtual Machines OVOC | IOM
Figure 14-2: OVOC server Upgrade – License Agreement
8. The upgrade process installs OS packages updates and patches. After the patch installation,reboot might be required:
● If you are prompted to reboot, press Enter to reboot the OVOC server and then repeatsteps 2-7 (inclusive).
● If you are not prompted to reboot, proceed to step Wait for the installation tocomplete and reboot the OVOC server by typing reboot. below
Figure 14-3: OVOC server Installation Complete
9. Wait for the installation to complete and reboot the OVOC server by typing reboot.
10. When the OVOC server has successfully restarted, login into the OVOC server by SSH, as‘acems’ user and enter password acems.
11. Switch to 'root' user and provide root password (default password is root):
su - root
12. Type the following command:
# EmsServerManager
- 176 -

CHAPTER 14 Upgrading OVOC Server on VMware and Microsoft Hyper-V Virtual Machines OVOC | IOM
13. Verify that all processes are up and running (Viewing Process Statuses on page 206) andverify that login to OVOC Web client is successful.
Option 2: Service Provider Cluster Upgrade Scripts
Once you have setup the virtual machines, you can run the OVOC server upgrade scripts for theManagement, VQM and PM servers; a separate script file for each of these cluster nodes isprovided on DVD3-OVOC Server Application ISO file. Do the following:
1. Upgrade Management server (see Upgrade Management Server below)
2. Upgrade PM and VQM servers:
● Upgrade VQM Server on page 179
● Upgrade PM Server on page 182
● Before starting the installation, it is highly recommended to configure the SSHclient (e.g. Putty application) to save the session output into a log file.
● Upgrade the Management server prior to upgrading the VQM and PM servers.
Upgrade Management Server
This section describes how to upgrade the Management server cluster node.
➢ To upgrade the Management Server cluster node:
1. Using the WinSCP utility (see Transferring Files on page 346), copy the DVD3 .ISO file thatyou saved to your PC in Step 1: Setup the Virtual Machineto the OVOC server acems userhome directory: /home/acems
2. Open an SSH connection or the VM console.
3. Login into the OVOC server as ‘acems’ user with password acems (or customer definedpassword).
4. Switch to 'root' user and provide root password (default password is root):
su – root
5. Mount the CDROM to make it available:
mount /home/acems/DVD3_OVOC_ 8.0.3098.iso /mnt
cd /mnt/EmsServerInstall/
6. Run the installation script from its location:
- 177 -

CHAPTER 14 Upgrading OVOC Server on VMware and Microsoft Hyper-V Virtual Machines OVOC | IOM
./install
Figure 14-4: OVOC server Installation Script
7. Enter y, and then press Enter to accept the License agreement.
Figure 14-5: OVOC server Upgrade – License Agreement
8. The upgrade process installs OS packages updates and patches. After the patch installation,reboot might be required:
- 178 -

CHAPTER 14 Upgrading OVOC Server on VMware and Microsoft Hyper-V Virtual Machines OVOC | IOM
● If you are prompted to reboot, press Enter to reboot the OVOC server and then repeatsteps 2-7 (inclusive).
● If you are not prompted to reboot, proceed to step Wait for the installation tocomplete and reboot the OVOC server by typing reboot. below
Figure 14-6: OVOC server Installation Complete
9. Wait for the installation to complete and reboot the OVOC server by typing reboot.
10. When the Management server has successfully restarted, login into the Managementserver by SSH, as ‘acems’ user and enter password acems.
11. Switch to 'root' user and provide root password (default password is root):
su - root
12. Type the following command:
# EmsServerManager
13. Verify that all processes are up and running (Viewing Process Statuses in Service ProviderCluster Mode on page 208) and verify that login to OVOC Web client is successful.
Upgrade VQM Server
Once you have setup the virtual machines and installed the Management Server (see ), you canrun the VQM server upgrade script.
Before starting the installation, it is highly recommended to configure the SSH client(e.g. Putty application) to save the session output into a log file.
➢ To upgrade VQM server:
1. Using the WinSCP utility (see Transferring Files on page 346 ), copy the DVD3 .ISO filecontaining the VQM server installation that you saved to your PC inStep 1: Setup the VirtualMachine to the OVOC server acems user home directory: /home/acems
2. Open an SSH connection or the VM console.
3. Login into the OVOC server as ‘acems’ user with password acems (or customer definedpassword).
4. Switch to 'root' user and provide root password (default password is root):
- 179 -

CHAPTER 14 Upgrading OVOC Server on VMware and Microsoft Hyper-V Virtual Machines OVOC | IOM
su – root
5. Mount the CDROM to make it available:
mount /home/acems/DVD3_OVOC_ 8.0.3098.iso /mnt
cd /mnt/EmsServerInstall/
6. Run the installation script from its location:
./install_vqm
Figure 14-7: OVOC server Installation Script
7. Enter y, and then press Enter to accept the License agreement.
- 180 -

CHAPTER 14 Upgrading OVOC Server on VMware and Microsoft Hyper-V Virtual Machines OVOC | IOM
Figure 14-8: OVOC server Upgrade – License Agreement
8. The upgrade process installs OS packages updates and patches. After the patch installation,reboot might be required:
● If you are prompted to reboot, press Enter to reboot the OVOC server and then repeatsteps 2-7 (inclusive).
● If you are not prompted to reboot, proceed to step Wait for the installation tocomplete and reboot the OVOC server by typing reboot. below
Figure 14-9: OVOC server Installation Complete
9. Wait for the installation to complete and reboot the OVOC server by typing reboot.
10. When the VQM server has successfully restarted, login to VQM server by SSH, as ‘acems’user and enter password acems.
11. Switch to 'root' user and provide root password (default password is root):
su - root
12. Type the following command:
- 181 -

CHAPTER 14 Upgrading OVOC Server on VMware and Microsoft Hyper-V Virtual Machines OVOC | IOM
# EmsServerManager
13. Verify that all processes are up and running (Viewing Process Statuses in Service ProviderCluster Mode on page 208).
Upgrade PM Server
Once you have setup the virtual machines and installed the Management Server (see Step 2:Run the OVOC Server Upgrade Script), you can run the PM server upgrade script.
Before starting the installation, it is highly recommended to configure the SSH client(e.g. Putty application) to save the session output into a log file.
➢ To run the PM server upgrade:
1. Using the WinSCP utility(see Transferring Files on page 346), copy the DVD3 .ISO filecontaining the VQM server installation that you saved to your PC in Step 1: Setup theVirtual Machine to the OVOC server acems user home directory: /home/acems.
2. Open an SSH connection or the VM console.
3. Login into the OVOC server as ‘acems’ user with password acems (or customer definedpassword).
4. Switch to 'root' user and provide root password (default password is root):
su – root
5. Mount the CDROM to make it available:
mount /home/acems/DVD3_OVOC_ 8.0.3098.iso /mnt
cd /mnt/EmsServerInstall/
6. Run the installation script from its location:
./install_pm
- 182 -

CHAPTER 14 Upgrading OVOC Server on VMware and Microsoft Hyper-V Virtual Machines OVOC | IOM
Figure 14-10: OVOC server Installation Script
7. Enter y, and then press Enter to accept the License agreement.
Figure 14-11: OVOC server Upgrade – License Agreement
8. The upgrade process installs OS packages updates and patches. After the patch installation,reboot might be required:
● If you are prompted to reboot, press Enter to reboot the OVOC server and then repeatsteps 2-7 (inclusive).
● If you are not prompted to reboot, proceed to step Wait for the installation tocomplete and reboot the OVOC server by typing reboot. on the next page
- 183 -

CHAPTER 14 Upgrading OVOC Server on VMware and Microsoft Hyper-V Virtual Machines OVOC | IOM
Figure 14-12: OVOC server Installation Complete
9. Wait for the installation to complete and reboot the OVOC server by typing reboot.
10. When the PM server has successfully restarted, login into the PM server by SSH, as ‘acems’user and enter password acems.
11. Switch to 'root' user and provide root password (default password is root):
su - root
12. Type the following command:
# EmsServerManager
13. Verify that all processes are up and running (Viewing Process Statuses in Service ProviderCluster Mode on page 208).
- 184 -

CHAPTER 15 Upgrading OVOC Server on Dedicated Hardware OVOC | IOM
15 Upgrading OVOC Server on Dedicated HardwareThis section describes the upgrade of the OVOC server on dedicated hardware.
● Before proceeding, it is highly recommended to backup the OVOC server files toan external location (OVOC server Backup).
● If you are upgrading from Version 7.2.3000, you can optionally migrate topologyto Version 7.4 and later (see documentMigration from EMS and SEM Version7.2.3000 to One Voice Operations Center).
● Before proceeding, ensure that the minimum platform requirements are met (seeHardware and Software Specifications on page 8). Failure to meet theserequirements will lead to the aborting of the upgrade.
● Upgrade of OVOC Version 7.8 and later must be performed on HP DL Gen10machines. Upgrade on HP DL G8 machines is not supported.
● For obtaining the upgrade file, see OVOC Software Deliverables on page 15✔ Note that you must verify this file, see Files Verification on page 18
Upgrading the OVOC Server-DVDThis section describes how to upgrade the OVOC server from the AudioCodes suppliedinstallation DVD. To upgrade the OVOC server, only DVD3 is required (see OVOC SoftwareDeliverables on page 15). Verify in the OVOC Manager ‘General Info’ screen that you haveinstalled the latest Linux revision ( seeHardware and Software Specifications on page 8). If youhave an older OS revision, a clean installation must be performed using all three DVDs ( seeInstalling the OVOC server on Dedicated Hardware).
Before starting the installation, it is highly recommended to configure the SSH client(e.g. Putty application) to save the session output into a log file.
➢ To upgrade the OVOC server:
1. Insert DVD3-OVOC Server Application Installation into the DVD ROM.
2. Login into the OVOC server by SSH, as ‘acems’ user and enter password acems (or customerdefined password).
3. Switch to 'root' user and provide root password (default password is root):
su – root
4. Mount the CDROM to make it available (if required):
mount /home/acems/DVD3_OVOC_/mnt
5. Run the installation script from its location:
- 185 -

CHAPTER 15 Upgrading OVOC Server on Dedicated Hardware OVOC | IOM
cd /misc/cd/EmsServerInstall/
./install
Figure 15-1: OVOC server Upgrade
6. Enter y, and then press Enter to accept the License agreement.
Figure 15-2: OVOC server Upgrade – License Agreement
7. The upgrade process installs OS packages updates and patches. After the patch installation,reboot might be required:
● If you are prompted to reboot, press Enter to reboot the OVOC server, and then repeatsteps 2-7 (inclusive).
- 186 -

CHAPTER 15 Upgrading OVOC Server on Dedicated Hardware OVOC | IOM
● If you are not prompted to reboot, proceed to step Wait for the installation tocomplete and reboot the OVOC server by typing reboot. below
Figure 15-3: OVOC server Installation Complete
8. Wait for the installation to complete and reboot the OVOC server by typing reboot.
9. When the OVOC server has successfully restarted, login into the OVOC server by SSH, as‘acems’ user and enter password acems.
10. Switch to 'root' user and provide root password (default password is root):
su - root
11. Type the following command:
# EmsServerManager
12. Verify that all processes are up and running (Viewing Process Statuses on page 206) andverify that login to OVOC Web client is successful.
Upgrading the OVOC Server using an ISO FileThis section describes how to upgrade the OVOC server using an ISO file.
➢ To upgrade using an ISO file:
1. Login into the OVOC server by SSH, as ‘acems’ user and enter password acems (or customerdefined password).
2. Using WinSCP utility (see Transferring Files on page 346), copy the .ISO file that youreceived from AudioCodes from your PC to the OVOC server acems user home directory:/home/acems
3. Switch to 'root' user and provide root password (default password is root):
su – root
4. Specify the following commands:
mount /home/acems/DVD3_OVOC_ 8.0.3098.iso /mnt
- 187 -

CHAPTER 15 Upgrading OVOC Server on Dedicated Hardware OVOC | IOM
cd /mnt/EmsServerInstall
5. Run the installation script from its location:
./install
Figure 15-4: OVOC server Upgrade
6. Enter y, and then press Enter to accept the License agreement.
Figure 15-5: OVOC server Upgrade– License Agreement
7. The upgrade process installs OS packages updates and patches. After the patch installation,reboot might be required:
- 188 -

CHAPTER 15 Upgrading OVOC Server on Dedicated Hardware OVOC | IOM
● If you are prompted to reboot, press Enter to reboot the OVOC server, login as ‘acems’user, enter password acems (or customer defined password) and then repeat steps 4-8(inclusive).
● If you are not prompted to reboot, proceed to step Wait for the installation tocomplete and reboot the OVOC server by typing reboot. below.
Figure 15-6: OVOC server Installation Complete
8. Wait for the installation to complete and reboot the OVOC server by typing reboot.
9. When the OVOC server has successfully restarted, login into the OVOC server by SSH, as‘acems’ user and enter password acems.
10. Switch to 'root' user and provide root password (default password is root):
su - root
11. Type the following command:
# EmsServerManager
12. Verify that all processes are up and running (Viewing Process Statuses on page 206) andverify that login to OVOC Web client is successful.
- 189 -

CHAPTER 16 Installation and Upgrade Troubleshooting of the Operational Environment OVOC | IOM
16 Installation and Upgrade Troubleshooting of theOperational EnvironmentThis section describes the different scenarios for troubleshooting the operational environment.
■ If you attempted to upgrade and your system did not meet the minimum hardwarerequirements, the following message is displayed:
Figure 16-1: Minimum Hardware Requirements Upgrade
■ If the OVOC server hardware configuration is changed and then the server is restarted, thefollowing message is displayed in the /var/log/ems/nohup.out file.
Figure 16-2: Minimum Hardware Requirements System Error
■ Whenever an upgrade or clean installation is performed, and then the hardware settingsare changed, which results in the minimum requirements not being met, the followingmessage is displayed in the OVOC Server ManagerStatus screen :
- 190 -

CHAPTER 16 Installation and Upgrade Troubleshooting of the Operational Environment OVOC | IOM
Figure 16-3: Status Screen Error
■ Whenever an upgrade or clean installation is performed, and then the hardware settingsare changed, which results in the minimum requirements not being met, the followingmessage is displayed in the OVOC Server Manager General Info screen:
- 191 -

CHAPTER 16 Installation and Upgrade Troubleshooting of the Operational Environment OVOC | IOM
Figure 16-4: General Info Minimum Requirements
- 192 -

Part V
OVOC Server Machine Backupand Restore
This part describes how to restore the OVOC server machine from a backup.

CHAPTER 17 OVOC Server Backup Processes OVOC | IOM
17 OVOC Server Backup ProcessesThere are four main backup processes that run on the OVOC server:
■ Weekly backup: runs once a week at a pre-configured date & time (default is Saturday02:00). In this process, the whole database is backed up into several “RMAN” files that arelocated in /data/NBIF/emsBackup/RmanBackup directory. For example, dailydbems_<time&date>_<randomstring>_<index>. In addition, several other configuration andsoftware files are backed up to the archive file emsServerBackup_<version>_<time&date>.tar in the /data/NBIF/emsBackup/RmanBackup directory. In general, this TARfile contains the entire /data/NBIF directory’s content, with the exception of the'emsBackup' directory, OVOC Software Manager content and server_xxx directory content.
To change the weekly backup’s time and date, see Change Schedule Backup Time on thenext page.
■ Daily backup: runs daily except on the day scheduled for the weekly backup (see above).The daily backup process backs up the last 24 hours. There are no changes in the TAR file inthis process.
■ Cassandra backup: runs daily (runs prior to the above) and backs up the last 24 hours tothe archive file cassandraBackup_<version>_<date>_<snapshotId>_<Role>_numberOfNodes.tar. When working in Service Provider Cluster, backup of the cluster nodeservers (VQM and PM) is performed on the Management server.
■ Configuration backup: runs daily and backs up to the archive file ovocConfigBackup_<version>_<time&date>.tar.gz
Daily and weekly backups run one hour after the Cassandra backup. For example, if the backuptime is 2:00, the Cassandra backup runs at 2:00 and the Weekly/Daily and Configurationbackups runs at 3:00.
● The Backup process does not backup configurations performed using OVOCServer Manager, such as networking and security.
● RmanBackup files are deleted during the OVOC server upgrade.● It is highly recommended to maintain all backup files on an external machine.
These files can be transferred outside the server directly from their defaultlocation by SCP or SFTP client using 'acems' user.
➢ Do the following:
1. Copy the following backup files to an external machine:
● /data/NBIF/emsBackup/emsServerBackup_<version>_<time&date>.tar
● /data/NBIF/emsBackup/ovocConfigBackup_<version>_<time&date>.tar.gz
● /data/NBIF/emsBackup/cassandraBackup_<version>_<date>_<snapshotId>_<MGMT>_numberOfNodes.tar
- 194 -

CHAPTER 17 OVOC Server Backup Processes OVOC | IOM
● /data/NBIF/emsBackup/RmanBackup/daily_dbems_<time&date>_<randomstring>_<index>
● /data/NBIF/emsBackup/RmanBackup/weekly_dbems_<time&date>_<randomstring>_<index>
● /data/NBIF/emsBackup/RmanBackup/control.ctl
● /data/NBIF/emsBackup/RmanBackup/init.ora
Change Schedule Backup TimeThis step describes how to reschedule the time to run the automatic backup of the followingfiles:
■ emsServerBackup_<version>_<time&date>.tar
■ RmanBackup
■ ovocConfigBackup_<version>_<time&date>.tar.gz
■ cassandraBackup_<version>_<date>_<snapshotId>_<Role>_numberOfNodes.tar.
where:
● <time&date> is an example; replace this path with your filename.
● <version> is the version number of the OVOC server release
➢ To schedule backup time:
1. From the Application Maintenance menu, choose Change Schedule Backup Time.
2. Choose the day of the week that you wish to perform the backup.
Figure 17-1: Backup Scheduling
- 195 -

CHAPTER 18 OVOC Server Restore OVOC | IOM
18 OVOC Server RestoreThis section describes how to restore the OVOC server. This can be done on the originalmachine that the backup files were created from or on any other machine.
● If you’re running the restore process on a different machine, its disk size shouldbe the same as the original machine from which the backup files were taken.
● Restore actions can be performed only with backup files which were previouslycreated in the same OVOC version.
● If you are restoring to a new machine, make sure that you have purchased a newlicense file machine ID. AudioCodes customer support will assist you to obtain anew license prior to the restore process.
➢ To restore the OVOC server:
1. Install (or upgrade) OVOC to the same version from which the backup files were created.The Linux version must also be identical between the source and target machines.
2. Use the OVOC server Management utility to perform all the required configurations, suchas Networking and Security, as was previously configured on the source machine.
3. For more details, see Getting Started on page 201.
4. Make sure all server processes are up in OVOC Server Manager / Status menu and theserver functions properly.
5. Copy all the files you backed up in OVOC Server Backup Processes on page 194 to/data/NBIF directory by SCP or SFTP client using the 'acems' user. Overwrite existing files ifrequired.
6. From the Application Maintenance menu, choose the Restore option.
Figure 18-1: Restore Menu
7. Choose one of the following options:
● Configuration Restore below
● Full Restore on page 198
Configuration RestoreThis option restores OVOC topology and OVOC Web configuration. The following data isrestored:
■ Network Topology
- 196 -

CHAPTER 18 OVOC Server Restore OVOC | IOM
■ License configuration
■ Alarm Forwarding Rules
■ Report Definitions
■ PM Profiles
■ QOE Thresholds
■ QOE Status and Alarm definitions
■ The entire configuration performed under System Configuration and System Administrationmenus
Data is restored from the following backup files:
■ emsServerBackup_<version>_<time&date>.tar
■ ovocConfigBackup_<version>_<time&date>.tar.gz
The restore process deletes all currently stored data as described above.Data that is retrieved from managed devices is not backed up, including: Alarms;Calls& SIP ladder; QoE & PM statistics; Users; Journals and Floating license reports.
➢ To run the configuration restore operation:
1. Select Option 1: Configuration Restore. A screen similar to the following is displayed:
Figure 18-2: Configuration Restore Prompt
2. Type y to proceed. A screen similar to the following is displayed:
- 197 -

CHAPTER 18 OVOC Server Restore OVOC | IOM
Figure 18-3: Configuration Restore-Confirm
3. Type y to proceed.
4. After the restore operation has completed, you are prompted to reboot the OVOC server.
5. If you installed custom certificates prior to the restore operation, you must reinstall thesecertificates (see Supplementary Security Procedures on page 333).
Full RestoreThis option restores OVOC topology, OVOC Web configuration (as detailed inConfigurationRestore on page 196) and data that is retrieved from managed devices including PMs, calls,alarms and journals. Data from the following backup files is restored:
■ emsServerBackup_<version>_<time&date>.tar
■ cassandraBackup_<version>_<date>_<snapshotId>_<MGMT>_numberOfNodes.tar
■ daily_dbems__<time&date>_<randomstring>_<index>
■ weekly_dbems__<time&date>_<randomstring>_<index>
■ control.ctl
■ init.ora
The restore process deletes all currently stored data including PMs, calls, alarms andjournals.
When operating in Service Provider Cluster:● The restore cluster should be defined with identical system specifications as the
backed up server i.e. the same number of VQM/PM servers.● Following restore, restart slaves and then wait up to 24 hours for Cassandra DB
data(call details and PM details) to synchronize on all servers.
- 198 -

CHAPTER 18 OVOC Server Restore OVOC | IOM
➢ To run the full restore operation:
1. Select Option 2: Full Restore. A screen similar to the following is displayed:
Figure 18-4: Full Restore Prompt
2. Type y to proceed. A screen similar to the following is displayed:
Figure 18-5: Confirm Full Restore
3. Type y to proceed.
4. After the restore operation has completed, you are prompted to reboot the OVOC server.
5. If you installed custom certificates prior to the restore, you must reinstall these certificates(see Supplementary Security Procedures on page 333).
- 199 -

Part VI
OVOC Server Manager
This part describes the OVOC server machine maintenance using the OVOC serverManagement utility. The OVOC server Management utility is a CLI interface that isused to configure networking parameters and security settings and to perform variousmaintenance actions on the OVOC server.
Warning: Do not perform OVOC Server Manageractions directly through the Linux OSshell. If you perform such actions, OVOC application functionality may be harmed.Note: To exit the OVOC Server Managerto Linux OS shell level, press q.

CHAPTER 19 Getting Started OVOC | IOM
19 Getting StartedThis section describes how to get started using the OVOC Server Manager.
Connecting to the OVOC Server ManagerYou can either run the OVOC Server Managerutility locally or remotely:
■ If you wish to run it remotely, then connect to the OVOC server using Secure Shell (SSH).
■ If you wish to run it locally, then connect using the management serial port or keyboardand monitor.
➢ Do the following:
1. Login into the OVOC server by SSH, as ‘acems’ user and enter password acems.
2. Switch to 'root' user and provide root password (default password is root):
su - root
3. Type the following command:
# EmsServerManager
The OVOC Server Manager menu is displayed:
Figure 19-1: OVOC Server Manager Menu
- 201 -
CHAPTER 19 Getting Started OVOC | IOM
● Whenever prompted to enter Host Name, provide letters or numbers.● Ensure IP addresses contain all correct digits.● For menu options where reboot is required, the OVOC server automatically
reboots after changes confirmation.● For some of the configuration options, you are prompted to authorize the
changes. There are three options: Yes, No, Quit (y,n,q). Yes implements thechanges, No cancels the changes and returns you to the initial prompt for theselected menu option and Quit returns you to the previous menu.
Using the OVOC Server Manager
The following describes basic user hints for using the OVOC Server Manager:
■ The screens displaying the Main menu options in the procedures described in this sectionare based on a Linux installation with 'root' user permissions.
■ The current navigation command path is displayed at the top of the screen to indicate yourcurrent submenu location in the CLI menu. For example,Main Menu > NetworkConfiguration > Ethernet Redundancy.
■ You can easily navigate between menu options using the keyboard arrow keys or by typingthe menu option number.
■ Each of the menu options includes an option to return to the main Menu "Back to MainMenu'' and in some cases there is an option to go back to the previous menu level byspecifying either "Back" or "Quit".
OVOC Server Manager Menu Options Summary
The following describes the full menu options for the OVOC Server Management utility:
■ Status – Shows the status of current OVOC processes (Viewing Process Statuses onpage 206)
■ General Information – Provides the general OVOC server current information from theLinux operating system, including OVOC Version, OVOC server Process Status, Oracle ServerStatus, Apache Server Status, Java Version, Memory size and Time Zone (Viewing GeneralInformation on page 211).
■ Collect Logs – Collates all important logs into a single compressed file (Collecting Logs onpage 216):
■ Application Maintenance – Manages system maintenance actions (ApplicationMaintenance on page 218):
● Start / Restart the Application
● Stop Application
● Web Servers
● Change Schedule Backup Time
- 202 -

CHAPTER 19 Getting Started OVOC | IOM
● Restore
● License
● Analytics API
● Guacamole RDP Gateway
● Service Provider Cluster
● Shutdown the machine
● Reboot the machine
■ Network Configuration – Provides all basic, advanced network management and interfaceupdates (Network Configuration on page 234):
● Server IP Address (The server is rebooted)
● Ethernet Interfaces (The server is rebooted)
● Ethernet Redundancy (The server is rebooted)
● DNS Client
● NAT
● Static Routes
● SNMP Agent
◆ Configure SNMP Agent
-SNMP Agent Listening Port
-Linux System Traps Forwarding Configuration
-SNMPv3 Engine ID
◆ Start SNMP Agent
◆ SNMPv3 Engine ID
● Cloud Architecture
● NFS
■ Date & Time – Configures time and date settings (Date and Time Settings on page 255):
● NTP
● Timezone Settings
● Date and Time Settings
■ Security – Manages all the relevant security configurations (Security on page 256):
● Add OVOC user
● SSH
● Oracle DB Password (OVOC server will be stopped)
● Cassandra DB Password (OVOC server will be stopped)
- 203 -

CHAPTER 19 Getting Started OVOC | IOM
● OS Users Passwords
● HTTP Security Settings:
◆ TLS Version 1.0
◆ TLS Version 1.1
◆ Show Allowed SSL Cipher Suites
◆ Edit SSL Cipher Suites Configuration String
◆ Restore SSL Cipher Suites Configuration Default
◆ Manage HTTP Service (Port 80)
◆ Manage IPP Files Service (Port 8080)
◆ Manage IPPs HTTP (Port 8081)
◆ Manage IPPs HTTPS (Port 8082)
◆ OVOC REST (Port 911)
◆ Floating License REST (Port 912)
◆ OVOC WebSocket (Port 915)
◆ QoE Teams Server REST (Port 5010)
◆ Trust Store Configuration
◆ SBC HTTPS Authentication
◆ Enable Device Manager client secured communication (Apache will be restarted)
◆ Change HTTP/S Authentication Password for NBIF Directory
◆ Disable Client's IP Address Validation
● File Integrity Checker
● Software Integrity Checker (AIDE) and Prelinking
● USB Storage
● Network Options
● Audit Agent Options (the server will be rebooted)
● Server Certificates Update
● OVOC Voice Quality Package - SBC Communication
■ Diagnostics – Manages system debugging and troubleshooting (Diagnostics on page 288):
● Server Syslog
● Devices Syslog
● Devices Debug
● Server Logger Levels
- 204 -

CHAPTER 19 Getting Started OVOC | IOM
● Network Traffic Capture
OVOC Server Manager Options for Service Provider Cluster
The following options are available in the OVOC Server Manager menu on the PM andVQM servers when the Service Provider Cluster feature is enabled:
■ Status
■ General Information
■ Collect Logs
■ Application Maintenance
● Restart Application
● Restore
● Service Provider Cluster Configuration
● Shutdown
● Reboot
■ Network Configuration
● Server IP address
■ Date & Time
● NTP
● Timezone Settings
● Date & Time Settings
■ Security
● SSH
● OS Users Passwords
● File Integrity Checker
● Software Integrity Checker (AIDE) and Prelinking
● USB Storage
● Network options
■ Diagnostics
● Logger Levels
● Network Traffic Capture
- 205 -

CHAPTER 20 Viewing Process Statuses OVOC | IOM
20 Viewing Process StatusesYou can view the statuses of the currently running OVOC applications.
➢ To view the statuses of the current OVOC applications:
1. From the OVOC server Management root menu, choose Status, and then press Enter; thefollowing is displayed:
Figure 20-1: Application Status in Stand-alone Mode
The following table describes the application statuses when OVOC runs in Stand-alone mode.
Table 20-1: Application Statuses in Stand-alone Mode
Application Status
Watchdog Indicates the status of the OVOC Watchdog process.
OVOC Monitor Validates the local OVOC server connection, clock configuration andinstalled software version.
OVOC Server Indicates the status of the OVOC server process.
QoE CPEs Master Indicates the voice quality master process status on the local server
QoE CPEs Slave Indicates the voice quality slave process status on the local server(identical to QoE CPEs Master process in Stand-alone mode)
QoE Lync Server Indicates the status of the process that is responsible for retrievingSkype for Business calls and for monitoring connectivity status withMicrosoft Lync server.
QoE EndpointsServer
Indicates the status of the Endpoint Server, which manages the UDPconnection with the Endpoints (IP Phones) for Voice Quality Package
- 206 -

CHAPTER 20 Viewing Process Statuses OVOC | IOM
Application Status
SIP Publish RFC 6035 messages.
QoE Teams Server Indicates the status of the OVOC process (QoE Teams Server –Up/Down) that is responsible for retrieving Teams Call Records fromdefined MS Teams Tenants and for monitoring connectivity statuswith MS Teams Tenants.
Floating LicenseServer
Indicates the status of the connection between the OVOC server andthe Floating License service.
PerformanceMonitoring Server
Indicates the status of the internal SNMP connection used by theOVOC server for polling managed devices.
WebSocket Server Indicates the status of the internal connection between theWebSocket client (OVOC Web interface) and the OVOC server. Thisconnection is used for managing the alarm and task notificationmechanism.
Kafka Indicates the status of the Kafka process for managing alarmsretrieved from the VQM and PM servers.
Cassandra Indicates the status of the Cassandra database that manages CallDetails and SIP Ladder messages.
Oracle DB Indicates the status of the Oracle Database process.
Oracle Listener Indicates the status of the Oracle Listener process.
Cloud TunnelService
Indicates the status of the Cloud Tunnel Service (see Configure OVOCCloud Architecture Mode (WebSocket Tunnel) on page 154
Apache HTTPServer
Indicates the status of the Apache server, which manages thefollowing connections:
■ HTTP/S connection with the AudioCodes device
■ The OVOC server-Client connection.
■ The HTTP connection that is used by Endpoints for downloadingfirmware and configuration files from the OVOC server.
SNMP Agent Indicates the status of the Linux SNMP Agent process. This agent isnot responsible for the SNMPv2/SNMPv3 connection with theAudioCodes devices.
NTP Daemon Indicates the status of the NTP Daemon process.
- 207 -

CHAPTER 20 Viewing Process Statuses OVOC | IOM
Viewing Process Statuses in Service Provider Cluster ModeThe figure below illustrates the process statuses in Service Provider Cluster mode.
➢ To view the statuses of the current OVOC applications:
1. From the OVOC server Management root menu, choose Status, and then press Enter; thefollowing is displayed:
Figure 20-2: Application Statuses in Service Provider Cluster on Management Server
Table 20-2: Application Statuses in Service Provider Cluster
Application Status
Watchdog Indicates the status of the OVOC Watchdog process.
OVOC Monitor Validates that all the cluster nodes are connected to the network,their clocks are synchronized with the Management server and are allnodes are installed with the same OVOC software version.
OVOC Server Indicates the status of the OVOC server process.
QoE CPEs Master Indicates the voice quality process status on the Management
- 208 -

CHAPTER 20 Viewing Process Statuses OVOC | IOM
Application Status
server.
QoE CPEs Slave Indicates the voice quality process status on the VQM server node inthe clustesr.
QoE Lync Server Indicates the status of the Skype for Business Server MS-SQL ServerHTTP/S connection.
QoE EndpointsServer
Indicates the status of the Endpoint Server, which manages the UDPconnection with the Endpoints (IP Phones) for Voice Quality PackageSIP Publish RFC 6035 messages.
Floating LicenseServer
Indicates the status of the connection between the OVOC server andthe Floating License service.
PerformanceMonitoring Server
Indicate the PM process status on the PM server node in the cluster.
WebSocket Server Indicates the status of the internal connection between theWebSocket client (OVOC Web interface) and the OVOC server. Thisconnection is used for managing the alarm and task notificationmechanism.
Kafka Indicates the status of the Kafka process for managing alarmsretrieved from the VQM and PM servers.
Cassandra Indicates the status of the Cassandra database that manages CallDetails and SIP Ladder messages.
QoE Teams Server Indicates the status of the OVOC process (QoE Teams Server –Up/Down) that is responsible for retrieving Teams Call Records fromdefined MS Teams Tenants and for monitoring connectivity statuswith MS Teams Tenants.
Oracle DB Indicates the status of the Oracle Database process.
Oracle Listener Indicates the status of the Oracle Listener process.
Cloud TunnelService
Indicates the status of the Cloud Tunnel Service (see Configure OVOCCloud Architecture Mode (WebSocket Tunnel) on page 154
ApacheHTTP Server
Indicates the status of the Apache server, which manages thefollowing connections:
■ HTTP/S connection with the AudioCodes device,
■ The OVOC server-Client connection.
- 209 -

CHAPTER 20 Viewing Process Statuses OVOC | IOM
Application Status
■ The HTTP connection that is used by Endpoints for downloadingfirmware and configuration files from the OVOC server.
SNMP Agent Indicates the status of the Linux SNMP Agent process. This agent isnot responsible for the SNMPv2/SNMPv3 connection with theAudioCodes devices.
NTP Daemon Indicates the status of the NTP Daemon process.
The following figure displays the server status on the VQM node.
Figure 20-3: VQM Server Status
The following figure displays the status on the PM server.
Figure 20-4: PM Server Status
- 210 -

CHAPTER 21 Viewing General Information OVOC | IOM
21 Viewing General InformationThis section describes the General Information and Logs collection options. The GeneralInformation option provides detailed information about the OVOC server configuration andcurrent status variables. The following information is provided:
■ Components versions
■ Components Statuses
■ Memory size and disk usage
■ Network configuration
■ Time Zone and NTP configuration
■ User logged in and session type
➢ To view General Information:
1. From the OVOC Server Manager root menu, choose General Information, and then pressEnter; the following is displayed:
Figure 21-1: General Information
2. Press <more> to view more information; the following is displayed:
- 211 -

CHAPTER 21 Viewing General Information OVOC | IOM
Figure 21-2: General Information 1
3. Press <more> again to view information on the second NTP server.
Viewing General Information in Service Provider Cluster ModeThe following shows general information that is displayed when the OVOC server is configuredin Service Provider Cluster mode.
➢ To view General Information:
1. From the OVOC Server Manager root menu, choose General Information, and then pressEnter; the following is displayed:
- 212 -

CHAPTER 21 Viewing General Information OVOC | IOM
Figure 21-3: General Information Service Provider Cluster Node (PM/VQM servers)
- 213 -

CHAPTER 21 Viewing General Information OVOC | IOM
Figure 21-4: General Information Service Provider Cluster Node (PM/VQM servers)
- 214 -

CHAPTER 21 Viewing General Information OVOC | IOM
Figure 21-5: General Information Service Provider Cluster Node (PM/VQM servers)
- 215 -

CHAPTER 22 Collecting Logs OVOC | IOM
22 Collecting LogsThis option enables you to collect important log files. All log files are collected in a single filelog.tar that is created under the user home directory.
When operating in the Service Provider Cluster Mode, logs are collected from allserver nodes in the cluster (Management, VQM and PM servers)
The following log files are collected:
■ OVOC server Application logs
■ General Info logs
■ Apache logs and configuration files
■ Cassandra DB logs
■ OS logs
■ Oracle DB logs
■ Hardware information (including disk)
■ OS Configuration
■ File Descriptors used by processes info
■ Rman logs
■ Installation logs
■ Oracle Database logs
■ Server’s Syslog Messages
■ Yafic scan files
■ Topology file
■ Topology export file
■ License file and Decoded License file
■ Relevant network configuration files (including static routes)
➢ To collect logs:
■ From the OVOC server Management root menu, choose Collect Logs, and then press Enter;you are prompted if you wish to collect logs, enter y to proceed, the OVOC servercommences the log collection process:
This process can take a few minutes. Once the file generation has completed, a message isdisplayed on the screen informing you that a Diagnostic tar file has been created and thelocation of the tar file:
- 216 -

CHAPTER 22 Collecting Logs OVOC | IOM
Figure 22-1: Collecting Logs
- 217 -

CHAPTER 23 Application Maintenance OVOC | IOM
23 Application MaintenanceThis section describes the application maintenance.
➢ To configure application maintenance:
■ From the OVOC Server Manager root menu, choose Application Maintenance; thefollowing is displayed:
Figure 23-1: Application Maintenance
This menu includes the following options:
● Start/Restart Application .(Start or Restart the Application below
● Stop Application (Stop the Application on page 220)
● Web Servers (Web Servers on page 220)
● Change Schedule Backup Time (Change Schedule Backup Time on page 195)
● Restore (OVOC Server Restore on page 196)
● License (License on page 221)
● Analytics API (Analytics API on page 226 )
● Guacamole RDP Gateway (Guacamole RDP Gateway on page 227)
● Service Provider Cluster (Service Provider Cluster on page 228)
● Shutdown the Machine ( Shutdown the OVOC Server Machine on page 233)
● Reboot the Machine (Reboot the OVOC Server Machine on page 233)
Start or Restart the ApplicationThis section describes how to start or restart the application.
- 218 -

CHAPTER 23 Application Maintenance OVOC | IOM
➢ To start/restart the application:
1. From the Application Maintenance menu, choose Start/Restart the Application, and thenpress Enter; the following is displayed:
Figure 23-2: Start or Restart the OVOC server
2. Do one of the following:
● Select Yes to start/restart the OVOC server
● Select No to return to menu
Start and Restart in Service Provider Cluster Mode
When running in Service Provider Cluster, the processes statuses following start or restart ofthe OVOC server are shown in the figures below:
For VQM and PM servers, there is no option in the OVOC Server Manager to stop theserver (only the"Restart" action is available).
Figure 23-3: PM Server
- 219 -

CHAPTER 23 Application Maintenance OVOC | IOM
Figure 23-4: VQM Server
Stop the Application
➢ To stop the application:
1. In the Application menu, choose option Stop Application.
2. You are prompted whether you wish to stop the OVOC server.
Figure 23-5: Stop OVOC server
Web ServersThis option enables you to stop and start the Apache HTTP Web server.
➢ To stop/start the Apache HTTP Web server:
1. From the Application maintenance menu, chooseWeb Servers, and then press Enter; thefollowing is displayed:
- 220 -

CHAPTER 23 Application Maintenance OVOC | IOM
Figure 23-6: Web Servers
2. Select option Stop/Start the Apache HTTP Server.
Change Schedule Backup TimeThis option enables you to reschedule the time that you wish to back up the OVOC server(OVOC Server Backup Processes on page 194).
LicenseThe License menu enables you to view the details of the existing license or upload a newlicense.
The OVOC server License (SBC License pool, IP Phones and Voice Quality) should have a validlicense loaded to the server in order for it to be fully operational.
To obtain a valid license for your OVOC server License you should activate your product throughLicense Activation tool at htttp://www.AudioCodes.com/swactivation. .
You will need your Product Key (see below) and the Server Machine ID (see below) for thisactivation process:
■ ProductKey: the Product Key string is used in the customer order for upgrading the OVOCproduct. For more information, contact your AudioCodes partner.
■ Machine ID: indicates the OVOC Machine ID that should be taken from the server as shownin the screen below (enter this ID in the Fingerprint field in the Activation form). This ID isalso used in the customer order process when the product key is not known (for moreinformation contact your AudioCodes representative).
■ License Status: indicates whether the OVOC license is enabled (OVOC License on the nextpage below).
■ OVOC Advanced: indicates whether the Voice Quality license is enabled (default-no). Whenthis parameter is set to default, the followingVoice Quality feature licenses are available:
● Total Devices = 2
● Total Endpoints = 10
● Total Sessions = 10
● Total Users = 10
When set to Yes, the above parameters can be configured according to the number ofpurchased licenses
- 221 -

CHAPTER 23 Application Maintenance OVOC | IOM
■ Expiration Date: indicates the expiration date of the OVOC time license. By default, thisfield displays 'Unlimited' ( below).
The time zone is determined by the configured date and time in the Date & Time menu(Timezone Settings on page 253).
● When you order AudioCodes devices (MediantSBC and MediantGatewayAudioCodes products), ensure that a valid feature key is enabled with the"OVOC" parameter for those devices that you wish to manage. Note that thisfeature key is a separate license to the OVOC server license.
● Licenses can be allocated to Tenants in the OVOCWeb according to the licenseparameters displayed in the License screen (see example inOVOC Licensebelow).
OVOC License
The OVOC time license sets the time period for product use. When the time license is enabledand the configured license time expires, the connection to the OVOC server is denied. The timebased license affects all the features in the OVOC including the SBC License Pool, Devices(entities managed by the Device Manager) and Voice Quality Management. When the OVOCserver time license approaches or reaches its expiration date, the ‘License alarm’ is raised(Refer to the One Voice Operations Center Alarms Guide).
➢ To view the license details or upload a new license:
1. Copy the license file that you have obtained from AudioCodes to the following path on theOVOC server machine:
/home/acems/<License_File>
2. From the Application Maintenance menu, choose License option, and then press Enter; thecurrent License details are displayed:
- 222 -

CHAPTER 23 Application Maintenance OVOC | IOM
Figure 23-7: License Manager
Table 23-1: License Pool Parameters
License Type License Parameter
Voice Quality
Total Devices The maximum number of Voice Quality monitored devices.
Total Endpoints The maximum number of Voice Quality monitored endpoints.
Total Sessions The maximum number of concurrent Voice Quality monitored SBC callsessions.
Total Users The maximum number of Voice Quality monitored users supported bythe SBC.
- 223 -

CHAPTER 23 Application Maintenance OVOC | IOM
License Type License Parameter
● A license value higher than 10 must be purchased toenable adding Skype for Business devices in the OVOCWeb interface.
● For customers with existing Skype for Business devicesdefined in OVOC with 10 or fewer licenses , there are nochanges; however, new Skype for Business devicescannot be added.
Total Reports The maximum number of customized Voice Quality reports that can begenerated in OVOC.
● Template reports can be generated without purchasinglicenses; however, to generate customized reports,licenses must be purchased. These licenses can beallocated to tenant or system operators in the OVOCWebinterface.
● For OVOC upgrades prior to version 7.8 releases:OVOCmigrates old Scheduled reports as Custom reportseven if there are insufficient licenses; however, theoperator will not be able to add additional Custom reportseven if they delete existing reports until the CustomReports count is below the Total Reports license value.
Analytics Stats Enables the Analytics API feature for retrieving Voice Quality data fromNorthbound Database access clients. By default disabled when OVOCAdvanced package is enabled.
Cloud License Manager
SBC Media The maximum number of concurrent SBC media sessions.
SBCRegistrations
The maximum number of SIP endpoints that can register with the SBCdevices.
SBCTranscoding
The maximum number of SBC transcoding sessions.
SBC Signaling The maximum number of SBC signaling sessions.
SIP Web RTCSessions
The maximum number of SIP Web RTC Sessions.
SIP Rec Streams The maximum number of SIP Rec streams.
- 224 -

CHAPTER 23 Application Maintenance OVOC | IOM
License Type License Parameter
Flex License
ManagedDevices
The maximum number of devices that can be managed by the Flexlicense. Default-250
SBC Media The maximum number of concurrent SBC media sessions.
SBCRegistrations
The maximum number of SIP endpoints that can register with the SBCdevices
SBCTranscoding
The maximum number of SBC transcoding sessions.
SBC Signaling The maximum number of SBC signaling sessions.
SIP Web RTCSessions
The maximum number of SIP Web RTC Sessions.
SIP Rec Streams The maximum number of SIP Rec streams.
SBC Shutdownon Failure(Days) Default:-90 days
When an SBC device does not receive acknowledgment from the OVOCserver that Usage reports have been received within the specified graceperiod, then service is shutdown for this SBC device. The SBC must thenre-establish connection with the OVOC server.
Fixed License Pool
SBC ManagedDevices
The total number of SBC devices that can be managed by the FixedLicense Pool.
SBC Sessions The maximum number of concurrent license SBC call sessions
SBCRegistrations
The number of SIP endpoints that can register with the SBC devices.
SBCTranscoding
The maximum number of SBC transcoding sessions.
SBC Signaling The maximum number of SBC signaling sessions.
CB Users The maximum number of CloudBond 365 users
CB PBX Users The maximum number of PBX users. Currently not supported.
CB AnalogDevices
The maximum number of CB Analog devices. Currently not supported.
- 225 -

CHAPTER 23 Application Maintenance OVOC | IOM
License Type License Parameter
CB VoicemailAccounts
The maximum number of CB Voicemail accounts. Currently notsupported.
Endpoints
ManagedEndpoints
The maximum number of endpoints that can be managed by the DeviceManager Pro.
Masterscope
MasterScopeLicense
Enables Single Sign-on to the MasterScope network equipment analysisapplication from the OVOC Web interface.
3. To load a new license, choose option 1.
4. Enter the license file path and name.
5. Restart the OVOC server.
Analytics APIThe Analytic API enables access to selected data from the OVOC database for the purpose ofintegration into Northbound third-party interfaces. Customers can connect to the OVOC Data-base using third-party DB access clients and retrieve topology and statistics. This data can thenbe used in management interfaces such as Power BI, Splunk and other Analytic tools to gen-erate customized dashboards, reports and other representative management data. This may beparticularly useful during management reporting periods. The following data can be retrieved:
■ Network Topology including Tenants, Regions, Devices, Non-ACL Devices, Links
■ QoE Statistics including Calls, Nodes and Links Summaries
■ Active and History Alarms
A dedicated DB operator ("ANALYTICS") is used for securing connection to the OVOC serverover port 1521. This port must be open on the customer firewall once this feature is enabled bythe feature key (seeOVOC License on page 222) and in the procedure described below.
For more information, refer to the OVOC Northbound Integration Guide.
➢ To manage the Analytics API:
1. From the Application Maintenance menu, choose Analytics API.
The License status indicates whether the license feature is enabled and the Operationalstatus indicates whether this option is enabled.
- 226 -

CHAPTER 23 Application Maintenance OVOC | IOM
Figure 23-8: Analytics API
Once enabled, an option "Change DB User Password" to change the default authenticationpassword for the ANALYTICS user connection appears in the menu. Enter the desired passwordand confirm.
Guacamole RDP GatewayThis option supports the opening of an RDP connection from the UMP 365 Device page via theApache Guacamole VPN gateway to the Windows server residing the UMP application. This fea-ture supports 10 simultaneous Remote access sessions where the Administrator can view thelist of active sessions and close (stop) sessions manually.
➢ To activate the Guacamole RDP gateway:
1. From the Application menu, choose Guacamole RDP Gateway.
Figure 23-9: Guacamole RDP Gateway
2. Select Option 1 to enable the RDP Gateway.
The gateway is built and installed.
- 227 -

CHAPTER 23 Application Maintenance OVOC | IOM
Figure 23-10: Building and Installing RDP Gateway
Figure 23-11: Enabled Guacamole RDP Gateway
3. Do one of the following:
● Change password: Select Option 2, enter the current password, enter new passwordand confirm (default username umpman, default password: umppass)
● Restart Tomcat: Select Option 3 and confirm.
● Restart Guacomole: Select Option 4 and confirm.
Service Provider ClusterThe Service Provider Cluster mode enables load sharing between Voice Quality and Per-formance Monitoring and General Management processes with a separate Virtual Machines foreach process.
Service Provider Cluster setup is released in this version as a Controlled Introductionfeature. When customers are ready to deploy this feature, contact the AudioCodesOVOC Product Manager to coordinate an initial interview session.
- 228 -

CHAPTER 23 Application Maintenance OVOC | IOM
The figure below illustrates the topology.
Figure 23-12: Service Provider Cluster
■ The Cassandra database for managing Call Details, SIP Ladder messages and PM Detailsruns in a Cluster mode on each of the following nodes: Management; VQM and PM servers.
■ The QoE CPEs server process for managing the XML-based Voice Quality Packagecommunication with managed devices runs as a sub-process on the VQM server.
■ The Performance Monitoring process for polling managed devices runs as a sub-process onthe Performance Monitoring Slave server.
■ Alarms are sent from the node servers to the Management server using Kafka
The procedure below describes how to configure the cluster nodes and to performsynchronization between the configured cluster nodes and the management server.
➢ To configure service provider cluster:
1. From the Application Maintenance menu, choose Service Provider Cluster.
- 229 -

CHAPTER 23 Application Maintenance OVOC | IOM
Figure 23-13: Service Provider Cluster
2. Select option 'Add VQM Server' to add a virtual machine for a VQM Server:
● Enter the server's IP address and confirm.
3. Select option 'Add PM Server' to add a virtual machine for a PM Server:
● Enter the server's IP address and confirm.
● The server that you wish to add must be connected to the network● The OVOC server must be pre-installed on the PM/VQM server (see OVOC
Software Deliverables on page 15)● The Management server clock must be synchronized with the PM/VQM clock.
Remove PM or VQM Server from Cluster
This section describes how to remove a PM or VQM server from the Service Provider Cluster.This scenario occurs when this server is connected to the cluster and needs to be removed (itsdata is synchronized with other servers in the network).
● Before performing this action, its recommended to backup from cluster (seeOVOC Server Backup Processes on page 194).
● The server removal process is time-consuming due mainly to the dataredistribution process.
● Make sure that the PM/VQM server is connected and running before removing it.
➢ To remove PM or VQM server from the cluster:
1. From the Service Provider Cluster menu, choose Remove Server.
- 230 -

CHAPTER 23 Application Maintenance OVOC | IOM
Figure 23-14: Removing PM/VQM Server
Force Remove PM or VQM Server from Cluster
This section describes how to force remove a PM or VQM server from the Service ProviderCluster. This scenario occurs when this server is not connected and its data cannot be syn-chronized and you wish to remove it from the cluster.
● Before performing this action, its recommended to backup from cluster (seeOVOC Server Backup Processes on page 194).
● Data may be lost since removed server data cannot be redistributed.
➢ To force remove a node from the service provider cluster:
1. From the Service Provider Cluster menu, choose Force Remove Server.
- 231 -

CHAPTER 23 Application Maintenance OVOC | IOM
Figure 23-15: Removing Slave Server
Synchronize Cluster Node Servers
The synchronization option performs sync on the shared files in the cluster configuration includ-ing DB passwords and server configurations.
➢ To synchronize cluster node servers:
1. From the Service Provider Cluster menu, choose Synchronize Servers.
Shared files in the cluster are updated.
Figure 23-16: Synchronize Cluster Mode
- 232 -

CHAPTER 23 Application Maintenance OVOC | IOM
Shutdown the OVOC Server MachineThis section describes how to shut down the OVOC server machine.
When operating in the Service Provider Cluster Mode, enabling this option shutsdown the entire cluster.
➢ To shut down the OVOC server machine:
1. From the Application Maintenance menu, choose Shutdown the Machine, and then pressEnter.
2. Type y to confirm the shutdown; the OVOC server machine is shutdown.
Reboot the OVOC Server MachineThis section describes how to reboot the OVOC server machine.
➢ To reboot the OVOC server machine:
1. From the Application Maintenance menu, choose Reboot the Machine, and then pressEnter.
2. Type y to confirm the reboot; the OVOC server machine is rebooted.
- 233 -

CHAPTER 24 Network Configuration OVOC | IOM
24 Network ConfigurationThis section describes the networking options in the OVOC Server Manager.
➢ To run the network configuration:
■ From the OVOC Server Manager root menu, choose Network Configuration; the followingis displayed:
Figure 24-1: Network Configuration
This menu includes the following options:
■ Server IP Address (the server will be rebooted) ( Server IP Address on the next page)
■ Ethernet Interfaces (the server will be rebooted) (Ethernet Interfaces on page 236)
■ Ethernet Redundancy (the server will be rebooted) (Ethernet Redundancy on page 240)
■ DNS Client (DNS Client on page 243)
■ NAT (Configure OVOC Server with NAT IP per Interface on page 150)
■ Static Routes (Static Routes on page 243)
■ OVOC Proxy Settings (Proxy Settings on page 245)
■ SNMP Agent (SNMP Agent on page 246)
■ Cloud Architecture (Configure OVOC Cloud Architecture Mode (WebSocket Tunnel) onpage 154)
■ NFS ( NFS on page 249)
- 234 -

CHAPTER 24 Network Configuration OVOC | IOM
● The following options are not applicable in Cloud deployments:✔ Server IP Address✔ Ethernet interfaces✔ Ethernet redundancy
● The following options support IPv6:✔ Ethernet Redundancy✔ DNS Client✔ Static Routes
Server IP AddressThis option enables you to update the OVOC server’s IP address. This option also enables you tomodify the OVOC server host name.
● When this operation has completed, the OVOC automatically reboots for thechanges to take effect.
● When configuring PM and VQM servers: this option can only be appliedbefore adding these servers to the cluster.
● This option does not support IPv6 interfaces.
➢ To change Server’s IP address:
1. From the Network Configuration menu, choose Server IP Address, and then press Enter; thefollowing is displayed:
Figure 24-2: OVOC Server Manager – Change Server's IP Address
2. Configure IP configuration parameters as desired.
Each time you press Enter, the different IP configuration parameters of the OVOC serverare displayed. These parameters include the Server Host Name, IP address, Subnet Mask,Network Address and Default Gateway.
3. Type y to confirm the changes, and then press Enter.
- 235 -

CHAPTER 24 Network Configuration OVOC | IOM
Figure 24-3: IP Configuration Complete
Upon confirmation, the OVOC automatically reboots for the changes to take effect.
Ethernet InterfacesThis section describes how to configure Ethernet interfaces. OVOC supports configuration ofmultiple IPv4 or IPv6 ethernet interfaces. This allows SBC devices to connect to OVOC fromdifferent subnets to different ethernet interfaces. .
● The OVOCMain Management interface only supports IPv4.● Each IPv4 interface can be configured for NAT and one of the IPv4 interfaces can
be configured to work in the Cloud Architecture mode
In case gateways are located in different subnets, static routes should be provisioned to allowthe connection from 'Southbound network interfaces' to each one of the subnets. For StaticRoutes configuration, Static Routes on page 243.
➢ To configure Ethernet Interfaces:
1. From the Network Configuration menu, choose Ethernet Interfaces, and then press Enter;the following is displayed:
- 236 -

CHAPTER 24 Network Configuration OVOC | IOM
Figure 24-4: OVOC Server Manager – Configure Ethernet Interfaces
2. Choose from one of the following options:
● Add Interface – Adds a new interface to the OVOC server ( Add Interface below).
● Remove Interface – Removes an existing interface from the OVOC server ( RemoveInterface on the next page).
● Modify Interface – Modifies an existing interface from the OVOC server ( Type y toconfirm the changes; the OVOC server automatically reboots for the changes to takeeffect. on page 239).
Add Interface
This section describes how to add a new Ethernet interface.
➢ To add a new Interface:
1. From the Ethernet Interfaces menu, choose option 1; a list of currently available interfaces(not yet configured) is displayed.
Figure 24-5: Add Interface
- 237 -

CHAPTER 24 Network Configuration OVOC | IOM
2. Enter the number of the IP interface that you wish to modify (on HP machines theinterfaces are called 'eno1', 'eno2', etc) and then press Enter.
3. Choose the IP interface type and then press Enter:
● Enter 4 for IPv4
● Enter 6 for IPv6
Figure 24-6: Add Interface
4. Enter the IP Address, Hostname and Network Prefix and confirm;. the new interfaceparameters are displayed.
Figure 24-7: Confirm Update
5. Type y to confirm the changes; the OVOC server automatically reboots for the changes totake effect.
Remove Interface
This section describes how to remove an Ethernet Interface.
- 238 -

CHAPTER 24 Network Configuration OVOC | IOM
➢ To remove an existing interface:
1. From the Ethernet Interfaces menu, choose option 2; the following is displayed:
Figure 24-8: Remove Ethernet Interface
2. Enter the number corresponding to the interface that you wish to remove.
3. Type y to confirm the changes; the OVOC server automatically reboots for the changes totake effect.
Modify Interface
This section describes how to modify an existing Ethernet Interface.
➢ To modify an existing interface:
1. From the Ethernet Interfaces menu, choose option 3.
Figure 24-9: Modify Interface
2. Enter the number corresponding to the interface that you wish to modify.
3. Change the interface parameters as required.
- 239 -

CHAPTER 24 Network Configuration OVOC | IOM
4. Type y to confirm the changes; the OVOC server automatically reboots for the changes totake effect.
Ethernet RedundancyThis section describes how to configure Ethernet Redundancy. Physical Ethernet InterfacesRedundancy balances traffic between multiple network interfaces that are connected to thesame IP link and provides a failover mechanism.
When the operation is finished, the OVOC server automatically reboots for thechanges to take effect.
➢ To configure Ethernet Redundancy:
1. From the Network Configuration menu, choose Ethernet Redundancy option, and thenpress Enter; the following is displayed:
Figure 24-10: Ethernet Redundancy Configuration
2. This menu includes the following options:
● Add Redundant Interface (Add Redundant Interface below ).
● Remove Redundant Interface (Remove Ethernet Redundancy on page 242).
● Modify Redundant Interface (Modify Redundant Interface on page 242 ).
Add Redundant Interface
➢ To add a redundant interface:
1. From the Ethernet Redundancy menu, choose option 1.
- 240 -

CHAPTER 24 Network Configuration OVOC | IOM
Figure 24-11: Add Redundant Interface
2. Choose the Master Interface for which to create a new redundant interface (for example,'OVOC Client-Server Network').
Figure 24-12: Ethernet Redundancy Mode
3. Enter the number corresponding to the interface in the selected network that you wish tomake redundant (for example, 'eno', 'eno1', 'eno2').
4. Enter the number corresponding to the desired Ethernet Redundancy Mode (for example'active-backup').
- 241 -

CHAPTER 24 Network Configuration OVOC | IOM
Figure 24-13: Confirm Ethernet Redundancy Update
5. Type y to confirm the changes; the OVOC server automatically reboots for changes to takeeffect.
Remove Ethernet Redundancy
Remove a redundant interface under the following circumstances:
■ You have configured at least one redundant Ethernet interface (Remove EthernetRedundancy above).
■ Your default router can respond to a ‘ping’ command, due to a heartbeat procedurebetween interfaces and the default router (to verify activity).
➢ To remove the Ethernet Redundancy interface:
1. From the Ethernet Redundancy menu, choose option 2.
2. Choose the Master Redundant Interface.
3. Enter the number corresponding to the interface in the selected network that you wish tomake remove (for example, 'eno', 'eno1', 'eno2').
4. Type y to confirm the changes; the OVOC server automatically reboots for the changes totake effect.
Modify Redundant Interface
This section describes how to modify a redundant interface.
➢ To modify redundant interface and change redundancy settings:
1. From the Ethernet Redundancy, choose option 3.
2. Choose the Master Redundant Interface to modify.
3. Enter the number corresponding to the interface in the selected network that you wish tomake modify (for example, 'eno', 'eno1', 'eno2').
- 242 -

CHAPTER 24 Network Configuration OVOC | IOM
4. Type y to confirm the changes; the OVOC server automatically reboots for the changes totake effect.
DNS ClientDomain Name System (DNS) is a database system that translates a computer's fully qualifieddomain name into an IP address. If a DNS server cannot fulfill your request, it refers the requestto another DNS server - and the request is passed along until the domain-name-to-IP-addressmatch is made.
This option enables you to configure the client side (Resolver). If there is no existing DNSconfiguration, the option Configure DNS is displayed. If already configured, the option ModifyDNS is displayed.
➢ To Configure the DNS Client:
1. From the Network Configuration menu, choose DNS Client, press Enter, and then in thesub-menu, choose Configure DNS; the following is displayed:
Figure 24-14: DNS Setup
2. Specify the location domain. Type y to specify the local domain name or type n, and thenpress Enter.
3. Specify a search list; type y to specify a list of domains (use a comma delimiter to separatesearch entries in the list) or type n, and then press Enter.
4. Specify DNS IP addresses 1, 2 and 3.
5. Type y to confirm your configuration; the new configuration is displayed.
Static RoutesThis option enables you to add or remove static route rules. Static routes are usually only usedin conjunction with /etc/defaultrouter. Static routes may be required for network topology,where you don’t want to traverse your default Gateway/Router. In this case, you will probably
- 243 -

CHAPTER 24 Network Configuration OVOC | IOM
wish to make the routes permanent by adding the static routing rules. Static routes can beadded with both IPv4 and IPv6 addresses.
➢ To configure static routes:
1. From the Network Configuration menu, choose Static Routes, and then press Enter; theStatic Routes Configuration is displayed:
Figure 24-15: Routing Table and Menu
2. From the Static Routes configuration screen, choose one of the following options:
● Add a Static Route
● Remove a Static Route
➢ To add a static route:
1. From the Static Routes menu, choose option 1.
Figure 24-16: Add Static Route
2. Enter the Router IP address in appropriate IPv4 or IPv6 format.
- 244 -

CHAPTER 24 Network Configuration OVOC | IOM
Figure 24-17: Confirm Static Route
3. Type y to confirm the changes.
➢ To remove a static route:
1. From the Static Routes menu, choose option 2.
Figure 24-18: Remove Static Route
2. Enter the number of the static route that you wish to remove.
Proxy SettingsThis option enables the configuration of a proxy server connection that is used to connect tobetween OVOC and a remote platform such as AudioCodes Floating License. The connection isconfigured over HTTP/HTTP/FTP .
- 245 -

CHAPTER 24 Network Configuration OVOC | IOM
➢ To configure proxy settings:
1. From the Network Configuration menu, choose Proxy Settings.
2. Select Configure Proxy, and confirm that you wish to configure the HTTP/HTTPS/FTP Proxyserver.
3. Enter the FQDN (without underscores), IP address and port of the proxy server.
4. Enter the Proxy username and password.
5. Enter "No Proxy" addresses (a list of IP addresses for connecting directly from OVOC andnot through a proxy server).
Figure 24-19: Proxy Settings
HTTPS Proxy server is currently not supported.
SNMP AgentThe SNMP Management agent enables access to system inventory and monitoring and providessupport for alarms using the industry standard management protocol: Simple NetworkManagement Protocol (SNMP). This agent serves OVOC, NMS, or higher level managementsystem synchronization. This menu includes the following options:
■ Stop and start the SNMP agent
■ Configure the SNMP agent including:
● Configure the SNMP agent listening port (SNMP Agent Listening Port on the next page)
● Configure the northbound destination for linux system traps forwarding (Linux SystemTrap Forwarding Configuration on page 248).
● Configure the SNMPv3 Engine ID (Server SNMPv3 Engine ID on page 248)
➢ To configure SNMP Agent:
1. From the Network Configuration menu, choose SNMP Agent, and then press Enter.
- 246 -

CHAPTER 24 Network Configuration OVOC | IOM
Figure 24-20: SNMP Agent
The SNMP Agent status is displayed.
➢ To start the SNMP Agent:
■ Choose option 2.
➢ To configure SNMP Agent:
1. Choose option 1.
Figure 24-21: Configure SNMP Agent
SNMP Agent Listening Port
The SNMP Agent Listening port is a bi-directional UDP port used by the SNMP agent forlistening for traps from managed devices. You can change this listening port according to yournetwork traffic management setup.
➢ To configure SNMP Agent Listening port
1. Choose option 1.
- 247 -

CHAPTER 24 Network Configuration OVOC | IOM
Figure 24-22: SNMP Agent Listening Port
2. Configure the desired listening port (default 161).
Linux System Trap Forwarding Configuration
This option enables you to configure the northbound interface for forwarding Linux systemtraps.
➢ To configure the Linux System Traps Forwarding Configuration:
1. Choose option 2.
2. Configure the NMS IP address.
3. Enter the Community string; the new configuration is applied.
Server SNMPv3 Engine ID
The OVOC server Engine ID is used by the SNMPv3 protocol when alarms are forwarded fromthe OVOC to an NMS. By default, the OVOC server SNMPv3 Engine ID is automatically createdfrom the OVOC server IP address. This option enables the user to customize the OVOC serverEngine ID according to their NMS configuration.
➢ To configure the SNMPv3 Engine ID:
1. From the Network Configuration menu, choose SNMPv3 Engine ID, and then press Enter;the following is displayed:
Figure 24-23: OVOC Server Manager – Configure SNMPv3 Engine ID
- 248 -

CHAPTER 24 Network Configuration OVOC | IOM
2. Enter '12' separate bytes ranges of the Engine ID (each valid range from between -128 to127). In each case, press Enter to confirm the current value insertion and then proceed tothe next one.
3. When all Engine ID bytes are provided, type y to confirm the configuration. To return to theroot menu of the OVOC Server Manager, press q.
Figure 24-24: SNMPv3 Engine ID Configuration – Complete Configuration
NFSThis section describes how to configure Network File System (NFS). This installs the NFS-utilspackage which enables OVOC to access an external storage system via NFS.
➢ To enable NFS Utils package:
1. From the Network Configuration menu, choose NFS.
Figure 24-25: Network File System (NFS)
2. Select Enable NFS Utils. You are prompted to enable the package, enter Y.
- 249 -

CHAPTER 25 NTP & Clock Settings OVOC | IOM
25 NTP & Clock SettingsThis chapter describes how to configure the NTP clock source and the OVOC server systemclock.
OVOC can be configured as an NTP server using either its IPv4 or IPv6 interface.
1. From the OVOC server Manager menu, choose Date & Time.
Figure 25-1: Date & Time Settings
This menu includes the following options:
■ NTP (NTP below)
■ Timezone Settings (Timezone Settings on page 253)
■ Date & Time Settings (Date and Time Settings on page 255)
NTPNetwork Time Protocol (NTP) is used to synchronize the time and date of the OVOC server andall its components with connected devices in the IP network. This option enables you to do thefollowing:
■ Configure the OVOC server to obtain its clock from an external NTP clock source. Otherdevices that are connected to the OVOC server in the IP network can synchronize with thisclock source. These devices may be any device containing an NTP server or client.
■ Configure the OVOC server as the NTP server source (Stand-alone NTP server) and allowother clients and subnets in the IP network to synchronize to this source.
- 250 -

CHAPTER 25 NTP & Clock Settings OVOC | IOM
● It is recommended to configure the OVOC server to synchronize with an externalclock source because the OVOC server clock is less precise than other NTPdevices. For example, for Cloud deployments, it is recommended to configure theMicrosoft Azure or Amazon AWS platforms as the external clock source.
● Configure the same NTP server IP address/domain name and other relevantsettings on both the OVOC server and on the the AudioCodes device (Setup >Administration > Time & Date).
● When connecting OVOC to Skype For Business, ensure that the same NTPserver clock source is configured on both ends.
➢ To configure NTP:
1. From the Date & Time menu, choose NTP, and then press Enter; the following is displayed:
Figure 25-2: OVOC Server Manager - Configure NTP
2. From the NTP menu, choose Configure NTP.
3. At the prompt, do one of the following:
● Type y for the OVOC server to act as both the NTP server and NTP client. Enter the IPaddress or domain name of the NTP servers to serve as the clock reference source forthe NTP client (Up to four NTP servers can be configured). The NTP process daemonstarts and the NTP status information is displayed on the screen.
- 251 -

CHAPTER 25 NTP & Clock Settings OVOC | IOM
Figure 25-3: External Clock Source
● Type n for the OVOC server to function as a Stand-alone NTP server. The NTP processdaemon starts and the NTP status information is displayed on the screen.
Figure 25-4: Local Clock Source
Stopping and Starting the NTP Server
This section describes how to stop and start the NTP server.
- 252 -

CHAPTER 25 NTP & Clock Settings OVOC | IOM
➢ To start NTP services:
■ From the NTP menu, choose option 2, and then choose one of the following options:
● If NTP Service is on: Stop NTP
● If NTP Service is off: Start NTP
The NTP daemon process starts; when the process completes, you return to the NTP menu.
Restrict Access to NTP Clients
When the OVOC server is configured as a Stand-alone NTP server, you configure NTP rules toauthorize which clients can synchronize with the OVOC NTP clock.
➢ To allow access to NTP clients:
■ From the NTP menu, choose option Restrict Access to NTP Clients to allow or restrictaccess to NTP clients; the screen is updated accordingly.
Activate DDoS Protection
This option enables you to activate DDos protection for preventing Distributed Denial of Serviceattacks on the OVOC server. For example, attacks resulting from security scans. This is relevantfor both when the OVOC server is configured as a Stand-alone clock source and when anexternal clock source is used.
➢ To activate DDoS protection:
■ From the NTP menu, select Activate/Deactivate DDoS Protection.
Authorizing Subnets to Connect to OVOC NTP
When the OVOC server is configured as a Stand-alone NTP server, you can configure NTP rulesto authorize which subnets can synchronize with the OVOC NTP clock.
➢ To authorize subnets:
■ From the NTP menu, select Add Authorized Subnet to Sync by NTP
➢ To remove authorized subnet from NTP rules:
■ From the NTP menu, select Remove Subnet from NTP Rules.
Timezone SettingsThis option enables you to change the timezone of the OVOC server.
The Apache server is automatically restarted after the timezone changes areconfirmed.
- 253 -

CHAPTER 25 NTP & Clock Settings OVOC | IOM
➢ To change the system timezone:
1. From the Date & Time menu, choose Time Zone Settings, and then press Enter.
2. Enter the required time zone.
3. Type y to confirm the changes; the OVOC server restarts the Apache server for the changesto take effect.
- 254 -

CHAPTER OVOC | IOM
Date and Time SettingsYou can set the date and time for the OVOC server system clock.
➢ To configure data and time:
1. From the Date & Time menu, select Date & Time Settings, and then press Enter.
Figure 26-1: New Server Time
2. Enter the new time as shown in the following example:
mmddHHMMyyyy.SS : month(08),day(16),Hour(16),Minute(08),year(2007),”.”Second.
- 255 -

CHAPTER 27 Security OVOC | IOM
27 SecurityThe OVOC Management security options enable you to perform security actions, such asconfiguring the SSH Server Configuration Manager, and user’s administration.
➢ To configure security settings:
■ From the OVOC Server Manager root menu, choose Security, and then press Enter, thefollowing is displayed:
Figure 27-1: Security Settings
This menu includes the following options:
● Add OVOC User (OVOC User on the next page)
● SSH (SSH on the next page)
● Oracle DB Password (Oracle DB Password on page 264)
● Cassandra Password (Cassandra Password on page 265)
● OS Users Password (OS Users Passwords on page 266)
● HTTP Security Settings ( HTTPS SSL TLS Security on page 272)
◆ Server Certificate Update (Server Certificates Update on page 273)
● File Integrity Checker (File Integrity Checker on page 269)
● Software Integrity Checker (AIDE) and Pre-linking (Software Integrity Checker (AIDE)and Pre-linking on page 270)
● USB Storage (USB Storage on page 270)
● Network options (Network Options on page 271)
● Audit Agent Options (Auditd Options on page 272)
● OVOC Voice Quality Package (OVOC Voice Quality Package - SBC Communication onpage 278)
- 256 -

CHAPTER 27 Security OVOC | IOM
OVOC UserThis option enables you to add a new administrator user to the OVOC server database. Thisuser can then log into the OVOC client. This option is advised to use for the operator’sdefinition only in cases where all the OVOC application users are blocked and there is no way toperform an application login.
➢ To add an OVOC user:
1. From the Security menu, choose Add OVOC User, and then press Enter.
2. Enter the name of the user you wish to add.
3. Enter a password for the user.
4. Type y to confirm your changes.
Note and retain these passwords for future access.
SSHThis section describes how to configure the OVOC server SSH connection properties using theSSH Server Configuration Manager.
➢ To configure SSH:
1. From the Security menu, choose SSH; the following is displayed:
Figure 27-2: SSH Configuration
This menu includes the following options:
● Configure SSH Log Level (SSH Log Level on the next page).
● Configure SSH Banner (SSH Banner on the next page).
● Configure SSH on Ethernet Interfaces (SSH on Ethernet Interfaces on page 259).
- 257 -

CHAPTER 27 Security OVOC | IOM
● Disable SSH Password Authentication (Enable/Disable SSH Password Authentication onpage 261).
● Enable SSH Ignore User Known Hosts Parameter (Enable SSH IgnoreUserKnownHostsParameter on page 261).
● Configure SSH Allowed Hosts (SSH Allowed Hosts on page 262).
SSH Log Level
You can configure the log level of the SSH daemon server. The log files are found at the location'/var/log/secure' (older records are stored in secure.1, secure.2 etc.).
➢ To configure the SSH Log Level:
1. From the SSH menu, choose option 1, and then press Enter; the following is displayed.
Figure 27-3: SSH Log Level Manager
2. To configure the desired log level, choose the number corresponding to the desired levelfrom the list, and then press Enter.
The SSH daemon restarts automatically.
The Log Level status is updated on the screen to the configured value.
SSH Banner
The SSH Banner displays a pre-defined text message each time the user connects to the OVOCserver using an SSH connection. You can customize this message. By default this option isdisabled.
➢ To configure the SSH banner:
1. From the SSH menu, choose option 2, and then press Enter; the following is displayed:
- 258 -

CHAPTER 27 Security OVOC | IOM
Figure 27-4: SSH Banner Manager
2. Edit a '/etc/issue' file with the desired text.
3. Choose option 1 to enable or disable the SSH banner.
Whenever you change the banner state, SSH is restarted.
The 'Current Banner State' is displayed in the screen.
SSH on Ethernet Interfaces
You can allow or deny SSH access separately for each network interface enabled on the OVOCserver.
➢ To configure SSH on Ethernet interfaces:
■ From the SSH menu, choose option 3, and then press Enter; the following is displayed:
Figure 27-5: Configure SSH on Ethernet Interfaces
This menu includes the following options:
● Add SSH to All Ethernet Interfaces (Add SSH to All Ethernet Interfaces on the nextpage).
● Add SSH to Ethernet Interface (Add SSH to Ethernet Interface on the next page).
- 259 -

CHAPTER 27 Security OVOC | IOM
● Remove SSH from Ethernet Interface (Remove SSH from Ethernet Interface below).
Add SSH to All Ethernet Interfaces
This option enables SSH access for all network interfaces currently enabled on the OVOC server.
➢ To add SSH to All Ethernet Interfaces:
■ From the Configure SSH on Ethernet Interfaces menu, choose option 1, and then pressEnter.
The SSH daemon restarts automatically to update this configuration action.
The column 'SSH Listener Status' displays ALL for all interfaces.
Add SSH to Ethernet Interface
This option enables you to allow SSH access separately for each network interface.
➢ To add SSH to Ethernet Interfaces:
1. From the Configure SSH on Ethernet Interfaces menu, choose option 2, and then pressEnter.
After entering the appropriate sub-menu, all the interfaces upon which SSH access iscurrently disabled are displayed.
2. Enter the appropriate interface number, and then press Enter.
The SSH daemon restarts automatically to update this configuration action.
The column 'SSH Listener Status' displays 'YES' for the configured interface.
Remove SSH from Ethernet Interface
This option enables you to deny SSH access separately for each network interface.
➢ To deny SSH from a specific Ethernet Interface:
1. From the Configure SSH on Ethernet Interfaces menu, choose option 3, and then pressEnter.
All the interfaces to which SSH access is currently enabled are displayed.
2. Enter the desired interface number, and then press Enter.
The SSH daemon restarts automatically to update this configuration action.
The column 'SSH Listener Status' displays 'No' for the denied interface.
If you attempt to deny SSH access for the only enabled interface, a message isdisplayed informing you that such an action is not allowed.
- 260 -

CHAPTER 27 Security OVOC | IOM
Enable/Disable SSH Password Authentication
This option enables you to disable the username/password authentication method for allnetwork interfaces enabled on the OVOC server.
➢ To disable SSH Password Authentication:
1. From the SSH menu, choose option 4, and then press Enter; the following is displayed:
Figure 27-6: Disable Password Authentication
2. Type y to disable SSH password authentication or n to enable, and then press Enter.
The SSH daemon restarts automatically to update this configuration action.
Once you perform this action, you cannot reconnect to the OVOC server usingUser/Password authentication. Therefore, before you disable this authenticationmethod, ensure that you provision an alternative SSH connection method. Forexample, using an RSA keys pair. For detailed instructions on how to perform suchan action, see www.junauza.com or search the internet for an alternative method.
Enable SSH IgnoreUserKnownHosts Parameter
This option enables you to disable the use of the '$HOME/.ssh/known_host' file with storedremote servers fingerprints.
➢ To enable SSH IgnoreUserKnowHosts parameter:
1. From the SSH menu, choose option 5, and then press Enter; the following is displayed:
Figure 27-7: SSH IgnoreUserKnowHosts Parameter - Confirm
2. Type y to change this parameter value to either 'YES' or 'NO' or type n to leave as is, andthen press Enter.
- 261 -

CHAPTER 27 Security OVOC | IOM
SSH Allowed Hosts
This option enables you to define which hosts are allowed to connect to the OVOC serverthrough SSH.
➢ To Configure SSH Allowed Hosts:
■ From the SSH menu, choose option 6, and then press Enter; the following is displayed:
Figure 27-8: Configure SSH Allowed Hosts
This menu includes the following options:
● Allow ALL Hosts (Allow ALL Hosts below).
● Deny ALL Hosts (Deny ALL Hosts below).
● Add Host/Subnet to Allowed Hosts ( Add Hosts to Allowed Hosts on the next page).
● Remove Host/Subnet from Allowed Hosts (Remove Host/Subnet from Allowed Hostson page 264).
Allow ALL Hosts
This option enables all remote hosts to access this OVOC server through the SSH connection(default).
➢ To allow ALL Hosts:
1. From the Configure SSH Allowed Hosts menu, choose option 1, and then press Enter.
2. Type y to confirm, and then press Enter.
The appropriate status is displayed in the screen.
Deny ALL Hosts
This option enables you to deny all remote hosts access to this OVOC server through the SSHconnection.
- 262 -

CHAPTER 27 Security OVOC | IOM
➢ To deny all remote hosts access:
1. From the Configure SSH Allowed Hosts menu, choose option 2, and then press Enter.
2. Type y to confirm, and then press Enter.
The appropriate status is displayed in the screen.
When this action is performed, the OVOC server is disconnected and you cannotreconnect to the OVOC server through SSH. Before you disable SSH access, ensurethat you have provisioned alternative connection methods, for example, serialmanagement connection or KVM connection.
Add Hosts to Allowed Hosts
This option enables you to allow different SSH access methods to different remote hosts. Youcan provide the desired remote host IP, subnet or host name in order to connect to the OVOCserver through SSH.
➢ To add Hosts to Allowed Hosts:
1. From the Configure SSH Allowed Hosts menu, choose option 3, and then press Enter; thefollowing is displayed:
Figure 27-9: Add Host/Subnet to Allowed Hosts
2. Choose the desired option, and then press Enter.
3. Enter the desired IP address, subnet or host name, and then press Enter.
When adding a Host Name, ensure the following:● Verify your remote host name appears in the DNS server database and your
OVOC server has an access to the DNS server.● Provide the host name of the desired network interface defined in “/etc/hosts” file.
4. Type y to confirm the entry, and then press Enter again.
- 263 -

CHAPTER 27 Security OVOC | IOM
If the entry is already included in the list of allowed hosts, an appropriate notification isdisplayed.
When the allowed hosts entry has been successfully added, it is displayed in the SSHAllow/Deny Host Manager screen as shown in the figure below:
Figure 27-10: Add Host/Subnet to Allowed Hosts-Configured Host
Remove Host/Subnet from Allowed Hosts
If you have already configured a list of allowed hosts IP addresses, you can then remove one ormore of these host addresses from the list.
➢ To remove an existing allowed host's IP address:
1. From the Configure SSH Allowed Hosts menu, choose option 1, and then press Enter; thefollowing is displayed:
2. Choose the desired entry to remove from the Allowed Hosts list, i.e. to deny access to theOVOC server through SSH connection, and then press Enter again.
3. Type y to confirm the entry, and then press Enter again.
When the allowed hosts entry has been successfully removed, it is displayed in the SSHAllow/Deny Host Manager screen as shown in the figure below:
When you remove either the only existing IP address, Subnet or Host Name in theAllowed Hosts in the Allowed Hosts list, the configuration is automatically set to thedefault state “Allow All Hosts”.
Oracle DB PasswordThis option enables you to change the default Oracle Database password "pass_1234". TheOVOC server shuts down automatically before changing the Oracle Database password.
- 264 -

CHAPTER 27 Security OVOC | IOM
➢ To change the DB Password:
1. From the Security menu, choose Oracle DB Password, and then press Enter; the OVOCserver is rebooted.
2. Press Enter until the New Password prompt is displayed.
Figure 27-11: OVOC Server Manager – Change DB Password
a. Enter the new password, which should be at least 15 characters long, contain at leasttwo digits, two lowercase and two uppercase characters, two punctuation charactersand should differ by one character from the previous passwords.
● The OVOC server is rebooted when you change the Oracle Database password.● Note and retain these passwords for future access. It is not possible to restore
these passwords or to enter the OVOCOracle Database without them.
3. After validation, a message is displayed indicating that the password was changedsuccessfully.
Cassandra PasswordThis section describes how to change the Cassandra password.
➢ To change the Cassandra Password:
1. From the Security menu, choose Cassandra DB Password, and then press Enter; the OVOCserver is rebooted.
2. Press Enter until the New Password prompt is displayed.
- 265 -

CHAPTER 27 Security OVOC | IOM
Figure 27-12: Change Cassandra Password
3. Enter the new password and confirm.
OS Users PasswordsThis section describes how to change the OS password settings.
➢ To change OS passwords:
1. From the Security menu, choose OS Users Passwords, and then press Enter.
2. Proceed to one of the following procedures:
● General Password Settings (General Password Settings below).
● Operating System User Security Extensions (Operating System User Security Extensionson the next page).
General Password Settings
This option enables you to change the OS general password settings, such as 'MinimumAcceptable Password Length' and 'Enable User Block on Failed Login'. This feature also enablesyou to modify settings for a specific user, such as 'User’s Password' and 'Password Validity MaxPeriod'.
➢ To modify general password settings:
1. The Change General Password Settings prompt is displayed; type y, and then press Enter.
2. Do you want to change general password settings? (y/n)y
3. The Minimum Acceptable Password Length prompt is displayed; type 10, and then pressEnter.
Minimum Acceptable Password Length [10]: 10
4. The Enable User Block on Failed Login prompt is displayed; type y, and then press Enter.
Enable User Block on Failed Login (y/n) [y] y
5. The Maximum Login Retries prompt is displayed; type 3, and then press Enter.
Maximum Login Retries [3]: 3
- 266 -

CHAPTER 27 Security OVOC | IOM
6. The Failed Login Locking Timeout prompt is displayed; type 900, and then press Enter.
Failed Login Locking Timeout [900]:900
7. You are prompted if you wish to continue; type y, and then press Enter.
Are you sure that you want to continue? (y/n/q) y
8. You are prompted if you wish to change the password for a specific user.
Do you wish to change this user's password?
9. Enter the username whose password you wish to change.
Enter Username [username]
10. Enter the new password and confirm.
Operating System User Security Extensions
This feature enables the administrator to configure the following additional user securityextensions:
■ Maximum allowed numbers of simultaneous open sessions.
■ Inactivity time period (days) before the OS user is locked.
To configure these parameters, in the OS Passwords Settings menu, configure parametersaccording to the procedure below (see also green arrows indicating the relevant parameters toconfigure ).
➢ To configure operating system users security extensions:
1. The Change General Password Settings prompt is displayed; type n, and then press Enter.
Do you want to change general password settings ? (y/n) n
2. The Change password for a specific user prompt is displayed; type y, and then press Enter.
Do you want to change password for specific user ? (y/n) y
3. Enter the Username upon which you wish to configure, and then press Enter.
Enter Username [acems]:
4. The change User Password prompt is displayed; type n, and then press Enter.
- 267 -

CHAPTER 27 Security OVOC | IOM
Do you want to change its password ? (y/n) n
5. An additional Password prompt is displayed, type y, and then press Enter.
Do you want to change its login and password properties? (y/n) y
6. The Password Validity prompt is displayed; press Enter.
Password Validity Max Period (days) [90]:
7. The Password Update prompt is displayed; press Enter.
Password Update Min Period (days) [1]:
8. The Password Warning prompt is displayed; press Enter.
Password Warning Max Period (days) [7]:
9. The Maximum number of Simultaneous Open Sessions prompt is displayed; enter thenumber of simultaneous open SSH connections you wish to allow for this user.
Maximum allowed number of simultaneous open sessions [0]:
10. The Inactivity Days prompt is displayed; enter the number of inactivity days before the useris locked. For example, if you’d like to suspend a specific user if they have not connected tothe OVOC server for a week, enter 7 days.
Days of inactivity before user is locked (days) [0]:
- 268 -

CHAPTER 27 Security OVOC | IOM
Figure 27-13: OS Passwords Settings with Security Extensions
If the user attempts to open more than three SSH sessions simultaneously, they are promptedand immediately disconnected from the fourth session as displayed in the figure below.
Figure 27-14: Maximum Active SSH Sessions
By default you can connect through SSH to the OVOC server with user acems only. Ifyou configure an inactivity days limitation on this user, the situation may arise, forexample, where a user is away for an extended period and has no active user toaccess the OVOC server. Therefore, we strongly recommend to use this limitationvery carefully and preferably to configure this option for each user to connect to theOVOC server through SSH other than with the acems user.
File Integrity CheckerThe File Integrity checker tool periodically verifies whether file attributes were changed (per-missions/mode, inode #, number of links, user id, group id, size, access time, modification time,creation/inode modification time). File Integrity violation problems are reported through OVOCSecurity Events. The File Integrity checker tool runs on the OVOC server machine.
■ From the Security menu, choose File Integrity Checker, and then press Enter; the FileIntegrity Checker is started or stopped.
- 269 -

CHAPTER 27 Security OVOC | IOM
Software Integrity Checker (AIDE) and Pre-linkingAIDE (Advanced Intrusion Detection Environment) is a file and directory integrity checker. Thismechanism creates a database from the regular expression rules that it finds in its configurationfile. Once this database is initialized, it can be used to verify the integrity of the files.
Pre-linking is designed to decrease process startup time by loading each shared library into anaddress for which the linking of needed symbols has already been performed. After a binary hasbeen pre-linked, the address where the shared libraries are loaded will no longer be random ona per-process basis. This is undesirable because it provides a stable address for an attacker touse during an exploitation attempt.
➢ To start AIDE and disable pre-linking:
1. From the Security menu, choose Software Integrity Checker (AIDE) and Pre-linking; thecurrent status of these two processes is displayed:
Figure 27-15: Software Integrity Checker (AIDE) and Pre-linking
2. Do one of the following:
● Type y to enable AIDE and disable pre-linking
● Type n to disable AIDE and enable pre-linking.
USB StorageThis menu option allows enabling or disabling the OVOC server’s USB storage access asrequired.
➢ To enable USB storage:
1. From the Security menu, choose USB Storage; the following prompt is displayed:
- 270 -

CHAPTER 27 Security OVOC | IOM
Figure 27-16: USB Storage
2. Enable or disable USB storage as required.
Network OptionsThis menu option provides the following options to enhance network security:
■ Ignore Internet Control Message Protocol (ICMP) Echo requests:
This option ensures that the OVOC server does not respond to ICMP broadcasts, andtherefore such replies are always discarded. This prevents attempts to discover the systemusing ping requests.
■ Ignore ICMP Echo and Timestamp requests:
This option ensures that the OVOC server does not respond to an ICMP timestamp requestto query for the current time. This reduces exposure to spoofing of the system time.
■ Send ICMP Redirect Messages:
This option disables the sending of ICMP Redirect Messages, which are generally sent onlyby routers.
■ Ignore ICMP Redirect Messages:
This option ensures that the OVOC server does not respond to ICMP Redirect broadcasts,and therefore such replies are always discarded.
This prevents an intruder from attempting to redirect traffic from the OVOC server to a dif-ferent gateway or a non-existent gateway.
➢ To enable network options:
1. From the Security menu, choose Network Options; the following screen is displayed:
- 271 -

CHAPTER 27 Security OVOC | IOM
Figure 27-17: Network Options
2. Set the required network options.
Auditd OptionsAuditd is the userspace component to the Linux Auditing System that is responsible for writingaudit records to the disk. Using the Auditd option, you can change the auditd tool settings tocomply with the Security Technical Information Guidelines (STIG) recommendations.
➢ To set Auditd options according to STIG:
1. From the Security menu, choose Auditd Options; the following screen is displayed:
Figure 27-18: Auditd Options
1. Enable or disable Auditd options as required.
Audit records are saved in the following /var/log/audit/ directory.
HTTPS SSL TLS SecurityThis section describes the configuration settings for the HTTPS/SSL/TLS connections. The figurebelow shows the maximum security that can be implemented in the OVOC environment.
- 272 -

CHAPTER 27 Security OVOC | IOM
Figure 27-19: OVOC Maximum Security Implementation
● The above figure shows all the HTTPS/SSL/TLS connections in the OVOCnetwork. Use this figure as an overview to the procedures described below. Notethat not all of the connections shown in the above figure have correspondingprocedures. For more information, refer to the OVOC Security Guidelinesdocument.
● This version supports TLS versions 1.0, 1.1, and 1.2.
Server Certificates Update
This menu option enables you to automatically generate custom SSL server certificates forsecuring connections between OVOC server and client processes. See . for an illustration ofthese connections.
If you are using self-generated certificates and private key, you can skip to step 4.
- 273 -

CHAPTER 27 Security OVOC | IOM
➢ The procedure for server certificates update consists of the following steps:
1. Step 1: Generate Server Private Key.
2. Step 2: Generate Server Certificate Signing Request (CSR).
3. Step 3: Transfer the generated CSR file to your PC and send to CA.
4. Step 4: Transfer certificates files received from CA back to OVOC server.
5. Step 5: Import new certificates on OVOC server.
6. Step 6: Verify the installed Server certificate.
7. Step 7: Verify the installed Root certificate.
8. Step 8: Perform Supplementary procedures to complete certificate update process (refer toAppendix Supplementary Security Procedures on page 333).
➢ To generate server certificates:
1. From the Security menu, choose Server Certificates Update.
Figure 27-20: Server Certificate Updates
Information on the currently installed certificate is displayed (the currently installedcertificate is the installation default).
➢ Step 1: Generate a server private key:
1. Select option 1. The following screen is displayed:
- 274 -

CHAPTER 27 Security OVOC | IOM
Figure 27-21: Generate Server Private Key
2. Select the number of bits required for the server private key.
3. Enter and reenter the server private key password and type Y to continue.
The private key is generated.
Figure 27-22: Server Private Key Generated
➢ Step 2: Generate a CSR for the server:
1. Select option 2.
2. Enter the private key password (the password that you entered in the procedure above).
3. Enter the Country Name code, state or province, locality, organization name, organizationunit name, common name (server host name) and email address.
4. Enter a challenge password and optionally a company name.
You are notified that a server Certificate Signing Request has successfully been generatedand saved to the specified location.
- 275 -

CHAPTER 27 Security OVOC | IOM
Figure 27-23: Generating a Server Certificate Signing Request (CSR)
➢ Step 3: Transfer the CSR file to your PC and send to CA:
■ Transfer the CSR file from the /home/acems/server_cert/server.csr directory to your PCand then sent it to the Certificate Authority (CA). For instructions on transferring files, seeAppendix Transferring Files on page 346.
Figure 27-24: Transfer CSR File to PC
➢ Step 4: Transfer server certificates from the CA:
■ Transfer the files that you received from the CA to the /home/acems/server_certsdirectory. The root certificate should have the name root.crt and that the server certificateshould have the name server.crt. If you received intermediate certificates, then renamethem to ca1.crt and ca2.crt. Make sure that all certificates are in PEM format.For instructions on transferring files, see Appendix Transferring Files on page 346.
- 276 -

CHAPTER 27 Security OVOC | IOM
Note: If your certificates are self-generated (you did not perform steps 1-3), the/home/acems/server_certs directory does not exist; therefore you must create it usingthe following commands:mkdir /home/acems/server_certschmod 777 /home/acems/server_certs
➢ Step 5: Import certificates:
■ Select option 3 and follow the prompts.
The certificate files are installed.
● The root certificate should be named root.crt and that the server certificate shouldbe named server.crt. If you received intermediate certificates then rename themto ca1.crt and ca2.crt.
● Make sure that all certificates are in PEM format and appear as follows (seeVerifying and Converting Certificates on page 347 for information on convertingfiles):
-----BEGIN CERTIFICATE-----MIIBuTCCASKgAwIBAgIFAKKlMbgwDQYJKoZIhvcNAQEFBQAwFzEVMBMGA1UEAxMMRU1TIFJPT1QgQ0EyMB4XDTE1MDUwMzA4NTE0MFoXDTI1MDUwMzA4NTE0MFowKjETTl6vqn5I27Oq/24KbY9q6EK2Yc3K2EAadL2IF1jnb+yvREuewprOz6TEEuxNJol0L6V8lzUYOfHrEiq/6g==-----END CERTIFICATE-----
➢ Step 6: Verify the installed server certificate:
■ Select option 4.
The installed server certificate is displayed:
- 277 -

CHAPTER 27 Security OVOC | IOM
Figure 27-25: Installed Server Certificate
➢ Step 7: Verify the installed root certificate:
■ Select Option 5. The installed root certificate is displayed:
Figure 27-26: Installed Root Certificate
➢ Step 8: Install device certificates and perform supplementary procedures
■ See Supplementary Security Procedures on page 333.
OVOC Voice Quality Package - SBC Communication
This option allows you to configure the transport type for the XML based OVOC Voice QualityPackage communication from the OVOC managed devices to the OVOC server. You can enablethe TCP port (port 5000), the TLS port (port 5001) connections or both port connections.
➢ To configure the OVOC Voice Quality Package - SBC Communication:
1. From the Security menu, select OVOC Voice Quality Package – SBC Communication
- 278 -
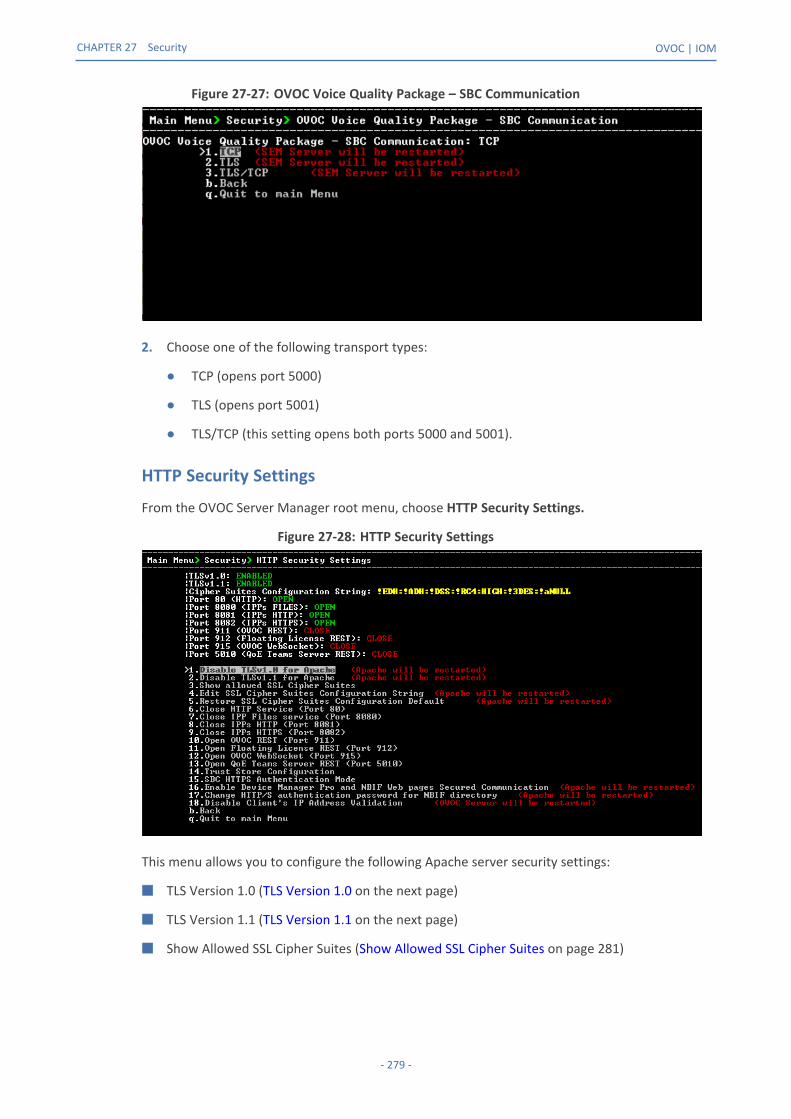
CHAPTER 27 Security OVOC | IOM
Figure 27-27: OVOC Voice Quality Package – SBC Communication
2. Choose one of the following transport types:
● TCP (opens port 5000)
● TLS (opens port 5001)
● TLS/TCP (this setting opens both ports 5000 and 5001).
HTTP Security Settings
From the OVOC Server Manager root menu, choose HTTP Security Settings.
Figure 27-28: HTTP Security Settings
This menu allows you to configure the following Apache server security settings:
■ TLS Version 1.0 (TLS Version 1.0 on the next page)
■ TLS Version 1.1 (TLS Version 1.1 on the next page)
■ Show Allowed SSL Cipher Suites (Show Allowed SSL Cipher Suites on page 281)
- 279 -

CHAPTER 27 Security OVOC | IOM
■ Edit SSL Cipher Suites Configuration String (Edit SSL Cipher Suites Configuration String onthe next page)
■ Restore SSL Cipher Suites Configuration Default (Restore SSL Cipher Suites ConfigurationDefault on page 282)
■ Manage HTTP Service (Port 80) (Manage HTTP Service Port (80) on page 282)
■ Manage IPP Files Service (Port 8080) (Manage IPP Files Service Port (8080) on page 282)
■ Manage IPPs HTTP (Port 8081) (Manage IPPs HTTP Port (8081) on page 283)
■ Manage IPPs HTTPS (Port 8082) (Manage IPPs HTTPS Port (8082) on page 283)
■ OVOC REST (Port 911) (OVOC Rest (Port 911) on page 283
■ Floating License REST (Port 912) (Floating License (Port 912) on page 283
■ OVOC WebSocket (Port 915) OVOC WebSocket (Port 915) on page 284
■ QoE Teams Server REST (Port 5010)
■ Trust Store Configuration (Trust Store Configuration on page 284)
■ SBC HTTPS Authentication (SBC HTTPS Authentication Mode on page 284 )
■ Enable Device Manager Pro and NBIF Web Pages Secured Communication ( Enable DeviceManager Pro and NBIF Web Pages Secured Communication on page 285)
■ Change HTTP/S Authentication Password for NBIF Directory ( Change HTTP/SAuthentication Password for NBIF Directory on page 286)
■ Disable Client's IP Address Validation (Disable Client's IP Address Validation on page 286)
TLS Version 1.0
This option enables/disables TLS Version 1.0 on port 443 (Apache server is restarted).
➢ To enable or disable TLS Version 1.0:
■ From the HTTP Security Settings menu, select option Enable TLSv1.0 for Apache.
When TLS Version 1.1 is disabled, TLS Version 1.0 is also disabled. Likewise, ifTLS Version1.0 is enabled, TLS Version 1.1 is also enabled.
Apache server is restarted. Default (enabled).
TLS Version 1.1
This option enables/disables TLS Version 1.1 on port 443 (Apache server is restarted).
➢ To enable or disable TLS Version 1.1:
■ From the HTTP Security Settings menu, select option Enable TLSv1.1 for Apache.
Default (enabled). Apache server is restarted.
- 280 -

CHAPTER 27 Security OVOC | IOM
● When TLS Version 1.1 is disabled, TLS Version 1.0 is also disabled. Likewise, ifTLS Version 1.0 is enabled, TLS Version 1.1 is also enabled.
Show Allowed SSL Cipher Suites
This option allows you to view the currently configured SSL cipher suites.
➢ To show allowed SSL cipher suites:
1. From the HTTP Security Settings menu, select option Show Allowed SSL Cipher Suites.
The currently configured SSL cipher suites are displayed. The overall figure indicates thetotal number of entries.
Figure 27-29: Show Allowed SSL Cipher Suites
Edit SSL Cipher Suites Configuration String
This option allows you to edit the SSL Cipher Suites configuration string.
➢ To edit the SSL cipher suites configuration string:
1. From the HTTP Security Settings menu, select option Edit SSL Cipher Suites ConfigurationString.
- 281 -

CHAPTER 27 Security OVOC | IOM
Figure 27-30: Show SSL Cipher Suites Configuration
2. Edit the new configuration and select y to apply the changes.
3. Run the Show Allowed SSL Cipher Suites command to display the new configuration.
Restore SSL Cipher Suites Configuration Default
This option allows you to restore the SSL Cipher Suites to the OVOC default values.
➢ To restore the SSL Cipher Suites Configuration default:
■ From the HTTP Security Settings menu, select Restore SSL Cipher Suites ConfigurationDefault.
Manage HTTP Service Port (80)
➢ To open/close HTTP Service (Port 80):
■ In the HTTP Security Settings menu, choose option Open/Close HTTP Service (Port 80), andthen press Enter.
This HTTP port is used for the connection between the OVOC server and all AudioCodesdevices with the Device Manager Pro Web browser
Manage IPP Files Service Port (8080)
➢ To open/close IPPs files service (port 8080):
■ In the HTTP Security Settings menu, choose option Open/Close IPPs files(Port 8080), andthen press Enter.
This HTTP port is used for downloading firmware and configuration files from the OVOCserver to the endpoints.
- 282 -

CHAPTER 27 Security OVOC | IOM
This option is reserved for backward compatibility with older device versions.
Manage IPPs HTTP Port (8081)
➢ To open/close IPPs HTTP (Port 8081):
■ In the HTTP Security Settings menu, choose option Open/Close IPPs HTTP (Port 8081), andthen press Enter.
This HTTP port is used for sending REST updates from the endpoints to the OVOC server,such as alarms and statuses.
This option is reserved for backward compatibility with older device versions.
Manage IPPs HTTPS Port (8082)
➢ To open/close IPPs HTTPS (Port 8082):
■ In the HTTP Security Settings menu, choose option Open/Close IPPs HTTPS (Port 8082),and then press Enter.
This HTTPS port is used for sending secure REST updates from the endpoints to the OVOCserver, such as alarms and statuses (HTTPS without certificate authentication).
This option is reserved for backward compatibility with older device versions.
OVOC Rest (Port 911)
This option allows you to open and close the REST port connection for (internal) port and serverdebugging.
➢ To configure OVOC REST:
1. From the HTTP Security Settings menu, choose option Open/Close OVOC REST (Port 911).
Floating License (Port 912)
This option allows you to open and close the Floating license REST service (internal) and Float-ing license service debugging.
➢ To open/close the Floating License port:
1. From the HTTP Security Settings menu, choose option Open/Close Floating License REST (Port 912).
- 283 -

CHAPTER 27 Security OVOC | IOM
OVOC WebSocket (Port 915)
This option allows you to open and close the OVOC WebSocket (Port 915) connection betweenthe Websocket client and OVOC server.
➢ To open/close the WebSocket port:
1. From the HTTP Security Settings menu, choose option Open/Close OVOC WebSocket (Port915).
QoE Teams Server REST (Port 5010)
Delete this text and replace it with your own content.
➢ To open/close QoE Teams Server port 5010:
1. From the HTTP Security Settings menu, choose option QoE Teams Server REST (Port 5010)
Trust Store Configuration
This procedure describes how to add a custom trusted root certificate to the OVOC serverinstallation for securing endpoint connections. These certificates are loaded for supporting themutual authentication mechanism (see IPP HTTPS Authentication Mode).
➢ To add a trusted root certificate:
1. From the HTTP Security Settings menu, choose Trust Store Configuration.
Figure 27-31: Trust Store Configuration
2. Select option Add Trusted Root Certificate.
3. Type the relevant valid root certificate file path and name. For example:
/home/acems/root.crt
SBC HTTPS Authentication Mode
This option enables you to configure whether certificates are used to authenticate theconnection between the OVOC server and the devices in one direction or in both directions:
■ Mutual Authentication: the OVOC authenticates the device connection request usingcertificates and the device authenticates the OVOC connection request using certificates.When this option is configured:
● The same root CA must sign the certificate that is loaded to the device and certificatethat is loaded to the OVOC server.
- 284 -

CHAPTER 27 Security OVOC | IOM
● Mutual authentication must also be enabled on the device (Step 5: Configure HTTPSParameters on the Device on page 337).
■ One-way Authentication option: the OVOC does not authenticate the device connectionrequest using certificates; only the device authenticates the OVOC connection request.
● You can use the procedure described in Server Certificates Update on page 273to load the certificate file to the OVOC server.
● See Step 5: Configure HTTPS Parameters on the Device on page 337 forequivalent settings on devices.
➢ To enable HTTPS authentication:
1. In the HTTP Security Settings menu, choose the SBC HTTPS Authentication option.
Figure 27-32: SBC HTTPS Authentication
2. Choose one of the following options:
● 1-Set Mutual Authentication
● 2. Set One-Way Authentication
Enable Device Manager Pro and NBIF Web Pages Secured Communication
This menu option enables you to secure the connection between the Device Manager Serverand NBIF Web pages and the Apache server over HTTPS. When this option is enabled, theconnection is secured through HTTPS port 443 (instead of port 80-HTTP).
➢ To secure connection the Device Manager Pro and NBIF Web pages connection:
■ From the HTTP Security Settings menu, choose IP Phone Manager and NBIF Web pagesSecured Communication; the connection is secured.
- 285 -

CHAPTER 27 Security OVOC | IOM
Change HTTP/S Authentication Password for NBIF Directory
This option enables you to change the password for logging to the OVOC client from a NBIFclient over an HTTP/S connection. The default user name is “nbif” and default password is“pass_1234”.
➢ To change the HTTP/S authentication password:
1. From the HTTP Security Settings menu, choose Change HTTP/S Authentication Passwordfor NBIF Directory.
You are prompted to change the HTTP/S authentication password. Enter y to change thepassword.
Figure 27-33: Change HTTP/S Authentication Password for NBIF Directory
2. Enter the new password.
3. Reenter the new password.
A confirmation message is displayed and the Apache server is restarted.
Disable Client's IP Address Validation
This option controls whether the OVOC server validates the WebSocket IP address and client'slogged in IP address (REST connection) for connection requests from the OVOC Web client. Thismaybe necessary to avoid scenarios where a Web Application Firewall (WAF) may randomlychange the Client IP address in the packets and therefore the OVOC server receives theWebSocket packet from an IP address that is different to the client's logged in IP address (RESTIP address). As a result, the Client-Server WebSocket connection cannot be established and theoperator is logged out.
➢ To disable client's IP address validation:
1. From the HTTP Security Settings menu, choose Disable Client's IP Address Validation.
Figure 27-34: Confirm Disabling of Client IP Address Validation
- 286 -

CHAPTER 27 Security OVOC | IOM
2. Enter y to confirm update. The OVOC Server is restarted.
- 287 -

CHAPTER 28 Diagnostics OVOC | IOM
28 DiagnosticsThis section describes the diagnostics procedures provided by the OVOC Server Manager.
An IPv6 address can be configured for the following:
● Server Syslog● Devices Syslog● Network Traffic Capture
➢ To run OVOC server diagnostics:
■ From the OVOC Server ManagerRoot menu, choose Diagnostics, and then press Enter, thefollowing is displayed:
Figure 28-1: Diagnostics
This menu includes the following options:
● Server Syslog Configuration (Server Syslog Configuration below).
● Devices Syslog Configuration (Devices Syslog Configuration on page 290).
● Devices Debug Configuration (Devices Debug Configuration on page 291).
● ServerLogger Levels (Server Logger Levels on page 292)
● Network Traffic Capture ( Network Traffic Capture on page 293)
Server Syslog ConfigurationThis section describes how to send OVOC server Operating System (OS)-related syslog EMERGevents to the system console and other OVOC server OS related messages to a designatedexternal server.
- 288 -

CHAPTER 28 Diagnostics OVOC | IOM
➢ To send EMERG event to the syslog console and other events to an external server:
1. From the Diagnostics menu, choose Server Syslog, and then press Enter.
2. To send EMERG events to the system console, type y, press Enter, and then confirm bytyping y again.
Figure 28-2: Syslog Configuration
Figure 28-3: Forward Messages to an External Server
3. You are prompted to forward messages to an external server, type y, and then press Enter.If this is changed, the server is rebooted.
4. Type one of the following Facilities from the list (case-sensitive) or select the wildcard * toselect all facilities in the list, and then press Enter:
● auth and authpriv: for authentication;
- 289 -

CHAPTER 28 Diagnostics OVOC | IOM
● cron: comes from task scheduling services, cron and atd;
● daemon: affects a daemon without any special classification (DNS, NTP, etc.)
● ftp: concerns the FTP server;
● kern: message coming from the kernel;
● lpr: comes from the printing subsystem;
● mail: comes from the e-mail subsystem;
● news: Usenet subsystem message (especially from an NNTP — Network News TransferProtocol — server that manages newsgroups);
● syslog: messages from the syslogd server, itself;
● user: user messages (generic);
● uucp: messages from the UUCP server (Unix to Unix Copy Program, an old protocolnotably used to distribute e-mail messages);
● local0 to local7: reserved for local use.
5. Each message is also associated with a Severity or priority level. Type one of the followingseverities (in decreasing order) and then press Enter:
● emerg: “Help!” There's an emergency, the system is probably unusable.
● alert: hurry up, any delay can be dangerous, action must be taken immediately;
● crit: conditions are critical;
● err: error;
● warn: warning (potential error);
● notice: conditions are normal, but the message is important;
● info: informative message;
● debug: debugging message.
6. Type the external server Hostname or IP address to which you wish to send the syslog.
Devices Syslog ConfigurationThe capture of the device's Syslog can be logged directly to the OVOC server without the needfor a third-party Syslog server in the same local network. The OVOC Server Manageris used toenable this feature.
Syslog is captured according to the device's configured Syslog parameters. For moreinformation, see the relevant device User's manual.
The user needs to also enable the monitored device to send syslog messages to the standardsyslog port (UDP 514) on the OVOC server machine.
- 290 -

CHAPTER 28 Diagnostics OVOC | IOM
The syslog log file 'syslog' is located in the following OVOC server directory:
/data/NBIF/mgDebug/syslog
The syslog file is automatically rotated once a week or when it reaches 100 MB. Up to foursyslog files are stored.
➢ To enable device syslog logging:
1. From the Diagnostics menu, choose Devices Syslog, and then press Enter.
2. You are prompted whether you wish to send EMER events to system console; type Y or N.
3. You are prompted whether you wish to send events to an external server; type Y or N.
Devices Debug ConfigurationDebug recordings packets from all managed machines can be logged directly to the OVOCserver without the need for a 3rd party network sniffer in the same local network.
Debug recording packets are collected according to the AudioCodes device'sconfigured Debug parameters. For more information, see the relevant device User'sManual.
The OVOC server runs the Wireshark network sniffer, which listens on a particular configuredport. The sniffer records the packets to a network capture file in the Debug Recording (DR) dir-ectory. You can then access this file from your PC through FTP.
The OVOC Server Manageris used to enable this feature. The user should configure the mon-itored device to send its debug record messages to a specific port (UDP 925) on the OVOCserver IP.
The DR capture file is located in the following OVOC server directory:
/data/NBIF/mgDebug/DebugRecording
The file ‘TPDebugRec<DATE>.cap’ is saved for each session. The user is responsible for closing(stopping) each debug recording session. In any case, each session (file) is limited to 10MB orone hour of recording (the first rule which is met causes the file to close i.e. if the file reaches10MB in less than an hour of recording, it is closed). A cleanup process is run daily, deletingcapture files that are 5 days old.
The user is able to retrieve this file from the OVOC server and open it locally on their own PCusing Wireshark with the debug recording plug-in installed (Wireshark version 1.6.2 supportsthe Debug Recording plug-in).
➢ To enable or disable devices debug:
1. From the Diagnostics menu, choose Devices Debug, and then press Enter.
A message is displayed indicating that debug recording is either enabled or disabled.
2. Type y, and then press Enter.
- 291 -

CHAPTER 28 Diagnostics OVOC | IOM
Recording files are saved in /data/NBIF/mgDebug directory on the server.
It is highly recommended to disable the 'TP Debug Recording' feature when you havecompleted recording because this feature heavily utilizes system resources.
Server Logger LevelsThis option allows you to change the log level for the different OVOC server log directories.
After completing the debugging, revert to the previous configuration to prevent overutilization of CPU resources.
➢ To change the <tc> server logger level:
1. From the Diagnostics menu, choose Logger Levels.
2. Enter the name of the log whose level you wish to change.
3. Enter the desired logger level.
4. Select Yes at the prompt to confirm the change.
Figure 28-4: Server Logger Name and Level
- 292 -

CHAPTER 28 Diagnostics OVOC | IOM
Network Traffic CaptureNetwork traffic can be captured to a PCAP capture file according to a list of IP addresses andports and a specified time period. The PCAP files can later be opened with a network sniffer pro-gram such as Wireshark.
➢ To capture TCP traffic:
1. From the Diagnostics menu, choose option Network Traffic Capture.
Figure 28-5: Network Traffic Capture
2. Select option 1 Start tcpdump.
3. Select y to start the tcpdump.
- 293 -

CHAPTER 28 Diagnostics OVOC | IOM
Figure 28-6: TCP Dump
4. Enter comma separated IP address (es) or accept the default "any" IP address.
5. Enter comma separated port (s) or accept the default "any".
6. Enter the capture time (in minutes). Default: network traffic for the last ten minutes iscaptured.
Figure 28-7: Starting TCP Dump
7. Select y to proceed.
- 294 -

CHAPTER 28 Diagnostics OVOC | IOM
Figure 28-8: TCP Dump Running
- 295 -

Part VII
Configuring the Firewall
This part describes how to configure the OVOC firewall.

CHAPTER 29 Configuring the Firewall OVOC | IOM
29 Configuring the FirewallThe OVOC interoperates with firewalls, protecting against unauthorized access by crackers andhackers, thereby securing regular communications. You need to define firewall rules to securecommunications for the OVOC client-server processes. Each of these processes use differentcommunication ports. By default, all ports are open on the OVOC server side. When installingthe OVOC server, you need to configure its network and open the ports in your Enterprise LANaccording to your site requirements; based on the firewall configuration rules (representingthese port connections) that are described in the table and figure below.
See also:
■ Cloud Architecture Mode (WebSocket Tunnel) Firewall Settings on page 308
■ Firewall Settings for NAT Deployment on page 309
■ Firewall Settings for Service Provider Cluster on page 315
■ Firewall Settings for OVOC Server Provider (Single Node)
Table 29-1: Firewall Configuration Rules
ConnectionPortType
SecuredConnectio
n
PortNumber
Purpose
Port side /
FlowDirection
OVOC clients and OVOC server
TCP/IP client↔ OVOCserver
TCP √ 22 SSHcommunicationbetween OVOCserver and TCP/IPclient.
■ Initiator: clientPC
OVOCserver side /Bi-directional.
HTTPS/NBIFClients↔OVOC server
TCP(HTTPS)
√ 443 Connection forOVOC/ NBIFclients.
■ Initiator: Client
OVOCserver side /Bi-directional
REST client TCP(HTTP)
× 911 Connection forOVOC server REST(internal) port andserver debugging.
■ Initiator(internal): OVO
OVOCserver side /Bi-directional
- 297 -

CHAPTER 29 Configuring the Firewall OVOC | IOM
ConnectionPortType
SecuredConnectio
n
PortNumber
Purpose
Port side /
FlowDirection
C server
■ Initiator(debugging): REST client
TCP(HTTP)
× 912 Floating licenseREST service(internal) com-munication andFloating license ser-vice debugging.
■ Initiator(internal): OVOC server
■ Initiator(debugging): REST client
OVOCserver side /Bi-directional
MicrosoftTeams↔ OVOCCommunication
TCP(HTTPS)
√ 443 Connection toMicrosoft Teams
■ Initiator:MicrosoftTeams
Bi-directional
MicrosoftTeams↔ OVO-C Com-munication
(Internal Con-nection)
TCP(HTTPS)
√ 5010 Internal OVOC serverside /Receive only
WebSocketClient↔OVOC ServerCommunication
TCP(HTTP)
√ 915 WebSocket Clientand OVOC Servercommunication(internal)according to RFC6455, used formanaging thealarm and task
OVOCserver side /Bi-directional
- 298 -

CHAPTER 29 Configuring the Firewall OVOC | IOM
ConnectionPortType
SecuredConnectio
n
PortNumber
Purpose
Port side /
FlowDirection
notificationmechanism in theOVOC Web.
■ Initiator(internal):WebSocketClient
OVOC server and OVOC Managed Devices
Device↔OVOC server(SNMP)
UDP √ 1161 Keep-alive - SNMPtrap listening port(usedpredominantly fordevices locatedbehind a NAT).Used also by FixedLicense Pool andFloating LicenseService.
■ Initiator:AudioCodesdevice
OVOCserver side /Receive only
UDP √ 162 SNMP traplistening port onthe OVOC.
■ Initiator:AudioCodesdevice
OVOCserver side /Receive only
UDP √ 161 SNMP TrapManager port onthe device that isused to send trapsto the OVOCserver. Used alsoby Fixed LicensePool and FloatingLicense Service.
MG side /
Bi-directional
- 299 -

CHAPTER 29 Configuring the Firewall OVOC | IOM
ConnectionPortType
SecuredConnectio
n
PortNumber
Purpose
Port side /
FlowDirection
■ Initiator: OVOCserver
Device↔OVOC server(NTP Server)
UDP
(NTPserver)
û 123 NTP serversynchronization forexternal clock.
■ Initiator: MG(and OVOCserver, ifconfigured asNTP client)
■ Initiator: Bothsides
Both sides /
Bi-directional
Device↔OVOC server
TCP(HTTP)
û 80 HTTP connectionfor files transferand RESTcommunication.
■ Initiator: Bothsides caninitiate anHTTP connection
OVOCserver side /Bi-directional
TCP(HTTPS)
√ 443 HTTPS connectionfor files transfer(upload anddownload) andRESTcommunication.
■ Initiator: Bothsides caninitiate anHTTPSconnection.
OVOCserver side /Bi-directional
Device↔OVOC serverFloating
TCP(HTTPS)
√ 443 HTTPS connectionfor files transfer(upload and
OVOCserver side /Bi-
- 300 -

CHAPTER 29 Configuring the Firewall OVOC | IOM
ConnectionPortType
SecuredConnectio
n
PortNumber
Purpose
Port side /
FlowDirection
LicenseManagement
download) andRESTcommunication fordevice FloatingLicenseManagement.
Initiator: Device
directional
Devices Managed by the Device Manager
OVOC server↔ DeviceManager Pro
TCP
(HTTP)
û 80 HTTP connectionbetween the OVOCserver and theDevice ManagerPro Web browser.
■ Initiator: Clientbrowser
OVOCserver side /Bi-Directional.
HTTP connectionthat is used byendpoints fordownloadingfirmware andconfiguration filesfrom the OVOCserver.
■ Initiator:Endpoint
TCP
(HTTPS)√ 443 HTTPS connection
between the OVOCserver and theDevice ManagerPro Web browser.
■ Initiator: Clientbrowser
OVOCserver side /Bi-Directional
HTTPS connectionused by endpointsfor downloading
- 301 -

CHAPTER 29 Configuring the Firewall OVOC | IOM
ConnectionPortType
SecuredConnectio
n
PortNumber
Purpose
Port side /
FlowDirection
firmware andconfiguration filesfrom the OVOCserver.
■ Initiator:Endpoints
OVOC server↔ Endpoints
(used forbackwardcompatibility)
TCP(HTTP)
û 8080 HTTP connectionthat is used byendpoints fordownloadingfirmware andconfiguration filesfrom the OVOCserver.
■ Initiator:Endpoint
OVOCserver side /Bi-directional
TCP(HTTP)
û 8081 HTTP REST updatesconnection.
It is recommendedto use thisconnection whenmanaging morethan 5000 IPPhones. In thiscase, you shouldchange theprovisioning URLport from 80 to8081 in thephone’sconfiguration file.
■ Initiator:Endpoint
OVOCserver side /Bi-directional
TCP(HTTPS)
√ 8082 HTTPS RESTupdatesconnection
OVOCserver side /Bi-directional
- 302 -

CHAPTER 29 Configuring the Firewall OVOC | IOM
ConnectionPortType
SecuredConnectio
n
PortNumber
Purpose
Port side /
FlowDirection
(encryption onlywithout SSLauthentication).
It is recommendedto use thisconnection whenmanaging morethan 5000 IPPhones. In thiscase, you shouldchange theprovisioning URLport from 443 to8082 in thephone’sconfiguration file.
■ Initiator:Endpoint
OVOC Voice Quality Package Server and Devices
MediaGateways↔Voice QualityPackage
TCP û 5000 XML basedcommunication forcontrol, mediadata reports andSIP call flowmessages.
■ Initiator: MediaGateway
OVOCserver side /Bi-directional
TCP(TLS)
√ 5001 XML based TLSsecuredcommunication forcontrol, mediadata reports andSIP call flowmessages.
■ Initiator:AudioCodesdevice
OVOCserver side /Bi-directional
- 303 -

CHAPTER 29 Configuring the Firewall OVOC | IOM
ConnectionPortType
SecuredConnectio
n
PortNumber
Purpose
Port side /
FlowDirection
Skype for Business MS-SQL Server
OVOC VoiceQualityPackage server↔ Skype forBusiness MS-SQL Server
TCP √ 1433 Connectionbetween the OVOCserver and the MS-SQL Skype forBusiness Server.This port should beconfigured withSSL.
■ Initiator: OVOCserver
Skype forBusinessSQL serverside /Bi-directional
LDAP Active Directory Server
Voice QualityPackage↔ActiveDirectoryLDAP server(Skype forBusiness userauthentication)
TCP û 389 Connectionbetween the VoiceQuality Packageserver and theActive DirectoryLDAP server.
■ Initiator: OVOCserver
ActiveDirectoryserver side/Bi-directional
TCP(TLS)
√ 636 Connectionbetween the VoiceQuality Packageserver and theActive DirectoryLDAP server withSSL configured.
■ Initiator: OVOCserver
ActiveDirectoryserver side/Bi-directional
OVOC server↔ ActiveDirectoryLDAP server(OVOC userauthenticatio
TCP û 389 Connectionbetween the OVOCserver and theActive DirectoryLDAP server (OVOCUsers).
ActiveDirectoryserver side/Bi-directional
- 304 -

CHAPTER 29 Configuring the Firewall OVOC | IOM
ConnectionPortType
SecuredConnectio
n
PortNumber
Purpose
Port side /
FlowDirection
n) ■ Initiator: OVOCserver
TCP(TLS)
√ 636 Connectionbetween the OVOCserver and theActive DirectoryLDAP server (OVOCUsers) with SSLconfigured.
■ Initiator: OVOCserver
ActiveDirectoryserver side/Bi-directional
RADIUS Server
OVOC server↔ RADIUSserver
TCP û 1812 Direct connectionbetween the OVOCserver and theRADIUS server(when OVOC useris authenticatedusing RADIUSserver).
■ Initiator: OVOCserver
OVOCserver side /Bi-directional
AudioCodes Floating License Service
OVOC server↔AudioCodes FloatingLicenseService
TCP √ 443 HTTPS for OVOC/Cloud Service
■ Initiator: OVOCREST client
OVOC RESTclient side /Bi-directional
External Server Connections
OVOC server↔MailServer
TCP û 25 Trap Forwarding toMail server
■ Initiator: OVOCserver
Mail serverside / Bi-directional
- 305 -

CHAPTER 29 Configuring the Firewall OVOC | IOM
ConnectionPortType
SecuredConnectio
n
PortNumber
Purpose
Port side /
FlowDirection
OVOC server↔ SyslogServer
TCP û 514 Trap Forwarding toSyslog server.
■ Initiator: OVOCserver
Syslogserver side/Bi-directional
OVOC server↔ DebugRecordingServer
UDP û 925 Trap Forwarding toDebug Recordingserver.
■ Initiator: OVOCserver
DebugRecordingserver /Bi-directional
OVOC server↔UMP-365server
TCP RDP √ 3389 Remote Desktopaccess to UMP-365server
■ Initiator: OVOCserver
UMP-365server/Bi-directional
Voice Quality
Voice QualityPackage↔Endpoints(RFC 6035 )
UDP û 5060 SIP Publish reportssent to the SEMserver from theendpoints,including RFC 6035SIP PUBLISH forreporting devicevoice qualitymetrics.
■ Initiator:Endpoint
SEM server/Bi-directional
Table 29-2: Northbound Interfaces Flows: NOC/OSS → OVOC
Source IPAddressRange
DestinationIP AddressRange
Protocol SecureSourcePortRange
DestinationPort Range
NOC/OSS OVOC SFTP √ 1024 -65535
20
FTP û 1024 - 21
- 306 -

CHAPTER 29 Configuring the Firewall OVOC | IOM
65535
SSH √ 1024 -65535
22
Telnet û 1024 -65535
23
NTP û 123 123
HTTP/HTTPS û/√ N/A 80/443
SNMP (UDP) Set forthe Active alarmsResync feature.
û N/A 161
TCP connection forData AnalyticsDB Access
Initiator: DB Accessclient
This port is openwhen the "DataAnalytics" VoiceQuality featurelicense has beenpurchased and thefeature has beenenabled (seeAnalytics API onpage 226)
û N/A 1521
Table 29-3: OAM Flows: OVOC → NOC/OSS
Source IPAddress Range
Destination IPAddressRange
Protocol SecureSourcePortRange
DestinationPort Range
- 307 -

CHAPTER 29 Configuring the Firewall OVOC | IOM
OVOC NOC/OSS NTP û 123 123
SNMP (UDP)Trap
û 1024 –65535
162
SNMP (UDP)port for theActive alarmsResync fea-ture
û 1164 -1174
-
SNMP (UDP)port foralarm for-warding
û 1180-1220
-
Figure 29-1: Firewall Configuration Schema
The above figure displays images of devices. For the full list of supported products,see Managed VoIP Equipment on page 3.
Cloud Architecture Mode (WebSocket Tunnel) Firewall SettingsWhen the OVOC server is deployed in a public cloud and the Cloud Architecture feature isenabled (see Configure OVOC Cloud Architecture Mode (WebSocket Tunnel) on page 154), allproprietary connections between SBC devices and the OVOC server are bundled into an HTTP/Stunnel overlay network over ports 80/443, therefore these ports must be open on the Enter-
- 308 -

CHAPTER 29 Configuring the Firewall OVOC | IOM
prise firewall. Configuring other Enterprise firewall rules for SBC and OVOC server connectionsis not necessary.
Firewall Settings for NAT DeploymentThe table below describes the mandatory firewall rules to configure in the Enterprise firewallfor connecting devices behind a NAT as described in Section Managing Device Connections onpage 149.
Configuration Option Ports to ConfigurePort side /
Flow Direction
SBC Devices
Cloud Architecture Mode(Device > OVOC Server)
■ TCP HTTP 80
■ TCP HTTPS 443
OVOC server side /Bi-directional
OVOC Server NAT Mode(OVOC > Devices)
SNMP UDP port 1161 OVOC server side /Receive only
SNMP UDP port 162 OVOC server side /Receive only
TCP 5000 OVOC server side /Bi-directional
TCP 5001 (Voice Quality Managementover TLS)
OVOC server side /Bi-directional
NTP 123 NTP server port (configure theOVOC server's Public IP address as theNTP server)
Both sides /
Bi-directional
Phones
Device Manager Agent TCP HTTPS Port 443 OVOC server side /Bi-Directional
Firewall Rules for Service Provider with Single NodeThe table below describes the OVOC Server Provider firewall settings for a Service Provider witha single node. It also includes the integration of the UMP/SBC connections for the Live TeamsCloud deployments.
- 309 -

CHAPTER 29 Configuring the Firewall OVOC | IOM
Table 29-4: Enterprise Firewall
ConnectionPortType
SecuredConnectio
n
PortNumbe
rPurpose
Port side /
FlowDirection
OVOC clients and OVOC server
HTTPS/NBIFClients↔OVOC server
TCP(HTTPS)
√ 443 Connection for OVOC/NBIF clients.
Initiator: Client
OVOCserver side/ Bi-directional
MicrosoftTeams↔ OVOCCommunication
TCP(HTTPS)
√ 443 Connection toMicrosoft Teams
Initiator: MicrosoftTeams
Bi-directional
WebSocketClient↔OVOC ServerCommunication
TCP(HTTP)
√ 915 WebSocket Client andOVOC Servercommunication(internal) according toRFC 6455, used formanaging the alarmand task notificationmechanism in theOVOC Web.
Initiator (internal):WebSocket Client
OVOCserver side/ Bi-directional
OVOC server and OVOC Managed Devices
Device↔OVOC server(SNMP)
UDP √ 1161 Keep-alive - SNMP traplistening port (usedpredominantly fordevices located behinda NAT). Used also byFixed License Pool andFloating LicenseService.
Initiator: AudioCodes device
OVOCserver side/ Receiveonly
UDP √ 162 SNMP trap listeningport on the OVOC.
OVOCserver side
- 310 -

CHAPTER 29 Configuring the Firewall OVOC | IOM
ConnectionPortType
SecuredConnectio
n
PortNumbe
rPurpose
Port side /
FlowDirection
Initiator: AudioCodes device
/ Receiveonly
UDP √ 161 SNMP Trap Managerport on the device thatis used to send traps tothe OVOC server. Usedalso by Fixed LicensePool and FloatingLicense Service.
Initiator: OVOC server
MG side /
Bi-directional
Device↔OVOC server(NTP Server)
UDP
(NTPserver)
√ 123 NTP serversynchronization forexternal clock.
Initiator: MG (andOVOC server, ifconfigured as NTPclient)
Initiator: Both sides
Both sides/
Bi-directional
Device↔OVOC server
TCP(HTTP)
× 80 HTTP connection forfiles transfer and RESTcommunication.
Initiator: Both sidescan initiate anHTTP connection
OVOCserver side/ Bi-directional
TCP(HTTPS)
√ 443 HTTPS connection forfiles transfer (uploadand download) andREST communication.
Initiator: Both sidescan initiate an HTTPSconnection.
OVOCserver side/ Bi-directional
Device↔OVOC server
TCP(HTTPS)
√ 443 HTTPS connection forfiles transfer (upload
OVOCserver side
- 311 -

CHAPTER 29 Configuring the Firewall OVOC | IOM
ConnectionPortType
SecuredConnectio
n
PortNumbe
rPurpose
Port side /
FlowDirection
FloatingLicenseManagement
and download) andREST communicationfor device FloatingLicense Management.
Initiator: Device
/ Bi-directional
Devices Managed by the Device Manager
OVOC server↔ DeviceManager Pro
TCP
(HTTP)× 80 HTTP connection
between the OVOCserver and the DeviceManager Pro Webbrowser.
Initiator: Clientbrowser
OVOCserver side/ Bi-Directional.
HTTP connection thatis used by endpointsfor downloadingfirmware andconfiguration filesfrom the OVOC server.
Initiator: Endpoint
TCP
(HTTPS)√ 443 HTTPS connection
between the OVOCserver and the DeviceManager Pro Webbrowser.
Initiator: Clientbrowser
OVOCserver side/ Bi-Directional
HTTPS connectionused by endpoints fordownloading firmwareand configuration filesfrom the OVOC server.
Initiator: Endpoints
OVOC server↔ Endpoints
TCP(HTTP)
× 8080 HTTP connection thatis used by endpoints
OVOCserver side
- 312 -

CHAPTER 29 Configuring the Firewall OVOC | IOM
ConnectionPortType
SecuredConnectio
n
PortNumbe
rPurpose
Port side /
FlowDirection
(used forbackwardcompatibility)
for downloadingfirmware andconfiguration filesfrom the OVOC server.
Initiator: Endpoint
/ Bi-directional
TCP(HTTP)
× 8081 HTTP REST updatesconnection.
It is recommended touse this connectionwhen managing morethan 5000 IP Phones.In this case, you shouldchange theprovisioning URL portfrom 80 to 8081 in thephone’s configurationfile.
Initiator: Endpoint
OVOCserver side/ Bi-directional
TCP(HTTPS)
√ 8082 HTTPS REST updatesconnection (encryptiononly without SSLauthentication).
It is recommended touse this connectionwhen managing morethan 5000 IP Phones.In this case, you shouldchange theprovisioning URL portfrom 443 to 8082 inthe phone’sconfiguration file.
Initiator: Endpoint
OVOCserver side/ Bi-directional
OVOC Voice Quality Package Server and Devices
- 313 -

CHAPTER 29 Configuring the Firewall OVOC | IOM
ConnectionPortType
SecuredConnectio
n
PortNumbe
rPurpose
Port side /
FlowDirection
MediaGateways↔Voice QualityPackage
TCP × 5000 XML basedcommunication forcontrol, media datareports and SIP callflow messages.
Initiator: MediaGateway
OVOCserver side/ Bi-directional
TCP(TLS)
√ 5001 XML based TLS securedcommunication forcontrol, media datareports and SIP callflow messages.
Initiator: AudioCodes device
OVOCserver side/ Bi-directional
LDAP Active Directory Server
OVOC server↔ ActiveDirectoryLDAP server(OVOC userauthentication)
TCP × 389 Connection betweenthe OVOC server andthe Active DirectoryLDAP server (OVOCUsers).
Initiator: OVOC server
ActiveDirectoryserver side/Bi-directional
TCP(TLS)
√ 636 Connection betweenthe OVOC server andthe Active DirectoryLDAP server (OVOCUsers) with SSLconfigured.
Initiator: OVOC server
ActiveDirectoryserver side/Bi-directional
AudioCodes Floating License Service
OVOC server↔AudioCodes FloatingLicenseService
TCP √ 443 HTTPS for OVOC/Cloud Service
Initiator: OVOC RESTclient
OVOC RESTclient side /Bi-directional
- 314 -

CHAPTER 29 Configuring the Firewall OVOC | IOM
ConnectionPortType
SecuredConnectio
n
PortNumbe
rPurpose
Port side /
FlowDirection
External Servers
OVOC server↔MailServer
TCP × 25 Trap Forwarding toMail server
Initiator: OVOC server
Mail serverside / Bi-directional
OVOC server↔ SyslogServer
TCP × 514 Trap Forwarding toSyslog server.
Initiator: OVOC server
Syslogserver side/Bi-directional
OVOC server↔ DebugRecordingServer
UDP × 925 Trap Forwarding toDebug Recordingserver.
Initiator: OVOC server
DebugRecordingserver /Bi-directional
OVOC server↔UMP-365server
TCP RDP
√ 3389 Remote Desktopaccess to UMP-365server
■ Initiator: OVOCserver
UMP-365server/Bi-directional
Voice Quality
Voice QualityPackage↔Endpoints(RFC 6035 )
UDP û 5060 SIP Publish reportssent to the SEM serverfrom the endpoints,including RFC 6035 SIPPUBLISH for reportingdevice voice qualitymetrics.
Initiator: Endpoint
SEM server/Bi-directional
Firewall Settings for Service Provider ClusterThe table below describes the ports for the OVOC Service Provider Cluster mode. This table isapplicable for the Management Server when Service Provider Cluster mode is enabled.
- 315 -

CHAPTER 29 Configuring the Firewall OVOC | IOM
Table 29-5: OVOC Service Provider Cluster Mode
Connection TypePorts to Con-
figureAccess Secured
Port side /
Flow Direction
OVOC Clients and OVOC Server
HTTP/REST 80 Public(MGMT)
û OVOC Managementserver side / Bi-directional
443 Public(MGMT)
√ OVOC Managementserver side / Bi-directional
REST 911 Private(MGMT)
û OVOC Managementserver side / Bi-directional
Floating License 912 Private(MGMT)
û OVOC Managementserver side / Bi-directional
Websocket 915 Private(MGMT)
û OVOC Managementserver side / Bi-directional
OVOC Server and Managed Devices
SNMP / Traps 1161 Public(MGMT)
√(v3)
OVOC Managementserver side / Bi-directional
SNMP 161 Public(MGMT)
√(v3)
OVOC Managementserver side / Bi-directional
SNMP Traps 162 Public(MGMT)
√(v3)
OVOC Managementserver side / Bi-directional
NTP 123 Public(MGMT)
û OVOC Managementserver side / Bi-directional
PM Server andManaged Devices
- 316 -

CHAPTER 29 Configuring the Firewall OVOC | IOM
Connection TypePorts to Con-
figureAccess Secured
Port side /
Flow Direction
HTTP REST connectionused for pollingmanaged devices.
80 Public(MGMT)
û OVOC Managementserver side / Sendonly
HTTPS REST connectionused for pollingmanaged devices.
443 Public(MGMT)
√ OVOC Managementserver side / Sendonly
OVOC Voice Quality Package and SIP Publish
Voice Quality Package 5000 Public(MGMT)
û OVOC Managementserver side / Receiveonly
5001 Public(MGMT)
√ OVOC Managementserver side /Receive only
SIP 6035 5060 Public(MGMT)
û OVOC Managementserver side /Receive only
Phones
IPP Files 8080 Public(MGMT)
û OVOC Managementserver side / Bi-directional
IPP REST 8081 Public(MGMT)
û OVOC Managementserver side / Bi-directional
IPP REST 8082 Public(MGMT)
√ OVOC Managementserver side / Bi-directional
External Servers
Skype for Business 1433 Skype ForBusinessServer
√ OVOC Managementserver side / Bi-directional
LDAP 389 LDAPServer
û OVOC Managementserver side / Bi-
- 317 -

CHAPTER 29 Configuring the Firewall OVOC | IOM
Connection TypePorts to Con-
figureAccess Secured
Port side /
Flow Direction
directional
LDAP 636 LDAPServer
√ OVOC Managementserver side / Bi-directional
RADIUS 1812 OnRADIUSServer
û OVOC Managementserver side / Bi-directional
Mail Server (forwarding) 25 MailServer
û OVOC Managementserver side/ Bi-directional
Syslog Server 514 SyslogServer
û OVOC Managementserver side / Bi-directional
OVOC server↔ DebugRecording Server
UDP × 925 Trap Forwarding toDebug Recordingserver.
Initiator: OVOCserver
OVOC server↔UMP-365 server
TCP RDP √ 3389 Remote Desktopaccess to UMP-365server
■ Initiator: OVOCserver
Dedicated Cluster NodePorts
Akka platform used forinter-processcommunication
2551..2555 Private(All)
Requiredaccessfromclusterservers
û OVOC Managementserver side/ Bi-directional
Java DatabaseConnectivity (JDBC)
1521 Private(MGMT)
û OVOC Managementserver side / Bi-
- 318 -

CHAPTER 29 Configuring the Firewall OVOC | IOM
Connection TypePorts to Con-
figureAccess Secured
Port side /
Flow Direction
used for communicationwith the PM server.
directional
Accessible onlyfrom otherPM/VQM servers
Kafka platform used forinter-processcommunication
9092 Private(All)
Requiredaccessfromclusterservers
û OVOC Managementserver side / Bi-directional
ZooKeeper 2181 Private(All)
Requiredaccessfromclusterservers
û OVOC Managementserver side / Bi-directional
- 319 -

Part VIII
Appendix
This part describes additional OVOC server procedures.

CHAPTER 30 Configuring OVOC as the Email Server on Microsoft Azure OVOC | IOM
30 Configuring OVOC as the Email Server onMicrosoft AzureThis section describes how to configure the OVOC server as the Email server on MicrosoftAzure. These steps are necessary in to overcome Microsoft Azure security restrictions for send-ing emails outside of the Microsoft Azure domain. The following options can be configured:
■ Configuring OVOC as the Email Server on Microsoft Azure using Microsoft Office 365 below
■ Configuring OVOC as the Email Server on Microsoft Azure using SMTP Relay on the nextpage
Configuring OVOC as the Email Server on Microsoft Azureusing Microsoft Office 365This procedure describes how to configure the OVOC server to forward alarms by email throughthe configuration of a user account on the Microsoft Office 365 platform. Replace OFFICE365_USERNAME and PASSWORD with an existing customer's Office 365 username and password.
The Office 365 user name is not necessarily the email address.
➢ Do the following:
1. Configure the Exim service on the OVOC server:
a. Login into the OVOC server by SSH, as ‘acems’ user and enter password acems.
b. Switch to 'root' user and provide root password (default password is root):
su - root
c. Backup the exim configuration file:
cp /etc/exim/exim.conf /etc/exim/exim.conf.bak
d. Edit the exim configuration file:
vim /etc/exim/exim.conf
e. After the line "begin routers:" add the following configuration:
begin routerssend_via_outlook:driver = manualroute
- 321 -

CHAPTER 30 Configuring OVOC as the Email Server on Microsoft Azure OVOC | IOM
domains = ! +local_domainstransport = outlook_smtproute_list = "* smtp.office365.com::587 byname"host_find_failed = deferno_more
f. After the line "begin transports", add the following configuration:
begin transportsoutlook_smtp:driver = smtphosts = smtp.office365.comhosts_require_auth = <; $host_addresshosts_require_tls = <; $host_address
g. After the line "begin authenticators", replace Username and Password with your Office365 username and password:
begin authenticatorsoutlook_login:driver = plaintextpublic_name = LOGINclient_send = : OFFICE365_USERNAME : PASSWORD
h. Restart the exim service:
systemctl restart exim
If following the restart, the alarm forwarding is still not working, edit /root/.muttrc,and replace the default email address set from = [email protected] the proper email address of the owner of the OFFICE365_USERNAMEaccount, because the Outlook SMTP server may block this default address if itverifies that the sender email does not match the specified mailbox user name.
Configuring OVOC as the Email Server on Microsoft Azureusing SMTP RelayThis procedure describes how to configure the OVOC server to forward alarms by email usingSMTP Relay. This setup is recommended by Microsoft, and SendGrid is one of the availableoptions. SendGrid service can be easily configured in the Azure Portal and in addition, includesa free tier subscription, supporting up to 25,000 emails per month.
- 322 -

CHAPTER 30 Configuring OVOC as the Email Server on Microsoft Azure OVOC | IOM
➢ Do the following:
1. Create SendGrid service on the Azure platform:
a. Open portal.azure.com
b. Go to "SendGrid Accounts" section, ( via Search or in "All services" section).
c. Click Add.
d. Fill in the following fields:
Name: Choose a name
Password
Subscription
Resource Group (create a new one or choose existing)
Pricing tier: choose Free or one of the other plans
Contact Information
Read legal terms
e. Click Create.
f. Wait for the service to be created.
g. Go back to "SendGrid Accounts", click on the new account name
h. Click the"Configurations" section in the Settings tab.
i. Copy the Username – it will be used in the next step along with the password ([email protected])
2. Configure the Exim service on the OVOC server:
a. Login into the OVOC server by SSH, as ‘acems’ user and enter password acems.
b. Switch to 'root' user and provide root password (default password is root):
su - root
c. Backup the exim configuration file:
cp /etc/exim/exim.conf /etc/exim/exim.conf.bak
d. Edit the exim configuration file:
vim /etc/exim/exim.conf
- 323 -

CHAPTER 30 Configuring OVOC as the Email Server on Microsoft Azure OVOC | IOM
e. After the line "begin transports", add the following configuration:
begin transportssendgrid_smtp:driver = smtphosts = smtp.sendgrid.nethosts_require_auth = <; $host_addresshosts_require_tls = <; $host_address
f. After the line "begin routers", add the following configuration:
begin routerssend_via_sendgrid:driver = manualroutedomains = ! +local_domainstransport = sendgrid_smtproute_list = "* smtp.sendgrid.net::587 byname"host_find_failed = deferno_more
g. After the line "begin authenticators", add the following configuration, replacingUsername and Password with your SendGrid User/Pass:
begin authenticatorssendgrid_login:driver = plaintextpublic_name = LOGINclient_send = : Username : Password
h. Save the file and exit back to the command line.
i. Restart the Exim service.
systemctl restart exim
j. Check that the alarm forwarding by email functions correctly.
You can access the SendGrid Web interface using the same username/password,where among other features you can find an Activity log, which may be useful forverifying issues such as when emails are sent correctly; however, are blocked by adestination email server.
- 324 -

CHAPTER 31 Configuring RAID-0 for AudioCodes OVOC on HP ProLiant DL360p Gen10 Servers OVOC | IOM
31 Configuring RAID-0 for AudioCodes OVOC on HPProLiant DL360p Gen10 ServersThis appendix describes the required equipment and the steps for configuring the HP ProLiantserver to support RAID-0 Disk Array configuration for the OVOC server installation.
● This procedure erases any residual data on the designated disk drives.● If you have purchased the server hardware from AudioCodes then this procedure
is not necessary.
RAID-0 PrerequisitesThis procedure requires the following:
■ ProLiant DL360p Gen10 server pre-installed in a compatible rack and connected to power.
■ Two SATA DS 1.92 TB SSD disk drives
■ A VGA display, USB keyboard, and USB mouse must be connected to the server back I/Opanel.
RAID-0 Hardware PreparationMake sure that two SATA DS 1.92 TB SSD disk drives are installed on slot 1 and 2 of the server. Ifrequired, refer to the HP Service Manual.
Figure 31-1: SATA DS 1.92 TB SSD Disks
Configuring RAID-0The following procedures describe how to configure RAID- 0 using the HP Smart StorageAdministrator utility:
■ Step 1 Create Logical Drive below
■ Step 2 Set Logical Drive as Bootable Volume on the next page
Step 1 Create Logical Drive
This section describes how to create a logical drive on RAID-0.
- 325 -

CHAPTER 31 Configuring RAID-0 for AudioCodes OVOC on HP ProLiant DL360p Gen10 Servers OVOC | IOM
➢ To create a logical drive on RAID-0:
1. Power up the server. If the server is already powered up and running, use the 'reboot'command (from system console as user root) to reboot the server.
2. While the server is powering up, monitor the server.
3. During reset, press <F9> to open the System Utilities.
4. Choose Embedded Applications > Intelligent Provisioning > Smart Storage Administrator.
5. Wait for the Smart Storage Administrator utility to finish loading.
6. In the left-hand pane, choose HPE Smart Array Controllers > HPESmart Array E208i-aSRGen10; an Actions menu is displayed.
7. Click Configure, and then click Clear Configuration to clear any previous configuration.
8. Click Clear to confirm; a summary display appears.
9. Click Finish to return to the main menu.
10. In the left-hand pane, select Unassigned Drives (2); make sure that both the drives areselected, and then click Create Array.
11. Select RAID 0 for RAID Level.
12. Select the 'Custom Size' check box, and then enter 2000GiB.
13. At the bottom of the screen, click Create Logical Drive.
After the array is created, a logical drive should be created.
14. Click Finish.
15. Proceed to Section Step 2 Set Logical Drive as Bootable Volume below
Step 2 Set Logical Drive as Bootable Volume
This section describes how to set the new logical drive as a bootable volume.
➢ To set new logical drive as bootable volume:
1. In the left-hand pane, select HPE Smart Array E208i-a SR Gen10, and then click SetBootable Logical Drive/Volume.
2. Select the ''Local - Logical Drive 1'' as Primary Boot Logical Drive/Volume, and then clickSave.
A summary window is displayed.
3. Click Finish.
4. Exit the Smart Storage Administrator utility by clicking the X sign on the top right-hand sideof the screen, and then confirm.
5. Click Exit at the bottom left-hand corner of the screen.
6. Click the Power icon in the upper right-hand corner of the screen.
- 326 -

CHAPTER 31 Configuring RAID-0 for AudioCodes OVOC on HP ProLiant DL360p Gen10 Servers OVOC | IOM
7. Click Reboot to reboot the server.
The Disk Array configuration is now complete.
8. Install the OVOC server (Installing OVOC Server on Dedicated Hardware on page 68).
- 327 -

CHAPTER 32 Managing Clusters OVOC | IOM
32 Managing ClustersThis appendix describes how to manually migrate or move OVOC VMs to another cluster node.
Migrating OVOC Virtual Machines in a VMware ClusterThis section describes how to migrate your OVOC Virtual Machine from one ESXi host toanother.
➢ To migrate your OVOC VM:
1. Select the OVOC VM that you wish to migrate and then choose theMigrate option:
Figure 32-1: Migration
2. Change a cluster host for migration:
Figure 32-2: Change Host
3. Choose the target host for migration:
- 328 -

CHAPTER 32 Managing Clusters OVOC | IOM
Figure 32-3: Target Host for Migration
The migration process commences:
Figure 32-4: Migration Process Started
After the migration has completed, the OVOC application will run seamlessly on the VM on thenew cluster’s host.
Moving OVOC VMs in a Hyper-V ClusterMoving OVOC VMs in a Hyper-V Cluster
- 329 -

CHAPTER 32 Managing Clusters OVOC | IOM
This section describes how to move a Virtual Machine to another host node in a Hyper-Vcluster.
➢ To move a Virtual Machine to another node of the cluster:
1. Select the Virtual Machine, right-click and from the menu, choose Move > Live Migration >Select Node.
Figure 32-5: Hyper-V Live Migration
The following screen is displayed:
- 330 -

CHAPTER 32 Managing Clusters OVOC | IOM
Figure 32-6: Move Virtual Machine
2. Select the relevant node and click OK.
The migration process starts.
- 331 -

CHAPTER 32 Managing Clusters OVOC | IOM
Figure 32-7: Hyper-V Migration Process Started
After the migration has completed, the OVOC application will run seamlessly on the VM on thenew cluster’s node.
- 332 -

CHAPTER 33 Supplementary Security Procedures OVOC | IOM
33 Supplementary Security ProceduresThe procedures in this appendix describe supplementary procedures for completing the setupof X.509 Custom certificates.
For more information on the implementation of custom certificates, refer to the OVOCSecurity Guidelines document.
This appendix describes the following procedures:
■ Downloading certificates to the AudioCodes device (Installing Custom Certificates onOVOC Managed Devices below)
■ Cleaning up Temporary files on the OVOC server ( Cleaning up Temporary Files on OVOCServer on page 345)
Installing Custom Certificates on OVOC Managed DevicesThis section describes how to install Custom certificates on OVOC managed devices. Thesecertificates will be used to secure the connection between the device and OVOC server. Thisprocedure is performed using the device's embedded Web server. This section describes how toinstall certificates for the following devices:
■ Enterprise gateways and SBC devices (Gateways and SBC Devices below).
■ MP-1xx devices (MP-1xx Devices on page 340).
● When securing the device connection over HTTPS, the certificate loaded to thedevice must be signed by the same CA as the certificate loaded to the OVOCserver.
● The Single-Sign On mechanism is used to enable automatic login to the devicesembeddedWeb server tool from the device's status screen in the OVOC. Thisconnection is secured over port 443. OVOC logs into the OVOC managed deviceusing the credentials that you configure in the AudioCodes device details orTenant Details in the OVOCWeb. You can also login to the AudioCodes deviceusing the RADIUS or LDAP credentials (for more information, refer to the OVOCUser’s Manual).
Gateways and SBC Devices
This section describes how to install custom certificates on gateways and SBC devices. Thedevice uses TLS Context #0 to communicate with the OVOC server. Therefore, the configurationdescribed below should be performed for TLS Context #0.
Step 1: Generate a Certificate Signing Request (CSR)
This step describes how to generate a Certificate Signing Request (CSR).
- 333 -

CHAPTER 33 Supplementary Security Procedures OVOC | IOM
➢ To generate certificate signing request:
1. Login to the device's Web server.
2. Open the TLS Contexts page (Setupmenu > IP Network tab > Security folder > TLSContexts).
3. In the table, select the TLS Context Index #0, and then click the TLS Context Certificatebutton, located below the table; the Context Certificates page appears.
Figure 33-1: Context Certificates
4. Under the Certificate Signing Request group, do the following:
a. In the 'Subject Name [CN]' field, enter the device’s DNS name, if such exists, or device’sIP address.
b. Fill in the rest of the request fields according to your security provider's instructions.
c. Click the Create CSR button; a textual certificate signing request is displayed in the areabelow the button:
Figure 33-2: Certificate Signing Request Group
5. Copy the text and send it to the certificate authority (CA) to sign this request.
- 334 -

CHAPTER 33 Supplementary Security Procedures OVOC | IOM
Step 2: Receive the New Certificates from the CA
You will receive the following files from the Certificate Authority (CA):
■ Your (device) certificate – rename this file to "device.crt"
■ Root certificate – rename this file to "root.crt"
■ Intermediate CA certificates (if such files exist) – rename these files to "ca1.crt", "ca2.crt"etc.
Save the signed certificate to a file (e.g., device.crt). Make sure that all certificates are in PEMformat and appear as follows:
-----BEGIN CERTIFICATE-----
MIIBuTCCASKgAwIBAgIFAKKlMbgwDQYJKoZIhvcNAQEFBQAwFzEVMBMGA1UEAxMM
RU1TIFJPT1QgQ0EyMB4XDTE1MDUwMzA4NTE0MFoXDTI1MDUwMzA4NTE0MFowKjET
...
Tl6vqn5I27Oq/24KbY9q6EK2Yc3K2EAadL2IF1jnb+yvREuewprOz6TEEuxNJol0
L6V8lzUYOfHrEiq/6g==
-----END CERTIFICATE-----
● The above files are required in the following steps. Make sure that you obtainthese files before proceeding and save them to the desired location.
● Use the exact filenames as mentioned above.
Step 3: Update Device with New Certificate
This step describes how to update the device with the new certificate.
➢ To update device with new certificate:
1. Open the TLS Contexts page (Setupmenu > IP Network tab > Security folder > TLSContexts).
2. In the table, select TLS Context #0, and then click the Change Certificate button, locatedbelow the table; the Context Certificates page appears.
- 335 -

CHAPTER 33 Supplementary Security Procedures OVOC | IOM
Figure 33-3: TLS Contexts Table
3. Under the Upload certificates files from your computer group, click the Browse buttoncorresponding to the 'Send Device Certificate...' field and then navigate to the device.crtfile, and click Send File.
Figure 33-4: Upload Certificate Files from your Computer Group
Step 4: Update Device’s Trusted Certificate Store
This step describes how to update the device's Trusted Certificate Store.
➢ To update device’s trusted certificate store:
1. Open the TLS Contexts page (Configuration tab > System menu > TLS Contexts).
2. In the table, select the TLS Context #0, and then click the Trusted Root Certificates button,located below the table; the Trusted Certificates page appears.
- 336 -

CHAPTER 33 Supplementary Security Procedures OVOC | IOM
Figure 33-5: Trusted Root Certificates
3. Click the Import button, and then browse to the root.crt file. Click OK to import the rootcertificate.
Figure 33-6: Importing Certificate into Trusted Certificates Store
4. If you received intermediary CA certificates – ca1.crt, ca2.crt, etc. – import them in a similarway.
Step 5: Configure HTTPS Parameters on the Device
This section describes how to configure HTTPS related parameters on the device.
● You can optionally pre-stage the device with a pre-loaded ini file including thisconfiguration (for more information, contact your AudioCodes representative).
● If you have enabled the Interoperability Automatic Provisioning feature, ensurethat your template file is also configured as described in this procedure tomaintain an active HTTPS connection after the template file has been loaded tothe device.
➢ To configure HTTPS parameters on the device:
1. In the OVOC Web interface, ensure that device and tenant connections are enabled forHTTPS (default).
- 337 -

CHAPTER 33 Supplementary Security Procedures OVOC | IOM
Figure 33-7: Tenant Details
Figure 33-8: Device Details (Default HTTPS)
2. Create a new text file using a text-based editor (e.g., Notepad).
3. Enable mutual authentication on the device. This configuration instructs the AutomaticUpdate mechanism to verify the TLS certificate received from the OVOC server.
● For Media Gateway and SBC devices:
AUPDVerifyCertificates=1
● For MP-1xx devices, the ini file should include the following two lines::
AUPDVerifyCertificates=1
ServerRespondTimeout=10000
4. Save and close the file.
5. Load the generated file as “Incremental INI file” (Maintenance menu > Software Update >Load Auxiliary Files > INI file (incremental).
6. In the SBC Web interface, open the Web Settings page and set parameter Secured WebConnection (HTTPS) to one of the following:
● HTTP and HTTPS
- 338 -

CHAPTER 33 Supplementary Security Procedures OVOC | IOM
● HTTPS Only
Figure 33-9: SBC Web Settings Page
7. If you configured the SBC Devices Communication parameter to Hostname-Based in theOVOC Web, you must configure the parameter "Verify Certificate SubjectName" on themanaged device (SetupMenu > Signaling & Media tab >Media folder > Quality ofExperience Settings).
Figure 33-10: Quality of Experience Settings
8. Open the TLS Contexts page (Setupmenu > IP Network tab > Security folder > TLSContexts).
9. In the table, select the TLS Context #0 (Management interface), and then click Edit . Thefollowing screen is displayed:
Figure 33-11: TLS Contexts
10. Set the required 'TLS Version' (default TLS Version 1.0).
- 339 -

CHAPTER 33 Supplementary Security Procedures OVOC | IOM
OVOC supports TLS versions 1.0, 1.1. and 1.2
11. Ensure 'Cipher Server' is set to DEFAULT.
12. Ensure 'Cipher Client' is set to DEFAULT.
Step 6: Reset Device to Apply the New Configuration
This step describes how to reset the device to apply the new configuration.
➢ To save the changes and reset the device:
1. Reset the device with a save-to-flash for your settings to take effect (Setup menu >Administration tab > Maintenance folder > Maintenance Actions).
MP-1xx Devices
This section describes how to install Custom certificates on the MP 1xx devices.
For installing certificates on MP2xx devices, refer to Section "Securing RemoteManagement with Certificates" in theMP-20x Telephone Adapter User's Manual.
Step 1: Generate a Certificate Signing Request (CSR)
This step describes how to generate a Certificate Signing Request (CSR).
➢ To generate a CSR:
1. Your network administrator should allocate a unique DNS name for the device (e.g., dns_name.corp.customer.com). This DNS name is used to access the device and therefore, mustbe listed in the server certificate.
2. If the device is operating in HTTPS mode, then set the 'Secured Web Connection (HTTPS)'parameter (HTTPSOnly) to HTTP and HTTPS (refer to theMP-11x and MP-124 User'sManual). This ensures that you have a method for accessing the device in case the newcertificate does not work. Restore the previous setting after testing the configuration.
3. Login to the MP-1xx Web server.
4. Open the Certificates page (Configuration tab > System menu > Certificates).
5. Under the Certificate Signing Request group, do the following:
a. In the 'Subject Name [CN]' field, enter the DNS name.
b. Fill in the rest of the request fields according to your security provider's instructions.
c. Click the Create CSR button; a textual certificate signing request is displayed in the areabelow the button:
- 340 -

CHAPTER 33 Supplementary Security Procedures OVOC | IOM
Figure 33-12: Certificate Signing Request Group
6. Copy the text and send it to the certificate authority (CA) to sign this request.
Step 2: Receive the New Certificates from the CA
You will receive the following files from the Certificate Authority (CA):
■ Your (device) certificate – rename this file to “device.crt”
■ Root certificate – rename this file to “root.crt”
■ Intermediate CA certificates (if such files exist) – rename these files to “ca1.crt”, “ca2.crt”etc.
Save the signed certificate to a file (e.g., device.crt). Make sure that all certificates are in PEMformat and appear as follows:-----BEGIN CERTIFICATE-----
MIIDkzCCAnugAwIBAgIEAgAAADANBgkqhkiG9w0BAQQFADA/MQswCQYDVQQGEwJGUjETMBEGA1UEChMKQ2VydGlwb3N0ZTEbMBkGA1UEAxMSQ2VydGlwb3N0ZSBTZXJ2ZXVyMB4XDTk4MDYyNDA4MDAwMFoXDTE4MDYyNDA4MDAwMFowPzELMAkGA1UEBhMCRlIxEzARBgNVBAoTCkNlcnRpcG9zdGUxGzAZBgNVBAMTEkNlcnRpcG9zdGUgU2VydmV1cjCCASEwDQYJKoZIhvcNAQEBBQADggEOADCCAQkCggEAPqd4MziR4spWldGRx8bQrhZkonWnNm`+Yhb7+4Q67ecf1janH7GcN/SXsfx7jJpreWULf7v7Cvpr4R7qIJcmdHIntmf7JPM5n6cDBv1
- 341 -

CHAPTER 33 Supplementary Security Procedures OVOC | IOM
7uSW63er7NkVnMFHwK1QaGFLMybFkzaeGrvFm4k3lRefiXDmuOe+FhJgHYezYHf44LvPRPwhSrzi9+Aq3o8pWDguJuZDIUP1F1jMa+LPwvREXfFcUW+w==
-----END CERTIFICATE-----
● The above files are required in the following steps. Make sure that you obtainthese files before proceeding.
● Use the exact filenames as mentioned above.
Step 3: Update Device with New Certificate
This step describes how to update the device with the new certificate.
➢ To update the device with the new certificate:
1. In the Certificates page, scroll down to the Upload certificates files from your computergroup, click the Browse button corresponding to the 'Send Device Certificate...' field,navigate to the device.crt file, and then click Send File.
2. After the certificate successfully loads to the device, save the configuration with a devicereset ( Step 6: Reset Device to Apply the New Configuration on page 345 below).
Step 4: Update Device’s Trusted Certificate Store
For the device to trust a whole chain of certificates you need to combine the contents of theroot.crt and ca.crt certificates into a single text file (using a text editor).
➢ To update the device with the new certificate:
1. Open the root.crt file (using a text-based editor, e.g., Notepad).
2. Open the ca.crt file (using a text-based editor, e.g., Notepad).
3. Copy the content of the ca.crt file and paste it into the root.crt file above the existingcontent.
Below is an example of two certificate files combined (the file "ca2.crt" and the "root.crt")where the ca2.crt file contents are pasted above the root.crt file contents:
-----BEGIN CERTIFICATE-----
MIIDNjCCAh6gAwIBAgIBBDANBgkqhkiG9w0BAQUFADAhMQwwCgYDVQQKEwNBQ0wx
ETAPBgNVBAMUCEVNU19ST09UMB4XDTEwMDEwMTAwMDAwMFoXDTIwMDEwMTAwMDAw
- 342 -

CHAPTER 33 Supplementary Security Procedures OVOC | IOM
MFowIDEMMAoGA1UEChMDQUNMMRAwDgYDVQQDFAdFTVNfQ0EyMIIBIjANBgkqhkiG
9w0BAQEFAAOCAQ8AMIIBCgKCAQEA4CmsdZNpWo6Gg5UgxflPjJeNggwnlQiUYhOK
kPEvS6yWH7tr8+TwnIzjT58kuuy+fFVLDyZzp117J53FIsgnCSxpVqcYfMoBbCL/
0fmXKHWlPIIbovWpZddgz8U1pEzD+5eGMUwCnqw99rbUseAHdwkxsXtOquwqE4yk
ihiWesMp54LwX5dUB46GWKUfT/pdQYqAuunM76ttLpUBc6yFYeqpLqj9OgKkR4cu
5B6wYNPoTjJX5OXgd9Yf+0IQYB2EiP06uzLtlyWL3AENGwDVeOvlfZgppLEZPBKI
hfULeMjay4fzE4XnS9LDxZGjJ+nV9ojA7WaRB5tl6nEJQ/7sLQIDAQABo3oweDAM
BgNVHRMEBTADAQH/MB0GA1UdDgQWBBRy2JQ1yZrvN4GifsXUB7AvctWvrTBJBgNV
HSMEQjBAgBThf6GbMQbO5b0CkLV8kW+Rg0AAhqElpCMwITEMMAoGA1UEChMDQUNM
MREwDwYDVQQDFAhFTVNfUk9PVIIBATANBgkqhkiG9w0BAQUFAAOCAQEAdAsYyfcg
TdkF/uDxlOGk0ygXrRAXHG2WFOS6afrcJHoZCCH3PNsvftRrEAwroGwx7tsn1/o+
CNV5YalstIz7BDIEIjTzCDrpO9sUsiHqxGuOnNhjLDUoLre1GDC0OyiKb4BOhlCq
hiemkXRe+eN7xcg0IfUo78VLTPuFMUhz0Bdn7TuE7QbiSayq2fY2ktHHOyDEKJGO
RUosIqgVwSZIsCnRZFumkKJtrT4PtnNYluYJHej/SHcsOWtgtCQ8cPdNJCZAWZ+V
XoAhN6pH17PMXLPclm9L/MlkVkmf0tp1bPmefrEBlO+np/O8F+P551uH0iOYA6Cc
Cj6oHGLq8RIndA==
-----END CERTIFICATE-----
-----BEGIN CERTIFICATE-----
MIIDNzCCAh+gAwIBAgIBATANBgkqhkiG9w0BAQUFADAhMQwwCgYDVQQKEwNBQ0wx
ETAPBgNVBAMUCEVNU19ST09UMB4XDTEwMDEwMTAwMDAwMFoXDTIwMDEwMTAwMDAw
- 343 -

CHAPTER 33 Supplementary Security Procedures OVOC | IOM
MFowITEMMAoGA1UEChMDQUNMMREwDwYDVQQDFAhFTVNfUk9PVDCCASIwDQYJKoZI
hvcNAQEBBQADggEPADCCAQoCggEBANCsaGivTMMcSv57+j5Hya3t6A6FSFhnUQrS
667hVpbQ1Eaj02jaMh8hNv9x8SFDT52hvgVXNmLBmpZwy+To1VR4kqbAEoIs+7/q
ebESJyW8pTLTszGQns2E214+U18sKHItpUZvs1dVUIX6xQiSYFDG1CDIPR5/70pq
zwtdbIipSsKgYijos0yRV3roVqNi4e+hmLVZA9rOIp6LR72Ta9HMJFJ4gyxJPUQA
jV3Led2Y4JObvBTNlka18WI7KORJigMMp7T8ewRkBQlJM7nmeGDPUf1wRjDWgl4G
BRw2MACYsu/M9z/H821UOICtsZ4oKUJMqbwjQ9lXI/HQkKRSTf8CAwEAAaN6MHgw
DAYDVR0TBAUwAwEB/zAdBgNVHQ4EFgQU4X+hmzEGzuW9ApC1fJFvkYNAAIYwSQYD
VR0jBEIwQIAU4X+hmzEGzuW9ApC1fJFvkYNAAIahJaQjMCExDDAKBgNVBAoTA0FD
TDERMA8GA1UEAxQIRU1TX1JPT1SCAQEwDQYJKoZIhvcNAQEFBQADggEBAHqkg4F6
wYiHMAjjH3bqxUPHt2rrrALaXA9eYWFCz1q4QVpQNYAwdBdEAKENznZttoP3aPZE
3EOx1C8Mw2wU4pOxD7B6pH0XO+oJ4LrxLB3SAJd5hW495X1RDF99BBA9eGUZ2nXJ
9pin4PWbnfc8eppq8Tpl8jJMW0Zl3prfPt012q93iEalkDEZX+wxkHGZEqS4ayBn
8bU3NHt5qh0Egpai8hB/nth1xnA1m841wxCbJW86AMRs2NznROyG695InAYaNlIo
HU9zBRdRRASV5vmBN/q5JnDhshZhL1Bm+M6QxOyGoNjL1DqE+aWZkmsw2k9STOpN
itSUgGYwEagnsMU=
-----END CERTIFICATE-----
The maximum supported size of the combined file of trusted chain of certificates is100,000 bytes (including the certificate's headers).
- 344 -

CHAPTER 33 Supplementary Security Procedures OVOC | IOM
4. Save the combined content to a file named "chain.pem" and close the file.
5. Open the Certificates page and upload chain.pem file using the 'Trusted Root CertificateStore' field.
Step 5: Configure HTTPS Parameters on Device
■ Configure HTTPS Parameters on the device (Step 5: Configure HTTPS Parameters on theDevice on page 337 above).
Step 6: Reset Device to Apply the New Configuration
This section describes how to apply the new configuration.
➢ To save the changes and reset the device:
1. Reset the device with a save-to-flash for your settings to take effect (Setup menu >Administration tab > Maintenance folder > Maintenance Actions).
Cleaning up Temporary Files on OVOC ServerIt is highly recommended to cleanup temporary files on the OVOC server after certificates havebeen successfully installed. This is necessary to prevent access to security-sensitive material(certificates and private keys) by malicious users.
➢ To delete temporary certificate files:
1. Login to the OVOC server as user root.
2. Remove the temporary directories:
rm -rf /home/acems/server_certsrm -rf /home/acems/client_certs
- 345 -

CHAPTER 34 Transferring Files OVOC | IOM
34 Transferring FilesThis appendix describes how to transfer files to and from the OVOC server using any SFTP/SCPfile transfer application.
FTP by default is disabled on the OVOC server.
➢ To transfer files to and from the OVOC server:
1. Open your SFTP/SCP application, such as WinSCP or FileZilla.
2. Login with the acems/acems credential (all files transferred to the OVOC server hostmachine are then by default saved to /home/acems directory).
3. Copy the relevant file(s) from your PC to the host machine (or vice-versa). For example,using the FileZilla program, you drag the relevant file from the left pane i.e. in your PCdirectory to the right pane i.e. the /home/acems directory on the OVOC server hostmachine.
- 346 -

CHAPTER 35 Verifying and Converting Certificates OVOC | IOM
35 Verifying and Converting CertificatesThis appendix describes how to verify that certificates are in PEM format and describes how toconvert them from DER to PEM if necessary.
➢ To verify and convert certificates:
1. Login to the OVOC server as user root.
2. Transfer the generated certificate to the OVOC server.
3. Execute the following command on the same directory that you transfer the certificate toverify that the certificate file is in PEM format:
Openssl x509 -in certfilename.crt -text -noout
4. Do one of the following:
a. If the certificate is displayed in text format, then this implies that the file is in PEMformat, and therefore you can skip the steps below.
b. If you receive an error similar to the one displayed below, this implies that you aretrying to view a DER encoded certificate and therefore need to convert it to the PEMformat.
unable to load certificate12626:error:0906D06C:PEM routines:PEM_read_bio:no start line:pem_lib.c:647:Expecting: TRUSTED CERTIFICATE
5. Convert the DER certificate to PEM format:
openssl x509 -inform der -in certfilename.crt -out certfilename.crt
- 347 -

CHAPTER 36 Self-Signed Certificates OVOC | IOM
36 Self-Signed CertificatesWhen using self-signed certificates, use the following instructions for recognizing the secureconnection with the OVOC server from your OVOC client browsers.
Mozilla FirefoxWhen you are prompted with a message that the web page that you are trying to open usingMozilla Firefox is insecure, do the following:
1. Click the “I Understand the Risks” option.
2. Click the Add Exception button, and then click the Confirm Security Exception button.
Figure 36-1: Mozilla Firefox Settings
Google ChromeWhen you are prompted with a message that the web page that you are trying to open usingGoogle Chrome is insecure, do the following:
1. Click Advanced and then click the “Proceed to <Server IP> (unsafe)” link.
- 348 -

CHAPTER 36 Self-Signed Certificates OVOC | IOM
Figure 36-2: Chrome Browser Settings
Microsoft EdgeWhen you are prompted with a message that the web page that you are trying to open usingMicrosoft Edge is insecure, do the following:
■ Click Details and then click the link Go on to the webpage.
Figure 36-3: Microsoft Edge Browser
Figure 36-4: Go on to the Web Page
- 349 -

CHAPTER 37 Datacenter Disaster Recovery OVOC | IOM
37 Datacenter Disaster Recovery
IntroductionThis appendix describes the OVOC Disaster Recovery procedure for deployments where OVOCis deployed in two separately geographically located datacenters with two different networkspaces, in which minimal impact on the SBC/Gateway and OVOC downtime is desired.
Examples shown in this Appendix are for the VMware platform; however, theseprocedures are also relevant for Hyper-V platform.
Solution DescriptionThe Disaster Recovery solution is composed of two virtual machines in accordance with theOVOC system requirements (see Hardware and Software Requirements ). Virtual Low andVirtual High setups are supported. It is recommended that each OVOC machine will have aVMware High Availability (HA) setup to support local Data Center (DC) HA.
■ Both machines should have identical hardware configuration and installed with the exactlysame OVOC software version. One of the machines will work as ‘Active’ and will beconstantly up and running. The second machine is defined as ‘Redundant’. It should not beturned off and the application should be stopped and always remain off.
■ The primary machine backup files should be saved and periodically transferred to theexternal storage of the standby location.
■ If the primary machine fails, the user should run the Disaster Recovery procedure as shownbelow.
Figure 37-1: Disaster Recovery Between Two DataCenters with VMware HA
- 350 -

CHAPTER 37 Datacenter Disaster Recovery OVOC | IOM
Initial RequirementsThe following initial requirements need to be adhered to before implementing the DisasterRecovery procedure:
■ Both machines should have identical hardware (CPU, Memory, Disk, IO).
■ An identical Linux OS (the same DVD), database, and the OVOC software version should beused.
■ Identical database passwords need to be configured on both servers.
■ Identical OVOC Server Manager settings must be configured on both servers (e.g.,HTTP/HTTPS communication, etc.).
■ If non-default certificates are used, they must be pre-installed on both servers.
■ Both machines should have a valid license per each Machine ID with identical capabilities.
■ When upgrading the OVOC server software, both machines should be upgraded. Make surethat redundant machine is not rebooted after the upgrade process and the OVOCapplication remains closed.
When upgrading OVOC, the backup that was created before the upgrade cannot beused anymore. You should only use the backups created after the upgrade process.For more information on backing up the OVOC server, see OVOC Server BackupProcesses on page 194.
■ Make sure that active server backups are not stored on the server machine.
New Customer ConfigurationThe procedure below describes the steps for a New Customer configuration.
➢ To perform a New Customer configuration:
1. Install and properly configure both servers.
2. Make sure the primary OVOC server is up and running.
3. For each device added and managed by the OVOC server, the following features should beprovisioned with both primary and secondary servers’ IP addresses:
● Trap Destination Server
● Session Experience Manager
● NTP Server Address
Data Synchronization ProcessTo save recovery time, it is advised that at the end of the daily / weekly backup, transfer thelatest backup files from the primary to the secondary server machine. The data transfer may be
- 351 -

CHAPTER 37 Datacenter Disaster Recovery OVOC | IOM
performed automatically using a customer- defined script.
The data transfer is the responsibility of the Enterprise's IT implementation team.
Recovery ProcessThe procedure below describes the recovery process.
➢ To run the recovery process:
1. If the primary machine fails, use the Server Manager to make sure the OVOC applicationhas been closed, before starting the secondary machine recovery process.
2. Do not run the OVOC software on the secondary machine at this stage. Just make sure themachine is up and running.
3. Verify that server software version is the same as on the Primary server, by checking theOVOC server Manager title.
4. Start the secondary server machine, making sure that all the processes are up and running.
5. Make sure that all backup files are in the /data/NBIF directory.
6. In OVOC Server Manager, go to the Application Maintenance menu and select the Restoreoption (OVOC Server Restore on page 196).
7. Follow the instructions during the process; you might need to press Enter a few times.
8. After the restore operation has completed, you are prompted to reboot the OVOC server.
9. If you have installed custom certificates prior to the restore, you must re-install them.
10. Login to the OVOC Web client and verify that there is connectivity and the application isfunctioning correctly.
11. If you are using one or more features which are marked in the table below as ‘NotSupported’, please provision all the managed devices with a new Management Server IPaddress.
12. For SBC Fixed and Floating License Pool customers, run the Update command for all themanaged devices .
See the table below summarizing the features affected byDisaster Recovery functionality.
Table 37-1: Features Affected by Disaster Recovery Functionality
Feature Status
Management
Alarms+ NAT communication based on Keepalive traps Supported
Fixed License Pool and Floating License Not Supported
- 352 -

CHAPTER 37 Datacenter Disaster Recovery OVOC | IOM
Feature Status
IP Phones Manager Pro: Alarms / Status reports Not Supported
Advanced Quality Package -
SBC/Gateway Voice Quality Monitoring Supported
Endpoint Quality monitoring (RFC 6035) Not Supported
Server
Server: Device NTP Server Supported
Server: Device Syslog Server Not Supported
Server: Device TP Debug recording server Not Supported
- 353 -

This page is intentionally left blank.
CHAPTER 37 Datacenter Disaster Recovery OVOC | IOM
- 354 -

International Headquarters
1 Hayarden Street,
Airport City
Lod 7019900, Israel
Tel: +972-3-976-4000
Fax: +972-3-976-4040
AudioCodes Inc.
200 Cottontail Lane
Suite A101E
Somerset NJ 08873
Tel: +1-732-469-0880
Fax: +1-732-469-2298
Contact us: https://www.audiocodes.com/corporate/offices-worldwide
Website: https://www.audiocodes.com/
Documentation Feedback: https://online.audiocodes.com/documentation-feedback
©2022 AudioCodes Ltd. All rights reserved. AudioCodes, AC, HD VoIP, HD VoIP Sounds Better, IPmedia,Mediant, MediaPack, What’s Inside Matters, OSN, SmartTAP, User Management Pack, VMAS, VoIPer-fect, VoIPerfectHD, Your Gateway To VoIP, 3GX, VocaNom, AudioCodes One Voice, AudioCodes MeetingInsights, AudioCodes Room Experience and CloudBond are trademarks or registered trademarks of Audi-oCodes Limited. All other products or trademarks are property of their respective owners. Product spe-cifications are subject to change without notice.
Document #: LTRT-94184