One Drop Sangha - Instructions for Sewing a Rakusu
39
One Drop Sangha Instructions for Sewing a Rakusu
-
Upload
khangminh22 -
Category
Documents
-
view
0 -
download
0
Transcript of One Drop Sangha - Instructions for Sewing a Rakusu

One Drop Sangha Instructions for Sewing a Rakusu

*Please contact Shinei at [email protected] with any questions or suggestions for improving this pattern. Thank you!
Materials: • One piece of black cloth - 1.45 x .5 meters (if you are taller then 1.85m, you will want to add
2cm to the length of the fabric for every 1cm you are taller than 1.85m. This is so you will have enough fabric to make longer straps). This is the main fabric for the rakusu – a non-stretch tightly woven natural cotton or hemp works best. You can also use scraps of matching fabric to make all the pieces. Some people prefer a poly/cotton blend which will wrinkle less.
• One piece of interfacing (stiffening fabric) 31 x 39cm • One piece of tightly woven white cotton, hemp, or silk cloth (for the calligraphy –The Roshi
will probably provide this) 31 x 39cm
• Rakusu ring (a round ring with an outside diameter of approximately 6-7cm, and an inside diameter of approximately 3-5.5cm -usually made from wood or bamboo)
• A hook and eye (for attaching short strap C –optional) • Black thread • A sharp, thin needle for hand sewing and one needle with an big eye for thick thread • Sharp scissors • Metric measuring tape or ruler and a straight edge or ruler • Tailor's chalk or washable fabric marking pencil • Sewing pins • A piece of black embroidery floss (thick thread for sewing triangle on back of neck strap) • An iron and ironing surface • Sewing machine (optional ). Most of the rakusu can be make with a machine if desired. • A completed rakusu (optional). This can be very helpful to refer to for clarification.
ATTENTION! To avoid confusion and mistakes, read through all steps and know the basic order of construction BEFORE beginning your rakusu.
IMPORANT General Sewing Notes: ***Whenever the instructions do not indicate to use a specific stitch, use the partial backstitch if hand sewing or a regular straight stitch on the sewing machine. If you are not using a machine, you will use the partial back stitch for the majority of your sewing.
***Be sure to use an overlapping backstitch at the beginning and end of each and every seam or else the seams will come apart! If you strongly prefer to use knots, try to hide the knots so they are not visible.
***Ironing and pinning are very important aspects of sewing. Do not skip these steps! Be very careful that your iron is not too hot or it will make burn marks on the fabric.

Glossary of Stitches:
Overlapping backstitch: This is how you secure the beginning and end of seams. Use it to secure ALL hand sewn seams. This is a smoother and neater alternative to a knot that can be easily hidden.
1. Bring the needle up though the fabric. 2. Make one 2mm stitch. 3. Go back over your original stitch 3 times (after 2 times, if you tug on the thread, it
should feel secure). 4. Cut the tread tail at the starting and finishing end of the thread right up close to the
overlapping backstitch. 1 2 3 4
Partial Back Stitch: If you are hand sewing your rakusu, this will be your primary stitch.
*Secure the end using the overlapping backstitch (see instructions for above). 1. Bring your needle up through the fabric 2 mm in front of the overlapping backstitch. 2. Insert your needle 1mm behind where you came up. 3. Repeat steps 2 & 3 until you reach the end. 4. Secure the end using the overlapping backstitch. 5. The back side of the stitches will look like small lines. 1 2 3(a)
3(b) 4. 5.

Slip Stitch (Invisible ladder Stitch):
1. Secure the end using the overlapping backstitch. Hide this stitch in the seam allowance of the top piece of fabric so it is hidden underneath the visible fabric.
2. Slip your needle inside the folded edge for a distance of 2mm and bring the needle out through the folded edge, being sure you stay exactly on the fold.
3. Insert the needle into the fabric directly across from the fold where it came out, making a stitch about 1mm long.
4. Bring the needle straight up from where it came out and insert back into the fold for another 2mm stitch.
5. Continue this back-and-forth pattern, pulling each stitch tight until you reach the end of your seam. The stitches should be nearly invisible.
6. Secure the end using the overlapping backstitch.
1. 2.
3. 4. 5.

Basting Stitch:
1. Weave the needle in and out of the fabric creating the look of a dashed line. 2. Use about 2cm long stitches with equal length spaces between. 3. Do not secure the basting stitch at the beginning or the end because it is just a
temporary stitch meant to come out easily later.
Short Running Stitch:
1. Secure the end using the overlapping backstitch. 2. Weave the needle in and out of the fabric creating the look of a dashed line. 3. Use about 2mm long stitches with equal length spaces between. 4. Secure the end using the overlapping backstitch.

Step 1: Preparing the cloth
If the fabric is new, check to see if it has been pre-shrunk. If not, wash and dry fabric. Iron cloth well.
Step 2: Marking the cutting and fold lines
Use tailor's chalk or fabric pencil to mark cutting lines. Precision in measuring and marking is important! Use the cutting layout and photo below as a guide. Most pieces lie right next to each other with no space in between them. Be sure to write the letter on the wrong side of each and every piece. Read the following notes before beginning this step.
Notes:
**If you are using a fabric that has a pattern (for example a diagonal weave), even if it is the same color, make sure you arrange the pieces in the same direction so that the pattern on the fabric lines up and will look nice when sewn together. Some fabrics do not have a pattern and the weave looks the same from all directions.
**If you are using fabric that has a right and a wrong side (meaning the front looks different from the back), make sure that the markings are on the wrong side of the fabric. Some fabrics look the same on both sides. If your fabric looks the same on both sides then your “wrong side” (or inside) will be the side you mark on and your “right side” (or outside), will be the side that you do not mark on.
**Cut off and discard the selvedge (frayed edge of the fabric). Do not include this raw, uneven edge as part of your rakusu pieces.
** If are are taller than 1.85 meters, you will need to add 2cm, for every 1cm you are taller, to the length of straps A and B.

Cutting Layout:
Measurements:
A (strap): Cut one, (*remember to lengthen this strap if you are taller than 1.85 meters) 13x104cm B (strap): Cut one, (*remember to lengthen this strap if you are taller than 1.85 meters) 11x110cm C (strap): Cut one, 11x16cm D (neck piece): Cut two, 12x25cm E (bottom and side border piece): Cut one, 7.5x91cm F (top border piece): Cut one, 8x39cm G (rice field piece): Cut two, 5x23cm H (rice field piece): Cut four, 4.8x19cm J (rice field piece): Cut two, 2.8x20.2cm K (rice field piece): Cut one, 8x23cm L (corner squares): Cut four, 5x5cm M (overlay): Cut one, 6x23cm N (back piece): Cut one, 31x39cm
D F
J
K
E
A
B
N
DJ
M
G HG LH L L LC

!

Step 3: Cut the pieces
1. Use sharp scissors or a rotary cutter to cut along all cutting lines. Precision in cutting is important!
!
Step 4: Mark and sew the folds on pieces G, K, and J
1. Using your fabric pencil or chalk, mark fold lines on wrong side of pieces G and K. Mark fold lines on J pieces on the right side of fabric. Use the pattern pieces (at the end of these instructions) to know where to mark the lines. The fold lines are the horizontal lines running across the pattern pieces. The pattern pieces should print out the same size as your cut pieces but check them to make sure.
2. All matching pairs should be lined up and checked to make sure the fold lines are identical before ironing and sewing.

3. Fold and iron pieces G and K on fold lines. Fold line marking should be on the outside of the fold (the wrong side of the fabric).
4. Sew all folds on pieces G and K using a 1 cm seam allowance. The 1cm of fabric between the stitching line and edge of the fabric or fold line is called the *seam allowance (remember this term).
5. J pieces are ironed differently on the front side of the fabric and stitched by hand with a slip stitch (see "glossary of stitches").
Fold and iron pieces on fold lines. (This piece has been unfolded in order to show the full piece.)
Mark lines on the front of J pieces. Fold and iron each set of parallel tucks away from each other. Each fold creates a 3mm tuck.

1. Iron the seam allowances of the folds on pieces G and K towards one another (see arrows on pattern pieces for clarification about which direction to iron the seam allowances of the folds). The direction the fold is ironed is important and will affect the look of the finished rakusu.
Step 5: Sew and iron the center rice field pieces together
The center rectangle created by sewing the nine strips together (G, H, J, H, K, H, J, H, G ) is called the “rice field” because the original Buddhist robe was made to resemble a rice field. From now on, the instructions will refer to this center section as the “rice field.”
Sew the nine center pieces together in the order shown in the rice field photo above. Iron each seam as you sew. Read through all the sewing/ironing instructions in this section before beginning to sew.
1. Before sewing each seam, line raw edges up and pin pieces together with right sides (front sides) of the fabric facing each other. The front side is the side that does not have any marking lines or letters written on it.
G H J H K H J H G

!
2. Begin sewing from the center of the rice field (sewing the raw edges of piece K to the raw edges of pieces H) and working out towards the edges on both sides.
3. The seam allowance for all strips is 1cm (this means that there is 1cm of fabric between the edge of the fabric and the stitching line).
4. As you sew each new piece, iron the seam in the direction of the arrow shown on the completed rice field photo below. The direction that the seam is ironed is important and will affect the look of the finished rakusu.
5. As you sew, make sure the horizontal folds on strips G, K, and J stay flat and in the direction in which they were previously ironed. Also make sure that these folded strips are orientated correctly from top to bottom and that the matching sets are sewn symmetrically on both sides of the rakusu.
6. After completed, if the top and bottom edges of your rice field are uneven, use the straight edge and chalk to mark a straight line on them. Trim off the excess uneven edges if needed. The final rice field piece should be 29cm x 19cm (or very close).
7. If you would like, you can use a damp cloth and gently wash off the letters on the back of the pieces after they are sewn together. It is also okay to leave the letters on if they do not show through to the front.

Step 6: Iron and attach the four corner pieces
1. Iron over ½ cm fold on two adjacent sides of each of the four corner pieces (L pieces). This fold should be ironed to the wrong side (inside) of the squares with the letter markings on them.
Note: If you are using a fabric that has a pattern (for example a diagonal weave), even if it is the same color, make sure you iron in the proper sides of the corners so they will look right when sewn on the front of the rakusu.
2. Pin the ironed squares to the four corners of the completed rice field with the folded sides facing toward the center and the raw unfolded edges lining up with the raw outside edges of the rice field.
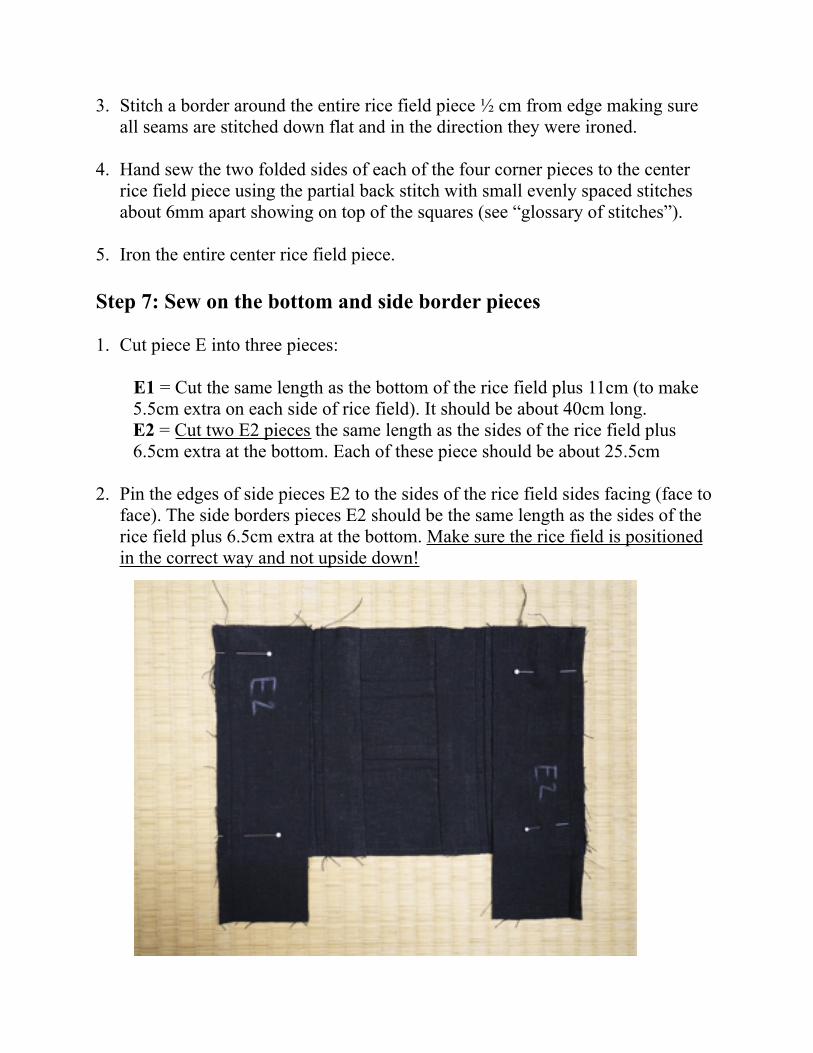
3. Stitch a border around the entire rice field piece ½ cm from edge making sure all seams are stitched down flat and in the direction they were ironed.
4. Hand sew the two folded sides of each of the four corner pieces to the center rice field piece using the partial back stitch with small evenly spaced stitches about 6mm apart showing on top of the squares (see “glossary of stitches”).
5. Iron the entire center rice field piece.
Step 7: Sew on the bottom and side border pieces
1. Cut piece E into three pieces:
E1 = Cut the same length as the bottom of the rice field plus 11cm (to make 5.5cm extra on each side of rice field). It should be about 40cm long. E2 = Cut two E2 pieces the same length as the sides of the rice field plus 6.5cm extra at the bottom. Each of these piece should be about 25.5cm
2. Pin the edges of side pieces E2 to the sides of the rice field sides facing (face to face). The side borders pieces E2 should be the same length as the sides of the rice field plus 6.5cm extra at the bottom. Make sure the rice field is positioned in the correct way and not upside down!

3. Sew both side borders with a 1cm seam allowance (1cm between edge of fabric and stitching line) and iron side border seams out toward the side borders.
4. Pin the edge of the bottom border piece E1 to the bottom edge of the rice field, right sides facing (face to face). It should be 6.5 cm longer than the bottom of the rice field on both sides so that it overlaps the side border pieces.

5. Sew on the bottom border with a 1 cm seam allowance. Sew only along the edge of the rice field – from side border to side border seam. Do not sew the bottom border to the side borders yet. Stop sewing when you reach the side border seam! Iron seam down towards the bottom of the border.

6. Miter the bottom corners by folding under the corner triangle section of both ends of the bottom border. This will create two diagonal seams from the corners of the rice filed to the corners of the bottom border. Iron and pin in place. Hand sew the diagonal seams down using the back stitch with small evenly spaced stitches showing on top of the squares about 6mm apart (see “glossary of stitches”).

7. Turn over and clip the excess fabric from the diagonal corner seams to 1 cm seam allowance – be careful not to get too close to stitches!

Step 8: Sew on the top border piece
1. Pin the edges of top border piece F to the top of the rice field and side borders, right sides facing (face to face). Sew with a 1 cm seam allowance. Make sure all your seams are stitched down in the correct direction!
Step 9: Attach the interfacing (stiffening fabric)
1. The interfacing should be the same size as your completed rice field with border. If it isn’t, cut the interfacing so it is the same size.
2. If using an iron-on interfacing, place the rice field face down on you ironing surface and iron the interfacing to the wrong side (the back) of the rice field.
3. If the interfacing is not “iron-on” then you need to stitch it on the back of the rice field. Pin the raw edges of the interfacing to the raw edges of the wrong side (back) of the rice field border. Use a ½ cm seam allowance (stitching ½ cm from edge of the fabric) around the entire edge of the rice field border. Use a basting stitch (see “glossary or stitches”). Make sure to stitch the interfacing exactly in place so that it lies flat behind the rice field.

Step 10: Sew on the black backing (piece N)
1. The black backing piece, N, should be the same size as your completed rice field with border and interfacing. If it isn’t, trim the backing so it is the same size.
2. Place the black backing piece, N, over the rice field with border, right sides facing (face to face). Pin raw edges together.
3. Make two marks on the top edge of the black backing, 10 cm from each of the top corners. Do not sew between these two marks.

4. Sew the backing to the rice field border using a 1 cm seam allowance. Leave the space between the two 10 cm marks open.
5. Trim all four corners diagonally ½ cm from corner stitches. Be careful not to come too close or cut the stitches!
6. Turn entire piece right side out though the 10 cm opening at the top edge. 7. Be sure to turn all corners out completely so that they are not rounded. A
chopstick pressed carefully into the inside of the corner can help make the corners look sharp and square. A thick needle can also help pull the corners out fully from the outside.
8. Iron edges flat.
9. Fold in the raw edges of the unstitched 10 cm opening at the top of the border and iron it so that the top edge of the rakusu is flat and even. Do not sew the opening closed.

Step 11: Sew the center overlay (piece M)
1. With the fabric pencil or chalk, make line 1 cm from each end of a long edge of the overlay piece M.
2. Center the overlay piece M on the top edge of the rakusu border, lengthwise, lining up the top edge of M with the top edge of the rakusu, right sides facing. Pin in place.
3. Starting at the line that is 1 cm from the end of overlay, sew overly to the top border using a ½ cm seam allowance. Stop sewing at the other line that is 1 cm before the end of the overlay.
4. Fold under 1 cm on both of the short sides of the overlay and iron.

5. Turn the overlay up and iron it so it extends above the rakusu. 6. Fold top edge of overlay under 1cm, fold corners at a diagonal, iron.
7. Fold entire overlay piece over the top edge of the rakusu, iron, and pin. Do not sew the overlay to the back of the rakusu yet – it is sewn over the white backing piece after it is placed.

12. Sew on the white backing for calligraphy (piece O) ***(The Roshi will probably provide this piece complete with calligraphy. This step can skipped and done last if you do not yet have the calligraphy piece. Roshi can also do the calligraphy on a complete rakusu with white backing already sewn on).
1. Fold under approximately 1cm of entire edge of white backing (piece O). It should be the same size (or 1-2mm smaller all around) as the back of the rakusu. You can fold under more fabric under is this piece is too big. It should not be larger than the rakusu and the white fabric should not be visible from the front of the rakusu.
2. Iron and pin the white backing to the back of the rakusu. The white backing should be stitched down underneath the overlay piece M (the small piece which was previously pinned over the top edge of the rakusu).
3. Using the invisible ladder stitch hand sew the white backing piece to the back of the rakusu (also use the invisible ladder stitch to sew the back of the overlay on top of the white backing when you get to it). The thread should be invisible or nearly invisible. Make sure your stitches only go through to the black backing piece – they should not go all the way through to the front of the rakusu. Your stitches should not be seen – especially not from the front of the rakusu.

Step 13: Make the straps
1. Before sewing on strap A, make sure it is the correct length. Many people will need to make this strap shorter. Fold the un-sewn strap piece A, (the wider strap) in half lengthwise and pin it in place on the rakusu. The outside edges of the strap should line up with the outside edges of the rakusu and the bottom edges of the strap should line up with the bottom edge of the top rakusu border piece. If the strap is too long for your body, cut the strap to the appropriate length, leaving an extra 2 cm (1cm at each end) to be tucked in as a seam allowance for the finished seam. Be careful not to cut the strap too short! The rakusu should be below your chest, cover the hara, and be long enough that it can be tucked into your belt or hakama straps.

2. Do not shorten strap piece B or C.
3. After you have found the right length, fold strap A in half crosswise to find the exact middle and use a fabric pencil or chalk to mark the middle with a horizontal line on the wrong side (inside) of the strap. Unfold and make two more marks, each 5.5 cm on either side of the center fold mark.
4. Now fold piece A in half lengthwise with right sides together (inside facing out). Match and pin all raw edges.
5. Using a 1 cm seam allowance (1 cm of fabric between the edge and the seam line), sew all raw edges of piece A except for the 5.5 cm on either side of the fold mark in the middle of the strap. Leave this 11 cm gap in the middle of the strap open – do not sew this opening shut! The opening is where the center neck piece will later be inserted and where you will turn the strap right side out. Be sure to back stitch when you reach the markings at the edges of opening to ensure the ends of the seams are secure.

6. Fold straps pieces B and C in half lengthwise with right sides together. Pin raw edges together and sew 1 cm from raw edges. Leave one end open on pieces B and C so that they can be turned right side out.
7. Trim corners diagonally ½ cm from corner stitches on all three pieces (A, B, & C). Be careful not to come too close to or cut the stitches!
White markings along seams show where the seam lines are.
8. Turn all three pieces (A, B, & C) right side out with the help of a chopstick or ruler. Be sure to turn all corners out completely so that they are not rounded (a chopstick pressed carefully into the inside of the corner can help make the corners look sharp and square. A thick needle can also help pull the corners out fully (from the outside).

9. Fold in and iron 1 cm at the open ends of pieces B and C using an invisible ladder stitch (see “glossary of stitches”) to hand sew the opening closed. Make sure the corners are sharp and square.
10.Turn in the raw edges of the unstitched opening in the middle of strap A and iron it so that the side edge is flat and even. Still do not sew this opening shut.
The 11cm gap is still open on edge of strap A.
11.Fold over both edges of strap piece C at a diagonal. These diagonal folds should be about 7.5cm long (leaving the the same length unfolded at the end of strap as the width of the top border of the rakusu, approximately 6cm). Hand stitch one fold down and then the other on top using the invisible ladder stitch (see “glossary of stitches”)

White marking shows how piece C is folded.
12. Iron all three straps flat.
Step 14: Attach the straps
1. With the seam side of strap facing towards the inside of the rakusu (the correct seam placement is important), pin the outside strap, A, to the rakusu front. The outside edges of the strap should line up with the outside edges of the rakusu and the bottom edges of the strap should line up with the bottom of the top rakusu border. Make sure your strap isn’t twisted! Pin in place.
2. Hand sew the strap in place at the very top edge of the rakusu border. First stitch a seam from the back through only the back layers of black fabric using the slip stitch (these stitches shouldn’t be visible from the front of the rakusu. Then stitch a seam from the front through all layers of the black fabric using partial back stitch -the small dots of the back stitch should be seen on the front of the straps about 6 mm apart (see “glossary of stitches”). The straps are sewn on twice because they are the part of the rakusu that gets the most stress and will most easily come apart. Make sure that your stitches do not go through the white backing and be sure to secure the ends well!
3. With seam side of strap facing towards the inside of the rakusu, pin the inside strap B to the rakusu front next to strap A on the left side of the rakusu as you are facing it. Stitch it in place the same as with the outside strap A (stitching twice for extra strengh). Before stitching make sure the bottoms of the two straps line up exactly at the bottom of the top border piece.
4. Pin the short inside strap C right next to strap A on the right side of the rakusu as you are facing it. Sew it on as you sewed the other straps.

Step 15: Attach the hook & eye and ring 1. Hand sew the eye part of the hook and eye to the end of strap C on the back
side. Be sure it is sewn on securely. The hook should face up.
2. Hand sew the hook part of the hook and eye to the back side of the top edge of the rakusu so the short strap can loop over and hooks onto it. Be sure it is sewn on securely.

3. Place strap C through the rakusu ring and hook in place.
***If you do not have a hook and eye, the end of strap C can just be sewn on to the top edge of the rakusu. If you do this, make sure to put the ring on the strap before sewing it. You will not be able to remove or replace the ring without unsewing and resewing this seam.
Japanese style hook and eye
Step 16: Sew the back neck piece (D) and attach it to straps
1. Pin both raw edges of the long sides of pieces D together, right sides facing. Using a 1 cm seam allowance, sew long sides together.
White markings show seam lines.

2. Turn joined neck pieces D right side out and iron seams flat. Fold and iron in half crosswise. Stitch raw edges together ½ cm from edges. If you have a sewing machine that sews zigzag or has an edging stitch, use one of these to stitch over the raw edges.
White markings show seam lines.
3. Insert the raw stitched edge of back neck piece 1cm inside opening in the center of the outside strap piece A. Make sure the neck piece is exactly perpendicular to the strap and that it is centered in the opening! Pin and hand sew in place on both sides. Use the slip stitch (see “glossary of stitch”). Also sew closed any small opening in the strap on either side of the neck piece.

4. Fold the neck piece D back over strap A. Run inside strap B thru the back neck piece so that it lies on top of the wider strap A as it goes thru the neck piece. (the end of strap B is not sewn down and will later go thru the rakusu ring). Pin strap B in place at the neckpiece. Try on the rakusu at this point and make sure the side on which the straps are sewn in place and pinned at the neck, lies flat and neat.
Step 17: Tie Strap B to rakusu ring
*If you shortened the length or strap A, strap B is probably too long also. You will need the shorten strap B about the same amount depending on the size of your ring. To find the right length, test it by tying the strap to your ring using the steps below until you find the correct spot where strap B is the same length as the other strap and lies flat. You may need to tie and untie a few times to get the right length. After finding the right length, cut the strap (if necessary) leaving a 1cm seam allowance at the end to tuck under. Finish the seam using a slip stitch (see “glossary of stitches”).
1. Iron approximately the last 17 cm of both sides of the strap into thirds, turning the outer sides of the strap under. This makes the part of the strap that will go through the ring thinner and neater. (It will be more than 17m if your strap is too long.)
2. Put approximately 17cm of the strap through the front/top of the ring and out the back to the left. (Again, this will be more than 17cm if your strap is too long.)
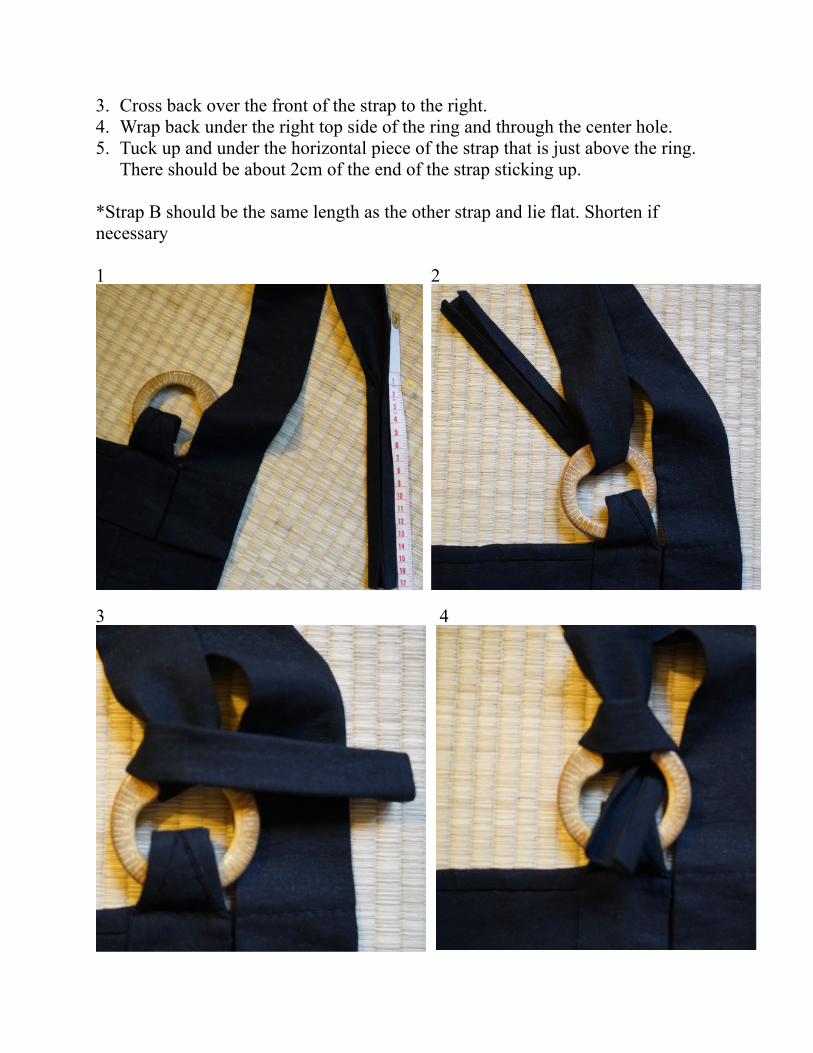
3. Cross back over the front of the strap to the right. 4. Wrap back under the right top side of the ring and through the center hole. 5. Tuck up and under the horizontal piece of the strap that is just above the ring.
There should be about 2cm of the end of the strap sticking up.
*Strap B should be the same length as the other strap and lie flat. Shorten if necessary 1 2
3 4

5
Step 18: Sew the equilateral triangle onto the neck piece
1. Finally, use the fabric marking pencil to lightly draw lightly a 2.4cm equilateral triangle on the backside of the center of the neckpiece. The top tip of the triangle should be 2cm from the top edge of the neckpiece. Make sure the triangle is right side up. Use thick black thread or embroidery floss and the larger needle to sew the triangle through all thicknesses of the neck piece and straps so that a triangle can be seen on both the top and bottom of the neckpiece. The beginning and ending knots can be hidden in between the straps so that the triangle looks nice and neat from both sides.
All sides 2.4cm
Height 2cm

Finished!
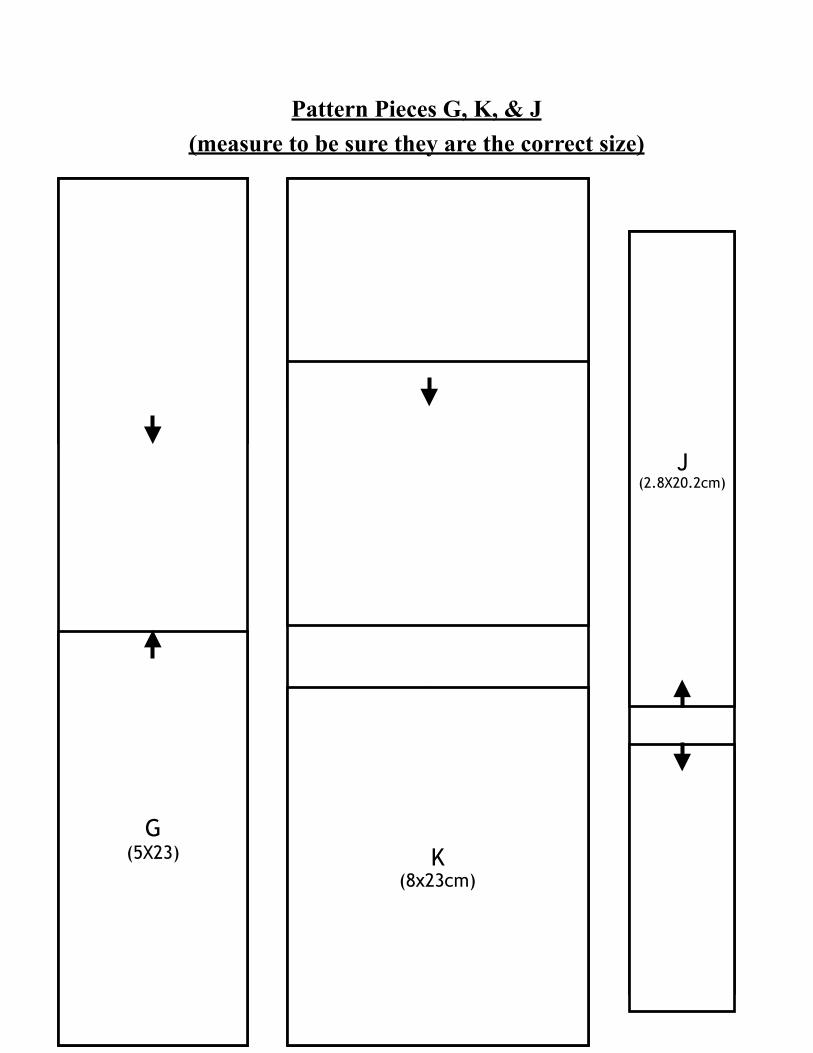
Pattern Pieces G, K, & J (measure to be sure they are the correct size)
J (2.8X20.2cm)
K (8x23cm)
G (5X23)

One Drop Sangha Instructions for Sewing a Rakusu