okidata-c5650-user-manual.pdf - Laser Express
225
59382001_cvr.jpg
-
Upload
khangminh22 -
Category
Documents
-
view
3 -
download
0
Transcript of okidata-c5650-user-manual.pdf - Laser Express

59382001_cvr.jpg

C5650n/C5650dn User’s GuideCopyright Information • 2
Copyright Information
Copyright © 2008 by Oki Data. All Rights Reserved
Document Information ________________________________C5650n/C5650dn User’s Guide
P/N 59309101, Revision 1.1
May, 2008
Disclaimer__________________________________________Every effort has been made to ensure that the information in this document is complete, accurate, and up-to-date. The manufacturer assumes no responsibility for the results of errors beyond its control. The manufacturer also cannot guarantee that changes in software and equipment made by other manufacturers and referred to in this guide will not affect the applicability of the information in it. Mention of software products manufactured by other companies does not necessarily constitute endorsement by the manufacturer .
While all reasonable efforts have been made to make this document as accurate and helpful as possible, we make no warranty of any kind, expressed or implied, as to the accuracy or completeness of the information contained herein.
The most up-to-date drivers and manuals are available from the web site:http://www.okiprintingsolutions.com
Trademark Information _______________________________Oki and Microline are registered trademarks of Oki Electric Industry Company Ltd.
Apple, Macintosh, EtherTalk, LaserWriter, Mac, and Mac OS are registered trademarks of Apple Computers Inc.
Hewlett-Packard, HP, and LaserJet are registered trademarks of Hewlett-Packard Company.
Microsoft, Windows, Windows Vista, Internet Explorer are either registered trademarks or trademarks of Microsoft Corporation in the United States and/or other countries.
Netscape, Netscape Navigator U.S. ™, Netscape Communications Corporation.
Adobe, Acrobat, Acrobat Reader, PostScript ™ Adobe Systems. Inc.
Ethernet® Digital Equipment Corp.
Other product names and brand names are registered trademarks or trademarks of their proprietors.

ContentsCopyright Information . . . . . . . . . . . . . . . . . . . . . . . .2
Document Information . . . . . . . . . . . . . . . . . . . . . . . . 2Disclaimer . . . . . . . . . . . . . . . . . . . . . . . . . . . . . . . . 2Trademark Information . . . . . . . . . . . . . . . . . . . . . . . 2
Notes, Cautions, etc. . . . . . . . . . . . . . . . . . . . . . . . . . .9Introduction . . . . . . . . . . . . . . . . . . . . . . . . . . . . . . .10
Features . . . . . . . . . . . . . . . . . . . . . . . . . . . . . . . . . 10Options . . . . . . . . . . . . . . . . . . . . . . . . . . . . . . . . . 10
Parts of the Printer . . . . . . . . . . . . . . . . . . . . . . . . . .11Front . . . . . . . . . . . . . . . . . . . . . . . . . . . . . . . . . . . 11Rear. . . . . . . . . . . . . . . . . . . . . . . . . . . . . . . . . . . . 12
Paper (Print Media). . . . . . . . . . . . . . . . . . . . . . . . . .13General Information. . . . . . . . . . . . . . . . . . . . . . . . . 13Paper Weights . . . . . . . . . . . . . . . . . . . . . . . . . . . . . 14
General Information . . . . . . . . . . . . . . . . . . . . . . . 14Windows . . . . . . . . . . . . . . . . . . . . . . . . . . . . . . . 14Macintosh . . . . . . . . . . . . . . . . . . . . . . . . . . . . . . 14
Paper, US Bond . . . . . . . . . . . . . . . . . . . . . . . . . . . . 16Paper, Index . . . . . . . . . . . . . . . . . . . . . . . . . . . . . . 18Letterhead . . . . . . . . . . . . . . . . . . . . . . . . . . . . . . . 20
General Information . . . . . . . . . . . . . . . . . . . . . . . 20Recommendations . . . . . . . . . . . . . . . . . . . . . . . . 21Loading. . . . . . . . . . . . . . . . . . . . . . . . . . . . . . . . 22
Envelopes . . . . . . . . . . . . . . . . . . . . . . . . . . . . . . . . 24General Information . . . . . . . . . . . . . . . . . . . . . . . 24Recommendations . . . . . . . . . . . . . . . . . . . . . . . . 24Loading. . . . . . . . . . . . . . . . . . . . . . . . . . . . . . . . 25
Labels . . . . . . . . . . . . . . . . . . . . . . . . . . . . . . . . . . 26General Information . . . . . . . . . . . . . . . . . . . . . . . 26Recommendations . . . . . . . . . . . . . . . . . . . . . . . . 26Loading. . . . . . . . . . . . . . . . . . . . . . . . . . . . . . . . 26Windows . . . . . . . . . . . . . . . . . . . . . . . . . . . . . . . 27Macintosh . . . . . . . . . . . . . . . . . . . . . . . . . . . . . . 27
Transparencies . . . . . . . . . . . . . . . . . . . . . . . . . . . . 29General Information . . . . . . . . . . . . . . . . . . . . . . . 29Recommendations . . . . . . . . . . . . . . . . . . . . . . . . 29Loading. . . . . . . . . . . . . . . . . . . . . . . . . . . . . . . . 29Windows . . . . . . . . . . . . . . . . . . . . . . . . . . . . . . . 30Macintosh . . . . . . . . . . . . . . . . . . . . . . . . . . . . . . 30
C5650n/C5650dn User’s GuideContents • 3

Paper Trays . . . . . . . . . . . . . . . . . . . . . . . . . . . . . . . .32Windows. . . . . . . . . . . . . . . . . . . . . . . . . . . . . . . . . 32Macintosh . . . . . . . . . . . . . . . . . . . . . . . . . . . . . . . . 32Paper Size Check. . . . . . . . . . . . . . . . . . . . . . . . . . . 34
General Information . . . . . . . . . . . . . . . . . . . . . . . 34Windows . . . . . . . . . . . . . . . . . . . . . . . . . . . . . . . 34Macintosh . . . . . . . . . . . . . . . . . . . . . . . . . . . . . . 34
Paper Size, Feed, and Exit. . . . . . . . . . . . . . . . . . . . .35Tray 1 and Optional Tray 2 . . . . . . . . . . . . . . . . . . . . 35Auto Switching . . . . . . . . . . . . . . . . . . . . . . . . . . . . 36
General Information . . . . . . . . . . . . . . . . . . . . . . . 36Printer Menu . . . . . . . . . . . . . . . . . . . . . . . . . . . . 36
Multi-Purpose Tray (MP Tray) [Manual Feed] . . . . . . . . . . . . . . . . . . . . . . . . . . . . . 38
General Information . . . . . . . . . . . . . . . . . . . . . . . 38Duplexing Restrictions . . . . . . . . . . . . . . . . . . . . . 39Paper Sizes and Exit Paths . . . . . . . . . . . . . . . . . . 40
Paper Exit Paths . . . . . . . . . . . . . . . . . . . . . . . . . . . .41Face Down (Top Exit) . . . . . . . . . . . . . . . . . . . . . . . . 41Face Up (Rear Exit) . . . . . . . . . . . . . . . . . . . . . . . . . 41Duplex Unit. . . . . . . . . . . . . . . . . . . . . . . . . . . . . . . 43
General Information . . . . . . . . . . . . . . . . . . . . . . . 43Duplexing Restrictions . . . . . . . . . . . . . . . . . . . . . 44
Loading Paper . . . . . . . . . . . . . . . . . . . . . . . . . . . . . .45Trays 1 and 2 . . . . . . . . . . . . . . . . . . . . . . . . . . . . . 45Multi-Purpose (MP) Tray . . . . . . . . . . . . . . . . . . . . . . 49
Consumables . . . . . . . . . . . . . . . . . . . . . . . . . . . . . . .52Life Expectancy . . . . . . . . . . . . . . . . . . . . . . . . . . . . 52Part Numbers . . . . . . . . . . . . . . . . . . . . . . . . . . . . . 52
Toner . . . . . . . . . . . . . . . . . . . . . . . . . . . . . . . . . 52Image Drum . . . . . . . . . . . . . . . . . . . . . . . . . . . . 52Fuser* . . . . . . . . . . . . . . . . . . . . . . . . . . . . . . . . 52Belt*. . . . . . . . . . . . . . . . . . . . . . . . . . . . . . . . . . 53Second Tray . . . . . . . . . . . . . . . . . . . . . . . . . . . . 53Duplex Unit . . . . . . . . . . . . . . . . . . . . . . . . . . . . . 53
Replace a Toner Cartridge . . . . . . . . . . . . . . . . . . . . 54 . . . . . . . . . . . . . . . . . . . . . . . . . . . . . . . . . . . . . 54Install a Toner Cartridge . . . . . . . . . . . . . . . . . . . . 57
Replace an Image Drum . . . . . . . . . . . . . . . . . . . . . . 62Replace the Fuser . . . . . . . . . . . . . . . . . . . . . . . . . . 71Replace the Belt Unit . . . . . . . . . . . . . . . . . . . . . . . . 76
Printer Settings (Menu Settings) . . . . . . . . . . . . . . . . . . . . . . . . . . . .82
C5650n/C5650dn User’s GuideContents • 4

Print a list of the current settings. . . . . . . . . . . . . . . . 82Menu Map . . . . . . . . . . . . . . . . . . . . . . . . . . . . . . 82
Changing Settings . . . . . . . . . . . . . . . . . . . . . . . . . . 83Example: Power Save Time . . . . . . . . . . . . . . . . . . 84
Reset to Factory Defaults . . . . . . . . . . . . . . . . . . . . . 85Lists of Available Settings by Menu . . . . . . . . . . . . . . 86
Information Menu. . . . . . . . . . . . . . . . . . . . . . . . . 86Print Menu. . . . . . . . . . . . . . . . . . . . . . . . . . . . . . 87Media Menu . . . . . . . . . . . . . . . . . . . . . . . . . . . . . 88Color Menu . . . . . . . . . . . . . . . . . . . . . . . . . . . . . 90System Configuration Menu. . . . . . . . . . . . . . . . . . 91USB Menu . . . . . . . . . . . . . . . . . . . . . . . . . . . . . . 92Network Menu . . . . . . . . . . . . . . . . . . . . . . . . . . . 93Memory Menu . . . . . . . . . . . . . . . . . . . . . . . . . . . 95System Adjust Menu. . . . . . . . . . . . . . . . . . . . . . . 96Maintenance Menu . . . . . . . . . . . . . . . . . . . . . . . . 97Usage Menu. . . . . . . . . . . . . . . . . . . . . . . . . . . . . 98
Menu Defaults . . . . . . . . . . . . . . . . . . . . . . . . . . . . . 99Information, Print, and Media Menus . . . . . . . . . . . 99Color, System Configuration, and USB Menus . . . . 100Network and Memory Menus . . . . . . . . . . . . . . . . 101System Adjust and Maintenance Menus . . . . . . . . 102Usage Menu. . . . . . . . . . . . . . . . . . . . . . . . . . . . 103
Options . . . . . . . . . . . . . . . . . . . . . . . . . . . . . . . . . .104RAM Memory. . . . . . . . . . . . . . . . . . . . . . . . . . . . . 104Second Paper Tray. . . . . . . . . . . . . . . . . . . . . . . . . 105
Specifications . . . . . . . . . . . . . . . . . . . . . . . . . . . . .106Troubleshooting . . . . . . . . . . . . . . . . . . . . . . . . . . .108
General Information. . . . . . . . . . . . . . . . . . . . . . . . 108Display Panel Messages . . . . . . . . . . . . . . . . . . . . . 109Print Quality Problems . . . . . . . . . . . . . . . . . . . . . . 113
Blurred print (letter edges) . . . . . . . . . . . . . . . . . 113Blurred print (one side of page) . . . . . . . . . . . . . . 113Fading, in patches . . . . . . . . . . . . . . . . . . . . . . . 113Fading, Vertically . . . . . . . . . . . . . . . . . . . . . . . . 114Light Print . . . . . . . . . . . . . . . . . . . . . . . . . . . . . 114Lines, Black (Vertical) . . . . . . . . . . . . . . . . . . . . . 115Lines, White (Vertical) . . . . . . . . . . . . . . . . . . . . 115Shading on unprinted sections . . . . . . . . . . . . . . . 116Toner rubs off when you rub the printed surface. . . 116
Paper Jams . . . . . . . . . . . . . . . . . . . . . . . . . . . . . . 117General Information . . . . . . . . . . . . . . . . . . . . . . 117If paper jams are frequent . . . . . . . . . . . . . . . . . 118
C5650n/C5650dn User’s GuideContents • 5

Jam is cleared, but printer does not print. . . . . . . . 118Jam 370, 373 and 383 . . . . . . . . . . . . . . . . . . . . 119Jam 371 . . . . . . . . . . . . . . . . . . . . . . . . . . . . . . 121Jam 372 and 380 . . . . . . . . . . . . . . . . . . . . . . . . 124Jam 381 . . . . . . . . . . . . . . . . . . . . . . . . . . . . . . 126Jam 382 . . . . . . . . . . . . . . . . . . . . . . . . . . . . . . 131Jam 390 . . . . . . . . . . . . . . . . . . . . . . . . . . . . . . 135Jam 391 and 392 . . . . . . . . . . . . . . . . . . . . . . . . 137
USB Problems . . . . . . . . . . . . . . . . . . . . . . . . . . . . 139Cannot configure for USB connection . . . . . . . . . . 139Cannot print . . . . . . . . . . . . . . . . . . . . . . . . . . . 140
Application error . . . . . . . . . . . . . . . . . . . . . . . . . . 141General Protection Fault . . . . . . . . . . . . . . . . . . . . . 141Paper Size Change Request . . . . . . . . . . . . . . . . . . 142Printer does not go online. . . . . . . . . . . . . . . . . . . . 142Printer makes a strange noise . . . . . . . . . . . . . . . . . 142Printer takes a long time to start printing . . . . . . . . . 143Printing cancels . . . . . . . . . . . . . . . . . . . . . . . . . . . 143Printing does not start . . . . . . . . . . . . . . . . . . . . . . 144Printing is slow . . . . . . . . . . . . . . . . . . . . . . . . . . . 144Cleaning . . . . . . . . . . . . . . . . . . . . . . . . . . . . . . . . 145
Cleaning Page . . . . . . . . . . . . . . . . . . . . . . . . . . 145Printer Drivers. . . . . . . . . . . . . . . . . . . . . . . . . . . . .146
General Information. . . . . . . . . . . . . . . . . . . . . . . . 146Macintosh . . . . . . . . . . . . . . . . . . . . . . . . . . . . . . . 147
General Information . . . . . . . . . . . . . . . . . . . . . . 147Summary . . . . . . . . . . . . . . . . . . . . . . . . . . . . . 148Presets . . . . . . . . . . . . . . . . . . . . . . . . . . . . . . . 148Scheduler . . . . . . . . . . . . . . . . . . . . . . . . . . . . . 149Paper Handling . . . . . . . . . . . . . . . . . . . . . . . . . 150
Printer Features . . . . . . . . . . . . . . . . . . . . . . . . . . .151Overview . . . . . . . . . . . . . . . . . . . . . . . . . . . . . . . 151Banners . . . . . . . . . . . . . . . . . . . . . . . . . . . . . . . . 152
General Information . . . . . . . . . . . . . . . . . . . . . . 152Specifications. . . . . . . . . . . . . . . . . . . . . . . . . . . 152Windows . . . . . . . . . . . . . . . . . . . . . . . . . . . . . . 153Macintosh . . . . . . . . . . . . . . . . . . . . . . . . . . . . . 153
Black Printing . . . . . . . . . . . . . . . . . . . . . . . . . . . . 154General Information . . . . . . . . . . . . . . . . . . . . . . 154Windows . . . . . . . . . . . . . . . . . . . . . . . . . . . . . . 155Macintosh . . . . . . . . . . . . . . . . . . . . . . . . . . . . . 158
Booklets (Binding Print) . . . . . . . . . . . . . . . . . . . . . 159General Information . . . . . . . . . . . . . . . . . . . . . . 159
C5650n/C5650dn User’s GuideContents • 6

Windows . . . . . . . . . . . . . . . . . . . . . . . . . . . . . . 161Collating. . . . . . . . . . . . . . . . . . . . . . . . . . . . . . . . 162
General Information . . . . . . . . . . . . . . . . . . . . . . 162Windows . . . . . . . . . . . . . . . . . . . . . . . . . . . . . . 163Macintosh . . . . . . . . . . . . . . . . . . . . . . . . . . . . . 164
Color Matching . . . . . . . . . . . . . . . . . . . . . . . . . . . 165Overview. . . . . . . . . . . . . . . . . . . . . . . . . . . . . . 165Background Information . . . . . . . . . . . . . . . . . . . 166How To . . . . . . . . . . . . . . . . . . . . . . . . . . . . . . . 182Color Synch . . . . . . . . . . . . . . . . . . . . . . . . . . . . 189
Custom Page Sizes . . . . . . . . . . . . . . . . . . . . . . . . 194General Information . . . . . . . . . . . . . . . . . . . . . . 194Windows . . . . . . . . . . . . . . . . . . . . . . . . . . . . . . 195
Duplex Printing . . . . . . . . . . . . . . . . . . . . . . . . . . . 197(Printing on Both Sides of the Paper) . . . . . . . . . . 197General Information . . . . . . . . . . . . . . . . . . . . . . 197Duplexing Restrictions . . . . . . . . . . . . . . . . . . . . 199Long Edge vs. Short Edge . . . . . . . . . . . . . . . . . . 199Windows . . . . . . . . . . . . . . . . . . . . . . . . . . . . . . 200Macintosh . . . . . . . . . . . . . . . . . . . . . . . . . . . . . 202
Grayscale . . . . . . . . . . . . . . . . . . . . . . . . . . . . . . . 203N-Up Printing . . . . . . . . . . . . . . . . . . . . . . . . . . . . 204
Printing Multiple Pages on One Sheet . . . . . . . . . . 204General Information . . . . . . . . . . . . . . . . . . . . . . 204Windows . . . . . . . . . . . . . . . . . . . . . . . . . . . . . . 204Macintosh . . . . . . . . . . . . . . . . . . . . . . . . . . . . . 206
Photographs . . . . . . . . . . . . . . . . . . . . . . . . . . . . . 207Windows . . . . . . . . . . . . . . . . . . . . . . . . . . . . . . 207Macintosh . . . . . . . . . . . . . . . . . . . . . . . . . . . . . 209
Posters. . . . . . . . . . . . . . . . . . . . . . . . . . . . . . . . . 210General Information . . . . . . . . . . . . . . . . . . . . . . 210Windows . . . . . . . . . . . . . . . . . . . . . . . . . . . . . . 210
Print Resolution . . . . . . . . . . . . . . . . . . . . . . . . . . . 211General Information . . . . . . . . . . . . . . . . . . . . . . 211Windows . . . . . . . . . . . . . . . . . . . . . . . . . . . . . . 211Macintosh . . . . . . . . . . . . . . . . . . . . . . . . . . . . . 214
Save as File . . . . . . . . . . . . . . . . . . . . . . . . . . . . . 215General Information . . . . . . . . . . . . . . . . . . . . . . 215Windows . . . . . . . . . . . . . . . . . . . . . . . . . . . . . . 215Macintosh . . . . . . . . . . . . . . . . . . . . . . . . . . . . . 215
Toner Saving. . . . . . . . . . . . . . . . . . . . . . . . . . . . . 216General Information . . . . . . . . . . . . . . . . . . . . . . 216Windows . . . . . . . . . . . . . . . . . . . . . . . . . . . . . . 217
C5650n/C5650dn User’s GuideContents • 7

Macintosh . . . . . . . . . . . . . . . . . . . . . . . . . . . . . 219Watermarks . . . . . . . . . . . . . . . . . . . . . . . . . . . . . 220
General Information . . . . . . . . . . . . . . . . . . . . . . 220Windows . . . . . . . . . . . . . . . . . . . . . . . . . . . . . . 221
Utilities . . . . . . . . . . . . . . . . . . . . . . . . . . . . . . . . . .224Summary of Utilities Provided . . . . . . . . . . . . . . . . . 224
C5650n/C5650dn User’s GuideContents • 8

C5650n/C5650dn User’s GuideNotes, Cautions, etc. • 9
Notes, Cautions, etc.
NOTEA note appears like this. A note provides additional information to supplement the main text which helps you to use and understand the product.
Important!An important message appears like this. An important message provides supplemental information which can prevent potential problems.
CAUTION!A caution appears like this. A caution provides additional information which, if ignored, may result in equipment malfunction or damage.
WARNING!A warning appears like this. A warning provides additional information which, if ignored, may result in a risk of personal injury.

C5650n/C5650dn User’s GuideIntroduction • 10
Introduction
Your new printer is designed with advanced features to give you clear, vibrant color printing and crisp black and white pages at high speed on a range of print media.
Features _________________________• Up to 22 pages per minute full color.
• Up to 26 pages per minute in black and white.
• 600 x 1200 dpi (dots per inch) print resolution.
• Single Pass Color Digital LED technology.
• Hiper-C emulation.
• 10 Base-T and 100 Base-TX network connection.
• Duplex Unit (C5650dn)
for automatic two-sided printing
Options __________________________• Additional Memory: see page 104
64 MB or 256 MB
• Second Paper Tray: see page 105.
capacity 530 sheets 20-lb. paper
• Duplex Unit (C5650n model) see page 43

Parts of the Printer
Front____________________________ c53_01_printerfull.jpg
1. Output Stacker, face downStandard printed copy delivery point.
Holds up to 250 sheets of 20-lb. (75 g/m²) paper.
2. Operator PanelMenu driven operator controls and LCD display panel
3. Paper TrayStandard paper tray.
Holds up to 300 sheets of 20-lb. (75 g/m²) paper.
4. Multi-Purpose TrayUsed for feeding transparencies, heavier paper stocks, envelopes and other special media.
Also for manual feeding of single sheets when required.
C5650n/C5650dn User’s GuideParts of the Printer • 11

Rear ____________________________ c51_01_backview.jpg
1. On/Off Switch2. Socket for Power Cord3. USB Interface4. Network Interface5. Duplex Unit (C5650dn)6. Rear Stacker (face up)
Capacity 100 sheets
When the rear paper stacker is folded down, paper exits the printer through the rear of the printer and is stacked face up.
This is used for labels, heavy print media, envelopes and custom paper sizes.
When used with the Multi-Purpose Tray, the paper path through the printer is essentially straight. This avoids bending the print media around curves in the paper path and makes paper feeding more reliable.
C5650n/C5650dn User’s GuideParts of the Printer • 12

C5650n/C5650dn User’s GuidePaper (Print Media) • 13
Paper (Print Media)
General Information _____________________
You need to know three characteristics about any paper (print media) you want to use with your printer:
• Type
• Weight
• Size
The type, weight, and size of the paper (print media) determine:
• which paper feed tray can be used
Choices are multipurpose tray (MP Tray/manual feed) or Trays 1 - 2
• which paper exit path can be used
Choices are face-down or face-up (straight-through)
• whether you can use double sided (duplex) printing
For type, see
• Paper: US Bond (Metric): see page 16
• Paper: Index: see page 18
• Letterhead: see page 20
• Envelopes: see page 24
• Transparencies: see page 29
• Labels: see page 26
For weight, refer to the correct paper type. Each paper type has a table (matrix) of paper size, paper weight, paper feed, paper exit, simplex/duplex correlations.
For general information on paper sizes, see “Paper Size, Feed, and Exit” on page 35.
CAUTION!Print media must be able to withstand 446°F (230°C) for 0.2 second.

Paper Weights ____________________
General Information
Windows1. Open the file you want to print.2. Click File → Print.3. In the Print dialog box, select your printer.4. Next:
Windows Vista/XP: click Properties.
Windows 2000: go to the next step.
5. On the Setup tab, under Weights, make your selection.
Macintosh
OS 10.3 and later1. Open the file you want to print.2. Click File → Print.3. Open the drop-down list below Presets. Select Printer
Option.
Designation WeightFeed Tray Duplexer?
Exit Tray
Light 16-19 lb. US Bond(60-71 g/m²)
Tray 1Tray 2
No Topa
Rearb
a. Face Down Stackerb. Face Up Stacker
Medium 20-27 lb. US Bond(75-101 g/m²)
Tray 1Tray 2MP Tray
Yes TopRear
Heavy 28-32 lb. US Bond(105-120 g/m²)
Tray 1Tray 2MP Tray
Yes (restricted to 28 lb. maximum)
Rear Only
Ultra Heavy 33-54 lb. US Bond(124-203 g/m²)
Tray 2c
MP Tray
c. 47 lb. (177 g/m²) maximum for Tray 2
No Rear Only
C5650n/C5650dn User’s GuidePaper Weights • 14

4. At Media Weight, make your selection.
Select the thickness/type of media on which you are printing a particular job, to produce optimum print results. This setting overrides the setting in the printer menu. The default printer menu setting is Medium.
Light
16-19 lb. US Bond (60-71 g/m2)
Medium
20-27 lb. US Bond (75-101 g/m2)
Heavy
28-32 lb. US Bond
58-67 lb. Index (105-120 g/m2)
Ultra Heavy
33-54 lb. US Bond
68-113 lb. Index (124-203 g/m2)
5. Change any other settings as desired.6. Click Print.
Important!If you are printing on a thick media such as card stock, be sure to select one of the thicker settings to get proper fusion of the toner to the page and to prevent possible damage to the printer.
C5650n/C5650dn User’s GuidePaper Weights • 15

Paper, US Bond____________________Paper Feed, Exit Path, and Duplex
General Information
The size, weight, and type of the paper (print media) determine:
• which paper feed tray can be used
• which paper exit path can be used
• whether you can use double sided (duplex) printing
Single sided printing is also known as simplex printing.
These settings can be made in the printer menu or in the printer driver.
Application settings override driver settings.
Driver settings override printer menu settings.
NOTETo determine if a paper weight is US Bond or Index, check the metric equivalent.
35 lb US Bond = 132 g/m2
35 lb Index = 64 g/m2
For more information, go to www.paper-paper.com/weight.html
C5650n/C5650dn User’s GuidePaper, US Bond • 16

The best performance is obtained when using paper designed for use in copiers and laser printers. Suitable types include:
• Hammermill® Laser Printer Radiant White, 24 lb. US Bond (90 g/m²)
• Xerox® 4024, 20 lb.US Bond (75 g/m²)
• Oki® 52206101 Bright White Proofing Paper, 32 lb. US Bond (120 g/m2)
Recommendations• Check www.okiprintingsolutions.com for the latest
information on recommended papers for your printer.
• Paper should be stored flat, away from moisture, direct sunlight and heat sources.
• The use of heavily laid or textured paper will seriously affect the life of the image drum and give poor print quality. Print quality can be improved by changing the media setting to ‘Ultra Heavy.’ However, this will reduce the output speed and prevent the use of the duplex option.
• Avoid:
– Damp, damaged or curled paper.– Very smooth, shiny or glossy paper.– Heavily embossed letterhead paper, very rough paper
or paper that has a large grain difference between the two sides.
– Paper with perforations, cut-outs or ragged edges.– Carbon paper, recycled paper, NCR paper,
photosensitive paper, pressure sensitive paper or thermal transfer paper.
C5650n/C5650dn User’s GuidePaper, US Bond • 17

Paper, Index______________________General Information
The size, weight, and type of the paper (print media) determine:
• which paper feed tray can be used
• which paper exit path can be used
• whether you can use double sided (duplex) printing
Single sided printing is also known as simplex printing.
These settings can be made in the printer menu or in the printer driver.
Application settings override driver settings.
Driver settings override printer menu settings.
NOTETo determine if a paper weight is US Bond or Index, check the metric equivalent.
• 35 lb US Bond = 132 g/m2
• 35 lb Index = 64 g/m2
For more information, go to www.paper-paper.com/weight.html
C5650n/C5650dn User’s GuidePaper, Index • 18

The best performance is obtained when using paper designed for use in copiers and laser printers. Suitable types include:
• Hammermill® Laser Printer Radiant White, 24 lb. US Bond (90 g/m²)
• Xerox® 4024, 20 lb.US Bond (75 g/m²)
• Oki® 52206101 Bright White Proofing Paper, 32 lb. US Bond (120 g/m2)
Recommendations• Check www.okiprintingsolutions.com for the latest
information on recommended papers for your printer.
• Paper should be stored flat, away from moisture, direct sunlight and heat sources.
• The use of heavily laid or textured paper will seriously affect the life of the image drum and give poor print quality. Print quality can be improved by changing the media setting to ‘Ultra Heavy.’ However, this will reduce the output speed and prevent the use of the duplex option.
• Avoid:
– Damp, damaged or curled paper.– Very smooth, shiny or glossy paper.– Heavily embossed letterhead paper, very rough paper
or paper that has a large grain difference between the two sides.
– Paper with perforations, cut-outs or ragged edges.– Carbon paper, recycled paper, NCR paper,
photosensitive paper, pressure sensitive paper or thermal transfer paper.
C5650n/C5650dn User’s GuidePaper, Index • 19

Letterhead _______________________
General InformationThe size, weight, and type of the paper (print media) determine:
• which paper feed tray can be used
• which paper exit path can be used
• whether you can use double sided (duplex) printing
Single sided printing is also known as simplex printing.
These settings can be made in the printer menu or in the printer driver.
Application settings override driver settings.
Driver settings override printer menu settings.
When using heavily laid or textured paper
• the life of the image drum is seriously shortened
• print quality may deteriorate
• change the media setting to ‘Ultra Heavy’.
This will improve print quality.
When using ‘Ultra Heavy’:
• print speed slows
• duplexing cannot be used.
C5650n/C5650dn User’s GuideLetterhead • 20

Recommendations
Only use letterhead designed for color laser printers and photocopiers.
Don’t use very smooth, shiny or glossy paper.
Don’t use heavily embossed headed paper, very rough paper or paper that has a large grain difference between the two sides.
• Check www.okiprintingsolutions.com for the latest information on recommended papers for your printer.
• Paper should be stored flat, away from moisture, direct sunlight and heat sources.
• The use of heavily laid or textured paper will seriously affect the life of the image drum and give poor print quality. Print quality can be improved by changing the media setting to ‘Ultra Heavy.’ However, this will reduce the output speed and prevent the use of the duplex option.
• Avoid:
– Damp, damaged or curled paper.– Very smooth, shiny or glossy paper.– Heavily embossed letterhead paper, very rough paper or
paper that has a large grain difference between the two sides.
– Paper with perforations, cut-outs or ragged edges.– Carbon paper, recycled paper, NCR paper, photosensitive
paper, pressure sensitive paper or thermal transfer paper.
CAUTIONPrint media must be able to withstand 446°F (230°C) for 0.2 second.
C5650n/C5650dn User’s GuideLetterhead • 21

Loading
Trays 1 and 2Long edge feed
Face down, top toward the back of the printer.
Letr_lef.bmp
Short edge feed
face down, top to the right
ltrhd_se.jpg
C5650n/C5650dn User’s GuideLetterhead • 22

Loading
Manual Feed (MP Tray)Long edge feed
Face up, top to the back of the printer
manl_le.jpg
Short edge feed
Face up, top to the left
manl_se.jp
C5650n/C5650dn User’s GuideLetterhead • 23

Envelopes ________________________
General InformationEnvelopes can only be fed from the multi-purpose (MP / manual feed) tray.
Envelopes can only exit the printer face-up.
Recommendations
Envelopes.jpg
1. Use only recommended envelopes.Oki 52206301 and 52206302
For more information, see "Print Media" in your Handy Reference Guide or www.okiprintingsolutions.com.
2. Store envelopes flat and away from • moisture
• direct sunlight
• heat sources
3. Don’t use envelopes with • windows
• metal clasps
• self-sealing flaps
• damp, damaged or curled paper envelopes
CAUTIONPrint media must be able to withstand 446°F (230°C) for 0.2 second.
C5650n/C5650dn User’s GuideEnvelopes • 24

Loading
Trays 1 - 2Envelopes cannot be fed from paper trays 1 - 2.
Multi-purpose TrayFace up (flap side down), top to the left (into the printer)
C96_LoadPaperMPTray_Envelopes_crop.JPG
C5650n/C5650dn User’s GuideEnvelopes • 25

Labels ___________________________
General InformationLabels can only be fed from the multi-purpose (MP / manual feed) tray.
Labels can only exit the printer face-up.
Avery 5161 White Laser Labels (letter size) work well with your printer.
Check www.okiprintingsolutions.com for the latest information on media for your printer.
Recommendations
• Only use labels designed for color laser printers and photocopiers.
• Labels must cover the entire carrier sheet.
• The carrier sheet or adhesive must not be exposed to any part of the printer.
Loading
Trays 1 - 2Labels cannot be fed from paper trays 1 - 2.
Manual Feed (MP Tray)Face up (print side up)
CAUTIONPrint media must be able to withstand 446°F (230°C) for 0.2 second.
C5650n/C5650dn User’s GuideLabels • 26

Default = long edge feed.
C96_LoadPaperMPTray_Labels_crop.JPG
Windows
Macintosh
OS 10.3 and later
1. Open the file you want to print.2. Click File → Print.
NOTERecommended labels for best print results: Avery 5161 White Laser Label (Letter size); Avery 7162, 7664, 7666 White Laser Labels (size A4).
NOTERecommended labels for best print results: Avery 5161 White Laser Label (Letter size); Avery 7162, 7664, 7666 White Laser Labels (size A4).
C5650n/C5650dn User’s GuideLabels • 27

3. Open the drop-down list below Presets. Select Printer Option.
4. At Media Weight, make your selection.Labels1: For labels 0.1 to 0.169 mm thick.
Labels2: For labels 0.17 to 0.2 mm thick.
5. Change any other settings as desired.6. Click Print.
C5650n/C5650dn User’s GuideLabels • 28

Transparencies ____________________
General Information transparency_color.jpg
Transparencies can only be fed from the multi-purpose (MP / manual feed) tray.
Transparencies can only exit the printer face-up.
Recommendations
1. Only use transparencies designed for color laser printers and photocopiers.
2. Only use recommended transparenciesOki 52205701
3M CG3720
3. Avoid office transparencies designed for use by hand with marker pens. These will melt in the fuser and cause damage.
Loading
Trays 1 - 2Transparencies cannot be fed from paper trays 1 - 5.
Manual Feed (MP Tray)Face up (print side up)
CAUTIONPrint media must be able to withstand 446°F (230°C) for 0.2 second.
C5650n/C5650dn User’s GuideTransparencies • 29

Default = long edge feed.
C96_LoadPaperMPTray.jpg
Windows1. Open the file you want to print.2. Click File → Print.3. In the Print dialog box, select your printer.4. Next:
Windows Vista/XP: click Properties.
Windows 2000: go to the next step.
5. On the Setup tab, under Weight, select Transparencies.
Macintosh
OS 10.3 and later
1. Open the file you want to print.2. Click File → Print.3. Open the drop-down list below Presets. Select Printer
Option.
NOTEUse only recommended transparencies (3M CG3720, Oki 52205701).
C5650n/C5650dn User’s GuideTransparencies • 30

4. At Media Weight, select Transparency.5. Change any other settings as desired.6. Click Print.
C5650n/C5650dn User’s GuideTransparencies • 31

Paper Trays
Windows_________________________1. Open the file you want to print.2. Click File → Print.3. In the Print dialog box, select your printer.4. Next:
Windows Vista/XP: click Properties.
Windows 2000: go to the next step.
5. On the Setup tab, under Source, make your selection:Automatically select
The printer automatically selects the paper tray.
Multi Purpose Tray / Tray1 / Tray 2Tray 2 appears only if an optional tray is installed.
Select a specific paper tray.
For example:
You are printing a job on special media (letterhead).
Place the media in the Multi Purpose Tray.
Select the Multi Purpose Tray here (in the driver) when printing the job.
Macintosh ________________________OS 10.3 and later1. Open the file you want to print.2. Click File → Print.3. Open the drop-down list below Presets. Select Paper
Source.4. Make your selection.
AutoThe printer automatically selects the paper tray.
Multi Purpose Tray / Tray1 / Tray 2Tray 2 appears only if an optional tray is installed.
Select a specific paper tray.
For example:
C5650n/C5650dn User’s GuideWindows • 32

You are printing a job on special media (letterhead).
Place the media in the Multi Purpose Tray.
Select the Multi Purpose Tray here (in the driver) when printing the job.
5. Change any other settings as desired.6. Click Print.
C5650n/C5650dn User’s GuideMacintosh • 33

C5650n/C5650dn User’s GuidePaper Size Check • 34
Paper Size Check __________________
General InformationIf Paper Size Check is turned on (enabled), the printer checks whether the size paper loaded in the selected tray matches that required for the document being printed.
Windows1. Open the file you want to print.2. Click File → Print.3. In the Print dialog box, select your printer.4. Next:
Windows Vista/XP: click Properties.
Windows 2000: go to the next step.
5. On the Setup tab, click Paper feed options.6. Select Media Check.
Macintosh
OS 10.3 and later1. Open the file you want to print.2. Click File → Print.3. Open the drop-down list below Presets. Select Printer
Option. 4. Make your selection for Paper size check.
If the box has a check mark, the feature is ON.
If the box is empty, the feature is OFF.
5. Change any other settings as desired.6. Click Print.

C5650n/C5650dn User’s GuideTray 1 and Optional Tray 2 • 35
Paper Size, Feed, and Exit
Tray 1 and Optional Tray 2 ___________
Feed Exit
Paper size Tray 1 Tray 2 Topa
a. Use the Top Exit (Face Down Stacker) only for paper up to 47 lb. US Bond (98 lb. Index, 177 g/m2).
Rearb
b. Switch to the Rear Exit (Face Up Stacker) when you are print-ing paper heavier than 47 lb. US Bond (98 lb. Index, 177 g/m2).
Letter (8½ x 11'')
S, Dc
c. S = Simplex; D = Duplex (printing on both sides)
S, D S, D S, D
Legal-14 (8½ x 14'')
S, D S, D S, D S, D
Legal-13.5(8½ x 13.5'')
S, D S, D S, D S, D
Legal-13 (8½ x 13'')
S, D S, D S, D S, D
Executive(7¼ x 10½'')
S, D S, D S, D S, D
A4 (210 x 297 mm)
S, D S, D S, D S, D
A5 (145 x 210 mm)
S, D S, D S, D S, D
A6 (105 x 148 mm)
S Not Usable Not Usable
S
B5 (182 x 257 mm)
S, D S, D S, D S, D
Custom S: min. 3.94 x 5.83'' [100 x 148 mm],D: min. 5.8 x 8.25'' [148 x 210 mm]S, D: max. 8.5 x 14'' [215.9 x 355.6 mm]
S: min. 3.94 x 5.83'' [100 x 148 mm],D: min. 5.8 x 8.25'' [148 x 210 mm]S, D: max. 8.5 x 14'' [215.9 x 355.6 mm]
S, D Not Usable.

Auto Switching ____________________
General InformationIf a paper tray (Tray 1) runs out of paper, your printer can automatically switch to another paper tray (MP Tray, optional Tray 2) loaded with the same type of paper. This is called Auto Switching.
This feature is enabled either through the printer menu or the printer driver.
Application settings override driver settings.
Driver settings override printer menu settings.
Printer MenuThis function is enabled in the Print Menu.
The factory default is ON.
To change the setting:
C53_Panel.eps
1. Press MENU + repeatedly until you see
PRINT MENU
2. Press ENTER.3. Press MENU + repeatedly until you see
AUTO TRAY SWITCH
4. Press ENTER.5. Press MENU + and/or MENU – repeatedly until you see
the desired setting (ON or OFF).6. Press ENTER to select the new setting.7. Press ON LINE to exit the menu and return the printer to
standby.
C5650n/C5650dn User’s GuideAuto Switching • 36

Macintosh1. Open the file you want to print.2. Click File → Print.3. Open the drop-down list below Presets. Select Printer
Option. 4. At Auto tray switch, make your selection.
If the box has a check mark, the feature is ON.
If the box is empty, the feature is OFF.
5. Change any other settings as desired.6. Click Print.
C5650n/C5650dn User’s GuideAuto Switching • 37

Multi-Purpose Tray (MP Tray) [Manual Feed] ____________________
General InformationThis tray is also called the manual feed tray.
Use the Multi-Purpose Tray (MP Tray) for printing card stock, labels, envelopes and transparencies.
If a paper tray (Tray 1) runs out of paper, your printer can automatically switch to another paper tray (MP Tray, optional Tray 2) loaded with the same type of paper. This is called Auto Switching. See “Auto Switching” on page 36
• Capacity
stack of media about 3/8'' (10 mm) high
about 10 envelopes
50 transparencies
• Loading
print side up, top edge facing into the printer.
• Exit path
rear exit (Face Up Stacker), best for general use
top exit (Face Down Stacker), with restrictions
See “Paper Sizes and Exit Paths” on page 40
duplex (printing on both sides), with restrictions
See “Duplexing Restrictions” on page 39
C5650n/C5650dn User’s GuideMulti-Purpose Tray (MP Tray) [Manual Feed] • 38

Duplexing Restrictions
Important!You can duplex
• paper• paper weights up to
28 lb. US Bond 58 lb. Index105 g/m2 metric
You cannot duplex• labels• envelopes• transparencies• paper weights above
28 lb. US Bond58 lb. Index105 g/m2 metric
C5650n/C5650dn User’s GuideMulti-Purpose Tray (MP Tray) [Manual Feed] • 39

Paper Sizes and Exit Paths
Paper size FeedMP Tray
ExitReara
a. Use the Rear Exit (Face Up Stacker) for heavy paper, transparencies, envelopes, and labels.
ExitTopb
b. Use the Top Exit (Face Down Stacker) only for paper up to 47 lb. US Bond (98 lb. Index, 177 g/m2).
Letter8½ x 11''
Yes Yes Yes
Legal-14 8½ x 14''
Yes Yes Yes
Legal-13.58½ x 13.5''
Yes Yes Yes
Legal-13 8½ x 13''
Yes Yes Yes
Executive7¼ x 10½''
Yes Yes Yes
A4210 x 297 mm
Yes Yes Yes
A5145 x 210 mm
Yes Yes Yes
B5182 x 257 mm
Yes Yes Yes
EnvelopesCOM-10
Yes Yes No
Custom Minimum 3.94 to 5.83'' 100 x 148 mm Maximum 8½ x 14'' 216 x 356 mm Bannerc
c. Banner specifications:– Length: up to 47'' (1.2 m)– Width Range = 8¼ to 8½'' (210 to 215.9 mm)– Weight Range = 28 to 34 lb. US Bond (105 to 128 g/m2)– Path = Rear Exit (Face Up Stacker) only– Feed one sheet at a time.
Yes Yes No
C5650n/C5650dn User’s GuideMulti-Purpose Tray (MP Tray) [Manual Feed] • 40

Paper Exit Paths
Face Down (Top Exit) _______________• Capacity
up to 250 sheets of standard paper
20-lb. US Bond
42 lb. Index, 75 g/m² metric
• Paper Weights
up to 47 lb. US Bond
98 lb. Index, 176 g/m² metric
• Print Sequence
Pages are printed in reading order
Page 1 first; last page on top, facing down
Face Up (Rear Exit) ________________ c53_72_rear3.jpg
Open the face up stacker at the rear of the printer and pull out the tray extension.
When the face up stacker is open, paper exits via this path, regardless of driver settings.
• Capacity
up to 100 sheets of standard paper
20 lb. US Bond
C5650n/C5650dn User’s GuideFace Down (Top Exit) • 41

42 lb. Index, 75 g/m²
• Paper Weights up to
54 lb. US Bond
113 lb. Index
203 g/m² metric
• Print Sequence
Papers are printed face up.
For multi-page documents,
Select “Reverse order printing” in your application Print dialog box (Click File → Print).
This puts the printed stack in the correct order.
NOTEAlways use this stacker and the Multi-Purpose Tray for paper stocks heavier than 47 lb. US Bond (98 lb. Index, 176 g/m² metric).
C5650n/C5650dn User’s GuideFace Up (Rear Exit) • 42

Duplex Unit_______________________
General InformationThe Duplex Unit (optional on the C5650n) enables your printer to print on both sides of the page.
See “Duplex Printing” on page 197.
Paper TypesPaper only
Cannot duplex
labels
envelopes
transparencies
Paper Sizes
Size Inches Millimeters
Letter 8½ x 11 215.9 x 279.4
Legal-14 8½ x 14 215.9 x 355.6
Legal-13.5 8½ x 13.5 215.9 x 342.9
Legal-13 8½ x 13 215.9 x 330.2
Executive 7¼ x 10½ 184.15 x
A4 8.27 x 11.69 210 x 297
A5 5.71 x 8.27 145 x 210
B5 7.17 x 10.12 182 x 257
Custom Minimum 5.8 x 8.25
Maximum 8.5 x 14
Minimum 148 x 210
Maximum 215.9 x 355.6
C5650n/C5650dn User’s GuideDuplex Unit • 43

Paper Weights20 to 28-lb. US Bond
42 to 58 lb. Index
75 to 105 g/m² metric
Duplexing Restrictions
Important!You can duplex
• paper
• paper weights up to
28 lb. US Bond 58 lb. Index105 g/m2 metric
You cannot duplex• labels
• envelopes
• transparencies
• paper weights above
28 lb. US Bond58 lb. Index105 g/m2 metric
C5650n/C5650dn User’s GuideDuplex Unit • 44

Loading Paper
Trays 1 and 2 _____________________
1. Remove the paper tray from the printer. c53_11_opntra.jpg
NOTEIf you have the optional second paper tray installed:• If you are printing from the 1st (upper) tray,
you can pull out the 2nd (lower) tray and reload it while the printer is printing.
• If you are printing from the 2nd (lower) tray, do not pull out the 1st (upper) tray while printing. This will cause a paper jam.
C5650n/C5650dn User’s GuideLoading Paper • 45

2. Fan the paper to be loaded at the edges (1) and in the middle (2). Then tap the edges of the stack on a flat surface to make it flush again (3).
Fan Paper.eps
C5650n/C5650dn User’s GuideLoading Paper • 46

3. Load paper print side down. Make sure the rear stopper (1) and paper guides (2) are snug against the paper.
c53_13_instlpapr.jpg
NOTELoad letterhead paper face down. The top edge is aimed towards the front of the printer.
c53_76_trayabc.jpg
C5650n/C5650dn User’s GuideLoading Paper • 47

4. Gently close the paper tray. c53_16_closetray.jpg
NOTETo prevent paper jams:• Do not leave space between the paper and
the guides and rear stopper.• Do not overfill the paper tray. Capacity
depends on the type of paper stock.• Do not load damaged paper.• Do not load paper of different sizes or types
at the same time.• Do not pull the paper tray out during printing
(except as described above for the 2nd tray).
C5650n/C5650dn User’s GuideLoading Paper • 48

Multi-Purpose (MP) Tray ____________
1. Open the MP Tray. c53_40_mptrayopen1_crop.jpg, c53_41_mptrayopen2_crop.jpg,
c53_42_mptrayopen3_crop.jpg
NOTEThe MP Tray will take
• a stack of media about 3/8'' (10 mm) high• about 10 envelopes• about 50 transparencies.
Do not exceed the 3/8'' (10 mm) media stack height.
C5650n/C5650dn User’s GuideMulti-Purpose (MP) Tray • 49

2. Press down on the loading platform. c53_87a_mptrayplatformdwn.jpg
3. Load the print media. Adjust the guides (1) to the size media being used.
c53_39_mptrayload.jpg
Letterhead:
Single-sided printing
load with pre-printed side up and the top edge into the printer.
Double-sided printing (duplex)
load with pre-printed side down and top edge away from the printer. (Optional duplex unit must be installed.)
C5650n/C5650dn User’s GuideMulti-Purpose (MP) Tray • 50

Envelopes
Load print side up (flap down) with top edge to the left and short edge into the printer.
You cannot duplex envelopes.
4. Press the blue tray latch (1) toward the paper stack to lift the paper platform into the feed position.
c53_86_mptraylevercolr.jpg
C5650n/C5650dn User’s GuideMulti-Purpose (MP) Tray • 51

Consumables
Life Expectancy____________________See “Specifications” on page 106
Part Numbers _____________________
TonerType C8
Black, High Capacity 43324404
Cyan, High Capacity 43324403
Magenta, High Capacity43324402
Yellow, High Capacity 43324401
Black, standard 43381904
Cyan, standard 43381903
Magenta, standard 43381902
Yellow, standard 43381901
Image DrumType C8
Black 43381704
Cyan 43381703
Magenta 43381702
Yellow 43381701
Fuser*120 V 43363201
230V 43363202
C5650n/C5650dn User’s GuideConsumables • 52

Belt*Belt 43363401
Second TraySecond Tray 43347601
Duplex UnitDuplex Unit 43347501
REPLACING CONSUMABLES AND MAINTENANCE ITEMS*Fusers and transfer belts are replaceable maintenance items. They are warranted against defects for 90 days. When the printer display indicates that they are near end of life, a replacement must be purchased.
C5650n/C5650dn User’s GuideConsumables • 53

Replace a Toner Cartridge ___________
c53_30_tonergroup.jpg
REPLACE TONERnnn: zzzz TONER EMPTY
nnn: ZZZZ =
410: YELLOW
411: MAGENTA
412: CYAN
413: BLACK
C5650n/C5650dn User’s GuideReplace a Toner Cartridge • 54

1. Press the cover release. Open the printer’s top cover fully.
c53_02_opencvr.jpg
WARNING!If the printer has been powered on, the fuser is HOT. This area is clearly labelled. Do not touch it.
C5650n/C5650dn User’s GuideReplace a Toner Cartridge • 55

2. Note the positions of the four cartridges: Cyan (1), Magenta (2), Yellow (3), Black (4).
c53_09_lidup.jpg
3. Pull the colored toner release lever on the cartridge to be replaced towards the front of the printer. Shown: replacement of the black toner cartridge
c53_74_tonerlvropen.jpg
C5650n/C5650dn User’s GuideReplace a Toner Cartridge • 56

4. Lift the right-hand end of the cartridge. Then, pull the cartridge to the right to release the left-hand end. Remove the toner cartridge. Discard it in accordance with your local regulations.
c53_80_tonrout.jpg
Install a Toner Cartridge5. Unpack the new toner cartridge. Gently shake it from
side to side to loosen and distribute the toner evenly inside the cartridge.
c53_04_shk_tnr.jpg
C5650n/C5650dn User’s GuideReplace a Toner Cartridge • 57

6. Remove the adhesive tape from the underside of the cartridge.
7. Hold the cartridge by its top center with the colored release lever to the right. Insert the left end of the
CAUTION!Do not touch the toner release lever until the toner cartridge is installed in the image drum. If you do, it will open the toner release slot and spill toner.
C5650n/C5650dn User’s GuideReplace a Toner Cartridge • 58

cartridge into the top of the image drum. Push it firmly against the spring on the drum unit.
c53_80_tonrout.jpg and c53_73_tonerdrum.jpg
C5650n/C5650dn User’s GuideReplace a Toner Cartridge • 59

8. Lower the right end of the cartridge into the image drum unit. Press it firmly down in place. Then, push the colored lock lever back to open the toner slot and lock it in place.
c53_75_tonrlvrclose.jpg
IMPORTANT!The lever should move easily. If it does not, STOP!Push down on the toner cartridge to be sure that it is properly seated in the image drum. Press back on the lever again.To avoid toner spillage, DO NOT open the toner release lever until the toner cartridge is firmly seated in the image drum.
C5650n/C5650dn User’s GuideReplace a Toner Cartridge • 60

9. Use the provided LED lens cleaner. Gently wipe the LED. c5x_ledarray_bw.jpg
10. Close and latch the top cover. c53_45_latchcvr.jpg
C5650n/C5650dn User’s GuideReplace a Toner Cartridge • 61

Replace an Image Drum _____________ c53_31_drumREV.jpg and c53_30_single_toner.JPG
REPLACE IMAGE DRUMnnn: ZZZZ DRUM LIFE
nnn: ZZZZ =
350: YELLOW
351: MAGENTA
352: CYAN
353: BLACK
Important!You must replace the toner cartridge when you replace the image drum. The life expectancy of the cartridge will be reduced as the toner charges the new drum.
C5650n/C5650dn User’s GuideReplace an Image Drum • 62

1. Press the cover release and open the top cover fully. c53_02_opencvr.jpg
2. Note the positions of the four image drums: Cyan (1), Magenta (2), Yellow (3), Black (4).
c53_09_lidup.jpg
WARNING!If the printer has been powered on, the fuser is HOT. This area is clearly labelled. Do not touch it.
C5650n/C5650dn User’s GuideReplace an Image Drum • 63

3. Lift the image drum, complete with its toner cartridge, out of the printer. Discard it in accordance with your local regulations.
c53_53_drumremove.jpg
C5650n/C5650dn User’s GuideReplace an Image Drum • 64

4. Unpack the new image drum.
CAUTION!Image drum handlingThe image drum contains toner. To avoid spilling toner, be careful to keep it upright.
c53_31_drum.jpg, Checkmark.bmp,
c53_79_drumtilt_3.jpg, c53_78_drumtilt_2.jpg
C5650n/C5650dn User’s GuideReplace an Image Drum • 65
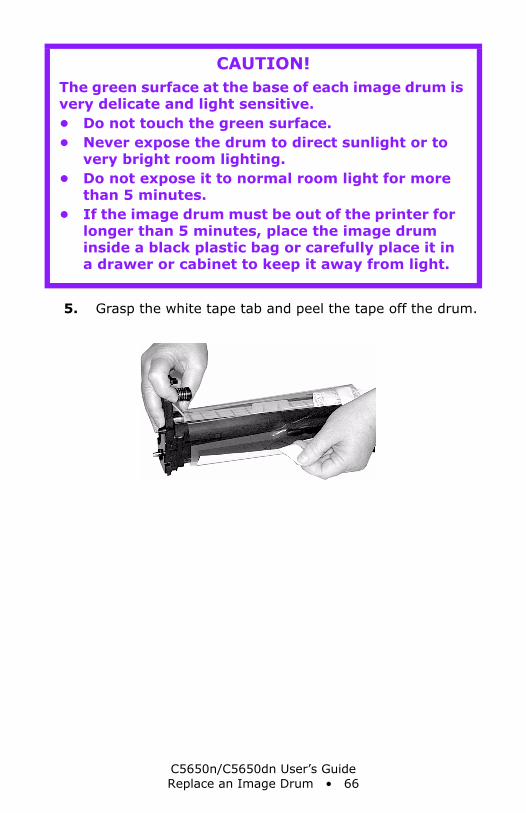
5. Grasp the white tape tab and peel the tape off the drum. c53_28_removedrumtape.jpg
CAUTION!The green surface at the base of each image drum is very delicate and light sensitive.• Do not touch the green surface.• Never expose the drum to direct sunlight or to
very bright room lighting.• Do not expose it to normal room light for more
than 5 minutes.• If the image drum must be out of the printer for
longer than 5 minutes, place the image drum inside a black plastic bag or carefully place it in a drawer or cabinet to keep it away from light.
C5650n/C5650dn User’s GuideReplace an Image Drum • 66

6. Remove the paper sheet. Then, remove the clear plastic film.
c53_26removepaper.jpg, c53_25_removeclearsheet.jpg
7. If present, remove the silica gel pack. c53_24_removejell.jpg
C5650n/C5650dn User’s GuideReplace an Image Drum • 67

8. Place the image drum in the printer. c53_84_removedrumwithorange.jpg
9. Remove the orange drum seal. c53_83_removeorangething.jpg
C5650n/C5650dn User’s GuideReplace an Image Drum • 68

10. Install the new toner cartridge in the image drum. See “Install a Toner Cartridge” on page 57.
C5650n/C5650dn User’s GuideReplace an Image Drum • 69

11. Use the provided LED lens cleaner. Gently wipe the LED. c5x_ledarray_bw.jpg
12. Close and latch the top cover. c53_45_latchcvr.jpg
C5650n/C5650dn User’s GuideReplace an Image Drum • 70

Replace the Fuser __________________ c53_104_fuser_transport_loc.jpg
REPLACE FUSER354: FUSER LIFE
WARNING!If the printer has been powered on, the fuser is HOT. This area is clearly labelled. Do not touch it.Handle the fuser with extreme care. Hold it only by its handle, which is only mildly warm to the touch.If in doubt, switch the printer off. Wait at least 10 minutes for the fuser to cool before opening the printer cover.
C5650n/C5650dn User’s GuideReplace the Fuser • 71

1. Press the cover release. Fully open the printer’s top cover.
c53_02_opencvr.jpg
2. Pull the two blue fuser lock levers (1) towards the front of the printer.
c53_59_fuser1.jpg
C5650n/C5650dn User’s GuideReplace the Fuser • 72

3. Hold the fuser by its handle. Lift the fuser out of the printer. If the fuser is still warm, place it on a flat surface which will not be damaged by heat. After letting the fuser cool down, discard it.
c53_60_fuser2.jpg
4. Remove the new fuser from its packaging. Remove any packing tape.
5. Push the orange transport lock to the left to release it. You’ll hear it snap. Remove it.
c53_104_fuser_transport_loc.jpg
C5650n/C5650dn User’s GuideReplace the Fuser • 73

6. Hold the new fuser by the handle. The fuser pressure release lever (1) should be on the right. Lower the fuser into the printer.
c53_60a_fuser2.jpg
7. Push the two blue retaining levers (1) toward the rear of the printer to lock the fuser in place.
c53_61a_fuser3.jpg
C5650n/C5650dn User’s GuideReplace the Fuser • 74

8. Close and latch the top cover. c53_45_latchcvr.jpg
C5650n/C5650dn User’s GuideReplace the Fuser • 75

Replace the Belt Unit _______________
REPLACE BELT355: BELT LIFE
The belt unit is located under the four image drums.
1. Press the cover release and open the top cover fully. c53_02_opencvr.jpg
WARNING!If the printer has been powered on, the fuser is HOT. This area is clearly labelled. Do not touch it.
C5650n/C5650dn User’s GuideReplace the Belt Unit • 76

2. Note the positions of the four image drums: Cyan (1), Magenta (2), Yellow (3), Black (4). It is essential that they go back in the correct order!
c53_09_lidup.jpg
3. Lift each of the image drum units out of the printer. Place them on a flat surface in a safe place away from direct sources of heat and light.
CAUTION!The green surface at the base of each image drum is very delicate and light sensitive.• Do not touch the green surface.• Never expose the drum to direct sunlight or to
very bright room lighting.• Do not expose it to normal room light for more
than 5 minutes.• If the image drum must be out of the printer for
longer than 5 minutes, place the image drum inside a black plastic bag or carefully place it in a drawer or cabinet to keep it away from light.
C5650n/C5650dn User’s GuideReplace the Belt Unit • 77

4. Locate the two blue locks (1) and the handle (2). c53_48_belt1.jpg
5. Turn the two locks about 45° counterclockwise to release the belt.
c53_49_belt2.jpg
C5650n/C5650dn User’s GuideReplace the Belt Unit • 78

6. Pull up the handle and lift the belt unit out of the printer. c53_50_belt3.jpg
7. Unpack the new belt unit. Hold it with the blue handle toward the front of the printer.
8. Place the drive gear at the back of the belt unit in the gear at the left rear corner of the printer. Lower the belt unit into the printer.
c53_51_belt4.jpg
C5650n/C5650dn User’s GuideReplace the Belt Unit • 79

9. Turn the two belt locks about 45° clockwise to secure the belt unit in place.
c53_48_belt1.jpg
10. Place the four image drums/toner cartridges back in the printer (1 = Cyan, 2 = Magenta, 3 = Yellow, 4 = Black). It is essential that they go back in the correct order!
c53_09_lidup.jpg
C5650n/C5650dn User’s GuideReplace the Belt Unit • 80

11. Close and latch the top cover. c53_45_latchcvr.jpg
C5650n/C5650dn User’s GuideReplace the Belt Unit • 81

Printer Settings (Menu Settings)
This section lists the menus accessed via the controls on the printer’s operator panel and displayed in the LCD window.
Many of these settings can be overridden by settings in the printer driver. However, several of the driver settings can be left at “Printer Setting,” which will then default to the settings entered in these printer menus
Print a list of the current settings _____
Menu Map
To print a list of the current menu settings:
1. Press + …
INFORMATION MENU
2. Press ENTER …
PRINT MENU MAPExecute
3. Press ENTER.4. The Menu Map prints. The printer goes back on line.
NOTE... = keep pressing the button repeatedly until you see the display indicated.
C5650n/C5650dn User’s GuidePrinter Settings (Menu Settings) • 82

Changing Settings _________________ C53_Panel.eps
1. Press + to enter the menu mode.2. Press +/ – to scan through the available menus until the
menu you wish to enter appears on the display.
3. Press ENTER to enter the menu.4. Use +/ – to move up and down through the items in the
selected menu. When the item you want to change is displayed, press ENTER to edit that item.
5. Use +/ – to move up and down through the available settings for this item.
6. When the setting you wish to use appears on the display, press ENTER.An asterisk (*) appears next to the setting. The setting flashes.
7. To finish:a. If you are through making settings in the menu, press
ON LINE to engage the setting and exit the menu.b. If you wish to make additional changes in the menu,
press BACK to engage the setting.–To change another setting in the same menu, use +/ – to move through the list of menu items to the one you wish to change, then follow steps 5 though 7.
–To change the setting for an item in a different menu, press BACK again, then follow steps 2 through 7.
NOTEThe menus and their various listings vary depending on which options you have installed on your printer.
C5650n/C5650dn User’s GuidePrinter Settings (Menu Settings) • 83

Example: Power Save TimeTo change the time interval for the printer to wait before going into Power Save mode (default setting is 60 MIN):
1. Press + to enter the menu mode.2. Press + and/or – repeatedly until you see
SYS CONFIG MENU
3. Press ENTER to go into the Sys Config Menu.
POW SAVE TIME60 MIN *
4. Press ENTER to select the Power Save Time item.The value on the second line of the display begins flashing.
POW SAVE TIME60 MIN *
5. Press + repeatedly until the interval (e.g., 240 MIN) you wish to select appears on the second line.
POW SAVE TIME240 MIN
6. Press ENTER to select the new setting:An asterisk appears on the second line of the display.
POW SAVE TIME240 MIN *
7. Press ON LINE to engage the new setting and to exit the menu.The printer returns to standby mode.
C5650n/C5650dn User’s GuidePrinter Settings (Menu Settings) • 84

Reset to Factory Defaults ____________
To reset the printer menu to its original default settings:
1. Press + to enter the Menu mode.2. Press + …
MAINTENANCE MENU
3. Press ENTER.
MENU RESETExecute
4. Press ENTER.5. The printer resets and returns to the on-line state.
NOTE… = keep pressing the button repeatedly until you see the display indicated.
C5650n/C5650dn User’s GuidePrinter Settings (Menu Settings) • 85

Lists of Available Settings by Menu ____
Information Menu
Item Action Explanation
PRINT MENU MAP EXECUTE Prints the MenuMap (menu listing) with current settings shown. Information about your printer is also shown at the top of each MenuMap page.
DEMO1 EXECUTE Prints the built-in Demo page.
NETWORK EXECUTE Prints Network Information.
SHUTDOWN EXECUTE Initiates the power-off process which protects any data saved in the printer from being lost when the printer is turned off.
C5650n/C5650dn User’s GuideLists of Available Settings by Menu • 86

Print MenuNotes:
Factory default settings are shown in bold.
Settings with a dagger (†) only appear when the appropriate option is installed.
Item Settings Explanation
COPIES 1 to 999 Enter the number of copies of a document to be printed.
PAPER FEED TRAY1TRAY2†MP TRAY
Selects the default tray for paper feed.
AUTO TRAY SWITCH
ONOFF
If two trays contain identical print media, the printer can switch to an alternate tray when the current tray runs out in the middle of a print job.
TRAY SEQUENCE
DOWNUPPAPER FEED TRAY
Sets the sequence in which the printer will seek an alternate tray with the same media size should the currently selected tray run out of media while printing a job.
MP TRAY USAGE
DO NOT USEWHEN MISMATCHXXX
If a document to be printed demands a paper size not installed in the selected tray, the printer can automatically feed from the Multi-Purpose Tray instead. If this function is not enabled, the printer will stop and request that the correct size be loaded.
MEDIA CHECK
ENABLEDISABLE
Set to DISABLE if you do not wish the printer to check to see if the size paper loaded in the selected tray matches that required for the document being printed.
C5650n/C5650dn User’s GuideLists of Available Settings by Menu • 87

Media MenuThis item appears if enabled by a System Administrator.
Notes:
• Factory default settings are shown in bold.
• Items with a dagger (†) only appear when the appropriate option is installed.
MONO-PRINT SPEED
AUTO SPEED NORMAL SPEEDCOLOR SPEED
Sets the print engine speed.If you are printing only color documents, switch to COLOR SPEED.If you are printing only monochrome documents, switch to MONO 24PPM.AUTO SPEED sets the speed of printing based on whether the first page is color or monochrome.If you are printing a document with a color cover followed by mostly monochrome pages, use MIXED SPEED.
Item Settings Explanation
TRAY1 PAPERSIZE A4, A5, A6, B5, LEGAL14, LEGAL13.5, LEGAL13, LETTER, EXECUTIVE, CUSTOM
Defines the size of paper loaded in Tray 1.
TRAY1 MEDIATYPE PLAINLETTERHEADBONDRECYCLEDROUGH
Defines the type of media loaded in Tray 1. This will help the printer to adjust its internal operating parameters, such as engine speed and fusing temperature.
TRAY1 MEDIAWEIGHT
LIGHT, MEDIUM, HEAVY
Adjusts the printer for the weight of paper stock loaded in the tray. See “Paper Weights” on page 14.
TRAY2 PAPERSIZE† A4, A5, B5, LEGAL14, LEGAL13.5, LEGAL13, LETTER, EXECUTIVE, CUSTOM
Defines the size of paper loaded in optional Tray 2.
TRAY2 MEDIATYPE† PLAIN, LETTERHEAD, BOND, RECYCLED, ROUGH
Defines the type of media loaded in optional Tray 2.
Item Settings Explanation
C5650n/C5650dn User’s GuideLists of Available Settings by Menu • 88

TRAY2 MEDIAWEIGHT†
LIGHT, MEDIUM, HEAVY
Adjusts the printer for the weight of paper stock loaded in optional Tray 2.
MPT PAPERSIZE LETTER, EXECUTIVE, LEGAL14, LEGAL13.5, LEGAL13, A4, A5, A6, B5, CUSTOM, COM-9 ENVELOPE, COM-10 ENVELOPE, MONARCH ENV, DL ENVELOPE, C5 ENVELOPE
Defines the size of paper to be fed from the Multi-Purpose Tray.
MPT PAPERTYPE PLAIN, LETTERHEAD, TRANSPARENCY, LABELS, BOND, RECYCLED, CARD STOCK, ROUGH
Defines the type of media to be fed from the Multi-Purpose Tray so that the printer can adjust its internal parameters for the media.
MPT MEDIAWEIGHT MEDIUM, HEAVY, ULTRA HEAVY
Defines the media weight to be fed from the Multi-Purpose Tray.
UNIT OF MEASURE MILLIMETERINCH
Defines the unit of measure for the next two items.
X-DIMENSION 3 to 8.5 INCHDefault = 8.5 INCH
Defines the width of paper defined by the “CUSTOM” settings.
Y-DIMENSION 5 to 35.5 INCHDefault = 11 INCH
Defines the length of paper defined by the “Custom” settings. Note that media of up to 47'' (1.2 m) in length can be fed one sheet at a time from the Multi-Purpose Tray- for banner printing.
Item Settings Explanation
C5650n/C5650dn User’s GuideLists of Available Settings by Menu • 89

Color MenuNote: Factory default settings are shown in bold.
The printer automatically adjusts color balance and density at appropriate intervals, optimizing the printed output for bright white paper viewed in natural daylight conditions.
The items on this menu provide a means of changing the default settings for special or particularly difficult print jobs. Settings revert to their default values when the next print job is complete.
Item Settings Explanation
DENSITY CONTROL
AUTOMANUAL
AUTO = image density is automatically adjusted:• at power on• when a new image drum or toner
cartridge is installed• at intervals of 100, 300 and 500 drum
countsAuto adjustment takes up to 55 seconds.Switch to manual only if you wish to initiate Density Control manually using the printer menu.
ADJUST DENSITY [EXECUTE] Selecting this will perform the auto density set up.
AJST REGISTRATION
[EXECUTE] Performs automatic color registration adjustment. Normally this is done at power on and when the top cover is opened and then closed. This process accurately aligns the cyan, magenta and yellow images to the black image.
C REG FINE ADJUSTM REG FINE ADJUSTY REG FINE ADJUST
-3 to + 3 in increments of 1Default = 0
Performs fine adjustment of image timing in relation to the black image component.A positive setting will darken the color; a negative setting will lighten the color.
C5650n/C5650dn User’s GuideLists of Available Settings by Menu • 90

System Configuration MenuNote: Factory default settings are shown in bold.
Items Settings Explanation
POW SAVE TIME
5153060 240
Adjusts the time before the printer automatically switches into power saving mode. In this mode power consumption is reduced, but when a job is sent the printer will require a warm-up time of up to 1 minute before printing can begin.
CLEARABLE WARNING
ON JOB
When ON, non-critical warnings, such as requests for a different paper size, can be cleared by pressing the ON LINE button. When set to JOB, they are only cleared when the print job resumes.
MANUAL TIMEOUT
OFF3060
Specifies how many seconds the printer will wait for paper to be fed before cancelling the job.
WAIT TIMEOUT 5 to 300 SECDefault = 90 seconds
Specifies how many seconds the printer will wait when received data pauses before forcing a page eject.
LOW TONER CONTINUE STOP
Specifies whether the printer should continue printing after a low toner condition is detected. If you change this to STOP, when low toner is detected, the printer goes off line.
JAM RECOVERY ON OFF
Specifies whether the printer should perform jam recovery after a paper jam has occurred. If ON, the printer will attempt to print again any pages lost due to a paper jam once the jam has been cleared.
ERROR REPORT ONOFF
Change this to ON if you wish the printer to print the error details when an error occurs.
C5650n/C5650dn User’s GuideLists of Available Settings by Menu • 91

USB MenuNote: Factory default settings are shown in bold.
Item Settings Explanation
SOFT RESET ENABLEDISABLE
Enables or disables the SOFT RESET command.
SPEED 480Mbps12Mbps
Sets the maximum transfer speed for the USB interface.
SERIAL NUMBER
ENABLEDISABLE
ENABLE allows your computer to identify the printer by its USB interface serial number.
C5650n/C5650dn User’s GuideLists of Available Settings by Menu • 92

Network MenuNote: Factory default settings are shown in bold.
Item Settings Explanation
TCP/IP ENABLEDISABLE
Enables or disables this network protocol.
NETBEUI ENABLEDISABLE
Enables or disables this network protocol.
IP ADDRESS SET
AUTOMANUAL
Change this to Manual to specify the IP address through the front panel (see next entry). Required for non-DHCP networks.
IP ADDRESS xxx.xxx.xxx.xxxDefault = 198.168.100.100
Current assigned IP address. To change:• Press ENTER.• Use +/– keys to increment first
octet.• Press ENTER to move on to the next
octet.• Use +/– keys to increment second
octet.• Press ENTER to move on to the next
octet.• Use +/– keys to increment third
octet.• Press ENTER to move on to the last
octet.• Use +/– keys to increment 1st
octet.• Press ENTER to register the new
address.
SUBNET MASK xxx.xxx.xxx.xxxDefault = 255.255.255.000
Current assigned subnet mask. To change, proceed as above.
GATEWAY ADDRESS
xxx.xxx.xxx.xxxDefault = 192.168.100.254
Current assigned gateway address. To change, proceed as above.
FACTORYDEFAULTS
[EXECUTE] Specifies whether or not to initialize the network menu.
WEB/IPP ENABLE DISABLE
Enables or disables Web config. facility and Internet Printing Protocol.This item will not appear in the menu if TCP/IP is set to DISABLE.
C5650n/C5650dn User’s GuideLists of Available Settings by Menu • 93

TELNET ENABLE DISABLE
Enables or disables Telnet config. facility.This item will not appear in the menu if TCP/IP is set to DISABLE.
FTP ENABLEDISABLE
Enables or disables communication via FTP.This item will not appear in the menu if TCP/IP is set to DISABLE.
SNMP ENABLEDISABLE
Enables or disables SNMP protocol.
NETWORK SCALE
NORMALSMALL
Normal = Global networkSmall = Local network
HUB LINK SETTING
AUTO NEGOTIATE100BASE-TX FUL100BASE-TX HALF10BASE-T FULL10BASE-T HALF
Sets full or half duplex for communication via a network hub.
Item Settings Explanation
C5650n/C5650dn User’s GuideLists of Available Settings by Menu • 94

Memory MenuThis item appears if enabled by a System Administrator.
Note: Factory default settings are shown in bold.
Item Settings Explanation
RECEIVE BUF SIZE
AUTO0.5MB1MB2MB4MB8MB16MB
Sets the size of the receive buffer.
FLASH INITIALIZE
[EXECUTE] Initializes Resident Flash memory.When ENTER is pressed, the following message displays.ARE YOU SURE? YES=ENTER/NO=CANCELPress ENTER. The following message displays:EXECUTE NOW? YES=ENTER/NO=CANCEL Press ENTER, then turn the printer off. The request to execute FLASH initialization is put into the memory and initialization is executed when the power is turned back on.
C5650n/C5650dn User’s GuideLists of Available Settings by Menu • 95

System Adjust MenuThis item appears if enabled by a System Administrator.
Notes:
• Factory default settings are shown in bold.
Item Settings Explanation
X ADJUST -2.00MILLIMETER TO +2.00MILLIMETERDefault = 0.00
Adjusts overall print position horizontally in 0.25 increments.
Y ADJUST -2.00MILLIMETER TO +2.00MILLIMETERDefault = 0.00
Adjusts overall print position vertically in 0.25 increments.
DUPLEX X ADJUST -2.00MILLIMETER TO +2.00MILLIMETERDefault = 0.00
Adjusts overall print position of print face horizontally in 0.25 increments.
DUPLEX Y ADJUST -2.00MILLIMETER TO +2.00MILLIMETERDefault = 0.00
Adjusts overall print position of print face vertically in 0.25 increments.
DRUM CLEANING OFFON
If you are experiencing horizontal white lines on your printed pages, enter the menu and temporarily change this setting to ON, then send a one page print job. This will cause an extra blank sheet to print, cleaning the drum prior to printing.Careful! Leaving this set to ON will reduce the image drum life.
C5650n/C5650dn User’s GuideLists of Available Settings by Menu • 96

Maintenance MenuNote: Factory default settings are shown in bold.
Item Settings Explanation
MENU RESET [EXECUTE] Resets menus to the default settings.
SAVE MENU [EXECUTE] Saves current menu settings as default values. At confirmation prompt, press ENTER to confirm save, or CANCEL.
POWER SAVE ENABLEDISABLE
Change this setting to Disable if you do not want the printer to enter the power save mode after the specified time.
PAPER BLACK SETTING
–2 to +2 in increments of 1Default = 0
Used for small adjustment when you experiencse faded print or light specks / streaking in monochrome printing on white paper. Select a higher value to reduce fading, or a lower value to reduce specks or streaking in high density print areas.
PAPER COLOR SETTING
–2 to +2 in increments of 1Default = 0
As above, but for color printing.
TRANSPR BLACK SETTING
–2 to +2 in increments of 1Default = 0
As above, but for mono printing on transparencies.
TRANSPR COLOR SETTING
–2 to +2 in increments of 1Default = 0
As above, but for color printing on transparencies.
C5650n/C5650dn User’s GuideLists of Available Settings by Menu • 97

Usage MenuThis menu is for information only. It provides an indication of total usage of the printer and the expected life left in its consumable items. This is particularly useful if you do not have a full set of replacement consumables on hand and you need to know how soon you will need them.
• Items with a dagger (†) only appear when the appropriate option is installed.
Item Explanation
TOTAL PAGE COUNT The total number of pages printed.
TRAY1 PAGE COUNT The total number of pages fed from Tray 1.
TRAY2 PAGE COUNT† The total number of pages fed from optional Tray 2.Appears only if the optional Second Paper Tray is installed. See “Second Paper Tray”, on page 105.
MPT PAGE COUNT The total number of pages fed from the Multi-Purpose Tray.
COLOR PAGE COUNT The total number of pages printed in color.
MONO PAGE COUNT The total number of pages printed in monochrome.
K DRUM LIFEC DRUM LIFEM DRUM LIFEY DRUM LIFE
Percentage of life remaining in these consumable items is indicated as nn%.
BELT LIFE Percentage of life remaining in these Maintenance items is indicated as nn%.
FUSER LIFE Percentage of life remaining in these Maintenance items is indicated as nn%.
K TONERC TONERM TONERY TONER
Current remaining toner is indicated as nn%.2k= standard cartridge5K= high-capacity cartridge
C5650n/C5650dn User’s GuideLists of Available Settings by Menu • 98

Menu Defaults_____________________
Information, Print, and Media MenusNote: Menus/Items with a dagger (†) only appear when the appropriate option is installed.
Menu Item Default Setting
INFORMATION MENU PRINT MENU MAP [EXECUTE]
NETWORK [EXECUTE]
DEMO1 [EXECUTE]
SHUTDOWN MENU SHUTDOWN START [EXECUTE]
PRINT MENU COPIES 1
DUPLEX OFF
PAPER FEED TRAY1
AUTO TRAY SWITCH ON
TRAY SEQUENCE DOWN
MP TRAY USAGE DO NOT USE
MEDIA CHECK ENABLE
MONO-PRINT SPEED AUTO SPEED
MEDIA MENU TRAY1 PAPERSIZE LETTER
TRAY1 MEDIATYPE PLAIN
TRAY1 MEDIAWEIGHT MEDIUM
TRAY2 PAPERSIZE† LETTER
TRAY2 MEDIATYPE† PLAIN
TRAY2 MEDIAWEIGHT† MEDIUM
MPT PAPERSIZE LETTER
MPT MEDIATYPE PLAIN
MPT MEDIAWEIGHT MEDIUM
UNIT OF MEASURE INCH
X DIMENSION 8.5 INCH
Y DIMENSION 11.0 INCH
C5650n/C5650dn User’s GuideMenu Defaults • 99

Color, System Configuration, and USB MenusNote: Menus/Items with a dagger (†) only appear when the appropriate option is installed.
Menu Item Default Setting
COLOR MENU DENSITY CONTROL AUTO
ADJUST DENSITY [EXECUTE]
AJST REGSTRATION [EXECUTE]
C REG FINE AJST 0
M REG FINE AJST 0
Y REG FINE AJST 0
SYS CONFIG MENU POW SAVE TIME 60 MIN
CLRABLE WARNING ON
MANUAL TIMEOUT 60 SEC
WAIT TIMEOUT 90 SEC
LOW TONER CONTINUE
JAM RECOVERY ON
ERROR REPORT OFF
LANGUAGE ENGLISH
USB MENU SOFT RESET DISABLE
SPEED 480Mbps
C5650n/C5650dn User’s GuideMenu Defaults • 100

Network and Memory MenusNote: Menus/Items with a dagger (†) only appear when the appropriate option is installed.
Menu Item Default Setting
NETWORK MENU TCP/IP ENABLE
NETBEUI DISABLE
IP ADDRESS SET AUTO
IP ADDRESS 192.168.100.100
SUBNET MASK 255.255.255.000
GATEWAY ADDRESS 192.168.100.254
FACTORY DEFAULTS [EXECUTE]
WEB/IPP ENABLE
TELNET ENABLE
FTP ENABLE
NETWORK SCALE NORMAL
SNMP ENABLE
LAN NORMAL
HUB LINK SETTING AUTO NEGOTIATE
MEMORY MENU† RECEIVE BUF SIZE AUTO
C5650n/C5650dn User’s GuideMenu Defaults • 101

System Adjust and Maintenance MenusNote: Menus/Items with a dagger (†) only appear when the appropriate option is installed.
Menu Item Default Setting
SYS ADJUST MENU X ADJUST 0.00 MILLIMETER
Y ADJUST 0.00 MILLIMETER
DUPLEX X ADJUST 0.00 MILLIMETER
DUPLEX Y ADJUST 0.00 MILLIMETER
DRUM CLEANING OFF
MAINTENANCE MENU MENU RESET [EXECUTE]
SAVE MENU [EXECUTE]
POWER SAVE ENABLE
PAPER BLACK SET 0
PAPER COLOR SET 0
TRNSPR BLACK SET 0
TRANSPR COLOR SET 0
C5650n/C5650dn User’s GuideMenu Defaults • 102

Usage Menu
Menu Item Default Setting
USAGE MENU TOTAL PAGE COUNT nnnn
TRAY1 PAGE COUNT nnnn
TRAY2 PAGE COUNT† nnnn
MPT PAGE COUNT nnnn
COLOR PAGE COUNT nnnn
MONO PAGE COUNT nnnn
K DRUM LIFE REMAINING nn%
C DRUM LIFE REMAINING nn%
M DRUM LIFE REMAINING nn%
Y DRUM LIFE REMAINING nn%
BELT LIFE REMAINING nn%
FUSER LIFE REMAINING nn%
K TONER REMAINING nn%
C TONER REMAINING nn%
M TONER REMAINING nn%
Y TONER REMAINING nn%
C5650n/C5650dn User’s GuideMenu Defaults • 103

Options
The following options are available for your printer:
• Additional RAM memory (see below)
• Second Paper Tray (see page 105)
Instructions for installing these options are found in the packaging with the option.
RAM Memory______________________Oki 70042801, 70042901
c53_82_ram.jpg
The basic printer comes equipped with 64 MB of main memory. This can be upgraded with an additional memory board containing
• 64 MB (Oki 70042801), increasing the memory to 128 MB
or
• 256 MB (Oki 70042901), increasing the memory to 320 MB.
C5650n/C5650dn User’s GuideOptions • 104

Second Paper Tray _________________Oki 43347601
c53_43_opttray2.jpg
The second paper tray takes:
• Up to 530 sheets of 20-lb. paper.
• All the same size media as Tray 1 except A6.
• Paper weight range 16 to 57 lbs. (60 to 203 g/m2).
C5650n/C5650dn User’s GuideOptions • 105

Specifications
Item Specification
Dimensions 16.61'' W x 22.09'' D x 13.58'' H(422 mm W x 561 mm D x 345 mm H)
Net Weight 57.3 lbs. (26 Kg)
Print speeds • 22 pages per minute (ppm) color• 26 ppm monochrome
Resolution 600 dpi or 600 x 1200 dpi
Emulation Hiper-C
Environmental Temperature• Operating: 50 to 90°F (10 to 32°C)• Storage (packed up): -14 to 110°F (-10 to 43 °C)• Power Off: 32 to 110°F (0 to 43°C)• Relative Humidity• Operating: 20 to 80% RH• Storage (packed up): 10 to 90% RH• Power Off: 10 to 90% RH
Electrical 110-127 volts, 60 Hz (±2 Hz)220-240 volts, 50 Hz (±2 Hz)Power Consumption:• Operating, Typical: 420 watts• Max.: 950 watts• Power Save Mode: 20 watts
Auto Features Auto registrationAuto density adjustmentAuto consumable counter reset
Memory 64 MB standard, upgradable with 64MB and 256MB options (see “RAM Memory”, on page 104)
Paper capacity (20-lb. [75 g/m²] paper)
Tray 1: 300 sheetsOptional Tray 2: 530 sheetsMulti-Purpose Tray: 100 sheets
Paper weight Range
Tray 1: 17 to 32 lb. (64 to120 g/m²)Optional Tray 2: 17 to 47 lb. (64 to 177 g/m²)Multi-Purpose Tray: 20 to 54 lb. (75 to 203 g/m²)
Paper output Top Exit (Face Down Stacker):250 sheets 20-lb. 75 g/m² paperRear Exit (Face Up Stacker): 100 sheets 20-lb. 75 g/m²
Printer life 420,000 pages or 5 years, whichever comes first
C5650n/C5650dn User’s GuideSpecifications • 106

Duty cycle Maximum: 50,000 pages per month at 5% duty cycle (equivalent to an average business letter)Average: 4,000 pages per month
Toner life Standard cartridge: approximately 2,000 pages at 5% coverageHigh-capacity cartridge: approximately 5,000 pages at 5% coverage
Image drum life 20,000 pages at 3 pages per job
Belt life 60,000 letter-size pages
Fuser life 60,000 letter-size pages
Item Specification
C5650n/C5650dn User’s GuideSpecifications • 107

C5650n/C5650dn User’s GuideTroubleshooting • 108
Troubleshooting
General Information________________This section provides information to help you deal with problems that may arise when using the printer.
Troubleshooting is divided into the following sections:
• “Display Panel Messages” see page 109
• “Paper Jams” see page 117
• “Print Quality Problems” see page 113
• “USB Problems” see page 139
• “Application error” see page 141
• “General Protection Fault” see page 141
• “Paper Size Change Request” see page 142
• “Printer does not go online” see page 142
• “Printer makes a strange noise” see page 142
• “Printer takes a long time to start printing” see page 143
• “Printing cancels” see page 143
• “Printing does not start” see page 144
• “Printing is slow” see page 144
• “Cleaning” see page 145

Display Panel Messages _____________
Message Meaning What to Do
* TONER SENSOR ERROR Flashes across the second line of the display: the indicated color toner (*) is missing from the printer.
Open the top cover and make sure the indicated toner is there and properly seated in the printer: C = Cyan, Y = Yellow, M = Magenta, K = Black.
ADD MORE MEMORY420: MEMORY OVERFLOW
The document size is too large for the printer’s memory.
Reduce the size of the document. If this happens frequently, install additional memory (see “RAM Memory”, on page 104).
CANCELLING JOB(JAM)
The setting for Jam Recovery in the menu has been changed to off and a paper jam has occurred. Any unprinted data is being deleted.
Clear the jam and resend the missing pages of the print job.
CHECK BELT330: BELT MISSING
The belt unit is not properly installed.
Open the top cover and lift out the black (K) and Yellow (Y) image drums, placing them on a flat surface. Check to be sure that the belt unit latches are fully in the latched position:
c53_48_belt1.jpg
then reinstall the image drums.
C5650n/C5650dn User’s GuideDisplay Panel Messages • 109

CHECK FUSER320: FUSER MISSING
The fuser unit is not properly installed.
Open the top cover and check to be sure that the fuser unit is properly seated in the printer and that the lock levers are pushed all the way toward the back of the printer:
c53_61a_fuser3.jpg
CHECK MP TRAY390: PAPER JAM
Paper has jammed while exiting the MP Tray.
Clear the jam. See “Jam 390”, on page 135.
CLOSE COVER316: DUPLEX COVER OPEN
The duplex cover is open or not properly latched.
Close the duplex cover:
c53_95_duplexjam_Crop.jpg
CLOSE COVERnnn: COVER OPEN
Either the top cover or the front cover is open.
Be sure both the top cover and the front cover are firmly closed.
INSTALL PAPER CASSETTE430: TRAY 1 MISSING
Tray 1 is not installed in the printer.
Install the missing tray.
INSTALL PAPER CASSETTE440: TRAY 1 OPEN
Tray 1 is not properly installed in the printer.
Make sure the tray is pushed fully into the printer.
Message Meaning What to Do
C5650n/C5650dn User’s GuideDisplay Panel Messages • 110

LOAD mmm AND PRESS ONLINE SWITCH490: MP TRAY EMPTY
Print job from MP Tray has been received and the MP Tray is empty.
Load the requested media (mmm) in the MP Tray and press ON-LINE.
LOAD mmmnnn: tttt EMPTY
A print job has been received and the indicated paper tray is empty.
Load mmm media in the indicated (tttt) tray.
LOAD mmm/ppp AND PRESS ONLINE SWITCHnnn: tttt MEDIA MISMATCH
The media type in the indicated tray (tttt) does not match that specified in the print job being processed.
Load the appropriate media in the tray and press ON-LINE.
LOAD mmm/ppp AND PRESS ONLINE SWITCHnnn: tttt SIZE MISMATCH
The media size (mmm) and/or type (ppp) loaded in the indicated tray (tttt) does not match that specified in the print job being processed.
Load the appropriate media in the tray and press ON-LINE.
OPEN DUPLEX COVERnnn: PAPER JAM
Paper has jammed entering or exiting the duplexer.
Clear the jam. See page 119 and page 121.
OPEN FRONT COVERnnn: PAPER JAM
Paper jam. Clear the jam. See page 124 and page 137
OPEN TOP COVERnnn: PAPER JAM
Paper jam. Clear the jam. See page 131 and page 126.
ORDER xxx Appears on the second line of the display to indicate that consumable xxx (e.g., belt, fuser, toner, image drum) is nearing end of life.
Make sure you have a replacement unit on hand.
POWER ON/OFF300: NETWORK ERROR
An error has occurred involving the network.
Shut the printer off, then turn it back on. If the message still appears, check with your network administrator.
Message Meaning What to Do
C5650n/C5650dn User’s GuideDisplay Panel Messages • 111

PRESS ONLINE SWINVALID DATA
The printer has received invalid data.
Press ON-LINE. Reprocess and resend the print job.
REPLACE TONERnnn: * TONER EMPTY
The indicated toner needs replacement.
Replace the indicated toner: 410: Y = Yellow411 M = Magenta412: C = Cyan413: K = Black
REPLACE yyyynnn: yyyy LIFE
The indicated component is nearing end of life and should be replaced.
Replace the indicated component: YYYY = Fuser, Belt, C Drum, Y Drum, M Drum, K Drum.
tttt EMPTY Appears on the second line of the display to indicate that ttt tray has run out of media.
Load media in tray tttt.
xxx LIFE Appears on the second line of the display to indicate that consumable xxx (e.g., belt, fuser, image drum) will need to be replaced soon.
Replace the indicated item.
YYYYnnn: FATAL ERROR
An error has occurred which requires service. YYYY = the general cause. nnn = error number.
Try turning off the printer then turning it back on. If this does not remedy the problem, write down the message including the error number “nnn,” then call your authorized Oki Data Service Dealer for service.Note: If you see a series of octets containing letters and numbers scrolling across the display, be sure to write these down also and report them to the Service Dealer.
Message Meaning What to Do
C5650n/C5650dn User’s GuideDisplay Panel Messages • 112

Print Quality Problems ______________
Blurred print (letter edges)
Blurred print (one side of page)
Fading, in patches
Possible cause Remedy
LED is dirty. Clean LED with lens cleaner or soft tissue.
Cannot print desired color because toner is low.
Replace toner cartridge. See “Replace a Toner Cartridge” on page 54.
Possible cause Remedy
Top cover is not properly closed.
Press the cover release latch and open, then close, the cover.
One or more of the toner cartridges is not seated properly.
Open the top cover and check to be sure that each toner cartridge is fully seated and that each toner cartridge lock lever is pushed all the way back.
Possible cause Remedy
The paper is moist. Store paper within specified temperature and humidity levels. See “Specifications” on page 106.
C5650n/C5650dn User’s GuidePrint Quality Problems • 113

Fading, Vertically
Light Print
Possible cause Remedy
LED head is dirty. Clean LED head with lens cleaner or soft tissue.
Toner is low. Change toner cartridge.
Paper is unsuitable for printer.
Use recommended paper.
Possible cause Remedy
The toner cartridge is incorrectly installed.
Reinstall the toner cartridge. See “Replace a Toner Cartridge” on page 54.
Toner is low. Change toner cartridge. See “Replace a Toner Cartridge” on page 54.
The paper is moist. Store paper within specified temperature and humidity levels. See “Specifications” on page 106.
Paper is unsuitable for printer.
Use recommended paper. See “Paper (Print Media)” on page 13.
C5650n/C5650dn User’s GuidePrint Quality Problems • 114

Lines, Black (Vertical)
Lines, White (Vertical)
Possible cause
Remedy
Image drum is damaged.
Replace image drum. See “Replace an Image Drum” on page 62.
Toner is low. Change toner cartridge. See “Replace a Toner Cartridge” on page 54.
Periodic black lateral lines or spots.
If the lines or spots occur at intervals of approximately
44 to 94 mm The green surface of the image drum is damaged or dirty. If damaged, replace the image drum cartridge. See “Replace an Image Drum” on page 62. If dirty, wipe the image drum gently with soft tissue. If this does not work, replace the image drum. See “Replace an Image Drum” on page 62.
113 mm The fuser roller is damaged. Change the fuser. See “Replace the Fuser” on page 71.
The image drum has been exposed to light.
Remove the image drum from the printer and store it in a dark place for several hours. If this does not work, replace the image drum. See “Replace an Image Drum” on page 62.
Remedy
Clean LED head with lens cleaner or soft tissue.
Change toner cartridge.
Change image drum.
C5650n/C5650dn User’s GuidePrint Quality Problems • 115

Shading on unprinted sections
Toner rubs off when you rub the printed surface.
Possible cause Remedy
Paper has been affected by static electricity.
Store paper within specified temperature and humidity levels. See “Specifications” on page 106.
Paper is too thick. Use recommended paper. See “Paper Weights” on page 14.
Toner is low. Replace toner cartridge. See “Replace a Toner Cartridge” on page 54.
Possible cause Remedy
Media Weight and Media Type settings may not be appropriate.
Set the value of media weight in the menu to the next heaviest one (MEDIA MENU → YYY MEDIA WEIGHT).
Packing materials were left on the fuser when it was installed.
Careful! Fuser my be HOT!Open the top cover and check to be sure that all the packing materials were removed from the fuser. See “Replace the Fuser” on page 71.
C5650n/C5650dn User’s GuidePrint Quality Problems • 116

Paper Jams _______________________
General InformationJams can occur due to paper misfeeding from a paper tray or at any point along the paper path.
When a jam occurs, the printer immediately stops. The control panel displays an error message. This message tells you where the first sheet is jammed.
All jammed sheets must be removed in order to restore the printer to normal operation.
Once you clear a jam and close the cover, you may see a new jam message indicating another jammed sheet which must be cleared. This is especially likely if you are printing a multi-page document or multiple copies of a single document.
Once all jams have been cleared, the printer should automatically try to reprint any pages lost due to paper jams. If it doesn’t, check the Jam Recovery setting in the System Configuration Menu. It must be set to ON. See “Changing Settings” on page 83.
• If paper jams are frequent: see page 118
• Jam is cleared, but printer does not print: see page 118
• Jam 370: see page 119
• Jam 371: see page 121
• Jam 372: see page 124
• Jam 373: see page 119
• Jam 380: see page 124
• Jam 381: see page 126
• Jam 382: see page 131
• Jam 383: see page 119
• Jam 390: see page 135
• Jam 391: see page 137
• Jam 392: see page 137
C5650n/C5650dn User’s GuidePaper Jams • 117

If paper jams are frequent• More than one sheet feeds at a time.
• Paper curls.
• Paper feeds at an angle.
Jam is cleared, but printer does not print.
Possible cause Remedy
The printer is not horizontal.
Place the printer on a stable, level surface.
The paper is too thin. Use the correct type of paper. See “Paper Weights” on page 14.
The paper is moist or affected by static.
Store paper within specified temperature and humidity levels. See “Specifications” on page 106.
The paper is creased or wrinkled.
Remove the creased / wrinkled paper from the feed tray.
The paper is not aligned correctly.
Adjust tray or manual feed guides.
Paper doesn’t feed. Correct paper feed selection in the Properties Setup tab in the printer driver.
Possible cause Remedy
The top cover has not remained open until all paper jams have been cleared.
Removing a paper jam is not sufficient:Raise and gently lower the top cover, especially if the paper jam has been removed from behind the front cover.
C5650n/C5650dn User’s GuidePaper Jams • 118

Jam 370, 373 and 383
OPEN DUPLEX COVERnnn: PAPER JAM
nnn = 370, 373, 383
1. Press the duplex cover release. Open the duplexer cover. c53_54_duplex1.jpg
2. Remove any jammed sheets. c53_65a_jamduplex1.jpg
C5650n/C5650dn User’s GuidePaper Jams • 119

c53_99a_jam37x.jpg
c53_88a_jam.jpg
3. Close the duplex unit cover. c53_95a_duplexjam.jpg
C5650n/C5650dn User’s GuidePaper Jams • 120

Jam 371
OPEN DUPLEX COVER371: Paper Jam
1. Turn off the printer.2. Pull out the duplexer. c53_96_jam371a.jpg
3. Pull the duplexer lid to unlock it. c53_97_jam371b.jpg
C5650n/C5650dn User’s GuidePaper Jams • 121

4. Open the lid. Remove the jammed sheet. c53_98_jam371c.jpg
5. Close the lid. Push it back to lock it in place. c53_97_jam371b.jpg
C5650n/C5650dn User’s GuidePaper Jams • 122

6. Push the duplexer back into the printer. c53_96_jam371a.jpg
7. Turn on the printer.
C5650n/C5650dn User’s GuidePaper Jams • 123

Jam 372 and 380
OPEN FRONT COVERnnn: PAPER JAM
nnn = 372 or 380.
1. Lift the front cover release. Pull open the front cover. c53_58_frcvropen.jpg
2. Remove any jammed sheets. c53_66_jamfront.jpg
C5650n/C5650dn User’s GuidePaper Jams • 124

3. Close the front cover. c53_57_frcvrclose.jpg
C5650n/C5650dn User’s GuidePaper Jams • 125

Jam 381
OPEN TOP COVER381: Paper Jam
1. Press the cover release. Fully open the printer’s top cover.
c53_02_opencvr.jpg
2. Note the positions of the four image drums: Cyan (1), Magenta (2), Yellow (3), Black (4). It is essential that they go back in the correct order!
c53_09_lidup.jpg
C5650n/C5650dn User’s GuidePaper Jams • 126

3. Lift each of the image drum/toner cartridge units out of the printer. Place them on a flat surface in a safe place away from direct sources of heat and light.
c53_53_drumremove.jpg
WARNING!If the printer has been powered on, the fuser is hot. This area is clearly labelled. Do not touch it.
C5650n/C5650dn User’s GuidePaper Jams • 127

4. Remove any sheets of paper on the belt unit. c53_63_jambelt1.jpg
CAUTION!The green surface at the base of each image drum is very delicate and light sensitive.• Do not touch the green surface.• Never expose the drum to direct sunlight or to
very bright room lighting.• Do not expose it to normal room light for more
than 5 minutes.• If the image drum must be out of the printer for
longer than 5 minutes, place the image drum inside a black plastic bag or carefully place it in a drawer or cabinet to keep it away from light.
CAUTION!Do not use any sharp or abrasive objects to separate sheets from the belt. This may damage the belt surface.
C5650n/C5650dn User’s GuidePaper Jams • 128

NOTEWarning! If the printer has been printing, the fuser will be HOT!
If the sheet is well advanced into the fuser (only a short length is still visible), do not attempt to pull it back. See step 4 under “Jam 382” .
To remove a sheet trapped in the fuser:1. Grasp the edge of the sheet.2. Push the fuser pressure release lever (1)
towards the front and down. 3. Lift out the sheet. 4. Let go of the fuser pressure release lever. c53_64_jambelt2.jpg
C5650n/C5650dn User’s GuidePaper Jams • 129

5. Place the four image drums/toner cartridges back in the printer. Be sure to place them in the proper sequence (1 = Cyan, 2 = Magenta, 3 = Yellow, 4 = Black).
c53_09_lidup.jpg
6. Close the top cover. c53_45_latchcvr.jpg
C5650n/C5650dn User’s GuidePaper Jams • 130

Jam 382
OPEN TOP COVER382: Paper Jam
1. Open the top cover. c53_02_opencvr.jpg
2. Gently pull the sheet out.• If the sheet does not come out easily, go to the next
step.
• If the sheet does come out, close the cover.
c53_68_jamtop_crop.jpg
C5650n/C5650dn User’s GuidePaper Jams • 131

3. Lower the rear exit tray. c53_70a_rear1.jpg
4. Pull out the jammed sheet. c53_67a_jamrear.jpg
C5650n/C5650dn User’s GuidePaper Jams • 132

5. Close the rear exit. c53_70a_rear1.jpg
Important!WARNING! The fuser may be HOT! If the sheet is difficult to remove, it is partially jammed in the fuser. To get it out, reach around the top cover and press down on the fuser pressure release lever (1) before pulling the sheet out. Then let go of the fuser pressure release lever.
c53_91_jam382_3.jpg
C5650n/C5650dn User’s GuidePaper Jams • 133

6. Close the top cover. c53_45_latchcvr.jpg
C5650n/C5650dn User’s GuidePaper Jams • 134

Jam 390
CHECK MP TRAY390: Paper Jam
Sheet has just entered the printer1. Gently pull the sheet out of the printer. c53_81_jammptray.jpg
Sheet can’t easily be pulled out from the front1. Lift the front cover release. Pull open the front cover. c53_102_jam390.jpg
C5650n/C5650dn User’s GuidePaper Jams • 135

2. Remove any jammed sheets. c53_94_jam390.jpg
3. Close the front cover. c53_102_jam390.jpg
C5650n/C5650dn User’s GuidePaper Jams • 136

Jam 391 and 392
OPEN FRONT COVERnnn: PAPER JAM
nnn = 391 or 392
1. Pull out the appropriate tray.391 = Tray 1
392 = Optional Tray 2.
2. Remove any sheet jammed as it exited the tray. c53_101a_jam392.jpg, c53_100a_jam391.jpg
392391
C5650n/C5650dn User’s GuidePaper Jams • 137

3. Open the front cover. c53_58_frcvropen.jpg
4. Remove any jammed sheets. c53_66_jamfront_crop.jpg
5. Close the front cover. c53_57a_frcvrclose.jpg
C5650n/C5650dn User’s GuidePaper Jams • 138

USB Problems _____________________
Cannot configure for USB connection
Possible cause Remedy
USB cable does not meet specifications.
Use USB cable to specification Ver.2.0.
Interface is disabled. Check that USB interface is set to Enable in the menu (USB MENU → USB → ENABLE).
Configuration procedure was not correctly followed or cancelled.
Configure again from the beginning.
USB cable is disconnected or faulty.
Reconnect or try another cable.
A USB hub is being used. The printer cannot be used with a USB hub. Connect the printer and computer directly.
The USB cable is installed in the Ethernet port.
Make sure the USB cable is plugged into the black USB port (1) on the printer:
c52_usb_2_crop.jpg
C5650n/C5650dn User’s GuideUSB Problems • 139

Cannot print• PRNUSBx write error is displayed.
Possible cause Remedy
Interface is disabled. In the printer menu settings, enable the USB interface (USB MENU → USB → ENABLE).
Printer is switched OFF.
Turn on the printer.
Printer interface cable is disconnected.
Reconnect the printer interface cable.
A converter, buffer, extension cable or USB hub is being used.
Test by connecting the printer and computer directly.
Printer driver output port is incorrect.
Set correct output port to which the printer interface cable is connected.
Printer is not selected in the printer driver.
Select the printer or set to default printer.
Incorrect printer driver is being used.
Delete this printer driver and install correct printer driver from the CD supplied with your printer.
C5650n/C5650dn User’s GuideUSB Problems • 140

Application error___________________or
General Protection Fault_____________
Possible cause Remedy
Application is not suitable for the operating system.
Upgrade the application.
Memory is insufficient for number of applications running.
Close all other applications.
Print file is corrupted.
Correct or recreate the file.
Memory is insufficient for application.
Increase computer’s memory.
Printer driver is incorrectly configured.
Correctly configure printer driver.
C5650n/C5650dn User’s GuideApplication error • 141

Paper Size Change Request __________
Printer does not go online ___________
Printer makes a strange noise ________
Possible cause Remedy
Paper loaded in tray is different size from that formatted in software application.
Either change paper in tray to match size formatted in application and press ON-LINE to continue, or continue printing on existing paper by pressing ON-LINE.
Possible cause Remedy
Bad connection Switch off the printer and disconnect the power cable. Reconnect the power cable and switch the printer on. If this does not clear the fault, call for service.
Possible cause Remedy
The printer is not horizontal.
Place the printer on a stable, level surface.
There are scraps of paper or other foreign matter inside the printer.
Check the inside of the printer and remove any such objects.
The top cover is not firmly shut.
Press the left and right sides of the top cover.
C5650n/C5650dn User’s GuidePaper Size Change Request • 142

Printer takes a long time to start printing
Printing cancels ___________________
Possible cause Remedy
The printer has to warm up returning from power save mode.
In the printer menu settings, set power save to a higher value to increase the length of time before entering power save mode (SYS CONFIG MENU → POW SAVE TIME).
The image drum carries out a cleaning process to ensure print quality, which takes time.
Wait until this process has been completed.
The fuser unit adjusts temperature, which takes time.
Wait until this process has been completed.
The printer is processing data from another interface.
Wait until this data is processed.
Possible cause Remedy
The printer interface cable is faulty.
Replace the printer interface cable.
The time out setting is too short.
Reset time out in the menu to a higher value (SYS CONFIG MENU → WAIT TIMEOUT).
C5650n/C5650dn User’s GuidePrinter takes a long time to start printing • 143

Printing does not start ______________
Printing is slow____________________
Possible cause Remedy
Printer error Check the control panel. If an error message is displayed, correct the problem.
Possible cause Remedy
Print processing is carried out by the computer.
Use a computer with a faster processor.
Print resolution is set high.
Set lower print resolution in the printer driver Job Options tab.
Data is too complex.
Simplify data.
C5650n/C5650dn User’s GuidePrinting does not start • 144

C5650n/C5650dn User’s GuideCleaning • 145
Cleaning _________________________
Cleaning Page
Macintosh
OS 10.3 and laterUse this to generate a cleaning page which runs through the printer before the job is printed. This should eliminate any fading, streaking or erratic marks from the printed pages.
1. Open the file you want to print.2. Click File → Print.3. Open the drop-down list below Presets. Select Printer
Option.4. Select “Run maintenance cycle before printing”.
If the box has a check mark, the feature is ON.
If the box is empty, the feature is OFF.
5. Change any other settings as desired.6. Click Print.

Printer Drivers
General Information________________
See your printed Setup Guide for information on installing the driver supplied with your printer.
You can also go to http://my.okidata.com to see/download a copy of the Setup Guide or for the latest information on printer drivers.
For more information about working with your printer driver, refer to the appropriate operating system.
• “Macintosh” see page 147
Summary
Presets
Scheduler
Paper Handling
NOTEMost applications allow the printer properties to be accessed from within the document print dialog box.Application settings override driver settings.Driver settings override printer menu settings.
C5650n/C5650dn User’s GuidePrinter Drivers • 146

Macintosh ________________________
General InformationSummary
Macintosh OS 10.3 and later
The “Summary” lists all the printer settings currently made for your print job. See “Summary” on page 148.
Presets
Macintosh OS 10.3 and later
“Presets” allow you to save a group of settings which you use for many documents, or to change the settings designated as the Standard Preset. See “Presets” on page 148.
Scheduler
“Scheduler” allows you to schedule when your job will print and its priority relative to other jobs in the print queue. See “Scheduler” on page 149.
Paper Handling
“Paper Handling” allows you to determine how the pages in your print job will print. Choices are: Reverse page order, All Pages, Odd numbered pages, or Even numbered pages.
Select “Reverse page order” to print the last page of the document first. This is useful when you are printing to the straight-through, rear (face up) exit required for heavy paper, labels, envelopes and transparencies.
See “Paper Handling” on page 150.
C5650n/C5650dn User’s GuidePrinter Drivers • 147

Summary
Macintosh OS 10.3 and laterThe “Summary” lists all the printer settings currently made for your print job.
1. Open the file you want to print.2. Click File → Print.3. Open the drop-down list below Presets. Select
Summary.
Presets
Macintosh OS 10.3 and later
Use / Save PresetsPresets allow you to save a group of settings which you use for many documents, or to change the settings designated as the Standard Preset.
For example, if you are using Job Accounting, you can enter your User Name and Job Account ID on the Job Accounting screen, then save the setting as part of the Standard Preset.
Create a New Preset1. Make all the printer settings you wish to save as a Preset.2. Select Summary. Review the settings to make sure you
have all the settings you want to save.3. Open the Presets drop-down list. Select Save As ….4. Type in a name under which to save your settings. Click
OK.5. The new Preset appears in the drop-down list.
Change an Existing Preset1. Make sure the Preset you wish to change is selected in
the Preset box.2. Make any needed changes in the printer settings.3. Review the Summary screen to confirm that the settings
are what you want.4. Open the drop-down list. Select Save.
The revised settings are saved under that Preset.
C5650n/C5650dn User’s GuidePrinter Drivers • 148

Delete a Preset
1. Make sure the Preset you wish to change is selected in the Preset box.
2. Open the drop-down list. Select Delete.The Preset is deleted from the list.
Scheduler1. Open the file you want to print.2. Click File → Print.3. Open the drop-down list below Presets. Select
Scheduler.4. At Print Document, set the schedule for when your job
prints.Now (the default).
At [a specific time you specify in one minute increments]
On Hold [until you come back and select Now]
5. At Priority, select the urgency of your print job.If your job competes with other documents in the print queue, this setting determines the printing priority of your job.
CAUTION!When you click Delete, the Preset is instantly deleted without prompting you to confirm the deletion.
C5650n/C5650dn User’s GuidePrinter Drivers • 149

Paper Handling1. Open the file you want to print.2. Click File → Print.3. Open the drop-down list below Presets. Select Paper
Handling.Reverse page order
Select this to print the last page of the document first. This is useful when you are printing to the straight-through, rear (face up) exit required for heavy paper, labels, envelopes and transparencies.
All Pages
Odd numbered pages
Even numbered pages
Use this to print only the odd or only the even pages in your document.
C5650n/C5650dn User’s GuidePrinter Drivers • 150

C5650n/C5650dn User’s GuidePrinter Features • 151
Printer Features
Overview ________________________Banners: see page 152
Black Printing: see page 154
Booklets: see page 159
Collating: see page 162
Color Matching: see page 165
Custom Page Size: see page 194
Duplex Printing: see page 197
Grayscale: see page 203
N Up (multiple pages on one sheet): see page 204
Photographs: see page 207
Posters: see page 210
Print Resolution: see page 211
Save as File: see page 215
Toner Saving: see page 216
Watermarks: see page 220

Banners _________________________
General InformationA banner is a document printed on an exta-long sheet of paper.
To print a banner, you must:
• use an application that supports banners
Notes:
Word does not support banners. Word limits page length to 22 inches (558.8 mm).
Power Point does support banners.
• define a custom page size for your banner
See “Custom Page Sizes” on page 194.
• use the Multi Purpose Tray and the Face Up (Rear) Exit
See
Multi-Purpose Tray (MP Tray) [Manual Feed], on page 38
Face Up (Rear Exit), on page 41
Specifications• Length: up to 47'' (1.2 m)
• Width Range = 8¼ to 8½'' (210 to 215.9 mm)
• Weight Range = 28 to 34 lb. US Bond (105 to 128 g/m2)
• Path = Rear Exit (Face Up Stacker) only
• Feed one sheet at a time.
C5650n/C5650dn User’s GuideBanners • 152

Windows For important information about printing banners, see General Information, on page 152.
Macintosh
OS 10.3 and laterFor important information about printing banners, see General Information, on page 152.
Before you print a banner, you must set Multi Purpose Tray is Manual feed to ON in the printer driver. The default is OFF.
The printer operator panel will prompt you to load the media before the job prints.
1. Open the file you want to print.2. Click File → Print.3. Open the drop-down list below Presets. Select Printer
Option.4. Select “Multi Purpose Tray is Manual feed”.
If the box has a check mark, the feature is ON.
If the box is empty, the feature is OFF.
5. Change any other settings as desired.6. Click Print.
C5650n/C5650dn User’s GuideBanners • 153

Black Printing _____________________
General InformationYour printer prints the color black in one of two ways:
• Composite Black
• True Black
Composite BlackThe cyan, magenta, yellow, and black toners are combined to create composite black.
Use composite black when printing photographs.
Composite Black can appear as a brownish-black.
True BlackOnly black toner is used to print true black.
Use True Black when printing a combination of text and graphics.
If you use True Black to print photographs, dark sections of the photos may appear black.
C5650n/C5650dn User’s GuideBlack Printing • 154

Windows
True BlackNormally, the printer prints black using all four toner colors (Composite Black).
If you do a lot of black-only printing, set the printer to use only black toner (True Black).
Individual Print Jobs
1. When you print a job, click on the driver’s Color tab2. Click in the box next to Grayscale.
If the box has a check mark, the feature is ON.
If the box is empty, the feature is OFF.
All Print Jobs (Default)
1. Click Start → Settings → Printers [Printers and Faxes in Windows XP].
2. Right-click the printer name.Windows Vista/2000/XP: select Properties. Click Printing Preferences.
3. On the Color tab, click Grayscale. If the box has a check mark, the feature is ON.
If the box is empty, the feature is OFF.
4. Click OK twice.
NOTEOnce Grayscale is set as the default, you must select either Auto Color or Manual Color on the Color tab when you print color documents.See “List of Color Matching Methods” on page 182.
C5650n/C5650dn User’s GuideBlack Printing • 155

Windows
Black Finish
Individual Print Jobs
1. Open the file you want to print.2. Click File → Print.3. Click on the Color tab.4. At Advanced Color, make your selection.
If the box has a check mark, the feature is ON.
If the box is empty, the feature is OFF.
5. Below Black Finish, make your selection.Choices are Auto, Gloss, and Matte.
Gloss
This option produces printing with a more glossy finish.
Matte
This option uses more Black and less CMYK while producing a flatter black.
6. Change any other settings as desired.7. Click Print.8. The document prints.
All Print Jobs (Default)
1. Click Start → Settings → Printers [Printers and Faxes in Windows XP].
2. Right-click the printer name.3. Next
Windows 2000/XP: Select Properties. Click Printing Preferences.
NOTEThe driver’s color options are only designed to work with RGB data.
C5650n/C5650dn User’s GuideBlack Printing • 156

4. Click on the Color tab.5. At Advanced Color, make your selection.
If the box has a check mark, the feature is ON.
If the box is empty, the feature is OFF.
6. Below Black Finish, make your selection.Choices are Auto, Gloss, and Matte.
Gloss
This option produces printing with a more glossy finish.
Matte
This option uses more Black and less CMYK while producing a flatter black.
7. Change any other settings as desired.8. Click Print.9. The document prints.
C5650n/C5650dn User’s GuideBlack Printing • 157

Macintosh
OS 10.3 and later
True Black
1. Open the file you want to print.2. Click File → Print.3. Open the drop-down list below Presets. Select Printer
Option.4. At “Always create 100% Black(K) Toner”, make your
selection.If the box has a check mark, the feature is ON.
If the box is empty, the feature is OFF.
5. Change any other settings as desired.6. Click Print.
Macintosh
OS 10.3 and later
Black Finish
1. Open the file you want to print.2. Click File → Print.3. Open the drop-down list below Presets. Select Color.4. Under Color Mode, select Advanced Color.5. Choose the type of black finish.
Gloss
This option produces printing with a more glossy finish.
Matte
This option uses more Black and less CMYK while producing a flatter black.
6. Change any other settings as desired.7. Click Print.
C5650n/C5650dn User’s GuideBlack Printing • 158

Booklets (Binding Print)_____________
General Information F3_05.jpg
Booklet printing allows you to print a document like a brochure or greeting card.
Both the duplex unit and additional memory must be installed and enabled in the driver before using booklet printing.
Some applications do not support booklet printing.
Please read the Notes (below).
C5650n/C5650dn User’s GuideBooklets (Binding Print) • 159

NOTESBoth the duplex unit and additional memory must be installed and enabled in the driver before using booklet printing.Not available on some network connections: see the Help file.Some software applications may not support booklet printing.The right-to-left setting allows a booklet to be printed for right to left reading, which is used in some languages.
Booklet printing is restricted to four (4) pages per sheet [two (2) pages per side].Examples:• print a 5½ x 8½ inch booklet on 8½ x 11 inch
paper • print an 8½ x 11 inch booklet on 11 x 17 inch
paper
Most applications allow the printer properties to be accessed from within the document print dialog box.Application settings override driver settings.Driver settings override printer menu settings.
C5650n/C5650dn User’s GuideBooklets (Binding Print) • 160

Windows
1. Open the file you want to print.2. Click File → Print.3. In the Print dialog box, select your printer.4. Next:
Windows Vista/XP: click Properties.
Windows 2000: go to the next step.
5. On the Setup tab, under Finishing Mode, in the drop-down list, select Booklets.
6. Click Options. Enter your settings. Click OK.7. Next:
Windows Vista/XP: click OK.
Windows 2000: go to the next step.
8. Next:Windows Vista/XP: click Print.
Windows 2000: click Print.
NOTESYou must have the duplex unit enabled in order to print booklets.Not available on some network connections: see the Help file.Some software applications may not support booklet printing.The right-to-left setting allows a booklet to be printed for right to left reading, which is used in some languages.Most applications allow the printer properties to be accessed from within the document print dialog box.Application settings override driver settings.Driver settings override printer menu settings.
C5650n/C5650dn User’s GuideBooklets (Binding Print) • 161

Collating _________________________
General Information
F3_07.jpg
Collating is printing multiple copies of a multi-page job where each copy has the pages arranged in the correct order.
If you print multiple copies of a multi-page job and DO NOT specify collating, all of the copies of the first page print before the copies of the subsequent page(s) print.
ImportantIf your software application has a collate option, use it instead of the collate option in the printer driver. This prevents any conflicts between the software application and the printer driver.
NOTEMost applications allow the printer properties to be accessed from within the document print dialog box.Application settings override driver settings.Driver settings override printer menu settings.
C5650n/C5650dn User’s GuideCollating • 162

Windows
1. Open the file you want to print.2. Click File → Print.3. In the Print dialog box, select your printer.4. Next:
Windows XP: click Properties.
Windows 2000: go to the next step.
5. On the Job Options tab, under Job Type, enter the number of copies required. Select Collate.
6. Next:Windows Vista/XP: click OK.
Windows 2000: go to the next step.
7. Next:Windows XP/2000: click Print.
ImportantIf your software application has a collate option, use it instead of the collate option in the printer driver. This prevents any conflicts between the software application and the printer driver.
NOTEMost applications allow the printer properties to be accessed from within the document print dialog box.Application settings override driver settings.Driver settings override printer menu settings.
C5650n/C5650dn User’s GuideCollating • 163

Macintosh
OS 10.3 and later1. Open the file you want to print.2. Click File → Print.3. Open the drop-down list below Presets. Select Copies &
Pages. 4. At Collated, make your selection.
If the box has a check mark, the feature is ON.
If the box is empty, the feature is OFF.
5. Change any other settings as desired.6. Click Print
C5650n/C5650dn User’s GuideCollating • 164

C5650n/C5650dn User’s GuideColor Matching • 165
Color Matching ____________________
Overview
Color reproduction is a complex topic.
This topic is divided into two sections:
• background information
The background information explains the factors that affect color matching.
See page 166.
• how-to information
The how-to information explains how to perform color matching with your printer.
See page 182.
NOTEMost applications allow the printer properties to be accessed from within the document print dialog box.Application settings override driver settings.Driver settings override printer menu settings.

Color Matching ____________________
Background Information
Color reproduction is a complex topic.
This background information explains the factors that affect color matching.
Background information is divided into these sections:
1. Factors that Affect Color Printing: see page 1672. Choosing a Color Matching Method: see page 1733. Printing Vivid Colors: see page 1784. Color Settings: see page 1795. Hue, Brightness, and Saturation: see page 180
NOTEMost applications allow the printer properties to be accessed from within the document print dialog box.Application settings override driver settings.Driver settings override printer menu settings.
C5650n/C5650dn User’s GuideColor Matching • 166

Color Matching
Factors that Affect Color PrintingThere are many factors that affect color printing.
Some of the most important factors are:
• the differences between the range of colors a monitor can reproduce versus the range of colors that a printer can reproduce. See page 168.
• monitor settings. See page 169.
• color settings in your software application. See page 170.
• how your software application displays colo.r See page 170.
• color settings in your printer driver. See page 171.
• viewing (lighting) conditions. See page 172.
• paper type. See page 172.
C5650n/C5650dn User’s GuideColor Matching • 167

Color Matching
Factors that Affect Color Printing
Monitor Colors vs. Printer Colors
(Differences between the range of colors a monitor or printer can reproduce)
Neither a printer nor a monitor can reproduce the full range of colors seen by the human eye.
Each device is limited to a certain range of colors.
• A printer cannot reproduce all of the colors displayed on a monitor.
• A monitor cannot reproduce all of the colors printed by a printer.
Both devices use very different technologies to represent color.
• A monitor uses Red, Green and Blue (RGB) phosphors (or LCDs).
• A printer uses Cyan, Yellow, Magenta and Black (CMYK) toner or ink.
Very vivid colors (such as intense reds and blues) can be displayed on a monitor. These same colors cannot be easily produced on any printer using toner or ink.
There are certain colors (for example, some yellows), that can be printed, but cannot be displayed accurately on a monitor.
These differences between monitor colors and printer colors are the main reasons why printed colors do not always match the colors displayed on screen.
C5650n/C5650dn User’s GuideColor Matching • 168

Color Matching
Factors that Affect Color Printing
Monitor Settings
The brightness and contrast controls on your monitor can change how your document looks on-screen.
Your monitor color temperature also influences how "warm" or "cool" the colors look.
There are several settings found on a typical monitor:
5000k * or D50
Warmest; yellowish lighting.
Typically used in graphics arts environments.
6500k * or D65
Cooler
Approximates daylight conditions.
9300k *
Cool
The default setting for many monitors and television sets.
*k = degrees Kelvin, a measurement of temperature
Macintosh
You can calibrate your monitor’s color regimen in System Preferences → Displays → Color.
NOTESeveral of the Color Matching options make reference to your monitor’s Color Temperature. Many monitors allow you to adjust the color temperature through their control panels.
C5650n/C5650dn User’s GuideColor Matching • 169

Color Matching
Factors that Affect Color Printing
Software Settings
Many software applications have their own color settings.
The application settings may override the settings in the printer driver.
Please refer to the documentation for your software application for details on how that particular program’s color management functions.
How the application displays color
Some graphics applications such as CorelDRAW®, Adobe® Photoshop®, or Macromedia Freehand® may display color differently from "office" applications such as Microsoft® Word.
For more information, please see your application’s online help or user manual.
C5650n/C5650dn User’s GuideColor Matching • 170

Color Matching
Factors that Affect Color Printing
Printer Driver Settings
The color settings in your printer driver can change the appearance of a document.
There are several options available to help match the printed colors with those displayed on screen.
See “How To” on page 182.
For Windows
The printer drivers supplied with your printer provide several controls for changing the color output.
The default driver settings produce good results for most documents.
For Macintosh
The install utility provides
• a color matching profile for your printer
and
• a Color Option utility in the print driver.
The Auto settings produce good results for most documents.
See “Auto Color” on page 183.
C5650n/C5650dn User’s GuideColor Matching • 171

Color Matching
Factors that Affect Color Printing
Lighting (Viewing) Conditions
A document can look very different under various lighting conditions.
For example, the colors may look different when viewed standing next to a sunlit window compared to how they look under standard office fluorescent lighting.
Paper Type
The type of paper used can also significantly affect the printed color.
For example, a printout on recycled paper can look duller than one on specially formulated glossy paper.
C5650n/C5650dn User’s GuideColor Matching • 172

Color Matching
Choosing a Color Matching Method
General Information
There is no one way to achieve a good match between the document displayed on your monitor, and its printed equivalent.
There are many factors involved in achieving accurate and reproducible color.
However, the following guidelines may help in achieving good color output from your printer.
There are several suggested methods. The method you choose is determined by the type of document you are printing.
• most common [RGB]. See page 175.
• professional desktop publishing and graphics [CMYK]. See page 175.
• photographic images. See page 176.
• specific colors (i.e., a company logo). See page 177.
• printing vivid colors. See page 178.
NOTEThese suggestions are for guidance only. Your results may vary depending on the application from which you are printing. Some applications override, without warning, any color matching settings in the printer driver.
C5650n/C5650dn User’s GuideColor Matching • 173

Color Matching
Choosing a Color Matching MethodYour choices are:
Auto Color
Advanced Color
Grayscale
Auto Color
Your printer automatically uses the best method to match color, depending on the type of document you are printing.
See “Auto Color” on page 183.
Advanced Color
Advanced Color allows you to customize the color matching settings you use.
Color matching is a complex topic. Use Advanced Color only if you are comfortable with color matching concepts!
See “Advanced Color” on page 185.
Grayscale
This option prints all documents as monochrome.
No color prints.
The printer interprets all colors as a variation of grays.
See “Grayscale” on page 187.
C5650n/C5650dn User’s GuideColor Matching • 174

Color Matching
Choosing a Color Matching Method
RGB or CMYK?
The guidelines for choosing a color matching method make distinctions between RGB and CMYK.
RGB = Red, Green, Blue
and
CMYK = Cyan, Magenta, Yellow, Black.
Most documents you print are in RGB format. This is the most common method. If you do not know your document’s color mode, assume that it is RGB.
CMYK documents are typically only supported in professional Desktop Publishing and Graphics applications.
Windows and Macintosh 10.3 and later
The driver and Color Swatch Utility supplied with your printer support only RBG. If you wish to use CMYK, you might be able to use the software application’s Soft Proofing feature.
C5650n/C5650dn User’s GuideColor Matching • 175

Color Matching
Choosing a Color Matching Method
Matching Photographs
RGB only
Select a matching method appropriate to your monitor.
Windows
Natural is generally a good choice. Select a matching method appropriate to your monitor.
See “Color Settings” on page 179.
Macintosh
OS 10.3 and later
Natural is a generally a good choice. Select a matching method appropriate to your monitor.
See “Color Settings” on page 179.
RGB or CMYK
If you are printing photographic images from a graphics application such as Adobe Photoshop, you may be able to use Soft-Proofing to simulate the printed image on your monitor.
C5650n/C5650dn User’s GuideColor Matching • 176

Color Matching
Choosing a Color Matching Method
Matching Specific Colors
(Example: Company logo)
RGB only
Windows
• Color Swatch Utility
Use the Color Swatch Utility to print out a chart of RGB swatches. Select your desired RGB values from the swatches. Enter the values in your application's color picker
Macintosh
OS 10.3 and later
• Color Swatch Utility
Use the Color Swatch Utility to print out a chart of RGB swatches. Select your desired RGB values from the swatches. Enter the values in your application's color picker
RGB or CMYK
If you are printing from a graphics application such as Adobe Photoshop, you may be able to use Soft-Proofing to simulate the printed image on your monitor.
C5650n/C5650dn User’s GuideColor Matching • 177

Color Matching
Choosing a Color Matching Method
Printing Vivid Colors
RGB only
Choices are
• Monitor 6500k Vivid
• sRGB
• Digital Camera settings.
Windows
See “Color Settings” on page 179.
Macintosh
OS 10.3 and later
See “Color Settings” on page 179.
RGB or CMYK
Windows
Auto is a generally a good choice.
See “Auto Color” on page 183.
Macintosh
OS 10.3 and later
Auto is a generally a good choice.
See “Auto Color” on page 183.
C5650n/C5650dn User’s GuideColor Matching • 178

Color SettingsThis is a list of all possible options.
The list you see varies according to your computer platform, operating system, color production method, and printer driver type.
You can modify these settings by selecting Advanced Color, then Natural. See “Advanced Color” on page 185.
Monitor (6500k) Auto
The default setting (in Macintosh) that selects the best options for your printer. This selection works best for office situations.
Optimized for printing general documents when using a monitor with a color temperature of 6500K.
Monitor (6500k) Perceptual
This is best choice for printing photographic images.
Optimized for printing photographs when using a monitor with a color temperature of 6500K.
Monitor (6500k) Vivid
Ideal for office graphics and text.
Optimized for printing bright colors when using a monitor with a color temperature of 6500K. Vivid or Digital Camera settings produce brightest colors.
Monitor (9300k)
Optimized for printing photographs when using a monitor with a color temperature of 9300K.
C5650n/C5650dn User’s GuideColor Matching • 179

Digital Camera
Optimized for printing photographs taken with a digital camera. This tends to produce prints with lighter and brighter colors.
For some photographs, other settings may be better depending on the subjects and the conditions under which they were taken. Vivid or Digital Camera settings produce brightest colors.
sRGB
This option attempts to simulate RGB color.
Optimized for matching specific colors, such as a company logo color. The colors within the printer's color gamut are printed without any modification. Only colors that fall outside the printable colors are modified.
Hue, Brightness, and SaturationThere are three main components to color: Hue, Brightness, and Saturation.
Hue
The component that determines the frequency of light or the position in the spectrum or the relative amounts of red, green and blue. Hue corresponds to the common definition of color, e.g. "red", "orange", "violet" etc.
Brightness
The component that determines the total amount of light (white) in the color. Zero brightness is black. 100% Brightness is white. Intermediate values are "light" or "dark" colors.
Windows and Macintosh 10.3
Brightness can be adjusted when using the Advanced Color or Gray Scale color modes (color matching methods).
Advanced Color: see page 185
Gray Scale: see page 187
C5650n/C5650dn User’s GuideColor Matching • 180

Saturation
The degree of saturation of a color is its relative purity, or freedom from, mixture with white.
Windows and Macintosh 10.3
Saturation can be adjusted when using the Advanced Color or Gray Scale color modes (color matching methods).
Advanced Color: see page 185
Gray Scale: see page 187
C5650n/C5650dn User’s GuideColor Matching • 181

Color Matching ____________________
How To
Color reproduction is a complex topic.
This how-to information explains how to perform color matching with your printer.
List of Color Matching MethodsThis is a list of all possible options.
The list you see varies according to your computer platform, operating system, color production method, and printer driver type.
To change these settings in your printer driver, refer to the appropriate section.
• Auto Color: see page 183
• Advanced Color: see page 185
• Grayscale: see page 187
NOTEMost applications allow the printer properties to be accessed from within the document print dialog box.Application settings override driver settings.Driver settings override printer menu settings.
C5650n/C5650dn User’s GuideColor Matching • 182

Auto ColorYour printer automatically uses the best method to match color, depending on the type of document you are printing.
Windows
Individual Print Jobs
1. Open the file you want to print.2. Click File → Print.3. Click on the Color tab.4. At Auto Color, make your selection.
If the box has a check mark, the feature is ON.
If the box is empty, the feature is OFF.
5. Click OK until you return to the Print dialog box.6. Print the document.
All Print Jobs (Default)
1. Click Start → Settings → Printers [Printers and Faxes in Windows XP].
2. Right-click the printer name.3. Next
Windows Vista/2000/XP: select Properties. Click Printing Preferences.
4. Click on the Color tab.5. At Auto Color, make your selection.
If the box has a check mark, the feature is ON.
If the box is empty, the feature is OFF.
6. Click OK until you return to the Print dialog box.7. Print the document.
NOTEThe driver’s color options are only designed to work with RGB data.
C5650n/C5650dn User’s GuideColor Matching • 183

Macintosh
OS 10.3 and later
1. Open the file you want to print.2. Click File → Print.3. Open the drop-down list below Presets. Select Color.4. Below Color Mode, at Auto Color, make your selection.
If the box has a check mark, the feature is ON.
If the box is empty, the feature is OFF.
5. Click Print.6. The document prints.
C5650n/C5650dn User’s GuideColor Matching • 184

Advanced ColorAdvanced Color allows you to customize the color matching settings you use.
Color matching is a complex topic. Use Advanced Color only if you are comfortable with color matching concepts!
Windows
Individual Print Jobs
1. Open the file you want to print.2. Click File → Print.3. Click on the Color tab.4. At Advanced Color, make your selection.
If the box has a check mark, the feature is ON.
If the box is empty, the feature is OFF.
5. Change any other settings as desired.6. Click Print.7. The document prints.
All Print Jobs (Default)
1. Click Start → Settings → Printers [Printers and Faxes in Windows XP].
2. Right-click the printer name.3. Next
Windows Vista/2000/XP: select Properties. Click Printing Preferences.
4. Click on the Color tab.5. At Advanced Color, make your selection.
If the box has a check mark, the feature is ON.
If the box is empty, the feature is OFF.
NOTEThe driver’s color options are only designed to work with RGB data.
C5650n/C5650dn User’s GuideColor Matching • 185

6. Change any other settings as desired.7. Click Print.8. The document prints.
Macintosh
OS 10.3 and later
1. Open the file you want to print.2. Click File → Print.3. Open the drop-down list below Presets. Select Color.4. Below Color Mode, at Advanced Color, make your
selection.If the box has a check mark, the feature is ON.
If the box is empty, the feature is OFF.
5. Change any other settings as desired.6. Click Print.7. The document prints.
C5650n/C5650dn User’s GuideColor Matching • 186

Grayscale This option prints all documents as monochrome.
No color prints.
The printer interprets all colors as a variation of grays.
Windows
Individual Print Jobs
1. Open the file you want to print.2. Click File → Print.3. Click on the Color tab.4. At Grayscale, make your selection.
If the box has a check mark, the feature is ON.
If the box is empty, the feature is OFF.
5. Change any other settings as desired.6. Click Print.7. The document prints.
All Print Jobs (Default)
1. Click Start → Settings → Printers [Printers and Faxes in Windows XP].
2. Right-click the printer name.3. Next
Windows 2000/XP: select Properties. Click Printing Preferences.
4. Click on the Color tab.5. At Grayscale, make your selection.
If the box has a check mark, the feature is ON.
If the box is empty, the feature is OFF.
NOTEThe driver’s color options are only designed to work with RGB data.
C5650n/C5650dn User’s GuideColor Matching • 187

6. Change any other settings as desired.7. Click Print.8. The document prints.
Macintosh
OS 10.3 and later
1. Open the file you want to print.2. Click File → Print.3. Open the drop-down list below Presets. Select Color.4. Below Color Mode, at Gray Scale, make your selection.
If the box has a check mark, the feature is ON.
If the box is empty, the feature is OFF.
5. Change any other settings as desired.6. Click Print.
NOTEOnce Grayscale is set as the default, you must select either Auto Color or Manual Color on the Color tab when you print color documents.See “List of Color Matching Methods” on page 182.
C5650n/C5650dn User’s GuideColor Matching • 188

Color Matching ____________________
Color Synch
Macintosh OS 10.31. To access the print features, open your print driver from
within an application by selecting File → Print.2. Open the drop-down list below Presets. Select Color
Synch.3. At Color Conversion, select Standard.4. At Quartz Filter, make your selection.
Choices are:
None, Black & White, Blue Tone, Gray Tone, Lightness Decrease, Lightness Increase, Reduce File Size, Sepia Tone, and Add Filters.
The following section has examples and explanations of each filter.
NOTETo see the affect of any of these filters on your document, select Add Filters. Click the filter in the list. Click Apply.
C5650n/C5650dn User’s GuideColor Matching • 189

Color Matching ____________________Color Synch
Macintosh OS 10.3
Filters
None
The default. No filters are applied to the document.
C32_Mac_10.3_11a.jpg
Black & White
Converts the document to black and white, with no gray shades.
C32_Mac_10.3_11b.jpg
C5650n/C5650dn User’s GuideColor Matching • 190

Blue Tone
Converts the document to shades of blue.
C32_Mac_10.3_11c.jpg
Gray Tone
Converts the document to shades of gray.
C32_Mac_10.3_11d.jpg
Lightness Decrease (A) / Lightness Increase (B)
Darkens or lightens the document. The middle picture below is with no filters applied.
C32_Mac_10.3_11e.jpg, C32_Mac_10.3_11a.jpg,
C32_Mac_10.3_11f.jpg
C5650n/C5650dn User’s GuideColor Matching • 191

Reduce File Size
This filters the document to reduce its file size.
Sepia Tone
Converts the document to shades of brown.
C32_Mac_10.3_11g.jpg
C5650n/C5650dn User’s GuideColor Matching • 192

Add Filters
Clicking this brings up a Preview screen.
Here you can see the effect produced by selecting any of the standard filters.
To do this, click the name in the Filters box. Then, click Apply.
You can also
• add New filters of your choice
• Delete filters you have added to the list
• set color conversion options such as Rendering Intent (Automatic, Perceptual, Relative, Saturation, Absolute), etc.
C32_Mac_10.3_11.jpg
C5650n/C5650dn User’s GuideColor Matching • 193

Custom Page Sizes _________________
General Information
Using the Printer Driver
Custom page sizes can be printed from Tray 1, Tray 2 or the Multi-Purpose (MP) Tray, one-sided printing only, rear exit only.
Tray 1 and Tray 2 Custom Size Range
• minimum 3.94'' x 5.83'' [100 x 148 mm]
• maximum 8½'' x 14'' [215.9 x 355.6 mm].
MP Tray Custom Size Range
• minimum 3.94'' to 5.83'' [100 x 148 mm]
• maximum 8½'' x 14'' [216 x 356 mm]
• banners from 8¼'' to 8½'' (210 to 215.9 mm) wide by up to 47¼'' (1.2 m) long. Banners must be fed one sheet at a time.
NOTEMost applications allow the printer properties to be accessed from within the document print dialog box.Application settings override driver settings.Driver settings override printer menu settings.
C5650n/C5650dn User’s GuideCustom Page Sizes • 194

Windows
Printing
1. Make sure the rear exit path is open: c53_72_rear3.jpg
2. Load the custom size paper in the tray of your choice.1. Open the file you want to print.2. Click File → Print.3. In the Print dialog box, select your printer.4. Next:
Windows XP/Vista: click Properties.
Windows 2000: go to the next step.
5. On the Setup tab, under Media, in the Size drop-down list, select User Defined Size from the bottom
or select a custom size you have already defined
See “Creating and Saving Custom Page Sizes” on page 196.
NOTEUp to 32 custom page sizes can be defined.
C5650n/C5650dn User’s GuideCustom Page Sizes • 195

Define the custom size in the dialog box which appears. Click OK
6. Under Media, in the Source drop-down list, select the tray you will be using. Click OK.
7. Next:Windows Vista/XP/2000: click Print.
Windows
Creating and Saving Custom Page Sizes1. Click Start → Settings → Printers [Printers and Faxes
for XP].2. Right click the printer icon.3. Next:
Windows Vista/XP/2000: select Properties.
4. Click Printing Preferences.5. On the Setup tab, click Paper Feed Options.6. Click Custom Size.7. For each size, enter a name, width and height. Click
Add.8. When done, click OK.9. Click OK three more times.
NOTEYou may see a Warning dialog box indicating a conflict. If you do, click OK and the driver will automatically make the needed changes to correct for the conflict.
C5650n/C5650dn User’s GuideCustom Page Sizes • 196

Duplex Printing____________________(Printing on Both Sides of the Paper)General Information
• Paper must be loaded print side up.
• Any tray (Tray 1, optional Tray 2, MP tray) can be used for duplex printing.
Paper TypesPaper only
Cannot duplex
labels
envelopes
transparencies
NOTEThe duplex unit must be enabled in the driver before duplex printing can be carried out.
NOTEMost applications allow the printer properties to be accessed from within the document print dialog box.Application settings override driver settings.Driver settings override printer menu settings.
C5650n/C5650dn User’s GuideDuplex Printing • 197

Paper Sizes
Paper Weights20 to 28-lb. US Bond
42 to 58 lb. Index
75 to 105 g/m² metric
Size Inches Millimeters
Letter 8½ x 11 215.9 x 279.4
Legal-14 8½ x 14 215.9 x 355.6
Legal-13.5 8½ x 13.5 215.9 x 342.9
Legal-13 8½ x 13 215.9 x 330.2
Executive 7¼ x 10½ 184.15 x
A4 8.27 x 11.69 210 x 297
A5 5.71 x 8.27 145 x 210
B5 7.17 x 10.12 182 x 257
Custom Minimum 5.8 x 8.25
Maximum 8.5 x 14
Minimum 148 x 210
Maximum 215.9 x 355.6
C5650n/C5650dn User’s GuideDuplex Printing • 198

Duplexing Restrictions
Long Edge vs. Short Edge
Important!You can duplex
• paper
• paper weights up to
28 lb. US Bond 58 lb. Index105 g/m2 metric
You cannot duplex• labels
• envelopes
• transparencies
• paper weights above
28 lb. US Bond58 lb. Index105 g/m2 metric
Long Edge Short Edge
C5650n/C5650dn User’s GuideDuplex Printing • 199

Windows
Individual Print JobsPlease review General Information, on page 197, for important information about duplex printing.
1. Open the file you want to print.2. Click File → Print.3. In the Print dialog box, select your printer.4. Windows Vista/XP/2000: click Properties.5. On the Setup tab, under 2-Sided Printing, make your
selection.Choices are Long Edge or Short Edge.
6. Next:Windows Vista/XP: Click OK.
Windows 2000: go to the next step.
7. Next:Windows XP/2000: click Print.
Long Edge Short Edge
C5650n/C5650dn User’s GuideDuplex Printing • 200

Windows
All Print Jobs (Default)1. Click Start → Settings → Printers [Printers and Faxes
for XP].2. Right click the printer icon.3. Windows Vista/XP/2000: select Properties. 4. Click Printing Preferences.5. Follow steps below. Note that the screen for setting
defaults will have more tabs.6. On the Setup tab, under 2-Sided Printing, make your
selection.Choices are Long Edge or Short Edge.
7. Next:Windows Vista/XP/2000: Click OK twice.
Long Edge Short Edge
C5650n/C5650dn User’s GuideDuplex Printing • 201

Macintosh
OS 10.3 and later1. Open the file you want to print.2. Click File → Print.3. Open the drop-down list below Presets. Select Duplex.4. At Duplex, make your selection.
Choices are: Off, Long-Edge Binding, and Short-Edge Binding.
5. Change any other settings as desired.6. Click Print.
Long Edge Binding Short Edge Binding
C5650n/C5650dn User’s GuideDuplex Printing • 202

C5650n/C5650dn User’s GuideGrayscale • 203
Grayscale ________________________This feature is described in the Color Matching section.
See “Grayscale” on page 187.

N-Up Printing _____________________
Printing Multiple Pages on One Sheet
General InformationN-Up printing allows you to reduce several full-size pages and print them on a single sheet.
NUp.jpg
Windows
1. Open the file you want to print.2. Click File → Print.3. In the Print dialog box, select your printer.4. Next:
Windows Vista/XP: click Properties.
Windows 2000: go to the next step.
NOTEMost applications allow the printer properties to be accessed from within the document print dialog box.Application settings override driver settings.Driver settings override printer menu settings.
C5650n/C5650dn User’s GuideN-Up Printing • 204

5. On the Setup tab, under Finishing Mode (1), select the required number of pages per sheet in the drop-down list.
6. To change additional settings, click Options (2). Settings are:
Pages per Sheet
Use this to print up to 16 pages on one sheet.
Layout Direction
Use this to set the orientation in which multiple pages are printed on the sheet.
Border
When printing multiple pages on one sheet, use this to print a border between the sheets, if desired.
7. Make your selections. Click OK.8. Next:
Windows Vista/XP: Click OK.
Windows 2000: go to the next step.
9. Next:Windows 2000: click Print.
C5650n/C5650dn User’s GuideN-Up Printing • 205

Macintosh
OS 10.3 and later1. Open the file you want to print.2. Click File → Print.3. Open the drop-down list below Presets. Select Layout.4. Make your selections.
Pages per Sheet
Use this to print up to 16 pages on one sheet.
Layout Direction
Use this to set the orientation in which multiple pages are printed on the sheet.
Border
When printing multiple pages on one sheet, use this to print a border between the sheets, if desired.
5. Change any other settings as desired.6. Click Print.
C5650n/C5650dn User’s GuideN-Up Printing • 206

Photographs ______________________For the best quality when printing photographs, select Photo Enhance in the driver.
Windows
All Print Jobs (Default)1. Click Start → Settings → Printers [Printers and Faxes
in Windows XP].2. Right-click the printer name.3. Next
Windows XP/2000: select Properties.
4. Click Printing Preferences.5. Follow the steps below. Note that the screen for setting
defaults will have more tabs.6. On the Job Options tab, select Photo Enhance.7. Change any other settings as desired.8. Next:
Vista/XP: click OK
Windows 2000: go to the next step.
9. Next:Windows XP/2000: click Print.
C5650n/C5650dn User’s GuidePhotographs • 207

Windows
Individual Print Jobs1. Open the file you want to print.2. Click File → Print.3. In the Print dialog box, select your printer.4. Next:
Windows XP: click Properties.
Windows 2000: go to the next step.
5. On the Job Options tab, select Photo Enhance.6. Change any other settings as desired.7. Next:
Vista/XP: click OK
Windows 2000: go to the next step.
8. Next:Windows XP/2000: click Print.
C5650n/C5650dn User’s GuidePhotographs • 208

Macintosh
OS 10.3 and later1. Open the file you want to print.2. Click File → Print.3. Open the drop-down list below Presets. Select Print
Quality.4. Select Photo Enhance5. Change any other settings as desired.6. Click Print.
C5650n/C5650dn User’s GuidePhotographs • 209

C5650n/C5650dn User’s GuidePosters • 210
Posters __________________________
General Information Poster.jpg
This option allows you to print posters by dividing a single document page into multiple pieces. Each piece prints, enlarged, on a separate sheet. Then, you combine the separate sheets to create a poster.
Windows1. Open the file you want to print.2. Click File → Print.3. In the Print dialog box, select your printer.4. Next:
Windows Vista/XP: click Properties.
Windows 2000: go to the next step.
5. On the Setup tab, under Finishing Mode, select PosterPrint.
6. Click Options... and enter the configuration details.Note: an overlap of at least 0.2 mm must be specified.
7. Click OK.8. Next:
Vista/XP: click OK.
Windows 2000: go to the next step.
9. Next:Windows XP/2000: click Print.

Print Resolution ___________________
General InformationAdjusting the resolution for a print job allows you to control the print speed and print quality of a job. Adjusting the resolution also allows you to improve your toner mileage.
When printing proofs or drafts, you usually don’t need the best possible print quality. You usually do need the fastest possible print speed. Using a lower print resolution can accomplish these goals.
Lowering the print resolution can reduce the need for toner and the wear on the image drum. This increases the mileage of your toner and drum.
Raising the print resolution can maximize the image quality of a print job. You usually do this for final versions of documents or when printing images (photographs).
Windows
All Print Jobs (Default)1. Click Start → Settings → Printers [Printers and Faxes for
XP].2. Right click the printer icon.3. Next:
Windows Vista/XP/2000: select Properties. Click Printing Preferences.
4. Follow the steps below. Note that the screen for setting defaults will have more tabs.
5. On the Job Options tab, under Quality, make your selection.High Quality
The best quality image the printer provides.
Choose this for optimum results when printing graphics.
Fine/Detail (600 x 1200)
high resolution printing
Normal
standard resolution. The default.
6. Change any other settings as desired.
C5650n/C5650dn User’s GuidePrint Resolution • 211

7. Next:Vista/XP: click OK.
Windows 2000: go to the next step.
8. Next:Windows XP/2000: click Print.
C5650n/C5650dn User’s GuidePrint Resolution • 212

Windows
Individual Print Jobs1. Open the file you want to print.2. Select File → Print.3. In the Print dialog box, select your printer.4. Next:
Windows XP: click Properties.
Windows 2000: go to the next step.
5. On the Job Options tab, under Quality, make your selection.High Quality
The best quality image the printer provides.
Choose this for optimum results when printing graphics.
Fine/Detail (600 x 1200)
high resolution printing
Normal
standard resolution. The default.
6. Change any other settings as desired.7. Next:
VistaXP: click OK.
Windows 2000: go to the next step.
8. Next:Windows XP/2000: click Print.
C5650n/C5650dn User’s GuidePrint Resolution • 213

Macintosh
OS 10.3 and later1. Open the file you want to print.2. Click File → Print.3. Open the drop-down list below Presets. Select Print
Quality.4. Make your selection.
High Quality
The best quality image the printer provides.
Choose this for optimum results when printing graphics.
Fine/Detail (600 x 1200)
high resolution printing
Normal
standard resolution. The default.
5. Change any other settings as desired.6. Click Print.
C5650n/C5650dn User’s GuidePrint Resolution • 214

C5650n/C5650dn User’s GuideSave as File • 215
Save as File_______________________
General InformationUse Save as File to save print data to a file, without actually printing a hardcopy.
Save as File captures either a PDF or a PostScript file.
WindowsThis feature is not available in this operating system.
Macintosh
OS 10.3 and later1. Open the file you want to print.2. Click File → Print.3. Open the drop-down list below Presets. Select Output
Options.4. At Save as File, make your selection.
If the box has a check mark, the feature is ON.
If the box is empty, the feature is OFF.
5. At Format, make your selection.Choices are:
Adobe® Acrobat® PDF
PostScript®
6. Change any other settings as desired.7. Click Print.

Toner Saving______________________
General InformationUse Toner Save to maximize the life of your toner cartridges.
Toner Save uses less toner to create the printed images. Toner Save adjusts the darkness of the color halftones. Images may appear lighter than normal.
NOTESToner Save does not work if you are printing 100 per cent black.Toner Save does not work if Gray Scale is the selected print mode.Toner Save does not work with applications and operating systems that create print data in CIE color space.
C5650n/C5650dn User’s GuideToner Saving • 216

Windows
Individual Print JobsPlease review General Information, on page 216, for important information about toner saving.
1. Open the file you want to print.2. Click File → Print.3. In the Print dialog box, select your printer.4. Next:
Windows Vista/XP: click Properties.
Windows 2000: go to the next step.
5. Click on the Job Options tab.6. At Toner Saving, make your selection.
Checking this will enable toner saving, but reduce print quality.
If the box has a check mark, the feature is ON.
If the box is empty, the feature is OFF.
7. Change any other settings as desired8. Next:
Vista/XP: click OK.
Windows 2000: go to the next step.
9. Next: Windows XP/2000: click Print.
C5650n/C5650dn User’s GuideToner Saving • 217

Windows
All Print Jobs (Default)Please review General Information, on page 216, for important information about toner saving.
1. Click Start → Settings → Printers [Printers and Faxes for XP].
2. Right click the printer icon.3. Next:
Windows XP/2000: select Properties. Click Printing Preferences.
4. Click on the Job Options tab.5. Follow the steps below. Note that the screen for setting
defaults will have more tabs.6. At Toner Saving, make your selection.
Checking this will enable toner saving, but reduce print quality.
If the box has a check mark, the feature is ON.
If the box is empty, the feature is OFF.
7. Change any other settings as desired8. Next:
Vista/XP: click OK.
Windows 2000: go to the next step.
9. Next: Windows XP/2000: click Print.
C5650n/C5650dn User’s GuideToner Saving • 218

Macintosh
OS 10.3 and later1. Open the file you want to print.2. Click File → Print.3. Open the drop-down list below Presets. Select Print
Quality.4. At Toner saving, make your selection.
Checking this will enable toner saving, but reduce print quality.
If the box has a check mark, the feature is ON.
If the box is empty, the feature is OFF.
5. Change any other settings as desired.6. Click Print.
C5650n/C5650dn User’s GuideToner Saving • 219

Watermarks ______________________
General Information watermark.jpg
Traditionally, a watermark is a mark which is made on some types of paper during its production which can only be seen if it is held against the light.
Your printer can print an element that performs as a watermark. This element is separate from the actual contents of a document. Examples are printing SAMPLE or INTERNAL USE ONLY on copies of document.
There are three steps in working with Watermarks:
1. Create the watermark. 2. Edit an existing watermark.3. Print, using a watermark
C5650n/C5650dn User’s GuideWatermarks • 220

Windows
Create a Watermark1. Open the file you want to print.2. Click File → Print.3. In the Print dialog box, select your printer.4. Next:
Windows Vista/XP: click Properties.
Windows 2000: go to the next step.
5. Click on the Job Options tab.6. Click Watermark.7. Click New.8. Enter the text for your watermark.9. Select the attributes (font, size, angle, etc.) for your
watermark.10. Click OK.
The new watermark appears in the Watermark list.
11. Change any other settings as desired12. Click OK.13. Next:
Vista/XP: click OK.
Windows 2000: go to the next step.
14. Next: Windows XP/2000: click Print.
C5650n/C5650dn User’s GuideWatermarks • 221

Windows
Edit a Watermark1. Open the file you want to print.2. Click File → Print.3. In the Print dialog box, select your printer.4. Next:
Windows Vista/XP: click Properties.
Windows 2000: go to the next step.
5. Click on the Job Options tab.6. Click Watermark.7. Select a name from the Watermark list.8. Click Edit.9. Modify the text for your watermark.10. Modify the attributes (font, size, angle) for your
watermark.11. Click OK.12. Adjust where and how the watermark prints, if
necessary.Choices are: On first page only, In background, As outline only
13. Change any other settings as desired14. Click OK.15. Next:
Windows Vista/XP: click OK.
Windows 2000: go to the next step.
16. Next: Windows XP/2000: click Print.
C5650n/C5650dn User’s GuideWatermarks • 222

Windows
Print, using a Watermark1. Open the file you want to print.2. Click File → Print.3. In the Print dialog box, select your printer.4. Next:
Windows Vista/XP: click Properties.
5. Click on Preferences.Windows 2000: go to the next step.
6. Click on the Job Options tab.7. Click Watermark.8. Select a name from the Watermark list 9. Adjust where and how the watermark prints, if
necessary.Choices are: On first page only, In background, As outline only
10. Change any other settings as desired11. Click OK.12. Next:
Windows Vista/XP: click OK.
Windows 2000: go to the next step.
13. Next: Windows XP/2000: click Print.
C5650n/C5650dn User’s GuideWatermarks • 223

Utilities
Summary of Utilities Provided ________
Utilities on the CDFor more information, click “Tell me more” on the Optional Utilities screen.
Windows• Admin Manager
For quick discovery and setup of the Oki network card in your printer. Runs directly off the CD.
• Direct Network Printing Utility (LPR) For printing on an Ethernet network without the need for a print server.
• Network Extension For use when your printer is connected over a TCP/IP network. Check the printer status and configuration from the Printer )Properties tab in the printer driver.
• Color Swatch Utility Print a color swatch and use the indicated RGB values to set up the color(s) of your choice in your graphics/design software application.
• Display Language Utility Use to change the language of the printer’s display.
Macintosh• Color Correct Utility
Fine tune the printer’s color settings (pallet color. gamma value/hue) and save them for future use.
• Op Panel Language Utility Use to change the language of the printer’s display.
• Profile Assistant Helps you to load and manage color profiles.
• NIC Setup Utility Use to set up the [printer network card.
• Swatch Utility Print a color swatch and use the indicated RGB values to set up the color(s) of your choice in your graphics/design software application.
C5650n/C5650dn User’s GuideSummary of Utilities Provided • 224

• Job Accounting Use to control printer access and to monitor consumables usage.
Utilities on the Web (Windows Only)Here is a list of the utilities provided via a download from the internet, accessed through the Menu Installer on the CD. For more information, click “Tell me more” on the Internet Options screen in the CD installer.
• PrintSuperVision View the real-time status of printers, monitor and report printer usage, manage consumables, check on the status of printers in the same department, the same building, the same country or on the other side of the world.
• Color Correct Utility Helps adjust how RGB colors are printed: office palette tuning, hue/saturation/gamma tuning.
• Job Accounting Utility Use to control printer access and to monitor consumables usage.
Installing the Utilities ____________Utilities on the CD
Load the utilities from the Menu Installer located on the CD supplied with your printer.
Download Utilities (Windows only)Download the utilities from the internet, accessed through the Menu Installer on the CD.
C5650n/C5650dn User’s GuideSummary of Utilities Provided • 225