octopo>kho! - Custom Sounds
159
&CAUTION Be sure to attach the protective cover and fix with the screws. If the protective cover is not attached, this unit I will not turn on. &ATTENTION Veillez a placer le cache de protection et a fixer avec les vis. l Si le couvercle de protection n'est pas installe, cet appareil ne s' allume pas. &ACHTUNG Bringen Sie unbedingt die Schutzabdeckung an und befestigen Sie sie mit den Schrauben. Wenn die Schutzabdeckung nicht angebracht ist, lasst sich das Gerat nicht einschalten. &LETOP Zorg ervoor dat u de beschermkap bevestigt en vastmaakt met de schroeven. Als de beschermkap niet is bevestigd, zal deze unit niet ingeschakeld worden . & ATTENZIONE Assicurarsi di applicare ii coperchio di protezione e di fissarlo con le viti. Se ii coperchio di protezione none applicato, questa unita non si accendera. & PRECAUCl6Ni Asegurese de colocar la cubierta protectora y fijarla con los tornillos. Si la cubierta protectora no esta colocada, esta unidad nose encendera. Pro _ tea,ve cover: C.ouvercle de protection Scli\J!Zab_q~ckung $eschermkap Coperch,o di protezioo.e (ubierta,protectora Certifique- se de que manta a tampa de prote<;ao e a fixa com os parafusos. Se a tam pa de prote<;ao nao estiver colocada, esta unidade nao se liga. & OCTOPO>KHO! O6fl3aTe/lbHO ycraH0B1,ne 3al.J..1111THYIO KpblWKY 111 3aKpen111Te ee s111HTaM111 . EC/1111 3al.J..1111THafl KpblWKa He ycraH0BJleHa, ycrpolilCTBO He BKJll04111TCfl. &UWAGA Pami~taj, aby zatozyc pokryw~ ochronnq i zamocowac jq srubami. Bez zatozenia pokrywy ochronnej wtqczenie tego urzqdzenia b~dzie niemozliwe. &POZOR Nezapomente nasadit ochranny kryt a prisroubovat jej. Pokud ochranny kryt nenasadfte a nepripevnite, jednotka se nezapne. & VIGYAZAT Mindenkeppen helyezze fel a vedoburkolatot, es rogzitse a csavarokkal. Ha a vedoburkolatot nem helyezte fel, a keszulek nem kapcsol be. & UPOZORNENIE Nezabudnite pripojif ochranny kryt a upevnif ho pomocou skrutiek. Ak sa ochranny kryt nepripoji, tato jednotka sa nezapne. _ ~T~mp_ ci-c:le protec;ao . < =lal.J..1111 THaR KPblWKa Pcokry_wa ochronna · ochranny kryt - n Vedoburkolat Ochranny kryt BSH-0339-00
-
Upload
khangminh22 -
Category
Documents
-
view
1 -
download
0
Transcript of octopo>kho! - Custom Sounds

&CAUTION
Be sure to attach the protective cover and fix with the screws.
If the protective cover is not attached, this unit I will not turn on.
&ATTENTION
Veillez a placer le cache de protection et a fixer avec les vis.
l
Si le couvercle de protection n'est pas installe, cet appareil ne s'allume pas.
&ACHTUNG
Bringen Sie unbedingt die Schutzabdeckung an und befestigen Sie sie mit den Schrauben.
Wenn die Schutzabdeckung nicht angebracht ist, lasst sich das Gerat nicht einschalten.
&LETOP
Zorg ervoor dat u de beschermkap bevestigt en vastmaakt met de schroeven.
Als de beschermkap niet is bevestigd, zal deze unit niet ingeschakeld worden.
& ATTENZIONE
Assicurarsi di applicare ii coperchio di protezione e di fissarlo con le viti.
Se ii coperchio di protezione none applicato, questa unita non si accendera.
& PRECAUCl6Ni
Asegurese de colocar la cubierta protectora y fijarla con los tornillos.
Si la cubierta protectora no esta colocada, esta unidad nose encendera.
Pro_tea,ve cover:
C.ouvercle de protection
Scli\J!Zab_q~ckung
$eschermkap
Coperch,o di protezioo.e
(ubierta,protectora
Certifique-se de que manta a tampa de prote<;ao e a fixa com os parafusos.
Se a tam pa de prote<;ao nao estiver colocada, esta unidade nao se liga.
& OCTOPO>KHO!
O6fl3aTe/lbHO ycraH0B1,ne 3al.J..1111THYIO KpblWKY 111 3aKpen111Te ee s111HTaM111.
EC/1111 3al.J..1111THafl KpblWKa He ycraH0BJleHa, ycrpolilCTBO He BKJll04111TCfl.
&UWAGA
Pami~taj, aby zatozyc pokryw~ ochronnq i zamocowac jq srubami.
Bez zatozenia pokrywy ochronnej wtqczenie tego urzqdzenia b~dzie niemozliwe.
&POZOR
Nezapomente nasadit ochranny kryt a prisroubovat jej.
Pokud ochranny kryt nenasadfte a nepripevnite, jednotka se nezapne.
& VIGYAZAT
Mindenkeppen helyezze fel a vedoburkolatot, es rogzitse a csavarokkal.
Ha a vedoburkolatot nem helyezte fel, a keszulek nem kapcsol be.
& UPOZORNENIE
Nezabudnite pripojif ochranny kryt a upevnif ho pomocou skrutiek.
Ak sa ochranny kryt nepripoji, tato jednotka sa nezapne.
~ ~ ~ ~~ _ ~T~mp_ci-c:le protec;ao . <=lal.J..1111 THaR KPblWKa
Pcokry_wa ochronna
·ochranny kryt - n
Vedoburkolat
Ochranny kryt
BSH-0339-00
IM403_ref_K_En_00 (K)© 2020 JVCKENWOOD Corporation
DNR1007XRGPS NAVIGATION SYSTEMINSTRUCTION MANUAL
Take the time to read through this instruction manual.Familiarity with installation and operation procedures will help you obtain the best performance from your new GPS Navigation System.For your recordsRecord the serial number, found on the top of the unit, in the spaces designated on the warranty card, and in the space provided below. Refer to the model and serial numbers whenever you call upon your KENWOOD dealer for information or service on the product.Model DNR1007XR Serial number
US Residence OnlyRegister Online
Register your KENWOOD product at www.kenwood.com/usa/
• Updated information (the latest Instruction Manual, system updates, new functions, etc.) is available from <https://www.kenwood.com/cs/ce/>.
• The Instruction manual is subject to change for modification of specifications and so forth. Be sure to download the latest edition of the Instruction manual for reference. <https://manual.kenwood.com/edition/im403/>

2
Contents
Before Use 4Precautions ................................................................... 4
Safety Precautions and Important Information ............................... 5
How to read this manual ......................................... 6
Basic Operations 7Functions of the Buttons on the Front Panel ... 7
Turning on the Unit ................................................... 8
Initial Settings .............................................................. 9
Adjusting the volume .............................................10
Touch screen operations .......................................10
HOME screen descriptions ....................................11
Popup menu ..............................................................11
Source selection screen description ..................12
Source control screen descriptions ...................14
List screen ...................................................................14
Navigation Operation .............................................15
Alert Message ............................................................19
Widget 20Widget ..........................................................................20
Drive Widget Panel ..................................................20
Importing Image Files.............................................21
APPS 22Wireless Mirroring Operation ...............................22
Apple CarPlay Operation .......................................22
Android Auto Operation ........................................24
USB/SD 27Connecting a USB device ......................................27
Inserting the SD ........................................................27
USB/SD Basic Operation.........................................28
Search Operation ......................................................29
iPod/iPhone 31Preparation .................................................................31
iPod/iPhone Basic Operation ...............................32
Search Operation ......................................................33
HD Radio™ Tuner 34HD Radio Tuner Basic Operation .........................34
Receive Mode ............................................................36
Memory Operation ..................................................36
Selecting Operation ................................................36
Bookmark ....................................................................38
SiriusXM® 39SiriusXM® Basic Operation ....................................39
Storing Channels in Preset Memory ..................41
Preset select ...............................................................41
Direct search ..............................................................41
Category/Channel search ......................................42
Replay ...........................................................................42
TuneMix™ ....................................................................43
SmartFavorites, TuneStart™ ..................................43
TuneScan™ ..................................................................43
Traffic & Weather Now™ .........................................44
Content Alerts............................................................44
SportsFlash™ ..............................................................45
SiriusXM SETUP .........................................................45

3English
Bluetooth Control 51Information for using Bluetooth® devices .......51
Register the Bluetooth device .............................52
Bluetooth Setup ........................................................54
Playing the Bluetooth Audio Device .................55
Using the Hands-Free Unit ....................................57
Hands-Free Setup .....................................................62
Other External Components 63View Camera ..............................................................63
Use Dashboard Camera..........................................65
External audio/video players (AV-IN).................66
HDMI source ...............................................................67
OEM Features Operation .......................................67
Setup 68Monitor Screen Setup .............................................68
Connections & AV Setup ........................................68
Display & Button Setup ..........................................70
User Interface Setup ................................................71
System Setup .............................................................72
Controlling Audio 743-way speaker system setup ................................74
Speaker / X’over setup ............................................75
Equalizer Control ......................................................76
Listening Position / DTA .........................................77
Fader / Balance / Zone Control ............................79
Volume Offset ............................................................81
Sound Effect ...............................................................81
Parametric Equalizer ................................................82
Audio Setup memory .............................................85
Remote control 86Battery Installation ...................................................86
Functions of the Remote control Buttons .......86
Connection/Installation 89Before Installation ....................................................89
Installing the unit .....................................................92
Troubleshooting 102Problems and Solutions ...................................... 102
Error Messages ....................................................... 103
Appendix 105Playable Media and Files..................................... 105
Specifications .......................................................... 107
About this Unit ....................................................... 110

Before Use
4
Before Use
Precautions
# WARNINGS
Ñ To prevent injury or fire, take the following precautions:
• To prevent a short circuit, never put or leave any metallic objects (such as coins or metallic tools) inside the unit.
• Do not watch or fix your eyes on the unit’s display when you are driving for any extended period.
• If you experience problems during installation, consult your KENWOOD dealer.
Ñ Precautions on using this unit• When you purchase optional accessories,
check with your KENWOOD dealer to make sure that they work with your model and in your area.
• You can select a language to display menus, audio file tags, etc. See System Setup (P.72).
• The Radio Broadcast Data System feature won’t work in areas where the service is not supported by any broadcasting station.
Ñ Protecting the monitor• To protect the monitor from damage, do not
operate the monitor using a ball point pen or similar tool with a sharp tip.
Ñ Cleaning the unit• If the faceplate of this unit is stained, wipe it
with a dry soft cloth such as a silicon cloth. If the faceplate is stained badly, wipe it with a cloth moistened with neutral cleaner, then wipe it again with a clean soft dry cloth.
NOTE• Applying spray cleaner directly to the unit
may damage its mechanical parts. Wiping the faceplate with a hard cloth or using a volatile liquid such as thinner or alcohol may scratch the surface or erase the screened print.
Ñ Acquiring GPS signalThe first time you turn on this unit, you must wait while the system acquires satellite signals for the first time. This process could take up to several minutes. Make sure your vehicle is outdoors in an open area away from tall buildings and trees for fastest acquisition.After the system acquires satellites for the first time, it will acquire satellites quickly each time thereafter.
Ñ About GLONASSThis unit uses Global Navigation Satellite System (GLONASS) in addition to GPS.Combining GPS and GLONASS can refine positioning accuracy than using GPS only.
Ñ Caution for Smartphone UsersSimultaneously running multiple applications on your smartphone while screen sharing places heavy demand on the microprocessor of the phone, potentially affecting communication and performance. For best results while pairing with your KENWOOD receiver, please be sure to close any unused applications.

Before Use
5English
Safety Precautions and Important Information
Read this information carefully before starting to operate the KENWOOD Car Navigation System and follow the instructions in this manual. Neither KENWOOD nor Garmin shall be liable for problems or accidents resulting from failure to observe the instructions in this manual.
# WARNINGFailure to avoid the following potentially hazardous situations could result in an accident or collision resulting in death or serious injury.When navigating, carefully compare information displayed on the navigation system to all available navigation sources, including information from street signs, visual sightings, and maps. For safety, always resolve any discrepancies or questions before continuing navigation.Always operate the vehicle in a safe manner.Do not become distracted by the navigation system while driving, and always be fully aware of all driving conditions. Minimize the amount of time spent viewing the screen of the navigation system while driving, and use voice prompts when possible.Do not enter destinations, change settings, or access any functions requiring prolonged use of the navigation system controls while driving. Stop your vehicle in a safe and legal manner before attempting such operations.Keep the system volume at a low enough level to be able to hear outside noises while driving. If you can no longer hear outside noises, you may be unable to react adequately to the traffic situation. This may cause accidents.The navigation system will not display the correct current position of the vehicle the first time it is used after purchase, or if the vehicle battery is disconnected. GPS satellite signals will soon be received, however, and the correct position will be displayed.Be careful of the ambient temperature. Using the navigation system at extreme temperatures can lead to malfunction or damage. Also note that the unit can be damaged by strong vibration, by metal objects, or by water getting inside the unit.
# CAUTIONFailure to avoid the following potentially hazardous situations may result in injury or property damage.The navigation system is designed to provide you with route suggestions. It does not reflect road closures or road conditions, weather conditions, or other factors that may affect safety or timing while driving.Use the navigation system only as a navigational aid. Do not attempt to use the navigation system for any purpose requiring precise measurement of direction, distance, location, or topography.The Global Positioning System (GPS) is operated by the United States government, which is solely responsible for its accuracy and maintenance. The government system is subject to changes that could affect the accuracy and performance of all GPS equipment, including the navigation system. Although the navigation system is a precision navigation device, any navigation device can be misused or misinterpreted and, therefore, become unsafe.
Ñ IMPORTANT INFORMATION
Vehicle Battery PreservationThis navigation system can be used when the ignition key is turned to ON or ACC. To preserve the battery, however, it should be used with the engine running whenever possible. Using the navigation system for a long time with the engine switched off can cause the battery to run down.
Map Data InformationOne of the goals of Garmin is to provide customers with the most complete and accurate cartography that is available to us at a reasonable cost. We use a combination of governmental and private data sources, which we identify in product literature and copyright messages displayed to the consumer. Virtually all data sources contain some inaccurate or incomplete data. In some countries, complete and accurate map information is either not available or is prohibitively expensive.

Before Use
6
How to read this manual
• The screens and panels shown in this manual are examples used to provide a clear explanation of operations.For this reason, they may be different from the actual screens or panels, or some display patterns may be different from the actual ones.
• Display language: English is used for the purpose of explanation. You can select a display language from the [SETUP] menu. See System Setup (P.72).

Basic Operations
7English
Basic Operations
Functions of the Buttons on the Front Panel
2 3 45
6 71
8
Number Name Motion
1 Remote Sensor
• Receives the remote control signal.
2 HOME/[ • Displays the HOME screen (P.11).• Pressing for 1 second turns the power off.• When the power is off, turns the power on.
3 NAV/CAMERA
• Displays the navigation screen.• While a navigation application is active on the device being used as the Apple
CarPlay or Android Auto source, displays the Apple CarPlay or Android Auto source screen.
• Pressing and holding switches view camera display on/off.The camera whose view is displayed first changes according to the Camera Assignment Settings (P.64) and the shift lever position in the shift gate. The camera whose view was displayed last is kept and the same camera view will be displayed the next time. If its assignment setting is changed, the rear camera view is displayed.
4 MENU/ATT • Displays the popup menu screen. • Pressing for 1 second switches attenuation of the volume on/off.
5 Volume knob
• Adjusts the volume. (P.10)
6 • Displays the APP (Apple CarPlay/Android Auto/Wireless Mirroring) screen.• While the APP screen is displayed, switches to the control screen of current source.
7 VOICE • Switches the voice recognition function on/off. See (P.24, 26, 59).• When neither Apple CarPlay, Android Auto, nor a Bluetooth Hands-Free phone is
connected, pressing and holding displays Bluetooth pairing waiting dialog. (P.52)

Basic Operations
8
Number Name Motion
8 SD card slot • A slot to insert an SD card.• You can play audio/visual files in the card. *1
• An SD card slot for upgrading the map. For how to upgrade the map, refer to the instruction manual of the navigation system. *2
*1 If the map update file remains in the SD card, you cannot play audio/visual files.*2 The system of the unit is rebooted after inserting/removing the MAP SD.
Turning on the Unit
1 Press the [HOME]/[ ] button.
hh The unit is turned on.
● To turn off the unit:
1 Press the [HOME]/[ ] button for 1 second.
NOTE• If it is your first time to turn the unit on after installation, it will be necessary to perform Initial SETUP (P.9).

Basic Operations
9English
Initial Settings
Initial SETUP
Perform this setup when you use this unit first time.
1 Set each item as follows.
■ [Locale]Select the country for the navigation system.The language, the distance unit, and the gasoline unit are set.1 Touch [Locale].2 Select the desired country.
■ [Language]Select the language used for the control screen and setting items. Default is “American English(en)”.1 Touch [Language].2 Touch [Language Select].3 Select the desired language.4 Touch [ ].For details, see System Setup (P.72).
■ [Display & Button]Set the button illumination color. 1 Touch [Display & Button].2 Touch [Button Illumination Color].3 Select the desired color.4 Touch [ ].For details, see Display & Button Setup (P.70).
■ [Camera]Set the parameters for the camera.1 Touch [Camera].2 Set each item and touch [ ].For details, see Camera Setup (P.63).
■ [OEM SETUP]This function requires a commercial adaptor.Consult your KENWOOD dealer for details.
■ [DEMO]Set the demonstration mode. Default is “ON”.
2 Touch [Finish].
NOTE• These settings can be made from the SETUP
menu. See Setup (P.68).
Calendar/clock settings
1 Press the [HOME]/[ ] button.
2 Touch [ ].
3 Touch [SETUP].hh SETUP Menu screen appears.
4 Touch [System].hh System setting menu appears.
5 Set each item as follows.Scroll the page to show hidden items.
■ [Time Format] Select the time display format.[12-Hour] (Default)/[24-Hour]
■ [Clock] [NAV-SYNC ](Default): Synchronizes the clock
time with navigation GPS data.[Manual]: Set the clock manually.

Basic Operations
10
■ [Time Zone]If you have selected [Manual] for Clock, select the time zone.
■ [Clock Adjust]If you select [Manual] for Clock, adjust the date and time manually. (P.10)
NOTE• Please set the date and time. If they are not set,
some functions may not work.
Adjust the date and time manually
1 Touch [Clock] in the System setting menu.
2 Select [Manual].
3 Touch [Time Zone] in the System setting menu.
4 Select the time zone.
5 Touch [Clock Adjust] in the System setting menu.
6 Adjust the date, then adjust the time.
7 Touch [Set].
Adjusting the volume
You can adjust the volume (0 to 40).Turn the knob clockwise to increase, and counter-clockwise to decrease.
Touch screen operations
To perform operations on the screen, you need to touch, touch and hold, flick or swipe to select an item, display a setting menu screen or change pages.
● TouchTouch the screen gently to select an item on the screen.
● Touch and holdTouch the screen and keep your finger in place until the display changes or a message is displayed.
● FlickSlide your finger quickly to the left or right on the screen to change the page.You can scroll a list screen by flicking up/down on the screen.
● SwipeSlide your finger up or down on the screen to scroll the screen.

Basic Operations
11English
HOME screen descriptions
Most functions can be performed from the HOME screen.
1
2
43
1 • Widget (P.20)
2 • Displays the source selection screen. (P.12)
3 • Displays the SETUP Menu screen. (P.68)
4 • Short-cut playback source icons (P.13)
NOTE• The speed limit feature is for information only
and does not replace your responsibility to abide by all posted speed limit signs and to use safe driving judgment at all times.
• Garmin and JVCKENWOOD Corporation will not be responsible for any traffic fines or citations you receive for failing to follow all applicable traffic laws and signs.
Display the HOME screen
1 Press the [HOME]/[ ] button.
hh HOME screen appears.
Popup menu
1 Press the [MENU]/[ATT] button.hh Popup menu appears.
2 Touch to display the popup menu.
1The contents of the menu are as follows.
• Displays the Screen Adjustment screen. (P.68)
• Turns the display off. (P.12)
• Displays the view camera screen. (P.63)
• Displays the SETUP Menu screen. (P.68)
• Displays the Audio screen. (P.74)
• Displays the control screen of current source. Icon feature differs depending on the source. This icon is for USB source.
• Close the popup menu.
1 • Short-cut source icons: The source changes to the one you have set with a short-cut. For the short-cut setting, refer to Customize Short-cut source icons (P.13).
• Displays the Device List screen. (P.52)

Basic Operations
12
Turn off the screen
1 Select [Display OFF] on the popup menu.
NOTE• Touch the display to turn on the screen.• To display the clock while the screen is off, it is
necessary to set "OSD Clock" to "ON". (P.70)
Source selection screen description
You can display icons of all playback sources and options on the source selection screen.
3 4
21
1 • Changes playback sources.For playback sources, see Select the playback source (P.12).
2 • Changes pages. (Touch [ ]/[ ].)You can also change pages by flicking left or right on the screen.
3 • Returns to the previous screen.
4 • Displays the SETUP Menu screen. (P.68)
Select the playback source
1 Press the [HOME]/[ ] button.hh HOME screen appears.
2 Touch [ ].From the screen, you can select the following sources and functions.
• Displays the navigation screen. (P.15)
• Switches to the Apple CarPlay screen from the connected iPhone. (P.22)
• Switches to the Android Auto screen from the connected Android smartphone. (P.24)
• Displays the Hands-Free screen. (P.57)When neither Apple CarPlay, Android Auto, nor a Bluetooth Hands-Free phone is connected, displays Bluetooth pairing waiting dialog.*1 (P.52)
• Switches to the Wireless Mirroring screen from the connected Android smartphone. (P.22)
• Switches to the HD Radio broadcast. (P.34)
• Switches to the SiriusXM® satellite radio broadcast. (P.39)
• Plays a Bluetooth audio player. (P.55)
• Plays an iPod/iPhone. (P.31)
• Plays files on a USB device. (P.27)
• Plays files on an SD card. (P.27)
• Plays a device connected to the HDMI input terminal. (P.67)
• Switches to an external component connected to the AV Audio input and the Video input terminal.*2 *3 (P.66)
• Puts the unit in standby. (P.13)
• For sources and information displayed when an iDatalink is connected, see OEM Features Operation (P.67).
Basic Operations
13English
*1 When connecting as Apple CarPlay or Android Auto, it works as a phone provided in Apple CarPlay or Android Auto. If Apple CarPlay or Android Auto are connected during talking by the Bluetooth device or iDatalink phone, the current call will be continued.
*2 You can use the [AV-IN] source when a cable from a visual source except a camera is connected to the Video input terminal, and a cable is connected to the AV Audio input terminal. (P.98)
*3 Set “VIDEO IN” to “None” in Camera Assignment Settings. (P.64)
Put the unit in standby
1 Press the [HOME]/[ ] button.hh HOME screen appears.
2 Touch [ ].
3 Touch [STANDBY].
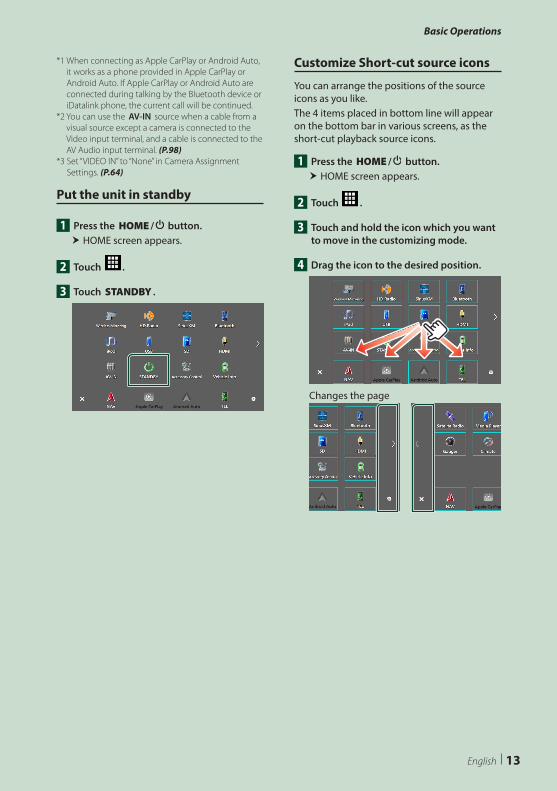
Customize Short-cut source icons
You can arrange the positions of the source icons as you like.The 4 items placed in bottom line will appear on the bottom bar in various screens, as the short-cut playback source icons.
1 Press the [HOME]/[ ] button.hh HOME screen appears.
2 Touch [ ].
3 Touch and hold the icon which you want to move in the customizing mode.
4 Drag the icon to the desired position.
Changes the page

Basic Operations
14
Source control screen descriptions
There are some functions which can be performed from most screens.
1 2 3
4
6 5
7 8
1
Displays the source selection screen. (P.12)
2
Displays the SETUP Menu screen. (P.68)
3 Short-cut source icons
The source changes to the one you have set with a short-cut. For the short-cut setting, refer to Customize Short-cut source icons (P.13).
4 Function panel *
Touch the right side of the screen to display the function panel. Touch again to close the panel.
5
Connected Bluetooth device information.
6 Indicator items
Displays the current source condition and so on.• [ATT]: The attenuator is active.• [DUAL]: The dual zone function is active.• [MUTE]: The mute function is active.• [LOUD]: The loudness control function is active.
7 Content list *
Displays the track/file/station/channel list.
8 Operation keys
You can operate the current source with these operation keys. The available functions are different depending on the source type.
* For right hand drive vehicles, the left and right drawers are swapped. For how to set up the driving position, see User Interface Setup (P.71).
List screen
There are some common function keys in the list screens of most sources. See (P.29, 33, 56).
Display the list screen
For USB/ SD/ iPod:
1 Touch [1] or the item listed on the information area in the source control screen.hh The list screen appears.
For Bluetooth audio:
1 Touch [1].hh The list screen appears.
You can use following operation keys from this screen.
6
3 4 5
1 2
1
Displays the list type selection window.
2
Displays a music/movie file list.

Basic Operations
15English
3 etc.
Keys with various functions are displayed here.• : Plays all tracks in the folder containing
the current track.• : Jumps to the letter you entered
(alphabetical search). • : Moves to the upper hierarchy
level.
4 Text scroll
Scrolls the displayed text.
5 [ ]/[ ]/[ ]/[ ] Page scroll
You can change pages to display more items by touching [ ]/[ ].• [ ]/[ ] : Displays the top or bottom page.
6 Return
Returns to the previous screen.
NOTE• Depending on the current source or mode, some
function key may not appear.
Navigation Operation
For details on the navigation function, please refer to the Navigation Instruction Manual.
Display the navigation screen
1 Press the [NAV]/[CAMERA] button.
hh The navigation screen appears.
2 Touch [ ].hh Main Menu screen appears.
How to Use the Navigation System
1 Operate the desired function from the Main Menu screen.
5
12 3
4
1 GNSS signal status.
2 Finds a destination.
3 Views the map.
4 Uses the Apps such as ecoRoute™ and Help.
5 Adjusts the settings.
NOTE• You can get additional information about
using the navigation system from Help. To display Help, touch [Apps] and then touch [Help].
NOTE• For more information about your navigation
system, download the latest version of the Owner’s Manual from https://manual.kenwood.com/edition/im403/
2 Enter your destination and start the guidance.Finding points of interest1 Touch [Where To?].2 Select a category and a subcategory.3 Select a destination.4 Touch [Go!].

Basic Operations
16
NOTE• To enter letters contained in the name, touch
the Search bar and enter the letters.
3 Follow your route to the destination.
NOTE• The speed limit icon feature is for information
only and does not replace the driver’s responsibility to abide by all posted speed limit signs and to use safe driving judgment at all times. Garmin and JVCKENWOOD Corporation will not be responsible for any traffic fines or citations that you may receive for failing to follow all applicable traffic laws and signs.
Your route is marked with a magenta line. As you travel, your navigation system guides you to your destination with voice prompts, arrows on the map, and directions at the top of the map. If you depart from the original route, your navigation system recalculates the route.
5
6 8 9
1 2
34
7
1 Views the Next Turn page or the junction view page, when available.
2 Views the Turn List page.
3 Views the Where Am I? page.
4 Stops the currents route.
5 Displays traffic information on the route.
6 Returns to the Main menu.
7 Data field. Touch to display a different data field.
8 Vehicle speed. Touch to display a trip information.
9 Displays more options.
NOTE• Touch and drag the map to view a different
area of the map.• A speed limit icon could appear as you travel
on major roadways.
● Adding a stop1 While navigating a route, touch [ ] and
then touch [Where To?].2 Search for the extra stop.3 Touch [Go!].4 Touch [Add to Active Route] to add this
stop before your final destination.
● Taking a detour1 While navigating a route, touch [ ].2 Touch [ ].
■ Manually avoiding traffic on your route1 From the map, touch [ ].2 Touch [Traffic On Route].3 If necessary, touch the arrows to view
other traffic delays on your route.4 Touch [ ] > [Avoid].
■ Viewing the traffic mapThe traffic map shows color-coded traffic flow and delays on nearby.1 From the map, touch [ ].2 Touch [Traffic Conditions].
■ About traffic• Traffic service is not available in some areas or
countries. • Garmin and JVCKENWOOD Corporation are
not responsible for the accuracy or timeliness of the traffic information.
• You can receive INRIX traffic information and weather forecast by connecting your iPhone or Android smartphone in which the “KENWOOD Traffic Powered By INRIX” application is installed. For details, see “KENWOOD Traffic Powered By INRIX” application.

Basic Operations
17English
■ Updating mapsYou can purchase updated map data from Garmin.1 Go to https://kenwood.garmin.com/
kenwood/site2 From the Map Updates section, select
Update3 Follow the on-screen instructions.
NOTE• After you update map data for the first time,
you can use an SD card and the Garmin Express™ application to perform future map updates.
Bottom bar on the navigation screen descriptions
There are some functions which can be performed from the navigation screen.
1 2 3 4
1 • Displays the source selection screen. (P.12)
2 • Displays the SETUP Menu screen. (P.68)
3 • Displays the control screen of current source.
4 • Displays the telephone function screen.When neither Apple CarPlay, Android Auto, nor a Bluetooth Hands-Free phone is connected, displays Bluetooth pairing waiting dialog. (P.52)
Navigation Setup
1 Touch [ ] on the navigation screen.
2 Touch [SETUP].hh SETUP Menu screen appears.
3 Touch [Navigation].hh Navigation setting menu appears.
4 Set each item as follows.
■ [NAV Mute] (2-way speaker system only)
Mutes the volume of rear speakers during voice guidance of the navigation system. Default is “ON”.
■ [NAV Interrupt Speaker]Selects speakers used for voice guidance of the navigation system.• [Front L]: Uses the front left side speaker for
voice guidance.• [Front R]: Uses the front right side speaker
for voice guidance.• [Front All] (Default): Uses both front
speakers for voice guidance.
■ [NAV Voice Volume]Adjusts the volume for voice guidance of the navigation system. Default is “24”.

Basic Operations
18
KENWOOD Traffic Powered By INRIX
You can receive INRIX traffic information and weather forecast by connecting your iPhone or Android smartphone in which the “KENWOOD Traffic Powered By INRIX” application is installed to this unit.
Preparation• Install the latest version of the KENWOOD Traffic
Powered By INRIX application on your iPhone or Android smartphone.
– iPhone: Search for "KENWOOD Traffic Powered By INRIX" in the Apple App Store to find and install the most current version.
– Android smartphone: Search for "KENWOOD Traffic Powered By INRIX" in Google play to find and install the most current version.
• For details, see “KENWOOD Traffic Powered By INRIX” application.
1 Connect the device.• To connect a device via Bluetooth,
register it as the Bluetooth device and do the App (SPP) profile setting of the connection beforehand. See Register the Bluetooth device (P.52) and Switch the connected device (P.53).
• Connect an iPhone using KCA-iP103 via the USB terminal. (P.100)
NOTE• When an Apple CarPlay is connected, you
can receive INRIX traffic information and weather forecast.
2 Press the [NAV]/[CAMERA] button.
hh The navigation screen appears.
3 Touch [ ].hh Main Menu screen appears.Touch [Apps] on the Main Menu screen and then an icon of your desired content.For details, see Navigation system manual.

Basic Operations
19English
Alert Message
This function is to receive alert messages. First, you need to turn on the “Emergency Alerts” on the HD Radio source control screen. (P.35)
When an Alert Message comes
1 32
1 • The alert message is erased. Same alert message cannot be displayed for next 10 minutes.
2 • The alert message is erased. Same alert message cannot be displayed for next 12 hours.
3 • Touch to tune to that channel of HD Radio source.
Display of the received Alert Message
You can read the received alert message afterward.
1 Touch [ ] on the right side of the HD Radio source control screen. Touch [Alert Message Log].
2 Select the desired Alert Message from the list.
hh The Alert Message appears.
3 Touch [Close].

Widget
20
Widget
Widget
1 Press the [HOME]/[ ] button.
2 You can change the widget or customize the widget area.
1
2
3
1 Full screen widget panel
You can change the full screen panel widget by flicking left or right on the widget panel. The widget is switched in the following sequence:Garmin Map, Album Art, Visualizer, Photo Frame.
2 Flexible source widget panel
• Displays the current source information and operation keys.
• While playing an audio source, you can switch the widget panel size between 2-line and 4-line by touching the right top corner of the widget panel.
• [ ] (SD/USB/HDMI/AV-IN/Wireless Mirroring source only):Displays the source control screen.
• [ ] (HDMI/AV-IN/Wireless Mirroring source only):Switches the widget panel orientation between horizontal and vertical.
3 Drive widget panel
You can change the drive panel widget by touching the right top corner of the widget panel. (P.20)
Photo Frame WidgetYou can display a slideshow of the image files stored in your iPhone or Android smartphone.
Preparation• See Importing Image Files (P.21).
Drive Widget Panel
You can change the widget.
1 Press the [HOME]/[ ] button.
2 Touch the right top corner of the drive widget panel.
hh The drive widget list appears.
3 Touch the desired widget.You can select from the following widgets.• Clock Widget• Weather Widget *1
• Compass Widget *2
• EQ Setting Widget• Camera Widget• Climate/TPMS/Radar Widget *3
• ADAS Widget *3
*1 You can receive INRIX weather forecast by connecting your iPhone or Android smartphone in which the “KENWOOD Traffic Powered By INRIX” application is installed.
*2 The Turn by Turn function is displayed during the guidance of the navigation system.
*3 Displayable widgets vary depending on the type of the connected iDatalink (commercially available) and the model of the vehicle.
● To change the widget positionYou can change the widget panel position to right or left. If the drive widget panel position is changed, the full screen widget panel position and flexible source widget panel position are also changed.

Widget
21English
1 Touch and hold the drive widget panel.hh Widget customize mode is activated.
2 Drag the drive widget to right or left.
Weather WidgetYou can display the weather forecast of the present location.
Preparation• See KENWOOD Traffic Powered By INRIX
(P.18).
Importing Image Files
You can display image files stored in your iPhone or Android smartphone by connecting your iPhone or Android smartphone in which the “KENWOOD Portal APP” application is installed to this unit.The image files are displayed on the photo frame widget. Also, you can set an image as the wallpaper.See Photo Frame Widget (P.20) and To register an original image (P.71).
Preparation• Install the latest version of the “KENWOOD Portal
APP” application on your iPhone or Android smartphone.
– iPhone: Search for “KENWOOD Portal APP” in the Apple App Store to find and install the most current version.
– Android smartphone: Search for “KENWOOD Portal APP” in Google play to find and install the most current version.
• For details, see “KENWOOD Portal APP” application.
1 Connect the device.• To connect a device via Bluetooth,
register it as the Bluetooth device and do the App (SPP) profile setting of the connection beforehand. See Register the Bluetooth device (P.52) and Switch the connected device (P.53).
• Connect an iPhone using KCA-iP103 via the USB terminal. (P.100)
2 Unlock your device.

APPS
22
APPS
Wireless Mirroring Operation
You can display the same screen of the Android smartphone on the monitor of the unit using the Wireless Mirroring function of the Android smartphone.
Preparation• You can use the Wireless Mirroring function
with Android smartphones compatible with this function.
• This function may be called Wireless Display, Screen Mirroring, AllShare Cast, etc., depending on the manufacturer.
• The settings on the Android smartphone differ depending on the device type. For details, refer to the instruction manual supplied with your Android smartphone.
• If your Android smartphone is locked, Mirroring screen may not appear.
• If the Android smartphone is not ready for UIBC, you cannot perform touch operation.
1 Press the [HOME]/[ ] button.
2 Touch [ ].
3 Touch [Wireless Mirroring]. (P.12)hh The App screen is displayed.
4 Operate your Android smartphone to activate the Wireless Mirroring function, then connect to this unit.
5 Select (”DNR1007XR”) as the network to use.hh When the connection is established, then the same screen displayed on the Android smartphone is displayed.
NOTE• Apps is discontinued when the power is turned
ON/OFF or you leave the vehicle. To restart Apps, operate the Android smartphone.
• When the Apps source is displayed, you cannot register or reconnect a Bluetooth device. Switch the Apps source to another source, and then operate the Bluetooth device.
Apple CarPlay Operation
Apple CarPlay is a smarter, safer way to use your iPhone in the car. Apple CarPlay takes the things you want to do with iPhone while driving and displays them on the screen of the product. You can get directions, make calls, send and receive messages, and listen to the music from iPhone while driving. You can also use Siri voice control to make it easier to operate iPhone.For details about Apple CarPlay, visit https://www.apple.com/ios/carplay/.
Compatible iPhone devicesYou can use Apple CarPlay with the following iPhone models.
• iPhone XS Max• iPhone XS• iPhone XR• iPhone X• iPhone 8 Plus• iPhone 8
• iPhone 7 Plus• iPhone 7• iPhone SE• iPhone 6s Plus• iPhone 6s
Ñ Connecting an iPhone
Wired connection
1 Connect your iPhone using KCA-iP103 via the USB terminal. (P.100)When an iPhone compatible with Apple CarPlay is connected to the USB terminal, the Bluetooth Hands-Free phone currently connected is disconnected. If another Bluetooth Hands-Free phone is being used, disconnection will occur after ending the call.
2 Unlock your iPhone.

APPS
23English
Wireless connection You can select the iPhone registered in [Device List] and use it as the Apple CarPlay device. See Register the Bluetooth device (P.52).
NOTE• Turn on the Bluetooth function and Wi-Fi function
of an iPhone.• If two or more iPhone have been registered,
select the iPhone to be used as the [Apple CarPlay] source. (P.23)
• It is necessary to connect the GPS antenna in order to use a wireless Apple CarPlay.
• When the Wi-Fi connection becomes unavailable, the HOME screen is displayed.
• You cannot use Apple CarPlay if the function is turned off by operating the iPhone at functional setup.
To switch the Current Screen to the Apple CarPlay Screen When Connecting Your iPhone• Touch [Apple CarPlay] icon on the source
selection screen. (P.12)• Touch the following connection message if the
message appears.
NOTE• The connection message appears when;
– The iPhone you used previously is connected again.
– The screen other than HOME and the source selection screen is displayed.
• The connection message is displayed for about 5 seconds.
Ñ Select an Apple CarPlay deviceIf two or more iPhone compatible with Apple CarPlay have been registered, select the iPhone to be used as the Apple CarPlay source. See Switch the connected device (P.53).
Ñ Operation keys and available Apps on the home screen of Apple CarPlay
You can use the Apps of the connected iPhone.The items displayed and the language used on the screen differ among the connected devices.To enter the Apple CarPlay mode, touch [Apple CarPlay] icon on the source selection screen. (P.12)
31
2
1 [ ]*
• Displays the home screen of Apple CarPlay.• Touch and hold to activate Siri.
2 Application keys
Starts the application.
3 [HOME]
Exits the Apple CarPlay screen and displays the Home screen.
* The icon design may change depending on the iOS version.
To exit the Apple CarPlay screen
1 Press the [HOME]/[ ] button.

APPS
24
Ñ Use SiriYou can activate Siri.
1 Press the [VOICE] button.
2 Talk to Siri.
To deactivate
1 Press the [VOICE] button.
Ñ Switch to the Apple CarPlay screen while listening to another source
1 Press the [ ] button.
NOTE• When listening to another source with the Apple
CarPlay screen displayed, playing music in the Apple CarPlay mode will switch the current source to the Apple CarPlay source.
Android Auto™ Operation
Android Auto enables you to use the functions of your Android smartphone convenient for driving. You can easily access route guidance, make calls, listen to music, and access convenient functions on the Android smartphone while driving.For details about Android Auto, visit https://www.android.com/auto/ and https://support.google.com/androidauto.
Compatible Android smartphonesYou can use Android Auto with Android smartphones of Android version 5.0 or later.For Wi-Fi connection, Android 8.0 or later.
NOTE• Android Auto may not be available on all devices
and may not be available in all countries or regions.
● About the placement of smartphoneInstall the smartphone connected as Android Auto device in the place where it can receive the GPS signals.When using Google Assistant, install the smartphone in the place where the smartphone easily catch a voice by the microphone.
NOTE• Do not put the smartphone in a spot exposed
to direct sunlight or near an air blowing out port of an air conditioner. The placement of the smartphone in such places can lead to malfunction or damage of your smartphone.
• Do not leave the smartphone in the vehicle.

APPS
25English
Ñ Connect Android smartphone
Wired connection
1 Connect an Android smartphone via the USB terminal. (P.100)To use the Hands-Free function, connect the Android smartphone via Bluetooth. When an Android smartphone compatible with Android Auto is connected to the USB terminal, the device is connected via Bluetooth automatically, and the Bluetooth Hands-Free phone currently connected is disconnected.
2 Unlock your Android smartphone.
3 Press the [HOME]/[ ] button.
4 Touch [ ].
5 Touch [Android Auto]. (P.12)
Wireless connectionYou can select the Android smartphone registered in [Device List] and use it as the Android Auto device. See Register the Bluetooth device (P.52).
1 Press the [HOME]/[ ] button.
2 Touch [ ].
3 Touch [Android Auto]. (P.12)
NOTE• Turn on the Bluetooth function and Wi-Fi function
of Android smartphone.• If two or more Android smartphones have been
registered, select the Android smartphone to be used as the Android Auto source. (P.25)
• To change the password for wireless connection manually, refer to [Reset Android Auto Wireless Connection] (P.69).
• When the Wi-Fi connection becomes unavailable, the HOME screen is displayed.
Ñ Select an Android smartphoneIf two or more Android smartphones have been registered, select the Android smartphone to be used as the Android Auto source. See Switch the connected device (P.53).
Ñ Operation keys and available Apps on the Android Auto screen
You can perform the operations of the Apps of the connected Android smartphone.The items displayed on the screen differ among the connected Android smartphones.To enter the Android Auto mode, touch the [Android Auto] icon on the source selection screen. (P.12)
1
1 Navigation bar
Starts the application or displays information.
To exit the Android Auto screen
1 Press the [HOME]/[ ] button.

APPS
26
Ñ Using voice control
1 Press the [VOICE] button.
2 Start speaking.
NOTE• When you press and hold the [VOICE] button
while inputting voice, you can start over from the beginning.
To cancel
1 Press the [VOICE] button.
Ñ Switch to the Android Auto screen while listening to another source
1 Press the [ ] button.
NOTE• When listening to another source with the
Android Auto screen displayed, playing music in the Android Auto mode will switch the current source to the Android Auto source.

USB/SD
27English
USB/SD
Connecting a USB device
1 Connect the USB device with the USB cable. (P.99)
2 Press the [HOME]/[ ] button.
3 Touch [ ].
4 Touch [USB]. (P.12)
Ñ Disconnect the USB device
1 Press the [HOME]/[ ] button.
2 Touch a source other than [USB].
3 Detach the USB device.
Ñ Usable USB deviceYou can use a mass-storage-class USB device with this unit. The word “USB device” appearing in this manual indicates a flash memory device.
● About the file systemThe file system should be the one of the following.
• FAT16 • FAT32 • exFAT • NTFS
NOTE• Install the USB device in the place where it will
not affect safe driving.• You cannot connect a USB device via a USB hub
and Multi Card Reader.• Take backups of the audio files used with this
unit. The files can be erased depending on the operating conditions of the USB device.We shall have no compensation for any damage arising from any erased data.
Inserting the SD
1 Tilt the panel toward you manually.
2 Insert the SD card into the slot until it clicks.
3 Close the panel.
4 Press the [HOME]/[ ] button.
5 Touch [ ].
6 Touch [SD]. (P.12)
Ñ Remove the SD card
1 Press the [HOME]/[ ] button.
2 Touch a source other than [SD].
3 Tilt the panel toward you manually.
4 Push the SD card until it clicks and then remove your finger from the card. The card pops up so that you can pull it out with your fingers.
5 Close the panel.
Ñ Usable SD cardThe unit is capable of playback of SD/SDHC/SDXC memory cards complying with the SD, SDHC or SDXC standard. A special adapter is required to use a miniSD card, miniSDHC card, microSD card, microSDHC, or microSDXC card.The MultiMedia Card (MMC) cannot be used.

USB/SD
28
USB/SD Basic Operation
Most functions can be controlled from the source control screen and playback screen.
NOTE• Set the remote controller mode switch to AUD
mode before starting operation, see Switch the operation mode (P.86).
Control screen
5
6
4
3
1
2
Open the drawer
763
63
1 [CODEC]
When a high-resolution source is played, its format information is displayed.
2 Operation keys
• 1] : Searches track/file. For details on search operation, see Search Operation (P.29).
• E] [F] : Searches the previous/next track/file.Touch and hold to fast forward or fast backward. (It will be cancelled automatically after about 50 seconds.)
• [DH] : Plays or pauses.• [ ] : Displays the Graphic Equalizer screen.
(P.76)
• [ ] : Repeats the current track/folder. Each time you touch the key, repeat modes are switched in the following sequence:File repeat ( ), Folder repeat ( ), Repeat all ( )
• [ ] : Randomly plays all tracks in the current folder. Each time you touch the key, random modes are switched in the following sequence:Folder random ( ), Random off ( )
3 Content list
• Touch the left side of the screen to display the Content list. Touch again to close the list.
• Displays the playing list. When you touch a track/file name on the list, playback will start.
4 Track information
Displays the information on the current file. Only a file name and a folder name are displayed if there is no tag information.
5 Play mode indicator/Playing time
• D, B, etc.: Current play mode indicatorMeanings of individual icons are as follows:D (play), B (fast forward), A (fast backward), H (pause).
• For confirmation of current playing position. You can drag the circle left or right to change the playing position.
6 Function panel
Touch the right side of the screen to display the function panel. Touch again to close the panel.
• [ ] [ ] : Searches for the previous/next folder.
7 Artwork
The jacket of the currently playing file is displayed.

USB/SD
29English
Video screen
9
88
8 File search area (Video file only)
Touch to search for the next/previous file.
9 Key display area (Video file only)
Touch to display the control screen.
Search Operation
You can search music or video files by the following operations.
1 Touch [1].
2 Touch [S].
3 Select a list type.
NOTE• For operations on the list screen, see List screen
(P.14).
Ñ Category searchYou can search for a file by selecting a category.
1 Touch [Category List].
2 Select whether you search audio files or video files .
3 Touch the desired category.
hh The list corresponding to your selection appears.
4 Touch to select the desired item in the list. Repeat this step until you find the desired file.

USB/SD
30
Ñ Link search (Audio file only)You can search for a file of the same artist/album/genre as that in the current track.
1 Touch [Link Search].
2 Touch the desired tag type. You can select from artists, albums and genres.
hh The list corresponding to your selection appears.
3 Touch the desired item in the content list.
Ñ Folder searchYou can search for a file according to hierarchy.
1 Touch [Folder List].
2 Touch the desired folder.
When you touch a folder its contents are displayed.
3 Touch to select your desired item in the list. Repeat this step until you find the desired file.

iPod/iPhone
31English
iPod/iPhone
Preparation
Ñ Connectable iPod/iPhoneThe following models can be connected to this unit.Made for
• iPhone XS Max• iPhone XS• iPhone XR• iPhone X• iPhone 8 Plus• iPhone 8
• iPhone 7 Plus• iPhone 7• iPhone SE• iPhone 6s Plus• iPhone 6s• iPod touch (6th
generation)
NOTE• Latest compatible list of iPod/iPhone. For details,
see www.kenwood.com/cs/ce/ipod/.• By connecting your iPod/iPhone to this unit with
the iPod connection cable KCA-iP103 (optional accessory), you can supply power to your iPod/iPhone as well as charge it while playing music. Note that the power of this unit must be held on.
• If you restart playback after connecting the iPod, the music that has been played by the iPod is played first.
Ñ Connect iPod/iPhone
Wired connection
Preparation• Connect an iPod/iPhone with the KCA-iP103
(optional accessory) while Apple CarPlay is not connected.
• With an iPhone compatible with Apple CarPlay, turn off Apple CarPlay by operating the iPhone at functional setup before connecting iPhone. For details of the setup method, contact the manufacturer of the terminal.
• Plug the iPod/iPhone into the USB terminal with the KCA-iP103 (optional accessory).
• Only one iPod/iPhone can be connected.
1 Connect the iPod/iPhone using the KCA-iP103. (P.100)
2 Press the [HOME]/[ ] button.
3 Touch [ ].
4 Touch [iPod]. (P.12)
● To disconnect the iPod/iPhone connected with the cable:
1 Detach the iPod/iPhone.
Bluetooth connectionPair the iPhone through Bluetooth.
Preparation• To connect an iPhone via Bluetooth, register it
as a Bluetooth device and do the profile setting for the connection beforehand. See Register the Bluetooth device (P.52) and Switch the connected device (P.53).
• Connect an iPhone via Bluetooth while Apple CarPlay and an iPod/iPhone are not connected via USB.
• With an iPhone compatible with Apple CarPlay, turn off Apple CarPlay by operating the iPhone at functional setup before connecting iPhone. For details of the setup method, contact the manufacturer of the terminal.
● Select the method of making connections for outputting sound from the iPod source
1 Press the [HOME]/[ ] button.
2 Touch [ ].
3 Touch [SETUP].hh SETUP Menu screen appears.
4 Touch [Connections & AV].hh Connections & AV setting menu appears.
5 Touch [iPod Bluetooth Connection].[Bluetooth] (Default): Output sound using a
Bluetooth device.[Bluetooth+HDMI]: Output sound using an
HDMI device and perform music selection, etc. using a Bluetooth device.

iPod/iPhone
32
iPod/iPhone Basic Operation
NOTE• Set the remote controller mode switch to AUD
mode before starting operation, see Switch the operation mode (P.86).
Control screen
4
2
3
1
Open the drawer
2
5
1 Operation keys
• 1] : Searches for a track/file. For details on search operation, see Search Operation (P.33).
• E] [F] : Searches for the previous/next track/file.Touch and hold to fast forward or fast backward. (It will be cancelled automatically after about 50 seconds.)
• [DH] : Plays or pauses.• [ ] : Displays the Graphic Equalizer screen.
(P.76)• [ ] : Repeats the current track/album. Each
time you touch the key, repeat modes are switched in the following sequence:Song repeat ( ), All songs repeat ( ), Repeat off ( )
• [ ] : Randomly plays all tracks in the current album. Each time you touch the key, random modes are switched in the following sequence:Song random ( ), Random off ( )
2 Content list
• Touch the left side of the screen to display the Content list. Touch again to close the list.
• Displays the playing list. When you touch a track/file name on the list, playback will start.
NOTE• The Content list is not displayed unless you select
a file from the category list and play it. To use the category list, see Search Operation (P.33).
3 Track information
• Displays the information on the current file.• Touch to display the category list screen. See
Category search (P.33).
4 Play mode indicator/Playing time
• D, B, etc.: Current play mode indicatorMeanings of individual icons are as follows:D (play), B (fast forward), A (fast backward), H (pause).
• For confirmation of current playing position. You can drag the circle left or right to change the playing position.
5 Artwork
The jacket of the currently being played file is displayed.

iPod/iPhone
33English
Search Operation
You can search music files by the following operations.
1 Touch [1].
2 Touch [S].
3 Select a list type.
NOTE• For operations on the list screen, see List screen
(P.14).
Ñ Category searchYou can search for a file by selecting a category.
1 Touch [Category List].
2 Touch the desired category.
hh The list corresponding to your selection appears.
3 Touch to select the desired item in the list. Repeat this step until you find the desired file.
Ñ Link searchYou can search for a file of the same artist/album/genre/composer as that in the current track.
1 Touch [Link Search].
2 Touch the desired tag type. You can select from artists, albums, genres and composers.
hh The list corresponding to your selection appears.
3 Touch the desired item in the content list.

HD Radio™ Tuner
34
HD Radio™ Tuner
HD Radio Tuner Basic Operation
Most functions can be controlled from the source control screen.To listen to the HD Radio source, touch [HD Radio] icon on the source selection screen. (P.12)
NOTE• Set the remote control mode switch to AUD
mode before starting operation, see Switch the operation mode (P.86).
• HD Radio broadcasting is for North American sales area only.
Control screen
4
2 5
1
3
Open the drawer
7
5
2 6
8
9
52
1 Operation keys
• [E] [F] : Tunes in a station. The method of switching frequencies can be changed (see 4 Seek mode).
• [CHS] [CHR] : Selects a channel.• [1] : Display the Channel List screen. See
Channel search (P.37).
• [ ] : Display a list of registered bookmarks. See Bookmark list (P.38).
• [ ] : Displays the Graphic Equalizer screen. (P.76)
2 Preset list
• Touching [ ]/[ ] allows you to change the display size.
• Recalls the memorized station or channel. • When touched for 2 seconds, stores the
currently being received station or channel in the memory.
3 Band keys
Switches bands (between FM and AM).
4 Seek mode
Touch to switch seek mode in the following sequence: [AUTO1], [AUTO2], [MANUAL].• [AUTO1]: Tunes in a station with good
reception automatically.• [AUTO2]: Tunes in the memorized stations one
after another.• [MANUAL]: Switches to the next frequency
manually.
5 Function panel
Touch the right side of the screen to display the function panel. Touch again to close the panel. • [10key Direct]: Display the direct station/
channel search screen. For details, see Direct search (P.37).
• [AME]: Presets stations automatically. For details, see Auto memory (P.36).
• [RCV]: Change the HD Radio reception mode. For details, see Receive Mode (P.36).
• [PTY] (FM only): Searches for a program by program type. For details, see Search by program type (P.37).
• [ ] : Stores the information about the song being received. See Bookmark (P.38).

HD Radio™ Tuner
35English
• [Emergency Alerts] : Turn on or off the alert message. See Alert Message (P.19).
• [Alert Message Log] : Displays the alert message received. See Alert Message (P.19).
6 Picture
• The picture data or station Logo data is displayed if available from current content.
7 Information display
• Displays the information on the current station: Frequency and ChannelTouching [ ] allows you to switch between Content A, Content B and Content C.Content A: Station name, Song Title, Artist NameContent B: Station Message, Radio TextContent C: PTY Genre, Album Name
8 Indicator Items
• [MC]: A multicast digital broadcast is being received.
• [EA]: White: Emergency Alert is on.No light: Emergency Alert is off.Orange: Interrupting or in snooze/ignore
state.• [ST]: A stereo broadcast is being received.
9 Indicator display
While receiving an HD Radio station, it lights with orange when the audio is digital and lights with gray when it is analog. While receiving an analog station, it is off.
• Adjacent to traditional main stations are HD2/HD3 Channels, providing new original programming on the FM dial
• A music & product discovery feature that enables users to store information about content on the radio, and can deliver interactive information via QR codes
• Crystal clear, CD-like digital audio quality to consumers; eliminates background noise
• Provides song name, artist, station ID, and other relevant data to enrich the listening experience
• Visual images, such as album art of over-the-air broadcasts from HD Radio stations
• Delivers critical and life-saving messages to the public during emergency situations

HD Radio™ Tuner
36
Receive Mode
You can set the radio broadcasts receive mode.
1 Touch [ ] on the right side of the screen. Touch [RCV].
2 Select a receive mode.
■ [Auto]Switch between digital and analog audio automatically.
■ [Digital]Select this to tune to digital audio only.
■ [Analog]Select this to tune to analog audio only.
Memory Operation
Ñ Auto memoryYou can store stations with good reception in the memory automatically.
1 Touch desired band key.
2 Touch [ ] on the right side of the screen. Touch [AME].
3 Touch [Yes].
hh Auto memory starts.
Ñ Manual memoryYou can store the currently being received station or channel in the memory.
1 Select the station or channel you wish to store in the memory.
2 Touch [FM#] (#:1-15) or [AM#] (#:1-5) in which you want to store the station or channel for 2 seconds until a beep sounds.
Selecting Operation
Ñ Preset selectYou can list and select memorized stations or channels.
1 Touch [ ] on the left side of the screen. Select a station or channel from the list.

HD Radio™ Tuner
37English
Ñ Direct searchYou can tune in by entering the desired frequency or channel number.
1 Touch [ ] on the right side of the screen. Touch [10key Direct].
2 Select the search method.
3 Enter the frequency or channel number.
4 Touch [Enter].
NOTE• To clear the number you entered, touch [BS].
Ñ Channel searchYou can specify the desired channel.
1 Touch [1].
2 Select the desired content from the list.
NOTE• Touch [Info Change] in the channel list. Select
the sequence of the list (Song title, artist name, album name).
Ñ Search by program type (FM only)
You can tune in the station broadcasting the specified type of program when listening to FM.
1 Touch [ ] on the right side of the screen. Touch [PTY].
hh TUNER PTY Mode screen appears.
2 Select a program type from the list.
3 Touch [Search].
You can search for the station broadcasting the selected type of program.

HD Radio™ Tuner
38
Bookmark
Stores tag information (title, artist, album, URL, and description) about the song you are listening to now.Detailed information and QR codes can be displayed according to the stored tag information.
Ñ Bookmark registration
1 Touch [ ] on the right side of the screen. Touch [ ].
hh Registers a bookmark.
NOTE• Up to 100 bookmarks can be registered to this
unit.
Ñ Bookmark listDisplaying a list of registered bookmarks and detailed information and QR code of the song.
1 Touch [ ].
2 Select the desired bookmark from the list.
hh The bookmark information appears.
■ [ Delete]Deletes the bookmarks being displayed.Touch [Delete] and then touch [YES] on the confirmation screen.
Bookmark deleteDeleting a bookmark.
1 Touch [Delete].
2 Select the bookmark to delete from the list.
■ [þ All]Select all bookmarks.
■ [¨ All]Erases all check marks.
3 Touch [Delete].hh Confirmation message appears.
4 Touch [Yes].hh All the selected bookmark(s) is deleted.

SiriusXM®
39English
SiriusXM®
SiriusXM® Basic Operation
Only SiriusXM® brings you more of what you love to listen to, all in one place. Get over 140 channels, including commercial-free music plus the best sports, news, talk, comedy and entertainment. Welcome to the world of satellite radio. A SiriusXM Vehicle Tuner and Subscription are required. For more information, visit www.siriusxm.com.To listen to the SiriusXM source, touch the [SiriusXM] icon on the source selection screen. (P.12)
Activating subscription• Check your Radio ID.
The SiriusXM Satellite Radio ID is required for activation and can be found by tuning in Channel 0 as well as on the label found on the SiriusXM Connect tuner and its package.The Radio ID does not include the letters I, O, S or F.
• Activate the SiriusXM Connect Vehicle Tuner using either one of the two methods below:
– For users in U.S.A. Online: Visit www.siriusxm.com/activatenow Phone: Call SiriusXM Listener Care at 1-866-635-2349
– For users in Canada: Online: Visit https://www.siriusxm.ca/help/activation-help/ Phone: Call XM customer Care at 1-877-438-9677
NOTE• Set the remote control mode switch to AUD
mode before starting operation, see Switch the operation mode (P.86).
• To use SiriusXM® Satellite Radio, the optional accessory is necessary.
Control screen
3
2 4
1
Open the drawer
6
42
7
5 8
42
1 Operation keys
• [1] : Display the Category search screen. For details on search operation, see Category/Channel search (P.42).
• [CHS] [CHR] : Selects a channel.• [ ] : Displays the Graphic Equalizer screen.
(P.76)
2 Preset list
• Touching [ ]/ [ ] allows you to change the display size.
• Recalls the memorized channel. • When touched for 2 seconds, stores the
currently being received channel in the memory.

SiriusXM®
40
3 Information display
• Displays the information on the current channel: Channel NameP#: Preset number#CH: Channel numberLogo: Channel logoTouching [ ] allows you to switch between Content A, Content B and Content C. Content A: Artist Name, Song TitleContent B: Content Info, Category NameContent C: Channel Description, Similar Channels[ ] : Touch for 2 seconds to register the artist of the current song as a Content Alert.[ ] : Touch for 2 seconds to register the current song as a Content Alert.For details, see Content Alerts (P.44).
NOTE• While getting contents, "Waiting" is showing on
the display.
4 Function panel
Touch the right side of the screen to display the function panel. Touch again to close the panel. • [Direct Channel]: Touch and enter the
desired number. For details, see Direct search (P.41).
• [SETUP]: Touch to display the SiriusXM SETUP screen. For details, see SiriusXM SETUP (P.45).
• [Replay]/[Live]: Touch to turn on or off the replay mode. See Replay (P.42).
• [Traffic & Weather]For SXV300 *1
Traffic & Weather Now™ allows you to access the latest report whenever you want to hear it. Select your city from the set up menu (see Select a City for Traffic & Weather (P.50)) and touch [Traffic & Weather] to check the latest report. It will start from the beginning.• (White) : Played already.• (Green) : New information arrived. • (Purple) : Playing. • (Gray) : No information.
For SXV200 or SXV100 *2
Turns the Traffic & Weather Jump function on or off.• (White) : Function on.• (Purple) : Playing. • (Gray) : Function off.
• [TuneScan]*3 : Allows you to hear a few seconds of songs from each of the SmartFavorite music channels on the current preset band. See TuneScan™ (P.43).
• [TuneMix]*4 : When turned ON, shuffles the preset channels on P1-P6 to play a blend of songs from your favorite channels. See TuneMix™ (P.43).
• [SportsFlash]*4 : Displays during SportsFlash™. Touch to cancel the SportsFlash™ function and return to the previous channel. See SportsFlash™ (P.45) and SportsFlash™ setup (P.49).
*1 Compatible with SXV300 or later tuner models. It may take a few minutes after power on to get the first full report on your city. Traffic channels are not available in Canada.
*2 When SXV200 or SXV100 is connected with this unit.
*3 Compatible with SXV200 or later tuner models.*4 Compatible with SXV300 or later tuner models.
5 Indicator display
Displays the “Mix” (TuneMix™), “Scan” (TuneScan™), (Traffic&Weather), or
(SportsFlash™) indicator and the received signal strength of the SiriusXM tuner.
6 Seek mode
Touch to switch seek mode.• [SEEK1]: Tunes in a station with good
reception automatically.• [SEEK2]: Tunes in the memorized stations one
after another.
7 Band key
Switches among bands. (SXM1/SXM2/SXM3/SXM4)
8 Artwork
Displays the album artwork for most SiriusXM music channels

SiriusXM®
41English
Storing Channels in Preset Memory
You can store the current channel in memory.
1 Tune in the channel you wish to store in the memory.
2 Touch [ ] on the left side of the screen.
3 Touch [SXM(1-4) P(1-6)] in which you want to store the channel for 2 seconds until a beep sounds.
Preset select
You can list and select memorized channels.
To select from the preset list
1 Touch [ ] on the left side of the screen. Select a channel from the list.
Direct search
You can tune in a channel directly.
1 Touch [ ] on the right side of the screen. Touch [Direct Channel].
2 Enter the channel number and touch [Enter].
NOTE• To clear the number you entered, touch [BS].

SiriusXM®
42
Category/Channel search
You can specify the desired category and select a channel.
1 Touch [1].
2 Select a category.
hh Channel list appears.
3 Select the desired content from the list.
NOTE• All channels in the selected category appear.• Touching [All-Channels] displays all channels.• Touch [Info Change] in the channel list. Select a
desired item:content info, channel name, artist name, song title, category name.
• Categories which have the prefix “Featured - “ are Featured Favorites.
• Featured Favorites are groups of channels that are created by the SiriusXM Programming department allowing you to discover new channels. Featured Favorite channels are dynamic and can change often, allowing you to discover new channels.
– You can set whether to be notified when the featured seasonal theme is updated. (P.50)
Replay
You can replay the last 60 minutes of the program from the current channel.
1 Touch [Replay] on the function panel.
■ [E] [F]
Press to skip to the previous/next track.Press and hold to rewind or fast forward. (It will be cancelled automatically after about 50 seconds.)
■ [DH]Plays or pauses.
■ Replay time bar/Play mode indicatorDisplays the recorded data capacity and playback position.D, B, etc.: Current play mode indicator
■ [1]Displays a list of recorded data on a program basis.
2 Touch [1] to display an Instant Replay List screen.
■ Instant Replay ListTouching this plays back the displayed program.[LIVE]: Touch to return to the live music/
content.
■ [Info Change]Touch [Info Change]. Select a desired item:content info, channel name, artist name, song title, category name.

SiriusXM®
43English
To return to live music/content
1 Touch [ ] on the right side of the screen.
2 Touch [Live].
TuneMix™
TuneMix™ plays a unique blend of songs from your Preset music channels of the current SiriusXM Preset Band, allowing you to build a custom channel from as few as two to as many as 6 music channels. You can even skip songs you don’t want to hear.
1 Touch [ ] on the right side of the screen. Touch [TuneMix] to set ON or OFF.
NOTE• Compatible with SXV300 or later tuner models.
SmartFavorites, TuneStart™
Preset channels 1 through 6 of the current band are SmartFavorites channels.The SiriusXM Vehicle Tuner automatically buffers the broadcast audio content of the SmartFavorites channels in the background.
You can rewind and replay up to 30 minutes of any of the missed news, talk, sports or music content on SmartFavorites channels. (See Replay (P.42).)
When tuning in a SmartFavorites channel, songs will be played from the beginning of each track (TuneStart™). You can enable/disable TuneStart. (See TuneStart™ (P.50).)
NOTE• Compatible with SXV200 or later tuner models.
TuneScan™
TuneScan™ is a feature that plays samples from the starts of multiple buffered songs from each of the SmartFavorites channels that predominantly play music selections.You have easy access to a large sampling of music content and can enjoy hearing a full song by stopping the scan on a song of interest.
1 Touch [ ] on the right side of the screen.
2 Touch [TuneScan] to begin scanning your SmartFavorites channels.You will hear a few seconds of the songs from each of the SmartFavorite channels.
3 While your favorite song is being played, touch [TuneScan] again to start listening to that song.
hh Scan finishes and the song is played continuously.
NOTE• To cancel TuneScan™, touch the right side of the
screen. Touch [TuneScan].• Touch and hold [TuneScan] to cancel TuneScan,
and the music/content which was present on the channel before starting TuneScan will be played.
• Compatible with SXV200 or later tuner models.

SiriusXM®
44
Traffic & Weather Now™
Traffic & Weather Now™ allows you to access the latest report whenever you want to hear it. First select your city in the set up menu. See Select a City for Traffic & Weather (P.50).
1 Touch [ ] on the right side of the screen.
2 Touch [Traffic & Weather].The report starts from the beginning. To stop and return to the previous channel, touch it again.Indicator display• (White) : Played already.• (Green) : New information arrived.• (Purple) : Playing.• (Gray) : No information.
NOTE• Compatible with SXV300 or later tuner models.
Content Alerts
When a broadcast program related to the registered artist, song or team starts, an Alert Content List screen appears to allow you to switch the current channel to the relevant channel.
1 When the broadcast of the registered content starts, an Alert Content List screen appears.
2 Select a content from the list.
NOTE• Touch [Type]. Select a desired item.
Artist Alert, Song Alert, GameAlert™• To learn how to register artists and songs for the
Content Alert function, see 3 Information display in SiriusXM® Basic Operation (P.39).
• To learn how to set up the Content Alerts function and select Teams for alerts, see Content Alerts setup (P.47).

SiriusXM®
45English
SportsFlash™
SportsFlash™ will notify you when a big play happens during a game with one of your favorite sports teams. Choose to tune in and hear the play unfold like it was live. Continue listening to the game or return to your previous channel.
1 When a big play happens during one of the games, an Alert screen appears.
■ [Listen]Touch to tune in that channel and play back the big play.
■ [Ignore]Touch to cancel this specific SportsFlash alert. Touching [Ignore] will ignore this specific alert but will allow future alerts for this game.
■ [Cancel]Touch to cancel SportsFlash alert. No alerts for this game will be displayed afterward.
NOTE• Compatible with SXV300 or later tuner models.• To learn how to set up the SportsFlash alert
function, see SportsFlash™ setup (P.49).
SiriusXM SETUP
1 Touch [ ] on the right side of the screen. Touch [SETUP].
hh SiriusXM SETUP screen appears.See the following sections for each setting.
• Set up the parental code (P.46)• Set up the Parental Control (P.46)• Set up the skip channel select (P.47)• Set up the Content Alerts (P.47)• Set up the teams for SportsFlash™
(P.49)• Select the city for Traffic & Weather Jump
or Traffic & Weather Now™ (P.50)• Select the Featured Bands Update
Messages (P.50)• Set up the TuneStart™ (P.50)• Reset to the default settings (P.50)

SiriusXM®
46
Ñ Parental codeYou can set a SiriusXM parental code for Parental Control.
1 Touch [Parental Code] on the SiriusXM SETUP screen.hh Parental Pass Check screen appears.
NOTE• The code number is set to “0000” as default.
2 Enter the current code number and touch [Enter].
hh Parental Pass 1st screen appears.
3 Enter the new code number and touch [Enter].
hh Parental Pass 2nd screen appears.
4 Enter the same code number as that you entered in step 3 and touch [Enter].hh The code number is confirmed and the SiriusXM parental code is now set.
Ñ Parental ControlParental Control is a feature that provides the user with the ability to prevent unauthorized access to mature content and user selected channels.
1 Touch [Parental Control] on the SiriusXM SETUP screen.
2 Touch [User], [Mature] or [OFF].
■ [User]Locks only the selected channels.
■ [Mature]Locks channels classified as “mature” only.
■ [OFF]Deactivates the parental mature and user locks.
3 Enter the parental code you originally input in as stated in Parental code (P.46) and touch [Enter].
When selecting [User]This allows you to limit access to any SiriusXM channel (Parental Lock Channel).
1 Touch [Parental Lock Channel Selection] on the SiriusXM SETUP screen.hh Parental Pass Check screen appears.
NOTE• You need to set up a parental code
beforehand as stated in Parental code (P.46).
2 Enter the parental code you originally input as stated in Parental code (P.46) and touch [Enter].hh Parental Lock Category Select screen appears.
3 Touch the desired category in the list.
hh Displays all channels in the selected category.

SiriusXM®
47English
NOTE• Touch [All-Channels] to display all channels.• To delete the parental lock channel setting,
touch [Disable All] and then touch [YES] on the confirmation screen.
4 Touch each channel on the list and set to ON or OFF.[ON]: Locks the channel.[OFF]: Unlocks the channel.
NOTE• Touch [Info Change]. Select a desired item:
content info, channel name, artist name, song title, category name.
Ñ Skip channel selectYou can set the undesired channels to skip.
1 Touch [Skip Channel Select].hh Skip Category Select screen appears.
2 Touch the desired category from the list.
hh Displays all channels in the selected category.
3 Touch each channel in the list and set to ON or OFF.
NOTE• To delete the skip channel setting, touch [Disable All] and then touch [YES] on the confirmation screen.
• Touch [Info Change]. Select a desired item:content info, channel name, artist name, song title, category name.
• Direct Channel and Preset Memory functions allow you to select channels.
Ñ Content Alerts setup
Activating content alert
1 Touch [Content Alerts] on the SiriusXM SETUP screen.hh Content Alerts is turned on or off. Default is “ON”.
Selecting the content for Content Alerts
1 Touch [Content Alerts Contents Set] on the SiriusXM SETUP screen.
2 Select the content you want to set up.
NOTE• To cancel all alert contents, touch [Clear] and
then touch [YES] on the confirmation screen.• Select [OFF] for the content you want to
deactivate the content alert for.
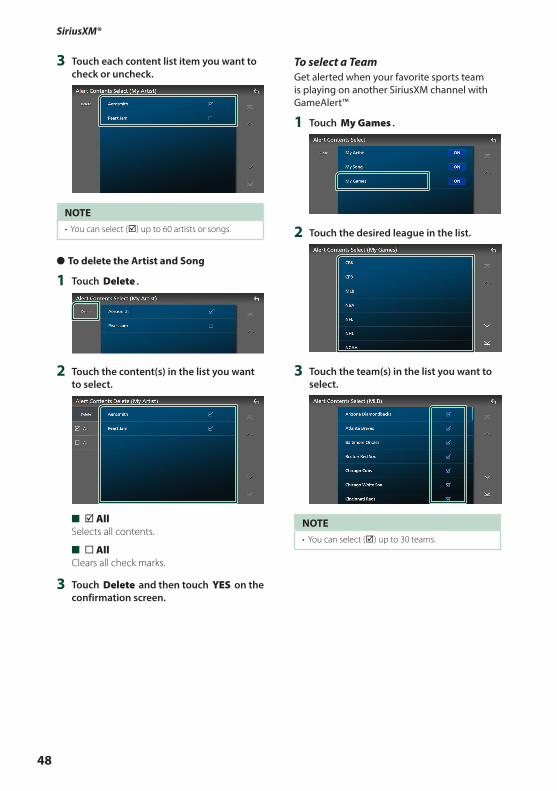
SiriusXM®
48
3 Touch each content list item you want to check or uncheck.
NOTE• You can select (þ) up to 60 artists or songs.
● To delete the Artist and Song
1 Touch [Delete].
2 Touch the content(s) in the list you want to select.
■ [þ All]Selects all contents.
■ [¨ All]Clears all check marks.
3 Touch [Delete] and then touch [YES] on the confirmation screen.
To select a TeamGet alerted when your favorite sports team is playing on another SiriusXM channel with GameAlert™
1 Touch [My Games].
2 Touch the desired league in the list.
3 Touch the team(s) in the list you want to select.
NOTE• You can select (þ) up to 30 teams.

SiriusXM®
49English
Ñ SportsFlash™ setup
Activating SportsFlash
1 Touch [SportsFlash] on the SiriusXM SETUP screen.hh SportsFlash is turned on or off. Default is “ON”.
Selecting SportsFlash Beep
1 Touch [SportsFlash Beep] on the SiriusXM SETUP screen.hh SportsFlash Beep is turned on or off. Default is “ON”.
Selecting the teams for SportsFlash
1 Touch [SportsFlash Team Set] on the SiriusXM SETUP screen.hh Team Set screen appears.
2 Touch [Edit].
3 Touch the desired league in the list.
4 Touch each team(s) in the list you want to select.
5 Touch [ ] twice.
■ [Edit]Sets and removes teams.
■ [Priority]Sets the priority of a team.
■ [Clear]Removes all teams that have been set. Touch [Clear]. When the confirmation screen appears, touch [YES].
NOTE• SportsFlash™ is available on SXV300 or later tuner
models. • Up to 50 teams can be added.
Set the SportsFlash™ Team Priority
1 Touch [Priority].
2 Set the priority of a team. Each time you touch a Team, the priority is set of reset.

SiriusXM®
50
3 Touch [Done].
NOTE• Priority can be set on up to 5 teams. • When priority has already been set for 5 teams,
it cannot be set for any other team. Delete an unnecessary team.
Ñ Select a City for Traffic & Weather
You can select a city for which you wish to receive SiriusXM Traffic & Weather broadcasts and hear them from the beginning.
1 Touch [Traffic & Weather City Select] on the SiriusXM SETUP screen.
2 Touch [T] and [U] to select a city.
3 Touch [Close].
Ñ Selecting Featured Bands Update Messages
You can set whether to be notified when the featured seasonal theme is updated.
1 Touch [Featured Bands Update Messages] on the SiriusXM SETUP screen.Featured Bands Update Messages is turned on or off.
Ñ TuneStart™
1 Touch [Tune Start] on the SiriusXM SETUP screen.The TuneStart is turned on or off.Default is “ON”.
Ñ Reset
1 Touch [SiriusXM Reset] on the SiriusXM SETUP screen.hh Confirmation screen appears.
2 Touch [YES].hh All SiriusXM settings are reset to defaults.

Bluetooth Control
51English
Bluetooth ControlUsing the Bluetooth function allows you to use various functions such as listening to the audio file and making/receiving a call.
Information for using Bluetooth® devices
Bluetooth is a short-range wireless radio communication technology for mobile devices such as smartphones/cell-phones, portable PCs, and other devices.Bluetooth devices can be connected without cables and communication with each other.
NOTE• While driving, do not perform complicated
operations such as dialing numbers, using the phonebook, etc. When you perform these operations, stop your car in a safe place.
• Some Bluetooth devices may not be connected to this unit depending on the Bluetooth version of the device.
• This unit may not work for some Bluetooth devices.
• Connecting conditions may vary depending on your environment.
• Some Bluetooth devices are disconnected when this unit is turned off.
• The Bluetooth devices cannot be used while using Apple CarPlay.
• The Bluetooth currently connected with other device is disconnected when an iPhone compatible with Apple CarPlay is connected.
Ñ About the smartphone/cell-phone and Bluetooth audio player
This unit conforms to the following Bluetooth specifications:
VersionBluetooth Ver. 5.0
ProfilesSmartphone/Cell-phone:HFP (V1.7) (Hands Free Profile)SPP (Serial Port Profile) PBAP (Phonebook Access Profile)
Audio player:A2DP (Advanced Audio Distribution Profile)AVRCP (V1.6) (Audio/Video Remote Control Profile)
Sound codecLDAC, SBC, AAC
NOTE• The units supporting the Bluetooth function have
been certified for conformity with the Bluetooth Standard according to the procedure prescribed by Bluetooth SIG.
• However, it may be impossible for such units to communicate with your smartphone/cell-phone depending on its type.

Bluetooth Control
52
Register the Bluetooth device
It is necessary to register the Bluetooth audio player or smartphone/cell-phone in this unit before using the Bluetooth function.You can register up to 10 Bluetooth devices.
NOTE• Up to 10 Bluetooth devices can be registered. If
an attempt is made to register the 11th Bluetooth device, the Bluetooth device connected on the earliest date will be deleted to register the 11th one.
• This unit is compatible with the Apple Easy Pairing function. When an iPod touch or iPhone connected via USB terminal previously is connected again, an authentication dialog appears. Performing operation for authentication on this unit, or iPod touch or iPhone registers the smartphone as a Bluetooth device.
1 Press the [HOME]/[ ] button.
2 Touch [ ].
3 Touch [SETUP].hh SETUP Menu screen appears.
4 Touch [Connections & AV].
5 Touch [Device List].
6 Select a device type.
■ [Bluetooth]To connect as Bluetooth Hands-Free and Bluetooth audio source.
■ [Apple CarPlay]To connect as Apple CarPlay source.
■ [Android Auto]To connect as Android Auto source.
7 Touch [ ].hh Bluetooth pairing waiting dialog appears.
NOTE• If an Apple CarPlay device is currently connected,
the Apple CarPlay device will be disconnected.• When neither Apple CarPlay, Android Auto, nor
a Bluetooth Hands-Free phone is connected, pressing and holding the [VOICE] button displays Bluetooth pairing waiting dialog.
8 Search for the unit (”DNR1007XR”) from your smartphone/cell-phone.Complete steps 8 to 10 within 30 seconds.
9 Operate your smartphone/cell-phone according to the displayed messages.
● Confirm the request both on the smartphone/cell-phone.
● Input the PIN Code in your smartphone/cell-phone.
PIN Code is set to “0000” as the default.

Bluetooth Control
53English
10 Touch [Yes].When data transmission and connection have completed, the Bluetooth connection icon appears on the screen.
NOTE• When registering the iPhone that is available for
Apple CarPlay wirelessly, a confirmation message appears.
– [Yes]: Displays the Apple CarPlay screen for wireless connection.
– [No]: Apple CarPlay is not connected. When using Apple CarPlay, see Select an Apple CarPlay device (P.23).
Ñ Switch the connected deviceIf two or more Bluetooth devices have been registered, select the device to be used.
1 Touch [Device List] in the Connections & AV setting menu.
2 Select the device type.
■ [Bluetooth]To connect as Bluetooth Hands-Free and Bluetooth audio source.
■ [Apple CarPlay]To connect as Apple CarPlay source.
■ [Android Auto]To connect as Android Auto source.
3 Touch the name of the device you want to connect.
NOTE• If the icon is lighted, it means that the unit will
use that device.• If you touch the device name with the icon
on the list of Apple CarPlay devices, it will be disconnected.
• You can quickly display the Device List screen by touching [ ] in the popup menu. (P.11)
To switch the connected device to a Bluetooth device
1 Touch [Bluetooth] on the Device List screen.hh Bluetooth device list appears.
2 Touch the name of the Bluetooth device you want to connect.
3 Set each profile as follows.
■ [TEL (HFP) 1], [TEL (HFP) 2]Select when the device is connected with the unit as Hands-Free phone 1 or 2.
■ [Audio (A2DP)/App (SPP)]Select to use as an audio player or to interwork with an application installed in a smartphone.
4 Touch [Close].
To delete the registered deviceYou can delete the device that is registered as Bluetooth source or Apple CarPlay source.When you delete a Bluetooth device which supports Android Auto, the device is also deleted from the Android Auto device list.
1 Touch [ ] on the Device List screen.

Bluetooth Control
54
2 Touch the device name to check.
■ [þ All]Selects all Bluetooth devices.
■ [¨ All]Clears all check marks.
NOTE• You cannot select a device currently connected. • When you select Android Auto tab, is not
displayed.
3 Touch [Delete].hh Confirmation message appears.
4 Touch [Yes].hh All the selected device(s) is deleted.
Bluetooth Setup
NOTE• The Bluetooth Setup is disabled while using
Apple CarPlay.
1 Press the [HOME]/[ ] button.
2 Touch [ ].
3 Touch [SETUP].hh SETUP Menu screen appears.
4 Touch [Connections & AV].
hh Connections & AV setting menu appears.
5 Touch [Bluetooth] and set to [ON].See the following section for each setting.• Change the PIN Code (P.54)• Change the device name (P.54)• Change the settings for Hands-Free
function, see Hands-Free Setup (P.62).
NOTE• For the other setting items on this screen, see
Connections & AV Setup (P.68).
Ñ Change the device name
1 Touch [Device Name] in the Connections & AV setting menu.hh Change Device Name screen appears.
2 Touch and hold [ ].
3 Input the device name.
4 Touch [Enter].
Ñ Change the PIN Code
1 Touch [PIN Code] in the Connections & AV setting menu.hh Change PIN Code screen appears.
2 Touch and hold [ ].
3 Input the PIN Code.
4 Touch [SET].

Bluetooth Control
55English
Playing the Bluetooth Audio Device
Most function can be controlled from the source control screen.To select Bluetooth source, touch [Bluetooth] icon on the source selection screen. (P.12)
NOTE• The Bluetooth audio source is disabled while
using Apple CarPlay.• The Bluetooth audio source is disabled when
the device set as Audio(A2DP)/App(SPP) is using Android Auto.
Ñ Bluetooth basic operationControl screen
2
3 5
1
6
4
1 Operation keys *
• [1]: Searches for a file. See File search (P.56).
• [E] [F]: Searches for the previous/next content.Touch and hold to fast forward or fast backward. (It will be cancelled automatically after about 50 seconds.)
• [D]: Plays.• [H]: Pauses.• [ ] : Displays the Graphic Equalizer screen.
(P.76)• [ ] : Repeats the current track/folder. Each
time you touch the key, repeat modes are switched in the following sequence:File repeat ( ), Folder repeat ( ), All songs repeat ( ), Repeat off ( )
• [ ] : Randomly plays all tracks in the current folder. Each time you touch the key, random modes are switched in the following sequence:Folder random ( ), All random ( ), Random off ( )
2 Information display *
• Displays the name of track information. • Connected device name.
3 Play mode indicator/Playing time
D, H: Current play mode indicatorMeanings of individual icons are as follows:D (play), B (fast forward), A (fast backward), H (pause), I (stop).
4 CODEC
When an LDAC-compatible device is connected, "LDAC" is displayed.
5 [ ]
Displays the Connections & AV setting menu. (P.54)
6 KENWOOD Music Mix
Bluetooth audio devices can be switched easily to play music. See KENWOOD Music Mix (P.56).
* These items appear only when the audio player which supports AVRCP profile is connected.
NOTE• The operation keys, indications and information
displayed on the screen differ depending on the connected device.
• If the operation keys do not appear, operate from the player.
• Depending on your smartphone/cell-phone or audio player, sound may be heard and controlled but text information may not appear.
• If the volume is too low, raise it on your smartphone/cell-phone or audio player.
• It is recommended that you change the playback quality from "priority on sound quality" to "priority on stable connection" in the settings of your LDAC-compatible device so that the intermittent sound problem is less likely to occur.

Bluetooth Control
56
Ñ KENWOOD Music MixUp to 5 Bluetooth audio device can be connected and switched easily to play music.
1 Touch [ ].hh A list of registered devices is displayed.
2 Touch [ ] of device name you want to connect.• Touching [ ] displays the Device List
screen. (P.53)• Touching [ ] on the left of the
connected device ([ ]) disconnects this device.
• : Device used normally.• : Device used for KENWOOD Music Mix
3 Touch [ ] (White/dark blue background) on the left of the name of the device to be played.The background changes from dark to light blue and starts playback.
• (Gray) : Not connected.• (White/dark blue background) :
Connected.• (White/light blue background) : During
playback.
4 Touch [ ].
NOTE• If a connected Bluetooth audio device is operated
to play music, connections are switched.• When a Bluetooth source is switched to another
one, its settings are deleted and the connection is restored to the connection before source switching.
• You cannot select an Android smartphone connected as an Android Auto device.
Ñ File search
1 Touch [1].
2 Touch the desired file or folder.
When you touch a folder its contents are displayed.
3 Touch the desired item in the content list.hh Playback starts.
NOTE• For operations in the list screen, see List screen
(P.14).

Bluetooth Control
57English
Using the Hands-Free Unit
You can use the telephone function by connecting the Bluetooth telephone to this unit.
NOTE• While Apple CarPlay or Android Auto is
connected, the Bluetooth Hands-Free function and two Bluetooth devices connections cannot be used. Only the Apple CarPlay or Android Auto Hands-Free function can be used.
Ñ Make a call
1 Press the [HOME]/[ ] button.
2 Touch [ ].
3 Touch [TEL].
hh Hands-Free screen appears.
NOTE• If your smartphone/cell-phone supports PBAP,
you can display the phonebook and call lists onto the touch panel screen when the smartphone/cell-phone is connected.
– Phonebook: up to 1000 entries – Up to 50 entries including dialed calls, received calls, and missed calls
4 Select a dialing method.
• [ ]: Call using call records• [ ]: Call using the phonebook• [ ]: Call using the preset number• [ ]: Call by entering a phone number
● Select the smartphone/cell-phone to useWhen you connect two smartphones/cell-phones1) Touch [ ] to select the phone
you want to use.
● Bluetooth Setup1) Touch [ ].
Connections & AV setting menu appears. (P.54)
● Voice Recognition1) Touch [ ]. (P.59)
NOTE• Status icons such as battery and antenna
icons may differ from those displayed on the smartphone/cell-phone.
• Setting the smartphone/cell-phone in the private mode can disable the Hands-Free function.

Bluetooth Control
58
Call using call records
1 Touch [ ].
2 Select the phone number from the list.
Call using the phonebook
1 Touch [ ].
2 Touch [ ].
3 Select the initial.
• Characters with no corresponding name will not appear.
• A first character with an accent character such as “ü” can be searched for with a non-accent character “u” . A character with an accent character in a sentence cannot be searched for.
4 Select the person you want to call from the list.
5 Select the phone number from the list.
NOTE• You can sort the phone numbers in the list by last
name or first name. For details, see Hands-Free Setup (P.62).
• When Russian is selected in “Language Select” (P.72), you can switch between English keyboard and Russian keyboard.
• When Hebrew is selected in “Language Select” (P.72), you can switch between English keyboard and Hebrew keyboard.
• You can search with 3 initial letters on the English keyboard and 1 initial letter on the Russian / Hebrew keyboard.
Call using the preset number
1 Touch [ ].
2 Touch the name or phone number.

Bluetooth Control
59English
Call by entering a phone number
1 Touch [ ].
2 Enter a phone number with number keys.
3 Touch [ ].
Ñ Voice RecognitionYou can access the voice recognition function of the smartphone/cell-phone connected to this unit. You can search the smartphone/cell-phone phonebook by voice. (The functionality depends on the smartphone/cell-phone.)
1 Press the [VOICE] button.
hh Voice Recognition screen appears.
2 Start speaking.
NOTE• You can use the voice recognition function by
touching [ ] on the Hands-Free screen.• You can use the voice recognition function for
the connected the smartphone/cell-phone if you selected [TEL (HFP) 1] or [TEL (HFP) 2] for HFP when registered.
Ñ Receive a call
1 Touch [ ] to answer a phone call or
[ ] to reject an incoming call.
NOTE• When shifting the gear to the reverse (R) position
and monitoring the picture from the rear view camera, this screen does not appear even if a call comes in.
• The portrait registered in the phonebook is displayed while making / receiving calls and during a call.
• If you edit the phonebook on the connected device side after downloading the phonebook, the portrait may not be displayed depending on the edited content. It is recommended that you download the phonebook whenever you edit it.
• The image quality of a displayed portrait may depends on a connected device.
To end call
1 While talking, touch [ ].

Bluetooth Control
60
Ñ Operations during a call
● Adjust the volume of your voice 1) Touch [Speech Quality].2) Touch [T] or [U] for [Microphone Level].
● Adjust the receiver volumeTurn the volume knob clockwise to increase, and counter-clockwise to decrease.
● Mute your voice
Touch [ ] to mute or not to mute your voice.
● Output the dial toneTouch [DTMF] to display the tone input screen.You can send tones by touching desired keys on the screen.
● Switching between speaking voice output destinations
Touching [ ]/[ ] each time switches speaking voice output destinations between the smartphone/cell-phone and the speaker.
● Call-waitingWhen you receive a new call while talking on the phone, you can answer the newly received call by touching [ ]. The current call is put on hold.
Each time you touch [ ], the caller will change to the other one.When you touch [ ], the current call will end to be switched to the call waiting on hold.
● Switching between the Hands-Free screen and the navigation screen
Press the [NAV]/[CAMERA] button to switch between the Hands-Free screen and the navigation screen.

Bluetooth Control
61English
Ñ Phone number presetYou can register frequently used phone numbers in this unit.
1 Touch [ ].
2 Touch [Edit].
3 Select where to preset.
■ [Delete all]To delete all preset numbers, touch [Delete all] and then touch [Yes] on the confirmation screen.
4 Select how to preset.
■ [Add number from phonebook]Select the number to preset from the phonebook.
■ [Add number direct]Enter the telephone number directly and touch [SET].
■ [Delete]To delete a preset number, touch [Delete] and then touch [OK] on the confirmation screen.
Ñ Phonebook transferYou can transfer phonebook data from your Bluetooth smartphone using PBAP.
1 Touch [ ].
2 Touch [ ].
hh Phonebook data transfer starts.
NOTE• If the Phonebook contains more than 1000
entries, only 1000 entries are transferred. The 1001st and later entries are not transferred.
• If no Phonebook has been downloaded, touching [Download Phonebook Now] will start downloading the Phonebook.
• The portrait registered in the phonebook is displayed while making / receiving calls and during a call.If you edit the phonebook on the connected device side after downloading the phonebook, the portrait may not be displayed depending on the edited content. It is recommended that you download the phonebook whenever you edit it.
Phonebook deletion
1 Touch [ ].
2 Touch the name to check.
■ [þ All]Checks all boxes.
■ [¨ All]Clears all check marks.
3 Touch [Delete].hh Confirmation message appears.
4 Touch [Yes].

Bluetooth Control
62
Hands-Free Setup
You can make various settings for the Hands-Free function.
1 Press the [HOME]/[ ] button.
2 Touch [ ].
3 Touch [SETUP].hh SETUP Menu screen appears.
4 Touch [Connections & AV].
hh Connections & AV setting menu appears.
5 Touch [TEL SETUP].hh TEL SETUP screen appears.
6 Set each function as follows.
■ [Bluetooth HF/Audio]Select the speakers to output the sound from the smartphone/cell-phone (such as phone call voice and ringing tone) and Bluetooth audio player.[Front]: Outputs sound from the front
speakers.[All ](Default): Outputs sound from all
speakers.
■ [Auto Response]*Set the automatic response time to pick-up an incoming call.[OFF ](Default): Turns off the Automatic
response function.[1]/[5]/[10]/[15]/[20]/[25]/[30]: Sets the ringing
time (second).
■ [Auto Pairing]When set to “ON”, the Apple Auto Pairing function is turned on to automatically register the iPod touch or iPhone connected to this unit.[ON ](Default): Turns on the Apple Auto
Pairing function.[OFF]: Turns off the Apple Auto Pairing
function.
■ [Sort Order]Set how to sort the data in the smartphone/cell-phone phonebook.[First] (Default): Sorts data by the first name.[Last]: Sorts data by the last name.
* Either the auto response time set on this unit or the time set on the smartphone/cell-phone, whichever is shorter takes effect.
7 Touch [OK].

Other External Components
63English
Other External Components
View Camera
NOTE• To connect a camera, see Connecting the
camera (P.101).• To use a rear view camera, a REVERSE lead
connection is required. (P.97)• If [Rear Camera Interruption] is active the
camera screen is displayed when you shift the gear to the reverse (R) position.
• The camera whose view was displayed last is kept and the same camera view will be displayed the next time. If its assignment setting is changed, the rear camera view is displayed.
• Rear/front camera interruption screen is not kept as the camera screen which will be displayed the next time.
Ñ Display the camera screen
1 Press the [MENU]/[ATT] button.hh Popup menu appears.
2 Touch [Camera].
hh View camera screen appears.
3 Adjust each item as follows.
2
3 4
1
1 Camera Switching Keys *1
Touch to switch the view camera. It is necessary to set “Camera Assignment Settings” beforehand except “Rear”. See To set up the camera assignment settings (P.64).
2 Camera offTouch to exit the camera screen.
3 Switching the Guideline *2
Touching each time turns on or off the guideline.
4 Switching the Angle *2
Touching each time changes camera angles.
*1 When two or more cameras of rear, front, dashboard, left, right, and 3rd are connected with this unit.
*2 Only when the rear camera screen is displayed and CMOS-3xx series is connected with this unit as the rear camera.
Ñ Camera Setup
1 Press the [HOME]/[ ] button.
2 Touch [ ].
3 Touch [SETUP].hh SETUP Menu screen appears.
4 Touch [Camera].hh Camera setting menu appears.
5 Set each item as follows.
■ Camera Assignment Settings Set up the camera assignment. See To set up the camera assignment settings (P.64).
■ [Rear Camera Interruption][ON] ](Default): Displays the picture from the
rear view camera when you shift the gear to the reverse (R) position.
[OFF: Select this when no camera is connected.

Other External Components
64
■ [Rear Camera Message] *1
[Always display] (Default): Always displays the caution message on the rear camera interruption screen.
[Clear after 5 seconds]: Displays the caution message for about 5 seconds on the rear camera interruption screen.
■ [Rear Camera Settings] *2
Adjusts the CMOS-3xx series with ID 1 ("Rear Camera") set. For details, see the instruction manual of your camera.
■ [Parking Guidelines]You can display parking guidelines to enable easier parking when you shift the gear to the reverse (R) position.Default is “ON”.
■ [Guidelines SETUP]If you select [ON] for [Parking Guidelines], you can adjust the parking guidelines. See To adjust the parking guidelines (P.65).
■ [Front Camera Settings] *3
Adjusts the CMOS-3xx series with ID 2 ("Front Camera") set. For details, see the instruction manual of your camera.
■ [Front Camera Interruption] *4
[10 sec]/[15 sec] (Default)/[20 sec]: The front camera screen is displayed when return the gear from the reverse (R) position.[OFF]: Cancel.
*1 To use the function, it is necessary to set [Rear Camera Interruption] to [ON].
*2 When CMOS-3xx series is connected with this unit.
*3 To use the function, it is necessary to connect CMOS-3xx series and to set [Camera Assignment Settings] to [Front]. (P.64)
*4 To use the function, it is necessary to set [Rear Camera Interruption] to [ON] and to set [Camera Assignment Settings] to [Front]. (P.64)
Ñ To set up the camera assignment settings
1 Touch [Camera Assignment Settings] in the Camera setting menu. (P.63)
2 Select the item to set up.
■ [REAR VIEW CAMERA]Set the camera assignment from view camera connected to Rear view camera input terminal.
■ [FRONT VIEW CAMERA / DASH CAM]Set the camera assignment from view camera connected to Front view camera/ Dashboard camera input terminal.
■ [3rd VIEW CAMERA]Set the camera assignment from view camera connected to 3rd view camera input terminal.
■ [VIDEO IN]Set the camera assignment from view camera connected to Video input terminal.
3 Select the view camera to set up.
3
21
1 Picture from view cameraDisplays the picture from the view camera connected to the input terminal to be set. (P.101)
2 Camera positionAssign each position to the view camera connected to the selected input terminal.Front *1/Left *1/Right *1/Dashboard Camera *1/Rear *2/[None]*1
3 Picture quality settingsSwitch the picture quality setting.[Signal] *3 : “HD”/“NTSC” (Default)/“PAL”[Mirror] *4 : “ON”/“OFF” (Default)

Other External Components
65English
*1 Except the [REAR VIEW CAMERA] setting screen.
*2 The [REAR VIEW CAMERA] setting screen only.
*3 The [REAR VIEW CAMERA] and [FRONT VIEW CAMERA / DASH CAM] setting screens only.
*4 The [FRONT VIEW CAMERA / DASH CAM] and [3rd VIEW CAMERA] setting screens only.
4 Touch [Enter].
NOTE• The screen shot above is for the [FRONT VIEW
CAMERA / DASH CAM] setting screen. It may be different from the ones for [REAR VIEW CAMERA], [3rd VIEW CAMERA] and [VIDEO IN].
• The Dashboard Camera can be selected when it is connected. (P.101)
Ñ To adjust the parking guidelines
NOTE• Install the rear view camera in the appropriate
position according to the instruction manual supplied with the rear view camera.
• When adjusting the parking guidelines, make sure to apply the parking brake to prevent the car from moving.
1 Touch [Parking Guidelines] in the Camera screen and set to [ON]. (P.63)
2 Touch [Guidelines SETUP] on the Camera screen.
3 Adjust the parking guidelines by selecting the mark.
4 Adjusting the position of the selected mark.
A
B
C D
Make sure that lines A and B are horizontally parallel, and that lines C and D are of the same length.
NOTE• Touch [Initialize] and then touch [Yes] to set all
the marks to their initial default position.
Use Dashboard Camera
A Dashboard Camera, DRV-N520 (optional accessory), connected to this unit lets you play video-recorded data and so on.For details, see the instruction manual of the Dashboard Camera DRV-N520 (optional accessory).
NOTE• To connect a dashboard camera, see Connecting
the camera (P.101).• To use the dashboard camera function, it is
necessary to set “Camera Assignment Settings” to “Dashboard Camera”. (P.64)

Other External Components
66
Ñ Display the dashboard camera screen
1 Press the [MENU]/[ATT] button.hh Popup menu appears.
2 Touch [Camera].
1
3 2
1 Camera Switching KeysTouch to switch the view camera. It is necessary to set “Camera Assignment Settings” beforehand except “Rear”. See To set up the camera assignment settings (P.64).
2 Camera offTouch to exit the camera screen.
3 Key displayTouch to display the dashboard camera control keys.
Ñ Added function
Display the map while playing the recorded file
1 Play the recorded file.See the instruction manual of the Dashboard Camera.
2 Touch [ ].
Return to the recorded file playback screen
1 Touch [ ].
External audio/video players (AV-IN)
1 Connect an external component to the AV Audio input and the Video input terminal. (P.98)
2 Select [AV-IN] as the source. (P.12)
3 Turn on the connected component and start playing the source.
NOTE• To select the AV-IN source, it is necessary to set
"VIDEO IN" to "None" in [Camera Assignment Settings]. (P.64)

Other External Components
67English
HDMI source
1 Connect your smartphone to the HDMI input terminal. (P.98)Use HDMI cable KCA-HD100 (optional accessory).
2 Select [HDMI] as the source. (P.12)
3 Start an application or playback on your smartphone.
OEM Features Operation
This unit can display vehicle information when connected to the bus system of the vehicle using an iDatalink (commercially available).
1 Press the [HOME]/[ ] button.hh HOME screen appears.
2 Touch [ ] on the HOME screen.
3 Touch icon.
• Displays the control screen of the Bluetooth Hands-Free function provided for the vehicle.
• Displays information about the tire pressures of the vehicle. *
• Displays the control screen of the satellite radio source provided for the vehicle.
• Displays the control screen of the media player source provided for the vehicle.
• Displays the control screen of the Bluetooth streaming source provided for the vehicle.
• Displays information about the Radar Detector. *
• Displays information about the instruments such as a speedometer.
• Displays information about the air conditioner of the vehicle. *
• Displays information about the Parking Distance Sensor of the vehicle.
• Displays the control screen of the accessories in the vehicle.
* These iDatalink features are displayed as the widget on the Home screen. (P.11) You can display the relevant screens by touching the widget.
NOTE• Displayable screens, key names, and screen
names vary depending on the type of the connected iDatalink and the model of the vehicle. For more details, access the following URL:www.idatalink.com/

Setup
68
Setup1 Press the [HOME]/[ ] button.
2 Touch [ ].
3 Touch [SETUP].
See the following section for each setting.
• Set up connections and AV (P.68)• Set up display and button (P.70)• Set up the user interface (P.71)• Set up camera (P.63)• Set up systems (P.72)• Set up navigation (P.17)
Monitor Screen Setup
You can adjust the image quality of video, menu screen, etc.
1 Press the [MENU]/[ATT] button.hh Popup menu appears.
2 Touch [Screen Adjustment].
hh Screen Adjustment screen appears.
3 Adjust each setting as follows.
■ [Backlight]/[Contrast]/[Black]/[Brightness]/[Color]/[Tint]
Adjust each setting.
■ [Aspect]Select a screen mode.[Full]: Changes the aspect ratio of video and
displays video fully on the screen.[Normal]: Displays video at the ratio of 4:3.[Auto]:
USB device and SD card: Displays video fully (vertically or horizontally) with no ratio change.
NOTE• Settings to adjust vary depending on the current
source.
Connections & AV Setup
You can set connections and AV parameters.
1 Press the [HOME]/[ ] button.
2 Touch [ ].
3 Touch [SETUP].hh SETUP Menu screen appears.
4 Touch [Connections & AV].hh Connections & AV setting menu appears.
5 Set each parameter as follows.
■ [Bluetooth]Turns the Bluetooth function on or off.
■ [Device List]Select the connected device to be used. (P.53)

Setup
69English
■ [Device Name]If you select [ON] for [Bluetooth], you can change the Bluetooth device name. See Change the device name (P.54).
■ [PIN Code]If you select [ON] for [Bluetooth], you can change the PIN code. See Change the PIN Code (P.54).
■ [Device address]Display the Bluetooth device address.
■ [TEL SETUP]You can make various settings for the Hands-Free function.See Hands-Free Setup (P.62).
■ [Wi-Fi SETUP]You can change the device name and display the device address, password. See Change the device name (P.69).
■ [Speech Quality Adjust]Adjust the speech quality.[Microphone Level] : Adjust the level of microphone gain. Default is “0”.[Echo Cancel Level] : Adjust the level of echo cancellation. Default is “0”.[Noise Reduction Level] : Reduce the noise generated in the surrounding environment without changing the microphone volume. Use this function when the voice of caller is not clear. Default is “0”.
■ [iPod Bluetooth Connection]See Select the method of making connections for outputting sound from the iPod source (P.31).
■ [AV-OUT]You can select an AV source to be output from the AV OUTPUT port.OFF, iPod, USB, SD, or AV-IN• You cannot select AV-IN if the Video input
terminal is used for camera.• You cannot select iPod if it is connected via
Bluetooth or Apple CarPlay is connected.• If you select iPod as the main source, you
cannot select USB or SD as the AV output source.
• If you select USB as the main source, you cannot select iPod or SD as the AV output source.
• If you select SD as the main source, you cannot select iPod or USB as the AV output source.
• If you select HDMI as the main source, files with sampling rates higher than 96 kHz in USB or SD selected as the AV output source are skipped.
• If you select Bluetooth audio, HD Radio, Wireless Mirroring, Apple CarPlay or Android Auto as the main source, you cannot select USB, SD or iPod as the AV output source.
■ [Reset Android Auto Wireless Connection]
You can change the password for wireless Android Auto.The system of the unit is rebooted after selecting [YES].
Ñ Change the device name
1 Touch [Device Name] in the Connections & AV setting menu. or Touch [Wi-Fi SETUP] and then touch [Device Name].hh Change Device Name screen appears.
2 Touch and hold [ ].
3 Input the device name.
4 Touch [Enter].

Setup
70
Display & Button Setup
1 Press the [HOME]/[ ] button.
2 Touch [ ].
3 Touch [SETUP].hh SETUP Menu screen appears.
4 Touch [Display & Button].hh Display & Button setting menu appears.
5 Set each parameter as follows.
■ [Dimmer]Select the dimmer mode.[OFF]: Does not dim the display and buttons.[ON]: Dims the display and buttons.[SYNC ](Default): Turns the dimmer function
on or off when the vehicle light control switch is turned on or off.
[NAV-SYNC]: Turns the dimmer function on or off according to the information (day/night) from the navigation.
■ [OSD Clock]Select if you want to display the clock while the screen is off, or while watching video files (USB, SD), etc."ON" (Default)/"OFF"
■ [Button Illumination Color]You can set the button illumination color. (P.70)
■ [Wallpaper Customize]You can change the wallpaper image or color. (P.71)
■ [Screen transition effect] Select whether to use the screen transition effect when the source control screen is switched to the Home screen."ON" (Default)/"OFF"
Ñ Customizing the button colorYou can set the button illumination color.
1 Touch [Button Illumination Color] in the Display & Button setting menu.
2 Touch the desired color.
■ [Variable]You can set the button color to continuously scan through the color spectrum.
■ [User]You can set the color created with the RGB color mixer.
■ [Car Color]This can be selected when the iDatalink (commercially available) is connected.
3 Touch [ ].
To register an original colorYou can register your original color.
1 Touch [User] on the Button Illumination Color screen.
2 Use [-] and [+] to adjust each color value.
3 Touch [ ].
NOTE• You can create a color based on a preset color.
Touch the preset color instead of [User], and adjust the color value.

Setup
71English
Ñ Change the wallpaper image or color
1 Touch [Wallpaper Customize] in the Display & Button setting menu.
2 Select an image.
*2*1 *3
*1 The album art currently being displayed is used as a wallpaper.
*2 Select a wallpaper color in advance.*3 Select an original image in advance.
To select wallpaper color
1 Touch [Wallpaper Color] on the Wallpaper Customize screen.
2 Select a wallpaper color.
■ [User]You can set the color created with the RGB color mixer. For how to create an original color, see To register an original color (P.70).
■ [Car Color]This can be selected when the iDatalink (commercially available) is connected.
■ [Button Illumination Synch] *1
The color you have selected at [Button Illumination Color] can be set. If you adjust the color value with the following RGB color mixer, the adjusted color will be applied to the wallpaper and the button illumination.
For how to set the button illumination color and create an original color, see Customizing the button color (P.70).“ON”/“OFF” (default)
*1 When [Button Illumination Color] is “Variable”, this option is fixed to OFF.
3 Touch [ ].
To register an original imageWith “KENWOOD Portal APP” application installed on your iPhone or Android smartphone, you can upload image files to this unit and set an image as the wallpaper image. See Importing Image Files (P.21).
User Interface Setup
You can setup user interface parameters.
1 Press the [HOME]/[ ] button.
2 Touch [ ].
3 Touch [SETUP].hh SETUP Menu screen appears.
4 Touch [User Interface].hh User Interface setting menu appears.
5 Set each parameter as follows.
■ [Source Setup - Remote Control]Select the sources to be switched with the remote controller. For how to operate the remote controller, see Basic Operation (P.87).
■ [Beep]Turn the key touch tone on or off.Default is “ON”.

Setup
72
■ [Parking Assist Display]When the iDatalink (commercially available) is connected, you can display information about obstacles around the car.[ON]: Always displays information.[Dyn.] (Default): Displays information when
the sensor detects obstacles.[OFF]: Cancels this function.
This can be set when the iDatalink (commercially available) is connected.
■ [Parking Assist Position]Select where to display information about obstacles on the screen (left or right).“Left”/“Right” (Default)This can be set when the iDatalink (commercially available) is connected.
■ [Driving Position]Select the driving position (left or right).“Left” (Default)/“Right”
System Setup
You can setup system parameters.
1 Press the [HOME]/[ ] button.
2 Touch [ ].
3 Touch [SETUP].hh SETUP Menu screen appears.
4 Touch [System].hh System setting menu appears.
5 Set each parameter as follows.
■ [DEMO]Select the demonstration mode. Default is “ON”.
■ [Software Information]Confirm the software version of this unit. (P.73)
■ [Open Source Licenses]Display the open source licenses.
■ [Initialize]Touch [Initialize] and then touch [Yes] to set all the settings to the initial default settings.• Audio SETUP Memory is not initialized.
■ [OEM SETUP]Confirm the information about or change the settings for using the iDatalink (commercially available).
■ [Language Select Mode]Switch the mode to select a language.[Easy] (Default): Selects a language easily.[Advanced]: Allows you to select languages
for respective items.*
■ [Language Select]Select a language.
■ [Time Format]
■ [Clock]
■ [Time Zone]
■ [Clock Adjust]You can set the date and time. See Calendar/clock settings (P.9).
* If you select [Advanced] for Language Select Mode, the following screen appears.
■ [GUI Language Select]Select the display language used for the control screen and so forth.
■ [Navigation Language Select]Select the language used for navigation.

Setup
73English
Ñ Software InformationYou can confirm the software version of this unit.
1 Touch [Software Information] in the System setting menu.
2 Confirm the software version.
NOTE• For how to update the software, see the relevant
update procedure manual which comes with the software.

Controlling Audio
74
Controlling AudioYou can adjust various settings such as audio balance or subwoofer level.
1 Press the [HOME]/[ ] button.
2 Touch [ ].
3 Touch [Audio].
See the following section for each setting.
• Set up Speaker / X’over (P.75)• Controlling EQ / SW Level (P.76)• Set Position / DTA (P.77)• Controlling FAD / BAL / Zone (P.79)• Set Volume Offset (P.81)• Set Sound Effect (P.81)• Use Audio Memory (P.85)
NOTE• When the iDatalink (commercially available)
is connected, the best audio settings are set automatically.Each parameter as follows are set.
– Speaker / X’over – EQ / SW Level – Position / DTA – FAD / BAL / Zone – Sound Effect
• To recall the settings automatically adjusted by the iDatalink connection when the settings are changed manually, touch [Audio SETUP Clear] in the Audio Memory setting menu. (P.85)
3-way speaker system setup
Select the appropriate crossover network mode for the speaker system used (2-way or 3-way speaker system).
# CAUTION• Connecting 3-way speakers with the 2-way
mode selected can break the speakers.
1 Press the [HOME]/[ ] button.hh HOME screen appears.
2 Touch [ ].hh Source selection screen appears.
3 Touch [STANDBY].
4 Press the [ ] button 1 followed by the [HOME]/[ ] button 2 for 1 second at the same time.
2 1
hh Speaker system select screen appears.
5 Select the crossover network mode.
hh A confirmation screen appears.
6 Touch [Yes].

Controlling Audio
75English
NOTE• When the 3-way speaker system is selected, the
following functions are disabled. – Front focus of Listening Position / DTA – Fader for Controlling General Audio – Zone Control – Selection of the speakers to output sound from the smartphone/cell-phone of Bluetooth HF/Audio
– Beep for User Interface Setup• While talking on the paired phone or using the
voice recognition function, the speaker system cannot be switched.
• When the dual zone is selected and audio source other than "OFF" is selected as Rear Source, the speaker system cannot be switched to the 3-way mode.
Speaker / X’over setup
1 Press the [HOME]/[ ] button.
2 Touch [ ].
3 Touch [Audio].hh Audio screen appears.
4 Touch [Speaker / X’over].
5 Select a car type.You can select the car type and speaker network, etc.When you select your car type, the Delay Time Alignment is activated automatically (for timing adjustment of sound output for each channel) to have the highest surround effects.
6 Touch the speaker (1) you wish to adjust and set each parameter (2) as follows.
221
■ [Speaker]You can select a speaker type and its size to get the best sound effects.When the speaker type and size are selected, the speaker crossover network is set automatically.
■ [Location] (Only for Front, Rear)Select the speaker position you have installed.
■ [Tweeter] (Only for Front)You can set up the tweeter when you are selecting front speakers.None, Small, Medium, Large
■ [HPF FREQ] (Only for Front, Rear)High Pass Filter adjustment.
■ [LPF FREQ] (Only for Subwoofer)Low Pass Filter adjustment.
■ [Slope]Set a crossover slope.
■ [Gain]Adjust the gain of the front speaker, rear speaker, or subwoofer.
■ [TW Gain] (Only for Front)Adjust the tweeter level.
■ [Phase Inversion] (Only for Subwoofer)Set the phase of subwoofer output.Check [Phase Inversion] to shift the phase 180 degrees.

Controlling Audio
76
When Speaker network is set to 3-way:
221
■ [Speaker]You can select a speaker type and its size to get the best sound effects. If you have no speakers, select “None”.When the speaker type and size are selected, the speaker crossover network is set automatically.
■ [FREQ] (High Pass)High Pass Filter adjustment. (Only for High Pass)
■ [FREQ] (Low Pass)Low Pass Filter adjustment. (Only for Low Pass)
■ [HPF FREQ], [LPF FREQ] (Only for Band Pass)
Band Pass Filter adjustment.
■ [Slope]*1 *2
Set a crossover slope.
■ [Gain]Set the gain of each speaker.
■ [Phase Inversion]Set the phase of tweeter, mid range, and woofer output.Check [Phase Inversion] to shift the phase 180 degrees.
*1 Only when “LPF FREQ”/“HPF FREQ” (Band Pass) is set to a mode other than “Through”.
*2 Only when “FREQ” (Low Pass) is set to a mode other than “Through”.
NOTE• For how to switch to the 3-way speaker system,
see 3-way speaker system setup (P.74).
Equalizer Control
You can adjust equalizer by selecting the optimized setting for each category.
1 Press the [HOME]/[ ] button.
2 Touch [ ].
3 Touch [Audio].hh Audio screen appears.
4 Touch [EQ / SW Level].
5 Touch the screen and set the Graphic Equalizer as desired.
■ Gain level (area in dotted frame)Adjust the gain level by touching each frequency bar.You can select a frequency bar and adjust its level by [R], [S].
■ [ALL SRC]Apply the adjusted equalizer curve to all sources. Touch [ALL SRC] and then touch [OK] on the confirmation screen.
■ [Memory]Saves the adjusted equalizer curve as “User1” to “User4”. (P.77)
■ [Initialize]Initialize (flatten) the current EQ curve.
■ [Bass EXT] (Bass Extend Settings)When turned on, the frequencies lower than 62.5 Hz is set to the same gain level (62.5 Hz).
■ [SW Level]Adjust the subwoofer volume. This setting is not available when Subwoofer is set to “None”. See Speaker / X’over setup (P.75).
■ [Pops]/[Easy]/[Top40]/[Jazz]/[Powerful]/[Rock]/[Flat]/[Bass Boost]/[User1]/[User2]/[User3]/[User4]
Recall the preset EQ curve.

Controlling Audio
77English
Ñ Save the EQ curve
1 Adjust the EQ curve.
2 Touch [Memory].
3 Select where to save.
Listening Position / DTA
Listening Position / DTA allows you to improve the sound field depending on the position of the seat you sit. Listening Position / DTA allows you to set “Listening Position” and “Front Focus”. You cannot set both at the same time.
1 Press the [HOME]/[ ] button.
2 Touch [ ].
3 Touch [Audio].hh Audio screen appears.
4 Touch [Position / DTA].
• Set up Listening Position (P.77)• Set up Front Focus (P.78)
Ñ Listening PositionAdjust the sound delay time so that the sounds from different speakers arrive at the listener sitting on the selected seat at the same time.
1 Touch [Listening Position] on the Position / DTA screen.
2 Select a listening position from [Front R] (Right front), [Front L] (Left front), [Front All] (All front), and [All].

Controlling Audio
78
Position DTA controlYou can fine-adjust your listening position.
1 Touch [Adjust].
2 Touch [Delay].
3 Touch [T] or [U] to adjust the delay time of the selected speaker.
4 Touch [Level].
5 Touch [T] or [U] to adjust the sound level of the selected speaker.
NOTE• To initialize the Delay and Level settings, touch [Initialize] and [YES] on the confirmation screen.
Ñ Front FocusYou can focus the imaginary sound image on the front of the selected seat.
1 Touch [Front Focus] in the Position / DTA screen.
2 Select a front focus position.For [Front All] and [All], select Priority L or R depending on which side you want to put the imaginary sound image.
NOTE• When the 3-way speaker system is selected, front
focus feature is disabled.
Front Focus fine adjustment
1 Touch [Adjust].
2 Touch [Delay].
3 Set each parameter as follows.
■ [Sound Image LR (Front)]Focus the sound image on the front of front seats.
■ [Sound Image LR (Rear)]Focus the sound image on the front of rear seats.

Controlling Audio
79English
■ [Size of the Virtual Sound Field]Adjust the size of sound image to meet your taste. If the sound image is shifted from the front, move it back by [Sound Image LR (Front)] or [Sound Image LR (Rear)].
■ [Subwoofer Delay]Adjust the delay time of subwoofer sound.
4 Touch [Level].
5 Touch [T] or [U] to adjust the sound level of the selected speaker.
NOTE• To initialize the Delay and Level settings, touch [Initialize] and [YES] on the confirmation screen.
Fader / Balance / Zone Control
1 Press the [HOME]/[ ] button.
2 Touch [ ].
3 Touch [Audio].hh Audio screen appears.
4 Touch [FAD / BAL / Zone].
• Fader / Balance Control (P.79)• Set up Zone Control (P.80)
Ñ Fader / Balance ControlYou can adjust the volume balance among the speakers.
1 Touch [C], [D], [R], and [S] to adjust the volume balance.
[C] and [D] adjust the left and right volume balance.[R] and [S] adjust the front and rear volume balance.
■ [Center]Clear the adjustment.
NOTE• When the 3-way speaker system is selected,
"Fader" adjustment is disabled.

Controlling Audio
80
Ñ Zone ControlYou can select different sources for front and rear positions in the vehicle.
1 Touch [Dual Zone] on the FAD / BAL / Zone screen.
■ [Source]You can switch the current source.
2 Set each source as follows.
■ [Zone Select]Touch [Single Zone] to turn off the dual zone function.
■ [Front Source], [Rear Source]Select an audio source for each.Rear Source; “AV-IN”/“iPod”/“SD”/“USB”/“OFF”
■ [Rear VOL.]Adjust the rear source volume.
NOTE• When the rear source is switched, the audio
source that is output at the AV OUTPUT terminal is also switched to the same source.
• When the dual zone function is set to on, the following functions are not available.
– Output from the subwoofer – Subwoofer Level/Bass Boost (P.81) – Equalizer Control/Sound Effect/Listening Position (P.76, 81, 77)
– Speaker Setup (P.75) – Fader for Controlling General Audio – High-resolution Sound Source File Playback
• When the dual zone is selected and audio source other than "OFF" is selected as Rear Source, the speaker system cannot be switched.
• You cannot select AV-IN if the Video input terminal is used for camera.
Rear Source• You cannot select iPod if it is connected via
Bluetooth or Apple CarPlay is connected.• If you select iPod as the Front Source, you cannot
select USB or SD as the Rear Source.• If you select USB as the Front Source, you cannot
select iPod or SD as the Rear Source.• If you select SD as the Front Source, you cannot
select iPod or USB as the Rear Source.• If you select HDMI as the Front Source, files with
sampling rates higher than 96 kHz in USB or SD selected as the Rear Source are skipped.
• If you select Bluetooth audio, HD Radio, Wireless Mirroring, Apple CarPlay or Android Auto as the Front Source, you cannot select USB, SD or iPod as the Rear Source.

Controlling Audio
81English
Volume Offset
Finely adjust the volume of the current source to minimize the difference in volume between different sources.
1 Press the [HOME]/[ ] button.
2 Touch [ ].
3 Touch [Audio].hh Audio screen appears.
4 Touch [Volume Offset].
5 Touch [+] or [-] to adjust the level.
■ [Initialize]Returns to the initial settings.Touch [Initialize] and then touch [YES] on the confirmation screen.
NOTE• If you have increased the volume first, then
reduce the volume using “Volume Offset”. Switching the current source to another source suddenly may output extremely loud sound.
Sound Effect
You can set sound effects.
1 Press the [HOME]/[ ] button.
2 Touch [ ].
3 Touch [Audio].hh Audio screen appears.
4 Touch [Sound Effect].
5 Set each parameter as follows.
■ [Bass Boost]Set the amount of bass boost “OFF”/“1”/“2”/“3”.
■ [Loudness]Set the amount of boost of low and high tones.“OFF”, “Low”, “High”
■ [Drive Equalizer+]The sound quality is automatically optimized to meet the current car speed by GPS. “OFF”, “ON”
■ [Space Enhancer]Select the feeling of sound space enhancement.“OFF”/“Small”/“Medium”/“Large”.This setting is not available for the HD Radio tuner source.
■ [Supreme]Turn ON/OFF the Supreme function.Technology to extrapolate and supplement with proprietary algorithm, the high-frequency range that is cut off when encoding.
■ [Realizer]Virtually make the sound more realistic using the Digital Signal Processor (DSP) system.Select the level from “OFF”/“1”/“2”/“3”.
■ [Stage EQ]You can adjust the height of speakers virtually to suit your listening position.“OFF”/“Low”/“Middle”/“High”.
■ [Parametric EQ]When set to “ON”, you can use the parametric equalizer. For details, see Parametric Equalizer (P.82).

Controlling Audio
82
Parametric Equalizer
In addition to the conventional Graphic Equalizer, this unit has a parametric equalizer, which allows you more precise adjustments. By using each equalizer properly, you can calibrate the unit more thoroughly.Adjustment using this function requires expertise.
When to Use Each Function
● Parametric EqualizerUse this to finely correct or improve the frequency characteristics of the acoustics of the car in order to establish a basis for adjustments.Practiced ears or a measuring equipment may be required to apprehend the problems of the sound field inside the car.
● Graphic EqualizerUse this to actively create an attractive sound as conventionally.Everybody can easily get the result through trial and error of intuitive operations.Even more effective adjustments are possible when the basis is established by using the Parametric Equalizer.
Ñ About the Parametric EqualizerThis system allows you to freely control the filter, frequency, Q factor (acuteness) and slope gain at 14 points consisting of 9 points common for front/rear/subwoofer, 2 points for front only, 2 points for rear only, and one point for subwoofer only.
NOTE• Configure the Parametric Equalizer to establish
the basis for adjustments before making adjustments using the Graphic Equalizer.
• The changes made using the Parametric Equalizer are not shown on the Graphic Equalizer screen.
• You can check the effects using the Parametric Equalizer ON/OFF key.
About AdjustmentsIf there are unpleasant peaks, you can slide the peaking filter to the left or right and search the frequencies by ear. Studio engineers use this method to make adjustments quickly and efficiently.However, in order to identify peaks and dips of a car audio system, you have to capture the pink noise outputted from the speaker using a microphone and analyze it using a real time analyzer (RTA). From the analysis result, identify the peaks and/or dips that need to be corrected and configure the filters to cancel them.
About the Filters of Parametric EqualizerFilters allow you to remove or extract specific sound through signal processing.
Filter
NOTE• Cutoff frequency is the boundary between the
passband and the stopband. The definition of cutoff frequency is a frequency for which the output is -3 dB of the nominal passband value.

Controlling Audio
83English
● High-Pass FilterPasses signals with frequencies higher than a certain frequency (fc: cutoff frequency) and attenuates signals with frequencies lower than the cutoff frequency. Use this to pass only high-frequency signals. Use this in the following cases for example:
– For extracting the frequency band for separate tweeters. By extracting the specific frequency band, level adjustment can be made to the frequency band individually. – The sound may be muddy when you play back low frequency sound. This occurs when frequencies below the speaker capacity is inputted. To cancel this, use the high-pass filter to cut off the frequencies below the speaker capacity.
[dB]
[Hz]fc
● High-Shelving Filter/Low-Shelving FilterThese filters reduce or increase signals above or below a certain frequency (fc: cutoff frequency), which create shelves in the frequency spectrums. A high-shelving filter reduces or increases the frequencies above the target frequency and a low-shelving filter reduces or increases the frequencies below the target frequency. The low shelf controls the lower frequencies and the high shelf controls the high frequencies. Use these in the following cases for example:
– When you want to change the volume of the tweeters, for example when they are close to your ears and are sounding too loud. – When you want to change the subwoofer volume at hand.
[dB]
[Hz]fc
● Peaking FilterThe frequencies in the vicinity of a certain frequency (f0: center frequency) are boosted or attenuated. Use this in the following cases for example:
– When you want to control a narrow range of frequencies to correct the frequency abnormality in the car. – To diminish a chattering noise from the speaker by attenuating the frequency range of the noise. – To adjust of the sound balance of the whole range between the low end and the high end.
[dB]
[Hz]f0
● Low-Pass FilterPasses signals with frequencies lower than a certain frequency (fc: cutoff frequency) and attenuates signals with frequencies higher than the cutoff frequency. Use this to pass only low-frequency signals. Use this in the following cases for example:
– For extracting the low frequencies band for a subwoofer. – For extracting middle/low frequencies when you are using speakers with separate tweeters and you want to output the high frequencies to the tweeters and output the middle/low frequencies to the woofers. – To cut the high frequencies when they are too loud.
[dB]
[Hz]fc

Controlling Audio
84
Ñ Adjust the Parametric Equalizer
Preparation• Correct the value in “Listening Position” and “Front
Focus” before adjusting the parametric equalizer. See Listening Position / DTA (P.77).
1 Press the [HOME]/[ ] button.
2 Touch [ ].
3 Touch [Audio].
4 Touch [Sound Effect].
5 Set the Parametric EQ to [ON] and touch [Yes].
6 Touch [SETUP].hh Parametric EQ screen appears.
7 While auditioning music, move the peaking filter to the left and right to search for unpleasant peaks and suppress them.
8 Use pink noise and an analyzer to identify dips, as dips are difficult to find.Correct steep (10 dB or greater) peaks and dips as these are generally regarded as obstructions to sound quality.
9 Set each parameter as follows.
1
2
34
6
789
5
1 Speaker
Select the speaker.When Speaker network is set to 2-way:
“Common” / “Front” / “Rear” / “Subwoofer”When Speaker network is set to 3-way:
“Common” / “Tweeter” / “Middle” / “Woofer”
2 EQ points/curve
Displays the EQ point and the curve. Adjust the EQ points by touching.EQ point (red): The EQ point currently being
adjusted.
EQ point (blue/yellow): EQ points that are not currently being adjusted.
Curve (orange): EQ curve of the speaker currently being adjusted.
Curve (blue): Overall EQ curve.
3 Filter
Select the filter.“High Pass” / “High Shelving” / “Peaking” / “Low Shelving” / “Low Pass”
4 Affects All Speakers *1
• [ON]: Outputs sound from all speakers.• [OFF]: Outputs sound from the currently
selected speaker only.
5 [Initialize] / [Flat]
• [Initialize]: Initialize (flatten) the adjustment of all the speakers.
• [Flat]: Initialize (flatten) the adjustment of the current speaker.
6 Frequency / Gain
Set the frequency and gain.[T] and [U] adjust the frequency.[R] and [S] adjust the gain.
NOTE• Touch the EQ point to roughly determine the
frequency and gain, then use this key to make fine adjustments.
7 Q / Slope*2
Set the Q factor and slope.
8 Point
Select the EQ point to adjust.
9 Preset
• [User1] / [User2] / [User3]: Recalls the preset EQ.
• [Memory]: Stores the current EQ settings.
*1 Only when the speaker other than “Common” is selected.
*2 When “Peaking” filter is selected, you can adjust the Q factor. When “High Pass”or “Low Pass” filter is selected, you can adjust the slope.
NOTE• You can adjust the EQ points and curve based on
a preset EQ. Recall the preset EQ and touch the preset key again to unselect it before adjustment.

Controlling Audio
85English
10 When you have finished adjustments, save the results as a preset, and check the effects by switching presets or turning the Parametric EQ [ON] and [OFF].
11 Use the Graphic Equalizer to make final adjustments. (P.76)
Audio Setup memory
Audio Control settings can be memorized. The memorized settings can be recalled at any time.
1 Press the [HOME]/[ ] button.
2 Touch [ ].
3 Touch [Audio].hh Audio screen appears.
4 Touch [Audio Memory].
■ [SETUP Memory]Lock or unlock the Audio SETUP Memory/Recall/Clear.
■ [Audio SETUP Memory]Memorize the current audio settings.• FAD / BAL / Zone, Speaker / X’over,
Equalizer (User Preset, SW Level), Position / DTA, Sound Effect (P.74)
■ [Audio SETUP Recall]Recall the memorized audio setting.
■ [Audio SETUP Clear]Clear the Audio SETUP Memory and the currently memorized audio settings.If the iDatalink (commercially available) is connected, the audio settings revert to the values set by the iDatalink.

Remote control
86
Remote controlThis unit can be operated using the remote control KNA-RCDV331 (optional accessory).
# CAUTION• Risk of fire or explosion if the battery is
replaced by an incorrect type. Ensure to replace only with the same type.
• Risk of fire, explosion or the leakage of flammable liquid or gas if the battery is left in an extremely high temperature surrounding environment and/or subjected extremely low air pressure. The battery pack or batteries shall not be exposed to excessive heat such as sunshine, fire or the like.
• Risk of fire, explosion or the leakage of flammable liquid or gas if the battery is disposed into fire or a hot oven, recharged, shorted, mechanically crushed or cut of the battery.
• If spilled fluid comes in contact with your eyes or on clothing, immediately rinse with water and consult a physician.
Battery Installation
If the remote control operates only over shorter distances or does not operate at all, it is possible that the batteries are depleted.In such instances, replace the both batteries with new ones.
1 Insert two “AAA”/“R03”-size batteries with the and poles aligned properly, following the illustration inside the case.
Functions of the Remote control Buttons
Ñ Switch the operation modeThe functions operated from the remote control differ depending on the position of the mode switch.
DVD
T V
NAV
AUD••••
■ AUD modeSwitch to this mode when controlling a selected source or tuner source, etc.
■ DVD modeNot used.
■ TV modeNot used.
■ NAV modeSwitch to this mode when controlling navigation function.
NOTE• When controlling a player that is not integrated in
the unit, select “AUD” mode.

Remote control
87English
Ñ Direct search modeUsing the remote control, you can jump directly to the desired channel by entering the number corresponding to the content.
NOTE• This operation cannot be performed for the USB
device and iPod.
1 Press the [#BS] button several times until the desired content appears.The available contents are different depending on the source type.
■ HD Radio tunerFrequency value/Channel number
■ SiriusXMChannel number
2 Enter the number of the content you want to play using the numeric keypad.
3 Press the [C] or [D] button.hh The content corresponding to the number you entered is played.
Ñ Basic Operation
1 2
5
17
19
21
22
23
24
25
26
18
20
3
6
7
8
10
12
13
14
1516
9
11
4
Key Name
Mode switch
Function
1 SRC AUD Switches to the source to be played. (P.71)In Hands-Free mode, hangs up the phone.
2 NAV − Switches between the navigation and the source screens.
3 MENU NAV Displays Main menu.
4 OUT, IN NAV Zooms in or out the navigation map.
5 POSITION AUD Pauses the track or file, and resumes playing by pressing twice.For the HD Radio source, switches the seek mode.
NAV Displays the current position.
6 Cursor Key NAV Moves the cursor or scrolls the map.
7 ENTER NAV Performs the selected function.
8 ROUTE M AUD Screen mode changes each time you press this key during video playback.NAV Displays Where To menu.
9 VOICE AUD Displays the control screen of current source. (USB, SD)NAV Speaks the voice guidance.
10 VIEW AUD Switches the AV source to be output. NAV Switches between 2D and 3D map displays.
11 MAP DIR NAV Switches between the heading up navigation and north up navigation map displays.
12 R/S AUD Selects the folder to be played.For the HD Radio source, selects FM/AM band to be received.For the SiriusXM source, selects the band to be received.

Remote control
88
Key Name
Mode switch
Function
13 C/D AUD Selects the track or file to be played.For the HD Radio and SiriusXM sources, switches to broadcast stations received by the unit.
14 Numeric Keypad
AUD Allows you to enter the number to search in the direct search mode.For details on the direct search mode, see Direct search mode (P.87).For the HD Radio and SiriusXM sources, allows you to enter the preset number.• If the preset number is one digit, press the number.• If the preset number is two digits, press continuously the numbers within 3
seconds.• Pressing [C][D] within 3 seconds allows you to determine the preset number of
one digit.
15 * + − Not used.
16 # BS AUD Switches to the direct search mode.For details on the direct search mode, see Direct search mode (P.87).
17 AUDIO − Not used.
18 CANCEL NAV Cancels the operations.
19 SUBTITLE − Not used.
20 − When a call comes in, answers the call.
21 ANGLE − Not used.
22 Vol RS − Adjusts the volume.
23 ZOOM − Not used.
24 2 ZONE AUD Switches the Dual Zone function on and off.
25 R.VOL − Adjusts volume at rear when the Dual Zone function is on.
26 ATT − Lowers the volume when pressed once. Restores the previous volume when pressed twice.

Connection/Installation
89English
Connection/InstallationThis section is for the professional installer.For safety’s sake, leave wiring and mounting to professionals. Consult the car audio dealer.
Before Installation
Before installation of this unit, please note the following precautions.
# WARNINGS• If you connect the ignition wire (red) and
the battery wire (yellow) to the car chassis (ground), you may cause a short circuit, that in turn may start a fire. Always connect those wires to the power source running through the fuse box.
• Do not cut out the fuse from the ignition wire (red) and the battery wire (yellow). The power supply must be connected to the wires via the fuse.
# CAUTION• Install this unit in the console of your vehicle.
Do not touch the metal part of this unit during and shortly after the use of the unit. Metal part such as the heat sink and enclosure become hot.
NOTE• Mounting and wiring this product requires
skills and experience. For best safety, leave the mounting and wiring work to professionals.
• Do not install the unit if it becomes an obstacle to driver performance.
• Adjust the panel position not to become an obstacle to driver performance.
• Adjust the panel position so that the panel can be moved to an angle that allows an SD card to be inserted and removed.
• Make sure to ground the unit to a negative 12V DC power supply.
• Do not install the unit in a spot exposed to direct sunlight or excessive heat or humidity. Also avoid places with too much dust or the possibility of water splashing.
• Do not use your own screws. Use only the screws provided. If you use the wrong screws, you could damage the unit.
• If the power is not turned ON (“There is an error in the speaker wiring. Please check the connections.” is displayed), the speaker wire may have a short-circuit or touched the chassis of the vehicle and the protection function may have been activated. Therefore, the speaker wire should be checked.
• If your car’s ignition does not have an ACC position, connect the ignition wires to a power source that can be turned on and off with the ignition key. If you connect the ignition wire to a power source with a constant voltage supply, such as with battery wires, the battery may be drained.
• If the console has a lid, the lid will not be closed even when the unit is installed correctly.
• If the fuse blows, first make sure the wires are not touching to cause a short circuit, then replace the old fuse with one with the same rating.
• Insulate unconnected wires with vinyl tape or other similar material. To prevent a short circuit, do not remove the caps on the ends of the unconnected wires or the terminals.
• Connect the speaker wires correctly to the terminals to which they correspond. The unit may be damaged or fail to work if you share the ¤ wires or ground them to any metal part in the car.
• When only two speakers are being connected to the system, connect the connectors either to both the front output terminals or to both the rear output terminals (do not mix front and rear). For example, if you connect the ¢ connector of the left speaker to a front output terminal, do not connect the ¤ connector to a rear output terminal.
• After the unit is installed, check whether the brake lamps, blinkers, wipers, etc. on the car are working properly.
• Mount the unit so that the mounting angle is 30° or less.
• This unit has the cooling fan to decrease the internal temperature. Do not mount the unit in a place where the cooling fan of the unit is blocked. Blocking these openings will inhibit the cooling of the internal temperature and result in malfunction.

Connection/Installation
90
Cooling fan• Do not press hard on the panel surface when
installing the unit to the vehicle. Otherwise scars, damage, or failure may result.
• Reception may drop if there are metal objects near the Bluetooth/Wi-Fi antenna.
Bluetooth/Wi-Fi antenna unit
● Forward and Lateral Fields of Vision• To determine driver’s forward and lateral fields
of vision under normal conditions, place a pole (directly visible from the front or visible through the car rear-view mirror) as shown.*1 *2
0.3 m
0.3 m0.3 m
2 m2 m
1 m 0.7 m 0.9 m
[ ]: Pole (height: 1m, diameter: 0.3m)[ ]: Field of vision from steering position[ ]: Exempted area (pole size is subject to
regulation)• For right hand drive vehicles, standards are
reversed.*1 The pole must be visible from the driver's position as
direct forward field of vision.*2 The pole must be directly visible or indirectly visible
through the mirror, etc. from the driver's position.
Ñ Supplied accessories for installation
1
x1
2
(1 m)x1
3(3 m)
x1
4
(M5 x 8 mm)x6
5
(M5 x 8 mm)x6
6
(3.5 m) x1
7
x1
8
x1
9
x2
0
Left/Right x1
-
(M5 x 8 mm)x6

Connection/Installation
91English
=
x1
~
(Ø3 x 6 mm)(Black)
x2
Ñ Installation procedure1) To prevent a short circuit, remove the key
from the ignition and disconnect the ¤ terminal of the battery.
2) Remove the vehicle parts for installing the unit and connecting wires to terminal.
3) Make the proper input and output wire connections for each unit.
4) Connect the speaker wires of the wiring harness.
5) Connect the wiring harness wires in the following order; ground, battery, ignition.
6) Determine the height of the display unit and position of the slider. See Distance between the display unit and the main unit (P.92).
7) Connect the wiring harness connector to the unit.
8) Install the main unit to the vehicle.9) Reinstall the vehicle parts.10) Install the display unit.11) Reconnect the ¤ terminal of the battery.12) Perform the Initial Setup.
See Initial SETUP (P.9).

Connection/Installation
92
Installing the unit
Ñ Confirm the installing position of the display unit
● Vehicles cannot be installedIt may be possible to install if it can avoid the following by adjustment for slider position and display height.
Lever operations are interfered such as shift lever, wiper lever, winker lever when install the unit.
A hazard switch is hidden from a driver seat.
The display unit hits a panel on the vehicle.
● Distance between the display unit and the main unitAdjust slider position and display height so that it does not interfere with display movement.Slider position
Display angle Display height-10° 0° 45° 1 2 3 4
Back position
4321
a4321
4321
4321
4321
4321
b
a
c
aa
b
b
d
d
b
c
4321
a4321
4321
4321
4321
4321
b
a
c
aa
b
b
d
d
b
c4321
a4321
4321
4321
4321
4321
b
a
c
aa
b
b
d
d
b
c
-10°a 10b 38.1 50.9 63.8 76.5
0°a 26.7b 34.7 47.7 60.7 73.7
45°
c 5.7 14.4 24.1 33.4
d 55.4 46.3 37.1 27.8
Forward position
4321
a4321
4321
4321
4321
4321
b
a
c
aa
b
b
d
d
b
c
4321
a4321
4321
4321
4321
4321
b
a
c
aa
b
b
d
d
b
c4321
a4321
4321
4321
4321
4321
b
a
c
aa
b
b
d
d
b
c
-10°a 30.1b 38.1 50.9 63.8 76.5
0°a 46.7b 34.7 47.7 60.7 73.7
45°
c 25.7 34.9 44.1 53.3
d 55.4 46.3 37.1 27.8
Unit: mm
ExamplesCluster panel on the vehicle
Slider in back position
Slider in forward position
C’4
14
14
21
4
C’ =30mm C’ =30mm
C’ =50mm C’ =50mm
• C'=50mm;Slider position: Forward positionDisplay height: Set only "4"
• C'=30mm;Slider position: Back positionDisplay height: Set only "4"
Slider position: Forward positionDisplay height: Set "2"~"4"

Connection/Installation
93English
Ñ Positioning the slider in forward
1 Remove the four screws from the bottom of the main unit.
Main unit
Screw
2 Remove the two cover for back position, and then remove the two hexagon head screws from the bracket for back position.
Hexagon head screw
Bracket for back position
Cover for back position
3 Pull the slider block forward and remove the two hexagon head screws to remove the bracket for back position.
Bracket for back position
Hexagon head screw
4 Install the bracket for forward position (accessory 0) each side so that its projections are aligned with the slots on the main unit.
Projection
Projection
0
5 Fix the bracket for forward position to the slider block with the two hexagon head screws. Push the slider block until it stops and then fix the bracket for forward position to the main unit with the two hexagon head screws.
Hexagon head screw
Hexagon head screw
6 Reinstall the four screws to the bottom of the main unit.
Screw
7 Install the cover for forward position (accessory 9) to two locations, as shown.
9

Connection/Installation
94
Ñ Adjusting the display height
1 Remove the four flat head screws from both sides.
Flat head screw
2 Adjust the display height according to the screw hole position. Default is "1".
1 2 3 4
Screw hole position
3 Reinstall the four flat head screws on both sides and fix the display.
NOTE• Fix with flat head screws correctly. After installing
the display unit (accessory 8) to the main unit, tilt the display forward until it stops and confirm that the display unit (accessory 8) does not hit vehicle parts. If the display unit hits vehicle parts, adjust the display height again.
Ñ GPS antennaGPS antenna is installed inside of the car. It should be installed as horizontally as possible to allow easy reception of the GPS satellite signals.To mount the GPS antenna inside your vehicle:1) Clean your dashboard or other surface.2) Remove the separator of the metal plate
(accessory 7).3) Press the metal plate (accessory 7) down
firmly on your dashboard or other mounting surface. You can bend the metal plate (accessory 7) to conform to a curved surface, if necessary.
4) Remove the separator of the GPS antenna (accessory 6), and stick the antenna to the metal plate (accessory 7).
7
6
NOTE• Use the supplied GPS antenna. Using the GPS
antenna other than the supplied one may cause a drop in positioning accuracy.
• Depending on the type of car, reception of the GPS satellite signals might not be possible with an inside installation.
• Please install this GPS antenna in an area away from any antennas that are used with CB radios or satellite televisions.
• The GPS antenna should be installed at a position that is spaced at least 12 inch (30 cm) from smartphone/cell-phone or other transmitting antennas. Signals from the GPS satellite may be interfered with by these types of communication.
• Painting the GPS antenna with (metallic) paint may cause a drop in performance.

Connection/Installation
95English
Ñ Microphone unit1) Check the installation position of the
microphone (accessory 3).2) Clean the installation surface.3) Remove the separator of the microphone
(accessory 3), and stick the microphone to the place shown below.
4) Wire the microphone cable up to the unit with it secured at several positions using tape or other desired method.
5) Adjust the direction of the microphone (accessory 3) to the driver.
3
Fix a cable with a commercial item of tape.
Ñ Installing the main unit
NOTE• Determine the slider position before installing the
main unit. (P.93) The slider position cannot be changed after installing to the vehicle.
• Make sure that the unit is installed securely in place. If the unit is unstable, it may malfunction (eg, the sound may skip).
1 Remove parts that interfere with installing such as a panel on the vehicle.
2 Install the car bracket to the main unit.
Car bracket
4 or 5
Main unit
3 Connect the wiring harness wires and peripheral equipment.
4 Install the main unit to the vehicle.
5 Reinstall the removed parts such as a panel on the vehicle.
Panel on the vehicle
Main unit
6 Install the display unit (accessory 8) to the main unit.
Main unit
8
NOTE• If the display unit hits a panel on the vehicle,
adjust the display height by referring to Adjusting the display height (P.94).
7 Fix the display unit with six hexagon head screws (accessory -).
-

Connection/Installation
96
8 Attach the protective cover (accessory =) to coupling part, and then fix it with two binding head screws (accessory ~).
~=
NOTE• If the protective cover (accessory =) is not
attached, this unit will not turn on. Even if the unit is turned on, the power may be turned off halfway.Be sure to attach the protective cover (accessory =).
9 Raise the display manually.

Connection/Installation
97English
Ñ Connecting wires to terminals
ILLUMI
ANT CONT
STEERING WHEEL REMOTE INPUTREMOTE CONT
PRK SW
REVERSE
P. CONT
CAM+
CAM–
S SENS
Fuse (15A)
When using the optional power amplifier, connect to its power control terminal. (Max. 200mA, 12V)
Depending on what antenna you are using, connect either to the control terminal of the motor antenna, or to the power terminal for the booster amplifier of the film-type antenna. (Max. 300mA, 12V)
Blue/White (Power control wire)
Green/White
Green/Red
To CMOS-3xx series (optional accessory) camera control terminal
Blue (Antenna control wire)
To car light control switch
Orange/White (Dimmer control wire)
Connect to the vehicle’s speed pulse harness.Do not cut the "S SENS" tag or failure may result.
Light Blue/Yellow (Steering remote control wire)
Connect to vehicle’s reverse lamp harness when using the optional rear view camera.
To steering remoteTo use the steering wheel remote control feature, you need an exclusive remote adapter (not supplied) matched to your car.
If no connections are made, do not let the cable come out from the tab.
Purple/Black
To rear right speaker
To rear left speaker
To front right speaker
To front left speaker
Speaker impedance: 4-8 Ω
Purple
Green/Black
Green
Gray/Black
Gray
White/Black
White
Accessory 1Connect to the vehicle’s parking brake detection switch harness.
Light Green (Parking sensor wire) (2 m)
For best safety, be sure to connect the parking sensor.
Ignition key switch
Red (Ignition wire)
Yellow (Battery wire)
Car fuse box
Battery
Black (Ground wire) ¤(To car chassis)
Pink (Speed Pulse Input) (2m)
Purple/White (Reverse sensor wire) (2 m)

Connection/Installation
98
+
+
+
+
When connecting to an external amplifier, connect its ground wire to the car’s chassis to avoid damaging the unit.
White/Black
Gray/Black
Green/Black
Purple/BlackSpeaker impedance: 4-8 Ω
Purple
Green
Gray
WhiteTo mid range left speaker
Subwoofer Preout
To mid range right speaker
Mid Range Preout
To tweeter left speaker
Tweeter Preout
To tweeter right speaker
Power amplifier(optional accessory)
RCA Cable(Sold separately)
Input
Speaker
Preout
NOTE• For speaker system setup, see 3-way speaker
system setup (P.74).• For speaker setup and crossover setup, see
Speaker / X’over setup (P.75).• For how to connect speaker wires to terminals
other than speaker terminals and Preout terminals, see Connecting the system and external components (P.98) and Connecting wires to terminals (P.97).
Ñ 3-way speaker system setup Ñ Connecting the system and external components
1213
14
15
678910
2
1
4 5
11
3
1 Accessory 3: Bluetooth Microphone
2 FM/AM antenna input
3 AV Audio output (ø3.5 mini jack)
4 When connecting to an external amplifier, connect its ground wire to the car’s chassis to avoid damaging the unit.
Rear Audio Preout (Left; White, Right; Red)
Front Audio Preout (Left; White, Right; Red)
Subwoofer Preout (Left; White, Right; Red)
5 SiriusXM Connect Vehicle Tuner connector For more information on how to install the SiriusXM Connect Vehicle tuner, consult the installation guide included with the tuner.

Connection/Installation
99English
6 HDMI inputUse HDMI cable KCA-HD100 (optional accessory).When you connect the cable to HDMI terminal, remove the fixture. After connecting the cable, put the fixture again.
HDMI connector
Fixture
7 iDatalink connector
8 Dashboard camera interfaceConnect a Dashboard Camera DRV-N520 (optional accessory). (P.101)
9 AV Audio input (ø3.5 mini jack)
10 Accessory 6: GPS AntennaUse the supplied GPS antenna. Using the GPS antenna other than the supplied one may cause a drop in positioning accuracy.
11 3rd view camera input (Yellow). See To set up the camera assignment settings (P.64).
12 Rear view camera input (Yellow)*1
13 Front view camera/Dashboard camera input (Yellow).*2 See To set up the camera assignment settings (P.64).
14 Video output (Yellow)
15 Video input (Yellow)
*1 Connect an HD camera to Rear view camera input terminal to use HD video.
*2 Connect an HD camera to Front view camera/Dashboard camera input terminal to use HD video.
Ñ Connecting a USB device
USB device [2]
USB terminal [1]
Accessory 2 (1 m) [3]
[1] USB maximum power supply current : DC 5 V = 1.5 A
[2] Sold separately[3] See Securing the USB extension cable
(P.100).

Connection/Installation
100
Ñ Securing the USB extension cable
Secure the USB extension cable with insulating tape or the like so that its connectors are not disconnected.
Ñ Connecting an iPod/iPhone
KCA-iP103 (0.8 m) [3]
KCA-iP103 (0.8 m) [3]
KCA-iP103 (0.8 m) [3]
iPhone (with Apple CarPlay) [2]
KCA-HD100 (1.8 m) [3]
Lightning Digital AV Adapter [2]
iPod/iPhone [2]
USB terminal [1]
Accessory 2 (1 m) [4]
[1] USB maximum power supply current : DC 5 V = 1.5 A
[2] Sold separately[3] Optional accessory[4] See Securing the USB extension cable
(P.100).
Ñ Connecting an Android smartphone
USB cable [2]
Android smartphone [2]
USB terminal [1]
Accessory 2 (1 m) [3]
[1] USB maximum power supply current : DC 5 V = 1.5 A
[2] Sold separately[3] See Securing the USB extension cable
(P.100).

Connection/Installation
101English
Ñ Connecting the camera
DRV-N520 [1]
3rd view camera input (Yellow)
Front view camera/Dashboard camera input (Yellow)
[3]
Left side view camera and Right side view camera [2]
Front view camera [4] [6]
Video input (Yellow)
Rear view camera input (Yellow)
Dashboard camera interface
Rear view camera [4] [5]
[1] Optional accessory[2] Sold separately[3] Up to 3 cameras of Dashboard camera, Front
view camera, Left side view camera and Right side view camera can be connected. For more information, see To set up the camera assignment settings (P.64).
[4] CMOS-3xx series (optional accessory) or commercially available camera.
[5] For HD video, an HD camera is also used as Rear view camera.
[6] For HD video, an HD camera is also used as Front view camera.

Troubleshooting
102
Troubleshooting
Problems and Solutions
If any trouble occurs, first check the following table for possible problems.
NOTE• Some functions of this unit may be disabled by
some settings made on this unit.• What might seem to be a malfunction in your
unit may just be the result of slight misoperation or miswiring.
Ñ About settings• Cannot set up the subwoofer.• Cannot set up subwoofer phase.• No output from the subwoofer.• Cannot set up the low pass filter.• Cannot set up the high pass filter.Subwoofer is not set to on.
� Set the subwoofer to on. See Speaker / X’over setup (P.75).
The dual zone function is enabled. � Set the dual zone function to off. See Zone Control
(P.80).
• Cannot select the output destination of the subsource in the dual zone.
• Cannot adjust the volume of the rear speakers.The dual zone function is disabled.
� Set the dual zone function to on. See Zone Control (P.80).
• Cannot set up the equalizer.• Cannot set up the crossover network.The dual zone function is enabled.
� Set the dual zone function to off. See Zone Control (P.80).
Ñ About audio operationsRadio reception is poor.The car antenna is not extended.
� Pull out the antenna all the way.The antenna control wire is not connected.
� Connect the wire correctly. See Connecting the system and external components (P.98).
Cannot select a folder.The random play function is enabled.
� Turn off the random function.
The unit does not respond when you try to perform a operation during USB mirroring.
� Unplug the smartphone from the USB terminal, then reattach the smartphone again.
Ñ OthersThe Touch Sensor Tone doesn’t sound.The preout jack is being used.
� The Touch Sensor Tone cannot be output from the preout jack.
Android smartphone operation is slow.This occurs when multiple applications are started on the Android smartphone.
� For details, see Caution for Smartphone Users (P.4).

Troubleshooting
103English
Error Messages
When you fail to operate the unit correctly, the cause of the failure appears as the message on the screen.
There is an error in the speaker wiring. Please check the connections.Protective circuit has been activated because a speaker cord has shorted or it has come in contact with the car chassis.
� Wire or insulate the speaker cord as appropriate and turn the power off and on again.
Hot ErrorWhen the internal temperature of this unit rises to 60°C or more, the protection circuit is activated and you may not be able to operate the unit.
� Use the unit again after reducing the temperature of the unit.
Error 07–67The unit is not operating correctly due to some reason or other.
� Turn the power off and on again. If the “Error 07−67” message does not disappear, contact your nearest KENWOOD dealer.
No Device (USB device)The USB device is selected as a source although no USB device is connected.
� Change the source to any source other than USB/iPod. Connect a USB device, and change the source to USB again.
Disconnected (iPod, Bluetooth audio player)The iPod/Bluetooth audio player is selected as a source although no iPod/Bluetooth audio player is connected.
� Change the source to any source other than iPod/Bluetooth. Connect an iPod/Bluetooth audio player, and change the source to iPod/Bluetooth again.
No Media fileThe connected USB device contains no playable audio file. Media was played that does not have data recorded that the unit can play.
� See Playable Media and Files (P.105) and try another USB device.
USB device over current status detected.The connected USB device is rated a current capacity higher than the allowable limit.
� Check the USB device. Some trouble may have occurred to the connected USB device.
� Change the source to any source other than USB. Remove the USB device.
Navigation Error. Please turn on power again later.The communication error has occurred due to severely cold temperature.
� Turn on power again after warming your car interior.
The speed sense wire is not connected. Please check the connection.The speed pulse disconnection is detected. By default, it is treated as connected.
� To improve precision of a vehicle position recognition, check the connection of the speed pulse.
Starting tuner failed.The tuner unit is not operating correctly due to some reason or other.
� Turn the power off and on again. If the “Starting tuner failed.” message does not disappear, contact your nearest KENWOOD dealer.
Ñ SiriusXMCheck TunerA SiriusXM tuner is not connected to this unit.
� Verify that the SiriusXM Connect Vehicle Tuner cable is securely connected to the radio.
Subscription Updated - Press Return To ContinueThe SiriusXM subscription has been renewed.
� Touching [Return] on the popup screen will clear the message.
SXM Chan UnavailableThe currently selected channel is unavailable.
� Visit www.siriusxm.com for more information about the SiriusXM channel lineup.
SXM Ch UnsubscribedThe currently selected channel is not subscribed to.
� In the U.S.A., visit www.siriusxm.com or call 1-866-635-2349 if you have questions about your subscription package or would like to subscribe to this channel.
� In Canada, visit www.siriusxm.ca or call 1-877-438-9677.
SXM Check AntennaNo antenna is connected to the SiriusXM tuner.
� Check that an antenna is connected to the SiriusXM tuner. Check antenna for damages.
SXM No SignalNo SiriusXM radio signal is received.
� Verify that your vehicle is outdoors with a clear view of the sky.
Channel LockedThe selected channel has been locked by the parental controls.
� Enter the unlock code when you are asked. See Parental Control (P.46).
Incorrect Pass Code enteredThe selected channel is a mature or parental lock channel, and locked by the parental lock or user lock code.
� Enter the correct lock code.

Troubleshooting
104
Ñ Apple CarPlayThe GPS antenna must be connected to use Apple CarPlay wirelessly. Please verify the proper connections or plug in by USB to use Apple CarPlay.The GPS antenna is not connected when the Apple CarPlay is started by connecting wirelessly or when the iPhone compatible with wireless Apple CarPlay is registered in [Device List].
� Check the connection of the GPS antenna or plug in over USB to use Apple CarPlay.

Appendix
105English
Appendix
Playable Media and Files
You can play various kinds of media and files on this unit.
Ñ About filesThe following audio and video files are supported.
■ Playable Audio filesFormat Bit rate Sampling frequency Bit count
AAC-LC (.m4a) MPEG-2/MPEG-4 AAC LCHE-AAC(V1,V2)
8 – 320kbps, VBR 16 – 48 kHz 16 bit
MP3 (.mp3) MPEG-1/MPEG-2 Audio Layer 3
8 – 320kbps, VBR 16 – 48 kHz 16 bit
WMA (.wma) Windows Media Audio Standard L3 profile (Version 7,8,9)
8 – 320kbps 16 – 48 kHz 16 bit
Linear PCM (WAVE) (.wav)
RIFF waveform Audio Format
–16 – 192 kHz (USB/SD) 16 bit/24 bit
FLAC (.flac) flac – 16 – 192 kHz (USB/SD) 16 bit/24 bitVorbis (.ogg) vorbis – 16 – 48 kHz 16 bitDSD (.dsf, .dff ) DSF, DSDIFF – 2.8 MHz, 5.6 MHz, 11.2 MHz 1 bit
• WMA and AAC files with DRM cannot be played.• DSD sound is converted to PCM sound before playback.• The EmChinks tag of DSDIFF is not supported.• Although the audio files complies with the standards listed above, they may not be played depending on the types or
conditions of media or device.• This unit supports playback of High-Resolution Audio files.
It is recommended that a car audio system should be configured with all High-Resolution Audio compatible products from player to speaker to enjoy its high quality sound.
■ Acceptable Video filesProfile Max. Picture size Max. bit rate Audio format
MPEG-1 (.mpg, .mpeg) – 352 × 240, 352 × 288 1.5 Mbps MPEG Audio Layer 2MPEG-2 (.mpg, .mpeg) MP@ML 720 × 480, 720 × 576 8 Mbps MPEG Audio Layer 2H.264/MPEG-4 AVC (.mp4, .m4v, .avi, .flv, .f4v)
Baseline Profile, Main Profile
1920 × 1080 (30 fps) 8 Mbps MP3, AAC
MPEG-4 (.mp4, .avi) Advanced Simple Profile
1920 × 1080 (30 fps) 8 Mbps MP3, AAC
WMV (.wmv) Main Profile 1920 × 1080 (30 fps) 8 Mbps WMAMKV (.mkv)
Video format follows H.264/MPEG-4 AVC, MPEG-4, WMVMP3, AAC, WMA, Vorbis, FLAC
• This unit can only play back files which are smaller than 4 GB.

Appendix
106
■ Limitation on structure of file and folderUSB device/SD
Maximum number of folder layers 8Maximum number of files (per folder) 999Maximum number of folders (per folder) 9999Maximum number of folders (per device) Unlimited
• You can enter a folder name and file name with 255 or fewer single-byte characters.• Files in the folder whose folder name begins with a dot (.) cannot be played.

Appendix
107English
Specifications
■ Monitor sectionPicture Size
: 10.1 inches (diagonal) wide: 223.7 mm (W) × 125.8 mm (H) 8-13/16 × 4-15/16 inch
Display System: AAS LCD panel
Drive System: TFT active matrix system
Number of Pixels: 2,764,800 (1280H × 720V × RGB)
Effective Pixels: 99.99 %
Pixel Arrangement: RGB striped arrangement
Back Lighting: LED
■ USB interface sectionUSB Standard
: USB 2.0 High Speed
File System: FAT 16, FAT 32, exFAT, NTFS
Maximum Power Supply Current: DC 5 V 1.5 A
D/A Converter: 24 bit/32 bit
Audio Decoder: MP3 / WMA / AAC / WAV / FLAC / DSD / Vorbis
Video Decoder: MPEG-1 / MPEG-2 / MPEG-4 / WMV / H.264 / MKV
Frequency Response• 192 kHz: 20 – 88,000 Hz• 96 kHz: 20 – 44,000 Hz• 48 kHz: 20 – 22,000 Hz• 44.1 kHz: 20 – 20,000 Hz
Total Harmonic Distortion: 0.010 % (1 kHz)
S/N Ratio (dB): 98.5 dB
Dynamic Range: 89 dB
■ SD sectionSD Standard
: SD / SDHC / SDXC
Compatible File System: FAT 16, FAT 32, exFAT, NTFS
Capacity: Maximum 2T Byte
Data Transfer Rate: Maximum 25 MB/sec
Audio Decoder: MP3 / WMA / AAC / WAV / FLAC / DSD / Vorbis
Video Decoder: MPEG-1 / MPEG-2 / MPEG-4 / WMV / H.264 / MKV
■ Wireless Mirroring SectionMode
: Sink
Copyright protection: HDCP2.2
Touch Control: UIBC
■ Wi-Fi sectionIEEE Standard
: 802.11 a/b/g/n/ac
Frequency Range: Dual Band (2.4GHz/5GHz)
Channels: Auto(1-11ch)/Auto(149,153,157,161ch)
Transfer rates (MAX): 11a: 54 Mbps / 11b: 11 Mbps / 11g: 54 Mbps / 11n: 300 Mbps / 11ac: 867 Mbps
Output Power2.4 GHz/SISO: 11b: 12 dBm ± 2 dB / 11g: 4 dBm ± 2 dB / 11n (20MHz):2 dBm ± 2 dB
5 GHz/SISO: 11a: 6 dBm ± 2 dB / 11n (20 MHz)/11ac (20 MHz): 6 dBm ± 2 dB / 11n (40 MHz)/11ac (40 MHz): 5 dBm ± 2 dB / 11ac (80 MHz): 5 dBm ± 2 dB
5 GHz/MIMO: 11n (20 MHz)/11ac (20 MHz): 9 dBm ± 2 dB / 11n (40 MHz)/11ac (40 MHz): 8 dBm ± 2 dB / 11ac (80 MHz): 8 dBm ± 2 dB
■ Bluetooth sectionTechnology
: Bluetooth Ver.5.0
Frequency: 2.402 – 2.480 GHz
RF Output Power (E.I.R.P.): +4 dBm (MAX), Power Class 2
Maximum Communication range: Line of sight approx. 10m (32.8 ft)
Audio Codec: SBC/AAC/LDAC
Profile (Multi Profile support)• HFP (V1.7) (Hands Free Profile)• SPP (Serial Port Profile) • A2DP (Advanced Audio Distribution Profile)• AVRCP (V1.6) (Audio/Video Remote Control Profile)• PBAP (Phonebook Access Profile)

Appendix
108
■ HDMI sectionHDMI
: Type-A
Input Resolution• VGA (640x480p @59.94Hz/60Hz)• 480p (720x480p @59.94Hz/60Hz)• 720p (1280x720p @59.94Hz/60Hz)
Input Audio Type: 32K/44.1K/48K/88.2K/96K/176.2K/192K Hz 16 bit/20 bit/24 bit Linerar PCM
■ DSP sectionGraphics equalizer
Band: 13 BandFrequency (BAND1 – 13): 62.5/100/160/250/400/630/1k/1.6k/2.5k/4k/6.3k/ 10k/16k Hz
Gain: -9/-8/-7/-6/-5/-4/-3/-2/-1/0/1/2/3/4/5/6/7/8/9 dB
2-way X'OverHigh pass filterFrequency: Through, 30/40/50/60/70/80/90/100/
120/150/180/220/250 HzSlope: -6/-12/-18/-24 dB/Oct.Low pass filterFrequency: 30/40/50/60/70/80/90/100/120/150/
180/220/250 Hz, ThroughSlope: -6/-12/-18/-24 dB/Oct.
3-way X'OverHigh pass filterFrequency: 250/300/1k/1.6k/2.5k/4k/5k/6.3k/8k/
10k/12.5k HzSlope: -12/-18/-24 dB/Oct.Band pass filterFrequency: Through, 50/60/70/80/90/100/120/150/
180/220/250/300 Hz 250/300/1k/1.6k/2.5k/4k/5k/6.3k/8k Hz, Through
Slope: -12/-18/-24 dB/Oct.Low pass filterFrequency: 30/40/50/60/70/80/90/100/120/150 Hz,
ThroughSlope: -12/-18/-24 dB/Oct.
PositionFront/Rear/Subwoofer Delay: 0 – 20.01 ft (0.03 or 0.04 ft Step)Gain: -8 – 0 dB
Subwoofer level: -50 – +10 dB
■ Digital FM tuner sectionFrequency Range (step)
: 87.9 MHz – 107.9 MHz (200 kHz)
Frequency Response (± 3.0 dB): 20 Hz – 20 kHz
S/N Ratio: 80 dB (STEREO)
■ Digital AM tuner sectionFrequency Range (step)
: 530 kHz – 1700 kHz (10 kHz)
Frequency Response (± 3.0 dB): 40 Hz – 15 kHz
S/N Ratio (dB): 80 dB (STEREO)
■ FM tuner sectionFrequency Range (step)
: 87.9 MHz – 107.9 MHz (200 kHz)
Usable Sensitivity (S/N : 30 dB): 7.3 dBf (0.7 μV/75 Ω)
Frequency Response: 30 Hz – 15 kHz
S/N Ratio (dB): 70 dB (MONO)
Selectivity (± 400 kHz): 80 dB
Stereo Separation: 45 dB (1 kHz)
■ AM tuner sectionFrequency Range (step)
: 530 kHz – 1700 kHz (10 kHz)
Usable Sensitivity: 30 dBμ (31 μV)
■ Video sectionColor System of External Video Input
: NTSC/PAL
External Audio Max Input Level (mini jack): 2 V/25 kΩ
Video Input Level (RCA jacks): 1 Vp-p/75 Ω
Video Output Level (RCA jacks): 1 Vp-p/75 Ω
Audio Output Level (mini jack): 0.9 V/10 kΩ

Appendix
109English
■ Audio sectionMaximum Power Output (Front & Rear)
: 50 W × 4
Typical Power Output (Front & Rear) Full Bandwidth Power (at less than 1% THD): 22 W × 4
Output frequency band: 20 – 88,000 Hz
Preout Level (V): 5 V/ 10 kΩ
Preout Impedance: ≤ 300 Ω
Speaker Impedance: 4 – 8 Ω
■ Navigation sectionReceiver
: High-sensitivity GNSS receiver
Reception FrequencyGPS: 1575.42 MHz (C/A code)GLONASS: 1598.0625 - 1605.375 MHz (C/A code)
Acquisition TimesCold: 26 seconds(typ)(All satellites at -130 dBm Without aiding)
Update Rate: 1/second, continuous
AccuracyPosition: < 2.0 meters,CEP, at -130 dBmVelocity: 0.05 meter/sec
Position Method: GPS/GLONASS
Antenna: External GNSS Antenna
■ GeneralOperating Voltage
: 12V DC car battery
Installation Dimensions (W × H × D): 178 × 100 × 155 mm 7 × 3-15/16 × 6-1/8 inch
Weight: 3.25 kg (7.28 lbs)
NOTE• Although the effective pixels for the liquid crystal
panel is given as 99.99% or more, 0.01% of pixels may not light or may light incorrectly.
Specifications are subject to change without prior notice.

Appendix
110
About this Unit
Ñ Important Notice on Software
■ Software License on This ProductThe software embedded in this product comprises a number of independent software components, each of which is copyrighted by JVCKENWOOD Corporation or by a third party.This product uses software components that are based on an End-User License Agreement (hereinafter called “EULA”) stipulated by JVCKENWOOD Corporation and by third parties.The EULA dictates the availability of the source codes of free-software components as a prerequisite to distributing them in executable form under the terms of the GNU General Public License or the Lesser General Public License (hereinafter called “GPL/LGPL”). To get information about the software components that are subject to the terms of the GPL/LGPL, please visit the following Website:Website URL https://www2.jvckenwood.com/gpl/Queries concerning the contents of the source code or the like will not be accepted.Please note that software components based on a EULA that is not subject to the terms of the GPL/LGPL or those that have been developed or created by JVCKENWOOD Corporation will be excluded from the scope of source code disclosure.Because licenses to use software components distributed under the GPL/LGPL are offered to the customers for free of charge, no warranty is granted to the customers, whether explicitly or implicitly, to the extent of the applicable laws. Unless otherwise stipulated by the applicable laws or agreed upon in writing, the copyright holders or those who are entitled to modify and redistribute the software components are not held responsible for any and all damages resulting from their use or from inability to use them. For more information about the terms of use of the software components, required items of compliance and so on, please refer to the GPL/LGPL.Customers wishing themselves to use a software component that is subject to the GPL/LGPL embedded in this product are encouraged to read the terms of the corresponding license before use. Because each individual license is prescribed by a third party other than JVCKENWOOD Corporation, the original (English) of the license is presented.
Ñ EULA
■ Software License AgreementJVCKENWOOD Corporation (hereinafter called “Licensor”) holds either the copyright to the embedded software or the right to sublicense it. This agreement establishes the conditions under which the customer uses this “Licensed Software.”The customer shall agree to the terms of this license agreement before proceeding to use Licensed Software.This agreement is deemed to have taken effect when the customer (hereinafter called “User”) has used a product implementation of Licensed Software.The Licensed Software may contain software Licensor has been licensed to use by third parties directly or indirectly. Some third parties may have terms of use prescribed for their customers, apart from this Software License Agreement. This agreement does not apply to such software. Be sure to consult “Important Notice on Software” as presented separately.
Article 1 (General)Licensor grants to User a non-exclusive, non-assignable right of use Licensed Software within the country where the User purchases the Product (hereinafter the "Country") (except for the exception provided for in Paragraph 1, Article 3).
Article 2 (Right of Use)1. The rise of use granted under this agreement is the
right to use Licensed Software in this product.2. User may not duplicate, copy, modify, add to,
translate or otherwise alter, or loan licensed Software and the associated literature in whole or in part.
3. Use of Licensed Software is limited to a private extent , and Licensed Software may not be distributed, licensed or sublicensed for any purposes whatsoever, including commercial use.
4. User shall use Licensed Software as per the instruction manual or instructions given in the help file and may not use or duplicate data in violations of the regulations of the Copyright Law or other governing laws by using Licensed Software in whole or in part.
Article 3 (Terms of License)1. In assigning this product, User may not retain
the original copy of the embedded Licensed Software (including associated literature, updates and upgrades) and any duplicates and associated literature with regard to the license to use Licensed Software. User may transfer Licensed Software only to the condition of binding the assignee to abide by the terms of this Software License Agreement.
2. User may not reverse-engineer, disassemble, decompile or otherwise analyze the source code of Licensed Software.

Appendix
111English
Article 4 (Rights to Licensed Software)All rights to Licensed Software and the associated literature, including copyrights, shall reside with Licensor or the original right holder who has granted the Right of Use and right to sublicense to Licensor (hereinafter referred to as “Original Right Holder”), and User does not have any rights other than Right of Use granted hereunder with regard to Licensed Software and the associated literature.
Article 5 (Exemption Granted to Licensor)1. Licensor and Original Right Holder do not assume
any responsibility for damages caused to User or third parties resulting from the exercise by User of the license granted hereunder, unless otherwise provided by any law to the contrary.
2. Licensor does not warrant Licensed Software to be merchantable, compatible and fit for specific purposes.
Article 6 (Responsibility for Third Parties)If disputes over the infringement of third parties’ intellectual property rights, such as copyrights and patent rights, arise out of the use of Licensed Software by User, User shall resolve these disputes at User’s own expenses while keep Licensor and Original Right Holder harmless.
Article 7 (Secrecy Obligation)User shall keep confidential Licensed Software provided hereunder, information contained in the associated literature or the like and those provisions of this agreement not yet in public knowledge and may not disclose or leak these to third parties without prior written consent from Licensor.
Article 8 (Cancellation of the Agreement)Licensor reserves the right to cancel this agreement forthwith and claim compensation from User for the damages caused by such cancellation when User:
(1) Breaches any of the provisions of this agreement, or (2) Has received a petition for seizure, provisional
seizure, provisional disposition or any other kind of compulsory execution.
Article 9 (Destruction of Licensed Software)If this agreement is terminated under the provision of the foregoing paragraph, User shall destroy Licensed Software, along with all associated literature and its duplicates, within two (2) weeks from the date of termination.
Article 10 (Copyright Protection)1. Copyrights and all other intellectual property
rights relating to Licensed Software shall reside with Licensor and Original Right Holder and in no circumstances with User.
2. User shall abide by the laws relating to copyrights and intellectual property rights in using Licensed Software.
Article 11 (Export Control)1. Licensed Software and the associated literature or
the like may not be exported to places outside the Country (including transmission outside the Country over the Internet or the like).
2. User agrees that Licensed Software is subject to export controls imposed by the Country and the United States of America.
3. User agrees to comply with all the international and domestic laws that apply to this software (U.S. Export Administration Regulations and regulations established by the U.S., the Country and their governmental agencies regarding usage by end users and export destinations).
Article 12 (Miscellaneous)1. Even if this agreement is invalidated in part by law, all
other provisions shall remain in effect.2. Licensor and User shall consult each other in
good faith to resolve any matters not provided for in this agreement or questions arising from the interpretation of this agreement.
3. Licensor and User agree that this agreement is governed by the law of Japan and that all disputes involving claims and obligations that may arise out of this agreement will be settled by arbitration at the Tokyo District Court as the court of first instance.

Appendix
112
■ Copyrights• The Bluetooth® word mark and logos are registered
trademarks owned by Bluetooth SIG, Inc. and any use of such marks by JVCKENWOOD Corporation is under license. Other trademarks and trade names are those of their respective owners.
• DSD, LDAC and LDAC logo are trademarks of Sony Corporation.
• Hi-Res Audio logo and Hi-Res Audio Wireless logo are used under license from Japan Audio Society.
• Windows Media is a registered trademark or trademark of Microsoft Corporation in the United States and/or other countries.This product is protected by certain intellectual property rights of Microsoft. Use or distribution of such technology outside of this product is prohibited without a license from Microsoft.
• This software is based in part on the work of the independent JPEG Group.
• Use of the Made for Apple badge means that an accessory has been designed to connect specifically to the Apple product(s) identified in the badge, and has been certified by the developer to meet Apple performance standards. Apple is not responsible for the operation of this device or its compliance with safety and regulatory standards. Please note that the use of this accessory with an Apple product may affect wireless performance.
• Apple, iPhone, iPod, iPod touch, and Lightning are trademarks of Apple Inc., registered in the U.S. and other countries.
• Apple, Siri, Apple CarPlay, Apple Music and Apple CarPlay logo are trademarks of Apple Inc., registered in the U.S. and other countries.
• App Store is a service mark of Apple Inc., registered in the U.S. and other countries.
• IOS is a trademark or registered trademark of Cisco in the U.S. and other countries and is used under license.
• Sirius, XM and all related marks and logos are trademarks of Sirius XM Radio Inc. All rights reserved.
• HD Radio Technology manufactured under license from iBiquity Digital Corporation. U.S. and Foreign Patents. For patents see https://dts.com/patents. HD Radio and the HD, HD Radio, and "ARC" logos are registered trademarks or trademarks of iBiquity Digital Corporation in the United States and/or other countries.
• INRIX is a registered trademark of INRIX, Inc.• Google, Android, Google Play and Android Auto are
trademarks of Google LLC.To use Android Auto on your car display, you’ll need an Android Auto compatible vehicle or aftermarket stereo, an Android phone running Android 5.0 or higher, and the Android Auto app.
• SDXC and microSDXC Logos are trademarks of SD-3C LLC.
• Wi-Fi® is a registered trademark of Wi-Fi Alliance®.• The Wi-Fi CERTIFIED™ Logo is a certification mark of
Wi-Fi Alliance®.• Copyright© 2018 Techpoint, Inc. All rights reserved.
• The terms HDMI and HDMI High-Definition Multimedia Interface, and the HDMI Logo are trademarks or registered trademarks of HDMI Licensing Administrator, Inc. in the United States and other countries.
• This product includes FontAvenue® fonts licenced by NEC Corporation.FontAvenue is a registered trademark of NEC Corporation.
• This product includes "Ubiquitous QuickBoot TM" technology developed by Ubiquitous Corp. Ubiquitous QuickBoot TM is a trademark of Ubiquitous Corp. Copyright© 2017 Ubiquitous Corp. All rights reserved.
• Garmin® is a trademark of Garmin Ltd. or its subsidiaries, registered in the USA and other countries. ecoRoute™ is a trademark of Garmin Ltd. or its subsidiaries. These trademarks may not be used without the express permission of Garmin.
• THIS PRODUCT IS LICENSED UNDER THE AVC PATENT PORTFOLIO LICENSE FOR THE PERSONAL USE OF A CONSUMER OR OTHER USES IN WHICH IT DOES NOT RECEIVE REMUNERATION TO (¡)ENCODE VIDEO IN COMPLIANCE WITH THE AVC STANDARD (“AVC VIDEO”) AND/OR (¡¡)DECODE AVC VIDEO THAT WAS ENCODED BY A CONSUMER ENGAGED IN A PERSONAL ACTIVITY AND/OR WAS OBTAINED FROM A VIDEO PROVIDER LICENSED TO PROVIDE AVC VIDEO. NO LICENSE IS GRANTED OR SHALL BE IMPLIED FOR ANY OTHER USE. ADDITIONAL INFORMATION MAY BE OBTAINED FROM MPEG LA, L.L.C. SEE HTTPS://WWW.MPEGLA.COM
• THIS PRODUCT IS LICENSED UNDER THE MPEG-4 VISUAL PATENT PORTFOLIO LICENSE FOR THE PERSONAL AND NON-COMMERCIAL USE OF A CONSUMER FOR (¡) ENCODING VIDEO IN COMPLIANCE WITH THE MPEG-4 VISUAL STANDARD (“MPEG-4 VIDEO”) AND/OR (¡¡) DECODING MPEG-4 VIDEO THAT WAS ENCODED BY A CONSUMER ENGAGED IN A PERSONAL AND NON-COMMERCIAL ACTIVITY AND/OR WAS OBTAINED FROM A VIDEO PROVIDER LICENSED BY MPEG LA TO PROVIDE MPEG-4 VIDEO. NO LICENSE IS GRANTED OR SHALL BE IMPLIED FOR ANY OTHER USE. ADDITIONAL INFORMATION INCLUDING THAT RELATING TO PROMOTIONAL, INTERNAL AND COMMERCIAL USES AND LICENSING MAY BE OBTAINED FROM MPEG LA, LLC. SEE HTTPS://WWW.MPEGLA.COM.

Appendix
113English
• THIS PRODUCT IS LICENSED UNDER THE VC-1 PATENT PORTFOLIO LICENSE FOR THE PERSONAL AND NON-COMMERCIAL USE OF A CONSUMER TO ( i ) ENCODE VIDEO IN COMPLIANCE WITH THE VC-1 STANDARD (“VC-1 VIDEO”) AND/OR ( ii ) DECODE VC-1 VIDEO THAT WAS ENCODED BY A CONSUMER ENGAGED IN A PERSONAL AND NON-COMMERCIAL ACTIVITY AND/OR WAS OBTAINED FROM A VIDEO PROVIDER LICENSED TO PROVIDE VC-1 VIDEO. NO LICENSE IS GRANTED OR SHALL BE IMPLIED FOR ANY OTHER USE. ADDITIONAL INFORMATION MAY BE OBTAINED FROM MPEG LA, L.L.C. SEE HTTPS://WWW.MPEGLA.COM
• libFLACCopyright (C) 2000-2009 Josh CoalsonCopyright (C) 2011-2013 Xiph.Org FoundationRedistribution and use in source and binary forms, with or without modification, are permitted provided that the following conditions are met:
– Redistributions of source code must retain the above copyright notice, this list of conditions and the following disclaimer.
– Redistributions in binary form must reproduce the above copyright notice, this list of conditions and the following disclaimer in the documentation and/or other materials provided with the distribution.
– Neither the name of the Xiph.org Foundation nor the names of its contributors may be used to endorse or promote products derived from this software without specific prior written permission.
THIS SOFTWARE IS PROVIDED BY THE COPYRIGHT HOLDERS AND CONTRIBUTORS ``AS IS'' AND ANY EXPRESS OR IMPLIED WARRANTIES, INCLUDING, BUT NOT LIMITED TO, THE IMPLIED WARRANTIES OF MERCHANTABILITY AND FITNESS FOR A PARTICULAR PURPOSE ARE DISCLAIMED. IN NO EVENT SHALL THE FOUNDATION OR CONTRIBUTORS BE LIABLE FOR ANY DIRECT, INDIRECT, INCIDENTAL, SPECIAL, EXEMPLARY, OR CONSEQUENTIAL DAMAGES (INCLUDING, BUT NOT LIMITED TO, PROCUREMENT OF SUBSTITUTE GOODS OR SERVICES; LOSS OF USE, DATA, OR PROFITS; OR BUSINESS INTERRUPTION) HOWEVER CAUSED AND ON ANY THEORY OF LIABILITY, WHETHER IN CONTRACT, STRICT LIABILITY, OR TORT (INCLUDING NEGLIGENCE OR OTHERWISE) ARISING IN ANY WAY OUT OF THE USE OF THIS SOFTWARE, EVEN IF ADVISED OF THE POSSIBILITY OF SUCH DAMAGE.
• libvorbisCopyright (c) 2002-2008 Xiph.org Foundation Redistribution and use in source and binary forms, with or without modification, are permitted provided that the following conditions are met:
– Redistributions of source code must retain the above copyright notice, this list of conditions and the following disclaimer.
– Redistributions in binary form must reproduce the above copyright notice, this list of conditions and the following disclaimer in the documentation
and/or other materials provided with the distribution.
– Neither the name of the Xiph.org Foundation nor the names of its contributors may be used to endorse or promote products derived from this software without specific prior written permission.
THIS SOFTWARE IS PROVIDED BY THE COPYRIGHT HOLDERS AND CONTRIBUTORS ``AS IS’’ AND ANY EXPRESS OR IMPLIED WARRANTIES, INCLUDING, BUT NOT LIMITED TO, THE IMPLIED WARRANTIES OF MERCHANTABILITY AND FITNESS FOR A PARTICULAR PURPOSE ARE DISCLAIMED. IN NO EVENT SHALL THE FOUNDATION OR CONTRIBUTORS BE LIABLE FOR ANY DIRECT, INDIRECT, INCIDENTAL, SPECIAL, EXEMPLARY, OR CONSEQUENTIAL DAMAGES (INCLUDING, BUT NOT LIMITED TO, PROCUREMENT OF SUBSTITUTE GOODS OR SERVICES; LOSS OF USE, DATA, OR PROFITS; OR BUSINESS INTERRUPTION) HOWEVER CAUSED AND ON ANY THEORY OF LIABILITY, WHETHER IN CONTRACT, STRICT LIABILITY, OR TORT (INCLUDING NEGLIGENCE OR OTHERWISE) ARISING IN ANY WAY OUT OF THE USE OF THIS SOFTWARE, EVEN IF ADVISED OF THE POSSIBILITY OF SUCH DAMAGE.
• liboggCopyright (c) 2002, Xiph.org Foundation Redistribution and use in source and binary forms, with or without modification, are permitted provided that the following conditions are met:
– Redistributions of source code must retain the above copyright notice, this list of conditions and the following disclaimer.
– Redistributions in binary form must reproduce the above copyright notice, this list of conditions and the following disclaimer in the documentation and/or other materials provided with the distribution.
– Neither the name of the Xiph.org Foundation nor the names of its contributors may be used to endorse or promote products derived from this software without specific prior written permission.
THIS SOFTWARE IS PROVIDED BY THE COPYRIGHT HOLDERS AND CONTRIBUTORS ``AS IS’’ AND ANY EXPRESS OR IMPLIED WARRANTIES, INCLUDING, BUT NOT LIMITED TO, THE IMPLIED WARRANTIES OF MERCHANTABILITY AND FITNESS FOR A PARTICULAR PURPOSE ARE DISCLAIMED. IN NO EVENT SHALL THE FOUNDATION OR CONTRIBUTORS BE LIABLE FOR ANY DIRECT, INDIRECT, INCIDENTAL, SPECIAL, EXEMPLARY, OR CONSEQUENTIAL DAMAGES (INCLUDING, BUT NOT LIMITED TO, PROCUREMENT OF SUBSTITUTE GOODS OR SERVICES; LOSS OF USE, DATA, OR PROFITS; OR BUSINESS INTERRUPTION) HOWEVER CAUSED AND ON ANY THEORY OF LIABILITY, WHETHER IN CONTRACT, STRICT LIABILITY, OR TORT (INCLUDING NEGLIGENCE OR OTHERWISE) ARISING IN ANY WAY OUT OF THE USE OF THIS SOFTWARE, EVEN IF ADVISED OF THE POSSIBILITY OF SUCH DAMAGE.

Appendix
114
■ FCC CAUTIONChanges or modifications not expressly approved by the party responsible for compliance could void the user's authority to operate the equipment.
NOTE• This equipment has been tested and found to
comply with the limits for a Class B digital device, pursuant to part 15 of the FCC Rules. These limits are designed to provide reasonable protection against harmful interference in a residential installation.
• This equipment generates, uses and can radiate radio frequency energy and, if not installed and used in accordance with the instructions, may cause harmful interference to radio communications. However, there is no guarantee that interference will not occur in a particular installation. If this equipment does cause harmful interference to radio or television reception, which can be determined by turning the equipment off and on, the user is encouraged to try to correct the interference by one or more of the following measures:
– Reorient or relocate the receiving antenna. – Increase the separation between the equipment and receiver.
– Connect the equipment into an outlet on a circuit different from that to which the receiver is connected.
– Consult the dealer or an experienced radio/TV technician for help.
This transmitter must not be co-located or operated in conjunction with any other antenna or transmitter.
■ ISED CAUTIONThis device contains licence-exempt transmitter(s)/receiver(s) that comply with Innovation, Science and Economic Development Canada’s licence-exempt RSS(s).Operation is subject to the following two conditions:(1) This device may not cause interference.(2) This device must accept any interference, including
interference that may cause undesired operation of the device.
# CAUTIONThis equipment complies with FCC/ISED radiation exposure limits set forth for an uncontrolled environment and meets the FCC radio frequency (RF) Exposure Guidelines and RSS-102 of the ISED radio frequency (RF) Exposure rules. This equipment should be installed and operated keeping the radiator at least 20cm or more away from person’s body.
Supplier’s Declaration of ConformityTrade Name: KENWOODProducts: GPS NAVIGATION SYSTEMModel Name: DNR1007XRResponsible Party: JVCKENWOOD USA
CORPORATION 2201 East Dominguez Street, Long Beach, CA 90810, U.S.A. PHONE: 310 639-9000
THIS DEVICE COMPLIES WITH PART 15 OF THE FCC RULES. OPERATION IS SUBJECT TO THE FOLLOWING TWO CONDITIONS:(1) THIS DEVICE MAY NOT CAUSE HARMFUL
INTERFERENCE, AND(2) THIS DEVICE MUST ACCEPT ANY INTERFERENCE
RECEIVED, INCLUDING INTERFERENCE THAT MAY CAUSE UNDESIRED OPERATION.

Appendix
115English
■ Información acerca de la eliminación de equipos eléctricos y electrónicos al final de la vida útil (aplicable a los países que hayan adoptado sistemas independientes de recogida de residuos)
Los productos con el símbolo de un contenedor con ruedas tachado no podrán ser desechados como residuos domésticos.
Los equipos eléctricos y electrónicos al final de la vida útil, deberán ser reciclados en instalaciones que puedan dar el tratamiento adecuado a estos productos y a sus subproductos residuales correspondientes. Póngase en contacto con su administración local para obtener información sobre el punto de recogida más cercano. Un tratamiento correcto del reciclaje y la eliminación de residuos ayuda a conservar los recursos y evita al mismo tiempo efectos perjudiciales en la salud y el medio ambiente.
■ Informação sobre a eliminação de pilhas
Este produto não deve ser eliminado como lixo doméstico geral. Devolva a pilha usada ao revendedor ou entidade autorizada para que a mesma seja devolvida ao fabricante ou importador.A reciclagem e a eliminação de lixo de maneira apropriada ajudarão a conservar os recursos naturais ao mesmo tempo que prevenirão os efeitos prejudicais à nossa saúde e ao meio ambiente.
■ Para cumplimiento de la IFT: “La operación de este equipo esta sujeta a las siguientes dos condiciones:(1) es posible que este equipo o dispositivo no cause interferencia perjudicial y(2) este equipo o dispositivo debe aceptar cualquier interferencia,incluyendo la que pueda causar su operación no deseada.”

Hi-Res Audio logo and Hi-Res Audio Wireless logo are used under license from Japan Audio Society.

B5K-0760-00 (K)© 2020 JVCKENWOOD Corporation
DNR1007XRGPS NAVIGATION SYSTEMQuick Start GuideSYSTÈME DE NAVIGATION GPSGuide de démarrage rapideSISTEMA DE NAVEGACIÓN GPSGuía de inicio rápido
Take the time to read through this instruction manual.Familiarity with installation and operation procedures will help you obtain the best performance from your new GPS Navigation System.For your recordsRecord the serial number, found on the top of the unit, in the spaces designated on the warranty card, and in the space provided below. Refer to the model and serial numbers whenever you call upon your KENWOOD dealer for information or service on the product.Model DNR1007XR Serial number
US Residence OnlyRegister Online
Register your KENWOOD product at www.kenwood.com/usa/
• Updated information (the latest Instruction Manual, system updates, new functions, etc.) is available from <https://www.kenwood.com/cs/ce/>.• The Instruction manual is subject to change for modification of specifications and so forth. Be sure to download the latest edition of the
Instruction manual for reference. <https://manual.kenwood.com/edition/im403/>• Des informations actualisées (le dernier mode d'emploi, les mises à jour du système, les nouvelles fonctions, etc.) sont disponibles sur le site
<https://www.kenwood.com/cs/ce/>.• Le mode d'emploi est susceptible d'être modifié suite aux changements pouvant être apportés aux spécifications etc. Téléchargez impérativement
la dernière édition du mode d'emploi aux fins de référence. <https://manual.kenwood.com/edition/im403/>• La información actualizada (el Manual de instrucciones más actualizado, actualizaciones del sistema, nuevas funciones, etc.) está disponible
desde <https://www.kenwood.com/cs/ce/>.• El Manual de instrucciones está sujeto a cambios por modificaciones de las especificaciones, etc. Asegúrese de descargar la última edición del
Manual de instrucciones a título de referencia. <https://manual.kenwood.com/edition/im403/>
!B5K-0760-00_20DNX_K_FP_QSG.indb 1 2020/07/02 14:24

2
Important Notice on Software
Ñ Software License on This Product
The software embedded in this product comprises a number of independent software components, each of which is copyrighted by JVCKENWOOD Corporation or by a third party.This product uses software components that are based on an End-User License Agreement (hereinafter called “EULA”) stipulated by JVCKENWOOD Corporation and by third parties.The EULA dictates the availability of the source codes of free-software components as a prerequisite to distributing them in executable form under the terms of the GNU General Public License or the Lesser General Public License (hereinafter called “GPL/LGPL”). To get information about the software components that are subject to the terms of the GPL/LGPL, please visit the following Website:
Website URL https://www2.jvckenwood.com/gpl/
Queries concerning the contents of the source code or the like will not be accepted.Please note that software components based on a EULA that is not subject to the terms of the GPL/LGPL or those that have been developed or created by JVCKENWOOD Corporation will be excluded from the scope of source code disclosure.Because licenses to use software components distributed under the GPL/LGPL are offered to the customers for free of charge, no warranty is granted to the customers, whether explicitly or implicitly, to the extent of the applicable laws. Unless otherwise stipulated by the applicable laws or agreed upon in writing, the copyright holders or those who are entitled to modify and redistribute the software components are not held responsible for any and all damages resulting from their use or from inability to use them. For more information about the terms of use of the software components, required items of compliance and so on, please refer to the GPL/LGPL.Customers wishing themselves to use a software component that is subject to the GPL/LGPL embedded in this product are encouraged to read the terms of the corresponding license before use. Because each individual license is prescribed by a third party other than
JVCKENWOOD Corporation, the original (English) of the license is presented.
EULA
Ñ Software License AgreementJVCKENWOOD Corporation (hereinafter called “Licensor”) holds either the copyright to the embedded software or the right to sublicense it. This agreement establishes the conditions under which the customer uses this “Licensed Software.”The customer shall agree to the terms of this license agreement before proceeding to use Licensed Software.This agreement is deemed to have taken effect when the customer (hereinafter called “User”) has used a product implementation of Licensed Software.The Licensed Software may contain software Licensor has been licensed to use by third parties directly or indirectly. Some third parties may have terms of use prescribed for their customers, apart from this Software License Agreement. This agreement does not apply to such software. Be sure to consult “Important Notice on Software” as presented separately.Article 1 (General)
Licensor grants to User a non-exclusive, non-assignable right of use Licensed Software within the country where the User purchases the Product (hereinafter the "Country") (except for the exception provided for in Paragraph 1, Article 3).
Article 2 (Right of Use)1. The rise of use granted under this agreement
is the right to use Licensed Software in this product.
2. User may not duplicate, copy, modify, add to, translate or otherwise alter, or loan licensed Software and the associated literature in whole or in part.
3. Use of Licensed Software is limited to a private extent , and Licensed Software may not be distributed, licensed or sublicensed for any purposes whatsoever, including commercial use.
4. User shall use Licensed Software as per the instruction manual or instructions given in the help file and may not use or duplicate data in violations of the regulations of the Copyright Law or other governing laws by using Licensed Software in whole or in part.
!B5K-0760-00_20DNX_K_FP_QSG.indb 2 2020/07/02 14:24

3
Article 3 (Terms of License)1. In assigning this product, User may not retain
the original copy of the embedded Licensed Software (including associated literature, updates and upgrades) and any duplicates and associated literature with regard to the license to use Licensed Software. User may transfer Licensed Software only to the condition of binding the assignee to abide by the terms of this Software License Agreement.
2. User may not reverse-engineer, disassemble, decompile or otherwise analyze the source code of Licensed Software.
Article 4 (Rights to Licensed Software)All rights to Licensed Software and the associated literature, including copyrights, shall reside with Licensor or the original right holder who has granted the Right of Use and right to sublicense to Licensor (hereinafter referred to as “Original Right Holder”), and User does not have any rights other than Right of Use granted hereunder with regard to Licensed Software and the associated literature.
Article 5 (Exemption Granted to Licensor)1. Licensor and Original Right Holder do not
assume any responsibility for damages caused to User or third parties resulting from the exercise by User of the license granted hereunder, unless otherwise provided by any law to the contrary.
2. Licensor does not warrant Licensed Software to be merchantable, compatible and fit for specific purposes.
Article 6 (Responsibility for Third Parties)If disputes over the infringement of third parties’ intellectual property rights, such as copyrights and patent rights, arise out of the use of Licensed Software by User, User shall resolve these disputes at User’s own expenses while keep Licensor and Original Right Holder harmless.
Article 7 (Secrecy Obligation)User shall keep confidential Licensed Software provided hereunder, information contained in the associated literature or the like and those provisions of this agreement not yet in public knowledge and may not disclose or leak these to third parties without prior written consent from Licensor.
Article 8 (Cancellation of the Agreement)Licensor reserves the right to cancel this agreement forthwith and claim compensation
from User for the damages caused by such cancellation when User:
(1) Breaches any of the provisions of this agreement, or
(2) Has received a petition for seizure, provisional seizure, provisional disposition or any other kind of compulsory execution.
Article 9 (Destruction of Licensed Software)If this agreement is terminated under the provision of the foregoing paragraph, User shall destroy Licensed Software, along with all associated literature and its duplicates, within two (2) weeks from the date of termination.
Article 10 (Copyright Protection)1. Copyrights and all other intellectual property
rights relating to Licensed Software shall reside with Licensor and Original Right Holder and in no circumstances with User.
2. User shall abide by the laws relating to copyrights and intellectual property rights in using Licensed Software.
Article 11 (Export Control)1. Licensed Software and the associated
literature or the like may not be exported to places outside the Country (including transmission outside the Country over the Internet or the like).
2. User agrees that Licensed Software is subject to export controls imposed by the Country and the United States of America.
3. User agrees to comply with all the international and domestic laws that apply to this software (U.S. Export Administration Regulations and regulations established by the U.S., the Country and their governmental agencies regarding usage by end users and export destinations).
Article 12 (Miscellaneous)1. Even if this agreement is invalidated in part by
law, all other provisions shall remain in effect.2. Licensor and User shall consult each other
in good faith to resolve any matters not provided for in this agreement or questions arising from the interpretation of this agreement.
3. Licensor and User agree that this agreement is governed by the law of Japan and that all disputes involving claims and obligations that may arise out of this agreement will be settled by arbitration at the Tokyo District Court as the court of first instance.
!B5K-0760-00_20DNX_K_FP_QSG.indb 3 2020/07/02 14:24

Before Use
4
Before Use
About the Quick start guide• This Quick Start Guide describes basic functions of this
unit. For functions not described in this Guide, refer to the Instruction Manual on the following website:https://manual.kenwood.com/edition/im403/
• The Instruction manual is subject to change for modification of specifications and so forth. Be sure to download the latest edition of the Instruction manual for reference.
How to read this manual• The screens and panels shown in this manual are
examples used to provide a clear explanation of operations.For this reason, they may be different from the actual screens or panels, or some display patterns may be different from the actual ones.
• Display language: English is used for the purpose of explanation. You can select a display language from the [SETUP] menu. See System Setup (P.72) in the Instruction Manual.
Precautions
# WARNINGS
Ñ To prevent injury or fire, take the following precautions:
• To prevent a short circuit, never put or leave any metallic objects (such as coins or metallic tools) inside the unit.
• Do not watch or fix your eyes on the unit’s display when you are driving for any extended period.
• If you experience problems during installation, consult your KENWOOD dealer.
Ñ Precautions on using this unit• When you purchase optional accessories,
check with your KENWOOD dealer to make sure that they work with your model and in your area.
Before Use ............................................. 4About the Quick start guide ................................. 4How to read this manual ........................................ 4Precautions ................................................................. 4Safety Precautions
and Important Information.............................. 5
Basic Operations ................................... 7Functions of the Buttons on the Front Panel.... 7Turning on the Unit .................................................. 8Initial Settings ............................................................ 9Touch screen operations ......................................10HOME screen descriptions ..................................11Popup menu .............................................................12Source selection screen description ................12Source control screen descriptions ..................14List screen ..................................................................14Navigation Operation ...........................................15
USB/SD/iPod........................................17Connecting a USB device .....................................17Inserting the SD ......................................................17Connect iPod/iPhone ............................................18USB/SD/iPod Basic Operation ............................18
HD Radio™ Tuner.................................19HD Radio Tuner Basic Operation .......................19Memory Operation ................................................20
Bluetooth Control ...............................21Register the Bluetooth device ............................21Using the Hands-Free Unit ..................................22
Controlling Audio ...............................24
Connection/Installation .....................25Before Installation ..................................................25Installing the unit....................................................28
Appendix .............................................37Note for specifications ..........................................37
Contents
Important Notice on Software ............................. 2EULA .............................................................................. 2
Contents ................................................ 4
!B5K-0760-00_20DNX_K_FP_QSG.indb 4 2020/07/02 14:24

Before Use
5English
• You can select a language to display menus, audio file tags, etc. See System Setup (P.72) in the Instruction Manual.
• The Radio Broadcast Data System feature won’t work in areas where the service is not supported by any broadcasting station.
Ñ Protecting the monitor• To protect the monitor from damage, do not
operate the monitor using a ball point pen or similar tool with a sharp tip.
Ñ Cleaning the unit• If the faceplate of this unit is stained, wipe it
with a dry soft cloth such as a silicon cloth. If the faceplate is stained badly, wipe it with a cloth moistened with neutral cleaner, then wipe it again with a clean soft dry cloth.
NOTE• Applying spray cleaner directly to the unit
may damage its mechanical parts. Wiping the faceplate with a hard cloth or using a volatile liquid such as thinner or alcohol may scratch the surface or erase the screened print.
Ñ Acquiring GPS signalThe first time you turn on this unit, you must wait while the system acquires satellite signals for the first time. This process could take up to several minutes. Make sure your vehicle is outdoors in an open area away from tall buildings and trees for fastest acquisition.After the system acquires satellites for the first time, it will acquire satellites quickly each time thereafter.
Ñ About GLONASSThis unit uses Global Navigation Satellite System (GLONASS) in addition to GPS.Combining GPS and GLONASS can refine positioning accuracy than using GPS only.
Ñ Caution for Smartphone UsersSimultaneously running multiple applications on your smartphone while screen sharing places heavy demand on the microprocessor of the phone, potentially affecting communication and performance. For best results while pairing with your KENWOOD receiver, please be sure to close any unused applications.
Safety Precautions and Important Information
Read this information carefully before starting to operate the KENWOOD Car Navigation System and follow the instructions in this manual. Neither KENWOOD nor Garmin shall be liable for problems or accidents resulting from failure to observe the instructions in this manual.
# WARNINGFailure to avoid the following potentially hazardous situations could result in an accident or collision resulting in death or serious injury.When navigating, carefully compare information displayed on the navigation system to all available navigation sources, including information from street signs, visual sightings, and maps. For safety, always resolve any discrepancies or questions before continuing navigation.Always operate the vehicle in a safe manner.Do not become distracted by the navigation system while driving, and always be fully aware of all driving conditions. Minimize the amount of time spent viewing the screen of the navigation system while driving, and use voice prompts when possible.Do not enter destinations, change settings, or access any functions requiring prolonged use of the navigation system controls while driving. Stop your vehicle in a safe and legal manner before attempting such operations.Keep the system volume at a low enough level to be able to hear outside noises while driving. If you can no longer hear outside noises, you may be unable to react adequately to the traffic situation. This may cause accidents.The navigation system will not display the correct current position of the vehicle the first time it is used after purchase, or if the vehicle battery is disconnected. GPS satellite signals will soon be received, however, and the correct position will be displayed.Be careful of the ambient temperature. Using the navigation system at extreme temperatures can lead to malfunction or damage. Also note that the unit can be damaged by strong vibration, by metal objects, or by water getting inside the unit.
!B5K-0760-00_20DNX_K_FP_QSG.indb 5 2020/07/02 14:24

Before Use
6
# CAUTIONFailure to avoid the following potentially hazardous situations may result in injury or property damage.The navigation system is designed to provide you with route suggestions. It does not reflect road closures or road conditions, weather conditions, or other factors that may affect safety or timing while driving.Use the navigation system only as a navigational aid. Do not attempt to use the navigation system for any purpose requiring precise measurement of direction, distance, location, or topography.The Global Positioning System (GPS) is operated by the United States government, which is solely responsible for its accuracy and maintenance. The government system is subject to changes that could affect the accuracy and performance of all GPS equipment, including the navigation system. Although the navigation system is a precision navigation device, any navigation device can be misused or misinterpreted and, therefore, become unsafe.
Ñ IMPORTANT INFORMATION
Vehicle Battery PreservationThis navigation system can be used when the ignition key is turned to ON or ACC. To preserve the battery, however, it should be used with the engine running whenever possible. Using the navigation system for a long time with the engine switched off can cause the battery to run down.
Map Data InformationOne of the goals of Garmin is to provide customers with the most complete and accurate cartography that is available to us at a reasonable cost. We use a combination of governmental and private data sources, which we identify in product literature and copyright messages displayed to the consumer. Virtually all data sources contain some inaccurate or incomplete data. In some countries, complete and accurate map information is either not available or is prohibitively expensive.
!B5K-0760-00_20DNX_K_FP_QSG.indb 6 2020/07/02 14:24

Basic Operations
7English
Basic Operations
Functions of the Buttons on the Front Panel
2 3 45
6 71
8
Number Name Motion
1 Remote Sensor
• Receives the remote control signal.
2 HOME/[ ] • Displays the HOME screen (P.11).• Pressing for 1 second turns the power off.• When the power is off, turns the power on.
3 NAV/CAMERA
• Displays the navigation screen.• While a navigation application is active on the device being used as the Apple
CarPlay or Android Auto source, displays the Apple CarPlay or Android Auto source screen.
• Pressing and holding switches view camera display on/off.The camera whose view is displayed first changes according to the Camera Assignment Settings (P.37) and the shift lever position in the shift gate. The camera whose view was displayed last is kept and the same camera view will be displayed the next time. If its assignment setting is changed, the rear camera view is displayed.
4 MENU/ATT • Displays the popup menu screen. • Pressing for 1 second switches attenuation of the volume on/off.
5 Volume knob
• Adjusts the volume.
6 • Displays the APP (Apple CarPlay/Android Auto/Wireless Mirroring) screen.• While the APP screen is displayed, switches to the control screen of current source.
7 VOICE • Switches the voice recognition function on/off.• When neither Apple CarPlay, Android Auto, nor a Bluetooth Hands-Free phone is
connected, pressing and holding displays Bluetooth pairing waiting dialog.
!B5K-0760-00_20DNX_K_FP_QSG.indb 7 2020/07/02 14:24

Basic Operations
8
Number Name Motion
8 SD card slot • A slot to insert an SD card.• You can play audio/visual files in the card. *1
• An SD card slot for upgrading the map. For how to upgrade the map, refer to the instruction manual of the navigation system. *2
*1 If the map update file remains in the SD card, you cannot play audio/visual files.*2 The system of the unit is rebooted after inserting/removing the MAP SD.
Turning on the Unit
1 Press the [HOME]/[ ] button.
hh The unit is turned on.
● To turn off the unit:
1 Press the [HOME]/[ ] button for 1 second.
NOTE• If it is your first time to turn the unit on after
installation, it will be necessary to perform Initial SETUP (P.9).
!B5K-0760-00_20DNX_K_FP_QSG.indb 8 2020/07/02 14:24

Basic Operations
9English
Initial Settings
Initial SETUP
Perform this setup when you use this unit first time.
1 Set each item as follows.
■ [Locale]Select the country for the navigation system.The language, the distance unit, and the gasoline unit are set.1 Touch [Locale].2 Select the desired country.
■ [Language]Select the language used for the control screen and setting items. Default is “American English(en)”.1 Touch [Language].2 Touch [Language Select].3 Select the desired language.4 Touch [ ].For details, see System Setup (P.72) in the Instruction Manual.
■ [Display & Button]Set the button illumination color. 1 Touch [Display & Button].2 Touch [Button Illumination Color].3 Select the desired color.4 Touch [ ].
For details, see Display & Button Setup (P.70) in the Instruction Manual.
■ [Camera]Set the parameters for the camera.1 Touch [Camera].2 Set each item and touch [ ].For details, see Camera Setup (P.63) in the Instruction Manual.
■ [OEM SETUP]This function requires a commercial adaptor.Consult your KENWOOD dealer for details.
■ [DEMO]Set the demonstration mode. Default is “ON”.
2 Touch [Finish].
NOTE• These settings can be made from the SETUP
menu. See Setup (P.68) in the Instruction Manual.
!B5K-0760-00_20DNX_K_FP_QSG.indb 9 2020/07/02 14:24

Basic Operations
10
Calendar/clock settings
1 Press the [HOME]/[ ] button.
2 Touch [ ].
3 Touch [SETUP].hh SETUP Menu screen appears.
4 Touch [System].hh System setting menu appears.
5 Set each item as follows.Scroll the page to show hidden items.
■ [Time Format] Select the time display format.[12-Hour] (Default)/[24-Hour]
■ [Clock] [NAV-SYNC] (Default): Synchronizes the clock
time with navigation GPS data.[Manual]: Set the clock manually.
■ [Time Zone]If you have selected [Manual] for Clock, select the time zone.
■ [Clock Adjust]If you select [Manual] for Clock, adjust the date and time manually.
NOTE• Please set the date and time. If they are not set,
some functions may not work.
Touch screen operationsTo perform operations on the screen, you need to touch, touch and hold, flick or swipe to select an item, display a setting menu screen or change pages.
● TouchTouch the screen gently to select an item on the screen.
● Touch and holdTouch the screen and keep your finger in place until the display changes or a message is displayed.
● FlickSlide your finger quickly to the left or right on the screen to change the page.You can scroll a list screen by flicking up/down on the screen.
● SwipeSlide your finger up or down on the screen to scroll the screen.
!B5K-0760-00_20DNX_K_FP_QSG.indb 10 2020/07/02 14:24

Basic Operations
11English
HOME screen descriptionsMost functions can be performed from the HOME screen.
1
2
43
1 • Widget
2 • Displays the source selection screen. (P.12)
3 • Displays the SETUP Menu screen.
4 • Short-cut playback source icons (P.13)
NOTE• The speed limit feature is for information only
and does not replace your responsibility to abide by all posted speed limit signs and to use safe driving judgment at all times.
• Garmin and JVCKENWOOD Corporation will not be responsible for any traffic fines or citations you receive for failing to follow all applicable traffic laws and signs.
Display the HOME screen
1 Press the [HOME]/[ ] button.
hh HOME screen appears.
Widget
1 Press the [HOME]/[ ] button.hh HOME screen appears.
2 You can change the widget or customize the widget area.
For details, see Widget (P.20) in the Instruction Manual.
!B5K-0760-00_20DNX_K_FP_QSG.indb 11 2020/07/02 14:24

Basic Operations
12
Popup menu
1 Press the [MENU]/[ATT] button.hh Popup menu appears.
2 Touch to display the popup menu.
1The contents of the menu are as follows.
• Displays the Screen Adjustment screen.
• Turns the display off. To turn on the screen: Touch the display.
• Displays the view camera screen.
• Displays the SETUP Menu screen.
• Displays the Audio screen. (P.24)
• Displays the control screen of current source. Icon feature differs depending on the source. This icon is for USB source.
• Close the popup menu.
• Displays the Device List screen.
1 • Short-cut source icons: The source changes to the one you have set with a short-cut. For the short-cut setting, refer to Customize Short-cut source icons (P.13).
Source selection screen description
You can display icons of all playback sources and options on the source selection screen.
3 4
21
1 • Changes playback sources.For playback sources, see Select the playback source (P.12).
2 • Changes pages. (Touch [ ]/[ ].)You can also change pages by flicking left or right on the screen.
3 • Returns to the previous screen.
4 • Displays the SETUP Menu screen.
Select the playback source
1 Press the [HOME]/[ ] button.hh HOME screen appears.
2 Touch [ ].From the screen, you can select the following sources and functions.
• Displays the navigation screen. (P.15)
• Switches to the Apple CarPlay screen from the connected iPhone.
• Switches to the Android Auto screen from the connected Android smartphone.
• Displays the Hands-Free screen. (P.22)When neither Apple CarPlay, Android Auto, nor a Bluetooth Hands-Free phone is connected, displays Bluetooth pairing waiting dialog.*1
!B5K-0760-00_20DNX_K_FP_QSG.indb 12 2020/07/02 14:24

Basic Operations
13English
• Switches to the Wireless Mirroring screen from the connected Android smartphone.
• Switches to the HD Radio broadcast. (P.19)
• Switches to the SiriusXM® satellite radio broadcast.
• Plays a Bluetooth audio player.
• Plays an iPod/iPhone. (P.18)
• Plays files on a USB device. (P.17)
• Plays files on an SD card. (P.17)
• Plays a device connected to the HDMI input terminal.
• Switches to an external component connected to the AV Audio input and the Video input terminal. *2 *3
• Puts the unit in standby. (P.13)
*1 When connecting as Apple CarPlay or Android Auto, it works as a phone provided in Apple CarPlay or Android Auto. If Apple CarPlay or Android Auto are connected during talking by the Bluetooth device or iDatalink phone, the current call will be continued.
*2 You can use the [AV-IN] source when a cable from a visual source except a camera is connected to the Video input terminal, and a cable is connected to the AV Audio input terminal. (P.34)
*3 Set “VIDEO IN” to “None” in Camera Assignment Settings. (P.37)
Put the unit in standby
1 Press the [HOME]/[ ] button.hh HOME screen appears.
2 Touch [ ].
3 Touch [STANDBY].
Customize Short-cut source icons
You can arrange the positions of the source icons as you like.The 4 items placed in bottom line will appear on the bottom bar in various screens, as the short-cut playback source icons.
1 Press the [HOME]/[ ] button.hh HOME screen appears.
2 Touch [ ].
3 Touch and hold the icon which you want to move in the customizing mode.
4 Drag the icon to the desired position.
!B5K-0760-00_20DNX_K_FP_QSG.indb 13 2020/07/02 14:24

Basic Operations
14
Source control screen descriptions
There are some functions which can be performed from most screens.
1 2 3
5 4
1
Displays the source selection screen. (P.12)
2
Displays the SETUP Menu screen.
3 Short-cut source icons
The source changes to the one you have set with a short-cut. For the short-cut setting, refer to Customize Short-cut source icons (P.13).
4
Connected Bluetooth device information.
5 Indicator items
Displays the current source condition and so on.
List screenThere are some common function keys in the list screens of most sources.
Display the list screen
1 Touch [1].hh The list screen appears.
4
2 1 3
1 Text scroll
Scrolls the displayed text.
2 etc.
Keys with various functions are displayed here.• : Plays all tracks in the folder containing
the current track.• : Jumps to the letter you entered
(alphabetical search). • : Moves to the upper hierarchy
level.
3 [ ]/[ ]/[ ]/[ ] Page scroll
You can change pages to display more items by touching [ ]/[ ].• [ ]/[ ] : Displays the top or bottom page.
4 Return
Returns to the previous screen.
!B5K-0760-00_20DNX_K_FP_QSG.indb 14 2020/07/02 14:24

Basic Operations
15English
Navigation OperationFor details on the navigation function, please refer to the Navigation Instruction Manual.
Display the navigation screen
1 Press the [NAV]/[CAMERA] button.
hh The navigation screen appears.
2 Touch [ ].hh Main Menu screen appears.
How to Use the Navigation System
1 Operate the desired function from the Main Menu screen.
5
12 3
4
1 GNSS signal status.
2 Finds a destination.
3 Views the map.
4 Uses the Apps such as ecoRoute™ and Help.
5 Adjusts the settings.
NOTE• You can get additional information about
using the navigation system from Help. To display Help, touch [Apps] and then touch [Help].
• For more information about your navigation system, download the latest version of the Owner’s Manual from https://manual.kenwood.com/edition/im403/
2 Enter your destination and start the guidance.Finding points of interest1 Touch [Where To?].2 Select a category and a subcategory.3 Select a destination.4 Touch [Go!].
NOTE• To enter letters contained in the name, touch
the Search bar and enter the letters.
3 Follow your route to the destination.
NOTE• The speed limit icon feature is for information
only and does not replace the driver’s responsibility to abide by all posted speed limit signs and to use safe driving judgment at all times. Garmin and JVCKENWOOD Corporation will not be responsible for any traffic fines or citations that you may receive for failing to follow all applicable traffic laws and signs.
Your route is marked with a magenta line. As you travel, your navigation system guides you to your destination with voice prompts, arrows on the map, and directions at the top of the map. If you depart from the original route, your navigation system recalculates the route.
!B5K-0760-00_20DNX_K_FP_QSG.indb 15 2020/07/02 14:24

Basic Operations
16
5
6 8 9
1 2
34
7
1 Views the Next Turn page or the junction view page, when available.
2 Views the Turn List page.
3 Views the Where Am I? page.
4 Stops the currents route.
5 Displays traffic information on the route.
6 Returns to the Main menu.
7 Data field. Touch to display a different data field.
8 Vehicle speed. Touch to display a trip information.
9 Displays more options.
NOTE• Touch and drag the map to view a different
area of the map.• A speed limit icon could appear as you travel
on major roadways.
● Adding a stop1 While navigating a route, touch [ ] and
then touch [Where To?].2 Search for the extra stop.3 Touch [Go!].4 Touch [Add to Active Route] to add this
stop before your final destination.
● Taking a detour1 While navigating a route, touch [ ].2 Touch [ ].
■ Manually avoiding traffic on your route1 From the map, touch [ ].2 Touch [Traffic On Route].3 If necessary, touch the arrows to view
other traffic delays on your route.4 Touch [ ] > [Avoid].
■ Viewing the traffic mapThe traffic map shows color-coded traffic flow and delays on nearby.1 From the map, touch [ ].2 Touch [Traffic Conditions].
■ About traffic• Traffic service is not available in some areas or
countries. • Garmin and JVCKENWOOD Corporation are
not responsible for the accuracy or timeliness of the traffic information.
• You can receive INRIX traffic information and weather forecast by connecting your iPhone or Android smartphone in which the “KENWOOD Traffic Powered By INRIX” application is installed. For details, see “KENWOOD Traffic Powered By INRIX” application.
■ Updating mapsYou can purchase updated map data from Garmin.1 Go to https://kenwood.garmin.com/
kenwood/site2 From the Map Updates section, select
Update3 Follow the on-screen instructions.
NOTE• After you update map data for the first time,
you can use an SD card and the Garmin Express™ application to perform future map updates.
!B5K-0760-00_20DNX_K_FP_QSG.indb 16 2020/07/02 14:24

USB/SD/iPod
17English
USB/SD/iPod
Connecting a USB device
1 Connect the USB device with the USB cable. (P.35)
2 Press the [HOME]/[ ] button.
3 Touch [ ].
4 Touch [USB]. (P.12)
Ñ Disconnect the USB device
1 Press the [HOME]/[ ] button.
2 Touch a source other than [USB].
3 Detach the USB device.
Ñ Usable USB deviceYou can use a mass-storage-class USB device with this unit. The word “USB device” appearing in this manual indicates a flash memory device.
Inserting the SD
1 Tilt the panel toward you manually.
2 Insert the SD card into the slot until it clicks.
3 Close the panel.
4 Press the [HOME]/[ ] button.
5 Touch [ ].
6 Touch [SD]. (P.12)
Ñ Remove the SD card
1 Press the [HOME]/[ ] button.
2 Touch a source other than [SD].
3 Tilt the panel toward you manually.
4 Push the SD card until it clicks and then remove your finger from the card. The card pops up so that you can pull it out with your fingers.
5 Close the panel.
!B5K-0760-00_20DNX_K_FP_QSG.indb 17 2020/07/02 14:24

USB/SD/iPod
18
Connect iPod/iPhone
Preparation• With an iPhone compatible with Apple CarPlay,
turn off Apple CarPlay by operating the iPhone at functional setup before connecting iPhone. For details of the setup method, contact the manufacturer of the terminal.
• Only one iPod/iPhone can be connected.
Wired connection
Preparation• Connect an iPod/iPhone with the KCA-iP103
(optional accessory) while Apple CarPlay is not connected.
1 Connect the iPod/iPhone using the KCA-iP103. (P.36)
● To disconnect the iPod/iPhone connected with the cable:
1 Detach the iPod/iPhone.
Bluetooth connectionPair the iPhone through Bluetooth.
Preparation• To connect an iPhone via Bluetooth, register it
as a Bluetooth device and do the profile setting for the connection beforehand. See Switch the connected device (P.53) in the Instruction Manual and Register the Bluetooth device (P.21).
• Connect an iPhone via Bluetooth while Apple CarPlay and an iPod/iPhone are not connected via USB.
Ñ Connectable iPod/iPhoneThe following models can be connected to this unit.Made for
• iPhone XS Max
• iPhone XS• iPhone XR• iPhone X• iPhone 8 Plus
• iPhone 8• iPhone 7 Plus• iPhone 7• iPhone SE• iPhone 6s
Plus
• iPhone 6s• iPod
touch (6th generation)
USB/SD/iPod Basic Operation
1 Press the [HOME]/[ ] button.
2 Touch [ ].
3 Touch [USB], [SD], or [iPod]. (P.12)
Control screen
3 2
1
1 CODEC
When a high-resolution source is played, its format information is displayed.
2 Operation keys
• [1] : Searches track/file.• [E] [F] : Searches the previous/next track/
file.Touch and hold to fast forward or fast backward. (It will be cancelled automatically after about 50 seconds.)
• [DH] : Plays or pauses.• [ ] : Displays the Graphic Equalizer screen.
(P.24)• [ ] : Repeats the current track/folder. • [ ] : Randomly plays all tracks in the current
folder.
3 Content list
• Touch the left side of the screen to display the Content list. Touch again to close the list.
• Displays the playing list. When you touch a track/file name on the list, playback will start.
!B5K-0760-00_20DNX_K_FP_QSG.indb 18 2020/07/02 14:24

HD Radio™ Tuner
19English
HD Radio™ Tuner
HD Radio Tuner Basic Operation
To listen to the HD Radio source, touch [HD Radio] icon on the source selection screen. (P.12)
NOTE• HD Radio broadcasting is for North American
sales area only.
Control screen
3
4
6
5
12
1 Operation keys
• [E] [F] : Tunes in a station. The method of switching frequencies can be changed (see 3 Seek mode/Band keys).
• [CHS] [CHR] : Selects a channel.• [1] : Display the Channel List screen.
• [ ] : Display a list of registered bookmarks.• [ ] : Displays the Graphic Equalizer screen.
(P.24)
2 Function panel
Touch the right side of the screen to display the function panel. Touch again to close the panel. • [10key Direct]: Display the direct station/
channel search screen.• [AME]: Presets stations automatically. (P.20)• [RCV]: Change the HD Radio reception mode.[Auto]: Switch between digital and analog audio automatically.[Digital]: Select this to tune to digital audio only.[Analog]: Select this to tune to analog audio only.
• [PTY] (FM only): Searches for a program by program type.
• [ ] : Stores the information about the song being received.
• [Emergency Alerts] : Turn on or off the alert message.
• [Alert Message Log] : Displays the alert message received.
3 Seek mode/Band keys
• Touch to switch seek mode in the following sequence: [AUTO1], [AUTO2], [MANUAL].
– [AUTO1]: Tunes in a station with good reception automatically.
– [AUTO2]: Tunes in the memorized stations one after another.
– [MANUAL]: Switches to the next frequency manually.
• Switches bands (between FM and AM).
4 Information display
Displays the information on the current station: Frequency and ChannelTouching [ ] allows you to switch between Content A, Content B and Content C.Content A: Station name, Song Title, Artist NameContent B: Station Message, Radio TextContent C: PTY Genre, Album Name
5 Preset list
• Touching [ ]/[ ] allows you to change the display size.
• Recalls the memorized station or channel. • When touched for 2 seconds, stores the
currently being received station or channel in the memory.
6 Indicator display
While receiving an HD Radio station, it lights with orange when the audio is digital and lights with gray when it is analog. While receiving an analog station, it is off.
!B5K-0760-00_20DNX_K_FP_QSG.indb 19 2020/07/02 14:24

HD Radio™ Tuner
20
Memory Operation
Ñ Auto memoryYou can store stations with good reception in the memory automatically.
1 Touch desired band key.
2 Touch [ ] on the right side of the screen. Touch [AME].
3 Touch [Yes].hh Auto memory starts.
Ñ Manual memoryYou can store the currently being received station or channel in the memory.
1 Select the station or channel you wish to store in the memory.
2 Touch [FM#] (#:1-15) or [AM#] (#:1-5) in which you want to store the station or channel for 2 seconds until a beep sounds.
Ñ Preset select
1 Touch [ ] on the left side of the screen. Select a station or channel from the list.
!B5K-0760-00_20DNX_K_FP_QSG.indb 20 2020/07/02 14:24

Bluetooth Control
21English
Bluetooth Control
Register the Bluetooth deviceIt is necessary to register the Bluetooth audio player or smartphone/cell-phone in this unit before using the Bluetooth function.
1 Press the [HOME]/[ ] button.
2 Touch [ ].
3 Touch [SETUP].hh SETUP Menu screen appears.
4 Touch [Connections & AV].
5 Touch [Device List].
6 Select a device type.
■ [Bluetooth]To connect as Bluetooth audio source.
■ [Apple CarPlay]To connect as Apple CarPlay source.
■ [Android Auto]To connect as Android Auto source.
7 Touch [ ].hh Bluetooth pairing waiting dialog appears.
8 Search for the unit (”DNR1007XR”) from your smartphone/cell-phone.Complete steps 8 to 10 within 30 seconds.
9 Operate your smartphone/cell-phone according to the displayed messages.
● Confirm the request both on the smartphone/cell-phone.
● Input the PIN Code in your smartphone/cell-phone.
PIN Code is set to “0000” as the default.
10 Touch [Yes].When data transmission and connection have completed, the Bluetooth connection icon appears on the screen.
NOTE• When registering the iPhone that is available for
Apple CarPlay wirelessly, a confirmation message appears. Touch [Yes] to display the Apple CarPlay screen for wireless connection.
!B5K-0760-00_20DNX_K_FP_QSG.indb 21 2020/07/02 14:24

Bluetooth Control
22
Using the Hands-Free UnitYou can use the telephone function by connecting the Bluetooth telephone to this unit.
NOTE• While Apple CarPlay or Android Auto is
connected, the Bluetooth Hands-Free function and two Bluetooth devices connections cannot be used. Only the Apple CarPlay or Android Auto Hands-Free function can be used.
Ñ Make a call
1 Press the [HOME]/[ ] button.
2 Touch [ ].
3 Touch [TEL].
hh Hands-Free screen appears.
NOTE• If your smartphone/cell-phone supports PBAP,
you can display the phonebook and call lists onto the touch panel screen when the smartphone/cell-phone is connected.
– Phonebook: up to 1000 entries – Up to 50 entries including dialed calls, received calls, and missed calls
4 Select a dialing method.
• [ ]: Call using call records• [ ]: Call using the phonebook
• [ ]: Call using the preset number• [ ]: Call by entering a phone number
● Select the smartphone/cell-phone to useWhen you connect two smartphones/cell-phones1) Touch [ ] to select the phone
you want to use.
Call using call records
1 Touch [ ].
2 Select the phone number from the list.
Call using the phonebook
1 Touch [ ].
2 Touch [ ].
3 Select the initial.• Characters with no corresponding name
will not appear.• A first character with an accent character
such as “ü” can be searched for with a non-accent character “u” . A character with an accent character in a sentence cannot be searched for.
4 Select the person you want to call from the list.
5 Select the phone number from the list.
!B5K-0760-00_20DNX_K_FP_QSG.indb 22 2020/07/02 14:24

Bluetooth Control
23English
NOTE• You can sort the phone numbers in the list by last
name or first name. For details, see Hands-Free Setup (P.62) in the Instruction Manual.
• When Russian or Hebrew is selected in "Language select", you can switch between English keyboard and the selected language keyboard. For details, see System Setup (P.72) in the Instruction Manual.
• You can search with 3 initial letters on the English keyboard and 1 initial letter on the Russian / Hebrew keyboard.
Call using the preset number
1 Touch [ ].
2 Touch the name or phone number.
Call by entering a phone number
1 Touch [ ].
2 Enter a phone number with number keys.
3 Touch [ ].
Ñ Receive a call
1 Touch [ ] to answer a phone call or
[ ] to reject an incoming call.
NOTE• When shifting the gear to the reverse (R) position
and monitoring the picture from the rear view camera, this screen does not appear even if a call comes in.
• The portrait registered in the phonebook is displayed while making/receiving calls and during a call.
• If you edit the phonebook on the connected device side after downloading the phonebook, the portrait may not be displayed depending on the edited content. It is recommended that you download the phonebook whenever you edit it.
• The image quality of a displayed portrait may depends on a connected device.
To end call
1 While talking, touch [ ].
Ñ Operations during a call
● Adjust the volume of your voice 1) Touch [Speech Quality].2) Touch [T] or [U] for [Microphone Level].
● Adjust the receiver volumeTurn the volume knob clockwise to increase, and counter-clockwise to decrease.
● Mute your voice
Touch [ ] to mute or not to mute your voice.
● Output the dial toneTouch [DTMF] to display the tone input screen.You can send tones by touching desired keys on the screen.
● Switching between speaking voice output destinations
Touching [ ]/[ ] each time switches speaking voice output destinations between the smartphone/cell-phone and the speaker.
● Switching between the Hands Free screen and the navigation screen
Press the [NAV]/[CAMERA] button to switch between the Hands Free screen and the navigation screen.
!B5K-0760-00_20DNX_K_FP_QSG.indb 23 2020/07/02 14:24

Controlling Audio
24
Controlling AudioYou can adjust various settings such as audio balance or subwoofer level.
1 Press the [HOME]/[ ] button.
2 Touch [ ].
3 Touch [Audio].
Ñ Controlling General Audio
1 Touch [FAD / BAL / Zone].
2 Set each parameter as follows.
[C] and [D] adjust the left and right volume balance.[R] and [S] adjust the front and rear volume balance.
■ [Center]Clear the adjustment.
Ñ Equalizer ControlYou can adjust equalizer by selecting the optimized setting for each category.
1 Touch [EQ / SW Level].
2 Touch the screen and set the Graphic Equalizer as desired.
■ Gain level (area in dotted frame)Adjust the gain level by touching each frequency bar.You can select a frequency bar and adjust its level by [R], [S].
■ [ALL SRC]Apply the adjusted equalizer curve to all sources. Touch [ALL SRC] and then touch [OK] on the confirmation screen.
■ [Memory]Saves the adjusted equalizer curve as “User1” to “User4”.
■ [Initialize]Initialize (flatten) the current EQ curve.
■ [Bass EXT] (Bass Extend Settings)When turned on, the frequencies lower than 62.5 Hz is set to the same gain level (62.5 Hz).
■ [SW Level]Adjust the subwoofer volume.
■ [Pops]/[Easy]/[Top40]/[Jazz]/[Powerful]/[Rock]/[Flat]/[Bass Boost]/[User1]/[User2]/[User3]/[User4]
Recall the preset EQ curve.
!B5K-0760-00_20DNX_K_FP_QSG.indb 24 2020/07/02 14:24

Connection/Installation
25English
Connection/InstallationThis section is for the professional installer.For safety’s sake, leave wiring and mounting to professionals. Consult the car audio dealer.
Before InstallationBefore installation of this unit, please note the following precautions.
# WARNINGS• If you connect the ignition wire (red) and
the battery wire (yellow) to the car chassis (ground), you may cause a short circuit, that in turn may start a fire. Always connect those wires to the power source running through the fuse box.
• Do not cut out the fuse from the ignition wire (red) and the battery wire (yellow). The power supply must be connected to the wires via the fuse.
# CAUTION• Install this unit in the console of your vehicle.
Do not touch the metal part of this unit during and shortly after the use of the unit. Metal part such as the heat sink and enclosure become hot.
NOTE• Mounting and wiring this product requires
skills and experience. For best safety, leave the mounting and wiring work to professionals.
• Do not install the unit if it becomes an obstacle to driver performance.
• Adjust the panel position not to become an obstacle to driver performance.
• Adjust the panel position so that the panel can be moved to an angle that allows an SD card to be inserted and removed.
• Make sure to ground the unit to a negative 12V DC power supply.
• Do not install the unit in a spot exposed to direct sunlight or excessive heat or humidity. Also avoid places with too much dust or the possibility of water splashing.
• Do not use your own screws. Use only the screws provided. If you use the wrong screws, you could damage the unit.
• If the power is not turned ON (“There is an error in the speaker wiring. Please check the connections.” is displayed), the speaker wire may have a short-circuit or touched the chassis of the vehicle and the protection function may have been activated. Therefore, the speaker wire should be checked.
• If your car’s ignition does not have an ACC position, connect the ignition wires to a power source that can be turned on and off with the ignition key. If you connect the ignition wire to a power source with a constant voltage supply, such as with battery wires, the battery may be drained.
• If the console has a lid, the lid will not be closed even when the unit is installed correctly.
• If the fuse blows, first make sure the wires are not touching to cause a short circuit, then replace the old fuse with one with the same rating.
• Insulate unconnected wires with vinyl tape or other similar material. To prevent a short circuit, do not remove the caps on the ends of the unconnected wires or the terminals.
• Connect the speaker wires correctly to the terminals to which they correspond. The unit may be damaged or fail to work if you share the ¤ wires or ground them to any metal part in the car.
• When only two speakers are being connected to the system, connect the connectors either to both the front output terminals or to both the rear output terminals (do not mix front and rear). For example, if you connect the ¢ connector of the left speaker to a front output terminal, do not connect the ¤ connector to a rear output terminal.
• After the unit is installed, check whether the brake lamps, blinkers, wipers, etc. on the car are working properly.
• Mount the unit so that the mounting angle is 30° or less.
• This unit has the cooling fan to decrease the internal temperature. Do not mount the unit in a place where the cooling fan of the unit is blocked. Blocking these openings will inhibit the cooling of the internal temperature and result in malfunction.
!B5K-0760-00_20DNX_K_FP_QSG.indb 25 2020/07/02 14:24

Connection/Installation
26
Cooling fan• Do not press hard on the panel surface when
installing the unit to the vehicle. Otherwise scars, damage, or failure may result.
• Reception may drop if there are metal objects near the Bluetooth/Wi-Fi antenna.
Bluetooth/Wi-Fi antenna unit
● Forward and Lateral Fields of Vision• To determine driver’s forward and lateral fields
of vision under normal conditions, place a pole (directly visible from the front or visible through the car rear-view mirror) as shown.*1 *2
0.3 m
0.3 m0.3 m
2 m2 m
1 m 0.7 m 0.9 m
[ ]: Pole (height: 1m, diameter: 0.3m)[ ]: Field of vision from steering position[ ]: Exempted area (pole size is subject to
regulation)• For right hand drive vehicles, standards are
reversed.*1 The pole must be visible from the driver's position as
direct forward field of vision.*2 The pole must be directly visible or indirectly visible
through the mirror, etc. from the driver's position.
Ñ Supplied accessories for installation
1
x1
2
(Black 1 m)x1
3(3 m)
x1
4
(M5 x 8 mm)x6
5
(M5 x 8 mm)x6
6
(3.5 m) x1
7
x1
8
x1
9
x2
0
Left/Right x1
-
(M5 x 8 mm)x6
!B5K-0760-00_20DNX_K_FP_QSG.indb 26 2020/07/02 14:24

Connection/Installation
27English
=
x1
~
(Ø3 x 6 mm)(Black)
x2
Ñ Installation procedure1) To prevent a short circuit, remove the key
from the ignition and disconnect the ¤ terminal of the battery.
2) Remove the vehicle parts for installing the unit and connecting wires to terminal.
3) Make the proper input and output wire connections for each unit.
4) Connect the speaker wires of the wiring harness.
5) Connect wiring harness wires in the following order; ground, battery, ignition.
6) Determine the height of the display unit and position of the slider. See Distance between the display unit and the main unit (P.28).
7) Connect the wiring harness connector to the unit.
8) Install the main unit to the vehicle.9) Reinstall the vehicle parts.10) Install the display unit.11) Reconnect the ¤ terminal of the battery.12) Perform the Initial Setup.
See Initial SETUP (P.9).
!B5K-0760-00_20DNX_K_FP_QSG.indb 27 2020/07/02 14:24

Connection/Installation
28
Installing the unit
Ñ Confirm the installing position of the display unit
● Vehicles cannot be installedIt may be possible to install if it can avoid the following by adjustment for slider position and display height.
Lever operations are interfered such as shift lever, wiper lever, winker lever when install the unit.
A hazard switch is hidden from a driver seat.
The display unit hits a panel on the vehicle.
● Distance between the display unit and the main unitAdjust slider position and display height so that it does not interfere with display movement.Slider position
Display angle Display height-10° 0° 45° 1 2 3 4
Back position
4321
a4321
4321
4321
4321
4321
b
a
c
aa
b
b
d
d
b
c
4321
a4321
4321
4321
4321
4321
b
a
c
aa
b
b
d
d
b
c4321
a4321
4321
4321
4321
4321
b
a
c
aa
b
b
d
d
b
c
-10°a 10b 38.1 50.9 63.8 76.5
0°a 26.7b 34.7 47.7 60.7 73.7
45°
c 5.7 14.4 24.1 33.4
d 55.4 46.3 37.1 27.8
Forward position
4321
a4321
4321
4321
4321
4321
b
a
c
aa
b
b
d
d
b
c
4321
a4321
4321
4321
4321
4321
b
a
c
aa
b
b
d
d
b
c4321
a4321
4321
4321
4321
4321
b
a
c
aa
b
b
d
d
b
c
-10°a 30.1b 38.1 50.9 63.8 76.5
0°a 46.7b 34.7 47.7 60.7 73.7
45°
c 25.7 34.9 44.1 53.3
d 55.4 46.3 37.1 27.8
Unit: mm
ExamplesCluster panel on the vehicle
Slider in back position
Slider in forward position
C’4
14
14
21
4
C’ =30mm C’ =30mm
C’ =50mm C’ =50mm
• C'=50mm;Slider position: Forward positionDisplay height: Set only "4"
• C'=30mm;Slider position: Back positionDisplay height: Set only "4"
Slider position: Forward positionDisplay height: Set "2"~"4"
!B5K-0760-00_20DNX_K_FP_QSG.indb 28 2020/07/02 14:24

Connection/Installation
29English
Ñ Positioning the slider in forward
1 Remove the four screws from the bottom of the main unit.
Main unit
Screw
2 Remove the two cover for back position, and then remove the two hexagon head screws from the bracket for back position.
Hexagon head screw
Bracket for back position
Cover for back position
3 Pull the slider block forward and remove the two hexagon head screws to remove the bracket for back position.
Bracket for back position
Hexagon head screw
4 Install the bracket for forward position (accessory 0) each side so that its projections are aligned with the slots on the main unit.
Projection
Projection
0
5 Fix the bracket for forward position to the slider block with the two hexagon head screws. Push the slider block until it stops and then fix the bracket for forward position to the main unit with the two hexagon head screws.
Hexagon head screw
Hexagon head screw
6 Reinstall the four screws to the bottom of the main unit.
Screw
7 Install the cover for forward position (accessory 9) to two locations, as shown.
9
!B5K-0760-00_20DNX_K_FP_QSG.indb 29 2020/07/02 14:24

Connection/Installation
30
Ñ Adjusting the display height
1 Remove the four flat head screws from both sides.
Flat head screw
2 Adjust the display height according to the screw hole position. Default is "1".
1 2 3 4
Screw hole position
3 Reinstall the four flat head screws on both sides and fix the display.
NOTE• Fix with flat head screws correctly. After installing
the display unit (accessory 8) to the main unit, tilt the display forward until it stops and confirm that the display unit (accessory 8) does not hit vehicle parts. If the display unit hits vehicle parts, adjust the display height again.
Ñ GPS antennaGPS antenna is installed inside of the car. It should be installed as horizontally as possible to allow easy reception of the GPS satellite signals.To mount the GPS antenna inside your vehicle:1) Clean your dashboard or other surface.2) Remove the separator of the metal plate
(accessory 7).3) Press the metal plate (accessory 7) down
firmly on your dashboard or other mounting surface. You can bend the metal plate (accessory 7) to conform to a curved surface, if necessary.
4) Remove the separator of the GPS antenna (accessory 6), and stick the antenna to the metal plate (accessory 7).
7
6
NOTE• Use the supplied GPS antenna. Using the GPS
antenna other than the supplied one may cause a drop in positioning accuracy.
• Depending on the type of car, reception of the GPS satellite signals might not be possible with an inside installation.
• Please install this GPS antenna in an area away from any antennas that are used with CB radios or satellite televisions.
• The GPS antenna should be installed at a position that is spaced at least 12 inch (30 cm) from smartphone/cell-phone or other transmitting antennas. Signals from the GPS satellite may be interfered with by these types of communication.
• Painting the GPS antenna with (metallic) paint may cause a drop in performance.
!B5K-0760-00_20DNX_K_FP_QSG.indb 30 2020/07/02 14:24

Connection/Installation
31English
Ñ Microphone unit1) Check the installation position of the
microphone (accessory 3).2) Clean the installation surface.3) Remove the separator of the microphone
(accessory 3), and stick the microphone to the place shown below.
4) Wire the microphone cable up to the unit with it secured at several positions using tape or other desired method.
5) Adjust the direction of the microphone (accessory 3) to the driver.
3
Fix a cable with a commercial item of tape.
Ñ Installing the main unit
NOTE• Determine the slider position before installing the
main unit. (P.29) The slider position cannot be changed after installing to the vehicle.
• Make sure that the unit is installed securely in place. If the unit is unstable, it may malfunction (eg, the sound may skip).
1 Remove parts that interfere with installing such as a panel on the vehicle.
2 Install the car bracket to the main unit.
Car bracket
4 or 5
Main unit
3 Connect the wiring harness wires and peripheral equipment.
4 Install the main unit to the vehicle.
5 Reinstall the removed parts such as a panel on the vehicle.
Panel on the vehicle
Main unit
6 Install the display unit (accessory 8) to the main unit.
Main unit
8
NOTE• If the display unit hits a panel on the vehicle,
adjust the display height by referring to Adjusting the display height (P.30).
7 Fix the display unit with six hexagon head screws (accessory -).
-
!B5K-0760-00_20DNX_K_FP_QSG.indb 31 2020/07/02 14:24

Connection/Installation
32
8 Attach the protective cover (accessory =) to coupling part, and then fix it with two binding head screws (accessory ~).
~=
NOTE• If the protective cover (accessory =) is not
attached, this unit will not turn on. Even if the unit is turned on, the power may be turned off halfway.Be sure to attach the protective cover (accessory =).
9 Raise the display manually.
!B5K-0760-00_20DNX_K_FP_QSG.indb 32 2020/07/02 14:24

Connection/Installation
33English
Ñ Connecting wires to terminals
ILLUMI
ANT CONT
STEERING WHEEL REMOTE INPUTREMOTE CONT
PRK SW
REVERSE
P. CONT
CAM+
CAM–
S SENS
Fuse (15A)
When using the optional power amplifier, connect to its power control terminal. (Max. 200mA, 12V)
Depending on what antenna you are using, connect either to the control terminal of the motor antenna, or to the power terminal for the booster amplifier of the film-type antenna. (Max. 300mA, 12V)
Blue/White (Power control wire)
Green/White
Green/Red
To CMOS-3xx series (optional accessory) camera control terminal
Blue (Antenna control wire)
To car light control switch
Orange/White (Dimmer control wire)
Connect to the vehicle’s speed pulse harness.Do not cut the "S SENS" tag or failure may result.
Light Blue/Yellow (Steering remote control wire)
Connect to vehicle’s reverse lamp harness when using the optional rear view camera.
To steering remoteTo use the steering wheel remote control feature, you need an exclusive remote adapter (not supplied) matched to your car.
If no connections are made, do not let the cable come out from the tab.
Purple/Black
To rear right speaker
To rear left speaker
To front right speaker
To front left speaker
Speaker impedance: 4-8 Ω
Purple
Green/Black
Green
Gray/Black
Gray
White/Black
White
Accessory 1Connect to the vehicle’s parking brake detection switch harness.
Light Green (Parking sensor wire) (2 m)
For best safety, be sure to connect the parking sensor.
Ignition key switch
Red (Ignition wire)
Yellow (Battery wire)
Car fuse box
Battery
Black (Ground wire) ¤(To car chassis)
Pink (Speed Pulse Input) (2m)
Purple/White (Reverse sensor wire) (2 m)
!B5K-0760-00_20DNX_K_FP_QSG.indb 33 2020/07/02 14:24

Connection/Installation
34
+
+
+
+
When connecting to an external amplifier, connect its ground wire to the car’s chassis to avoid damaging the unit.
White/Black
Gray/Black
Green/Black
Purple/Black
Speaker impedance: 4-8 Ω
Purple
Green
Gray
WhiteTo mid range left speaker
Subwoofer Preout
To mid range right speaker
Mid Range Preout
To tweeter left speaker
Tweeter Preout
To tweeter right speaker
Power amplifier(optional accessory)
RCA Cable(Sold separately)
Input
Speaker
Preout
NOTE• For speaker system setup, see 3-way speaker
system setup (P.74) in the Instruction Manual.• For speaker setup and crossover setup, see
Speaker / X’over setup (P.75) in the Instruction Manual.
• For how to connect speaker wires to terminals other than speaker terminals and Preout terminals, see Connecting the system and external components (P.34) and Connecting wires to terminals (P.33).
Ñ 3-way speaker system setup Ñ Connecting the system and external components
1213
14
15
678910
2
1
4 5
11
3
1 Accessory 3: Bluetooth Microphone
2 FM/AM antenna input
3 AV Audio output (ø3.5 mini jack)
4 When connecting to an external amplifier, connect its ground wire to the car’s chassis to avoid damaging the unit.
Rear Audio Preout (Left; White, Right; Red)
Front Audio Preout (Left; White, Right; Red)
Subwoofer Preout (Left; White, Right; Red)
5 SiriusXM Connect Vehicle Tuner connector For more information on how to install the SiriusXM Connect Vehicle tuner, consult the installation guide included with the tuner.
!B5K-0760-00_20DNX_K_FP_QSG.indb 34 2020/07/02 14:24

Connection/Installation
35English
6 HDMI inputUse HDMI cable KCA-HD100 (optional accessory).When you connect the cable to HDMI terminal, remove the fixture. After connecting the cable, put the fixture again.
HDMI connector
Fixture
7 iDatalink connector
8 Dashboard camera interfaceConnect a Dashboard Camera DRV-N520 (optional accessory). (P.36)
9 AV Audio input (ø3.5 mini jack)
10 Accessory 6: GPS AntennaUse the supplied GPS antenna. Using the GPS antenna other than the supplied one may cause a drop in positioning accuracy.
11 3rd view camera input (Yellow). See To set up the camera assignment settings (P.37).
12 Rear view camera input (Yellow)*1
13 Front view camera/Dashboard camera input (Yellow).*2 (P.37)
14 Video output (Yellow)
15 Video input (Yellow)
*1 Connect an HD camera to Rear view camera input terminal to use HD video.
*2 Connect an HD camera to Front view camera/Dashboard camera input terminal to use HD video.
Ñ Connecting a USB device
USB device [2]
USB terminal [1]
Accessory 2 (1 m) [3]
[1] USB maximum power supply current : DC 5 V = 1.5 A
[2] Sold separately[3] See Securing the USB extension cable
(P.36).
Ñ Connecting an Android smartphone
USB cable [2]
Android smartphone [2]
USB terminal [1]
Accessory 2 (1 m) [3]
[1] USB maximum power supply current : DC 5 V = 1.5 A
[2] Sold separately[3] See Securing the USB extension cable
(P.36).
!B5K-0760-00_20DNX_K_FP_QSG.indb 35 2020/07/02 14:24

Connection/Installation
36
Ñ Connecting an iPod/iPhoneKCA-iP103 (0.8 m) [3]
KCA-HD100 (1.8 m) [3]
KCA-iP103 (0.8 m) [3]
KCA-iP103 (0.8 m) [3]
Lightning Digital AV Adapter [2]
iPod/iPhone [2]
iPhone (with Apple CarPlay) [2]
USB terminal [1]
Accessory 2 (1 m) [4]
[1] USB maximum power supply current : DC 5 V = 1.5 A
[2] Sold separately[3] Optional accessory[4] See Securing the USB extension cable
(P.36).
Ñ Securing the USB extension cable
Secure the USB extension cable with insulating tape or the like so that its connectors are not disconnected.
Ñ Connecting the camera
DRV-N520 [1]
3rd view camera input (Yellow)
Front view camera/Dashboard camera input (Yellow)
[3]
Left side view camera and Right side view camera [2]
Front view camera [4] [6]
Video input (Yellow)
Rear view camera input (Yellow)
Dashboard camera interface
Rear view camera [4] [5]
[1] Optional accessory[2] Sold separately[3] Up to 3 cameras of Dashboard camera, Front
view camera, Left side view camera and Right side view camera can be connected. (P.37)
[4] CMOS-3xx series (optional accessory) or commercially available camera.
[5] For HD video, an HD camera is also used as Rear view camera.
[6] For HD video, an HD camera is also used as Front view camera.
!B5K-0760-00_20DNX_K_FP_QSG.indb 36 2020/07/02 14:24

Appendix
37English
Ñ To set up the camera assignment settings
1 Press the [HOME]/[ ] button.
2 Touch [ ].
3 Touch [SETUP].hh SETUP Menu screen appears.
4 Touch [Camera].hh Camera setting menu appears.
5 Touch [Camera Assignment Settings].
6 Select the item to set up.
■ [REAR VIEW CAMERA]Set the camera assignment from view camera connected to Rear view camera input terminal.
■ [FRONT VIEW CAMERA / DASH CAM]Set the camera assignment from view camera connected to Front view camera/ Dashboard camera input terminal.
■ [3rd VIEW CAMERA]Set the camera assignment from view camera connected to 3rd view camera input terminal.
■ [VIDEO IN]Set the camera assignment from view camera connected to Video input terminal.
7 Select the view camera to set up.
3
1 2
1 Picture from view camera2 Camera position3 Picture quality settings
8 Touch [Enter].
Appendix
Note for specifications
■ Bluetooth sectionFrequency
: 2.402 – 2.480 GHz
RF Output Power (E.I.R.P.): +4 dBm (MAX), Power Class 2
■ GeneralOperating Voltage
: 12 V DC car battery
Speaker Impedance: 4 – 8 Ω
!B5K-0760-00_20DNX_K_FP_QSG.indb 37 2020/07/02 14:24

Appendix
38
■ Copyrights• The Bluetooth® word mark and logos are registered
trademarks owned by Bluetooth SIG, Inc. and any use of such marks by JVCKENWOOD Corporation is under license. Other trademarks and trade names are those of their respective owners.
• DSD, LDAC and LDAC logo are trademarks of Sony Corporation.
• Hi-Res Audio logo and Hi-Res Audio Wireless logo are used under license from Japan Audio Society.
• Windows Media is a registered trademark or trademark of Microsoft Corporation in the United States and/or other countries.This product is protected by certain intellectual property rights of Microsoft. Use or distribution of such technology outside of this product is prohibited without a license from Microsoft.
• This software is based in part on the work of the independent JPEG Group.
• Use of the Made for Apple badge means that an accessory has been designed to connect specifically to the Apple product(s) identified in the badge, and has been certified by the developer to meet Apple performance standards. Apple is not responsible for the operation of this device or its compliance with safety and regulatory standards. Please note that the use of this accessory with an Apple product may affect wireless performance.
• Apple, iPhone, iPod, iPod touch, and Lightning are trademarks of Apple Inc., registered in the U.S. and other countries.
• Apple, Siri, Apple CarPlay, Apple Music and Apple CarPlay logo are trademarks of Apple Inc., registered in the U.S. and other countries.
• App Store is a service mark of Apple Inc., registered in the U.S. and other countries.
• IOS is a trademark or registered trademark of Cisco in the U.S. and other countries and is used under license.
• Sirius, XM and all related marks and logos are trademarks of Sirius XM Radio Inc. All rights reserved.
• HD Radio Technology manufactured under license from iBiquity Digital Corporation. U.S. and Foreign Patents. For patents see https://dts.com/patents. HD Radio and the HD, HD Radio, and "ARC" logos are registered trademarks or trademarks of iBiquity Digital Corporation in the United States and/or other countries.
• INRIX is a registered trademark of INRIX, Inc.• Google, Android, Google Play and Android Auto are
trademarks of Google LLC.To use Android Auto on your car display, you’ll need an Android Auto compatible vehicle or aftermarket stereo, an Android phone running Android 5.0 or higher, and the Android Auto app.
• SDXC Logo is a trademark of SD-3C LLC.• Wi-Fi® is a registered trademark of Wi-Fi Alliance®.• The Wi-Fi CERTIFIED™ Logo is a certification mark of
Wi-Fi Alliance®.• Copyright© 2018 Techpoint, Inc. All rights reserved.
• The terms HDMI and HDMI High-Definition Multimedia Interface, and the HDMI Logo are trademarks or registered trademarks of HDMI Licensing Administrator, Inc. in the United States and other countries.
• This product includes FontAvenue® fonts licenced by NEC Corporation.FontAvenue is a registered trademark of NEC Corporation.
• This product includes "Ubiquitous QuickBoot TM" technology developed by Ubiquitous Corp. Ubiquitous QuickBoot TM is a trademark of Ubiquitous Corp. Copyright© 2017 Ubiquitous Corp. All rights reserved.
• Garmin® is a trademark of Garmin Ltd. or its subsidiaries, registered in the USA and other countries. ecoRoute™ is a trademark of Garmin Ltd. or its subsidiaries. These trademarks may not be used without the express permission of Garmin.
• THIS PRODUCT IS LICENSED UNDER THE AVC PATENT PORTFOLIO LICENSE FOR THE PERSONAL USE OF A CONSUMER OR OTHER USES IN WHICH IT DOES NOT RECEIVE REMUNERATION TO (¡)ENCODE VIDEO IN COMPLIANCE WITH THE AVC STANDARD (“AVC VIDEO”) AND/OR (¡¡)DECODE AVC VIDEO THAT WAS ENCODED BY A CONSUMER ENGAGED IN A PERSONAL ACTIVITY AND/OR WAS OBTAINED FROM A VIDEO PROVIDER LICENSED TO PROVIDE AVC VIDEO. NO LICENSE IS GRANTED OR SHALL BE IMPLIED FOR ANY OTHER USE. ADDITIONAL INFORMATION MAY BE OBTAINED FROM MPEG LA, L.L.C. SEE HTTPS://WWW.MPEGLA.COM
• THIS PRODUCT IS LICENSED UNDER THE MPEG-4 VISUAL PATENT PORTFOLIO LICENSE FOR THE PERSONAL AND NON-COMMERCIAL USE OF A CONSUMER FOR (¡) ENCODING VIDEO IN COMPLIANCE WITH THE MPEG-4 VISUAL STANDARD (“MPEG-4 VIDEO”) AND/OR (¡¡) DECODING MPEG-4 VIDEO THAT WAS ENCODED BY A CONSUMER ENGAGED IN A PERSONAL AND NON-COMMERCIAL ACTIVITY AND/OR WAS OBTAINED FROM A VIDEO PROVIDER LICENSED BY MPEG LA TO PROVIDE MPEG-4 VIDEO. NO LICENSE IS GRANTED OR SHALL BE IMPLIED FOR ANY OTHER USE. ADDITIONAL INFORMATION INCLUDING THAT RELATING TO PROMOTIONAL, INTERNAL AND COMMERCIAL USES AND LICENSING MAY BE OBTAINED FROM MPEG LA, LLC. SEE HTTPS://WWW.MPEGLA.COM.
• THIS PRODUCT IS LICENSED UNDER THE VC-1 PATENT PORTFOLIO LICENSE FOR THE PERSONAL AND NON-
!B5K-0760-00_20DNX_K_FP_QSG.indb 38 2020/07/02 14:24

Appendix
39English
COMMERCIAL USE OF A CONSUMER TO ( i ) ENCODE VIDEO IN COMPLIANCE WITH THE VC-1 STANDARD (“VC-1 VIDEO”) AND/OR ( ii ) DECODE VC-1 VIDEO THAT WAS ENCODED BY A CONSUMER ENGAGED IN A PERSONAL AND NON-COMMERCIAL ACTIVITY AND/OR WAS OBTAINED FROM A VIDEO PROVIDER LICENSED TO PROVIDE VC-1 VIDEO. NO LICENSE IS GRANTED OR SHALL BE IMPLIED FOR ANY OTHER USE. ADDITIONAL INFORMATION MAY BE OBTAINED FROM MPEG LA, L.L.C. SEE HTTPS://WWW.MPEGLA.COM
• libFLACCopyright (C) 2000-2009 Josh CoalsonCopyright (C) 2011-2013 Xiph.Org FoundationRedistribution and use in source and binary forms, with or without modification, are permitted provided that the following conditions are met:
– Redistributions of source code must retain the above copyright notice, this list of conditions and the following disclaimer.
– Redistributions in binary form must reproduce the above copyright notice, this list of conditions and the following disclaimer in the documentation and/or other materials provided with the distribution.
– Neither the name of the Xiph.org Foundation nor the names of its contributors may be used to endorse or promote products derived from this software without specific prior written permission.
THIS SOFTWARE IS PROVIDED BY THE COPYRIGHT HOLDERS AND CONTRIBUTORS ``AS IS'' AND ANY EXPRESS OR IMPLIED WARRANTIES, INCLUDING, BUT NOT LIMITED TO, THE IMPLIED WARRANTIES OF MERCHANTABILITY AND FITNESS FOR A PARTICULAR PURPOSE ARE DISCLAIMED. IN NO EVENT SHALL THE FOUNDATION OR CONTRIBUTORS BE LIABLE FOR ANY DIRECT, INDIRECT, INCIDENTAL, SPECIAL, EXEMPLARY, OR CONSEQUENTIAL DAMAGES (INCLUDING, BUT NOT LIMITED TO, PROCUREMENT OF SUBSTITUTE GOODS OR SERVICES; LOSS OF USE, DATA, OR PROFITS; OR BUSINESS INTERRUPTION) HOWEVER CAUSED AND ON ANY THEORY OF LIABILITY, WHETHER IN CONTRACT, STRICT LIABILITY, OR TORT (INCLUDING NEGLIGENCE OR OTHERWISE) ARISING IN ANY WAY OUT OF THE USE OF THIS SOFTWARE, EVEN IF ADVISED OF THE POSSIBILITY OF SUCH DAMAGE.
• libvorbisCopyright (c) 2002-2008 Xiph.org Foundation Redistribution and use in source and binary forms, with or without modification, are permitted provided that the following conditions are met:
– Redistributions of source code must retain the above copyright notice, this list of conditions and the following disclaimer.
– Redistributions in binary form must reproduce the above copyright notice, this list of conditions and the following disclaimer in the documentation and/or other materials provided with the distribution.
– Neither the name of the Xiph.org Foundation nor the names of its contributors may be used to endorse or promote products derived from this software without specific prior written permission.
THIS SOFTWARE IS PROVIDED BY THE COPYRIGHT HOLDERS AND CONTRIBUTORS ``AS IS’’ AND ANY EXPRESS OR IMPLIED WARRANTIES, INCLUDING, BUT NOT LIMITED TO, THE IMPLIED WARRANTIES OF MERCHANTABILITY AND FITNESS FOR A PARTICULAR PURPOSE ARE DISCLAIMED. IN NO EVENT SHALL THE FOUNDATION OR CONTRIBUTORS BE LIABLE FOR ANY DIRECT, INDIRECT, INCIDENTAL, SPECIAL, EXEMPLARY, OR CONSEQUENTIAL DAMAGES (INCLUDING, BUT NOT LIMITED TO, PROCUREMENT OF SUBSTITUTE GOODS OR SERVICES; LOSS OF USE, DATA, OR PROFITS; OR BUSINESS INTERRUPTION) HOWEVER CAUSED AND ON ANY THEORY OF LIABILITY, WHETHER IN CONTRACT, STRICT LIABILITY, OR TORT (INCLUDING NEGLIGENCE OR OTHERWISE) ARISING IN ANY WAY OUT OF THE USE OF THIS SOFTWARE, EVEN IF ADVISED OF THE POSSIBILITY OF SUCH DAMAGE.
• liboggCopyright (c) 2002, Xiph.org Foundation Redistribution and use in source and binary forms, with or without modification, are permitted provided that the following conditions are met:
– Redistributions of source code must retain the above copyright notice, this list of conditions and the following disclaimer.
– Redistributions in binary form must reproduce the above copyright notice, this list of conditions and the following disclaimer in the documentation and/or other materials provided with the distribution.
– Neither the name of the Xiph.org Foundation nor the names of its contributors may be used to endorse or promote products derived from this software without specific prior written permission.
THIS SOFTWARE IS PROVIDED BY THE COPYRIGHT HOLDERS AND CONTRIBUTORS ``AS IS’’ AND ANY EXPRESS OR IMPLIED WARRANTIES, INCLUDING, BUT NOT LIMITED TO, THE IMPLIED WARRANTIES OF MERCHANTABILITY AND FITNESS FOR A PARTICULAR PURPOSE ARE DISCLAIMED. IN NO EVENT SHALL THE FOUNDATION OR CONTRIBUTORS BE LIABLE FOR ANY DIRECT, INDIRECT, INCIDENTAL, SPECIAL, EXEMPLARY, OR CONSEQUENTIAL DAMAGES (INCLUDING, BUT NOT LIMITED TO, PROCUREMENT OF SUBSTITUTE GOODS OR SERVICES; LOSS OF USE, DATA, OR PROFITS; OR BUSINESS INTERRUPTION) HOWEVER CAUSED AND ON ANY THEORY OF LIABILITY, WHETHER IN CONTRACT, STRICT LIABILITY, OR TORT (INCLUDING NEGLIGENCE OR OTHERWISE) ARISING IN ANY WAY OUT OF THE USE OF THIS SOFTWARE, EVEN IF ADVISED OF THE POSSIBILITY OF SUCH DAMAGE.
!B5K-0760-00_20DNX_K_FP_QSG.indb 39 2020/07/02 14:24

Hi-Res Audio logo and Hi-Res Audio Wireless logo are used under license from Japan Audio Society.
!B5K-0760-00_20DNX_K_FP_QSG.indb 116 2020/07/02 14:25

MILITARY
Units purchased through the U.S.A. military exchange service overseas may be serviced under warranty in the continental U.S.A., subject to the tollowing conditions. 1) The original warranty is in etfect. 2) Proo! of purchase is provided to the servicer.
WARRANTY FOR MILITARY MARKET JVC KENWOOO corporation is proud of the quality and workmanship of its audio equipment. This unit has been properly designed, tested and inspected before it was shipped to you. If properly installed and operated in accordance with inslructions furnished, it should give you an optimum reliable performance.
WARRANTY PERIOD This product is warranted for a period of (1) year from the date of the original purchase.
SCOPE OF WARRANTY Except as specified below, lhis warranty coYers all defects in materials and workmanship al the Kenwood brand products.
During the warranty period, any authorized Kenwood Service Center in the military market listed in the back of this warranty card will provide you free-of-charge both parts and labor required to correct any defect in materials or workmanship.
The following are not covered by this warranty. 1. Voltage conversions. 2. Periodiccheck-upswhichdonotdiscloseanydefectcovered
by the warranty. 3. Cabinets, grilles, other exterior finishes, belts, tape heads,
and other non-durable parts and accessories. 4. Units on which the serial number has been effaced, modified
or removed. 5. Installation and/or removal charges. 6. Oamaged magnetic tapes. 7. House call charges tor any repairs. 8. Shipping or delivery charges to or from an authorized
Kenwood Service Center. 9. This warranty will not cover anyfailurethat is due to any of the
I allowing conditions in accordance with the visual inspeclion of the authorized Kenwood Service Center:
• Improper maintenance or repair, including the installation of parts or accessories thal do not conform to the quality and specifir.ations of the original parts.
• Misuse, abuse, neglect, unauthorized product modifir.ation or failure to follow instructions contained in the Owner's Manual.
• Accidental or intentional damages. • Repairs or attempted repairs by an unauthorized agency.
(All repairs must be performed at an authorized Kenwood Service Center.)
* Damages or deteriorations r.aused during shipment (Claims must be presented to the carrier).
• Damages or deteriorations resulting from removal and/ or replacement.
PURCHASER'S RESPONSIBILITIES As the purchased ol a new Kenwood brand product, you are requested to do the following in order to obtain Kenwood warranty service. 1. Retain yoursales slip or other evidence of purchase for proving
your eligibility lor requesting Kenwood warranty service. 2. Make your unit available to an authorized Kenwood Service
Center in the military market for inspection and approved warranty service, or ship your unit in its original carton box or equivalent, fully insured and shipping charges prepaid, to the authorized Kenwood Service Center.
Dear Customer,
LIMITATION OF IMPLIED WARRANTIES
Any and all implied warranties, including warranties of merchantability and fitness !or a particular purpose, shall be limiled in duration to the length ol this warranty.
EXCLUSION OF CERTAIN DAMAGES KENWOOO's liability for any defective product is limited to the repair or replacement of said product. at our potion, and shall not include damages of any kind, wtlelher incidental, consequential or otherwise, expect to the extent prohibited by applicable law.
KENWOOD AUTHORIZED SERVICE CENTERS IN MILITARY MARKET
JAPAN: Yokota Kenwood Rep,; c/o Yokota BX, JAAX AAFES-PAC, APO San Francisco 96328
Zama Kenwood Rep,; c/o Zama PX, JAAX AAFES-PAC, APO San Francisco 96343
Misawa Kenwood Rep,; c/o Misawa BX, JAAX AAFES-PAC, APO San Francisco 96519
Yokosuka Kenwood Rep,; c/o A-33, Yokosuka NEX No. 260-010 FPO Seattle 98760
Atsugi Kenwood Rep,; c/o Atsugi NEX No. 260-020 FPO Seattle 98767
lwakuni Kenwood Rep,; c/o Marine Corps Exchange, Marine Corps Air Station, FPO Seattle 98764
Sasebo Sasebo NEX; ·Navy Exchange 260-040 F.A. Box 115 FPO Seattle 98766
Okinawa Kenwood Rep,; c/o OWAX, AAFES-PAC, APO San Francisco 96230
KOREA: Kenwood Rep,; c/o KOAX Repair Shop, AAFES-PAC DD-Camp Market, APO San Francisco 96488
GUAM: Kenwood Rep,; c/o Guam NEX No. 230-010, FPO San Francisco 96630 Kenwood Rep,; c/o GUAX, AAFES-PAC, APO San Francisco 96334
U.S.A.: In The Continental U.S.A. For Nearest Authorized Service Center; Tel: 1-800-536-9663 www.us.jvckenwood.com
EUROPE: Please inquire at the military resale outlets where you bought your Kenwood products, or JVCKENWOOD DEUTSCHLAND GMBH: Konrad-Adenauer Allee 1-11, 61118 Bad Vilbel, Germany
Thank you for purchasing this kenwood product. As mentioned in the pages of this booklet, our warranty is only valid in the countries listed. If your country is not listed please contact your retailer for information on warranty procedure, or write to:
JVC KENWOOD Customer Information Center 3-12, Moriyacho, Kanagawa-ku, Yokohama-shi, Kanagawa 221-0022, Japan
Warranty Card
Attention:
Identification du produit Modelo do aparelho e numero de s~rie Model number & serial number
Aevendeur & cachet Nome da loja e carimbo Dealer & stamp
Date d'achtat Data da compra Purchase date
Norn & adresse du client Nome e endere~o do cliente Name & address of customer
This card and receipt (or invoice) are necessary to purchase a new panel in case of theft or damage. Attention: Vous aurez besoin de cette carte et du re~u (ou de la facture) pour acheter un nouveau panneau en cas de vol ou d'endommagement. Aten~ao: Em caso de dano ou perda do painel fronta l, este Certificado de Garantia ea Nata Fiscal de compra serao requisitados para a aquisi~ao de um nova painel.
© 846-0824-00/04 (K) (15/11)

U.S.A. JVCKENWOOD USA Corporation
This warranty will be honored only in the U.S.A.
KENWOOD LIMITED WARRANTY FOR CAR STEREO COMPONENTS
HOW LONG IS THE WARRANTY JVCKENWOOO USA Corporation ("Kenwood") warranls this product for a period of one (1) year from the date of original purchase.
WHAT IS COVERED AND WHAT IS NOT COVERED
Except as specified below, this warranty covers all defects in material and workmanship in Kenwood r.ar slereo components. The following are net covered by !he warranty· 1. Any product which is not distributed in the U.S.A. by
Kenwood or which is not purchased in the U.S.A. from an authorized Kenwood car stereo dealer or an automobile dealer, unless the product is purchased through the U.S.A Military Exchange Service.
2. Any product on which the serial number has been defaced, modified or removed.
3. Damage, deterioration or malfunction resulting from: a. Any shipment of the product (claims must be presented
to the carrier). b. Installation or removal of the product. c. Accident, acts of nature, misuse, abuse, neglect,
unauthorized product modification or failure lo follow instructions supplied with the product
d. Repair or attempted repair by anyone not authorized by Kenwood.
e. Any other cause which does not relate to a product defect.
WHO IS PROTECTED This warranty is enforceable only by the original purchaser.
WHAT WE WILL PAV FOR We will pay for all labor and material expenses for covered items. Payment of shipping charges is discussed in the next section of this warranty.
HOW TO OBTAIN WARRANTY SERVICE
If your KENWOOD product ever needs service: 1. Take or ship ii to any KENWOOD Authorized Service Center
in the U.S.A. along with & complete description of the problem. (if you are uncertain as to whether a Service Center is authorized, pleasecall 1-800-KENWOOD for the nearest Service Center. 1-800-536-9663j.
2. Although you must pay any shipping charges if ii is necessary to ship the product for warranty service, we will pay the return shipping charges lf the repairs are covered by the warranty within the United States.
3. Whenever your units are taken or sent for warranty service, you must include a copy of the original dated sales receipt as proof of warranty coverage.
LIMITATION OF IMPLIED WARRANTIES
ALL IMPLIED WARRANTIES, INCLUDING WARRANTIES OF MERCHANTABILITY ANO FITNESS FOR A PARTICULAR PURPOSE, ARE LIMITED IN DURATION TO THE LENGTH OF THIS WARRANTY.
EXCLUSION OF DAMAGES KENWOOO'S LIABILITY FOR ANY DEFECTIVE PRODUCT IS LIMITED TO THE REPAIR OR REPLACEMENT OFTHE PRODUCT AT OUR OPTION. KENWOOD SHALL NOT BE LIABLE FOR: 1. INSTALLATION OR REMOVAL CHARGES, DAMAGE
TO OTHER PROPERTY CAUSED BY ANY DEFECTS IN KENWOOD CAR STEREO COMPONENTS, DAMAGES BASED UPON INCONVENIENCE, LOSS OF USE OF THE PRODUCT; OR
2. ANY OTHER DAMAGES, WHETHER INCIDENTAL, CONSEQUENTIAL OR OTHERWISE.
SOME STATES 00 NOT ALLOW LIMITATIONS ON HOW LONG AN IMPLIED WARRANTY LASTS AND/OR DO NOT ALLOW THE EXCLUSION OR LIMITATION OF INCIDENTAL OR CONSEQUENTIAL DAMAGES, SO THE ABOVE LIMITATIONS ANO EXCLUSIONS MAY NOT APPLY TO YOU.
This warranty gives you specific legal rights, and you may also have other rights which vary from state to s~le.
If a problem develops during or after lhe Limited Warranty Period, or if you have any questions regarding the operation of the product, you should con~cl your KENWOOD Authorized Dealer or Authorized Service Center. II the problem or your question is not handled to your satisfaction, please contact our Customer Relations Department at the address listed below:
JVCKENWOOD USA Corporation PO Box 22745, 2201 E. Dominguez St.
Long Beach, CA 90810-5745 Tel: (8001 536-9663
www.us.jvckenwood.com
BRASIL JVC KENWOOD DO BRASIL COMERCIO DE ELETRONICOS LTDA
0 fabrlcante garante o produto identificado na Nata Fiscal de venda ao consumidor contra qualquer defeito de fabrir.a<;ao au de materia-prirna durante o perfodo de garantia. Esta garantia e valida no territ6rio brasileiro desde que o produto lenha sido adquirldo no Brasil e distribufdo pela JVC KENWOOD do Brasil Comercio de EletrOnicos Lida.
PERiODO DE GARANTIA Este produto e garantido pelo prazo de 01 (um) ano, incluindo o periodo eslabelecido par lei, a partir da data de aquisicao, comprovada mediante a apresentacao da respectiva Nola Fiscal de veoda ao consumidor final. Eventuais reparos realizados no produto durante o perlodo de garantia nao implicam na dilatacao do seu prazo.
EXCLUSAO DA GARANTIA (a) Produtos com o nUmero de serie ou certif icado de garantia rasurados, adu lterados ou ilegfveis; (b) Defeitos resultantes de acidentes (quedas, batidas e etc), uso em desacordo com o manual
de instru,iles, ma utiliza,ao, liga,ao a tonte de tens:to diferenle da especificada no Manual de lnslr!Jliles, modilica,iles nao autorizadas;
(c) Danos causados par agentes da natureza (Ex: chuvas, raios, maresia, enchentes e etc); (d) Oefeitos ou danos em decorrencia de consertos realizados por pessoas Mo autorizadas; ( e) Defeitos au danos resu ltantes do uso de pecas ou dispositivos nao conf ormesas especif icacOes
da JVC KENWOOD; (f) Danos ou deterioracoes aos aca.bamentos externos, partes cosmaticas, cabos, chicotes,
parafusos de fixacao, luvas, alcas, balsas, estojos, adaptadores, antenas, fitas, cabecas gravadoras, CDs au danos causados par pilhas defeituosas ou com vazarnento:
(g) Defeitos au clanos devido ao transporte (reclamacoes devem ser feitas junta a empresa transportadora);
(h) Qualquer outra causa que Mo esteja relacionada a clefeitos cle matt'lria-prima e de fabrtcai,ao; (i) Danos causados par tentativa de roubo ou furto; (j) Danos causados par uso de CDs de ma qualidade; (k) Danos decorrentes do desgaste natural do produto; (I} Danos causados par mau uso. { derramamento de liquidos etou alimentos, corrosao, oxidaC30,
exposii;ao a umidade ou situai;oes climaticas extremas, riscos ou quedas).
CONSERTO EM GARANTIA t indispensavel a apresenta~o deste Certificado de Garantia devidamente preenchido, acompanhado da respectiva Nata Fiscal de compra do produto, desde que nao apresente rasuras au modificacoes. 0 consumidor somente !era direito a estes benelfcios, quando o produto for entregue diretamente no balcao de um Servi,o Autorizado da JVC KENWOOD.
0 QUE NAO E COBERTO PELA GARANTIA lnstalac,ao e remoC30 do produto, despesas de frete, seguro e embalagem sao de responsabi I idade do proprietario.
Este produto e deslinado exclusivamente ao uso dome5tico.
IMPORTANTE: Para qualquer informacao sabre seu equipamenlo JVC KENWOOD, au para abler o endere<;o do Servico Autorizado mais pr6ximo, acesse o site www.kenwood_com.br, ou ligue para a Central de Atendimenlo JVC KENWOOD - Tel.: +55 (11) 3777-6771 com os dados abaixo preenchidos.
JVC KENWOOD DO BRASIL COMERCIO DE ELETRONICOS LTDA Tel: (11) 3777-6771
www.kenwood.com.br
Nome do consumidor: ______________ _
Endere,o: __________ CEP: ______ _
Cidade: __________ Estado: ______ _
Telefone: ________ _
Data da compra: __ f __ f __ Nata Fiscal: ____ _
CANADA
KENWOOD WARRANTY JVCKENWOOO Canada Inc. (hereinafter called "KENWOOD"), gives the following written warranty to the original customer of each new Kenwood product distributed in Canada by KENWOOD and purchased from a dealer authorized by KENWOOD.
KENWOOD warrants that each new Kenwood product, under normal use, is free from any defects, subject to the terms and conditions set forth below. II a defect should occur within the warranty period, repairs will be made tree of charge for parts and labour when such defects are determined by KENWOOD or its' authorized service centres to be attributable to faulty materials or workmanship at time of manufacture. Please contact KENWOOD to confirm if a dealer or service centre is authorized by KENWOOD.
WARRANTY PERIOD This Kenwood product is warranted for parts and labour for a period of one (1) year from the date of original purchase, lease or rental, except for products which are used in a professional or commercial application, which are warranted for a period of ninety (90) days for parts and labour and are subject to the terms and conditions of the warranty.
WARRANTY EXCLUSIONS This warranty excludes: (a) Products purchased in a foreign country or purchased in
Canada and taken to a foreign country. (bl Products purchased from a dealer not authorized by
KENWOOD. (c) Products with the serial number defaced, altered or
missing. (d) Periodic check-ups which do not disclose any defects
covered by this warranty.
GARANTIE KENWOOD JVCKENWOOD Canada Inc. (ci-apres appelee "KENWOOD"), donne par E!crit la garantie sulvante a l'acheteur original de chaque nouveau produil Kenwood distribue au Canada par KENWOOD et achete a un concessionnaire autorise par KENWOOD.
KENWOOD garantit, sous reserve des term es et des conditions enonces ci-{fessous, que chaque nouveau produit Kenwood, dans des conditions d'emploi normales, est exempt de lous defauts. Si l'un defautseproduil pendanl laperiodedegarantie, KENWOOD s'engage a assurrer le coat des pi!ces defectueuses et de la main-<l'oeuvre necessaires pour effectuer les reparations pourvu que de tels defauts sont attribuables ; des pieces delectueuses employees lors de la fabrication du produit Kenwood OU a la main-d"oeuvre tel qu'etabli par KENWOOD OU par l'un de ses centres de service autoris!s. Appelez KENWOOD pour verifier si un concessionnaire ou un centre de service est autorise par KENWOOD.
PERIODE DE GARANTIE Les pieces et la main-d'oeuvre necessaires pour la reparation des produits Kenwood sont garanties pendant la periode d'un (1 ) an a compter de la date d'achat. de bail ou de location originale, sauf dans les cas all Jes produits Kenwood sontemployBsdans un but professionnel ou commercial, oU la garanlie des pieces et de la main-d'oeuvre demeure en vigueur pendant une periode de quatre-vingt-dix (90) jours sous reserve des termes et des conditions de la garantie.
EXCLUSIONS DE GARANTIE Cette garantie r.a couvre pas: (a) les produits achetes a l'!tranger au achetes au Canada et
transportes a l'!tranger: (b) les produits achetes a un concesslonnaire non autorise
par KENWOOD; (c) les produits dont le numero de serie manque, a !le efface
OU mocfifie; (d) les services d'entretien pt'lrlodiques qui n'indiquent aucun
defaul couvert par celle garantie;
JVCKENWOOD Canada Inc.
(e) Defects resulting from disaster. accident, abuse, misuse, lightning, power surges, neglect or lack of periodic maintenance, unauthorized modification or failure lo I ol low instructions in the owner's manual.
(f) Defects or damage as a result al repairs pertormed by a person or party not authorized by KENWOOD.
(g) Defects resulting from the use of parts or devices that do not conform to KENWOOD specifications.
(h) Damage or deterioration occurring to any exterior finishes, cosmetic parts, tape heads, adaptors, antennas, cables, tapes, discs or faults or damage caused by defective or leaking batteries.
(i) Oefoctsordamageoccurringduringshipping(c~imsshould be presented to the shipping company).
(j) Product voltage and /or tine frequency conversions. (k) Product installation or removal charges.
TO OBTAIN WARRANTY SERVICE Should your Kenwood product require warranty service, deliver it to any authorized KENWOOD service centre and present the original copy of your bill of sale and this warranty card as proof of warranty, or send your product fully insured and freight prepaid to the nearest authorized KENWOOD service centre. To avoid possible shipping damage, make sure the product is properly packed. Include a copy of your original bill of sale and this warranty card as proof of warranty along with your name, home and /or work telephone number(s), a complete return address and a detailed description of the fault(s). Products repaired within warranty will be returned freight prepaid to destinations within Canada. The customer is responsible for all freight and related costs for the return of product(s) to destinations outside Canada.
(e) les defauls causes par les desastres, les accidents. les a bus, les emplois incorrects, les E!clairs, [es surtensions de courant, les manques de so ins ou d'entretiens periodiques, les modifications non autorisee5 au 1es manques de respect du mode d'emploi;
(f) les defauts au les dommages causes lors de r!parations eflectuees par une personne ou par une partie non autorisee par KENWOOD;
(g) lesdefautscausesparl'emploidepi!cesoudedispositifsqui ne se conformenl pas aux exigences de KENWOOD;
(h) les finitions ext6rieures, les pieces cosmetiques, les tetes de bandes, les adaptateurs, les antennes, les olbles, les bandes, les disques endommages au d6J}eris, ni les defauts ou dommages causes par des piles dt'lfectueuses au qui fuient;
(i) les defauts ou dommages qui se produisent pendant l'expedition des produits Kenwood (On devrail deposer de telles reclamations aupres des compagnies de transport);
(j) les conversions de tension eVou de frequence du produit;
(k) les frais d'insrallation au d'enl!vement du produit.
COMMENT OBTENIR DU SERVICE SOUS GARANTIE
Au cas o\J un service sous garanlie de volre produit Kenwood s'avere n6::essaire, veuillez livrer le produit a n'importe quel centre de service KENWOOD el presenter la copie or,ginale du contra! de vente et cette carte de garantie en ta11l que preuve de garantie ou veuillez faire parvenir votre produit assu,e et port paye au centre de service KENWOOD autorise le plus proche. Pour eviler toutes possibilites de dommages pendant le transport, veuillez bien emballer le produit. Veuillez inclure une copie du contra! de vente original el cette carte de garantie en tant que preuve de garantie aussl bien que votre nom, numeros de telephone au paste de lravail eVou au domicile votre adresse et une description detaiUee des defauts. Les produits sous garantie repares seront retoumes port paye aux destinations a l'int6rieur du Canada. Le consommateur sera responsable de tous frais de transoort et d'autres lrais qui s'y rapportent pour faire expedier les produits a destinations a l'extfrieur du Canada.
ENTIRE WARRANTY This warranty constitutes the entire written warranty given by KENWOOD No person, party, dealer or service centre or their agents or employees are authorized to extend or enlarge this warranty on behalf of KENWOOD by any written or verbal statement or advertisement or promotion, including any extended warranty program or plan that may be ottered by the dealer or service centre, unless approved in writing by KENWOOD.
DISCLAIMER KENWOOD disclaims any responsibility for loss of lime or use of the product or any other indirect, incidental or consequential damage to other products or goods, inconvenience or commercial loss.
NOTICE TO CONSUMER The provisionscontained in this written warranty are not iniended to limit, modify, take away, disclaim or exclude any warranties or rights you may have which are set forth in any applicable provincial or federal laws or legislation.
IMPORTANT This warranty card by itselt is not considered by KENWOOD as a valid proof of purchase. When applying for warranty repairs, you must present the original copy of your bill of sale and this warranty card as proof of warranty, sowe recommend that they be kepi in a sate place, should they be required in the lulure.
JVCKENWOOD Canada Inc. 6070 Kestrel Road, Mississauga,
Ontario, Canada L5T 1S8 Tel.: (905) 670-7211 Fax: (905) 670-7248
1:ENTIERE GARANTIE Cette garantie represente l'entiere garanlie don nee par ecrit par KENWOOD. KENWOOD ne se tient aucunernent responsable de toutes extensions ni de toutes augmentations de cette garantie faites au entreprises par toutes personnes, parties, concessionnaires ou centres de service ou par leurs agents ou employes au nom de KENWOOD au moyen d'aflirmations verbales ou ecrites, d'annoncesou de promotions, y inclus taus programmes ou plans de garanlle etendue que puissent offrir les concessionnaires au les centres de service, a mains que KENWOOD n'y ail consenti par !cril d'avance.
RENONCIATION KENWOOD reno nee! tout es responsabilit!s de perte de temps, d'emploi du produit, de taus dormnages indirects ou accessoires causes a d'autres produits au biens, de taus inconvenients au de toutes pertes commerciales.
AVIS AUX CONSOMMATEURS Les stipulations contenues dans la presente garantie ecrite n'ont pas pour but de limiter, de modifier, de diminuer, de rejeter ni d'exclure d'autres garanlies ni droits enonces dans n'importe quelles lois ou legislations provinciales ou federales.
IMPORTANT KENWOOD ne considl:!re pas cette garanlie toute seule comme etant une preuve d'achat val ide. Lorsqu'on demande du service sous gar an tie, ii laudra presenter la copie originaledu contra! de vente aussi bien que cette carte de garanlie en tant que preuve de gar an lie. On recommande de les conserver dans un lieu sor au cas oU elles s·avereraient necesaires a l'avenir.
JVCKENWOOD Canada Inc. 6070 Kestrel Road, Mississauga,
Ontario, Canada L5T 1 S8 Telephone: (9051670-7211 Telecopieur: (905) 670-7248