Results of the Mars Pathfinder atmospheric structure investigation
Upload
khangminh22Category
view
0download
0
Nissan Tablet / Primary
Don't enlarge the this template.The size of this template can be reduced.
Getting The Most From YourNISSAN PATHFINDER
QUICK REFERENCE GUIDE

CONTENTS
Rear View/Around View Monitor (if equipped) ................................................................................. 16Driver Assistance Systems (if equipped) ............................................................................................... 16Cruise Control .................................................................................................................................................................. 18Automatic air Conditioner system .............................................................................................................. 19Audio/Video System ................................................................................................................................................. 20Auxiliary Inputs................................................................................................................................................................ 20Navigation System (if equipped) ................................................................................................................... 20Pairing Your Mobile Phone or Bluetooth device Via Bluetooth ........................................ 21Bluetooth Audio Streaming ............................................................................................................................... 22Hands Free Text Messaging Assistant ..................................................................................................... 22Mobile Entertainment System (if equipped) ...................................................................................... 23In Case of Emergency.............................................................................................................................................. 24
Hybrid Electric Vehicle - Introduction ...................................................................................................... 26Starting the Hybrid Electric Vehicle ........................................................................................................... 26Assist Charge Gauge ............................................................................................................................................... 26Energy Flow Display .................................................................................................................................................. 26Air vents for Li-ion battery cooling ............................................................................................................. 26Approaching Vehicle Sound For Pedestrians .................................................................................. 27Hybrid System Warning Light .......................................................................................................................... 27EV Indicator Light ........................................................................................................................................................ 27
Photo Index ........................................................................................................................................................................ 5Doors and tailgate – locking/unlocking ................................................................................................. 6Seat Adjustment And Seat Folding ............................................................................................................. 7Heated Seats (if equipped) .................................................................................................................................. 8Climate controlled seats (if equipped) ..................................................................................................... 8Automatic Drive Positioner System (if equipped) ......................................................................... 8Moonroof (if equipped)............................................................................................................................................ 9Vehicle Information Display ............................................................................................................................... 9Vehicle Information Display Languages ................................................................................................ 10Headlights and Wipers ............................................................................................................................................ 10Steering Wheel Adjustment ............................................................................................................................... 11Starting & Stopping the Engine with the Intelligent Key ........................................................ 11Ignition Switch Sequence .................................................................................................................................... 11Starting the Engine/Hybrid System when the Intelligent Key Battery is Discharged ................................................................................................................................................................... 12Remote Engine/Hybrid System Start (if equipped) .................................................................... 12Multi-function Control Panel ............................................................................................................................. 13Four Wheel Drive Mode Control (if equipped) ................................................................................... 14Hill Start Assist (if equipped).............................................................................................................................. 15Hill Descent Control (if equipped)................................................................................................................. 15Refuelling ............................................................................................................................................................................. 15Rear Sonar System (if equipped) .................................................................................................................. 16
This Quick Reference Guide provides a quick reference to several useful features of your new PATHFINDER.Note that some of these features are optional and may not apply to your vehicle.
For a complete description of all systems and features of your vehicle, please refer to the vehicle’s Owner's Manual. ENJOY YOUR DRIVE!
PETROL/HYBRID MODEL - COMMON ITEMS
HYBRID MODEL - UNIQUE ITEMS
WELCOME TO YOUR NEW NISSAN PATHFINDER

4

PHOTO INDEX
Seats - Seat Adjustment and Seat Folding - page 7 - Heated Seats - page 8
Climate Controlled Seats - page 8
Automatic Drive Positioner Switches - Automatic Drive Positioner System - page 8
Steering Wheel Adjustment Lever/Switch - Steering Wheel Adjustment - page 10
Door Handle - Doors and Tailgate - Locking/Unlocking - page 6
Headlight Switch - Headlights & Wipers - page 10
Fuel Gauge/Assist Charge Gauge (hybrid models) - Refuelling - page 15 - Assist Charge Gauge - page 26
Vehicle Information Display - Vehicle Information Display - page 9 - Trip Computer - page 9 - Driver Assistance Systems - page 16
Twin Trip Odometer Switch - Odometer and Trip Odometer - Page 9
Wiper Switch - Headlights & Wipers - page 10
Cruise Control Switches - Conventional Cruise Control System - page 18 - Intelligent Cruise Control System - page 18
Push-Button Ignition Switch - Starting and Stopping the Engine with the Intelligent Key - page 11 - Ignition Switch Sequence - page 11 - Starting the Engine/Hybrid System when the Intelligent Key Battery
is discharged - page 12 - Starting the Hybrid Vehicle - page 26
Centre Display - Rear View/Around View monitor - page 16 - Energy Flow Display - page 26
Multi-Function Control Panel - Multi-Function Control Panel - page 13 - Navigation System - page 20 - Pairing your Mobile Phone or Bluetooth Device via Bluetooth - page 21 - Mobile Entertainment System - page 23
Audio system - Audio/Video system - page 20 - Bluetooth Audio Streaming - page 22
Climate Control System - Automatic Air Conditioner System- page 19 - Rear Automatic Air Conditioner System - page 19
Heated/Climate Controlled Seats - Heated Seats - page 8 - Climate Controlled Seats - page 8
Four Wheel Drive Mode Switch - Four Wheel Drive Mode Control - page 14 - Hill Descent Control - page 15
Auxiliary Inputs - Auxiliary Inputs - page 20
PE
TR
OL
/H
YB
RID
MO
DE
L - C
OM
MO
N IT
EM
S
5

DOORS AND TAILGATE – LOCKING/UNLOCKING
Remote locking/unlockingYou can lock and unlock the doors by pressing the of button on the intelligent key. The tailgate can be opened or closed by pressing the button on the intelligent key for longer than 0.5 sec. If you press the button during opening/closing of the tailgate, the movement will stop. When pressing the button again, the direction of movement will reverse.
Intelligent Key SystemThe Intelligent Key System is a convenience keyless entry system that allows you to lock and unlock the doors and tailgate without actively using the key while the Intelligent Key is within the vehicle’s operating range. To open a door, push the request switch on the door and pull the handle towards you. Unlock the tail gate by pushing the request switch on the tail gate. Open the tail gate by pushing the tailgate opener switch . To lock the doors or tail gate, press the request switch on the door handle or tail gate .
Door Unlock ModesTwo different unlock modes can be selected:• Selective Door Unlock mode – Only the driver’s door will initially unlock
after pressing the request switch on the driver's door handle or the unlock button on the key fob. To unlock all doors, press either button again.
• Convenience mode – All doors will be unlocked with a single press on the request switch on the door handle or the button on the key fob.
As default, the unlock mode is set to 'Selective Unlock mode'.To swap between modes navigate to the [Vehicle Settings] menu in the Vehicle Information Display and scroll to [Selective Unlock] in the menu. Press the <ENTER> switch on the steering wheel to turn [Selective Unlock] ON or OFF.
Power tailgate opening/closingThe power tailgate can be opened/closed by using the on the intelligent key for more than 0.5 seconds while the shift lever is in the <P> position.Also, the tailgate can be opened/closed by pressing the tailgate request switch on the tailgate or by pushing the tailgate OPEN/CLOSE switch on the instrument panel.
Motion operated power tail gate (if equipped)The power tailgate can also be “hands-free” opened by making a kicking movement with your leg under the rear bumper as illustrated. Make sure to move your leg within the areas under the bumper as illustrated. After the sensors in the rear bumper detect the movement of your leg, the power tailgate will automatically start to open.
PE
TR
OL
/H
YB
RID
MO
DE
L -
CO
MM
ON
IT
EM
S
6
Power tailgate main switchTo prevent that the tailgate can be opened from the outside, push the power tailgate main switch on the instrument panel to <OFF>. When switched OFF, power tailgate operation is still possible by using the power tailgate OPEN/CLOSE switch on the instrument panel or by pressing the button on the intelligent key.
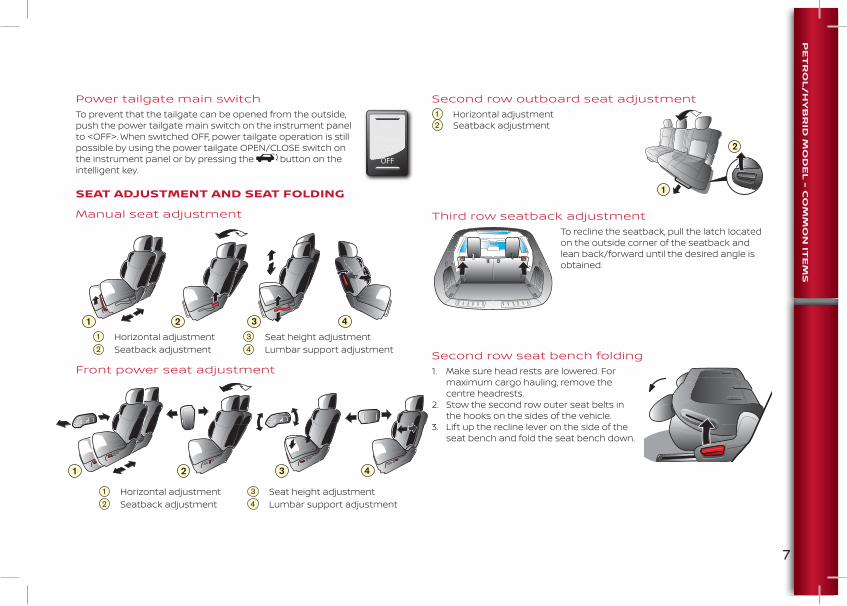
SEAT ADJUSTMENT AND SEAT FOLDING
Manual seat adjustmentMANUAL SEAT ADJUSTMENT
Horizontal adjustment Seat height adjustment Seatback adjustment Lumbar support adjustment
Front power seat adjustmentMANUAL SEAT ADJUSTMENT
Horizontal adjustment Seat height adjustment Seatback adjustment Lumbar support adjustment
Second row outboard seat adjustment Horizontal adjustment Seatback adjustment
Third row seatback adjustmentTo recline the seatback, pull the latch located on the outside corner of the seatback and lean back/forward until the desired angle is obtained.
Second row seat bench folding1. Make sure head rests are lowered. For
maximum cargo hauling, remove the centre headrests.
2. Stow the second row outer seat belts in the hooks on the sides of the vehicle.
3. Lift up the recline lever on the side of the seat bench and fold the seat bench down.
PE
TR
OL
/H
YB
RID
MO
DE
L - C
OM
MO
N IT
EM
S
7

Third row seat bench folding1. Pull the strap to recline the head
restraint.2. Stow the seat belts in the seat belt
hooks on the sides of the cargo area.
3. Pull the latches on the corners of the seatback and fold down the seatback.
4. To return the seat back to the upright position, pull the straps
until the seatback locks into position.
Third row one touch walk-in functionThe third row seats can be easily accessed from outside the vehicle by using the one touch walk in function.
To do so, lift the seatback lever on the outboard side of the second row seatback; this will release the seatback, fold up the seat cushion and release the seat's sliding mechanism so you can slide the seat forward.
HEATED SEATS (IF EQUIPPED)
To switch on the seat heating of the front seats, press the <HI> (high temperature) or <LO> (low temperature) side of the switch. The respective indicator light in the switch will illuminate.
Note: To prevent battery discharge, only use the seat heating when the engine is running.
CLIMATE CONTROLLED SEATS (IF EQUIPPED)
The climate controlled seat system warms up or cools down the seat by blowing warm or cool air from below the seat surface.To activate the climate controlled seat heating or cooling, turn the climate control knob clockwise (heating) or counter clockwise (cooling). The indicator light in the control knob will illuminate when the climate controlled seat system is active.
AUTOMATIC DRIVE POSITIONER SYSTEM (IF EQUIPPED)
Two memorised positions for the driver’s seat, steering column and outside mirrors can be stored in the automatic drive positioner system. To store a position:1. With the ignition switched ON and the shift
lever in the <P> position, adjust the driver’s seat, steering column and outside mirrors to the desired positions.
2. Push the <SET> switch and, within 5 seconds, push and hold the memory switch 1 or 2.
3. A chime will sound after the positions have been stored correctly into the memory.
In addition, the automatic drive positioner system has an entry/exit function that allows easy entry to and exit from the vehicle by automatically moving the seat and steering column to positions that allow easy entry to and exit from the vehicle. For full details on the system’s functioning, refer to your vehicle’s Owner’s Manual.
12
PE
TR
OL
/H
YB
RID
MO
DE
L -
CO
MM
ON
IT
EM
S
8

Odometer and Trip odometerThe odometer displays the total mileage the vehicle has driven.The trip odometer displays the mileage driven during Trip A or
Trip B since the last time the trip odometer A or B was reset.To toggle between the display of Trip A and Trip B, shortly push the <TRIP RESET> switch To reset the trip odometer A or B to zero, push and hold the <TRIP RESET> switch for more than one second.
Trip ComputerTo display the trip computer data on the vehicle information display, press the switch on the steering wheel until the trip computer screen is displayed.
The trip computer can only be displayed when it is first selected as a main menu item in the vehicle information display: in the [Settings] Menu, select [Main Menu Selection] and turn ON [Trip Computer] to enable display of the trip computer data on the vehicle information display.
Following information is shown on the trip computer display:
• Range left until refuelling is required.• Average fuel consumption and speed since the last time the trip
computer was reset.• Total driving distance and time since the last time the trip computer was
reset.To reset the trip computer, press the <ENTER> switch on the steering wheel for more than 1.5 seconds.
RPMx10004
5
6
720
40
6080 km/h
100
120
140
455 km 135 km
C21
A
AVERAGE
11.4 km/l
45 km/h
45.4 km
6.15
DRIVING
C21
MOONROOF (IF EQUIPPED)
To open or close the moonroof, slide the moonroof switch to the OPEN or CLOSE position and release the switch. To stop the movement of the moonroof while opening/closing, slide the switch once again.To tilt up the moonroof, first fully close the moonroof, then push the tilt side of the switch and release it. To tilt down the moonroof, push the tilt down side of the switch.
Panoramic SunshadeTo open or close the panoramic sunshade of the moonroof, push the sunshade switch, located on the roof console, to the open or close position.
VEHICLE INFORMATION DISPLAY
The Vehicle Information Display is located centrally between the tachometer and speedometer. The display provides a lot of useful information, like:• Vehicle settings• Trip computer information• Driver Assistance system warnings
and settings (where fitted)• Cruise control information• Intelligent key operation information• Tyre pressure information• Indicators and warningsTo change the information displayed on the vehicle information display or customise the display and settings, switches , and on the left hand side of the steering wheel are used:
Change from one display to the next. Navigate through items in a menu (arrow up/
down) and change or select an item in a menu using the <ENTER> switch.
Go back to a previous menu or screen.
RPMx10004
5
6
720
40
6080 km/h
100
C21
455 km 135 km
ENTER
SOURCE
PE
TR
OL
/H
YB
RID
MO
DE
L - C
OM
MO
N IT
EM
S
9

VEHICLE INFORMATION DISPLAY LANGUAGES
The language of the vehicle information display can be changed to English/Arabic according to the following procedure:
1. Starting on the Home Screen, use the Steering wheel mounted controls to navigate to the settings display, depicted by a gear on the menu bar.
2. After entering the settings menu, use the steering wheel mounted down button to navigate to [Language].
3. With [Language] highlighted, press the <ENTER> button on the steering wheel to enter the language sub-menu.
4. In the langauge sub-menu, select the desired language using the Up/down Steering wheel switches. Then, press <ENTER>.
5. After pressing <ENTER>, the display language will change to the selected language.
HEADLIGHTS AND WIPERS
Auto light systemTurn the light switch to the <AUTO> position. The headlamps will turn on and off automatically depending on the exterior light conditions.
Note: Even if the headlamps are switched OFF or if you have selected the or <AUTO> position, the day time running lights will be switched ON as
long as the headlamps are not, either manually or automatically, switched ON.
HeadlightsFront Foglights (if equipped)Turn the fog light switch to turn on the front fog lights. The front fog light will only operate when the headlights are, either automatically or manually, switched on.
Wipers Windscreen wipersPush the wiper switch downwards to operate the windscreen wipers: Intermittent operation <INT>, low speed <LO> or high speed <HI>.
Push the switch upwards for one-sweep <MIST> operation.
Pull the switch towards you to operate the windscreen washer.To adjust the wiping interval during intermittent operation, turn the ring towards A or B:
Longer interval Shorter interval
AUTO
INTFRONTOFF
INT
LO
HI
INTON
PE
TR
OL
/H
YB
RID
MO
DE
L -
CO
MM
ON
IT
EM
S
10

Rear wiperTo operate the rear wiper, turn the rear wiper switch towards <INT> (intermittent operation) or <ON> (continuous operation).Push the switch away from you to operate the rear window washer.
STEERING WHEEL ADJUSTMENT
Manually operated typeThe steering wheel can be tilted and telescopically adjusted as illustrated.
To adjust the steering wheel in either direction:
• Push down the lock lever.
• Adjust the steering wheel as desired
• Firmly push the lock lever up to lock the steering wheel.
Electrically operated typeMove the switch in either direction to adjust the steering wheel.
INTFRONTOFF
INT
LO
HI
INTON
STARTING & STOPPING THE ENGINE WITH THE INTELLIGENT KEY
To start the engine:1. Depress the brake pedal and make sure the shift
lever is in the <P> (Park) or <N> (Neutral) position.2. Push the push button ignition switch to start the
engine.
To stop the engine:1. Stop the vehicle.2. Depress the brake pedal and move the shift lever to the <P> (Park) or
<N> (Neutral) position.3. Apply the parking brake.4. Push the push button ignition switch to stop the engine. The ignition
switch will now be in the OFF position.5. After opening the door, the ignition switch position will change from the
OFF to the LOCK position and the steering lock will be activated.
IGNITION SWITCH SEQUENCE
When repeatedly pushing the <ENGINE START/STOP> button without depressing the brake pedal, the state of the ignition will change as follows:
• Push once to change to ACC (several electrical systems can be used).
• Push twice to change to ON (all electrical systems can be used)
• Push three times to change to OFF (all electrical systems disconnected).
From the OFF position, after opening or closing a door, the LOCK position will be reached in which the steering wheel is locked.
LOCK
OFFOPEN/CLOSE DOOR
ACC ON
PE
TR
OL
/H
YB
RID
MO
DE
L - C
OM
MO
N IT
EM
S
11

REMOTE ENGINE/HYBRID SYSTEM START (IF EQUIPPED)
The engine or hybrid system can be remotely started when the Intelligent Key is in the remote start operating range (within approx. 60 m from the vehicle) and the shift lever is in the P (Park) position. The remote start function could for example be used to warm up the interior and/or defog the windows prior to departure.
To remotely start the engine/hybrid system:
• Press the LOCK button on the Intelligent Key.• Within 5 seconds, press the button on the Intelligent
Key until the indicator lights start flashing and the parking lights come on: the engine/hybrid system will start.
As long as the engine/hybrid system is running, the parking lights will be on. After 10 minutes, the engine/hybrid system will automatically stop. After the engine/hybrid system has stopped, you can once more start a remote engine/hybrid system start cycle. You can also extend the engine/hybrid system running time with another 10 minutes before the engine/hybrid system automatically stops after 10 minutes by following the remote engine/hybrid system start procedure while the engine/hybrid system is still running.
After the engine/hybrid system has been remotely started twice, you need to switch the ignition from OFF to ON and back to OFF again before you can start another cycle of remote engine/hybrid system starts.
To cancel a remote engine/hybrid system start cycle, press the button on the Intelligent Key until the parking lights turn off and the engine/hybrid system stops.
STARTING THE ENGINE/HYBRID SYSTEM WHEN THE INTELLIGENT KEY BATTERY IS DISCHARGED
When the battery of the Intelligent Key is discharged, the [Key Low Battery] warning will be displayed on the Vehicle Information Display. Replace the battery of the Intelligent Key at the earliest opportunity when this message is displayed.
When you can no longer start the engine or hybrid system in the normal way due to the fact that the battery of the Intelligent Key is discharged, proceed as follows:
• Move the shift lever to the P (Park) position.
• Depress the brake pedal.
• Touch the push-button ignition switch with the Intelligent Key as illustrated; a chime will sound.
• Within 5 seconds (petrol engine models) resp. 10 seconds (hybrid models) after the chime sounds, push the ignition switch. The engine/hybrid system will start.
Key low battery
PE
TR
OL
/H
YB
RID
MO
DE
L -
CO
MM
ON
IT
EM
S
12

MULTI-FUNCTION CONTROL PANEL
APPS
CLIMATE NAVI
MAP
STATUS
AUDIO SETTING
INFO
VOICEBACK
OFF
CAMERA
APPS
CLIMATE NAVI
MAP
STATUS
AUDIO SETTING
INFO
VOICEBACK
Type A/B (models with navigation system)
OFF
AUDIO
CLIMATE
APPS
SETTING
INFO
CAMERA
STATUSBACK
Type C/D (models without navigation system)
<CAMERA> Push to display the Rear/Around View Monitor screens.
Push to switch between day/night display illumination modes. Push and hold to turn off the display). <APPS> Push to display the available apps. <NAVI> Push to operate the navigation system. Multi-function controller: Use the directional buttons to scroll through menus, adjust settings in menus or move on a map (if equipped). Turn centre dial to zoom into/out on a map (if equipped). Press <ENTER> to confirm a selection made. <STATUS> Push to cycle through status screens for navigation (if equipped), fuel economy and climate control. <INFO> Push to display the information screen. <+/-> Push to increase/decrease display brightness. <AUDIO> Push to operate the audio system. <MAP> Push to display the current location map. <SETTING> Push to access the system settings menu. <VOICE> Push to repeat last spoken route guidance instruction. <BACK> Push to go back to a previous screen. Telephone button: push to operate the hands-free phone system.
PE
TR
OL
/H
YB
RID
MO
DE
L - C
OM
MO
N IT
EM
S
13

FOUR WHEEL DRIVE MODE CONTROL (IF EQUIPPED)
The Four Wheel Drive (4WD) mode switch, located at the centre console, is used to select between two wheel drive (2WD), AUTO or LOCK (4WD) mode, depending on driving conditions.
• To select 2WD mode, turn the 4WD mode select switch to the <2WD> position.• To select AUTO mode, turn the switch to the <AUTO> position• To select LOCK (4WD) mode, turn the 4WD mode select switch to the <LOCK> position while the vehicle speed is below 40 km/h. The switch will return to the central position while the LOCK mode is activated. To de-activate the LOCK mode and return to the AUTO mode, turn the switch once more to the <LOCK> position and release it.Use the below table as a reference to select the appropriate drive mode.
4WD mode Wheels driven4WD mode
indicator light Driving conditions
2WD
Front wheels 2WD For driving on dry, paved roads.
AUTO
Distribution of torque to the front and rear wheels changes automatically, depending on road conditions encountered. The ratio for torque distribution between front and rear axle ranges between 100:0 (2WD) and 50:50 (4WD).
AUTOFor driving on paved or slippery roads. This is the recommended mode for normal/everyday driving.
LOCK
Front and Rear wheels LOCK For driving on rough roads.
Note: LOCK mode changes to AUTO mode automatically when the vehicle is sharply accelerated or the vehicle speed is over approximately 40 km/h. The 4WD LOCK indicator light turns off. Turning off the ignition automatically cancels the LOCK mode.
PE
TR
OL
/H
YB
RID
MO
DE
L -
CO
MM
ON
IT
EM
S
14

HILL START ASSIST (IF EQUIPPED)
The Hill Start Assist system automatically keeps the brakes applied for maximum 2 seconds to prevent the vehicle from rolling as release the brake pedal in order to drive away on an uphill or downhill slope.
Hill Start Assist will operate automatically under the following conditions:
• The shift lever is shifted into a forward (vehicle facing uphill slope) or reverse gear (vehicle facing downhill slope),
• The vehicle is stopped completely on a hill by applying the foot brake,
• The slope exceeds 3°.
If the slope is steep enough to activate the Hill Start Assist system, the green Hill Start Assist indicator light in the meter will illuminate.
HILL DESCENT CONTROL (IF EQUIPPED)
The Hill Descent Control system provides automatic additional braking on steep hills at speeds below 25-35 km/h, e.g. during off-road driving. It is a useful feature when engine braking alone is not enough to control the desired vehicle speed.
To most efficiently use the Hill Descent Control system:1. Move the shift lever to the L (Low) position.2. Turn the 4WD mode switch to the <LOCK> position and release it.3. Push the Hill Descent Control switch on the 4WD mode switch; the Hill
Descent Control indicator light on the instrument panel will illuminate and the system will automatically maintain a low descending speed.
If you depress either the accelerator pedal or the brake pedal when the Hill Descent Control system is active, the system will be temporarily deactivated. As soon as you release the accelerator or brake pedal, the Hill Descent Control function will be restored.
To turn off the Hill Descent Control system, push the Hill Descent Control switch again; the indicator light on the instrument panel will turn off.
REFUELLING
The fuel gauge indicates the approximate level of fuel in the tank when the ignition is switched ON. When the level in the tank becomes low, a low fuel warning will be shown on the vehicle information display and the low level fuel warning light will illuminate. When the warnings appear, refuel as soon as possible.
The fuel pump symbol reminds you that the fuel filler lid is positioned on the left side of the vehicle.To open the fuel filler lid, push the fuel filler lid, then open it. After refuelling, turn the fuel filler cap until you hear the ratchet click.
0
2020
260km/h
140
160MPH0
1/2
PE
TR
OL
/H
YB
RID
MO
DE
L - C
OM
MO
N IT
EM
S
15

Moving Object DetectionThe around view monitor is equipped with a Moving Object Detection (MOD) function. The MOD indicator on the screen will change to blue to indicate that the MOD function is operational. If a moving object is detected, a yellow frame will appear around the camera image where the object is detected and a beep will sound to warn you on the moving object detected.
DRIVER ASSISTANCE SYSTEMS (IF EQUIPPED)
Your vehicle may be equipped with following Driver Assistance systems:• Blind Spot Warning• Rear Cross Traffic Alert• Forward Emergency Braking
Blind Spot WarningThe Blind Spot Warning (BSW) system alerts you of the presence of vehicles in the adjacent driving lane(s). The system operates at speeds over approximately 32 km/h. If a vehicle is detected, the BSW indicator light in the mirror at the side where a vehicle is detected will illuminate. If you subsequently activate the respective turn signal switch, the BSW indicator light will start flashing and a chime will sound to alert you on the presence of a vehicle in the lane next to you. The BSW indicator light continues to flash until the detected vehicle leaves the detection zone.
MOD MOD
Check surroundings for safety
Split display: Rear view/Bird's eye view
REAR SONAR SYSTEM (IF EQUIPPED)
The Rear Sonar System helps you while reversing to avoid contact with obstacles behind the rear of the vehicle.
The Rear Sonar System is automatically activated when the shift lever is shifted into the R (Reverse) position and will sound a tone to warn you of obstacles near the rear bumper. The closer you approach the detected obstacle, the more frequent the tone will sound.
If you approach the obstacle very closely, the tone will sound continuously.
REAR VIEW/AROUND VIEW MONITOR (IF EQUIPPED)
The rear view or around view monitor system helps you to manoeuvre your vehicle by detecting objects behind respectively around the vehicle, e.g. when parking your vehicle.
The system will automatically be activated when you select reverse (R) gear. Additionally, the around view monitor system will be automatically activated when the shift lever is in the Drive (D) position at speeds below 10 km/h. Also, you can manually activate the system or change views of the around view monitor system by pressing the <CAMERA> button on the Audio/Navigation unit.
Following split display images can be selected on the around view monitor:- Front view/Bird's eye view- Front view/Front-side view- Rear view/Bird's eye view- Rear view/Front-side view
MOD MOD
Check surroundings for safety
Split display: Front view/Bird's eye view
PE
TR
OL
/H
YB
RID
MO
DE
L -
CO
MM
ON
IT
EM
S
16

Rear Cross Traffic AlertThe Rear Cross Traffic Alerts (RCTA) system alerts you of approaching vehicles, for example when backing out of a parking space. The system is automatically activated when the shift lever is shifted into the R (Reverse) position and the vehicle speed is less than approximately 8 km/h.If the RCTA system detects an approaching vehicle, a chime will sound and the Blind Spot Warning indicator light at the side where the vehicle is detected will start flashing.
Forward Emergency BrakingThe Forward Emegency Braking (FEB) system assists you in avoiding frontal collisions. The system operates at speeds over approx. 5 km/h. It uses a radar sensor in the front of the vehicle to calculate the distance between your vehicle and the vehicle travelling ahead of you.
If the distance becomes too small, the Forward Emergency Braking system warning light will flash, an audible warning will be provided and a first visible warning will be displayed on the Vehicle Information Display.
If you don’t take (sufficient) action and the distance becomes even smaller, the audible alarm will sound with higher frequency, a second warning will be displayed on the Vehicle Information Display and the system will apply partial braking. If the risk of a collision finally becomes imminent, the system will apply harder braking automatically in order to avoid the frontal collision.
WARNING
• The Forward Emergency Braking system is a supplemental aid to the driver. It is not a substitute for the driver's attention to traffic conditions or his responsibility to drive safely. It cannot prevent accidents due to carelessness or dangerous driving.
• The Forward Emergency Braking system may not function under all driving, traffic, weather and road conditions.
PWR
RPMx1000
0
1
2
34
5
6
7
020
40
6080 km/h
100
80
1/2
455 km 135 km
C21
A
D
Activating/deactivating Driver Assistance Systems
The driver assistance systems (BSW/RCTA and FEB) can be activated or de-activated through the [Settings] menu in the vehicle information display.
Push the button on the steering wheel until [Settings] is displayed. Use the arrow UP/DOWN switch to scroll through the [Settings] menu, select [Driver Assistance] and push <ENTER>.
Select the system to be disabled and press the <ENTER> button to turn the system OFF or ON.
Note: The Rear Cross Traffic Alert system is integrated with the Blind Spot Warning system. Once Blind Spot Warning is turned off, Rear Cross Traffic Alert is turned off automatically as well.
Settings
P
Driver Assistance
Vehicle Settings
Main Menu Selection
C21
PE
TR
OL
/H
YB
RID
MO
DE
L - C
OM
MO
N IT
EM
S
17

CRUISE CONTROL
Conventional Cruise Control systemThe cruise control system allows driving at speeds between approximately 30 and 160 km/h without the need for you to keep your foot on the accelerator pedal. To activate cruise control:
1. Push the cruise control <ON/OFF> switch to activate the cruise control system. The <CRUISE> icon in the vehicle information display will illuminate,
2. Accelerate to the desired cruising speed and push the <COAST/SET> switch; the <SET> icon in the vehicle information display will illuminate.
The vehicle will now maintain the set cruising speed without depressing the accelerator pedal.
Adjust the cruising speed up or down by pushing the <ACCEL/RES> or <COAST/SET> switch.
Cancel cruise control operation by tapping the brake pedal or by pressing <CANCEL> .
Resume cruising at the previous speed by pressing <ACCEL/RES>.
To turn cruise control off, push the cruise control <ON/OFF> switch. The <CRUISE> icon in the vehicle information display will turn off.
Intelligent Cruise Control system (if equipped)The Intelligent Cruise Control (ICC) system is designed as a cruise control system that additionally can maintain a selected distance from the vehicle travelling in the same lane ahead of you. A radar sensor at the front of the vehicle continuously measures the distance between your vehicle and the vehicle ahead of you. When the vehicle ahead of you is driving slower than your set cruising speed, the ICC system will automatically decrease the speed in order to maintain the selected distance between your vehicle and the vehicle ahead of you. Once the vehicle ahead of you accelerates or
CANCEL
ACCEL/RES
COAST/SETONOFF
moves to another lane, the ICC system will automatically resume the set cruising speed.
Note: Note that the ICC system is not designed to control vehicle speed when approaching stationary or slow moving vehicles/objects; you must always pay attention to traffic in order to interfere by braking when traffic conditions require so!
The operation of the cruise control function of the ICC system is identical to the conventional cruise control system.• Switch on the ICC system using the CRUISE ON/OFF
main switch .• Use the <SET/-> and <RES/+> switch to set,
adjust or resume the set cruising speed.• Temporarily cancel cruise control operation by
pressing the <CANCEL> button or by tapping the brake pedal.
To select the distance to be maintained between your vehicle and any vehicle ahead of you, press the DISTANCE switch . You can select between three set distances:
• Long (approx. 60 m)• Middle (approx. 45 m)• Short (approx. 30 m)
The selected distance is indicated by the number of bars displayed on the Vehicle Information Display: 1 bar for short distance, 2 for middle distance, 3 for long distance.The vehicle symbol is displayed when a vehicle is detected ahead of you.
Note: For full details on the use of the cruise control/intelligent cruise control system, please refer to your vehicle’s Owner’s Manual.
CANCEL
RES/+
SET/-
CRUISEON/OFF
60km/h
PE
TR
OL
/H
YB
RID
MO
DE
L -
CO
MM
ON
IT
EM
S
18

Rear automatic air conditioner systemThe rear automatic air conditioner system can be controlled either from the front or the second row seat.
To operate the rear air conditioner system from the front:
1. Press the <REAR ON-OFF> switch on the climate control panel to switch the rear automatic air conditioner on; the indicator light in the switch will turn on.
2. Press the <CLIMATE> button on the multifunction control panel and touch the [Rear CLIMATE] key on the [CLIMATE] display.
3. Touch any key at the lower side of the display to control the rear air conditioner system’s temperature or fan speed.
4. To switch off the rear air conditioner system, press the <REAR ON-OFF> button on the climate control panel; the indicator light in the switch will turn off.
To operate the rear air conditioner system from the second row seat:1. Make sure that the [Rear CLIIMATE] screen is not displayed on the front
display. 2. Turn the rear air conditioner system on with the <AUTO> switch on
the rear air conditioner control panel: the rear air conditioner system can now be controlled by the second row occupants using the rear air conditioner control panel switches.
Rear Climate A/C DUAL
CLIMATE
C21C21
Decrease Temperature
IncreaseTemperature
DecreaseAir Flow
IncreaseAir Flow
ON/OFF
Rear Climate
C21
AUTO
AUTOMATIC AIR CONDITIONER SYSTEM
Push to activate air recirculation mode. Push to switch on the air conditioner. Push to switch between air distribution modes. Push to turn rear air conditioner system on/off Push to enable dual mode in which driver’s and passenger’s side
temperatures are individually controlled. Turn to adjust passenger’s side temperature in dual mode.
Push to activate the rear window defogger. Push to turn air conditioner system system ON or OFF.
Turn to adjust fan speed. Push to select windscreen defogger mode. Push to select automatic climate control mode.
Turn to adjust temperature at driver’s and passenger’s side or, in dual mode, at driver’s side only.
Defrosting/defogging the windscreenTo quickly defrost/defog the windscreen:
1. Push the windscreen defogger switch ; the indicator light in the switch will illuminate. At outside temperatures above 2 °C, the air conditioner will automatically turn on and the air recirculation mode, if selected, will be turned off.
2. Turn the temperature control dial to a high temperature.3. Turn the fan speed control dial to a high fan speed.4. After the windscreen is defrosted/defogged, press the <AUTO> dial to
return to the automatic climate control mode.
A/C
REAR
MODE
PUSH AUTO PUSH ON • OFF PUSH DUAL
REARON•OFF
PE
TR
OL
/H
YB
RID
MO
DE
L - C
OM
MO
N IT
EM
S
19

AUXILIARY INPUTS
Your vehicle is equipped with auxiliary inputs (2 x USB, AUDIO IN, VIDEO IN) located in the centre console. The auxiliary inputs can be used to connect an iPod/iPhone, MP3 player or memory device to the vehicle’s audio system or to play back video from an external device on the vehicle’s centre display
Press the <MEDIA> button on the audio unit or touch the desired source key (USB or AUX) on the source bar on the centre display to select playback from the externally connected device.
Note: Note that video can only be played on the front centre display when the vehicle is stationary, the shift lever is in the P (Park) position and the parking brake is applied.
NAVIGATION SYSTEM (IF EQUIPPED)
For full details on all functions of the Navigation System, please refer to the separate Navigation System Owner’s Manual. As an example, below is described how to operate the system in order to navigate to a Point of Interest, in this case by keyword search for a shopping mall.
• Press the <NAVI> button on the Multifunction Control panel to display the [Navigation] screen.
• Select [Points of Interest] from the [Navigation] screen.
• Select [Name Entry] from the [Points of Interest] screen.
MAP
AUDIO IN
VIDEO IN
Navigation
RouteMenu
Edit RouteRoute InfoCancelRoute
DestinationMenu
HomePoints ofInterest
StreetAddress
12:25
Navigation
Banks,post offices
HealthcarePetrol StationTravel
Car ParksAccommodationPood and DrinkName Entry
Country UNITED ARAB EMIRATES
12:25
Push to turn rear climate control system OFF. Push to increase/decrease fan speed. Push to switch system ON and turn AUTO climate control mode ON. Push to increase/decrease temperature.
AUDIO/VIDEO SYSTEM
Push to eject a loaded CD/DVD. Push to turn unit ON/OFF.
Turn to adjust volume. Station preset buttons. Push to adjust audio settings.
Turn to tune into a radio station or to scroll through folders of a memory device, connected through the USB input socket.
Push to select audio input source (iPod, USB, Bluetooth streaming audio, AUX or Rear Display (if equipped)).
Push to seek radio stations or skip /fast forward/rewind through tracks being played.
Push to select play back from CD/DVD. In radio mode: push to scan through broadcasting stations and listen
to each broadcasting station for 5 seconds. Push again to continue to listen to the radio station. In CD/DVD/USB/AUX mode: push to repeatedly play back tracks on a CD/DVD or from an externally connected device.
Push to select AM or FM radio band. Push and hold to automatically store broadcasting stations under the
6 preset buttons. Shortly push to toggle between automatically and manually stored stations under the preset buttons.
VOL
TUNE / FOLDER
RADIO MEDIADISC
1 2 3 4 5 6
SEEKAUTO.P SCANRPT TRACKPUSH ON • O
FF PUSH AUDIO
PE
TR
OL
/H
YB
RID
MO
DE
L -
CO
MM
ON
IT
EM
S
20
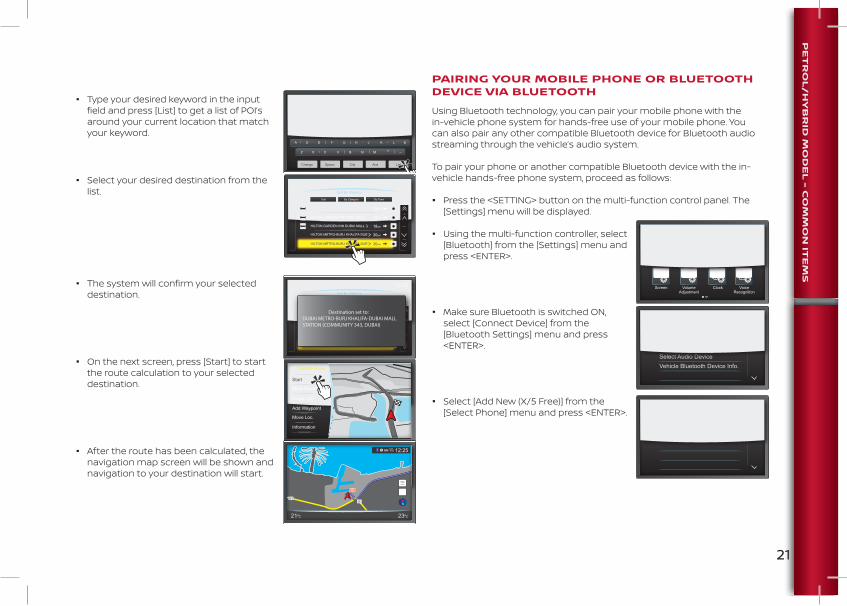
PAIRING YOUR MOBILE PHONE OR BLUETOOTH DEVICE VIA BLUETOOTH
Using Bluetooth technology, you can pair your mobile phone with the in-vehicle phone system for hands-free use of your mobile phone. You can also pair any other compatible Bluetooth device for Bluetooth audio streaming through the vehicle’s audio system.
To pair your phone or another compatible Bluetooth device with the in-vehicle hands-free phone system, proceed as follows:
• Press the <SETTING> button on the multi-function control panel. The [Settings] menu will be displayed.
• Using the multi-function controller, select [Bluetooth] from the [Settings] menu and press <ENTER>.
• Make sure Bluetooth is switched ON, select [Connect Device] from the [Bluetooth Settings] menu and press <ENTER>.
• Select [Add New (X/5 Free)] from the [Select Phone] menu and press <ENTER>.
Settings
VoiceRecognition
ClockVolumeAdjustment
Screen
AudioNavigationPhone/MailBluetooth
ON
Vehicle Bluetooth Device Info.Select Audio DeviceSelect Phone
Bluetooth
Bluetooth Settings
Pair Device
NazarMohsin
Device List 12:25
Add New (4/5 Free)
• Type your desired keyword in the input field and press [List] to get a list of POI’s around your current location that match your keyword.
• Select your desired destination from the list.
• The system will confirm your selected destination.
• On the next screen, press [Start] to start the route calculation to your selected destination.
• After the route has been calculated, the navigation map screen will be shown and navigation to your destination will start.
Navigation
Change
1 2 3 4 5 6 7 8 9 0
Q W E R T Y U I O P
A S D F G H J K
Z X C V B N M -
L &
Space City And List
DeleteDUBAI MALL12:25
Navigation
HILTON GARDEN INN DUBAI MALL
Sort By Distance
Sort By Category By Town
18km
HILTON GARDEN INN DUBAI MALL 18km
HILTON GARDEN INN DUBAI MALL 18km
HILTON METRO-BURJ KHALIFA-DUE 30km
HILTON METRO-BURJ KHALIFA-DUE 30km
Navigation
HILTON GARDEN INN DUBAI MALL
Sort By Distance
Sort By Category By Town
18km
HILTON GARDEN INN DUBAI MALL 18km
HILTON GARDEN INN DUBAI MALL 18km
HILTON METRO-BURJ KHALIFA-DUE 30km
HILTON METRO-BURJ KHALIFA-DUE 30km
Destination set to:DUBAI METRO-BURJ KHALIFA-DUBAI MALL STATION (COMMUNITY 343, DUBAI)
12:25
Calculate Route
Start
More Routes
Route Info
Add Waypoint
Move Loc.
Information
12:25
N
C21 C23
S
PE
TR
OL
/H
YB
RID
MO
DE
L - C
OM
MO
N IT
EM
S
21

• The [Connect Device] screen will be displayed. You are asked to start the pairing process from your Bluetooth device. Enter the PIN code displayed on the screen on your Bluetooth device.
• The message [Bluetooth Device Connection Successful] will be displayed to confirm that your device has been connected to the in-vehicle system.
BLUETOOTH AUDIO STREAMING
You can play music from a compatible Bluetooth audio device (e.g. an iPhone or other compatible device) via Bluetooth through the vehicle’s audio system.
To do so:
• Connect your audio device with the vehicle’s audio system. Follow the procedure as described in ‘Connecting your mobile phone or Bluetooth device via Bluetooth’.
• Press the <MEDIA> button on the audio unit several times until [Bluetooth Audio]
appears on the display.
You can also touch the [Source] key on any active audio screen to select the [Bluetooth Audio] mode.
Start the pairing process from your Bluetooth deviceConnecting Device...
Connect Device
CancelPIN: 0000Device Address:Device Name: MY-CAR
Bluetooth DeviceConnection Successful
Connected Device
Cancel
Bluetooth AudioSource
RandomRepeat
OFF
Track 0
OFF
Folder/Tracks
PausePlay
Control
12:25
HANDS FREE TEXT MESSAGING ASSISTANT
The Hands-Free Text Messaging Assistant allows receiving text messages through the vehicle interface. When a message is received, a notification will be shown on the display accompanied by a tone.
For iPhone users to enable the Hands-Free Text Messaging Assistant, proceed as follows:
1. Pair your iPhone to the in-vehicle system as described earlier in this Quick Reference Guide.
2. On your iPhone, select the [Bluetooth] menu and switch [Show Notifications] to ON.
3. Disconnect and reconnect your iPhone with the in-vehicle system, for example by switching Bluetooth off and then on again.
After reconnecting, you can make use of the Hands-Free Text Messaging Assistant.
For full details on using the Hands-Free Text Messaging Assistant, please refer to your vehicle's Owner's Manual.
2:15
P42K-PT
62%du
Forget This Device
Bluetooth
Show Notifications
Sync Contacts
Phone Favorites
Phone Recents
All Contacts
GROUPS
PE
TR
OL
/H
YB
RID
MO
DE
L -
CO
MM
ON
IT
EM
S
22

MOBILE ENTERTAINMENT SYSTEM (IF EQUIPPED)
The mobile entertainment system allows you and your passengers to enjoy audio or video from up to three different sources at the same time. Note that the front display can only be used to play video when the vehicle is stationary with shift lever in the P (Park) position and the parking brake applied.
The Mobile Entertainment System consists of following components:
• Front centre display• Two rear displays at the back of the front head restraints• A remote controller• Two headphones• Rear USB and HDMI ports
For audio/video playback on the front centre display, various input sources are available:
In addition to DVD playback, two USB ports , an AUDIO IN and a VIDEO IN input are provided in the centre console.
For the rear displays, video can be played from DVD or from a device connected to the front audio/video inputs.
In the rear of the vehicle, at the lower back side of the centre console, additional USB and HDMI ports are available. These can be used to play audio/video through the rear system only.
The rear displays can be operated either from the front or the rear.
MAP
AUDIO IN
VIDEO IN
HDMI
Front operation1. Press the <AUDIO> button on the
multi-function control panel2. Touch the [Rear Display] key on the
source bar of the Audio screen. The rear display screen is shown.
– Select the desired rear display by touching the display icon.
– Select the available source by touching [Select Rear Source] (DVD, AUX, USB or HDMI input).
Various settings for the rear system are controlled by selecting one of the icons at the bottom of the display:
• [L Display Power]/[R Display Power] to turn the left/right display on or off.• [Mute] to mute/unmute the volume of all speakers and the headphones.• [Rear sound control] to select between [No rear sound - Front only], [Play
sound for left display] and [Play sound for right display]• [Source Control] to display the operation screen for the currently selected
source for the right or left rear display• [Remote Controller Lock] to lock/unlock the operation of the remote
controller• [Rr Speaker Mute] to mute/unmute the rear speakers• [Auto Display Power On] to select/unselect the automatic switching on of
the rear displays after inserting a DVD into the CD/DVD slot.
Rear operation1. Press the <POWER> button to switch the rear
displays on.2. Select the left <L> or right <R> rear display with the
<DISPLAY SELECT> switch 3. Press the <HOME> button to display the [HOME]
screen on the selected display and select the desired input source (DVD, AUX, USB or HDMI) for the selected display.
Rear DisplaySource
DVD
Rear SoundControl
SelectRear Source
Mute R Display Power
L Display Power
12:25
MENU
HL
DISPLAY SELECTPOWER
HOME
SETUP
HEADPHONESPEAKER
BACK
VOL
ENTER
PE
TR
OL
/H
YB
RID
MO
DE
L - C
OM
MO
N IT
EM
S
23
4. Press the MENU button to display the operation screen for the selected audio source.
5. Press the <SETUP> button to control various rear display settings.6. To play back audio through all vehicle speakers, press the <SPEAKER>
button . To listen to audio through the headphone, push the <HEADPHONE> button .
To play back audio through one of the headphones, first turn on the headphone by pressing the <ON/OFF> switch . Select the display to which the headphone should be linked using the <DISPLAY SELECT> switch . Select the desired sound mode (<CINEMA>, <MUSIC> or <GAME>) by repeatedly pushing the <MODE> switch .
IN CASE OF EMERGENCY
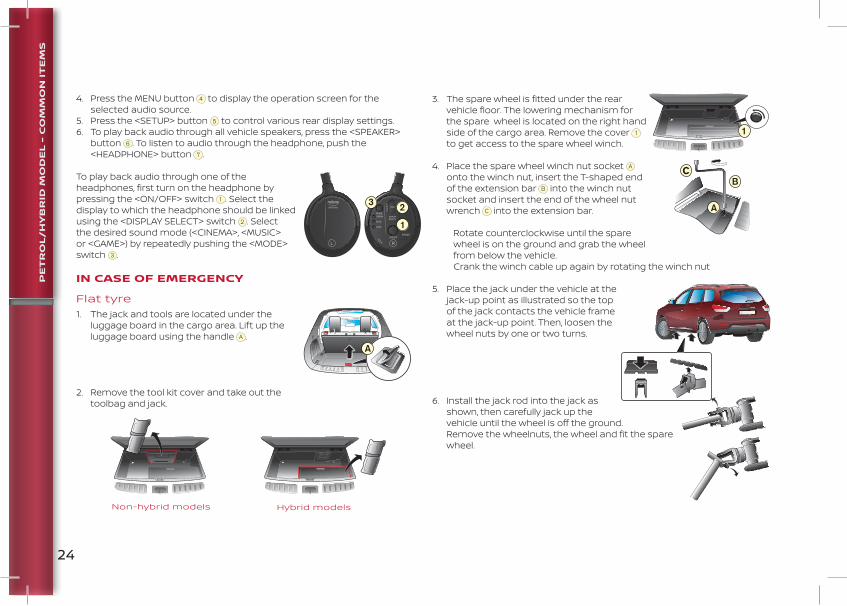
Flat tyre1. The jack and tools are located under the
luggage board in the cargo area. Lift up the luggage board using the handle .
2. Remove the tool kit cover and take out the toolbag and jack.
RON/OFF
POWER
MODECINEMA DISPLAY
SELECTMUSIC
GAME
L
R
VOLL
natuneSURROUND
Hybrid modelsNon-hybrid models
3. The spare wheel is fitted under the rear vehicle floor. The lowering mechanism for the spare wheel is located on the right hand side of the cargo area. Remove the cover to get access to the spare wheel winch.
4. Place the spare wheel winch nut socket onto the winch nut, insert the T-shaped end of the extension bar into the winch nut socket and insert the end of the wheel nut wrench into the extension bar.
Rotate counterclockwise until the spare wheel is on the ground and grab the wheel from below the vehicle.
Crank the winch cable up again by rotating the winch nut
5. Place the jack under the vehicle at the jack-up point as illustrated so the top of the jack contacts the vehicle frame at the jack-up point. Then, loosen the wheel nuts by one or two turns.
6. Install the jack rod into the jack as shown, then carefully jack up the vehicle until the wheel is off the ground. Remove the wheelnuts, the wheel and fit the spare wheel.
PE
TR
OL
/H
YB
RID
MO
DE
L -
CO
MM
ON
IT
EM
S
24

7. Tighten the wheel nuts with the wheel nut wrench in the order A-B-C-D-E as illustrated. Lower the vehicle slowly until the wheel touches the ground, then securely tighten the wheelnuts in the order A-B-C-D-E as illustrated.
8. Lower the vehicle completely and securely store the flat tyre, jack and tools in the vehicle.
Jump starting (non-hybrid models)To start your vehicle using a booster battery or the battery from another vehicle, follow the procedure decribed below.
1. If the booster battery is in another vehicle, position the vehicles so the batteries are close to each other. Do not allow the vehicles to touch.
2. Apply the parking brake and move the shift lever to the P (Park) position. Switch off all unnecessary electrical systems.
3. Connect the jumper cables in the sequence A-B-C-D as illustrated.
4. Start the engine of the booster vehicle and let it run for a few minutes.5. Keep the engine speed of the booster vehicle at about 2,000 rpm and
start the engine of the vehicle being jump started.6. After the engine has started, carefully disconnect the jumper cables in
the sequence D-C-B-A.
Note: If you don't follow the above jump start procedure, the engine's computer system may be damaged.
VEHICLE BEING JUMP STARTED SUPPORT VEHICLE
Jump starting (hybrid models)Jump starting the hybrid vehicle provides power to the 12V electrical system to allow the electrical systems to operate. The electrical systems must be operating to allow the Li-ion battery to be charged. Jump starting does not charge the Li-ion battery.
To jump start the hybrid vehicle, follow the procedure below.
1. If the booster battery is in another vehicle, position the vehicles so the batteries are close to each other. Do not allow the vehicles to touch.
2. Apply the parking brake and move the shift lever to the P (Park) position. Swich off all unnecessary electrical systems.
3. Locate the fusible link box behind the air cleaner.
4. Push the tab in and lift up to remove the cover and expose the remote positive battery terminal.
5. Connect the jumper cables in the sequence A-B-C-D as illustrated.6. Start the engine of the booster vehicle and let it run for a few minutes.7. Depress the brake pedal and press the <START> button. The vehicle
instruments and gauges will light up and the green READY light will come on.
8. Carefully disconnect the jumper cables: first the negative, then the positive cable in the sequence D-C-B-A.
Tand highlight the [Energy Flow] key on the display using the multi-function controller, then push <ENTER>.
VEHICLE BEING JUMP STARTED
SUPPORT VEHICLE
PE
TR
OL
/H
YB
RID
MO
DE
L - C
OM
MO
N IT
EM
S
25

HYBRID ELECTRIC VEHICLE - INTRODUCTION
This section contains specific information applicable to the Hybrid Electric Vehicle (HEV) version of the NISSAN Pathfinder. For additional details on HEV specific features, consult your vehicle’s Owner’s Manual.The NISSAN PUREDRIVE™ Hybrid System combines the power of a petrol engine and an electric motor to help minimise fuel consumption and exhaust gas emission.Depending on driving conditions, the vehicle runs on a combination of the petrol engine and the electric motor, whichever is best for the actual driving conditions.Because the petrol engine charges the Lithium-ion (Li-ion) battery as needed, the battery does not have to be charged from an outside source like an all-electric vehicle.
STARTING THE HYBRID ELECTRIC VEHICLE
To start the hybrid electric vehicle, depress the brake pedal and push the push-button ignition switch while the transmission is in the <P> or <N> position.The READY to drive indicator light will flash until the hybrid system becomes operational and then will come on continuously.
When the READY to drive indicator light illuminates continuously, the vehicle can be driven, even when the petrol engine is not running.
Note: The petrol engine starts and stops automatically. It may stop during deceleration or when the vehicle is stopped.
ASSIST CHARGE GAUGE
The assist charge gauge displays the actual level of power consumption by the electric motor or the energy regeneration to the Li-ion battery during deceleration of the vehicle due to the regenerative braking feature.
ENERGY FLOW DISPLAY
On models equipped with navigation system, the energy flows can be displayed.The energy flow display changes, depending on the actual operating conditions. To display the energy flow screen, push the <INFO> button on the control panel and highlight the [Energy Flow] key on the display using the multi-function controller, then push <ENTER>.
AIR VENTS FOR LI-ION BATTERY COOLING
Air vents to cool the Li-ion battery are located on the rear side trim panels in the cargo area as illustrated. If the vents are covered, the Li-ion battery may overheat resulting in reduced output performance of the hybrid system.During normal operation, you may hear the noise of the cooling fan from the air vent.
Note: Do not place objects covering the air vents to prevent damage to the Li-ion battery or other parts of the electrical system.
PWR0 8
Energy Flow 12:25
Fuel Economy HistoryHY
BR
ID M
OD
EL
- U
NIQ
UE
IT
EM
S
26

APPROACHING VEHICLE SOUND FOR PEDESTRIANS
The Approaching Vehicle Sound for Pedestrians (VSP) system uses sound to alert pedestrians of the presence of the vehicle when it is being driven at a low speed in the electric drive mode. The VSP system is automatically turned on when the vehicle is in the Ready to Drive mode.If there is a malfunction in the VSP system, the VSP OFF indicator light in the combination meter will illuminate. If this is the case, contact a NISSAN dealer or another authorised workshop to resolve the problem.
HYBRID SYSTEM WARNING LIGHT
The hybrid system warning light comes on when:• the amount of fuel in the tank is getting low,• there is a problem with the traction motor or another
hybrid system component.
If the fuel gauge indicates a low fuel level, refill the fuel tank as soon as possible.After the fuel tank is refilled, the ignition switch is placed in the ON position and the hybrid system is in the Ready to Drive mode, the hybrid system warning light should be off.If this is not the case, stop your vehicle and contact your NISSAN dealer or an authorised workshop to resolve the problem.
EV INDICATOR LIGHT
The EV (Electric Vehicle) indicator light will come on when the vehicle is powered by the electric motor only.
OFF
EV
HY
BR
ID M
OD
EL
- U
NIQ
UE
ITE
MS
27

QR20EN-R52GOME1
Every effort has been made to ensure that the contents of this publication is correct at the time of going to press.In accordance with the company’s policy of continuously improving its products, NISSAN MIDDLE EAST FZE reserves the right to change at any time the specifications of the vehicles described and shown in this publication without notice.
nissan-me.comfacebook.com/NissanME /NissanME /NissanMiddleEast @nissanmiddleeast
Copyright © 2022 FDOKUMEN