NatureMaps 3.2 Help Guide - Enviro Data SA
169
PUBLIC NatureMaps 3.2 Help Guide
-
Upload
khangminh22 -
Category
Documents
-
view
3 -
download
0
Transcript of NatureMaps 3.2 Help Guide - Enviro Data SA

PUBLIC
NatureMaps 3.2
Help Guide

PUBLIC
Creative Commons Attribution 4.0
© Crown in right of the State of South Australia, Department for Environment and Water, 2018

PUBLIC
Contents Section 1: Getting Started ................................................................................................................. 8
NatureMaps Layout ........................................................................................................................... 9
Navigating Around the Map ............................................................................................................. 10
Selecting a base map ....................................................................................................................... 10
Layer List Panel ................................................................................................................................ 11
Transparency Slider ..................................................................................................................... 13
Search the Layer List .................................................................................................................... 14
Layer List Actions Menu ............................................................................................................... 14
Show Legend ........................................................................................................................... 14
Open Results Table .................................................................................................................. 15
Open Results List ..................................................................................................................... 15
Change Layer Drawing Order ................................................................................................... 15
Reorder at Map Service Level ............................................................................................... 16
Reorder at layer Level .......................................................................................................... 17
Layer Actions Menu ..................................................................................................................... 17
Customising Layer Symbolisation ................................................................................................. 18
Simple Symbolisation ............................................................................................................... 18
Attribute Symbolisation ........................................................................................................... 19
Customising Layer Labels ............................................................................................................. 20
Toggle Label ................................................................................................................................ 21
Identify ............................................................................................................................................ 21
Address or Location Search ............................................................................................................. 23
Right Click Menu .............................................................................................................................. 26
Section 2: Using the NatureMaps Toolbar ...................................................................................... 27
Tabbed Toolbar ............................................................................................................................... 28
General Tools .............................................................................................................................. 28
Initial Extent ............................................................................................................................ 28
Previous Extent ........................................................................................................................ 28
Print Tool ................................................................................................................................. 28
Query Builder Tool ................................................................................................................... 31
Identify Results Action Menu ............................................................................................... 34
Results Actions Menu........................................................................................................... 36
Feature Actions Menu .......................................................................................................... 37
Filter Builder Tool .................................................................................................................... 37
Export Map .............................................................................................................................. 37
Upload Data Tool ..................................................................................................................... 38

PUBLIC
Uploading a shapefile........................................................................................................... 38
Uploading a csv, gpx or xlsx .................................................................................................. 40
Uploading a kml ................................................................................................................... 43
Zoom to XY Tool....................................................................................................................... 45
Plot Coordinates Tool .............................................................................................................. 47
Google Street View .................................................................................................................. 49
Share Map via Email ................................................................................................................ 50
Select Tools ................................................................................................................................. 50
Point ........................................................................................................................................ 50
Multi Point............................................................................................................................... 51
Line ......................................................................................................................................... 51
Polygon ................................................................................................................................... 51
Rectangle ................................................................................................................................. 51
Extended Select Tools .............................................................................................................. 51
Enable Buffering .................................................................................................................. 52
Snapping .............................................................................................................................. 54
Identifiable Layers ................................................................................................................ 55
Measure Tools ............................................................................................................................. 56
Line Measurement ................................................................................................................... 56
Freehand Line Measurement ................................................................................................... 57
Polygon Measurement ............................................................................................................. 58
Freehand Shape Measurement ................................................................................................ 61
Circle Measurement ................................................................................................................ 61
Rectangle Measurement .......................................................................................................... 62
Editing Measurements ............................................................................................................. 63
Exporting Measurements ......................................................................................................... 64
Draw Tools .................................................................................................................................. 65
Drawing Styling ........................................................................................................................ 66
Text Styling .......................................................................................................................... 66
Point Styling ......................................................................................................................... 68
Line Styling .......................................................................................................................... 69
Polygon Styling .................................................................................................................... 70
Editing Drawings ...................................................................................................................... 72
Exporting Drawings .................................................................................................................. 72
Find Tools .................................................................................................................................... 73
NPWSA Reserve ....................................................................................................................... 73
Marine Park ............................................................................................................................. 73
Hundred .................................................................................................................................. 74

PUBLIC
LGA .......................................................................................................................................... 74
Drill Hole.................................................................................................................................. 74
Shipwreck ................................................................................................................................ 75
Parcel Tools ................................................................................................................................. 76
Parcel by Manual Selection ...................................................................................................... 76
Parcel by Parcel ID ................................................................................................................... 76
Parcel by Plan Parcel ................................................................................................................ 77
Parcel by Title Reference ......................................................................................................... 77
Flora Search ................................................................................................................................. 78
General Query Tool .................................................................................................................. 78
Querying by State ................................................................................................................ 79
Querying by Current Extent .................................................................................................. 80
Querying by NRM Region ..................................................................................................... 81
Querying by DEW Reserve.................................................................................................... 82
Querying by IBRA Subregion ................................................................................................ 83
Querying by Survey Name .................................................................................................... 84
Querying by Heritage Agreement ......................................................................................... 85
Querying by Pastoral Station ................................................................................................ 86
Querying by Pastoral Land System ....................................................................................... 87
Querying by Proposed Burn ................................................................................................. 88
Querying by Defining a Selection Area ................................................................................. 89
Querying Using a Buffered Line or Point ............................................................................... 91
Applying Filters .................................................................................................................... 93
Filter by Species ............................................................................................................................. 94 Filter by State/Nationally Rated ..................................................................................................... 97 Filter by Native Species .................................................................................................................. 98 Filter by Introduced Species ........................................................................................................... 99 Filter by Source ............................................................................................................................ 100 Filter by Observer ........................................................................................................................ 101 Filter by Sighting Date .................................................................................................................. 102 Filter by Spatial Reliability ............................................................................................................ 103 Filter by Survey Name .................................................................................................................. 104 Map Results ................................................................................................................................. 105
Create Simple Species List ...................................................................................................... 106
Querying by Current Extent ................................................................................................ 107
Querying by NRM Region ................................................................................................... 108
Querying by DEW Reserve.................................................................................................. 109
Querying by IBRA Subregion .............................................................................................. 110
Querying by Survey Name .................................................................................................. 111
Querying by Heritage Agreement ....................................................................................... 112
Querying by Pastoral Station .............................................................................................. 113

PUBLIC
Querying by Pastoral Land System ..................................................................................... 114
Querying by Proposed Burn ............................................................................................... 115
Querying by Defining a Selection Area ............................................................................... 116
Querying Using a Buffered Line or Point ............................................................................. 117
Map a Species ........................................................................................................................ 120
Record Identification.......................................................................................................... 122
Regional Assessments ............................................................................................................ 123
Refresh View ......................................................................................................................... 123
Report Error........................................................................................................................... 123
Fauna Search ............................................................................................................................. 124
General Query Tool ................................................................................................................ 124
Querying by State .............................................................................................................. 125
Querying by Current Extent ................................................................................................ 126
Querying by NRM Region ................................................................................................... 127
Querying by DEW Reserve.................................................................................................. 128
Querying by IBRA Subregion .............................................................................................. 129
Querying by Survey Name .................................................................................................. 130
Querying by Heritage Agreement ....................................................................................... 131
Querying by Pastoral Station .............................................................................................. 132
Querying by Pastoral Land System ..................................................................................... 133
Querying by Proposed Burn ............................................................................................... 134
Querying by Defining a Selection Area ............................................................................... 135
Querying Using a Buffered Line or Point ............................................................................. 137
Applying Filters .................................................................................................................. 139
Filter by Species ........................................................................................................................... 140 Filter by State/Nationally Rated ................................................................................................... 142 Filter by Native Species ................................................................................................................ 143 Filter by Introduced Species ......................................................................................................... 144 Filter by Source ............................................................................................................................ 145 Filter by Observer ........................................................................................................................ 146 Filter by Sighting Date .................................................................................................................. 147 Filter by Spatial Reliability ............................................................................................................ 148 Filter by Survey Name .................................................................................................................. 149 Map Results ................................................................................................................................. 150
Create Simple Species List ...................................................................................................... 151
Querying by Current Extent ................................................................................................ 152
Querying by NRM Region ................................................................................................... 153
Querying by DEW Reserve.................................................................................................. 154
Querying by IBRA Subregion .............................................................................................. 155
Querying by Survey Name .................................................................................................. 156
Querying by Heritage Agreement ....................................................................................... 157

PUBLIC
Querying by Pastoral Station .............................................................................................. 158
Querying by Pastoral Land System ..................................................................................... 159
Querying by Proposed Burn ............................................................................................... 160
Querying by Defining a Selection Area ............................................................................... 161
Querying Using a Buffered Line or Point ............................................................................. 162
Map a Species ........................................................................................................................ 164
Record Identification.......................................................................................................... 167
Regional Assessments ................................................................................................................ 167
Refresh View ............................................................................................................................. 168
Report Error .............................................................................................................................. 168

PUBLIC
Section 1: Getting Started

PUBLIC
NatureMaps Layout
1 Address or Location Search: type an address or a location to search on 7 Bookmark: create or open a bookmark
2 Toolbar tabs: tools are grouped by function. Select the tab to display the required tools 8 Panel tabs: displays a tab for each open panel. Click the tab to swap between the different panels e.g. Home, Layer List,
Results 3 Toolbar: contains the tools that interact with the map or perform a specific function 9 Base Maps: lists the base maps you can select from
4 Toolbar icon: shows or hides the toolbar when you click the icon 10 Coordinate display: select the coordinate system to display
5 Panel icon: expand, Collapse or hide the information panel using this button 11 Scalebar & Map Scale: use the dropdown to zoom quickly between map scales
6 Zoom buttons: zoom in or out using the + or - buttons 12 Map Tip: map tip appears when you left click on a feature. Click View Additional Details to find out more information
1 2
3
4
5
6
7
8
9
10
12
11

PUBLIC
Navigating Around the Map
In NatureMaps most navigation can be done using the mouse, but at times you may also use a key press in combination with a mouse click and dragging across the map. If you’re using a touch screen, touch a spot on the map and move your finger to move the map around. Double tap or pinch outwards to zoom in. Pinch inwards to zoom out. On the desktop map, you can use the following controls:
To… Do this…
Pan or move the map. Click and hold the left mouse button and drag the map in any direction.
Move the map left or right. Press the Left or Right arrow keys on the keyboard.
Move the map up or down Press the Up or Down arrow keys on the keyboard.
Zoom in or out using the Mouse Scroll the mouse wheel away from you to zoom in; towards you to zoom out.
Zoom in or out using the Map Tools
Click the Plus + or Minus - to zoom in or out.
Zoom in to a specific region on the map. Press SHIFT, hold down the left mouse button and drag a rectangle around the area you want to zoom in to.
Zoom in or out using the keyboard Press the Plus + key to zoom in. Press the Minus - key to zoom out.
Selecting a base map The base map menu in the bottom left of the map view lists the base maps available. There are currently 3 base maps you can choose from:
Topo – the topographic base map resembles a traditional paper based topographic map. It is best suited to use in regional areas, however, depending on the intended use can also be used in metropolitan areas.
Street Map - This can be considered a pseudo "Street Directory" type map which also includes the parcel cadastre when zoomed in far enough.
Imagery - Is a tile cache of the South Australian Governments latest aerial photography
Land Cover – Sliding scale base map of SA Most Likely Land Cover

PUBLIC
Layer List Panel The Layer List Panel shows a list of all the layers currently available through NatureMaps. From here you can turn layers on and off as desired. When you first open the Layer List you’ll be presented with the top level folders.
To expand the folder click on the next to the Folder name, and check the box to activate the folder.

PUBLIC
To turn a layer on click the check box next to the layer name. If a layer name is greyed out and italic, this means that it has a scale dependency. You will be able to “check it on” but it won’t became active until you have zoomed to the appropriate scale.
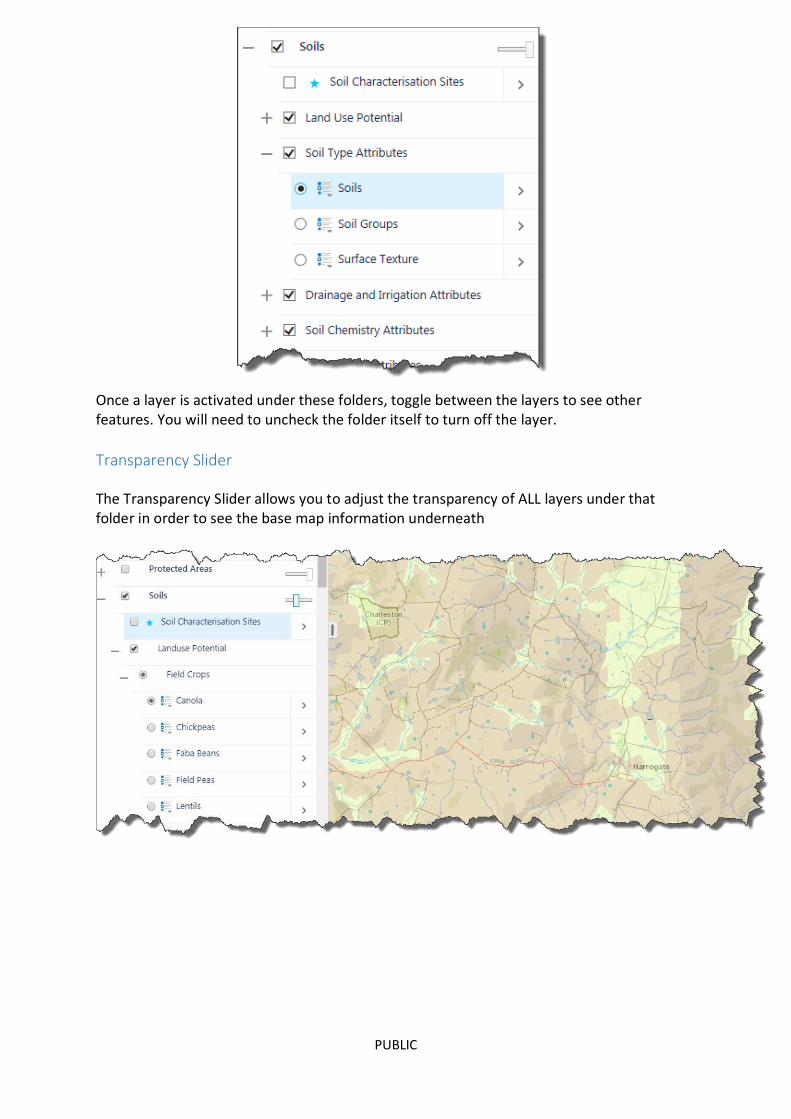
Certain folders within NatureMaps have a restriction whereby only one layer in that folder
can be activated at a time. This is indicated by a circle check option
Top Folder Level
Sub Folder Level
Active Layer
Scale Dependant Layer
PUBLIC
Once a layer is activated under these folders, toggle between the layers to see other features. You will need to uncheck the folder itself to turn off the layer.
Transparency Slider
The Transparency Slider allows you to adjust the transparency of ALL layers under that folder in order to see the base map information underneath

PUBLIC
Search the Layer List When you begin typing in the Search input field, the layer list shows the layer names that match or contain the text in the Search field. If the matching layers are in folders, those folders are displayed and expanded to show the layer names.
Layer List Actions Menu
Show Legend The Show Legend opens the Legend Panel and displays the legend for any visible and active layers

PUBLIC
Open Results Table Opens the Results table view
Open Results List Opens the Results List view
Change Layer Drawing Order You can now modify the drawing order of map services and layers. This can also be applied to multiple layers uploaded using Upload Data tool. Note: User uploaded layers will always be drawn on top and cannot be drawn under default map layers. The drawing order of user added layers can be changed Once the panel is open, users can choose to change the layer drawing order for Graphical Layers (if present) or Map Services.

PUBLIC
Reorder at Map Service Level Both of these options lead to the main drawing order user interface, where items in the drawing order appear from top to bottom and can be rearranged using the drag handle on the left side of each item.
If you want to undo the changes, use the Reset button to reset the drawing order back to the default order Click the close the panel or use the Done button to save the new state and continue using the viewer.

PUBLIC
Reorder at layer Level Individual layers within the list of map services can be reordered selecting the action button.
If you want to undo the changes, use the Reset button to reset the drawing order back to the default order Click the close the panel or use the Done button to save the new state and continue using the viewer.
Layer Actions Menu To view the Layer Actions, metadata and, where available, the data download for a particular layer. Click on the arrow to the right of the Layer name and select the Metadata or Data Download link.

PUBLIC
Customising Layer Symbolisation Using the Layer Visualisation option users can re-symbolise a layer and create a custom layer style.
From the dropdown menu, select the Custom Layer Style option.
The Visualisation Options panel opens and displays the symbolisation options.
Simple Symbolisation The Simple symbology type allows users to define the style of a single symbol for all features in a layer

PUBLIC
Tip: Use the Transparency Slider to adjust the fill transparency of the feature. Drag the slider
right back to the left hand side to create a no fill feature
Attribute Symbolisation The Attribute symbology type allows users to style features in a layer based on the information in a specific field.
You can also symbolise a layer based on field attribution by selecting Attribute from the Choose Symbolisation Type menu.

PUBLIC
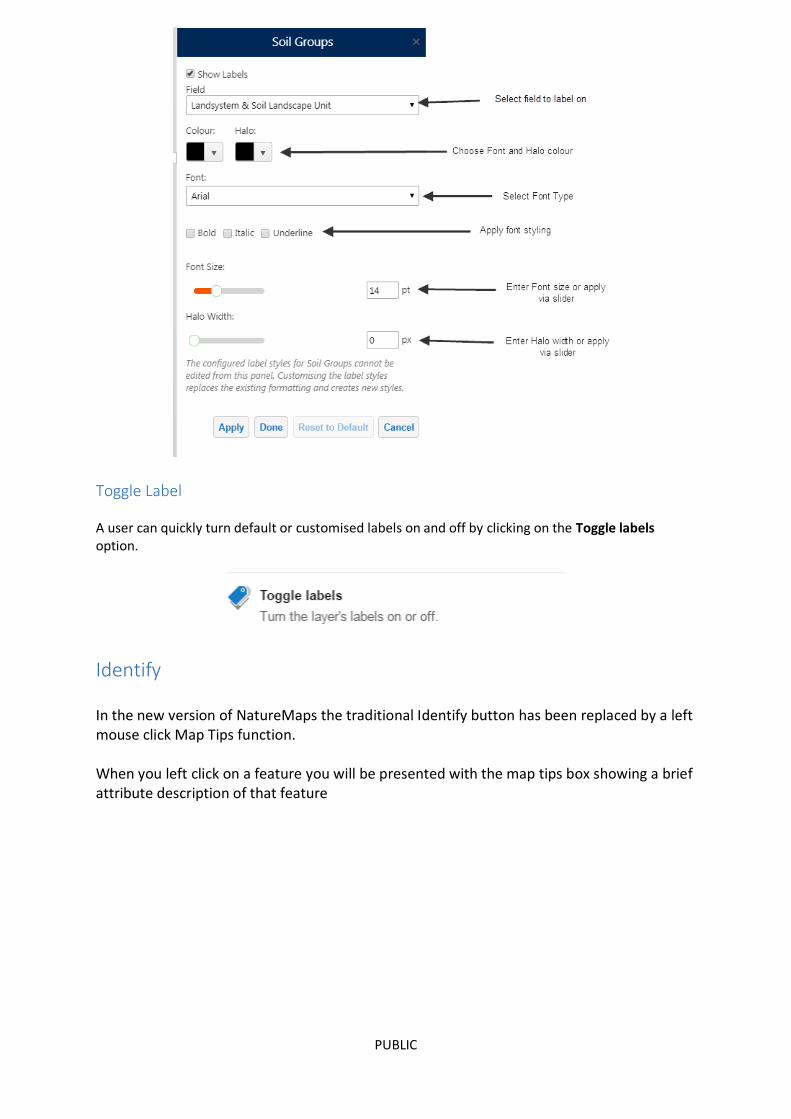
Customising Layer Labels Using the Customise Label option users can apply and customise a label for features of a layer based on available fields.
If no label styles have been defined previously, before users can access the label options panel, they are informed that the configured styles cannot be edited, and that customising the styles replaces the existing styles.
The user can use the Customise button to continue modifying the styles.
PUBLIC
Toggle Label A user can quickly turn default or customised labels on and off by clicking on the Toggle labels option.
Identify In the new version of NatureMaps the traditional Identify button has been replaced by a left mouse click Map Tips function. When you left click on a feature you will be presented with the map tips box showing a brief attribute description of that feature

PUBLIC
More attribute details are available, on an identified feature, when you click the View Additional Details option
If more than 1 feature is present click on the arrow to cycle through identified features

PUBLIC
Address or Location Search NatureMaps uses the Address Validation Service from Location SA to enable you to search for street addresses or gazetted locations within South Australia
To find a specific address, type the address you wish to find in the Dialog Box type and click on the magnifying glass, or, hit Return on your keyboard. The closest match results to your query are returned in the left hand side panel.

PUBLIC
Select the matching result in the Results Panel and NatureMaps will zoom to that location.
To find a place or location, type the location you wish to find in the Dialog Box type and click on the magnifying glass, or, hit Return on your keyboard. Depending on the search parameters entered a large number of results might be returned.

PUBLIC
Try refining your search parameter to something more specific.
Select the matching result in the Results Panel and NatureMaps will zoom to that location.

PUBLIC
Right Click Menu Using the right mouse button at any point on the map, you can find information about that location and perform a number of actions.
1 Address information (where available) at selected location 6 Add some text at that location
2 Coordinates at that location. Change coordinate display by selecting the appropriate coordinate system from the display options at the bottom of the screen
7 Centres the map screen to that location
3 Find out information about features displayed at that location 8 Zooms screen to the initial start-up extent
4 Draw a point on the screen at that location 9 Clears any highlighted features
5 Plot coordinates on the screen for that location 10 Retrieves, where available, imagery information (capture date and resolution) at that location. Note: please ensure that imagery base map is activated
1
2
3
4
5
6
7
8
9
10

PUBLIC
Section 2: Using the NatureMaps Toolbar

PUBLIC
Tabbed Toolbar
The tools in NatureMaps are now available from a series of Tabs at the very top of the map view.
General Tools
The General Tools menu contains the general tools that are used within NatureMaps
Initial Extent
Returns the map view to the opening/initial extent of the map view
Previous Extent
Zooms back to the previous map extent
Print Tool
Activates the Print function

PUBLIC
Select the desired layout from the Layout dropdown list
Select the desired format from the Output Format dropdown list.
Enter the output scale you wish for the printed map

PUBLIC
Enter the desired title in the Title text box, then click OK to generate the map.
When the Map is completed, click on the link to open the map. You can then save or print the map as required.

PUBLIC
Query Builder Tool
The Query Builder tool enables you to construct queries that search for specific features in a layer. The results of a query list the features in the specified layer that match the query conditions. In addition, each feature in the query results is highlighted on the map with a yellow circle. If you place focus on a specific item in the list, the highlight colour for that item changes to blue on the map.
1 Data Source: lists the feature layers. Select one from the list.
2 Map Area: indicates the scope for the query. Select All or Current Extent.
3 Find results area: Indicates the selected data source name that the query applies to. Select All of the following must be true to use the AND operator in the query. Select At least one of the following must be true to use the OR operator in the query.
4 Expression fields: Select the query subject in the field on the left. Select the operator for the expression in the centre field (the list of operators is dependent on whether the subject represents an

PUBLIC
alphanumeric or numeric value). Type the value being searched for in the field on the right.
5 Add Condition: If All of the following must be true (the AND operator) is selected, AND expression fields are added to the query. If At least one of the following must be true (the OR operator) is selected, OR expression fields are added to the query.
6 Add Subclause: Adds a nested clause to the expression. The subclause allows the user to nest an AND or OR expression by selecting the respective option. Note that the user can nest only one subclause expression.
7 Search: Click Search to run the query.
Once you have activated the Query tool, select the layer to run the query on.
Select the field you wish to query (e.g. If you wanted to see Dill Holes that are for Irrigation, choose Primary Purpose as the field) Chose an operator: Numeric and Date fields offer mathematical functions (=,<,>); Text fields offer partial matches or whole matches (=, starts with etc.). Choose a value: for numeric fields, enter a number; For text fields, enter text. - Example values are available in a drop-down menu.
You can query on multiple option by adding a Subclause and using the OR operator

PUBLIC
Using the AND operation in combination with the OR operator you can build more advanced queries In this example, the query returns results where the Yield is equal or greater than 5 AND the Primary Purpose is Irrigation OR Domestic

PUBLIC
You can then view all the results in a tabular form by selecting the Switch to Table options from the Panel Actions Menu
Identify Results Action Menu

PUBLIC
1 Switch to Table: The view displays the results in a table with a separate tabs for each Layer.
2 Show Buffer Options: Opens and enables the buffering tool; see Buffering for more details
3 Export to CSV: Exports all results for each layer to separate CSV Table(s)
4 Export to XLSX: Exports all results to Excel Spreadsheet, with separate tabs for each layer
5 Open Saved Results: Opens up the list of any previously saved results*
6 Save Results: Saves all results for further analysis*
7 Combine Results: Perform modifications previously saved results*
8 Zoom to All: Zooms to the full extent of all selected records for all Layers
*Saved results only persist for the duration of your current browser session. If you refresh or close the browser you will lose all saved results.

PUBLIC
Results Actions Menu
1 Zoom to All: Zooms to the full extent of all selected records for that Layer
2 Show Buffer Options: Opens and enables the buffering tool; see Buffering for more details
3 Export to CSV: Exports all results to a CSV Table
4 Export to XLSX: Exports all results to Excel Spreadsheet
5 Open Saved Results: Opens up the list of any previously saved results*
6 Save Results: Saves all results for further analysis*
7 Combine Results: Perform modifications previously saved results*
8 Remove from Results: Removes all features for that layer from results collection
*Saved results only persist for the duration of your current browser session. If you refresh or close the browser you will lose all saved results.

PUBLIC
Feature Actions Menu
1 Show Buffer Options: Opens and enables the buffering tool; see Buffering for more details
2 Zoom to All: Zooms to the extent of that selected feature
3 Pan: Pans (moves) the map to centre on that feature
4 Remove from Results: Removes that features from the results
Filter Builder Tool
The Filter Builder Tool works similarly to the Query Builder Tool, however a filter limits the features that show on the map based on a set of criteria.
Export Map
The Export Map tool allows you to export the current map image to a file.

PUBLIC
When you check the Include Georeference Data box, the exported image can be used in mobile mapping solutions such as Avenza Maps.
Upload Data Tool
The Upload Data Tool allows you to upload files containing spatial, coordinate or address data. The data is uploaded as a new feature layer, and can be interacted with as with any other layer. This includes support for identify, query and filter operations. The uploaded data is only visible whilst the map is open, when the session ends the data is removed from the map. Supported file types for upload include:
.csv
.xlsx
.kml
.shp
.gpx
.zip containing multiple shapefiles NOTE: When uploading a single shapefile (.shp) you must also select all associated files, including .prj, .dbf, .shx etc.
Uploading a shapefile
Click Bowse to find the file(s) for upload, then click Upload

PUBLIC
Enter the desired Layer name, then click Proceed
Select the desired styling, then click Proceed
The uploaded shapefile is then displayed on the map

PUBLIC
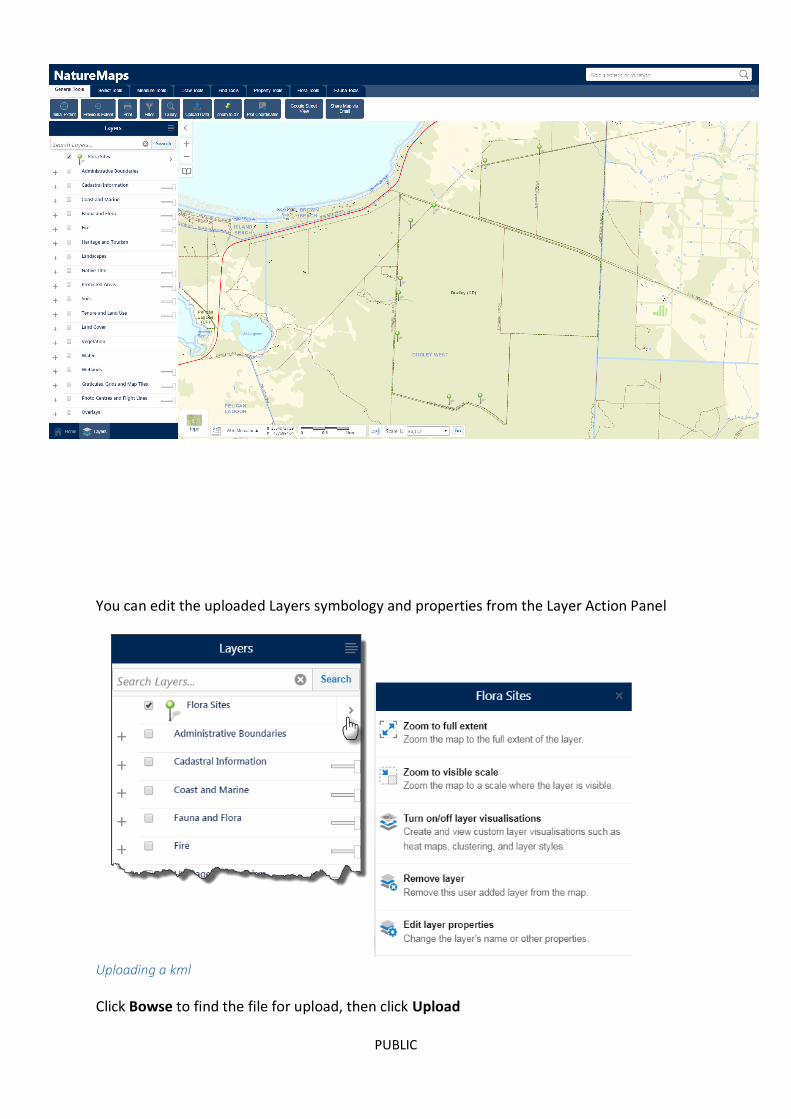
You can edit the uploaded Layers symbology and properties from the Layer Action Panel
Uploading a csv, gpx or xlsx
Click Bowse to find the file for upload, then click Upload

PUBLIC
Select the X and Y axis columns and the appropriate Spatial Reference, then click Confirm
Enter the desired Layer name, then click Proceed
A dialog box will appear, stating how many records will be mapped and how many have been rejected e.g. Due to missing coordinates. Click Done

PUBLIC
Select the desired styling, then click Proceed
The uploaded file is then displayed on the map
PUBLIC
You can edit the uploaded Layers symbology and properties from the Layer Action Panel
Uploading a kml
Click Bowse to find the file for upload, then click Upload

PUBLIC
Enter the desired Layer name, then click Proceed
Select the desired styling, then click Proceed
The uploaded file is then displayed on the map
You can edit the uploaded Layers symbology and properties from the Layer Action Panel

PUBLIC
Zoom to XY Tool
The Zoom to XY Coordinate Tool allows you to enter a set of coordinates and zoom to that location on the map. From the dropdown list, select the desired projection and click OK. In this example MGA Zone 54 is chosen
In the dialog box, enter the coordinates and click OK

PUBLIC
NatureMaps will then zoom to that location and place a point on the screen
Tip: The style and colour of the point can be changed using the Edit function under the Draw Tools tab. Tip: The point can be deleted using the Erase function under the Draw Tools Tab.

PUBLIC
Plot Coordinates Tool
The Plot Coordinates Tool gives you the ability to plot a series of coordinates for specific locations on the map. Plotted coordinates can be printed or exported as a csv or xlsx from the results table. Plotted coordinates are removed from the map when the current session ends.
1 To plot a coordinate click at the location on the screen 5 The list of plotted coordinates is also displayed in the results table
2 The coordinate system can be changed from either the dropdown menu or coordinate display widget 6 From the Results Table action panel, the list of plotted coordinates can then be exported to a .csv or .xlsx file or copied to a drawing layer
3 To centre on a particular set of coordinates, click on the number next to the set. For further actions, click on the ellipse (…) to the right of the set
7 Using the Snapping tools you can also select individual layers to “snap” the cursor to when plotting a coordinate.
4 Coordinates can also be manually added in the XY boxes and clicking Add 8 Coordinates Panel Action Menu

PUBLIC
Clicking on the ellipse (…) next to a set of coordinates, opens a ‘Further Actions Panel’
Hide Coordinates – Temporarily hides a set of coordinates from view. If a set is already hidden then the Show Coordinate option will be available
Edit – Allows you to edit the locations of a set of coordinates, either manually or by clicking on a new location on screen. When plotted coordinates are being edited the callout changes from black to blue
Delete – Deletes the set of coordinates and removes it permanently from the map. All displayed coordinates can be either hidden or deleted from the Coordinates Panel Action Menu
PUBLIC
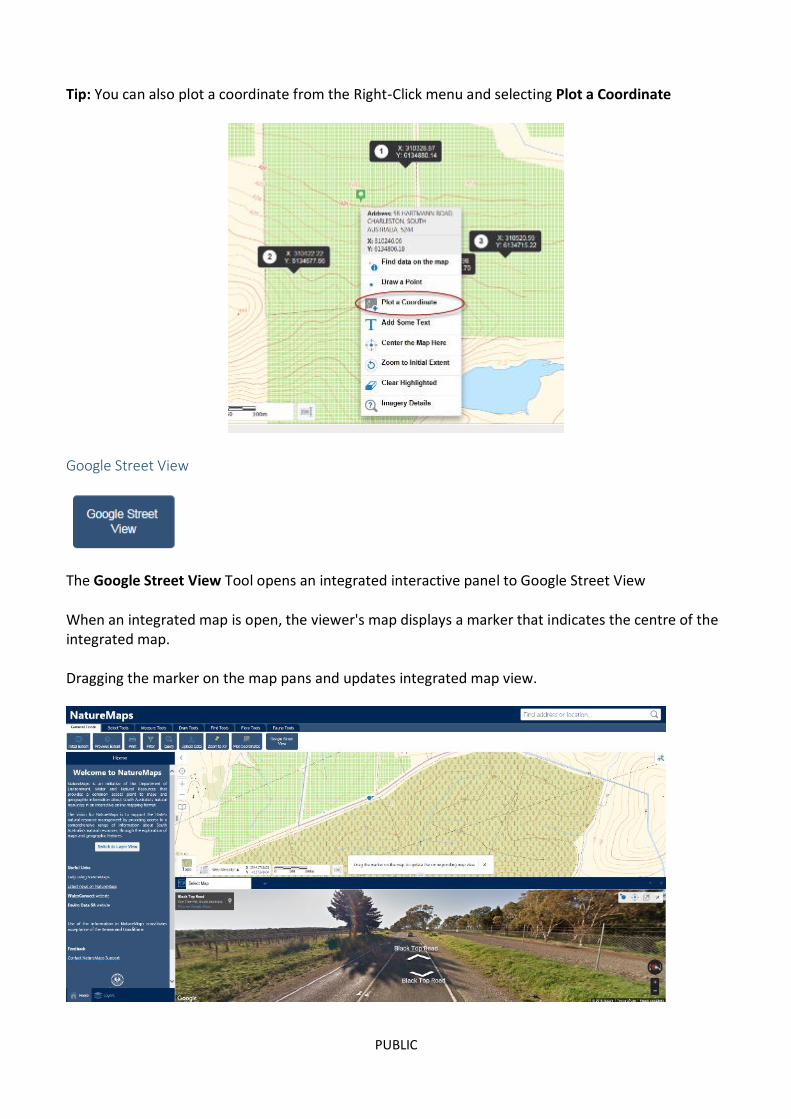
Tip: You can also plot a coordinate from the Right-Click menu and selecting Plot a Coordinate
Google Street View
The Google Street View Tool opens an integrated interactive panel to Google Street View
When an integrated map is open, the viewer's map displays a marker that indicates the centre of the integrated map. Dragging the marker on the map pans and updates integrated map view.

PUBLIC
You can pan and zoom the NatureMaps View and Google Street View maps independently of each other by using the standard map controls for panning and zooming. When you pan or move around in the Google Street View map, the marker on the NatureMaps view stays synchronized with the Google Street View map.
Viewpoint Indicator: Shows the location marker that is used in NatureMaps. The Viewpoint Indicator is for information only—it is not clickable.
Center: Moves the location marker to the centre of the NatureMaps view and rescales Google Street View to match. Note: you may need to manually reposition the marker on a road for Google Street View to return Street View data.
Dock/Undock: Allows the user to dock and undock the Google Street View map from the viewer. Depending on the browser settings, the map may undock to a new tab or to a new window. Note: Tablets and Smart Phones do not support the undocking function.
Share Map via Email
The Share Map via Email Tool give you the ability to share a link of the current map view and active layers via email.
Select Tools
The Select Tools tab offers a series of selection/identify tools that will allow you to select and return information about features in NatureMaps.
Point
Activated Select Tools enable further options

PUBLIC
Activate the Point tool and click or tap on a feature on the map to return information.
Multi Point
Activate the Multi Point tool and click or tap on features on the map (double click or double tap to finish) to return information.
Line
Activate the Line tool and click to start then draw a line (double click or double tap to finish) to intersect through the features on the map you are interested in.
Polygon
Activate the Polygon tool and click to start then draw a shape (double click or double tap to finish) around the features on the map you are interested in.
Rectangle
Activate the Rectangle tool and click and drag a rectangle around the features on the map you are interested in. Note: All Select Tools are Sticky meaning a tool will remain active until you click on it again.
Extended Select Tools
Depending on the Select Tool chosen a number of extra tools will be made available to you.
PUBLIC
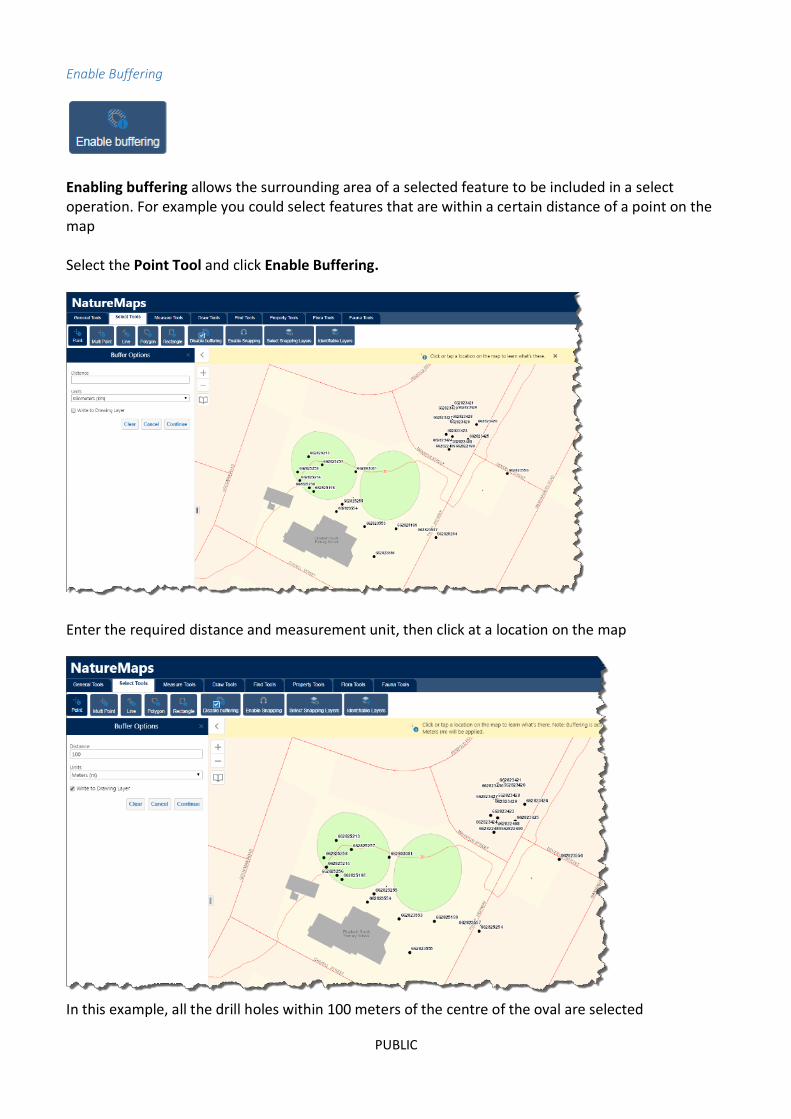
Enable Buffering
Enabling buffering allows the surrounding area of a selected feature to be included in a select operation. For example you could select features that are within a certain distance of a point on the map Select the Point Tool and click Enable Buffering.
Enter the required distance and measurement unit, then click at a location on the map
In this example, all the drill holes within 100 meters of the centre of the oval are selected

PUBLIC
Optional: Check Write to Drawing Layer to create a graphic of the buffered area.
Note: You can use the Buffer Tool with all the available Select Tools
Tip: You can also apply a buffer to an already selected feature From the Selected Features Action Panel Menu, select Show Buffer Options
Enter a Distance and Measurement Unit

PUBLIC
Click Continue
In the example above all the drill holes within 50m of the initially selected drill hole have now been selected.
Snapping
Snapping allows you to precisely select features on the map by snapping to the nearest point, vertex or edge of that within the radius around the mouse pointer.

PUBLIC
When snapping you must ensure that you select the Layer(s) you wish to snap to, using the Select Snapping Layers function
In the example below Enable Snapping has been activated and the cursor has snapped to the nearest drill hole feature within the cursors radius.
Note: Snapping is only available in the desktop environment, it is not configured for tablets or smart phones. Note: The Snapping tool is not available for the Rectangle Select Tool
Identifiable Layers
By selecting the Identifiable Layers function you can choose which layers are affected by the Select Tools. Note: All Layers are selectable/identifiable by default.

PUBLIC
Measure Tools
The Measurement Tools allow you to measure distance and area on the map. You can also edit your measurements and export as a csv, xlsx and shapefile using other tools and functionality within NatureMaps.
Line Measurement
To measure a line select the Line Measurement Tool and click to start measuring a line, click at each direction change point then double click to finish.
For a precise measurement along a feature in the Layers List, enable Snapping. Snapping allows you to precisely measure a feature on the map by snapping to the nearest point, vertex or edge within the radius around the mouse pointer.
When snapping you must ensure that you select the Layer(s) you wish to snap to, using the Select Snapping Layers function
Activated Measure Tools enable further options

PUBLIC
Freehand Line Measurement
PUBLIC
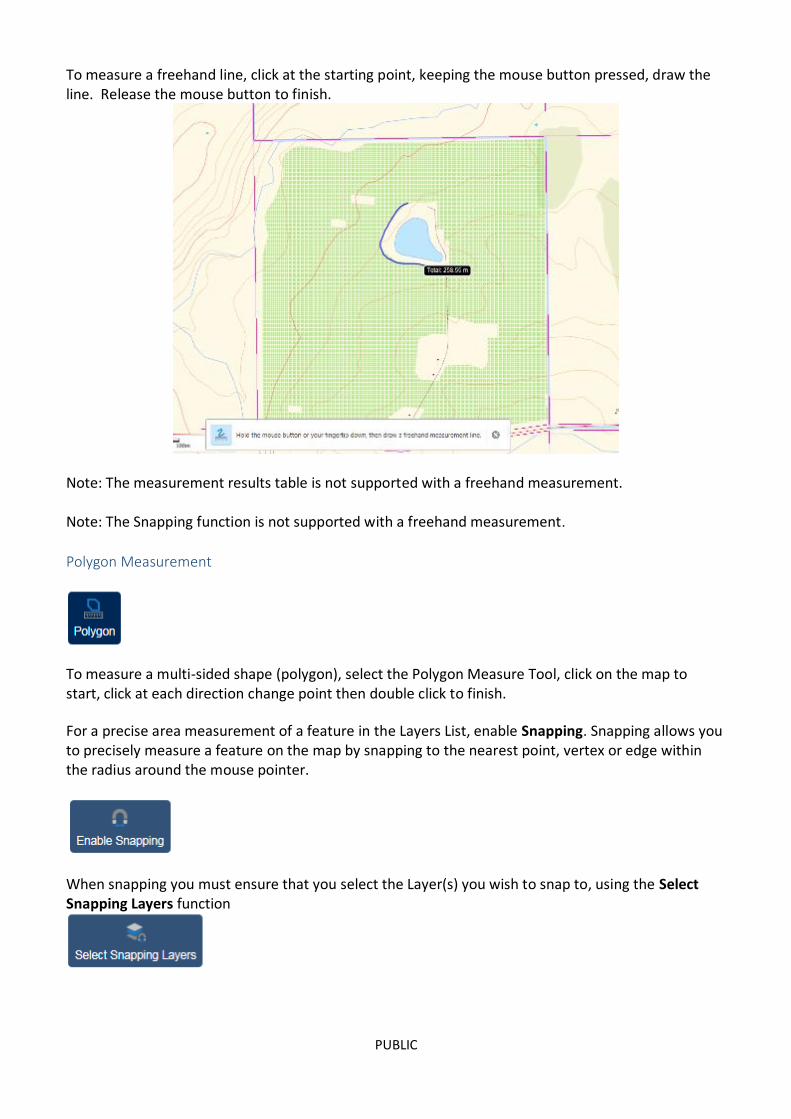
To measure a freehand line, click at the starting point, keeping the mouse button pressed, draw the line. Release the mouse button to finish.
Note: The measurement results table is not supported with a freehand measurement. Note: The Snapping function is not supported with a freehand measurement.
Polygon Measurement
To measure a multi-sided shape (polygon), select the Polygon Measure Tool, click on the map to start, click at each direction change point then double click to finish.
For a precise area measurement of a feature in the Layers List, enable Snapping. Snapping allows you to precisely measure a feature on the map by snapping to the nearest point, vertex or edge within the radius around the mouse pointer.
When snapping you must ensure that you select the Layer(s) you wish to snap to, using the Select Snapping Layers function

PUBLIC

PUBLIC
Tip: You can change the units of measurement for the Length and /or Area of a measurement from the Measurements dropdown list that becomes available once a measurement tool has been activated

PUBLIC
Freehand Shape Measurement
To measure a freehand shape, select the Freehand Shape Tool click at the starting point, keeping the mouse button pressed, draw the shape. Release the mouse button to finish.
Note: The measurement results table is not supported with a freehand measurement. Note: The Snapping function is not supported with a freehand measurement.
Circle Measurement

PUBLIC
To measure a circle on screen, select the Circle Measurement Tool, click a point on the screen and drag out the circle, then release the mouse button to finish.
Note: The Snapping function is not supported with a circle measurement. Note: The measurement results table is not supported with a freehand measurement.
Rectangle Measurement
To measure a rectangle on screen, select the Rectangle Measurement Tool, click a point on the screen and drag out the area, then release the mouse button to finish.

PUBLIC
Note: The Snapping function is not supported with a rectangle measurement.
Editing Measurements
When a measurement is performed, the segment, perimeter, or area can be edited using the Edit Tool, the measurements are automatically recalculated and adjusted on the map.
Individual measurements can be erased (deleted) using the Erase Tool. When selected, click on a measurement to immediately and permanently delete.

PUBLIC
Note: This cannot be undone
The Clear Tool permanently erases all measurements and drawings in the current map session. You will be presented with the following warning before proceeding.
Exporting Measurements
You can export the measurement results to a file, by opening the Panel Actions Menu in the Results Table and selecting either Export to CSV or Export to XLSX

PUBLIC
You can also export your measurement graphic as a Shapefile. However, the area, perimeter and segment lengths are NOT exported. To export to a shapefile, open the Draw Tools tab and select the Export Drawing Tool
Draw Tools
You can add text, point, line and polygon drawings to the map using the various drawing options under the Draw Tools Tab.
Activated Draw Tools enable further options
PUBLIC
Some of the draw options also participate in the Snapping Function.
Snapping allows you to precisely select features on the map by snapping to the nearest point, vertex or edge within the radius around the mouse pointer. When snapping you must ensure that you select the Layer(s) you wish to snap to, using the Select Snapping Layers function
Note: the following draw options do not participate in the Snapping Function;
Freehand Line
Arrow
Ellipse
Circle
Rectangle
Drawing Styling
There are a number of style choices for the various drawing options. These can be selected either prior to commencing the drawing or afterward by selecting the graphic with the Edit Tool active. To select an appropriate style select the Style Tool
Text Styling
When applying text styling you can choose a predefined style and size.

PUBLIC
Click Done to apply
Alternatively you can create your own custom text styling.

PUBLIC
Click Done to apply.
Point Styling
When applying point styling you can choose a predefined basic style and size.
Click Done to apply For more pictorial point symbols, select Choose an image from the type dropdown menu.

PUBLIC
Click Done to apply To create your own simple marker style, select Create your own style from the Type dropdown menu.
Line Styling

PUBLIC
When applying Line styling you can choose a predefined basic style, colour and thickness.
Click Done to apply To create your own simple line style, select Create your own style from the Type dropdown menu.
Polygon Styling

PUBLIC
When applying Polygon styling you can choose a predefined basic style, colour and outline.
To create your own simple polygon style, select Create your own style from the Type dropdown menu.
Tip: Use the Transparency Slider to adjust the fill transparency of the feature. Drag the slider right back to the left hand side to create a no fill feature

PUBLIC
Editing Drawings
You can edit an existing graphic by using the Edit Tool. You can then resize, shape and restyle the drawing as desired
Individual drawings can be erased (deleted) using the Erase Tool. When selected, click on a measurement to immediately and permanently delete. Note: This cannot be undone
The Clear Tool permanently erases all measurements and drawings in the current map session. You will be presented with the following warning before proceeding.
Exporting Drawings
The Export Drawings Tool creates a shapefile(s) in an Export.zip file containing all of the drawings. The shapefile format is a vector data format for GIS software developed by Esri. Shapefiles support point, line, and area features. A valid shapefile requires one .shp file as well as a .shx and .dbf file. If the Edit Drawings tool is enabled, the Export Drawings tool will be disabled. When the Export Drawings tool is selected, a confirmation dialog will appear. Once accepted, the Export.zip file is saved to your PC.

PUBLIC
The Export.zip contains the user's drawings as shapefiles. Separate shapefiles are exported for each type of drawing. For example, if a map contained multiple point drawings and multiple polygon drawings, the export will contain a combined point.shp file and a combined polygon.shp file. Combined shapefiles can have the following names:
Point.shp
Polygon.shp
Polyline.shp Exported shapefiles do not include any measurements, although the geometry values and scale will be preserved. Similarly, exports do not include text or drawing styles from the on-screen drawing. Note: Export Drawings is not available on Tablets or Smart Phones
Find Tools
The Find Tools are a few “quick” search and zoom to tools for some commonly searched for features in NatureMaps. After selecting the desired feature in the dropdown menu, NatureMaps will zoom to, highlight that feature, and turn it on in the Layer List.
NPWSA Reserve
Select a NPWSA Reserve from the dropdown list and click Search to zoom to that feature.
Marine Park

PUBLIC
Select a Marine Park from the dropdown list and click Search to zoom to that feature.
Hundred
Select a Hundred from the dropdown list and click Search to zoom to that feature.
LGA
Select a Local Government Area (LGA) from the dropdown list and click Search to zoom to that feature.
Drill Hole

PUBLIC
Find and zoom to a Drill Hole by entering the Drill Hole Number in the Drill Hole No. option
OR
Find and zoom to a Drill Hole by entering the Unit Number in the Unit Number option
Shipwreck
Select a Shipwreck from the dropdown list and click Search to zoom to that feature.
PUBLIC
Parcel Tools
The Parcel Tools are a few search and zoom to tools for some commonly searched for the Cadastre data in NatureMaps.
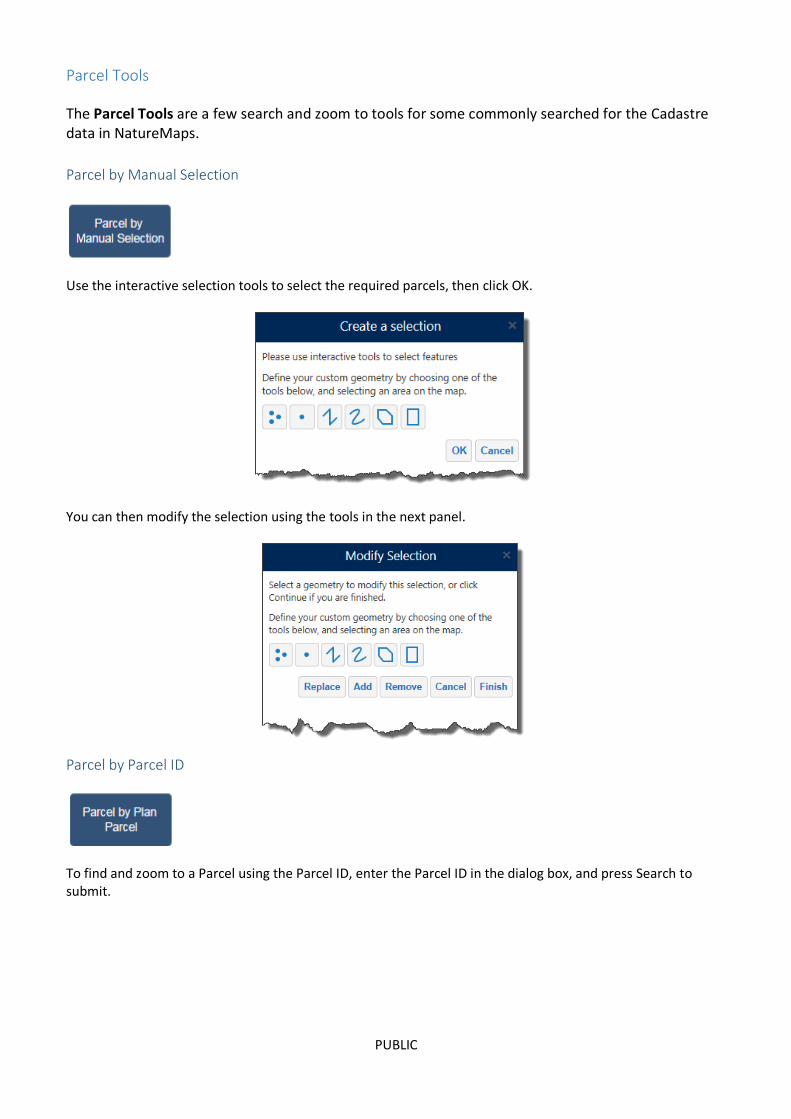
Parcel by Manual Selection
Use the interactive selection tools to select the required parcels, then click OK.
You can then modify the selection using the tools in the next panel.
Parcel by Parcel ID
To find and zoom to a Parcel using the Parcel ID, enter the Parcel ID in the dialog box, and press Search to submit.

PUBLIC
You can also add additional parcels to the current selection by checking the Add to current selection box. Note: This is supported across all 3 Parcel Search Tools.
Parcel by Plan Parcel
To find and zoom to a Parcel using the Plan Type and Parcel Number, enter the details in the dialog boxes, optionally you can also enter the Parcel Type and Parcel Number to further refine the search. Press Search to submit.
You can also add additional parcels to the current selection by checking the Add to current selection box. Note: This is supported across all 3 Parcel Search Tools.
Parcel by Title Reference
To find and zoom to a Parcel using the Title Reference, enter the Title Prefix, and, Volume and Folios Numbers in the dialog boxes, press Search to submit.

PUBLIC
You can also add additional parcels to the current selection by checking the Add to current selection box. Note: This is supported across all 3 Parcel Search Tools.
Flora Search
General Query Tool
The General Query Tool allows users to extract records from the Flora Supertable (BDBSA) layer based on an area of interest and optionally to filter the results by species, rating, native/introduced, source, observer, sighting date, spatial reliability or survey name, or a combination of any. The result of the query is a downloadable spreadsheet with an option to display the results on the map. Area of interest can be a
State (a filter or filters must be applied at this level) Current Extent (selecting too large an area will cause the query to time out)n DEW Reserve Natural Resource Management (NRM) Region or District IBRA Subregion Survey Name Heritage Agreement Pastoral Station Pastoral Land Systems Proposed Burns Define a selection area manually Use a buffered line or point

PUBLIC
Note: For the manual and buffer options the selection area is restricted in size due to the large number of records in the dataset. The allowable selection area is larger in areas where there a fewer species recorded (i.e. in the outback)
Querying by State
To generate a query for the entire State, check the radio button next to State, and click Continue. A filter or filters must be applied at the state level due to the large number of records in the Flora Supertable layer.
Click ‘Continue’ to proceed to filter options.

PUBLIC
1. Shows the Filters that have been applied to the report 2. Hyperlink to open the generated report 3. Opens BDBSA Supertable overview document 4. Link to Creative Commons description 5. Displays the locations of the results on the map as graphic points, see Map Results 6. Closes the query.
Querying by Current Extent
To generate a query based on the current map extent, check the radio button next to Current Extent, and click Continue. Do not use the Current Extent option at the state level – use the State option. Current extent works best when zoomed in to a particular area of interest as it will be extremely slow or fail if the selected area is too large.
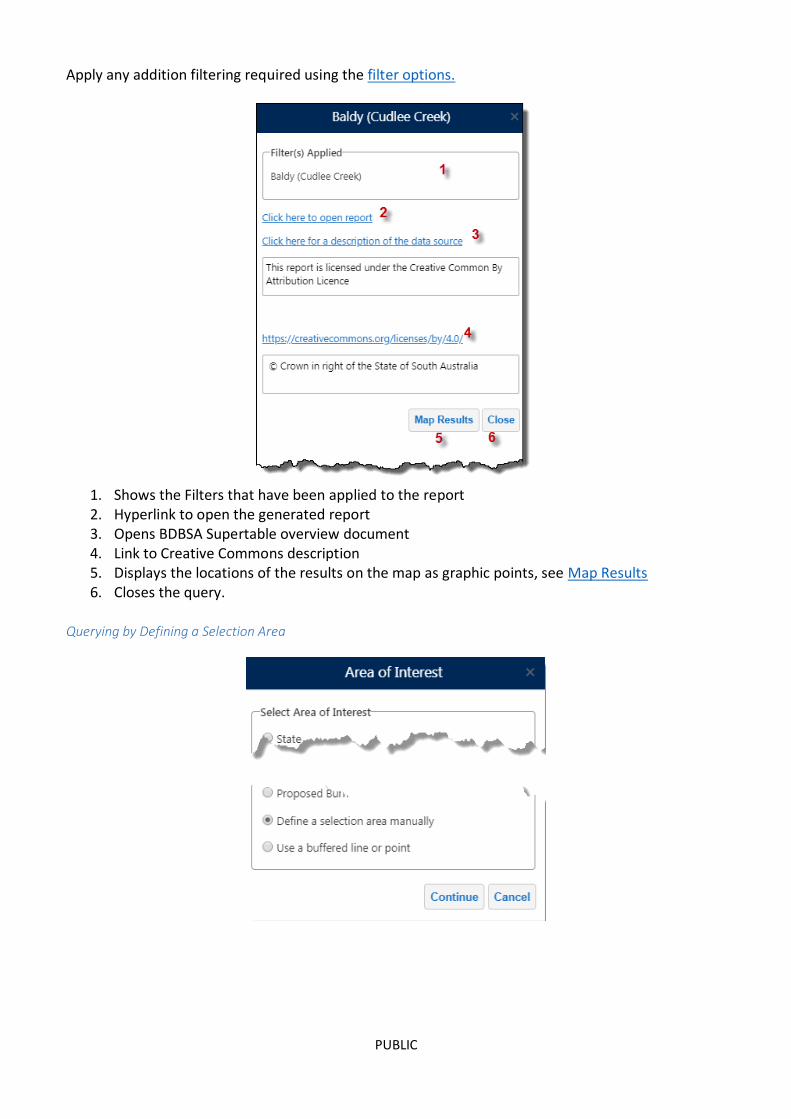
Adjust the extent if required using the tool provided or click OK to continue, or Cancel to end the operation. Apply any addition filtering required using the filter options.

PUBLIC
1. Shows the Filters that have been applied to the report 2. Hyperlink to open the generated report 3. Opens BDBSA Supertable overview document 4. Link to Creative Commons description 5. Displays the locations of the results on the map as graphic points, see Map Results 6. Closes the query.
Querying by NRM Region
To generate a query within a NRM Region or NRM District, check the radio button next to NRM Region. Select the NRM Region (required), and District (optional) from the drop Down List and click Continue

PUBLIC
Apply any addition filtering required using the filter options.
1. Shows the Filters that have been applied to the report 2. Hyperlink to open the generated report 3. Opens BDBSA Supertable overview document 4. Link to Creative Commons description 5. Displays the locations of the results on the map as graphic points, see Map Results 6. Closes the query.
Querying by DEW Reserve
To generate a query within a DEW Reserve, check the radio button next to DEW Reserve. Select the DEW Reserve (required) from the drop Down List and click Continue

PUBLIC
Apply any addition filtering required using the filter options.
1. Shows the Filters that have been applied to the report 2. Hyperlink to open the generated report 3. Opens BDBSA Supertable overview document 4. Link to Creative Commons description 5. Displays the locations of the results on the map as graphic points, see Map Results 6. Closes the query.
Querying by IBRA Subregion
To generate a query within IBRA Subregion, check the radio button next to IBRA Subregion. Select the IBRS Subregion (required) from the drop Down List and click Continue

PUBLIC
Apply any addition filtering required using the filter options.
1. Shows the Filters that have been applied to the report 2. Hyperlink to open the generated report 3. Opens BDBSA Supertable overview document 4. Link to Creative Commons description 5. Displays the locations of the results on the map as graphic points, see Map Results 6. Closes the query.
Querying by Survey Name
To generate a query on a Survey Name, check the radio button next to Survey Name. Select the Survey Name (required) from the drop Down List and click Continue

PUBLIC
Apply any addition filtering required using the filter options.
1. Shows the Filters that have been applied to the report 2. Hyperlink to open the generated report 3. Opens BDBSA Supertable overview document 4. Link to Creative Commons description 5. Displays the locations of the results on the map as graphic points, see Map Results 6. Closes the query.
Querying by Heritage Agreement
To generate a query for a Heritage Agreement, check the radio button next to Heritage Agreement. Enter the Heritage Agreement number (required) in the text box and click Continue

PUBLIC
Apply any addition filtering required using the filter options.
1. Shows the Filters that have been applied to the report 2. Hyperlink to open the generated report 3. Opens BDBSA Supertable overview document 4. Link to Creative Commons description 5. Displays the locations of the results on the map as graphic points, see Map Results 6. Closes the query.
Querying by Pastoral Station
To generate a query for a Pastoral Station, check the radio button next to Pastoral Station. Select the Pastoral Station name (required) from the drop Down List and click Continue

PUBLIC
Apply any addition filtering required using the filter options.
1. Shows the Filters that have been applied to the report 2. Hyperlink to open the generated report 3. Opens BDBSA Supertable overview document 4. Link to Creative Commons description 5. Displays the locations of the results on the map as graphic points, see Map Results 6. Closes the query.
Querying by Pastoral Land System
To generate a query within a Pastoral Land System, check the radio button next to Pastoral Land System. Select the Land System name (required) from the drop Down List and click Continue

PUBLIC
Apply any addition filtering required using the filter options.
1. Shows the Filters that have been applied to the report 2. Hyperlink to open the generated report 3. Opens BDBSA Supertable overview document 4. Link to Creative Commons description 5. Displays the locations of the results on the map as graphic points, see Map Results 6. Closes the query.
Querying by Proposed Burn
To generate a query within a Proposed Burn, check the radio button next to Proposed Burn. Select the Burn name (required) from the drop Down List and click Continue
PUBLIC
Apply any addition filtering required using the filter options.
1. Shows the Filters that have been applied to the report 2. Hyperlink to open the generated report 3. Opens BDBSA Supertable overview document 4. Link to Creative Commons description 5. Displays the locations of the results on the map as graphic points, see Map Results 6. Closes the query.
Querying by Defining a Selection Area

PUBLIC
1. Select by Rectangle 2. Select by Polygon
Apply any addition filtering required using the filter options.

PUBLIC
1. Shows the Filters that have been applied to the report 2. Hyperlink to open the generated report 3. Opens BDBSA Supertable overview document 4. Link to Creative Commons description 5. Displays the locations of the results on the map as graphic points, see Map Results 6. Closes the query.
Querying Using a Buffered Line or Point
1. Select by single point 2. Select by multiple point locations (double click to capture last location) 3. Select by line 4. Select by freehand line

PUBLIC
Apply any addition filtering required using the filter options.

PUBLIC
1. Shows the Filters that have been applied to the report 2. Hyperlink to open the generated report 3. Opens BDBSA Supertable overview document 4. Link to Creative Commons description 5. Displays the locations of the results on the map as graphic points, see Map Results 6. Closes the query.
Applying Filters
Refine the query by applying a series of filters. You can filter on 1 or more of the following:
Species
State/Nationally Rated
Native Species
Introduced Species
Source
Observer
Sighting Date
Spatial Reliability
Survey Name

PUBLIC
Filter by Species
To filter on Species, check the radio button next to Species and click Continue to proceed to species selection
You can search on Common Name OR Species Name either by Keyword OR selecting from a species list.

PUBLIC
Using the Keyword Search, enter part of the species name and click Continue
Select the desired species from the list and click OK

PUBLIC
Click Yes to apply additional filters, or No to continue.
1. Shows the Filters that have been applied to the report 2. Hyperlink to open the generated report 3. Opens BDBSA Supertable overview document 4. Link to Creative Commons description 5. Displays the locations of the results on the map as graphic points, see Map Results 6. Closes the query.

PUBLIC
Filter by State/Nationally Rated
To filter State/Nationally rated , check the radio button next to State/Nationally Rated and click Continue to proceed to species selection
1. Shows the Filters that have been applied to the report 2. Hyperlink to open the generated report 3. Opens BDBSA Supertable overview document 4. Link to Creative Commons description 5. Displays the locations of the results on the map as graphic points, see Map Results 6. Closes the query.

PUBLIC
Filter by Native Species
To filter on Native Species , check the radio button next to Native Species and click Continue to proceed to species selection
1. Shows the Filters that have been applied to the report 2. Hyperlink to open the generated report 3. Opens BDBSA Supertable overview document 4. Link to Creative Commons description 5. Displays the locations of the results on the map as graphic points, see Map Results 6. Closes the query.

PUBLIC
Filter by Introduced Species
To filter on Introduced Species , check the radio button next to Introduced Species and click Continue to proceed to species selection
1. Shows the Filters that have been applied to the report 2. Hyperlink to open the generated report 3. Opens BDBSA Supertable overview document 4. Link to Creative Commons description 5. Displays the locations of the results on the map as graphic points, see Map Results 6. Closes the query.

PUBLIC
Filter by Source
To filter by data source , check the radio button next to Source, select the required source from the dropdown list, and click Continue to proceed to species selection
1. Shows the Filters that have been applied to the report 2. Hyperlink to open the generated report 3. Opens BDBSA Supertable overview document 4. Link to Creative Commons description 5. Displays the locations of the results on the map as graphic points, see Map Results 6. Closes the query.

PUBLIC
Filter by Observer
To filter by observer , check the radio button next to Observer, enter part of the observers name, and click Continue to proceed to species selection
1. Shows the Filters that have been applied to the report 2. Hyperlink to open the generated report 3. Opens BDBSA Supertable overview document 4. Link to Creative Commons description 5. Displays the locations of the results on the map as graphic points, see Map Results 6. Closes the query.

PUBLIC
Filter by Sighting Date
To filter on sighting date, check the radio button next to Sighting Date select the date range and click Continue to proceed to species selection
1. Shows the Filters that have been applied to the report 2. Hyperlink to open the generated report 3. Opens BDBSA Supertable overview document 4. Link to Creative Commons description 5. Displays the locations of the results on the map as graphic points, see Map Results 6. Closes the query.

PUBLIC
Filter by Spatial Reliability
To filter on spatial reliability, check the radio button next to Spatial Reliability, select required value from the dropdown list and click Continue to proceed to species selection
1. Shows the Filters that have been applied to the report 2. Hyperlink to open the generated report 3. Opens BDBSA Supertable overview document 4. Link to Creative Commons description 5. Displays the locations of the results on the map as graphic points, see Map Results 6. Closes the query.
PUBLIC
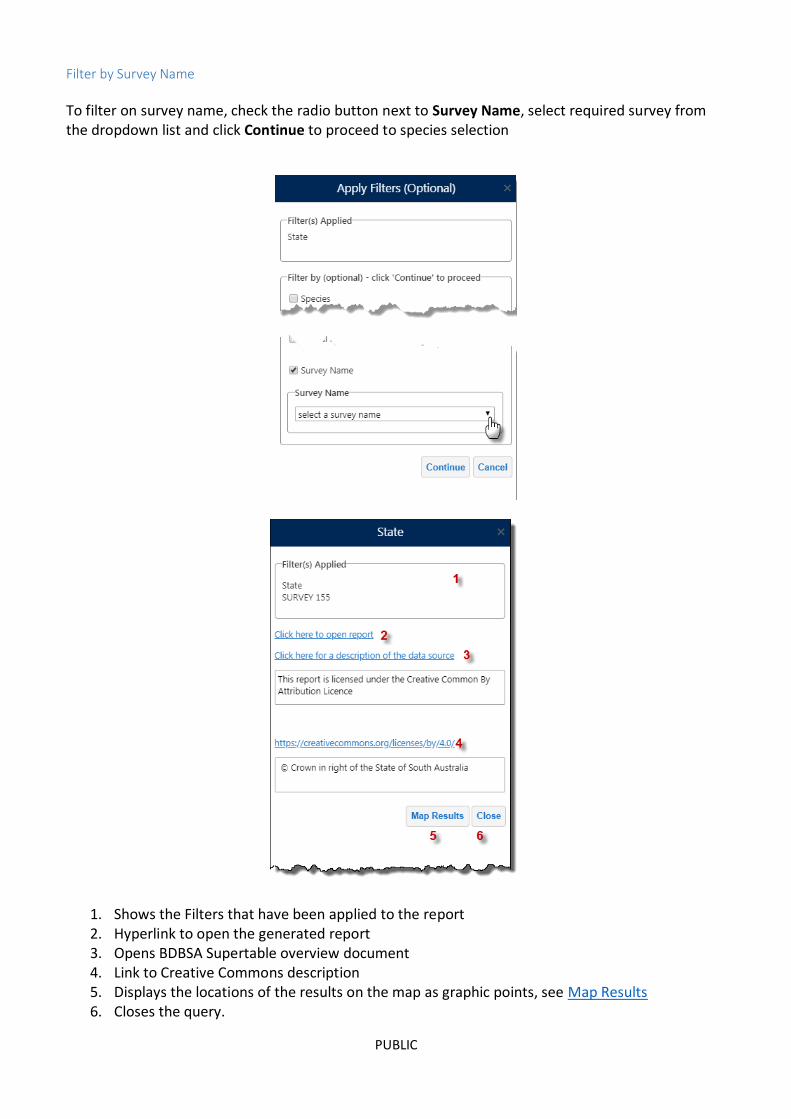
Filter by Survey Name
To filter on survey name, check the radio button next to Survey Name, select required survey from the dropdown list and click Continue to proceed to species selection
1. Shows the Filters that have been applied to the report 2. Hyperlink to open the generated report 3. Opens BDBSA Supertable overview document 4. Link to Creative Commons description 5. Displays the locations of the results on the map as graphic points, see Map Results 6. Closes the query.

PUBLIC
Map Results The Map Results button adds a graphic point at the location of the species defined in the query
After the query has run click the Map Results button
To enable identification on individual points click the Record Identify button. NatureMaps will activate the Supertable layer and, if required, zoom to the minimum required scale for identifying. Use the Left Mouse Button to click on a record to return the information.

PUBLIC
Create Simple Species List
The Create Simple Species List generates and downloads a unique species list from the Flora Supertable (BDBSA) layer for an area of interest. Output spreadsheet provides a summary of species with any state and national ratings, count and date of last sighting. Area of interest can be a
Current Extent Natural Resource Management (NRM)
Region or District DEW Reserve IBRA Subregion Survey Name
Heritage Agreement Pastoral Station Pastoral Land Systems Proposed Burns Define a selection area manually Use a buffered line or point
Note: For the manual and buffer options the selection area is restricted in size due to the large number of records in the dataset. The allowable selection area is larger in areas where there a fewer species recorded (i.e. in the outback)

PUBLIC
Querying by Current Extent
To generate a Species list based on the current map extent, check the radio button next to Current Extent, and click Continue.
Adjust the extent if required using the tool provided or click OK to continue, or Cancel to end the operation. Choose the report type to generate, and click Continue
1. Hyperlink to open the generated report 2. Opens BDBSA Supertable overview document 3. Link to Creative Commons description 4. Click to create another report 5. Click to finish and close dialog box

PUBLIC
Querying by NRM Region
To generate a Species list within a NRM Region, check the radio button next to NRM Region. Select the NRM Region (required), and District (optional) from the drop Down List and click Continue
Choose the report type to generate, and click Continue
1. Hyperlink to open the generated report 2. Opens BDBSA Supertable overview document 3. Link to Creative Commons description 4. Click to create another report 5. Click to finish and close dialog box

PUBLIC
Querying by DEW Reserve
To generate a Species list within a DEW Reserve, check the radio button next to DEW Reserve. Select the DEW Reserve (required) from the drop Down List and click Continue
Choose the report type to generate, and click Continue
1. Hyperlink to open the generated report 2. Opens BDBSA Supertable overview document 3. Link to Creative Commons description 4. Click to create another report 5. Click to finish and close dialog box

PUBLIC
Querying by IBRA Subregion
To generate a Species list within IBRA Subregion, check the radio button next to IBRA Subregion. Select the IBRS Subregion (required) from the drop Down List and click Continue
Choose the report type to generate, and click Continue
1. Hyperlink to open the generated report 2. Opens BDBSA Supertable overview document 3. Link to Creative Commons description 4. Click to create another report 5. Click to finish and close dialog box

PUBLIC
Querying by Survey Name
To generate a Species list on a Survey Name, check the radio button next to Survey Name. Select the Survey Name (required) from the drop Down List and click Continue
Choose the report type to generate, and click Continue
1. Hyperlink to open the generated report 2. Opens BDBSA Supertable overview document 3. Link to Creative Commons description 4. Click to create another report 5. Click to finish and close dialog box

PUBLIC
Querying by Heritage Agreement
To generate a Species list by Heritage Agreement, check the radio button next to Heritage Agreement. Enter the Heritage Agreement number (required) in the text box and click Continue
Choose the report type to generate, and click Continue
1. Hyperlink to open the generated report 2. Opens BDBSA Supertable overview document 3. Link to Creative Commons description 4. Click to create another report 5. Click to finish and close dialog box

PUBLIC
Querying by Pastoral Station
To generate a Species list for a Pastoral Station, check the radio button next to Pastoral Station. Select the Pastoral Station name (required) from the drop Down List and click Continue
Choose the report type to generate, and click Continue
1. Hyperlink to open the generated report 2. Opens BDBSA Supertable overview document 3. Link to Creative Commons description 4. Click to create another report 5. Click to finish and close dialog box
PUBLIC
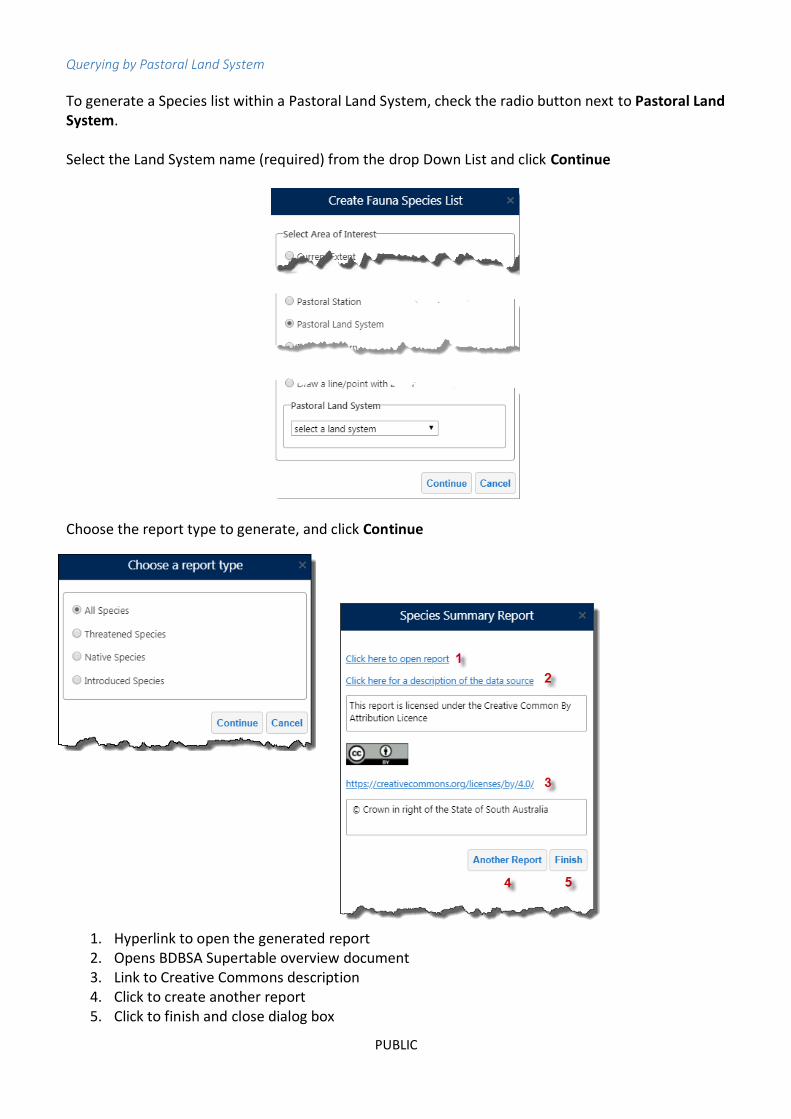
Querying by Pastoral Land System
To generate a Species list within a Pastoral Land System, check the radio button next to Pastoral Land System. Select the Land System name (required) from the drop Down List and click Continue
Choose the report type to generate, and click Continue
1. Hyperlink to open the generated report 2. Opens BDBSA Supertable overview document 3. Link to Creative Commons description 4. Click to create another report 5. Click to finish and close dialog box

PUBLIC
Querying by Proposed Burn
To generate a Species list within a Proposed Burn, check the radio button next to Proposed Burn. Select the Burn name (required) from the drop Down List and click Continue
Choose the report type to generate, and click Continue
1. Hyperlink to open the generated report 2. Opens BDBSA Supertable overview document 3. Link to Creative Commons description 4. Click to create another report 5. Click to finish and close dialog box

PUBLIC
Querying by Defining a Selection Area
You can manually create an area to query on by using the Draw a rectangle/polygon option and drawing an area on the screen. Check the radio button next to Draw a rectangle/polygon and click Continue
Choose either the Rectangle or Polygon option and draw the area on the map. Click OK when completed.

PUBLIC
Choose the report type to generate, and click Continue
1. Hyperlink to open the generated report 2. Opens BDBSA Supertable overview document 3. Link to Creative Commons description 4. Click to create another report 5. Click to finish and close dialog box
Querying Using a Buffered Line or Point
You can query on a buffered line or point by using the Draw line/point with buffer option and drawing an area on the screen. Check the radio button next Draw line/point with buffer and click Continue
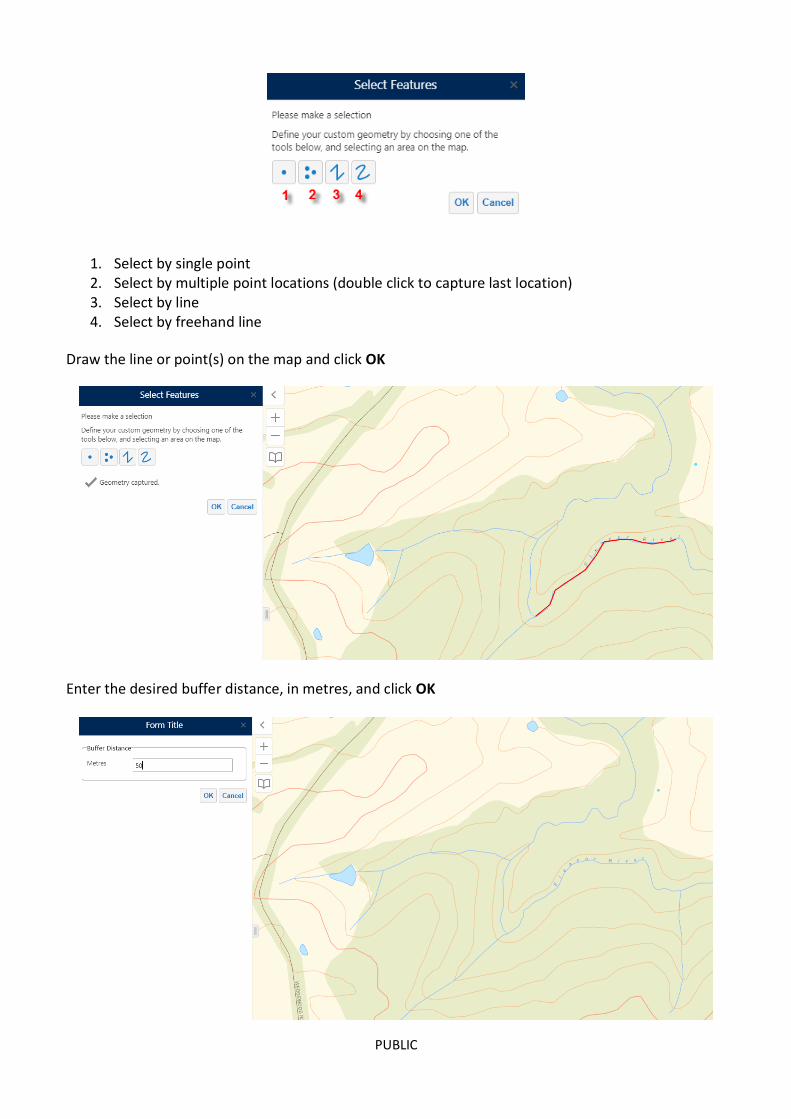
PUBLIC
1. Select by single point 2. Select by multiple point locations (double click to capture last location) 3. Select by line 4. Select by freehand line
Draw the line or point(s) on the map and click OK
Enter the desired buffer distance, in metres, and click OK

PUBLIC
Choose the report type to generate, and click Continue
1. Hyperlink to open the generated report 2. Opens BDBSA Supertable overview document 3. Link to Creative Commons description 4. Click to create another report 5. Click to finish and close dialog box

PUBLIC
Map a Species
The Map a Species tool displays the distribution of a selected species or genus in South Australia from the Flora Supertable (BDBSA) layer. The selected species or genus is displayed for the whole state. If user wants to download supertable records for the selected species/genus then an area of interest needs to be selected. Record details can be returned from a left mouse click by clicking the ‘Record Identify’ button which turns on the Flora Supertable layer and zooms to the layer’s visible scale. You can search on Common Name OR Species Name either by Keyword OR selecting from a species list.
Using the Keyword Search, enter part of the species name and click Continue
Select the desired species from the list and click OK

PUBLIC
The distribution of the selected species is then displayed on the map as red dots
To export the records to a report, click the Export Results option, and use the Select Area of Interest options to define the desired area.

PUBLIC
1. Hyperlink to open the generated report 2. Opens BDBSA Supertable overview document 3. Link to Creative Commons description 4. Click to create another report 5. Click to finish and close dialog box
Record Identification When you select the Record Identify button the map will zoom to the minimum required scale and activate the Flora Supertable Layer. Left Click on a location to return the results.
Note: The minimum scale level for identify to work is 1:288,895 (or a smaller number)
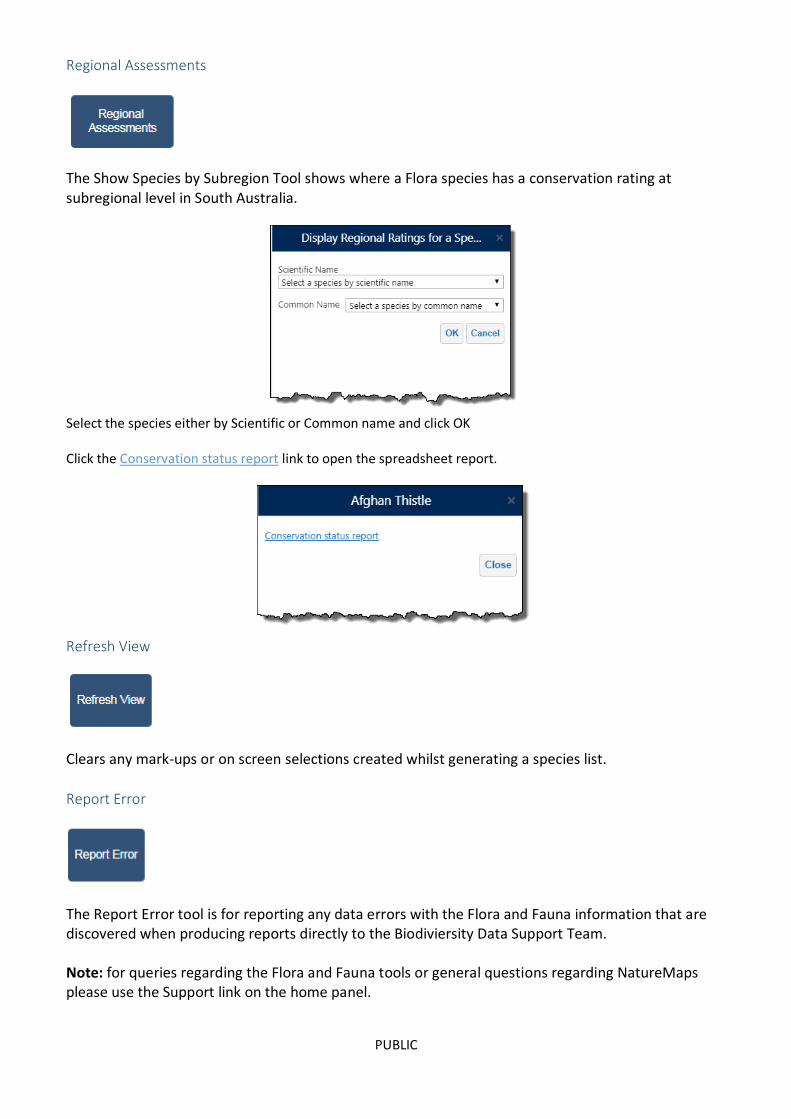
PUBLIC
Regional Assessments
The Show Species by Subregion Tool shows where a Flora species has a conservation rating at subregional level in South Australia.
Select the species either by Scientific or Common name and click OK Click the Conservation status report link to open the spreadsheet report.
Refresh View
Clears any mark-ups or on screen selections created whilst generating a species list.
Report Error
The Report Error tool is for reporting any data errors with the Flora and Fauna information that are discovered when producing reports directly to the Biodiviersity Data Support Team. Note: for queries regarding the Flora and Fauna tools or general questions regarding NatureMaps please use the Support link on the home panel.

PUBLIC
Fauna Search
General Query Tool
The General Query Tool allows users to extract records from the Fauna Supertable (BDBSA) layer based on an area of interest and optionally to filter the results by species, rating, native/introduced, source, observer, sighting date, spatial reliability or survey name, or a combination of any. The result of the query is a downloadable spreadsheet with an option to display the results on the map. Area of interest can be a
State (a filter or filters must be applied at this level) Current Extent (selecting too large an area will cause the query to time out) DEW Reserve Natural Resource Management (NRM) Region or District IBRA Subregion Survey Name Heritage Agreement Pastoral Station Pastoral Land Systems Proposed Burns Define a selection area manually Use a buffered line or point

PUBLIC
Note: For the manual and buffer options the selection area is restricted in size due to the large number of records in the dataset. The allowable selection area is larger in areas where there a fewer species recorded (i.e. in the outback)
Querying by State
To generate a query for the entire State, check the radio button next to State, and click Continue. A filter or filters must be applied at the state level due to the large number of records in the Flora Supertable layer.
Apply any addition filtering required using the filter options.

PUBLIC
1. Shows the Filters that have been applied to the report 2. Hyperlink to open the generated report 3. Opens BDBSA Supertable overview document 4. Link to Creative Commons description 5. Displays the locations of the results on the map as graphic points, see Map Results 6. Closes the query.
Querying by Current Extent
To generate a query based on the current map extent, check the radio button next to Current Extent, and click Continue. Do not use the Current Extent option at the state level – use the State option. Current extent works best when zoomed in to a particular area of interest as it will be extremely slow or fail if the selected area is too large.
Adjust the extent if required using the tool provided or click OK to continue, or Cancel to end the operation. Apply any addition filtering required using the filter options.

PUBLIC
1. Shows the Filters that have been applied to the report 2. Hyperlink to open the generated report 3. Opens BDBSA Supertable overview document 4. Link to Creative Commons description 5. Displays the locations of the results on the map as graphic points, see Map Results 6. Closes the query.
Querying by NRM Region
To generate a Species list within a NRM Region, check the radio button next to NRM Region. Select the NRM Region (required), and District (optional) from the drop Down List and click Continue

PUBLIC
Apply any addition filtering required using the filter options.
1. Shows the Filters that have been applied to the report 2. Hyperlink to open the generated report 3. Opens BDBSA Supertable overview document 4. Link to Creative Commons description 5. Displays the locations of the results on the map as graphic points, see Map Results 6. Closes the query.
Querying by DEW Reserve
To generate a query within a DEW Reserve, check the radio button next to DEW Reserve. Select the DEW Reserve (required) from the drop Down List and click Continue

PUBLIC
Apply any addition filtering required using the filter options.
1. Shows the Filters that have been applied to the report 2. Hyperlink to open the generated report 3. Opens BDBSA Supertable overview document 4. Link to Creative Commons description 5. Displays the locations of the results on the map as graphic points, see Map Results 6. Closes the query.
Querying by IBRA Subregion
To generate a query within IBRA Subregion, check the radio button next to IBRA Subregion. Select the IBRS Subregion (required) from the drop Down List and click Continue

PUBLIC
Apply any addition filtering required using the filter options.
1. Shows the Filters that have been applied to the report 2. Hyperlink to open the generated report 3. Opens BDBSA Supertable overview document 4. Link to Creative Commons description 5. Displays the locations of the results on the map as graphic points, see Map Results 6. Closes the query.
Querying by Survey Name
To generate a query on a Survey Name, check the radio button next to Survey Name. Select the Survey Name (required) from the drop Down List and click Continue

PUBLIC
Apply any addition filtering required using the filter options.
1. Shows the Filters that have been applied to the report 2. Hyperlink to open the generated report 3. Opens BDBSA Supertable overview document 4. Link to Creative Commons description 5. Displays the locations of the results on the map as graphic points, see Map Results 6. Closes the query.
Querying by Heritage Agreement
To generate a query by Heritage Agreement, check the radio button next to Heritage Agreement. Enter the Heritage Agreement number (required) in the text box and click Continue

PUBLIC
Apply any addition filtering required using the filter options.
1. Shows the Filters that have been applied to the report 2. Hyperlink to open the generated report 3. Opens BDBSA Supertable overview document 4. Link to Creative Commons description 5. Displays the locations of the results on the map as graphic points, see Map Results 6. Closes the query.
Querying by Pastoral Station
To generate a query for a Pastoral Station, check the radio button next to Pastoral Station. Select the Pastoral Station name (required) from the drop Down List and click Continue

PUBLIC
Apply any addition filtering required using the filter options.
1. Shows the Filters that have been applied to the report 2. Hyperlink to open the generated report 3. Opens BDBSA Supertable overview document 4. Link to Creative Commons description 5. Displays the locations of the results on the map as graphic points, see Map Results 6. Closes the query.
Querying by Pastoral Land System
To generate a query within a Pastoral Land System, check the radio button next to Pastoral Land System. Select the Land System name (required) from the drop Down List and click Continue

PUBLIC
Apply any addition filtering required using the filter options.
1. Shows the Filters that have been applied to the report 2. Hyperlink to open the generated report 3. Opens BDBSA Supertable overview document 4. Link to Creative Commons description 5. Displays the locations of the results on the map as graphic points, see Map Results 6. Closes the query.
Querying by Proposed Burn
To generate a query within a Proposed Burn, check the radio button next to Proposed Burn. Select the Burn name (required) from the drop Down List and click Continue

PUBLIC
Apply any addition filtering required using the filter options.
1. Shows the Filters that have been applied to the report 2. Hyperlink to open the generated report 3. Opens BDBSA Supertable overview document 4. Link to Creative Commons description 5. Displays the locations of the results on the map as graphic points, see Map Results 6. Closes the query.
Querying by Defining a Selection Area

PUBLIC
1. Select by Rectangle 2. Select by Polygon
Apply any addition filtering required using the filter options.

PUBLIC
1. Shows the Filters that have been applied to the report 2. Hyperlink to open the generated report 3. Opens BDBSA Supertable overview document 4. Link to Creative Commons description 5. Displays the locations of the results on the map as graphic points, see Map Results 6. Closes the query.
Querying Using a Buffered Line or Point
1. Select by single point 2. Select by multiple point locations (double click to capture last location) 3. Select by line 4. Select by freehand line
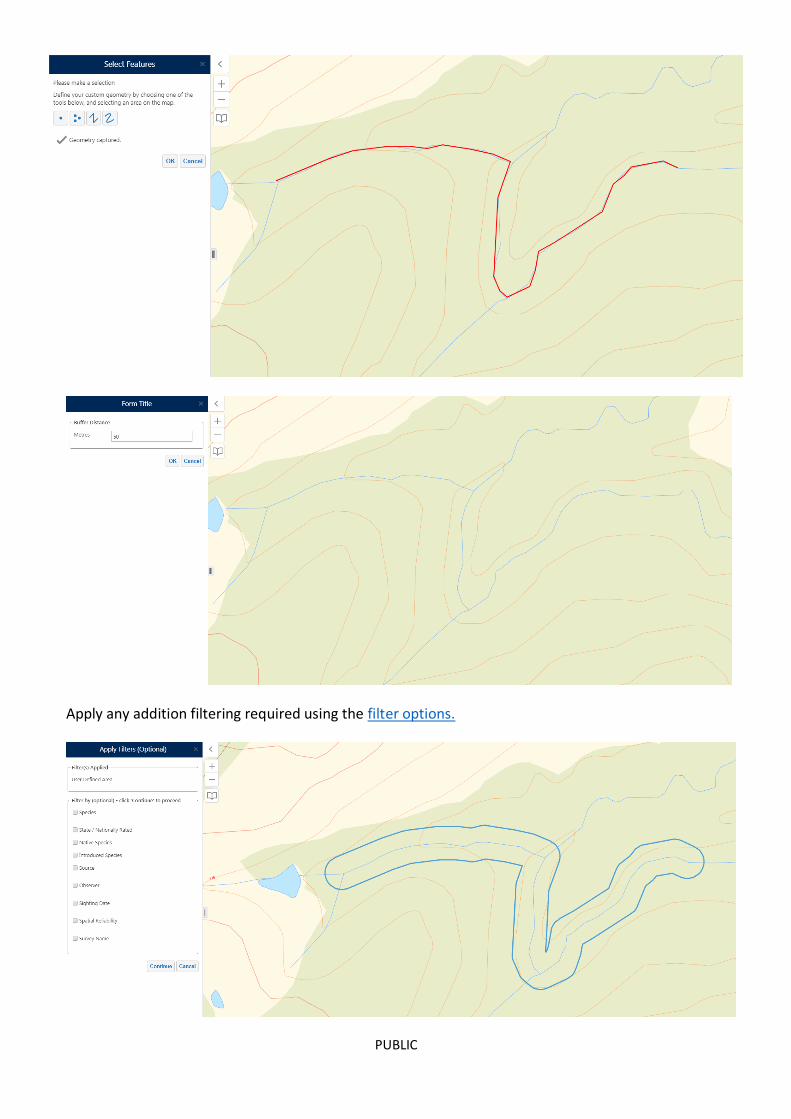
PUBLIC
Apply any addition filtering required using the filter options.

PUBLIC
1. Shows the Filters that have been applied to the report 2. Hyperlink to open the generated report 3. Opens BDBSA Supertable overview document 4. Link to Creative Commons description 5. Displays the locations of the results on the map as graphic points, see Map Results 6. Closes the query.
Applying Filters
Refine the query by applying a series of filters. You can filter on 1 or more of the following:
Species
State/Nationally Rated
Native Species
Introduced Species
Source
Observer
Sighting Date
Spatial Reliability
Survey Name

PUBLIC
Filter by Species
To filter on Species, check the radio button next to Species and click Continue to proceed to species selection
You can search on Common Name OR Species Name either by Keyword OR selecting from a species list.
Using the Keyword Search, enter part of the species name and click Continue

PUBLIC
Select the desired species from the list and click OK
Click Yes to apply additional filters, or No to continue.
1. Shows the Filters that have been applied to the report 2. Hyperlink to open the generated report 3. Opens BDBSA Supertable overview document 4. Link to Creative Commons description 5. Displays the locations of the results on the map as graphic points, see Map Results 6. Closes the query.

PUBLIC
Filter by State/Nationally Rated
To filter State/Nationally rated, check the radio button next to State/Nationally Rated and click Continue to proceed to species selection
1. Shows the Filters that have been applied to the report 2. Hyperlink to open the generated report 3. Opens BDBSA Supertable overview document 4. Link to Creative Commons description 5. Displays the locations of the results on the map as graphic points, see Map Results 6. Closes the query.

PUBLIC
Filter by Native Species
To filter on Native Species, check the radio button next to Native Species and click Continue to proceed to species selection
1. Shows the Filters that have been applied to the report 2. Hyperlink to open the generated report 3. Opens BDBSA Supertable overview document 4. Link to Creative Commons description 5. Displays the locations of the results on the map as graphic points, see Map Results 6. Closes the query.

PUBLIC
Filter by Introduced Species
To filter on Introduced Species, check the radio button next to Introduced Species and click Continue to proceed to species selection
1. Shows the Filters that have been applied to the report 2. Hyperlink to open the generated report 3. Opens BDBSA Supertable overview document 4. Link to Creative Commons description 5. Displays the locations of the results on the map as graphic points, see Map Results 6. Closes the query.

PUBLIC
Filter by Source
To filter by data source, check the radio button next to Source, select the required source from the dropdown list, and click Continue to proceed to species selection
1. Shows the Filters that have been applied to the report 2. Hyperlink to open the generated report 3. Opens BDBSA Supertable overview document 4. Link to Creative Commons description 5. Displays the locations of the results on the map as graphic points, see Map Results 6. Closes the query.

PUBLIC
Filter by Observer
To filter by observer, check the radio button next to Observer, enter part of the observers name, and click Continue to proceed to species selection
1. Shows the Filters that have been applied to the report 2. Hyperlink to open the generated report 3. Opens BDBSA Supertable overview document 4. Link to Creative Commons description 5. Displays the locations of the results on the map as graphic points, see Map Results 6. Closes the query.

PUBLIC
Filter by Sighting Date
To filter on sighting date, check the radio button next to Sighting Date select the date range and click Continue to proceed to species selection
1. Shows the Filters that have been applied to the report 2. Hyperlink to open the generated report 3. Opens BDBSA Supertable overview document 4. Link to Creative Commons description 5. Displays the locations of the results on the map as graphic points, see Map Results 6. Closes the query.

PUBLIC
Filter by Spatial Reliability
To filter on spatial reliability, check the radio button next to Spatial Reliability, select required value from the dropdown list and click Continue to proceed to species selection
1. Shows the Filters that have been applied to the report 2. Hyperlink to open the generated report 3. Opens BDBSA Supertable overview document 4. Link to Creative Commons description 5. Displays the locations of the results on the map as graphic points, see Map Results 6. Closes the query.

PUBLIC
Filter by Survey Name
To filter on survey name, check the radio button next to Survey Name, select required survey from the dropdown list and click Continue to proceed to species selection
1. Shows the Filters that have been applied to the report 2. Hyperlink to open the generated report 3. Opens BDBSA Supertable overview document 4. Link to Creative Commons description 5. Displays the locations of the results on the map as graphic points, see Map Results 6. Closes the query.

PUBLIC
Map Results The Map Results button adds a graphic point at the location of the species defined in the query
After the query has run click the Map Results button
To enable identification on individual points click the Record Identify button. NatureMaps will activate the Supertable layer and, if required, zoom to the minimum required scale for identifying. Use the Left Mouse Button to click on a record to return the information.

PUBLIC
Create Simple Species List
The Create Simple Species List generates and downloads a unique species list from the Flora Supertable (BDBSA) layer for an area of interest. Output spreadsheet provides a summary of species with any state and national ratings, count and date of last sighting. Area of interest can be a
Current Extent NRM Region or District DEW Reserve IBRA Subregion Survey Name Heritage Agreement Pastoral Station Pastoral Land Systems Proposed Burns Define a selection area manually Use a buffered line or point
Note: For the manual and buffer options the selection area is restricted in size due to the large number of records in the dataset. The allowable selection area is larger in areas where there a fewer species recorded (i.e. in the outback)

PUBLIC
Querying by Current Extent
To generate a Species list based on the current map extent, check the radio button next to Current Extent, and click Continue.
Adjust the extent if required using the tool provided or click OK to continue, or Cancel to end the operation. Choose the report type to generate, and click Continue
1. Hyperlink to open the generated report 2. Opens BDBSA Supertable overview document 3. Link to Creative Commons description 4. Click to create another report 5. Click to finish and close dialog box
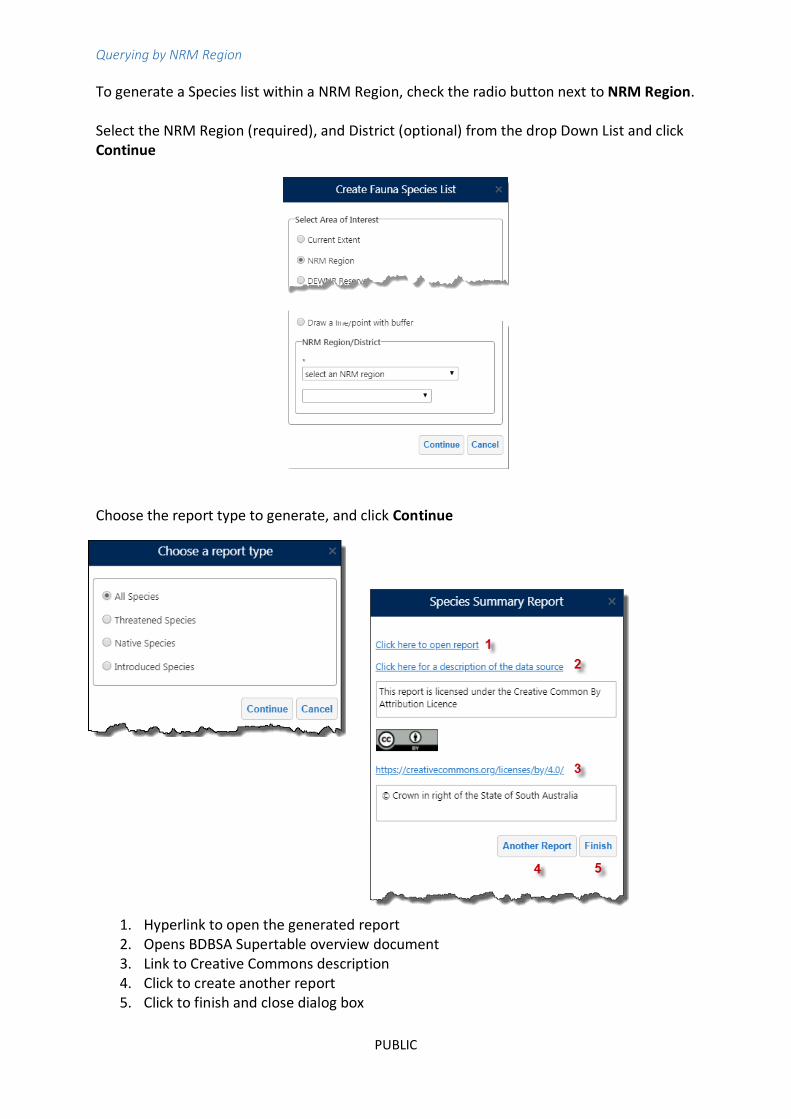
PUBLIC
Querying by NRM Region
To generate a Species list within a NRM Region, check the radio button next to NRM Region. Select the NRM Region (required), and District (optional) from the drop Down List and click Continue
Choose the report type to generate, and click Continue
1. Hyperlink to open the generated report 2. Opens BDBSA Supertable overview document 3. Link to Creative Commons description 4. Click to create another report 5. Click to finish and close dialog box

PUBLIC
Querying by DEW Reserve
To generate a Species list within a DEW Reserve, check the radio button next to DEW Reserve. Select the DEW Reserve (required) from the drop Down List and click Continue
Choose the report type to generate, and click Continue
1. Hyperlink to open the generated report 2. Opens BDBSA Supertable overview document 3. Link to Creative Commons description 4. Click to create another report 5. Click to finish and close dialog box

PUBLIC
Querying by IBRA Subregion
To generate a Species list within IBRA Subregion, check the radio button next to IBRA Subregion. Select the IBRS Subregion (required) from the drop Down List and click Continue
Choose the report type to generate, and click Continue
1. Hyperlink to open the generated report 2. Opens BDBSA Supertable overview document 3. Link to Creative Commons description 4. Click to create another report 5. Click to finish and close dialog box
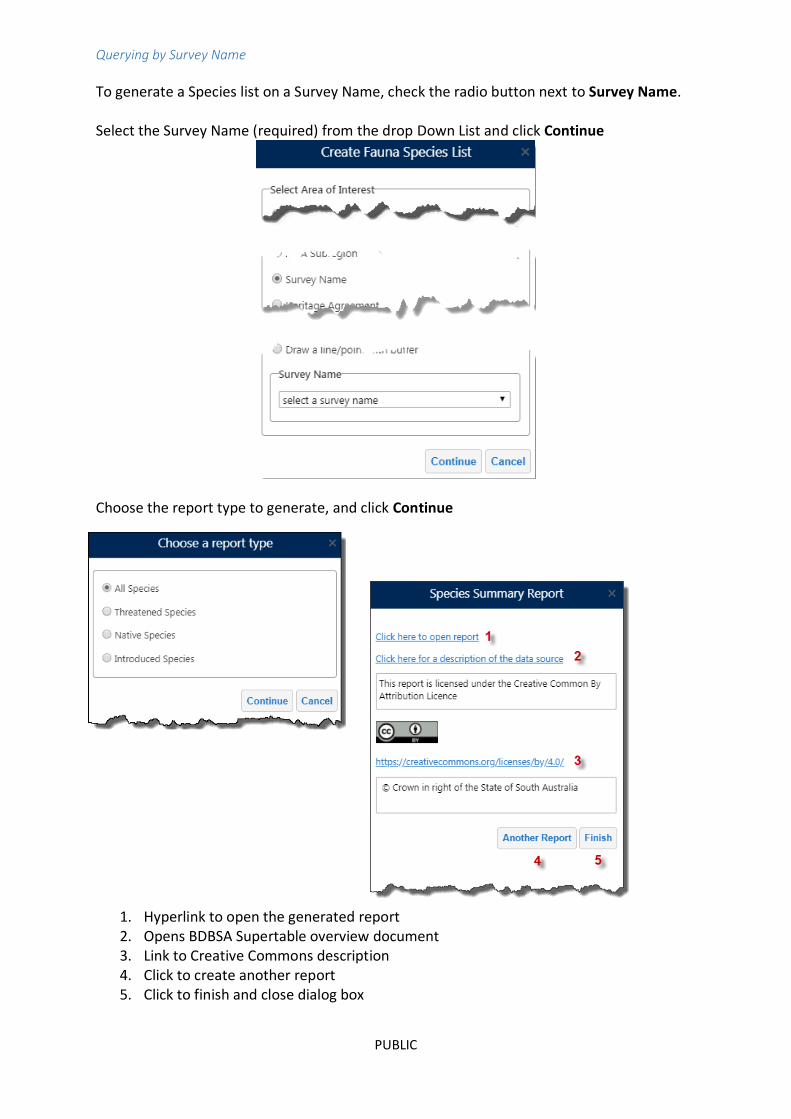
PUBLIC
Querying by Survey Name
To generate a Species list on a Survey Name, check the radio button next to Survey Name. Select the Survey Name (required) from the drop Down List and click Continue
Choose the report type to generate, and click Continue
1. Hyperlink to open the generated report 2. Opens BDBSA Supertable overview document 3. Link to Creative Commons description 4. Click to create another report 5. Click to finish and close dialog box

PUBLIC
Querying by Heritage Agreement
To generate a Species list by Heritage Agreement, check the radio button next to Heritage Agreement. Enter the Heritage Agreement number (required) in the text box and click Continue
Choose the report type to generate, and click Continue
1. Hyperlink to open the generated report 2. Opens BDBSA Supertable overview document 3. Link to Creative Commons description 4. Click to create another report 5. Click to finish and close dialog box

PUBLIC
Querying by Pastoral Station
To generate a Species list for a Pastoral Station, check the radio button next to Pastoral Station. Select the Pastoral Station name (required) from the drop Down List and click Continue
Choose the report type to generate, and click Continue
1. Hyperlink to open the generated report 2. Opens BDBSA Supertable overview document 3. Link to Creative Commons description 4. Click to create another report 5. Click to finish and close dialog box

PUBLIC
Querying by Pastoral Land System
To generate a Species list within a Pastoral Land System, check the radio button next to Pastoral Land System. Select the Land System name (required) from the drop Down List and click Continue
Choose the report type to generate, and click Continue
1. Hyperlink to open the generated report 2. Opens BDBSA Supertable overview document 3. Link to Creative Commons description 4. Click to create another report 5. Click to finish and close dialog box

PUBLIC
Querying by Proposed Burn
To generate a Species list within a Proposed Burn, check the radio button next to Proposed Burn. Select the Burn name (required) from the drop Down List and click Continue
Choose the report type to generate, and click Continue
1. Hyperlink to open the generated report 2. Opens BDBSA Supertable overview document 3. Link to Creative Commons description 4. Click to create another report 5. Click to finish and close dialog box
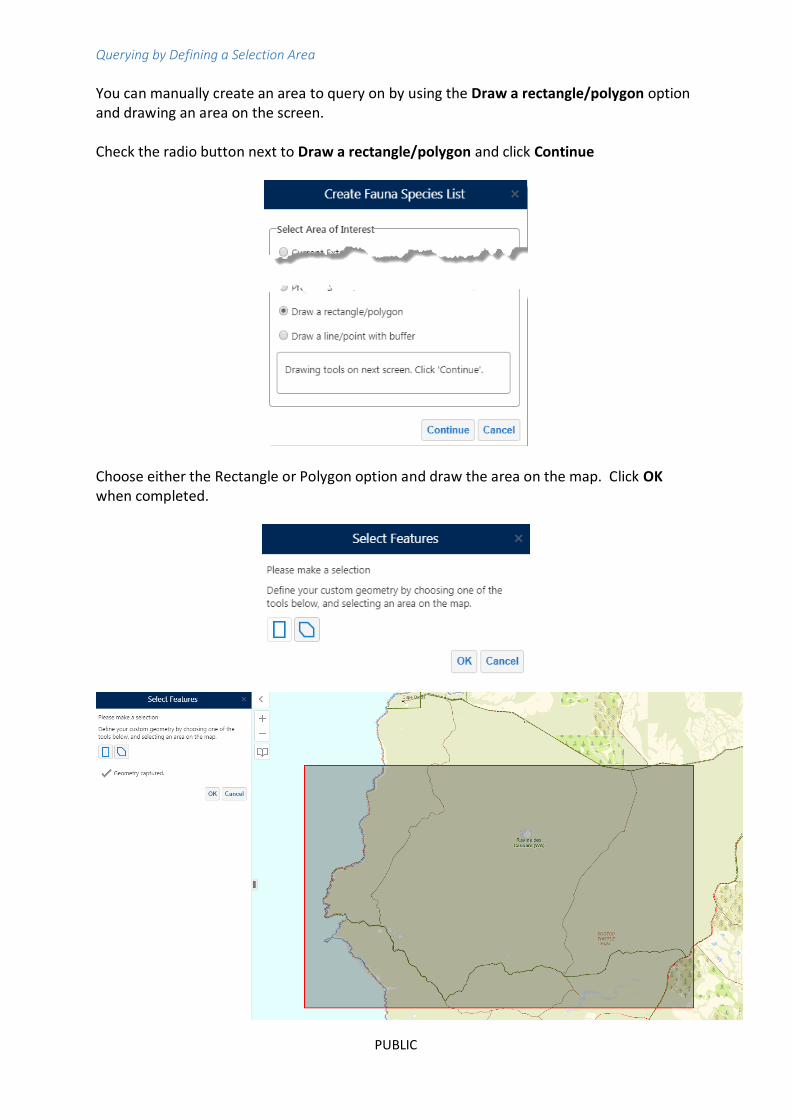
PUBLIC
Querying by Defining a Selection Area
You can manually create an area to query on by using the Draw a rectangle/polygon option and drawing an area on the screen. Check the radio button next to Draw a rectangle/polygon and click Continue
Choose either the Rectangle or Polygon option and draw the area on the map. Click OK when completed.

PUBLIC
Choose the report type to generate, and click Continue
1. Hyperlink to open the generated report 2. Opens BDBSA Supertable overview document 3. Link to Creative Commons description 4. Click to create another report 5. Click to finish and close dialog box
Querying Using a Buffered Line or Point
You can query on a buffered line or point by using the Draw line/point with buffer option and drawing an area on the screen. Check the radio button next Draw line/point with buffer and click Continue

PUBLIC
Draw the line or point(s) on the map and click OK
Enter the desired buffer distance, in metres, and click OK

PUBLIC
Choose the report type to generate, and click Continue
1. Hyperlink to open the generated report 2. Opens BDBSA Supertable overview document 3. Link to Creative Commons description 4. Click to create another report 5. Click to finish and close dialog box
Map a Species
The Map a Species tool displays the distribution of a selected species or genus in South Australia from the Fauna Supertable (BDBSA) layer. The selected species or genus is displayed for the whole state. If user wants to download supertable records for the selected species/genus then an area of interest needs to be selected. Record details can be returned from a left mouse click by clicking the ‘Record Identify’ button which turns on the Fauna Supertable layer and zooms to the layer’s visible scale. You can search on Common Name OR Species Name either by Keyword OR selecting from a species list.

PUBLIC
Using the Keyword Search, enter part of the species name and click Continue
Select the desired species from the list and click OK
The distribution of the selected species is then displayed on the map as red dots

PUBLIC
To export the records to a report, click the Export Results option, and use the Select Area of Interest options to define the desired area.
1. Hyperlink to open the generated report 2. Opens BDBSA Supertable overview document 3. Link to Creative Commons description 4. Click to create another report 5. Click to finish and close dialog box

PUBLIC
Record Identification When you select the Record Identify button the map will zoom to the minimum required scale and activate the Fauna Supertable Layer. Left Click on a location to return the results.
Note: The minimum scale level for identify to work is 1:288,895 (or a smaller number)
Regional Assessments
The Show Species by Subregion Tool shows where a Fauna species has a conservation rating at subregional level in South Australia.
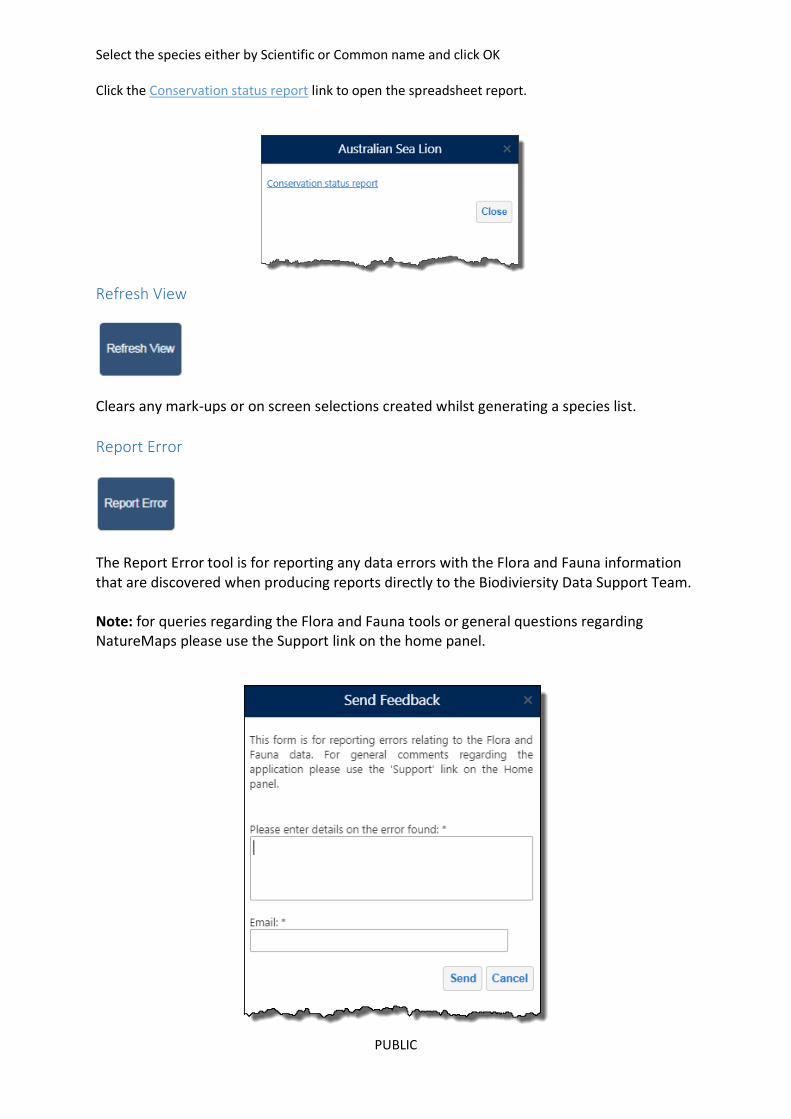
PUBLIC
Select the species either by Scientific or Common name and click OK Click the Conservation status report link to open the spreadsheet report.
Refresh View
Clears any mark-ups or on screen selections created whilst generating a species list.
Report Error
The Report Error tool is for reporting any data errors with the Flora and Fauna information that are discovered when producing reports directly to the Biodiviersity Data Support Team. Note: for queries regarding the Flora and Fauna tools or general questions regarding NatureMaps please use the Support link on the home panel.

PUBLIC