Nature Art Projects - Williams College
20
Nature Art Projects The following 14 projects were compiled by students at Williams College through Lehman Community Engagement. These art projects use materials that can be found outside, like pinecones, sticks, or leaves, and other art supplies that are commonly found in homes. The goals of these art projects are to motivate children to be outside, as they have been spending a lot of time on a computer for school, and to encourage children to spend more time on art! We hope you enjoy these projects! Project Page 1. Pinecone Owl 1 2. Colorful Nature Weave 2 3. Dried Leaf & Flower Animals 3 4. Fairy House 4 5. Fairy Wands 5 6. Grass Heads 7 7. Make Your Own Shadow Tracing Drawing 11 8. Log Cabin 12 9. Nature Name Collage 14 10. Pet Rock Family 15 11. Nature Character 16 12. Paper Bag Jellyfish 17 13. Stick Star Garden Mobile 18 14. Sunflowers 19
-
Upload
khangminh22 -
Category
Documents
-
view
1 -
download
0
Transcript of Nature Art Projects - Williams College

Nature Art ProjectsThe following 14 projects were compiled by students at Williams College through
Lehman Community Engagement. These art projects use materials that can be foundoutside, like pinecones, sticks, or leaves, and other art supplies that are commonly
found in homes. The goals of these art projects are to motivate children to be outside,as they have been spending a lot of time on a computer for school, and to encourage
children to spend more time on art! We hope you enjoy these projects!
Project Page1. Pinecone Owl 12. Colorful Nature Weave 23. Dried Leaf & Flower Animals 34. Fairy House 45. Fairy Wands 56. Grass Heads 77. Make Your Own Shadow Tracing Drawing 118. Log Cabin 129. Nature Name Collage 1410. Pet Rock Family 1511. Nature Character 1612. Paper Bag Jellyfish 1713. Stick Star Garden Mobile 1814. Sunflowers 19

Pinecone Owl
Materials:
1 pinecone 2 acorn caps 2 small, colorful leaves 2 googly eyes 1 piece of orange craft foam
or paper
Instructions:
1. Go outside and find one pinecone, two acorn caps, and two small, colorful leaves.
2. Glue one googly eye inside of each acorn cap. Option: Instead of glueing googly eyes to the acorn caps, draw eyes onto the acorn caps with a marker!
3. Glue each acorn cap onto the top of the pinecone as eyes. 4. Glue each leaf on opposite sides of the pinecone as wings. 5. Cut out a small triangle out of orange craft foam (or paper) and glue
it beneath the eyes. 6. Cut out two foot shapes out of orange craft foam (or paper) and
glue them on the bottom of the pinecone as feet.
1

Colorful Nature WeaveMaterials:
● Piece of cardboard● Scissors● Yarn or string● Tape● Blades of grass, flowers, or leaves
Instructions:
1. Cut a piece of cardboard into a rectangle thatis a little bit bigger than the size of an indexcard to make a loom.
2. Cut slits along each end, ½ inch long and ½inch apart.
3. Wind your yarn or string around the cardboard loom, fitting it into the slits you justmade. Place tape on the back of the loom where the string starts and where itends.
4. Go outside and collect items to weave—anything that can fit onyour cardboard loom! Items may include small flowers, bladesof grass, pea pods, or leaves.
5. Starting on the left side of your loom, weave the nature itemover and under the yarn until it reaches the other side of therectangle. Repeat this for as many nature items as you like.
From diyThought.com
2

Dried Leaf & Flower Animals
Materials:-Paper-Glue-Heavy books (or anything that can be used as a weight)-An assortment of flowers and leaves you find outside!
Instructions:1. Go outside and collect many different leaves and flowers!2. Place the flowers inside a heavy book (like a dictionary), and place more heavy
books or weights on top. This will dry out the leaves and flowers and help themretain their color!
3. After a week, open up the books and take out the leaves. They should be driednow! (if they are not fully dried out, you can leave them in the books for longer)
4. Think of an animal you want to create. Glue the leaves and flowers onto yourpaper in the shape of an animal.
a. For example, leaves can be great ears and wings and flowers can begreat heads. Use your imagination!
3

Fairy House
A fairy house is a small, partly concealed house - sometimes built next to a stump, tree, or bush - that is made out of natural materials like twigs, leaves, and acorns. It is a place for fairies and
other woodland creatures to live.
Materials : Any leaves, twigs, acorns, or other natural materials you find!
Instructions :
1. Find a place to build your fairy house. This could be next to a stump, tree, bush and could be behind your house, in a field, in the woods, or anywhere else!
2. Next, collect a bunch of materials to build your house. This includes leaves, twigs, acorns, bark, pinecones, and more!
3. Build your house. Let your imagination lead the way.
To read the Fairy House books by Tracy Kane, watch read-alongs by Tracy Kane, find activities related to fairy houses (word searches and coloring pages), see pictures of other fairy houses, and learn more, visit the Fairy House website here or by scanning the QR code below!
The pictures on this instruction sheet come from fairyhouses.com
4

Fairy Wands
Materials:
❖ Herbs from a garden❖ Sticks❖ Rubber bands❖ Ribbon❖ Burlap❖ Long fabric scraps cut into 3 or 4-foot lengths❖ Glue
5

Instructions
1. Wrap a rubber band around the top of your stick.2. Place a stem of herbs under the rubber band and wrap the herb around
the stick.3. Wrap a ribbon around the stick covering the herbs. When you get to the
bottom of the stick tie a knot. Add a dab of glue to secure the knot andprevent it from unraveling.
4. If desired add beads onto the loose ends of ribbon, knot the ribbonaround a bead or add glue at the end, and trim ribbon ends as necessary.Tip: Wrap the end of the ribbon with a piece of clear tape so that youcan thread it with beads more easily.
6
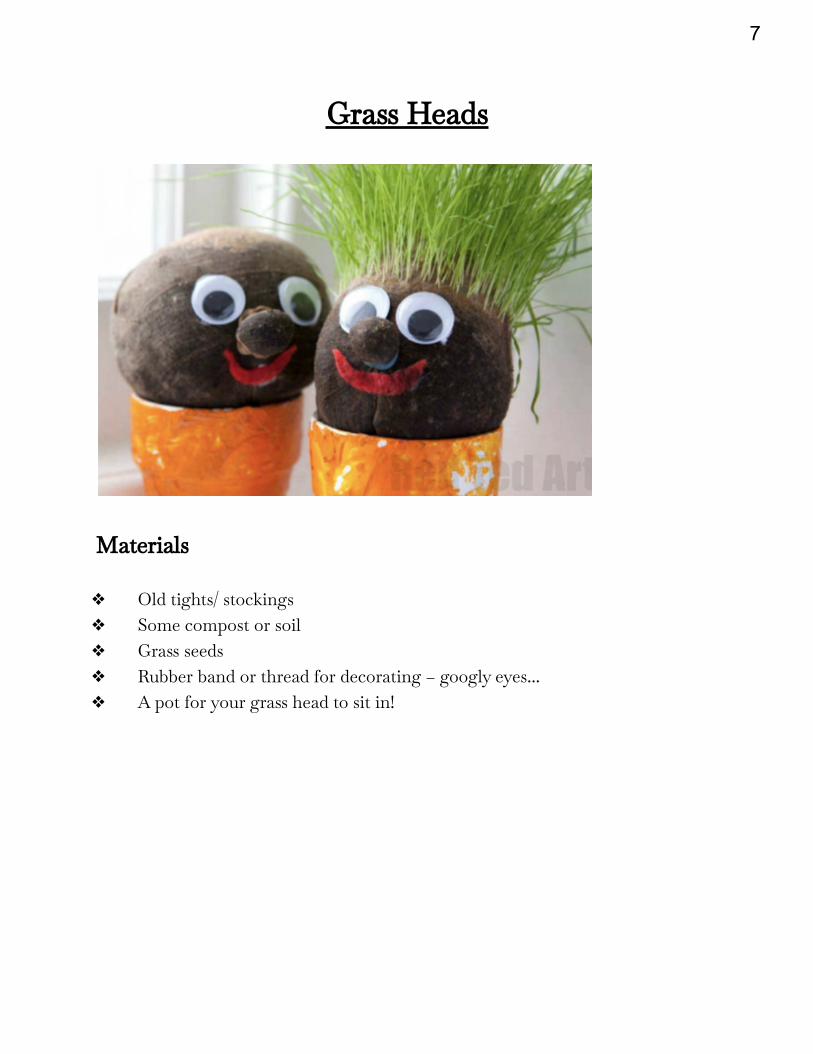
Grass Heads
Materials
❖ Old tights/ stockings❖ Some compost or soil❖ Grass seeds❖ Rubber band or thread for decorating – googly eyes...❖ A pot for your grass head to sit in!
7
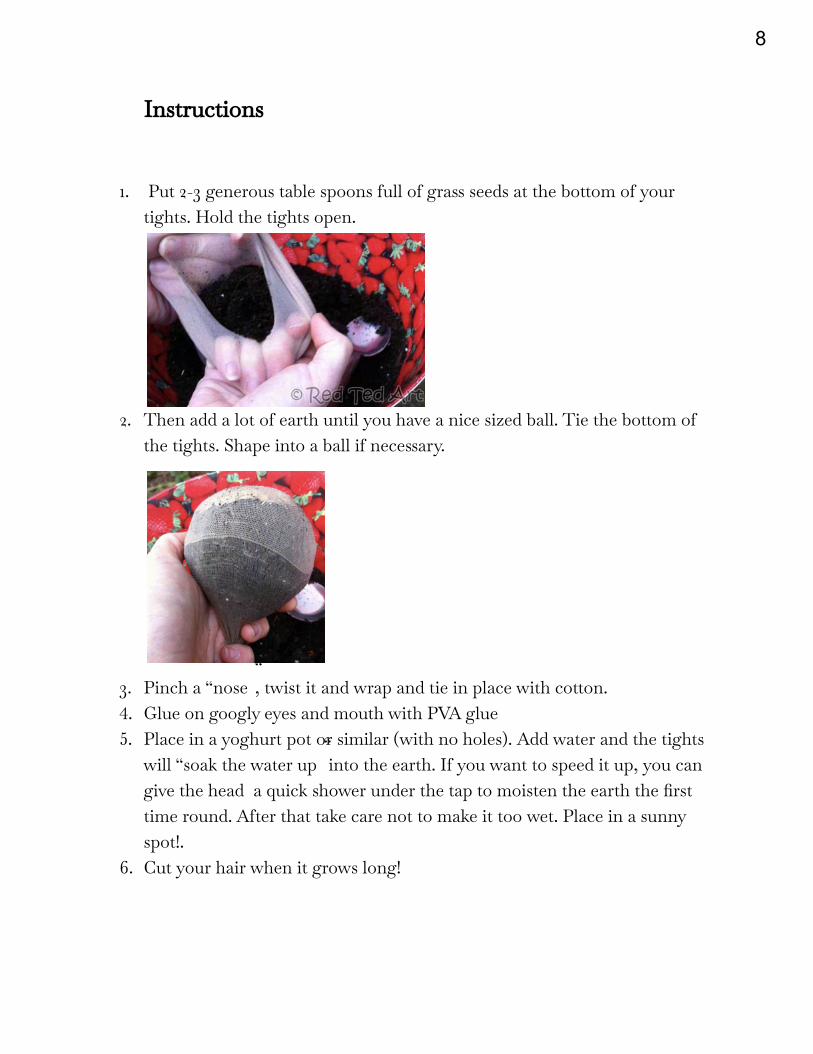
Instructions
1. Put 2-3 generous table spoons full of grass seeds at the bottom of yourtights. Hold the tights open.
2. Then add a lot of earth until you have a nice sized ball. Tie the bottom ofthe tights. Shape into a ball if necessary.
3. Pinch a “nose”, twist it and wrap and tie in place with cotton.4. Glue on googly eyes and mouth with PVA glue5. Place in a yoghurt pot or similar (with no holes). Add water and the tights
will “soak the water up” into the earth. If you want to speed it up, you cangive the head a quick shower under the tap to moisten the earth the firsttime round. After that take care not to make it too wet. Place in a sunnyspot!.
6. Cut your hair when it grows long!
8

9

10

Make Your Own Shadow Tracing Drawing
Materials:● Paper● A writing utensil● Things that cast shadows● The sun● Something to color with (Optional)
Step 1: Go outside on a sunny day and find things that will cast interesting shadows. Examples: pinecones, sticks, leaves, rocks, pine needles, flowers, etc.
Step 2: Set your paper on a flat surface and start experimenting with the shadows you can make on the paper. Try setting your objects directly on the paper, or holding them up above it. How do the shadows change?
Step 3: Trace the shadows on your paper. Don’t worry about being perfectly on the line!
Step 4: Fill the paper with traced shadows until you like what you see. Make as many pages as you want, trying different things as you go.
Step 5: If you want to, take your coloring materials and fill in the shapes you’ve made! What new pictures can you make from the shadows you’ve traced?
11

Log Cabin Instruction Sheet
Materials:
● A lot of wooden sticks, anywhere in length between 6-10 inches.
● Pinecones if available.
● Piece of paper (colorful paper can make it more creative if possible).
● Glue, tape, or any other adhesive.
Instructions:
1) Begin by gathering as many wooden sticks as possible from outside! It might be
helpful to do so with friends, family, or classmates to speed up the collection
process.
2) Gather pinecones as well.
3) Begin by gluing two sticks to the paper next to each other, about 8 inches apart.
For each thing that needs to be glued together, tape or another adhesive can be
used.
4) Place two sticks on top of those. However, they should be in the opposite
direction, to connect the ends of the sticks on the paper and to make a square.
5) Place two sticks in the opposite direction again, connecting the end of the two
sticks below it.
6) Repeat step 5 until the square building is about 6 inches tall.
7) Glue sticks together side by side to make a wall about 8 inches by 10 inches.
8) Repeat step 7 to have 2 walls.
12

9) These walls will be the roof. Glue them together (the 8 by 8 sides) at an angle to
make a triangle-shaped roof.
10)Glue the roof to the building, completing the house.
11)Apply glue where it is needed to strengthen the building.
12)Glue the pinecones around the house on the paper, to model trees around the
house.
13)You are finished! Add any other nature materials or decorations to make your
house special to you.
13

Nature Name Collage
Materials:❏ 1 Piece of Paper❏ Writing Utensil (pen or
pencil)❏ Anything from outside!
(leaves, grass, petals, etc)❏ Glue or Tape
Instructions:
1. On a piece of paper, write your name in BIG letters across the whole page.
2. Go outside and find as many leaves, petals, blades of grass, etc. as you can find.
3. Using what you wrote before as a guide, glue or tape down what you foundoutside onto the paper in the shape of the letters of your name.
14

Pet Rock Family
Materials:❏ Several Rocks/Pebbles
(as many as you want!)❏ Sharpie Markers/Paint❏ 2 Googly Eyes per Rock
Instructions:
1. Go outside and find a few rocks or pebbles of any size/shape/color.
2. Glue two googly eyes onto each rock.(Option: Instead of gluing googly eyes to the rocks, draw or paint eyes onto therocks!)
3. Decorate each rock with markers/paint/anything really.(Tip: Give them a nice smile, or stylish outfit, or wild hair — get creative here!)
15

Nature Character
Materials:
● Leaves, acorns, twigs ● Colored pencils/markers/crayons ● Glue ● Cardstock or paper ● Googly eyes (optional)
Instructions:
1. Collect leaves, acorns, twigs, bark, and other materials you find outside! 2. Arrange these materials into a fun character on a piece of paper and then
glue them down. Optional: glue googly eyes onto your creature.
3. Draw a fun scene around your character!
16

Paper Bag Jellyfish
Materials:
• Paper Bag • Markers, Crayons, and/or Paint • Glue • Googly Eyes (Optional) • Scissors
Instructions:
1. Glue googly eyes to the top of the bag (if you do not have googly eyes, you can draw in eyes with a pencil or markers)
2. Color/paint the rest of your paper bag with whichever colors you like 3. Once your colors have dried, cut squiggly lines from the bottom of the bag, to halfway to
the top
17

Stick Star Garden Mobile Grades 4 and 5
Materials: ● 5 small sticks for each star ● Colorful embroidery floss (or
string) ● 4 larger sticks for the top of the
mobile
Instructions: 1. Go outside and gather large and
small sticks. 2. Arrange five small sticks into a
star shape and secure it with embroidery floss. Optional: hot glue the sticks into place.
3. Wrap embroidery floss around the star frame until the star is covered with floss.
4. Repeat steps 2 & 3 until you have the desired number of stars. 5. Arrange the four large sticks into a square shape and use embroidery
floss to secure it. 6. Wrap embroidery floss around the square frame until the square is
covered with floss. 7. Tie the stars to varying lengths of embroidery floss and hang them
from the square frame.
18

Sunflowers
Materials:
• Paper • Pencil • Scissors • Glue • Markers, Crayons, and/or Paint • Bowl or Cup
Instructions: 1. Place your bowl on the center piece of paper, and trace around it to create a circle 2. Cut out the circle, and color it in with your markers, crayons, or paint 3. Cut out flower petals, a stem, and few leaves from your other pieces of paper 4. Color them in using a different color for each part 5. Glue the circle to the center of a blank piece of paper 6. Glue the petals around the circle to create your own flower!
19