MyConnect for Android - Inver Hills Community College
16
1 | Page MyConnect for Android Nov, 2012 Ver 1 AWest
-
Upload
khangminh22 -
Category
Documents
-
view
0 -
download
0
Transcript of MyConnect for Android - Inver Hills Community College
1 | P a g e
MyConnect for Android
Nov, 2012 Ver 1 AWest

2 | P a g e
Introducing MyConnect for Android .......................................................................................................... 3 System Requirements ......................................................................................................................................... 3 Installation and Setup .......................................................................................................................................... 3
Getting Started ......................................................................................................................................... 4 Logging into MyConnect ...................................................................................................................................... 4 Registering a New Account ................................................................................................................................. 4 Activating your Account ....................................................................................................................................... 5
Navigating the App ................................................................................................................................... 6 Swipe through Tabs ............................................................................................................................................. 6 Overflow Menu .................................................................................................................................................... 7 Back Button ......................................................................................................................................................... 7
Adding Institutions .................................................................................................................................... 8 Registering with Restricted Sites ......................................................................................................................... 9
Associating with Others ................................................................................................................................... 9 Subscribing to New Notifications ............................................................................................................ 10
Managing your Subscriptions ............................................................................................................................ 11 Updating your Contact Information ......................................................................................................... 12
Add an Email ..................................................................................................................................................... 13 Add a Phone Number ........................................................................................................................................ 13 Deleting Contact Information ............................................................................................................................. 13
Viewing your Messages ......................................................................................................................... 14 Filtering your Messages .................................................................................................................................... 15
Contacting Client Care ........................................................................................................................... 16
3 | P a g e
Introducing MyConnect for Android
System Requirements
Installation and Setup
View messages and manage subscription details in one single location, where ever you may be.
• Find institutions and register to receive their messages. • Subscribe to notifications that interest you. • Configure how you want to receive your messages. • Add multiple institutions to view all your messages in one location.
To run the MyConnect app for Android, you will need:
• Android Version 2.2 and above. • WiFi or Data connection
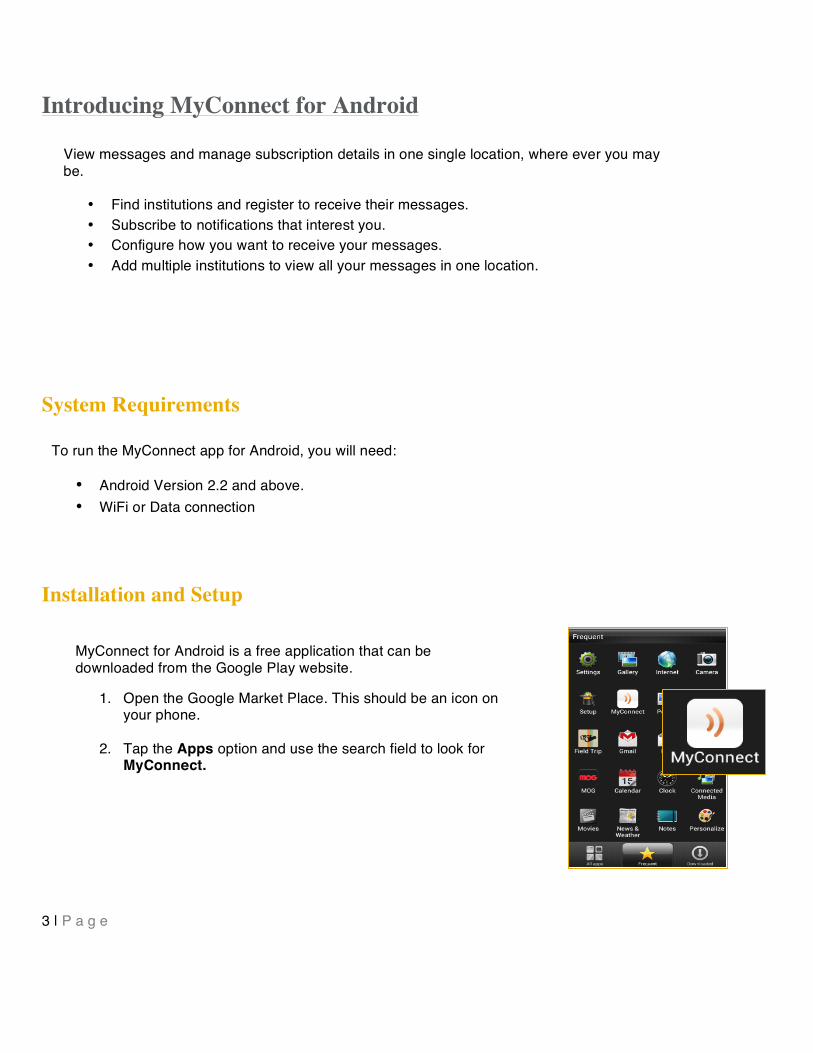
MyConnect for Android is a free application that can be downloaded from the Google Play website.
1. Open the Google Market Place. This should be an icon on your phone.
2. Tap the Apps option and use the search field to look for MyConnect.
3. Locate the Connect for Android app and select Install on
4 | P a g e
Getting Started
Logging into MyConnect
Registering a New Account
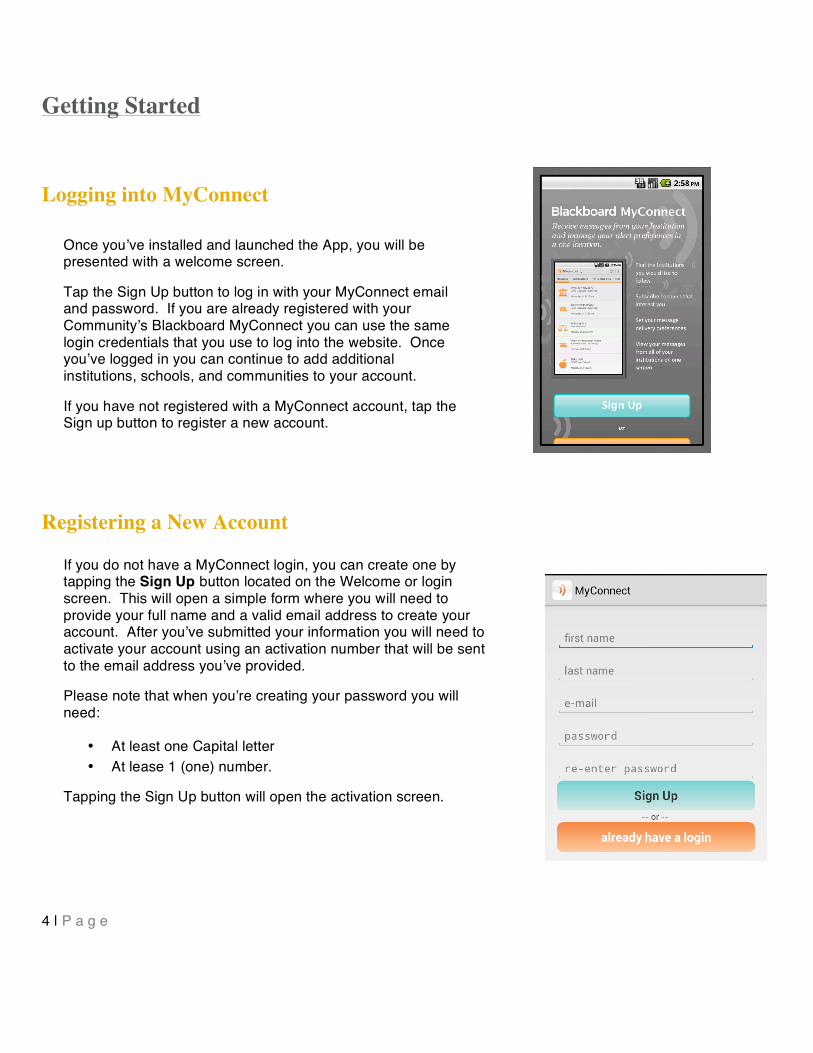
Once you’ve installed and launched the App, you will be presented with a welcome screen.
Tap the Sign Up button to log in with your MyConnect email and password. If you are already registered with your Community’s Blackboard MyConnect you can use the same login credentials that you use to log into the website. Once you’ve logged in you can continue to add additional institutions, schools, and communities to your account.
If you have not registered with a MyConnect account, tap the Sign up button to register a new account.
If you do not have a MyConnect login, you can create one by tapping the Sign Up button located on the Welcome or login screen. This will open a simple form where you will need to provide your full name and a valid email address to create your account. After you’ve submitted your information you will need to activate your account using an activation number that will be sent to the email address you’ve provided.
Please note that when you’re creating your password you will need:
• At least one Capital letter • At lease 1 (one) number.
Tapping the Sign Up button will open the activation screen.
5 | P a g e
Activating your Account
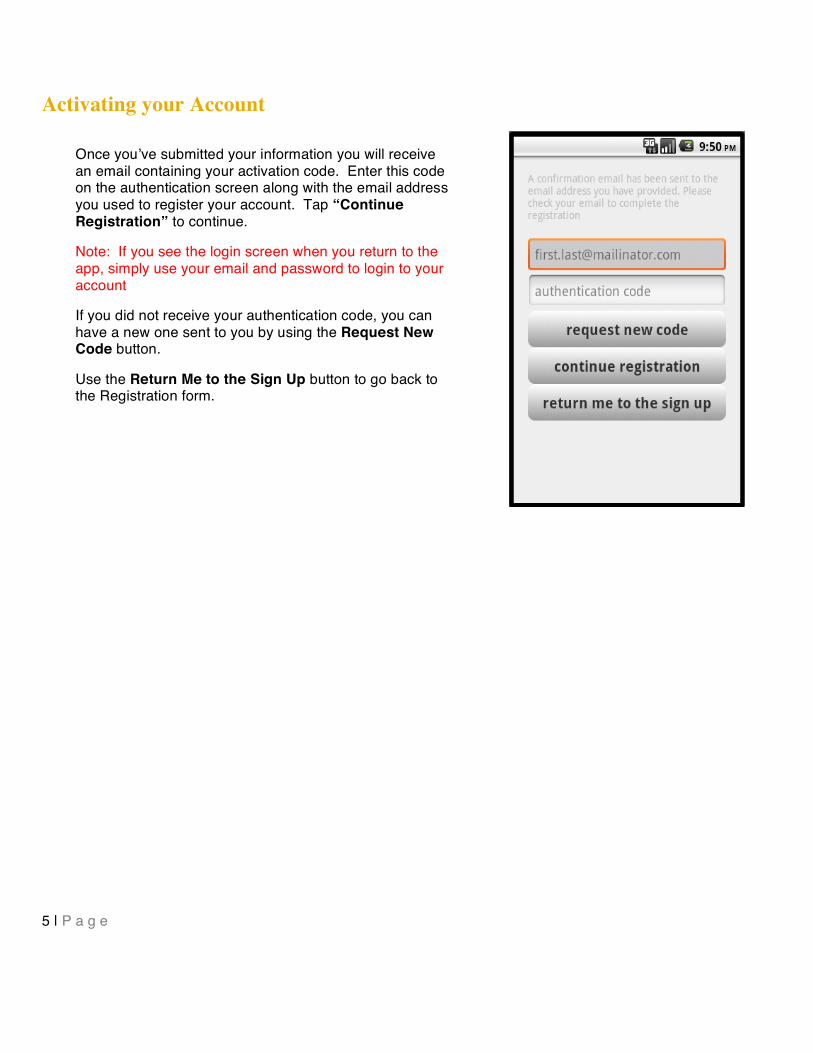
Once you’ve submitted your information you will receive an email containing your activation code. Enter this code on the authentication screen along with the email address you used to register your account. Tap “Continue Registration” to continue.
Note: If you see the login screen when you return to the app, simply use your email and password to login to your account
If you did not receive your authentication code, you can have a new one sent to you by using the Request New Code button.
Use the Return Me to the Sign Up button to go back to the Registration form.
6 | P a g e
Navigating the App
Swipe through Tabs
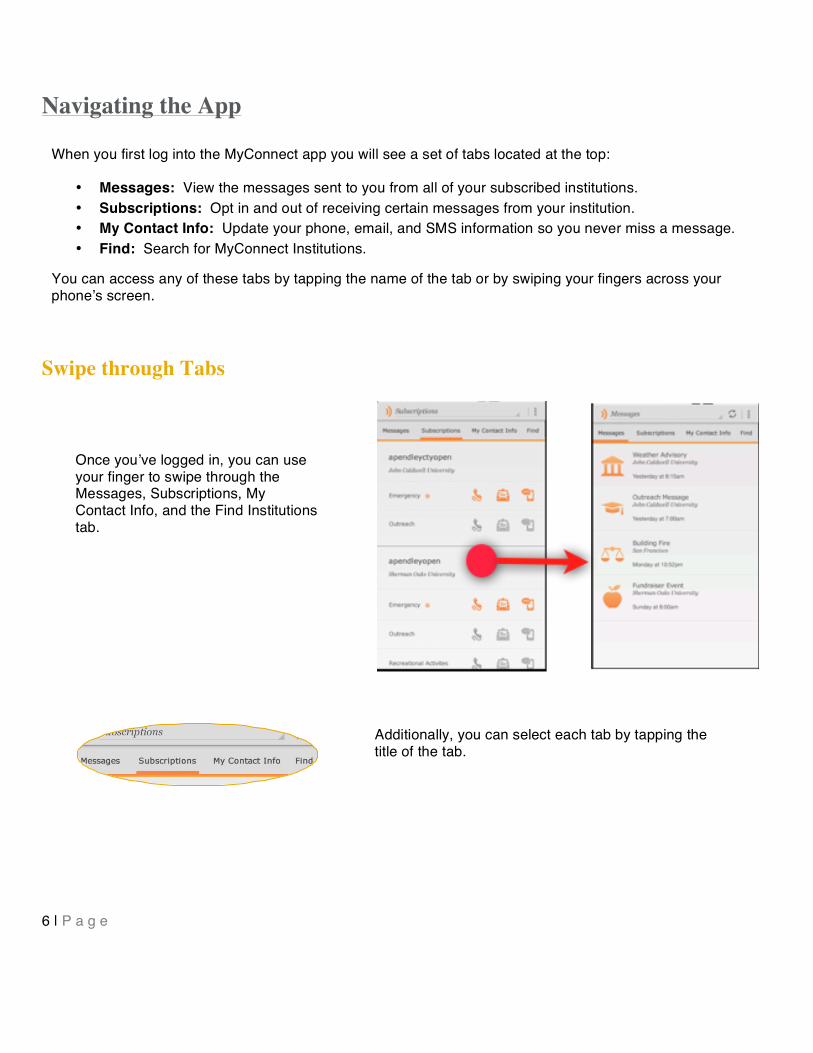
When you first log into the MyConnect app you will see a set of tabs located at the top:
• Messages: View the messages sent to you from all of your subscribed institutions. • Subscriptions: Opt in and out of receiving certain messages from your institution. • My Contact Info: Update your phone, email, and SMS information so you never miss a message. • Find: Search for MyConnect Institutions.
You can access any of these tabs by tapping the name of the tab or by swiping your fingers across your phone’s screen.
Once you’ve logged in, you can use your finger to swipe through the Messages, Subscriptions, My Contact Info, and the Find Institutions tab.
Additionally, you can select each tab by tapping the title of the tab.

7 | P a g e
Overflow Menu
Back Button
The Overflow button is a fixed button that can be found on the bottom of all Android devices. This button will open a set of options that will allow you to change your log in password, adjust your Notification Settings, tour the app, and view your linked contacts.
You can also use this button to log out of your account.
You can use the physical “Back” button located below the screen of your Android device or use the left arrow icon located in the upper left corner of the screen.
8 | P a g e
Adding Institutions
1
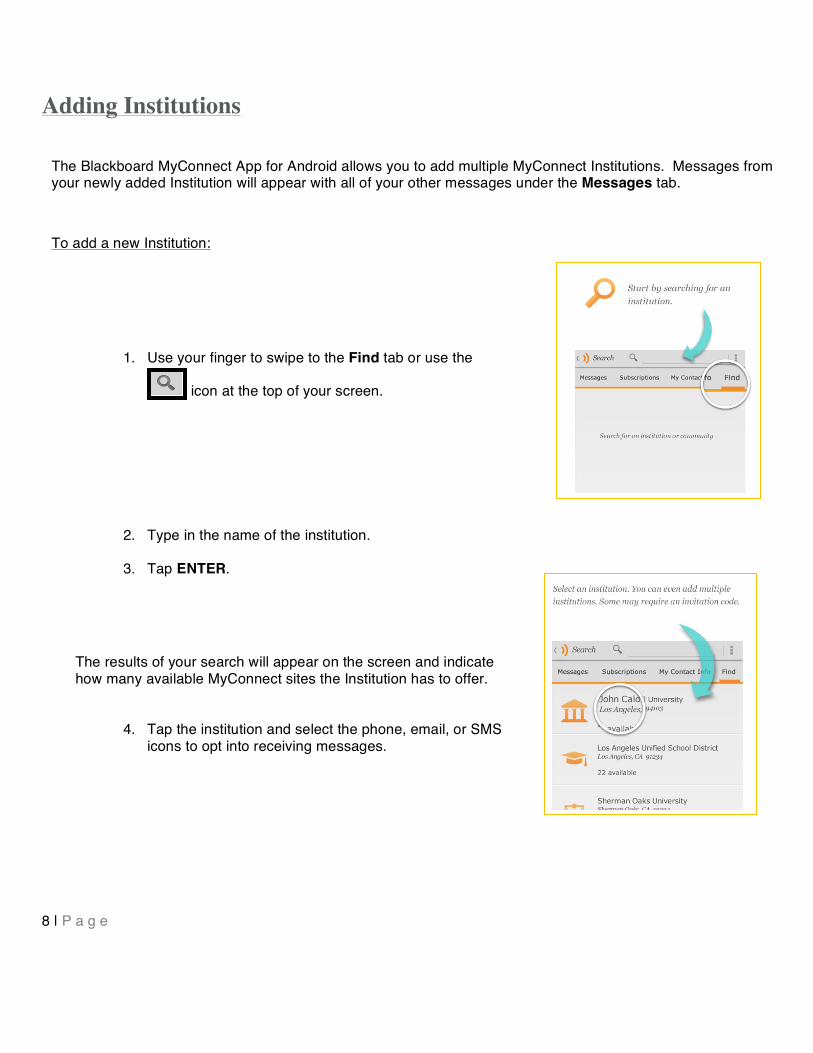
The Blackboard MyConnect App for Android allows you to add multiple MyConnect Institutions. Messages from your newly added Institution will appear with all of your other messages under the Messages tab.
To add a new Institution:
2
1. Use your finger to swipe to the Find tab or use the
icon at the top of your screen.
3
2. Type in the name of the institution.
3. Tap ENTER.
4
The results of your search will appear on the screen and indicate how many available MyConnect sites the Institution has to offer.
4. Tap the institution and select the phone, email, or SMS icons to opt into receiving messages.

9 | P a g e
Registering with Restricted Sites
Associating with Others
1
Many institutions have restricted MyConnect sites that are used for communicating to internal staff and employees as well as adding extra security measures for K-12 institutions. You can see if a MyConnect site is restricted by viewing an Institution’s
site under Find. Restricted Institutions will have an icon located next to the listed site.
Public schools often used restricted MyConnect sites to protect information that is intended to only students.
If you are a parent who would like to subscribe to receive messages for your student on restricted MyConnect site, you will need to provide the email or phone number that is on file for your student at the institution and indicate your relationship (father, mother, or guardian).
2
If you are a member of a restricted MyConnect site, you will need to have an account set up with your Institution and you will need to provide either the email address or phone number that you have on file with your Institution.

10 | P a g e
Subscribing to New Notifications
Every MyConnect School, Government, or University that uses Blackboard Connect sends notifications to their communities in the event of an emergency. Many Institutions will also send general outreach messages to inform you of events and due-dates that are not considered an emergency.
Additionally, Institutions may offer more specific topics, which can range from departments to special events within a School or government, such as sports announcements or election updates.
As a member of a MyConnect community, you can use the subscriptions tab to see the topics each Institution offers their communities. You can subscribe to messages by simply tapping a phone, email, or SMS icon next to a topic that interests you. Once you’ve subscribed, you will receive a phone, email, or SMS messages your institution sends.
NOTE: You cannot not unsubscribe to emergency messages.
To subscribe to a new message:
1. Open the Subscriptions tab at the top of the screen. 2. Tap the gray “Header bar” with your institution’s name. This will open the available subscriptions for
your institution. 3. Select a topic by tapping on the topic’s name. The Set Preferences window will open.
To subscribe to a topic, simply tap the Phone, SMS, or EMAIL icons to subscribe to the messages.

11 | P a g e
Managing your Subscriptions
Once you’ve selected an option, the icon you tapped will turn orange to indicate you are subscribed to the notifications and you will receive those notifications based on the delivery mode you’ve selected (phone, email, or SMS).
1
You can manage you subscriptions under the Subscriptions tab. Simply tap Subscriptions at the top of the screen to view all the message notifications you’re subscribed to.
2
To change how you receive your messages (phone, email, etc) simply select the topic and tap the icon to specify which type of message (phone, email, sms) you would like to receive.
NOTE: Emergency notifications cannot be edited or deleted.

12 | P a g e
Updating your Contact Information
1
Use the CONTACT INFORMATION tab to add or change your email address and phone number. The information you add to your MyConnect app will be stored with your institution and will be used to send you notifications.
2
To change your contact information
1. Open the My Contact Info tab located at the top of the screen.
2. Tap on the email or phone number you want to change.
3. Tap the email or phone field and use the onscreen keyboard to make your changes.
3
If you’re updating your phone number, make sure that you label whether your phone is a work, mobile, or home number. Also, make sure to add an extension (if applicable) and specify whether your new number can receive voice mails, text messages, and TTY enabled messages by using the available checkboxes on the screen.

13 | P a g e
Add an Email
Add a Phone Number
Deleting Contact Information
1. Open the My Contact Info tab located at the top of the screen.
2. Click the button located in the upper right corner of the screen.
3. Type in your email in the given field.
4. Click OK.
1. Tap the button located in the upper right corner of the screen.
2. Provide your phone number, extension in the given fields.
3. Tap HOME and select from the popup list to indicate whether your phone is a home, work, or mobile number.
4. Tap the USA option to select the country or region that you reside in.
5. Use the checkboxes to specify whether your phone can receive voice, text, or TTY messages.
In the event you need to remove your contact information (such as deleting an old phone number) you can do so on the My Contact Info tab.
Tap the phone number you want to remove to open the Edit Phone Number screen (see image above). Tap Remove and click OK on the popup notice to confirm the deletion.

14 | P a g e
Viewing your Messages
The Messages tab is where you can view the messages that have been sent to you from your subscribed institutions. These messages will appear with the most recent message at the top.
1
Use your finger to scroll through the list of messages that have been sent to you. To view the details of the message, simply tap the message to open the Message Details screen.
Notice that the Details screen also includes “Phone, Email, or SMS.” This corresponds with the type of message that has been sent to you. For example, if you only see a Phone entry on a Message Details page, the message you’ve received was sent as a voice message to your phone number.
There can be multiple modes for each message.
2
To view the message, simply tap on the phone, email, or SMS entry and you will see the text version of the message.

15 | P a g e
Filtering your Messages
When you view the Messages tab you will see all the messages that have been sent to you from all of your subscribed institutions.
You can filter your messages by Institution using the Navigation Menu located at the top of the screen.
Simply tap the down arrow next to “Messages” (located in the upper left corner of the screen) and select one of your subscribed Institutions in the list to view all the messages that Institution has sent you.

16 | P a g e
Contacting Client Care
If you have any questions regarding the information in this manual, you can contact us 24 hours a day, 7 days a week. Also check out our new support website Behind the Blackboard, where you can find more information about Connect’s special features as well as share ideas with other schools and institutions.
Phone Support: 1-866-360-2155
Email Support: [email protected]