
Introduction to Mobile Application Development, Android Overview
Upload
khangminh22Category
view
0download
0
ANDROID DEVELOPMENT
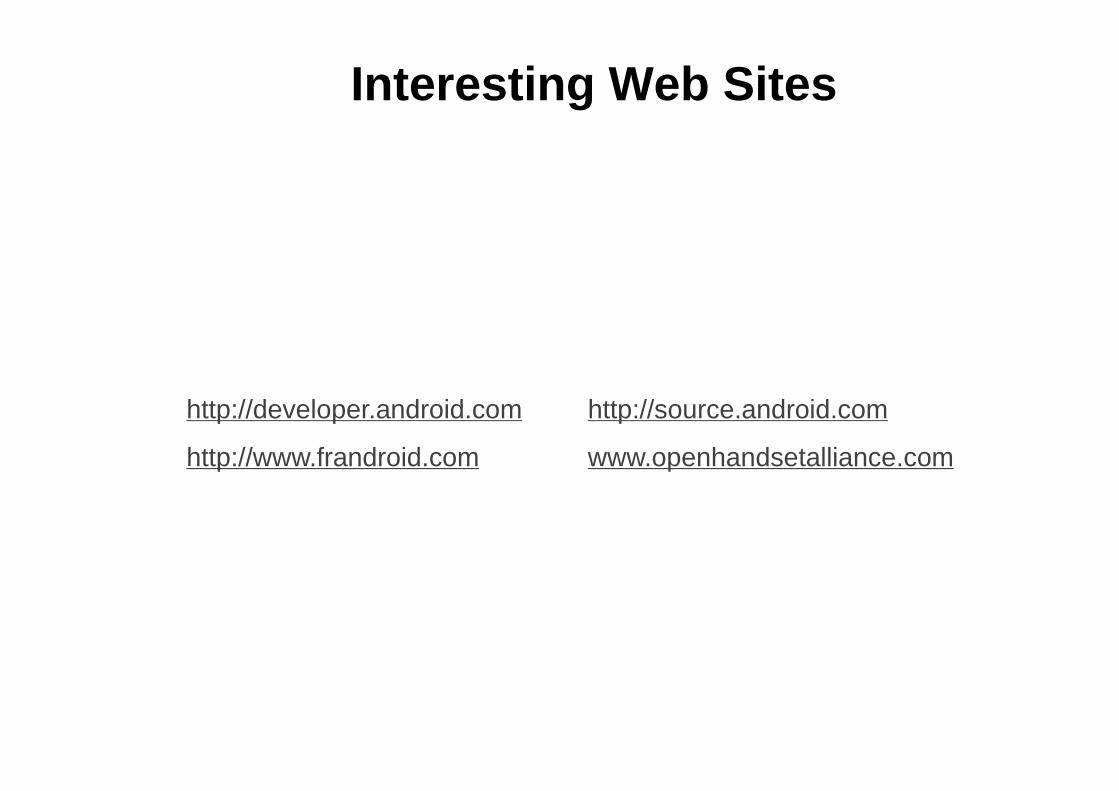
Interesting Web Sites
http://developer.android.com http://source.android.comhttp://developer.android.com
http://www.frandroid.com
http://source.android.com
www.openhandsetalliance.com
Discover tools
Preparation
What will you use?

Preview
� Android SDK
� Eclipse
� ADT Plug-in for Eclipse
These are the chapters that we will approach :
Discover tools

Android SDK
� Android Software Development Kit
� Available on Windows, Mac OS X and Linux
� Used in order to develop Android Application
� Contains the emulator, APIs, tools and more
Discover tools
� Provided by Google

Eclipse
� Multi-language software development environment
� With an extensible plug-in system
� Written in Java
� Free and Open Source
Discover tools
� Platform independent
� Supported by the Eclipse Foundation

ADT plug -in for Eclipse
� Android Development Tools
� Plug-in for Eclipse IDE
� Give a powerful, integrated environment to build Android applications
Discover tools
� Extends the capabilities of Eclipse
� Android Project support
� Debug yours applications
� Export them as APKs

Install tools
Preparation
Download and install

Preview
� Android SDK installation
� Eclipse installation
� ADT plug-in installation
� Link ADT plug-in with Android SDK
These are the chapters that we will approach :
Install tools
� Link ADT plug-in with Android SDK
� SDK Platform Components installation

Android SDK installationInstall tools
� Go to http://developer.android.com/sdk/index.html and download the latest SDK for your platform
� Unpack it to a convenient location
� Add <android_sdk_dir>/platform-tools to your system PATH
� For example : /Users/bargenson/Library/android-sdk-mac_x86/platform-toolsmac_x86/platform-tools
� Test your installation by running adb from the command line

Eclipse installationInstall tools
� Download Eclipse at http://www.eclipse.org/downloads/
� Unpack it to a convenient location
� And that’s all, you can now launch the Eclipse binary ☺

ADT plug -in installation� Launch Eclipse
� Go to Help -> Install New Software…
� Enter https://dl-ssl.google.com/android/eclipse/ in the “Work with” field
Install tools
� Select all the � Select all the packages found

ADT plug -in installation� Click Next until you can click Finish
� Eclipse’s going to download and install the plug-in
� When finished, restart Eclipse
� Now, you can see some new Buttons in your toolbar
Install tools

Link ADT plug -in with Android SDK� Go to Eclipse Preferences
� Click in the left panel on Android
� Complete the field “SDK Location ”
Install tools

SDK Platform Components installation
� Go to Window -> Android SDK and AVD Manager
� Select Available Packages on the left hand side
� Expand the Google Android site in the "Site, Packages, and Archives" Tree
Install tools

SDK Platform Components installationInstall tools

SDK Platform Components installation
� Check the following items:
� SDK Platform Android 2.2
� Google APIs by Google Inc.
� Click Install Selected
Install tools
� We're now ready to develop Android applications !

Test
Preparation
Test your installations

Create a Project
� Create a new Android Project named HelloDroid with :
� Android 2.2 selected in Build Target list
� Application name : “Hello Droid !”
� Package name : “com.efrei.hellodroid”
Test
� Activity name : “Main”
� Look at the project contentsHello Droid !

Execute it in an Emulator
� Setup an Android Virtual Device
� Return to Android SDK and AVD Manager
� Select Virtual Devices
� Click New… and fill the form to create the new AVD
Test
� Execute your application in your emulator
� Right click on your project
� Run As…
– Android Application
Hello Droid !

Execute it in an EmulatorTest

Next topics covered
� The Android Platform
� Android Project Tree
� Activities
� User Interface� User Interface
� Intent
� Persistence
� REST Web Services

The Android Platform
Discover what is really Android.

IntroductionThe Android Platform
� Apple transformed the telephone market with the iPhone :
� New Functionalities
� New Uses
� New Opportunities (Application market)
� Difficulties for competitors…� Difficulties for competitors…
� End of 2007 : Open Handset Alliance creation
� Coalition to promote a new OS : Android
� 34 IT companies at the creation
� 79 today

Open Handset AllianceThe Android Platform

PresentationThe Android Platform
� Android Platform Key points :
� Innovative : Integrates all the latest phone technology
� Touchscreen, GPS, Camera, Accelerometer…
� Accessible :
� No need to buy specific Software or Hardware to � No need to buy specific Software or Hardware to develop
� Java is the most widely used language, no need to learn another little used language
� Open :
� Open Source license : everyone can see the sources and working on it

PresentationThe Android Platform
The definition of open according to Android chief Andy Rubin :

PresentationThe Android Platform
� Android is designed for mobile devices in a broad sense :
� Phones
� Tablets
� Televisions
� Headphones� Headphones
� Microwaves
� …
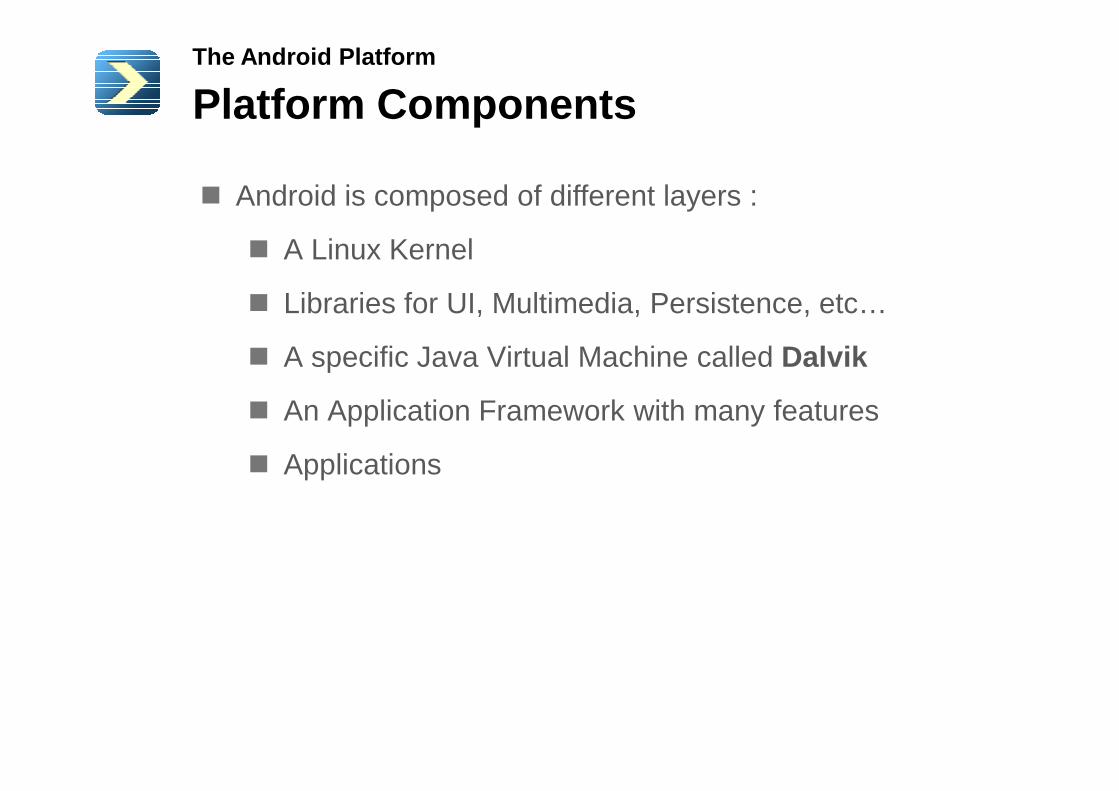
Platform ComponentsThe Android Platform
� Android is composed of different layers :
� A Linux Kernel
� Libraries for UI, Multimedia, Persistence, etc…
� A specific Java Virtual Machine called Dalvik
� An Application Framework with many features� An Application Framework with many features
� Applications

Platform ComponentsThe Android Platform

VersionsThe Android Platform
2008 2009 2011
Septembre 2008
Android 1.0
Février 2009
Android 1.1
Septembre 2009
1.6 : Donut
Mai 2010
2.2 : Froyo
20102008 2009 2011
Avril 2009
1.5 : Cupcake
Janvier 2010
2.1 : Eclair
Décembre 2010
2.3 : Gingerbread
2010

VersionsThe Android Platform
2011
February 2011
3.0 : Honeycomb
July 2011
Android 3.2
20122011
May 2011
Android 3.1
Novembre 2011
4.0 : Ice Cream Sandwich
2012
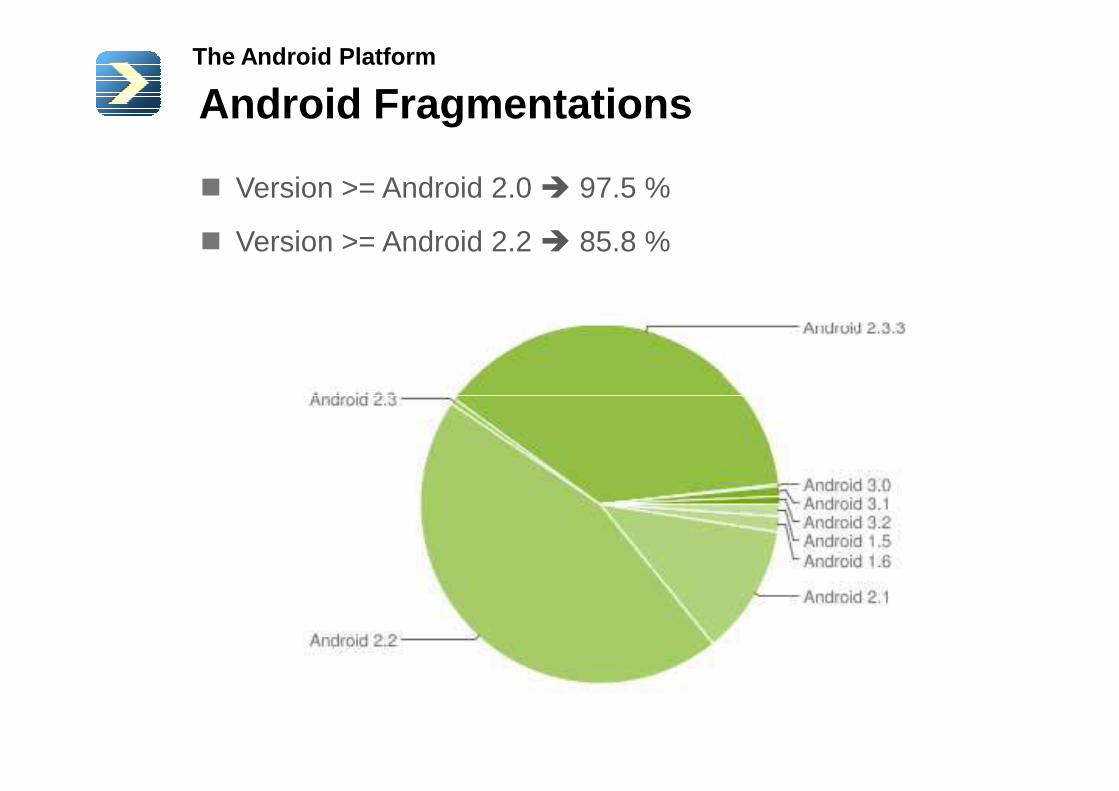
Android FragmentationsThe Android Platform
� Version >= Android 2.0 � 97.5 %
� Version >= Android 2.2 � 85.8 %

Android and CompetitorsThe Android Platform
� Today, Android is the No. 1 Worldwide Mobile Operating System !

Android Project Tree

Overview
� When ADT create a project, it generate numbers of folders and files :
� src folder
� res folder
� gen folder
Android Project Tree
� gen folder
� assets folder
� AndroidManifest.xml file
� default.properties

Folder : src
� The same folder as other Java Project
� Contain packages and Java code files
Android Project Tree

Folder : res
� Three main types :
� drawable : images and animations
� layout : XML layout files used to
� Contain all the resources needed by the application
Android Project Tree
� layout : XML layout files used to construct user interfaces
� values : value type resources such as string and integer constants

Folder : gen� Contain Java files auto-generated by ADT
� Contain the class R :
� Special static class
� Reference the data contained in resource files
� Contain one static inner class by resource type
Android Project Tree
public final class R{
public static final class drawable {public static final int icon=0x7f020000;
}public static final class layout {
public static final int main=0x7f030000;}... //code omitted
}

Folder : assets
� Contain asset files
� Quite similar to resources
� Accessed in a classic file manipulation style
� With stream of bytes manipulation
� Need to use AssertManager class to open them
Android Project Tree
� Need to use AssertManager class to open them
� Not for an usage as extensive as resources

File: AndroidManifest.xml
� Mandatory file in every Android projects
� Contain information needed by Android to run the application
� Package name of the application
Android Project Tree
� List of Activities, Services, Broadcast Receivers, …
� Permissions needed by the application
� etc…
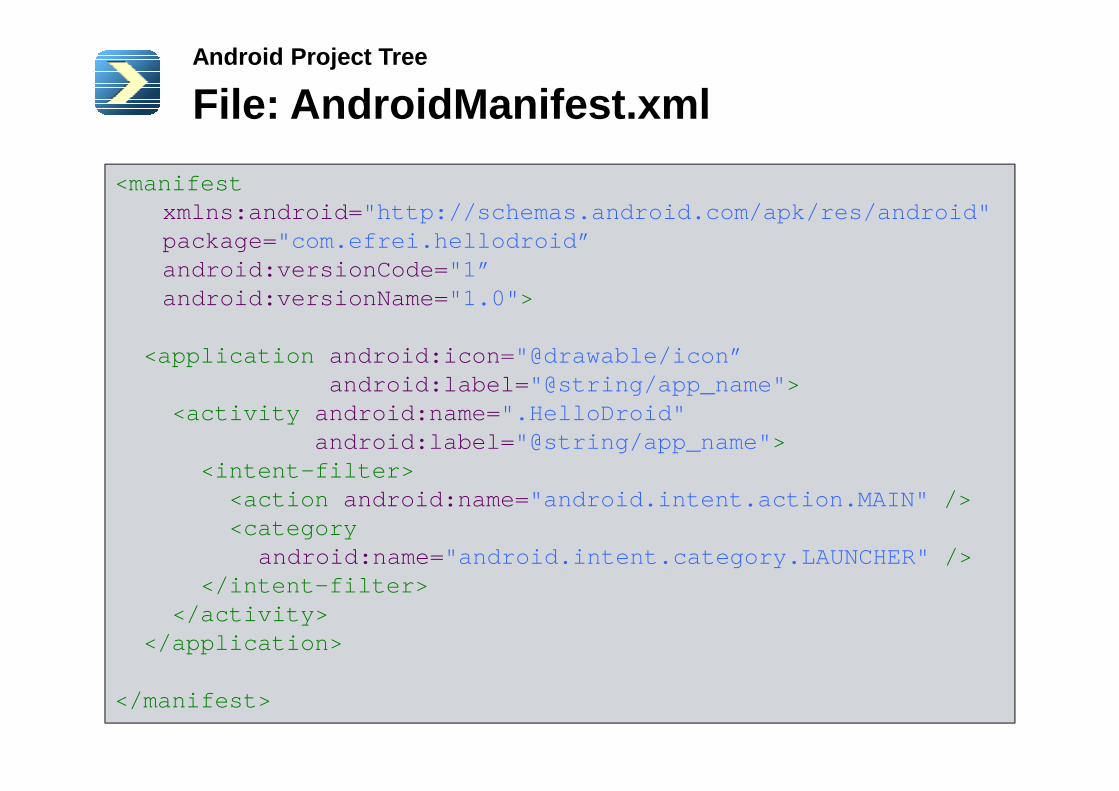
File: AndroidManifest.xml
<manifest xmlns:android= "http://schemas.android.com/apk/res/android"package= "com.efrei.hellodroid”android:versionCode= "1”android:versionName= "1.0" >
<application android:icon= "@drawable/icon”android:labe l ="@string/ app_name" >
Android Project Tree
android:labe l ="@string/ app_name" ><activity android:name= ".HelloDroid"
android:label= "@string/app_name" ><intent-filter>
<action android:name= "android.intent.action.MAIN" /><category
android:name= "android.intent.category.LAUNCHER" /></intent-filter>
</activity></application>
</manifest>

File: default.properties
� Contain all the project settings :
� The build target
� If the project is a library or not
� Library references
� etc…
Android Project Tree
� etc…
� Never edit this file manually :
� Edit this properties by the Properties Project window of Eclipse

Activities
Presentation layer

Preview
� Presentation
� Example
� Life Cycle
This is the contain we'll see :
Activities

Presentation
� An activity is a sort of screen composed of several views and controls :
� For instance an add contact form or a personalized Google Map
� As many activities as application screens
� Presentation layer of an application
Activities
� Presentation layer of an application
Presentation
� Composed of two parts :
� The Activity Logic :
� Define in Java inside a class extending android.app.Activity
Activities
� The User Interface :
� Define either in Java inside the Activity class or inside a XML file (in the folder /res/layout/ )

Example
� Activity class simple example :
Activities
package com.efrei.hellodroid;
import android.app.Activity;import android.os.Bundle;
public class Main extends Activity {
/** Called when the activity is first created. */@Overridepublic void onCreate(Bundle savedInstanceState) {
super .onCreate(savedInstanceState);setContentView(R.layout. main );
}
}

Example
� Layout file simple example :
Activities
<?xml version ="1.0" encoding ="utf-8" ?><LinearLayout
xmlns:android =“ http://schemas.android.com/apk/res/android”android:orientation ="vertical”android:layout_width ="fill_parent”android:layout_height ="fill_parent”>
<TextViewandroid:layout_width ="fill_parent" android:layout_height ="wrap_content" android:text ="@string/hello”/>
</LinearLayout>

Life CycleActivities
� An activity can have three states :
� Active
� The activity is visible and has the user focus
� Paused
� The activity is at least partly visible but doesn’t have the focushave the focus
� Stopped
� The activity is not
visible
� Activity class defines
methods to manage life cycle

Life CycleActivities

Declare an ActivityActivities
� To be usable, an activity must be declared
� Inside the AndroidManifest.xml file :
...<application android:icon= "@drawable/icon”
android:labe l= "@string/app_name" ><activity android:name= ".HelloDroid"
android:label ="@string/ app_name" >android:label ="@string/ app_name" ><intent-filter>
<action android:name= "android.intent.action.MAIN" /><category
android:name= "android.intent.category.LAUNCHER" /></intent-filter>
</activity><activity android:name= ”.GoodByeDroid"
android:label= "@string/app_name" ></activity>
</application>... Activity declarationsActivity declarations
Main Activity declaration

Exercise (1/2)Activities
� Create a new Android Project named ActivityLifeCyclewith :
� Application name : “Activity Life Cycle”
� Package name : “com.efrei.lifecycle”
� Activity name : “ MyActivity ”� Activity name : “ MyActivity ”
� Override the methods below :
� onCreate(Bundle)
� onStart()
� onResume()
� onPause()
� onStop()
� onDestroy()

Exercise (2/2)Activities
� In each method, add a log statement like this :
Where <method name> is the name of the method in which you are.
Log.d( “LifeCycle” , <method name>);
which you are.
� Deploy and run your application
� Look at the Android Logcat
� Play with emulator to see how the activity Life Cycle work.
� Display the DDMS perspective inside Eclipse
� Try to simulate an incoming call or SMS and look how your activity responds
Resources
How to use them.

Preview
� Presentation
� Use Resources
� System Resources
� Simples Values
This is the contain we'll see :
Resources
� Simples Values
� Images

PresentationResources
� Android externalize resources like :
� Images
� Strings
� User Interface description
� …
� Easier to manage and maintain them
� Contained inside the res folder

Use the resourcesResources
� Resources are accessible inside the code thanks to the static class : R
� This class is automatically generated by ADT
� When you add a resource inside the res folder, ADT add a reference to it inside the R class
� The syntax to retrieve a resource reference is :
R. resource_type . resource_name

ExampleResources
public final class R{
public static final class string {public static final int app_name=0x7f020000 ;
}public static final class layout {
public static final int my_screen= 0x7f030000 ;}... //code omitted
// Define the layout of an activity
setContentView(R.layout. my_screen );
// Retrieve the application name
Resources resources = getResources();
String appName = resources.getString(R.string. app_name);
... //code omitted}

Use the resourcesResources
� You can also use resources inside XML resources
� Very much used in layouts
� Syntax :
“@[package_name:] resource_type / resource_identifier ”
� Example :
...<TextView
android:layout_width ="fill_parent" android:layout_height ="wrap_content" android:text ="@string/hello”/>
...

System ResourcesResources
� Android already includes a number of resources
� Predefined Colors
� Predefined Strings
� Predefined Images
� Examples :
String cancel =
...<TextView
android:layout_width ="fill_parent" android:layout_height ="wrap_content”android:textColor ="@android:color/darker_gray"android:text ="@string/hello”/>
...
String cancel =
resources.getString(android.R.string. cancel );

Simple valuesResources
� Simple values are stored in XML files inside /res/valuesfolder
� You can declare
� Strings
� You can use the HTML tags <b>, <i> and <u>
� Colors� Colors
� Accept #RGB, #ARGB, #RRGGBB and #AARRGGBB format
� Dimensions
� In pixels (px), inches (in), millimeters (mm), points (pt), density-independent pixel (dp) or scale-independent pixel (sp)
� Arrays
� Of Integers or Strings.

Simple valuesResources
� Example :
<?xml version ="1.0" encoding ="utf-8" ?><resources>
<color name="Cyan" >#00FFFF</color><string name="first_name" >Brice </string>
<string-array name="my_array" ><item> A string </item><item> Another String </item>
</string-array>
<integer-array name="my_other_array" ><item> 123</item><item> 456</item>
</integer-array>
<dimen name="my_dimension" >4dp</dimen><dimen name="text_size" >4px </dimen>
</resources>

ImagesResources
� Android accept different bitmap format for resources :
� PNG (advised by the documentation)
� JPEG
� GIF (deprecated)
� From Android 1.6, three folders :
� drawable-hdpi : resource for high-resolution screens
� drawable-mdpi : resources for medium-resolution screens
� drawable-ldpi : resources for low-resolution screens

Exercise (1/3)Resources
� Create a new Android Project named GeekQuote with :
� Application name : “Geek Quote”
� Package name : “com.efrei.geekquote”
� Activity name : “QuoteListActivity”
� Create a package “com.efrei.geekquote.model”
� Create a JavaBean class named Quote inside it with :
� A string field named strQuote
� An int field named rating
� A date field named creationDate

Exercise (2/3)Resources
� Define an ArrayList field in your activity :
� It will contain all our quote objects
� Add a String Array inside your strings.xml resource file
� Set a few quotes that we’ll use to initialize our list� Set a few quotes that we’ll use to initialize our list
� Create a method in your activity class :
� void addQuote(String strQuote)
� It must convert the string received in parameter to Quote object and add it to your ArrayList

Exercise (3/3)Resources
� In onCreate(…) method
� Retrieve your string array resource
� Convert its content to Quote object and add them to your list
� Use the addQuote(…) method to do that
� To see if it works you can use :
� The Eclipse Debugger to explore your field content
� Loggers to display it in the LogCat
� Toast class to display it to the screen as a notification popup

User Interfaces
Views, Controls, and Layouts.

Preview
� Presentation
� XML Definition VS Java Definition
� ID Attributes
This is the content we'll see
User Interface
� Layouts
� Views
� List Adapters
� Events

PresentationUser Interface
� A user interface is a set of graphical components like :
� Button
� Text
� Form field
� Component composed of other components…
� This components are called Views
� The last one is a special view
called ViewGroup

PresentationUser Interface
Views
ViewGroups

PresentationUser Interface
� User interfaces can be defined :
� In XML, inside a layout resource file
� Directly in the Activity code
� We’re going to see both� We’re going to see both
XML Definition VS Java DefinitionUser Interface
� Use XML layout to define user interfaces is advised :
� Separate interface structure and interface logic
� Easier to maintain
� But java definition can also be useful :� But java definition can also be useful :
� Adding components dynamically

XML Definition : ExampleUser Interface
<?xml version ="1.0" encoding ="utf-8" ?><LinearLayout
xmlns:android =“ http://schemas.android.com/apk/res/android”android:orientation ="vertical”android:layout_width ="fill_parent”android:layout_height ="fill_parent”>
<TextView<TextViewandroid:layout_width ="wrap_content" android:layout_height ="wrap_content" android:text ="@string/first_name”/>
<EditTextandroid:layout_width ="wrap_content" android:layout_height ="wrap_content" android:id ="@+id/first_name”/>
</LinearLayout> GroupViewGroupView
Views

Java Definition : ExampleUser Interface
public void onCreate(Bundle savedInstanceState) {super .onCreate(savedInstanceState);
LinearLayout layout = new LinearLayout( this );layout.setOrientation(LinearLayout. VERTICAL);layout.setLayoutParams(
new LayoutParams(LayoutParams. FILL_PARENT,
LayoutParams. FILL_PARENT));LayoutParams. FILL_PARENT));
TextView textView = new TextView( this );textView.setText(R.string. first_name );
EditText editText = new EditText( this );
layout.addView(textView);layout.addView(editText);
setContentView(layout);}

ID AttributeUser Interface
� Ids are typically assigned in the layout XML files, and are used to retrieve specific views inside the Activity code.
� You can ask to ADT to generate one with the special syntax :
“@+id/ resource_identifier ”
Instead of :
“@id/ resource_identifier ”

ID AttributeUser Interface
� Example :
<EditTextandroid:layout_width ="wrap_content" android:layout_height ="wrap_content" android:id ="@+id/first_name”/>
EditText txtFirstName = (EditText) findViewById(R.id.first_name);

LayoutsUser Interface
� A layout is a ViewGroup which help us to position our views
� A layout is also a view
� A layout can contain other layouts
� Common layouts provide by the SDK are :
� LinearLayout
� RelativeLayout
� FrameLayout
� TableLayout
� We’re going to see only the first one.

LinearLayoutUser Interface
� A Layout that arranges its children in a single column or a single row.
� This layout is the more use in � This layout is the more use in Android development
� It can almost do everything others can do
� With nesting layout !

LinearLayout : Component SizeUser Interface
� The size of its components can be defined with :
� In XML with layout_width and layout_heightattributes
<TextViewandroid:layout_width ="wrap_content" android:layout_height =”10px"
� In Java with a LayoutParams object
� Their values may be a dimension or one of the special constants :
FILL_PARENT , MATCH_PARENT , WRAP_CONTENT
android:layout_height =”10px" />

� Defined how views on the same row share the layout size
� Useful when you want several views share all the screen
� Example :
LinearLayout : WeightUser Interface
� Example :
<Buttonandroid:layout_width ="wrap_content" android:layout_height =”wrap_content”android:layout_weight =”2”android:layout_text =”weight=2" />
LinearLayout : GravityUser Interface
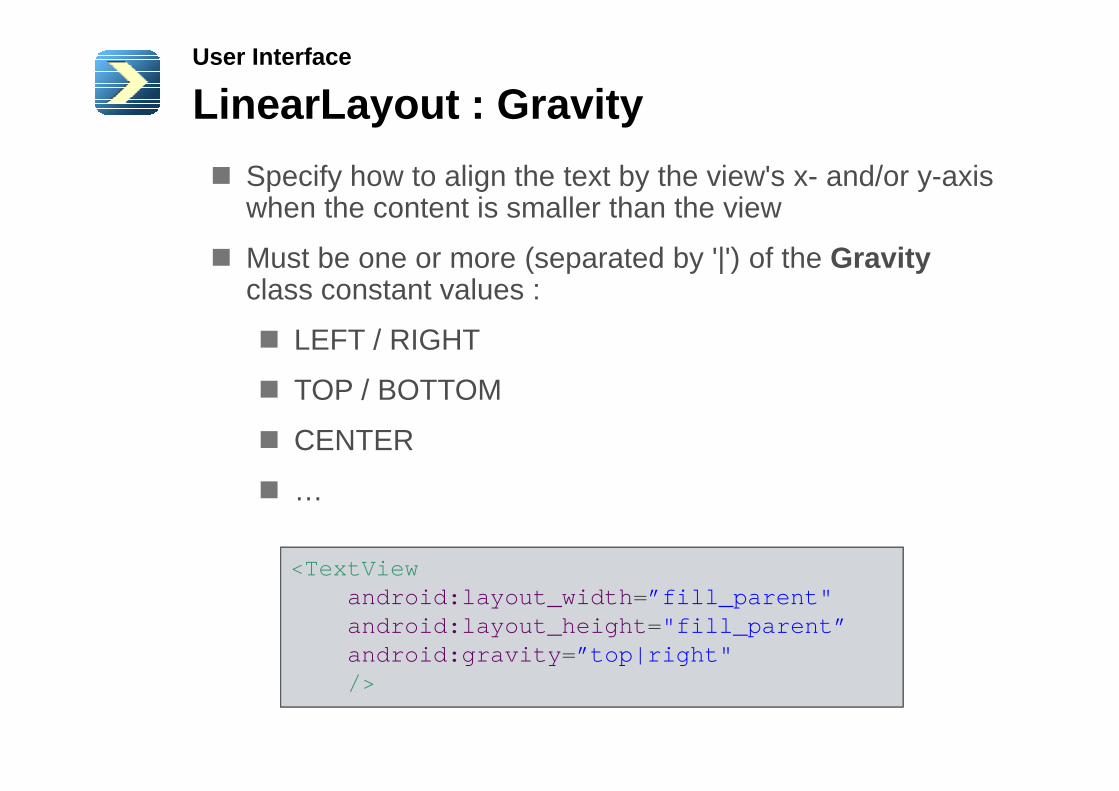
� Specify how to align the text by the view's x- and/or y-axis when the content is smaller than the view
� Must be one or more (separated by '|') of the Gravity class constant values :
� LEFT / RIGHT
� TOP / BOTTOM� TOP / BOTTOM
� CENTER
� …
<TextViewandroid:layout_width =”fill_parent" android:layout_height ="fill_parent”android:gravity =”top|right" />

LinearLayout : PaddingUser Interface
� By default, components are tightened each other
� You can define space between them thanks to padding !
� Padding is defined as space between the edges of the view and the view's content
� Value in pixels
� Five padding attributes exist :
� padding
� paddingLeft
� paddingRight
� paddingTop
� paddingBottom

LinearLayout : PaddingUser Interface
� XML example :
/>
<TextViewandroid:layout_width =”fill_parent" android:layout_height ="fill_parent”android:padding =”20px" />
� Java example :
EditText txtFirstName = ... ;// left, top, right, bottomtxtFirstName.setPadding( 20, 30, 10, 20);

ViewsUser Interface
� Android SDK propose many common components :
� TextView
� EditText
� AutoCompleteTextView
� RadioButton
� CheckBox� CheckBox
� Spinner
� RatingBar
� Button
� …
� We’re going to see them.

TextViewUser Interface
� Displays text to the user
� Can be editable
� But disable by default
<TextViewandroid:layout_width =”fill_parent" android:layout_height ="fill_parent”android:gravity =”top|right" />
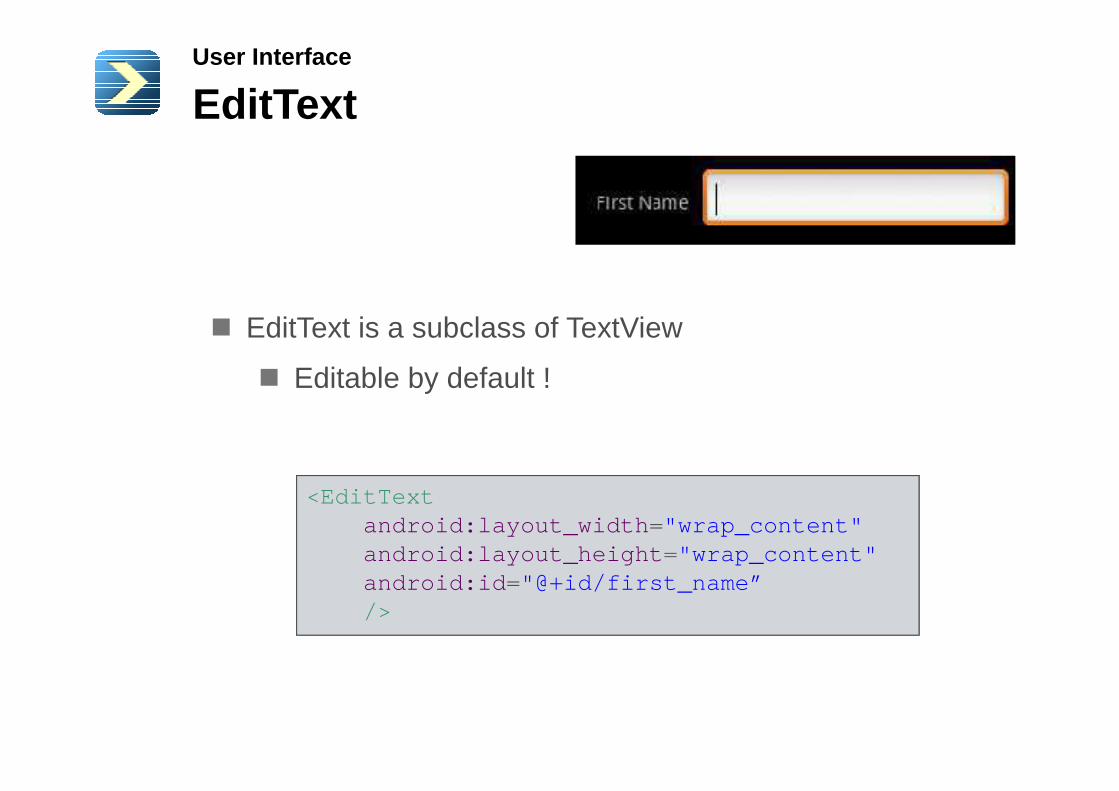
EditTextUser Interface
� EditText is a subclass of TextView
� Editable by default !
<EditTextandroid:layout_width ="wrap_content" android:layout_height ="wrap_content" android:id ="@+id/first_name”/>

CheckBoxUser Interface
<CheckBoxandroid:id ="@+id/checkbox”android:layout_width =" wrap_content ”
� A check box is a two-states button that can be either checked or unchecked
android:layout_width =" wrap_content ”android:layout_height ="wrap_content”android:text ="check it out" />

RadioButtonUser Interface
� A radio button is a two-states button that can be either checked or unchecked
� Contrary to checkbox, only one button by radio group can be checked
<RadioGroupandroid:layout_width ="fill_parent"android:layout_height ="fill_parent"android:id ="@+id/ radio_group "android:id ="@+id/ radio_group ">
<RadioButtonandroid:layout_width ="fill_parent"android:layout_height ="wrap_content"android:text ="Easy"
/>
...
</RadioGroup>

SpinnerUser Interface
<Spinnerandroid:id ="@+id/spinner”android:layout_width ="fill_parent”android:layout_height ="wrap_content”android:prompt ="@string/planet_prompt”/>
� A spinner is the Android version of the combo box

Spinner : AdapterUser Interface
String[] values = { "Easy" , "Medium" , "Hard" };
ListAdapter adapter = new ArrayAdapter <String>( this ,
� To set spinner options, you need to use a ListAdapterobject
new ArrayAdapter <String>( this , android.R.layout. simple_spinner_item ,
values);
adapter.setDropDownViewResource(android.R.layout. simple_spinner_dropdown_item );
Spinner spinner = (Spinner) findViewById(R.id. spinner );spinner.setAdapter(adapter);
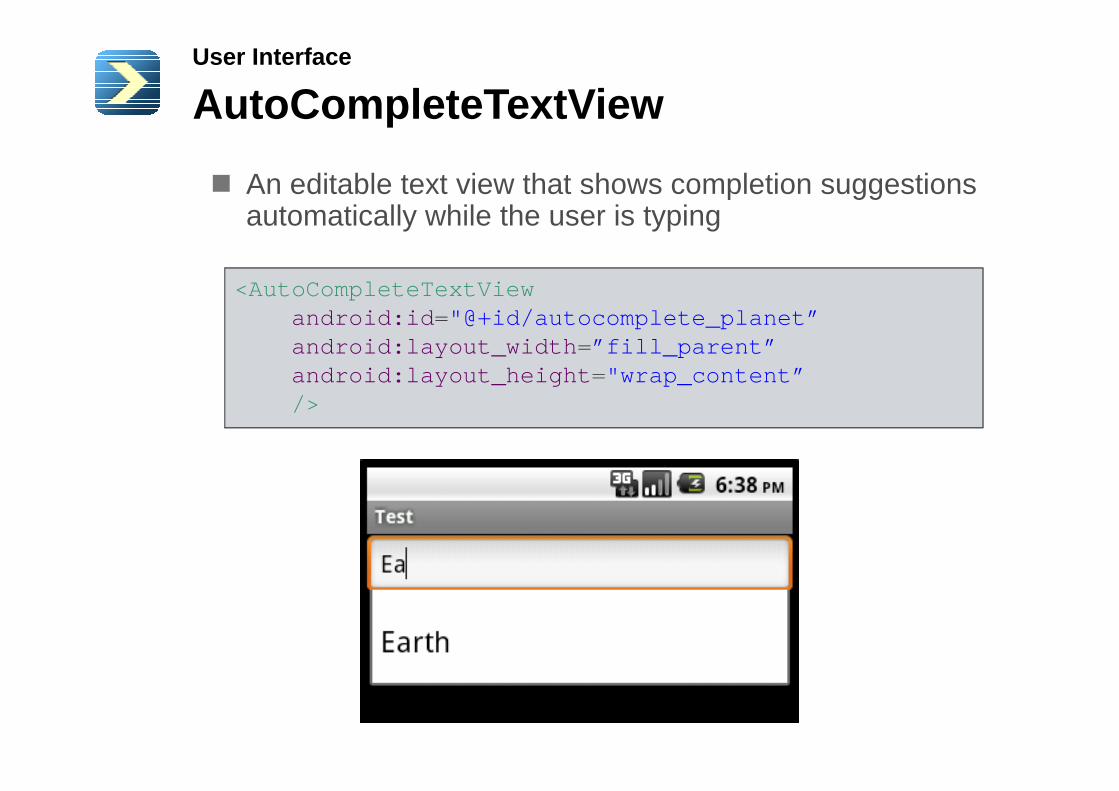
AutoCompleteTextViewUser Interface
� An editable text view that shows completion suggestions automatically while the user is typing
<AutoCompleteTextViewandroid:id ="@+id/autocomplete_planet”android:layout_width =”fill_parent”android:layout_height ="wrap_content” />/>

AutoCompleteTextView : AdapterUser Interface
String[] values = { ”Mercury” , ”Venus” , ”Earth” , ”Mars" };
� To set AutoCompleteTextView options, you need to use a ListAdapter object again
ListAdapter adapter = new ArrayAdapter<String>( this ,
android.R.layout. simple_dropdown_item_1line , values);
AutoCompleteTextView textView = (AutoCompleteTextView)findViewById(R.id. autocomplete_planet );
textView.setAdapter(adapter);
RatingBarUser Interface
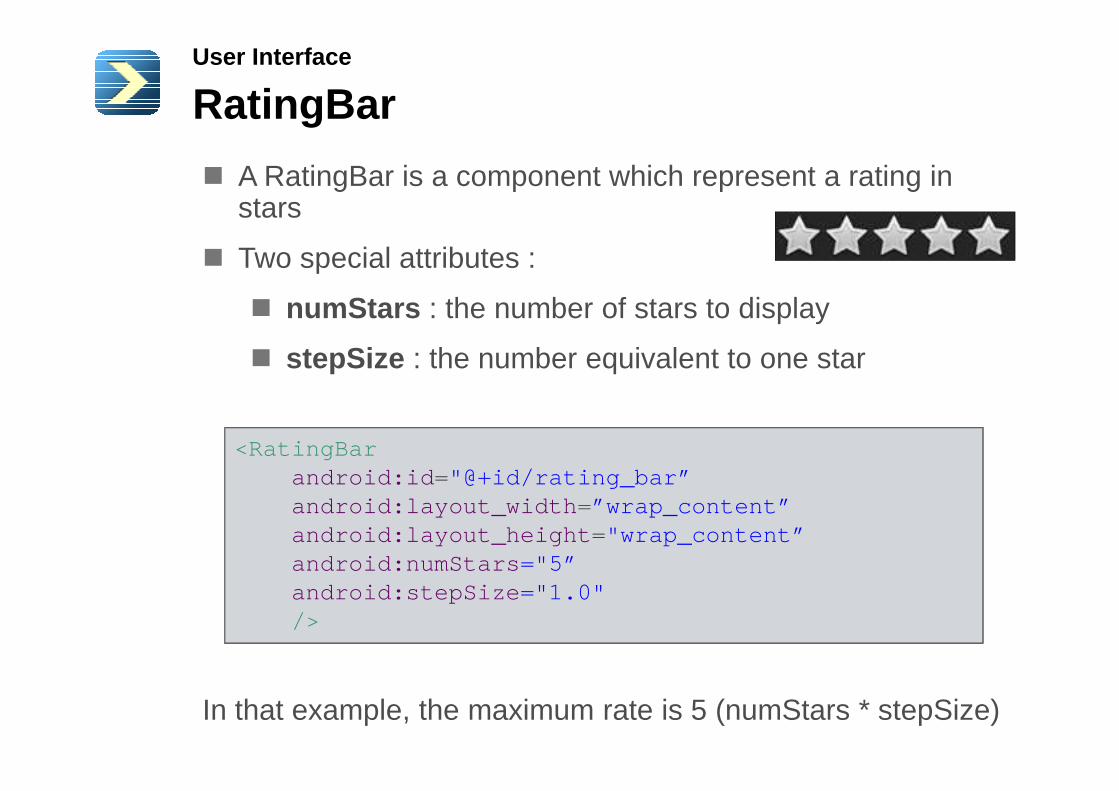
� A RatingBar is a component which represent a rating in stars
� Two special attributes :
� numStars : the number of stars to display
� stepSize : the number equivalent to one star
In that example, the maximum rate is 5 (numStars * stepSize)
<RatingBarandroid:id ="@+id/rating_bar”android:layout_width =”wrap_content”android:layout_height ="wrap_content”android:numStars ="5”android:stepSize ="1.0" />

ButtonUser Interface
� Represents a push-button widget
� Push-buttons can be pressed, or clicked, by the user to perform an action
<Buttonandroid:id ="@+id/ my_button ”android:id ="@+id/ my_button ”android:layout_width =”wrap_content”android:layout_height ="wrap_content”android:text =“@string/button_text”/>

ImageButtonUser Interface
� Represents a push-button widget but with an image instead of text inside
<ImageButtonandroid:id ="@+id/my_button”android:layout_width =” wrap_content ”android:layout_width =” wrap_content ”android:layout_height ="wrap_content”android:src ="@drawable/logo_google"/>

ListViewUser Interface
� A view that shows items in a vertically scrolling list
<ListViewandroid:id ="@+id/my_list_view”android:layout_width =”fill_parent”android:layout_height =”fill_parent”/>
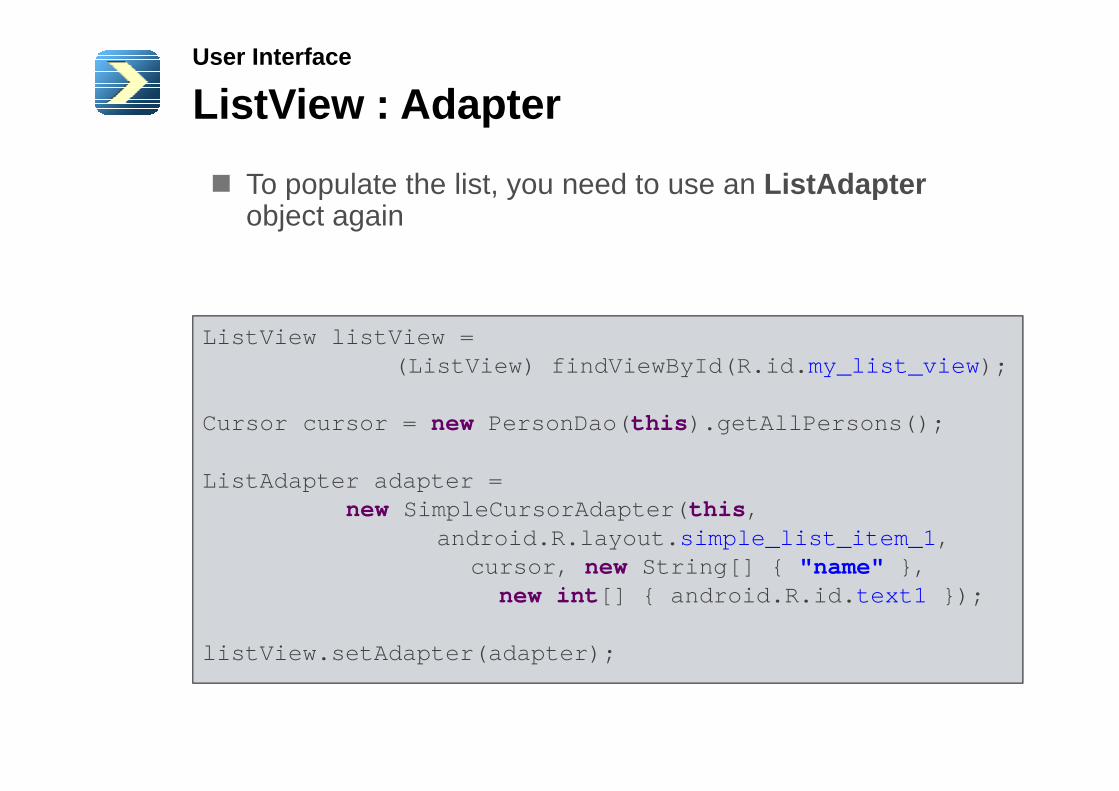
ListView : AdapterUser Interface
ListView listView = (ListView) findViewById(R.id. my_list_view );
� To populate the list, you need to use an ListAdapterobject again
Cursor cursor = new PersonDao( this ).getAllPersons();
ListAdapter adapter = new SimpleCursorAdapter( this ,
android.R.layout. simple_list_item_1 , cursor, new String[] { "name" },
new int [] { android.R.id. text1 });
listView.setAdapter(adapter);

More about ListAdapter…User Interface
� The bridge between a component and the data that backs the list
� The most used concrete subclasses are :
� ArrayAdapter
� Adapter to map object arrays or object lists to a view
� SimpleCursorAdapter� SimpleCursorAdapter
� Adapter to map columns of a cursor to a view
� We’ll see more about curser later…
� Constructors of these classes take a resource id :
� The layout to apply to the item of the view
� You can use one of proposed by the SDK
� You can define your own layout
� Remember : android.R ≠ R

Other viewsUser Interface
� Now you understand the principle
� Go to see the Android Documentation for more information
� You will see many more views :
� ImageView
� WebView
� GridView� GridView
� DatePicker
� DigitalClock
� ProgressBar
� ToggleButton
� VideoView
� …

Exercise (1/3)User Interface
� We’re going to design the user interface of our application !
� Your activity layout file have to define :
� A vertical LinearLayout containing :
� A horizontal LinearLayout containing :
� A TextField to enter new quotes
� A Button to create new quotes
Exercise (2/3)User Interface
� Modify the addQuote(…) method :
� After add your quote in the ArrayList :
� Create a TextView object
� Set the quote string as text of it� Set the quote string as text of it
� Define a different background-color if the ArrayListsize is odd or even
� Add the TextView to the vertical LinearLayout

Exercise (3/3)User Interface
� You should get something like that :

EventsUser Interface
� With Android, all user actions are events
� Click
� Long click
� Key pressed
� Item selected� Item selected
� …
� You can link behaviors to this events
� The interception mechanism based on the Listener notion
� As with Swing !

Click EventUser Interface
� To add a listener to a click event on a view :
� setOnClickListener(View.OnClickListener)
� OnClickListener is an inner interface of the View class
� You have three possibilities :
� Make your activity implements it
� Create a new class implementing it
� Create an anonymous class

Click EventUser Interface
� First solution :
public class MyActivity extends Activity implements View.OnClickListener {
protected void onCreate(Bundle savedInstanceState) {super .onCreate(savedInstanceState);
Button button = (Button) findViewById(R.id. my_button );button.setOnClickListener( this );
}
public void onClick(View view) {// Display a notification popup during 1 second.Toast.makeText( this , "Button clicked !" , 1000).show();
}
}

Click EventUser Interface
� Second solution :
public class MyActivity extends Activity {
protected void onCreate(Bundle savedInstanceState) {super .onCreate(savedInstanceState);
Button button = (Button) findViewById(R.id. my_button );button.setOnClickListener( new ButtonClickListener());
}}
public class ButtonClickListenerimplements View.OnClickListener {
public void onClick(View view) {// Display a notification popup during 1 second.Toast.makeText( this , "Button clicked !" , 1000).show();
}}

Click EventUser Interface
� Third solution :
public class MyActivity extends Activity {
protected void onCreate(Bundle savedInstanceState) {super .onCreate(savedInstanceState);
Button button = (Button) findViewById(R.id. my_button );
}
button.setOnClickListener( new View.OnClickListener() {
public void onClick(View view) {// Display a notification popup during 1 second.Toast.makeText(MyActivity. this , “Clicked!" , 1000)
.show();}
});}
}

Other EventsUser Interface
� All events are based on the same principle
� Some have to return if the event has been consumed
� If true, the event does not fire other listeners
EditText editText = (EditText) findViewById(R.id. my_text );
editText.setOnTouchListener( new View.OnTouchListener() {
public boolean onTouch(View view, MotionEvent e) {Toast.makeText(MyActivity. this , "Touch!" , 1000 )
.show();return true ; // True means the listener has consumed the event.
}
});

Exercise (1/4)User Interface
� Now you know how to use listeners :
� When the user click on the add quote button :
� Create a new Quote object and add it to the ArrayList and to the screen
� Empty the text field

Exercise (2/4)User Interface
� We’re going to use a ListView instead of create TextViewsin our code
� Modify the layout and add a ListView component
� Create an ArrayAdapter object to link our ArrayList and the ListView
� Don’t forget to override the toString() method of Quote class
� ArrayAdapter call this method to display elements in the ListView

Exercise (3/4)User Interface
� Use toString() method to display something to the user is not a good practice…
� Create your own ListAdapter is better !
� Create a class named QuoteListAdapter which :
� Extends BaseAdapter class
� Override the getView (…) method :� Override the getView (…) method :
� Look at the ArrayAdapter code of that method :
http://grepcode.com/snapshot/repository.grepcode.com/java/ext/com.google.android/android/2.2_r1.1/
� Make your own to :
� Avoid to use toString() method
� Change background color according to parity

Exercise (4/4)User Interface
� You should get something like that :

Intent
Communication between components.

Preview
� Presentation
� Launch an Activity
� Include Extra Data
� Implicit Intents
This is the content we'll see
Intent
� Native Actions

PresentationIntent
� An intent is an abstract description of an operation to be performed
� We can use it to :
� Launch an Activity
� Communicate with components like :
� Background Services
� Broadcast Receivers
� The first one is the most common usage
� We’ll only see it

Launch an ActivityIntent
� To simply launch an activity :
� One of Instant constructors take only this two parameters :
Intent intent = new Intent( this , ActivityToLaunch. class );startActivity(intent);
� One of Instant constructors take only this two parameters :
� The context of the intent, here the activity instance creating it
� The component class used for the intent
� startActivity(Intent) :
� An instance method of Activity class to start a new activity with an intent

NoteIntent

Launch an ActivityIntent
� You can also start an Activity and wait a result code from it :

Launch an ActivityIntent
� To do that, just use the method startActivityForResult(…) instead of startActivity(…) :
...
private static final int MY_ACTIVITY_CODE = 1;
...
Intent intent = new Intent( this , ActivityToLaunch. class );
// MY_ACTIVITY_CODE Constant represent an id for the// request that will be used later identify the activity // returning the result.startActivityForResult(intent, MY_ACTIVITY_CODE);

Launch an ActivityIntent
� In the launched activity, use the setResult(…) method to return a result code to the launching activity :
Button submitButton = (Button) findViewById(R.id.submit);submitButton.setOnClickListener( new View.OnClickListener() {
public void onClick(View view) {setResult(RESULT_OK);finish();
}
});

Launch an ActivityIntent
� In the launching activity, override the onActivityResult(…) method :
protected void onActivityResult( int requestCode, int resultCode, Intent data) {
switch (requestCode) {case MY_ACTIVITY_CODE:
TextView textView = ...
switch (resultCode) {case RESULT_CANCELED :
textView.setText( "Cancel Button Pressed" );break ;
case RESULT_OK :textView.setText( "Submit Button Pressed" );break ;
}...}
}
Include Extra DataIntent
� When you launch another activity, you often need to communicate some information
� You can use the intent methods below :
� void putExtra(…)
� Bundle getExtras(…)
� Supported types are :
� Primitives : byte, short, int, long, float, double, …
� Primitive Arrays : int[], long[], …
� Strings
� Serializable objects

Include Extra DataIntent
� To put an extra data :
� To retrieve it in the launched Activity :
Intent intent = new Intent( this , MyActivity. class );intent.putExtra( "smthg" , "Hi Activity." );startActivity(intent, MY_ACTIVITY_CODE);
� Intent getIntent() :
� Return the intent that started this activity
Bundle extras = getIntent().getExtras();
if (extras != null ) {String message = extras.getString( "smthg" );
}

Include Extra DataIntent
� If an Activity has been launched by startActivityForResult(…) method :
� It can send information to the launching Activity
� In sending an intent in addition to result code
� You can retrieve it in the launching Activity in the onActivityResult(…) method

Include Extra DataIntent
� Launched Activity :
...setResult( RESULT_OK);getIntent()
.putExtra( “message” , “Thank you for calling me” );finish();...
� Launching Activity :
}
protected void onActivityResult( int requestCode, int resultCode, Intent data)
{...
Bundle extras = data.getExtras();if (extras != null ) {
String message = extras.getString( ”message" );}
}

Implicit IntentsIntent
� Two primary forms of intents :
� Explicit Intents :
� Provide the exact class to be run
� Implicit Intents :
� Component to run determined by the system� Component to run determined by the system
� We just saw the first one
� We’re going to see the second one

Implicit IntentsIntent
� Implicit Intents are based on Actions
� Android provide many native Actions
� But you can create your own.
� You have mainly two constructors to create an implicit Intent :
� Intent (String action)
� Intent (String action, Uri uri)

Native ActionsIntent
Action Definition
ACTION_ANSWER Handle an incoming phone call.
ACTION_CALL Perform a call to someone specified by the data.
ACTION_DELETE Start an Activity to delete the given data from its container.
ACTION_DIAL Shows an UI with the number being dialed, allowing the user to explicitly initiate the call.
ACTION_EDIT Provide explicit editable access to the given data.
ACTION_SEARCH Perform a search.
ACTION_SEND Deliver some data to someone else by SMS or e-mail.
ACTION_SENDTO Send a message to someone specified by the data.
ACTION_VIEW Starting the default activity associated with the data to view it.
ACTION_WEB_SEARCH Perform a web search.

Native ActionsIntent
� Example :
� Launch the Android Market :
Uri uri = Uri.parse( “market://search?”+ “q=pname:com.google.android.stardroid” );
Intent intent = new Intent(Intent. ACTION_VIEW, uri);startActivity(intent);
� Launch a Web browser :
Uri uri = Uri.parse( “http://www.efrei.com” );Intent intent = new Intent(Intent. ACTION_VIEW, uri);startActivity(intent);

Native ActionsIntent
� Example :
� Call a number :
Uri uri = Uri.parse( “tel:0607080910” );Intent intent = new Intent(Intent. ACTION_CALL, uri);startActivity(intent);
� To make this piece of code work
� You have to specify that the application have the permission to call.
� Just add a <use-permission> element in your Android Manifest.
<uses-permissionandroid:name ="android.permission.CALL_PHONE” />

Exercise (1/3)Intent
� Now, you know how to use Intents :
� Create a new Activity named QuoteActivity :
� User Interface should be something like that :

Exercise (2/3)Intent
� This activity have to be launch when an user click on a element of the ListView
� It have to display :
� A TextView with the text of the selected quote
� Another TextView with the date of the selected quote
� A RatingBar with the rating of the selected quote
� This element is editable to allow user to change the rating
� A Cancel button which return to the previous Activity without save the new ratting
� A Ok button which return to the previous Activity with the new ratting value

Exercise (3/3)Intent
� Add a long click event to the TextView containing quote text
� Display a Dialog box allowing user to edit it
� Use Android documentation about Dialog class if you need :
� http://developer.android.com/guide/topics/ui/dialogs� http://developer.android.com/guide/topics/ui/dialogs.html#AlertDialog

Persistence
How to store data…

Preview
� Presentation
� Instance State
� Shared Preferences
� SQLite
This is the contain we'll see :
Persistence

PresentationPersistence
� Android provide four ways to store data :
� Instance State
� Shared Preferences
� SQLite databases
� Files� Files
� We’re going to see the first three.

Instance StatePersistence
� You have seen earlier activities life cycle
� A background activity can be unloaded if another one need memory
� How to save activity state to allow user to retrieve his activity as before ?
� Thanks to Instance State !� Thanks to Instance State !
� We’re going to see the two
activity methods to manageinstance state :
onSaveInstanceState(…)onRestoreInstanceState(…)

Instance StatePersistence
� onSaveInstanceState(Bundle)
� Called to retrieve per-instance state from an activity before being killed so that the state can be restored in onCreate(Bundle) or onRestoreInstanceState(Bundle) (the Bundle populated by this method will be passed to both).to both).
� onRestoreInstanceState(Bundle)
� This method is called after onStart() when the activity is being re-initialized from a previously saved state, given here in Bundle type parameter.

Instance StatePersistence
� By default, Instance State save the values of all views with id attribute
� If you want to save more information, just override the two methods we have just seen
private String myInformation ;...
protected void onSaveInstanceState(Bundle outState) {outState.putString( "anotherInformation" , myInformation );super .onSaveInstanceState(outState);
}
protected void onRestoreInstanceState(Bundle savedInstanceState){super .onRestoreInstanceState(savedInstanceState);myInformation =
savedInstanceState.getString( "anotherInformation" );}
Exercise (1/2)Persistence
� Open the app launcher
� Go to Dev Tools > Development Settings .

Exercise (2/2)Persistence
� Re-launch your Geek Quote application
� Create a new quote
� Simulate an incoming call
� Look at your list content…
� Use Instance States to correct that !

Shared PreferencesPersistence
� Share across all components in an application
� Set of key/value pair
� Can only store boolean , int , long , float and String values
� Permission can be given :
� MODE_PRIVATE� MODE_PRIVATE
� Default value, the created file is only accessible by the application that created it.
� MODE_WORD_READABLE
� Other applications can read the file but not modify it.
� MODE_WORD_WRITABLE
� Other applications can modify the file.

Shared PreferencesPersistence
� Examples :
� Retrieve shared preferences :
SharedPreferences prefs = getPreferences(Context. MODE_PRIVATE);
// If there is no value for “username”, return nullString username = prefs.getString( “username” , null );
// If there is no value for “isAdmin”, return falseboolean admin = prefs.getBoolean( “isAdmin” , false );
// If there is no value for “id”, return zerolong id = prefs.getLong( “id” , 0L);

Shared PreferencesPersistence
� Examples :
� Save shared preferences :
SharedPreferences prefs = SharedPreferences prefs = getPreferences(Context. MODE_PRIVATE);
SharedPreferences.Editor editor = prefs.edit();editor.putString( “username” , “Droid” ); editor.putBoolean( “isAdmin” , true );editor.commit();

SQLite DatabasesPersistence
� Relational Database Management System
� Useful to stock complex data
� Each database is dedicated to only one application
� An application can have several databases
� To share data with another application, you can use a � To share data with another application, you can use a Content Provider (out of the course's scope)

SQLite DatabasesPersistence
� Don’t design your SQLite database as a MySQL or PostgreSQL ones
� Mobile devices are not dedicated database server
� Little storage space
� Little memory
� Store only what you need
� Avoid frequent requests
� Design SQLite databases with :
� A simple structure
� Data easily identifiable
� Don’t store binary data !

SQLiteOpenHelperPersistence
� To simplify your code to create or update a Database schema, the SDK propose you a Helper class named : SQLiteOpenHelper .
� To use it, create your proper class and extend it.
AbstractMethods

SQLiteOpenHelperPersistence
public class MyOpenHelper extends SQLiteOpenHelper {
private static final String DATABASE_NAME = “my.db” ;private static final int DATABASE_VERSION = 2;private static final String TABLE_NAME = ”persons" ;private static final String TABLE_CREATE =
� Example :
private static final String TABLE_CREATE ="CREATE TABLE " + TABLE_NAME+ " (" +”id INTEGER PRIMARY KEY AUTOINCREMENT, " +“name TEXT NOT NULL);" ;
public MyOpenHelper(Context context) {super (context, DATABASE_NAME, null , DATABASE_VERSION);
}
...

SQLiteOpenHelperPersistence
...
public void onCreate(SQLiteDatabase db) {db.execSQL( TABLE_CREATE);
}
� Example :
public void onUpgrade(SQLiteDatabase db, int oldVersion, int newVersion) {
Log.w( "Example" , ”Upgrading database, this will drop” + “tables and recreate." );
db.execSQL( "DROP TABLE IF EXISTS " + TABLE_NAME);onCreate(db);
}
}

SQLiteOpenHelperPersistence
� This class provides two other methods very useful :
� SQLiteDatabase getWritableDatabase()
� Return a SQLiteDatabase instance to read or write in the Database. Throw an exception if the database cannot be opened for writing (bad permission or full disk).
� SQLiteDatabase getReadableDatabase()
� Return a SQLiteDatabase instance with read-only access to the database.
� Both will create the database if it doesn’t exist.

SQLiteDatabasePersistence
� Exposes methods to manage a SQLite database
� Has methods to create, delete, execute SQL commands, and perform other common database management tasks
� We’re going to see some useful methods :
� void execSQL(...)
� long insert(…)
� int update(…)
� int delete(…)
� Cursor query(…)

SQLiteDatabasePersistence
� void execSQL(String sql) :
� Execute a single SQL statement that is not a query
� For example, CREATE TABLE, DELETE, INSERT, etc.
� Example :
SQLiteDatabase db = ...
db.execSQL( "DROP TABLE IF EXISTS my_table" );

SQLiteDatabasePersistence
� long insert (String table, String nullColumnHack, ContentValues values) :
� Convenience method for inserting a row into the database
� Three parameters :
� table : The table to insert the row into
� nullColumnHack : � nullColumnHack :
� SQL doesn't allow inserting a completely empty row
� If initialValues is empty this column will explicitly be assigned a NULL value
� values :
� Map containing the column values for the row
� The keys should be the column names
� The values the column values

SQLiteDatabasePersistence
� long insert (String table, String nullColumnHack, ContentValues values) :
� Return the row ID of the inserted row
� Example :
SQLiteDatabase db = ...
ContentValues values = new ContentValues();values.put( “name” , “Cartman” );
db.insert( “persons” , null , values);

SQLiteDatabasePersistence
� int update (String table, ContentValues values, String whereClause, String[] whereArgs) :
� Convenience method for updating rows in the database
� Four parameters :
� table : the table to update in� table : the table to update in
� values : a map from column names to new column values
� whereClause : the optional WHERE clause to apply when updating
� whereArgs : an array of the value to apply to the WHERE clause
� Return the number of rows affected

SQLiteDatabasePersistence
� int update (String table, ContentValues values, String whereClause, String[] whereArgs) :
� Example :
SQLiteDatabase db = ...
ContentValues values = new ContentValues();values.put( "name" , ”John" );String[] whereArgs = { "1" };
db.update( “persons” , values, "id=?" , whereArgs);

SQLiteDatabasePersistence
� int delete (String table, String whereClause, String[] whereArgs) :
� Convenience method for deleting rows in the Database
� Three parameters :
� table : the table to delete from� table : the table to delete from
� whereClause : the optional WHERE clause to apply when deleting
� whereArgs : an array of the value to apply to the WHERE clause
� Return the number of rows affected

SQLiteDatabasePersistence
� int delete (String table, String whereClause, String[] whereArgs) :
� Example :
SQLiteDatabase db = ...
String[] whereArgs = { "1" };db.delete( "persons" , "id=?" , whereArgs);

SQLiteDatabasePersistence
� Cursor query(String table, String[] columns, String selection, String[] selectionArgs,
String groupBy, String having, String orderBy) :
� Query the given table, returning a Cursor over the result setset
� Seven parameters :
� table : The table name to compile the query
� columns : A list of which columns to return
� selection : A filter declaring which rows to return, formatted as an SQL WHERE clause

SQLiteDatabasePersistence
� Cursor query(String table, String[] columns, String selection, String[] selectionArgs,
String groupBy, String having, String orderBy) :
� Seven parameters :
� selectionArgs : You may include ?s in selection, � selectionArgs : You may include ?s in selection, which will be replaced by the values from selectionArgs
� groupBy : A filter declaring how to group rows, formatted as an SQL GROUP BY clause
� having : A filter declare which row groups to include in the cursor, if row grouping is being used, formatted as an SQL HAVING clause
� orderBy : How to order the rows, formatted as an SQL ORDER BY clause

SQLiteDatabasePersistence
� Cursor query(String table, String[] columns, String selection, String[] selectionArgs,
String groupBy, String having, String orderBy) :
� Example :� Example :
SQLiteDatabase db = ...
String[] columns = { ID_COLUMN, NAME_COLUMN };String[] params = { “Cartman” };Cursor result = db.query( TABLE_NAME, columns, ”name=?" ,
params, null , null , null , "1" );

CursorPersistence
� Provide access to the result set returned by a database query
� Methods commonly used are :
� getCount() : returns the number of rows
� moveToFirst() : moves the cursor to the first row
� moveToNext() : moves the cursor to the next line
� isAfterLast() : returns true if the cursor position is after the last row
� getColumnNames() : returns a string array holding the names of all of the columns in the result set
� getColumnIndex(String name) : return the index of the corresponding column name

CursorPersistence
� Example of use :
String[] columns = { “id” , “name” };
Cursor result = db.query( “persons” , columns, null , null , null , null , null );
List<Person> persons = new ArrayList<Person>();
result.moveToFirst ();result.moveToFirst ();while (!result.isAfterLast()) {
Person person = new Person();person.setId(result.getLong( 0));person.setName(result.getString( 1));persons.add(person);
result.moveToNext();}result.close();
return persons;
ExercisePersistence
� Instance States are cool but it is not the better way to our list of Geek Quotes
� Refactor your application to persist your quotes inside a SQLite Database !
� Tip : If you want to explore your database, all SQLiteDatabases are by default stocked inside /data/data folder
� Use eclipse to import file to your computer and use a SQLite browser to see what are inside

REST Web Services
How to consume them ?

Preview
� Presentation
� Instance State
� Shared Preferences
� SQLite
This is the contain we'll see :
REST Web Services

PresentationREST Web Services
� Android apps can consume SOAP and REST Web Services
� The libraries needed for REST Web Services are directly available in the SDK
� The libraries for SOAP are not

HttpClientREST Web Services
� Android SDK provides the HttpClient Library from the Apache Foundation
� Provide an efficient, up-to-date, and feature-rich package implementing the client side of the HTTP standards and recommendations

HttpClientREST Web Services
� Each request with HttpClient follows the steps above :
1. Create an instance of HttpClient class
2. Create an instance of HttpRequest2. Create an instance of HttpRequest
3. Configure properties of the request
4. Execute the request with the HttpClient instance
5. Analysis and processing of the response

Get RequestREST Web Services
public String sendGetRequest(String address) {String result = null ;
try {HttpClient httpClient = new DefaultHttpClient();HttpGet httpGet = new HttpGet();
URI uri = new URI(address);URI uri = new URI(address);httpGet.setURI(uri);
HttpResponse response = httpClient.execute(httpGet);
result = EntityUtils.toString(response.getEntity());} catch (Exception e) {
Log.e( LOG_TAG, e.getMessage(), e);}
return result;}

Post RequestREST Web Services
public void sendPostRequest(String address, String entity) {
try {HttpClient httpClient = new DefaultHttpClient();HttpGet post = new HttpPost();
URI uri = new URI(address);post.setURI ( uri );post.setURI ( uri );post.setEntity( new StringEntity(entity));
httpClient.execute(post);
} catch (Exception e) {Log.e( LOG_TAG, e.getMessage(), e);
}
}

EntityREST Web Services
� HTTP Request and HTTP Response can contain data (entity) in different format :
� JSON
� XML
� Simple Text
� HTML
� …
� You have to generate and/or parse them !

EntityREST Web Services
� To parse XML, Android SDK provides SAX library :
� http://www.saxproject.org/quickstart.html
� To parse JSON, Android SDK provides JSON library :
� http://json.org/java/� http://json.org/java/

JSON ExampleREST Web Services
public Student convertToStudent(JSONObject object) throws JSONException {
Student student = new Student();
student.setIdBooster(object.getLong( ID_BOOSTER_FIELD));student.setFirstName(object.getString( FIRST_NAME_FIELD));student.setLastName(object.getString( LAST_NAME_FIELD));String formatedDate = object.getString ( BIRTH_DATE_FIELD) ;String formatedDate = object.getString ( BIRTH_DATE_FIELD) ;
try {student.setBirthDate( dateFormat .parse(formatedDate));
} catch (ParseException e) {Log.e( LOG_TAG, "Parse Exception!" , e);
}
return student;}

JSON ExampleREST Web Services
public JSONObject convertToJson(Student student) throws JSONException {
JSONObject jsonStudent = new JSONObject();
jsonStudent.put ( ID_BOOSTER_FIELD,
return jsonStudent ;}
jsonStudent.put ( ID_BOOSTER_FIELD, student.getIdBooster());
jsonStudent.put( FIRST_NAME_FIELD, student.getFirstName());
jsonStudent.put( LAST_NAME_FIELD,student.getLastName());jsonStudent.put( BIRTH_DATE_FIELD,
dateFormat.format(student.getBirthDate()));
return jsonStudent;}

ExerciseREST Web Services
� Create a new Java Web Application :
� Develop a persistence layer with JPA to store our Geek Quotes
� Develop a REST Web Service layer with JAX-RS to manipulate our Geek Quotes
� Refactor your Android Application to use your new � Refactor your Android Application to use your new Web Services
Copyright © 2022 FDOKUMEN