IBM Tivoli Netcool Service Quality Management Center V4.2 ...
Upload
khangminh22Category
view
3download
0
Medicare Secondary Payer Recovery Portal (MSPRP)
User Guide
Version 4.2
Rev. 2018/2 July COBR-Q3-2018-v4.2
MSPRP User Guide Confidentiality Statement
ii
Confidentiality Statement The collection of this information is authorized by Section 1862(b) of the Social Security Act (codified at 42 U.S.C 1395y(b)) (see also 42, C.F.R. 411.24). The information collected will be used to identify and recover past conditional and mistaken Medicare primary payments and to prevent Medicare from making mistaken payments in the future for those Medicare Secondary Payer situations that continue to exist. The Privacy Act (5 U.S.C. 552a(b)), as amended, prohibits the disclosure of information maintained by the Centers for Medicare & Medicaid Services (CMS) in a system of records to third parties, unless the beneficiary provides a written request or explicit written consent/authorization for a party to receive such information. Where the beneficiary provides written consent/proof of representation, CMS will permit authorized parties to access requisite information.

MSPRP User Guide Table of Contents
iii
Table of Contents
Chapter 1 : Summary of Version 4.2 Updates ..................................................................... 1-1
Chapter 2 : Introduction ........................................................................................................ 2-1
2.1 Overview ...................................................................................................................... 2-1 2.2 Account Types ............................................................................................................. 2-2 2.3 User Roles (Non-Beneficiary)....................................................................................... 2-2
2.3.1 Account Representative (AR) Role ................................................................ 2-2 2.3.2 Account Manager (AM) Role ......................................................................... 2-3 2.3.3 Account Designee (AD) Role ......................................................................... 2-4 2.3.4 Beneficiary Role ............................................................................................ 2-4 2.3.5 Login ID and Password Limits ....................................................................... 2-5 2.3.6 Electronic Data Interchange (EDI) Representative Support ........................... 2-5
Chapter 3 : Welcome to the MSPRP ..................................................................................... 3-1
3.1 Navigation Menu .......................................................................................................... 3-1 3.2 New Registration.......................................................................................................... 3-2 3.3 Account Setup ............................................................................................................. 3-2 3.4 Account Login .............................................................................................................. 3-3
Chapter 4 : New Registration (Step 1) .................................................................................. 4-1
4.1 Registration Steps ........................................................................................................ 4-2 4.1.1 Corporate Account Type ................................................................................ 4-4 4.1.2 Representative Account Type ........................................................................ 4-8
Chapter 5 : Account Setup (Step 2) ...................................................................................... 5-1
5.1 Account Setup Steps ................................................................................................... 5-1 5.1.1 Account Setup—Corporate ............................................................................ 5-4 5.1.2 Account Setup—Representative .................................................................... 5-4 5.1.3 Account Manager (AM) Setup ....................................................................... 5-5
Chapter 6 : Accessing the MSPRP ....................................................................................... 6-1
6.1 Log in to the MSPRP Site (Account Manager/Account Designee) ................................ 6-1 6.1.1 Account Manager and Account Designee Home Page .................................. 6-3
6.2 Log in to the MSPRP Site (Beneficiary) ........................................................................ 6-5 6.2.1 MyMedicare.gov: Case ID ............................................................................. 6-5 6.2.2 MyMedicare.gov: Go to MSPRP .................................................................... 6-6
6.3 Forgot User Name (Login ID) ....................................................................................... 6-6 6.4 Forgot Password .......................................................................................................... 6-8
Chapter 7 : Multi-Factor Authentication ............................................................................... 7-1
7.1 Eligibility ....................................................................................................................... 7-1 7.2 Understanding MFA Statuses and Actions ................................................................... 7-1 7.3 Downloading and Installing Credential IDs ................................................................... 7-4
MSPRP User Guide Table of Contents
iv
7.4 ID Proofing Process ..................................................................................................... 7-5 7.4.1 ID Proofing and MFA Overview ..................................................................... 7-5 7.4.2 Completing ID Proofing Core Credentials ...................................................... 7-5 7.4.3 Identity Verification Questions ....................................................................... 7-9
7.5 Multi-Factor Authentication (MFA) Credential Maintenance ....................................... 7-11 7.5.1 Downloading and Installing Credential IDs .................................................. 7-11 7.5.2 Activate Credential IDs ................................................................................ 7-12 7.5.3 Reactivate Credential IDs ............................................................................ 7-13 7.5.4 Deactivate Credential IDs ............................................................................ 7-14
7.6 Logging in Using MFA Services ................................................................................. 7-15 7.7 Troubleshooting ......................................................................................................... 7-16
7.7.1 Contact Experian ......................................................................................... 7-16 7.7.2 Contact the BCRC ....................................................................................... 7-18
Chapter 8 : Account Settings ............................................................................................... 8-1
8.1 Update Personal Information ....................................................................................... 8-1 8.2 Update Account Information ......................................................................................... 8-5
8.2.1 Corporate Account—Update Account Information ......................................... 8-5 8.2.2 Representative Account—Update Account Information ............................... 8-11
8.3 Designee Maintenance .............................................................................................. 8-14 8.3.1 Add a Designee to an Account .................................................................... 8-14 8.3.2 Delete a Designee from an Account ............................................................ 8-18 8.3.3 Edit Designee Information ........................................................................... 8-19 8.3.4 Regenerate Invitation E-Mail ....................................................................... 8-21
8.4 View Account Activity ................................................................................................. 8-23 8.4.1 Access More Than 1000 Account Activity Records ...................................... 8-24
8.5 Change Password ...................................................................................................... 8-26
Chapter 9 : Account Designee Registration ........................................................................ 9-1
Chapter 10 : Case Authorization ........................................................................................ 10-1
10.1 Authorization Request Types ..................................................................................... 10-1 10.2 Authorizations: Example Letters, Templates, and Model Language ........................... 10-1 10.3 Authorization Status ................................................................................................... 10-3
10.3.1 Beneficiary CTR Supporting Documentation Requirements ......................... 10-5 10.3.2 Beneficiary POR Supporting Documentation Requirements ........................ 10-5 10.3.3 Recovery Agent Authorization Supporting Document Requirements ........... 10-6
Chapter 11 : Request Case Access .................................................................................... 11-1
11.1 Account Designee ...................................................................................................... 11-1 11.2 Account Manager ....................................................................................................... 11-4 11.3 Beneficiary ................................................................................................................. 11-8
MSPRP User Guide Table of Contents
v
Chapter 12 : Case Listing .................................................................................................... 12-1
12.1 Account Designee ...................................................................................................... 12-1 12.1.1 View Detailed Case Information ................................................................... 12-5 12.1.2 Remove a Case ........................................................................................... 12-5
12.2 Account Manager ....................................................................................................... 12-7 12.2.1 Locate One or More Cases ........................................................................ 12-10 12.2.2 View Detailed Case Information ................................................................. 12-11 12.2.3 Remove a Case ......................................................................................... 12-11 12.2.4 Grant/Revoke Case Access ....................................................................... 12-12
12.3 Beneficiary ............................................................................................................... 12-15 12.3.1 Locate a Case ........................................................................................... 12-17 12.3.2 View Detailed Case Information ................................................................. 12-17
Chapter 13 : Retrieve a Recovery Case ............................................................................. 13-1
13.1 Case Information Page .............................................................................................. 13-1 13.1.1 Case Tabs ................................................................................................... 13-3 13.1.2 Case Actions ............................................................................................. 13-11 13.1.3 View/Request Authorizations ..................................................................... 13-13 13.1.4 Request an Update to the Conditional Payment Amount ........................... 13-17 13.1.5 Request an Electronic Copy of the Conditional Payment Letter with
Current Conditional Payment Amount ........................................................ 13-18 13.1.6 Request a Mailed Copy of the Conditional Payment Letter ........................ 13-21 13.1.7 View/Dispute Claims Listing ...................................................................... 13-23 13.1.8 Begin Final Conditional Payment Process and Provide 120 Days'
Notice of Anticipated Settlement ................................................................ 13-32 13.1.9 Calculate Final Conditional Payment Amount ............................................ 13-33 13.1.10 Request an Electronic Dispute Denial for Final Conditional Payment
Case Letter with Current Conditional Payment Amount ............................. 13-33 13.1.11 View/Provide the Notice of Settlement Information .................................... 13-34 13.1.12 Initiate Demand Letter ............................................................................... 13-40 13.1.13 View/Submit Redetermination (First Level Appeal) .................................... 13-42 13.1.14 Submit Waiver Request ............................................................................. 13-43 13.1.15 Submit Compromise Request .................................................................... 13-44
Chapter 14 : Obtaining Final Conditional Payment Amount............................................. 14-1
14.1 Things to Consider Before Initiating the Final CP Process ......................................... 14-1 14.2 Final CP Timeline: Required Actions .......................................................................... 14-1 14.3 Final CP Payments .................................................................................................... 14-2 14.4 Cases Ineligible for Final CP ...................................................................................... 14-2 14.5 Final CP Process (Beneficiaries) ................................................................................ 14-3
14.5.1 Notify BCRC within 120 Days of Settlement ................................................ 14-3 14.5.2 View/Submit Disputes .................................................................................. 14-4 14.5.3 Request Final CP Amount ........................................................................... 14-5 14.5.4 Request Conditional Payment Letter ........................................................... 14-7

MSPRP User Guide Table of Contents
vi
14.5.5 Final CP Requirements for Providing Settlement Information ...................... 14-9 14.6 Final CP Process (Insurers) ..................................................................................... 14-10
14.6.1 Notify BCRC that Insurer-Debtor Case is 120 Days of Settlement ............. 14-11
Chapter 15 : Requesting Redeterminations, Waivers, and Compromises ..................... 15-1
15.1 Redetermination Requests (First Level Appeal) ......................................................... 15-1 15.1.1 Redetermination Timeline ............................................................................ 15-2 15.1.2 Before Requesting a Redetermination ......................................................... 15-2 15.1.3 Submitting a Redetermination Request ....................................................... 15-2 15.1.4 Uploading Redetermination Documents and Completing Submission.......... 15-6 15.1.5 Viewing Redetermination Requests ............................................................. 15-7
15.2 Waiver Requests........................................................................................................ 15-9 15.2.1 Before Requesting a Waiver ........................................................................ 15-9 15.2.2 Submitting a Waiver Request ...................................................................... 15-9 15.2.3 Uploading Waiver Documents and Completing Submission ...................... 15-12 15.2.4 Viewing Waiver Request Details ................................................................ 15-13
15.3 Compromise Requests............................................................................................. 15-13 15.3.1 Before Requesting a Compromise ............................................................. 15-13 15.3.2 Submitting a Compromise Request ........................................................... 15-14 15.3.3 Uploading Compromise Documents and Completing Submission ............. 15-17 15.3.4 Viewing Compromise Request Details ....................................................... 15-17
15.4 Submitting Additional Documentation ....................................................................... 15-18
Chapter 16 : Log Off ............................................................................................................ 16-1
Chapter 17 : Troubleshooting ............................................................................................. 17-1
17.1 Replace Account Representative ............................................................................... 17-1 17.2 Replace Account Manager ......................................................................................... 17-1 17.3 Unsuccessful Account Registration ............................................................................ 17-1 17.4 Unsuccessful Account Setup...................................................................................... 17-1 17.5 Unsuccessful Account Designee Invitation ................................................................. 17-2 17.6 Unsuccessful Account Designee Registration ............................................................ 17-2 17.7 Unsuccessful Login .................................................................................................... 17-2 17.8 Case Request Errors ................................................................................................. 17-3 17.9 Concurrent Sessions .................................................................................................. 17-3 Appendix A : Acronyms ........................................................................................................... A-1 Appendix B : Disabling Internet Explorer Add-Ons .................................................................. B-1 Appendix C : Previous Version Changes ................................................................................ C-1
List of Tables Table 3-1: Navigation Menu ....................................................................................................... 3-2 Table 4-1: Corporate Information ............................................................................................... 4-5 Table 4-2: Account Representative (AR) Information ................................................................. 4-6 Table 4-3: Representative Information ....................................................................................... 4-9
MSPRP User Guide Table of Contents
vii
Table 4-4: Beneficiary Information ........................................................................................... 4-11 Table 5-1: Account Setup .......................................................................................................... 5-4 Table 5-2: Account Manager Personal Information .................................................................... 5-6 Table 5-3: Recovery Case Mailing Address ............................................................................... 5-7 Table 5-4: Account Manager Login Information ......................................................................... 5-8 Table 7-1: MFA Statuses and Next Step Actions ....................................................................... 7-3 Table 7-2: Next Step Action Details ........................................................................................... 7-4 Table 7-3: ID Proofing Core Credentials .................................................................................... 7-8 Table 8-1: Update Personal Information .................................................................................... 8-3 Table 8-2: Corporate Information ............................................................................................... 8-7 Table 8-3: Recovery Case Mailing Address ............................................................................... 8-7 Table 8-4: Update Account Representative (AR) Information .................................................... 8-9 Table 8-5: Update Representative Information ........................................................................ 8-12 Table 8-6: Designee Invitation ................................................................................................. 8-17 Table 8-7: Update Designee Information ................................................................................. 8-20 Table 8-8: Change Password .................................................................................................. 8-28 Table 9-1: Designee Personal Information ................................................................................. 9-6 Table 9-2: Designee Login Information ...................................................................................... 9-7 Table 10-1: Authorization Types and Actions........................................................................... 10-2 Table 11-1: New Case Request ............................................................................................... 11-3 Table 11-2: New Case Request ............................................................................................... 11-6 Table 11-3: New Case Request ............................................................................................... 11-9 Table 12-1: Case Listing (Top) ................................................................................................ 12-4 Table 12-2: Case Listing (Bottom) ........................................................................................... 12-5 Table 12-3: Case Listing (Top) ................................................................................................ 12-9 Table 12-4: Case Listing (Bottom) ......................................................................................... 12-10 Table 12-5: Case Listing ........................................................................................................ 12-17 Table 13-1: Case Information: Header Fields .......................................................................... 13-2 Table 13-2: Payment Information Tab Fields ........................................................................... 13-5 Table 13-3: Refund Information Tab Fields .............................................................................. 13-6 Table 13-4: Letter Activity Tab Fields ...................................................................................... 13-7 Table 13-5: Waiver/Redetermination/Compromise Tab (BCRC case)/Redetermination Tab (CRC case) Fields ............................................................................................................ 13-8 Table 13-6: Final Conditional Payment Process Tab Fields ................................................... 13-10 Table 13-7: Case Status Definitions ...................................................................................... 13-12 Table 13-8: Payment Summary Form Fields........................................................................... 13-20 Table 13-9: Claims Listing (All Fields).................................................................................... 13-28 Table 13-10: Demand Claims Listing ..................................................................................... 13-29 Table 13-11: Claims Dispute Verification ............................................................................... 13-31 Table 13-12: Settlement Information ...................................................................................... 13-37 Table A-1: Acronyms ................................................................................................................ A-1
List of Figures Figure 3-1: Welcome to the MSPRP .......................................................................................... 3-1 Figure 3-2: Navigation Menu ..................................................................................................... 3-1 Figure 3-3: New Registration and Account Setup Buttons ......................................................... 3-2 Figure 3-4: Account Login.......................................................................................................... 3-3 Figure 4-1: Login Warning ......................................................................................................... 4-3 Figure 4-2: Welcome to the MSPRP .......................................................................................... 4-4 Figure 4-3: Select Account Type................................................................................................ 4-4 Figure 4-4: Corporate Information .............................................................................................. 4-5 Figure 4-5: Account Representative (AR) Information ................................................................ 4-6
MSPRP User Guide Table of Contents
viii
Figure 4-6: Registration Summary ............................................................................................. 4-7 Figure 4-7: Thank You ............................................................................................................... 4-8 Figure 4-8: Representative Information...................................................................................... 4-9 Figure 4-9: Beneficiary Information .......................................................................................... 4-10 Figure 4-10: Registration Summary ......................................................................................... 4-11 Figure 4-11: Thank You ........................................................................................................... 4-12 Figure 4-12: Sample PIN Letter (Page 1) ................................................................................. 4-13 Figure 4-13: Sample PIN Letter (Page 2) ................................................................................. 4-14 Figure 5-1: Welcome to the MSPRP .......................................................................................... 5-2 Figure 5-2: Account Setup Introduction...................................................................................... 5-3 Figure 5-3: Account Setup ......................................................................................................... 5-3 Figure 5-4: Account Setup—Corporate Information ................................................................... 5-4 Figure 5-5: Account Setup—Representative Information ........................................................... 5-5 Figure 5-6: Account Manager Personal Information ................................................................... 5-6 Figure 5-7: Account Manager Login Information ........................................................................ 5-8 Figure 5-8: Account Manager Summary .................................................................................... 5-9 Figure 5-9: Thank You ............................................................................................................... 5-9 Figure 5-10: Sample E-Mail Notification ................................................................................... 5-11 Figure 5-11: Sample Profile Report ......................................................................................... 5-11 Figure 6-1: Login Warning ......................................................................................................... 6-2 Figure 6-2: Welcome to the MSPRP .......................................................................................... 6-3 Figure 6-3: Account List ............................................................................................................. 6-4 Figure 6-4: Case Information (Beneficiary) ................................................................................ 6-5 Figure 6-5: Case Information (Actions: Beneficiary) ................................................................... 6-6 Figure 6-6: Welcome! Page (Beneficiary) .................................................................................. 6-6 Figure 6-7: Forgot ID Link .......................................................................................................... 6-7 Figure 6-8: Forgot Login ID ........................................................................................................ 6-7 Figure 6-9: Forgot Login ID or Password ................................................................................... 6-8 Figure 6-10: Forgot Login ID Confirmation ................................................................................. 6-8 Figure 6-11: Forgot Password Link ............................................................................................ 6-9 Figure 6-12: Forgot Password ................................................................................................... 6-9 Figure 6-13: Forgot Login ID or Password ............................................................................... 6-10 Figure 6-14: Forgot Password Confirmation ............................................................................ 6-10 Figure 7-1: Account List (MFA) .................................................................................................. 7-2 Figure 7-2: Example Symantec VIP Access Screen .................................................................. 7-4 Figure 7-3: ID Proofing and Multi-Factor Authentication Overview ............................................. 7-6 Figure 7-4: ID Proofing Core Credentials ................................................................................... 7-7 Figure 7-5: Example Identity Verification Questions ................................................................. 7-10 Figure 7-6: Failure to Respond in Time.................................................................................... 7-11 Figure 7-7: Example Symantec VIP Access Screen ................................................................ 7-12 Figure 7-8: Multi-Factor Authentication (MFA) Credential Maintenance ................................... 7-13 Figure 7-9: Activate Credential ................................................................................................ 7-14 Figure 7-10: Credential Activated Successfully ........................................................................ 7-14 Figure 7-11: Deactivate Credential Confirmation ..................................................................... 7-15 Figure 7-12: Choose Credential ID and Enter Security Code ................................................... 7-16 Figure 7-13: Contact Experian ................................................................................................. 7-17 Figure 7-14: Account List (MFA Status: Failed Phone) ............................................................ 7-18 Figure 7-15: Contact the BCRC ............................................................................................... 7-19 Figure 7-16: Example Notary Statement .................................................................................. 7-20 Figure 8-1: Account Settings ..................................................................................................... 8-2 Figure 8-2: Update Personal Information ................................................................................... 8-2 Figure 8-3: Personal Information Update Confirmation .............................................................. 8-4 Figure 8-4: Sample Personal Information Update E-Mail ........................................................... 8-4
MSPRP User Guide Table of Contents
ix
Figure 8-5: Account Settings ..................................................................................................... 8-5 Figure 8-6: Update Corporate Information ................................................................................. 8-6 Figure 8-7: Corporate Information .............................................................................................. 8-6 Figure 8-8: Update Corporate Information ................................................................................. 8-8 Figure 8-9: Update Account Representative (AR) Information ................................................... 8-9 Figure 8-10: Update Corporate Information ............................................................................. 8-10 Figure 8-11: Corporate Information Update Confirmation ........................................................ 8-10 Figure 8-12: Account Settings ................................................................................................. 8-11 Figure 8-13: Update Account Information ................................................................................ 8-11 Figure 8-14: Update Representative Information ..................................................................... 8-12 Figure 8-15: Update Account Information ................................................................................ 8-13 Figure 8-16: Update Account Information Confirmation ........................................................... 8-14 Figure 8-17: Account Settings ................................................................................................. 8-15 Figure 8-18: Designee Listing .................................................................................................. 8-15 Figure 8-19: Designee Information .......................................................................................... 8-16 Figure 8-20: Designee Invitation .............................................................................................. 8-17 Figure 8-21: Designee Confirmation ........................................................................................ 8-18 Figure 8-22: Delete Designee Confirmation ............................................................................. 8-19 Figure 8-23: Update Designee Information .............................................................................. 8-20 Figure 8-24: Designee Confirmation ........................................................................................ 8-21 Figure 8-25: Update Designee Information .............................................................................. 8-22 Figure 8-26: Sample of Re-Generated E-Mail Invitation ........................................................... 8-23 Figure 8-27: Account Activity Page .......................................................................................... 8-24 Figure 8-28: Account Activity Page with Display Range and Pagination Control ...................... 8-25 Figure 8-29: Account Settings Box .......................................................................................... 8-27 Figure 8-30: Change Password ............................................................................................... 8-28 Figure 8-31: Change Password Confirmation .......................................................................... 8-29 Figure 9-1: Sample Designee Invitation E-Mail .......................................................................... 9-2 Figure 9-2: Login Warning ......................................................................................................... 9-3 Figure 9-3: Designee Registration ............................................................................................. 9-4 Figure 9-4: Designee Personal Information ............................................................................... 9-5 Figure 9-5: Designee Login Information ..................................................................................... 9-6 Figure 9-6: Designee Summary ................................................................................................. 9-7 Figure 9-7: Designee Thank You ............................................................................................... 9-8 Figure 11-1: Account List (Account Designee) ......................................................................... 11-2 Figure 11-2: Welcome! Page (Account Designee) ................................................................... 11-2 Figure 11-3: New Case Request .............................................................................................. 11-3 Figure 11-4: Case Results Page .............................................................................................. 11-4 Figure 11-5: Account List Page (Account Manager)................................................................. 11-5 Figure 11-6: New Case Request .............................................................................................. 11-6 Figure 11-7: Case Results Page .............................................................................................. 11-7 Figure 11-8: Welcome! Page (Beneficiary) .............................................................................. 11-8 Figure 11-9: New Case Request .............................................................................................. 11-9 Figure 12-1: Account List (Account Designee) ......................................................................... 12-2 Figure 12-2: Welcome! Page (Account Designee) ................................................................... 12-2 Figure 12-3: Case Listing......................................................................................................... 12-3 Figure 12-4: Remove Cases Verification ................................................................................. 12-6 Figure 12-5: Remove Cases Confirmation ............................................................................... 12-7 Figure 12-6: Welcome! Page (Account Manager) .................................................................... 12-8 Figure 12-7: Case Listing......................................................................................................... 12-8 Figure 12-8: Remove Cases Verification ............................................................................... 12-12 Figure 12-9: Remove Cases Confirmation ............................................................................. 12-12 Figure 12-10: Welcome! Page (Account Manager) ................................................................ 12-13
MSPRP User Guide Table of Contents
x
Figure 12-11: Case Listing ..................................................................................................... 12-14 Figure 12-12: Manage Case Access ...................................................................................... 12-14 Figure 12-13: Case Access Confirmation .............................................................................. 12-15 Figure 12-14: Welcome! Page (Beneficiary) .......................................................................... 12-16 Figure 12-15: Case Listing (Beneficiary) ................................................................................ 12-16 Figure 13-1: Case Information: Header Fields ........................................................................ 13-1 Figure 13-2: Payment Information Tab .................................................................................... 13-4 Figure 13-3: Refund Information Tab ....................................................................................... 13-6 Figure 13-4: Letter Activity Tab ................................................................................................ 13-7 Figure 13-5: Waiver/Redetermination/Compromise Tab .......................................................... 13-8 Figure 13-6: Final Conditional Payment Process Tab ............................................................ 13-10 Figure 13-7: Case Actions (Example) .................................................................................... 13-12 Figure 13-8: Authorization Documentation ............................................................................. 13-14 Figure 13-9: Authorization Documentation Upload ................................................................ 13-15 Figure 13-10: Sample of Uploaded Document ....................................................................... 13-16 Figure 13-11: Authorization Documentation Confirmation ...................................................... 13-17 Figure 13-12: Payment Summary Form ................................................................................. 13-19 Figure 13-13: Electronic Conditional Payment Letter Confirmation ........................................ 13-21 Figure 13-14: Electronic No Claims Paid by Medicare Letter Confirmation ............................ 13-21 Figure 13-15: Conditional Payment Letter Confirmation ........................................................ 13-23 Figure 13-16: No Claims Paid by Medicare Letter Confirmation ............................................ 13-23 Figure 13-17: Example Claims Listing for a Non-Beneficiary or Viewed without MFA ............ 13-26 Figure 13-18: Example Claims Listing for a Beneficiary or Viewed with MFA......................... 13-27 Figure 13-19: Demand Claims Listing .................................................................................... 13-27 Figure 13-20: Claims Dispute Verification (BCRC) ................................................................ 13-30 Figure 13-21: Dispute Claims Documentation Upload ........................................................... 13-31 Figure 13-22: Claims Dispute Confirmation (BCRC) .............................................................. 13-32 Figure 13-23: Settlement Information .................................................................................... 13-36 Figure 13-24: View Settlement Information ............................................................................ 13-39 Figure 13-25: Notice of Settlement Documentation Upload ................................................... 13-39 Figure 13-26: Notice of Settlement Confirmation ................................................................... 13-40 Figure 13-27: Initiate Demand Letter Confirmation (BCRC Case) .......................................... 13-41 Figure 13-28: Initiate Demand Letter Confirmation (Bene-Debtor) ......................................... 13-41 Figure 13-29: Update Settlement Information ........................................................................ 13-42 Figure 14-1: Warning - 120 Day Notification Action Can Only Be Selected Once .................... 14-3 Figure 14-2: 120 Days' Notice of Anticipated Settlement ......................................................... 14-4 Figure 14-3: Electronic Dispute Denial for Final CP Letter Confirmation .................................. 14-5 Figure 14-4: Warning - Calculate Final CP Amount Can Only Be Selected Once .................... 14-6 Figure 14-5: Calculate Final Conditional Payment Amount Confirmation ................................. 14-6 Figure 14-6: Notice of Anticipated Settlement Letter Confirmation ........................................... 14-7 Figure 14-7: Electronic Notice of Anticipated Settlement Letter Confirmation .......................... 14-8 Figure 14-8: Electronic Final Conditional Payment Letter Confirmation ................................... 14-9 Figure 14-9: Final Conditional Payment Amount Voided Confirmation ................................... 14-10 Figure 14-10: Verify Settlement Date ..................................................................................... 14-10 Figure 14-11: 120-Day Notification Action Can Only Be Selected Once (Insurer) .................. 14-11 Figure 14-12: 120-Day Notice of Settlement Confirmation (Insurer) ....................................... 14-12 Figure 15-1: Redetermination (First Level Appeal) Submission (Example: Beneficiary/MFA) .. 15-3 Figure 15-2: Redetermination (First Level Appeal) Verification (Example: Beneficiary/MFA) ... 15-4 Figure 15-3: Redetermination (First Level Appeal) Verification (Uploaded Documents) ........... 15-5 Figure 15-4: Redetermination (First Level Appeal) Submission Confirmation (Example: BCRC) .................................................................................................................... 15-6 Figure 15-5: Redetermination (First Level Appeal) Documentation Upload .............................. 15-7 Figure 15-6: View Redetermination (First Level Appeal) Submission (Example: BCRC) .......... 15-8
MSPRP User Guide Table of Contents
xi
Figure 15-7: Waiver Submission ............................................................................................ 15-10 Figure 15-8: Waiver Verification............................................................................................. 15-10 Figure 15-9: Waiver Verification (Uploaded Documents) ....................................................... 15-11 Figure 15-10: Waiver Submission Confirmation ..................................................................... 15-12 Figure 15-11: Waiver Documentation Upload ........................................................................ 15-13 Figure 15-12: Compromise Request (Pre-Demand)............................................................... 15-14 Figure 15-13: Compromise Request (Post-Demand) ............................................................. 15-15 Figure 15-14: Compromise Request (Pre-Demand Uploaded Documents) ............................ 15-16 Figure 15-15: Compromise Request Confirmation ................................................................. 15-16 Figure 15-16: Compromise Request Documentation Upload ................................................. 15-17 Figure 16-1: Sign Off Successful ............................................................................................. 16-1 Figure 17-1: Concurrent Sessions Detected ............................................................................ 17-3 Figure B-1: Tools Menu Manage Add-Ons ............................................................................... B-1 Figure B-2: Manage Add-Ons Dialog (Add-Ons Enabled) ......................................................... B-2 Figure B-3: Manage Add-Ons Dialog (Add-Ons Disabled) ........................................................ B-2
MSPRP User Guide Chapter 1: Summary of Version 4.2 Updates
1-1
Chapter 1: Summary of Version 4.2 Updates
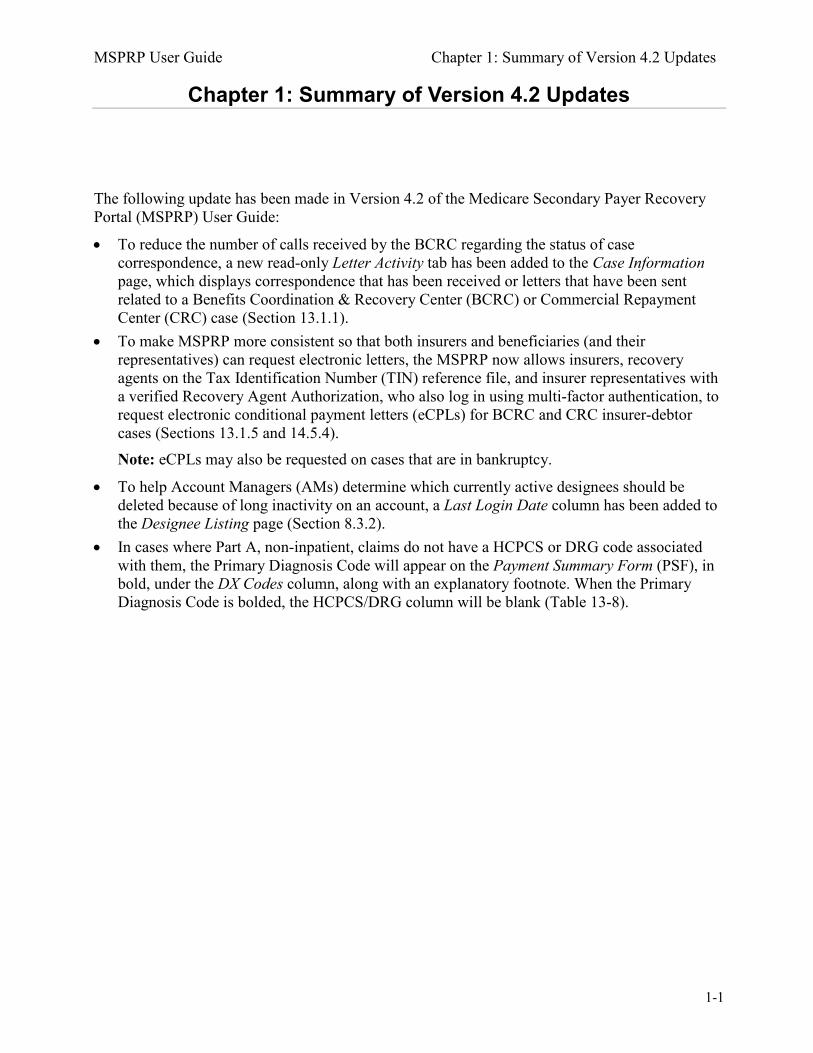
The following update has been made in Version 4.2 of the Medicare Secondary Payer Recovery Portal (MSPRP) User Guide:
• To reduce the number of calls received by the BCRC regarding the status of case correspondence, a new read-only Letter Activity tab has been added to the Case Information page, which displays correspondence that has been received or letters that have been sent related to a Benefits Coordination & Recovery Center (BCRC) or Commercial Repayment Center (CRC) case (Section 13.1.1).
• To make MSPRP more consistent so that both insurers and beneficiaries (and their representatives) can request electronic letters, the MSPRP now allows insurers, recovery agents on the Tax Identification Number (TIN) reference file, and insurer representatives with a verified Recovery Agent Authorization, who also log in using multi-factor authentication, to request electronic conditional payment letters (eCPLs) for BCRC and CRC insurer-debtor cases (Sections 13.1.5 and 14.5.4). Note: eCPLs may also be requested on cases that are in bankruptcy.
• To help Account Managers (AMs) determine which currently active designees should be deleted because of long inactivity on an account, a Last Login Date column has been added to the Designee Listing page (Section 8.3.2).
• In cases where Part A, non-inpatient, claims do not have a HCPCS or DRG code associated with them, the Primary Diagnosis Code will appear on the Payment Summary Form (PSF), in bold, under the DX Codes column, along with an explanatory footnote. When the Primary Diagnosis Code is bolded, the HCPCS/DRG column will be blank (Table 13-8).
MSPRP User Guide Chapter 2: Introduction
2-1
Chapter 2: Introduction
2.1 Overview The Medicare Secondary Payer Recovery Portal (MSPRP) is a secure web-based application that provides attorneys, representatives, beneficiaries, insurers, claimants, and recovery agents the ability to access and update certain Medicare Secondary Payer (MSP) case-specific information. Cases can come from the Benefits Coordination & Recovery Center (BCRC) and from the Commercial Repayment Center (CRC). Case IDs displayed in the application will either be the “BCRC Case ID” (BCRC insurer cases and all beneficiary cases) or the “CRC Recovery ID” (CRC insurer cases). Online, users can distinguish between BCRC and CRC cases in two ways: by the format of their Case ID and by the correspondence received for the cases. The Case ID is a 15-digit number in ##### ##### ##### format. BCRC Case IDs begin with the number 2, while CRC Case IDs begin with the number 3. The MSPRP allows users to:
• Submit Beneficiary Proof of Representation (POR), Beneficiary Consent to Release (CTR), or Recovery Agent Authorization.
• Request an update to a conditional payment amount. • Request an electronic conditional payment letter with Current Conditional Payment Amount. • Request a mailed copy of the conditional payment letter. • View/Dispute claims included in a conditional payment letter. • Request that a case be put into the Final Conditional Payment process. • View/submit Notice of Settlement information. • Initiate the Demand Letter process. • View/submit a redetermination (first level appeal). • Submit a waiver request. • Submit a compromise request. Not all actions are available to all users. What you can do on a case depends on the case type and your authorization level. For details regarding case authorization, see Chapter 10. This user guide was written to help you understand how to use the MSPRP. It explains the registration process and how to manage your recovery case. The information in this guide should be used in unison with the reference material available on the MSPRP, including the How To and Help About This Page documentation. All reference materials can be accessed from the MSPRP link: https://www.cob.cms.hhs.gov/MSPRP on the internet.

MSPRP User Guide Chapter 2: Introduction
2-2
2.2 Account Types Before beginning the registration process, you must determine your account type. There are two types of MSPRP accounts: Corporate and Representative. Account types are mutually exclusive and require registration on the MSPRP. Note: You can only select one account type during registration.
• Corporate account type indicates that the entity has an Employer Identification Number (EIN) or Tax Identification Number (TIN). Corporate accounts may have up to 100 designees.
• Representative account type indicates that the entity does not have an EIN or TIN. Representative accounts may have up to 5 designees.
Note: Beneficiaries will not register to use the MSPRP. Beneficiaries will access the MSPRP via the MyMedicare.gov website at https://mymedicare.gov/ using their established login ID and password for that application. Once logged into MyMedicare.gov, they can access the MSPRP from the MSP section of MyMedicare.gov. Beneficiaries are granted full access to their cases, and are matched to the cases by their Medicare ID (Health Insurance Claim Number [HICN] or Medicare Beneficiary Identifier [MBI]).
2.3 User Roles (Non-Beneficiary) An MSPRP user can be defined as one of three possible roles: Account Representative, Account Manager, or Account Designee. Users can have multiple roles across different accounts. You can be an Account Manager on one account and an Account Designee on another. ARs can also be ARs for multiple accounts.
2.3.1 Account Representative (AR) Role Your Account Representative is the individual who has the legal authority to bind the company to the contract and terms of MSPRP requirements and processing. Your Account Representative has ultimate accountability for the company’s compliance with MSPRP requirements and must approve the organization’s profile during the initial account setup and through any subsequent changes. Note: To change the Account Representative, the assigned Account Manager must follow the instructions to Update Corporate Information, as described in Section 8.2.
2.3.1.1 Account Representative Responsibilities • Performs the New Registration step on the MSPRP but is not provided with a login ID. • Assigns the Account Manager to the account. • Must approve the account setup, by physically signing the Profile Report, including the Data
Use Agreement, and returning it to Medicare.
2.3.1.2 Account Representative Restrictions Cannot be the Account Manager (Corporate accounts only) or Account Designee for any account (both Corporate and Representative). Note: For Representative accounts, the Account Representative may be the Account Manager, but they have the option to assign the Account Manager role to another person.
MSPRP User Guide Chapter 2: Introduction
2-3
2.3.2 Account Manager (AM) Role Each MSPRP account must have an assigned Account Manager. The Account Manager is established during the Account Setup process. Each MSPRP account can have only one Account Manager. This is the individual who controls the administration of an organization’s account and manages cases, which includes managing access to case information. The Account Manager is a registered user of the system. The Beneficiary is, by default, the Account Manager for their recovery cases. For Corporate and Representative account types, the Account Manager is assigned during the Account Setup process. (For Representative accounts, the Account Representative may be the Account Manager, but they have the option to assign the Account Manager role to another person). Note: To change an Account Manager, the Account Representative for the Corporate or Representative account must contact the Electronic Data Interchange (EDI) department. (Section 2.3.6.)
2.3.2.1 Account Manager Responsibilities • Register on the MSPRP, obtain a login ID and password, and complete account setup. • For Representative accounts, reviews, signs, and returns the Profile Report upon its receipt in
order to be granted access to all MSPRP functionality. Note: For Corporate accounts, the Account Manager will only be granted access after the Profile Report is signed and returned by the Account Representative.
2.3.2.2 Account Manager Abilities • Can invite other users to register on the MSPRP and function as Account Designees for a
specific account. • Can grant/add an Account Designee’s access to a case. • Can revoke/remove an Account Designee’s access to a case and/or an entire MSPRP account. • Can change own personal information. • Can update account contact information (e.g., company name, recovery case mailing address,
etc.). • Can submit new case requests for the MSPRP account they are associated with. • Can view/manage cases that they are associated with (i.e., cases they successfully requested
access to). • Can replace the Account Representative for the MSPRP account. • Can be associated to other MSPRP accounts as an Account Manager or an Account Designee. • Can remove a case(s) from the account (see Chapter 12).
2.3.2.3 Account Manager Restrictions Account Managers cannot be an Account Representative for any Account ID (Corporate account only).
MSPRP User Guide Chapter 2: Introduction
2-4
2.3.3 Account Designee (AD) Role At the organization’s discretion, an Account Manager for Corporate or Representative Account types may invite other individuals, known as Account Designees, to have access to the MSPRP for the Account Manager’s account. Corporate accounts may have up to 100 Account Designees associated with one MSPRP account; Representative accounts may have up to 5.
2.3.3.1 Account Designee Responsibilities Account Designees must register on the MSPRP and obtain a login ID and password.
2.3.3.2 Account Designee Abilities • Can be associated with multiple MSPRP accounts in the role of Account Designee, but only
by an Account Manager invitation. • Can be reassigned to be the Account Manager for an existing account. • Can change his or her personal information on the MSPRP. • Can submit new case requests for the MSPRP account they are associated with. • Can view/manage cases that they are associated with (i.e., cases they successfully requested
access to as well as cases that their Account Manager has granted them access to). • Can remove a case(s) from the Case Listing page (see Chapter 12). • Can be added, removed, or deleted by the Account Manager.
2.3.3.3 Account Designee Restrictions • Cannot be an Account Representative for any MSPRP account. • Cannot invite other users to be an Account Designee for an MSPRP account. • Cannot update MSPRP account information.
2.3.4 Beneficiary Role A beneficiary is authorized to access and manage each of their recovery cases on the MSPRP.
2.3.4.1 Beneficiary Abilities • Access the MSPRP as an authenticated user through the MyMedicare website • Perform Case Actions:
• Request an update to a conditional payment amount • Request an electronic conditional payment letter with Current Conditional Payment
Amount • Request a mailed copy of a conditional payment letter • Request that their case be put into the Final Conditional Payment process • View/Dispute Claims • View/submit Notice of Settlement • Initiate Demand Letter • View/Submit Redetermination (First Level Appeal) • Submit Waiver Request
MSPRP User Guide Chapter 2: Introduction
2-5
• Submit Compromise Request • View case information with unmasked Medicare ID (HICN or MBI), name, case ID, and date
of birth • View claim data with unmasked Medicare ID (HICN or MBI), processing contractor, provider
name, diagnosis codes, and types of services
2.3.5 Login ID and Password Limits Each user of the MSPRP can have only one login ID and password. Unless previously registered, all registrants are directed to the MSPRP URL to register for a MSPRP account. Users of other Coordination of Benefits Secure Website (COBSW) applications (Section 111 COBSW, Workers’ Compensation Medicare Set-Aside Arrangement Portal (WCMSAP), and the Commercial Repayment Center Portal (CRCP)) must use the same login ID and password for all of these applications. Accordingly, if you change your password in any COBSW application, it is changed for all other COBSW applications, including MSPRP.
2.3.6 Electronic Data Interchange (EDI) Representative Support Users of the MSPRP may need assistance with managing an account or managing their personal information within the application. If necessary, you may contact an EDI representative for assistance. Contact an EDI representative if the Account ID and Personal Identification Number (PIN) letter is not received within 2 weeks (10 business days) after completing the New Registration process. The EDI representative can re-send the letter, allowing you to complete the account setup. Information entered during initial registration can only be changed after the initial registration letter has been received. Contact an EDI representative if:
• You have any questions or problems regarding your account at any time during account setup. • You forget your login ID and cannot remember the answers to your security questions. The
EDI representative can re-send your login ID to your registered e-mail address. • You forget your password and cannot remember the answers to your security questions. The
EDI representative can generate a temporary password and send it to your registered e-mail address.
• You incorrectly entered your PIN 3 times and locked the account. The EDI representative can reset the PIN to unlock the account.
• You have questions about case request errors. The EDI representative will work with you to understand the error and determine the solution.
Contact the EDI Department by phone at (646) 458-6740 (TTY/TDD: 1-855-797-2627), or by e-mail at [email protected]. EDI representatives are available to assist you Monday through Friday, excluding Federal holidays, from 9:00 a.m. to 5:00 p.m., Eastern Time.
MSPRP User Guide Chapter 3: Welcome to the MSPRP
3-1
Chapter 3: Welcome to the MSPRP
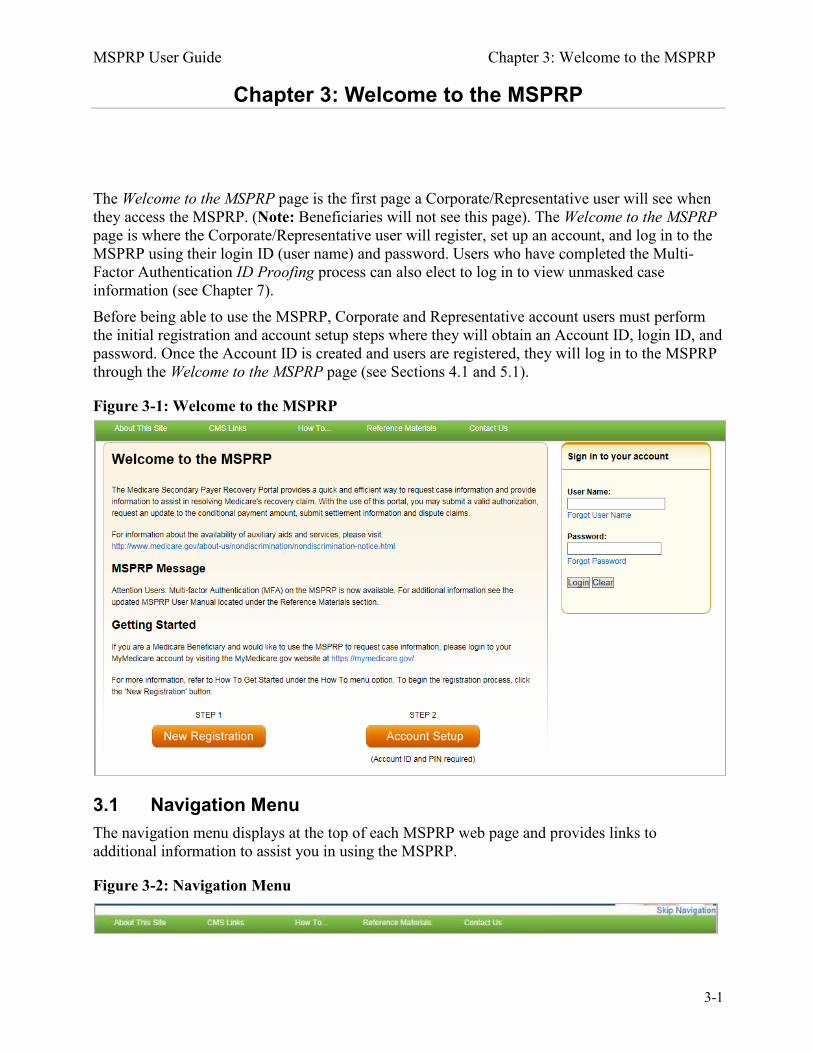
The Welcome to the MSPRP page is the first page a Corporate/Representative user will see when they access the MSPRP. (Note: Beneficiaries will not see this page). The Welcome to the MSPRP page is where the Corporate/Representative user will register, set up an account, and log in to the MSPRP using their login ID (user name) and password. Users who have completed the Multi-Factor Authentication ID Proofing process can also elect to log in to view unmasked case information (see Chapter 7). Before being able to use the MSPRP, Corporate and Representative account users must perform the initial registration and account setup steps where they will obtain an Account ID, login ID, and password. Once the Account ID is created and users are registered, they will log in to the MSPRP through the Welcome to the MSPRP page (see Sections 4.1 and 5.1).
Figure 3-1: Welcome to the MSPRP
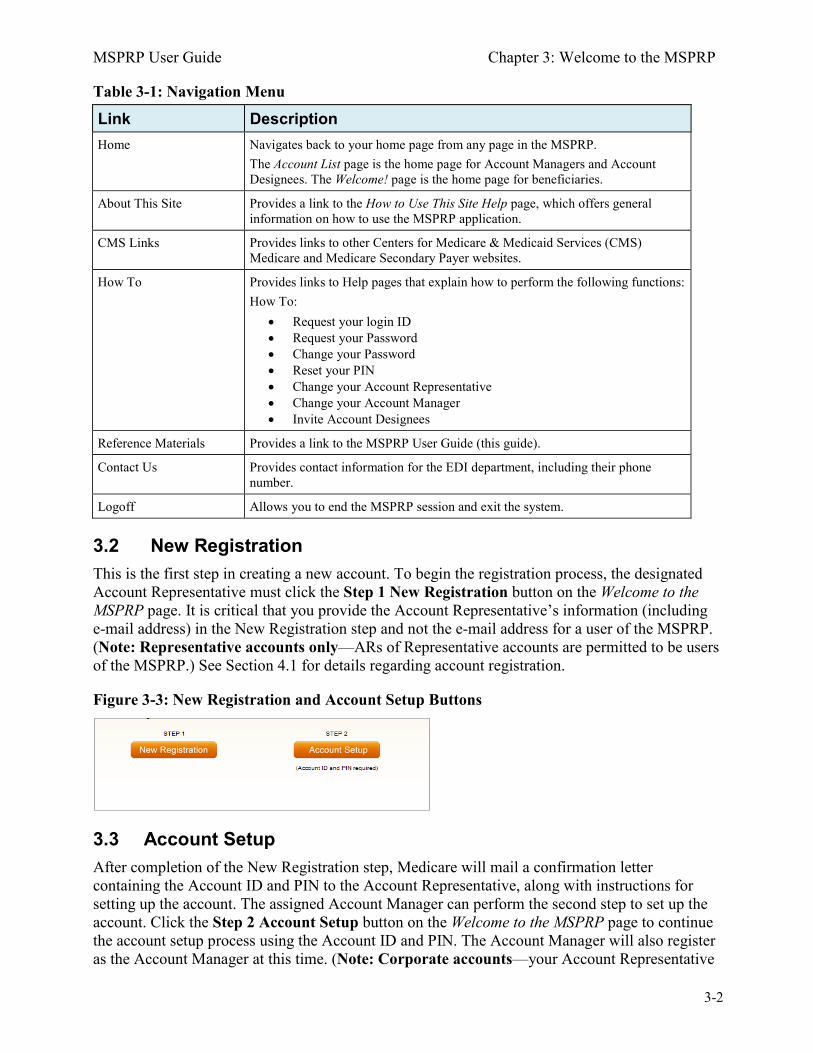
3.1 Navigation Menu The navigation menu displays at the top of each MSPRP web page and provides links to additional information to assist you in using the MSPRP.
Figure 3-2: Navigation Menu
MSPRP User Guide Chapter 3: Welcome to the MSPRP
3-2
Table 3-1: Navigation Menu
Link Description Home Navigates back to your home page from any page in the MSPRP.
The Account List page is the home page for Account Managers and Account Designees. The Welcome! page is the home page for beneficiaries.
About This Site Provides a link to the How to Use This Site Help page, which offers general information on how to use the MSPRP application.
CMS Links Provides links to other Centers for Medicare & Medicaid Services (CMS) Medicare and Medicare Secondary Payer websites.
How To Provides links to Help pages that explain how to perform the following functions: How To:
• Request your login ID • Request your Password • Change your Password • Reset your PIN • Change your Account Representative • Change your Account Manager • Invite Account Designees
Reference Materials Provides a link to the MSPRP User Guide (this guide).
Contact Us Provides contact information for the EDI department, including their phone number.
Logoff Allows you to end the MSPRP session and exit the system.
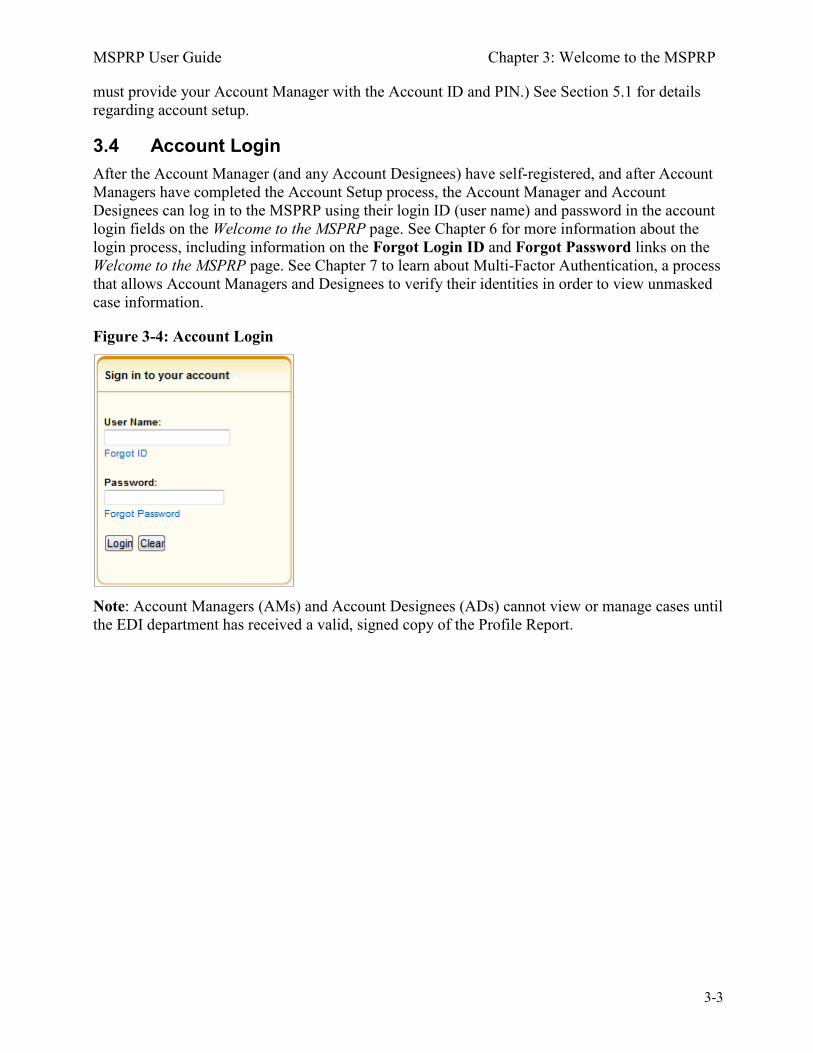
3.2 New Registration This is the first step in creating a new account. To begin the registration process, the designated Account Representative must click the Step 1 New Registration button on the Welcome to the MSPRP page. It is critical that you provide the Account Representative’s information (including e-mail address) in the New Registration step and not the e-mail address for a user of the MSPRP. (Note: Representative accounts only—ARs of Representative accounts are permitted to be users of the MSPRP.) See Section 4.1 for details regarding account registration.
Figure 3-3: New Registration and Account Setup Buttons
3.3 Account Setup After completion of the New Registration step, Medicare will mail a confirmation letter containing the Account ID and PIN to the Account Representative, along with instructions for setting up the account. The assigned Account Manager can perform the second step to set up the account. Click the Step 2 Account Setup button on the Welcome to the MSPRP page to continue the account setup process using the Account ID and PIN. The Account Manager will also register as the Account Manager at this time. (Note: Corporate accounts—your Account Representative
MSPRP User Guide Chapter 3: Welcome to the MSPRP
3-3
must provide your Account Manager with the Account ID and PIN.) See Section 5.1 for details regarding account setup.
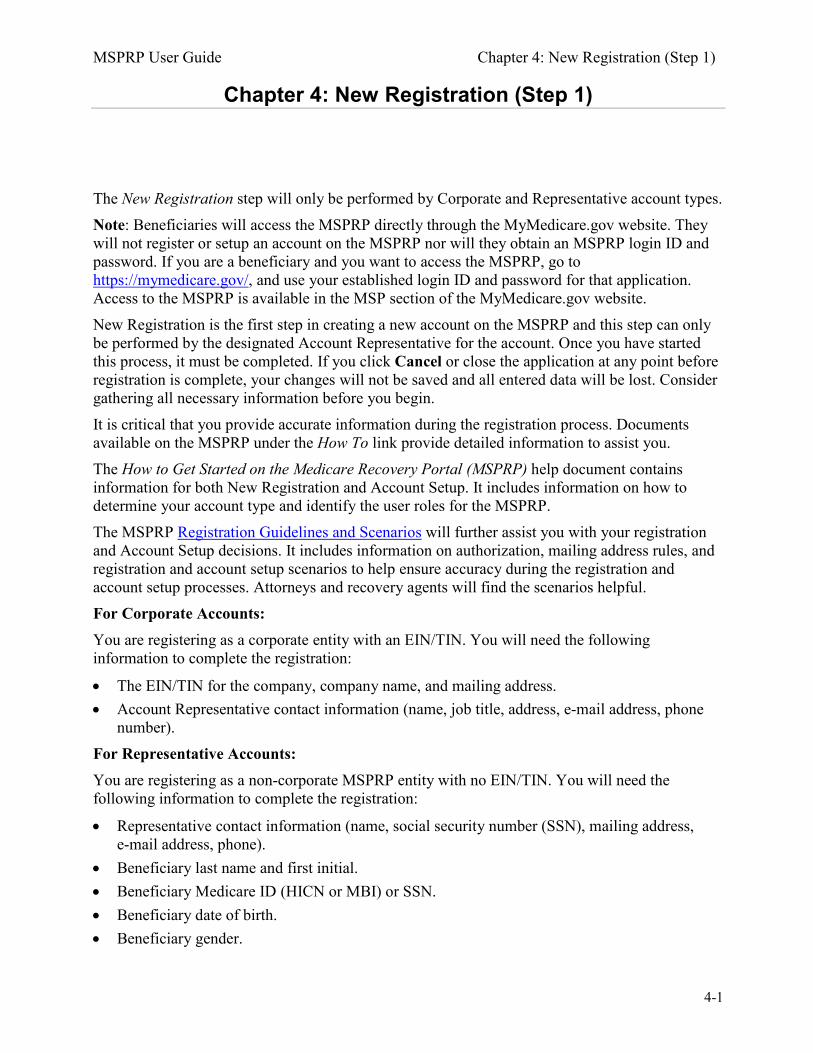
3.4 Account Login After the Account Manager (and any Account Designees) have self-registered, and after Account Managers have completed the Account Setup process, the Account Manager and Account Designees can log in to the MSPRP using their login ID (user name) and password in the account login fields on the Welcome to the MSPRP page. See Chapter 6 for more information about the login process, including information on the Forgot Login ID and Forgot Password links on the Welcome to the MSPRP page. See Chapter 7 to learn about Multi-Factor Authentication, a process that allows Account Managers and Designees to verify their identities in order to view unmasked case information.
Figure 3-4: Account Login
Note: Account Managers (AMs) and Account Designees (ADs) cannot view or manage cases until the EDI department has received a valid, signed copy of the Profile Report.
MSPRP User Guide Chapter 4: New Registration (Step 1)
4-1
Chapter 4: New Registration (Step 1)
The New Registration step will only be performed by Corporate and Representative account types. Note: Beneficiaries will access the MSPRP directly through the MyMedicare.gov website. They will not register or setup an account on the MSPRP nor will they obtain an MSPRP login ID and password. If you are a beneficiary and you want to access the MSPRP, go to https://mymedicare.gov/, and use your established login ID and password for that application. Access to the MSPRP is available in the MSP section of the MyMedicare.gov website. New Registration is the first step in creating a new account on the MSPRP and this step can only be performed by the designated Account Representative for the account. Once you have started this process, it must be completed. If you click Cancel or close the application at any point before registration is complete, your changes will not be saved and all entered data will be lost. Consider gathering all necessary information before you begin. It is critical that you provide accurate information during the registration process. Documents available on the MSPRP under the How To link provide detailed information to assist you. The How to Get Started on the Medicare Recovery Portal (MSPRP) help document contains information for both New Registration and Account Setup. It includes information on how to determine your account type and identify the user roles for the MSPRP. The MSPRP Registration Guidelines and Scenarios will further assist you with your registration and Account Setup decisions. It includes information on authorization, mailing address rules, and registration and account setup scenarios to help ensure accuracy during the registration and account setup processes. Attorneys and recovery agents will find the scenarios helpful. For Corporate Accounts: You are registering as a corporate entity with an EIN/TIN. You will need the following information to complete the registration:
• The EIN/TIN for the company, company name, and mailing address. • Account Representative contact information (name, job title, address, e-mail address, phone
number). For Representative Accounts: You are registering as a non-corporate MSPRP entity with no EIN/TIN. You will need the following information to complete the registration:
• Representative contact information (name, social security number (SSN), mailing address, e-mail address, phone).
• Beneficiary last name and first initial. • Beneficiary Medicare ID (HICN or MBI) or SSN. • Beneficiary date of birth. • Beneficiary gender.
MSPRP User Guide Chapter 4: New Registration (Step 1)
4-2
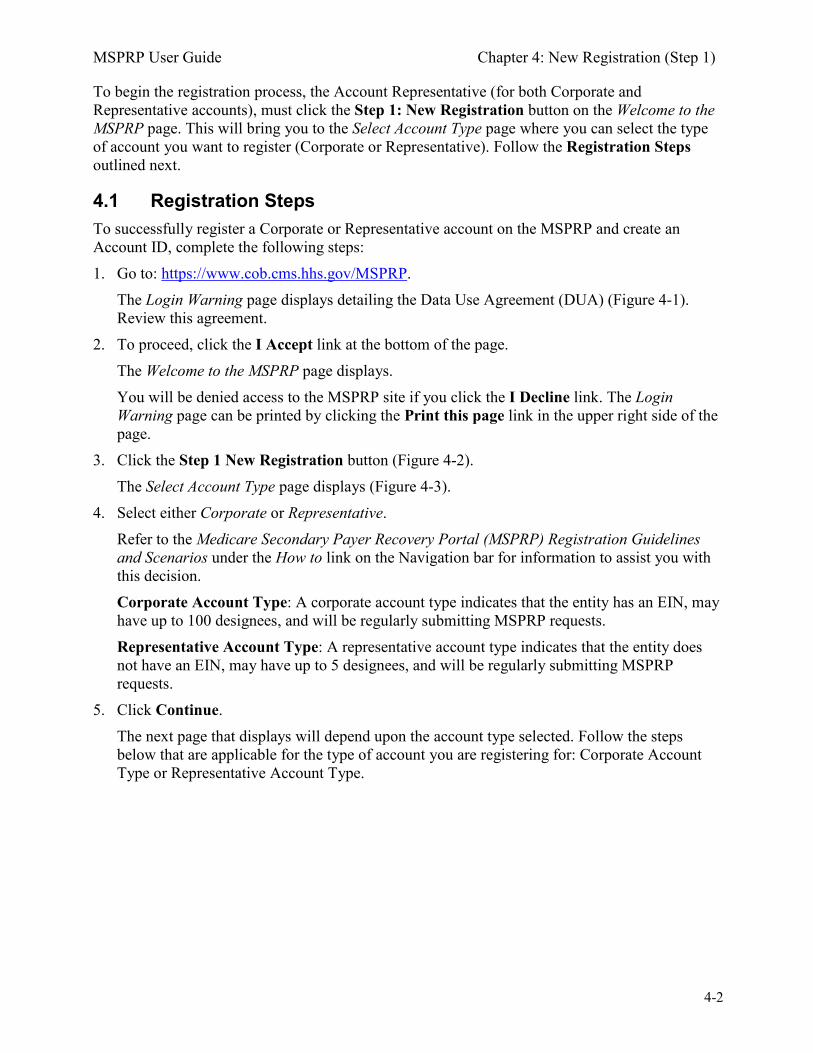
To begin the registration process, the Account Representative (for both Corporate and Representative accounts), must click the Step 1: New Registration button on the Welcome to the MSPRP page. This will bring you to the Select Account Type page where you can select the type of account you want to register (Corporate or Representative). Follow the Registration Steps outlined next.
4.1 Registration Steps To successfully register a Corporate or Representative account on the MSPRP and create an Account ID, complete the following steps: 1. Go to: https://www.cob.cms.hhs.gov/MSPRP.
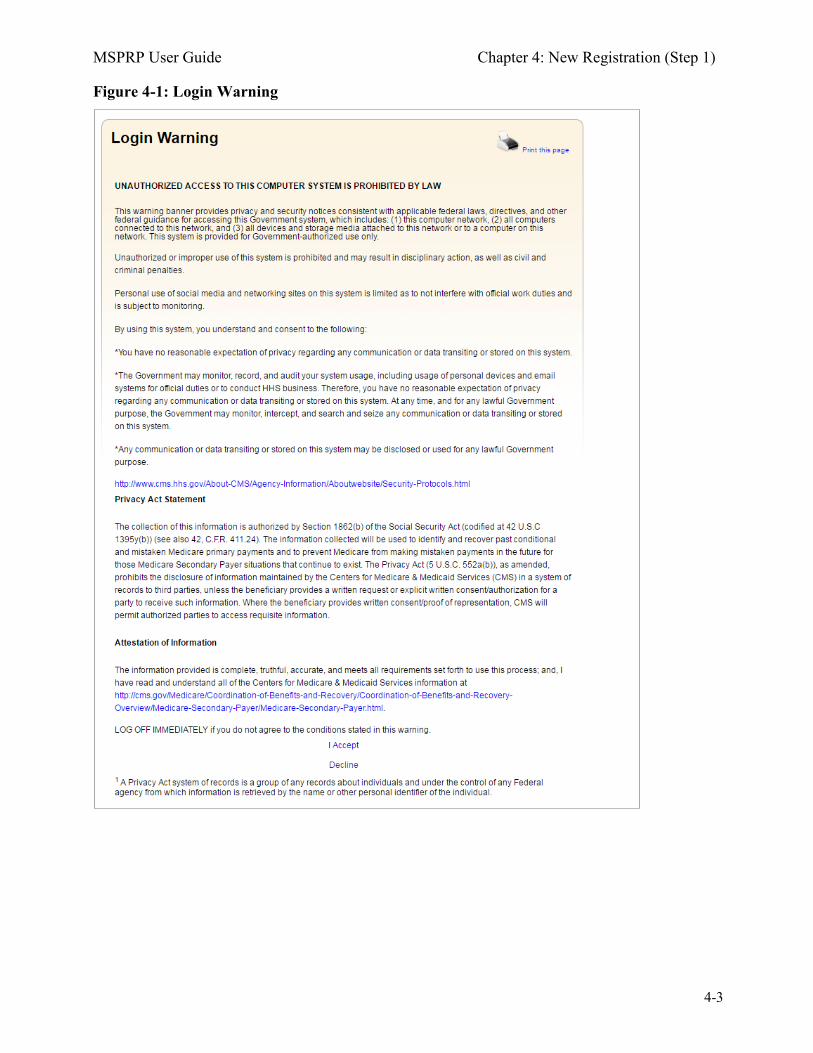
The Login Warning page displays detailing the Data Use Agreement (DUA) (Figure 4-1). Review this agreement.
2. To proceed, click the I Accept link at the bottom of the page. The Welcome to the MSPRP page displays. You will be denied access to the MSPRP site if you click the I Decline link. The Login Warning page can be printed by clicking the Print this page link in the upper right side of the page.
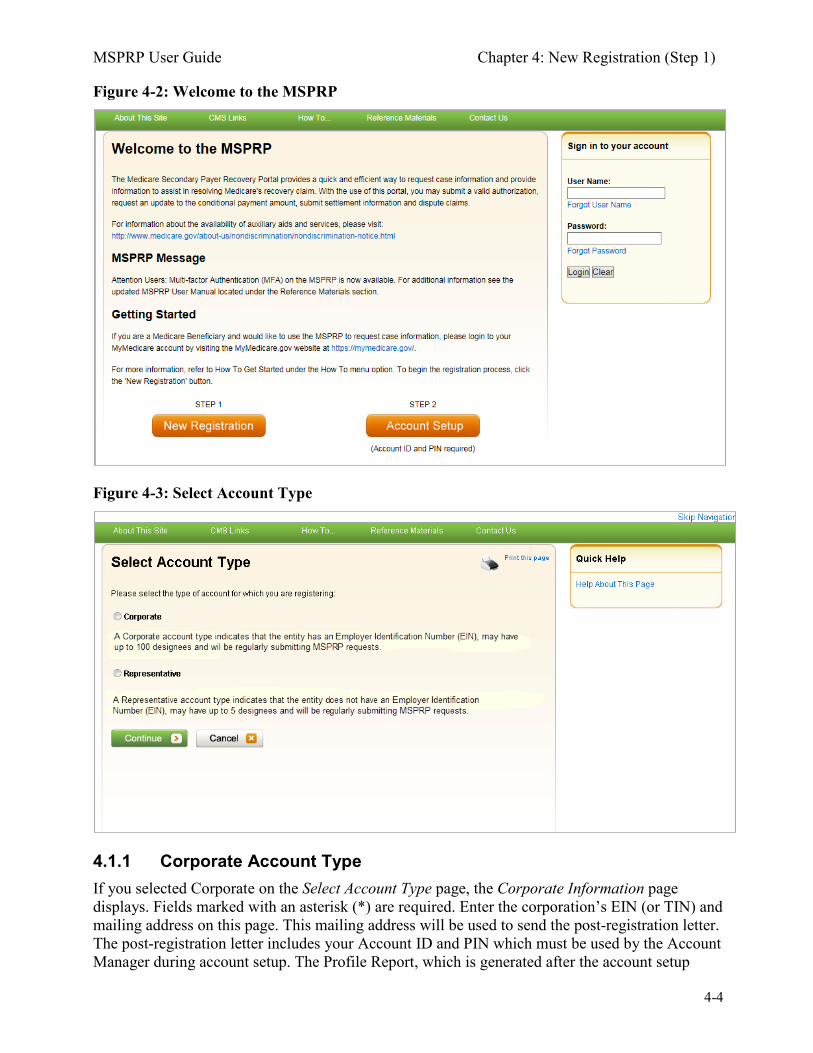
3. Click the Step 1 New Registration button (Figure 4-2). The Select Account Type page displays (Figure 4-3).
4. Select either Corporate or Representative. Refer to the Medicare Secondary Payer Recovery Portal (MSPRP) Registration Guidelines and Scenarios under the How to link on the Navigation bar for information to assist you with this decision. Corporate Account Type: A corporate account type indicates that the entity has an EIN, may have up to 100 designees, and will be regularly submitting MSPRP requests. Representative Account Type: A representative account type indicates that the entity does not have an EIN, may have up to 5 designees, and will be regularly submitting MSPRP requests.
5. Click Continue. The next page that displays will depend upon the account type selected. Follow the steps below that are applicable for the type of account you are registering for: Corporate Account Type or Representative Account Type.
MSPRP User Guide Chapter 4: New Registration (Step 1)
4-3
Figure 4-1: Login Warning
MSPRP User Guide Chapter 4: New Registration (Step 1)
4-4
Figure 4-2: Welcome to the MSPRP
Figure 4-3: Select Account Type
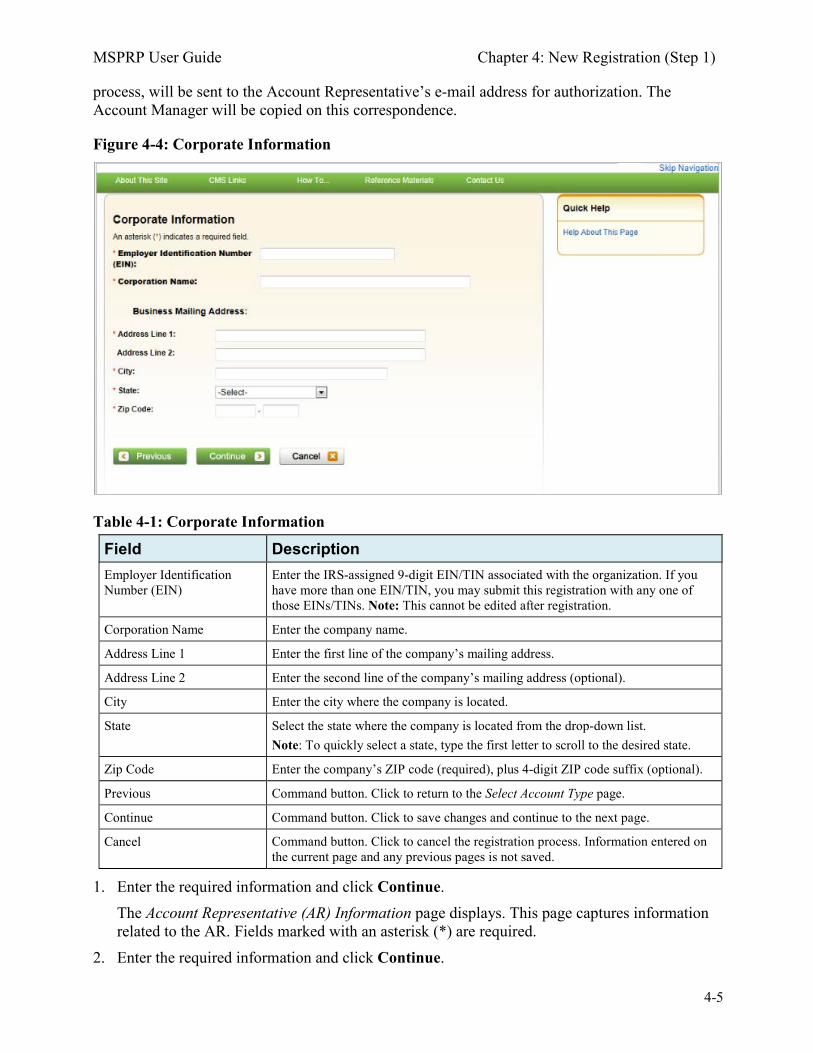
4.1.1 Corporate Account Type If you selected Corporate on the Select Account Type page, the Corporate Information page displays. Fields marked with an asterisk (*) are required. Enter the corporation’s EIN (or TIN) and mailing address on this page. This mailing address will be used to send the post-registration letter. The post-registration letter includes your Account ID and PIN which must be used by the Account Manager during account setup. The Profile Report, which is generated after the account setup
MSPRP User Guide Chapter 4: New Registration (Step 1)
4-5
process, will be sent to the Account Representative’s e-mail address for authorization. The Account Manager will be copied on this correspondence.
Figure 4-4: Corporate Information
Table 4-1: Corporate Information
Field Description Employer Identification Number (EIN)
Enter the IRS-assigned 9-digit EIN/TIN associated with the organization. If you have more than one EIN/TIN, you may submit this registration with any one of those EINs/TINs. Note: This cannot be edited after registration.
Corporation Name Enter the company name.
Address Line 1 Enter the first line of the company’s mailing address.
Address Line 2 Enter the second line of the company’s mailing address (optional).
City Enter the city where the company is located.
State Select the state where the company is located from the drop-down list. Note: To quickly select a state, type the first letter to scroll to the desired state.
Zip Code Enter the company’s ZIP code (required), plus 4-digit ZIP code suffix (optional).
Previous Command button. Click to return to the Select Account Type page.
Continue Command button. Click to save changes and continue to the next page.
Cancel Command button. Click to cancel the registration process. Information entered on the current page and any previous pages is not saved.
1. Enter the required information and click Continue. The Account Representative (AR) Information page displays. This page captures information related to the AR. Fields marked with an asterisk (*) are required.
2. Enter the required information and click Continue.
MSPRP User Guide Chapter 4: New Registration (Step 1)
4-6
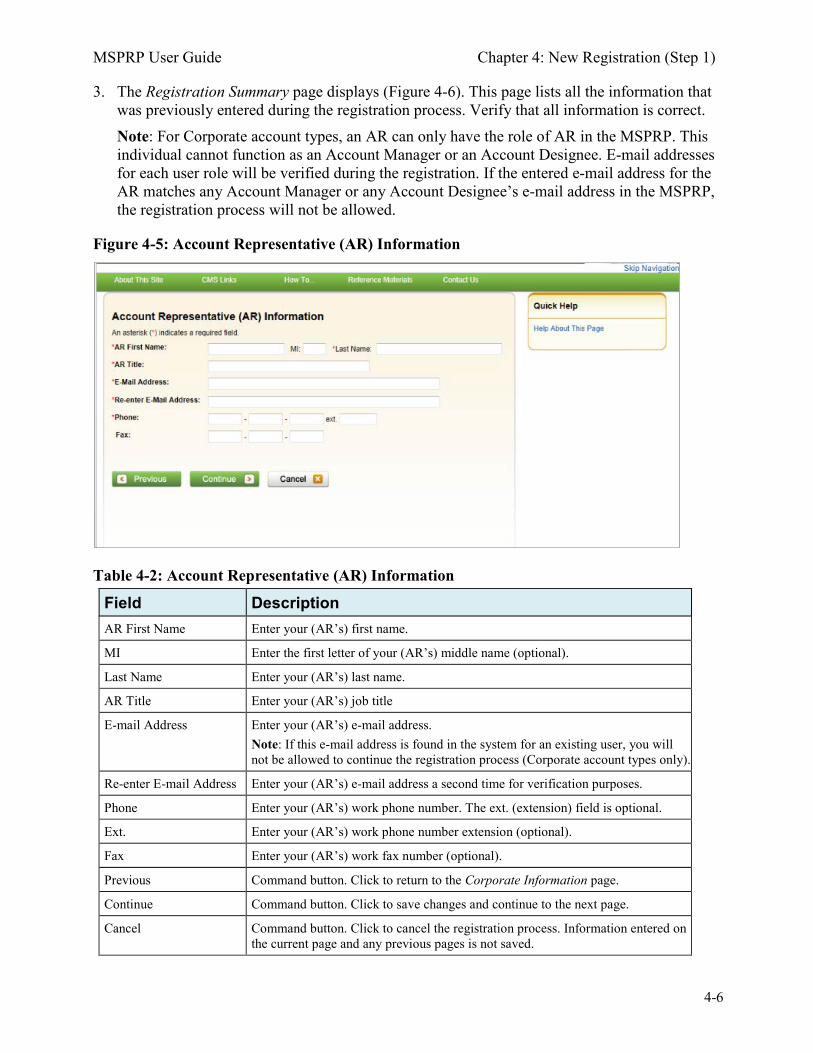
3. The Registration Summary page displays (Figure 4-6). This page lists all the information that was previously entered during the registration process. Verify that all information is correct. Note: For Corporate account types, an AR can only have the role of AR in the MSPRP. This individual cannot function as an Account Manager or an Account Designee. E-mail addresses for each user role will be verified during the registration. If the entered e-mail address for the AR matches any Account Manager or any Account Designee’s e-mail address in the MSPRP, the registration process will not be allowed.
Figure 4-5: Account Representative (AR) Information
Table 4-2: Account Representative (AR) Information
Field Description AR First Name Enter your (AR’s) first name.
MI Enter the first letter of your (AR’s) middle name (optional).
Last Name Enter your (AR’s) last name.
AR Title Enter your (AR’s) job title
E-mail Address Enter your (AR’s) e-mail address. Note: If this e-mail address is found in the system for an existing user, you will not be allowed to continue the registration process (Corporate account types only).
Re-enter E-mail Address Enter your (AR’s) e-mail address a second time for verification purposes.
Phone Enter your (AR’s) work phone number. The ext. (extension) field is optional.
Ext. Enter your (AR’s) work phone number extension (optional).
Fax Enter your (AR’s) work fax number (optional).
Previous Command button. Click to return to the Corporate Information page.
Continue Command button. Click to save changes and continue to the next page.
Cancel Command button. Click to cancel the registration process. Information entered on the current page and any previous pages is not saved.

MSPRP User Guide Chapter 4: New Registration (Step 1)
4-7
4. Click Previous to return to the Account Representative (AR) Information page. Click Cancel to exit the registration process and delete all information entered during the registration process.
5. To make corrections, click Edit next to the applicable section to return to that page. If you click Edit, you will need to enter your e-mail address in the Re-enter E-mail address field on the Account Representative (AR) Information page to continue.
6. Once all corrections have been made, click Continue at the bottom of the Registration Summary page. The Thank You page displays (Figure 4-7). Note: Your assigned Account ID is provided on this page. Make a note of your Account ID, or use the Print this page link to print this information.
7. Click the Medicare Secondary Payer Portal Welcome Page link to return to the Welcome to the MSPRP page.
Figure 4-6: Registration Summary
MSPRP User Guide Chapter 4: New Registration (Step 1)
4-8
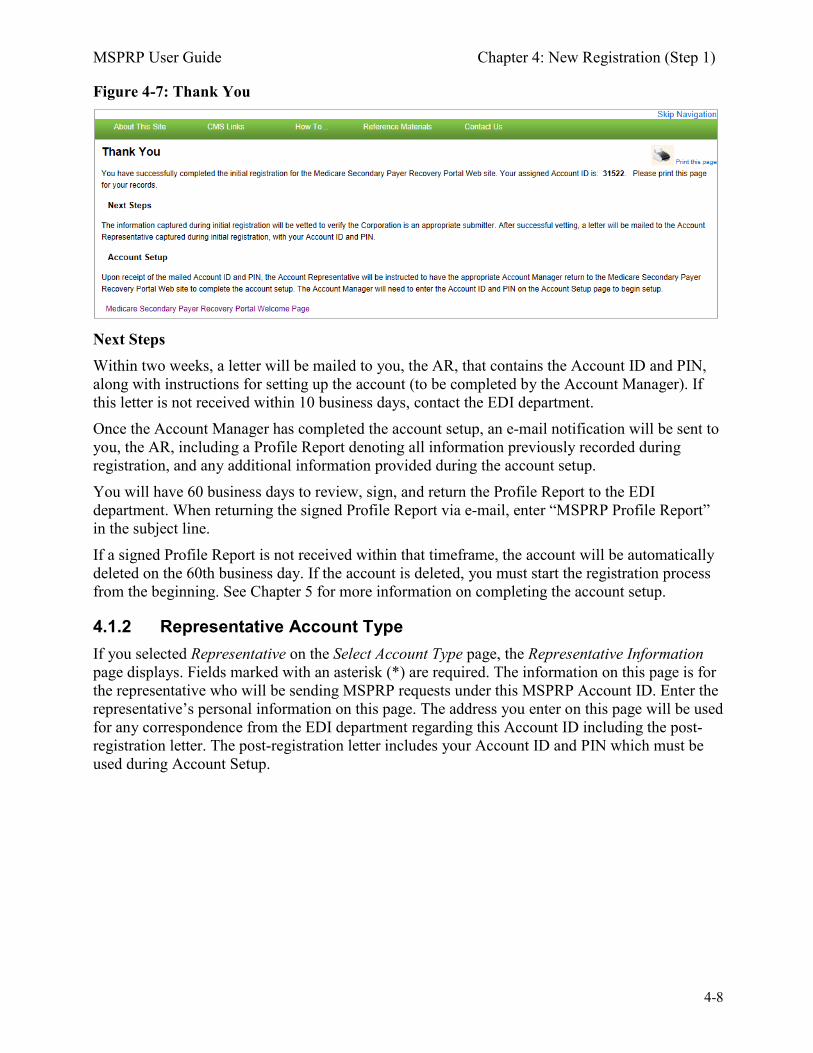
Figure 4-7: Thank You
Next Steps Within two weeks, a letter will be mailed to you, the AR, that contains the Account ID and PIN, along with instructions for setting up the account (to be completed by the Account Manager). If this letter is not received within 10 business days, contact the EDI department. Once the Account Manager has completed the account setup, an e-mail notification will be sent to you, the AR, including a Profile Report denoting all information previously recorded during registration, and any additional information provided during the account setup. You will have 60 business days to review, sign, and return the Profile Report to the EDI department. When returning the signed Profile Report via e-mail, enter “MSPRP Profile Report” in the subject line. If a signed Profile Report is not received within that timeframe, the account will be automatically deleted on the 60th business day. If the account is deleted, you must start the registration process from the beginning. See Chapter 5 for more information on completing the account setup.
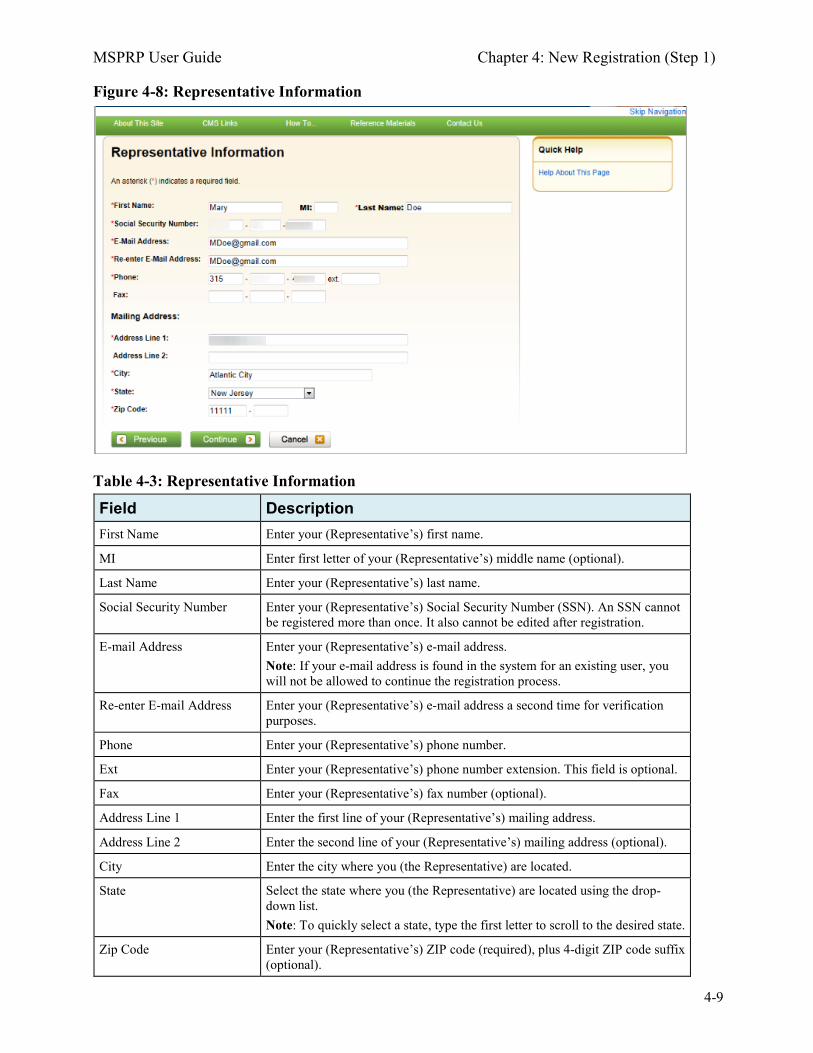
4.1.2 Representative Account Type If you selected Representative on the Select Account Type page, the Representative Information page displays. Fields marked with an asterisk (*) are required. The information on this page is for the representative who will be sending MSPRP requests under this MSPRP Account ID. Enter the representative’s personal information on this page. The address you enter on this page will be used for any correspondence from the EDI department regarding this Account ID including the post-registration letter. The post-registration letter includes your Account ID and PIN which must be used during Account Setup.
MSPRP User Guide Chapter 4: New Registration (Step 1)
4-9
Figure 4-8: Representative Information
Table 4-3: Representative Information
Field Description First Name Enter your (Representative’s) first name.
MI Enter first letter of your (Representative’s) middle name (optional).
Last Name Enter your (Representative’s) last name.
Social Security Number Enter your (Representative’s) Social Security Number (SSN). An SSN cannot be registered more than once. It also cannot be edited after registration.
E-mail Address Enter your (Representative’s) e-mail address. Note: If your e-mail address is found in the system for an existing user, you will not be allowed to continue the registration process.
Re-enter E-mail Address Enter your (Representative’s) e-mail address a second time for verification purposes.
Phone Enter your (Representative’s) phone number.
Ext Enter your (Representative’s) phone number extension. This field is optional.
Fax Enter your (Representative’s) fax number (optional).
Address Line 1 Enter the first line of your (Representative’s) mailing address.
Address Line 2 Enter the second line of your (Representative’s) mailing address (optional).
City Enter the city where you (the Representative) are located.
State Select the state where you (the Representative) are located using the drop-down list. Note: To quickly select a state, type the first letter to scroll to the desired state.
Zip Code Enter your (Representative’s) ZIP code (required), plus 4-digit ZIP code suffix (optional).

MSPRP User Guide Chapter 4: New Registration (Step 1)
4-10
Field Description Previous Command button. Click to return to the Select Account Type page.
Continue Command button. Click to save changes and continue to the next page.
Cancel Command button. Click to cancel the registration process. Information entered on the current page and any previous pages is not saved.
1. Enter the required information in the provided fields and click Continue. The Beneficiary Information page displays (Figure 4-9). You must submit information for a beneficiary who will have MSPRP requests submitted under this Account ID.
2. Enter the required information in the provided fields and click Continue. The Registration Summary page displays (Figure 4-10). This page lists all the information that was previously entered during the registration process. Verify that all information is correct.
3. Click Previous to return to the Beneficiary Information page. Click Cancel to exit the registration process and delete all information entered during the registration process.
4. To make corrections, click the Edit button next to the applicable section to return to that page. 5. Once all corrections have been made, click Continue at the bottom of the Registration
Summary page. The Thank You page displays (Figure 4-11). This page outlines the next steps in the registration process. Note: Your assigned Account ID is provided on this page. Make a note of your Account ID, or use the Print this page link to print this information.
6. Click the Medicare Secondary Payer Portal Welcome Page link to return to the Welcome to the MSPRP page.
Figure 4-9: Beneficiary Information

MSPRP User Guide Chapter 4: New Registration (Step 1)
4-11
Table 4-4: Beneficiary Information
Field Description Beneficiary Last Name Enter the beneficiary’s last name.
First Initial Enter the first initial of the beneficiary’s first name.
Medicare ID Enter the beneficiary’s HICN or MBI. If you enter the HICN or MBI, do not enter an SSN.
Beneficiary Social Security Number (SSN)
Enter the beneficiary’s SSN. If you enter the SSN, do not enter a Medicare ID.
Beneficiary Date of Birth Enter the beneficiary’s date of birth.
Beneficiary Gender Select the beneficiary’s gender from the drop-down list.
Previous Command button. Click to return to the Representative Information page.
Continue Command button. Click to save changes and continue to the next page.
Cancel Command button. Click to cancel the registration process. Information entered on the current page and any previous pages is not saved.
Figure 4-10: Registration Summary
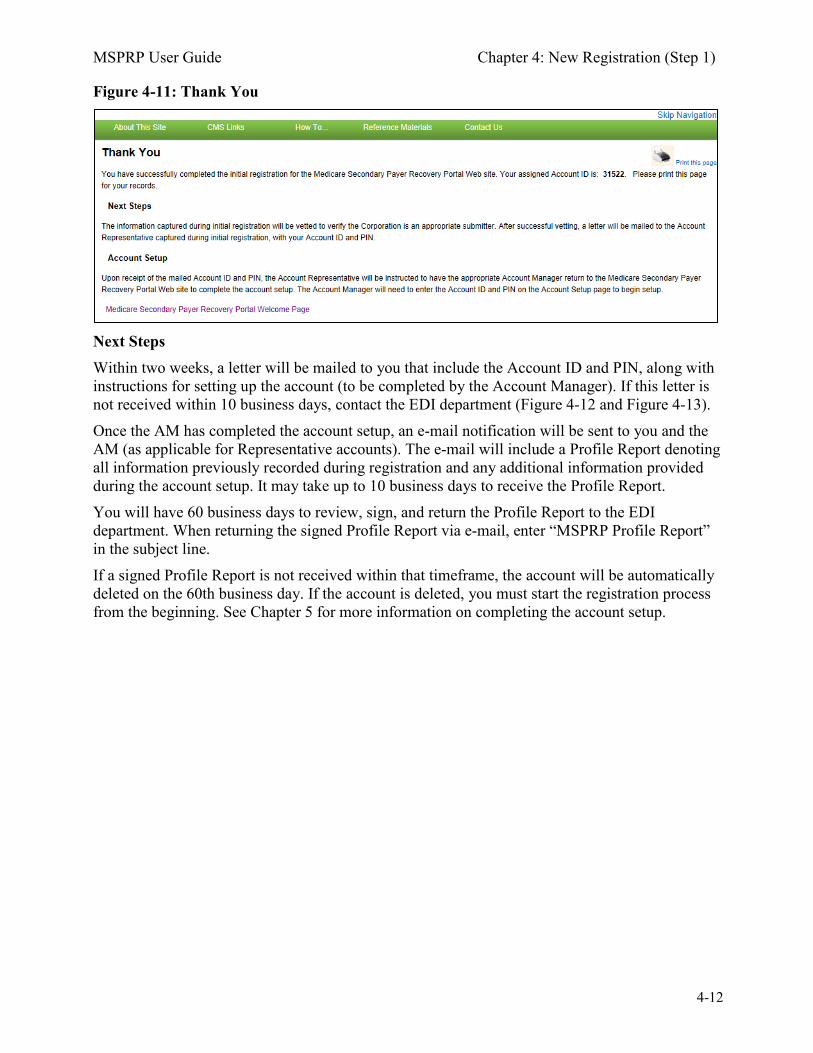
MSPRP User Guide Chapter 4: New Registration (Step 1)
4-12
Figure 4-11: Thank You
Next Steps Within two weeks, a letter will be mailed to you that include the Account ID and PIN, along with instructions for setting up the account (to be completed by the Account Manager). If this letter is not received within 10 business days, contact the EDI department (Figure 4-12 and Figure 4-13). Once the AM has completed the account setup, an e-mail notification will be sent to you and the AM (as applicable for Representative accounts). The e-mail will include a Profile Report denoting all information previously recorded during registration and any additional information provided during the account setup. It may take up to 10 business days to receive the Profile Report. You will have 60 business days to review, sign, and return the Profile Report to the EDI department. When returning the signed Profile Report via e-mail, enter “MSPRP Profile Report” in the subject line. If a signed Profile Report is not received within that timeframe, the account will be automatically deleted on the 60th business day. If the account is deleted, you must start the registration process from the beginning. See Chapter 5 for more information on completing the account setup.

MSPRP User Guide Chapter 4: New Registration (Step 1)
4-13
Figure 4-12: Sample PIN Letter (Page 1)
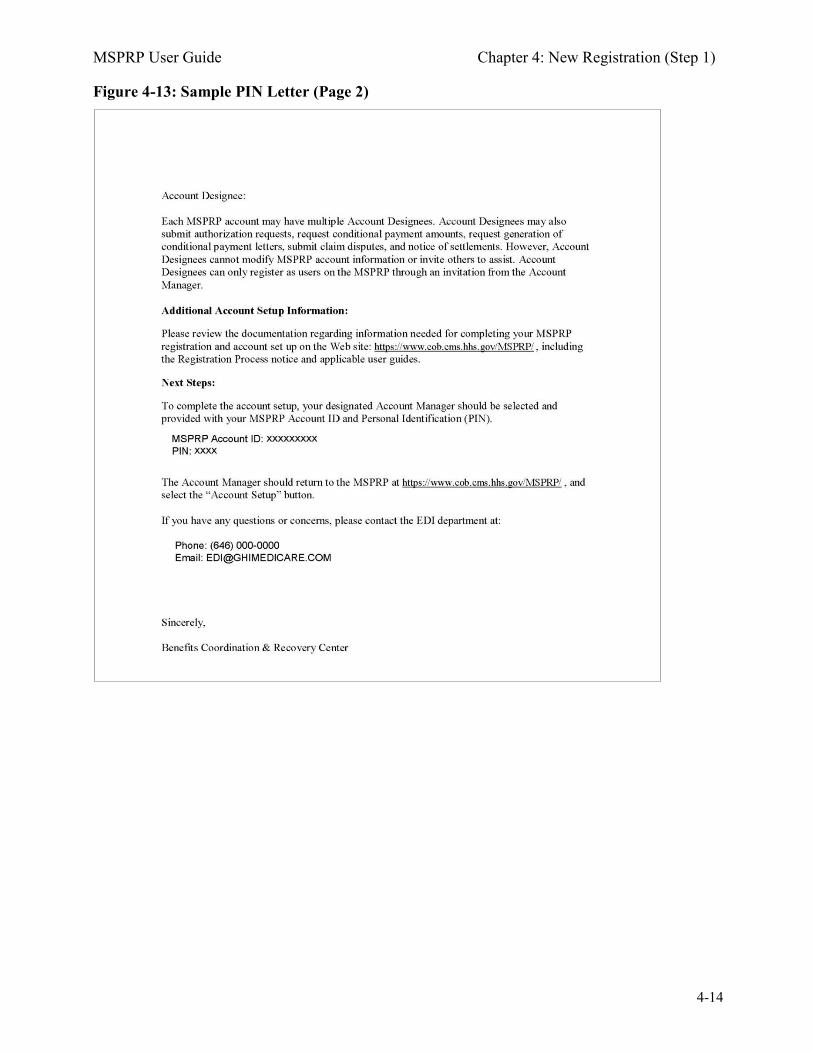
MSPRP User Guide Chapter 4: New Registration (Step 1)
4-14
Figure 4-13: Sample PIN Letter (Page 2)
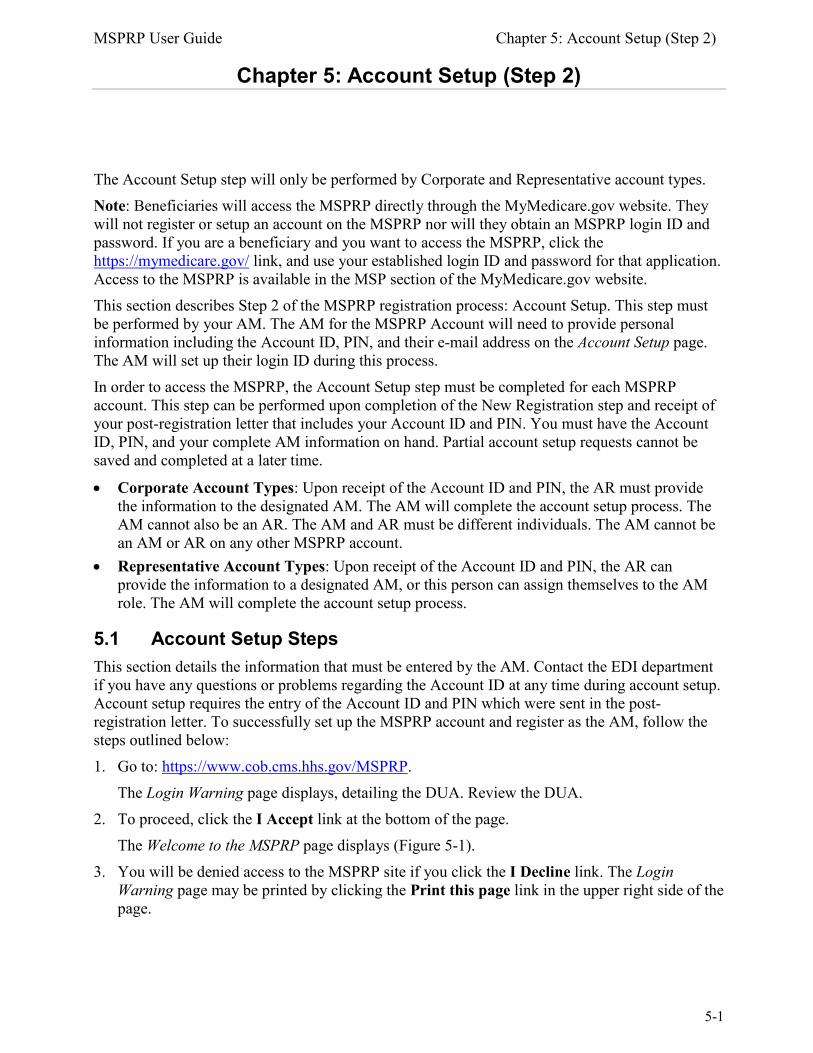
MSPRP User Guide Chapter 5: Account Setup (Step 2)
5-1
Chapter 5: Account Setup (Step 2)
The Account Setup step will only be performed by Corporate and Representative account types. Note: Beneficiaries will access the MSPRP directly through the MyMedicare.gov website. They will not register or setup an account on the MSPRP nor will they obtain an MSPRP login ID and password. If you are a beneficiary and you want to access the MSPRP, click the https://mymedicare.gov/ link, and use your established login ID and password for that application. Access to the MSPRP is available in the MSP section of the MyMedicare.gov website. This section describes Step 2 of the MSPRP registration process: Account Setup. This step must be performed by your AM. The AM for the MSPRP Account will need to provide personal information including the Account ID, PIN, and their e-mail address on the Account Setup page. The AM will set up their login ID during this process. In order to access the MSPRP, the Account Setup step must be completed for each MSPRP account. This step can be performed upon completion of the New Registration step and receipt of your post-registration letter that includes your Account ID and PIN. You must have the Account ID, PIN, and your complete AM information on hand. Partial account setup requests cannot be saved and completed at a later time.
• Corporate Account Types: Upon receipt of the Account ID and PIN, the AR must provide the information to the designated AM. The AM will complete the account setup process. The AM cannot also be an AR. The AM and AR must be different individuals. The AM cannot be an AM or AR on any other MSPRP account.
• Representative Account Types: Upon receipt of the Account ID and PIN, the AR can provide the information to a designated AM, or this person can assign themselves to the AM role. The AM will complete the account setup process.
5.1 Account Setup Steps This section details the information that must be entered by the AM. Contact the EDI department if you have any questions or problems regarding the Account ID at any time during account setup. Account setup requires the entry of the Account ID and PIN which were sent in the post-registration letter. To successfully set up the MSPRP account and register as the AM, follow the steps outlined below: 1. Go to: https://www.cob.cms.hhs.gov/MSPRP.
The Login Warning page displays, detailing the DUA. Review the DUA. 2. To proceed, click the I Accept link at the bottom of the page.
The Welcome to the MSPRP page displays (Figure 5-1). 3. You will be denied access to the MSPRP site if you click the I Decline link. The Login
Warning page may be printed by clicking the Print this page link in the upper right side of the page.
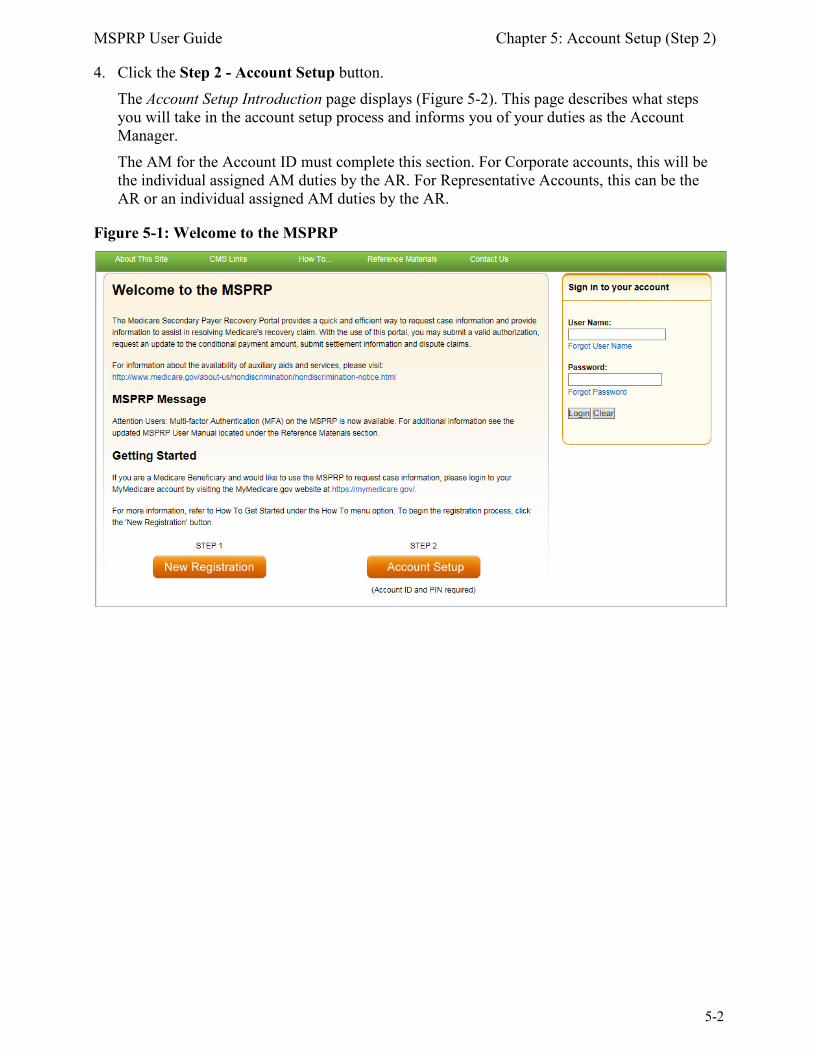
MSPRP User Guide Chapter 5: Account Setup (Step 2)
5-2
4. Click the Step 2 - Account Setup button. The Account Setup Introduction page displays (Figure 5-2). This page describes what steps you will take in the account setup process and informs you of your duties as the Account Manager. The AM for the Account ID must complete this section. For Corporate accounts, this will be the individual assigned AM duties by the AR. For Representative Accounts, this can be the AR or an individual assigned AM duties by the AR.
Figure 5-1: Welcome to the MSPRP
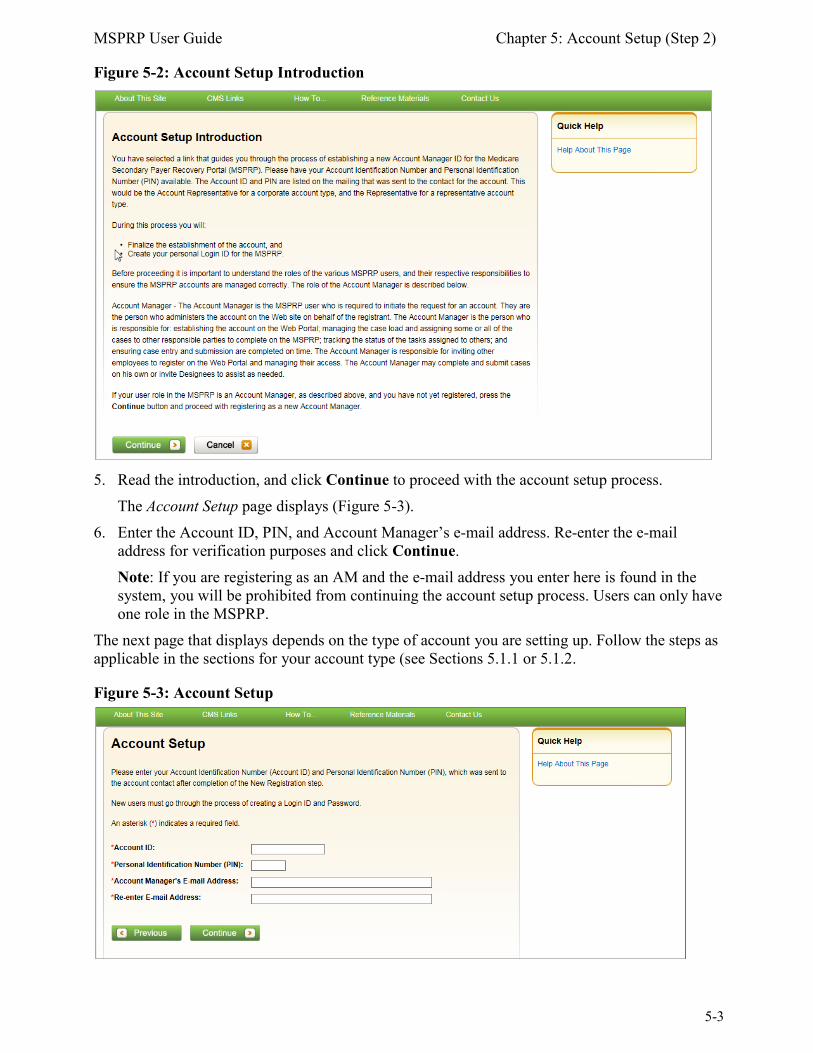
MSPRP User Guide Chapter 5: Account Setup (Step 2)
5-3
Figure 5-2: Account Setup Introduction
5. Read the introduction, and click Continue to proceed with the account setup process. The Account Setup page displays (Figure 5-3).
6. Enter the Account ID, PIN, and Account Manager’s e-mail address. Re-enter the e-mail address for verification purposes and click Continue. Note: If you are registering as an AM and the e-mail address you enter here is found in the system, you will be prohibited from continuing the account setup process. Users can only have one role in the MSPRP.
The next page that displays depends on the type of account you are setting up. Follow the steps as applicable in the sections for your account type (see Sections 5.1.1 or 5.1.2.
Figure 5-3: Account Setup
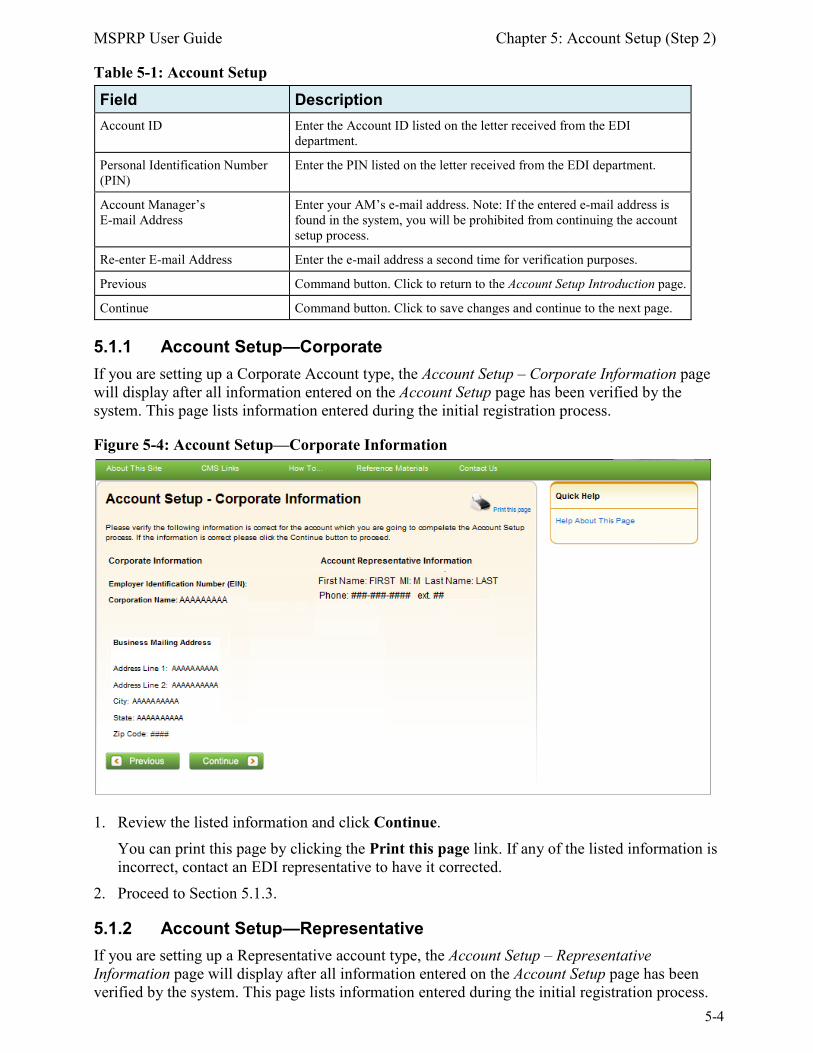
MSPRP User Guide Chapter 5: Account Setup (Step 2)
5-4
Table 5-1: Account Setup
Field Description Account ID Enter the Account ID listed on the letter received from the EDI
department.
Personal Identification Number (PIN)
Enter the PIN listed on the letter received from the EDI department.
Account Manager’s E-mail Address
Enter your AM’s e-mail address. Note: If the entered e-mail address is found in the system, you will be prohibited from continuing the account setup process.
Re-enter E-mail Address Enter the e-mail address a second time for verification purposes.
Previous Command button. Click to return to the Account Setup Introduction page.
Continue Command button. Click to save changes and continue to the next page.
5.1.1 Account Setup—Corporate If you are setting up a Corporate Account type, the Account Setup – Corporate Information page will display after all information entered on the Account Setup page has been verified by the system. This page lists information entered during the initial registration process.
Figure 5-4: Account Setup—Corporate Information
1. Review the listed information and click Continue. You can print this page by clicking the Print this page link. If any of the listed information is incorrect, contact an EDI representative to have it corrected.
2. Proceed to Section 5.1.3.
5.1.2 Account Setup—Representative If you are setting up a Representative account type, the Account Setup – Representative Information page will display after all information entered on the Account Setup page has been verified by the system. This page lists information entered during the initial registration process.

MSPRP User Guide Chapter 5: Account Setup (Step 2)
5-5
Figure 5-5: Account Setup—Representative Information
1. Review the listed information and click Continue. You can print this page by clicking the Print this page link. If any of the listed information is incorrect, contact an EDI representative to have it corrected.
2. Proceed to Section 5.1.3.
5.1.3 Account Manager (AM) Setup The Account Manager controls the administration of a specific MSPRP account. The AM has the following responsibilities:
• Review, sign, and return the Profile Report upon its receipt to be granted full access to all MSPRP functionality. (For Corporate accounts, the AR signs the Profile Report.)
• Manage the MSPRP account information and update general account information. • Invite other users to function as an AD for a specific account. • Grant AD access to cases. • Revoke AD access to cases and/or an entire MSPRP account. • Send requests for the MSPRP account they are associated with. • View and update cases for the MSPRP account they are associated with. • Upload documentation to a specific case for the MSPRP account they are associated with. • Replace the AR. • Remove a case(s) from the account Case Listing and Designee Case Listing page. Once you have clicked Continue on the Account Setup – Representative Information page or Account Setup – Corporate Information (as applicable), the Account Manager Personal Information page displays. The information entered here is required for subsequent communications. The AM’s personal information must be entered to register as the AM. The recovery case mailing address entered should be the mailing address at which you have previously received
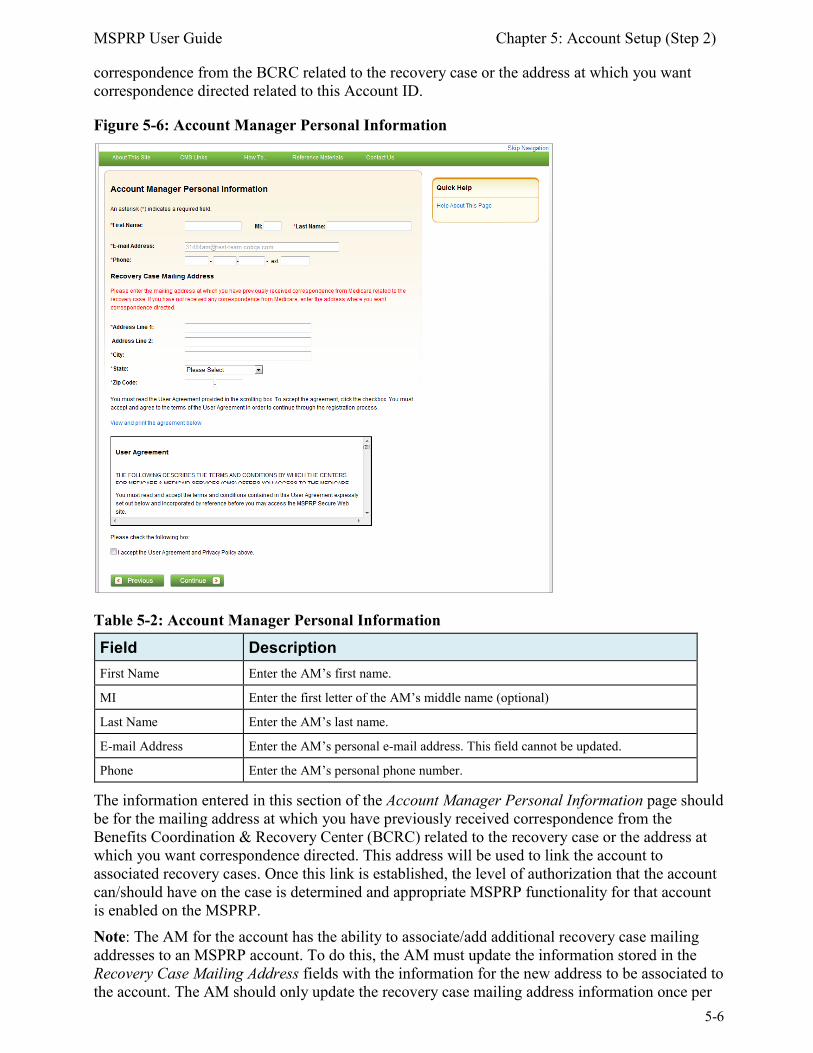
MSPRP User Guide Chapter 5: Account Setup (Step 2)
5-6
correspondence from the BCRC related to the recovery case or the address at which you want correspondence directed related to this Account ID.
Figure 5-6: Account Manager Personal Information
Table 5-2: Account Manager Personal Information
Field Description First Name Enter the AM’s first name.
MI Enter the first letter of the AM’s middle name (optional)
Last Name Enter the AM’s last name.
E-mail Address Enter the AM’s personal e-mail address. This field cannot be updated.
Phone Enter the AM’s personal phone number.
The information entered in this section of the Account Manager Personal Information page should be for the mailing address at which you have previously received correspondence from the Benefits Coordination & Recovery Center (BCRC) related to the recovery case or the address at which you want correspondence directed. This address will be used to link the account to associated recovery cases. Once this link is established, the level of authorization that the account can/should have on the case is determined and appropriate MSPRP functionality for that account is enabled on the MSPRP. Note: The AM for the account has the ability to associate/add additional recovery case mailing addresses to an MSPRP account. To do this, the AM must update the information stored in the Recovery Case Mailing Address fields with the information for the new address to be associated to the account. The AM should only update the recovery case mailing address information once per
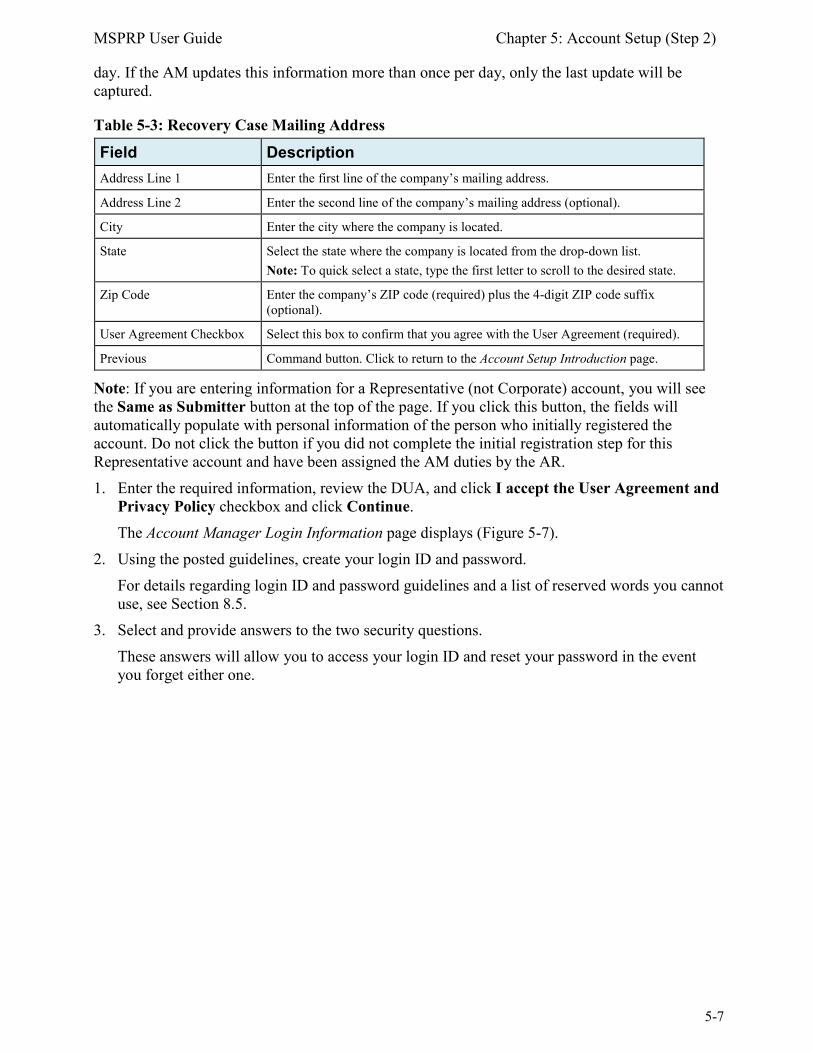
MSPRP User Guide Chapter 5: Account Setup (Step 2)
5-7
day. If the AM updates this information more than once per day, only the last update will be captured.
Table 5-3: Recovery Case Mailing Address
Field Description Address Line 1 Enter the first line of the company’s mailing address.
Address Line 2 Enter the second line of the company’s mailing address (optional).
City Enter the city where the company is located.
State Select the state where the company is located from the drop-down list. Note: To quick select a state, type the first letter to scroll to the desired state.
Zip Code Enter the company’s ZIP code (required) plus the 4-digit ZIP code suffix (optional).
User Agreement Checkbox Select this box to confirm that you agree with the User Agreement (required).
Previous Command button. Click to return to the Account Setup Introduction page.
Note: If you are entering information for a Representative (not Corporate) account, you will see the Same as Submitter button at the top of the page. If you click this button, the fields will automatically populate with personal information of the person who initially registered the account. Do not click the button if you did not complete the initial registration step for this Representative account and have been assigned the AM duties by the AR. 1. Enter the required information, review the DUA, and click I accept the User Agreement and
Privacy Policy checkbox and click Continue. The Account Manager Login Information page displays (Figure 5-7).
2. Using the posted guidelines, create your login ID and password. For details regarding login ID and password guidelines and a list of reserved words you cannot use, see Section 8.5.
3. Select and provide answers to the two security questions. These answers will allow you to access your login ID and reset your password in the event you forget either one.

MSPRP User Guide Chapter 5: Account Setup (Step 2)
5-8
Figure 5-7: Account Manager Login Information
Table 5-4: Account Manager Login Information
Field Description Login ID Enter a new login ID that you will use when you log in to the MSPRP.
Password Enter a new password that will be assigned to you, the AM.
Re-enter Password Enter the new password a second time for verification purposes.
Security Question 1 Click the drop-down arrow to view the list of security questions. Select one question to answer.
Answer 1 Enter your answer to the security question. Make sure to remember this answer.
Security Question 2 Click the drop-down arrow to view the list of security questions. Select one question to answer.
Answer 2 Enter your answer to the security question. Make sure to remember this answer.
Previous Command button. Click to return to the previous page.
Continue Command button. Click to save changes and continue to the next page.
4. Once all required information is entered, click Continue. The Account Manager Summary page displays (Figure 5-8). This page lists information that was previously entered during the account setup process.
5. Click Previous to return to the Account Manager Login Information page.
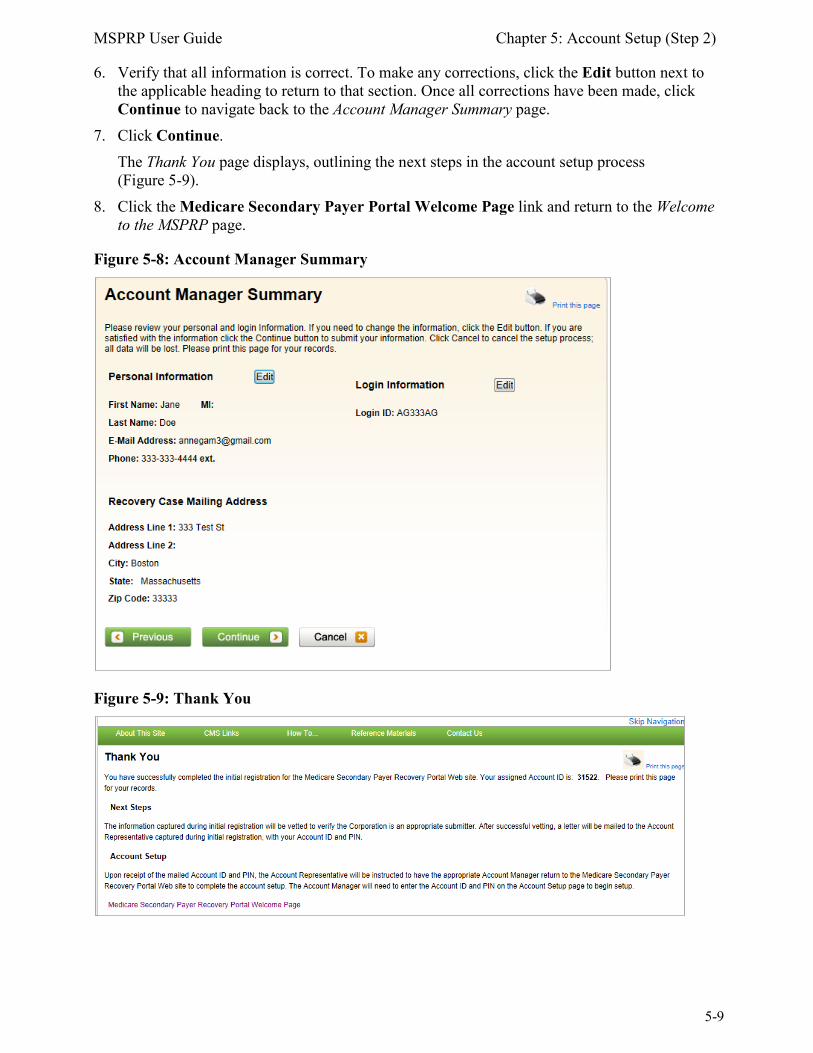
MSPRP User Guide Chapter 5: Account Setup (Step 2)
5-9
6. Verify that all information is correct. To make any corrections, click the Edit button next to the applicable heading to return to that section. Once all corrections have been made, click Continue to navigate back to the Account Manager Summary page.
7. Click Continue. The Thank You page displays, outlining the next steps in the account setup process (Figure 5-9).
8. Click the Medicare Secondary Payer Portal Welcome Page link and return to the Welcome to the MSPRP page.
Figure 5-8: Account Manager Summary
Figure 5-9: Thank You
MSPRP User Guide Chapter 5: Account Setup (Step 2)
5-10
Next Steps You have successfully set up the account and registered yourself as the Account Manager. As the AM, you control the administration of the MSPRP account. An e-mail notification will be sent to the AR listed on the account (Figure 5-10). If you are the AM of a Corporate account or an AM assigned to a Representative account, you will receive a copy of the e-mail. The e-mail will include a Profile Report noting all information previously recorded during registration and any additional information provided during the account setup (Figure 5-11). At the bottom of the Profile Report, the AR will be required to sign and date the report. For Representative accounts, if the AM is the same individual as the AR, then the AM can sign the report. It may take up to 10 business days to receive the Profile Report. Contact the EDI department if you do not receive a Profile Report after 10 business days. The AR will have 60 business days to review, sign, and return the Profile Report to the EDI department. When returning the signed Profile Report via e-mail, enter “MSPRP Profile Report” in the subject line. If a signed Profile Report is not received within that timeframe, the account will be automatically deleted on the 60th business day. If the account is deleted, you must start the registration process from the beginning. You will have limited functionality within the MSPRP until the Profile Report is returned. You cannot view or manage cases until the signed Profile Report is received by the EDI department. However, you can manage AD access (see Section 8.3). After the Profile Report has been received by the EDI department, you can log in to the account to maintain account and case information.
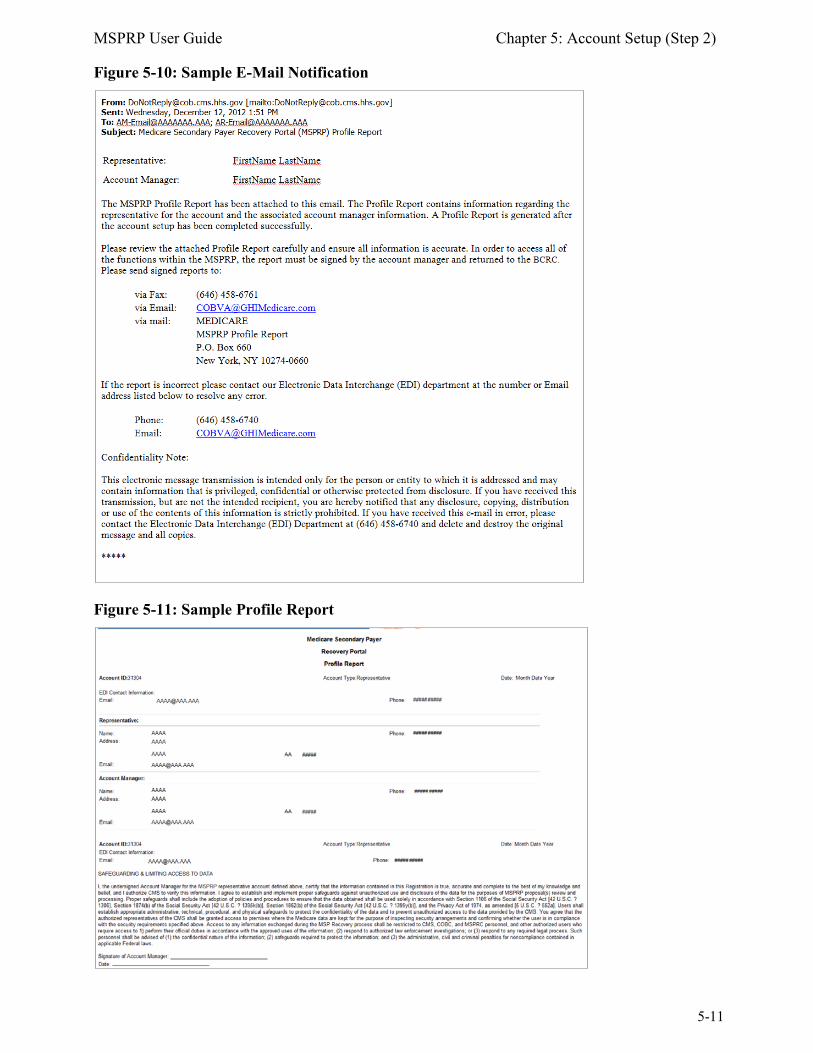
MSPRP User Guide Chapter 5: Account Setup (Step 2)
5-11
Figure 5-10: Sample E-Mail Notification
Figure 5-11: Sample Profile Report
MSPRP User Guide Chapter 6: Accessing the MSPRP
6-1
Chapter 6: Accessing the MSPRP
6.1 Log in to the MSPRP Site (Account Manager/Account Designee) Once the New Registration and Account Setup steps have been completed, the AM (Corporate or Representative) can log in to the MSPRP. Note: ADs will be able to log in to the site after they self-register on the MSPRP via an invitation e-mail received from an AM. (See Chapter 9 for more information). Note: The login process described in this section does not apply to beneficiaries. Beneficiaries will access the MSPRP directly through the MyMedicare.gov website. They will not register or setup an account on the MSPRP nor will they obtain an MSPRP login ID or password. If you are a beneficiary and you want to access the MSPRP, go to https://mymedicare.gov/ and use your established login ID and password for that application. Access to the MSPRP is available from the MSP section of the MyMedicare.gov website. 1. Go to: https://www.cob.cms.hhs.gov/MSPRP.
The Login Warning page displays, detailing the DUA (Figure 6-1).The Login Warning page can be printed by clicking the Print this page link in the upper right side of the page. Review the DUA.
2. To proceed, click the I Accept link at the bottom of the page. The Welcome to the MSPRP page displays (Figure 6-2). You will be denied access to the MSPRP site if you click the I Decline link.
3. Enter your login ID in the User Name field and your password in the Password field and click Login. Note: To remove the information entered in the User Name and Password fields click Clear. Your home page will display. See Section 6.1.1.
Note: If you have already completed the ID Proofing process and have activated a Credential ID, then the first page you will see after you log in will be the Choose Credential ID and Enter Security Code page (Figure 7-4). This page requires you to select whether or not you will use your Credential ID to view unmasked case information (Chapter 7) before your home page displays.
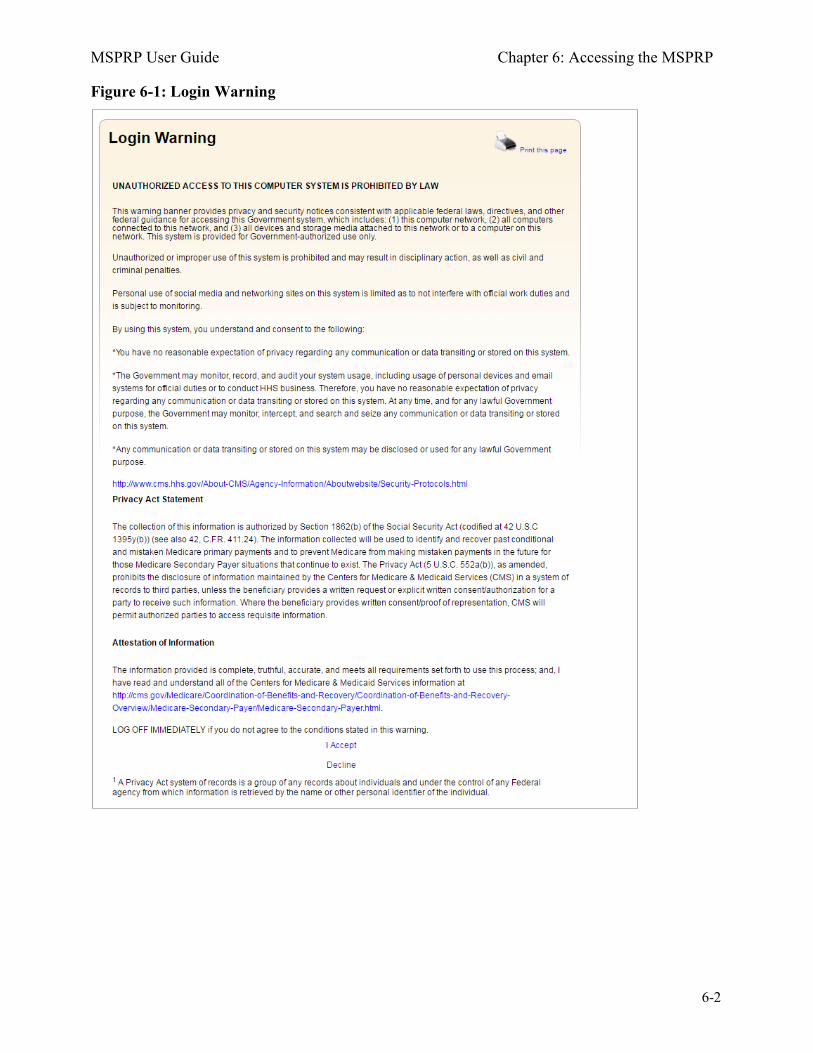
MSPRP User Guide Chapter 6: Accessing the MSPRP
6-2
Figure 6-1: Login Warning
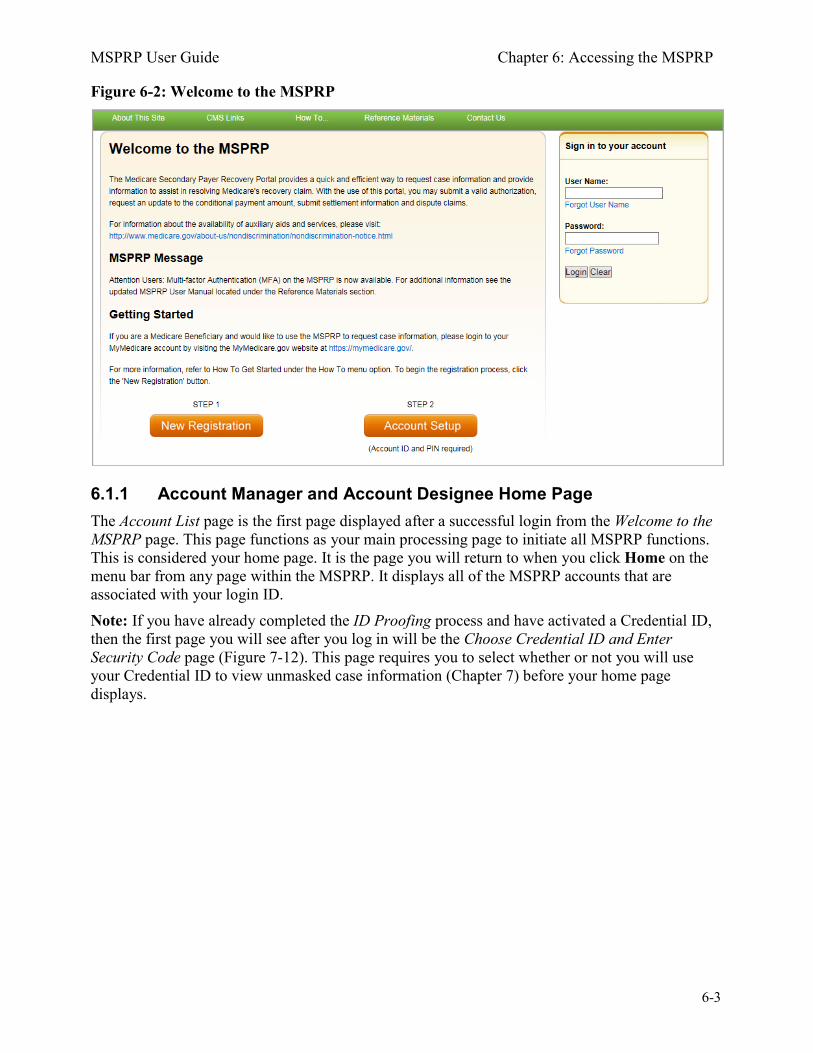
MSPRP User Guide Chapter 6: Accessing the MSPRP
6-3
Figure 6-2: Welcome to the MSPRP
6.1.1 Account Manager and Account Designee Home Page The Account List page is the first page displayed after a successful login from the Welcome to the MSPRP page. This page functions as your main processing page to initiate all MSPRP functions. This is considered your home page. It is the page you will return to when you click Home on the menu bar from any page within the MSPRP. It displays all of the MSPRP accounts that are associated with your login ID. Note: If you have already completed the ID Proofing process and have activated a Credential ID, then the first page you will see after you log in will be the Choose Credential ID and Enter Security Code page (Figure 7-12). This page requires you to select whether or not you will use your Credential ID to view unmasked case information (Chapter 7) before your home page displays.
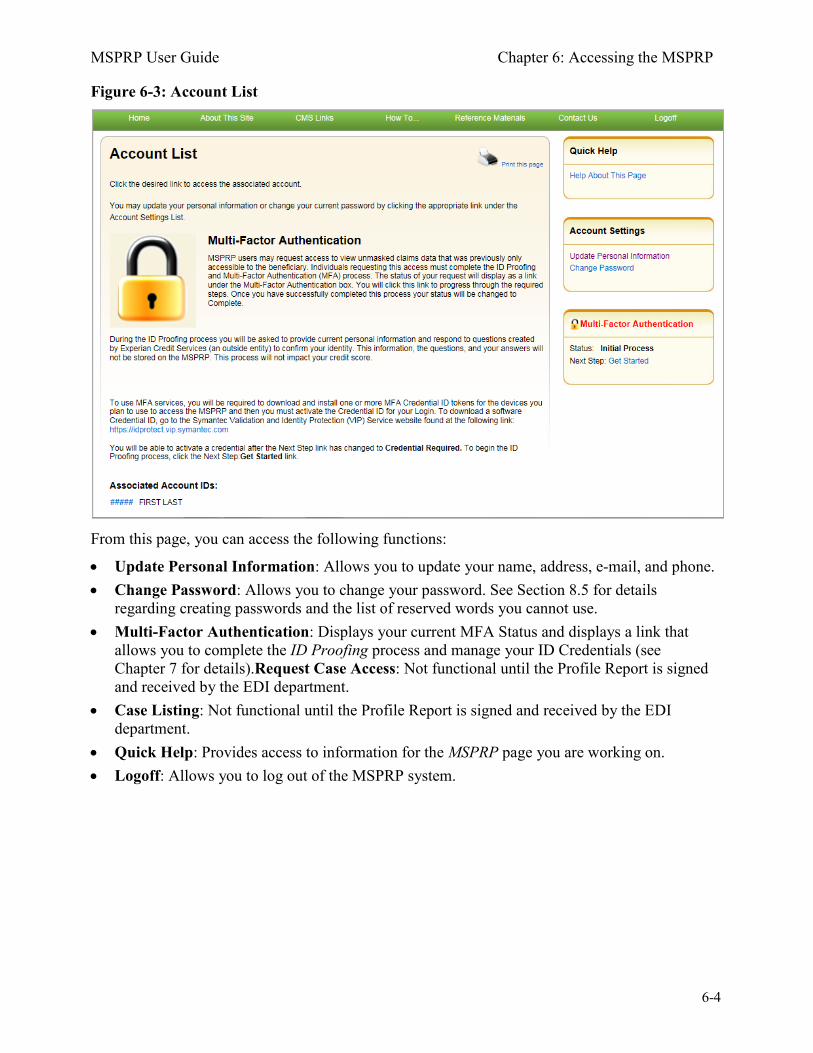
MSPRP User Guide Chapter 6: Accessing the MSPRP
6-4
Figure 6-3: Account List
From this page, you can access the following functions:
• Update Personal Information: Allows you to update your name, address, e-mail, and phone. • Change Password: Allows you to change your password. See Section 8.5 for details
regarding creating passwords and the list of reserved words you cannot use. • Multi-Factor Authentication: Displays your current MFA Status and displays a link that
allows you to complete the ID Proofing process and manage your ID Credentials (see Chapter 7 for details).Request Case Access: Not functional until the Profile Report is signed and received by the EDI department.
• Case Listing: Not functional until the Profile Report is signed and received by the EDI department.
• Quick Help: Provides access to information for the MSPRP page you are working on. • Logoff: Allows you to log out of the MSPRP system.
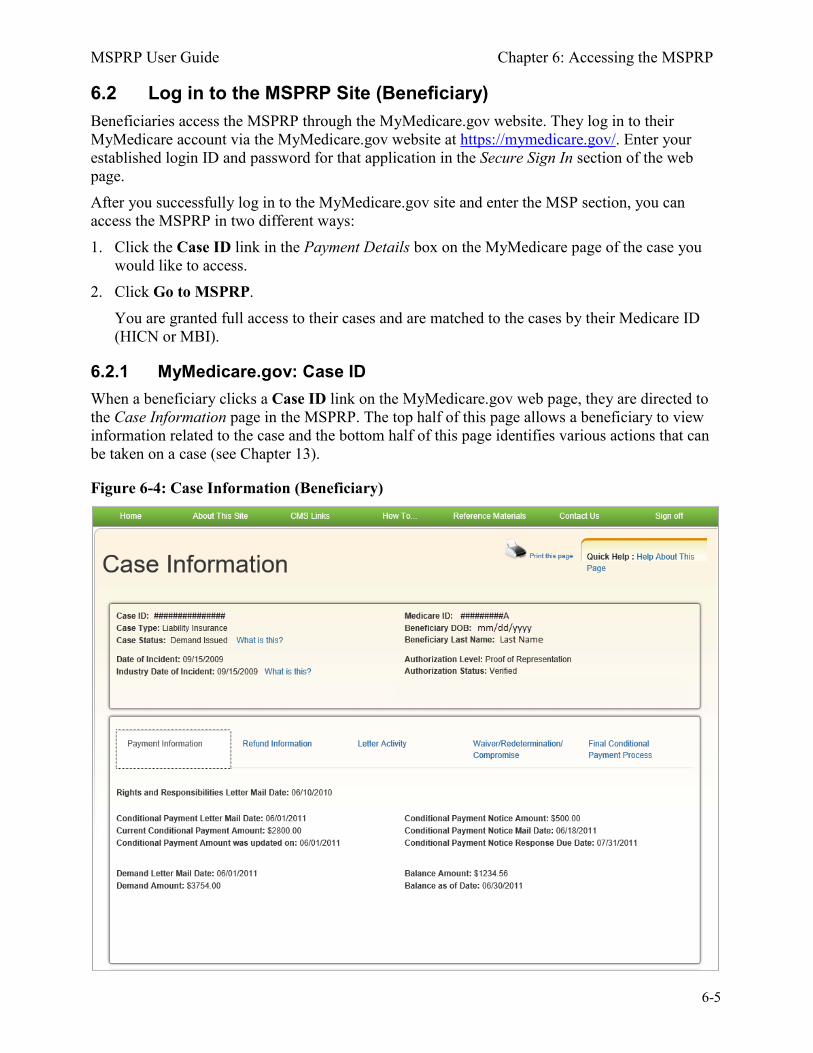
MSPRP User Guide Chapter 6: Accessing the MSPRP
6-5
6.2 Log in to the MSPRP Site (Beneficiary) Beneficiaries access the MSPRP through the MyMedicare.gov website. They log in to their MyMedicare account via the MyMedicare.gov website at https://mymedicare.gov/. Enter your established login ID and password for that application in the Secure Sign In section of the web page. After you successfully log in to the MyMedicare.gov site and enter the MSP section, you can access the MSPRP in two different ways: 1. Click the Case ID link in the Payment Details box on the MyMedicare page of the case you
would like to access. 2. Click Go to MSPRP.
You are granted full access to their cases and are matched to the cases by their Medicare ID (HICN or MBI).
6.2.1 MyMedicare.gov: Case ID When a beneficiary clicks a Case ID link on the MyMedicare.gov web page, they are directed to the Case Information page in the MSPRP. The top half of this page allows a beneficiary to view information related to the case and the bottom half of this page identifies various actions that can be taken on a case (see Chapter 13).
Figure 6-4: Case Information (Beneficiary)

MSPRP User Guide Chapter 6: Accessing the MSPRP
6-6
Figure 6-5: Case Information (Actions: Beneficiary)
6.2.2 MyMedicare.gov: Go to MSPRP When a beneficiary clicks the Go to MSPRP on the MyMedicare.gov web page, they will be directed to the Welcome! page in the MSPRP. This page functions as the main processing page to initiate all MSPRP functions. This is considered the beneficiary home page. It is the page you will return to when you click Home on the menu bar from any page within the MSPRP.
Figure 6-6: Welcome! Page (Beneficiary)
From this page, you can access the following functions:
• Quick Help: Provides access to information for the MSPRP page you are working on. • Logoff: Allows you to log out of the MSPRP system. • Request Case Access: Displays the New Case Request page where you can search for and add
a case to your Case Listing page (see Chapter 11). • Case Listing: Displays the Case Listing page where you will be able to view and manage your
cases (see Chapter 12).
6.3 Forgot User Name (Login ID) If you (Corporate or Representative Account types only) forgot your login ID (user name), follow the steps below.

MSPRP User Guide Chapter 6: Accessing the MSPRP
6-7
1. On the Welcome to the MSPRP page, click the Forgot ID link below the User Name field (Figure 6-6). This displays the Forgot Login ID page (Figure 6-8).
Figure 6-7: Forgot ID Link
Figure 6-8: Forgot Login ID
2. Enter your e-mail address and click Continue. The Forgot Login ID or Password page displays (Figure 6-9). Note: Click Cancel to stop and return to the Welcome to the MSPRP page without requesting your login ID.
3. Answer the two security questions with information you provided during the registration process. Correctly answer each of your pre-selected security questions.
4. Click Continue. The Forgot Login ID Confirmation page displays if your answers are correct (Figure 6-10). This page confirms that you have successfully requested your login ID. If the information you entered is correct, your login ID will be sent via e-mail. If you receive an error indicating that the answers are incorrect, check your answers and enter the information again. If you cannot remember the answers to your security questions, contact an EDI representative.
5. Click the Medicare Secondary Payer Recovery Portal Welcome Page link to return to the Welcome to the MSPRP page. You will receive an e-mail containing your login ID. After receipt of the e-mail, return to the MSPRP site and log in using your login ID and password. If you do not receive an e-mail within 24 hours, contact an EDI representative.
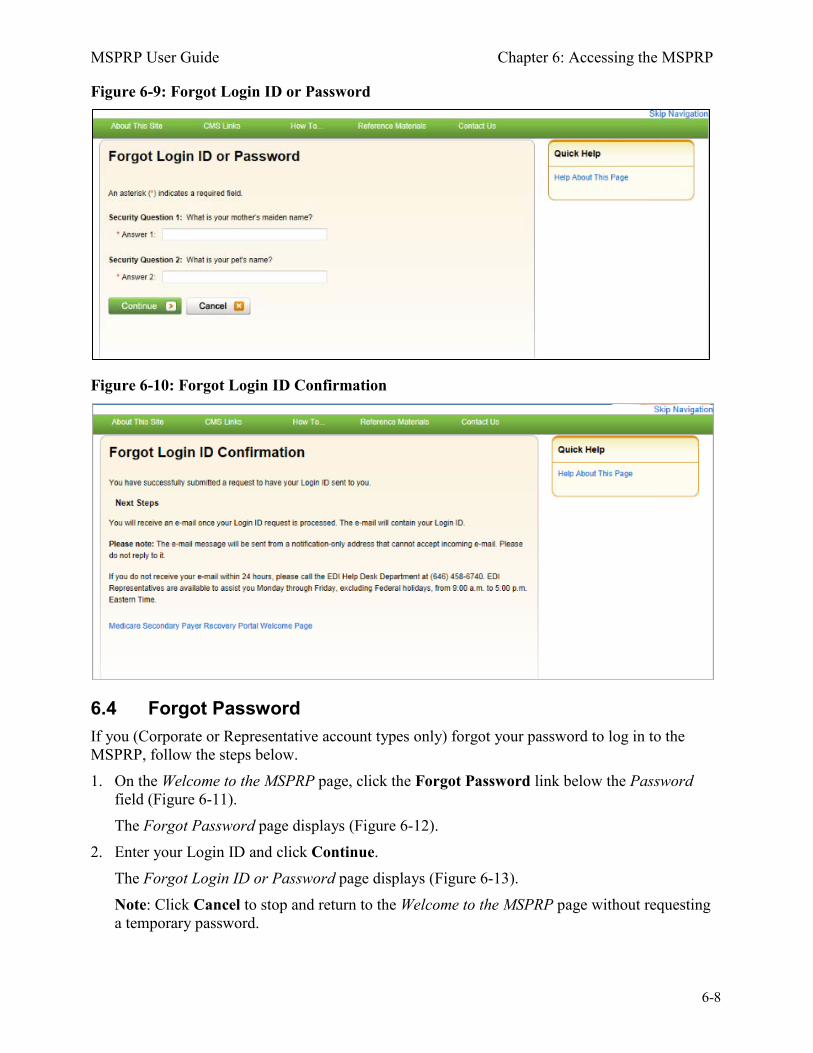
MSPRP User Guide Chapter 6: Accessing the MSPRP
6-8
Figure 6-9: Forgot Login ID or Password
Figure 6-10: Forgot Login ID Confirmation
6.4 Forgot Password If you (Corporate or Representative account types only) forgot your password to log in to the MSPRP, follow the steps below. 1. On the Welcome to the MSPRP page, click the Forgot Password link below the Password
field (Figure 6-11). The Forgot Password page displays (Figure 6-12).
2. Enter your Login ID and click Continue. The Forgot Login ID or Password page displays (Figure 6-13). Note: Click Cancel to stop and return to the Welcome to the MSPRP page without requesting a temporary password.

MSPRP User Guide Chapter 6: Accessing the MSPRP
6-9
Figure 6-11: Forgot Password Link
Figure 6-12: Forgot Password
3. Answer the two security questions with information you provided during the registration process. Correctly answer each of your pre-selected security questions.
4. Click Continue. The Forgot Password Confirmation page displays if your answers are correct (Figure 6-14). This page confirms that you have successfully requested a temporary password. If the information you entered is correct, your new temporary password will be sent via e-mail. If you receive an error indicating that the answers are incorrect, check your answers and enter the information again. If you cannot remember the answers to your security questions, contact an EDI representative.
5. Click the Medicare Secondary Payer Recovery Portal Welcome Page link to return to the Welcome to the MSPRP page. You will receive an e-mail containing your temporary password. After receipt of the e-mail, return to the MSPRP site and log in using your login ID and temporary password. If you do not receive an e-mail within 24 hours, contact an EDI representative. You will be prompted to change your temporary password when you use it to log in to the MSPRP.
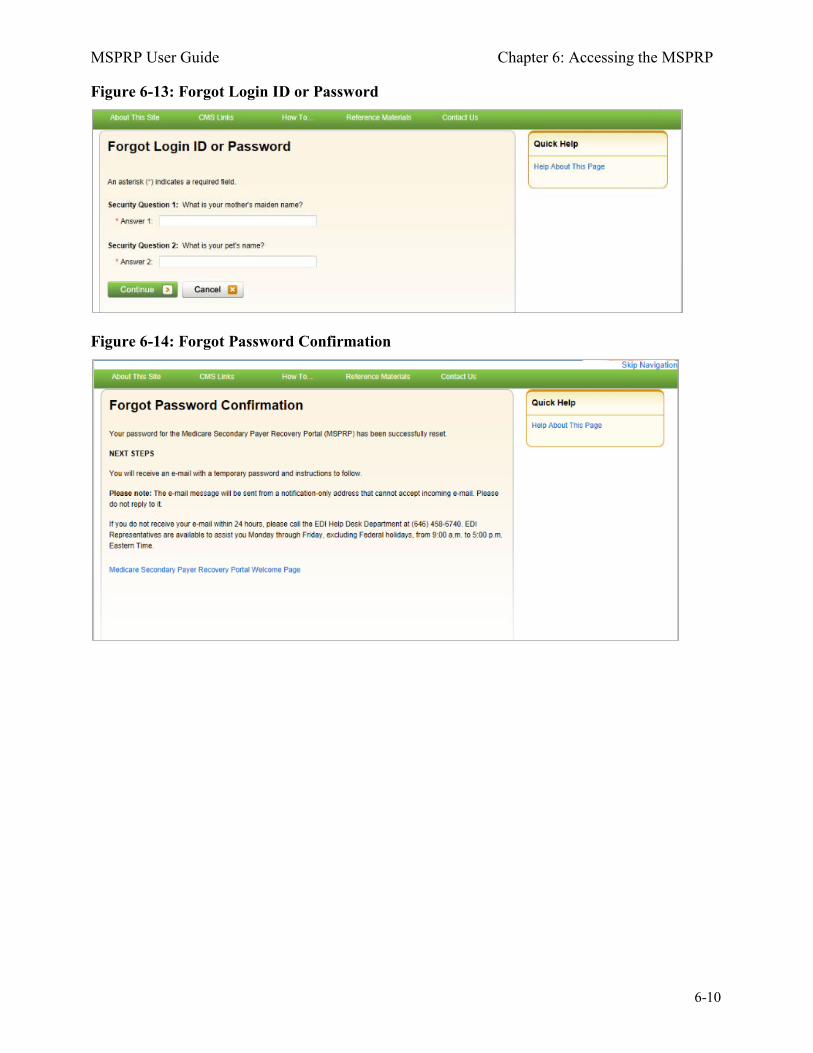
MSPRP User Guide Chapter 6: Accessing the MSPRP
6-10
Figure 6-13: Forgot Login ID or Password
Figure 6-14: Forgot Password Confirmation
MSPRP User Guide Chapter 7: Multi-Factor Authentication
7-1
Chapter 7: Multi-Factor Authentication
CMS has adopted Identity Proofing and Multi-Factor Authentication (MFA) to provide certain users with the ability to view unmasked case information. The ID Proofing process requires that you provide information to Experian (an external Remote Identity Proofing (RIDP) service provider) sufficient to prove that you are the person you claim to be. This process works in conjunction with MFA Services, which uses two or more different authentication factors to verify a user’s identity. Note: Medicare beneficiaries do not need to use this process, as they already have complete access to their cases on the MSPRP. This section applies to non-beneficiaries only. Once you complete the process, you can choose whether or not to use an MFA Credential ID to view previously masked case information on your accounts when you log in to the MSPRP. To complete the ID Proofing process, you will be required to enter personal information and then respond to a set of questions. Before you start the process, the default MFA status displayed on your home page will be Initial Process and the Next Step will be Get Started. After you finish the process, the final MFA status will be Complete. MFA access is granted when you:
• Successfully complete the ID Proofing process, • Download and install at least one registered Credential ID on a device that you will be using to
access the MSPRP (e.g., computer or mobile device), and • Activate at least one Credential ID through the MSPRP. All ID Proofing requests are vetted through the Experian Credit Service (“Experian”), an outside entity. Once you complete the ID Proofing process, you then have the option to choose whether or not to log in to the MSPRP using your activated Credential ID. Your MFA status does not expire, so you won’t ever need to repeat the process, although you can activate and deactivate Credential IDs at any time. Establishing MFA access for one MSPRP account extends access to all of your MSPRP accounts. Non-beneficiary users who have not completed the ID Proofing process can continue to access the MSPRP as they currently do with limited views of case information. Note: Users may also download a summary FAQ document of the ID Proofing process from the Reference Materials drop-down menu on the MSPRP.
7.1 Eligibility Current Account Managers and Designees can complete the ID Proofing process to view previously masked case information.
7.2 Understanding MFA Statuses and Actions After logging in to the MSPRP, and depending on where you are in the ID Proofing process, different MFA Statuses and Next Step actions will appear on your home page in the Multi-Factor
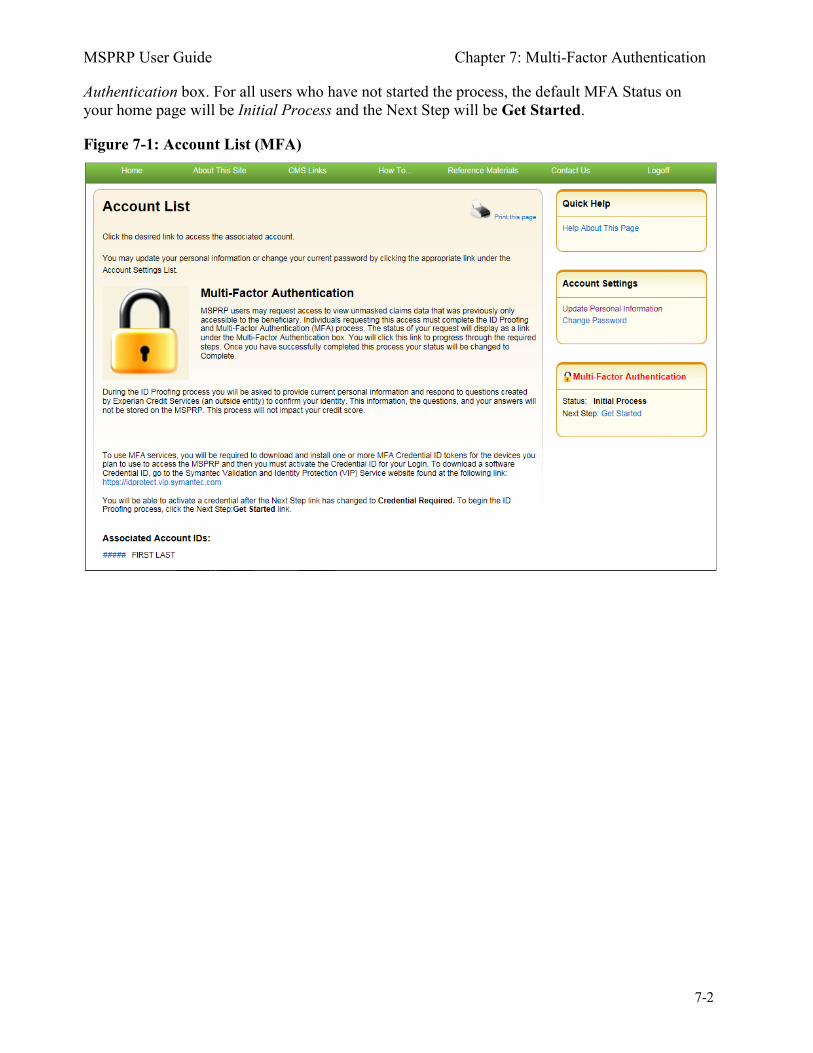
MSPRP User Guide Chapter 7: Multi-Factor Authentication
7-2
Authentication box. For all users who have not started the process, the default MFA Status on your home page will be Initial Process and the Next Step will be Get Started.
Figure 7-1: Account List (MFA)
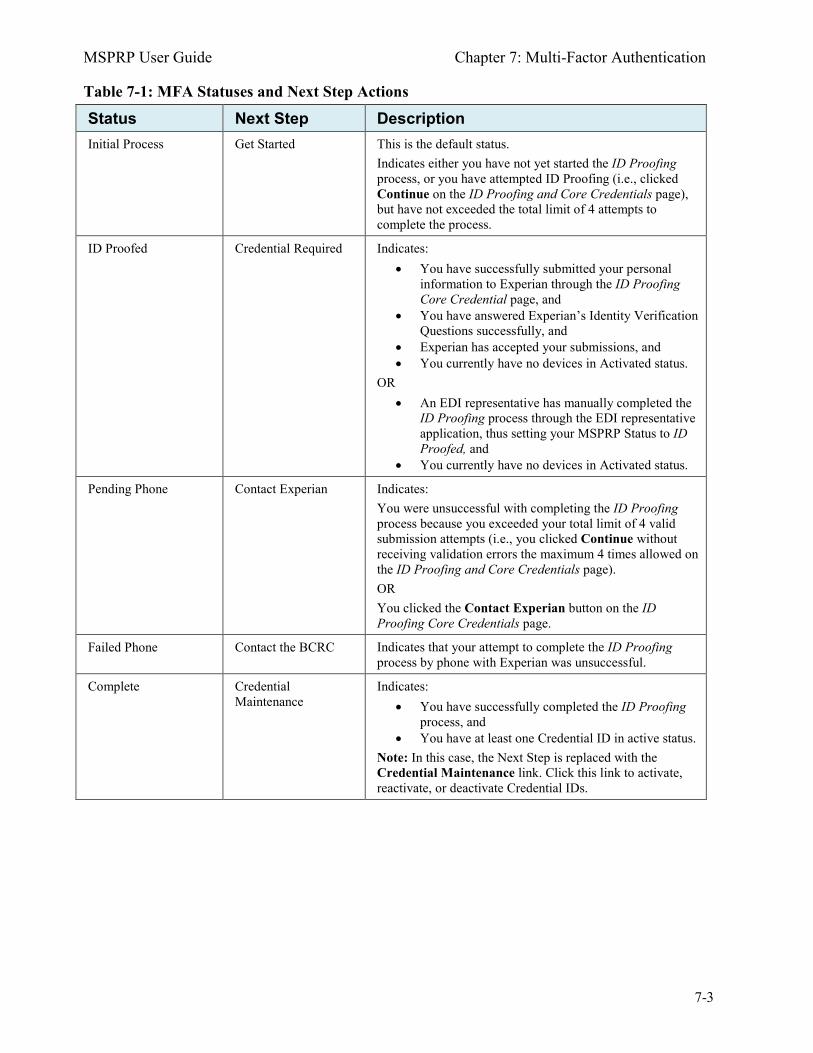
MSPRP User Guide Chapter 7: Multi-Factor Authentication
7-3
Table 7-1: MFA Statuses and Next Step Actions
Status Next Step Description Initial Process Get Started This is the default status.
Indicates either you have not yet started the ID Proofing process, or you have attempted ID Proofing (i.e., clicked Continue on the ID Proofing and Core Credentials page), but have not exceeded the total limit of 4 attempts to complete the process.
ID Proofed Credential Required Indicates: • You have successfully submitted your personal
information to Experian through the ID Proofing Core Credential page, and
• You have answered Experian’s Identity Verification Questions successfully, and
• Experian has accepted your submissions, and • You currently have no devices in Activated status.
OR • An EDI representative has manually completed the
ID Proofing process through the EDI representative application, thus setting your MSPRP Status to ID Proofed, and
• You currently have no devices in Activated status.
Pending Phone Contact Experian Indicates: You were unsuccessful with completing the ID Proofing process because you exceeded your total limit of 4 valid submission attempts (i.e., you clicked Continue without receiving validation errors the maximum 4 times allowed on the ID Proofing and Core Credentials page). OR You clicked the Contact Experian button on the ID Proofing Core Credentials page.
Failed Phone Contact the BCRC Indicates that your attempt to complete the ID Proofing process by phone with Experian was unsuccessful.
Complete Credential Maintenance
Indicates: • You have successfully completed the ID Proofing
process, and • You have at least one Credential ID in active status.
Note: In this case, the Next Step is replaced with the Credential Maintenance link. Click this link to activate, reactivate, or deactivate Credential IDs.
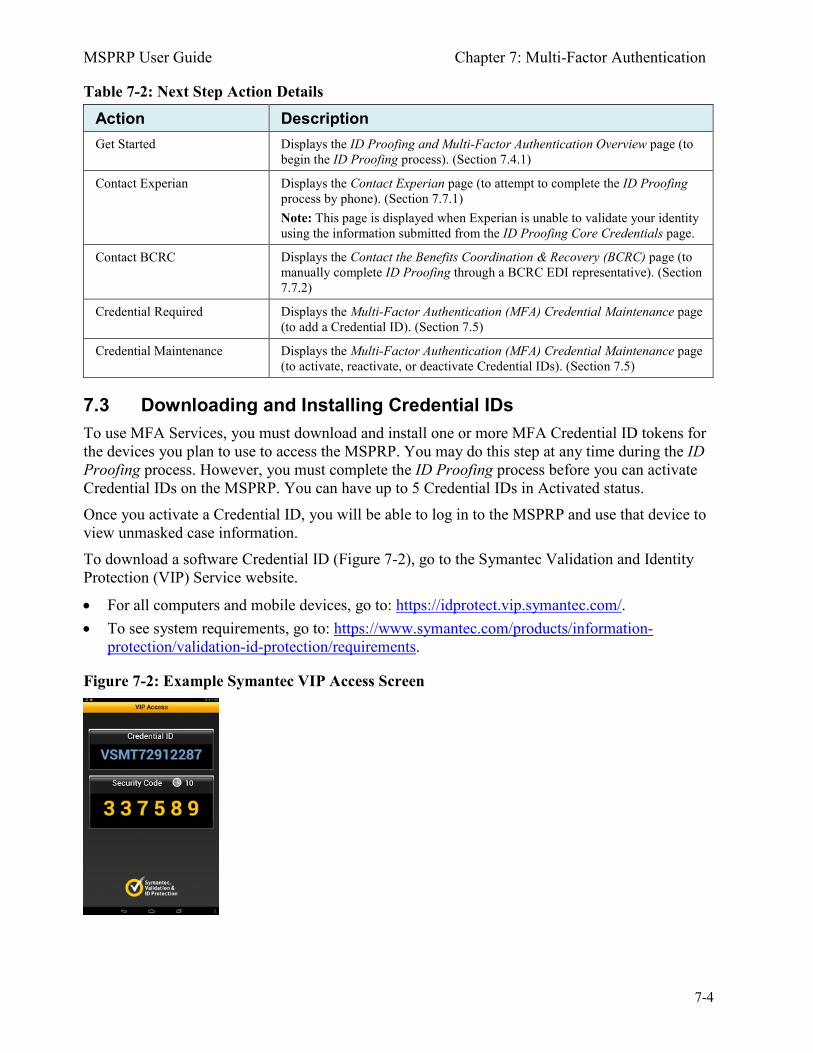
MSPRP User Guide Chapter 7: Multi-Factor Authentication
7-4
Table 7-2: Next Step Action Details
Action Description Get Started Displays the ID Proofing and Multi-Factor Authentication Overview page (to
begin the ID Proofing process). (Section 7.4.1)
Contact Experian Displays the Contact Experian page (to attempt to complete the ID Proofing process by phone). (Section 7.7.1) Note: This page is displayed when Experian is unable to validate your identity using the information submitted from the ID Proofing Core Credentials page.
Contact BCRC Displays the Contact the Benefits Coordination & Recovery (BCRC) page (to manually complete ID Proofing through a BCRC EDI representative). (Section 7.7.2)
Credential Required Displays the Multi-Factor Authentication (MFA) Credential Maintenance page (to add a Credential ID). (Section 7.5)
Credential Maintenance Displays the Multi-Factor Authentication (MFA) Credential Maintenance page (to activate, reactivate, or deactivate Credential IDs). (Section 7.5)
7.3 Downloading and Installing Credential IDs To use MFA Services, you must download and install one or more MFA Credential ID tokens for the devices you plan to use to access the MSPRP. You may do this step at any time during the ID Proofing process. However, you must complete the ID Proofing process before you can activate Credential IDs on the MSPRP. You can have up to 5 Credential IDs in Activated status. Once you activate a Credential ID, you will be able to log in to the MSPRP and use that device to view unmasked case information. To download a software Credential ID (Figure 7-2), go to the Symantec Validation and Identity Protection (VIP) Service website.
• For all computers and mobile devices, go to: https://idprotect.vip.symantec.com/. • To see system requirements, go to: https://www.symantec.com/products/information-
protection/validation-id-protection/requirements.
Figure 7-2: Example Symantec VIP Access Screen
MSPRP User Guide Chapter 7: Multi-Factor Authentication
7-5
7.4 ID Proofing Process Process Overview Click the Next Step: Get Started link from your home page, and work through the pages that follow. Once that process is completed, you will download and activate a Credential ID from Symantec. At that point, you will be able to log in to the MSPRP using that Credential ID in order to see previously masked case information, as applicable. During this process, you will be asked to provide current personal information and respond to questions created by Experian Credit Services (an outside entity) to confirm your identity. This information, the questions, and your answers will not be stored on the MSPRP. This process will not impact your credit score.
7.4.1 ID Proofing and MFA Overview The ID Proofing and Multi-Factor Authentication Overview page is the first step for starting the ID Proofing process. This page provides general information about the process and its purpose. Click Continue to continue the process.
7.4.2 Completing ID Proofing Core Credentials Clicking Continue from the ID Proofing and Multi-Factor Authentication Overview page displays the ID Proofing Core Credentials page. This page allows you to enter personal information and submit it to Experian to validate your identity as part of the ID Proofing process (see Table 7-3 for field descriptions). Notes:
First and Last Name fields are pre-filled and are the ones associated with your login ID. These names must match your full legal name, or Experian will not be able to validate your identity. Address information entered on this page should match your current residential address so Experian can verify your identity. Successful ID proofing hinges upon Experian be able to use the address you provide to match to the address they have on file for you.
If you need to make corrections, click Cancel on this page and make any changes through the MSPRP Update Personal Information page. When you click Continue from the ID Proofing Core Credentials page, you will see an error message if any of the data you entered fails a validation check. Data validation corrections do not count towards your total submission attempts. Your data must pass all validation checks on this page before the Contact Experian button is enabled. You cannot contact Experian for assistance until all validation errors have been resolved. After your data passes validation checks, you may contact Experian at any time for assistance. If you click Continue and the submission fails after 4 attempts, your MFA Status is automatically set to Pending Phone and the MSPRP will display the Contact Experian page (Section 7.7.1). At this stage, you must contact Experian for assistance in completing the ID Proofing process. To Complete ID Proofing Core Credentials 1. From your home page in the MSPRP, click the Next Step: Get Started link displayed in the
Multi-Factor Authentication box. The ID Proofing and Multi-Factor Authentication Overview page displays (Figure 7-3).
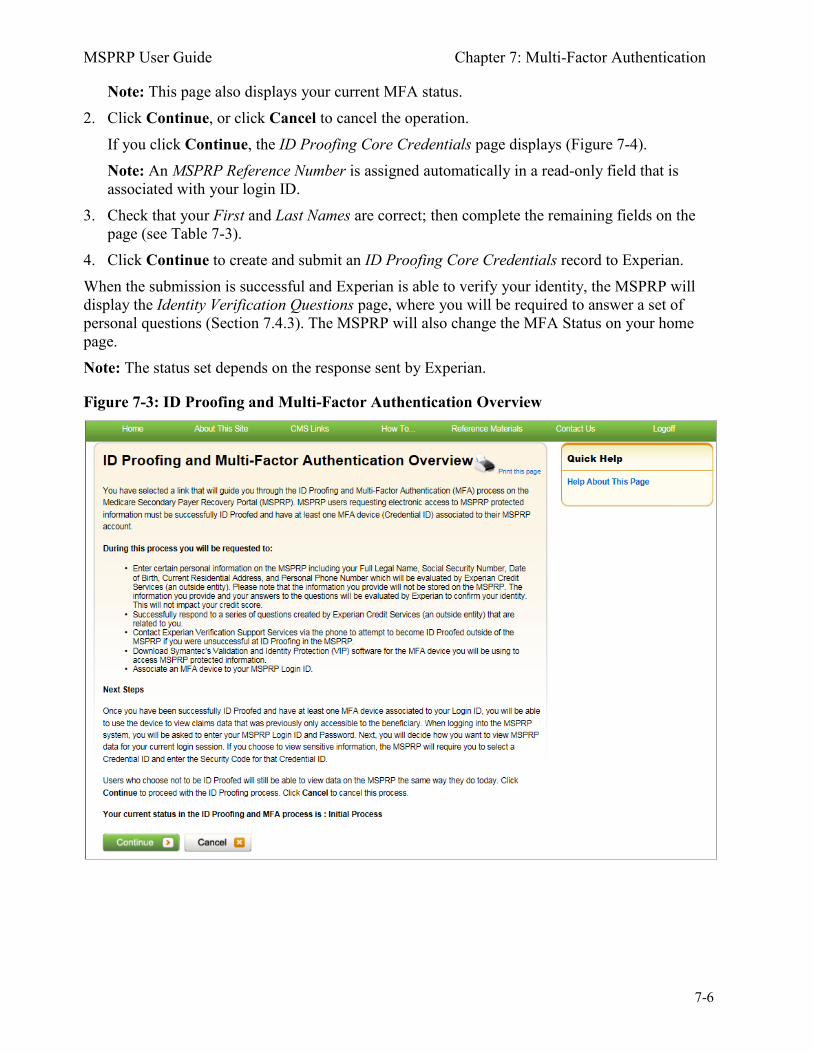
MSPRP User Guide Chapter 7: Multi-Factor Authentication
7-6
Note: This page also displays your current MFA status. 2. Click Continue, or click Cancel to cancel the operation.
If you click Continue, the ID Proofing Core Credentials page displays (Figure 7-4). Note: An MSPRP Reference Number is assigned automatically in a read-only field that is associated with your login ID.
3. Check that your First and Last Names are correct; then complete the remaining fields on the page (see Table 7-3).
4. Click Continue to create and submit an ID Proofing Core Credentials record to Experian. When the submission is successful and Experian is able to verify your identity, the MSPRP will display the Identity Verification Questions page, where you will be required to answer a set of personal questions (Section 7.4.3). The MSPRP will also change the MFA Status on your home page. Note: The status set depends on the response sent by Experian.
Figure 7-3: ID Proofing and Multi-Factor Authentication Overview
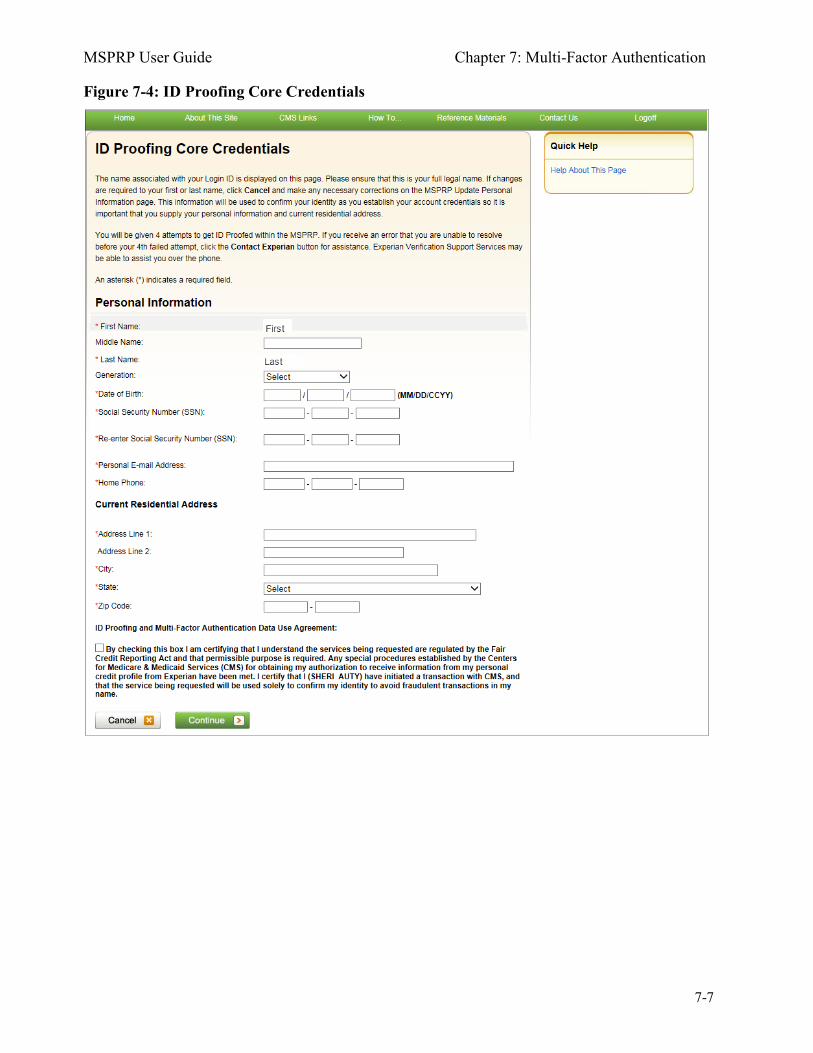
MSPRP User Guide Chapter 7: Multi-Factor Authentication
7-7
Figure 7-4: ID Proofing Core Credentials
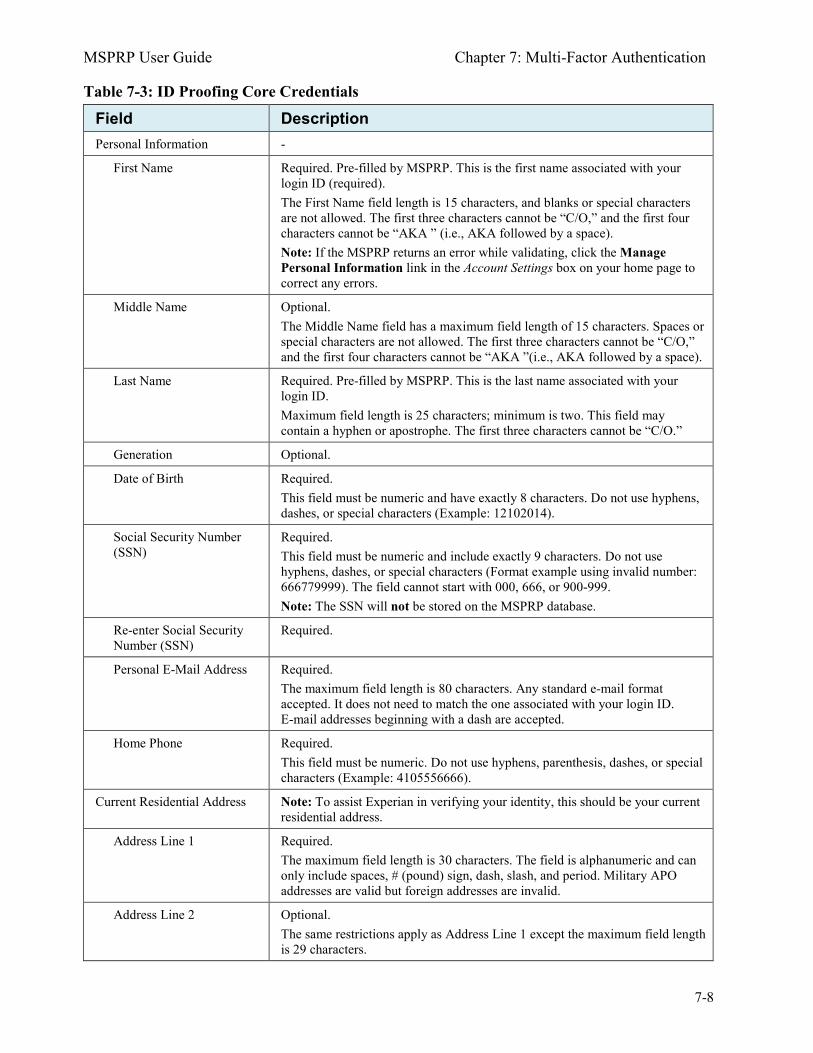
MSPRP User Guide Chapter 7: Multi-Factor Authentication
7-8
Table 7-3: ID Proofing Core Credentials
Field Description Personal Information -
First Name Required. Pre-filled by MSPRP. This is the first name associated with your login ID (required). The First Name field length is 15 characters, and blanks or special characters are not allowed. The first three characters cannot be “C/O,” and the first four characters cannot be “AKA ” (i.e., AKA followed by a space). Note: If the MSPRP returns an error while validating, click the Manage Personal Information link in the Account Settings box on your home page to correct any errors.
Middle Name Optional. The Middle Name field has a maximum field length of 15 characters. Spaces or special characters are not allowed. The first three characters cannot be “C/O,” and the first four characters cannot be “AKA ”(i.e., AKA followed by a space).
Last Name Required. Pre-filled by MSPRP. This is the last name associated with your login ID. Maximum field length is 25 characters; minimum is two. This field may contain a hyphen or apostrophe. The first three characters cannot be “C/O.”
Generation Optional.
Date of Birth Required. This field must be numeric and have exactly 8 characters. Do not use hyphens, dashes, or special characters (Example: 12102014).
Social Security Number (SSN)
Required. This field must be numeric and include exactly 9 characters. Do not use hyphens, dashes, or special characters (Format example using invalid number: 666779999). The field cannot start with 000, 666, or 900-999. Note: The SSN will not be stored on the MSPRP database.
Re-enter Social Security Number (SSN)
Required.
Personal E-Mail Address Required. The maximum field length is 80 characters. Any standard e-mail format accepted. It does not need to match the one associated with your login ID. E-mail addresses beginning with a dash are accepted.
Home Phone Required. This field must be numeric. Do not use hyphens, parenthesis, dashes, or special characters (Example: 4105556666).
Current Residential Address Note: To assist Experian in verifying your identity, this should be your current residential address.
Address Line 1 Required. The maximum field length is 30 characters. The field is alphanumeric and can only include spaces, # (pound) sign, dash, slash, and period. Military APO addresses are valid but foreign addresses are invalid.
Address Line 2 Optional. The same restrictions apply as Address Line 1 except the maximum field length is 29 characters.
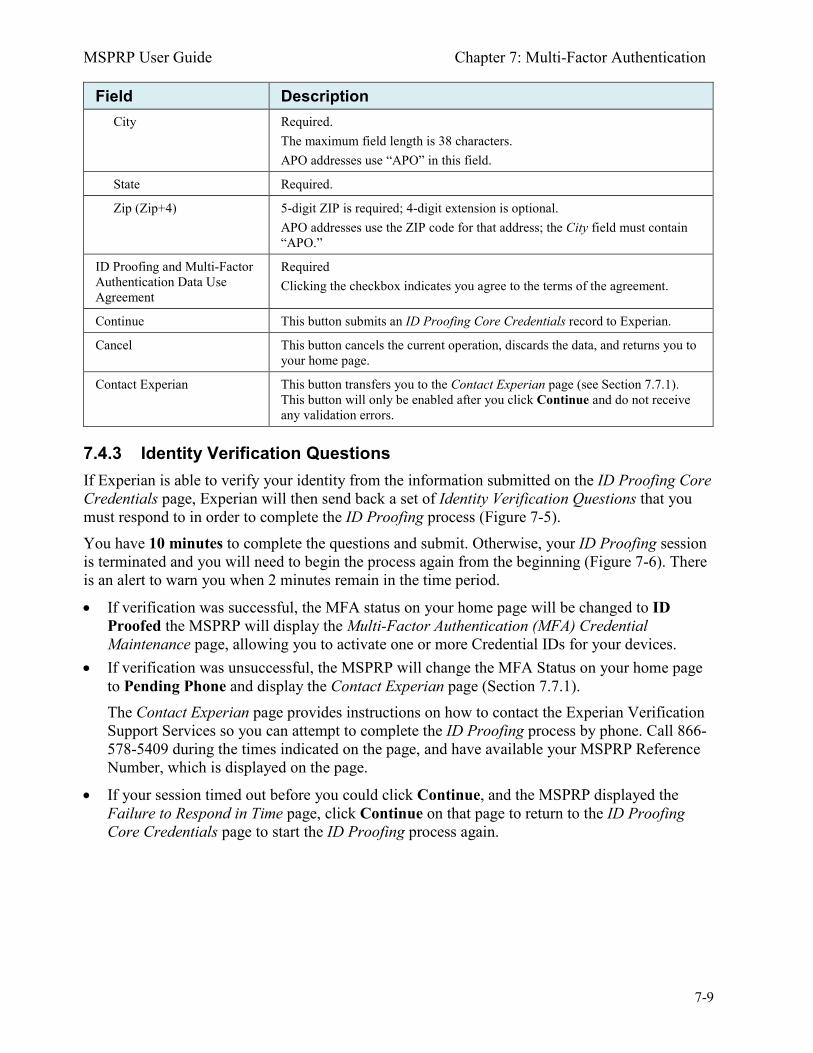
MSPRP User Guide Chapter 7: Multi-Factor Authentication
7-9
Field Description City Required.
The maximum field length is 38 characters. APO addresses use “APO” in this field.
State Required.
Zip (Zip+4) 5-digit ZIP is required; 4-digit extension is optional. APO addresses use the ZIP code for that address; the City field must contain “APO.”
ID Proofing and Multi-Factor Authentication Data Use Agreement
Required Clicking the checkbox indicates you agree to the terms of the agreement.
Continue This button submits an ID Proofing Core Credentials record to Experian.
Cancel This button cancels the current operation, discards the data, and returns you to your home page.
Contact Experian This button transfers you to the Contact Experian page (see Section 7.7.1). This button will only be enabled after you click Continue and do not receive any validation errors.
7.4.3 Identity Verification Questions If Experian is able to verify your identity from the information submitted on the ID Proofing Core Credentials page, Experian will then send back a set of Identity Verification Questions that you must respond to in order to complete the ID Proofing process (Figure 7-5). You have 10 minutes to complete the questions and submit. Otherwise, your ID Proofing session is terminated and you will need to begin the process again from the beginning (Figure 7-6). There is an alert to warn you when 2 minutes remain in the time period.
• If verification was successful, the MFA status on your home page will be changed to ID Proofed the MSPRP will display the Multi-Factor Authentication (MFA) Credential Maintenance page, allowing you to activate one or more Credential IDs for your devices.
• If verification was unsuccessful, the MSPRP will change the MFA Status on your home page to Pending Phone and display the Contact Experian page (Section 7.7.1). The Contact Experian page provides instructions on how to contact the Experian Verification Support Services so you can attempt to complete the ID Proofing process by phone. Call 866- 578-5409 during the times indicated on the page, and have available your MSPRP Reference Number, which is displayed on the page.
• If your session timed out before you could click Continue, and the MSPRP displayed the Failure to Respond in Time page, click Continue on that page to return to the ID Proofing Core Credentials page to start the ID Proofing process again.
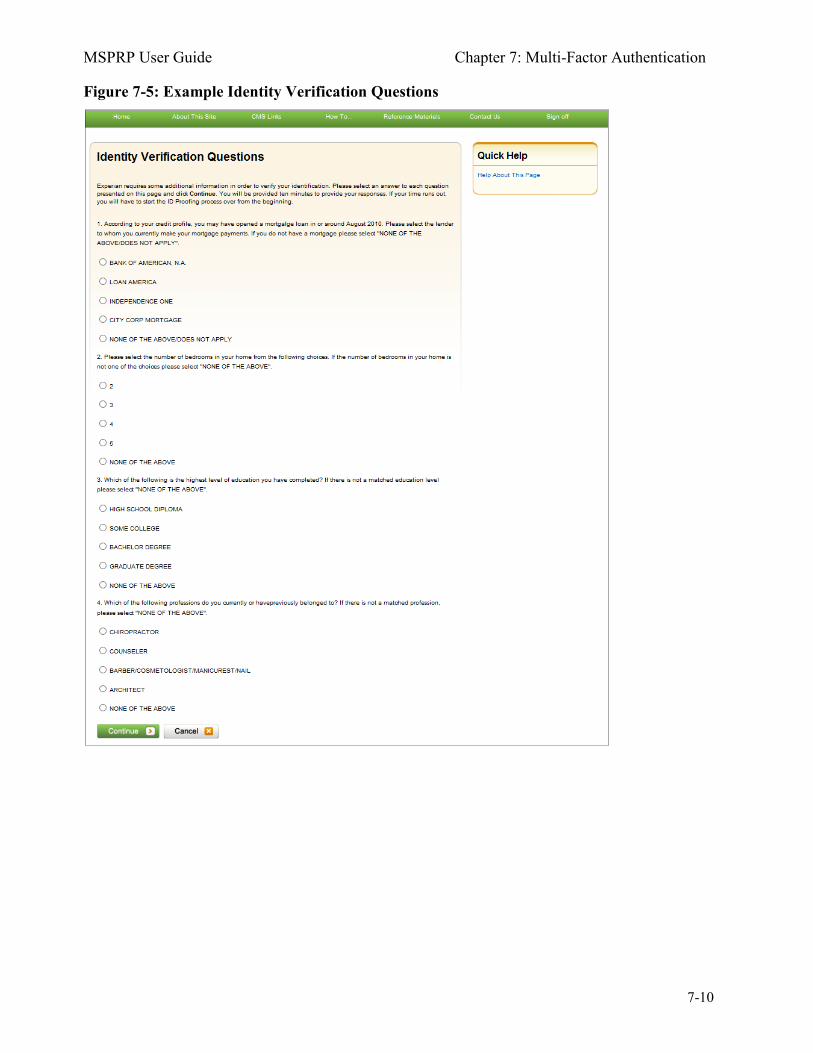
MSPRP User Guide Chapter 7: Multi-Factor Authentication
7-10
Figure 7-5: Example Identity Verification Questions
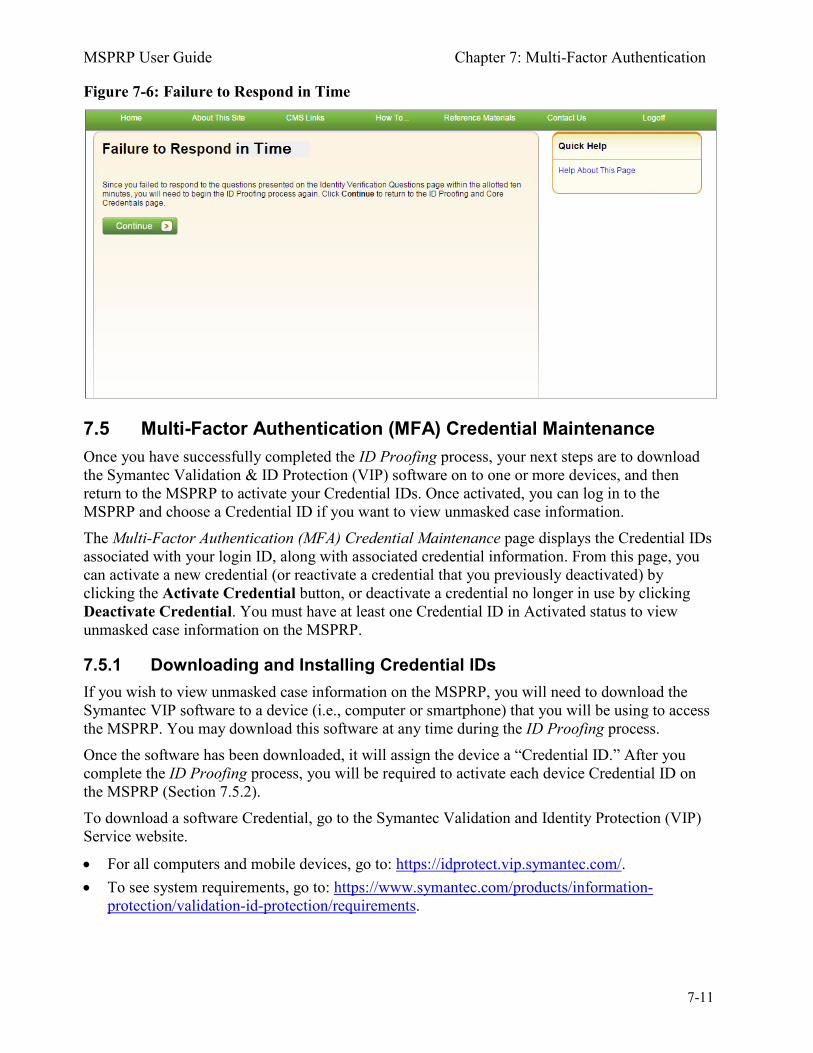
MSPRP User Guide Chapter 7: Multi-Factor Authentication
7-11
Figure 7-6: Failure to Respond in Time
7.5 Multi-Factor Authentication (MFA) Credential Maintenance Once you have successfully completed the ID Proofing process, your next steps are to download the Symantec Validation & ID Protection (VIP) software on to one or more devices, and then return to the MSPRP to activate your Credential IDs. Once activated, you can log in to the MSPRP and choose a Credential ID if you want to view unmasked case information. The Multi-Factor Authentication (MFA) Credential Maintenance page displays the Credential IDs associated with your login ID, along with associated credential information. From this page, you can activate a new credential (or reactivate a credential that you previously deactivated) by clicking the Activate Credential button, or deactivate a credential no longer in use by clicking Deactivate Credential. You must have at least one Credential ID in Activated status to view unmasked case information on the MSPRP.
7.5.1 Downloading and Installing Credential IDs If you wish to view unmasked case information on the MSPRP, you will need to download the Symantec VIP software to a device (i.e., computer or smartphone) that you will be using to access the MSPRP. You may download this software at any time during the ID Proofing process. Once the software has been downloaded, it will assign the device a “Credential ID.” After you complete the ID Proofing process, you will be required to activate each device Credential ID on the MSPRP (Section 7.5.2). To download a software Credential, go to the Symantec Validation and Identity Protection (VIP) Service website.
• For all computers and mobile devices, go to: https://idprotect.vip.symantec.com/. • To see system requirements, go to: https://www.symantec.com/products/information-
protection/validation-id-protection/requirements.

MSPRP User Guide Chapter 7: Multi-Factor Authentication
7-12
Figure 7-7: Example Symantec VIP Access Screen
7.5.2 Activate Credential IDs The Activate Credential page allows you to activate, or reactivate, a Credential ID that will be associated to your MSPRP login ID. At this point, you must have successfully completed the ID Proofing process, downloaded the Symantec Validation & ID Protection (VIP) software to a device (i.e., computer or smartphone), and have that device Credential ID available for activation on the MSPRP. You can have up to 5 Credential IDs in Activated status. To Activate or Reactivate Credential IDs 1. Click the Credential Maintenance link on your home page.
The Multi-Factor Authentication (MFA) Credential Maintenance page displays. 2. Click Activate Credential.
The Activate Credential page displays (Figure 7-9). 3. Enter (and re-enter) a Credential ID, as generated by the VIP software. 4. Enter the Security Code for the Credential ID, also generated by the VIP software. 5. Enter a Credential ID Nickname (optional) (up to 20 characters).
Note: If you need to change the nickname, you must first deactivate the Credential ID and then reactivate it with the new nickname.
6. Click Continue to validate through Symantec, or click Cancel to return to the Multi-Factor Authentication (MFA) Credential Maintenance page without activating the Credential ID. When validated, the Credential Activated Successfully page displays (Figure 7-10). Validation Criteria:
• The Credential ID must be between 4 and 100 characters, may contain both letters and numbers, and can only include the following special characters: # (number), . (period), or * (asterisk).
• The Security Code must be between 6 and 10 characters long. It can contain letters or numbers but no special characters.
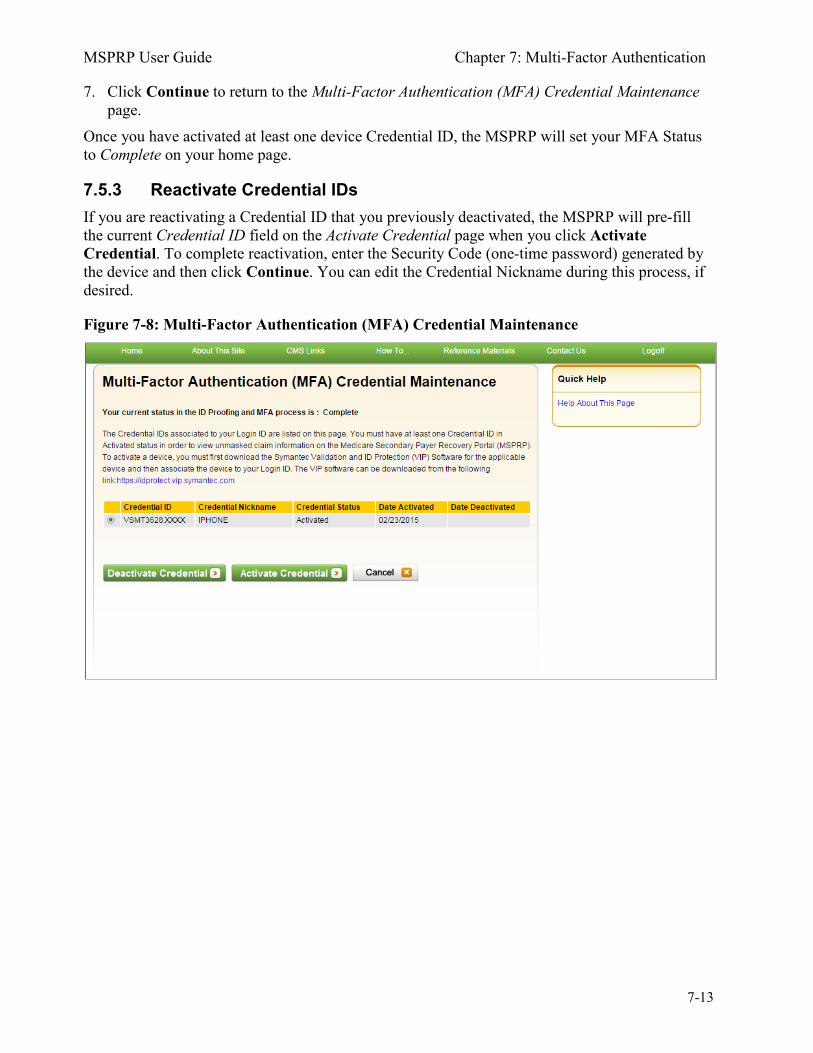
MSPRP User Guide Chapter 7: Multi-Factor Authentication
7-13
7. Click Continue to return to the Multi-Factor Authentication (MFA) Credential Maintenance page.
Once you have activated at least one device Credential ID, the MSPRP will set your MFA Status to Complete on your home page.
7.5.3 Reactivate Credential IDs If you are reactivating a Credential ID that you previously deactivated, the MSPRP will pre-fill the current Credential ID field on the Activate Credential page when you click Activate Credential. To complete reactivation, enter the Security Code (one-time password) generated by the device and then click Continue. You can edit the Credential Nickname during this process, if desired.
Figure 7-8: Multi-Factor Authentication (MFA) Credential Maintenance
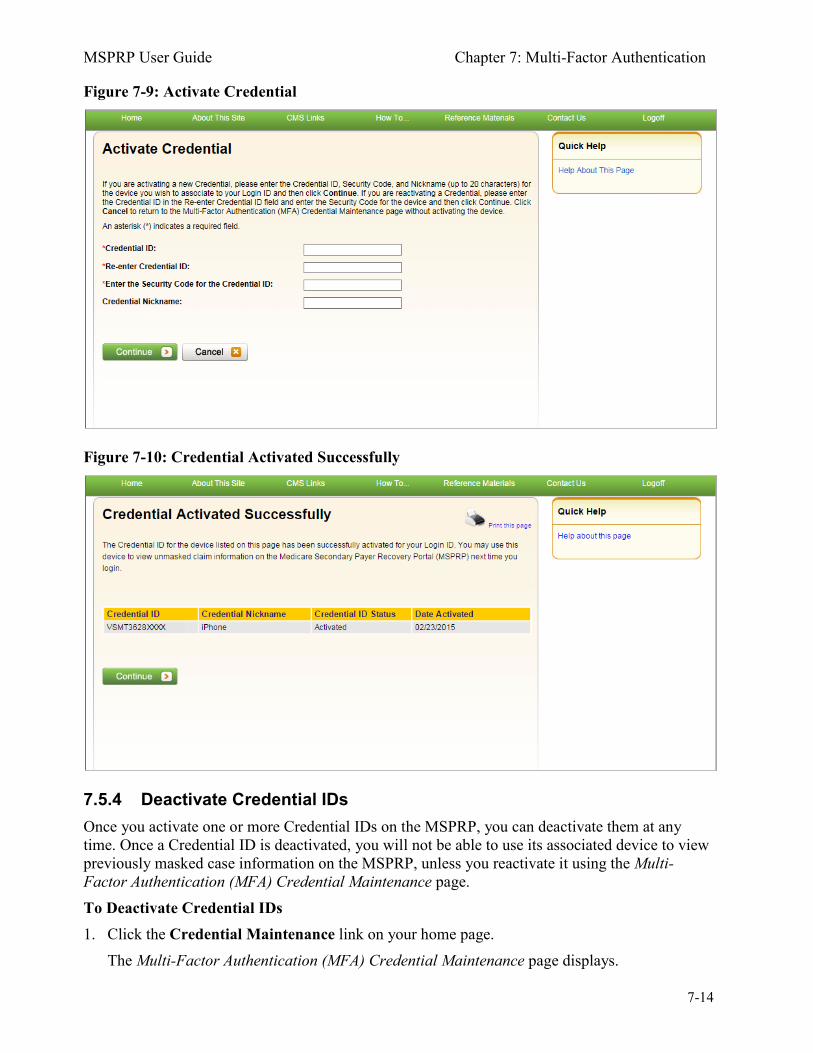
MSPRP User Guide Chapter 7: Multi-Factor Authentication
7-14
Figure 7-9: Activate Credential
Figure 7-10: Credential Activated Successfully
7.5.4 Deactivate Credential IDs Once you activate one or more Credential IDs on the MSPRP, you can deactivate them at any time. Once a Credential ID is deactivated, you will not be able to use its associated device to view previously masked case information on the MSPRP, unless you reactivate it using the Multi-Factor Authentication (MFA) Credential Maintenance page. To Deactivate Credential IDs 1. Click the Credential Maintenance link on your home page.
The Multi-Factor Authentication (MFA) Credential Maintenance page displays.
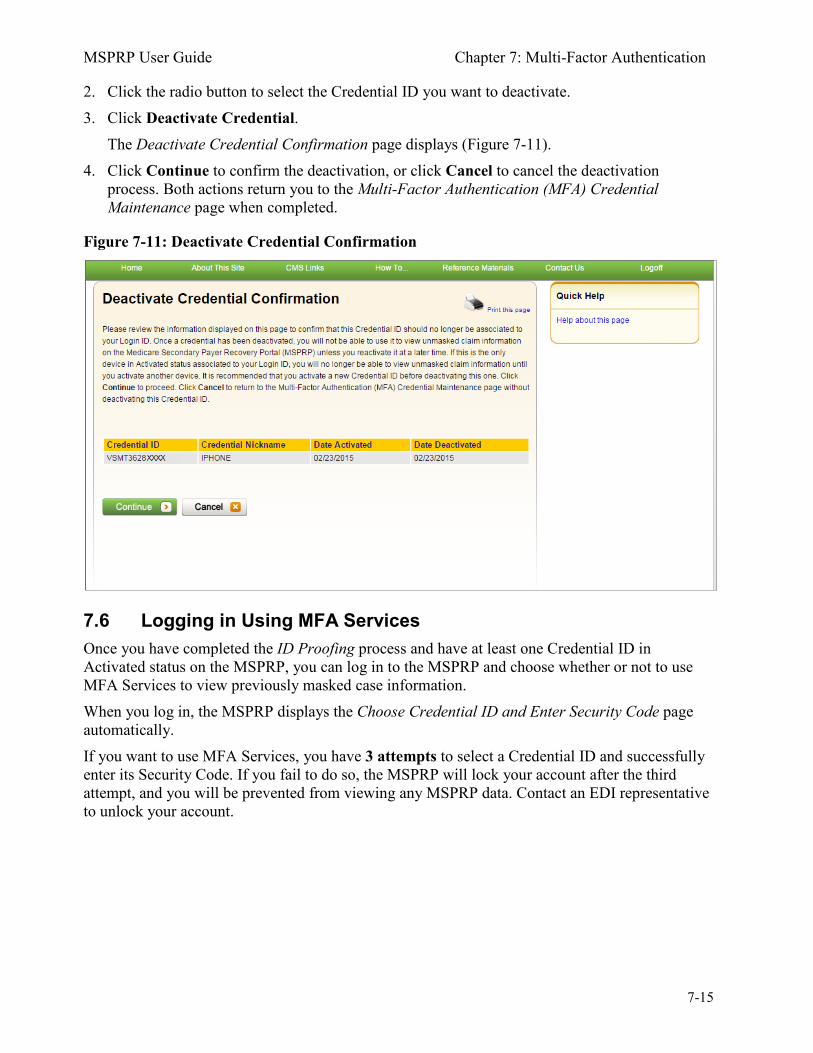
MSPRP User Guide Chapter 7: Multi-Factor Authentication
7-15
2. Click the radio button to select the Credential ID you want to deactivate. 3. Click Deactivate Credential.
The Deactivate Credential Confirmation page displays (Figure 7-11). 4. Click Continue to confirm the deactivation, or click Cancel to cancel the deactivation
process. Both actions return you to the Multi-Factor Authentication (MFA) Credential Maintenance page when completed.
Figure 7-11: Deactivate Credential Confirmation
7.6 Logging in Using MFA Services Once you have completed the ID Proofing process and have at least one Credential ID in Activated status on the MSPRP, you can log in to the MSPRP and choose whether or not to use MFA Services to view previously masked case information. When you log in, the MSPRP displays the Choose Credential ID and Enter Security Code page automatically. If you want to use MFA Services, you have 3 attempts to select a Credential ID and successfully enter its Security Code. If you fail to do so, the MSPRP will lock your account after the third attempt, and you will be prevented from viewing any MSPRP data. Contact an EDI representative to unlock your account.
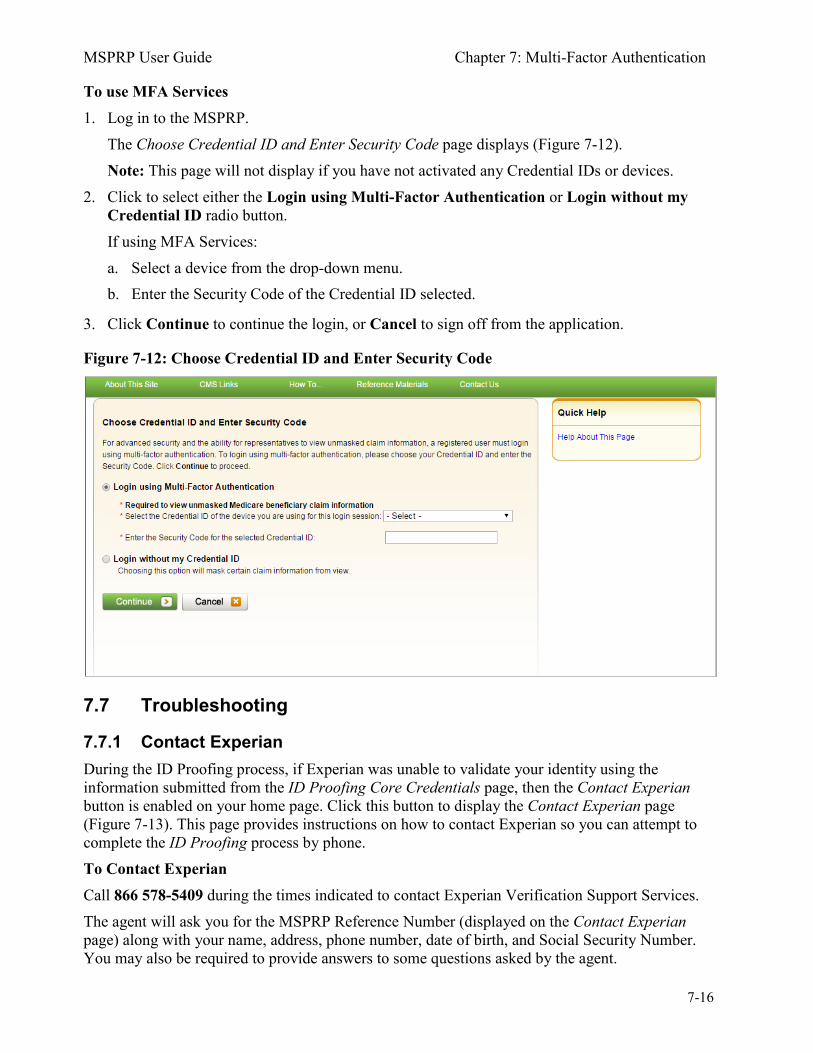
MSPRP User Guide Chapter 7: Multi-Factor Authentication
7-16
To use MFA Services 1. Log in to the MSPRP.
The Choose Credential ID and Enter Security Code page displays (Figure 7-12). Note: This page will not display if you have not activated any Credential IDs or devices.
2. Click to select either the Login using Multi-Factor Authentication or Login without my Credential ID radio button. If using MFA Services: a. Select a device from the drop-down menu. b. Enter the Security Code of the Credential ID selected.
3. Click Continue to continue the login, or Cancel to sign off from the application.
Figure 7-12: Choose Credential ID and Enter Security Code
7.7 Troubleshooting
7.7.1 Contact Experian During the ID Proofing process, if Experian was unable to validate your identity using the information submitted from the ID Proofing Core Credentials page, then the Contact Experian button is enabled on your home page. Click this button to display the Contact Experian page (Figure 7-13). This page provides instructions on how to contact Experian so you can attempt to complete the ID Proofing process by phone. To Contact Experian Call 866 578-5409 during the times indicated to contact Experian Verification Support Services. The agent will ask you for the MSPRP Reference Number (displayed on the Contact Experian page) along with your name, address, phone number, date of birth, and Social Security Number. You may also be required to provide answers to some questions asked by the agent.
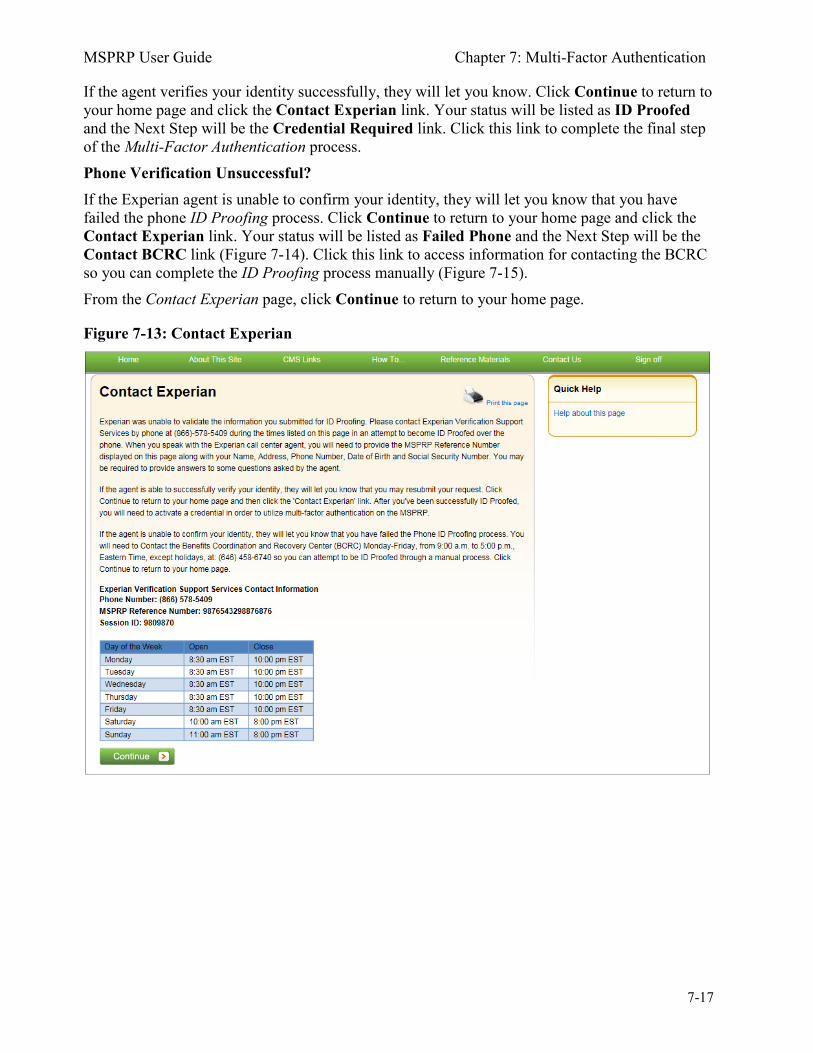
MSPRP User Guide Chapter 7: Multi-Factor Authentication
7-17
If the agent verifies your identity successfully, they will let you know. Click Continue to return to your home page and click the Contact Experian link. Your status will be listed as ID Proofed and the Next Step will be the Credential Required link. Click this link to complete the final step of the Multi-Factor Authentication process. Phone Verification Unsuccessful? If the Experian agent is unable to confirm your identity, they will let you know that you have failed the phone ID Proofing process. Click Continue to return to your home page and click the Contact Experian link. Your status will be listed as Failed Phone and the Next Step will be the Contact BCRC link (Figure 7-14). Click this link to access information for contacting the BCRC so you can complete the ID Proofing process manually (Figure 7-15). From the Contact Experian page, click Continue to return to your home page.
Figure 7-13: Contact Experian
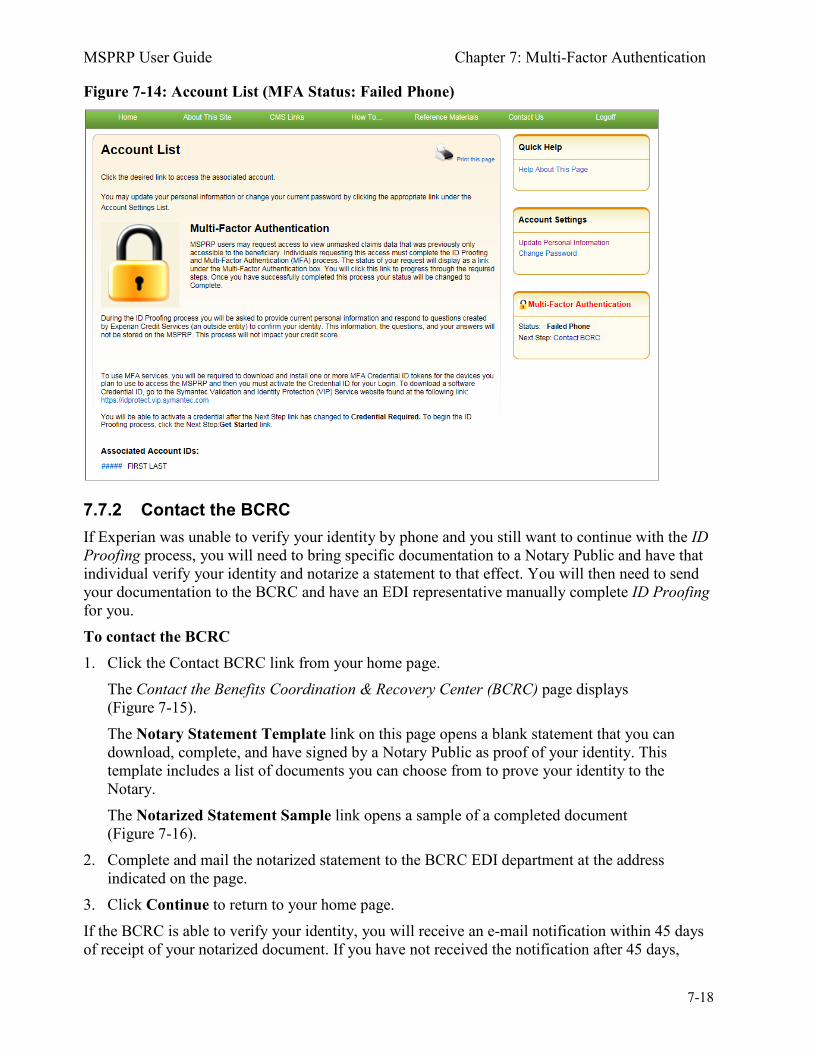
MSPRP User Guide Chapter 7: Multi-Factor Authentication
7-18
Figure 7-14: Account List (MFA Status: Failed Phone)
7.7.2 Contact the BCRC If Experian was unable to verify your identity by phone and you still want to continue with the ID Proofing process, you will need to bring specific documentation to a Notary Public and have that individual verify your identity and notarize a statement to that effect. You will then need to send your documentation to the BCRC and have an EDI representative manually complete ID Proofing for you. To contact the BCRC 1. Click the Contact BCRC link from your home page.
The Contact the Benefits Coordination & Recovery Center (BCRC) page displays (Figure 7-15). The Notary Statement Template link on this page opens a blank statement that you can download, complete, and have signed by a Notary Public as proof of your identity. This template includes a list of documents you can choose from to prove your identity to the Notary. The Notarized Statement Sample link opens a sample of a completed document (Figure 7-16).
2. Complete and mail the notarized statement to the BCRC EDI department at the address indicated on the page.
3. Click Continue to return to your home page. If the BCRC is able to verify your identity, you will receive an e-mail notification within 45 days of receipt of your notarized document. If you have not received the notification after 45 days,
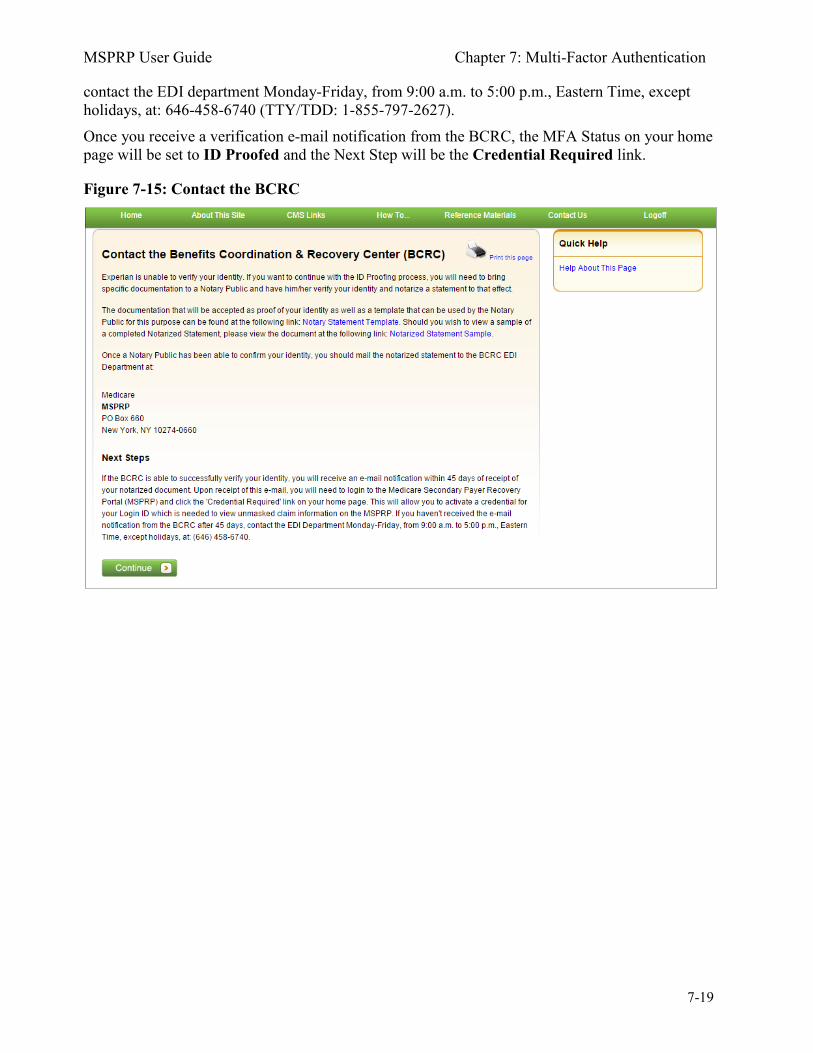
MSPRP User Guide Chapter 7: Multi-Factor Authentication
7-19
contact the EDI department Monday-Friday, from 9:00 a.m. to 5:00 p.m., Eastern Time, except holidays, at: 646-458-6740 (TTY/TDD: 1-855-797-2627). Once you receive a verification e-mail notification from the BCRC, the MFA Status on your home page will be set to ID Proofed and the Next Step will be the Credential Required link.
Figure 7-15: Contact the BCRC
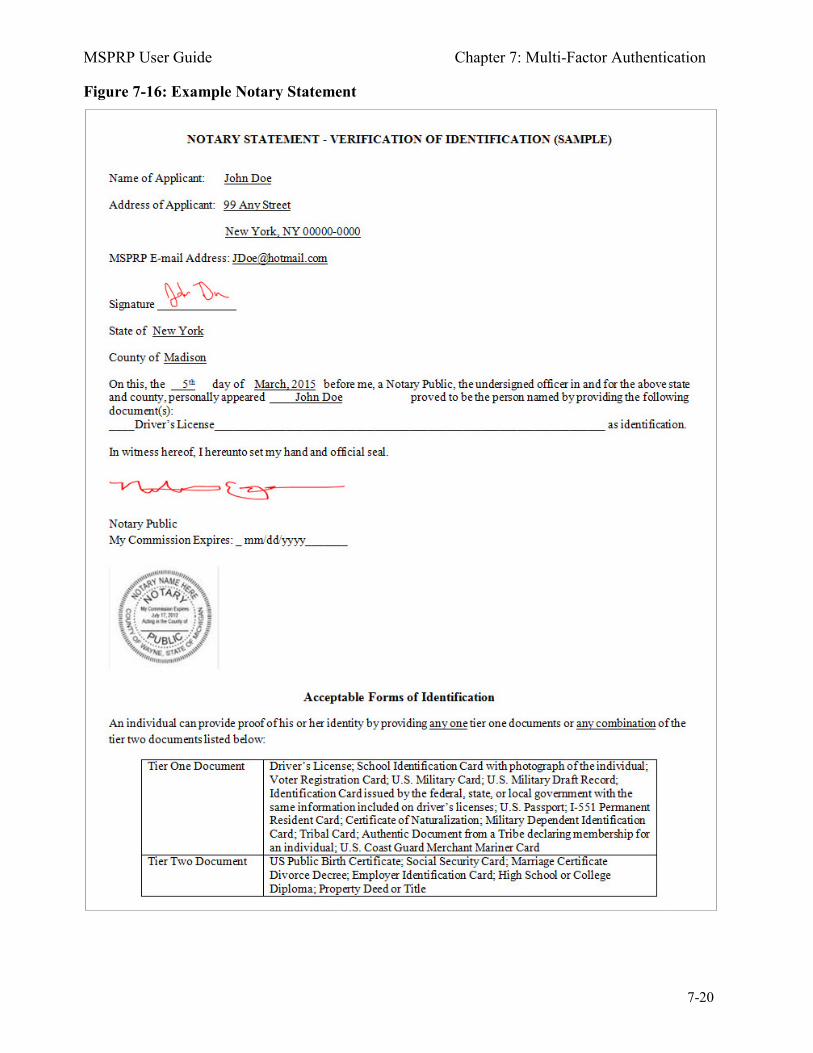
MSPRP User Guide Chapter 7: Multi-Factor Authentication
7-20
Figure 7-16: Example Notary Statement
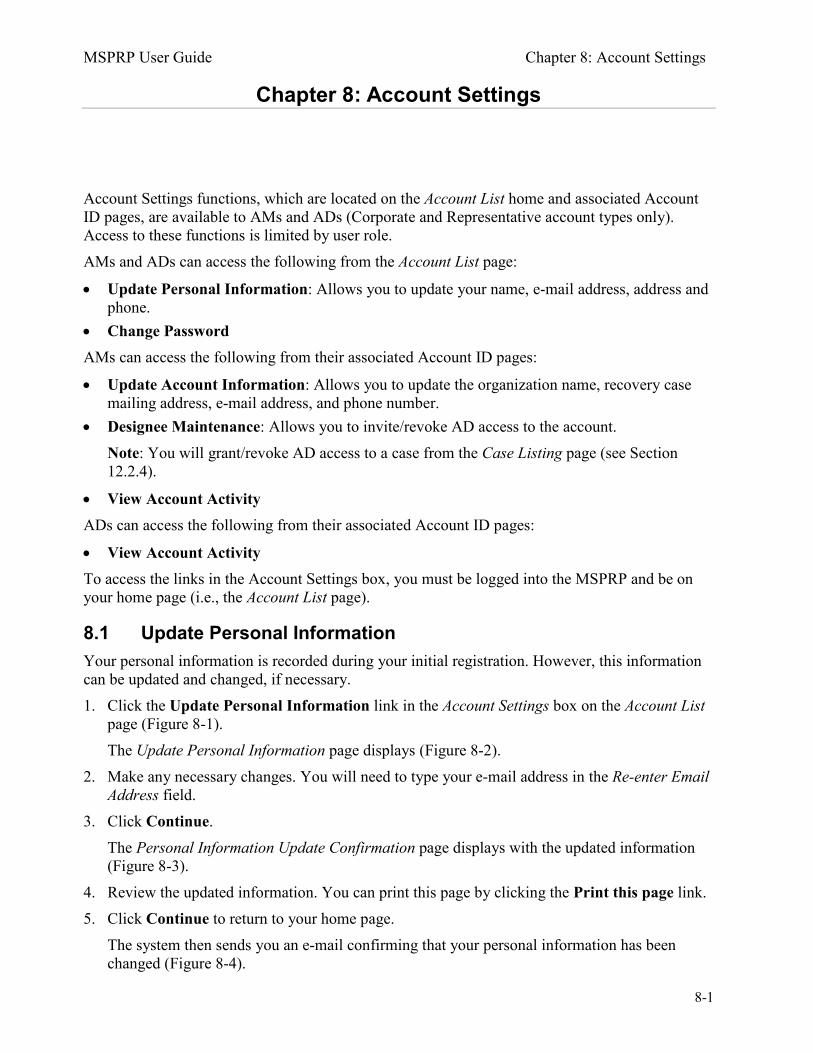
MSPRP User Guide Chapter 8: Account Settings
8-1
Chapter 8: Account Settings
Account Settings functions, which are located on the Account List home and associated Account ID pages, are available to AMs and ADs (Corporate and Representative account types only). Access to these functions is limited by user role. AMs and ADs can access the following from the Account List page:
• Update Personal Information: Allows you to update your name, e-mail address, address and phone.
• Change Password AMs can access the following from their associated Account ID pages:
• Update Account Information: Allows you to update the organization name, recovery case mailing address, e-mail address, and phone number.
• Designee Maintenance: Allows you to invite/revoke AD access to the account. Note: You will grant/revoke AD access to a case from the Case Listing page (see Section 12.2.4).
• View Account Activity ADs can access the following from their associated Account ID pages:
• View Account Activity To access the links in the Account Settings box, you must be logged into the MSPRP and be on your home page (i.e., the Account List page).
8.1 Update Personal Information Your personal information is recorded during your initial registration. However, this information can be updated and changed, if necessary. 1. Click the Update Personal Information link in the Account Settings box on the Account List
page (Figure 8-1). The Update Personal Information page displays (Figure 8-2).
2. Make any necessary changes. You will need to type your e-mail address in the Re-enter Email Address field.
3. Click Continue. The Personal Information Update Confirmation page displays with the updated information (Figure 8-3).
4. Review the updated information. You can print this page by clicking the Print this page link. 5. Click Continue to return to your home page.
The system then sends you an e-mail confirming that your personal information has been changed (Figure 8-4).
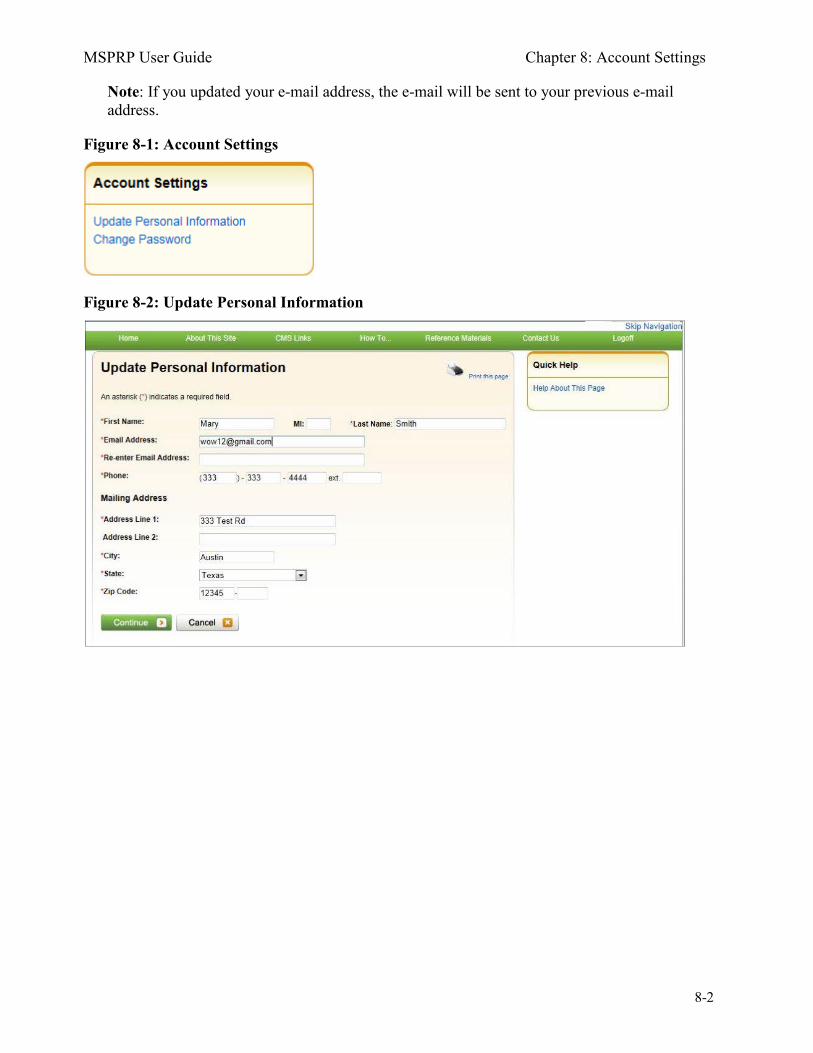
MSPRP User Guide Chapter 8: Account Settings
8-2
Note: If you updated your e-mail address, the e-mail will be sent to your previous e-mail address.
Figure 8-1: Account Settings
Figure 8-2: Update Personal Information
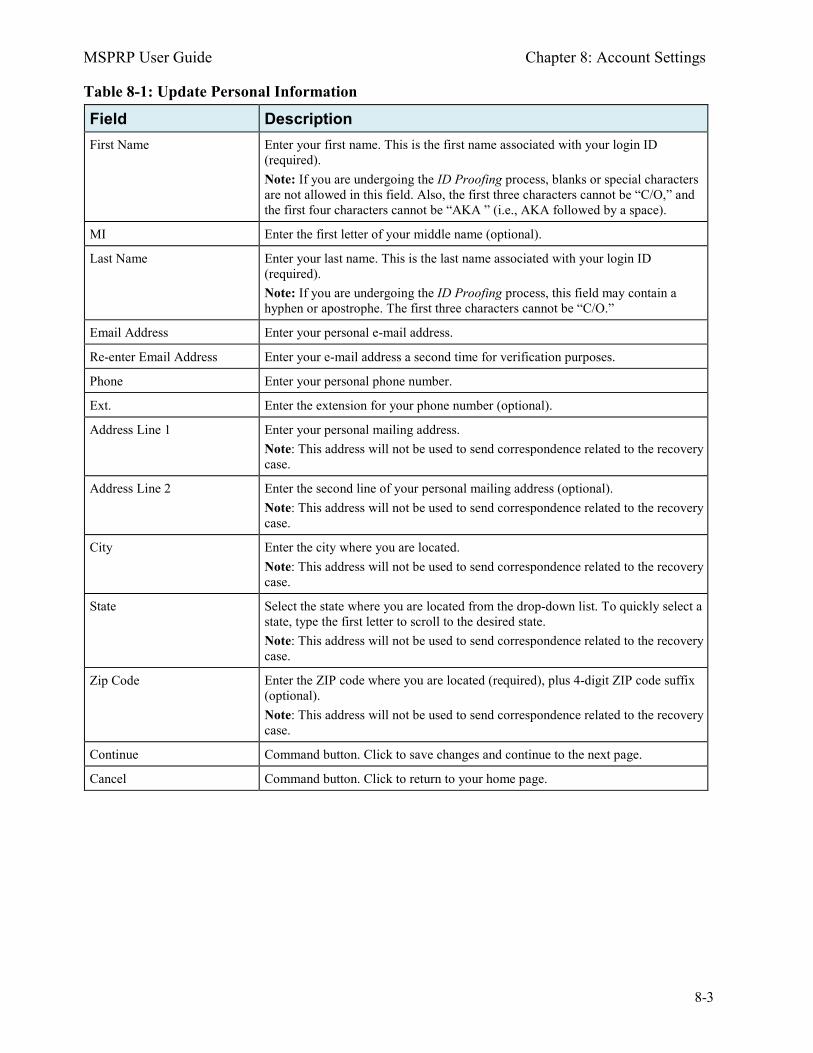
MSPRP User Guide Chapter 8: Account Settings
8-3
Table 8-1: Update Personal Information
Field Description First Name Enter your first name. This is the first name associated with your login ID
(required). Note: If you are undergoing the ID Proofing process, blanks or special characters are not allowed in this field. Also, the first three characters cannot be “C/O,” and the first four characters cannot be “AKA ” (i.e., AKA followed by a space).
MI Enter the first letter of your middle name (optional).
Last Name Enter your last name. This is the last name associated with your login ID (required). Note: If you are undergoing the ID Proofing process, this field may contain a hyphen or apostrophe. The first three characters cannot be “C/O.”
Email Address Enter your personal e-mail address.
Re-enter Email Address Enter your e-mail address a second time for verification purposes.
Phone Enter your personal phone number.
Ext. Enter the extension for your phone number (optional).
Address Line 1 Enter your personal mailing address. Note: This address will not be used to send correspondence related to the recovery case.
Address Line 2 Enter the second line of your personal mailing address (optional). Note: This address will not be used to send correspondence related to the recovery case.
City Enter the city where you are located. Note: This address will not be used to send correspondence related to the recovery case.
State Select the state where you are located from the drop-down list. To quickly select a state, type the first letter to scroll to the desired state. Note: This address will not be used to send correspondence related to the recovery case.
Zip Code Enter the ZIP code where you are located (required), plus 4-digit ZIP code suffix (optional). Note: This address will not be used to send correspondence related to the recovery case.
Continue Command button. Click to save changes and continue to the next page.
Cancel Command button. Click to return to your home page.
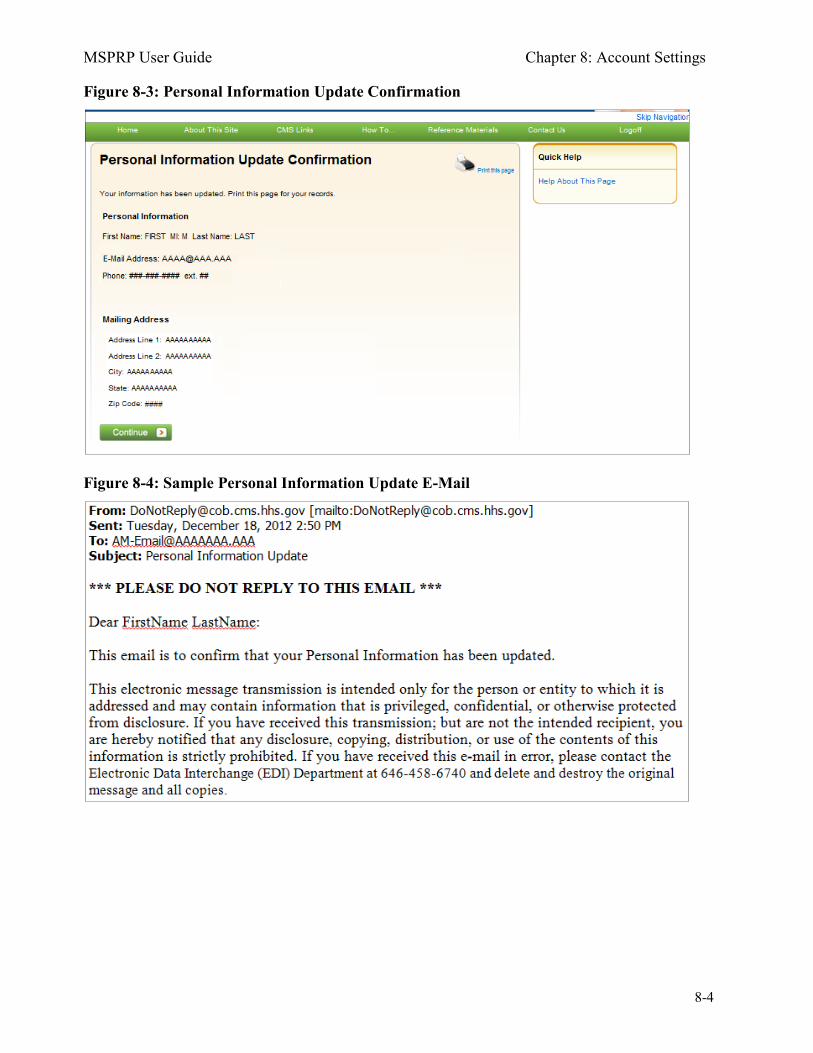
MSPRP User Guide Chapter 8: Account Settings
8-4
Figure 8-3: Personal Information Update Confirmation
Figure 8-4: Sample Personal Information Update E-Mail
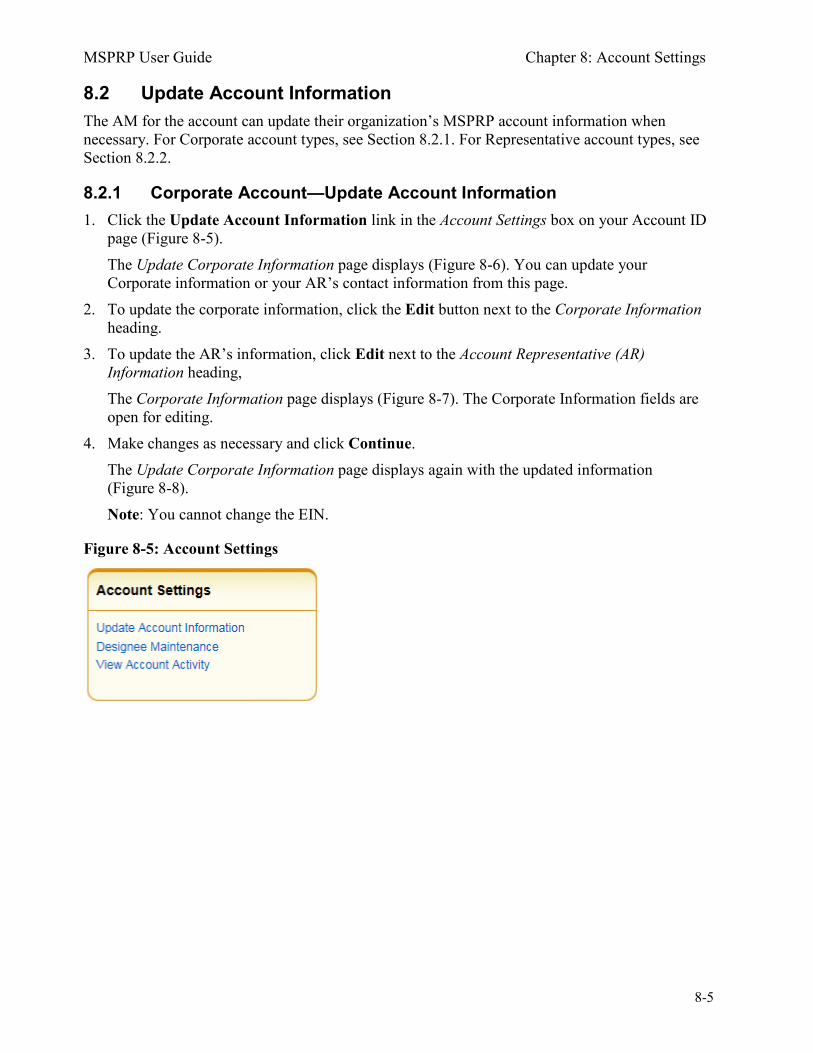
MSPRP User Guide Chapter 8: Account Settings
8-5
8.2 Update Account Information The AM for the account can update their organization’s MSPRP account information when necessary. For Corporate account types, see Section 8.2.1. For Representative account types, see Section 8.2.2.
8.2.1 Corporate Account—Update Account Information 1. Click the Update Account Information link in the Account Settings box on your Account ID
page (Figure 8-5). The Update Corporate Information page displays (Figure 8-6). You can update your Corporate information or your AR’s contact information from this page.
2. To update the corporate information, click the Edit button next to the Corporate Information heading.
3. To update the AR’s information, click Edit next to the Account Representative (AR) Information heading, The Corporate Information page displays (Figure 8-7). The Corporate Information fields are open for editing.
4. Make changes as necessary and click Continue. The Update Corporate Information page displays again with the updated information (Figure 8-8). Note: You cannot change the EIN.
Figure 8-5: Account Settings
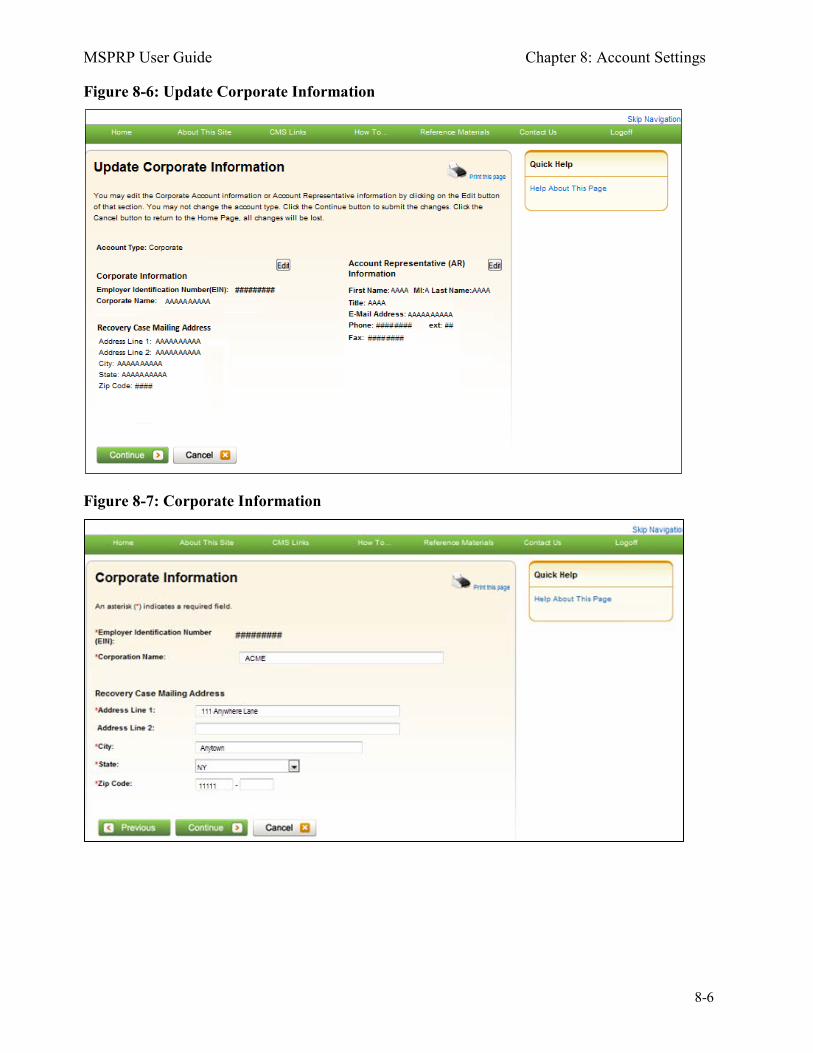
MSPRP User Guide Chapter 8: Account Settings
8-6
Figure 8-6: Update Corporate Information
Figure 8-7: Corporate Information
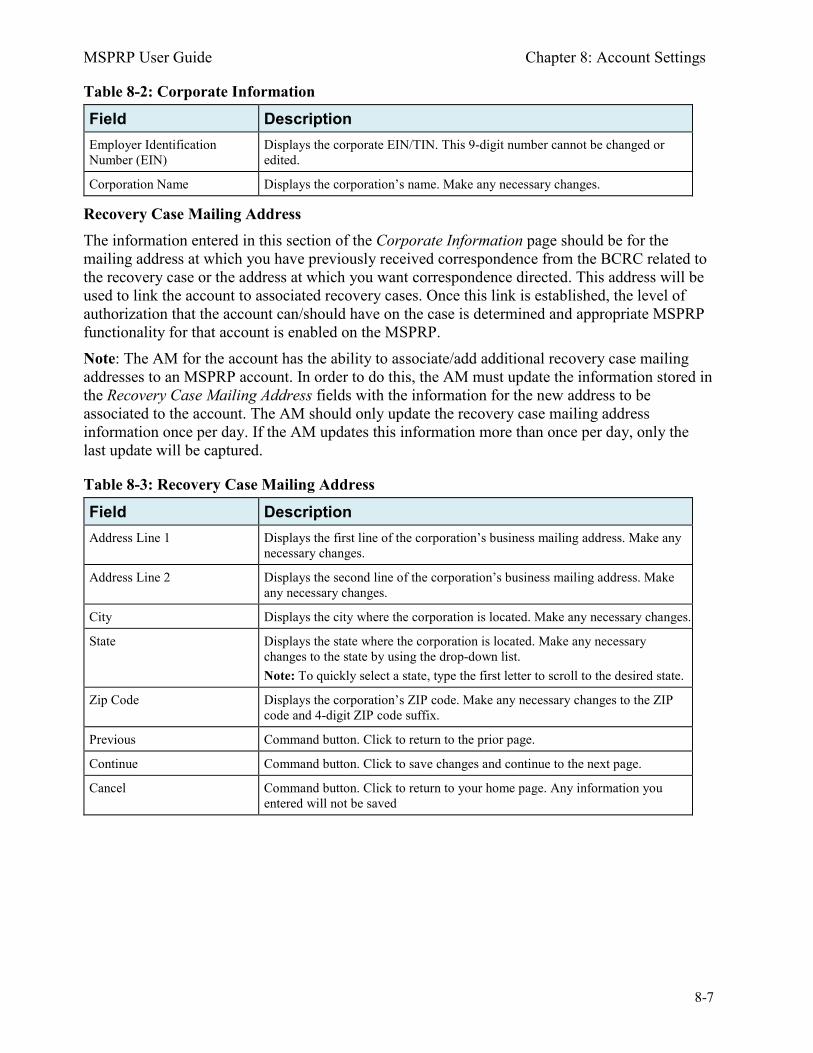
MSPRP User Guide Chapter 8: Account Settings
8-7
Table 8-2: Corporate Information
Field Description Employer Identification Number (EIN)
Displays the corporate EIN/TIN. This 9-digit number cannot be changed or edited.
Corporation Name Displays the corporation’s name. Make any necessary changes.
Recovery Case Mailing Address The information entered in this section of the Corporate Information page should be for the mailing address at which you have previously received correspondence from the BCRC related to the recovery case or the address at which you want correspondence directed. This address will be used to link the account to associated recovery cases. Once this link is established, the level of authorization that the account can/should have on the case is determined and appropriate MSPRP functionality for that account is enabled on the MSPRP. Note: The AM for the account has the ability to associate/add additional recovery case mailing addresses to an MSPRP account. In order to do this, the AM must update the information stored in the Recovery Case Mailing Address fields with the information for the new address to be associated to the account. The AM should only update the recovery case mailing address information once per day. If the AM updates this information more than once per day, only the last update will be captured.
Table 8-3: Recovery Case Mailing Address
Field Description Address Line 1 Displays the first line of the corporation’s business mailing address. Make any
necessary changes.
Address Line 2 Displays the second line of the corporation’s business mailing address. Make any necessary changes.
City Displays the city where the corporation is located. Make any necessary changes.
State Displays the state where the corporation is located. Make any necessary changes to the state by using the drop-down list. Note: To quickly select a state, type the first letter to scroll to the desired state.
Zip Code Displays the corporation’s ZIP code. Make any necessary changes to the ZIP code and 4-digit ZIP code suffix.
Previous Command button. Click to return to the prior page.
Continue Command button. Click to save changes and continue to the next page.
Cancel Command button. Click to return to your home page. Any information you entered will not be saved

MSPRP User Guide Chapter 8: Account Settings
8-8
Figure 8-8: Update Corporate Information
5. If you also need to update the AR Information, click the Edit button next to the Account Representative (AR) Information heading. If you have completed your updates click Continue. The Update Account Representative (AR) Information page displays confirming that your updates have been made (Figure 8-9).
6. Click Continue to return to your home page to perform another action, or click the navigation Logoff link to exit the MSPRP. You can update/replace the AR’s name, title, e-mail address, and phone number.
7. Make any necessary changes and click Continue. The Update Corporate Information page displays the updated information (Figure 8-10). Note: You must re-enter the AR’s e-mail address in the Re-enter E-mail Address field.
8. Verify your updates and click Continue. The Corporate Information Update Confirmation page displays confirming that your updates have been made (Figure 8-11).
9. Click Continue to return to your home page to perform another action, or click Logoff to exit the MSPRP.
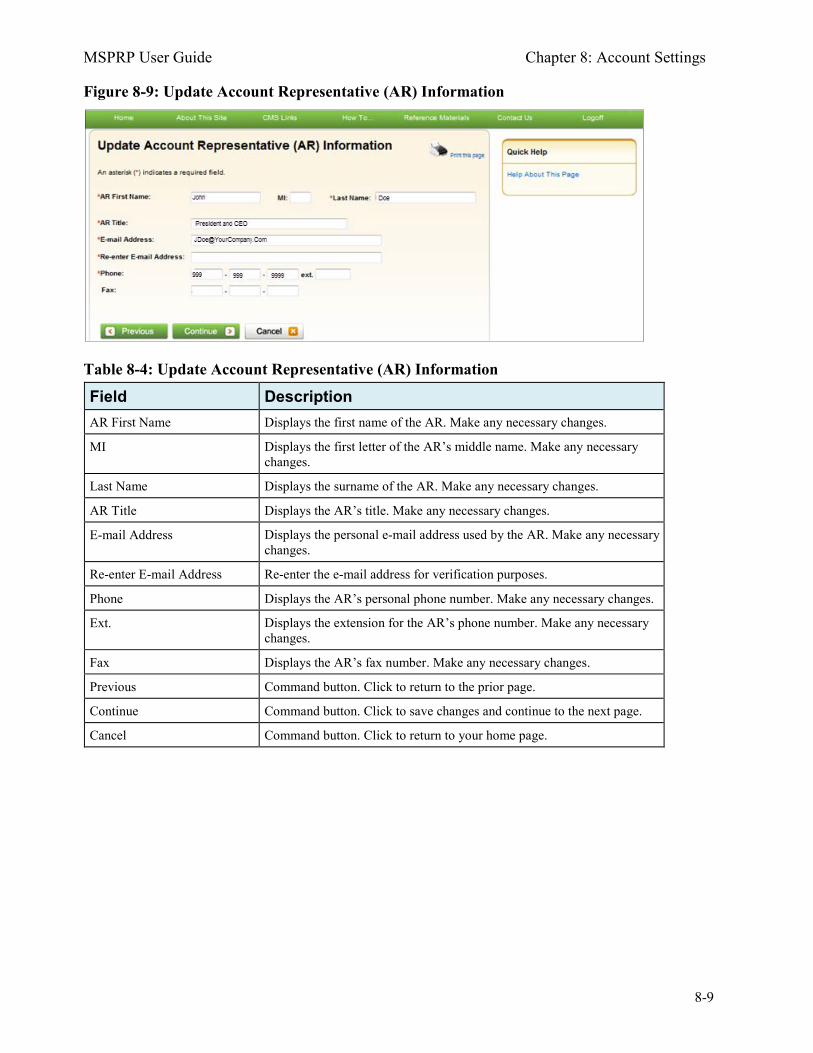
MSPRP User Guide Chapter 8: Account Settings
8-9
Figure 8-9: Update Account Representative (AR) Information
Table 8-4: Update Account Representative (AR) Information
Field Description AR First Name Displays the first name of the AR. Make any necessary changes.
MI Displays the first letter of the AR’s middle name. Make any necessary changes.
Last Name Displays the surname of the AR. Make any necessary changes.
AR Title Displays the AR’s title. Make any necessary changes.
E-mail Address Displays the personal e-mail address used by the AR. Make any necessary changes.
Re-enter E-mail Address Re-enter the e-mail address for verification purposes.
Phone Displays the AR’s personal phone number. Make any necessary changes.
Ext. Displays the extension for the AR’s phone number. Make any necessary changes.
Fax Displays the AR’s fax number. Make any necessary changes.
Previous Command button. Click to return to the prior page.
Continue Command button. Click to save changes and continue to the next page.
Cancel Command button. Click to return to your home page.
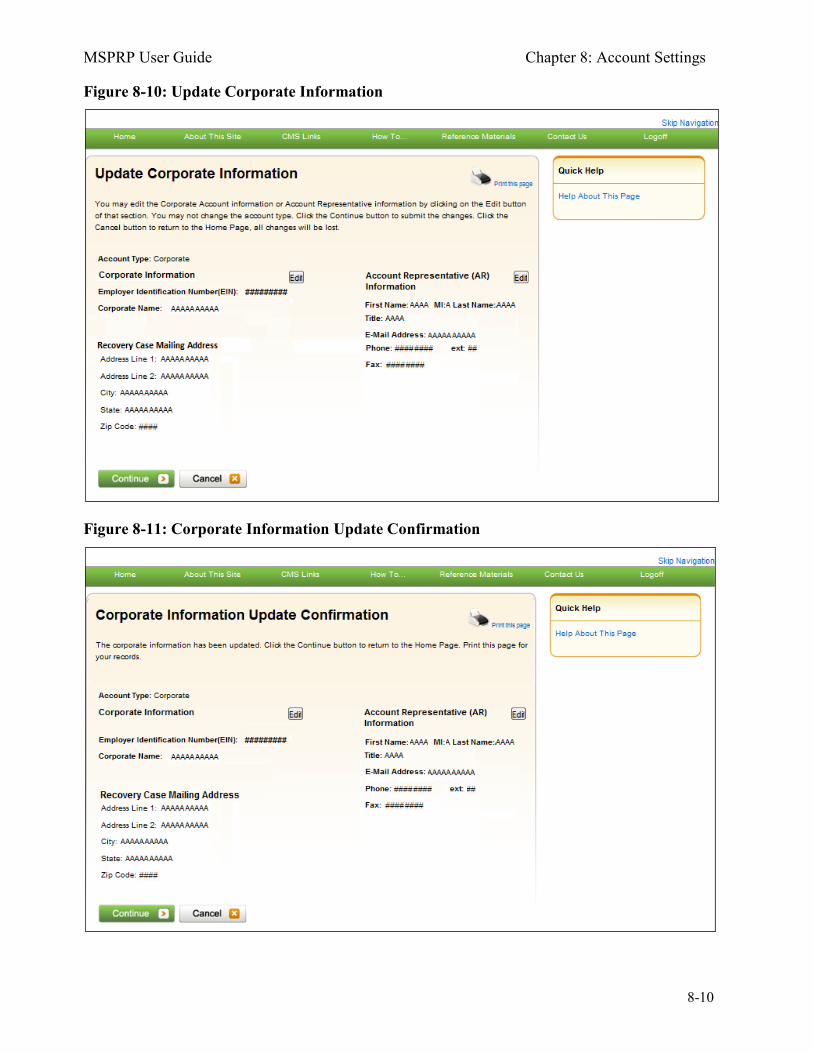
MSPRP User Guide Chapter 8: Account Settings
8-10
Figure 8-10: Update Corporate Information
Figure 8-11: Corporate Information Update Confirmation
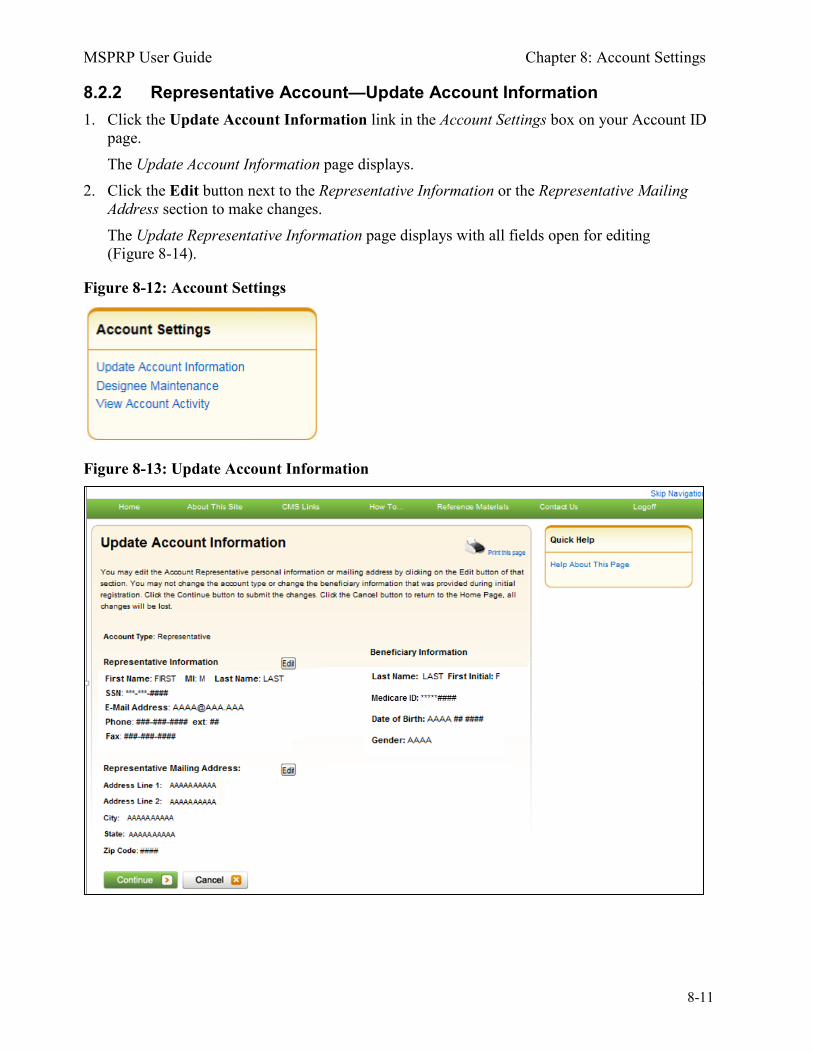
MSPRP User Guide Chapter 8: Account Settings
8-11
8.2.2 Representative Account—Update Account Information 1. Click the Update Account Information link in the Account Settings box on your Account ID
page. The Update Account Information page displays.
2. Click the Edit button next to the Representative Information or the Representative Mailing Address section to make changes. The Update Representative Information page displays with all fields open for editing (Figure 8-14).
Figure 8-12: Account Settings
Figure 8-13: Update Account Information
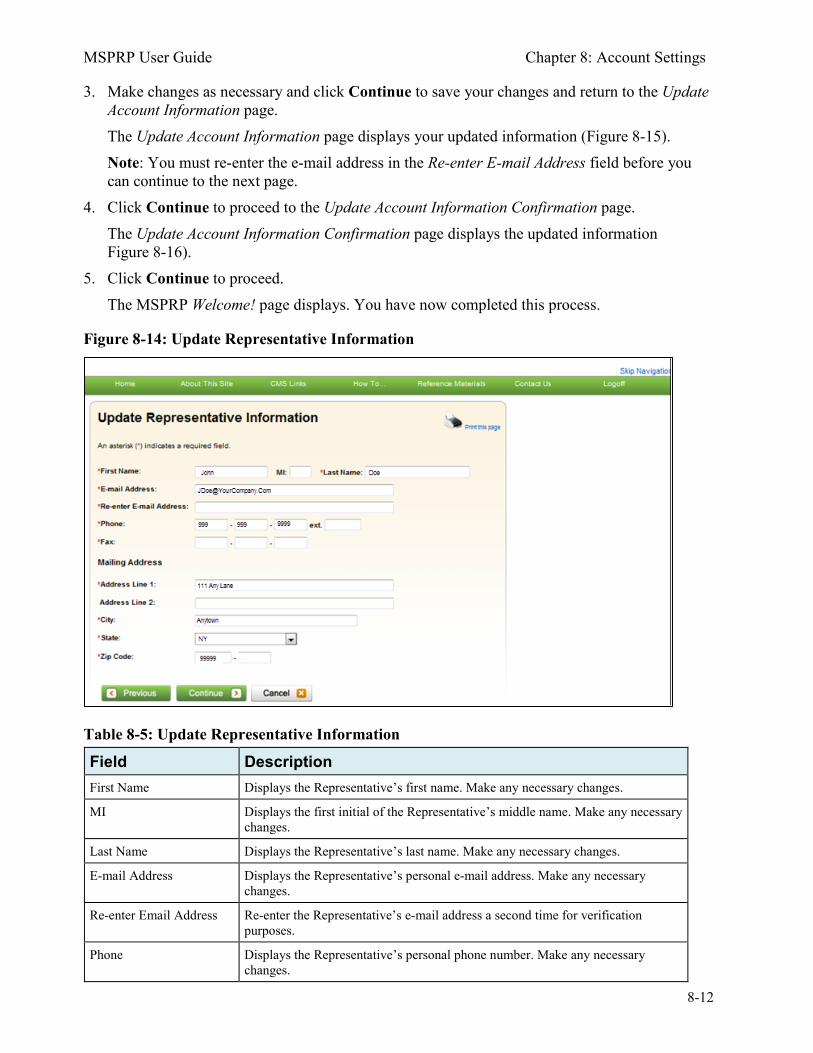
MSPRP User Guide Chapter 8: Account Settings
8-12
3. Make changes as necessary and click Continue to save your changes and return to the Update Account Information page. The Update Account Information page displays your updated information (Figure 8-15). Note: You must re-enter the e-mail address in the Re-enter E-mail Address field before you can continue to the next page.
4. Click Continue to proceed to the Update Account Information Confirmation page. The Update Account Information Confirmation page displays the updated information Figure 8-16).
5. Click Continue to proceed. The MSPRP Welcome! page displays. You have now completed this process.
Figure 8-14: Update Representative Information
Table 8-5: Update Representative Information
Field Description First Name Displays the Representative’s first name. Make any necessary changes.
MI Displays the first initial of the Representative’s middle name. Make any necessary changes.
Last Name Displays the Representative’s last name. Make any necessary changes.
E-mail Address Displays the Representative’s personal e-mail address. Make any necessary changes.
Re-enter Email Address Re-enter the Representative’s e-mail address a second time for verification purposes.
Phone Displays the Representative’s personal phone number. Make any necessary changes.
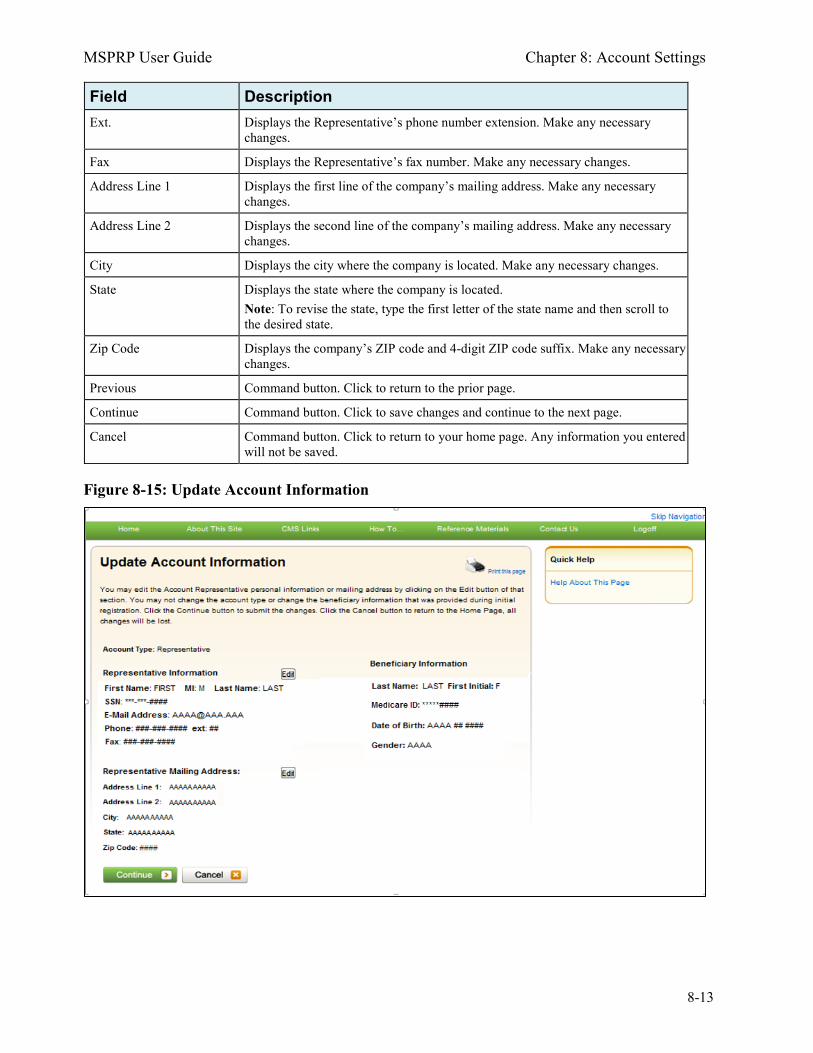
MSPRP User Guide Chapter 8: Account Settings
8-13
Field Description Ext. Displays the Representative’s phone number extension. Make any necessary
changes.
Fax Displays the Representative’s fax number. Make any necessary changes.
Address Line 1 Displays the first line of the company’s mailing address. Make any necessary changes.
Address Line 2 Displays the second line of the company’s mailing address. Make any necessary changes.
City Displays the city where the company is located. Make any necessary changes.
State Displays the state where the company is located. Note: To revise the state, type the first letter of the state name and then scroll to the desired state.
Zip Code Displays the company’s ZIP code and 4-digit ZIP code suffix. Make any necessary changes.
Previous Command button. Click to return to the prior page.
Continue Command button. Click to save changes and continue to the next page.
Cancel Command button. Click to return to your home page. Any information you entered will not be saved.
Figure 8-15: Update Account Information
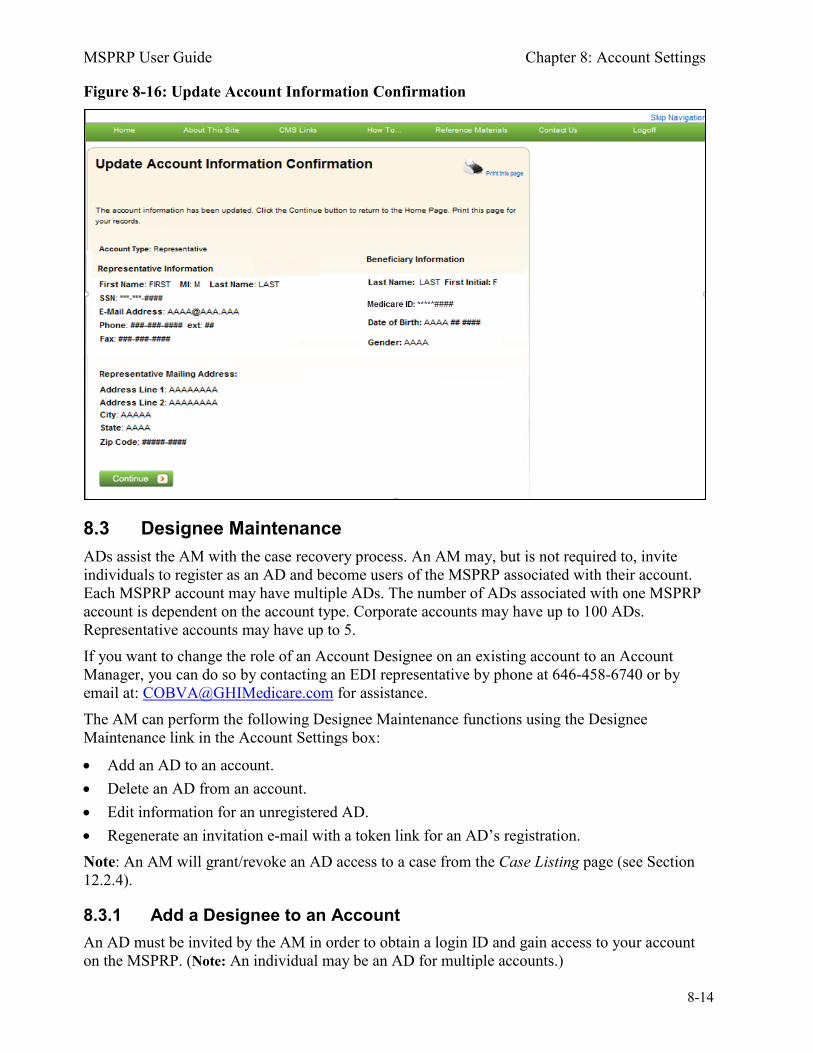
MSPRP User Guide Chapter 8: Account Settings
8-14
Figure 8-16: Update Account Information Confirmation
8.3 Designee Maintenance ADs assist the AM with the case recovery process. An AM may, but is not required to, invite individuals to register as an AD and become users of the MSPRP associated with their account. Each MSPRP account may have multiple ADs. The number of ADs associated with one MSPRP account is dependent on the account type. Corporate accounts may have up to 100 ADs. Representative accounts may have up to 5. If you want to change the role of an Account Designee on an existing account to an Account Manager, you can do so by contacting an EDI representative by phone at 646-458-6740 or by email at: [email protected] for assistance. The AM can perform the following Designee Maintenance functions using the Designee Maintenance link in the Account Settings box:
• Add an AD to an account. • Delete an AD from an account. • Edit information for an unregistered AD. • Regenerate an invitation e-mail with a token link for an AD’s registration. Note: An AM will grant/revoke an AD access to a case from the Case Listing page (see Section 12.2.4).
8.3.1 Add a Designee to an Account An AD must be invited by the AM in order to obtain a login ID and gain access to your account on the MSPRP. (Note: An individual may be an AD for multiple accounts.)
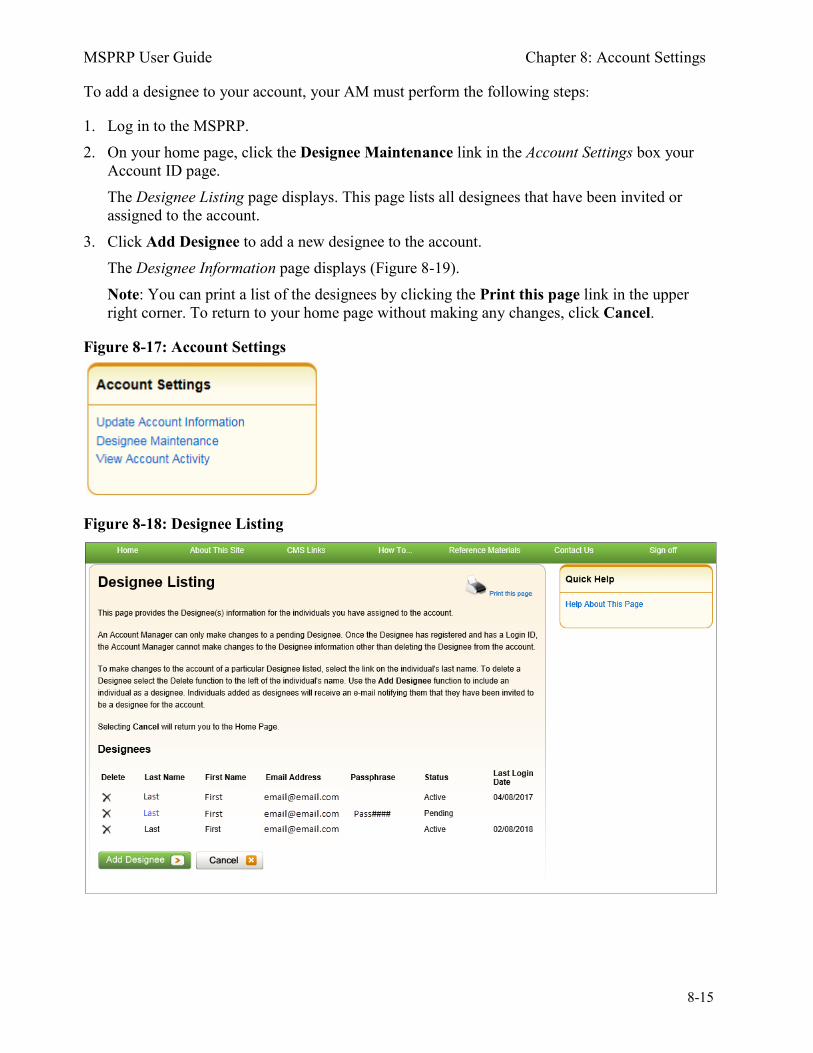
MSPRP User Guide Chapter 8: Account Settings
8-15
To add a designee to your account, your AM must perform the following steps:
1. Log in to the MSPRP. 2. On your home page, click the Designee Maintenance link in the Account Settings box your
Account ID page. The Designee Listing page displays. This page lists all designees that have been invited or assigned to the account.
3. Click Add Designee to add a new designee to the account. The Designee Information page displays (Figure 8-19). Note: You can print a list of the designees by clicking the Print this page link in the upper right corner. To return to your home page without making any changes, click Cancel.
Figure 8-17: Account Settings
Figure 8-18: Designee Listing
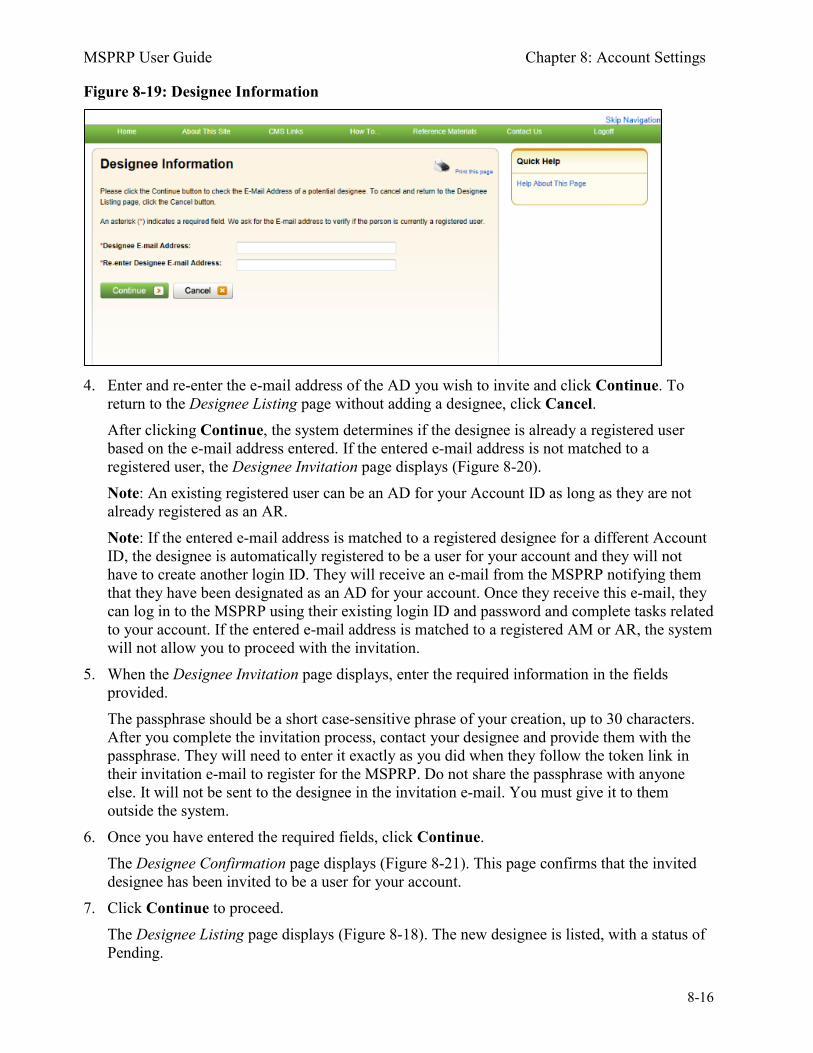
MSPRP User Guide Chapter 8: Account Settings
8-16
Figure 8-19: Designee Information
4. Enter and re-enter the e-mail address of the AD you wish to invite and click Continue. To return to the Designee Listing page without adding a designee, click Cancel. After clicking Continue, the system determines if the designee is already a registered user based on the e-mail address entered. If the entered e-mail address is not matched to a registered user, the Designee Invitation page displays (Figure 8-20). Note: An existing registered user can be an AD for your Account ID as long as they are not already registered as an AR. Note: If the entered e-mail address is matched to a registered designee for a different Account ID, the designee is automatically registered to be a user for your account and they will not have to create another login ID. They will receive an e-mail from the MSPRP notifying them that they have been designated as an AD for your account. Once they receive this e-mail, they can log in to the MSPRP using their existing login ID and password and complete tasks related to your account. If the entered e-mail address is matched to a registered AM or AR, the system will not allow you to proceed with the invitation.
5. When the Designee Invitation page displays, enter the required information in the fields provided. The passphrase should be a short case-sensitive phrase of your creation, up to 30 characters. After you complete the invitation process, contact your designee and provide them with the passphrase. They will need to enter it exactly as you did when they follow the token link in their invitation e-mail to register for the MSPRP. Do not share the passphrase with anyone else. It will not be sent to the designee in the invitation e-mail. You must give it to them outside the system.
6. Once you have entered the required fields, click Continue. The Designee Confirmation page displays (Figure 8-21). This page confirms that the invited designee has been invited to be a user for your account.
7. Click Continue to proceed. The Designee Listing page displays (Figure 8-18). The new designee is listed, with a status of Pending.
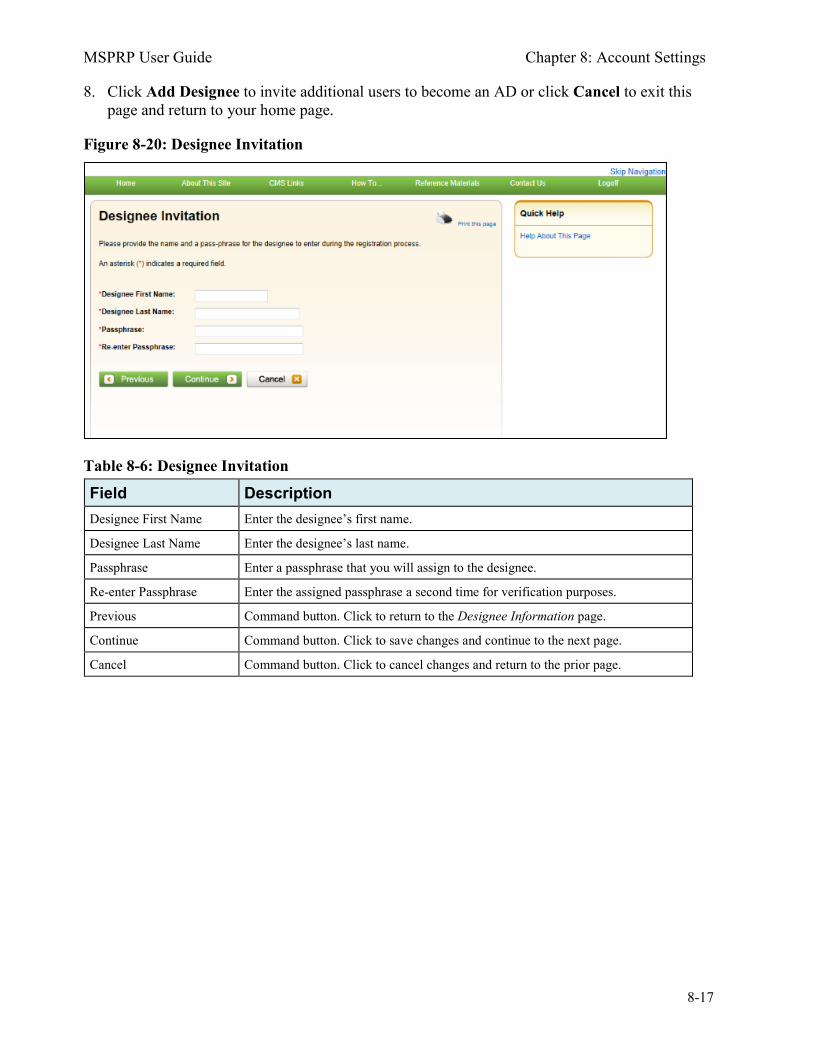
MSPRP User Guide Chapter 8: Account Settings
8-17
8. Click Add Designee to invite additional users to become an AD or click Cancel to exit this page and return to your home page.
Figure 8-20: Designee Invitation
Table 8-6: Designee Invitation
Field Description Designee First Name Enter the designee’s first name.
Designee Last Name Enter the designee’s last name.
Passphrase Enter a passphrase that you will assign to the designee.
Re-enter Passphrase Enter the assigned passphrase a second time for verification purposes.
Previous Command button. Click to return to the Designee Information page.
Continue Command button. Click to save changes and continue to the next page.
Cancel Command button. Click to cancel changes and return to the prior page.
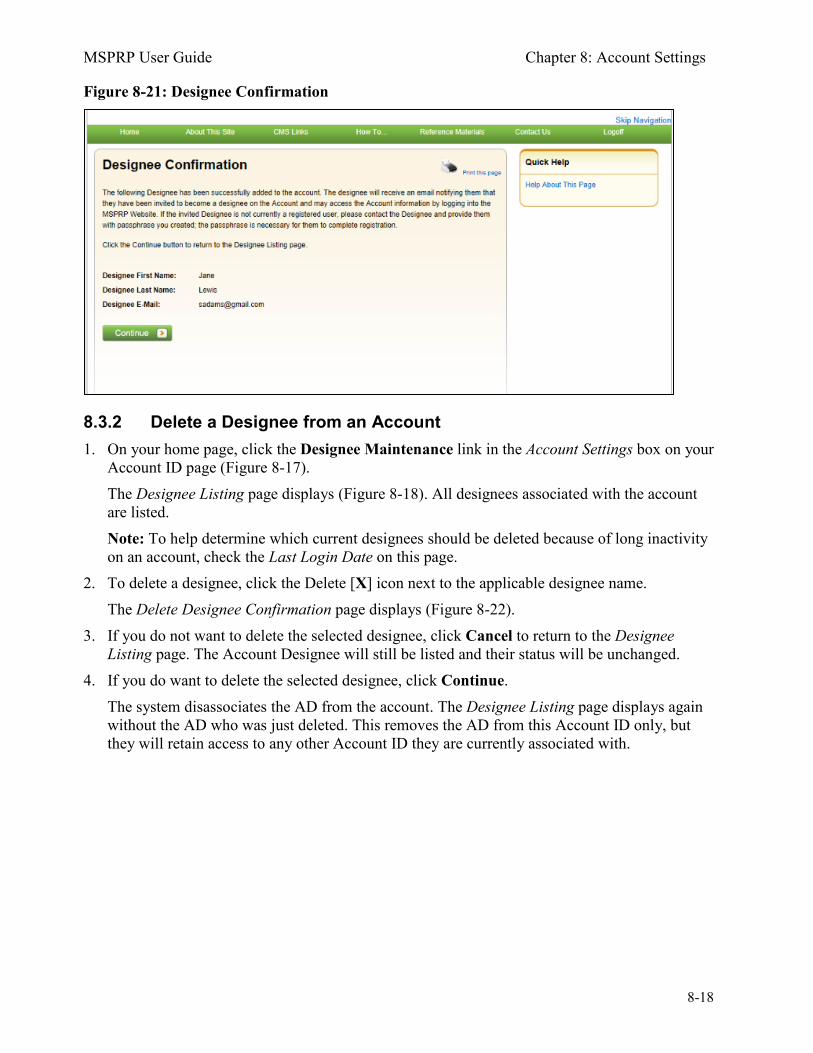
MSPRP User Guide Chapter 8: Account Settings
8-18
Figure 8-21: Designee Confirmation
8.3.2 Delete a Designee from an Account 1. On your home page, click the Designee Maintenance link in the Account Settings box on your
Account ID page (Figure 8-17). The Designee Listing page displays (Figure 8-18). All designees associated with the account are listed. Note: To help determine which current designees should be deleted because of long inactivity on an account, check the Last Login Date on this page.
2. To delete a designee, click the Delete [X] icon next to the applicable designee name. The Delete Designee Confirmation page displays (Figure 8-22).
3. If you do not want to delete the selected designee, click Cancel to return to the Designee Listing page. The Account Designee will still be listed and their status will be unchanged.
4. If you do want to delete the selected designee, click Continue. The system disassociates the AD from the account. The Designee Listing page displays again without the AD who was just deleted. This removes the AD from this Account ID only, but they will retain access to any other Account ID they are currently associated with.

MSPRP User Guide Chapter 8: Account Settings
8-19
Figure 8-22: Delete Designee Confirmation
8.3.3 Edit Designee Information An AM can edit a designee’s personal information as long as the designee status is equal to Pending. ADs in Pending status have not yet registered on the MSPRP. Once a designee has registered and their status has been changed to Active, the AM can only view the designee’s personal information. 1. On your home page, click the Designee Maintenance link in the Account Settings box on your
Account ID page (Figure 8-17). The Designee Listing page displays (Figure 8-18).
2. Click the last name of the designee in pending status whose information you wish to update. The Update Designee Information page displays and is open for editing (Figure 8-23).
3. Revise information as necessary and click Continue. You will need to re-enter the designee E-mail Address and passphrase. The Designee Confirmation page displays with the updated designee information (Figure 8-24).
4. Click Continue to return to the Designee Listing page. The Designee Listing page displays again with the list of designee names (Figure 8-18).
5. Click Cancel to return to your home page. To edit information for another designee registered to this Account ID, click the designee’s last name, and follow these previous steps.
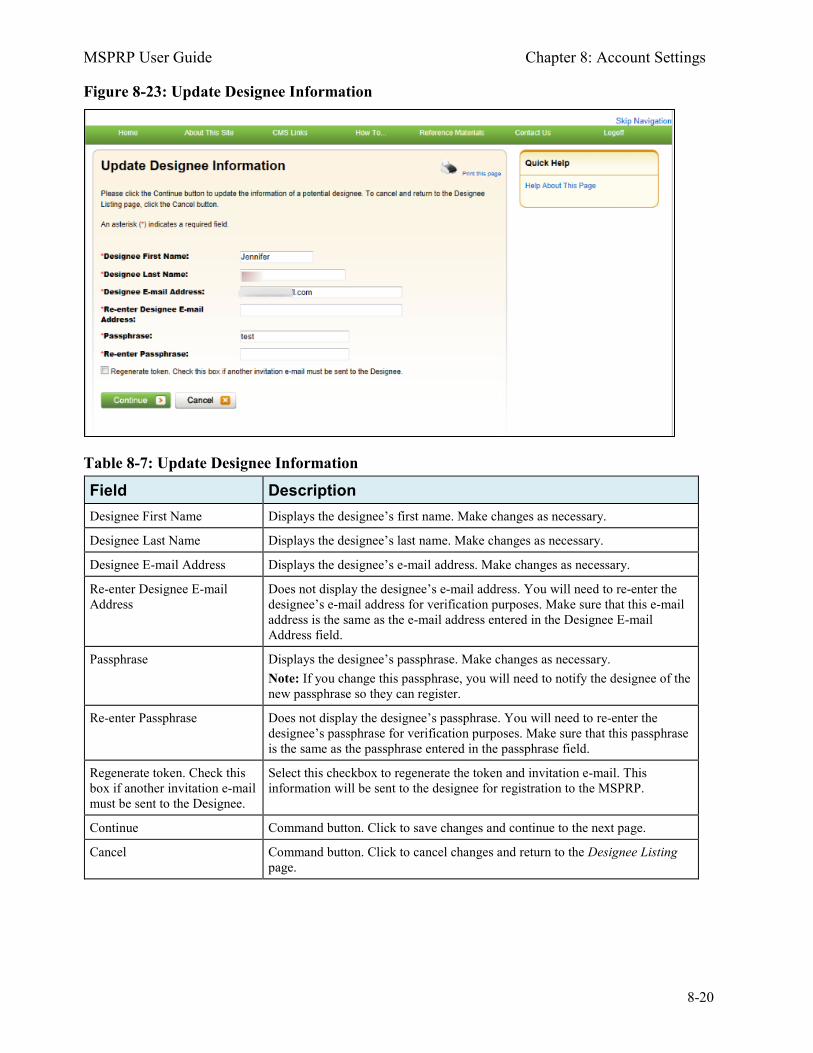
MSPRP User Guide Chapter 8: Account Settings
8-20
Figure 8-23: Update Designee Information
Table 8-7: Update Designee Information
Field Description Designee First Name Displays the designee’s first name. Make changes as necessary.
Designee Last Name Displays the designee’s last name. Make changes as necessary.
Designee E-mail Address Displays the designee’s e-mail address. Make changes as necessary.
Re-enter Designee E-mail Address
Does not display the designee’s e-mail address. You will need to re-enter the designee’s e-mail address for verification purposes. Make sure that this e-mail address is the same as the e-mail address entered in the Designee E-mail Address field.
Passphrase Displays the designee’s passphrase. Make changes as necessary. Note: If you change this passphrase, you will need to notify the designee of the new passphrase so they can register.
Re-enter Passphrase Does not display the designee’s passphrase. You will need to re-enter the designee’s passphrase for verification purposes. Make sure that this passphrase is the same as the passphrase entered in the passphrase field.
Regenerate token. Check this box if another invitation e-mail must be sent to the Designee.
Select this checkbox to regenerate the token and invitation e-mail. This information will be sent to the designee for registration to the MSPRP.
Continue Command button. Click to save changes and continue to the next page.
Cancel Command button. Click to cancel changes and return to the Designee Listing page.
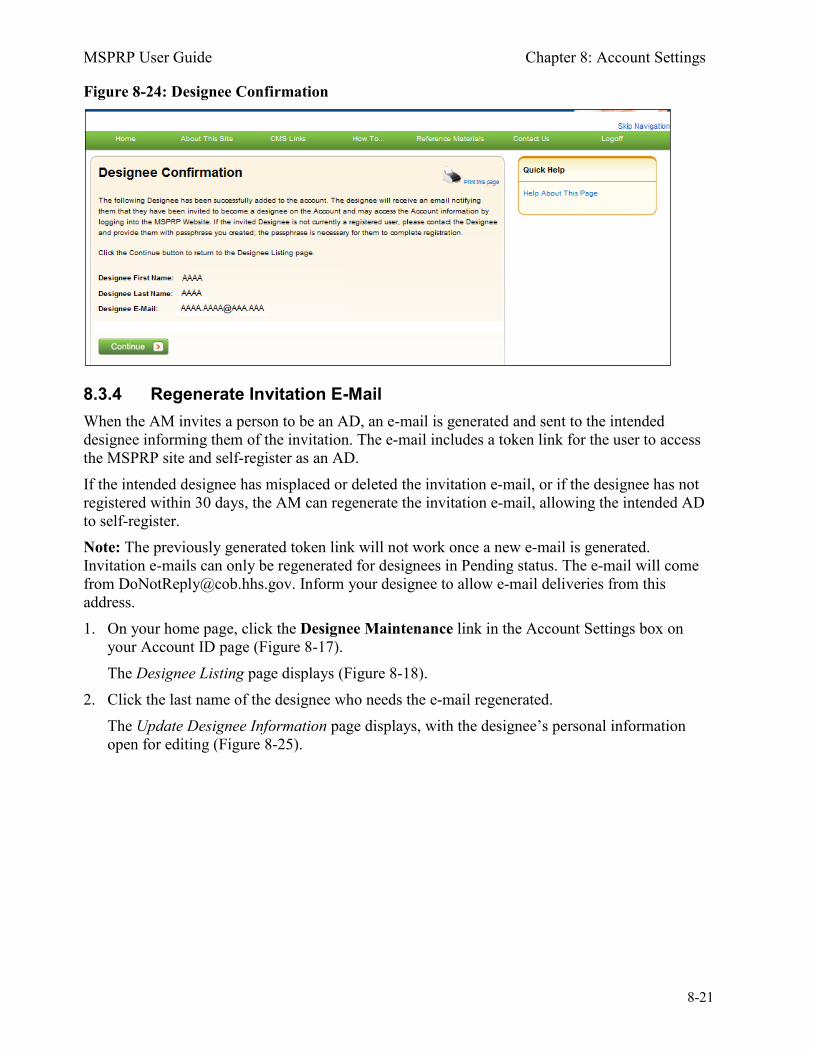
MSPRP User Guide Chapter 8: Account Settings
8-21
Figure 8-24: Designee Confirmation
8.3.4 Regenerate Invitation E-Mail When the AM invites a person to be an AD, an e-mail is generated and sent to the intended designee informing them of the invitation. The e-mail includes a token link for the user to access the MSPRP site and self-register as an AD. If the intended designee has misplaced or deleted the invitation e-mail, or if the designee has not registered within 30 days, the AM can regenerate the invitation e-mail, allowing the intended AD to self-register. Note: The previously generated token link will not work once a new e-mail is generated. Invitation e-mails can only be regenerated for designees in Pending status. The e-mail will come from [email protected]. Inform your designee to allow e-mail deliveries from this address. 1. On your home page, click the Designee Maintenance link in the Account Settings box on
your Account ID page (Figure 8-17). The Designee Listing page displays (Figure 8-18).
2. Click the last name of the designee who needs the e-mail regenerated. The Update Designee Information page displays, with the designee’s personal information open for editing (Figure 8-25).
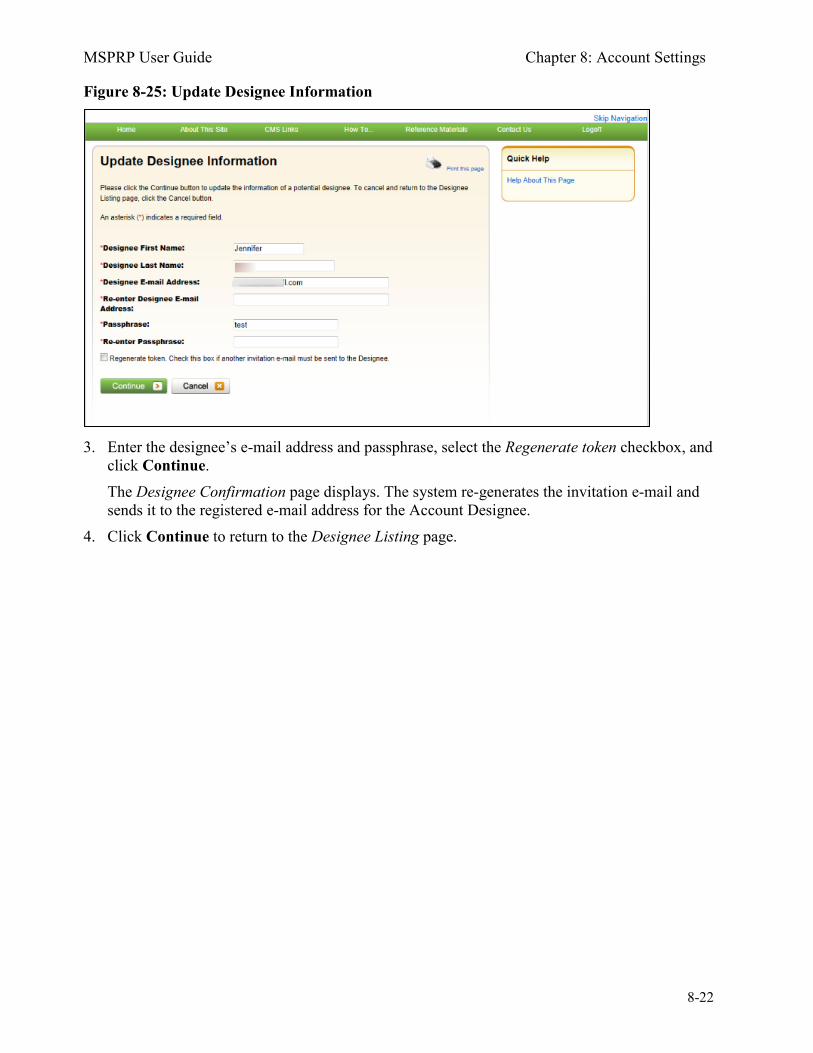
MSPRP User Guide Chapter 8: Account Settings
8-22
Figure 8-25: Update Designee Information
3. Enter the designee’s e-mail address and passphrase, select the Regenerate token checkbox, and click Continue. The Designee Confirmation page displays. The system re-generates the invitation e-mail and sends it to the registered e-mail address for the Account Designee.
4. Click Continue to return to the Designee Listing page.
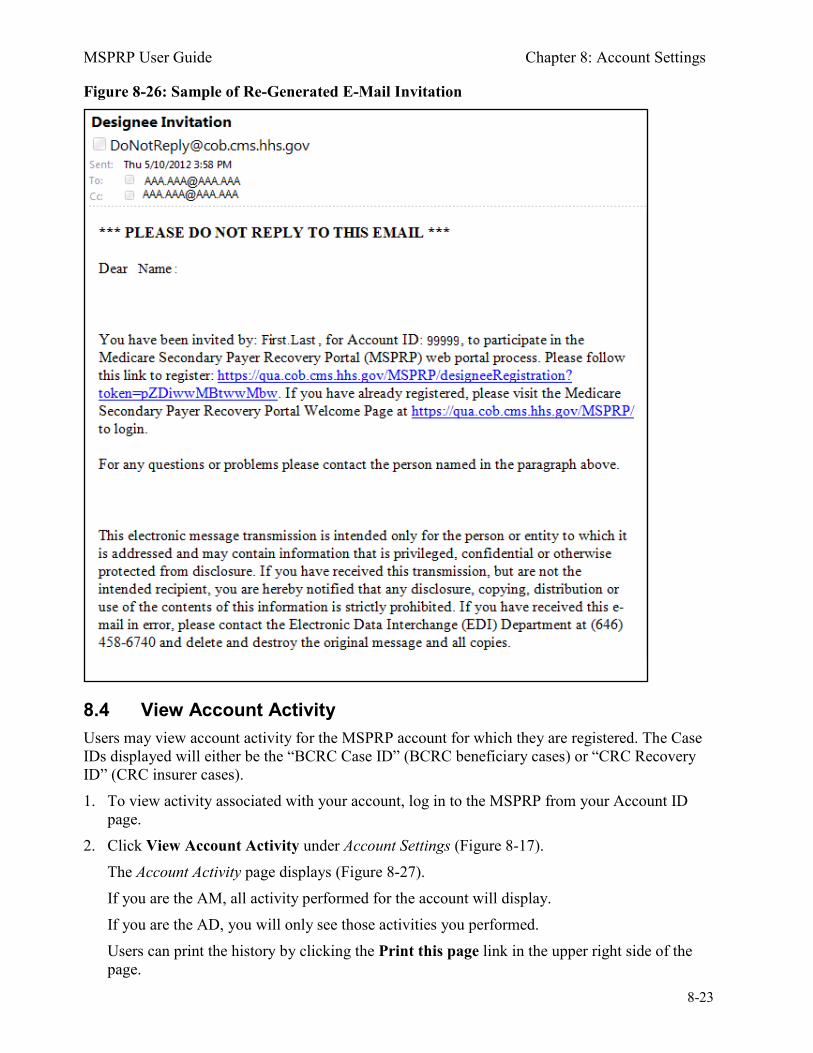
MSPRP User Guide Chapter 8: Account Settings
8-23
Figure 8-26: Sample of Re-Generated E-Mail Invitation
8.4 View Account Activity Users may view account activity for the MSPRP account for which they are registered. The Case IDs displayed will either be the “BCRC Case ID” (BCRC beneficiary cases) or “CRC Recovery ID” (CRC insurer cases). 1. To view activity associated with your account, log in to the MSPRP from your Account ID
page. 2. Click View Account Activity under Account Settings (Figure 8-17).
The Account Activity page displays (Figure 8-27). If you are the AM, all activity performed for the account will display. If you are the AD, you will only see those activities you performed. Users can print the history by clicking the Print this page link in the upper right side of the page.
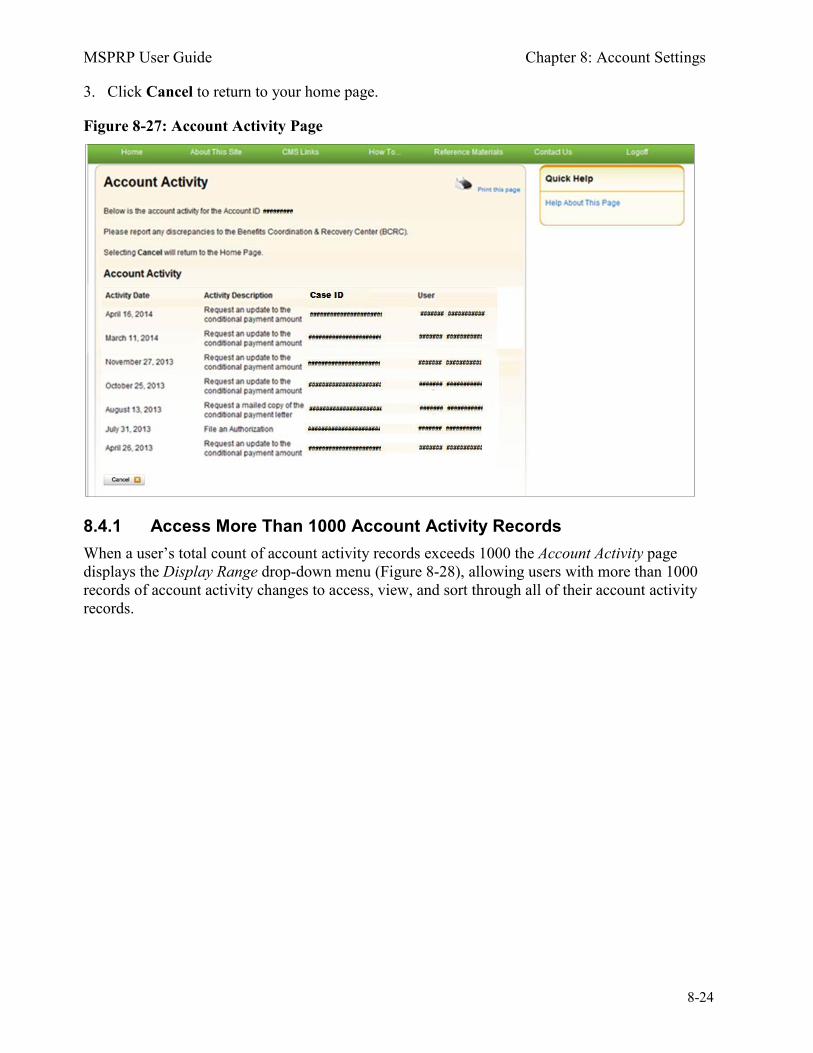
MSPRP User Guide Chapter 8: Account Settings
8-24
3. Click Cancel to return to your home page.
Figure 8-27: Account Activity Page
8.4.1 Access More Than 1000 Account Activity Records When a user’s total count of account activity records exceeds 1000 the Account Activity page displays the Display Range drop-down menu (Figure 8-28), allowing users with more than 1000 records of account activity changes to access, view, and sort through all of their account activity records.
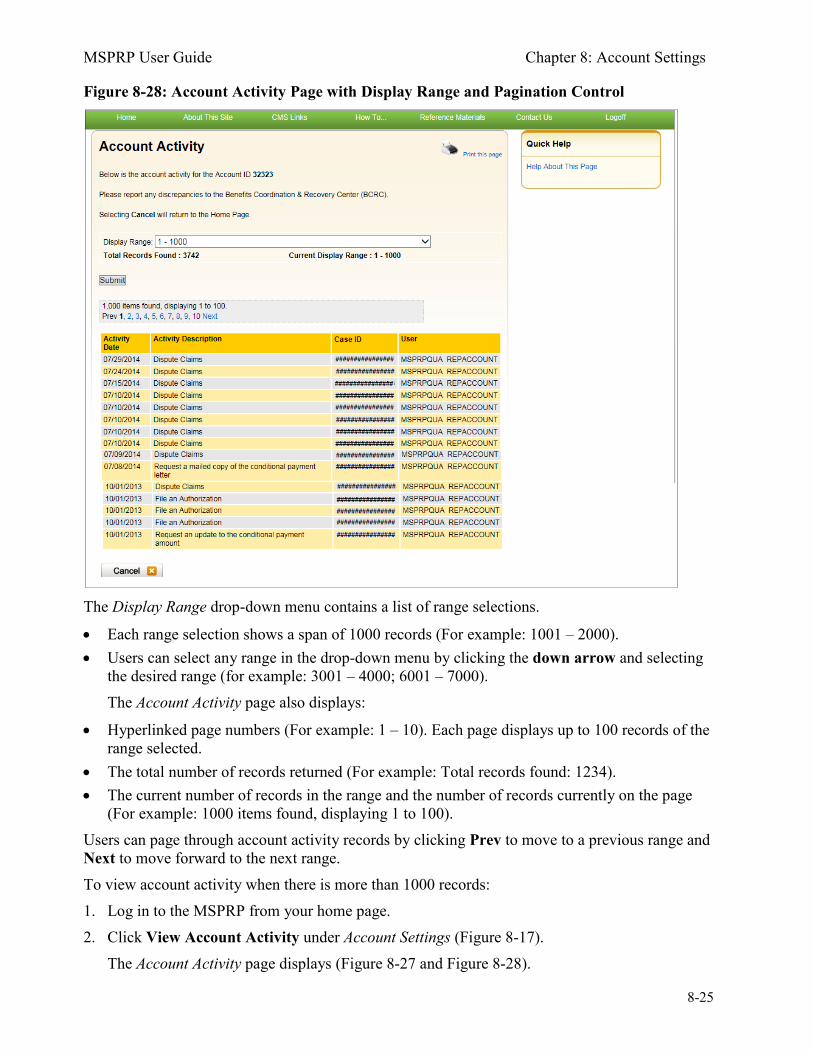
MSPRP User Guide Chapter 8: Account Settings
8-25
Figure 8-28: Account Activity Page with Display Range and Pagination Control
The Display Range drop-down menu contains a list of range selections.
• Each range selection shows a span of 1000 records (For example: 1001 – 2000). • Users can select any range in the drop-down menu by clicking the down arrow and selecting
the desired range (for example: 3001 – 4000; 6001 – 7000). The Account Activity page also displays:
• Hyperlinked page numbers (For example: 1 – 10). Each page displays up to 100 records of the range selected.
• The total number of records returned (For example: Total records found: 1234). • The current number of records in the range and the number of records currently on the page
(For example: 1000 items found, displaying 1 to 100). Users can page through account activity records by clicking Prev to move to a previous range and Next to move forward to the next range. To view account activity when there is more than 1000 records: 1. Log in to the MSPRP from your home page. 2. Click View Account Activity under Account Settings (Figure 8-17).
The Account Activity page displays (Figure 8-27 and Figure 8-28).
MSPRP User Guide Chapter 8: Account Settings
8-26
3. Click the down arrow to the right of the Display Range drop-down menu. 4. Select the range of account activity records (For example: 3001 – 4000). 5. Click Submit.
MSPRP displays account activity records for the range selected.
8.5 Change Password The system requires you to change your password every 60 days. You will also need to change your password when you have forgotten it. In this case, a temporary password is assigned. Your password can only be changed once every 24 hours. To change your password, perform the following steps. 1. From your home page, click Change Password under Account Settings on the right side of
the page (Figure 8-29). The Change Password page displays (Figure 8-30).
2. Enter your current password and then enter and re-enter a new password that adheres to the prescribed guidelines shown next and on the Change Password help page.
• Login IDs must be 7 characters • Login IDs must be in the format of AA999AA (first two alphabetic, next three numeric,
last two alphabetic) • Login ID and Password cannot be the same • Password must be changed every sixty (60) days. • Password must consist of at least eight (8) characters. • Password must contain at least one uppercase letter, one lowercase letter, one number and
one special character. • Password must contain a minimum of four (4) changed characters from the previous
password. • Password cannot be changed more than once per day. • Password must be different from the previous twenty four (24) passwords. • Password cannot contain a reserved word: PASSWORD, WELCOME, CMS, HCFA, SYSTEM, MEDICARE, MEDICAID, TEMP, LETMEIN, GOD, SEX, MONEY, QUEST, 1234, F20ASYA, RAVENS, REDSKIN, ORIOLES, BULLETS, CAPITOL, TERPS, DOCTOR, 567890, 12345678, ROOT, BOSSMAN, JANUARY, FEBRUARY, MARCH, APRIL, MAY, JUNE, JULY, AUGUST, SEPTEMBER, OCTOBER, NOVEMBER, DECEMBER, SSA, FIREWALL, CITIC, ADMIN, UNISYS, PWD, SECURITY, 76543210, 43210, 098765, IRAQ, OIS, TMG, INTERNET, INTRANET, EXTRANET, ATT, LOCKHEED, LOCKH33D, SOCIAL, FACEBOOK, YOUTUBE, WINDOWS, STEELERS, PATRIOTS, COMPUTER, DILBERT, MONDAY, TUESDAY, WEDNESDAY, THURSDAY, FRIDAY, SATURDAY, SUNDAY, SPRING, SUMMER, AUTUMN, FALL, WINTER, BACKUP, BUSINESS, FALCONS, BRONCOS, EAGLES, PANTHERS, DOLPHINS, JAGUARS, CHIEFS, TEXANS, RAMS, BEARS, BROWNS, LIONS, BENGALS, COWBOYS, CARDINAL, CHARGERS, RAIDERS, SAINTS, REDSOX, YANKEES, PIRATES, PHILLIES, HHS, BRAVES, NATIONAL, UNITED, STATES, TWITTER, MITRE, MARLINS, OILERS, WHITESOX,
MSPRP User Guide Chapter 8: Account Settings
8-27
CUBS, DODGERS, GIANTS, ANGELS, DEVILS, DIAMOND, SEATTLE, HOLLYWOOD, ARIZONA, ALABAMA, ALASKA, ARKANSAS, COLORADO, DELAWARE, FLORIDA, GEORGIA, HAWAII, IDAHO, ILLINOIS, INDIANA, IOWA, KANSAS, KENTUCKY, MAINE, MARYLAND, MICHIGAN, MISSOURI, MONTANA, NEBRASKA, NEVADA, LASVEGAS, NEWYORK, OHIO, OKLAHOMA, OREGON, UTAH, VERMONT, VIRGINIA, WYOMING, ATLANTIC, PACIFIC, SANFRAN, REGIONAL, MACS, EDC, BOSTON, ATLANTA, CMSNET, MDCN, TAMPA, MIAMI, STLOUIS, CHICAGO, DETROIT, DENVER, HOUSTON, DALLAS, INDIANS, TIGERS, ROYALS, BREWERS, TWINS, MARINERS, RANGERS, BLUEJAYS, ROCKIES, ASTROS, PADRES, LAPTOP, MODEM, DELL, SOLARIS, UNIX, LINUX, IBM, ROUTER, SWITCH, SERVER, STAFF, GOOGLE, YAHOO, VERIZON, ISSO, CISO, HACKER, PROGRAM, CYBER, DESKTOP, ENTER, EXIT, UNION, PIV, NETWORK, DROID, IPAD, IPHONE, DANGER, STARWAR, STARTREK, VULCAN, KLINGON, SPOCK, KIRK, CAPTAIN, XMEN, FLASH, FRINGE, JEDI, HOLIDAY, OUTLOOK, VETERAN, ARMY, NAVY, MARINE, AIRFORCE, MAINFRAME, CDS, HP, LHM, FLEX, SESAME, POLICY, HCPCS, DME, HOD, INTEL, VIPS, VPN, CISCO, APPLE, SECURE, DISNEY, VACATION, LEXMARK, LAKERS, THUNDER, JAZZ, MAVERICKS, PHOENIX, SPURS, CELTICS, HEAT, MAGIC, BULLS, HAWKS, HORNETS, NUGGETS, BLAZERS, GRIZZLIES, BOBCATS, WIZARDS, WARRIORS, KINGS, CLIPPERS, KNICKS, NETS, RAPTORS, 76ERS, ROCKETS, PISTONS, BUCKS, PACERS, CAVALIERS, SUNS, TIMBERWOLVES
3. Click Continue to proceed. The Change Password Confirmation page displays confirming that your password has been changed successfully (Figure 8-31). You will be required to use the new password the next time you log in to the MSPRP.
4. Click the Medicare Secondary Payer Recovery Portal Welcome Page link to continue to your home page or click the navigation Logoff link to exit the MSPRP.
Figure 8-29: Account Settings Box
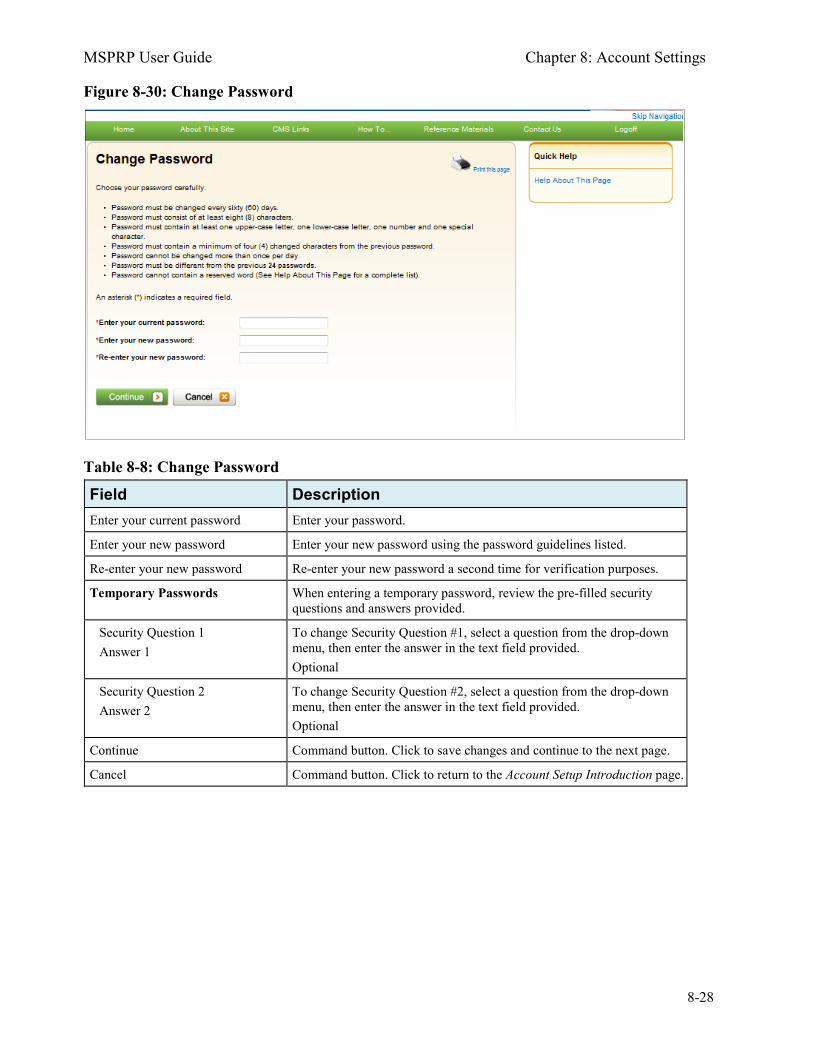
MSPRP User Guide Chapter 8: Account Settings
8-28
Figure 8-30: Change Password
Table 8-8: Change Password
Field Description Enter your current password Enter your password.
Enter your new password Enter your new password using the password guidelines listed.
Re-enter your new password Re-enter your new password a second time for verification purposes.
Temporary Passwords When entering a temporary password, review the pre-filled security questions and answers provided.
Security Question 1 Answer 1
To change Security Question #1, select a question from the drop-down menu, then enter the answer in the text field provided. Optional
Security Question 2 Answer 2
To change Security Question #2, select a question from the drop-down menu, then enter the answer in the text field provided. Optional
Continue Command button. Click to save changes and continue to the next page.
Cancel Command button. Click to return to the Account Setup Introduction page.
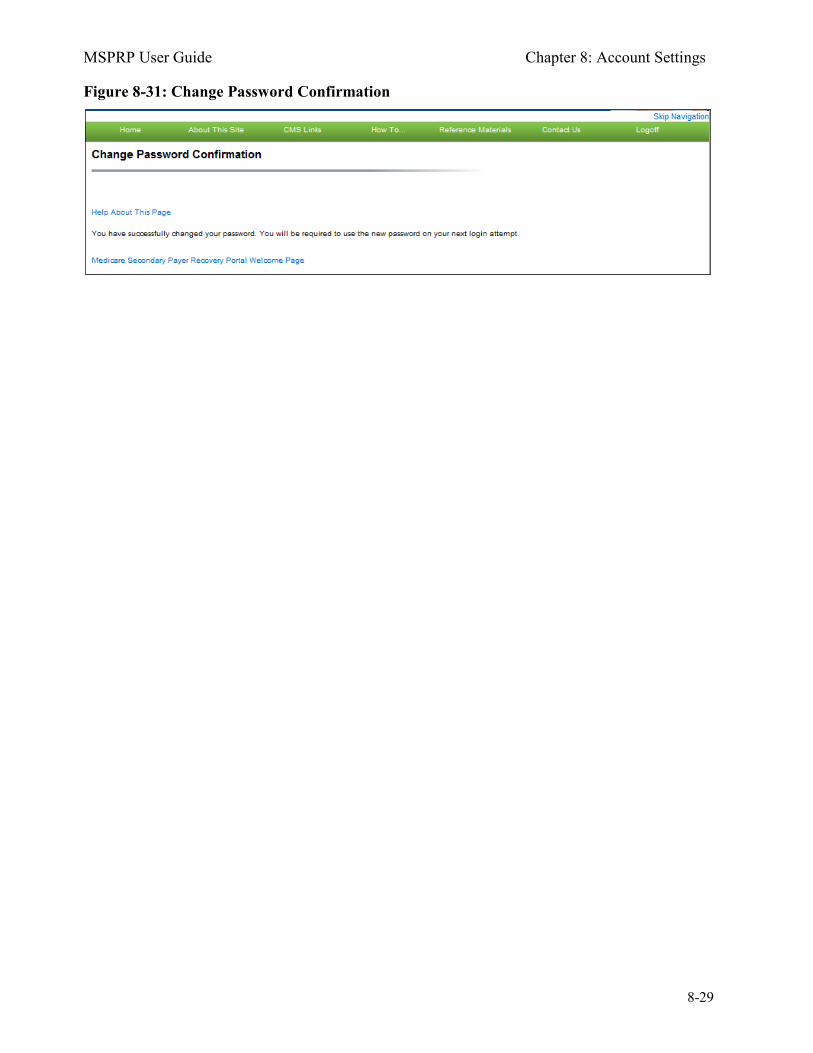
MSPRP User Guide Chapter 8: Account Settings
8-29
Figure 8-31: Change Password Confirmation
MSPRP User Guide Chapter 9: Account Designee Registration
9-1
Chapter 9: Account Designee Registration
ADs are optional users associated with an Account ID who assist the AM in managing a Corporate or Representative account. ADs can perform most of the functions on the MSPRP, but will not be able to invite additional users to be associated with the Account ID and are not permitted to update company information. ADs are assigned by the AM. After the AM adds you to an account, the system sends you an invitation e-mail containing a specific URL. It is necessary for you to use this URL, as it contains a specific token link which grants access to the registration site. You will also separately receive a Passphrase from the AM, which must be entered during the registration process. The token link becomes inactive after 30 days of non-use, so it is imperative to register as soon as possible after receiving the invitation e-mail. As an AD, you register yourself on the MSPRP using the information contained in the system-generated e-mail sent by Medicare and the passphrase given to you by your AM. You will only go through this process once, as you need only one login ID no matter how many Account IDs you will ultimately work with. To successfully register yourself as an AD, follow the steps outlined below. 1. Click the token link provided in the invitation e-mail sent by Medicare (Figure 9-1).
The Login Warning page displays, detailing the DUA (Figure 9-2). The e-mail will come from [email protected]. You must allow e-mail deliveries from this address.
2. Review the DUA. To proceed, click the I Accept link at the bottom of the page. The Designee Registration page displays, confirming that you have been invited as an AD for the listed Account ID (Figure 9-3). You will be denied access to the MSPRP registration process if you click I Decline.
3. In the Enter the Passphrase field, type the passphrase given to you by your Account Manager. Note: The passphrase is case-sensitive. Enter it exactly as it was given to you.
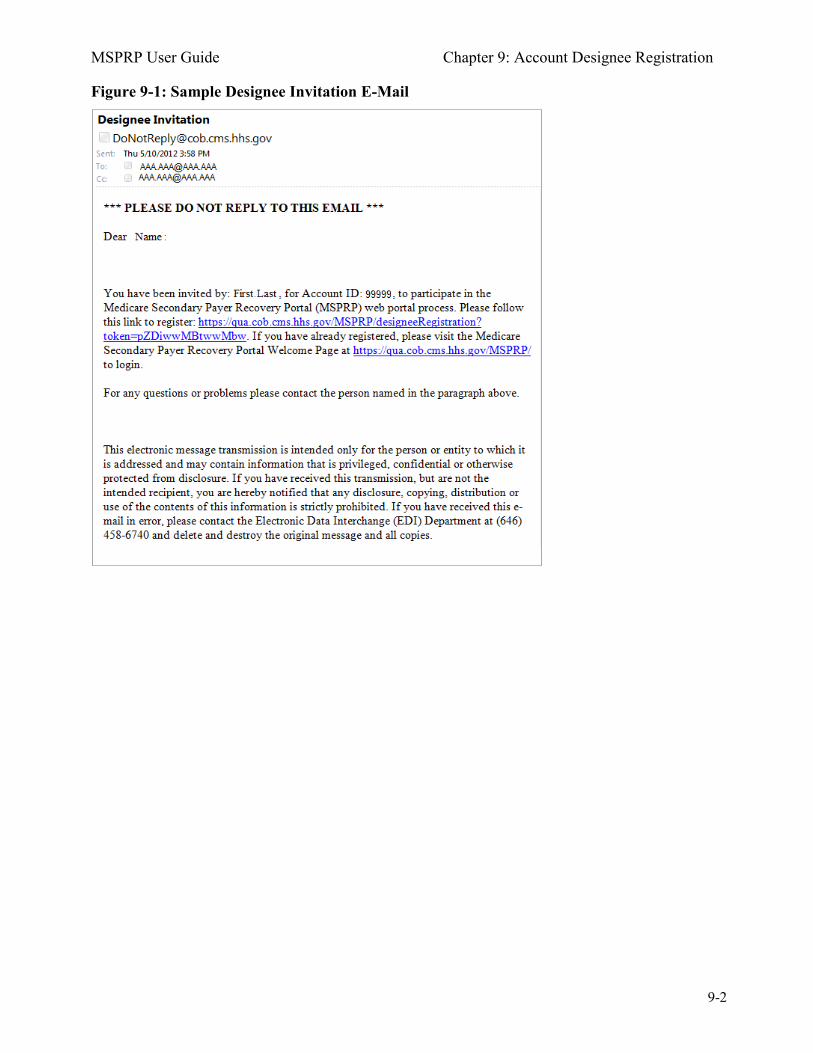
MSPRP User Guide Chapter 9: Account Designee Registration
9-2
Figure 9-1: Sample Designee Invitation E-Mail
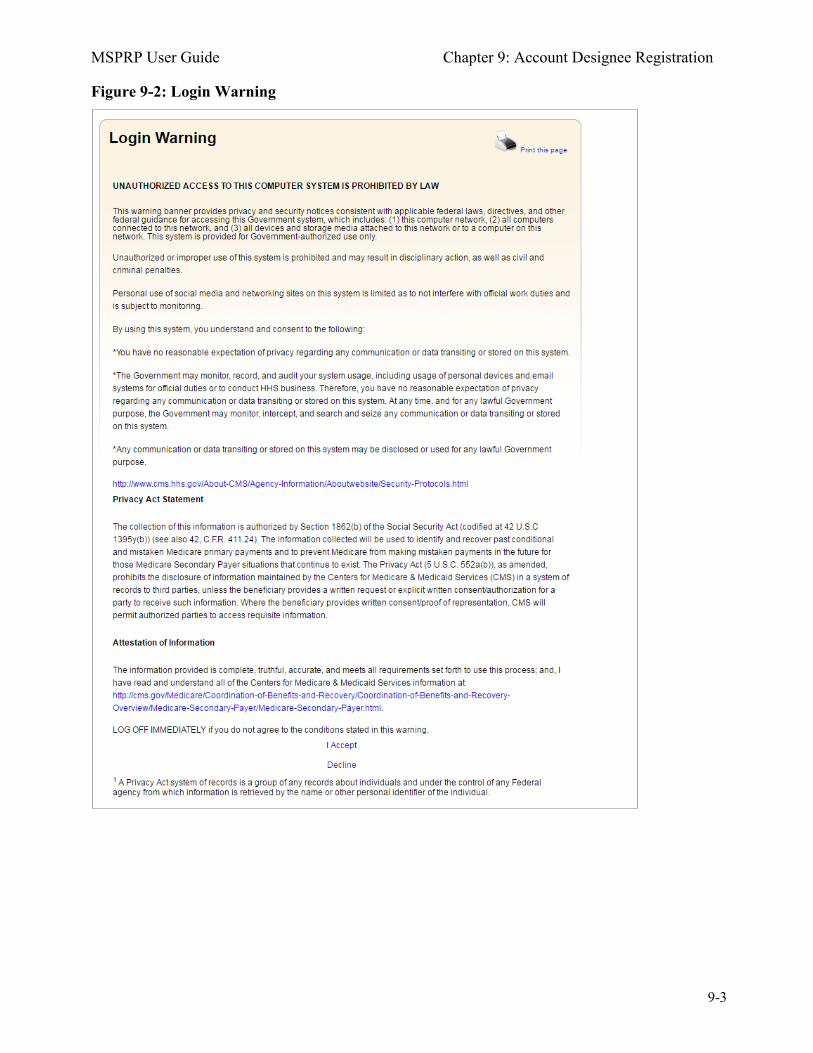
MSPRP User Guide Chapter 9: Account Designee Registration
9-3
Figure 9-2: Login Warning
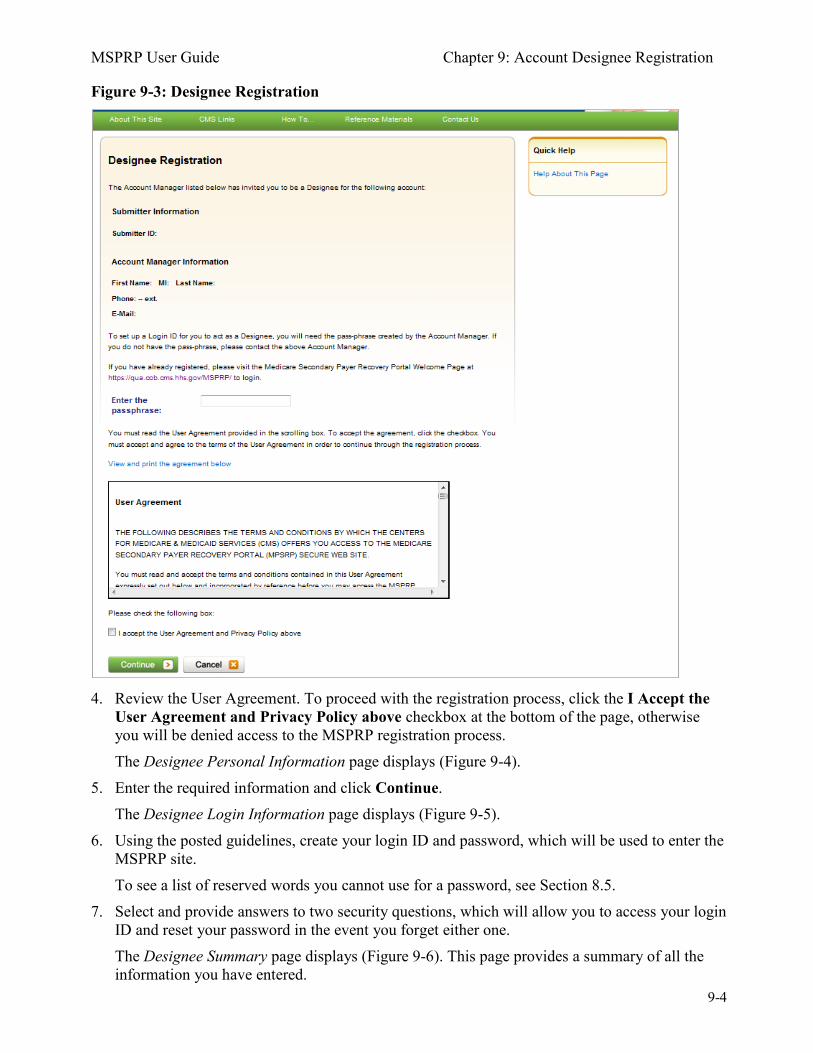
MSPRP User Guide Chapter 9: Account Designee Registration
9-4
Figure 9-3: Designee Registration
4. Review the User Agreement. To proceed with the registration process, click the I Accept the User Agreement and Privacy Policy above checkbox at the bottom of the page, otherwise you will be denied access to the MSPRP registration process. The Designee Personal Information page displays (Figure 9-4).
5. Enter the required information and click Continue. The Designee Login Information page displays (Figure 9-5).
6. Using the posted guidelines, create your login ID and password, which will be used to enter the MSPRP site. To see a list of reserved words you cannot use for a password, see Section 8.5.
7. Select and provide answers to two security questions, which will allow you to access your login ID and reset your password in the event you forget either one. The Designee Summary page displays (Figure 9-6). This page provides a summary of all the information you have entered.
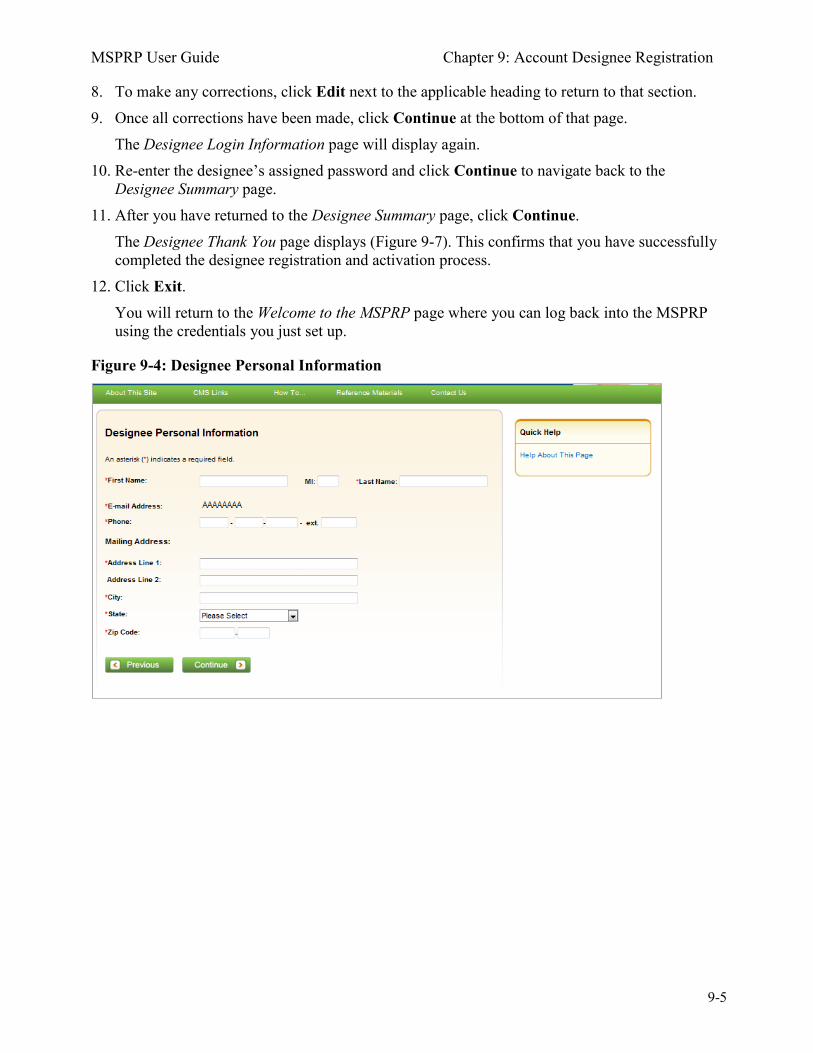
MSPRP User Guide Chapter 9: Account Designee Registration
9-5
8. To make any corrections, click Edit next to the applicable heading to return to that section. 9. Once all corrections have been made, click Continue at the bottom of that page.
The Designee Login Information page will display again. 10. Re-enter the designee’s assigned password and click Continue to navigate back to the
Designee Summary page. 11. After you have returned to the Designee Summary page, click Continue.
The Designee Thank You page displays (Figure 9-7). This confirms that you have successfully completed the designee registration and activation process.
12. Click Exit. You will return to the Welcome to the MSPRP page where you can log back into the MSPRP using the credentials you just set up.
Figure 9-4: Designee Personal Information
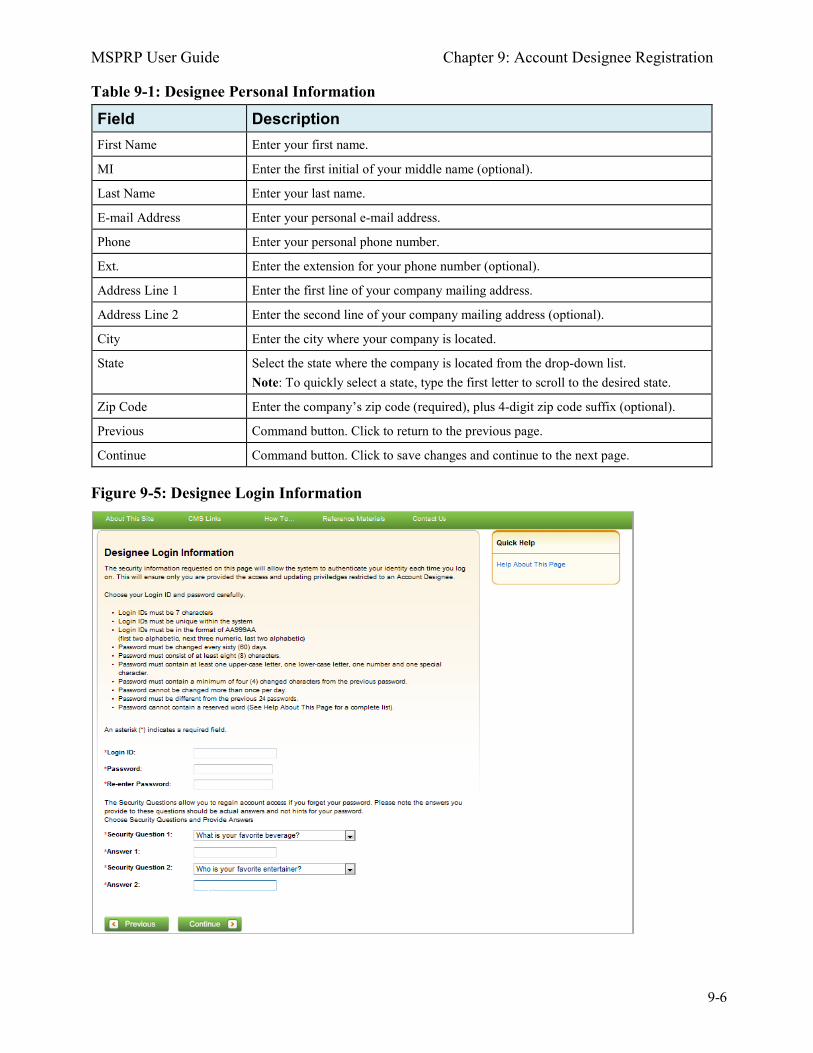
MSPRP User Guide Chapter 9: Account Designee Registration
9-6
Table 9-1: Designee Personal Information
Field Description First Name Enter your first name.
MI Enter the first initial of your middle name (optional).
Last Name Enter your last name.
E-mail Address Enter your personal e-mail address.
Phone Enter your personal phone number.
Ext. Enter the extension for your phone number (optional).
Address Line 1 Enter the first line of your company mailing address.
Address Line 2 Enter the second line of your company mailing address (optional).
City Enter the city where your company is located.
State Select the state where the company is located from the drop-down list. Note: To quickly select a state, type the first letter to scroll to the desired state.
Zip Code Enter the company’s zip code (required), plus 4-digit zip code suffix (optional).
Previous Command button. Click to return to the previous page.
Continue Command button. Click to save changes and continue to the next page.
Figure 9-5: Designee Login Information
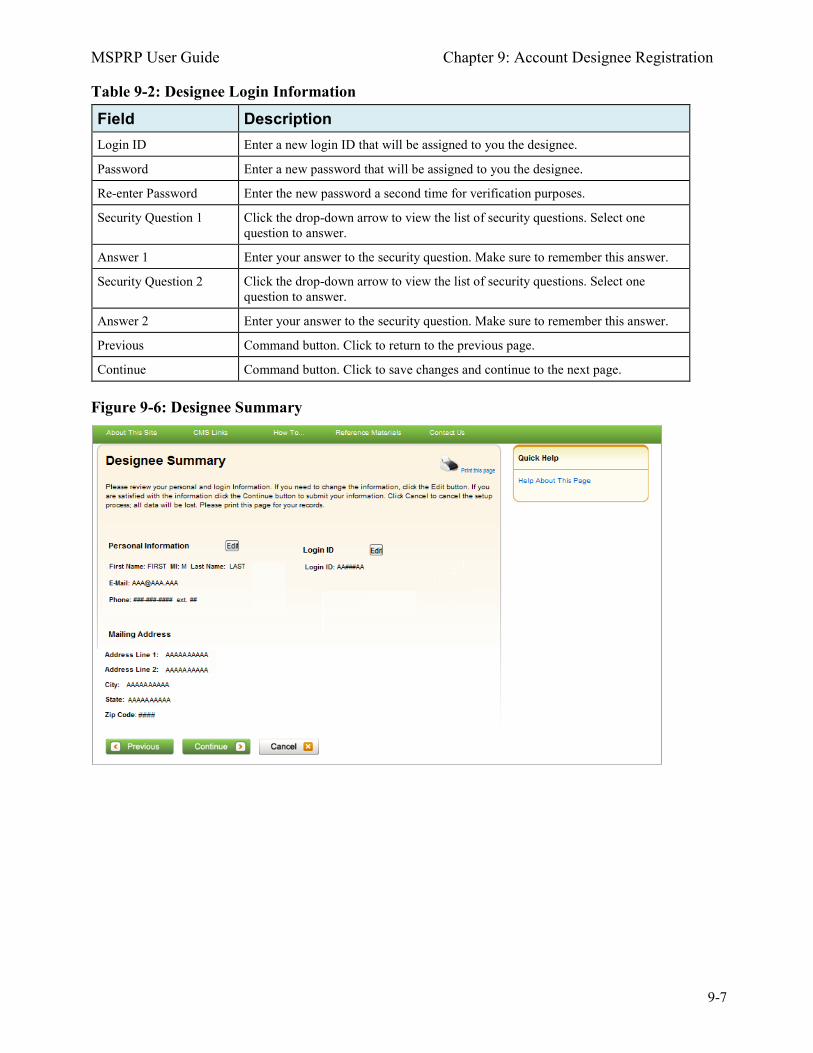
MSPRP User Guide Chapter 9: Account Designee Registration
9-7
Table 9-2: Designee Login Information
Field Description Login ID Enter a new login ID that will be assigned to you the designee.
Password Enter a new password that will be assigned to you the designee.
Re-enter Password Enter the new password a second time for verification purposes.
Security Question 1 Click the drop-down arrow to view the list of security questions. Select one question to answer.
Answer 1 Enter your answer to the security question. Make sure to remember this answer.
Security Question 2 Click the drop-down arrow to view the list of security questions. Select one question to answer.
Answer 2 Enter your answer to the security question. Make sure to remember this answer.
Previous Command button. Click to return to the previous page.
Continue Command button. Click to save changes and continue to the next page.
Figure 9-6: Designee Summary
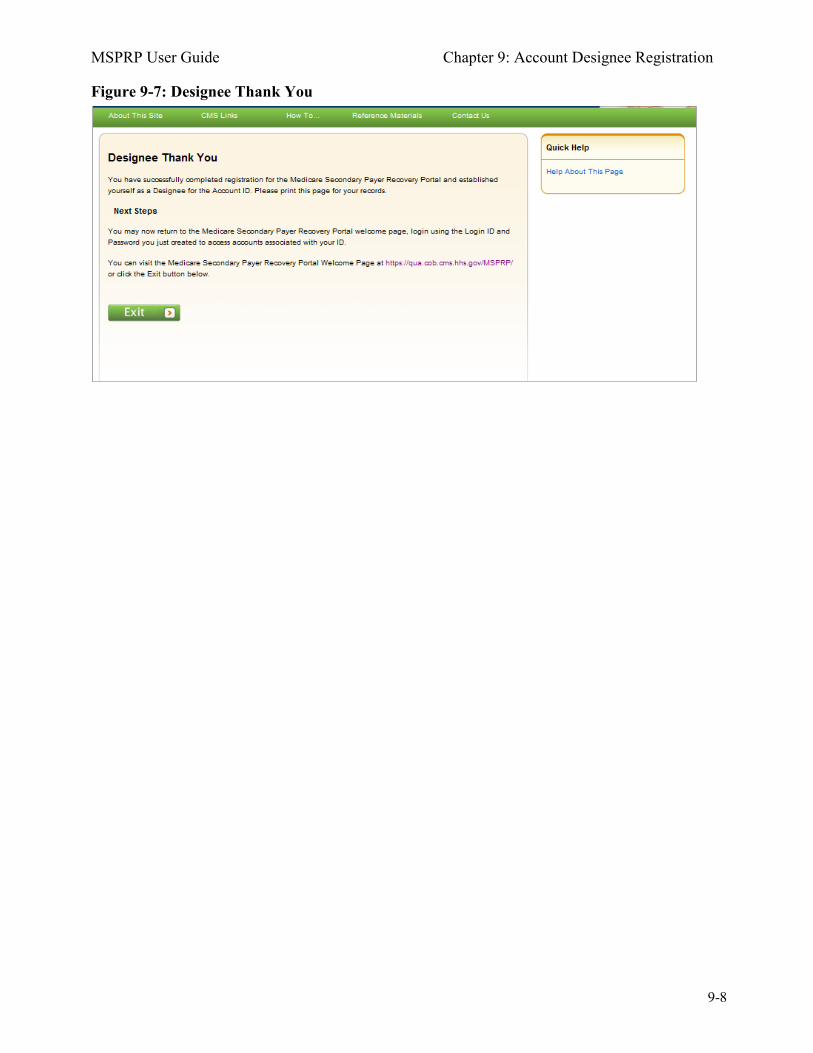
MSPRP User Guide Chapter 9: Account Designee Registration
9-8
Figure 9-7: Designee Thank You
MSPRP User Guide Chapter 10: Case Authorization
10-1
Chapter 10: Case Authorization
CMS will allow an individual or entity to have access to a Medicare beneficiary's personal information only if the Medicare beneficiary has provided this authorization to CMS in writing. Two types of beneficiary authorizations are Beneficiary Proof of Representation (POR) and Beneficiary Consent to Release (CTR). Another type of authorization, Recovery Agent Authorization, allows an individual or entity to work on behalf of a liability insurer, no-fault insurer, or workers’ compensation entity. The MSPRP allows you to view or manage MSPRP BCRC (insurer and all beneficiary) and CRC (insurer) recovery cases only if you have the correct authorization. This authorization must be submitted on the MSPRP and be in a Verified Authorization Status. See Section 13.1.1 for more information on how to submit an authorization. Note: The case debtor (beneficiary or insurer) can perform all the available actions on a case without authorization. Authorization applies only to users working on behalf of the case debtor.
10.1 Authorization Request Types The three types of authorization for case management are:
• Beneficiary Proof of Representation (POR) is the authorization request that is submitted to inform Medicare that the Medicare beneficiary has given another individual or entity (including an attorney) the authority to represent them and act on their behalf with respect to their case. An individual/entity with a verified POR will be able to submit information/requests, receive copies of all mail related to the case (e.g., the Rights and Responsibilities letter, the Conditional Payment Letter, the Demand letter, etc.), receive identifiable health information, respond to requests from the MSPRP, or resolve any potential recovery claim that Medicare may have if there is a settlement, judgment, award, or other payment.
• Beneficiary Consent to Release (CTR) is the authorization request that is submitted to inform Medicare that the Medicare beneficiary has given another individual or entity the authority to receive claims and other information related to the injury and/or illness but does not give this individual the authority to represent the Medicare beneficiary and act on their behalf. An individual or entity with a verified CTR will be able to receive copies of all mail sent related to the case (e.g., the Rights and Responsibilities letter, the Conditional Payment Letter, the Demand letter, etc.).
• Recovery Agent Authorization is the authorization request that is submitted to inform Medicare that a liability insurer (including self-insured entities), no-fault insurer, or workers’ compensation entity wishes to be represented by another party. The identified representative can act on behalf of the insurer regarding an MSP recovery case and is authorized to take any actions or make any decisions needed to resolve Medicare’s recovery claim.
10.2 Authorizations: Example Letters, Templates, and Model Language
Example letters, blank templates, and model language for these three authorization types (CTR, POR, or Recovery Agent Authorization) can be found on the CMS.gov website:
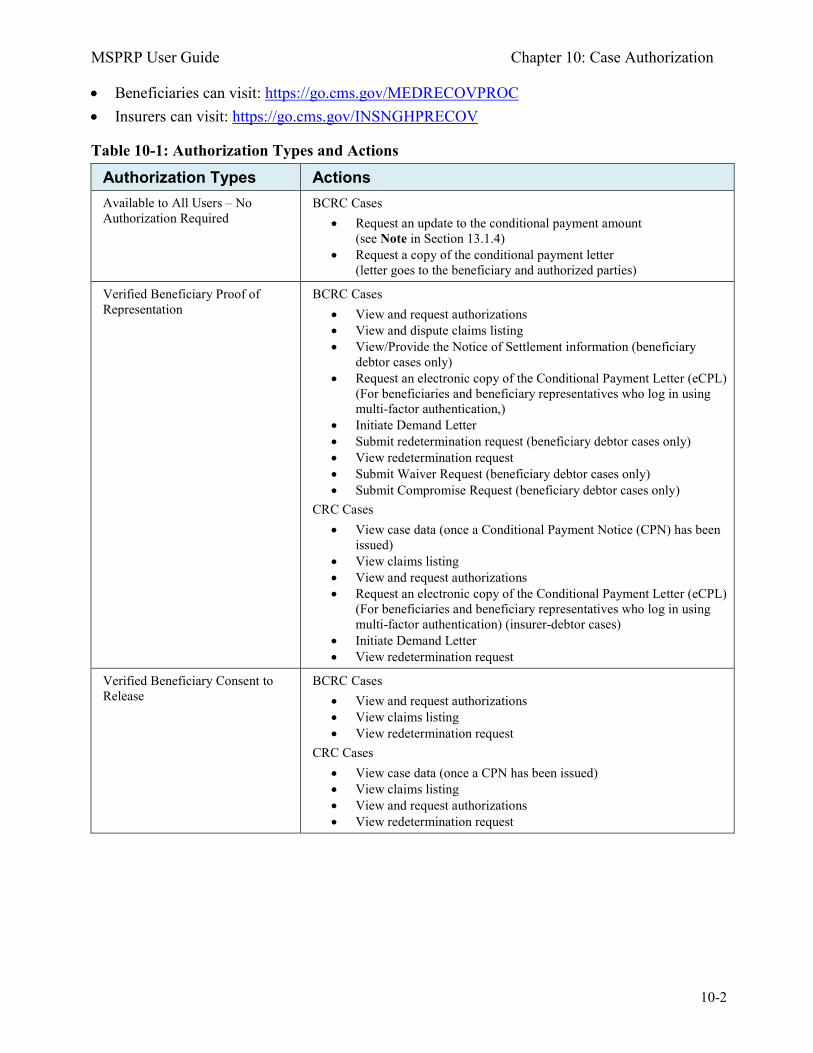
MSPRP User Guide Chapter 10: Case Authorization
10-2
• Beneficiaries can visit: https://go.cms.gov/MEDRECOVPROC • Insurers can visit: https://go.cms.gov/INSNGHPRECOV
Table 10-1: Authorization Types and Actions
Authorization Types Actions Available to All Users – No Authorization Required
BCRC Cases • Request an update to the conditional payment amount
(see Note in Section 13.1.4) • Request a copy of the conditional payment letter
(letter goes to the beneficiary and authorized parties)
Verified Beneficiary Proof of Representation
BCRC Cases • View and request authorizations • View and dispute claims listing • View/Provide the Notice of Settlement information (beneficiary
debtor cases only) • Request an electronic copy of the Conditional Payment Letter (eCPL)
(For beneficiaries and beneficiary representatives who log in using multi-factor authentication,)
• Initiate Demand Letter • Submit redetermination request (beneficiary debtor cases only) • View redetermination request • Submit Waiver Request (beneficiary debtor cases only) • Submit Compromise Request (beneficiary debtor cases only)
CRC Cases • View case data (once a Conditional Payment Notice (CPN) has been
issued) • View claims listing • View and request authorizations • Request an electronic copy of the Conditional Payment Letter (eCPL)
(For beneficiaries and beneficiary representatives who log in using multi-factor authentication) (insurer-debtor cases)
• Initiate Demand Letter • View redetermination request
Verified Beneficiary Consent to Release
BCRC Cases • View and request authorizations • View claims listing • View redetermination request
CRC Cases • View case data (once a CPN has been issued) • View claims listing • View and request authorizations • View redetermination request
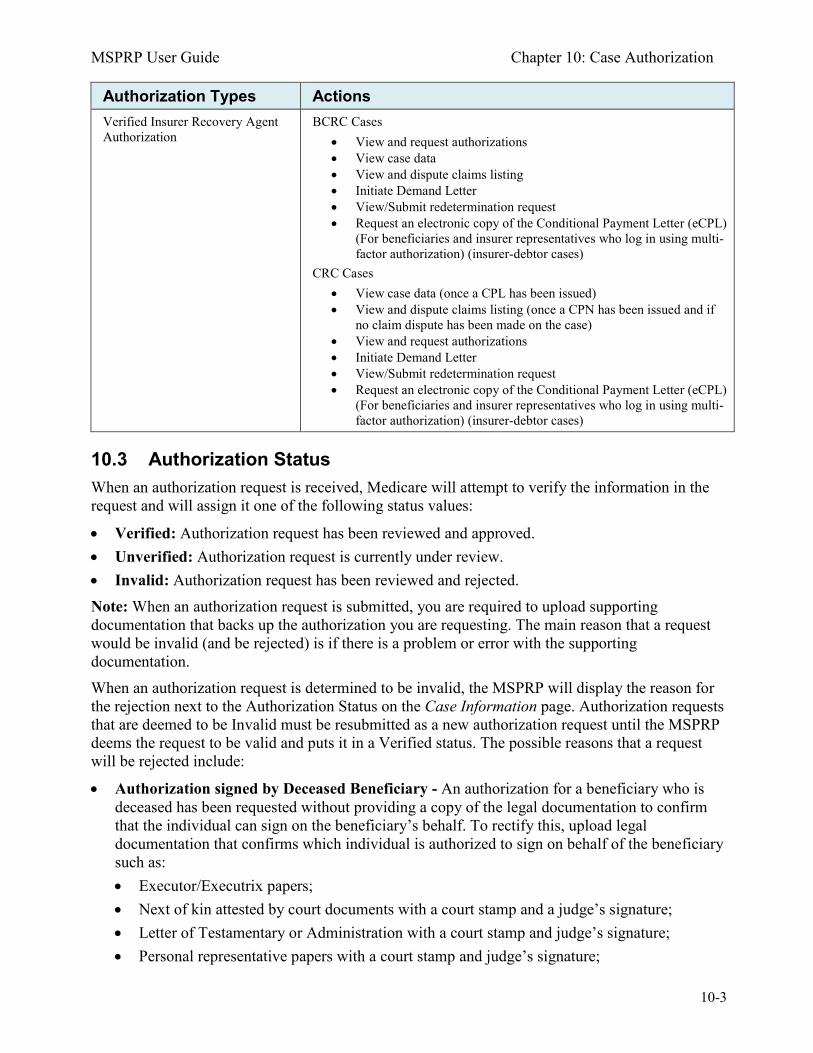
MSPRP User Guide Chapter 10: Case Authorization
10-3
Authorization Types Actions Verified Insurer Recovery Agent Authorization
BCRC Cases • View and request authorizations • View case data • View and dispute claims listing • Initiate Demand Letter • View/Submit redetermination request • Request an electronic copy of the Conditional Payment Letter (eCPL)
(For beneficiaries and insurer representatives who log in using multi-factor authorization) (insurer-debtor cases)
CRC Cases • View case data (once a CPL has been issued) • View and dispute claims listing (once a CPN has been issued and if
no claim dispute has been made on the case) • View and request authorizations • Initiate Demand Letter • View/Submit redetermination request • Request an electronic copy of the Conditional Payment Letter (eCPL)
(For beneficiaries and insurer representatives who log in using multi-factor authorization) (insurer-debtor cases)
10.3 Authorization Status When an authorization request is received, Medicare will attempt to verify the information in the request and will assign it one of the following status values:
• Verified: Authorization request has been reviewed and approved. • Unverified: Authorization request is currently under review. • Invalid: Authorization request has been reviewed and rejected. Note: When an authorization request is submitted, you are required to upload supporting documentation that backs up the authorization you are requesting. The main reason that a request would be invalid (and be rejected) is if there is a problem or error with the supporting documentation. When an authorization request is determined to be invalid, the MSPRP will display the reason for the rejection next to the Authorization Status on the Case Information page. Authorization requests that are deemed to be Invalid must be resubmitted as a new authorization request until the MSPRP deems the request to be valid and puts it in a Verified status. The possible reasons that a request will be rejected include:
• Authorization signed by Deceased Beneficiary - An authorization for a beneficiary who is deceased has been requested without providing a copy of the legal documentation to confirm that the individual can sign on the beneficiary’s behalf. To rectify this, upload legal documentation that confirms which individual is authorized to sign on behalf of the beneficiary such as: • Executor/Executrix papers; • Next of kin attested by court documents with a court stamp and a judge’s signature; • Letter of Testamentary or Administration with a court stamp and judge’s signature; • Personal representative papers with a court stamp and judge’s signature;
MSPRP User Guide Chapter 10: Case Authorization
10-4
• Will; • Birth certificate, marriage license, or death certificate; • Signed/notarized statement.
• Medicare ID Does Not Match – The beneficiary’s Medicare ID submitted on the authorization request does not match the Medicare ID on the MSPRP case. To rectify this, resubmit the authorization request with the corrected Medicare ID.
• Beneficiary Name Does Not Match – The beneficiary’s name submitted on the authorization request does not match the beneficiary’s name on the MSPRP case. To rectify this, resubmit the authorization request with the corrected beneficiary name.
• Date(s) of Authorization conflict with Supporting Documentation – The authorization start/end date(s) submitted on the Authorization Documentation page are different than the corresponding date(s) submitted on the uploaded supporting documentation. To rectify this, verify the start and end dates on the supporting documentation are correct. Submit a new authorization request and ensure that the dates provided on the supporting documentation exactly match the authorization start date and end date (if applicable) you entered on the Authorization Documentation page.
• DOI Not Provided – The Date of Incident submitted on the authorization request was not provided. To rectify this, re-submit the authorization request that includes the correct DOI.
• Missing or Insufficient Supporting Documentation – Information is missing from the supporting documentation. To rectify this, identify what is missing, make the necessary correction(s), submit a new authorization request, and upload the applicable supporting documentation.
• Missing Required Signature(s) – One or more signatures are missing from the supporting documentation (e.g., the beneficiary or attorney’s signature). To rectify this, obtain the missing signatures, submit a new authorization request, and upload the appropriate supporting documentation.
• Name on Document Does Not Match the Portal Submitter – The supporting document that was submitted identifies an individual to whom the information can be released but that name does not match the company name listed on the portal account. To rectify this, resubmit the document with the appropriate name. For example: The company name on the portal account is “ABC Law Firm.” An authorization request is submitted for this case, but the letterhead/company name on the supporting document is for “Mary Smith.” Since the BCRC cannot assume that “Mary Smith” is a part of “ABC Law Firm,” the authorization request will be considered invalid. In this case, the supporting document should be re-submitted with the name, “Mary Smith, ABC Law Firm.” The letterhead/company name on the supporting document must match the company name of the portal account you are uploading the supporting documentation to, otherwise the request will be considered invalid.
• No Authorizing Statement on Document – The Consent to Release that was submitted did not indicate which entity (e.g., attorney, recovery agent, etc.) is allowed to receive information from CMS, its agents, and/or contractors. To rectify this, resubmit a new CTR that clearly identifies the name, address, and phone number of the entity that can receive this information.
• Other/Multiple Reason(s) for Authorization being invalid - The requirements for submission were not met for reasons other than those listed above (e.g., the uploaded authorization documentation does not match the case, or all required documentation is missing
MSPRP User Guide Chapter 10: Case Authorization
10-5
etc.). To rectify this, make all necessary corrections and submit the authorization request as a new authorization request and upload all applicable supporting documentation.
• Case ID/Recovery ID Number Does Not Match – The supporting document did not match the information on the case. To rectify this, review the documentation that was uploaded and resubmit the correct documentation to the appropriate case.
• Signed by Third Party with No Supporting Documentation – An authorization was submitted by an entity but the required supporting documentation was missing. To rectify this, re-submit the required supporting documentation. See the following sections for CTR requirements and for POR requirements. See Section 10.3.3 for Recovery Agent Authorization requirements.
10.3.1 Beneficiary CTR Supporting Documentation Requirements • The Medicare beneficiary’s name exactly as shown on their Medicare card; • Medicare ID (Health Insurance Claim Number [HICN] or Medicare Beneficiary Identifier
[MBI]) of the Medicare beneficiary exactly as it is shown on the Medicare card, including any letters;
• Name of individual or entity to which the information may be disclosed; • When to start the request for authorization; • When to terminate the request for authorization (if applicable); • Signature of the Medicare beneficiary or the beneficiary’s representative; and • Date the Medicare beneficiary signed the CTR. Note: If you are requesting authorization for a deceased beneficiary, you must include a copy of the legal documentation which confirms that you can sign or speak on the beneficiary’s behalf. For example, you can include:
• Executor/Executrix papers; • Next of kin attested by court documents with a court stamp and a judge’s signature; • Letter of Testamentary or Administration with a court stamp and judge’s signature; • Personal representative papers with a court stamp and judge’s signature; • Birth certificate; • Marriage license; • Death certificate; or • Signed/notarized statement.
10.3.2 Beneficiary POR Supporting Documentation Requirements A copy of a Retainer Agreement (i.e., an agreement between a client and his or her lawyer that spells out the terms of the business arrangement between them) will be accepted as POR. Required information if you are submitting a Retainer Agreement:
• Retainer Agreement on attorney letterhead or accompanied by a cover letter on letterhead; • Beneficiary name (printed on the agreement or cover letter); • Signature of beneficiary; • Date of signature of beneficiary;
MSPRP User Guide Chapter 10: Case Authorization
10-6
• Signature of attorney; and • Date of signature of attorney. Required information if you are not submitting a Retainer Agreement:
• The Medicare beneficiary’s name exactly as shown on their Medicare card; • Medicare ID (Health Insurance Claim Number [HICN] or Medicare Beneficiary Identifier
[MBI]) of the Medicare beneficiary exactly as it is shown on the Medicare card, including any letters;
• Representation type (i.e., Attorney, Guardian/Conservator, Power of Attorney, Third Party Administrator, Individual/Other); If the POR is for a Third Party Administrator, the POR must also include a letter on the insurer’s letterhead that contains:
• A beneficiary-specific statement (including the beneficiary’s name and Medicare ID) on the insurer or workers’ compensation entity’s letterhead that the agent is representing the insurer or workers’ compensation carrier with respect to a claim involving the identified Medicare beneficiary;
• Name(s) of person(s) that have been hired; and • A statement as to what they are approved to do. • Firm/company name (if applicable); • Signature of beneficiary; • Date of signature of beneficiary; • Name of representative/attorney; • Signature of representative/attorney; and • Date of signature of representative/attorney.
Note: If the beneficiary is incapacitated, you must also include a court document appointing power of attorney to confirm that you can sign the POR or speak on the beneficiary’s behalf.
10.3.3 Recovery Agent Authorization Supporting Document Requirements An authorization, such as a Recovery Agent Authorization, is required any time that an applicable plan (such as self-insured, no-fault insurer or workers’ compensation entity) is represented by an agent that will work with CMS’ contractors to address coordination of benefits and recovery issues on behalf of that applicable plan. CMS must have authorization on file for each recovery case. Any time that an applicable plan would like an agent to work on its behalf, CMS must have authorization on file. Notes: If an applicable plan designates an agent electronically via Section 111 reporting, further documentation does not need to be submitted unless the agent needs to act on behalf of the insurer after a demand is issued. Actions that occur after a demand is issued include requests for appeal and requests for reopening. Requests for appeal and reopening will be denied if submitted by an entity other than the applicable plan and we do not have Recovery Agent Authorization in verified status on file.
MSPRP User Guide Chapter 10: Case Authorization
10-7
Recovery Agents who are associated to an insurer-debtor case as the insurer’s Section 111 (S111) Recovery Agent may submit a Recovery Agent authorization. An S111 Recovery Agent with an active Recovery Agent authorization in verified status has authority on the insurer-debtor case pre- and post-demand, even if the agent was removed or replaced on the insurer’s S111 TIN Reference File. Required information if you are submitting a Recovery Agent Authorization:
• It must be in writing (that is, signed and dated by both entities). • It must state that one entity appoints the other entity to act on its behalf. • It must include purpose and scope (that is, it must describe the reason for the authorization). • It must include name, phone and address of each entity. (Note: These elements are often
already part of the letterhead.) • It must reference professional status or relationship between the entities (for example:
attorney/client, agency, third-party administrator, etc.). • It must reference the recovery case ID, or otherwise provide information that allows CMS’
recovery contractor to associate authorization to a particular beneficiary file. • It must include a timeframe for the agent’s authority. • It must be submitted to CMS’ recovery contractor.
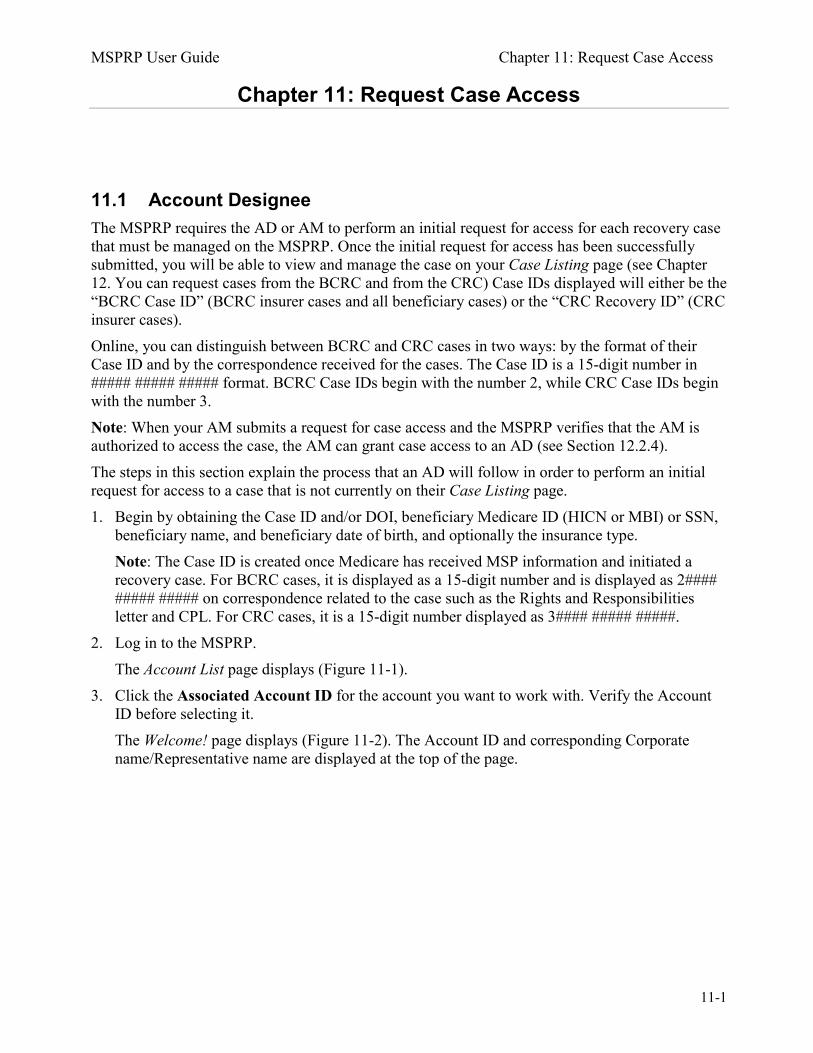
MSPRP User Guide Chapter 11: Request Case Access
11-1
Chapter 11: Request Case Access
11.1 Account Designee The MSPRP requires the AD or AM to perform an initial request for access for each recovery case that must be managed on the MSPRP. Once the initial request for access has been successfully submitted, you will be able to view and manage the case on your Case Listing page (see Chapter 12. You can request cases from the BCRC and from the CRC) Case IDs displayed will either be the “BCRC Case ID” (BCRC insurer cases and all beneficiary cases) or the “CRC Recovery ID” (CRC insurer cases). Online, you can distinguish between BCRC and CRC cases in two ways: by the format of their Case ID and by the correspondence received for the cases. The Case ID is a 15-digit number in ##### ##### ##### format. BCRC Case IDs begin with the number 2, while CRC Case IDs begin with the number 3. Note: When your AM submits a request for case access and the MSPRP verifies that the AM is authorized to access the case, the AM can grant case access to an AD (see Section 12.2.4). The steps in this section explain the process that an AD will follow in order to perform an initial request for access to a case that is not currently on their Case Listing page. 1. Begin by obtaining the Case ID and/or DOI, beneficiary Medicare ID (HICN or MBI) or SSN,
beneficiary name, and beneficiary date of birth, and optionally the insurance type. Note: The Case ID is created once Medicare has received MSP information and initiated a recovery case. For BCRC cases, it is displayed as a 15-digit number and is displayed as 2#### ##### ##### on correspondence related to the case such as the Rights and Responsibilities letter and CPL. For CRC cases, it is a 15-digit number displayed as 3#### ##### #####.
2. Log in to the MSPRP. The Account List page displays (Figure 11-1).
3. Click the Associated Account ID for the account you want to work with. Verify the Account ID before selecting it. The Welcome! page displays (Figure 11-2). The Account ID and corresponding Corporate name/Representative name are displayed at the top of the page.
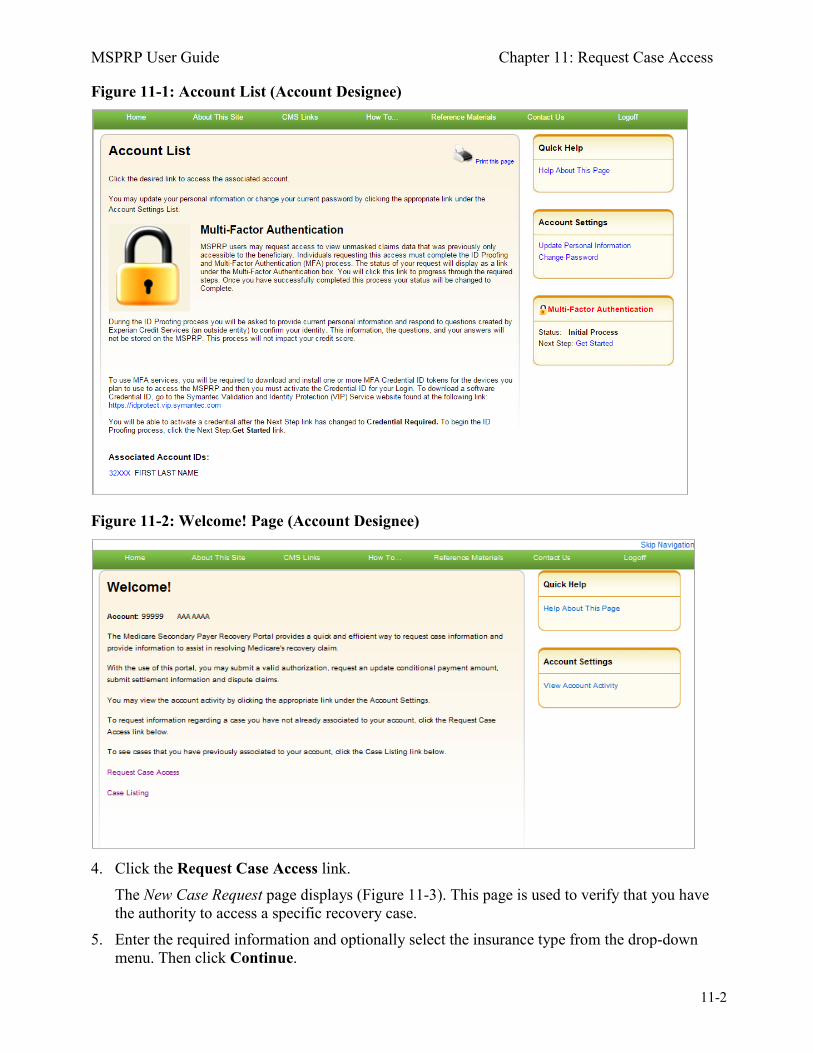
MSPRP User Guide Chapter 11: Request Case Access
11-2
Figure 11-1: Account List (Account Designee)
Figure 11-2: Welcome! Page (Account Designee)
4. Click the Request Case Access link. The New Case Request page displays (Figure 11-3). This page is used to verify that you have the authority to access a specific recovery case.
5. Enter the required information and optionally select the insurance type from the drop-down menu. Then click Continue.
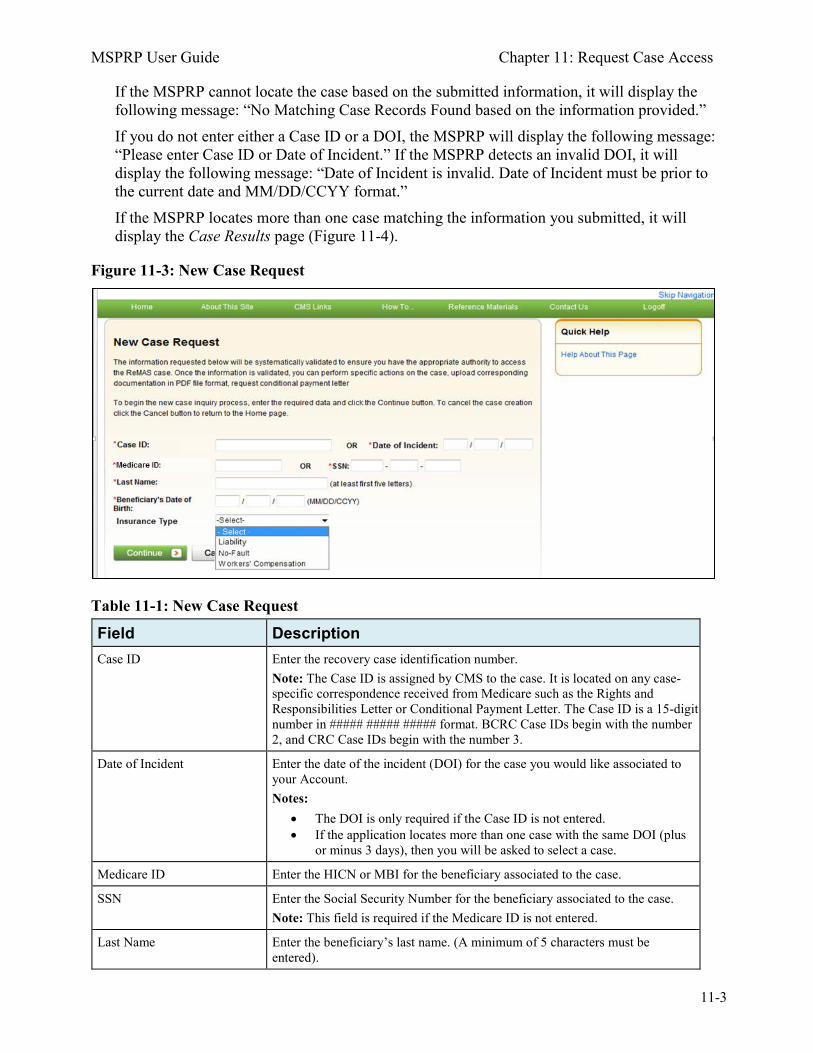
MSPRP User Guide Chapter 11: Request Case Access
11-3
If the MSPRP cannot locate the case based on the submitted information, it will display the following message: “No Matching Case Records Found based on the information provided.” If you do not enter either a Case ID or a DOI, the MSPRP will display the following message: “Please enter Case ID or Date of Incident.” If the MSPRP detects an invalid DOI, it will display the following message: “Date of Incident is invalid. Date of Incident must be prior to the current date and MM/DD/CCYY format.” If the MSPRP locates more than one case matching the information you submitted, it will display the Case Results page (Figure 11-4).
Figure 11-3: New Case Request
Table 11-1: New Case Request
Field Description Case ID Enter the recovery case identification number.
Note: The Case ID is assigned by CMS to the case. It is located on any case-specific correspondence received from Medicare such as the Rights and Responsibilities Letter or Conditional Payment Letter. The Case ID is a 15-digit number in ##### ##### ##### format. BCRC Case IDs begin with the number 2, and CRC Case IDs begin with the number 3.
Date of Incident Enter the date of the incident (DOI) for the case you would like associated to your Account. Notes:
• The DOI is only required if the Case ID is not entered. • If the application locates more than one case with the same DOI (plus
or minus 3 days), then you will be asked to select a case.
Medicare ID Enter the HICN or MBI for the beneficiary associated to the case.
SSN Enter the Social Security Number for the beneficiary associated to the case. Note: This field is required if the Medicare ID is not entered.
Last Name Enter the beneficiary’s last name. (A minimum of 5 characters must be entered).
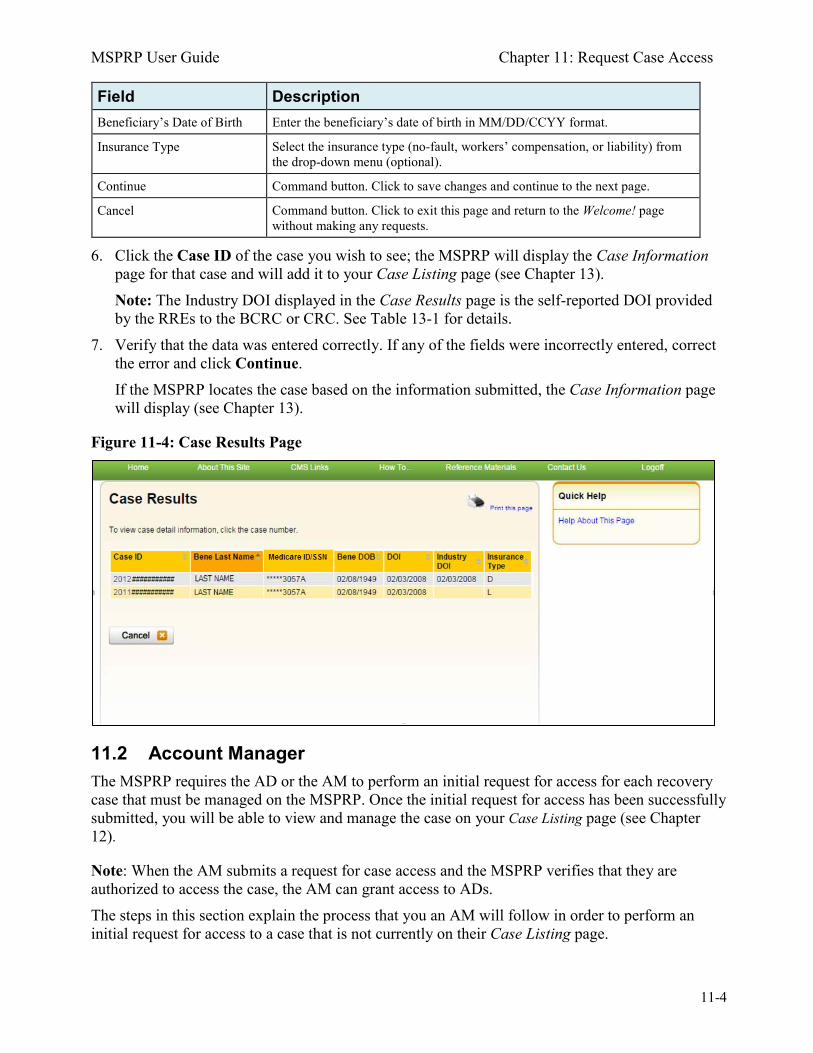
MSPRP User Guide Chapter 11: Request Case Access
11-4
Field Description Beneficiary’s Date of Birth Enter the beneficiary’s date of birth in MM/DD/CCYY format.
Insurance Type Select the insurance type (no-fault, workers’ compensation, or liability) from the drop-down menu (optional).
Continue Command button. Click to save changes and continue to the next page.
Cancel Command button. Click to exit this page and return to the Welcome! page without making any requests.
6. Click the Case ID of the case you wish to see; the MSPRP will display the Case Information page for that case and will add it to your Case Listing page (see Chapter 13). Note: The Industry DOI displayed in the Case Results page is the self-reported DOI provided by the RREs to the BCRC or CRC. See Table 13-1 for details.
7. Verify that the data was entered correctly. If any of the fields were incorrectly entered, correct the error and click Continue. If the MSPRP locates the case based on the information submitted, the Case Information page will display (see Chapter 13).
Figure 11-4: Case Results Page
11.2 Account Manager The MSPRP requires the AD or the AM to perform an initial request for access for each recovery case that must be managed on the MSPRP. Once the initial request for access has been successfully submitted, you will be able to view and manage the case on your Case Listing page (see Chapter 12).
Note: When the AM submits a request for case access and the MSPRP verifies that they are authorized to access the case, the AM can grant access to ADs. The steps in this section explain the process that you an AM will follow in order to perform an initial request for access to a case that is not currently on their Case Listing page.
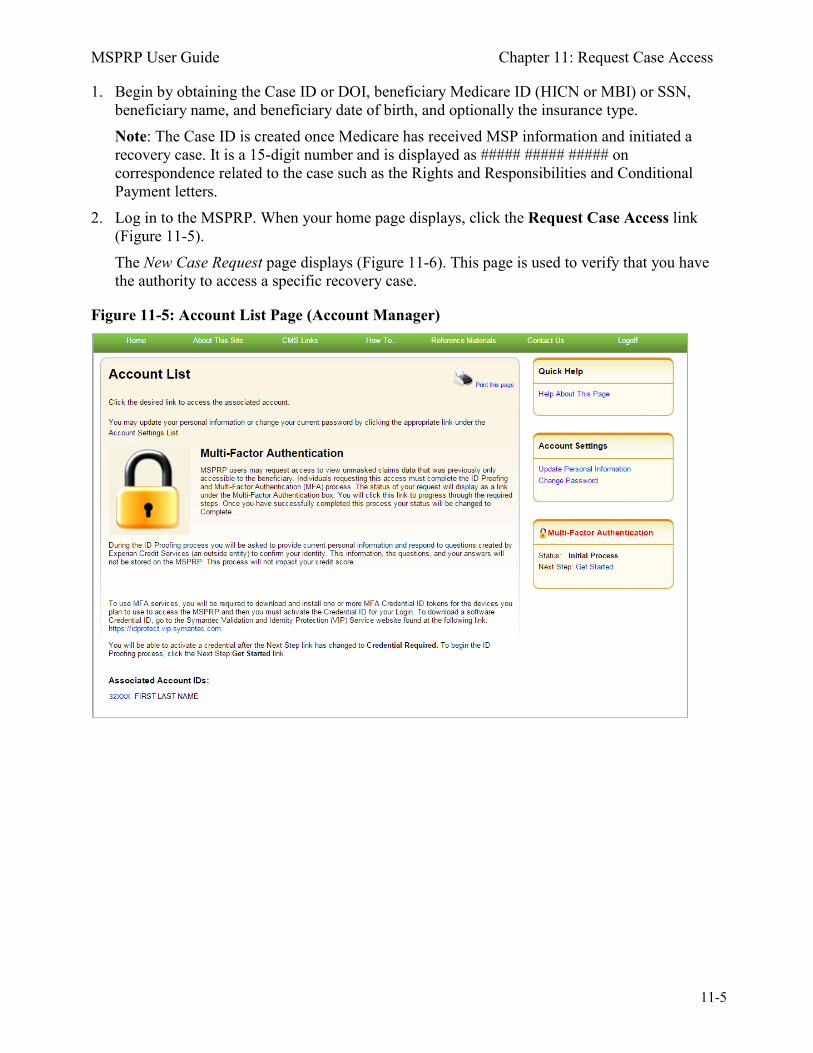
MSPRP User Guide Chapter 11: Request Case Access
11-5
1. Begin by obtaining the Case ID or DOI, beneficiary Medicare ID (HICN or MBI) or SSN, beneficiary name, and beneficiary date of birth, and optionally the insurance type. Note: The Case ID is created once Medicare has received MSP information and initiated a recovery case. It is a 15-digit number and is displayed as ##### ##### ##### on correspondence related to the case such as the Rights and Responsibilities and Conditional Payment letters.
2. Log in to the MSPRP. When your home page displays, click the Request Case Access link (Figure 11-5). The New Case Request page displays (Figure 11-6). This page is used to verify that you have the authority to access a specific recovery case.
Figure 11-5: Account List Page (Account Manager)
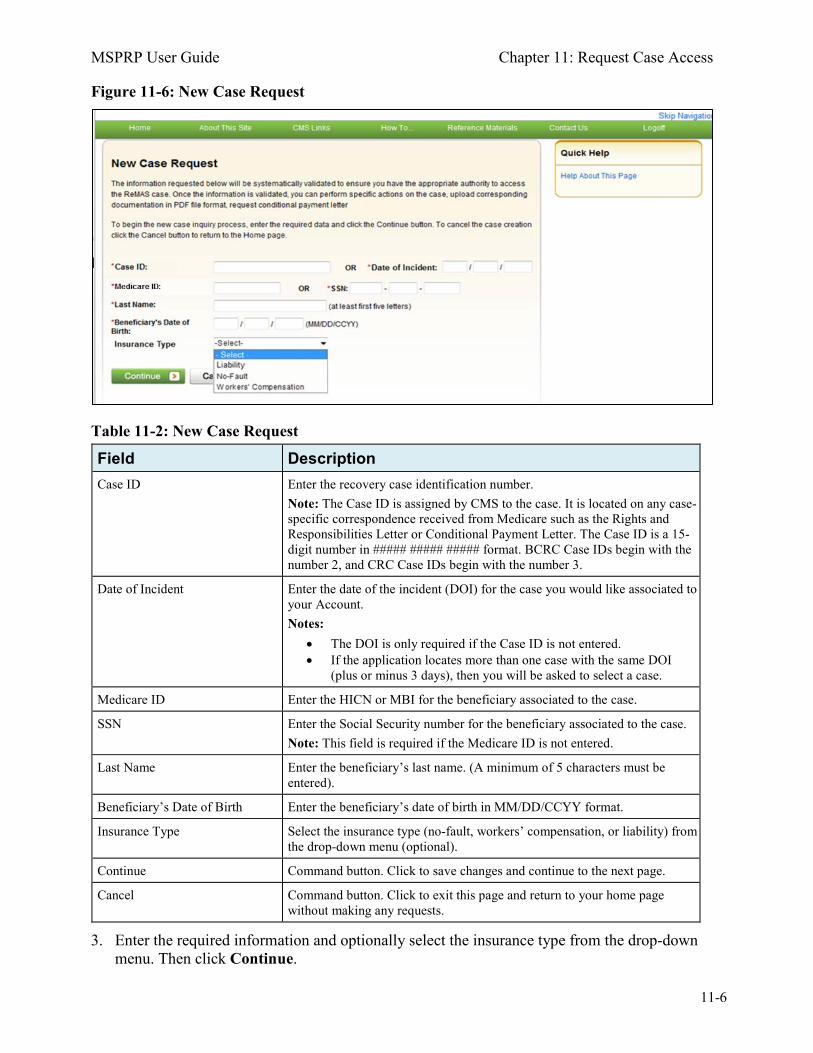
MSPRP User Guide Chapter 11: Request Case Access
11-6
Figure 11-6: New Case Request
Table 11-2: New Case Request
Field Description Case ID Enter the recovery case identification number.
Note: The Case ID is assigned by CMS to the case. It is located on any case-specific correspondence received from Medicare such as the Rights and Responsibilities Letter or Conditional Payment Letter. The Case ID is a 15-digit number in ##### ##### ##### format. BCRC Case IDs begin with the number 2, and CRC Case IDs begin with the number 3.
Date of Incident Enter the date of the incident (DOI) for the case you would like associated to your Account. Notes:
• The DOI is only required if the Case ID is not entered. • If the application locates more than one case with the same DOI
(plus or minus 3 days), then you will be asked to select a case.
Medicare ID Enter the HICN or MBI for the beneficiary associated to the case.
SSN Enter the Social Security number for the beneficiary associated to the case. Note: This field is required if the Medicare ID is not entered.
Last Name Enter the beneficiary’s last name. (A minimum of 5 characters must be entered).
Beneficiary’s Date of Birth Enter the beneficiary’s date of birth in MM/DD/CCYY format.
Insurance Type Select the insurance type (no-fault, workers’ compensation, or liability) from the drop-down menu (optional).
Continue Command button. Click to save changes and continue to the next page.
Cancel Command button. Click to exit this page and return to your home page without making any requests.
3. Enter the required information and optionally select the insurance type from the drop-down menu. Then click Continue.
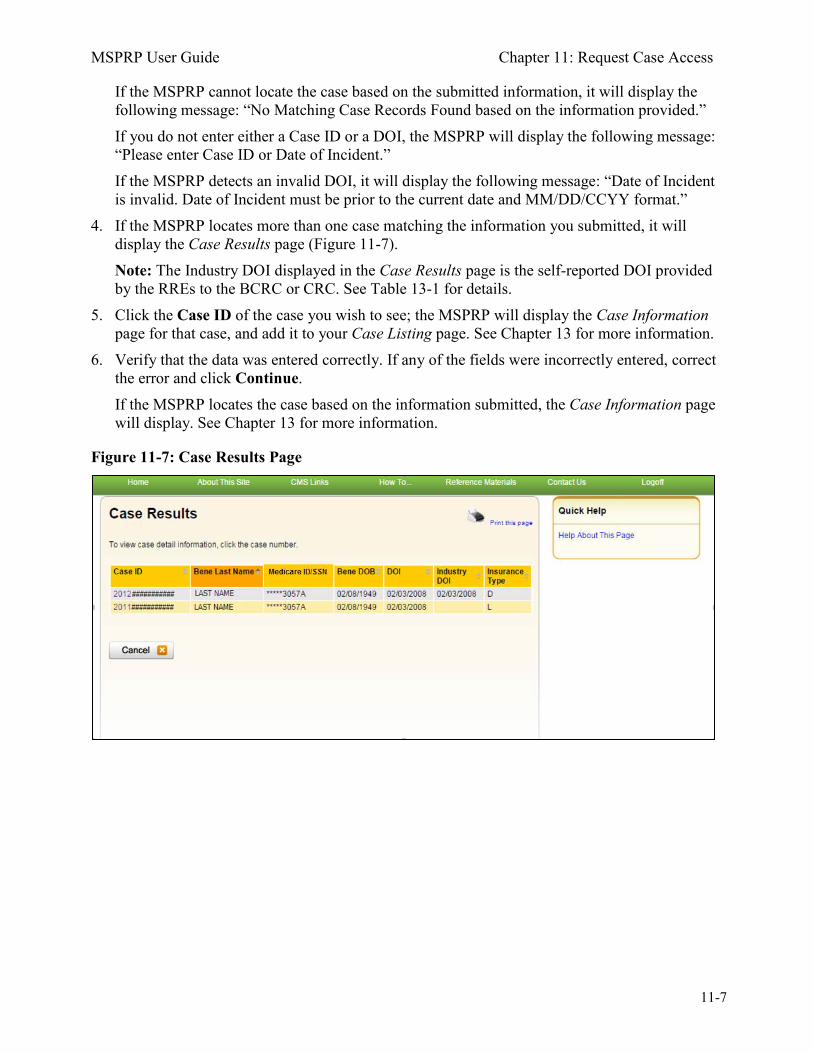
MSPRP User Guide Chapter 11: Request Case Access
11-7
If the MSPRP cannot locate the case based on the submitted information, it will display the following message: “No Matching Case Records Found based on the information provided.” If you do not enter either a Case ID or a DOI, the MSPRP will display the following message: “Please enter Case ID or Date of Incident.” If the MSPRP detects an invalid DOI, it will display the following message: “Date of Incident is invalid. Date of Incident must be prior to the current date and MM/DD/CCYY format.”
4. If the MSPRP locates more than one case matching the information you submitted, it will display the Case Results page (Figure 11-7). Note: The Industry DOI displayed in the Case Results page is the self-reported DOI provided by the RREs to the BCRC or CRC. See Table 13-1 for details.
5. Click the Case ID of the case you wish to see; the MSPRP will display the Case Information page for that case, and add it to your Case Listing page. See Chapter 13 for more information.
6. Verify that the data was entered correctly. If any of the fields were incorrectly entered, correct the error and click Continue. If the MSPRP locates the case based on the information submitted, the Case Information page will display. See Chapter 13 for more information.
Figure 11-7: Case Results Page
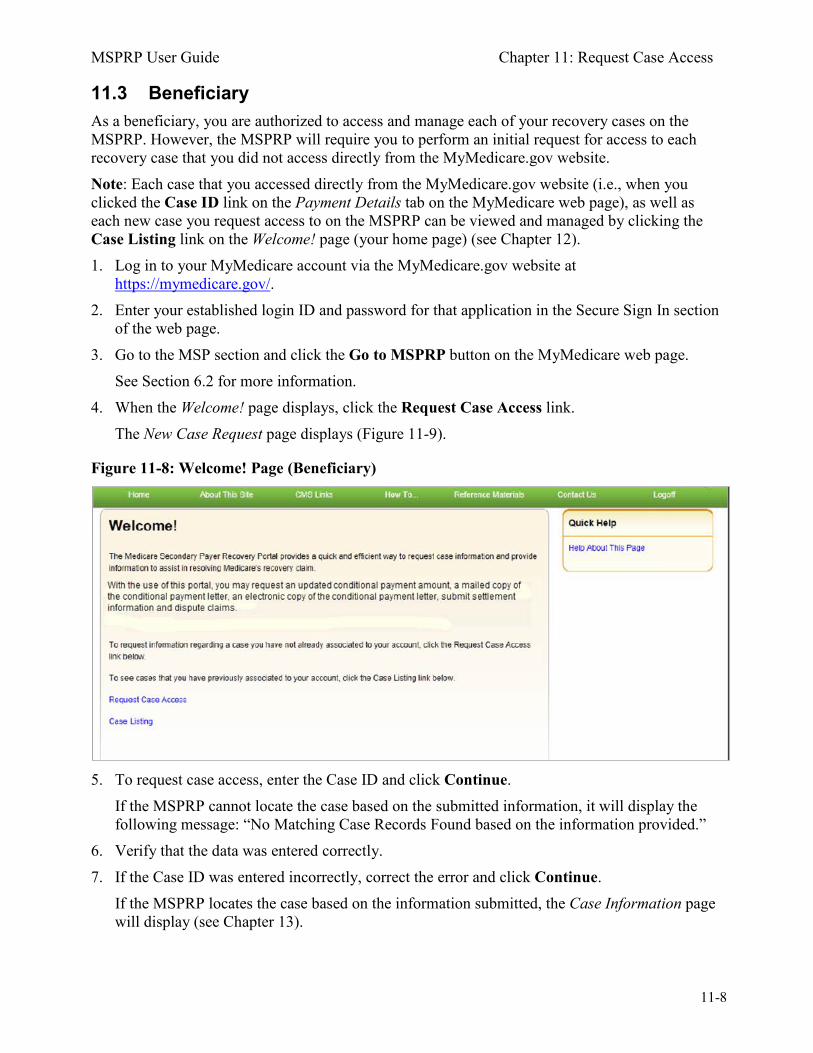
MSPRP User Guide Chapter 11: Request Case Access
11-8
11.3 Beneficiary As a beneficiary, you are authorized to access and manage each of your recovery cases on the MSPRP. However, the MSPRP will require you to perform an initial request for access to each recovery case that you did not access directly from the MyMedicare.gov website. Note: Each case that you accessed directly from the MyMedicare.gov website (i.e., when you clicked the Case ID link on the Payment Details tab on the MyMedicare web page), as well as each new case you request access to on the MSPRP can be viewed and managed by clicking the Case Listing link on the Welcome! page (your home page) (see Chapter 12). 1. Log in to your MyMedicare account via the MyMedicare.gov website at
https://mymedicare.gov/. 2. Enter your established login ID and password for that application in the Secure Sign In section
of the web page. 3. Go to the MSP section and click the Go to MSPRP button on the MyMedicare web page.
See Section 6.2 for more information. 4. When the Welcome! page displays, click the Request Case Access link.
The New Case Request page displays (Figure 11-9).
Figure 11-8: Welcome! Page (Beneficiary)
5. To request case access, enter the Case ID and click Continue. If the MSPRP cannot locate the case based on the submitted information, it will display the following message: “No Matching Case Records Found based on the information provided.”
6. Verify that the data was entered correctly. 7. If the Case ID was entered incorrectly, correct the error and click Continue.
If the MSPRP locates the case based on the information submitted, the Case Information page will display (see Chapter 13).

MSPRP User Guide Chapter 11: Request Case Access
11-9
Figure 11-9: New Case Request
Table 11-3: New Case Request
Field Description Case ID Enter the case identification number.
Medicare ID Displays the beneficiary’s HICN or MBI, which can be found on their Medicare card.
Last Name Displays the beneficiary’s last name.
Beneficiary’s Date of Birth Displays the beneficiary’s date of birth.
Continue Command button. Click to save changes and continue to the next page.
Cancel Command button. Click to exit this page and return to the Welcome! page without making any requests.
MSPRP User Guide Chapter 12: Case Listing
12-1
Chapter 12: Case Listing
12.1 Account Designee The Case Listing page displays a list of cases that you are authorized to access. The Case ID displayed will either be the “BCRC Case ID” (BCRC insurer cases and all beneficiary cases) or the “CRC Recovery ID” (CRC insurer cases). The list includes cases that you successfully requested access to (on the New Case Request page) as well as cases that your AM has granted you access to. Note: If you are approaching settlement on a case that is not yet available on the MSPRP and you wish to initiate the Final Conditional Payment process, contact the BCRC by phone at (855) 798-2627, or by mail at: NGHP, P.O. Box 138832, Oklahoma City, OK 73113. See Chapter 14 for details regarding the Final Conditional Payment process. To get to the Case Listing page, perform the following steps: 1. On the Account List page (Figure 12-1), click the Associated Account ID link.
The Welcome! page displays (Figure 12-2). The Account ID and corresponding Corporate name/Representative name are displayed at the top of the page. Note: Verify the Account ID before selecting it.
2. Click the Case Listing link. The Case Listing page displays (Figure 12-3). This page allows you to:
• Locate a specific case(s) by providing search criteria. • View detailed case information for a selected case. • Remove a case(s) from the Case Listing page.
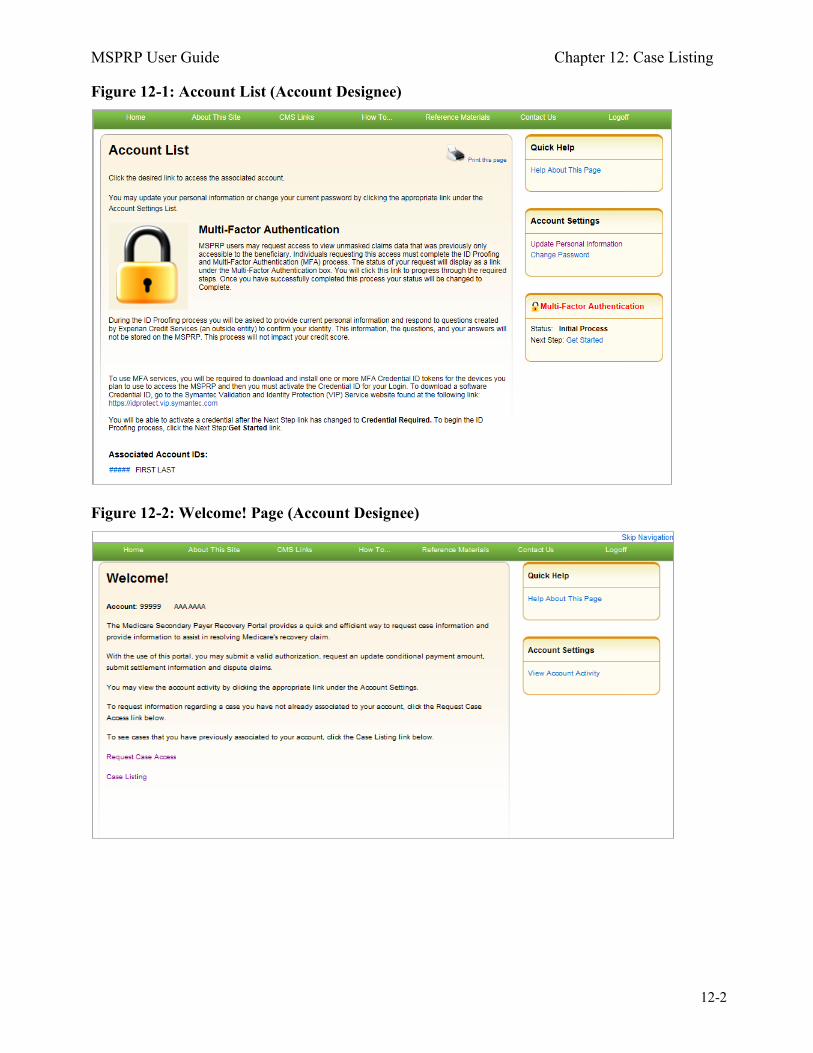
MSPRP User Guide Chapter 12: Case Listing
12-2
Figure 12-1: Account List (Account Designee)
Figure 12-2: Welcome! Page (Account Designee)
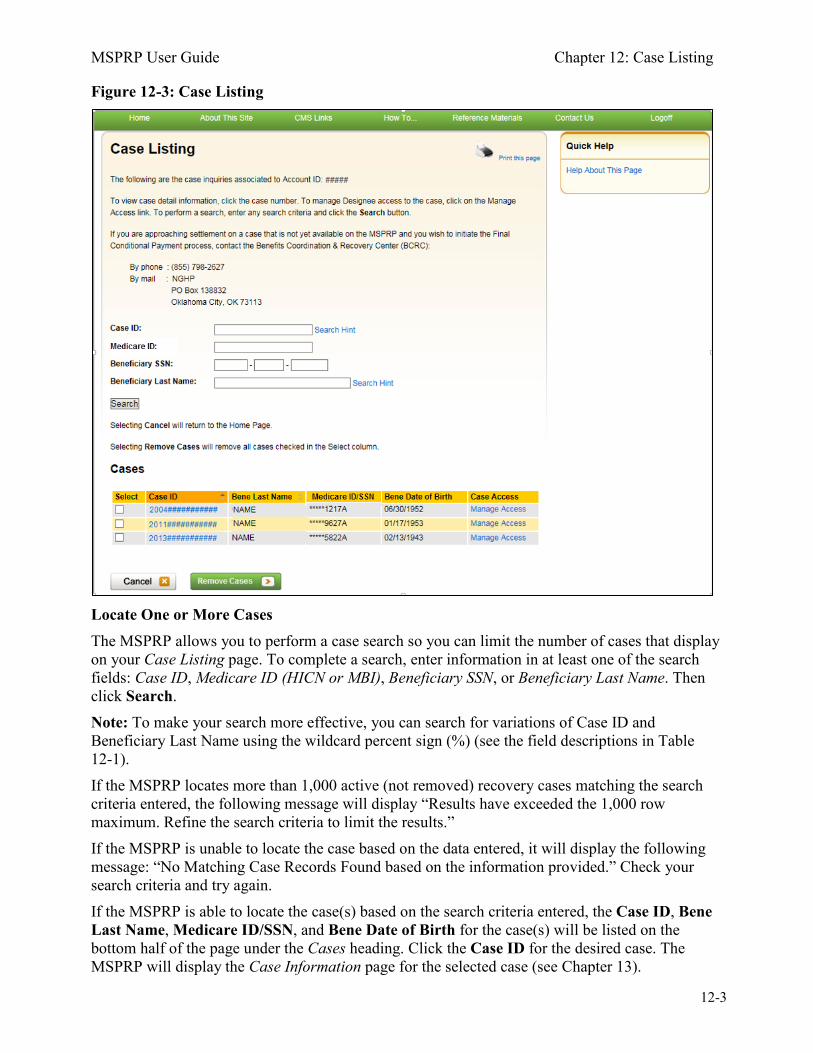
MSPRP User Guide Chapter 12: Case Listing
12-3
Figure 12-3: Case Listing
Locate One or More Cases The MSPRP allows you to perform a case search so you can limit the number of cases that display on your Case Listing page. To complete a search, enter information in at least one of the search fields: Case ID, Medicare ID (HICN or MBI), Beneficiary SSN, or Beneficiary Last Name. Then click Search. Note: To make your search more effective, you can search for variations of Case ID and Beneficiary Last Name using the wildcard percent sign (%) (see the field descriptions in Table 12-1). If the MSPRP locates more than 1,000 active (not removed) recovery cases matching the search criteria entered, the following message will display “Results have exceeded the 1,000 row maximum. Refine the search criteria to limit the results.” If the MSPRP is unable to locate the case based on the data entered, it will display the following message: “No Matching Case Records Found based on the information provided.” Check your search criteria and try again. If the MSPRP is able to locate the case(s) based on the search criteria entered, the Case ID, Bene Last Name, Medicare ID/SSN, and Bene Date of Birth for the case(s) will be listed on the bottom half of the page under the Cases heading. Click the Case ID for the desired case. The MSPRP will display the Case Information page for the selected case (see Chapter 13).
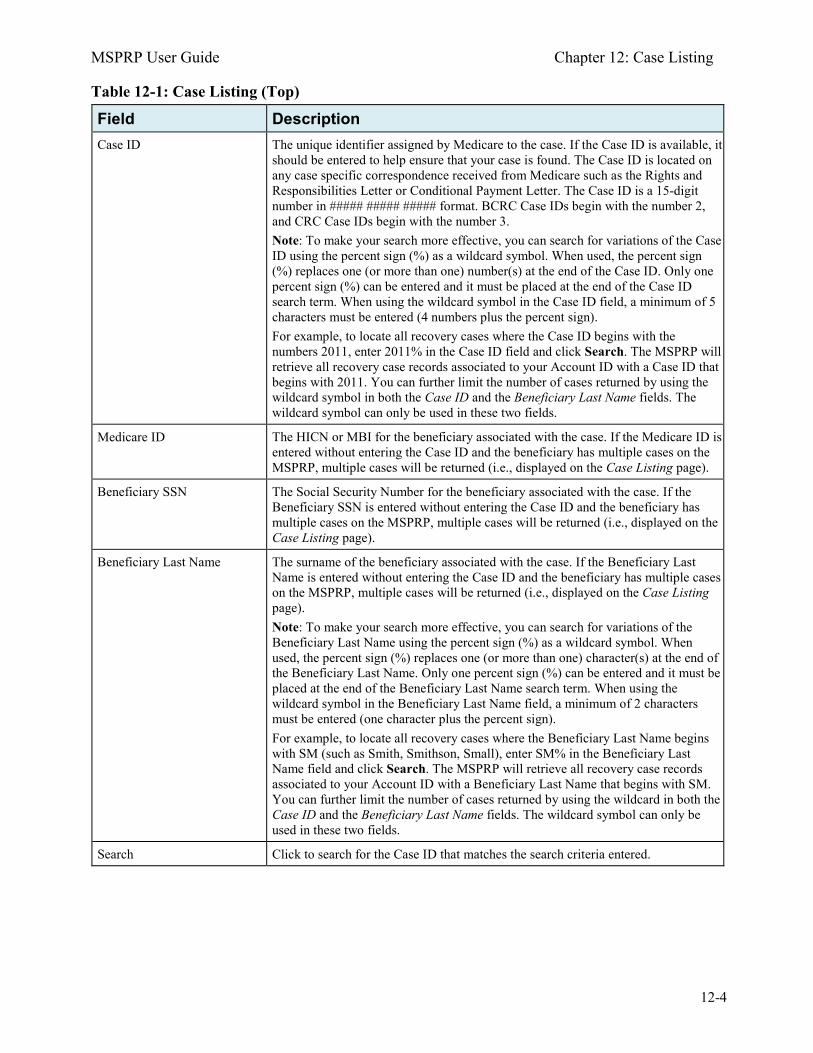
MSPRP User Guide Chapter 12: Case Listing
12-4
Table 12-1: Case Listing (Top)
Field Description Case ID The unique identifier assigned by Medicare to the case. If the Case ID is available, it
should be entered to help ensure that your case is found. The Case ID is located on any case specific correspondence received from Medicare such as the Rights and Responsibilities Letter or Conditional Payment Letter. The Case ID is a 15-digit number in ##### ##### ##### format. BCRC Case IDs begin with the number 2, and CRC Case IDs begin with the number 3. Note: To make your search more effective, you can search for variations of the Case ID using the percent sign (%) as a wildcard symbol. When used, the percent sign (%) replaces one (or more than one) number(s) at the end of the Case ID. Only one percent sign (%) can be entered and it must be placed at the end of the Case ID search term. When using the wildcard symbol in the Case ID field, a minimum of 5 characters must be entered (4 numbers plus the percent sign). For example, to locate all recovery cases where the Case ID begins with the numbers 2011, enter 2011% in the Case ID field and click Search. The MSPRP will retrieve all recovery case records associated to your Account ID with a Case ID that begins with 2011. You can further limit the number of cases returned by using the wildcard symbol in both the Case ID and the Beneficiary Last Name fields. The wildcard symbol can only be used in these two fields.
Medicare ID The HICN or MBI for the beneficiary associated with the case. If the Medicare ID is entered without entering the Case ID and the beneficiary has multiple cases on the MSPRP, multiple cases will be returned (i.e., displayed on the Case Listing page).
Beneficiary SSN The Social Security Number for the beneficiary associated with the case. If the Beneficiary SSN is entered without entering the Case ID and the beneficiary has multiple cases on the MSPRP, multiple cases will be returned (i.e., displayed on the Case Listing page).
Beneficiary Last Name The surname of the beneficiary associated with the case. If the Beneficiary Last Name is entered without entering the Case ID and the beneficiary has multiple cases on the MSPRP, multiple cases will be returned (i.e., displayed on the Case Listing page). Note: To make your search more effective, you can search for variations of the Beneficiary Last Name using the percent sign (%) as a wildcard symbol. When used, the percent sign (%) replaces one (or more than one) character(s) at the end of the Beneficiary Last Name. Only one percent sign (%) can be entered and it must be placed at the end of the Beneficiary Last Name search term. When using the wildcard symbol in the Beneficiary Last Name field, a minimum of 2 characters must be entered (one character plus the percent sign). For example, to locate all recovery cases where the Beneficiary Last Name begins with SM (such as Smith, Smithson, Small), enter SM% in the Beneficiary Last Name field and click Search. The MSPRP will retrieve all recovery case records associated to your Account ID with a Beneficiary Last Name that begins with SM. You can further limit the number of cases returned by using the wildcard in both the Case ID and the Beneficiary Last Name fields. The wildcard symbol can only be used in these two fields.
Search Click to search for the Case ID that matches the search criteria entered.
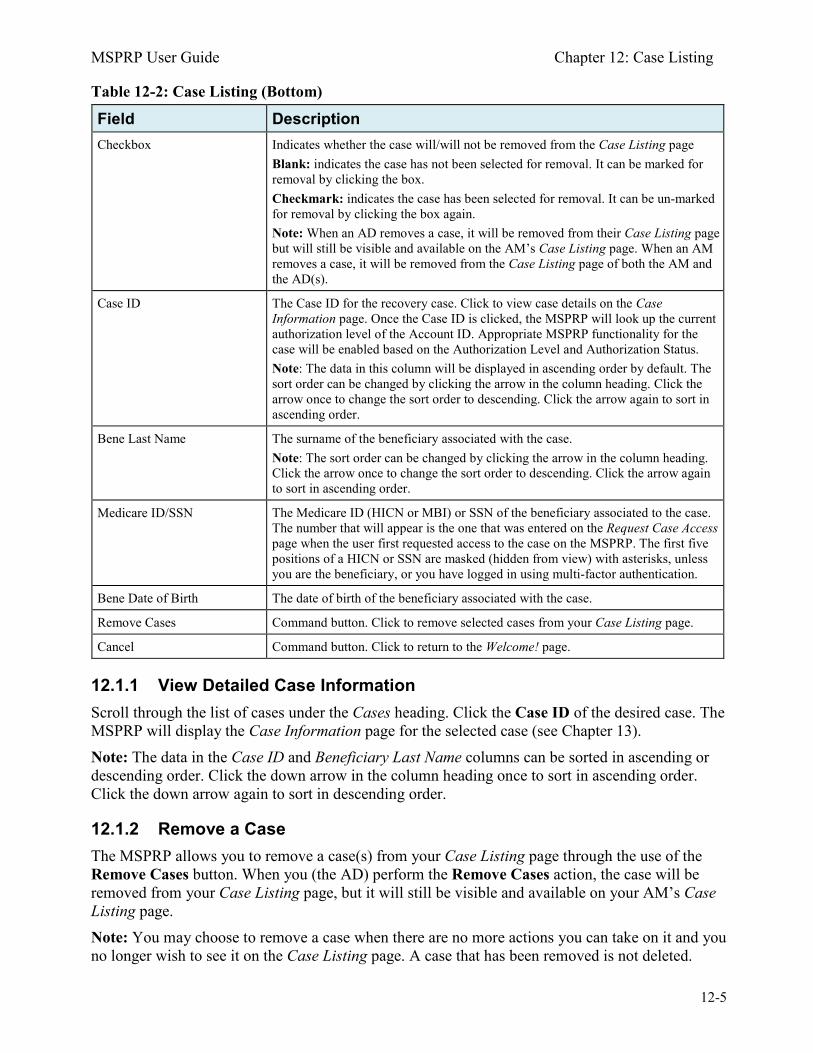
MSPRP User Guide Chapter 12: Case Listing
12-5
Table 12-2: Case Listing (Bottom)
Field Description Checkbox Indicates whether the case will/will not be removed from the Case Listing page
Blank: indicates the case has not been selected for removal. It can be marked for removal by clicking the box. Checkmark: indicates the case has been selected for removal. It can be un-marked for removal by clicking the box again. Note: When an AD removes a case, it will be removed from their Case Listing page but will still be visible and available on the AM’s Case Listing page. When an AM removes a case, it will be removed from the Case Listing page of both the AM and the AD(s).
Case ID The Case ID for the recovery case. Click to view case details on the Case Information page. Once the Case ID is clicked, the MSPRP will look up the current authorization level of the Account ID. Appropriate MSPRP functionality for the case will be enabled based on the Authorization Level and Authorization Status. Note: The data in this column will be displayed in ascending order by default. The sort order can be changed by clicking the arrow in the column heading. Click the arrow once to change the sort order to descending. Click the arrow again to sort in ascending order.
Bene Last Name The surname of the beneficiary associated with the case. Note: The sort order can be changed by clicking the arrow in the column heading. Click the arrow once to change the sort order to descending. Click the arrow again to sort in ascending order.
Medicare ID/SSN The Medicare ID (HICN or MBI) or SSN of the beneficiary associated to the case. The number that will appear is the one that was entered on the Request Case Access page when the user first requested access to the case on the MSPRP. The first five positions of a HICN or SSN are masked (hidden from view) with asterisks, unless you are the beneficiary, or you have logged in using multi-factor authentication.
Bene Date of Birth The date of birth of the beneficiary associated with the case.
Remove Cases Command button. Click to remove selected cases from your Case Listing page.
Cancel Command button. Click to return to the Welcome! page.
12.1.1 View Detailed Case Information Scroll through the list of cases under the Cases heading. Click the Case ID of the desired case. The MSPRP will display the Case Information page for the selected case (see Chapter 13). Note: The data in the Case ID and Beneficiary Last Name columns can be sorted in ascending or descending order. Click the down arrow in the column heading once to sort in ascending order. Click the down arrow again to sort in descending order.
12.1.2 Remove a Case The MSPRP allows you to remove a case(s) from your Case Listing page through the use of the Remove Cases button. When you (the AD) perform the Remove Cases action, the case will be removed from your Case Listing page, but it will still be visible and available on your AM’s Case Listing page. Note: You may choose to remove a case when there are no more actions you can take on it and you no longer wish to see it on the Case Listing page. A case that has been removed is not deleted.
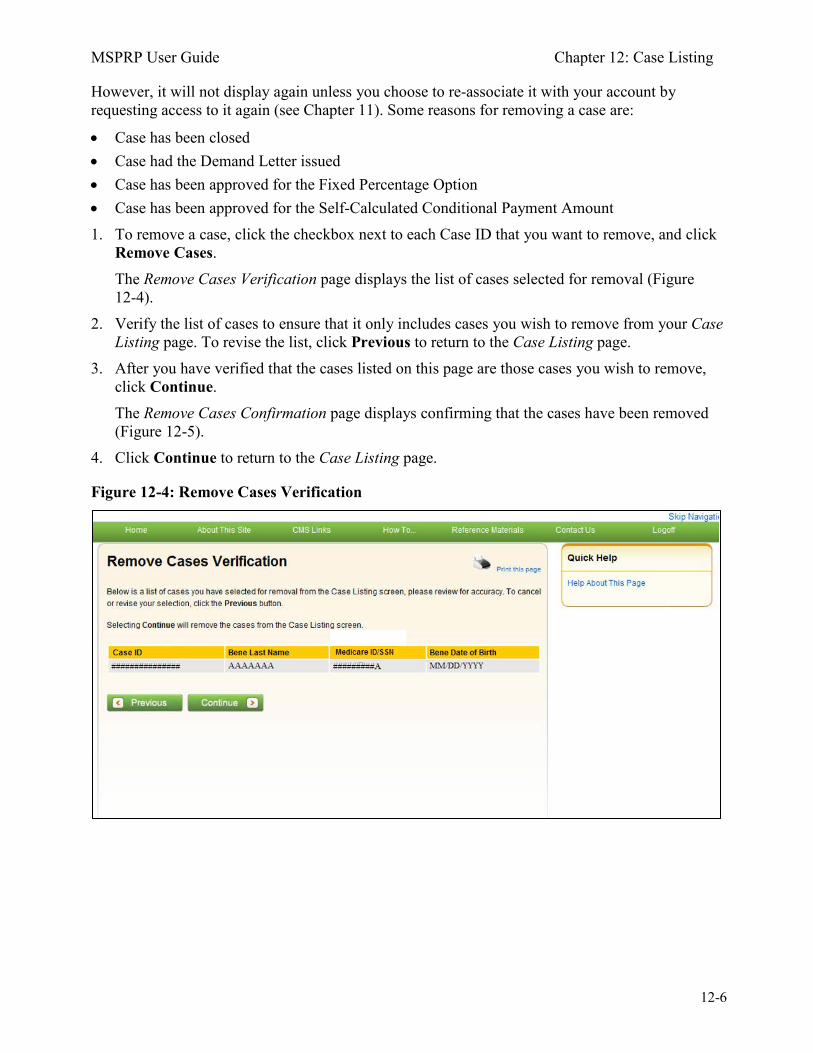
MSPRP User Guide Chapter 12: Case Listing
12-6
However, it will not display again unless you choose to re-associate it with your account by requesting access to it again (see Chapter 11). Some reasons for removing a case are:
• Case has been closed • Case had the Demand Letter issued • Case has been approved for the Fixed Percentage Option • Case has been approved for the Self-Calculated Conditional Payment Amount 1. To remove a case, click the checkbox next to each Case ID that you want to remove, and click
Remove Cases. The Remove Cases Verification page displays the list of cases selected for removal (Figure 12-4).
2. Verify the list of cases to ensure that it only includes cases you wish to remove from your Case Listing page. To revise the list, click Previous to return to the Case Listing page.
3. After you have verified that the cases listed on this page are those cases you wish to remove, click Continue. The Remove Cases Confirmation page displays confirming that the cases have been removed (Figure 12-5).
4. Click Continue to return to the Case Listing page.
Figure 12-4: Remove Cases Verification
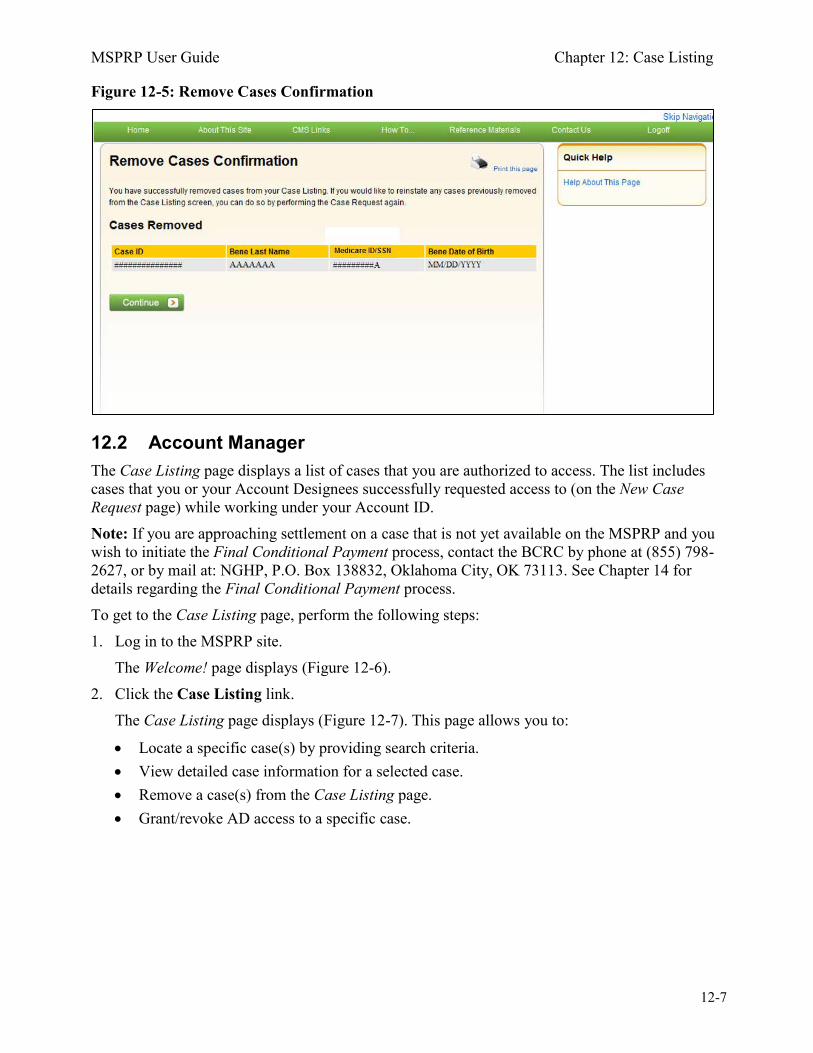
MSPRP User Guide Chapter 12: Case Listing
12-7
Figure 12-5: Remove Cases Confirmation
12.2 Account Manager The Case Listing page displays a list of cases that you are authorized to access. The list includes cases that you or your Account Designees successfully requested access to (on the New Case Request page) while working under your Account ID. Note: If you are approaching settlement on a case that is not yet available on the MSPRP and you wish to initiate the Final Conditional Payment process, contact the BCRC by phone at (855) 798-2627, or by mail at: NGHP, P.O. Box 138832, Oklahoma City, OK 73113. See Chapter 14 for details regarding the Final Conditional Payment process. To get to the Case Listing page, perform the following steps: 1. Log in to the MSPRP site.
The Welcome! page displays (Figure 12-6). 2. Click the Case Listing link.
The Case Listing page displays (Figure 12-7). This page allows you to:
• Locate a specific case(s) by providing search criteria. • View detailed case information for a selected case. • Remove a case(s) from the Case Listing page. • Grant/revoke AD access to a specific case.
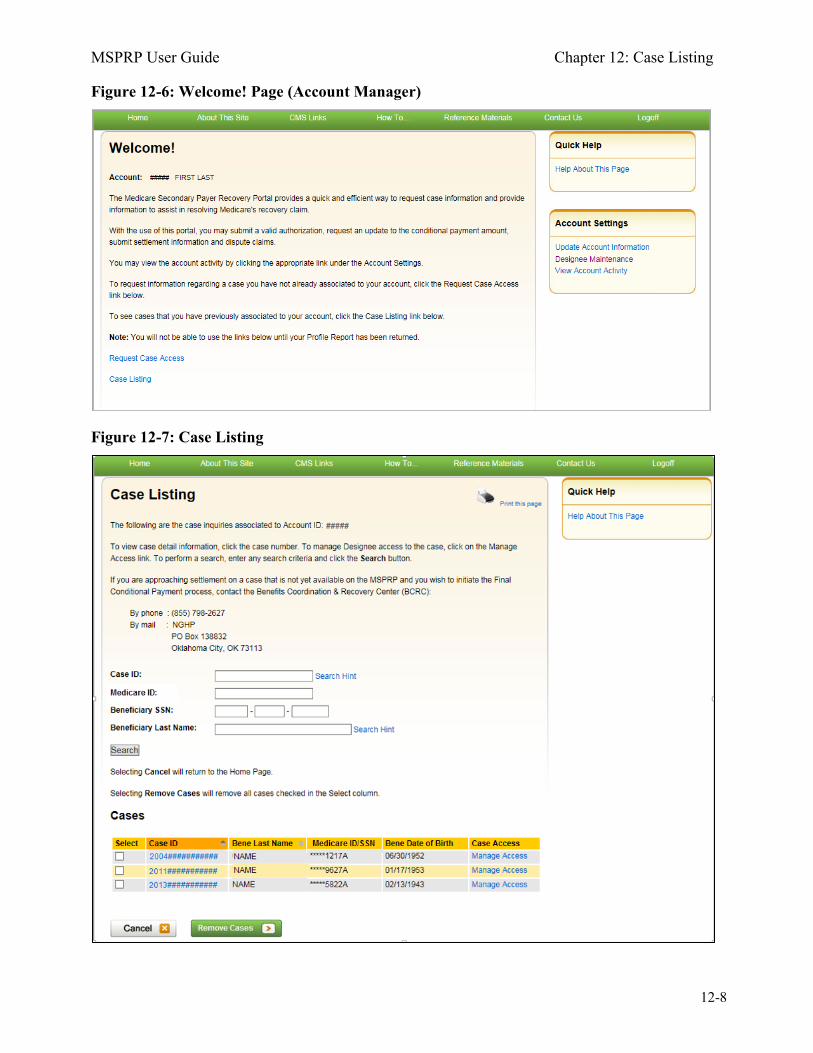
MSPRP User Guide Chapter 12: Case Listing
12-8
Figure 12-6: Welcome! Page (Account Manager)
Figure 12-7: Case Listing

MSPRP User Guide Chapter 12: Case Listing
12-9
Table 12-3: Case Listing (Top)
Field Description Case ID Enter the unique identifier assigned by Medicare to the case. If the Case ID is
available, it should be entered to help ensure your case is found. The Case ID is located on any case specific correspondence received from Medicare such as the Rights and Responsibilities Letter or Conditional Payment Letter. It is a 15-digit number and is displayed as ##### ##### ##### on the correspondence from Medicare. BCRC Case IDs begin with the number 2, and CRC Case IDs begin with the number 3. Note: To make your search more effective, you can search for variations of the Case ID using the percent sign (%) as a wildcard symbol. When used, the percent sign (%) replaces one (or more than one) number(s) at the end of the Case ID. Only one percent sign (%) can be entered and it must be placed at the end of the Case ID search term. When using the wildcard symbol in the Case ID field, a minimum of 5 characters must be entered (4 numbers plus the percent sign). For example, to locate all recovery cases where the Case ID begins with the numbers 2011, enter 2011% in the Case ID field and click Search. The MSPRP will retrieve all recovery case records associated to your Account ID with a Case ID that begins with 2011. You can further limit the number of cases returned by using the wildcard symbol in both the Case ID and the Beneficiary Last Name fields. The wildcard symbol can only be used in these two fields.
Medicare ID The Medicare ID (HICN or MBI) for the beneficiary associated with the case. If the Medicare ID is entered without entering the Case ID and the beneficiary has multiple cases on the MSPRP, multiple Case IDs will be returned (i.e., displayed on the Case Listing page).
Beneficiary SSN The Social Security Number for the beneficiary associated with the case. If the beneficiary SSN is entered without entering the Case ID and the beneficiary has multiple cases on the MSPRP, multiple Case IDs will be returned (i.e., displayed on the Case Listing page).
Beneficiary Last Name The surname of the beneficiary associated with the case. If the beneficiary’s last name is entered without entering the Case ID and the beneficiary has multiple cases on the MSPRP, multiple Case IDs will be returned (i.e., displayed on the Case Listing page). Note: To make your search more effective, you can search for variations of the beneficiary last name using the percent sign (%) as a wildcard symbol. When used, the percent sign (%) replaces one (or more than one) character(s) at the end of the beneficiary last name. Only one percent sign (%) can be entered and it must be placed at the end of the beneficiary last name search term. When using the wildcard symbol in the beneficiary last name field, a minimum of 2 characters must be entered (1 character plus the percent sign). For example, to locate all recovery cases where the beneficiary last name begins with SM (such as Smith, Smithson, Small), enter SM% in the Beneficiary Last Name field and click Search. The MSPRP will retrieve all recovery case records associated with your Account ID with a beneficiary last name that begins with SM. You can further limit the number of cases returned by using the wildcard in both the Case ID and the Beneficiary Last Name fields. The wildcard symbol can only be used in these two fields.
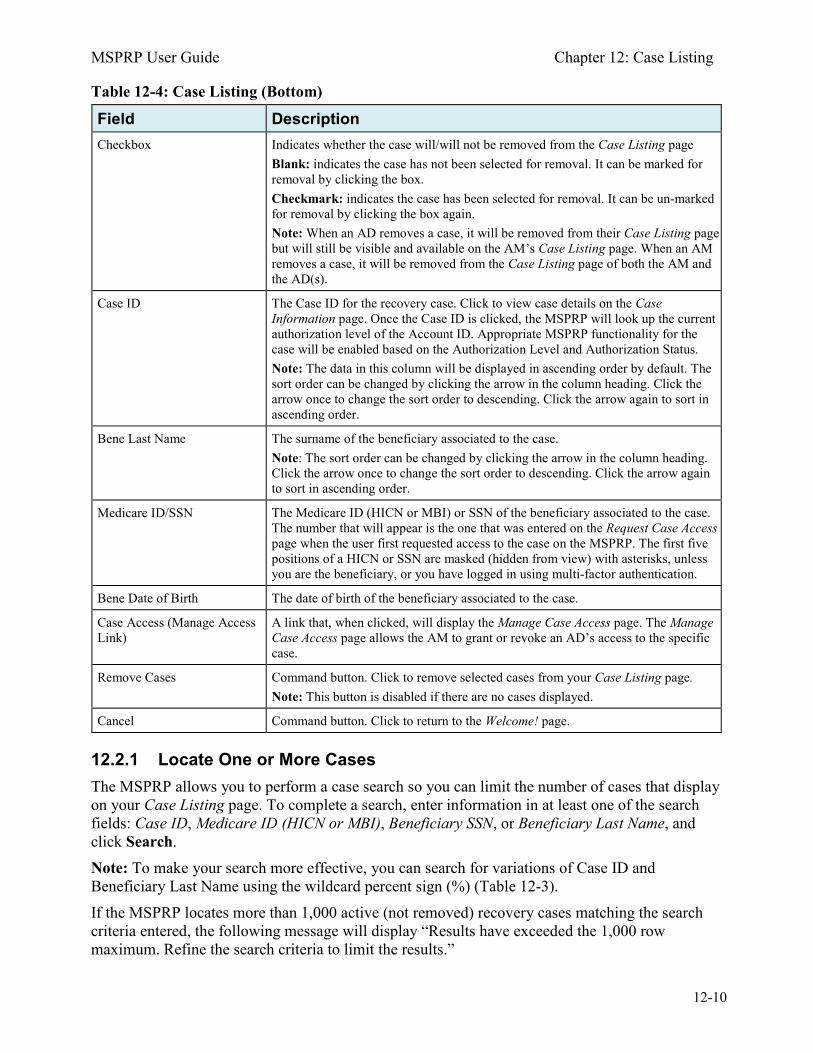
MSPRP User Guide Chapter 12: Case Listing
12-10
Table 12-4: Case Listing (Bottom)
Field Description Checkbox Indicates whether the case will/will not be removed from the Case Listing page
Blank: indicates the case has not been selected for removal. It can be marked for removal by clicking the box. Checkmark: indicates the case has been selected for removal. It can be un-marked for removal by clicking the box again. Note: When an AD removes a case, it will be removed from their Case Listing page but will still be visible and available on the AM’s Case Listing page. When an AM removes a case, it will be removed from the Case Listing page of both the AM and the AD(s).
Case ID The Case ID for the recovery case. Click to view case details on the Case Information page. Once the Case ID is clicked, the MSPRP will look up the current authorization level of the Account ID. Appropriate MSPRP functionality for the case will be enabled based on the Authorization Level and Authorization Status. Note: The data in this column will be displayed in ascending order by default. The sort order can be changed by clicking the arrow in the column heading. Click the arrow once to change the sort order to descending. Click the arrow again to sort in ascending order.
Bene Last Name The surname of the beneficiary associated to the case. Note: The sort order can be changed by clicking the arrow in the column heading. Click the arrow once to change the sort order to descending. Click the arrow again to sort in ascending order.
Medicare ID/SSN The Medicare ID (HICN or MBI) or SSN of the beneficiary associated to the case. The number that will appear is the one that was entered on the Request Case Access page when the user first requested access to the case on the MSPRP. The first five positions of a HICN or SSN are masked (hidden from view) with asterisks, unless you are the beneficiary, or you have logged in using multi-factor authentication.
Bene Date of Birth The date of birth of the beneficiary associated to the case.
Case Access (Manage Access Link)
A link that, when clicked, will display the Manage Case Access page. The Manage Case Access page allows the AM to grant or revoke an AD’s access to the specific case.
Remove Cases Command button. Click to remove selected cases from your Case Listing page. Note: This button is disabled if there are no cases displayed.
Cancel Command button. Click to return to the Welcome! page.
12.2.1 Locate One or More Cases The MSPRP allows you to perform a case search so you can limit the number of cases that display on your Case Listing page. To complete a search, enter information in at least one of the search fields: Case ID, Medicare ID (HICN or MBI), Beneficiary SSN, or Beneficiary Last Name, and click Search. Note: To make your search more effective, you can search for variations of Case ID and Beneficiary Last Name using the wildcard percent sign (%) (Table 12-3). If the MSPRP locates more than 1,000 active (not removed) recovery cases matching the search criteria entered, the following message will display “Results have exceeded the 1,000 row maximum. Refine the search criteria to limit the results.”
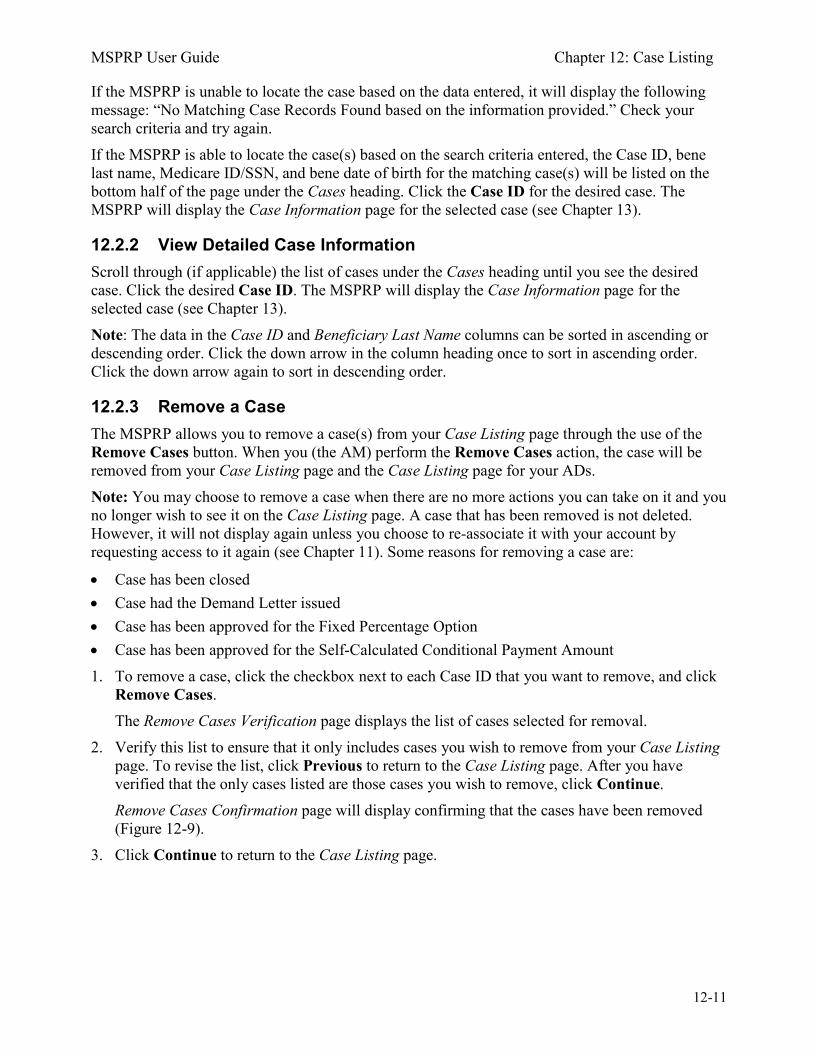
MSPRP User Guide Chapter 12: Case Listing
12-11
If the MSPRP is unable to locate the case based on the data entered, it will display the following message: “No Matching Case Records Found based on the information provided.” Check your search criteria and try again. If the MSPRP is able to locate the case(s) based on the search criteria entered, the Case ID, bene last name, Medicare ID/SSN, and bene date of birth for the matching case(s) will be listed on the bottom half of the page under the Cases heading. Click the Case ID for the desired case. The MSPRP will display the Case Information page for the selected case (see Chapter 13).
12.2.2 View Detailed Case Information Scroll through (if applicable) the list of cases under the Cases heading until you see the desired case. Click the desired Case ID. The MSPRP will display the Case Information page for the selected case (see Chapter 13). Note: The data in the Case ID and Beneficiary Last Name columns can be sorted in ascending or descending order. Click the down arrow in the column heading once to sort in ascending order. Click the down arrow again to sort in descending order.
12.2.3 Remove a Case The MSPRP allows you to remove a case(s) from your Case Listing page through the use of the Remove Cases button. When you (the AM) perform the Remove Cases action, the case will be removed from your Case Listing page and the Case Listing page for your ADs. Note: You may choose to remove a case when there are no more actions you can take on it and you no longer wish to see it on the Case Listing page. A case that has been removed is not deleted. However, it will not display again unless you choose to re-associate it with your account by requesting access to it again (see Chapter 11). Some reasons for removing a case are:
• Case has been closed • Case had the Demand Letter issued • Case has been approved for the Fixed Percentage Option • Case has been approved for the Self-Calculated Conditional Payment Amount 1. To remove a case, click the checkbox next to each Case ID that you want to remove, and click
Remove Cases. The Remove Cases Verification page displays the list of cases selected for removal.
2. Verify this list to ensure that it only includes cases you wish to remove from your Case Listing page. To revise the list, click Previous to return to the Case Listing page. After you have verified that the only cases listed are those cases you wish to remove, click Continue. Remove Cases Confirmation page will display confirming that the cases have been removed (Figure 12-9).
3. Click Continue to return to the Case Listing page.
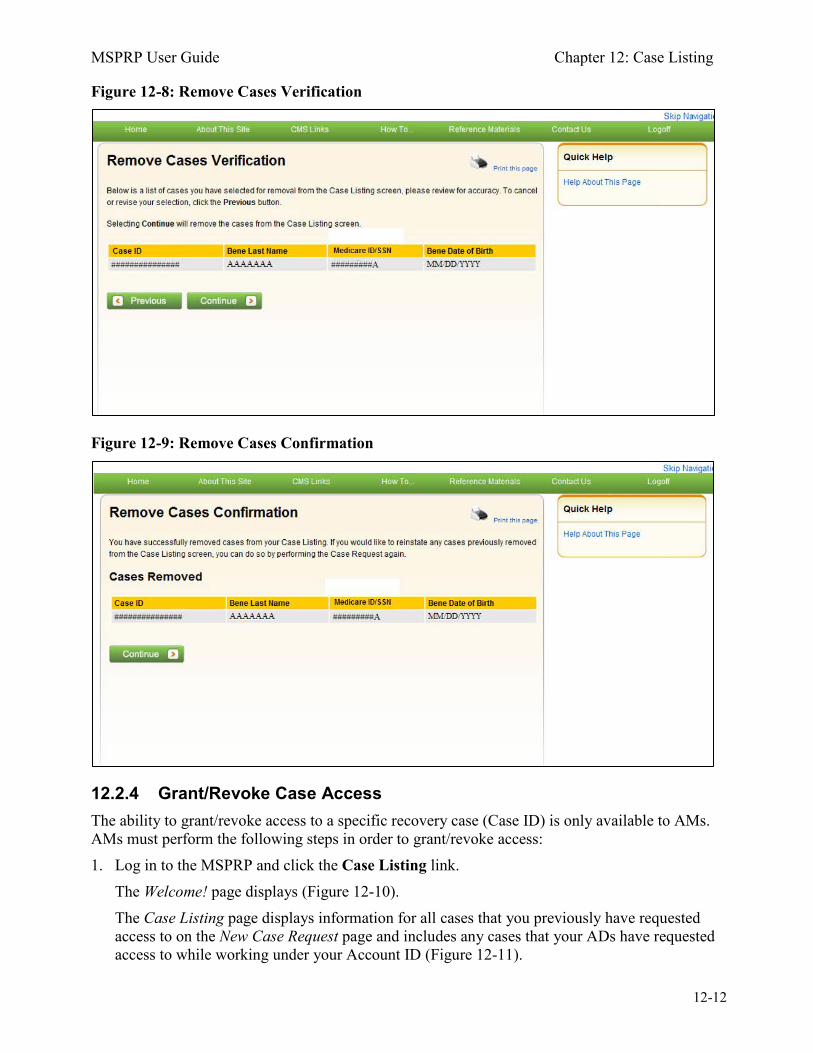
MSPRP User Guide Chapter 12: Case Listing
12-12
Figure 12-8: Remove Cases Verification
Figure 12-9: Remove Cases Confirmation
12.2.4 Grant/Revoke Case Access The ability to grant/revoke access to a specific recovery case (Case ID) is only available to AMs. AMs must perform the following steps in order to grant/revoke access: 1. Log in to the MSPRP and click the Case Listing link.
The Welcome! page displays (Figure 12-10). The Case Listing page displays information for all cases that you previously have requested access to on the New Case Request page and includes any cases that your ADs have requested access to while working under your Account ID (Figure 12-11).
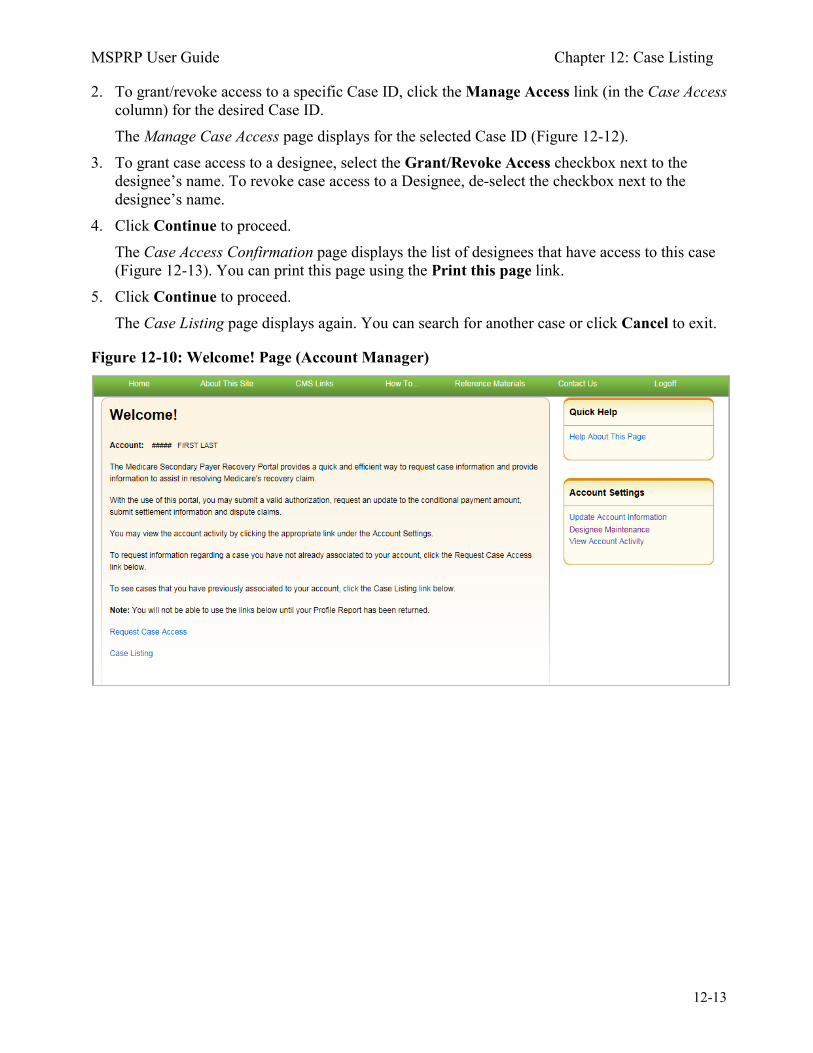
MSPRP User Guide Chapter 12: Case Listing
12-13
2. To grant/revoke access to a specific Case ID, click the Manage Access link (in the Case Access column) for the desired Case ID. The Manage Case Access page displays for the selected Case ID (Figure 12-12).
3. To grant case access to a designee, select the Grant/Revoke Access checkbox next to the designee’s name. To revoke case access to a Designee, de-select the checkbox next to the designee’s name.
4. Click Continue to proceed. The Case Access Confirmation page displays the list of designees that have access to this case (Figure 12-13). You can print this page using the Print this page link.
5. Click Continue to proceed. The Case Listing page displays again. You can search for another case or click Cancel to exit.
Figure 12-10: Welcome! Page (Account Manager)
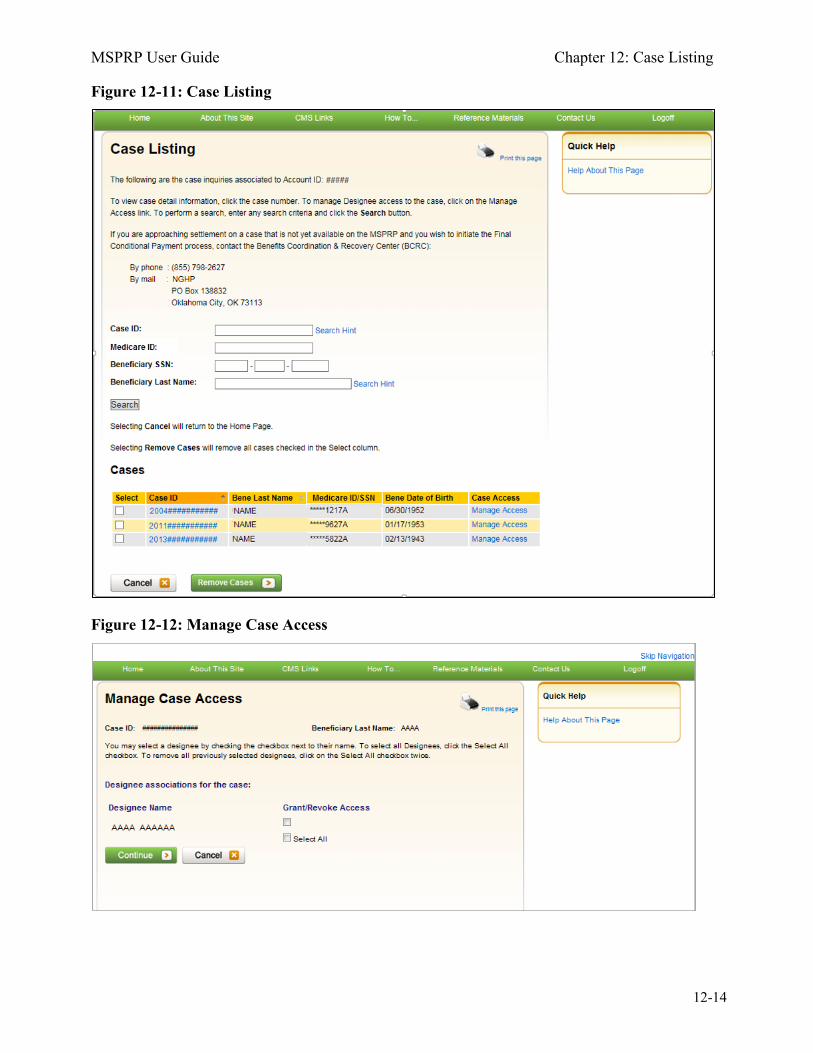
MSPRP User Guide Chapter 12: Case Listing
12-14
Figure 12-11: Case Listing
Figure 12-12: Manage Case Access
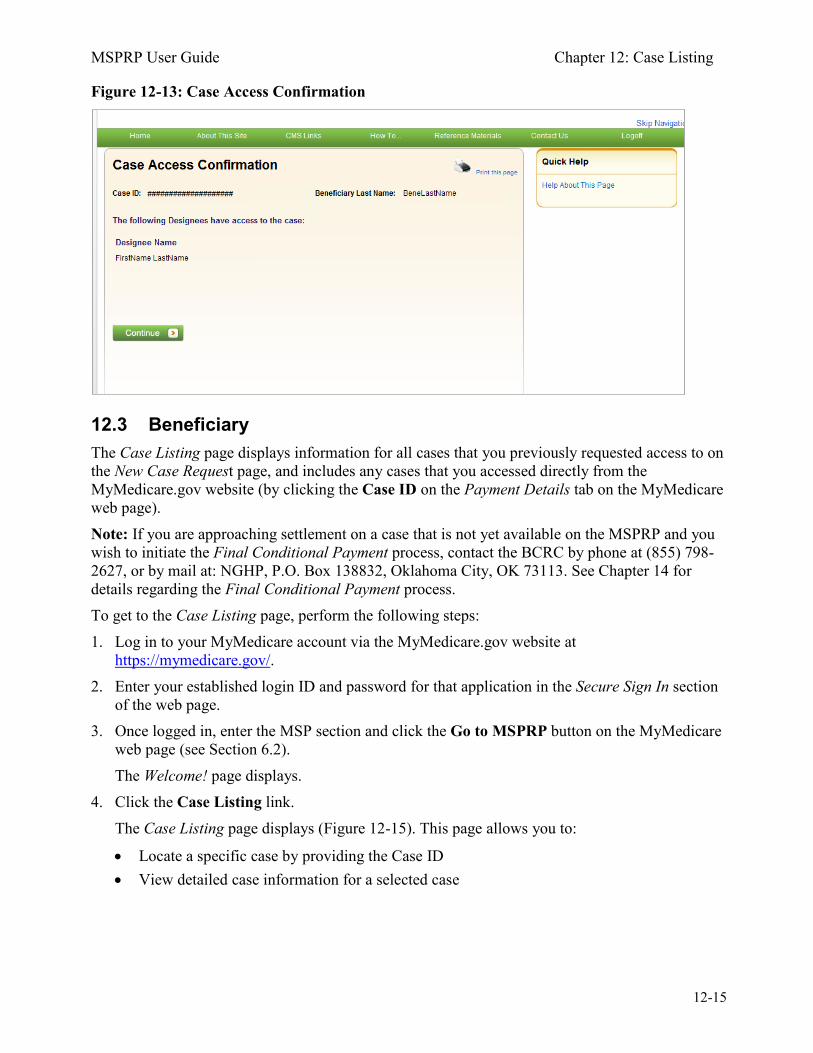
MSPRP User Guide Chapter 12: Case Listing
12-15
Figure 12-13: Case Access Confirmation
12.3 Beneficiary The Case Listing page displays information for all cases that you previously requested access to on the New Case Request page, and includes any cases that you accessed directly from the MyMedicare.gov website (by clicking the Case ID on the Payment Details tab on the MyMedicare web page). Note: If you are approaching settlement on a case that is not yet available on the MSPRP and you wish to initiate the Final Conditional Payment process, contact the BCRC by phone at (855) 798-2627, or by mail at: NGHP, P.O. Box 138832, Oklahoma City, OK 73113. See Chapter 14 for details regarding the Final Conditional Payment process. To get to the Case Listing page, perform the following steps: 1. Log in to your MyMedicare account via the MyMedicare.gov website at
https://mymedicare.gov/. 2. Enter your established login ID and password for that application in the Secure Sign In section
of the web page. 3. Once logged in, enter the MSP section and click the Go to MSPRP button on the MyMedicare
web page (see Section 6.2). The Welcome! page displays.
4. Click the Case Listing link. The Case Listing page displays (Figure 12-15). This page allows you to:
• Locate a specific case by providing the Case ID • View detailed case information for a selected case
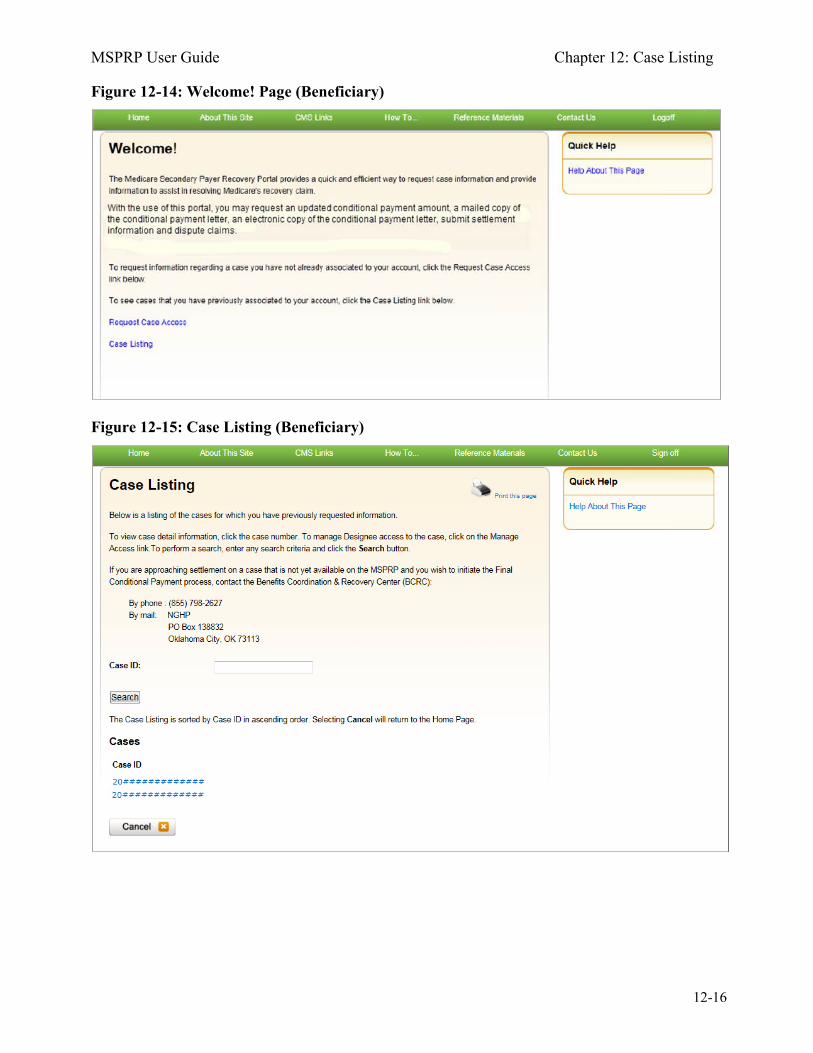
MSPRP User Guide Chapter 12: Case Listing
12-16
Figure 12-14: Welcome! Page (Beneficiary)
Figure 12-15: Case Listing (Beneficiary)
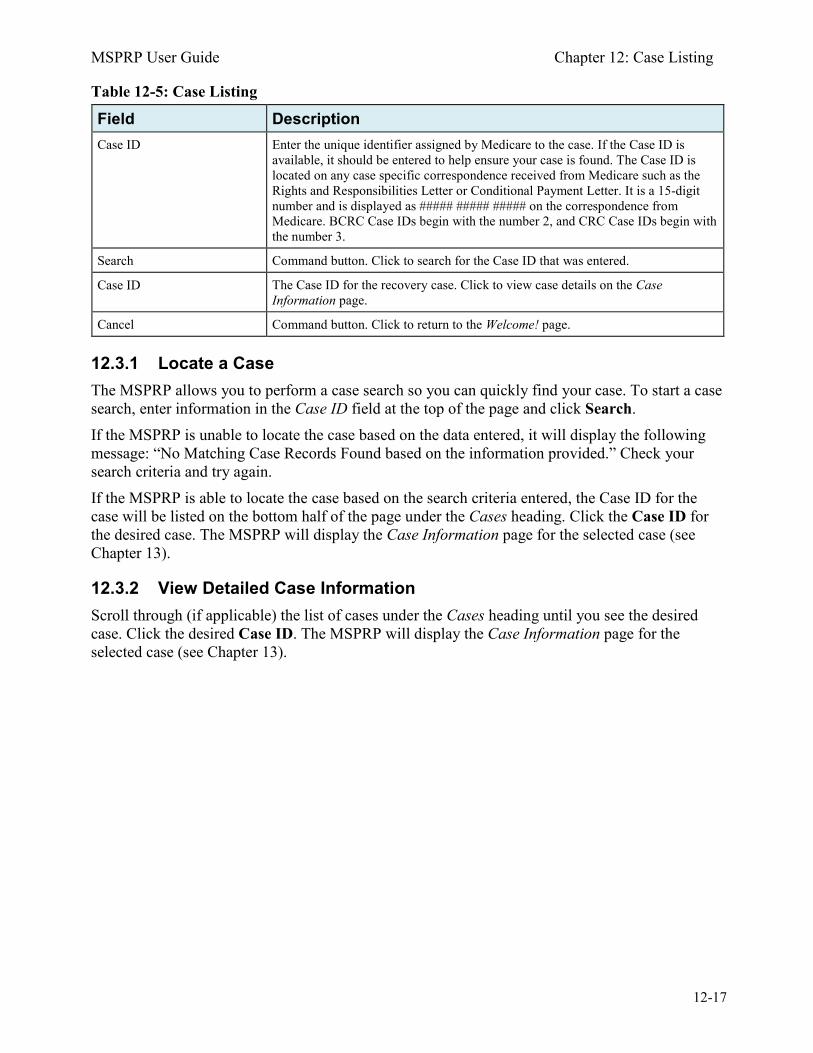
MSPRP User Guide Chapter 12: Case Listing
12-17
Table 12-5: Case Listing
Field Description Case ID Enter the unique identifier assigned by Medicare to the case. If the Case ID is
available, it should be entered to help ensure your case is found. The Case ID is located on any case specific correspondence received from Medicare such as the Rights and Responsibilities Letter or Conditional Payment Letter. It is a 15-digit number and is displayed as ##### ##### ##### on the correspondence from Medicare. BCRC Case IDs begin with the number 2, and CRC Case IDs begin with the number 3.
Search Command button. Click to search for the Case ID that was entered.
Case ID The Case ID for the recovery case. Click to view case details on the Case Information page.
Cancel Command button. Click to return to the Welcome! page.
12.3.1 Locate a Case The MSPRP allows you to perform a case search so you can quickly find your case. To start a case search, enter information in the Case ID field at the top of the page and click Search. If the MSPRP is unable to locate the case based on the data entered, it will display the following message: “No Matching Case Records Found based on the information provided.” Check your search criteria and try again. If the MSPRP is able to locate the case based on the search criteria entered, the Case ID for the case will be listed on the bottom half of the page under the Cases heading. Click the Case ID for the desired case. The MSPRP will display the Case Information page for the selected case (see Chapter 13).
12.3.2 View Detailed Case Information Scroll through (if applicable) the list of cases under the Cases heading until you see the desired case. Click the desired Case ID. The MSPRP will display the Case Information page for the selected case (see Chapter 13).
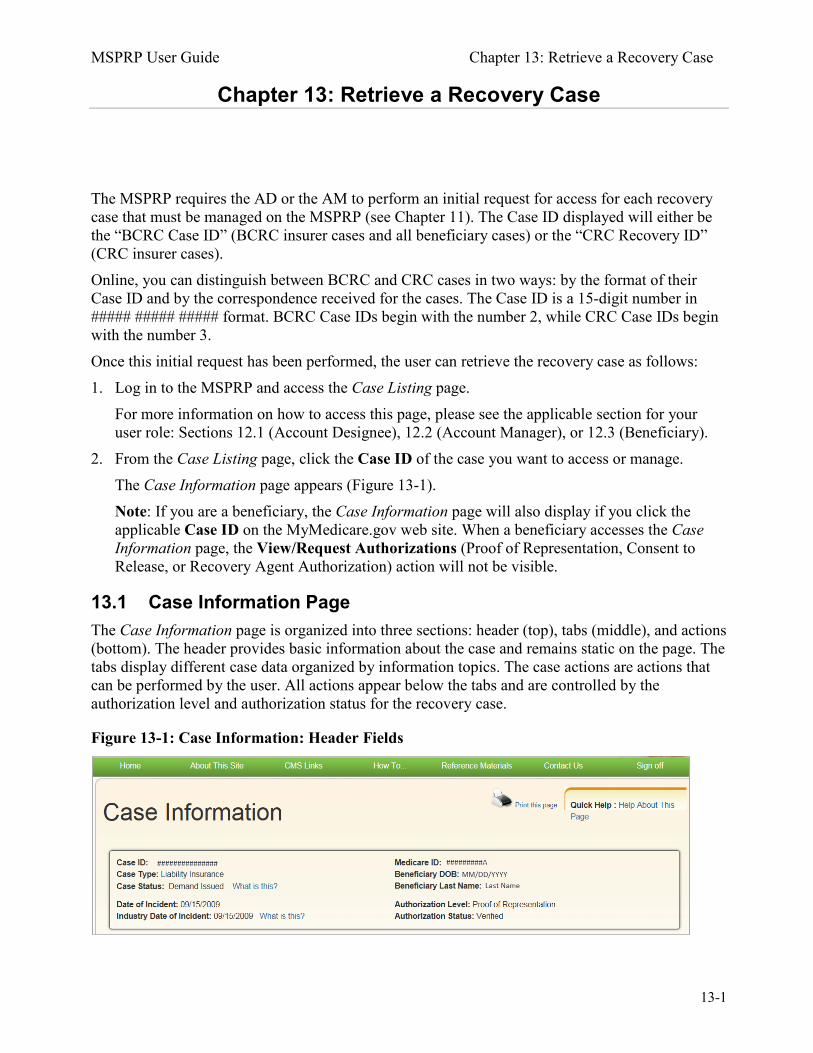
MSPRP User Guide Chapter 13: Retrieve a Recovery Case
13-1
Chapter 13: Retrieve a Recovery Case
The MSPRP requires the AD or the AM to perform an initial request for access for each recovery case that must be managed on the MSPRP (see Chapter 11). The Case ID displayed will either be the “BCRC Case ID” (BCRC insurer cases and all beneficiary cases) or the “CRC Recovery ID” (CRC insurer cases). Online, you can distinguish between BCRC and CRC cases in two ways: by the format of their Case ID and by the correspondence received for the cases. The Case ID is a 15-digit number in ##### ##### ##### format. BCRC Case IDs begin with the number 2, while CRC Case IDs begin with the number 3. Once this initial request has been performed, the user can retrieve the recovery case as follows: 1. Log in to the MSPRP and access the Case Listing page.
For more information on how to access this page, please see the applicable section for your user role: Sections 12.1 (Account Designee), 12.2 (Account Manager), or 12.3 (Beneficiary).
2. From the Case Listing page, click the Case ID of the case you want to access or manage. The Case Information page appears (Figure 13-1). Note: If you are a beneficiary, the Case Information page will also display if you click the applicable Case ID on the MyMedicare.gov web site. When a beneficiary accesses the Case Information page, the View/Request Authorizations (Proof of Representation, Consent to Release, or Recovery Agent Authorization) action will not be visible.
13.1 Case Information Page The Case Information page is organized into three sections: header (top), tabs (middle), and actions (bottom). The header provides basic information about the case and remains static on the page. The tabs display different case data organized by information topics. The case actions are actions that can be performed by the user. All actions appear below the tabs and are controlled by the authorization level and authorization status for the recovery case.
Figure 13-1: Case Information: Header Fields

MSPRP User Guide Chapter 13: Retrieve a Recovery Case
13-2
Table 13-1: Case Information: Header Fields
Field Description Case ID The primary identifier assigned by the Centers for Medicare & Medicaid
Services (CMS) to the case. The case ID is located on any case-specific correspondence received from Medicare such as the Rights and Responsibilities Letter or Conditional Payment Letter. The Case ID is a 15-digit number in ##### ##### ##### format. Note: BCRC case IDs begin with the number 2, and CRC case IDs begin with the number 3.
Case Type The type of insurance coverage provided by the plan for the case. This can be any of the following:
• Liability Insurance - Insurance that pays on behalf of the policyholder or self-insured entity against claims for negligence, inappropriate action or inaction, which results in injury or illness to an individual or property damage.
• Workers' Compensation - A law or plan that requires the employer's insurance company to provide medical care or compensation for an employee who gets sick or injured on the job.
• No-Fault - Insurance that pays for health care services resulting from injury to an individual or damage to property in an accident, regardless of who is at fault for causing the accident.
Case Status The current state of the case in the Medicare Secondary Payer Recovery Portal (MSPRP) system. For BCRC cases, it can be any of the following:
• In Development • Open • Claim Retrieval • Demand Issued or Demand in Progress • Bill Issued • Closed
For CRC cases, it can be any of the following: • In Development • Open • Claim Retrieval • Transitioned • Demand Issued or Demand in Progress • Closed
For a complete description of all statuses, please see Table 13-7.
Date of Incident The Date of Incident (DOI) (or Date of Injury) is the date defined by the Centers for Medicare & Medicaid Services (CMS).
Industry Date of Incident The Industry DOI is a self-reported date used by the insurance/workers’ compensation industry.
Medicare ID The Medicare ID (HICN or MBI) of the beneficiary who is associated to the case. This number can be found on the beneficiary's Medicare card. The first five positions of a HICN will be masked (hidden from view) with asterisks, unless you are the beneficiary, or you have logged in using multi-factor authentication.
Beneficiary DOB The date of birth of the Medicare beneficiary associated to the case.
Beneficiary Last Name The beneficiary's last name as it appears on the Medicare card.
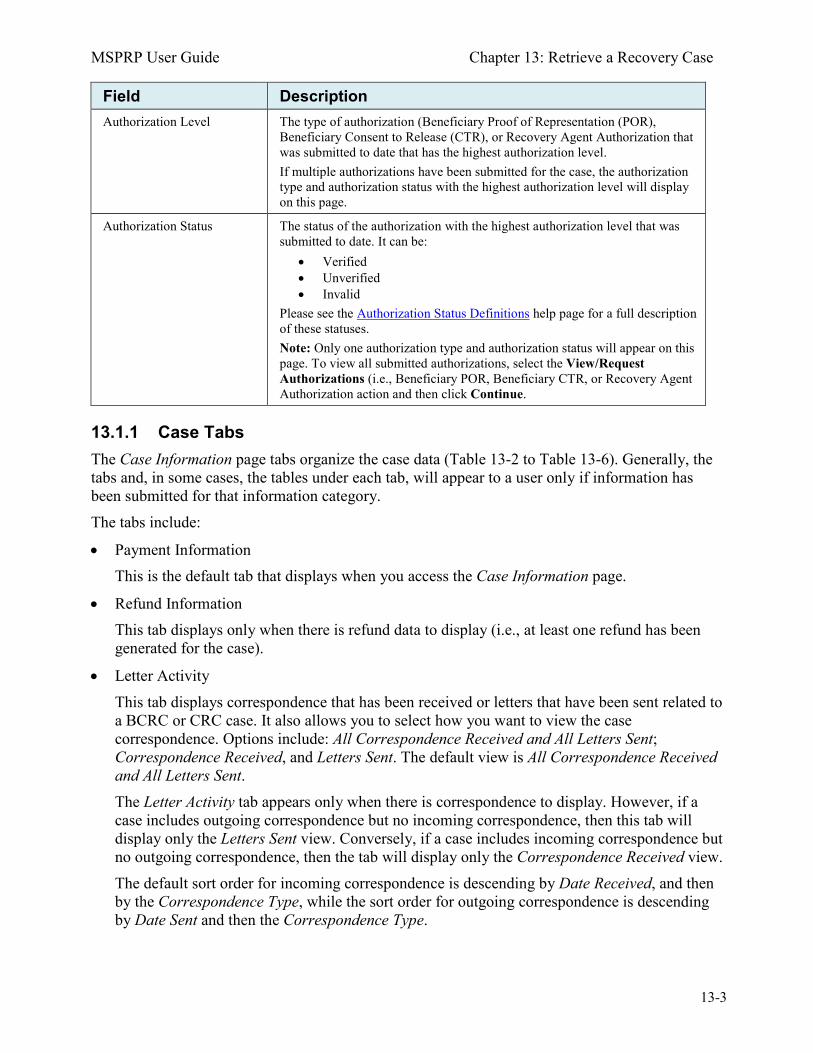
MSPRP User Guide Chapter 13: Retrieve a Recovery Case
13-3
Field Description Authorization Level The type of authorization (Beneficiary Proof of Representation (POR),
Beneficiary Consent to Release (CTR), or Recovery Agent Authorization that was submitted to date that has the highest authorization level. If multiple authorizations have been submitted for the case, the authorization type and authorization status with the highest authorization level will display on this page.
Authorization Status The status of the authorization with the highest authorization level that was submitted to date. It can be:
• Verified • Unverified • Invalid
Please see the Authorization Status Definitions help page for a full description of these statuses. Note: Only one authorization type and authorization status will appear on this page. To view all submitted authorizations, select the View/Request Authorizations (i.e., Beneficiary POR, Beneficiary CTR, or Recovery Agent Authorization action and then click Continue.
13.1.1 Case Tabs The Case Information page tabs organize the case data (Table 13-2 to Table 13-6). Generally, the tabs and, in some cases, the tables under each tab, will appear to a user only if information has been submitted for that information category. The tabs include:
• Payment Information This is the default tab that displays when you access the Case Information page.
• Refund Information This tab displays only when there is refund data to display (i.e., at least one refund has been generated for the case).
• Letter Activity This tab displays correspondence that has been received or letters that have been sent related to a BCRC or CRC case. It also allows you to select how you want to view the case correspondence. Options include: All Correspondence Received and All Letters Sent; Correspondence Received, and Letters Sent. The default view is All Correspondence Received and All Letters Sent. The Letter Activity tab appears only when there is correspondence to display. However, if a case includes outgoing correspondence but no incoming correspondence, then this tab will display only the Letters Sent view. Conversely, if a case includes incoming correspondence but no outgoing correspondence, then the tab will display only the Correspondence Received view. The default sort order for incoming correspondence is descending by Date Received, and then by the Correspondence Type, while the sort order for outgoing correspondence is descending by Date Sent and then the Correspondence Type.
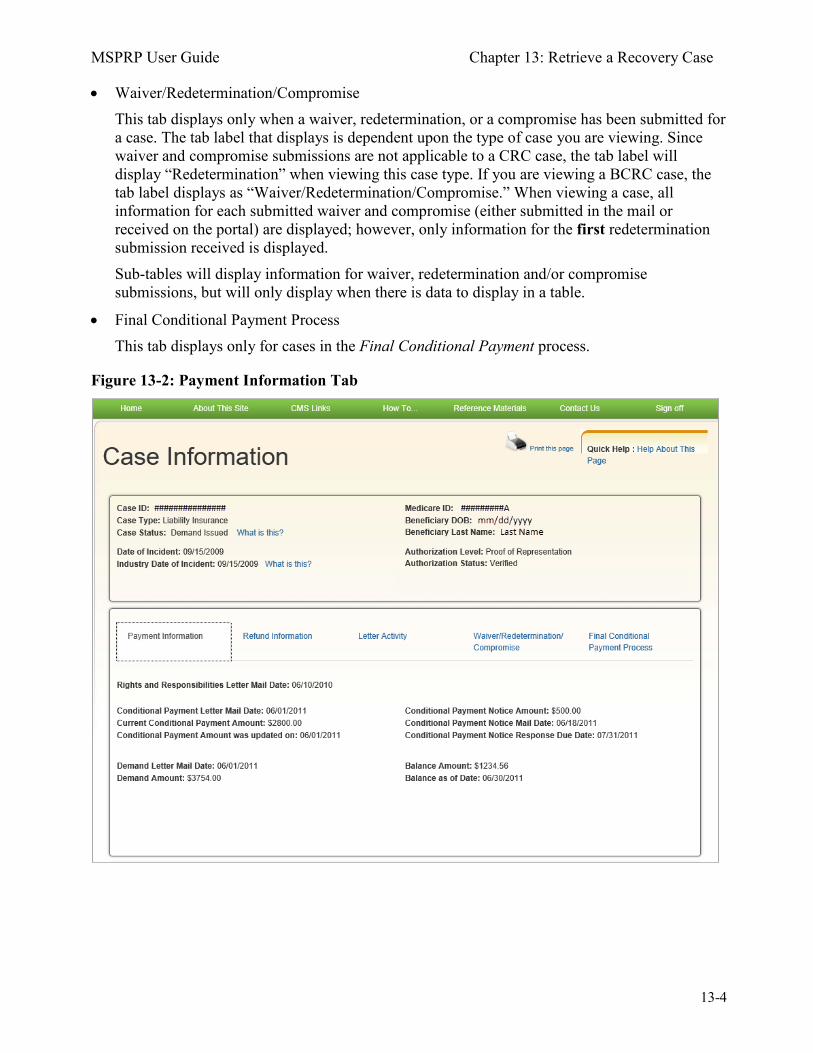
MSPRP User Guide Chapter 13: Retrieve a Recovery Case
13-4
• Waiver/Redetermination/Compromise This tab displays only when a waiver, redetermination, or a compromise has been submitted for a case. The tab label that displays is dependent upon the type of case you are viewing. Since waiver and compromise submissions are not applicable to a CRC case, the tab label will display “Redetermination” when viewing this case type. If you are viewing a BCRC case, the tab label displays as “Waiver/Redetermination/Compromise.” When viewing a case, all information for each submitted waiver and compromise (either submitted in the mail or received on the portal) are displayed; however, only information for the first redetermination submission received is displayed. Sub-tables will display information for waiver, redetermination and/or compromise submissions, but will only display when there is data to display in a table.
• Final Conditional Payment Process This tab displays only for cases in the Final Conditional Payment process.
Figure 13-2: Payment Information Tab
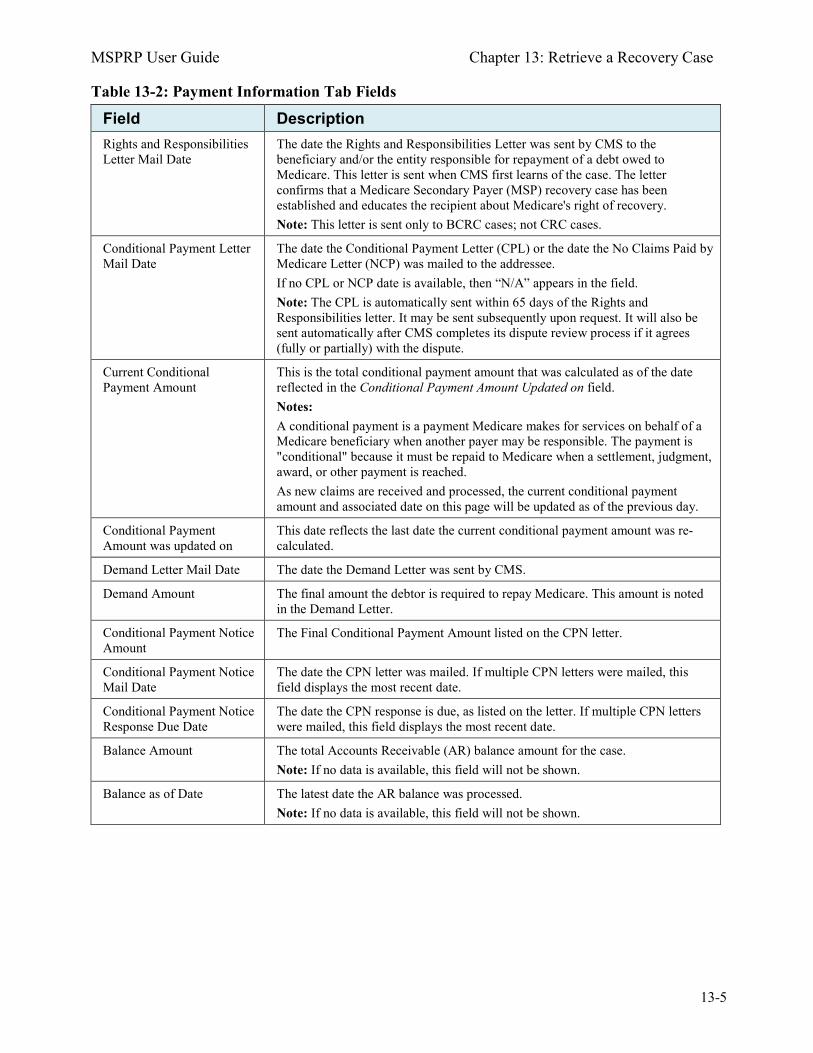
MSPRP User Guide Chapter 13: Retrieve a Recovery Case
13-5
Table 13-2: Payment Information Tab Fields
Field Description Rights and Responsibilities Letter Mail Date
The date the Rights and Responsibilities Letter was sent by CMS to the beneficiary and/or the entity responsible for repayment of a debt owed to Medicare. This letter is sent when CMS first learns of the case. The letter confirms that a Medicare Secondary Payer (MSP) recovery case has been established and educates the recipient about Medicare's right of recovery. Note: This letter is sent only to BCRC cases; not CRC cases.
Conditional Payment Letter Mail Date
The date the Conditional Payment Letter (CPL) or the date the No Claims Paid by Medicare Letter (NCP) was mailed to the addressee. If no CPL or NCP date is available, then “N/A” appears in the field. Note: The CPL is automatically sent within 65 days of the Rights and Responsibilities letter. It may be sent subsequently upon request. It will also be sent automatically after CMS completes its dispute review process if it agrees (fully or partially) with the dispute.
Current Conditional Payment Amount
This is the total conditional payment amount that was calculated as of the date reflected in the Conditional Payment Amount Updated on field. Notes: A conditional payment is a payment Medicare makes for services on behalf of a Medicare beneficiary when another payer may be responsible. The payment is "conditional" because it must be repaid to Medicare when a settlement, judgment, award, or other payment is reached. As new claims are received and processed, the current conditional payment amount and associated date on this page will be updated as of the previous day.
Conditional Payment Amount was updated on
This date reflects the last date the current conditional payment amount was re-calculated.
Demand Letter Mail Date The date the Demand Letter was sent by CMS.
Demand Amount The final amount the debtor is required to repay Medicare. This amount is noted in the Demand Letter.
Conditional Payment Notice Amount
The Final Conditional Payment Amount listed on the CPN letter.
Conditional Payment Notice Mail Date
The date the CPN letter was mailed. If multiple CPN letters were mailed, this field displays the most recent date.
Conditional Payment Notice Response Due Date
The date the CPN response is due, as listed on the letter. If multiple CPN letters were mailed, this field displays the most recent date.
Balance Amount The total Accounts Receivable (AR) balance amount for the case. Note: If no data is available, this field will not be shown.
Balance as of Date The latest date the AR balance was processed. Note: If no data is available, this field will not be shown.
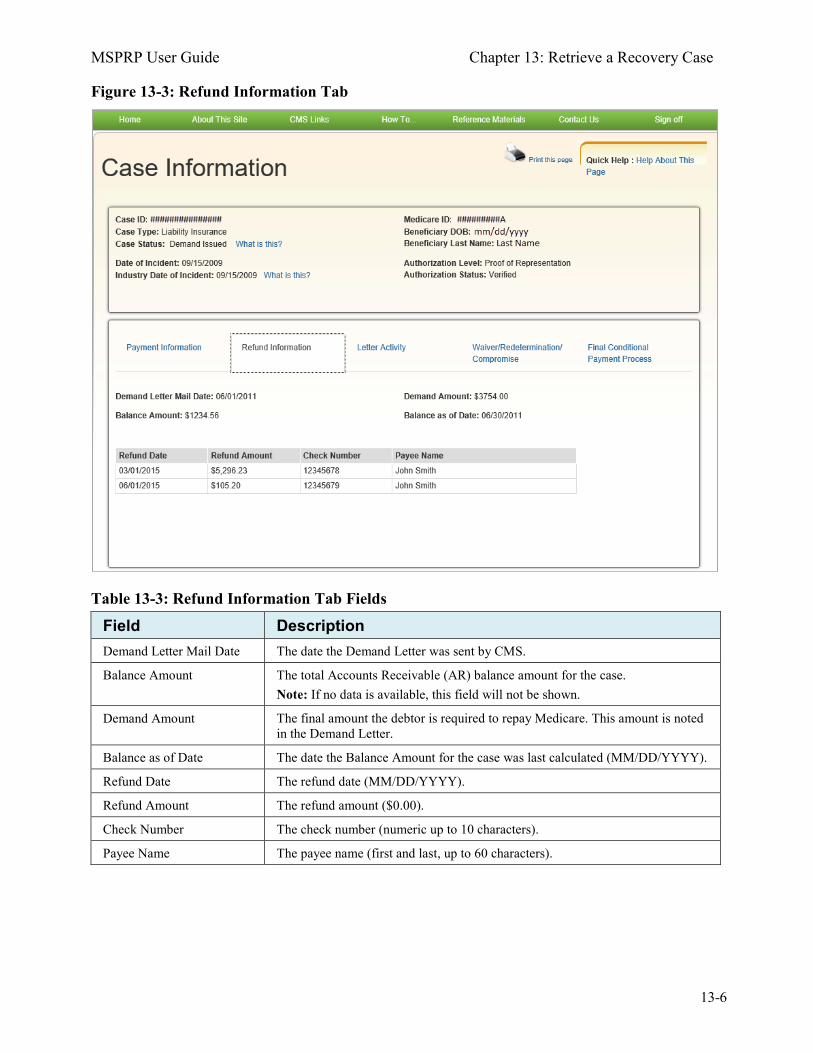
MSPRP User Guide Chapter 13: Retrieve a Recovery Case
13-6
Figure 13-3: Refund Information Tab
Table 13-3: Refund Information Tab Fields
Field Description Demand Letter Mail Date The date the Demand Letter was sent by CMS.
Balance Amount The total Accounts Receivable (AR) balance amount for the case. Note: If no data is available, this field will not be shown.
Demand Amount The final amount the debtor is required to repay Medicare. This amount is noted in the Demand Letter.
Balance as of Date The date the Balance Amount for the case was last calculated (MM/DD/YYYY).
Refund Date The refund date (MM/DD/YYYY).
Refund Amount The refund amount ($0.00).
Check Number The check number (numeric up to 10 characters).
Payee Name The payee name (first and last, up to 60 characters).
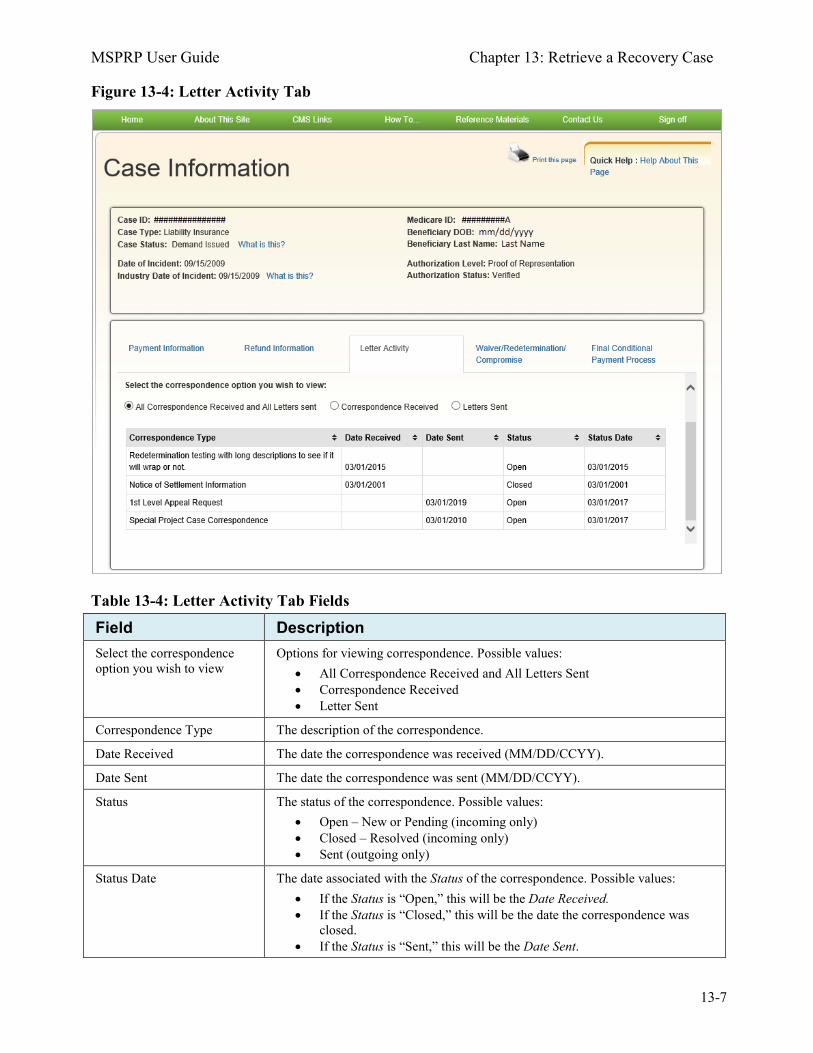
MSPRP User Guide Chapter 13: Retrieve a Recovery Case
13-7
Figure 13-4: Letter Activity Tab
Table 13-4: Letter Activity Tab Fields
Field Description Select the correspondence option you wish to view
Options for viewing correspondence. Possible values: • All Correspondence Received and All Letters Sent • Correspondence Received • Letter Sent
Correspondence Type The description of the correspondence.
Date Received The date the correspondence was received (MM/DD/CCYY).
Date Sent The date the correspondence was sent (MM/DD/CCYY).
Status The status of the correspondence. Possible values: • Open – New or Pending (incoming only) • Closed – Resolved (incoming only) • Sent (outgoing only)
Status Date The date associated with the Status of the correspondence. Possible values: • If the Status is “Open,” this will be the Date Received. • If the Status is “Closed,” this will be the date the correspondence was
closed. • If the Status is “Sent,” this will be the Date Sent.
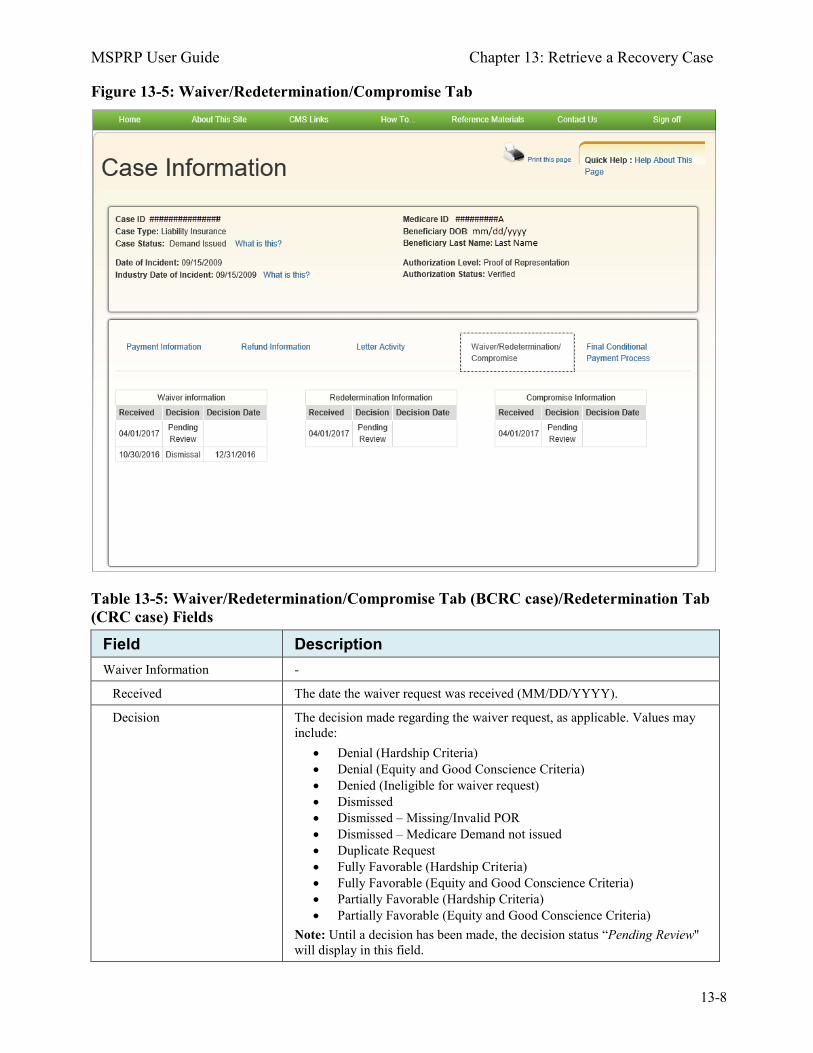
MSPRP User Guide Chapter 13: Retrieve a Recovery Case
13-8
Figure 13-5: Waiver/Redetermination/Compromise Tab
Table 13-5: Waiver/Redetermination/Compromise Tab (BCRC case)/Redetermination Tab (CRC case) Fields
Field Description Waiver Information -
Received The date the waiver request was received (MM/DD/YYYY).
Decision The decision made regarding the waiver request, as applicable. Values may include:
• Denial (Hardship Criteria) • Denial (Equity and Good Conscience Criteria) • Denied (Ineligible for waiver request) • Dismissed • Dismissed – Missing/Invalid POR • Dismissed – Medicare Demand not issued • Duplicate Request • Fully Favorable (Hardship Criteria) • Fully Favorable (Equity and Good Conscience Criteria) • Partially Favorable (Hardship Criteria) • Partially Favorable (Equity and Good Conscience Criteria)
Note: Until a decision has been made, the decision status “Pending Review" will display in this field.
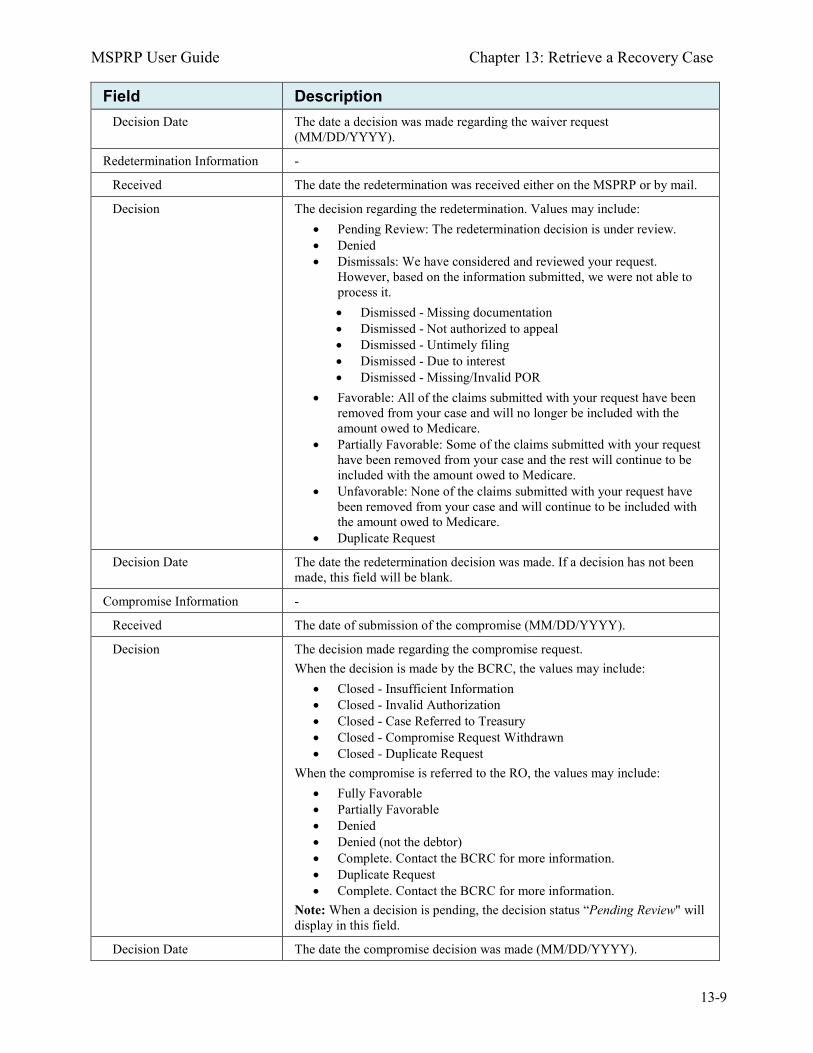
MSPRP User Guide Chapter 13: Retrieve a Recovery Case
13-9
Field Description Decision Date The date a decision was made regarding the waiver request
(MM/DD/YYYY).
Redetermination Information -
Received The date the redetermination was received either on the MSPRP or by mail.
Decision The decision regarding the redetermination. Values may include: • Pending Review: The redetermination decision is under review. • Denied • Dismissals: We have considered and reviewed your request.
However, based on the information submitted, we were not able to process it. • Dismissed - Missing documentation • Dismissed - Not authorized to appeal • Dismissed - Untimely filing • Dismissed - Due to interest • Dismissed - Missing/Invalid POR
• Favorable: All of the claims submitted with your request have been removed from your case and will no longer be included with the amount owed to Medicare.
• Partially Favorable: Some of the claims submitted with your request have been removed from your case and the rest will continue to be included with the amount owed to Medicare.
• Unfavorable: None of the claims submitted with your request have been removed from your case and will continue to be included with the amount owed to Medicare.
• Duplicate Request
Decision Date The date the redetermination decision was made. If a decision has not been made, this field will be blank.
Compromise Information -
Received The date of submission of the compromise (MM/DD/YYYY).
Decision The decision made regarding the compromise request. When the decision is made by the BCRC, the values may include:
• Closed - Insufficient Information • Closed - Invalid Authorization • Closed - Case Referred to Treasury • Closed - Compromise Request Withdrawn • Closed - Duplicate Request
When the compromise is referred to the RO, the values may include: • Fully Favorable • Partially Favorable • Denied • Denied (not the debtor) • Complete. Contact the BCRC for more information. • Duplicate Request • Complete. Contact the BCRC for more information.
Note: When a decision is pending, the decision status “Pending Review" will display in this field.
Decision Date The date the compromise decision was made (MM/DD/YYYY).
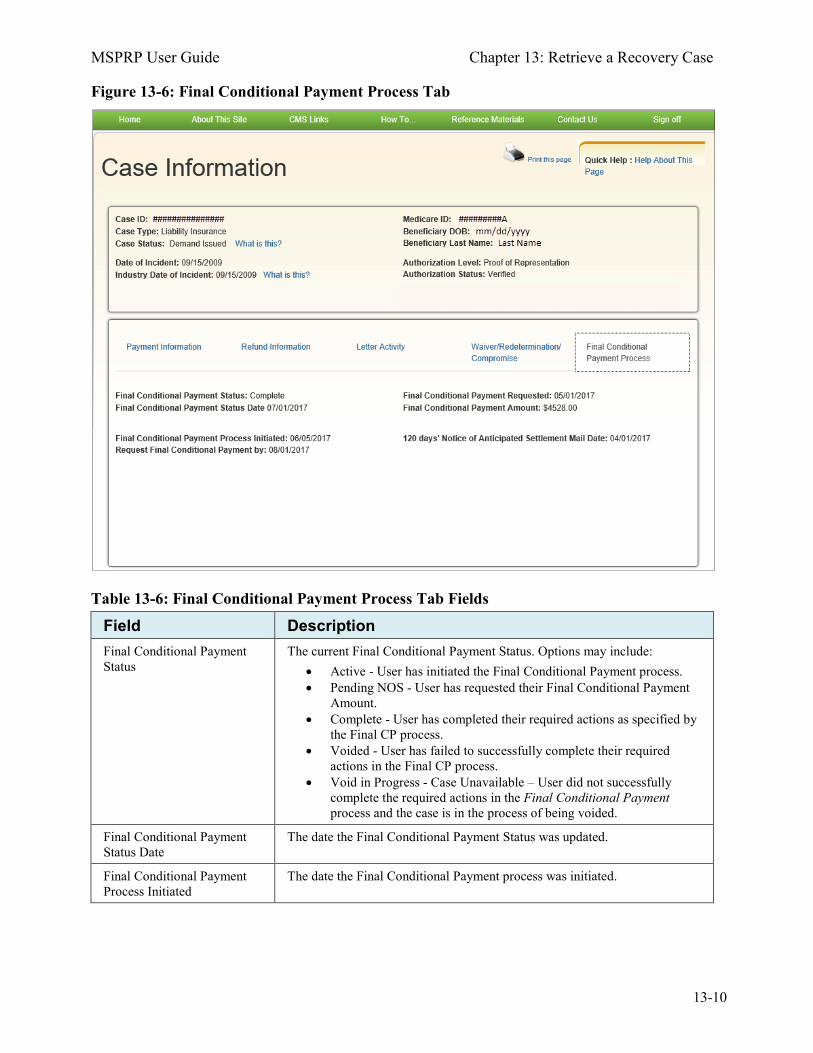
MSPRP User Guide Chapter 13: Retrieve a Recovery Case
13-10
Figure 13-6: Final Conditional Payment Process Tab
Table 13-6: Final Conditional Payment Process Tab Fields
Field Description Final Conditional Payment Status
The current Final Conditional Payment Status. Options may include: • Active - User has initiated the Final Conditional Payment process. • Pending NOS - User has requested their Final Conditional Payment
Amount. • Complete - User has completed their required actions as specified by
the Final CP process. • Voided - User has failed to successfully complete their required
actions in the Final CP process. • Void in Progress - Case Unavailable – User did not successfully
complete the required actions in the Final Conditional Payment process and the case is in the process of being voided.
Final Conditional Payment Status Date
The date the Final Conditional Payment Status was updated.
Final Conditional Payment Process Initiated
The date the Final Conditional Payment process was initiated.
MSPRP User Guide Chapter 13: Retrieve a Recovery Case
13-11
Field Description Request Final Conditional Payment by
The latest date a user can select the Calculate Final Conditional Payment Amount action. This date is equal to the Final Conditional Payment Process Initiated date plus 120 calendar days. If the Final Conditional Payment Status equals Voided, this field will be blank.
Final Conditional Payment Requested
The date and timestamp when the Final Conditional Payment amount was calculated.
Final Conditional Payment Amount
The Final Conditional Payment Amount of the case.
120 days’ Notice of Anticipated Settlement Mail Date
The date that the 120 days’ Notice of Anticipated Settlement letter (NAS) was sent.
13.1.2 Case Actions The bottom half of the Case Information page (Figure 13-7) lists the actions that can be performed on a case when the Case status is Open. The ability to perform these actions is dependent on the authorization level and associated status for the case. Note that the Submit Waiver Request, View/Provide the Notice of Settlement Information action (view only), Submit Compromise Request, and the View/Submit Redetermination (First Level Appeal) action will all be available post-demand (Case status is Demand Issued). The actions that are available to a user for a case depend on the following conditions:
• The user has authorization to perform that action, • The case is in Open status, and • The action is available for the case at the time of login. Note: The case debtor (beneficiary or insurer) can perform all the available actions on a case without authorization. Authorization applies only to users working on behalf of the case debtor. The following actions can be performed on a case that is in an Open, Active, and (where noted) in Demand Issued status. Some actions may not be available depending on your authorization level and the type of case.
• View/Request Authorizations • Request an update to the conditional payment amount • Request an Electronic Copy of the Conditional Payment Letter with Current Conditional
Payment Amount • Request a (mailed) copy of the conditional payment letter • Begin Final Conditional Payment Process and Provide 120 Days' Notice of Anticipated
Settlement • Calculate Final Conditional Payment Amount • Request an Electronic Dispute Denial for Final Conditional Payment Case Letter with Current
Conditional Payment Amount • View/Dispute Claims Listing • View/Provide the Notice of Settlement Information (view-only available post demand where
Case Status is Demand Issued)
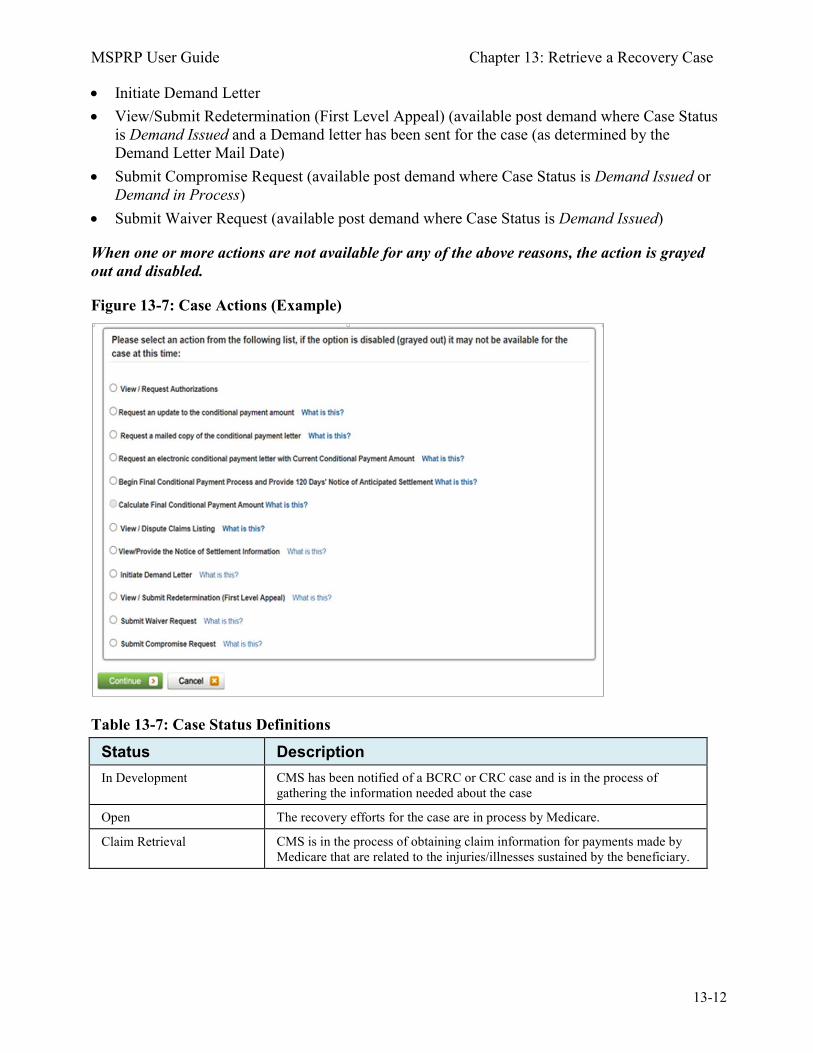
MSPRP User Guide Chapter 13: Retrieve a Recovery Case
13-12
• Initiate Demand Letter • View/Submit Redetermination (First Level Appeal) (available post demand where Case Status
is Demand Issued and a Demand letter has been sent for the case (as determined by the Demand Letter Mail Date)
• Submit Compromise Request (available post demand where Case Status is Demand Issued or Demand in Process)
• Submit Waiver Request (available post demand where Case Status is Demand Issued)
When one or more actions are not available for any of the above reasons, the action is grayed out and disabled.
Figure 13-7: Case Actions (Example)
Table 13-7: Case Status Definitions
Status Description In Development CMS has been notified of a BCRC or CRC case and is in the process of
gathering the information needed about the case
Open The recovery efforts for the case are in process by Medicare.
Claim Retrieval CMS is in the process of obtaining claim information for payments made by Medicare that are related to the injuries/illnesses sustained by the beneficiary.
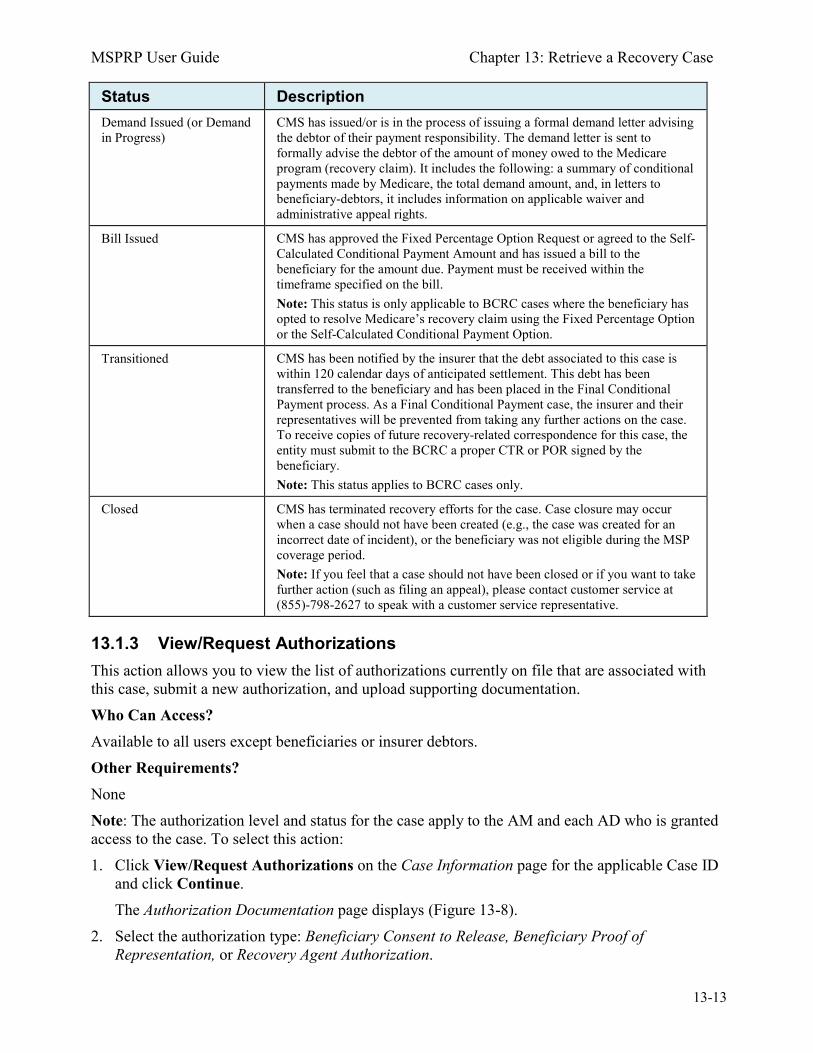
MSPRP User Guide Chapter 13: Retrieve a Recovery Case
13-13
Status Description Demand Issued (or Demand in Progress)
CMS has issued/or is in the process of issuing a formal demand letter advising the debtor of their payment responsibility. The demand letter is sent to formally advise the debtor of the amount of money owed to the Medicare program (recovery claim). It includes the following: a summary of conditional payments made by Medicare, the total demand amount, and, in letters to beneficiary-debtors, it includes information on applicable waiver and administrative appeal rights.
Bill Issued CMS has approved the Fixed Percentage Option Request or agreed to the Self-Calculated Conditional Payment Amount and has issued a bill to the beneficiary for the amount due. Payment must be received within the timeframe specified on the bill. Note: This status is only applicable to BCRC cases where the beneficiary has opted to resolve Medicare’s recovery claim using the Fixed Percentage Option or the Self-Calculated Conditional Payment Option.
Transitioned CMS has been notified by the insurer that the debt associated to this case is within 120 calendar days of anticipated settlement. This debt has been transferred to the beneficiary and has been placed in the Final Conditional Payment process. As a Final Conditional Payment case, the insurer and their representatives will be prevented from taking any further actions on the case. To receive copies of future recovery-related correspondence for this case, the entity must submit to the BCRC a proper CTR or POR signed by the beneficiary. Note: This status applies to BCRC cases only.
Closed CMS has terminated recovery efforts for the case. Case closure may occur when a case should not have been created (e.g., the case was created for an incorrect date of incident), or the beneficiary was not eligible during the MSP coverage period. Note: If you feel that a case should not have been closed or if you want to take further action (such as filing an appeal), please contact customer service at (855)-798-2627 to speak with a customer service representative.
13.1.3 View/Request Authorizations This action allows you to view the list of authorizations currently on file that are associated with this case, submit a new authorization, and upload supporting documentation. Who Can Access? Available to all users except beneficiaries or insurer debtors. Other Requirements? None Note: The authorization level and status for the case apply to the AM and each AD who is granted access to the case. To select this action: 1. Click View/Request Authorizations on the Case Information page for the applicable Case ID
and click Continue. The Authorization Documentation page displays (Figure 13-8).
2. Select the authorization type: Beneficiary Consent to Release, Beneficiary Proof of Representation, or Recovery Agent Authorization.
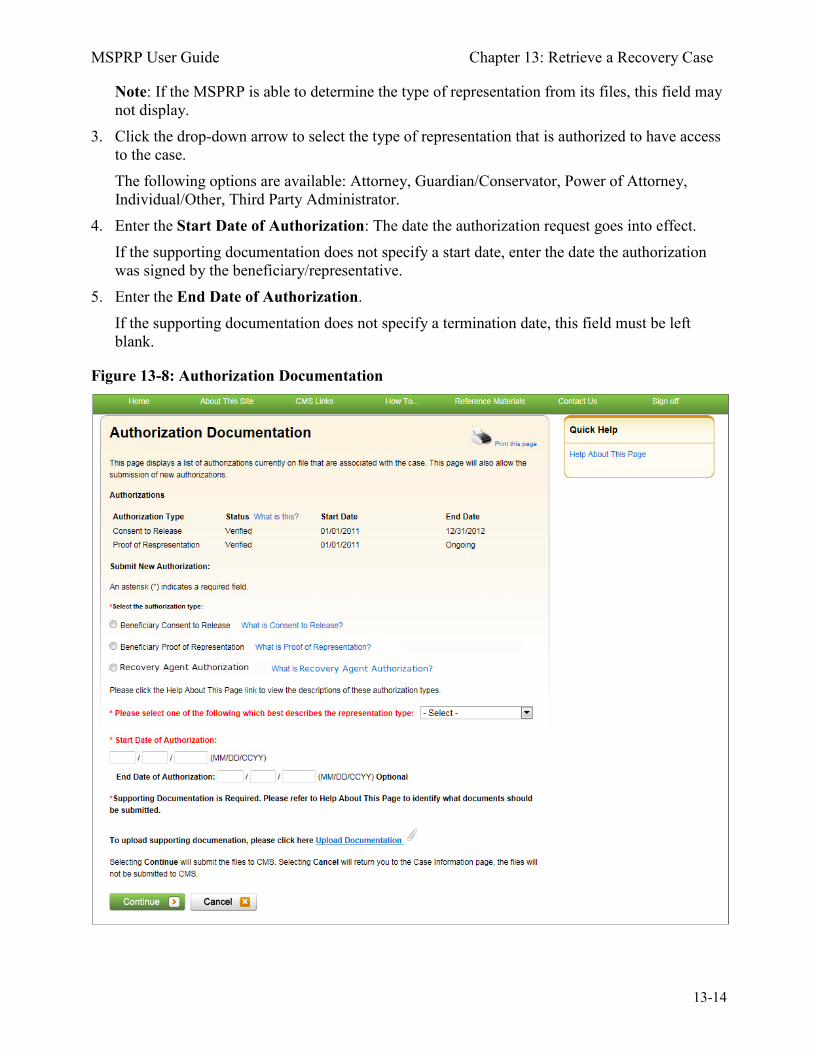
MSPRP User Guide Chapter 13: Retrieve a Recovery Case
13-14
Note: If the MSPRP is able to determine the type of representation from its files, this field may not display.
3. Click the drop-down arrow to select the type of representation that is authorized to have access to the case. The following options are available: Attorney, Guardian/Conservator, Power of Attorney, Individual/Other, Third Party Administrator.
4. Enter the Start Date of Authorization: The date the authorization request goes into effect. If the supporting documentation does not specify a start date, enter the date the authorization was signed by the beneficiary/representative.
5. Enter the End Date of Authorization. If the supporting documentation does not specify a termination date, this field must be left blank.
Figure 13-8: Authorization Documentation
MSPRP User Guide Chapter 13: Retrieve a Recovery Case
13-15
Figure 13-9: Authorization Documentation Upload
6. Upload any additional supporting documentation. To attach supporting documentation to this case, click the Upload Documentation link. The Authorization Documentation Upload page displays.
7. Click Browse to locate the document you want to upload; then click Continue. Note: Before uploading your document, ensure that the following requirements are met, otherwise your file will fail to upload:
• The file format must be Adobe Acrobat (.PDF) • The file must be virus free • The file size must be less than or equal to 40 MB (megabytes) in size • The filename (naming convention) must only include the following valid characters:
alphanumeric (any letter: A-Z, a-z), any number (0-9), and any of the following special characters: hyphen (-), period (.) and underscore ( _ ).
• The filename does not include spaces The uploaded document will be displayed on the bottom the Authorization Documentation page (Figure 13-8).
8. Click Continue. The Authorization Documentation Confirmation page displays (Figure 13-11). The first 5 characters of a beneficiary HICN will be masked (hidden from view), unless you have logged in using multi-factor authentication.
9. Click Continue. You are returned to the Case Information page.
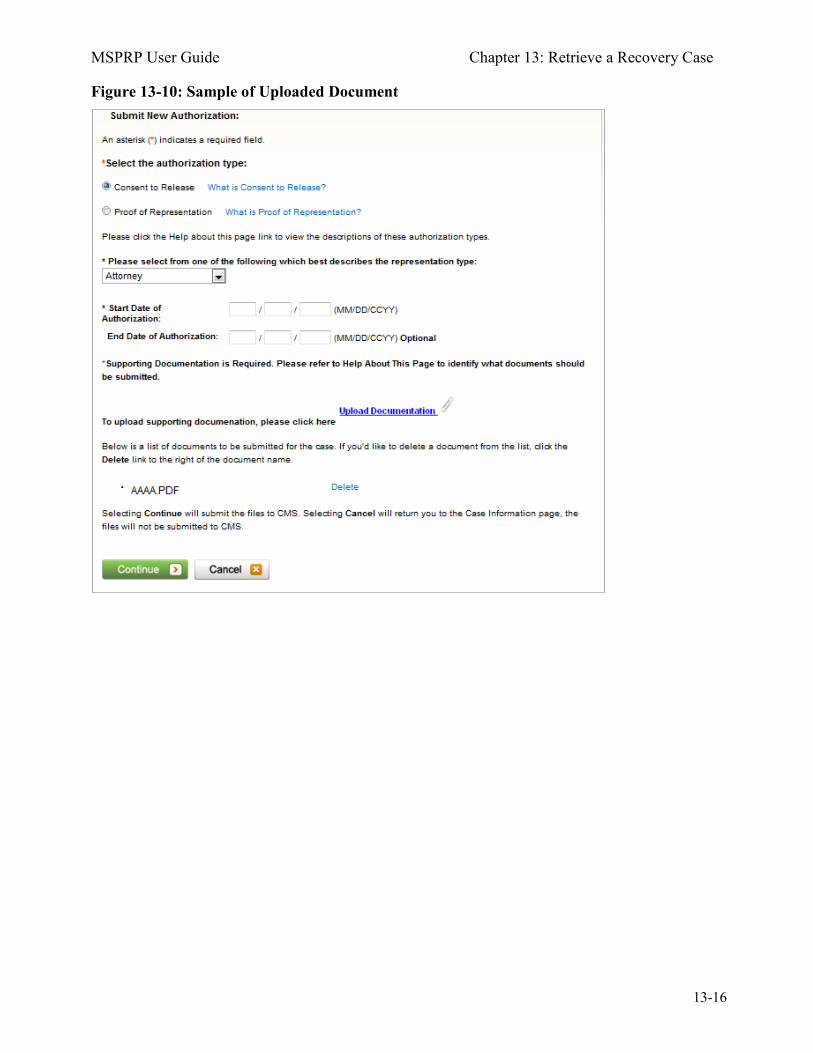
MSPRP User Guide Chapter 13: Retrieve a Recovery Case
13-16
Figure 13-10: Sample of Uploaded Document
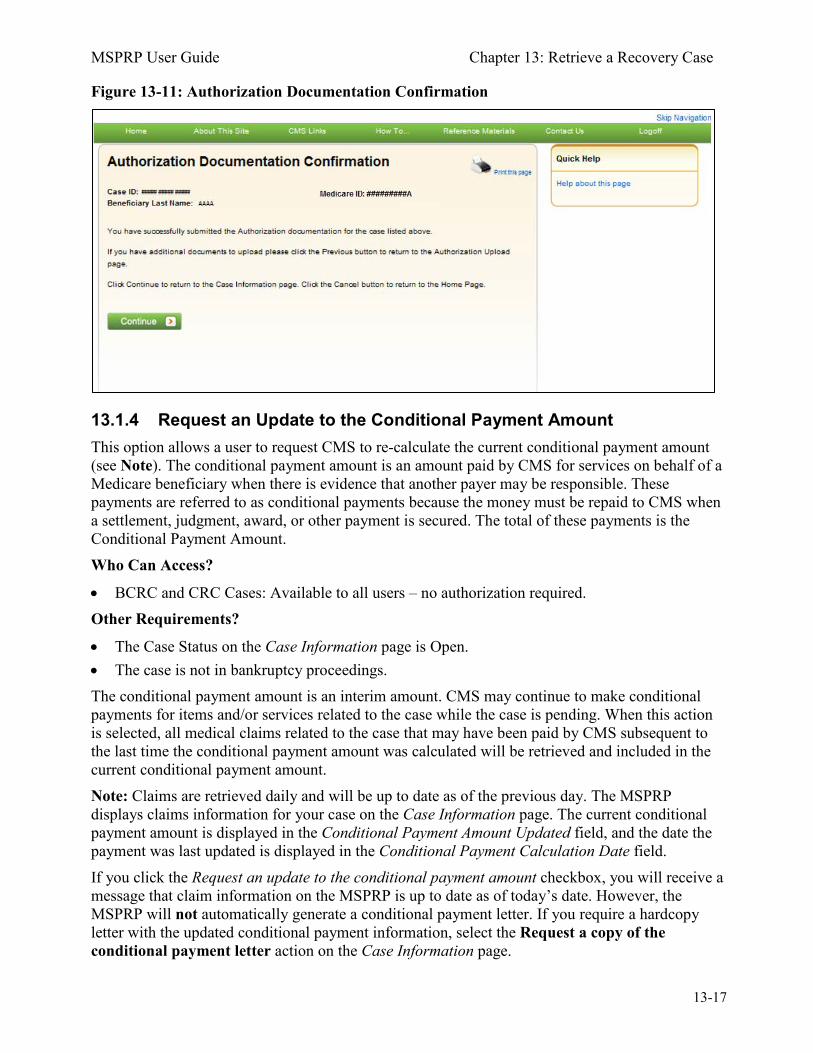
MSPRP User Guide Chapter 13: Retrieve a Recovery Case
13-17
Figure 13-11: Authorization Documentation Confirmation
13.1.4 Request an Update to the Conditional Payment Amount This option allows a user to request CMS to re-calculate the current conditional payment amount (see Note). The conditional payment amount is an amount paid by CMS for services on behalf of a Medicare beneficiary when there is evidence that another payer may be responsible. These payments are referred to as conditional payments because the money must be repaid to CMS when a settlement, judgment, award, or other payment is secured. The total of these payments is the Conditional Payment Amount. Who Can Access?
• BCRC and CRC Cases: Available to all users – no authorization required. Other Requirements?
• The Case Status on the Case Information page is Open. • The case is not in bankruptcy proceedings. The conditional payment amount is an interim amount. CMS may continue to make conditional payments for items and/or services related to the case while the case is pending. When this action is selected, all medical claims related to the case that may have been paid by CMS subsequent to the last time the conditional payment amount was calculated will be retrieved and included in the current conditional payment amount. Note: Claims are retrieved daily and will be up to date as of the previous day. The MSPRP displays claims information for your case on the Case Information page. The current conditional payment amount is displayed in the Conditional Payment Amount Updated field, and the date the payment was last updated is displayed in the Conditional Payment Calculation Date field. If you click the Request an update to the conditional payment amount checkbox, you will receive a message that claim information on the MSPRP is up to date as of today’s date. However, the MSPRP will not automatically generate a conditional payment letter. If you require a hardcopy letter with the updated conditional payment information, select the Request a copy of the conditional payment letter action on the Case Information page.

MSPRP User Guide Chapter 13: Retrieve a Recovery Case
13-18
13.1.5 Request an Electronic Copy of the Conditional Payment Letter with Current Conditional Payment Amount
This action allows beneficiaries and their authorized representatives to submit a request for an electronic copy of the Conditional Payment Letter (eCPL), as long as the case meets certain requirements. The eCPL includes the associated case and claims information as displayed on the Case Information page, in .PDF format. The eCPL will include a Payment Summary Form (Figure 13-12) unless the overpayment amount equals zero ($0.00), in which case an Electronic No Claims Paid by Medicare letter is sent without a Payment Summary Form. See “Other Requirements?” This action also allows insurers, recovery agents who are on the TIN reference file, and insurer representatives with a verified Recovery Agent Authorization, who also log in using multi-factor authentication, to request an eCPL, on insurer-debtor cases only. Again, the eCPL will include the associated case and claims information as displayed on the Case Information page, in .PDF format. The eCPL will also include a Payment Summary Form unless the overpayment amount equals zero ($0.00). Who Can Access?
• BCRC Beneficiary-Debtor Cases: Beneficiaries and their authorized representatives who have an existing verified POR and who have logged in to the MSPRP using multi-factor authentication.
• BCRC or CRC Insurer-Debtor Cases: Insurers, recovery agents on the TIN reference file, and insurer representatives with a verified recovery agent authorization who have logged in to the MSPRP using multi-factor authentication. Beneficiaries and their authorized representatives who have an existing verified POR on the MSPRP and who have logged in to the MSPRP using multi-factor authentication also have access.
Other Requirements?
• The Case Status on the Case Information page is Open, • Automated processing and initial claims retrieval are complete for the case, • A Conditional Payment Notice (CPN):
• Has not been issued previously or is not pending, or • Was previously issued in error, and
• No claims on the Claims Listing page are in dispute, • The total count of Part-A claims and Part-B claim lines actively associated to the case is less
than or equal to 1,500, • Beneficiary must not have accepted the self-calculated conditional payment option or entered
into a Fixed Percentage Agreement. Notes: If the overpayment, or Current Conditional Payment Amount, is equal to zero ($0.00) and the case is not in the Final Conditional Payment (Final CP) process (that is, Status is not Active, Pending NOS, or Complete) (BCRC cases only), an Electronic No Claims Paid by Medicare letter is generated (Figure 13-14). A Payment Summary Form is not displayed with this letter. When you select this option, the MSPRP will generate the eCPL in a separate browser window, along with the Payment Summary Form in .PDF. A confirmation page is displayed afterwards indicating that you have successfully requested the generation of the eCPL. Once displayed, you will see options to save or print the letter to a local machine or printer. Clicking Continue on the confirmation page returns you to the Case Information page.
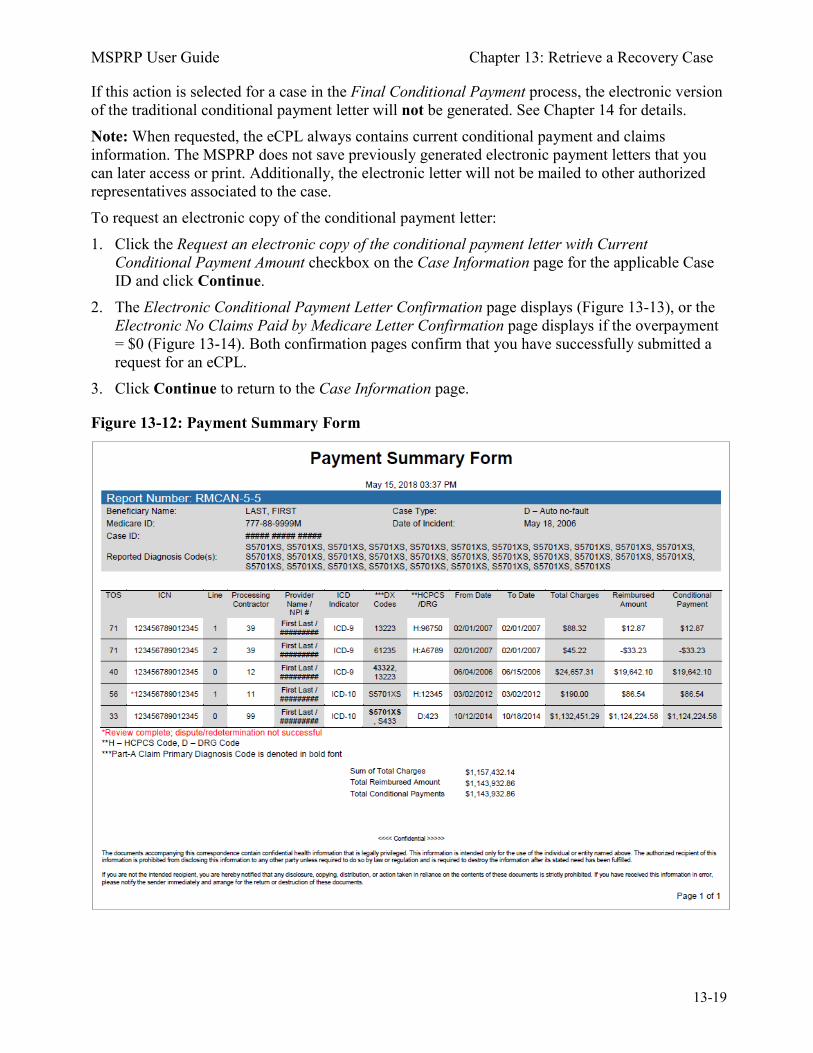
MSPRP User Guide Chapter 13: Retrieve a Recovery Case
13-19
If this action is selected for a case in the Final Conditional Payment process, the electronic version of the traditional conditional payment letter will not be generated. See Chapter 14 for details. Note: When requested, the eCPL always contains current conditional payment and claims information. The MSPRP does not save previously generated electronic payment letters that you can later access or print. Additionally, the electronic letter will not be mailed to other authorized representatives associated to the case. To request an electronic copy of the conditional payment letter: 1. Click the Request an electronic copy of the conditional payment letter with Current
Conditional Payment Amount checkbox on the Case Information page for the applicable Case ID and click Continue.
2. The Electronic Conditional Payment Letter Confirmation page displays (Figure 13-13), or the Electronic No Claims Paid by Medicare Letter Confirmation page displays if the overpayment = $0 (Figure 13-14). Both confirmation pages confirm that you have successfully submitted a request for an eCPL.
3. Click Continue to return to the Case Information page.
Figure 13-12: Payment Summary Form
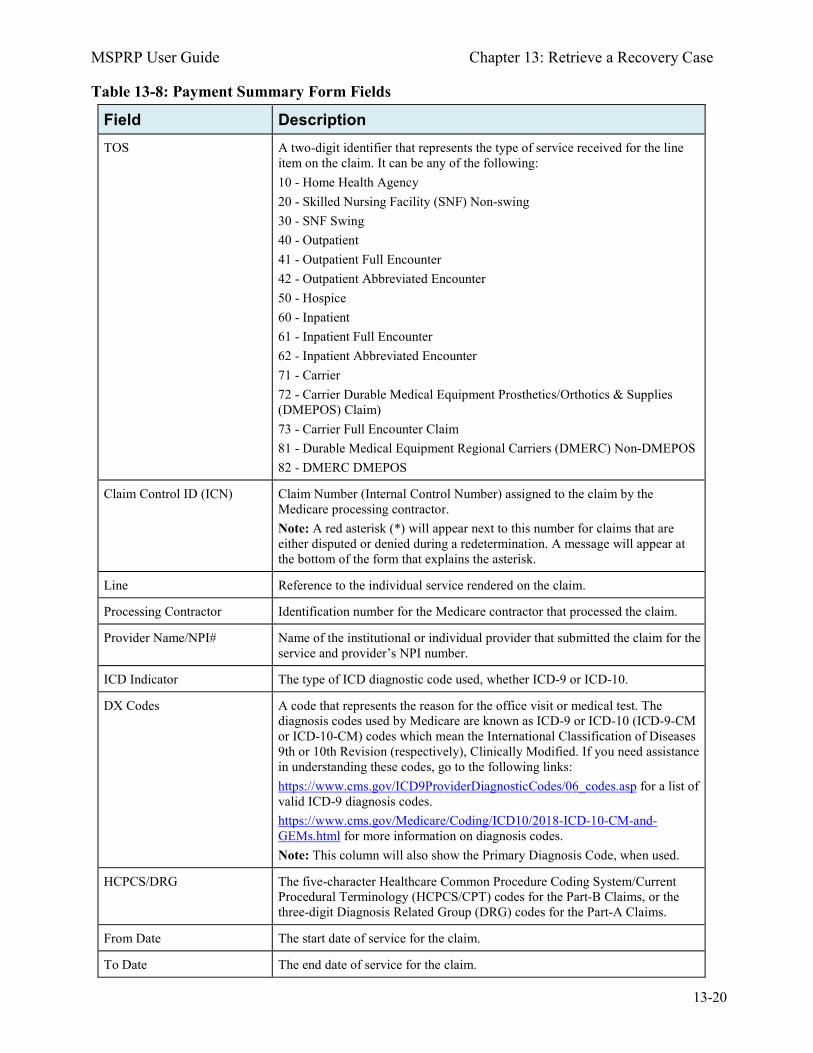
MSPRP User Guide Chapter 13: Retrieve a Recovery Case
13-20
Table 13-8: Payment Summary Form Fields
Field Description TOS A two-digit identifier that represents the type of service received for the line
item on the claim. It can be any of the following: 10 - Home Health Agency 20 - Skilled Nursing Facility (SNF) Non-swing 30 - SNF Swing 40 - Outpatient 41 - Outpatient Full Encounter 42 - Outpatient Abbreviated Encounter 50 - Hospice 60 - Inpatient 61 - Inpatient Full Encounter 62 - Inpatient Abbreviated Encounter 71 - Carrier 72 - Carrier Durable Medical Equipment Prosthetics/Orthotics & Supplies (DMEPOS) Claim) 73 - Carrier Full Encounter Claim 81 - Durable Medical Equipment Regional Carriers (DMERC) Non-DMEPOS 82 - DMERC DMEPOS
Claim Control ID (ICN) Claim Number (Internal Control Number) assigned to the claim by the Medicare processing contractor. Note: A red asterisk (*) will appear next to this number for claims that are either disputed or denied during a redetermination. A message will appear at the bottom of the form that explains the asterisk.
Line Reference to the individual service rendered on the claim.
Processing Contractor Identification number for the Medicare contractor that processed the claim.
Provider Name/NPI# Name of the institutional or individual provider that submitted the claim for the service and provider’s NPI number.
ICD Indicator The type of ICD diagnostic code used, whether ICD-9 or ICD-10.
DX Codes A code that represents the reason for the office visit or medical test. The diagnosis codes used by Medicare are known as ICD-9 or ICD-10 (ICD-9-CM or ICD-10-CM) codes which mean the International Classification of Diseases 9th or 10th Revision (respectively), Clinically Modified. If you need assistance in understanding these codes, go to the following links: https://www.cms.gov/ICD9ProviderDiagnosticCodes/06_codes.asp for a list of valid ICD-9 diagnosis codes. https://www.cms.gov/Medicare/Coding/ICD10/2018-ICD-10-CM-and-GEMs.html for more information on diagnosis codes. Note: This column will also show the Primary Diagnosis Code, when used.
HCPCS/DRG The five-character Healthcare Common Procedure Coding System/Current Procedural Terminology (HCPCS/CPT) codes for the Part-B Claims, or the three-digit Diagnosis Related Group (DRG) codes for the Part-A Claims.
From Date The start date of service for the claim.
To Date The end date of service for the claim.
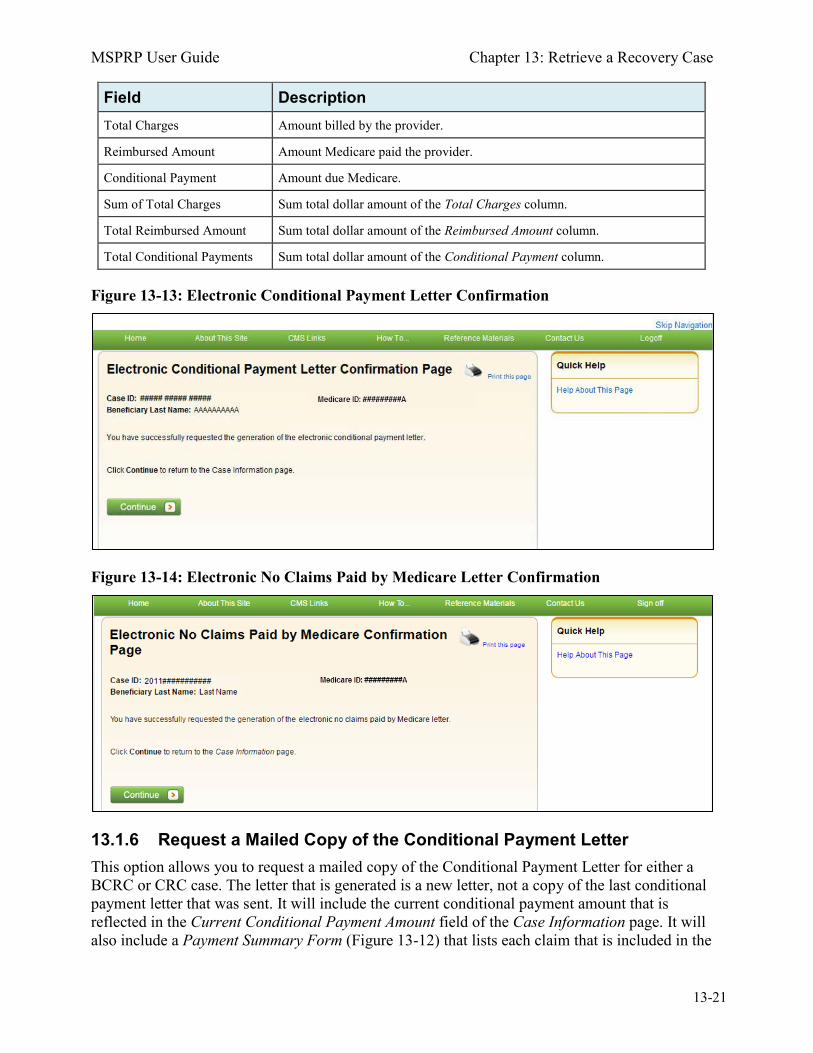
MSPRP User Guide Chapter 13: Retrieve a Recovery Case
13-21
Field Description Total Charges Amount billed by the provider.
Reimbursed Amount Amount Medicare paid the provider.
Conditional Payment Amount due Medicare.
Sum of Total Charges Sum total dollar amount of the Total Charges column.
Total Reimbursed Amount Sum total dollar amount of the Reimbursed Amount column.
Total Conditional Payments Sum total dollar amount of the Conditional Payment column.
Figure 13-13: Electronic Conditional Payment Letter Confirmation
Figure 13-14: Electronic No Claims Paid by Medicare Letter Confirmation
13.1.6 Request a Mailed Copy of the Conditional Payment Letter This option allows you to request a mailed copy of the Conditional Payment Letter for either a BCRC or CRC case. The letter that is generated is a new letter, not a copy of the last conditional payment letter that was sent. It will include the current conditional payment amount that is reflected in the Current Conditional Payment Amount field of the Case Information page. It will also include a Payment Summary Form (Figure 13-12) that lists each claim that is included in the
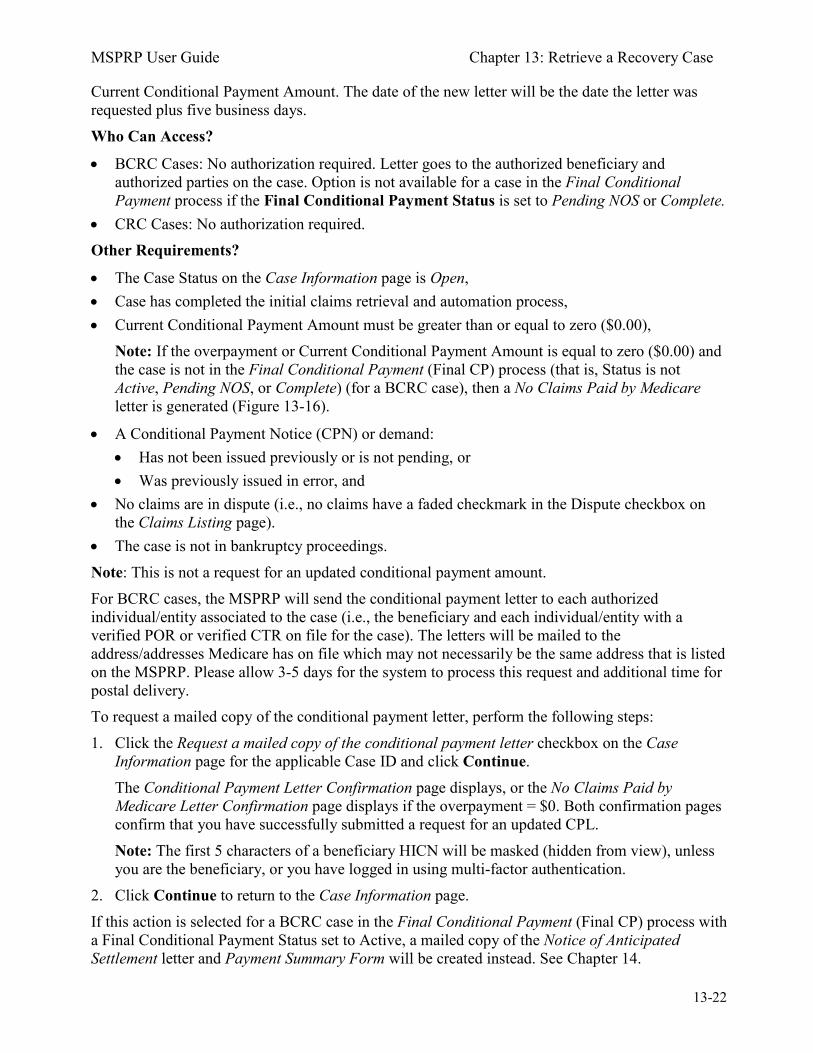
MSPRP User Guide Chapter 13: Retrieve a Recovery Case
13-22
Current Conditional Payment Amount. The date of the new letter will be the date the letter was requested plus five business days. Who Can Access?
• BCRC Cases: No authorization required. Letter goes to the authorized beneficiary and authorized parties on the case. Option is not available for a case in the Final Conditional Payment process if the Final Conditional Payment Status is set to Pending NOS or Complete.
• CRC Cases: No authorization required. Other Requirements?
• The Case Status on the Case Information page is Open, • Case has completed the initial claims retrieval and automation process, • Current Conditional Payment Amount must be greater than or equal to zero ($0.00),
Note: If the overpayment or Current Conditional Payment Amount is equal to zero ($0.00) and the case is not in the Final Conditional Payment (Final CP) process (that is, Status is not Active, Pending NOS, or Complete) (for a BCRC case), then a No Claims Paid by Medicare letter is generated (Figure 13-16).
• A Conditional Payment Notice (CPN) or demand: • Has not been issued previously or is not pending, or • Was previously issued in error, and
• No claims are in dispute (i.e., no claims have a faded checkmark in the Dispute checkbox on the Claims Listing page).
• The case is not in bankruptcy proceedings. Note: This is not a request for an updated conditional payment amount. For BCRC cases, the MSPRP will send the conditional payment letter to each authorized individual/entity associated to the case (i.e., the beneficiary and each individual/entity with a verified POR or verified CTR on file for the case). The letters will be mailed to the address/addresses Medicare has on file which may not necessarily be the same address that is listed on the MSPRP. Please allow 3-5 days for the system to process this request and additional time for postal delivery. To request a mailed copy of the conditional payment letter, perform the following steps: 1. Click the Request a mailed copy of the conditional payment letter checkbox on the Case
Information page for the applicable Case ID and click Continue. The Conditional Payment Letter Confirmation page displays, or the No Claims Paid by Medicare Letter Confirmation page displays if the overpayment = $0. Both confirmation pages confirm that you have successfully submitted a request for an updated CPL. Note: The first 5 characters of a beneficiary HICN will be masked (hidden from view), unless you are the beneficiary, or you have logged in using multi-factor authentication.
2. Click Continue to return to the Case Information page. If this action is selected for a BCRC case in the Final Conditional Payment (Final CP) process with a Final Conditional Payment Status set to Active, a mailed copy of the Notice of Anticipated Settlement letter and Payment Summary Form will be created instead. See Chapter 14.
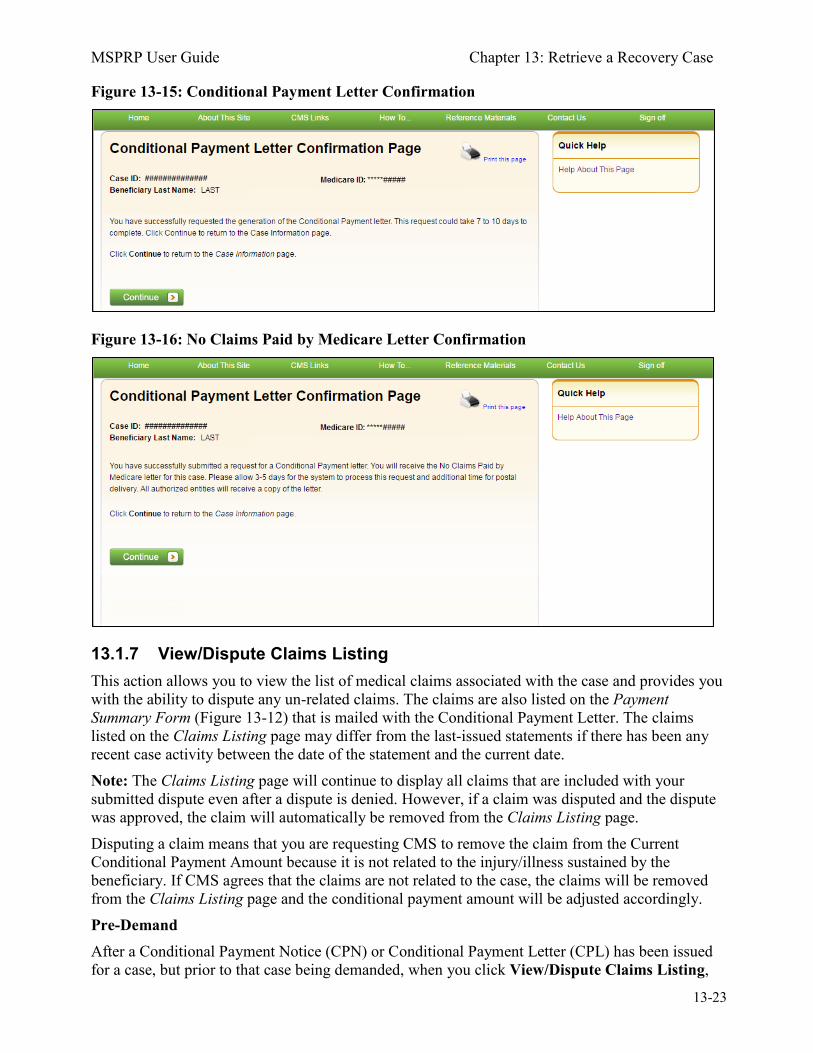
MSPRP User Guide Chapter 13: Retrieve a Recovery Case
13-23
Figure 13-15: Conditional Payment Letter Confirmation
Figure 13-16: No Claims Paid by Medicare Letter Confirmation
13.1.7 View/Dispute Claims Listing This action allows you to view the list of medical claims associated with the case and provides you with the ability to dispute any un-related claims. The claims are also listed on the Payment Summary Form (Figure 13-12) that is mailed with the Conditional Payment Letter. The claims listed on the Claims Listing page may differ from the last-issued statements if there has been any recent case activity between the date of the statement and the current date. Note: The Claims Listing page will continue to display all claims that are included with your submitted dispute even after a dispute is denied. However, if a claim was disputed and the dispute was approved, the claim will automatically be removed from the Claims Listing page. Disputing a claim means that you are requesting CMS to remove the claim from the Current Conditional Payment Amount because it is not related to the injury/illness sustained by the beneficiary. If CMS agrees that the claims are not related to the case, the claims will be removed from the Claims Listing page and the conditional payment amount will be adjusted accordingly. Pre-Demand After a Conditional Payment Notice (CPN) or Conditional Payment Letter (CPL) has been issued for a case, but prior to that case being demanded, when you click View/Dispute Claims Listing,
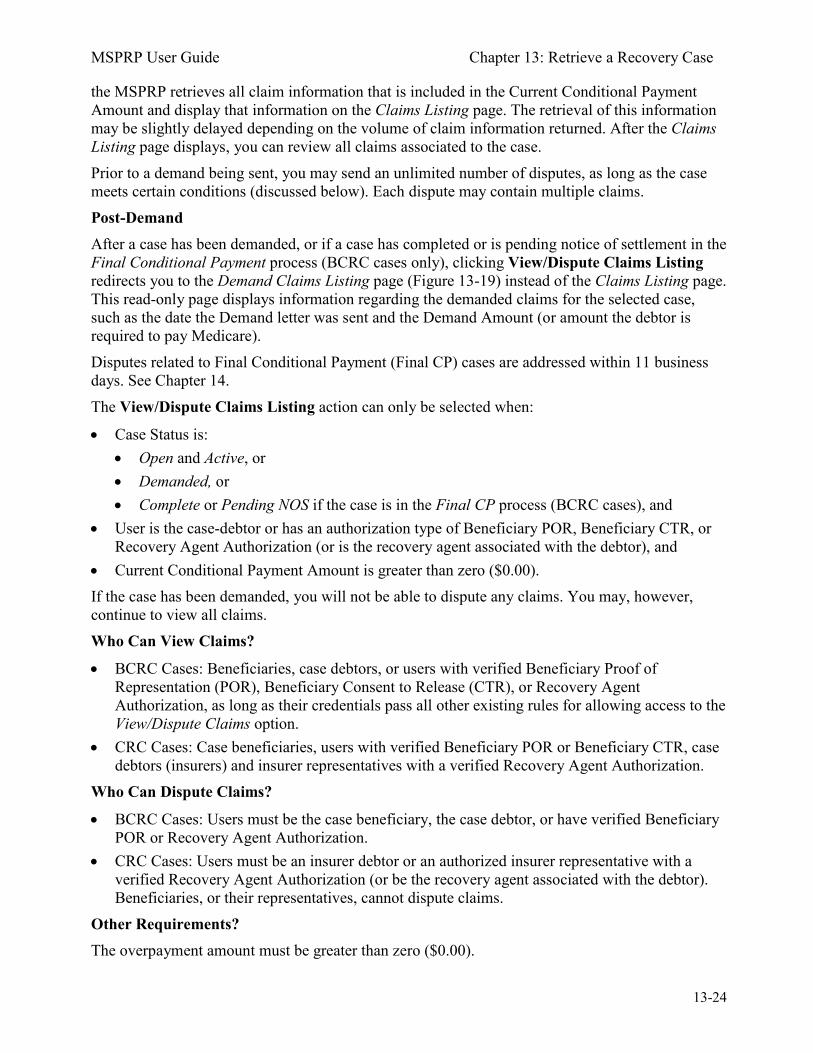
MSPRP User Guide Chapter 13: Retrieve a Recovery Case
13-24
the MSPRP retrieves all claim information that is included in the Current Conditional Payment Amount and display that information on the Claims Listing page. The retrieval of this information may be slightly delayed depending on the volume of claim information returned. After the Claims Listing page displays, you can review all claims associated to the case. Prior to a demand being sent, you may send an unlimited number of disputes, as long as the case meets certain conditions (discussed below). Each dispute may contain multiple claims. Post-Demand After a case has been demanded, or if a case has completed or is pending notice of settlement in the Final Conditional Payment process (BCRC cases only), clicking View/Dispute Claims Listing redirects you to the Demand Claims Listing page (Figure 13-19) instead of the Claims Listing page. This read-only page displays information regarding the demanded claims for the selected case, such as the date the Demand letter was sent and the Demand Amount (or amount the debtor is required to pay Medicare). Disputes related to Final Conditional Payment (Final CP) cases are addressed within 11 business days. See Chapter 14. The View/Dispute Claims Listing action can only be selected when:
• Case Status is: • Open and Active, or • Demanded, or • Complete or Pending NOS if the case is in the Final CP process (BCRC cases), and
• User is the case-debtor or has an authorization type of Beneficiary POR, Beneficiary CTR, or Recovery Agent Authorization (or is the recovery agent associated with the debtor), and
• Current Conditional Payment Amount is greater than zero ($0.00). If the case has been demanded, you will not be able to dispute any claims. You may, however, continue to view all claims. Who Can View Claims?
• BCRC Cases: Beneficiaries, case debtors, or users with verified Beneficiary Proof of Representation (POR), Beneficiary Consent to Release (CTR), or Recovery Agent Authorization, as long as their credentials pass all other existing rules for allowing access to the View/Dispute Claims option.
• CRC Cases: Case beneficiaries, users with verified Beneficiary POR or Beneficiary CTR, case debtors (insurers) and insurer representatives with a verified Recovery Agent Authorization.
Who Can Dispute Claims?
• BCRC Cases: Users must be the case beneficiary, the case debtor, or have verified Beneficiary POR or Recovery Agent Authorization.
• CRC Cases: Users must be an insurer debtor or an authorized insurer representative with a verified Recovery Agent Authorization (or be the recovery agent associated with the debtor). Beneficiaries, or their representatives, cannot dispute claims.
Other Requirements? The overpayment amount must be greater than zero ($0.00).
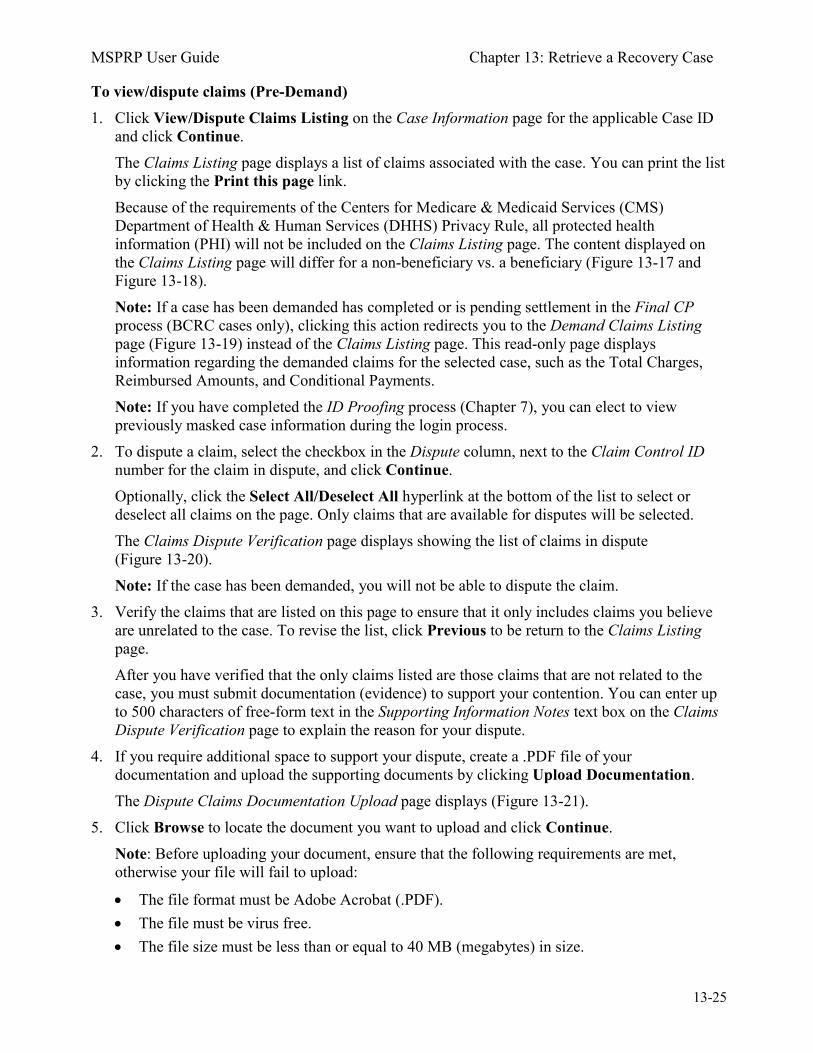
MSPRP User Guide Chapter 13: Retrieve a Recovery Case
13-25
To view/dispute claims (Pre-Demand) 1. Click View/Dispute Claims Listing on the Case Information page for the applicable Case ID
and click Continue. The Claims Listing page displays a list of claims associated with the case. You can print the list by clicking the Print this page link. Because of the requirements of the Centers for Medicare & Medicaid Services (CMS) Department of Health & Human Services (DHHS) Privacy Rule, all protected health information (PHI) will not be included on the Claims Listing page. The content displayed on the Claims Listing page will differ for a non-beneficiary vs. a beneficiary (Figure 13-17 and Figure 13-18). Note: If a case has been demanded has completed or is pending settlement in the Final CP process (BCRC cases only), clicking this action redirects you to the Demand Claims Listing page (Figure 13-19) instead of the Claims Listing page. This read-only page displays information regarding the demanded claims for the selected case, such as the Total Charges, Reimbursed Amounts, and Conditional Payments. Note: If you have completed the ID Proofing process (Chapter 7), you can elect to view previously masked case information during the login process.
2. To dispute a claim, select the checkbox in the Dispute column, next to the Claim Control ID number for the claim in dispute, and click Continue. Optionally, click the Select All/Deselect All hyperlink at the bottom of the list to select or deselect all claims on the page. Only claims that are available for disputes will be selected. The Claims Dispute Verification page displays showing the list of claims in dispute (Figure 13-20). Note: If the case has been demanded, you will not be able to dispute the claim.
3. Verify the claims that are listed on this page to ensure that it only includes claims you believe are unrelated to the case. To revise the list, click Previous to be return to the Claims Listing page. After you have verified that the only claims listed are those claims that are not related to the case, you must submit documentation (evidence) to support your contention. You can enter up to 500 characters of free-form text in the Supporting Information Notes text box on the Claims Dispute Verification page to explain the reason for your dispute.
4. If you require additional space to support your dispute, create a .PDF file of your documentation and upload the supporting documents by clicking Upload Documentation. The Dispute Claims Documentation Upload page displays (Figure 13-21).
5. Click Browse to locate the document you want to upload and click Continue. Note: Before uploading your document, ensure that the following requirements are met, otherwise your file will fail to upload:
• The file format must be Adobe Acrobat (.PDF). • The file must be virus free. • The file size must be less than or equal to 40 MB (megabytes) in size.
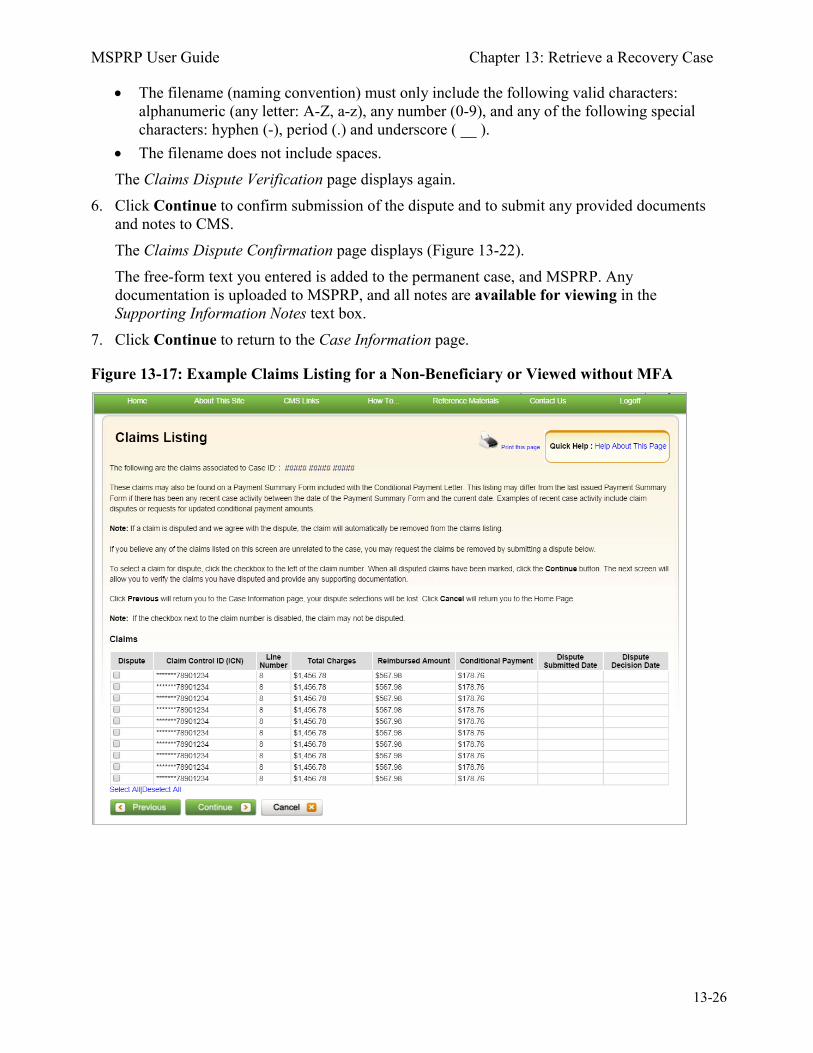
MSPRP User Guide Chapter 13: Retrieve a Recovery Case
13-26
• The filename (naming convention) must only include the following valid characters: alphanumeric (any letter: A-Z, a-z), any number (0-9), and any of the following special characters: hyphen (-), period (.) and underscore ( __ ).
• The filename does not include spaces. The Claims Dispute Verification page displays again.
6. Click Continue to confirm submission of the dispute and to submit any provided documents and notes to CMS. The Claims Dispute Confirmation page displays (Figure 13-22). The free-form text you entered is added to the permanent case, and MSPRP. Any documentation is uploaded to MSPRP, and all notes are available for viewing in the Supporting Information Notes text box.
7. Click Continue to return to the Case Information page.
Figure 13-17: Example Claims Listing for a Non-Beneficiary or Viewed without MFA

MSPRP User Guide Chapter 13: Retrieve a Recovery Case
13-27
Figure 13-18: Example Claims Listing for a Beneficiary or Viewed with MFA
Figure 13-19: Demand Claims Listing
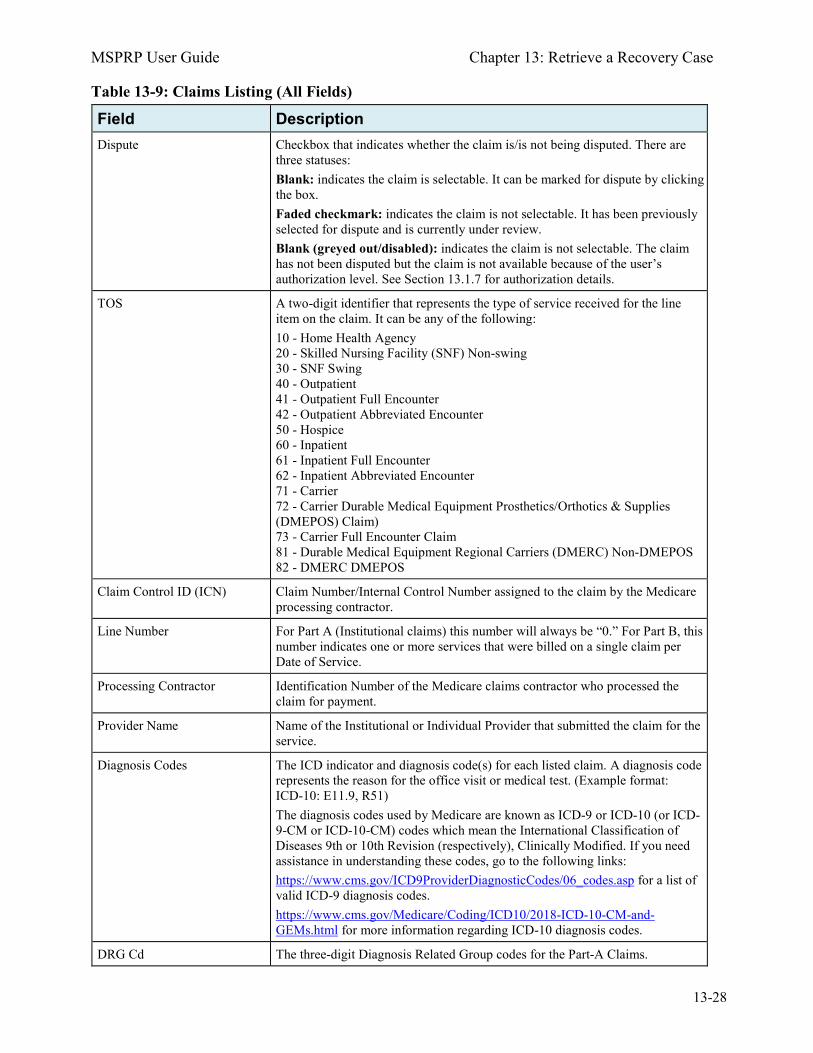
MSPRP User Guide Chapter 13: Retrieve a Recovery Case
13-28
Table 13-9: Claims Listing (All Fields)
Field Description Dispute Checkbox that indicates whether the claim is/is not being disputed. There are
three statuses: Blank: indicates the claim is selectable. It can be marked for dispute by clicking the box. Faded checkmark: indicates the claim is not selectable. It has been previously selected for dispute and is currently under review. Blank (greyed out/disabled): indicates the claim is not selectable. The claim has not been disputed but the claim is not available because of the user’s authorization level. See Section 13.1.7 for authorization details.
TOS A two-digit identifier that represents the type of service received for the line item on the claim. It can be any of the following: 10 - Home Health Agency 20 - Skilled Nursing Facility (SNF) Non-swing 30 - SNF Swing 40 - Outpatient 41 - Outpatient Full Encounter 42 - Outpatient Abbreviated Encounter 50 - Hospice 60 - Inpatient 61 - Inpatient Full Encounter 62 - Inpatient Abbreviated Encounter 71 - Carrier 72 - Carrier Durable Medical Equipment Prosthetics/Orthotics & Supplies (DMEPOS) Claim) 73 - Carrier Full Encounter Claim 81 - Durable Medical Equipment Regional Carriers (DMERC) Non-DMEPOS 82 - DMERC DMEPOS
Claim Control ID (ICN) Claim Number/Internal Control Number assigned to the claim by the Medicare processing contractor.
Line Number For Part A (Institutional claims) this number will always be “0.” For Part B, this number indicates one or more services that were billed on a single claim per Date of Service.
Processing Contractor Identification Number of the Medicare claims contractor who processed the claim for payment.
Provider Name Name of the Institutional or Individual Provider that submitted the claim for the service.
Diagnosis Codes The ICD indicator and diagnosis code(s) for each listed claim. A diagnosis code represents the reason for the office visit or medical test. (Example format: ICD-10: E11.9, R51) The diagnosis codes used by Medicare are known as ICD-9 or ICD-10 (or ICD-9-CM or ICD-10-CM) codes which mean the International Classification of Diseases 9th or 10th Revision (respectively), Clinically Modified. If you need assistance in understanding these codes, go to the following links: https://www.cms.gov/ICD9ProviderDiagnosticCodes/06_codes.asp for a list of valid ICD-9 diagnosis codes. https://www.cms.gov/Medicare/Coding/ICD10/2018-ICD-10-CM-and-GEMs.html for more information regarding ICD-10 diagnosis codes.
DRG Cd The three-digit Diagnosis Related Group codes for the Part-A Claims.
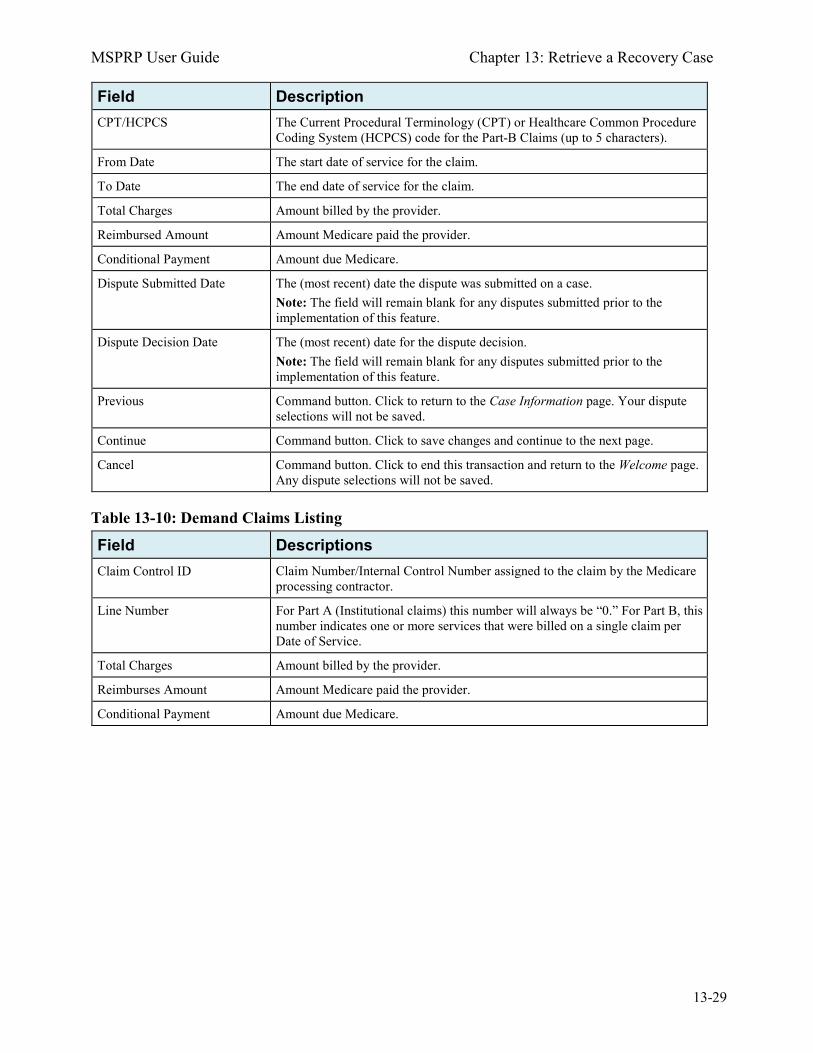
MSPRP User Guide Chapter 13: Retrieve a Recovery Case
13-29
Field Description CPT/HCPCS The Current Procedural Terminology (CPT) or Healthcare Common Procedure
Coding System (HCPCS) code for the Part-B Claims (up to 5 characters).
From Date The start date of service for the claim.
To Date The end date of service for the claim.
Total Charges Amount billed by the provider.
Reimbursed Amount Amount Medicare paid the provider.
Conditional Payment Amount due Medicare.
Dispute Submitted Date The (most recent) date the dispute was submitted on a case. Note: The field will remain blank for any disputes submitted prior to the implementation of this feature.
Dispute Decision Date The (most recent) date for the dispute decision. Note: The field will remain blank for any disputes submitted prior to the implementation of this feature.
Previous Command button. Click to return to the Case Information page. Your dispute selections will not be saved.
Continue Command button. Click to save changes and continue to the next page.
Cancel Command button. Click to end this transaction and return to the Welcome page. Any dispute selections will not be saved.
Table 13-10: Demand Claims Listing
Field Descriptions Claim Control ID Claim Number/Internal Control Number assigned to the claim by the Medicare
processing contractor.
Line Number For Part A (Institutional claims) this number will always be “0.” For Part B, this number indicates one or more services that were billed on a single claim per Date of Service.
Total Charges Amount billed by the provider.
Reimburses Amount Amount Medicare paid the provider.
Conditional Payment Amount due Medicare.
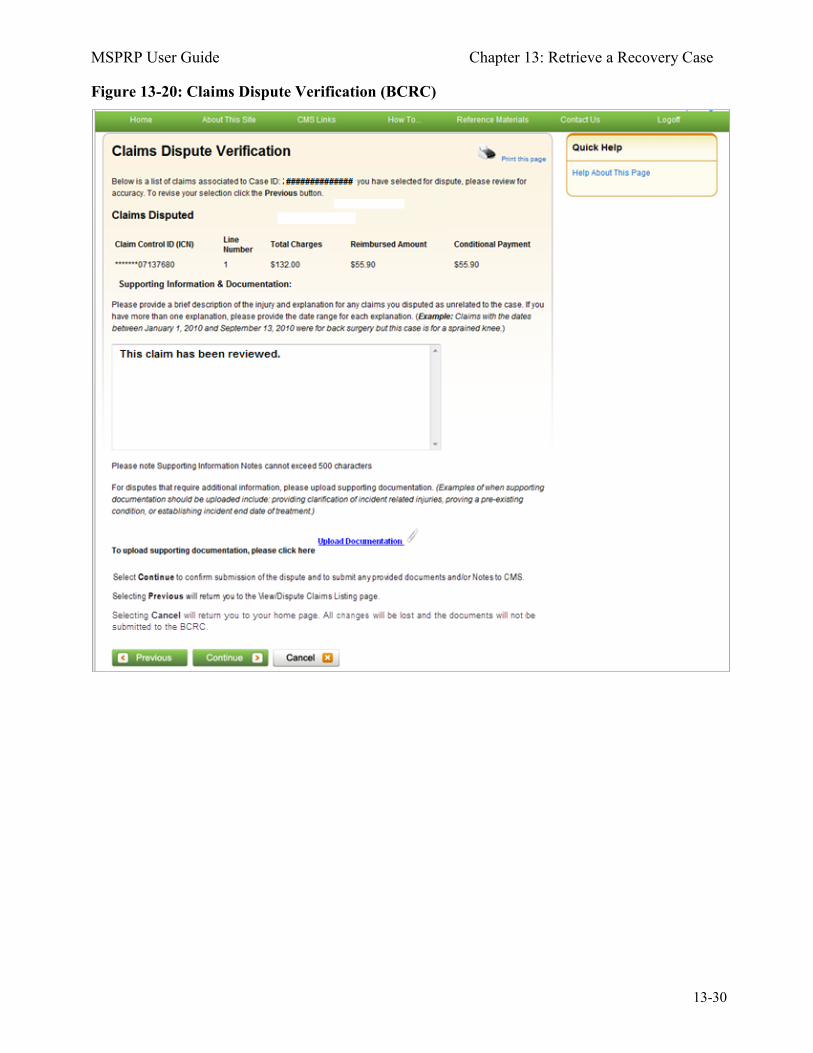
MSPRP User Guide Chapter 13: Retrieve a Recovery Case
13-30
Figure 13-20: Claims Dispute Verification (BCRC)
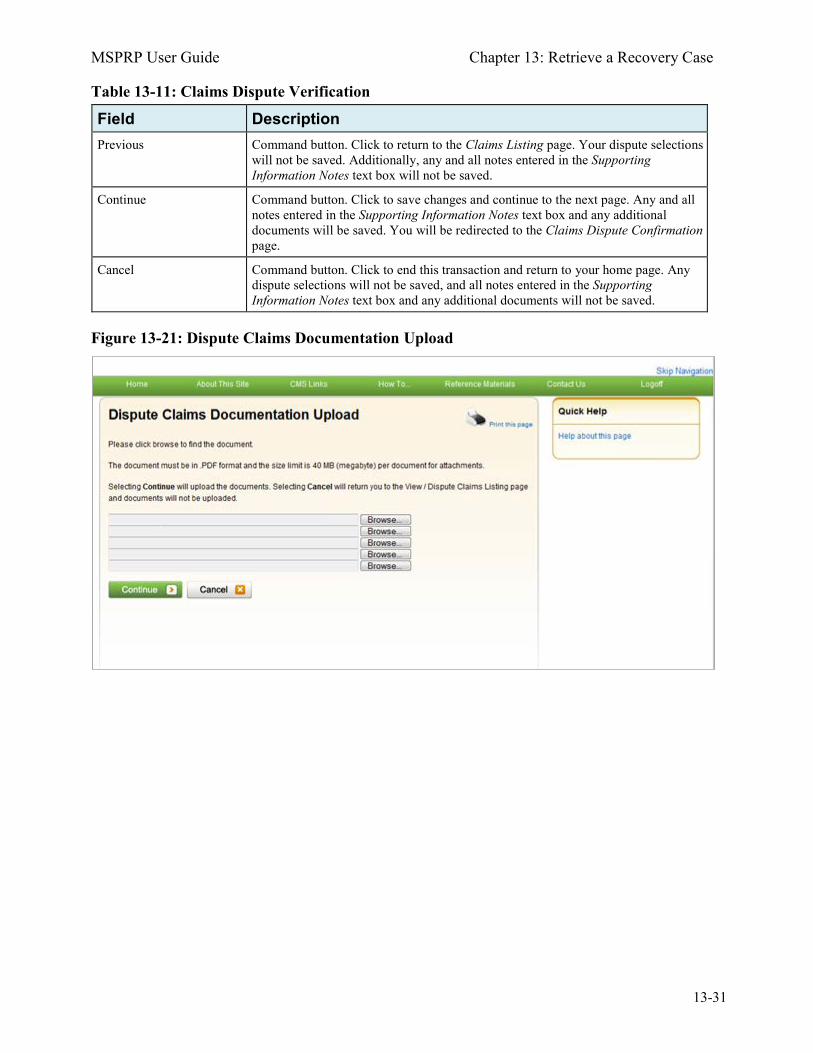
MSPRP User Guide Chapter 13: Retrieve a Recovery Case
13-31
Table 13-11: Claims Dispute Verification
Field Description Previous Command button. Click to return to the Claims Listing page. Your dispute selections
will not be saved. Additionally, any and all notes entered in the Supporting Information Notes text box will not be saved.
Continue Command button. Click to save changes and continue to the next page. Any and all notes entered in the Supporting Information Notes text box and any additional documents will be saved. You will be redirected to the Claims Dispute Confirmation page.
Cancel Command button. Click to end this transaction and return to your home page. Any dispute selections will not be saved, and all notes entered in the Supporting Information Notes text box and any additional documents will not be saved.
Figure 13-21: Dispute Claims Documentation Upload
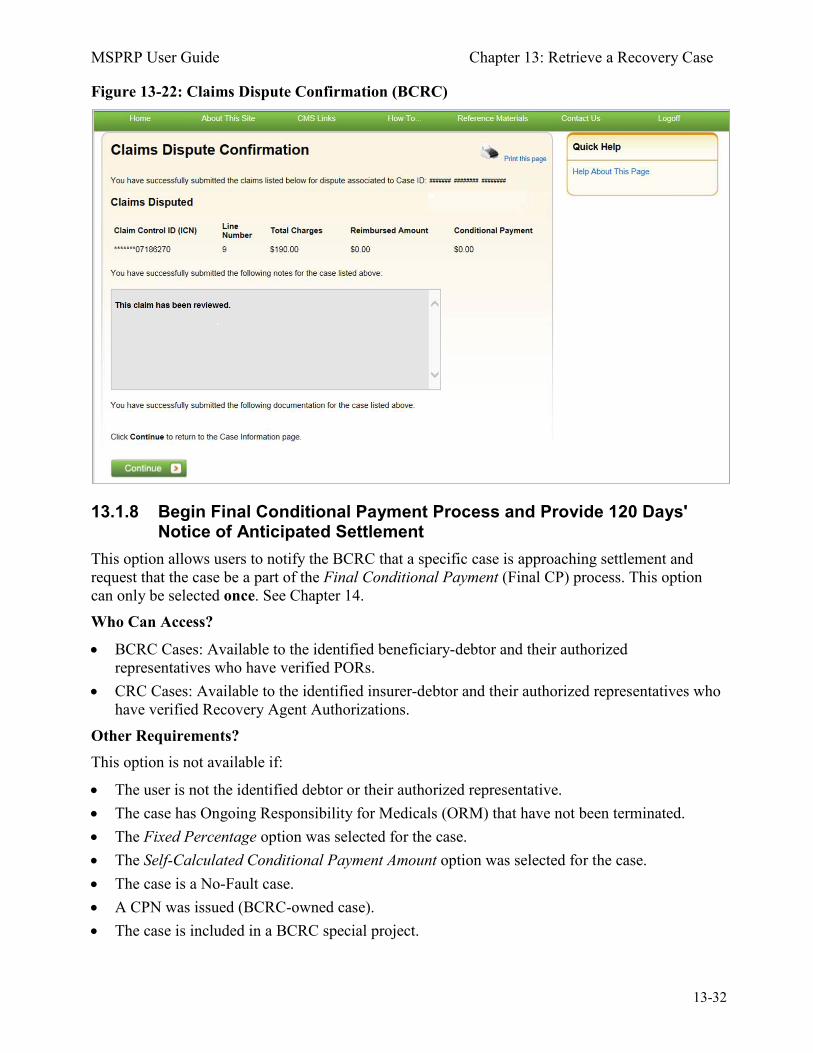
MSPRP User Guide Chapter 13: Retrieve a Recovery Case
13-32
Figure 13-22: Claims Dispute Confirmation (BCRC)
13.1.8 Begin Final Conditional Payment Process and Provide 120 Days' Notice of Anticipated Settlement
This option allows users to notify the BCRC that a specific case is approaching settlement and request that the case be a part of the Final Conditional Payment (Final CP) process. This option can only be selected once. See Chapter 14. Who Can Access?
• BCRC Cases: Available to the identified beneficiary-debtor and their authorized representatives who have verified PORs.
• CRC Cases: Available to the identified insurer-debtor and their authorized representatives who have verified Recovery Agent Authorizations.
Other Requirements? This option is not available if:
• The user is not the identified debtor or their authorized representative. • The case has Ongoing Responsibility for Medicals (ORM) that have not been terminated. • The Fixed Percentage option was selected for the case. • The Self-Calculated Conditional Payment Amount option was selected for the case. • The case is a No-Fault case. • A CPN was issued (BCRC-owned case). • The case is included in a BCRC special project.
MSPRP User Guide Chapter 13: Retrieve a Recovery Case
13-33
13.1.9 Calculate Final Conditional Payment Amount This action allows a user to request a Final Conditional Payment (Final CP) amount for a case in the Final CP process, and is enabled for a Final Conditional Payment case where the Final Conditional Payment Status is set to Active. This option is unavailable if the Final Conditional Payment amount has already been calculated. See Chapter 14. This action must be selected within 120 calendar days of starting the Final CP process or the case will be voided. Who Can Access?
• BCRC Beneficiary-Debtor Cases: Users with a verified Beneficiary POR authorization and beneficiaries.
• CRC Cases: None. Option is not available (or visible) to any users. Other Requirements? This option is unavailable if:
• There is a pending dispute on one or more claims or line items associated with the case. • The Calculate Final Conditional Payment Amount action has already been selected. • The Final Conditional Payment Requested Date has been set.
13.1.10 Request an Electronic Dispute Denial for Final Conditional Payment Case Letter with Current Conditional Payment Amount
This action is available on Final Conditional Payment (Final CP) cases in which at least one submitted dispute was denied after the Final CP process was initiated. It allows users to request an Electronic Dispute Denial for Final Conditional Payment Case letter that displays the current Conditional Payment Amount. See Chapter 14. This letter, along with the Payment Summary Form, will be created and displayed in a separate browser window. The dispute denial letter and the Payment Summary Form will both display in .PDF format. The Payment Summary Form includes all active claims related to the case. Note: The letter and the Payment Summary Form can be saved and/or printed. Who Can Access?
• BCRC Beneficiary-Debtor Cases: Users with a verified Beneficiary POR authorization who have logged in to the MSPRP using multi-factor authentication, and beneficiaries.
• CRC Cases: None. Option is not available (or visible) to any users. Other Requirements? This letter cannot be requested if the Final CP status on the case is Voided or Void in progress.
MSPRP User Guide Chapter 13: Retrieve a Recovery Case
13-34
13.1.11 View/Provide the Notice of Settlement Information Pre-Demand This action will direct you to the Settlement Information page where you (the beneficiary or beneficiary representative with a verified POR) can enter notice of settlement (NOS) information for a beneficiary-debtor case, upload supporting settlement documentation, and if the case qualifies, elect the Fixed Percentage Option. Completion of this page will result in the issuance of a demand bill. Once a case has settled, notice of the settlement must be transmitted to Medicare so that the reimbursement process can be brought to a conclusion. Note: Users cannot provide notice of settlement information for insurer-debtor cases (BCRC or CRC). For cases that are in the Final CP process, notice of settlement information must be submitted within 30 calendar days of requesting the Final CP amount. See Chapter 14. Post Demand This action will direct you (the beneficiary or beneficiary representative with a verified POR beneficiary representative with a verified CTR) to the View Settlement Information page (Figure 13-24), a read-only version of the Settlement Information page, which displays the notice of settlement information previously submitted. This page displays if the Case Status is set to Demand, Demand in Progress, or Bill Issued; or where the Final Conditional Payment Status is Complete. Who Can Provide the Notice of Settlement?
• BCRC Beneficiary-Debtor Cases: Users with a verified beneficiary POR authorization and beneficiaries.
• CRC Cases: None. Option is not available (or visible) to any users. Who Can View Settlement Information?
• BCRC Beneficiary-Debtor Cases: Users with a verified beneficiary POR or verified beneficiary CTR authorization and beneficiaries.
• CRC Cases: None. Option is not available (or visible) to any users. Other Requirements?
• The overpayment amount must be greater than zero ($0.00). • No claims are in dispute (i.e., no claims have a faded checkmark in the Dispute checkbox on
the Claims Listing page). • The case is not in bankruptcy proceedings. • The Case Status is not Closed. To enter Settlement Information 1. Click View/Provide the Notice of Settlement Information on the Case Information page for
the applicable Case ID and click Continue. The Settlement Information page displays (Figure 13-23).
2. Enter all required information.
MSPRP User Guide Chapter 13: Retrieve a Recovery Case
13-35
3. If you are not uploading additional documents, click Continue. 4. If you are submitting supporting documents for the settlement, click the Upload
Documentation link. The Notice of Settlement Documentation Upload page displays (Figure 13-25). Note: Before uploading your document, ensure that the following requirements are met, otherwise your file will fail to upload:
• The file format must be Adobe Acrobat (.PDF). • The file must be virus free. • The file size must be less than or equal to 40 MB (megabytes) in size. • The filename (naming convention) must only include the following valid characters:
alphanumeric (any letter: A-Z, a-z; any number 0-9), and any of the following special characters: hyphen (-), period (.) and underscore ( __ ).
• The filename does not include spaces. 5. Click Browse to locate the documents you want to upload.
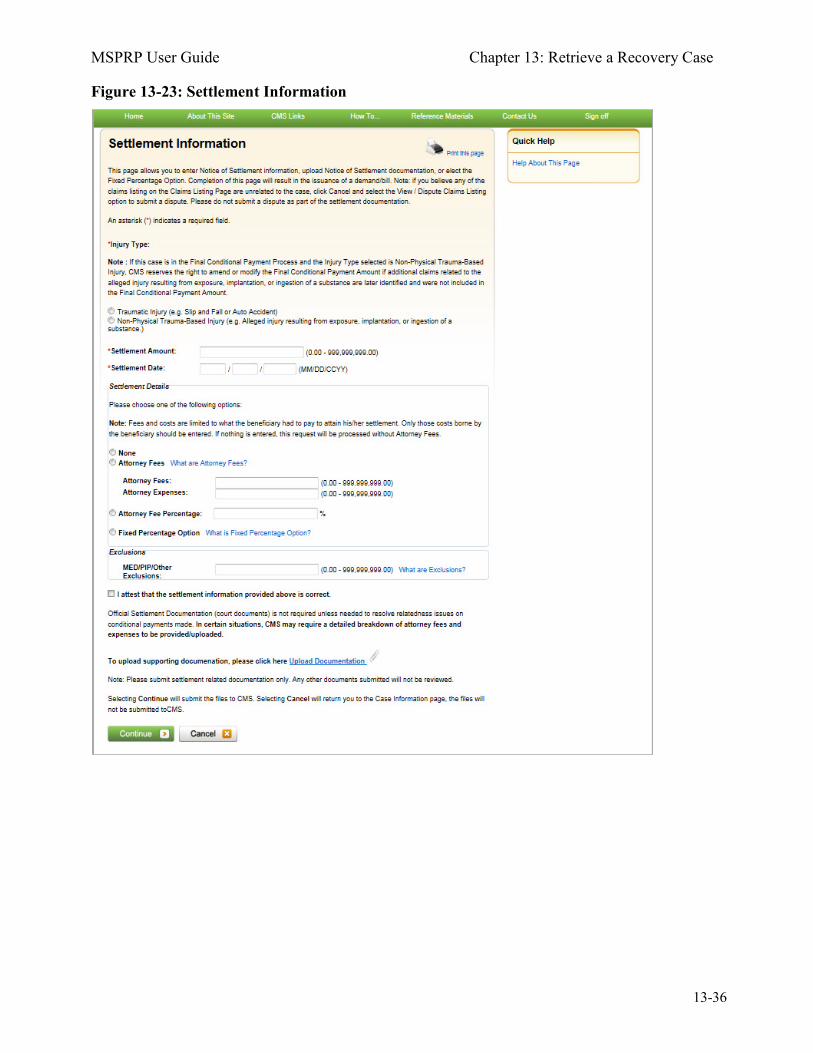
MSPRP User Guide Chapter 13: Retrieve a Recovery Case
13-36
Figure 13-23: Settlement Information

MSPRP User Guide Chapter 13: Retrieve a Recovery Case
13-37
Table 13-12: Settlement Information
Field Description Injury Type The type of accident/injury/illness being claimed and/or released with respect
to the Medicare beneficiary. This field is required. Select: Traumatic Injury – An injury/illness resulting from a sudden physical injury such as a slip and fall, or auto-accident (i.e., the injury/illness does not relate to ingestion, exposure, or medical implant). Non-Physical Trauma-Based Injury - An injury/illness that does not result from a sudden physical injury (i.e., an alleged injury resulting from exposure, implantation, or ingestion of a substance.) Notes: Traumatic Injury must be selected when the Fixed Percentage Option is selected. If this case in in the Final Conditional Payment process and the Injury Type selected is a Non-Physical Trauma-Based injury, Medicare reserves the right to amend or modify the Final Conditional Payment Amount if additional claims related to the alleged injury resulting from exposure, implantation, or ingestion of a substance are later identified and were not included in the Final Conditional Payment Amount.
Settlement Amount The dollar amount of the total payment obligation to or on behalf of the Medicare beneficiary in connection with the settlement, judgment, award, or other payment. Note: If attorney fees and/or costs are awarded in addition to the settlement, please include the award as a part of the Settlement Amount. This field is required. Data Entry Requirements:
• Enter a numeric value (decimals and commas are optional). You can enter cents as well. If cents are not entered, the MSPRP will store the amount with zero cents. For example, a settlement amount of $10,000. Could be entered as: 10000, or 10,000, or 10,000.00).
• Do not enter the ‘$’ as part of your entry. • Amount must be less than or equal to $5,000 if the Fixed Percentage
Option is selected.
Settlement Date The date the payment obligation was established, not necessarily the payment date or check issue date. It is the date the obligation is signed if there is a written agreement unless court approval is required. If court approval is required, it is the later of the date the obligation is signed or the date of court approval. If there is no written agreement it is the date the payment (or first payment if there will be multiple payments) is issued. This field is required. Data Entry Requirements:
• Must be a valid date. • Date must be greater than 01/01/1960. • Date must be less than or equal to the current date. • Date must be greater than the Date of Incident on the case.
Note: For cases in the Final Conditional Payment process: if the entered Settlement Date is not within 3 business days of the Final Conditional Payment Requested date, you will be asked to verify the Settlement Date. If the Settlement Date is not within 3 business days of the Final Conditional Payment Requested Date, the case will be voided from the Final Conditional Payment process.
None Settlement Detail Option. Indicates that the beneficiary did not incur any attorney fees.

MSPRP User Guide Chapter 13: Retrieve a Recovery Case
13-38
Field Description Attorney Fees Settlement Detail Option. Indicates that the beneficiary incurred attorney fees.
Select this option when a dollar amount will be entered for the attorney fees and/or expenses. If this option is selected, you must enter a numeric value in the Attorney Fees field (i.e., the total amount charged by the attorney to take the case) and/or Attorney Expenses field (i.e., the total amount of additional expenses, not including the Attorney Fees). Data Entry Requirements:
• Decimals and commas are optional. • Do not enter the ‘$’ as part of your entry. • Cents can be entered. If cents are not entered, the MSPRP will store the
amount with zero cents. • Attorney Fees and/or Attorney Expenses cannot both be zero.
Attorney Fee Percentage Settlement Detail Option. Indicates that there was an agreed-upon percentage of the settlement amount charged by the attorney to the beneficiary. If this option is selected, you must enter a whole number between 1 and 100. You cannot enter a fraction or a percent.
Fixed Percentage Option Settlement Detail Option. Indicates that the Medicare beneficiary has opted to resolve Medicare’s recovery claim using the fixed percentage option. This option is disabled for cases in the Final Conditional Payment (Final CP) process. Note: The case must meet specific criteria in order to qualify for this option.
MED/PIP/Other Exclusions The total coverage amount paid directly to the Medicare beneficiary and/or Medicare from Medical Payments Coverage (MEDPAY), Personal Injury Protection (PIP), or another coverage with respect to the accident/injury/illness/incident being claimed and/or released. Note: If Medicare has paid claims in relation to the incident, Medicare's recovery amount will be directly impacted by the amount entered. Data Entry Requirements:
• Cannot be entered if the Fixed Percentage Option has been selected. • When entered, it must contain a numeric value (decimals and commas
are allowed).
Attestation A checkbox that indicates you are confirming the accuracy of the submitted settlement information. You must select this box in order to submit your settlement information.
Upload Documentation Hyperlink. Click to upload settlement related documentation.
Continue Command button. Click to save changes and continue to the next page.
Cancel Command button. Click to return to the Case Information page.
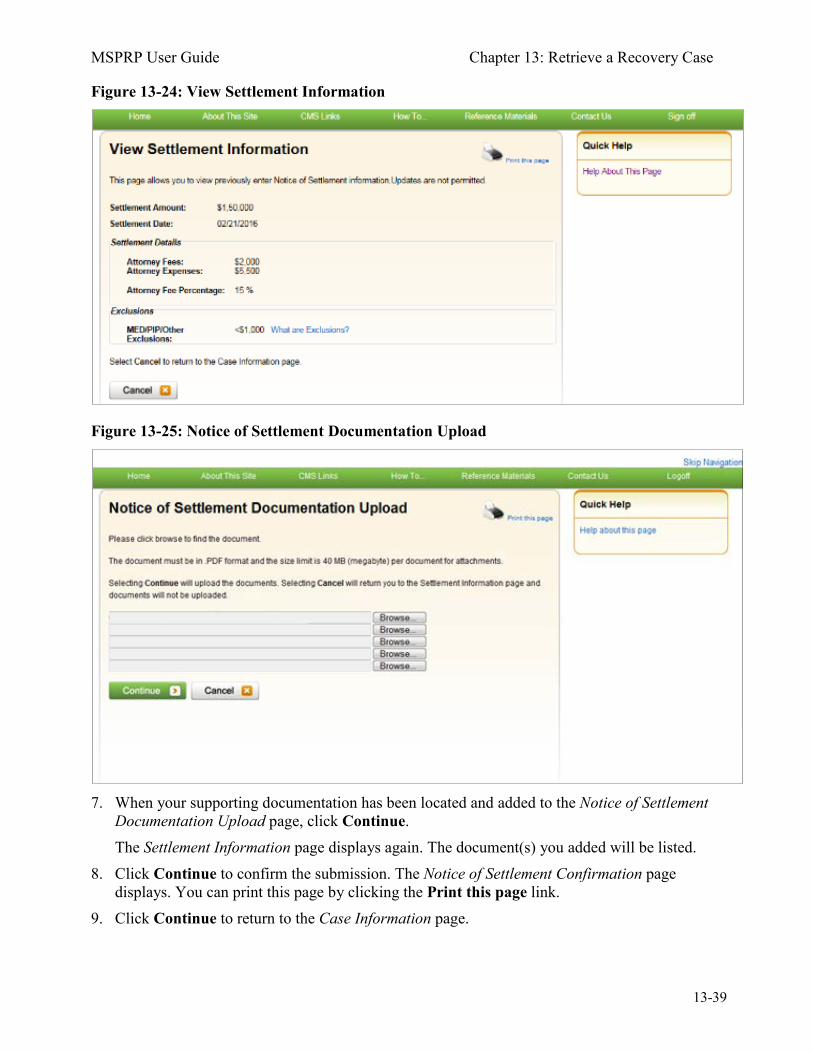
MSPRP User Guide Chapter 13: Retrieve a Recovery Case
13-39
Figure 13-24: View Settlement Information
Figure 13-25: Notice of Settlement Documentation Upload
7. When your supporting documentation has been located and added to the Notice of Settlement Documentation Upload page, click Continue. The Settlement Information page displays again. The document(s) you added will be listed.
8. Click Continue to confirm the submission. The Notice of Settlement Confirmation page displays. You can print this page by clicking the Print this page link.
9. Click Continue to return to the Case Information page.
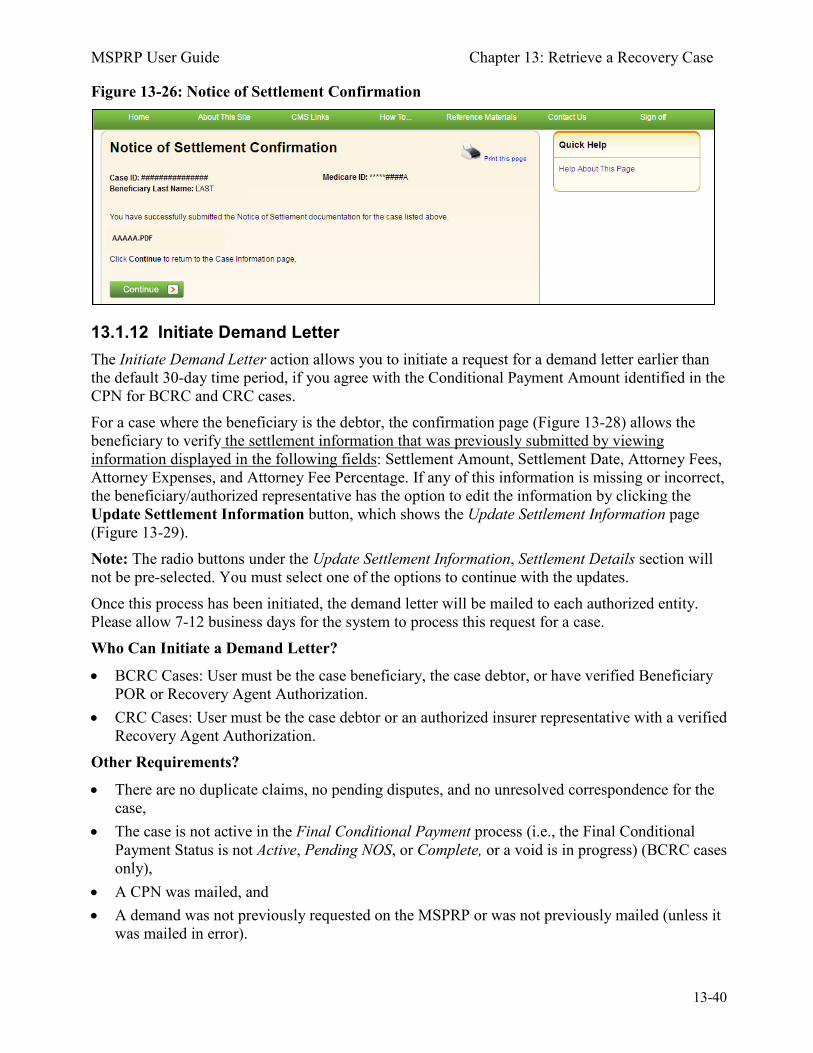
MSPRP User Guide Chapter 13: Retrieve a Recovery Case
13-40
Figure 13-26: Notice of Settlement Confirmation
13.1.12 Initiate Demand Letter The Initiate Demand Letter action allows you to initiate a request for a demand letter earlier than the default 30-day time period, if you agree with the Conditional Payment Amount identified in the CPN for BCRC and CRC cases. For a case where the beneficiary is the debtor, the confirmation page (Figure 13-28) allows the beneficiary to verify the settlement information that was previously submitted by viewing information displayed in the following fields: Settlement Amount, Settlement Date, Attorney Fees, Attorney Expenses, and Attorney Fee Percentage. If any of this information is missing or incorrect, the beneficiary/authorized representative has the option to edit the information by clicking the Update Settlement Information button, which shows the Update Settlement Information page (Figure 13-29). Note: The radio buttons under the Update Settlement Information, Settlement Details section will not be pre-selected. You must select one of the options to continue with the updates. Once this process has been initiated, the demand letter will be mailed to each authorized entity. Please allow 7-12 business days for the system to process this request for a case. Who Can Initiate a Demand Letter?
• BCRC Cases: User must be the case beneficiary, the case debtor, or have verified Beneficiary POR or Recovery Agent Authorization.
• CRC Cases: User must be the case debtor or an authorized insurer representative with a verified Recovery Agent Authorization.
Other Requirements?
• There are no duplicate claims, no pending disputes, and no unresolved correspondence for the case,
• The case is not active in the Final Conditional Payment process (i.e., the Final Conditional Payment Status is not Active, Pending NOS, or Complete, or a void is in progress) (BCRC cases only),
• A CPN was mailed, and • A demand was not previously requested on the MSPRP or was not previously mailed (unless it
was mailed in error).

MSPRP User Guide Chapter 13: Retrieve a Recovery Case
13-41
To Initiate a Demand Letter 1. Click Initiate Demand Letter on the Case Information page for the applicable Case ID and
click Continue. The Initiate Demand Letter Confirmation page displays. For bene-debtors, you can also click Update Settlement Information if you need to make additional updates prior to initiating a request for a demand.
2. Click Continue to initiate the request or click Previous to cancel the request.
Figure 13-27: Initiate Demand Letter Confirmation (BCRC Case)
Figure 13-28: Initiate Demand Letter Confirmation (Bene-Debtor)
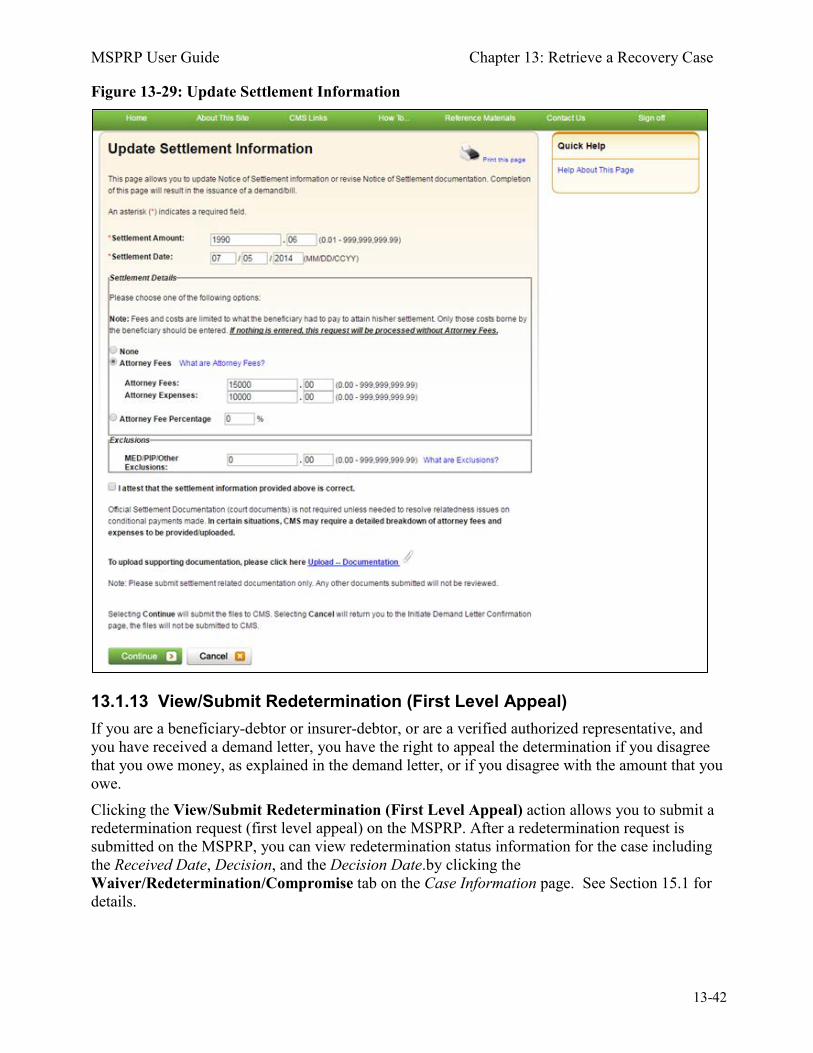
MSPRP User Guide Chapter 13: Retrieve a Recovery Case
13-42
Figure 13-29: Update Settlement Information
13.1.13 View/Submit Redetermination (First Level Appeal) If you are a beneficiary-debtor or insurer-debtor, or are a verified authorized representative, and you have received a demand letter, you have the right to appeal the determination if you disagree that you owe money, as explained in the demand letter, or if you disagree with the amount that you owe. Clicking the View/Submit Redetermination (First Level Appeal) action allows you to submit a redetermination request (first level appeal) on the MSPRP. After a redetermination request is submitted on the MSPRP, you can view redetermination status information for the case including the Received Date, Decision, and the Decision Date.by clicking the Waiver/Redetermination/Compromise tab on the Case Information page. See Section 15.1 for details.

MSPRP User Guide Chapter 13: Retrieve a Recovery Case
13-43
Who Can Submit a Redetermination?
• BCRC Cases: User must be the case beneficiary, the case debtor, or have a verified beneficiary POR (for a beneficiary-debtor case) or be an insurer representative with a verified Recovery Agent Authorization (for an insurer-debtor case).
• CRC Cases: User must be the case debtor or an authorized insurer representative with a verified Recovery Agent Authorization.
Who Can View a Redetermination?
• BCRC Cases: User must be the case beneficiary, the case debtor, or have a verified beneficiary POR or CTR (for a beneficiary-debtor or insurer-debtor case) or be an insurer representative with a verified Recovery Agent Authorization (for an insurer-debtor case).
• CRC Cases: User must be the case beneficiary, the case debtor, or have a verified beneficiary POR or CTR, or be an insurer representative with a verified Recovery Agent Authorization.
Other Requirements to Submit a Redetermination Request?
• The case must be in a Demand Issued status and a Demand letter has been sent for the case (as determined by the Demand Letter Mail Date).
• A redetermination request can only be submitted once either in the mail or on the MSPRP. • A redetermination must be submitted within 120 days from the date of receipt of the demand
letter. Other Requirements to View a Redetermination Request?
• Redetermination request must have been previously submitted on the MSPRP.
13.1.14 Submit Waiver Request The Submit Waiver Request action allows you to submit a request for a waiver. A waiver is when all or part of the demand amount owed to Medicare is dismissed. This action is only available if a waiver has not yet been submitted on the MSPRP or sent in the mail. You have the right to request that the Medicare program waive recovery of the demand amount owed in full or in part. The Medicare program may waive recovery of the amount owed if the following conditions are met:
• You are not at fault for Medicare making conditional payments, and; • Paying back the money would cause financial hardship or would be unfair for some other
reason, and; • A demand letter has been sent for the case. You must provide supporting information or submit supporting documentation to back up your request. The SSA 632 Request for Waiver form is required if you are claiming financial hardship. A hyperlink to the form is available during the waiver request process or download the SSA 632 form from the cms.gov website. You can also submit additional documents to support your request. See Section 15.2 for details. Who Can Submit a Waiver Request?
• BCRC Beneficiary-Debtor Cases: Users with a verified Beneficiary POR authorization and beneficiaries.
• CRC Cases: None. Option is not available (or visible) to any users.
MSPRP User Guide Chapter 13: Retrieve a Recovery Case
13-44
Other Requirements for a Waiver Request on the MSPRP?
• No waiver request exists for your case. • A demand letter has been sent.
13.1.15 Submit Compromise Request The Submit Compromise Request action allows you to submit an offer for Medicare to accept less than the amount Medicare is owed. You can request a compromise before a demand letter is issued (called a pre-settlement compromise), or after the case settles and funds have been paid (called a post-settlement compromise). When you submit a compromise request, you must also provide supporting information or documentation by entering a text explanation or uploading documentation (evidence) to support your compromise request. See Section 15.3 for details. Who Can Submit a Compromise Request?
• BCRC Beneficiary-Debtor Cases: Users with a verified Beneficiary POR authorization and beneficiaries.
• CRC Cases: None. Option is not available (or visible) to any users. Other Requirements for a Compromise Request? The case must be in an Open, Bill Issued, Demand Issued, or Demand in Process status. Compromise requests cannot be submitted when the case status is Claim Retrieval, Closed, In Development, or Transitioned.
MSPRP User Guide Chapter 14: Obtaining Final Conditional Payment Amount
14-1
Chapter 14: Obtaining Final Conditional Payment Amount
The MSPRP provides authorized users with the option of requesting a case to be put into the Final Conditional Payment (Final CP) process. This process permits authorized users to notify the BCRC that a case is approaching settlement, obtain time- and date-stamped final conditional payment summary documents before reaching settlement, and ensure that related disputes are addressed within 11 business days of receipt of dispute documentation. The Final CP process is only available for liability and workers’ compensation cases where the beneficiary is the identified debtor.
NOTE: An insurer and their authorized representatives can initiate the Final CP process on a case where the insurer is the identified debtor under certain circumstances. This action will close the insurer case and transition the debt to the beneficiary. Please see the Final CP Process (Insurers) section for additional information.
If you are approaching settlement on a case that is not yet available on the MSPRP and you wish to initiate the Final CP process, contact the BCRC at: (855) 798-2627. This chapter discusses the details and the steps for the Final CP process.
14.1 Things to Consider Before Initiating the Final CP Process Before initiating the Final CP process, please note the following:
• All Final CP actions must be completed on the MSPRP. • Process can be initiated by:
• A beneficiary-debtor, or an authorized representative of the beneficiary with a verified POR on a case where the beneficiary is the identified debtor, or
• An insurer user, or an authorized representative of the insurer with a verified Recovery Agent Authorization.
• Only available for liability cases. • Can only be initiated once per case. • Limits disputes to one per claim (that is, claims can only be disputed one time). • Guarantees that claim disputes submitted through the MSPRP are addressed within 11 business
days. • Final Conditional Payment Amount on the Payment Summary Form.
14.2 Final CP Timeline: Required Actions Once the Final CP process has been initiated, you will be required to complete the following actions in order for the case to remain in this process. Failure to complete any of these actions in time will void the Final CP process and you will not be permitted to start the process again. Note: Calendar days include the final day (e.g., “30 calendar days” includes the 30th day).
MSPRP User Guide Chapter 14: Obtaining Final Conditional Payment Amount
14-2
• Request your Final Conditional Payment Amount on the MSPRP within 120 calendar days from the date that you initiated the process (i.e., 120 calendar days from the Final Conditional Payment Process Requested date).
• Settle the case within three (3) business days of requesting the Final Conditional Payment Amount.
• Submit your settlement information on the MSPRP within 30 calendar days of requesting the Final Conditional Payment Amount (i.e., 30 calendar days from the Final Conditional Payment Requested date).
14.3 Final CP Payments To request your Final Conditional Payment Amount, the following conditions apply:
• Can only be requested after the Final CP process has been initiated for a case. • Must be requested within 120 calendar days of initiating the Final CP process. • Can only be requested after all submitted disputes have been resolved.
Note: Once you request a calculation of the final payment amount, you will not be permitted to submit any additional disputes.
• Once calculated, the Final CP amount will remain frozen as long as you complete the following required Final CP actions on time. a. Settle the case within three (3) business days of requesting the Final Conditional Payment
Amount. b. Submit your settlement information on the MSPRP within 30 calendar days of
requesting the Final Conditional Payment Amount (i.e., 30 calendar days from the Final Conditional Payment Requested date).
Note: The Final Conditional Payment Amount is displayed in the Final Conditional Payment Amount field on the Case Information page. It includes all items or services the BCRC has identified as being related to the pending claim that Medicare has paid conditionally to date. This amount is considered your Final Conditional Payment as of the day you requested it.
14.4 Cases Ineligible for Final CP The Final CP process is not available if:
• The user is not the identified debtor or their authorized representative. • The case has Ongoing Responsibility for Medicals (ORM) that have not been terminated. • The Fixed Percentage option was selected for the case. • The Self-Calculated Conditional Payment Amount option was selected for the case. • The case is a No-Fault case. • A Conditional Payment Notice (CPN) was issued (BCRC-owned case). • The case is included in a BCRC special project.
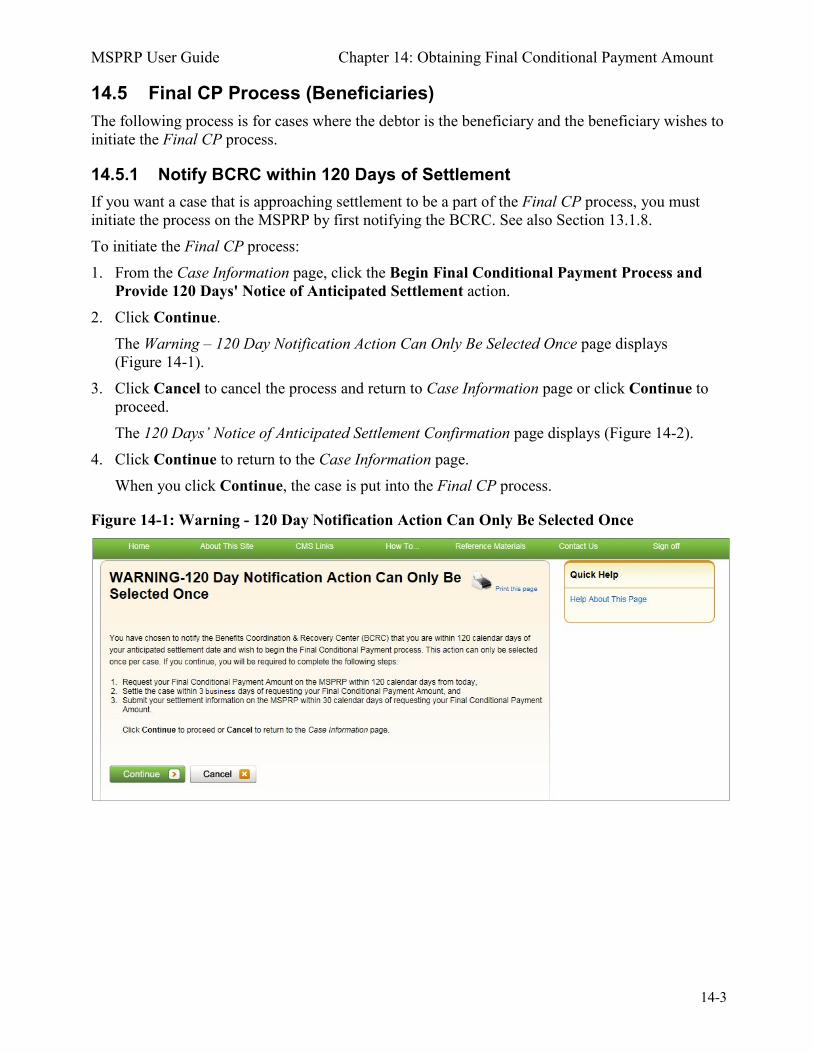
MSPRP User Guide Chapter 14: Obtaining Final Conditional Payment Amount
14-3
14.5 Final CP Process (Beneficiaries) The following process is for cases where the debtor is the beneficiary and the beneficiary wishes to initiate the Final CP process.
14.5.1 Notify BCRC within 120 Days of Settlement If you want a case that is approaching settlement to be a part of the Final CP process, you must initiate the process on the MSPRP by first notifying the BCRC. See also Section 13.1.8. To initiate the Final CP process: 1. From the Case Information page, click the Begin Final Conditional Payment Process and
Provide 120 Days' Notice of Anticipated Settlement action. 2. Click Continue.
The Warning – 120 Day Notification Action Can Only Be Selected Once page displays (Figure 14-1).
3. Click Cancel to cancel the process and return to Case Information page or click Continue to proceed. The 120 Days’ Notice of Anticipated Settlement Confirmation page displays (Figure 14-2).
4. Click Continue to return to the Case Information page. When you click Continue, the case is put into the Final CP process.
Figure 14-1: Warning - 120 Day Notification Action Can Only Be Selected Once
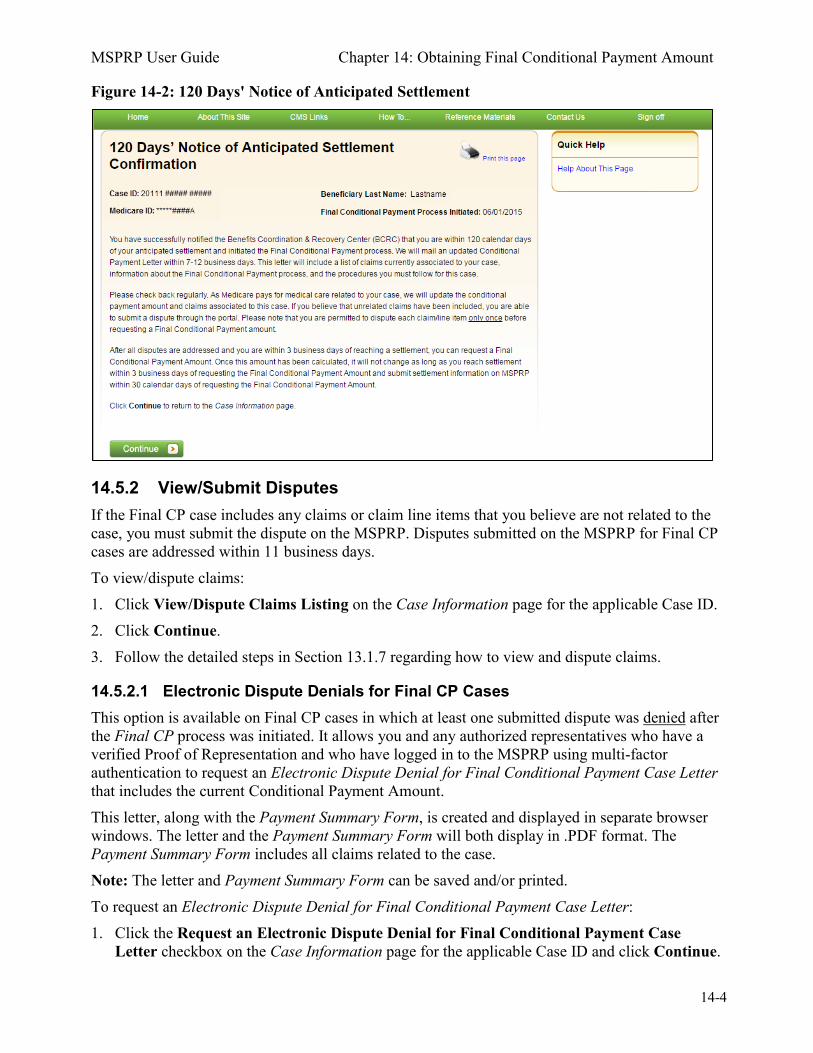
MSPRP User Guide Chapter 14: Obtaining Final Conditional Payment Amount
14-4
Figure 14-2: 120 Days' Notice of Anticipated Settlement
14.5.2 View/Submit Disputes If the Final CP case includes any claims or claim line items that you believe are not related to the case, you must submit the dispute on the MSPRP. Disputes submitted on the MSPRP for Final CP cases are addressed within 11 business days. To view/dispute claims: 1. Click View/Dispute Claims Listing on the Case Information page for the applicable Case ID. 2. Click Continue. 3. Follow the detailed steps in Section 13.1.7 regarding how to view and dispute claims.
14.5.2.1 Electronic Dispute Denials for Final CP Cases This option is available on Final CP cases in which at least one submitted dispute was denied after the Final CP process was initiated. It allows you and any authorized representatives who have a verified Proof of Representation and who have logged in to the MSPRP using multi-factor authentication to request an Electronic Dispute Denial for Final Conditional Payment Case Letter that includes the current Conditional Payment Amount. This letter, along with the Payment Summary Form, is created and displayed in separate browser windows. The letter and the Payment Summary Form will both display in .PDF format. The Payment Summary Form includes all claims related to the case. Note: The letter and Payment Summary Form can be saved and/or printed. To request an Electronic Dispute Denial for Final Conditional Payment Case Letter: 1. Click the Request an Electronic Dispute Denial for Final Conditional Payment Case
Letter checkbox on the Case Information page for the applicable Case ID and click Continue.
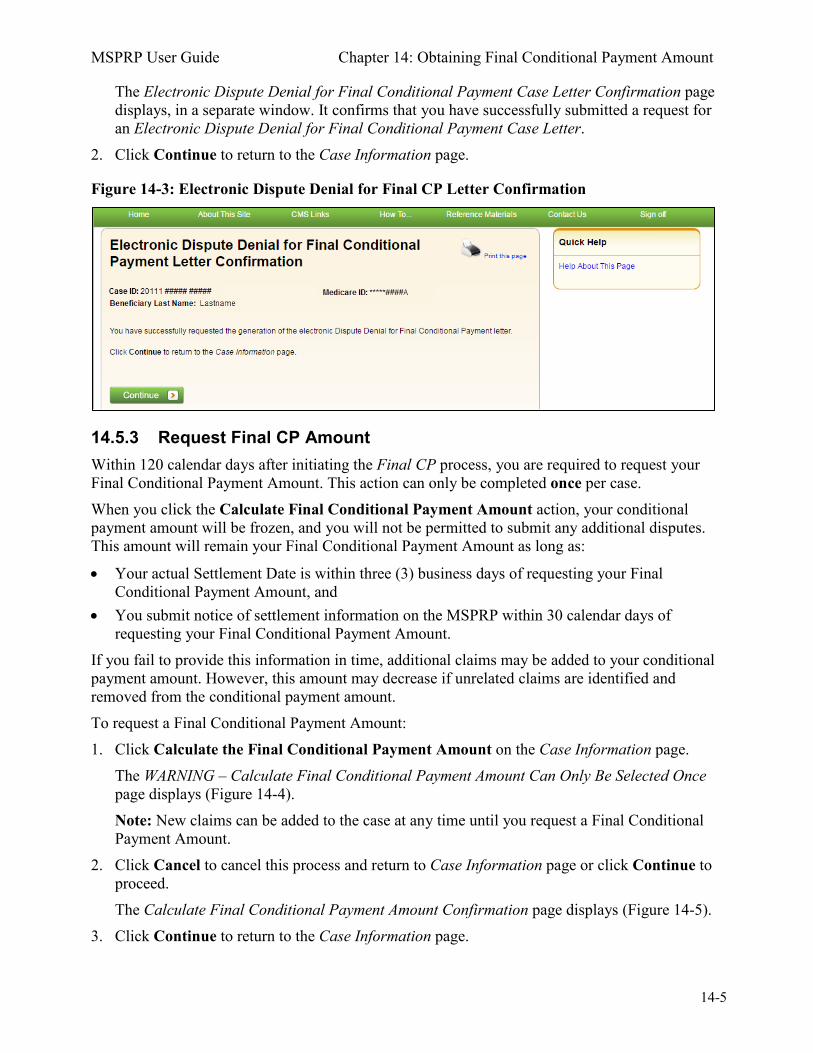
MSPRP User Guide Chapter 14: Obtaining Final Conditional Payment Amount
14-5
The Electronic Dispute Denial for Final Conditional Payment Case Letter Confirmation page displays, in a separate window. It confirms that you have successfully submitted a request for an Electronic Dispute Denial for Final Conditional Payment Case Letter.
2. Click Continue to return to the Case Information page.
Figure 14-3: Electronic Dispute Denial for Final CP Letter Confirmation
14.5.3 Request Final CP Amount Within 120 calendar days after initiating the Final CP process, you are required to request your Final Conditional Payment Amount. This action can only be completed once per case. When you click the Calculate Final Conditional Payment Amount action, your conditional payment amount will be frozen, and you will not be permitted to submit any additional disputes. This amount will remain your Final Conditional Payment Amount as long as:
• Your actual Settlement Date is within three (3) business days of requesting your Final Conditional Payment Amount, and
• You submit notice of settlement information on the MSPRP within 30 calendar days of requesting your Final Conditional Payment Amount.
If you fail to provide this information in time, additional claims may be added to your conditional payment amount. However, this amount may decrease if unrelated claims are identified and removed from the conditional payment amount. To request a Final Conditional Payment Amount: 1. Click Calculate the Final Conditional Payment Amount on the Case Information page.
The WARNING – Calculate Final Conditional Payment Amount Can Only Be Selected Once page displays (Figure 14-4). Note: New claims can be added to the case at any time until you request a Final Conditional Payment Amount.
2. Click Cancel to cancel this process and return to Case Information page or click Continue to proceed. The Calculate Final Conditional Payment Amount Confirmation page displays (Figure 14-5).
3. Click Continue to return to the Case Information page.
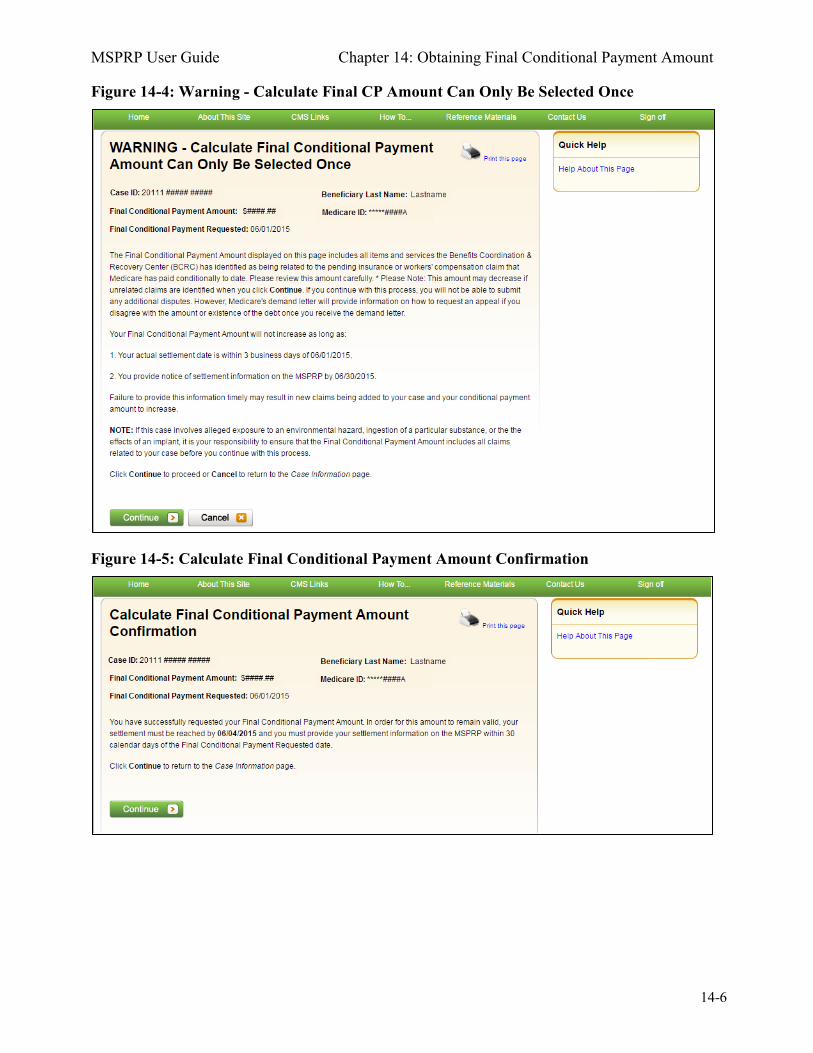
MSPRP User Guide Chapter 14: Obtaining Final Conditional Payment Amount
14-6
Figure 14-4: Warning - Calculate Final CP Amount Can Only Be Selected Once
Figure 14-5: Calculate Final Conditional Payment Amount Confirmation

MSPRP User Guide Chapter 14: Obtaining Final Conditional Payment Amount
14-7
14.5.4 Request Conditional Payment Letter When a case is in the Final CP process and you request a conditional payment letter, electronic or mailed, you will receive one of the following letters, depending on the status of your Final CP case:
• Notice of Anticipated Settlement Letter – generated if the Final Conditional Payment Status is set to Active.
• Final Conditional Payment Letter – generated if the Final Conditional Payment Status is set to Pending NOS or Complete. This letter is only available in an electronic format.
A conditional payment letter includes a Payment Summary Form, which lists all claims paid by Medicare that are being claimed and/or released with respect to the accident, illness, injury, or other incident. See also Sections 13.1.5 and 13.1.6. Note: The ability to request an electronic version of the conditional payment letter is available to beneficiaries and authorized beneficiary representatives who have a verified POR signed by the beneficiary, and who have logged into the MSPRP in using multi-factor authentication. Insurers and their authorized representatives who have a verified Recovery Agent Authorization, who log in using multi-factor authentication, can also request an eCPL for insurer-debtor cases only.
14.5.4.1 Mailed Copy of the Notice of Anticipated Settlement Letter If the status of your Final CP case is Active, and you request a mailed copy of the conditional payment letter, you will receive the Notice of Anticipated Settlement Letter along with a Payment Summary Form. To request a mailed copy of the Notice of Anticipated Settlement Letter: 1. Click the Request a mailed copy of the conditional payment letter checkbox on the Case
Information page for the applicable Case ID and click Continue. The Notice of Anticipated Settlement Letter Confirmation page displays, confirming that you have successfully submitted a request for this conditional payment letter. You and all authorized representatives on the case will receive a copy of the Notice of Anticipated Settlement Letter.
2. Click Continue to return to the Case Information page.
Figure 14-6: Notice of Anticipated Settlement Letter Confirmation
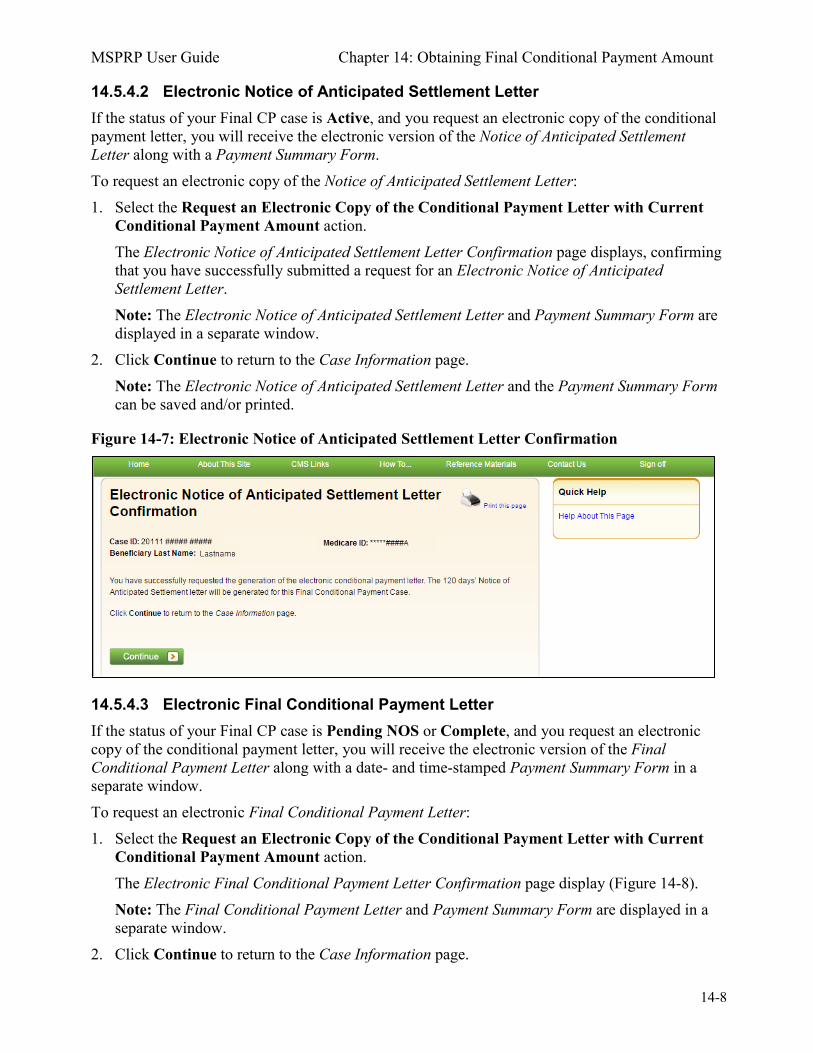
MSPRP User Guide Chapter 14: Obtaining Final Conditional Payment Amount
14-8
14.5.4.2 Electronic Notice of Anticipated Settlement Letter If the status of your Final CP case is Active, and you request an electronic copy of the conditional payment letter, you will receive the electronic version of the Notice of Anticipated Settlement Letter along with a Payment Summary Form. To request an electronic copy of the Notice of Anticipated Settlement Letter: 1. Select the Request an Electronic Copy of the Conditional Payment Letter with Current
Conditional Payment Amount action. The Electronic Notice of Anticipated Settlement Letter Confirmation page displays, confirming that you have successfully submitted a request for an Electronic Notice of Anticipated Settlement Letter. Note: The Electronic Notice of Anticipated Settlement Letter and Payment Summary Form are displayed in a separate window.
2. Click Continue to return to the Case Information page. Note: The Electronic Notice of Anticipated Settlement Letter and the Payment Summary Form can be saved and/or printed.
Figure 14-7: Electronic Notice of Anticipated Settlement Letter Confirmation
14.5.4.3 Electronic Final Conditional Payment Letter If the status of your Final CP case is Pending NOS or Complete, and you request an electronic copy of the conditional payment letter, you will receive the electronic version of the Final Conditional Payment Letter along with a date- and time-stamped Payment Summary Form in a separate window.To request an electronic Final Conditional Payment Letter: 1. Select the Request an Electronic Copy of the Conditional Payment Letter with Current
Conditional Payment Amount action. The Electronic Final Conditional Payment Letter Confirmation page display (Figure 14-8). Note: The Final Conditional Payment Letter and Payment Summary Form are displayed in a separate window.
2. Click Continue to return to the Case Information page.
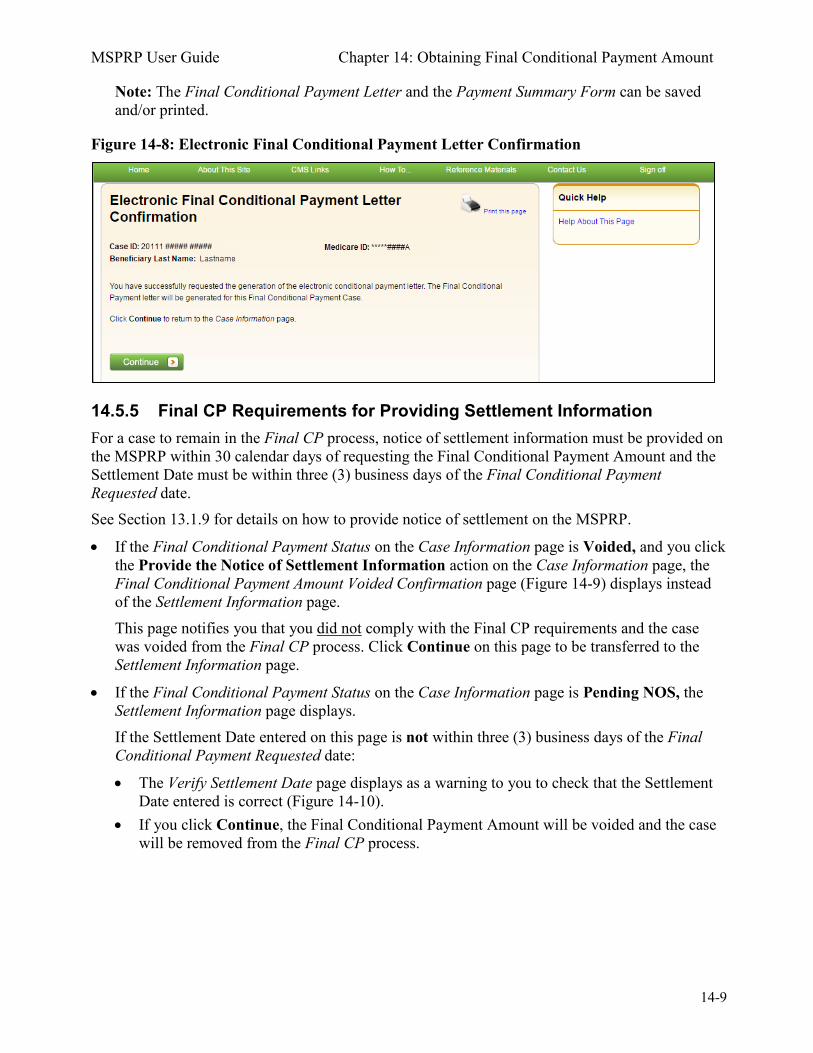
MSPRP User Guide Chapter 14: Obtaining Final Conditional Payment Amount
14-9
Note: The Final Conditional Payment Letter and the Payment Summary Form can be saved and/or printed.
Figure 14-8: Electronic Final Conditional Payment Letter Confirmation
14.5.5 Final CP Requirements for Providing Settlement Information For a case to remain in the Final CP process, notice of settlement information must be provided on the MSPRP within 30 calendar days of requesting the Final Conditional Payment Amount and the Settlement Date must be within three (3) business days of the Final Conditional Payment Requested date. See Section 13.1.9 for details on how to provide notice of settlement on the MSPRP.
• If the Final Conditional Payment Status on the Case Information page is Voided, and you click the Provide the Notice of Settlement Information action on the Case Information page, the Final Conditional Payment Amount Voided Confirmation page (Figure 14-9) displays instead of the Settlement Information page. This page notifies you that you did not comply with the Final CP requirements and the case was voided from the Final CP process. Click Continue on this page to be transferred to the Settlement Information page.
• If the Final Conditional Payment Status on the Case Information page is Pending NOS, the Settlement Information page displays. If the Settlement Date entered on this page is not within three (3) business days of the Final Conditional Payment Requested date:
• The Verify Settlement Date page displays as a warning to you to check that the Settlement Date entered is correct (Figure 14-10).
• If you click Continue, the Final Conditional Payment Amount will be voided and the case will be removed from the Final CP process.
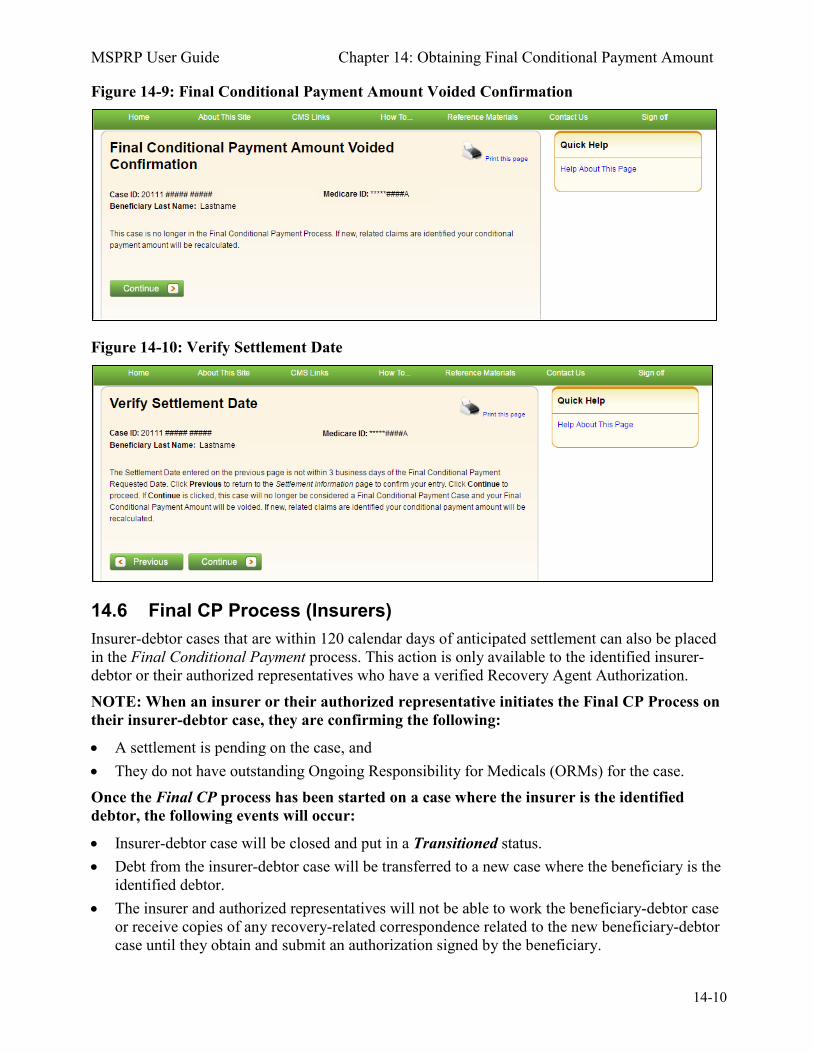
MSPRP User Guide Chapter 14: Obtaining Final Conditional Payment Amount
14-10
Figure 14-9: Final Conditional Payment Amount Voided Confirmation
Figure 14-10: Verify Settlement Date
14.6 Final CP Process (Insurers) Insurer-debtor cases that are within 120 calendar days of anticipated settlement can also be placed in the Final Conditional Payment process. This action is only available to the identified insurer-debtor or their authorized representatives who have a verified Recovery Agent Authorization. NOTE: When an insurer or their authorized representative initiates the Final CP Process on their insurer-debtor case, they are confirming the following:
• A settlement is pending on the case, and • They do not have outstanding Ongoing Responsibility for Medicals (ORMs) for the case. Once the Final CP process has been started on a case where the insurer is the identified debtor, the following events will occur:
• Insurer-debtor case will be closed and put in a Transitioned status. • Debt from the insurer-debtor case will be transferred to a new case where the beneficiary is the
identified debtor. • The insurer and authorized representatives will not be able to work the beneficiary-debtor case
or receive copies of any recovery-related correspondence related to the new beneficiary-debtor case until they obtain and submit an authorization signed by the beneficiary.
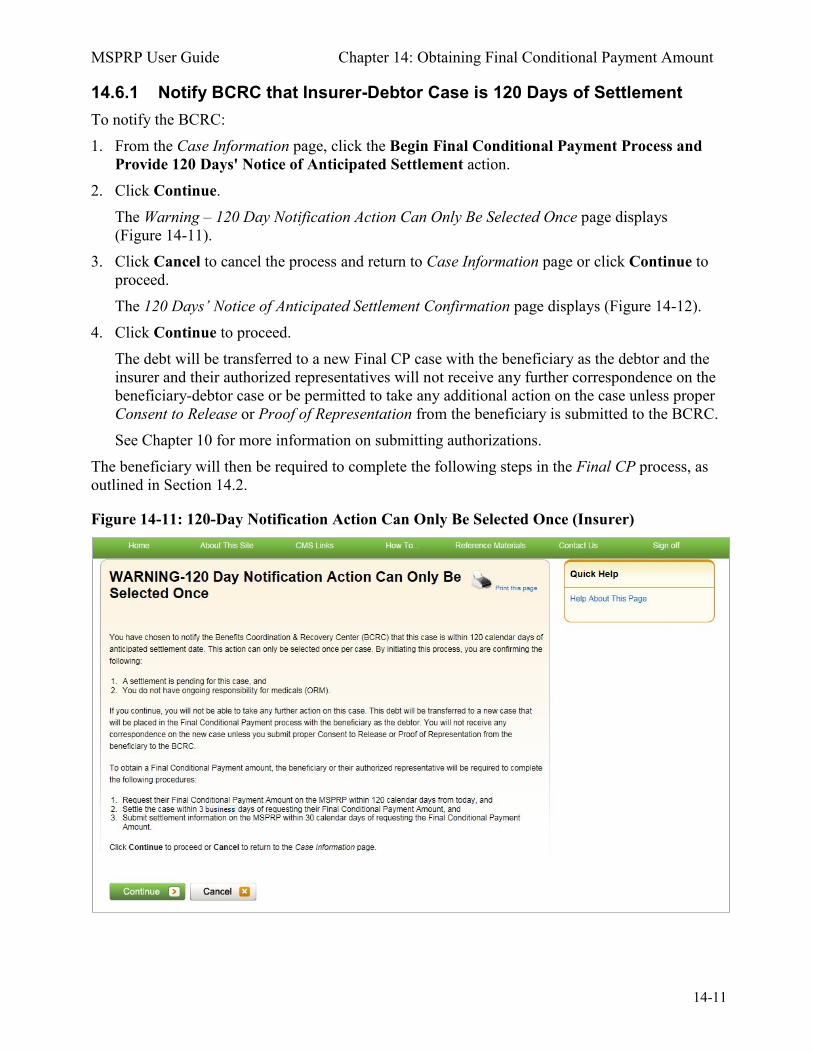
MSPRP User Guide Chapter 14: Obtaining Final Conditional Payment Amount
14-11
14.6.1 Notify BCRC that Insurer-Debtor Case is 120 Days of Settlement To notify the BCRC: 1. From the Case Information page, click the Begin Final Conditional Payment Process and
Provide 120 Days' Notice of Anticipated Settlement action. 2. Click Continue.
The Warning – 120 Day Notification Action Can Only Be Selected Once page displays (Figure 14-11).
3. Click Cancel to cancel the process and return to Case Information page or click Continue to proceed. The 120 Days’ Notice of Anticipated Settlement Confirmation page displays (Figure 14-12).
4. Click Continue to proceed. The debt will be transferred to a new Final CP case with the beneficiary as the debtor and the insurer and their authorized representatives will not receive any further correspondence on the beneficiary-debtor case or be permitted to take any additional action on the case unless proper Consent to Release or Proof of Representation from the beneficiary is submitted to the BCRC. See Chapter 10 for more information on submitting authorizations.
The beneficiary will then be required to complete the following steps in the Final CP process, as outlined in Section 14.2.
Figure 14-11: 120-Day Notification Action Can Only Be Selected Once (Insurer)
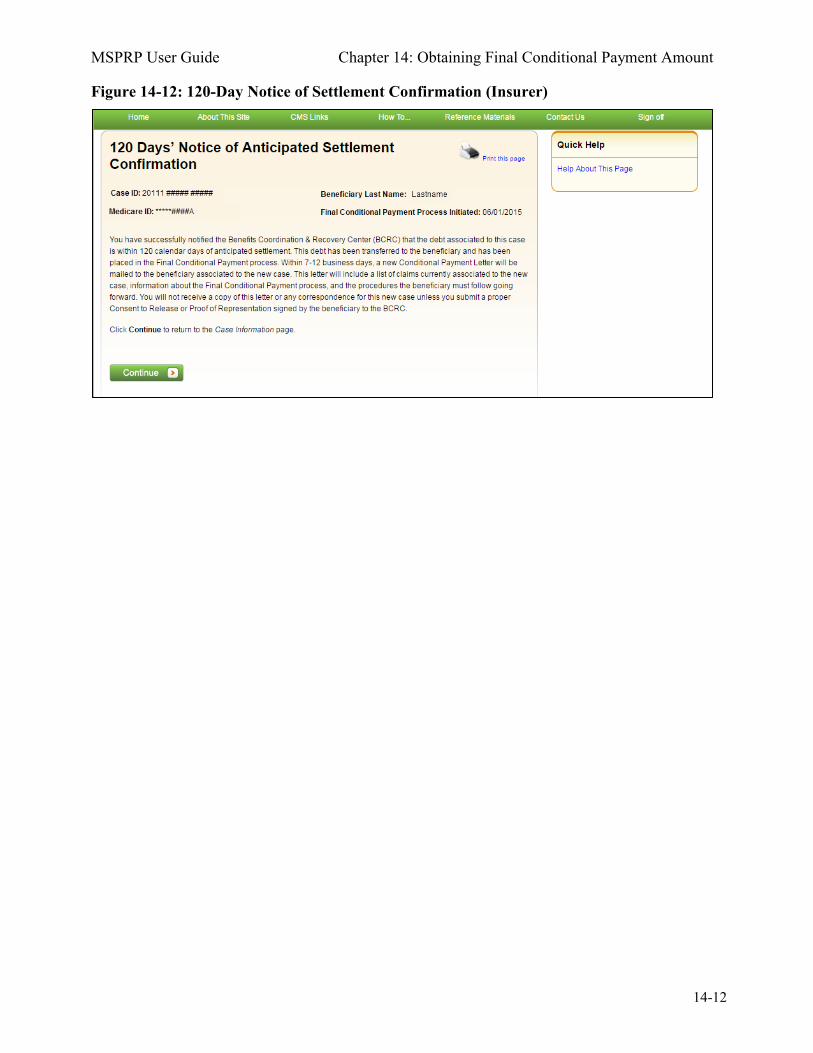
MSPRP User Guide Chapter 14: Obtaining Final Conditional Payment Amount
14-12
Figure 14-12: 120-Day Notice of Settlement Confirmation (Insurer)
MSPRP User Guide Chapter 15: Requesting Redeterminations, Waivers, and Compromises
15-1
Chapter 15: Requesting Redeterminations, Waivers, and Compromises
The MSPRP provides authorized users with the following options if the user disagrees with the balance detailed in the demand letter: The user may submit a request to appeal the demand amount (i.e., Redetermination), to waive the amount (in full or in part), or to reduce the amount (i.e., Compromise), depending on the circumstances.
• Redetermination (Appeal) Requests: If you are a beneficiary-debtor or insurer-debtor, or are a verified authorized representative, and you have received a demand letter, you have the right to appeal the determination if you disagree that you owe money, as explained in the demand letter, or if you disagree with the amount that you owe (see Section 15.1).
• Waiver (Dismiss) Requests: If you are the beneficiary-debtor, or a verified authorized representative of the beneficiary, and a demand letter has been sent for the case, you have the right to request that Medicare waive recovery of the demand amount owed in part or in full. The amount may be waived or dismissed if you are not at fault for Medicare making conditional payments and if paying back the money would cause financial hardship or would be unfair for some other reason (see Section 15.2). (Note: The right to request a waiver of recovery is separate from the right to appeal the demand letter. However, both requests can be made at the same time.)
• Compromise Requests: If you are the beneficiary-debtor, or a verified authorized representative of the beneficiary, you have the right to submit a request for Medicare to accept less than the amount owed. A compromise request can be submitted either before the case has settled (pre-demand settlement) or after the case has settled (post-demand settlement) (see Section 15.3).
Each request option is described in more detail in the following sections.
15.1 Redetermination Requests (First Level Appeal) To begin the process, go to the Case Information page, click the View/Submit Redetermination (First Level Appeal) action, and then submit a redetermination request through the Redetermination (First Level Appeal) Submission page. This page allows you to identify claims that you believe are not related to this case and include them in the request. You will be required to select at least one claim on this page and provide documentation (in the form of written notes in the text box provided or via uploaded documents) to support the request on a subsequent page in this process. Once Medicare receives your redetermination, they will review the request and decide if the original demand amount is correct and send you a letter that explains the reasons for their decision. This letter will also explain the steps you will need to follow to appeal that decision if it is less than fully favorable to you. While your redetermination request is being processed at any level of review, no collection action will be taken.
MSPRP User Guide Chapter 15: Requesting Redeterminations, Waivers, and Compromises
15-2
Note: After submitting a redetermination request successfully, you can view a read-only version of that request by clicking the View/Submit Redetermination (First Level Appeal) action on the Case Information page or clicking the Waiver/Redetermination/Compromise tab on the Case Information page to see the following details for the first redetermination that has been requested for the current Case ID: Received (date), Decision, and the Decision Date (see Table 13-4 for details). Additionally, non-beneficiary users and account managers can view activity details for a successful redetermination submitted for a case on the Account Activity page (Figure 8-37).
15.1.1 Redetermination Timeline The following information provides a timeline for each phase of the redetermination process:
• You have 120 calendar days from the date the demand letter is sent to submit a redetermination request.
• If you do not file a redetermination request within the first 30 days after receipt of the demand letter, interest begins to accrue.
• Once the redetermination request is submitted, Medicare will make a decision on the case within 60 days.
• If additional documentation is submitted after the redetermination was requested, Medicare has an additional 14 days (equaling 74 days from the original redetermination request) to make a decision.
15.1.2 Before Requesting a Redetermination When submitting a redetermination request (first level appeal), please note the following:
• The case must be in a Demand Issued status and a Demand letter has been sent for the case (as determined by the Demand Letter Mail Date).
• A redetermination request can only be submitted once either in the mail or on the MSPRP. • The request must be submitted within 120 days from the date of receipt of the demand letter.
15.1.3 Submitting a Redetermination Request To submit a Redetermination Request: 1. Go to the Case Information page and click the View/Submit Redetermination (First Level
Appeal) action. The Redetermination (First Level Appeal) Submission page appears. The details shown for each of the listed claims depends on your authorization level. All claims appear in the same order in the Payment Summary Form (PSF). If a redetermination has already been submitted on the MSPRP when you click this action, you will be directed to the read-only View Redetermination (First Level Appeal) Submission page.
2. Click the Redetermination check boxes to select one or more claims from the list to include with the redetermination request. Clicking Select All selects all the claims.
3. Click Continue to proceed. You will be directed to the Redetermination (First Level Appeal Verification page (Figure 15-2) where you will verify your selected claims and submit your supporting documentation. Click Cancel to return to the Case Information page without saving any data.
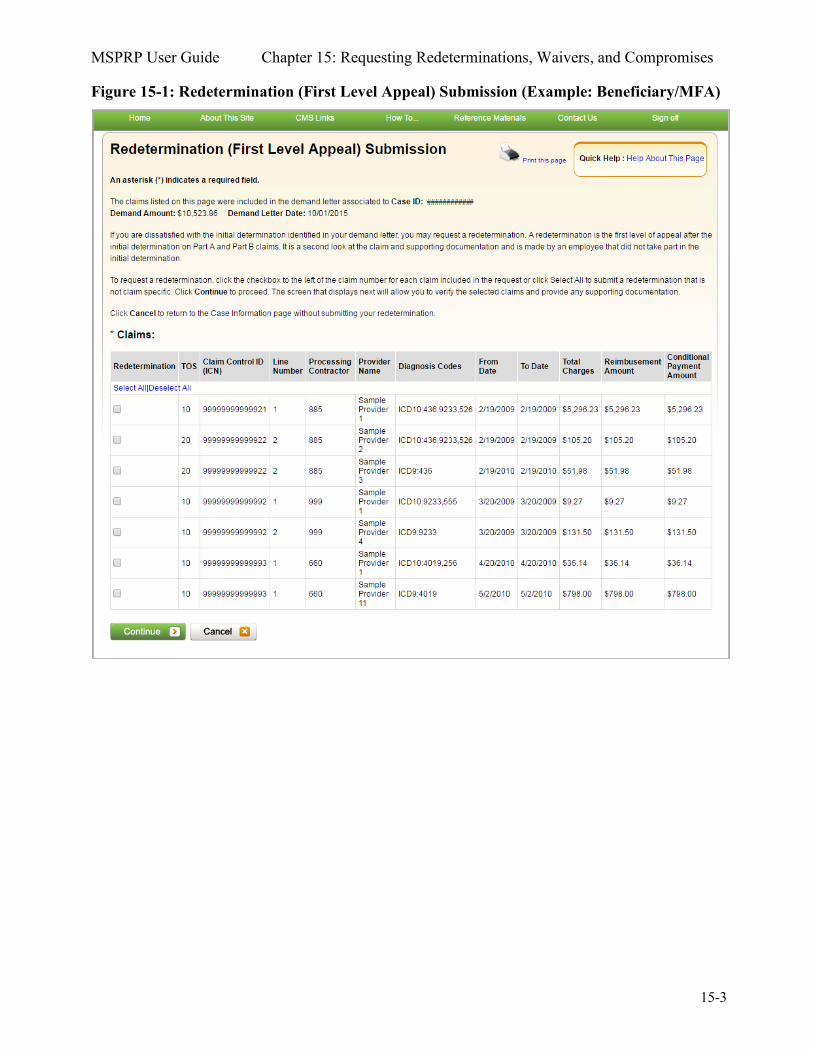
MSPRP User Guide Chapter 15: Requesting Redeterminations, Waivers, and Compromises
15-3
Figure 15-1: Redetermination (First Level Appeal) Submission (Example: Beneficiary/MFA)
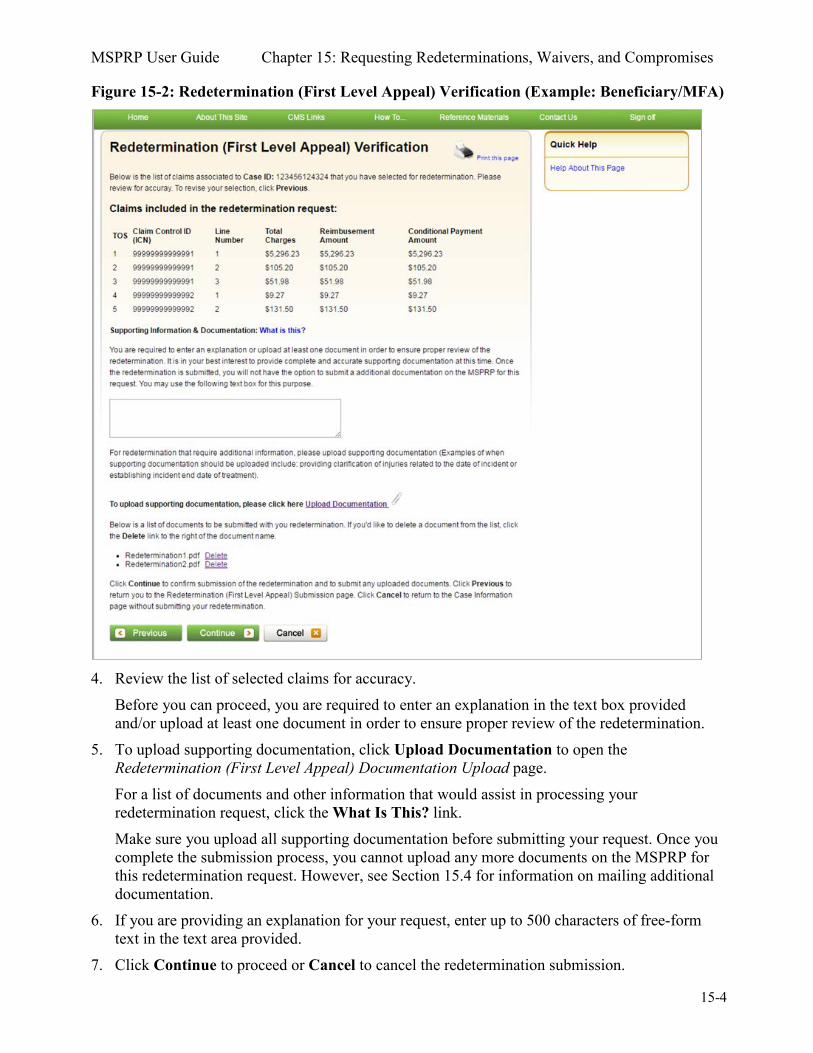
MSPRP User Guide Chapter 15: Requesting Redeterminations, Waivers, and Compromises
15-4
Figure 15-2: Redetermination (First Level Appeal) Verification (Example: Beneficiary/MFA)
4. Review the list of selected claims for accuracy. Before you can proceed, you are required to enter an explanation in the text box provided and/or upload at least one document in order to ensure proper review of the redetermination.
5. To upload supporting documentation, click Upload Documentation to open the Redetermination (First Level Appeal) Documentation Upload page. For a list of documents and other information that would assist in processing your redetermination request, click the What Is This? link. Make sure you upload all supporting documentation before submitting your request. Once you complete the submission process, you cannot upload any more documents on the MSPRP for this redetermination request. However, see Section 15.4 for information on mailing additional documentation.
6. If you are providing an explanation for your request, enter up to 500 characters of free-form text in the text area provided.
7. Click Continue to proceed or Cancel to cancel the redetermination submission.
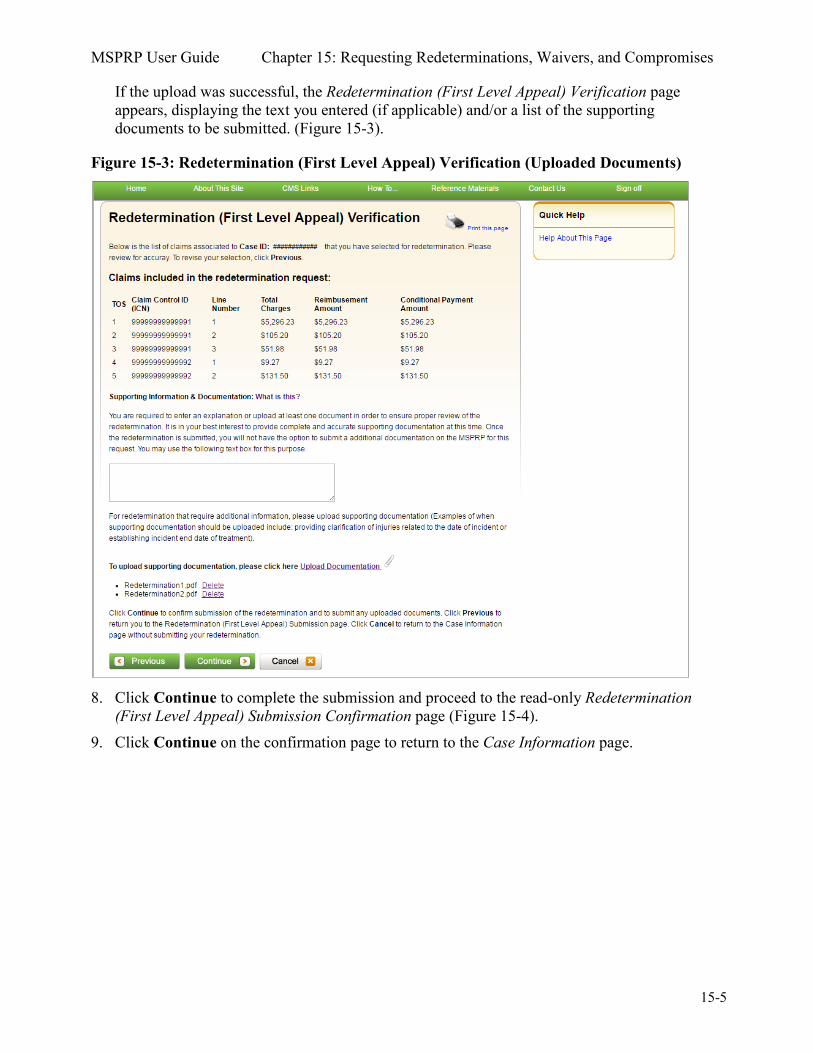
MSPRP User Guide Chapter 15: Requesting Redeterminations, Waivers, and Compromises
15-5
If the upload was successful, the Redetermination (First Level Appeal) Verification page appears, displaying the text you entered (if applicable) and/or a list of the supporting documents to be submitted. (Figure 15-3).
Figure 15-3: Redetermination (First Level Appeal) Verification (Uploaded Documents)
8. Click Continue to complete the submission and proceed to the read-only Redetermination (First Level Appeal) Submission Confirmation page (Figure 15-4).
9. Click Continue on the confirmation page to return to the Case Information page.
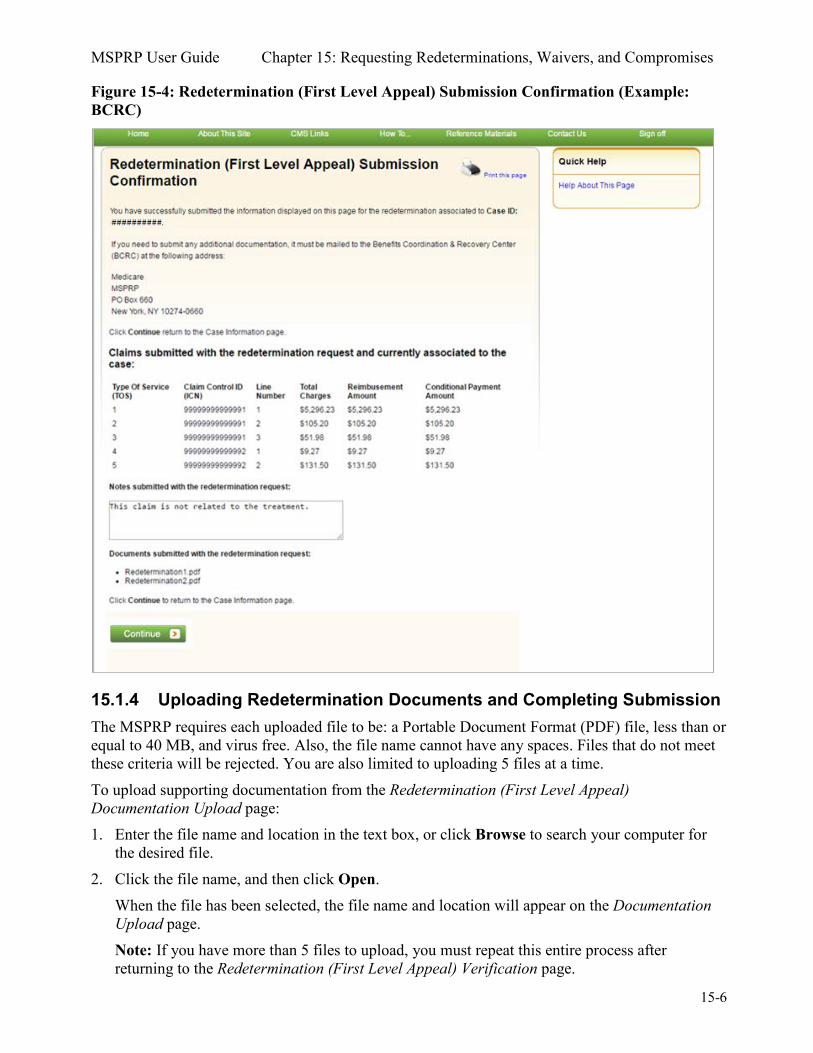
MSPRP User Guide Chapter 15: Requesting Redeterminations, Waivers, and Compromises
15-6
Figure 15-4: Redetermination (First Level Appeal) Submission Confirmation (Example: BCRC)
15.1.4 Uploading Redetermination Documents and Completing Submission The MSPRP requires each uploaded file to be: a Portable Document Format (PDF) file, less than or equal to 40 MB, and virus free. Also, the file name cannot have any spaces. Files that do not meet these criteria will be rejected. You are also limited to uploading 5 files at a time. To upload supporting documentation from the Redetermination (First Level Appeal) Documentation Upload page: 1. Enter the file name and location in the text box, or click Browse to search your computer for
the desired file. 2. Click the file name, and then click Open.
When the file has been selected, the file name and location will appear on the Documentation Upload page. Note: If you have more than 5 files to upload, you must repeat this entire process after returning to the Redetermination (First Level Appeal) Verification page.
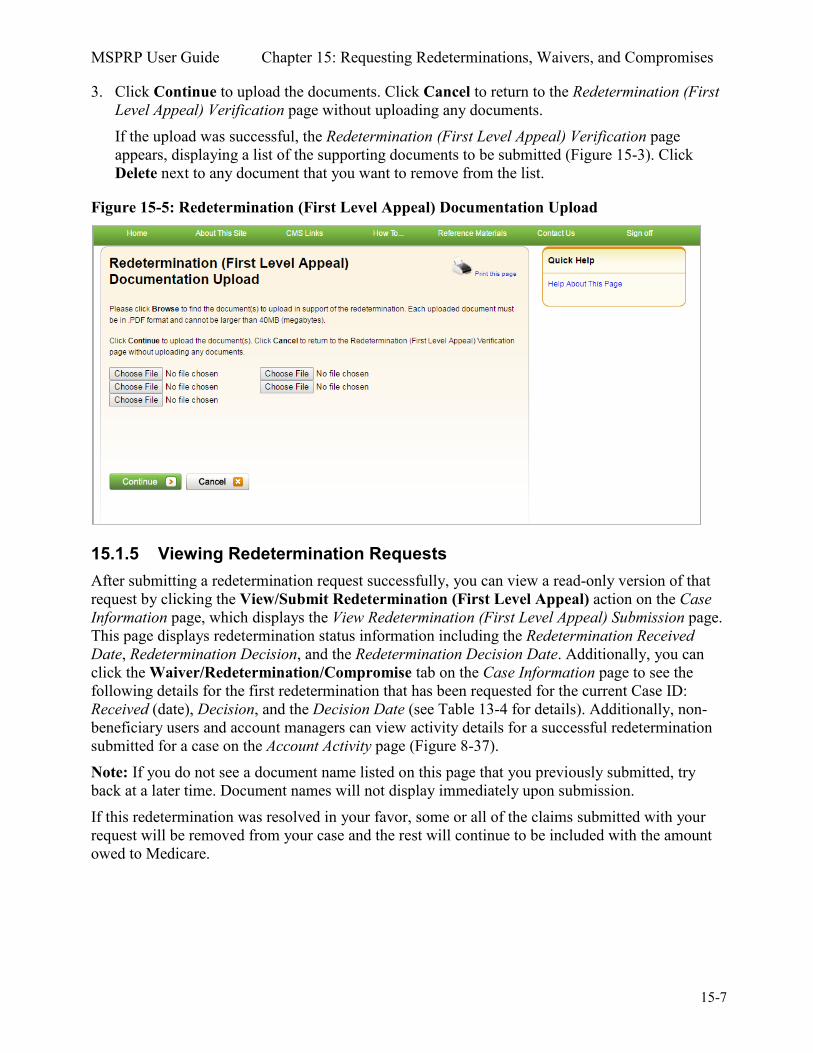
MSPRP User Guide Chapter 15: Requesting Redeterminations, Waivers, and Compromises
15-7
3. Click Continue to upload the documents. Click Cancel to return to the Redetermination (First Level Appeal) Verification page without uploading any documents. If the upload was successful, the Redetermination (First Level Appeal) Verification page appears, displaying a list of the supporting documents to be submitted (Figure 15-3). Click Delete next to any document that you want to remove from the list.
Figure 15-5: Redetermination (First Level Appeal) Documentation Upload
15.1.5 Viewing Redetermination Requests After submitting a redetermination request successfully, you can view a read-only version of that request by clicking the View/Submit Redetermination (First Level Appeal) action on the Case Information page, which displays the View Redetermination (First Level Appeal) Submission page. This page displays redetermination status information including the Redetermination Received Date, Redetermination Decision, and the Redetermination Decision Date. Additionally, you can click the Waiver/Redetermination/Compromise tab on the Case Information page to see the following details for the first redetermination that has been requested for the current Case ID: Received (date), Decision, and the Decision Date (see Table 13-4 for details). Additionally, non-beneficiary users and account managers can view activity details for a successful redetermination submitted for a case on the Account Activity page (Figure 8-37). Note: If you do not see a document name listed on this page that you previously submitted, try back at a later time. Document names will not display immediately upon submission. If this redetermination was resolved in your favor, some or all of the claims submitted with your request will be removed from your case and the rest will continue to be included with the amount owed to Medicare.
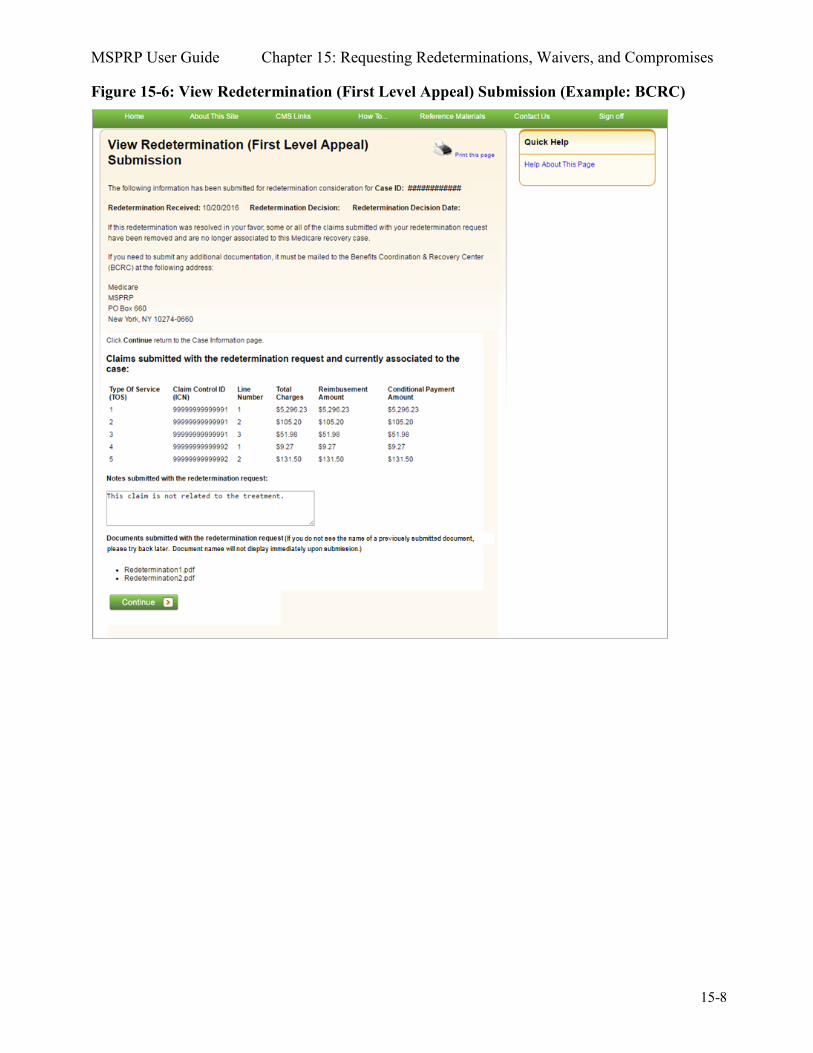
MSPRP User Guide Chapter 15: Requesting Redeterminations, Waivers, and Compromises
15-8
Figure 15-6: View Redetermination (First Level Appeal) Submission (Example: BCRC)
MSPRP User Guide Chapter 15: Requesting Redeterminations, Waivers, and Compromises
15-9
15.2 Waiver Requests To begin the waiver request submission process, go to the Case Information page, click the Submit Waiver Request action, and review information about the submission process on the Waiver Submission page. From there, you can access the Waiver Documentation Upload page, where you may begin your waiver request. This page allows you to upload documentation to support a waiver request. You will be required to provide documentation (in the form of written notes in the text box provided or via uploaded documents) to support the request, depending on your reason for the waiver request. Once the BCRC receives your waiver request, they will review it and decide if the waiver of recovery can be granted and send you a letter that explains the reason for their decision. This letter will also explain the steps you will need to follow to appeal that decision if it is less than fully favorable to you. Note: The right to request a waiver of recovery is separate from the right to appeal the demand amount; however, both a waiver and an appeal may be requested at the same time. Once a decision is made, the decision will be displayed on the MSPRP on the Waiver/Redetermination/Compromise tab of the Case Information page.
15.2.1 Before Requesting a Waiver When submitting a waiver request, please note the following:
• The case cannot have any waiver requests. • A demand letter must have been sent.
15.2.2 Submitting a Waiver Request To submit a waiver request: 1. Go to the Case Information page and click the Submit Waiver Request action.
The Waiver Submission page appears (Figure 15-7). 2. Review details about the waiver submission process and conditions for a waiver.
If you are claiming financial hardship, you must submit the SSA 632 Request for Waiver form, which requests specific information about the beneficiary’s income, assets, expenses, and the reasons why waiver of recovery should be granted. Click the SSA 632 Request for Waiver hyperlink on this page to access this form and instructions on completing it. Optionally, you may also download the SSA 632 form on the cms.gov website.
3. Download and complete the SSA 632 Request for Waiver form, if you are claiming financial hardship. Save the form to your computer. You will upload it on the Waiver Verification page.
4. Click Continue to proceed. The Waiver Verification page appears (Figure 15-8). Click Cancel to return to the Case Information page.
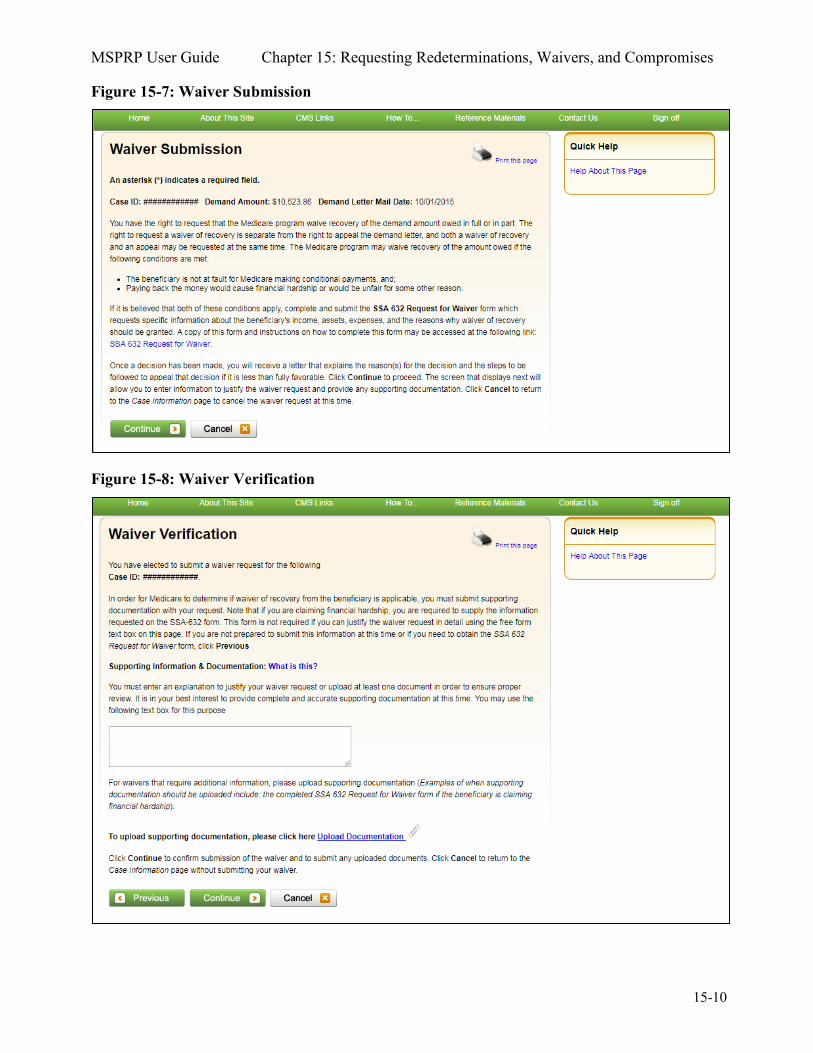
MSPRP User Guide Chapter 15: Requesting Redeterminations, Waivers, and Compromises
15-10
Figure 15-7: Waiver Submission
Figure 15-8: Waiver Verification
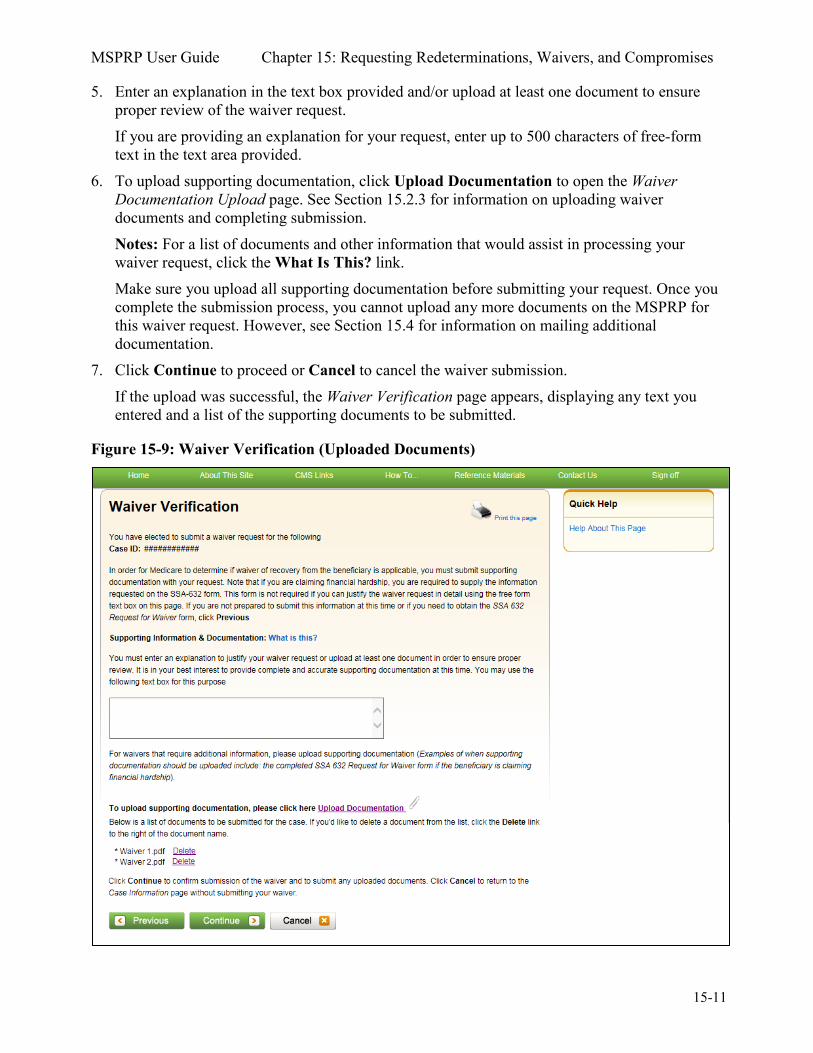
MSPRP User Guide Chapter 15: Requesting Redeterminations, Waivers, and Compromises
15-11
5. Enter an explanation in the text box provided and/or upload at least one document to ensure proper review of the waiver request. If you are providing an explanation for your request, enter up to 500 characters of free-form text in the text area provided.
6. To upload supporting documentation, click Upload Documentation to open the Waiver Documentation Upload page. See Section 15.2.3 for information on uploading waiver documents and completing submission. Notes: For a list of documents and other information that would assist in processing your waiver request, click the What Is This? link. Make sure you upload all supporting documentation before submitting your request. Once you complete the submission process, you cannot upload any more documents on the MSPRP for this waiver request. However, see Section 15.4 for information on mailing additional documentation.
7. Click Continue to proceed or Cancel to cancel the waiver submission. If the upload was successful, the Waiver Verification page appears, displaying any text you entered and a list of the supporting documents to be submitted.
Figure 15-9: Waiver Verification (Uploaded Documents)
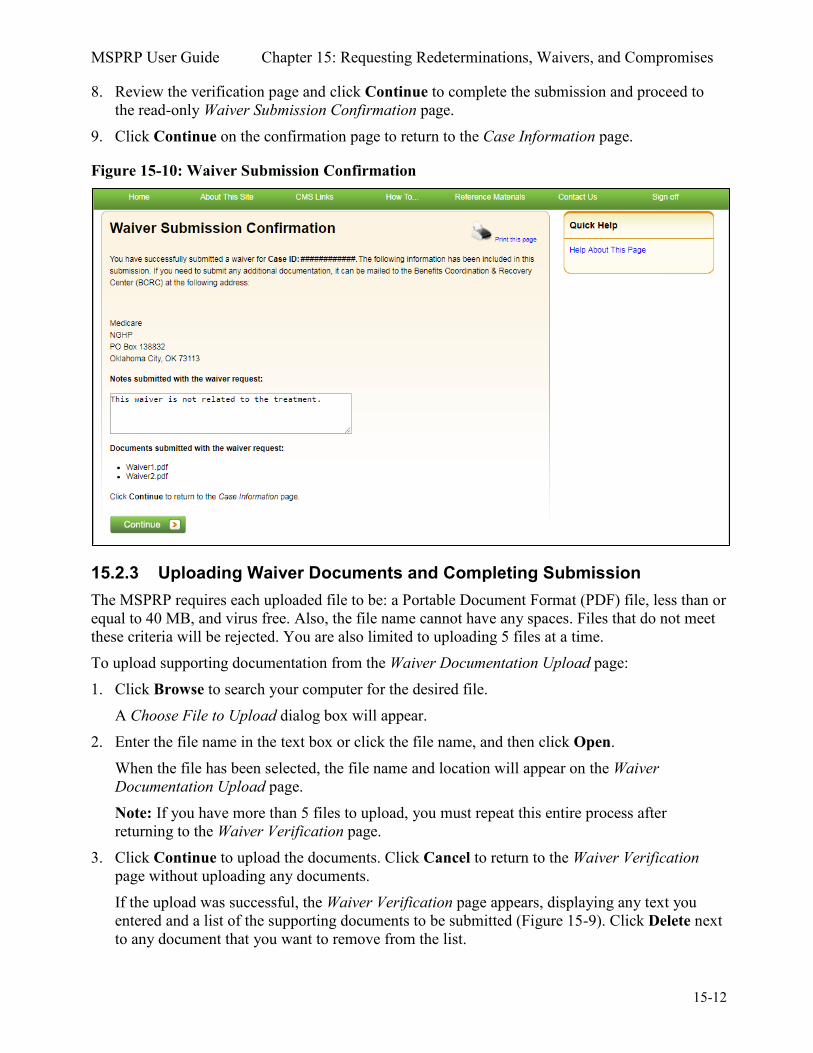
MSPRP User Guide Chapter 15: Requesting Redeterminations, Waivers, and Compromises
15-12
8. Review the verification page and click Continue to complete the submission and proceed to the read-only Waiver Submission Confirmation page.
9. Click Continue on the confirmation page to return to the Case Information page.
Figure 15-10: Waiver Submission Confirmation
15.2.3 Uploading Waiver Documents and Completing Submission The MSPRP requires each uploaded file to be: a Portable Document Format (PDF) file, less than or equal to 40 MB, and virus free. Also, the file name cannot have any spaces. Files that do not meet these criteria will be rejected. You are also limited to uploading 5 files at a time. To upload supporting documentation from the Waiver Documentation Upload page: 1. Click Browse to search your computer for the desired file.
A Choose File to Upload dialog box will appear. 2. Enter the file name in the text box or click the file name, and then click Open.
When the file has been selected, the file name and location will appear on the Waiver Documentation Upload page. Note: If you have more than 5 files to upload, you must repeat this entire process after returning to the Waiver Verification page.
3. Click Continue to upload the documents. Click Cancel to return to the Waiver Verification page without uploading any documents. If the upload was successful, the Waiver Verification page appears, displaying any text you entered and a list of the supporting documents to be submitted (Figure 15-9). Click Delete next to any document that you want to remove from the list.

MSPRP User Guide Chapter 15: Requesting Redeterminations, Waivers, and Compromises
15-13
Figure 15-11: Waiver Documentation Upload
15.2.4 Viewing Waiver Request Details After submitting a waiver request successfully on the MSPRP, you can view details about your request and all requests submitted for a case by clicking the Waiver/Redetermination/ Compromise tab on the Case Information page. This tab displays a record of each waiver that has been requested for the current Case ID and includes details such as the Received (date), Decision, and the Decision Date (see Table 13-4 for details). Additionally, non-beneficiary users and account managers can view activity details for all successful waivers submitted for a case on the Account Activity page (see Figure 8-37).
15.3 Compromise Requests To begin the compromise request submission process, go to the Case Information page, click the Submit Compromise Request action, and then submit a request through the Compromise Request page. This page allows you to submit a request for compromise before or after settlement. You will be required to enter the amount of compromise, state the reason why you believe a compromise should be granted, and provide documentation (in the form of written notes in the text box provided or via uploaded documents) to support the request. Once the BCRC receives your compromise request, they will forward it to the appropriate Centers for Medicare & Medicaid Services (CMS) Regional Offices (RO) for review. A staff member from the Regional Office will decide if your request can be granted and contact you once a decision is made. Note: The BCRC does not have the authority to approve or deny compromise requests. A compromise decision made by CMS is final and is not subject to appeal.
15.3.1 Before Requesting a Compromise When submitting a compromise request, please note the following:
• The case must be in an Open, Bill Issued, Demand Issued, or Demand in Process status. • Compromise requests cannot be submitted when the case status is Claim Retrieval, Closed, In
Development, or Transitioned.
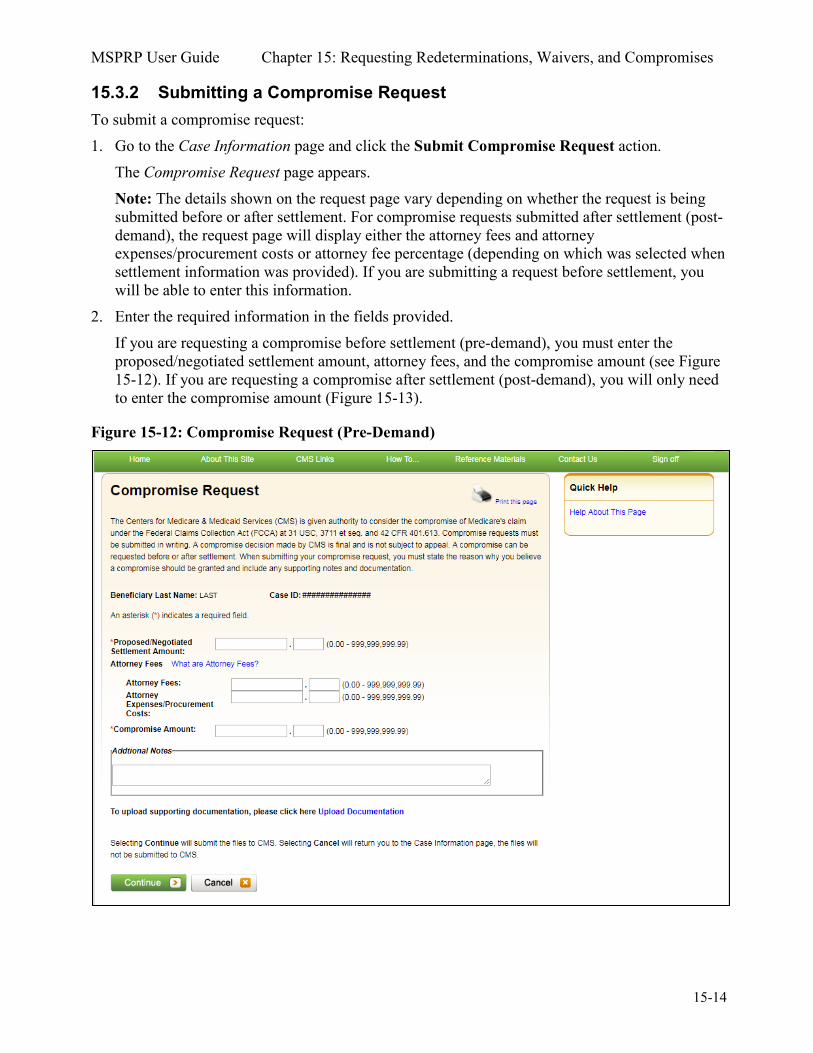
MSPRP User Guide Chapter 15: Requesting Redeterminations, Waivers, and Compromises
15-14
15.3.2 Submitting a Compromise Request To submit a compromise request: 1. Go to the Case Information page and click the Submit Compromise Request action.
The Compromise Request page appears. Note: The details shown on the request page vary depending on whether the request is being submitted before or after settlement. For compromise requests submitted after settlement (post-demand), the request page will display either the attorney fees and attorney expenses/procurement costs or attorney fee percentage (depending on which was selected when settlement information was provided). If you are submitting a request before settlement, you will be able to enter this information.
2. Enter the required information in the fields provided. If you are requesting a compromise before settlement (pre-demand), you must enter the proposed/negotiated settlement amount, attorney fees, and the compromise amount (see Figure 15-12). If you are requesting a compromise after settlement (post-demand), you will only need to enter the compromise amount (Figure 15-13).
Figure 15-12: Compromise Request (Pre-Demand)
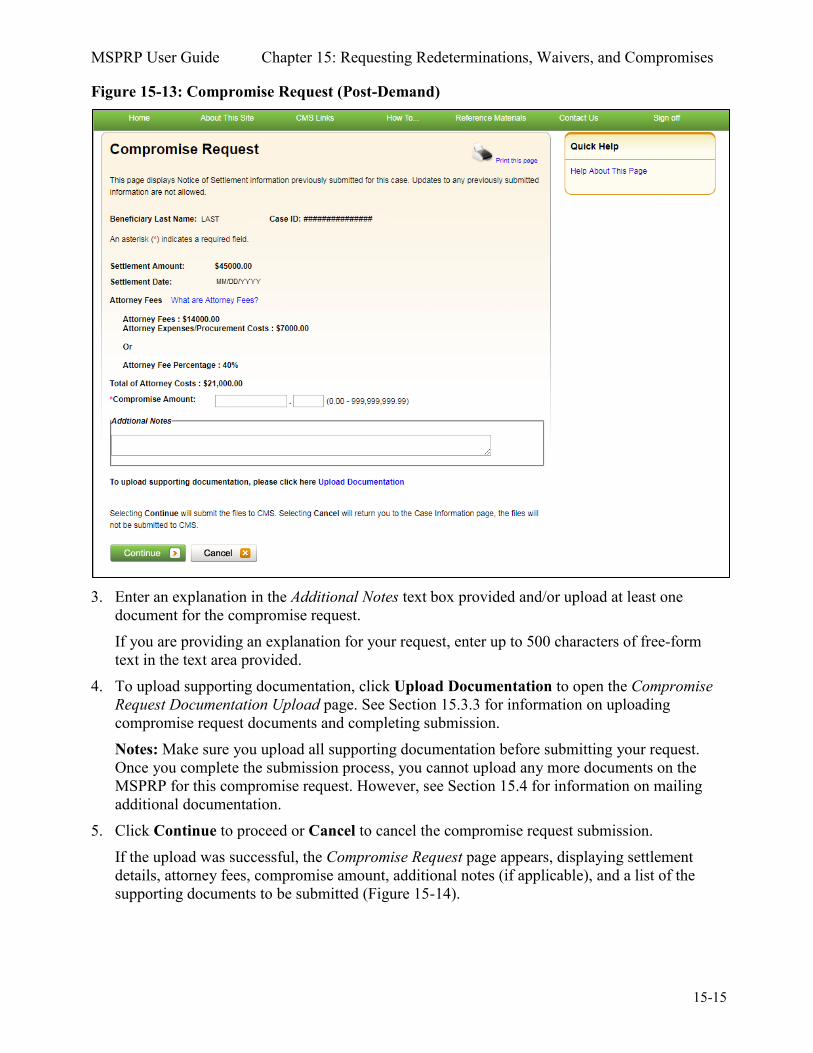
MSPRP User Guide Chapter 15: Requesting Redeterminations, Waivers, and Compromises
15-15
Figure 15-13: Compromise Request (Post-Demand)
3. Enter an explanation in the Additional Notes text box provided and/or upload at least one document for the compromise request. If you are providing an explanation for your request, enter up to 500 characters of free-form text in the text area provided.
4. To upload supporting documentation, click Upload Documentation to open the Compromise Request Documentation Upload page. See Section 15.3.3 for information on uploading compromise request documents and completing submission. Notes: Make sure you upload all supporting documentation before submitting your request. Once you complete the submission process, you cannot upload any more documents on the MSPRP for this compromise request. However, see Section 15.4 for information on mailing additional documentation.
5. Click Continue to proceed or Cancel to cancel the compromise request submission. If the upload was successful, the Compromise Request page appears, displaying settlement details, attorney fees, compromise amount, additional notes (if applicable), and a list of the supporting documents to be submitted (Figure 15-14).
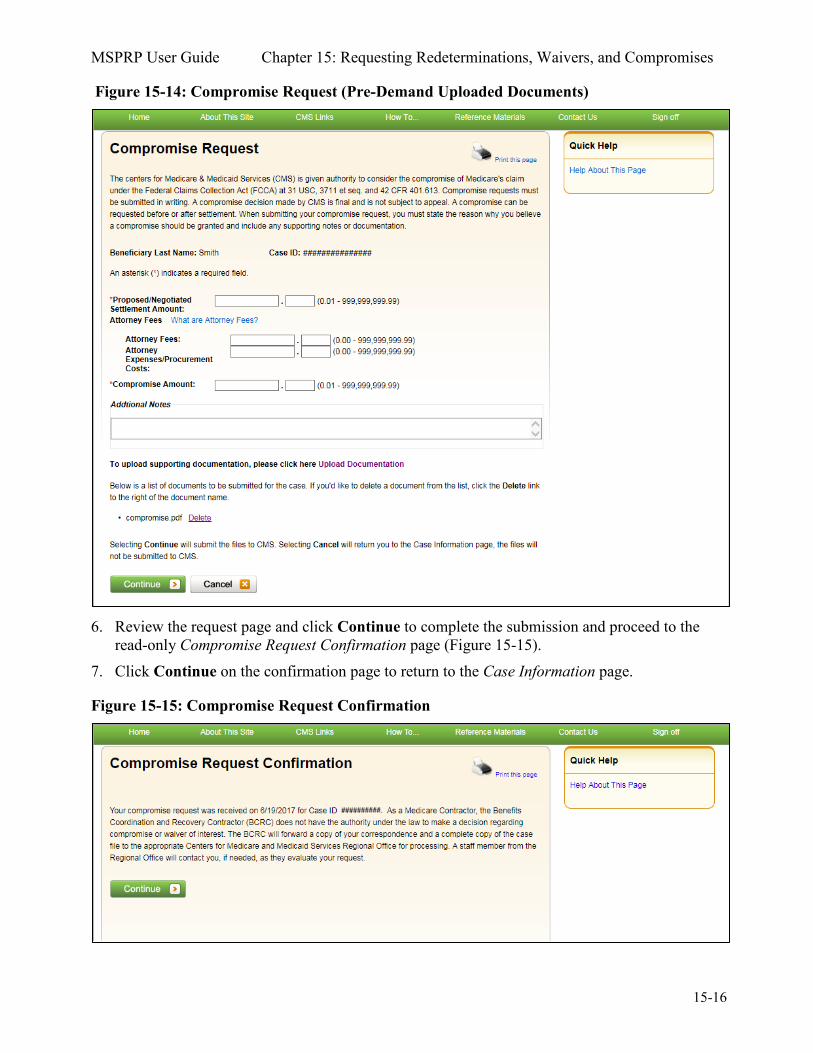
MSPRP User Guide Chapter 15: Requesting Redeterminations, Waivers, and Compromises
15-16
Figure 15-14: Compromise Request (Pre-Demand Uploaded Documents)
6. Review the request page and click Continue to complete the submission and proceed to the read-only Compromise Request Confirmation page (Figure 15-15).
7. Click Continue on the confirmation page to return to the Case Information page.
Figure 15-15: Compromise Request Confirmation

MSPRP User Guide Chapter 15: Requesting Redeterminations, Waivers, and Compromises
15-17
15.3.3 Uploading Compromise Documents and Completing Submission The MSPRP requires each uploaded file to be: a Portable Document Format (PDF) file, less than or equal to 40 MB, and virus free. Also, the file name cannot have any spaces. Files that do not meet these criteria will be rejected. You are also limited to uploading 5 files at a time. To upload supporting documentation from the Compromise Request Documentation Upload page: 1. Click Browse to search your computer for the desired file.
A Choose File to Upload dialog box will appear. 2. Enter the file name in the text box or click the file name, and then click Open.
When the file has been selected, the file name and location will appear on the Compromise Request Documentation Upload page. Note: If you have more than 5 files to upload, you must repeat this entire process after returning to the Compromise Request page.
3. Click Continue to upload the documents. Click Cancel to return to the Compromise Request page without uploading any documents. If the upload was successful, the Compromise Request page appears, displaying a list of the supporting documents to be submitted (Figure 15-14). Click Delete next to any document that you want to remove from the list.
Figure 15-16: Compromise Request Documentation Upload
15.3.4 Viewing Compromise Request Details After submitting a compromise request successfully on the MSPRP, you can view details about your request and all requests submitted for a case by clicking the Waiver/Redetermination/ Compromise tab on the Case Information page. This tab displays a record of each compromise that has been requested for the current Case ID and includes details such as the Received (date), Decision, and the Decision Date (see Table 13-4 for details). Additionally, non-beneficiary users and account managers can view activity details for all successful compromises submitted for a case on the Account Activity page (see Figure 8-37).
MSPRP User Guide Chapter 15: Requesting Redeterminations, Waivers, and Compromises
15-18
15.4 Submitting Additional Documentation If you need to provide additional supporting documentation for the redetermination, waiver, or compromise request you submitted on the MSPRP, you must mail it to one of the following addresses.
For CRC Cases Medicare Commercial Repayment Center (CRC) PO Box 269003 Oklahoma City, OK 73126 For BCRC Cases Medicare MSPRP PO Box 660 New York, NY 10274-0660

MSPRP User Guide Chapter 16: Log Off
16-1
Chapter 16: Log Off
From any page in the MSPRP, click the Logoff link at the top right side of the page. The system ends your session and displays the Sign off successful page. Once this displays you can close your browser.
Figure 16-1: Sign Off Successful
MSPRP User Guide Chapter 17: Troubleshooting
17-1
Chapter 17: Troubleshooting
17.1 Replace Account Representative Use the Edit button on the Update Corporate Information page. This can be accomplished from the Account Settings box on your home page (see Section 8.2.1).
17.2 Replace Account Manager If an Account Manager must be replaced for Corporate accounts, the Account Representative must contact the EDI department and request replacement. AMs cannot be replaced using the MSPRP site.
17.3 Unsuccessful Account Registration • Previously Used EIN: During initial registration, an error message will display on the
Corporate Information page if you enter an EIN that has already been registered. Change the EIN and continue the registration process.
• Previously Used SSN: During initial registration, an error message will display on the Representative Information or Beneficiary Information page if you enter an SSN that has already been registered. If you incorrectly entered the SSN, correct it and continue the registration process.
• Registration Denied: During initial registration, an error message will display if the beneficiary entered for Representative account type is not found in the database. Registration cannot be completed for this beneficiary.
17.4 Unsuccessful Account Setup Account PIN Error
The PIN for the Account ID will be sent to you (for Representative accounts) or the AAR (for Corporate accounts), after the New Registration step has been completed. If, during account setup, the AM receives an Invalid Account ID/PIN Combination error message, check the numbers on the mailing received. An Account ID should always contain five digits and a PIN should have four digits. If your numbers are shorter, add leading zeroes to make them the proper length. You have three tries to enter the PIN correctly before the account is locked. Contact an EDI representative to confirm the Account ID/PIN combination or to unlock the PIN.
Account ID Already Registered During account setup, an error message will display on the Account Setup page if you enter an Account ID and PIN that has already been registered. The message will indicate that the account is already set up. Because the account is already set up, you cannot self-register as the AM for the Account ID, or repeat the account setup process. There can be only one AM for each Account ID.
MSPRP User Guide Chapter 17: Troubleshooting
17-2
If you had previously completed account setup for the Account ID and registered as the AM, go back to the Welcome! page and enter your login ID and password to sign in to the MSPRP site. If you are not the AM, contact the existing AM to add you as an AD if you need access to the system.
Account Manager and Account Representative E-mail Addresses Match An error message will display during account setup if the AM’s e-mail matches the e-mail address of any AR recorded in the system. ARs cannot be users of the MSPRP site for any Account ID. Click Continue on the error message to be returned to your home page. If the wrong individual was named as the AR in the New Registration step, contact an EDI representative to make the necessary correction.
17.5 Unsuccessful Account Designee Invitation Account Designee E-mail Address Matches Account Representative or Account Manager E-mail Address
An error message will display if, while an AM is adding an AD to an Account ID, it is found that the designee’s e-mail address matches the e-mail address of any AR or AM recorded in the system. ARs cannot be users of the MSPRP site for any Account ID, and AMs cannot also be designees. Click Continue on the error message to be returned to your home page.
Account Designee E-mail Address Matches Account Designee Already Associated with Account
An error message will display if, while an AM is adding an AD to an Account ID, it is found that the designee’s e-mail address matches the e-mail address of an AD already assigned to the same Account ID. Return to the Designee Listing page to manage the AD’s case access.
17.6 Unsuccessful Account Designee Registration Incorrect Passphrase
The passphrase must be provided to the AD by the AM, outside the system. It will not be included in the invitation e-mail. The AM’s name is contained in the invitation e-mail and can also be found on the registration page where the error is received. Contact your AM to obtain the passphrase. If your AM does not remember the passphrase, they can log in to the MSPRP site and create another passphrase by accessing the Designee Maintenance page and selecting the details associated with your last name. They can then provide the correct passphrase to you. The passphrase is case-sensitive.
17.7 Unsuccessful Login Invalid Login ID
Refer to Chapter 6. Inactive Login ID
If you receive this error message at login, your access to the MSPRP site has been deactivated due to inactivity in the last 180 days. Contact an EDI representative to reactivate your login ID and create a new password.
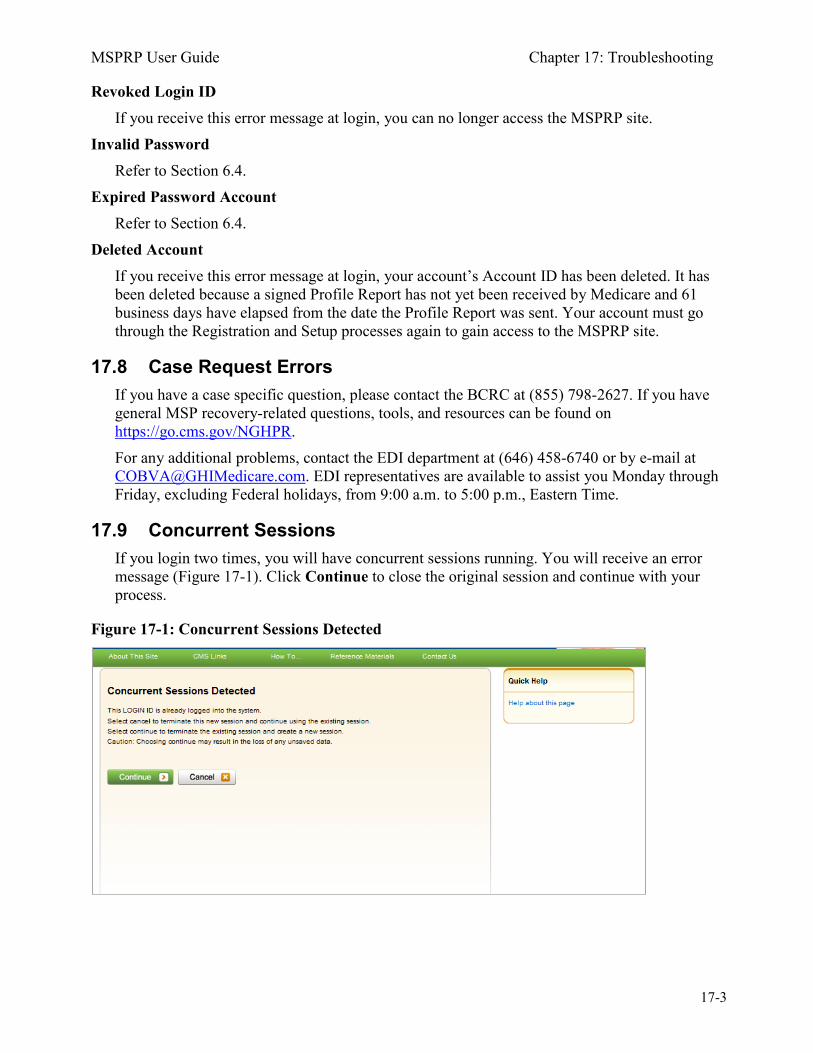
MSPRP User Guide Chapter 17: Troubleshooting
17-3
Revoked Login ID If you receive this error message at login, you can no longer access the MSPRP site.
Invalid Password Refer to Section 6.4.
Expired Password Account Refer to Section 6.4.
Deleted Account If you receive this error message at login, your account’s Account ID has been deleted. It has been deleted because a signed Profile Report has not yet been received by Medicare and 61 business days have elapsed from the date the Profile Report was sent. Your account must go through the Registration and Setup processes again to gain access to the MSPRP site.
17.8 Case Request Errors If you have a case specific question, please contact the BCRC at (855) 798-2627. If you have general MSP recovery-related questions, tools, and resources can be found on https://go.cms.gov/NGHPR. For any additional problems, contact the EDI department at (646) 458-6740 or by e-mail at [email protected]. EDI representatives are available to assist you Monday through Friday, excluding Federal holidays, from 9:00 a.m. to 5:00 p.m., Eastern Time.
17.9 Concurrent Sessions If you login two times, you will have concurrent sessions running. You will receive an error message (Figure 17-1). Click Continue to close the original session and continue with your process.
Figure 17-1: Concurrent Sessions Detected
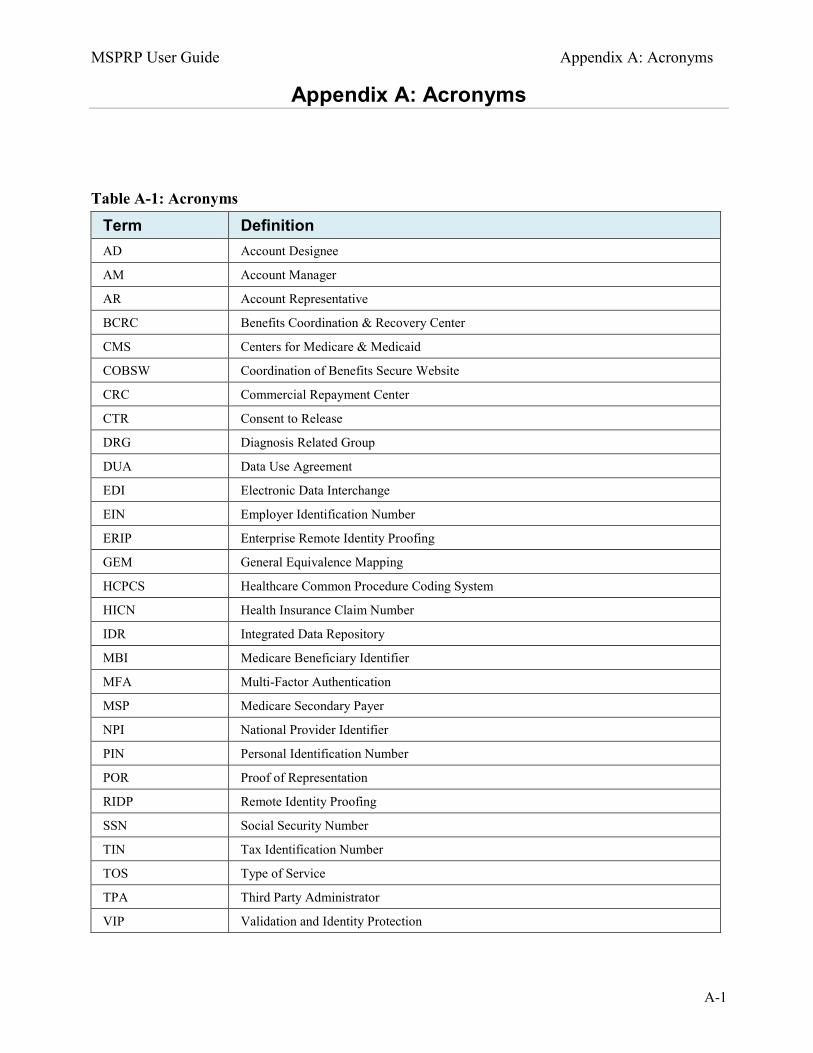
MSPRP User Guide Appendix A: Acronyms
A-1
Appendix A: Acronyms
Table A-1: Acronyms
Term Definition AD Account Designee
AM Account Manager
AR Account Representative
BCRC Benefits Coordination & Recovery Center
CMS Centers for Medicare & Medicaid
COBSW Coordination of Benefits Secure Website
CRC Commercial Repayment Center
CTR Consent to Release
DRG Diagnosis Related Group
DUA Data Use Agreement
EDI Electronic Data Interchange
EIN Employer Identification Number
ERIP Enterprise Remote Identity Proofing
GEM General Equivalence Mapping
HCPCS Healthcare Common Procedure Coding System
HICN Health Insurance Claim Number
IDR Integrated Data Repository
MBI Medicare Beneficiary Identifier
MFA Multi-Factor Authentication
MSP Medicare Secondary Payer
NPI National Provider Identifier
PIN Personal Identification Number
POR Proof of Representation
RIDP Remote Identity Proofing
SSN Social Security Number
TIN Tax Identification Number
TOS Type of Service
TPA Third Party Administrator
VIP Validation and Identity Protection
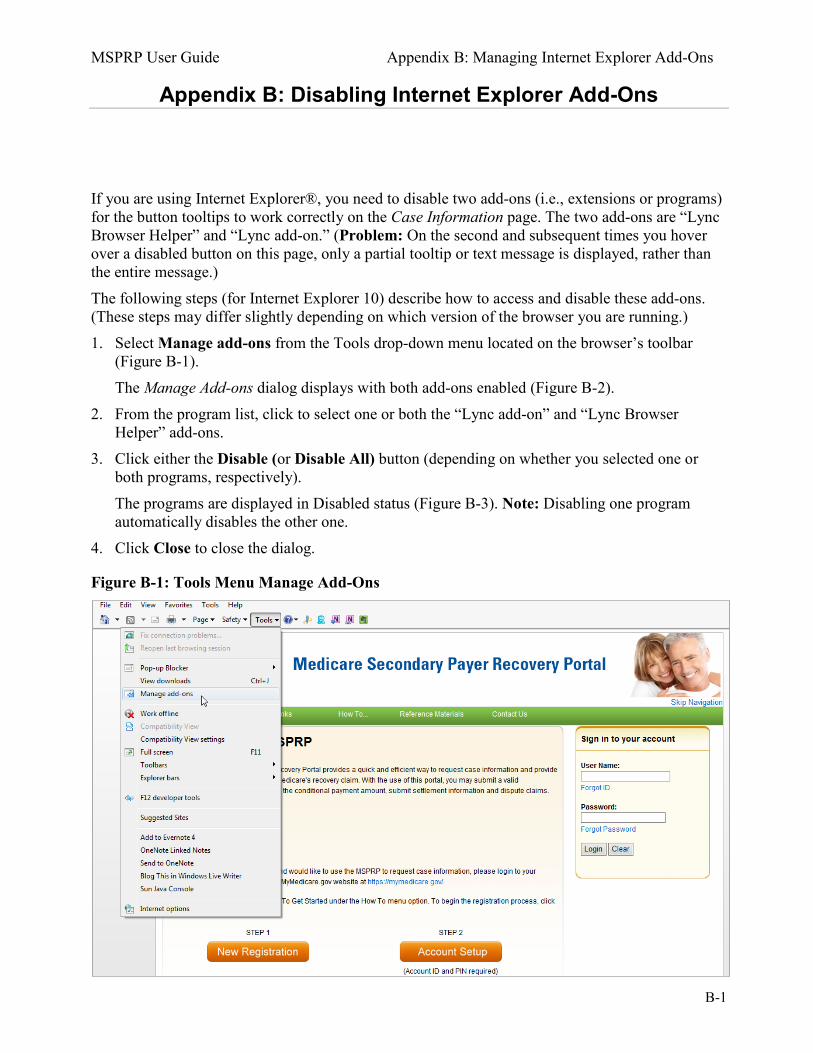
MSPRP User Guide Appendix B: Managing Internet Explorer Add-Ons
B-1
Appendix B: Disabling Internet Explorer Add-Ons
If you are using Internet Explorer®, you need to disable two add-ons (i.e., extensions or programs) for the button tooltips to work correctly on the Case Information page. The two add-ons are “Lync Browser Helper” and “Lync add-on.” (Problem: On the second and subsequent times you hover over a disabled button on this page, only a partial tooltip or text message is displayed, rather than the entire message.) The following steps (for Internet Explorer 10) describe how to access and disable these add-ons. (These steps may differ slightly depending on which version of the browser you are running.) 1. Select Manage add-ons from the Tools drop-down menu located on the browser’s toolbar
(Figure B-1). The Manage Add-ons dialog displays with both add-ons enabled (Figure B-2).
2. From the program list, click to select one or both the “Lync add-on” and “Lync Browser Helper” add-ons.
3. Click either the Disable (or Disable All) button (depending on whether you selected one or both programs, respectively). The programs are displayed in Disabled status (Figure B-3). Note: Disabling one program automatically disables the other one.
4. Click Close to close the dialog.
Figure B-1: Tools Menu Manage Add-Ons
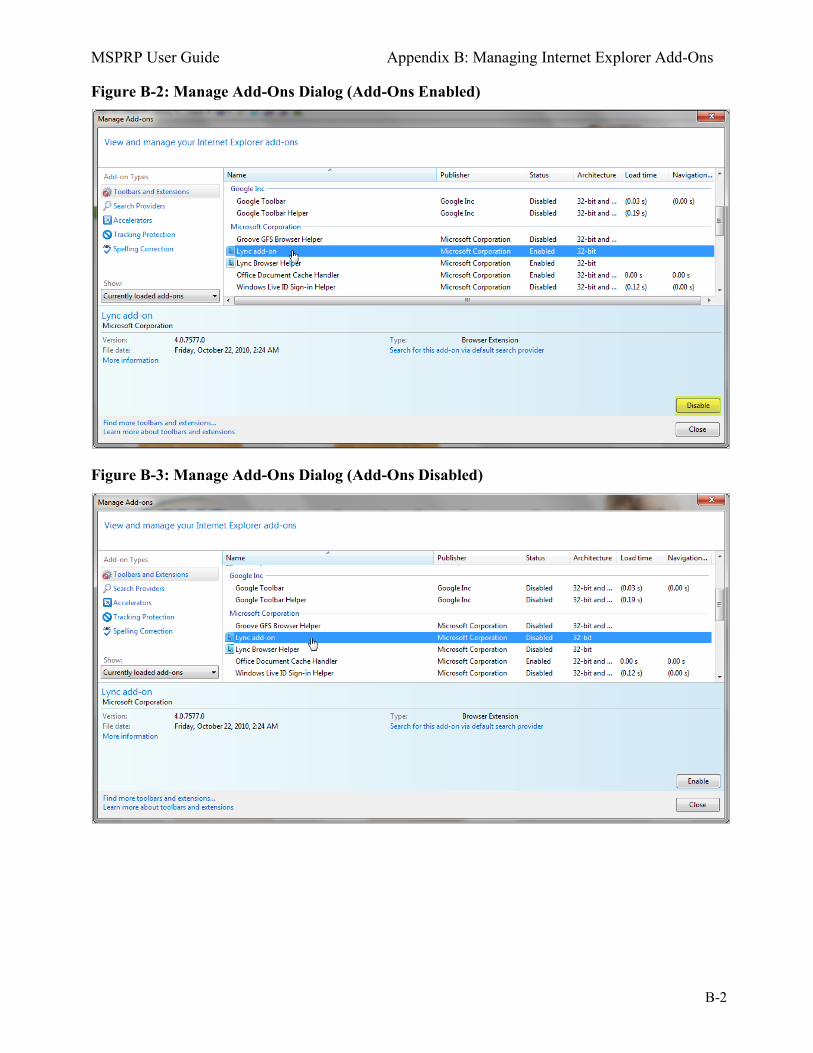
MSPRP User Guide Appendix B: Managing Internet Explorer Add-Ons
B-2
Figure B-2: Manage Add-Ons Dialog (Add-Ons Enabled)
Figure B-3: Manage Add-Ons Dialog (Add-Ons Disabled)
MSPRP User Guide Appendix C: Previous Version Changes
C-1
Appendix C: Previous Version Changes
Version 4.1
• To comply with the requirements of Section 501 of the Medicare Access and CHIP (Children’s Health Insurance Program) Reauthorization Act (MACRA) of 2015, the Medicare ID field has been updated to accept either the Health Insurance Claim Number (HICN) or the Medicare Beneficiary Identifier (MBI) (changes throughout).
• At the request of the Centers for Medicare & Medicaid Services (CMS), the Payment Summary Form has been updated to include the Part-A Diagnosis Related Group (DRG) codes and the Part-B Current Procedural Terminology/Healthcare Common Procedure Coding System (CPT/HCPCS) codes (Section 13.1.5). The Claims Listing page has also been updated to display the DRG Cd and CPT/HCPCS columns (Section 13.1.7).
• To prevent users from requesting a redetermination for a case before the Demand has been issued, the criteria for submitting case redeterminations has been clarified. Users may only submit a redetermination if a Demand letter has been sent, as determined by the Demand Letter Mail Date (Section 15.1.2).
Version 4.0
• To make the Case Information page more user friendly, the page has been redesigned using tabs to display case information. Additionally, some information that used to be displayed in the header has been moved to a tab that displays similar data. Case actions still remain dependent on the user authorization level and status of the case (Section13.1).
• The Case Information page Waiver/Redetermination/Compromise tab only displays when a waiver, redetermination, or compromise has been submitted for a case. The label displayed on the tab is dependent on the type of case being viewed. If viewing an ongoing responsibility for medicals (ORM) case, where waivers and compromise submissions don’t apply, the tab label will display as “Redetermination.” If viewing a non-ORM case, the tab label will display as “Waiver/Redetermination/ Compromise” (Section13.1).
• To provide consistent information, the original BCRC Payment Summary Form (PSF) has been updated to include information currently shown in the CRC Statement of Reimbursement (SOR), such as reported diagnosis codes, total reimbursed amount and National Provider Identifiers (NPIs). This new PSF format is now the standard for both organizations (Figure 13-10).
If you need to provide additional supporting documentation for a submitted redetermination, waiver, or compromise request, the address for the Commercial Repayment Center (CRC) has been updated for CRC cases. (Section 15.4). Version 3.9 To streamline and automate the waiver request process, beneficiary-debtors and their verified authorized representatives now have the ability to request waivers of the Medicare demand amount (in part or in full) on beneficiary-debtor cases through the portal (Sections 13.1.12 and 15.2).
MSPRP User Guide Appendix C: Previous Version Changes
C-2
To streamline and automate the compromise request process, beneficiary-debtors and their verified authorized representatives can now submit pre- or post-demand compromise requests through the portal on the amount owed to Medicare for beneficiary-debtor cases (Sections 13.1.13 and15.3). To ensure the case ID format is accurately described for BCRC and CRC cases, all references to the case ID format have been updated throughout this guide to reflect the following:
• The Case ID is a 15-digit number in ##### ##### ##### format. • BCRC Case IDs begin with the number 2, and CRC Case IDs begin with the number 3. Version 3.8 To comply with security and privacy federal controls regarding the use of social media and networking sites, the login warning banner has been updated (Figure 4-1). Version 3.7 As part of the Medicare Access and CHIP (Children’s Health Insurance Program) Reauthorization Act (MACRA) of 2015, field names have been changed from “HICN” to “Medicare ID” throughout this application. To clarify for users, case status definitions have been updated (Table 13-2). Version 3.6 To automate the redetermination process, the debtor and their authorized representatives can now submit a redetermination request (first level appeal) on the MSPRP (Chapter 15). To make post demand refund data available to users, and to reduce calls to the Benefits Coordination & Recovery Center (BCRC), the MSPRP now displays accounts receivable (AR) balance and refund information on the Case Information screen (Section 13.1). To help users distinguish between ICD-9 or ICD-10 diagnosis codes on their claims, an ICD indicator field has been added to the Claims Listing screen for each claim line (Section 13.1.5). The information for the Update Settlement Information screen has been clarified. When making updates, the radio buttons (None, Attorney Fees, and Attorney Fee Percentage) will not display as originally selected. You will be required to select one before continuing (Section 13.1.10). Version 3.5 To help distinguish between a recovery agent submitted on a Responsible Reporting Entity’s (RRE’s) Section 111 (S111) TIN Reference File and a recovery agent that submitted recovery agent authorization, which have slightly different authority levels, Recovery Agents who are associated to an insurer-debtor case as the insurer’s S111 Recovery Agent may now submit a Recovery Agent authorization. An S111 Recovery Agent has authorization on an insurer-debtor case pre-demand. An entity with an active Recovery Agent Authorization in verified status has authority on an insurer-debtor case both pre- and post-demand (Section 10.3.3). To allow authorized users to edit settlement information prior to initiating a demand and allow them to view settlement information after submission, authorized users can now:
• Add or update settlement information after clicking the Initiate Demand Letter action on the Case Information page. (Section 13.1.10).
• View read-only settlement information after it’s been provided (Section 13.1.9).

MSPRP User Guide Appendix C: Previous Version Changes
C-3
Additionally, the Provide the Notice of Settlement Information action on the Case Information page has been renamed to View/Provide the Notice of Settlement Information. To ensure consistency, the case statuses displayed for Commercial Repayment Center (CRC) cases have been revised to better match the case statuses displayed for Benefits Coordination & Recovery Center (BCRC) cases (Table 13-2). To provide similar BCRC functionality for CRC cases:
• Users may now request an update to the conditional payment amount (Section 13.1.2). • Beneficiaries and beneficiary representatives with verified Proof of Representation (POR) who
log in using multi-factor authentication may now request an electronic Conditional Payment Letter (eCPL), or a mailed copy of the Conditional Payment Letter (CPL). Additionally, if requested, these users will also receive an electronic or mailed version of the “no claims paid by Medicare” letter where the overpayment amount = $0 (Section 13.1.3).
• Authorized users may now submit unlimited disputes any time prior to the case being demanded, after a conditional payment notice (CPN) or a CPL has been issued (Section 13.1.5).
To let users know that the final conditional payment (CP) amount displayed on the WARNING - Calculate Final Conditional Payment Amount Can Only Be Selected Once page may be different than the final amount shown on the Confirmation page, the text shown on the Warning page has been modified to indicate that the final CP amount may decrease if unrelated claims are identified and removed from the conditional payment amount (Figure 14-3). The word “New” was removed from Final Conditional Payment Process section of the Case Information page (Figure 13-3). Version 3.4 To help explain to beneficiary or insurer debtors that Medicare has not paid any claims related to an incident, and to automate the process of requesting an electronic or mailed conditional payment letter (eCPL or CPL) in cases where the overpayment (Current Conditional Payment Amount) is equal to zero ($0.00), then either an Electronic No Claims Paid by Medicare letter or a No Claims Paid by Medicare letter is sent to users. To receive these letters, cases must not in the Final Conditional Payment process (that is, Status is not Active, Pending NOS, or Complete) (Sections 13.1.3 and 13.1.4). To reduce password reset phone calls to the Electronic Data Interchange (EDI) Representatives, the Change Password page now asks users to select to change or keep their pre-filled security questions when logging in using a temporary password (Section 8.5). To help users select all claims displayed on the Claims Listing pages (beneficiary and non-beneficiary) a Select All/Deselect All hyperlink is now available. Users may use this link to submit a dispute for all of the selected claims. Note: This option only selects claims that are available for dispute (Section 13.1.5). The "Transitioned" Case Status, which is currently used by the Final Conditional Payment process, is now included in this user guide. This status indicates that CMS has been notified by the insurer that the debt associated to this case is within 120 calendar days of anticipated settlement. This debt has been transferred to the beneficiary and has been placed in the Final Conditional Payment process (Table 13-2).
MSPRP User Guide Appendix C: Previous Version Changes
C-4
The Current Conditional Amount field that displays on the Case Information page will now display the Ongoing Responsibility for Medicals (ORM) overpayment amount for Commercial Repayment Center (CRC) cases (Table 13-1). The Beneficiary Case Information figure has been updated to reflect what the beneficiary will see when they access the MSPRP from the MyMedicare.gov web page (Figure 6-4). Version 3.3 User Roles Expanded The Account Listing page has been updated to display all AM and AD accounts associated with your login ID. You can now have multiple roles across different accounts. Examples:
• If you are an Account Manager (AM), you can be invited as an Account Designee (AD) on a different account.
• If you would like an AD for an existing account to become the AM for the same account, you can request that change by contacting an EDI representative.
• An Account Representative (AR) for an account can now register as an AR for multiple accounts.
See Section 2.3 and Chapter 6. Requesting Electronic or Mailed Conditional Payment Letters (CPLs) after Demand Sent Normally, once a Conditional Payment Notice (CPN) or demand has been issued on a case, you cannot request an electronic or mailed CPL. However, if the CPN was sent in error, the case will be adjusted so you can continue to request the CPLs, until a CPN or demand is issued. (Sections 13.1.3 and13.1.4) Claims Listing: Display of Dispute Submitted and Decision Dates To help users check the status or verify if a dispute has been processed, two additional fields have been added to the Claims Listing pages for non-beneficiaries and beneficiaries: Dispute Submitted Date and Dispute Decision Date. Also, a general statement has been added to indicate that if a claim was disputed and the dispute was approved, the claim will automatically be removed from the Claims Listing page.” (Table 13-4) Case Information: Display of Additional CPN Information To assist users with determining the correct status of their case, CPN information has been added to the Case Information page. This page now displays the CPN Amount, CPN Mail Date, (original) Date of Incident (DOI), and the Section 111 Industry DOI. Additionally, the Industry DOI has been added to the Case Results page, along with the original DOI. (Table 13-1) Initiate Demand Letters Early If you agree with the amount in the CPN on your case and want to initiate the Demand process early, you can now do so by clicking the Initiate Demand Letter action through the Case Information page. The MSPRP will create and send the demand letter to all authorized users on the case. (Section13.1.10) View/Dispute Claims Listing: Display Demand Details on Demand Claims Listing Page To make it easier for authorized users to view details regarding conditional payments made for a case that is already in Demand status, you can now view final demand information by clicking the
MSPRP User Guide Appendix C: Previous Version Changes
C-5
View/Dispute Claims Listing action on the Case Information page. Instead of going to the Claims Listing page, you will be redirected to the Demand Claims Listing page. This read-only page displays demand details such as the Total Charges, Reimbursed Amounts, and Conditional Payments. (Section 13.1.5) ID Proofing: Residential Address Based on feedback regarding users failing remote ID proofing because they did not use their current residential address, additional information has been added to the ID Proofing Core Credentials page to alert users to enter their residential address. (Section7.4.2) Version 3.2 The Final Conditional Payment (Final CP) Settlement Date must be within 3 business days of the date the user requested their Final CP, instead of 3 calendar days. See Chapter 14. Version 3.1 As part of the Strengthening Medicare and Repaying Taxpayers (SMART) Act of 2012, the MSPRP has been modified to permit authorized users to notify the Benefits Coordination & Recovery Center (BCRC) that a specific case is approaching settlement, and to request that the case be a part of the Final Conditional Payment (Final CP) process. See Chapter 14. References to the Insurer Letter of Authorization (LOA) have been changed to Recovery Agent Authorization. Changes are throughout document. Links to model language, examples, and templates for the Recovery Agent Authorization (previously referred to as the Letter of Authorization), Beneficiary POR, and Beneficiary CTR authorization documents have been removed from the Authorization Documentation page. You can now view and download these documents on the CMS.gov website. See Section 10.2. The Multi-Factor Authentication (MFA) Home, ID Proofing, and MFA Overview pages have been updated to remove the word “new” and now include additional language regarding the use of Experian (an outside company) in verification of current personal information. See Chapter 7. A new MFA FAQ document was added to the MSPRP Reference Materials drop-down menu. Updates have been made to the reserved words list for password changes. See Section 8.5. When the MSPRP was updated to remove the “Enter NOS” action/radio button from the Case Information page for when the case is an insurer debtor case (BCRC or CRC), several now obsolete notes on the Settlement Information page were removed. See Section 13.1.9. Version 3.0 ORM Cases With the addition of Non-Group Health Plan (NGHP) Ongoing Responsibility for Medicals (ORM) Commercial Repayment Center (CRC) recovery case processing, functionality to support NGHP recovery activities for ORM and non-ORM cases has been implemented in MSPRP. With proper authorization, users can now view and perform specific actions on all cases (non-ORM and ORM) to which they are associated. Users requesting to serve as representatives for CRC insurer cases can submit a new authorization document called an Insurer Recovery Agent Authorization to perform their actions. See Chapter 13.
MSPRP User Guide Appendix C: Previous Version Changes
C-6
When viewing cases online, users can distinguish between BCRC and CRC cases in two ways: by the format of the case ID and from the correspondence receives about the case. See Section 2.1. Password Requirements Password requirements have been updated to ensure that the rules for creating and resetting passwords are consistent across all Coordination of Benefits Secure Website (COBSW) applications. See Section 8.5. Payment Summary Form An International Classification of Diseases (ICD) indicator has been added to the system-generated Payment Summary Form (PSF), with each claim line specifying whether the code is ICD-9 or ICD-10. See Section 13.1.3. ICD-10 With the implementation of ICD-10 in October 2015, all references to ICD-10 implementation dates have been removed, while other ICD references have been updated. See Table 13-4. POR & CTR Templates Updated versions of the POR and CTR templates were added. See Section 1.1. Version 2.9 As part of the Strengthening Medicare and Repaying Taxpayers (SMART) Act, CMS has identified the need for Enterprise Remote Identity Proofing (ERIP) and Multi-Factor Authentication (MFA) Services. Identity proofing is the process of providing sufficient information (e.g., identity history, credentials, and documents) to Experian (an external Remote Identity Proofing (RIDP) service provider) to prove a user’s identity. MFA is the use of two or more different authentication factors to verify the identity of a user. Existing users who are not Medicare beneficiaries and who choose not to complete the ID Proofing process may continue to use the MSPRP as they do now. However, users now have the option to be vetted so as to view previously masked case data. See Chapter 7. Version 2.8 (Pilot) Note: This user guide is a preliminary version for MFA pilot users only. As part of the Strengthening Medicare and Repaying Taxpayers (SMART) Act, CMS has identified the need for Enterprise Remote Identity Proofing (ERIP) and Multi-Factor Authentication (MFA) Services. Identity proofing is the process of providing sufficient information (e.g., identity history, credentials, and documents) to Experian (an external Remote Identity Proofing (RIDP) service provider) to prove a user’s identity. MFA is the use of two or more different authentication factors to verify the identity of a user. Existing users who are not Medicare beneficiaries and who choose not to complete the ID Proofing process may continue to use the MSPRP as they do now. However, users now have the option to be vetted so as to view previously masked case data. You must have Proof of Representation (POR) to view unmasked case information. See Chapter 7. Version 2.7 This release coincides with the implementation of the Integrated Data Repository (IDR) special project. The purpose of the IDR is to provide more timely updates to claims data related to cases. Once the full implementation is complete, instead of needing to send a request to determine if new
MSPRP User Guide Appendix C: Previous Version Changes
C-7
claims or adjustments are available, the MSPRP will automatically reflect up-to-date claims information as of the previous day. A new process for gathering the paid claims is being implemented. Your ability to request an update to the Conditional Payment Amount will not be affected from what you currently see within the Case Information page except in once instance. If all claims are up-to-date when you select the Request an update to the conditional payment amount checkbox, you will receive the following message: “The claims and conditional payment amount are up-to-date as of (today’s date)” (Section12.1.2). Version 2.6 When tooltips (text messages) were implemented in October 2015 for disabled buttons on the Case Information page (Section12.1), a problem was discovered where the tooltip would display the full text message only when you hovered over a button the very first time. For the second and subsequent times, only part of the text would display. If you are using Internet Explorer®, you need to disable two add-ons (i.e., extensions or programs), for the button tooltips to work correctly on the Case Information page. The two add-ons are “Lync Browser Helper” and “Lync add-on.” Access both programs by selecting the Manage add-ons option from the Tools drop-down menu, located on the browser’s toolbar. See Appendix B for step details. Version 2.5 Users can now view all of their account activity and can page through and sort through more than 1000 records of activity changes on the Account Activity page (See Section 7.4.1). Users with Verified Consent to Release (CTR) may now view claims listings for a case when all other conditions for viewing have been met. (See Section 12.1. Tooltip Text messages now display why an action on the Case Information page is greyed out and disabled. Users are able to display the reason(s) the action is not available by placing the mouse over the action and pausing (hovering). (See Section12.1). The Claims Dispute Confirmation page now displays the notes users enter in the Supporting Information Notes text box on the Claims Dispute Verification page. Users can review the notes they have entered before the notes are submitted to CMS, receive confirmation that the notes have been submitted to CMS, and print the notes they entered on the Claims Dispute Verification page (See Section12.1.5). To comply with federal language changes related to the Defense of Marriage Act (DOMA), the guide has been reviewed to ensure that spouse references are gender neutral in accordance with the following CMS Policy: “The Department of Health & Human Services has adopted a policy treating same-sex marriages on the same terms as opposite-sex marriages to the greatest extent reasonably possible. Any same-sex marriage legally entered into in a U.S. jurisdiction that recognizes the marriage—including one of the 50 states, the District of Columbia, or a U.S. territory—or a foreign country, so long as that marriage would also be recognized by a U.S. jurisdiction, will be recognized. Consistent with this policy and the purpose of the MSP provisions, effective January 1, 2015, the rules below apply with respect to the term “spouse” under the MSP Working Aged provisions. This is true for both opposite-sex and same-sex marriages as described herein.
MSPRP User Guide Appendix C: Previous Version Changes
C-8
• If an individual is entitled to Medicare as a spouse based upon the Social Security Administration’s rules, that individual is a “spouse” for purposes of the MSP Working Aged provisions.
• If a marriage is valid in the jurisdiction in which it was performed as described herein, both parties to the marriage are “spouses” for purposes of the MSP Working Aged provisions.
• Where an employer, insurer, third party administrator, GHP, or other plan sponsor has a broader or more inclusive definition of spouse for purposes of its GHP arrangement, it may (but is not required to) assume primary payment responsibility for the “spouse” in question. If such an individual is reported as a “spouse” pursuant to MMSEA Section 111, Medicare will pay accordingly and pursue recovery, as applicable.”
Version 2.4 To prevent portal users needing to contact the BCRC for ReMAS Case IDs, users have the option of entering the date of incident (DOI) instead of the Case ID on the New Case Request page. The page now contains an optional field for Insurance Type (No-Fault, Workers’ Compensation, or Liability). A Case Results screen was added in the event that multiple cases match the criteria provided; on this page, the user sorts and selects cases to view and add to the user’s Case Listing page. New warnings alert users to missing or invalid DOIs on the New Case Request page. See Sections 10.1 and 10.2. To prevent erroneous reductions in demand amounts, MSPRP no longer allows entry of procurement costs (attorney fees and expenses) on the Settlement Information page when the debtor in the case is not the beneficiary. See Section 12.1.7. Since Conditional Payment Letters (CPLs) are never issued when a Conditional Payment Notice (CPN) has already been issued on a case, the option to request CPLs in that situation has been removed from the MSPRP. A note of this condition has been added to the CPL and electronic CPL (eCPL) sections of this guide. See Sections 12.1.3 and 12.1.4. Version 2.3
• The Beneficiary Welcome page has been updated to remove incorrect language. Previously, the page stated that beneficiaries could submit valid authorizations, which was incorrect. Only the representatives (attorney, insurer, or TPA) can submit authorizations. It also did not mention that beneficiaries could request Conditional Payment Letter (CPL), and the page referred to account settings that beneficiaries did not have.
• The language used on the Select Account Type page has been clarified to create a clearer distinction between selecting corporate or representative account types. Corporate accounts may have up to 100 designees, while representative accounts may have up to 5 designees. The previous language could hinder use of the portal by certain users. For example, an attorney that only had a few cases may not sign up because they may think the portal is only for users with many cases.
Version 2.2 The MSPRP provides new case functionality: the ability of beneficiaries to generate an electronic Conditional Payment Letter (CPL) and to print or save it in .PDF format with the current Conditional Payment Amount and the associated case and claims information. (See 12.1.3.) Version 2.1

MSPRP User Guide Appendix C: Previous Version Changes
C-9
The number of Account Designees allowed for corporate accounts has been increased from 20 to 100. If the Account Manager attempts to add a designee after the limit of 100 has been reached, they will receive a message informing them that they have reached their limit. Chapter 9 has been revised as follows:
• Added information regarding the following four new Authorization Documentation page hyperlinks: Proof of Representation Example link (opens a POR document example). Proof of Representation Blank Template link (opens a blank POR template). Consent to Release Example link (opens a CTR document example). Consent to Release Blank Template link (opens a blank CTR template).
• Added the following new reasons that may cause an authorization request to be considered invalid. Note: If an authorization request is deemed to be invalid, the reason will display on the Case Information page: Authorization signed by Deceased Beneficiary; Beneficiary Medicare Number Value Does Not Match; Beneficiary Name Does Not Match; Date of Incident (DOI) Not Provided; Name on Document Does Not Match the Portal Submitter; No Authorizing Statement on Document; and ReMAS Case ID Does Not Match.
Copyright © 2022 FDOKUMEN