MR393CLIO6-Sealing and Soundproofing - baixardoc
10
© Renault s.a.s. 2007 "The repair methods given by the manufacturer in this document are based on the technical specifications current when it was prepared. The methods may be modified as a result of changes introduced by the manufacturer in the production of the various component units and accessories from which his vehicles are constructed." All copyrights reserved by Renault. The reproduction or translation in part of whole of the present document, as well as the use of the spare parts reference numbering system, are prohibited without the prior written consent of Renault. MAY 2005 Edition Anglaise X85 6 Sealing and soundproofing 65A OPENING ELEMENT SEALING 66A WINDOW SEALING 68A SOUNDPROOFING
-
Upload
khangminh22 -
Category
Documents
-
view
8 -
download
0
Transcript of MR393CLIO6-Sealing and Soundproofing - baixardoc
© Renault s.a.s. 2007
"The repair methods given by the manufacturer in this document are based on the technicalspecifications current when it was prepared.
The methods may be modified as a result of changes introduced by the manufacturer in theproduction of the various component units and accessories from which his vehicles areconstructed."
All copyrights reserved by Renault.
The reproduction or translation in part of whole of the present document, as well as the useof the spare parts reference numbering system, are prohibited without the prior writtenconsent of Renault.
MAY 2005 Edition Anglaise
X85
6 Sealing and soundproofing
65A OPENING ELEMENT SEALING
66A WINDOW SEALING
68A SOUNDPROOFING
CLIO III - Section 6
Contents
Page
CLIO III - Section 6ContentsPage
65A OPENING ELEMENT SEALING
Door sealing film: Removal -
Refitting 65A-1
Sunroof seal: Removal - Refitting 65A-5
66A WINDOW SEALING
Front side door glass run
channel: Removal - Refitting 66A-1
Front door side exterior
weather strip: Removal -
Refitting 66A-3
Glass run channel in rear
side door: Removal -
Refitting 66A-4
Rear side door exterior
weather strip: Removal -
Refitting 66A-6
68A SOUNDPROOFING
Bonnet soundproofing:
Removal - Refitting 68A-1
Centre floor side
soundproofing: Removal -
Refitting 68A-2
Centre floor rear
soundproofing: Removal -
Refitting 68A-4
65A-1
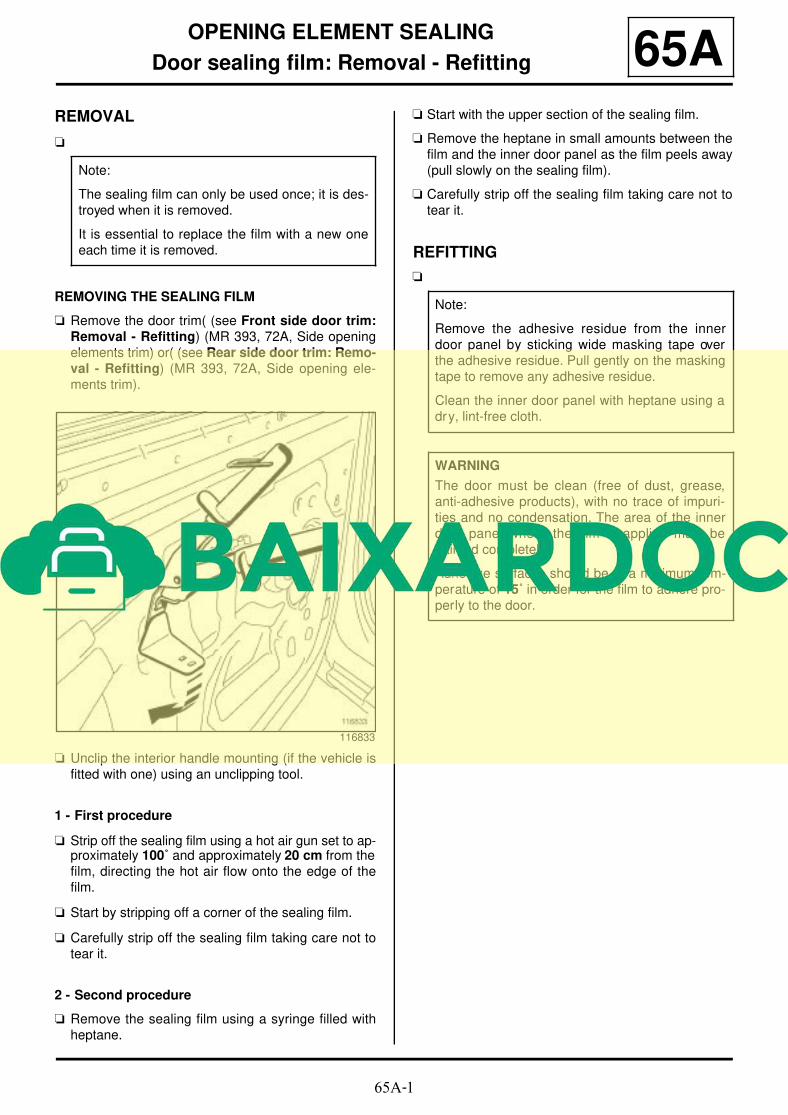
OPENING ELEMENT SEALING
Door sealing film: Removal - Refitting 65AREMOVAL
a
REMOVING THE SEALING FILM
a Remove the door trim( (see Front side door trim:Removal - Refitting) (MR 393, 72A, Side opening
elements trim) or( (see Rear side door trim: Remo-val - Refitting) (MR 393, 72A, Side opening ele-
ments trim).
a Unclip the interior handle mounting (if the vehicle is
fitted with one) using an unclipping tool.
1 - First procedure
a Strip off the sealing film using a hot air gun set to ap-proximately 100˚ and approximately 20 cm from the
film, directing the hot air flow onto the edge of the
film.
a Start by stripping off a corner of the sealing film.
a Carefully strip off the sealing film taking care not to
tear it.
2 - Second procedure
a Remove the sealing film using a syringe filled with
heptane.
a Start with the upper section of the sealing film.
a Remove the heptane in small amounts between the
film and the inner door panel as the film peels away
(pull slowly on the sealing film).
a Carefully strip off the sealing film taking care not to
tear it.
REFITTING
a
Note:
The sealing film can only be used once; it is des-
troyed when it is removed.
It is essential to replace the film with a new one
each time it is removed.
116833
Note:
Remove the adhesive residue from the inner
door panel by sticking wide masking tape over
the adhesive residue. Pull gently on the masking
tape to remove any adhesive residue.
Clean the inner door panel with heptane using a
dry, lint-free cloth.
WARNING
The door must be clean (free of dust, grease,
anti-adhesive products), with no trace of impuri-
ties and no condensation. The area of the inner
door panel where the film is applied must be
painted completely.
Adhesive surfaces should be at a minimum tem-
perature of 15˚ in order for the film to adhere pro-
perly to the door.
65A-2
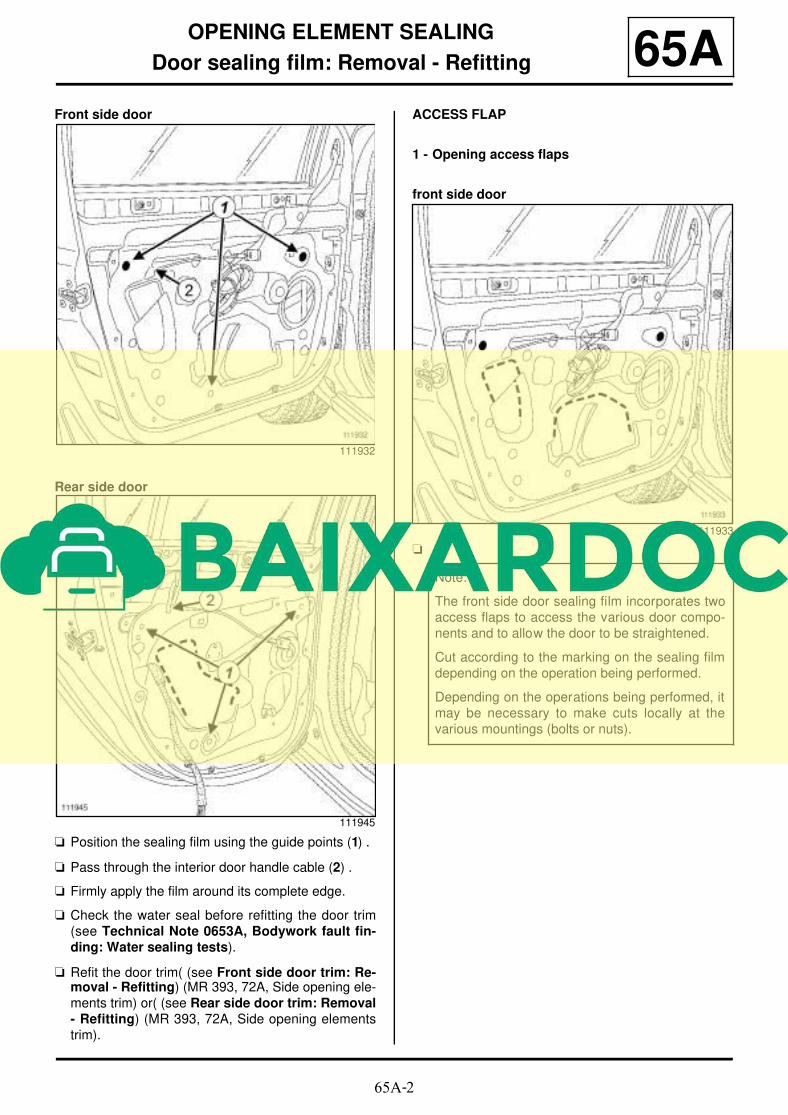
OPENING ELEMENT SEALING
Door sealing film: Removal - Refitting 65AFront side door
Rear side door
a Position the sealing film using the guide points (1) .
a Pass through the interior door handle cable (2) .
a Firmly apply the film around its complete edge.
a Check the water seal before refitting the door trim
(see Technical Note 0653A, Bodywork fault fin-ding: Water sealing tests).
a Refit the door trim( (see Front side door trim: Re-moval - Refitting) (MR 393, 72A, Side opening ele-
ments trim) or( (see Rear side door trim: Removal- Refitting) (MR 393, 72A, Side opening elements
trim).
ACCESS FLAP
1 - Opening access flaps
front side door
a
111932
111945
111933
Note:
The front side door sealing film incorporates two
access flaps to access the various door compo-
nents and to allow the door to be straightened.
Cut according to the marking on the sealing film
depending on the operation being performed.
Depending on the operations being performed, it
may be necessary to make cuts locally at the
various mountings (bolts or nuts).

65A-3
OPENING ELEMENT SEALING
Door sealing film: Removal - Refitting 65Arear side door
a
112886
Note:
The rear side door sealing film incorporates an
access flap to access the various door compo-
nents and to allow the door to be straightened.
Cut according to the marking on the sealing film
depending on the operation being performed.
Depending on the operations being performed, it
may be necessary to make cuts locally at the
various mountings (bolts or nuts).
65A-4
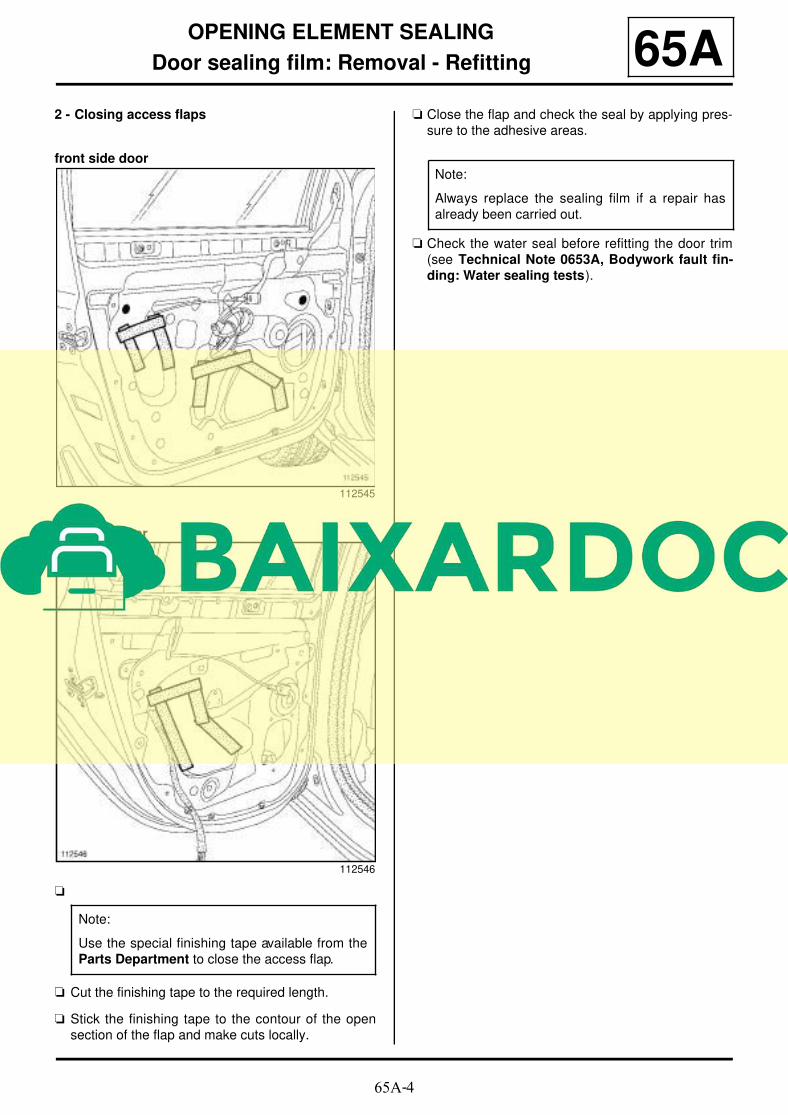
OPENING ELEMENT SEALING
Door sealing film: Removal - Refitting 65A2 - Closing access flaps
front side door
Rear side door
a
a Cut the finishing tape to the required length.
a Stick the finishing tape to the contour of the open
section of the flap and make cuts locally.
a Close the flap and check the seal by applying pres-
sure to the adhesive areas.
a Check the water seal before refitting the door trim
(see Technical Note 0653A, Bodywork fault fin-ding: Water sealing tests).
112545
112546
Note:
Use the special finishing tape available from the
Parts Department to close the access flap.
Note:
Always replace the sealing film if a repair has
already been carried out.
65A-5
OPENING ELEMENT SEALING
Sunroof seal: Removal - Refitting 65AREMOVAL
I - REMOVAL PREPARATION OPERATION
a Remove the sunroof mobile panel( (see Sunroofmoving panel: Removal - Refitting) (MR 393, 52A,
Non-side opening element mechanisms).
II - OPERATION FOR REMOVAL OF PART CONCERNED
a
a Remove the sunroof seal.
REFITTING
I - REFITTING PREPARATION OPERATION
a Clean and then degrease the bonding area with hep-
tane.
II - REFITTING OPERATION FOR PART CONCERNED
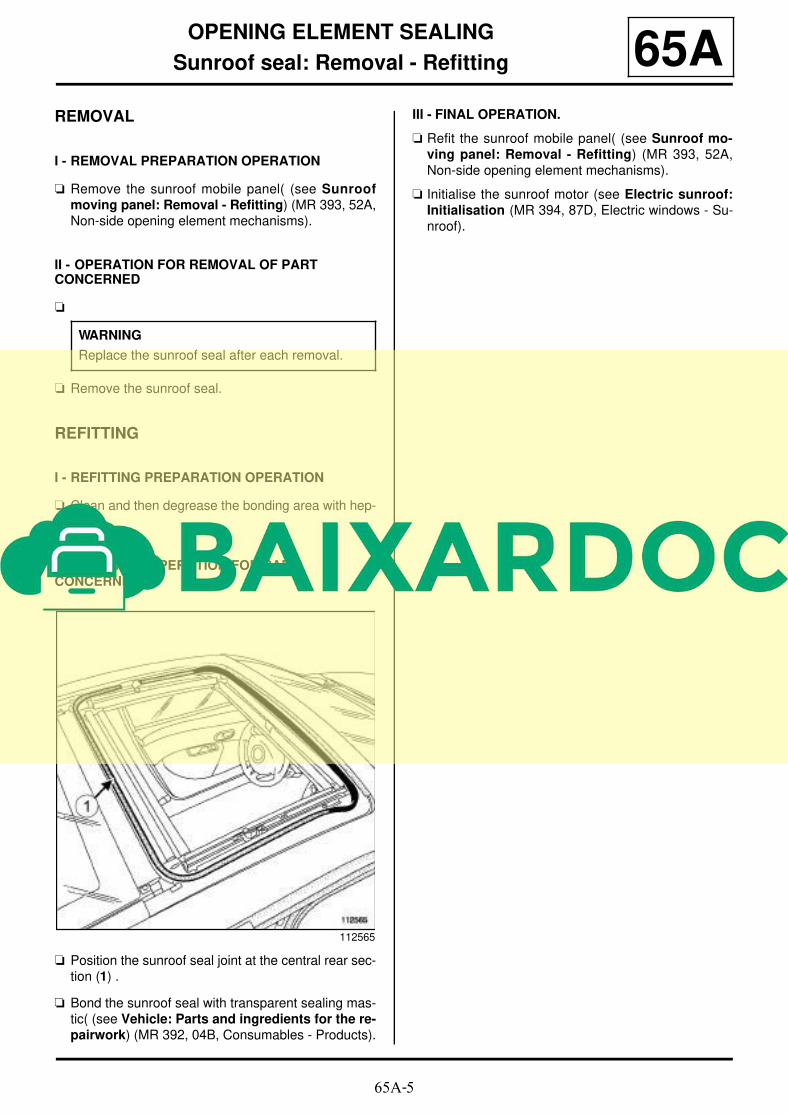
a Position the sunroof seal joint at the central rear sec-
tion (1) .
a Bond the sunroof seal with transparent sealing mas-
tic( (see Vehicle: Parts and ingredients for the re-pairwork) (MR 392, 04B, Consumables - Products).
III - FINAL OPERATION.
a Refit the sunroof mobile panel( (see Sunroof mo-ving panel: Removal - Refitting) (MR 393, 52A,
Non-side opening element mechanisms).
a Initialise the sunroof motor (see Electric sunroof:Initialisation (MR 394, 87D, Electric windows - Su-
nroof).
WARNING
Replace the sunroof seal after each removal.
112565
66A-1
WINDOW SEALING
Front side door glass run channel: Removal - Refitting 66AREMOVAL
I - REMOVAL PREPARATION OPERATION
a Remove:
- the door trim( (see Front side door trim: Removal- Refitting) (MR 393, 72A, Side opening elements
trim),
- the interior weatherstrip,
- the door mirror( (see Door mirror: Removal - Re-fitting) (MR 393, 56A, Exterior equipment),
- the sliding window( (see Sliding window in frontside door: Removal - Refitting) (MR 393, 54A,
Windows),
- the exterior weatherstrip (see 66A, Window sea-ling, Front door side exterior weather strip: Re-moval - Refitting, page 66A-3) .
II - OPERATION FOR REMOVAL OF PART CONCERNED
a Remove the run channel from the door window.
REFITTING
I - REFITTING PREPARATIONS OPERATION
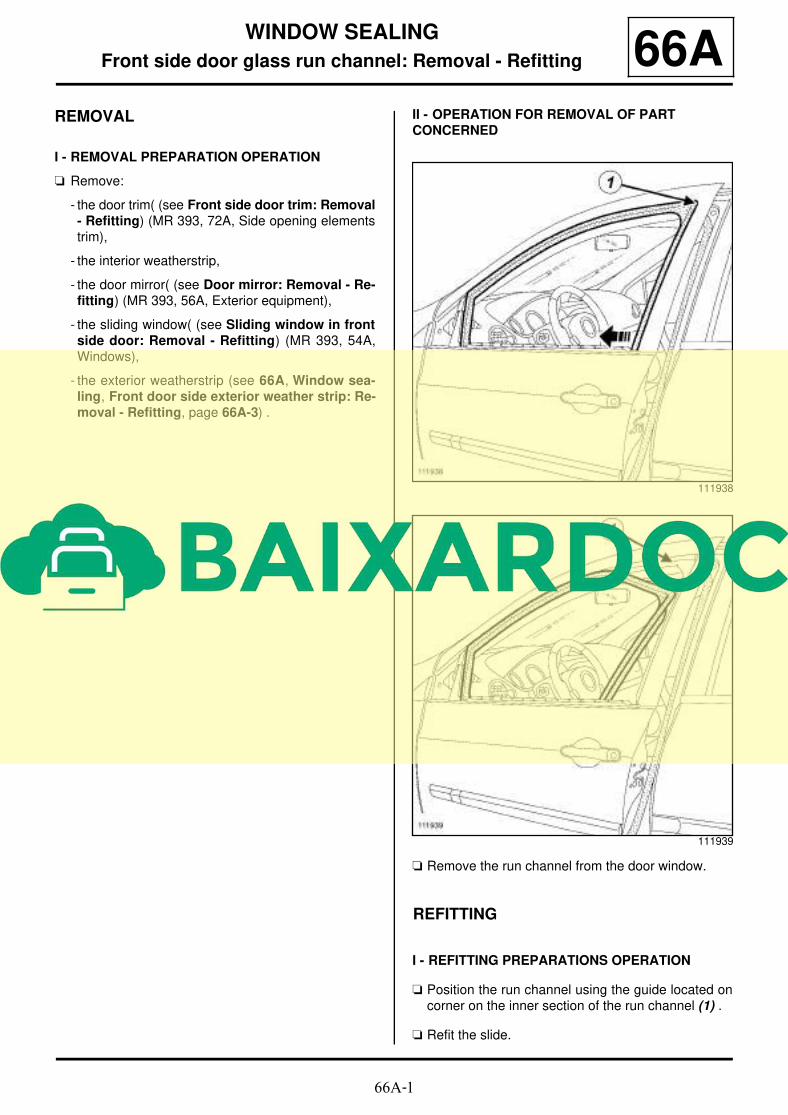
a Position the run channel using the guide located on
corner on the inner section of the run channel (1) .
a Refit the slide.
111938
111939
66A-2
WINDOW SEALING
Front side door glass run channel: Removal - Refitting 66AII - FINAL OPERATION.
a Refit:
- the exterior weatherstrip (see 66A, Window sea-ling, Front door side exterior weather strip: Re-moval - Refitting, page 66A-3) ,
- the sliding window( (see Sliding window in frontside door: Removal - Refitting) (MR 393, 54A,
Windows),
- the door mirror( (see Door mirror: Removal - Re-fitting) (MR 393, 56A, Exterior equipment),
- the interior weatherstrip,
- the door trim( (see Front side door trim: Removal- Refitting) (MR 393, 72A, Side opening elements
trim).
66A-3
WINDOW SEALING
Front door side exterior weather strip: Removal - Refitting 66AREMOVAL
I - REMOVAL PREPARATION OPERATION
a Remove:
- the front door trim( (see Front side door trim: Re-moval - Refitting) .
- the door mirror( (see Door mirror: Removal - Re-fitting) ,
- the sliding window( (see Sliding window in frontside door: Removal - Refitting) ,
- the front door window run channel, as necessary.
II - OPERATION FOR REMOVAL OF PART CONCERNED
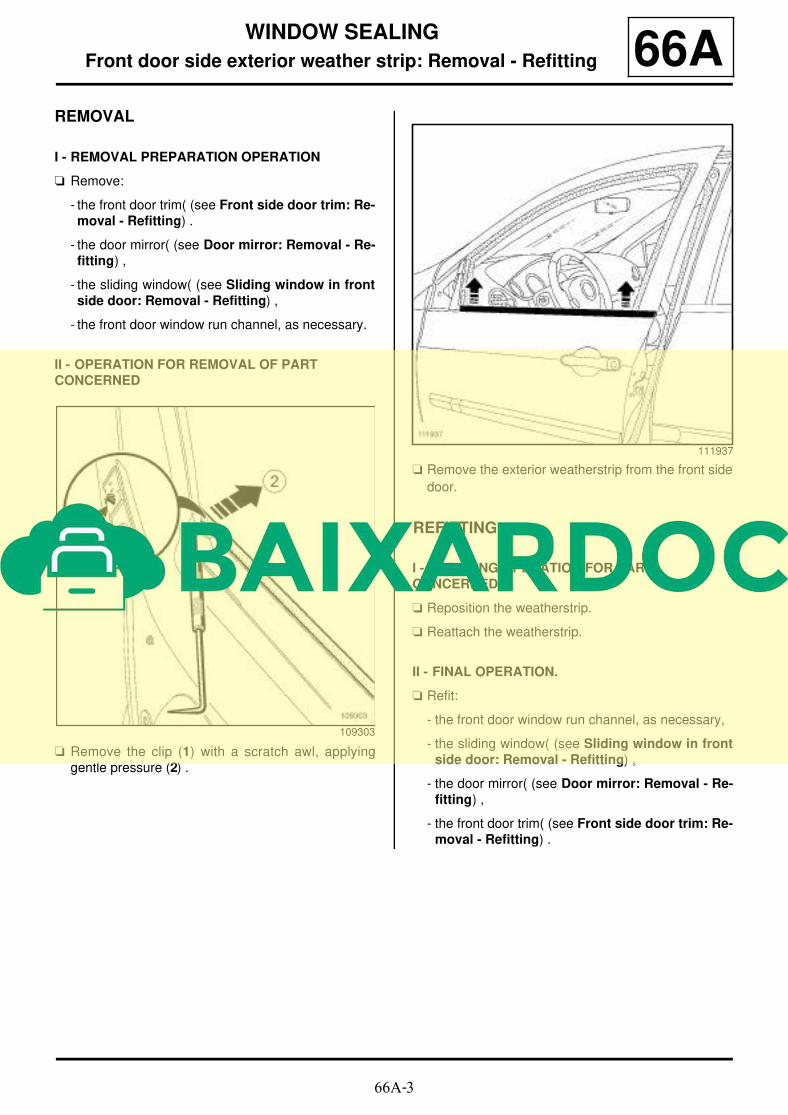
a Remove the clip (1) with a scratch awl, applying
gentle pressure (2) .
a Remove the exterior weatherstrip from the front side
door.
REFITTING
I - REFITTING OPERATION FOR PART CONCERNED
a Reposition the weatherstrip.
a Reattach the weatherstrip.
II - FINAL OPERATION.
a Refit:
- the front door window run channel, as necessary,
- the sliding window( (see Sliding window in frontside door: Removal - Refitting) ,
- the door mirror( (see Door mirror: Removal - Re-fitting) ,
- the front door trim( (see Front side door trim: Re-moval - Refitting) .
109303
111937