Model DS7060 Handrail Scale User Manual
11
Model DS7060 Handrail Scale User Manual Doran Scales, Inc. 1315 Paramount Pkwy Batavia, IL 60510 USA 1-800-264-4107 www.doranmedical.com MAN0302 Revision 0.0 TNW 2/20/2013
-
Upload
khangminh22 -
Category
Documents
-
view
0 -
download
0
Transcript of Model DS7060 Handrail Scale User Manual
Model DS7060 Handrail Scale
User Manual
Doran Scales, Inc. 1315 Paramount Pkwy
Batavia, IL 60510 USA 1-800-264-4107
www.doranmedical.com MAN0302 Revision 0.0
TNW 2/20/2013

Section 1. Unpacking and Installation..................................................... 1
Introduction .................................................................................................................. 1
Unpacking .................................................................................................................... 1
Cautions and Warnings ................................................................................................ 1
Care & Cleaning ........................................................................................................... 1
Section 2. Battery Operation .................................................................... 2
Section 3. Scale Operation ...................................................................... 3
Display Pushbuttons .................................................................................................... 3
Display Annunciators.................................................................................................... 4
Weighing a Patient ....................................................................................................... 6
Zero Operation ............................................................................................................. 6
BMI Operation .............................................................................................................. 6
Reweigh Operation....................................................................................................... 6
Section 4. Specifications .......................................................................... 7
Section 5. Troubleshooting ..................................................................... 8
General Problem Resolution ........................................................................................ 8
Section 1. Unpacking and Installation
Introduction Thank you for purchasing a Doran scale. This product has been designed with the highest level of technology. We are dedicated to delivering a superior product that will provide many years of trouble free service. As an ISO9001 registered company, Doran Scales is dedicated to delivering products built with strict compliance to our high quality standards. If you have any questions regarding your scale, please contact Doran Scales, Inc.
Unpacking
Carefully remove the scale from the shipping carton. If you notice any shipping damage, notify the shipper immediately. Be sure to retain all shipping materials in case the scale must be shipped elsewhere.
Cautions and Warnings
Your new scale is a durable industrial grade product, but it is also a sensitive weighing instrument. Normal care should be taken when handling and using this product. Improper handling or abuse can damage the scale and result in costly repairs that may not be covered by the warranty. Please observe the following precautions to insure years of trouble free service from your new scale. •••• Do not use sharp objects to press any of the buttons. •••• Do not pick up the scale by the indicator. •••• Do not use the scale if the scale is damaged in any way. •••• Do not leave patients unattended on the scale. •••• Do not exceed the scale capacity. •••• Do not drop the scale. •••• Do not drop objects on the scale. •••• When transporting, do not hit other objects, walls or doorframes with the
scale.
Care & Cleaning With reasonable care, this product will last for many years. Here are some tips to care for your scale. Failure to comply with these guidelines may void the warranty. •••• Hand clean the scale platform and indicator with a moist cloth. •••• Only clean with a mild detergent. •••• Do not get water inside the indicator. •••• Do not use strong solvents or abrasive cleaners as this can damage the
touch panel or other plastic parts. •••• Do not immerse. •••• Examine the scale periodically for damage and wear and tear before use. •••• Remove batteries during long periods of non-use.
2
Section 2. Battery Operation
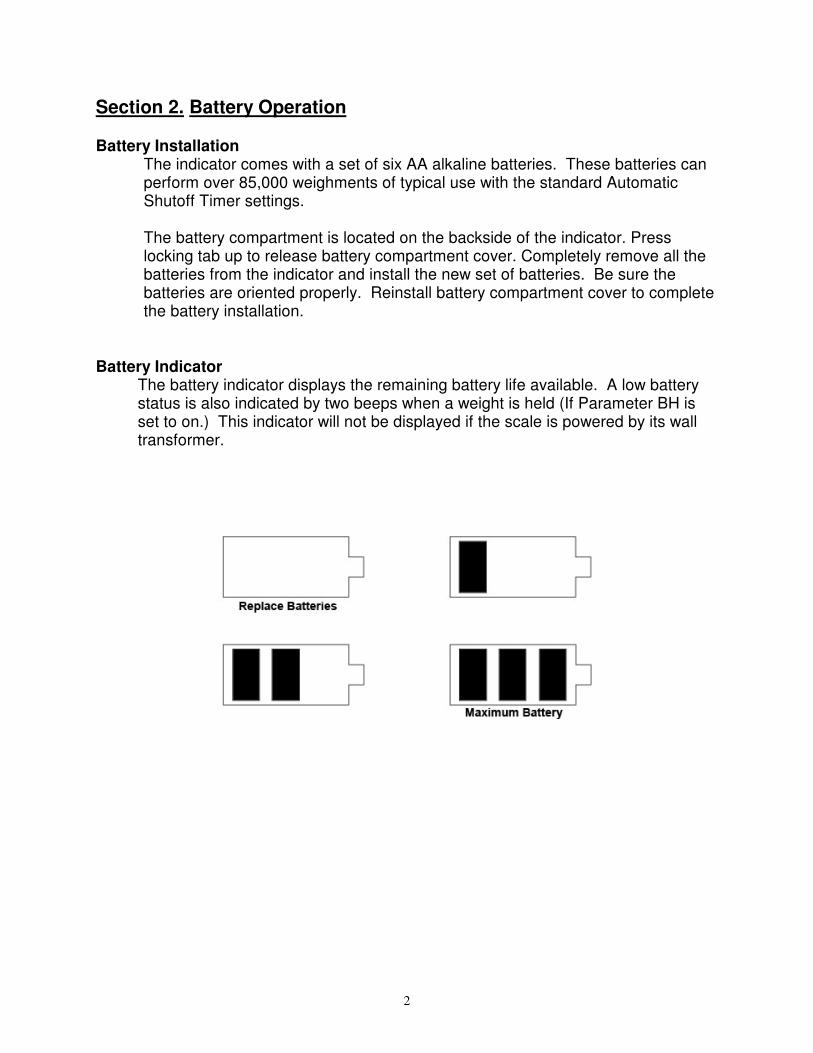
Battery Installation The indicator comes with a set of six AA alkaline batteries. These batteries can perform over 85,000 weighments of typical use with the standard Automatic Shutoff Timer settings. The battery compartment is located on the backside of the indicator. Press locking tab up to release battery compartment cover. Completely remove all the batteries from the indicator and install the new set of batteries. Be sure the batteries are oriented properly. Reinstall battery compartment cover to complete the battery installation.
Battery Indicator The battery indicator displays the remaining battery life available. A low battery status is also indicated by two beeps when a weight is held (If Parameter BH is set to on.) This indicator will not be displayed if the scale is powered by its wall transformer.
3
Section 3. Scale Operation
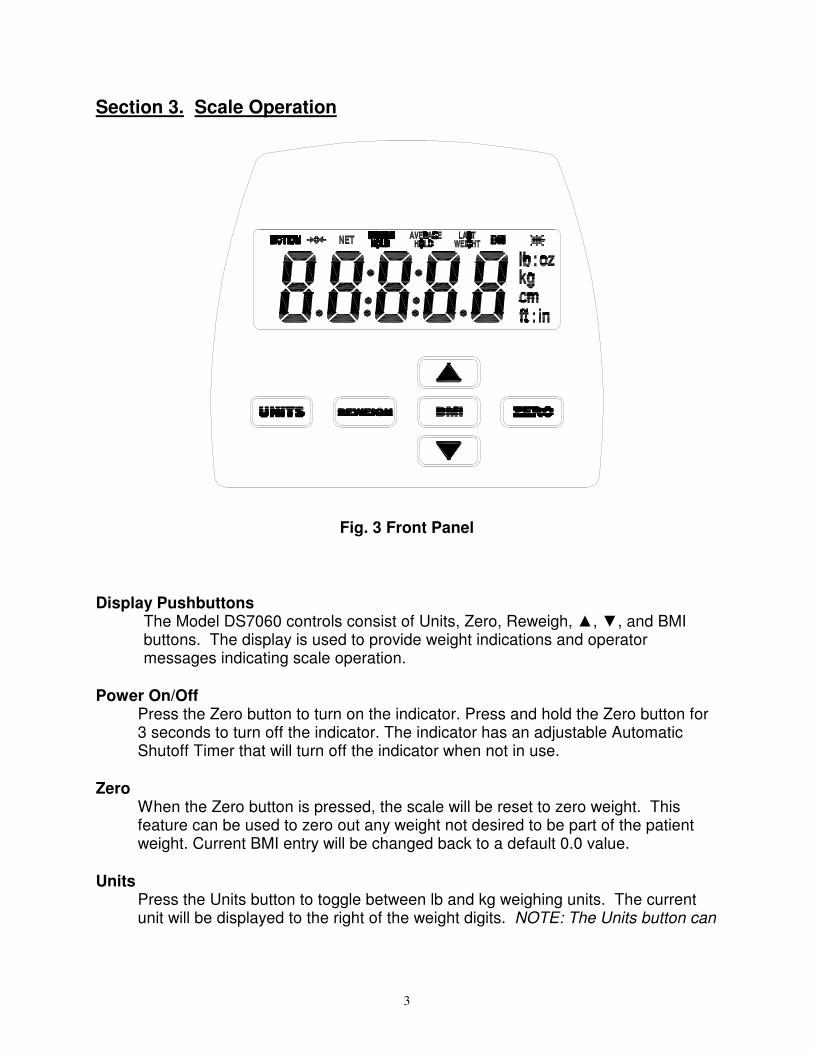
Fig. 3 Front Panel
Display Pushbuttons The Model DS7060 controls consist of Units, Zero, Reweigh, ▲, ▼, and BMI buttons. The display is used to provide weight indications and operator messages indicating scale operation.
Power On/Off
Press the Zero button to turn on the indicator. Press and hold the Zero button for 3 seconds to turn off the indicator. The indicator has an adjustable Automatic Shutoff Timer that will turn off the indicator when not in use.
Zero
When the Zero button is pressed, the scale will be reset to zero weight. This feature can be used to zero out any weight not desired to be part of the patient weight. Current BMI entry will be changed back to a default 0.0 value.
Units
Press the Units button to toggle between lb and kg weighing units. The current unit will be displayed to the right of the weight digits. NOTE: The Units button can

4
be locked or unlocked by pressing and holding Units for 5 seconds. An “L on“ message is displayed when button is locked and “L off“ when unlocked.
Reweigh To reinitiate the weighing process, press Reweigh. This will allow a new measurement to be taken without the patient having to leave the platform.
BMI With the Hold weight being displayed, press the BMI button to enter the height of the patient. Adjust the value by using the ▲ or ▼ buttons. NOTE: Select the Height units by pressing the Units button to toggle between the height in inches or centimeters. A menu timer will exit out of this mode if no buttons are pressed within a 30 second time period.
Display Annunciators The display annunciators will indicate the scale status.
Motion When the scale senses motion, MOTION will be indicated. Once motion ceases, a stable reading will be displayed.
Stable Hold Indicates a stable weight has been achieved and held on the display. This indicates an accurate weight has been achieved. Note: Weights below 4.5 pounds will not be held. Average Hold Indicates that the weight held on the display is a result of averaging several weights due to excessive motion on the scale. Note: Weights below 4.5 pounds will not be held. The Average Hold weight may be slightly less accurate than a Stable Hold weight. Displaying an Average Hold weight instead of a Stable Hold weight will speed the weighment process of patients that cannot stand still. The Average Hold weight will differ from the patient’s actual weight based upon the severity of the motion caused by the patient while on the scale. Although this weight may be less accurate than a Stable Hold weight, the deviation from the patient’s actual weight will be minimal. The time required for the Average Hold to engage is based upon the Average Aperture parameter. See the Parameter Setup section for configuration instructions.
5
Battery Indicator The battery indicator displays the remaining battery life available. See the battery operation section for detailed information. NOTE: Battery Indicator will be disabled when using an external power supply.
Software Number and Revision display Pressing and holding the Reweigh button for 3 seconds will perform a display test, show the Software number “Su179” and the revision “r 2.9” or higher and then display “StESt” to indicate Switch test mode is active. The Switch test mode stops after 10 seconds if no switch was pressed. Scale will then run a Display Segment test. After Display Segment test, the scale will return to the normal weighing operation.
6
Weighing a Patient 1. Turn on the indicator by pressing the Zero button. 2. The indicator will perform a startup zero. 3. The indicator will momentarily display dashes, “-----”, followed by 0.0. 4. Patient stands on the scale platform. NOTE: The handrails and indicator
tower can be grasped during weighing. 5. The display will scroll dashes for 3-5 seconds and then show the active
weight until the patient’s weight is captured. 6. The indicator will beep (when enabled) and then hold the weight on the
display until the scale shuts off. Zero Operation
1. Place item to be zeroed on the scale platform. 2. Press Zero. The scale will display a zero weight. If the item is removed, the
stable negative weight will be automatically zeroed out after 3 seconds. 3. Step onto the scale platform and the patient’s weight, less the item’s weight,
will be displayed. 4. To reset the scale weight to zero, Press Zero again with the scale platform
empty. BMI Operation
1. With Hold weight displayed, press BMI button to enter the height value. Height entry starts at 5: 6.0 or 168.0 in representing 5 foot 6 inches or 168 centimeters. NOTE: Height units can be changed by pressing the Units button.
2. Press the ▲ button to increase or the ▼ button to decrease the value. When the correct value is displayed, press the BMI button to enter value and exit. NOTE: A menu timer will exit out of this entry mode if no buttons are pressed within a 30 second time period.
Reweigh Operation
1. With the patient standing on the scale platform, press Reweigh to reinitiate the weighing process.
2. The display will scroll dashes for about 3-5 seconds. Then an active weight is shown until the patient’s weight is captured.
3. The indicator will beep (when enabled) and hold the weight on the display until the scale shuts off automatically.
7
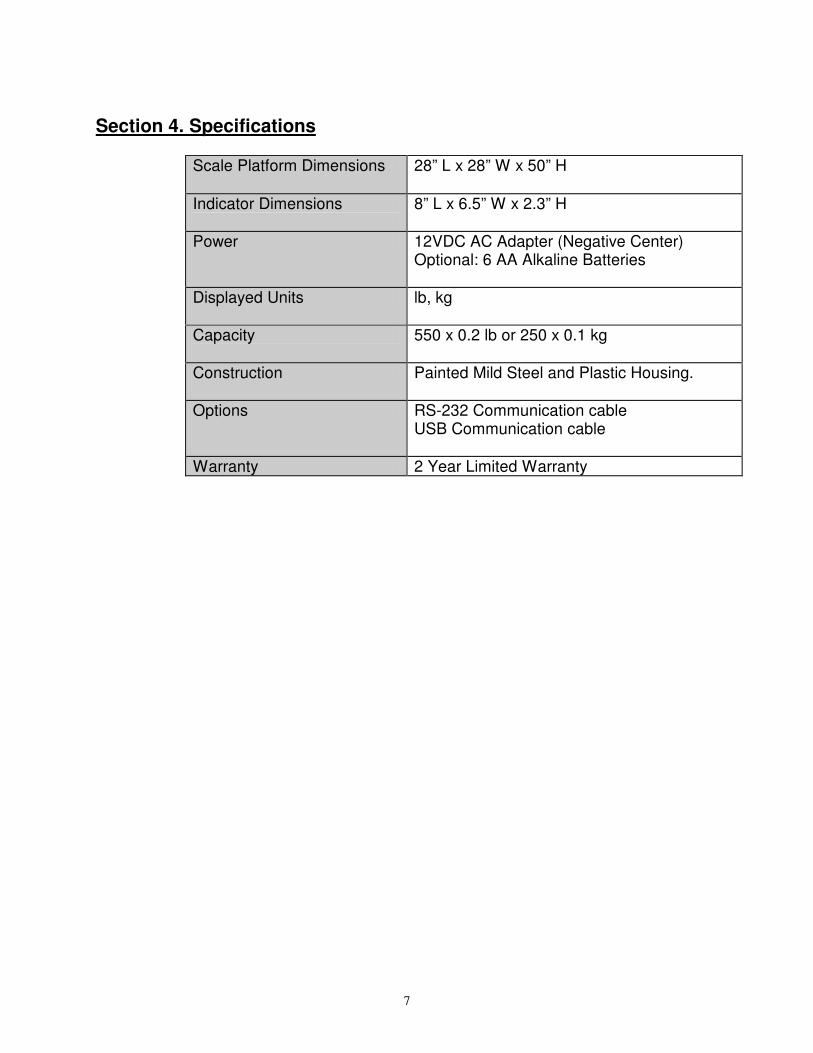
Section 4. Specifications
Scale Platform Dimensions 28” L x 28” W x 50” H
Indicator Dimensions
8” L x 6.5” W x 2.3” H
Power 12VDC AC Adapter (Negative Center) Optional: 6 AA Alkaline Batteries
Displayed Units lb, kg
Capacity 550 x 0.2 lb or 250 x 0.1 kg
Construction Painted Mild Steel and Plastic Housing.
Options RS-232 Communication cable USB Communication cable
Warranty 2 Year Limited Warranty
8
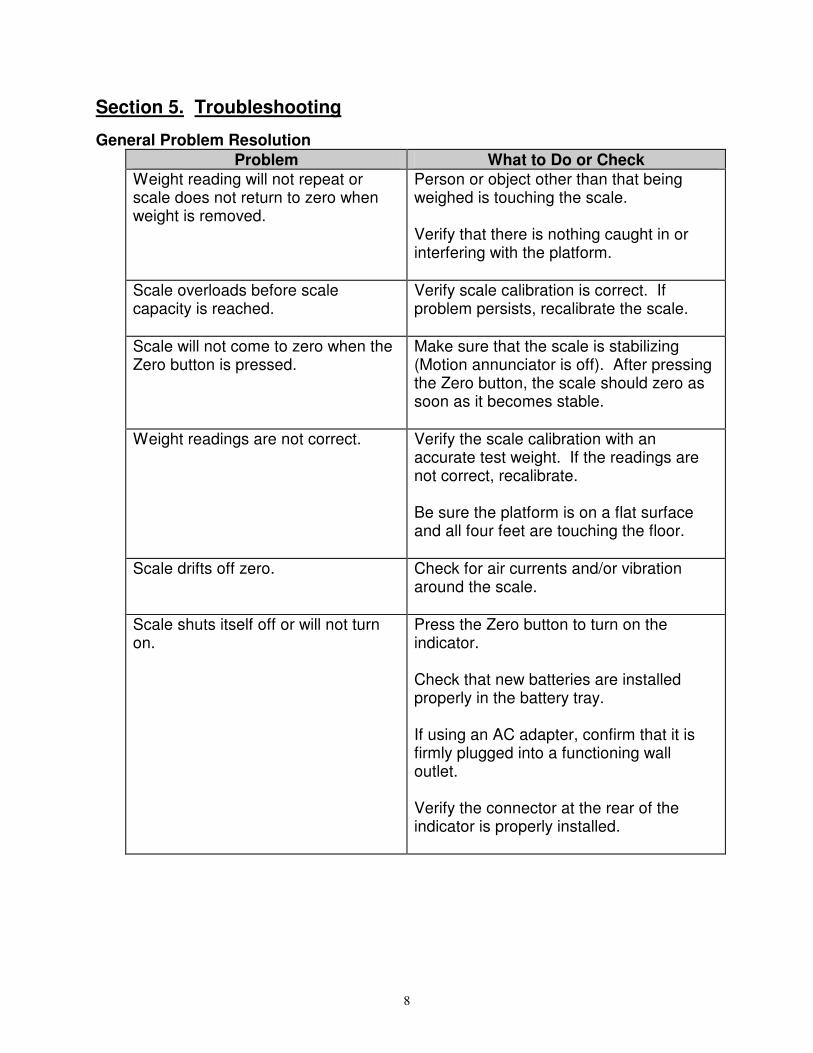
Section 5. Troubleshooting
General Problem Resolution
Problem What to Do or Check
Weight reading will not repeat or scale does not return to zero when weight is removed.
Person or object other than that being weighed is touching the scale. Verify that there is nothing caught in or interfering with the platform.
Scale overloads before scale capacity is reached.
Verify scale calibration is correct. If problem persists, recalibrate the scale.
Scale will not come to zero when the Zero button is pressed.
Make sure that the scale is stabilizing (Motion annunciator is off). After pressing the Zero button, the scale should zero as soon as it becomes stable.
Weight readings are not correct. Verify the scale calibration with an accurate test weight. If the readings are not correct, recalibrate. Be sure the platform is on a flat surface and all four feet are touching the floor.
Scale drifts off zero.
Check for air currents and/or vibration around the scale.
Scale shuts itself off or will not turn on.
Press the Zero button to turn on the indicator. Check that new batteries are installed properly in the battery tray. If using an AC adapter, confirm that it is firmly plugged into a functioning wall outlet. Verify the connector at the rear of the indicator is properly installed.