Integrated Urban System and Energy Consumption Model: Residential Buildings
Upload
khangminh22Category
view
0download
0

Model buildings
Name: Hannah Elton-Dobbin Candidate number: 3684
Investigating the design context
Development of design proposals Making Testing and evaluation
Task AnalysisContext:
Many model and hobby shops sell buildings that are flat packed ready for the purchaser to construct
Task:Using appropriate graphical materials design and make a true to scale kit for a building that will be
sold flat packed ready for saleModel and hobby shops: What do they usually sell?Graphical materials: What pictures, photographs, drawings am I going to include?True to scale: How big is it going to be?Kit: What will be included?Building: What building will I create?Sold flat packed: How will it fit together?Ready for sale: What packaging/promotional material will I create?
This research plan will help me structure my project to achieve the highest amount of interest by the largest audience. It will help me achieve maximum profit as it will show me what they are likely to pay, what they want it made out of and the size they want. This will help me find where I should put the largest amount of our costs, which will help me find my profit margins.
What I will research Where I will research How this will help me When I want it completed
Model and hobby shops
What do they usually sell?What is their target audience?
Going in to shops and asking questions This will enable me to see if there are any gaps in the market I can capitalize on. It will also help me get the largest target audience possible
1st March
Graphicalmaterial
How much detail is included?What material they use to put detail in?Pictures or drawings?What is tools are available at school
Hobby and model shopsLooking inside the kits
This will show me how much detail I should put into the building. It will show which type of graphical material touse and it will also help with my material choices.
10th March
True to scale What size are they usually?What scale are they?What's the preferred size?
Asking people who create themCreating one Going to a hobby and model shop
This will show the best size and scale to use. 15th March
Kit What's included?Glue?Construction guide?What’s the average price?What’s the average construction time?
Looking inside various kits to see what's included.Looking at the variety available in shops
It will show what I need to put into my box, It will show me my construction size, construction time and number of pieces I should do.
20th March
Building What is popular to build?What is there a lot of?
Looking in shops to see what there is. This will help me decide what building I should do. 1st April
Sold flat packed How many pieces?How thick should the material be?How will it be constructed?What size pieces?
Looking inside various kits.Making kits
This will show me what's the best material to use. It will help me to decide how it should be constructed and they type of pieces I should use including the sizes.
10Th April
Ready for sale Packaging?-Materials?-Size of packaging-Images on packaging What promotional material will I include?Legal requirements?
Looking at companiesLooking at existing products
This will help me to produce the most eye-catching packaging and what promotional material I should use.
18th April

Investigating the design context
Development of design proposals Making Testing and evaluation
Existing Product Analysis
Name: Lego Architecture Range
The Lego architecture range is one of the more advanced Lego ranges. They contain around 700 pieces and are recommended for 12 plus. They sell for around £20-40.In the 1960, the ‘Scale Model’ line was made, this line has been very successful. It contained an architecture book to interest the customers. A LEGO fan ,Adam Reed Tucker used Lego bricks to create true to scale landmarks. With the help of Lego they combined the two lines to create the Lego architecture range
Name: Arckit
Arckit is a product that combines models and computer software. The basic kit costs £50, this gives you 160 pieces along with a software to produce the building on google sketch up. They are produced in different scales the most popular being 1;50.The target market for this product is architect and hobbyists. This allows them to add finishing touches like bricks, grass and furniture online. This also has expansion packs which include more pieces.
Name: Metcalfe
These are reedy cut card kits. They are self adhesive to aid construction. They cost around £10 .These are vey easy to build are aimed to put around a train track.
Name: Scale Model
Scenery Ltd.They produce laser cut card & wood building & accessory kits. They focus on detail along with textures.
Name: Young Modeler
This is recommended for 15 years and over, this product retail's for £40. They are made out of laser cut ply-wood. They believe the construction time would be 300 minuets, which shows how complex this kit is. The fully completed size for this is 200 x 160 x 120 mm. The only problem about this product is it isn’t universally acceptable as it only gives the construction guide in South Korean. This means that is very hard for people in other countries to assemble. This is made out of sustainable wood
Name: QUAY Woodcraft Construction Kit
This is made out of ply-wood laser cut pieces. These pieces are FSC® certified wood. This means this product is eco friendly which is a good selling point. The finished product measures up as H51cm x L38cm x W27cm. Each piece is numbered and slots together. There’s a step-to-step guide online with videos to help the consumer. They come in sheets each kit cost around £15
All images from google images
Scale Ratio000 or 2 mm 1:152
N 1:148
TT/TT3 or 3 mm 1:102
H0 or 3.5 mm 1:8700 or 4 mm 1:76
EM or 4 mm 1:76
P4 /S4 or 4 mm 1:76.2
O14 1:43.50 or 7 mm 1:43.5ScaleSeven(S7) 7 mm
1:43.5
British railway transport modelling scale standards

Investigating the design context
Development of design proposals Making Testing and evaluation
Existing Product Analysis What I’ve found out by existing product analysisIn existing products they use a range of the materials including ply-wood, acrylic and card. The card ones are the cheapest, and the acrylic ones are the most expensive.
I’ve found that I don’t want too many pieces, otherwise it could be mistaken for a more of a puzzle than a building kit.
I have discovered that they cost between £10-50 but generally the larger the finished product the more expensive the product.
Each box usually comes with glue, if required and some sort o construction, either a video online or a booklet showing instructions on how to construct.
They usually have some sort of detail, weather its stickers or printing on the pieces.
Name: 3D puzzles 3D puzzles come in various piece numbers, materials and prices. The one above comes from Hobbycraft, costing £6 , made out of wood, with large puzzle pieces. There are only 58 puzzle pieces that slot together. Others have hundreds and are more a puzzle than a kit.
All photos on this page were taken by myself
Problems That I Found• There's a lot of waste• It can break easily• The instructions are hard to follow• You can’t finish it without glue
Video of what’s included in the product
Things that worked well• Minimal packaging• The sandpaper was very helpful-needed to fit
together• You can assemble it easily
Video of me constructing the product
Review of productWhen I bought this product it looked quite simplistic and easy. I think that it is balsa wood, this means that it is very lightweight. I noticed that the instructions were going top be a problem as they were very simple .Opening the product showed me that there would be quite a lot of waste and that it wasn’t cut out very well. There was also quite small pieces and that means its not suitable for young children.When popping out the pieces some broke off a bit due to poor cutting, this is something I need to look at if I choose to produce it in wood.I like the detail on the building with the indenting on the wood and around the windows.I found that while constructing I needed glue to stick on the detail on the roof and the chimney, so not everything was included, they didn’t clarify I needed glue but I couldn’t complete it without.
Things I am going to take from this product• Wood isn’t the best as it can snap easily• Good instructions help a lot• I shouldn’t have any small l pieces as this means I
have a smaller target market• I like the locking technique on the house• I liked the detail created by engraving
Please click on these two videos
The videos These two videos show me opening the product and then me constructing it. The first video is me opening it, it is the first impressions a consumer will have. My first impressions were that this product looks quite simple. As it was only cheep I didn’t expect a lot but I expected some more detailed instructions. There were no packaging apart from cellophane to stop the pieces from separating. On the front there is no suggested age range although the font and design makes it look child-like.The video of me constructing it. It shows that it is quite easy to construct. This also shows that it was quite simple although as you can see you cant complete it as it has not detail on the roof and no chimney.

Investigating the design context
Development of design proposals Making Testing and evaluation
Additional Researchimage from google images
What is needed for a product to be ready to be sold flat packed There are many legal requirements for packaging, these include:1. Country of origin.2. Ingredients (listed in order of amount).3. Weight or Volume.4. Instructions for use (including safety hazards).5. Name of product6. Name of company 7. Explaining any risks8. Suitable for recycling, energy recovery or organic
recovery such as composting
There are various rules about trading in and out of the EU, all rules can be found here: https://www.gov.uk/government/uploads/system/uploads/attachment_data/file/460891/BIS-15-460-packaging-essential-requirements-regulations-gov-guidance-notes.pdf
I will need to look back at this document as there are various rules for using re-cycled material in packaging as I have not decided at this stage in my product.
Graphical materialGraphical material definition online: Generally, two-dimensional pictorial representations whether opaque (e.g., prints, photographic prints, drawings), or intended to be viewed, or projected without motion, by means of an optical device I could also be material which has had some sort of graphical inputs, eg CAD or CAM
Some examples of graphical materials are:• Vinyl stickers• Cards • Plastics• Boards• Some wood(balsa)
I could use graphical material in various ways, I could do a vacuumed formed mould, laser cut materials and vinyl cut material.
Scales There are nine typical architecture scales but only five would be suitable for this project.:A typical height of story in building is 3m per floor, so depending on my decision on how big I want it this will help me with my scale but a 3 story building would be 1. 1:1 (9m)2. 1:10(90cm)3. 1:5 (1.8m)4. 1:50 (18cm)5. 1:20 (45cm)
For a product to be ready to sell it needs to be in some sort of box, Boxes are made out of different things and they have different benefits:• Grey board100% recycled, most common type of box material, can easily put design and images onto.• Corrugated cardboardProtects, good for easily breakable or damageable products, IKEA use them so their products don’t chip or get damaged. Also used as packaging boxes Often just plain or basic design on top.
The definition of flat packed is :A piece of furniture or other equipment that is sold in pieces packed flat in a box that is easily transportable and assembled by the buyer.
Conclusion from my research
In my research I have found a lot of things out.I have found out that• This appeals to a large audience, from around 8 to adults • The most common material to use is cardboard• They have various difficulties• They come in various sizes• They come in various prices between £6-£60This will help me with my product as it shows that I don’t want to do it too complicated or too difficult as that will mean my target audience is smaller. In general, the older the person, the smaller the building, this is because the most common reason for creating a building is for a railway set. The railway buildings are cardboard and usually come in one foldable piece. This makes it very easy to construct, these are also the cheapest This means that if I use a different material rather than cardboard with various pieces, not just one than I can go into the high quality end, I can spend quite a lot of money on the production, This could be used so there is lots of detail in the building.
Small parts If a product contains small parts, it isn’t suitable for children under 36 months. It must be larger than the average throat size for three year olds. This is because it is a chocking risk for those children.To qualify for it being suitable for under threes, each piece no fit completely in a cylinder that’s 2.25 inches long by 1.25 inches wide. If it does complete any piece that completely fits into this cylinder than it classifies as containing small parts.
Safety standardsTo conform to safety standards the product needs to be sent for testing. It would be tested for a variety of things including safety and functionality.
Graphical material definition online: Generally, two-dimensional pictorial representations whether opaque (e.g., prints, photographic prints, drawings), or intended to be viewed, or projected without motion, by means of an optical device I could also be material which has had some sort of graphical inputs, eg CAD or CAM

Investigating the design context
Development of design proposals Making Testing and evaluation
Target Market Research image from google images
Survey Monkey I created a survey monkey to see what my target audience wanted in this product .This is so I could find out what my target market wants along with finding out who my target market truly is I asked them 10 questions1. Their details2. Their age3. Their gender4. What sort of building it should be5. How it should be fit together6. How big it should be7. What material I should use8. What detail there should be9. What instructions there should be10. How many pieces there should be
I asked 15 people and I tried to get it as accurate as possible, I managed to get about equal amount of boys and girls(7 boys, 8 girls)I got a variety of ages from 14-53.This shows that the older the people the smaller they want, which is also my results of my online research, but they do not want it smaller than 30cm x 30cm. Also the older people want real buildings, like landmarks and service building where as all of the fantasy results came under the age of 16.
These enabled me to find out the most popular results along with any similarities as I can spit the results up into gender or age. With the results from survey monkey I have found out that:• It should be large, • It should be 30cm cubed and up, but
no larger than 60cm cubed• It should slot together • There should be between 10-30 pieces• It should be made of acrylic or wood
However they were undecided on a few things:• What the building should be – the
three top ones were landmarks, service buildings or fantasy
• What detail should be in the building-One result even said all of them , so I should do a variety not just one
• What sort of instructions, they think there should be some however, as nobody selected no instructions.
This will help me choose what I create, as I have eliminated a number of things.
In conclusion I have discovered there's two target markets
The younger (between 14-18)wanted it larger with less pieces and a less realistic building, like fantasy.
The older(18 and up) wanted a smaller building with more pieces and real-life building. They also tend to be men
All of them want detailed instructions as well as it being slotted together,
They want either a landmark or a service building, in particular a hospital as hen I asked people that was there favourite service building .
I have chosen to do it for the 18 and up market as, it will be more complicated and smaller. It will be easier to put to a scale as there will be building in real life to refer to. Also they still want a lot of variety of detail in them .
How would you like it to be fit together?
Slotted together Glued together Magnetically Pinned Folded Other
What type of building should it be? House
Service Building
Public transport
Hobby Building
Landmark
Fantasy
Medevil
Other
Investigating the design context
Development of design proposals Making Testing and evaluation
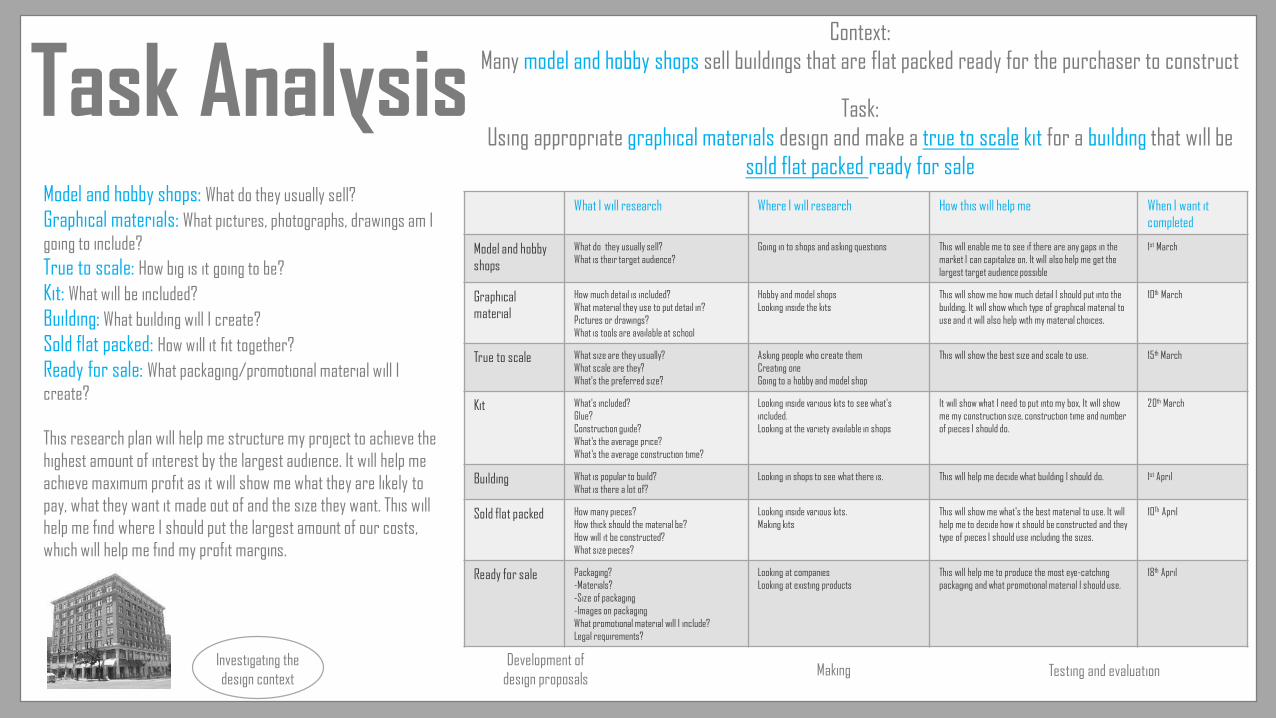
Specificationimage from google images
Aesthetics-Cost-Customer-Environment-Size-Safety-Function-Material-
Must-represent a building as that is what is stated in my briefShould-Be either a service building or landmark as they were the most popular buildings from my surveyCould- Have a variety of detail in the building as my survey didn’t come into conclusions of their favourite detail
Must-Be affordable for my target market, the model and hobby enthusiasts as stated in my briefShould-RRP price should be around £50,as that’s the average price for a building that I have found when looking at existing products, this means that I need its cost to be quite low.Could-Have expansion packs to get more money ,as some products on the market that I have looked at have some, this will generate more money
Must-Appeal to my target market, it must also be suitable for hobby and model enthusiasts as stated on my brief. The target market I have found out is older people, usually men. Should-Include what my target market wants which I have found out via the survey
Must- Suitable for recycling, energy recovery or organic recovery such as composting as this is a legal requirement for all products that are on sale.Should-Be eco-friendly e.g. sustainable wood or bio-plastics (as existing products I have researched are made from sustainable wood)
Must- Be flat packed and must be to a scale this is because it is stated on my brief.Should-Be the size my target market wants (around 30cm³), this will mean that it’s more likely to sell.Could-Come in two sizes to appeal to a larger target market(as the two target markets want different sizes)
Must-Have all the relevant safety precautions on the packaging, I have found these out in my researchShould-Do all the relevant tests to do the British and European standards. It should also contain no small parts as some people (parents with young children)might not buy it, this will reduce my target market.
Must-Be able to be constructed as that is stated in my brief due to it being flat packedShould-Slot together as that was a unanimous decision on my survey
Must-Include graphical material because this is stated on my brief.Should- Be either wood or acrylic as these are the two most popular results from the surveyCould- Have environmental features(see environment section) .
This is my design specification, it is a document showing everything I must, should and could have in my product. The more specifications I meet the better product it would be for my customers. This will help me when I design as it gives me easy access to what my target market wants. This will also help me achieve maximum success.

Investigating the design context
Development of design proposals Making Testing and evaluation
Initial IdeasMatrix:The six most important things from my spec is:1. representing a building as that is what is stated in my brief2. Be flat packed and must be to a scale this is because it is stated
on my brief.3. Include graphical material because this is stated on my brief4. Slot together as that was a unanimous decision on my survey5. Be either wood or acrylic as these are the two most popular
results from the survey6. Be the size my target market wants (around 30cm³), this will
mean that it’s more likely to sell.
The building that I chose fits my matrix the best, it will be easily slotted together as well as being the right size. It will look very good in acrylic and this will enable me to add lots of graphical material and detail to it. This will also be the right scale and size for my brief and target market. This enables me to fulfil all my main needs for a successful product.

Investigating the design context
Development of design proposals Making Testing and evaluation
Additional Research I have researched what the majority of hospitals have and where they are placed on the hospital siteI have found that they tend to have one large centre building with a few around it. They tend to have A&E situated
either in a separate building or on the side of a building, it always had easy access to parking and the ambulance/helipad.
I have also found out that they tend to have a few road in the hospital grounds. They also have a bus stop, taxi rank, shops and car parks. They have at least one car park and a hele pad, which connects to various parts of the hospital.
The emergency vehicles tend to have priority access and special access to parts such as the Emergency department.
What they tend to have.
Standard sizesI have found out some standard sizes with in hospitals, this allows me to design the building properly, as it will look if
it was real.:Standard of hospital buildings-
I have also looked at the story height for a hospital, I have found out that they tend to be larger than the average story height, it tends to be 12.5 foot high instead of 10 foot- therefore the building will be 25.6m tall . As I have also found out that they tend to have 8 stories in the main building. This means that the total height of the main building should be 29.2m also they tend to have an area of around 500m x400m, but varies a lot than with the roof put on it
would have a height of 30m . This now allows me to find out the right scale to use, the scale I will use is 1:1000 Standard of lift shafts-
Standard lift shafts for hospitals are 1500x2500 with an overhead height of 2200. This means that the lift would have to stick out 4400 on the roof to allow access to the top floor along with
the machine room. Hospitals normally have two for ambulance yes, therefore, they will be 3000x3000(due to casing)
Standards of roads-I have looked at the UK standards of road document produced by the highway department.
This allows me to know my road size. I have discovered that the total length for a 2 way road, and pavements will be 11m.
Helipads-Helipads are 72m in diameter, they also cant be with in 100m of any building that could
obstruct this, This means that I have decided to put it on top of the building with a lift, as it would be hard and a waste of space to put it on the ground. Also there's the problem that in real life if it was on the ground it would be very noisy. This is why most hospitals have it on
top of a car park or building.
Getting first hand informationI visited the Victoria and albert museum in London and saw their exhibition on architecture, but in particular the model buildings like the Eden project but also more typical ones like houses from various parts of the world. This
helped me a lot as I can see what they use for them, how they stick together and what features they have.
I have also visited a hospital to have 1st hand pictures and references for my project, I walked around the perimeter of the hospital and also the inside to see what they had, what worked well and what could be improved.
I also talked to a professional who worked at a hospital and asked her what is the most important things about a hospital to make it work well- these were:• Easy access to all parts of the hospital
• Enough parking for people and staff (preferably separate)• Outside space for patients and staff
• Good bus and taxi service for everyone to be able to come and leave
These are the pictures that I took during my visit to Southampton General hospital

Investigating the design context
Development of design proposals Making Testing and evaluation
Developing IdeasChoosing Material
I have looked at various material to use for my project. These are acrylic, plywood and grey board. I will look at:• how you stick them together as this will be what the consumer does- this means the glue that you use (weather its
harmful and ease of use etc..)• The cost of material – if its expensive than this will effect the overall price of the product.
• The look of the material- this will effect the overall look of the product- it needs to look professional and appealing.• The strength of the material- it needs to be strong as some bits will need to hold a large weight on it.
• Environmental impact- this will be important and could bring more customers in- the more eco-friendly the better
I have made a four sided box (as this could be the weakest part of the building) of each material and choose which is best to use
The Material Ease ofsticking
The cost of material
The overalllook
The strength of material
Environmental impact
Overall view
Acrylic Very easy and quick with dichloromethane
600x1000sheet3mm £15
This makes a very shiny and clean look
It is very strong and sturdy
Notbiodegradable but can be reused
This has a nice effect but not perfect for my project
Ply-Wood This was quite hard to stick asits slow drying (needs a clamp)
This has a nice look and lookssmart
The wood is strong however the glue takes a long time to dry
Biodegradable,Very eco-friendly
This is nice, but I believe it takes too long to dry
Greyboard
This was very easy and quick with a glue gun
Around £1 a sheet
This had a very nice and professional
This is very strong andalso very light
Recycled material-therefore the most eco-friendly
This isthe best for my needs
I have chosen to do grey board for my final piece , this is because:• It is very cheep
• It is very eco friendly• It is very quick to stick together and also suitable for a larger age range
• It was used for a lot of professional ones I looked at.
I have modelled various parts of my hospital, this will allow me to find the best layout and structure to the hospital.
Planning the hospital
This is a basic layout of my hospital. As you can see there is a main road that run at the base of the hospital ground. There is one large parking area, that could be one or two stories high. Also there is one main building (green) with another situated next to it. Along with this there will be a separate ambulance parking which gives it easy access. This ,although its basic will allow me to picture it easily and will help me in later design stages.
There are various plans of the hospital that I sketched down. There are various ways that the hospital plan could be constructed. This allows me to look easily at what would be the best layout. The best layout would have easy access for people and emergency services, easy to walk around and aesthetically pleasing. These allow me to find the best layout. I have taken the best out of them and merged them to make the best design possible.
However, I have done some additional research and found out that the helipad can’t be at the place I want I to be as it needs to be 100m from any building that is higher than the helipad, this will cause a problem to the hospital and any buildings that go around- this will make it less realistic. Therefore, the helipad will go on top of building 2, with a lift at the other side of it (this will be over 100m between the two) and this will also allow me to extend the main building.
Investigating the design context
Development of design proposals Making Testing and evaluation
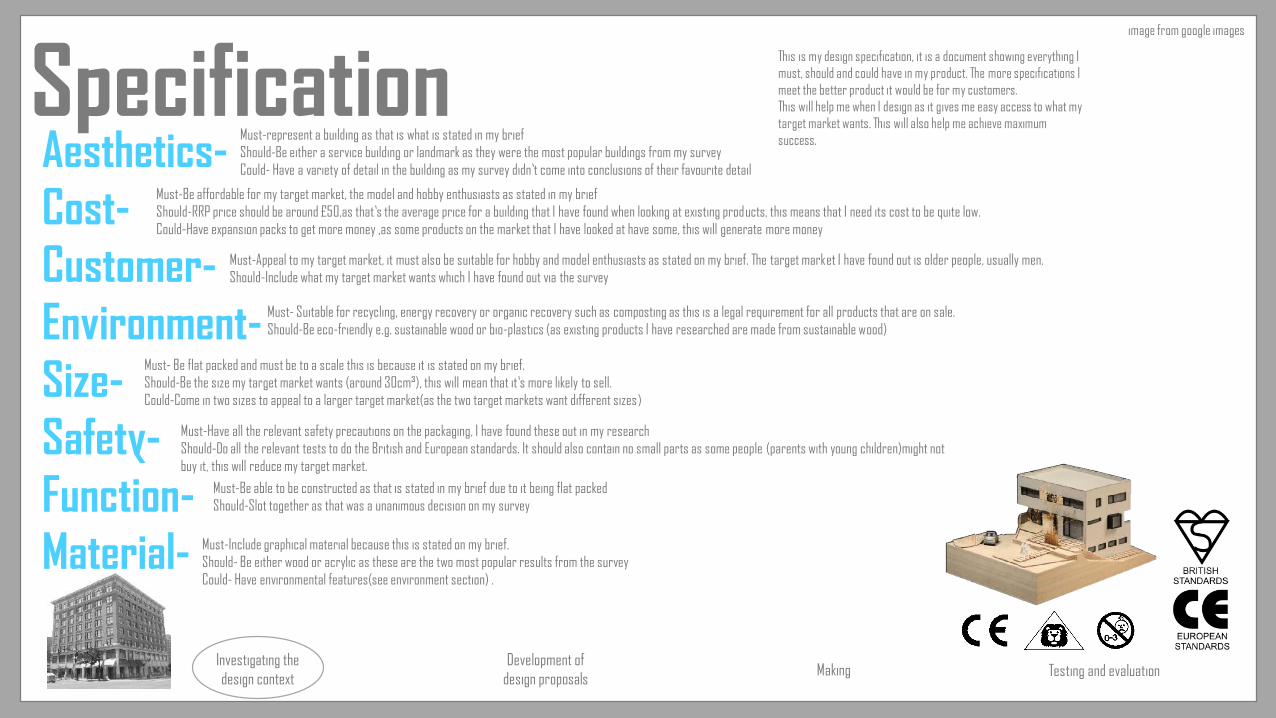
Net Development By Making nets I have discovered that my design has a flaw The height that I printed the nets was wrong, the height was 10x the size by accident. This means that the height will be too small.. I first chose a long and short one as this is more common but now I have decided to do a smaller one that’s taller, as this will look better. This means that I have to go back and redesign the whole thing. This will take a lot if time, meaning my production will occur later but I believe that this will be a lot better and it should be the best design possible instead of an average one.
Additional Research I have researched the average height of this certain type of hospital rather than the story height. This means that it will be more realistic to the consumer. The tallest hospital is 148m tall, I will not do it this tall but I will do it slightly taller than average at 100m high. This means that I will also decrease the length and width thus increasing the scale. Also instead if 300m long its about 250m long therefore I will reduce the length by 50m on each building and increase the height to 100m other than that everything else will stay the same. Therefore I can increase the product slightly to between 30cm³-60cm³
Before making it in production, I made a mock-up of the small building. This will help me give an idea of scale along with the ease of the slotting mechanism.It worked well.The cost of production for this mock up would be £2.10 (2x £1.05 for each sheet of geyboard)
I chose to do a curved front on the larger one, as most hospitals make a feature of the entrance and this is normally how they do it. I have sketched various ways of making the two buildings unique, I settled on other the same height but one larger, I have done a quick sketch of what me final design will be.

Investigating the design context
Development of design proposals Making Testing and evaluation
The photo above is a drawing that I did, I labelled all the parts and included everything you typically find in a hospital. The picture to the right was the drawing before I redrew it- changing the dimensions of it to make it more realistic and with in my target markets specification
Building final designMain building- with reception
Bus stops
Drop off pointTaxi rank
Hospital roads
Lift shafts
Car park
Helipad
Ambulance parking
These are the dimensions of the parts for the small building
These are the dimensions of the parts for the small building

Investigating the design context
Development of design proposals Making Testing and evaluation
Building graphics
These are screen shots of my process of Photoshopping the graphics on the building. I chose to do one made of bricks and one made of tiles ads most hospitals have a variety of materials used and they are the most popular. I used a basic design so that is easy to make and also assemble for the user. Everything is in scale of each other.Windows and doors are larger than average due to them being lower and wider for the use of wheelchairs.
These are the final design of the graphics with my nets on.These will be used for the final production

Investigating the design context
Development of design proposals Making Testing and evaluation
Developing board/Final design
These are some screenshots of myself, Photoshopping the board .This allows me to give a professional finish.
297
420
I have developed some instructions, these will sit on the back of the board, as you do not need the board till all the construction is complete, and it will be kept safe there. I look photos of myself
constructing it and I also made a video. This is posted onto YouTube for easy access, but I've also put qr codes at the bottom of the instructions, for ease for the consumer. This is something that
one of my target market said would help, as some instructions are complicated. I have attached links to the two videos below:
Small Building Construction
Large Builidng Construction

Investigating the design context
Development of design proposals Making Testing and evaluation
Box development
These are pictures of my models of the box, I then started planning
where bits of information on.
I have drawn a collection of different boxes, I chose my favourite than developed
various versions of it. I then chose my favourite of that, I then drew up a quick sketch of what the net was like, This
made it easier for when I drew it up on CAD for
printing. I put dust flaps on it, this means that it will keep neatly, and also nothing will enter that could damage it .
I have tried out how my board will close, I chose to make it the size of my board. Therefore I found that I can fold it in half and it will fit neatly in the bottom of the box. I have found that you need a 3mm margin on
either side of a A4 sheet of greyboard. This gives a nice neat finish which is easy to fold and looks professional.
Investigating the design context
Development of design proposals Making Testing and evaluation
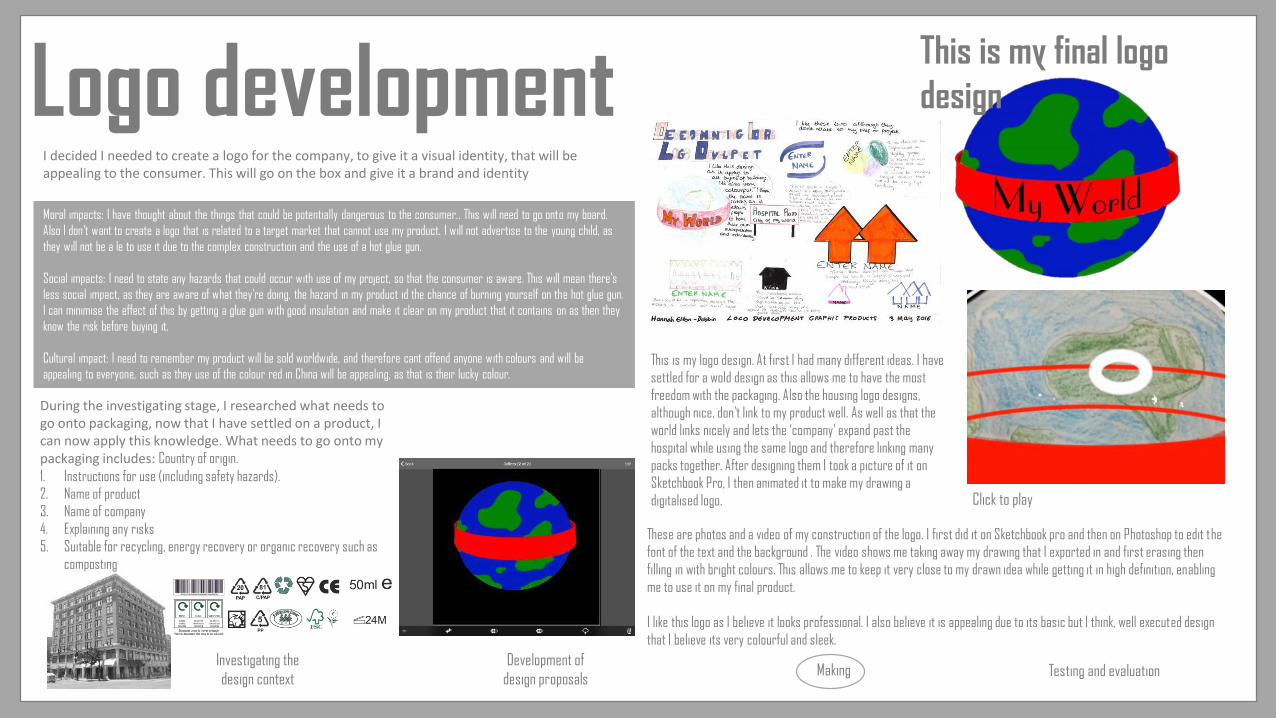
Logo development This is my final logo design
This is my logo design. At first I had many different ideas. I have settled for a wold design as this allows me to have the most freedom with the packaging. Also the housing logo designs, although nice, don’t link to my product well. As well as that the world links nicely and lets the ‘company’ expand past the hospital while using the same logo and therefore linking many packs together. After designing them I took a picture of it on Sketchbook Pro, I then animated it to make my drawing a digitalised logo.
These are photos and a video of my construction of the logo. I first did it on Sketchbook pro and then on Photoshop to edit the font of the text and the background . The video shows me taking away my drawing that I exported in and first erasing then filling in with bright colours. This allows me to keep it very close to my drawn idea while getting it in high definition, enabling me to use it on my final product.
I like this logo as I believe it looks professional. I also believe it is appealing due to its basic but I think, well executed design that I believe its very colourful and sleek.
Click to play
I decided I needed to create a logo for the company, to give it a visual identity, that will be appealing to the consumer. This will go on the box and give it a brand and identity
Moral impacts: I have thought about the things that could be potentially dangerous to the consumer.. This will need to go onto my board. Also I don’t want to create a logo that is related to a target market that cannot use my product. I will not advertise to the young child, as they will not be a le to use it due to the complex construction and the use of a hot glue gun.
Social impacts: I need to state any hazards that could occur with use of my project, so that the consumer is aware. This will mean there’s less social impact, as they are aware of what they’re doing, the hazard in my product id the chance of burning yourself on the hot glue gun. I can minimise the effect of this by getting a glue gun with good insulation and make it clear on my product that it contains on as then they know the risk before buying it.
Cultural impact: I need to remember my product will be sold worldwide, and therefore cant offend anyone with colours and will beappealing to everyone, such as they use of the colour red in China will be appealing, as that is their lucky colour.
During the investigating stage, I researched what needs to go onto packaging, now that I have settled on a product, I can now apply this knowledge. What needs to go onto my packaging includes: Country of origin.1. Instructions for use (including safety hazards).2. Name of product3. Name of company 4. Explaining any risks5. Suitable for recycling, energy recovery or organic recovery such as
composting

Investigating the design context
Development of design proposals Making Testing and evaluation
Box final design
These are some screenshots of making the box,I used Photoshop to make it very professional
After I designed my box, I drew it up on Photoshop. After I put the logo on it, took some professional looking photos of the box. I made all of it in keeping with the logo, I believe the bright colours on the grey background make it stand out even more.
I have calculated the cost for the box without labor costs This will allow me to start seeing the profit being made and also, where if needed I could save money :1 x £1 printed sleeve1 x £1 printed box3 x £1.05 cardboard to strengthen the boxTotal= £5.15
I have printed and made a blank box, then I started putting logos and information on it, it.
This allows me to look at various designs quickly. I settled on the design, with a banner
on the right and the logo top left, with a picture filling up the majority of the other
space. I will use the main colours, bright blue, red and green, to put the brand image throughout. This will keep the company
branding throughout and make it a b=stronger brand image.
000
000
Investigating the design context
Development of design proposals Making Testing and evaluation
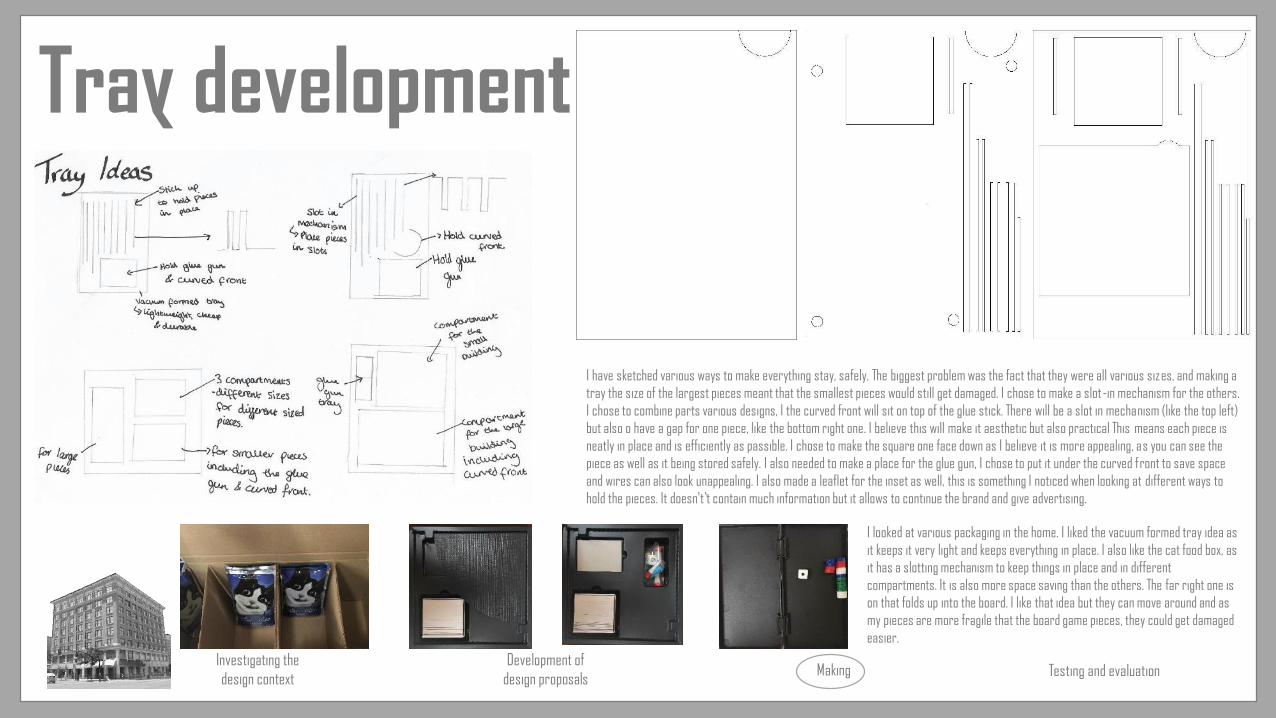
Tray development
I have sketched various ways to make everything stay, safely. The biggest problem was the fact that they were all various sizes, and making a tray the size of the largest pieces meant that the smallest pieces would still get damaged. I chose to make a slot-in mechanism for the others. I chose to combine parts various designs, I the curved front will sit on top of the glue stick. There will be a slot in mechanism (like the top left) but also o have a gap for one piece, like the bottom right one. I believe this will make it aesthetic but also practical This means each piece is neatly in place and is efficiently as passible. I chose to make the square one face down as I believe it is more appealing, as you can see the piece as well as it being stored safely. I also needed to make a place for the glue gun, I chose to put it under the curved front to save space and wires can also look unappealing. I also made a leaflet for the inset as well, this is something I noticed when looking at different ways to hold the pieces. It doesn't’t contain much information but it allows to continue the brand and give advertising.
I looked at various packaging in the home. I liked the vacuum formed tray idea as it keeps it very light and keeps everything in place. I also like the cat food box, as it has a slotting mechanism to keep things in place and in different compartments. It is also more space saving than the others. The far right one is on that folds up into the board. I like that idea but they can move around and as my pieces are more fragile that the board game pieces, they could get damaged easier.

Investigating the design context
Development of design proposals Making Testing and evaluation
Blippar developmentFor a new product to succeed it needs a USP to make customers interested and change from what they’re used to.
After asking the general public what they wanted (graph below). I settled on augmented reality, as it was the most popular by far and can also bring in the sound element as well.
Blippar and ZapWorks are the two most popular apps for augmented reality, I chose to use blippar over ZapWorks, due to the brands such as Coca-cola that are using blippar, meaning it is more popular to the large markets, and also the ease of use.
The one problem about blippar was that I couldn't’t create loops and was very limited on the amount of animations I could do on a free account. This however was still less restrictions than the ZapWorks.
I uploaded my board with the buildings onto Blippar, after, I downloaded some free sounds to put in the background. Then using fireworks I made the gifts move, that I then I put on blippar. I made the helicopter land on the helipad and then fly away, and the cars
move down the road. If this was made in production, there would me more cars, coming into and out of the hospital, along with
people walking in and out of the hospital building. After making it, I sent for it to be published and it was approved, therefore when anyone, with the blippar app hovers over it there will be sound and a moving helicopter and a car.
The unique selling proposition (USP) or unique selling point is a marketing concept first proposed as a theory to explain a pattern in successful advertising campaigns of the early 1940s. The USP states that such campaigns made unique propositions to customers that convinced them to switch brands.
0
20
40
60 % people
% people
How you use it:• Download blippar from any app
store• Open blippar and hover your
camera over the whole building.• Watch it come to life!

Investigating the design context
Development of design proposals Making Testing and evaluation
Production planThe hospital
The box
Box
Inserts
Tubing
Glue gun holder
Investigating the design context
Development of design proposals Making Testing and evaluation
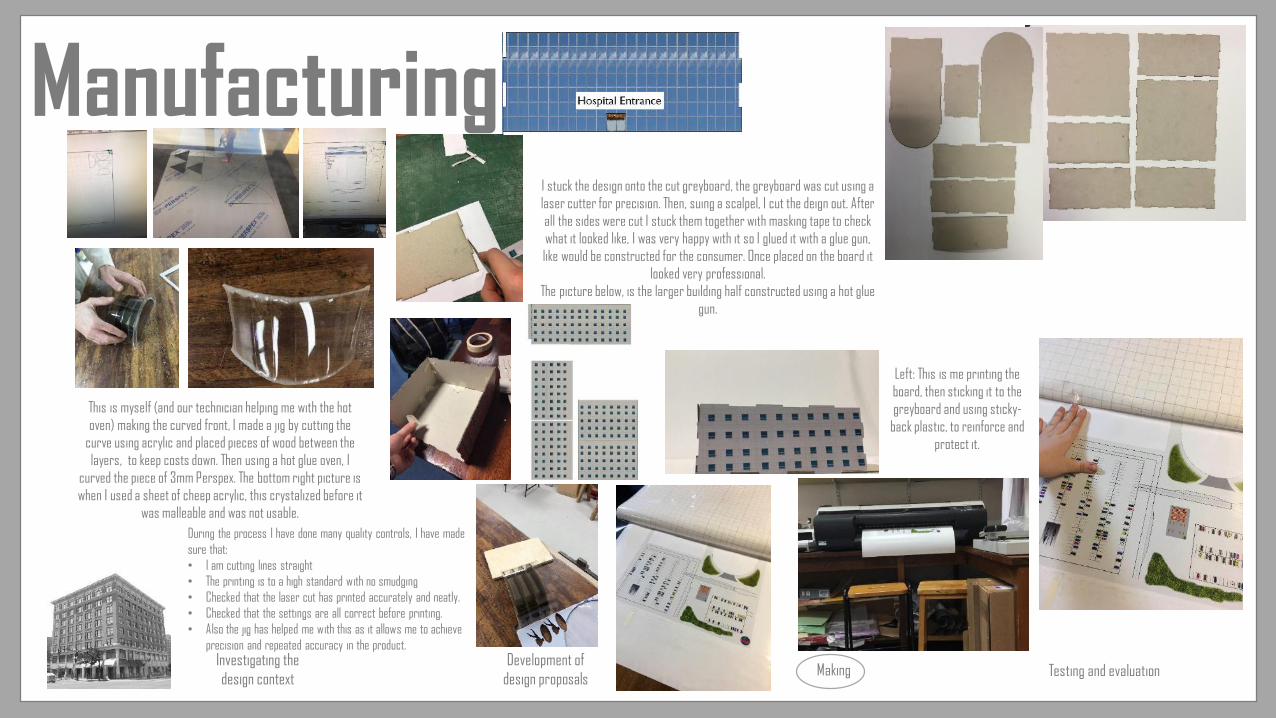
Manufacturing
This is myself (and our technician helping me with the hot oven) making the curved front, I made a jig by cutting the
curve using acrylic and placed pieces of wood between the layers, to keep costs down. Then using a hot glue oven, I
curved the piece of 3mm Perspex. The bottom right picture is when I used a sheet of cheep acrylic, this crystalized before it
was malleable and was not usable.
I stuck the design onto the cut greyboard, the greyboard was cut using a laser cutter for precision. Then, suing a scalpel, I cut the deign out. After all the sides were cut I stuck them together with masking tape to check what it looked like, I was very happy with it so I glued it with a glue gun, like would be constructed for the consumer. Once placed on the board it
looked very professional.The picture below, is the larger building half constructed using a hot glue
gun.
Left: This is me printing the board, then sticking it to the greyboard and using sticky-
back plastic, to reinforce and protect it.
During the process I have done many quality controls, I have made sure that:• I am cutting lines straight• The printing is to a high standard with no smudging• Checked that the laser cut has printed accurately and neatly.• Checked that the settings are all correct before printing.• Also the jig has helped me with this as it allows me to achieve
precision and repeated accuracy in the product.

Investigating the design context
Development of design proposals Making Testing and evaluation
Manufacturing
I made a jig for the glue gun holder. I got a block of wood and cut, using a band saw, then sanded using a belt sander, to made it a pyramid shape, making draft angles. I then put it in
the vacuum former and made a very neat vacuum formed tray for it.For the inserts I drew up a
slotting mechanism on 2D design before printing it in on the laser
cutter, to increase precision. and to increase the height without increasing much weight, I put some tubs in the centre. I cut them on a band saw and then
sanded them to make them glue easier, with dichloromethane.
These are photos of me sticking the box together. I used a bigger gluer gun than in the box, but I don’t think that will matter as it has the same size nozzle. I am happy with the ease of sticking
together and I believe so will me customers.


Investigating the design context
Development of design proposals Making Testing and evaluation
Reviewing my productWhen showing them the brief they believed I fulfilled it very well. They believed I did it to a very high standard and even said I put in more than required for the brief. They were even talking about a whole set of them making their own little world, if this was a company it would expand to this. This is why I chose the name my world as it allows each user to have their own unique configuration
Their favourite part was the packaging, which they couldn't fault! They said it as simple but elegant and that it would be very eye catching on the shelves. Mrs White said that she liked that there were no people on it as that would narrow the target market. Also the information on the box is very clear and informative. Mr Piggott said that the use of advertising blippar was very effective., he thought the graphics were very good.
They liked the scale that I chose as it gave a good sized product with lots of detail on it, although they thought I could've printed them in higher definition, but then I explained about the restrictions of the school. This is one thing that I will think about if it went into manufacture on a large scale. They also suggested that I could've printed all the way to the edges, leaving none of the greybeard exposed. One other thing they picked up was that some of the pieces had glue marks on them, this is due to the spray mount sealing through the paper. this will not be a problem in mass manufacture as I could get a glue suited to the weight of the paper.They found the slotting mechanism very neat and thought that the construction of it was easy but effective. They said that if I stick the design on then layered I might not get the problem of the designs pealing off, but this will also work if I had specialist glue, also mentioned earlier.
They believed the graphics were very realistic, but thought that the signs may be better laser cut as this would get them to stand out more, this is something I would consider as this will be easy to do and could give it a higher finish.
The only problem they had was that they weren't quite sure who my target market would be as hospitals are normally for girls, but construction sets are usually aimed at boy. I said that this could help bringing both sexes together playing, but also could help the stigma of engineering is for boys.
I went to my schools architectural society for me specialists review, this will help me to find faults in my product. I asked young adults (16-18) who all want to be architects when they're older to review my product. As well as this I asked two ’true’ specialists, Mrs White, who builds models for theatre companies, and Mr Piggott who is a designer to help with the graphical side.
Specialist reviewing my product
WHAT I LEARNED FROM THE SPECIALIST REVIEW
• My main target market would be girls aged 10-14 although by not putting any people on the packaging my target market
would be wider, everyone will enjoy it.• I should print my surface graphics on higher quality paper and
in higher definition if it went to manufacture.• The graphics are very realistic and the blippar feature will be
my USP• The box is very eye catching and will help my product sell to
my target market.• It fulfills my brief well.
• They can see it being sold in many shops including hobby shops.
When we talked about the product being sold they thought that my product was very unique, due to the blippar features will sell very well. They thought my target main target market would be girls aged 10-14 but they could also see boys and young adults buying it. Therefore I believe I had a very successful meeting with the specialists and it has helped me in many ways deciding on what I would change if my product was sold on the mass market

Investigating the design context
Development of design proposals Making Testing and evaluation
Reviewing my productTarget marketAfter the review of my product by the specialists, as they suggested my target market would be females, I asked two girls age (12-14) to review my product as I believe that this will be my target market. I chose these two particularly as they are interested in engineering and model making.
They also though the box was very good and the insert meant it looked very neat, they thought that I could do with a bit of design on it to make it more in keeping with the logo. They thought the sleeve was a good idea as it was slightly different to the usual, but allows lots of designs on it. It is also easy to get the product out.
They said they could see themselves buying the product and expect to pay around £50 for it, this would give a good profit margin, therefore I think this would be a good RRP price.
The building, they though was a good size but if you had lots of expansions, in the brand, it would become rather large. This is something to consider, but as hospitals are very large in comparison to houses and other buildings I think it will be fine. They had to ask me what the lift shafts were on the top, therefore I think that I should either take it off, as most people don’t know what they look like, or make it more realistic by taking a photo of one and pasting it on.
They thought that blippar was very fascinating and would be the main reason they would buy this product over similar ones, as this is the only one I could find that has blippar features, it really makes my product unique. They had not heard of blippar before, so this may be a slight problem as if they don’t know what the USP is then they might not buy it. However blippar is becoming increasingly popular so, I don’t think this is a major problem ,but one worth considering.
I also asked then about the target market, they agreed thinking that is was for girls but they also thought that boys of a similar age would buy it.Therefore the age range for my product will be teenagers who are just getting in to modelling.
WHAT I LEARNED FROM THE TARGET MARKET REVIEW
• They would pay around £50• Their favorite part was the blippar features.
• They hadn’t heard of blippar before-needs more advertising.

Investigating the design context
Development of design proposals Making Testing and evaluation
Specification Evaluation
Aesthetics-Cost-Customer-Environment-Size-Safety-Function-Material-
Must-represent a building as that is what is stated in my briefShould-Be either a service building or landmark as they were the most popular buildings from my surveyCould- Have a variety of detail in the building as my survey didn’t come into conclusions of their favourite detail
Must-Be affordable for my target market, the model and hobby enthusiasts as stated in my briefShould-RRP price should be around £50,as that’s the average price for a building that I have found when looking at existing products, this means that I need its cost to be quite low.Could-Have expansion packs to get more money ,as some products on the market that I have looked at have some, this will generate more money
Must-Appeal to my target market, it must also be suitable for hobby and model enthusiasts as stated on my brief. The target market I have found out is older people, usually men. Should-Include what my target market wants which I have found out via the survey
Must- Suitable for recycling, energy recovery or organic recovery such as composting as this is a legal requirement for all products that are on sale.Should-Be eco-friendly e.g. sustainable wood or bio-plastics (as existing products I have researched are made from sustainable wood)
Must- Be flat packed and must be to a scale this is because it is stated on my brief.Should-Be the size my target market wants (no bigger than 60cm³), this will mean that it’s more likely to sell.Could-Come in two sizes to appeal to a larger target market(as the two target markets want different sizes)
Must-Have all the relevant safety precautions on the packaging, I have found these out in my researchShould-Do all the relevant tests to do the British and European standards. It should also contain no small parts as some people (parents with young children)might not buy it, this will reduce my target market.
Must-Be able to be constructed as that is stated in my brief due to it being flat packedShould-Slot together as that was a unanimous decision on my surveyMust-Include graphical material because this is stated on my brief.Should- Be either wood or acrylic as these are the two most popular results from the surveyCould- Have environmental features(see environment section) .
This fills all of these, It is a hospital (service building) and also has lots of detail on it. If it was made in production, the detail would be printed rather than stuck onto my greyboard as it would look neater
There are lots of consumables, but I roughly used about 3 sheets of greyboard at about £1 a sheet. Therefore it wouldn’t cost a lot to make, thus making a profit
The building include the things that I found out when doing my research.I believe that they would appeal to the young hobbyist in particular but everyone would have fun building it
I have used all material that is recyclable. The only thing that isn’t is the glue-gun, but I believe that it will be reusable, and therefore fulfils this brief.
It is flat packed. It is on the larger size of my targets markets wants. If I did it again I would make it smaller as it would help with printing problems.
It has all the relevant safety symbols on the packaging, if it was in production I would have put it through the British and European standards, but this was not possible in the project.
My hospital does slot together, it is also able to be built, I believe that they have to have some experience, as it isn’t the easiest to build.
This includes lot of graphical detail. However it isn’t acrylic or wood, due to the environmental and cost features greyboard, I chose to do this instead.

Investigating the design context
Development of design proposals Making Testing and evaluation
ComparisonsI chose to compare my product with this as this is a scale hospital. Although there are many similarities there are also lots of differences, this is however the closest I could get to mine, but I thin k that’s good as it means that my product is truly unique.
This is made to go round a train track, therefore it shares the point of making for own town or village, as they both allow the consumer to do that. I believe this is a key point, as they both draw the consumer to be unique. When the cities are made up they both end up rather large, the HO scale is 1:87, it is actually slightly larger than mine therefore I don’t think the size of my product will be a problem at all.
However there are some significant differences, my product has panels as sides that you glue together, whereas the comparison is made out of a large sheet of card which is folded together. Also they both have an emergency section but the comparison is connected to the main building whereas my product are two separate building.
The comparison doesn't’t have a base, however as it is used round a train track, you can buy bases separately, this is a good idea, and could be used on mine, however as there's lots of graphics on the board I think it would be hard to make each carpark separate and the roads separate as well, therefore I will stick with my idea if it went to commercial production.
Also the comparison is a traditional hospital whereas mine is a modern hospital, I believe that the comparison is more recognisable as a hospital, therefore I will make a few modifications to make it more recognisable, such as signage or the outside, With the comparison you can buy people, trees and cars, this is a good idea, which I think I will do also, as you then can play with it o blippar or by hand.
The other significant difference is the price, this one retails for around £20 where as mine will be about £50, although this is a significant difference, I will keep mine at the price, as I have a much larger cost of production and it also has many bonus features, therefore I believe my product is stil l reasonable.
Investigating the design context
Development of design proposals Making Testing and evaluation
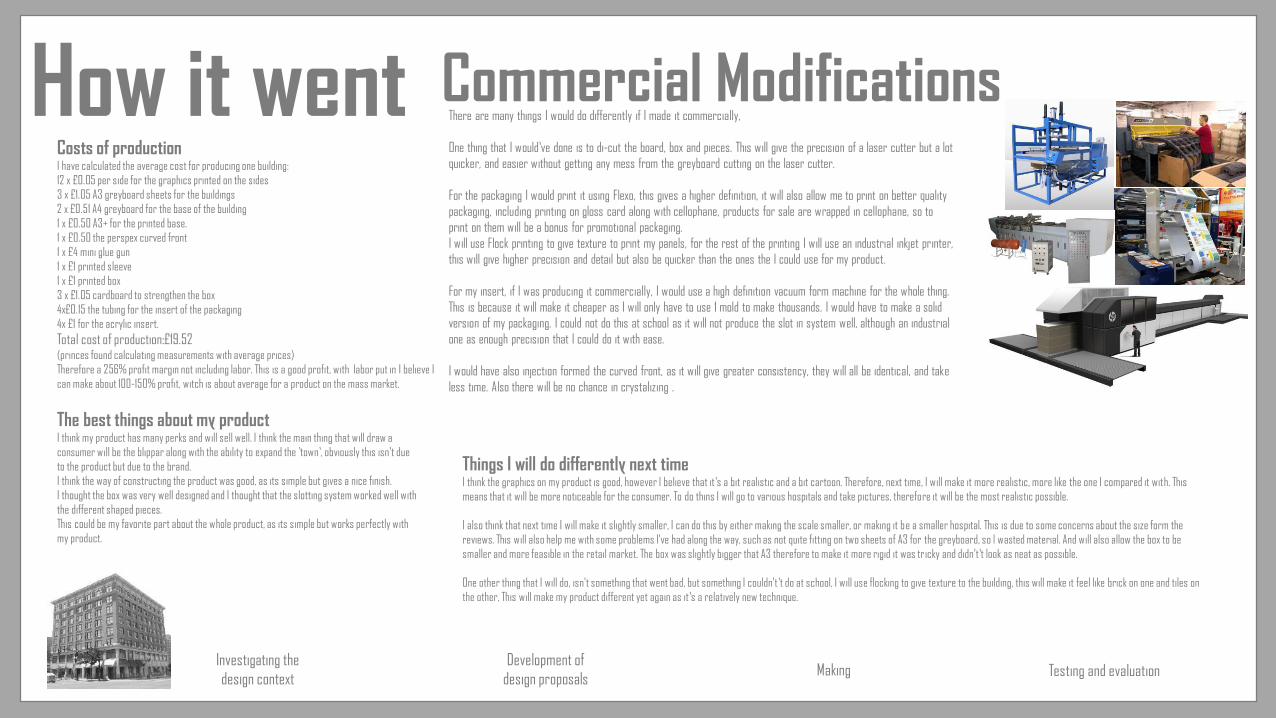
How it wentCosts of productionI have calculated the average cost for producing one building:12 x £0.05 per side for the graphics printed on the sides3 x £1.05 A3 greyboard sheets for the buildings2 x £0.51 A4 greyboard for the base of the building1 x £0.50 A3+ for the printed base.1 x £0.50 the perspex curved front1 x £4 mini glue gun1 x £1 printed sleeve1 x £1 printed box3 x £1.05 cardboard to strengthen the box4x£0.15 the tubing for the insert of the packaging4x £1 for the acrylic insert.Total cost of production:£19.52(princes found calculating measurements with average prices)Therefore a 256% profit margin not including labor. This is a good profit, with labor put in I believe I can make about 100-150% profit, witch is about average for a product on the mass market.
The best things about my productI think my product has many perks and will sell well. I think the main thing that will draw a consumer will be the blippar along with the ability to expand the ’town’, obviously this isn't due to the product but due to the brand.I think the way of constructing the product was good, as its simple but gives a nice finish.I thought the box was very well designed and I thought that the slotting system worked well with the different shaped pieces.This could be my favorite part about the whole product, as its simple but works perfectly with my product.
Things I will do differently next timeI think the graphics on my product is good, however I believe that it’s a bit realistic and a bit cartoon. Therefore, next time, I will make it more realistic, more like the one I compared it with. This means that it will be more noticeable for the consumer. To do thins I will go to various hospitals and take pictures, therefore it will be the most realistic possible.
I also think that next time I will make it slightly smaller, I can do this by either making the scale smaller, or making it be a smaller hospital. This is due to some concerns about the size form the reviews. This will also help me with some problems I've had along the way, such as not quite fitting on two sheets of A3 for the greyboard, so l wasted material. And will also allow the box to be smaller and more feasible in the retail market. The box was slightly bigger that A3 therefore to make it more rigid it was tricky and didn't’t look as neat as possible.
One other thing that I will do, isn't something that went bad, but something I couldn't’t do at school, I will use flocking to give texture to the building, this will make it feel like brick on one and tiles on the other, This will make my product different yet again as it’s a relatively new technique.
Commercial ModificationsThere are many things I would do differently if I made it commercially,
One thing that I would’ve done is to di-cut the board, box and pieces. This will give the precision of a laser cutter but a lot quicker, and easier without getting any mess from the greyboard cutting on the laser cutter.
For the packaging I would print it using Flexo, this gives a higher definition, it will also allow me to print on better quality packaging, including printing on gloss card along with cellophane, products for sale are wrapped in cellophane, so to print on them will be a bonus for promotional packaging. I will use Flock printing to give texture to print my panels, for the rest of the printing I will use an industrial inkjet printer, this will give higher precision and detail but also be quicker than the ones the I could use for my product.
For my insert, if I was producing it commercially, I would use a high definition vacuum form machine for the whole thing. This is because it will make it cheaper as I will only have to use 1 mold to make thousands. I would have to make a solid version of my packaging. I could not do this at school as it will not produce the slot in system well, although an industrialone as enough precision that I could do it with ease.
I would have also injection formed the curved front, as it will give greater consistency, they will all be identical, and take less time. Also there will be no chance in crystalizing .
Copyright © 2022 FDOKUMEN