model: avr-x2000w - Sound United
19
Model Information INTEGRATED NETWORK AV RECEIVER I/R Codes Product Specifications Upgrades/Updates Accessories Reset Procedure Warranty Remote Control Rear Panel Front Panel Protection History Display Mode MODEL: AVR-X2000W 1 Model Information Index NOTE: This edition is missing the FAQ’s content (pages 13 and 14) ………………………………………………………..7/29/2015 This edition is missing the link to the IR Codes………………………………………………………………………....7/29/2015 MI072915E3-1
-
Upload
khangminh22 -
Category
Documents
-
view
7 -
download
0
Transcript of model: avr-x2000w - Sound United

Model Information
INTEGRATED NETWORK AV RECEIVER
I/R Codes
Product Specifications
Upgrades/Updates
Accessories
Reset Procedure
Warranty
Remote Control
Rear Panel
Front Panel
Protection History Display Mode
MODEL: AVR-X2000W
1
Model InformationIndex
NOTE:This edition is missing the FAQ’s content (pages 13 and 14) ………………………………………………………..7/29/2015This edition is missing the link to the IR Codes………………………………………………………………………....7/29/2015
MI072915E3-1

Power operation button (O)This turns the power of MAIN ZONE on/off (standby). Power indicatorThis is lit as follows according to the power status:• Power on : Green• Normal standby : Off• When “HDMI Pass Through” or “HDMI Control” is set to “On”: Red• When “IP Control” is set to “Always On”: Red Headphones jack (PHONES)When the headphones are plugged into this jack, audio will no longerbe output from the connected speakers.NOTE: To prevent hearing loss, do not raise the volume level excessively when using headphones. AUX-HDMI connectorUsed to connect devices such as video cameras and game consoles.
Front Panel (1 of 2)
HOME FRONT PANEL 2DISPLAY 1 2
USB portUsed to connect USB storages (such as USB memory devices) and theUSB cable supplied with iPod. SETUP MIC jackUsed to connect the supplied Setup and measurement microphone. MASTER VOLUME knobThis adjusts the volume level. DisplayThis displays various pieces of information. Remote control sensorThis receives signals from the remote control unit. SOURCE SELECT knobThis selects the input source. Tuner preset channel buttons (TUNER PRESET CH +, –)These select preset FM/AM radio stations

ZONE2 ON/OFF buttonThis turns the power of ZONE2 on/off. ZONE2 SOURCE buttonThis selects the input source for ZONE2. DIMMER buttonEach press of this switches the brightness of the display. STATUS buttonEach press of this switches the status information that is shown on the display. QUICK SELECT buttonsWith a single press of any of these buttons, you can call up varioussettings you’ve registered to each button such as the input source,volume level and sound mode settings.
Front Panel (2 of 2)
HOME DISPLAY 1FRONT PANEL 1 3

Information displayThe input source name, sound mode, setting values and otherinformation are displayed here.
Input signal indicators
MULTI ZONE indicatorsThis lights up when ZONE2 (separate room) power is turned on.
MUTE indicatorThis lights when the audio mute mode is selected.
Master volume indicator
Circle indicatorCircle indicator is displayed when the input source is “NETWORK” or“iPod/USB” when you are playing back music.
Sleep timer indicatorThis lights when the sleep mode is selected. Tuner reception mode indicatorsThese light according to the reception conditions when the inputsource is set to “TUNER”.STEREO : In FM mode, this lights up when receiving stereo broadcasts.TUNED : Lights up when the broadcast is properly tuned in. Audyssey® indicatorThis indicator lights when the “MultEQ® XT” “DynamicEQ” or “Dynamic Volume” setting is set to other than “Off”.
Display (1 of 2)
HOME DISPLAY 2FRONT PANEL 2 4

HOMEDISPLAY 1
Display (2 of 2)
Decoder indicator
These light when Dolby or DTS signals are input or when the Dolby or DTS decoder is running.
Surround back indicator
This lights when audio signals are being output from the surround back speakers .
Input mode indicators
Set the audio input modes for the different input sources.
5REAR PANEL

HOMEDISPLAY 2 6
Rear Panel
FM/AM antenna terminals (ANTENNA)Used to connect FM and AM antennas. Speaker terminals (SPEAKERS)Used to connect speakers. Video connectors (VIDEO)Used to connect devices equipped with video connectors. Component video connectors (COMPONENT VIDEO)Used to connect devices equipped with component video connectors. AC inlet (AC IN)Used to connect the power cord. HDMI connectorsUsed to connect devices equipped with HDMI connectors Digital audio connectors (DIGITAL AUDIO)Used to connect devices equipped with digital audio connectors.
Network connector (NETWORK)Used to connect this unit to the network. PRE OUT connectorsUsed to connect a subwoofer with a built-in amplifier or an external power amplifier. REMOTE CONTROL jacksUsed to connect infrared receivers/transmitters in order to operate this unit and external devices from a different room. Analog audio connectors (AUDIO)Used to connect devices equipped with analog audio connectors. RS-232C connectorThe RS-232C serial port is provided to allow compatibility with an external home automation controller. Consult the owner’s manual of the home automation controller for more information about serial control of this unit. The serial port allows two-way control and status via an external home automation controller.NOTE: Do not touch the inner pins of the connectors on the rear panel. Electrostatic discharge may cause permanent damage to the unit.
REMOTE CONTROL 1
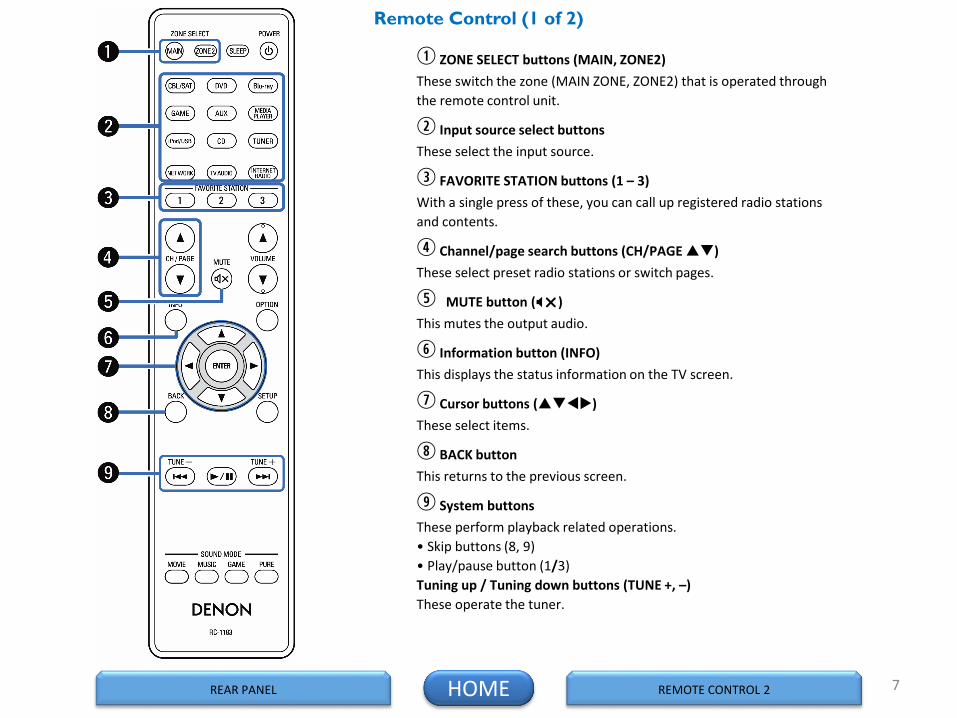
ZONE SELECT buttons (MAIN, ZONE2)These switch the zone (MAIN ZONE, ZONE2) that is operated throughthe remote control unit.
Input source select buttonsThese select the input source.
FAVORITE STATION buttons (1 – 3)With a single press of these, you can call up registered radio stationsand contents.
Channel/page search buttons (CH/PAGE )These select preset radio stations or switch pages.
MUTE button ()This mutes the output audio.
Information button (INFO)This displays the status information on the TV screen.
Cursor buttons ()These select items.
BACK buttonThis returns to the previous screen.
System buttonsThese perform playback related operations.• Skip buttons (8, 9)• Play/pause button (1/3)Tuning up / Tuning down buttons (TUNE +, –)These operate the tuner.
HOME REMOTE CONTROL 2REAR PANEL
Remote Control (1 of 2)
7

SOUND MODE buttons
These select the sound mode.• MOVIE button• MUSIC button• GAME button• PURE button
Remote control signal transmitter
This transmits signals from the remote control unit.
SLEEP button
This sets the sleep timer.
POWER button (O)
This turns the power on/off.
VOLUME buttons ()
These adjust the volume level.
OPTION button
This displays the option menu on the TV screen.
ENTER button
This determines the selection.
SETUP button
This displays the menu on the TV screen
HOME WARRANTY 1REMOTE CONTROL 1
Remote Control (2 of 2)
8

DENON LIMITED WARRANTY (1 of 2)
This warranty will be honored only in the U.S.A.
Length of Non-Transferable WarrantyThis warranty on your DENON product which is distributed and warranted by DENON ELECTRONICS (USA), LLC remains in effect for the following periods from the date of the original consumer purchase from an AUTHORIZED DENON ELECTRONICS (USA), LLC DEALER.
DENON ELECTRONICS (USA), LLC(a D&M Holdings Company)100 Corporate DriveMahwah, NJ 07430-2041(201) 762-6665www.usa.denon.com
DENON FACTORY SERVICE by PANURGY OEM701 Ford Road (South Dock)Rockaway, NJ 07866-2053(973) 625-4056(973) 625-9489 Faxhttp://www.panurgyoem.com/Denon/Denonrepair.html
See the next page for more information about the Denon limited warranty
HOME
3 years for units purchased new
1 year for refurbished (B-Stock) units
WARRANTY 2REMOTE CONTROL 2 9

Warranty (2 of 2)What is CoveredExcept as specified below, this Warranty covers all defects in material and workmanship in this product occurring during the above warranty periods. The following are not covered by the Warranty: (1) Any product which is not distributed in the U.S.A. by DENON ELECTRONICS (USA), LLC. (2) Any product which is not purchased in the U.S.A. from an authorized DENON dealer. (Note: AUTHORIZED DENON DEALERS can be identified by DENON AUTHORIZED DEALER sticker displayed in the stores. If you are uncertain as to whether a dealer is a DENON AUTHORIZED DEALER, please contact DENON as listed below). (3) Any product on which the serial number has been defaced, modified or removed. (4) Damaged deterioration or malfunction resulting from: a) Accident, act of nature, abuse, misuse, neglect, unauthorized product repair, opening of or modification or failure to follow instructions supplied with the product. b) Repair or attempted repair by anyone not authorized by DENON. c) Any shipment of the product (claim must be presented to carrier). (5) Items subject to wear from normal usage (tape heads, cartridges, stylus, battery, etc.). (6) Periodic check-ups which do not disclose any defect. (7) Use of the product outside the U.S.A. (8) Damaged magnetic tape or CD/DVD/BD discs. (9) Use in industrial, commercial, and/or professional applications. (10) Any installation or removal charges resulting from product failure.What We Will Pay ForIf during the applicable warranty period from the date of original consumer purchase your DENON product is found to be defective by DENON, DENON will repair, or at its option, replace with new, reconditioned or equivalent model, such defective product without charge for parts or labor.How to Obtain Warranty PerformanceIf your unit ever needs service, it may be taken or shipped to any authorized DENON service station or DENON ELECTRONICS (if you are uncertain as to whether a service station is DENON authorized, please visit our website at http://usa.denon.com/us/Support/Pages/ServiceCenterSearch.aspx or contact DENON as listed below.) In all other cases, the following procedures apply whenever your unit must be transported for warranty service;
You are responsible for transporting your unit or arranging for its transportation.If shipment of your unit is required;
You must pay the initial shipping charges, but we will pay the return shipping charges if the repairs are covered by the Warranty.WHEN RETURNING YOUR UNIT FOR WARRANTY SERVICE, A COPY OF THE ORIGINAL SALES SLIP MUST BE ATTACHED.You should include the following: your name, address, daytime telephone number, model and serial number of the product and a description of the problem. In the case of a CD/DVD/BD Player, please enclose ONE (1) disc that the unit has failed with for test reasons. It will be returned with the unit.
THIS WARRANTY IS VALID IN THE U.S.A. ONLY.If your product does not require service, but you have questions regarding its operation, please contact our Customer Support Department as listed below.THIS WARRANTY IS EXPRESSLY MADE IN LIEU OF ALL OTHER WARRANTIES, EXPRESSED OR IMPLIED, INCLUDING WITHOUT LIMITATION, WARRANTIES OF MERCHANTABILITY AND FITNESS FOR A PARTICULAR PURPOSE.OUR LIABILITY IS LIMITED TO THE REPAIR OR REPLACEMENT, AT OUR OPTION, OF ANY DEFECTIVE PRODUCT AND SHALL IN NO EVENT INCLUDE INCIDENTAL OR CONSEQUENTIAL COMMERCIAL OR PROPERTY DAMAGES OF ANY KIND. WE ARE NOT RESPONSIBLE FOR PRODUCTS LOST, STOLEN AND/OR DAMAGED DURING SHIPPING.SOME STATES DO NOT ALLOW LIMITATIONS ON HOW LONG AN IMPLIED WARRANTY LASTS AND/OR DO NOT ALLOW THE EXCLUSION OF INCIDENTAL OR CONSEQUENTIAL DAMAGES, SO THE ABOVE LIMITATIONS AND EXCLUSIONS MAY NOT APPLY TO YOU.This warranty gives you specific legal rights, but you may also have other rights which vary from state to state. This Warranty may not be altered other than in a writing signed by an officer of Denon Electronics USA, LLC.
HOME RESETWARRANTY 1 10

HOME
Reset procedure:With the power off, press and hold the “TUNER PRESET CH +” button, the “TUNER PRESET CH -” button, and the “POWER” button simultaneously on the AVR for a few seconds until the display starts flashing at intervals of about 1 second.
Resetting the micro is a procedure used to "reboot" the microprocessor to restore its normal operation when it temporarily freezes, locks up, or behaves erratically. Resetting the microprocessor, erases any saved settings you may have previously programmed into the unit
Issues that can affect the performance of the microprocessor:
• A jolt of static electricity• Current surge through an input
Before resetting the microprocessor;
• Check all connections carefully • Check for setup errors• Back up your settings. You may also want to write down your preferred settings for easier task of setting up the AVR after reset.
Note: The Web (Browser) Control feature can be used to back up your settings by saving a configuration file on your hard drive. For this feature, we recommend using one of the following web browsers: Internet Explorer 10 and above, Mozilla Firefox 24 and above, Google Chrome 29 and above, and Safari 5.x and above.
Note: If you had an installer setup your system, please first contact your installer to see if they can reset and then setup your system again as there may be specific EQ calibrations (Audyssey) that the installer will need to perform.
Important: Back up the settings before resetting the microprocessor. Most settings are reset to the factory default values after performing this procedure. This means that all the settings data will be completely lost if it’s not previously saved.
WARRANTY 2
Reset
Power/Standby button
TUNER PRESET CH +” buttonTUNER PRESET CH -” button
11ACCESSORIES

Accessories
HOMERESET
30701013800AD $48.99 32401000800AD $31.99 963549101000D $16.82
963116100070S $8.99 963116100080S $3.27 90M-ZC000470R $30.64
Remote Control(RC1183)
Sound Calibration
Microphone (ACM1HB)
Sound Calibration
Microphone Stand
AM Loop Antenna
FM Indoor Antenna
CD ROM Owner’s Manual
Notes on Radio Quick Start Guide
Safety Instructions
Warranty (For North
America Only)
12FAQs

FAQ’s ( 1 of ?)
HOME FAQ’s 2ACCESSORIES 13

FAQ’s (2 of ?)
HOME UPGRADEFAQ’s 1 14

Upgrades/Updates
HOME Specifications – Audio SectionFQA’s 2
Firmware:This unit has the ability to update its firmware over the internet if so is selected by the user. When connected to a network via Wi-Fi or Ethernet, the AVR searches automatically for new updates and if any is found, a message appears on the screen for approx. 40 seconds with the options of updating the firmware: “NOW”, “LATER”, or “IGNORE”. Note: This feature of displaying the update message, can be disable from the “Setup” menu(Setup/General/Firmware/Notifications/Update or Upgrade/Off).
If the update process is interrupted, “Update retry” appears on the display and the unit tries repeatedly to continue the update until it either reconnects and picks up where it left off and continue the update process or times itself out after trying several times. When the latter occurs, one of the following messages will appear on the screen.
To Check for Firmware Update from the Denon server when the unit is connected to the internet via the Ethernet port (When Firmware Notification is turned off). Press “SETUP” and select “GENERAL” and then select “FIRMWARE” followed by “UPDATE” and finally, select “CHECK FOR UPDATE”.Note: This will also check the time it will approximately take to complete the update.
To download the latest version of firmware for AVR-X2000W, click on the following Upgrade page:www.usa.denon.com/US/Downloads/Pages/Product-Updates.aspx
To display the AVR’s current firmware version on the TV screen:Press “SETUP” and select “GENERAL” and then select “INFORMATION” followed by “FIRMWARE”.
To check to see if an update or upgrade is available for your unit and also to see a list of “Recent Updates/Upgrades”, click on the following link:http://usa.denon.com/us/downloads/productupdates?_ga=1.114028992.611911196.1430951505
Connection fail Download fail Updating fail Server is busy Login failed
15
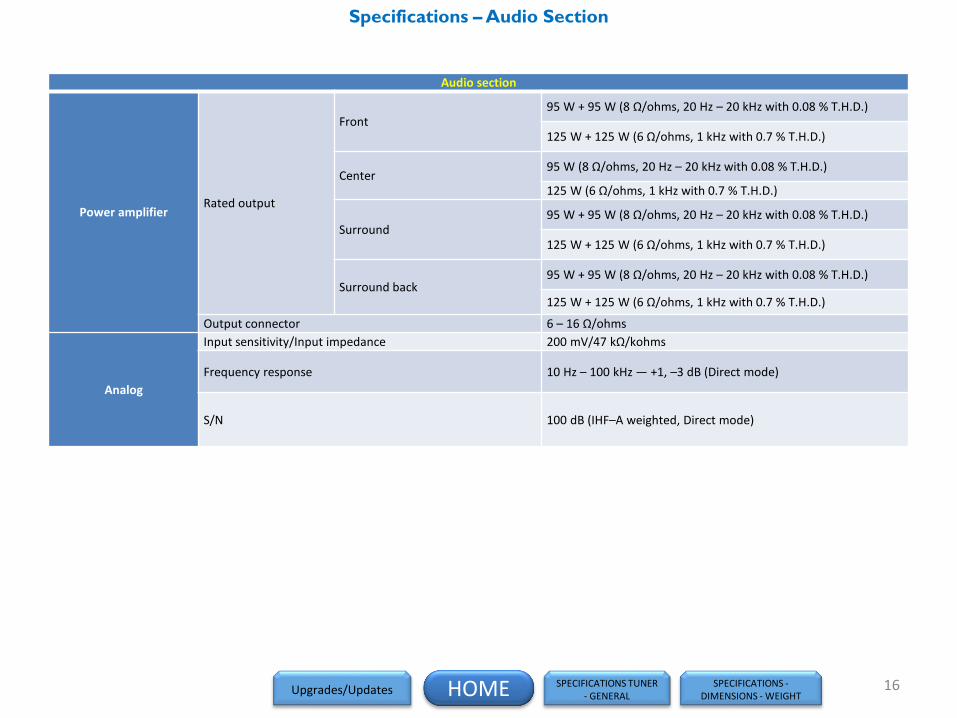
Specifications – Audio Section
HOME
Audio section
Power amplifierRated output
Front95 W + 95 W (8 Ω/ohms, 20 Hz – 20 kHz with 0.08 % T.H.D.)
125 W + 125 W (6 Ω/ohms, 1 kHz with 0.7 % T.H.D.)
Center95 W (8 Ω/ohms, 20 Hz – 20 kHz with 0.08 % T.H.D.)
125 W (6 Ω/ohms, 1 kHz with 0.7 % T.H.D.)
Surround95 W + 95 W (8 Ω/ohms, 20 Hz – 20 kHz with 0.08 % T.H.D.)
125 W + 125 W (6 Ω/ohms, 1 kHz with 0.7 % T.H.D.)
Surround back95 W + 95 W (8 Ω/ohms, 20 Hz – 20 kHz with 0.08 % T.H.D.)
125 W + 125 W (6 Ω/ohms, 1 kHz with 0.7 % T.H.D.)
Output connector 6 – 16 Ω/ohms
Analog
Input sensitivity/Input impedance 200 mV/47 kΩ/kohms
Frequency response 10 Hz – 100 kHz — +1, –3 dB (Direct mode)
S/N 100 dB (IHF–A weighted, Direct mode)
Upgrades/Updates SPECIFICATIONS -DIMENSIONS - WEIGHT
SPECIFICATIONS TUNER - GENERAL
16

Specifications - Tuner Section, General Section
HOME
Tuner section
FM AM
Note: µV at 75 Ω/ohms, 0 dBf = 1x10-15 WReception frequency range 87.5 MHz - 107.9 MHz 520 KHz -1710 KHzEffective sensitivity 1.2 µV (12.8 dBf) 18µV50 dB sensitivity MONO ― 2.8 μV (20.2 dBf)
S/N ratio MONO 70 dB (IHF–A weighted, Direct mode)STEREO 67 dB (IHF–A weighted, Direct mode)
Distortion Mono 0.7 %Stereo 1.0 %
SPECIFICATIONS -AUDIO
SPECIFICATIONS -DIMENSIONS - WEIGHT
17
General sectionPower supply AC 120V, 60HzPower consumption 500WPower consumption in standby mode 0.1WPower consumption in CEC standby mode 0.5WPower consumption in network standby mode 2.7W
For purpose of improvement, specifications and design are subject to change without notice.

Specifications – Dimensions, Weight
HOME
Dimensions section (Unit : inch/mm)
Weight: 20 lbs 15 oz (9.5 kg)
SPECIFICATIONS - TUNER –GENERAL
SPECIFICATIONS -AUDIO
18

The End
HOME 19
NOTE:This edition is missing the FAQ’s content (pages 13 and 14) ………………………………………………………..7/29/2015This edition is missing the link to the IR Codes………………………………………………………………………....7/29/2015