Memory card recording times - Panasonic Pass
27
14 Memory card recording times • Recording times (approx.) when using Panasonic SD/SDHC/SDXC memory cards Recording mode Memory card capacity AVCHD mode DV mode PS *4 (Highest quality mode *3 / 1920X1080 pixels) PH *1 (Highest quality mode *3 / 1920X1080 pixels or 1280X720 pixels) PM *2 (Long duration mode/ 1280X720 pixels) HA *1 (High quality mode/ 1920X1080 pixels) HE *2 (Long duration mode/ 1440X1080 pixels) DV 512 MB Approx. 1 min 40 sec Approx. 2 min Approx. 5 min Approx. 3 min Approx. 10 min Approx. 2 min 1 GB Approx. 4 min Approx. 5 min Approx. 12 min Approx. 7 min Approx.21 min Approx. 4 min 2 GB Approx. 9 min Approx. 10 min Approx. 25 min Approx. 15 min Approx. 45 min Approx. 8 min 4 GB Approx. 18 min Approx. 21 min Approx. 52 min Approx. 30 min Approx. 1 hr 30 min Approx. 16 min 6 GB Approx. 30 min Approx. 33 min Approx. 1 hr 20 min Approx. 45 min Approx. 2 hr 15 min - 8 GB Approx. 40 min Approx. 45 min Approx. 1 hr 50 min Approx. 1 hr Approx. 3 hr Approx. 32 min 12 GB Approx. 1 hr Approx. 1 hr 5 min Approx. 2 hr 50 min Approx. 1 hr 30 min Approx. 4 hr 30 min - 16 GB Approx. 1 hr 20 min Approx. 1 hr 30 min Approx. 3 hr 45 min Approx. 2 hr Approx. 6 hr Approx. 1 hr 4 min 32 GB Approx. 2 hr 40 min Approx. 3 hr Approx. 7 hr 30 min Approx. 4 hr Approx. 12 hr Approx. 2 hr 8 min 48 GB Approx. 4 hr Approx. 4 hr 30 min Approx. 11 hr 20 min Approx. 6 hr Approx. 18 hr Approx. 3 hr 12 min 64 GB Approx. 5 hr 20 Approx. 6 hr Approx. 15 hr Approx. 8 hr Approx. 24 hr Approx. 4 hr 16 min AVCHD mode *1 Use a memory card of SD speed class 4 or above when recording with PH mode/HA mode. Recording cannot be performed with a memory card of lower than SD speed class 4. *2 Use a memory card of SD speed class 2 or above when recording with PM mode/HE mode. *3 PH mode: This is the highest quality mode in 1080i/720P format. PS mode: This is the highest quality mode in 1080P format. *4 Use a memory card of SD speed class 6 or above when recording with PS mode. Recording cannot be performed with a memory card of lower than SD speed class 6. • The camera utilizes the VBR recording system. VBR stands for Variable Bit Rate, a recording system where the bit rate automatically varies (volume of data per given time period) according to the subject being shot. Therefore, recording times will be shorter when fast moving subjects have been recorded. • Control space is included in the displayed capacity, and available recording capacity will be smaller. • Continuous recording time is a maximum of 12 hours (when using the AC adaptor). • Recording can be sometimes restarted even if it was paused due to shortage of space. • Even for the same memory card, the recording time differs depending on conditions such as the recording format or recorded images. • The recording time of a memory card may shorten when record and delete are repeated often over and over. In that case, format the memory card with the camera. When a memory card is formatted, all data recorded on the memory card is erased and cannot be restored. Save important data to your computer. • Use a memory card of SD speed class 6 or above when using the VFR function. Recording cannot be performed with a memory card of lower than SD speed class 6.
-
Upload
khangminh22 -
Category
Documents
-
view
7 -
download
0
Transcript of Memory card recording times - Panasonic Pass

14
Memory card recording times • Recording times (approx.) when using Panasonic SD/SDHC/SDXC memory cards
Recording mode
Memory card capacity
AVCHD mode DV mode
PS*4
(Highest quality mode*3/
1920X1080 pixels)
PH*1
(Highest quality mode*3/
1920X1080 pixels or
1280X720 pixels)
PM*2
(Long duration mode/
1280X720 pixels)
HA*1
(High quality mode/
1920X1080 pixels)
HE*2
(Long duration mode/
1440X1080 pixels)
DV
512 MB Approx. 1 min 40 sec Approx. 2 min Approx. 5 min Approx. 3 min Approx. 10 min Approx. 2 min1 GB Approx. 4 min Approx. 5 min Approx. 12 min Approx. 7 min Approx.21 min Approx. 4 min2 GB Approx. 9 min Approx. 10 min Approx. 25 min Approx. 15 min Approx. 45 min Approx. 8 min4 GB Approx. 18 min Approx. 21 min Approx. 52 min Approx. 30 min Approx. 1 hr 30 min Approx. 16 min 6 GB Approx. 30 min Approx. 33 min Approx. 1 hr 20 min Approx. 45 min Approx. 2 hr 15 min -8 GB Approx. 40 min Approx. 45 min Approx. 1 hr 50 min Approx. 1 hr Approx. 3 hr Approx. 32 min
12 GB Approx. 1 hr Approx. 1 hr 5 min Approx. 2 hr 50 min Approx. 1 hr 30 min Approx. 4 hr 30 min -16 GB Approx. 1 hr 20 min Approx. 1 hr 30 min Approx. 3 hr 45 min Approx. 2 hr Approx. 6 hr Approx. 1 hr 4 min 32 GB Approx. 2 hr 40 min Approx. 3 hr Approx. 7 hr 30 min Approx. 4 hr Approx. 12 hr Approx. 2 hr 8 min 48 GB Approx. 4 hr Approx. 4 hr 30 min Approx. 11 hr 20 min Approx. 6 hr Approx. 18 hr Approx. 3 hr 12 min 64 GB Approx. 5 hr 20 Approx. 6 hr Approx. 15 hr Approx. 8 hr Approx. 24 hr Approx. 4 hr 16 min
� AVCHD mode*1 Use a memory card of SD speed class 4 or above when recording with PH mode/HA mode. Recording cannot
be performed with a memory card of lower than SD speed class 4.*2 Use a memory card of SD speed class 2 or above when recording with PM mode/HE mode.*3 PH mode: This is the highest quality mode in 1080i/720P format.
PS mode: This is the highest quality mode in 1080P format.*4 Use a memory card of SD speed class 6 or above when recording with PS mode. Recording cannot be
performed with a memory card of lower than SD speed class 6. • The camera utilizes the VBR recording system. VBR stands for Variable Bit Rate, a recording system where the bit rate automatically varies (volume of data per given time period) according to the subject being shot. Therefore, recording times will be shorter when fast moving subjects have been recorded.
• Control space is included in the displayed capacity, and available recording capacity will be smaller. • Continuous recording time is a maximum of 12 hours (when using the AC adaptor). • Recording can be sometimes restarted even if it was paused due to shortage of space. • Even for the same memory card, the recording time differs depending on conditions such as the recording format or recorded images.
• The recording time of a memory card may shorten when record and delete are repeated often over and over. In that case, format the memory card with the camera. When a memory card is formatted, all data recorded on the memory card is erased and cannot be restored. Save important data to your computer.
• Use a memory card of SD speed class 6 or above when using the VFR function. Recording cannot be performed with a memory card of lower than SD speed class 6.

32
SIMUL RECWhen memory cards are inserted in both of the two slots, activating this function enables recording the same video to both the memory cards. Set the [SIMUL REC] item on the setup menu [RECORDING SETUP] screen to [ON] to enter the SIMUL REC mode.In the media capacity display on the screen, the available recording time possible for SIMUL REC (the available recording time of the memory card with lower memory capacity) is displayed, and the icon [ ] is displayed. • Recording stops when one of the memory cards in Slot 1 or Slot 2 has no remaining space. (The following figure shows the case that the memory card in Slot 1 becomes full.)
Slot 1
Slot 2
Clip A
Clip A
Standby
Standby Standby
Clip B
Clip B
If you press the <START/STOP> button without replacing the memory card in Slot 1, video will be recorded normally on the memory card in Slot 2 (the memory card with remaining memory).
When the capacity of Slot 1 (the memory card with lower remaining memory) becomes full, SIMUL REC will stop.To resume the SIMUL REC, replace the memory card to a new memory card and press the <START/STOP> button.
Startrecording
End recording
Start recording
Clip C
Stop recording(No space left on memory card)
Memory card recording time
Start recording (normal recording)
• If the remaining capacity of the memory card in Slot 1 is same as in Slot 2, the remaining capacity in Slot 1 is displayed.
• SIMUL REC cannot be used at the same time as relay recording, VFR recording, or INTERVAL REC.• During SIMUL REC, if recording has stopped because a recording error has occurred in one of the
memory cards, the other memory card will continue to record.• After SIMUL REC ends, when there is capacity remaining on one of the memory cards, that memory
card will automatically be selected as the memory card for recording. Press the <START/STOP> button again for normal recording.
• While in SIMUL REC mode, if only one memory card is inserted, normal recording takes place.• After SIMUL REC, the REC CHECK function does not operate.• After SIMUL REC, the [LAST CLIP] function does not operate.• When switching to <PB> mode after SIMUL REC, the thumbnails of the memory card in slot 1 will be
displayed.

56
1 Thumbnail display status (Page 60)The types of clips displayed as thumbnails appear in this area.
2 Repeat playback indicator (Page 58)Displayed during repeat playback.
3 Media status displayDisplays status of memory card.
4 Battery level display (Page 25 of Vol. 1)Displays remaining battery level.
5 Cursor (Orange frame)Displayed on currently selected thumbnail.
6 Recording mode displayDisplays recording mode if the clip currently highlighted by the cursor has been shot in PS, PH, PM, and DV modes. (Page 14)
7 Time display (Page 60)Displays a time code at start of clip recording/user information at start of clip recording/shooting time/shooting date/shooting date and time - according to settings.
8 Recording format displayDisplays recording format of the clip with the cursor position.
9 Duration displayDisplays duration of the clip with the cursor position.
10 Clip numberDisplayed in order of shooting. (Up to 1000 clips) Numbers of clips that cannot be played back (e.g. clips with different recording formats) are displayed in red.To play clips displayed in red, set the [PB FORMAT] item in the setup menu [PLAY SETUP] screen to the appropriate recording format. (Page 99)
11 [ ]: Clip protect display (AVCHD mode only)Displayed on protected clips.
� In DV mode
X
!X
!X
1
56 7 8
2 3 4
9
10
12

58
Make settings for playback format and method.
Setting playback format [PB FORMAT] (only in AVCHD mode)
Set format for playback.
1 Press the <MENU> button.Menu operation (Page 31 of Vol. 1)
2 Select the [PB FORMAT] item in the [PLAY SETUP] screen, and push the OPERATION lever (or tilt in the direction).
3 Tilt the OPERATION lever in the < >< > directions to select the format for playback, and push the OPERATION lever. • The setting for the [REC FORMAT] item on the setup menu [RECORDING SETUP] screen is reflected as the initial setting.
• Clip numbers will be displayed in black where playback is possible, and in red where playback is not possible.
• Even if the playback format is set, the recording format set in the [REC FORMAT] item on the setup menu [RECORDING SETUP] screen is restored when the camera is switched to <CAMERA> mode.
• If the playback format does not conform to the clips created at the relay destination using the relay recording function, thumbnail images will not be displayed ([!] will be displayed). Thumbnail images will be displayed when the playback format is matched to the clips.
Repeat playback [REPEAT PLAY]Use this setting to repeatedly play back all available clips on the selected slot.
1 Press the <MENU> button.Menu operation (Page 31 of Vol. 1)
2 Set the [REPEAT PLAY] item in the [PLAY SETUP] screen to [ON].
3 Press the <MENU> button to return to the thumbnail screen.The repeat playback indicator will be displayed.When the playback operation is performed, the playable clips are played back repeatedly. • Repeat playback will continue until playback is paused.
• To turn the repeat playback setting [OFF], select [OFF] in step 2.
Playback settings [PLAY SETUP]

71
Editi
ng
� Output list when external devices (TV/Monitor) are connected
[SYSTEM FREQ] = [59.94Hz]
ModeMenu settings Output terminal format
REC FORMAT SDI&HDMI OUT SEL
DOWNCON MODE*6
SDI OUT
SDI 24PsF SDI OUT HDMI
OUTVIDEO OUT DV OUT
AVCHD
1080/60i(30P), 1080/60P
1080i/720P
Disabled ON
Disabled 1080/60i*5 1080/60i*5 No output
No output
1080/24PON 1080/24PsF No output*2 No outputOFF 1080/60i 1080/60i No output
720/60P(30P), 720/24P Disabled 720/60P 720/60P No output
1080/60i(30P), 1080/24P SIDE CROP
LETTER BOXSQUEEZE*1
OFF DisabledNo output 1080/60i 480/60i
720/60P(30P), 720/24P No output 720/60P 480/60i*3
1080/60i(30P), 1080/24P
720/60P(30P), 720/24P
DOWN CONV
SIDE CROPLETTER BOX
SQUEEZE
ONDisabled
480/60i 480/60P*4 No output
OFF No output 480/60P*4 480/60i
DV480/60i 480/30P 480/24P
Disabled DisabledON
Disabled480/60i No output 480/60i 480/60i
OFF No output No output 480/60i 480/60i
[SYSTEM FREQ] = [50Hz]
ModeMenu settings Output terminal format
REC FORMAT SDI&HDMI OUT SEL
DOWNCON MODE*6 SDI OUT SDI OUT HDMI
OUTVIDEO OUT DV OUT
AVCHD
1080/50i(25P), 1080/50P
1080i/720P
Menu settings disabled ON
1080/50i*5 1080/50i*5 No output
No output
720/50P(25P) 720/50P 720/50P No output
1080/50i(25P) SIDE CROPLETTER BOXSQUEEZE*1
OFFNo output 1080/50i 576/50i
720/50P(25P) No output 720/50P 576/50i*3
1080/50i(25P) 720/50P(25P)
DOWN CONV
SIDE CROPLETTER BOX
SQUEEZE
ON 576/50i 576/50P*4 No output
OFF No output 576/50P*4 576/50i
DV 576/50i 576/25P Disabled Disabled
ON 576/50i No output 576/50i 576/50i
OFF No output No output 576/50i 576/50i
*1 Both of the formats are enabled only when output is performed with <VIDEO OUT>.*2 When the [SDI 24PsF] item of the setup menu [AV OUT SETUP] screen is set to [ON], <HDMI> will not be
output.*3 Video is not output from <VIDEO OUT> when HDMI connection is in use. Output when HDMI connection is
not used.*4 In AVCHD mode, if the [SDI&HDMI OUT SEL] item on the [AV OUT SETUP] screen is set to [DOWN CONV],
the signal is converted to progressive (480P or 576P) and output from the HDMI OUT terminal.*5 Even when the recording format is 1080/60P or 1080/50P, video is not output at 1080/60P or 1080/50P. It is
output at 1080/60i or 1080/50i.*6 When the [VIDEO OUT OSD] item of the setup menu [DISPLAY SETUP] screen is set to [ON] and under the
following settings, video is automatically displayed in [LETTER BOX] mode after the menu opens, in order to prevent characters from cropping during <SDI OUT>/<HDMI>/<VIDEO OUT> output. When the menu is closed, video returns to [SIDE CROP] mode. AVCHD mode: When the [DOWNCON MODE] item of the [AV OUT SETUP] screen is set to [SIDE CROP] DV mode: When the [ASPECT CONV] item of the [RECORDING SETUP] screen is set to [SIDE CROP]

83
Men
uD
ispl
ays
Setup menu list[SCENE FILE] screen
Item Display mode Description of settings
[LOAD/SAVE/INIT]
<CAMERA> [LOAD]: Loads the scene file settings saved in this camera.[SAVE]: Saves the updated scene file settings.[INIT]: Returns the scene file settings selected using the <SCENE FILE>
dial, to the factory settings.[NO]: Returns to the previous screen.
[VFR MODE] <CAMERA>(AVCHD mode only)
[ON]: Enables the VFR (Variable Frame Rate) mode.[OFF]: Disables the VFR mode.
Operates only when [REC FORMAT] is [PH 1080/24P], [PH 1080/30P], or [PH 1080/25P].When [SDI 24PsF] = [ON], VFR operation is disabled.When [VFR MODE] = [ON], you cannot record audio.When VFR mode is set to [ON], INTERVAL REC, relay recording, and SIMUL REC settings will all be cancelled. This mode cannot be used with INTERVAL REC, relay recording, SIMUL REC, and pre-rec functions.
[FRAME RATE] <CAMERA>(AVCHD mode only)
Sets [FRAME RATE].Operates when [VFR MODE] is [ON].You can set using <SHTR/F.RATE> on the left side of the camera body.When [SYSTEM FREQ] = [59.94Hz]When [REC FORMAT] = [PH 1080/24P] [PH 1080/30P]:[2]/[6]/[9]/[12]/[15]/[18]/[20]/[21]/[22]/[24]/[25]/[26]/[27]/[28]/[30]/[32]/[34]/[36]/[40]/[44]/[48]/[54]/[60]When [SYSTEM FREQ] = [50Hz]When [REC FORMAT] = [PH 1080/25P][2]/[6]/[9]/[12]/[15]/[18]/[20]/[21]/[22]/[23]/[24]/[25]/[26]/[27]/[28]/[30]/[32]/[34]/[37]/[42]/[45]/[48]/[50]
[SYNC SCAN TYPE]
<CAMERA> Selects the synchro scan display setting.[deg.]: Sets to angle display.[sec]: Sets to speed display.
[SYNCHRO SCAN]
<CAMERA> Adjusts the synchro scan shutter speed used for shooting images on a TV screen, etc.Holding the OPERATION lever tilted upward or downward will cause the values to change at a faster rate.When [SYSTEM FREQ] = [59.94Hz] • When [SYNC SCAN TYPE] = [sec]60i/60 P mode: [1/60.0] - [1/249.8] secs30 P mode: [1/30.0] - [1/48.0] - [1/249.8] secs24 P mode: [1/24.0] - [1/48.0] - [1/249.8] secs
• When [SYNC SCAN TYPE] = [deg.][3.0 d] - [180.0 d] - [360.0 d] (0.5 d increments, angle display)
When [SYSTEM FREQ] = [50Hz] • When [SYNC SCAN TYPE] = [sec]50i/50 P mode: [1/50.0] - [1/250.0] secs25 P mode: [1/25.0] - [1/50.0] - [1/250.0] secs
• When [SYNC SCAN TYPE] = [deg.][3.0 d] - [180.0 d] - [360.0 d] (0.5 d increments, angle display)
is the factory default mode for the <SCENE FILE> dial <F1>.
Menu

84
Item Display mode Description of settings
[DETAIL LEVEL]
<CAMERA> Adjusts the level of the image outline correction (in the horizontal and vertical directions).[-7] … [0] … [+7]
[V DETAIL LEVEL]
<CAMERA> Adjusts the level of outline correction in the vertical direction.[-7] … [0] … [+7]
[DETAIL CORING]
<CAMERA> Adjusts the level of noise reduction of the detail signal.Set to – for a clearer image, but noise increases slightly.Set to + to reduce noise.[-7] … [0] … [+7]
[CHROMA LEVEL]
<CAMERA> Adjusts the chroma level.[-7] … [0] … [+7]
[CHROMA PHASE]
<CAMERA> Adjusts the chroma phase.[-7] … [0] … [+7]
[COLOR TEMP Ach]
<CAMERA> Make fine adjustments to the color temperature (after white balance Ach adjustment).[-7] … [0] … [+7]
[COLOR TEMP Bch]
<CAMERA> Make fine adjustments to the color temperature (after white balance Bch adjustment).[-7] … [0] … [+7]
[MASTER PED] <CAMERA> Adjusts the master pedestal (black level of the image) as the basis for images.[-15] … [0] … [+15]
[A.IRIS LEVEL] <CAMERA> Sets the desired AUTO IRIS level.[-6] … [0] … [+6]
[DRS] <CAMERA> Selects the [DRS] (dynamic range stretcher) function.[ON]: Enables the [DRS] function.[OFF]: Disables the [DRS] function. • If you assign the [DRS] function to the USER button, pressing the USER button switches it ON/OFF.
[DRS EFFECT] <CAMERA> Selects the level of the [DRS] (dynamic range stretcher) function.It enables the dynamic range to be expanded by compressing the level of the video signals in the high-brightness areas where overexposure results during normal shooting.[1], [2], [3] • The higher the number of the setting, the higher the compression level of the high-brightness areas.
is the factory default mode for the <SCENE FILE> dial <F1>.

85
Men
u
Item Display mode Description of settings
[GAMMA] <CAMERA> Selects the gamma curve.[HD NORM]: This gamma setting is suitable for HD shooting.
[LOW]: Makes a mellow image using the gamma curve that has a gentle incline in low-brightness curve. The contrast sharpens.
[SD NORM]: This is the normal video setting carried over from Panasonic AG-DVX100 series.
[HIGH]: Expands the tone of dark parts and makes a brighter image using the gamma curve that has a sharp incline in low-brightness curve. The contrast softens.
[B.PRESS]: Makes the contrast sharper than LOW.[CINE-LIKE D]: Uses a gamma curve designed to create cinema-like images.[CINE-LIKE V]: Uses a gamma curve designed to create cinema-like images
with emphasized contrast. • When you select [CINE-LIKE] gamma, we recommend setting the lens aperture lower than normal image level (approximately 1/2) for optimal results.
[KNEE] <CAMERA> To avoid overexposure, select the compression level (knee point) of the high intensity video signals received through the image pickup device.[AUTO]: Sets the level automatically according to the received signals.[LOW]: Low setting (Compression starts at approx. 80%)[MID]: Medium setting (Compression starts at approx. 90%)[HIGH]: High setting (Compression starts at approx. 100%) • Not available when a [DRS] value is set, or when [GAMMA] is set to [CINE-LIKE].
[MATRIX] <CAMERA> Selects the MATRIX table suitable for the desired color expression during shooting.[NORM1]: Suitable for shooting in the open air or under a halogen lamp.[NORM2]: Suitable for brighter colors than the [NORM1] mode.[FLUO]: Suitable for shooting under fluorescent lights indoors.[CINE-LIKE]: Suitable for cinema-like images.
[SKIN TONE DTL]
<CAMERA> Switches skin tone details [ON]/[OFF]. Select ON to reduce the skin tone details and soften the skin tone.[ON] [OFF]
[CARD READ] <CAMERA> Reads scene files from the memory card.[SLOT1]: Reads scene files (all scenes from <F1> to <F6>) saved on the
memory card of slot 1 after selecting the setting values.[SLOT2]: Reads scene files (all scenes from <F1> to <F6>) saved on the
memory card of slot 2 after selecting the setting values.[NO]: Returns to the previous screen.
[CARD WRITE] <CAMERA> Saves scene files to the memory card.[SLOT1]: Saves the setting values of scene files (all scenes from <F1> to
<F6>) on the memory card of Slot 1.[SLOT2]: Saves the setting values of scene files (all scenes from <F1> to
<F6>) on the memory card of Slot 2.[NO]: Returns to the previous screen.
[NAME EDIT] <CAMERA> Edits the name of the currently selected scene file.[YES] [NO]
is the factory default mode for the <SCENE FILE> dial <F1>.

86
[SW MODE] screen
Item Display mode Description of settings
[FUNCTION KNOB]
<CAMERA> Sets the function assigned to the AREA operation of the <FUNCTION> knob.[INH]: No function is assigned.[FOCUS]: AUTO FOCUS / FOCUS BAR function[IRIS]: AUTO IRIS/IRIS METER function[Y GET]: [Y GET] (Luminance measurement) function[FOCUS/IRIS]: Simultaneous operation of [FOCUS] and [IRIS] described
above [FOCUS/Y GET]: Simultaneous operation of [FOCUS] and [Y GET] described
above
[LOW GAIN] <CAMERA> Sets the gain value assigned to the <L> position of the <GAIN> switch.[0dB], [3dB], [6dB], [9dB], [12dB], [15dB], [18dB]
[MID GAIN] <CAMERA> Sets the gain value assigned to the <M> position of the <GAIN> switch.[0dB], [3dB], [6dB], [9dB], [12dB], [15dB], [18dB]
[HIGH GAIN] <CAMERA> Sets the gain value assigned to the <H> position of the <GAIN> switch.[0dB], [3dB], [6dB], [9dB], [12dB], [15dB], [18dB]
[SUPER GAIN] <CAMERA> Selects the super gain value assigned to the USER button.[24dB], [30dB]
[ATW] <CAMERA> Assigns [ATW] (Auto Tracking White) function on the <WHITE BAL> switch (on the position <A>, <B>, or <PRST>). When the [ATW] function is assigned to the USER button, the USER button operation remains effective. [Ach]: Activates the [ATW] function when the <WHITE BAL> switch
is set to <A>.[Bch]: Activates the [ATW] function when the <WHITE BAL> switch
is set to <B>.[PRST]: Activates the [ATW] function when the <WHITE BAL> switch
is set to <PRST>.[OFF]: Deactivates the [ATW] function with <WHITE BAL> switch
[MF ASSIST] <CAMERA> Activates automatic final focus when in manual focus mode.[ON]: Activates automatic final focus.[OFF]: Deactivates automatic focus.
• When there is large discrepancy in focus, you may not be able to focus. • Cannot be activated by an operation on the remote control connected to the <CAM REMOTE> terminal.
[FOCUS ASSIST]
<CAMERA> Sets the function assigned to the <FOCUS ASSIST> button.[IN RED]: The image contour has red edges.[EXPAND]: The screen center of the LCD monitor is enlarged.
[HANDLE ZOOM]
<CAMERA> Sets the zoom speed assigned to positions of the <HANDLE ZOOM> switch.[L/OFF/H]: Sets LOW (slow)/OFF/HIGH (fast) to the <1>/<2>/<3>
positions.(OFF deactivates ZOOM operations.)
[L/M/H]: Sets LOW (slow)/MID (medium)/HIGH (fast) to the <1>/<2>/<3> positions.
[L/OFF/M]: Sets LOW (slow)/OFF/MID (medium) to the <1>/<2>/<3> positions. (OFF deactivates ZOOM operations.)
is the factory default mode.

87
Men
u
Item Display mode Description of settings
[USER1] <CAMERA> <PB>
Sets the function assigned to the <USER1> button.[INH]: No function is assigned.[FACE DETECT]:
This is the face detection function. Performs the AUTO IRIS/AUTO FOCUS operation centering around the detected face. Enabled when both focus control and iris control are set to auto.
[WFM]: Selects the wave form display. This is displayed on the LCD when shooting.
[EVF DTL]: Pressing the button emphasizes the outlines of the screen images, making it easier to focus.
[D.ZOOM]: Selects magnification of DIGITAL ZOOM function. Each press of the button moves to the next setting in a sequence of OFF (x 1) x 2x 5x 10, and OFF (x 1).
[DRS]: Switches the [DRS] function [ON]/[OFF].[S.GAIN]: Selects the set value ([24dB]/[30dB]).[ATW]: Switches the [ATW] function [ON]/[OFF].[ATW LOCK]: Fixes the white balance value when the button is pressed
during [ATW]. Press again to perform [ATW] function.[SHOT MARK]: Records shot mark. (Page 29) Enabled during recording,
thumbnail display, and clip display.[INDEX]: Enabled during index recording (Page 29) (AVCHD only).[LAST CLIP]: Deletes the last recorded clip. (Page 29) • You cannot delete clips if the following operations are performed after shooting.- When switched to <PB> mode- When changing the recording format- When connecting to a computer using a USB cable- When powering off the camera- When opening the memory card slot cover
[BACKLIGHT]: Auto iris control for the backlight compensation[SPOTLIGHT]: Switches auto iris control ON/OFF for the spotlight.[BLACKFADE]: Black fade (Page 27)[WHITEFADE]: White fade (Page 27)
[USER2] <CAMERA> <PB>
Sets the function assigned to the <USER2> button.The setting contents are the same as [USER1].[D.ZOOM]
[USER3] <CAMERA> <PB>
Sets the function assigned to the <USER3> button.The setting contents are the same as [USER1].[SHOT MARK]
[WFM] <CAMERA> Switches the WAVE FORM display that appears when the <WFM> button is pressed.
[WAVE]: Displays as a waveform.[VECTOR]: Displays as a vector.[WAVE/VECTOR]:
Each press of the button moves to the next setting in a sequence of [OFF][WAVE][VECTOR], and [OFF].
is the factory default mode.

88
[AUTO SW] screen
Item Display mode Description of settings
[A.IRIS] <CAMERA> [ON]: Activates auto iris control when in Auto mode. In this mode, the <IRIS> button is disabled.
[OFF]: Deactivates auto iris control when in Auto mode. Performs iris control operation selected using <IRIS> button.
[AGC] <CAMERA> Sets auto gain control operation when [ON] is selected in the [A.IRIS] item.[OFF]: Deactivates auto gain control when in Auto mode. Performs gain
control operation selected using <GAIN> switch.[6dB]: Activates auto gain control with a maximum of 6 dB when in Auto
mode.[12dB]: Activates auto gain control with a maximum of 12 dB when in Auto
mode.[18dB]: Activates auto gain control with a maximum of 18 dB when in Auto
mode.
[ATW] <CAMERA> [ON]: Activates [ATW] (Auto Tracking White) function when in Auto mode. At this time, the [ATW] function operation cannot be switched [ON]/[OFF] using the <WHITE BAL> switch or the USER button. However, if you have assigned [ATW LOCK] to the USER button, you can use the USER button to fix the white balance value.
[OFF]: Deactivates the [ATW] function when in Auto mode. Activates white balance function selected using the <WHITE BAL> switch.
[AF] <CAMERA> [ON]: Activates auto focus when in Auto mode. At this time, the <FOCUS> switch is disabled.
[OFF]: Deactivates auto focus when in Auto mode. Performs focus operation selected using <FOCUS> switch.
is the factory default mode.
Item Display mode Description of settings
[LCD] <CAMERA> <PB>
Sets the function assigned to the <LCD> button.[LCD REV]: Flips the image displayed on the LCD vertically and horizontally.[LCD BL]: Selects the brightness of the LCD backlight. • The setting selected using the <LCD> button is reflected in the setting of the [LCD BACKLIGHT] item on the [DISPLAY SETUP] screen.
[FACE FRAMING]
<CAMERA> Frames the faces detected during operation of the [FACE DETECT] function with the USER button. The maximum number of detected frames is 15, and faces bigger and closer to the center of the screen are given priority.[OFF]: Frames are not displayed.[PRIMARY]: Displays only the high-priority frames.[ALL]: Displays all frames. • Displays the high-priority frames with an orange border. Focuses on high-priority frames and adjusts brightness.
is the factory default mode.

89
Men
u
[RECORDING SETUP] screen
Item Display mode Description of settings
[HD/SD MODE] <CAMERA> Switches the mode AVCHD/DV.[AVCHD], [DV] • If the [TURN POWER OFF] message is displayed, switch the camera OFF and then ON again. Switching the camera ON/OFF switches the mode.
[REC FORMAT] <CAMERA> � AVCHD modeSelects the recording format. (Page 14) • [PH 1080/24P] and [PH 720/24P] are for native recording.
When [SYSTEM FREQ] = [59.94Hz][PS 1080/60P], [PH 1080/60i], [PH 1080/30P], [PH 1080/24P], [PH 720/60P], [PH 720/30P], [PH 720/24P], [PM 720/60P], [HA 1080/60i], [HE 1080/60i]When [SYSTEM FREQ] = [50Hz][PS 1080/50P], [PH 1080/50i], [PH 1080/25P], [PH 720/50P], [PH 720/25P], [PM 720/50P], [HA 1080/50i], [HE 1080/50i]
� DV modeSelects the recording format. (Page 14)When [SYSTEM FREQ] = [59.94Hz][DV 480/60i], [DV 480/30P], [DV 480/24P]When [SYSTEM FREQ] = [50Hz][DV 576/50i], [DV 576/25P]
[ASPECT CONV]
<CAMERA>(DV mode only)
Selects aspect ratio for DV mode recording.[SIDE CROP]: Records in 4:3. Crops the left and right edges.[LETTER BOX]: Records in 16:9. Adds black bands at the top and bottom of
the screen.[SQUEEZE]: Records with horizontal compression of picture.
[PREREC MODE]
<CAMERA> Sets the pre recording to ON or OFF.[ON]: Enables the pre-rec function.[OFF]: Disables the pre-rec function. • [TCG] is set to [FREE RUN]. • The INTERVAL REC setting will be released.
[SIMUL REC] <CAMERA> Records the same images to both memory card slots. (Page 32)[ON]: Enables the simul recording.[OFF]: Enables the normal recording.
[RELAY REC] <CAMERA> [ON]: Enables the relay recording. When the memory card used for recording has no remaining space, recording continues on another memory card if the memory card that can be used for recording is inserted in another memory card slot.
[OFF]: Relay recording is not performed. Recording stops when the selected memory card has no remaining space.
is the factory default mode.
90
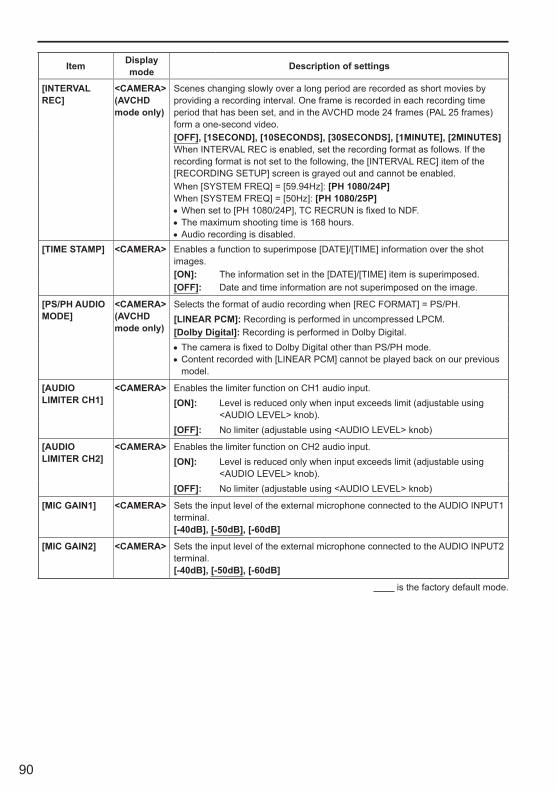
Item Display mode Description of settings
[INTERVAL REC]
<CAMERA>(AVCHD mode only)
Scenes changing slowly over a long period are recorded as short movies by providing a recording interval. One frame is recorded in each recording time period that has been set, and in the AVCHD mode 24 frames (PAL 25 frames) form a one-second video.[OFF], [1SECOND], [10SECONDS], [30SECONDS], [1MINUTE], [2MINUTES]When INTERVAL REC is enabled, set the recording format as follows. If the recording format is not set to the following, the [INTERVAL REC] item of the [RECORDING SETUP] screen is grayed out and cannot be enabled.When [SYSTEM FREQ] = [59.94Hz]: [PH 1080/24P]When [SYSTEM FREQ] = [50Hz]: [PH 1080/25P] • When set to [PH 1080/24P], TC RECRUN is fixed to NDF. • The maximum shooting time is 168 hours. • Audio recording is disabled.
[TIME STAMP] <CAMERA> Enables a function to superimpose [DATE]/[TIME] information over the shot images.[ON]: The information set in the [DATE]/[TIME] item is superimposed.[OFF]: Date and time information are not superimposed on the image.
[PS/PH AUDIO MODE]
<CAMERA>(AVCHD mode only)
Selects the format of audio recording when [REC FORMAT] = PS/PH.[LINEAR PCM]: Recording is performed in uncompressed LPCM.[Dolby Digital]: Recording is performed in Dolby Digital. • The camera is fixed to Dolby Digital other than PS/PH mode. • Content recorded with [LINEAR PCM] cannot be played back on our previous model.
[AUDIO LIMITER CH1]
<CAMERA> Enables the limiter function on CH1 audio input. [ON]: Level is reduced only when input exceeds limit (adjustable using
<AUDIO LEVEL> knob).[OFF]: No limiter (adjustable using <AUDIO LEVEL> knob)
[AUDIO LIMITER CH2]
<CAMERA> Enables the limiter function on CH2 audio input.[ON]: Level is reduced only when input exceeds limit (adjustable using
<AUDIO LEVEL> knob).[OFF]: No limiter (adjustable using <AUDIO LEVEL> knob)
[MIC GAIN1] <CAMERA> Sets the input level of the external microphone connected to the AUDIO INPUT1 terminal.[-40dB], [-50dB], [-60dB]
[MIC GAIN2] <CAMERA> Sets the input level of the external microphone connected to the AUDIO INPUT2 terminal.[-40dB], [-50dB], [-60dB]
is the factory default mode.

91
Men
u
[TC/UB SETUP] screen
Item Display mode Description of settings
[TC MODE] <CAMERA> Selects the correction mode of the internal time code when the time code of the internal time code generator is recorded.[DF]: Uses the drop frame mode.[NDF]: Uses the non-drop frame mode. • Automatically set to [NDF] when you set the recording frame rate of the recording format to 24P.
• Enabled only when [SYSTEM FREQ] = [59.94Hz].
[TCG] <CAMERA> Sets the mode in which you advance the internal time code generator.[FREE RUN]: The time code is advanced regardless of the operation mode. A
slight time error may occur when switching to <PB> mode if the frame rate is set to 24P.
[REC RUN]: The time code is advanced when shooting.
[TC PRESET] <CAMERA> Sets the initial time code.When you set the frame rate of the recording format to 24P, set the frame value to 0 or a multiple of 4 in AVCHD mode and to 5 frame units in DV mode. If any other value is set, the recorded time code will mismatch.[YES] [NO]
[UB MODE] <CAMERA>(DV mode only)
Sets the content to be recorded as the user information.[USER]: Records the user information.[TIME]: The time is recorded.[DATE]: The date and time are recorded.[TCG]: Records the value of the time code generator.[FRAME RATE]: Records the frame rate information of frame conversion.
[UB PRESET] <CAMERA> Sets the user information.[YES] [NO]
[EXT TC LINK] <CAMERA> Synchronizes the initial time code value during multi-camera shooting. ([SLAVE] camera time codes are synchronized to the [MASTER] internal [TCG] value.)[MASTER]: Sets the mode to master mode.[SLAVE]: Sets the mode to slave mode. When the <RESET/TC SET>
button is pressed, input time codes are synchronized to the internal [TCG].
[NO]: Returns to the previous screen. • [MASTER] and [SLAVE] mode settings are in effect only when this menu is open. When the menu is closed, [EXT TC LINK] is automatically canceled.
is the factory default mode.
92
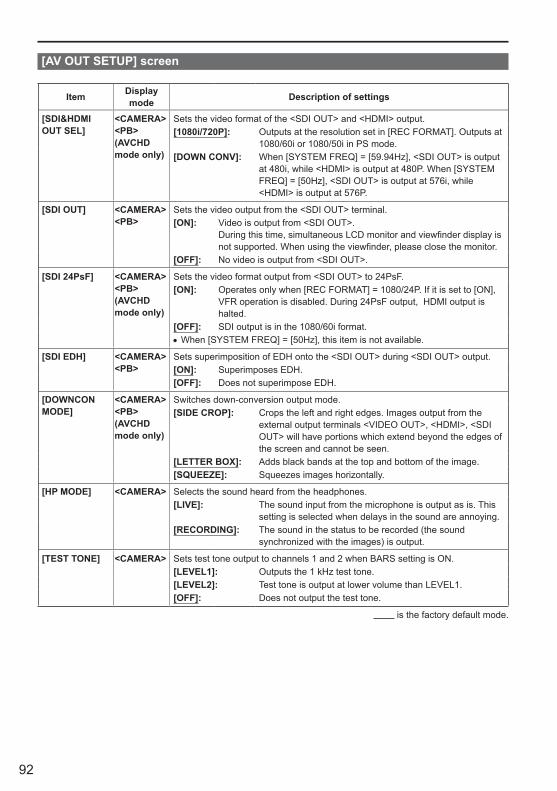
[AV OUT SETUP] screen
Item Display mode Description of settings
[SDI&HDMI OUT SEL]
<CAMERA> <PB>(AVCHD mode only)
Sets the video format of the <SDI OUT> and <HDMI> output.[1080i/720P]: Outputs at the resolution set in [REC FORMAT]. Outputs at
1080/60i or 1080/50i in PS mode.[DOWN CONV]: When [SYSTEM FREQ] = [59.94Hz], <SDI OUT> is output
at 480i, while <HDMI> is output at 480P. When [SYSTEM FREQ] = [50Hz], <SDI OUT> is output at 576i, while <HDMI> is output at 576P.
[SDI OUT] <CAMERA> <PB>
Sets the video output from the <SDI OUT> terminal.[ON]: Video is output from <SDI OUT>.
During this time, simultaneous LCD monitor and viewfinder display is not supported. When using the viewfinder, please close the monitor.
[OFF]: No video is output from <SDI OUT>.
[SDI 24PsF] <CAMERA> <PB>(AVCHD mode only)
Sets the video format output from <SDI OUT> to 24PsF.[ON]: Operates only when [REC FORMAT] = 1080/24P. If it is set to [ON],
VFR operation is disabled. During 24PsF output, HDMI output is halted.
[OFF]: SDI output is in the 1080/60i format. • When [SYSTEM FREQ] = [50Hz], this item is not available.
[SDI EDH] <CAMERA> <PB>
Sets superimposition of EDH onto the <SDI OUT> during <SDI OUT> output.[ON]: Superimposes EDH.[OFF]: Does not superimpose EDH.
[DOWNCON MODE]
<CAMERA> <PB>(AVCHD mode only)
Switches down-conversion output mode.[SIDE CROP]: Crops the left and right edges. Images output from the
external output terminals <VIDEO OUT>, <HDMI>, <SDI OUT> will have portions which extend beyond the edges of the screen and cannot be seen.
[LETTER BOX]: Adds black bands at the top and bottom of the image.[SQUEEZE]: Squeezes images horizontally.
[HP MODE] <CAMERA> Selects the sound heard from the headphones.[LIVE]: The sound input from the microphone is output as is. This
setting is selected when delays in the sound are annoying.[RECORDING]: The sound in the status to be recorded (the sound
synchronized with the images) is output.
[TEST TONE] <CAMERA> Sets test tone output to channels 1 and 2 when BARS setting is ON.[LEVEL1]: Outputs the 1 kHz test tone.[LEVEL2]: Test tone is output at lower volume than LEVEL1.[OFF]: Does not output the test tone.
is the factory default mode.

93
Men
u
Item Display mode Description of settings
[VIDEO SETUP] <CAMERA> <PB>
Sets the setup level of video signals.[0%]: <VIDEO OUT> terminal output and recording setup levels will both
be set to 0%.[7.5%A]: <VIDEO OUT> terminal output setup level will be set to 7.5%,
while recording setup level will be set to 0%. • When [SYSTEM FREQ] = [50Hz], this item is not available.
[AUDIO OUT] <CAMERA> <PB>
Sets the audio signals to output from the <AUDIO OUT> terminal (A/V OUT).[CH1/CH2]: CH1 terminal = CH1 signals, CH2 terminal = CH2 signals[CH1]: CH1 terminal = CH1 signals, CH2 terminal = CH1 signals[CH2]: CH1 terminal = CH2 signals, CH2 terminal = CH2 signals • When a memory card containing 5.1 channel content recorded on another equipment is played back on the camera, it is down-mixed to 2 channels when output through the <AUDIO OUT> and headphone terminals.
is the factory default mode.
[DISPLAY SETUP] screen
Item Display mode Description of settings
[ZEBRA DETECT1]
<CAMERA> Selects the brightness level of the right-leaning zebra patterns on the screen.[105%], [100%], [95%], [90%], [85%], [80%], [75%], [70%], [65%], [60%], [55%], [50%]
[ZEBRA DETECT2]
<CAMERA> Selects the brightness level of the left-leaning zebra patterns on the screen.[OFF], [105%], [100%], [95%], [90%], [85%], [80%], [75%], [70%], [65%], [60%], [55%], [50%]
[Y GET MARKER]
<CAMERA> Sets the display of the marker used for displaying the luminance level to [ON]/[OFF].Select [ON] to display the marker by pressing the <ZEBRA> button.[ON], [OFF]
[SAFETY ZONE]
<CAMERA> Sets [SAFETY ZONE]. � AVCHD mode
[90%]: 90% display at 16:9[4:3]: 100% display at 4:3[14:9]: 100% display at 14:9 (the size between 16:9 and 4:3)[1.85:1]: 100% display at 1.85:1 (the size of American vista)[2:1]: 100% display at 2:1 (scope size)[2.35:1]: 100% display at 2.35:1 (the size of Cinemascope)[2.39:1]: 100% display at 2.39:1[GRID]: 16:9 angular field of view with nine grid lines[OFF]: The SAFETY ZONE is not displayed.
� DV mode[90%]: 90% display at 16:9[4:3]: 100% display at 4:3[OFF]: The SAFETY ZONE is not displayed.
is the factory default mode.

94
Item Display mode Description of settings
[CENTER MARKER]
<CAMERA> Sets the marker display to [ON]/[OFF].Select [ON] to display the marker by pressing the <ZEBRA> button.[ON], [OFF]
[FOCUS BAR] <CAMERA> Sets the FOCUS ASSIST bar display to [ON]/[OFF]. Select [ON] to display the FOCUS ASSIST bar.[ON], [OFF]
[IRIS METER] <CAMERA> Sets [IRIS METER] display.[ON]: Displays the difference from an optimum value for the brightness of
the image, as judged by the camera. The bar appears on the right: The image is too bright. The bar appears on the left: The image is too dark.
[OFF]: IRIS METER is not displayed.
[REC COUNTER]
<CAMERA> Selects counter operation during shooting.[TOTAL]: The count continues to increase until the <COUNTER> button is
pressed to reset it.[CLIP]: Resets the counter at the start of recording and counts the time of
each recording session. • The count is not displayed in <PB> mode.
[VIDEO OUT OSD]
<CAMERA><PB>
Select [ON] to output the information displayed on the viewfinder or LCD monitor together with the signals from the VIDEO OUT jack.[ON], [OFF] • The external outputs <VIDEO OUT>, <SDI OUT>, <HDMI> include items that are not displayed.
[DATE/TIME] <CAMERA><PB>
Sets whether to display the date and time on the viewfinder or LCD monitor and whether to output the date and time from the VIDEO OUT jack.[OFF]: The date and time are not displayed.[TIME]: The time is displayed.[DATE]: The date is displayed.[TIME&DATE]: The date and time are displayed.
[DATE FORMAT]
<CAMERA><PB>
Changes the style of displaying the year, month, and day. (The factory setting values may vary depending on the region.)[Y/M/D]: Year/Month/Day[M/D/Y]: Month/Day/Year[D/M/Y]: Day/Month/Year
[LEVEL METER]
<CAMERA><PB>
Switches the audio level meter display [ON]/[OFF].[ON], [OFF]
[ZOOM& FOCUS]
<CAMERA> Selects the unit of zoom and focus values.[OFF], [NUMBER], [mm/m], [mm/feet] • The [mm/feet] display and [mm/m] display may be in error, so please use them as approximations.
is the factory default mode.

95
Men
u
Item Display mode Description of settings
[CARD& BATTERY]
<CAMERA><PB>
Select [ON]/[OFF] to display/hide the remaining memory card recording capacity and remaining battery charge.[ON], [OFF]
[OTHER DISPLAY]
<CAMERA><PB>
Selects how much information to display on the viewfinder and LCD monitor.[OFF], [PARTIAL], [ALL]
[LCD SET] <CAMERA><PB>
Adjusts the display level of images on the LCD monitor.[BRIGHTNESS]: brightness[COLOR]: color level[CONTRAST]: contrast
[EVF SET] <CAMERA><PB>
Adjusts the display level of images on the viewfinder.[BRIGHTNESS]: brightness[COLOR]: color level[CONTRAST]: contrast
[LCD BACKLIGHT]
<CAMERA><PB>
Adjusts the backlight of the LCD monitor.[+1], [0], [-1], [-2], [-3][+1]: The backlight becomes brighter.[-3]: The backlight becomes the darkest.
[SELF SHOOT] <CAMERA> Switches the LCD monitor to mirror mode for self-portrait shooting.Select [MIRROR] to flip the left and right side of the LCD monitor image during self-portrait shooting.[NORMAL], [MIRROR]
[EVF MODE] <CAMERA><PB>
Switches the screen display of images.[AUTO]: If you open the LCD monitor, images on the viewfinder disappear.[ON]: Images are always displayed on the viewfinder. • When the [SDI OUT] item on the [AV OUT SETUP] screen is [ON], the camera is forced to operate in [AUTO] setting.
[EVF COLOR] <CAMERA><PB>
Switches viewfinder images to color/black and white.[ON]: Color [OFF]: Black and white
is the factory default mode.

96
[CARD FUNCTIONS] screen
Item Display mode Description of settings
[CARD FORMAT]
<CAMERA><PB>
Formats memory card.[SLOT1]: Formats the memory card inserted in slot 1.[SLOT2]: Formats the memory card inserted in slot 2.[NO]: Returns to the previous screen.
[CARD STATUS]
<CAMERA><PB>
Displays the memory card status.[SLOT1]: Displays information about the memory card inserted in slot 1.[SLOT2]: Displays information about the memory card inserted in slot 2.[NO]: Returns to the previous screen.
[CLIP PROPERTY]
<PB> Displays information about the selected clip.[YES]: Displays clip information.[NO]: Returns to the previous screen.This can also be displayed using the <DISP/MODE CHK> button.
is the factory default mode.
[USER FILE] screen
Item Display mode Description of settings
[CARD READ] <CAMERA><PB>
Reads the user files saved on the memory card.[SLOT1]: Reads user files from the memory card inserted in slot 1.[SLOT2]: Reads user files from the memory card inserted in slot 2.[NO]: Returns to the previous screen. • When reading the user files with different system frequency, change the system frequency on the camera in advance.
[CARD WRITE] <CAMERA><PB>
Saves user files on the memory card. You can also add a title to the saved files.[SLOT1]: Saves user file on the memory card inserted in slot 1.[SLOT2]: Saves user file on the memory card inserted in slot 2.[NO]: Returns to the previous screen.
[LOAD/SAVE/INIT]
<CAMERA><PB>
[LOAD]: Loads the settings in a previously stored user file. [SAVE]: Saves the updated user file settings.[INIT]: Returns the settings in the user file to the factory settings.[NO]: Returns to the previous screen. • After performing [LOAD] or [INIT], turn POWER/MODE switch of the camera OFF and then ON again to enable the new settings.
• When [INIT] is executed, the setting value of the scene file, time code, the [TIME ZONE] item, the [CLOCK SET] item, and the [TIME ZONE] item remain unchanged.
is the factory default mode.

97
Men
u
[META DATA] screen (AVCHD mode only)
Item Display mode Description of settings
[CARD READ] <CAMERA>(AVCHD mode only)
Loads the metadata recorded on the memory card into the camera.[SLOT1] [SLOT2] [NO] • [NO FILE] is displayed when there is no metadata recorded on the memory card.
[RECORD] <CAMERA>(AVCHD mode only)
Sets whether to simultaneously record the metadata on a memory card as it is loaded into the camera.[ON]: Records simultaneously.[OFF]: Does not record simultaneously.
[USER CLIP NAME]
<CAMERA>(AVCHD mode only)
Sets [USER CLIP NAME] recording method.[TYPE1]: The user clip name is the same as the [CLIP NAME] if no
metadata is uploaded or if no uploaded data exists.[TYPE2]: The user clip name is the same as the [CLIP NAME] if no
combination of data and COUNT value is uploaded, or if no uploaded data exists.
[META DATA PROP]
<CAMERA>(AVCHD mode only)
Displays the metadata recorded in the unit.[YES] [NO]
[CLIP COUNTER RST]
<CAMERA>(AVCHD mode only)
Resets the COUNT value to 1.[YES] [NO]
[META INIT SET]
<CAMERA>(AVCHD mode only)
Initializes the metadata recorded in the unit.All settings, including the [ON]/[OFF] setting for [RECORD] are cleared.[YES] [NO]
is the factory default mode.
[OTHER FUNCTIONS] screen
Item Display mode Description of settings
[IR REMOTE] <CAMERA><PB>
Sets the operations of the supplied remote control unit.[ON]: Accepts commands from the remote control.
• Note that if the same type of remote control is used near the unit, the unit may receive commands from the other remote control during shooting, for example, and suddenly operate in an unexpected manner.
[OFF]: Does not accept commands from the remote control.
[DV CONTROL] <CAMERA>(DV mode only)
Specifies the control method when a backup device is connected to the <DV OUT> terminal for backup recording.[OFF]: Backup device is not controlled.[EXT]: Backup device controlled using <START/STOP> button. Note,
however, that recording on the camera is not performed.[BOTH]: Backup recording performed by the unit and the backup device.[CHAIN]: When the recording nears the end, recording on the backup device
which is on standby will automatically start.
is the factory default mode.

98
Item Display mode Description of settings
[DV CMD SEL] <CAMERA>(DV mode only)
Sets the recording operation to be performed by the backup device when you press the <START/STOP> button.[REC P]: Pauses and unpauses the recording.[STOP]: Starts and stops the recording.
[TALLY LAMP] <CAMERA> Sets lighting of the tally lamp.[FRONT]: The front tally lamp (microphone side) lights.[REAR]: The rear tally lamp (viewfinder side) lights.[BOTH]: Both tally lamps light.[OFF]: No tally lamp lights.
[CLOCK SET] <CAMERA><PB>
Sets the built-in calendar of the camera.
[TIME ZONE] <CAMERA><PB>
Adds to or deducts from GMT the time value of [-12:00] to [+13:00] in 30-minute steps. (Refer to the following table.)[0:00]
Time difference Region Time
difference Region
+00:00 Greenwich –00:30–01:00 Azores –01:30–02:00 Mid-Atlantic –02:30–03:00 Buenos Aires –03:30 Newfoundland Island–04:00 Halifax –04:30–05:00 New York –05:30–06:00 Chicago –06:30–07:00 Denver –07:30–08:00 Los Angeles –08:30–09:00 Alaska –09:30 Marquesas Islands–10:00 Hawaii –10:30–11:00 Midway Islands –11:30–12:00 Kwajalein Atoll +12:30+13:00 +11:30 Norfolk Island+12:00 New Zealand +10:30 Lord Howe Island+11:00 Solomon Islands +09:30 Darwin Islands+10:00 Guam +08:30+09:00 Tokyo +07:30+08:00 Beijing +06:30 Yangong+07:00 Bangkok +05:30 Mumbai+06:00 Dacca +04:30 Kabul+05:00 Islamabad +03:30 Tehran+04:00 Abu Dhabi +02:30+03:00 Moscow +01:30+02:00 Eastern Europe +00:30+01:00 Central Europe
[LANGUAGE] <CAMERA><PB>
Sets the Menu language.
[English], [Español], [Français] (AG-AC160AP)
[English], [Español], [Français], [Deutsch], [Italiano] (AG-AC160AEJ)
[English], [Español], [Русский] (AG-AC160AEN)
[SYSTEM FREQ]
<CAMERA> Sets the system frequency. (The factory setting values may vary depending on the region.)
[59.94Hz]: NTSC region
[50Hz]: PAL region • If the [TURN POWER OFF] message is displayed, switch the camera OFF and then ON again. Every time the power is turned on, the system frequency changes.
[SYSTEM INFO]
<CAMERA><PB>
Displays the version of the system in this camera.
is the factory default mode.

99
Men
u
Item Display mode Description of settings
[MENU INIT] <CAMERA> Returns the menu settings (scene files and user files) to factory default settings. (Except for time code/[OPERATION TIME] item/[CLOCK SET] item/[TIME ZONE] item settings)
[OPERATION TIME]
<CAMERA><PB>
Displays the power-on time (a 5-digit figure).
is the factory default mode.
[OPTION MENU] screen
Item Display mode Description of settings
[1394 STATUS] <CAMERA>(DV mode only)
Displays IEEE1394 status.[YES] [NO]
[1394 CONFIG] <CAMERA>(DV mode only)
Sets IEEE1394.[DFLT], [1] - [255]
[OPTION MENU] is displayed when you press the <MENU> button while holding down the <DISP/MODE CHK> button.
is the factory default mode.
[PLAY SETUP] screen
Item Display mode Description of settings
[PB FORMAT] <PB>(AVCHD mode only)
Sets the playback format.When [SYSTEM FREQ] = [59.94Hz][1080/60P], [1080/60i(30P)], [1080/24P], [720/60P(30P)], [720/24P]When [SYSTEM FREQ] = [50Hz][1080/50P], [1080/50i(25P)], [720/50P(25P)] • The [REC FORMAT] setting in the <CAMERA> mode prior to migrating to the PB mode becomes the default value of the [PB FORMAT].
[REPEAT PLAY]
<PB> [ON] [OFF]When [ON] is selected, supported clips are played repeatedly.
[RESUME PLAY]
<PB> [ON] [OFF]When [ON] is selected, playback resumes from the video position where clip playback had stopped.
[SKIP MODE] <PB>(AVCHD mode only)
Selects the starting position for cued playback after pausing.[CLIP]: Stops playback at the beginning of the previous clip.[CLIP & INDEX]:
Stops at the beginning of the clip and the INDEX.
is the factory default mode.

100
[THUMBNAIL] screen
Item Display mode Description of settings
[THUMBNAIL MODE]
<PB> Selects the thumbnail display method.[ALL]: Displays all clips.[SAME FORMAT]:
Displays clips in the same recording format. (AVCHD mode only)
[MARKER]: Displays clips with shot marks.[INDEX]: Displays clips with an INDEX. (AVCHD mode only)
[INDICATOR] <PB> Sets whether or not to display the indicator.[ON]: Displays indicator.[OFF]: Does not display indicator.
[DATA DISPLAY]
<PB> Selects the information to be displayed in the time display area of the clips.[TC]: Time code[UB]: User information[TIME]: Shooting time[DATE]: Shooting date[DATE&TIME]: Shooting date and time
[DATE FORMAT]
<PB> Selects display order for [DATE] or [DATE&TIME] of the [DATA DISPLAY] item. (The factory setting values may vary depending on the region.)[Y/M/D]: Year/Month/Day[M/D/Y]: Month/Day/Year[D/M/Y]: Day/Month/Year
is the factory default mode.
[OPERATION] screen
Item Display mode Description of settings
[DELETE] <PB> Deletes clips.[ALL CLIPS]: Deletes all clips.
[SELECT]: Deletes only the selected clips. Press <EXEC> to delete.[NO]: Returns to the previous screen. • Clips for which CLIP PROTECT is specified are not deleted.
[INDEX] <PB>(AVCHD mode only)
Adds or deletes an [INDEX] to a clip.[YES]: Displays.[NO]: Does not display.
[CLIP PROTECT]
<PB>(AVCHD mode only)
Protects clips to prevent accidental deletion.[YES]: Enables clip protection or releases protection.[NO]: Returns to the previous screen. • Formatting the memory card will delete all clips even if they are protected.
[REPAIR] <PB>(DV mode only)
Restores defective clips. (Page 62)
is the factory default mode.

38
General
Supply voltageDC7.2V(whenthebatteryisused)/DC 7.3 V (when the AC adaptor is used)
Power consumptionRecording: 11.8 W
indicates safety items.
Ambient operating temperature0°C - 40°C (32°F to 104°F)
Ambient operating humidity10% to 80% (no condensation)
WeightApprox.2.4kg(5.3lb)(excludingthebatteryandaccessories)
Dimensions (W x H x D)180mmx195mmx438mm(7inchesx7-11/16inchesx17-1/4inches)(excludingwidth,height,depth,andprotrudingpart)
CameraPickup devices1/3MOSfixedpickupdevicex3(2.2megapixelsprogressivesupported)
LensOpticalimagestabilizerlens,Electric/manualswitching,22Xzoom,F1.6 - 3.2 (f = 3.9 mm to 86 mm)(35 mm conversion: 28 mm - 616 mm)
Color separation optical systemPrism format
Filter diameter72 mm
ND filterOFF,1/4,1/16,1/64
Minimum shooting distanceApprox.1m
Gain settings0/+3/+6/+9/+12/+15/+18/+24/+30dB* +24 dB and +30 dB are assigned to the USER
button (S.GAIN)Color temperature settings
ATW, ATW LOCK, preset 3200 K,preset 5600 K, preset VAR, Ach, Bch
Digital zoom2X/5X/10X* assigned to the USER button (ratio is changed
every time the button is pressed)Minimum subject illumination0.4lx(F1.6,gain+30dB,shutterspeed1/30seconds)
Lens hoodWidefieldlargelenshood
Shutter speedPresetwhenSYSTEMFREQ=59.94Hz:60i/60Pmode:1/60,1/100,1/120,1/250,1/500,1/1000,1/2000seconds
30P mode:1/30,1/50,1/60,1/120,1/250,1/500,1/1000,1/2000seconds
24P mode:1/24,1/50,1/60,1/120,1/250,1/500,1/1000,1/2000seconds
whenSYSTEMFREQ=50Hz:50i/50Pmode:1/50,1/60,1/120,1/250,1/500,1/1000,1/2000seconds
25P mode:1/25,1/50,1/60,1/120,1/250,1/500,1/1000,1/2000seconds
* Underline indicates value when shutter is OFFSynchro scanwhenSYSTEMFREQ=59.94Hz:when SYNC SCAN TYPE = sec60i/60Pmode:1/60.0seconds-1/249.8seconds
30P mode:1/30.0seconds-1/249.8seconds
24P mode:1/24.0seconds-1/249.8seconds
when SYNC SCAN TYPE = deg3.0d - 180.0d - 360.0d(0.5d increments, angle display)
whenSYSTEMFREQ=50Hz:when SYNC SCAN TYPE = sec50i/50Pmode:1/50.0seconds-1/250.0seconds
25P mode:1/25.0seconds-1/250.0seconds
when SYNC SCAN TYPE = deg3.0d - 180.0d - 360.0d(0.5d increments, angle display)
SpecificationsReference

39
Ref
eren
ce
Slowshutterspeed(canonlybesetwhentheVFRMODEintheSCENEFILEscreenisOFF)whenSYSTEMFREQ=59.94Hz:60i/60Pmode:1/8,1/15,1/30seconds
30Pmode:1/8,1/15seconds
24Pmode:1/6,1/12seconds
whenSYSTEMFREQ=50Hz:50i/50Pmode:1/6,1/12,1/25seconds
25Pmode:1/6,1/12seconds
Image/Recording/Playback
� AVCHD mode
Recording formatAVCHDVer.2.0standardcompliant(AVCHDProgressive)
Compression formatsMPEG-4AVC/H.264
Recording mediaSDmemorycard:512MB,1GB,upto2GB(FAT12,FAT16formatssupported)
SDHCmemorycard:4GB,6GB,8GB,12GB,16GB,32GB(FAT32formatsupported)
SDXCmemorycard:48GB,64GB,upto2TB(exFATformatsupported)
However,memorycardsaboveClass4aresupportedinPH/HAmode,memorycardsaboveClass2aresupportedinPM/HEmode,andmemorycardsaboveClass6aresupportedinPSmodeorduringVFRrecording.
Recording format (recording mode and resolution)whenSYSTEMFREQ=59.94Hz(Theframeratesinthesetupmenuare60P,60i,30P,and24P.):PS1080/59.94PPH1080/59.94iPH1080/29.97PPH1080/23.98P(Nativerecording)PH720/59.94PPH720/29.97PPH720/23.98P(Nativerecording)PM720/59.94PHA1080/59.94iHE1080/59.94i
whenSYSTEMFREQ=50Hz:PS1080/50PPH1080/50iPH1080/25P
PH720/50PPH720/25PPM720/50PHA1080/50iHE1080/50i
Transmission ratePSmode:Approx.25Mbps(VBR)PHmode:Approx.21Mbps(VBR)PMmode:Approx.8Mbps(VBR)HAmode:Approx.17Mbps(VBR)HEmode:Approx.6Mbps(VBR)
Interval recordingOFF/1s/10s/30s/1min/2min*Fortherecordingmode,PH1080/24P(whenSYSTEMFREQ=59.94Hz),PH1080/25P(whenSYSTEMFREQ=50Hz)fixed,andshootingtimehasamaximumof168hours(1week)
VFR recordingwhenRECFORMAT=1080/24P,1080/30P:2*/6/9/12/15/18/20/21/22/24/25/26/27/28/30/32/34/36/40/44/48/54/60frames/second
whenRECFORMAT=1080/25P:2*/6/9/12/15/18/20/21/22/23/24/25/26/27/28/30/32/34/37/42/45/48/50frames/second
*Gainvalueisfixedat0dBandthecameraissettomanualfocusmode.
� DV mode
Recording formatDVstandardcompliant
File formatAVIType2
Recording mediaSDmemorycard:512MB,1GB,2GB(FAT12,FAT16formatssupported)
SDHCmemorycard:4GB,8GB,16GB,32GB(FAT32formatsupported)
SDXCmemorycard:48GB,64GB,upto2TB(exFATformatsupported)However,itispossibletouseClass6orhigher.
Recording format (recording mode and resolution)whenSYSTEMFREQ=59.94Hz(Theframeratesinthesetupmenuare60i,30P,and24P.):480/59.94i480/29.97P480/23.98P
whenSYSTEMFREQ=50Hz:576/50i576/25P

40
Image output
� AVCHD mode
SDI OUT terminalBNC,0.8V[p-p],75ΩHDSDIwhenSYSTEMFREQ=59.94Hz:1080/60i,1080/24PsF,720/60PwhenSYSTEMFREQ=50Hz:1080/50i,720/50P
SDSDIwhenSYSTEMFREQ=59.94Hz:480/60iwhenSYSTEMFREQ=50Hz:576/50i
HDMI OUT terminalHDMI(HDMITypeAterminal)whenSYSTEMFREQ=59.94Hz:1080/60i,720/60P,480/60PwhenSYSTEMFREQ=50Hz:1080/50i,720/50P,576/50P(VIERALinknotsupported)
VIDEO OUT terminalPinjack,1.0V[p-p],75ΩwhenSYSTEMFREQ=59.94Hz:480/60iwhenSYSTEMFREQ=50Hz:576/50i
� DV mode
SDI OUT terminalSDSDIwhenSYSTEMFREQ=59.94Hz:480/60iwhenSYSTEMFREQ=50Hz:576/50i
VIDEO OUT terminalPinjack,1.0V[p-p],75ΩwhenSYSTEMFREQ=59.94Hz:480/60iwhenSYSTEMFREQ=50Hz:576/50i
Audio recording playback
� AVCHD mode
Compression formatsRecording/Playback:PS/PHModeDolbyDigital/2ch,linearPCMswitch
PM/HA/HEmodeDolbyDigital/2ch
Sampling frequency48kHz
Encoding16bit
Compressed bit ratePS/PHmode:384kbpsPM/HA/HEmode:256kbps
� DV mode
Compression formatsRecording/Playback:
linearPCM(digital2ch)Sampling frequency48kHz
Encoding16bit
Audio inputBuilt-in microphoneStereomicrophone
XLR inputXLR(3-pin)x2(AUDIOINPUT1,AUDIOINPUT2),LINE/MICselectable,highimpedanceLINE:0dBuMIC:-40/-50/-60dBu(menuselectable)MICPOWER+48VON/OFFswitchable
Audio outputAudio outputOutputlevel:600Ω,316mVPinjackx2(CH1,CH2)
SDI OUT2ch(linearPCM)
HDMI OUT (AVCHD mode only)2ch(linearPCM)/5.1ch(DolbyDigital)
Headphones3.5mmdiameter,stereominijackx1
SpeakerRound,20mmdiameter

41
Ref
eren
ce
Inrushcurrent,measuredaccordingtoEuropeanstandardEN55103-1:6.5A(ACAdaptor), 5.5A(Batterycharger)
Other terminalsCamera remote terminal2.5mmdiameter,superminijackx1(ZOOMS/S)3.5mmdiameter,minijackx1(FOCUS/IRIS)
INDEX remote terminal2.5mmdiameter,superminijackx1
TC PRESET IN/OUT terminalVIDEOOUTterminaldual-purposeIN:1.0V-4.0V[p-p],10kΩOUT:2.0V±0.5V[p-p],lowimpedance
USB2.0 terminalMemorycardreader/writerfunction(withoutcopyrightprotection)TypeminiBconnector(USB2.0compliant)
DV OUT terminal (DV mode only)6-pin(IEEE1394standardcompliant),digitaloutputonly
MonitorLCD3.45inchwideLCDcolormonitor(approx.920,000dots)
Viewfinder0.45inchwideLCDcolormonitor(approx.1,220,000dotsequivalent)
AC adaptor (For AG-AC160AP/AG-AC160AEN only)
Power Source:110V-240VAC,50Hz/60Hz22W
Power Output:7.3VDC,1.75A(Camera-recorder)8.4VDC,1.3A(Charge)
indicatessafetyinformation.
WeightApprox.140g(0.31lb)
Dimensions (W x H x D)103mmx36mmx62mm(4-1/16inchesx1-13/32inchesx2-7/16inches)
AC adaptor (For AG-AC160AEJ only)
PowerSource: 100V-240VAC,50Hz-60Hz0.4A
PowerOutput: 7.3VDC,1.95A
indicatessafetyinformation.
Weight Approx.165gDimensions (W x H x D) 42mmx31mmx104.4mm
Battery charger (For AG-AC160AEJ only)
PowerSource: 110V-240VAC,50Hz/60Hz22W
PowerOutput: 8.4VDC,1.3A
indicatessafetyinformation.
Weight Approx.140gDimensions (W x H x D) 103mmx36mmx62mm