
McAfee Data Loss Prevention 11.0.0 Product Guide For use ...
262
Product Guide Revision A McAfee Data Loss Prevention 11.0.0 For use with McAfee ePolicy Orchestrator McAfee Cloud Data Protection Beta Release 21-Mar-2017
-
Upload
khangminh22 -
Category
Documents
-
view
1 -
download
0
Transcript of McAfee Data Loss Prevention 11.0.0 Product Guide For use ...

Product GuideRevision A
McAfee Data Loss Prevention 11.0.0For use with McAfee ePolicy Orchestrator
McAfee Cloud Data Protection Beta Release 21-Mar-2017

COPYRIGHT
© 2017 Intel Corporation
TRADEMARK ATTRIBUTIONSIntel and the Intel logo are registered trademarks of the Intel Corporation in the US and/or other countries. McAfee and the McAfee logo, McAfee ActiveProtection, McAfee DeepSAFE, ePolicy Orchestrator, McAfee ePO, McAfee EMM, McAfee Evader, Foundscore, Foundstone, Global Threat Intelligence,McAfee LiveSafe, Policy Lab, McAfee QuickClean, Safe Eyes, McAfee SECURE, McAfee Shredder, SiteAdvisor, McAfee Stinger, McAfee TechMaster, McAfeeTotal Protection, TrustedSource, VirusScan are registered trademarks or trademarks of McAfee, Inc. or its subsidiaries in the US and other countries.Other marks and brands may be claimed as the property of others.
LICENSE INFORMATION
License AgreementNOTICE TO ALL USERS: CAREFULLY READ THE APPROPRIATE LEGAL AGREEMENT CORRESPONDING TO THE LICENSE YOU PURCHASED, WHICH SETSFORTH THE GENERAL TERMS AND CONDITIONS FOR THE USE OF THE LICENSED SOFTWARE. IF YOU DO NOT KNOW WHICH TYPE OF LICENSE YOUHAVE ACQUIRED, PLEASE CONSULT THE SALES AND OTHER RELATED LICENSE GRANT OR PURCHASE ORDER DOCUMENTS THAT ACCOMPANY YOURSOFTWARE PACKAGING OR THAT YOU HAVE RECEIVED SEPARATELY AS PART OF THE PURCHASE (AS A BOOKLET, A FILE ON THE PRODUCT CD, OR AFILE AVAILABLE ON THE WEBSITE FROM WHICH YOU DOWNLOADED THE SOFTWARE PACKAGE). IF YOU DO NOT AGREE TO ALL OF THE TERMS SETFORTH IN THE AGREEMENT, DO NOT INSTALL THE SOFTWARE. IF APPLICABLE, YOU MAY RETURN THE PRODUCT TO MCAFEE OR THE PLACE OFPURCHASE FOR A FULL REFUND.
McAfee Cloud Data Protection Beta Release 21-Mar-2017
2 McAfee Data Loss Prevention 11.0.0 Product Guide

Contents
Preface 11About this guide . . . . . . . . . . . . . . . . . . . . . . . . . . . . . . . . . . 11
Audience . . . . . . . . . . . . . . . . . . . . . . . . . . . . . . . . . . 11Conventions . . . . . . . . . . . . . . . . . . . . . . . . . . . . . . . . . 11
Find product documentation . . . . . . . . . . . . . . . . . . . . . . . . . . . . . 12
1 Product overview 13What is McAfee DLP? . . . . . . . . . . . . . . . . . . . . . . . . . . . . . . . . 13Key features . . . . . . . . . . . . . . . . . . . . . . . . . . . . . . . . . . . . 14How it works . . . . . . . . . . . . . . . . . . . . . . . . . . . . . . . . . . . 14McAfee DLP Endpoint and McAfee Device Control — Controlling endpoint content and removable media. . . . . . . . . . . . . . . . . . . . . . . . . . . . . . . . . . . . . . . . . 16
How the client software works . . . . . . . . . . . . . . . . . . . . . . . . . 17McAfee DLP Endpoint on the Microsoft Windows platform . . . . . . . . . . . . . . . 18McAfee DLP Endpoint on the OS X platform . . . . . . . . . . . . . . . . . . . . 19
McAfee DLP Discover — Scanning files, repositories, and databases . . . . . . . . . . . . . 20Supported repositories . . . . . . . . . . . . . . . . . . . . . . . . . . . . 20Types of scans . . . . . . . . . . . . . . . . . . . . . . . . . . . . . . . . 21
McAfee DLP Prevent — Protecting email and web traffic . . . . . . . . . . . . . . . . . . 21Protecting email traffic . . . . . . . . . . . . . . . . . . . . . . . . . . . . 22Protecting web traffic . . . . . . . . . . . . . . . . . . . . . . . . . . . . . 22
McAfee DLP Monitor — Analyzing network traffic . . . . . . . . . . . . . . . . . . . . . 23Supported protocols . . . . . . . . . . . . . . . . . . . . . . . . . . . . . 23
McAfee DLP Prevent for Mobile Email — Protecting mobile email . . . . . . . . . . . . . . . 24Interaction with other McAfee products . . . . . . . . . . . . . . . . . . . . . . . . . 24
Deployment and installation2 Planning your deployment 27
Basic McAfee DLP implementation . . . . . . . . . . . . . . . . . . . . . . . . . . . 27Deployment options . . . . . . . . . . . . . . . . . . . . . . . . . . . . . . . . 28
McAfee DLP Endpoint or Device Control options . . . . . . . . . . . . . . . . . . 28McAfee DLP Discover options . . . . . . . . . . . . . . . . . . . . . . . . . . 28McAfee DLP Prevent options . . . . . . . . . . . . . . . . . . . . . . . . . . 29McAfee DLP Prevent for Mobile Email requirements . . . . . . . . . . . . . . . . . 29McAfee DLP Monitor options . . . . . . . . . . . . . . . . . . . . . . . . . . 29
Deployment scenarios . . . . . . . . . . . . . . . . . . . . . . . . . . . . . . . . 30Synchronizing McAfee DLP and McAfee Endpoint Health Check with McAfee ePO Cloud . . . 30Deploying McAfee DLP Endpoint in Citrix environments . . . . . . . . . . . . . . . 31Running McAfee Device Control on air-gapped computers . . . . . . . . . . . . . . 31
Planning your DLP policy . . . . . . . . . . . . . . . . . . . . . . . . . . . . . . . 32McAfee DLP workflow . . . . . . . . . . . . . . . . . . . . . . . . . . . . . 32The McAfee DLP protection process . . . . . . . . . . . . . . . . . . . . . . . 33Policy workflow . . . . . . . . . . . . . . . . . . . . . . . . . . . . . . . 36Best practice McAfee DLP Discover workflow . . . . . . . . . . . . . . . . . . . . 37
McAfee Cloud Data Protection Beta Release 21-Mar-2017
McAfee Data Loss Prevention 11.0.0 Product Guide 3

Shared policy components . . . . . . . . . . . . . . . . . . . . . . . . . . . 38Default ports used by McAfee DLP . . . . . . . . . . . . . . . . . . . . . . . . . . . 38Deployment checklist . . . . . . . . . . . . . . . . . . . . . . . . . . . . . . . . 40
3 Installing McAfee DLP 43Download product extensions and installation files . . . . . . . . . . . . . . . . . . . . 43Install and license the McAfee DLP extension . . . . . . . . . . . . . . . . . . . . . . 44
Install the extension using the Software Manager . . . . . . . . . . . . . . . . . . 45Install the extension manually . . . . . . . . . . . . . . . . . . . . . . . . . 45License McAfee DLP . . . . . . . . . . . . . . . . . . . . . . . . . . . . . . 45Applying backward compatibility . . . . . . . . . . . . . . . . . . . . . . . . 47Convert policies and migrate data . . . . . . . . . . . . . . . . . . . . . . . . 49
Install the McAfee DLP Endpoint and Device Control client software . . . . . . . . . . . . . 50Install the McAfee DLP Discover server package . . . . . . . . . . . . . . . . . . . . . 50
Considerations for upgrading McAfee DLP Discover . . . . . . . . . . . . . . . . . 51Install or upgrade the server package using McAfee ePO . . . . . . . . . . . . . . . 51Install or upgrade the server package manually . . . . . . . . . . . . . . . . . . 52Verify the installation . . . . . . . . . . . . . . . . . . . . . . . . . . . . . 52
Install your McAfee DLP appliance . . . . . . . . . . . . . . . . . . . . . . . . . . . 53Install the extensions . . . . . . . . . . . . . . . . . . . . . . . . . . . . . 54Configure network information . . . . . . . . . . . . . . . . . . . . . . . . . 54Connect Capture port 0 to your network McAfee DLP Monitor only) . . . . . . . . . . . 55Install the software on a virtual appliance . . . . . . . . . . . . . . . . . . . . . 55Install the software on a hardware appliance . . . . . . . . . . . . . . . . . . . 56Run the Setup Wizard and register with McAfee ePO . . . . . . . . . . . . . . . . 58
Install the McAfee DLP Prevent for Mobile Email server package . . . . . . . . . . . . . . . 59Post-installation tasks . . . . . . . . . . . . . . . . . . . . . . . . . . . . . . . . 59
Configuration and use4 Configuring system components 63
Configuring McAfee DLP in the Policy Catalog . . . . . . . . . . . . . . . . . . . . . . 63Import or export the McAfee DLP Endpoint configuration . . . . . . . . . . . . . . . 64Client configuration . . . . . . . . . . . . . . . . . . . . . . . . . . . . . . 64Support for client configuration parameters . . . . . . . . . . . . . . . . . . . . 66Configure client settings . . . . . . . . . . . . . . . . . . . . . . . . . . . . 67Configure server settings . . . . . . . . . . . . . . . . . . . . . . . . . . . 67
Protecting files with rights management . . . . . . . . . . . . . . . . . . . . . . . . 69How McAfee DLP works with rights management . . . . . . . . . . . . . . . . . . 69Supported RM servers . . . . . . . . . . . . . . . . . . . . . . . . . . . . . 70Define a Rights Management server . . . . . . . . . . . . . . . . . . . . . . . 71
Documenting events with evidence . . . . . . . . . . . . . . . . . . . . . . . . . . 71Using evidence and evidence storage . . . . . . . . . . . . . . . . . . . . . . . 71Creating evidence folders . . . . . . . . . . . . . . . . . . . . . . . . . . . 74Configure evidence folder settings . . . . . . . . . . . . . . . . . . . . . . . . 74
Controlling assignments with users and permission sets . . . . . . . . . . . . . . . . . . 75REST API for importing definitions and applying policies . . . . . . . . . . . . . . . 76Create end-user definitions . . . . . . . . . . . . . . . . . . . . . . . . . . . 76Assigning McAfee DLP permission sets . . . . . . . . . . . . . . . . . . . . . . 77Create a McAfee DLP permission set . . . . . . . . . . . . . . . . . . . . . . . 78
Control access to McAfee DLP appliance features . . . . . . . . . . . . . . . . . . . . . 80Restrict users from viewing appliances in the System Tree . . . . . . . . . . . . . . 80Allow users to edit the policy . . . . . . . . . . . . . . . . . . . . . . . . . . 80Control access to Appliance Management features . . . . . . . . . . . . . . . . . 81
Working with McAfee DLP policies . . . . . . . . . . . . . . . . . . . . . . . . . . . 82Set connection timeout settings . . . . . . . . . . . . . . . . . . . . . . . . . 82
McAfee Cloud Data Protection Beta Release 21-Mar-2017Contents
4 McAfee Data Loss Prevention 11.0.0 Product Guide

Set up a cluster of McAfee DLP Prevent appliances . . . . . . . . . . . . . . . . . 82Close the appliance SMTP ports . . . . . . . . . . . . . . . . . . . . . . . . . 83Specify a maximum level of nesting of archived attachments . . . . . . . . . . . . . 83Add additional MTAs that can deliver email . . . . . . . . . . . . . . . . . . . . 84Deliver emails using a round-robin approach . . . . . . . . . . . . . . . . . . . . 84Limiting connections to specified hosts or networks . . . . . . . . . . . . . . . . . 84Enable TLS on incoming or outgoing messages . . . . . . . . . . . . . . . . . . . 85Configure McAfee DLP Prevent to scan encrypted web traffic only . . . . . . . . . . . 86Close the McAfee DLP Prevent appliance ICAP ports . . . . . . . . . . . . . . . . . 86Enable a McAfee DLP Prevent appliance to process response requests . . . . . . . . . 87Using external authentication servers . . . . . . . . . . . . . . . . . . . . . . 87The Common Appliance Management policy . . . . . . . . . . . . . . . . . . . . 91Edit the Email Gateway policy to work with McAfee DLP Prevent . . . . . . . . . . . . 91Integrate McAfee DLP Prevent in your web environment . . . . . . . . . . . . . . . 93
McAfee ePO features . . . . . . . . . . . . . . . . . . . . . . . . . . . . . . . . 94
5 Protecting removable media 97Protecting devices . . . . . . . . . . . . . . . . . . . . . . . . . . . . . . . . . 98Managing devices with device classes . . . . . . . . . . . . . . . . . . . . . . . . . 99Define a device class . . . . . . . . . . . . . . . . . . . . . . . . . . . . . . . . 99
Obtain a GUID . . . . . . . . . . . . . . . . . . . . . . . . . . . . . . . 100Create a device class . . . . . . . . . . . . . . . . . . . . . . . . . . . . . 100
Organizing devices with device templates . . . . . . . . . . . . . . . . . . . . . . . 101Working with device templates . . . . . . . . . . . . . . . . . . . . . . . . . 102
Device properties . . . . . . . . . . . . . . . . . . . . . . . . . . . . . . . . . 105Device control rules . . . . . . . . . . . . . . . . . . . . . . . . . . . . . . . . 108
Create a removable storage device rule . . . . . . . . . . . . . . . . . . . . . 109Create a plug-and-play device rule . . . . . . . . . . . . . . . . . . . . . . . 110Create a removable storage file access device rule . . . . . . . . . . . . . . . . . 111Create a fixed hard drive device rule . . . . . . . . . . . . . . . . . . . . . . 111Create a Citrix device rule . . . . . . . . . . . . . . . . . . . . . . . . . . . 112Create a TrueCrypt device rule . . . . . . . . . . . . . . . . . . . . . . . . . 113
Removable storage file access rules . . . . . . . . . . . . . . . . . . . . . . . . . . 113
6 Classifying sensitive content 115Components of the Classification module . . . . . . . . . . . . . . . . . . . . . . . . 115Using classifications . . . . . . . . . . . . . . . . . . . . . . . . . . . . . . . . 116
Classifying by file destination . . . . . . . . . . . . . . . . . . . . . . . . . 117Classifying by file location . . . . . . . . . . . . . . . . . . . . . . . . . . . 118Text extraction . . . . . . . . . . . . . . . . . . . . . . . . . . . . . . . 119How McAfee DLP Endpoint categorizes applications . . . . . . . . . . . . . . . . . 119
Classification definitions and criteria . . . . . . . . . . . . . . . . . . . . . . . . . 120Dictionary definitions . . . . . . . . . . . . . . . . . . . . . . . . . . . . . 122Advanced pattern definitions . . . . . . . . . . . . . . . . . . . . . . . . . 123Classifying content with document properties or file information . . . . . . . . . . . 123Application templates . . . . . . . . . . . . . . . . . . . . . . . . . . . . 124
Manual classification . . . . . . . . . . . . . . . . . . . . . . . . . . . . . . . . 125Embedded properties . . . . . . . . . . . . . . . . . . . . . . . . . . . . 126Configure manual classification . . . . . . . . . . . . . . . . . . . . . . . . 127
Registered documents . . . . . . . . . . . . . . . . . . . . . . . . . . . . . . . 127Manual registration . . . . . . . . . . . . . . . . . . . . . . . . . . . . . 128Automatic registration . . . . . . . . . . . . . . . . . . . . . . . . . . . . 128
Whitelisted text . . . . . . . . . . . . . . . . . . . . . . . . . . . . . . . . . . 129Create and configure classifications . . . . . . . . . . . . . . . . . . . . . . . . . . 129
Create a classification . . . . . . . . . . . . . . . . . . . . . . . . . . . . 129Create classification criteria . . . . . . . . . . . . . . . . . . . . . . . . . . 130
McAfee Cloud Data Protection Beta Release 21-Mar-2017Contents
McAfee Data Loss Prevention 11.0.0 Product Guide 5

Upload registered documents . . . . . . . . . . . . . . . . . . . . . . . . . 130Upload files to whitelist text . . . . . . . . . . . . . . . . . . . . . . . . . . 131Export a classification . . . . . . . . . . . . . . . . . . . . . . . . . . . . 131
Configure classification components for McAfee DLP Endpoint . . . . . . . . . . . . . . . 131Create content fingerprinting criteria . . . . . . . . . . . . . . . . . . . . . . 132Use case: Application-based fingerprinting . . . . . . . . . . . . . . . . . . . . 132Assign manual classification permissions . . . . . . . . . . . . . . . . . . . . . 133Use case: Manual classification . . . . . . . . . . . . . . . . . . . . . . . . . 134
Create classification definitions . . . . . . . . . . . . . . . . . . . . . . . . . . . . 135Create a general classification definition . . . . . . . . . . . . . . . . . . . . . 135Create or import a dictionary definition . . . . . . . . . . . . . . . . . . . . . 135Create an advanced pattern . . . . . . . . . . . . . . . . . . . . . . . . . . 136Create a URL list definition . . . . . . . . . . . . . . . . . . . . . . . . . . 137
Use case: Integrate Titus client with third-party tags . . . . . . . . . . . . . . . . . . . 138Use case: Integrate Boldon James Email Classifier with classification criteria . . . . . . . . . 139
7 Protecting sensitive content 141Creating policies with rule sets . . . . . . . . . . . . . . . . . . . . . . . . . . . . 141
Synchronizing rule sets with McAfee ePO Cloud . . . . . . . . . . . . . . . . . . 142Create rule definitions . . . . . . . . . . . . . . . . . . . . . . . . . . . . . . . 142
Create a network port range . . . . . . . . . . . . . . . . . . . . . . . . . . 142Create a network address range . . . . . . . . . . . . . . . . . . . . . . . . 143Create an email address list definition . . . . . . . . . . . . . . . . . . . . . . 143Create a network printer definition . . . . . . . . . . . . . . . . . . . . . . . 144
Defining rules to protect sensitive content . . . . . . . . . . . . . . . . . . . . . . . 144Defining rules by reputation . . . . . . . . . . . . . . . . . . . . . . . . . . 145Protecting data-in-use . . . . . . . . . . . . . . . . . . . . . . . . . . . . 146Device control rules . . . . . . . . . . . . . . . . . . . . . . . . . . . . . 155Discovery rules in McAfee DLP Endpoint and in McAfee DLP Discover . . . . . . . . . 155Application control rules . . . . . . . . . . . . . . . . . . . . . . . . . . . 155
Whitelists . . . . . . . . . . . . . . . . . . . . . . . . . . . . . . . . . . . . 156Customizing end-user messages . . . . . . . . . . . . . . . . . . . . . . . . . . . 156Reactions available for rule types . . . . . . . . . . . . . . . . . . . . . . . . . . . 158Create and configure rules and rule sets . . . . . . . . . . . . . . . . . . . . . . . . 161
Create a rule set . . . . . . . . . . . . . . . . . . . . . . . . . . . . . . 161Create a rule . . . . . . . . . . . . . . . . . . . . . . . . . . . . . . . . 161Assign rule sets to policies . . . . . . . . . . . . . . . . . . . . . . . . . . 162Enable, disable, or delete rules . . . . . . . . . . . . . . . . . . . . . . . . . 163Back up and restore policy . . . . . . . . . . . . . . . . . . . . . . . . . . 163Configure rule or rule set columns . . . . . . . . . . . . . . . . . . . . . . . 163Create a justification definition . . . . . . . . . . . . . . . . . . . . . . . . . 164Create a notification definition . . . . . . . . . . . . . . . . . . . . . . . . . 165
Rule use cases . . . . . . . . . . . . . . . . . . . . . . . . . . . . . . . . . . 165Use case: Removable storage file access device rule with a whitelisted process . . . . . 166Use case: Set a removable device as read-only . . . . . . . . . . . . . . . . . . 167Use case: Block and charge an iPhone with a plug-and-play device rule . . . . . . . . 167Use case: Prevent burning sensitive information to disk . . . . . . . . . . . . . . . 168Use case: Block outbound messages with confidential content unless they are sent to aspecified domain . . . . . . . . . . . . . . . . . . . . . . . . . . . . . . 169Use case: Allow a specified user group to send credit information . . . . . . . . . . . 170Use case: Classify attachments as NEED-TO-SHARE based on their destination . . . . . 172
8 Scanning data with McAfee DLP Endpoint discovery 175Protecting files with discovery rules . . . . . . . . . . . . . . . . . . . . . . . . . . 175How discovery scanning works . . . . . . . . . . . . . . . . . . . . . . . . . . . . 176Find content with the Endpoint Discovery crawler . . . . . . . . . . . . . . . . . . . . 177
McAfee Cloud Data Protection Beta Release 21-Mar-2017Contents
6 McAfee Data Loss Prevention 11.0.0 Product Guide

Create and define a discovery rule . . . . . . . . . . . . . . . . . . . . . . . 177Create a scheduler definition . . . . . . . . . . . . . . . . . . . . . . . . . 178Set up a scan . . . . . . . . . . . . . . . . . . . . . . . . . . . . . . . . 178Use case: Restore quarantined files or email items . . . . . . . . . . . . . . . . . 179
9 Scanning data with McAfee DLP Discover 181Choosing the scan type . . . . . . . . . . . . . . . . . . . . . . . . . . . . . . . 181
How inventory scans work . . . . . . . . . . . . . . . . . . . . . . . . . . 182How classification scans work . . . . . . . . . . . . . . . . . . . . . . . . . 182How remediation scans work . . . . . . . . . . . . . . . . . . . . . . . . . 183How registration scans work . . . . . . . . . . . . . . . . . . . . . . . . . . 184
Scan considerations and limitations . . . . . . . . . . . . . . . . . . . . . . . . . . 184Repositories and credentials for scans . . . . . . . . . . . . . . . . . . . . . . . . . 186Using definitions and classifications with scans . . . . . . . . . . . . . . . . . . . . . 187Using rules with scans . . . . . . . . . . . . . . . . . . . . . . . . . . . . . . . 188Configure policy for scans . . . . . . . . . . . . . . . . . . . . . . . . . . . . . . 189
Create definitions for scans . . . . . . . . . . . . . . . . . . . . . . . . . . 189Create rules for remediation scans . . . . . . . . . . . . . . . . . . . . . . . 194
Configure a scan . . . . . . . . . . . . . . . . . . . . . . . . . . . . . . . . . 194Configure an inventory scan . . . . . . . . . . . . . . . . . . . . . . . . . . 195Configure a classification scan . . . . . . . . . . . . . . . . . . . . . . . . . 195Configure a remediation scan . . . . . . . . . . . . . . . . . . . . . . . . . 196Configure a registration scan . . . . . . . . . . . . . . . . . . . . . . . . . 197
Perform scan operations . . . . . . . . . . . . . . . . . . . . . . . . . . . . . . 198Scan behavior . . . . . . . . . . . . . . . . . . . . . . . . . . . . . . . . . . 199Analyzing scanned data . . . . . . . . . . . . . . . . . . . . . . . . . . . . . . . 199
How McAfee DLP Discover uses OLAP . . . . . . . . . . . . . . . . . . . . . . 199Viewing scan results . . . . . . . . . . . . . . . . . . . . . . . . . . . . . 200Analyze scan results . . . . . . . . . . . . . . . . . . . . . . . . . . . . . 201View inventory results . . . . . . . . . . . . . . . . . . . . . . . . . . . . 202
Monitoring and reporting10 Incidents and operational events 205
Monitoring and reporting events . . . . . . . . . . . . . . . . . . . . . . . . . . . 205DLP Incident Manager/DLP Operations . . . . . . . . . . . . . . . . . . . . . . . . . 206
How the Incident Manager works . . . . . . . . . . . . . . . . . . . . . . . . 207Working with incidents . . . . . . . . . . . . . . . . . . . . . . . . . . . . 209
View incidents . . . . . . . . . . . . . . . . . . . . . . . . . . . . . . . . . . 209Sort and filter incidents . . . . . . . . . . . . . . . . . . . . . . . . . . . . 210Configure column views . . . . . . . . . . . . . . . . . . . . . . . . . . . 210Configure incident filters . . . . . . . . . . . . . . . . . . . . . . . . . . . 211View incident details . . . . . . . . . . . . . . . . . . . . . . . . . . . . . 212
Manage incidents . . . . . . . . . . . . . . . . . . . . . . . . . . . . . . . . . 213Update a single incident . . . . . . . . . . . . . . . . . . . . . . . . . . . 213Update multiple incidents . . . . . . . . . . . . . . . . . . . . . . . . . . . 214Email selected events . . . . . . . . . . . . . . . . . . . . . . . . . . . . 214Manage labels . . . . . . . . . . . . . . . . . . . . . . . . . . . . . . . 215
Working with cases . . . . . . . . . . . . . . . . . . . . . . . . . . . . . . . . 216Manage cases . . . . . . . . . . . . . . . . . . . . . . . . . . . . . . . . . . 216
Create cases . . . . . . . . . . . . . . . . . . . . . . . . . . . . . . . . 216View case information . . . . . . . . . . . . . . . . . . . . . . . . . . . . 217Assign incidents to a case . . . . . . . . . . . . . . . . . . . . . . . . . . . 217Move or remove incidents from a case . . . . . . . . . . . . . . . . . . . . . . 217Update cases . . . . . . . . . . . . . . . . . . . . . . . . . . . . . . . . 218Add or remove labels to a case . . . . . . . . . . . . . . . . . . . . . . . . . 219
McAfee Cloud Data Protection Beta Release 21-Mar-2017Contents
McAfee Data Loss Prevention 11.0.0 Product Guide 7
Delete cases . . . . . . . . . . . . . . . . . . . . . . . . . . . . . . . . 220
11 Collecting and managing data 221Edit server tasks . . . . . . . . . . . . . . . . . . . . . . . . . . . . . . . . . 221
Create a Purge events task . . . . . . . . . . . . . . . . . . . . . . . . . . 222Create an Automatic mail Notification task . . . . . . . . . . . . . . . . . . . . 223Create a Set Reviewer task . . . . . . . . . . . . . . . . . . . . . . . . . . 224Create an incident synchronization task with McAfee ePO Cloud . . . . . . . . . . . 224
Monitor task results . . . . . . . . . . . . . . . . . . . . . . . . . . . . . . . . 225Creating reports . . . . . . . . . . . . . . . . . . . . . . . . . . . . . . . . . 225
Report types . . . . . . . . . . . . . . . . . . . . . . . . . . . . . . . . 225Report options . . . . . . . . . . . . . . . . . . . . . . . . . . . . . . . 226Predefined dashboards . . . . . . . . . . . . . . . . . . . . . . . . . . . . 226Create a data rollup server task . . . . . . . . . . . . . . . . . . . . . . . . 227
12 McAfee DLP appliances logging and monitoring 229Event reporting . . . . . . . . . . . . . . . . . . . . . . . . . . . . . . . . . . 229
McAfee DLP appliance events . . . . . . . . . . . . . . . . . . . . . . . . . 229Using syslog with McAfee DLP appliances . . . . . . . . . . . . . . . . . . . . 231
Monitoring system health and status . . . . . . . . . . . . . . . . . . . . . . . . . 233Appliance Management dashboard . . . . . . . . . . . . . . . . . . . . . . . 233The system health cards . . . . . . . . . . . . . . . . . . . . . . . . . . . 233View the status of an appliance . . . . . . . . . . . . . . . . . . . . . . . . 234Download MIBs and SMI files . . . . . . . . . . . . . . . . . . . . . . . . . 234
Maintenance and troubleshooting13 McAfee DLP Endpoint Diagnostics 237
Diagnostic Tool . . . . . . . . . . . . . . . . . . . . . . . . . . . . . . . . . . 237Checking the agent status . . . . . . . . . . . . . . . . . . . . . . . . . . 238Run the Diagnostic Tool . . . . . . . . . . . . . . . . . . . . . . . . . . . . 238Tuning policies . . . . . . . . . . . . . . . . . . . . . . . . . . . . . . . 239
14 McAfee DLP appliance maintenance and troubleshooting 241Managing with the McAfee DLP appliance console . . . . . . . . . . . . . . . . . . . . 241Accessing the appliance console . . . . . . . . . . . . . . . . . . . . . . . . . . . 242Change original network settings . . . . . . . . . . . . . . . . . . . . . . . . . . . 242Modify speed and duplex settings for hardware appliances . . . . . . . . . . . . . . . . . 243Managing hardware appliances with the RMM . . . . . . . . . . . . . . . . . . . . . . 243
Configure the RMM . . . . . . . . . . . . . . . . . . . . . . . . . . . . . 244Run the Setup Wizard using the remote KVM service . . . . . . . . . . . . . . . . 244Best practice: Securing the RMM . . . . . . . . . . . . . . . . . . . . . . . . 244
Upgrading an appliance . . . . . . . . . . . . . . . . . . . . . . . . . . . . . . . 245Apply a patch or hotfix using the internal install image . . . . . . . . . . . . . . . 245Upgrading the appliance using a CD . . . . . . . . . . . . . . . . . . . . . . . 246Upgrade the appliance using a USB drive . . . . . . . . . . . . . . . . . . . . 246
Restart the appliance . . . . . . . . . . . . . . . . . . . . . . . . . . . . . . . 246Reset the appliance to its factory defaults . . . . . . . . . . . . . . . . . . . . . . . 246Log off the appliance . . . . . . . . . . . . . . . . . . . . . . . . . . . . . . . . 247McAfee DLP Prevent does not accept email . . . . . . . . . . . . . . . . . . . . . . . 247Replace the default certificate . . . . . . . . . . . . . . . . . . . . . . . . . . . . 247
Regenerate the appliance's private key . . . . . . . . . . . . . . . . . . . . . 249Error messages . . . . . . . . . . . . . . . . . . . . . . . . . . . . . . . . . . 249Create a Minimum Escalation Report (MER) . . . . . . . . . . . . . . . . . . . . . . . 251
McAfee Cloud Data Protection Beta Release 21-Mar-2017Contents
8 McAfee Data Loss Prevention 11.0.0 Product Guide

A Glossary 253
Index 257
McAfee Cloud Data Protection Beta Release 21-Mar-2017Contents
McAfee Data Loss Prevention 11.0.0 Product Guide 9

McAfee Cloud Data Protection Beta Release 21-Mar-2017Contents
10 McAfee Data Loss Prevention 11.0.0 Product Guide
Preface
This guide provides the information you need to work with your McAfee product.
Contents About this guide Find product documentation
About this guideThis information describes the guide's target audience, the typographical conventions and icons usedin this guide, and how the guide is organized.
AudienceMcAfee documentation is carefully researched and written for the target audience.
The information in this guide is intended primarily for:
• Administrators — People who implement and enforce the company's security program.
• Security officers — People who determine sensitive and confidential data, and define thecorporate policy that protects the company's intellectual property.
ConventionsThis guide uses these typographical conventions and icons.
Italic Title of a book, chapter, or topic; a new term; emphasis
Bold Text that is emphasized
Monospace Commands and other text that the user types; a code sample; a displayed message
Narrow Bold Words from the product interface like options, menus, buttons, and dialog boxes
Hypertext blue A link to a topic or to an external website
Note: Extra information to emphasize a point, remind the reader of something, orprovide an alternative method
Tip: Best practice information
Caution: Important advice to protect your computer system, software installation,network, business, or data
Warning: Critical advice to prevent bodily harm when using a hardware product
McAfee Cloud Data Protection Beta Release 21-Mar-2017
McAfee Data Loss Prevention 11.0.0 Product Guide 11

Find product documentationOn the ServicePortal, you can find information about a released product, including productdocumentation, technical articles, and more.
Task1 Go to the ServicePortal at https://support.mcafee.com and click the Knowledge Center tab.
2 In the Knowledge Base pane under Content Source, click Product Documentation.
3 Select a product and version, then click Search to display a list of documents.
McAfee Cloud Data Protection Beta Release 21-Mar-2017PrefaceFind product documentation
12 McAfee Data Loss Prevention 11.0.0 Product Guide

1 Product overview
Data loss occurs when confidential or private information leaves the enterprise as a result ofunauthorized communication through channels such as applications, physical devices, or networkprotocols.
McAfee®
Data Loss Prevention (McAfee DLP) identifies and protects data within your network. McAfeeDLP helps you understand the types of data on your network, how the data is accessed andtransmitted, and if the data contains sensitive or confidential information. Use McAfee DLP to build andimplement effective protection policies while reducing the need for extensive trial and error.
Contents What is McAfee DLP? Key features How it works McAfee DLP Endpoint and McAfee Device Control — Controlling endpoint content and removablemedia McAfee DLP Discover — Scanning files, repositories, and databases McAfee DLP Prevent — Protecting email and web traffic McAfee DLP Monitor — Analyzing network traffic McAfee DLP Prevent for Mobile Email — Protecting mobile email Interaction with other McAfee products
What is McAfee DLP?McAfee DLP is a suite of products, each of which protects different types of data in your network.
• McAfee® Data Loss Prevention Endpoint (McAfee DLP Endpoint) — Inspects and controlscontent and user actions on endpoints.
• McAfee® Device Control — Controls the use of removable media on endpoints.
• McAfee® Data Loss Prevention Discover (McAfee DLP Discover) — Scans file, Box,SharePoint, and database repositories to identify and protect sensitive data. Scans file, Box, andSharePoint repositories to extract fingerprint information and stores the signatures in a registereddocuments database.
• McAfee® Data Loss Prevention Prevent (McAfee DLP Prevent) — Works with your web proxyor MTA server to protect web and email traffic.
• McAfee® Data Loss Prevention Prevent for Mobile Email (McAfee DLP Prevent for MobileEmail) — Works with MobileIron to monitor Microsoft Exchange ActiveSync or Microsoft Office 365ActiveSync requests.
• McAfee® Data Loss Prevention Monitor (McAfee DLP Monitor) — Passively scans unencryptednetwork traffic for potential data loss incidents.
1McAfee Cloud Data Protection Beta Release 21-Mar-2017
McAfee Data Loss Prevention 11.0.0 Product Guide 13

Key featuresMcAfee DLP includes these features.
Advanced protection — Leverage fingerprinting, classification, and file tagging to secure sensitive,unstructured data, such as intellectual property and trade secrets.
McAfee DLP provides comprehensive protection for all potential leaking channels, including removablestorage devices, the cloud, email, instant messaging, web, printing, clipboard, screen capture, andfile-sharing applications.
Compliance enforcement — Ensure compliance by addressing day-to-day end-user actions, such asemailing, cloud posting, and downloading to removable media devices.
Scanning and discovery — Scan files and databases stored on local endpoints, shared repositories,or the cloud to identify sensitive data.
End-user education — Provide real-time feedback through educational pop-up messages to helpshape corporate security awareness and culture.
Centralized management — Integrate natively with McAfee®
ePolicy Orchestrator®
(McAfee®
ePO™
)software to streamline policy and incident management.
McAfee ePO Cloud synchronization — Synchronize McAfee DLP web and cloud protection incidentsand McAfee DLP Endpoint health check data with McAfee ePO Cloud reporting services. Exportclassifications for import in McAfee ePO Cloud. Synchronize McAfee ePO Cloud Global Settings, WebApplication Filter, and Cloud Data Protection policies with on-premises McAfee DLP.
How it worksAll McAfee DLP products identify sensitive data or user activity, take action on policy violations, andcreate incidents of violations.
Detect and identify
McAfee DLP identifies data on your network when that data:
• Is used or accessed by a user
• Is in transit across or outside your network
• Resides on a local file system or shared repository
React and protect
The software can take different actions on sensitive data, such as:
• Report an incident
• Block user access
• Move or encrypt files
• Quarantine emails that contain the data
Monitor and report
When policy violations are discovered, McAfee DLP creates an incident with details of the violation.
McAfee Cloud Data Protection Beta Release 21-Mar-20171 Product overview
Key features
14 McAfee Data Loss Prevention 11.0.0 Product Guide

Categorizing data
McAfee DLP collects data and categorizes it by vectors — Data in Motion, Data at Rest, and Data inUse.
Data vector Description Products
Data in Use The actions of users on endpoints, such as copyingdata and files to removable media, printing files toa local printer, and taking screen captures.
• McAfee DLP Endpoint
• McAfee Device Control
Data in Motion Live traffic on your network. Traffic is analyzed,categorized, and stored in the McAfee DLPdatabase.
• McAfee DLP Prevent
• McAfee DLP Prevent for MobileEmail
• McAfee DLP Monitor
Data at Rest Data residing in file shares, databases, andrepositories. McAfee DLP can scan, track, andperform remedial actions on Data at Rest.
• McAfee DLP Discover
• McAfee DLP Endpointdiscovery
How McAfee DLP products interact
Installing all McAfee DLP products allows you to use the full feature set of the product suite.
This diagram shows a simplified network where all McAfee DLP products and McAfee ePO are deployed.
Reference Description Data vector
1 McAfee ePO handles policy configuration and incident management forall McAfee DLP products.
Not applicable
2 McAfee DLP Endpoint and McAfee Device Control monitor and restrictusers' data use. McAfee DLP Endpoint also scans endpoint file systemsand email.
• Data in Use
• Data at Rest
McAfee Cloud Data Protection Beta Release 21-Mar-2017Product overview
How it works 1
McAfee Data Loss Prevention 11.0.0 Product Guide 15

Reference Description Data vector
3 McAfee DLP Discover scans files from local or cloud repositories and localdatabases to find sensitive information. Registration scans storesignatures in a database that can be used to define scans or McAfee DLPPrevent and McAfee DLP Monitor policies.
Data at Rest
4 • McAfee DLP Prevent receives email from MTA servers. It analyzes themessages, adds appropriate headers based on configured policy, andsends the emails to a single MTA server, also known as the SmartHost.
• McAfee DLP Prevent receives web traffic from web proxy servers. Itanalyzes the web traffic, determines if the traffic should be allowed orblocked, and sends the traffic back to the appropriate web proxyserver.
• McAfee DLP Prevent for Mobile Email receives email from a MobileIronSentry server. It analyzes the email and attachments and createsincidents, or saves evidence, based on mobile protection rules.
Data in Motion
5 McAfee DLP Monitor acquires network packets through a network tap.Traffic from your email and web servers and data going to and from yournetwork shares is copied to McAfee DLP Monitor
Not applicable
6 McAfee DLP Monitor analyzes the network traffic and creates incidents orsaves evidence for the supported protocols applying either networkcommunication rules, web protection rules, or email protection rules.
Data in Motion
McAfee DLP Endpoint and McAfee Device Control — Controllingendpoint content and removable media
McAfee DLP Endpoint inspects enterprise users’ actions on sensitive content on their computers.
McAfee Device Control prevents unauthorized use of removable media devices. McAfee DLP Endpointincludes all McAfee Device Control functionality, and, in addition, protects against data loss through abroad set of potential data-loss channels.
Key features
McAfee Device Control:
• Controls what data can be copied to removable devices, or controls the devices themselves. It canblock devices completely or make them read-only.
• Blocks executables on removable media from running. Exceptions can be made for requiredexecutables such as virus protection.
• Provides protection for USB drives, smartphones, Bluetooth devices, and other removable media
McAfee DLP Endpoint protects against data loss from:
• Clipboard software
• Cloud applications
• Email (including email sent to mobile devices)
• Network shares
• Printers
• Screen captures
McAfee Cloud Data Protection Beta Release 21-Mar-20171 Product overview
McAfee DLP Endpoint and McAfee Device Control — Controlling endpoint content and removable media
16 McAfee Data Loss Prevention 11.0.0 Product Guide

• Specified applications and browsers
• Web posts
The McAfee DLP classification engine applies definitions and classification criteria that define thecontent to be protected, and where and when the protection is applied. Protection rules apply theclassification criteria and other definitions to protect the sensitive content.
Rules Supported by
Data Protection • McAfee DLP Endpoint
• McAfee Device Control (removable storage protection rules only)
• McAfee DLP Prevent (email and web protection rules)
Device Control • McAfee DLP Endpoint
• McAfee Device Control
Discovery • McAfee DLP Endpoint (endpoint discovery)
• McAfee DLP Discover
The McAfee DLP Endpoint discovery crawler runs on the local endpoint, searching local file system andemail storage files and applying policies to protect sensitive content.
How it works
McAfee DLP Endpoint safeguards sensitive enterprise information:
• Applies policies that consist of definitions, classifications, rule sets, endpoint client configurations,and endpoint discovery schedules
• Monitors the policies and blocks actions on sensitive content, as needed
• Encrypts sensitive content before allowing the action
• Creates reports for review and control of the process, and can store sensitive content as evidence
How the client software worksThe McAfee DLP Endpoint client software is deployed as a McAfee Agent plug-in, and enforces thepolicies defined in the McAfee DLP policy. The McAfee DLP Endpoint client software audits useractivities to monitor, control, and prevent unauthorized users from copying or transferring sensitivedata. It then generates events recorded by the McAfee ePO Event Parser.
Event Parser
Events generated by the McAfee DLP Endpoint client software are sent to the McAfee ePO EventParser, and recorded in tables in the McAfee ePO database. Events are stored in the database forfurther analysis and used by other system components.
Online/offline operation
You can apply different device and protection rules, depending on whether the managed computer isonline (connected to the enterprise network) or offline (disconnected from the network). Some rulesalso allow you to differentiate between computers within the network and those connected to thenetwork by VPN.
McAfee Cloud Data Protection Beta Release 21-Mar-2017Product overview
McAfee DLP Endpoint and McAfee Device Control — Controlling endpoint content and removable media 1
McAfee Data Loss Prevention 11.0.0 Product Guide 17

McAfee DLP Endpoint on the Microsoft Windows platformWindows-based computers can be protected with either McAfee Device Control or McAfee DLPEndpoint. The McAfee DLP Endpoint client software uses advanced discovery technology, text patternrecognition, and predefined dictionaries. It identifies sensitive content, and incorporates devicemanagement and encryption for added layers of control.
Information Rights Management (IRM) software protects sensitive files using encryption andmanagement of access permissions. McAfee DLP Endpoint supports Microsoft Rights ManagementService (RMS) and Seclore FileSecure as complementary methods of data protection. A typical use isto prevent copying files that are not IRM protected.
Classification software verifies that emails and other files are consistently classified and protectivelylabeled. McAfee DLP Endpoint integrates with Titus Message Classification and Boldon James EmailClassifier for Microsoft Outlook to create email protection rules based on the applied classifications. Itintegrates with other Titus classification clients through the Titus SDK to create other protection rulesbased on the applied classifications.
Screen reader support
Job Access With Sound (JAWS), the widely used screen reader software for the visually impaired, issupported on endpoint computers. The following McAfee DLP Endpoint features are supported:
• End-user notification pop-up — If the pop-up dialog box is set to close manually (in DLP PolicyManager), dialog text is read allowing a visually impaired person to navigate the buttons and links.
• End-user justification dialog — The combo box is accessible with the tab key, and justificationcan be selected with arrow keys.
• End-user console Notification History tab — When the tab is selected, JAWS reads,"Notification history tab selected." There is no actionable content. All information in the right paneis read.
• End-user console Discovery tab — When the tab is selected, JAWS reads, "Discovery tabselected." There is no actionable content. All information in the right pane is read.
• End-user console Tasks tab — When the tab is selected, JAWS reads, "Tasks tab selected." Allsteps are accessible with the tab key, and appropriate instructions are read.
• End-user console About tab — When the tab is selected, JAWS reads, "About tab selected."There is no actionable content. All information in the right pane is read.
Multiple user sessions
The McAfee DLP Endpoint client software supports Fast User Switching (FUS) with multiple usersessions on those versions of the Windows operating system that support FUS. Virtual desktop supportcan also lead to multiple users sessions on a single host computer.
Endpoint console
The endpoint console was designed to share information with the user and to facilitateself-remediation of problems. It is configured on the Client Configuration | User Interface Service tab.
On Windows-based computers, the console is activated from the icon in the System Tray by selectingManage Features | DLP Endpoint Console. Fully configured, it has four tabbed pages:
• Notifications History — Displays events, including details of aggregated events.
• Discovery — Displays details of discovery scans.
McAfee Cloud Data Protection Beta Release 21-Mar-20171 Product overview
McAfee DLP Endpoint and McAfee Device Control — Controlling endpoint content and removable media
18 McAfee Data Loss Prevention 11.0.0 Product Guide

• Tasks — Generates ID codes and enter release codes for agent bypass and quarantine.
• About — Displays information about agent status, active policy, configuration, and computerassignment group, including revision ID numbers.
McAfee DLP Endpoint on the OS X platformMcAfee DLP Endpoint for Mac prevents unauthorized use of removable devices and provides protectionfor sensitive content on endpoints and network shares.
McAfee DLP Endpoint for Mac supports removable storage and plug-and-play device rules. It alsosupports the following data protection rules:
• Application file access protection rules
• Cloud protection rules
• Network share protection rules
• Removable storage protection rules
You can identify sensitive content with classifications, as on Windows-based computers, but registereddocuments and tagging are not supported. Manual classifications are recognized, but there is nooption to set them or see them in the user interface. Text extraction is supported, as are evidenceencryption and business justification definitions.
Endpoint console
On Mac endpoints, the console is activated from the McAfee menulet on the status bar. The Dashboardis integrated with other installed McAfee software such as McAfee
®
VirusScan®
for Mac, and displays anoverview of the status of all installed McAfee software. The Event Log page displays recent McAfeesoftware events. Click an entry to view the details.
Figure 1-1 McAfee DLP Endpoint for Mac endpoint display
To activate the agent bypass screen, select Preferences from the menulet.
McAfee Cloud Data Protection Beta Release 21-Mar-2017Product overview
McAfee DLP Endpoint and McAfee Device Control — Controlling endpoint content and removable media 1
McAfee Data Loss Prevention 11.0.0 Product Guide 19

McAfee DLP Discover — Scanning files, repositories, anddatabases
McAfee DLP Discover runs on Microsoft Windows servers and scans network file systems anddatabases to identify and protect sensitive files and data.
McAfee DLP Discover is a scalable, extensible software system that can meet the requirements of anysize network. Deploy McAfee DLP Discover software to as many servers throughout the network asneeded.
Key featuresUse McAfee DLP Discover for:
• Detecting and classifying sensitive content
• Creating registered document signature databases
• Moving or copying sensitive files
• Integrating with Microsoft Rights Management Service to apply protection to files
• Automating IT tasks such as finding blank files, determining permissions, and listing files thatchanged within a specified time range
How it worksMcAfee ePO uses McAfee
®
Agent to install and deploy the McAfee DLP Discover software to a Discoverserver — a designated Windows Server.
McAfee ePO applies the scan policy to Discover servers, which scan the repository or database at thescheduled time. The data collected and the actions applied to files depend on the scan type andconfiguration. For database scans, the only actions available are to report the incident and storeevidence.
Use McAfee ePO to perform configuration and analytics tasks such as:
• Displaying available Discover servers
• Configuring and scheduling scans
• Configuring policy items such as definitions, classifications, and rules
• Reviewing data analytics and inventory results
• Reviewing incidents generated from remediation scans
Supported repositoriesMcAfee DLP Discover supports local network and cloud repositories.
File repositories:
• Box
• Common Internet File System (CIFS)
• SharePoint 2010 and 2013
SharePoint Enterprise Search Center (ESS) websites are not supported. An ESS website is aconsolidation that does not contain files, but only links to the original files. For ESS websites, scanthe actual site collections or the entire web application.
Databases:
McAfee Cloud Data Protection Beta Release 21-Mar-20171 Product overview
McAfee DLP Discover — Scanning files, repositories, and databases
20 McAfee Data Loss Prevention 11.0.0 Product Guide

• Microsoft SQL
• MySQL, commercial editions
MySQL Community Edition is not supported.
• Oracle
• DB2
Types of scansMcAfee DLP Discover supports four scan types — inventory, classification, remediation, and documentregistration.
Inventory scans
Inventory scans give you a high-level view of what types of files exist in the repository. This scancollects only metadata — the files are not fetched. McAfee DLP Discover sorts scanned metadata intodifferent content types and analyzes attributes such as file size, location, and file extension. Use thisscan to create an overview of your repository or for IT tasks such as locating infrequently used files.You can run inventory scans on all supported file repositories and databases.
Classification scans
Classification scans help you understand the data that exists in the targeted repository. By matchingscanned content to classifications such as text patterns or dictionaries, you can analyze data patternsto create optimized remediation scans. You can run classification scans on all supported filerepositories and databases.
Remediation scans
Remediation scans find data that is in violation of a policy. You can run remediation scans on allsupported file repositories and databases. You can monitor, apply a Rights Management policy, copy,or move files to an export location. All actions can produce incidents that are reported to the IncidentManager in McAfee ePO.
For database scans, you can monitor, report incidents, and store evidence.
Registration scans
Document registration scans extract content from files based on selected fingerprint criteria, and savethe data to a signature database. The registered documents can be used to define classification andremediation scans, or McAfee DLP Prevent and McAfee DLP Monitor policies. You can run documentregistration scans only on supported file repositories, not on databases. A file can potentially be pickedup by more than one document registration scan. In that case, it is classified based on more than oneset of criteria, and it's signatures are recorded in more than one registered document.
McAfee DLP Prevent — Protecting email and web trafficMcAfee DLP Prevent integrates with an MTA server or web proxy to monitor email and web traffic andprevent potential data loss incidents.
McAfee Cloud Data Protection Beta Release 21-Mar-2017Product overview
McAfee DLP Prevent — Protecting email and web traffic 1
McAfee Data Loss Prevention 11.0.0 Product Guide 21

Protecting email trafficMcAfee DLP Prevent integrates with any MTA that supports header inspection.
Key features
McAfee DLP Prevent interacts with your email traffic, generates incidents, and records the incidents inMcAfee ePO for subsequent case review.
How it works
Figure 1-2 McAfee DLP Prevent email traffic flow
1 Users — Incoming or outgoing email messages go to the MTA server.
2 MTA server — Forwards the email messages to McAfee DLP Prevent.
3 McAfee DLP Prevent — Receives SMTP connections from the MTA server and:• Decomposes the email message into its component parts
• Extracts the text for fingerprinting and rule analysis
• Analyzes the email message to detect policy violations
• Adds an X-RCIS-Action header
• Sends the message to the configured Smart Host.
In this example, the configured Smart Host is the original MTA.
4 MTA server — Based on information it gets from the X-RCIS-Action header, the MTA server actson the email message.
Protecting web traffic
Key features
McAfee DLP Prevent receives ICAP connections from a web proxy server, analyzes the content, anddetermines if the traffic should be allowed or blocked.
McAfee Cloud Data Protection Beta Release 21-Mar-20171 Product overview
McAfee DLP Prevent — Protecting email and web traffic
22 McAfee Data Loss Prevention 11.0.0 Product Guide

How it works
Figure 1-3 McAfee DLP Prevent web traffic flow
Step Description
1 Users send web traffic to the web proxy server.
2 The web proxy server forwards the web traffic to McAfee DLP Prevent.
3 McAfee DLP Prevent inspects the web traffic, and returns a response to the web proxy serverto allow the traffic through to the destination server or deny access.
The web proxy server sends the inspected web traffic to the appropriate destinations.
McAfee DLP Monitor — Analyzing network trafficUse McAfee DLP Monitor to learn about the quantity and types of data transferred across the network.McAfee DLP Monitor does not block or change network traffic, so you can integrate it into a productionenvironment without impacting live traffic.
Types of protection rules
McAfee DLP Monitor can apply one of these McAfee DLP protection rules to your network traffic.
• Email Protection — By default, McAfee DLP Monitor inspects SMTP traffic using email protection ruleswhich incorporate protocol-specific information such as sender and recipient email addresses.
• Web Protection — By default, McAfee DLP Monitor inspects HTTP and FTP traffic using web protectionrules which incorporate protocol-specific information such as the URL.
• Network Communication Protection — McAfee DLP Monitor can inspect all supported traffic using networkcommunication protection rules which do not incorporate any protocol-specific information.
If you do not want to analyze SMTP, HTTP, or FTP traffic with email and web protection rules, youcan configure McAfee DLP Monitor to use network communication protection rules. Go to Menu | PolicyCatalog | DLP Appliance Management | Monitor Settings.
Using Email Protection and Web Protection rules allows you to share rules with McAfee DLP Prevent.
Supported protocolsMcAfee DLP Monitor inspects several protocols.
• SMTP* • Telnet
• IMAP* • FTP
• POP3* • IRC
McAfee Cloud Data Protection Beta Release 21-Mar-2017Product overview
McAfee DLP Monitor — Analyzing network traffic 1
McAfee Data Loss Prevention 11.0.0 Product Guide 23

• HTTP • SMB**
• LDAP
* These protocols support STARTTLS (plain text initial connection converted to TLS/SSL afterSTARTTLS command). McAfee DLP Monitor treats these protocols as encrypted and does not analyzethem if STARTTLS is used.
** Data transferred using SMB might be encrypted depending on the version of the protocol and yourconfiguration.
McAfee DLP Monitor does not analyze the content of encrypted connections. If McAfee DLP Monitorcannot classify a connection as a known protocol, it shows the connection as unknown.
McAfee DLP Prevent for Mobile Email — Protecting mobile emailMcAfee DLP Prevent for Mobile Email integrates with MobileIron Mobile Device Management (MDM)servers to analyze email sent to mobile devices.
Key features
McAfee DLP Prevent for Mobile Email analyzes email traffic from Microsoft Exchange ActiveSync or theMicrosoft Office 365 ActiveSync, generates incidents, and records the incidents and evidence in McAfeeePO for subsequent case review.
How it works
Using the ActiveSync feature in Microsoft Exchange, mobile email applications can connect directly toExchange to send and receive emails. This email traffic doesn't use SMTP, so it can't be detected byMcAfee DLP Prevent email protection. The MobileIron MDM Sentry server acts as a front-endActiveSync proxy that intercepts mobile email traffic. It forwards the email to the McAfee DLP Serverfor Mobile, where the email and its attachments are analyzed according to mobile protection rulesdefined in the DLP Policy Manager. Sensitive content triggers an event in the DLP Incident Manager forsubsequent case review.
Interaction with other McAfee productsMcAfee DLP integrates with other McAfee products, increasing the functionality of the product suite.
Product Description
McAfee ePO All McAfee DLP products integrate with McAfee ePO for configuration,management, monitoring, and reporting.
McAfee® Email Gateway Integrates with McAfee DLP Prevent to provide email protection.
McAfee® File and RemovableMedia Protection (FRP)
Integrates with McAfee DLP Endpoint to encrypt sensitive files. Notsupported on McAfee DLP Endpoint for Mac.
McAfee® Logon Collector Integrates with McAfee DLP Monitor and McAfee DLP Prevent for userauthentication information.
McAfee® Web Gateway Integrates with McAfee DLP Prevent to provide web protection.
McAfee Cloud Data Protection Beta Release 21-Mar-20171 Product overview
McAfee DLP Prevent for Mobile Email — Protecting mobile email
24 McAfee Data Loss Prevention 11.0.0 Product Guide

Deployment and installationDetermine the deployment option that best suits your environment, theninstall the extension. Depending on your McAfee DLP products, install theMcAfee DLP Endpoint clients to endpoints, install the McAfee DLP Discoverserver package, or install the McAfee DLP Appliance Management extensionand appliance.
Chapter 2 Planning your deploymentChapter 3 Installing McAfee DLP
McAfee Cloud Data Protection Beta Release 21-Mar-2017
McAfee Data Loss Prevention 11.0.0 Product Guide 25

McAfee Cloud Data Protection Beta Release 21-Mar-2017Deployment and installation
26 McAfee Data Loss Prevention 11.0.0 Product Guide

2 Planning your deployment
Prepare your environment for installation.
Contents Basic McAfee DLP implementation Deployment options Deployment scenarios Planning your DLP policy Default ports used by McAfee DLP Deployment checklist
Basic McAfee DLP implementationThe recommended installation for a simple McAfee DLP implementation is on a single McAfee ePOserver.
For recommendations on whether to use a separate server for the McAfee ePO database in morecomplex installations, see the McAfee ePolicy Orchestrator Hardware Sizing and Bandwidth UsageGuide.
The recommended architecture includes:
• McAfee ePO server — Hosts the embedded McAfee DLP extension and the DLP Classification,Incident Manager, Operations, and Case Management modules. It communicates with the McAfeeDLP Discover, McAfee DLP Prevent, and McAfee DLP Monitor servers, and with the McAfee DLPEndpoint software on the network endpoints.
• Administrator workstation — Accesses McAfee ePO and the McAfee DLP module consoles in abrowser.
The optional components include:
• Managed endpoints — Apply the security policies using the McAfee DLP Endpoint client software.
• McAfee DLP Discover server — Scans network repositories and databases, classifies data, andapplies security policies (remediation).
2McAfee Cloud Data Protection Beta Release 21-Mar-2017
McAfee Data Loss Prevention 11.0.0 Product Guide 27

• McAfee DLP Prevent server — Analyzes email and web traffic and applies security policies.
• McAfee DLP Monitor server — Monitors network traffic and applies security policies.
Deployment optionsThe McAfee DLP product suite offers several options for integration in your network.
McAfee DLP Endpoint or Device Control optionsThe McAfee DLP extension in McAfee ePO can run on physical or virtual servers. Large networkstypically divide the workload by LAN or workgroup, and McAfee DLP can assign different policies todifferent groups. Reporting can be by group, or a roll up data server task can collect data from severalservers to produce a single report.
McAfee DLP can support multiple McAfee DLP Endpoint versions with the backward compatibility optionin DLP Settings.
McAfee DLP Discover optionsMcAfee DLP Discover can run on physical or virtual servers. You can install one or multiple Discoverservers on your network using McAfee ePO (recommended) or manually.
Make sure that any servers you use for McAfee DLP Discover meet these requirements:
• The server has McAfee Agent installed and running.
• The server is communicating with McAfee ePO.
• The server is added to the McAfee ePO System Tree.
To store and distribute registered document signature databases, make sure the servers meet thefollowing additional requirements:
• The Master Database server and the slave servers have McAfee DLP Discover software installed. Forthe server to be a Master Redis server, the role is set to DLP Server.This is done automatically when you install or upgrade from McAfee ePO. When installing manually,use the command line:
DiscoverServerInstallx64.exe SERVER_ROLE=DLP
McAfee DLP Discover uses the open-source Redis in-memory data structure store for signaturedatabases. Redis is installed with McAfee DLP Discover server software on all servers. Thedifference between a McAfee DLP Discover server (one that can run scans) and a Redis databaseserver is the server role. On McAfee DLP Discover servers, Redis runs in read-only mode.
• Verify that the redis-server.exe process is running.
For information about installing and running McAfee Agent, see the McAfee Agent Product Guide.
McAfee Cloud Data Protection Beta Release 21-Mar-20172 Planning your deployment
Deployment options
28 McAfee Data Loss Prevention 11.0.0 Product Guide

McAfee DLP Prevent optionsYou can add McAfee DLP Prevent appliances to clusters to balance the load and ensure high availabilityin case of failure. McAfee DLP Prevent can also be set up as a standalone appliance on physical orvirtual hardware.
• Virtual appliances can run on your own VMware ESX or ESXi server.
• You can install McAfee DLP Prevent on model 4400 or 5500 appliances.
• You can install a VMware ESX or ESXi server on model 4400 or 5500 appliances.
Cluster setup
Best practice: Run McAfee DLP Prevent appliances as part of a cluster.
A cluster of McAfee DLP Prevent appliances contains a primary node (the master) and a number ofsecondary nodes (cluster scanners). The nodes listen on the same virtual IP address (VIP) and mustbe in the same network segment. The master is responsible for distributing email and web traffic foranalysis between itself and the cluster scanners. If the master fails, any of the cluster scanners cantake over the primary role. When the original master recovers, it rejoins the cluster as a clusterscanner.
The Cluster ID and virtual IP address must be unique.
MTA requirements
An MTA server must meet these requirements to integrate with McAfee DLP Prevent.
• The MTA must send all or a portion of email traffic to McAfee DLP Prevent. Example: In someenvironments, it might be preferable for McAfee DLP Prevent to process only mail going to or frompublic sites, such as Gmail, rather than processing every email sent and received on the network.
• The MTA must be able to inspect email headers so that it can distinguish email arriving fromMcAfee DLP Prevent and act on the header strings that McAfee DLP Prevent adds to the emailmessages. If certain actions are not supported on the MTA server, do not configure rules on McAfeeDLP Prevent to use these actions.
• Your MTA must ensure that email messages received from McAfee DLP Prevent are routed to theintended destination, and not back to McAfee DLP Prevent. Example: Routing might be definedusing a port number or source IP address, or by checking if X-RCIS-Action headers are present.
McAfee DLP Prevent for Mobile Email requirementsThe McAfee DLP Prevent for Mobile Email software can run on physical or virtual servers. Therequirements are the same as for the McAfee DLP Discover server software. Do not run both productsfrom the same server.
McAfee DLP Monitor optionsMcAfee DLP Monitor is registered with McAfee ePO and provides initial network assessment withoutblocking traffic.
• Analyze the traffic of well-known TCP protocols to identify users or devices that send a high volumeof unknown traffic which might indicate a violation of company policy.
• Analyze points of data loss without impacting your network to help you plan your data lossprevention strategy. Use
• Support protocols that are not proxied by other email or web gateways
McAfee Cloud Data Protection Beta Release 21-Mar-2017Planning your deployment
Deployment options 2
McAfee Data Loss Prevention 11.0.0 Product Guide 29

High-level steps for implementation
1 Connect the appliance to your network.
2 Install McAfee DLP Monitor.
3 Enable relevant predefined policies and rules.
4 Create additional rules and policies.
5 Review incidents generated by McAfee DLP Monitor.
6 Tune rules as needed to reduce false positives.
Best practice: To use McAfee DLP Monitor and McAfee DLP Prevent on the same network, installMcAfee DLP Monitor first to see how traffic flows through your network.
Network placement
The placement of McAfee DLP Monitor determines what data is analyzed. McAfee DLP Monitor canconnect to any switch in your network using, for example, a SPAN port or network tap. Typically, itconnects to the LAN switch before the WAN router. This placement ensures that McAfee DLP Monitoranalyzes all connections entering or leaving the network.
McAfee DLP Monitor Capture port 1 must be connected to a network port that emits all the packetsyou want it to analyze.
DLP Monitor clustering section
Deployment scenariosDue to the number of McAfee DLP products and the ways to implement them, deployments often differfrom network to network.
Synchronizing McAfee DLP and McAfee Endpoint Health Checkwith McAfee ePO CloudThe McAfee DLP extension sends McAfee DLP events and McAfee Endpoint Health Check syncmessages to McAfee ePO Cloud.
McAfee DLP uses McAfee ePO Server Tasks to push cloud protection incidents, web protectionincidents, and Endpoint Health Check sync messages to the McAfee ePO Cloud reporting services.
How it works
The on-premises McAfee ePO server communicates with McAfee ePO Cloud using the ePO Cloud Bridgeextension. The communication details are set up on the DLP Settings | Advanced page, where you find thepreconfigured server tasks. As with other McAfee DLP server tasks, you can only edit the enabled/disabled status and the schedule details.
Configure on-premise McAfee ePO communication with the cloudSet up communications between your on-premise McAfee ePO server and McAfee ePO Cloud.
Before you beginEnsure you have installed the following extensions on your on-premise McAfee ePO server:
McAfee Cloud Data Protection Beta Release 21-Mar-20172 Planning your deployment
Deployment scenarios
30 McAfee Data Loss Prevention 11.0.0 Product Guide

• CloudBridge extension
• Endpoint HealthCheck extension
TaskFor details about product features, usage, and best practices, click ? or Help.
1 From your on-premise McAfee ePO server, navigate to Server settings. In the Settings Categories panel,select McAfee ePO Cloud Bridge.
2 Enter your McAfee ePO Cloud logon tenant email address and tenant password. Click Save.
3 Navigate to Server Tasks. Enable the two CDP tasks (upload DLP incidents to cloud ePO and upload EndpointHealth Check information to cloud ePO) to run hourly.
Deploying McAfee DLP Endpoint in Citrix environmentsMcAfee DLP Endpoint for Windows can be installed on Citrix controllers for XenApp and XenDesktop.
Using McAfee DLP Endpoint for Windows in Citrix environments has the following requirements:
• Citrix XenApp 6.5 FP2, or 7.8
• Citrix XenDesktop 7.0, 7.5, or 7.8
Deploy McAfee Agent and McAfee DLP Endpoint client to the Citrix controllers, as to any endpoint.Deploy a McAfee DLP Endpoint for Windows client policy to the Citrix controllers.
McAfee DLP Endpoint client does not need to be deployed to the endpoints to work with Citrix. CitrixReceiver 4.4.1000 is all that is required. When the Windows endpoint connects to the Citrix controllerand opens files or emails, rules are enforced.
How it works
Protection rules in Citrix have the following differences from McAfee DLP Endpoint installed on anenterprise computer:
• Citrix Device Rules are not supported when using a separate controller server with XenApp 7.8.
• Screen capture protection rules are not supported. This is because the screen capture is activatedfrom the endpoint computer where the rule cannot take effect. For screen capture protection,install McAfee DLP Endpoint client on the endpoint computer.
• Clipboard protection rules are supported, but without pop-up notifications or events. This isbecause the attempted copy action takes place on the Citrix controller, where rules are supported,but the attempted paste action takes place on the endpoint, and cannot activate the popup orgenerate an event.
These limitations do not apply if you use RDP to connect to the Citrix controller.
Running McAfee Device Control on air-gapped computersDevice Control can be used to control the use of removable devices connected to air-gapped systems.
Security for air-gapped systems includes limiting the removable devices that are commonly used withthese systems to recognized devices and authorized uses.
McAfee Cloud Data Protection Beta Release 21-Mar-2017Planning your deployment
Deployment scenarios 2
McAfee Data Loss Prevention 11.0.0 Product Guide 31
Three slightly different systems can be described as air-gapped systems. Setting up each for DeviceControl protection represents a different scenario.
1 Computers connected to the enterprise intranet, but isolated from the Internet
2 An isolated computer network that includes a McAfee ePO server
3 Isolated computers, where the only way to get information in or out is by using removable storagedevices
How it works
For scenario 1, McAfee Agent is deployed to the air-gapped computers. The system then works in thenormal way, receiving policies from McAfee ePO and sending incidents to the McAfee ePO server. Allcommunication remains in the intranet.
For scenario 2, configurations and policies can be created on the main McAfee ePO server. Create abackup and save to a removable storage device. Take the backup to the isolated McAfee ePO server,and copy it using the Restore button in DLP Settings.
Scenario 3 uses the policy injection mode of operation. The Device Control client is configured to getpolicies from a specified folder. Policies created on an external McAfee ePO server are then manuallycopied to that folder. In this mode of operation, McAfee Agent Events are stored in a local folder, andmust be manually copied to the McAfee ePO server at regular intervals. If Device Control is configuredwith removable storage protection rules, agent events include evidence, incidents, and operationalevents.
Planning your DLP policyUnderstand the workflows and policy components to help you plan your DLP approach.
McAfee DLP workflowUse this workflow as general guidance for working with your McAfee DLP products.
• Understand the data — Detect and identify what data is on your network.
1 Use McAfee DLP to passively monitor the data and user actions on the network. You can usepredefined rules or create a basic policy.
2 Review incidents and analyze scan results to see potential policy violations. Use this informationto begin creating an effective policy.
• Configure policy — Use rules to react to violations to protect data.
1 Classify and define sensitive data by configuring classifications and definitions.
2 Track sensitive data and files with content fingerprinting and registered documents.
3 Protect data with scans and rules. Configure the action to take when sensitive data isdiscovered, accessed, or transmitted.
• Monitor results — Monitor incidents and create reports.
1 Review incidents for false positives and genuine policy violations.
2 Group related incidents into cases, which can be escalated to other departments, such as legalor Human Resources.
McAfee Cloud Data Protection Beta Release 21-Mar-20172 Planning your deployment
Planning your DLP policy
32 McAfee Data Loss Prevention 11.0.0 Product Guide

• Refine policy — Fine-tune your policy as needed. Continue monitoring incidents and scan results,adjusting the policy based on the types of violations and false positives you find.
The McAfee DLP protection processMcAfee DLP features and policy components make up a protection process that fits into the overallworkflow.
Figure 2-1 The McAfee DLP protection process
ClassifyTo protect sensitive content, start by defining and classifying sensitive information to be protected.
Content is classified by defining classifications and classification criteria. Classification criteria definesthe conditions on how data is classified. Methods to define criteria include:
• Advanced patterns — Regular expressions combined with validation algorithms, used to matchpatterns such as credit card numbers
• Dictionaries — Lists of specific words or terms, such as medical terms for detecting possibleHIPAA violations
• True file types — Document properties, file information, or the application that created the file
• Source or destination location — URLs, network shares, or the application or user that createdor received the content
McAfee DLP Endpoint supports third-party classification software. You can classify email using BoldonJames Email Classifier. You can classify email or other files using Titus classification clients – TitusMessage Classification, Titus Classification for Desktop, and Titus Classification Suite. To implementTitus support, the Titus SDK must be installed on the endpoint computers.
McAfee DLP Prevent supports Titus classifications. It does not support Boldon James classifications.
McAfee Cloud Data Protection Beta Release 21-Mar-2017Planning your deployment
Planning your DLP policy 2
McAfee Data Loss Prevention 11.0.0 Product Guide 33

TrackMcAfee DLP can track content based on storage location or the application used to create it.
The mechanisms used to track content are:
• Content fingerprinting — Supported on McAfee DLP Endpoint for Windows only.
• Registered documents — Supported on McAfee DLP Endpoint for Windows, McAfee DLP Discover,McAfee DLP Prevent, and McAfee DLP Monitor.
Manual registration, performed in the Classification module, is supported only on McAfee DLP Endpointfor Windows. Automatic registration, performed by McAfee DLP Discover registration scans, issupported on all other McAfee DLP products.
• Manual classifications — Created only by McAfee DLP Endpoint for Windows users, but supportedon all McAfee DLP products.
Content fingerprinting
Content fingerprinting is a technique for identifying and tracking content. The administrator creates aset of content fingerprinting criteria. The criteria define either the file location or the application usedto access the file, and the classification to place on the files. The McAfee DLP Endpoint client tracksany file that is opened from the locations, or by the applications, defined in the content fingerprintingcriteria and creates fingerprint signatures of these files in real time when the files are accessed. Itthen uses these signatures to track the files or fragments of the files. Content fingerprinting criteriacan be defined by application, UNC path (location), or URL (web application).
Support for persistent fingerprint information
Content fingerprint signatures are stored in a file's extended file attributes (EA) or alternate datastreams (ADS). When such files are accessed, McAfee DLP Endpoint software tracks datatransformations and maintains the classification of the sensitive content persistently, regardless ofhow it is being used. For example, if a user opens a fingerprinted Word document, copies a fewparagraphs of it into a text file, and attaches the text file to an email message, the outgoing messagehas the same signatures as the original document.
For file systems that do not support EA or ADS, McAfee DLP Endpoint software stores signatureinformation as a metafile on the disk. The metafiles are stored in a hidden folder named ODB$, whichthe McAfee DLP Endpoint client software creates automatically.
Signatures and content fingerprinting criteria are not supported in McAfee Device Control.
Registered documents
The registered documents feature is based on pre-scanning all files in specified repositories (such asthe engineering SharePoint) and creating signatures of fragments of each file in these repositories.McAfee DLP Endpoint and the network McAfee DLP products use slightly different versions ofregistered documents.
McAfee DLP Endpoint uses manual registration. Signatures of files are manually uploaded to a McAfeeePO database by McAfee DLP extension. These signatures are then distributed to all managedendpoints. The McAfee DLP Endpoint client is then able to track any paragraph copied from one ofthese documents and classify it according to the classification of the registered document signature.McAfee DLP Prevent and McAfee DLP Monitor also access the McAfee ePO database to use registereddocuments.
McAfee Cloud Data Protection Beta Release 21-Mar-20172 Planning your deployment
Planning your DLP policy
34 McAfee Data Loss Prevention 11.0.0 Product Guide

McAfee DLP Discover runs registration scans on file repositories. The signatures created by thisautomatic registration are stored in signature databases on servers designated as DLP Servers. They areused by McAfee DLP Discover to create classification and remediation scans. They are also used byMcAfee DLP Prevent and McAfee DLP Monitor to define rules.
Registered documents use extensive memory which might affect performance, as each document thatthe McAfee DLP software inspects is compared to all registered document signatures to identify itsorigin.
Best practice: To minimize the number of signatures and the performance implications of thistechnique, use registered documents to track only the most sensitive documents.
Manual classificationUsers working with manual classification have the option of applying content fingerprints or contentclassifications to their files. Manually applied content fingerprinting is identical to the automaticallyapplied fingerprinting described previously. Manually applied content classifications embed a physicaltag in the file which can be used to track the file wherever it is copied, but do not create signatures.Content copied from these files into other files can't be tracked.
ProtectCreate rules to identify sensitive data and take appropriate action.Rules are made up of conditions, exceptions, and actions. Conditions contain multiple parameters —such as classifications — to define the data or user action to identify. Exceptions specify parameters toexclude from triggering the rule. Actions specify how the rule behaves when a rule is triggered, suchas blocking user access, encrypting a file, and creating an incident.
Data Protection rulesData protection rules are used by McAfee DLP Endpoint, Device Control, McAfee DLP Prevent, andMcAfee DLP Monitor to prevent unauthorized distribution of classified data. When a user tries to copyor attach classified data, McAfee DLP intercepts the attempt and uses the data protection rules todetermine which action to take. For example, McAfee DLP Endpoint can halt the attempt and display adialog box to the user. The user inputs the justification for the attempt, and processing continues.
McAfee DLP Prevent uses web and email protection rules to monitor and take action on communicationfrom an MTA server or web proxy server.
McAfee DLP Monitor can apply the network communication protection, email protection, or webprotection rules to analyze supported traffic on your network.
McAfee Device Control uses only removable storage data protection rules.
Device Control rulesDevice Control rules monitor and potentially block the system from loading physical devices such asremovable storage devices, Bluetooth, Wi-Fi, and other plug-and-play devices. Device Control rulesconsist of device templates and reaction specifications, and can be assigned to specific end-usergroups by filtering the rule with end-user group definitions.
Application control rulesApplication control rules block the application rather than blocking content. For example, a webapplication control rule blocks a specified URL either by name or by reputation.
Discovery rulesDiscovery rules are used by McAfee DLP Endpoint and McAfee DLP Discover for file and data scanning.
McAfee Cloud Data Protection Beta Release 21-Mar-2017Planning your deployment
Planning your DLP policy 2
McAfee Data Loss Prevention 11.0.0 Product Guide 35

Endpoint Discovery is a crawler that runs on managed computers. It scans the local endpoint filesystem and the local email (cached) inbox and PST files. Local file system and email storage discoveryrules define whether the content is to be quarantined, tagged, or encrypted. These rules can alsodefine whether the classified file or email is reported as an incident, and whether to store the file oremail as evidence included in the incident.
File system scans are not supported on server operating systems.
McAfee DLP Discover scans repositories and can move or copy files, apply Rights Management policiesto files, and create incidents.
Rule sets
Rules are organized into rule sets. A rule set can contain any combination of rule types.
Policies
Policies contain active rule sets and are deployed from McAfee ePO to the McAfee DLP Endpoint clientsoftware, Discovery server, or a McAfee DLP appliance. McAfee DLP Endpoint policies also containpolicy assignment information and definitions.
MonitorReview incidents for policy violations that have occurred.
Monitoring functions include:
• Incident management — Incidents are sent to the McAfee ePO Event Parser and stored in adatabase. Incidents contain the details about the violation, and can optionally include evidenceinformation. You can view incidents and evidence as they are received in the DLP Incident Managerconsole.
• Case management — Group related incidents into cases for further review in the DLP CaseManagement console.
• Operational events — View errors and administrative events in the DLP Operations console.
• Evidence collection — For rules that are configured to collect evidence, a copy of the data or fileis saved and linked to the specific incident. This information can help determine the severity orexposure of the event. Evidence is encrypted using the AES algorithm before being saved.
• Hit highlighting — Evidence can be saved with highlighting of the text that caused the incident.Highlighted evidence is stored as a separate encrypted HTML file.
• Reports — McAfee DLP Endpoint can create reports, charts, and trends for display in McAfee ePOdashboards.
Policy workflowMcAfee DLP products use a similar workflow for creating policies.
A policy consists of rules, grouped into rule sets. Rules use classifications and definitions to specifywhat McAfee DLP detects. Rule reactions determine the action to take when data matches the rule.
Use the following workflow for creating policies.
1 Create classifications and definitions.
2 Create data protection, device, and discovery rules. All rules require either classifications ordefinitions in the rule.
McAfee Cloud Data Protection Beta Release 21-Mar-20172 Planning your deployment
Planning your DLP policy
36 McAfee Data Loss Prevention 11.0.0 Product Guide

3 Assign rule sets to DLP policies. For McAfee DLP Discover, create scan definitions.
4 Assign and deploy the policies in the System Tree. For McAfee DLP Discover, apply policy to theDiscover servers.
Figure 2-2 How policy components make up a policy
The options and availability for these components vary depending on which McAfee DLP you use.
See also Shared policy components on page 38
Best practice McAfee DLP Discover workflowUse this workflow as guidance when implementing McAfee DLP Discover, especially in newenvironments.
1 To collect metadata from the files in your organization's repositories, run an inventory scan. Thescan results help you understand what files reside in the repositories.
2 Configure classifications to detect classified or sensitive information. Use these classifications todefine and run a classification scan.
3 Use the results of the classification scan to see where sensitive information resides.
4 Configure a remediation scan to encrypt sensitive files or move them to a more secure repository.
5 Continue to run scans regularly, monitoring scan results and any incidents generated. Refine scansbased on the results or changes in your organization's policy.
6 Registered documents have a significant RAM impact. Run registration scans only on the mostsensitive repositories.
McAfee Cloud Data Protection Beta Release 21-Mar-2017Planning your deployment
Planning your DLP policy 2
McAfee Data Loss Prevention 11.0.0 Product Guide 37
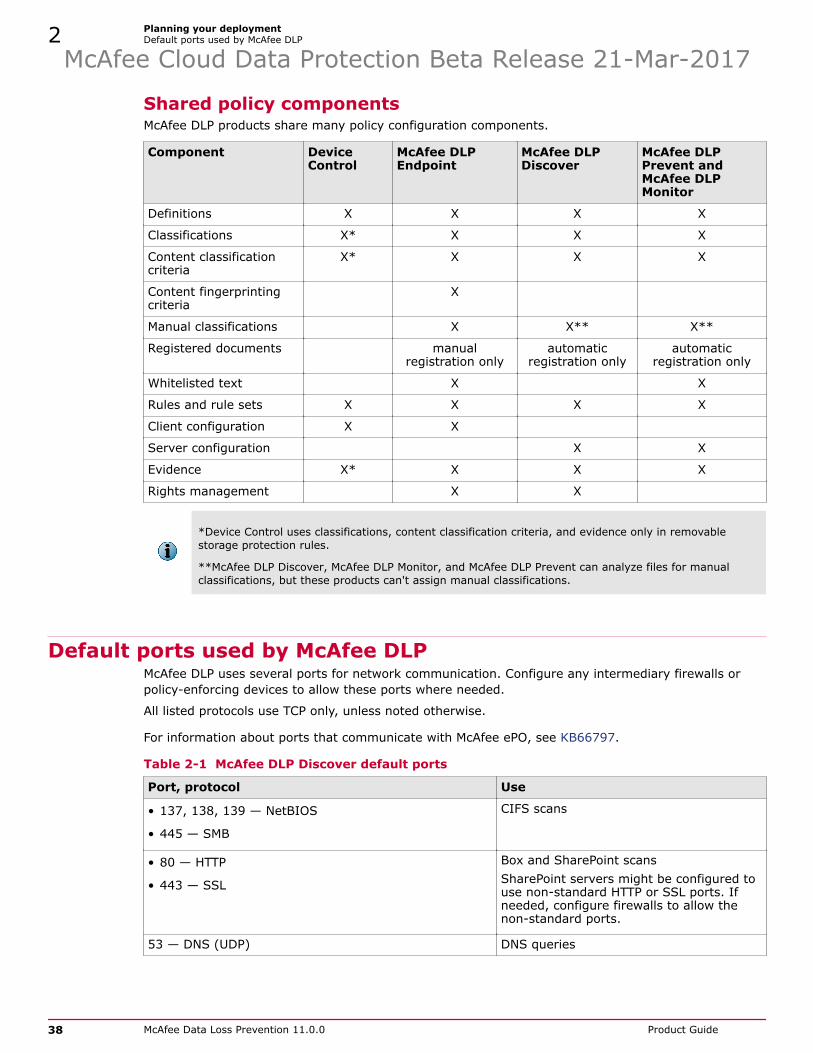
Shared policy componentsMcAfee DLP products share many policy configuration components.
Component DeviceControl
McAfee DLPEndpoint
McAfee DLPDiscover
McAfee DLPPrevent andMcAfee DLPMonitor
Definitions X X X X
Classifications X* X X X
Content classificationcriteria
X* X X X
Content fingerprintingcriteria
X
Manual classifications X X** X**
Registered documents manualregistration only
automaticregistration only
automaticregistration only
Whitelisted text X X
Rules and rule sets X X X X
Client configuration X X
Server configuration X X
Evidence X* X X X
Rights management X X
*Device Control uses classifications, content classification criteria, and evidence only in removablestorage protection rules.
**McAfee DLP Discover, McAfee DLP Monitor, and McAfee DLP Prevent can analyze files for manualclassifications, but these products can't assign manual classifications.
Default ports used by McAfee DLPMcAfee DLP uses several ports for network communication. Configure any intermediary firewalls orpolicy-enforcing devices to allow these ports where needed.
All listed protocols use TCP only, unless noted otherwise.
For information about ports that communicate with McAfee ePO, see KB66797.
Table 2-1 McAfee DLP Discover default ports
Port, protocol Use
• 137, 138, 139 — NetBIOS
• 445 — SMB
CIFS scans
• 80 — HTTP
• 443 — SSL
Box and SharePoint scansSharePoint servers might be configured touse non-standard HTTP or SSL ports. Ifneeded, configure firewalls to allow thenon-standard ports.
53 — DNS (UDP) DNS queries
McAfee Cloud Data Protection Beta Release 21-Mar-20172 Planning your deployment
Default ports used by McAfee DLP
38 McAfee Data Loss Prevention 11.0.0 Product Guide

Table 2-1 McAfee DLP Discover default ports (continued)
Port, protocol Use
• 1801 — TCP
• 135, 2101*, 2103*, 2105 — RPC
• 1801, 3527 — UDP
* Indicates that the port numbers might be incrementedby 11 depending on the available ports at initialization.For more information, see Microsoft KB article https://support.microsoft.com/en-us/kb/178517#/en-us/kb/178517.
Microsoft Message Queuing (MSMQ)
1433 Microsoft SQL
1521 Oracle
3306 MySQL
50000 DB2
6379 This port must be open/allowed on bothMcAfee DLP Discover servers and the DLPserver (Redis database server). Thesignature database uses this port to addregistered documents.
Table 2-2 McAfee DLP Prevent default ports
Port Use
22 — SSH SSH (when enabled)
25 — SMTP SMTP traffic with the MTA
161 — SNMP SNMP (when enabled)
1344, 11344 — ICAP and ICAP over SSL ICAP traffic with the web proxy
8081 — ePO ePO agent service
10443 — HTTPS HTTPS traffic to download, for example, the MinimumEscalation Report (MER) and MIB files
53 — DNS (UDP) DNS queries
123 — NTP NTP requests
389, 636 — LDAP and Secure LDAP Obtaining groups for rule evaluation
Table 2-3 McAfee DLP Monitor default ports
Port Protocol
22 — SSH SSH (when enabled)
161 — SNMP SNMP (when enabled)
8081 — ePO ePO agent service
10443 — HTTPS HTTPS traffic to download, for example, the Minimum EscalationReport (MER) and MIB files
53 — DNS (UDP) DNS queries
123 — NTP NTP requests
389, 636 — LDAP and Secure LDAP Obtaining groups for rule evaluation
McAfee Cloud Data Protection Beta Release 21-Mar-2017Planning your deployment
Default ports used by McAfee DLP 2
McAfee Data Loss Prevention 11.0.0 Product Guide 39

Deployment checklistBefore installing McAfee DLP products, verify that you have all information needed for a successfuldeployment.
Table 2-4 McAfee DLP Endpoint and Device Control considerations
Determine Consideration
Work impact Test new installations or upgrades on a subnet of the production network.Set new rules to No Action and monitor the results in the DLP IncidentManager to gauge the impact. Adjust rule parameters to matchrequirements before implementing in the production network.In large organizations, full-scale deployment is typically done in phases tominimize impact and allow time for troubleshooting.
Type of deployment(physical or virtual)
Virtual deployments have additional limitations. See the relevant SizingGuide for details.
Table 2-5 McAfee DLP Discover considerations
Determine Consideration
Discover servers Determine how many and which Windows servers to install the McAfee DLPDiscover server software. To enable the registered documents feature, a DLPserver (McAfee DLP Discover server with server role set to DLP) is requiredfor the Redis Master Database.
Server installationmethod
Determine whether to install the McAfee DLP Discover software throughMcAfee ePO or manually.
Repositories Create a list of the repositories to scan. Gather the paths and credentials forthese repositories and verify that McAfee DLP Discover supports theserepository types.
Table 2-6 McAfee DLP Prevent considerations
Determine Consideration
Security • Use out-of-band management on a network that McAfee ePO can access toisolate management and network traffic.
• LAN1 traffic must not be accessible from outside your organization.
• Connect any baseboard management controller (BMC) interface to a dedicatedsecure management network.
• Control who can access the physical or virtual appliance console.
Best practice: Use the encrypted channel for your ICAP traffic.
Best practice: Disable all unused services.
Networkinformation
• Network interfaces — Verify that these are statically assigned IP addresses,rather than dynamically assigned IP addresses.
• Logon account — The appliance has a local administrator account for loggingon to the appliance console. To make the account secure, you need to changethe default password.
• In a cluster environment, the virtual IP address must be in the same subnet asthe appliance IP address.
RemoteManagementModule (RMM)
(Hardware appliances only) If you intend to use the RMM for appliancemanagement, use a secure or closed network to connect to the RMM.
McAfee Cloud Data Protection Beta Release 21-Mar-20172 Planning your deployment
Deployment checklist
40 McAfee Data Loss Prevention 11.0.0 Product Guide

Table 2-7 McAfee DLP Monitor considerations
Determine Consideration
Security • Use out-of-band management on a network that McAfee ePO can access toisolate management and network traffic.
• When clustering is enabled, LAN1 traffic must not be accessible from outsideyour organization. You do not have to connect LAN1 if you are not usingclustering.
• Connect any baseboard management controller (BMC) interface to a dedicatedsecure management network.
• Control who can access the physical or virtual appliance console.
Networkinformation
• Determine the most appropriate place in your network to attach the McAfeeDLP Monitor appliance Capture port 0. For example, you could consider using aSPAN port or a network tap.
• Network interfaces — Verify that these are statically assigned IP addresses,rather than dynamically assigned IP addresses.
• Logon account — The appliance has a local administrator account for logging onto the virtual machine shell. To make the account secure, change the defaultpassword.
• In a cluster environment, the virtual IP address must be in the same subnet asthe appliance LAN1 IP addresses.
RemoteManagementModule (RMM)
(Hardware appliances only) If you intend to use the RMM for appliancemanagement, use a secure or closed network to connect to the RMM.
McAfee Cloud Data Protection Beta Release 21-Mar-2017Planning your deployment
Deployment checklist 2
McAfee Data Loss Prevention 11.0.0 Product Guide 41

McAfee Cloud Data Protection Beta Release 21-Mar-20172 Planning your deployment
Deployment checklist
42 McAfee Data Loss Prevention 11.0.0 Product Guide

3 Installing McAfee DLP
Install the extensions and packages needed for your products and perform any initial configurations.
All McAfee DLP products use the McAfee DLP extension for McAfee ePO. Install this as your startingpoint.
Contents Download product extensions and installation files Install and license the McAfee DLP extension Install the McAfee DLP Endpoint and Device Control client software Install the McAfee DLP Discover server package Install your McAfee DLP appliance Install the McAfee DLP Prevent for Mobile Email server package Post-installation tasks
Download product extensions and installation filesDownload the files for your installation.
Before you beginLocate the grant number you received after purchasing the product.
You can also use the McAfee ePO Software Manager (Menu | Software | Software Manager) to view,download, and install the software.
Task1 In a web browser, go to www.mcafee.com/us/downloads/downloads.aspx.
2 Enter your grant number, then select the product and version.
3 On the Software Downloads tab, select and save the appropriate file.
Product File description File name
All products McAfee Data LossPreventionextension
DLP_Mgmt_version_Package.zip
McAfee DLPEndpoint,Device Control
Client software • Device Control —HDLP_Agent_Device_Control_version_x.zip
• Microsoft Windows —HDLP_Agent_version_x.zip
• Mac OS X — DLPAgentInstaller.zip
3McAfee Cloud Data Protection Beta Release 21-Mar-2017
McAfee Data Loss Prevention 11.0.0 Product Guide 43

Product File description File name
McAfee DLPDiscover
Server package McAfeeDLPDiscoverversionLicensed.zip
McAfee DLPPrevent andMcAfee DLPMonitor
McAfee DLPApplianceManagementextension
dlp-appliance-management-package-version-extensions.zip
AME extension appliance-management-package-version-extensions.zip
Common UIextension
commonui-core-package-version-extensions.zip
Installation image • Virtual appliance• McAfee-PS-version.ps.hw8.hdd.ova
• McAfee-MS-version.ms.hw8.hdd.ova
• Hardware appliance —
• McAfee-PS-version.iso
• McAfee-MS-version.iso
McAfee DLPPrevent forMobile Email
None (part of theMcAfee Data LossPreventionextension).Activation of theMcAfee DLPPrevent for MobileEmail componentrequires a McAfeeDLP Preventlicense.
N/A
Install and license the McAfee DLP extensionThe extension provides the user interface for configuring McAfee DLP in McAfee ePO.
Before you beginVerify that the McAfee ePO server name is listed under Trusted Sites in the InternetExplorer security settings.
Tasks• Install the extension using the Software Manager on page 45
You can use the Software Manager to install, upgrade, and remove extensions.
• Install the extension manually on page 45Install the extension using the Extensions page.
• License McAfee DLP on page 45Provide the license to access the McAfee DLP consoles.
• Applying backward compatibility on page 47Backward-compatible policies allow you to use the new extension format with older clientversions, providing large enterprises with an orderly upgrade path.
• Convert policies and migrate data on page 49Upgrading to McAfee DLP 10.0 from versions earlier than 9.4.100 requires migrating orconverting incidents, operational events, or policies. McAfee ePO server tasks are used forthe conversion/migration.
McAfee Cloud Data Protection Beta Release 21-Mar-20173 Installing McAfee DLP
Install and license the McAfee DLP extension
44 McAfee Data Loss Prevention 11.0.0 Product Guide

Install the extension using the Software ManagerYou can use the Software Manager to install, upgrade, and remove extensions.
TaskFor details about product features, usage, and best practices, click ? or Help.
1 In McAfee ePO, select Menu | Software | Software Manager.
2 In the left pane, expand Software (by Label) and select Data Loss Prevention.
3 Select your McAfee DLP product.
If you are installing McAfee DLP Prevent or McAfee DLP Monitor, select the entry for McAfee DLPAppliance Management, which installs all of the necessary extensions:
• McAfee DLP
• Common UI
• Appliance Management Extension
• McAfee DLP Appliance Management
4 For all available software, click Check In.
5 Select the checkbox to accept the agreement, then click OK.
The extension is installed. Extensions that are checked in appear in the Checked In Software list. As newversions of the software are released, you can use the Update option to update the extensions.
Install the extension manuallyInstall the extension using the Extensions page.
Before you beginDownload the McAfee DLP extension from the McAfee download site.
TaskFor details about product features, usage, and best practices, click ? or Help.
1 In McAfee ePO, select Menu | Software | Extensions, then click Install Extension.
2 Browse to the extension .zip file and click OK.
The installation dialog box displays the file parameters to verify that you are installing the correctextension.
3 Click OK to install the extension.
License McAfee DLPProvide the license to access the McAfee DLP consoles.
You must enter at least one license key — more if you have multiple McAfee DLP products. Thelicenses you enter determine which configuration options in McAfee ePO are available to you.
You can enter a license for either McAfee DLP Endpoint or Device Control in the McAfee DLP Endpointfield. Replacing one type of license with another changes the configuration.
You can enter keys for these products:
McAfee Cloud Data Protection Beta Release 21-Mar-2017Installing McAfee DLP
Install and license the McAfee DLP extension 3
McAfee Data Loss Prevention 11.0.0 Product Guide 45

• McAfee DLP Endpoint or Device Control
• McAfee DLP Discover
• McAfee Legacy Network DLP (9.3.x)
• McAfee DLP Prevent (10.x or later)
This license also activates the McAfee DLP Server for Mobile software.
• McAfee DLP Monitor (11.x or later)
TaskFor details about product features, usage, and best practices, click ? or Help.
1 Install licenses and components in DLP Settings to customize the installation.
The DLP Settings module has seven tabbed pages. Information on the General tab is required. You canuse the defaults for the rest of the settings if you don't have special requirements.
a Select Menu | Data Protection | DLP Settings.
b For each license that you want to add: In the License Keys | Key field, enter the license, then clickAdd.
You can remove components by entering the nullify license: 0000-0000-00000-0000-0000. Youcan't selectively remove components; you must remove all licenses, then re-enter license keysfor the components you want to keep.
Installing the license activates the related McAfee ePO components and McAfee ePO PolicyCatalog policies.
c In the Default Evidence Storage field, enter the path.
The evidence storage path must be a network path, that is \\[server]\[share]. This step isrequired to save the settings and activate the software.
Installing the license activates the related McAfee ePO components and McAfee ePO PolicyCatalog policies.
d Set the shared password.
e Set the backward compatibility.
Choose from one of the four options ranging from 9.4.0.0 to 10.0.101.0 and later compatibility. Thissetting limits the possibility of using new features.
Two modes of compatibility are available: strict and non-strict. In strict mode, policies withbackward compatibility errors cannot be applied. In non-strict mode, the policy owner, or a userwith Administrator permissions, can choose to apply policies with backward compatibility errors.
Backward compatibility applies to McAfee DLP Endpoint and McAfee DLP Discover policies. Itdoesn't apply to McAfee DLP Prevent or McAfee DLP Monitor policies.
For McAfee DLP Endpoint, if you are using multiple client versions, set the compatibility to matchthe oldest client version in use.
2 Click Save.
3 To back up the configuration, select the Back Up & Restore tab, then click Backup to file.
McAfee DLP modules appear in Menu | Data Protection according to the license.
McAfee Cloud Data Protection Beta Release 21-Mar-20173 Installing McAfee DLP
Install and license the McAfee DLP extension
46 McAfee Data Loss Prevention 11.0.0 Product Guide

Tasks
• Set advanced configuration options on page 47
• Set DLP Incident Manager, DLP Operations, and DLP Case Management settings on page47
See also Client configuration on page 64Configure server settings on page 67
Set advanced configuration optionsAll settings except Cloud Security Platform have defaults. You can accept the defaults and save the page, oredit them as required.
TaskFor details about product features, usage, and best practices, click ? or Help.
1 Set the Challenge-Response key length (8-character or 16-character keys).
2 Set System Tree permissions to filter information for incidents, events, queries, and dashboards.
3 Set the Customized Event Timezone to order events according to their local time zone.
The setting is the offset from UTC time.
4 Set the DLP Policy Manager defaults for rule states and rule reactions.
5 Enable or disable REST API calls.
6 Enter the Cloud Security Platform communication information.
The information is hard-coded in the current release.
Set DLP Incident Manager, DLP Operations, and DLP Case Managementsettings
Before you begin
TaskFor details about product features, usage, and best practices, click ? or Help.
•
Applying backward compatibilityBackward-compatible policies allow you to use the new extension format with older client versions,providing large enterprises with an orderly upgrade path.
Backward compatibility is supported for McAfee DLP 10.0.0, 9.4.0 or 9.4.200 policies. The optionsappear on the DLP Settings page (Menu | Data Protection | DLP Settings). Backward compatibility is notsupported for McAfee DLP 9.3 policies. Policies from versions earlier than 9.4.0 must be migrated tothe 9.4 schema.
McAfee Cloud Data Protection Beta Release 21-Mar-2017Installing McAfee DLP
Install and license the McAfee DLP extension 3
McAfee Data Loss Prevention 11.0.0 Product Guide 47

When working in a backward compatible mode, the McAfee DLP extension does not push policies toendpoints if they contain conditions that can cause the older client versions to misinterpret the policy.More than 90% of version 10.0.100 policies are either old features, or features that the 9.4 clients canignore without causing a problem. Backward compatibility blocks the remaining <10% of policies frombeing applied. While this is useful in networks with older McAfee DLP Endpoint clients, it also meansthat some new features are not available to any endpoints, even those with the latest client version.
Compatibilitymode
Unsupported items (items causing an error)
9.4.0 • A classification contains a Luhn10 Bin Number advanced pattern definition.
• A classification contains a Croatian Personal Identification Number advancedpattern definition.
• A policy uses the password validator to define the length and format of validpasswords.
• An application file access protection rule uses the non-supported GoogleChrome version option.
• An email protection rule uses an email envelope definition of digitally signed,S-MIME encrypted, or PGP encrypted.
9.4.200 • A classification contains a Japanese My Number advanced pattern definition.
• A classification contains an Australian Medicare advanced pattern definition.
10.0 • No reaction was selected.
• A business justification was used with an unsupported action.
• A McAfee DLP Discover rule contains a Box definition.
The table is cumulative, that is, for 9.4.0 compatibility an error is caused by any item in the table. For9.4.200 compatibility, errors are caused by items in the last two rows. For 10.0 compatibility, only thelast row is relevant.
Backward compatibility can be applied in two modes:
• Non-strict mode — Compatibility errors in the policy display a warning. An administrator with policyadministration permissions can apply the policy.
• Strict mode — Policies with errors can't be applied to the McAfee ePO database.
When a policy with backward compatibility errors is applied to the database, the errors are displayedon the DLP Policy --> Policy Validation page. The Details column on the page includes adescription of what can happen if you apply the rule to endpoint clients that don't support the feature.
McAfee DLP Prevent can use policies with warnings created in non-strict mode. When backwardcompatibility is applied in strict mode, policies with errors can't be applied to the McAfee ePOdatabase, and therefore aren't detected by McAfee DLP Prevent.
Example – Device descriptionsDevice definitions in McAfee DLP version 9.4.200 and 10.0 can have an optional parameternamed Device Description that was not available in earlier versions. Using a devicedescription to define a device definition, and including that definition in a Device Controlrule, creates a rule set that can't be enforced on 9.4.0 clients. If you accept the policydespite the warning, the error is displayed on the Policy Validation page. The Details fieldexplains that the error "matches and performs reactions for devices you did not intend tomatch..." You can click Edit to repair the error.
McAfee Cloud Data Protection Beta Release 21-Mar-20173 Installing McAfee DLP
Install and license the McAfee DLP extension
48 McAfee Data Loss Prevention 11.0.0 Product Guide

Convert policies and migrate dataUpgrading to McAfee DLP 10.0 from versions earlier than 9.4.100 requires migrating or convertingincidents, operational events, or policies. McAfee ePO server tasks are used for the conversion/migration.
Before you beginThis task describes upgrading from McAfee DLP Endpoint 9.3.x.
You can upgrade from McAfee DLP Endpoint 9.4.0 directly. You can set backwardcompatibility to support 9.4.0 clients, but must run the DLP Incident Events conversion from 9.4 to9.4.1 and above server task if you want to display older incidents and operational events in theversion 10.0 DLP Incident Manager or DLP Operations consoles.
Upgrade the McAfee DLP Endpoint extension to version 9.3.600 (9.3 Patch 6) or later, theninstall the McAfee DLP 9.4.100 or later extension in McAfee ePO.
The policy conversion task only converts rules that are enabled and applied to thedatabase. To verify the status of rules you want to convert, review your McAfee DLPEndpoint 9.3 policy before conversion.
TaskFor details about product features, usage, and best practices, click ? or Help.
1 In McAfee ePO, select Menu | Automation | Server Tasks.
2 Select DLP Policy Conversion, then click Actions | Run.
The Server Task Log page opens, allowing you to verify that the task is running. The convertedpolicy is compatible with version 9.4.100 and later policies.
The task fails if it has run previously. If you make changes to the McAfee DLP 9.3 policy and want torerun the conversion, edit the server task by deselecting the option Do not run policy conversion if rule set'[9.3] Policy Conversion Rule Set' exists on the Actions page. The previous rule set is deleted and replaced.
3 Return to the Server Tasks page, select DLP Incident Migration, then click Actions | Edit.
DLP Operational Events Migration is performed in the same way.
4 Select Schedule status | Enabled, then click Next twice.
The migration is pre-programmed, so you can skip the Actions page.
5 Select a schedule type and occurrence.
Best practice: Schedule the migration tasks for weekends or other non-work hours due to the loadthey place on the processor.
a Set the start date and end date to define a time period, and schedule the task for every hour.
b Schedule repeating the task according to the size of incident database you are migrating.
Incidents are migrated in chunks of 200,000.
6 Click Next to review the settings, then click Save.
McAfee Cloud Data Protection Beta Release 21-Mar-2017Installing McAfee DLP
Install and license the McAfee DLP extension 3
McAfee Data Loss Prevention 11.0.0 Product Guide 49

Install the McAfee DLP Endpoint and Device Control clientsoftware
Use McAfee ePO to deploy the client software to endpoint computers.Clean install of McAfee DLP Endpoint 10.0 client software does not require restarting the endpointcomputer. If you are upgrading the client from an earlier version, however, you must restart theendpoint computer after installation.
TaskFor details about product features, usage, and best practices, click ? or Help.
1 In McAfee ePO, select Menu | Software | Master Repository.
2 In the Master Repository, click Check In Package.
3 Select package type Product or Update (.ZIP). Click Browse.
For Microsoft Windows client, browse to ...\HDLP_Agent_10_0_0_xxx.zip. For Mac client, browseto ...\DlpAgentInstaller.zip.
4 Click Next.
5 Review the details on the Check in Package page, then click Save.
The package is added to the Master Repository.
Install the McAfee DLP Discover server packageThe server package is deployed to Discover servers and installs McAfee DLP Discover and necessarycomponents such as .NET, postgreSQL, Redis, AD RMS client 2.1, and C++ redistributables.
McAfee DLP Discover can be installed as a Discover server (for scans) or as a DLP server (forregistered documents database). The server role is set automatically when you install from McAfeeePO. When installing manually, use the command line:
DiscoverServerInstallx64.exe SERVER_ROLE=DLP
Tasks• Install or upgrade the server package using McAfee ePO on page 51
We recommend using McAfee ePO to install the server package.
• Install or upgrade the server package manually on page 52If you are unable to install the server package through McAfee ePO due to issues such asnetwork connectivity, you can manually install McAfee DLP Discover on the Discover server.
• Verify the installation on page 52Make sure McAfee DLP Discover is successfully installed and communicating with McAfeeePO.
McAfee Cloud Data Protection Beta Release 21-Mar-20173 Installing McAfee DLP
Install the McAfee DLP Endpoint and Device Control client software
50 McAfee Data Loss Prevention 11.0.0 Product Guide
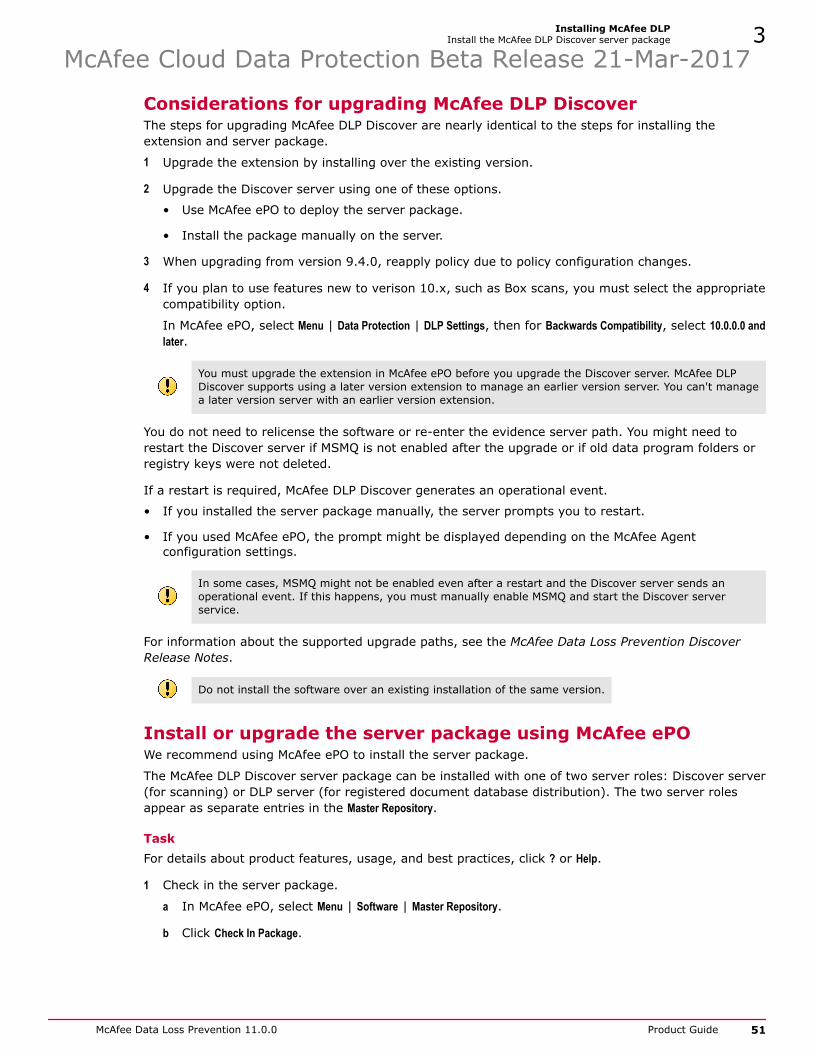
Considerations for upgrading McAfee DLP DiscoverThe steps for upgrading McAfee DLP Discover are nearly identical to the steps for installing theextension and server package.
1 Upgrade the extension by installing over the existing version.
2 Upgrade the Discover server using one of these options.
• Use McAfee ePO to deploy the server package.
• Install the package manually on the server.
3 When upgrading from version 9.4.0, reapply policy due to policy configuration changes.
4 If you plan to use features new to verison 10.x, such as Box scans, you must select the appropriatecompatibility option.
In McAfee ePO, select Menu | Data Protection | DLP Settings, then for Backwards Compatibility, select 10.0.0.0 andlater.
You must upgrade the extension in McAfee ePO before you upgrade the Discover server. McAfee DLPDiscover supports using a later version extension to manage an earlier version server. You can't managea later version server with an earlier version extension.
You do not need to relicense the software or re-enter the evidence server path. You might need torestart the Discover server if MSMQ is not enabled after the upgrade or if old data program folders orregistry keys were not deleted.
If a restart is required, McAfee DLP Discover generates an operational event.
• If you installed the server package manually, the server prompts you to restart.
• If you used McAfee ePO, the prompt might be displayed depending on the McAfee Agentconfiguration settings.
In some cases, MSMQ might not be enabled even after a restart and the Discover server sends anoperational event. If this happens, you must manually enable MSMQ and start the Discover serverservice.
For information about the supported upgrade paths, see the McAfee Data Loss Prevention DiscoverRelease Notes.
Do not install the software over an existing installation of the same version.
Install or upgrade the server package using McAfee ePOWe recommend using McAfee ePO to install the server package.
The McAfee DLP Discover server package can be installed with one of two server roles: Discover server(for scanning) or DLP server (for registered document database distribution). The two server rolesappear as separate entries in the Master Repository.
TaskFor details about product features, usage, and best practices, click ? or Help.
1 Check in the server package.
a In McAfee ePO, select Menu | Software | Master Repository.
b Click Check In Package.
McAfee Cloud Data Protection Beta Release 21-Mar-2017Installing McAfee DLP
Install the McAfee DLP Discover server package 3
McAfee Data Loss Prevention 11.0.0 Product Guide 51

c Browse to the server package .zip file and click Next.
d Click Save.
2 Create a client task.
a Select Menu | System Tree.
b Select the Discover server and select Actions | Agent | Modify Tasks on a Single System.
c Select Actions | New Client Task Assignment.
3 Configure the task assignment.
a In the Product area, select McAfee Agent.
b In the Task Type area, select Product Deployment.
c In the Task Name area, click Create New Task.
4 Configure the task.
a In the Target platforms area, select Windows.
b From the Product and components menu, select McAfee DLP Discover Server.
To install a Redis database server, select McAfee DLP Server.
c From the Action menu, select Install.
d Click Save.
5 Select the name of the new task, then click Next.
6 Configure when to run the task, then click Next.
7 Click Save.
Install or upgrade the server package manuallyIf you are unable to install the server package through McAfee ePO due to issues such as networkconnectivity, you can manually install McAfee DLP Discover on the Discover server.
Task• Download or transfer the DiscoverServerInstallx64.exe file to the Discover server.
• To install the software with a Discover server role, double-click the file and follow the on-screeninstructions.
• To install the software with a DLP server role, use the command lineDiscoverServerInstallx64.exe SERVER_ROLE=DLP.
Verify the installationMake sure McAfee DLP Discover is successfully installed and communicating with McAfee ePO.
In the event of an installation failure, McAfee DLP Discover generates an operational event. To viewevents, select Menu | Data Protection | DLP Operations.
Task1 If MSMQ is not enabled after the installation or if old data program folders or registry keys were not
deleted, restart the Discover server.
McAfee Cloud Data Protection Beta Release 21-Mar-20173 Installing McAfee DLP
Install the McAfee DLP Discover server package
52 McAfee Data Loss Prevention 11.0.0 Product Guide

If you must restart the server, McAfee DLP Discover generates an operational event.
• If you installed the server package manually, the server prompts you to restart.
• If you used McAfee ePO, the prompt might display depending on the McAfee Agent configurationsettings.
Sometimes MSMQ is not enabled even after a restart and the Discover server sends an operationalevent. If this happens, you must manually enable MSMQ and start the Discover server service.
For information about enabling MSMQ, see KB87274.
2 In the server operating system, validate that these McAfee DLP Discover services and processesare running:
• McAfee Discover Service
• McAfee Discover Server Postgres service
• redis-server.exe
3 Wake up agents in McAfee ePO or collect and send properties from the Discover server.
• In McAfee ePO, select Menu | System Tree, select the server, and click Wake Up Agents.
• From the Discover server notification area, click the McAfee icon, select McAfee Agent Status Monitor,and click Collect and Send Props.The Status column displays Enforcing Policies for DISCOVERxxxx.
4 Make sure that the Discover server is detected.
a In McAfee ePO, select Menu | Data Protection | DLP Discover.
b Click the Discover Servers tab.
A list of detected servers appear.
If the server is not listed, select Actions | Detect Servers. This task runs every 10 minutes by default.
5Best practice: Change the McAfee Agent agent-server communication interval to ensure analyticaldata is up to date.
a Select Menu | Policy | Policy Catalog.
b From the Product drop-down list, select McAfee Agent.
c In the Category column, locate the default policy listed as General and open it.
d On the General tab, in the Agent-to-server communication area, change the interval to 5.
To uninstall the Discover server, use Control Panel | Programs and Features on the Windows Server.
Install your McAfee DLP applianceInstall the appliance and register it with McAfee ePO.McAfee DLP performs cryptographic operations in a way that is compliant with FIPS 140-2.
McAfee Cloud Data Protection Beta Release 21-Mar-2017Installing McAfee DLP
Install your McAfee DLP appliance 3
McAfee Data Loss Prevention 11.0.0 Product Guide 53

Tasks• Install the extensions on page 54
If you manually installed the McAfee DLP extension instead of using the Software Manager,you must also install the extensions necessary for McAfee DLP Prevent and McAfee DLPMonitor.
• Configure network information on page 54For McAfee DLP appliances, configure the DNS server and NTP server. For McAfee DLPPrevent, you must also configure a Smart Host.
• Connect Capture port 0 to your network McAfee DLP Monitor only) on page 55Integrate McAfee DLP Monitor into your network. You could use a SPAN port or networktap.
• Install the software on a virtual appliance on page 55Use the OVA file for installing McAfee DLP Prevent on your virtual environment.
• Install the software on a hardware appliance on page 56Install McAfee DLP Prevent or McAfee DLP Monitor on a model 4400, 5500, or 6600appliance.
• Run the Setup Wizard and register with McAfee ePO on page 58Use the Setup Wizard to configure network settings and register the appliance with McAfeeePO.
Install the extensionsIf you manually installed the McAfee DLP extension instead of using the Software Manager, you mustalso install the extensions necessary for McAfee DLP Prevent and McAfee DLP Monitor.
Before you begin• Download the extensions.
• Install the McAfee DLP extension.
TaskFor details about product features, usage, and best practices, click ? or Help.
1 In McAfee ePO, select Menu | Software | Extensions, then click Install Extension.
2 Follow these steps for each of the extensions. Install the extensions in this order:
• Common UI package
• Appliance Management Extension
• McAfee DLP Appliance Management
a Browse to the extension .zip file.
b Click OK twice.
Configure network informationFor McAfee DLP appliances, configure the DNS server and NTP server. For McAfee DLP Prevent, youmust also configure a Smart Host.
McAfee Cloud Data Protection Beta Release 21-Mar-20173 Installing McAfee DLP
Install your McAfee DLP appliance
54 McAfee Data Loss Prevention 11.0.0 Product Guide

TaskFor details about product features, usage, and best practices, click ? or Help.
1 In McAfee ePO, select Menu | Policy | Policy Catalog.
2 From the Product drop-down list, select Common Appliance Management.
3 Select the My Default policy.
4 Add the DNS server and the NTP server, then click Save.
5 From the Product drop-down list, select DLP Appliance Management.
6 Select the My Default policy for Prevent Email Settings.
7 Enter the IP address of the Smart Host, then click Save.
Connect Capture port 0 to your network McAfee DLP Monitoronly)Integrate McAfee DLP Monitor into your network. You could use a SPAN port or network tap.
Install the software on a virtual applianceUse the OVA file for installing McAfee DLP Prevent on your virtual environment.
Task1 Start the VMware vSphere client and log on to the VMware vCenter Server.
2 Click Actions | Deploy OVF Template.
The Deploy OVF Template dialog box appears.
3 Select Local file | Browse and open the OVA file you downloaded from the McAfee download site.
4 Follow the on-screen instructions, clicking Next to advance through the setup.
a Validate the package and select Accept extra configuration options.
b Enter a name for the appliance, then specify the datacenter and folder to deploy to.
c Select the cluster and an optional resource pool.
d Select the datastore for the appliance.
Best practice: Select the Thick Provision Lazy Zeroed option for the virtual disk format. Initialperformance might be degraded with other options. The Thick Eager option can take some time tocomplete.
McAfee Cloud Data Protection Beta Release 21-Mar-2017Installing McAfee DLP
Install your McAfee DLP appliance 3
McAfee Data Loss Prevention 11.0.0 Product Guide 55

e Select the virtual networks. By default, these IP addresses are configured:
• LAN_1 — 10.1.1.108/24
Use the LAN_1 network for McAfee DLP Prevent SMTP or ICAP traffic. You can also use it formanagement traffic.
• OOB — 10.1.3.108/24
(Optional) Use the Out-of-band (OOB) network for management traffic including McAfee ePOcommunication.
If your network uses DHCP, the first IP address that the DHCP server assigns to the appliance isused instead. You can manually configure the IP address with the Setup Wizard. The appliancedoes not support using a continuous DCHP configuration.
The default gateway for the appliance uses the LAN1 network. Configure any routing requiredon the OOB interface using static routes.
f Review the summary.
5 Click Finish.
Use the information in Recent Tasks to check if the virtual machine is created.
6 Navigate to the virtual machine and turn it on.
Install the software on a hardware applianceInstall McAfee DLP Prevent or McAfee DLP Monitor on a model 4400, 5500, or 6600 appliance.
Tasks
• Connect your appliance on page 56Prepare the appliance to install it in a non-cluster environment.
• Install a new image on hardware appliances on page 57Install McAfee DLP Prevent or McAfee DLP Monitor on the appliance.
Connect your appliancePrepare the appliance to install it in a non-cluster environment.
By default, each appliance is configured with these IP addresses:
• LAN_1 — 10.1.1.108/24
Use the LAN_1 network for McAfee DLP Prevent SMTP or ICAP traffic. You can also use it formanagement traffic.
• OOB — 10.1.3.108/24
(Optional) Use the Out-of-band (OOB) network for management traffic including McAfee ePOcommunication.
McAfee DLP Monitor Capture port 0 does not require an IP address. It must be connected to yournetwork to acquire packets for analysis. Typically, this would be connected to a SPAN port or networktap.
If your network uses DHCP, the first IP address that the DHCP server assigns to the appliance is usedinstead. You can manually configure the IP address with the Setup Wizard. The appliance does notsupport using a continuous DCHP configuration.
The default gateway for the appliance uses the LAN1 network. Configure any routing required on theOOB interface using static routes.
McAfee Cloud Data Protection Beta Release 21-Mar-20173 Installing McAfee DLP
Install your McAfee DLP appliance
56 McAfee Data Loss Prevention 11.0.0 Product Guide

The appliance also has a Remote Management Module (RMM) which provides Lights Out Managementfunctionality, such as remote KVM access and access to the appliance BIOS.
For information about identifying the network ports for your appliance, see the McAfee Data LossPrevention Hardware Guide.
Task1 Connect a monitor, keyboard, and mouse to the appliance.
2 Connect the LAN1 interface of the appliance to your network.
3 (Optional) Connect the OOB interface to a different network.
4 (Optional) Connect the RMM interface to a management network.
Best practice: Use a closed or secure network for the RMM.
Serial console settingsYou can use the serial console to install the McAfee DLP appliance software only.
You must use another method, such as the RMM, to configure network settings and register withMcAfee ePO. You can enable the RMM through the serial console.
Installation progress does not appear when using the serial console.
Table 3-1 Serial connection parameters
Port setting Value
Baud rate 115200
Data bits 8
Stop bits 1
Parity None
Flow control None
See also Configure the RMM on page 244
Install a new image on hardware appliancesInstall McAfee DLP Prevent or McAfee DLP Monitor on the appliance.
You can perform the initial installation using these methods:
• USB drive
Use image writing software, such as Launchpad Image Writer, to write the image to the USB drive.For more information, see KB87321.
• USB CD drive
McAfee Cloud Data Protection Beta Release 21-Mar-2017Installing McAfee DLP
Install your McAfee DLP appliance 3
McAfee Data Loss Prevention 11.0.0 Product Guide 57

• (4400 appliances only) Integrated CD drive
• Virtual CD drive using the remote management module (RMM)
Task1 Using the installation ISO file, create or set up the external imaging media.
2 Insert or connect the media to the appliance.
3 Turn on or restart the appliance.
4 Before the operating system starts, press F6 for the boot menu and select the external media.
R3c0n3x is the BIOS password for 4400 appliances.
5 Follow the onscreen prompts.
6 Read the End User License Agreement, then press Y to accept it.
7 At the installation menu, press A for a full installation, then press Y to continue.
When the installation sequence is complete, the appliance restarts.
If the installation fails, call McAfee technical support. Do not perform the installation again.
Run the Setup Wizard and register with McAfee ePOUse the Setup Wizard to configure network settings and register the appliance with McAfee ePO.
After the appliance installs and restarts, the Setup Wizard starts automatically.
If you installed the software using the serial console on a hardware appliance, use another method,such as the RMM, to complete the Setup Wizard.
Task1 Choose the language for the Setup Wizard, then configure the basic network settings.
The wizard contains information to help you configure the settings.
a On the Welcome page, select Basic Network Setup and click Next.
b Complete the options on the Basic Settings page, then click Next.
You must change the default password the first time that you run the Setup Wizard. The newpassword must have at least eight characters. The default password is password.
c Complete the options on the Network Services page, then click Next.
d Review the information on the Summary page and make any corrections.
e Click Finish.
The initial network settings are applied. The first time you complete the Setup Wizard, or if youneed to register with a new McAfee ePO, the wizard restarts after the network settings areapplied.
2 Register with McAfee ePO.
a Select ePO Registration and click Next.
b Complete the options on the ePO Registration page.
c Click Finish.
McAfee Cloud Data Protection Beta Release 21-Mar-20173 Installing McAfee DLP
Install your McAfee DLP appliance
58 McAfee Data Loss Prevention 11.0.0 Product Guide
3 Log on to McAfee ePO.
The product appears in the System Tree. If needed, move the entry to the correct location in thehierarchy.
Install the McAfee DLP Prevent for Mobile Email server packageThe McAfee DLP Prevent for Mobile Email server package can be deployed to servers manually or withMcAfee ePO. The installation is identical to that of the McAfee DLP Discover server package.
Do not install both server packages on the same server.
See also Install or upgrade the server package using McAfee ePO on page 51Install or upgrade the server package manually on page 52
Post-installation tasksAfter installation, configure settings and policies for your products.Tasks include:
• Create and configure evidence folders.
• Configure client or server settings.
• Create classifications, definitions, and rules.
• Assign the configurations and policies in the System Tree.
• (McAfee DLP Discover and McAfee DLP Endpoint) Create scans.
• (McAfee DLP Prevent) Integrate with an MTA server or web proxy.
• (McAfee DLP Monitor) Check the DLP Incident Manager.
See also Documenting events with evidence on page 71Classification definitions and criteria on page 120Defining rules to protect sensitive content on page 144Protecting files with discovery rules on page 175Working with McAfee DLP policies on page 82Configure client settings on page 67Configure server settings on page 67Configure policy for scans on page 189Download product extensions and installation files on page 43
McAfee Cloud Data Protection Beta Release 21-Mar-2017Installing McAfee DLP
Install the McAfee DLP Prevent for Mobile Email server package 3
McAfee Data Loss Prevention 11.0.0 Product Guide 59

McAfee Cloud Data Protection Beta Release 21-Mar-20173 Installing McAfee DLP
Post-installation tasks
60 McAfee Data Loss Prevention 11.0.0 Product Guide

Configuration and useConfigure the software for optimized use in the enterprise environmentbased on management decisions of what content to protect, and how best toprotect it.
Chapter 4 Configuring system componentsChapter 5 Protecting removable mediaChapter 6 Classifying sensitive contentChapter 7 Protecting sensitive contentChapter 8 Scanning data with McAfee DLP Endpoint discoveryChapter 9 Scanning data with McAfee DLP Discover
McAfee Cloud Data Protection Beta Release 21-Mar-2017
McAfee Data Loss Prevention 11.0.0 Product Guide 61

McAfee Cloud Data Protection Beta Release 21-Mar-2017Configuration and use
62 McAfee Data Loss Prevention 11.0.0 Product Guide

4 Configuring system components
System components can be customized to best fit the needs of your enterprise. By configuring theagent and system options, you can optimize the system to safeguard sensitive enterprise informationefficiently.
Contents Configuring McAfee DLP in the Policy Catalog Protecting files with rights management Documenting events with evidence Controlling assignments with users and permission sets Control access to McAfee DLP appliance features Working with McAfee DLP policies McAfee ePO features
Configuring McAfee DLP in the Policy CatalogMcAfee DLP uses the Policy Catalog in McAfee ePO to store policies and client configurations.McAfee DLP creates policies in the Policy Catalog. Policies are assigned to endpoints in the McAfee ePOSystem Tree.
• DLP Policy — Contains the Active Rule Sets assigned to the policy, scheduled Endpoint Discovery scans,Settings for application strategy, device class overrides, and privileged users, and Policy Validation.
• Server Configuration — Contains the McAfee DLP Discover, McAfee DLP Prevent, McAfee DLPMonitor, and McAfee DLP Prevent for Mobile Email configurations. Allows you to set the evidencecopy service and logging options, Rights Management and SharePoint settings, and text extractoroptions.
The server configuration displays only if a McAfee DLP Discover, McAfee DLP Prevent, or McAfee DLPMonitor license is registered.
Best practice: Create separate server configurations for McAfee DLP Discover, McAfee DLP Prevent,McAfee DLP Monitor, and McAfee DLP Prevent for Mobile Email.
McAfee DLP Prevent and McAfee DLP Monitor use only the Evidence Copy Service section of the serverconfiguration. McAfee DLP Prevent for Mobile Email uses only ActiveSync Proxy. McAfee DLP Discoveruses all of the sections except ActiveSync Proxy.
• Client Configurations — Separate configurations for Microsoft Windows and OS X computerscontain the configuration settings for the McAfee DLP Endpoint clients. The settings determine howclients apply McAfee DLP policies on the endpoints.
Client configurations display only if a McAfee DLP Endpoint license is registered.
The DLP Policy consists of Active Rule Sets, the Endpoint Discovery configuration, Settings, and Policy Validation.
4McAfee Cloud Data Protection Beta Release 21-Mar-2017
McAfee Data Loss Prevention 11.0.0 Product Guide 63

The client configuration policies (Windows, OS X) contains settings that determine how the endpointswork with policies. They are where you enable the Evidence Copy Service for McAfee DLP Endpoint.
Use the server configuration policies for McAfee Data Loss Prevention Discover, McAfee DLP Monitor,and McAfee DLP Prevent. Configure settings such as the Evidence Copy Service and logging parameters.
Import or export the McAfee DLP Endpoint configurationEndpoint policy configurations can be saved in HTML format for backup or to transfer policies to otherMcAfee ePO servers.
Do not use this procedure to save DLP Policy configurations. While the Export option does save the file,Import fails to import it. To save DLP Policies, use the Backup & Restore page in DLP Settings.
TaskFor details about product features, usage, and best practices, click ? or Help.
1 In McAfee ePO, select Policy Catalog | Product | Data Loss Prevention.
2 Do one of the following:
• To export, click Export. In the Export window, right-click the file link and select Save Link As to savethe policy as an XML file.
The Export button exports all policies. You can export an individual policy by selecting Export in theActions column in the policy name row.
• To import a saved policy, click Import. In the Import Policies window, browse to a saved policy, clickOpen, then OK.
The import window opens, displaying the policies you are about to import and whether there isa naming conflict. You can deselect any conflicting policies and not import them. If you chooseto import a policy with a name conflict, it overwrites the existing policy and assumes itsassignments.
Client configurationThe McAfee DLP Endpoint client software for McAfee Agent resides on enterprise computers andexecutes the defined policy. The software also monitors user activities involving sensitive content.Client configuration is stored in the policy, which is deployed to managed computers.
The Policy Catalog comes with McAfee default policies for Windows and OS X endpoint configurationsand DLP policy. Click Duplicate (in the Actions column) to create an editable copy as a base for your policy.
The client configuration is stored in the policy, which is deployed to managed computers by McAfeeePO. If the configuration is updated, you must redeploy the policy.
Client Service WatchDog
The Client Service WatchDog is not supported on McAfee DLP Endpoint for Mac.
To maintain normal operation of McAfee DLP Endpoint software even in the event of maliciousinterference, McAfee DLP Endpoint runs a protective service called the Client Service WatchDog. Thisservice monitors the McAfee DLP Endpoint software, and restarts it if it stops running for any reason.The service is enabled by default. If you want to verify that it is running, look in the MicrosoftWindows Task Manager processes for the service named fcagswd.exe.
McAfee Cloud Data Protection Beta Release 21-Mar-20174 Configuring system components
Configuring McAfee DLP in the Policy Catalog
64 McAfee Data Loss Prevention 11.0.0 Product Guide

Client configuration settings
Client configuration settings determine how the endpoint software operates. Most of the clientconfiguration settings have reasonable defaults that can be used for initial setup and testing withoutalteration.
Best practice: To verify that the client configuration settings continue to meet your requirements,review them at regular intervals.
The following table lists some of the more important settings to verify.
Table 4-1 Endpoint configuration
Setting Details Description
Advanced Configuration Run DLP client in SafeModeApplies toWindows clientsonly
Disabled by default. When enabled, McAfee DLPEndpoint is fully functional when the computer isstarted in Safe Mode. A recovery mechanism exists incase the McAfee DLP Endpoint client causes a bootfailure.
Agent BypassApplies to bothWindows andMac OS X clients
Stops the agent bypass when a new clientconfiguration is loaded. Deselected by default
Content TrackingApplies to both Windowsand Mac OS X clients
Use the followingfallback ANSI codepage
If no language is set, the fallback is the defaultlanguage of the endpoint computer.
Whitelisted Processes Add processes and extensions to whitelist.
Corporate connectivityApplies to both Windowsand Mac OS X clients
Corporate NetworkDetection
Corporate VPNDetection
You can apply different prevent actions to endpointcomputers in the corporate network or outside thenetwork. For some rules, you can apply differentprevent actions when connected by VPN. To use theVPN option, or to determine network connectivity bycorporate server rather than by connection to McAfeeePO, set the server IP address in the relevantsection.
Email ProtectionApplies to Windows clientsonly
Email Caching Stores tag signatures from emails to disk to eliminatere-parsing emails.
Email Handling API Outgoing email is handled by either Outlook ObjectModel (OOM) or Messaging Application ProgrammingInterface (MAPI). OOM is the default API, but someconfigurations require MAPI.
Outlook 3rd partyadd-in integration
Two third-party classification applications aresupported: Titus and Boldon James.
Email TimeoutStrategy
Sets the maximum time to analyze an email and theaction if the time is exceeded.
Evidence Copy ServiceApplies to both Windowsand Mac OS X clients
Evidence Storageshare UNC
Replace the example text with the evidence storageshare.
Client Settings You can change the way hit highlighting is displayedby setting classification matches to all matches orabbreviated results.
Operational Mode and ModulesApplies to both Windowsand Mac OS X clients
Operational Mode Set Device Control or full McAfee DLP Endpoint mode.Reset this parameter if you upgrade or downgradelicensing.
McAfee Cloud Data Protection Beta Release 21-Mar-2017Configuring system components
Configuring McAfee DLP in the Policy Catalog 4
McAfee Data Loss Prevention 11.0.0 Product Guide 65

Table 4-1 Endpoint configuration (continued)
Setting Details Description
Data ProtectionModules
Activate required modules
Best practice: To improve performance, deselectmodules you are not using.
Web ProtectionApplies to Windows clientsonly
Web protectionevaluation
Select inputs for web request evaluation whenmatching web protection rules. These settings allowblocking requests sent by AJAX to a different URLfrom the one displayed in the address bar. At leastone option must be selected.
Process HTTP GETrequests
GET requests are disabled by default because theyare resource-intensive. Use this option with caution.
Supported Chromeversions
If you use Google Chrome, click Browse to add thecurrent list of supported versions. The list is an XMLfile that you download from McAfee Support.
Web Timeout strategy Sets the web post analysis timeout, action to performif timeout is exceeded, and optional user message.
Whitelisted URLs Lists URLs excluded from web protection rules.
Support for client configuration parametersMcAfee DLP Endpoint for Windows and McAfee DLP Endpoint for Mac are configured in separate clientpolicies.
Table 4-2 Debugging and Logging page
Parameter Operating system support
Administrative events reported bythe clients
The filter settings that apply to both McAfee DLP Endpoint for Windowsand McAfee DLP Endpoint for Mac are:• Client Enters Bypass Mode
• Client Leaves Bypass Mode
• Client Installed
All other settings apply to McAfee DLP Endpoint for Windows only.
Logging Supported on both McAfee DLP Endpoint for Windows and McAfee DLPEndpoint for Mac.
Table 4-3 User Interface Components page
Section Parameter Operating system support
Client User Interface Show DLP Console (all options) McAfee DLP Endpoint for Windows only
Enable end-user notification popup McAfee DLP Endpoint for Windows and McAfeeDLP Endpoint for Mac
Show request justification dialog McAfee DLP Endpoint for Windows and McAfeeDLP Endpoint for Mac
Challenge and Response All options McAfee DLP Endpoint for Windows and McAfeeDLP Endpoint for Mac
Release code lockout policy All options McAfee DLP Endpoint for Windows and McAfeeDLP Endpoint for Mac
Client Banner Image All options McAfee DLP Endpoint for Windows only
McAfee Cloud Data Protection Beta Release 21-Mar-20174 Configuring system components
Configuring McAfee DLP in the Policy Catalog
66 McAfee Data Loss Prevention 11.0.0 Product Guide

Configure client settingsConfigure settings for McAfee DLP Endpoint.
TaskFor details about product features, usage, and best practices, click ? or Help.
1 In McAfee ePO, select Menu | Policy | Policy Catalog.
2 From the Product drop-down list, select Data Loss Prevention 10.
3 (Optional) From the Category drop-down list, select Windows Client Configuration or Mac OS X ClientConfiguration.
4 Select a configuration to edit or click Duplicate for the McAfee Default configuration.
5 On the Evidence Copy Service page, enter the storage share and credentials.
6 Update the settings on the other pages as needed.
7 Click Apply Policy.
Configure server settingsConfigure settings for McAfee DLP Discover, McAfee DLP Prevent, McAfee DLP Monitor, and McAfeeDLP Prevent for Mobile.
Before you beginFor McAfee DLP Discover server settings:
• If you are using a Rights Management server, obtain the domain name, user name, andpassword.
• If you plan to run remediation scans on SharePoint servers, determine if the SharePointservers in your enterprise use the recycle bin. Mismatching this setting can lead toerrors or unexpected behavior during the remediation scan.
For McAfee DLP Server for Mobile, configure the MobileIron Sentry server ActiveSyncConfiguration as follows:
• Server Authentication: Pass Through
• ActiveSync Server(s): [DLP ActiveSync proxy address]
McAfee DLP Server for Mobile requires certification. See KBxxxxx for information aboutobtaining and installing certificates.
• McAfee DLP Server for Mobile uses the ActiveSync Proxy settings only.
• McAfee DLP Prevent and McAfee DLP Monitor use the Evidence Copy Service settings only.
• McAfee DLP Discover can use all server setting options except ActiveSync Proxy, though some areoptional.
TaskFor details about product features, usage, and best practices, click ? or Help.
1 In McAfee ePO, select Menu | Policy | Policy Catalog.
2 From the Product drop-down list, select Data Loss Prevention 10.
3 (Optional) From the Category drop-down list, select Server Configuration.
McAfee Cloud Data Protection Beta Release 21-Mar-2017Configuring system components
Configuring McAfee DLP in the Policy Catalog 4
McAfee Data Loss Prevention 11.0.0 Product Guide 67

4 Do one of the following.
• Select a server configuration to edit.
• Click Duplicate for the McAfee Default configuration.
5 (Optional, McAfee DLP Discover only) On the Box page, verify the options for trash and versionhistory.
6 On the Evidence Copy Service page, enter the storage share and credentials.
For McAfee DLP Prevent or McAfee DLP Monitor, specify a user name and a password. Do not selectthe local system account option.
Best practice: Use the default values for Server Settings. McAfee DLP Prevent and McAfee DLP Monitorignore the transmission bandwidth setting.
7 (Optional, McAfee DLP Discover only) On the Logging page, set the log output type and log level.
Best practice: Use the default values.
8 (McAfee DLP Server for Mobile only) On the ActiveSync Proxy page, enter the ActiveSync server DNSname.
9 (Optional, McAfee DLP Discover only) On the Registered Documents page:
a Verify that the Registered Documents Classification Engine is enabled.
The classification engine stores a copy of the registered documents database in RAM, allowingthe server to use registered documents in classification and remediation scans. If you are notusing registered documents, you can disable the classification engine.
b Set the Copy content fingerprints server.
• To use registered documents on a single LAN, accept the default setting.
• To use registered documents on multiple LANs, point McAfee DLP Discover server to theregistration server on the same LAN.
10 (McAfee DLP Discover only) On the Rights Management page, set the RM service credentials.
11 (McAfee DLP Discover only) On the SharePoint page, select, or deselect, Use Recycle bin when deleting a file.
If you enable this setting and the SharePoint server does not use the recycle bin, any Move actionstaken on files fail and default to Copy. The default setting in SharePoint is to enable the recycle bin.
12 (Optional, McAfee DLP Discover only) On the Text Extractor page, configure the text extractor settings.
Best practice: Use the default values.
a Set the ANSI fallback code page.
The default uses the default language of the Discover server.
b Set the input and output maximum file size, and the timeouts.
13 Click Apply Policy.
See also Protecting files with rights management on page 69Documenting events with evidence on page 71Data protection rule actions on page 153
McAfee Cloud Data Protection Beta Release 21-Mar-20174 Configuring system components
Configuring McAfee DLP in the Policy Catalog
68 McAfee Data Loss Prevention 11.0.0 Product Guide

Protecting files with rights managementMcAfee DLP Endpoint and McAfee DLP Discover can integrate with rights management (RM) servers toapply protections to files that match rule classifications.
With McAfee DLP Endpoint 10.x, you must install Active Directory Rights Management Services Client2.1 build 1.0.2004.0 on each endpoint using RM services. The Apply RM command does not work withoutthis version of the RM client.
McAfee DLP Prevent and McAfee DLP Monitor can identify if an email or an attachment has RMprotection applied to it. However, they do not support applying RM policies.
You can apply an RM policy reaction to these data protection and discovery rules:
• Cloud protection • File server (CIFS) protection
• Endpoint file system • SharePoint protection
• Box protection
RM policies cannot be used with Device Control rules.
McAfee DLP can recognize RM protected files by adding a file encryption property to either contentclassification or content fingerprinting criteria. These files can be included or excluded from theclassification.
How McAfee DLP works with rights managementMcAfee DLP follows a workflow to apply RM policies to files.
RM workflow
1 Create and apply a data protection or a discovery rule with a reaction to apply RM policy. Thereaction requires an RM server and an RM policy entry.
2 When a file triggers the rule, McAfee DLP sends the file to the RM server.
3 The RM server applies protections based on the specified policy, such as encrypting the file, limitingthe users allowed to access or decrypt the file, and limiting the conditions in which the file can beaccessed.
4 The RM server sends the file back to the source with the applied protections.
5 If you've configured a classification for the file, McAfee DLP can monitor the file.
Limitations
McAfee DLP Endpoint software does not inspect RM protected files for content. When a classification isapplied to a file that is RM protected, only content fingerprint criteria (location, application, or webapplication) are maintained. If a user modifies the file, all fingerprint signatures are lost when the fileis saved.
McAfee Cloud Data Protection Beta Release 21-Mar-2017Configuring system components
Protecting files with rights management 4
McAfee Data Loss Prevention 11.0.0 Product Guide 69

Supported RM serversMcAfee DLP Endpoint supports Microsoft Windows Rights Management Services (Microsoft RMS) andSeclore FileSecure™ information rights management (IRM). McAfee DLP Discover supports MicrosoftRMS.
Microsoft RMS
McAfee DLP supports Microsoft RMS on Windows Server 2003 and Active Directory RMS (AD-RMS) onWindows Servers 2008 and 2012. You can apply Windows Rights Management Services protection tothe following applications.
Document type Version
Microsoft Word 2010, 2013, and 2016
Microsoft Excel
Microsoft PowerPoint
SharePoint 2007
Exchange Server
With Microsoft RMS, McAfee DLP can inspect the content of protected files if the current user has viewpermissions.
For more information on Microsoft RMS, go to http://technet.microsoft.com/en-us/library/cc772403.aspx.
Seclore IRM
McAfee DLP Endpoint supports Seclore FileSecure RM, which supports over 140 file formats includingmost commonly used document formats:
• Microsoft Office documents
• Open Office documents
• Text and text-based formats, including CSV, XML, and HTML
• Image formats, including JPEG, BMP, GIF and so forth
• Engineering design formats, including DWG, DXF, and DWF
The McAfee DLP Endpoint client works with the FileSecure desktop client to provide online and offlineintegration.
For more information on Seclore IRM, go to http://seclore.com/seclorefilesecure_overview.html.
McAfee Cloud Data Protection Beta Release 21-Mar-20174 Configuring system components
Protecting files with rights management
70 McAfee Data Loss Prevention 11.0.0 Product Guide

Define a Rights Management serverMcAfee DLP Endpoint supports two Rights Management (RM) systems: Microsoft Windows RightsManagement Services (RMS) and Seclore FileSecure™. To use these systems, configure the serverproviding the RM policies in McAfee ePO.
Before you begin• Set up the RM servers and create users and policies. Obtain the URL and password for
all servers — policy template, certification, and licensing. For Seclore, you need the HotFolder Cabinet ID and passphrase, and information on advanced licenses, if any.
• Verify that you have permission to view, create, and edit Microsoft RMS and Secloreservers. In McAfee ePO, select Menu | User Management | Permission Sets, and verify that youbelong to a group that has the required permissions in Registered Servers.
TaskFor details about product features, usage, and best practices, click ? or Help.
1 In McAfee ePO, select Menu | Registered Servers.
2 Click New Server.
The Registered Servers description page opens.
3 From the Server type drop-down list, select the type of server you want to configure: Microsoft RMSServer or Seclore Server.
4 Type a name for the server configuration, then click Next.
5 Enter the required details. When you have entered the required fields, click Test Connectivity to verifythe data entered.
• RMS settings also include a DLP enforcement settings section. The Local path to RMS template field isoptional, but the URL fields for certification and licensing are required unless you choose the ADauto-service discovery option.
• Seclore requires HotFolder Cabinet information, but additional license information is optional.
6 Click Save when you have completed the configuration.
Documenting events with evidenceEvidence is a copy of the data that caused a security event to be posted to the DLP Incident Manager.Multiple evidence files are created for an event when possible. For example, if an Email Protection ruleis triggered, the email, the body text, and the attachments are all saved as evidence files.
If a classification occurs in the email headers, no separate evidence is written because it can be foundin the message itself. The matched text is included in the hit highlights for the body evidence.
Using evidence and evidence storageMost rules allow the option of storing evidence. When this option is selected, an encrypted copy of thecontent that was blocked or monitored is stored in the predefined evidence folder.McAfee DLP Endpoint stores evidence in a temporary location on the client between agent-servercommunication intervals. When McAfee Agent passes information to the server, the folder is purgedand the evidence is stored in the server evidence folder. You can specify the maximum size and age oflocal evidence storage when the computer is offline.
McAfee Cloud Data Protection Beta Release 21-Mar-2017Configuring system componentsDocumenting events with evidence 4
McAfee Data Loss Prevention 11.0.0 Product Guide 71

Prerequisites for evidence storage
Enabling evidence storage is the default condition for McAfee DLP. If you do not want to saveevidence, you can improve performance by disabling the evidence service. The following are eitherrequired or set as defaults when setting up the software:
• Evidence storage folder — Creating a network evidence storage folder and specifying the UNCpath to the folder are requirements for applying a policy to McAfee ePO. Specify the path on theDLP Settings page. The default UNC path is copied to the Evidence Copy Service pages of the serverconfiguration (McAfee DLP Discover, McAfee DLP Prevent, and McAfee DLP Monitor) and the clientconfigurations (McAfee DLP Endpoint) in the Policy Catalog. You can edit the default to specifydifferent evidence storage folders in the configurations.
• Evidence copy service — The evidence copy service for McAfee DLP Endpoint is enabled on theOperational Mode and Modules page of the client configuration policy. Reporting Service, under which it is asubentry, must also be enabled for evidence collection. For McAfee DLP Discover, McAfee DLPPrevent, and McAfee DLP Monitor the service is activated in the server configuration policy.
See also Configure client settings on page 67Configure server settings on page 67
Evidence storage and memoryThe number of evidence files stored per event has implications for storage volume, event parserperformance, and the screen rendering (and thus user experience) of the DLP Incident Manager and DLPOperations pages. To handle different evidence requirements, McAfee DLP software does the following:
• The maximum number of evidence files to store per event is set on the Evidence Copy Service page.
• When many evidence files are linked to one event, only the first 100 file names are stored in thedatabase and displayed in the DLP Incident Manager details page. The remaining evidence files (up tothe set maximum) are stored in the evidence storage share, but are not associated with the event.Reports and queries that filter evidence based on file name have access only to these first 100 filenames.
• The DLP Incident Manager field Total Match Count displays the total evidence count.
• If the evidence storage becomes critically full, McAfee DLP Prevent temporarily rejects the messagewith an SMTP error. An event is listed in the Client Events log, and an alert appears in the ApplianceManagement dashboard.
Hit highlightingThe hit highlighting option helps administrators identify exactly which sensitive content caused anevent.
When selected, it stores an encrypted HTML evidence file with extracted text.
The evidence file is made up of snippets, where a snippet for content classifications or contentfingerprints typically contains the sensitive text, with 100 characters preceding it and 100 charactersafter it (for context) organized by the content classification or content fingerprint that triggered theevent, and including a count of the number of events per content classification or content fingerprint.If there are multiple hits within 100 characters of the previous hit, those hits are highlighted, and thehighlighted text together with the next 100 characters are added to the snippet. If the hit is in theheader or footer of a document, the snippet contains the highlighted text without the 100 characterprefix or suffix.
McAfee Cloud Data Protection Beta Release 21-Mar-20174 Configuring system components
Documenting events with evidence
72 McAfee Data Loss Prevention 11.0.0 Product Guide

Display options are set on the Evidence Copy Service page of the client or server configuration policy in theClassification matches file field:
• Create abbreviated results (default)
• Create all matches
• Disabled — Disables the hit highlighting feature
Abbreviated results can contain up to 20 snippets. An all matches hit highlight file can contain anunlimited number of snippets, but there is a limit on the number of hits per classification. For AdvancedPattern and Keyword classifications, the limit is 100 hits. For Dictionary classifications, the limit is 250 hitsper dictionary entry. If there are multiple classifications in a hit highlight file, the classification namesand the match counts are displayed at the beginning of the file, before the snippets.
Rules allowing evidence storageThese rules have the option of storing evidence.
Table 4-4 Evidence saved by rules
Rule What is saved Product
Application File Access Protection Rule Copy of the file McAfee DLP Endpoint
Clipboard Protection Rule Copy of the clipboard
Cloud Protection Rule Copy of the file
Email Protection Rule Copy of the email • McAfee DLP Endpoint
• McAfee DLP Prevent
• McAfee DLP Monitor
Mobile Protection Rule Copy of the email McAfee DLP Prevent for Mobile Email
Network Communication Protection Rule Copy of the content McAfee DLP Endpoint and McAfee DLP Monitor
Network Share Protection Rule Copy of the file McAfee DLP Endpoint
Printer Protection Rule Copy of the file
Removable Storage Protection Rule Copy of the file
Screen Capture Protection Rule JPEG of the screen
File System Discovery Rule Copy of the file
Email Storage Discovery Rule Copy of the .msg file
Web Protection Rule Copy of the web post • McAfee DLP Endpoint
• McAfee DLP Prevent
• McAfee DLP Monitor
Box Protection Rule Copy of the file McAfee DLP Discover
File Server (CIFS) Protection Rule Copy of the file
SharePoint Protection Rule Copy of the file
Database Protection Rule Copy of the table
McAfee Cloud Data Protection Beta Release 21-Mar-2017Configuring system componentsDocumenting events with evidence 4
McAfee Data Loss Prevention 11.0.0 Product Guide 73

Creating evidence foldersEvidence folders contain information used by all McAfee DLP software products for creating policiesand for reporting. Depending on your McAfee DLP installation, certain folders and network shares mustbe created, and their properties and security settings must be configured appropriately.
Evidence folder paths are set in different locations in the various McAfee DLP products. When morethan one McAfee DLP product is installed in McAfee ePO, the UNC paths for the evidence folders aresynchronized. The folders do not need to be on the same computer as the McAfee DLP Databaseserver, but it is usually convenient to put them there.
The evidence storage path must be a network share, that is, it must include the server name.
• Evidence folder — Certain rules allow for storing evidence, so you must designate, in advance, aplace to put it. If, for example, a file is blocked, a copy of the file is placed in the evidence folder.
• Copy and move folders — Used by McAfee DLP Discover to remediate files.
We suggest the following folder paths, folder names, and share names, but you can create others asappropriate for your environment.
• c:\dlp_resources\
• c:\dlp_resources\evidence
• c:\dlp_resources\copy
• c:\dlp_resources\move
See also Configure evidence folder settings on page 74
Configure evidence folder settingsEvidence folders store evidence information when files match a rule.
Depending on your McAfee DLP installation, certain folders and network shares must be created, andtheir properties and security settings must be configured appropriately. The required Default EvidenceStorage field in DLP Settings meets the basic requirement, but we recommend setting separate evidenceshares for each McAfee DLP product. Setting evidence shares as described below overrides the defaultsetting.
You must configure write permission for the user account that writes to the evidence folder, such as thelocal system account on the server. In order to view evidence from McAfee ePO, you must allow readaccess for the local system account of the McAfee ePO server.
TaskFor details about product features, usage, and best practices, click ? or Help.
1 In McAfee ePO, select Menu | Policy | Policy Catalog.
2 From the Product drop-down list, select Data Loss Prevention 10.
3 From the Category drop-down list, select one of these options based on the product to configure.
• Windows Client Configuration — McAfee DLP Endpoint for Windows
• Mac OS X Client Configuration — McAfee DLP Endpoint for Mac
• Server Configuration — McAfee DLP Discover, McAfee DLP Prevent and McAfee DLP Monitor
4 Select a configuration to edit, or click Duplicate for the McAfee Default configuration.
McAfee Cloud Data Protection Beta Release 21-Mar-20174 Configuring system components
Documenting events with evidence
74 McAfee Data Loss Prevention 11.0.0 Product Guide

5 On the Evidence Copy Service page:
a Select whether the service is enabled or disabled.
The evidence copy service allows you to store evidence when rules are triggered. If disabled,evidence is not collected and only incidents are generated.
b If needed, enter the evidence storage share UNC. If you don't want to use the local systemaccount, enter a user name a password to store evidence.
For McAfee DLP Prevent and McAfee DLP Monitor, you must specify a user name and password.
By default, the UNC is the one entered on the DLP Settings page when configuring the license. Youcan change the UNC for each working policy you create, or keep the default.
c (Optional) Reset the default Maximum evidence file size and Maximum evidence transmission bandwidth filters.
McAfee DLP Prevent and McAfee DLP Monitor ignore the transmission bandwidth setting.
d Select whether storing the original file is enabled or disabled.
Selecting Disabled overrides the Store Original File setting in individual rules.
e Set the classification match to abbreviated results or all matches. You can also disable matchingwith this control.
6 Click Apply Policy.
See also Using evidence and evidence storage on page 71
Controlling assignments with users and permission setsMcAfee DLP uses McAfee ePO Users and Permission Sets to assign different parts of the McAfee DLPadministration to different users or groups.
Best practice: Create specific McAfee DLP permission sets, users, and groups.
Create different roles by assigning different administrator and reviewer permissions for the differentMcAfee DLP modules in McAfee ePO.
System Tree filtering permissions supportMcAfee DLP supports McAfee ePO System Tree filtering permissions in DLP Incident Manager and DLP Operations.When System Tree filtering is enabled, McAfee ePO operators can only see incidents from computers intheir permitted part of the System Tree. Group Administrators do not have any permissions in the McAfeeePO System Tree by default. Regardless of permissions assigned in the Data Loss Prevention permission set,they cannot see any incidents in DLP Incident Manager or DLP Operations. System Tree filtering is disabled bydefault, but can be enabled in DLP Settings.
Best practice: For customers who have been using Group Administrators in Data Loss Prevention permissionsets, give Group Administrators
· View "System Tree" tab permission (under Systems)· System Tree access permissions at the appropriate level
Sensitive data redaction and the McAfee ePO permission setsTo meet the legal demand in some markets to protect confidential information in all circumstances,McAfee DLP software offers a data redaction feature. Fields in the DLP Incident Manager and DLP Operationsconsoles with confidential information can be redacted to prevent unauthorized viewing. Links to
McAfee Cloud Data Protection Beta Release 21-Mar-2017Configuring system components
Controlling assignments with users and permission sets 4
McAfee Data Loss Prevention 11.0.0 Product Guide 75

sensitive evidence are hidden. The feature is designed with a "double key" release. Thus, to use thefeature, you must create two permission sets: one to view the incidents and events and another toview the redacted fields (supervisor permission). Both roles can be assigned to the same user.
REST API for importing definitions and applying policiesMcAfee DLP now uses REST (REpresentational State Transfer) architecture for certain functions toreduce bandwidth.
REST API calls can now be used for policy creation in certain circumstances, and for importing somedefinitions. To use this feature, the McAfee DLP administrators must be valid McAfee ePO usersassigned to permission sets that allow them to perform the actions invoked by the APIs.
You can create REST API calls in the programming language of your preference. See KB87855 forsample Java source code that demonstrates how to use the REST API.
Create end-user definitionsMcAfee DLP accesses Active Directory (AD) or Lightweight Directory Access Protocol (LDAP) servers tocreate end-user definitions.
End-user groups are used for administrator assignments and permissions, and in protection anddevice rules. They can consist of users, user groups, or organizational units (OU), thus allowing theadministrator to choose an appropriate model. Enterprises organized on an OU model can continueusing that model, while others can use groups or individual users where required.
LDAP objects can be identified by name or security ID (SID). SIDs are more secure, and permissionscan be maintained even if accounts are renamed. On the other hand, they are stored in hexadecimal,and have to be decoded to convert them to a readable format.
TaskFor details about product features, usage, and best practices, click ? or Help.
1 In McAfee ePO, select Menu | Data Protection | DLP Policy Manager.
2 Click the Definitions tab.
3 Select Source/Destination | End-User Group, then Actions | New.
4 In the New End-User Group page, enter a unique name and optional description.
5 Select the method of identifying objects (SID or name).
6 Click one of the Add buttons (Add Users, Add Groups, Add OU).
The selection window opens displaying the selected type of information.
The display might take a few seconds if the list is long. If no information appears, select Container andchildren from the Preset drop-down menu.
7 Select names and click OK to add them to the definition.
Repeat the operation as required to add additional users, groups, or organizational users.
8 Click Save.
McAfee Cloud Data Protection Beta Release 21-Mar-20174 Configuring system components
Controlling assignments with users and permission sets
76 McAfee Data Loss Prevention 11.0.0 Product Guide

Assigning McAfee DLP permission setsMcAfee DLP permission sets assign permissions to view and save policies, and view redacted fields.They are also used to assign role-based access control (RBAC).
Installing the McAfee DLP server software adds the McAfee ePO permission set Data Loss Prevention.If a previous version of McAfee DLP is installed on the same McAfee ePO server, that permission setalso appears.
The permission sets cover all sections of the management console. There are three levels ofpermissions:
• Use — The user can see only names of objects (definitions, classifications, and so forth), not details.
For policies, the minimum permission is no permission.
• View and use — The user can view details of objects, but cannot change them.
• Full permission — The user can create and change objects.
You can set permissions for different sections of the management console, giving administrators andreviewers different permissions as required. The sections are grouped by logical hierarchy, forexample, selecting Classifications automatically selects Definitions because configuring classification criteriarequires using definitions.
The McAfee DLP Endpoint permission groups are:
Group I Group II Group III
• Policy Catalog
• DLP Policy Manager
• Classifications
• Definitions
• DLP Policy Manager
• Classifications
• Definitions
• Classifications
• Definitions
The McAfee DLP Discover permission group is:
• DLP Discover
• DLP Policy Manager
• Classifications
• Definitions
Incident Management, Operational Events, Case Management, and DLP Settings can be selectedseparately.
Permissions for Data Loss Prevention Actions have been moved to the Help Desk Actions permission set.These permissions allow administrators to generate client bypass and uninstall keys, release fromquarantine keys, and master keys.
McAfee Cloud Data Protection Beta Release 21-Mar-2017Configuring system components
Controlling assignments with users and permission sets 4
McAfee Data Loss Prevention 11.0.0 Product Guide 77

In addition to the default permission for the section, you can set an override for each object. Theoverride can either increase or decrease the permission level. For example, in the DLP Policy Managerpermissions, all rule sets existing when the permission set is created are listed. You can set a differentoverride for each one. When new rule sets are created, they receive the default permission level.
Figure 4-1 McAfee DLP permission sets
Create a McAfee DLP permission setPermission sets define different administrative and reviewer roles in McAfee DLP software.
TaskFor details about product features, usage, and best practices, click ? or Help.
1 In McAfee ePO, select Menu | User Management | Permission Sets.
2 Select a predefined permission set or click New to create a permission set.
a Type a name for the set and select users.
b Click Save.
3 Select a permission set, then click Edit in the Data Loss Prevention section.
a In the left pane, select a data protection module.
Incident Management, Operational Events, and Case Management can be selected separately. Other optionsautomatically create predefined groups.
b Edit the options and override permissions as needed.
Policy Catalog has no options to edit. If you are assigning Policy Catalog to a permission set,you can edit the sub-modules in the Policy Catalog group.
c Click Save.
Tasks• Use case: DLP administrator permissions on page 79
You can separate administrator tasks as required — for example, to create a policyadministrator with no event review responsibilities.
• Use case: Limit DLP Incident Manager viewing with redaction permissions on page 79To protect confidential information, and to meet legal demands in some markets, McAfeeDLP Endpoint offers a data redaction feature.
McAfee Cloud Data Protection Beta Release 21-Mar-20174 Configuring system components
Controlling assignments with users and permission sets
78 McAfee Data Loss Prevention 11.0.0 Product Guide

Use case: DLP administrator permissionsYou can separate administrator tasks as required — for example, to create a policy administrator withno event review responsibilities.
TaskFor details about product features, usage, and best practices, click ? or Help.
1 In McAfee ePO, select Menu | Permission Sets.
2 Click New to create a permission set.
a Type a name for the set and select users.
To edit a policy, the user must be the policy owner or a member of the global administratorpermission set.
b Click Save.
3 In the Data Loss Prevention permissions set, select Policy Catalog.
DLP Policy Manager, Classifications, and Definitions are selected automatically.
4 In each of the three submodules, verify that the user has full permissions and full access.
Full permissions is the default setting.
The administrator can now create and change policies, rules, classifications, and definitions.
Use case: Limit DLP Incident Manager viewing with redaction permissionsTo protect confidential information, and to meet legal demands in some markets, McAfee DLP Endpointoffers a data redaction feature.
When using data redaction, specific fields in the DLP Incident Manager and DLP Operations displayscontaining confidential information are encrypted to prevent unauthorized viewing, and links toevidence are hidden.
The fields computer name and user name are predefined as private.
This example shows how to set up the DLP Incident Manager permissions for a redaction reviewer — asingle administrator who cannot view actual incidents, but can reveal encrypted fields when requiredfor another reviewer viewing the incident.
TaskFor details about product features, usage, and best practices, click ? or Help.
1 In McAfee ePO, select Menu | User Management | Permission Sets
2 Create permission sets for regular reviewers and for the redaction reviewer.
a Click New (or Actions | New).
b Enter a name for the group such as DLPE Incident Reviewer or Redaction Reviewer.
You can assign different types of incidents to different reviewer groups. You must create thegroups in Permission Sets before you can assign incidents to them.
c Assign users to the group, either from available McAfee ePO users or by mapping ActiveDirectory users or groups to the permission set. Click Save.
The group appears in the left panel Permission Sets list.
McAfee Cloud Data Protection Beta Release 21-Mar-2017Configuring system components
Controlling assignments with users and permission sets 4
McAfee Data Loss Prevention 11.0.0 Product Guide 79

3 Select a standard reviewer permission set, then click Edit in the Data Loss Prevention section.
a In the left pane, select Incident Management.
b In the Incidents Reviewer section, select User can view incidents assigned to the following permission sets, clickthe choose icon, and select the relevant permission set or sets.
c In the Incidents Data Redaction section, deselect the default Supervisor permission, and select theObfuscate sensitive incidents data option.
Selecting this option activates the redaction feature. Leaving it deselected displays all data fieldsin clear text.
d In the Incident Tasks section, select or deselect tasks as required.
e Click Save.
4 Select the redaction reviewer permission set, then click Edit in the Data Loss Prevention section.
a In the left pane, select Incident Management.
b In the Incidents Reviewer section, select User can view all incidents.
In this example, we assume a single redaction reviewer for all incidents. You can also assigndifferent redaction reviewers for different sets of incidents.
c In the Incidents Data Redaction section, select both the Supervisor permission and the Obfuscate sensitiveincidents data option.
d In the Incident Tasks section, deselect all tasks.
Redaction reviewers do not normally have other reviewer tasks. This is optional according toyour specific requirements.
e Click Save.
Control access to McAfee DLP appliance featuresUse McAfee ePO Permission Sets to control what roles in your organization have access to McAfee DLPappliance and Appliance Management policies and settings.
Restrict users from viewing appliances in the System TreeUse the No permissions option to restrict users from viewing appliances in the System Tree and viewing orediting the policies.
TaskFor details about product features, usage, and best practices, click ? or Help.
1 In McAfee ePO, select Permission sets from the User Management section of the menu.
2 Select the permission set whose roles you want to edit.
3 Locate the DLP Appliance Management Policy role, and click Edit.
4 Select No permissions, and click Save.
Allow users to edit the policyConfigure the role to allow users to view and change the policy and task settings.
McAfee Cloud Data Protection Beta Release 21-Mar-20174 Configuring system components
Control access to McAfee DLP appliance features
80 McAfee Data Loss Prevention 11.0.0 Product Guide

TaskFor details about product features, usage, and best practices, click ? or Help.
1 In McAfee ePO, select Permission sets from the User Management section of the menu.
2 Select the permission set whose roles you want to edit.
3 Locate the DLP Appliance Management Policy role, and click Edit.
4 Select View and change policy and task settings, and click Save.
Control access to Appliance Management featuresFor McAfee DLP appliances, you can apply two roles to the Appliance Management features.
• Appliance Management Common Policy — Controls who can view or change the CommonAppliance Management policy in the Policy Catalog.
• Appliance Management — Controls who can view appliance management statistics and tasks,and who can create and run database tasks.
To find out more about permissions for the Appliance Management features, see topics in the ApplianceManagement help extension.
Allow users to view Appliance Management statisticsAllow users in a selected permission set to view system health and statistics in the Appliance Managementdashboard.
TaskFor details about product features, usage, and best practices, click ? or Help.
1 In McAfee ePO, open the menu and select Permission sets from the User Management section.
2 Select the permission set for the roles you want to edit.
3 Select the Appliance Management role, and click Edit.
4 In Appliance Health and Statistics, select View health and statistics, and click Save.
Restrict users from viewing the Common Appliance Management settingsThe Common Appliance Management policy settings enable users to set the appliance date and time, addDNS servers and static routes, allow remote logon using SSH, and add one or more remote loggingservers.
TaskFor details about product features, usage, and best practices, click ? or Help.
1 In McAfee ePO, open the menu and select Permission Sets.
2 Select the permission set for the roles you want to edit.
3 Click Edit next to the Appliance Management Common Policy.
4 Select No permissions, and click Save.
McAfee Cloud Data Protection Beta Release 21-Mar-2017Configuring system components
Control access to McAfee DLP appliance features 4
McAfee Data Loss Prevention 11.0.0 Product Guide 81

Working with McAfee DLP policiesPolicy settings are available from the Policy Catalog.
DLP Appliance Management
Use the DLP Appliance Management categories to perform activities such as specifying a Smart Host, ICAPchannels, and the LDAP servers that you want to get user information from. You can also set up loadbalancing and timeout settings.
Data Loss Prevention
Use the Server Configuration policy category to edit the Evidence Copy Service settings to work with McAfeeDLP appliances.
The following options in the Evidence Copy Service section do not apply to McAfee DLP appliances.
• Free space on hard drive must be greater than (MB):
• Maximum evidence transmission bandwidth (KBps)
Common Appliance Management
Specify DNS settings, static route settings, and remote logging servers. You can also edit theappliance date and time and enable SNMP alerts and monitoring.
For more information about the Common Appliance policy settings, see the topics in the ApplianceManagement help extension.
Set connection timeout settingsChange the number of seconds that McAfee DLP Prevent attempts to connect with an MTA.
By default, McAfee DLP Prevent attempts to connect for twenty seconds. If a connection cannot bemade in that time, there is an issue with either the network or the MTA that should be investigated.
TaskFor details about product features, usage, and best practices, click ? or Help.
1 In McAfee ePO, open the Policy Catalog.
2 Select the DLP Appliance Management product, choose the General category, and open the policy that youwant to edit.
3 In Onward connection, type the number of seconds that McAfee DLP Prevent can spend trying toconnect to an MTA.
4 Click Save.
Set up a cluster of McAfee DLP Prevent appliancesTo load balance incoming traffic and ensure high availability, you can create clusters of appliances.
Before you beginConfigure two or more McAfee DLP Prevent appliances with LAN1 connected to the samenetwork segment.
All the appliances in a cluster must be in the same subnet or network.
McAfee Cloud Data Protection Beta Release 21-Mar-20174 Configuring system components
Working with McAfee DLP policies
82 McAfee Data Loss Prevention 11.0.0 Product Guide

TaskFor details about product features, usage, and best practices, click ? or Help.
1 In McAfee ePO, open the Policy Catalog.
2 Select the DLP Appliance Management product, choose the General category, and open the policy that youwant to edit.
3 In Load Balancing, select Enable.
4 In Cluster ID, use the arrows to select a number to identify the cluster.
5 In Virtual IP, enter a virtual IP address so that packets for the virtual IP address are sent to thecluster master.
The appliances in the cluster use the netmask assigned to the physical IP address. The virtual IPaddress must be in the same subnet or network as the other McAfee DLP Prevent appliances, andcannot be the same IP address as any other appliance in the cluster.
McAfee ePO pushes the configuration to all the appliances in the cluster when you apply the changes.It takes about five minutes for the cluster to stabilize and identify the cluster master and clusterscanners. The appliance descriptions then change accordingly in Appliance Management.
Close the appliance SMTP portsTo improve performance and security on an appliance dedicated to analyzing web traffic, close theSMTP ports.
TaskFor details about product features, usage, and best practices, click ? or Help.
1 In McAfee ePO, open the Policy Catalog.
2 Select the DLP Appliance Management product, select the Prevent Email Settings category, and open thepolicy that you want to edit.
3 Deselect Enable SMTP.
4 Click Update.
5 Click Save.
Specify a maximum level of nesting of archived attachmentsTo protect the appliance from denial-of-service attacks, set the maximum level of nesting of archivedattachments that it attempts to analyze before it times out.
An example of a nested attachment is a .zip file in another .zip file.
TaskFor details about product features, usage, and best practices, click ? or Help.
1 In McAfee ePO, open the Policy Catalog.
2 Select the DLP Appliance Management product, choose the General category, and open the policy that youwant to edit.
McAfee Cloud Data Protection Beta Release 21-Mar-2017Configuring system components
Working with McAfee DLP policies 4
McAfee Data Loss Prevention 11.0.0 Product Guide 83

3 In Maximum nesting depth, set the maximum level of nested archive attachments.
4 Click Save.
Add additional MTAs that can deliver emailMcAfee DLP Prevent delivers email messages using the configured Smart Host. You can add moreMTAs that McAfee DLP Prevent can deliver email messages to in addition to the Smart Host.
Before you beginEnsure that you have the IP addresses or host names of the Smart Hosts.
McAfee DLP Prevent can accept email messages from more than one MTA but forwards the inspectedemail messages to only one of the configured Smart Hosts.
TaskFor details about product features, usage, and best practices, click ? or Help.
1 In McAfee ePO, open the Policy Catalog.
2 Select the DLP Appliance Management product, choose the Prevent Email Settings category, and open thepolicy that you want to edit.
3 Add the details of the MTAs that you want to use.
4 Click Update.
5 Click Save.
Deliver emails using a round-robin approachConfigure McAfee DLP Prevent to deliver to multiple email servers by distributing the email messagesamong them.
Before you beginEnsure that you have the IP addresses or host names of the Smart Hosts.
TaskFor details about product features, usage, and best practices, click ? or Help.
1 In McAfee ePO, open the Policy Catalog.
2 Select the DLP Appliance Management product, choose the Prevent Email Settings category, and open thepolicy that you want to edit.
3 Select the Round-robin checkbox and add the details of the MTAs that you want to use.
4 Click Update.
5 Click Save.
Limiting connections to specified hosts or networksBy default McAfee DLP Prevent accepts messages from any host. Specify the hosts that can sendmessages to McAfee DLP Prevent so that only legitimate source MTAs can relay email though theappliance.
McAfee Cloud Data Protection Beta Release 21-Mar-20174 Configuring system components
Working with McAfee DLP policies
84 McAfee Data Loss Prevention 11.0.0 Product Guide

TaskFor details about product features, usage, and best practices, click ? or Help.
1 In McAfee ePO, open the Policy Catalog.
2 Select the DLP Appliance Management product, choose the Prevent Email Settings category, and open thepolicy that you want to edit.
3 Select Accept mail from these hosts only.
4 Type the details of a host that the McAfee DLP Prevent appliance can receive messages from.
Add the host information using its IP address and subnet, domain names, or wildcard domainname.
5 Click Update to add the details to the list of permitted hosts.
You can create groups of relay hosts using subnets or wildcard domains. To add more than onesubnet, you must create separate entries for each.
Enable TLS on incoming or outgoing messagesYou can specify whether McAfee DLP Prevent uses TLS to protect ingoing and outgoing messages, oronly uses TLS when it is available (known as Opportunistic). A minimum protocol version of TLS 1.1 isused.
McAfee DLP Prevent can perform cryptographic operations in a way that is compliant with FIPS 140-2.This means that incoming and outgoing TLS connections use high-strength cryptographic algorithms.
Using FIPS 140-2 can impact performance when analyzing SMTP content.
The option to enable FIPS 140-2 is located in the General category of the DLP Appliance Management productin the Policy Catalog.
TLS works by communicating a set of parameters — known as a handshake — at the start of aconnection between participating servers. When these parameters are defined, communicationsbetween the servers become secure so that servers that did not participate in the handshake cannotdecode them.
The handshake process
• The appliance requests a secure connection to the receiving email server and presents it with a listof cipher suites.
• The receiving server selects the strongest supported cipher from the list, and gives the details tothe appliance.
• The servers use the Public Key Infrastructure (PKI) to establish authenticity by exchanging digitalcertificates.
• Using the server's public key, the appliance generates a random number as a session key andsends it to the receiving email server. The receiving server decrypts the key using the private key.
• Both the appliance and the receiving email server use the encrypted key to set up communicationsand complete the handshake process.
Once the handshake is complete, the secure connection is used to transfer the email messages. Theconnection remains secure until the connection is closed.
If you select the Always option for outbound communications, but the Smart Host is not configured touse TLS, McAfee DLP Prevent sends a 550 x.x.x.x: Denied by policy. TLS conversation requirederror.
McAfee Cloud Data Protection Beta Release 21-Mar-2017Configuring system components
Working with McAfee DLP policies 4
McAfee Data Loss Prevention 11.0.0 Product Guide 85

TaskFor details about product features, usage, and best practices, click ? or Help.
1 In McAfee ePO, open the Policy Catalog.
2 Select the DLP Appliance Management product, choose the Prevent Email Settings category, and open thepolicy that you want to edit.
3 In Transport Layer Security, select either Always, Never, or Opportunistic for inbound communications.
Opportunistic is the default setting.
4 Select either Always, Never, or Opportunistic for outbound communications.
Opportunistic is the default setting.
5 Click Save.
Configure McAfee DLP Prevent to scan encrypted web trafficonlyTo improve security, you can stop the McAfee DLP Prevent appliance from analyzing unencrypted webtraffic.
TaskFor details about product features, usage, and best practices, click ? or Help.
1 In McAfee ePO, open the Policy Catalog.
2 Select the DLP Appliance Management product, select the Prevent Web Settings category, and open the policyyou want to edit.
3 Deselect Unencrypted ICAP (port 1344).
4 Click Save.
Close the McAfee DLP Prevent appliance ICAP portsTo improve security and performance on a McAfee DLP Prevent appliance dedicated to analyzing emailtraffic, you can close the ICAP ports.
TaskFor details about product features, usage, and best practices, click ? or Help.
1 In McAfee ePO, open the Policy Catalog.
2 Select the DLP Appliance Management product, select the Prevent Web Settings category, and open the policythat you want to edit.
3 Deselect both of the ICAP service options.
4 Click Save.
McAfee Cloud Data Protection Beta Release 21-Mar-20174 Configuring system components
Working with McAfee DLP policies
86 McAfee Data Loss Prevention 11.0.0 Product Guide

Enable a McAfee DLP Prevent appliance to process responserequestsYou can configure a McAfee DLP Prevent appliance to analyze requests made to your web servers fromexternal users.
A common McAfee DLP Prevent deployment is to have the McAfee DLP Prevent appliance inside yournetwork and the web server outside your network. Enabling RESPMOD analysis can impact performancebecause it takes longer to get responses from the appliance, which causes a slower user experience.
TaskFor details about product features, usage, and best practices, click ? or Help.
1 In McAfee ePO, open the Policy Catalog.
2 Select the DLP Appliance Management product, select the Prevent Web Settings category, and open the policyyou want to edit.
3 Select RESPMOD.
4 Click Save.
Using external authentication serversMcAfee DLP appliances can work with registered LDAP servers and McAfee Logon Collector to retrieveuser information and logon data. The data helps identify users responsible for data loss incidents usingtheir name, group, department, city, or country.
McAfee DLP appliances can:
• Get information from Active Directory servers and OpenLDAP directory servers that are registeredwith McAfee ePO.
• Communicate with a registered LDAP server over SSL.
• Act on email and web protection rules which apply to specific users and groups.
• McAfee DLP Monitor acts on network communication protection rules which apply to specific usersand groups.
• Connect to Global Catalog ports instead of standard LDAP ports to retrieve user and group informationwhen querying Active Directory.
• Include user information in incidents so that you can see all incidents generated by a user,regardless of the McAfee DLP product that detected them.
McAfee Logon Collector records Windows user logon events and communicates the information toMcAfee DLP appliances. McAfee DLP appliances can map an IP address to a Windows user name if noother authentication information is available.
What happens if the LDAP server is unavailable?
McAfee DLP appliances cache LDAP information. The cache updates every 24 hours, so temporaryunavailability of the LDAP server does not affect McAfee DLP appliances service availability. If thecache update fails, McAfee DLP appliances use the previous cache. If a previous cache is not available,it performs an LDAP lookup to get the information.
McAfee Cloud Data Protection Beta Release 21-Mar-2017Configuring system components
Working with McAfee DLP policies 4
McAfee Data Loss Prevention 11.0.0 Product Guide 87

When McAfee DLP Prevent needs LDAP group information to evaluate rules for a request or message,and LDAP is not configured or the server is unavailable:
• For SMTP traffic — A temporary failure code (451) is returned so the message is queued on thesending server and retried.
• For ICAP traffic — An ICAP status 500 code is returned that indicates the server encountered anerror and was unable to analyze the request. You can configure your web gateway to fail open orclosed when it receives an error from the McAfee DLP Prevent server.
For McAfee DLP Monitor, if McAfee Logon Collector or the LDAP server is unavailable, rules cannot bematched and incidents are not created. But, your traffic flow is unaffected.
OpenLDAP and Active Directory servers
• OpenLDAP and Active Directory produce different user schemas. Active Directory has a constrainedset of parameters, but OpenLDAP is customizable.
• OpenLDAP and Active Directory servers identify users by using different means of identification.Active Directory uses sAMAccountName, and OpenLDAP uses UID. LDAP queries forsAMAccountName are handled by using the UID property on OpenLDAP systems.
• OpenLDAP and Active Directory servers also identify user classes by using different user attributes.Instead of the User object class, OpenLDAP uses inetOrgPerson, which does not support country ormemberOf attributes.
Additional web protection authentication
When applying web protection rules, McAfee DLP Prevent can get user information from:
• X-Authenticated-User ICAP request header sent from the web gateway.
• McAfee Logon Collector
If a user name is supplied in the X-Authenticated-User ICAP header, it is used in preference to datafrom McAfee Logon Collector.
Best practice: Using the X-Authenticated-User header is the recommended authentication methodbecause it indicates that the web gateway has positively authenticated the end user. To set it up, youmust perform some additional configuration on the web gateway. For more information, see your webgateway product documentation.
If the X-Authenticated-User header is not available, you can configure McAfee Logon Collector toprovide additional authentication. McAfee Logon Collector is another McAfee product that monitorsWindows logon events and maps an IP address to a Security Identifier (SID). To use McAfee LogonCollector, you must have at least one LDAP server configured: The McAfee DLP appliance can query itto convert a SID to a user name.
When applying email or web protection rules, McAfee DLP Prevent evaluates group information fromthe user information. It ignores any X-Authenticated-Groups header value from the web gateway.
To select rules based on users and groups for McAfee DLP Monitor, you must configure McAfee LogonCollector.
To obtain user or group information, you must have at least one LDAP server configured. The McAfeeDLP appliance queries LDAP servers to get required attributes. For example, for McAfee Logon Collector,the McAfee DLP appliance uses the LDAP server to convert the SID to a user DN.
McAfee Cloud Data Protection Beta Release 21-Mar-20174 Configuring system components
Working with McAfee DLP policies
88 McAfee Data Loss Prevention 11.0.0 Product Guide

Supported authentication schemes
The McAfee DLP Prevent appliance supports the NTLM and LDAP authentication schemes to processthe X-Authenticated-User header from the web gateway.
With NTLM, the McAfee DLP Prevent appliance expects the format for the X-Authenticated-User headerto be in the format NTLM://<NetBIOS_name/sAMAccountName> for Active Directory.
NTLM with OpenLDAP is not supported.
With LDAP, McAfee DLP Prevent expects the X-Authenticated-User header to be in the format LDAP://<LDAP_servername/distinguished-name> for Active Directory and OpenLDAP.
McAfee DLP Prevent uses the distinguishedName LDAP attribute to retrieve user details for webprotection rules. Verify that your LDAP server exposes this attribute to ensure that the LDAPauthentication scheme works correctly.
Use case
You want to configure a web protection rule that blocks uploads of PCI data for all users in adepartment apart from one.
1 Register an Active Directory server with McAfee ePO that contains the user account of theemployee that you suspect.
2 Set up McAfee Logon Collector.
3 Create a web protection rule that looks for web requests from users in the group GROUPNAMEmatching a classification.
4 Create an exception for user USERNAME.
5 Set the reaction to Block.
6 Monitor the DLP Incident Manager for incidents sent by the user that contain the component name.
Retrieve information from registered LDAP serversMcAfee DLP appliances can get user and group information from LDAP servers that are registered withMcAfee ePO. You need to select the registered LDAP servers that you want McAfee DLP appliances toget information from.
Before you beginYou have registered the LDAP servers with McAfee ePO.
For information about registering LDAP servers with McAfee ePO, see the McAfee ePolicyOrchestrator Product Guide.
User and groups details are used when evaluating the Sender information. The McAfee DLP appliancecan:
• Connect to OpenLDAP and Active Directory servers.
• Communicate with a registered LDAP server over SSL.
• Connect to Global Catalog ports instead of standard LDAP ports to retrieve user and group informationwhen querying Active Directory.
McAfee Cloud Data Protection Beta Release 21-Mar-2017Configuring system components
Working with McAfee DLP policies 4
McAfee Data Loss Prevention 11.0.0 Product Guide 89

If you configured Active Directory to use Global Catalog ports, make sure that at least one of theseattributes are replicated to the Global Catalog server from the domains in the forest:
• proxyAddresses
If a McAfee DLP appliance needs to use NTLM authentication for analyzing web protection rules,these LDAP attributes must also be replicated:
• configurationNamingContext
• netbiosname
• msDS-PrincipalName
Messages are temporarily rejected with a 451 status code when both of these conditions are met:
• McAfee DLP Prevent uses rules that specify the sender is a member of a particular LDAPuser group.
• McAfee DLP Prevent is not configured to receive information from the LDAP server thatcontains the specified user group.
Events are sent to the Client Events log if synchronization with the LDAP server or an LDAPquery fails.
TaskFor details about product features, usage, and best practices, click ? or Help.
1 In McAfee ePO, open the Policy Catalog.
2 Select the DLP Appliance Management product, choose the Users and groups category, and open the policythat you want to edit.
3 In LDAP Servers, select the LDAP servers that you want to use.
4 Click Save.
Add a Logon Collector server and certificate to a McAfee DLP applianceAdd a McAfee Logon Collector certificate to McAfee DLP Monitor or McAfee DLP Prevent. And add aMcAfee Data Loss Prevention Prevent or McAfee DLP Monitor certificate to McAfee Logon Collector.
Before you beginHave at least one McAfee Logon Collector server configured.
For more information, see the McAfee Logon Collector Administration Guide.
TaskFor details about product features, usage, and best practices, click ? or Help.
1 To download the certificate from the McAfee DLP appliance, go to https://<APPLIANCE>:10443/certificates, then select [Hostname.domain.crt]
2 In McAfee Logon Collector, select Menu | Trusted CAs | New Authority | Choose File, select the certificateyou downloaded, and click Save.
3 In McAfee ePO, open the Policy Catalog.
McAfee Cloud Data Protection Beta Release 21-Mar-20174 Configuring system components
Working with McAfee DLP policies
90 McAfee Data Loss Prevention 11.0.0 Product Guide

4 Select the DLP Appliance Management product, choose the Users and groups category, and open the policythat you want to edit.
5 Add the McAfee Logon Collector server details to McAfee DLP Prevent or McAfee DLP Monitor.
a In the McAfee Logon Collector section, select Identify users making web requests.
b Click + to open the Add dialog box.
c Type an IPv4 address or host name of a McAfee Logon Collector server you want to connect to.
d Edit the McAfee Logon Collector port if needed.
6 Get the certificate text from McAfee Logon Collector.
a In McAfee Logon Collector, select Menu | Server Settings.
b Click Identity Replication Certificate.
c Select the certificate text in the Base 64 field and copy it to the clipboard or into a file.
7 Return to the Add dialog box and select either Import from file or Paste from clipboard to add the certificatetext..
8 Click OK to complete the McAfee Logon Collector authentication.
[Optional] Add more McAfee Logon Collector servers.
The McAfee Logon Collector server is added to the list of servers.
The Common Appliance Management policyThe Common Appliance Management policy category is installed as part of the Appliance Managementextension. It applies common settings to new or re-imaged appliances.
• Date and time, and time zone information • Secure Shell (SSH) remote logon settings
• Lists of DNS servers • Remote logging settings
• Static routing information • SNMP alerts and monitoring
Information about these options is available in the Appliance Management Help.
Edit the Email Gateway policy to work with McAfee DLP PreventTo redirect email from the Email Gateway appliance to McAfee DLP Prevent for analysis, and takeaction on potential data loss incidents, edit the Email Gateway configuration policy.
To configure McAfee DLP Prevent to send email messages back to the email gateway for processing,edit the Email Settings policy.
Use case: Configure Email Gateway to process analysis resultsConfigure your email configuration policy to take action on potential data loss incidents.
Before you beginHave an Email Gateway appliance managed by McAfee ePO set up and running.
McAfee Cloud Data Protection Beta Release 21-Mar-2017Configuring system components
Working with McAfee DLP policies 4
McAfee Data Loss Prevention 11.0.0 Product Guide 91

TaskThis example assumes that McAfee DLP Prevent detected a potential data loss incident sent in anemail message from an Email Gateway appliance. You want to block the email from leaving yourorganization, and notify the sender of the action taken. For details about product features, usage, andbest practices, click ? or Help.
1 In McAfee ePO, open the Policy Catalog.
2 Select McAfee Email Gateway from the Products list, and select your email configuration policy.
3 Select Add Policy and click Add Rule.
a In Rule Type, select Email Header.
b In Header name, select X-RCIS-Action.
c In the Value field, select ^BLOCK$.
d Click OK, and OK again.
4 In Policy Options, select Policy-based Action.
5 Select Accept and then drop the data, then select Send one or more notification emails.
6 Click Deliver a notification email to the sender and click OK.
7 Save the policy.
Redirect email to McAfee DLP PreventRedirect email from Email Gateway to McAfee DLP Prevent for analysis.
Before you beginHave an Email Gateway appliance or virtual appliance managed by McAfee ePO.
TaskFor details about product features, usage, and best practices, click ? or Help.
1 In McAfee ePO, open the Policy Catalog.
2 Select McAfee Email Gateway from the Products list, and select the email configuration category.
3 Click Add Policy and click Add Rule.
a In Rule Type, select Email Header.
b In Header name, select X-MFE-Encrypt and set the Match to "is not present".
c Click OK, and OK again
4 In Policy Options, select Policy-based Action.
5 Select Route to an alternate relay.
6 Select the relay for your McAfee DLP Prevent server, and click OK.
Refer to the McAfee ePO online Help to get information about relays.
7 Save the policy.
McAfee Cloud Data Protection Beta Release 21-Mar-20174 Configuring system components
Working with McAfee DLP policies
92 McAfee Data Loss Prevention 11.0.0 Product Guide

Integrate McAfee DLP Prevent in your web environmentMcAfee DLP Prevent works with your web proxy to protect web traffic.
McAfee DLP Prevent uses ICAP or ICAPS (ICAP over TLS) to process web traffic, which uses theseports:
• ICAP — 1344
• ICAPS — 11344
Use these high-level steps to configure your environment for web protection.
1 Configure endpoint clients to send web traffic to the web proxy.
2 Configure the web proxy to forward HTTP traffic to McAfee DLP Prevent via ICAP.
3 Configure policy on McAfee DLP Prevent to specify the action to take based on the content of thetraffic.
Example: Configure a rule to allow or block traffic from particular users that contains credit cardnumbers.
After McAfee DLP Prevent analyzes the traffic, it performs one of these actions:
• Allows the traffic and informs the web proxy.
• Denies the traffic and supplies a block page which is presented to the user.
See also Protecting web traffic on page 22Use case: Allow a specified user group to send credit information on page 170
Integrate with Web GatewayConfigure Web Gateway to forward ICAP traffic to McAfee DLP Prevent for analysis.
McAfee DLP Prevent returns a response to Web Gateway, allowing or denying the page.
TaskFor details about product features, usage, and best practices, click ? or Help.
1 In Web Gateway, select Policy, then click the Settings tab.
2 Follow these steps to create the ICAP REQMOD client.
a Right-click ICAP Client and click Add.
b Enter a name, such as ICAP-REQMOD-Client.
c In the Settings for pane, select ICAP Client.
d In the ICAP Service pane, click Add.
e Enter a name, then click OK & Edit.
f Click the green plus sign (Add ICAP Server), then enter the IP address and port of the McAfee DLPPrevent appliance.
g Click OK three times.
McAfee Cloud Data Protection Beta Release 21-Mar-2017Configuring system components
Working with McAfee DLP policies 4
McAfee Data Loss Prevention 11.0.0 Product Guide 93

3 Add the rule set.
a Click the Rule Sets tab.
b Select Add | Rule Set from Library.
c Select the ICAP Client rule set, then click OK.
4 Edit the REQMOD settings.
a On the Rule Sets tab, expand the ICAP Client rule set and select ReqMod.
b Select Call ReqMod Server, then click Edit.
c Select the Rule Criteria step.
d Select If the following criteria is matched.
e Select the criteria entry and click Edit.
f From the Settings drop-down list, select the ICAP REQMOD client you created.
g Click OK, then click Finish.
5 Enable the rule.
a On the Rule Sets tab, select the ICAP Client rule.
b Select Enable.
6 Click Save Changes.
McAfee ePO featuresMcAfee DLP uses these McAfee ePO features.
You must have appropriate permissions to access most features.
McAfee ePOfeature
Addition
Actions Actions that you can perform from the System Tree or use to customizeautomatic responses.
Client tasks Client tasks that you can use to automate management and maintenance onclient systems.
Dashboards Dashboards and monitors that you can use to keep watch on your environment.
Events andresponses
• Events for which you can configure automatic responses.
• Event groups and event types that you can use to customize automaticresponses.
Managed systemproperties
Properties that you can review in the System Tree or use to customize queries.
Permissions sets • Permission sets.
• Data Loss Prevention permission category, available in all existing permissionsets.
McAfee Cloud Data Protection Beta Release 21-Mar-20174 Configuring system components
McAfee ePO features
94 McAfee Data Loss Prevention 11.0.0 Product Guide

McAfee ePOfeature
Addition
Policies DLP Policy, Windows Client Configuration, and Mac OS X Client Configuration forMcAfee DLP Endpoint, and Server Configuration for McAfee DLP Discover andMcAfee DLP appliance policy categories in the Data Loss Prevention 10 productgroup.
Queries andreports
• Default queries that you can use to run reports.
• Custom property groups based on managed system properties that you canuse to build your own queries and reports.
Server tasks Server tasks for McAfee DLP Endpoint include DLP Incident Manager, DLP Operations,and synchronization with cloud McAfee ePO. The Roll UP Data task can be used toroll up McAfee DLP incidents, operational events, or endpoint discovery datafrom selected McAfee ePO servers to produce a single report. The Detect DiscoveryServers task is used with McAfee DLP Discover, and the LdapSync task is used withMcAfee DLP appliances.
Data Protection Used to configure, manage, and monitor McAfee DLP.
Help Desk Used to issue challenge-response keys for uninstalling protected applications,removing files from quarantine, and temporarily bypassing security policies whenthere is a legitimate business need.
For information about these features, see the McAfee ePO documentation.
McAfee Cloud Data Protection Beta Release 21-Mar-2017Configuring system components
McAfee ePO features 4
McAfee Data Loss Prevention 11.0.0 Product Guide 95

McAfee Cloud Data Protection Beta Release 21-Mar-20174 Configuring system components
McAfee ePO features
96 McAfee Data Loss Prevention 11.0.0 Product Guide

5 Protecting removable media
McAfee®
Device Control protects enterprises from the risk associated with unauthorized transfer ofsensitive content whenever storage devices are used.
Device Control can monitor or block devices attached to enterprise-managed computers, allowing youto monitor and control their use in the distribution of sensitive information. Devices such assmartphones, removable storage devices, Bluetooth devices, MP3 players, or plug-and-play devicescan all be controlled.
McAfee Device Control is a component of McAfee DLP Endpoint that is sold as a separate product.While the term Device Control is used throughout this section, all features and descriptions apply toMcAfee DLP Endpoint as well. Implementation of Device Control rules on Microsoft Windows and onMac computers is similar, but not identical. The table below identifies some of the differences.
Table 5-1 Device Control terminology
Term Applies tooperatingsystems:
Definition
Device class Windows A collection of devices that have similar characteristicsand can be managed in a similar manner. Device classeshave the status Managed, Unmanaged, or Whitelisted.
Device template Windows, OS X andMacOS
A list of device properties used to identify or groupdevices.
Device group Windows, OS X andMacOS
A list of device templates grouped into a single template.Used to simplify rules while maintaining granularity.
Device property Windows, OS X andMacOS
A property such as bus type, vendor ID, or product IDthat can be used to define a device.
Device rule Windows, OS X andMacOS
Defines the action taken when a user attempts to use adevice that has a matching device definition in the policy.The rule is applied to the hardware, either at the devicedriver level or the file system level. Device rules can beassigned to specific end-users.
Managed device Windows A device class status indicating that the devices in thatclass are managed by Device Control.
Removablestorage devicerule
Windows, OS X andMacOS
Used to block or monitor a device, or set it as read-only.
Removablestorageprotection rule
Windows, OS X andMacOS
Defines the action taken when a user attempts to copycontent labeled as sensitive to a managed device.
5McAfee Cloud Data Protection Beta Release 21-Mar-2017
McAfee Data Loss Prevention 11.0.0 Product Guide 97

Table 5-1 Device Control terminology (continued)
Term Applies tooperatingsystems:
Definition
Unmanageddevice
Windows A device class status indicating that the devices in thatclass are not managed by Device Control.
Whitelisted device Windows A device class status indicating that the devices in thatclass cannot be managed by Device Control becauseattempts to manage them can affect the managedcomputer, system health, or efficiency.
Contents Protecting devices Managing devices with device classes Define a device class Organizing devices with device templates Device properties Device control rules Removable storage file access rules
Protecting devicesUSB drives, small external hard drives, smartphones, and other removable devices can be used toremove sensitive data from the enterprise.
USB drives are an easy, cheap, and almost-untraceable method of downloading large amounts of data.They are often considered the "weapon of choice" for unauthorized data transfer. Device Controlsoftware monitors and controls USB drives and other external devices, including smartphones,Bluetooth devices, plug-and-play devices, audio players, and non-system hard disks. Device Controlruns on most Microsoft Windows and OS X operating systems, including servers. See the systemrequirements page in this guide for details.
McAfee Device Control protection is built in three layers:
• Device classes — Collections of devices that have similar characteristics and can be managed in asimilar manner. Device classes apply only to plug-and-play device definitions and rules, and are notapplicable to OS X operating systems.
• Device definitions — Identify and group devices according to their common properties.
• Device rules — Control the behavior of devices.
A device rule consists of a list of the device definitions included or excluded from the rule, and theactions taken when use of the device triggers the rule. In addition, it can specify end-users included orexcluded from the rule. They can optionally include an application definition to filter the rule accordingto the source of the sensitive content.
Removable storage protection rules
In addition to device rules, Device Control includes one data protection rule type. Removable storageprotection rules include one or more classifications to define the sensitive content that triggers therule. They can optionally include an application definition or web browser URL, and can include orexclude end users.
Web browser URLs are not supported on McAfee DLP Endpoint for Mac.
McAfee Cloud Data Protection Beta Release 21-Mar-20175 Protecting removable media
Protecting devices
98 McAfee Data Loss Prevention 11.0.0 Product Guide

Managing devices with device classesA device class is a collection of devices that have similar characteristics and that can be managed in asimilar manner.
Device classes name and identify the devices used by the system. Each device class definition includesa name and one or more globally unique identifiers (GUIDs). For example, the Intel® PRO/1000 PLNetwork Connection and Dell wireless 1490 Dual Band WLAN Mini-Card are two devices that belong tothe Network Adapter device class.
Device classes are not applicable to OS X devices.
How device classes are organized
The DLP Policy Manager lists predefined (built-in) device classes on the Definitions tab under DeviceControl. Device classes are categorized by status:
• Managed devices are specific plug-and-play or removable storage devices that are managed byMcAfee DLP Endpoint.
• Unmanaged devices are not managed by Device Control in the default configuration.
• Whitelisted devices are devices that Device Control does not try to control, such as battery devicesor processors.
To avoid potential system or operating system malfunction, the device classes cannot be edited, butthey can be duplicated and changed to add user-defined classes to the list.
Best practice: Do not add a device class to the list without first testing the consequences. In the PolicyCatalog, use the DLP policy | Device Classes | Settings tab to create temporary device class overrides todevice class status and filter type settings.
Overrides can be used for testing user-defined changes before creating a permanent class, as well astroubleshooting device control problems.
Device Control uses device definitions and plug-and-play device control rules to control the behavior ofmanaged device classes and specific devices belonging to a managed device class. Removable storagedevice rules, on the other hand, do not require a managed device class. The reason is related to thedifferent way the two types of device rules use device classes:
• Plug-and-play device rules are triggered when the hardware device is plugged into the computer.Since the reaction is to a device driver, the device class must be managed for the device to berecognized.
• Removable storage device rules are triggered when a new file system is mounted. When thisoccurs, the Device Control client associates the drive letter with the specific hardware device andchecks the device properties. Since the reaction is to a file system operation (that is, when the filesystem is mounted) the device class does not need to be managed.
See also Create a device class on page 100
Define a device classIf a suitable device class does not exist on the predefined list, or is not created automatically whennew hardware is installed, you can create a new device class in the McAfee DLP Endpoint PolicyManager console.
McAfee Cloud Data Protection Beta Release 21-Mar-2017Protecting removable media
Managing devices with device classes 5
McAfee Data Loss Prevention 11.0.0 Product Guide 99

Obtain a GUIDDevice class definitions require a name and one or more globally unique identifiers (GUIDs).
Some hardware devices install their own new device class. To control the behavior of plug-and-playhardware devices that define their own device class, you must first add a new device class to theManaged status in the Device Classes list.
A device class is defined by two properties: a name and a GUID. The name of a new device isdisplayed in the device manager, but the GUID is displayed only in the Windows Registry and there isno easy way to obtain it. To ease the retrieval of new device names and GUIDs, the Device Controlclient reports a New Device Class Found event to the DLP Incident Manager when a hardware devicethat does not belong to a recognized device class is plugged into the host computer.
TaskFor details about product features, usage, and best practices, click ? or Help.
1 In McAfee ePO, select (Menu | Data Protection | DLP Incident Manager | Incident List).
2 Click Edit next to the Filter drop-down list to edit the filter criteria.
3 In the Available Properties list (left pane), select Incident Type.
4 Verify that the Comparison drop-down list value is Equals.
5 From the Values drop-down list, select Device New Class Found.
6 Click Update Filter.
The Incident List displays the new device classes found on all endpoint computers.
7 To view the name and GUID of a specific device, double-click the item to display the incidentdetails.
Create a device classCreate a device class if a suitable device class does not exist on the predefined list or is not createdautomatically when new hardware is installed.
Before you beginObtain the device GUID before beginning this task.
TaskFor details about product features, usage, and best practices, click ? or Help.
1 In McAfee ePO, select Menu | Data Protection | DLP Policy Manager | Definitions.
2 In the left pane, select Device Control | Device Class.
3 Do one of the following:
• Select Actions | New.
• Locate a similar device class on the built-in device class list, then click Duplicate in the Actionscolumn. Click Edit for the duplicated device class.
4 Enter a unique Name and optional Description.
5 Verify the Status and Filter Type required.
McAfee Cloud Data Protection Beta Release 21-Mar-20175 Protecting removable media
Define a device class
100 McAfee Data Loss Prevention 11.0.0 Product Guide

6 Enter the GUID, then click Add.
The GUID must be in the correct format. You are prompted if you enter it incorrectly.
7 Click Save.
See also Managing devices with device classes on page 99Organizing devices with device templates on page 101
Organizing devices with device templatesA device template is a list of device properties such as bus type, device class, vendor ID and productID.
The role of device templates is to identify and group devices according to their common deviceproperties. Some device properties can be applied to any device template, others are exclusive to aspecific device type or types.
Available device template types are:
• Fixed hard drive devices attach to the computer and are not marked by the operating system asremovable storage. Device Control can control fixed hard drives other than the boot drive.
• Plug and play devices are added to the managed computer without any configuration or manualinstallation of DLLs and drivers. Plug-and-play devices include most Microsoft Windows devices. OSX and MacOS devices are supported for USB only.
• Removable storage devices are external devices containing a file system that appear on themanaged computer as drives. Removable storage device templates support either MicrosoftWindows or OS X/MacOS operating systems.
• Whitelisted plug and play devices do not interact with device management properly and mightcause the system to stop responding or cause other serious problems. Supported for MicrosoftWindows devices only.
Whitelisted plug-and-play device templates are added automatically to the excluded list in everyplug-and-play device control rule. They are never managed, even if the parent device class ismanaged.
You can also create device group templates, which are collections of previously defined devicetemplates. Device groups must specify only one operating system, either Microsoft Windows or OS X/MacOS.
Removable storage device templates are more flexible and include additional properties related to theremovable storage devices.
Best practice: Use the removable storage device templates and rules to control devices that can beclassified as either, such as USB mass storage devices.
See also Create a device class on page 100
McAfee Cloud Data Protection Beta Release 21-Mar-2017Protecting removable media
Organizing devices with device templates 5
McAfee Data Loss Prevention 11.0.0 Product Guide 101
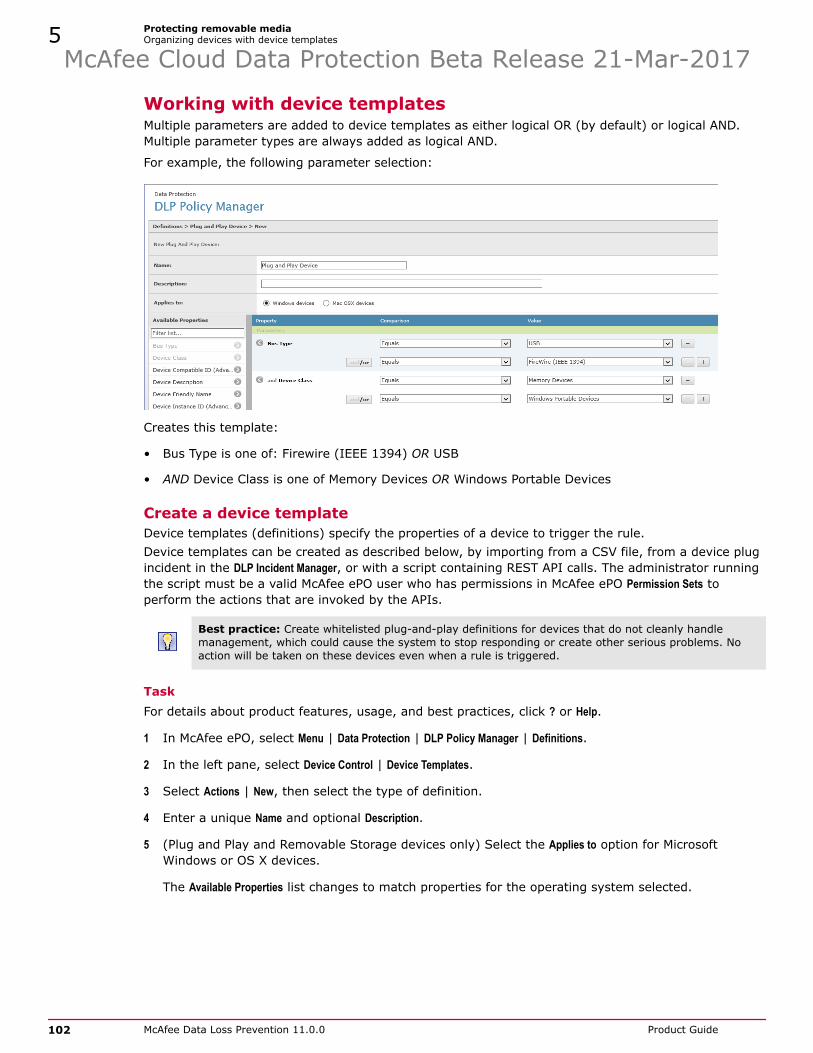
Working with device templatesMultiple parameters are added to device templates as either logical OR (by default) or logical AND.Multiple parameter types are always added as logical AND.
For example, the following parameter selection:
Creates this template:
• Bus Type is one of: Firewire (IEEE 1394) OR USB
• AND Device Class is one of Memory Devices OR Windows Portable Devices
Create a device templateDevice templates (definitions) specify the properties of a device to trigger the rule.Device templates can be created as described below, by importing from a CSV file, from a device plugincident in the DLP Incident Manager, or with a script containing REST API calls. The administrator runningthe script must be a valid McAfee ePO user who has permissions in McAfee ePO Permission Sets toperform the actions that are invoked by the APIs.
Best practice: Create whitelisted plug-and-play definitions for devices that do not cleanly handlemanagement, which could cause the system to stop responding or create other serious problems. Noaction will be taken on these devices even when a rule is triggered.
TaskFor details about product features, usage, and best practices, click ? or Help.
1 In McAfee ePO, select Menu | Data Protection | DLP Policy Manager | Definitions.
2 In the left pane, select Device Control | Device Templates.
3 Select Actions | New, then select the type of definition.
4 Enter a unique Name and optional Description.
5 (Plug and Play and Removable Storage devices only) Select the Applies to option for MicrosoftWindows or OS X devices.
The Available Properties list changes to match properties for the operating system selected.
McAfee Cloud Data Protection Beta Release 21-Mar-20175 Protecting removable media
Organizing devices with device templates
102 McAfee Data Loss Prevention 11.0.0 Product Guide

6 Select properties for the device.
The available properties list varies depending on the type of device.
• To add a property, click >.
• To remove a property, click <.
• To add additional values for the property, click +.Values are added as logical OR by default. Click the and/or button to change it to AND.
• To remove properties, click -.
7 Click Save.
See also Working with incidents on page 209REST API for importing definitions and applying policies on page 76
Create a device groupDevice groups simplify rules while maintaining granularity by combining several device templates intoone group.Device groups can be created as described below, or with a script containing REST API calls. Theadministrator running the script must be a valid McAfee ePO user who has permissions in McAfee ePOPermission Sets to perform the actions that are invoked by the APIs.
TaskFor details about product features, usage, and best practices, click ? or Help.
1 In McAfee ePO, select Menu | Data Protection | DLP Policy Manager | Definitions.
2 In the Device Templates pane, select Actions | New Group, then select the type of group.
Three device group types are supported: Fixed Hard Drive, Plug and Play Device, or Removable Storage Device.
3 Enter a unique Name for the group and optional Description.
4 Select the Applies to option for Microsoft Windows or Mac OS X devices.
This field is not available for fixed hard drive device groups.
5 Using the check boxes, select the items to add to the group.
You can filter long device template lists by typing some text in the Filter items text box and clickingGo.
6 Click Save.
See also REST API for importing definitions and applying policies on page 76
Create a whitelisted plug and play templateThe purpose of whitelisted plug and play devices is to deal with those devices that do not handledevice management well. If not whitelisted, they might cause the system to stop responding or cause
McAfee Cloud Data Protection Beta Release 21-Mar-2017Protecting removable media
Organizing devices with device templates 5
McAfee Data Loss Prevention 11.0.0 Product Guide 103

other serious problems. Whitelisted plug and play templates are not supported on McAfee DLPEndpoint for Mac.
Whitelisted plug-and-play devices are added to plug-and-play device rules on the Exceptions tab. Theyare never managed, even if their parent device class is managed.
Best practice: To avoid compatibility problems, add devices that do not handle device managementwell to the whitelisted device list.
TaskFor details about product features, usage, and best practices, click ? or Help.
1 In McAfee ePO, select Menu | Data Protection | DLP Policy Manager | Definitions.
2 In the left pane, select Device Control | Device Templates, then select Actions | New | Whitelisted Plug and PlayDevice Template.
3 Enter a unique Name and optional Description.
4 Select properties for the device.
• To add a property, click >.
• To remove a property, click <.
• To add additional values for the property, click +.Values are added as logical OR by default. Click the and/or button to change it to AND.
• To remove properties, click -.
5 Click Save.
Create a removable storage device templateA removable storage device is an external device containing a file system that appears on themanaged computer as a drive. Removable storage device templates are more flexible thanplug-and-play device templates, and include additional properties related to the devices.
TaskFor details about product features, usage, and best practices, click ? or Help.
1 In McAfee ePO, select Menu | Data Protection | DLP Policy Manager | Definitions.
2 In the left pane, select Device Control | Device Templates, then select Actions | New | Removable Storage DeviceTemplate.
3 Enter a unique Name and optional Description.
4 Select the Applies to option for Microsoft Windows or OS X devices.
The Available Properties list changes to match properties for the operating system selected.
5 Select properties for the device.
• To add a property, click >.
• To remove a property, click <.
McAfee Cloud Data Protection Beta Release 21-Mar-20175 Protecting removable media
Organizing devices with device templates
104 McAfee Data Loss Prevention 11.0.0 Product Guide

• To add additional values for the property, click +.Values are added as logical OR by default. Click the and/or button to change it to AND.
• To remove properties, click -.
6 Click Save.
Create a serial number and user pair definitionYou can create exceptions for Plug and Play and removable storage device rules based on paireddevice serial numbers and user identities. By linking the device to the logged on user, you create ahigher level of security.
Before you beginObtain the device serial numbers for the devices you are adding to the definition.
You can create a serial number and user pair definition by importing the information in CSV format.You can also export existing definitions in CSV format.
Best practice: Serial number and user pair CSV files use multiple columns. Export a definition tounderstand how the columns are populated before creating a file for import.
Serial number and user pair definitions are not supported on McAfee DLP Endpoint for Mac.
TaskFor details about product features, usage, and best practices, click ? or Help.
1 In McAfee ePO, select Menu | Data Protection | DLP Policy Manager | Definitions.
2 In the left pane, select Device Control | Serial Number & End User Pair.
3 Select Actions | New.
4 Enter a unique Name and optional Description.
5 Enter the required information in the text boxes at the bottom of the page, then click Add. Repeatas required to add additional serial number and end-user pairs.
For User Type | Everyone, leave the End-User field blank. If you are specifying a user, use the [email protected].
6 Click Save.
See also Device properties on page 105
Device propertiesDevice properties specify device characteristics such as the device name, bus type, or file systemtype.
The table provides device property definitions, which definition types use the property, and whichoperating system they apply to.
McAfee Cloud Data Protection Beta Release 21-Mar-2017Protecting removable media
Device properties 5
McAfee Data Loss Prevention 11.0.0 Product Guide 105

Table 5-2 Types of device properties
Propertyname
Devicedefinition
Applies tooperatingsystems:
Description
Bus Type All • Windows —Bluetooth,Firewire(IEEE1394),IDE/SATA, PCI,PCMIA, SCSI,USB
• Mac OS X —Firewire(IEEE1394),IDE/SATA, SD,Thunderbolt,USB
Selects the device BUS type from the availablelist.
For plug-and-play device rules, McAfee DLPEndpoint for Mac only supports USB bus type.
CD/DVDDrives
Removablestorage
• Windows
• Mac OS X
Select to indicate any CD or DVD drive.
Contentencrypted byEndpointEncryption
Removablestorage
Windows Devices protected with Endpoint Encryption.
Device Class Plug and Play Windows Selects the device class from the availablemanaged list.
DeviceCompatibleIDs
All Windows A list of physical device descriptions. Effectiveespecially with device types other than USB andPCI, which are more easily identified using PCIVendorID/DeviceID or USB PID/VID.
DeviceInstance ID(MicrosoftWindows XP)DeviceInstance Path(WindowsVista andlaterMicrosoftWindowsoperatingsystems,includingservers)
All Windows A Windows-generated string that uniquelyidentifies the device in the system.Example:
USB\VID_0930&PID_6533\5&26450FC&0&6.
DeviceFriendlyName
All • Windows
• Mac OS X
The name attached to a hardware device,representing its physical address.
McAfee Cloud Data Protection Beta Release 21-Mar-20175 Protecting removable media
Device properties
106 McAfee Data Loss Prevention 11.0.0 Product Guide

Table 5-2 Types of device properties (continued)
Propertyname
Devicedefinition
Applies tooperatingsystems:
Description
File SystemType
• Fixed harddisk
• Removablestorage
• Windows —CDFS, exFAT,FAT16, FAT32,NTFS, UDFS
• Mac OS X —CDFS, exFAT,FAT16, FAT32,HFS/HFS+,NTFS, UDFS
Mac OS Xsupports FAT onlyon disks otherthan the bootdisk. Mac OS Xsupports NTFS asread-only.
The type of file system.• For hard disks, select one of exFAT, FAT16,
FAT32, or NTFS.
• For removable storage devices, any of theabove plus CDFS or UDFS.
File SystemAccess
Removablestorage
• Windows
• Mac OS X
The access to the file system: read only orread-write.
File SystemVolume Label
• Fixed harddisk
• Removablestorage
• Windows
• Mac OS X
The user-defined volume label, viewable inWindows Explorer. Partial matching is allowed.
File SystemVolumeSerialNumber
• Fixed harddisk
• Removablestorage
Windows A 32-bit number generated automatically when afile system is created on the device. It can beviewed by running the command-line commanddir x:, where x: is the drive letter.
PCIVendorID /DeviceID
All Windows The PCI VendorID and DeviceID are embedded inthe PCI device. These parameters can be obtainedfrom the Hardware ID string of physical devices.Example:
PCI\VEN_8086&DEV_2580&SUBSYS_00000000&REV_04
TrueCryptdevices
Removablestorage
Windows Select to specify a TrueCrypt device.
USB ClassCode
Plug and Play Windows Identifies a physical USB device by its generalfunction. Select the class code from the availablelist.
McAfee Cloud Data Protection Beta Release 21-Mar-2017Protecting removable media
Device properties 5
McAfee Data Loss Prevention 11.0.0 Product Guide 107

Table 5-2 Types of device properties (continued)
Propertyname
Devicedefinition
Applies tooperatingsystems:
Description
USB DeviceSerialNumber
• Plug andPlay
• Removablestorage
• Windows
• Mac OS X
A unique alphanumeric string assigned by theUSB device manufacturer, typically for removablestorage devices. The serial number is the last partof the instance ID.Example:
USB\VID_3538&PID_0042\00000000002CD8A valid serial number must have a minimum of 5alphanumeric characters and must not containampersands (&). If the last part of the instance IDdoes not follow these requirements, it is not aserial number.
You can enter a partial serial number by using thecomparison Contains rather than Equals.
USB VendorID / ProductID
• Plug andPlay
• Removablestorage
• Windows
• Mac OS X
The USB VendorID and ProductID are embeddedin the USB device. These parameters can beobtained from the Hardware ID string of physicaldevices.Example:
USB\Vid_3538&Pid_0042
Device control rulesDevice control rules define the action taken when particular devices are used.
Device control rule Description Supported on
Removable StorageDevice Rule
Used to block or monitor removable storagedevices, or set as read-only. The user can benotified of the action taken.
McAfee DLP Endpoint forWindows, McAfee DLPEndpoint for Mac
Plug-and-play DeviceRule
Used to block or monitor plug-and-play devices.The user can be notified of the action taken.
McAfee DLP Endpoint forWindows, McAfee DLPEndpoint for Mac (USBdevices only)
Removable StorageFile Access Rule
Used to block executables on plug-in devicesfrom running.
McAfee DLP Endpoint forWindows
Fixed Hard Drive Rule Used to block or monitor fixed hard drives, orset as read-only. The user can be notified of theaction taken. Fixed hard drive device rules donot protect the boot or system partition.
McAfee DLP Endpoint forWindows
Citrix XenApp DeviceRule
Used to block Citrix devices mapped to shareddesktop sessions.
McAfee DLP Endpoint forWindows
TrueCrypt DeviceRule
Used to protect TrueCrypt devices. Can be usedto block, monitor, or set to read-only. The usercan be notified of the action taken.
McAfee DLP Endpoint forWindows
McAfee Cloud Data Protection Beta Release 21-Mar-20175 Protecting removable media
Device control rules
108 McAfee Data Loss Prevention 11.0.0 Product Guide

Create a removable storage device ruleRemovable storage devices appear on the managed computer as drives. Use removable storage devicerules to block use of removable devices, or to set them to read-only. They are supported on bothMcAfee DLP Endpoint for Windows and McAfee DLP Endpoint for Mac.
Removable storage device rules do not require a managed device class due to the difference in howthe two types of device rules use device classes:
• Plug-and-play device rules are triggered when the hardware device is plugged into the computer.Since the reaction is to a device driver, the device class must be managed for the device to berecognized.
• Removable storage device rules are triggered when a new file system is mounted. When file systemmount occurs, the McAfee DLP Endpoint software associates the drive letter with the specifichardware device and checks the device properties. Since the reaction is to a file system operation,not a device driver, the device class does not need to be managed.
Device rules have an Enforce on parameter that applies the rule to either Windows or OS X or both.Device templates used in device rules have an Applies to parameter that specifies either Windows devices orMac OSX devices. When selecting device templates, match the operating system in the template and therule. The McAfee DLP Endpoint clients for both operating systems ignore properties that do not apply tothat system. But you cannot save a rule that, for example, enforces on Windows only but contains MacOS X device templates.
TaskFor details about product features, usage, and best practices, click ? or Help.
1 In McAfee ePO, select Menu | Data Protection | DLP Policy Manager | Rule Sets.
2 Select Actions | New Rule Set, or edit an existing rule set.
3 Click the rule set name to open the rule set for editing. Click the Device Control tab.
4 Select Actions | New Rule | Removable Storage Device Rule.
5 Enter a unique Rule Name.
6 (Optional) Change the status and select a severity.
7 Deselect the McAfee DLP Endpoint for Windows or McAfee DLP Endpoint for Mac OS X checkbox if the rule appliesto only one operating system.
8 On the Condition tab, select one or more removable storage items or groups. Optional: assignend-user groups and a Process Name to the rule.
When saving the rule, the device template used to create the items or groups is validated againstthe operating systems selected in the Enforce on field. If they don't match, an error message displays.You must correct the error by deleting templates or changing the selected Enforce on operatingsystem selected before you can save the rule.
9 (Optional) On the Exceptions tab, select a whitelisted device template and fill in the required fields.
You can add multiple exceptions by adding more than one whitelisted device template.
Excluded Processes and Excluded Serial Number & User Pair options are not supported on McAfee DLP Endpointfor Mac.
10 On the Reaction tab, select an Action. Optional: add a User Notification, and Report Incident.
If you don't select Report Incident there is no record of the incident in the DLP Incident Manager.
McAfee Cloud Data Protection Beta Release 21-Mar-2017Protecting removable media
Device control rules 5
McAfee Data Loss Prevention 11.0.0 Product Guide 109

11 (Optional) Select a different action when the end-user is working outside the corporate network.
12 Click Save.
See also Use case: Removable storage file access device rule with a whitelisted process on page 166Use case: Set a removable device as read-only on page 167
Create a plug-and-play device ruleUse plug and play device rules to block or monitor plug and play devices. They are supported on bothMcAfee DLP Endpoint for Windows and McAfee DLP Endpoint for Mac. On OS X computers, support isfor USB devices only.
A plug and play device is a device that can be added to the managed computer without anyconfiguration or manual installation of DLLs and drivers. For plug and play device rules to controlMicrosoft Windows hardware devices, the device classes specified in device templates used by the rulemust be set to Managed status.
Device rules have an Enforce on parameter that applies the rule to either Windows or OS X or both.Device templates used in device rules have an Applies to parameter that specifies either Windows devices orMac OSX devices. When selecting device templates, match the operating system in the template and therule. The McAfee DLP Endpoint clients for both operating systems ignore properties that do not apply tothat system. But you cannot save a rule that, for example, enforces on Windows only but contains MacOS X device templates.
TaskFor details about product features, usage, and best practices, click ? or Help.
1 In McAfee ePO, select Menu | Data Protection | DLP Policy Manager | Rule Sets.
2 Select Actions | New Rule Set, or edit an existing rule set.
3 To open the rule set for editing, click the rule set name. Click the Device Control tab.
4 Select Actions | New Rule | Plug and Play Device Rule.
5 Enter a unique rule name.
6 (Optional) Change the status and select a severity.
7 Deselect the McAfee DLP Endpoint for Windows or McAfee DLP Endpoint for Mac OS X checkbox if the rule appliesto only one operating system.
8 On the Condition tab, select one or more plug and play items or groups.
When saving the rule, the template used to create the items or groups is validated against theoperating systems selected in the Enforce on field. If they don't match, an error message displays. Youmust correct the error by deleting templates or changing the selected Enforce on operating systemselected before you can save the rule.
9 (Optional) Assign end-user groups to the rule.
10 (Optional) On the Exceptions tab, select a whitelisted device template and fill in the required fields.
You can add multiple exceptions by adding more than one whitelisted item or a whitelisted plug andplay group.
11 On the Reaction tab, select an Action. Optional: Add a User Notification, and Report Incident.
If you don't select Report Incident, there is no record of the incident in the DLP Incident Manager.
McAfee Cloud Data Protection Beta Release 21-Mar-20175 Protecting removable media
Device control rules
110 McAfee Data Loss Prevention 11.0.0 Product Guide

12 (Optional) Select a different action when the end user is working outside the corporate network, oris connected by VPN.
13 Click Save.
See also Use case: Block and charge an iPhone with a plug-and-play device rule on page 167
Create a removable storage file access device ruleUse removable storage file access rules to block executables on plug-in devices from running.
TaskFor details about product features, usage, and best practices, click ? or Help.
1 In McAfee ePO, select Menu | Data Protection | DLP Policy Manager | Rule Sets.
2 Select Actions | New Rule Set, or edit an existing rule set.
3 Click the rule set name to open the rule set for editing. Click the Device Control tab.
4 Select Actions | New Rule | Removable Storage File Access Rule.
5 Enter a unique Rule Name.
6 (Optional) Change the status and select a severity.
7 On the Condition tab, select one or more removable storage device items or groups. (Optional)assign end-user groups to the rule.
8 (Optional) Change the default True File Type or File Extension definitions according to your requirements.
9 (Optional) On the Exceptions tab, select Whitelisted File Names, and fill in the required fields.
The File Name exception is for applications that must be allowed to run. An example is encryptionapplications on encrypted drives.
10 On the Reaction tab, select an Action. (Optional) add a User Notification, and Report Incident.
If you don't select Report Incident there is no record of the incident in the DLP Incident Manager.
11 (Optional) Select a different action when the end-user is working outside the corporate network.
12 Click Save.
See also Removable storage file access rules on page 113
Create a fixed hard drive device ruleUse fixed hard drive device rules to control hard drives attached to the computer and not marked bythe operating system as removable storage. They are supported on McAfee DLP Endpoint for Windowsonly.
Fixed hard drive rules include a drive definition with an action to block or make read-only, an end-userdefinition, and optional user notification. They do not protect the boot or system partition.
McAfee Cloud Data Protection Beta Release 21-Mar-2017Protecting removable media
Device control rules 5
McAfee Data Loss Prevention 11.0.0 Product Guide 111

TaskFor details about product features, usage, and best practices, click ? or Help.
1 In McAfee ePO, select Menu | Data Protection | DLP Policy Manager | Rule Sets.
2 Select Actions | New Rule Set, or edit an existing rule set.
3 Click the rule set name to open the rule set for editing. Click the Device Control tab.
4 Select Actions | New Rule | Fixed Hard Drive Rule.
5 Enter a unique Rule Name.
6 (Optional) change the status and select a severity.
7 On the Condition tab, select one or more fixed hard drive items or groups. (Optional) assign end-usergroups to the rule.
8 (Optional) On the Exceptions tab, select a whitelisted definition and fill in the required fields.
You an add multiple exceptions by adding more than one whitelisted definition.
9 On the Reaction tab, select an Action. Optional: add a User Notification, and Report Incident.
If you don't select Report Incident there is no record of the incident in the DLP Incident Manager.
10 (Optional) Select a different action when the end-user is working outside the corporate network.
11 Click Save.
Create a Citrix device ruleUse Citrix device rules to block Citrix devices mapped to shared desktop sessions.
Citrix XenApp device rules are supported on Windows-based computers only. McAfee DLP Endpointsoftware can block Citrix devices mapped to shared desktop sessions. Floppy disk, fixed, CD,removable, and network drives can all be blocked, as well as printers and clipboard redirection. Youcan assign the rule to specific end users.
TaskFor details about product features, usage, and best practices, click ? or Help.
1 In McAfee ePO, select Menu | Data Protection | DLP Policy Manager | Rule Sets.
2 Select Actions | New Rule Set, or edit an existing rule set.
3 Click the rule set name to open the rule set for editing. Click the Device Control tab.
4 Select Actions | New Rule | Citrix XenApp Device Rule.
5 Enter a unique Rule Name.
6 (Optional) Change the status and select a severity.
7 On the Condition tab, select one or more resources.
8 (Optional) Assign end-user groups to the rule.
9 (Optional) On the Exceptions tab, fill in the required fields for whitelisted users.
10 Click Save.
McAfee Cloud Data Protection Beta Release 21-Mar-20175 Protecting removable media
Device control rules
112 McAfee Data Loss Prevention 11.0.0 Product Guide

The selected resources are blocked.
The only Action for Citrix rules is Block. You do not need to set the action on the Reaction pane.
Create a TrueCrypt device ruleUse TrueCrypt device rules to block or monitor TrueCrypt virtual encryption devices, or set them toread-only. They are supported on McAfee DLP Endpoint for Windows only.
TrueCrypt device rules are a subset of removable storage device rules. TrueCrypt encrypted virtualdevices can be protected with TrueCrypt device rules or with removable storage protection rules.
• Use a device rule if you want to block or monitor a TrueCrypt volume, or make it read-only.
• Use a protection rule if you want content-aware protection of TrueCrypt volumes.
McAfee DLP Endpoint client software treats all TrueCrypt mounts as removable storage, even when theTrueCrypt application is writing to the local disk.
TaskFor details about product features, usage, and best practices, click ? or Help.
1 In McAfee ePO, select Menu | Data Protection | DLP Policy Manager | Rule Sets.
2 Select Actions | New Rule Set, or edit an existing rule set.
3 Click the rule set name to open the rule set for editing. Click the Device Control tab.
4 Select Actions | New Rule | TrueCrypt Device Rule.
5 Enter a unique Rule Name.
6 (Optional) Change the status and select a severity.
7 (Optional) On the Condition tab, assign end-user groups to the rule.
8 (Optional) On the Exceptions tab, fill in the required fields for whitelisted users.
9 On the Reaction tab, select an Action. (Optional) add a User Notification, and Report Incident.
If you don't select Report Incident there is no record of the incident in the DLP Incident Manager.
10 (Optional) Select a different action when the end-user is working outside the corporate network.
11 Click Save.
Removable storage file access rulesRemovable storage file access rules are used to block executables on plug-in devices from running.They are supported on Microsoft Windows computers only.
Removable storage file access rules block removable storage devices from running applications. Youcan specify included and excluded devices in the rule. Because some executables, such as encryptionapplications on encrypted devices, must be allowed to run, the rule includes a File Name | is none ofparameter to exempt named files from the blocking rule.
McAfee Cloud Data Protection Beta Release 21-Mar-2017Protecting removable media
Removable storage file access rules 5
McAfee Data Loss Prevention 11.0.0 Product Guide 113

File access rules use true file type and extension to determine which files to block. True file typeidentifies the file by its internally registered data type, providing accurate identification even if theextension was changed. By default, the rule blocks compressed files (.zip, .gz, .jar, .rar, and .cab) andexecutables (.bat, .bin, .cgi, .com, .cmd, .dll, .exe, .class, .sys, and .msi). You can customize the fileextension definitions to add any file type required.
File access rules also block executable files from being copied to removable storage devices because thefile filter driver cannot differentiate between opening and creating an executable.
McAfee Cloud Data Protection Beta Release 21-Mar-20175 Protecting removable media
Removable storage file access rules
114 McAfee Data Loss Prevention 11.0.0 Product Guide

6 Classifying sensitive content
Classifications identify and track sensitive content and files.
On installation, McAfee DLP displays many predefined classifications. You can use these classificationsas is in protection rules, but if you want to customize a classification you must duplicate it first. Theclassifications in the current release have been improved to reduce false positives.
Classifications can be exported to a file, to facilitate synchronizing policies with McAfee ePO Cloud.
Contents Components of the Classification module Using classifications Classification definitions and criteria Manual classification Registered documents Whitelisted text Create and configure classifications Configure classification components for McAfee DLP Endpoint Create classification definitions Use case: Integrate Titus client with third-party tags Use case: Integrate Boldon James Email Classifier with classification criteria
Components of the Classification moduleMcAfee DLP uses two mechanisms to classify sensitive content: content classifications and contentfingerprinting, and two modes: automatic and manual classification.
Automatic classifications are defined in McAfee DLP and distributed by McAfee ePO in the policiesdeployed to endpoints. They are then applied to content according to the criteria that define them.Manual classifications are applied by authorized users to files and emails on their computers. Themanual classification dialog is only supported on McAfee DLP Endpoint for Windows. All other McAfeeDLP products can enforce data protection rules based on manual classifications, but cannot set or viewthem
The Classification module in McAfee DLP stores content classification and fingerprinting criteria, and thedefinitions used to configure them. It is also the place for setting up registered documentsrepositories, user authorization for manual classification, and whitelisted text.
The module provides these features:
• Manual Classification — Configures the end-user groups allowed to manually classify or fingerprintcontent
• Definitions — Defines the content, properties, and location of files for classification
6McAfee Cloud Data Protection Beta Release 21-Mar-2017
McAfee Data Loss Prevention 11.0.0 Product Guide 115

• Classification — Creates classifications and defines content classification and fingerprinting criteria
• Register Documents — Uploads files containing known sensitive content
• Whitelisted Text — Uploads files containing text for whitelisting
Using classificationsClassifications identify and track sensitive content by applying content fingerprints or contentclassifications to files and content.
McAfee DLP identifies and tracks sensitive content with user-defined classifications. All McAfee DLPproducts support content classifications, that is, can apply them by assigning them to data protection,device control, or discovery rules. All McAfee DLP products can enforce content fingerprints, but onlyMcAfee DLP Endpoint for Windows can apply them. Content fingerprints label the sensitiveinformation, and the label stays with the content even if it is copied into another document or saved toa different format.
Content classification
Content classifications include data and file conditions that define sensitive content. For automaticclassification, the classification criteria are compared to the content each time a data protection,endpoint discovery, or McAfee DLP Discover rule is triggered. For manual classification, theclassification is embedded as a physical tag inside the file or email. Manual content classifications arepersistent, and remain in the file when copied to storage, attached to an email, or uploaded to awebsite such as SharePoint.
Automatic content classifications are supported on all McAfee DLP products. Data protection rulesbased on manual classifications are enforced on all McAfee DLP products, but only McAfee DLPEndpoint for Windows has the manual classification dialog that allows users to classify files.
Content classification criteria identify sensitive text patterns, dictionaries, and keywords, alone or incombinations. Combinations can be simply multiple named properties, or properties with a definedrelationship known as proximity. They can also specify file conditions such as the file type, documentproperties, file encryption, or location in the file (header/body/footer).
Content fingerprints
Content fingerprint criteria are applied to files or content based one of these options:
• Application-based — The application that created or changed the file.
• Location-based — The network share or the removable storage definition of where the file isstored.
• Web-based — The web addresses that opened or downloaded the files.
All data and file conditions available to classification criteria are also available to content fingerprintcriteria, allowing fingerprints to combine the functionality of both criteria types.
Content fingerprint signatures are stored in a file's extended file attributes (EA), alternate data stream(ADS), or in a hidden folder (ODB$). You can select the preferred technology on the Windows clientconfiguration Content Tracking page. They are applied to a file when the file is saved. The mechanism isthe same for automatic and manual content fingerprints. If a user copies or moves fingerprinted
McAfee Cloud Data Protection Beta Release 21-Mar-20176 Classifying sensitive content
Using classifications
116 McAfee Data Loss Prevention 11.0.0 Product Guide

content to another file, the fingerprint criteria are applied to that file. If the fingerprinted content isremoved from the file, the content fingerprint signatures are also removed. If the file is copied to asystem that doesn't support EA or ADS (such as SharePoint), the fingerprint criteria are lost.
McAfee DLP Endpoint applies content fingerprint criteria to files after a policy is applied regardless ofwhether the classification is used in a protection rule or not.
Applying classification criteria
McAfee DLP applies criteria to a file, email, or web request in one of the following ways:
• McAfee DLP Prevent applies criteria when an email or web request matches a configuredclassification.
• McAfee DLP Monitor applies criteria when network traffic matches a configured classification.
• McAfee DLP Endpoint applies criteria when:
• The file matches a configured classification.
• The file or sensitive content is moved or copied to a new location.
• A file is matched during a discovery scan.
• An email or a web request matches a configured classification.
• A user with permission manually applies criteria to a file.
See also Create classification criteria on page 130Create content fingerprinting criteria on page 132Assign manual classification permissions on page 133
Classifying by file destinationIn addition to classifying content by its originating location, you can classify and control where contentis being sent. In data loss prevention parlance, this is known as data-in-motion.
File protection rules controlling destinations include:
• Cloud Protection rules
• Email Protection rules
• Mobile Protection rules
• Network Communication Protection rules (outgoing)
• Printer Protection rules
• Removable Storage Protection rules
• Web Protection rules
Working with emailMcAfee DLP Endpoint protects sensitive data in email headers, body, or attachments when emails aresent. Email storage discovery detects emails with sensitive data in OST or PST files and either tags orquarantines them.
McAfee DLP Endpoint protects sensitive content in email by adding content classifications to contentand blocking emails with sensitive content from being sent. The email protection policy can specifydifferent rules for different users and email destinations, or for emails protected with encryption or
McAfee Cloud Data Protection Beta Release 21-Mar-2017Classifying sensitive content
Using classifications 6
McAfee Data Loss Prevention 11.0.0 Product Guide 117

Rights Management. Rules can be enabled for McAfee DLP Endpoint for Windows, McAfee DLP Prevent,or both. Manual classifications added by McAfee DLP Endpoint for Windows users are supported byMcAfee DLP appliances.
McAfee DLP Prevent for Mobile Email applies classifications to analyze emails sent to mobile devices.Rules can save evidence and create incidents that can be assigned to cases.
See also Protecting email content and attachments on page 147
Define network parametersNetwork definitions serve as filter criteria in network protection rules.
• Network Addresses monitor network connections between an external source and a managedcomputer. The definition can be a single address, a range, or a subnet. You can include and excludedefined network addresses in network communication protection rules.
• Network Port definitions in network communication protection rules allow you to exclude specificservices as defined by their network ports. A list of common services and their ports is built in. Youcan edit the items on the list, or create your own definitions.
• Network Share definitions specify shared network folders in network share protection rules. Youcan include or exclude defined shares.
Working with printersPrinter protection rules manage both local and network printers, and either block or monitor theprinting of confidential material.Printer protection rules in McAfee DLP Endpoint support advanced mode and V4 printers. Definedprinters and end-users can be included or excluded from a rule. Image printers and PDF printers canbe included in the rule.
Printer protection rules can include application definitions. You can define whitelisted processes thatare exempted from printer protection rules on the Printing Protection page in the Windows Client Configuration.
Controlling information uploaded to websitesWeb addresses are used in web protection rules.You can use web address definitions to block tagged data from being posted to defined webdestinations (websites or specific pages in a website), or use them to prevent tagged data from beingposted to websites that are not defined. Typically, the web address definitions define any internalwebsites as well as external websites where posting tagged data is allowed.
Classifying by file locationSensitive content can be can be defined by where it is located (stored) or by where it is used (fileextension or application).McAfee DLP Endpoint uses several methods to locate and classify sensitive content. Data-at-rest is theterm used to describe file locations. It classifies content by asking questions like "where is it in thenetwork?" or "which folder is it in?" Data-in-use is the term used to define content by how or where itis used. It classifies content by asking questions like "which application called it?" or "what is the fileextension?"
McAfee DLP Endpoint Discovery rules find your data-at-rest. They can search for content in endpointcomputer files or email storage (PST, mapped PST, and OST) files. Depending on the properties,applications, or locations in the rule classification, the rule can search specified storage locations andapply encryption, quarantine, or RM policies. Alternately, the files can be tagged or classified to controlhow they are used.
McAfee Cloud Data Protection Beta Release 21-Mar-20176 Classifying sensitive content
Using classifications
118 McAfee Data Loss Prevention 11.0.0 Product Guide

Text extractionThe text extractor parses the file content when files are opened or copied and compares it to textpatterns and dictionary definitions in the classification rules. When a match occurs, the criteria areapplied to the content.
McAfee DLP supports accented characters. When an ASCII text file contains a mix of accentedcharacters, such as French and Spanish, as well as some regular Latin characters, the text extractormight not correctly identify the character set. This issue occurs in all text extraction programs. Thereis no known method or technique to identify the ANSI code page in this case. When the text extractorcannot identify the code page, text patterns and content fingerprint signatures are not recognized. Thedocument cannot be properly classified, and the correct blocking or monitoring action cannot be taken.To work around this issue, McAfee DLP uses a fallback code page. The fallback is either the defaultlanguage of the computer or a different language set by the administrator.
Text extraction with McAfee DLP Endpoint
Text extraction is supported on Microsoft Windows and Apple OS X computers.
The text extractor can run multiple processes depending on the number of cores in the processor.
• A single core processor runs only one process.
• Dual-core processors run up to two processes.
• Multi-core processors run up to three simultaneous processes.
If multiple users are logged on, each user has their own set of processes. Thus, the number of textextractors depends on the number of cores and the number of user sessions. The multiple processescan be viewed in the Windows Task Manager. Maximum memory usage for the text extractor isconfigurable. The default is 75 MB.
How McAfee DLP Endpoint categorizes applicationsBefore you create classifications or rule sets using applications, you should understand how McAfeeDLP Endpoint categorizes them, and the effect this has on system performance.
This categorization is not supported on McAfee DLP Endpoint for Mac.
McAfee DLP Endpoint software divides applications into four categories called strategies. These affecthow the software works with different applications. You can change the strategy to achieve a balancebetween security and the computer’s operating efficiency.
The strategies, in order of decreasing security, are:
• Editor — Any application that can modify file content. This includes “classic” editors like MicrosoftWord and Microsoft Excel, as well as browsers, graphics software, accounting software, and soforth. Most applications are editors.
• Explorer — An application that copies or moves files without changing them, such as MicrosoftWindows Explorer or certain shell applications.
McAfee Cloud Data Protection Beta Release 21-Mar-2017Classifying sensitive content
Using classifications 6
McAfee Data Loss Prevention 11.0.0 Product Guide 119

• Trusted — An application that needs unrestricted access to files for scanning purposes. Examplesare McAfee® VirusScan® Enterprise, backup software, and desktop search software such as GoogleDesktop.
• Archiver — An application that can reprocess files. Examples are compression software such asWinZip, and encryption applications such as McAfee Endpoint Encryption software or PGP.
How to work with DLP strategies
Change the strategy as necessary to optimize performance. For example, the high level of observationthat an editor application receives is not consistent with the constant indexing of a desktop searchapplication. The performance penalty is high, and the risk of a data leak from such an application islow. Therefore, you should use the trusted strategy with these applications.
You can override the default strategy on the DLP Policy | Settings | Application Strategy page. Createand remove overrides as necessary to experiment with fine-tuning the policy.
You can also create more than one template for an application and assign it more than one strategy.Use the different templates in different classifications and rules to achieve different results in differentcontexts. You must be careful, however, in assigning such templates within rule sets to avoid conflicts.McAfee DLP Endpoint resolves potential conflicts according to the following hierarchy: archiver >trusted > explorer > editor. That is, editor has the lowest ranking. If an application is an editor in onetemplate and anything else in another template in the same rule set, McAfee DLP Endpoint does nottreat the application as an editor.
Classification definitions and criteriaClassification definitions and criteria contain one or more conditions describing the content or fileproperties.
Table 6-1 Available conditions
Property Applies to: Definition Products
AdvancedPattern
Definitions,criteria
Regular expressions or phrases used to matchdata such as dates or credit card numbers.
All products
Dictionary Definitions,criteria
Collections of related keywords and phrasessuch as profanity or medical terminology.
Keyword Criteria A string value.You can add multiple keywords to contentclassification or content fingerprinting criteria.The default Boolean for multiple keywords isOR, but can be changed to AND.
Proximity Criteria Defines a conjunction between two propertiesbased on their location to each other.Advanced patterns, dictionaries, or keywordscan be used for either property.
The Closeness parameter is defined as "lessthan x characters," where the default is 1.You can also specify a Match count parameterto determine the minimum number ofmatches to trigger a hit.
McAfee Cloud Data Protection Beta Release 21-Mar-20176 Classifying sensitive content
Classification definitions and criteria
120 McAfee Data Loss Prevention 11.0.0 Product Guide

Table 6-1 Available conditions (continued)
Property Applies to: Definition Products
DocumentProperties
Definitions,criteria
Contains these options:• Any Property • Last saved by
• Author • Manager Name
• Category • Security
• Comments • Subject
• Company • Template
• Keywords • Title
Any Property is a user-defined property.
File Encryption Criteria Contains these options:
• Not encrypted*
• McAfee Encrypted Self-Extractor
• McAfee Endpoint Encryption
• Microsoft Rights Management encryption*
• Seclore Rights Management encryption
• Unsupported encryption types or passwordprotected file*
• McAfee DLPEndpoint forWindows (Alloptions)
• McAfee DLPDiscover, McAfeeDLP Prevent,
• McAfee DLP Monitor(Options markedwith *)
File Extension Definitions,criteria
Groups of supported file types such as MP3and PDF.
All products
File Information Definitions,criteria
Contains these options:• Date Accessed • File Name*
• Date Created • File Owner
• Date Modified • File Size*
• File Extension*
• All products
• McAfee DLP Prevent
• McAfee DLP Monitor(Options markedwith *)
Location in file Criteria The section of the file the data is located in.• Microsoft Word documents — the
classification engine can identify Header,Body, and Footer.
• PowerPoint documents — WordArt isconsidered Header; everything else isidentified as Body.
• Other documents — Header and Footer arenot applicable. The classification criteriadoes not match the document if they areselected.
Third Party tags Criteria Used to specify Titus field names and values. • McAfee DLPEndpoint forWindows
• McAfee DLP Prevent
• McAfee DLP Monitor
McAfee Cloud Data Protection Beta Release 21-Mar-2017Classifying sensitive content
Classification definitions and criteria 6
McAfee Data Loss Prevention 11.0.0 Product Guide 121

Table 6-1 Available conditions (continued)
Property Applies to: Definition Products
True File Type Definitions,criteria
Groups of file types.For example, the built-in Microsoft Excelgroup includes Excel XLS, XLSX, and XMLfiles, as well as Lotus WK1 and FM3 files, CSVand DIF files, Apple iWork files, and more.
All products
ApplicationTemplate
Definitions The application or executable accessing thefile.
• McAfee DLPEndpoint forWindows
• McAfee DLPEndpoint for Mac
End-User Group Definitions Used to define manual classificationpermissions.
Network Share Definitions The network share the file is stored in. McAfee DLP Endpointfor WindowsURL List Definitions The URL the file is accessed from.
See also Create classification definitions on page 135
Dictionary definitionsA dictionary is a collection of keywords or key phrases where each entry is assigned a score.
Content classification and content fingerprinting criteria use specified dictionaries to classify adocument if a defined threshold (total score) is exceeded — that is, if enough words from thedictionary appear in the document. The assigned scores can be negative or positive, allowing you tolook for words or phrases in the presence of other words or phrases.
The difference between a dictionary and a string in a keyword definition is the assigned score.
• A keyword classification always tags the document if the phrase is present.
• A dictionary classification gives you more flexibility because you can set a threshold when youapply the definition, making the classification relative. The threshold can be up to 1000. You canalso choose how matches are counted: Count multiple occurrences increases the count with each match,Count each match string only one time counts how many dictionary entries match the document.
McAfee DLP software includes several built-in dictionaries with terms commonly used in health,banking, finance, and other industries. You can also create your own dictionaries. Dictionaries can becreated and edited manually or by copying and pasting from other documents.
Limitations
There are some limitations to using dictionaries. Dictionaries are saved in Unicode (UTF-8) and can bewritten in any language. The following descriptions apply to dictionaries written in English. Thedescriptions generally apply to other languages, but there might be unforeseen problems in certainlanguages.
Dictionary matching has these characteristics:
• It is only case sensitive when you create case-sensitive dictionary entries. Built-in dictionaries,created before this feature was available, are not case-sensitive.
• It can optionally match substrings or whole phrases.
• It matches phrases including spaces.
McAfee Cloud Data Protection Beta Release 21-Mar-20176 Classifying sensitive content
Classification definitions and criteria
122 McAfee Data Loss Prevention 11.0.0 Product Guide

If substring matching is specified, use caution when entering short words because of the potential forfalse positives. For example, a dictionary entry of "cat" would flag "cataracts" and "duplicate." Toprevent these false positives, use the whole phrase matching option, or use statistically improbablephrases (SIPs) to give the best results. Similar entries are another source of false positives. Forexample, in some HIPAA disease lists, both "celiac" and "celiac disease" appear as separate entries. Ifthe second term appears in a document and substring matching is specified, it produces two hits (onefor each entry) and skews the total score.
See also Create or import a dictionary definition on page 135
Advanced pattern definitionsAdvanced patterns use regular expressions (regex) that allow complex pattern matching, such as insocial security numbers or credit card numbers. Definitions use the Google RE2 regular expressionsyntax.
Advanced pattern definitions include a score (required), as with dictionary definitions. They can alsoinclude an optional validator — an algorithm used to test regular expressions. Use of the propervalidator can significantly reduce false positives. The definition can include an optional IgnoredExpressions section to further reduce false positives. The ignored expressions can be regexexpressions or keywords. You can import multiple keywords to speed up creating the expressions.
When defining an advanced pattern, you can choose how matches are counted: Count multiple occurrencesincreases the count with each match, Count each match string only one time counts how many definedpatterns give an exact match in the document.
Advanced patterns indicate sensitive text. Sensitive text patterns are redacted in hit highlightedevidence.
If both an matched pattern and an ignored pattern are specified, the ignored pattern has priority. Thisallows you to specify a general rule and add exceptions to it without rewriting the general rule.
See also Create an advanced pattern on page 136
Classifying content with document properties or fileinformationDocument property definitions classify content by predefined metadata values. File informationdefinitions classify content by file metadata.
Document properties
Document properties can be retrieved from any Microsoft Office document or PDF, and can be used inclassification definitions. Partial matching is supported using the Contains comparison.
There are three types of document properties:
McAfee Cloud Data Protection Beta Release 21-Mar-2017Classifying sensitive content
Classification definitions and criteria 6
McAfee Data Loss Prevention 11.0.0 Product Guide 123

• Predefined properties — Standard properties such as author and title.
• Custom properties — Custom properties added to the document metadata are allowed by someapplications such as Microsoft Word. A custom property can also reference a standard documentproperty that is not on the predefined properties list, but cannot duplicate a property that is on thelist.
• Any property — Allows defining a property by value alone. This feature is useful in cases wherethe keyword has been entered in the wrong property parameter or when the property name isunknown. For example, adding the value Secret to the Any property parameter classifies alldocuments that have the word Secret in at least one property.
File informationFile information definitions are used in data protection and discovery rules, and in classifications, toincrease granularity. File information includes date created, date modified, file owner, and file size. Thedate properties have both exact (before, after, between) and relative (in last X days, weeks, years)date options. File Type (extensions only) is a predefined, extensible list of file extensions.
McAfee DLP Prevent and McAfee DLP Monitor cannot detect the Date Accessed, Date Created, Date Modified, andFile Owner file conditions because they are not embedded into the file. Consequently, the conditions arelost when the file is in-motion, or uploaded to the cloud or a website:
Application templatesAn application template controls specific applications using properties such as product or vendorname, executable file name, or window title.An application template can be defined for a single application, or a group of similar applications.There are built-in (predefined) templates for a number of common applications such as WindowsExplorer, web browsers, encryption applications, and email clients.
The application template definition includes a field with a checkbox for operating system. Analyzingmemory mapped files is a Windows-only feature, and is disabled automatically when you select OS Xapplications.
Application templates for Microsoft Windows can use any of the following parameters:
• Command line — Allows command line arguments, for example: java-jar, that can controlpreviously uncontrollable applications.
• Executable directory — The directory where the executable is located. One use of this parameteris to control U3 applications.
• Executable file hash — The application display name, with an identifying SHA2 hash.
• Executable file name — Normally the same as the display name (minus the SHA2 hash), butcould be different if the file is renamed.
• Original executable file name — Identical to the executable file name, unless the file has beenrenamed.
• Product name — The generic name of the product, for example, Microsoft Office 2012, if listed inthe executable file's properties.
• Vendor name — The company name, if listed in the executable file's properties.
• Window title — A dynamic value that changes at runtime to include the active file name.
All parameters except the SHA2 application name and the executable directory accept substringmatches.
Application templates for OS X can use any of the following parameters:
McAfee Cloud Data Protection Beta Release 21-Mar-20176 Classifying sensitive content
Classification definitions and criteria
124 McAfee Data Loss Prevention 11.0.0 Product Guide

• Command line
• Executable directory
• Executable file hash
• Executable file name
Manual classificationEnd users can manually apply or remove classifications or content fingerprinting to files.
The manual classification feature applies file classification. That is, the classifications applied do notneed to be related to content. For example, a user can place a PCI classification on any file. The filedoes not have to contain credit card numbers. Manual classification is embedded in the file. InMicrosoft Office files, the classification is stored as a document property. In other supported files, it isstored as an XMP property. For email, it is added as markup text.
When setting up manual classification, you can also allow a user to manually apply contentfingerprints.
Support for manual classification is as follows:
• McAfee DLP Endpoint for Windows end users can manually classify files.
• McAfee DLP Endpoint clients (on both Windows and Mac endpoints) McAfee DLP Prevent, andMcAfee DLP Monitor can detect manually classified files (in email attachments, for example) andtake appropriate action based on the classification.
• McAfee DLP Discover can detect manual classifications in classification and remediation scans, andcan take appropriate action in remediation scans.
By default, end users do not have permission to view, add, or remove classifications, but you canassign specific classifications to specific user groups, or to Everyone. The assigned users can then applythe classification to files as they work. Manual classification can also allow you to maintain yourorganization’s classification policy even in special cases of sensitive or unique information that thesystem does not process automatically.
When setting up permission for manual classification, you have the option of allowing contentclassifications, content fingerprints, or both to be applied manually.
Support for manual classification
McAfee DLP offers two types of support for manual classifications: one for Microsoft Office files, andone for all supported file types.
Microsoft Office applications (Word, Excel, and PowerPoint) and Microsoft Outlook are supported at thefile creation level. End users can choose to classify files by clicking the manual classification icon. Youcan also set options to force users to classify files by activating the manual classification pop-up whenfiles are saved, or Outlook emails sent.
McAfee Cloud Data Protection Beta Release 21-Mar-2017Classifying sensitive content
Manual classification 6
McAfee Data Loss Prevention 11.0.0 Product Guide 125
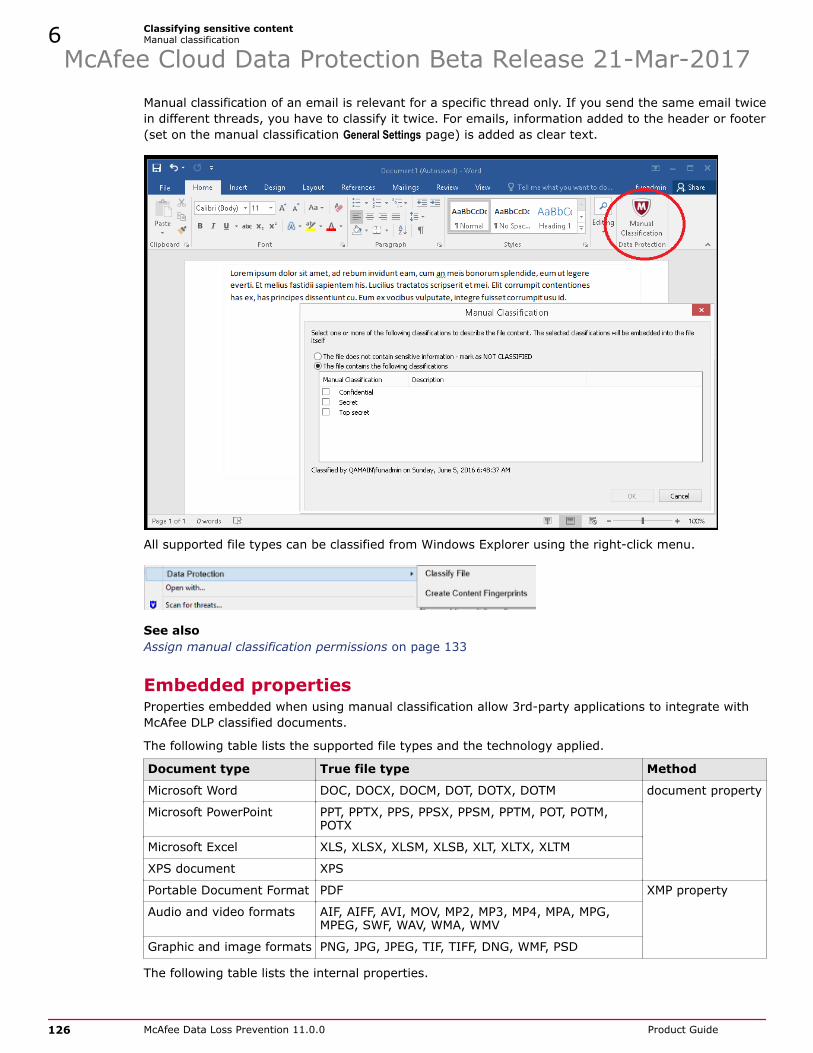
Manual classification of an email is relevant for a specific thread only. If you send the same email twicein different threads, you have to classify it twice. For emails, information added to the header or footer(set on the manual classification General Settings page) is added as clear text.
All supported file types can be classified from Windows Explorer using the right-click menu.
See also Assign manual classification permissions on page 133
Embedded propertiesProperties embedded when using manual classification allow 3rd-party applications to integrate withMcAfee DLP classified documents.
The following table lists the supported file types and the technology applied.
Document type True file type Method
Microsoft Word DOC, DOCX, DOCM, DOT, DOTX, DOTM document property
Microsoft PowerPoint PPT, PPTX, PPS, PPSX, PPSM, PPTM, POT, POTM,POTX
Microsoft Excel XLS, XLSX, XLSM, XLSB, XLT, XLTX, XLTM
XPS document XPS
Portable Document Format PDF XMP property
Audio and video formats AIF, AIFF, AVI, MOV, MP2, MP3, MP4, MPA, MPG,MPEG, SWF, WAV, WMA, WMV
Graphic and image formats PNG, JPG, JPEG, TIF, TIFF, DNG, WMF, PSD
The following table lists the internal properties.
McAfee Cloud Data Protection Beta Release 21-Mar-20176 Classifying sensitive content
Manual classification
126 McAfee Data Loss Prevention 11.0.0 Product Guide

Classification Property name
Manual file classification DLPManualFileClassification
File classification last modified by DLPManualFileClassificationLastModifiedBy
File classification last modification date DLPManualFileClassificationLastModificationDate
File classification version DLPManualFileClassificationVersion
Endpoint discovery automatic classification DLPAutomaticFileClassification
Endpoint discovery automatic classification version DLPAutomaticFileClassificationVersion
Configure manual classificationManual classification has several options that specify how the feature works, and what messages aredisplayed.
Manual classification allows McAfee DLP Endpoint for Windows end-users to add classifications to filesfrom the Windows Explorer right-click menu. For Microsoft Office applications and Outlook, manualclassifications can be applied when saving files or sending emails. All McAfee DLP products can applyrules based on manual classifications.
TaskFor details about product features, usage, and best practices, click ? or Help.
1 In McAfee ePO select Menu | Data Protection | Classification.
2 Click Manual Classification.
3 From the View drop-down list, select General Settings.
4 Select or deselect options to optimize to your enterprise requirements.
5 (Optional) Select additional information to add to the email by clicking and selecting anotification definition or creating one.
The notifications support the Locales feature for all supported languages. Language support alsoapplies to added email comments.
See also Customizing end-user messages on page 156
Registered documentsThe registered documents feature is an extension of location-based content fingerprinting. It givesadministrators another way to define sensitive information, to protect it from being distributed inunauthorized ways.
To create registered documents, McAfee DLP categorizes and fingerprints the contents of filespredefined as sensitive, for example sales estimate spreadsheets for the upcoming quarter. It uses thefingerprints to create signatures that are stored as registered documents. The signatures created arelanguage-agnostic, that is, the process works for all languages.
McAfee DLP supports two types of registered documents, manual and automatic.
Create manually registered documents by uploading files in the Classification module on the RegisterDocuments page. Then create packages from the uploaded files to distribute to the McAfee DLP Endpointfor Windows clients and be used in rules enforced on the endpoints. McAfee DLP Endpoint for Mac doesnot support registered documents.
McAfee Cloud Data Protection Beta Release 21-Mar-2017Classifying sensitive content
Registered documents 6
McAfee Data Loss Prevention 11.0.0 Product Guide 127

Create automatically registered documents by running McAfee DLP Discover document registrationscans. The registered documents are stored on McAfee DLP Discover servers, and used to defineclassification and remediation scans, and McAfee DLP Prevent and McAfee DLP Monitor protectionrules.
Viewing registered documents data
The default Statistics view displays totals for number of files, file size, number of signatures, and soforth, in the left pane, and statistics per file in the right pane. Use this data to remove less importantpackages if the signature limit is approached.
The Group by view for manual registration allows grouping by classification or type/extension. Itdisplays uploaded files per classification or type. You can filter the data by classification or with acustom filter. Information about last package creation and changes to the file list are displayed in theupper right.
For automatic registration, Group by allows grouping by classification, repository server, scan, or TrueFile type. You can filter the data by scan, classification, or with a custom filter.
See also Upload registered documents on page 130Using classifications on page 116How registration scans work on page 184
Manual registrationManually registered documents are supported on McAfee DLP Endpoint for Windows clients.
To use manually registered documents, upload files on the Classification | Register Documents page,assigning them to a classification as you upload them. Then, select uploaded files to create a package.
The File Upload and Create Package options are available only when a McAfee DLP Endpoint license isregistered on the DLP Settings page.
When you create a package, McAfee DLP processes all files on the list, and loads the fingerprints tothe McAfee ePO database. When you add or delete documents, you must create a new package. Thesoftware makes no attempt to calculate whether some of the files have already been fingerprinted. Italways processes the entire list. The McAfee ePO database distributes the packages to the endpoints.The McAfee DLP Endpoint for Windows client on the managed computers applies the protection rulesthat can contain registered content fragments in the classification definitions. McAfee DLP Prevent andMcAfee DLP Monitor can access the McAfee ePO database to use registered documents.
The Create Package command works on the registered documents list and the whitelisted documentslist simultaneously to create a single package. The maximum number of signatures per package is 1million each for registered documents and whitelisted documents.
Automatic registrationAutomatically registered documents are supported on McAfee DLP Discover, McAfee DLP Prevent, andMcAfee DLP Monitor.
McAfee DLP Discover registered documents scans create signature files that are stored on the McAfeeDLP Discover servers. You can run registered document scans on CIFS, SharePoint, or Boxrepositories. Assign a classification to the registered documents on the Scan Details page when settingup the scan. You can view the scans on the Register Documents page when you select Type: AutomaticRegistration.
McAfee Cloud Data Protection Beta Release 21-Mar-20176 Classifying sensitive content
Registered documents
128 McAfee Data Loss Prevention 11.0.0 Product Guide

When multiple McAfee DLP Discover servers are distributed in a network, one server is selected tocontain the master signature database. All signatures are sent to the master database, and a copy ofthe master database is distributed to slave databases on the other McAfee DLP Discover servers. Adistributed system can be set up to share the signature databases across LANs or LAN/WAN networks.
Whitelisted textMcAfee DLP ignores whitelisted text when processing file content.
McAfee DLP Discover and McAfee DLP Endpoint for Mac do not support whitelisted text.
You can upload files containing text to McAfee ePO for whitelisting. Whitelisted text will not causecontent to be classified, even if parts of it match content classification or content fingerprintingcriteria. Use whitelisting for text that commonly appears in files, such as boilerplates, legaldisclaimers, and copyright information.
• Files for whitelisting must contain at least 400 characters.
• If a file contains both classified and whitelisted data, it is not ignored by the system. All relevantcontent classification and content fingerprinting criteria associated with the content remain ineffect.
See also Upload files to whitelist text on page 131
Create and configure classificationsCreate classifications and criteria for use in rules or scans.
Tasks• Create a classification on page 129
Data protection and discovery rules require classification definitions in their configuration.
• Create classification criteria on page 130Apply classification criteria to files based on file content and properties.
• Upload registered documents on page 130Select and classify documents to distribute to the endpoint computers.
• Upload files to whitelist text on page 131Upload files containing commonly used text for whitelisting.
• Export a classification on page 131Create a classification file for import into McAfee ePO Cloud.
Create a classificationData protection and discovery rules require classification definitions in their configuration.
TaskFor details about product features, usage, and best practices, click ? or Help.
1 In McAfee ePO, select Menu | Data Protection | Classification.
2 Click New Classification.
3 Enter a name and optional description.
McAfee Cloud Data Protection Beta Release 21-Mar-2017Classifying sensitive content
Whitelisted text 6
McAfee Data Loss Prevention 11.0.0 Product Guide 129

4 Click OK.
5 Add end user groups to manual classification, or registered documents to the classification, byclicking Edit for the respective component.
6 Add content classification criteria or content fingerprinting criteria with the Actions control.
Create classification criteriaApply classification criteria to files based on file content and properties.
You build content classification criteria from data and file Definitions. If a required definition does notexist, you can create it as you define the criteria.
TaskFor details about product features, usage, and best practices, click ? or Help.
1 In McAfee ePO, select Menu | Data Protection | Classification.
2 Select the classification to add the criteria to, then select Actions | New Content Classification Criteria.
3 Enter the name.
4 Select properties and configure the comparison and value entries.
• To remove a property, click <.
• For some properties, click ... to select an existing property or to create one.
• To add additional values to a property, click +.
• To remove values, click –.
5 Click Save.
See also Using classifications on page 116
Upload registered documentsSelect and classify documents to distribute to the endpoint computers.
Uploading registered documents requires a McAfee DLP Endpoint, McAfee DLP Prevent, or McAfee DLPMonitor license.
TaskFor details about product features, usage, and best practices, click ? or Help.
1 In McAfee ePO, select Menu | Data Protection | Classification.
2 Click the Register Documents tab.
3 Click File Upload.
4 Browse to the file, select whether to overwrite a file if the file name exists, and select aclassification.
File Upload processes a single file. To upload multiple documents, create a .zip file.
McAfee Cloud Data Protection Beta Release 21-Mar-20176 Classifying sensitive content
Create and configure classifications
130 McAfee Data Loss Prevention 11.0.0 Product Guide

5 Click OK.
The file is uploaded and processed, and statistics are displayed on the page.
6 Click Create Package when the file list is complete.
You can create a package of only registered or whitelisted documents by leaving one list blank.When files are deleted, remove them from the list and create a new package to apply the changes.
A signature package of all registered documents and all whitelisted documents is loaded to theMcAfee ePO database for distribution to the endpoint computers. McAfee DLP Prevent and McAfeeDLP Monitor can access the McAfee ePO database to use registered documents in rule definitions.
See also Registered documents on page 127
Upload files to whitelist textUpload files containing commonly used text for whitelisting.
McAfee DLP Discover does not support whitelisted text.
TaskFor details about product features, usage, and best practices, click ? or Help.
1 In McAfee ePO, select Menu | Data Protection | Classification.
2 Click the Whitelisted Text tab.
3 Click File Upload.
4 Browse to the file and select wether or not to overwrite a file if the file name exists.
5 Click OK.
See also Whitelisted text on page 129
Export a classificationCreate a classification file for import into McAfee ePO Cloud.
TaskFor details about product features, usage, and best practices, click ? or Help.
1 In the Classification module, select a classification to be exported.
Each classification you export creates a separate file.
2 Select Group Actions | Export.
If you are using Internet Explorer or Mozilla Firefox, a dialog box opens. You can open or save thefile. With Internet Explorer, you can also choose where to save the file. If you are using GoogleChrome, the file is saved directly to the Downloads folder without opening a dialog box. The file isnamed dlpClassification_{date}.backup, where the date format is yyyymmdd.
Configure classification components for McAfee DLP EndpointMcAfee DLP Endpoint supports manual classification and applying content fingerprinting criteria.
McAfee Cloud Data Protection Beta Release 21-Mar-2017Classifying sensitive content
Configure classification components for McAfee DLP Endpoint 6
McAfee Data Loss Prevention 11.0.0 Product Guide 131

Tasks• Create content fingerprinting criteria on page 132
Apply fingerprinting criteria to files based on the application or file location.
• Use case: Application-based fingerprinting on page 132You can classify content as sensitive according to the application that produced it.
• Assign manual classification permissions on page 133Configure users allowed to manually classify files.
• Use case: Manual classification on page 134Workers whose jobs require routine creation of files that contain sensitive data can beassigned manual classification permission. They can classify the files as they create themas part of their normal workflow.
Create content fingerprinting criteriaApply fingerprinting criteria to files based on the application or file location.
TaskFor details about product features, usage, and best practices, click ? or Help.
1 In McAfee ePO, select Menu | Data Protection | Classification.
2 Select the classification to add the criteria to.
3 Select Actions | New Content Fingerprinting Criteria, then select the type of fingerprinting criteria.
4 Enter the name and specify additional information based on the type of fingerprinting criteria.
• Application — Click ... to select one or more applications.
• Location — Click ... to select one or more network shares. If needed, specify the type ofremovable media.
• Web application — Click ... to select one or more URL lists.
5 (Optional) Select one or more properties and configure the comparison and value entries.
• To remove a property, click <.
• For some properties, click ... to select an existing property or to create a new one.
• To add additional values to a property, click +.
• To remove values, click –.
6 Click Save.
See also Using classifications on page 116
Use case: Application-based fingerprintingYou can classify content as sensitive according to the application that produced it.
In some cases, content can be classified as sensitive by the application that produces it. An example istop-secret military maps. These are JPEG files, typically produced by a specific US Air Force GISapplication. By selecting this application in the fingerprinting criteria definition, all JPEG files producedby the application are tagged as sensitive. JPEG files produced by other applications are not tagged.
McAfee Cloud Data Protection Beta Release 21-Mar-20176 Classifying sensitive content
Configure classification components for McAfee DLP Endpoint
132 McAfee Data Loss Prevention 11.0.0 Product Guide

TaskFor details about product features, usage, and best practices, click ? or Help.
1 In McAfee ePO, select Menu | Data Protection | Classification.
2 On the Definitions tab, select Application Template, then select Actions | New.
3 Enter a name, for example GIS Application, and optional description.
4 Using one or more properties from the Available Properties list, define the GIS application, then clickSave.
5 On the Classification tab, click New Classification, and enter a name, for example, GIS application, andoptional definition. Click OK.
6 Select Actions | New Content Fingerprinting Criteria | Application to open the applications fingerprintingcriteria page.
7 In the Name field, enter a name for the tag, for example GIS tag.
8 In the Applications field, select the GIS application created in step 1.
9 From the Available Properties | File Conditions list, select True File Type, then in the Value field, select Graphicfiles [built-in].
The built-in definition includes JPEG, as well as other graphic file types. By selecting an applicationas well as a file type, only JPEG files produced by the application are included in the classification.
10 Click Save, then select Actions | Save Classification.
The classification is ready to be used in protection rules.
Assign manual classification permissionsConfigure users allowed to manually classify files.
TaskFor details about product features, usage, and best practices, click ? or Help.
1 In McAfee ePO, select Menu | Data Protection | Classification.
2 Click the Manual Classification tab.
3 From the View drop-down list, select either Group by classifications or Group by end-user groups.
You can assign classifications to end-user groups or end-user groups to classifications, which everis more convenient. The View list controls the display.
4 If you are grouping by classifications:
a Select a classification from the displayed list.
b In the Classifications section, select the classification type.
Reduce the list by typing a string in the Filter list text box if the list is very long.
c Select Actions | Select End-User Groups.
d In the Choose from existing values window, select user groups or click New Item to create a new group.Click OK.
McAfee Cloud Data Protection Beta Release 21-Mar-2017Classifying sensitive content
Configure classification components for McAfee DLP Endpoint 6
McAfee Data Loss Prevention 11.0.0 Product Guide 133

5 If you are grouping by end-user groups:
a Select a user group from the displayed list.
b Select Actions | Select Classifications.
c In the Choose from existing values window, select classifications. Click OK.
Use case: Manual classificationWorkers whose jobs require routine creation of files that contain sensitive data can be assignedmanual classification permission. They can classify the files as they create them as part of theirnormal workflow.
The manual classification feature works with McAfee DLP Endpoint, McAfee DLP Prevent, and McAfeeDLP Monitor.
In this example, a health-care provider knows that all patient records must be considered confidentialunder HIPAA rules. Workers creating or editing patient records are given manual classificationpermissions.
TaskFor details about product features, usage, and best practices, click ? or Help.
1 Create a user group or groups for workers who create or edit patient records.
a In McAfee ePO, open the Classification module (Menu | Data Protection | Classification).
b On the Definitions tab, select Source/Destination | End User Group.
c Select Actions | New, replace the default name with a meaningful name such as PHI User Group,and add users or groups to the definition.
d Click Save.
2 Create a PHI (Protected Health Information) classification.
a In the Classification module, on the Classification tab, select [Sample] PHI [built-in] in the left pane, thenselect Actions | Duplicate Classification.
An editable copy of the sample classification appears.
b Edit the Name, Description, and Classification Criteria fields as required.
c In the Manual Classification field, click Edit.
d In the Additional Actions section, select the classification type.
By default, Manual classification only is selected.
e Select Actions | Select End-User Groups.
f In the Choose from existing values window, select the group or groups you created previously, thenclick OK.
g Go back to the Classification tab and select Actions | Save Classification.
Workers who are members of the assigned groups can now classify the patient records as they arecreated. To do so, right-click on the file, select Data Protection, and select the appropriate option.
Only selected options (step 2.d) appear in the menu.
McAfee Cloud Data Protection Beta Release 21-Mar-20176 Classifying sensitive content
Configure classification components for McAfee DLP Endpoint
134 McAfee Data Loss Prevention 11.0.0 Product Guide

Create classification definitionsYou can use predefined classification definitions or create new definitions. Predefined definitionscannot be modified or deleted.
Tasks
• Create a general classification definition on page 135Create and configure definitions for use in classifications and rules.
• Create or import a dictionary definition on page 135A dictionary is a collection of keywords or key phrases where each entry is assigned ascore. Scores allow for more granular rule definitions.
• Create an advanced pattern on page 136Advanced patterns are used to define classifications. An advanced pattern definition canconsist of a single expression or a combination of expressions and false positive definitions.
• Create a URL list definition on page 137URL list definitions are used to define web protection rules. They are added to rules as Webaddress (URL) conditions.
See also Classification definitions and criteria on page 120
Create a general classification definitionCreate and configure definitions for use in classifications and rules.
TaskFor details about product features, usage, and best practices, click ? or Help.
1 In McAfee ePO, select Menu | Data Protection | Classification.
2 Select the type of definition to configure, then select Actions | New.
3 Enter a name and configure the options and properties for the definition.
The available options and properties depend on the type of definition.
4 Click Save.
Create or import a dictionary definitionA dictionary is a collection of keywords or key phrases where each entry is assigned a score. Scoresallow for more granular rule definitions.
You can create a dictionary definition by importing a dictionary file in CSV format. You can also importitems with a script containing REST API calls. The administrator running the script must be a validMcAfee ePO user who has permissions in McAfee ePO Permission Sets to perform the actions that areinvoked by the APIs.
Best practice: Dictionary CSV files can use multiple columns. Export a dictionary to understand howthe columns are populated before creating a file for import.
TaskFor details about product features, usage, and best practices, click ? or Help.
1 In McAfee ePO, select Menu | Data Protection | Classification.
2 Click the Definitions tab.
McAfee Cloud Data Protection Beta Release 21-Mar-2017Classifying sensitive contentCreate classification definitions 6
McAfee Data Loss Prevention 11.0.0 Product Guide 135

3 In the left pane, select Dictionary.
4 Select Actions | New.
5 Enter a name and optional description.
6 Add entries to the dictionary.
To import entries:
a Click Import Entries.
b Enter words or phrases, or cut and paste from another document.
The text window is limited to 20,000 lines of 50 characters per line.
c Click OK.
All entries are assigned a default score of 1.
d If needed, updated the default score of 1 by clicking Edit for the entry.
e Select the Start With, End With, and Case Sensitive columns as needed.
Start With and End With provide substring matching.
To manually create entries:
a Enter the phrase and score.
b Select the Start With, End With, and Case Sensitive columns as needed.
c Click Add.
7 Click Save.
See also REST API for importing definitions and applying policies on page 76
Create an advanced patternAdvanced patterns are used to define classifications. An advanced pattern definition can consist of asingle expression or a combination of expressions and false positive definitions.
Advanced patterns are defined using regular expressions (regex). A discussion of regex is beyond thescope of this document. There are a number of regex tutorials on the Internet where you can learnmore about this subject.
TaskFor details about product features, usage, and best practices, click ? or Help.
1 In McAfee ePO, select Menu | Data Protection | Classification.
2 Select the Definitions tab, then select Advanced pattern in the left pane.
The available patterns appear in the right pane.
To view only the user-defined advanced patterns, deselect the Include Built-in items checkbox.User-defined patterns are the only patterns that can be edited.
3 Select Actions | New.
The New Advanced pattern definition page appears.
McAfee Cloud Data Protection Beta Release 21-Mar-20176 Classifying sensitive content
Create classification definitions
136 McAfee Data Loss Prevention 11.0.0 Product Guide

4 Enter a name and optional description.
5 Under Matched Expressions, do the following:
a Enter an expression in the text box. Add an optional description.
b Select a validator from the drop-down list.
McAfee recommends using a validator when possible to minimize false positives, but it is notrequired. If you don't want to specify a validator, or if validation is not appropriate for theexpression, select No Validation.
c Enter a number in the Score field.
This number indicates the weight of the expression in threshold matching. This field is required.
d Click Add.
6 Under Ignored Expressions, do the following:
a Enter an expression in the text box.
If you have text patterns stored in an external document, you can copy-paste them into thedefinition with Import Entries.
b In the Type field, select RegEx from the drop-down list if the string is a regular expression, orKeyword if it is text.
c Click Add.
7 Click Save
Create a URL list definitionURL list definitions are used to define web protection rules. They are added to rules as Web address (URL)conditions.
You can create a URL list definition by importing the list in CSV format. You can also import items witha script containing REST API calls. The administrator running the script must be a valid McAfee ePOuser who has permissions in McAfee ePO Permission Sets to perform the actions that are invoked by theAPIs.
Best practice: URL list CSV files can use multiple columns. Export a URL list to understand how thecolumns are populated before creating a file for import.
TaskFor each URL required, perform steps 1–4. For details about product features, usage, and bestpractices, click ? or Help.
1 In McAfee ePO, select Menu | Data Protection | DLP Policy Manager | Definitions.
2 In the left pane, select URL List, then select Actions | New.
3 Enter a unique Name and optional Definition.
4 Do one of the following:
• Enter the Protocol, Host, Port, and Path information in the text boxes, then click Add.
• Paste a URL in the Paste URL text box, then click Parse, then click Add.
McAfee Cloud Data Protection Beta Release 21-Mar-2017Classifying sensitive contentCreate classification definitions 6
McAfee Data Loss Prevention 11.0.0 Product Guide 137

The URL fields are filled in by the software.
5 When all required URLs are added to the definition, click Save.
See also REST API for importing definitions and applying policies on page 76
Use case: Integrate Titus client with third-party tagsContent classification or content fingerprinting criteria can include multiple tag name/tag value pairs.
Before you begin1 In the Policy Catalog, open the current Windows Client Configuration. Select Settings |
Operational Modes and Modules. Verify that Outlook Add-ins | Activate 3rd Party Add-in Integration isselected.
2 In Settings | Email Protection, in the Outlook 3rd Party Add-in Integration section, select Titus fromthe Vendor Name drop-down list.
These settings affect the use of third-party tags with email only. You can use third-partytags with files without changing client configuration settings.
McAfee DLP calls the third-party API to identify tagged files and determine the tags. Classificationscreated with third-party tags can be applied to all protection and discovery rules that inspect files.
To implement this feature, the third-party SDK must be installed on the endpoints.
TaskFor details about product features, usage, and best practices, click ? or Help.
1 In McAfee ePO, select Menu | Data Protection | Classification.
2 Click New Classification.
3 Type a unique name and an optional description.
4 Click Actions, then select either New Content Classification Criteria or New Content Fingerprinting Criteria
5 Select the Third Party tags property.
6 Enter the Titus tag name and a value. Select the value definition from the drop-down list.
The value string entered can be defined as:
• equals one of
• equals all of
• contains one of
• contains all of
7 (Optional) Click + and add another name / value pair.
8 Click Save.
McAfee Cloud Data Protection Beta Release 21-Mar-20176 Classifying sensitive content
Use case: Integrate Titus client with third-party tags
138 McAfee Data Loss Prevention 11.0.0 Product Guide

Use case: Integrate Boldon James Email Classifier withclassification criteria
Create classification criteria to integrate Boldon James Email Classifier.
Boldon James Email Classifier is an email solution that labels and classifies emails. McAfee DLPEndpoint software can integrate with Email Classifier and block emails based on assignedclassifications. You can choose what string Email Classifier sends to McAfee DLP Endpoint when youset up the Email Classifier software. Use this string to define the classification criteria.
TaskFor details about product features, usage, and best practices, click ? or Help.
1 Set up Boldon James compatibility in McAfee DLP Endpoint:
a Using the Boldon James Classifier Administration console, open Classifier Application Settings | OutlookSettings. Set McAfee Host DLP scan to Enabled and set McAfee Host DLP marking to refer to a markingformat that contains the classification value together with static text unique to the DLP marking.A string based on this marking format will be passed to McAfee DLP Endpoint containing theclassification criteria.
b In the Policy Catalog, open the current Client Configuration. Select Settings | Operational Modes andModules. Verify that Outlook Add-ins | Activate 3rd Party Add-in Integration is selected.
c In Settings | Email Protection, in the Outlook 3rd Party Add-in Integration section, select Boldon Jamesfrom the Vendor Name drop-down list.
2 Create a Boldon James classification.
For each required classification, perform the following steps:
a In McAfee ePO, select Menu | Data Protection | Classification.
b Click the Classification tab, then click New Classification.
c Type a unique name and an optional description.
d Click Actions | New Content Classification Criteria.
e Select the Keyword property. In the Value field, enter the string built from the marking format thatyou selected in the Classifier Administration setup to send to McAfee DLP Endpoint.
[Boldon James classification] is the string you selected in the Email Classifier setup tosend to McAfee DLP Endpoint
3 In McAfee ePO, select Menu | Data Protection | DLP Rule Sets.
4 On the Rule Sets tab, do one of the following.
• Select Actions | New Rule Set.
• Select an existing rule set.
5 Select Actions | New Rule | Email Protection.
An Email Protection definition form appears.
6 Enter a unique rule name.
McAfee Cloud Data Protection Beta Release 21-Mar-2017Classifying sensitive content
Use case: Integrate Boldon James Email Classifier with classification criteria 6
McAfee Data Loss Prevention 11.0.0 Product Guide 139

7 On the Condition tab, select Body from the drop-down list, then select the appropriate Boldon Jamesclassification. Select appropriate End-User, Email Envelope, and Recipients options.
The McAfee DLP Endpoint client considers the Boldon James classification to be part of the emailbody. Limiting the definition to scan only the body makes the rule more efficient.
8 On the Reaction tab, select the appropriate Prevent Action, User Notification, Report Incident, and Severityparameters. Set the Status to Enabled, then click Save.
McAfee Cloud Data Protection Beta Release 21-Mar-20176 Classifying sensitive content
Use case: Integrate Boldon James Email Classifier with classification criteria
140 McAfee Data Loss Prevention 11.0.0 Product Guide

7 Protecting sensitive content
McAfee DLP protects sensitive content with a combination of McAfee DLP Endpoint, McAfee DLPDiscover, McAfee DLP Monitor, and McAfee DLP Prevent policies.
McAfee ePO deploys McAfee DLP policies to endpoints, McAfee DLP Discover servers, and McAfee DLPappliances which protect the sensitive content.
Contents Creating policies with rule sets Create rule definitions Defining rules to protect sensitive content Whitelists Customizing end-user messages Reactions available for rule types Create and configure rules and rule sets Rule use cases
Creating policies with rule setsRule sets define McAfee DLP policies. A rule set can contain a combination of data protection, devicecontrol, discovery rules, and application control rules. Rule definitions apply to all rule sets.
The Rule Sets page displays a list of defined rule sets and the status of each. The display includes thenumber of incidents logged for each rule set, how many rules have been defined, and how manyenabled. Colored icons indicate the types of rules enabled. The ToolTip displayed when mousing overicons shows the type of rule and number of enabled rules.
Figure 7-1 Rule Sets page showing ToolTip information
In Rule set 1, eleven data protection rules are defined, but only three of the rules are enabled. Theblue icon shows which types of rules are defined. The ToolTip shows two of these are clipboard rules.To view which rules are defined but disabled, open the rule for editing.
See also Protecting files with discovery rules on page 175Create a rule on page 161
7McAfee Cloud Data Protection Beta Release 21-Mar-2017
McAfee Data Loss Prevention 11.0.0 Product Guide 141

Synchronizing rule sets with McAfee ePO CloudMcAfee ePO Cloud can push Unified Security Policy rules to McAfee DLP.
You can synchronize McAfee ePO Cloud rules and definitions to McAfee DLP. You can set up McAfeeePO Cloud to synchronize when you make changes in the policy, or manually run the Download Cloud DataProtection Policy server task on McAfee ePO Cloud. Synchronization creates three read-only rule sets inthe DLP Policy Manager:
• Web Application Filter (CASB)
• Cloud Data Protection (CASB)
• Cloud Global Settings (CASB)
Web Application Filter rule set
Rules defined in the Web Application Filter section of the McAfee ePO Cloud Unified Security Policysynchronize to McAfee DLP as web application control rules. Rules for Google Drive, Box, and OneDrivealso create cloud protection rules in the Data Protection section of the rule set. In other words, a singleOneDrive rule in McAfee ePO Cloud produces two rules in McAfee DLP.
Cloud Data Protection rule set
Each cloud data protection rule from McAfee ePO Cloud produces a cloud protection rule and a webprotection rule in McAfee DLP. In the case where the McAfee ePO Cloud rule has more than onereaction, the cloud data protection rule produces McAfee DLP cloud and web protection rules for eachreaction.
Cloud Global Settings rule set
URLs defined in the Global URL Blacklist synchronize as web address definitions in web application controlrule conditions. URLs defined in the Global URL Whitelist synchronize as web address definitions in webapplication control rule exceptions.
Create rule definitionsDefinitions are used in the creation of data protection, device control, and discovery rules.
The DLP Policy Manager contains a large number of built-in (predefined) definitions. They can be used asis, or duplicated and customized as required.
Tasks
• Create a network port range on page 142Network port ranges serve as filter criteria in network communication protection rules.
• Create a network address range on page 143Network address ranges serve as filter criteria in network communication protection rules.
• Create an email address list definition on page 143Email address list definitions are predefined email domains or specific email addresses thatcan be referenced in email protection rules.
• Create a network printer definition on page 144Use network printer definitions to create granular printer protection rules. Defined printerscan be included or excluded from rules.
Create a network port rangeNetwork port ranges serve as filter criteria in network communication protection rules.
McAfee Cloud Data Protection Beta Release 21-Mar-20177 Protecting sensitive content
Create rule definitions
142 McAfee Data Loss Prevention 11.0.0 Product Guide

TaskFor details about product features, usage, and best practices, click ? or Help.
1 In McAfee ePO, select Menu | Data Protection | DLP Policy Manager | Definitions.
2 In the left pane, select Network Port, then click Actions | New.
You can also edit the built-in definitions.
3 Enter a unique name and optional description.
4 Enter the port numbers, separated by commas, and optional description, then click Add.
5 When you have added all required ports, click Save.
Create a network address rangeNetwork address ranges serve as filter criteria in network communication protection rules.
TaskFor each required definition, perform steps 1–4: For details about product features, usage, and bestpractices, click ? or Help.
1 In McAfee ePO, select Menu | Data Protection | DLP Policy Manager | Definitions.
2 In the left pane, select Network Address (IP address), then click Actions | New.
3 Enter a unique name for the definition and an optional description.
4 Enter an address, a range, or a subnet in the text box. Click Add.
Correctly formatted examples are displayed on the page.
Only IPv4 addresses are supported. If you enter an IPv6 address, the message says IP address isinvalid rather than saying that it isn't supported.
5 When you have entered all required definitions, click Save.
Create an email address list definitionEmail address list definitions are predefined email domains or specific email addresses that can bereferenced in email protection rules.
To get granularity in email protection rules, you include some email addresses, and exclude others.Make sure to create both types of definitions.
Best practice: For combinations of operators that you use frequently, add multiple entries to one emailaddress list definition.
You can import email address lists in CSV format. You can also import items with a script containingREST API calls. The administrator running the script must be a valid McAfee ePO user who haspermissions in McAfee ePO Permission Sets to perform the actions that are invoked by the APIs.
Best practice: Email address list CSV files use multiple columns. Export an address list to understandhow the columns are populated before creating a file for import.
Email value definitions support wildcards, and can define conditions. An example of a condition definedwith a wildcard is *@intel.com. Combining an address list condition with a user group in a ruleincreases granularity.
McAfee Cloud Data Protection Beta Release 21-Mar-2017Protecting sensitive content
Create rule definitions 7
McAfee Data Loss Prevention 11.0.0 Product Guide 143

TaskFor details about product features, usage, and best practices, click ? or Help.
1 In McAfee ePO, select Menu | Data Protection | DLP Policy Manager | Definitions.
2 In the left pane, select Email Address List, then Actions | New.
3 Enter a Name and optional Description.
4 Select an Operator from the drop-down list.
Operators defined using the Email Addresses option support wildcards in the Value field.
Email protection rules that are enforced on McAfee DLP Prevent or McAfee DLP Monitor do not matchon the Display name operators.
5 Enter a value, then click Add.
6 Click Save when you have finished adding email addresses.
See also REST API for importing definitions and applying policies on page 76
Create a network printer definitionUse network printer definitions to create granular printer protection rules. Defined printers can beincluded or excluded from rules.
Before you beginObtain the UNC path of the printer in the network.
TaskFor details about product features, usage, and best practices, click ? or Help.
1 In McAfee ePO, select Menu | Data Protection | DLP Policy Manager | Definitions.
2 In the left panel, select Network Printer, then select Actions | New.
3 Enter a unique Name and optional Description.
4 Enter the UNC path.
All other fields are optional.
5 Click Save.
Defining rules to protect sensitive contentRules define the action taken when an attempt is made to transfer or transmit sensitive data.
Rule sets can contain three types of rules: data protection, device control, and discovery. A rule hasthree parts, Condition, Exceptions, and Reaction. Each part is defined on a separate tab in the ruledefinition. Rules can be enabled or disabled, and are assigned a Severity, selected from a drop-downlist.
McAfee Cloud Data Protection Beta Release 21-Mar-20177 Protecting sensitive content
Defining rules to protect sensitive content
144 McAfee Data Loss Prevention 11.0.0 Product Guide

Condition
The condition defines what triggers the rule. For data protection and discovery rules, the conditionalways includes a Classification, and can include other conditions. For example, a cloud protection rulecontains fields to define the end user and cloud service in addition to the classification. For devicecontrol rules, the condition always specifies the end user, and can include other conditions such as thedevice template. Device control rules do not include classifications.
Exceptions
Exceptions define parameters excluded from the rule. For example, a cloud protection rule can allowspecified users and classifications to upload data to the specified cloud services, while blocking thoseusers and classifications defined in the condition section of the rule. Exceptions have a separatesetting to enable or disable them, allowing you to turn the exception on or off when testing rules.Creating an exception definition is optional.
Exception definitions for data protection and discovery rules are similar to condition definitions. Theparameters available for exclusion are a subset of the parameters available for defining the condition.
For device control rules, the exception is defined by selecting whitelisted device templates from a list.The available whitelisted templates depend on the type of device rule.
Reaction
The reaction defines what happens when the rule triggers. The actions available vary with the type ofrule, but the default for all rules is No Action. When selected together with the Report Incident option,you can monitor the frequency of rule violations. This procedure is useful for tuning the rule to thecorrect level to catch data leaks without creating false positives.
The reaction also defines whether the rule is applied outside the enterprise and, for some rules, whenconnected to the enterprise by VPN.
Defining rules by reputationUse McAfee ePO Cloud RISK DB or Threat Intelligence Exchange file and certificate securityreputations to define rules.
You can define certain rules using reputations either from McAfee ePO Cloud RISK DB or ThreatIntelligence Exchange.
Risk DB is a feature of McAfee ePO Cloud data protection rules. The database contains a list of websites and applications, and rates the risk of each on a scale of 0 to 100. When you synchronize dataprotection rules with McAfee ePO Cloud, the database is imported. McAfee DLP can use the databasein web protection and web application control rules to define the web address.
There are five reputation options to choose from. Each represents 20% of the RISK DB scale.
McAfee®
Threat Intelligence Exchange (TIE) software determines and distributes file and certificatesecurity reputations. McAfee DLP communicates with the McAfee
®
Data Exchange Layer (DXL) in TIE toshare information about file and certificate threat levels. You can define the Applications field inapplication file access protection rules according to TIE reputation.
To use TIE reputation in rules, DXL client must be installed on the endpoint computer.
TIE reputation is supported on McAfee DLP for Windows, McAfee DLP Prevent, and McAfee DLPMonitor.
McAfee Cloud Data Protection Beta Release 21-Mar-2017Protecting sensitive content
Defining rules to protect sensitive content 7
McAfee Data Loss Prevention 11.0.0 Product Guide 145

Protecting data-in-useData protection rules monitor and control user content and activity.
Data protection rules should specify at least one classification. The classification identifies the contentas sensitive or not, and determines accordingly what can be done with the content. Other definitionsin the rule act as filters to determine which files are monitored.
Data protection rules are supported differently by the different McAfee DLP applications.
• McAfee DLP Endpoint for Windows supports all data protection rules.
• McAfee DLP Endpoint for Mac supports application file access, network share, and removablestorage protection rules.
• McAfee DLP Prevent supports email and web protection rules.
• McAfee DLP Monitor supports email, web, and network communication protection rules.
McAfee DLP Monitor is a passive device that reports on detected incidents but does not block ormodify the data.
Protecting content by applicationApplication file access protection rules monitor files based on the application or applications thatcreated them. They are supported on Microsoft Windows and OS X computers. On McAfee DLPEndpoint for Mac, only OS X-supported applications and browsers are supported.
To limit the rule to specific applications, select an application or URL definition. You can also specify aTIE reputation.
URL definitions are not supported on McAfee DLP Endpoint for Mac.
You can also block non-supported Chrome versions. When you select the non-supported Chromeversions option, you are prompted to specify a URL. Only the specified URLs can be blocked whennon-supported Chrome versions are used.
When using application file access protection rules to block uploading files, Chrome can't detect theactive tab. Rather, the list of URLs on all opened tabs is identified. If both allowed and blocked tabs areopen, uploading sensitive content to the allowed URLs is also blocked. We recommend creating a UserNotification message to alert the user that one or more tabs are open to websites that are blocked.
Use classification definitions to limit the rule to specific content fingerprinting or content classificationcriteria. You can also limit the rule to local users or to specified user groups.
See also Defining rules by reputation on page 145Use case: Prevent burning sensitive information to disk on page 168Client configuration support for data protection rules on page 151Data protection rule actions on page 153
Controlling copy-pasteClipboard protection rules manage content copied with the Windows clipboard. They are supported onMcAfee DLP Endpoint for Windows only.
Clipboard protection rules are used to block copying of sensitive content from one application toanother. The rule can define both the application copied from and the application copied to, or you canwrite a general rule specifying any application for either source or destination. Supported browsers canbe specified as applications. The rule can be filtered with an end-user definition to limit it to specificusers. As with other data protection rules, exceptions to the rule are defined on the Exceptions tab.
McAfee Cloud Data Protection Beta Release 21-Mar-20177 Protecting sensitive content
Defining rules to protect sensitive content
146 McAfee Data Loss Prevention 11.0.0 Product Guide

By default, copying sensitive content from one Microsoft Office application to another is allowed. If youwant to block copying within Microsoft Office, disable the Microsoft Office clipboard in the Windowsclient configuration.
See also Client configuration support for data protection rules on page 151Data protection rule actions on page 153
Protecting cloud uploadsCloud protection rules manage files uploaded to cloud applications. They are supported on McAfee DLPEndpoint for Windows and McAfee DLP Endpoint for Mac.
Cloud applications are increasingly used to back up and share files. Most cloud applications create aspecial folder on the disk drive that synchronizes with the cloud server. McAfee DLP Endpointintercepts file creation in the cloud application folder, scans the files, and applies the relevant policies.If the policy allows synchronizing the file to the cloud application folder, and the file is later changed, itis rescanned and the policy reapplied. If the changed file violates a policy, it cannot be synchronized tothe cloud.
The McAfee DLP Endpoint Cloud Protection Rule supports:
• Box • OneDrive (personal)
• Dropbox • OneDrive for business (groove.exe)
• GoogleDrive • Syncplicity
• iCloud
iCloud and Syncplicity are not supported on McAfee DLP Endpoint for Mac.
To improve scanning speed, you can specify the top-level subfolders included or excluded in the rule.
Cloud protection rules can be imported from McAfee ePO Cloud if the on-premises McAfee ePO is setup to synchronize policies. Rules in the Cloud Data Protection section of the Unified Security Policy can besynchronized automatically or manually, and produce a read-only rule set in DLP Policy Manager. The ruleset contains cloud protection and web protection rules.
See also Synchronizing rule sets with McAfee ePO Cloud on page 142Client configuration support for data protection rules on page 151Data protection rule actions on page 153
Protecting email content and attachmentsEmail protection rules monitor or block email sent to specific destinations or users. They are supportedon McAfee DLP Endpoint for Windows, McAfee DLP Monitor, and McAfee DLP Prevent.
McAfee DLP Prevent email protection rules can block emails according to the following parameters:
• Classification definitions limit the rule to specific content fingerprinting or content classificationcriteria. You can apply classifications to to the whole email, or just the subject, body, emailheaders, or attachments.
• Sender definitions limit the rule to specific user groups or email address lists. User group informationcan be obtained from registered LDAP servers. You can also limit the rule to local or non-LDAPusers.
McAfee Cloud Data Protection Beta Release 21-Mar-2017Protecting sensitive content
Defining rules to protect sensitive content 7
McAfee Data Loss Prevention 11.0.0 Product Guide 147
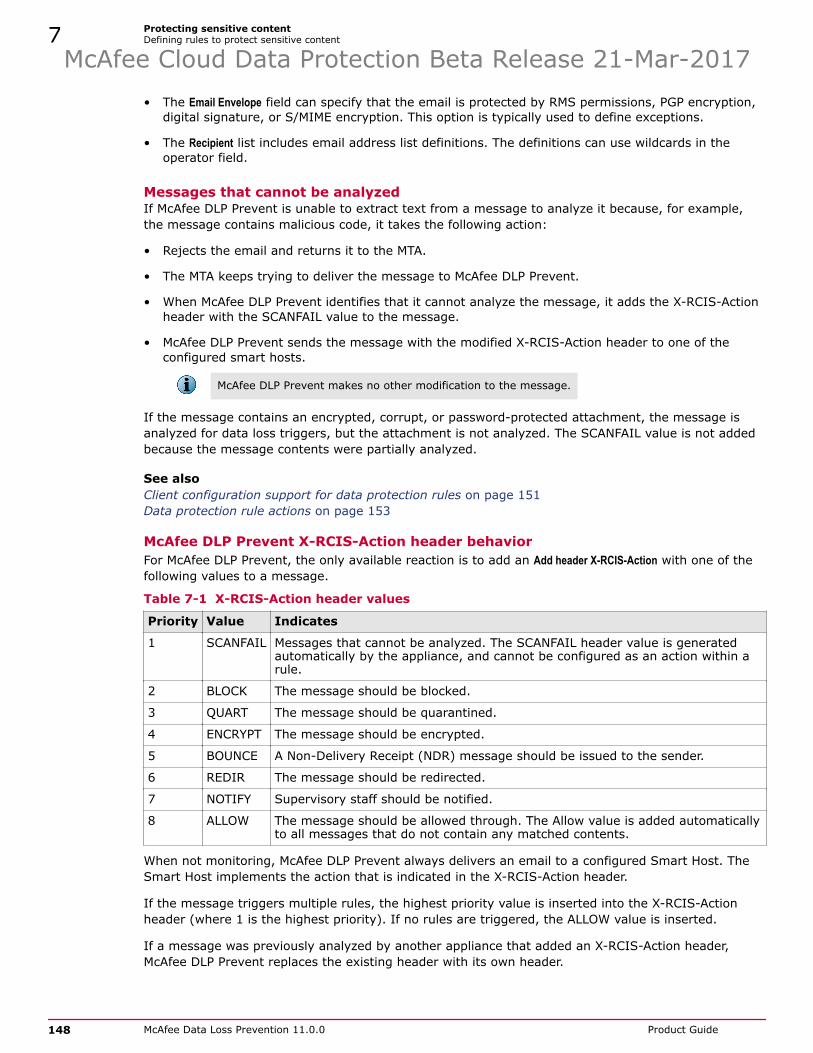
• The Email Envelope field can specify that the email is protected by RMS permissions, PGP encryption,digital signature, or S/MIME encryption. This option is typically used to define exceptions.
• The Recipient list includes email address list definitions. The definitions can use wildcards in theoperator field.
Messages that cannot be analyzedIf McAfee DLP Prevent is unable to extract text from a message to analyze it because, for example,the message contains malicious code, it takes the following action:
• Rejects the email and returns it to the MTA.
• The MTA keeps trying to deliver the message to McAfee DLP Prevent.
• When McAfee DLP Prevent identifies that it cannot analyze the message, it adds the X-RCIS-Actionheader with the SCANFAIL value to the message.
• McAfee DLP Prevent sends the message with the modified X-RCIS-Action header to one of theconfigured smart hosts.
McAfee DLP Prevent makes no other modification to the message.
If the message contains an encrypted, corrupt, or password-protected attachment, the message isanalyzed for data loss triggers, but the attachment is not analyzed. The SCANFAIL value is not addedbecause the message contents were partially analyzed.
See also Client configuration support for data protection rules on page 151Data protection rule actions on page 153
McAfee DLP Prevent X-RCIS-Action header behaviorFor McAfee DLP Prevent, the only available reaction is to add an Add header X-RCIS-Action with one of thefollowing values to a message.
Table 7-1 X-RCIS-Action header values
Priority Value Indicates
1 SCANFAIL Messages that cannot be analyzed. The SCANFAIL header value is generatedautomatically by the appliance, and cannot be configured as an action within arule.
2 BLOCK The message should be blocked.
3 QUART The message should be quarantined.
4 ENCRYPT The message should be encrypted.
5 BOUNCE A Non-Delivery Receipt (NDR) message should be issued to the sender.
6 REDIR The message should be redirected.
7 NOTIFY Supervisory staff should be notified.
8 ALLOW The message should be allowed through. The Allow value is added automaticallyto all messages that do not contain any matched contents.
When not monitoring, McAfee DLP Prevent always delivers an email to a configured Smart Host. TheSmart Host implements the action that is indicated in the X-RCIS-Action header.
If the message triggers multiple rules, the highest priority value is inserted into the X-RCIS-Actionheader (where 1 is the highest priority). If no rules are triggered, the ALLOW value is inserted.
If a message was previously analyzed by another appliance that added an X-RCIS-Action header,McAfee DLP Prevent replaces the existing header with its own header.
McAfee Cloud Data Protection Beta Release 21-Mar-20177 Protecting sensitive content
Defining rules to protect sensitive content
148 McAfee Data Loss Prevention 11.0.0 Product Guide

Protecting email on mobile devicesMobile email protection rules enforce McAfee DLP policies on emails sent to mobile devices.
Rules are defined with a classification (required), user, and mobile device definitions. The rule islimited to any user. You can optionally select any Mobile Device, or add a mobile device definition.
Mobile email protection rules are enforced on McAfee DLP Server for Mobile, which must be configuredin the Policy Catalog as the ActiveSync proxy.
See also Data protection rule actions on page 153Configure server settings on page 67
Controlling network trafficNetwork communication protection rules monitor or block incoming or outgoing data on your network.They are supported on McAfee DLP Endpoint for Windows. McAfee DLP Monitor also supports networkcommunication protection rules, but cannot block data.
Network communication protection rules control network traffic based on specified network addresses(required) and ports (optional). You can also specify incoming or outgoing connections, or both. Youcan add one network address definition and one port definition, but definitions can contain multipleaddresses or ports.
Use classification definitions to limit the rule to specific content fingerprinting criteria. You can alsolimit the rule to local users or to specified user groups, and by specifying the application creating theconnection.
Network communication protection rules do not check content classification criteria. Use contentfingerprinting criteria when defining classifications used with network communication protection rules.
See also Client configuration support for data protection rules on page 151Data protection rule actions on page 153
Protecting network sharesNetwork share protection rules control sensitive content stored on network shares. They are supportedon Microsoft Windows and OS X computers.
Network share protection rules can apply to all network shares or to specified shares. One sharedefinition can be included in the rule, and the definition can contain multiple shares. An includedclassification (required) defines what sensitive content is protected.
Use classification definitions to limit the rule to specific content fingerprinting or content classificationcriteria. You can also limit the rule to local users or to specified user groups, by specific networkshares, or by the application copying the file.
Protecting sensitive content sent to printersPrinter protection rules monitor or block files from being printed. They are supported on McAfee DLPEndpoint for Windows only.
Use classifications to limit the rule. You can also limit the rule by specifying users, printers, orapplications printing the file. The printer definition can specify local printers, network printers, namednetwork printers, or image printers.
Image printers, which had a separate rule in earlier versions, are now included in the general printerrule.
McAfee Cloud Data Protection Beta Release 21-Mar-2017Protecting sensitive content
Defining rules to protect sensitive content 7
McAfee Data Loss Prevention 11.0.0 Product Guide 149

See also Client configuration support for data protection rules on page 151Data protection rule actions on page 153
Protecting content written to removable devicesRemovable storage protection rules monitor or block data from being written to removable storagedevices. They are supported on McAfee DLP Endpoint for Windows and McAfee DLP Endpoint for Mac.On McAfee DLP Endpoint for Mac, CD and DVD devices are not supported.Removable storage protection rules can control CD and DVD devices, removable storage devices, orboth. Limit the rule with content fingerprinting or content classification criteria in classifications(required). You can also define the rule with specified users, applications, or web URLs.
Removable storage protection rules for McAfee DLP Endpoint for Mac only support control of removablestorage devices. They do not support CD/DVD devices.
Use classifications to limit the rule. You can also limit the rule by specifying users, or the applicationscopying the file.
See also Client configuration support for data protection rules on page 151Data protection rule actions on page 153
Controlling screen capturesScreen capture protection rules control data copied and pasted from a screen. They are supported onMcAfee DLP Endpoint for Windows only.Use classification definitions to limit the rule to specific content fingerprinting criteria. You can alsolimit the rule to local users or to specified user groups, or by applications visible on the screen.
Screen capture protection rules do not check content classification criteria. Use content fingerprintingcriteria when defining classifications used with screen capture rules.
See also Client configuration support for data protection rules on page 151Data protection rule actions on page 153
Controlling content posted to websitesWeb protection rules monitor or block data from being posted to websites, including web-based emailsites. They are supported on McAfee DLP Endpoint for Windows and McAfee DLP Prevent. McAfee DLPMonitor also supports web protection rules, but cannot block data.Web protection rules are defined by four conditions:
• Classification
• End User
• Web address (URL)
• Upload type
Define the rule by adding URL List definitions to the web address condition. You can use built-in URL Listdefinitions as is or with your own modifications. You can also define the URL by RISK DB reputation.
Definition by reputation requires TIE software installed on the endpoint.
Use the upload type is file upload to limit the rule to files only. This option allows other data types, suchas webmail or web forms, to be uploaded without inspection.
McAfee Cloud Data Protection Beta Release 21-Mar-20177 Protecting sensitive content
Defining rules to protect sensitive content
150 McAfee Data Loss Prevention 11.0.0 Product Guide

Web protection rules can be imported from McAfee ePO Cloud if the on-premises McAfee ePO is set upto synchronize policies. Rules in the Cloud Data Protection section of the Unified Security Policy can besynchronized automatically or manually, and produce a read-only rule set in DLP Policy Manager. The ruleset contains web protection and cloud protection rules.
See also Defining rules by reputation on page 145Synchronizing rule sets with McAfee ePO Cloud on page 142Client configuration support for data protection rules on page 151Data protection rule actions on page 153
Client configuration support for data protection rulesData protection rules work with settings in the client configuration.
Best practice: To optimize data protection rules, create client configurations to match therequirements of different rule sets.
The following table lists data protection rules, and the specific settings in the client configuration thataffect them. In most cases, you can accept the default setting
Table 7-2 Data protection rules and client configuration settings
Data protectionrule
Client configuration page and settings
Application File AccessProtection
Content Tracking — Add or edit whitelisted processes
Clipboard Protection • Operational Mode and Modules — Activate the clipboard service.
• Clipboard Protection — Add or edit whitelisted processes. Enable or disable theMicrosoft Office Clipboard.
Microsoft Office Clipboard is enabled by default. When enabled, you can't preventcopying from one Office application to another.
Cloud Protection Operational Mode and Modules: Select cloud protection handlers.
Email Protection • Operational Mode and Modules — Activate available email software (Lotus Notes,Microsoft Outlook). For Microsoft Outlook, select the required add-ins.
In systems where both Microsoft Exchange and Lotus Notes are available, emailrules do not work if the outgoing mail server (SMTP) name is not configured forboth.
• Email Protection — Select Microsoft Outlook third-party add-ins (Boldon James orTitus). Set the timeout strategy, caching, API, and user notification
When the third-party add-in is installed and active, the McAfee DLP EndpointOutlook add-in sets itself to bypass mode. McAfee DLP Prevent and McAfee DLPMonitor do not work with Boldon James.
NetworkCommunicationProtection
• Corporate connectivity — Add or edit corporate VPN servers
• Operational Mode and Modules — Activate or deactivate the network communicationdriver (activated by default).
Network ShareProtection
No settings
McAfee Cloud Data Protection Beta Release 21-Mar-2017Protecting sensitive content
Defining rules to protect sensitive content 7
McAfee Data Loss Prevention 11.0.0 Product Guide 151

Table 7-2 Data protection rules and client configuration settings (continued)
Data protectionrule
Client configuration page and settings
Printer Protection • Corporate connectivity — Add or edit corporate VPN servers
• Operational Mode and Modules — Select printer application add-ins
• Printing Protection — Add or edit whitelisted processes.
Printer application add-ins can improve printer performance when using certaincommon applications. The add-ins are only installed when a printer protectionrule is enabled on the managed computer.
Removable StorageProtection
• Operational Mode and Modules — Activate advanced options.
• Removable Storage Protection — Set the deletion mode. Normal mode deletes thefile; aggressive mode makes the deleted file unrecoverable.
Screen CaptureProtection
• Operational Mode and Modules — Activate the screen capture service. The serviceconsist of the application handler and the Print Screen key handler, which canbe activated separately.
• Screen Capture Protection — Add, edit, or delete screen capture applicationsprotected by screen capture protection rules.
Disabling the application handler, or the screen capture service, disables all theapplications listed on the Screen Capture Protection page.
Web Protection • Operational Mode and Modules — Enable supported browsers for web protection.
• Web Protection — Add or edit whitelisted URLs, enable HTTP GET requestprocessing (disabled by default because they are resource-intensive), and setthe web timeout strategy.
The page also contains a list of supported Google Chrome versions. The list isrequired due to the frequency of Chrome updates. The list is populated bydownloading a current list from McAfee support and using Browse to install theXML file.
Removable storage protection advanced options details
The following sections describe the Windows Client Configuration | Operational Mode and Modules | Removable StorageProtection Advanced Options.
Protect TrueCrypt Local Disks Mounts
TrueCrypt encrypted virtual devices can be protected with TrueCrypt device rules, or with removablestorage protection rules. TrueCrypt protection is not supported on McAfee DLP Endpoint for Mac.
• Use a device rule if you want to block or monitor a TrueCrypt volume, or make it read-only.
• Use a protection rule if you want content-aware protection of TrueCrypt volumes.
Signatures are lost when content fingerprinted content is copied to TrueCrypt volumes becauseTrueCrypt volumes do not support extended file attributes. Use document properties, file encryption, orfile type groups definitions in the classification definition to identify the content.
Portable Devices Handler (MTP)
McAfee Cloud Data Protection Beta Release 21-Mar-20177 Protecting sensitive content
Defining rules to protect sensitive content
152 McAfee Data Loss Prevention 11.0.0 Product Guide

Media Transfer Protocol (MTP) is used for transferring files and associated metadata from computers tomobile devices such as smartphones. MTP devices are not traditional removable devices because thedevice implements the file system, not the computer it is connected to. When the client is configuredfor MTP devices, the removable storage protection rule allows it to intercept MTP transfers and applysecurity policies. Only USB connections are currently supported.
The handler works with all data transfers made by Windows Explorer. It does not work with iOSdevices, which use iTunes to manage the data transfers. One alternative strategy with iOS devices isto use a removable storage device rule to set the devices to read-only.
Advanced file copy protection
Advanced file copy protection intercepts Windows Explorer copy operations and allows the McAfee DLPEndpoint client to inspect the file at source before copying it to the removable device. It is enabled bydefault, and should only be disabled for troubleshooting.
There are use cases where advanced copy protection does not apply. For example, a file opened by anapplication and saved to a removable device with Save As reverts to normal copy protection. The file iscopied to the device, then inspected. If sensitive content is found, the file is immediately deleted.
Data protection rule actionsThe action performed by a data protection rules is entered on the Reaction tab.
By default, the action for all data protection rules is No Action. When combined with the Report Incidentoption, this creates a monitoring action that can be used to fine-tune rules before applying them asblocking rules. Along with reporting, most rules allow you to store the original file that triggered therule as evidence. Storing evidence is optional when reporting an incident.
Best practice: Set the default for all rules to report incidents in DLP Settings. This prevents accidentalerrors by failing to enter any reaction. You can change the default setting when required.
The user notification option activates the user notification pop-up on the endpoint. Select a usernotification definition to activate the option.
Different actions can be applied when the computer is disconnected from the corporate network. Somerules also allow different actions when connected to the network by VPN.
The table lists the available actions other than No Action, Report Incident, User Notification, and Store original fileas evidence.
Table 7-3 Available actions for data protection rules
Data protectionrule
Reactions Additional information
Application File AccessProtection
Block When the classification field is set to is anydata (ALL), the block action is not allowed.Attempting to save the rule with theseconditions generates an error.
Clipboard Protection Block
Cloud Protection • Block
• Request Justification
• Apply RM Policy
• Encrypt
Encryption is supported on Box, Dropbox,GoogleDrive, and OneDrive personal.Attempting to upload encrypted files toother cloud applications fails to save thefile.
McAfee Cloud Data Protection Beta Release 21-Mar-2017Protecting sensitive content
Defining rules to protect sensitive content 7
McAfee Data Loss Prevention 11.0.0 Product Guide 153

Table 7-3 Available actions for data protection rules (continued)
Data protectionrule
Reactions Additional information
Email Protection McAfee DLP Endpoint actions:• Block
• Request Justification
For McAfee DLP Prevent, the onlyreaction is Add headerX-RCIS-Action.
For McAfee DLP Monitor, the onlyreaction is No Action.
Supports different actions for McAfee DLPEndpoint when the computer isdisconnected from the corporate network.
Mobile Device Protection No Action Currently supported only for monitoring(Report Incident and Store original file as evidence).
Network CommunicationProtection
BlockFor McAfee DLP Monitor, the onlyreaction is No Action.
Storing evidence is not available as anoption for McAfee DLP Endpoint.McAfee DLP Endpoint supports differentactions when the computer is connected tothe corporate network using VPN.
Network Share Protection • Request Justification
• Encrypt
Encryption options are McAfee® File andRemovable Media Protection (FRP) andStormShield Data Security encryptionsoftware.Encrypt action is not supported onMcAfeeDLP Endpoint for Mac.
Printer Protection • Block
• Request Justification
Supports different actions when thecomputer is connected to the corporatenetwork using VPN.
Removable StorageProtection
• Block
• Request Justification
• Encrypt
Encrypt action is not supported on McAfeeDLP Endpoint for Mac.
Screen CaptureProtection
Block
Web Protection McAfee DLP Endpoint reactions:• Block
• Request Justification
McAfee DLP Prevent reactions• No Action
• Block
For McAfee DLP Monitor, the onlyreaction is No Action
Request Justification action is not availableon McAfee DLP Prevent.
McAfee Cloud Data Protection Beta Release 21-Mar-20177 Protecting sensitive content
Defining rules to protect sensitive content
154 McAfee Data Loss Prevention 11.0.0 Product Guide

Device control rulesDevice control rules define the action taken when particular devices are used.
Device control rules can monitor or block devices attached to enterprise-managed computers. McAfeeDLP Endpoint for Windows supports the following types of rules:
• Citrix XenApp Device Rule • Removable Storage Device Rule
• Fixed Hard Drive Rule • Removable Storage File Access Device Rule
• Plug And Play Device Rule • TrueCrypt Device Rule
McAfee DLP Endpoint for Mac supports the following types of rules:
• Plug And Play Device Rule (USB devices only)
• Removable Storage File Access Device Rule
Device control rules are described in detail in the Protecting removable media section.
See also Protecting devices on page 98
Discovery rules in McAfee DLP Endpoint and in McAfee DLPDiscoverMcAfee DLP Endpoint and McAfee DLP Discover use discovery rules to scan files and repositories.
Table 7-4 Data vector descriptions
Product Discovery rule
McAfee DLP Endpoint Local Email (OST, PST)
Local File System
McAfee DLP Discover Box Protection
Database Protection
File Server (CIFS) Protection
SharePoint Protection
Application control rulesApplication control rules monitor or block websites by URL. They are enforced on McAfee DLP Endpointfor Windows and McAfee DLP Prevent.
Web application control rules are similar to web protection rules, but do not include a classification.Rather than blocking content uploaded to specified websites, they block all GET requests to thespecified URL. The rule checks the browser address bar, post-URL, and the http referred header. If anyone of them matches the URL definition, the rule triggers. You can also define the URL parameter byRISK DB reputation.
Web application control rules can be imported from McAfee ePO Cloud if the on-premises McAfee ePOis set up to synchronize policies. Rules in the Web Application Filter section of the Unified Security Policycan be synchronized automatically or manually, and produce a read-only rule set in DLP Policy Manager.
See also Defining rules by reputation on page 145Synchronizing rule sets with McAfee ePO Cloud on page 142
McAfee Cloud Data Protection Beta Release 21-Mar-2017Protecting sensitive content
Defining rules to protect sensitive content 7
McAfee Data Loss Prevention 11.0.0 Product Guide 155

WhitelistsWhitelists are collections of items that you want the system to ignore.
You can whitelist content, devices, processes, and user groups.
Whitelists in data protection rules
You can specify whitelisted processes for clipboard and printer protection rules in the Policy CatalogWindows client configuration on their respective pages. You can specify whitelisted URLs on the WebProtection page. Because these whitelists are applied at the client, they work with all clipboard, printer,and web protection rules. Clipboard and printer protection rules ignore content produced bywhitelisted processes. Web protection rules are not enforced on whitelisted URLs.
You can specify whitelisted processes for text extraction on the Content Tracking page. Depending on thedefinition, the text extractor does not analyze files or content fingerprinting opened by the specifiedapplication, or does not create dynamic fingerprints for web upload. The definition can specify specificfolders and extensions, allowing granular control what is whitelisted. If no folder is named, the processis not monitored by application file access rules.
Whitelists in device rules
You can create whitelisted plug and play items in the Definitions | Device Control | Device Templates page inthe DLP Policy Manager.
Some plug and play devices do not handle device management well. Attempting to manage themmight cause the system to stop responding or cause other serious problems. Whitelisted plug and playdevices are automatically excluded when a policy is applied.
Whitelisted plug and play definitions are not applicable on OS X operating systems.
The Exceptions tab in device control rules is defined by whitelists that are specific to the rule thatcontains them. The whitelists exclude the specified definitions from the rule.
• Excluded Users — Used in all device rules
• Excluded Device Definitions — Used in all device rules except Citrix and TrueCrypt
• Excluded Processes — Used in plug and play and removable storage rules
• Excluded Serial Number & User Pairs — Used in plug and play and removable storage rules
• Excluded File names — Used in removable storage file access rules to exempt files such as anti-virusapplications
Customizing end-user messagesMcAfee DLP Endpoint sends two types of messages to communicate with end users: notifications anduser justification messages. McAfee DLP Prevent sends a user notification to notify a user that itblocked a web request.
Notification and justification definitions can specify Locales (languages), and add placeholders that arereplaced by their real values. When locales are defined, the messages and option buttons (for businessjustifications) appear in the default language of the endpoint computer. The following locales aresupported:
• English (US) • Japanese
• English (UK) • Korean
McAfee Cloud Data Protection Beta Release 21-Mar-20177 Protecting sensitive content
Whitelists
156 McAfee Data Loss Prevention 11.0.0 Product Guide

• French • Russian
• German • Chinese (simplified)
• Spanish • Chinese (traditional)
English (US) is the standard default locale, but any supported locale can be set as the default in thedefinition. The default locale is used when other defined locales are not available as the endpointcomputer default language. McAfee DLP Prevent attempts to detect the user's preferred language fromrequest headers.
McAfee DLP Prevent does not fully support Korean, Russian, or Chinese (Simplified) locales.
User notification
McAfee DLP Endpoint user notifications are pop-up messages that notify the user of a policy violation.
When a rule triggers multiple events, the pop-up message states: There are new DLP events in yourDLP console, rather than displaying multiple messages.
When McAfee DLP Prevent blocks a web request, it sends the user notification as an HTML documentthat appears in the user's browser. The notification text that you configure can contain embeddedHTML tags, such as <p>, <ul>, or <li>. The alert that the user sees also shows Access Denied.
Business justification
Business justification is a form of policy bypass. When Request Justification is specified as the action in arule, the user can enter the justification to continue without being blocked.
Business justification messages are not available for McAfee DLP Prevent.
Placeholders
Placeholders are a way of entering variable text in messages, based on what triggered the end-usermessage. The available placeholders are:
• %c for classifications
• %r for rule-set name
• %v for vector (for example, Email Protection, Web Protection, DLP Prevent)
• %a for action (for example, Block)
• %s for context value (for example, file name, device name, email subject, URI)
See also Create a justification definition on page 164Create a notification definition on page 165
McAfee Cloud Data Protection Beta Release 21-Mar-2017Protecting sensitive content
Customizing end-user messages 7
McAfee Data Loss Prevention 11.0.0 Product Guide 157

Reactions available for rule typesThe available reactions for a rule vary depending on the rule type.
• Data protection rules are available for McAfee DLP Endpoint. Some data protection rules areavailable for McAfee DLP Prevent and McAfee DLP Monitor.
• Device control rules are available for McAfee DLP Endpoint and Device Control.
• Some discovery rules are available for McAfee DLP Endpoint, some are available for McAfee DLPDiscover.
Table 7-5 Rule reactions
Reaction Applies to rules: Result
No Action All Allows the action.
Add headerX-RCIS-Action
Email Protection (McAfeeDLP Prevent only)
Adds an action value to the X-RCIS-Action header
Apply RM Policy • Data Protection
• Network Discovery
Not supported onMcAfee DLP Endpoint forMac.
Applies a rights management (RM) policy to the file.
Block • Data Protection
• Device Control
Blocks the action.
Classify file Endpoint Discovery Applies automatic classifications and embeds theclassification Tag ID into the file format.
Copy Network Discovery Copies the file to the specified UNC location.
Create ContentFingerprint
Endpoint Discovery Applies content fingerprinting to the file.
Encrypt • Data Protection
• Endpoint Discovery
Not supported onMcAfee DLP Endpoint forMac.
Encrypts the file. Encryption options are FRP orStormShield Data Security encryption software.
Modify anonymous shareto login required
Network Discovery BoxProtection
Removes anonymous sharing for the file.
Move Network Discovery Moves the file to the specified UNC location. Allowscreation of a placeholder file (optional) to notify theuser that the file has been moved. The placeholder fileis specified by selecting a user notification definition.
Quarantine Endpoint Discovery Quarantines the file.
Read-only Device Control Forces read-only access.
Report Incident All Generates an incident entry of the violation in DLPIncident Manager.
Request justification Data Protection Produces a pop-up on the end user computer. Theuser selects a justification (with optional user input)or selects an optional action.
Show file in DLPEndpoint console
Endpoint Discovery Displays Filename and Path in the endpoint console.Filename is a link to open the file, except when the fileis quarantined. Path opens the folder where the file islocated.
McAfee Cloud Data Protection Beta Release 21-Mar-20177 Protecting sensitive content
Reactions available for rule types
158 McAfee Data Loss Prevention 11.0.0 Product Guide

Table 7-5 Rule reactions (continued)
Reaction Applies to rules: Result
Store original email asevidence
• Data Protection
Not supported onMcAfee DLP Endpoint forMac.
Stores the original message on the evidence share.Applies to McAfee DLP Endpoint and McAfee DLPPrevent email protection rules only.
Store original file asevidence
• Data Protection
• Endpoint Discovery
• Network Discovery
Saves the file for viewing through the incidentmanager.
Requires a specified evidence folder and activationof the evidence copy service.
User notification • Data Protection
• Device Control
• Endpoint Discovery
Sends a message to the endpoint to notify the user ofthe policy violation.
When User Notification is selected, and multiple eventsare triggered, the pop-up message states: Thereare new DLP events in your DLP console, ratherthan displaying multiple messages.
Reconfigure action rules for web content
You must reconfigure McAfee DLP Prevent action rules for use on proxy servers.
Proxy servers can only ALLOW or BLOCK web content.
Table 7-6 McAfee DLP Endpoint data protection rule reactions
Rules Reactions
Noaction
ApplyRM
Policy
Block Encrypt ReportIncident
Requestjustification
Storeoriginal
file(email)
asevidence
Usernotification
Application FileAccessProtection
X X X X X
Clipboardprotection
X X X X X
Cloudprotection
X X X X X X X X
Emailprotection(McAfee DLPEndpoint forWindows only)
X X X X X
Mobileprotection
X X X
Networkcommunicationprotection
X X X X
Network shareprotection
X X X X
Printerprotection
X X X X X X
McAfee Cloud Data Protection Beta Release 21-Mar-2017Protecting sensitive content
Reactions available for rule types 7
McAfee Data Loss Prevention 11.0.0 Product Guide 159

Table 7-6 McAfee DLP Endpoint data protection rule reactions (continued)
Rules Reactions
Noaction
ApplyRM
Policy
Block Encrypt ReportIncident
Requestjustification
Storeoriginal
file(email)
asevidence
Usernotification
Removablestorageprotection
X X X X X X X
Screen captureprotection
X X X X X
Web protection X X X X X X
Table 7-7 Device control rule reactions
RulesReactions
No action Block Read-only
Citrix XenApp device X
Fixed hard drive X X X
Plug-and-play device X X
Removable storage device X X X
Removable storage file access X X
TrueCrypt device X X X
Table 7-8 McAfee DLP Endpoint discovery rule reactions
Rules
Reactions
No action Encrypt Apply RM policy QuarantineCreatecontentfingerprint
Classify file
Endpoint filesystem
X X X X X X
Endpoint mailstorageprotection
X X X
Table 7-9 McAfee DLP Discover discovery rule reactions
RulesReactions
No action Copy Move Apply RM policy Modify anonymous share to loginrequired
Box protection X X X X X
File server(CIFS)protection
X X X X
SharePointprotection
X X X X
McAfee Cloud Data Protection Beta Release 21-Mar-20177 Protecting sensitive content
Reactions available for rule types
160 McAfee Data Loss Prevention 11.0.0 Product Guide

Create and configure rules and rule setsCreate and configure rules for your McAfee DLP Endpoint, Device Control, McAfee DLP Discover,McAfee DLP Prevent, and McAfee DLP Prevent for Mobile Email policies.
Tasks
• Create a rule set on page 161Rule sets combine multiple device protection, data protection, and discovery scan rules.
• Create a rule on page 161The process for creating a rule is similar for all rule types.
• Assign rule sets to policies on page 162Before being assigned to endpoint computers, rule sets are assigned to policies and thepolicies are applied to the McAfee ePO database.
• Enable, disable, or delete rules on page 163You can delete or change the state of multiple rules at once.
• Back up and restore policy on page 163You can back up policy, including rules and classifications, from a McAfee ePO server andrestore them onto another McAfee ePO server.
• Configure rule or rule set columns on page 163Move, add, or remove columns displayed for rules or rule sets.
• Create a justification definition on page 164For McAfee DLP Endpoint, business justification definitions define parameters for thejustification prevent action in rules.
• Create a notification definition on page 165With McAfee DLP Endpoint, user notifications appear in popups or the end-user consolewhen user actions violate policies.
Create a rule setRule sets combine multiple device protection, data protection, and discovery scan rules.
TaskFor details about product features, usage, and best practices, click ? or Help.
1 In McAfee ePO, select Menu | Data Protection | DLP Policy Manager.
2 Click the Rule Sets tab.
3 Select Actions | New Rule Set.
4 Enter the name and optional note, then click OK.
Create a ruleThe process for creating a rule is similar for all rule types.
TaskFor details about product features, usage, and best practices, click ? or Help.
1 In McAfee ePO, select Menu | Data Protection | DLP Policy Manager.
2 Click the Rule Sets tab.
3 Click the name of a rule set and if needed, select the appropriate tab for the Data Protection, DeviceControl, or Discovery rule.
McAfee Cloud Data Protection Beta Release 21-Mar-2017Protecting sensitive content
Create and configure rules and rule sets 7
McAfee Data Loss Prevention 11.0.0 Product Guide 161

4 Select Actions | New Rule, then select the type of rule.
5 On the Condition tab, enter the information.
• For some conditions, such as classifications or device template items, click ... to select anexisting item or create an item.
• To add additional criteria, click +.
• To remove criteria, click –.
6 (Optional) To add exceptions to the rule, click the Exceptions tab.
a Select Actions | Add Rule Exception.
Device rules do not display an Actions button. To add exceptions to device rules, select an entryfrom the displayed list.
b Fill in the fields as needed.
7 On the Reaction tab, configure the Action, User Notification, and Report Incident options.
Rules can have different actions, depending on whether the endpoint computer is in the corporatenetwork. Some rules can also have a different action when connected to the corporate network byVPN.
8 Click Save.
See also Creating policies with rule sets on page 141
Assign rule sets to policiesBefore being assigned to endpoint computers, rule sets are assigned to policies and the policies areapplied to the McAfee ePO database.
Before you beginOn the DLP Policy Manager | Rule Sets page, create one or more rules sets and add the requiredrules to them.
TaskFor details about product features, usage, and best practices, click ? or Help.
1 On the DLP Policy Manager | Policy Assignment page, do one of the following:
• Select Actions | Assign a Rule Set to policies. In the assignment window, select a rule set from thedrop-down list and select the policies to assign it to. Click OK.
• Select Actions | Assign Rule Sets to a policy. In the assignment window, select a policy from thedrop-down list and select the rule sets to assign it to. Click OK.
If you deselect a rule set or policy previously selected, the rule set is deleted from the policy.
2 Select Actions | Apply selected policies. In the assignment window, select the policies to apply to theMcAfee ePO database. Click OK.
Only policies not yet applied to the database appear in the selection window. If you change a ruleset assignment, or a rule in an assigned rule set, the policy appears and the revised policy isapplied in place of the previous policy.
McAfee Cloud Data Protection Beta Release 21-Mar-20177 Protecting sensitive content
Create and configure rules and rule sets
162 McAfee Data Loss Prevention 11.0.0 Product Guide

Enable, disable, or delete rulesYou can delete or change the state of multiple rules at once.
TaskFor details about product features, usage, and best practices, click ? or Help.
1 In McAfee ePO, select Menu | Data Protection | DLP Policy Manager.
2 Click the Rule Sets tab.
3 Click the name of a rule set and if needed, click the appropriate tab for the Data Protection, DeviceControl, or Discovery rule.
4 Select one or more rules.
5 Update or delete the selected rules.
• To enable the rules, select Actions | Change State | Enable.
• To disable the rules, select Actions | Change State | Disable.
• To delete the rules, select Actions | Delete Protection Rule.
Back up and restore policyYou can back up policy, including rules and classifications, from a McAfee ePO server and restore themonto another McAfee ePO server.Consider these points when restoring from a file:
• Make sure there is a license key added before restoring the file. If you restore the file without alicense, all rules become disabled, and you must enable rules before applying policy.
• For McAfee DLP Discover, you must reassign Discover servers to scans before applying policy.
Task1 In McAfee ePO, select Data Protection | DLP Settings | Back Up & Restore.
2 Click Backup to file and save the file in a place such as a USB drive or a shared folder.
3 On another McAfee ePO server, select Data Protection | DLP Settings | Back Up & Restore.
4 Click Restore from file and select the file you saved earlier.
Configure rule or rule set columnsMove, add, or remove columns displayed for rules or rule sets.
TaskFor details about product features, usage, and best practices, click ? or Help.
1 In McAfee ePO, select Menu | Data Protection | DLP Policy Manager.
2 Click the Rule Sets tab.
3 Access the Select the Columns to Display page.
• Rule sets — Select Actions | Choose Columns.
• Rules — Select a rule set, then select Actions | Choose Columns.
McAfee Cloud Data Protection Beta Release 21-Mar-2017Protecting sensitive content
Create and configure rules and rule sets 7
McAfee Data Loss Prevention 11.0.0 Product Guide 163

4 Modify the columns.
• In the Available Columns pane, click items to add columns.
• In the Selected Columns pane, click the arrows or x to move or delete columns.
• Click Use Defaults to restore the columns to the default configuration.
5 Click Save.
Create a justification definitionFor McAfee DLP Endpoint, business justification definitions define parameters for the justificationprevent action in rules.
TaskFor details about product features, usage, and best practices, click ? or Help.
1 In McAfee ePO, select Menu | Data Protection | DLP Policy Manager.
2 Click the Definitions tab, then select Notification | Justification.
3 Select Actions | New.
4 Enter a unique name and optional description.
5 To create justification definitions in more than one language, select Locale Actions | New Locale. Foreach required locale, select a locale from the drop-down list.
The selected locales are added to the list.
6 For each locale, do the following:a In the left pane, select the locale to edit. Enter text in the text boxes and select checkboxes as
required.
Show Match Strings provides a link on the popup to display the hit-highlighted content. More Infoprovides a link to a document or intranet page for information.
When entering a locale definition, checkboxes and actions are not available. You can only enterbutton labels, overview, and title. In the Justification Options section, you can replace the defaultdefinitions with the locale version by using the Edit feature in the Actions column.
b Enter a Justification Overview and optional Dialog Title.
The overview is a general instruction for the user, for example: This action requires a businessjustification. Maximum entry is 500 characters.
c Enter text for button labels and select button actions. Select the Hide button checkbox to create atwo-button definition.
Button actions must match the prevent actions available for the type of rule that uses thedefinition. For example, network share protection rules can have only No Action, Encrypt, or RequestJustification for prevent actions. If you select Block for one of the button actions, and attempt touse the definition in a network share protection rule definition, an error message appears.
d Enter text in the text box and click Add to add to the list of Justification Options. Select the Showjustifications options checkbox if you want the end user to view the list.
You can use placeholders to customize the text, indicating what caused the popup to trigger.
7 When all locales are complete, click Save.
See also Customizing end-user messages on page 156
McAfee Cloud Data Protection Beta Release 21-Mar-20177 Protecting sensitive content
Create and configure rules and rule sets
164 McAfee Data Loss Prevention 11.0.0 Product Guide

Create a notification definitionWith McAfee DLP Endpoint, user notifications appear in popups or the end-user console when useractions violate policies.
TaskFor details about product features, usage, and best practices, click ? or Help.
1 In McAfee ePO, select Menu | Data Protection | DLP Policy Manager.
2 Click the Definitions tab, then select Notification | User Notification.
3 Select Actions | New.
4 Enter a unique name and optional description.
5 To create user notification definitions in more than one language, select Locale Actions | New Locale. Foreach required locale, select a locale from the drop-down list.
The selected locales are added to the list.
6 For each locale, do the following:
a In the left pane, select the locale to edit.
You can set any locale to be the default by selecting the Default locale checkbox.
b Enter text in the text box.
You can use placeholders to customize the text, indicating what caused the popup to trigger.
c (Optional) Select the Show link to more information checkbox and enter a URL to provide moredetailed information.
Available only in the default locale.
7 When all locales are complete, click Save.
See also Customizing end-user messages on page 156
Rule use casesThe following use cases provide examples of using device and data protection rules.
McAfee Cloud Data Protection Beta Release 21-Mar-2017Protecting sensitive content
Rule use cases 7
McAfee Data Loss Prevention 11.0.0 Product Guide 165

Tasks• Use case: Removable storage file access device rule with a whitelisted process on page
166You can whitelist file names as an exception to a removable storage blocking rule.
• Use case: Set a removable device as read-only on page 167Removable storage device protection rules, unlike plug-and-play device rules, have aread-only option.
• Use case: Block and charge an iPhone with a plug-and-play device rule on page 167Apple iPhones can be blocked from use as storage devices while being charged from thecomputer.
• Use case: Prevent burning sensitive information to disk on page 168Application file access protection rules can be used to block the use of CD and DVD burnersfor copying classified information.
• Use case: Block outbound messages with confidential content unless they are sent to aspecified domain on page 169Outbound messages are blocked if they contain the word Confidential, unless the recipientis exempt from the rule.
• Use case: Allow a specified user group to send credit information on page 170Allow people in the human resources user group to send messages that contain personalcredit information by obtaining information from your Active Directory.
• Use case: Classify attachments as NEED-TO-SHARE based on their destination on page172Create classifications that allow NEED-TO-SHARE attachments to be sent to employees inthe United States, Germany, and Israel.
Use case: Removable storage file access device rule with awhitelisted processYou can whitelist file names as an exception to a removable storage blocking rule.
Removable storage file access device rules are used to block applications from acting on theremovable device. Whitelisted file names are defined as processes that are not blocked. In thisexample, we block Sandisk removable storage devices, but allow anti-virus software to scan thedevice to remove infected files.
This feature is supported only for Windows-based computers.
TaskFor details about product features, usage, and best practices, click ? or Help.
1 In McAfee ePO, select Menu | Data Protection | DLP Policy Manager.
2 On the Definitions tab, locate the built-in device template All Sandisk removable storage devices (Windows), andclick Duplicate.
The template uses the Sandisk vendor ID 0781.
Best practice: Duplicate the built-in templates to customize a template. For example, you can addother vendor IDs to the duplicated Sandisk template to add other brands of removable devices.
3 On the Rule Sets tab, select or create a rule set.
4 On the rule set Device Control tab, select Actions | New Rule | Removable Storage File Access Device Rule.
5 Enter a name for the rule and select State | Enabled.
McAfee Cloud Data Protection Beta Release 21-Mar-20177 Protecting sensitive content
Rule use cases
166 McAfee Data Loss Prevention 11.0.0 Product Guide

6 On the Conditions tab, select an End-User or leave the default (is any user). In the Removable Storage field,select the device template item you created in step 2. Leave the default settings for True File Type andFile Extension.
7 On the Exceptions tab, select Excluded File Names.
8 In the File Name field, add the built-in McAfee AV definition.
As with the removable storage device template item, you can duplicate this template andcustomize it.
9 On the Reaction tab, select Action | Block. You can optionally add a user notification, select the ReportIncident option, or select a different action when disconnected from the corporate network.
10 Click Save, then click Close.
Use case: Set a removable device as read-onlyRemovable storage device protection rules, unlike plug-and-play device rules, have a read-only option.By setting removable devices to read-only, you can allow users to use their personal devices as MP3players while preventing their use as storage devices.
TaskFor details about product features, usage, and best practices, click ? or Help.
1 In McAfee ePO, select Menu | Data Protection | DLP Policy Manager.
2 On the Definitions tab, on Device Templates page, create a removable storage device template item.
Removable storage device templates must be categorized as Windows or Mac templates. Start byduplicating one of the built-in templates for Windows or Mac and customize it. The Bus Type caninclude USB, Bluetooth, and any other bus type you expect to be used. Identify devices with vendorIDs or device names.
3 On the Rule Sets tab, select or create a rule set.
4 On the Device Control tab, select Actions | New Rule | Removable Storage Device Rule.
5 Enter a name for the rule and select State | Enabled. In the Conditions section, in the Removable Storagefield, select the device template item you created in step 2.
6 On the Reaction tab, select Action | Read-only. You can optionally add a user notification, select theReport Incident option, or select a different action when the user is disconnected from the corporatenetwork.
7 Click Save, then click Close.
Use case: Block and charge an iPhone with a plug-and-playdevice ruleApple iPhones can be blocked from use as storage devices while being charged from the computer.This use case creates a rule that blocks a user from using the iPhone as a mass storage device. Aplug-and-play device protection rule is used because it allows iPhones to charge no matter how therule is specified. This feature is not supported for other smartphones, or other Apple mobile devices. Itdoes not prevent an iPhone from charging from the computer.
To define a plug-and-play device rule for specific devices, you create a device definition with thevendor and product ID codes (VID/PID). You can find this information from the Windows Device Managerwhen the device is plugged in. Because this example only requires a VID, you can use the built-indevice definition All Apple devices rather than looking up the information.
McAfee Cloud Data Protection Beta Release 21-Mar-2017Protecting sensitive content
Rule use cases 7
McAfee Data Loss Prevention 11.0.0 Product Guide 167

TaskFor details about product features, usage, and best practices, click ? or Help.
1 In McAfee ePO, select Menu | Data Protection | DLP Policy Manager.
2 On the Rule Sets tab, select a rule set (or create one). Click the Device Control tab, and create aplug-and-play device rule. Use the built-in device definition All Apple devices as the included (is one of(OR)) definition.
3 On the Reaction tab, set the Action to Block.
4 Click Save, then click Close.
Use case: Prevent burning sensitive information to diskApplication file access protection rules can be used to block the use of CD and DVD burners forcopying classified information.
Before you beginCreate a classification to identify the classified content. Use parameters that are relevant toyour environment — keyword, text pattern, file information, and so forth.
TaskFor details about product features, usage, and best practices, click ? or Help.
1 In McAfee ePO, select Menu | Data Protection | DLP Policy Manager.
2 On the Rule Sets tab, select a current rule set or select Actions | New Rule Set and define a rule set.
3 On the Data Protection tab, select Actions | New Rule | Application File Access Protection.
4 (Optional) Enter a name in the Rule Name field (required). Select options for the State and Severityfields.
5 On the Condition tab, in the Classification field, select the classification you created for your sensitivecontent.
6 In the End-User field, select user groups (optional).
Adding users or groups to the rule limits the rule to specific users.
7 In the Applications field, select Media Burner Application [built-in] from the available application definitionslist.
You can create your own media burner definition by editing the built in definition. Editing a built indefinition automatically creates a copy of the original definition.
8 (Optional) On the Exceptions tab, create exceptions to the rule.
Exception definitions can include any field that is in a condition definition. You can define multipleexceptions to use in different situations. One example is to define "privileged users" who areexempt from the rule.
9 On the Reaction tab, set the Action to Block. Select a User Notification (optional). Click Save, then Close.
Other options are to change the default incident reporting and prevent action when the computer isdisconnected from the network.
McAfee Cloud Data Protection Beta Release 21-Mar-20177 Protecting sensitive content
Rule use cases
168 McAfee Data Loss Prevention 11.0.0 Product Guide

10 On the Policy Assignment tab, assign the rule set to a policy or policies:
a Select Actions | Assign a Rule Set to policies.
b Select the appropriate rule set from the drop-down list.
c Select the policy or policies to assign it to.
11 Select Actions | Apply Selected Policies. Select policies to apply to the McAfee ePO database, and clickOK.
Use case: Block outbound messages with confidential contentunless they are sent to a specified domainOutbound messages are blocked if they contain the word Confidential, unless the recipient is exemptfrom the rule.
Table 7-10 Expected behavior
Email contents Recipient Expected result
Body: Confidential [email protected] The message is blocked because it containsthe word Confidential.
Body: Confidential [email protected] The message is not blocked because theexception settings mean that confidentialmaterial can be sent to people atexample.com
Body:Attachment:Confidential
[email protected][email protected]
The message is blocked because one of therecipients is not allowed to receive it.
TaskFor details about product features, usage, and best practices, click ? or Help.
1 Create an email address list definition for a domain that is exempt from the rule.
a In the Data Protection section in McAfee ePO, select DLP Policy Manager and click Definitions.
b Select the Email Address List definition and create a duplicate copy of the built-in My organization emaildomain.
c Select the email address list definition you created, and click Edit.
d In Operator, select Domain name is and set the value to example.com.
e Click Save.
2 Create a rule set with an Email Protection rule.
a Click Rule Sets, then select Actions | New Rule Set.
b Name the rule set Block Confidential in email.
c Create a duplicate copy of the in-built Confidential classification.
An editable copy of the classification appears.
d Click Actions | New Rule | Email Protection Rule.
e Name the new rule Block Confidential and enable it.
f Enforce the rule on DLP Endpoint for Windows and DLP Prevent.
McAfee Cloud Data Protection Beta Release 21-Mar-2017Protecting sensitive content
Rule use cases 7
McAfee Data Loss Prevention 11.0.0 Product Guide 169
g Select the classification you created and add it to the rule.
h Set the Recipient to any recipient (ALL).
Leave the other settings on the Condition tab with the default settings.
3 Add exceptions to the rule.
a Click Exceptions, then select Actions | Add Rule Exception.
b Type a name for the exception and enable it.
c Set the classification to Confidential.
d Set Recipient to at least one recipient belongs to all groups (AND), then select the email address listdefinition you created.
4 Configure the reaction to messages that contain the word Confidential.
a Click Reaction.
b In DLP Endpoint, set the Action to Block for computers connected to and disconnected from thecorporate network.
c In DLP Prevent, select the Add header X-RCIS-Action option and click the Block value.
5 Save and apply the policy.
Use case: Allow a specified user group to send creditinformationAllow people in the human resources user group to send messages that contain personal creditinformation by obtaining information from your Active Directory.
Before you beginRegister an Active Directory server with McAfee ePO. Use the Registered Servers featuresin McAfee ePO to add details of the server. For more information about registering servers,see the McAfee ePolicy Orchestrator Product Guide for information.
Follow these high-level steps to:
1 (Optional for McAfee DLP Prevent only) Select an LDAP server to get the user group from.
2 Create a personal credit information classification.
3 Create a rule set and a rule that acts on the new classification.
4 Make the human resources user group exempt from the rule.
5 Block messages that contain personal credit information.
6 Apply the policy.
Best practice: To ensure that your rules identify potential data loss incidents with minimal falsepositive results, create your rules using the No action setting. Monitor the DLP Incident Manager until you aresatisfied that the rule identifies incidents correctly, then change the Action to Block.
McAfee Cloud Data Protection Beta Release 21-Mar-20177 Protecting sensitive content
Rule use cases
170 McAfee Data Loss Prevention 11.0.0 Product Guide

TaskFor details about product features, usage, and best practices, click ? or Help.
1 Select the LDAP server that you want to get the user group from.
a In McAfee ePO, open the Policy Catalog.
b Select the McAfee DLP Prevent Server policy.
c Open the Users and Groups category and open the policy that you want to edit.
d Select the Active Directory servers that you want to use.
e Click Save.
2 From the McAfee ePO menu, select Classification, and create a duplicate PCI classification.
3 Create the rule set and exceptions to it.
a Open the DLP Policy Manager.
b In Rule Sets, create a rule set called Block PCI for DLP Prevent and Endpoint.
c Open the rule set you created, select Action | New Rule | Email Protection, and type a name for therule.
d In Enforce On select DLP Endpoint for Windows and DLP Prevent.
e In Classification of, select the classification you created.
f Leave Sender, Email Envelope, and Recipient with the default settings.
4 Specify the user group that you want to exclude from the rule.
a Select Exceptions, click Actions | Add Rule Exception, and name it Human resource group exception.
b Set the State to Enabled.
c In Classification of, select contains any data (ALL).
d In Sender select Belongs to one of end-user groups (OR).
e Select New Item, and create an end-user group called HR.
f Click Add Groups, select the group, and click OK.
5 Set the action you want to take if the rule triggers.
a Select the group you created and click OK.
b Select the Reaction tab.
c In the DLP Endpoint section, set the Action to Block.
If DLP Endpoint is selected, you must set a reaction.
d In the DLP Prevent section, set the X-RCIS-Action header value to Block.
If you want to test the rule, you can keep the Action as No Action until you are satisfied that ittriggers as expected.
e Select Report Incident.
f Save the rule and click Close.
McAfee Cloud Data Protection Beta Release 21-Mar-2017Protecting sensitive content
Rule use cases 7
McAfee Data Loss Prevention 11.0.0 Product Guide 171

6 Apply the rule.
a In the DLP Policy Manager, select Policy Assignment.
Pending Changes, shows Yes.
b Select Actions | Assign Rule Sets to a policy.
c Select the rule set you created.
d Select Actions | Apply Selected Policies.
e Click Apply policy.
Pending Changes shows No.
Use case: Classify attachments as NEED-TO-SHARE based ontheir destinationCreate classifications that allow NEED-TO-SHARE attachments to be sent to employees in the UnitedStates, Germany, and Israel.
Before you begin1 Use the Registered Servers features in McAfee ePO to add details of the LDAP servers. For
more information about registering servers, see the McAfee ePolicy Orchestrator ProductGuide.
2 Use the LDAP Settings feature in the Users and Groups policy category to push groupinformation to the McAfee DLP Prevent appliance.
Follow these high-level steps:
• Create a NEED-TO-SHARE classification.
• Create a United States classification.
• Create an Israel classification.
• Create email address list definitions.
• Create a rule set and a rule that classifies attachments as NEED-TO-SHARE.
• Specify exceptions to the rule.
The example classifications in the table show how the classifications behave with differentclassification triggers and recipients.
Table 7-11 Expected behavior
Classification Recipient Expected result
Attachment1 — NEED-TO-SHARE,Israel (.il) and United States (.us)Attachment2 — NEED-TO-SHARE,Israel (.il) and Germany (.de)
[email protected] Allow — example1.com isallowed to receive allNEED-TO-SHAREattachments
Attachment1 — NEED-TO-SHARE,Israel (.il) and United States (.us)Attachment2 — NEED-TO-SHARE,Israel (.il) and Germany (.de)
[email protected] Allow — example2.com isallowed to receive allNEED-TO-SHAREattachments
McAfee Cloud Data Protection Beta Release 21-Mar-20177 Protecting sensitive content
Rule use cases
172 McAfee Data Loss Prevention 11.0.0 Product Guide

Table 7-11 Expected behavior (continued)
Classification Recipient Expected result
Attachment1 — NEED-TO-SHARE,Israel (.il) and United States (.us)Attachment2 — NEED-TO-SHARE,Israel (.il) and Germany (.de)
[email protected]@example1.com
Allow — example1.com andexample2.com are allowedto receive both attachments
Attachment1 — NEED-TO-SHARE,Israel (.il) and United States (.us)Attachment2 — NEED-TO-SHARE,Israel (.il) and Germany (.de)
[email protected] Allow — gov.il is allowed forboth attachments
Attachment1 — NEED-TO-SHARE,Israel (.il) and United States (.us)Attachment2 — NEED-TO-SHARE,Israel (.il) and Germany (.de)
[email protected] Block — exampleuser4 isnot allowed to receiveAttachment2
Attachment1 — NEED-TO-SHARE,Israel (.il) and United States (.us)Attachment2 — NEED-TO-SHARE,Israel (.il) and Germany (.de)
[email protected]@gov.us
Block — exampleuser4 isnot allowed to receiveAttachment2
Attachment1 — NEED-TO-SHARE,Israel (.il) and United States (.us)Attachment2 — NEED-TO-SHARE,Israel (.il) and Germany (.de)
[email protected]@gov.us
Block — exampleuser4 isnot allowed to receiveAttachment2
Attachment1 — NEED-TO-SHARE,Israel (.il) and United States (.us)Attachment2 — NEED-TO-SHARE,Israel (.il) and Germany (.de)
[email protected]@example1.com
Allow — exampleuser1 andexampleuser3 are allowed toreceive both attachments
Attachment1 — NEED-TO-SHARE,Israel (.il) and United States (.us)Attachment2 — NEED-TO-SHARE,Israel (.il) and Germany (.de)
[email protected]@example1.com
Block — exampleuser4cannot receive Attachment2
TaskFor details about product features, usage, and best practices, click ? or Help.
1 Create an email address list definition for the domains that are exempt from the rule.
a In the Data Protection section in McAfee ePO, select DLP Policy Manager and click Definitions.
b Select the Email Address List definition and create a duplicate copy of the built-in My organization emaildomain.
c Select the email address list definition you created, and click Edit.
d In Operator, select Domain name is and set the value to example1.com.
e Create an entry for example2.com.
f Click Save.
g Repeat these steps to create a definition for gov.il.
h Repeat the steps again to create a definition for gov.us.
McAfee Cloud Data Protection Beta Release 21-Mar-2017Protecting sensitive content
Rule use cases 7
McAfee Data Loss Prevention 11.0.0 Product Guide 173

2 Create a rule set that includes an Email Protection rule.
a Click Rule Sets, then select Actions | New Rule Set.
b Name the rule set Allow NEED-TO-SHARE email to Israel and United States.
3 Create a rule and add the NEED-TO-SHARE classification criteria.
a Click Actions | New Rule | Email Protection Rule.
b Name the rule NEED-TO-SHARE, enable it, and enforce it on DLP Endpoint for Windows and DLP Prevent.
c Set Classification of to one of the attachments (*).
d Select contains one of (OR), and select the NEED-TO-SHARE classification criteria.
e Set the Recipient to any recipient (ALL).
f Leave the other settings on the Condition tab with the default settings.
4 Add exceptions to the rule, and enable each exception.
• Exception 1
1 Set Classification of to matched attachment.
2 Select contains one of (OR), and select the NEED-TO-SHARE classification criteria.
3 Set the Recipient to matched recipient belongs to one of groups (OR), and select the email addressdefinition that includes example.com and example2.com that you created.
• Exception 2
1 Set Classification of to matched attachment.
2 Select contains all of (AND), and select the NEED-TO-SHARE and .il (Israel) classification criteria.
3 Set the Recipient to matched recipient belongs to one of groups (OR), and select gov.il.
• Exception 3
1 Set Classification of to matched attachment.
2 Select contains all of (AND), and select the NEED-TO-SHARE and .us (United States) classification criteria.
3 Set the Recipient to matched recipient belongs to one of groups (OR), and select gov.us.
5 Set the reaction you want to take if the rule triggers.
a In DLP Endpoint, set the Action to Block.
b In DLP Prevent, set the Action to Add header X-RCIS-Action, and select the BLOCK value.
6 Click Save.
7 Apply the policy.
McAfee Cloud Data Protection Beta Release 21-Mar-20177 Protecting sensitive content
Rule use cases
174 McAfee Data Loss Prevention 11.0.0 Product Guide

8 Scanning data with McAfee DLP Endpointdiscovery
Discovery is a crawler that runs on endpoint computers. It searches local file system and email storagefiles, and applies rules to protect sensitive content.
Contents Protecting files with discovery rules How discovery scanning works Find content with the Endpoint Discovery crawler
Protecting files with discovery rulesDiscovery rules define the content that McAfee DLP searches for when scanning repositories anddetermine the action taken when matching content is found. Discovery rules can be defined for McAfeeDLP Discover or for McAfee DLP Endpoint discovery.
Depending on the type of rule, files matching a scan can be copied, moved, classified, encrypted,quarantined, content fingerprinted, or have a rights management policy applied. All discovery ruleconditions include a classification.
When using email storage discovery rules with the Quarantine prevent action, verify that the OutlookAdd-in is enabled (Policy Catalog | Data Loss Prevention 10 | Client Configuration | Operational Modesand Modules). You cannot release emails from quarantine when the Outlook Add-in is disabled.
Table 8-1 Available discovery rules
Rule type Product Controls files discovered from...
Local File System McAfee DLP Endpoint Local file system scans.
Local Email (OST, PST) McAfee DLP Endpoint Email storage system scans.
File Server (CIFS) Protection McAfee DLP Discover File server scans.
SharePoint Protection McAfee DLP Discover SharePoint server scans.
McAfee DLP Discover rules also require a repository. See the chapter Scanning data with McAfee DLPDiscover for information on configuring rules and scans.
End-user initiated scans
When activated in the DLP Policy local file system scan configuration, end-users can run enabled scansand can view self-remediation actions. Every scan must have an assigned schedule, and the scan runsaccording to the schedule whether or not the user chooses to run a scan, but when the userinteraction option is enabled, the end-users can also run scans at their convenience. If theself-remediation option is also selected, end-users and also perform remediation actions.
8McAfee Cloud Data Protection Beta Release 21-Mar-2017
McAfee Data Loss Prevention 11.0.0 Product Guide 175

Local file system automatic classification
When the Classify File action is chosen for local file system discovery rules, the rule applies automaticclassification, and embeds the classification Tag ID into the file format. The ID is added to all MicrosoftOffice and PDF files, and to audio, video, and image file formats. The classification ID can be detectedby all McAfee DLP products and 3rd-party products.
Limitation:
In McAfee DLP version 10.0.100, only McAfee DLP Discover and McAfee DLP Endpoint for Windows candetect the embedded classification automatically.
See also Components of the Classification module on page 115
How discovery scanning worksUse endpoint discovery scans to locate local file system or email storage files with sensitive contentand tag or quarantine them.
McAfee DLP Endpoint discovery is a crawler that runs on client computers. When it finds predefinedcontent, it can monitor, quarantine, tag, encrypt, or apply an RM policy to the files containing thatcontent. Endpoint discovery can scan computer files or email storage (PST, mapped PST, and OST)files. Email storage files are cached on a per-user basis.
To use endpoint discovery, you must activate the Discovery modules on the Policy Catalog | Clientconfiguration | Operational Mode and Modules page.
At the end of each discovery scan, the McAfee DLP Endpoint client sends a discovery summary eventto the DLP Incident Manager console in McAfee ePO to log the details of the scan. The event includesan evidence file that lists the files that could not be scanned and the reason for not scanning each ofthese files. There is also an evidence file with files matching the classification and the action taken.
In McAfee DLP Endpoint 9.4.0, the summary event was an operational event. To update old summaryevents to the DLP Incident Manager, use the McAfee ePO server task DLP Incident Event Migration from9.4 to 9.4.1.
When can you search?
Schedule discovery scans on the Policy Catalog | DLP Policy | Endpoint Discovery page. You can run ascan at a specific time daily, or on specified days of the week or month. You can specify start and stopdates, or run a scan when the McAfee DLP Endpoint configuration is enforced. You can suspend a scanwhen the computer's CPU or RAM exceed a specified limit.
If you change the discovery policy while an endpoint scan is running, rules and schedule parameterswill change immediately. Changes to which parameters are enabled or disabled will take effect with thenext scan. If the computer is restarted while a scan is running, the scan continues where it left off.
What content can be discovered?
You define discovery rules with a classification. Any file property or data condition that can be addedto classification criteria can be used to discover content.
What happens to discovered files with sensitive content?
You can quarantine or tag email files. You can encrypt, quarantine, tag, or apply an RM policy to localfile system files. You can store evidence for both file types.
McAfee Cloud Data Protection Beta Release 21-Mar-20178 Scanning data with McAfee DLP Endpoint discovery
How discovery scanning works
176 McAfee Data Loss Prevention 11.0.0 Product Guide
Find content with the Endpoint Discovery crawlerThere are four steps to running the discovery crawler.
1 Create and define classifications to identify the sensitive content.
2 Create and define a discovery rule. The discovery rule includes the classification as part of thedefinition.
3 Create a schedule definition.
4 Set up the scan parameters. The scan definition includes the schedule as one of the parameters.
Tasks• Create and define a discovery rule on page 177
Discovery rules define the content the crawler searches for, and what to do when thiscontent is found.
• Create a scheduler definition on page 178The scheduler determines when and how frequently a discovery scan is run.
• Set up a scan on page 178Discovery scans crawl the local file system or mailboxes for sensitive content.
• Use case: Restore quarantined files or email items on page 179When McAfee DLP Endpoint discovery finds sensitive content, it moves the affected files oremail items into a quarantine folder, replacing them with placeholders that notify users thattheir files or emails have been quarantined. The quarantined files and email items are alsoencrypted to prevent unauthorized use.
Create and define a discovery ruleDiscovery rules define the content the crawler searches for, and what to do when this content is found.
Discovery rules can define endpoint (local email, local file system) or network (Box, CIFS, SharePoint)discovery rules.
Changes to a discovery rule take effect when the policy is deployed. Even if a scan is in progress, anew rule takes effect immediately.
For email storage (PST, mapped PST, and OST) scans, the crawler scans email items (body andattachments), calendar items, and tasks. It does not scan public folders or sticky notes.
TaskFor details about product features, usage, and best practices, click ? or Help.
1 In McAfee ePO, select Menu | Data Protection | DLP Policy Manager.
2 On the Rule Sets page, select Actions | New Rule Set. Enter a name and click OK.
You can also add discovery rules to an existing rule set.
3 On the Discovery tab, select Actions | New Endpoint Discovery Rule, then select either Local Email or Local FileSystem.
The appropriate page appears.
4 Enter a rule name and select a classification.
5 Click Reaction. Select an Action from the drop-down list.
McAfee Cloud Data Protection Beta Release 21-Mar-2017Scanning data with McAfee DLP Endpoint discovery
Find content with the Endpoint Discovery crawler 8
McAfee Data Loss Prevention 11.0.0 Product Guide 177

6 (Optional) Select Report Incident options, set the State to Enabled, and select a Severity designation fromthe drop-down list.
7 Click Save.
Create a scheduler definitionThe scheduler determines when and how frequently a discovery scan is run.
Five schedule types are provided:
• Run immediately • Weekly
• Once • Monthly
• Daily
TaskFor details about product features, usage, and best practices, click ? or Help.
1 In McAfee ePO, select Menu | Data Protection | DLP Policy Manager.
2 Click the Definitions tab.
3 In the left pane, click Scheduler
If both McAfee DLP Discover and McAfee DLP Endpoint are installed, the list of existing schedulesdisplayed includes schedules for both.
4 Select Actions | New.
The New Scheduler page appears.
5 Enter a unique Name, and select the Schedule type from the drop-down list.
The display changes when you select the schedule type to provide the necessary fields for thattype.
6 Fill in the required options and click Save.
Set up a scanDiscovery scans crawl the local file system or mailboxes for sensitive content.
Before you beginVerify that the rule sets you want to apply to the scans have been applied to the DLP Policy.This information is displayed on the DLP Policy | Rule Sets tab.
Changes in discovery setting parameters take effect on the next scan. They are not applied to scansalready in progress.
TaskFor details about product features, usage, and best practices, click ? or Help.
1 In McAfee ePO, select Menu | Policy | Policy Catalog.
2 Select Product | Data Loss Prevention 10, then select the active DLP Policy.
3 On the Endpoint Discovery tab, select Actions | New Endpoint Scan, then select either Local Email or Local FileSystem.
McAfee Cloud Data Protection Beta Release 21-Mar-20178 Scanning data with McAfee DLP Endpoint discovery
Find content with the Endpoint Discovery crawler
178 McAfee Data Loss Prevention 11.0.0 Product Guide

4 Enter a name for the scan, then select a schedule from the drop-down list.
5 Optional: Change the Incident Handling and Error Handling defaults. Set the State to Enabled.
Error handling refers to when text cannot be extracted.
6 (Optional) For local file system scans, select the checkbox in the User Interaction field to allow the userto run enabled scans before they are scheduled. You can also enable the user to performremediation actions from the McAfee DLP Endpoint client console.
7 On the Folders tab, do one of the following:
• For file system scans, select Actions | Select Folders. Select a defined folder definition or click NewItem to create one. Define the folder as Include or Exclude.
• For email scans, select the file types (OST, PST) and the mailboxes to be scanned.
8 (Optional) On the Filters tab (file system scans only) select Actions | Select Filters. Select a fileinformation definition or click New Item to create one. Define the filter as Include or Exclude. Click OK.
The default is All Files. Defining a filter makes the scan more efficient.
9 On the Rules tab, verify the rules that apply.
All discovery rules from rule sets applied to the policy are run.
Use case: Restore quarantined files or email itemsWhen McAfee DLP Endpoint discovery finds sensitive content, it moves the affected files or email itemsinto a quarantine folder, replacing them with placeholders that notify users that their files or emailshave been quarantined. The quarantined files and email items are also encrypted to preventunauthorized use.
Before you beginTo display the McAfee DLP icon in Microsoft Outlook, the Show Release from Quarantine Controls inOutlook option must be enabled in Policy Catalog | Client Policy | Operational Mode and Modules. Whendisabled, both the icon and the right-click option for viewing quarantined emails areblocked, and you cannot release emails from quarantine.
When you set a file system discovery rule to Quarantine and the crawler finds sensitive content, it movesthe affected files into a quarantine folder, replacing them with placeholders that notify users that theirfiles have been quarantined. The quarantined files are encrypted to prevent unauthorized use.
For quarantined email items, McAfee DLP Endpoint discovery attaches a prefix to the Outlook Subject toindicate to users that their emails have been quarantined. Both the email body and any attachmentsare quarantined.
The mechanism has been changed from previous McAfee DLP Endpoint versions, which could encrypteither the body or attachments, to prevent signature corruption when working with the email signingsystem.
Microsoft Outlook calendar items and tasks can also be quarantined.
Figure 8-1 Quarantined email example
McAfee Cloud Data Protection Beta Release 21-Mar-2017Scanning data with McAfee DLP Endpoint discovery
Find content with the Endpoint Discovery crawler 8
McAfee Data Loss Prevention 11.0.0 Product Guide 179

Task1 To restore quarantined files:
a In the system tray of the managed computer, click the McAfee Agent icon, and select Manage Features| DLP Endpoint Console.
The DLP Endpoint Console opens.
b On the Tasks tab, select Open Quarantine Folder.
The quarantine folder opens.
c Select the files to be restored. Right-click and select Release from Quarantine.
The Release from Quarantine context-sensitive menu item only appears when selecting files oftype *.dlpenc (DLP encrypted).
The Release Code pop-up window appears.
2 To restore quarantined email items: Click the McAfee DLP icon, or right-click and select Release fromQuarantine.
a In Microsoft Outlook, select the emails (or other items) to be restored.
b Click the McAfee DLP icon.
The Release Code pop-up window appears.
3 Copy the challenge ID code from the pop-up window and send it to the DLP administrator.
4 The administrator generates a response code and sends it to the user. (This also creates anoperational event recording all the details.)
5 The user enters the release code in the Release Code pop-up window and clicks OK.
The decrypted files are restored to their original location. If the release code lockout policy hasbeen activated (in the Agent Configuration | Notification Service tab) and you enter the code incorrectlythree times, the pop-up window times out for 30 minutes (default setting).
For files, if the path has been changed or deleted, the original path is restored. If a file with thesame name exists in the location, the file is restored as xxx-copy.abc
McAfee Cloud Data Protection Beta Release 21-Mar-20178 Scanning data with McAfee DLP Endpoint discovery
Find content with the Endpoint Discovery crawler
180 McAfee Data Loss Prevention 11.0.0 Product Guide

9 Scanning data with McAfee DLP Discover
Configure McAfee DLP Discover scans and policy to detect and protect your files.
Contents Choosing the scan type Scan considerations and limitations Repositories and credentials for scans Using definitions and classifications with scans Using rules with scans Configure policy for scans Configure a scan Perform scan operations Scan behavior Analyzing scanned data
Choosing the scan typeThe type of scan you configure determines the amount of information retrieved in a scan, the actionstaken during the scan, and the configuration required for the scan.
• Inventory scans retrieve metadata only, providing a base for configuring classification andremediation scans.
• Classification scans retrieve metadata, analyze files, and match policy classifications that youdefine.
• Remediation scans include classification scan analysis and can enforce rules on files.
For database scans, remediation scans can only report an incident and store evidence.
• Registration scans fingerprint content in sensitive files and store the fingerprints as registereddocuments on the Master Redis server.
The policy components you must configure depend on the scan type.Table 9-1 Required policy components
Scan type Definitions Classifications Rules Fingerprint criteria
Inventory X
Classification X X
Remediation X X X
Registration X X
Scan results are displayed on the Data Analytics tab. The Data Inventory tab displays the inventory of filesfrom scans that have the File List option enabled.
9McAfee Cloud Data Protection Beta Release 21-Mar-2017
McAfee Data Loss Prevention 11.0.0 Product Guide 181

How inventory scans workInventory scans are the fastest scans, retrieving only metadata. Because of this, an inventory scan isa good place to begin planning a data loss prevention strategy.
An inventory scan performs the following:
Action When scanning a filerepository
When scanning adatabase
Collects metadata but does not download any files/tables
x x
Returns Online Analytical Processing (OLAP) countersand data inventory (list of files/tables scanned)
x x
Restores the last access time of files scanned x
Inventory scans on file repositories collect metadata such as the file type, size, date created, and datemodified. The type of available metadata depends on the repository type. For example, Box scansretrieve sharing, collaboration, and account name metadata. Inventory scans on databases collectmetadata such as the schema name, table name, number of records, size, and owner.
The results of inventory scans are displayed on the Data Inventory and Data Analytics tabs.
You can also use inventory scans to help automate IT tasks such as
• finding empty files
• finding files that have not been modified for a long time
• extracting database table formatting
How classification scans workUse the results of inventory scans to build classification scans.
A classification scan performs the following:
Action When scanning afile repository
When scanninga database
Collects the same metadata as an inventory scan x x
Analyzes the true file type based on the content of thefile rather than the extension
x
Collects data on files/tables that match the configuredclassification
x x
Restores the last access time of files scanned x
Classification scans are slower than inventory scans because the text extractor accesses, parses, andanalyzes the files to match definitions in the classification specifications. Classifications consist ofdefinitions that can include keywords, dictionaries, text patterns, and document properties. Thesedefinitions help identify sensitive content that might require additional protection. By using the OLAPtools to view multidimensional patterns of these parameters, you can create optimized remediationscans.
The results of classification scans are displayed on the Data Inventory and Data Analytics tabs.
Detecting encrypted files
File repository classification scans detect data with these encryption types:
McAfee Cloud Data Protection Beta Release 21-Mar-20179 Scanning data with McAfee DLP Discover
Choosing the scan type
182 McAfee Data Loss Prevention 11.0.0 Product Guide

• Microsoft Rights Management encryption
• Seclore Rights Management encryption
• Unsupported encryption types or password protection
• Not encrypted
Consider these points when scanning encrypted files:
• McAfee DLP Discover can extract and scan files encrypted with Microsoft RMS provided that McAfeeDLP Discover has the credentials configured. Other encrypted files cannot be extracted, scanned, ormatched to classifications.
• Files encrypted with Adobe Primetime digital rights management (DRM) and McAfee® File andRemovable Media Protection (FRP) are detected as Not Encrypted.
• McAfee DLP Discover supports classification criteria options for Microsoft Rights Management Encryption andNot Encrypted.
How remediation scans workUse the results of inventory and classification scans to build remediation scans.
Remediation scans apply rules to protect sensitive content in the scanned repository. When datamatches the classification in a remediation scan, McAfee DLP Discover can perform the following:
Action When scanning a file repository When scanninga database
Generate an incident. x x
Store the original file/table in theevidence share.
x x
Copy the file. x
Move the file. x
Box and SharePoint scans supportmoving files only to CIFS shares.
Apply RM policy to the file. x
Modify anonymous share to loginrequired.
Box scans only
McAfee DLP Discover cannot prevent Boxusers from reenabling external sharingon their files.
Take no action. x x
Moving files or applying RM policy to files is NOT supported for SharePoint lists. These actions aresupported for files attached to SharePoint lists or stored in document libraries. Some file types used forbuilding SharePoint pages, such as .aspx or .js cannot be moved or deleted.
A remediation scan also performs the same tasks as inventory and classification scans. Remediationscans require classifications and rules to determine the action to take on matched files.
The results of remediation scans are displayed on the Data Inventory and Data Analytics tabs. Remediationscans can also generate incidents displayed in the Incident Manager.
McAfee Cloud Data Protection Beta Release 21-Mar-2017Scanning data with McAfee DLP Discover
Choosing the scan type 9
McAfee Data Loss Prevention 11.0.0 Product Guide 183

How registration scans workDocument registration scans extract signatures from files for use in defining classification criteria.
Registered documents are an extension of location-based content fingerprinting. The registration scancreates signatures based on defined fingerprint criteria and stores them in a Redis master database.The Redis master database is distributed and synchronized with signature databases on all McAfee DLPDiscover servers in the network. The signature database on the McAfee DLP Discover server is held inRAM, and is read-only. The signatures can be used to define classification and remediation scans.
The registered documents created by a registration scan are referred to as automatic registration. Theycan be viewed on the Classification | Register Documents page by selecting Type: Automatic Registration. They canbe used to define McAfee DLP Prevent and McAfee DLP Monitor policies, and for defining McAfee DLPDiscover scans. They can't be used in McAfee DLP Endpoint policies.
The Master Registration Server, a DLP server, is specified in DLP Settings on the Classification page, whereyou enter the host name or IP address of the server. This server distributes the signature database toMcAfee DLP Discover servers in the network. If distribution is required across more than one LAN, asecond DLP server is used to synchronize the database between LANs.
Redistribution follows these rules:
• All signatures are added ONLY to the Master Registration Server.
• Signatures are deleted when the scan that recorded them is deleted.
• Signatures are over-written when the scan that recorded them runs again.
Limitations
Signatures can have a large RAM impact. 100M (100,000,000) signatures, the maximum per run, takeabout 5 GB of RAM.
• The maximum size of the database is set on the Classification page in DLP Settings, and can range from10,000,000 to 500,000,000 signatures.
• The maximum number of registration scans, enabled and disabled, that can be listed in ScanOperations is 100.
• The Master Registration Server host listed in DLP Settings must be in the same LAN as the McAfeeePO server. McAfee DLP Discover servers and slave database servers can be in another LAN or overWAN.
• User credentials provided for registration scans must have, as a minimum, READ permissions andaccess to the scanned folders.
See also Registered documents on page 127Automatic registration on page 128
Scan considerations and limitationsWhen planning and configuring your scans, consider these items.
Directory exclusion
To avoid negative performance impacts, exclude McAfee DLP Discover directories and processes fromthese applications:
McAfee Cloud Data Protection Beta Release 21-Mar-20179 Scanning data with McAfee DLP Discover
Scan considerations and limitations
184 McAfee Data Loss Prevention 11.0.0 Product Guide

• Anti-virus software, including McAfee® VirusScan® Enterprise
• McAfee® Host Intrusion Prevention and other McAfee software
• Firewalls
• Access protection software
• On-access scanning
Table 9-2 McAfee DLP Discover items to exclude
Type Exclude
Processes • dscrawler.exe • dssvc.exe
• dstex.exe • dsrms.exe
• dseng.exe • dsmbroker.exe
• dsreport.exe • redis-server.exe
Directories • c:\programdata\mcafee\discoverserver
• c:\program files\mcafee\discoverserver
Registry keys • HKEY_LOCAL_MACHINE\SOFTWARE\Wow6432Node\McAfee\DiscoverServer
• HKEY_LOCAL_MACHINE\SOFTWARE\McAfee\DiscoverServer
• HKEY_LOCAL_MACHINE\SOFTWARE\ODBC.INI\McAfeeDSPostgres
Repository definitionsConfiguring repository locations in McAfee ePO has these limitations.
• IP address ranges are supported for Class C addresses only.
• IP address ranges cannot include addresses ending in 0 or 255.
You can define a single IP address ending in 0 or 255.
• IPv6 is not supported.
SharePoint scansSharePoint scans do not crawl system catalogs, hidden lists, or lists flagged as NoCrawl. BecauseSharePoint lists are highly customizable, there might be other lists that are not scanned.
Most lists available out-of-the-box with SharePoint 2010 or 2013 can be crawled, such as:
• Announcements • Issue trackers
• Contacts • Links
• Discussion boards • Meetings
• Events • Tasks
• Generic list
Individual items in a list are combined and grouped in an XML structure and are scanned as a singleXML file. Files attached to list items are scanned as is.
Box scansConfiguring the same Box repository on multiple Discover servers is not supported.
McAfee Cloud Data Protection Beta Release 21-Mar-2017Scanning data with McAfee DLP Discover
Scan considerations and limitations 9
McAfee Data Loss Prevention 11.0.0 Product Guide 185

Scan ability varies depending on the account used. To scan other accounts, contact Box support toenable the as-user functionality.
• The administrator account can scan all accounts.
• A co-administrator account can scan its own account and user accounts.
• A user account can scan only its own account.
Database scans
The following database column types are ignored during all McAfee DLP Discover scans. Text is notextracted, and classifications are not matched.
• All binary types (blob, clob, image, and so forth)
• TimeStamp
In Microsoft SQL, TimeStamp is a row version counter, not a field with a time.
Proximity relationships in classification scans can only be applied within a cell. The use case issearching for proximate sensitive information in a Comments column.
Setting bandwidth for a scan
Large scans might take up noticeable bandwidth, especially on networks with low transmissioncapacities. By default, McAfee DLP Discover does not throttle bandwidth while scanning.
When bandwidth throttling is enabled, McAfee DLP Discover applies it to individual files being fetchedrather than as an average across the entire scan. A scan might burst above or below the configuredthrottle limit. The average throughput measured across the entire scan, however, remains very closeto the configured limit. When enabled, the default throttling value is 2000 Kbps.
Repositories and credentials for scansMcAfee DLP Discover supports Box, CIFS, and SharePoint repositories.
CIFS and SharePoint repositories
When defining a CIFS repository, the UNC path can be the fully qualified domain name (FQDN) (\\myserver1.mydomain.com) or the local computer name (\\myserver1). You can add both conventionsto a single definition.
When defining a SharePoint repository, the host name is the server URL unless Alternate AccessMapping (AAM) is configured on the server. For information about AAM, see the SharePointdocumentation from Microsoft.
A credential definition is specific to a CIFS or SharePoint repository definition. In the credentialsdefinition, if the user is a domain user, use the FQDN for the Domain name field. If the user is aworkgroup user, use the local computer name. If the repository definition contains only one UNCversion, for example FQDN, you must use that version in the credential definition.
For AD domain repositories, use the Test Credential option to verify the user name and password. Usingincorrect credentials creates an event indicating the reason for the scan failure. View the event in theOperational Event List page for details.
McAfee Cloud Data Protection Beta Release 21-Mar-20179 Scanning data with McAfee DLP Discover
Repositories and credentials for scans
186 McAfee Data Loss Prevention 11.0.0 Product Guide

Box repositories
When defining a Box repository, obtain the client ID and client secret from the Box website. Use theBox website to configure the McAfee DLP Discover application, the manage enterprise and as-userfunctionality. If you are not using an administrator account, contact Box support for more informationabout configuring this functionality.
Databases
When defining a database, the database server can be identified by hostname or IP address. You alsospecify the port and database name. You can specify a particular SSL certificate, any SSL certificate,or no certificate. SSL certificates specified in database definitions are defined in DLP Policy Manager |Definitions.
Using definitions and classifications with scansUse definitions and classifications to configure rules, classification criteria, and scans. All scan typesrequire definitions.
There are two types of definitions used for McAfee DLP Discover.
• Definitions used in scans specify schedules, repositories, and credentials for repositories.
• Definitions used in classifications specify what to match when crawling files, such as the fileproperties or the data in a file.
Table 9-3 Definitions available by feature
Definition Used for
Advanced Pattern* Classifications
Dictionary*
Document Properties
True File Type*
File Extension* Classifications and scans
File Information
Credentials Scans
Scheduler
SSL Certificate
Box
File Server (CIFS)
Database
SharePoint
* Indicates that predefined (built-in) definitions are available
Classification and remediation scans use classifications to identify sensitive files and data.
McAfee Cloud Data Protection Beta Release 21-Mar-2017Scanning data with McAfee DLP Discover
Using definitions and classifications with scans 9
McAfee Data Loss Prevention 11.0.0 Product Guide 187
Classifications use one or more definitions to match file properties and content in a file. You can useclassification scans to analyze data patterns in files. Use the results of the classification scans tofine-tune your classifications, which can then be used in remediation scans.
Registered documents and content fingerprinting criteria are not used in McAfee DLP Discover.Classification and remediation scans can detect manually classified files, but McAfee DLP Discovercannot apply manual classifications to files.
McAfee DLP Discover can detect and identify automatic classifications on files set by McAfee DLPEndpoint. You can view automatic classifications in the incident details or the Data Inventory tab.
See also Using classifications on page 116Classification definitions and criteria on page 120
Using rules with scansRemediation scans use rules to detect and take action on sensitive files.
Files crawled by a remediation scan are compared against active discovery rules. If the file matchesthe repository and classifications defined in a rule, McAfee DLP Discover can take action on the file.These options are available:
• Take no action
• Create an incident
• Store the original file as evidence
• Copy the file
• Move the file
• Apply an RM policy to the file
• (Box scans only) Remove anonymous sharing for the file
Moving files or applying RM policy to files is not supported for SharePoint lists. These actions aresupported for files attached to SharePoint lists or stored in document libraries. Some file types usedfor building SharePoint pages, such as .aspx or .js, cannot be moved or deleted.
Box scans support moving files only to CIFS shares. Database scans support only creating an incidentand storing the original data as evidence.
See also Creating policies with rule sets on page 141Defining rules to protect sensitive content on page 144
McAfee Cloud Data Protection Beta Release 21-Mar-20179 Scanning data with McAfee DLP Discover
Using rules with scans
188 McAfee Data Loss Prevention 11.0.0 Product Guide

Configure policy for scansBefore you set up a scan, create definitions, classifications, and rules for your McAfee DLP Discoverpolicy.
Tasks• Create definitions for scans on page 189
Configure the credentials, repositories, and schedulers used for scans.
• Create rules for remediation scans on page 194Use rules to define the action to take when a remediation scan detects files that matchclassifications.
See also Create and configure classifications on page 129Create classification definitions on page 135
Create definitions for scansConfigure the credentials, repositories, and schedulers used for scans.
Tasks• Create scan definitions on page 189
All scans require a definition to specify the repository, credentials, and schedule.
• Create a credentials definition on page 190Credentials are required to read and change files in most repositories. If your repositorieshave the same credentials, you can use a single credentials definition for thoserepositories.
• Create a CIFS or SharePoint repository definition on page 191Configure a CIFS or SharePoint repository for scanning.
• Create a Box repository definition on page 192Configure a Box repository for scanning.
• Export or import repository definitions on page 193If you have a large number of repositories, it might be easier to manage them as an XMLfile rather than adding and editing them one by one in McAfee ePO.
• Create a scheduler definition on page 193The scan scheduler determines when and how frequently a scan is run.
Create scan definitionsAll scans require a definition to specify the repository, credentials, and schedule.
Before you beginYou must have the user name, password, and path for the repository.
TaskFor details about product features, usage, and best practices, click ? or Help.
1 In McAfee ePO, select Menu | Data Protection | DLP Discover.
2 Click the Definitions tab.
McAfee Cloud Data Protection Beta Release 21-Mar-2017Scanning data with McAfee DLP Discover
Configure policy for scans 9
McAfee Data Loss Prevention 11.0.0 Product Guide 189

3 Create a credentials definition.
For remediation scans, the credentials must have read and write permissions. For remediation scansthat apply RM policy or move files, full control permissions are required.
a In the left pane, select Others | Credentials.
b Select Actions | New and replace the default name with a unique name for the definition.
c Fill in the credentials parameters. Click Save.
4 Create a repository definition.
a In the left pane, under Repositories, select the type of new repository you want to create.
b Select Actions | New, type a unique repository name in the Name field, and fill in the rest of theType and Definitions information.
Exclude parameters are optional. At least one Include definition is required.
5 Create a scheduler definition.
a In the left pane, select Others | DLP Scheduler.
b Select Actions | New and fill in the scheduler parameters. Click Save.
Parameter options depend on which Schedule type you select.
6 Create a file information definition.
File information definitions are used to define scan filters. Filters allow you to scan repositories in amore granular manner by defining which files are included and which are excluded. File informationdefinitions are optional, but recommended.
a In the left pane, select Data | File Information.
b Select Actions | New and replace the default name with a unique name for the definition.
c Select properties to use as filters and fill in the Comparison and Value details. Click Save.
Create a credentials definitionCredentials are required to read and change files in most repositories. If your repositories have thesame credentials, you can use a single credentials definition for those repositories.
TaskFor details about product features, usage, and best practices, click ? or Help.
1 In McAfee ePO, select Menu | Data Protection | DLP Discover.
2 Click the Definitions tab.
3 In the left pane, select Credentials.
4 Select Actions | New.
McAfee Cloud Data Protection Beta Release 21-Mar-20179 Scanning data with McAfee DLP Discover
Configure policy for scans
190 McAfee Data Loss Prevention 11.0.0 Product Guide

5 Enter a unique name for the definition. The Description and Domain name are optional fields. All otherfields are required.
If the user is a domain user, use the domain suffix for the Domain name field. If the user is aworkgroup user, use the local computer name.
To crawl all site collections in a SharePoint web application, use a credential which has Full readpermission on the entire web application.
6 For Windows domain repositories, click Test Credential to verify the user name and password fromMcAfee ePO.
This does not test the credentials from the Discover server.
There is no verification for credentials that are not part of a Windows domain. If a scan fails due toincorrect credentials, an event is created on the Operational Event List page.
Create a CIFS or SharePoint repository definitionConfigure a CIFS or SharePoint repository for scanning.
You can use regex in Perl syntax when specifying include or exclude parameters for folders, ratherthan using a specific full path.
• For include entries, specify the path prefix, such as \\server or \\server\share\folder. The regularexpression must be an exact match of the path suffix.
• For exclude entries, folders that match the path will be skipped entirely from the scan.
TaskFor details about product features, usage, and best practices, click ? or Help.
1 In McAfee ePO, select Menu | Data Protection | DLP Discover.
2 Click the Definitions tab.
3 In the left pane, under Repositories, select the type of repository.
4 Select Actions | New.
5 Enter a name, select the credentials to use, and configure at least one Include definition.
6 (CIFS repositories) Configure at least one Include entry.
a Select the Prefix Type.
b In the Prefix field, enter the UNC path, single IP address, or IP address range.
The UNC path can be the fully qualified domain name (FQDN) (\\myserver1.mydomain.com) orthe local computer name (\\myserver1). You can add both versions to a single definition.Multiple entries are parsed as logical OR.
c (Optional) Enter a regular expression for matching folders to scan.
d Click Add.
McAfee Cloud Data Protection Beta Release 21-Mar-2017Scanning data with McAfee DLP Discover
Configure policy for scans 9
McAfee Data Loss Prevention 11.0.0 Product Guide 191

7 (SharePoint repositories) Configure at least one Include entry.
a Select the Include type.
b Configure one or more URLs.
The SharePoint Server option uses only one URL. The host name is the NetBIOS name of the serverunless Alternate Access Mapping (AAM) is configured on the server. For information about AAM,see the SharePoint documentation from Microsoft.
• To specify a site — End the URL with a slash (http://SPServer/sites/DLP/).
• To specify a subsite — Use the subsite ending with a slash (http://SPserver/sites/DLP/Discover/).
• To specify a web application — Use only the web application name and port in the URL(http://SPServer:port).
• To specify a list or document library — Use the complete URL up to the default view ofthe list (http://SPServer/sites/DLP/Share%20Documents/Default.aspx).
You can look up the default view URL in the list or library settings page. If you do not haveprivileges to view this, contact your SharePoint administrator.
c If you configured a Sites list URL, click Add.
8 (Optional) Configure Exclude parameters to exclude folders from being scanned.
9 Click Save.
Create a Box repository definitionConfigure a Box repository for scanning.
TaskFor details about product features, usage, and best practices, click ? or Help.
1 In McAfee ePO, select Menu | Data Protection | DLP Discover.
2 Click the Definitions tab.
3 In the left pane, under Repositories, select Box.
4 Select Actions | New.
5 Enter the name and optional description.
6 Click the link to the Box website. Follow the instructions on the website to define the Boxapplication and to obtain the client ID and client secret.
• When defining the application, select the manage enterprise option.
• For the redirect URI, enter the exact address of the McAfee ePO server.
In other words, if you access McAfee ePO using the host name, you must use the host name forthe redirect URI; you can't use an IP address. Any mismatch in addresses leads to a Box redirectURI error.
• To scan other accounts, contact Box support to enable the as-user functionality.
7 Enter the client ID and client secret, then click Get Token.
8 When prompted on the Box website, grant access for the Discover server.
McAfee Cloud Data Protection Beta Release 21-Mar-20179 Scanning data with McAfee DLP Discover
Configure policy for scans
192 McAfee Data Loss Prevention 11.0.0 Product Guide

9 Specify whether to scan all user accounts or specific user accounts.
10 Click Save.
Export or import repository definitionsIf you have a large number of repositories, it might be easier to manage them as an XML file ratherthan adding and editing them one by one in McAfee ePO.
Use the export feature to save existing repository definitions and associated credentials to an XML file.Use this file as a baseline for adding and configuring your repositories in XML format.
When importing an XML file, the repository definitions and credentials are validated and added to thelist of entries. If a repository definition exists in McAfee ePO and the XML file, the definition isoverwritten with the information in the XML file. The definitions are uniquely identified by the id valuein the XML file.
TaskFor details about product features, usage, and best practices, click ? or Help.
1 In McAfee ePO, select Menu | Data Protection | DLP Discover.
2 Click the Definitions tab.
3 Select File Server (CIFS) or SharePoint.
4 Perform one of these tasks.
• To export repositories:
1 Select Actions | Export.
2 Select whether to open or save the file and click OK.
• To import repositories:
1 Select Actions | Import.
2 Browse to the file and click OK.
Create a scheduler definitionThe scan scheduler determines when and how frequently a scan is run.
These schedule types are provided:
• Run immediately • Weekly
• Once • Monthly
• Daily
TaskFor details about product features, usage, and best practices, click ? or Help.
1 In McAfee ePO, select Menu | Data Protection | DLP Discover.
2 Click the Definitions tab.
3 In the left pane, click Scheduler.
4 Select Actions | New.
McAfee Cloud Data Protection Beta Release 21-Mar-2017Scanning data with McAfee DLP Discover
Configure policy for scans 9
McAfee Data Loss Prevention 11.0.0 Product Guide 193

5 Enter a unique name and select the schedule type.
The display changes when you select the schedule type to provide the necessary fields for that type.
6 Fill in the required options and click Save.
Create rules for remediation scansUse rules to define the action to take when a remediation scan detects files that match classifications.
TaskFor details about product features, usage, and best practices, click ? or Help.
1 In McAfee ePO, select Menu | Data Protection | DLP Policy Manager.
2 Click the Rule Sets tab.
3 If there are no rule sets configured, create a rule set.
a Select Actions | New Rule Set.
b Enter the name and optional note, then click OK.
4 Click the name of a rule set, then if needed, click the Discover tab.
5 Select Actions | New Network Discovery Rule, then select the type of rule.
6 On the Condition tab, configure one or more classifications and repositories.
• Create an item — Click ...
• Add additional criteria — Click +.
• Remove criteria — Click -.
7 (Optional) On the Exceptions tab, specify any exclusions from triggering the rule.
8 On the Reaction tab, configure the reaction.
The available reactions depend on the repository type.
9 Click Save.
Configure a scanThe amount and type of data that McAfee DLP Discover collects depends on the type of scanconfigured.
Tasks• Configure an inventory scan on page 195
Inventory scans collect metadata only. They are the fastest scans, and thus the usualstarting point in determining what scans are needed.
• Configure a classification scan on page 195Classification scans collect file data based on defined classifications. They are used toanalyze file systems for sensitive data to be protected with a remediation scan.
• Configure a remediation scan on page 196Remediation scans apply rules to protect sensitive content in the scanned repository.
McAfee Cloud Data Protection Beta Release 21-Mar-20179 Scanning data with McAfee DLP Discover
Configure a scan
194 McAfee Data Loss Prevention 11.0.0 Product Guide

Configure an inventory scanInventory scans collect metadata only. They are the fastest scans, and thus the usual starting point indetermining what scans are needed.
Use inventory scans to plan your data protection strategy. You can create scans or edit and reuseexisting ones as required.
TaskFor details about product features, usage, and best practices, click ? or Help.
1 In McAfee ePO, select Menu | Data Protection | DLP Discover.
2 On the Discover Servers tab, select Actions | Detect Servers to refresh the list.
If the list is long, you can define a filter to display a shorter list.
3 On the Scan Operations tab, select Actions | New Scan and select the repository type.
4 Type a unique name and select Scan Type: Inventory. Select a server platform and a schedule.
Discover servers must be predefined. You can select a defined schedule or create one.
5 (Optional) Set values for Files List or Error Handling in place of the default values.
6 Select the repositories to scan.
a On the Repositories tab, click Actions | Select Repositories.
b If needed, specify the credentials for each repository from the drop-down list.
The credentials default to what is configured for that repository.
You can create repository and credentials definitions if necessary from the selection window.
7 (Optional) On the Filters tab, select Actions | Select Filters to specify files to include or exclude.
By default, all files are scanned.
8 Click Save.
9 Click Apply policy.
Configure a classification scanClassification scans collect file data based on defined classifications. They are used to analyze filesystems for sensitive data to be protected with a remediation scan.
Before you begin• Run an inventory scan. Use the inventory data to define classifications.
• Create the required classification definitions before setting up a classification scan.There is no option to create a classification within the configuration setup.
McAfee Cloud Data Protection Beta Release 21-Mar-2017Scanning data with McAfee DLP Discover
Configure a scan 9
McAfee Data Loss Prevention 11.0.0 Product Guide 195

TaskFor details about product features, usage, and best practices, click ? or Help.
1 In McAfee ePO, select Menu | Data Protection | DLP Discover.
2 On the Discover Servers tab, select Actions | Detect Servers to refresh the list.
If the list is long, you can define a filter to display a shorter list.
3 On the Scan Operations tab, select Actions | New Scan and select the repository type.
4 Type a unique name and select Scan Type: Classification. Select a server platform and a schedule.
Discover servers must be predefined. You can select a defined schedule or create one.
5 (Optional) Set values for Throttling, Files List, or Error Handling in place of the default values.
6 Select the repositories to scan.
a On the Repositories tab, click Actions | Select Repositories.
b If needed, specify the credentials for each repository from the drop-down list.
The credentials default to what is configured for that repository.
You can create repository and credentials definitions if necessary from the selection window.
7 (Optional) On the Filters tab, select Actions | Select Filters to specify files to include or exclude.
By default, all files are scanned.
8 Select the classifications for the scan.
a On the Classifications tab, click Actions | Select Classifications.
b Select one or more classifications from the list.
9 Click Save.
10 Click Apply policy.
Configure a remediation scanRemediation scans apply rules to protect sensitive content in the scanned repository.
Before you begin• If the scan is configured to apply RM policy or move files, make sure the credentials for
the repository have full control permissions.
• Create the classifications and rules for the scan.
TaskFor details about product features, usage, and best practices, click ? or Help.
1 In McAfee ePO, select Menu | Data Protection | DLP Discover.
2 On the Discover Servers tab, select Actions | Detect Servers to refresh the list.
If the list is long, you can define a filter to display a shorter list.
McAfee Cloud Data Protection Beta Release 21-Mar-20179 Scanning data with McAfee DLP Discover
Configure a scan
196 McAfee Data Loss Prevention 11.0.0 Product Guide

3 On the Scan Operations tab, select Actions | New Scan and select the repository type.
4 Type a unique name and select Scan Type: Remediation. Select a server platform and a schedule.
Discover servers must be predefined. You can select a defined schedule or create one.
5 (Optional) Set values for Throttling, Files List, Incident Handling, or Error Handling in place of the defaultvalues.
6 Select the repositories to scan.
a On the Repositories tab, click Actions | Select Repositories.
b If needed, specify the credentials for each repository from the drop-down list.
The credentials default to what is configured for that repository.
You can create repository and credentials definitions if necessary from the selection window.
7 (Optional) On the Filters tab, select Actions | Select Filters to specify files to include or exclude.
By default, all files are scanned.
8 Select the rules for the scan.
a On the Rules tab, click Actions | Select Rule Sets.
b Select one or more rule sets from the list.
9 Click Save.
10 Click Apply policy.
Configure a registration scanRegistration scans extract signatures from files.
Before you beginCreate one or more classifications with fingerprint criteria based on the repository to bescanned.
TaskFor details about product features, usage, and best practices, click ? or Help.
1 In McAfee ePO, select Menu | Data Protection | DLP Discover.
2 On the Discover Servers tab, select Actions | Select Servers to refresh the list.
If the list is long, you can define a filter to display a shorter list.
3 On the Scan Operations tab, select Actions | New Scan and select the repository type.
You can run registration scans on Box, CIFS, or SharePoint repositories only.
4 Type a unique name and select Scan Type: Document Registration. Select a server platform and aschedule.
Discover servers must be predefined. You can select a defined schedule or create one.
5 (Optional) Set values for Throttling, Files List, Signatures, or Error Handling in place of the default values.
McAfee Cloud Data Protection Beta Release 21-Mar-2017Scanning data with McAfee DLP Discover
Configure a scan 9
McAfee Data Loss Prevention 11.0.0 Product Guide 197

6 Select the repositories to scan.
a On the Repositories tab, click Actions | Select Repositories.
b If needed, specify the credentials for each repository from the drop-down list.
The credentials default to what is configured for that repository.
You can create repository and credentials definitions if needed from the selection window.
7 (Optional) On the Filters tab, select Actions | Select Filters to specify files to include or exclude.
By default, all files are scanned.
8 Select criteria for the scan.
a On the Fingerprint Criteria tab, click Actions | Select Classifications.
b Select one or more classifications from the list. Click OK.
9 Click Save.
10 Click Apply policy.
Perform scan operationsManage and view information about configured scans.
Applying policy starts any scans that are scheduled to run immediately. Scans that are currently runningare not affected.
TaskFor details about product features, usage, and best practices, click ? or Help.
1 In McAfee ePO, select Menu | Data Protection | DLP Discover.
2 Click the Scan Operations tab.
The tab displays information about configured scans, such as the name, type, state, and overviewof the results.
3 To update the configuration for all scans, click Apply policy.
4 To apply a filter to the scan list, select a filter from the Filter drop-down list.
5 To enable or disable a scan:
a Select the checkbox for the scans you want to enable or disable.
The icon in the State column shows if the scan is enabled or disabled.
• Solid blue icon — Enabled
• Blue and white icon — Disabled
b Select Actions | Change State, then select Enabled or Disabled.
c Click Apply policy.
6 To change the running state of the scan, click the start, pause, or stop buttons in the Commandscolumn.
The availability of these options depends on the scan state and if the scan is running or inactive.
McAfee Cloud Data Protection Beta Release 21-Mar-20179 Scanning data with McAfee DLP Discover
Perform scan operations
198 McAfee Data Loss Prevention 11.0.0 Product Guide

7 To clone, delete, or edit a scan:
a Select the checkbox for the scan.
b Select Actions, then select Clone Scan, Delete Scan, or Edit Scan.
To modify the Discover server assigned to the scan, you must disable the scan. You cannotmodify the scan type assigned to a scan. To change the type, clone the scan.
8 To refresh the tab, select Actions | Synchronize Data.
Scan behaviorChanging properties of a scan that is in progress can affect the behavior of the scan.
Table 9-4 Effect of changing properties during a scan
Change Effect
Disable scan Scan stops
Delete scan Scan stops and is deleted
Change scan name Affects only logs on the next scan run
Change schedule Affects only the next scan run
Change throttling Affects only the next scan run*
Change file list Affects only the next scan run*
Change repository Affects only the next scan run
Change filters Affects only the next scan run
Change rules Affects only the next scan run*
Change classification Affects only the next scan run*
Change evidence share Affects the current scan*
Change evidence user credentials Affects the current scan*
Change remediation user credentials Affects only the next scan run*
Upgrade or uninstall the Discover server Scan stops
* The effect takes place after an agent server communication interval (ASCI) occurs.
Analyzing scanned dataYou can analyze information collected from scanned data in several ways.
The basic inventory scan (collection of metadata) is part of all scan types. Classification scans alsoanalyze data based on defined classifications. The text extractor parses file content, adding additionalinformation to the stored metadata.
How McAfee DLP Discover uses OLAPMcAfee DLP Discover uses Online Analytical Processing (OLAP), a data model that enables quickprocessing of metadata from different viewpoints.
Use the McAfee DLP Discover OLAP tools to view multidimensional relationships between data collectedfrom scans. These relationships are known as hypercubes or OLAP cubes.
McAfee Cloud Data Protection Beta Release 21-Mar-2017Scanning data with McAfee DLP Discover
Scan behavior 9
McAfee Data Loss Prevention 11.0.0 Product Guide 199

You can sort and organize scan results based on conditions such as classification, file type, repository,and more. Using the data patterns to estimate potential violations, you can optimize classification andremediation scans to identify and protect data quickly and more effectively.
Viewing scan resultsThe Data Inventory and Data Analytics tabs in the DLP Discover module display scan results from inventory,classification, and remediation scans.
These tabs display the results collected from the last time the scan was run.
Results from registration scans can be viewed in the Classification module on the Register Documents tabwhen you select Type: Automatic Registration.
Data Analytics tab
The Data Analytics tab allows you to analyze files from scans. The tab uses an OLAP data model todisplay up to three categories to expose multidimensional data patterns. Use these patterns tooptimize your classification and remediation scans.
Figure 9-1 Configuring data analytics
McAfee Cloud Data Protection Beta Release 21-Mar-20179 Scanning data with McAfee DLP Discover
Analyzing scanned data
200 McAfee Data Loss Prevention 11.0.0 Product Guide

1 Scan Name — The drop-down list displays available scans for all types. Analysis can only beperformed on a single scan.
2 Analytic Type — Select from Files or Classifications. For inventory scans, only Files is available. Theanalytic type determines the available categories.
3 Show — Controls how many entries are displayed.
4 Expand Table/Collapse Table — Expands the entire page. You can also expand or collapse individualgroups.
5 Category selector — Drop-down list displays all available categories. You can select from theremaining categories in the second and third selectors to create a three-dimensional analysis ofdata patterns.
6 Item expansion — The arrow icon controls expansion/collapse of individual groups to clean upthe display.
7 Count — Number of files (or classifications) in each group. Click the number to go to the DataInventory tab and display details for that group.
If the Analytic Type is set to Classifications and any files have more than one associated classification, thisnumber might be larger than the total number of files.
Data Inventory tab
The Data Inventory tab displays the inventory of files from scans that have the File List option enabled. Youcan define and use filters to adjust the information displayed, which might reveal patterns or potentialpolicy violations.
Classification and File type are not available for inventory scans.
See also How inventory scans work on page 182
Analyze scan resultsUse the OLAP data model to organize and view relationships between files from scans.
TaskFor details about product features, usage, and best practices, click ? or Help.
1 In McAfee ePO, select Menu | Data Protection | DLP Discover.
2 Click the Data Analytics tab.
3 From the Scan Name drop-down list, select the scan to analyze.
4 From the Analytic Type drop-down list, select File or Classification.
5 From the Show drop-down list, select the number of top entries to display.
6 Use the category drop-down lists to display files from up to three categories.
McAfee Cloud Data Protection Beta Release 21-Mar-2017Scanning data with McAfee DLP Discover
Analyzing scanned data 9
McAfee Data Loss Prevention 11.0.0 Product Guide 201

7 Use the Expand Table and Collapse Table options to expand or collapse the amount of informationdisplayed.
8 To view the inventory results of files belonging to a category, click the link that shows the numberof files in parentheses.
The link is available only if you selected the Files List option in the scan configuration. The linkdisplays the Data Inventory page.
View inventory resultsView the inventory of files from all scan types.
TaskFor details about product features, usage, and best practices, click ? or Help.
1 In McAfee ePO, select Menu | Data Protection | DLP Discover.
2 Click the Data Inventory tab.
3 Perform any of these tasks.
• To view the results of a particular scan, select the scan from the Scan drop-down list.
• To filter the files displayed, select a filter from the Filter drop-down list.
Click Edit to modify and create filters.
• To group files based on a certain property:
1 From the Group By drop-down list, select a category.
The available properties appear in the left pane.
2 Select the property to group files.
• To configure the displayed columns:
1 Select Actions | Choose Columns.
2 From the Available Columns list, click an option to move it to the Selected Columns area.
3 In the Selected Columns area, arrange and delete columns as needed.
• To remove a column, click x.
• To move a column, click the arrow buttons, or drag and drop the column.
4 Click Update View.
McAfee Cloud Data Protection Beta Release 21-Mar-20179 Scanning data with McAfee DLP Discover
Analyzing scanned data
202 McAfee Data Loss Prevention 11.0.0 Product Guide

Monitoring and reportingYou can use McAfee DLP extension components to track and review policyviolations (DLP Incident Manager), and to track administrative events (DLPOperations).
Chapter 10 Incidents and operational eventsChapter 11 Collecting and managing dataChapter 12 McAfee DLP appliances logging and monitoring
McAfee Cloud Data Protection Beta Release 21-Mar-2017
McAfee Data Loss Prevention 11.0.0 Product Guide 203
McAfee Cloud Data Protection Beta Release 21-Mar-2017Monitoring and reporting
204 McAfee Data Loss Prevention 11.0.0 Product Guide

10 Incidents and operational events
McAfee DLP offers different tools for viewing incidents and operational events.
• Incidents — The DLP Incident Manager page displays incidents generated from rules.
• Operational events — The DLP Operations page displays errors and administrative information.
• Cases — The DLP Case Management page contains cases that have been created to group and managerelated incidents.
When multiple McAfee DLP products are installed, the consoles display incidents and events from allproducts.
The display for both DLP Incident Manager and DLP Operations can include information about the computerand logged-on user generating the incident/event, client version, operating system, and otherinformation.
Stakeholders
A stakeholder is anyone with an interest in a particular incident, event, or case. Typical stakeholdersare DLP administrators, case reviewers, managers, or users with incidents. McAfee DLP sendsautomatic emails notifying stakeholders when an incident, event, or case is created or changed. It canalso automatically add stakeholders to the list, as, for example, when a reviewer is assigned to a case.The administrator also has the option of manually adding stakeholders to specific incidents, events, orcases.
Automatic email details are set in DLP Settings. Options on the Incident Manager, Operations Center, and CaseManagement pages determine whether automatic emails are sent, and who is automatically added to thestakeholders list. The administrator can add stakeholders manually from the DLP Incident Manager, DLPOperations, or DLP Case Management modules.
Contents Monitoring and reporting events DLP Incident Manager/DLP Operations View incidents Manage incidents Working with cases Manage cases
Monitoring and reporting eventsMcAfee DLP divides events into two classes: incidents (that is, policy violations) and administrativeevents. These events are viewed in the two consoles, DLP Incident Manager and DLP Operations.
10McAfee Cloud Data Protection Beta Release 21-Mar-2017
McAfee Data Loss Prevention 11.0.0 Product Guide 205

When McAfee DLP determines a policy violation has occurred, it generates an event and sends it to theMcAfee ePO Event Parser. These events are viewed, filtered, and sorted in the DLP Incident Managerconsole, allowing security officers or administrators to view events and respond quickly. If applicable,suspicious content is attached as evidence to the event.
As McAfee DLP takes a major role in an enterprise’s effort to comply with all regulation and privacylaws, the DLP Incident Manager presents information about the transmission of sensitive data in anaccurate and flexible way. Auditors, signing officers, privacy officials and other key workers can usethe DLP Incident Manager to observe suspicious or unauthorized activities and act in accordance withenterprise privacy policy, relevant regulations or other laws.
The system administrator or the security officer can follow administrative events regarding agents andpolicy distribution status.
Based on which McAfee DLP products you use, the DLP Operations console can display errors, policychanges, agent overrides, and other administrative events.
You can configure an email notification to be sent to specified addresses whenever updates are madeto incidents, cases, and operational events.
DLP Incident Manager/DLP OperationsUse the DLP Incident Manager module in McAfee ePO to view the security events from policyviolations. Use DLP Operations to view administrative information, such as information about clientdeployment.
DLP Incident Manager has four tabbed pages. On each page the Present drop-down list determines the dataset displayed: Data-in-use/motion, Data-at-rest (Endpoint), or Data-at-rest (Network).
• Analytics — A display of six charts that summarize the incident list. Each chart has a filter to adjustthe display. The charts display:
• Top 10 RuleSets • Number of Incidents Per Day
• Incidents per Type • Top 10 Destinations
• Top 10 Users with Violations • Top 10 Classifications
• Incident List — The current list of policy violation events.
• Incident Tasks — A list of actions you can take on the list or selected parts of it. They includeassigning reviewers to incidents, setting automatic email notifications, and purging all or part ofthe list.
• Incident History — A list with all historic incidents. Purging the incident list does not affect the history.
DLP Operations has four tabbed pages:
• Operational Event List — The current list of administrative events.
• Operational Event Tasks — A list of actions you can take on the list or selected parts of it, similar tothe incident tasks.
• Operational Event History — A list with all historic events.
• User Information — Displays data from the user information table.
Detailed information can be viewed by drilling down (selecting) a specific incident or event.
McAfee Cloud Data Protection Beta Release 21-Mar-201710 Incidents and operational events
DLP Incident Manager/DLP Operations
206 McAfee Data Loss Prevention 11.0.0 Product Guide

User Information
The User Information page displays data from the user information table. The table is populatedautomatically from user information in incidents and operational events. You can add more detailedinformation by importing from a CSV file.
Information displayed typically includes user principal name (username@xyz), user log on name, useroperational unit, first name, last name, user primary email, user manager, department, and businessunit. The complete list of available fields can be viewed from the Edit command for the View option.
How the Incident Manager worksThe Incident List tab of the DLP Incident Manager has all the functionality required for reviewing policyviolation incidents. Event details are viewed by clicking a specific event. You can create and save filtersto change the view or use the predefined filters in the left pane. You can also change the view byselecting and ordering columns. Color-coded icons and numeric ratings for severity facilitate quickvisual scanning of events.
To display the User Principal Name and User Logon Name in McAfee DLP appliance incidents, add an LDAPserver to the DLP Appliance Management policy (Users and Groups category). You must do this even if your emailprotection rules do not use LDAP.
The Incident List tab works with McAfee ePO Queries & Reports to create McAfee DLP Endpoint reports anddisplay data on McAfee ePO dashboards.
Operations you can perform on events include:
• Case management — Create cases and add selected incidents to a case
• Comments — Add comments to selected incidents
• Email events — Send selected events
• Export device parameters — Export device parameters to a CSV file (Data in-use/motion listonly)
• Labels — Set a label for filtering by label
• Release redaction — Remove redaction to view protected fields (requires correct permission)
• Set properties — Edit the severity, status, or resolution; assign a user or group for incidentreview
Figure 10-1 DLP Incident Manager
The DLP Operations page works in an identical manner with administrative events. The events containinformation such as why the event was generated and which McAfee DLP product reported the event.It can also include user information connected with the event, such as user logon name, user principal
McAfee Cloud Data Protection Beta Release 21-Mar-2017Incidents and operational events
DLP Incident Manager/DLP Operations 10
McAfee Data Loss Prevention 11.0.0 Product Guide 207

name (username@xyz), or user manager, department, or business unit. Operational events can befiltered by any of these, or by other parameters such as severity, status, client version, policy name,and more.
Figure 10-2 DLP Operations
Incident tasks/Operational Event tasks
Use the Incident Tasks or Operational Event Tasks tab to set criteria for scheduled tasks. Tasks set up on thepages work with the McAfee ePO Server Tasks feature to schedule tasks.
Both tasks tabs are organized by the task type (left pane). The Incident Tasks tab is also organized byincident type, so that it is actually a 4 x 3 matrix, the information displayed depending on which twoparameters you select.
Data in-use/motion
Data at-rest(Endpoint)
Data at-rest(Network)
Data in-use/motion(History)
Set Reviewer X X X
Automatic mailnotification X X X
Purge events X X X X
Use case: Setting properties
Properties are data added to an incident that requires follow-up. You can add the properties from thedetails pane of the incident or by selecting Actions | Set Properties. The properties are:
• Severity • Reviewing Group
• Status • Reviewing User
• Resolution
The reviewer can be any McAfee ePO user. The reason severity can be changed is that if theadministrator determines that the status is false positive, then the original severity is no longermeaningful.
Use case: Changing the view
In addition to using filters to change the view, you can also customize the fields and the order ofdisplay. Customized views can be saved and reused.
Creating a filter involves the following tasks:
McAfee Cloud Data Protection Beta Release 21-Mar-201710 Incidents and operational events
DLP Incident Manager/DLP Operations
208 McAfee Data Loss Prevention 11.0.0 Product Guide

1 To open the view edit window, click Actions | View | Choose Columns.
2 To move columns to the left or right, use the x icon to delete columns, and the arrow icons.
3 To apply the customized view, click Update View.
4 To save for future use, click Actions | View | Save View.
When you save the view, you can also save the time and custom filters. Saved views can be chosenfrom the drop-down list at the top of the page.
Working with incidentsWhen McAfee DLP receives data that matches parameters defined in a rule, a violation is triggered andMcAfee DLP generates an incident.
Using the DLP Incident Manager in McAfee ePO, you can view, sort, group, and filter incidents to findimportant violations. You can view details of incidents or delete incidents that are not useful.
Device plug incidents
Two options on the Incident List Actions menu allow you to work with device plug incidents. Create DeviceTemplate creates a device definition from a device plug incident. The option is available only when asingle device plug incident is selected. If you select more than one incident, or a non-device plugincident, a popup informs you of your error. Export Device Information to CSV saves information from one ormore device plug incidents. You can import saved device information from the DLP Policy Manager |Definitions | Device Templates page.
View incidentsDLP Incident Manager displays all incidents reported by McAfee DLP applications. You can alter theway incidents appear to help you locate important violations more efficiently.
The Present field in the DLP Incident Manager displays incidents according to the application thatproduced them:
• Data in-use/motion• McAfee DLP Endpoint • McAfee DLP Monitor
• Device Control • McAfee DLP Prevent for Mobile Email
• McAfee DLP Prevent
• Data at rest (Endpoint) — McAfee DLP Endpoint discovery
• Data at rest (Network) — McAfee DLP Discover
When McAfee DLP processes an object — such as an email message — that triggers multiple rules,DLP Incident Manager collates and displays the violations as one incident, rather than separateincidents.
McAfee Cloud Data Protection Beta Release 21-Mar-2017Incidents and operational events
View incidents 10
McAfee Data Loss Prevention 11.0.0 Product Guide 209

Tasks• Sort and filter incidents on page 210
Arrange the way incidents appear based on attributes such as time, location, user, orseverity.
• Configure column views on page 210Use views to arrange the type and order of columns displayed in the incident manager.
• Configure incident filters on page 211Use filters to display incidents that match specified criteria.
• View incident details on page 212View the information related to an incident.
Sort and filter incidentsArrange the way incidents appear based on attributes such as time, location, user, or severity.
TaskFor details about product features, usage, and best practices, click ? or Help.
1 In McAfee ePO, select DLP Incident Manager.
2 From the Present drop-down list, select the option for your product.
3 Perform any of these tasks.
• To sort by column, click a column header.
• To change columns to a custom view, from the View drop-down list, select a custom view.
• To filter by time, from the Time drop-down list, select a time frame.
• To apply a custom filter, from the Filter drop-down list, select a custom filter.
• To group by attribute:
1 From the Group By drop-down list, select an attribute.
A list of available options appears. The list contains up to 250 of the most frequentlyoccurring options.
2 Select an option from the list. Incidents that match the selection are displayed.
ExampleWhen working with McAfee DLP Endpoint incidents, select User ID to display the names of usersthat have triggered violations. Select a user name to display all incidents for that user.
Configure column viewsUse views to arrange the type and order of columns displayed in the incident manager.
TaskFor details about product features, usage, and best practices, click ? or Help.
1 In McAfee ePO, select DLP Incident Manager.
2 From the Present drop-down list, select the option for your product.
3 From the View drop-down list, select Default and click Edit.
McAfee Cloud Data Protection Beta Release 21-Mar-201710 Incidents and operational events
View incidents
210 McAfee Data Loss Prevention 11.0.0 Product Guide
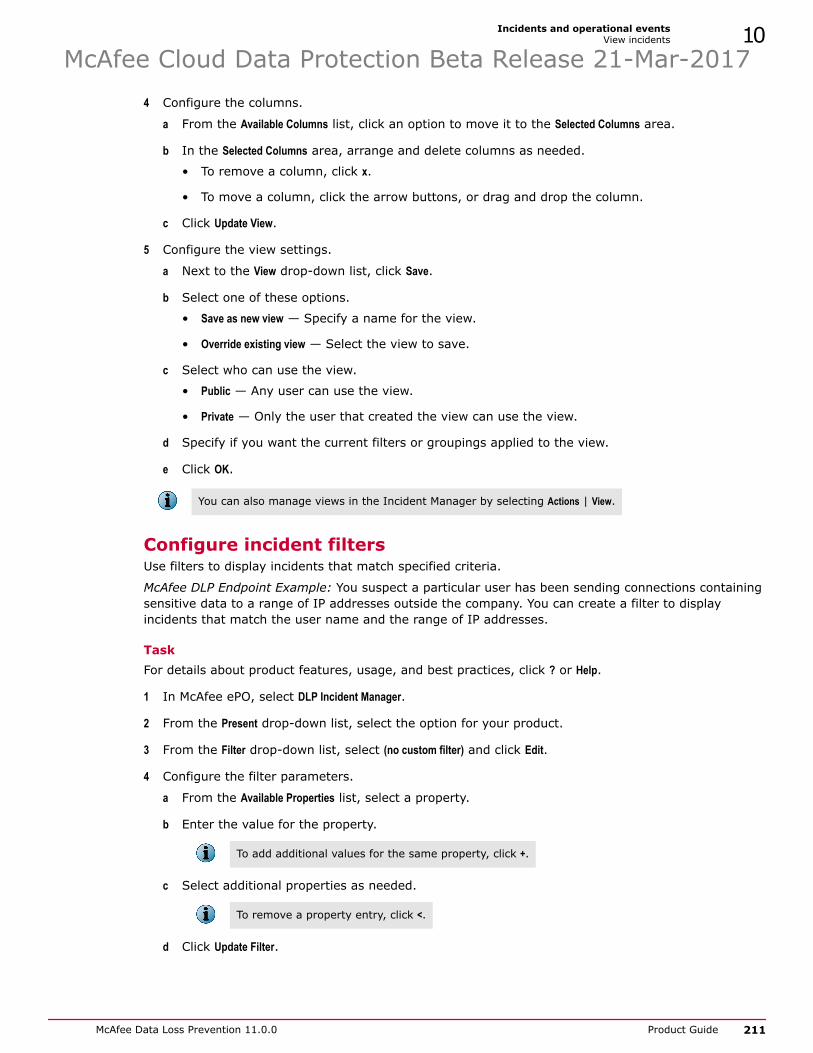
4 Configure the columns.
a From the Available Columns list, click an option to move it to the Selected Columns area.
b In the Selected Columns area, arrange and delete columns as needed.
• To remove a column, click x.
• To move a column, click the arrow buttons, or drag and drop the column.
c Click Update View.
5 Configure the view settings.
a Next to the View drop-down list, click Save.
b Select one of these options.
• Save as new view — Specify a name for the view.
• Override existing view — Select the view to save.
c Select who can use the view.
• Public — Any user can use the view.
• Private — Only the user that created the view can use the view.
d Specify if you want the current filters or groupings applied to the view.
e Click OK.
You can also manage views in the Incident Manager by selecting Actions | View.
Configure incident filtersUse filters to display incidents that match specified criteria.
McAfee DLP Endpoint Example: You suspect a particular user has been sending connections containingsensitive data to a range of IP addresses outside the company. You can create a filter to displayincidents that match the user name and the range of IP addresses.
TaskFor details about product features, usage, and best practices, click ? or Help.
1 In McAfee ePO, select DLP Incident Manager.
2 From the Present drop-down list, select the option for your product.
3 From the Filter drop-down list, select (no custom filter) and click Edit.
4 Configure the filter parameters.
a From the Available Properties list, select a property.
b Enter the value for the property.
To add additional values for the same property, click +.
c Select additional properties as needed.
To remove a property entry, click <.
d Click Update Filter.
McAfee Cloud Data Protection Beta Release 21-Mar-2017Incidents and operational events
View incidents 10
McAfee Data Loss Prevention 11.0.0 Product Guide 211

5 Configure the filter settings.
a Next to the Filter drop-down list, click Save.
b Select one of these options.
• Save as new filter — Specify a name for the filter.
• Override existing filter — Select the filter to save.
c Select who can use the filter.
• Public — Any user can use the filter.
• Private — Only the user that created the filter can use the filter.
d Click OK.
You can also manage filters in the incident manager by selecting Actions | Filter.
View incident detailsView the information related to an incident.
TaskFor details about product features, usage, and best practices, click ? or Help.
1 In McAfee ePO, select DLP Incident Manager.
2 From the Present drop-down list, select the option for your product.
3 Click an Incident ID.
For McAfee DLP Endpoint, McAfee DLP Monitor, and McAfee DLP Prevent incidents, the pagedisplays general details and source information. Depending on the incident type, destination ordevice details appear. For McAfee DLP Discover incidents, the page displays general details aboutthe incident.
4 To view additional information, perform any of these tasks.
• To view user information for McAfee DLP Endpoint incidents, click the user name in the Sourcearea.
• To view evidence files:
1 Click the Evidence tab.
2 Click a file name to open the file with an appropriate program.
The Evidence tab also displays the Short Match String, which contains up to three hit highlights as asingle string.
• To view rules that triggered the incident, click the Rules tab.
• To view classifications, click the Classifications tab.
For McAfee DLP Endpoint incidents, the Classifications tab does not appear for some incidenttypes.
• To view incident history, click the Audit Logs tab.
• To view comments added to the incident, click the Comments tab.
McAfee Cloud Data Protection Beta Release 21-Mar-201710 Incidents and operational events
View incidents
212 McAfee Data Loss Prevention 11.0.0 Product Guide

• To email the incident details, including decrypted evidence and hit highlight files, select Actions |Email Selected Events.
• To return to the incident manager, click OK.
Manage incidentsUse the DLP Incident Manager to update and manage incidents.
If you have email notifications configured, an email is sent whenever an incident is updated.
To delete incidents, configure a task to purge events.
Tasks• Update a single incident on page 213
Update incident information such as the severity, status, and reviewer.
• Update multiple incidents on page 214Update multiple incidents with the same information simultaneously.
• Email selected events on page 214The following tables give some details concerning the email and export selected eventsoptions.
• Manage labels on page 215A label is a custom attribute used to identify incidents that share similar traits.
Update a single incidentUpdate incident information such as the severity, status, and reviewer.
The Audit Logs tab reports all updates and modifications performed on an incident.
TaskFor details about product features, usage, and best practices, click ? or Help.
1 In McAfee ePO, select DLP Incident Manager.
2 From the Present drop-down list, select the option for your product.
3 Click an incident.
The incident details window opens.
4 In the General Details pane, perform any of these tasks.
• To update the severity, status, or resolution:
1 From the Severity, Status, or Resolution drop-down lists, select an option.
2 Click Save.
• To update the reviewer:
1 Next to the Reviewer field, click ...
2 Select the group or user and click OK.
3 Click Save.
McAfee Cloud Data Protection Beta Release 21-Mar-2017Incidents and operational events
Manage incidents 10
McAfee Data Loss Prevention 11.0.0 Product Guide 213

• To add a comment:
1 Select Actions | Add Comment.
2 Enter a comment, then click OK.
Update multiple incidentsUpdate multiple incidents with the same information simultaneously.
Example: You have applied a filter to display all incidents from a particular user or scan, and you wantto change the severity of these incidents to Major.
TaskFor details about product features, usage, and best practices, click ? or Help.
1 In McAfee ePO, select DLP Incident Manager.
2 From the Present drop-down list, select the option for your product.
3 Select the checkboxes of the incidents to update.
To update all incidents displayed by the current filter, click Select all in this page.
4 Perform any of these tasks.
• To add a comment, select Actions | Add Comment, enter a comment, then click OK.
• To send the incidents in an email, select Actions | Email Selected Events, enter the information, thenclick OK.
You can select a template, or create a template by entering the information and clicking Save.
• To export the incidents, select Actions | Export Selected Events, enter the information, then click OK.
• To release redaction on the incidents, select Actions | Release Redaction, enter a user name andpassword, then click OK.
You must have data redaction permission to remove redaction.
• To change the properties, select Actions | Set Properties, change the options, then click OK.
See also Email selected events on page 214
Email selected eventsThe following tables give some details concerning the email and export selected events options.
Table 10-1 Email selected events
Parameter Value
Maximum number of events to mail 100
Maximum size of each event unlimited
Maximum size of the compressed (ZIP) file 20MB
From limited to 100 characters
To, CC limited to 500 characters
Subject limited to 150 characters
Body limited to 1000 characters
McAfee Cloud Data Protection Beta Release 21-Mar-201710 Incidents and operational events
Manage incidents
214 McAfee Data Loss Prevention 11.0.0 Product Guide

Table 10-2 Export selected events
Parameter Value
Maximum number of events to export 1000
Maximum size of each event unlimited
Maximum size of the export compressed (ZIP) file unlimited
Manage labelsA label is a custom attribute used to identify incidents that share similar traits.
You can assign multiple labels to an incident and you can reuse a label on multiple incidents.
Example: You have incidents that relate to several projects your company is developing. You cancreate labels with the name of each project and assign the labels to the respective incidents.
TaskFor details about product features, usage, and best practices, click ? or Help.
1 In McAfee ePO, select DLP Incident Manager.
2 From the Present drop-down list, select the option for your product.
3 Select the checkboxes of one or more incidents.
To update all incidents displayed by the current filter, click Select all in this page.
4 Perform any of these tasks.
• To add labels:
1 Select Actions | Labels | Attach.
2 To add a new label, enter a name and click Add.
3 Select one or more labels.
4 Click OK.
• To remove labels from an incident:
1 Select Actions | Labels | Detach.
2 Select the labels to remove from the incident.
3 Click OK.
• To delete labels:
1 Select Actions | Labels | Delete Labels.
2 Select the labels to delete.
3 Click OK.
McAfee Cloud Data Protection Beta Release 21-Mar-2017Incidents and operational events
Manage incidents 10
McAfee Data Loss Prevention 11.0.0 Product Guide 215

Working with casesCases allow administrators to collaborate on the resolution of related incidents.
In many situations, a single incident is not an isolated event. You might see multiple incidents in theDLP Incident Manager that share common properties or are related to each other. You can assignthese related incidents to a case. Multiple administrators can monitor and manage a case dependingon their roles in the organization.
McAfee DLP Endpoint Scenario: You notice that a particular user often generates several incidentsafter business hours. This could indicate that the user is engaging in suspicious activity or that theuser's system has been compromised. Assign these incidents to a case to keep track of when and howmany of these violations occur.
McAfee DLP Discover Scenario: Incidents generated from a remediation scan show that many sensitivefiles were recently added to a publicly accessible repository. Another remediation scan shows thatthese files have also been added to a different public repository.
Depending on the nature of the violations, you might need to alert the HR or legal teams about theseincidents. You can allow members of these teams to work on the case, such as adding comments,changing the priority, or notifying key stakeholders.
Manage casesCreate and maintain cases for incident resolution.
Tasks• Create cases on page 216
Create a case to group and review related incidents.
• View case information on page 217View audit logs, user comments, and incidents assigned to a case.
• Assign incidents to a case on page 217Add related incidents to a new or existing case.
• Move or remove incidents from a case on page 217If an incident is no longer relevant to a case, you can remove it from the case or move it toanother case.
• Update cases on page 218Update case information such as changing the owner, sending notifications, or addingcomments.
• Add or remove labels to a case on page 219Use labels to distinguish cases by a custom attribute.
• Delete cases on page 220Delete cases that are no longer needed.
Create casesCreate a case to group and review related incidents.
TaskFor details about product features, usage, and best practices, click ? or Help.
1 In McAfee ePO, select Menu | Data Protection | DLP Case Management.
2 Select Actions | New.
McAfee Cloud Data Protection Beta Release 21-Mar-201710 Incidents and operational events
Working with cases
216 McAfee Data Loss Prevention 11.0.0 Product Guide

3 Enter a title name and configure the options.
4 Click OK.
View case informationView audit logs, user comments, and incidents assigned to a case.
TaskFor details about product features, usage, and best practices, click ? or Help.
1 In McAfee ePO, select Menu | Data Protection | DLP Case Management.
2 Click on a case ID.
3 Perform any of these tasks.
• To view incidents assigned to the case, click the Incidents tab.
• To view user comments, click the Comments tab.
• To view the audit logs, click the Audit Log tab.
4 Click OK.
Assign incidents to a caseAdd related incidents to a new or existing case.
TaskFor details about product features, usage, and best practices, click ? or Help.
1 In McAfee ePO, select Menu | Data Protection | DLP Incident Manager.
2 From the Present drop-down list, select an incident type. For Data at rest (Network) click the Scan link toset the scan if needed.
3 Select the checkboxes of one or more incidents.
Use options such as Filter or Group By to show related incidents. To update all incidents displayed bythe current filter, click Select all in this page.
4 Assign the incidents to a case.
• To add to a new case, select Actions | Case Management | Add to new case, enter a title name, andconfigure the options.
• To add to an existing case, select Actions | Case Management | Add to existing case, filter by the case IDor title, and select the case.
5 Click OK.
Move or remove incidents from a caseIf an incident is no longer relevant to a case, you can remove it from the case or move it to anothercase.
McAfee Cloud Data Protection Beta Release 21-Mar-2017Incidents and operational events
Manage cases 10
McAfee Data Loss Prevention 11.0.0 Product Guide 217
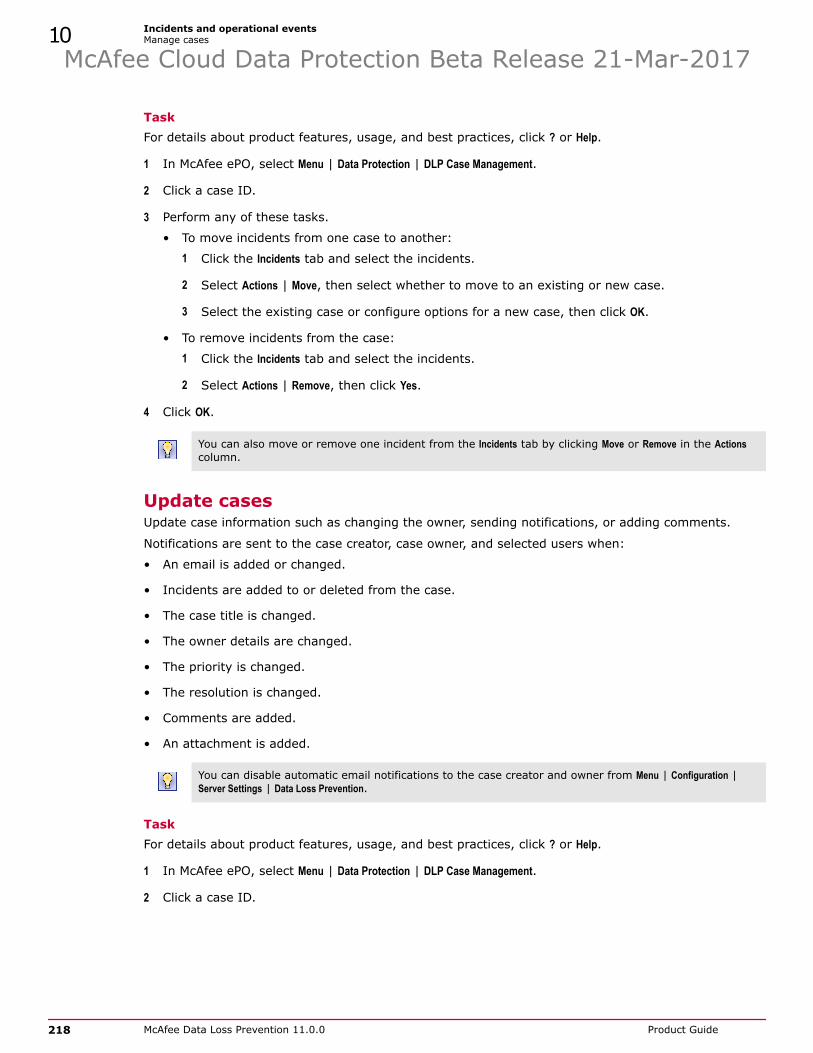
TaskFor details about product features, usage, and best practices, click ? or Help.
1 In McAfee ePO, select Menu | Data Protection | DLP Case Management.
2 Click a case ID.
3 Perform any of these tasks.
• To move incidents from one case to another:
1 Click the Incidents tab and select the incidents.
2 Select Actions | Move, then select whether to move to an existing or new case.
3 Select the existing case or configure options for a new case, then click OK.
• To remove incidents from the case:
1 Click the Incidents tab and select the incidents.
2 Select Actions | Remove, then click Yes.
4 Click OK.
You can also move or remove one incident from the Incidents tab by clicking Move or Remove in the Actionscolumn.
Update casesUpdate case information such as changing the owner, sending notifications, or adding comments.
Notifications are sent to the case creator, case owner, and selected users when:
• An email is added or changed.
• Incidents are added to or deleted from the case.
• The case title is changed.
• The owner details are changed.
• The priority is changed.
• The resolution is changed.
• Comments are added.
• An attachment is added.
You can disable automatic email notifications to the case creator and owner from Menu | Configuration |Server Settings | Data Loss Prevention.
TaskFor details about product features, usage, and best practices, click ? or Help.
1 In McAfee ePO, select Menu | Data Protection | DLP Case Management.
2 Click a case ID.
McAfee Cloud Data Protection Beta Release 21-Mar-201710 Incidents and operational events
Manage cases
218 McAfee Data Loss Prevention 11.0.0 Product Guide

3 Perform any of these tasks.
• To update the case name, in the Title field, enter a new name, then click Save.
• To update the owner:
1 Next to the Owner field, click ...
2 Select the group or user.
3 Click OK.
4 Click Save.
• To update the Priority, Status, or Resolution options, use the drop-down lists to select the items,then click Save.
• To send email notifications:
1 Next to the Send notifications to field, click ...
2 Select the users to send notifications to.
If no contacts are listed, specify an email server for McAfee ePO and add email addresses forusers. Configure the email server from Menu | Configuration | Server Settings | Email Server.Configure users from Menu | User Management | Users.
3 Click Save.
• To add a comment to the case:
1 Click the Comments tab.
2 Enter the comment in the text field.
3 Click Add Comment.
4 Click OK.
Add or remove labels to a caseUse labels to distinguish cases by a custom attribute.
TaskFor details about product features, usage, and best practices, click ? or Help.
1 In McAfee ePO, select Menu | Data Protection | DLP Case Management.
2 Select the checkboxes of one or more cases.
To update all incidents displayed by the current filter, click Select all in this page.
3 Perform any of these tasks.
• To add labels to the selected cases:
1 Select Actions | Manage Labels | Attach.
2 To add a new label, enter a name and click Add.
3 Select one or more labels.
4 Click OK.
McAfee Cloud Data Protection Beta Release 21-Mar-2017Incidents and operational events
Manage cases 10
McAfee Data Loss Prevention 11.0.0 Product Guide 219

• To remove labels from the selected cases:
1 Select Actions | Manage Labels | Detach.
2 Select the labels to remove.
3 Click OK.
Delete casesDelete cases that are no longer needed.
TaskFor details about product features, usage, and best practices, click ? or Help.
1 In McAfee ePO, select Menu | Data Protection | DLP Case Management.
2 Select the checkboxes of one or more cases.
To delete all cases displayed by the current filter, click Select all in this page.
3 Select Actions | Delete, then click Yes.
McAfee Cloud Data Protection Beta Release 21-Mar-201710 Incidents and operational events
Manage cases
220 McAfee Data Loss Prevention 11.0.0 Product Guide

11 Collecting and managing data
Monitoring the system consists of gathering and reviewing evidence and events, and producingreports. Incident and event data from the DLP tables in the McAfee ePO database is viewed in the DLPIncident Manager and DLP Operations pages or is collated into reports and dashboards. Userinformation is collated on the User Information tab of the DLP Operations module, and can be exported to aCSV file.
By reviewing recorded events and evidence, administrators determine when rules are too restrictive,causing unnecessary work delays, and when they are too lax, allowing data leaks.
Contents Edit server tasks Monitor task results Creating reports
Edit server tasksMcAfee DLP uses the McAfee ePO Server Tasks to run tasks for McAfee DLP Discover and McAfee DLPappliances, DLP Incident Manager, DLP Operations, and DLP Case Management.
Each incident and operational events task is predefined in the server tasks list. The only optionsavailable are to enable or disable them or to change the scheduling. The available McAfee DLP servertasks for incidents and events are:
• DLP events conversion 9.4 and above
• DLP incident migration from 9.3.x to 9.4.1 and above
• DLP operational events migration from 9.3.x to 9.4.1 and above
• DLP Policy Conversion
• DLP Purge History of Operational Events and Incidents
• DLP Purge Operational Events and Incidents
• DLP Send Email for Operational Events and Incidents
• DLP Set Reviewer for Operational Events and Incidents
Two tasks synchronize information with McAfee ePO Cloud:
• CDP – upload Endpoint Health Check information to cloud ePO
• CDP – upload DLP incidents to cloud ePO
McAfee DLP server tasks for McAfee DLP Discover and McAfee DLP appliances are:
11McAfee Cloud Data Protection Beta Release 21-Mar-2017
McAfee Data Loss Prevention 11.0.0 Product Guide 221

• Detect Discovery Servers
• LDAPSync: Sync across users from LDAP
In addition, the Roll Up Data (Local ePO Server) task can be used to roll up McAfee DLP incidents, operationalevents, or endpoint discovery data from selected McAfee ePO servers to produce a single report.
If you are upgrading and have McAfee DLP Endpoint installed in McAfee ePO, you also see thefollowing tasks:
• DLP incident tasks runner
• DLP MA Properties Reporting Task
• DLP Policy Push task
Consult the McAfee Data Loss Prevention Endpoint Product Guide 9.3 for information about thesetasks.
TaskFor details about product features, usage, and best practices, click ? or Help.
1 In McAfee ePO, select Menu | Automation | Server Tasks.
2 Select the task to edit.
Best practice: Enter DLP in the Quick find field to filter the list.
3 Select Actions | Edit, then click Schedule.
4 Edit the schedule as required, then click Save.
Tasks• Create a Purge events task on page 222
You create incident and event purge tasks to clear the database of data that is no longerneeded.
• Create an Automatic mail Notification task on page 223You can set automatic email notifications of incidents and operational events toadministrators, managers, or users.
• Create a Set Reviewer task on page 224You can assign reviewers for different incidents and operational events to divide theworkload in large organizations.
• Create an incident synchronization task with McAfee ePO Cloud on page 224
See also Create a data rollup server task on page 227
Create a Purge events taskYou create incident and event purge tasks to clear the database of data that is no longer needed.
Purge tasks can be created for the Incident List, data in-use incidents on the History list, or theOperational Event List.
McAfee Cloud Data Protection Beta Release 21-Mar-201711 Collecting and managing data
Edit server tasks
222 McAfee Data Loss Prevention 11.0.0 Product Guide

TaskFor details about product features, usage, and best practices, click ? or Help.
1 In McAfee ePO, select Menu | Data Protection | DLP Incident Manager or Menu | Data Protection | DLP Operations.
2 Click the Incident Tasks or Operational Event Tasks tab.
3 Select an incident type from the drop-down list (Incident Tasks only), select Purge events in the TaskType pane, then click Actions | New Rule.
Data in-use/motion (Archive) purges events from the History.
4 Enter a name and optional description, then click Next.
Rules are enabled by default. You can change this setting to delay running the rule.
5 Click > to add criteria, < to remove them. Set the Comparison and Value parameters. When you havefinished defining criteria, click Save.
The task runs daily for live data and every Friday at 10:00 PM for historical data.
Create an Automatic mail Notification taskYou can set automatic email notifications of incidents and operational events to administrators,managers, or users.
TaskFor details about product features, usage, and best practices, click ? or Help.
1 In McAfee ePO, select Menu | Data Protection | DLP Incident Manager or Menu | Data Protection | DLP Operations.
2 Click the Incident Tasks or Operational Events Tasks tab.
3 Select an incident type from the drop-down list (Incident Tasks only), select Automatic mail Notificationin the Task Type pane, then click Actions | New Rule.
4 Enter a name and optional description.
Rules are enabled by default. You can change this setting to delay running the rule.
5 Select the events to process.
• Process all incidents/events (of the selected incident type).
• Process incidents/events since the last mail notification run.
6 Select Recipients.
This field is required. At least one recipient must be selected.
7 Enter a subject for the email.
This field is required.
You can insert variables from the drop-down list as required.
8 Enter the body text of the email.
You can insert variables from the drop-down list as required.
McAfee Cloud Data Protection Beta Release 21-Mar-2017Collecting and managing data
Edit server tasks 11
McAfee Data Loss Prevention 11.0.0 Product Guide 223

9 (Optional) Select the checkbox to attach evidence information to the email. Click Next.
10 Click > to add criteria, < to remove them. Set the Comparison and Value parameters. When you havefinished defining criteria, click Save.
The task runs hourly.
Create a Set Reviewer taskYou can assign reviewers for different incidents and operational events to divide the workload in largeorganizations.
Before you beginIn McAfee ePO User Management | Permission Sets, create a reviewer, or designate a groupreviewer, with Set Reviewer permissions for DLP Incident Manager and DLP Operations.
The Set Reviewer task assigns a reviewer to incidents/events according to the rule criteria. The taskonly runs on incidents where a reviewer has not been assigned. You cannot use it to reassign incidentsto a different reviewer.
TaskFor details about product features, usage, and best practices, click ? or Help.
1 In McAfee ePO, select Menu | Data Protection | DLP Incident Manager or Menu | Data Protection | DLP Operations.
2 Click the Incident Tasks or Operational Event Tasks tab.
3 Select an incident type from the drop-down list (Incident Tasks only), select Set Reviewer in the TaskType pane, then click Actions | New Rule.
4 Enter a name and optional description. Select a reviewer or group, then click Next.
Rules are enabled by default. You can change this setting to delay running the rule.
5 Click > to add criteria, < to remove them. Set the Comparison and Value parameters. When you havefinished defining criteria, click Save.
Best practice: If there are multiple Set Reviewer rules, reorder the rules in the list.
The task runs hourly.
After a reviewer is set, it is not possible to override the reviewer through the Set Reviewer task.
Create an incident synchronization task with McAfee ePO Cloud
Before you begin1 Download, install, and configure the McAfee ePO Cloud Bridge extension.
2 Configure the Cloud Security Platform on the DLP Settings | Advanced page.
McAfee DLP server tasks are predefined. You can set two options: enable/disable and the schedule.
McAfee Cloud Data Protection Beta Release 21-Mar-201711 Collecting and managing data
Edit server tasks
224 McAfee Data Loss Prevention 11.0.0 Product Guide

TaskFor details about product features, usage, and best practices, click ? or Help.
1 In McAfee ePO, go to Menu | Automation | Server Tasks.
2 Select the DLP incident sync with cloud ePO task, and click Actions | Edit.
3 (Optional) Select Schedule status | Enabled.
You can leave tasks disabled, then enable several at once by selecting them and clicking Actions |Enable Tasks.
4 Go to the schedule page by clicking Next twice or selecting Schedule in the Server Task Builder bar.
5
Monitor task resultsMonitor the results of incident and operational event tasks.
TaskFor details about product features, usage, and best practices, click ? or Help.
1 In McAfee ePO, select Menu | Automation | Server Task Log.
2 Locate the completed McAfee DLP tasks.
Best practice: Enter DLP in the Quick find field or set a custom filter.
3 Click the name of the task.
The details of the task appear, including any errors if the task failed.
Creating reportsMcAfee DLP uses McAfee ePO reporting features. Several pre-programmed reports are available, aswell as the option of designing custom reports.
See the Querying the Database topic in the McAfee ePolicy Orchestrator Product Guide for details.
Report typesUse the McAfee ePO reporting features to monitor McAfee DLP Endpoint performance.
Four types of reports are supported in McAfee ePO dashboards:
• DLP Incident summary
• DLP Endpoint discovery summary
• DLP Policy summary
• DLP Operations summary
The dashboards provide a total of 22 reports, based on the 28 queries found in the McAfee ePOconsole under Menu | Reporting | Queries & Reports | McAfee Groups | Data Loss Prevention.
McAfee Cloud Data Protection Beta Release 21-Mar-2017Collecting and managing data
Monitor task results 11
McAfee Data Loss Prevention 11.0.0 Product Guide 225

Report optionsMcAfee DLP software uses McAfee ePO Reports to review events. In addition, you can view informationon product properties on the McAfee ePO Dashboard.
McAfee ePO Reports
McAfee DLP Endpoint software integrates reporting with the McAfee ePO reporting service. Forinformation on using the McAfee ePO reporting service, see the McAfee ePolicy Orchestrator ProductGuide.
McAfee ePO rollup queries and rolled up reports, which summarize data from multiple McAfee ePOdatabases, are supported.
McAfee ePO Notifications are supported. See the Sending Notifications topic in the McAfee ePolicyOrchestrator Product Guide for details.
ePO Dashboards
You can view information on McAfee DLP product properties in the McAfee ePO Menu | Dashboards page.There are four predefined dashboards:
• DLP Incident summary
• DLP Endpoint discovery summary
• DLP Policy summary
• DLP Operations summary
Dashboards can be edited and customized, and new monitors can be created. See the McAfee ePOdocumentation for instructions.
The predefined queries summarized in the Dashboards are available by selecting Menu | Queries & Reports.They are listed under McAfee Groups.
Predefined dashboardsThe following table describes the predefined McAfee DLP dashboards.
Table 11-1 Predefined DLP dashboards
Category Option Description
DLP: Incident Summary
Number of Incidents per day These charts show total incidents, and givedifferent breakdowns to help analyze specificproblems.Number of Incidents per severity
Number of Incidents per type
Number of Incidents per rule set
DLP: OperationsSummary
Number of Operational events perday
Displays all administrative events.
Agent Version Displays the distribution of endpoints in theenterprise. Used to monitor agent deploymentprogress.
Distribution of DLP products onendpoint computers
Displays a pie chart showing the number ofWindows and Mac endpoints, as well as thenumber of endpoints where no client is installed.
DLP Discovery (Endpoint): LocalFile System Scan Status
Displays a pie chart showing the number of localfile system discovery scan properties and theirstates (completed, running, undefined).
McAfee Cloud Data Protection Beta Release 21-Mar-201711 Collecting and managing data
Creating reports
226 McAfee Data Loss Prevention 11.0.0 Product Guide

Table 11-1 Predefined DLP dashboards (continued)
Category Option Description
Agent Status Displays all agents and their status.
Agent Operation Mode Displays a pie chart of agents by DLP operationmodes. Operation modes are:• Device control only mode
• Device control and full content protection mode
• Device control and content aware removablestorage protection mode
• Unknown
DLP Discovery (Endpoint): LocalEmail Storage Scan Status
Displays a pie chart showing the number of localemail storage scan discovery properties and theirstates (completed, running, undefined).
DLP: Policy Summary Policy distribution Displays the DLP policy distribution by versionthroughout the enterprise. Used to monitorprogress when deploying a new policy.
Enforced Rule Sets per endpointcomputers
Displays a bar chart showing the rule set nameand the number of policies enforced.
Bypassed Users Displays the system name/user name and thenumber of user session properties.
Undefined Device Classes (forWindows devices)
Displays the undefined device classes for Windowsdevices.
Privileged Users Displays the system name/user name and thenumber of user session properties.
Policy revision distribution Similar to Policy distribution, but displays revisions– that is, updates to an existing version.
DLP: Endpoint DiscoverySummary
DLP Discovery (Endpoint): LocalFile System Scan Latest Status
Displays a pie chart showing the run status of alllocal file system scans.
DLP Discovery (Endpoint): LocalFile System Scan Latest SensitiveFiles
Displays a bar chart showing the range of sensitivefiles found on systems files.
DLP Discovery (Endpoint): LocalFile System Scan Latest Errors
Displays a bar chart showing the range of errorsfound in systems files.
DLP Discovery (Endpoint): LocalFile System Scan LatestClassifications
Displays a bar chart showing the classificationsapplied to systems files.
DLP Discovery (Endpoint): LocalEmail Scan Latest Status
Displays a pie chart showing the run status of alllocal email folders.
DLP Discovery (Endpoint): LocalEmail Scan Latest Sensitive Emails
Displays a bar chart showing the range of sensitiveemails found in local email folders.
DLP Discovery (Endpoint): LocalEmail Scan Latest Errors
Displays a bar chart showing the range of errorsfound in local email folders.
DLP Discovery (Endpoint): LocalEmail Scan Latest Classifications
Displays a bar chart showing the classificationsapplied to local emails.
Create a data rollup server taskMcAfee ePO rollup tasks draw data from multiple servers to produce a single report. You can createrollup reports for McAfee DLP operational events and incidents.
McAfee Cloud Data Protection Beta Release 21-Mar-2017Collecting and managing data
Creating reports 11
McAfee Data Loss Prevention 11.0.0 Product Guide 227

TaskFor details about product features, usage, and best practices, click ? or Help.
1 In McAfee ePO, select Menu | Automation | Server Tasks.
2 Click New Task.
3 In the Server Task Builder, enter a name and optional note, then click Next.
4 From the Actions drop-down list, select Roll Up Data.
The rollup data form appears.
5 (Optional) Select servers in the Roll up data from field.
6 From the Data Type drop-down list, select DLP Incidents, DLP Operational Event, or McAfee DLP EndpointDiscovery, as required.
7 (Optional) Configure the Purge, Filter, or Rollup method options. Click Next.
8 Enter the schedule type, start date, end date, and schedule time. Click Next.
9 Review the Summary information, then click Save.
See also Edit server tasks on page 221
McAfee Cloud Data Protection Beta Release 21-Mar-201711 Collecting and managing data
Creating reports
228 McAfee Data Loss Prevention 11.0.0 Product Guide

12 McAfee DLP appliances logging andmonitoring
McAfee DLP appliances include logging and monitoring options that provide information about systemhealth, email and web traffic statistics, and can help you troubleshoot problems.
Contents Event reporting Monitoring system health and status
Event reportingA number of McAfee DLP Prevent events are available from the Client Events log and the DLP Operations login McAfee ePO. Additional information can be obtained from the on-box syslog and a remote loggingserver if you have one enabled.
The Client Events log also displays Appliance Management events. For information about those events,see the Appliance Management online Help.
McAfee DLP appliance eventsMcAfee DLP appliances send events to the Client Events log or the DLP Operations log.
Client Events log events
Some events include reason codes that you can use to search log files.
Best practice: Ensure you regularly purge the Client Events log.
Event ID UI event text Description
15001 LDAP query failure The query failed. Reasons are provided in the event descriptions
15007 LDAP directorysynchronization
Directory synchronization status
210003 Resource usage reachedcritical level
McAfee DLP Prevent cannot analyze a message because thedirectory is critically full
12McAfee Cloud Data Protection Beta Release 21-Mar-2017
McAfee Data Loss Prevention 11.0.0 Product Guide 229
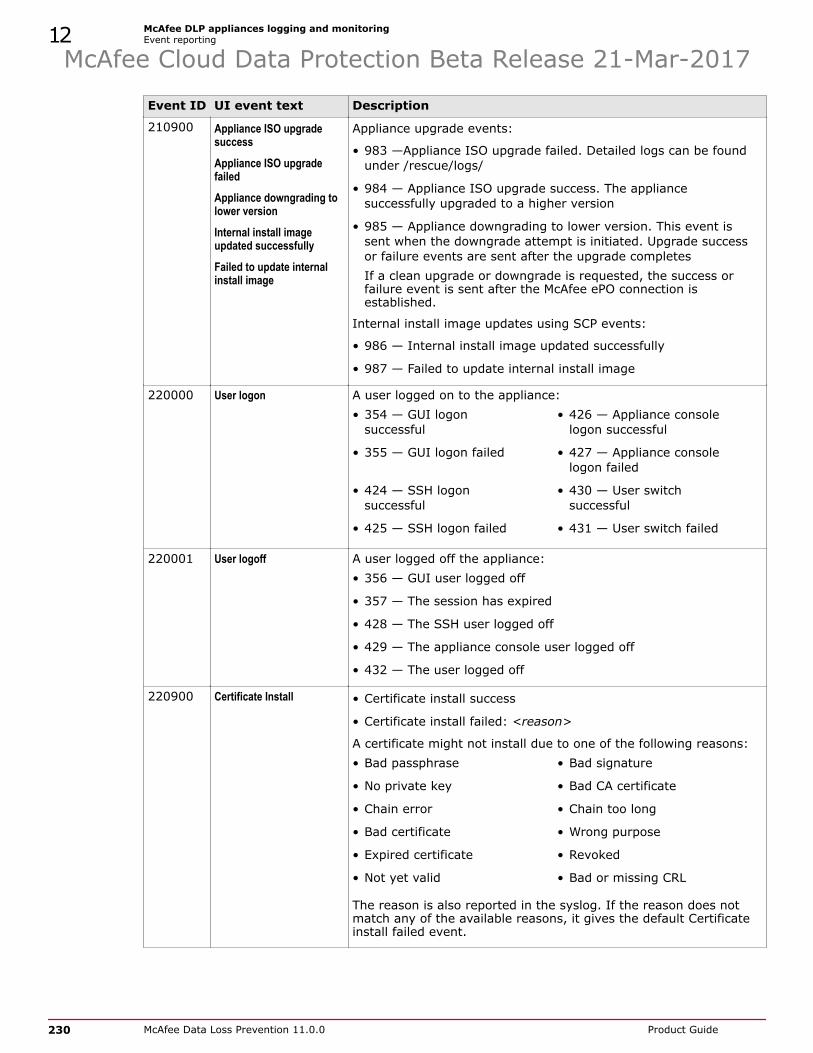
Event ID UI event text Description
210900 Appliance ISO upgradesuccess
Appliance ISO upgradefailed
Appliance downgrading tolower version
Internal install imageupdated successfully
Failed to update internalinstall image
Appliance upgrade events:
• 983 —Appliance ISO upgrade failed. Detailed logs can be foundunder /rescue/logs/
• 984 — Appliance ISO upgrade success. The appliancesuccessfully upgraded to a higher version
• 985 — Appliance downgrading to lower version. This event issent when the downgrade attempt is initiated. Upgrade successor failure events are sent after the upgrade completesIf a clean upgrade or downgrade is requested, the success orfailure event is sent after the McAfee ePO connection isestablished.
Internal install image updates using SCP events:
• 986 — Internal install image updated successfully
• 987 — Failed to update internal install image
220000 User logon A user logged on to the appliance:• 354 — GUI logon
successful• 426 — Appliance console
logon successful
• 355 — GUI logon failed • 427 — Appliance consolelogon failed
• 424 — SSH logonsuccessful
• 430 — User switchsuccessful
• 425 — SSH logon failed • 431 — User switch failed
220001 User logoff A user logged off the appliance:• 356 — GUI user logged off
• 357 — The session has expired
• 428 — The SSH user logged off
• 429 — The appliance console user logged off
• 432 — The user logged off
220900 Certificate Install • Certificate install success
• Certificate install failed: <reason>
A certificate might not install due to one of the following reasons:• Bad passphrase • Bad signature
• No private key • Bad CA certificate
• Chain error • Chain too long
• Bad certificate • Wrong purpose
• Expired certificate • Revoked
• Not yet valid • Bad or missing CRL
The reason is also reported in the syslog. If the reason does notmatch any of the available reasons, it gives the default Certificateinstall failed event.
McAfee Cloud Data Protection Beta Release 21-Mar-201712 McAfee DLP appliances logging and monitoring
Event reporting
230 McAfee Data Loss Prevention 11.0.0 Product Guide

DLP Operations log events
Event ID UI event text Description
19100 Policy Change Appliance Management successfully pushed a policy to theappliance
19500 Policy Push Failed Appliance Management failed to push a policy to the appliance
19105 Evidence Replication Failed • An evidence file could not be encrypted
• An evidence file could not be copied to the evidence server
19501 Analysis Failed • Possible denial-of-service attack
• The content could not be decomposed for analysis
19402 DLP Prevent Registered The appliance successfully registered with McAfee ePO
19403 DLP Monitor Registered The appliance successfully registered with McAfee ePO
Using syslog with McAfee DLP appliancesMcAfee DLP appliances send protocol and hardware logging information to the local syslog, and one ormore remote logging servers if you have them enabled. Examples of information sent to the syslog arecertificate installation status and ICAP events.
Use settings in the General category of the Common Appliance policy to set up remote logging servers.
McAfee DLP appliances send information to the syslog in the Common Event Format (CEF) . CEF is anopen log management standard that improves the interoperability of security-related information fromdifferent security and network devices and applications. To simplify integration, syslog is used as atransport mechanism. This applies a common prefix to each message that contains the date and hostname.
For more information about CEF and McAfee DLP appliances event data fields, see the McAfee DLPPrevent Common Event Format Guide that is available from the McAfee knowledgebase.
Best practice: Select the TCP protocol to send McAfee DLP appliances events data to a remote loggingserver. UDP has a limit of 1024 bytes per packet so events that exceed that amount are truncated.
Syslog entries contain information about the device itself (the vendor, product name, and version), theseverity of the event, and the date the event occurred. The table provides information about some ofthe most common McAfee DLP appliances fields that appear in syslog entries.
SMTP message events can include the sender and recipient, the subject, the source and destination IPaddresses. Every attempt to send a message results in at least one entry in the log. If the messagecontains content that violates a data loss prevention policy, another entry is added to the log. Wheretwo log entries are added to the log, both entries contain the correspondingMcAfeeDLPOriginalMessageID number.
Table 12-1 Syslog log entry definitions
Field Definition
act The McAfee DLP action that was taken because of the event
app The name of the process that raised the event
msg A descriptive message about the event, for example, the The RAIDdisk is being rebuilt
dvc The host on which the event occurred
dst The destination IP address if the connection is available
McAfee Cloud Data Protection Beta Release 21-Mar-2017McAfee DLP appliances logging and monitoring
Event reporting 12
McAfee Data Loss Prevention 11.0.0 Product Guide 231

Table 12-1 Syslog log entry definitions (continued)
Field Definition
dhost The destination host name if the connection is available
src The originating IP address of the host making the connection
shost The originating host name of the host making the connection
suser The email sender
duser A list of recipient email addresses
sourceServiceName The name of the active policy
filePath The name of the file in which the detection occurred
field A unique ID assigned to each email message
rt The time that the event occurred in milliseconds since epoch
flexNumber1 An ID assigned to the reason for the event
McAfeeDLPOriginalSubject The original subject line in the message
McAfeeDLPOriginalMessageId The original ID number assigned to the message
McAfeeDLPProduct The name of the McAfee DLP product that detected the event
McAfeeDLPHardwareComponent The name of the McAfee DLP hardware appliance that detected theevent
McAfeeEvidenceCopyError There was a problem copying the evidence
McAfeeDLPClassificationText Information about the McAfee DLP classifications
cs fields
The cs entries in syslog behave according to the value of the cs5 field:
Value Definition
cs1 If cs5 is 'DP' or 'DPA': The file that triggered the DLP rule
If cs5 is 'AR': Anti Relay rule that triggered the event
cs2 If cs5 is 'DP' or 'DPA': The DLP categories that triggered
cs3 If cs5 is 'DP': The DLP classifications that triggered
cs4 Email attachments (if available)
cs5 For a detection event, the scanner which triggered the event: 'DL' - Data Loss Prevention
cs6 The subject of the email
cs1Label If cs5 is 'DP' or 'DPA': 'dlpfile'
If cs5 is 'AR': 'antirelay-rule'
cs2Label If cs5 is 'DP' or 'DPA': 'dlp-rules'
cs3Label If cs5 is 'DP': dlpclassification'
cs4Label email-attachments
cs5Label master-scan-type
cs6Label email-subject
McAfee Cloud Data Protection Beta Release 21-Mar-201712 McAfee DLP appliances logging and monitoring
Event reporting
232 McAfee Data Loss Prevention 11.0.0 Product Guide

Monitoring system health and statusUse the Appliance Management dashboard in McAfee ePO to manage your appliances, view system healthstatus, and get detailed information about alerts.
Appliance Management dashboardThe Appliance Management dashboard combines the Appliances tree view, System Health cards, Alerts and Detailspanes.
The dashboard shows the following information for all of your managed appliances.
• A selection of information about each McAfee DLP appliance.
In a cluster environment, the system health cards shows the tree view display of the cluster masterand a number of cluster scanners.
• Indicators to show whether an appliance needs attention.
• Detailed information about any detected issues.
The information bar includes the appliance name, the number of currently reported alerts, and otherinformation specific to the reported appliance.
The system health cardsSystem health cards display status, alerts, and notifications that help you manage all virtual andphysical McAfee appliances that you have on your network.
The system health cards show the following information for each McAfee DLP Prevent appliance andcluster of appliances.
In a cluster environment, the tree view displays a cluster master and a number of cluster scanners.
Pane Information
SystemHealth
• Evidence Queue — the number of files waiting to be copied to evidence storage. The queuesize is real-time.
• Emails — the number of messages that were delivered, were permanently or temporarilyrejected, or could not be analyzed. The counters show data from the previous 60seconds.
• Web Requests — the number of received web requests, and the number of web requeststhat could not be analyzed. The counters show data from the previous 60 seconds.
• CPU usage — the total CPU usage.
• Memory — the memory swap rate.
• Disk — the percentage of disk usage.
• Network — the network interfaces on the appliance, showing information about receivedand transmitted data. The counters show data from the previous 60 seconds.
Alerts Displays errors or warnings that relate to:• System health statuses
• Evidence queue size
• Policy enforcement
• Communication between McAfee ePO and McAfee DLP Prevent
More information about an alert is available on the Details pane.
McAfee Cloud Data Protection Beta Release 21-Mar-2017McAfee DLP appliances logging and monitoring
Monitoring system health and status 12
McAfee Data Loss Prevention 11.0.0 Product Guide 233

View the status of an applianceYou can find out whether an appliance is operating correctly or needs attention by viewing informationin Appliance Management.
Task1 Log on to McAfee ePO.
2 From the menu, select Appliance Management from the Systems section.
3 From the Appliances tree view, expand the list of appliances until you locate the appliance that youwant to view.
Information about states and alerts is available in the Appliance Management online Help.
Download MIBs and SMI filesDownload MIB and SMI files to view the SNMP traps and counters that are available on the appliance.
For more information about how the appliance works with SNMP, see the McAfee ApplianceManagement Extension online help.
TaskFor details about product features, usage, and best practices, click ? or Help.
1 Go to https://<APPLIANCE>:10443/mibs.
2 Download the MCAFEE-SMI.txt, MCAFEE-DLP-PREVENT-MIB.txt, andMCAFEE-DLP-MONITOR-MIB.txt files in the language you want to view the information in.
3 Import the MIB and SMI files into your network monitoring software.
McAfee Cloud Data Protection Beta Release 21-Mar-201712 McAfee DLP appliances logging and monitoring
Monitoring system health and status
234 McAfee Data Loss Prevention 11.0.0 Product Guide

Maintenance andtroubleshootingUse the McAfee DLP Diagnostic Tool Utility for troubleshooting McAfee DLPEndpoint for Windows clients. Use the McAfee DLP Prevent and McAfee DLPappliance console for maintenance and troubleshooting options.
Chapter 13 McAfee DLP Endpoint DiagnosticsChapter 14 McAfee DLP appliance maintenance and troubleshooting
McAfee Cloud Data Protection Beta Release 21-Mar-2017
McAfee Data Loss Prevention 11.0.0 Product Guide 235

McAfee Cloud Data Protection Beta Release 21-Mar-2017Maintenance and troubleshooting
236 McAfee Data Loss Prevention 11.0.0 Product Guide

13 McAfee DLP Endpoint Diagnostics
Use the McAfee DLP Endpoint Diagnostic Tool utility for troubleshooting and monitoring system health.
Diagnostic ToolThe Diagnostic Tool is designed to aid troubleshooting McAfee DLP Endpoint problems on MicrosoftWindows endpoint computers. It is not supported on OS X computers.
The Diagnostic Tool gathers information on the performance of client software. The IT team uses thisinformation to troubleshoot problems and tune policies. When severe problems exist, it can be used tocollect data for analysis by the McAfee DLP development team.
The tool is distributed as a utility to install on problem computers. It consists of seven tabbed pages,each devoted to a different aspect of McAfee DLP Endpoint software operation.
On all pages displaying information in tables (all pages except General information and Tools), you cansort the tables on any column by clicking the column header.
Generalinformation
Collects data such as whether the agent processes and drivers are running andgeneral policy, agent, and logging information. Where an error is detected,information about the error is presented.
DLPE Modules Displays the agent configuration (as shown in the McAfee DLP Endpoint policyconsole as the Agent Configuration | Miscellaneous page). It shows the configurationsetting and status of each module, add-in, and handler. Selecting a module displaysdetails that can help you determine problems.
Data Flow Displays the number of events and the memory used by the McAfee DLP Endpointclient, and displays event details when a specific event is selected.
Tools Allows you to perform several tests and displays the results. When necessary, a datadump is performed for further analysis.
Process list Displays all processes currently running on the computer. Selecting a processdisplays details and related window titles and application definitions.
Devices Displays all Plug and Play and removable devices currently connected to thecomputer. Selecting a device displays details of the device and related devicedefinitions.Displays all active device control rules and relevant definitions from the devicedefinitions.
Active policy Displays all rules contained in the active policy, and the relevant policy definitions.Selecting a rule or definition displays the details.
13McAfee Cloud Data Protection Beta Release 21-Mar-2017
McAfee Data Loss Prevention 11.0.0 Product Guide 237

Checking the agent statusUse the General information tab to get an overview of the agent status.
The information on the General information tab is designed to confirm expectations and answer basicquestions. Are the agent processes and drivers running? What product versions are installed? What isthe current operation mode and policy?
Agent processes and driversOne of the most important questions in troubleshooting is, "Is everything running as expected?" TheAgent processes and Drivers sections show this at a glance. The checkboxes show if the process isenabled; the colored dot shows if it is running. If the process or driver is down, the text box givesinformation on what is wrong.
The default maximum memory is 150 MB. A high value for this parameter can indicate problems.
Table 13-1 Agent processes
Term Process Expected status
Fcag McAfee DLP Endpoint agent (client) enabled; running
Fcags McAfee DLP Endpoint agent service enabled; running
Fcagte McAfee DLP Endpoint text extractor enabled; running
Fcagwd McAfee DLP Endpoint watch dog enabled; running
Fcagd McAfee DLP Endpoint agent with automatic dump enabled only for troubleshooting.
Table 13-2 Drivers
Term Process Expected status
Hdlpflt McAfee DLP Endpoint minifilter driver (enforces removablestorage device rules)
enabled; running
Hdlpevnt McAfee DLP Endpoint event enabled; running
Hdlpdbk McAfee DLP Endpoint device filter driver (enforces devicePlug and Play rules)
can be disabled in configuration
Hdlpctrl McAfee DLP Endpoint control enabled; running
Hdlhook McAfee DLP Endpoint Hook driver enabled; running
Agent info sectionOperation mode and Agent status are expected to match. The Agent Connectivity indication, togetherwith EPO address, can be useful in troubleshooting.
Agent Connectivity has three options: online, offline, or connected by VPN.
Run the Diagnostic ToolThe Diagnostic Tool utility provides IT teams with detailed information on the agent status.
Before you beginDiagnostic Tool requires authentication with McAfee
®
Help Desk.
Task1 Double-click the hdlpDiag.exe file.
An authentication window opens.
McAfee Cloud Data Protection Beta Release 21-Mar-201713 McAfee DLP Endpoint Diagnostics
Diagnostic Tool
238 McAfee Data Loss Prevention 11.0.0 Product Guide

2 Copy the Identification Code to the Help Desk Identification Code text box on the Generate DLP Client BypassKey page. Fill in the rest of the information and generate a Release Code.
3 Copy the Release Code to the authentication window Validation Code text box and click OK.
The diagnostic tool utility opens.
The General Information, DLPE Modules, and Process List tabs have a Refresh button in the lower rightcorner. Changes that occur when a tab is open do not update information automatically on these tabs.Click the Refresh button frequently to verify that you are viewing current data.
Tuning policiesThe Diagnostic Tool can be used to troubleshoot or tune policies.
Use case: High CPU usageUsers are sometimes plagued by slow performance when a new policy is enforced. Onecause might be high CPU usage. To determine this, go to the Process List tab. If you see anunusually large number of events for a process, this could be the problem. For example, arecent check found that taskmgr.exe was classified as an Editor, and had the secondhighest number of total events. It is quite unlikely that this application is leaking data, andthe McAfee DLP Endpoint client does not need to monitor it that closely.
To test the theory, create an application template. In the Policy Catalog, go to DLP Policy |Settings and set an override to Trusted. Apply the policy, and test to see if performancehas improved.
Use case: Creating effective content classification and content fingerprintingcriteriaTagging sensitive data lies at the heart of a data protection policy. Diagnostic Tool displaysinformation that helps you design effective content classification and content fingerprintingcriteria. Tags can be too tight, missing data that should be tagged, or too loose, creatingfalse positives.
The Active Policy page lists classifications and their content classification and contentfingerprinting criteria. The Data Flow page lists all tags applied by the policy, and the countfor each. When counts are higher than expected, false positives are suspected. In onecase, an extremely high count led to the discovery that the classification was triggered byDisclaimer text. Adding the Disclaimer to the whitelist removed the false positives. By thesame token, lower than expected counts suggest a classification that is too strict.
If a new file is tagged while the Diagnostic Tool is running, the file path is displayed. in thedetails pane. Use this information to locate files for testing.
McAfee Cloud Data Protection Beta Release 21-Mar-2017McAfee DLP Endpoint Diagnostics
Diagnostic Tool 13
McAfee Data Loss Prevention 11.0.0 Product Guide 239

McAfee Cloud Data Protection Beta Release 21-Mar-201713 McAfee DLP Endpoint Diagnostics
Diagnostic Tool
240 McAfee Data Loss Prevention 11.0.0 Product Guide

14 McAfee DLP appliance maintenance andtroubleshooting
Use the appliance console for general maintenance tasks such as changing network settings andperforming software updates.
Troubleshooting options, sanity checks, and error messages are available to help you identify andresolve problems with a McAfee DLP appliance.
Contents Managing with the McAfee DLP appliance console Accessing the appliance console Change original network settings Modify speed and duplex settings for hardware appliances Managing hardware appliances with the RMM Upgrading an appliance Restart the appliance Reset the appliance to its factory defaults Log off the appliance McAfee DLP Prevent does not accept email Replace the default certificate Error messages Create a Minimum Escalation Report (MER)
Managing with the McAfee DLP appliance consoleUse administrator credentials to open the appliance console to edit network settings you entered inthe Setup Wizard and perform other maintenance and troubleshooting tasks.
You can add your own text to appear on the top of the appliance console or SSH logon screen usingthe Custom Logon Banner option in McAfee ePO (Menu | Policy Catalog | DLP Appliance Management | General.
Table 14-1 Appliance console menu options
Option Definition
Graphical configuration wizard Open the graphical configuration wizard.
If you log on using SSH, the graphical configuration wizard option is notavailable.
Shell Open the appliance Shell.
Enable/Disable SSH Enable or disable SSH as a method of connecting to the appliance.
Generate MER Create a Minimum Escalation Report (MER) to send to McAfee Support todiagnose problems with the appliance.
14McAfee Cloud Data Protection Beta Release 21-Mar-2017
McAfee Data Loss Prevention 11.0.0 Product Guide 241

Table 14-1 Appliance console menu options (continued)
Option Definition
Power down Shut down the appliance.
Reboot Restart the appliance.
Rescue Image Create a rescue image for the appliance to boot from.
Reset to factory defaults Reset the appliance to its factory default settings.
Change password Change the administrator account password.
Logout Log off the master appliance.
Accessing the appliance consoleThe appliance console allows you to perform various maintenance tasks. There are different ways toaccess the console depending on the type of appliance you have.
Table 14-2 Methods for accessing the console
Method Virtual appliance Hardware appliance
SSH X X
vSphere Client X
Local KVM (keyboard, monitor, mouse) X
RMM X
Serial port X
Change original network settingsYou can use the graphical configuration wizard to change network settings that you entered during theinstallation process.
Task1 Log on to the appliance with administrator credentials.
If you log on using SSH, the graphical configuration wizard option is not available.
2 Open the graphical configuration wizard.
3 Edit the Basic Network Setup settings that you want to change.
4 Click Finish.
McAfee Cloud Data Protection Beta Release 21-Mar-201714 McAfee DLP appliance maintenance and troubleshooting
Accessing the appliance console
242 McAfee Data Loss Prevention 11.0.0 Product Guide

Modify speed and duplex settings for hardware appliancesBy default, the network interfaces are configured for auto-negotiation. Use the command line tochange the speed and duplex settings.
Task1 Using a command line session, log on to the appliance.
2 From the options menu, select the Shell option.
3 View the help on forming the command.
$ /opt/NETAwss/mgmt/nic_options -?• Use lan1 for the client interface and mgmt for the management interface.
• --(no)autoneg turns auto-negotiation on or off. The default is on.
• --duplex specifies the duplex — half or full. The default is full.
• --speed specifies the network speed in Mb/s — 0, 100, or 1000. The default is 1000.
• --mtu specifies the Maximum Transmission Unit (MTU) size in bytes — a value between 576–1500. The default is 1500.
4 Enter the command to change the setting. Examples:
• To disable auto-negotiation and set a network speed of 100 Mb/s on the client interface:$ sudo /opt/NETAwss/mgmt/nic_options --noautoneg --speed 100 lan1
• To restore the default behavior to the management port:$ sudo /opt/NETAwss/mgmt/nic_options mgmt
Managing hardware appliances with the RMMUse the RMM — also called the Baseboard Management Controller (BMC) — to manage a hardwareappliance remotely. The RMM is not available on virtual appliances.
Use the appliance console to enable and configure basic settings for the RMM. After configuring theRMM network settings, you can also access the appliance console using the integrated web server.From the web interface, you can check the hardware status, perform additional configuration, andremotely manage the appliance. Go to:
https://<RMM IP address>
Use the appliance admin credentials to access the user interface. You can configure the RMM to useLDAP for authentication instead of the admin account.
By default, all protocols used to access the RMM are enabled:
• HTTP/HTTPS
• SSH
McAfee Cloud Data Protection Beta Release 21-Mar-2017McAfee DLP appliance maintenance and troubleshooting
Modify speed and duplex settings for hardware appliances 14
McAfee Data Loss Prevention 11.0.0 Product Guide 243

• IPMI over LAN
• Remote KVM
Configure the RMMConfigure network settings and protocols used by the RMM.
Task1 Using the console, log on to the appliance.
2 From the console menu, select Configure the BMC.
3 Perform any of these tasks.
• To configure network information:
1 Select Configure the address.
2 Type the IP address, the network mask, and the optional gateway. Use the up and downarrows to navigate between options.
3 Press Enter or select OK to save the changes.
• To configure the allowed protocols:
1 Select Configure remote protocols.
2 Press the space bar enable or disable an option. Use the up and down arrows to navigatebetween options.
3 Press Enter or select OK to save the changes.
Use the administrator account and password to log on to the appliance using the RMM.
Run the Setup Wizard using the remote KVM serviceIf you do not have local access to the keyboard, monitor, and mouse to run the Setup Wizard, you cando so using the RMM web interface.
Task1 Using a web browser, log on to https://<RMM IP address>.
2 Click the Remote Control tab.
3 Click Launch Console.
4 For some browsers, you might need to download the remote console application. In this case,download and open the jviewer.jnlp file.
5 From admin shell, select Graphical configuration wizard.
Best practice: Securing the RMMSecure your RMM environment to prevent unauthorized users from accessing the appliance.
• Make sure the RMM firmware is up-to-date.
• Connect the RMM port to a secure, dedicated physical network or VLAN.
• Disable unused protocols. Only HTTP/HTTPS and the remote KVM service are required to remotelyconfigure the appliance.
McAfee Cloud Data Protection Beta Release 21-Mar-201714 McAfee DLP appliance maintenance and troubleshooting
Managing hardware appliances with the RMM
244 McAfee Data Loss Prevention 11.0.0 Product Guide

• If your appliances uses RMM4, make sure the appliance is configured to force the use of HTTPS.
The appliance console and the web-based interface display which RMM type the appliance uses —RMM3 or RMM4.
From the web-based interface, click the Configuration tab, select Security Settings, then select the ForceHTTPS option.
• Periodically change the administrator password.
Upgrading an applianceMcAfee DLP appliances contain a partition with an internal install image which you can use to upgradeor reinstall the appliance.
Patches or Hofixes are distributed as .iso files. To apply a patch or hotfix, you must boot from the .isofile. You can either write this to a CD or USB and boot from it, or copy the image over the appliance'sinternal install image and boot from that.
Best practice: Copy the .iso file over the appliance install image, then boot from the internal installimage. This option is available from the appliance console when you log on as admin either from theconsole menu or SSH. You can also update the appliance install image from a CD, USB (Exfat filesystemis not supported), or virtual CD (RMM or VMware).
If you are installing a version earlier than what is currently installed, a warning is displayed that you canonly perform a reinstallation. Downgrading to an earlier version does not retain any configuration orMcAfee ePO registration.
Installation options
• Full — Retains all configuration, including evidence files and hit highlighting waiting to be copied tothe evidence storage share
• Config — Retains all configuration but does not retain evidence files or hit highlighting waiting to becopied
• Basic — Retains only network configuration and McAfee ePO registration
• Reinstall — Reinstalls without retaining any configuration; you must use the Setup Wizard to registerwith McAfee ePO
Apply a patch or hotfix using the internal install image
Task1 Update the install image using a utility such as WinSCP or a command line session to copy the .iso
file to /home/admin/upload/iso/.
2 Using a command line session, log on to the appliance as admin.
3 From the appliance console menu, select Upgrade.
4 Select Show the internal install image details to confirm the version.
The current install image version should be the one you copied earlier.
5 Select Boot from the internal install image.
McAfee Cloud Data Protection Beta Release 21-Mar-2017McAfee DLP appliance maintenance and troubleshooting
Upgrading an appliance 14
McAfee Data Loss Prevention 11.0.0 Product Guide 245

6 Select the Full option, then select Yes.
The appliance restarts and installs, preserving all data.
7 Return to the menu, and click Show internal rescue image details to confirm the new versionhas been installed.
Upgrading the appliance using a CD
Task1 Insert the CD into the appliance.
2 Select Update the internal install image from an external device.
3 Verify that the external device is correctly identified in the list.
If there are multiple .iso files detected, all of the files are listed for selection.
4 Select the .iso image and device, then select Yes.
Upgrade the appliance using a USB drive
Task1 Create a USB drive containing the install image.
a Insert the USB drive into the appliance.
b Select Copy the internal install image to a USB flash device.
c Select Yes.
2
Restart the applianceShut down and restart McAfee DLP Prevent.
Task1 Log on to the appliance with administrator credentials.
2 From the general console menu, select Reboot.
Reset the appliance to its factory defaultsReturn the appliance to its original settings.You will have to reconfigure network configuration settings.
Task1 Log on to the appliance with administrator credentials.
The general console menu opens.
2 From the general console menu, press the Reset to factory defaults option.
McAfee Cloud Data Protection Beta Release 21-Mar-201714 McAfee DLP appliance maintenance and troubleshooting
Restart the appliance
246 McAfee Data Loss Prevention 11.0.0 Product Guide

Log off the applianceClose the logon session and return to a logon prompt.
Task
1 Log on to the appliance with administrator credentials.
The general console menu opens.
2 From the general console menu, press the Logout option.
Either the SSH session closes, or the console returns to the logon prompt.
McAfee DLP Prevent does not accept emailIf a Smart Host is not configured, McAfee DLP Prevent cannot accept email messages because it hasnowhere to send them to.
McAfee DLP Prevent issues a 451 System problem: retry later. (No SmartHost has been configured)error, and closes the connection.
You can check whether McAfee DLP Prevent can accept email using telnet. If the appliance is correctlyconfigured, you get a 220 welcome message:
220 host.domain.example PVA/SMTP Ready
TaskFor details about product features, usage, and best practices, click ? or Help.
• To resolve a connection issue, you must:
a Install the required extensions in McAfee ePO.
b Register the appliance with a McAfee ePO server.
Follow the steps in the McAfee DLP Prevent Setup Wizard help.
c Configure at least one DNS server in the Common Appliance Management policy.
See the configuring general settings section in the Appliance Management Extension online help.
d Configure a Smart Host in the McAfee DLP Prevent Email Settings policy category.
e Apply a McAfee Data Loss Prevention policy.
See the policy assignment section in the McAfee ePolicy Orchestrator online help.
See also Working with McAfee DLP policies on page 82
Replace the default certificate You can replace the self-signed certificate with one issued by a certificate authority (CA) so that otherhosts on the network can validate the appliance's SSL certificate.
Before you beginSSH must be enabled.
McAfee Cloud Data Protection Beta Release 21-Mar-2017McAfee DLP appliance maintenance and troubleshooting
Log off the appliance 14
McAfee Data Loss Prevention 11.0.0 Product Guide 247

To replace the certificate, you can either:
• Upload a new certificate and private key.
• Download a certificate signing request (CSR) from the appliance, have it signed by a CA, andupload the certificate that the CA gives you.
Best practice: Downloading a CSR from the appliance ensures that the appliance's private key cannotbe inadvertently exposed.
Only ECDSA and RSA certificates and keys are allowed in the uploaded file. The certificate must besuitable for use as both a TLS server and a TLS client and the upload must include the wholecertificate chain. Uploads can be in the following formats:
• PEM (Base64) — Certificate chain and private key or certificate chain only
• PKCS#12 — Certificate chain and private key
• PKCS#7 — Certificate chain only
If the upload format is PKCS#12 or PKCS#7, the correct file endings must be used:
• PKCS#12 must have the file ending .p12 or .pfx.
• PKCS#7 must have the file ending .p7b.
The certificate might fail to install if:
• The certificate is not usable for its intended role.
• The certificate has expired.
• The uploaded file does not contain the CA certificates that it needs to verify it.
• The certificate uses an unsupported public key algorithm, such as DSA.
If installation fails, detailed information is available in the appliance syslog. To view it, log on to theappliance console, select the Shell option, and type $ grep import_ssl_cert /var/log/messages.
TaskFor details about product features, usage, and best practices, click ? or Help.
1 In a browser, go to https://APPLIANCE:10443/certificates/ and select one of the CSR links fordownload.
Two files are available: one contains an RSA public key (the file ending in .rsa.csr) and the othercontains an ECDSA public key (the file ending in .ec.csr).
2 Follow your CA's instructions to get the request signed.
3 Use an SFTP client, such as winscp, to copy the file to the /home/admin/upload/cert directory onthe appliance.
The Client Events log reports whether the installation succeeded or failed.
The file installs automatically.
Tasks• Regenerate the appliance's private key on page 249
You can regenerate the private key if it was compromised, or if you need to renew acertificate that was signed externally.
See also McAfee DLP appliance events on page 229Using syslog with McAfee DLP appliances on page 231
McAfee Cloud Data Protection Beta Release 21-Mar-201714 McAfee DLP appliance maintenance and troubleshooting
Replace the default certificate
248 McAfee Data Loss Prevention 11.0.0 Product Guide

Regenerate the appliance's private keyYou can regenerate the private key if it was compromised, or if you need to renew a certificate thatwas signed externally.
TaskFor details about product features, usage, and best practices, click ? or Help.
1 Log on to the appliance console.
2 Select the Shell option.
3 Type sudo /opt/NETAwss/mgmt/make_ssl_cert.
The appliance's private key, self-signed certificate, and certificate signing requests are renewed.
If the appliance was using a certificate that was signed externally, you must upload a signed certificateagain.
Error messagesIf the appliance is not configured correctly, it tries to identify the problem and sends a temporary orpermanent failure message.
The text in parentheses in the error message provides additional information about the problem. Someerror messages relay the response from the Smart Host so the McAfee DLP Prevent response containsthe IP address, which is indicated by x.x.x.x.
For example, 442 192.168.0.1 : Connection refused indicates that the Smart Host with the address192.168.0.1 did not accept the SMTP connection.
Table 14-3 Temporary failure messages
Text Cause Recommended action
451 (The system hasnot been registeredwith an ePO server)
The initial setup was not completed. Register the appliance with a McAfeeePO server using the GraphicalConfiguration Wizard option in theappliance console.
451 (No DNS servershave been configured)
The configuration applied fromMcAfee ePO did not specify any DNSservers.
Configure at least one DNS server inthe General category of the CommonAppliance policy.
451 (No Smart Hosthas been configured)
The configuration applied fromMcAfee ePO did not specify a SmartHost.
Configure a Smart Host in the EmailSettings policy category.
451 (Policy OPG filenot found in configuredlocation)
The configuration applied fromMcAfee ePO was incomplete.
• Ensure that the Data Loss Preventionextension is installed.
• Configure a Data Loss Preventionpolicy.
• Contact your technical supportrepresentative. The configurationOPG file must be applied with thepolicy OPG file.
McAfee Cloud Data Protection Beta Release 21-Mar-2017McAfee DLP appliance maintenance and troubleshooting
Error messages 14
McAfee Data Loss Prevention 11.0.0 Product Guide 249
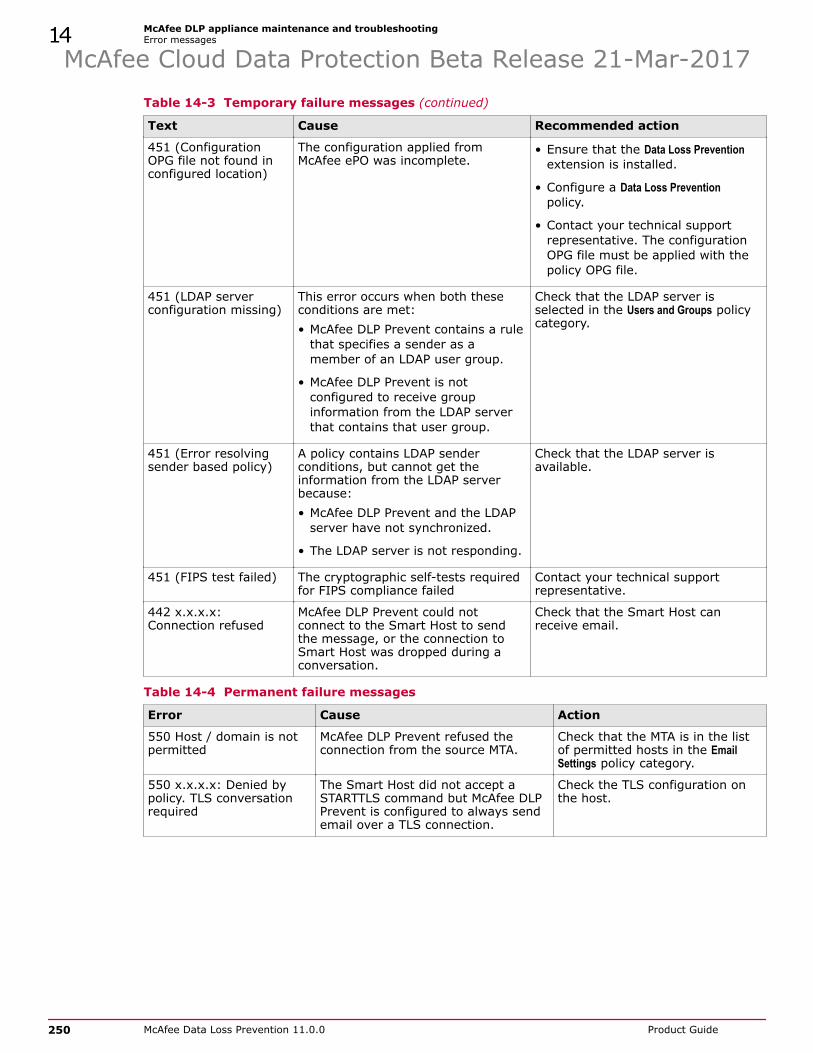
Table 14-3 Temporary failure messages (continued)
Text Cause Recommended action
451 (ConfigurationOPG file not found inconfigured location)
The configuration applied fromMcAfee ePO was incomplete.
• Ensure that the Data Loss Preventionextension is installed.
• Configure a Data Loss Preventionpolicy.
• Contact your technical supportrepresentative. The configurationOPG file must be applied with thepolicy OPG file.
451 (LDAP serverconfiguration missing)
This error occurs when both theseconditions are met:• McAfee DLP Prevent contains a rule
that specifies a sender as amember of an LDAP user group.
• McAfee DLP Prevent is notconfigured to receive groupinformation from the LDAP serverthat contains that user group.
Check that the LDAP server isselected in the Users and Groups policycategory.
451 (Error resolvingsender based policy)
A policy contains LDAP senderconditions, but cannot get theinformation from the LDAP serverbecause:• McAfee DLP Prevent and the LDAP
server have not synchronized.
• The LDAP server is not responding.
Check that the LDAP server isavailable.
451 (FIPS test failed) The cryptographic self-tests requiredfor FIPS compliance failed
Contact your technical supportrepresentative.
442 x.x.x.x:Connection refused
McAfee DLP Prevent could notconnect to the Smart Host to sendthe message, or the connection toSmart Host was dropped during aconversation.
Check that the Smart Host canreceive email.
Table 14-4 Permanent failure messages
Error Cause Action
550 Host / domain is notpermitted
McAfee DLP Prevent refused theconnection from the source MTA.
Check that the MTA is in the listof permitted hosts in the EmailSettings policy category.
550 x.x.x.x: Denied bypolicy. TLS conversationrequired
The Smart Host did not accept aSTARTTLS command but McAfee DLPPrevent is configured to always sendemail over a TLS connection.
Check the TLS configuration onthe host.
McAfee Cloud Data Protection Beta Release 21-Mar-201714 McAfee DLP appliance maintenance and troubleshooting
Error messages
250 McAfee Data Loss Prevention 11.0.0 Product Guide

Table 14-5 ICAP error messages
Error Cause Action
500 (LDAP serverconfigurationmissing)
This error occurs when both these conditions are met:• McAfee DLP Prevent contains a rule that specifies an
end-user as a member of an LDAP user group.
• McAfee DLP Prevent is not configured to receivegroup information from the LDAP server that containsthat user group.
Check that the LDAPserver is selected inthe Users and Groupspolicy category.
500 (Error resolvingend-user basedpolicy)
A policy contains LDAP sender conditions, but cannotget the information from the LDAP server because:• McAfee DLP Prevent and the LDAP server have not
synchronized.
• The LDAP server is not responding.
Check that the LDAPserver is available.
Create a Minimum Escalation Report (MER)Create a Minimum Escalation Report to provide McAfee support the information they need to diagnosea problem with a McAfee DLP appliance.
You can download the Minimum Escalation Report. Up to five reports can be available at any one time,and each is deleted after 24 hours. If another report is generated, the oldest report is deleted. It cantake several minutes to generate a Minimum Escalation Report, and the file is several megabytes insize.
The report contains information such as hardware logs, software versions, disk and memory usage,network and system information, open files, active processes, IPC, binaries, reporting, rescue images,and system tests.
The report does not contain details of evidence or hit highlight information.
Best practice: When you create a Minimum Escalation Report, specify a password to secure the report.Remember to include the password when you send the report to McAfee support.
TaskFor details about product features, usage, and best practices, click ? or Help.
1 Log on to the appliance with administrator credentials.
The general console menu opens.
2 Use the down arrow key to select Generate MER.
3 Type a password that McAfee Support can use to open the MER, and use the arrow key to move tothe password confirmation field.
4 Press ENTER to start generating the report.
When the report is ready, you receive notification of the URL (https://<APPLIANCE>:10443/mer)that you can download the report from.
McAfee Cloud Data Protection Beta Release 21-Mar-2017McAfee DLP appliance maintenance and troubleshooting
Create a Minimum Escalation Report (MER) 14
McAfee Data Loss Prevention 11.0.0 Product Guide 251

5 Browse to the URL, and select the Minimum Escalation Report that you want to download.
6 Follow instructions from McAfee support to send the report.
Remember to include the password if you set one.
McAfee Cloud Data Protection Beta Release 21-Mar-201714 McAfee DLP appliance maintenance and troubleshooting
Create a Minimum Escalation Report (MER)
252 McAfee Data Loss Prevention 11.0.0 Product Guide

A Glossary
Table A-1 McAfee DLP terminology
Term Definition Products
Action What a rule does when content matches the definitionin the rule. Common examples of actions are block,encrypt, or quarantine.
All
Crawling Retrieving files and information from repositories, filesystems, and email.
• McAfee DLP Endpoint(Discovery)
• McAfee DLP Discover
Classification Used to identify and track sensitive content and files.Can include content classifications, contentfingerprints, registered documents, and whitelistedtext.
All
Contentclassification
A mechanism for identifying sensitive content usingdata conditions such as text patterns and dictionaries,and file conditions such as document properties or fileextensions.
All
Contentfingerprinting
A mechanism for classifying and tracking sensitivecontent. Content fingerprinting criteria specifyapplications or locations, and can include data and fileconditions. The fingerprint signatures remain withsensitive content when it is copied or moved.
McAfee DLP Endpointfor Windows
Data vector A definition of content status or usage. McAfee DLPprotects sensitive data when it is stored (data atrest), as it is used (data in use), and when it istransferred (data in motion).
All
Definition A configuration component that makes up aclassification or McAfee DLP Discover scan policy.
All
Device class A collection of devices that have similarcharacteristics and can be managed in a similarmanner. Device classes apply to Windows OScomputers only, and can have the status Managed,Unmanaged, or Whitelisted.
• Device Control
• McAfee DLP Endpointfor Windows
Discover server The Windows Server where the McAfee DLP Discoversoftware is installed.You can install multiple Discover servers in yournetwork.
McAfee DLP Discover
DLP server A McAfee DLP Discover server that has the server roleset to DLP. DLP servers are used as Master Redisservers to store and synchronize the registereddocument database.
McAfee DLP Discover
McAfee Cloud Data Protection Beta Release 21-Mar-2017
McAfee Data Loss Prevention 11.0.0 Product Guide 253

Table A-1 McAfee DLP terminology (continued)
Term Definition Products
File information A definition that can include the file name, owner,size, extension, and date created, changed, oraccessed.Use file information definitions in filters to include orexclude files to scan.
All products
Fingerprinting A text extraction procedure that uses an algorithm tomap a document to signatures. Used to createregistered documents and for content fingerprinting.
• McAfee DLP Endpointfor Windows
• McAfee DLP Prevent
• McAfee DLP Monitor
FIPS compliancy Cryptographic software is configured and used in away that is compliant with Federal InformationProcessing Standard 140-2
• McAfee DLP Prevent
• McAfee DLP Monitor
Managed devices A device class status indicating that the devices inthat class are managed by Device Control.
• Device Control
• McAfee DLP Endpoint
Match string The found content that matches a rule. All products
MTA Message Transfer Agent McAfee DLP Prevent
Path A UNC name, IP address, or web address. • McAfee DLP Endpoint(Discovery)
• McAfee DLP Discover
• McAfee DLP Prevent
• McAfee DLP Monitor
Policy A set of definitions, classifications, and rules thatdefine how the McAfee DLP software protects data.
All products
Redactionreviewer
Allows confidential information in the DLP IncidentManager and DLP Operations consoles to be redacted toprevent unauthorized viewing.
All products
Registereddocuments
Pre-scanned files from specified repositories. SeeFingerprinting.Manual registration — Signatures of the files areuploaded to theMcAfee ePO database, distributed toall managed endpoints, and used to track and classifycontent copied from these files. Supported on McAfeeDLP Endpoint for Windows (only).
Automatic registration — Produced by McAfee DLPDiscover registration scans and stored in fingerprintdatabases on McAfee DLP Discover servers.Supported on network McAfee DLP products.
• McAfee DLP Endpointfor Windows
• McAfee DLP Discover
• McAfee DLP Prevent
• McAfee DLP Monitor
Repository A folder, server, or account containing shared files.The repository definition includes the paths andcredentials for scanning the data.
• McAfee DLP Endpoint(Discovery)
• McAfee DLP Discover
Rule Defines the action taken when an attempt is made totransfer or transmit sensitive data.
All products
Rule set A combination of rules. All products
McAfee Cloud Data Protection Beta Release 21-Mar-2017A Glossary
254 McAfee Data Loss Prevention 11.0.0 Product Guide

Table A-1 McAfee DLP terminology (continued)
Term Definition Products
Scheduler A definition that specifies scan details and theschedule type, such as daily, weekly, monthly, once,or immediately.
• McAfee DLP Endpoint(Discovery)
• McAfee DLP Discover
Strategy McAfee DLP Endpoint divides applications into fourcategories called strategies that affect how thesoftware works with different applications. In order ofdecreasing security, the strategies are Editor,Explorer, Trusted, and Archiver.
McAfee DLP Endpoint
Unmanageddevices
A device class status indicating that the devices inthat class are not managed by Device Control. Someendpoint computers use devices that havecompatibility issues with the McAfee DLP Endpointdevice drivers. To prevent operational problems,these devices are set to Unmanaged.
• Device Control
• McAfee DLP Endpointfor Windows
Whitelisteddevices
A device class status indicating that Device Controldoes not try to control the devices in that class.Examples are battery devices and processors.
Device Control McAfeeDLP Endpoint forWindows
McAfee Cloud Data Protection Beta Release 21-Mar-2017Glossary A
McAfee Data Loss Prevention 11.0.0 Product Guide 255

McAfee Cloud Data Protection Beta Release 21-Mar-2017A Glossary
256 McAfee Data Loss Prevention 11.0.0 Product Guide

Index
Aabout this guide 11
Active Directory servers 87
advanced patternscreating 136
agent configurationMac OS support 66
anti-relay settings 84
application definitionsstrategy 119
application templatesabout 124
assignment groupsdefinition 35
authentication servers 87
Bbackward compatibility 47
bandwidth 184
best practices 34, 45, 49, 75, 101, 103, 166
Boldon James 139
Box 147
business justification, customizing 156
Ccases
about 216
adding comments 218
assigning incidents 217
audit logs 217
creating 216
deleting 220
labels 219
sending notifications 218
updating 218
certificates 247
challenge/response 179
Chrome, supported versions 150
Citrix XenApp device rules 108
classification 115
criteria 130
email 139
manual 125
classification rules 33
classification scansabout 182
configuring 195
classification, manual 133
classifications 129
about 115
client configuration 64
system tree 63
Client Service WatchDog 64
clipboardMicrosoft Office 146
clipboard protection rules 146
cloud protection rules 147
Common Appliance Management 91
content classificationcriteria 116
content fingerprintingcriteria 116
content fingerprinting criteria 34
conventions and icons used in this guide 11
conversion 49
credentials 190
Ddashboards, report options 226
dataclassifying 122
data-in-motion 118
data rollup 227
data-at-rest 176
default ports 38
definitionscredentials 190
dictionaries 122
document properties 123
file extension 123
file information 189
for scans 189
McAfee DLP Discover 187
network 118
registered documents 127
repositories 191, 192
scheduler 193
McAfee Cloud Data Protection Beta Release 21-Mar-2017
McAfee Data Loss Prevention 11.0.0 Product Guide 257

definitions (continued)text pattern 123
web destination 118
definitions, for rules 142
denial-of-service attackavoid 83
device classes 99
device GUID 100
device rules 161
about 108
definition 35
device templates 101
groups 103
removable storage 104
deviceslists, adding plug-and-play templates 103
devices properties 105
Diagnostic Tool 237, 239
dictionariesabout 122
creating 135
importing entries 135
disable SMTP scanning 83
discoveryabout 176
creating a file system discovery rule 177
setup 178
DLP applianceavoid denial-of-service attack 83
McAfee Logon Collector 90
DLP Appliance Management policy 82
DLP appliancesLDAP servers 87
McAfee Logon Collector 87
policyselect LDAP server 89
DLP data, classifying 123
DLP Discover 176
DLP Endpointchecking in to McAfee ePO 50
DLP Incident Manager 206
responding to events 205
DLP Operations 206
DLP Policy console, installing 44
DLP Preventand McAfee Email Gateway 91
anti-relay 84
configure additional MTAs 84
disable web traffic analysis 86
email protection 22
enable TLS 85
permitted hosts 84
round-robin delivery 84
rule reactions 148
timeout settings 82
DLP Prevent (continued)user notifications 156
web protection 22
with McAfee Web Gateway 93
DLP Prevent for Mobile Email, installation 59
DLP rulesclassification 33
device 35
protection 35
DLP Settings 45
document properties definitions 123
documentationaudience for this guide 11
product-specific, finding 12
typographical conventions and icons 11
Dropbox 147
Eemail 117
mobile 24
network 22
email address lists 147
email addressescreating 143
importing 143
email classification 139
email protection rules 147
embedded tags 125, 126
endpoint console 17–19
endpoint discovery 175
endpoint discovery rules 161
ePO Cloud 30
ePO notifications 226
ePO reports 226
event parser 17
eventsmonitoring 205
evidenceendpoint events 205
storage for encrypted content 71
evidence folder 74
evidence storage 72
exceptions to rules 161
Ffile access
rules, about 108
file extensionsdefinitions 123
filters 189
network definitions 118
fingerprinting criteria 132
McAfee Cloud Data Protection Beta Release 21-Mar-2017Index
258 McAfee Data Loss Prevention 11.0.0 Product Guide

GGoogle Chrome, supported versions 150
GoogleDrive 147
groupsdevice templates 103
GUID, See device GUID
Hhandlers
cloud protection 147
hit highlighting, events 72
hotfix 245
Iincident manager 206, 207
incident tasks 206, 221
incidentsdetails 212
filtering 210, 211
labels 215
sorting 210
updating 213, 214
views 210
installation 50
patch or hotfix 245
internal install image 245
inventory scansabout 182
configuring 195
JJAWS support 18
LLDAP 89
limitations 184
location, classifying by 118
MMacOS support 101
management port, connecting 56
manual classification 127, 133
manual classification, persistence of 116
McAfee Agent 28
McAfee DLPMcAfee DLP Monitor protection rules 23
McAfee DLP applianceinstallation 53
serial console 57
McAfee DLP Monitor 23
network requirements 29
McAfee DLP Preventcluster setup 29
McAfee DLP Prevent (continued)MTA server requirements 29
replace the default certificate 247
Setup Wizard 58, 244
McAfee Email Gatewaywith McAfee DLP Prevent 91
McAfee ePO features 94
McAfee Logon Collector 87
McAfee ServicePortal, accessing 12
McAfee Web Gatewaywith McAfee DLP Prevent 93
migration 49
mobile email 24
monitoring 206
MTAsadd more 84
Nnetwork definitions
about 118
address range 143
port range 142
network email 22
network tap 29
non-supported Chrome versions 146
notifications, ePolicy Orchestrator 226
OOLAP 199
OneDrive 147
online/offline operation 17
OpenLDAP servers 87
operational event tasks 221
operational events 207
OS X support 19, 97, 101, 108–110, 115, 119, 124, 146, 150
OST files 117
Ppatch
upgrade 245
permission sets 77
Appliance Management 80
McAfee DLP appliance 80
permission sets, defining 78
permission sets, System Tree filtering 75
placeholders 156
plug-and-play deviceswhitelisted template, creating 103
policiesdefinition 35
DLP Appliance Management 82
policies, tuning 239
policy catalog 63
policy, configuring 189
McAfee Cloud Data Protection Beta Release 21-Mar-2017Index
McAfee Data Loss Prevention 11.0.0 Product Guide 259

Prevent Email Settings policydisable SMTP scanning 83
printer protection rules 118
protection rule types 23
protection rules 161
definition 35
proximity 116
PST files 117
Qquarantine
restoring files or email items from 179
Rreactions 158
redaction 75
registered documents 34, 127
automatic 128, 184
manual 128, 130
registration scan 197
remediation scansabout 183
configuring 196
repositories 191, 192
REST API 76, 103, 135, 137, 143
rights management 69, 71
RMM 243, 244
role-based access control 78
roles and permissions 74
rolled up reports 226
round-robin message delivery 84
rule definitions 142
rule reactions 148
rule setsabout 141
creating 161
rules 144
about 188
Citrix XenApp 108
cloud protection 147
creating 161
email protection 147
exceptions 161
for remediation scans 194
reactions 158
rules storing evidence 73
Sscans
classification 182, 195
credentials 190
inventory 182, 195
registration 197
remediation 183, 196
scans (continued)repositories 191, 192
results 200
scheduler 193
types of 21
scheduler 193
server tasks 49, 221
server tasks, rollup 227
ServicePortal, finding product documentation 12
SMTPdisable scanning 83
SPAN port 29
strategy, See application definitions Syncplicity 147
Ttagging 115
about 116
technical support, finding product information 12
text extractor 119
text patternsabout 123
throttling 184
TIE support 146
timeout settings 82
timeout strategy, web post 150
Titus, integration 138
TLSenable 85
Transport Layer Securitysee TLS 85
TrueCrypt device rules 108
Uupgrading 51
URL listscreating 137
user notification, customizing 156
user self-remediation 175
user sessions 108
user-initiated scans 175
Vvalidators 123
WWake Up Agents 52
WatchDog service 64
web application control 155
web destinationsabout 118
web protection authentication 87
web protection rules 150
whitelisted text 131
McAfee Cloud Data Protection Beta Release 21-Mar-2017Index
260 McAfee Data Loss Prevention 11.0.0 Product Guide

whitelists 35
plug-and-play templates, creating 103
wildcards, in email address definitions 147
XX-RCIS-Action header 148
McAfee Cloud Data Protection Beta Release 21-Mar-2017Index
McAfee Data Loss Prevention 11.0.0 Product Guide 261

A00