master visual basic
1058
SERIOUS SKILLS. Visual Basic ® 2010 MASTERING Build Rich Client and Web Applications with Visual Basic Work with the .NET Framework 4.0 Microsoft ® Evangelos Petroutsos
Transcript of master visual basic

The Visual Basic Book Programmers Count On
If you want to learn how to use Visual Basic 2010, you’ve come to the right place. New users, you’ll build a simple VB application in the very fi rst chapter, getting you quickly up to speed on the VB user interface and simple coding. Intermediate and advanced users, you can bypass the basics and jump straight to building data-driven applications, working with .NET 4.0 framework, creating rich client and web applications, programming with web services, and much more. Packed with step-by-step instruction and real-world scenarios for users of all levels, this book is what you need to build top-level skills in Visual Basic 2010.
COVERAGE INCLUDES:
• Getting started with Visual Basic 2010• Mastering VB programming essentials, including GUI design,
event-driven programming, basic Windows controls, and more• Working with custom classes, controls, and objects• Understanding the .NET framework, including XML, LINQ, and
storing data in collections• Programming with ADO.NET, using the data entity model, and
understanding DataSets• Building web applications and programming with web services• Getting the most out of advanced Windows controls such as ListView
and TreeView controls
Master Visual Basic 2010 and .NET Framework 4.0
Understand the Core Language and User Interface
Find a Wealth of Content for All Users
Create Custom, Practical, Data-Driven Applications and Web Apps
Reinforce Your Skills with Real-World Examples
ABOUT THE AUTHOR
Evangelos Petroutsos is a computer engineer who has worked for the California Institute of Technology and MCI. Currently, he writes computer books and articles, teaches networking and programming courses, and works as a computer communications consultant. He is the author of the Sybex titles Mastering Microsoft Visual Basic 2008 and Mastering Microsoft Visual Basic 2005, among other books.
CATEGORY
COMPUTERS/Programming Languages/Visual Basic
$59.99 US$71.99 CAN SERIOUS SKILLS.
Visual Basic® 2010
MASTERING
Build Rich Client and Web Applications with Visual Basic
Work with the .NET Framework 4.0
ISBN 978-0-470-53287-4
www.sybex.com/go/masteringvb2010www.sybex.com
MASTERING
Visual B
asic® 2010
Petroutsos
spine=2.11”
Microsoft®
Microsoft®
Evangelos Petroutsos


MasteringMicrosoft® Visual Basic® 2010

MasteringMicrosoft® Visual Basic® 2010
Evangelos Petroutsos
Wiley Publishing, Inc.
Acquisitions Editor: Agatha KimDevelopment Editor: Mary Ellen SchutzTechnical Editor: Kirstin JuhlProduction Editor: Rachel McConlogueCopy Editors: Judy Flynn and Kim WimpsettEditorial Manager: Pete GaughanProduction Manager: Tim TateVice President and Executive Group Publisher: Richard SwadleyVice President and Publisher: Neil EddeBook Designers: Maureen Forys and Judy FungProofreader: Rebecca RiderIndexer: Jack LewisProject Coordinator, Cover: Lynsey StanfordCover Designer: Ryan SneedCover Image: © Pete Gardner/DigitalVision/Getty Images
Copyright © 2010 by Wiley Publishing, Inc., Indianapolis, Indiana
Published simultaneously in Canada
ISBN: 978-0-470-53287-4
No part of this publication may be reproduced, stored in a retrieval system or transmitted in any form or by anymeans, electronic, mechanical, photocopying, recording, scanning or otherwise, except as permitted under Sections 107or 108 of the 1976 United States Copyright Act, without either the prior written permission of the Publisher, or autho-rization through payment of the appropriate per-copy fee to the Copyright Clearance Center, 222 Rosewood Drive,Danvers, MA 01923, (978) 750-8400, fax (978) 646-8600. Requests to the Publisher for permission should be addressedto the Permissions Department, John Wiley & Sons, Inc., 111 River Street, Hoboken, NJ 07030, (201) 748-6011, fax (201)748-6008, or online at http://www.wiley.com/go/permissions.
Limit of Liability/Disclaimer of Warranty: The publisher and the author make no representations or warranties withrespect to the accuracy or completeness of the contents of this work and specifically disclaim all warranties, includ-ing without limitation warranties of fitness for a particular purpose. No warranty may be created or extended bysales or promotional materials. The advice and strategies contained herein may not be suitable for every situation.This work is sold with the understanding that the publisher is not engaged in rendering legal, accounting, or otherprofessional services. If professional assistance is required, the services of a competent professional person should besought. Neither the publisher nor the author shall be liable for damages arising herefrom. The fact that an organiza-tion or Web site is referred to in this work as a citation and/or a potential source of further information does notmean that the author or the publisher endorses the information the organization or Web site may provide or rec-ommendations it may make. Further, readers should be aware that Internet Web sites listed in this work may havechanged or disappeared between when this work was written and when it is read.
For general information on our other products and services or to obtain technical support, please contact our Cus-tomer Care Department within the U.S. at (877) 762-2974, outside the U.S. at (317) 572-3993 or fax (317) 572-4002.
Wiley also publishes its books in a variety of electronic formats. Some content that appears in print may not be avail-able in electronic books.
Library of Congress Cataloging-in-Publication Data
Petroutsos, Evangelos.Mastering Microsoft Visual Basic 2010 / Evangelos Petroutsos. -- 1st ed.
p. cm.ISBN 978-0-470-53287-4 (paper/website)1. Microsoft Visual BASIC. 2. BASIC (Computer program language) I. Title.
QA76.73.B3P487 2010005.2’768--dc22
2010000339
TRADEMARKS: Wiley, the Wiley logo, and the Sybex logo are trademarks or registered trademarks of John Wiley &Sons, Inc. and/or its affiliates, in the United States and other countries, and may not be used without written permis-sion. Microsoft and Visual Basic are registered trademarks of Microsoft Corporation in the United States and/or othercountries. All other trademarks are the property of their respective owners. Wiley Publishing, Inc. is not associatedwith any product or vendor mentioned in this book.
10 9 8 7 6 5 4 3 2 1

Dear Reader,
Thank you for choosing Mastering Microsoft Visual Basic 2010. This book is part of a family ofpremium-quality Sybex books, all of which are written by outstanding authors who combinepractical experience with a gift for teaching.
Sybex was founded in 1976. More than 30 years later, we’re still committed to producing con-sistently exceptional books. With each of our titles, we’re working hard to set a new standardfor the industry. From the paper we print on to the authors we work with, our goal is to bringyou the best books available.
I hope you see all that reflected in these pages. I’d be very interested to hear your commentsand get your feedback on how we’re doing. Feel free to let me know what you think aboutthis or any other Sybex book by sending me an email at [email protected]. If you think you’vefound a technical error in this book, please visit http://sybex.custhelp.com. Customer feed-back is critical to our efforts at Sybex.
Best regards,
Neil EddeVice President and PublisherSybex, an Imprint of Wiley

To my dearest and most precious ones, Nepheli andEleni-Myrsini

AcknowledgmentsMany people contributed to this book, and I would like to thank them all. I first want to expressmy deep appreciation to Danijel Arsenovski for contributing and revising several chapters, andespecially for his work on Chapter 17, ‘‘Using the Entity Data Model.’’ Many thanks to the book’stechnical editor, Kirstin Juhl, who has read this book with great care and a particular attentionto detail. Thank you, Kirstin. I also want to thank the folks at Microsoft for their commitment toVisual Basic. Visual Basic remains my absolute favorite language.
Special thanks to the talented people at Sybex — to all of them and to each one individ-ually — starting with my ‘‘Gentle Editor,’’ Mary Ellen Schutz, who has taken this book underher wing and improved it in numerous ways. To acquisitions editor Agatha Kim, who hasfollowed the progress of this book from its conception through its completion. (She will keepworking on this book long after I’m done with this page). To Pete Gaughan, editorial manager;Rachel McConlogue, production editor; Judy Flynn and Kim Wimpsett, copyeditors; RebeccaRider, proofreader; Jack Lewis, indexer; the compositors at Laserwords; and everyone else whoadded their expertise and talent to this book.


About the AuthorEvangelos Petroutsos is a computer engineer by education, but he has spent most of his profes-sional life developing applications and digging through databases. He has a degree in computerengineering from the University of California, Santa Barbara, and several years of professionalexperience at the California Institute of Technology. He has worked as a consultant for manycompanies, large and small, and has taught courses on Visual Basic and databases. He espe-cially enjoys writing and teaching. With over 25 years of experience in this industry, he makeshis living by optimizing code and databases.
When he’s not obsessed with a new technology, he spends time with his family and friends,reads science books, and finds excuses to visit every state in the country.


Contents at a Glance
Introduction . . . . . . . . . . . . . . . . . . . . . . . . . . . . . . . . . . . . . . . . . . . . . . . . . . . . . . . . . . . . . . . . . xxv
Part 1 • Visual Basic: The Language . . . . . . . . . . . . . . . . . . . . . . . . . . . . . . . 1
Chapter 1 • Getting Started with Visual Basic 2010 . . . . . . . . . . . . . . . . . . . . . . . . . . . 3
Chapter 2 • Handling Data . . . . . . . . . . . . . . . . . . . . . . . . . . . . . . . . . . . . . . . . . . . . . 37
Chapter 3 • Visual Basic Programming Essentials . . . . . . . . . . . . . . . . . . . . . . . . . . . 85
Part 2 • Developing Windows Applications . . . . . . . . . . . . . . . . . . . . . . . . 127
Chapter 4 • GUI Design and Event-Driven Programming . . . . . . . . . . . . . . . . . . . . 129
Chapter 5 • Basic Windows Controls . . . . . . . . . . . . . . . . . . . . . . . . . . . . . . . . . . . . 161
Chapter 6 • Working with Forms . . . . . . . . . . . . . . . . . . . . . . . . . . . . . . . . . . . . . . . 203
Chapter 7 • More Windows Controls . . . . . . . . . . . . . . . . . . . . . . . . . . . . . . . . . . . . 253
Part 3 • Working with Custom Classes and Controls . . . . . . . . . . . . . . . . . 303
Chapter 8 • Working with Objects . . . . . . . . . . . . . . . . . . . . . . . . . . . . . . . . . . . . . . 305
Chapter 9 • Building Custom Windows Controls . . . . . . . . . . . . . . . . . . . . . . . . . . 355
Chapter 10 • Applied Object-Oriented Programming . . . . . . . . . . . . . . . . . . . . . . . 387
Part 4 • Working with the .NET Framework . . . . . . . . . . . . . . . . . . . . . . . 431
Chapter 11 • The Framework at Large . . . . . . . . . . . . . . . . . . . . . . . . . . . . . . . . . . . 433
Chapter 12 • Storing Data in Collections . . . . . . . . . . . . . . . . . . . . . . . . . . . . . . . . . 493
Chapter 13 • XML in Modern Programming . . . . . . . . . . . . . . . . . . . . . . . . . . . . . . 529
Chapter 14 • An Introduction to LINQ . . . . . . . . . . . . . . . . . . . . . . . . . . . . . . . . . . . 577

xii CONTENTS AT A GLANCE
Part 5 • Developing Data-Driven Applications . . . . . . . . . . . . . . . . . . . . . . 629
Chapter 15 • Programming with ADO.NET . . . . . . . . . . . . . . . . . . . . . . . . . . . . . . . 631
Chapter 16 • Developing Data-Driven Applications . . . . . . . . . . . . . . . . . . . . . . . . 687
Chapter 17 • Using the Entity Data Model . . . . . . . . . . . . . . . . . . . . . . . . . . . . . . . . 725
Chapter 18 • Building Data-Bound Applications . . . . . . . . . . . . . . . . . . . . . . . . . . . 769
Part 6 • Developing for the Web . . . . . . . . . . . . . . . . . . . . . . . . . . . . . . . 813
Chapter 19 • Accessing the Web . . . . . . . . . . . . . . . . . . . . . . . . . . . . . . . . . . . . . . . . 815
Chapter 20 • Building Web Applications . . . . . . . . . . . . . . . . . . . . . . . . . . . . . . . . . 845
Chapter 21 • Building and Using Web Services . . . . . . . . . . . . . . . . . . . . . . . . . . . . 893
Appendix • The Bottom Line . . . . . . . . . . . . . . . . . . . . . . . . . . . . . . . . . . 941
Index . . . . . . . . . . . . . . . . . . . . . . . . . . . . . . . . . . . . . . . . . . . . . . . . . . . . . . . . . . . . . . . . . . . . . . 987

Contents
Introduction . . . . . . . . . . . . . . . . . . . . . . . . . . . . . . . . . . . . . . . . . . . . . . . . . . . . . . . . . . . . . . . . . xxv
Part 1 • Visual Basic: The Language . . . . . . . . . . . . . . . . . . . . . . . . . . . . . . . . . . . . . 1
Chapter 1 • Getting Started with Visual Basic 2010 . . . . . . . . . . . . . . . . . . . . 3
Exploring the Integrated Development Environment . . . . . . . . . . . . . . . . . . . . . . . . . . . 3The Start Page . . . . . . . . . . . . . . . . . . . . . . . . . . . . . . . . . . . . . . . . . . . . . . . . . . . . . . . 4Starting a New Project . . . . . . . . . . . . . . . . . . . . . . . . . . . . . . . . . . . . . . . . . . . . . . . . 5Using the Windows Form Designer . . . . . . . . . . . . . . . . . . . . . . . . . . . . . . . . . . . . . . 7
Creating Your First VB Application . . . . . . . . . . . . . . . . . . . . . . . . . . . . . . . . . . . . . . . 13Making the Application More User Friendly . . . . . . . . . . . . . . . . . . . . . . . . . . . . . . 18
Understanding the IDE Components . . . . . . . . . . . . . . . . . . . . . . . . . . . . . . . . . . . . . . 21The IDE Menus . . . . . . . . . . . . . . . . . . . . . . . . . . . . . . . . . . . . . . . . . . . . . . . . . . . . . 21The Toolbox Window . . . . . . . . . . . . . . . . . . . . . . . . . . . . . . . . . . . . . . . . . . . . . . . . 26The Solution Explorer Window . . . . . . . . . . . . . . . . . . . . . . . . . . . . . . . . . . . . . . . . 26The Properties Window . . . . . . . . . . . . . . . . . . . . . . . . . . . . . . . . . . . . . . . . . . . . . . 26The Output Window . . . . . . . . . . . . . . . . . . . . . . . . . . . . . . . . . . . . . . . . . . . . . . . . . 27The Command and Immediate Windows . . . . . . . . . . . . . . . . . . . . . . . . . . . . . . . . 27The Error List Window . . . . . . . . . . . . . . . . . . . . . . . . . . . . . . . . . . . . . . . . . . . . . . . 28
Setting Environment Options . . . . . . . . . . . . . . . . . . . . . . . . . . . . . . . . . . . . . . . . . . . . 29Building a Console Application . . . . . . . . . . . . . . . . . . . . . . . . . . . . . . . . . . . . . . . . . . . 30Using Code Snippets . . . . . . . . . . . . . . . . . . . . . . . . . . . . . . . . . . . . . . . . . . . . . . . . . . . 32Using the My Component . . . . . . . . . . . . . . . . . . . . . . . . . . . . . . . . . . . . . . . . . . . . . . . 33The Bottom Line . . . . . . . . . . . . . . . . . . . . . . . . . . . . . . . . . . . . . . . . . . . . . . . . . . . . . . 36
Chapter 2 • Handling Data . . . . . . . . . . . . . . . . . . . . . . . . . . . . . . . . . . . . 37
Variables . . . . . . . . . . . . . . . . . . . . . . . . . . . . . . . . . . . . . . . . . . . . . . . . . . . . . . . . . . . . 37Declaring Variables . . . . . . . . . . . . . . . . . . . . . . . . . . . . . . . . . . . . . . . . . . . . . . . . . . 38Types of Variables . . . . . . . . . . . . . . . . . . . . . . . . . . . . . . . . . . . . . . . . . . . . . . . . . . 40The Strict, Explicit, and Infer Options . . . . . . . . . . . . . . . . . . . . . . . . . . . . . . . . . . . 55Object Variables . . . . . . . . . . . . . . . . . . . . . . . . . . . . . . . . . . . . . . . . . . . . . . . . . . . . 59
Variables as Objects . . . . . . . . . . . . . . . . . . . . . . . . . . . . . . . . . . . . . . . . . . . . . . . . . . . . 60Converting Variable Types . . . . . . . . . . . . . . . . . . . . . . . . . . . . . . . . . . . . . . . . . . . . 62Formatting Numbers . . . . . . . . . . . . . . . . . . . . . . . . . . . . . . . . . . . . . . . . . . . . . . . . 65User-Defined Data Types . . . . . . . . . . . . . . . . . . . . . . . . . . . . . . . . . . . . . . . . . . . . . 68Examining Variable Types . . . . . . . . . . . . . . . . . . . . . . . . . . . . . . . . . . . . . . . . . . . . 70A Variable’s Scope . . . . . . . . . . . . . . . . . . . . . . . . . . . . . . . . . . . . . . . . . . . . . . . . . . 71A Variable’s Lifetime . . . . . . . . . . . . . . . . . . . . . . . . . . . . . . . . . . . . . . . . . . . . . . . . 73
Constants . . . . . . . . . . . . . . . . . . . . . . . . . . . . . . . . . . . . . . . . . . . . . . . . . . . . . . . . . . . . 74

xiv CONTENTS
Arrays . . . . . . . . . . . . . . . . . . . . . . . . . . . . . . . . . . . . . . . . . . . . . . . . . . . . . . . . . . . . . . 75Declaring Arrays . . . . . . . . . . . . . . . . . . . . . . . . . . . . . . . . . . . . . . . . . . . . . . . . . . . . 75Initializing Arrays . . . . . . . . . . . . . . . . . . . . . . . . . . . . . . . . . . . . . . . . . . . . . . . . . . . 76Multidimensional Arrays . . . . . . . . . . . . . . . . . . . . . . . . . . . . . . . . . . . . . . . . . . . . . 78Collections . . . . . . . . . . . . . . . . . . . . . . . . . . . . . . . . . . . . . . . . . . . . . . . . . . . . . . . . 81
The Bottom Line . . . . . . . . . . . . . . . . . . . . . . . . . . . . . . . . . . . . . . . . . . . . . . . . . . . . . . 82
Chapter 3 • Visual Basic Programming Essentials . . . . . . . . . . . . . . . . . . . 85
Flow-Control Statements . . . . . . . . . . . . . . . . . . . . . . . . . . . . . . . . . . . . . . . . . . . . . . . . 85Decision Statements . . . . . . . . . . . . . . . . . . . . . . . . . . . . . . . . . . . . . . . . . . . . . . . . 86Loop Statements . . . . . . . . . . . . . . . . . . . . . . . . . . . . . . . . . . . . . . . . . . . . . . . . . . . . 93Nested Control Structures . . . . . . . . . . . . . . . . . . . . . . . . . . . . . . . . . . . . . . . . . . . . 99The Exit and Continue Statements . . . . . . . . . . . . . . . . . . . . . . . . . . . . . . . . . . . . 102
Writing and Using Procedures . . . . . . . . . . . . . . . . . . . . . . . . . . . . . . . . . . . . . . . . . . 102Subroutines . . . . . . . . . . . . . . . . . . . . . . . . . . . . . . . . . . . . . . . . . . . . . . . . . . . . . . . 103Functions . . . . . . . . . . . . . . . . . . . . . . . . . . . . . . . . . . . . . . . . . . . . . . . . . . . . . . . . 104
Arguments . . . . . . . . . . . . . . . . . . . . . . . . . . . . . . . . . . . . . . . . . . . . . . . . . . . . . . . . . . 106Argument-Passing Mechanisms . . . . . . . . . . . . . . . . . . . . . . . . . . . . . . . . . . . . . . . 108Built-in Functions . . . . . . . . . . . . . . . . . . . . . . . . . . . . . . . . . . . . . . . . . . . . . . . . . . 111Custom Functions . . . . . . . . . . . . . . . . . . . . . . . . . . . . . . . . . . . . . . . . . . . . . . . . . . 113Passing Arguments and Returning Values . . . . . . . . . . . . . . . . . . . . . . . . . . . . . . . 115Overloading Functions . . . . . . . . . . . . . . . . . . . . . . . . . . . . . . . . . . . . . . . . . . . . . . 118
The Bottom Line . . . . . . . . . . . . . . . . . . . . . . . . . . . . . . . . . . . . . . . . . . . . . . . . . . . . . 125
Part 2 • Developing Windows Applications . . . . . . . . . . . . . . . . . . . . . . . . . . . . . 127
Chapter 4 • GUI Design and Event-Driven Programming . . . . . . . . . . . . . . 129
On Designing Windows Applications . . . . . . . . . . . . . . . . . . . . . . . . . . . . . . . . . . . . . 129Building a Loan Calculator . . . . . . . . . . . . . . . . . . . . . . . . . . . . . . . . . . . . . . . . . . . . . 130
Understanding How the Loan Calculator Application Works . . . . . . . . . . . . . . . . 131Designing the User Interface . . . . . . . . . . . . . . . . . . . . . . . . . . . . . . . . . . . . . . . . . 133Programming the Loan Application . . . . . . . . . . . . . . . . . . . . . . . . . . . . . . . . . . . . 136Validating the Data . . . . . . . . . . . . . . . . . . . . . . . . . . . . . . . . . . . . . . . . . . . . . . . . . 140
Building a Calculator . . . . . . . . . . . . . . . . . . . . . . . . . . . . . . . . . . . . . . . . . . . . . . . . . . 144Designing the User Interface . . . . . . . . . . . . . . . . . . . . . . . . . . . . . . . . . . . . . . . . . 145Programming the MathCalculator . . . . . . . . . . . . . . . . . . . . . . . . . . . . . . . . . . . . . 147Using the Basic Debugging Tools . . . . . . . . . . . . . . . . . . . . . . . . . . . . . . . . . . . . . . 152Exception Handling . . . . . . . . . . . . . . . . . . . . . . . . . . . . . . . . . . . . . . . . . . . . . . . . 155
The Bottom Line . . . . . . . . . . . . . . . . . . . . . . . . . . . . . . . . . . . . . . . . . . . . . . . . . . . . . 158
Chapter 5 • Basic Windows Controls . . . . . . . . . . . . . . . . . . . . . . . . . . . . 161
The TextBox Control . . . . . . . . . . . . . . . . . . . . . . . . . . . . . . . . . . . . . . . . . . . . . . . . . . 161Basic Properties . . . . . . . . . . . . . . . . . . . . . . . . . . . . . . . . . . . . . . . . . . . . . . . . . . . . 162Text-Manipulation Properties . . . . . . . . . . . . . . . . . . . . . . . . . . . . . . . . . . . . . . . . . 165Text-Selection Properties . . . . . . . . . . . . . . . . . . . . . . . . . . . . . . . . . . . . . . . . . . . . 167Undoing Edits . . . . . . . . . . . . . . . . . . . . . . . . . . . . . . . . . . . . . . . . . . . . . . . . . . . . . 168VB 2010 at Work: The TextPad Project . . . . . . . . . . . . . . . . . . . . . . . . . . . . . . . . . . 168

CONTENTS xv
Capturing Keystrokes . . . . . . . . . . . . . . . . . . . . . . . . . . . . . . . . . . . . . . . . . . . . . . . 176Autocomplete Properties . . . . . . . . . . . . . . . . . . . . . . . . . . . . . . . . . . . . . . . . . . . . 179
The ListBox, CheckedListBox, and ComboBox Controls . . . . . . . . . . . . . . . . . . . . . . . 182Basic Properties . . . . . . . . . . . . . . . . . . . . . . . . . . . . . . . . . . . . . . . . . . . . . . . . . . . . 183Manipulating the Items Collection . . . . . . . . . . . . . . . . . . . . . . . . . . . . . . . . . . . . . 184Selecting Items . . . . . . . . . . . . . . . . . . . . . . . . . . . . . . . . . . . . . . . . . . . . . . . . . . . . 187VB 2010 at Work: The ListBox Demo Project . . . . . . . . . . . . . . . . . . . . . . . . . . . . . 188Searching the ListBox . . . . . . . . . . . . . . . . . . . . . . . . . . . . . . . . . . . . . . . . . . . . . . . 191The ComboBox Control . . . . . . . . . . . . . . . . . . . . . . . . . . . . . . . . . . . . . . . . . . . . . 193
The ScrollBar and TrackBar Controls . . . . . . . . . . . . . . . . . . . . . . . . . . . . . . . . . . . . . 197The ScrollBar Control . . . . . . . . . . . . . . . . . . . . . . . . . . . . . . . . . . . . . . . . . . . . . . . 197The TrackBar Control . . . . . . . . . . . . . . . . . . . . . . . . . . . . . . . . . . . . . . . . . . . . . . . 200
The Bottom Line . . . . . . . . . . . . . . . . . . . . . . . . . . . . . . . . . . . . . . . . . . . . . . . . . . . . . 201
Chapter 6 • Working with Forms . . . . . . . . . . . . . . . . . . . . . . . . . . . . . . 203
The Appearance of Forms . . . . . . . . . . . . . . . . . . . . . . . . . . . . . . . . . . . . . . . . . . . . . . 203Properties of the Form Object . . . . . . . . . . . . . . . . . . . . . . . . . . . . . . . . . . . . . . . . . 204Placing Controls on Forms . . . . . . . . . . . . . . . . . . . . . . . . . . . . . . . . . . . . . . . . . . . 209Setting the TabIndex Property . . . . . . . . . . . . . . . . . . . . . . . . . . . . . . . . . . . . . . . . 211VB 2010 at Work: The Contacts Project . . . . . . . . . . . . . . . . . . . . . . . . . . . . . . . . . . 212Anchoring and Docking . . . . . . . . . . . . . . . . . . . . . . . . . . . . . . . . . . . . . . . . . . . . . 216Splitting Forms into Multiple Panes . . . . . . . . . . . . . . . . . . . . . . . . . . . . . . . . . . . . 219Form Events . . . . . . . . . . . . . . . . . . . . . . . . . . . . . . . . . . . . . . . . . . . . . . . . . . . . . . 221
Loading and Showing Forms . . . . . . . . . . . . . . . . . . . . . . . . . . . . . . . . . . . . . . . . . . . 223The Startup Form . . . . . . . . . . . . . . . . . . . . . . . . . . . . . . . . . . . . . . . . . . . . . . . . . . 224Controlling One Form from within Another . . . . . . . . . . . . . . . . . . . . . . . . . . . . . 225Forms versus Dialog Boxes . . . . . . . . . . . . . . . . . . . . . . . . . . . . . . . . . . . . . . . . . . . 226
Building Dynamic Forms at Runtime . . . . . . . . . . . . . . . . . . . . . . . . . . . . . . . . . . . . . 233The Form’s Controls Collection . . . . . . . . . . . . . . . . . . . . . . . . . . . . . . . . . . . . . . 234Creating Event Handlers at Runtime . . . . . . . . . . . . . . . . . . . . . . . . . . . . . . . . . . . 241
Designing Menus . . . . . . . . . . . . . . . . . . . . . . . . . . . . . . . . . . . . . . . . . . . . . . . . . . . . . 243The Menu Editor . . . . . . . . . . . . . . . . . . . . . . . . . . . . . . . . . . . . . . . . . . . . . . . . . . . 243The ToolStripMenuItem Properties . . . . . . . . . . . . . . . . . . . . . . . . . . . . . . . . . . . . 246Manipulating Menus at Runtime . . . . . . . . . . . . . . . . . . . . . . . . . . . . . . . . . . . . . . 248
The Bottom Line . . . . . . . . . . . . . . . . . . . . . . . . . . . . . . . . . . . . . . . . . . . . . . . . . . . . . 251
Chapter 7 • More Windows Controls . . . . . . . . . . . . . . . . . . . . . . . . . . . . 253
The Common Dialog Controls . . . . . . . . . . . . . . . . . . . . . . . . . . . . . . . . . . . . . . . . . . . 254Using the Common Dialog Controls . . . . . . . . . . . . . . . . . . . . . . . . . . . . . . . . . . . 255The ColorDialog Control . . . . . . . . . . . . . . . . . . . . . . . . . . . . . . . . . . . . . . . . . . . . 256The FontDialog Control . . . . . . . . . . . . . . . . . . . . . . . . . . . . . . . . . . . . . . . . . . . . . 258The OpenDialog and SaveDialog Controls . . . . . . . . . . . . . . . . . . . . . . . . . . . . . . . 261The FolderBrowserDialog Control . . . . . . . . . . . . . . . . . . . . . . . . . . . . . . . . . . . . . 266
The RichTextBox Control . . . . . . . . . . . . . . . . . . . . . . . . . . . . . . . . . . . . . . . . . . . . . . . 269The RTF Language . . . . . . . . . . . . . . . . . . . . . . . . . . . . . . . . . . . . . . . . . . . . . . . . . 270Text Manipulation and Formatting Properties . . . . . . . . . . . . . . . . . . . . . . . . . . . . 271Methods . . . . . . . . . . . . . . . . . . . . . . . . . . . . . . . . . . . . . . . . . . . . . . . . . . . . . . . . . 274

xvi CONTENTS
Advanced Editing Features . . . . . . . . . . . . . . . . . . . . . . . . . . . . . . . . . . . . . . . . . . 275Cutting, Copying, and Pasting . . . . . . . . . . . . . . . . . . . . . . . . . . . . . . . . . . . . . . . . 276VB 2010 at Work: The RTFPad Project . . . . . . . . . . . . . . . . . . . . . . . . . . . . . . . . . . 277
The TreeView and ListView Controls . . . . . . . . . . . . . . . . . . . . . . . . . . . . . . . . . . . . . 286Tree and List Structures . . . . . . . . . . . . . . . . . . . . . . . . . . . . . . . . . . . . . . . . . . . . . 287The TreeView Control . . . . . . . . . . . . . . . . . . . . . . . . . . . . . . . . . . . . . . . . . . . . . . 289The ListView Control . . . . . . . . . . . . . . . . . . . . . . . . . . . . . . . . . . . . . . . . . . . . . . . 293VB 2010 at Work: The CustomExplorer Project . . . . . . . . . . . . . . . . . . . . . . . . . . . 299
The Bottom Line . . . . . . . . . . . . . . . . . . . . . . . . . . . . . . . . . . . . . . . . . . . . . . . . . . . . . 300
Part 3 • Working with Custom Classes and Controls . . . . . . . . . . . . . . . . . . . . . . . 303
Chapter 8 • Working with Objects . . . . . . . . . . . . . . . . . . . . . . . . . . . . . 305
Classes and Objects . . . . . . . . . . . . . . . . . . . . . . . . . . . . . . . . . . . . . . . . . . . . . . . . . . . 305What Is a Class? . . . . . . . . . . . . . . . . . . . . . . . . . . . . . . . . . . . . . . . . . . . . . . . . . . . . . . 306
Classes Combine Code with Data . . . . . . . . . . . . . . . . . . . . . . . . . . . . . . . . . . . . . . 307Building the Minimal Class . . . . . . . . . . . . . . . . . . . . . . . . . . . . . . . . . . . . . . . . . . . . . 308
Adding Code to the Minimal Class . . . . . . . . . . . . . . . . . . . . . . . . . . . . . . . . . . . . 311Using Property Procedures . . . . . . . . . . . . . . . . . . . . . . . . . . . . . . . . . . . . . . . . . . . 313Customizing Default Members . . . . . . . . . . . . . . . . . . . . . . . . . . . . . . . . . . . . . . . . 320Custom Enumerations . . . . . . . . . . . . . . . . . . . . . . . . . . . . . . . . . . . . . . . . . . . . . . 323Object Constructors . . . . . . . . . . . . . . . . . . . . . . . . . . . . . . . . . . . . . . . . . . . . . . . . 331Using the SimpleClass in Other Projects . . . . . . . . . . . . . . . . . . . . . . . . . . . . . . . . 333Firing Events . . . . . . . . . . . . . . . . . . . . . . . . . . . . . . . . . . . . . . . . . . . . . . . . . . . . . . 335Instance and Shared Methods . . . . . . . . . . . . . . . . . . . . . . . . . . . . . . . . . . . . . . . . . 338
A ‘‘Real’’ Class . . . . . . . . . . . . . . . . . . . . . . . . . . . . . . . . . . . . . . . . . . . . . . . . . . . . . . . 342Nesting Classes . . . . . . . . . . . . . . . . . . . . . . . . . . . . . . . . . . . . . . . . . . . . . . . . . . . . 344
Operator Overloading . . . . . . . . . . . . . . . . . . . . . . . . . . . . . . . . . . . . . . . . . . . . . . . . . 347VB 2010 at Work: The LengthUnits Class . . . . . . . . . . . . . . . . . . . . . . . . . . . . . . . . 348
The Bottom Line . . . . . . . . . . . . . . . . . . . . . . . . . . . . . . . . . . . . . . . . . . . . . . . . . . . . . 353
Chapter 9 • Building Custom Windows Controls . . . . . . . . . . . . . . . . . . . 355
On Designing Windows Controls . . . . . . . . . . . . . . . . . . . . . . . . . . . . . . . . . . . . . . . . 355Enhancing Existing Controls . . . . . . . . . . . . . . . . . . . . . . . . . . . . . . . . . . . . . . . . . . . . 356
Building the FocusedTextBox Control . . . . . . . . . . . . . . . . . . . . . . . . . . . . . . . . . . 357Building Compound Controls . . . . . . . . . . . . . . . . . . . . . . . . . . . . . . . . . . . . . . . . . . . 364
VB 2010 at Work: The ColorEdit Control . . . . . . . . . . . . . . . . . . . . . . . . . . . . . . . . 365Building User-Drawn Controls . . . . . . . . . . . . . . . . . . . . . . . . . . . . . . . . . . . . . . . . . . 368
VB 2010 at Work: The Label3D Control . . . . . . . . . . . . . . . . . . . . . . . . . . . . . . . . . 369Raising Custom Events . . . . . . . . . . . . . . . . . . . . . . . . . . . . . . . . . . . . . . . . . . . . . . 377Using the Custom Control in Other Projects . . . . . . . . . . . . . . . . . . . . . . . . . . . . . 378
Designing Irregularly Shaped Controls . . . . . . . . . . . . . . . . . . . . . . . . . . . . . . . . . . . . 379Customizing List Controls . . . . . . . . . . . . . . . . . . . . . . . . . . . . . . . . . . . . . . . . . . . . . . 382
Designing Owner-Drawn ListBox Controls . . . . . . . . . . . . . . . . . . . . . . . . . . . . . . 383The Bottom Line . . . . . . . . . . . . . . . . . . . . . . . . . . . . . . . . . . . . . . . . . . . . . . . . . . . . . 385

CONTENTS xvii
Chapter 10 • Applied Object-Oriented Programming . . . . . . . . . . . . . . . . 387
Issues in Object-Oriented Programming . . . . . . . . . . . . . . . . . . . . . . . . . . . . . . . . . . . 387Classes versus Objects . . . . . . . . . . . . . . . . . . . . . . . . . . . . . . . . . . . . . . . . . . . . . . 387Objects versus Object Variables . . . . . . . . . . . . . . . . . . . . . . . . . . . . . . . . . . . . . . . 388Properties versus Fields . . . . . . . . . . . . . . . . . . . . . . . . . . . . . . . . . . . . . . . . . . . . . 395Shared versus Instance Members . . . . . . . . . . . . . . . . . . . . . . . . . . . . . . . . . . . . . . 395Type Casting . . . . . . . . . . . . . . . . . . . . . . . . . . . . . . . . . . . . . . . . . . . . . . . . . . . . . . 397Early versus Late Binding . . . . . . . . . . . . . . . . . . . . . . . . . . . . . . . . . . . . . . . . . . . . 398Discovering a Variable’s Type . . . . . . . . . . . . . . . . . . . . . . . . . . . . . . . . . . . . . . . . 399
Inheritance . . . . . . . . . . . . . . . . . . . . . . . . . . . . . . . . . . . . . . . . . . . . . . . . . . . . . . . . . . 400How to Apply Inheritance . . . . . . . . . . . . . . . . . . . . . . . . . . . . . . . . . . . . . . . . . . . 401Designing with Inheritance . . . . . . . . . . . . . . . . . . . . . . . . . . . . . . . . . . . . . . . . . . 402
Extension Methods . . . . . . . . . . . . . . . . . . . . . . . . . . . . . . . . . . . . . . . . . . . . . . . . . . . 407Polymorphism . . . . . . . . . . . . . . . . . . . . . . . . . . . . . . . . . . . . . . . . . . . . . . . . . . . . . . . 411
Building the Shape Class . . . . . . . . . . . . . . . . . . . . . . . . . . . . . . . . . . . . . . . . . . . . 413Who Can Inherit What? . . . . . . . . . . . . . . . . . . . . . . . . . . . . . . . . . . . . . . . . . . . . . . . . 418
Parent Class Keywords . . . . . . . . . . . . . . . . . . . . . . . . . . . . . . . . . . . . . . . . . . . . . . 418Derived Class Keywords . . . . . . . . . . . . . . . . . . . . . . . . . . . . . . . . . . . . . . . . . . . . 419Parent Class Member Keywords . . . . . . . . . . . . . . . . . . . . . . . . . . . . . . . . . . . . . . 419Derived Class Member Keyword . . . . . . . . . . . . . . . . . . . . . . . . . . . . . . . . . . . . . . 420VB 2010 At Work: The InheritanceKeywords Project . . . . . . . . . . . . . . . . . . . . . . . 420MyBase and MyClass . . . . . . . . . . . . . . . . . . . . . . . . . . . . . . . . . . . . . . . . . . . . . . . . 422Putting Inheritance to Work . . . . . . . . . . . . . . . . . . . . . . . . . . . . . . . . . . . . . . . . . . 423The Class Diagram Designer . . . . . . . . . . . . . . . . . . . . . . . . . . . . . . . . . . . . . . . . . 429
The Bottom Line . . . . . . . . . . . . . . . . . . . . . . . . . . . . . . . . . . . . . . . . . . . . . . . . . . . . . 430
Part 4 • Working with the .NET Framework . . . . . . . . . . . . . . . . . . . . . . . . . . . . . 431
Chapter 11 • The Framework at Large . . . . . . . . . . . . . . . . . . . . . . . . . . . 433
What Is the Framework? . . . . . . . . . . . . . . . . . . . . . . . . . . . . . . . . . . . . . . . . . . . . . . . 433Using Snippets . . . . . . . . . . . . . . . . . . . . . . . . . . . . . . . . . . . . . . . . . . . . . . . . . . . . . . . 434Using the My Component . . . . . . . . . . . . . . . . . . . . . . . . . . . . . . . . . . . . . . . . . . . . . . . 436
How to Use the My Component . . . . . . . . . . . . . . . . . . . . . . . . . . . . . . . . . . . . . . . 439The IO Namespace . . . . . . . . . . . . . . . . . . . . . . . . . . . . . . . . . . . . . . . . . . . . . . . . . . . . 440
The Directory Class . . . . . . . . . . . . . . . . . . . . . . . . . . . . . . . . . . . . . . . . . . . . . . . . . 441The File Class . . . . . . . . . . . . . . . . . . . . . . . . . . . . . . . . . . . . . . . . . . . . . . . . . . . . . 442The DriveInfo Class . . . . . . . . . . . . . . . . . . . . . . . . . . . . . . . . . . . . . . . . . . . . . . . . 442The DirectoryInfo Class . . . . . . . . . . . . . . . . . . . . . . . . . . . . . . . . . . . . . . . . . . . . . 443The Path Class . . . . . . . . . . . . . . . . . . . . . . . . . . . . . . . . . . . . . . . . . . . . . . . . . . . . 444Streaming Data . . . . . . . . . . . . . . . . . . . . . . . . . . . . . . . . . . . . . . . . . . . . . . . . . . . . 445
Drawing and Painting . . . . . . . . . . . . . . . . . . . . . . . . . . . . . . . . . . . . . . . . . . . . . . . . . 446Drawing Methods . . . . . . . . . . . . . . . . . . . . . . . . . . . . . . . . . . . . . . . . . . . . . . . . . . 449Gradients . . . . . . . . . . . . . . . . . . . . . . . . . . . . . . . . . . . . . . . . . . . . . . . . . . . . . . . . 453
The Image Class . . . . . . . . . . . . . . . . . . . . . . . . . . . . . . . . . . . . . . . . . . . . . . . . . . . . . . 454

xviii CONTENTS
Printing . . . . . . . . . . . . . . . . . . . . . . . . . . . . . . . . . . . . . . . . . . . . . . . . . . . . . . . . . . . . 455The PrintDocument Control . . . . . . . . . . . . . . . . . . . . . . . . . . . . . . . . . . . . . . . . . . 455The PrintDialog Control . . . . . . . . . . . . . . . . . . . . . . . . . . . . . . . . . . . . . . . . . . . . . 457The PageSetupDialog Control . . . . . . . . . . . . . . . . . . . . . . . . . . . . . . . . . . . . . . . . 457The PrintPreviewDialog Control . . . . . . . . . . . . . . . . . . . . . . . . . . . . . . . . . . . . . . 458Page Geometry . . . . . . . . . . . . . . . . . . . . . . . . . . . . . . . . . . . . . . . . . . . . . . . . . . . . 458Basic Printing Methods . . . . . . . . . . . . . . . . . . . . . . . . . . . . . . . . . . . . . . . . . . . . . . 459VB 2010 at Work: Generating a Simple Printout . . . . . . . . . . . . . . . . . . . . . . . . . . . 460
Handling Strings and Characters . . . . . . . . . . . . . . . . . . . . . . . . . . . . . . . . . . . . . . . . 463The Char Class . . . . . . . . . . . . . . . . . . . . . . . . . . . . . . . . . . . . . . . . . . . . . . . . . . . . 463The String Class . . . . . . . . . . . . . . . . . . . . . . . . . . . . . . . . . . . . . . . . . . . . . . . . . . . 466The StringBuilder Class . . . . . . . . . . . . . . . . . . . . . . . . . . . . . . . . . . . . . . . . . . . . . 472
Handling Dates and Time . . . . . . . . . . . . . . . . . . . . . . . . . . . . . . . . . . . . . . . . . . . . . . 476The DateTime Class . . . . . . . . . . . . . . . . . . . . . . . . . . . . . . . . . . . . . . . . . . . . . . . . 476The TimeSpan Class . . . . . . . . . . . . . . . . . . . . . . . . . . . . . . . . . . . . . . . . . . . . . . . . 485The StopWatch Class . . . . . . . . . . . . . . . . . . . . . . . . . . . . . . . . . . . . . . . . . . . . . . . 489
The Bottom Line . . . . . . . . . . . . . . . . . . . . . . . . . . . . . . . . . . . . . . . . . . . . . . . . . . . . . 490
Chapter 12 • Storing Data in Collections . . . . . . . . . . . . . . . . . . . . . . . . . 493
Advanced Array Topics . . . . . . . . . . . . . . . . . . . . . . . . . . . . . . . . . . . . . . . . . . . . . . . . 493Sorting Arrays . . . . . . . . . . . . . . . . . . . . . . . . . . . . . . . . . . . . . . . . . . . . . . . . . . . . . 494Searching Arrays . . . . . . . . . . . . . . . . . . . . . . . . . . . . . . . . . . . . . . . . . . . . . . . . . . 495Performing Other Array Operations . . . . . . . . . . . . . . . . . . . . . . . . . . . . . . . . . . . 498
Collection Types . . . . . . . . . . . . . . . . . . . . . . . . . . . . . . . . . . . . . . . . . . . . . . . . . . . . . 500Creating Collections . . . . . . . . . . . . . . . . . . . . . . . . . . . . . . . . . . . . . . . . . . . . . . . . 501Sorting Lists . . . . . . . . . . . . . . . . . . . . . . . . . . . . . . . . . . . . . . . . . . . . . . . . . . . . . . 507Searching Lists . . . . . . . . . . . . . . . . . . . . . . . . . . . . . . . . . . . . . . . . . . . . . . . . . . . . 508Iterating Through a List . . . . . . . . . . . . . . . . . . . . . . . . . . . . . . . . . . . . . . . . . . . . . 509
The Dictionary Collection . . . . . . . . . . . . . . . . . . . . . . . . . . . . . . . . . . . . . . . . . . . . . . 510The HashTable Collection . . . . . . . . . . . . . . . . . . . . . . . . . . . . . . . . . . . . . . . . . . . . . . 512
VB 2010 at Work: The WordFrequencies Project . . . . . . . . . . . . . . . . . . . . . . . . . . 513The SortedList Collection . . . . . . . . . . . . . . . . . . . . . . . . . . . . . . . . . . . . . . . . . . . . . . 518Other Collections . . . . . . . . . . . . . . . . . . . . . . . . . . . . . . . . . . . . . . . . . . . . . . . . . . . . . 519The IEnumerator and IComparer Interfaces . . . . . . . . . . . . . . . . . . . . . . . . . . . . . . . . 519
Enumerating Collections . . . . . . . . . . . . . . . . . . . . . . . . . . . . . . . . . . . . . . . . . . . . 520Custom Sorting . . . . . . . . . . . . . . . . . . . . . . . . . . . . . . . . . . . . . . . . . . . . . . . . . . . . 522
The Bottom Line . . . . . . . . . . . . . . . . . . . . . . . . . . . . . . . . . . . . . . . . . . . . . . . . . . . . . 528
Chapter 13 • XML in Modern Programming . . . . . . . . . . . . . . . . . . . . . . . 529
A Very Quick Introduction to XML . . . . . . . . . . . . . . . . . . . . . . . . . . . . . . . . . . . . . . . 530XML Schema . . . . . . . . . . . . . . . . . . . . . . . . . . . . . . . . . . . . . . . . . . . . . . . . . . . . . . 534Numbers and Dates in XML . . . . . . . . . . . . . . . . . . . . . . . . . . . . . . . . . . . . . . . . . . 537
Manipulating XML with VB . . . . . . . . . . . . . . . . . . . . . . . . . . . . . . . . . . . . . . . . . . . . 538XML as a Data Type . . . . . . . . . . . . . . . . . . . . . . . . . . . . . . . . . . . . . . . . . . . . . . . . 540Saving and Loading XML Documents . . . . . . . . . . . . . . . . . . . . . . . . . . . . . . . . . . 542

CONTENTS xix
Traversing XML Documents . . . . . . . . . . . . . . . . . . . . . . . . . . . . . . . . . . . . . . . . . . . . 543The Element and Elements Methods . . . . . . . . . . . . . . . . . . . . . . . . . . . . . . . . . . . 543Ancestors and Descendants Methods . . . . . . . . . . . . . . . . . . . . . . . . . . . . . . . . . 543Attribute Property . . . . . . . . . . . . . . . . . . . . . . . . . . . . . . . . . . . . . . . . . . . . . . . . 544VB Axis Properties . . . . . . . . . . . . . . . . . . . . . . . . . . . . . . . . . . . . . . . . . . . . . . . . . 544Editing XML Documents . . . . . . . . . . . . . . . . . . . . . . . . . . . . . . . . . . . . . . . . . . . . 545
VB 2010 at Work: Manipulating XML Data . . . . . . . . . . . . . . . . . . . . . . . . . . . . . . . . . 546Locating Information in the Document . . . . . . . . . . . . . . . . . . . . . . . . . . . . . . . . . 547Editing the Document . . . . . . . . . . . . . . . . . . . . . . . . . . . . . . . . . . . . . . . . . . . . . . . 549Using XML Segments as Literals . . . . . . . . . . . . . . . . . . . . . . . . . . . . . . . . . . . . . . 551Using Lambda Expressions . . . . . . . . . . . . . . . . . . . . . . . . . . . . . . . . . . . . . . . . . . 557
XML Serialization . . . . . . . . . . . . . . . . . . . . . . . . . . . . . . . . . . . . . . . . . . . . . . . . . . . . 559The Serialization Process . . . . . . . . . . . . . . . . . . . . . . . . . . . . . . . . . . . . . . . . . . . . 560Serializing Individual Objects . . . . . . . . . . . . . . . . . . . . . . . . . . . . . . . . . . . . . . . . . 562Serializing Custom Objects . . . . . . . . . . . . . . . . . . . . . . . . . . . . . . . . . . . . . . . . . . . 563Serializing Collections of Objects . . . . . . . . . . . . . . . . . . . . . . . . . . . . . . . . . . . . . . 567
Other Types of Serialization . . . . . . . . . . . . . . . . . . . . . . . . . . . . . . . . . . . . . . . . . . . . 569Deserializing Individual Objects . . . . . . . . . . . . . . . . . . . . . . . . . . . . . . . . . . . . . . 571
The Bottom Line . . . . . . . . . . . . . . . . . . . . . . . . . . . . . . . . . . . . . . . . . . . . . . . . . . . . . 575
Chapter 14 • An Introduction to LINQ . . . . . . . . . . . . . . . . . . . . . . . . . . . 577
What Is LINQ? . . . . . . . . . . . . . . . . . . . . . . . . . . . . . . . . . . . . . . . . . . . . . . . . . . . . . . . 578LINQ Components . . . . . . . . . . . . . . . . . . . . . . . . . . . . . . . . . . . . . . . . . . . . . . . . . 580
LINQ to Objects . . . . . . . . . . . . . . . . . . . . . . . . . . . . . . . . . . . . . . . . . . . . . . . . . . . . . . 581Anonymous Types and Extension Methods . . . . . . . . . . . . . . . . . . . . . . . . . . . . . . 583Querying Arbitrary Collections . . . . . . . . . . . . . . . . . . . . . . . . . . . . . . . . . . . . . . . 584Aggregating with LINQ . . . . . . . . . . . . . . . . . . . . . . . . . . . . . . . . . . . . . . . . . . . . . 587Some Practical LINQ Examples . . . . . . . . . . . . . . . . . . . . . . . . . . . . . . . . . . . . . . . 589Transforming Objects with LINQ . . . . . . . . . . . . . . . . . . . . . . . . . . . . . . . . . . . . . . 593
LINQ to XML . . . . . . . . . . . . . . . . . . . . . . . . . . . . . . . . . . . . . . . . . . . . . . . . . . . . . . . . 597Adding Dynamic Content to an XML Document . . . . . . . . . . . . . . . . . . . . . . . . . . 599
LINQ to SQL . . . . . . . . . . . . . . . . . . . . . . . . . . . . . . . . . . . . . . . . . . . . . . . . . . . . . . . . 609Retrieving Data with the ExecuteQuery Method . . . . . . . . . . . . . . . . . . . . . . . . . . 613Working with LINQ to SQL Classes . . . . . . . . . . . . . . . . . . . . . . . . . . . . . . . . . . . . 615Navigation Methods . . . . . . . . . . . . . . . . . . . . . . . . . . . . . . . . . . . . . . . . . . . . . . . . 620Updates . . . . . . . . . . . . . . . . . . . . . . . . . . . . . . . . . . . . . . . . . . . . . . . . . . . . . . . . . . 624
The Bottom Line . . . . . . . . . . . . . . . . . . . . . . . . . . . . . . . . . . . . . . . . . . . . . . . . . . . . . 628
Part 5 • Developing Data-Driven Applications . . . . . . . . . . . . . . . . . . . . . . . . . . . . 629
Chapter 15 • Programming with ADO.NET . . . . . . . . . . . . . . . . . . . . . . . 631
What Is a Database? . . . . . . . . . . . . . . . . . . . . . . . . . . . . . . . . . . . . . . . . . . . . . . . . . . . 631Using Relational Databases . . . . . . . . . . . . . . . . . . . . . . . . . . . . . . . . . . . . . . . . . . 632Obtaining the Northwind and Pubs Sample Databases . . . . . . . . . . . . . . . . . . . . . 633

xx CONTENTS
Exploring the Northwind Database . . . . . . . . . . . . . . . . . . . . . . . . . . . . . . . . . . . . 635Exploring the Pubs Database . . . . . . . . . . . . . . . . . . . . . . . . . . . . . . . . . . . . . . . . . 638Understanding Relations . . . . . . . . . . . . . . . . . . . . . . . . . . . . . . . . . . . . . . . . . . . . 640
SQL: An Overview . . . . . . . . . . . . . . . . . . . . . . . . . . . . . . . . . . . . . . . . . . . . . . . . . . . 642Executing SQL Statements . . . . . . . . . . . . . . . . . . . . . . . . . . . . . . . . . . . . . . . . . . . 643Selection Queries . . . . . . . . . . . . . . . . . . . . . . . . . . . . . . . . . . . . . . . . . . . . . . . . . . 645Working with Calculated Fields . . . . . . . . . . . . . . . . . . . . . . . . . . . . . . . . . . . . . . . 651Calculating Aggregates . . . . . . . . . . . . . . . . . . . . . . . . . . . . . . . . . . . . . . . . . . . . . . 651Using SQL Joins . . . . . . . . . . . . . . . . . . . . . . . . . . . . . . . . . . . . . . . . . . . . . . . . . . . 653Grouping Rows . . . . . . . . . . . . . . . . . . . . . . . . . . . . . . . . . . . . . . . . . . . . . . . . . . . . 656
Action Queries . . . . . . . . . . . . . . . . . . . . . . . . . . . . . . . . . . . . . . . . . . . . . . . . . . . . . . . 658Deleting Rows . . . . . . . . . . . . . . . . . . . . . . . . . . . . . . . . . . . . . . . . . . . . . . . . . . . . . 659Inserting New Rows . . . . . . . . . . . . . . . . . . . . . . . . . . . . . . . . . . . . . . . . . . . . . . . . 660Editing Existing Rows . . . . . . . . . . . . . . . . . . . . . . . . . . . . . . . . . . . . . . . . . . . . . . . 661
Stream- versus Set-Based Data Access . . . . . . . . . . . . . . . . . . . . . . . . . . . . . . . . . . . . 662The Basic Data-Access Classes . . . . . . . . . . . . . . . . . . . . . . . . . . . . . . . . . . . . . . . . . . . 662
The Connection Class . . . . . . . . . . . . . . . . . . . . . . . . . . . . . . . . . . . . . . . . . . . . . . . 663The Command Class . . . . . . . . . . . . . . . . . . . . . . . . . . . . . . . . . . . . . . . . . . . . . . . . 665The DataReader Class . . . . . . . . . . . . . . . . . . . . . . . . . . . . . . . . . . . . . . . . . . . . . . . 676
The Bottom Line . . . . . . . . . . . . . . . . . . . . . . . . . . . . . . . . . . . . . . . . . . . . . . . . . . . . . 685
Chapter 16 • Developing Data-Driven Applications . . . . . . . . . . . . . . . . . . 687
Using Business Objects . . . . . . . . . . . . . . . . . . . . . . . . . . . . . . . . . . . . . . . . . . . . . . . . 687VB 2010 at Work: The NWOrders Application . . . . . . . . . . . . . . . . . . . . . . . . . . . . 689
Storing Data in DataSets . . . . . . . . . . . . . . . . . . . . . . . . . . . . . . . . . . . . . . . . . . . . . . . 701Filling DataSets . . . . . . . . . . . . . . . . . . . . . . . . . . . . . . . . . . . . . . . . . . . . . . . . . . . . 702Accessing the DataSet’s Tables . . . . . . . . . . . . . . . . . . . . . . . . . . . . . . . . . . . . . . . . 707Working with Rows . . . . . . . . . . . . . . . . . . . . . . . . . . . . . . . . . . . . . . . . . . . . . . . . 708Handling Null Values . . . . . . . . . . . . . . . . . . . . . . . . . . . . . . . . . . . . . . . . . . . . . . . 709Adding and Deleting Rows . . . . . . . . . . . . . . . . . . . . . . . . . . . . . . . . . . . . . . . . . . 710Navigating Through a DataSet . . . . . . . . . . . . . . . . . . . . . . . . . . . . . . . . . . . . . . . . 711
Performing Update Operations . . . . . . . . . . . . . . . . . . . . . . . . . . . . . . . . . . . . . . . . . . 714Updating the Database with the DataAdapter . . . . . . . . . . . . . . . . . . . . . . . . . . . . 715Handling Identity Columns . . . . . . . . . . . . . . . . . . . . . . . . . . . . . . . . . . . . . . . . . . 716
VB 2010 at Work: The SimpleDataSet Project . . . . . . . . . . . . . . . . . . . . . . . . . . . . . . . 717The Bottom Line . . . . . . . . . . . . . . . . . . . . . . . . . . . . . . . . . . . . . . . . . . . . . . . . . . . . . 723
Chapter 17 • Using the Entity Data Model . . . . . . . . . . . . . . . . . . . . . . . . 725
The Entity Framework: Raising the Data Abstraction Bar . . . . . . . . . . . . . . . . . . . . . 725How Will You Benefit from the Entity Framework? . . . . . . . . . . . . . . . . . . . . . . . 726Entity Data Model: Model-First Approach . . . . . . . . . . . . . . . . . . . . . . . . . . . . . . . 732
Putting the EDM to Work . . . . . . . . . . . . . . . . . . . . . . . . . . . . . . . . . . . . . . . . . . . . . . 751Querying the Entity Data Model . . . . . . . . . . . . . . . . . . . . . . . . . . . . . . . . . . . . . . 751Modifying the Data with the Entity Framework . . . . . . . . . . . . . . . . . . . . . . . . . . 763
Reverse-Engineering an Entity Data Model . . . . . . . . . . . . . . . . . . . . . . . . . . . . . . . . 767The Bottom Line . . . . . . . . . . . . . . . . . . . . . . . . . . . . . . . . . . . . . . . . . . . . . . . . . . . . . 767

CONTENTS xxi
Chapter 18 • Building Data-Bound Applications . . . . . . . . . . . . . . . . . . . . 769
Working with Typed DataSets . . . . . . . . . . . . . . . . . . . . . . . . . . . . . . . . . . . . . . . . . . 769Generating a Typed DataSet . . . . . . . . . . . . . . . . . . . . . . . . . . . . . . . . . . . . . . . . . . 770Exploring the Typed DataSet . . . . . . . . . . . . . . . . . . . . . . . . . . . . . . . . . . . . . . . . . 774
Data Binding . . . . . . . . . . . . . . . . . . . . . . . . . . . . . . . . . . . . . . . . . . . . . . . . . . . . . . . . 778Using the BindingSource Class . . . . . . . . . . . . . . . . . . . . . . . . . . . . . . . . . . . . . . . . 781
Designing Data-Driven Interfaces the Easy Way . . . . . . . . . . . . . . . . . . . . . . . . . . . . 786Enhancing the Navigational Tools . . . . . . . . . . . . . . . . . . . . . . . . . . . . . . . . . . . . . 789Binding Hierarchical Tables . . . . . . . . . . . . . . . . . . . . . . . . . . . . . . . . . . . . . . . . . . 791Adjusting the Appearance of the DataGridView Control . . . . . . . . . . . . . . . . . . . 794Editing the Data in Hierarchical Tables . . . . . . . . . . . . . . . . . . . . . . . . . . . . . . . . . 799Building More-Functional Interfaces . . . . . . . . . . . . . . . . . . . . . . . . . . . . . . . . . . . 801Data Binding with LINQ . . . . . . . . . . . . . . . . . . . . . . . . . . . . . . . . . . . . . . . . . . . . 808
The Bottom Line . . . . . . . . . . . . . . . . . . . . . . . . . . . . . . . . . . . . . . . . . . . . . . . . . . . . . 811
Part 6 • Developing for the Web . . . . . . . . . . . . . . . . . . . . . . . . . . . . . . . . . . . . . 813
Chapter 19 • Accessing the Web . . . . . . . . . . . . . . . . . . . . . . . . . . . . . . . 815
The WebBrowser Control . . . . . . . . . . . . . . . . . . . . . . . . . . . . . . . . . . . . . . . . . . . . . . 816WebBrowser Control under the Hood . . . . . . . . . . . . . . . . . . . . . . . . . . . . . . . . . . 816WebBrowser Control Properties . . . . . . . . . . . . . . . . . . . . . . . . . . . . . . . . . . . . . . . 816WebBrowser Control Methods . . . . . . . . . . . . . . . . . . . . . . . . . . . . . . . . . . . . . . . . 821WebBrowser Control Events . . . . . . . . . . . . . . . . . . . . . . . . . . . . . . . . . . . . . . . . . . 822VB 2010 at Work: The Stock Quotes Project . . . . . . . . . . . . . . . . . . . . . . . . . . . . . . 823
Accessing the Web with the WebClient and HttpWebRequest/Response Classes . . . 827The WebClient Class . . . . . . . . . . . . . . . . . . . . . . . . . . . . . . . . . . . . . . . . . . . . . . . . 827WebClient Class Properties . . . . . . . . . . . . . . . . . . . . . . . . . . . . . . . . . . . . . . . . . . 827WebClient Class Methods . . . . . . . . . . . . . . . . . . . . . . . . . . . . . . . . . . . . . . . . . . . . 828WebClient Class Event . . . . . . . . . . . . . . . . . . . . . . . . . . . . . . . . . . . . . . . . . . . . . . 829WebClient Asynchronous Download Example . . . . . . . . . . . . . . . . . . . . . . . . . . . 830HttpWebRequest and HttpWebResponse Classes . . . . . . . . . . . . . . . . . . . . . . . . . 831
Putting It All Together: The Address Visualization Form . . . . . . . . . . . . . . . . . . . . . . 831Composing Web Services . . . . . . . . . . . . . . . . . . . . . . . . . . . . . . . . . . . . . . . . . . . . 832Coding Address Visualization Form . . . . . . . . . . . . . . . . . . . . . . . . . . . . . . . . . . . 834
The Bottom Line . . . . . . . . . . . . . . . . . . . . . . . . . . . . . . . . . . . . . . . . . . . . . . . . . . . . . 842
Chapter 20 • Building Web Applications . . . . . . . . . . . . . . . . . . . . . . . . . 845
Developing for the Web . . . . . . . . . . . . . . . . . . . . . . . . . . . . . . . . . . . . . . . . . . . . . . . . 845Understanding HTML and XHTML . . . . . . . . . . . . . . . . . . . . . . . . . . . . . . . . . . . . . . 846Working with HTML . . . . . . . . . . . . . . . . . . . . . . . . . . . . . . . . . . . . . . . . . . . . . . . . . . 848
Page Construction . . . . . . . . . . . . . . . . . . . . . . . . . . . . . . . . . . . . . . . . . . . . . . . . . . 848Text Management . . . . . . . . . . . . . . . . . . . . . . . . . . . . . . . . . . . . . . . . . . . . . . . . . . 849Horizontal Rules . . . . . . . . . . . . . . . . . . . . . . . . . . . . . . . . . . . . . . . . . . . . . . . . . . . 850Images . . . . . . . . . . . . . . . . . . . . . . . . . . . . . . . . . . . . . . . . . . . . . . . . . . . . . . . . . . . 850Links . . . . . . . . . . . . . . . . . . . . . . . . . . . . . . . . . . . . . . . . . . . . . . . . . . . . . . . . . . . . 850

xxii CONTENTS
Embedding Media . . . . . . . . . . . . . . . . . . . . . . . . . . . . . . . . . . . . . . . . . . . . . . . . . 851Comments . . . . . . . . . . . . . . . . . . . . . . . . . . . . . . . . . . . . . . . . . . . . . . . . . . . . . . . . 851Scripts . . . . . . . . . . . . . . . . . . . . . . . . . . . . . . . . . . . . . . . . . . . . . . . . . . . . . . . . . . . 851Lists . . . . . . . . . . . . . . . . . . . . . . . . . . . . . . . . . . . . . . . . . . . . . . . . . . . . . . . . . . . . . 851Tables . . . . . . . . . . . . . . . . . . . . . . . . . . . . . . . . . . . . . . . . . . . . . . . . . . . . . . . . . . . 852Page Formatting . . . . . . . . . . . . . . . . . . . . . . . . . . . . . . . . . . . . . . . . . . . . . . . . . . . 853Forms and Form Elements . . . . . . . . . . . . . . . . . . . . . . . . . . . . . . . . . . . . . . . . . . . 854
Cascading Style Sheets (CSS) . . . . . . . . . . . . . . . . . . . . . . . . . . . . . . . . . . . . . . . . . . . . 856Formatting Styles with CSS . . . . . . . . . . . . . . . . . . . . . . . . . . . . . . . . . . . . . . . . . . 857Page Formatting with CSS . . . . . . . . . . . . . . . . . . . . . . . . . . . . . . . . . . . . . . . . . . . 858
JavaScript . . . . . . . . . . . . . . . . . . . . . . . . . . . . . . . . . . . . . . . . . . . . . . . . . . . . . . . . . . . 861AJAX . . . . . . . . . . . . . . . . . . . . . . . . . . . . . . . . . . . . . . . . . . . . . . . . . . . . . . . . . . . . 863
Microformats . . . . . . . . . . . . . . . . . . . . . . . . . . . . . . . . . . . . . . . . . . . . . . . . . . . . . . . . 863Server-Side Technologies . . . . . . . . . . . . . . . . . . . . . . . . . . . . . . . . . . . . . . . . . . . . . . . 863Creating a Web Application . . . . . . . . . . . . . . . . . . . . . . . . . . . . . . . . . . . . . . . . . . . . 864Controls . . . . . . . . . . . . . . . . . . . . . . . . . . . . . . . . . . . . . . . . . . . . . . . . . . . . . . . . . . . . 867
Standard Controls . . . . . . . . . . . . . . . . . . . . . . . . . . . . . . . . . . . . . . . . . . . . . . . . . . 867Data Controls . . . . . . . . . . . . . . . . . . . . . . . . . . . . . . . . . . . . . . . . . . . . . . . . . . . . . 868Validation Controls . . . . . . . . . . . . . . . . . . . . . . . . . . . . . . . . . . . . . . . . . . . . . . . . . 868Navigation Controls . . . . . . . . . . . . . . . . . . . . . . . . . . . . . . . . . . . . . . . . . . . . . . . . 868Login Controls . . . . . . . . . . . . . . . . . . . . . . . . . . . . . . . . . . . . . . . . . . . . . . . . . . . . 870WebParts Controls . . . . . . . . . . . . . . . . . . . . . . . . . . . . . . . . . . . . . . . . . . . . . . . . . 870AJAX Extensions Controls . . . . . . . . . . . . . . . . . . . . . . . . . . . . . . . . . . . . . . . . . . . 870Reporting Controls . . . . . . . . . . . . . . . . . . . . . . . . . . . . . . . . . . . . . . . . . . . . . . . . . 871HTML Controls . . . . . . . . . . . . . . . . . . . . . . . . . . . . . . . . . . . . . . . . . . . . . . . . . . . . 871
Maintaining State . . . . . . . . . . . . . . . . . . . . . . . . . . . . . . . . . . . . . . . . . . . . . . . . . . . . . 871Master Pages . . . . . . . . . . . . . . . . . . . . . . . . . . . . . . . . . . . . . . . . . . . . . . . . . . . . . . . . 874ASP.NET Objects . . . . . . . . . . . . . . . . . . . . . . . . . . . . . . . . . . . . . . . . . . . . . . . . . . . . . 875Postback . . . . . . . . . . . . . . . . . . . . . . . . . . . . . . . . . . . . . . . . . . . . . . . . . . . . . . . . . . . . 879VB 2010 at Work: Online Ordering Application . . . . . . . . . . . . . . . . . . . . . . . . . . . . . 879
Creating the Project . . . . . . . . . . . . . . . . . . . . . . . . . . . . . . . . . . . . . . . . . . . . . . . . 880Creating the Products Web Form . . . . . . . . . . . . . . . . . . . . . . . . . . . . . . . . . . . . . . 880Creating the Quantity Web Form . . . . . . . . . . . . . . . . . . . . . . . . . . . . . . . . . . . . . . 883
The Bottom Line . . . . . . . . . . . . . . . . . . . . . . . . . . . . . . . . . . . . . . . . . . . . . . . . . . . . . 891
Chapter 21 • Building and Using Web Services . . . . . . . . . . . . . . . . . . . . . 893
Using ASP.NET and WCF Web Services . . . . . . . . . . . . . . . . . . . . . . . . . . . . . . . . . . . 893What Is a Service? . . . . . . . . . . . . . . . . . . . . . . . . . . . . . . . . . . . . . . . . . . . . . . . . . . 894Consuming Web Services . . . . . . . . . . . . . . . . . . . . . . . . . . . . . . . . . . . . . . . . . . . . 894ASP.NET Web Services . . . . . . . . . . . . . . . . . . . . . . . . . . . . . . . . . . . . . . . . . . . . . . 898WCF . . . . . . . . . . . . . . . . . . . . . . . . . . . . . . . . . . . . . . . . . . . . . . . . . . . . . . . . . . . . 899
Understanding Technologies Associated with Web Services . . . . . . . . . . . . . . . . . . . 899SOAP . . . . . . . . . . . . . . . . . . . . . . . . . . . . . . . . . . . . . . . . . . . . . . . . . . . . . . . . . . . 899WSDL . . . . . . . . . . . . . . . . . . . . . . . . . . . . . . . . . . . . . . . . . . . . . . . . . . . . . . . . . . . 900SOAP Discovery . . . . . . . . . . . . . . . . . . . . . . . . . . . . . . . . . . . . . . . . . . . . . . . . . . . 900UDDI . . . . . . . . . . . . . . . . . . . . . . . . . . . . . . . . . . . . . . . . . . . . . . . . . . . . . . . . . . . . 900

CONTENTS xxiii
Creating a Simple ASP.NET Web Service . . . . . . . . . . . . . . . . . . . . . . . . . . . . . . . . . . 900Setting Up the Web Service . . . . . . . . . . . . . . . . . . . . . . . . . . . . . . . . . . . . . . . . . . 901Testing the Web Service . . . . . . . . . . . . . . . . . . . . . . . . . . . . . . . . . . . . . . . . . . . . . 901Consuming the Web Service . . . . . . . . . . . . . . . . . . . . . . . . . . . . . . . . . . . . . . . . . . 902
Developing a Stand-Alone Web Service . . . . . . . . . . . . . . . . . . . . . . . . . . . . . . . . . . . 903Building MyWebService . . . . . . . . . . . . . . . . . . . . . . . . . . . . . . . . . . . . . . . . . . . . . 904Deploying MyWebService . . . . . . . . . . . . . . . . . . . . . . . . . . . . . . . . . . . . . . . . . . . 905Consuming MyWebService . . . . . . . . . . . . . . . . . . . . . . . . . . . . . . . . . . . . . . . . . . 906
Simple AJAX Implementation . . . . . . . . . . . . . . . . . . . . . . . . . . . . . . . . . . . . . . . . . . . 910Building and Using WCF Services . . . . . . . . . . . . . . . . . . . . . . . . . . . . . . . . . . . . . . . . 912
Building a WCF Service . . . . . . . . . . . . . . . . . . . . . . . . . . . . . . . . . . . . . . . . . . . . . 912ADO.NET Data Services . . . . . . . . . . . . . . . . . . . . . . . . . . . . . . . . . . . . . . . . . . . . . . . 920
Building a Windows Client . . . . . . . . . . . . . . . . . . . . . . . . . . . . . . . . . . . . . . . . . . 928Submitting Updates . . . . . . . . . . . . . . . . . . . . . . . . . . . . . . . . . . . . . . . . . . . . . . . . 932Performing Transactions . . . . . . . . . . . . . . . . . . . . . . . . . . . . . . . . . . . . . . . . . . . . . 934Securing Your Data Service . . . . . . . . . . . . . . . . . . . . . . . . . . . . . . . . . . . . . . . . . . 937
The Bottom Line . . . . . . . . . . . . . . . . . . . . . . . . . . . . . . . . . . . . . . . . . . . . . . . . . . . . . 939
Appendix • The Bottom Line . . . . . . . . . . . . . . . . . . . . . . . . . . . . . . . . . . . . . . . . 941
Chapter 1: Getting Started with Visual Basic 2010 . . . . . . . . . . . . . . . . . . . . . . . . . . . 941Chapter 2: Handling Data . . . . . . . . . . . . . . . . . . . . . . . . . . . . . . . . . . . . . . . . . . . . . . 942Chapter 3: Visual Basic Programming Essentials . . . . . . . . . . . . . . . . . . . . . . . . . . . . 944Chapter 4: GUI Design and Event-Driven Programming . . . . . . . . . . . . . . . . . . . . . . 945Chapter 5: Basic Windows Controls . . . . . . . . . . . . . . . . . . . . . . . . . . . . . . . . . . . . . . 946Chapter 6: Working with Forms . . . . . . . . . . . . . . . . . . . . . . . . . . . . . . . . . . . . . . . . . 948Chapter 7: More Windows Controls . . . . . . . . . . . . . . . . . . . . . . . . . . . . . . . . . . . . . . 950Chapter 8: Working with Projects . . . . . . . . . . . . . . . . . . . . . . . . . . . . . . . . . . . . . . . . 953Chapter 9: Building Custom Windows Controls . . . . . . . . . . . . . . . . . . . . . . . . . . . . . 956Chapter 10: Applied Object-Oriented Programming . . . . . . . . . . . . . . . . . . . . . . . . . 959Chapter 11: The Framework at Large . . . . . . . . . . . . . . . . . . . . . . . . . . . . . . . . . . . . . 959Chapter 12: Storing Data in Collections . . . . . . . . . . . . . . . . . . . . . . . . . . . . . . . . . . . . 964Chapter 13: XML in Modern Programming . . . . . . . . . . . . . . . . . . . . . . . . . . . . . . . . 967Chapter 14: An Introduction to LINQ . . . . . . . . . . . . . . . . . . . . . . . . . . . . . . . . . . . . . 970Chapter 15: Programming with ADO.NET . . . . . . . . . . . . . . . . . . . . . . . . . . . . . . . . . 972Chapter 16: Developing Data-Driven Applications . . . . . . . . . . . . . . . . . . . . . . . . . . . 974Chapter 17: Using the Entity Data Model . . . . . . . . . . . . . . . . . . . . . . . . . . . . . . . . . . 975Chapter 18: Building Data-Bound Applications . . . . . . . . . . . . . . . . . . . . . . . . . . . . . 976Chapter 19: Accessing the Web . . . . . . . . . . . . . . . . . . . . . . . . . . . . . . . . . . . . . . . . . . 978Chapter 20: Building Web Applications . . . . . . . . . . . . . . . . . . . . . . . . . . . . . . . . . . . 981Chapter 21: Building and Using Web Services . . . . . . . . . . . . . . . . . . . . . . . . . . . . . . 984
Index . . . . . . . . . . . . . . . . . . . . . . . . . . . . . . . . . . . . . . . . . . . . . . . . . . . . . . . . . . . . . . . . . . . . . . 987


Introduction
Welcome to Microsoft’s Visual Basic 2010, another milestone version of the most popularprogramming language for building Windows and web applications. In modern software devel-opment, however, the language is only one of the components we use to build applications.The most important component is the .NET Framework, which is an indispensable componentof every application; it’s actually more important than the language itself. You can think ofthe Framework as an enormous collection of functions for just about any programming task.All drawing methods, for example, are part of the System.Drawing class. To draw a rectangle,you call the DrawRectangle method of the System.Drawing class, passing the appropriatearguments. To create a new folder, you call the CreateDirectory method of the Directoryclass, and to retrieve the files in a folder, you call the GetFiles method of the same class.
The Framework contains all the functionality of the operating system and makes it availableto your application through methods. Methods are very similar to functions, which extend thebasic capabilities of a language. The Framework is a huge collection of such methods, organizedin units according to their role and in a way that makes it fairly easy to locate the methods forthe task at hand. The language and the Framework are the two ‘‘programming’’ componentsabsolutely necessary to build Windows applications. It’s possible to develop applications withthese two components alone, but the process would be awfully slow.
The software development process relies on numerous tools that streamline the coding expe-rience. The third component is an integrated environment that hosts those tools, enabling youto perform many common tasks with point-and-click operations. It’s basically an environmentin which you can design your forms with visual tools and write code as well. This environ-ment, provided by Visual Studio, is known as an integrated development environment, or IDE.You’ll be amazed by the functionality provided by the tools of Visual Studio: you can actu-ally design a functional data-driven application without writing a single line of code. You canuse similar tools in the same environment to design a fancy data-driven web page without asingle line of code. Visual Studio even provides tools for manipulating databases and allowsyou to switch between tasks, all in the same, streamlined environment. You realize, of course,that Visual Studio isn’t about writing applications without code; it just simplifies certain tasksthrough wizards, and more often than not, we step in and provide custom code to write afunctional application. Even so, Visual Studio provides numerous tools, from debugging toolsthat help you track and fix all kinds of bugs in your code to database-manipulation tools anddeployment wizards that streamline the process of deploying applications.
This book shows you how to use Visual Studio 2010 and Visual Basic 2010 to designrich Windows and web applications. We’ll start with the visual tools and then we’ll exploreVisual Basic and the Framework. A Windows application consists of a visual interface andcode behind the elements of the interface. (The code handles the user actions on the visualinterface, such as the click of a button, the selection of a menu item, and so on.) You’ll use the

xxvi INTRODUCTION
tools of Visual Studio to build the visual interface, and then you’ll program the elements ofthe application with Visual Basic. For any nontrivial processing, such as file and folder manip-ulation, data storage, and so on, you’ll use the appropriate classes of the .NET Framework. Asubstantial segment of this book deals with the most useful components of the Framework. Wewill also explore databases and data-driven applications, which are the most common type ofbusiness applications. Finally, we’ll go through the basics of web programming. You’ll learnhow to build web applications with Visual Basic and how to write web services.
The Mastering SeriesThe Mastering series from Sybex provides outstanding instruction for readers with intermedi-ate and advanced skills in the form of top-notch training and development for those alreadyworking in their field and clear, serious education for those aspiring to become pros. EveryMastering book includes the following:
◆ Real-World Scenarios, ranging from case studies to interviews, that show how the tool,technique, or knowledge presented is applied in actual practice
◆ Skill-based instruction, with chapters organized around real tasks rather than abstractconcepts or subjects
◆ Self-review test questions, so you can be certain you’re equipped to do the job right
Who Should Read This Book?You don’t need a solid knowledge of Visual Basic to read this book, but you do need a basicunderstanding of programming. You need to know the meaning of variables and functions andhow an If…Then structure works. This book is aimed at the typical programmer who wants toget the most out of Visual Basic. It covers the topics I felt are of use to most VB programmers,and it does so in depth. Visual Basic 2010 and the .NET Framework 4.0 are two extremely richprogramming tools, and I had to choose between a superficial coverage of many topics and anin-depth coverage of fewer topics. To make room for more topics, I have avoided includinga lot of reference material and lengthy listings. For example, you won’t find complete projectlistings or form descriptions. I assume that you can draw a few controls on a form and set theirproperties and that you don’t need long descriptions of the control properties (even if you don’tknow how to design a form, you’ll learn how in the first two chapters). I’m also assuming thatyou don’t want to read the trivial segments of each application. Instead, the listings concentrateon the ‘‘meaty’’ part of the code: the procedures that explain the topic at hand.
The topics covered in this book were chosen to provide a solid understanding of the prin-ciples and techniques for developing applications with Visual Basic. Programming isn’t aboutnew keywords and functions. I chose the topics I felt every programmer should learn in orderto master the language. I was also motivated by my desire to present useful, practical examples.You will not find all topics equally interesting or important. My hope is that everyone will findsomething interesting and something of value for their daily work — whether it’s an applica-tion that maps the folders and files of a drive to a TreeView control, an application that printstabular data, a data-driven application for editing customers or products, or an application thatsaves a collection of objects to a file.
Many books offer their readers long, numbered sequences of steps to accomplish a task. Fol-lowing instructions simplifies certain tasks, but programming isn’t about following instructions.

INTRODUCTION xxvii
It’s about being creative; it’s about understanding principles and being able to apply the sametechniques in several practical situations. And the way to creatively exploit the power of a lan-guage such as Visual Basic 2010 is to understand its principles and its programming model.
In many cases, I provide a detailed, step-by-step procedure that will help you accomplisha task, such as designing a menu, for example. But not all tasks are as simple as designingmenus. I explain why things must be done in a certain way, and I present alternatives and tryto connect new topics to those explained earlier in the book. In several chapters, I expand onapplications developed in earlier chapters. Associating new knowledge with something youhave mastered already provides positive feedback and a deeper understanding of the language.
This book isn’t about the hottest features of the language either; it’s about solid program-ming techniques and practical examples. After you master the basics of programming Windowsapplications with Visual Basic 2010 and you feel comfortable with the more advanced examplesof the book, you will find it easy to catch up with the topics not discussed in this book.
How about the Advanced Topics?Some of the topics discussed in this book are nontrivial, and quite a few topics can be consid-ered advanced. Creating collections of custom objects and querying them and exposing somefunctionality in the form of web services are not trivial topics, but these are the tools that willallow you to make the most of Visual Studio.
You may also find some examples to be more difficult than you expected. I have tried tomake the text and the examples easy to read and understand, but not unrealistically simple.Understanding the basic functions for manipulating files and folders isn’t difficult. To make themost of these functions, however, you need to understand how to scan a folder’s files, includ-ing the files in its subfolders and the files in their subfolders, with a technique known as recur-sion. To make each chapter as useful as possible, I’ve included nontrivial examples, which willprovide a better understanding of the topics. In addition, many of these examples can be easilyincorporated into your applications.
You can do a lot with the TreeView control with very little programming, but to make themost out of this control, you must be ready for some advanced programming — nothing terri-bly complicated, but some things just aren’t trivial. Programming most of the operations of theTreeView control, for instance, is not complicated, but if your application calls for populatinga TreeView control with an arbitrary number of branches (such as mapping a directorystructure to a TreeView control), the code can get complex. The same goes for printing; it’sfairly straightforward to write a program that prints some text, but printing tabular reportstakes substantial coding effort.
The reason I’ve included the more advanced examples is that the corresponding chapterswould be incomplete without them. If you find some material to be over your head at firstreading, you can skip it and come back to it after you have mastered other aspects of the lan-guage. But don’t let a few advanced examples intimidate you. Most of the techniques are wellwithin the reach of an average VB programmer. The few advanced topics were included for thereaders who are willing to take that extra step and build elaborate interfaces by using the latesttools and techniques.
There’s another good reason for including advanced topics. Explaining a simple topic, suchas how to populate a collection with items, is very simple. But what good is it to populate acollection if you don’t know how to save it to disk and read back its items in a later session?Likewise, what good is it to learn how to print simple text files? In a business environment,you will most likely be asked to print a tabular report, which is substantially more complicated

xxviii INTRODUCTION
than printing text. One of my goals in writing this book was to exhaust the topics I’ve chosento discuss and present all the information you need to do something practical: not just how tocreate collections, but also how to save them in disk files; not just how to write to a file, butalso how to prompt users for a filename with the same dialog box all Windows applicationsuse; not just how to print something, but also how to create a preview of the printout. In short,I’ve tried to include everything you need to know in order to incorporate in your applicationsthe features everybody has come to expect from a Windows application.
The Structure of the BookThis book isn’t meant to be read from cover to cover, and I know that most people don’t readcomputer books this way. Each chapter is independent of the others, although all chapters con-tain references to other chapters. Each topic is covered in depth; however, I make no assump-tions about the reader’s knowledge of the topic. As a result, you may find the introductorysections of a chapter too simple. The topics become progressively more advanced, and evenexperienced programmers will find some new information in most chapters. Even if you arefamiliar with the topics in a chapter, take a look at the examples. I have tried to simplify manyof the advanced topics and to demonstrate them with clear, practical examples.
This book tries to teach through examples. Isolated topics are demonstrated with shortexamples, and at the end of many chapters you’ll build a large, practical application (a real-world application) that ‘‘puts together’’ the topics and techniques discussed throughout thechapter. You may find some of the more advanced applications a bit more difficult to under-stand, but you shouldn’t give up. Simpler applications would have made my job easier, but thebook wouldn’t deserve the Mastering title, and your knowledge of Visual Basic wouldn’t be ascomplete.
The book starts with the fundamentals of Visual Basic, even though very little of it is specificto version 2010. You’ll learn how to design visual interfaces with point-and-click operations andhow to program a few simple events, such as the click of the mouse on a button. After readingthe first two chapters, you’ll understand the structure of a Windows application. Then you’llexplore the elements of the visual interface (the basic Windows controls) and how to programthem. You’ll also learn about the My object and code snippets, two features that make VisualBasic so simple and fun to use (again). These two objects will also ease the learning processand make it much simpler to learn the features of the language.
In Part 2, I discuss in detail the basic components of Windows applications. I explain themost common controls you’ll use in building Windows forms as well as how to work withforms: how to design forms, how to design menus for your forms, how to create applicationswith multiple forms, and so on. You will find detailed discussions of many Windows controlsas well as how to take advantage of the built-in dialog boxes, such as the Font and Color dialogboxes, in your applications.
Visual Basic 2010 is a truly object-oriented language, and objects are the recurring theme inevery chapter. Part 3 of the book (Chapter 8, Chapter 9, and Chapter 10) contains a formal andmore systematic treatment of objects. You will learn how to build custom classes and controls,which will help you understand object-oriented programming a little better. You will also learnabout inheritance and will see how easy it is to add custom functionality to existing classesthrough inheritance.
Part 4 deals with some of the most common classes of the .NET Framework. The Frame-work is at the very heart of Windows programming; it’s your gateway to the functionality ofthe operating system itself. The first chapter in this part of the book is an introduction to the

INTRODUCTION xxix
Framework at large, and it shows you how to use the basic classes for manipulating files andfolders, how to manipulate data and time, how to work with time spans, how to create graph-ics and printouts, and other interesting aspects of the Framework. In the next chapter you’lllearn how to use collections in your code and then you’ll find a chapter on XML and a chapteron LINQ. You will see how easy it is to create and use XML in your VB code as well as howto query collections, XML, and databases with a new language that’s embedded into VB: Lan-guage Integrated Query (LINQ). LINQ is the hottest new technology that allows you to querydata with widely different structures, and data from different sources, in a uniform way.
The first 14 chapters deal with the fundamentals of the language and Windows applications.Following these chapters, you will find an overview of the data-access tools. I’m assuming thatthe majority of you will eventually build a data-driven application. The emphasis in Part 5 ison the visual tools, and you will learn how to query databases and present data to the user.You will also find information on programming the basic objects of ADO.NET and write simpledata-driven Windows applications.
In the last few chapters of this book you will learn about web applications, the basics ofASP.NET 4, how to develop data-bound web applications, and how to write web services. SinceI could not discuss both Windows and web applications in the same detail, I’ve decided tofocus on Windows applications, and in the last few chapters (Part 6) show you how to applyyour knowledge to the Web. While the interface is totally different, the essential code is thesame.
Don’t Miss the TutorialsIn addition to the printed material, this book is accompanied by a number of tutorials, whichyou can download from www.sybex.com/go/masteringvb2010. These tutorials are actual chap-ters (some of them quite lengthy); we couldn’t include them in the printed version of the book,so we included them as PDF files. They are as follows:
◆ Accessing Files and Folders
◆ Creating Graphics with VB 2010
◆ Printing with VB 2010
◆ Making the Most of the ListView and TreeView Controls
This book is a revision of Mastering Visual Basic 2008. As the book couldn’t keep growing —and we had to make room for new topics — we decided to remove some chapters that wereincluded in the previous edition of the book from the printed version. These chapters have beenrevised and edited and you will find them in PDF format at this book’s website. Throughoutthis book, I’ll be referring to them as tutorials; they’re complete chapters with sample projectsand the same structure as the book’s chapters. You can download the tutorials from the samesite as the book’s projects and read them on your computer screen.
Downloading This Book’s CodeThe code for the examples and projects can be downloaded from the Sybex website (www.sybex.com). At the main page, you can find the book’s page by searching for the author,the title, or the ISBN (9780470187425) and then clicking the book’s link listed in the searchresults. On the book’s page, click the Download link and it will take you to the download

xxx INTRODUCTION
page. Or, you can go directly to the book’s page at www.sybex.com/go/masteringvb2010. Thedownloaded source code is a ZIP file, which you can unzip with the WinZip utility.
How to Reach the Author
Despite our best efforts, a book of this size is bound to contain errors. Although a printedmedium isn’t as easy to update as a website, I will spare no effort to fix every problemyou report (or I discover). The revised applications, along with any other material I thinkwill be of use to the readers of this book, will be posted on the Sybex website. If you haveany problems with the text or the applications in this book, you can contact me directly [email protected].
Although I can’t promise a response to every question, I will fix any problems in the examplesand provide updated versions. I would also like to hear any comments you may have onthe book, about the topics you liked or did not like and how useful the examples are. Yourcomments will be carefully considered for future editions.

MasteringMicrosoft® Visual Basic® 2010


Part 1
Visual Basic:The Language◆ Chapter 1: Getting Started with Visual Basic 2010
◆ Chapter 2: Handling Data
◆ Chapter 3: Visual Basic Programming Essentials


Chapter 1
Getting Started withVisual Basic 2010
I’m assuming that you have installed one of the several versions of Visual Studio 2010. For thisbook, I used the Professional edition of Visual Studio, but just about everything discussed inthis book applies to the Standard edition as well. Some of the Professional edition features thatare not supported by the Standard edition include the database tools, which are discussed inChapter 15 through Chapter 18 of this book.
You may have already explored the new environment on your own, but I’m going to startwith an overview of Visual Studio and its basic tools for the benefit of readers who aren’t famil-iar with them. I will not assume any prior knowledge of Visual Basic 6 or Visual Basic .NET,just some familiarity with programming at large.
As you already know, Visual Basic 2010 is just one of the languages you can use to buildapplications with Visual Studio 2010. I happen to be convinced that it is also the simplest, mostconvenient language, but this isn’t really the issue; I’m assuming you have your reasons to codein VB or you wouldn’t be reading this book. What you should keep in mind is that Visual Stu-dio 2010 is an integrated environment for building, testing, debugging, and deploying a vari-ety of applications: Windows applications, web applications, classes and custom controls, andeven console applications. It provides numerous tools for automating the development process,visual tools for performing many common design and programming tasks, and more featuresthan any author could hope to cover.
In this chapter, you’ll learn how to do the following:
◆ Navigate the integrated development environment of Visual Studio
◆ Understand the basics of a Windows application
Exploring the Integrated Development EnvironmentVisual Basic 2010 is just one of the languages you can use to program your applications. Thelanguage is only one aspect of a Windows application. The visual interface of the applicationisn’t tied to a specific language, and the same tools you’ll use to develop your application’sinterface will also be used by all programmers, regardless of the language they’ll use to codethe application.

4 CHAPTER 1 GETTING STARTED WITH VISUAL BASIC 2010
To simplify the process of application development, Visual Studio provides an environmentthat’s common to all languages, known as an integrated development environment (IDE). The pur-pose of the IDE is to enable the developer to do as much as possible with visual tools beforewriting code. Even as you write code, the IDE will help you in many ways. For example, itunderlines errors, it suggests the keywords that may appear at the current place in your code ina list, and it even provides tools for locating and fixing errors (a process known as debugging).
The IDE provides tools for designing, executing, and debugging your applications. It will bea while before you explore all the elements of the IDE, and I will explain the various items asneeded in the course of the book. In the following sections, you’ll look at the basic componentsof the IDE you’ll be using to build simple Windows applications. You’ll learn how its toolsallow you to quickly design the user interface of your application as well as how to programthe application.
The IDE is your second desktop, and you’ll be spending most of your productive hours inthis environment.
The Start PageWhen you run Visual Studio 2010 for the first time, you will be prompted to select the typeof projects you plan to build so that the environment can be optimized for that specific typeof development. I’m assuming that you have initially selected the Visual Basic Developmentsettings, which will optimize your copy of Visual Studio for building Windows and web appli-cations with Visual Basic 2010. You can always change these settings, as explained at the end ofthis section.
After the initial configuration, you will see a window similar to the one shown in Figure 1.1.The Recent Projects tab will be empty, of course, unless you have already created some testprojects. Visual Studio 2010 will detect the settings of a previous installation, so if you’reupgrading from an earlier version of Visual Studio, the initial screen will not be identical to theone shown in Figure 1.1.
Figure 1.1
This is what you’ll seewhen you start VisualStudio for the first time.

EXPLORING THE INTEGRATED DEVELOPMENT ENVIRONMENT 5
On the Start Page window of Visual Studio, you will see the following panes under the GetStarted heading:
Welcome Click the Welcome tab to see a series of links that provide developer assistance forusing Visual Studio. These links include What’s New In Visual Studio 2010, Creating Applica-tions With Visual Studio, and Extending Visual Studio, among others. Other related links maybe added as this book goes to the printer.
Windows Here you’ll find a list of topics related to Windows application development. Win-dows applications, frequently referred to as desktop applications, are the applications youinstall on a local computer and execute locally.
Web Here you’ll find a list of topics related to web application development. Web applica-tions are executed on a remote computer, the web server, and you interact with them througha browser.
Cloud, Office, SharePoint In addition to Windows and web applications, Visual Studio canbe used to develop applications for Office and SharePoint as well as applications that use a newMicrosoft platform for building distributed applications, the Azure platform. These three typesof projects aren’t discussed in this book.
Data Here you’ll find a list of topics related to data-driven programming. All applicationsthat interact with a database are data driven; they can be Windows or web applications. Theprinciples of interacting with a database (retrieve, display, and update database data) are thesame regardless of whether you use them to build Windows or web applications.
Recent Projects Here you see a list of the projects you opened most recently with Visual Stu-dio, and you can select the one you want to open again — chances are you will continue work-ing on the same project as the last time. Each project name is a hyperlink, and you can open aproject by clicking its name. Above the list of recent projects there are two hyperlinks — one forcreating a new project and another one for opening a new solution. You will find more infor-mation on solutions and projects later in this chapter.
Most developers will skip the Start Page. To do so, open the Tools menu and choose theImport And Export Settings command to start a configuration wizard. In the first dialog boxof the wizard, select the Reset All Settings check box and then click the Next button. The nextscreen of the wizard prompts you for a location in which to save the new settings so thatVisual Studio can read them every time it starts. Leave the default location as is and clickNext again to see the last screen of the wizard, in which you’re prompted to select a defaultcollection of settings. This collection depends on the options you’ve installed on your system.I installed Visual Studio 2010 with Visual Basic only on my system, and I was offered thefollowing options (among others): General Development Settings, Visual Basic DevelopmentSettings, and Web Development. For the default configuration of my copy of Visual Studio,and for the purpose of this book, I chose Visual Basic Development Settings so that VisualStudio could optimize the environment for a typical VB developer. Click the Finish button tosee a summary of the process and then close the wizard.
Starting a New ProjectAt this point, you can create a new project and start working with Visual Studio. To bestexplain the various items of the IDE, let’s build a simple form. The form is the window of yourapplication — it’s what users will see on their Desktop when they run your application.

6 CHAPTER 1 GETTING STARTED WITH VISUAL BASIC 2010
The basic work item with Visual Studio is the solution, which is a container for one or moreprojects. When you create a set of related projects, they should belong to the same solution. (Inthis book, you’ll learn how to build individual, unrelated projects.) Even when you create anindividual new project, though, Visual Studio automatically creates a solution for it. You canadd a new or existing project to the solution at any time.
Open the File menu and choose New Project, or click the New Project link on the StartPage. In the New Project dialog box that pops up (see Figure 1.2), you’ll see a list of projecttypes you can create with Visual Studio. The most important ones are Windows Forms Appli-cations, which are typical Windows applications with one or more forms (windows); ConsoleApplications, which are simple applications that interact with the user through a text window(the console); Windows Forms Control Libraries, which are collections of custom controls; andClass Libraries, which are collections of classes. These are the project types I’ll cover in depthin this book.
Figure 1.2
The New Projectdialog box
If you have Visual Basic 2010 Express edition installed, you will see fewer project types inthe New Project dialog box, but all of the projects discussed in this book are included.
Notice the Create Directory For Solution check box in the dialog box shown in Figure 1.2.If this box is checked, Visual Studio will create a new folder for the solution under the folderyou specify in the Location box. You also have the option to create a new solution or add theproject to the current solution, if you have one open at the time. While following along with theprojects of this book, you should create a new solution for each project and store it in its ownfolder.
You may discover at some point that you have created too many projects and youdon’t really need all of them. You can remove unwanted projects from your system bydeleting the corresponding folders — no special action is required. You’ll know it’s timeto remove unneeded project folders when Visual Studio suggests project names such asWindowsApplication9 or WindowsApplication49.
For this project, select the Windows Forms Application template; Visual Studio suggests thename WindowsApplication1 as the project name. Change it to MyTestApplication, select theCreate Directory For Solution check box, and then click the OK button to create the new project.

EXPLORING THE INTEGRATED DEVELOPMENT ENVIRONMENT 7
What you see now is the Visual Studio IDE displaying the Form Designer for a new project,as shown in Figure 1.3. The main window of your copy of Visual Studio may be slightly dif-ferent, but don’t worry about it. I’ll go through all the components you need to access in theprocess of designing, coding, and testing a Windows application.
Figure 1.3
The integrated develop-ment environment ofVisual Studio 2010 for anew project
Output
Click to accessthe Toolbox.
Form DesignerDefault new form component
Pushpin iconslock and unlockwindow positions.
Solution Explorer
Click AZ to displaythe properties inalphabetical order.
The Properties windowis also known as theProperties Browser.
Click a propertyname to edit.
The new project contains a form already: the Form1 component in the Solution Explorer. Themain window of the IDE is the Form Designer, and the gray surface on it is the window ofyour new application in design mode. Using the Form Designer, you’ll be able to design thevisible interface of the application (place various components of the Windows interface on theform and set their properties) and then program the application.
The default environment is rather crowded, so let’s hide a few of the toolbars that we won’tuse in the projects of the first few chapters. You can always show any of the toolbars at anytime. Open the View menu and choose Toolbars. You’ll see a submenu with 28 commands thatare toggles. Each command corresponds to a toolbar, and you can turn the corresponding tool-bar on or off by clicking one of the commands in the Toolbars submenu. For now, turn off allthe toolbars except the Layout and Standard toolbars. These are the toolbars shown by defaultand you shouldn’t hide them; if you do (perhaps to make more room for the designer), this isthe place where you go to make them visible again.
The last item in the Toolbars submenu is the Customize command; Customize leads to a dia-log box in which you can specify which of the toolbars and which of the commands you wantto see. After you have established a work pattern, use this menu to customize the environmentfor the way you work with Visual Studio. You can hide just about any component of the IDE,except for the main menu — after all, you have to be able to undo the changes!
Using the Windows Form DesignerTo design the form, you must place on it all the controls you want to display to the user atruntime. The controls are the components of the Windows interface (buttons, text boxes, radiobuttons, lists, and so on). Open the Toolbox by moving the pointer over the Toolbox tab at the

8 CHAPTER 1 GETTING STARTED WITH VISUAL BASIC 2010
far left; the Toolbox, shown in Figure 1.4, pulls out. This Toolbox contains an icon for each con-trol you can use on your form.
Figure 1.4
Windows Forms Toolboxof the Visual Studio IDE
The controls are organized into groups according to function on the interface. In the firstpart of the book, you’ll create simple Windows applications and you’ll use the controls on theCommon Controls tab. When you develop web applications, you will see a different set of iconsin the Toolbox.
To place a control on the form, you can double-click the icon for the control. A new instancewith a default size will be placed on the form. Then you can position and resize it with themouse. Or you can select the control from the Toolbox with the mouse and then click and dragthe mouse over the form and draw the outline of the control. A new instance of the controlwill be placed on the form, and it will fill the rectangle you specified with the mouse. Start byplacing a TextBox control on the form.
The control properties will be displayed in the Properties window. Figure 1.5 shows theproperties of a TextBox control. This window, at the far right edge of the IDE and below theSolution Explorer, displays the properties of the selected control on the form. If the Propertieswindow is not visible, open the View menu and choose Properties Window, or press F4. If nocontrol is selected, the properties of the selected item in the Solution Explorer aredisplayed.
In the Properties window, also known as the Properties Browser, you see the propertiesthat determine the appearance of the control and (in some cases) its function. The propertiesare organized in categories according to their role. The properties that determine the appear-ance of the control are listed alphabetically under the header Appearance, the properties thatdetermine the control’s behavior are listed alphabetically under the header Behavior, and so on.

EXPLORING THE INTEGRATED DEVELOPMENT ENVIRONMENT 9
You can click the AZ button on the window’s title bar to display all properties in alphabeticalorder. After you familiarize yourself with the basic properties, you will most likely switch tothe alphabetical list.
Figure 1.5
Properties of a TextBoxcontrol
Rearranging the IDE Windows
As soon as you place a control on the form, the Toolbox retracts to the left edge of theDesigner. You can fix this window on the screen by clicking the pushpin icon on the Toolbox’stoolbar. (It’s the icon next to the Close icon at the upper-right corner of the Toolbox window,and it appears when the Toolbox window is docked but not while it’s floating.)
You can easily rearrange the various windows that make up the IDE by moving them aroundwith the mouse. Move the pointer to a window’s title bar, press the left mouse button, anddrag the window around. If you can’t move a window with the mouse, it’s because the win-dow’s position is locked. In this case, click the pushpin icon to unlock the window’s positionand then move it around with the mouse.
As you move the window, eight semitransparent buttons with arrows appear on the screen,indicating the areas where the window can be docked, as shown in the following screen shot.Keep moving the window until the pointer hovers over one of these buttons and the dockingarea appears in semitransparent blue color. Find a position you like and release the mousebutton to dock it. If you release the mouse button while the pointer is not on top of an arrow,the window is not docked. Instead, it remains where you dropped it as a floating window, andyou can move it around with your mouse at will.

10 CHAPTER 1 GETTING STARTED WITH VISUAL BASIC 2010
Most developers would rather work with docked windows, and the default positions of theIDE windows are quite convenient. If you want to open even more windows and arrangethem differently on the screen, use the docking feature of the IDE to dock the additionalwindows.
Locate the TextBox control’s Text property and set it to My TextBox Control by enteringthe string into the box next to the property name. The control’s Text property is the string thatappears in the control (the caption), and most controls have a Text property.
Next locate its BackColor property and select it with the mouse. A button with an arrowappears next to the current setting of the property. Click this button and you’ll see a dialogbox with three tabs (Custom, Web, and System), as shown in Figure 1.6. In this dialog box, youcan select the color that will fill the control’s background. Set the control’s background color toyellow and notice that the control’s appearance changes on the form.
One of the settings you’ll want to change is the font of the various controls. While theTextBox control is still selected on the form, locate the Font property in the Properties window.You can click the plus sign in front of the property name and set the individual properties ofthe font, or you can click the ellipsis button to invoke the Font dialog box. Here you can setthe control’s font and its attributes and then click OK to close the dialog box. Set the TextBoxcontrol’s Font property to Verdana, 14 points, bold. As soon as you close the Font dialog box,the control on the form is adjusted to the new setting.
There’s a good chance that the string you assigned to the control’s Text property won’t fitin the control’s width when rendered in the new font. Select the control on the form with themouse and you will see eight handles along its perimeter. Rest the pointer over any of thesehandles and it will assume a shape indicating the direction in which you can resize the control.

EXPLORING THE INTEGRATED DEVELOPMENT ENVIRONMENT 11
Make the control long enough to fit the entire string. If you have to, resize the form as well.Click somewhere on the form, and when the handles appear along its perimeter, resize it withthe mouse.
Figure 1.6
Setting a color prop-erty in the Propertieswindow
Some controls, such as the Label, Button, and CheckBox controls, support the AutoSizeproperty; AutoSize determines whether the control is resized automatically to accommodatethe caption. The TextBox control, as well as many others, doesn’t support the AutoSize prop-erty. If you attempt to make the control tall enough to accommodate a few lines of text, you’llrealize that you can’t change the control’s height. By default, the TextBox control accepts a sin-gle line of text, and you must set its MultiLine property to True before you can resize theTextBox control vertically.
The Font Is a Design Element
Like documents, forms should be designed carefully and follow the rules of a printed pagedesign. At the very least, you shouldn’t use multiple fonts on your forms, just as you shouldn’tmix different fonts on a printed page. You could use two font families on rare occasions, butyou shouldn’t overload your form. You also shouldn’t use the bold style in excess.
To avoid adjusting the Font property for multiple controls on the form, set the font for theform first because each control you place on a form inherits the form’s font. If you change theform’s font, the controls will be adjusted accordingly, but this may throw off the alignmentof the controls on the form. Experiment with a few Label controls, select a font that you likethat’s appropriate for your interface (you shouldn’t use a handwritten style with a businessapplication, for example), and then set the form’s Font property to the desired font. Every

12 CHAPTER 1 GETTING STARTED WITH VISUAL BASIC 2010
time you add a new form to the application, you should start by setting its Font property tothat same font so that the entire application will have a consistent look.
The font is the most basic design element, whether you’re designing forms or a document.Various components of the form may have a different font size, even a different style (likebold or italics), but there must be a dominant font family that determines the look of theform. The Verdana family was designed for viewing documents on computer monitors and is apopular choice. Another great choice is Segoe UI, a new font family introduced with WindowsVista. The Segoe Print font has a distinguished handwritten style, and you can use it withgraphics applications.
The second most important design element is color, but don’t get too creative with colorsunless you’re a designer. I recommend that you stay with the default colors and use similarshades to differentiate a few elements of the interface.
The design of a modern interface has become a new discipline in application develop-ment, and there are tools for designing interfaces. One of them is Microsoft’s ExpressionBlend, which enables designers to design the interface and developers to write code with-out breaking each other’s work. You can download a trial version of Expression Blend fromwww.microsoft.com/expression.
So far, you’ve manipulated properties that determine the appearance of the control. Nowyou’ll change a property that determines not only the appearance, but also the function of thecontrol. Locate the Multiline property. Its current setting is False. Expand the list of availablesettings and change it to True. (You can also change it by double-clicking the name of the prop-erty. This action toggles the True/False settings.) Switch to the form, select the TextBox control,and make it as tall as you wish.
The Multiline property determines whether the TextBox control can accept one (ifMultiline = False) or more (if Multiline = True) lines of text. Set this property to True, goback to the Text property, set it to a long string, and press Enter. The control breaks the longtext into multiple lines. If you resize the control, the lines will change, but the entire string willfit in the control because the control’s WordWrap property is True. Set it to False to see how thestring will be rendered on the control.
Multiline TextBox controls usually have a vertical scroll bar so users can quickly locate thesection of text that they’re interested in. Locate the control’s ScrollBars property and expandthe list of possible settings by clicking the button with the arrow. This property’s settings areNone, Vertical, Horizontal, and Both. Set it to Vertical, assign a very long string to its Textproperty, and watch how the control handles the text. At design time, you can’t scroll the texton the control; if you attempt to move the scroll bar, the entire control will be scrolled. Thescroll bar will work as expected at runtime. (It will scroll the text vertically.)
You can also make the control fill the entire form. Start by deleting any other controls youmay have placed on the form and then select the multiline TextBox. Locate the Dock propertyin the Properties window and keep double-clicking the name of the property until its settingchanges to Fill. (You’ll learn a lot more about docking controls in Chapter 6, ‘‘Working withForms.’’) The TextBox control fills the form and is resized as you resize the form, both at designtime and runtime.
To examine the control’s behavior at runtime, press F5. The application will be compiled,and a few moments later, a window filled with a TextBox control (like the one shown in
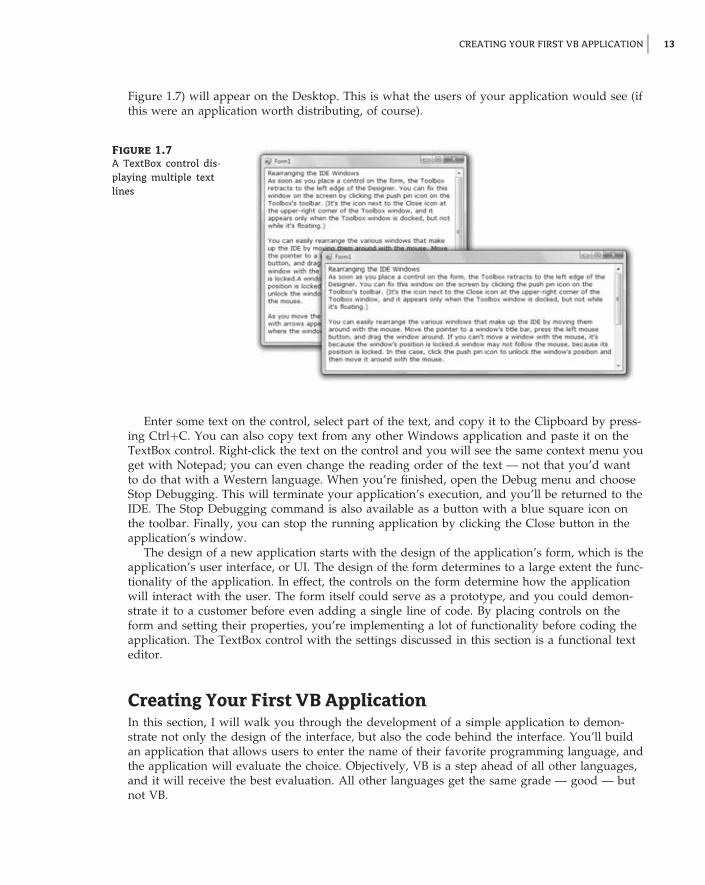
CREATING YOUR FIRST VB APPLICATION 13
Figure 1.7) will appear on the Desktop. This is what the users of your application would see (ifthis were an application worth distributing, of course).
Figure 1.7
A TextBox control dis-playing multiple textlines
Enter some text on the control, select part of the text, and copy it to the Clipboard by press-ing Ctrl+C. You can also copy text from any other Windows application and paste it on theTextBox control. Right-click the text on the control and you will see the same context menu youget with Notepad; you can even change the reading order of the text — not that you’d wantto do that with a Western language. When you’re finished, open the Debug menu and chooseStop Debugging. This will terminate your application’s execution, and you’ll be returned to theIDE. The Stop Debugging command is also available as a button with a blue square icon onthe toolbar. Finally, you can stop the running application by clicking the Close button in theapplication’s window.
The design of a new application starts with the design of the application’s form, which is theapplication’s user interface, or UI. The design of the form determines to a large extent the func-tionality of the application. In effect, the controls on the form determine how the applicationwill interact with the user. The form itself could serve as a prototype, and you could demon-strate it to a customer before even adding a single line of code. By placing controls on theform and setting their properties, you’re implementing a lot of functionality before coding theapplication. The TextBox control with the settings discussed in this section is a functional texteditor.
Creating Your First VB ApplicationIn this section, I will walk you through the development of a simple application to demon-strate not only the design of the interface, but also the code behind the interface. You’ll buildan application that allows users to enter the name of their favorite programming language, andthe application will evaluate the choice. Objectively, VB is a step ahead of all other languages,and it will receive the best evaluation. All other languages get the same grade — good — butnot VB.

14 CHAPTER 1 GETTING STARTED WITH VISUAL BASIC 2010
The project is called WindowsApplication1. You can download the project fromwww.sybex.com/go/masteringvb2010 and examine it, but I suggest you follow the stepsoutlined in this section to build the project from scratch. Start a new project, use the defaultname, WindowsApplication1, and place a TextBox and a Button control on the form. Use themouse to position and resize the controls on the form, as shown in Figure 1.8.
Figure 1.8
A simple applica-tion that processes auser-supplied string
Start by setting the form’s Font property to Segoe UI, 9 pt. Arrange and size the controlsas shown in Figure 1.8. Then, place a Label control on the form and set its Text property toEnter your favorite programming language. The Label will be resized according to its cap-tion because the control’s AutoSize property is True by default. To be sure that a Label controlwill not grow too long and cover other controls on the form, set its AutoSize property to Falseand size it manually. As you move the controls around on the form, you’ll see some blue linesconnecting the edges of the controls when they’re aligned. These lines are called snap lines, andthey allow you to align controls on the form.
Now you must insert some code to evaluate the user’s favorite language. Windows applica-tions are made up of small code segments, called event handlers, which react to specific actionssuch as the click of a button, the selection of a menu command, the click of a check box, andso on. For this example, you want to program the action of clicking the button. When the userclicks the button, you want to execute some code that will display a message.
The Windows programming model is known as event-driven programming, as it’s basedon programming events. A Windows form contains controls, such as Buttons, CheckBoxes,TextBoxes, and so on. These controls react to certain events, which are usually initiated by theuser. A button click, checking or clearing a check box, a drag and a drop operation — all areexamples of user-initiated events. You decide the events to which your application should reactand then program the desired actions by inserting some code into the event’s handler. Eventhandlers are independent of one another, and you can focus on one event at a time.
To insert some code behind the Button control, double-click the control. You’ll see the form’scode window, which is shown in Figure 1.9. You will see only the definition of the procedure,not the code that is shown between the two statements in the figure. The statement beginningwith Private… is too long to fit on the printed page, so I had to break it into two lines. Whena line is too long, you can break it into two (or more) lines by pressing Enter. In previous ver-sions, you had to insert a space followed by an underscore to indicate that the statement con-tinues on the following line. Alternatively, you can turn on the word wrap feature of the editor(you’ll see shortly how to adjust the editor’s properties). Notice that I also inserted quite a bit

CREATING YOUR FIRST VB APPLICATION 15
of space before the second half of the first code line. It’s customary to indent continued lines sothey can be easily distinguished from the other lines.
Figure 1.9
Outline of a subrou-tine that handles theClick event of a Buttoncontrol
The editor opens a subroutine, which is delimited by the following statements:
Private Sub Button1_Click(ByVal sender As System.Object,ByVal e As System.EventArgs) Handles Button1.Click
End Sub
At the top of the main pane of the Designer, you will see two tabs named after the form: theForm1.vb [Design] tab and the Form1.vb tab. The first tab is the Windows Form Designer (inwhich you build the interface of the application with visual tools), and the second is the codeeditor (in which you insert the code behind the interface). At the top of the code editor, whichis what you see in Figure 1.9, are two ComboBoxes. The one on the left contains the namesof the controls on the form. The one on the right contains the names of events each controlrecognizes. When you select a control (or an object, in general) in the left list, the other list’scontents are adjusted accordingly. To program a specific event of a specific control, select thename of the control in the left list (the Objects list) and the name of the event in the right list(the Events list). While Button1 is selected in the Objects list, open the Events list to see theevents to which the button can react.
The Click event happens to be the default event of the Button control. To program the But-ton’s Click event, double-click the Button on the form and the editor will open a window withthe Button1_Click subroutine. This subroutine is an event handler, which is invoked automati-cally every time an event takes place. The event of interest in our example is the Click event ofthe Button1 control. Every time the Button1 control on the form is clicked, the Button1_Clicksubroutine is activated. To react to the Click event of the button, you must insert the appropri-ate code in this subroutine.
There are more than two dozen events for the Button control, and it is among the simplercontrols. (After all, what can you do to a button besides click it?) Most of the controls recognizea very large number of events, which we rarely code. I’ve never seen a button that reactsto a double-click, even though you can program this event, or coding for the KeyPress

16 CHAPTER 1 GETTING STARTED WITH VISUAL BASIC 2010
event, which is fired when the user presses a key when the button has the focus. Whenprogramming a TextBox control, however, the KeyPress event is one of the most commonevents to code.
The definition of the event handler can’t be modified; this is the event handler’s signature(the arguments it passes to the application). All event handlers in VB 2010 pass two argumentsto the application: the sender argument, which is an object that represents the control that firedthe event, and the e argument, which provides additional information about the event.
The name of the subroutine is made up of the name of the control, followed by anunderscore and the name of the event (Button1_Click). This is just the default name, andyou can change it to anything you like (such as EvaluateLanguage, for this example, orStartCalculations). What makes this subroutine an event handler is the keyword Handles atthe end of the statement. The Handles keyword tells the compiler which event this subroutineis supposed to handle. Button1.Click is the Click event of the Button1 control. If there wereanother button on the form, the Button2 control, you’d have to write code for a subroutinethat would handle the Button2.Click event. Each control recognizes many events, and youcan provide a different event handler for each control and event combination. Of course, wenever program every possible event for every control.
The controls have a default behavior and handle the basic events on their own. The TextBoxcontrol knows how to handle keystrokes. The CheckBox control (a small square with a checkmark) changes state by hiding or displaying the check mark every time it’s clicked. The Scroll-Bar control moves its indicator (the button in the middle of the control) every time you clickone of the arrows at the two ends. Because of this default behavior of the controls, you neednot supply any code for the events of most controls on the form.
If you change the name of the control after you have inserted some code in an event han-dler, the name of the event handled by the subroutine will be automatically changed. The nameof the subroutine, however, won’t change. If you change the name of the Button1 control tobttnEvaluate, the subroutine’s header will become
Private Sub Button1_Click(ByVal sender As System.Object,ByVal e As System.EventArgs) Handles bttnEvaluate.Click
End Sub
Rename the Button1_Click subroutine to EvaluateLanguage. You must edit the code tochange the name of the event handler. I try to name the controls before adding any code tothe application so that their event handlers will be named correctly. Alternatively, you can useyour own name for each event handler. The default names of the controls you place on a formare quite generic, and you should change them to something more meaningful. I usually prefixthe control names with a few characters that indicate the control’s type (such as txt, lbl, bttn,and so on), followed by a name that reflects the function of the control on the form. Namessuch as txtLanguage and bttnEvaluate make your code far more readable. It’s a good prac-tice to change the default names of the controls as soon as you add the controls to the form.Names such as Button1, Button2, Button3, and so on, don’t promote the readability of yourcode. With the exception of this first sample project, I’m using descriptive names for the con-trols used in this book’s projects.
Let’s add some code to the Click event handler of the Button1 control. When this but-ton is clicked, I want to examine the text the user entered in the text box. If it’s Visual Basic,

CREATING YOUR FIRST VB APPLICATION 17
I want to display one message; if not, I want to display a different message. Insert the lines ofListing 1.1 between the Private Sub and End Sub statements. (I’m showing the entire listinghere, but there’s no reason to retype the first and last statements.)
Listing 1.1: Processing a user-supplied string
Private Sub EvaluateLanguage(ByVal sender As System.Object,ByVal e As System.EventArgs) Handles Button1.Click
Dim language As Stringlanguage = TextBox1.TextIf language = "Visual Basic" Then
MsgBox("We have a winner!")Else
MsgBox(language & " is not a bad language.")End If
End Sub
Here’s what this code does. First, it assigns the text of the TextBox control to the variablelanguage. A variable is a named location in memory where a value is stored. Variablesare where you store the intermediate results of your calculations when you write code. Allvariables are declared with a Dim statement and have a name and a type. The first statementdeclares a new variable, the language variable, with the Dim statement and sets its type toString (it’s a variable that will store text).
You could also declare and assign a value to the language variable in a single step:
Dim language = TextBox1.Text
The compiler will create a String variable, because the statement assigns a string to the vari-able. We’ll come back to the topic of declaring and initializing variables in Chapter 2, ‘‘Han-dling Data.’’
Then the program compares the value of the language variable to the string Visual Basic,and depending on the outcome of the comparison, it displays one of two messages. TheMsgBox() function displays the message that you passed as an argument by placing it betweenthe parentheses in a small window with an OK button, as shown in Figure 1.8. The argumentfor a MsgBox() function must be a string. Users can view the message and then click the OKbutton to close the message box.
Even if you’re not familiar with the syntax of the language, you should be able to under-stand what this code does. Visual Basic is the simplest of the languages supported by VisualStudio 2010, and I will discuss the various aspects of the language in detail in the followingchapters. In the meantime, focus on understanding the process of developing a Windows appli-cation: how to build the visible interface of the application and how to program the events towhich you want your application to react.
The code of this first application isn’t very robust. If the user doesn’t enter the string withthe exact spelling shown in the listing, the comparison will fail. You can convert the string touppercase and then compare it with VISUAL BASIC to eliminate differences in case. To convert

18 CHAPTER 1 GETTING STARTED WITH VISUAL BASIC 2010
a string to uppercase, use the ToUpper method of the String class. The following expressionreturns the string stored in the language variable, converted to uppercase:
language.ToUpper
You should also take into consideration the fact that the user might enter VB or VB2010, orsomething similar. You never know what users may throw at your application, so wheneverpossible you should try to limit their responses to the number of available choices. In this case,you could display the names of certain languages (the ones you’re interested in) and force theuser to select one of them.
One way to display a limited number of choices is to use a ComboBox control. In the nextsection, you’ll revise your sample application so that users won’t have to enter the name of thelanguage. You’ll force them to select their favorite language from a list so that you won’t haveto validate the string supplied by the user.
Making the Application More User FriendlyStart a new project: the WindowsApplication2 project. Do not select the Create Directory ForSolution check box; save the project from within the IDE. As soon as the project is created,open the File menu and choose Save All to save the project. When the Save Project dialog boxappears, click the Browse button to select the folder where the project will be saved. In theProject Location dialog box that appears, select an existing folder or create a new folder suchas MyProjects or VB.NET Samples.
Open the Toolbox and double-click the ComboBox tool icon. A ComboBox control will beplaced on your form. Now, place a Button control on the form and position it so that your formlooks like the one shown in Figure 1.10. Then set the Text property for the button to EvaluateMy Choice.
Figure 1.10
Displaying options in aComboBox control
You must now populate the ComboBox control with the valid choices. Select the ComboBoxcontrol on the form by clicking it with the mouse and locate its Items property in the Proper-ties window. The setting of this property is Collection, which means that the Items property

CREATING YOUR FIRST VB APPLICATION 19
doesn’t have a single value; it’s a collection of items (strings, in this case). Click the ellipsis but-ton and you’ll see the String Collection Editor dialog box, as shown in Figure 1.11.
Figure 1.11
Click the ellipsis buttonnext to the Items prop-erty of a ComboBox tosee the String CollectionEditor dialog box.
The main pane in the String Collection Editor dialog box is a TextBox, in which you canenter the items you want to appear in the ComboBox control at runtime. Enter the followingstrings, one per row and in the order shown here:
C++C#
Visual Basic
Java
Cobol
Click the OK button to close the dialog box. The items you just entered will not appear onthe control at design time, but you will see them when you run the project. Before runningthe project, set one more property. Locate the ComboBox control’s Text property and set it toSelect your favorite programming language. This is not an item of the list; it’s the string thatwill initially appear on the control.
You can run the project now and see how the ComboBox control behaves. Press F5 andwait a few seconds. The project will be compiled, and you’ll see the form displayed on yourDesktop, on top of the Visual Studio window. I’m sure you know how the ComboBox controlbehaves in a typical Windows application, and your sample application is no exception. Youcan select an item on the control, either with the mouse or with the keyboard. Click the buttonwith the arrow to expand the list and then select an item with the mouse. Or press the down orup arrow keys to scroll through the list of items. The control isn’t expanded, but each time youclick an arrow button, the next or previous item in the list appears on the control. Press the Tabkey to move the focus to the Button control and press the spacebar to emulate a Click event(or simply click the Button control).
You haven’t told the application what to do when the button is clicked yet, so let’s go backand add some code to the project. Stop the application by clicking the Stop button on the tool-bar (the solid black square) or by choosing Debug � Stop Debugging from the main menu.When the form appears in design mode, double-click the button and the code window will

20 CHAPTER 1 GETTING STARTED WITH VISUAL BASIC 2010
open, displaying an empty Click event handler. Insert the statements shown in Listing 1.2between the Private Sub and End Sub statements.
Listing 1.2: The revised Click event handler
Private Sub Button1_Click(ByVal sender As System.Object,ByVal e As System.EventArgs) Handles Button1.Click
Dim language As Stringlanguage = ComboBox1.TextIf language = "Visual Basic" Then
MsgBox("We have a winner!")Else
MsgBox(language & "is not a bad language.")End If
End Sub
When the form is first displayed, a string that doesn’t correspond to a language is displayedin the ComboBox control. This is the string that prompts the user to select a language; it isn’t avalid selection because it’s not included in the list of items.
You can also preselect one of the items from within your code when the form is first loaded.When a form is loaded, the Load event of the Form object is raised. Double-click somewhere onthe form and the editor will open the form’s Load event handler:
Private Sub Form1_Load(ByVal sender As System.Object,ByVal e As System.EventArgs) Handles MyBase.Load
End Sub
Enter the following code to select the Visual Basic item when the form is loaded:
Private Sub Form1_Load(ByVal sender As System.Object,ByVal e As System.EventArgs) Handles MyBase.Load
ComboBox1.SelectedIndex = 2End Sub
SelectedIndex is a property of the ComboBox control that returns the index of the selecteditem in the Items collection. You can set it to an integer value from within your code to selectan item on the control, and you can also use it to retrieve the index of the selected item in thelist. Instead of comparing strings, you can compare the SelectedIndex property to the valuethat corresponds to the index of the item Visual Basic, with a statement such as the following:
If ComboBox1.SelectedIndex = 2 ThenMsgBox("We have a winner!")
ElseMsgBox(ComboBox1.Text & " is not a bad language.")
End If

UNDERSTANDING THE IDE COMPONENTS 21
The Text property of the ComboBox control returns the text on the control, and it’s usedto print the selected language’s name. The & symbol is an operator, similar to the arithmeticoperators, that concatenates two strings. The first string is the Text property of the ComboBoxcontrol and the second string is a literal enclosed in double quotes. To combine the two, use theconcatenation operator.
Of course, if you insert or remove items from the list, you must edit the code accordingly.If you run the application and test it thoroughly, you’ll realize that there’s a problem with theComboBox control. Users can type in the control a new string, which will be interpreted as alanguage. By default, the ComboBox control allows users to type in something in addition toselecting an item from the list. To change the control’s behavior, select it on the form and locateits DisplayStyle property in the Properties window. Expand the list of possible settings forthe control and change the property’s value from DropDown to DropDownList. Run the applica-tion again and test it; your sample application has become bulletproof. It’s a simple application,but you’ll see more techniques for building robust applications in Chapter 4, ‘‘GUI Design andEvent-Driven Programming.’’
The controls on the Toolbox are more than nice pictures you can place on your forms. Theyencapsulate a lot of functionality and expose properties that allow you to adjust their appear-ance and their functionality. Most properties are usually set at design time, but quite frequentlyyou change the properties of various controls from within your code. And it should be obviousby now that the changes take place from within the code that resides in the handlers for theevents to which the application should react.
Now that you’re somewhat familiar with the process of building Windows applications, andbefore you look into any additional examples, I will quickly present the components of theVisual Studio IDE.
Understanding the IDE ComponentsThe IDE of Visual Studio 2010 contains numerous components, and it will take you a while toexplore them. It’s practically impossible to explain in a single chapter what each tool, window,and menu command does. I’ll discuss specific tools as we go along and as the topics becomemore and more advanced. In the following sections, I will go through the basic items of theIDE — the ones you’ll use in the following few chapters to build simple Windows applications.
The IDE MenusThe IDE menus provide access to a variety of commands; some lead to submenus. Notice thatmost menus can be displayed as toolbars. Also, not all options are available at all times. Theoptions that cannot possibly apply to the current state of the IDE are either invisible or dis-abled. The Edit menu is a typical example. It’s quite short when you’re designing the form andquite lengthy when you edit code. The Data menu disappears altogether when you switch tothe code editor — you can’t use these menu options while editing code. If you open an XMLdocument in the IDE, the XML item will be added to the menu bar of Visual Studio. Yes, VisualStudio can handle XML files too. Not only that, but Visual Basic provides built-in support forXML files, which I’ll help you explore in Chapter 13, ‘‘XML in Modern Programming.’’
File Menu
The File menu contains commands for opening and saving projects or project items as well ascommands for adding new or existing items to the current project. For the time being, use the

22 CHAPTER 1 GETTING STARTED WITH VISUAL BASIC 2010
New � Project command to create a new project, Open � Project/Solution to open an existingproject or solution, Save All to save all components of the current project, and the RecentProjects submenu to open one of the recent projects.
Edit Menu
The Edit menu contains the usual editing commands. Among these commands are theAdvanced command and the IntelliSense command. Both commands lead to submenus, whichare discussed next. Note that these two items are visible only when you’re editing your codeand are invisible while you’re designing a form.
Edit � Advanced Submenu
The following options are the more-interesting ones available through the Edit � Advancedsubmenu:
View White Space Space characters (necessary to indent lines of code and make it easy toread) are replaced by periods.
Word Wrap When a code line’s length exceeds the length of the code window, the line isautomatically wrapped.
Comment Selection/Uncomment Selection Comments are lines you insert between yourcode statements to document your application. Every line that begins with a single quote isa comment; it is part of the code, but the compiler ignores it. Sometimes, you want to disable afew lines from your code but not delete them (because you want to be able to restore them later,should you change your mind). A simple technique to disable a line of code is to commentit out (insert the comment symbol in front of the line). The Comment Selection/UncommentSelection command allows you to comment (or uncomment) large segments of code in a singlemove.
Edit � IntelliSense Submenu
Edit � IntelliSense leads to a submenu with five options, which are described next. IntelliSenseis a feature of the editor (and other Microsoft applications) that displays as much informa-tion as possible, whenever possible. When you type the name of a control and the followingperiod, IntelliSense displays a list of the control’s properties and methods so that you can selectthe desired one — no more guessing at names. When you type the name of a function and anopening parenthesis, IntelliSense will display the syntax of the function — its arguments. TheIntelliSense submenu includes the following options:
List Members When this option is on, the editor lists all the members (properties, methods,events, and argument list) in a drop-down list. This list appears when you enter the nameof an object or control followed by a period. Then, you can select the desired member fromthe list using either the mouse or the keyboard. Let’s say your form contains a control namedTextBox1 and you’re writing code for this form. When you enter the name of the control fol-lowed by a period (TextBox1.), a list with the members of the TextBox control will appear (asshown in Figure 1.12).
In addition, a description of the selected member is displayed in a ToolTip box, as you cansee in the same figure. Select the Text property and then enter the equal sign, followed by astring in quotes, as follows:
TextBox1.Text = "Your User Name"

UNDERSTANDING THE IDE COMPONENTS 23
Figure 1.12
Viewing the members ofa control in the Intelli-Sense drop-down list
If you select a property that can accept a limited number of settings, you will see the names ofthe appropriate constants in a drop-down list. If you enter the following statement, you willsee the constants you can assign to the property (see Figure 1.13):
TextBox1.TextAlign =
Figure 1.13
Viewing the possiblesettings of a prop-erty in the IntelliSensedrop-down list
Again, you can use your mouse to select the desired value. The drop-down list with the mem-bers of a control or object (the Members list) remains open until you type a terminator key (theEsc or End key) or select a member by pressing the spacebar or the Enter key.
Parameter Info While editing code, you can move the pointer over a variable, method, orproperty and see its declaration in a pop-up box. You can also jump to the variable’s definitionor the body of a procedure by choosing Go To Definition from the context menu that appears ifyou right-click the variable or method name in the code window.
Quick Info Quick Info is another IntelliSense feature that displays information about com-mands and functions. When you type an opening parenthesis following the name of a function,for example, the function’s arguments will be displayed in a ToolTip box. The first argumentappears in bold font; after a value for this argument is entered, the next one is shown in bold.If an argument accepts a fixed number of settings, these values will appear in a drop-down list,as explained previously.
Complete Word The Complete Word feature enables you to complete the current word bypressing Ctrl+spacebar. For example, if you type TextB and then press Ctrl+spacebar, youwill see a list of words that you’re most likely to type (TextBox, TextBox1, and so on).
Insert Snippet This command opens the Insert Snippet window at the current location in thecode editor window. Code snippets, which are an interesting feature of Visual Studio 2010, arediscussed in the section ‘‘Using Code Snippets’’ later in this chapter.

24 CHAPTER 1 GETTING STARTED WITH VISUAL BASIC 2010
Edit � Outlining Submenu
A practical application contains a substantial amount of code in a large number of event han-dlers and custom procedures (subroutines and functions). To simplify the management of thecode window, the Outlining submenu contains commands that collapse and expand the variousprocedures.
Let’s say you’re finished editing the Click event handlers of several buttons on the form.You can reduce these event handlers to a single line that shows the names of the procedureswith a plus sign in front of them. You can expand a procedure’s listing at any time by clickingthe plus sign. When you do so, a minus sign appears in front of the procedure’s name, andyou can click it to collapse the body of the procedure again. The Outlining submenu containscommands to handle the outlining of the various procedures or to turn off outlining and viewthe complete listings of all procedures. You will use these commands as you write applicationswith substantial amounts of code:
Hide Selection This option lets you hide the selected code segment. You can select part ofa routine or multiple routines, which are hidden as a whole with this command. To displaythe hidden code, click the plus icon on the left margin, or use the Stop Hiding Selectioncommand.
Toggle Outlining Expansion This option lets you change the outline mode of the currentprocedure. If the procedure’s definition is collapsed, the code is expanded, and vice versa.
Toggle All Outlining This option is similar to the Toggle Outlining Expansion option, but ittoggles the outline mode of the current document. A form is reduced to a single statement. Afile with multiple classes is reduced to one line per class.
Stop Outlining This option turns off outlining and adds a new command to the Outliningsubmenu, Start Automatic Outlining, which you can select to turn on automatic outliningagain.
Stop Hiding Current This option stops hiding the currently hidden selection.
Collapse To Definitions This option reduces the listing to a list of procedure headers.
View Menu
This menu contains commands that allow you to display any toolbar or window of the IDE.The Other Windows command leads to a submenu with the names of some standard windows,including the Output and Command windows. The Output window is the console of the appli-cation. The compiler’s messages, for example, are displayed in the Output window. The Com-mand window allows you to enter and execute statements. When you debug an application,you can stop it and enter VB statements in the Command window. Another related window isthe Immediate window, which is very similar to the Command window, and it has the advan-tage of displaying the IntelliSense box as you type. You’ll see how to use these windows laterin this book (they’re used mostly for debugging).
Project Menu
This menu contains commands for adding items to the current solution (an item can be a form,a file, a component, or another project). The last option in this menu is the Project Propertiescommand, which opens the project’s properties pages. The Add Reference and Add WebReference commands allow you to add references to .NET components and web components,

UNDERSTANDING THE IDE COMPONENTS 25
respectively. These two commands are also available in the project’s shortcut menu (to openthis menu, right-click the name of the project in the Solution Explorer).
Build Menu
The Build menu contains commands for building (compiling) your project. The two basiccommands in this menu are Build and Rebuild All. The Build command compiles (buildsthe executable for) the entire solution, but it doesn’t compile any components of the projectthat haven’t changed since the last build. The Rebuild All command clears any existing filesand builds the solution from scratch. Every time you start your application, Visual Studiorecompiles it as needed so you don’t usually have to build your application to execute it. Thereare situations (when you add custom classes and controls to your application) when you mustbuild the project. These topics are discussed later in this book.
Debug Menu
This menu contains commands to start or end an application as well as the basic debuggingtools. The basic commands of this menu are discussed briefly in Chapter 4.
Data Menu
This menu contains commands you will use with projects that access data. You’ll see how touse this short menu’s commands in the discussion of the visual database tools in Chapter 16through Chapter 18.
Format Menu
The Format menu, which is visible only while you design a Windows or web form, containscommands for aligning the controls on the form. The commands accessible from this menu arediscussed in Chapter 4. The Format menu is invisible when you work in the code editor — thecommands apply to the visible elements of the interface.
Tools Menu
This menu contains a list of useful tools, such as the Macros command, which leads to a sub-menu with commands for creating macros. Just as you can create macros in a Microsoft Officeapplication to simplify many tasks, you can create macros to automate many of the repetitivetasks you perform in the IDE. The last command in this menu, the Options command, leads tothe Options dialog box, in which you can fully customize the environment. The Choose Tool-box Items command opens a dialog box that enables you to add more controls to the Toolbox.In Chapter 9, ‘‘Building Custom Windows Controls,’’ you’ll learn how to design custom con-trols and add them to the Toolbox.
Window Menu
This is the typical Window menu of any Windows application. In addition to the list ofopen windows, it contains the Hide command, which hides all toolboxes, leaving the entirewindow of the IDE devoted to the code editor or the Form Designer. The toolboxes don’tdisappear completely; they’re all retracted, and you’ll be able see the tabs on the left andright edges of the IDE window. To expand a toolbox, just hover the mouse pointer over thecorresponding tab.

26 CHAPTER 1 GETTING STARTED WITH VISUAL BASIC 2010
Help Menu
This menu contains the various help options. The Dynamic Help command opens the DynamicHelp window, which is populated with topics that apply to the current operation. The Indexcommand opens the Index window, in which you can enter and get help on a specific topic.
The Toolbox WindowThe Toolbox window contains all the controls you can use to build your application interface.This window is usually retracted, and you must move the pointer over it to view the Toolbox.The controls in the Toolbox are organized in various tabs, so take a look at them to becomefamiliar with their functions.
In the first few chapters, we’ll work with the controls in the Common Controls and Menus& Toolbars tabs. The Common Controls tab contains the icons for the most common Windowscontrols, while the All Windows Controls tab contains all the controls you can place onyour form. The Data tab contains the icons for the objects you will use to build data-drivenapplications (they’re explored later in this book). The Menus & Toolbars tab contains the Menuand ContextMenu controls (they’re discussed in Chapter 4) among others. On the Printing tabyou will find all the controls you’ll need to create printouts, and they’re discussed briefly inChapter 11 and in more detail in the tutorial ‘‘Printing with Visual Basic.’’ The Dialogs tabcontains controls for implementing the common dialog controls, which are so common inWindows interfaces; they’re discussed in Chapter 7, ‘‘More Windows Controls.’’
The Solution Explorer WindowThe Solution Explorer window contains a list of the items in the current solution. A solutioncan contain multiple projects, and each project can contain multiple items. The SolutionExplorer displays a hierarchical list of all the components, organized by project. You canright-click any component of the project and choose Properties in the context menu to see theselected component’s properties in the Properties window. If you select a project, you will seethe Project Properties dialog box. You will find more information on project properties in thefollowing chapter.
If the solution contains multiple projects, you can right-click the project you want to becomethe startup form and select Set As StartUp Project. (The Startup project is the one that startsexecuting when you press F5 in the IDE.) You can also add items to a project with the AddItem command from the context menu or remove a component from the project with theExclude From Project command. This command removes the selected component from theproject but doesn’t affect the component’s file on the disk. The Delete command removes theselected component from the project and also deletes the component’s file from the disk.
If a project contains many items, you can organize them into folders. Right-click the projectname and select Add from the context menu. From the shortcut menu that appears, select NewFolder. To move an existing item into a folder, just drag it and drop it on one of the projectfolders.
The Properties WindowThis window (also known as the Properties Browser) displays all the properties of the selectedcomponent and their settings. Every time you place a control on a form, you switch to thiswindow to adjust the appearance of the control. You have already seen how to manipulatethe basic properties of a control through the Properties window, and you will find many moreexamples in this and the following chapter.

UNDERSTANDING THE IDE COMPONENTS 27
Many properties are set to a single value, such as a number or a string. If the possiblesettings of a property are relatively few, they’re displayed as meaningful constants in adrop-down list. Other properties are set through a more elaborate interface. Color properties,for example, are set on a Color dialog box that’s displayed right in the Properties window.Font properties are set through the usual Font dialog box. Collections are set in a CollectionEditor dialog box, in which you can enter one string for each item of the collection, as you didfor the items of the ComboBox control earlier in this chapter.
If the Properties window is hidden, or if you have closed it, you can choose View � Prop-erties Window or right-click a control on the form and choose Properties, or you can simplypress F4 to bring up this window. There will be times when one control might totally overlapanother control, and you won’t be able to select the hidden control and view its properties. Inthis case, you can select the desired control in the ComboBox at the top of the Properties win-dow. This box contains the names of all the controls on the form, and you can select a controlon the form by selecting its name from this box.
The Output WindowThe Output window is where many of the tools, including the compiler, send their output.Every time you start an application, a series of messages is displayed in the Output window.These messages are generated by the compiler, and you need not understand them atthis point. If the Output window is not visible, choose View � Other Windows � Outputfrom the menu.
The Command and Immediate WindowsWhile testing a program, you can interrupt its execution by inserting a breakpoint. Whenthe breakpoint is reached, the program’s execution is suspended and you can execute a state-ment in the Immediate window. Any statement that can appear in your VB code can alsobe executed in the Immediate window. To evaluate an expression, enter a question markfollowed by the expression you want to evaluate, as in the following samples, where result isa variable in the program you interrupted:
? Math.Log(35)? "The answer is " & result.ToString
You can also send output to this window from within your code with the Debug.Write andDebug.WriteLine methods. Actually, this is a widely used debugging technique — to printthe values of certain variables before entering a problematic area of the code. There are moreelaborate tools to help you debug your application, but printing a few values to the Immediatewindow is a time-honored practice in programming with VB.
In many of the examples of this book, especially in the first few chapters, I use theDebug.WriteLine statement to print something to the Immediate window. To demonstrate theuse of the DateDiff() function, for example, I’ll use a statement like the following:
Debug.WriteLine(DateDiff(DateInterval.Day, #3/9/2007#, #5/15/2008#))
When this statement is executed, the value 433 (which is the number of days between thetwo dates) will appear in the Immediate window. This statement demonstrates the syntax ofthe DateDiff() function, which returns the difference between the two dates in days. Sending

28 CHAPTER 1 GETTING STARTED WITH VISUAL BASIC 2010
some output to the Immediate window to test a function or display the results of intermediatecalculations is a common practice.
To get an idea of the functionality of the Immediate window, switch back to your firstsample application and insert the Stop statement after the End If statement in the button’sClick event handler. Run the application, select a language, and click the button on the form.After displaying a message box, the application will reach the Stop statement and its executionwill be suspended. You’ll see the Immediate window at the bottom of the IDE. If it’s notvisible, open the Debug menu and choose Windows � Immediate. In the Immediate window,enter the following statement:
? ComboBox1.Items.Count
Then, press Enter to execute it. Notice that IntelliSense is present while you’re typing inthe Immediate window. The expression prints the number of items in the ComboBox control.(Don’t worry about the numerous properties of the control and the way I present them here;they’re discussed in detail in Chapter 5, ‘‘Basic Windows Controls.’’) As soon as you pressEnter, the value 5 will be printed on the following line.
You can also manipulate the controls on the form from within the Immediate window. Enterthe following statement and press Enter to execute it:
ComboBox1.SelectedIndex = 4
The fifth item on the control will be selected (the indexing of the items begins with 0). How-ever, you can’t see the effects of your changes because the application isn’t running. Press F5 toresume the execution of the application and you will see that the item Cobol is now selected inthe ComboBox control.
The Immediate window is available only while the application’s execution is suspended. Tocontinue experimenting with it, click the button on the form to evaluate your choice. When theStop statement is executed again, you’ll be switched to the Immediate window.
Unlike the Immediate window, the Command window is available at design time. The Com-mand window allows you to access all the commands of Visual Studio by typing their namesin this window. If you enter the string Edit followed by a period, you will see a list of allcommands of the Edit menu, including the ones that are not visible at the time, and youcan invoke any of these commands and pass arguments to them. For example, if you enterEdit.Find ‘‘Margin’’ in the Command window and then press Enter, the first instance ofthe string Margin will be located in the open code window. To start the application, youcan type Debug.Start. You can add a new project to the current solution with the AddProjcommand, and so on. Most developers hardly ever use this window in designing or debuggingapplications.
The Error List WindowThis window is populated by the compiler with error messages if the code can’t be success-fully compiled. You can double-click an error message in this window and the IDE will takeyou to the line with the statement in error — which you should fix. Change the MsgBox() func-tion name to MssgBox(). As soon as you leave the line with the error, the name of the functionwill be underlined with a wiggly red line and the following error description will appear in theError List window:
Name ‘MssgBox’ is not declared

SETTING ENVIRONMENT OPTIONS 29
Correct the function name (it should be MsgBox with one s) and the error number will disap-pear from the Error List window. The Error List window has two more tabs, the Warnings taband the Messages tab, which display various warnings.
Setting Environment OptionsThe Visual Studio IDE is highly customizable. I will not discuss all the customization optionshere, but I will show you how to change the default settings of the IDE. Open the Tools menuand select Options (the last item in the menu). The Options dialog box appears, in which youcan set all the options regarding the environment. Figure 1.14 shows the options for the fonts ofthe various items of the IDE. Here you can set the font for the Text Editor, dialog boxes, tool-boxes, and so on. Select an item in the tree in the left pane list and then set the font for thisitem in the box below.
Figure 1.14
The Fonts And Colorsoptions
Figure 1.15 shows the Projects And Solutions options. The top box indicates the default loca-tion for new projects. The Save New Projects When Created check box determines whetherthe editor will create a new folder for the project when it’s created. If you uncheck this box,then Visual Studio will create a folder in the Temp folder. Projects in the Temp folder will beremoved when you run the Disk Cleanup utility to claim more space on your hard drives.
By default, Visual Studio saves the changes to the current project every time you press F5.You can change this behavior by setting the Before Building option in the Build And Run page,under the Project And Solutions branch. If you change this setting, you must save your projectfrom time to time with the File � Save All command.
Most of the tabs in the Options dialog box are straightforward, and you should take a lookat them. If you don’t like some of the default aspects of the IDE, this is the place to changethem. If you switch to the Basic item under the Text Editor branch of the tree in the left pane ofthe Options dialog box, you will find the Line Numbers option. Select this check box to displaynumbers in front of each line in the code window. The Options dialog box contains a lot ofoptions for customizing your work environment, and it’s worth exploring on your own. Beforeyou make any changes in the Visual Studio options, make sure you save the current settingswith the Import And Exporting Settings command accessible from the Tools menu.

30 CHAPTER 1 GETTING STARTED WITH VISUAL BASIC 2010
Figure 1.15
The Projects And Solu-tions options
Building a Console ApplicationApart from Windows applications, you can use Visual Studio 2010 to build applications thatrun in a command prompt window. The command prompt window isn’t really a DOS win-dow, even though it looks like one. It’s a text window, and the only way to interact with anapplication is to enter lines of text and read the output generated by the application, which isdisplayed in this text window, one line at a time. This type of application is called a consoleapplication, and I’m going to demonstrate console applications with a single example. We willnot return to this type of application later in the book because it’s not what you’re supposed todo as a Windows developer.
The console application you’ll build in this section, ConsoleApplication1, prompts users toenter the name of their favorite language. It then prints the appropriate message on a new line,as shown in Figure 1.16.
Figure 1.16
A console applicationuses the commandprompt window to inter-act with the user.
Start a new project. In the New Project dialog box, select the template Console Application.You can also change its default name from ConsoleApplication1 to a more descriptive name.For this example, don’t change the application’s name.

BUILDING A CONSOLE APPLICATION 31
A console application doesn’t have a user interface, so the first thing you’ll see is the codeeditor’s window with the following statements:
Module Module1
Sub Main()
End Sub
End Module
Unlike a Windows application, which is a class, a console application is a module. Main()is the name of a subroutine that’s executed automatically when you run a console application.The code you want to execute must be placed between the statements Sub Main() and End Sub.Insert the statements shown in Listing 1.3 in the application’s Main() subroutine.
Listing 1.3: Console application
Module Module1Sub Main()
Console.WriteLine("Enter your favorite language")Dim language As Stringlanguage = Console.ReadLine()language = language.ToUpperIf language = "VISUAL BASIC" Or
language = "VB" Orlanguage = "VB.NET" Orlanguage = "VISUAL BASIC 2010" Then
Console.WriteLine("We have a winner!")Else
Console.WriteLine(language & " is not a bad language.")End IfConsole.WriteLine()Console.WriteLine()Console.WriteLine("PRESS ENTER TO EXIT")Console.ReadLine()
End SubEnd Module
This code is quite similar to the code of the equivalent Windows applications we developedearlier, except that it uses the Console.WriteLine statement to send its output to the commandprompt window instead of a message box.
A console application doesn’t react to events because it has no visible interface. However,it’s easy to add some basic elements of the Windows interface to a console application. If youchange the Console.WriteLine method call into the MsgBox() function, the message will bedisplayed in a message box.
One reason to build a console application is to test a specific feature of the language with-out having to build a user interface. Many of the examples in the documentation are console

32 CHAPTER 1 GETTING STARTED WITH VISUAL BASIC 2010
applications; they demonstrate the topic at hand and nothing more. If you want to test theDateDiff() function, for example, you can create a new console application and enter the linesfrom Listing 1.4 in its Main() subroutine.
Listing 1.4: Testing the DateDiff() function with a console application
Sub Main()Console.WriteLine(DateDiff(DateInterval.Day, #3/9/2000#, #5/15/2008#))Console.WriteLine("PRESS ENTER TO EXIT")Console.ReadLine()
End Sub
The last two lines will be the same in every console application you write. Without them,the command prompt window will close as soon as the End Sub statement is reached, and youwon’t have a chance to see the result. The Console.ReadLine method waits until the userpresses the Enter key.
Console applications are convenient for testing short code segments, but Windows program-ming is synonymous with designing graphical user interfaces, so you won’t find any moreconsole applications in this book.
Using Code SnippetsVisual Basic 2010 comes with a lot of predefined code snippets for selected actions, and youcan insert these snippets into your code as needed. Let’s say you want to insert the statementsfor writing some text to a file, but you have no idea how to access files. Create an empty line inthe listing (press the Enter key a couple of times at the end of a code line). Then open the Editmenu and choose IntelliSense � Insert Snippet (or right-click somewhere in the code windowand choose Insert Snippet from the context menu).
When Insert Snippet opens, you will see a list of the snippets, organized in folders accordingto their function, as shown in Figure 1.17. Double-click any folder name to see the subfold-ers or actual snippets available for that function. Try it out. Double-click the Fundamentalsfolder and take a look at the options available to you: Collections, Data Types, File System, andMath. Double-click the filesystem item to see a list of common file-related tasks, as shown inFigure 1.18. Scroll down and locate the item Write Text To A File in the list. Now, double-clickit to insert that snippet at the current location in the code window.
The following snippet will be inserted in your code:
My.Computer.FileSystem.WriteAllText("C:\test.txt", "Text", True)
To write some text to a file, you need to call the WriteAllText method of theMy.Computer.FileSystem object. You can replace the strings shown in the snippet withactual values. The first string is the filename, the second string is the text to be written to thefile, and the last argument of the method determines whether the text will be appended to thefile (if False) or will overwrite any existing text (if True).
Each snippet shows you the basic statements for performing a common task, and you canedit the code inserted by Visual Studio as needed. A real-world application would probablyprompt the user for a filename via the File common dialog box and then use the filename spec-ified by the user in the dialog box instead of a hard-coded filename.

USING THE MY COMPONENT 33
Figure 1.17
The code snippets areorganized according tofunction.
Figure 1.18
Selecting a code snippetto insert in your code
As you program, you should always try to find out whether there’s a snippet for the task athand. Sometimes you can use a snippet without even knowing how it works. Although snip-pets can simplify your life, they won’t help you understand the Framework, which is discussedin detail throughout this book.
Using the My ComponentYou have probably noticed that the code snippets available through Visual Studio use an entitycalled My — a peculiar object that was introduced with VB 2005 to simplify many programming tasks. As you saw in the preceding code snippet, the My component allowed you to writesome text to a file with a single statement, the WriteAllText method. If you’re familiar withearlier versions of Visual Basic, you know that to actually write text to a file you must firstopen a file, then write some text to it, and finally close the file. The My component allows youto perform all these operations with a single statement.
Another example is the Play method, which you can use to play back a WAV file fromwithin your code:
My.Computer.Audio.Play ("C:\Sounds\CountDown.wav")
Or you can use it to play back a system sound:
My.Computer.Audio.PlaySystemSound(System.Media.SystemSounds.Exclamation)

34 CHAPTER 1 GETTING STARTED WITH VISUAL BASIC 2010
The method that plays back the sound is the Play method, and the method that writes textto a file is the WriteAllText method. However, you can’t call them directly through the Mycomponent; they’re not methods of the My component. If they were, you’d have to dig hard tofind out the method you need. The My component exposes six components, which contain theirown components. Here’s a description of the basic components of the My component and thefunctionality you should expect to find in each component:
My.Application The Application component provides information about the current appli-cation. The CommandLineArgs property of My.Application returns a collection of strings, whichare the arguments passed to the application when it was started. Typical Windows applicationsaren’t called with command-line arguments, but it’s possible to start an application and pass afilename as an argument to the application (the document to be opened by the application, forexample). The Info property is an object that exposes properties such as DirectoryPath (theapplication’s default folder), ProductName, Version, and so on.
My.Computer This component exposes a lot of functionality via a number of properties,many of which are objects. The My.Computer.Audio component lets you play back sounds.The My.Computer.Clipboard component lets you access the Clipboard. To find out whetherthe Clipboard contains a specific type of data, use the ContainsText, ContainsImage,ContainsData, and ContainsAudio methods. To retrieve the contents of the Clipboard, usethe GetText, GetImage, GetData, and GetAudioStream methods. Assuming that you have aform with a TextBox control and a PictureBox control, you can retrieve text or image data fromthe Clipboard and display it on the appropriate control with the following statements:
If My.Computer.Clipboard.ContainsImage ThenPictureBox1.Image = My.Computer.Clipboard.GetImage
End IfIf My.Computer.Clipboard.ContainsText Then
TextBox2.Text = My.Computer.Clipboard.GetTextEnd If
You may have noticed that using the My component in your code requires that you write longstatements. You can shorten them substantially via the With statement, as shown next:
With My.Computer.ClipboardIf .ContainsImage Then
PictureBox1.Image = .GetImageEnd IfIf .ContainsText Then
TextBox2.Text = .GetTextEnd If
End With
When you’re executing multiple statements on the same object, you can specify the object ina With statement and call its methods in the block of the With statement by specifying themethod name prefixed with a dot. The With statement is followed by the name of the objectto which all following methods apply and is terminated with the End With statement.
Another property of the My.Computer component is the FileSystem object that exposesall the methods you need to access files and folders. If you enter the expression

USING THE MY COMPONENT 35
My.Computer.FileSystem followed by a dot, you will see all the methods exposed bythe FileSystem component. Among them, you will find DeleteFile, DeleteDirectory,RenameFile, RenameDirectory, WriteAllText, ReadAllText, and many more. Select amethod and then type the opening parenthesis. You will see the syntax of the method in aToolTip. The syntax of the CopyFile method is as follows:
My.Computer.FileSystem.CopyFile(sourceFileName As String, destinationFileName As String)
Just specify the path of the file you want to copy and the new file’s name, and you’re finished.This statement will copy the specified file to the specified location.
You will notice that the ToolTip box with the syntax of the CopyFile method has multiple ver-sions, which are listed at the left side of the box along with arrow up and arrow down icons.Click these two buttons to see the next and previous versions of the method. The second ver-sion of the CopyFile method is as follows:
My.Computer.FileSystem.CopyFile(sourceFileName As String, destinationFileName As String,overwrite As Boolean)
The overwrite argument specifies whether the method should overwrite the destination file ifit exists.
The third version of the method accepts a different third argument that determines whetherthe usual copy animation will be displayed as the file is being copied.
The various versions of the same method differ in the number and/or type of their arguments,and they’re called overloaded forms of the method. Instead of using multiple method namesfor the same basic operation, the overloaded forms of a method allow you to call the samemethod name and adjust its behavior by specifying different arguments.
My.Forms This component lets you access the forms of the current application. You can alsoaccess the application’s forms by name, so the Forms component isn’t the most useful one.
My.Settings This component lets you access the application settings. These settings apply tothe entire application and are stored in an XML configuration file. The settings are created fromwithin Visual Studio, and you use the Settings component to read them.
My.User This component returns information about the current user. The most importantproperty of the User component is the CurrentPrincipal property, which is an object thatrepresents the credentials of the current user.
My.WebServices The WebServices component represents the web services referenced by thecurrent application.
The My component gives beginners unprecedented programming power and allows you toperform tasks that would require substantial code if implemented with earlier versions of thelanguage, not to mention the research it would take to locate the appropriate methods in theFramework. You can explore the My component on your own and use it as needed. My is not asubstitute for learning the language and the Framework. It can help you initially, but you can’tgo far without learning the methods of the Framework for handling files or any other feature.

36 CHAPTER 1 GETTING STARTED WITH VISUAL BASIC 2010
Let’s say you want to locate all the files of a specific type in a folder, including its sub-folders. Scanning a folder and its subfolders to any depth is quite a task (you’ll findthe code in the tutorial ‘‘Accessing Folders and Files,’’ which you can download fromwww.sybex.com/go/masteringvb2010). You can do the same with a single statement by usingthe My component:
Dim files As ReadOnlyCollection(Of String)files = My.Computer.FileSystem.GetFiles("D:\Data", True, "*.txt")
The GetFiles method populates the files collection with the pathnames of the text files inthe folder D:\Data and its subfolders. However, it won’t help you if you want to process eachfile in place. Moreover, this GetFiles method is synchronous: If the folder contains many sub-folders with many files, it will block the interface until it retrieves all the files. In the tutorial‘‘Accessing Folders and Files,’’ you’ll see the code that retrieves filenames and adds them to acontrol as it goes along.
If you’re already familiar with VB, you may think that the My component is an aid for the abso-lute beginner or the nonprogrammer. This isn’t true. VB is about productivity, and the My com-ponent can help you be more productive with your daily tasks, regardless of your knowledgeof the language or programming skills. If you can use My to save a few (or a few dozen) state-ments, do it. There’s no penalty for using the My component because the compiler replaces themethods of the My component with the equivalent method calls to the Framework.
The Bottom Line
Navigate the integrated development environment of Visual Studio. To simplify the pro-cess of application development, Visual Studio provides an environment that’s common to alllanguages, known as an integrated development environment (IDE). The purpose of the IDEis to enable the developer to do as much as possible with visual tools before writing code. TheIDE provides tools for designing, executing, and debugging your applications. It’s your seconddesktop, and you’ll be spending most of your productive hours in this environment.
Master It Describe the basic components of the Visual Studio IDE.
Understand the basics of a Windows application. A Windows application consists ofa visual interface and code. The visual interface is what users see at runtime: a form withcontrols with which the user can interact — by entering strings, checking or clearing checkboxes, clicking buttons, and so on. The visual interface of the application is designed withvisual tools. The visual elements incorporate a lot of functionality, but you need to write somecode to react to user actions.
Master It Describe the process of building a simple Windows application.
Chapter 2
Handling Data
This chapter and the next discuss the fundamentals of any programming language: variablesand data types. A variable stores data, which is processed with statements. A program is a listof statements that manipulate variables. To write even simple applications, you need a basicunderstanding of some fundamental topics, such as the data types (the kind of data you canstore in a variable), the scope and lifetime of variables, and how to write procedures and passarguments to them. In this chapter, we’ll explore the basic data types of Visual Basic, and in thefollowing one, you’ll learn about procedures and flow-control statements.
If you’re new to Visual Basic, you may find some material in this chapter less than exciting.It covers basic concepts and definitions — in general, tedious, but necessary, material. Think ofthis chapter as a prerequisite for the following ones. If you need information on core featuresof the language as you go through the examples in the rest of the book, you’ll probably find ithere.
In this chapter, you’ll learn how to do the following:
◆ Declare and use variables
◆ Use the native data types
◆ Create custom data types
◆ Use arrays
VariablesIn Visual Basic, as in any other programming language, variables store values during a pro-gram’s execution. A variable has a name and a value. The variable UserName, for example,might have the value Joe, and the variable Discount might have the value 0.35. UserName andDiscount are variable names, and Joe and 0.35 are their values. Joe is a string (that is, text),and 0.35 is a numeric value. When a variable’s value is a string, it must be enclosed in doublequotes. In your code, you can refer to the value of a variable by the variable’s name.
In addition to a name and a value, variables have a data type, which determines what kindof values you can store to a variable. VB 2010 supports several data types (and they’re dis-cussed in detail later in this chapter). It’s actually the Common Language Runtime (CLR) thatsupports the data types, and the data types are common to all languages, not just to VisualBasic. The data type of a variable is specified when the variable is declared, and you should

38 CHAPTER 2 HANDLING DATA
always declare variables before using them. (I’ll tell you more about declaring variables in thenext section.)
The various data types are discussed in detail later in this chapter, but let me start withsome simple examples to demonstrate the concepts of using variables in an application. Oneof the available numeric data types is the Decimal data type; it can store both integer andnon-integer values. For example, the following statements calculate and display the discountfor the amount of $24,500:
Dim Amount As DecimalDim Discount As DecimalDim DiscountedAmount As DecimalAmount = 24500Discount = 0.35DiscountedAmount = Amount * (1 - Discount)MsgBox(′′Your price is $′′ & DiscountedAmount.ToString)
If you enter these statements in a button’s Click event handler to test them, the compilermay underline the statement that assigns the value 0.35 to the Discount variable and generatean error message. To view the error message, hover the pointer over the underlined segmentof the statement in error. This will happen if the Strict option is on. (I discuss the Strict option,along with two more options of the compiler, later in this chapter.) By default, the Strict optionis off and the statement won’t generate an error.
The compiler treats any numeric value with a fractional part as a Double value and detectsthat you’re attempting to assign a Double value to a Decimal variable. To specify that anumeric value should be treated as a Decimal type, use the following notation:
Discount = 0.35D
As you will see later, the D character at the end of a numeric value indicates that the valueshould be treated as a Decimal value, and there are a few more type characters (see Table 2.2later in this chapter). I’ve used the Decimal data type here because it’s commonly used in finan-cial calculations.
The amount displayed on the message box by the last line of code depends on the valuesof the Discount and Amount variables. If you decide to offer a better discount, all you have todo is change the value of the Discount variable. If you didn’t use the Discount variable, you’dhave to make many changes throughout your code. In other words, if you coded the line thatcalculated the discounted amount as follows, you’d have to look for every line in your codethat calculates discounts and change the discount from 0.35 to another value:
DiscountedAmount = 24500 * (1 - 0.35)
When you change the value of the Discount variable in a single place in your code, theentire program is up-to-date and it will evaluate the proper discount on any amount.
Declaring VariablesIn most programming languages, variables must be declared in advance. Historically, the rea-son for doing this has been to help the compiler generate the most efficient code. If the compiler

VARIABLES 39
knows all the variables and their types ahead of time, it can produce the most compact and effi-cient, or optimized, code. For example, when you tell the compiler that the variable Discountwill hold a number, the compiler sets aside a certain number of bytes for the Discount variableto use.
When programming in VB 2010, you should declare your variables because this is thedefault mode, and Microsoft recommends this practice strongly. If you attempt to use anundeclared variable in your code, VB 2010 will throw an exception. It will actually catch theerror as soon as you type in the line that uses the undeclared variable, underlining it witha wiggly line. It is possible to change the default behavior and use undeclared variablesthe way most people did with earlier versions of VB, but all the examples in this bookuse explicitly declared variables. In any case, you’re strongly encouraged to declare yourvariables.
You already know how to declare variables with the Dim statement and the As keyword,which introduces their type:
Dim meters As IntegerDim greetings As String
The first variable, meters, will store integers, such as 3 or 1,002; the second variable,greetings, will store text. You can declare multiple variables of the same or different type inthe same line, as follows:
Dim Qty As Integer, Amount As Decimal, CardNum As String
If you want to declare multiple variables of the same type, you need not repeat the type.Just separate all the variables of the same type with commas and set the type of the lastvariable:
Dim Length, Width, Height As Integer, Volume, Area As Double
This statement declares three Integer variables and two Double variables. Double variables holdfractional values (or floating-point values, as they’re usually called) that are similar to the Sin-gle data type except that they can represent non-integer values with greater accuracy.
An important aspect of variables is their scope, a topic that’s discussed in more detail later inthis chapter. In the meantime, bear in mind that all variables declared with the Dim statementexist in the module in which they were declared. If the variable Count is declared in a subrou-tine (an event handler, for example), it exists only in that subroutine. You can’t access it fromoutside the subroutine. Actually, you can have a Count variable in multiple procedures. Eachvariable is stored locally, and they don’t interfere with one another.
Variable-Naming Conventions
When declaring variables, you should be aware of a few naming conventions:
◆ A variable’s name must begin with a letter or an underscore character, followed by moreletters or digits.
◆ It can’t contain embedded periods or other special punctuation symbols. The only specialcharacter that can appear in a variable’s name is the underscore character.

40 CHAPTER 2 HANDLING DATA
◆ It mustn’t exceed 1,024 characters.
◆ It must be unique within its scope. This means that you can’t have two identically namedvariables in the same subroutine, but you can have a variable named counter in many dif-ferent subroutines.
Variable names are not case sensitive: myAge, myage, and MYAGE all refer to the same vari-able in your code. Actually, as you enter variable names in your code, the editor converts theircasing so that they match their declaration.
Variable Initialization
Visual Basic allows you to initialize variables in the same line that declares them. The followingstatement declares an Integer variable and immediately places the value 3,045 in it:
Dim distance As Integer = 3045
This statement is equivalent to the following two:
Dim distance As Integerdistance = 3045
It is also possible to declare and initialize multiple variables (of the same or different type)on the same line:
Dim quantity As Integer = 1, discount As Single = 0.25
Types of VariablesYou’ve learned how to declare variables and that all variables should have a type. But whatdata types are available? Visual Basic recognizes the following five categories of variables:
◆ Numeric
◆ String
◆ Boolean
◆ Date
◆ Object
The two major variable categories are numeric and string. Numeric variables store numbers,and string variables store text. Object variables can store any type of data. Why bother to spec-ify the type if one type suits all? On the surface, using object variables might seem like a goodidea, but they have their disadvantages. Integer variables are optimized for storing integers,and date variables are optimized for storing dates. Before VB can use an object variable, it mustdetermine its type and perform the necessary conversions. If the variable is declared with aspecific type, these conversions are not necessary.
Text is stored in string variables, but numbers can be stored in many formats, depending onthe size of the number and its precision. That’s why there are many types of numeric variables.The String and Date data types are much richer in terms of the functionality they expose andare discussed in more detail in Chapter 11, ‘‘The Framework at Large.’’

VARIABLES 41
Numeric Variables
You’d expect that programming languages would use the same data type for numbers. Afterall, a number is a number. But this couldn’t be further from the truth. All programming lan-guages provide a variety of numeric data types, including the following:
◆ Integer (there are several Integer data types)
◆ Decimal
◆ Single (floating-point numbers with limited precision)
◆ Double (floating-point numbers with extreme precision)
Decimal, Single, and Double are the three basic data types for storing floating-point numbers(numbers with a fractional part). The Double data type can represent these numbers more accu-rately than the Single type and is used almost exclusively in scientific calculations. The Integerdata types store whole numbers. The data type of your variable can make a difference in theresults of the calculations. The proper variable types are determined by the nature of the val-ues they represent, and the choice of data type is frequently a trade-off between precision andspeed of execution (less-precise data types are manipulated faster). Visual Basic supports thenumeric data types shown in Table 2.1. In the Data Type column, I show the name of each datatype and the corresponding keyword in parentheses.
Integer Variables
There are three types of variables for storing integers, and they differ only in the range ofnumbers each can represent. As you understand, the more bytes a type takes, the largervalues it can hold. The type of Integer variable you’ll use depends on the task at hand. Youshould choose the type that can represent the largest values you anticipate will come upin your calculations. You can go for the Long type, to be safe, but Long variables take upfour times as much space as Short variables and it takes the computer longer to processthem.
Single- and Double-Precision Numbers
The Single and Double data type names come from single-precision and double-precisionnumbers. Double-precision numbers are stored internally with greater accuracy than single-precision numbers. In scientific calculations, you need all the precision you can get; in thosecases, you should use the Double data type.
The Single and Double data types are approximate; you can’t represent any numeric valueaccurately and precisely with these two data types. The problem stems from the fact that com-puters must store values in a fixed number of bytes, so some accuracy will be lost. Instead ofdiscussing how computers store numeric values, I will demonstrate the side effects of using thewrong data type with a few examples.
The result of the operation 1 ÷ 3 is 0.333333 . . . (an infinite number of the digit 3). You couldfill 256 MB of RAM with 3s, and the result would still be truncated. Here’s a simple examplethat demonstrates the effects of truncation.
In a button’s Click event handler, declare two variables as follows:
Dim a As Single, b As Double

42 CHAPTER 2 HANDLING DATA
Table 2.1: Visual Basic numeric data types
Data Type Memory
Representation
Stores
Byte (Byte) 1 byte Integers in the range 0 to 255.
Signed Byte(SByte)
1 byte Integers in the range −128 to 127.
Short (Int16) 2 bytes Integer values in the range −32,768 to 32,767.
Integer (Int32) 4 bytes Integer values in the range −2,147,483,648 to2,147,483,647.
Long (Int64) 8 bytes Integer values in the range −9,223,372,036,854,755,808 to9,223,372,036,854,755,807.
Unsigned Short(UShort)
2 bytes Positive integer values in the range 0 to 65,535.
Unsigned Integer(UInteger)
4 bytes Positive integers in the range 0 to 4,294,967,295.
Unsigned Long(ULong)
8 bytes Positive integers in the range 0 to18,446,744,073,709,551,615.
Single Precision(Single)
4 bytes Single-precision floating-point numbers. A single precisionvariable can represent negative numbers in the range−3.402823E38 to −1.401298E–45 and positive numbers inthe range 1.401298E–45 to 3.402823E38. The value 0 can’tbe represented precisely (it’s a very, very small number,but not exactly 0).
Double Precision(Double)
8 bytes Double-precision floating-point numbers. A doubleprecision variable can represent negative numbers in therange −1.79769313486232E308 to−4.94065645841247E–324 and positive numbers in therange 4.94065645841247E–324 to 1.79769313486232E308.
Decimal (Decimal) 16 bytes Integer and floating-point numbers scaled by a factor inthe range from 0 to 28. See the description of the Decimaldata type for the range of values you can store in it.
Then enter the following statements:
a = 1 / 3Debug.WriteLine(a)
Run the application, and you should get the following result in the Output window:
.3333333

VARIABLES 43
There are seven digits to the right of the decimal point. Break the application by pressingCtrl+Break and append the following lines to the end of the previous code segment:
a = a * 100000Debug.WriteLine(a)
This time, the following value will be printed in the Output window:
33333.34
The result is not as accurate as you might have expected initially — it isn’t even roundedproperly. If you divide a by 100,000, the result will be as follows:
0.3333334
This number is different from the number we started with (0.3333333). The initial value wasrounded when we multiplied it by 100,000 and stored it in a Single variable. This is an impor-tant point in numeric calculations, and it’s called error propagation. In long sequences of numericcalculations, errors propagate. Even if you can tolerate the error introduced by the Single datatype in a single operation, the cumulative errors might be significant.
Let’s perform the same operations with double-precision numbers, this time using the vari-able b. Add these lines to the button’s Click event handler:
b = 1 / 3Debug.WriteLine(b)b = b * 100000Debug.WriteLine(b)
This time, the following numbers are displayed in the Output window:
0.33333333333333333333.3333333333
The results produced by the double-precision variables are more accurate.Why are such errors introduced in our calculations? The reason is that computers store
numbers internally with two digits: zero and one. This is very convenient for computersbecause electronics understand two states: on and off. As a matter of fact, all the statementsare translated into bits (zeros and ones) before the computer can understand and executethem. The binary numbering system used by computers is not much different from the decimalsystem we humans use; computers just use fewer digits. We humans use 10 different digitsto represent any number, whole or fractional, because we have 10 fingers (in effect, computerscount with just two fingers). Just as with the decimal numbering system, in which somenumbers can’t be precisely represented, there are numbers that can’t be represented preciselyin the binary system.
Let me give you a more illuminating example. Create a single-precision variable, a, and adouble-precision variable, b, and assign the same value to them:
Dim a As Single, b As Double

44 CHAPTER 2 HANDLING DATA
a = 0.03007b = 0.03007
Then print their difference:
Debug.WriteLine(a-b)
If you execute these lines, the result won’t be zero! It will be –6.03199004634014E–10. This isa very small number that can also be written as 0.000000000603199004634014. Because differentnumeric types are stored differently in memory, they don’t quite match. What this means toyou is that all variables in a calculation should be of the same type.
Eventually, computers will understand mathematical notation and will not convert allnumeric expressions into values as they do today. If you multiply the expression 1/3 by 3, theresult should be 1. Computers, however, must convert the expression 1/3 into a value beforethey can multiply it by 3. Because 1/3 can’t be represented precisely, the result of the (1/3) ×3 will not be exactly 1. If the variables a and b are declared as Single or Double, the followingstatements will print 1:
a = 3b = 1 / aDebug.WriteLine(a * b)
If the two variables are declared as Decimal, however, the result will be a number veryclose to 1 but not exactly 1 (it will be 0.9999999999999999999999999999 — there will be 28 dig-its after the decimal point). Fortunately, these errors do not surface with typical business-lineapplications, but you should be aware of truncation errors and how they may affect your cal-culations. In business applications, we always round our results to two decimal digits and thevalue 0.999999 of the preceding example will be rounded to 1.00.
The Decimal Data Type
Variables of the Decimal type are stored internally as integers in 16 bytes and are scaled bya power of 10. The scaling power determines the number of decimal digits to the right of thefloating point, and it’s an integer value from 0 to 28. When the scaling power is 0, the value ismultiplied by 100, or 1, and it’s represented without decimal digits. When the scaling power is28, the value is divided by 1028(which is 1 followed by 28 zeros — an enormous value), and it’srepresented with 28 decimal digits.
The largest possible value you can represent with a Decimal value is an integer: 79,228,162,514,264,337,593,543,950,335. The smallest number you can represent with a Decimal variableis the negative of the same value. These values use a scaling factor of 0. When the scaling fac-tor is 28, the largest value you can represent with a Decimal variable is quite small, actually. It’s7.9228162514264337593543950335 (and the smallest value is the same with a minus sign). This isa very small numeric value (not quite 8), but it’s represented with extreme accuracy. The num-ber zero can’t be represented precisely with a Decimal variable scaled by a factor of 28. Thesmallest positive value you can represent with the same scaling factor is 0.00 . . . 01 (there are27 zeros between the decimal period and the digit 1) — an extremely small value, but still notquite zero. The more accuracy you want to achieve with a Decimal variable, the smaller therange of available values you have at your disposal — just as with everything else in life.

VARIABLES 45
When using decimal numbers, the compiler keeps track of the decimal digits (the digits fol-lowing the decimal point) and treats all values as integers. The value 235.85 is represented asthe integer 23585, but the compiler knows that it must scale down the value by 100 when itfinishes using it. Scaling down by 100 (that is, 102) corresponds to shifting the decimal pointby two places. First, the compiler multiplies this value by 100 to make it an integer. Then, itdivides it by 100 to restore the original value. Let’s say that you want to multiply the followingvalues:
328.558 * 12.4051
First, the compiler turns them into integers. The compiler remembers that the first numberhas three decimal digits and the second number has four decimal digits. The result of the mul-tiplication will have seven decimal digits. So the compiler can multiply the following integervalues:
328558 * 124051
It then treats the last seven digits of the result as decimals. The result of the multiplica-tion is 40,757,948,458. The actual value after taking into consideration the decimal digits is4,075.7948458. This is how the compiler manipulates the Decimal data type.
Type Characters
As I mentioned earlier, the D character at the end of a numeric value specifies that thenumber should be converted into a Decimal value. By default, every value with a fractionalpart is treated as a Double value because this type can accommodate fractional values withthe greatest possible accuracy. Assigning a Double value to a Decimal variable will producean error if the Strict option is on, so you must specify explicitly that the two values shouldbe converted to the Decimal type. The D character at the end of the value is called a typecharacter. Table 2.2 lists all of the type characters that are available in Visual Basic.
Table 2.2: Type characters
Type Character Description Example
C Converts value to a Char type Dim ch As String = "A"c
D or @ Converts value to a Decimal type Dim price As Decimal = 12.99D
R or # Converts value to a Double type Dim pi As Double = 3.14R
I or % Converts value to an Integer type Dim count As Integer = 99I
L or & Converts value to a Long type Dim distance As Long = 1999L
S Converts value to a Short type Dim age As Short = 1S
F or ! Converts value to a Single type Dim velocity As Single = 74.99F

46 CHAPTER 2 HANDLING DATA
If you perform the same calculations with Single variables, the result will be truncated (androunded) to three decimal digits: 4,075.795. Notice that the Decimal data type didn’t introduceany rounding errors. It’s capable of representing the result with the exact number of decimaldigits provided the Decimal type can accommodate both operands and their result. This is thereal advantage of Decimals, which makes them ideal for financial applications. For scientificcalculations, you must still use Doubles. Decimal numbers are the best choice for calculationsthat require a specific precision (such as four or eight decimal digits).
Infinity and Other Oddities
The Framework can represent two very special values, which may not be numeric values them-selves but are produced by numeric calculations: NaN (not a number) and Infinity. If yourcalculations produce NaN or Infinity, you should give users a chance to verify their data, oreven recode your routines as necessary. For all practical purposes, neither NaN nor Infinitycan be used in everyday business calculations.
Not a Number (NaN)
NaN is not new. Packages such as Wolfram Mathematica and Microsoft Excel have been usingit for years. The value NaN indicates that the result of an operation can’t be defined: It’s nota regular number, not zero, and not infinity. NaN is more of a mathematical concept ratherthan a value you can use in your calculations. The Log() function, for example, calculatesthe logarithm of positive values. By definition, you can’t calculate the logarithm of a negativevalue. If the argument you pass to the Log() function is a negative value, the function willreturn the value NaN to indicate that the calculations produced an invalid result. You mayfind it annoying that a numeric function returns a non-numeric value, but it’s better than ifit throws an exception. Even if you don’t detect this condition immediately, your calculationswill continue and they will all produce NaN values.
Some calculations produce undefined results, such as infinity. Mathematically, the result ofdividing any number by zero is infinity. Unfortunately, computers can’t represent infinity, sothey produce an error when you request a division by zero. Visual Basic will report a specialvalue, which isn’t a number: the Infinity value. If you call the ToString method of this value,however, it will return the string Infinity. Let’s generate an Infinity value. Start by declar-ing a Double variable, dblVar:
Dim dblVar As Double = 999
Then divide this value by zero:
Dim infVar as DoubleinfVar = dblVar / 0
And display the variable’s value:
MsgBox(infVar)

VARIABLES 47
The string Infinity will appear in a message box. This string is just a description; it tellsyou that the result is not a valid number (it’s a very large number that exceeds the range ofnumeric values that can be represented with any data type), but it shouldn’t be used in othercalculations. However, you can use the Infinity value in arithmetic operations. Certain opera-tions with infinity make sense; others don’t. If you add a number to infinity, the result is stillinfinity (any number, even an arbitrarily large one, can still be increased). If you divide a valueby infinity, you’ll get the zero value, which also makes sense. If you divide one Infinity valueby another Infinity value, you’ll get the second odd value, NaN.
Another calculation that will yield a non-number is the division of a very large number bya very small number (a value that’s practically zero, but not quite). If the result exceeds thelargest value that can be represented with the Double data type, the result is Infinity. Declarethree variables as follows:
Dim largeVar As Double = 1E299Dim smallVar As Double = 1E-299Dim result As Double
The notation 1E299 means 10 raised to the power of 299, which is an extremely large num-ber. Likewise, 1E-299 means 10 raised to the power of –299, which is equivalent to dividing 10by a number as large as 1E299.
Then divide the large variable by the small variable and display the result:
result = largeVar / smallVarMsgBox(result)
The result will be Infinity. If you reverse the operands (that is, you divide the very smallby the very large variable), the result will be zero. It’s not exactly zero, but the Double datatype can’t accurately represent numeric values that are very, very close (but not equal) to zero.
You can also produce an Infinity value by multiplying a very large (or very small) numberby itself many times. But clearly, the most absurd method of generating an Infinity value isto assign the Double.PositiveInfinity or Double.NegativeInfinity value to a variable!
The result of the division 0 / 0, for example, is not a numeric value. If you attempt to enterthe statement 0 / 0 in your code, however, VB will catch it even as you type, and you’ll get theerror message Division by zero occurs in evaluating this expression.
To divide zero by zero, set up two variables as follows:
Dim var1, var2 As DoubleDim result As Doublevar1 = 0var2 = 0result = var1 / var2MsgBox(result)
If you execute these statements, the result will be NaN. Any calculations that involve theresult variable will also yield NaN. The following statements will produce a NaN value:
result = result + resultresult = 10 / result
48 CHAPTER 2 HANDLING DATA
result = result + 1E299MsgBox(result)
If you make var2 a very small number, such as 1E-299, the result will be zero. If you makevar1 a very small number, the result will be Infinity.
For most practical purposes, Infinity is handled just like NaN. They’re both numbers thatshouldn’t occur in business applications (unless you’re projecting the national deficit in thenext 50 years), and when they do, it means that you must double-check your code or your data.They are much more likely to surface in scientific calculations, and they must be handled withthe statements described in the next section.
Testing for Infinity and NaN
To find out whether the result of an operation is a NaN or Infinity, use the IsNaN andIsInfinity methods of the Single and Double data types. The Integer data type doesn’tsupport these methods, even if it’s possible to generate Infinity and NaN results with integers.If the IsInfinity method returns True, you can further examine the sign of the Infinity valuewith the IsNegativeInfinity and IsPositiveInfinity methods.
In most situations, you’ll display a warning and terminate the calculations. The statementsof Listing 2.1 do just that. Place these statements in a button’s Click event handler and run theapplication.
Listing 2.1: Handling NaN and Infinity values
Dim var1, var2 As DoubleDim result As Doublevar1 = 0var2 = 0result = var1 / var2If Double.IsInfinity(result) Then
If Double.IsPositiveInfinity(result) ThenMsgBox(′′Encountered a very large number. Can’t continue′′)
ElseMsgBox(′′Encountered a very small number. Can’t continue′′)
End IfElse
If Double.IsNaN(result) ThenMsgBox(′′Unexpected error in calculations′′)
ElseMsgBox(′′The result is : ′′ & result.ToString)
End IfEnd If
This listing will generate a NaN value. Set the value of the var1 variable to 1 to generatea positive Infinity value or to –1 to generate a negative Infinity value. As you can see, theIsInfinity, IsPositiveInfinity, IsNegativeInfinity, and IsNaN methods require that thevariable be passed as an argument.

VARIABLES 49
If you change the values of the var1 and var2 variables to the following values and executethe application, you’ll get the message Encountered a very large number:
var1 = 1E+299var2 = 1E-299
If you reverse the values, you’ll get the message Encountered a very small number. In eithercase, the program will terminate gracefully and let the user know the type of problem that pre-vents the completion of the calculations.
Byte Variables
None of the previous numeric types is stored in a single byte. In some situations, however, dataare stored as bytes, and you must be able to access individual bytes. The Byte data type holdsan integer in the range of 0 to 255. Bytes are frequently used to access binary files, image andsound files, and so on. To declare a variable as a Byte, use the following statement:
Dim n As Byte
The variable n can be used in numeric calculations too, but you must be careful not to assignthe result to another Byte variable if its value might exceed the range of the Byte type. If thevariables A and B are initialized as:
Dim A As Byte, B As ByteA = 233B = 50
the following statement will produce an overflow exception:
Debug.WriteLine(A + B)
The result (283) can’t be stored in a single byte. Visual Basic generates the correct answer, butit can’t store it into a Byte variable.
Boolean Operations with Bytes
The operators that won’t cause overflows are the Boolean operators And, Or, Not, and Xor,which are frequently used with Byte variables. These aren’t logical operators that return Trueor False; they combine the matching bits in the two operands and return another byte. If youcombine the numbers 199 and 200 with the AND operator, the result is 192. The two values inbinary format are 11000111 and 11001000. If you perform a bitwise AND operation on these twovalues, the result is 11000000, which is the decimal value 192.
In addition to the Byte data type, VB 2010 provides a Signed Byte data type, SByte, whichcan represent signed values in the range from –128 to 127. The bytes starting with the 1 bitrepresent negative values. The range of positive values is less by one than the range of negativevalues because the value 0 is considered a positive value (its first bit is 0).

50 CHAPTER 2 HANDLING DATA
Boolean Variables
The Boolean data type stores True/False values. Boolean variables are, in essence, integers thattake the value –1 (for True) and 0 (for False). Actually, any nonzero value is considered True.Boolean variables are declared as
Dim failure As Boolean
and they are initialized to False. Even so, it’s a good practice to initialize your variables explic-itly, as in the following code segment. Boolean variables are used in testing conditions, such asthe following:
Dim failure As Boolean = False’ other statements …If failure Then MsgBox(′′Couldn’t complete the operation′′)
They are also combined with the logical operators And, Or, Not, and Xor. The Not operatortoggles the value of a Boolean variable. The following statement is a toggle:
running = Not running
If the variable running is True, it’s reset to False and vice versa. This statement is a shorterway of coding the following:
Dim running As BooleanIf running = True Then
running = FalseElse
running = TrueEnd If
Boolean operators operate on Boolean variables and return another Boolean as their result.The following statements will display a message if one (or both) of the variables ReadOnly andHidden are True (in the following example, the ReadOnly and Hidden variables might representthe corresponding attributes of a file):
If ReadOnly Or Hidden ThenMsgBox(′′Couldn’t open the file′′)
Else’ statements to open and process file…
End If
The condition of the If statement combines the two Boolean values with the Or operator. Ifone or both of them are True, the final expression is True.
String Variables
The String data type stores only text, and string variables are declared as follows:
Dim someText As String
VARIABLES 51
You can assign any text to the variable someText. You can store nearly 2 GB of text in astring variable (that’s 2 billion characters, and it’s much more text than you care to read on acomputer screen). The following assignments are all valid:
Dim aString As StringaString = ′′Now is the time for all good men to come ′′
′′to the aid of their country′′
aString = ′′ ′′
aString = ′′There are approximately 25,000 words in this chapter′′
aString = ′′25,000′′
The second assignment creates an empty string, and the last one creates a string that justhappens to contain numerals, which are also characters. The difference between these two vari-ables is that they hold different values:
Dim aNumber As Integer = 25000Dim aString As String = ′′25,000′′
The aString variable holds the characters 2, 5, comma, 0, 0, and 0, and aNumber holds asingle numeric value. However, you can use the variable aString in numeric calculations andthe variable aNumber in string operations. VB will perform the necessary conversions as longas the Strict option is off. In general, you should turn on the Strict option because it will helpyou catch possible runtime errors, as discussed in the section ‘‘The Strict, Explicit, and InferOptions.’’ The recommended practice is to convert strings to numbers and numbers to stringsexplicitly as needed using the methods discussed in the section ‘‘Converting Variable Types,’’later in this chapter. Even if you prefer to work with the Strict option off, which is the defaultvalue, it’s recommended that you turn it on temporarily to spot any areas in your code thatmight cause runtime errors.
Character Variables
Character variables store a single Unicode character in two bytes. In effect, characters areUnsigned Short integers (UInt16), but the Framework provides all the tools you need to workwith characters without having to resort to their numeric values (a very common practice forthe older among us).
To declare a Character variable, use the Char data type:
Dim char1, char2 As Char
You can initialize a Char variable by assigning either a character or a string to it. In the lattercase, only the first character of the string is assigned to the variable. The following statementswill print the characters a and A to the Output window:
Dim char1 As Char = ′′a′′, char2 As Char = ′′ABC′′
Debug.WriteLine(char1)Debug.WriteLine(char2)

52 CHAPTER 2 HANDLING DATA
These statements will work only if the Strict option is off. If it’s on, the values assigned tothe char1 and char2 variables will be marked in error and the code will not compile. To fixthe error, change the Dim statement as follows:
Dim char1 As Char = ′′a′′c, char2 As Char = ′′A′′c
(This tells the compiler to treat the values of the variables as characters, not strings.) When theStrict option is on, you can’t assign a string to a Char variable and expect that only the firstcharacter of the string will be used.
Unicode or ANSI
The Integer values that correspond to the English characters are the ANSI (American NationalStandards Institute) codes of the equivalent characters. The following statement will print thevalue 65:
Debug.WriteLine(Convert.ToInt32("a"))
If you convert the Greek character alpha (α) to an integer, its value is 945. The Unicode valueof the famous character π is 960. Unicode and ANSI values for English characters are the same,but all ‘‘foreign’’ characters have a unique Unicode value.
Character variables are used in conjunction with strings. You’ll rarely save real data as char-acters. However, you might have to process the individual characters in a string, one at a time.Let’s say the string variable password holds a user’s new password, and you require that pass-words contain at least one special symbol. The code segment of Listing 2.2 scans the passwordand rejects it if it contains letters and digits only.
Listing 2.2: Processing individual characters
Dim password As String, ch As CharDim i As IntegerDim valid As Boolean = FalseWhile Not valid
password = InputBox(′′Please enter your password′′)For i = 0 To password.Length - 1
ch = password.Chars(i)If Not Char.IsLetterOrDigit(ch) Then
valid = TrueExit For
End IfNextIf valid Then
MsgBox(′′You new password will be activated immediately! ′′)Else
MsgBox(′′Your password must contain at least one special symbol! ′′)End If
End While

VARIABLES 53
If you are not familiar with the If…Then, For…Next, or While…End While structures, you canread their descriptions in the following chapter.
The code prompts the user with an input box to enter a password. The valid variable isBoolean and it’s initialized to False. (You don’t have to initialize a Boolean variable to Falsebecause this is its default initial value, but it does make the code easier to read.) It’s set to Truefrom within the body of the loop only if the password contains a character that is not a letter ora digit. We set it to False initially, so the While…End While loop will be executed at least once.This loop will keep prompting the user until a valid password is entered.
The For…Next loop scans the string variable password, one letter at a time. At each iteration,the next letter is copied into the ch variable. The Chars property of the String data type is anarray that holds the individual characters in the string (another example of the functionalitybuilt into the data types).
Then the program examines the current character. The IsLetterOrDigit method of theChar data type returns True if a character is either a letter or a digit. If the current characteris a symbol, the program sets the valid variable to True so that the outer loop won’t be exe-cuted again, and it exits the For…Next loop. Finally, it prints the appropriate message and eitherprompts for another password or quits.
Date Variables
Date variables store date values that may include a time part (or not), and they are declaredwith the Date data type:
Dim expiration As Date
The following are all valid assignments:
expiration = #01/01/2010#expiration = #8/27/1998 6:29:11 PM#expiration = ′′July 2, 2011′′
expiration = Today()
Now and Today
By the way, the Today() function returns the current date and time, while the Now() functionreturns the current date. You can also retrieve the current date by calling the Today propertyof the Date data type: Date.Today.
The pound sign tells Visual Basic to store a date value to the expiration variable, just asthe quotes tell Visual Basic that the value is a string. You can store a date as a string to a Datevariable, but it will be converted to the appropriate format.
The format of the date inside the pound characters is determined by the regional settings(found in Control Panel). In the United States, the format is mm/dd/yy. (In other countries, theformat is dd/mm/yy.) If you assign an invalid date to a Date variable, such as 23/04/2012, thestatement will be underlined and an error message will appear in the Task List window. Thedescription of the error is Date constant is not valid.
You can also perform arithmetic operations with date values. VB recognizes your inten-tion to subtract dates and it properly evaluates their difference. The result is a TimeSpan

54 CHAPTER 2 HANDLING DATA
object, which represents a time interval. If you execute the following statements, the value638.08:49:51.4970000 will appear in the Output window:
Dim d1, d2 As Dated1 = Nowd2 = #1/1/2004#Debug.WriteLine(d1 - d2)
The value of the TimeSpan object represents an interval of 638 days, 8 hours, 49 minutes,and 51.497 seconds.
Converting between Locales
In a global environment like ours, handling dates has gotten a bit complicated. If you live inthe United States and you receive a data file that includes dates from a company in the UnitedKingdom, you should take into consideration the locale of the computer that generated thefile. To specify the locale of a date value, use the Parse method of the DateTime class, whichaccepts two arguments: the date to be parsed and a CultureInfo object that represents thedate’s locale. (If you find this tip too advanced on first reading, please make a note and look itup when you have to deal with dates in different cultures).
The date 25/12/2011 is a valid UK date, but if you attempt to assign this value to a Datevariable (assuming that your computer’s locale is English-US), the statement will generate anerror. To convert the date to US format, create a CultureInfo that represents the locale ofthe original date:
Dim UK As New CultureInfo("en-GB")
Then call the DateTime.Parse method, as follows, to convert the date value to a valid date:
Dim D1 As DateD1 = DateTime.Parse("25/12/2011", UK)
The following code segment compares two dates with different locales to one another andprints an appropriate message that indicates whether the two dates are equal (in this example,they are):
Dim D1, D2 As DateDim UK As New CultureInfo("en-GB")Dim US As New CultureInfo("en-US")D1 = DateTime.Parse("27/8/2010", UK)D2 = DateTime.Parse("8/27/2010", US)If D1 = D2 Then
MsgBox("Same date")Else
MsgBox("Different dates")End If
Dates like 3/4/2025 or 4/3/2025 are valid in any culture, but they may not be correct unlessyou interpret them with the proper locale, so be careful when importing dates. You can look
VARIABLES 55
up the locales of other countries in the documentation. For example, fr-FR is France’s Frenchlocale, fr-BE is Belgium’s French locale, and fr-CH is Switzerland’s French locale. For Switzer-land, a culturally diverse place, there’s also a German locale, the de-CH locale. The problem oflocales is also addressed by XML, which is the definitive standard for data exchange, and it’sdiscussed later in this book in Chapter 13, ‘‘XML in Modern Programming,’’ and Chapter 14,‘‘Introduction to LINQ.’’
You’ll face a similar issue with formatted numeric values because some locales use the periodas the decimal separator while others use it as a separator for thousands. The two formattedvalues 19,000.99 and 19.000,99 are valid in different cultures, but they’re not the same atonce. To properly convert these formatted numbers, use the Parse method of the Decimal orDouble class, passing as argument the string to be parsed and the locale of the original value(the US locale for 19,999.99 and the UK locale for 19,999.99). Again, examine the followingstatements that convert these two formatted numeric strings into numeric values, taking intoconsideration the proper locale. The statements are equivalent to the ones I showed you earlierfor handling dates. For this example, I’ll use the Italian language locale; that locale uses theperiod as the thousands separator and the coma as the decimal separator.
Dim val1, val2 As DecimalDim IT As New CultureInfo("it-IT")Dim US As New CultureInfo("en-US")val1 = System.Decimal.Parse("19,999.99", IT)val2 = System.Decimal.Parse("19,999.99", US)If val1 = val2 Then
MsgBox("Same values")Else
MsgBox("Different values")End If
Many developers try to remove the thousands separator(s) from the formatted number andthen replace the period with a coma (or vice versa). Use the technique shown here; it willwork regardless of the current locale and it’s so much easier to read and so much safer.
The Strict, Explicit, and Infer OptionsThe Visual Basic compiler provides three options that determine how it handles variables:
◆ The Explicit option indicates whether you will declare all variables.
◆ The Strict option indicates whether all variables will be of a specific type.
◆ The Infer option indicates whether the compiler should determine the type of a variablefrom its value.
These options have a profound effect on the way you declare and use variables, and youshould understand what they do. By exploring these settings, you will also understand a littlebetter how the compiler handles variables. It’s recommended that you turn on all three, but oldVB developers may not want to follow this advice.
VB 2010 doesn’t require that you declare your variables, but the default behavior is tothrow an exception if you attempt to use a variable that hasn’t been previously declared. If an

56 CHAPTER 2 HANDLING DATA
undeclared variable’s name appears in your code, the editor will underline the variable’s namewith a wiggly line, indicating that it caught an error. The description of the error will appearin the Task List window below the code window. If you rest the cursor over the segment inquestion, you will see the description of the error in a ToolTip box.
To change the default behavior, you must insert the following statement at the beginning ofthe file:
Option Explicit Off
The Option Explicit statement must appear at the very beginning of the file. This settingaffects the code in the current module, not in all files of your project or solution. You can turnon the Strict (as well as the Explicit) option for an entire solution. Open the project’s proper-ties page (right-click the project’s name in Solution Explorer and select Properties), select theCompile tab, and set the Strict and Explicit options accordingly, as shown in Figure 2.1.
Figure 2.1
Setting thevariable-related optionson the project’s proper-ties pages
You can also set default values for the Explicit option (as well as for Strict and Infer) for allprojects through the Options dialog box of the IDE (Integrated Development Environment). Toopen this dialog box, choose the Options command from the Tools menu. When the dialog boxappears, select the VB Defaults tab under Projects And Solutions, as shown in Figure 2.2. Hereyou can set the default values for all four options. You can still change the default values forspecific projects through the project’s properties pages.
The way undeclared variables are handled by VB 2010 is determined by the Explicit andStrict options, which can be either on or off. The Explicit option requires that all variablesused in the code are declared before they’re used. The Strict option requires that variables aredeclared with a specific type. In other words, the Strict option disallows the use of genericvariables that can store any data type.
The default value of the Explicit statement is On. This is also the recommended value, andyou should not make a habit of changing this setting. By setting the Explicit option to Off,you’re telling VB that you intend to use variables without declaring them. As a consequence,VB can’t make any assumption about the variable’s type, so it uses a generic type of variablethat can hold any type of information. These variables are called Object variables, and they’reequivalent to the old variants.

VARIABLES 57
Figure 2.2
Setting thevariable-related optionsin the Visual StudioOptions dialog box
While the option Explicit is set to Off, every time Visual Basic runs into an undeclared vari-able name, it creates a new variable on the spot and uses it. Visual Basic adjusts the variable’stype according to the value you assign to it. With Explicit turned off, create two variables, var1and var2, by referencing them in your code with statements like the following ones:
var1 = ′′Thank you for using Fabulous Software′′
var2 = 49.99
The var1 variable is a string variable, and var2 is a numeric one. You can verify this withthe GetType method, which returns a variable’s type. The following statements print the high-lighted types shown below each statement:
Debug.WriteLine ′′Variable var1 is ′′ & var1.GetType().ToStringVariable var1 is System.StringDebug.WriteLine ′′Variable var2 is ′′ & var2.GetType().ToStringVariable var2 is System.Double
Later in the same program, you can reverse the assignments:
var1 = 49.99var2 = ′′Thank you for using Fabulous Software′′
If you execute the preceding type-checking statements again, you’ll see that the types of thevariables have changed. The var1 variable is now a Double, and var2 is a String. The type ofa generic variable is determined by the variable’s contents, and it can change in the course ofthe application. Of course, changing a variable’s type at runtime doesn’t come without a per-formance penalty (a small one, but nevertheless some additional statements must be executed).
Another related option is the Strict option, which is off by default. The Strict option tellsthe compiler whether the variables should be strictly typed. A strictly typed (or strongly typed)variable must be declared with a specific type and it can accept values of the same type only.

58 CHAPTER 2 HANDLING DATA
With the Strict option set to Off, you can use a string variable that holds a number in a numericcalculation:
Dim a As String = ′′25000′′
Debug.WriteLine a / 2
The last statement will print the value 12500 in the Immediate window. Likewise, you can usenumeric variables in string calculations:
Dim a As Double = 31.03a = a + ′′1′′
After the execution of the preceding statements, the a variable will still be a Double and willhave the value 32.03. If you turn the Strict option on by inserting the following statement at thebeginning of the file, you won’t be able to mix and match variable types:
Option Strict On
If you attempt to execute any of the last two code segments while the Strict option is on, theeditor will underline a segment of the statement to indicate an error. If you rest the cursor overthe underlined segment of the code, the following error message will appear in a tip box:
Option strict disallows implicit conversions from String to Double
or any type conversion is implied by your code.When the Strict option is set to On, the compiler will allow some implicit conversions
between data types, but not always. For example, it will allow you to assign the value of aninteger to a Long, but not the opposite. The Long value might exceed the range of values thatcan be represented by an Integer variable.
Type Inference
One of the trademark features of BASIC, including earlier versions of Visual Basic, was the abil-ity to use variables without declaring them. It has never been a recommended practice, yet VBdevelopers loved it. This feature is coming back to the language, only in a safer manner. VB2010 allows you to declare variables by assigning values to them. The compiler will infer thetype of the variable from its value and will create a variable of the specific type behind thescenes. The following statement creates an Integer variable:
Dim count = 2999
Behind the scenes, the compiler will create a typed variable with the following statement:
Dim count As Integer = 2999
To request the variable’s type, use the GetType method. This method returns a Type object,which represents the variable’s type. The name of the type is given by the ToString property.The following statement will print the highlighted string in the Immediate window:
Debug.WriteLine(count.GetType.ToString)System.Int32

VARIABLES 59
The count variable is of the Integer type (the 32-bit integer variety, to be precise). If youattempt to assign a value of a different type, such as a date, to this variable later in your code,the editor will underline the value and generate a warning like this: Value of type ‘Date’ can-not be converted to Integer. The compiler has inferred the type of the value assigned initially tothe variable and created a variable of the same type. That’s why subsequent statements can’tchange the variable’s type. Behind the scenes, the compiler will actually insert a Dim statement,as if you had declared the variable explicitly.
If the Infer option is off, the compiler will handle variables declared without a specific typedepending on the Strict option. If the Strict option is off, the compiler will create an Object vari-able, which can store any value, even values of different types in the course of the application.If the Strict option is on, the compiler will reject the declaration; it will underline the variable’sname with a wiggly line and generate the following warning: Option Strict On requires all vari-able declarations to have an As clause.
Object VariablesVariants — variables without a fixed data type — were the bread and butter of VB programmersup to version 6. Variants are the opposite of strictly typed variables: They can store all types ofvalues, such as integers, strings, characters, you name it. If you’re starting with VB 2010, youshould use strongly typed variables. However, variants are a major part of the history of VB,and most applications out there (the ones you may be called to maintain) use them. I will discussvariants briefly in this section and show you what was so good (and bad) about them.
Variants, or object variables, are the most flexible data type because they can accommodateall other types. A variable declared as Object (or a variable that hasn’t been declared at all) ishandled by Visual Basic according to the variable’s current contents. If you assign an integervalue to an object variable, Visual Basic treats it as an integer. If you assign a string to an objectvariable, Visual Basic treats it as a string. Variants can also hold different data types in the courseof the same program. Visual Basic performs the necessary conversions for you.
To declare a variant, you can turn off the Strict option and use the Dim statement withoutspecifying a type, as follows:
Dim myVar
You can use object variables in both numeric and string calculations. Suppose that the vari-able modemSpeed has been declared as Object with one of the following statements:
Dim modemSpeed ‘ with Option Strict = OffDim modemSpeed As Object ‘ with Option Strict = On
Later in your code, you assign the following value to it:
modemSpeed = ′′28.8′′You can treat the modemSpeed variable as a string and use it in statements such as thefollowing:
MsgBox ′′We suggest a ′′ & modemSpeed & ′′ modem.′′
This statement displays the following message:
′′We suggest a 28.8 modem.′′

60 CHAPTER 2 HANDLING DATA
You can also treat the modemSpeed variable as a numeric value, as in the followingstatement:
Debug.WriteLine ′′A ′′ & modemSpeed & ′′ modem can transfer ′′ &modemSpeed * 1024 / 8 & ′′ bytes per second.′′
This statement displays the following message:
′′A 28.8 modem can transfer 3686.4 bytes per second.′′
The first instance of the modemSpeed variable in the preceding statement is treated as a stringbecause this is the variant’s type according to the assignment statement (we assigned a stringto it). The second instance, however, is treated as a number (a single-precision number). Thecompiler sees that it’s used in a numeric calculation and converts it to a double value beforeusing it.
Another example of this behavior of variants can be seen in the following statements:
Dim I, SI = 10S = ′′11′′
Debug.WriteLine(I + S)Debug.WriteLine(I & S)
The first WriteLine statement will display the numeric value 21, whereas the second state-ment will print the string 1011. The plus operator (+) tells VB to add two values. In doing so,VB must convert the two strings into numeric values and then add them. The concatenationoperator (&) tells VB to concatenate the two strings.
Visual Basic knows how to handle object variables in a way that makes sense. Theresult may not be what you had in mind, but it certainly is dictated by common sense. Ifyou really want to concatenate the strings 10 and 11, you should use the concatenationoperator (&), which tells Visual Basic exactly what to do. Quite impressive, but for manyprogrammers, this is a strange behavior that can lead to subtle errors — and they avoid it.Keep in mind that if the value of the S variable were the string A1, then the code wouldcompile fine but would crash at runtime. And this is what we want to avoid at all costs: anapplication that compiles without warnings but crashes at runtime. Using strongly typedvariables is one of the precautions you can take to avoid runtime errors. Keep in mind thata program that prompts users for data, or reads it from a file, may work for quite a while,just because it’s reading valid data, and crash when it encounters invalid data. It’s up toyou to decide whether to use variants and how far you will go with them. Sure, you canperform tricks with variants, but you shouldn’t overuse them to the point that others can’t readyour code.
Variables as ObjectsVariables in Visual Basic are more than just names or placeholders for values. They’re intelli-gent entities that can not only store but also process their values. I don’t mean to scare you,but I think you should be told: VB variables are objects. And here’s why: A variable that holdsdates is declared as such with the following statement:
Dim expiration As Date

VARIABLES AS OBJECTS 61
To assign a date value to the expiration variable, use a statement like this:
expiration = #1/1/2003#
So far, nothing out of the ordinary; this is how we always used variables, in most languages.In addition to holding a date, however, the expiration variable can manipulate dates. Thefollowing expression will return a new date that’s three years ahead of the date stored in theexpiration variable:
expiration.AddYears(3)
The AddYears method returns a new date, which you can assign to another date variable:
Dim newExpiration As DatenewExpiration = expiration.AddYears(3)
AddYears is a method that knows how to add a number of years to a Date variable. Byadding a number of years (or months, or days) to a date, we get back another date. The methodwill take into consideration the number of days in each month and the leap years, which is atotally nontrivial task if we had to code it ourselves. There are similarly named methods foradding months, days, and so on. In addition to methods, the Date type exposes properties, suchas the Month and Day properties, which return the date’s month and day number, respectively.The keywords following the period after the variable’s name are called methods and properties,just like the properties and methods of the controls you place on a form to create your appli-cation’s visual interface. The methods and properties (or the members) of a variable expose thefunctionality that’s built into the class representing the variable itself. Without this built-in func-tionality, you’d have to write some serious code to extract the month from a date variable, toadd a number of days to a given date, to figure out whether a character is a letter or a digit ora punctuation symbol, and so on. Much of the functionality that you’ll need in an applicationthat manipulates dates, numbers, or text has already been built into the variables themselves.
Don’t let the terminology scare you. Think of variables as placeholders for values and accesstheir functionality with expressions like the ones shown earlier. Start using variables to storevalues, and if you need to process them, enter a variable’s name followed by a period to seea list of the members it exposes. In most cases, you’ll be able to figure out what these mem-bers do by just reading their names. I’ll come back to the concept of variables as objects, but Iwanted to hit it right off the bat. A more detailed discussion of the notion of variables as objectscan be found in Chapter 8, ‘‘Working with Objects,’’ which discusses objects in detail.
Basic Data Types versus Objects
Programming languages can treat simple variables much more efficiently than they treat objects.An integer takes two bytes in memory, and the compiler will generate very efficient code tomanipulate an integer variable (add it to another numeric value, compare it to another integer,and so on). If you declare an integer variable and use it in your code as such, Visual Basicdoesn’t create an object to represent this value. It creates a new variable for storing integers,like good old BASIC. After you call one of the variable’s methods, the compiler emits code tocreate the actual object. This process is called boxing, and it introduces a small delay, which istruly insignificant compared to the convenience of manipulating a variable through its methods.

62 CHAPTER 2 HANDLING DATA
As you’ve seen by now, variables are objects. This shouldn’t come as a surprise, but it’s anodd concept for programmers with no experience in object-oriented programming. We haven’tcovered objects and classes formally yet, but you have a good idea of what an object is. It’san entity that exposes some functionality by means of properties and methods. The TextBoxcontrol is an object and it exposes the Text property, which allows you to read or set the texton the control. Any name followed by a period and another name signifies an object. The nameafter the period is a property or method of the object.
Converting Variable TypesIn many situations, you will need to convert variables from one type into another. Table 2.3shows the methods of the Convert class that perform data-type conversions.
Table 2.3: The data-type conversion methods of the Convert class
Method Converts Its Argument To
ToBoolean Boolean
ToByte Byte
ToChar Unicode character
ToDateTime Date
ToDecimal Decimal
ToDouble Double
ToInt16 Short Integer (2-byte integer, Int16)
ToInt32 Integer (4-byte integer, Int32)
ToInt64 Long (8-byte integer, Int64)
ToSByte Signed Byte
CShort Short (2-byte integer, Int16)
ToSingle Single
ToString String
ToUInt16 Unsigned Integer (2-byte integer, Int16)
ToUInt32 Unsigned Integer (4-byte integer, Int32)
ToUInt64 Unsigned Long (8-byte integer, Int64)

VARIABLES AS OBJECTS 63
In addition to the methods of the Convert class, you can still use the data-conversion func-tions of VB (CInt() to convert a numeric value to an Integer, CDbl() to convert a numericvalue to a Double, CSng() to convert a numeric value to a Single, and so on), which you canlook up in the documentation. If you’re writing new applications in VB 2010, use the new Con-vert class to convert between data types.
To convert the variable initialized as
Dim A As Integer
to a Double, use the ToDouble method of the Convert class:
Dim B As DoubleB = Convert.ToDouble(A)
Suppose you have declared two integers, as follows:
Dim A As Integer, B As IntegerA = 23B = 7
The result of the operation A / B will be a Double value. The statement
Debug.Write(A / B)
displays the value 3.28571428571429. The result is a Double value, which provides the greatestpossible accuracy. If you attempt to assign the result to a variable that hasn’t been declared asDouble and the Strict option is on, the editor will generate an error message. No other datatype can accept this value without loss of accuracy. To store the result to a Single variable, youmust convert it explicitly with a statement like the following:
Dim C As Single = Convert.ToSingle(A / B)
You can also use the DirectCast() function to convert a variable or expression from onetype to another. The DirectCast() function is identical to the CType() function. Let’s say thevariable A has been declared as String and holds the value 34.56. The following statement con-verts the value of the A variable to a Decimal value and uses it in a calculation:
Dim A As String = ′′34.56′′
Dim B As DoubleB = DirectCast(A, Double) / 1.14
The conversion is necessary only if the Strict option is on, but it’s a good practice to performyour conversions explicitly. The following section explains what might happen if your coderelies on implicit conversions.

64 CHAPTER 2 HANDLING DATA
Widening and Narrowing Conversions
In some situations, VB 2010 will convert data types automatically, but not always. Let’s sayyou have declared and initialized two variables, an Integer and a Double, with the followingstatements:
Dim count As Integer = 99Dim pi As Double = 3.1415926535897931
If the Strict option is off and you assign the variable pi to the count variable, the count vari-able’s new value will be 3. (The Double value will be rounded to an Integer value, according tothe variable’s type.) Although this may be what you want, in most cases it’s an oversight thatwill lead to incorrect results.
If the Strict option is on and you attempt to perform the same assignment, the compiler willgenerate an error message to the effect that you can’t convert a Double to an Integer. The exactmessage is Option Strict disallows implicit conversions from Double to Integer.
When the Strict option is on, VB 2010 will allow conversions that do not result in loss ofaccuracy (precision) or magnitude. These conversions are called widening conversions. When youassign an Integer value to a Double variable, no accuracy or magnitude is lost. This is a widen-ing conversion because it goes from a narrower to a wider type and will therefore be allowedwhen Strict is on.
On the other hand, when you assign a Double value to an Integer variable, some accuracycould be lost (the decimal digits may be truncated). This is a narrowing conversion because wego from a data type that can represent a wider range of values to a data type that can representa narrower range of values. With the Strict option on, such a conversion will not be allowed.
Because you, the programmer, are in control, you might want to give up theaccuracy — presumably, it’s no longer needed. Table 2.4 summarizes the widening conversionsthat VB 2010 will perform for you automatically.
Table 2.4: VB 2010 widening conversions
Original Data Type Wider Data Type
Any type Object
Byte Short, Integer, Long, Decimal, Single, Double
Short Integer, Long, Decimal, Single, Double
Integer Long, Decimal, Single, Double
Long Decimal, Single, Double
Decimal Single, Double
Single Double
Double None
Char String

VARIABLES AS OBJECTS 65
If the Strict option is on, the compiler will point out all the statements that may cause run-time errors and you can reevaluate your choice of variable types. Even if you’re working withthe Strict option off, you can turn it on momentarily to see the compiler’s warnings and thenturn it off again.
Formatting NumbersSo far, you’ve seen how to use the basic data types. Let me digress here for a moment andmention that the basic data types are no longer part of the language (Visual Basic or C#).They’re actually part of the Common Language Runtime (CLR), which is a basic componentof Visual Studio (actually, it’s the core of Visual Studio and it’s shared by all languages thatcan be used with Visual Studio). You can treat this note as fine print for now, but don’t besurprised when you read in the documentation that the basic data types are part of the CLR.All data types expose a ToString method, which returns the variable’s value (a number ordate) as a string so that it can be used with other strings in your code. The ToString methodformats numbers and dates in many ways, and it’s probably one of the most commonly usedmethods. You can call the ToString method without any arguments, as we have done so far,to convert any value to a string. With many types, the ToString method, however, accepts anoptional argument, which determines how the value will be formatted as a string. For example,you can format a number as currency by prefixing it with the appropriate symbol (such as thedollar symbol) and displaying it with two decimal digits, and you can display dates in manyformats. Some reports require that negative amounts are enclosed in parentheses. The ToStringmethod allows you to display numbers and dates, and any other type, in any way you wish.
Notice that ToString is a method, not a property. It returns a value that you can assign toa string variable or pass as arguments to a function such as MsgBox(), but the original value isnot affected. The ToString method can also format a value if called with an optional argument:
ToString(formatString)
The formatString argument is a format specifier (a string that specifies the exact format to beapplied to the variable). This argument can be a specific character that corresponds to a pre-determined format (a standard format string, as it’s called) or a string of characters that havespecial meaning in formatting numeric values (a picture format string). Use standard formatstrings for the most common formatting options, and use picture strings to specify unusual for-matting requirements. To format the value 9959.95 as a dollar amount, you can use the C formatspecifier, which stands for Currency:
Dim Amnt As Single = 9959.95Dim strAmnt As StringstrAmnt = Amnt.ToString(′′C′′)
Or use the following picture numeric format string:
strAmnt = Amnt.ToString(′′$#,###.00′′)
Both statements will format the value as $9,959.95. If you’re using a non-U.S. version ofWindows, the currency symbol will change accordingly. If you’re in the United States, usethe Regional And Language Options tool in Control Panel to temporarily change the currentculture to a European one and the amount will be formatted with the Euro sign.

66 CHAPTER 2 HANDLING DATA
The picture format string is made up of literals and characters that have special meaningin formatting. The dollar sign has no special meaning and will appear as is. The # symbol isa digit placeholder; all # symbols will be replaced by numeric digits, starting from the right.If the number has fewer digits than specified in the string, the extra symbols to the left willbe ignored. The comma tells the ToString method to insert a comma between thousands. Theperiod is the decimal point, which is followed by two more digit placeholders. Unlike the #sign, the 0 is a special placeholder: If there are not enough digits in the number for all the zerosyou’ve specified, a 0 will appear in the place of the missing decimal digits. If the original valuehad been 9959.9, for example, the last statement would have formatted it as $9,959.90. If youused the # placeholder instead, the string returned by the ToString method would have a sin-gle decimal digit.
Standard Numeric Format Strings
The ToString method of the numeric data types recognizes the standard numeric formatstrings shown in Table 2.5.
The format character can be followed by an integer. If present, the integer value specifies thenumber of decimal places that are displayed. The default accuracy is two decimal digits.
Table 2.5: Standard numeric format strings
Format
Character
Description Example
C or c Currency (12345.67).ToString(′′C′′) returns $12,345.67.
D or d Decimal (123456789).ToString(′′D′′) returns123456789. It works with integer values only.
E or e Scientific format (12345.67).ToString(′′E′′) returns 1.234567E+ 004.
F or f Fixed-point format (12345.67).ToString(′′F′′) returns 12345.67.
G or g General format Returns a value either in fixed-point or scientificformat.
N or n Number format (12345.67).ToString(′′N′′) returns 12,345.67.
P or p Percentage (0.12345).ToString(′′N′′) returns 12.35%.
R or r Round-trip (1 / 3).ToString(′′R′′) returns0.33333333333333331 (where the G specifierwould return a value with fewer decimal digits:0.333333333333333).
X or x Hexadecimal format 250.ToString(′′X′′) returns FA.

VARIABLES AS OBJECTS 67
The C format string causes the ToString method to return a string representing the num-ber as a currency value. An integer following the C determines the number of decimal digitsthat are displayed. If no number is provided, two digits are shown after the decimal sepa-rator. Assuming that the variable value has been declared as Decimal and its value is 5596,then the expression value.ToString(′′C′′) will return the string $5,596.00. If the value of thevariable were 5596.4499, then the expression value.ToString(′′C3′′) would return the string$5,596.450. Also note that the C format string formats negative amounts in a pair of parenthe-ses, as is customary in business applications.
Notice that not all format strings apply to all data types. For example, only integer values canbe converted to hexadecimal format, and the D format string works with integer values only.
Picture Numeric Format Strings
If the format characters listed in Table 2.5 are not adequate for the control you need over theappearance of numeric values, you can provide your own picture format strings. Picture for-mat strings contain special characters that allow you to format your values exactly as you like.Table 2.6 lists the picture formatting characters.
Table 2.6: Picture numeric format strings
Format Character Description Effect
0 Display zeroplaceholder
Results in a nonsignificant zero if anumber has fewer digits than there arezeros in the format
# Display digitplaceholder
Replaces the symbol with onlysignificant digits
. Decimal point Displays a period (.) character
, Group separator Separates number groups — forexample, 1,000
% Percent notation Displays a % character
E + 0, E − 0, e + 0, e − 0 Exponent notation Formats the output of exponentnotation
\ Literal character Used with traditional formattingsequences such as \n (newline)
′′ ′′ Literal string Displays any string within single ordouble quotation marks literally
; Section separator Specifies different output if thenumeric value to be formatted ispositive, negative, or zero

68 CHAPTER 2 HANDLING DATA
The following statements will print the highlighted values:
Dim Amount As Decimal = 42492.45Debug.WriteLine(Amount.ToString(′′$#,###.00′′))$42,492.45Amount = 0.2678Debug.WriteLine(Amount.ToString(′′0.000′′))0.268Amount = -24.95Debug.WriteLine(Amount.ToString(′′$#,###.00;($#,###.00)′′))($24.95)
User-Defined Data TypesIn the previous sections, we used variables to store individual values (or scalar values, asthey’re called). As a matter of fact, most programs store sets of data of different types. Forexample, a program for balancing your checkbook must store several pieces of information foreach check: the check’s number, amount, date, and so on. All these pieces of information arenecessary to process the checks, and ideally, they should be stored together.
What we need is a variable that can hold multiple related values of the same or differenttype. You can create custom data types that are made up of multiple values using Structures.A Structure allows you to combine multiple values of the basic data types and handle them asa whole. For example, each check in a checkbook-balancing application is stored in a separateStructure (or record), as shown in Figure 2.3. When you recall a given check, you need all theinformation stored in the Structure.
Figure 2.3
Pictorial representationof a structure
Record StructureCheck Number
275276277278
11/04/201011/09/201011/12/201011/21/2010
104.2548.76
200.00631.50
Gas Co.BooksVISARent
Check Date Check Amount Check Paid To
Array of Records
To define a Structure in VB 2010, use the Structure statement, which has the following syn-tax:
Structure structureNameDim variable1 As varTypeDim variable2 As varType…Dim variablen As varType
End Structure
varType can be any of the data types supported by the CLR or the name of another Structurethat has been defined already. The Dim statement can be replaced by the Private or Publicaccess modifiers. For Structures, Dim is equivalent to Public.

VARIABLES AS OBJECTS 69
After this declaration, you have in essence created a new data type that you can use in yourapplication. structureName can be used anywhere you’d use any of the base types (Integers,Doubles, and so on). You can declare variables of this type and manipulate them as you manip-ulate all other variables (with a little extra typing). The declaration for the CheckRecord Struc-ture shown in Figure 2.3 is as follows:
Structure CheckRecordDim CheckNumber As IntegerDim CheckDate As DateDim CheckAmount As SingleDim CheckPaidTo As String
End Structure
This declaration must appear outside any procedure; you can’t declare a Structure in a sub-routine or function. Once declared, the CheckRecord Structure becomes a new data type foryour application.
To declare variables of this new type, use a statement such as this one:
Dim check1 As CheckRecord, check2 As CheckRecord
To assign a value to one of these variables, you must separately assign a value to each oneof its components (they are called fields), which can be accessed by combining the name of thevariable and the name of a field separated by a period, as follows:
check1.CheckNumber = 275
Actually, as soon as you type the period following the variable’s name, a list of all membersto the CheckRecord Structure will appear, as shown in Figure 2.4. Notice that the Structuresupports a few members on its own. You didn’t write any code for the Equals, GetType,and ToString members, but they’re standard members of any Structure object, and you canuse them in your code. Both the GetType and ToString methods will return a string likeProjectName.FormName + CheckRecord. You can provide your own implementation of theToString method, which will return a more meaningful string:
Public Overrides Function ToString() As StringReturn ′′CHECK # ′′ & CheckNumber & ′′ FOR ′′ & CheckAmount.ToString(′′C′′)
End Function
I haven’t discusses the Overrides keyword yet; it tells the compiler to override the defaultimplementation of the ToString method. For the time being, use it as shown here to createyour custom ToString method. This, as well as other object-related terms, are discussed indetail in Chapter 8.
As you understand, Structures are a lot like objects that expose their fields as properties andthen expose a few members of their own. The following statements initialize a variable of theCheckRecord type:
check2.CheckNumber = 275check2.CheckDate = #09/12/2010#

70 CHAPTER 2 HANDLING DATA
check2.CheckAmount = 104.25check2.CheckPaidTo = ′′Gas Co.′′
Figure 2.4
Variables of customtypes expose their mem-bers as properties.
Examining Variable TypesBesides setting the types of variables and the functions for converting between types, VisualBasic provides the GetType method. GetType returns a string containing the name of the vari-able type (Int32, Decimal, and so on). All variables expose this method automatically, and youcan call it like this:
Dim var As DoubleDebug.WriteLine ′′The variable’s type is ′′ & var.GetType.ToString
There’s also a GetType operator, which accepts as an argument a type and returns a Typeobject for the specific data type. The GetType method and GetType operator are used mostly inIf structures, like the following one:
If var.GetType() Is GetType(Double) Then‘ code to handle a Double value
End If
Notice that the code doesn’t reference data type names directly. Instead, it uses the valuereturned by the GetType operator to retrieve the type of the class System.Double and thencompares this value to the variable’s type with the Is (or the IsNot) keyword. If you attemptto express this comparison with the equals operator (=), the editor will detect the error and

VARIABLES AS OBJECTS 71
suggest that you use the Is operator. This syntax is a bit arcane for BASIC developers; justmake a note, and when you need to find out a variable’s type in your application, use itas is.
Is It a Number, String, or Date?
Another set of Visual Basic functions returns variable data types, but not the exact type. Theyreturn a True/False value indicating whether a variable holds a numeric value, a date, or anarray. The following functions are used to validate user input, as well as data stored in files,before you process them.
IsNumeric() Returns True if its argument is a number (Short, Integer, Long, Single, Double,Decimal). Use this function to determine whether a variable holds a numeric value beforepassing it to a procedure that expects a numeric value or before processing it as a number.The following statements keep prompting the user with an InputBox for a numeric value.The user must enter a numeric value or click the Cancel button to exit. As long as the userenters non-numeric values, the InputBox keeps popping up and prompting for a numericvalue:
Dim strAge as String = ""Dim Age As IntegerWhile Not IsNumeric(strAge)
strAge = InputBox("lease enter your age")End WhileAge = Convert.ToInt16(strAge)
The variable strAge is initialized to a non-numeric value so that the While…End While loopwill be executed at least once.
IsDate() Returns True if its argument is a valid date (or time). The following expressionsreturn True because they all represent valid dates:
IsDate(#10/12/2010#)IsDate("10/12/2010")IsDate("October 12, 2010")
IsArray() Returns True if its argument is an array.
A Variable’s ScopeIn addition to a type, a variable has a scope. The scope (or visibility) of a variable is the sectionof the application that can see and manipulate the variable. If a variable is declared withina procedure, only the code in the specific procedure has access to that variable; the variabledoesn’t exist for the rest of the application. When the variable’s scope is limited to a procedure,it’s called local.
Suppose that you’re coding the handler for the Click event of a button to calculate thesum of all even numbers in the range 0 to 100. One possible implementation is shown inListing 2.3.

72 CHAPTER 2 HANDLING DATA
Listing 2.3: Summing even numbers
Private Sub Button1_Click(ByVal sender As Object, _ByVal e As System.EventArguments) _Handles Button1.Click
Dim i As IntegerDim Sum As Integer = 0For i = 0 to 100 Step 2
Sum = Sum + iNextMsgBox ′′The sum is ′′ & Sum.ToString
End Sub
The variables i and Sum are local to the Button1_Click() procedure. If you attempt to setthe value of the Sum variable from within another procedure, Visual Basic will complain thatthe variable hasn’t been declared. (Or, if you have turned off the Explicit option, it will createanother Sum variable, initialize it to zero, and then use it. But this won’t affect the variable Sumin the Button1_Click() subroutine.) The Sum variable is said to have procedure-level scope;it’s visible within the procedure and invisible outside the procedure.
Sometimes, however, you’ll need to use a variable with a broader scope: a variable that’savailable to all procedures within the same file. This variable, which must be declared outsideany procedure, is said to have a module-level scope. In principle, you could declare all vari-ables outside the procedures that use them, but this would lead to problems. Every procedurein the file would have access to any variable, and you would need to be extremely careful notto change the value of a variable without good reason. Variables that are needed by a singleprocedure (such as loop counters) should be declared in that procedure.
Another type of scope is the block-level scope. Variables introduced in a block of code,such as an If statement or a loop, are local to the block but invisible outside the block. Let’srevise the previous code segment so that it calculates the sum of squares. To carry out thecalculation, we first compute the square of each value and then sum the squares. The squareof each value is stored to a variable that won’t be used outside the loop, so we can definethe sqrValue variable in the loop’s block and make it local to this specific loop, as shown inListing 2.4.
Listing 2.4: A variable scoped in its own block
Private Sub Button1_Click(ByVal sender As Object, _ByVal e As System.EventArguments) _Handles Button1.Click
Dim i, Sum As IntegerFor i = 0 to 100 Step 2
Dim sqrValue As IntegersqrValue = i * iSum = Sum + sqrValue
NextMsgBox ′′The sum of the squares is ′′ & Sum
End Sub

VARIABLES AS OBJECTS 73
The sqrValue variable is not visible outside the block of the For…Next loop. If you attemptto use it before the For statement or after the Next statement, the code won’t compile.
The sqrValue variable maintains its value between iterations. The block-level variable is notinitialized at each iteration, even though there’s a Dim statement in the loop.
Finally, in some situations, the entire application must access a certain variable. In this case,the variable must be declared as Public. Public variables have a global scope; they are visiblefrom any part of the application. To declare a public variable, use a Public statement in placeof a Dim statement. Moreover, you can’t declare public variables in a procedure. If you havemultiple forms in your application and you want the code in one form to see a certain variablein another form, you can use the Public modifier.
So, why do we need so many types of scope? You’ll develop a better understanding of scopeand which type of scope to use for each variable as you get involved in larger projects. In gen-eral, you should try to limit the scope of your variables as much as possible. If all variableswere declared within procedures, you could use the same name for storing a temporary valuein each procedure and be sure that one procedure’s variables wouldn’t interfere with those ofanother procedure, even if you use the same name.
A Variable’s LifetimeIn addition to type and scope, variables have a lifetime, which is the period for which theyretain their value. Variables declared as Public exist for the lifetime of the application. Localvariables, declared within procedures with the Dim or Private statement, live as long as theprocedure. When the procedure finishes, the local variables cease to exist, and the allocatedmemory is returned to the system. Of course, the same procedure can be called again, andthen the local variables are re-created and initialized again. If a procedure calls another, its localvariables retain their values while the called procedure is running.
You also can force a local variable to preserve its value between procedure calls by usingthe Static keyword. Suppose that the user of your application can enter numeric values atany time. One of the tasks performed by the application is to track the average of the numericvalues. Instead of adding all the values each time the user adds a new value and dividing bythe count, you can keep a running total with the function RunningAvg(), which is shown inListing 2.5.
Listing 2.5: Calculations with global variables
Function RunningAvg(ByVal newValue As Double) As DoubleCurrentTotal = CurrentTotal + newValueTotalItems = TotalItems + 1RunningAvg = CurrentTotal / TotalItems
End Function
You must declare the variables CurrentTotal and TotalItems outside the function so thattheir values are preserved between calls. Alternatively, you can declare them in the functionwith the Static keyword, as shown in Listing 2.6.
Listing 2.6: Calculations with local Static variables
Function RunningAvg(ByVal newValue As Double) As DoubleStatic CurrentTotal As Double

74 CHAPTER 2 HANDLING DATA
Static TotalItems As IntegerCurrentTotal = CurrentTotal + newValueTotalItems = TotalItems + 1RunningAvg = CurrentTotal / TotalItems
End Function
The advantage of using static variables is that they help you minimize the number of totalvariables in the application. All you need is the running average, which the RunningAvg()function provides without making its variables visible to the rest of the application. Therefore,you don’t risk changing the variable values from within other procedures.
Variables declared in a form module outside any procedure take effect when the form isloaded and cease to exist when the form is unloaded. If the form is loaded again, its variablesare initialized as if it’s being loaded for the first time.
Variables are initialized when they’re declared, according to their type. Numeric variablesare initialized to zero, string variables are initialized to a blank string, and object variables areinitialized to Nothing.
ConstantsSome variables don’t change value during the execution of a program. These variables are con-stants that appear many times in your code. For instance, if your program does math calcula-tions, the value of pi (3.14159. . .) might appear many times. Instead of typing the value 3.14159over and over again, you can define a constant, name it pi, and use the name of the constant inyour code. The statement
circumference = 2 * pi * radius
is much easier to understand than the equivalent
circumference = 2 * 3.14159 * radius
The manner in which you declare constants is similar to the manner in which you declarevariables except that you use the Const keyword, and in addition to supplying the constant’sname, you must also supply a value, as follows:
Const constantname As type = value
Constants also have a scope and can be Public or Private. The constant pi, for instance, isusually declared in a module as Public so that every procedure can access it:
Public Const pi As Double = 3.14159265358979
The rules for naming variables also apply to naming constants. The constant’s value is a lit-eral value or a simple expression composed of numeric or string constants and operators. Youcan’t use functions in declaring constants. By the way, the specific value I used for this exampleneed not be stored in a constant. Use the pi member of the Math class instead (Math.pi).

ARRAYS 75
ArraysA standard structure for storing data in any programming language is the array. Whereas indi-vidual variables can hold single entities, such as one number, one date, or one string, arrays canhold sets of data of the same type (a set of numbers, a series of dates, and so on). An array hasa name, as does a variable, and the values stored in it can be accessed by a number or index.
For example, you could use the variable Salary to store a person’s salary:
Salary = 34000
But what if you wanted to store the salaries of 16 employees? You could either declare 16variables — Salary1, Salary2, and so on up to Salary16 — or declare an array with 16 ele-ments. An array is similar to a variable: It has a name and multiple values. Each value is iden-tified by an index (an integer value) that follows the array’s name in parentheses. Each differentvalue is an element of the array. If the array Salaries holds the salaries of 16 employees, theelement Salaries(0) holds the salary of the first employee, the element Salaries(1) holdsthe salary of the second employee, and so on up to the element Salaries(15). Yes, the defaultindexing of arrays starts at zero, as odd as it may be for traditional BASIC developers.
Declaring ArraysArrays must be declared with the Dim (or Public) statement followed by the name of the arrayand the index of the last element in the array in parentheses, as in this example:
Dim Salary(15) As Integer
Salary is the name of an array that holds 16 values (the salaries of the 16 employees) withindices ranging from 0 to 15. Salary(0) is the first person’s salary, Salary(1) the second per-son’s salary, and so on. All you have to do is remember who corresponds to each salary, buteven this data can be handled by another array. To do this, you’d declare another array of 16elements:
Dim Names(15) As String
Then assign values to the elements of both arrays:
Names(0) = ′′Joe Doe′′
Salary(0) = 34000Names(1) = ′′Beth York′′
Salary(1) = 62000…Names(15) = ′′Peter Smack′′
Salary(15) = 10300
This structure is more compact and more convenient than having to hard-code the names ofemployees and their salaries in variables.
All elements in an array have the same data type. Of course, when the data type is Object,the individual elements can contain different kinds of data (objects, strings, numbers, andso on).

76 CHAPTER 2 HANDLING DATA
Arrays, like variables, are not limited to the basic data types. You can declare arrays thathold any type of data, including objects. The following array holds colors, which can be usedlater in the code as arguments to the various functions that draw shapes:
Dim colors(2) As Colorcolors(0) = Color.BurlyWoodcolors(1) = Color.AliceBluecolors(2) = Color.Sienna
The Color class represents colors, and among the properties it exposes are the names of thecolors it recognizes.
A better technique for storing names and salaries is to create a structure and then declare anarray of this type. The following structure holds names and salaries:
Structure EmployeeDim Name As StringDim Salary As Decimal
End Structure
Insert this declaration in a form’s code file, outside any procedure. Then create an array of theEmployee type:
Dim Emps(15) As Employee
Each element in the Emps array exposes two fields, and you can assign values to them by usingstatements such as the following:
Emps(2).Name = ′′Beth York′′
Emps(2).Salary = 62000
The advantage of using an array of structures instead of multiple arrays is that the relatedinformation will always be located under the same index. The code is more compact, and youneed not maintain multiple arrays.
Initializing ArraysJust as you can initialize variables in the same line in which you declare them, you can initializearrays, too, with the following constructor (an array initializer, as it’s called):
Dim nameArray() As type = {entry0, entry1, … entryN}
Here’s an example that initializes an array of strings:
Dim Names() As String = {′′Joe Doe′′, ′′Peter Smack′′}
This statement is equivalent to the following statements, which declare an array with two ele-ments and then set their values:
Dim Names(1) As String

ARRAYS 77
Names(0) = ′′Joe Doe′′
Names(1) = ′′Peter Smack′′
The number of elements in the curly brackets following the array’s declaration determines thedimensions of the array, and you can’t add new elements to the array without resizing it. Ifyou need to resize the array in your code dynamically, you must use the ReDim statement andsupply the new size of the array in parentheses.
Array Limits
The first element of an array has index 0. The number that appears in parentheses in the Dimstatement is one fewer than the array’s total capacity and is the array’s upper limit (or upperbound). The index of the last element of an array (its upper bound) is given by the methodGetUpperBound, which accepts as an argument the dimension of the array and returns theupper bound for this dimension. The arrays we have examined so far are one-dimensional, andthe argument to be passed to the GetUpperBound method is the value 0. The total number ofelements in the array is given by the method GetLength, which also accepts a dimension asan argument. The upper bound of the following array is 19, and the capacity of the array is 20elements:
Dim Names(19) As Integer
The first element is Names(0), and the last is Names(19). If you execute the following state-ments, the highlighted values will appear in the Output window:
Debug.WriteLine(Names.GetLowerBound(0))0Debug.WriteLine(Names.GetUpperBound(0))19
To assign a value to the first and last element of the Names array, use the followingstatements:
Names(0) = ′′First entry′′
Names(19) = ′′Last entry′′
To iterate through the array elements, use a loop like the following one:
Dim i As Integer, myArray(19) As IntegerFor i = 0 To myArray.GetUpperBound(0)myArray(i) = i * 1000
Next
The number of elements in an array is given by the expression myArray.GetUpperBound(0) + 1. You can also use the array’s Length property to retrieve the count of elements.The following statement will print the number of elements in the array myArray in the Outputwindow:
Debug.WriteLine(myArray.Length)

78 CHAPTER 2 HANDLING DATA
Still confused with the zero-indexing scheme, the count of elements, and the index of thelast element in the array? You can make the array a little larger than it needs to be and ignorethe first element. Just make sure that you never use the zero element in your code — don’tstore a value in the element Array(0), and you can then ignore this element. To get 20 ele-ments, declare an array with 21 elements as Dim MyArray(20) As type and then ignore the firstelement.
Multidimensional ArraysOne-dimensional arrays, such as those presented so far, are good for storing long sequences ofone-dimensional data (such as names or temperatures). But how would you store a list of citiesand their average temperatures in an array? Or names and scores, years and profits, or datawith more than two dimensions, such as products, prices, and units in stock? In some situa-tions, you will want to store sequences of multidimensional data. You can store the same datamore conveniently in an array of as many dimensions as needed.
Figure 2.5 shows two one-dimensional arrays — one of them with city names, the otherwith temperatures. The name of the third city would be City(2), and its temperature wouldbe Temperature(2).
Figure 2.5
Two one-dimensionalarrays and the equiv-alent two-dimensionalarray
Cities (7)01234567
Two one-dimensional arrays A two-dimensional array
San Francisco San Francisco7886
7886
65 65
Los Angeles Los Angeles
Seattle Seattle
Temperatures (7) Temperatures (7, 1)
A two-dimensional array has two indices: The first identifies the row (the order of the city inthe array), and the second identifies the column (city or temperature). To access the name andtemperature of the third city in the two-dimensional array, use the following indices:
Temperatures(2, 0) ‘ is the third city′s nameTemperatures(2, 1) ‘ is the third city′s average temperature
The benefit of using multidimensional arrays is that they’re conceptually easier to manage.Suppose you’re writing a game and want to track the positions of certain pieces on a board.Each square on the board is identified by two numbers: its horizontal and vertical coordinates.The obvious structure for tracking the board’s squares is a two-dimensional array, in which thefirst index corresponds to the row number and the second corresponds to the column number.The array could be declared as follows:
Dim Board(9, 9) As Integer

ARRAYS 79
When a piece is moved from the square in the first row and first column to the square in thethird row and fifth column, you assign the value 0 to the element that corresponds to the initialposition:
Board(0, 0) = 0
And you assign 1 to the square to which it was moved to indicate the new state of the board:
Board(2, 4) = 1
To find out whether a piece is on the top-left square, you’d use the following statement:
If Board(0, 0) = 1 Then’ piece found
Else’ empty square
End If
This notation can be extended to more than two dimensions. The following statement createsan array with 1,000 elements (10 by 10 by 10):
Dim Matrix(9, 9, 9)
You can think of a three-dimensional array as a cube made up of overlaid two-dimensionalarrays, such as the one shown in Figure 2.6.
Figure 2.6
Pictorial representa-tions of one-, two-, andthree-dimensional arrays
0
Data(7) Data(7, 3) Data(7, 3, 3)
1234567
0,01,02,03,04,05,06,07,0
0,11,12,13,14,15,16,17,1
0,21,22,23,24,25,26,27,2
0,31,32,33,34,35,36,37,3
3,0,0 3,0,1 3,0,2 3,0,33,1,33,2,33,3,33,4,33,5,33,6,33,7,3
2,0,0 2,0,1 2,0,2 2,0,32,1,32,2,32,3,32,4,32,5,32,6,32,7,3
1,0,0 1,0,1 1,0,2 1,0,31,1,31,2,31,3,31,4,31,5,31,6,31,7,3
0,0,00,1,00,2,00,3,00,4,00,5,00,6,00,7,0
0,0,10,1,10,2,10,3,10,4,10,5,10,6,10,7,1
0,0,20,1,20,2,20,3,20,4,20,5,20,6,20,7,2
0,0,30,1,30,2,30,3,30,4,30,5,30,6,30,7,3
It is possible to initialize a multidimensional array with a single statement, just as youdo with a one-dimensional array. You must insert enough commas in the parenthesesfollowing the array name to indicate the array’s rank. The following statements initialize atwo-dimensional array and then print a couple of its elements:
Dim a(,) As Integer = {{10, 20, 30}, {11, 21, 31}, {12, 22, 32}}Console.WriteLine(a(0, 1)) ’ will print 20Console.WriteLine(a(2, 2)) ’ will print 32

80 CHAPTER 2 HANDLING DATA
You should break the line that initializes the dimensions of the array into multiple lines tomake your code easier to read:
Dim a(,) As Integer = {{10, 20, 30},{11, 21, 31},{12, 22, 32}}
If the array has more than one dimension, you can find out the number of dimensions withthe Array.Rank property. Let’s say you have declared an array for storing names and salariesby using the following statements:
Dim Employees(1,99) As Employee
To find out the number of dimensions, use the following statement:
Employees.Rank
When using the Length property to find out the number of elements in a multidimensionalarray, you will get back the total number of elements in the array (2 × 100 for our example).To find out the number of elements in a specific dimension, use the GetLength method, pass-ing as an argument a specific dimension. The following expressions will return the number ofelements in the two dimensions of the array:
Debug.WriteLine(Employees.GetLength(0))2Debug.WriteLine(Employees.GetLength(1))100
Because the index of the first array element is zero, the index of the last element is the lengthof the array minus 1. Let’s say you have declared an array with the following statement to storeplayer statistics for 15 players and there are five values per player:
Dim Statistics(14, 4) As Integer
The following statements will return the highlighted values shown beneath them:
Debug.WriteLine(Statistics.Rank)2 ’ dimensions in arrayDebug.WriteLine(Statistics.Length)75 ’ total elements in arrayDebug.WriteLine(Statistics.GetLength(0))15 ’ elements in first dimensionDebug.WriteLine(Statistics.GetLength(1))5 ’ elements in second dimensionDebug.WriteLine(Statistics.GetUpperBound(0))14 ’ last index in the first dimensionDebug.WriteLine(Statistics.GetUpperBound(1))4 ’ last index in the second dimension

ARRAYS 81
Multidimensional arrays are becoming obsolete because arrays (and other collections) of cus-tom structures and objects are more flexible and convenient.
CollectionsHistorically, arrays are the primary structures for storing sets of data, and for years they werethe primary storage mechanism for in-memory data manipulation. In this field, however,where technologies grow in and out of style overnight, arrays are being replaced by other,more flexible and more powerful structures, the collections. Collections are discussed in detailin Chapter 12, but I should mention them briefly in this chapter, not only for completeness, butalso because collections are used a lot in programming and you will find many examples ofcollections in this book’s chapters.
A collection is a dynamic data storage structure: You don’t have to declare the size of acollection ahead of time. Moreover, the position of the items in a collection is not nearly asimportant as the position of the items in an array. New items are appended to a collectionwith the Add method, while existing items are removed with the Remove method. (Note thatthere’s no simple method of removing an array element, short of copying the original arrayto a new one and skipping the element to be removed.) The collection I just described is theList collection, which is very similar to an array. To declare a List collection, use the Newkeyword:
Dim names As New List(Of String)
The New keyword is literally new to you; use it to create variables that are true objects (anyvariable that’s not of a basic data type or structure). The New keyword tells the compiler to cre-ate a variable of the specified type and initialize it. The List collection must be declared with aspecific data type, which is specified with the Of keyword in parentheses. All items stored inthe example names list must be strings. A related collection is the ArrayList collection, which isidentical to the List collection but you don’t have to declare the type of variables you intend tostore in it because you can add objects of any type to an ArrayList collection.
To create a collection of color values, use the following declaration:
Dim colors As New List(Of Color)
The following statements add a few items to the two collections:
names.Add(′′Richard′′)names.Add(′′Nancy′′)colors.Add(Color.Red)colors.Add(TextBox1.BackColor)
Another collection is the Dictionary collection, which allows you to identify each element bya key instead of an index value. The following statement creates a new Dictionary collection forstoring names and birth dates:
Dim BDays As New Dictionary(Of String, Date)

82 CHAPTER 2 HANDLING DATA
The first data type following the Of keyword is the data type of the keys, while the followingargument is the data type of the values you want to store to the collection. Here’s how you adddata to a Dictionary collection:
BDays.Add(′′Manfred′′, #3/24/1972#)BDays.Add(′′Alfred′′, #11/24/1959#)
To retrieve the birth date of Manfred, use the following statement:
BDays(′′Manfred′′)
Finally, you can use collections to store custom objects too. Let’s say you have three vari-ables that represent checks (they’re of the CheckRecord custom type presented earlier in thischapter in the section ‘‘User-Defined Data Types’’). You can add them to a List collection justas you would add integers or strings to a collection:
Dim Checks As New List(Of CheckRecord)Checks.Add(check1)Checks.Add(check2)Checks.Add(check3)
A seasoned developer would store the same data to a Dictionary collection using the checknumber as an index value:
Dim Checks As New Dictionary(Of Integer, CheckRecord)Checks.Add(check1.CheckNumber, check1)
An application that uses this structure can prompt the user for a specific check number,retrieve it by its index from the Checks collection and display it to the user. As you will see inChapter 12, a big advantage of collections over arrays is that collections allow you to removeelements with the Remove method.
The Bottom Line
Declare and use variables. Programs use variables to store information during their execu-tion, and different types of information are stored in variables of different types. Dates, forexample, are stored in variables of the Date type, while text is stored in variables of the Stringtype. The various data types expose a lot of functionality that’s specific to a data type; the meth-ods provided by each data type are listed in the IntelliSense box.
Master It How would you declare and initialize a few variables?
Master It Explain briefly the Explicit, Strict, and Infer options.
Use the native data types. The CLR recognized the following data types, which you can usein your code to declare variables: String, numeric data types (Integer, Double, and so on), Date,Char and Boolean types.

THE BOTTOM LINE 83
All other variables, or variables that are declared without a type, are Object variables and canstore any data type or any object.
Master It How will the compiler treat the following statement?
Dim amount = 32
Create custom data types. Practical applications need to store and manipulate multiple dataitems, not just integers and strings. To maintain information about people, we need to storeeach person’s name, date of birth, address, and so on. Products have a name, a description, aprice, and other related items. To represent such entities in our code, we use structures, whichhold many pieces of information about a specific entity together.
Master It Create a structure for storing products and populate it with data.
Use arrays. Arrays are structures for storing sets of data as opposed to single-valuedvariables.
Master It How would you declare an array for storing 12 names and another one for stor-ing 100 names and Social Security numbers?


Chapter 3
Visual Basic Programming Essentials
The one thing you should have learned about programming in Visual Basic so far is that anapplication is made up of small, self-contained segments. The code you write isn’t a monolithiclisting; it’s made up of small segments called procedures, and you work on one procedure at atime.
In this chapter we’ll explore the two types of procedures supported by Visual Basic: sub-routines and functions — the building blocks of your applications. We’ll discuss them in detail:how to call them with arguments and how to retrieve the results returned by the functions.You’ll learn how to use the built-in functions that come with the language as well as how towrite your own subroutines and functions.
The statements that make up the core of the language are actually very few. The flexibil-ity of any programming language is based on its capacity to alter the sequence in which thestatements are executed through a set of so-called flow-control statements. These are the state-ments that literally make decisions and react differently depending on the data, user actions, orexternal conditions. Among other topics, in this chapter you’ll learn how to do the following:
◆ Use Visual Basic’s flow-control statements
◆ Write subroutines and functions
◆ Pass arguments to subroutines and functions
Flow-Control StatementsWhat makes programming languages so flexible and capable of handling every situation andprogramming challenge with a relatively small set of commands is their capability to examineexternal or internal conditions and act accordingly. Programs aren’t monolithic sets of com-mands that carry out the same calculations every time they are executed; this is what calcula-tors (and extremely simple programs) do. Instead, they adjust their behavior depending on thedata supplied; on external conditions, such as a mouse click or the existence of a peripheral;even on a coding mistake you haven’t caught during your tests.
In effect, the statements discussed in the first half of this chapter are what programming isall about. Without the capability to control the flow of the program, computers would just bebulky calculators. You have seen how to use the If statement to alter the flow of execution inprevious chapters, and I assume you’re somewhat familiar with these kinds of statements. In

86 CHAPTER 3 VISUAL BASIC PROGRAMMING ESSENTIALS
this section, you’ll find a formal discussion of flow-control statements, which are grouped intotwo major categories: decision statements and looping statements.
Decision StatementsApplications need a mechanism to test conditions, and they take a different course of actiondepending on the outcome of the test. Visual Basic provides three statements that allow you toalter the course of the application based on the outcome of a condition:
◆ If…Then
◆ If…Then…Else
◆ Select Case
If…Then Statements
The If…Then statement tests an expression, which is known as a condition. If the conditionis True, the program executes the statement(s) that follow the Then keyword up to the EndIf statement, which terminates the conditional statement. The If…Then statement can have asingle-line or a multiple-line syntax. To execute one statement conditionally, use the single-linesyntax as follows:
If condition Then statement
To execute multiple statements conditionally, embed the statements within an If and End Ifstatement, as follows:
If condition Then' Statement' Statement
End If
Conditions are logical expressions that evaluate to a True/False value and they usually con-tain comparison operators — equals (=), different (< >), less than (<), greater than (>), less thanor equal to (<=), and so on — and logical operators — And, Or, Xor, and Not. Here are a fewexamples of valid conditions:
If (age1 < age2) And (age1 > 12) Then …If score1 = score2 Then …
The parentheses are not really needed in the first sample expression, but they make thecode a little easier to read and understand. Sometimes parentheses are mandatory, to specifythe order in which the expression’s parts will be evaluated, just as math formulae may requireparentheses to indicate the precedence of calculations.
The expressions can get quite complicated. The following expression evaluates to True if thedate1 variable represents a date earlier than the year 2005 and either one of the score1 andscore2 variables exceeds 90 (you could use it locate high scores in a specific year):
If (date1 < #1/1/2005) And (score1 > 90 Or score2 > 90) Then‘ statements
End If

FLOW-CONTROL STATEMENTS 87
The parentheses around the last part of the comparison are mandatory because we want thecompiler to perform the following comparison first:
score1 > 90 Or score2 > 90
If either variable exceeds 90, the preceding expression evaluates to True and the initial con-dition is reduced to the following:
If (date1 < #1/1/2008) And (True) Then
The compiler will evaluate the first part of the expression (it will compare two dates) andfinally it will combine two Boolean values with the And operator: If both values are True, theentire condition is True; otherwise, it’s False. If you didn’t use parentheses, the compiler wouldevaluate the three parts of the expression:
expression1: date1 < #1/1/2008#expression2: score1 < 90expression3: score2 < 90
Then it would combine expression1 with expression2 using the And operator, and finallyit would combine the result with expression3 using the Or operator. If score2 were greaterthan 90, the entire expression would evaluate to True, regardless of the value of the date1 andscore1 variables.
If…Then…Else Statements
A variation of the If…Then statement is the If…Then…Else statement, which executes one blockof statements if the condition is True and another block of statements if the condition is False.The syntax of the If…Then…Else statement is as follows:
If condition Thenstatementblock1
Elsestatementblock2
End If
Visual Basic evaluates the condition; if it’s True, VB executes the first block of statementsand then jumps to the statement following the End If statement. If the condition is False,Visual Basic ignores the first block of statements and executes the block following the Elsekeyword.
A third variation of the If…Then…Else statement uses several conditions, with the ElseIfkeyword:
If condition1 Thenstatementblock1
ElseIf condition2 Thenstatementblock2
ElseIf condition3 Thenstatementblock3

88 CHAPTER 3 VISUAL BASIC PROGRAMMING ESSENTIALS
Elsestatementblock4
End If
You can have any number of ElseIf clauses. The conditions are evaluated from the top,and if one of them is True, the corresponding block of statements is executed. The Else clause,which is optional, will be executed if none of the previous expressions is True. Listing 3.1 is anexample of an If statement with ElseIf clauses.
Listing 3.1: Multiple ElseIf statements
score = InputBox("Enter score")If score < 50 Then
Result = "Failed"ElseIf score < 75 Then
Result = "Pass"ElseIf score < 90 Then
Result = "Very Good"Else
Result = "Excellent"End IfMsgBox Result
Multiple If . . . Then Structures versus ElseIf
Notice that after a True condition is found, Visual Basic executes the associated statementsand skips the remaining clauses. It continues executing the program with the statementimmediately after End If. All following ElseIf clauses are skipped, and the code runs a bitfaster. That’s why you should prefer the complicated structure with the ElseIf statementsused in Listing 3.1 to this equivalent series of simple If statements:
If score < 50 ThenResult = "Failed"
End IfIf score < 75 And score >= 50 Then
Result = "Pass"End IfIf score < 90 And score > =75 Then
Result = "Very Good"End IfIf score >= 90 Then
Result = "Excellent"End If
With the multiple If statements, the compiler will generate code that evaluates all the condi-tions, even if the score is less than 50.

FLOW-CONTROL STATEMENTS 89
The order of the comparisons is vital when you’re using multiple ElseIf statements. Hadyou written the previous code segment with the first two conditions switched, like the follow-ing segment, the results would be quite unexpected:
If score < 75 ThenResult = "Pass"
ElseIf score < 50 ThenResult = "Failed"
ElseIf score < 90 ThenResult = "Very Good"
ElseResult = "Excellent"
End If
Let’s assume that score is 49. The code would compare the score variable to the value 75.Because 49 is less than 75, it would assign the value Pass to the variable Result, and then itwould skip the remaining clauses. Thus, a student who scored 49 would have passed the test!So be extremely careful and test your code thoroughly if it uses multiple ElseIf clauses. Youmust either make sure they’re listed in the proper order or use upper and lower limits, as inthe sidebar ‘‘Multiple If…Then Structures versus ElseIf.’’ It goes without saying that such acode segment should be tested for all possible intervals of the score variable.
The IIf() Function
Not to be confused with the If…Then statement, the IIf() function is also part of the lan-guage. This built-in function accepts as an argument an expression and two values, evaluatesthe expression, and returns the first value if the expression is True or the second value if theexpression is False. The IIf() function has the following syntax:
IIf(expression, TruePart, FalsePart)
The TruePart and FalsePart arguments are objects. (They can be integers, strings, or anybuilt-in or custom object.) The IIf() function is a more compact notation for simple Ifstatements, and you can use it to shorten If…Then…Else expressions. Let’s say you wantto display one of the strings "Close" or "Far", depending on the value of the distancevariable. Instead of a multiline If statement, you can call the IIf() function as follows:
Dim result As StringResult = IIf(distance > 1000, "Far", "Close")MsgBox(result)
Another typical example of the IIf() function is in formatting negative values. It’s fairlycommon in business applications to display negative amounts in parentheses. Use the IIf()statement to write a short expression that formats negative and positive amounts differently,like the following one:
IIf(amount < 0, " (" & Math.Abs(amount).ToString("#.00") & ")",amount.ToString("#.00"))

90 CHAPTER 3 VISUAL BASIC PROGRAMMING ESSENTIALS
The Abs method of the Math class returns the absolute value of a numeric value, and the ‘‘#.00’’argument of the ToString method specifies that the amount should be formatted as a currencyamount with two decimal digits. You can insert the preceding statement anywhere you woulddisplay the amount variable. Assign a positive or negative value to the amount variable and thenpass the entire expression to the MsgBox() function to display the formatted value:
MsgBox(IIf(amount < 0, "(" & Math.Abs(amount).ToString("#.00") & ")",amount.ToString("#.00")))
Select Case Statements
An alternative to the efficient but difficult-to-read code of the multiple ElseIf structure is theSelect Case structure, which compares the same expression to different values. The advantageof the Select Case statement over multiple If…Then…ElseIf statements is that it makes thecode easier to read and maintain.
The Select Case structure evaluates a single expression at the top of the structure. Theresult of the expression is then compared with several values; if it matches one of them, thecorresponding block of statements is executed. Here’s the syntax of the Select Case statement:
Select Case expressionCase value1
' statementblock1Case value2
' statementblock2...
Case ElsestatementblockN
End Select
A practical example based on the Select Case statement is shown in Listing 3.2.
Listing 3.2: Using the Select Case statement
Dim Message As StringSelect Case Now.DayOfWeek
Case DayOfWeek.Mondaymessage = "Have a nice week"
Case DayOfWeek.Fridaymessage = "Have a nice weekend"
Case Elsemessage = "Welcome back! "
End SelectMsgBox(message)

FLOW-CONTROL STATEMENTS 91
In the listing, the expression that’s evaluated at the beginning of the statement is theNow.DayOfWeek method. This method returns a member of the DayOfWeek enumeration, andyou can use the names of these members in your code to make it easier to read. The value ofthis expression is compared with the values that follow each Case keyword. If they match,the block of statements up to the next Case keyword is executed, and the program skipsto the statement following the End Select statement. The block of the Case Else statement isoptional and is executed if none of the previous cases matches the expression. The first twoCase statements take care of Fridays and Mondays, and the Case Else statement takes care ofthe other days.
Some Case statements can be followed by multiple values, which are separated by commas.Listing 3.3 is a revised version of the previous example. The code of Listing 3.3 handles Satur-days and Sundays.
Listing 3.3: A Select Case statement with multiple cases per clause
Select Case Now.DayOfWeekCase DayOfWeek.Monday
message = "Have a nice week"Case DayOfWeek.Tuesday, DayOfWeek.Wednesday, DayOfWeek.Thursday
message = "Welcome back!"Case DayOfWeek.Friday, DayOfWeek.Saturday, DayOfWeek.Sunday
message = "Have a nice weekend!"End SelectMsgBox(message)
Monday, weekends, and weekdays are handled separately by three Case statements. Thesecond Case statement handles multiple values (all workdays except for Monday and Friday).Monday is handled by a separate Case statement. This structure doesn’t contain a Case Elsestatement because all possible values are examined in the Case statements; the DayOfWeekmethod can’t return another value.
The Case statements can get a little more complex. For example, you may want to distin-guish a case where the variable is larger (or smaller) than a value. To implement this logic, usethe Is keyword, as in the following code segment that distinguishes between the first and sec-ond half of the month:
Select Now.DayCase Is < 15
MsgBox("It’s the first half of the month")Case Is >= 15
MsgBox("It’s the second half of the month")End Select
Short-Circuiting Expression Evaluation
A common pitfall of evaluating expressions with VB is to attempt to compare a Nothing valueto something. An object variable that hasn’t been set to a value can’t be used in calculations or

92 CHAPTER 3 VISUAL BASIC PROGRAMMING ESSENTIALS
comparisons. Consider the following statements:
Dim B As SolidBrushB = New SolidBrush(Color.Cyan)If B.Color = Color.White Then
MsgBox("Please select another brush color")End If
These statements create a SolidBrush object variable, the B variable, and then examine thebrush color and prohibit the user from drawing with a white brush. The second statement ini-tializes the brush to the cyan color. (Every shape drawn with this brush will appear in cyan.)If you instead attempted to use the B variable without initializing it (that is, if you had notincluded the line that creates a new SolidBrush object), a runtime exception would be thrown:the infamous NullReferenceException would be thrown when the program gets to the Ifstatement because the B variable has no value (it’s Nothing), and the code attempts to com-pare it to something. Nothing values can’t be compared to anything. Comment out the secondstatement by inserting a single quote in front of it and then execute the code to see what willhappen. Then restore the statement by removing the comment mark.
Actually, as soon as you comment out the statement that initializes the B variable, the editorwill underline the B variable and it will generate the warning Variable B is used before it has beenassigned a value. A null reference exception could result at runtime.
Let’s fix it by making sure that B is not Nothing:
If B IsNot Nothing And B.Color = Color.White ThenMsgBox("Please select another brush color")
End If
The If statement should compare the Color property of the B object, only if the B object isnot Nothing. But this isn’t the case. The AND operator evaluates all terms in the expression andthen combines their results (True or False values) to determine the value of the expression. Ifthey’re all True, the result is also True. However, it won’t skip the evaluation of some terms assoon as it hits a False value. To avoid unnecessary comparisons, use the AndAlso operator. TheAndAlso operator does what the And operator should have done in the first place: it evaluatesthe expressions from left to right, and when it encounters a False value, it stops evaluating theremaining terms because they won’t affect the result. If one of its operands is False, the entireexpression will evaluate to False. In other words, if B is Nothing, there’s no reason to examineits color; the entire expression will evaluate to False, regardless of the brush color. Here’s howto use the AndAlso operator:
If B IsNot Nothing AndAlso B.Color = Color.White ThenMsgBox("Please select another brush color")
End If
The AndAlso operator is said to short-circuit the evaluation of the entire expression assoon as it runs into a False value. As soon as one of the parts in an AndAlso operation turnsout to be False, the entire expression is False and there’s no need to evaluate the remainingterms.

FLOW-CONTROL STATEMENTS 93
There’s an equivalent operator for short-circuiting OR expressions: the OrElse operator. TheOrElse operator can speed the evaluation of logical expressions a little by returning True whenthe first operand evaluates to True (the result of the OR operation will be True, regardless of thevalue of the second operand). Another good reason for short-circuiting expression evaluation isto help performance. If the second term of an And expression takes longer to execute (it has toaccess a remote database, for example), you can use the AndAlso operator to make sure that it’snot executed when it’s not needed.
Loop StatementsLoop statements allow you to execute one or more lines of code repetitively. Many tasks consistof operations that must be repeated over and over again, and loop statements are an importantpart of any programming language. Visual Basic supports the following loop statements:
◆ For…Next
◆ Do…Loop
◆ While…End While
For…Next Loops
Unlike the other two loops, the For…Next loop requires that you know the number of times thatthe statements in the loop will be executed. The For…Next loop has the following syntax:
For counter = start To end [Step increment]' statements
Next [counter]
The keywords in the square brackets are optional. The arguments counter, start, end, andincrement are all numeric. The loop is executed as many times as required for the countervariable’s value to reach (or exceed) the end value. The variable that appears next to the Forkeyword is the loop’s counter, or control variable.
In executing a For…Next loop, Visual Basic does the following:
1. Sets the counter variable equal to the start variable (this is the control variable’s initialvalue).
2. Tests to see whether counter is greater than end. If so, it exits the loop without executingthe statements in the loop’s body, not even once. If increment is negative, Visual Basic teststo see whether the counter value is less than the end value. If it is, it exits the loop.
3. Executes the statements in the block.
4. Increases the counter variable by the amount specified with the increment argument fol-lowing the Step keyword. If the increment argument isn’t specified, counter is increasedby 1. If Step is a negative value, counter is decreased accordingly.
5. Continues with step 2.
The For…Next loop in Listing 3.4 scans all the elements of the numeric array data and calcu-lates their average.

94 CHAPTER 3 VISUAL BASIC PROGRAMMING ESSENTIALS
Listing 3.4: Iterating an array with a For…Next loop
Dim i As Integer, total As DoubleFor i = 0 To data.Length
total = total + data(i)Next iDebug.WriteLine (total / Data.Length)
The single most important thing to keep in mind when working with For…Next loops is thatthe loop’s ending value is set at the beginning of the loop. Changing the value of the end vari-able in the loop’s body won’t have any effect. For example, the following loop will be executed10 times, not 100 times:
Dim endValue As Integer = 10Dim i as IntegerFor i = 0 To endValue
endValue = 100' more statements
Next i
You can, however, adjust the value of the counter variable from within the loop. The fol-lowing is an example of an endless (or infinite) loop:
For i = 0 To 10Debug.WriteLine(i)i = i - 1
Next i
This loop never ends because the loop’s control variable, in effect, is never increased. (If you trythis, press Ctrl+Break to interrupt the endless loop.)
Do Not Manipulate the Loop Counter
Manipulating the control variable of a For…Next loop is strongly discouraged. This practicewill most likely lead to bugs, such as infinite loops, overflows, and so on. If the number ofrepetitions of a loop isn’t known in advance, use a Do…Loop or a While…End While structure(discussed shortly). To jump out of a For…Next loop prematurely, use the Next For state-ment. You can also use the Continue For statement to continue with the next iteration ofthe loop (in other words, jump to the beginning of the loop and start a new iteration).
The increment argument can be either positive or negative. If start is greater than end, thevalue of increment must be negative. If not, the loop’s body won’t be executed, not even once.
VB 2010 allows you to declare the counter in the For statement. The control variable ceases toexist when the program bails out of the loop:
For i As Integer = 1 to 10Debug.WriteLine(i.ToString)

FLOW-CONTROL STATEMENTS 95
NextDebug.WriteLine(i.ToString)
The i variable is used as the loop counter and it’s not visible outside the loop. The last state-ment won’t even compile; the editor will underline it with a wiggly line and will generate theerror message Name ‘i’ is not declared.
For Each…Next Loops
This is a variation of the classic For loop and it’s used to iterate through the items of a collec-tion or array. Let’s say you have declared an array of strings like the following:
Dim months() As String = _{"January", "February", "March", "April", "May", "June"}
You can iterate through the month names with a For Each loop like the one that follows:
For Each month As String In monthsDebug.WriteLine(month)
Next
The month control variable need not be declared if the Infer option is on. The compiler willfigure out the type of the control variable based on the types of the values you’re iterating over,which in our example are strings. You can easily write the equivalent For…Next loop for thesame task, but the For Each loop is more elegant. It also provides a variable that represents thecurrent item at each iteration.
Let’s look at a more interesting example of the For Each loop to get an idea of the typeof operations it’s best suited for. The Process class of the Framework provides methods forinspecting the process running on the target computer at any time. These are the processes yousee in the Processes tab of the Task Manager. Each process is represented by a Process object,which in turn exposes several useful properties (such as the name of the process, the physicalmemory it’s using, and so on) as well as methods to manipulate the processes, including theKill method that terminates a process.
The GetProcesses method returns an array of Process objects, one for each running process.To iterate through the current processes, you can use a For Each loop like the following:
Dim processes() = Process.GetProcessesFor Each Proc As Process In processes
Debug.WriteLine(Proc.ProcessName & " " &Proc.PrivateMemorySize64.ToString)
Next
This loop will display a list like the following in the Output window:
taskeng 10588160svchost 11476992YahooMessenger 20496384sqlservr 104538112

96 CHAPTER 3 VISUAL BASIC PROGRAMMING ESSENTIALS
svchost 4255744svchost 6549504SearchIndexer 53612544sqlwriter 3715072searchFilterHost 3514368cmd 2080768iexplore 250073088
As you can see, the For Each loop is much more elegant than a For…Next loop when it comesto iterating through the items of a collection. The loop’s counter is not an index, but an objectthat represents the current entity — provided that all elements are of the same type, of course.Many developers use a For Each…Next loop whenever possible, even in situations where a triv-ial For…Next loop would suffice. Compare the loops in Listing 3.5 and Listing 3.6 for iteratingthrough the elements of an array of integers.
Listing 3.5: Using a For…Next loop
Dim numbers() = {10, 11, 12, 13, 14, 15, 16, 17, 18, 19, 20}For i As Integer = 1 to numbers.Length - 1
` Process value numbers(i)Next
Listing 3.6: Using a For Each…Next loop
Dim numbers() = {10, 11, 12, 13, 14, 15, 16, 17, 18, 19, 20}For Each number As Integer In numbers
` Process value numberNext
Although I declare the control variable in both of the preceding loops, this isn’t mandatoryas long as you have turned on type inference. The compiler will figure out the proper typefrom the type of the objects that make up the collection you’re iterating.
Do Loops
The Do…Loop statement executes a block of statements for as long as a condition is True oruntil a condition becomes True. Visual Basic evaluates an expression (the loop’s condition), andif it’s True, the statements in the loop body are executed. The expression is evaluated eitherat the beginning of the loop (before any statements are executed) or at the end of the loop (afterthe block statements are executed at least once). If the expression is False, the program’s execu-tion continues with the statement following the loop. These two variations use the keywordsWhile and Until to specify how long the statements will be executed. To execute a block ofstatements while a condition is True, use the following syntax:
Do While condition' statement-block
Loop

FLOW-CONTROL STATEMENTS 97
To execute a block of statements until the condition becomes True, use the following syntax:
Do Until condition' statement-block
Loop
When Visual Basic executes these loops, it first evaluates condition. If condition is False,a Do…While loop is skipped (the statements aren’t even executed once) but a Do…Until loopis executed. When the Loop statement is reached, Visual Basic evaluates the expression again;it repeats the statement block of the Do…While loop if the expression is True or repeats thestatements of the Do…Until loop if the expression is False. In short, the Do…While loop isexecuted when the condition is True (while the condition is True), and the Do…Until loopis executed when the condition is False (until the condition becomes True).
A last variation of the Do statement, the Do…Loop statement, allows you to always evaluatethe condition at the end of the loop, even in a While loop. Here’s the syntax of both types ofloop, with the evaluation of the condition at the end of the loop:
Do' statement-block
Loop While condition
Do' statement-block
Loop Until condition
As you can guess, the statements in the loop’s body are executed at least once, even in thecase of the While loop, because no testing takes place as the loop is entered.
Here’s a typical example of using a Do…Loop: Suppose that the variable MyText holds sometext (like the Text property of a TextBox control) and you want to count the words in the text.(We’ll assume that there are no multiple spaces in the text and that the space character sepa-rates successive words.) To locate an instance of a character in a string, use the IndexOf methodof the String class. This method accepts two arguments: the starting location of the search andthe character being searched. The following loop repeats for as long as there are spaces in thetext. Each time the IndexOf method finds another space in the text, it returns the location ofthe space. When there are no more spaces in the text, the IndexOf method returns the value –1,which signals the end of the loop, as shown:
Dim MyText As String ="The quick brown fox jumped over the lazy dogs"
Dim position, words As Integerposition = 0words = 0Do While position >= 0
position = MyText.IndexOf(" ", position + 1)words += 1
LoopMsgBox("There are " & words & " words in the text")
The Do…Loop is executed while the IndexOf method function returns a positive number,which means that there are more spaces (and therefore words) in the text. The variable

98 CHAPTER 3 VISUAL BASIC PROGRAMMING ESSENTIALS
position holds the location of each successive space character in the text. The search for thenext space starts at the location of the current space plus 1 (so the program won’t keep findingthe same space). For each space found, the program increases the value of the words variable,which holds the total number of words when the loop ends. By the way, there are simplermethods of breaking a string into its constituent words, such as the Split method of the Stringclass. This is just an example of the Do…While loop.
You might notice a problem with the previous code segment: It assumes that the text con-tains at least one word. You should insert an If statement that detects zero-length strings anddoesn’t attempt to count words in them. You can also use the IsNullOrEmpty method of theString class, which returns True if a String variable is empty or Nothing.
You can code the same routine with the Until keyword. In this case, you must continuesearching for spaces until position becomes –1. Here’s the same code with a different loop:
Dim position As Integer = 0Dim words As Integer = 0Do Until position = -1
position = MyText.IndexOf(" ", position + 1)words = words + 1
LoopMsgBox("There are " & words & " words in the text")
While Loops
The While…End While loop executes a block of statements as long as a condition is True. Theloop has the following syntax:
While condition' statement-block
End While
If condition is True, the statements in the block are executed. When the End While state-ment is reached, control is returned to the While statement, which evaluates condition again.If condition is still True, the process is repeated. If condition is False, the program resumeswith the statement following End While.
The loop in Listing 3.7 prompts the user for numeric data. The user can type a negativevalue to indicate he’s done entering values and terminate the loop. As long as the user enterspositive numeric values, the program keeps adding them to the total variable.
Listing 3.7: Reading an unknown number of values
Dim number, total As Doublenumber = 0While number => 0
total = total + numbernumber = InputBox("Please enter another value")
End While

FLOW-CONTROL STATEMENTS 99
I’ve assigned the value 0 to the number variable before the loop starts because this value isn’tnegative and doesn’t affect the total.
Sometimes, the condition that determines when the loop will terminate can’t be evaluated atthe top of the loop. In these cases, we declare a Boolean value and set it to True or False fromwithin the loop’s body. Here’s the outline of such a loop:
Dim repeatLoop As BooleanrepeatLoop = TrueWhile repeatLoop
' statementsIf condition Then
repeatLoop = TrueElse
repeatLoop = FalseEnd If
End While
You may also see an odd loop statement like the following one:
While True' statements
End While
It’s also common to express the True condition in one of the following two forms:
While 1 = 1
or
While True
Now, there’s no good reason to use statements like these; I guess they’re leftovers from old pro-grams. The seemingly endless loops must be terminated from within the body using an ExitWhile statement, which is called when a condition becomes True or False. The following loopterminates when a condition is met in the loop’s body:
While True' statementsIf condition Then Exit While' more statements
End While
Of course, this code isn’t elegant and you should avoid it, except when you’re implementingsome complicated logic that can’t be easily coded differently.
Nested Control StructuresYou can place, or nest, control structures inside other control structures (such as an If…Thenblock within a For…Next loop) or nest multiple If…Then blocks within one another. Control

100 CHAPTER 3 VISUAL BASIC PROGRAMMING ESSENTIALS
structures in Visual Basic can be nested in as many levels as you want. The editor automaticallyindents the bodies of nested decision and loop structures to make the program easier to read.
When you nest control structures, you must make sure that they open and close within thesame structure. In other words, you can’t start a For…Next loop in an If statement and closethe loop after the corresponding End If. The following code segment demonstrates how to nestseveral flow-control statements:
For a = 1 To 100' statementsIf a = 99 Then
' statementsEnd IfWhile b < a
' statementsIf total <= 0 Then
' statementsEnd If
End WhileFor c = 1 to a
' statementsNext c
Next a
I show the names of the control variables after the Next statements to make the code morereadable to humans. To find the matching closing statement (Next, End If, or End While), movedown from the opening statement until you hit a line that starts at the same column. This is thematching closing statement. Notice that you don’t have to align the nested structures yourself;the editor reformats the code automatically as you type. It also inserts the matching closingstatement — the End If statement is inserted automatically as soon as you enter an If state-ment and press Enter, for example. Not only that, but as soon as you click in a control or loopstatement, the editor highlights the corresponding ending statement.
Listing 3.8 shows a typical situation with nested loops. The two nested loops scan all theelements of a two-dimensional array.
Listing 3.8: Iterating through a two-dimensional array
Dim Array2D(6, 4) As IntegerDim iRow, iCol As IntegerFor iRow = 0 To Array2D.GetUpperBound(0)
For iCol = 0 To Array2D.GetUpperBound(1)Array2D(iRow, iCol) = iRow * 100 + iColDebug.Write(iRow & ", " & iCol & " = " &
Array2D(iRow, iCol) & " ")Next iColDebug.WriteLine()
Next iRow

FLOW-CONTROL STATEMENTS 101
The outer loop (with the iRow counter) scans each row of the array. At each iteration, theinner loop scans all the elements in the row specified by the counter of the outer loop (iRow).After the inner loop completes, the counter of the outer loop is increased by one, and the innerloop is executed again — this time to scan the elements of the next row. The loop’s body con-sists of two statements that assign a value to the current array element and then print it in theOutput window. The current element at each iteration is Array2D(iRow, iCol).
Another typical example of nested loops is the code that iterates through the cells of aListView control. (This control is discussed in Chapter 7, ‘‘More Windows Controls,’’ andalso in the tutorial ‘‘The ListView and TreeView controls.’’) The ListView control is basicallya grid — not an editable one, I’m afraid, but an excellent tool for displaying tabular data. Toiterate through the control’s cells, you must set up a loop that iterates through its rows and anested loop that iterates through the current row’s cells. Each row of the ListView control is aListViewItem object, which provides information about the rows’ cells through the SubItemsproperty. The SubItems property is an array of values, one for each cell of the grid’s row. Theexpression ListView1.Items(2).SubItems(1).Text returns the contents of the second cell inthe control’s third row. The following code segment iterates through the cells of any ListViewcontrol, regardless of the number of rows and columns it contains:
For iRow As Integer = 0 To ListView1.Items.Count – 1Dim LI As ListViewItem = ListView1.Items(iRow)For iCol As Integer = 0 To LI.SubItems.Count – 1
' process cell LI.SubItems(iCol)Next
Next
The two nested For…Next loops are quite old-fashioned. In modern VB, you’d write the samecode as follows:
Dim str As String = ""For Each LI As ListViewItem In ListView1.Items
For Each cell In LI.SubItemsstr = str & cell.Text.ToString & vbTab
Nextstr = str & vbCrLf
NextMsgBox(str)
The preceding code segment gradually builds a string with the contents of the ListView con-trol, separating cells in the same row with a tab (vbTab constant) and consecutive rows with aline feed (vbCrLf constant). You can also nest multiple If statements. The code in Listing 3.9tests a user-supplied value to determine whether it’s positive; if so, it determines whether thevalue exceeds a certain limit.
Listing 3.9: Simple nested If statements
Dim Income As DecimalIncome = Convert.ToDecimal(InputBox("Enter your income"))If Income > 0 Then

102 CHAPTER 3 VISUAL BASIC PROGRAMMING ESSENTIALS
If Income > 12000 ThenMsgBox "You will pay taxes this year"
ElseMsgBox "You won’t pay any taxes this year"
End IfElse
MsgBox "Bummer"End If
The Income variable is first compared with zero. If it’s negative, the Else clause of theIf…Then statement is executed. If it’s positive, it’s compared with the value 12,000, anddepending on the outcome, a different message is displayed. The code segment shown heredoesn’t perform any extensive validations and assumes that the user won’t enter a string whenprompted for income.
The Exit and Continue StatementsThe Exit statement allows you to prematurely exit from a block of statements in a controlstructure, from a loop, or even from a procedure. Suppose that you have a For…Next loop thatcalculates the square root of a series of numbers. Because the square root of negative numberscan’t be calculated (the Math.Sqrt method will generate a runtime error), you might want tohalt the operation if the array contains an invalid value. To exit the loop prematurely, use theExit For statement as follows:
For i = 0 To UBound(nArray)If nArray(i) < 0 Then
MsgBox("Can’t complete calculations" & vbCrLf &"Item " & i.ToString & " is negative! "
Exit ForEnd IfnArray(i) = Math.Sqrt(nArray(i))
Next
If a negative element is found in this loop, the program exits the loop and continues with thestatement following the Next statement.
There are similar Exit statements for the Do loop (Exit Do), the While loop (Exit While),the Select statement (Exit Select), and functions and subroutines (Exit Function and ExitSub). If the previous loop was part of a function, you might want to display an error and exitnot only the loop, but also the function itself by using the Exit Function statement.
Sometimes you may need to continue with the following iteration instead of exiting the loop(in other words, skip the body of the loop and continue with the following value). In thesecases, you can use the Continue statement (Continue For for For… Next loops, Continue Whilefor While loops, and so on).
Writing and Using ProceduresNow that you have seen the decision and looping structures of Visual Basic, let’s move on toprocedures. In traditional programming languages, procedures are the basic building blocksof every application. And what exactly is a traditional language? Well, a procedural language, of

WRITING AND USING PROCEDURES 103
course. A procedural language is one that requires you to specify how to carry out specific tasksby writing procedures. A procedure is a series of statements that tell the computer how to carryout a specific task. The task could be the calculation of a loan’s monthly payment (a task thatcan be coded literally with a single statement) or the retrieval of weather data from a remoteserver. In any case, the body of statements form a unit of code that can be invoked by name,not unlike scripts or macro commands but much more flexible and certainly more complex.
The idea of breaking a large application into smaller, more manageable sections is not newto computing. Few tasks, programming or otherwise, can be managed as a whole. Using eventhandlers is just one example of breaking a large application into smaller tasks.
For example, when you write code for a control’s Click event, you concentrate on the eventat hand — namely, how the program should react to the Click event. What happens when thecontrol is double-clicked or when another control is clicked is something you will worry aboutlater — in another control’s event handler. This divide-and-conquer approach isn’t unique toprogramming events. It permeates the Visual Basic language, and developers write even thelongest applications by breaking them into small, well-defined, easily managed tasks. Eachtask is performed by a procedure that is written and tested separately from the others. Asmentioned earlier, the two types of procedures supported by Visual Basic are subroutines andfunctions.
Subroutines perform actions and they don’t return any result. Functions, on the other hand,perform some calculations and return a value. This is the only difference between subroutinesand functions. Both subroutines and functions can accept arguments (values you pass to theprocedure when you call it). Usually, the arguments are the values on which the procedure’scode acts. Arguments and the related keywords are discussed in detail later in this chapter.
SubroutinesA subroutine is a block of statements that carries out a well-defined task. The block of state-ments is placed within a set of Sub…End Sub statements and can be invoked by name. The fol-lowing subroutine displays the current date in a message box:
Sub ShowDate()MsgBox("Today’s date is " & Now().ToShortDateString)
End Sub
To use it in your code, you can just enter the name of the function in a line of its own:
ShowDate()
To experiment with the procedures presented in this chapter, start a new Windows project,place a button on the main form, and then enter the definition of the ShowDate() subrou-tine outside any event handler. In the button’s Click event handler, enter the statementShowDate(). If you run the application and click the button, the current date will appear on amessage box. The single statement in the event handler calls the ShowDate() subroutine, whichdisplays the current date. Your main program calls the subroutine by name and it doesn’t carehow complex the subroutine is.
Normally, the task performed by a subroutine is more sophisticated than this, but even thissimple subroutine is a block of code isolated from the rest of the application. The statements ina subroutine are executed, and when the End Sub statement is reached, control returns to thecalling code. It’s possible to exit a subroutine prematurely by using the Exit Sub statement. In

104 CHAPTER 3 VISUAL BASIC PROGRAMMING ESSENTIALS
effect, a subroutine is a set of statements that perform a very specific task, and you can invokethem by name. Use subroutines to break your code into smaller, more manageable units andcertainly if you’re coding tasks that may be used in multiple parts of the application. Note thatthe ShowDate() subroutine can be called from any event handler in the current form.
All variables declared within a subroutine are local to that subroutine. When the subroutineexits, all variables declared in it cease to exist.
Most procedures also accept and act upon arguments. The ShowDate() subroutine displaysthe current date in a message box. If you want to display any other date, you have to imple-ment it differently and add an argument to the subroutine:
Sub ShowDate(ByVal aDate As Date)MsgBox(aDate.ToShortDateString)
End Sub
aDate is a variable that holds the date to be displayed; its type is Date. The ByVal keywordmeans that the subroutine sees a copy of the variable, not the variable itself. What this meanspractically is that the subroutine can’t change the value of the variable passed by the calling code.
To display a specific date with the second implementation of the subroutine, use a statementlike the following:
Dim myBirthDate = #2/9/1960#ShowDate(myBirthDate)
Or, you can pass the value to be displayed directly without the use of an intermediatevariable:
ShowDate(#2/9/1960#)
If you later decide to change the format of the date, there’s only one place in your code youmust edit — the statement that displays the date from within the ShowDate() subroutine.
FunctionsA function is similar to a subroutine, but a function returns a result. Because they return values,functions — like variables — have types. The value you pass back to the calling program froma function is called the return value, and its type determines the type of the function. Functionsaccept arguments, just like subroutines. The statements that make up a function are placed in aset of Function…End Function statements, as shown here:
Function NextDay() As DateDim theNextDay As DatetheNextDay = Now.AddDays(1)Return theNextDay
End Function
Functions are called like subroutines — by name — but their return value is usuallyassigned to a variable. To call the NextDay() function, use a statement like this:
Dim tomorrow As Date = NextDay()

WRITING AND USING PROCEDURES 105
Because functions have types like variables, they can be used anywhere you’d use a variablename. You will find several examples of practical functions later in this chapter, both built-infunctions that are part of the language and custom functions. Subroutines are being graduallyreplaced by functions, and in some languages there are no subroutines, just functions. Evenif you need a procedure to perform some task without returning a value, you can implementit as a function that returns a True/False value to indicate whether the operations completedsuccessfully or not.
The Function keyword is followed by the function name and the As keyword that specifiesits type, similar to a variable declaration. Inside the preceding sample function, AddDays is amethod of the Date type, and it adds a number of days to a date value. The NextDay() func-tion returns tomorrow’s date by adding one day to the current date. NextDay() is a customfunction, which calls the built-in AddDays method to complete its calculations.
The result of a function is returned to the calling program with the Return statement, whichis followed by the value you want to return from your function. This value, which is usuallya variable, must be of the same type as the function. In our example, the Return statementhappens to be the last statement in the function, but it could appear anywhere; it could evenappear several times in the function’s code. The first time a Return statement is executed, thefunction terminates and control is returned to the calling code.
You can also return a value to the calling routine by assigning the result to the name of thefunction. The following is an alternate method of coding the NextDay() function:
Function NextDay() As DateNextDay = Now.AddDays(1)
End Function
Notice that this time I’ve assigned the result of the calculation to the function’s namedirectly and haven’t use a Return statement. This assignment, however, doesn’t terminate thefunction as the Return statement does. It sets up the function’s return value, but the functionwill terminate when the End Function statement is reached or when an Exit Function state-ment is encountered.
Similar to the naming of variables, a custom function has a name that must be unique in itsscope (which is also true for subroutines, of course). If you declare a function in a form, thefunction name must be unique in the form. If you declare a function as Public or Friend, itsname must be unique in the project. Functions have the same scope rules as variables and canbe prefixed by many of the same keywords. In effect, you can modify the default scope of afunction with the keywords Public, Private, Protected, Friend, and Protected Friend. Inaddition, functions have types, just like variables, and they’re declared with the As keyword.
Suppose that the function CountWords() counts the number of words and the functionCountChars() counts the number of characters in a string. The average length of a word in thestring longString could be calculated as follows:
Dim longString As String, avgLen As DoublelongString = TextBox1.TextavgLen = CountChars(longString) / CountWords(longString)
The first executable statement gets the text of a TextBox control and assigns it to a variable,which is then used as an argument to the two functions. When the third statement executes,Visual Basic first calls the functions CountChars() and CountWords() with the specified argu-ments and then divides the results they return.

106 CHAPTER 3 VISUAL BASIC PROGRAMMING ESSENTIALS
The CountWords() function uses the Split method, which isolates the words in a stringand returns them as an array of strings. Then the code reads the length of the array, whichequals the number of words in the string. The Split method accepts as an argument a charac-ter, which is the delimiter it will use to break the string into words. The space character beingpassed as an argument is enclosed in double quotes, but this is a string, not a character. It’sa string that contains a single character, but a string nevertheless. To convert the space string(””) into a character value, you just append the c character to the string. The number of wordsin the string is the length of the array that holds the individual words, the words array.
Function CountWords(ByVal longString As String) As IntegerDim words = longString.Split(" "c)Return words.Length
End Function
Function CountChars(ByVal longString As String) As IntegerlongString = longString.Replace(" ", "")Return longString.Length
End Function
You can call functions in the same way that you call subroutines, but the result won’t bestored anywhere. For example, the function Convert() might convert the text in a text box touppercase and return the number of characters it converted. Normally, you’d call this functionas follows:
nChars = Convert()
If you don’t care about the return value — you only want to update the text on a TextBoxcontrol — you would call the Convert() function with the following statement:
Convert()
Most of the procedures in an application are functions, not subroutines. The reason is thata function can return (at the very least) a True/False value that indicates whether it completedsuccessfully or not. In the remainder of this chapter, I will focus on functions, but the sameprinciples apply to subroutines as well, except for the return value.
ArgumentsSubroutines and functions aren’t entirely isolated from the rest of the application. Most pro-cedures accept arguments from the calling program. Recall that an argument is a value youpass to the procedure and on which the procedure usually acts. This is how subroutines andfunctions communicate with the rest of the application.
Subroutines and functions may accept any number of arguments, and you must supply a valuefor each argument of the procedure when you call it. Some of the arguments may be optional,which means you can omit them; you will see shortly how to handle optional arguments.
Let’s implement a simple custom function to demonstrate the use of arguments. The Min()function, shown next, is a custom function that accepts two arguments and returns the smaller

ARGUMENTS 107
one. Once you write the function, you can call it from within your code just like any built-infunction. The difference is that while the built-in functions are always available, the customfunctions are available only to the project in which they are declared. Here’s the implementa-tion of the Min() function:
Function Min(ByVal a As Single, ByVal b As Single) As SingleMin = IIf(a < b, a, b)
End Function
Interestingly, the Min() function calls the IIf() built-in function. IIf() is a built-in functionthat evaluates the first argument, which is a logical expression. If the expression is True, theIIf() function returns the second argument. If the expression is False, the function returns thethird argument.
To call the Min() custom function, use a few statements like the following:
Dim val1 As Single = 33.001Dim val2 As Single = 33.0011Dim smallerVal as SinglesmallerVal = Min(val1, val2)MsgBox("The smaller value is " & smallerVal)
If you execute these statements (place them in a button’s Click event handler), you will seethe following in a message box:
The smaller value is 33.001
Or you can insert these statements in the Main subroutine of a Console application and replacethe call to the MsgBox function with a call to the Console.WriteLine method to see the outputon a console window. Here’s what the entire Console application’s code should look like:
Module Module1
Sub Main()Dim val1 As Single = 33.001Dim val2 As Single = 33.0011Dim smallerVal As SinglesmallerVal = Min(val1, val2)Console.WriteLine("The smaller value is " & smallerVal)Console.ReadKey()
End Sub
Function Min(ByVal a As Single, ByVal b As Single) As SingleMin = IIf(a < b, a, b)
End Function
End Module

108 CHAPTER 3 VISUAL BASIC PROGRAMMING ESSENTIALS
If you attempt to call the same function with two Double values with a statement like thefollowing, you will see the value 3.33 in the Immediate window:
Debug.WriteLine(Min(3.33000000111, 3.33000000222))
The compiler converted the two values from Double to Single data type and returned oneof them. Which one is it? It doesn’t make a difference because when converted to Single, bothvalues are the same.
Interesting things will happen if you attempt to use the Min() function with the Strictoption turned on. Insert the statement Option Strict On at the very beginning of the file, orset Option Strict to On in the Compile tab of the project’s properties pages. The editor willunderline the statement that implements the Min() function: the IIf() function. The IIf()function accepts two Object variables as arguments and returns one of them as its result. TheStrict option prevents the compiler from converting an Object to a numeric variable. To use theIIf() function with the Strict option, you must change the Min implementation as follows:
Function Min(ByVal a As Object, ByVal b As Object) As ObjectMin = IIf(Val(a) < Val(b), a, b)
End Function
It’s possible to implement a Min() function that can compare arguments of all types (inte-gers, strings, dates, and so on).
Argument-Passing MechanismsOne of the most important topics in implementing your own procedures is the mechanism usedto pass arguments. The examples so far have used the default mechanism: passing argumentsby value. The other mechanism is passing them by reference. Although most programmers usethe default mechanism, it’s important to know the difference between the two mechanisms andwhen to use each.
By Value versus by Reference
When you pass an argument by value, the procedure sees only a copy of the argument. Evenif the procedure changes this copy, the changes aren’t reflected in the original variable passedto the procedure. The benefit of passing arguments by value is that the argument values areisolated from the procedure and only the code segment in which they are declared can changetheir values.
In VB 6, the default argument-passing mechanism was by reference, and this is somethingyou should be aware of, especially if you’re migrating VB 6 code to VB 2010.
To specify the arguments that will be passed by value, use the ByVal keyword in front ofthe argument’s name. If you omit the ByVal keyword, the editor will insert it automaticallybecause it’s the default option. Suppose you’re creating a function called Degrees() to converttemperatures from degrees Celsius to degrees Fahrenheit. To declare that the Degrees() function’sargument is passed by value, use the ByVal keyword in the argument’s declaration as follows:
Function Degrees(ByVal Celsius as Single) As SingleReturn((9 / 5) * Celsius + 32)
End Function

ARGUMENTS 109
To see what the ByVal keyword does, add a line that changes the value of the argument inthe function:
Function Degrees(ByVal Celsius as Single) As SingleDim Fahrenheit = (9 / 5) * Celsius + 32Celsius = 0Return Fahrenheit
End Function
Now call the function as follows:
Dim CTemp As Single = InputBox("Enter temperature in degrees Celsius")Dim FTemp As Single = Degrees(CTemp)MsgBox(CTemp.ToString & " degrees Celsius are " &
FTemp & " degrees Fahrenheit")
If you enter the value 32, the following message is displayed:
32 degrees Celsius are 89.6 degrees Fahrenheit
The value you specify in the InputBox is stored in the CTemp variable, which is then passedto the Degrees() function. The function’s return value is then stored in the FTemp variable,which is then used to display the result to the user. Replace the ByVal keyword with the ByRefkeyword in the function’s definition and call the function with the same statements; the pro-gram will display the following message:
0 degrees Celsius are 89.6 degrees Fahrenheit
When the CTemp argument was passed to the Degrees() function, its value was 32. But thefunction changed its value, and upon return it was 0. Because the argument was passed by ref-erence, any changes made by the procedure affected the calling code’s variable that was passedinto the function.
Returning Multiple Values
If you want to write a function that returns more than a single result, you will most likelypass additional arguments by reference and set their values from within the function’s code.The CalculateStatistics() function, shown a little later in this section, calculates the basicstatistics of a data set. The values of the data set are stored in an array, which is passedto the function by reference. The CalculateStatistics() function must return twovalues: the average and standard deviation of the data set. Here’s the declaration of theCalculateStatistics() function:
Function CalculateStatistics(ByRef Data() As Double,ByRef Avg As Double, ByRef StDev As Double) As Integer
The declaration of a procedure is basically its signature; it includes all the information youneed in order to use the procedure in your call. Of course, you have to know what the variousarguments represent, but this is where the documentation comes in. It’s also possible to add

110 CHAPTER 3 VISUAL BASIC PROGRAMMING ESSENTIALS
a short description for each argument, which will appear in the IntelliSense box, as with thebuilt-in procedures. You’ll learn how to automate the documentation of your procedures in thelast section of this chapter. The function returns an integer, which is the number of values inthe data set. The two important values calculated by the function are returned in the Avg andStDev arguments:
Function CalculateStatistics(ByRef Data() As Double,ByRef Avg As Double, ByRef StDev As Double) As Integer
Dim i As Integer, sum As Double, sumSqr As Double, points As Integerpoints = Data.LengthFor i = 0 To points - 1
sum = sum + Data(i)sumSqr = sumSqr + Data(i) ˆ 2
NextAvg = sum / pointsStDev = System.Math.Sqrt(sumSqr / points – Avg ˆ 2)Return(points)
End Function
To call the CalculateStatistics() function from within your code, set up an array of Dou-bles and declare two variables that will hold the average and standard deviation of the data set:
Dim Values() = {102.301, 391.200, 19.29, 179.42, 88.031, 208.01}Dim average, deviation As DoubleDim points As Integerpoints = CalculateStatistics(Values, average, deviation)Debug.WriteLine(points & " values processed.")Debug.WriteLine("The average is " & average.ToString & " and ")Debug.WriteLine("the standard deviation is " & deviation.ToString)
The simplest method for a function to effectively return multiple values is to pass to it argu-ments by reference using the ByRef keyword. However, the definition of your functions mightbecome cluttered, especially if you want to return more than a few values. Another problemwith this technique is that it’s not clear whether an argument must be set before calling thefunction. As you will see shortly, it is possible for a function to return an array or a customstructure with fields for any number of values.
A Note on Refactoring Code
A relatively new term in computer programming, refactoring, refers to rewriting a piece ofcode using procedures. As developers, we tend to insert a lot of code in applications. We startcoding a simple operation, and once we get it to work, we realize that we can improve it oradd more features to it. The result is a procedure that keeps growing. It doesn’t take a rocketscientist to realize that large segments of code are hard to understand and even harder tomaintain. That’s why there are tools that allow us to break large procedures into smaller ones.The process isn’t automatic, of course. As soon as you realize that a procedure has gotten toolong, you can select segments of it and implement them as procedures: You move the code

ARGUMENTS 111
into a procedure and insert a call to the procedure in the code’s place. The process isn’t trivialbecause you need to pass arguments to the procedure. Refactoring tools do just that: Theyremove a code segment from a routine and use it to create a new routine. I won’t discussrefactoring tools in this book, but you should know that help is available when you decide toreorganize your code.
Built-in FunctionsVB provides many functions that implement common or complicated tasks, and you canlook them up in the documentation. (You’ll find them in the Visual Studio � Visual Basic �Reference � Functions branch of the contents tree in the Visual Studio documentation.) Thereare functions for the common math operations, functions to perform calculations with dates(these are truly complicated operations), financial functions, and many more. When you usethe built-in functions, you don’t have to know how they work internally — just how to callthem and how to retrieve the return value.
The Pmt() function, for example, calculates the monthly payments on a loan. All you have toknow is the arguments you must pass to the function and how to retrieve the result. The syntaxof the Pmt() function is as follows, where MPay is the monthly payment, Rate is the monthlyinterest rate, and NPer is the number of payments (the duration of the loan in months). PV isthe loan’s present value (the amount you took from the bank):
MPay = Pmt(Rate, NPer, PV, FV, Due)
Due is an optional argument that specifies when the payments are due (the beginning or theend of the month), and FV is another optional argument that specifies the future value of anamount. This isn’t needed in the case of a loan, but it can help you calculate how much moneyyou should deposit each month to accumulate a target amount over a given time. (The amountreturned by the Pmt() function is negative because it’s a negative cash flow — it’s money youowe — so pay attention to the sign of your values.)
To calculate the monthly payment for a $20,000 loan paid off over a period of six years at afixed interest rate of 7.25%, you call the Pmt() function, as shown in Listing 3.10.
Listing 3.10: Using the Pmt() built-in function
Dim mPay, totalPay As DoubleDim Duration As Integer = 6 * 12Dim Rate As Single = (7.25 / 100) / 12Dim Amount As Single = 20000mPay = -Pmt(Rate, Duration, Amount)totalPay = mPay * DurationMsgBox("Your monthly payment will be " & mPay.ToString("C") &
vbCrLf & "You will pay back a total of " &totalPay.ToString("C"))

112 CHAPTER 3 VISUAL BASIC PROGRAMMING ESSENTIALS
Notice that the interest (7.25%) is divided by 12 because the function requires the monthlyinterest. The value returned by the function is the monthly payment for the loan specified withthe Duration, Amount, and Rate variables. If you place the preceding lines in the Click eventhandler of a button, run the project, and then click the button, the following message willappear in a message box:
Your monthly payment will be $343.39You will pay back a total of $24,723.80
Let’s say you want to accumulate $40,000 over the next 15 years by making monthlydeposits of equal amounts. To calculate the monthly deposit amount, you must call the Pmt()function, passing 0 as the present value and the target amount as the future value. Replace thestatements in the button’s Click event handler with the following and run the project:
Dim mPay As DoubleDim Duration As Integer = 15 * 12Dim Rate As Single = (4.0 / 100.0) / 12Dim Amount As Single = -40000.0mPay = Pmt(Rate, Duration, 0, Amount)MsgBox("A monthly deposit of " & mPay.ToString("C") & vbCrLf &
"every month will yield $40,000 in 15 years")
It turns out that if you want to accumulate $40,000 over the next 15 years to send your kid tocollege, assuming a constant interest rate of 4%, you must deposit $162.54 every month. You’llput out almost $30,000, and the rest will be the interest you earn.
Pmt() is one of the simpler financial functions provided by the Framework, but most of uswould find it really difficult to write the code for this function. Because financial calculationsare quite common in business programming, many of the functions you might need alreadyexist, and all you need to know is how to call them. If you’re developing financial applications,you should look up the financial functions in the documentation. You can experiment with thePmt() function (and learn the basics of banking) by finding out the monthly payments for aloan and an investment of the same amount and same duration, using the current interest rates.
Let’s look at another useful built-in function, the MonthName() function, which accepts as anargument a month number and returns the name of the month. This function is not as trivialas you might think because it returns the month name or its abbreviation in the language ofthe current culture. The MonthName() function accepts as arguments the month number and aTrue/False value that determines whether it will return the abbreviation or the full name of themonth. The following statements display the name of the current month (both the abbreviationand the full name). Every time you execute these statements, you will see the current month’sname in the current language:
Dim mName As StringmName = MonthName(Now.Month, True)MsgBox(mName) ‘ prints "Jan"mName = MonthName(Now.Month, False)MsgBox(mName) ‘ prints "January"
A similar function, the WeekDayName() function, returns the name of the week for a specificweekday. This function accepts an additional argument that determines the first day of the

ARGUMENTS 113
week. (See the documentation for more information on the syntax of the WeekDayName()function.)
The primary role of functions is to extend the functionality of the language. Many functionsthat perform rather common practical operations have been included in the language, but theyaren’t nearly enough for the needs of all developers or all types of applications. Besides thebuilt-in functions, you can write custom functions to simplify the development of your customapplications, as explained in the following section.
Custom FunctionsMost of the code we write is in the form of custom functions or subroutines that are calledfrom several places in the application. Subroutines are just like functions except that they don’treturn a value, so we’ll focus on the implementation of custom functions. With the exception ofa function’s return value, everything else presented in this and the following section applies tosubroutines as well.
Let’s look at an example of a fairly simple (but not trivial) function that does somethinguseful. Books are identified by a unique international standard book number (ISBN), and everyapplication that manages books needs a function to verify the ISBN, which is made up of 12digits followed by a check digit. To calculate the check digit, you multiply each of the 12 digitsby a constant; the first digit is multiplied by 1, the second digit is multiplied by 3, the thirddigit by 1 again, the fourth digit by 3, and so on. The sum of these multiplications is thendivided by 10, and we take the remainder. The check digit is this remainder subtracted from10. To calculate the check digit for the ISBN 978078212283, compute the sum of the followingproducts:
9 * 1 + 7 * 3 + 8 * 1 + 0 * 3 + 7 * 1 + 8 * 3 +2 * 1 + 1 * 3 + 2 * 1 + 2 * 3 + 8 * 1 + 3 * 3 = 99
The sum is 99; when you divide it by 10, the remainder is 9. The check digit is 10 – 9, or 1, andthe book’s complete ISBN is 9780782122831. The ISBNCheckDigit() function, shown in Listing3.11, accepts the 12 digits of the ISBN as an argument and returns the appropriate check digit.
Listing 3.11: The ISBNCheckDigit() custom function
Function ISBNCheckDigit(ByVal ISBN As String) As StringDim i As Integer, chksum As Integer = 0Dim chkDigit As IntegerDim factor As Integer = 3For i = 0 To 11
factor = 4 - factorchksum += factor * Convert.ToInt16(ISBN.SubString(i, 1))
NextReturn (10 - (chksum Mod 10)).ToString
End Function
The ISBNCheckDigit() function returns a string value because ISBNs are handled as strings,not numbers. (Leading zeros are important in an ISBN but are totally meaningless, and omitted,in a numeric value.) The SubString method of a String object extracts a number of characters
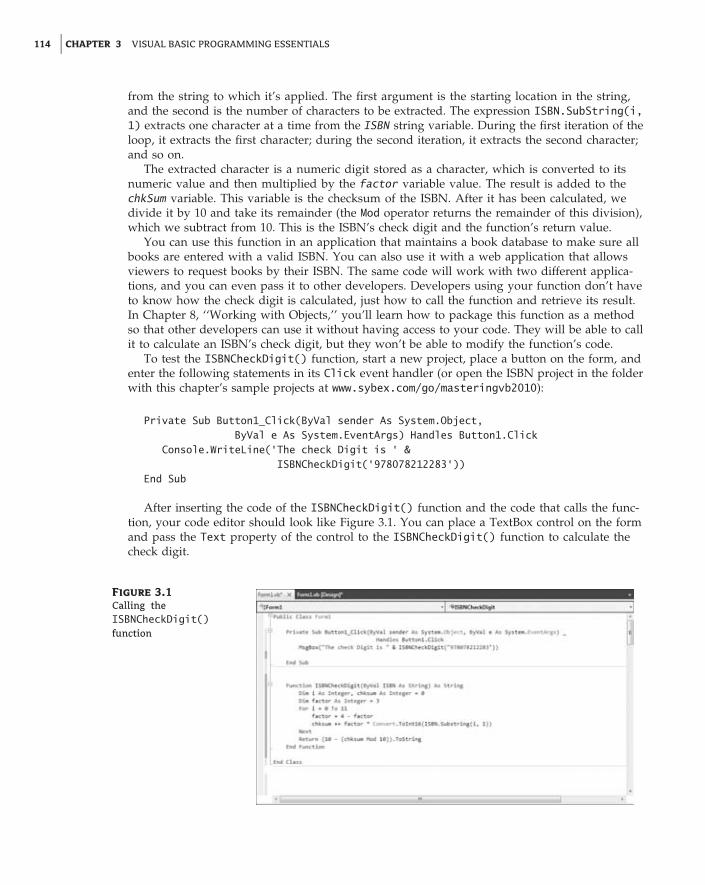
114 CHAPTER 3 VISUAL BASIC PROGRAMMING ESSENTIALS
from the string to which it’s applied. The first argument is the starting location in the string,and the second is the number of characters to be extracted. The expression ISBN.SubString(i,1) extracts one character at a time from the ISBN string variable. During the first iteration of theloop, it extracts the first character; during the second iteration, it extracts the second character;and so on.
The extracted character is a numeric digit stored as a character, which is converted to itsnumeric value and then multiplied by the factor variable value. The result is added to thechkSum variable. This variable is the checksum of the ISBN. After it has been calculated, wedivide it by 10 and take its remainder (the Mod operator returns the remainder of this division),which we subtract from 10. This is the ISBN’s check digit and the function’s return value.
You can use this function in an application that maintains a book database to make sure allbooks are entered with a valid ISBN. You can also use it with a web application that allowsviewers to request books by their ISBN. The same code will work with two different applica-tions, and you can even pass it to other developers. Developers using your function don’t haveto know how the check digit is calculated, just how to call the function and retrieve its result.In Chapter 8, ‘‘Working with Objects,’’ you’ll learn how to package this function as a methodso that other developers can use it without having access to your code. They will be able to callit to calculate an ISBN’s check digit, but they won’t be able to modify the function’s code.
To test the ISBNCheckDigit() function, start a new project, place a button on the form, andenter the following statements in its Click event handler (or open the ISBN project in the folderwith this chapter’s sample projects at www.sybex.com/go/masteringvb2010):
Private Sub Button1_Click(ByVal sender As System.Object,ByVal e As System.EventArgs) Handles Button1.Click
Console.WriteLine("The check Digit is " &ISBNCheckDigit("978078212283"))
End Sub
After inserting the code of the ISBNCheckDigit() function and the code that calls the func-tion, your code editor should look like Figure 3.1. You can place a TextBox control on the formand pass the Text property of the control to the ISBNCheckDigit() function to calculate thecheck digit.
Figure 3.1
Calling theISBNCheckDigit()function

ARGUMENTS 115
A similar algorithm is used for calculating the check digit of credit cards: the Luhns algo-rithm. You can look it up on the Internet and write a custom function for validating credit cardnumbers.
Passing Arguments and Returning ValuesSo far, you’ve learned how to write and call procedures with a few simple arguments andhow to retrieve the function’s return value and use it in your code. This section covers a fewadvanced topics on argument-passing techniques and how to write functions that return multi-ple values, arrays of values, and custom data types.
Passing an Unknown Number of Arguments
Generally, all the arguments that a procedure expects are listed in the procedure’s definition,and the program that calls the procedure must supply values for all arguments. On occasion,however, you might not know how many arguments will be passed to the procedure. Proce-dures that calculate averages or, in general, process multiple values can accept from a fewto several arguments whose count is not known at design time. Visual Basic supports theParamArray keyword, which allows you to pass a variable number of arguments to a proce-dure. There are situations where you might not know in advance whether a procedure willbe called with two or two dozen arguments, and this is where the ParamArray comes in veryhandy because it allows you to pass an array with any number of arguments.
Let’s look at an example. Suppose that you want to populate a ListBox control with ele-ments. To add a single item to the ListBox control, you call the Add method of its Items col-lection as follows:
ListBox1.Items.Add("new item")
This statement adds the string new item to the ListBox1 control. If you frequently addmultiple items to a ListBox control from within your code, you can write a subroutine thatperforms this task. The following subroutine adds a variable number of arguments to theListBox1 control:
Sub AddNamesToList(ByVal ParamArray NamesArray() As Object)Dim x As ObjectFor Each x In NamesArray
ListBox1.Items.Add(x)Next x
End Sub
This subroutine’s argument is an array prefixed with the keyword ParamArray. This arrayholds all the parameters passed to the subroutine. If the parameter array holds items of thesame type, you can declare the array to be of the specific type (string, integer, and so on). Toadd items to the list, call the AddNamesToList() subroutine as follows:
AddNamesToList("Robert", "Manny", "Renee", "Charles", "Madonna")
If you want to know the number of arguments actually passed to the procedure, use the Lengthproperty of the parameter array. The number of arguments passed to the AddNamesToList()subroutine is given by the following expression:
NamesArray.Length

116 CHAPTER 3 VISUAL BASIC PROGRAMMING ESSENTIALS
The following loop goes through all the elements of the NamesArray array and adds them tothe list (this is an alternate implementation of the AddNamesToList subroutine):
Dim i As IntegerFor i = 0 to NamesArray.Length
ListBox1.Items.Add(NamesArray(i))Next i
A procedure that accepts multiple arguments relies on the order of the arguments. To omitsome of the arguments, you must use the corresponding comma. Let’s say you want to callsuch a procedure and specify the first, third, and fourth arguments. The procedure must becalled as follows:
ProcName(arg1, , arg3, arg4)
The arguments to similar procedures are frequently of equal stature, and their order doesn’tmake any difference. A function that calculates the mean or other basic statistics of a set ofnumbers, or a subroutine that populates a ListBox or ComboBox control, is prime candidatesfor this type of implementation. If the procedure accepts a variable number of arguments thataren’t equal in stature, you should consider the technique described in the following section. Ifthe function accepts a parameter array, the parameter array must be the last argument in thelist, and none of the other parameters can be optional.
Named Arguments
You learned how to write procedures with optional arguments and how to pass a variablenumber of arguments to the procedure. The main limitation of the argument-passing mecha-nism, though, is the order of the arguments. By default, Visual Basic matches the values passedto a procedure to the declared arguments by their order (which is why the arguments you’veseen so far are called positional arguments).
This limitation is lifted by Visual Basic’s capability to understand named arguments. Withnamed arguments, you can supply arguments in any order because they are recognized byname and not by their order in the list of the procedure’s arguments. Suppose you’ve written afunction that expects three arguments: a name, an address, and an email address:
Sub CreateContact(Name As String, Address As String, EMail As String)
Presumably, this subroutine creates a new contact with the specified data, but right nowwe’re not interested in the implementation of the function, just how to call it. When calling thissubroutine, you must supply three strings that correspond to the arguments Name, Address,and EMail, in that order. You can call this subroutine as follows:
CreateContact("Peter Evans", "2020 Palm Ave., Santa Barbara, CA 90000","[email protected]")
However, there’s a safer way. You can call it by supplying the arguments in any order by theirnames:
CreateContact(Address:= "2020 Palm Ave., Santa Barbara, CA 90000",EMail:= "[email protected]", Name:= "Peter Evans")

ARGUMENTS 117
The := operator assigns values to the named arguments. Because the arguments are passed byname, you can supply them in any order.
To test this technique, enter the following subroutine declaration in a form’s code:
Sub CreateContact(ByVal Name As String, ByVal Address As String,ByVal EMail As String)
Debug.WriteLine(Name)Debug.WriteLine(Address)Debug.WriteLine(EMail)
End Function
Then call the CreateContact() subroutine from within a button’s Click event with the fol-lowing statement:
Debug.WriteLine(CreateContact(Address:= "2020 Palm Ave., Santa Barbara, CA 90000",
Name:= "Peter Evans", EMail:= "[email protected]"))
You’ll see the following in the Immediate window:
Peter Evans2020 Palm Ave., Santa Barbara, CA [email protected]
The subroutine knows which value corresponds to which argument and can process themthe same way that it processes positional arguments. Notice that the subroutine’s definitionis the same, whether you call it with positional or named arguments. The difference is in howyou call the subroutine and not how you declare it.
Named arguments make code safer and easier to read, but because they require a lot oftyping, most programmers don’t use them. Besides, when IntelliSense is on, you can see thedefinition of the function as you enter the arguments, and this minimizes the chances of swap-ping two values by mistake.
Functions Returning Arrays
In addition to returning custom data types, VB 2010 functions can return arrays. This is aninteresting possibility that allows you to write functions that return not only multiple values,but also any number of values.
In this section, we’ll write the Statistics() function, similar to the CalculateStatistics()function you saw a little earlier in this chapter. The Statistics() function returns the statisticsin an array. Moreover, it returns not only the average and the standard deviation, but theminimum and maximum values in the data set as well. One way to declare a function thatcalculates all the statistics is as follows:
Function Statistics(ByRef DataArray() As Double) As Double()

118 CHAPTER 3 VISUAL BASIC PROGRAMMING ESSENTIALS
This function accepts an array with the data values and returns an array of Doubles. Toimplement a function that returns an array, you must do the following:
1. Specify a type for the function’s return value and add a pair of parentheses after the type’sname. Don’t specify the dimensions of the array to be returned here; the array will bedeclared formally in the function.
2. In the function’s code, declare an array of the same type and specify its dimensions. If thefunction should return four values, use a declaration like this one:
Dim Results(3) As Double
The Results array, which will be used to store the results, must be of the same type as thefunction — its name can be anything.
3. To return the Results array, simply use it as an argument to the Return statement:
Return(Results)
4. In the calling procedure, you must declare an array of the same type without dimensions:
Dim Statistics() As Double
5. Finally, you must call the function and assign its return value to this array:
Stats() = Statistics(DataSet())
Here, DataSet is an array with the values whose basic statistics will be calculated by theStatistics() function. Your code can then retrieve each element of the array with an indexvalue as usual.
Overloading FunctionsThere are situations in which the same function must operate on different data types or a dif-ferent number of arguments. In the past, you had to write different functions, with differentnames and different arguments, to accommodate similar requirements. The Framework intro-duced the concept of function overloading, which means that you can have multiple implemen-tations of the same function, each with a different set of arguments and possibly a differentreturn value. Yet all overloaded functions share the same name. Let me introduce this conceptby examining one of the many overloaded functions that comes with the .NET Framework.
The Next method of the System.Random class returns a random integer value from–2,147,483,648 to 2,147,483,647. (This is the range of values that can be represented by theInteger data type.) We should also be able to generate random numbers in a limited range ofinteger values. To emulate the throw of a die, we want a random value in the range from 1 to6, whereas for a roulette game we want an integer random value in the range from 0 to 36.You can specify an upper limit for the random number with an optional integer argument. Thefollowing statement will return a random integer in the range from 0 to 99:
randomInt = rnd.Next(100)

ARGUMENTS 119
You can also specify both the lower and upper limits of the random number’s range. Thefollowing statement will return a random integer in the range from 1,000 to 1,999:
randomInt = rnd.Next(1000, 2000)
To use the Random class in your code, you must create a variable of this type and then callits methods:
Dim rnd As New Math.RandomMsgBox(rnd.Next(1, 6))
The same method behaves differently based on the arguments we supply. The behavior ofthe method depends on the type of the arguments, the number of the arguments, or both. Asyou will see, there’s no single function that alters its behavior based on its arguments. There areas many different implementations of the same function as there are argument combinations.All the functions share the same name, so they appear to the user as a single multifaceted func-tion. These functions are overloaded, and you’ll see how they’re implemented in the followingsection.
If you haven’t turned off the IntelliSense feature of the editor, as soon as you type the open-ing parenthesis after a function or method name, you’ll see a yellow box with the syntax of thefunction or method. You’ll know that a function, or a method, is overloaded when this box con-tains a number and two arrows. Each number corresponds to a different overloaded form, andyou can move to the next or previous overloaded form by clicking the two little arrows or bypressing the arrow keys.
Let’s return to the Min() function we implemented earlier in this chapter. The initial imple-mentation of the Min() function is shown next:
Function Min(ByVal a As Double, ByVal b As Double) As DoubleMin = IIf(a < b, a, b)
End Function
By accepting Double values as arguments, this function can handle all numeric types. VB2010 performs automatic widening conversions (it can convert Integers and Decimals to Dou-bles), so this trick makes the function work with all numeric data types. However, what aboutstrings? If you attempt to call the Min() function with two strings as arguments, you’ll get acompiler error. The Min() function just can’t handle strings.
To write a Min() function that can handle both numeric and string values, you must writetwo Min() functions. All Min() functions must be prefixed with the Overloads keyword. Thefollowing statements show two different implementations of the same function, one for num-bers and another one for strings:
Overloads Function Min(ByVal a As Double, ByVal b As Double) As DoubleMin = Convert.ToDouble(IIf(a < b, a, b))
End Function
Overloads Function Min(ByVal a As String, ByVal b As String) As StringMin = Convert.ToString(IIf(a < b, a, b))
End Function

120 CHAPTER 3 VISUAL BASIC PROGRAMMING ESSENTIALS
You need a third overloaded form of the same function to compare dates. If you call theMin() function, passing as an argument two dates as in the following statement, the Min()function will compare them as strings and return (incorrectly) the first date:
Debug.WriteLine(Min(#1/1/2011#, #3/4/2010#))
This statement is not even valid when the Strict option is on, so you clearly need another over-loaded form of the function that accepts two dates as arguments, as shown here:
Overloads Function Min(ByVal a As Date, ByVal b As Date) As DateMin = Convert.ToDateTime(IIf(a < b, a, b))
End Function
If you now call the Min() function with the dates #1/1/2011# and #3/4/2010#, the func-tion will return the second date, which is chronologically smaller than the first. Assuming thatyou have inserted the three forms of the Min() function in your code as shown in Figure 3.2,as soon you enter the name of the function, the IntelliSense box will display the first form ofthe function. Click the buttons with the arrows to see the other ones and select the appropri-ate form.
Figure 3.2
(Top) The implementa-tion of three overloadedforms of a function.(Bottom) The three over-loaded forms of theMin() function in theIntelliSense list.
If you’re wondering about the Convert.ToDateTime method, it’s used because the IIf()function returns a value of the Object type. Each of the overloaded forms of the Min() function,however, has a specific type. If the Strict option is on (the recommended setting), you shouldmake sure the function returns the appropriate type by converting the result of the IIf() func-tion to the corresponding type, as shown in the preceding Min() examples.
VB2010 at Work: The OverloadedFunctions Project
Let’s look into a more complicated overloaded function, which makes use of some topics dis-cussed later in this book. The CountFiles() function that follows counts the number of filesin a folder that meet certain criteria. The criteria could be the size of the files, their type, or thedate they were created. You can come up with any combination of these criteria, but the follow-ing are the most useful combinations. (These are the functions I would use, but you can create

ARGUMENTS 121
even more combinations or introduce new criteria of your own.) The names of the argumentsare self-descriptive, so I won’t explain what each form of the CountFiles() function does.
CountFiles(ByVal minSize As Integer, ByVal maxSize As Integer) As IntegerCountFiles(ByVal fromDate As Date, ByVal toDate As Date) As IntegerCountFiles(ByVal type As String) As IntegerCountFiles(ByVal minSize As Integer, ByVal maxSize As Integer,
ByVal type As String) As IntegerCountFiles(ByVal fromDate As Date, ByVal toDate As Date,
ByVal type As String) As Integer
Listing 3.12 shows an implementation of these overloaded forms of the CountFiles() func-tion. (I’m not showing all overloaded forms of the function; you can open the Overloaded-Functions project in the IDE and examine the code.) Because we haven’t discussed file oper-ations yet, most of the code in the function’s body will be new to you — but it’s not hard tofollow. For the benefit of readers who are totally unfamiliar with file operations, I included astatement that prints in the Immediate window the type of files counted by each function. TheDebug.WriteLine statement prints the values of the arguments passed to the function alongwith a description of the type of search it will perform. The overloaded form that accepts twointeger values as arguments prints something like this:
You’ve requested the files between 1000 and 100000 bytes
The overloaded form that accepts a string as an argument prints the following:
You’ve requested the .EXE files
Listing 3.12: The overloaded implementations of the CountFiles() function
Overloads Function CountFiles(ByVal minSize As Integer, ByVal maxSize As Integer) As Integer
Debug.WriteLine("You’ve requested the files between " &minSize & " and " & maxSize & " bytes")
Dim files() As Stringfiles = System.IO.Directory.GetFiles("c:\windows")Dim i, fileCount As IntegerFor i = 0 To files.GetUpperBound(0)
Dim FI As New System.IO.FileInfo(files(i))If FI.Length >= minSize And FI.Length <= maxSize Then
fileCount = fileCount + 1End If
NextReturn(fileCount)
End Function
Overloads Function CountFiles(

122 CHAPTER 3 VISUAL BASIC PROGRAMMING ESSENTIALS
ByVal fromDate As Date, ByVal toDate As Date) As IntegerDebug.WriteLine("You’ve requested the count of files created from " &
fromDate & " to " & toDate)Dim files() As Stringfiles = System.IO.Directory.GetFiles("c:\windows")Dim i, fileCount As IntegerFor i = 0 To files.GetUpperBound(0)
Dim FI As New System.IO.FileInfo(files(i))If FI.CreationTime.Date >= fromDate And
FI.CreationTime.Date <= toDate ThenfileCount = fileCount + 1
End IfNextReturn(fileCount)
End Function
Overloads Function CountFiles(ByVal type As String) As IntegerDebug.WriteLine("You’ve requested the " & type & " files")‘ Function Implementation
End Function
Overloads Function CountFiles(ByVal minSize As Integer, ByVal maxSize As Integer,ByVal type As String) As Integer
Debug.WriteLine("You’ve requested the " & type &" files between " & minSize & " and " &maxSize & " bytes")
‘ Function implementationEnd Function
Overloads Function CountFiles(ByVal fromDate As Date,ByVal toDate As Date, ByVal type As String) As Integer
Debug.WriteLine("You’ve requested the " & type &" files created from " & fromDate & " to " & toDate)
‘ Function implementationEnd Function
If you’re unfamiliar with the Directory and File objects, focus on the statement that printsto the Immediate window and ignore the statements that actually count the files that meetthe specified criteria. After reading the tutorial ‘‘Accessing Folders and Files,’’ published atwww.sybex.com/go/masteringvb2010, you can revisit this example and understand the state-ments that select the qualifying files and count them.
Start a new project and enter the definitions of the overloaded forms of the function on theform’s level. Listing 3.12 is lengthy, but all the overloaded functions have the same structureand differ only in how they select the files to count. Then place a TextBox and a button on theform, as shown in Figure 3.3, and enter a few statements that exercise the various overloaded

ARGUMENTS 123
forms of the function (such as the ones shown in Listing 3.13) in the button’s Click eventhandler.
Listing 3.13: Testing the overloaded forms of the CountFiles() function
Private Sub Button1_Click(…) Handles Button1.ClickTextBox1.AppendText(CountFiles(1000, 100000) &
" files with size between 1KB and 100KB" & vbCrLf)TextBox1.AppendText(CountFiles(#1/1/2006#, #12/31/2006#) &
" files created in 2006" & vbCrLf)TextBox1.AppendText(CountFiles(".BMP") & " BMP files" & vbCrLf)TextBox1.AppendText(CountFiles(1000, 100000, ".EXE") &
" EXE files between 1 and 100 KB" & vbCrLf)TextBox1.AppendText(CountFiles(#1/1/2006#, #12/31/2007#, ".EXE") &
" EXE files created in 2006 and 2007")End Sub
Figure 3.3
The OverloadedFunc-tions project
The button calls the various overloaded forms of the CountFiles() function one after theother and prints the results on the TextBox control. From now on, I’ll be omitting the list ofarguments in the most common event handlers, such as the Click event handler, becausethey’re always the same and they don’t add to the readability of the code. In place of the twoarguments, I’ll insert an ellipsis to indicate the lack of the arguments.
Function overloading is used heavily throughout the language. There are relatively fewfunctions (or methods, for that matter) that aren’t overloaded. Every time you enter thename of a function followed by an opening parenthesis, a list of its arguments appears in thedrop-down list with the arguments of the function. If the function is overloaded, you’ll see anumber in front of the list of arguments, as shown in Figure 3.4. This number is the order of

124 CHAPTER 3 VISUAL BASIC PROGRAMMING ESSENTIALS
the overloaded form of the function, and it’s followed by the arguments of the specific formof the function. The figure shows all the forms of the CountFiles() function.
Figure 3.4
The overloaded formsof the CountFiles()function
Documenting Functions
When working with overloaded functions and methods, you need as much help from the editoras possible because there are many arguments taken in total. You can document each argumentof each overloaded form with a short description that will be displayed in the IntelliSense boxas the user enters the argument values for the selected form, as shown in Figure 3.4. The sametechniques apply to all functions, of course, not just to overloaded functions. While you can getby without documenting functions that are not overloaded, it’s almost a necessity when work-ing with overloaded functions. To document a function, enter three single quotes in an emptyline of the editor, just before the function’s definition. As soon as you type the third quote, theeditor will insert a boilerplate for the function as follows:
''' <summary>'''''' </summary>''' <param name="fromDate"></param>''' <param name="toDate"></param>''' <param name="type"></param>''' <returns></returns>''' <remarks></remarks>
Enter any comments about the function in the summary section, even notes to yourself aboutfuture improvements, desired but not implemented features, and so on. There’s a param sectionfor each of the arguments where you must insert a short description regarding each argument.This is the description that will appear in the IntelliSense drop-down list as the user enters eachargument. Finally, in the returns section you must enter the function’s description, which willbe also displayed in the IntelliSense list. Here’s the documentation of one of the overloadedforms of the CountFiles method:
''' <summary>'''''' </summary>

THE BOTTOM LINE 125
''' <param name="minSize">The minimum size of the file to be includedin the search</param>
''' <param name="maxSize">The maximum size of the file to be includedin the search</param>
''' <param name="type">The number of files of the specified type</param>''' <returns>The number of files with a size in a given range
and of a specific type</returns>''' <remarks></remarks>
The Bottom Line
Use Visual Basic’s flow-control statements Visual Basic provides several statements for con-trolling the flow of control in a program: decision statements, which change the course of exe-cution based on the outcome of a comparison, and loop statements, which repeat a number ofstatements while a condition is true or false.
Master It Explain briefly the decision statements of Visual Basic.
Write subroutines and functions To manage large applications, break your code into small,manageable units. These units of code are the subroutines and functions. Subroutines performactions and don’t return any values. Functions, on the other hand, perform calculations andreturn values. Most of the language’s built-in functionality is in the form of functions.
Master It How will you create multiple overloaded forms of the same function?
Pass arguments to subroutines and functions Procedures and functions communicate withone another via arguments, which are listed in a pair of parentheses following the procedure’sname. Each argument has a name and a type. When you call a procedure, you must supplyvalues for each argument, and the types of the values should match the types listed in the pro-cedure’s definition.
Master It Explain the difference between passing arguments by value and passing argu-ments by reference.

Part 2
Developing WindowsApplications◆ Chapter 4: GUI Design and Event-Driven Programming
◆ Chapter 5: Basic Windows Controls
◆ Chapter 6: Working with Forms
◆ Chapter 7: More Windows Controls


Chapter 4
GUI Design and Event-DrivenProgramming
The first three chapters of this book introduced you to the basics of designing applications withVisual Studio 2010 and the components of the Visual Basic language. You know how to designgraphical user interfaces (GUIs) and how to use Visual Basic statements to program events forthe various controls. You also know how to write functions and subroutines and how to callthe functions and subroutines that are built into Visual Basic.
In this chapter, you’ll design a few more Windows applications — this time, a few practicalapplications with more functional interfaces and a bit of code that does something more prac-tical. You’ll put together the information presented so far in the book by building Windowsapplications with the visual tools of Visual Studio, and you’ll see how the applications interactwith users by coding the events of interest. If you are new to Visual Studio, you should designthe examples on your own using the instructions in the text rather than open the projects forthis chapter (available for download at www.sybex.com/go/masteringvb2010) and look atthe code.
In this chapter, you will learn how to do the following:
◆ Design graphical user interfaces
◆ Program events
◆ Write robust applications with error handling
On Designing Windows ApplicationsAs you recall from Chapter 1, ‘‘Getting Started with Visual Basic 2010,’’ the design of a Win-dows application consists of two distinct phases: the design of the application’s interface andthe coding of the application. The design of the interface is performed with visual tools andconsists of creating a form with the relevant elements. These elements are the building blocksof Windows applications and are called controls.
The available controls are shown in the Toolbox and are the same elements used by all Win-dows applications. You can purchase additional controls from third-party vendors or createyour own custom controls. After you install third-party or custom controls, they will appearin the Toolbox alongside the built-in controls. In addition to being visually rich, the controlsembed a lot of functionality. The TextBox control, for example, can handle text on its own,

130 CHAPTER 4 GUI DESIGN AND EVENT-DRIVEN PROGRAMMING
without any programming effort on your part. The ComboBox control expands the list with itsitems when users click the arrow button and displays the selected item in its edit box. In gen-eral, the basic functionality of the controls is built in by design so that all applications maintaina consistent look.
The interface dictates how users will interact with your application. To prompt users fortext or numeric data, use TextBox controls. When it comes to specifying one or more of severaloptions, you have many choices: You can use a ComboBox control from which users can selectan option, or you can put a few CheckBox controls on a form that users can select or clear. Ifyou want to display a small number of mutually exclusive options, place a few RadioButtoncontrols on the form. Every time the user selects an option, the previously selected one iscleared. To initiate actions, place one or more Button controls on the form. You will learnmore about basic Windows controls and their properties in Chapter 5, ‘‘The Basic WindowsControls.’’
Controls expose a large number of properties, which are displayed in the Properties windowat design time. You use these properties to adjust not only the appearance of the controls onthe form but their functionality as well. The process of designing the interface consists mostlyof setting the properties of the various controls. By the way, you can also set the properties ofcontrols through code. The code will take effect in runtime. You will see some examples of suchcode in the next chapter.
An important aspect of the design of your application’s user interface is the alignment of thecontrols on the form. Controls that are next to one another should be aligned horizontally. Con-trols that are stacked should have either their left or right edges aligned vertically. You shouldalso make sure the controls are spaced equally. The integrated development environment (IDE)provides all the tools for sizing, aligning, and spacing controls on the form, and you’ll see thesetools in action through examples in this chapter.
By designing the interface you have practically outlined how the application will interactwith the user. The next step is to actually implement the interaction by writing some code. Theprogramming model of Visual Basic is event driven: As the user interacts with the controls onyour form, some code is executed in response to user actions. The user’s actions cause events,and each control recognizes its own set of events and handles them through subroutines, whichare called event handlers. When users click a button, the control’s Click event is fired, and youmust insert the relevant code in the control’s Click event handler. The event-driven program-ming model has proven very successful because it allows developers to focus on handling spe-cific actions. It allows you to break a large application into smaller, manageable units of codeand implement each unit of code independently of any other.
Developing Windows applications is a conceptually simple process, but there’s a methodol-ogy to it and it’s not trivial. Fortunately, the IDE provides many tools to simplify the process;it will even catch most of the errors in your code as you type. You have seen how to use someof the tools of the IDE in the first three chapters. In this chapter, I’ll present these tools throughexamples.
Building a Loan CalculatorOne easy-to-implement, practical application is a program that calculates loan parameters.Visual Basic provides built-in functions for performing many types of financial calculations,and you need only a single line of code to calculate the monthly payment given the loanamount, its duration, and the interest rate. Designing the user interface, however, takes muchmore effort.

BUILDING A LOAN CALCULATOR 131
Regardless of the language you use, you must go through the following process to developan application:
1. Decide what the application will do and how it will interact with the user.
2. Design the application’s user interface according to the requirements of step 1.
3. Write the actual code behind the events you want to handle.
Using Prototypes to Capture Application Requirements
A prototype is an incomplete version of an application that simulates some aspects of applica-tion functionality. The prototype is created by using constant or hard-coded values to supplantvalues the program should calculate in runtime. For example, a prototype for the Loan Calcu-lator application (see Figure 4.1) might display the form with all of the controls necessary forloan calculation. However, when the user presses the Monthly Payment button, the value thatappears in the Monthly Payment text box would always be the same hard-coded value andwould not vary with input from the other controls.
Most commonly, prototypes are used to simulate the user interface. The purpose of the proto-type is to get the customer’s approval on the appearance and functionality of an application.Instead of reading documentation or analyzing drawings of the interface, users can actuallytry out the application. This often facilitates user feedback in early application developmentstages. Some prototypes are throw-away applications while others can be evolved further intofully functional applications. Visual Basic is well known for its rapid prototyping features.
Understanding How the Loan Calculator Application WorksFollowing the first step of the process outlined previously, you decide that the user should beable to specify the amount of the loan, the interest rate, and the duration of the loan in months.You must, therefore, provide three text boxes in which the user can enter these values.
Another parameter affecting the monthly payment is whether payments are made at thebeginning or at the end of each month, so you must also provide a way for the user to spec-ify whether the payments will be early (first day of the month) or late (last day of the month).The most appropriate type of control for entering Yes/No or True/False type of informationis the CheckBox control. This control is a toggle: If it’s selected, you can clear it by clicking it;if it’s cleared, you can select it by clicking again. The user doesn’t enter any data in this con-trol (which means you need not anticipate user errors with this control), and it’s the simplestmethod for specifying values with two possible states.
Figure 4.1 shows a user interface that matches our design specifications. This is the mainform of the LoanCalculator project, which you will find in this chapter’s folder on the book’sproject download site.
The user enters all the information on the form and then clicks the Monthly Payment buttonto calculate the monthly payment. The program will calculate the monthly payment and dis-play it in the lower TextBox control. All the action takes place in the Monthly Payment button’sClick event handler.

132 CHAPTER 4 GUI DESIGN AND EVENT-DRIVEN PROGRAMMING
Figure 4.1
LoanCalculator is a sim-ple financial application.
To calculate the monthly payments on a loan, we call the built-in Pmt () function, whosesyntax is as follows:
MonthlyPayment = Pmt(InterestRate, Periods, Amount, FutureValue, Due)
The Pmt () Function
Here’s how the Pmt () function works. The interest rate, argument InterestRate, is spec-ified as a monthly rate. If the annual interest rate is 14.5 percent, the value entered by theuser in the Interest Rate box should be 14.5. The user will express the rate as a percentage,but the function accepts the decimal value. To convert percentage to a decimal value, youneed to multiply the annual percentage rate by 0.01. Finally, since this is the annual rate andyou need a monthly value, you need to divide the value by 12. The mathematical expressionfor converting the annual interest rate specified by the user to a monthly interest rate acceptedby the Pmt() function is: 0.01 * annualInterestRate / 12. In this example, with a 14.5annual rate, the monthly rate will be 0.145/12. The duration of the loan, the Periods argu-ment, is specified in number of months, and the Amount argument is the total loan amount.The FutureValue argument is the value of the loan at the end of the period, which shouldbe zero (it would be a positive value for an investment), and the last argument, Due, specifieswhen payments are due. The value of Due can be one of the constants DueDate.BegOfPeriodand DueDate.EndOfPeriod. These two constants are built into the language, and you can usethem without knowing their exact value.
The present value of the loan is the amount of the loan with a negative sign. It’s negativebecause you don’t have the money now. You’re borrowing it — it is money you owe to thebank. Future value represents the value of something at a stated time — in this case, whatthe loan will be worth when it’s paid off. This is what one side owes the other at the endof the specified period. So the future value of a loan is zero.
You don’t need to know how the Pmt () function calculates the monthly payment, just how tocall it and how to retrieve the results. To calculate the monthly payment on a loan of $25,000with an interest rate of 14.5 percent, payable over 48 months and payments due the last day ofthe payment period (which in this case is a month), you’d call the Pmt() function as follows:
Pmt(0.145 / 12, 48, -25000, 0, DueDate.EndOfPeriod)

BUILDING A LOAN CALCULATOR 133
The Pmt() function will return the value 689.448821287218. Because it’s a dollar amount,you must round it to two decimal digits on the interface. Notice the negative sign in front ofthe Amount argument in the statement. If you specify a positive amount, the result will bea negative payment. The payment and the loan’s amount have different signs because theyrepresent different cash flows. The loan’s amount is money you owe to the bank, whereas thepayment is money you pay to the bank.
The last two arguments of the Pmt() function are optional. The Parameter Info feature ofthe IntelliSense autocompletion system built into Visual Studio will indicate optional param-eters by placing them inside the square brackets in the Parameter Info pop-up window, asshown here.
If you omit optional parameters, Visual Basic uses their default values, which are 0 for theFutureValue argument and DueDate.BegOfPeriod for the Due argument. You can entirelyomit these arguments and call the Pmt() function like this:
Pmt(0.145 / 12, 48, -25000)
Calculating the amount of the monthly payment given the loan parameters is quite simple.For this exercise, what you need to understand are the parameters of a loan and how to passthem to the Pmt() function. You must also know how the interest rate is specified to avoidinvalid values. Although the calculation of the payment is trivial, designing the interface willtake a bit of effort. You need to make sure the interface is easily understood and intuitive.When the user is confronted with the application, they should be able to guess easily whatthe application is doing and how they can interact with it. The application should also behaveaccording to the principle of least surprise. For example, if the user presses the Tab button,they expect that focus of the controls will move from right to left or from top to bottom. Also,the user will expect the application to perform basic data validation. If the application detectsinvalid data, the user will expect that the focus will be set on the control containing the invalidvalue so that they can immediately correct the entered value. These are just a few examplecharacteristics of well-behaved applications.
If you wish to learn more about GUI guidelines that Microsoft recommends for applicationsrunning on Windows 7 and Windows Vista, you can download the ‘‘Windows User ExperienceInteraction Guidelines’’ PDF file from MSDN. You will find the download link at the followingURL: http://msdn.microsoft.com/en-us/library/aa511258.aspx.
Designing the User InterfaceNow that you know how to calculate the monthly payment and understand the basics of goodinterface design, you can design your own user interface. To do so, start a new Windows Formsproject, name it LoanCalculator, and rename its form to frmLoan. Your first task is to decidethe font and size of the text you’ll use for the controls on the form. The form is the container

134 CHAPTER 4 GUI DESIGN AND EVENT-DRIVEN PROGRAMMING
for the controls, and they receive some of the form’s properties, such as the font. You canchange the font later during the design, but it’s a good idea to start with the right font. At anyrate, don’t try to align the controls if you’re planning to change their fonts. The change will,most likely, throw off your alignment efforts.
The book’s sample project uses the 10-point Verdana font. To change it, select the form withthe mouse, double-click the name of the Font property in the Properties window to open theFont dialog box, and select the desired font and attributes. I use the Verdana and Seago fontsa lot because they’re clean and they were designed for viewing on monitors. Of course, this isa personal choice. Avoid elaborate fonts and don’t mix different fonts on the same form (or indifferent forms of the same application).
To design the form shown in Figure 4.1, follow these steps:
1. Place four labels on the form and assign the captions (the Text property of each control)listed in Table 4.1 to them.You don’t need to change the default names of the four Label controls on the form becausetheir captions are all you need. You aren’t going to add any code to them.
2. Place a TextBox control next to each label. Use the information in Table 4.2 to set the Nameand Text property values. I used meaningful names for the TextBox controls because we’lluse them in our code shortly to retrieve the values entered by the user on these controls.These initial values correspond to a loan of $25,000 with an interest rate of 14.5 percent anda payoff period of 48 months.
Table 4.1: LoanCalulator label captions
Name Text
Label1 Amount
Label2 Duration (months)
Label3 Interest Rate (annual)
Label4 Monthly Payment
Table 4.2: LoanCalulator TextBox control names and default value text
Name Text
txtAmount 25000
txtDuration 48
txtRate 14.5
txtPayment

BUILDING A LOAN CALCULATOR 135
3. The fourth TextBox control is where the monthly payment will appear. The user isn’t sup-posed to enter any data in this box, so set the ReadOnly property to True to lock the con-trol and prevent users from entering data. You’ll be able to change its value from withinyour code, but users won’t be able to type anything in it. (We could have used a Labelcontrol instead, but the uniform look of TextBoxes on a form is usually preferred.) Youwill also notice that the TextBox controls have a 3D frame. Experiment with the control’sBorderStyle property to discover the available styles for the control’s frame (I’ve used theFixed3D setting for the TextBox controls).
4. Next, place a CheckBox control on the form. By default, the control’s caption is CheckBox1,and it appears to the right of the check box. Because we want the titles to be to the left of thecorresponding controls, we’ll change this default appearance.
5. Select the check box with the mouse, and in the Properties window locate the CheckAlignproperty. Its value is MiddleLeft. If you expand the drop-down list by clicking the arrowbutton, you’ll see that this property has many different settings, and each setting is shownas a square. Select the button that will center the text vertically and right-align it horizon-tally. The string MiddleRight will appear in the Properties window when you click theappropriate button.
6. With the check box selected, locate the Name property in the Properties window, and set itto chkPayEarly.
7. Change the CheckBox’s caption by entering the string Early Payment in its Text propertyfield.
8. Place a Button control in the bottom-left corner of the form. Name it bttnShowPayment, andset its Text property to Monthly Payment.
9. Finally, place another Button control on the form, name it bttnExit, and set its Text prop-erty to Exit.
Aligning the Controls
Your next step is to align the controls on the form. The IDE provides commands to align thecontrols on the form, all of which can be accessed through the Format menu. To align the con-trols that are already on the form, follow these steps:
1. Select the four labels on the form. The handles of all selected controls will be black exceptfor one control whose handles will be white. To specify the control that will be used as areference for aligning the other controls, click it after making the selection. (You can selectmultiple controls either by using the mouse to draw a rectangle that encloses them or byclicking each control while holding down the Ctrl button.)
2. With the four text boxes selected, choose Format � Align � Lefts to left-align them. Don’tinclude the check box in this selection.
3. Resize the CheckBox control. Its left edge should align with the left edges of the Label con-trols, and its right edge should align with the right edges of the Label controls. In casethe resizing markers do not appear on the CheckBox control, set the value of its AutoSizeproperty to False.
4. Select all the Label and the CheckBox controls and choose Format � Vertical Spacing�Make Equal. This action will space the controls vertically. Then align the baseline of

136 CHAPTER 4 GUI DESIGN AND EVENT-DRIVEN PROGRAMMING
each TextBox control with the baseline of the matching Label control. To do so, move eachTextBox control with the mouse until you see a magenta line that connects the baseline ofthe TextBox control you’re moving and that of the matching Label control.
Your form should now look like the one shown in Figure 4.1. Take a good look at it andmake sure no controls are misaligned. In the interface design process, you tend to overlooksmall problems such as a slightly misaligned control. The user of the application, however,instantly spots such mistakes.
Programming the Loan ApplicationNow you’ve created the interface, run the application, and seen how it behaves. Next you’llenter a few values in the text boxes, change the state of the check box, and test the function-ality already built into the application. Clicking the Monthly Payment button won’t have anyeffect because we have not yet added any code. If this were a prototype you were building fora customer, you would add a statement in the Monthly Payment button to display a randomvalue in the Monthly Payment box.
When you double-click the control for the first time, Visual Studio will generate an emptydefault event handler declaration for you. Next time you double-click the control, Visual Studiowill bring you to the event handler. If you’re happy with the user interface, stop the applica-tion, open the form, and double-click the Monthly Payment Button control. Visual Basic opensthe code window and displays the definition of the ShowPayment_Click event:
Private Sub bttnShowPayment_Click(...) HandlesbttnPayment.Click
Because all Click event handlers have the same signature (they provide the same two argu-ments), I’ll be omitting the list of arguments from now on. Actually, all event handlers havetwo arguments, and the first of them is always the control that fired the event. The type of thesecond argument differs depending on the type of the event. Place the pointer between the linesPrivate Sub and End Sub, and enter the rest of the lines of Listing 4.1. (You don’t have to reen-ter the first and last lines that declare the event handler.)
Listing 4.1: The Code behind the Monthly Payment button
Private Sub bttnShowPayment_Click(ByVal (…)Handles bttnShowPayment.Click
Dim Payment As DoubleDim LoanIRate As DoubleDim LoanDuration As IntegerDim LoanAmount As Integer
LoanAmount = Convert.ToInt32(txtAmount.Text)LoanIRate = 0.01 * Convert.ToDecimal(txtRate.Text) / 12LoanDuration = Convert.ToInt32(txtDuration.Text)Dim payEarly As DueDateIf chkPayEarly.Checked Then
payEarly = DueDate.BegOfPeriod

BUILDING A LOAN CALCULATOR 137
ElsepayEarly = DueDate.EndOfPeriod
End IfPayment = Pmt(LoanIRate, LoanDuration, -LoanAmount, 0, payEarly)txtPayment.Text = Payment.ToString("#.00")
End Sub
The code window should now look like the one shown in Figure 4.2. In previous versionsof Visual Basic, you would use the underscore character at the end of the first part of the longline. For the most part, this is no longer necessary; Visual Basic in Visual Studio 2010 supportsimplicit line continuations. I’m using implicit line continuations in this book a lot to fit longlines on the printed page. The same statement you see as multiple lines in the book may appearin a single, long line in the project.
Figure 4.2
The Show Paymentbutton’s Click eventhandler
You don’t have to break long lines manually as you enter code in the editor’s window. Openthe Edit menu and choose Advanced � Word Wrap. The editor will wrap long lines automati-cally. While the word wrap feature is on, a check mark appears in front of the Edit � Advanced� Word Wrap command. To turn off word wrapping, select the same command again.
Enumeration Types
Enumerations are a special kind of type in Visual Basic language used to define a set of log-ically related unchanging literal values. A typical example for an enumeration is DayOfWeekthat contains members for each day of the week (DayOfWeek.Monday, DayOfWeek.Tuesday,and so on). Enumerations are declared with the Enum keyword, in following fashion:

138 CHAPTER 4 GUI DESIGN AND EVENT-DRIVEN PROGRAMMING
Public Enum DayOfWeekMondayTuesdayWednesdayThursdayFridaySaturdaySunday
End Enum
By using Enum instead of simple constant literal values, you add type safety to your applica-tion. For example, if you define the function that has a day as the DayOfWeek parameter, asin TicketPrice(movie as Movie, day as DayOfWeek) as Decimal, the code that is callingthe function will have to pass a value defined in the DayOfWeek enum as a parameter, as infollowing statement:
Dim price = TicketPrice(avatarMovie, DayOfWeek.Saturday)
Had you defined the days of the week names as constants, as in following code, you would notbe able to perform type checking:
Const Monday As String = "Monday"Const Tuesday As String = "Tuesday"Const Wednesday As String = "Wednesday"’ …
Had you no Enum construct in Visual Basic, you would have to resort to constants. When youuse constants, the TicketPrice function would have to declare the day parameter as String,meaning that when invoking the function, you could pass just any String value. Using theEnum type, however, you know that value belongs to predefined enumeration.
In Listing 4.1, the first line of code within the subroutine declares a variable. It lets the appli-cation know that Payment is a variable for storing a floating-point number (a number with adecimal part) — the Double data type. The line before the If statement declares a variable ofthe DueDate type. This is the type of argument that determines whether the payment takesplace at the beginning or the end of the month. The last argument of the Pmt() function mustbe a variable of this type, so we declare a variable of the DueDate type. As mentioned earlier inthis chapter, DueDate is an enumeration with two members: BegOfPeriod and EndOfPeriod.
The first really interesting statement in the subroutine is the If statement that examinesthe value of the chkPayEarly CheckBox control. If the control is selected, the code sets thepayEarly variable to DueDate.BegOfPeriod. If not, the code sets the same variable toDueDate.EndOfPeriod. The ComboBox control’s Checked property returns True if the controlis selected at the time and False otherwise. After setting the value of the payEarly variable, thecode calls the Pmt() function, passing the values of the controls as arguments:
◆ The first argument is the interest rate. The value entered by the user in the txtRateTextBox is multiplied by 0.01 so that the value 14.5 (which corresponds to 14.5 percent)is passed to the Pmt() function as 0.145. Although we humans prefer to specify interest

BUILDING A LOAN CALCULATOR 139
rates as integers (8 percent) or floating-point numbers larger than 1 (8.24 percent), thePmt() function expects to read a number that’s less than 1. The value 1 corresponds to 100percent. Therefore, the value 0.1 corresponds to 10 percent. This value is also divided by 12to yield the monthly interest rate.
◆ The second argument is the duration of the loan in months (the value entered in thetxtDuration TextBox).
◆ The third argument is the loan’s amount (the value entered in the txtAmount TextBox).
◆ The fourth argument (the loan’s future value) is 0 by definition.
◆ The last argument is the payEarly variable, which is set according to the status of the chk-PayEarly control.
The last statement in Listing 4.1 converts the numeric value returned by the Pmt() functionto a string and displays this string in the fourth TextBox control. The result is formatted appro-priately with the following expression:
Payment.ToString("#.00")
The Payment variable is numeric, and all numeric variables provide the method ToString,which formats the numeric value and converts it to a string. The character # stands for theinteger part of the variable. The period separates the integer from the fractional part, whichis rounded to two decimal digits. The Pmt() function returns a precise number, such as372.2235687646345, and you should round it to two decimal digits and format it nicely beforedisplaying it. For more information on formatting numeric (and other) values, see the section‘‘Formatting Numbers’’ in Chapter 2, ‘‘VB Programming Essentials.’’ Finally, the formattedstring is assigned to the Text property of the TextBox control on the form.
A Code Snippet for Calculating Monthly Loan Payments
If you didn’t know about the Pmt() built-in function, how would you go about calculatingloan payments? Code snippets to the rescue!
1. Right-click somewhere in the code window, and from the context menu, choose the InsertSnippet command.
2. Double-click the Fundamentals folder to see another list of items.
3. This time, double-click the Math folder and then select the snippet Calculate a Monthly Paymenton a Loan.
The following code will be inserted at the location of the pointer:
Dim futureValue As Double = 0Dim payment As Doublepayment1 = Pmt(0.05 / 12, 36, -1000, futureValue, DueDate.EndOfPeriod)

140 CHAPTER 4 GUI DESIGN AND EVENT-DRIVEN PROGRAMMING
The snippet demonstrates the use of the Pmt() function. All you have to do is replace the val-ues of the various parameters with the data from the appropriate controls on the form.
If you don’t know how to use the arguments of the Pmt() function, start editing the func-tion’s arguments and you will see their description in the usual tooltip box, as with allbuilt-in functions.
The code of the LoanCalculator sample project is a bit different and considerably longerthan what I have presented here. The statements discussed in the preceding text are the bareminimum for calculating a loan payment. The user can enter all kinds of unreasonable valueson the form and cause the program to crash. In the next section, you’ll see how you canvalidate the data entered by the user, catch errors, and handle them gracefully (that is, give theuser a chance to correct the data and proceed) as opposed to terminating the application witha runtime error.
Validating the DataIf you enter a non-numeric value in one of the fields, the program will crash and display anerror message. For example, if you enter twenty in the Duration text box, the program will dis-play the error message shown in Figure 4.3. A simple typing error can crash the program. Thisisn’t the way Windows applications should work. Your applications must be able to handle allkinds of user errors, provide helpful messages, and in general, guide the user in running theapplication efficiently. If a user error goes unnoticed, your application will either end abruptlyor will produce incorrect results without an indication.
Figure 4.3
The FormatExceptionerror message meansthat you supplied astring where a numericvalue was expected.
Visual Basic will take you back to the application’s code window in which the statementsthat caused the error will be highlighted in green. Obviously, we must do something about usererrors. One way to take care of typing errors is to examine each control’s contents; if the con-trols don’t contain valid numeric values, display your own descriptive message and give theuser another chance. Listing 4.2 is the revised Click event handler that examines the value ofeach text box before attempting to use it in any calculations.
Listing 4.2: Revised Show Payment button
Private Sub bttnShowPayment_Click(...) Handles bttnPayment.ClickDim Payment As Double

BUILDING A LOAN CALCULATOR 141
Dim LoanIRate As DoubleDim LoanDuration As IntegerDim LoanAmount As Integer
‘ Validate amountIf IsNumeric(txtAmount.Text) Then
LoanAmount = Convert.ToInt32(txtAmount.Text)Else
MsgBox("Invalid amount, please re-enter")txtAmount.Focus()txtAmount.SelectAll()Exit Sub
End If‘ Validate interest rateIf IsNumeric(txtRate.Text) Then
LoanIRate = 0.01 * Convert.ToDouble(txtRate.Text) / 12Else
MsgBox("Invalid interest rate, please re-enter")txtRate.Focus()txtRate.SelectAll()Exit Sub
End If‘ Validate loan’s durationIf IsNumeric(txtDuration.Text) Then
LoanDuration = Convert.ToInt32(txtDuration.Text)Else
MsgBox("Please specify the loan’s duration as a number of months")txtDuration.Focus()txtDuration.SelectAll()Exit Sub
End If‘ If all data were validated, proceed with calculationsDim payEarly As DueDateIf chkPayEarly.Checked Then
payEarly = DueDate.BegOfPeriodElse
payEarly = DueDate.EndOfPeriodEnd IfPayment = Pmt(LoanIRate, LoanDuration, -LoanAmount, 0, payEarly)txtPayment.Text = Payment.ToString("#.00")
End Sub
First, we declare three variables in which the loan’s parameters will be stored: LoanAmount,LoanIRate, and LoanDuration. These values will be passed to the Pmt() function as argu-ments. Each text box’s value is examined with an If structure. If the corresponding text boxholds a valid number, its value is assigned to the numeric variable. If not, the program dis-plays a warning and exits the subroutine without attempting to calculate the monthly pay-ment. Before exiting the subroutine, however, the code moves the focus to the text box with

142 CHAPTER 4 GUI DESIGN AND EVENT-DRIVEN PROGRAMMING
the invalid value and selects the text in the textbox because this is the control that the user willmost likely edit. After fixing the incorrect value, the user can click the Show Payment buttonagain. IsNumeric() is another built-in function that accepts a variable and returns True if thevariable is a number and False otherwise.
You can run the revised application and check it out by entering invalid values in the fields.Notice that you can’t specify an invalid value for the last argument; the CheckBox control won’tlet you enter a value. You can only select or clear it, and both options are valid. The actual cal-culation of the monthly payment takes a single line of Visual Basic code. Displaying it requiresanother line of code. Adding the code to validate the data entered by the user, however, is anentire program. And that’s the way things are.
Writing Well-Behaved Applications
Well-behaved applications must contain data-validation code. If an application such as Loan-Calculator crashes because of a typing mistake, nothing really bad will happen. The user willtry again or else give up on your application and look for a more professional one. However, ifthe user has been entering data for hours, the situation is far more serious. It’s your responsi-bility as a programmer to make sure that only valid data are used by the application and thatthe application keeps working, no matter how the user misuses or abuses it.
Our sample application is not typical because it calculates the result with a single functioncall, but in developing typical business applications, you must write a substantial amountof code to validate user input. The reason for validating user input is to control inputs to yourcode so that you can ensure that it behaves correctly and that you can provide specific errormessages to help the user identify the error and correct it.
You will notice that the sample applications included in this book don’t contain muchdata-validation code, because it would obscure the ‘‘useful’’ code that applies to the topic athand. Instead, they demonstrate specific techniques. You can use parts of the examples in yourapplications, but you should provide your own data-validation code (and error-handling code,as you’ll see in a moment).
Now run the application one last time and enter an enormous loan amount. Try to findout what it would take to pay off the national debt with a reasonable interest rate in, say, 72months. The program will crash again (as if you didn’t know). This time the program will godown with a different error message, as shown in Figure 4.4. Visual Basic will complain aboutan overflow. The exact message is Value was either too large or too small for an Int32, and the pro-gram will stop at the line that assigns the contents of the txtAmount TextBox to the LoanAmountvariable. Press the Break button and the offending statement in the code will be highlighted.
An overflow is a numeric value too large for the program to handle. This error is usuallyproduced when you divide a number by a very small value. When you attempt to assign a verylarge value to an Integer variable, you’ll also get an overflow exception.
Actually, in the LoanCalculator application, any amount greater than 2,147,483,647 willcause an overflow condition. This is the largest value you can assign to an Integer variable;it’s plenty for our banking needs but not nearly adequate for handling government deficits.

BUILDING A LOAN CALCULATOR 143
As you learned in Chapter 2, Visual Basic provides other types of variables, which can storeenormous values (making the national debt look really small). In the meantime, if you wantthe loan calculator to be truly useful, change the declaration of the LoanAmount variable to thefollowing:
Dim LoanAmount As Double
Figure 4.4
Very large values cancause the application tocrash and display thiserror message.
The Double data type can hold much larger values. Besides, the Double data type can alsohold non-integer values. Not that anyone will ever apply for a loan of $25,000 and some cents,but if you want to calculate the precise monthly payment for a debt you have accumulated,you should be able to specify a non-integer amount. In short, I should have declared theLoanAmount variable with the Double data type in the first place. By the way, there’s anotherinteger type, the Long data type, which can hold much larger integer values.
An overflow error can’t be caught with data-validation code. There’s always a chance thatyour calculations will produce overflows or other types of math errors. Data validation won’thelp here; you just don’t know the result before you carry out the calculations. You need some-thing called error handling, or exception handling. This is additional code that can handle errorsafter they occur. In effect, you’re telling VB that it shouldn’t stop with an error message, whichwould be embarrassing for you and wouldn’t help the user one bit. Instead, VB should detectthe error and execute the proper statements to handle the error. Obviously, you must supplythese statements. (You’ll see examples of handling errors at runtime shortly.)
The sample application works as advertised, and it’s fail-safe. Yet there’s one last touchyou can add to the application. The various values on the form are not always in synch. Let’ssay you’ve calculated the monthly payment for a specific loan and then you want to changethe duration of the loan to see how it affects the monthly payment. As soon as you change theduration of the loan, and before you click the Monthly Payment button, the value in theMonthly Payment box doesn’t correspond to the parameters of the loan. Ideally, the monthlypayment should be cleared as soon as the user starts editing one of the loan’s parameters. Todo so, you must insert a statement that clears the txtPayment control. But what’s the proper

144 CHAPTER 4 GUI DESIGN AND EVENT-DRIVEN PROGRAMMING
event handler for this statement? The TextBox control fires the TextChanged event every timeits text is changed, and this is the proper place to execute the statement that clears the monthlypayment on the form. Because there are three TextBox controls on the form, you must programthe TextChanged event of all three controls or write an event handler inside the frmLoan classthat handles all three events:
Private Sub txtAmount_TextChanged(ByVal (…) HandlestxtAmount.TextChanged, txtDuration.TextChanged,txtRate.TextChanged
txtPayment.Clear()End Sub
Yes, you can write a common handler for multiple events, as long as the events are of thesame type and they’re all listed after the Handles keyword. You’ll see another example ofthe same technique in the following sample project.
One of the sample projects for this chapter is a revised version of the LoanCalculator project,the LoanCalculator-Dates project, which uses a different interface. Instead of specifying theduration of the loan in months, this application provides two instances of the DateTimePickercontrol, which is used to specify dates. Delete the TextBox control and the corresponding Labelsand insert two new Label controls and two DateTimePicker controls on the form. Name theDateTimePicker controls dtFrom and dtTo. Users can set the loan’s starting and ending dateson these two controls and the program calculates the duration of the loan in months with thefollowing statement:
LoanDuration = DateDiff(DateInterval.Month,dtFrom.Value, dtTo.Value) + 1
The DateDiff() function returns the difference between two dates in the interval supplieras the first argument to the function. The rest of the code doesn’t change; as long as theLoanDuration variable has the correct value, the same statements will produce the correctresult. If you open the project, you’ll find a few more interesting statements that set the dtFromcontrol to the first date of the selected month and the dtTo control to the last date of theselected month.
Building a CalculatorThis next application is more advanced, but it’s not as advanced as it looks. It’s a calculatorwith a typical visual interface that demonstrates how Visual Basic can simplify the program-ming of fairly advanced operations. If you haven’t tried it, you may think that writing an appli-cation such as this one is way too complicated for a beginner, but it isn’t. The MathCalculatorapplication is shown in Figure 4.5.
The application emulates the operation of a handheld calculator and implements basic arith-metic operations. It has the look of a math calculator, and you can easily expand it by addingmore features. In fact, adding features such as cosines and logarithms is actually simpler thanperforming the basic arithmetic operations. This interface will also give you a chance to exercisemost of the tools of the IDE for aligning and spacing the controls on a form.

BUILDING A CALCULATOR 145
Figure 4.5
The calculator applica-tion window
Designing the User InterfaceThe application’s interface is straightforward, but it takes a bit of effort. You must align the but-tons on the form and make the calculator look as much like a handheld calculator as possible.Start a new Windows Forms project, the MathCalculator project, and rename the main formfrom Form1.vb to frmCalculator.vb.
Designing the interface of the application isn’t trivial because it’s made up of many buttons,all perfectly aligned on the form. To simplify the design, follow these steps:
1. Select a font that you like for the form. All the command buttons you’ll place on the formwill inherit this font. The MathCalculator sample application uses 10-point Verdana font.I’ve used a size of 12 points for the Period button because the 10-point period was too smalland very near the bottom of the control.
2. Add the Label control, which will become the calculator’s display. Set its BorderStyleproperty to Fixed3D so that it will have a 3D look, as shown in Figure 4.5. Change itsForeColor and BackColor properties too, if you want it to look different from the rest ofthe form. The sample project uses colors that emulate the — now extinct — green CRTmonitors. Name the Label control lblDisplay.
3. Draw a Button control on the form, change its Text property to 1, and name it bttn1. Sizethe button carefully so that its caption is centered on the control. The other buttons on theform will be copies of this one, so make sure you’ve designed the first button as best as youcan before you start making copies of it. You can also change the button’s style with theFlatStyle property. (You can experiment with the Popup, Standard, and System settingsfor this property.)
4. Place the button in its final position on the form. At this point, you’re ready to create theother buttons for the calculator’s digits. Right-click the button and choose Copy from thecontext menu. The Button control is copied to the Clipboard, and now you can paste it onthe form (which is much faster than designing an identical button).
5. Right-click somewhere on the form, choose Paste, and the button copied to the Clipboardwill be pasted on the form. The copy will have the same caption as the button it was copiedfrom, and its name will be Button1.
6. Now set the button’s Name property to bttn2 and its Text property to 2. This button is thedigit 2. Place the new button to the right of the previous button. You don’t have to align thetwo buttons perfectly now; later we’ll use the commands of the Format menu to alignthe buttons on the form. As you move the control around on the form, one or more linesmay appear on the design surface at times. These lines are called snap lines, and they appear

146 CHAPTER 4 GUI DESIGN AND EVENT-DRIVEN PROGRAMMING
as soon as a control is aligned (vertically or horizontally) with one or more of the existingcontrols on the form. The snap lines allow you to align controls with the mouse. Blue snaplines appear when the control’s edge is aligned with the edge of another control. Redsnap lines appear when the control’s baseline is aligned with the baseline of anothercontrol. The baseline is the invisible line on which the characters of the control’s captionare based.
7. Repeat steps 5 and 6 eight more times, once for each numeric digit. Each time a new Buttoncontrol is pasted on the form, Visual Basic names it Button1 and sets its caption to 1; youmust change the Name and Text properties. You can name the buttons anything you like,but a name that indicates their role in the application is preferred.
8. When the buttons of the numeric digits are all on the form, place two more buttons, onefor the C (Clear) operation and one for the Period button. Name them bttnClear andbttnDecimalPoint, and set their captions accordingly. Use a larger font size for the Periodbutton to make its caption easier to read.
9. When all the digit buttons of the first group are on the form and in their approximate posi-tions, align them by using the commands of the Format menu. You can use the snap lines toalign horizontally and vertically the various buttons on the form, but you must still spacethe controls manually, which isn’t a trivial task. Here’s how you can align the buttons per-fectly via the Format menu:
a. First, align the buttons of the top row. Start by aligning the 1 button with the left side ofthe lblDisplay Label. Then select all the buttons of the top row and make their hori-zontal spacing equal (choose Format � Horizontal Spacing �Make Equal). Then do thesame with the buttons in the first column; this time, make sure their vertical distancesare equal (Format � Vertical Spacing �Make Equal).
b. Now you can align the buttons in each row and each column separately. Use one of thebuttons you aligned in the last step as the guide for the rest of them. The buttons can bealigned in many ways, so don’t worry if somewhere in the process you ruin the align-ment. You can always use the Undo command in the Edit menu. Select the three buttonson the second row and align their tops by using the first button as a reference. To set theanchor control for the alignment, click it with the mouse while holding down the Ctrlkey. Do the same for the third and fourth rows of buttons. Then do the same for thefour columns of buttons, using the top button as a reference.
10. Now, place the buttons for the arithmetic operations on the form — addition (+), subtrac-tion (–), multiplication (*), and division (/). Name the addition button bttnPlus, the sub-traction button bttnMinus, the multiplication button bttnMultiply, and the division but-ton bttnDivide.
11. Finally, place the Equals button on the form, name it bttnEquals, and make it wide enoughto span the space of two operation buttons. Use the commands on the Format menu to alignthese buttons, as shown in Figure 4.5. The form shown in Figure 4.5 has a few more buttons,which you can align by using the same techniques you used to align the numeric buttons.
If you don’t feel quite comfortable with the alignment tools of the IDE, you can still positionthe controls on the form through the x and y components of each control’s Location property.(They’re the x- and y-coordinates of the control’s upper-left corner on the form.) The variousalignment tools are among the first tools of the IDE you’ll master, and you’ll be creating formswith perfectly aligned controls in no time at all.

BUILDING A CALCULATOR 147
Programming the MathCalculatorNow you’re ready to add some code to the application. Double-click one of the digit buttons onthe form and you’ll see the following in the code window:
Private Sub bttn1_Click(ByVal sender As System.Object,ByVal e As System.EventArgs) Handlesbttn1.Click
End Sub
This is the Click event’s handler for a single digit button. Your first inclination might beto program the Click event handler of each digit button, but repeating the same code 10 timesisn’t very productive. (Not to mention that if you decide to edit the code later, the process mustbe repeated 10 times.) We’re going to use the same event handler for all buttons that representdigits. All you have to do is append the names of the events to be handled by the same sub-routine after the Handles keyword. You should also change the name of the event handler tosomething that indicates its role. Because this subroutine handles the Click event for all thedigit buttons, let’s call it DigitClick(). Here’s the revised declaration of a subroutine that canhandle all the digit buttons:
Private Sub DigitClick(ByVal sender As System.Object,ByVal e As System.EventArgs)Handles bttn0.Click, bttn1.Click, bttn2.Click,bttn3.Click, bttn4.Click, bttn5.Click, bttn6.Click,bttn7.Click, bttn8.Click, bttn9.Click
End Sub
You don’t have to type all the event names; as soon as you insert the first comma afterbttn0.Click, a drop-down list with the names of the controls will open and you can select thename of the next button with the down arrow. Press the spacebar to select the desired control(bttn1, bttn2, and so on), and then type the period. This time, you’ll see another list with thenames of the events for the selected control. Locate the Click event and select it by pressingthe spacebar. Type the next comma and repeat the process for all the buttons. This extremelyconvenient feature of the language is IntelliSense: The IDE presents the available and validkeywords as you type.
When you press a digit button on a handheld calculator, the corresponding digit isappended to the display. To emulate this behavior, insert the following line in the Click eventhandler:
lblDisplay.Text = lblDisplay.Text + sender.Text
This line appends the digit clicked to the calculator’s display. The sender argument of theClick event represents the control that was clicked (the control that fired the event). The Textproperty of this control is the caption of the button that was clicked. For example, if you havealready entered the value 345, clicking the digit 0 displays the value 3450 on the Label controlthat acts as the calculator’s display.
The expression sender.Text is not the best method of accessing the Text property of thebutton that was clicked, but it will work as long as the Strict option is off. As discussed in

148 CHAPTER 4 GUI DESIGN AND EVENT-DRIVEN PROGRAMMING
Chapter 2, we must cast the sender object to a specific type (the Button type) and then call itsText method:
CType(sender, Button).Text
The code behind the digit buttons needs a few more lines. After certain actions, the displayshould be cleared. After one of the buttons that correspond to math operations is pressed, thedisplay should be cleared in anticipation of the second operand. Actually, the display must becleared as soon as the first digit of the second operand is pressed and not as soon as the mathoperator button is pressed. Likewise, the display should also be cleared after the user clicks theEquals button. Revise the DigitClick event handler, as shown in Listing 4.3.
Listing 4.3: The DigitClick event
Private Sub DigitClick(ByVal sender As System.Object,ByVal e As System.EventArgs)Handles bttn1.Click, bttn2.Click, bttn3.Click,bttn4.Click, bttn5.Click, bttn6.Click,bttn7.Click, bttn8.Click, bttn9.Click
If clearDisplay ThenlblDisplay.Text = ""clearDisplay = False
End IflblDisplay.Text = lblDisplay.Text + sender.text
End Sub
The clearDisplay variable is declared as Boolean, which means it can take a True or Falsevalue. Suppose the user has performed an operation and the result is on the calculator’s dis-play. The user now starts typing another number. Without the If clause, the program wouldcontinue to append digits to the number already on the display. This is not how calculatorswork. When the user starts entering a new number, the display must be cleared. Our programuses the clearDisplay variable to know when to clear the display.
The Equals button sets the clearDisplay variable to True to indicate that the display con-tains the result of an operation. The DigitClick() subroutine examines the value of this vari-able each time a new digit button is pressed. If the value is True, DigitClick() clears thedisplay and then prints the new digit on it. The subroutine also sets clearDisplay to Falseso that when the next digit is pressed, the program won’t clear the display again.
What if the user makes a mistake and wants to undo an entry? The typical handheld calcula-tor has no Backspace key. The Clear key erases the current number on the display. Let’s imple-ment this feature. Double-click the C button and enter the code of Listing 4.4 in its Click event.
Listing 4.4: Programming the Clear button
Private Sub bttnClear_Click (ByVal sender As System.Object,ByVal e As System.EventArgs) Handles bttnClear.Click
lblDisplay.Text = ""End Sub
BUILDING A CALCULATOR 149
Now we can look at the Period button. A calculator, no matter how simple, should be ableto handle fractional numbers. The Period button works just like the digit buttons, with oneexception. A digit can appear any number of times in a numeric value, but the decimal pointcan appear only once. A number such as 99.991 is valid, but you must make sure the user can’tenter numbers such as 23.456.55. After a decimal point is entered, this button must not insertanother one. The code in Listing 4.5 accounts for this.
Listing 4.5: Programming the Period button
Private Sub bttnDecimalPointClick(…) Handles bttnDecimalPoint.ClickIf lblDisplay.Text.IndexOf(".") >= 0 Then
Exit SubElse
lblDisplay.Text = lblDisplay.Text & "."End If
End Sub
IndexOf is a method that can be applied to any string. The expression lblDisplay.Textis a string (the text on the Label control), so we can call its IndexOf method. The expressionlblDisplay.Text.IndexOf(".") returns the location of the first instance of the period in thecaption of the Label control. If this number is zero or positive, the number entered contains aperiod already and another can’t be entered. In this case, the program exits the subroutine. Ifthe method returns –1, the period is appended to the number entered so far, just like a regulardigit.
Check out the operation of the application. We have already created a functional user inter-face that emulates a handheld calculator with data-entry capabilities. It doesn’t perform anyoperations yet, but we have already created a functional user interface with only a small num-ber of statements.
Coding the Math Operations
Now we can move to the interesting part of the application: the coding of the math operations.Let’s start by defining the three variables listed in Table 4.3.
Table 4.3: Math operation variable definitions
Variable Definition
Operand1 The first number in the operation
MathOperator The desired operation
Operand2 The second number in the operation
When the user clicks one of the math symbols, the application will store the value of theoperand in the variable Operand1. If the user then clicks the Plus button, the program mustmake a note to itself that the current operation is an addition and set the clearDisplay

150 CHAPTER 4 GUI DESIGN AND EVENT-DRIVEN PROGRAMMING
variable to True so that the user can enter another value (the second value to be added). Thesymbol of the operation is stored in the MathOperator variable. The user enters another valueand then clicks the Equals button to see the result. At this point, your program must do thefollowing:
1. Read the value on the display into the Operand2 variable.
2. Perform the operation indicated by the MathOperator variable with the two operands.
3. Display the result and set the clearDisplay variable to True.
The Equals button must perform the following operation:
Operand1 MathOperator Operand2
Suppose the number on the display when the user clicks the Plus button is 3342. The userthen enters the value 23 and clicks the Equals button. The program must carry out the addition:3342 + 23.
If the user clicks the Division button, the operation is as follows: 3342 ÷ 23.Variables are local in the subroutines in which they are declared. Other subroutines have
no access to them and can’t read or set their values. Sometimes, however, variables must beaccessed from many places in a program. The variables Operand1, Operand2, and Operator,as well as the clearDisplay variable, must be accessed from within more than one subrou-tine, so they must be declared outside any subroutine; their declarations usually appear at thebeginning of the class code with the following statements:
Dim clearDisplay As BooleanDim Operand1 As DoubleDim Operand2 As DoubleDim MathOperator As String
These variables are called form-wide variables, or simply form variables, because they are visi-ble from within any subroutine on the form. Let’s see how the program uses the MathOperatorvariable. When the user clicks the Plus button, the program must store the value + in theMathOperator variable. This takes place from within the Plus button’s Click event.
All variables that store numeric values are declared as variables of the Double type, whichcan store values with the greatest possible precision. The Boolean type takes two values: Trueand False. You have already seen how the clearDisplay variable is used.
With the variable declarations out of the way, we can now implement the operator but-tons. Double-click the Plus button, and in the Click event’s handler, enter the lines shown inListing 4.6.
Listing 4.6: The Plus button
Private Sub bttnPlus_Click(ByVal (…) Handles bttnPlus.ClickOperand1 = Convert.ToDouble(lblDisplay.Text)MathOperator = "+"clearDisplay = True
End Sub

BUILDING A CALCULATOR 151
The variable Operand1 is assigned the value currently on the display. The Convert.ToDouble() method converts its argument to a double value. The Text property of theLabel control is a string. The actual value stored in the Text property is not a number. It’sa string such as 428, which is different from the numeric value 428. That’s why we use theConvert.ToDouble method to convert the value of the Label’s caption to a numeric value.The remaining buttons do the same, and I won’t show their listings here.
After the second operand is entered, the user can click the Equals button to calculate theresult. When this happens, the code of Listing 4.7 is executed.
Listing 4.7: The Equals button
Private Sub bttnEquals_Click(ByVal (…) Handles bttnEquals.ClickDim result As DoubleOperand2 = Convert.ToDouble(lblDisplay.Text)Select Case MathOperator
Case "+"result = Operand1 + Operand2
Case "-"result = Operand1 - Operand2
Case "*"result = Operand1 * Operand2
Case "/"If Operand2 <> "0" Then
result = Operand1 / Operand2End If
End SelectlblDisplay.Text = result.ToStringclearDisplay = True
End Sub
The result variable is declared as Double so that the result of the operation will be storedwith maximum precision. The code extracts the value displayed in the Label control and storesit in the variable Operand2. It then performs the operation with a Select Case statement. Thisstatement compares the value of the MathOperator variable to the values listed after each Casestatement. If the value of the MathOperator variable matches one of the Case values, the fol-lowing statement is executed.
Division takes into consideration the value of the second operand because if it’s zero, thedivision can’t be carried out. The last statement carries out the division only if the divisor isnot zero. If Operand2 happens to be zero, nothing happens.
Now run the application and check it out. It works just like a handheld calculator, and youcan’t crash it by specifying invalid data. We didn’t have to use any data-validation code in thisexample because the user doesn’t get a chance to type invalid data. The data-entry mechanismis foolproof. The user can enter only numeric values because there are only numeric digits onthe calculator. The only possible error is to divide by zero, and that’s handled in the Equalsbutton.
Of course, users should be able to just type the numeric values; you shouldn’t force themto click the digit buttons on the interface. To intercept keystrokes from within your code, you

152 CHAPTER 4 GUI DESIGN AND EVENT-DRIVEN PROGRAMMING
must first set the form’s KeyPreview property to True. By default, each keystroke is reportedto the control that has the focus at the time and fires the keystroke-related events: the KeyDown,KeyPress, and KeyUp events. Sometimes we need to handle certain keystrokes from a centralplace, and we set the form’s KeyPreview property to True so that keystrokes are reported firstto the form and then to the control that has the focus. We can intercept the keystrokes in theform’s KeyPress event and handle them in this event handler. Insert the statements shown inListing 4.8 in the form’s KeyPress event handler.
Listing 4.8: Handling keystrokes at the form’s level
Private Sub CalculatorForm_KeyPress(ByVal sender As Object,ByVal e As System.Windows.Forms.KeyPressEventArgs) HandlesMe.KeyPress
Select Case e.KeyCharCase "1" : bttn1.PerformClick()Case "2" : bttn2.PerformClick()Case "3" : bttn3.PerformClick()Case "4" : bttn4.PerformClick()Case "5" : bttn5.PerformClick()Case "6" : bttn6.PerformClick()Case "7" : bttn7.PerformClick()Case "8" : bttn8.PerformClick()Case "9" : bttn9.PerformClick()Case "0" : bttn0.PerformClick()Case "." : bttnDecimalPoint.PerformClick()Case "C", "c" : bttnClear.PerformClick()Case "+" : bttnPlus.PerformClick()Case "-" : bttnMinus.PerformClick()Case "*" : bttnMultiply.PerformClick()Case "/" : bttnDivide.PerformClick()Case "=" : bttnEquals.PerformClick()
End SelectEnd Sub
This event handler examines the key pressed by the user and invokes the Click event han-dler of the appropriate button by calling its PerformClick method. This method allows you to‘‘click’’ a button from within your code. When the user presses the digit 3, the form’s KeyPressevent handler intercepts the keystrokes and emulates the click of the bttn3 button. Because thelarge Select Case statement doesn’t handle characters and punctuation symbols, there’s no wayfor the user to enter invalid digits when a number is expected.
Using the Basic Debugging ToolsOur sample applications work nicely and are quite easy to test and fix if you discover some-thing wrong with them (but only because they’re very simple applications). As you write code,you’ll soon discover that something doesn’t work as expected, and you should be able to findout why and then fix it. The process of eliminating errors in logic — as opposed to errors in

BUILDING A CALCULATOR 153
syntax, which are caught by the compiler — is called debugging. Visual Studio provides thetools to simplify the process of debugging. There are a few simple debugging techniques youshould know, even as you work with simple projects.
Open the MathCalculator project in the code editor and place the pointer in the line thatcalculates the difference between the two operands. Let’s pretend there’s a problem with thisline and we want to follow the execution of the program closely to find out what’s going wrongwith the application. Press F9 and the line will be highlighted in brown. This line has become abreakpoint: As soon as it is reached, the program will stop.
Another way to add a breakpoint is to use the Breakpoint option in the context menu. Youcan display the context menu in the editor by right-clicking the line of code where you wishthe execution to stop. Finally, there is a special window in Visual Studio that displays break-points. You can display the Breakpoints window by navigating to the Debug � Windows �Breakpoints menu options in Visual Studio. In this window, you can see all the breakpoints inthe solution, deactivate and activate breakpoints, attach conditions and labels to breakpoints,and even view some breakpoint-related statistics.
Visual Studio Function Keys and Keyboard Shortcuts
F9 is not the only useful function key or shortcut key combination available in Visual Studio.The following list includes some of the function key commands and shortcut key combinationsyou will find useful.
Function Key Command
F1 Context-Sensitive Help
F5 Run Application In Debug Mode
Shift + F5 Run Application Without Debugging
F7 Toggle Design View - Code View
F9 Toggle Breakpoint
F10 Step Over (while Debugging)
F11 Step Into (while Debugging)
F12 Go To Definition
Ctrl + , ‘‘Navigate To’’ Window
Ctrl + . Generate Code Stubs
Ctrl + Mouse Wheel Zoom In / Zoom Out In Code Window
Ctrl + Shift Highlight All Keyword References
Press F5 to run the application and perform a subtraction. Enter a number; click the minusbutton and then another number, and finally, click the Equals button. The application will stop,and the code editor will open. The breakpoint will be highlighted in yellow. You’re still inruntime mode, but the execution of the application is suspended. You can even edit the code inbreak mode and then press F5 to continue the execution of the application. Hover the pointerover the Operand1 and Operand2 variables in the code editor’s window. The value of the

154 CHAPTER 4 GUI DESIGN AND EVENT-DRIVEN PROGRAMMING
corresponding variable will appear in a small ToolTip box. Move the pointer over any variablein the current event handler to see its value. These are the values of the variables just prior tothe execution of the highlighted statement.
The result variable is zero because the statement hasn’t been executed yet. If the variablesinvolved in this statement have their proper values (if they don’t, you know that the problemis prior to this statement and perhaps in another event handler), you can execute this statementby pressing F10, which executes only the highlighted statement. The program will stop at thenext line. The next statement to be executed is the End Select statement.
Find an instance of the result variable in the current event handler, rest the pointer over it,and you will see the value of the variable after it has been assigned a value. Now you can pressF10 to execute another statement or press F5 to return to normal execution mode.
You can also evaluate expressions involving any of the variables in the current event han-dler by entering the appropriate statement in the Immediate window. The Immediate windowappears at the bottom of the IDE. If it’s not visible, open the Debug menu and choose Windows� Immediate. The current line in the command window is prefixed with the greater-thansymbol (reminiscent of the DOS days). Place the cursor next to it and enter the followingstatement:
? Operand1 / Operand2
The quotient of the two values will appear in the following line. The question mark is just ashorthand notation for the Print command.
If you want to know the current value on the calculator’s display, enter the followingstatement:
? lblDisplay.Text
This statement requests the value of a control’s property on the form. The current value of theLabel control’s Text property will appear in the following line.
You can also evaluate math expressions with statements such as the following:
? Math.Log(3/4)
Log() is the logarithm function and a method of the Math class. With time, you’ll discoverthat the Immediate window is a handy tool for debugging applications. If you have a state-ment with a complicated expression, you can request the values of the expression’s individualcomponents and make sure they can be evaluated.
Now move the pointer over the breakpoint and press F9 again. This will toggle thebreakpoint status, and the execution of the program won’t halt the next time this statement isexecuted.
If the execution of the program doesn’t stop at a breakpoint, it means that the statement isnever reached. In this case, you must search for the bug in statements that are executed beforethe breakpoint is reached. Chances are that the statement that was not reached was in an Ifstatement that wasn’t executed, or in a subroutine that has never been called. For example,if you didn’t assign the proper value to the MathOperator variable, the Case clause for the sub-traction operation will never be reached. You should place the breakpoint at the first executablestatement of the Click event handler for the Equals button to examine the values of all vari-ables the moment this subroutine starts its execution. If all variables have the expected values,

BUILDING A CALCULATOR 155
you will continue testing the code forward. If not, you’d have to test the statements that lead tothis statement — the statements in the event handlers of the various buttons.
Another simple technique for debugging applications is to print the values of certainvariables in the Immediate window. Although this isn’t a debugging tool, it’s commonpractice among VB programmers. Many programmers print the values of selected variablesbefore and after the execution of some complicated statements. To do so, use the statementDebug.WriteLine followed by the name of the variable you want to print, or an expression:
Debug.WriteLine(Operand1)
This statement sends its output to the Immediate window. This is a simple technique, but itworks. You can also use it to test a function or method call. If you’re not sure about the syntaxof a function, pass an expression that contains the specific function to the Debug.WriteLinestatement as an argument. If the expected value appears in the Immediate window, you can goahead and use it in your code.
In the project’s folder, you will find the MoreFeatures.txt document, which describes howto add more features to the math calculator. Such features include the inversion of a number(the 1/x button), the negation of a number (the +/– button), and the usual math functions (log-arithms, square roots, trigonometric functions, and so on).
Exception HandlingCrashing this application won’t be as easy as crashing the LoanCalculator application. If youstart multiplying very large numbers, you won’t get an overflow exception. Enter a very largenumber by repeatedly typing the digit 9; then multiply this value with another equally largevalue. When the result appears, click the multiplication symbol and enter another verylarge value. Keep multiplying the result with very large numbers until you exhaust the valuerange of the Double data type (that is, until the result is so large that it can’t be stored to avariable of the Double type). When this happens, the string infinity will appear in the display.This is Visual Basic’s way of telling you that it can’t handle very large numbers. This isn’t alimitation of VB; it’s the way computers store numeric values: They provide a limited numberof bytes for each variable. (We discussed oddities such as infinity in Chapter 2.)
You can’t create an overflow exception by dividing a number by zero, either, because thecode will not even attempt to carry out this calculation. In short, the MathCalculator applicationis pretty robust. However, we can’t be sure that users won’t cause the application to generatean exception, so we must provide some code to handle all types of errors.
Exceptions versus Errors
Errors that occur during application execution are now called exceptions. They used to becalled errors in pre-.NET versions of Visual Basic. You can think of them as exceptions to thenormal (or intended) flow of execution. If an exception occurs, the program must executespecial statements to handle it — statements that wouldn’t be executed normally. I thinkthey’re called exceptions because error is a word nobody likes and most people can’t admitthey wrote code that contains errors. The term exception can be vague. What would you rathertell your customers: that the application you wrote has errors or that your code has raised anexception? You may not have noticed it, but the term bug is not used as frequently anymore;bugs are now called known issues. The term debugging, however, hasn’t changed yet.

156 CHAPTER 4 GUI DESIGN AND EVENT-DRIVEN PROGRAMMING
How do you prevent an exception raised by a calculation? Data validation won’t help. Youjust can’t predict the result of an operation without actually performing the operation. And ifthe operation causes an overflow, you can’t prevent it. The answer is to add a structured excep-tion handler. Most of the sample application’s code is straightforward, and you can’t easily gen-erate an exception for demonstration purposes. The only place where an exception may occuris the handler of the Equals button, where the calculations take place. This is where you mustadd an exception handler. The outline of the structured exception handler is the following:
Try‘ statements block
Catch Exception‘ handler block
Finally‘ cleanup statements block
End Try
The program will attempt to perform the calculations, which are coded in the statementsblock. If the program succeeds, it continues with the cleanup statements in the Finally sectionof the handler. These statements are mostly cleanup code used to release reserved resources,and the Finally section of the statement is optional. If it’s missing, the program execution con-tinues with the statement following the End Try statement. If an error occurs in the first blockof statements, the Catch Exception section is activated and the statements in the handler blockare executed. If present, the Finally block is executed next. As you can see, the Finally blockis executed no matter the outcome of statements block execution; error or no error, you can becertain that cleanup code is executed and important resources like database connections and filehandlers are released.
The Catch Exception block is where you handle the error. There’s not much you can doabout errors that result from calculations. All you can do is display a warning and give the usera chance to change the values. There are other types of errors, however, that can be handledmuch more gracefully. If your program can’t read a file from a CD drive, you can give the usera chance to insert the CD and retry. In other situations, you can prompt the user for a missingvalue and continue. If the application attempts to write to a read-only file, for example, chancesare that the user specified a file on a CD drive or a file with its read-only attribute set. You candisplay a warning, exit the subroutine that saves the data, and give the user a chance to eitherselect another filename or change the read-only attribute of the selected file.
Exception Handling
A common programming mistake is to place the cleanup code inside the statements blockand to omit the Finally block altogether. Such code can result in a dreaded memory leakproblem. This way some precious computing resources end up without being recovered. Whenunmanaged resources (like file handles and database connections) are accessed, they have tobe released explicitly or they will stay in memory and the program might eventually stall.Unfortunately, since the cleanup code is placed inside the statements block, the program

BUILDING A CALCULATOR 157
executions will jump to the Catch block immediately after the error is raised, thus omittingthe cleanup statements.
What makes such memory leak problems even more sinister is the fact that they are producedonly under exceptional conditions. If everything goes well, all resources are recovered. If anerror is produced, however, resources are leaked. Under such circumstances a program can goon without crashing for quite some time. Usual debugging techniques are often helpless undersuch circumstances. You will typically have to employ some special tools like memory profilersto pinpoint the exact block of code responsible for producing the memory leak.
The following snippet is a simplified illustration of such a scenario. The code assumes thatthe SomeFile.txt file has an integer written on the first line. If this is true, the applicationwill correctly close the writer. However, if you encounter something else — for example, thecharacters abc on the first line in the file — the error handler will prevent the applicationfrom crashing but will not close the writer.
To test the snippet, create a new Console Application project. Change the name of Module1to ResourceLeakingModule and make sure it is marked as a startup object. Copy the followingcode to ResourceLeakingModule:
Imports System.IO
Module ResourceLeakingModule
Sub Main()Dim fileReader As StreamReaderDim firstNumber As IntegerTry
fileReader = File.OpenText("C:\SomeFile.txt")firstNumber = fileReader.ReadLineConsole.WriteLine("At this point execution already " &
"jumped over to catch block")fileReader.Close() ‘should go to Finally block
Catch ex As ExceptionConsole.WriteLine("fileReader has not been closed")‘ Wait so that output can be readConsole.ReadLine()
End TryEnd Sub
End Module
Now create a SomeFile.txt file in the root of your C drive and write abc on the first line ofthe file. You can place the file in some other location as long as you modify the snippet so itpoints to the correct location of the file.
The way you can resolve the memory leak problem in this case is to place a fileReader.Close() statement inside the Finally block. Another way to release unmanaged resourcescorrectly is to employ Visual Basic’s Using statement. This statement is convenient as longas you can release the resource inside the same block of code that you used to create theresource.

158 CHAPTER 4 GUI DESIGN AND EVENT-DRIVEN PROGRAMMING
In general, there’s no unique method to handle all exceptions. You must consider all typesof exceptions that your application may cause and handle them on an individual basis. What’simportant about error handlers is that your application doesn’t crash; it simply doesn’t performthe operation that caused the exception (this is also known as the offending operation, or offendingstatement) and continues.
The error handler for the MathCalculator application must inform the user that an erroroccurred and abort the calculations — it does not even attempt to display a result. If you openthe Equals button’s Click event handler, you will find the statements detailed in Listing 4.9.
Listing 4.9: Revised Equals button
Private Sub bttnEquals_Click(…) Handles bttnEquals.ClickDim result As DoubleOperand2 = Convert.ToDouble(lblDisplay.Text)Try
Select Case MathOperatorCase "+"
result = Operand1 + Operand2Case "-"
result = Operand1 - Operand2Case "*"
result = Operand1 * Operand2Case "/"
If Operand2 <> "0" Then result = Operand1 / Operand2End SelectlblDisplay.Text = result
Catch exc As ExceptionMsgBox(exc.Message)result = "ERROR"
FinallyclearDisplay = True
End TryEnd Sub
Most of the time, the error handler remains inactive and doesn’t interfere with theoperation of the program. If an error occurs, which most likely will be an overflow error,the error-handling section of the Try…Catch…End Try statement will be executed. This codedisplays a message box with the description of the error, and it also displays the string ERRORon the calculator’s display. The Finally section is executed regardless of whether an exceptionoccurred. In this example, the Finally section sets the clearDisplay variable to True so thatwhen another digit button is clicked, a new number will appear on the display.
The Bottom Line
Design graphical user interfaces. A Windows application consists of a graphical user inter-face and code. The interface of the application is designed with visual tools and consists ofcontrols that are common to all Windows applications. You drop controls from the Toolbox

THE BOTTOM LINE 159
window onto the form, size and align the controls on the form, and finally set their propertiesthrough the Properties window. The controls include quite a bit of functionality right out of thebox, and this functionality is readily available to your application without a single line of code.
Master It Describe the process of aligning controls on a form.
Program events. Windows applications follow an event-driven model: We code the events towhich we want our application to respond. For example, an application reacts to Click eventsof the various buttons. You select the actions to which you want your application to react andprogram these events accordingly.
When an event is fired, the appropriate event handler is automatically invoked. Event handlersare subroutines that pass two arguments to the application: the sender argument (which isan object that represents the control that fired the event) and the e argument (which carriesadditional information about the event).
Master It How will you handle certain keystrokes regardless of the control that receivesthem?
Write robust applications with error handling. Numerous conditions can cause an applica-tion to crash, but a well-written application should be able to detect abnormal conditions andhandle them gracefully. To begin with, you should always validate your data before you attemptto use them in your code. A well-known computer term is ‘‘garbage in, garbage out,’’ whichmeans you shouldn’t perform any calculations on invalid data.
Master It How will you execute one or more statements in the context of a structuredexception handler?

Chapter 5
Basic Windows Controls
In previous chapters, we explored the environment of Visual Basic and the principles ofevent-driven programming, which is the core of VB’s programming model. In the process, webriefly explored a few basic controls through the examples. The .NET Framework providesmany more controls, and all of them have a multitude of trivial properties (such as Font,BackgroundColor, and so on), which you can set either in the Properties window or fromwithin your code.
This chapter explores in depth the basic Windows controls: the controls you’ll use mostoften in your applications because they are the basic building blocks of typical rich client-userinterfaces. Rather than look at the background and foreground color, font, and other trivialproperties of all controls, we’ll look at the properties unique to each control and see howthese properties are used in building functional, rich user interfaces.
In this chapter, you’ll learn how to do the following:
◆ Use the TextBox control as a data-entry and text-editing tool
◆ Use the ListBox, CheckedListBox, and ComboBox controls to present lists of items
◆ Use the ScrollBar and TrackBar controls to enable users to specify sizes and positions withthe mouse
The TextBox ControlThe TextBox control is the primary mechanism for displaying and entering text. It is a smalltext editor that provides all the basic text-editing facilities: inserting and selecting text, scrollingif the text doesn’t fit in the control’s area, and even exchanging text with other applicationsthrough the Clipboard.
The TextBox control is an extremely versatile data-entry tool that can be used for enteringand editing single lines of text, such as a number or a password or an entire text file. Figure 5.1shows a few typical examples. All the boxes in Figure 5.1 contain text — some a single line,some several lines. The scroll bars you see in some text boxes are part of the control. You canspecify which scroll bars (vertical and/or horizontal) will be attached to the control, and theyappear automatically whenever the control’s contents exceed the visible area of the control.

162 CHAPTER 5 BASIC WINDOWS CONTROLS
Figure 5.1
Typical uses of theTextBox control
Basic PropertiesLet’s start with the properties that specify the appearance and, to some degree, the functionalityof the TextBox control; these properties are usually set at design time through the Propertieswindow. Then, we’ll look at the properties that allow you to manipulate the control’s contentsand interact with users from within your code.
TextAlign
This property sets (or returns) the alignment of the text on the control, and its value is a mem-ber of the HorizontalAlignment enumeration: Left, Right, or Center. The TextBox controldoesn’t allow you to format text (mix different fonts, attributes, or colors), but you can set thefont in which the text will be displayed with the Font property as well as the control’s back-ground color with the BackColor property.
MultiLine
This property determines whether the TextBox control will hold a single line or multiple linesof text. Every time you place a TextBox control on your form, it’s sized for a single line of textand you can change its width only. To change this behavior, set the MultiLine property toTrue. When creating multiline TextBoxes, you will most likely have to set one or more of theMaxLength, ScrollBars, and WordWrap properties in the Properties window.
MaxLength
This property determines the number of characters that the TextBox control will accept. Itsdefault value is 32,767, which was the maximum number of characters the VB 6 version of thecontrol could hold. Set this property to zero so that the text can have any length up to the con-trol’s capacity limit — 2,147,483,647 characters, to be exact. To restrict the number of charactersthat the user can type, set the value of this property accordingly.
The MaxLength property of the TextBox control is often set to a specific value in data-entryapplications to prevent users from entering more characters than can be stored in a database

THE TEXTBOX CONTROL 163
field. A TextBox control for entering international standard book numbers (ISBNs), for instance,shouldn’t accept more than 13 characters.
ScrollBars
This property lets you specify the scroll bars you want to attach to the TextBox if the textexceeds the control’s dimensions. Single-line text boxes can’t have a scroll bar attached, evenif the text exceeds the width of the control. Multiline text boxes can have a horizontal or avertical scroll bar or both.
If you attach a horizontal scroll bar to the TextBox control, the text won’t wrap automaticallyas the user types. To start a new line, the user must press Enter. This arrangement is usefulfor implementing code editors in which lines must break explicitly. If the horizontal scroll baris missing, the control inserts soft line breaks when the text reaches the end of a line, and thetext is wrapped automatically. You can change the default behavior by setting the WordWrapproperty.
WordWrap
This property determines whether the text is wrapped automatically when it reaches the rightedge of the control. The default value of this property is True. If the control has a horizontalscroll bar, however, you can enter very long lines of text. The contents of the control will scrollto the left, so the insertion point is always visible as you type. You can turn off the horizontalscroll bar and still enter long lines of text; just use the left/right arrow keys to bring any partof the text into view. You can experiment with the WordWrap and ScrollBars properties in theTextPad sample application, which is described later in this chapter.
Notice that the WordWrap property has no effect on the actual line breaks. The lines arewrapped automatically, and there are no hard breaks (returns) at the end of each line. Openthe TextPad project, enter a long paragraph, and resize the window — the text is automaticallyadjusted to the new width of the control.
A Functional Text Editor by Design
A TextBox control with its MaxLength property set to 0, its MultiLine and WordWrap prop-erties set to True, and its ScrollBars property set to Vertical is, on its own, a functional texteditor. Place a TextBox control with these settings on a form, run the application, and checkout the following:
◆ Enter text and manipulate it with the usual editing keys: Delete, Insert, Home, and End.
◆ Select multiple characters with the mouse or the arrow keys while holding down the Shift key.
◆ Move segments of text around with Copy (Ctrl+C), Cut (Ctrl+X), and Paste (Ctrl+V orShift+Insert) operations.
◆ Right-click the control to see its context menu; it contains all the usual text-editing commands(and a few Unicode-related commands you’ll never use).
◆ Exchange data with other applications through the Clipboard.

164 CHAPTER 5 BASIC WINDOWS CONTROLS
You can do all this without a single line of code! If you use the My object, you can save andload files by using two lines of code. Shortly, you’ll see what you can do with the TextBoxcontrol if you add some code to your application, but first let’s continue our exploration of theproperties that allow us to manipulate the control’s functionality.
AcceptsReturn, AcceptsTab
These two properties specify how the TextBox control reacts to the Enter and Tab keys. TheEnter key activates the default button on the form, if there is one. The default button is usuallyan OK button that can be activated with the Enter key, even if it doesn’t have the focus. In amultiline TextBox control, however, we want to be able to use the Enter key to change lines.The default value of the AcceptsReturn property is False, so pressing Enter does not create anew line on the control. If you leave this property’s value set to False, users can still create newlines in the TextBox control, but they’ll have to press Ctrl+Enter. If the form contains no defaultbutton, the Enter key creates a new line regardless of the AcceptsReturn setting.
Likewise, the AcceptsTab property determines how the control reacts to the Tab key. Nor-mally, the Tab key takes you to the next control in the Tab order, and we generally avoidchanging the default setting of the AcceptsTab property. In a multiline TextBox control, how-ever, you may want the Tab key to insert a Tab character in the text of the control instead;to do this, set the control’s AcceptsTab property to True (the default value is False). If youchange the default value, users can still move to the next control in the Tab order by pressingCtrl+Tab. Notice that the AcceptsTab property affects only the TextBox controls.
CharacterCasing
This property tells the control to change the casing of the characters as they’re entered by theuser. Its default value is Normal, and characters are displayed as typed. You can set it to Upperor Lower to convert the characters to upper- or lowercase automatically.
PasswordChar
This property turns the characters typed into any character you specify. If you don’t want todisplay the actual characters typed by the user (when entering a password, for instance), usethis property to define the character to appear in place of each character the user types.
The default value of this property is an empty string, which tells the control to display thecharacters as entered. If you set this value to an asterisk (*), for example, the user sees an aster-isk in the place of every character typed. This property doesn’t affect the control’s Text prop-erty, which contains the actual characters. If the PasswordChar property is set to any character,the user can’t copy or cut the text on the control.
ReadOnly, Locked
If you want to display text on a TextBox control but prevent users from editing it (such as foran agreement or a contract they must read, software installation instructions, and so on), youcan set the ReadOnly property to True. When ReadOnly is set to True, you can put text on thecontrol from within your code and users can view it yet they can’t edit it.
To prevent editing of the TextBox control with VB 6, you had to set the Locked property toTrue. Oddly, the Locked property is also supported, but now it has a very different function.The Locked property of VB 2010 locks the control at design time (so that you won’t move it orchange its properties by mistake as you design the form).

THE TEXTBOX CONTROL 165
Text-Manipulation PropertiesMost of the properties for manipulating text in a TextBox control are available at runtime only.The following sections present a breakdown of each property.
Text
The most important property of the TextBox control is the Text property, which holds the con-trol’s text. You can set this property at design time to display some text on the control initiallyand read it from within your code to obtain the user’s input and process it.
Notice that there are two methods of setting the Text property at design time. For single-lineTextBox controls, set the Text property to a short string, as usual. For multiline TextBox con-trols, open the Lines property and enter the text in the String Collection Editor window, whichwill appear. In this window, each paragraph is entered as a single line of text. When you’refinished, click OK to close the window; the text you entered in the String Collection Editor win-dow will be placed on the control. Depending on the width of the control and the setting of theWordWrap property, paragraphs may be broken into multiple lines.
At runtime, use the Text property to extract the text entered by the user or to replace theexisting text. You can also manipulate it with the members of the String class. The followingexpression returns the number of characters in the TextBox1 control:
Dim strLen As Integer = TextBox1.Text.Length
The IndexOf method of the String class will locate a specific string in the control’s text. Thefollowing statement returns the location of the first occurrence of the string Visual in the text:
Dim location As Integerlocation = TextBox1.Text.IndexOf("Visual")
For more information on locating strings in a TextBox control, see the section ‘‘VB 2010at Work: The TextPad Project’’ later in this chapter, where we’ll build a text editor withsearch-and-replace capabilities.
To store the control’s contents in a file, use a statement such as the following:
My.Computer.FileSystem.WriteAllText("MyText.txt", TextBox1.Text, False, System.Text.Encoding.UTF8)
The first argument is the name of the file where the text will be saved and the secondargument is the text to be saved. The following argument is a True/False value that indicateswhether the text will be appended to the file (if True) or whether it will replace the file’scontents. That holds true if the file exists, of course. If the file doesn’t exist, a new one will becreated.
Similarly, you can read the contents of a text file into a TextBox control by using a statementsuch as the following:
TextBox1.Text = My.Computer.FileSystem.ReadAllText("MyText.txt")
To locate all instances of a string in the text, use a loop like the one in Listing 5.1. This looplocates successive instances of the string Basic and then continues searching from the character

166 CHAPTER 5 BASIC WINDOWS CONTROLS
following the previous instance of the word in the text. To locate the last instance of a stringin the text, use the LastIndexOf method. You can write a loop similar to the one in Listing 5.1that scans the text backward.
Listing 5.1: Locating all instances of a string in a TextBox
Dim startIndex = -1startIndex = TextBox1.Text.IndexOf("Basic", startIndex + 1)While startIndex > 0
Console.WriteLine "String found at " & startIndexstartIndex = TextBox1.Text.IndexOf("Basic", startIndex + 1)
End While
To test this code segment, place a multiline TextBox and a Button control on a form; thenenter the statements of the listing in the button’s Click event handler. Run the applicationand enter some text on the TextBox control. Make sure the text contains the word Basic orchange the code to locate another word, and click the button. Notice that the IndexOf methodperforms a case-sensitive search.
Use the Replace method to replace a string with another within the line, the Split methodto split the line into smaller components (such as words), and any other method exposed bythe String class to manipulate the control’s text.
The AppendText method appends the string specified by its argument to the control as is,without any line breaks between successive calls. If you want to append individual paragraphsto the control’s text, you must insert the line breaks explicitly, with a statement such as the fol-lowing (vbCrLf is a constant for the carriage return/newline characters):
Dim newString = "enter some text here"TextBox1.AppendText(newString & vbCrLf)
Lines
In addition to using the Text property, you can access the text on the control by using theLines property. The Lines property is a string array, and each element holds a paragraph oftext. You can iterate through the text lines with a loop such as the following:
Dim iLine As IntegerFor iLine = 0 To TextBox1.Lines.Length - 1
‘ process string TextBox1.Lines(iLine)Debug.WriteLine TextBox1.Lines(iLine)Next
Because the Lines property is an array, it supports the Length property, which returns thenumber of items in the array. Each element of the Lines array is a string, and you can call anyof the String class’s methods to manipulate it. Just keep in mind that you can’t alter the text onthe control by editing the Lines array. However, you can set the control’s text by assigning anarray of strings to the Lines property at design time.

THE TEXTBOX CONTROL 167
Text-Selection PropertiesThe TextBox control provides three properties for manipulating the text selected by the user:SelectedText, SelectionStart, and SelectionLength. Users can select a range of text with aclick-and-drag operation and the selected text will appear in reverse color. You can access theselected text from within your code through the SelectedText property and its location in thecontrol’s text through the SelectionStart and SelectionLength properties.
SelectedText
This property returns the selected text, enabling you to manipulate the current selection fromwithin your code. For example, you can replace the selection by assigning a new value to theSelectedText property. To convert the selected text to uppercase, use the ToUpper method ofthe String class:
TextBox1.SelectedText = TextBox1.SelectedText.ToUpper
SelectionStart, SelectionLength
Use these two properties to read the text selected by the user on the control or to select textfrom within your code. The SelectionStart property returns or sets the position of the firstcharacter of the selected text, somewhat like placing the cursor at a specific location in the textand selecting text by dragging the mouse. The SelectionLength property returns or sets thelength of the selected text.
Suppose the user is seeking the word Visual in the control’s text. The IndexOf methodlocates the string but doesn’t select it. The following statements select the word in the text,highlight it, and bring it into view so that users can spot it instantly:
Dim seekString As String = "Visual"Dim strLocation As LongstrLocation = TextBox1.Text.IndexOf(seekString)If strLocation > 0 Then
TextBox1.SelectionStart = strLocationTextBox1.SelectionLength = seekString.Length
End IfTextBox1.ScrollToCaret()
These lines locate the string Visual (or any user-supplied string stored in the seekStringvariable) in the text and select it by setting the SelectionStart and SelectionLength prop-erties of the TextBox control. If the located string lies outside the visible area of the control,the user must scroll the text to bring the selection into view. The TextBox control provides theScrollToCaret method, which brings the section of the text with the cursor (the caret position)into view.
The few lines of code shown previously form the core of a text editor’s Find command.Replacing the current selection with another string is as simple as assigning a new value tothe SelectedText property, and this technique provides you with an easy implementation ofa Find and Replace operation.

168 CHAPTER 5 BASIC WINDOWS CONTROLS
Locating the Cursor Position in the Control
The SelectionStart and SelectionLength properties always have a value even if no textis selected on the control. In this case, SelectionLength is 0, and SelectionStart is thecurrent position of the pointer in the text. If you want to insert some text at the pointer’s loca-tion, simply assign it to the SelectedText property, even if no text is selected on the control.
In addition to using the SelectionStart and SelectionLength properties, you can selecttext on the control with the Select method, which accepts as arguments the starting positionand the length of the selection:
TextBox1.Select(start, length)
A variation of the Select method is the SelectAll method, which selects all the text on thecontrol. Finally, the DeselectAll method deselects any text on the control.
HideSelection
The selected text in the TextBox does not remain highlighted when the user moves to anothercontrol or form; to change this default behavior, set the HideSelection property to False. Usethis property to keep the selected text highlighted, even if another control, form, or a dialogbox, such as a Find & Replace dialog box, has the focus. Its default value is True, which meansthat the text doesn’t remain highlighted when the TextBox loses the focus.
Undoing EditsAn interesting feature of the TextBox control is that it can automatically undo the most recentedit operation. To undo an operation from within your code, you must first examine the valueof the CanUndo property. If it’s True, the control can undo the operation; then you can call theUndo method to undo the most recent edit.
An edit operation is the insertion or deletion of characters. Entering text without deletingany is considered a single operation and will be undone in a single step. Even if the user hasspent an hour entering text (without making any corrections), you can make all the text dis-appear with a single call to the Undo method. Fortunately, the deletion of the text becomes themost recent operation, which can be undone with another call to the Undo method. In effect, theUndo method is a toggle. When you call it for the first time, it undoes the last edit operation. Ifyou call it again, it redoes the operation it previously undid. You can disable the redo operationby calling the ClearUndo method, which clears the undo buffer of the control. You should callit from within an Undo command’s event handler to prevent an operation from being redone. Inmost cases, you should give users the option to redo an operation, especially because the Undomethod can delete an enormous amount of text from the control.
VB 2010 at Work: The TextPad ProjectThe TextPad application, shown in Figure 5.2, demonstrates most of the TextBox control’sproperties and methods described so far. TextPad is a basic text editor that you can incorporateinto your programs and customize for special applications. The TextPad project’s main form iscovered by a TextBox control, whose size is adjusted every time the user resizes the form. This

THE TEXTBOX CONTROL 169
feature doesn’t require any programming — just set the Dock property of the TextBox control toFill.
Figure 5.2
TextPad demonstratesthe most useful proper-ties and methods of theTextBox control.
The name of the application’s main form is frmTextPad, and the name of the Find & Replacedialog box is frmFind. You can design the two forms as shown in the figures of this chapter,or you can open the TextPad project. To design the application’s interface from scratch, placea MenuStrip control on the form. The control will be docked to the top of the form automat-ically. Then place a TextBox control on the main form, name it txtEditor, and set the fol-lowing properties: Multiline to True, MaxLength to 0 (to edit text documents of any length),HideSelection to False (so that the selected text remains highlighted even when the main formdoesn’t have the focus), and Dock to Fill, so that it will fill the form.
The menu bar of the form contains all the commands you’d expect to find in any text editingapplication; they’re listed in Table 5.1.
The File menu commands are implemented with the Open and Save As dialog boxes,the Font command with the Font dialog box, and the Color command with the Color dialogbox. These dialog boxes are discussed in the following chapters, and as you’ll see, you don’thave to design them yourself. All you have to do is place a control on the form and set a fewproperties; the Framework takes it from there. The application will display the standard OpenFile/Save File/Font/Color dialog boxes, in which the user can select or specify a filename, orselect a font or color. Of course, we’ll provide a few lines of code to actually move the textinto a file (or read it from a file and display it on the control), change the control’s backgroundcolor, and so on. I’ll discuss the commands of the File menu in Chapter 7, ‘‘More WindowsControls.’’
The Editing Commands
The options on the Edit menu move the selected text to and from the Clipboard. For theTextPad application, all you need to know about the Clipboard is that the SetText methodplaces the currently selected text on the Clipboard and the GetText method retrievesinformation from the Clipboard (see Figure 5.3).

170 CHAPTER 5 BASIC WINDOWS CONTROLS
Table 5.1: The TextPad form’s menu
Menu Command Description
File New Clears the text
Open Loads a new text file from disk
Save Saves the text to its file on disk
Save As Saves the text with a new filename on disk
Print Prints the text
Exit Terminates the application
Edit Undo/Redo Undoes/redoes the last edit operation
Copy Copies selected text to the Clipboard
Cut Cuts the selected text
Paste Pastes the Clipboard’s contents to the editor
Select All Selects all text in the control
Find & Replace Displays a dialog box with Find and Replace options
Process Convert To Upper Converts selected text to uppercase
Convert To Lower Converts selected text to lowercase
Number Lines Numbers the text lines
Format Font Sets the text’s font, size, and attributes
Page Color Sets the control’s background color
Text Color Sets the color of the text
WordWrap Toggle menu item that turns text wrapping on and off
The Copy command, for example, is implemented with a single line of code (txtEditoris the name of the TextBox control). The Cut command does the same, and it also clears theselected text. The code for these and for the Paste command, which assigns the contents of theClipboard to the current selection, is presented in Listing 5.2.
If no text is currently selected, the Clipboard’s text is pasted at the pointer’s current loca-tion. If the Clipboard contains a bitmap (placed there by another application) or any othertype of data that the TextBox control can’t handle, the paste operation will fail; that’s why wehandle the Paste operation with an If statement. You could provide some hint to the user byincluding an Else clause that informs them that the data on the Clipboard can’t be used with atext-editing application.

THE TEXTBOX CONTROL 171
Figure 5.3
The Copy, Cut, andPaste operations of theTextPad application canbe used to exchangetext with any otherapplication.
Listing 5.2: The Cut, Copy, and Paste commands
Private Sub EditCopyItem_Click(…)Handles EditCopyItem.Click
If txtEditor.SelectionLength > 0 ThenClipboard.SetText(txtEditor.SelectedText)
End IfEnd Sub
Private Sub EditCutItem_Click(…)Handles EditCutItem.Click
Clipboard.SetText(txtEditor.SelectedText)txtEditor.SelectedText = ""
End Sub
Private Sub EditPasteItem_Click(…)Handles EditPasteItem.Click
If Clipboard.ContainsText ThentxtEditor.SelectedText = Clipboard.GetText
End IfEnd Sub
The Process and Format Menus
The commands of the Process and Format menus are straightforward. The Format menucommands open the Font or Color dialog box and change the control’s Font, ForeColor, andBackColor properties. You will learn how to use these controls in the following chapter. The

172 CHAPTER 5 BASIC WINDOWS CONTROLS
Upper Case and Lower Case commands of the Process menu are also trivial: They select allthe text, convert it to uppercase or lowercase, respectively, and assign the converted text to thecontrol’s SelectedText property with the following statements:
txtEditor.SelectedText = txtEditor.SelectedText.ToLowertxtEditor.SelectedText = txtEditor.SelectedText.ToUpper
Notice that the code uses the SelectedText property to convert only the selected text, notthe entire document. The Number Lines command inserts a number in front of each text lineand demonstrates how to process the individual lines of text on the control. However, it doesn’tremove the line numbers, and there’s no mechanism to prevent the user from editing the linenumbers or inserting/deleting lines after they have been numbered. Use this feature to create anumbered listing or to number the lines of a file just before saving it or sharing it with anotheruser. Listing 5.3 shows the Number Lines command’s code and demonstrates how to iteratethrough the TextBox control’s Lines array.
Listing 5.3: The Number Lines command
Private Sub ProcessNumberLinesItem_Click(…)Handles ProcessNumberLines.Click
Dim iLine As IntegerDim newText As New System.Text.StringBuilder()For iLine = 0 To txtEditor.Lines.Length - 1
newText.Append((iLine + 1).ToString & vbTab &txtEditor.Lines(iLine) & vbCrLf)
NexttxtEditor.SelectAll()Clipboard.SetText(newText.ToString)txtEditor.Paste()
End Sub
This event handler uses a StringBuilder variable. The StringBuilder class, discussed inChapter 11, ‘‘The Framework at Large,’’ is equivalent to the String class; it exposes similarmethods and properties, but it’s much faster at manipulating dynamic strings than theString class.
Search and Replace Operations
The last option in the Edit menu — and the most interesting — displays a Find & Replace dialogbox (shown earlier in Figure 5.2). This dialog box works like the similarly named dialog boxof Microsoft Word and many other Windows applications. The buttons in the Find & Replacedialog box are relatively self-explanatory:
Find The Find command locates the first instance of the specified string in the text afterthe cursor location. If a match is found, the Find Next, Replace, and Replace All buttonsare enabled.

THE TEXTBOX CONTROL 173
Find Next This command locates the next instance of the string in the text. Initially, this but-ton is disabled; it’s enabled only after a successful Find operation.
Replace This command replaces the current selection with the replacement string and thenlocates the next instance of the same string in the text. Like the Find Next button, it’s disableduntil a successful Find operation occurs.
Replace All This command replaces all instances of the string specified in the Search For boxwith the string in the Replace With box.
To design the Find & Replace form, add a new form to the project (select Add New Itemfrom the project’s context menu) and place the following controls on it:
◆ A TextBox control and the Search for Label control.
◆ A TextBox control and the Replace with Label control.
◆ A CheckBox control with the caption Case Sensitive.
◆ The Find, Find Next, Replace, and Replace All buttons.
Set the new form’s TopMost property to True; you want this form to remain on top of themain form, even when it doesn’t have the focus. Whether the search is case sensitive or notdepends on the status of the Case Sensitive CheckBox control. If the string is found in thecontrol’s text, the program will highlight it by selecting it. In addition, the code will call theTextBox control’s ScrollToCaret method to bring the selection into view. The Find Nextbutton takes into consideration the location of the pointer and searches for a match after thecurrent location. If the user moves the pointer somewhere else and then clicks the Find Nextbutton, the program will locate the first instance of the string after the current location of thepointer — and not necessarily after the last match. Of course, you can always keep track of thelocation of each match and continue the search from this location. The Find button executes thecode shown in Listing 5.4.
Listing 5.4: The Find button
Private Sub bttnFind_Click(…) Handles bttnFind.ClickDim selStart As IntegerIf chkCase.Checked = True Then
selStart =frmTextPad.txtEditor.Text.IndexOf(searchWord.Text, StringComparison.Ordinal)
ElseselStart =
frmTextPad.txtEditor.Text.IndexOf(searchWord.Text,StringComparison.OrdinalIgnoreCase)
End IfIf selStart = -1 Then
MsgBox("Text not found")Exit Sub
End If

174 CHAPTER 5 BASIC WINDOWS CONTROLS
frmTextPad.txtEditor.Select(selStart, searchWord.Text.Length)
bttnFindNext.Enabled = TruebttnReplace.Enabled = TruebttnReplaceAll.Enabled = TruefrmTextPad.txtEditor.ScrollToCaret()
End Sub
The Find button examines the value of the chkCase CheckBox control, which specifieswhether the search will be case sensitive and calls the appropriate form of the IndexOfmethod. The first argument of this method is the string we’re searching for; the second argu-ment is the search mode, and its value is a member of the StringComparison enumeration:Ordinal for case-sensitive searches and OrdinalIgnoreCase for case-insensitive searches. Ifthe IndexOf method locates the string, the program selects it by calling the control’s Selectmethod with the appropriate arguments. If not, it displays a message. Notice that after asuccessful Find operation, the Find Next, Replace, and Replace All buttons on the formare enabled.
The code of the Find Next button is the same, but it starts searching at the character follow-ing the current selection:
selStart = frmTextPad.txtEditor.Text.IndexOf(searchWord.Text,frmTextPad.txtEditor.SelectionStart + 1,StringComparison.Ordinal)
The Replace button replaces the current selection with the replacement string and thenlocates the next instance of the find string. The Replace All button replaces all instances of thesearch word in the document. Listing 5.5 presents the code behind the Replace and Replace Allbuttons.
Listing 5.5: The Replace and Replace All operations
Private Sub bttnReplace_Click(…) Handles bttnReplace.ClickIf frmTextPad.txtEditor.SelectedText <> "" Then
frmTextPad.txtEditor.SelectedText = replaceWord.TextEnd IfbttnFindNext_Click(sender, e)
End Sub
Private Sub bttnReplaceAll_Click(…) Handles bttnReplaceAll.ClickDim curPos, curSel As IntegercurPos = frmTextPad.txtEditor.SelectionStartcurSel = frmTextPad.txtEditor.SelectionLengthfrmTextPad.txtEditor.Text =
frmTextPad.txtEditor.Text.Replace(searchWord.Text.Trim, replaceWord.Text.Trim)

THE TEXTBOX CONTROL 175
frmTextPad.txtEditor.SelectionStart = curPosfrmTextPad.txtEditor.SelectionLength = curSel
End Sub
The Replace method is case sensitive, which means that it replaces instances of the searchargument in the text that have the exact same spelling as its first argument. For a case-insensitive replace operation, you must write the code to perform consecutive case-insensitivesearch-and-replace operations. Alternatively, you can use the Replace built-in function toperform case-insensitive searches. Here’s how you’d call the Replace function to perform acase-insensitive replace operation:
Replace(frmTextPad.txtEditor.Text, searchWord.Text.Trim,replaceWord.Text.Trim, , , CompareMethod.Text)
The last, optional, argument determines whether the search will be case-sensitive (Compare-Method.Binary) or case-insensitive (CompareMethod.Text).
When you’re searching for a string in the text, the active form is the frmFind form and anyselection you make from within your code in the main form’s TextBox control isn’t highlightedby default. You must set the HideSelection property of the TextBox control to False to high-light the selected text on a control that doesn’t currently have the focus. This is a commonproperty for many controls, and you should remember to change it to False if you want theselection to remain visible even when the control loses the focus. (You will use this propertymost often with the TextBox, ListBox, ListView, and TreeView controls.)
The Undo/Redo Commands
The Undo command (shown in Listing 5.6) is implemented with a call to the Undo method.However, because the Undo method works like a toggle, we must also toggle its caption fromUndo to Redo (and vice versa) each time the command is activated.
Listing 5.6: The Undo/Redo command of the Edit menu
Private Sub EditUndoItem_Click(…)Handles EditUndoItem.Click
If EditUndoItem.Text = "Undo" ThenIf txtEditor.CanUndo Then
txtEditor.Undo()EditUndoItem.Text = "Redo"
End IfElse
If txtEditor.CanUndo ThentxtEditor.Undo()EditUndoItem.Text = "Undo"
End IfEnd If
End Sub

176 CHAPTER 5 BASIC WINDOWS CONTROLS
The TextBox control doesn’t provide more granular undo operations — unlike Word, whichkeeps track of user actions (insertions, deletions, replacements, and so on) and then undoesthem in steps. If you edit the text after an undo operation, you can no longer redo the last undooperation. This means that as soon as the contents of the TextBox control change, the caption ofthe first command in the Edit menu must become Undo, even if it’s Redo at the time. To detectthe action of editing the control’s contents and reset the Undo command’s caption, insert thefollowing statement in the TextChanged event of the TextBox control:
EditUndoItem.Text = "Undo"
If you need a more-granular undo feature, you should use the RichTextBox control, which isdiscussed in detail in Chapter 7. The RichTextBox control can display formatted text, but it canalso be used as an enhanced TextBox control.
Capturing KeystrokesAnother event that is quite commonly used in programming the TextBox control is theKeyPress event, which occurs every time a key is pressed and reports the character that waspressed. You can use this event to capture certain keys and modify the program’s behaviordepending on the character typed.
By capturing keystrokes, you can process the data as they are entered, in real time. Forexample, you can make sure that a TextBox accepts only numeric or hexadecimal charactersand rejects all others. To implement a binary editor, use the KeyPress event handler shown inListing 5.7.
Listing 5.7: Handling keystrokes
Private Sub TextBox1_KeyPress(…) Handles TextBox1.KeyPressIf Char.IsLetterOrDigit(e.KeyChar) Then
Select Case UCase(e.KeyChar)Case "1", "2", "3", "4", "5", "6", "7", "8", "9", "0"
TextBox1.SelectedText = e.KeyCharCase "A", "B", "C", "D", "E", "F"
TextBox1.SelectedText = UCase(e.KeyChar)End Selecte.Handled = True
End IfEnd Sub
The very first executable statement in the event handler examines the key that was pressedand exits if it is a special editing key (Delete, Backspace, Ctrl+V, and so on). If so, the handlerexits without taking any action. The KeyChar property of the e argument of the KeyPress eventreports the key that was pressed. The code converts it to a string and then uses a Case state-ment to handle individual keystrokes. If the user pressed the a or the 1 key, for example, thecode displays the corresponding uppercase character ("1" or "A"). If the character pressed isnot among the characters that may appear in hexadecimal values, the code skips it by settingthe Handled property to True.

THE TEXTBOX CONTROL 177
You can process the characters pressed from within the KeyDown event handler, only thistime you must set the SuppressKeyPress property to True:
Private Sub TextBox1_KeyDown(…) Handles TextBox1.KeyDownDim ch As Windows.Forms.Keysch = e.KeyCodeIf Char.IsLetterOrDigit(Chr(ch)) Then
Select Case chCase Keys.D1, Keys.D2, Keys.D3, Keys.D4, Keys.D5,
Keys.D6, Keys.D7, Keys.D8, Keys.D9, Keys.D0TextBox1.SelectedText = Chr(ch)
Case Keys.A, Keys.B, Keys.C, Keys.D, Keys.E, Keys.FTextBox1.SelectedText = UCase(Chr(ch))
Case Else
End Selecte.SuppressKeyPress = True
End IfEnd Sub
Canceling Keystrokes
Before you exit the event handler, you must ‘‘kill’’ the original key that was pressed so itwon’t appear on the control. You do this by setting the Handled property to True, whichtells VB that it shouldn’t process the keystroke any further. If you omit this statement, thespecial characters will be printed twice: once in their transformed format and once as regularcharacters (Aa, Bb, and so on).
Capturing Function Keys
Another common feature used in all types of applications is the assignment of special opera-tions to the function keys. The Notepad application, for example, uses the F5 function key toinsert the current date and time at the cursor’s location. You can do the same with the TextPadapplication, but you can’t use the KeyPress event — the KeyChar argument doesn’t reportfunction keys. The events that can capture the function keys are the KeyDown and KeyUp events.Also, unlike the KeyPress event, these two events don’t report the character pressed butinstead report the key’s code (a special number that distinguishes each key on the keyboard,also known as the scancode) through the e.KeyCode property.
The keycode is unique for each key, not each character. Lower- and uppercase charactershave different ASCII values but the same keycode because they are on the same key. Forexample, the number 4 and the $ symbol have the same keycode because the same key on thekeyboard generates both characters. Along with the key’s code, the KeyDown and KeyUp eventsalso report the state of the Shift, Ctrl, and Alt keys through the e.Shift, e.Alt, and e.Controlproperties.
The KeyUp event handler shown in Listing 5.8 uses the F5 and F6 function keys to insert thecurrent date and time in the document. It also uses the F7 and F8 keys to insert two predefinedstrings in the document.

178 CHAPTER 5 BASIC WINDOWS CONTROLS
Listing 5.8: KeyUp event examples
Private Sub txtEditor_KeyUp(ByVal sender As Object,ByVal e As System.Windows.Forms.KeyEventArgs)Handles txtEditor.KeyUp
Select Case e.KeyCodeCase Keys.F5 :
txtEditor.SelectedText =Now().ToLongDateString
Case Keys.F6 :txtEditor.SelectedText =Now().ToLongTimeString
Case Keys.F7 :txtEditor.SelectedText ="MicroWeb Designs, Inc."
Case Keys.F8 :txtEditor.SelectedText ="Another user-supplied string"
End SelectEnd Sub
Windows already uses some of the function keys (for example, the F1 key for help), and youshouldn’t modify their original functions. With a little additional effort, you can provide userswith a dialog box that lets them assign their own strings to function keys. You’ll probably haveto take into consideration the status of the Shift, Control, and Alt properties of the event’s eargument. To find out whether two of the modifier keys are pressed along with a key, use theAND operator with the appropriate properties of the e argument. The following If clause detectsthe Ctrl and Alt keys:
If e.Control AND e.Alt Then{ Both Alt and Control keys were down}
End If
If you need to control the keystrokes from within your code (a rather common scenario inan advanced, functional user interface design), you should be aware of the order of the eventsfired every time a key is pressed. First, the KeyDown event is fired; this event is fired before thekeystroke is passed to the control. This is the event in which you should ‘‘kill’’ any keystrokesthat you don’t want to be processed normally by the control, or replace them with a differentkey. Then the KeyPress event is fired, if the keystroke corresponds to a character, number, orsymbol but not a control key. Finally, the KeyUp event is fired. By that time, the keystroke hasalready been processed by the control and it’s too late to kill or replace the original keystroke.Can you guess what will happen if you insert the following statements in a TextBox control’s(or Form’s) KeyDown event handler?
If e.KeyCode = Keys.A Thene.SuppressKeyPress = True
End If
The A key will never be processed, as if the keyboard isn’t working with this application.

THE TEXTBOX CONTROL 179
Autocomplete PropertiesOne set of interesting properties of the TextBox control are the autocomplete properties. Haveyou noticed how Internet Explorer prompts you with possible matches as soon as you start typ-ing an address or your username in a text box (or in the address bar of the browser)? You caneasily implement such boxes with a single-line TextBox control and the autocomplete proper-ties. Please note that these properties apply to single-line TextBoxes only.
Let me review the properties that relate to automatic completion. You may wish to open theAutoCompleteTextBoxes project (available for download from www.sybex.com/go/mastering-vb2010) to experiment with the settings of these properties while reading the text. The Auto-CompleteMode property determines whether, and how, the TextBox control will promptusers, and its setting is a member of the AutoCompleteMode enumeration: Suggest, Append,SuggestAppend, and None. In Append mode, the TextBox control selects the first matching itemin the list of suggestions and completes the text. In SuggestAppend mode, the control suggeststhe first matching item in the list, as before, but it also expands the list. In Suggest mode, thecontrol simply opens a list with the matching items but doesn’t select any of them. RegularTextBox controls have their AutoCompleteMode property set to None.
The AutoCompleteSource property determines where the list of suggestions comesfrom; its value is a member of the AutoCompleteSource enumeration, which is shown inTable 5.2.
Table 5.2: The members of the AutoCompleteSource enumeration
Member Description
AllSystemSources The suggested items are the names of system resources.
AllUrl The suggested items are the URLs visited by the target computer. Doesnot work if you’re deleting the recently viewed pages.
CustomSource The suggested items come from a custom collection.
FileSystem The suggested items are filenames.
HistoryList The suggested items come from the computer’s history list.
RecentlyUsedList The suggested items come from the Recently Used folder.
None The control doesn’t suggest any items.
To demonstrate the basics of the autocomplete properties, I’ve included the AutoComplete-TextBoxes project, which you can download from www.sybex.com/go/masteringvb2010. Themain form of the project is shown in Figure 5.4. This project allows you to set the autocompletemode and source for a single-line TextBox control. The top TextBox control uses a custom listof words, while the lower one uses one of the built-in autocomplete sources (file system, URLs,and so on).
Once you set the AutoCompleteSource to CustomSource, you must also populate anAutoCompleteStringCollection object with the desired suggestions and assign it to the

180 CHAPTER 5 BASIC WINDOWS CONTROLS
AutoCompleteCustomSource property. The AutoCompleteStringCollection is just a collectionof strings. Listing 5.9 shows statements in a form’s Load event that prepare such a list and useit with the TextBox1 control.
Figure 5.4
Suggestingwords with theAutoCompleteSourceproperty
Listing 5.9: Populating a custom AutoCompleteSource property
Private Sub Form1_Load(…) Handles MyBase.LoadDim knownWords As New AutoCompleteStringCollectionknownWords.Add("Visual Basic 2008")knownWords.Add("Visual Basic .NET")knownWords.Add("Visual Basic 6")knownWords.Add("Visual Basic")knownWords.Add("Framework")TextBox1.AutoCompleteCustomSource = knownWordsTextBox1.AutoCompleteSource = AutoCompleteSource.CustomSourceTextBox1.AutoCompleteMode = AutoCompleteMode.SuggestTextBox2.AutoCompleteSource = AutoCompleteSource.RecentlyUsedListTextBox2.AutoCompleteMode = AutoCompleteMode.Suggest
End Sub
The TextBox1 control on the form will open a drop-down list with all possible matches inthe knownWords collection as soon as the user starts typing in the control, as shown in the toppart of Figure 5.4.

THE TEXTBOX CONTROL 181
Data-Entry Applications
Typical business applications contain numerous forms for data entry, and the most commonelement on data-entry forms is the TextBox control. Data-entry operators are very efficientwith the keyboard, and they should be able to use your application without reaching for themouse.
Seasoned data-entry operators can’t live without the Enter key; they reach for this key at theend of each operation. In my experience, a functional interface should add intelligence to thiskeystroke: the Enter key should perform the obvious or most likely operation at any time.When data is being entered, for example, it should take the user to the next control in the Taborder. Consider a data-entry screen like the one shown in the following image, which containsseveral TextBox controls, a DataTimePicker control for entering dates, and two CheckBoxcontrols. This is the main form of the Simple Data Entry Form sample project, which you willfind at www.sybex.com/go/masteringvb2010 along with the other projects available for usewith this book.
The application demonstrates how to use the Enter key intelligently: Every time the Enter keyis pressed, the focus is moved to the next control in the Tab order. Even if the current controlis a CheckBox, this keystroke doesn’t change the status of the CheckBox controls; it simplymoves the focus forward.
You could program the KeyUp event of each control to react to the Enter key, but this app-roach can lead to maintenance problems if you add new controls to an existing form. The bestapproach is to intercept the Enter keystroke at the form level, before it reaches a control. Todo so, you must set the KeyPreview property of the form to True. This setting causes the keyevents to be fired first at the form level and then at the control that has the focus. In essence,it allows you to handle certain keystrokes for multiple controls at once. The KeyUp eventhandler of the sample project’s main form intercepts the Enter keystroke and reacts to it bymoving the focus to the next control in the Tab order via the ProcessTabKey method. Thismethod simulates the pressing of the Tab key, and it’s called with a single argument, which isa Boolean value: True moves the focus forward, and False moves it backward. Here’s the codein the KeyDown event handler of the application’s form that makes the interface much more

182 CHAPTER 5 BASIC WINDOWS CONTROLS
functional and intuitive (you can open the DataEntry project, examine all of the code, and seehow it functions):
Private Sub frmDataEntry_KeyDown(ByVal sender As Object,ByVal e As System.Windows.Forms.KeyEventArgs)Handles Me.KeyUp
If e.KeyCode = Keys.Enter And Not (e.Alt Or e.Control) ThenIf Me.ActiveControl.GetType Is GetType(TextBox) Or
Me.ActiveControl.GetType Is GetType(CheckBox) OrMe.ActiveControl.GetType IsGetType(DateTimePicker) Then
If e.Shift ThenMe.ProcessTabKey(False)
ElseMe.ProcessTabKey(True)
End IfEnd If
End IfEnd Sub
It’s important to program the KeyDown event if you want to be able to process keystrokesbefore the control captures them, or even if you want to cancel keystrokes. If you insert thesame code in the KeyUp event, the keystrokes will be processed by the control first and thenby your code. There are a couple of things you should notice about this handler. First, itdoesn’t react to the Enter key if it was pressed along with the Alt or Ctrl key. The Shift key,on the other hand, is used to control the direction in the Tab order. The focus moves forwardwith the Enter keystroke and moves backward with the Shift + Enter keystroke. Also, thefocus is handled automatically only for the TextBox, CheckBox, and DataTimePicker controls.When the user presses the Enter key when a button has the focus, the program reacts asexpected by invoking the button’s Click event handler.
The ListBox, CheckedListBox, and ComboBox ControlsThe ListBox, CheckedListBox, and ComboBox controls present lists of choices from which theuser can select one or more of the items. The first two are illustrated in Figure 5.5.
Figure 5.5
The ListBox andCheckedListBox controls

THE LISTBOX, CHECKEDLISTBOX, AND COMBOBOX CONTROLS 183
The ListBox control occupies a user-specified amount of space on the form and is populatedwith a list of items. If the list of items is longer than can fit on the control, a vertical scroll barappears automatically.
The CheckedListBox control is a variation of the ListBox control. It’s identical to the List-Box control, but a check box appears in front of each item. The user can select any number ofitems by checking or clearing the boxes. As you know, you can also select multiple items froma ListBox control by pressing the Shift or Ctrl key.
The ComboBox control also contains multiple items but typically occupies less space onthe screen. The ComboBox control is an expandable ListBox control: The user can expand it tomake a selection and collapse it after the selection is made. The real advantage of the Combo-Box control, however, is that the user can enter new information in the ComboBox rather thanbeing forced to select from the items listed.
To add items to any of the three controls at design time, locate the Items property in theProperties window for the control and click the ellipsis button. When the String CollectionEditor window pops up, you can add the items you want to display in the list. Each item mustappear on a separate text line, and blank text lines will result in blank lines in the list. Theseitems will appear in the list when the form is loaded, but you can add more items (or removeexisting ones) from within your code at any time. They appear in the same order as entered onthe String Collection Editor window unless the control has its Sorted property set to True, inwhich case the items are automatically sorted regardless of the order in which you’ve specifiedthem.
The next sections explore the ListBox control’s properties and methods. Later in the chapter,you’ll see how the same properties and methods can be used with the ComboBox control.
Basic PropertiesIn the following sections, you’ll find the properties that determine the functionality of the List-Box, CheckedListBox, and ComboBox controls. These properties are usually set at design time,but you can change the settings from within your application’s code.
IntegralHeight
This property can be set to a True/False value that indicates whether the control’s height willbe adjusted to avoid the partial display of the last item. When IntegralHeight is set to True,the control’s actual height changes in multiples of the height of a single line, so only an integernumber of rows are displayed at all times.
Items
The Items property is a collection that holds the list items for the control. At design time, youcan populate this list through the String Collection Editor window. At runtime, you can accessand manipulate the items through the methods and properties of the Items collection, whichare described in the section ‘‘Manipulating the Items Collection’’ later in this chapter.
MultiColumn
A ListBox control can display its items in multiple columns if you set its MultiColumn prop-erty to True. The problem with multicolumn ListBoxes is that you can’t specify the columnin which each item will appear. ListBoxes (and CheckedListBoxes) with many items and theMultiColumn property set to True expand horizontally, not vertically. A horizontal scroll bar

184 CHAPTER 5 BASIC WINDOWS CONTROLS
will be attached to a multicolumn ListBox so that users can bring any column into view. Thisproperty does not apply to the ComboBox control.
SelectionMode
This property, which applies to the ListBox and CheckedListBox controls only, determineshow the user can select the list’s items. The possible values of this property — members of theSelectionMode enumeration — are shown in Table 5.3.
Table 5.3: The SelectionMode enumeration
Value Description
None No selection at all is allowed.
One (Default) Only a single item can be selected.
MultiSimple Simple multiple selection: A mouse click (or pressing the spacebar) selects ordeselects an item in the list. You must click all the items you want to select.
MultiExtended Extended multiple selection: Press Shift and click the mouse (or press one of thearrow keys) to select multiple contiguous items. This process highlights all the itemsbetween the previously selected item and the current selection. Press Ctrl and clickthe mouse to select or deselect multiple single items in the list.
Sorted
When this property is True, the items remain sorted at all times. The default is False becauseit takes longer to insert new items in their proper location. This property’s value can be set atdesign time as well as runtime. The items in a sorted ListBox control are sorted in ascendingand case-sensitive order, also known as phone book order. Because of this, the ListBox con-trol won’t sort numeric data. The number 10 will appear in front of the number 5 because thenumeric value of the string 10 is smaller than the numeric value of the string 5. If the numbersare formatted as 010 and 005, they will be sorted correctly.
Text
The Text property returns the selected text on the control. Although you can set the Text prop-erty for the ComboBox control at design time, this property is available only at runtime for theother two controls. Notice that the items need not be strings. By default, each item is an object.For each object, however, the control displays a string, which is the same string returned by theobject’s ToString method.
Manipulating the Items CollectionTo manipulate a ListBox control from within your application, you should be able to do thefollowing:
◆ Add items to the list
◆ Remove items from the list
◆ Access individual items in the list

THE LISTBOX, CHECKEDLISTBOX, AND COMBOBOX CONTROLS 185
The items in the list are represented by the Items collection. You use the members of theItems collection to access the control’s items and to add or remove items. The Items propertyexposes the standard members of a collection, which are described later in this section.
Each member of the Items collection is an object. In most cases, we use ListBox controls tostore strings, but it’s also common to store objects to this control. When you add an object to aListBox control, a string is displayed on the corresponding line of the control. This is the stringreturned by the object’s ToString method. You can display any other property of the object bysetting the control’s ValueMember property to the name of the property.
If you add a Font object and a Rectangle object to the Items collection with the statements
ListBox1.Items.Add(New Font("Verdana", 12, FontStyle.Bold))ListBox1.Items.Add(New Rectangle(0, 0, 100, 100))
then the following strings appear on the first two lines of the control:
[Font: Name=Verdana, Size=12, Units=3, GdiCharSet=1, gdiVerticalFont=False]{X=0, Y=0, Width=100, Height=100}
However, you can access the members of the two objects because the ListBox stores objects,not their descriptions. The following statement prints the width of the Rectangle object (the out-put produced by the statement is highlighted):
Debug.WriteLine(ListBox1.Items.Item(1).Width)100
The expression in the preceding statement is late-bound, which means that the compilerdoesn’t know whether the first object in the Items collection is a Rectangle object and it can’tverify the member Width. If you attempt to call the Width property of the first item in thecollection, you’ll get an exception at runtime indicating that the code has attempted to access amissing member. The missing member is the Width property of the Font object.
The proper way to read the objects stored in a ListBox control is to examine the type of theobject first and then attempt to retrieve a property (or call a method) of the object, but onlyif it’s of the appropriate type. Here’s how you would read the Width property of a Rectangleobject:
If ListBox1.Items.Item(0).GetType IsGetType(Rectangle) Then
Debug.WriteLine(CType(ListBox1.Items.Item(0), Rectangle).Width)End If
The Add Method
To add items to the list, use the Items.Add or Items.Insert method. The Add method acceptsas an argument the object to be added to the list. New items are appended to the end of thelist, unless the Sorted property has been set to True. The following loop adds the elements ofthe array words to a ListBox control, one at a time:
Dim words(100) As String{ statements to populate array }

186 CHAPTER 5 BASIC WINDOWS CONTROLS
Dim i As IntegerFor i = 0 To 99
ListBox1.Items.Add(words(i))Next
Then, to iterate through all the items on the control, use a loop such as the following:
Dim i As IntegerFor i = 0 To ListBox1.Items.Count - 1
{ statements to process item ListBox1.Items(i) }Next
You can also use the For Each…Next statement to iterate through the Items collection, asshown here:
Dim itm As ObjectFor Each itm In ListBox1.Items
{ process the current item, represented by the itm variable }Next
When you populate a ListBox control with a large number of items, call the BeginUpdatemethod before starting the loop and call the EndUpdate method when you’re done. Thesetwo methods turn off the visual update of the control while you’re populating it, and theyspeed up the process considerably. When the EndUpdate method is called, the control isredrawn with all the items.
The Insert Method
To insert an item at a specific location, use the Insert method, whose syntax is as follows:
ListBox1.Items.Insert(index, item)
Remember that you must declare the item prior to using it. If you don’t initialize it, you willget a null ref.
The item parameter is the object to be added, and index is the location of the new item.(The first item’s index in the list is zero).
The Clear Method
The Clear method removes all the items from the control. Its syntax is quite simple:
ListBox1.Items.Clear
The Count Property
This is the number of items in the list. If you want to access all the items with a For…Nextloop, the loop’s counter must go from 0 to ListBox.Items.Count – 1, as shown in the exampleof the Add method.

THE LISTBOX, CHECKEDLISTBOX, AND COMBOBOX CONTROLS 187
The CopyTo Method
The CopyTo method of the Items collection retrieves all the items from a ListBox control andstores them in the array passed to the method as an argument. The syntax of the CopyTomethod is as follows, where destination is the name of the array that will accept the items,and index is the index of an element in the array where the first item will be stored:
ListBox1.CopyTo(destination, index)
The array that will hold the items of the control must be declared explicitly and must be largeenough to hold all the items.
The Remove and RemoveAt Methods
To remove an item from the list, you can simply call the Items collection’s Remove method,passing the object to be removed as an argument. If the control contains strings, pass the stringto be removed. If the same string appears multiple times on the control, only the first instancewill be removed.
You can also remove an item by specifying its position in the list via the RemoveAt method,which accepts as argument the position of the item to be removed:
ListBox1.Items.RemoveAt(index)
The index parameter is the order of the item to be removed, and the first item’s order is 0.
The Contains Method
The Contains method of the Items collection — not to be confused with the control’s Containsmethod — accepts an object as an argument and returns a True/False value that indicateswhether the collection contains this object. Use the Contains method to avoid the insertion ofidentical objects into the ListBox control. The following statements add a string to the Itemscollection only if the string isn’t already part of the collection:
Dim itm As String = "Remote Computing"If Not ListBox1.Items.Contains(itm) Then
ListBox1.Items.Add(itm)End If
Selecting ItemsThe ListBox control allows the user to select either one or multiple items, depending on the set-ting of the SelectionMode property. In a single-selection ListBox control, you can retrieve theselected item by using the SelectedItem property and its index by using the SelectedIndexproperty. SelectedItem returns the selected item, which is an object. The text of the selecteditem is reported by the Text property.
If the control allows the selection of multiple items, they’re reported with the Selected-Items property. This property is a collection of objects and exposes the same members as theItems collection. Because the ComboBox does not allow the selection of multiple items, it pro-vides only the SelectedIndex and SelectedItem properties.

188 CHAPTER 5 BASIC WINDOWS CONTROLS
To iterate through all the selected items in a multiselection ListBox control, use a loop suchas the following:
For Each itm As Object In ListBox1.SelectedItemsDebug.WriteLine(itm)
Next
The itm variable should be declared as Object because the items in the ListBox control areobjects. If they’re all of the same type, you can convert them to the specific type and then calltheir methods. If all the items are of the Rectangle type, you can use a loop like the followingto print the area of each rectangle:
For Each itm As Rectangle In ListBox1.SelectedItemsDebug.WriteLine(itm.Width * itm.Height)
Next
VB 2010 at Work: The ListBox Demo ProjectThe ListBox Demo application (shown in Figure 5.6) demonstrates the basic operations of theListBox control. The two ListBox controls on the form operate slightly differently. The first hasthe default configuration: Only one item can be selected at a time, and new items are appendedafter the existing item. The second ListBox control has its Sorted property set to True and itsMultiSelect property set according to the values of the two RadioButton controls at the bot-tom of the form.
Figure 5.6
ListBox Demo demon-strates most of theoperations you’ll per-form with ListBoxes.

THE LISTBOX, CHECKEDLISTBOX, AND COMBOBOX CONTROLS 189
The code for the ListBox Demo application contains much of the logic you’ll need in yourListBox manipulation routines. It shows you how to do the following:
◆ Add and remove items at runtime
◆ Transfer items between lists at runtime
◆ Handle multiple selected items
◆ Maintain sorted lists
The Add Item Buttons
The Add Item buttons use the InputBox() function to prompt the user for input, and then theyadd the user-supplied string to the ListBox control. The code is identical for both buttons (seeListing 5.10).
Listing 5.10: The Add Item buttons
Private Sub bttnSourceAdd_Click(…)Handles bttnSourceAdd.Click
Dim ListItem As StringListItem = InputBox("Enter new item’s name")If ListItem.Trim <> "" Then
sourceList.Items.Add(ListItem)End If
End Sub
Notice that the subroutine examines the data entered by the user to avoid adding blankstrings to the list. The code for the Clear buttons is also straightforward; it simply calls theClear method of the Items collection to remove all entries from the corresponding list.
Removing Items from the Two Lists
The code for the Remove Selected Item button is different from that for the Remove SelectedItems button (both are presented in Listing 5.11). The code for the Remove Selected Item buttonremoves the selected item, while the Remove Selected Items buttons must scan all the items ofthe left list and remove the selected one(s).
Listing 5.11: The Remove buttons
Private Sub bttnDestinationRemove_Click(…)Handles bttnDestinationRemove.Click
destinationList.Items.Remove( destinationList.SelectedItem)End Sub

190 CHAPTER 5 BASIC WINDOWS CONTROLS
Private Sub bttnSourceRemove_Click(…)Handles bttnSourceRemove.Click
Dim i As IntegerFor i = 0 To sourceList.SelectedIndices.Count - 1
sourceList.Items.RemoveAt( sourceList.SelectedIndices(0))Next
End Sub
Notice that the code of the second event handler (the one that removes multiple selecteditems) always removes the first item in the SelectedIndices collection. If you attempt to removethe item SelectedIndices(i), you will remove the first selected item during the first itera-tion. After an item is removed from the selection, the remaining items are no longer at the samelocations. (In effect, you have to refresh the SelectedIndices collection.) The second selecteditem will take the place of the first selected item, which was just deleted, and so on. By remov-ing the first item in the SelectedIndices collection, we make sure that all selected items, andonly those items, will be eventually removed.
Moving Items Between Lists
The two single-arrow buttons (located between the ListBox controls shown in Figure 5.6) trans-fer selected items from one list to another. The button with the single arrow pointing to theright transfers the items selected in the left list after it ensures that the list contains at least oneselected item. Its code is presented in Listing 5.12. First, it adds the item to the second list, andthen it removes the item from the original list. Notice that the code removes an item by passingit as an argument to the Remove method because it doesn’t make any difference which one oftwo identical objects will be removed.
Listing 5.12: Moving the selected items
Private Sub bttnSourceMove_Click(…)Handles bttnSourceMove.Click
While sourceList.SelectedIndices.Count > 0destinationList.Items.Add(sourceList.Items(
sourceList.SelectedIndices(0)))sourceList.Items.Remove(sourceList.Items(
sourceList.SelectedIndices(0)))End While
End Sub
The second single-arrow button transfers items in the opposite direction. The destinationcontrol (the one on the right) doesn’t allow the selection of multiple items, so you can use theSelectedIndex and SelectedItem properties. The event handler that moves a single item fromthe right to the left ListBox is shown next:
sourceList.Items.Add(destinationList.SelectedItem)destinationList.Items.RemoveAt(destinationList.SelectedIndex)
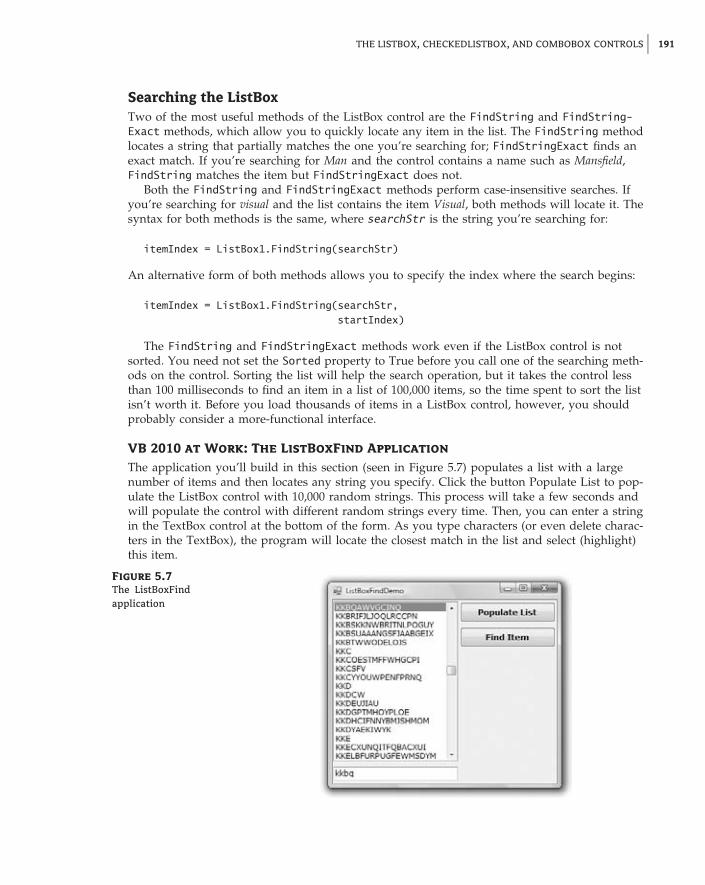
THE LISTBOX, CHECKEDLISTBOX, AND COMBOBOX CONTROLS 191
Searching the ListBoxTwo of the most useful methods of the ListBox control are the FindString and FindString-Exact methods, which allow you to quickly locate any item in the list. The FindString methodlocates a string that partially matches the one you’re searching for; FindStringExact finds anexact match. If you’re searching for Man and the control contains a name such as Mansfield,FindString matches the item but FindStringExact does not.
Both the FindString and FindStringExact methods perform case-insensitive searches. Ifyou’re searching for visual and the list contains the item Visual, both methods will locate it. Thesyntax for both methods is the same, where searchStr is the string you’re searching for:
itemIndex = ListBox1.FindString(searchStr)
An alternative form of both methods allows you to specify the index where the search begins:
itemIndex = ListBox1.FindString(searchStr,startIndex)
The FindString and FindStringExact methods work even if the ListBox control is notsorted. You need not set the Sorted property to True before you call one of the searching meth-ods on the control. Sorting the list will help the search operation, but it takes the control lessthan 100 milliseconds to find an item in a list of 100,000 items, so the time spent to sort the listisn’t worth it. Before you load thousands of items in a ListBox control, however, you shouldprobably consider a more-functional interface.
VB 2010 at Work: The ListBoxFind Application
The application you’ll build in this section (seen in Figure 5.7) populates a list with a largenumber of items and then locates any string you specify. Click the button Populate List to pop-ulate the ListBox control with 10,000 random strings. This process will take a few seconds andwill populate the control with different random strings every time. Then, you can enter a stringin the TextBox control at the bottom of the form. As you type characters (or even delete charac-ters in the TextBox), the program will locate the closest match in the list and select (highlight)this item.
Figure 5.7
The ListBoxFindapplication

192 CHAPTER 5 BASIC WINDOWS CONTROLS
The sample application reacts to each keystroke in the TextBox control and locates the stringyou’re searching for as you enter characters. The Find Item button does the same, but I thoughtI should demonstrate the efficiency of the ListBox control and the type of functionality you’dexpect in a rich client application.
The code (shown in Listing 5.13) attempts to locate an exact match via the FindStringExactmethod. If it succeeds, it reports the index of the matching element. If not, it attempts to locatea near match with the FindString method. If it succeeds, it reports the index of the nearmatch (which is the first item on the control that partially matches the search argument) andterminates. If it fails to find either an exact or a near match, it reports that the string wasn’tfound in the list.
Listing 5.13: Searching the list
Private Sub TextBox1_TextChanged(…) Handles TextBox1.TextChangedDim srchWord As String = TextBox1.Text.TrimIf srchWord.Length = 0 Then Exit SubDim wordIndex As IntegerwordIndex = ListBox1.FindStringExact(srchWord)If wordIndex >= 0 Then
ListBox1.TopIndex = wordIndexListBox1.SelectedIndex = wordIndex
ElsewordIndex = ListBox1.FindString(srchWord)If wordIndex >= 0 Then
ListBox1.TopIndex = wordIndexListBox1.SelectedIndex = wordIndex
ElseDebug.WriteLine("Item " & srchWord &
" is not in the list")End If
End IfEnd Sub
If you search for SAC, for example, and the control contains a string such as SAC or sac orsAc, the program will return the index of the item in the list and will report an exact match. Ifno exact match can be found, the program will return something like SACDEF, if such a stringexists on the control, as a near match. If none of the strings on the control starts with the char-acters SAC, the search will fail.
The application is quite responsive even if you increase the size of the ListBox control to100,000 items, except that the process of generating the random strings and populating the con-trol takes considerably longer. In a practical application, however, you should never have todisplay that many items to the user. (Consider an overhaul of your application interface beforeyou present the user with an enormous list.)
The Populate List button creates 10,000 random items with the help of the Random class.First, it generates a random value in the range 1 through 20, which is the length of the string(not all strings have the same length). Then the program generates as many random charac-ters as the length of the string and builds the string by appending each character to it. These

THE LISTBOX, CHECKEDLISTBOX, AND COMBOBOX CONTROLS 193
random numbers are in the range of 65 to 91 and they’re the ANSI values of the uppercasecharacters.
By the way, this technique for generating random strings is not a contrived sample of VBcode. I’ve used similar techniques on several occasions to populate large database tables withdata and optimize my queries and data-driven applications for performance.
The ComboBox ControlThe ComboBox control is similar to the ListBox control in the sense that it contains multipleitems and the user may select one, but it typically occupies less space onscreen. The ComboBoxis practically an expandable ListBox control, which can grow when the user wants to make aselection and retract after the selection is made. Normally, the ComboBox control displays oneline with the selected item because this control doesn’t allow multiple-item selection. The essen-tial difference, however, between ComboBox and ListBox controls is that the ComboBox allowsthe user to specify items that don’t exist in the list.
There are three types of ComboBox controls. The value of the control’s DropDownStyle prop-erty determines which box is used; these values are shown in Table 5.4.
Table 5.4: DropDownStyle options for the ComboBox control
Value Effect
DropDown (Default) The control is made up of a drop-down list, which is visible at alltimes, and a text box. The user can select an item from the list or type a newone in the text box.
DropDownList This style is a drop-down list from which the user can select one of its items butcan’t enter a new one. The control displays a single item, and the list is expan-ded as needed.
Simple The control includes a text box and a list that doesn’t drop down. The user canselect from the list or type in the text box.
The ComboBox Styles project, shown in Figure 5.8, demonstrates the three styles of theComboBox control. This is another common element of the Windows interface, and its pro-perties and methods are identical to those of the ListBox control. Load the ComboBox Stylesproject in the Visual Basic IDE and experiment with the three styles of the ComboBox control.
The DropDown and Simple ComboBox styles allow the user to select an item from the list orenter a new one in the edit box of the control. Moreover, they’re collapsed by default and theydisplay a single item unless the user expands the list of items to make a selection. The Drop-DownList style is similar to a ListBox control in the sense that it restricts the user to selectingan item (the user cannot enter a new one). However, it takes much less space on the form thana ListBox does because normally it displays a single item. When the user wants to make a selec-tion, the DropDownList expands to display more items. After the user has made a selection,the list contracts to a single line again. Finally, the DropDownList style of the control doesn’t

194 CHAPTER 5 BASIC WINDOWS CONTROLS
allow the user to enter a new string in the edit area; users are restricted to selecting one of theexisting items.
Figure 5.8
The ComboBox Stylesproject
Most of the properties and methods of the ListBox control also apply to the ComboBox con-trol, shown in Figure 5.9. The Items collection gives you access to the control’s items, and theSelectedIndex and SelectedItem properties give you access to the current selection. You canalso use the FindString and FindStringExact methods to locate any item in the control fromwithin your code. Both methods return the index of the item you’re searching for on the con-trol, or the value –1 if no such item exists.
Figure 5.9
You can use theDropDownWidth prop-erty to save space.

THE LISTBOX, CHECKEDLISTBOX, AND COMBOBOX CONTROLS 195
There’s one aspect worth mentioning regarding the operation of the control. Although theedit box at the top allows you to enter a new string, the new string doesn’t become a new itemin the list. It remains there until you select another item or you clear the edit box. You can pro-vide some code to add any string entered by the user in the control’s edit box to the list ofexisting items.
The most common use of the ComboBox control is as a lookup table. The ComboBox controltakes up very little space on the form, but it can be expanded at will. You can save even morespace when the ComboBox is contracted by setting it to a width that’s too small for the longestitem. Use the DropDownWidth property, which is the width of the segment of the drop-downlist. By default, this property is equal to the control’s Width property. The second ComboBoxcontrol in Figure 5.9 contains an unusually long item. The control is wide enough to display thedefault selection. When the user clicks the arrow to expand the control, the drop-down sectionof the control is wider than the default width so that the long items can be read.
Adding Items to a ComboBox at Runtime
Although the ComboBox control allows users to enter text in the control’s edit box, it doesn’tprovide a simple mechanism for adding new items at runtime. Let’s say you provide a Combo-Box with city names. Users can type the first few characters and quickly locate the desired item.But what if they want to specify a new city name? You can provide this capability with twosimple techniques. The simpler one is to place a button with an ellipsis (three periods) rightnext to the control. When users want to add a new item to the control, they can click the buttonand be prompted for the new item.
A more-elegant and user-friendly approach is to examine the control’s Text property as soonas the control loses focus or the user presses the Enter key. If the string entered by the userdoesn’t match an item on the control, you must add a new item to the control’s Items collec-tion and select the new item from within your code. The FlexComboBox project demonstrateshow to use both techniques in your code. The main form of the project, which is shown inFigure 5.10, is a simple data-entry screen. It’s not the best data-entry form, but it’s meant fordemonstration purposes.
Figure 5.10
The FlexComboBoxproject demonstratestwo techniques foradding new items toa ComboBox at runtime.
You can either enter a city name (or country name) and press the Tab key to move toanother control or click the button next to the control to be prompted for a new city/country

196 CHAPTER 5 BASIC WINDOWS CONTROLS
name. The application will let you enter any city/country combination. You should providecode to limit the cities within the selected country, but this is a nontrivial task. You also needto store the new city names entered on the first ComboBox control to a file (or a databasetable) so users will find them there the next time they run the application. I haven’t made theapplication elaborate; I’ve added the code only to demonstrate how to add new items to aComboBox control at runtime.
VB 2010 At Work: The FlexCombo Project
The ellipsis button next to the City ComboBox control prompts the user for the new itemvia the InputBox() function. Then it searches the Items collection of the control via theFindString method, and if the new item isn’t found, it’s added to the control. Then the codeselects the new item in the list. To do so, it sets the control’s SelectedIndex property to thevalue returned by the Items.Add method or the value returned by the FindString method,depending on whether the item was located or added to the list. Listing 5.14 shows the codebehind the ellipsis button.
Listing 5.14: Adding a new item to the ComboBox control at runtime
Private Sub Button1_Click(…) Button1.ClickDim itm As Stringitm = InputBox("Enter new item", "New Item")If itm.Trim <> "" Then AddElement(ComboBox1, itm)
End Sub
The AddElement() subroutine, which accepts the control you are adding to and a string asarguments and adds the string to the control, is shown in Listing 5.15. If the item doesn’t existin the control, it’s added to the Items collection. If the item is already a member of the Itemscollection, it’s selected. As you will see, the same subroutine will be used by the second methodfor adding items to the control at runtime.
Listing 5.15: The AddElement() subroutine
Sub AddElement(ByRef control As ComboBox, ByVal newItem As String)Dim idx As IntegerIf ComboBox1.FindString(newItem) > 0 Then
idx = control.FindString(newItem)Else
idx = control.Items.Add(newItem)End Ifcontrol.SelectedIndex = idx
End Sub
THE SCROLLBAR AND TRACKBAR CONTROLS 197
You can also add new items at runtime by adding the same code in the control’s LostFocusevent handler:
Private Sub ComboBox1_LostFocus(…) Handles ComboBox1.LostFocusDim newItem As String = ComboBox1.TextAddElement(ComboBox1, newItem)
For an even more functional interface, capture the Enter keystroke in the control’s KeyUpevent, add the new item to the list (if needed), and then move the focus to the next control onthe form, as discussed earlier in this chapter.
The ScrollBar and TrackBar ControlsThe ScrollBar and TrackBar controls let the user specify a magnitude by moving a selectorbetween its minimum and maximum values. In some situations, the user doesn’t know inadvance the exact value of the quantity to specify (and in this case, a text box would suffice),so your application must provide a more-flexible mechanism for specifying a value along withsome type of visual feedback.
The vertical scroll bar that lets a user move up and down a long document is a typicalexample of the use of the ScrollBar control. The scroll bar and visual feedback are the primemechanisms for repositioning the view in a long document or in a large picture that won’t fitentirely in a window.
The TrackBar control is similar to the ScrollBar control, but it doesn’t cover a continuousrange of values. The TrackBar control has a fixed number of tick marks and users can place theslider’s indicator to the desired value.
In short, the ScrollBar control should be used when the exact value isn’t as important as thevalue’s effect on another object or data element. The TrackBar control should be used when theuser can type a numeric value and the value your application expects is a number in a specificrange — for example, integers between 0 and 100 or a value between 0 and 5 inches in stepsof 0.1 inches (0.0, 0.1, 0.2 . . . 5.0). The TrackBar control is preferred to the TextBox control insimilar situations because there’s no need for data validation on your part. The user can specifyonly valid numeric values with the mouse.
The ScrollBar ControlThere’s no ScrollBar control per se in the Toolbox; instead, there are two versions of it: theHScrollBar and VScrollBar controls. They differ only in their orientation, but because they sharethe same members, I will refer to both controls collectively as ScrollBar controls. Actually, bothcontrols inherit from the ScrollBar control, which is an abstract control: It is used to imple-ment vertical and horizontal scroll bars, but it can’t be used directly on a form. Moreover, theHScrollBar and VScrollBar controls are not displayed in the Common Controls tab of the Tool-box. You have to open the All Windows Forms tab to locate these two controls.
The ScrollBar control is a long stripe, which allows users to select a value between the twoends of the control. The left (or bottom) end of the control corresponds to its minimum value;the other end is the control’s maximum value. The current value of the control is determinedby the position of the indicator, which can be scrolled between the minimum and maximumvalues. The basic properties of the ScrollBar control, therefore, are properly named Minimum,Maximum, and Value.

198 CHAPTER 5 BASIC WINDOWS CONTROLS
Minimum The control’s minimum value. The default value is 0, but because this is an Integervalue, you can set it to negative values as well.
Maximum The control’s maximum value. The default value is 100, but you can set it to anyvalue that you can represent with the Integer data type.
Value The control’s current value, specified by the indicator’s position.
To cover a range of non-integers, you must supply the code to map the actual values to Inte-ger values. For example, to cover a range from 2.5 to 8.5, set the Minimum property to 25, setthe Maximum property to 85, and divide the control’s value by 10. If the range you need is from–2.5 to 8.5, set the Minimum property to –25 and the Maximum value to 85, and divide the Valueproperty by 10.
There are two more properties that allow you to control the movement of the indicator:the SmallChange and LargeChange properties. The first property is the amount by which theindicator changes when the user clicks one of the arrows at the two ends of the control. TheLargeChange property is the displacement of the indicator when the user clicks somewhere inthe scroll bar itself. You can manipulate a scroll bar by using the keyboard as well. Press thearrow keys to move the indicator in the corresponding direction by SmallChange and the PageUp/Page Down keys to move the indicator by LargeChange.
VB 2010 at Work: The Colors Project
Figure 5.11 shows the main form of the Colors sample project, which lets the user specify acolor by manipulating the value of its basic colors (red, green, and blue) through scroll bars.Each basic color is controlled by a scroll bar and has a minimum value of 0 and a maximumvalue of 255. By adjusting the value of each of the basic colors, you can create (almost) anycolor imaginable. This is what the Colors application does.
Figure 5.11
The Colors applicationdemonstrates the use ofthe ScrollBar control.
As the scroll bar is moved, the corresponding color is displayed, and the user can easilyspecify a color without knowing the exact values of its primary components. All the user needsto know is whether the desired color contains, for example, too much red or too little green.With the help of the scroll bars and the immediate feedback from the application, the user caneasily pinpoint the desired color.

THE SCROLLBAR AND TRACKBAR CONTROLS 199
The ScrollBar Control’s Events
You can monitor the changes of the ScrollBar’s value from within your code by using twoevents: ValueChanged and Scroll. Both events are fired every time the indicator’s positionis changed. If you change the control’s value from within your code, only the ValueChangedevent will be fired.
The Scroll event can be fired in response to many different actions, such as the scrolling ofthe indicator with the mouse, a click on one of the two buttons at the ends of the scroll bars,and so on. If you want to know the action that caused this event, you can examine the Typeproperty of the second argument of the event handler. The value of the e.Type property is amember of the ScrollEventType enumeration (LargeDecrement, SmallIncrement, Track, andso on).
Handling the Events in the Colors Application
The two PictureBox controls display the color designed with the three scroll bars. The leftPictureBox is colored from within the Scroll event, whereas the other one is colored fromwithin the ValueChanged event. Both events are fired as the user scrolls the scroll bar’s indi-cator, but in the Scroll event handler of the three scroll bars, the code examines the value ofthe e.Type property and reacts to it only if the event was fired because the scrolling of theindicator has ended. For all other actions, the event handler doesn’t update the color of the leftPictureBox.
If the user attempts to change the Color value by clicking the two arrows of the scroll barsor by clicking in the area to the left or to the right of the indicator, both PictureBox controls areupdated. While the user slides the indicator or keeps pressing one of the end arrows, only thePictureBox to the right is updated.
The conclusion from this experiment is that you can program either event to provide contin-uous feedback to the user. If this feedback requires too many calculations, which would slowdown the reaction of the corresponding event handler, you can postpone the reaction until theuser has stopped scrolling the indicator. You can detect this condition by examining the valueof the e.Type property. When it’s ScrollEventType.EndScroll, you can execute the appropri-ate statements. Listing 5.16 shows the code behind the Scroll and ValueChanged events of thescroll bar that controls the red component of the color. The code of the corresponding events ofthe other two controls is identical.
Listing 5.16: Programming the ScrollBar control’s scroll event
Private Sub redBar_Scroll(…) Handles redBar.ScrollIf e.Type = ScrollEventType.EndScroll Then
ColorBox1()lblRed.Text = "RED " & redBar.Value.ToString("###")
End IfEnd Sub
Private Sub redBar_ValueChanged(…) Handles redBar.ValueChangedColorBox2()
End Sub

200 CHAPTER 5 BASIC WINDOWS CONTROLS
The ColorBox1() and ColorBox2() subroutines update the color of the two PictureBox con-trols by setting their background colors. You can open the Colors project in Visual Studio andexamine the code of these two routines.
The TrackBar ControlThe TrackBar control is similar to the ScrollBar control, but it lacks the granularity of ScrollBar.Suppose that you want the user of an application to supply a value in a specific range, such asthe speed of a moving object. Moreover, you don’t want to allow extreme precision; you needonly a few distinct settings. The user can set the control’s value by sliding the indicator or byclicking on either side of an indicator like the one shown in Figure 5.12.
Figure 5.12
The Inches applicationdemonstrates the useof the TrackBar controlin specifying an exactvalue in a specific range.
Granularity determines how specific you want to be in measuring. In measuring distancesbetween towns, a granularity of a mile is quite adequate. In measuring (or specifying) thedimensions of a building, the granularity could be on the order of a foot or an inch. TheTrackBar control lets you set the type of granularity that’s necessary for your application.
Similar to the ScrollBar control, SmallChange and LargeChange properties are available.SmallChange is the smallest increment by which the Slider value can change. The user canchange the slider by the SmallChange value only by sliding the indicator. (Unlike with theScrollBar control, there are no arrows at the two ends of the Slider control.) To change theSlider’s value by LargeChange, the user can click on either side of the indicator.
VB 2010 at Work: The Inches Project
Figure 5.12 demonstrates a typical use of the TrackBar control. The form in the figure is anelement of a program’s user interface that lets the user specify a distance between 0 and 10inches in increments of 0.2 inches. As the user slides the indicator, the current value is dis-played on a Label control below the TrackBar. If you open the Inches application, you’ll noticethat there are more stops than there are tick marks on the control. This is made possible withthe TickFrequency property, which determines the frequency of the visible tick marks.
You might specify that the control has 50 stops (divisions) but that only 10 of them will bevisible. The user can, however, position the indicator on any of the 40 invisible tick marks. Youcan think of the visible marks as the major tick marks and the invisible ones as the minor tickmarks. If the TickFrequency property is 5, only every fifth mark will be visible. The slider’sindicator, however, will stop at all tick marks.
When using the TrackBar control on your interfaces, you should set the TickFrequencyproperty to a value that helps the user select the desired setting. Too many tick marks are con-fusing and difficult to read. Without tick marks, the control isn’t of much help. You might also
THE BOTTOM LINE 201
consider placing a few labels to indicate the value of selected tick marks, as I have done inthis example.
The properties of the TrackBar control in the Inches application are as follows:
Minimum = 0Maximum = 50SmallChange = 1LargeChange = 5TickFrequency = 5
The TrackBar needs to cover a range of 10 inches in increments of 0.2 inches. If you set theSmallChange property to 1, you have to set LargeChange to 5. Moreover, the TickFrequencyis set to 5, so there will be a total of five divisions in every inch. The numbers below the tickmarks were placed there with properly aligned Label controls.
The label at the bottom needs to be updated as the TrackBar’s value changes. This is sig-naled to the application with the Change event, which occurs every time the value of the controlchanges, either through scrolling or from within your code. The ValueChanged event handler ofthe TrackBar control is shown next:
Private Sub TrackBar1_ValueChanged(…) Handles TrackBar1.ValueChangedlblInches.Text = "Length in inches = " &
Format(TrackBar1.Value / 5, "#.00")End Sub
The Label controls below the tick marks can also be used to set the value of the control.Every time you click one of the labels, the following statement sets the TrackBar control’s value.Notice that all the Label controls’ Click events are handled by a common handler. (There aremore event handlers following the Handles keyword in the listing.)
Private Sub Label_Click(…) Handles Label1.Click, Label2.Click, …TrackBar1.Value = CInt(CType(sender, Label).text) * 5
End Sub
The code is a bit complicated, but it will compile with the Strict option on. The CType()function converts its argument, which is an Object variable and may represent any of theLabels on the form, to a Label object. Then it converts the Label’s caption to an integer value(the string "1" to the numeric value 1, and so on) by calling the CInt() function. CInt() isa VB function; the equivalent method of the Framework is System.Convert.ToInt32. Thecaptions of all Labels are numbers by design, so the conversion will never fail. This value isthen assigned to the Value property of the TrackBar control.
The Bottom Line
Use the TextBox control as a data-entry and text-editing tool. The TextBox control is themost common element of the Windows interface, short of the Button control, and it’s used todisplay and edit text. You can use a TextBox control to prompt users for a single line of text(such as a product name) or a small document (a product’s detailed description). You can

202 CHAPTER 5 BASIC WINDOWS CONTROLS
actually implement a functional text editor by placing a TextBox control on a form and settinga few of its properties.
Master It What are the most important properties of the TextBox control? Which oneswould you set in the Properties windows at design time?
Master It How would you implement a control that suggests lists of words matching thecharacters entered by the user?
Use the ListBox, CheckedListBox, and ComboBox controls to present lists of items. TheListBox control contains a list of items from which the user can select one or more, dependingon the setting of the SelectionMode property.
Master It How would you locate an item in a ListBox control?
Use the ScrollBar and TrackBar controls to enable users to specify sizes and positions withthe mouse. The ScrollBar and TrackBar controls let the user specify a magnitude by scrollinga selector between its minimum and maximum values. The ScrollBar control uses some visualfeedback to display the effects of scrolling on another entity, such as the current view in a longdocument.
Master It Which event of the ScrollBar control would you code to provide visual feedbackto the user?

Chapter 6
Working with Forms
In Visual Basic, the form is the container for all the controls that make up the user interface.When a Visual Basic application is executing, each window it displays on the Desktop is aform. The terms form and window describe the same entity. A window is what the user seeson the Desktop when the application is running. A form is the same entity at design time. Theproper term is Windows form, as opposed to web form, but I will refer to them as forms. Thisterm includes both typical Windows forms and dialog boxes, which are simple forms you usefor very specific actions, such as to prompt the user for a particular piece of data or to displaycritical information. A dialog box is a form with a small number of controls, no menus, andusually an OK and a Cancel button to close it.
Forms have a built-in functionality that is always available without any programming efforton your part. You can move a form around, resize it, and even cover it with other forms. Youdo so with the mouse or with the keyboard through the Control menu.
In previous chapters, you concentrated on placing the elements of the user interface onforms, setting their properties, and adding code behind selected events. Now you’ll lookat forms themselves and at a few related topics. In this chapter, you’ll learn how to do thefollowing:
◆ Use form properties
◆ Design applications with multiple forms
◆ Design dynamic forms
◆ Design menus
Forms have many trivial properties that won’t be discussed here. Instead, let’s jump directlyto the properties that are unique to forms and then look at how to manipulate forms fromwithin an application’s code.
The Appearance of FormsApplications are made up of one or more forms — usually more than one. You should craftyour forms carefully, make them functional, and keep them simple and intuitive. You alreadyknow how to place controls on the form, but there’s more to designing forms than populat-ing them with controls. The main characteristic of a form is the title bar on which the form’scaption is displayed (see Figure 6.1).
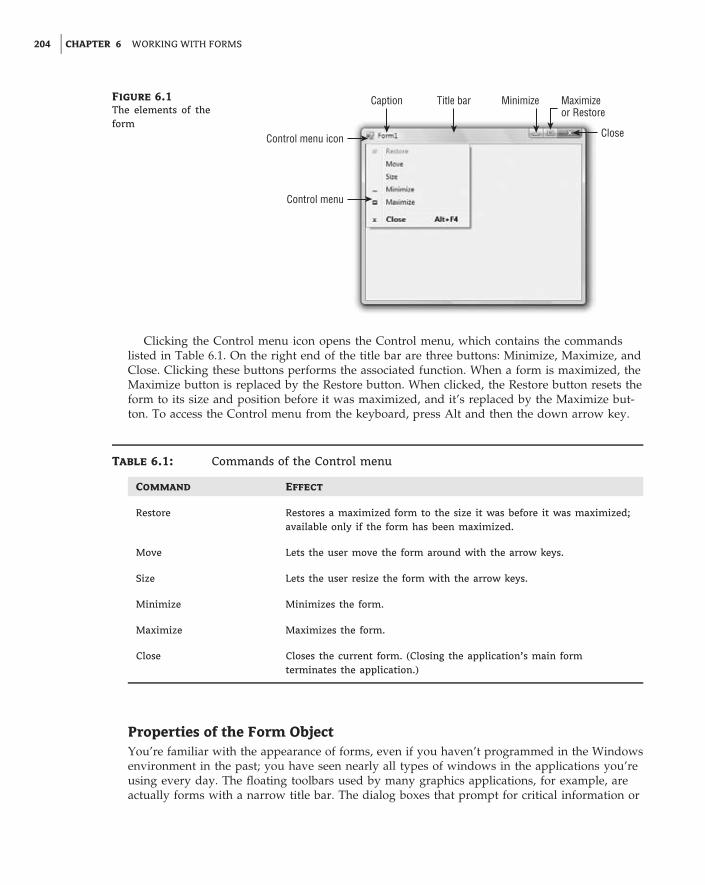
204 CHAPTER 6 WORKING WITH FORMS
Figure 6.1
The elements of theform
Caption Title bar Minimize Maximizeor Restore
CloseControl menu icon
Control menu
Clicking the Control menu icon opens the Control menu, which contains the commandslisted in Table 6.1. On the right end of the title bar are three buttons: Minimize, Maximize, andClose. Clicking these buttons performs the associated function. When a form is maximized, theMaximize button is replaced by the Restore button. When clicked, the Restore button resets theform to its size and position before it was maximized, and it’s replaced by the Maximize but-ton. To access the Control menu from the keyboard, press Alt and then the down arrow key.
Table 6.1: Commands of the Control menu
Command Effect
Restore Restores a maximized form to the size it was before it was maximized;available only if the form has been maximized.
Move Lets the user move the form around with the arrow keys.
Size Lets the user resize the form with the arrow keys.
Minimize Minimizes the form.
Maximize Maximizes the form.
Close Closes the current form. (Closing the application’s main formterminates the application.)
Properties of the Form ObjectYou’re familiar with the appearance of forms, even if you haven’t programmed in the Windowsenvironment in the past; you have seen nearly all types of windows in the applications you’reusing every day. The floating toolbars used by many graphics applications, for example, areactually forms with a narrow title bar. The dialog boxes that prompt for critical information or

THE APPEARANCE OF FORMS 205
prompt you to select the file to be opened are also forms. You can duplicate the look of anywindow or dialog box through the following properties of the Form object.
AcceptButton, CancelButton
These two properties let you specify the default Accept and Cancel buttons. The Accept but-ton is the one that’s automatically activated when you press Enter, no matter which controlhas the focus at the time; it is usually the button with the OK caption. Likewise, the Cancelbutton is the one that’s automatically activated when you hit the Esc key; it is usually the but-ton with the Cancel caption. To specify the Accept and Cancel buttons on a form, locate theAcceptButton and CancelButton properties of the form and select the corresponding con-trols from a drop-down list, which contains the names of all the buttons on the form. For moreinformation on these two properties, see the section ‘‘Forms versus Dialog Boxes,’’ later in thischapter.
AutoScaleMode
This property determines how the control is scaled, and its value is a member of theAutoScaleMode enumeration: None (automatic scaling is disabled); Font (the controls on theform are scaled relative to the size of the font); Dpi, which stands for dots per inch (the controlson the form are scaled relative to the display resolution); and Inherit (the controls are scaledaccording to the AutoScaleMode property of their parent class). The default value is Font; ifyou change the form’s font size, the controls on it are scaled to the new font size. As a result,the entire form is resized.
AutoScroll
The AutoScroll property is a True/False value that indicates whether scroll bars (as shownin Figure 6.2) will be automatically attached to the form if the form is resized to a point thatnot all its controls are visible. Use this property to design large forms without having to worryabout the resolution of the monitor on which they’ll be displayed. Scrolling forms are notvery common, but they’re easy to implement. The AutoScroll property is used in conjunctionwith two other properties (described a little later in this section): AutoScrollMargin andAutoScrollMinSize. Note that the AutoScroll property applies to a few controls as well,including the Panel and SplitContainer controls. For example, you can create a form with afixed and a scrolling pane by placing two Panel controls on it and setting the AutoScrollproperty of one of them (the Panel control you want to scroll) to True.
Figure 6.2
If the controls don’tfit in a form’s visiblearea, scroll bars can beattached automatically.

206 CHAPTER 6 WORKING WITH FORMS
The AutoScroll property is rarely used with data-entry forms, but it’s used routinely todisplay large images. You’ll see how to create a scrolling form for displaying large images laterin this chapter in the section on anchoring and docking controls.
AutoScrollPosition
This property is available from within your code only (you can’t set this property at designtime but it can be set at runtime from within your code), and it indicates the number of pixelsthat the form was scrolled up or down. Its initial value is zero, and it takes on a value whenthe user scrolls the form (provided that the AutoScroll property is True). Use this propertyto find out the visible controls from within your code or to scroll the form from within yourapplication’s code to bring a specific control into view.
AutoScrollMargin
This is a margin, expressed in pixels, that’s added around all the controls on the form. If theform is smaller than the rectangle that encloses all the controls adjusted by the margin, theappropriate scroll bar(s) will be displayed automatically.
AutoScrollMinSize
This property lets you specify the minimum size of the form before the scroll bars are attached.If your form contains graphics that you want to be visible at all times, set the Width andHeight members of the AutoScrollMinSize property to the dimensions of the graphics. (Ofcourse, the graphics won’t be visible at all times, but the scroll bars indicate that there’s moreto the form than can fit in the current window.) Notice that this isn’t the form’s minimumsize; users can make the form even smaller. To specify a minimum size for the form, use theMinimumSize property, described later in this section.
Let’s say the AutoScrollMargin property of the form is 180×150. If the form is resizedto fewer than 180 pixels horizontally or 150 pixels vertically, the appropriate scroll bars willappear automatically as long as the AutoScroll property is True. If you want to enable theAutoScroll feature when the form’s width is reduced to anything fewer than 250 pixels, set theAutoScrollMinSize property to (250, 0). In this example, setting AutoScrollMinSize.Width toanything less than 180, or AutoScrollMinSize.Height to anything less than 150, will have noeffect on the appearance of the form and its scroll bars.
Bringing Selected Controls into View
In addition to the Autoscroll properties, the Form object provides a Scroll method,which allows you to scroll a form programmatically, and ScrollControlIntoView, whichscrolls the form until the specified control comes into view. The Scroll method acceptsas arguments the horizontal and vertical displacements for the scrolling operation, whereasScrollControlIntoView accepts as an argument the control you want to bring into view.Notice that activating a control with the Tab key automatically brings the next control intoview if it’s not already visible on the form. Finally, the Scroll event is fired every time aform is scrolled.

THE APPEARANCE OF FORMS 207
FormBorderStyle
The FormBorderStyle property determines the style of the form’s border; its value is one ofthe FormBorderStyle enumeration members, which are shown in Table 6.2. You can makethe form’s title bar disappear altogether by setting the form’s FormBorderStyle property toFixedToolWindow, the ControlBox property to False, and the Text property (the form’s cap-tion) to an empty string. However, a form like this can’t be moved around with the mouse andwill probably frustrate users.
Table 6.2: The FormBorderStyle enumeration
Value Effect
Fixed3D A window with a fixed visible border ‘‘raised’’ relative to the mainarea. Unlike the None setting, this setting allows users to minimize andclose the window.
FixedDialog A fixed window used to implement dialog boxes.
FixedSingle A fixed window with a single-line border.
FixedToolWindow A fixed window with a Close button only. It looks like a toolbardisplayed by drawing and imaging applications.
None A borderless window that can’t be resized. This setting is rarely used.
Sizable (default) A resizable window that’s used for displaying regular forms.
SizableToolWindow Same as the FixedToolWindow, but it’s resizable. In addition, itscaption font is smaller than the usual.
Create a simple form and try out the various settings of the FormBorderStyle property tofind out how this property affects the appearance of the form.
ControlBox
This property is also True by default. Set it to False to hide the control box icon and disable theControl menu. Although the Control menu is rarely used, Windows applications don’t disableit. When the ControlBox property is False, the three buttons on the title bar are also disabled.If you set the Text property to an empty string, the title bar disappears altogether.
MinimizeBox, MaximizeBox
These two properties, which specify whether the Minimize and Maximize buttons will appearon the form’s title bar, are True by default. Set them to False to hide the corresponding buttonson a form’s title bar.
MinimumSize, MaximumSize
These two properties read or set the minimum and maximum size of a form. When users resizethe form at runtime, the form won’t become any smaller than the dimensions specified by the

208 CHAPTER 6 WORKING WITH FORMS
MinimumSize property or any larger than the dimensions specified by the MaximumSize prop-erty. The MinimumSize property is a Size object, and you can set it with a statement like thefollowing:
Me.MinimumSize = New Size(400, 300)
Or you can set the width and height separately:
Me.MinimumSize.Width = 400Me.MinimumSize.Height = 300
The MinimumSize.Height property includes the height of the form’s title bar; you shouldtake that into consideration. If the minimum usable size of the form is 400×300, use the follow-ing statement to set the MinimumSize property:
Me.MinimumSize = New Size(400, 300 + SystemInformation.CaptionHeight)
The default value of both properties is (0, 0), which means that no minimum or maximumsize is imposed on the form and the user can resize it as desired.
Use the SystemInformation Class to Read System Information
The height of the caption is not a property of the Form object, even though it’s used todetermine the useful area of the form (the total height minus the caption bar). Keep in mindthat the height of the caption bar is given by the CaptionHeight property of the System-Information object. You should look up the SystemInformation object; it exposes a lot of usefulproperties, such as BorderSize (the size of the form’s borders), Border3DSize (the size ofthree-dimensional borders), CursorSize (the cursor’s size), and many more.
KeyPreview
This property enables the form to capture all keystrokes before they’re passed to the controlthat has the focus. Normally, when you press a key, the KeyPress event of the control with thefocus is triggered (as well as the KeyUp and KeyDown events), and you can handle the keystrokefrom within the control’s appropriate handler. In most cases, you let the control handle thekeystroke and don’t write any form code for that.
Some forms perform certain actions when you hit a specific key (the F5 key for refresh-ing the form being a very common example), no matter which control on the form has thefocus. If you want to use these keystrokes in your application, you must set the KeyPreviewproperty to True. Doing so enables the form to intercept all keystrokes, so you can processthem from within the form’s keystroke event handlers. To handle a specific keystroke at theform’s level, set the form’s KeyPreview property to True and insert the appropriate code inthe form’s KeyDown or KeyUp event handler (the KeyPress event isn’t fired for the function andother non-character keys).
The same keystrokes are then passed to the control with the focus, unless you kill thekeystroke by setting its SuppressKeystroke property to True when you process it on theform’s level. For more information on processing keystrokes at the form level and using special

THE APPEARANCE OF FORMS 209
keystrokes throughout your application, see the Contacts project later in this chapter as well asthe TextPad project discussed in Chapter 5, ‘‘The Basic Window Controls.’’
SizeGripStyle
This property gets or sets the style of the sizing handle to display in the lower-right corner ofthe form. You can set it to a member of the SizeGripStyle enumeration: Auto (the size grip isdisplayed as needed), Show (the size grip is displayed at all times), or Hide (the size grip is notdisplayed, but users can still resize the form with the mouse).
StartPosition, Location
The StartPosition property, which determines the initial position of the form when it’sfirst displayed, can be set to one of the members of the FormStartPosition enumeration:CenterParent (the form is centered in the area of its parent form), CenterScreen (the formis centered on the monitor), Manual (the position of the form is determined by the Locationproperty), WindowsDefaultLocation (the form is positioned at the Windows default location),and WindowsDefaultBounds (the form’s location and bounds are determined by Windowsdefaults). The Location property allows you to set the form’s initial position at design time orto change the form’s location at runtime.
TopMost
This property is a True/False setting that lets you specify whether the form will remain ontop of all other forms in your application. Its default value is False, and you should changeit only on rare occasions. Some dialog boxes, such as the Find & Replace dialog box of anytext-processing application, are always visible, even when they don’t have the focus. Formore information on using the TopMost property, see the discussion of the TextPad projectin Chapter 5. You can also add a professional touch to your application by providing aCheckBox control that determines whether a form should remain on top of all other forms ofthe application.
Size
Use the Size property to set the form size at design time or at runtime. Normally, the formwidth and height are controlled by the user at runtime. This property is usually set from withinthe form Resize event handler to maintain a reasonable aspect ratio when the user resizes theform. The Form object also exposes the Width and Height properties for controlling its size.
Placing Controls on FormsThe first step in designing your application interface is, of course, the analysis and careful plan-ning of the basic operations you want to provide through your interface. The second step isto design the forms. Designing a form means placing Windows controls on it and setting thecontrol properties (and finally, of course, writing code to handle the events of interest). VisualStudio is a rapid application development (RAD) environment. This doesn’t mean that you’reexpected to develop applications rapidly. It has come to mean that you can rapidly prototypean application and show something to the customer. And this is made possible through thevisual tools that come with Visual Studio, especially the new Form Designer.
To place controls on your form, you select them in the Toolbox and then draw, on the form,the rectangle in which the control will be enclosed. Or you can double-click the control’s icon

210 CHAPTER 6 WORKING WITH FORMS
to place an instance of the control on the form. Or you can just drag the desired control fromthe Toolbox and drop it on the form. All controls have a default size, and you can resize thecontrol on the form by using the mouse.
Each control’s dimensions can also be set in the Properties window through the Size prop-erty. The Size property is a composite property that exposes the Width and Height fields,which are expressed in pixels. Likewise, the Location property returns (or sets) the coordi-nates of the top-left corner of the control. In ‘‘Building Dynamic Forms at Runtime’’ later in thischapter, you’ll see how to create new controls at runtime and place them in a specific locationon a form from within your code.
As you place controls on the form, you can align them in groups with the relevant com-mands from the Format menu. Select multiple controls on the form by using the mouse andthe Shift (or Ctrl) key, and then align their edges or center them vertically and horizontallywith the appropriate command from the Format menu. To align the left edges of a column ofTextBoxes, choose the Format � Align � Left command. You can also use the commands fromthe Format � Make Same Size command to adjust the dimensions of the selected controls. (Tomake them equal in size, make the widths or heights equal.)
As you move controls around with the mouse, a blue snap line appears when the controlsbecome aligned with another control. Release the mouse while the snap line is visible to leavethe control aligned with the one indicated by the snap lines. The blue snap lines indicate edgealignment. Most of the time, you need to align not the edges of two controls but their baselines(the baseline of the text on the control). The snap lines that indicate baseline alignment are red.Figure 6.3 shows both types of snap lines. When you’re aligning a Label control with its match-ing TextBox control on a form, you want to align their baselines, not their frames (especiallyif you consider that the Label controls are always displayed without borders). If the control isaligned with other controls in both directions, two snap lines will appear — a horizontal oneand a vertical one.
Figure 6.3
Edge alignment (verti-cal) and baseline align-ment (horizontal)
This snap line indicateshorizontal alignment.
This snap line indicatesvertical alignment.
One of the most important (and most overlooked) aspects of designing forms is the align-ment of the controls on the form. Whether the form contains a lot of controls or just a few, theapplication is more professional looking and easier for the end user to interact with when theprogrammer spends the time to align the controls one to another and group them function-ally. Try to group controls together based on their functionality. Try to present an unclutteredinterface to the end user. Once you have aligned the controls on the form as discussed in thissection, you can select them all and lock them in place by setting their Locked property toTrue. When the Locked property is True, the designer won’t allow you to move them aroundby mistake.

THE APPEARANCE OF FORMS 211
Setting the TabIndex PropertyAnother important issue in form design is the tab order of the controls on the form. As youknow, by default, pressing the Tab key at runtime takes you to the next control on a form. Thetab order of the controls is the order in which they were placed on the form, but this is hardlyever what we want. When you design the application, you can specify the order in which thecontrols receive the focus (the tab order, as it is known) with the help of the TabIndex prop-erty. Each control has its own TabIndex setting, which is an integer value. When the Tab key ispressed, the focus is moved to the control whose tab order immediately follows the tab orderof the current control (the one with the next larger TabIndex property value).
To specify the tab order of the various controls, you can set their TabIndex property in theProperties window or you can choose the Tab Order command from the View menu. The taborder of each control will be displayed on the corresponding control, as shown in Figure 6.4.(The form shown in the figure is the Contacts application, which is discussed shortly.)
Figure 6.4
Setting the tab order ofthe controls on the mainform of the Contactsproject
To set the tab order of the controls, click each control in the order in which you want themto receive the focus. You must click all of them in the desired order, starting with the firstcontrol in the tab order. Each control’s index in the tab order appears in the upper-left cornerof the control. When you’re finished, choose the Tab Order command from the View menuagain to hide the numbers. Note that Label controls never receive the focus, but they have theirown TabIndex value. When the next control to receive the focus is a Label control, the focusis moved automatically to the next control in the tab order until a control that can actuallyreceive the focus is reached.
Design with the User in Mind
Designing functional forms is a crucial step in the process of developing Windows applications.Most data-entry operators don’t work with the mouse, and you must make sure that all theactions (such as switching to another control, opening a menu, clicking a button, and so on)can be performed with the keyboard. This requirement doesn’t apply to graphics applications,

212 CHAPTER 6 WORKING WITH FORMS
of course, but most applications developed with VB are business applications, and users shouldbe able to perform most of the tasks with the keyboard, not with the mouse.
In my experience, the most important aspect of the user interface of a business application isthe handling of the Enter keystroke. When a TextBox control has the focus, the Enter keystrokeshould advance the focus to the next control in the tab order; when a list control (such as theListBox or ListView control) has the focus, the Enter keystroke should invoke the same actionas double-clicking the current item. The idea is to package as much intelligence into the Enterkeystroke as possible. The sample project in the following section demonstrates many of thefeatures you’d expect from a data-entry application.
If you’re developing a data-entry form, you must take into consideration the needs of theusers. Make a prototype and ask the people who will use the application to test-drive it. Listento their objections carefully, collect all the information, and then use it to refine your applica-tion’s user interface. Don’t defend your design — just learn from the users. They will uncoverall the flaws of the application and they’ll help you design the most functional interface. Inaddition, they will accept the finished application with fewer objections and complaints if theyknow what to expect.
VB 2010 at Work: The Contacts ProjectI want to conclude with a simple data-entry application that demonstrates many of the topicsdiscussed here as well as a few techniques for designing easy-to-use forms. Figure 6.5 shows adata-entry form for maintaining contact information, and I’m sure you will add your own fieldsto make this application more useful.
Figure 6.5
A simple data-entryscreen
You can navigate through the contacts by clicking the arrow keys on the keyboard as wellas add new contacts or delete existing ones by clicking the appropriate buttons. When you’reentering a new contact, the buttons shown in Figure 6.5 are replaced by the usual OK andCancel buttons. The action of adding a new contact, or editing an existing one, must end byclicking one of these two buttons. After a new contact is committed or the action is canceled,the usual navigation buttons appear again.

THE APPEARANCE OF FORMS 213
Now, it’s your turn to design the Contacts project. Create a new VB project and place thecontrols you see in Figure 6.5 on the application’s form, align them appropriately, and lockthem in position. Or, if you prefer, open the Contacts sample project available for downloadfrom www.sybex.com/go/masteringvb2010. After the controls are on the form, the next stepis to set their tab order. You must specify a value for the TabIndex property even for controlsthat never receive focus, such as the Label controls. In addition to setting the tab order of thecontrols, use shortcut keys to give the user quick access to the most common fields. The short-cut keys are displayed as underlined characters on the corresponding labels. Notice that theLabel controls have shortcut keys, even though they don’t receive the focus. When you pressthe shortcut key of a Label control, the focus is moved to the following control in the tab order,which (on this form) is the TextBox control next to it.
If you open the application and run it now, you’ll see that the focus moves from oneTextBox to the next with the Tab key and that the labels are skipped. After the last TextBoxcontrol, the focus is moved to the buttons and then back to the first TextBox control. To add ashortcut key for the most common fields, determine which fields will have shortcut keys andthen which keys will be used for that purpose. Being the Internet buffs that we all are, let’sassign shortcut keys to the Company, EMail, and URL fields. Locate each label’s Text propertyin the Properties window and insert the & symbol in front of the character you want to act asa shortcut for each Label. The Text property of the three controls should be &Company, &EMail,and &URL.
Shortcut keys are activated at runtime by pressing the shortcut character while holdingdown the Alt key. The shortcut key will move the focus to the corresponding Label control,but because labels can’t receive the focus, the focus is moved immediately to the next controlin the tab order, which is the adjacent TextBox control.
The contacts are stored in an ArrayList object, which is similar to an array but a little moreconvenient. We’ll discuss ArrayLists in Chapter 12, ‘‘Storing Data in Collections.’’ For now, youcan ignore the parts of the application that manipulate the contacts and focus on the designissues.
Start by loading the sample data included with the application that you downloaded fromwww.sybex.com/go/masteringvb2010. Open the File menu and choose Load. You won’t beprompted for a filename; the application always opens the same file in its root folder (it’s theCONTACTS.BIN file). After reading about the OpenFileDialog and SaveFileDialog controls, youcan modify the code so that it prompts the user to choose the file to read from or write to. Thenenter a new contact by clicking the Add button or edit an existing contact by clicking the Editbutton. Both actions must end with the OK or Cancel button. In other words, users must explic-itly end the operation and cannot switch to another contact while adding or editing a contactwithout committing or discarding the changes.
The code behind the various buttons is straightforward. The Add button hides all the nav-igational buttons at the bottom of the form and clears the TextBoxes in anticipation of a newcontact record. The OK button saves the new contact to an ArrayList structure and redisplaysthe navigational buttons. The Cancel button ignores the data entered by the user and likewisedisplays the navigational buttons. In all cases, when the user switches back to the view mode,the code locks all the TextBoxes by setting their ReadOnly property to True.
Handling Keystrokes
Although the Tab key is the Windows method of moving to the next control on the form, mostusers will find it more convenient to use the Enter key for that purpose. The Enter key is themost important one on the keyboard, and applications should handle it intelligently. When

214 CHAPTER 6 WORKING WITH FORMS
the user presses Enter in a single-line TextBox, for example, the obvious action is to move thefocus to the following control. I included a few statements in the KeyDown event handlers of theTextBox controls to move the focus to the following one:
Private Sub txtAddress1_KeyDown(…) Handles txtAddress1.KeyDownIf e.KeyData = Keys.Enter Then
e.SuppressKeyPress = TruetxtAddress2.Focus()
End IfEnd Sub
If you use the KeyUp event handler instead, the result won’t be any different, but an annoy-ing beeping sound will be emitted with each keystroke. The beep occurs when the button isdepressed, so you must intercept the Enter key as soon as it happens and not after the controlreceives the notification for the KeyDown event. The control will still catch the KeyUp event andit will beep because it’s a single-line TextBox control (the beep is an audible warning that thespecific key shouldn’t be used in a single-line TextBox control). To avoid the beep sound, thecode ‘‘kills’’ the keystroke by setting the SuppressKeystroke property to True.
Processing Keys from within Your Code
The code shown in the preceding KeyDown event handler will work, but you must repeat itfor every TextBox control on the form. A more convenient approach is to capture the Enterkeystroke in the form’s KeyDown event handler and process it for all TextBox controls. First,you must figure out whether the control with the focus is a TextBox control. The propertyMe.ActiveControl returns a reference to the control with the focus. To find out the typeof the active control and compare it to the TextBox control’s type, use the following Ifstatement:
If Me.ActiveControl.GetType Is GetType(TextBox) Then’ process the Enter keyEnd If
Once you can figure out the active control’s type, you need a method of simulating the Tabkeystroke from within your code so you don’t have to code every TextBox control’s KeyDownevent. An interesting method of the Form object is the ProcessTabKey method, whichimitates the Tab keystroke. Calling the ProcessTabKey method is equivalent to pressing theTab key from within your code. The method accepts a True/False value as an argument, whichindicates whether it will move the focus to the next control in the tab order (if True) or to theprevious control in the tab order.
Start by setting the form’s KeyPreview property to True and then insert the followingstatements in the form’s KeyDown event handler:
If e.KeyCode = Keys.Enter ThenIf Me.ActiveControl.GetType Is GetType(TextBox) Then

THE APPEARANCE OF FORMS 215
e.SuppressKeyPress = TrueIf e.Shift Then
Me.ProcessTabKey(False)Else
Me.ProcessTabKey(True)End If
End IfEnd If
The last topic demonstrated in this example is how to capture certain keystrokes regardlessof the control that has the focus. We’ll use the F10 keystroke to display the total number ofcontacts entered so far. Assuming that you have already set the form’s KeyPreview propertyto True, enter the following code in the form’s KeyDown event:
If e.Keycode = keys.F10 ThenMsgBox("There are " & MyContacts.Count.ToString & " contacts in the database")e.Handled = True
End If
Listing 6.1 shows the complete handler for the form’s KeyDown event, which also allows youto move to the next or previous contact by using the Alt+Plus or Alt+Minus keys, respectively.
Listing 6.1: Handling keystrokes in the form’s KeyDown event handler
Public Sub Form1_KeyDown(ByVal sender As Object,ByVal e As System.WinForms.KeyEventArgs)
Handles Form1.KeyUpIf e.Keycode = Keys.F10 Then
MsgBox("There are " & MyContacts.Count.ToString &" contacts in the database")
e.Handled = TrueEnd IfIf e.KeyCode = Keys.Subtract And e.Modifiers = Keys.Alt Then
bttnPrevious.PerformClickEnd IfIf e.KeyCode = Keys.Add And e.Modifiers = Keys.Alt Then
bttnNext.PerformClickEnd IfIf e.KeyCode = Keys.Enter Then
If Me.ActiveControl.GetType Is GetType(TextBox) Thene.SuppressKeyPress = TrueIf e.Shift Then
Me.ProcessTabKey(False)Else
Me.ProcessTabKey(True)

216 CHAPTER 6 WORKING WITH FORMS
End IfEnd If
End IfEnd Sub
Anchoring and DockingA common issue in form design is the design of forms that can be properly resized. Forinstance, you might design a nice form for a given size, but when it’s resized at runtime, thecontrols are all clustered in the upper-left corner. Or a TextBox control that covers the entirewidth of the form at design time suddenly ‘‘cringes’’ on the left when the user drags out thewindow. If the user makes the form smaller than the default size, part of the TextBox could beinvisible because it’s outside the form. You can attach scroll bars to the form, but that doesn’treally help — who wants to type text and have to scroll the form horizontally? It makes senseto scroll vertically because you get to see many lines at once, but if the TextBox control iswider than the form, you can’t read entire lines.
Visual Studio provides several techniques for designing forms that scale nicely. The twomost important of them are the Anchor and Dock properties.
Anchoring Controls
The Anchor property lets you attach one or more edges of the control to corresponding edges ofthe form. The anchored edges of the control maintain the same distance from the correspondingedges of the form.
Place a TextBox control on a new form, set its MultiLine property to True, and then openthe control’s Anchor property in the Properties window. You will see a rectangle within alarger rectangle and four pegs that connect the small control to the sides of the larger box (seeFigure 6.6). The large box is the form, and the small one is the control. The four pegs are theanchors, which can be either white or gray. The gray anchors denote a fixed distance betweenthe control and the edge of the form. By default, the control is placed at a fixed distancefrom the upper-left corner of the form. When the form is resized, the control retains its sizeand its distance from the upper-left corner of the form.
Figure 6.6
The settings for theAnchor property

THE APPEARANCE OF FORMS 217
Let’s say you’re designing a simple form with a TextBox control that must fill the width ofthe form, be anchored to the top of the form, and leave some space for a few buttons at thebottom. You also want your form to maintain this arrangement regardless of its size. Makethe TextBox control as wide as the form (allowing, perhaps, a margin of a few pixels on eitherside). Then place a couple of buttons at the bottom of the form and make the TextBox controltall enough that it stops above the buttons. This is the form of the Anchor sample project.
Now open the TextBox control’s Anchor property and make all four anchors gray by clickingthem. This action tells the Form Designer to resize the control accordingly, so that the distancesbetween the sides of the control and the corresponding sides of the form remain the same asthose you set at design time. Select each button on the form and set their Anchor properties inthe Properties window: Anchor the left button to the left and bottom of the form and the rightbutton to the right and bottom of the form.
Resize the form at design time without running the project and you’ll see that all the con-trols are resized and rearranged on the form at all times. Figure 6.7 shows the Anchor project’smain form in two different sizes.
Figure 6.7
Use the Anchor propertyof the various controlsto design forms that canbe resized gracefully atruntime.
Yet, there’s a small problem: If you make the form very narrow, there will be no room forboth buttons across the form’s width. The simplest way to fix this problem is to impose a min-imum size for the form. To do so, you must first decide the form’s minimum width and heightand then set the MinimumSize property to these values. You can also use the AutoScroll prop-erties, but it’s not recommended that you add scroll bars to a small form like ours. Use theAutoScroll properties for large forms with many controls that can’t be resized with the form.
Docking Controls
In addition to the Anchor property, most controls provide a Dock property, which determineshow a control will dock on the form. The default value of this property is None.

218 CHAPTER 6 WORKING WITH FORMS
Create a new form, place a multiline TextBox control on it, and then open the Dock propertyfor the control. The various rectangular shapes are the settings of the property. If you click themiddle rectangle, the control will be docked over the entire form: It will expand and shrinkboth horizontally and vertically to cover the entire form. This setting is appropriate for simpleforms that contain a single control, usually a TextBox, and sometimes a menu. Try it out.
Let’s create a more complicated form with two controls (see the Docking sample project atwww.sybex.com/go/masteringvb2010). The form shown in Figure 6.8 contains a TreeView con-trol on the left and a ListView control on the right. The two controls display folder and file dataon an interface that’s very similar to that of Windows Explorer. The TreeView control displaysthe directory structure, and the ListView control displays the selected folder’s files.
Figure 6.8
Filling a form with twocontrols
Place a TreeView control on the left side of the form and a ListView control on the right sideof the form. Then dock the TreeView to the left and the ListView to the right. If you run theapplication now, as you resize the form, the two controls remain docked to the two sides of theform — but their sizes don’t change. If you make the form wider, there will be a gap betweenthe two controls. If you make the form narrower, one of the controls will overlap the other.
End the application, return to the Form Designer, select the ListView control, and set itsDock property to Fill. This time, the ListView will change size to take up all the space to theright of the TreeView. The ListView control will attempt to fill the form, but it won’t take upthe space of another control that has been docked already. The TreeView and ListView controlsare discussed in the tutorial ‘‘The TreeView and ListView Controls,’’ which you can downloadfrom www.sybex.com/go/masteringvb2010. That’s why I’ve populated them with some fakedata at design time. In the tutorial, you’ll learn how to populate these two controls at runtimewith folder names and filenames, respectively, and build a custom Windows Explorer.
Scrolling PictureBox
An interesting technique I should mention here is how to create a scrolling form for displayinglarge images. The basic requirement is that the image can’t take up the entire form; you needsome space for a menu, a few buttons, or other controls to interact with the form. The imagemust be displayed on a PictureBox control with its SizeMode property set to AutoSize. Thissetting causes the PictureBox to adjust to the size of the image it contains. Place the various

THE APPEARANCE OF FORMS 219
controls you need for your interface on the form, as shown here, and then place a Panel onthe form. Anchor the Panel to all four edges of the form so that it’s resized along with theform. Then set its AutoScroll property to True. Finally, place a PictureBox control on thePanel and align its upper-left corner with the upper-left corner of the Panel control. Do notanchor or dock this control, because its size will be determined by the size of the image itcontains, not by its container’s size. Now assign a large image to the PictureBox control (youcan use any of the images in the Sample Pictures folder).
If you run the application now, you will see as much of the upper-left corner of the imageas can fit on the Panel control. You can resize the form to see more of the image or scroll itaround with the two scroll bars to bring any segment of the image into view. This techniqueallows you to display an image of any size on a form of any (usually smaller) size.
Splitting Forms into Multiple PanesSo far, the form for the Docking sample project you’ve designed behaves better than the initialdesign, but it’s not what you really expect from a Windows application. The problem with theform in Figure 6.8 is that users can’t change the relative widths of the controls. In other words,they can’t make one of the controls narrower to make room for the other, which is a fairly com-mon concept in the Windows interface.
The narrow bar that allows users to control the relative sizes of two controls is a splitter.When the cursor hovers over a splitter, it changes to a double arrow to indicate that thebar can be moved. By moving the splitter, you can enlarge one of the two controls whileshrinking the other. The Form Designer provides a special control for creating resizable paneson a form: the SplitContainer control. We’ll design a new form with two TextBoxes and asplitter between them so that users can change the relative size of the two controls.
Start by placing a SplitContainer control on the form. The SplitContainer consists of twoPanel controls, the Panel1 and Panel2 controls, and a vertical splitter between them. This is

220 CHAPTER 6 WORKING WITH FORMS
the default configuration; you can change the orientation of the splitter by using the control’sOrientation property. Also by default, the two panels of the Splitter control are resized pro-portionally as you resize the form. If you want to keep one of the panels fixed and have theother one take up the remaining space of the form, set the control’s FixedPanel property to thename of the panel you want to retain its size.
Next, place a TextBox control in the left panel of the SplitContainer control and set itsMultiline property to True. You don’t need to do anything about its size because we’ll dockit in the panel to which it belongs. With the TextBox control selected, locate its Dock propertyand set it to Fill. The TextBox control will fill the left panel of the SplitContainer control. Dothe same with another TextBox control, which will fill the right panel of the SplitContainercontrol. Set this control’s Multiline property to True and its Dock property to Fill.
Now run the project and check out the functionality of the SplitContainer. Pastesome text on the two controls and then change their relative sizes by sliding the split-ter between them, as shown in Figure 6.9. You will find this project, called Splitter1, atwww.sybex.com/go/masteringvb2010 among the sample projects for this chapter.
Figure 6.9
The SplitContainer con-trol lets you change therelative size of the con-trols on either side.
Splitter
Splitter
Let’s design a more elaborate form with two SplitContainer controls, such as the one shownin Figure 6.10. (It’s the form in the Splitter2 sample project.) This form, which resembles theinterface of Microsoft Office Outlook, consists of a TreeView control on the left (where the fold-ers are displayed), a ListView control (where the selected folder’s items are displayed), and aTextBox control (where the selected item’s details are displayed). Because we haven’t discussedthe ListView and TreeView controls yet, I’m using three TextBox controls with different back-ground colors; the process of designing the form is identical regardless of the controls you puton it.
Start by placing a SplitContainer control on the form. Then place a multiline TextBox con-trol on the left panel of the SplitContainer control and set the TextBox control’s Dock propertyto Fill. The TextBox control will fill the left panel of the SplitContainer control. Place anotherSplitContainer in the right panel of the first SplitContainer control. This control will be auto-matically docked in its panel and will fill it. Its orientation, however, is vertical, and the splitter

THE APPEARANCE OF FORMS 221
will separate the panel into two smaller vertical panes. Select the second SplitContainer control,locate its Orientation property in the Properties window, and set it to Horizontal.
Figure 6.10
An elaborate form withtwo splitter controls
Default splitter is vertical. Reorient the splitter for horizontal panes.
Now you can fill each of the panels with a TextBox control. Set each TextBox control’sBackgroundColor to a different color, its MultiLine property to True, and its Dock propertyto Fill. The TextBox controls will fill their containers, which are the panels of the twoSplitContainer controls, not the form. If you look up the properties of a SplitContainer control,you’ll see that it’s made up of two Panel controls, which are exposed as properties of theSplitContainer control, the Panel1 and Panel2 controls. You can set many of the propertiesof these two constituent controls, such as their font and color, their minimum size, and so on.They even expose an AutoScroll property so that users can scroll the contents of each oneindependently of the other. You can also set other properties of the SplitContainer control, suchas the SplitterWidth property, which is the width of the splitter bar between the two panelsin pixels, and the SplitterIncrement property, which is the smallest number of pixels that thesplitter bar can be moved in either direction.
So far, you’ve seen what the Form Designer and the Form object can do for your application.Let’s switch our focus to programming forms and explore the events triggered by the Formobject.
Form EventsThe Form object triggers several events. The most important are Activated, Deactivate,FormClosing, Resize, and Paint.
The Activated and Deactivate Events
When more than one form is displayed, the user can switch from one to the other by using themouse or by pressing Alt+Tab. Each time a form is activated, the Activated event takes place.Likewise, when a form is activated, the previously active form receives the Deactivate event.Insert the code you want to execute when a form is activated (set certain control properties, forexample) and when a form loses the focus or is deactivated in these two event handlers. These

222 CHAPTER 6 WORKING WITH FORMS
two events are the equivalents of the Enter and Leave events of the various controls. Noticethat there’s an inconsistency in the names of the two events: the Activated event takes placeafter the form has been activated, whereas the Deactivate event takes place right before theform is deactivated.
The FormClosing and FormClosed Events
The FormClosing event is fired when the user closes the form by clicking its Close button.If the application must terminate because Windows is shutting down, the same event will befired. Users don’t always quit applications in an orderly manner, and a professional applicationshould behave gracefully under all circumstances. The same code you execute in the applicationExit command must also be executed from within the FormClosing event. For example, youmight display a warning if the user has unsaved data, you might have to update a database,and so on. Place the code that performs these tasks in a subroutine and call it from within yourmenu’s Exit command as well as from within the FormClosing event’s handler.
You can cancel the closing of a form by setting the e.Cancel property to True. The eventhandler in Listing 6.2 displays a message box informing the user that the data hasn’t beensaved and gives them a chance to cancel the action and return to the application.
Listing 6.2: Canceling the closing of a form
Public Sub Form1_FormClosing (…) Handles Me.FormClosingDim reply As MsgBoxResultreply = MsgBox("Document has been edited. " &
"OK to terminate application, Cancel to " &"return to your document.", MsgBoxStyle.OKCancel)
If reply = MsgBoxResult.Cancel Thene.Cancel = True
End IfEnd Sub
The e argument of the FormClosing event provides the CloseReason property,which reports how the form is closing. Its value is one of the following members of theCloseReason enumeration: FormOwnerClosing, MdiFormClosing, None, TaskManagerClosing,WindowsShutDown, ApplicationExitCall, and UserClosing. The names of the members areself-descriptive, and you can query the CloseReason property to determine how the window isclosing.
The Resize, ResizeBegin, and ResizeEnd Events
The Resize event is fired every time the user resizes the form by using the mouse. In the past,programmers had to insert quite a bit of code in the Resize event’s handler to resize the con-trols and possibly rearrange them on the form. With the Anchor and Dock properties, much ofthis overhead can be passed to the form itself. If you want the two sides of the form to main-tain a fixed ratio, however, you have to resize one of the dimensions from within the Resizeevent handler. Let’s say the form’s width-to-height ratio must be 3:4. Assuming that you’re

LOADING AND SHOWING FORMS 223
using the form’s height as a guide, insert the following statement in the Resize event handlerto make the width equal to three-fourths of the height:
Private Form1_Resize (…) Handles Me.ResizeMe.Width = (0.75 * Me.Height)
End Sub
The Resize event is fired continuously while the form is being resized. If you want to keeptrack of the initial form’s size and perform all the calculations after the user has finished resiz-ing the form, you can use the ResizeBegin and ResizeEnd events, which are fired at the begin-ning and after the end of a resize operation, respectively. Store the form’s width and height totwo global variables in the ResizeBegin event and use these two variables in the ResizeEndevent handler to adjust the positions of the various controls on the form.
The Scroll Event
The Scroll event is fired by forms that have the AutoScroll property set to True when theuser scrolls the form. The second argument of the Scroll event handler exposes the OldValueand NewValue properties, which are the displacements of the form before and after the scrolloperation. This event can be used to keep a specific control in view when the form’s contentsare scrolled.
The AutoScroll property is handy for large forms, but it has a serious drawback: It scrollsthe entire form. In most cases, you want to keep certain controls in view at all times. Insteadof a scrollable form, you can create forms with scrollable sections by exploiting the AutoScrollproperties of the Panel and/or the SplitContainer controls. You can also reposition certain con-trols from within the form’s Scroll event handler. Let’s say you have placed a few controls ona Panel container and you want to keep this panel at the top of a scrolling form. The followingstatements in the form’s Scroll event handler reposition the panel at the top of the form everytime the user scrolls the form:
Private Sub Form1_Scroll(…) Handles Me.ScrollPanel1.Top = Panel1.Top + (e.NewValue - e.OldValue)
End Sub
The Paint Event
This event takes place every time the form must be refreshed, and we use its handler to exe-cute code for any custom drawing on the form. When you switch to another form that partiallyor totally overlaps the current one and then switch back to the first form, the Paint event willbe fired to notify your application that it must redraw the form. The form will refresh its con-trols automatically, but any custom drawing on the form won’t be refreshed automatically. Thisevent is discussed in more detail in the tutorial ‘‘Drawing and Painting with Visual Basic 2008,’’where the Framework’s drawing methods are presented. You can download the tutorial fromwww.sybex.com/go/masteringvb2010.
Loading and Showing FormsMost practical applications are made up of multiple forms and dialog boxes. One of the opera-tions you’ll have to perform with multiform applications is to load and manipulate forms fromwithin other forms’ code. For example, you might want to display a second form to prompt the

224 CHAPTER 6 WORKING WITH FORMS
user for data specific to an application. You must explicitly load the second form and read theinformation entered by the user when the auxiliary form is closed. Or you might want to main-tain two forms open at once and let the user switch between them. A text editor and its Find &Replace dialog box is a typical example.
You can access a form from within another form using its name. Let’s say that your appli-cation has two forms, named Form1 and Form2, and that Form1 is the project’s startup form. Toshow Form2 when an action takes place on Form1, call the Show method of the auxiliary form:
Form2.Show
This statement brings up Form2 and usually appears in a button’s or menu item’s Clickevent handler. To exchange information between two forms, use the techniques described inthe section ‘‘Sharing Variables between Forms’’ later in this chapter.
The Show method opens a form in a modeless manner: The two forms are equal in statureon the desktop, and the user can switch between them. You can also display the second formin a modal manner, which means that users can’t return to the form from which they invoked itwithout closing the second form. While a modal form is open, it remains on top of the desktop,and you can’t move the focus to any other form of the same application (but you can switch toanother application). To open a modal form, use the ShowDialog method:
Form2.ShowDialog
A dialog box is simply a modal form. When you display forms as dialog boxes, change theborder of the forms to the setting FixedDialog and invoke them with the ShowDialog method.Modeless forms are more difficult to program because the user may switch among them at anytime. Moreover, the two forms that are open at once must interact with one another. When theuser acts on one of the forms, it might necessitate changes in the other, and you’ll see shortlyhow this is done. If the two active forms don’t need to interact, display one of them as adialog box.
When you’re finished with the second form, you can either close it by calling its Closemethod or hide it by calling its Hide method. The Close method closes the form, and itsresources are returned to the system. The Hide method sets the form’s Visible property toFalse; you can still access a hidden form’s controls from within your code, but the user can’tinteract with it.
The Startup FormA typical application has more than a single form. When an application starts, the main formis loaded. You can control which form is initially loaded by setting the startup object in theproject Properties window. To open this dialog box, right-click the project’s name in the Solu-tion Explorer and select Properties. In the project’s Properties pages, switch to the Applicationtab and select the appropriate item in the Startup Form combo box. By default, the IDE sug-gests the name of the first form it created, which is Form1. If you change the name of the form,Visual Basic will continue using the same form as the startup form with its new name.
You can also start an application by using a subroutine without loading a form. This sub-routine is the MyApplication_Startup event handler, which is fired automatically when theapplication starts. To display the AuxiliaryForm object from within the Startup event handler,use the following statement:

LOADING AND SHOWING FORMS 225
Private Sub MyApplication_Startup (…) Handles Me.StartupSystem.Windows.Forms.Application.Run(New AuxiliaryForm())
End Sub
To view the MyApplication_Startup event handler, click the View Application Events but-ton at the bottom of the Application pane in the project’s Properties window. This action willtake you to the MyApplication code window, where you can select the MyApplication Eventsitem in the object list and the Startup item in the events list.
Controlling One Form from within AnotherLoading and displaying a form from within another form’s code is fairly trivial. In some sit-uations, this is all the interaction you need between forms. Each form is designed to operateindependently of the others, but they can communicate via public variables (see the followingsection). In most situations, however, you need to control one form from within another’s code.Controlling the form means accessing its controls and setting or reading values from withinanother form’s code.
Sharing Variables between Forms
The preferred method for two forms to communicate with each other is through publicvariables. These variables are declared in the form’s declarations section, outside any proce-dure, with the keyword Public. If the following declarations appear in Form1, the variableNumPoints and the array DataValues can be accessed by any procedure in Form1 as well asfrom within the code of any form belonging to the same project:
Public NumPoints As IntegerPublic DataValues(100) As Double
To access a public variable declared in Form1 from within another form’s code, you mustprefix the variable’s name by the name of the form, as in the following:
Form1.NumPoints = 99Form1.DataValues(0) = 0.3395022
In effect, the two public variables have become properties of the form in which they weredeclared. You can use the same notation to access the controls on another form. If Form1 con-tains the TextBox1 control, you can use the following statement to read its text:
Form1.TextBox1.Text
The controls on a form can be accessed by the code in another form because the defaultvalue of the Modifiers property of the controls on a form is Friend, which means that allcomponents in a solution can access them. Other settings of the Modifiers property are Public(any application can access the control) and Private (the control is private to the form to whichit belongs and cannot be accessed from code outside its own form). There are two more values,Protected and Protected Friend, which apply to inherited forms, a topic that’s not coveredin this book.

226 CHAPTER 6 WORKING WITH FORMS
If a button on Form1 opens the auxiliary form Form2, you can set selected controls to specificvalues before showing the auxiliary form. The following statements should appear in a button’sor menu item’s Click event handler:
Form2.TextBox1.Text = "some text"Form2.DateTimePicker1.Value = TodayForm2.Show()
You can also create a variable to represent another form and access the auxiliary formthrough this variable. Let’s say you want to access the resources of Form2 from within the codeof Form1. Declare the variable auxForm to represent Form2 and then access the resources ofForm2 with the following statements:
Dim auxForm As Form2auxForm.TextBox1.Text = "some text"auxForm.DateTimePicker1.Value = TodayauxForm.Show
Multiple Instances of a Single Form
Note that the variable that represents an auxiliary form is declared without the New keyword.The auxForm variable represents an existing form. If we used the New keyword, we’d createa new instance of the corresponding form. This technique is used when we want to displaymultiple instances of the same form, as in an application that allows users to open multipledocuments of the same type.
Let’s say you’re designing an image-processing application or a simple text editor. Eachnew document should be opened in a separate window. Obviously, you can’t design manyidentical forms and use them as needed. The solution is to design a single form and createnew instances of it every time the user opens an existing document or creates a new one.These instances are independent of one another and they may interact with the main form.
The approach described here is reminiscent of Multiple Document Interface (MDI) applica-tions. The MDI interface requires that all windows be contained within a parent window, andalthough once very popular, it’s going slowly out of style. The new interfaces open multipleindependent windows on the Desktop. Each window is an instance of a single form andit’s declared with the New keyword. I’ve used this style of interface to redesign the TextPadapplication of Chapter 5, and I’ve included the revised application in this chapter’s projects foryour reference. Open the project in Visual Studio and examine its code, which contains a lotof comments.
Forms versus Dialog BoxesDialog boxes are special types of forms with very specific functionality that prompt the userfor data. The Open and Save dialog boxes are two of the most familiar dialog boxes in Win-dows. They’re so common that they’re actually known as common dialog boxes. Technically,a dialog box is a good old form with its FormBorderStyle property set to FixedDialog. Like

LOADING AND SHOWING FORMS 227
forms, dialog boxes might contain a few simple controls, such as Labels, TextBoxes, and But-tons. Don’t overload a dialog box with controls and functionality; you’ll end up with a regularform. Dialog boxes are supposed to present a few options and perform very simple tasks. Thereare exceptions, of course, like the Printer Setup dialog box, but dialog boxes are usually simpleforms with a pair of OK/Cancel buttons.
Figure 6.11 shows a couple of dialog boxes you have certainly seen while working with Win-dows applications. The Caption dialog box of Word is a modal dialog box: You must close itbefore switching to your document. The Find and Replace dialog box is modeless: It allows youto switch to your document, yet it remains visible while open even if it doesn’t have the focus.
Figure 6.11
Typical dialog boxesused by Word
Notice that some dialog boxes, such as Open, Color, and even the humble MessageBox,come with the Framework, and you can incorporate them in your applications without havingto design them.
A characteristic of dialog boxes is that they provide an OK and a Cancel button. The OKbutton tells the application that you’re finished using the dialog box and the application canprocess the information in it. The Cancel button tells the application that it should ignore theinformation in the dialog box and cancel the current operation. As you will see, dialog boxesallow you to quickly find out which buttons were clicked to close them so that your applicationcan take a different action in each case.
In short, the difference between forms and dialog boxes is artificial. If it were really impor-tant to distinguish between the two, they’d be implemented as two different objects — butthey’re the same object. So, without any further introduction, let’s look at how to create anduse dialog boxes.
To create a dialog box, start with a Windows form, set its FormBorderStyle property toFixedDialog, and set the ControlBox, MinimizeBox, and MaximizeBox properties to False.Then add the necessary controls on the form and code the appropriate events, as you woulddo with a regular Windows form.
Figure 6.12 shows a simple dialog box that prompts the user for an ID and a password (seethe Password sample project available for download from www.sybex.com/go/masteringvb2010).The dialog box contains two TextBox controls (next to the appropriate labels) and the usual OKand Cancel buttons.
Now, to design your own Password main form, start a new project, rename the formMainForm, and place a button on it. This is the application main form, and we’ll invoke thedialog box from within the button’s Click event handler. Then add a new form to the project,name it PasswordForm, and place on it the controls shown in Figure 6.12.

228 CHAPTER 6 WORKING WITH FORMS
Figure 6.12
A simple dialog boxthat prompts users for ausername and password
To display a modal form, you call the ShowDialog method instead of the Show method. Youalready know how to read the values entered on the controls of the dialog box. You also needto know which button was clicked to close the dialog box. To convey this information from thedialog box back to the calling application, the Form object provides the DialogResult property.This property can be set to one of the values shown in Table 6.3 to indicate which button wasclicked. The DialogResult.OK value indicates that the user has clicked the OK button on theform. There’s no need to place an OK button on the form; just set the form’s DialogResultproperty to DialogResult.OK.
Table 6.3: The DialogResult enumeration
Value Description
Abort The dialog box was closed with the Abort button.
Cancel The dialog box was closed with the Cancel button.
Ignore The dialog box was closed with the Ignore button.
No The dialog box was closed with the No button.
None The dialog box hasn’t been closed yet. Use this option to find outwhether a modeless dialog box is still open.
OK The dialog box was closed with the OK button.
Retry The dialog box was closed with the Retry button.
Yes The dialog box was closed with the Yes button.
The dialog box need not contain any of the buttons mentioned here. It’s your responsibil-ity to set the value of the DialogResult property from within your code to one of the settingsshown in the table. This value can be retrieved by the calling application. The code behind thetwo buttons in the dialog box is quite short:
Private Sub bttnOK_Click(…) Handles bttnOK.ClickMe.DialogResult = DialogResult.OK

LOADING AND SHOWING FORMS 229
Me.CloseEnd Sub
Private Sub bttnCancel_Click(…) Handles bttnCancel.ClickMe.DialogResult = DialogResult.CancelMe.Close
End Sub
The event handler of the button that displays this dialog box should contain an If statementthat examines the value returned by the ShowDialog method:
If PasswordForm.ShowDialog = DialogResult.OK Then‘ { process the user selection }
End If
Depending on your application, you might allow the user to close the dialog box byclicking more than two buttons. Some of them must set the DialogResult property toDialogResult.OK, others to DialogResult.Cancel.
If the form contains an Accept and a Cancel button, you don’t have to enter a singleline of code in the modal form. The user can enter values on the various controls and thenclose the dialog box by pressing the Enter or Cancel key. The dialog box will close and willreturn the DialogResult.OK or DialogResult.Cancel value. The Accept button sets theform’s DialogResult property to DialogResult.OK automatically, and the Cancel button setsthe same property to DialogResult.Cancel. Any other button must set the DialogResultproperty explicitly. Listing 6.3 shows the code behind the Log In button on the sample project’smain form.
Listing 6.3: Prompting the user for an ID and a password
Private Sub Button1_Click(…) Handles Button1.ClickIf PasswordForm.ShowDialog() = DialogResult.OK Then
If PasswordForm.txtUserID.Text = "" OrPasswordForm.txtPassword.Text = "" Then
MsgBox("Please specify a user ID and a password to connect")Exit Sub
End IfMsgBox("You were connected as " & PasswordForm.txtUserID.Text)
ElseMsgBox("Connection failed for user " & PasswordForm.txtPassword.Text)
End IfEnd Sub
VB 2010 at Work: The MultipleForms Project
It’s time to write an application that puts together the topics discussed in this section. TheMultipleForms project, available for download from www.sybex.com/go/masteringvb2010,consists of a main form, an auxiliary form, and a dialog box. All three components of the

230 CHAPTER 6 WORKING WITH FORMS
application interface are shown in Figure 6.13. The buttons on the main form display both theauxiliary form and the dialog box.
Figure 6.13
The MultipleFormsproject interface
Let’s review the various operations you want to perform — they’re typical for many situa-tions, not for only this application. At first, you must be able to invoke both the auxiliary formand the dialog box from within the main form; the Show Auxiliary Form and Show Dialog Boxbuttons do this. The main form contains a variable declaration: strProperty. This variable is,in effect, a property of the main form and is declared as public with the following statement:
Public strProperty As String = "Mastering VB 2010"
The main form calls the auxiliary form’s Show method to display it in a modeless manner.The auxiliary form button with the caption Read Shared Variable In Main Form reads thestrProperty variable of the main form with the following statement:
Private Sub bttnReadShared_Click(…) Handles bttnReadShared.ClickMsgBox(MainForm.strProperty, MsgBoxStyle.OKOnly,
"Public Variable Value")End Sub
Using the same notation, you can set this variable from within the auxiliary form. The fol-lowing event handler prompts the user for a new value and assigns it to the shared variable ofthe main form:
Private Sub bttnSetShared_Click(…) Handles bttnSetShared.ClickDim str As Stringstr = InputBox("Enter a new value for strProperty")MainForm.strProperty = str
End Sub

LOADING AND SHOWING FORMS 231
The two forms communicate with each other through public properties. Let’s make this com-munication a little more elaborate by adding an event. Every time the auxiliary form sets thevalue of the strProperty variable, it raises an event to notify the main form. The main form,in turn, uses this event to display the new value of the string on the TextBox control as soon asthe code in the auxiliary form changes the value of the variable and before it’s closed.
To raise an event, you must declare the event name in the form’s declaration section. Insertthe following statement in the auxiliary form’s declarations section:
Event strPropertyChanged()
Now add a statement that fires the event. To raise an event, call the RaiseEvent statementand pass the name of the event as an argument. This statement must appear in the Click eventhandler of the Set Shared Variable In Main Form button, right after setting the value of theshared variable. As soon as the user clicks the button, the auxiliary form notifies the main formby raising the strPropertyChanged event. Listing 6.4 shows the revised event handler.
Listing 6.4: Raising an event
Private Sub bttnSetShared_Click(…) Handles bttnSetShared.ClickDim str As Stringstr = InputBox("Enter a new value for strProperty")MainForm.strProperty = strRaiseEvent strPropertyChanged
End Sub
The event will be raised, but it will go unnoticed if you don’t handle it from within the mainform’s code. To handle the event, you must create a variable that represents the auxiliary formwith the WithEvents keyword:
Dim WithEvents FRM As New AuxiliaryForm()
The WithEvents keyword tells VB that the variable is capable of raising events and thatVB should listen for events from the specific form. If you expand the drop-down list with theobjects in the code editor, you will see the name of the FRM variable, along with the other con-trols you can program. Select FRM in the list and then expand the list of events for the selecteditem. In this list, you will see the strPropertyChanged event. Select it and the definition of anevent handler will appear. Enter these statements in this event’s handler:
Private Sub FRM_strPropertyChanged() Handles FRM.strPropertyChangedTextBox1.Text = strPropertyBeep()
End Sub
It’s a simple handler, but it’s adequate for demonstrating how to raise and handle customevents on the form level. If you want, you can pass arguments to the event handler by

232 CHAPTER 6 WORKING WITH FORMS
including them in the declaration of the event. To pass the original and the new value throughthe strPropertyChanged event, use the following declaration:
Event strPropertyChanged(ByVal oldValue As String,ByVal newValue As String)
If you run the application now, you’ll see that the value of the TextBox control in the mainform changes as soon as you change the property’s value in the auxiliary form. You can actu-ally change the value of the variable several times before closing the auxiliary form, and eachtime the current value will be displayed on the main form.
Of course, you can update the TextBox control on the main form directly from within theauxiliary form’s code. Use the expression MainForm.TextBox1 to access the control and thenmanipulate it as usual. Events are used to perform some actions on a form when an actiontakes place. The benefit of using events, as opposed to accessing members of another form fromwithin your code, is that the auxiliary form need not know anything about the form that calledit. The auxiliary form raises the event, and it’s the calling form’s responsibility to handle it.Moreover, the event handler in the main form may perform other actions in addition to set-ting a control’s value; it may submit something to a database, log the action, and perform anyother operation suited for the application at hand.
Let’s see now how the main form interacts with the dialog box. What goes on between aform and a dialog box is not exactly interaction; it’s a more timid type of behavior. The formdisplays the dialog box and waits until the user closes the dialog box. Then it looks at the valueof the DialogResult property to find out whether it should even examine the values passedback by the dialog box. If the user has closed the dialog box with the Cancel (or an equivalent)button, the application ignores the dialog box settings. If the user closed the dialog box withthe OK button, the application reads the values and proceeds accordingly.
Before showing the dialog box, the code of the Show Dialog Box button sets the values ofcertain controls on the dialog box. In the course of the application, it usually makes sense tosuggest a few values in the dialog box so that the user can accept the default values by pressingthe Enter key. The main form reads a date on the dialog box’s controls and then displays thedialog box with the statements given in Listing 6.5.
Listing 6.5: Displaying a dialog box and reading its values
Protected Sub Button3_Click(…) Handles Button3.Click’ Preselects the date 4/11/1980
AgeDialog.cmbMonth.Text = "4"AgeDialog.cmbDay.Text = "11"AgeDialog.CmbYear.Text = "1980"AgeDialog.ShowDialog()If AgeDialog.DialogResult = DialogResult.OK Then
MsgBox(AgeDialog.cmbMonth.Text & " " &AgeDialog.cmbDay.Text & "," &AgeDialog.cmbYear.Text)
ElseMsgBox("OK, we’ll protect your vital personal data")

BUILDING DYNAMIC FORMS AT RUNTIME 233
End IfEnd Sub
To close the dialog box, you can click the OK or Cancel button. Each button sets theDialogResult property to indicate the action that closed the dialog box. The code behind thetwo buttons is shown in Listing 6.6.
Listing 6.6: Setting a dialog box DialogResult property
Protected Sub bttnOK_Click(…) Handles bttnOK.ClickMe.DialogResult = DialogResult.OK
End Sub
Protected Sub bttnCancel_Click(…) Handles bttnCancel.ClickMe.DialogResult = DialogResult.Cancel
End Sub
Because the dialog box is modal, the code in the Show Dialog Box button is suspended atthe line that shows the dialog box. As soon as the dialog box is closed, the code in the mainform resumes with the statement following the one that called the ShowDialog method of thedialog box. This is the If statement in Listing 6.5 that examines the value of the DialogResultproperty and acts accordingly.
Building Dynamic Forms at RuntimeSometimes you won’t know in advance how many instances of a given control might berequired on a form. Let’s say you’re designing a form for displaying the names of all tablesin a database. It’s practically impossible to design a form that will accommodate everydatabase users might throw at your application. Another typical example is a form for enteringfamily-related data, which includes the number of children in the family and their ages. Assoon as the user enters (or changes) the number of children, you should display as manyTextBox controls as there are children to collect their ages.
For these situations, it is possible to design dynamic forms, which are populated at runtime.The simplest approach is to create more controls than you’ll ever need and set their Visibleproperties to False at design time. At runtime, you can display the controls by switching theirVisible properties to True. As you know already, quick-and-dirty methods are not the mostefficient ones. You must still rearrange the controls on the form to make it look nice at all times.The proper method to create dynamic forms at runtime is to add controls to and remove themfrom your form as needed from within your code using the techniques discussed in the follow-ing sections.
Just as you can create new instances of forms, you can also create new instances of any con-trol and place them on a form. The Form object exposes the Controls property, which is acollection that contains all the controls on the form. This collection is created automatically asyou place controls on the form at design time, and you can access the members of this collec-tion from within your code. It is also possible to add new members to the collection, or removeexisting members, with the Add and Remove methods of the Form object accordingly.

234 CHAPTER 6 WORKING WITH FORMS
The Form’s Controls CollectionAll the controls on a form are stored in the Controls collection, which is a property of theForm object. The Controls collection exposes members for accessing and manipulating the con-trols at runtime, and they’re the usual members of a collection:
Add Method The Add method adds a new element to the Controls collection. In effect, it addsa new control on the current form. The Add method accepts a reference to a control as an argu-ment and adds it to the collection. Its syntax is the following, where controlObj is an instanceof a control:
Controls.Add(controlObj)
To place a new Button control on the form, declare a variable of the Button type, set its proper-ties, and then add it to the Controls collection:
Dim bttn As New System.Windows.Forms.Buttonbttn.Text = "New Button"bttn.Left = 100bttn.Top = 60bttn.Width = 80Me.Controls.Add(bttn)
Remove Method The Remove method removes an element from the Controls collection. Itaccepts as an argument either the index of the control to be removed or a reference to the con-trol to be removed (a variable of the Control type that represents one of the controls on theform). The syntax of these two forms of the Remove method is as follows:
Me.Controls.Remove(index)Me.Controls.Remove(controlObj)
Count Property and All Method The Count property returns the number of elements in theControls collection. Notice that if there are container controls, such as a Panel control, the con-trols in the containers are not included in the count. The Panel control has its own Controlscollection. The All method returns all controls on a form (or a container control) as an array ofthe System.WinForms.Control type.
Clear Method The Clear method removes all the elements of the Controls array and effec-tively clears the form.
The Controls collection is also a property of any control that can host other controls. Asyou recall from our discussion of the Anchor and Dock properties, it’s customary to place con-trols on a panel and handle them collectively as a section of the form. They are moved alongwith the panel at design time, and they’re rearranged as a group at runtime. The Panel belongsto the form’s Controls collection, and it provides its own Controls collection, which lets youaccess the controls on the panel.
VB 2010 at Work: The ShowControls Project
The ShowControls project (shown in Figure 6.14) demonstrates the basic methods ofthe Controls property. Download the ShowControls project from www.sybex.com/go/

BUILDING DYNAMIC FORMS AT RUNTIME 235
masteringvb2010, open it, and add any number of controls on the main form. You can place apanel to act as a container for other controls as well. Just don’t remove the button at the top ofthe form (the Scan Controls On This Form button); it contains the code to list all the controls.
Figure 6.14
Accessing the controlson a form at runtime
The code behind the Scan Controls On This Form button enumerates the elements of theform’s Controls collection. The code doesn’t take into consideration containers within contain-ers. This would require a recursive routine, which would scan for controls at any depth. Thecode that iterates through the form’s Controls collection and prints the names of the controlsin the Output window is shown in Listing 6.7.
Listing 6.7: Iterating the Controls collection
Private Sub Button1_Click(…) Handles Button1.ClickDim Control As Windows.Forms.ControlFor Each Control In Me.Controls
Debug.WriteLine(Control.ToString)If Control.GetType Is GetType(System.Windows.Forms.Panel) Then
Dim nestedControl As Windows.Forms.ControlFor Each nestedControl In Control.Controls
Debug.WriteLine(" " & nestedControl.ToString)Next
End IfNext
End Sub

236 CHAPTER 6 WORKING WITH FORMS
The form shown in Figure 6.15 produced the following (partial) output (the controls on thePanel are indented to stand out in the listing):
Panel1: System.Windows.Forms.Panel,BorderStyle: System.Windows.Forms.BorderStyle.FixedSingle
CheckBox4: System.Windows.Forms.CheckBox, CheckState: 0CheckBox3: System.Windows.Forms.CheckBox, CheckState: 0
HScrollBar1: System.Windows.Forms.HScrollBar,Minimum: 0, Maximum: 100, Value: 0
CheckedListBox1: System.Windows.Forms.CheckedListBox,Items.Count: 3, Items[0]: Item 1
TextBox2: System.Windows.Forms.TextBox,Text: TextBox2
To find out the type of individual controls, call the GetType method. The following state-ment examines whether the control in the first element of the Controls collection is a TextBox:
If Me.Controls(0).GetType Is GetType( System.Windows.Forms.TextBox) ThenMsgBox("It’s a TextBox control")
End If
Notice the use of the Is operator in the preceding statement. The equals operator wouldcause an exception because objects can be compared only with the Is operator. (You’re com-paring instances, not values.)
To access other properties of the control represented by an element of the Controls col-lection, you must first cast it to the appropriate type. If the first control of the collection is aTextBox control, use the CType() function to cast it to a TextBox variable and then request itsSelectedText property:
If Me.Controls(0).GetType Is GetType( System.Windows.Forms.TextBox) ThenDebug.WriteLine(CType(Me.Controls(0), TextBox).SelectedText)
End If
The If statement is necessary, unless you can be sure that the first control is a TextBox con-trol. If you omit the If statement and attempt to convert the control to a TextBox, a runtimeexception will be thrown if the object Me.Controls(0) isn’t a TextBox control.
VB 2010 at Work: The DynamicForm Project
To demonstrate how to handle controls at runtime from within your code, I included theDynamicForm project (Figure 6.15) on www.sybex.com/go/masteringvb2010. It’s a simpledata-entry window for a small number of data points. The user can specify at runtime thenumber of data points she wants to enter, and the number of TextBoxes on the form is adjustedautomatically.
The control you see at the top of the form is the NumericUpDown control. All youreally need to know about this control is that it displays an integer in the range specifiedby its Minimum and Maximum properties and allows users to select a value. It also fires theValueChanged event every time the user clicks one of the two arrows or types another valuein its edit area. This event handler’s code adds or removes controls on the form so that the

BUILDING DYNAMIC FORMS AT RUNTIME 237
number of text boxes (as well as the number of corresponding labels) matches the value onthe control. Listing 6.8 shows the handler for the ValueChanged event of the NumericUpDown1control.
Figure 6.15
The DynamicFormproject
Listing 6.8: Adding and removing controls at runtime
Private Sub NumericUpDown1_ValueChanged(…) Handles NumericUpDown1.ValueChangedDim TB As New TextBox()Dim LBL As New Label()Dim i, TBoxes As Integer‘ Count all TextBox controls on the FormFor i = 0 To Me.Controls.Count - 1
If Me.Controls(i).GetType IsGetType(System.Windows.Forms.TextBox) Then
TBoxes = TBoxes + 1End If
Next‘ Add new controls if number of controls on the Form is less‘ than the number specified with the NumericUpDown controlIf TBoxes < NumericUpDown1.Value Then
TB.Left = 100: TB.Width = 120TB.Text = ""For i = TBoxes To CInt(NumericUpDown1.Value) - 1
TB = New TextBox()LBL = New Label()If NumericUpDown1.Value = 1 Then
TB.Top = 20: TB.TabIndex = 0Else
TB.Top = Me.Controls(Me.Controls.Count - 2).Top + 25End If
‘ Set the trivial properties of the new controlsLBL.Left = 20: LBL.Width = 80LBL.Text = "Data Point " & iLBL.Top = TB.Top + 3TB.Left = 100: TB.Width = 120

238 CHAPTER 6 WORKING WITH FORMS
TB.Text = ""‘ add controls to the formMe.Controls.Add(TB)Me.Controls.Add(LBL)TB.TabIndex = Convert.ToInt32(NumericUpDown1.Value)‘ and finally connect their GotFocus/LostFocus events‘ to the appropriate handlerAddHandler TB.Enter,
New System.EventHandler(AddressOf TBox_Enter)AddHandler TB.Leave,
New System.EventHandler(AddressOf TBox_Leave)Next
ElseFor i = Me.Controls.Count - 1 To Me.Controls.Count -
2 * (TBoxes - CInt(NumericUpDown1.Value)) Step -2Me.Controls.Remove(Controls(i))Me.Controls.Remove(Controls(i - 1))
NextEnd If
End Sub
The code is lengthy but straightforward; most of the statements just set the basic proper-ties of the Label and TextBox controls on the form. Ignore the AddHandler statements for now;they’re discussed in the following section. First, the code counts the number of TextBoxes onthe form; then it figures out whether it should add or remove elements from the Controlscollection. To remove controls, the code iterates through the last n controls on the form andremoves them. The number of controls to be removed is the following, where TBoxes is thetotal number of controls on the form minus the value specified in the NumericUpDown control:
2 * (TBoxes - NumericUpDown1.Value)
If the value entered in the NumericUpDown control is less than the number of TextBox con-trols on the form, the code removes the excess controls from within a loop. At each step, itremoves two controls, one of them a TextBox and the other a Label control with the matchingcaption. (That’s why the loop variable is decreased by two.) The code also assumes that the firsttwo controls on the form are the Button and the NumericUpDown controls. If the value enteredby the user exceeds the number of TextBox controls on the form, the code adds the necessarypairs of TextBox and Label controls to the form.
To add controls, the code initializes a TextBox (TB) and a Label (LBL) variable. Then, it setstheir locations and the label’s caption. The left coordinate of all labels is 20, their width is 80,and their Text property (the label’s caption) is the order of the data item. The vertical coordi-nate is 20 pixels for the first control, and all other controls are 3 pixels below the control on theprevious row. After a new control is set up, it’s added to the Controls collection with one ofthe following statements:
Me.Controls.Add(TB) ‘ adds a TextBox controlMe.Controls.Add(LBL) ‘ adds a Label control

BUILDING DYNAMIC FORMS AT RUNTIME 239
To use the values entered by the user on the dynamic form, we must iterate the Controlscollection, extract the values in the TextBox controls, and read their values. Listing 6.9 showshow the Process Values button scans the TextBox controls on the form and performs some basiccalculations with them (counting the number of data points and summing their values).
Listing 6.9: Reading the controls on the form
Private Sub Button1_Click(…) Handles Button1.ClickDim TBox As TextBoxDim Sum As Double = 0, points As Integer = 0Dim iCtrl As IntegerFor iCtrl = 0 To Me.Controls.Count - 1
If Me.Controls(iCtrl).GetType IsGetType(System.Windows.Forms.TextBox) Then
TBox = CType(Me.Controls(iCtrl), TextBox)If IsNumeric(TBox.Text) Then
Sum = Sum + Val(TBox.Text)points = points + 1
End IfEnd If
NextMsgBox("The sum of the " & points.ToString &
" data points is " & Sum.ToString)End Sub
Handling Repeated Data Items
Dynamic forms are actually quite common even in business-line applications. There are situ-ations where users are expected to enter or review multiple items of information on a singleform. If each data item consists of several fields (such as names, ages, and the like), your bestbet is to design a form like the following one.
This form, which is part of the DynamicDataEntry project, is a more typical example of adynamic form, which allows users to enter an unknown number of dependant members (orany other entity, for that matter). Although you can create an auxiliary form where the usercan enter each entry, the form shown here works better because it allows the user to focus ona single form.
Initially the form is populated with the appropriate controls for entering a single member.Users can click the ‘‘Add new member’’ link to create a new entry. On the left you see theform in its initial state and on the right you see the same form after adding four members.The ‘‘Remove member’’ link removes the last member from the form. Users can enter anynumber of dependant members on this form by adding new entries. If the number of entries

240 CHAPTER 6 WORKING WITH FORMS
exceeds the height of the form, a scroll bar appears. Notice that the scroll bar scrolls theentries for the members and not the fixed items on the form, which are the two links at thetop and the Done Entering Members button at the bottom. You can change the structure ofeach entry to enable other types of data (such as room types in a hotel reservation system, astudent’s courses and grades, the statistics of various teams, and so on).
I will not present the full code for the application here; it is well documented and you canexamine it on your own. The individual entries are made up of a number of controls, all ona Panel control. This allows you to use the same name for the controls. There’s no namingconflict since the controls belong to a different Panel. All individual panels are placed onanother larger Panel control, which is anchored to all four sides of the form and resizes nicelyalong with the form. The AutoScroll property on this Panel control was set to True so thatthe appropriate scroll bars appear automatically should the user have a large number ofmembers to enter.
Adding and removing entries is quite straightforward. I will show you only the code thatiterates through all entries and processes them:
For Each ctrl As Control In Me.Controls("pnlAllMembers").ControlsIf ctrl.GetType Is GetType(System.Windows.Forms.Panel) Then
Name = ctrl.Controls("txtName").TextAge = CType(ctrl.Controls("cbAge"), ComboBox).SelectedItemIf CType(ctrl.Controls("rdMale"), RadioButton).Checked
Then sex = "Male"If CType(ctrl.Controls("rdFemale"), RadioButton).Checked
Then sex = "Female"message &= "NAME: " & Name & vbCrLf &
"AGE: " & Age & vbCrLf &"SEX: " & sex & vbCrLf &

BUILDING DYNAMIC FORMS AT RUNTIME 241
"-----------------------------" & vbCrLfEnd If
Next
The outer loop goes through the controls on the pnlAllMembers Panel control, which is thelarge panel with the entries. If the current control is a Panel, we can process it. Normally, allchild controls on the pnlAllMembers Panel will be also Panel controls; you may choose toadd other control as well. Then the code accesses each individual control by name. txtName isthe name of the TextBox control for the member’s name and it’s always the same regardlessof the entry to which it belongs. The code gradually builds a string with the data of thedependant members and displays them. A real-world application would submit the same datato a database, convert it to XML format, and store it locally or process the data in some othermeaningful way. You can open the DynamicDataEntry project and examine its code, which isactually quite short considering all the flexibility.
If you make the form wide, the various entries will still be lined up in a single column,leaving most of the form empty. How about entering some code in the form’s resizing eventsto display the entries in multiple columns depending on the width of the form?
Creating Event Handlers at RuntimeYou saw how to add controls on your forms at runtime and how to access the properties ofthese controls from within your code. In many situations, this is all you need: a way to accessthe properties of the controls (the text on a TextBox control or the status of a CheckBox orRadioButton control). What good is a Button control, however, if it can’t react to the Clickevent? The only problem with the controls you add to the Controls collection at runtime isthat they don’t react to events. It’s possible, though, to create event handlers at runtime, andthis is what you’ll learn in this section.
To create an event handler at runtime, create a subroutine that accepts two arguments — theusual sender and e arguments — and enter the code you want to execute when a specific con-trol receives a specific event. The type of the e argument must match the definition of the sec-ond argument of the event for which you want to create a handler. Let’s say that you want toadd one or more buttons at runtime on your form and these buttons should react to the Clickevent. Create the ButtonClick() subroutine and enter the appropriate code in it. The name ofthe subroutine can be anything; you don’t have to make up a name that includes the control’sor the event’s name.
After the subroutine is in place, you must connect it to an event of a specific control. TheButtonClick() subroutine, for example, must be connected to the Click event of a Button con-trol. The statement that connects a control’s event to a specific event handler is the AddHandlerstatement, whose syntax is as follows:
AddHandler control.event, New System.EventHandler(AddressOf ButtonClick)
Consider, for example, an application that performs certain calculations with an existing sub-routine. To connect the ProcessNow() subroutine to the Click event of the Calculate button,use the following statement:
AddHandler Calculate.Click,New System.EventHandler(AddressOf ProcessNow)

242 CHAPTER 6 WORKING WITH FORMS
You can use similar statements to connect the same subroutine to other control eventhandlers. You can also associate multiple controls’ Click event handler with the ProcessNow()subroutine.
Let’s add a little more complexity to the DynamicForm application. I’ll program the Enterand Leave events of the TextBox controls added to the form at runtime. When a TextBox con-trol receives the focus, I’ll change its background color to a light yellow, and when it losesthe focus, I’ll restore the background to white so the user knows which box has the focus atany time. I’ll use the same handlers for all TextBox controls. (The code for the two handlers isshown in Listing 6.10.)
Listing 6.10: Event handlers added at runtime
Private Sub TBox_Enter(ByVal sender As Object,ByVal e As System.EventArgs)
CType(sender, TextBox).BackColor = color.LightCoralEnd Sub
Private Sub TBox_Leave(ByVal sender As Object,ByVal e As System.EventArgs)
CType(sender, TextBox).BackColor = color.WhiteEnd Sub
The two subroutines use the sender argument to find out which TextBox control receivedor lost the focus, and they set the appropriate control’s background color. (These subroutinesare not event handlers yet because they’re not followed by the Handles keyword — at least,not before we associate them with an actual control and a specific event.) This process is donein the same segment of code that sets the properties of the controls we create dynamically atruntime. After adding the control to the Me.Controls collection, call the following statementsto connect the new control’s Enter and Leave events to the appropriate handlers:
AddHandler TB.Enter, New System.EventHandler(AddressOf TBox_Enter)AddHandler TB.Leave, New System.EventHandler(AddressOf TBox_Leave)
Note that you don’t have to raise the event from within your code; neither do you specifythe arguments to the event. Since you’ve associated the two routines with the Click event han-dler, the compiler knows that they’re Click event handlers and passes the appropriate argu-ments to them. All you have to do is make sure the signatures of the two routines match thesignature of the Click event handler.
Run the DynamicForm application and see how the TextBox controls handle thefocus-related events. With a few statements and a couple of subroutines, we were able to createevent handlers at runtime from within our code.
Designing an Application Generator
In the preceding sections of this chapter, you learned how to create new forms from withinyour code and how to instantiate them. In effect, you have the basic ingredients for designing

DESIGNING MENUS 243
applications from within your code. Designing an application from within the code is not atrivial task, but now you have a good understanding of how an application generator works.You can even design a wizard that prompts the user for information about the appearance ofthe form and then design the form from within your code.
Designing MenusMenus are among the most common and most characteristic elements of the Windows userinterface. Even in the old days of character-based displays, menus were used to displaymethodically organized choices and guide the user through an application. Despite the visuallyrich interfaces of Windows applications and the many alternatives, menus are still the mostpopular means of organizing a large number of options. Many applications duplicate some orall of their menus in the form of toolbar icons, but the menu is a standard fixture of a form.You can turn the toolbars on and off, but not the menus.
The Menu EditorMenus can be attached only to forms, and they’re implemented through the MenuStrip control.The items that make up the menu are ToolStripMenuItem objects, which belong to a MenuStripcontrol (they’re the menu options) or to another ToolStripMenuItem (they form submenus). Asyou will see, the MenuStrip control and ToolStripMenuItem objects give you absolute controlover the structure and appearance of the menus of your application. The MenuStrip control is avariation of the Strip control, which is the base of menus, toolbars, and status bars.
You can design menus visually and then program their Click event handlers. In principle,that’s all there is to a menu: You specify its items (the menu commands) and then you programeach command’s actions, as if the menu items were buttons. Depending on the needs of yourapplication, you might want to enable and disable certain commands, add context menus tosome of the controls on your form, and so on. Because each item in a menu is represented bya ToolStripMenuItem object, you can control the application’s menus from within your code bymanipulating the properties of the ToolStripMenuItem objects. Let’s start by designing a simplemenu, and I’ll show you how to manipulate the menu objects from within your code as we goalong.
Double-click the MenuStrip icon in the Toolbox. (You’ll find the MenuStrip control in theMenus & Toolbars tab of the Toolbox.) An instance of the MenuStrip control will be added tothe form, and a single menu command will appear on your form. Its caption will be Type Here.If you don’t see the first menu item on the form right away, select the MenuStrip control in theComponents tray below the form. Do as the caption says: Click it and enter the first commandcaption, File, as shown in Figure 6.16. To add items under the File menu, press Enter. To enteranother command in the main menu, press Tab. Depending on your action, another box willbe added and you can type the caption of the next command in it. Press Enter to move to thenext item vertically and Tab to move to the next item horizontally. To insert a separator enter ahyphen (-) as the item’s caption.
When you hover the pointer over a menu item, a drop-down button appears to the right ofthe item. Click this button to select the type of item you’ll place on the menu. This item can bea MenuItem object, a separator, a ComboBox, or a TextBox. In this chapter, I’ll focus on menuitems, which are by far the most common elements on a menu. The last two options, however,allow you to build elaborate menus, reminiscent of the Office menus.

244 CHAPTER 6 WORKING WITH FORMS
Figure 6.16
Designing a menu onthe form
Enter the items you wish to include in the File menu — New, Open, Save, SaveAs, andExit — and then click somewhere on the form. All the temporary items (the ones with theType Here caption) will disappear, and the menu will be finalized on the form.
To add the Edit menu, select the MenuStrip icon to activate the visual menu editor and thenclick the File item. In the new item that appears next to the File item on the control, enter thestring Edit. Press Enter and you’ll switch to the first item of the Edit menu. Fill the Edit menuwith the usual editing commands. Table 6.4 shows the captions (property Text) and names(property Name) for each menu and each command. You can also insert a standard menu withthe Insert Standard Items command of the MenuStrip object’s context menu.
Table 6.4: The captions and names of the File and Edit menus
Caption Name Caption Name
File FileMenu Tools ToolsMenu
New FileNew Edit EditMenu
Open FileOpen Undo EditCopy
Save FileSave Redo EditRedo
Save As FileSaveAs Cut EditCut
Print FilePrint Copy EditCopy
Print Preview FilePrintPreview Paste EditPaste
Exit FileExit Select All EditSelectAll
Help HelpMenu
The bold items in Table 6.4 are the names of the first-level menus (File and Edit); the cap-tions that are indented in the table are the commands on these two menus. The default namesof the menu items you add visually to the application’s menu are based on the item’s captionfollowed by the suffix ToolStripMenuItem (FileToolStripMenuItem, NewToolStripMenuItem,

DESIGNING MENUS 245
and so on). You’ll probably want to change the default names to something less redundant.To do so, change the Name property in the Properties window. To view the properties of amenu item, right-click it and select Properties from the context menu. One of the propertiesyou should try out is the LayoutStyle property, which determines the orientation of the menu.
The most convenient method of editing a menu is to use the Items Collection Editor win-dow, which is shown in Figure 6.17. This isn’t a visual editor, but you can set all the propertiesof each menu item in the dialog box without having to switch to the Properties window.
Figure 6.17
Editing a menu with theItems Collection Editor
The Add button adds to the menu an item of the type specified in the combo box next to it(a menu item, combo box, or text box). To insert an item at a different location, add it to themenu and then use the arrow buttons to move it up or down. As you add new items, youcan set their Text and Name properties on the right pane of the editor. You can also set theirfont, set the alignment and orientation of the text, and specify an image to be displayed alongwith the text. To add an image to a menu item, locate the Image property and click the ellipsisbutton. A dialog box in which you can select the appropriate resource will appear. Notice thatall the images you use on your form are stored as resources of the project. You can add all theimages and icons you might need in a project to the same resource file and reuse them at will.The TextImageRelation property allows you to specify the relative positions of the text andthe image. You can also select to display text only, images only, or text and images for eachmenu item with the DisplayStyle property.
If the menu item leads to a submenu, you must also specify the submenu’s items. Locatethe DropDownItems property and click the ellipsis button. An identical window will appear, inwhich you can enter the drop-down items of the current menu item. Notice that the menu onthe form is continuously updated while you edit it in the Items Collection Editor window, soyou can see the effects of your changes on the form. Personally, I’m more productive with theeditor than with the visual tools, mainly because all the properties are right there and I don’thave to switch between the design surface and the Properties window.
Note that except for MenuItems, you can add ComboBoxes and TextBoxes to a menu. TheTextBox control can be used to facilitate search operations, similar to the Search box of thebrowsers. You can also display a number of options in a ComboBox control on the menu.The advantage of the ComboBox menu item is that the selected option is visible at all times.

246 CHAPTER 6 WORKING WITH FORMS
ComboBoxes are used in the menus of Office applications a lot (a typical example is theFont name and size ComboBoxes that allow you to change the current selections’ font nameand size).
The ToolStripMenuItem PropertiesThe ToolStripMenuItem class represents a menu command, at any level. If a command leads toa submenu, it’s still represented by a ToolStripMenuItem object, which has its own collectionof ToolStripMenuItem objects: the DropDownItems property, which is a collection and it’smade up of ToolStripMenuItem objects. The ToolStripMenuItem class provides the followingproperties, which you can set in the Properties window at design time or manipulate fromwithin your code:
Checked Some menu commands act as toggles, and they are usually selected (checked) toindicate that they are on or deselected (unchecked) to indicate that they are off. To initially dis-play a check mark next to a menu command, set its Checked property to True. You can alsoaccess this property from within your code to change the checked status of a menu commandat runtime. For example, to toggle the status of a menu command called FntBold, use thisstatement:
FntBold.Checked = Not FntBold.Checked
Enabled Some menu commands aren’t always available. The Paste command, for example,has no meaning if the Clipboard is empty (or if it contains data that can’t be pasted in the cur-rent application). To indicate that a command can’t be used at the time, you set its Enabledproperty to False. The command then appears grayed out in the menu, and although it can behighlighted, it can’t be activated.
IsOnDropDown If the menu command represented by a ToolStripMenuItem object belongs toa submenu, its IsOnDropDown property is True; otherwise, it’s False. The IsOnDropDown prop-erty is read-only and False for the items on the first level of the menu.
Visible To remove a command temporarily from the menu, set the command’s Visibleproperty to False. The Visible property isn’t used frequently in menu design. In general, youshould prefer to disable a command to indicate that it can’t be used at the time (some otheraction is required to enable it). Making a command invisible frustrates users, who might spendtime trying to locate the command in another menu.
Programming Menu Commands
When a menu item is selected by the user, it triggers a Click event. To program a menu item,insert the appropriate code in the item’s Click event handler. The Exit command’s code wouldbe something like the following:
Sub menuExit(…) Handles menuExit.ClickEnd
End Sub
If you need to execute any cleanup code before the application ends, place it in theCleanUp() subroutine and call this subroutine from within the Exit item’s Click event handler:

DESIGNING MENUS 247
Sub menuExit(…) Handles menuExit.ClickCleanUp()End
End Sub
The same subroutine must also be called from within the FormClosing event handler of theapplication’s main form because some users might terminate the application by clicking theform’s Close button.
An application’s Open menu command contains the code that prompts the user to select afile and then open it. You will see many examples of programming menu commands in thefollowing chapters. All you really need to know now is that each menu item is a ToolStrip-MenuItem object and each fires the Click event every time it’s selected with the mouse or thekeyboard. In most cases, you can treat the Click event handler of a ToolStripMenuItem objectjust like the Click event handler of a Button.
Another interesting event of the ToolStripMenuItem is the DropDownOpened event, which isfired when the user opens a menu or submenu (in effect, when the user clicks a menu item thatleads to a submenu). In this event’s handler, you can insert code to modify the submenu. TheEdit menu of just about any application contains the ubiquitous Cut/Copy/Paste commands.These commands are not meaningful at all times. If the Clipboard doesn’t contain text, thePaste command should be disabled. If no text is selected, the Copy and Cut commands shouldalso be disabled. Here’s how you could change the status of the Paste command from withinthe DropDownOpened event handler of the Edit menu:
If My.Computer.Clipboard.ContainsText ThenPasteToolStripMenuItem.Enabled = True
ElsePasteToolStripMenuItem.Enabled = True
End If
Likewise, to change the status of the Cut and Copy commands, use the following statementsin the DropDownOpened event of the ToolStripMenuItem that represents the Edit menu:
If txtEditor.SelectedText.Trim.Length > 0 ThenCopyToolStripMenuItem.Enabled = TrueCutToolStripMenuItem.Enabled = True
ElseCopyToolStripMenuItem.Enabled = FalseCutToolStripMenuItem.Enabled = False
End If
Using Access and Shortcut Keys
Menus provide a convenient way to display a large number of choices to the user. Theyallow you to organize commands in groups, according to their functions, and are availableat all times. Opening menus and selecting commands with the mouse, however, can be aninconvenience. When using a word processor, for example, you don’t want to have to takeyour hands off the keyboard and reach for the mouse. To simplify menu access, Windowsforms support access keys and shortcut keys.

248 CHAPTER 6 WORKING WITH FORMS
Access Keys
Access keys allow the user to open a menu by pressing the Alt key and a letter key. To openthe Edit menu in all Windows applications, for example, you can press Alt+E. E is the Editmenu’s access key. After the menu is open, the user can select a command with the arrow keysor by pressing another key, which is the command’s access key, without holding down the Altkey.
Access keys are designated by the designer of the application and are marked with anunderline character. To assign an access key to a menu item, insert the ampersand symbol (&)in front of the character you want to use as an access key in the ToolStripMenuItem’s Textproperty.
Default Access Keys Are Based on Item Captions
If you don’t designate access keys, Visual Basic will use the first character in the captionof each top-level menu as its access key. The user won’t see the underline character underthe first character but can open the menu by pressing the first character of its caption whileholding down the Alt key. If two or more menu captions begin with the same letter, the first(leftmost and topmost) menu will open.
Because the & symbol has a special meaning in menu design, you can’t use it in a menuitem’s caption. To actually display the & symbol in a caption, prefix it with another & symbol.For example, the caption &Drag produces a command with the caption Drag (the first char-acter is underlined because it’s the access key). The caption Drag && Drop will create anothercommand whose caption will be Drag & Drop. Finally, the string &Drag && Drop will createanother command with the caption Drag & Drop (note the underline character in front of thefirst uppercase D in the string).
Shortcut Keys
Shortcut keys are similar to access keys, but instead of opening a menu, they run a commandwhen pressed. Assign shortcut keys to frequently used menu commands so that users can reachthem with a single keystroke. Shortcut keys are combinations of the Ctrl key and a function orcharacter key. For example, the usual access key for the Close command (after the File menu isopened with Alt+F) is C, but the usual shortcut key for the Close command is Ctrl+W.
To assign a shortcut key to a menu command, drop down the ShortcutKeys list in theToolStripMenuItem’s Properties window and select a keystroke. Specify a modifier (Shift,Ctrl, or Alt) and a key. When assigning access and shortcut keys, take into consideration thewell-established Windows standards. Users expect Alt+F to open the File menu, so don’tuse Alt+F for the Format menu. Likewise, pressing Ctrl+C universally performs the Copycommand; don’t use Ctrl+C as a shortcut for the Cut command.
Manipulating Menus at RuntimeDynamic menus change at runtime to display more or fewer commands, depending on the cur-rent status of the program. The following sections explore two techniques for implementingdynamic menus:
◆ Creating short and long versions of the same menu
◆ Adding and removing menu commands at runtime
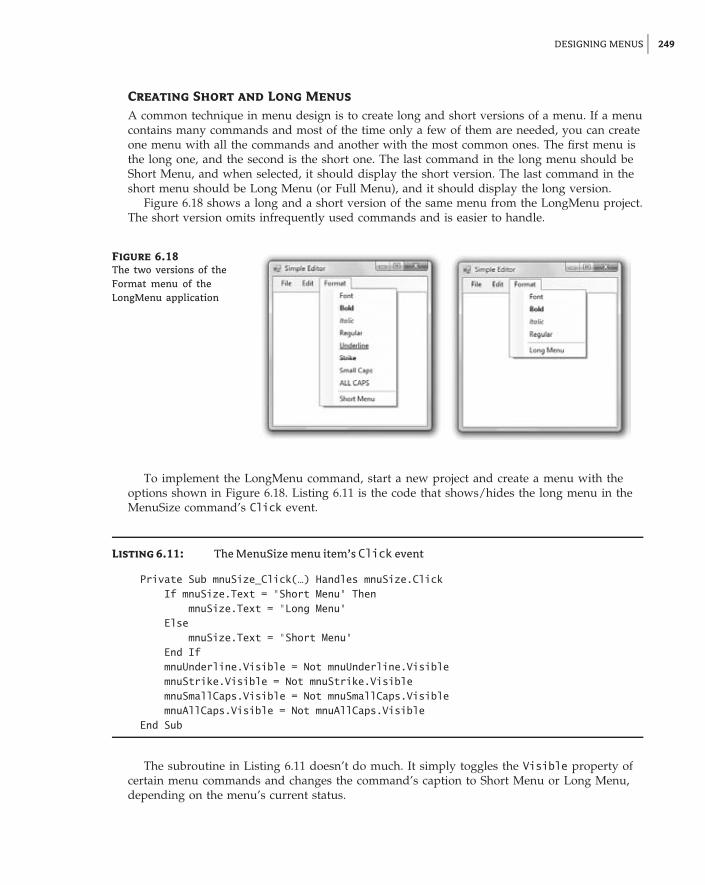
DESIGNING MENUS 249
Creating Short and Long Menus
A common technique in menu design is to create long and short versions of a menu. If a menucontains many commands and most of the time only a few of them are needed, you can createone menu with all the commands and another with the most common ones. The first menu isthe long one, and the second is the short one. The last command in the long menu should beShort Menu, and when selected, it should display the short version. The last command in theshort menu should be Long Menu (or Full Menu), and it should display the long version.
Figure 6.18 shows a long and a short version of the same menu from the LongMenu project.The short version omits infrequently used commands and is easier to handle.
Figure 6.18
The two versions of theFormat menu of theLongMenu application
To implement the LongMenu command, start a new project and create a menu with theoptions shown in Figure 6.18. Listing 6.11 is the code that shows/hides the long menu in theMenuSize command’s Click event.
Listing 6.11: The MenuSize menu item’s Click event
Private Sub mnuSize_Click(…) Handles mnuSize.ClickIf mnuSize.Text = "Short Menu" Then
mnuSize.Text = "Long Menu"Else
mnuSize.Text = "Short Menu"End IfmnuUnderline.Visible = Not mnuUnderline.VisiblemnuStrike.Visible = Not mnuStrike.VisiblemnuSmallCaps.Visible = Not mnuSmallCaps.VisiblemnuAllCaps.Visible = Not mnuAllCaps.Visible
End Sub
The subroutine in Listing 6.11 doesn’t do much. It simply toggles the Visible property ofcertain menu commands and changes the command’s caption to Short Menu or Long Menu,depending on the menu’s current status.

250 CHAPTER 6 WORKING WITH FORMS
Adding and Removing Commands at Runtime
I conclude the discussion of menu design with a technique for building dynamic menus, whichgrow and shrink at runtime. Many applications maintain a list of the most recently opened filesin the File menu. When you first start the application, this list is empty, and as you open andclose files, it starts to grow.
The RunTimeMenu project, available for download from www.sybex.com/go/masteringvb2010, demonstrates how to add items to and remove items from a menu at runtime. Themain menu of the application’s form contains the Run Time Menu submenu, which is initiallyempty.
The two buttons on the form add commands to and remove commands from the RunTime Menu. Each new command is appended at the end of the menu, and the commands areremoved from the bottom of the menu first (the most recently added commands are removedfirst). To change this order and display the most recent command at the beginning of themenu, use the Insert method instead of the Add method to insert the new item. Listing 6.12shows the code behind the two buttons that add and remove menu items.
Listing 6.12: Adding and removing menu items at runtime
Private Sub bttnAddItem_Click(…) Handles bttnAddItem.ClickDim Item As New ToolStripMenuItemItem.Text = "Run Time Option" &
RunTimeMenuToolStripMenuItem.DropDownItems.Count.ToStringRunTimeMenuToolStripMenuItem.DropDownItems.Add(Item)AddHandler Item.Click, New System.EventHandler(AddressOf OptionClick)
End Sub
Private Sub bttnRemoveItem_Click(…) Handles bttnRemoveItem.ClickIf RunTimeMenuToolStripMenuItem.DropDownItems.Count > 0 Then
Dim mItem As ToolStripItemDim items As Integer =
RunTimeMenuToolStripMenuItem.DropDownItems.CountmItem = RunTimeMenuToolStripMenuItem.DropDownItems(items - 1)
RunTimeMenuToolStripMenuItem.DropDownItems.Remove(mItem)End If
End Sub
The Remove button’s code uses the Remove method to remove the last item in the menu byits index after making sure the menu contains at least one item. The Add button adds a newitem and sets its caption to Run Time Option n, where n is the item’s order in the menu. Inaddition, it assigns an event handler to the new item’s Click event. This event handler is thesame for all the items added at runtime; it’s the OptionClick() subroutine. All the runtimeoptions invoke the same event handler — it would be quite cumbersome to come up with aseparate event handler for different items. In the single event handler, you can examine thename of the ToolStripMenuItem object that invoked the event handler and act accordingly.The OptionClick() subroutine used in Listing 6.13 displays the name of the menu item thatinvoked it. It doesn’t do anything, but it shows you how to figure out which item of the RunTime Menu was clicked.

THE BOTTOM LINE 251
Listing 6.13: Programming dynamic menu items
Private Sub OptionClick(…)Dim itemClicked As New ToolStripMenuItemitemClicked = CType(sender, ToolStripMenuItem)MsgBox("You have selected the item " & itemClicked.Text)
End Sub
Creating Context Menus
Nearly every Windows application provides a context menu that the user can invoke byright-clicking a form or a control. (It’s sometimes called a shortcut menu or pop-up menu.)This is a regular menu, but it’s not anchored on the form. It can be displayed anywhere on theform or on specific controls. Different controls can have different context menus, depending onthe operations you can perform on them at the time.
To create a context menu, place a ContextMenuStrip control on your form. The new contextmenu will appear on the form just like a regular menu, but it won’t be displayed there at run-time. You can create as many context menus as you need by placing multiple instances of theContextMenuStrip control on your form and adding the appropriate commands to each one. Toassociate a context menu with a control on your form, set the ContextMenu property for thatcontrol to the name of the corresponding context menu.
Designing a context menu is identical to designing a regular menu. The only difference isthat the first command in the menu is always ContextMenuStrip and it’s not displayed alongwith the menu.
The Bottom Line
Visual form design Forms expose a lot of trivial properties for setting their appearance. Inaddition, they expose a few properties that simplify the task of designing forms that can beresized at runtime. The Anchor property causes a control to be anchored to one or more edgesof the form to which it belongs. The Dock property allows you to place on the form controlsthat are docked to one of its edges. To create forms with multiple panes that the user can resizeat runtime, use the SplitContainer control. If you just can’t fit all the controls in a reasonablysized form, use the AutoScroll properties to create a scrollable form.
Master It You’ve been asked to design a form with three distinct sections. You should alsoallow users to resize each section. How will you design this form?
Design applications with multiple forms. Typical applications are made up of multipleforms: the main form and one or more auxiliary forms. To show an auxiliary form from withinthe main form’s code, call the auxiliary form’s Show method, or the ShowDialog method if youwant to display the auxiliary form modally (as a dialog box).
Master It How will you set the values of selected controls in a dialog box, display them,and then read the values selected by the user from the dialog box?

252 CHAPTER 6 WORKING WITH FORMS
Design dynamic forms. You can create dynamic forms by populating them with controls atruntime through the form’s Controls collection. First, create instances of the appropriate con-trols by declaring variables of the corresponding type. Then set the properties of each of thesevariables that represent controls. Finally, place the control on the form by adding the corre-sponding variable to the form’s Controls collection.
Master It How will you add a TextBox control to your form at runtime and assign a han-dler to the control’s TextChanged event?
Design menus. Both form menus and context menus are implemented through the Menu-Strip control. The items that make up the menu are ToolStripMenuItem objects. The ToolStrip-MenuItem objects give you absolute control over the structure and appearance of the menus ofyour application.
Master It What are the two basic events fired by the ToolStripMenuItem object?

Chapter 7
More Windows Controls
In this chapter, I will continue the discussion of the Windows controls. I’ll start with the con-trols that implement the common dialog boxes and the RichTextBox control. Then I will dealwith two more advanced controls, TreeView and ListView.
The .NET Framework provides a set of controls for displaying common dialog boxes, suchas the Open and Color dialog boxes. Each of these controls encapsulates a large amount offunctionality that would take a lot of code to duplicate. The common dialog controls are fun-damental components because they enable you to design user interfaces with the look and feelof a Windows application.
You’ll also explore the RichTextBox control, which is an advanced version of the TextBoxcontrol. The RichTextBox control provides all the functionality you’ll need to build a word pro-cessor — WordPad is actually built around the RichTextBox control. The RichTextBox control al-lows you to format text by mixing fonts and attributes, aligning paragraphs differently, and so on.
The TreeView and ListView controls implement two of the more-advanced data structures.TreeView can be used to present a hierarchical list — a tree in which items that belong toother items appear under their parent with the proper indentation. For instance, a list ofcity and state names should be structured so that each city appears under the correspondingstate. ListView can be used to present a ‘‘flat’’ structure where each item has a number ofsubitems. A typical example is a file, whose most important attributes are name, size, type, andmodification date. These attributes can be presented as subitems in a list of files.
The TreeView and ListView controls were designed to hide much of the complexity of thesestructures, and they do this very well. They are among the more-advanced controls, and theyare certainly more difficult to program than the ones discussed in the preceding chapters. Thesetwo controls, however, are the basic makings of unique user interfaces, as you’ll see in thischapter’s examples.
In this chapter you’ll learn how to do the following:
◆ Use the OpenFileDialog and SaveFileDialog controls to prompt users for filenames.
◆ Use ColorDialog and FontDialog controls to prompt users for colors and typefaces.
◆ Use the RichTextBox control as an advanced text editor to present richly formatted text.
◆ Use the TreeView and ListView controls to present hierarchical lists and lists of structureditems.

254 CHAPTER 7 MORE WINDOWS CONTROLS
The Common Dialog ControlsA rather tedious, but quite common, task in nearly every application is to prompt the userfor filenames, font names and sizes, or colors to be used by the application. Designing yourown dialog boxes for these purposes would be a hassle, not to mention that your applicationswouldn’t conform to the basic Windows interface design principles. Truth be told, users arenot fond of surprises, and all your creative effort will most likely backfire. Unexpected interfacefeatures are guaranteed to curb GUI usability and result in a number of frustrated users. In fact,all Windows applications use standard dialog boxes for common operations; two of them areshown in Figure 7.1. These dialog boxes are implemented as standard controls in the Toolbox.To use any of the common dialog controls in your interface, just place the appropriate controlfrom the Dialogs section of the Toolbox on your form and activate it from within your code bycalling the ShowDialog method.
Figure 7.1
The Open and Font com-mon dialog boxes
The common dialog controls are invisible at runtime, and they’re not placed on your formsbecause they’re implemented as modal dialog boxes and they’re displayed as needed. You sim-ply add them to the project by double-clicking their icons in the Toolbox; a new icon appears inthe components tray of the form, just below the Form Designer. The following common dialogcontrols are in the Toolbox under the Dialogs tab:
OpenFileDialog Lets users select a file to open. It also allows the selection of multiple filesfor applications that must process many files at once.

THE COMMON DIALOG CONTROLS 255
SaveFileDialog Lets users select or specify the path of a file in which the current documentwill be saved.
FolderBrowserDialog Lets users select a folder (an operation that can’t be performed withthe OpenFileDialog control).
ColorDialog Lets users select a color from a list of predefined colors or specify custom colors.
FontDialog Lets users select a typeface and style to be applied to the current text selection.The Font dialog box has an Apply button, which you can intercept from within your code anduse to apply the currently selected font to the text without closing the dialog box.
There are three more common dialog controls: the PrintDialog, PrintPreviewDialog, andPageSetupDialog controls. These controls are discussed in detail in the tutorial ‘‘Printing withVisual Basic 2010,’’ available for download from www.sybex.com/go/masteringvb2010, in thecontext of VB’s printing capabilities.
Using the Common Dialog ControlsTo display any of the common dialog boxes from within your application, you must first addan instance of the appropriate control to your project. Then you must set some basic propertiesof the control through the Properties window. Most applications set the control’s propertiesfrom within the code because common dialogs interact closely with the application. When youcall the Color common dialog, for example, you should preselect a color from within yourapplication and make it the default selection on the control. When prompting the user for thecolor of the text, the default selection should be the current setting of the control’s ForeColorproperty. Likewise, the Save dialog box must suggest a filename when it first pops up (or thefilename’s extension, at least).
To display a common dialog box from within your code, you simply call the control’sShowDialog method, which is common for all controls. Note that all common dialog controlscan be displayed only modally and they don’t expose a Show method. As soon as you call theShowDialog method, the corresponding dialog box appears onscreen, and the execution of theprogram is suspended until the box is closed. Using the Open, Save, and FolderBrowser dialogboxes, users can traverse the entire structure of their drives and locate the desired filename orfolder. When the user clicks the Open or Save button, the dialog box closes and the program’sexecution resumes. The code should read the name of the file selected by the user throughthe FileName property and use it to open the file or store the current document there. Thefolder selected in the FolderBrowserDialog control is returned to the application through theSelectedPath property.
Here is the sequence of statements used to invoke the Open common dialog and retrieve theselected filename:
If OpenFileDialog1.ShowDialog = Windows.Forms.DialogResult.OK ThenfileName = OpenFileDialog1.FileName‘ Statements to open the selected file
End If
The ShowDialog method returns a value indicating how the dialog box was closed. Youshould read this value from within your code and ignore the settings of the dialog box if theoperation was cancelled.

256 CHAPTER 7 MORE WINDOWS CONTROLS
The variable fileName in the preceding code segment is the full pathname of the fileselected by the user. You can also set the FileName property to a filename, which will bedisplayed when the Open dialog box is first opened:
OpenFileDialog1.FileName ="C:\WorkFiles\Documents\Document1.doc"
If OpenFileDialog1.ShowDialog =Windows.Forms.DialogResult.OK Then
fileName = OpenFileDialog1.FileName‘ Statements to open the selected file
End If
Similarly, you can invoke the Color dialog box and read the value of the selected color byusing the following statements:
ColorDialog1.Color = TextBox1.BackColorIf ColorDialog1.ShowDialog = DialogResult.OK Then
TextBox1.BackColor = ColorDialog1.ColorEnd If
The ShowDialog method is common to all controls. The Title property is also common toall controls and it’s the string displayed in the title bar of the dialog box. The default title is thename of the dialog box (for example, Open, Color, and so on), but you can adjust it from withinyour code with a statement such as the following:
ColorDialog1.Title = "Select Drawing Color"
The ColorDialog ControlThe Color dialog box, shown in Figure 7.2, is one of the simplest dialog boxes. Its Colorproperty returns the color selected by the user or sets the initially selected color when the useropens the dialog box.
Figure 7.2
The Color dialog box

THE COMMON DIALOG CONTROLS 257
The following statements set the initial color of the ColorDialog control, display the dialogbox, and then use the color selected in the control to fill the form. First, place a ColorDialogcontrol in the form and then insert the following statements in a button’s Click event handler:
Private Sub Button1_Click(…) Handles Button1.ClickColorDialog1.Color = Me.BackColorIf ColorDialog1.ShowDialog = Windows.Forms.DialogResult.OK Then
Me.BackColor = ColorDialog1.ColorEnd If
End Sub
The following sections discuss the basic properties of the ColorDialog control.
AllowFullOpen
Set this property to True if you want users to be able to open the dialog box and define theirown custom colors, as you can in the one shown in Figure 7.2. The AllowFullOpen propertydoesn’t open the custom section of the dialog box; it simply enables the Define Custom Colorsbutton in the dialog box. Otherwise, this button is disabled.
AnyColor
This property is a Boolean value that determines whether the dialog box displays all availablecolors in the set of basic colors.
Color
This is the color specified on the control. You can set it to a color value before showing thedialog box to suggest a reasonable selection. On return, read the value of the same propertyto find out which color was picked by the user in the control:
ColorDialog1.Color = Me.BackColorIf ColorDialog1.ShowDialog = DialogResult.OK Then
Me.BackColor = ColorDialog1.ColorEnd If
CustomColors
This property indicates the set of custom colors that will be shown in the dialog box. The Colordialog box has a section called Custom Colors, in which you can display 16 additional customcolors. The CustomColors property is an array of integers that represent colors. To display threecustom colors in the lower section of the Color dialog box, use a statement such as the following:
Dim colors() As Integer = {222663, 35453, 7888}ColorDialog1.CustomColors = colors
You’d expect that the CustomColors property would be an array of Color values, but it’snot. You can’t create the array CustomColors with a statement such as this one:
Dim colors() As Color ={Color.Azure, Color.Navy, Color.Teal}

258 CHAPTER 7 MORE WINDOWS CONTROLS
Because it’s awkward to work with numeric values, you should convert color values to inte-ger values by using a statement such as the following:
Color.Navy.ToArgb
The preceding statement returns an integer value that represents the color navy. This value,however, is negative because the first byte in the color value represents the transparency ofthe color. To get the value of the color, you must take the absolute value of the integer valuereturned by the previous expression. To create an array of integers that represent color values,use a statement such as the following:
Dim colors() As Integer ={Math.Abs(Color.Gray.ToArgb),Math.Abs(Color.Navy.ToArgb),Math.Abs(Color.Teal.ToArgb)}
Now you can assign the colors array to the CustomColors property of the control and thecolors will appear in the Custom Colors section of the Color dialog box.
SolidColorOnly
This indicates whether the dialog box will restrict users to selecting solid colors only. This settingshould be used with systems that can display only 256 colors. Although today few systems can’tdisplay more than 256 colors, some interfaces are limited to this number. When you run an app-lication through Remote Desktop, for example, only the solid colors are displayed correctly on theremote screen regardless of the remote computer’s graphics card (and that’s for efficiency reasons).
The FontDialog ControlThe Font dialog box, shown in Figure 7.3, lets the user review and select a font and then setits size and style. Optionally, by clicking the Apply button users can also select the font’s colorand even apply the current settings to the selected text on a control of the form without closingthe dialog box. This button isn’t displayed by default; to show this button, you must set thecontrol’s ShowApply property to True. To see how the Apply button is used, see the descriptionof the ShowApply property a little later in this section.
Figure 7.3
The Font dialog box

THE COMMON DIALOG CONTROLS 259
When the dialog is closed by clicking the OK button, you can retrieve the selected font byusing the control’s Font property. In addition to the OK button, the Font dialog box may con-tain the Apply button, which reports the current setting to your application. You can interceptthe Click event of the Apply button and adjust the appearance of the text on your form whilethe common dialog is still visible.
The main property of this control is the Font property, which sets the initially selected fontin the dialog box and retrieves the font selected by the user. The following statements displaythe Font dialog box after setting the initial font to the current font of the TextBox1 control.When the user closes the dialog box, the code retrieves the selected font and assigns it to thesame TextBox control:
FontDialog1.Font = TextBox1.FontIf FontDialog1.ShowDialog = DialogResult.OK Then
TextBox1.Font = FontDialog1.FontEnd If
Use the following properties to customize the Font dialog box before displaying it.
AllowScriptChange
This property is a Boolean value that indicates whether the Script combo box will be displayedin the Font dialog box. This combo box allows the user to change the current character set andselect a non-Western language (such as Greek, Hebrew, Cyrillic, and so on).
AllowVerticalFonts
This property is a Boolean value that indicates whether the dialog box allows the display andselection of both vertical and horizontal fonts. Its default value is False, which displays onlyhorizontal fonts.
Color, ShowColor
The Color property sets or returns the selected font color. To enable users to select a color forthe font, you must also set the ShowColor property to True.
FixedPitchOnly
This property is a Boolean value that indicates whether the dialog box allows only theselection of fixed-pitch fonts. Its default value is False, which means that all fonts (fixed- andvariable-pitch fonts) are displayed in the Font dialog box. Fixed-pitch fonts, or monospacedfonts, consist of characters of equal widths that are sometimes used to display columns ofnumeric values so that the digits are aligned vertically.
Font
This property is a Font object. You can set it to the preselected font before displaying the dialogbox and assign it to a Font property upon return. You’ve already seen how to preselect a fontand how to apply the selected font to a control from within your application.

260 CHAPTER 7 MORE WINDOWS CONTROLS
You can also create a new Font object and assign it to the control’s Font property. Uponreturn, the TextBox control’s Font property is set to the selected font:
Dim newFont As New Font("Verdana", 12, FontStyle.Underline)FontDialog1.Font = newFontIf FontDialog1.ShowDialog() = DialogResult.OK Then
TextBox1.ForeColor = FontDialog1.ColorEnd If
FontMustExist
This property is a Boolean value that indicates whether the dialog box forces the selection ofan existing font. If the user enters a font name that doesn’t correspond to a name in the listof available fonts, a warning is displayed. Its default value is True, and there’s no reason tochange it.
MaxSize, MinSize
These two properties are integers that determine the minimum and maximum point size theuser can specify in the Font dialog box. Use these two properties to prevent the selectionof extremely large or extremely small font sizes because these fonts might throw off awell-balanced interface (text will overflow in labels, for example).
ShowApply
This property is a Boolean value that indicates whether the dialog box provides an Apply but-ton. Its default value is False, so the Apply button isn’t normally displayed. If you set this prop-erty to True, you must also program the control’s Apply event — the changes aren’t appliedautomatically to any of the controls in the current form.
The following statements display the Font dialog box with the Apply button:
Private Sub Button2_Click(…) Handles Button2.ClickFontDialog1.Font = TextBox1.FontFontDialog1.ShowApply = TrueIf FontDialog1.ShowDialog = DialogResult.OK Then
TextBox1.Font = FontDialog1.FontEnd If
End Sub
The FontDialog control raises the Apply event every time the user clicks the Apply button.In this event’s handler, you must read the currently selected font and use it in the form so thatusers can preview the effect of their selection:
Private Sub FontDialog1_Apply(…) Handles FontDialog1.ApplyTextBox1.Font = FontDialog1.Font
End Sub
ShowEffects
This property is a Boolean value that indicates whether the dialog box allows the selectionof special text effects, such as strikethrough and underline. The effects are returned to the

THE COMMON DIALOG CONTROLS 261
application as attributes of the selected Font object, and you don’t have to do anything specialin your application.
The OpenDialog and SaveDialog ControlsOpen and Save As, the two most widely used common dialog boxes (see Figure 7.4), are imple-mented by the OpenFileDialog and SaveFileDialog controls. Nearly every application promptsusers for filenames, and the .NET Framework provides two controls for this purpose. The twodialog boxes are nearly identical, and most of their properties are common, so we’ll start withthe properties that are common to both controls.
Figure 7.4
The Open and Save Ascommon dialog boxes
When either of the two controls is displayed, it rarely displays all the files in any givenfolder. Usually the files displayed are limited to the ones that the application recognizes so thatusers can easily spot the file they want. The Filter property limits the types of files that willappear in the Open or Save As dialog box.
It’s also standard for the Windows interface not to display the extensions of filenames(although Windows distinguishes files by their filename extensions). The file type ComboBox,which appears at the bottom of the form next to the File Name box, contains the various file

262 CHAPTER 7 MORE WINDOWS CONTROLS
types recognized by the application. The various file types can be described in plain Englishwith long descriptive names and without their filename extensions.
The extension of the default file type for the application is described by the DefaultExten-sion property, and the list of the file types displayed in the Save As Type box is determined bythe Filter property.
To prompt the user for a file to be opened, use the following statements. The Open dialogbox displays the files with the filename extension .bin only:
OpenFileDialog1.DefaultExt = ".bin"OpenFileDialog1.AddExtension = TrueOpenFileDialog1.Filter = "Binary Files|*.bin"If OpenFileDialog1.ShowDialog() =
Windows.Forms.DialogResult.OK ThenDebug.WriteLine(OpenFileDialog1.FileName)
End If
The following sections describe the properties of the OpenFileDialog and SaveFileDialogcontrols.
AddExtension
This property is a Boolean value that determines whether the dialog box automatically adds anextension to a filename if the user omits it. The extension added automatically is the one spec-ified by the DefaultExtension property, which you must set before calling the ShowDialogmethod. This is the default filename extension of the files recognized by your application.
CheckFileExists
This property is a Boolean value that indicates whether the dialog box displays a warning if theuser enters the name of a file that does not exist in the Open dialog box or if the user enters thename of a file that exists in the Save dialog box.
CheckPathExists
This property is a Boolean value that indicates whether the dialog box displays a warning if theuser specifies a path that does not exist as part of the user-supplied filename.
DefaultExt
This property sets the default extension for the filenames specified on the control. Use thisproperty to specify a default filename extension, such as .txt or .doc, so that when a file withno extension is specified by the user, the default extension is automatically appended to thefilename. You must also set the AddExtension property to True. The default extension propertystarts with the period, and it’s a string — for example, .bin.
DereferenceLinks
This property indicates whether the dialog box returns the location of the file referenced bythe shortcut or the location of the shortcut itself. If you attempt to select a shortcut on yourDesktop when the DereferenceLinks property is set to False, the dialog box will return to
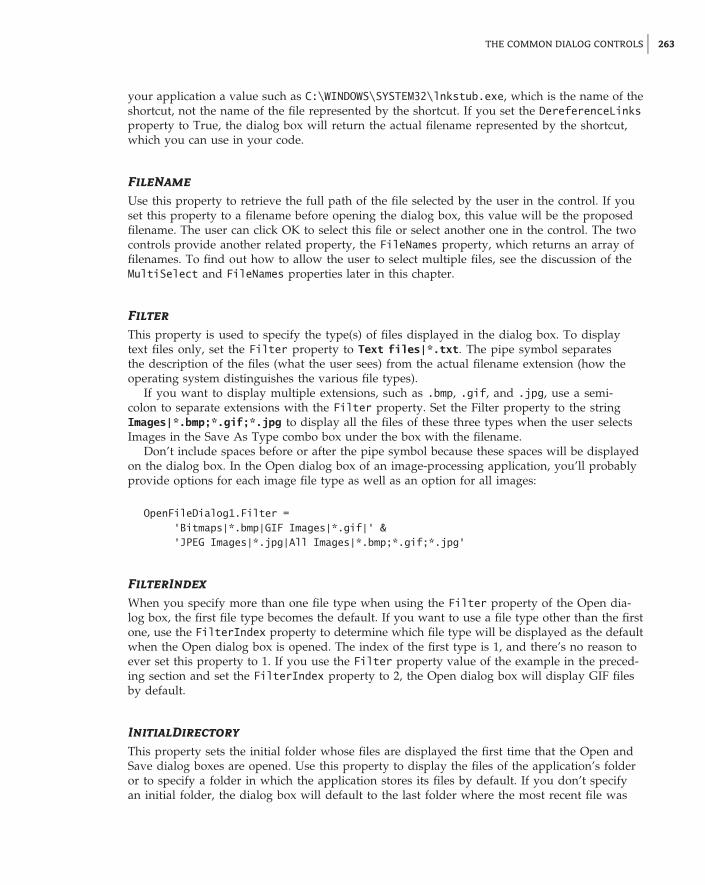
THE COMMON DIALOG CONTROLS 263
your application a value such as C:\WINDOWS\SYSTEM32\lnkstub.exe, which is the name of theshortcut, not the name of the file represented by the shortcut. If you set the DereferenceLinksproperty to True, the dialog box will return the actual filename represented by the shortcut,which you can use in your code.
FileName
Use this property to retrieve the full path of the file selected by the user in the control. If youset this property to a filename before opening the dialog box, this value will be the proposedfilename. The user can click OK to select this file or select another one in the control. The twocontrols provide another related property, the FileNames property, which returns an array offilenames. To find out how to allow the user to select multiple files, see the discussion of theMultiSelect and FileNames properties later in this chapter.
Filter
This property is used to specify the type(s) of files displayed in the dialog box. To displaytext files only, set the Filter property to Text files|*.txt. The pipe symbol separatesthe description of the files (what the user sees) from the actual filename extension (how theoperating system distinguishes the various file types).
If you want to display multiple extensions, such as .bmp, .gif, and .jpg, use a semi-colon to separate extensions with the Filter property. Set the Filter property to the stringImages|*.bmp;*.gif;*.jpg to display all the files of these three types when the user selectsImages in the Save As Type combo box under the box with the filename.
Don’t include spaces before or after the pipe symbol because these spaces will be displayedon the dialog box. In the Open dialog box of an image-processing application, you’ll probablyprovide options for each image file type as well as an option for all images:
OpenFileDialog1.Filter ="Bitmaps|*.bmp|GIF Images|*.gif|" &"JPEG Images|*.jpg|All Images|*.bmp;*.gif;*.jpg"
FilterIndex
When you specify more than one file type when using the Filter property of the Open dia-log box, the first file type becomes the default. If you want to use a file type other than the firstone, use the FilterIndex property to determine which file type will be displayed as the defaultwhen the Open dialog box is opened. The index of the first type is 1, and there’s no reason toever set this property to 1. If you use the Filter property value of the example in the preced-ing section and set the FilterIndex property to 2, the Open dialog box will display GIF filesby default.
InitialDirectory
This property sets the initial folder whose files are displayed the first time that the Open andSave dialog boxes are opened. Use this property to display the files of the application’s folderor to specify a folder in which the application stores its files by default. If you don’t specifyan initial folder, the dialog box will default to the last folder where the most recent file was

264 CHAPTER 7 MORE WINDOWS CONTROLS
opened or saved. It’s also customary to set the initial folder to the application’s path by usingthe following statement:
OpenFileDialog1.InitialDirectory = Application.ExecutablePath
The expression Application.ExecutablePath returns the path in which the application’sexecutable file resides.
RestoreDirectory
Every time the Open and Save As dialog boxes are displayed, the current folder is the onethat was selected by the user the last time the control was displayed. The RestoreDirectoryproperty is a Boolean value that indicates whether the dialog box restores the current directorybefore closing. Its default value is False, which means that the initial directory is not restoredautomatically. The InitialDirectory property overrides the RestoreDirectory property.
FileNames
If the Open dialog box allows the selection of multiple files (you have set the MultiSelectproperty to True), the FileNames property contains the pathnames of all selected files.FileNames is a collection, and you can iterate through the filenames with an enumerator. Thisproperty should be used only with the OpenFileDialog control, even though the SaveFileDialogcontrol exposes a FileNames property.
MultiSelect
This property is a Boolean value that indicates whether the user can select multiple files in thedialog box. Its default value is False, and users can select a single file. When the MultiSelectproperty is True, the user can select multiple files, but they must all come from the same folder(you can’t allow the selection of multiple files from different folders). This property is uniqueto the OpenFileDialog control. This and the following two properties are unique to the Open-FileDialog control.
ReadOnlyChecked, ShowReadOnly
The ReadOnlyChecked property is a Boolean value that indicates whether the Read-Only checkbox is selected when the dialog box first pops up (the user can clear this box to open a filein read/write mode). You can set this property to True only if the ShowReadOnly property isalso set to True. The ShowReadOnly property is also a Boolean value that indicates whether theRead-Only check box is available. If this check box appears on the form, the user can select itso the file will be opened as read-only. Files opened as read-only shouldn’t be saved with thesame filename — always prompt the user for a new filename.
The OpenFile and SaveFile Methods
The OpenFileDialog control exposes the OpenFile method, which allows you to quicklyopen the selected file. Likewise, the SaveFileDialog control exposes the SaveFile method,which allows you to quickly save a document to the selected file. Normally, after retriev-ing the name of the file selected by the user, you must open this file for reading (in

THE COMMON DIALOG CONTROLS 265
the case of the Open dialog box) or writing (in the case of the Save dialog box). Thetopic of reading from or writing to files is discussed in detail in the tutorial ‘‘Access-ing Files and Folders with the System.IO Class,’’ which is available for download atwww.sybex.com/go/masteringvb2010.
When this method is applied to the Open dialog box, the file is opened with read-only per-mission. The same method can be applied to the SaveFile dialog box, in which case the file isopened with read-write permission. Both methods return a Stream object, and you can call thisobject’s Read and Write methods to read from or write to the file.
VB 2010 at Work: Multiple File Selection
The Open dialog box allows the selection of multiple files. This feature can come in handywhen you want to process files en masse. You can let the user select many files, usually of thesame type, and then process them one at a time. Or, you might want to prompt the user toselect multiple files to be moved or copied.
To allow the user to select multiple files in the Open dialog box, set the MultiSelect prop-erty to True. The user can then select multiple files with the mouse by holding down the Shiftor Ctrl key. The names of the selected files are reported by the property FileNames, which isan array of strings. The FileNames array contains the pathnames of all selected files, and youcan iterate through them and process each file individually.
One of this chapter’s sample projects is the MultipleFiles project, which demonstrates howto use the FileNames property. The application’s form is shown in Figure 7.5. The button atthe top of the form, Show Files in Folder, displays the Open dialog box, where you can selectmultiple files. After closing the dialog box by clicking the Open button on the Open dialog box,the application displays the pathnames of the selected files on a ListBox control.
Figure 7.5
The MultipleFilesproject lets the userselect multiple files inthe Open dialog box.
The code behind the Open Files button is shown in Listing 7.1. In this example, I usedthe array’s enumerator to iterate through the elements of the FileNames array. You can use

266 CHAPTER 7 MORE WINDOWS CONTROLS
any of the methods discussed in Chapter 2, ‘‘VB Programming Essentials’’ to iterate throughthe array.
Listing 7.1: Processing multiple selected files
Private Sub bttnFile_Click(…) Handles bttnFile.ClickOpenFileDialog1.Multiselect = TrueOpenFileDialog1.ShowDialog()Dim filesEnum As IEnumeratorListBox1.Items.Clear()filesEnum = OpenFileDialog1.FileNames.GetEnumerator()While filesEnum.MoveNext
ListBox1.Items.Add(filesEnum.Current)End While
End Sub
The FolderBrowserDialog ControlSometimes we need to prompt users for a folder rather than a filename. An application thatprocesses files in batch mode shouldn’t force users to select the files to be processed. Instead, itshould allow users to select a folder and process all files of a specific type in the folder (it couldencrypt all text documents or resize all image files, for example). As elaborate as the File Opendialog box might be, it doesn’t allow the selection of a folder. To prompt users for a folder’spath, use the FolderBrowser dialog box, which is a very simple one; it’s shown in Figure 7.6. TheFolderBrowserDialog control exposes a small number of properties, which are discussed next.
Figure 7.6
Selecting a folder viathe FolderBrowser dialogbox
FolderBrowserDialog control
Resulting Browse For Folder dialog box

THE COMMON DIALOG CONTROLS 267
RootFolder
This property indicates the initial folder to be displayed when the dialog box is shown. It isnot necessarily a string; it can also be a member of the SpecialFolder enumeration. To see themembers of the enumeration, enter the following expression:
FolderBrowserDialog1.RootFolder =
As soon as you enter the equals sign, you will see the members of the enumeration. Themost common setting for this property is My Computer, which represents the target computer’sfile system. You can set the RootFolder property to a number of special folders (for example,Personal, Desktop, ApplicationData, LocalApplicationData, and so on). You can also set thisproperty to a string with the desired folder’s pathname.
SelectedPath
After the user closes the FolderBrowser dialog box by clicking the OK button, you can retrievethe name of the selected folder with the SelectedPath property, which is a string, and youcan use it with the methods of the System.IO namespace to access and manipulate the selectedfolder’s files and subfolders.
ShowNewFolderButton
This property determines whether the dialog box will contain a New button; its default valueis True. When users click the New button to create a new folder, the dialog box prompts themfor the new folder’s name and creates a new folder with the specified name under the selectedfolder.
VB 2010 at Work: Folder Browsing Demo Project
The FolderBrowser control is a trivial control, but I’m including a sample application,available for download from www.sybex.com/go/masteringvb2010, to demonstrateits use. The same application demonstrates how to retrieve the files and subfolders ofthe selected folder and how to create a directory listing in a RichTextBox control, likethe one shown in Figure 7.6. The members of the System.IO namespace, which allowyou to access and manipulate files and folders from within your code, are discussed indetail in the tutorial ‘‘Accessing Files and Folders,’’ which is available for download atwww.sybex.com/go/masteringvb2010.
The FolderBrowser dialog box is set to display the entire file system of the target computerand is invoked with the following statements:
FolderBrowserDialog1.RootFolder = Environment.SpecialFolder.MyComputerFolderBrowserDialog1.ShowNewFolderButton = FalseIf FolderBrowserDialog1.ShowDialog = DialogResult.OK Then’ process files in selected folderEnd If
As usual, we examine the value returned by the ShowDialog method of the controland we proceed if the user has closed the dialog box by clicking the OK button. The codethat iterates through the selected folder’s files and subfolders, shown in Listing 7.2, is

268 CHAPTER 7 MORE WINDOWS CONTROLS
basically a demonstration of some members of the System.IO namespace, but I’ll review itbriefly here.
Listing 7.2: Scanning a folder
Private Sub bttnSelectFiles_Click(…) Handles bttnSelectFiles.ClickFolderBrowserDialog1.RootFolder =
Environment.SpecialFolder.MyComputerFolderBrowserDialog1.ShowNewFolderButton = FalseIf FolderBrowserDialog1.ShowDialog = Windows.Forms.DialogResult.OK Then
RichTextBox1.Clear()‘ Retrieve initial folderDim initialFolder As String =
FolderBrowserDialog1.SelectedPathDim InitialDir As New IO.DirectoryInfo(
FolderBrowserDialog1.SelectedPath)‘ and print its name w/o any indentationPrintFolderName(InitialDir, "")‘ and then print the files in the top folderIf InitialDir.GetFiles("*.*").Length = 0 Then
SwitchToItalics()RichTextBox1.AppendText(
"folder contains no files" & vbCrLf)SwitchToRegular()
ElsePrintFileNames(InitialDir, "")
End IfDim DI As IO.DirectoryInfo‘ Iterate through every subfolder and print itFor Each DI In InitialDir.GetDirectories
PrintDirectory(DI)Next
End IfEnd Sub
The selected folder’s name is stored in the initialFolder variable and is passed as anargument to the constructor of the DirectoryInfo class. The InitialDir variable represents thespecified folder. This object is passed to the PrintFolderName() subroutine, which prints thefolder’s name in bold. Then the code iterates through the same folder’s files and prints themwith the PrintFileNames() subroutine, which accepts as an argument the DirectoryInfo objectthat represents the current folder and the indentation level. After printing the initial folder’sname and the names of the files in the folder, the code iterates through the subfolders of theinitial folder. The GetDirectories method of the DirectoryInfo class returns a collection ofobjects, one for each subfolder under the folder represented by the InitialDir variable. Foreach subfolder, it calls the PrintDirectory() subroutine, which prints the folder’s name and

THE RICHTEXTBOX CONTROL 269
the files in this folder, and then iterates through the folder’s subfolders. The code that iteratesthrough the selected folder’s files and subfolders is shown in Listing 7.3.
Listing 7.3: The PrintDirectory() subroutine
Private Sub PrintDirectory(ByVal CurrentDir As IO.DirectoryInfo)Static IndentationLevel As Integer = 0IndentationLevel += 1Dim indentationString As String = ""indentationString =
New String(Convert.ToChar(vbTab), IndentationLevel)PrintFolderName(CurrentDir, indentationString)If CurrentDir.GetFiles("*.*").Length = 0 Then
SwitchToItalics()RichTextBox1.AppendText(indentationString &
"folder contains no files" & vbCrLf)SwitchToRegular()
ElsePrintFileNames(CurrentDir, indentationString)
End IfDim folder As IO.DirectoryInfoFor Each folder In CurrentDir.GetDirectories
PrintDirectory(folder)NextIndentationLevel -= 1
End Sub
The code that iterates through the subfolders of a given folder is discussed in detail inthe tutorial ‘‘Accessing Files and Folders,’’ available for download from www.sybex.com/go/masteringvb2010, so you need not worry if you can’t figure out how it works yet. In thefollowing sections, you’ll learn how to display formatted text in the RichTextBox control.
The RichTextBox ControlThe RichTextBox control is the core of a full-blown word processor. It provides all the func-tionality of a TextBox control; it can handle multiple typefaces, sizes, and attributes and offersprecise control over the margins of the text (see Figure 7.7). You can even place images in yourtext on a RichTextBox control (although you won’t have the kind of control over the embeddedimages that you have with Microsoft Word).
The fundamental property of the RichTextBox control is its Rtf property. Similar to the Textproperty of the TextBox control, this property is the text displayed on the control. Unlike theText property, however, which returns (or sets) the text of the control but doesn’t contain for-matting information, the Rtf property returns the text along with any formatting information.

270 CHAPTER 7 MORE WINDOWS CONTROLS
Therefore, you can use the RichTextBox control to specify the text’s formatting, including para-graph indentation, font, and font size or style.
Figure 7.7
A word processor basedon the functionality ofthe RichTextBox control
RTF, which stands for Rich Text format, is a standard for storing formatting informationalong with the text. The beauty of the RichTextBox control for programmers is that they don’tneed to supply the formatting codes. The control provides simple properties to change the fontof the selected text, change the alignment of the current paragraph, and so on. The RTF code isgenerated internally by the control and used to save and load formatted files. It’s possible tocreate elaborately formatted documents without knowing the RTF specification.
The WordPad application that comes with Windows is based on the RichTextBox control.You can easily duplicate every bit of WordPad’s functionality with the RichTextBox control, asyou will see later in this chapter.
The RTF LanguageA basic knowledge of the Rich Text format, its commands, and how it works will certainlyhelp you understand the RichTextBox control’s inner workings. RTF is a language that usessimple commands to specify the formatting of a document. These commands, or tags, areASCII strings, such as \par (the tag that marks the beginning of a new paragraph) and \b(the tag that turns on the bold style). And this is where the value of the Rich Text format lies.RTF documents don’t contain special characters and can be easily exchanged among differentoperating systems and computers, as long as there is an RTF-capable application to read thedocument.
RTF is similar to Hypertext Markup Language (HTML), and if you’re familiar with HTML,a few comparisons between the two standards will provide helpful hints and insight into theRTF language. Like HTML, RTF was designed to create formatted documents that could be dis-played on different systems. The following RTF segment displays a sentence with a few wordsin italic:
\bRTF\b0 (which stands for Rich Text Format) is a \idocument formatting language\i0 that uses simplecommands to specify the formatting of the document.

THE RICHTEXTBOX CONTROL 271
The following is the equivalent HTML code:
<b>RTF</b> (which stands for Rich Text Format) is a<i>document formatting language</i> that uses simplecommands to specify the formatting of the document.
The <b> and <i> tags of HTML, for example, are equivalent to the \b and \i tags of RTF.The closing tags in RTF are \b0 and \i0, respectively.
Although you don’t need to understand the RTF specifications to produce formatted textwith the RichTextBox control, if you want to generate RTF documents from within your code,visit the RTF Cookbook site at http://search.cpan.org/∼sburke/RTF-Writer/lib/RTF/Cookbook.pod. There’s also a Microsoft resource on RTF at http://msdn2.microsoft.com/en-us/library/aa140277(office.10).aspx.
Text Manipulation and Formatting PropertiesThe RichTextBox control provides properties for manipulating the selected text on the con-trol. The names of these properties start with the Selection or Selected prefix, and the mostcommonly used ones are shown in Table 7.1. Some of these properties are discussed in furtherdetail in following sections.
Table 7.1: RichTextBox properties for manipulating selected text
Property What It Manipulates
SelectedText The selected text
SelectedRtf The RTF code of the selected text
SelectionStart The position of the selected text’s first character
SelectionLength The length of the selected text
SelectionFont The font of the selected text
SelectionColor The color of the selected text
SelectionBackColor The background color of the selected text
SelectionAlignment The alignment of the selected text
SelectionIndent, SelectionRightIndent,SelectionHangingIndent
The indentation of the selected text
RightMargin The distance of the text’s right margin from theleft edge of the control
SelectionTabs An array of integers that sets the tab stoppositions in the control
SelectionBullet Whether the selected text is bulleted
BulletIndent The amount of bullet indent for the selected text

272 CHAPTER 7 MORE WINDOWS CONTROLS
SelectedText
The SelectedText property represents the selected text, whether it was selected by the user viathe mouse or from within your code. To assign the selected text to a variable, use the followingstatement:
selText=RichTextbox1.SelectedText
You can also modify the selected text by assigning a new value to the SelectedText prop-erty. The following statement converts the selected text to uppercase:
RichTextbox1.SelectedText =RichTextbox1.SelectedText.ToUpper
You can assign any string to the SelectedText property. If no text is selected at the time,the statement will insert the string at the location of the pointer.
SelectionStart, SelectionLength
To simplify the manipulation and formatting of the text on the control, two additional prop-erties, SelectionStart and SelectionLength, report (or set) the position of the first selectedcharacter in the text and the length of the selection, respectively, regardless of the formatting ofthe selected text. One obvious use of these properties is to select (and highlight) some text onthe control:
RichTextBox1.SelectionStart = 0RichTextBox1.SelectionLength = 100
You can also use the Select method, which accepts as arguments the starting location andthe length of the text to be selected.
SelectionAlignment
Use this property to read or change the alignment of one or more paragraphs. This property’svalue is one of the members of the HorizontalAlignment enumeration: Left, Right, and Center.Users don’t have to select an entire paragraph to align it; just placing the pointer anywhere inthe paragraph will do the trick because you can’t align part of the paragraph.
SelectionIndent, SelectionRightIndent, SelectionHangingIndent
These properties allow you to change the margins of individual paragraphs. The Selection-Indent property sets (or returns) the amount of the text’s indentation from the left edge of thecontrol. The SelectionRightIndent property sets (or returns) the amount of the text’s inden-tation from the right edge of the control. The SelectionHangingIndent property indicates theindentation of each paragraph’s first line with respect to the following lines of the same para-graph. All three properties are expressed in pixels.

THE RICHTEXTBOX CONTROL 273
The SelectionHangingIndent property includes the current setting of the SelectionIndentproperty. If all the lines of a paragraph are aligned to the left, the SelectionIndent propertycan have any value (this is the distance of all lines from the left edge of the control), but theSelectionHangingIndent property must be zero. If the first line of the paragraph is shorterthan the following lines, the SelectionHangingIndent has a negative value. Figure 7.8 showsseveral differently formatted paragraphs. The settings of the SelectionIndent and Selection-HangingIndent properties are determined by the two sliders at the top of the form.
Figure 7.8
Various combinations ofthe SelectionIndentand SelectionHangingIndent properties pro-duce all possible para-graph styles.
SelectionBullet, BulletIndent
You use these properties to create a list of bulleted items. If you set the SelectionBullet prop-erty to True, the selected paragraphs are formatted with a bullet style, similar to the <ul> tagin HTML. To create a list of bulleted items, select them from within your code and assign thevalue True to the SelectionBullet property. To change a list of bulleted items back to normaltext, make the same property False.
The paragraphs formatted as bullets are also indented from the left by a small amount. Toset the amount of the indentation, use the BulletIndent property, which is also expressed inpixels.
SelectionTabs
Use this property to set the tab stops in the RichTextBox control. The Selection tab should be setto an array of integer values, which are the absolute tab positions in pixels. Use this propertyto set up a RichTextBox control for displaying tab-delimited data.

274 CHAPTER 7 MORE WINDOWS CONTROLS
Using the RichTextBox Control to Display Delimited Data
As a developer I tend to favor the RichTextBox control over the TextBox control, even thoughI don’t mix font styles or use the more-advanced features of the RichTextBox control. I sug-gest that you treat the RichTextBox control as an enhanced TextBox control and use it as asubstitute for the TextBox control. One of the features of the RichTextBox control that I findvery handy is its ability to set the tab positions and display tabular data. You can also displaytabular data on a ListView control, as you will see later in the chapter, but it’s simpler touse a RichTextBox control with its ReadOnly property set to True and its SelectionTabsproperty set to an array of values that will accommodate your data. Here’s how to set up aRichTextBox control to display a few rows of tab-delimited data:
RichTextBox1.ReadOnly = TrueRichTextBox1.SelectionTabs = New Integer() {100, 160, 340}RichTextBox1.AppendText("R1C1" & vbTab &
"R1C2" & vbTab &"R1C3" & vbCrLf)
RichTextBox1.AppendText("R2C1" & vbTab &"R2C2" & vbTab &"R2C3" & vbCrLf)
This technique is a lifesaver when I have to read the delimited data from a file. I just set upthe tab positions and then load the data with the LoadFile method, which is discussed in thenext section.
MethodsThe first two methods of the RichTextBox control you need to know are SaveFile andLoadFile. The SaveFile method saves the contents of the control to a disk file, and theLoadFile method loads the control from a disk file.
SaveFile
The syntax of the SaveFile method is as follows, where path is the path of the file in whichthe current document will be saved:
RichTextBox1.SaveFile(path, filetype)
By default, the SaveFile method saves the document in RTF format and uses the .rtf exten-sion. You can specify a different format by using the second optional argument, which can takeon the value of one of the members of the RichTextBoxStreamType enumeration, described inTable 7.2.
LoadFile
Similarly, the LoadFile method loads a text or RTF file to the control. Its syntax is identical tothe syntax of the SaveFile method:
RichTextBox1.LoadFile(path, filetype)

THE RICHTEXTBOX CONTROL 275
Table 7.2: The RichTextBoxStreamType enumeration
Format Effect
PlainText Stores the text on the control without any formatting
RichNoOLEObjs Stores the text without any formatting and ignores any embedded OLE (ObjectLinking and Embedding) objects
RichText Stores the text in RTF format (text with embedded RTF commands)
TextTextOLEObjs Stores the text along with the embedded OLE objects
UnicodePlainText Stores the text in Unicode format
The filetype argument is optional and can have one of the values of the RichTextBox-StreamType enumeration. Saving and loading files to and from disk files is as simple as pre-senting a Save or Open common dialog to the user and then calling one of the SaveFile orLoadFile methods with the filename returned by the common dialog box.
Select, SelectAll
The Select method selects a section of the text on the control, similar to setting the Selection-Start and SelectionLength properties. The Select method accepts two arguments, the loca-tion of the first character to be selected and the length of the selection:
RichTextBox1.Select(start, length)
The SelectAll method accepts no arguments and it selects all the text on the control.
Advanced Editing FeaturesThe RichTextBox control provides all the text-editing features you’d expect to find in atext-editing application, similar to the TextBox control. Among its more-advanced features,the RichTextBox control provides the AutoWordSelection property, which controls how thecontrol selects text. If it’s True, the control selects a word at a time.
In addition to formatted text, the RichTextBox control can handle object linking and embed-ding (OLE) objects. You can insert images in the text by pasting them with the Paste method.The Paste method doesn’t require any arguments; it simply inserts the contents of the Clip-board at the current location (the location of the cursor) in the document.
Unlike the plain TextBox control, the RichTextBox control encapsulates undo and redooperations at multiple levels. Each operation has a name (Typing, Deletion, and so on), andyou can retrieve the name of the next operation to be undone or redone and display it onthe menu. Instead of a simple Undo or Redo caption, you can change the captions of the Editmenu to something like Undo Delete or Redo Typing. To program undo and redo operationsfrom within your code, you must use the properties and methods discussed in the followingsections.

276 CHAPTER 7 MORE WINDOWS CONTROLS
CanUndo, CanRedo
These two properties are Boolean values you can read to find out whether there’s an operationthat can be undone or redone. If they’re False, you must disable the corresponding menu com-mand from within your code. The following statements disable the Undo command if there’sno action to be undone at the time (EditUndo is the name of the Undo command on the Editmenu):
If RichTextBox1.CanUndo ThenEditUndo.Enabled = True
ElseEditUndo.Enabled = False
End If
These statements should appear in the menu item’s Select event handler (not in the Clickevent handler) because they must be executed before the menu is displayed. The Select eventis triggered when a menu is opened. As a reminder, the Click event is fired when you click anitem and not when you open a menu. For more information on programming the events of amenu, see Chapter 6, ‘‘Working with Forms.’’
UndoActionName, RedoActionName
These two properties return the name of the action that can be undone or redone. The mostcommon value of both properties is Typing, which indicates that the Undo command willdelete a number of characters. Another common value is Delete, and some operations arenamed Unknown. If you change the indentation of a paragraph on the control, this action’sname is Unknown. Even when an action’s name is Unknown the action can be undone with theUndo method.
The following statement sets the caption of the Undo command to a string that indicates theaction to be undone (Editor is the name of a RichTextBox control):
If Editor.CanUndo ThenEditUndo.Text = "Undo " & Editor.UndoActionName
End If
Undo, Redo
These two methods undo or redo an action. The Undo method cancels the effects of the lastaction of the user on the control. The Redo method redoes the most recent undo action. TheRedo method does not repeat the last action; it applies to undo operations only.
Cutting, Copying, and PastingTo cut, copy, and paste text in the RichTextBox control, you can use the same techniques youuse with the regular TextBox control. For example, you can replace the current selection byassigning a string to the SelectedText property. The RichTextBox, however, provides a fewuseful methods for performing these operations. The Copy, Cut, and Paste methods performthe corresponding operations. The Cut and Copy methods are straightforward and require noarguments. The Paste method accepts a single argument, which is the format of the data to bepasted. Because the data will come from the Clipboard, you can extract the format of the data

THE RICHTEXTBOX CONTROL 277
in the Clipboard at the time and then call the CanPaste method to find out whether the controlcan handle this type of data. If so, you can then paste them in the control by using the Pastemethod.
This technique requires a bit of code because the Clipboard class doesn’t return the formatof the data in the Clipboard. You must call the following method of the Clipboard class to findout whether the data is of a specific type and then paste it on the control:
If Clipboard.GetDataObject.GetDataPresent(DataFormats.Text) ThenRichTextBox1.Paste(DataFormats.GetFormat("Text")
End If
This is a very simple case because we know that the RichTextBox control can accepttext. For a robust application, you must call the GetDataPresent method for each typeof data your application should be able to handle. (You may not want to allow users topaste all types of data that the control can handle.) By the way, you can simplify the codewith the help of the ContainsText/ContainsImage and GetText/GetImage methods of theMy.Application.Clipboard object.
In the RTFPad project in this chapter, we’ll use a structured exception handler to allow usersto paste anything in the control. If the control can’t handle it, the data won’t be pasted in thecontrol.
VB 2010 at Work: The RTFPad ProjectCreating a functional — even fancy — word processor based on the RichTextBox control isunexpectedly simple. The challenge is to provide a convenient interface that lets the userselect text, apply attributes and styles to it, and then set the control’s properties accordingly.The RTFPad sample application of this section does just that. You can download a copy fromwww.sybex.com/go/masteringvb2010.
The RTFPad application (refer to Figure 7.7) is based on the TextPad application developedin Chapter 5, ‘‘Basic Windows Controls.’’ It contains the same text-editing commands and someadditional text-formatting commands that can be implemented only with the RichTextBox con-trol; for example, it allows you to apply multiple fonts and styles to the text and, of course,multiple Undo/Redo operations.
The two TrackBar controls above the RichTextBox control manipulate the indentation of thetext. We already explored this arrangement in the discussion of the TrackBar control in Chapter5, but let’s review the operation of the two controls again. Each TrackBar control has a widthof 816 pixels, which is equivalent to 8.5 inches on a monitor that has a resolution of 96 dotsper inch (dpi). The height of the TrackBar controls is 42 pixels, but unfortunately they can’t bemade smaller. The Minimum property of both controls is 0, and the Maximum property is 16. TheTickFrequency is 1. With these values, you can adjust the indentation in steps of 1
2 inch. Setthe Maximum property to 32 and you’ll be able to adjust the indentation in steps of 1
4 inch. It’snot the perfect interface, as it’s built for A4 pages in portrait orientation only. You can experi-ment with this interface to build an even more functional word processor.
Each time the user slides the top TrackBar control, the code sets the SelectionIndent prop-erty to the proper percentage of the control’s width. Because the SelectionHangingIndentincludes the value of the SelectionIndent property, it also adjusts the setting of the Selec-tionHangingIndent property. Listing 7.4 is the code that’s executed when the upper TrackBarcontrol is scrolled.

278 CHAPTER 7 MORE WINDOWS CONTROLS
Listing 7.4: Setting the SelectionIndent property
Private Sub TrackBar1_Scroll(…) Handles TrackBar1.ScrollEditor.SelectionIndent = Convert.ToInt32(Editor.Width *
(TrackBar1.Value / TrackBar1.Maximum))Editor.SelectionHangingIndent =
Convert.ToInt32(Editor.Width *(TrackBar2.Value / TrackBar2.Maximum) –Editor.SelectionIndent)
End Sub
Editor is the name of the RichTextBox control on the form. The code sets the control’sindentation to the same percentage of the control’s width, as indicated by the value of the topTrackBar control. It also does the same for the SelectionHangingIndent property, which iscontrolled by the lower TrackBar control. If the user has scrolled the lower TrackBar control,the code sets the RichTextBox control’s SelectionHangingIndent property in the eventhandler, as presented in Listing 7.5.
Listing 7.5: Setting the SelectionHangingIndent property
Private Sub TrackBar2_Scroll(…) Handles TrackBar2.ScrollEditor.SelectionHangingIndent =
Convert.ToInt32(Editor.Width *(TrackBar2.Value / TrackBar2.Maximum) -Editor.SelectionIndent)
End Sub
Enter a few lines of text in the control, select one or more paragraphs, and check out theoperation of the two sliders.
The Scroll events of the two TrackBar controls adjust the text’s indentation. The oppositeaction must take place when the user rests the pointer on another paragraph: The sliders’ posi-tions must be adjusted to reflect the indentation of the selected paragraph. The selection of anew paragraph is signaled to the application by the SelectionChanged event. The statementsof Listing 7.6, which are executed from within the SelectionChanged event, adjust the twoslider controls to reflect the indentation of the text.
Listing 7.6: Setting the slider controls
Private Sub Editor_SelectionChanged(…)Handles Editor.SelectionChanged
If Editor.SelectionIndent = Nothing ThenTrackBar1.Value = TrackBar1.MinimumTrackBar2.Value = TrackBar2.Minimum
Else

THE RICHTEXTBOX CONTROL 279
TrackBar1.Value = Convert.ToInt32(Editor.SelectionIndent *TrackBar1.Maximum / Editor.Width)
TrackBar2.Value = Convert.ToInt32( _(Editor.SelectionHangingIndent /Editor.Width) *TrackBar2.Maximum + TrackBar1.Value)
End IfEnd Sub
If the user selects multiple paragraphs with different indentations, the SelectionIndentproperty returns Nothing. The code examines the value of this property and, if it’s Nothing,moves both controls to the left edge. This way, the user can slide the controls and set the inden-tations for multiple paragraphs. Some applications make the handles gray to indicate that theselected text doesn’t have uniform indentation, but unfortunately you can’t gray the sliders andkeep them enabled. Of course, you can always design a custom control. This wouldn’t be a badidea, especially if you consider that the TrackBar controls are too tall for this type of interfaceand can’t be made very narrow (as a result, the interface of the RTFPad application isn’t veryelegant).
The File Menu
The RTFPad application’s File menu contains the usual Open, Save, and Save As commands,which are implemented with the control’s LoadFile and SaveFile methods. Listing 7.7 showsthe implementation of the Open command in the File menu.
Listing 7.7: The Open command
Private Sub OpenToolStripMenuItem_Click(…) HandlesOpenToolStripMenuItem.Click
If DiscardChanges() ThenOpenFileDialog1.Filter =
"RTF Files|*.RTF|DOC Files|*.DOC|" &"Text Files|*.TXT|All Files|*.*"
If OpenFileDialog1.ShowDialog() =DialogResult.OK Then
fName = OpenFileDialog1.FileNameEditor.LoadFile(fName)Editor.Modified = False
End IfEnd If
End Sub
The fName variable is declared on the form’s level and holds the name of the currently openfile. This variable is set every time a new file is successfully opened, and it’s used by the Savecommand to automatically save the open file without prompting the user for a filename.

280 CHAPTER 7 MORE WINDOWS CONTROLS
DiscardChanges() is a function that returns a Boolean value, depending on whether thecontrol’s contents can be discarded. The function examines the Editor control’s Modified prop-erty. If True, it prompts users as to whether they want to discard the edits. Depending on thevalue of the Modified property and the user response, the function returns a Boolean value. Ifthe DiscardChanges() function returns True, the program goes on and opens a new document.If the function returns False, the program aborts the operation to give the user a chance to savethe document. Listing 7.8 shows the DiscardChanges() function.
Listing 7.8: The DiscardChanges() function
Function DiscardChanges() As BooleanIf Editor.Modified Then
Dim reply As MsgBoxResultreply = MsgBox(
"Text hasn’t been saved. Discard changes?",MsgBoxStyle.YesNo)
If reply = MsgBoxResult.No ThenReturn False
ElseReturn True
End IfElse
Return TrueEnd If
End Function
The Modified property becomes True after the first character is typed and isn’t reset backto False. The RichTextBox control doesn’t handle this property very intelligently and doesn’treset it to False even after saving the control’s contents to a file. The application’s code sets theEditor.Modified property to False after creating a new document as well as after saving thecurrent document.
The Save As command (see Listing 7.9) prompts the user for a filename and then stores theEditor control’s contents to the specified file. It also sets the fName variable to the file’s path sothat the Save command can use it.
Listing 7.9: The Save As command
Private Sub SaveAsToolStripMenuItem_Click(…)Handles SaveAsToolStripMenuItem.Click
SaveFileDialog1.Filter ="RTF Files|*.RTF|DOC Files" &"|*.DOC|Text Files|*.TXT|All Files|*.*"
SaveFileDialog1.DefaultExt = "RTF"If SaveFileDialog1.ShowDialog() = DialogResult.OK Then
fName = SaveFileDialog1.FileName

THE RICHTEXTBOX CONTROL 281
Editor.SaveFile(fName)Editor.Modified = False
End IfEnd Sub
The Save command’s code is similar, only it doesn’t prompt the user for a filename. It callsthe SaveFile method, passing the fName variable as an argument. If the fName variable has novalue (in other words, if a user attempts to save a new document by using the Save command),the code activates the event handler of the Save As command automatically and resets the con-trol’s Modified property to False. Listing 7.10 shows the code behind the Save command.
Listing 7.10: The Save command
Private Sub SaveToolStripMenuItem_Click(…)Handles SaveToolStripMenuItem.Click
If fName <> "" ThenEditor.SaveFile(fName)Editor.Modified = False
ElseSaveAsToolStripMenuItem_Click(sender, e)
End IfEnd Sub
The Edit Menu
The Edit menu contains the usual commands for exchanging data through the Clipboard (Copy,Cut, Paste), Undo/Redo commands, and a Find command to invoke the Search & Replace dia-log box. All the commands are almost trivial, thanks to the functionality built into the control.The basic Cut, Copy, and Paste commands call the RichTextBox control’s Copy, Cut, and Pastemethods to exchange data through the Clipboard. Listing 7.11 shows the implementation of thePaste command.
Listing 7.11: The Paste command
Private Sub PasteToolStripMenuItem_Click(…)Handles PasteToolStripMenuItem.Click
TryEditor.Paste()
Catch exc As ExceptionMsgBox(
"Can’t paste current clipboard’s contents. " &"Try pasting the data in some other format.")
End TryEnd Sub

282 CHAPTER 7 MORE WINDOWS CONTROLS
As you may recall from the discussion of the Paste command, using the CanPaste methodisn’t trivial, you have to handle each data type differently. By using an exception handler, youallow the user to paste all types of data that the RichTextBox control can accept and displaya message when an error occurs. Using exceptions for programming application logic can bequite costly, but in this case it’s acceptable because the RTFPad editor is a desktop applica-tion serving a single user. A delay of a few milliseconds in this case should not make a hugedifference.
For a more robust solution though, you might wish to handle each data type separatelyusing the CanPaste method. That way, you can provide the user with much more precise feed-back over the problem that caused the error; that is, the exact format of the data in the Clip-board they are trying to paste but the RichTextBox is not able to handle. That way you can savethe user from having to guess the format your application can handle.
The Undo and Redo commands of the Edit menu are coded as follows. First, the name of theaction to be undone or redone is displayed in the Edit menu. When the Edit menu is selected,the DropDownOpened event is fired. This event takes place before the Click event, so I inserteda few lines of code that read the name of the most recent action that can be undone or redoneand print it next to the Undo or Redo command’s caption. If there’s no such action, the pro-gram will disable the corresponding command. Listing 7.12 is the code that’s executed whenthe Edit menu is dropped.
Listing 7.12: Setting the captions of the Undo and Redo commands
Private Sub EditToolStripMenuItem_DropDownOpened(…) HandlesEditToolStripMenuItem.DropDownOpened
If Editor.UndoActionName <> "" ThenUndoToolStripMenuItem.Text =
"Undo " & Editor.UndoActionNameUndoToolStripMenuItem.Enabled = True
ElseUndoToolStripMenuItem.Text = "Undo"UndoToolStripMenuItem.Enabled = False
End IfIf Editor.RedoActionName <> "" Then
RedoToolStripMenuItem.Text ="Redo" & Editor.RedoActionName
RedoToolStripMenuItem.Enabled = TrueElse
RedoToolStripMenuItem.Text = "Redo"RedoToolStripMenuItem.Enabled = False
End IfEnd Sub
When the user selects one of the Undo or Redo commands, the code simply calls the appro-priate method from within the menu item’s Click event handler, as shown in Listing 7.13.
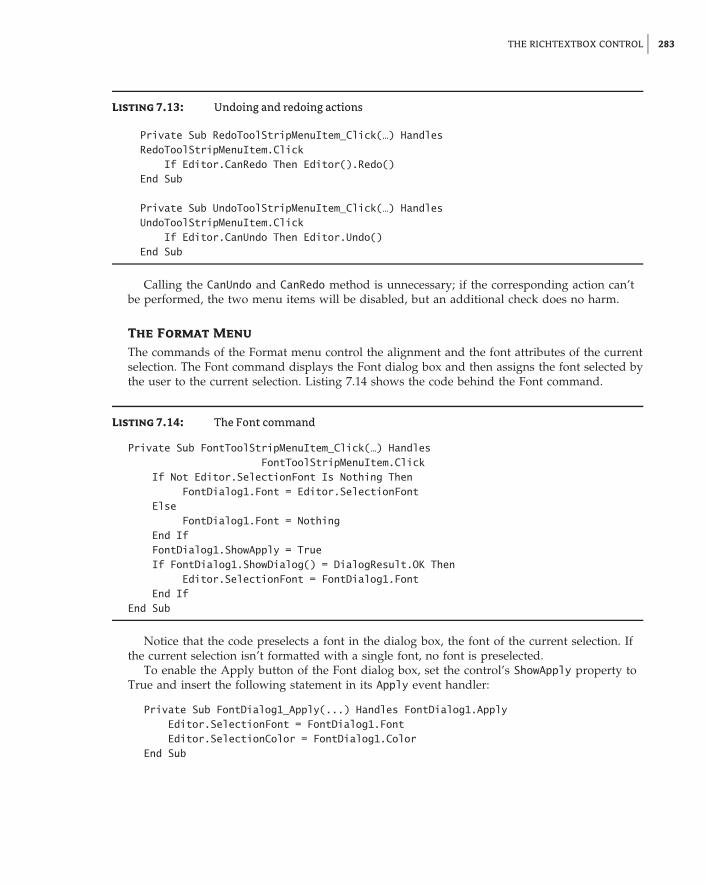
THE RICHTEXTBOX CONTROL 283
Listing 7.13: Undoing and redoing actions
Private Sub RedoToolStripMenuItem_Click(…) HandlesRedoToolStripMenuItem.Click
If Editor.CanRedo Then Editor().Redo()End Sub
Private Sub UndoToolStripMenuItem_Click(…) HandlesUndoToolStripMenuItem.Click
If Editor.CanUndo Then Editor.Undo()End Sub
Calling the CanUndo and CanRedo method is unnecessary; if the corresponding action can’tbe performed, the two menu items will be disabled, but an additional check does no harm.
The Format Menu
The commands of the Format menu control the alignment and the font attributes of the currentselection. The Font command displays the Font dialog box and then assigns the font selected bythe user to the current selection. Listing 7.14 shows the code behind the Font command.
Listing 7.14: The Font command
Private Sub FontToolStripMenuItem_Click(…) HandlesFontToolStripMenuItem.Click
If Not Editor.SelectionFont Is Nothing ThenFontDialog1.Font = Editor.SelectionFont
ElseFontDialog1.Font = Nothing
End IfFontDialog1.ShowApply = TrueIf FontDialog1.ShowDialog() = DialogResult.OK Then
Editor.SelectionFont = FontDialog1.FontEnd If
End Sub
Notice that the code preselects a font in the dialog box, the font of the current selection. Ifthe current selection isn’t formatted with a single font, no font is preselected.
To enable the Apply button of the Font dialog box, set the control’s ShowApply property toTrue and insert the following statement in its Apply event handler:
Private Sub FontDialog1_Apply(...) Handles FontDialog1.ApplyEditor.SelectionFont = FontDialog1.FontEditor.SelectionColor = FontDialog1.Color
End Sub

284 CHAPTER 7 MORE WINDOWS CONTROLS
The options of the Align menu set the RichTextBox control’s SelectionAlignment propertyto different members of the HorizontalAlignment enumeration. The Align � Left command,for example, is implemented with the following statement:
Editor.SelectionAlignment = HorizontalAlignment.Left
The Search & Replace Dialog Box
The Find command in the Edit menu opens the dialog box shown in Figure 7.9, whichperforms search-and-replace operations (whole-word or case-sensitive match or both). TheSearch & Replace form (it’s the frmFind form in the project) has its TopMost property setto True so that it remains visible while it’s open, even if it doesn’t have the focus. The codebehind the buttons on this form is quite similar to the code for the Find & Replace dialogbox of the TextPad application, with one basic difference: the RTFPad project’s code uses theRichTextBox control’s Find method; the simple TextBox control doesn’t provide an equivalentmethod and we had to use the methods of the String class to perform the same operations. TheFind method of the RichTextBox control performs all types of searches, and some of its optionsare not available with the IndexOf method of the String class.
Figure 7.9
The Search & Replacedialog box of the RTFPadapplication
To invoke the Search & Replace dialog box, the code calls the Show method of the frmFindform, as discussed in Chapter 5, via the following statement:
frmFind.Show()
The Find method of the RichTextBox control allows you to perform case-sensitive or-insensitive searches as well as search for whole words only. These options are specifiedthrough an argument of the RichTextBoxFinds type. The SetSearchMode() function (seeListing 7.15) examines the settings of the two check boxes at the bottom of the form and setsthe mode variable, which represents the Find method’s search mode.

THE RICHTEXTBOX CONTROL 285
Listing 7.15: Setting the search options
Function SetSearchMode() As RichTextBoxFindsDim mode As RichTextBoxFinds =
RichTextBoxFinds.NoneIf chkCase.Checked = True Then
mode = mode Or RichTextBoxFinds.MatchCaseEnd IfIf chkWord.Checked = True Then
mode = mode Or RichTextBoxFinds.WholeWordEnd IfReturn mode
End Function
The Click event handlers of the Find and Find Next buttons call this function to retrievethe constant that determines the type of search specified by the user on the form. This value isthen passed to the Find method. Listing 7.16 shows the code behind the Find and Find Nextbuttons.
Listing 7.16: The Find and Find Next commands
Private Sub bttnFind_Click(…) Handles bttnFind.ClickDim wordAt As IntegerDim srchMode As RichTextBoxFindssrchMode = SetSearchMode()wordAt = frmEditor.Editor.Find(
txtSearchWord.Text, 0, srchMode)If wordAt = -1 Then
MsgBox("Can’t find word")Exit Sub
End IffrmEditor.Editor.Select(wordAt, txtSearchWord.Text.Length)bttnFindNext.Enabled = TruebttnReplace.Enabled = TruebttnReplaceAll.Enabled = TruefrmEditor.Editor.ScrollToCaret()
End Sub
Private Sub bttnFindNext_Click(…) Handles bttnFindNext.ClickDim selStart As IntegerDim srchMode As RichTextBoxFindssrchMode = SetSearchMode()selStart = frmEditor.Editor.Find(
txtSearchWord.Text,frmEditor.Editor.SelectionStart + 2,srchMode)

286 CHAPTER 7 MORE WINDOWS CONTROLS
If selStart = -1 ThenMsgBox("No more matches")Exit Sub
End IffrmEditor.Editor.Select(
selStart, txtSearchWord.Text.Length)frmEditor.Editor.ScrollToCaret()
End Sub
Notice that both event handlers call the ScrollToCaret method to force the selected text tobecome visible — should the Find method locate the desired string outside the visible segmentof the text.
The TreeView and ListView ControlsThe TreeView and ListView controls are among the more advanced Windows controls andthey certainly are more difficult to program than the others discussed. However, these twocontrols are the basic makings of unique user interfaces, as you will see in the examplesin the following sections. The ListView and TreeView controls are discussed in detail inthe tutorial ‘‘The ListView and TreeView controls,’’ which is available for download fromwww.sybex.com/go/masteringvb2010. In this chapter, you will find an introduction to thesetwo controls and their basic properties and methods. For more information on using thesecontrols in your interface and interesting examples, please read the tutorial.
Figure 7.10 shows the TreeView and ListView controls used in tandem. What you see inFigure 7.10 is Windows Explorer, a utility for examining and navigating your hard disk’s struc-ture. The left pane, where the folders are displayed, is a TreeView control. The folder names aredisplayed in a manner that reflects their structure on the hard disk. You can expand and con-tract certain branches and view only the segment(s) of the tree structure you’re interested in.
Figure 7.10
Windows Explorer ismade up of a Tree-View (left pane) anda ListView (right pane)control.

THE TREEVIEW AND LISTVIEW CONTROLS 287
The right pane is a ListView control. The items on the ListView control can be displayed infive ways (as large or small icons, as a list, on a grid, or tiled). They are the various views youcan set through the View menu of Windows Explorer. Although most people prefer to look atthe contents of the folders as icons, the most common view is the Details view, which displaysnot only filenames, but also their attributes. In the Details view, the list can be sorted accordingto any of its columns, making it easy for the user to locate any item based on various criteria(file type, size, creation date, and so on).
Tree and List StructuresThe TreeView control implements a data structure known as a tree. A tree is the most appro-priate structure for storing hierarchical information. The organizational chart of a company, forexample, is a tree structure. Every person reports to another person above him or her, all theway to the president or CEO. Figure 7.11 depicts a possible organization of continents, coun-tries, and cities as a tree. Every city belongs to a country, and every country to a continent. Inthe same way, every computer file belongs to a folder that may belong to an even bigger folder,and so on up to the drive level. You can’t draw large tree structures on paper, but it’s possibleto create a similar structure in the computer’s memory without size limitations.
Figure 7.11
The world viewedas a tree
Globe Root node
First-level nodes
Second-level nodes
Third-level nodes
Africa Asia Europe...
...
...
Germany France Spain
Berlin Munich Frankfurt
S. America
Each item in the tree of Figure 7.11 is called a node, and nodes can be nested to any level.Oddly, the top node is the root of the tree, and the subordinate nodes are called child nodes. Ifyou try to visualize this structure as a real tree, think of it as an upside-down tree with thebranches emerging from the root. The end nodes, which don’t lead to any other nodes, arecalled leaf nodes or end nodes.
To locate a city, you must start at the root node and select the continent to which the citybelongs. Then you must find the country (in the selected continent) to which the city belongs.Finally, you can find the city you’re looking for. If it’s not under the appropriate country node,it doesn’t exist.
TreeView Items Are Just Strings
The items displayed on a TreeView control are just strings. Moreover, the TreeView controldoesn’t require that the items be unique. You can have identically named nodes in the samebranch — as unlikely as this might be for a real application. There’s no property that makes anode unique in the tree structure or even in its own branch.

288 CHAPTER 7 MORE WINDOWS CONTROLS
You can also start with a city and find its country. The country node is the city node’s parentnode. Notice that there is only one route from child nodes to their parent nodes, which meansthat you can instantly locate the country or continent of a city. The data shown in Figure 7.11 isshown in Figure 7.12 in a TreeView control. Only the nodes we’re interested in are expanded.The plus sign indicates that the corresponding node contains child nodes. To view them, endusers click the button with the plus sign and expand the node.
Figure 7.12
The nodes shown inFigure 7.11 implementedwith a TreeView control
The tree structure is ideal for data with parent-child relations (relations that can be describedas belongs to or owns). The continents-countries-cities data is a typical example. The folder struc-ture on a hard disk is another typical example. Any given folder is the child of another folderor the root folder.
Maintaining a tree structure is a fundamental operation in software design; computer sci-ence students spend a good deal of their time implementing tree structures. Fortunately, withVisual Basic you don’t have to implement tree structures on your own. The TreeView control isa mechanism for storing hierarchically structured data in a control with a visible interface. TheTreeView control hides (or encapsulates, in object-oriented terminology) the details of the imple-mentation and allows you to set up tree structures with a few lines of code — in short, all thegain without the pain (almost).
The ListView control implements a simpler structure, known as a list. A list’s items aren’tstructured in a hierarchy; they are all on the same level and can be traversed serially, oneafter the other. You can also think of the list as a multidimensional array, but the list offersmore features. A list item can have subitems and can be sorted according to any column. Forexample, you can set up a list of customer names (the list’s items) and assign a number ofsubitems to each customer: a contact, an address, a phone number, and so on. Or you can setup a list of files with their attributes as subitems. Figure 7.13 shows a Windows folder mappedon a ListView control. Each file is an item, and its attributes are the subitems. As you alreadyknow, you can sort this list by filename, size, file type, and so on. All you have to do is clickthe header of the corresponding column.
The ListView control is a glorified ListBox control. If all you need is a control to storesorted objects, use a ListBox control. If you want more features, such as storing multipleitems per row, sorting them in different ways, or locating them based on any subitem’s

THE TREEVIEW AND LISTVIEW CONTROLS 289
value, you must consider the ListView control. You can also look at the ListView control as aview-only grid.
Figure 7.13
A folder’s files displayedin a ListView control(Details view)
The TreeView and ListView controls are commonly used along with the ImageList control.The ImageList control is a simple control for storing images so they can be retrieved quicklyand used at runtime. You populate the ImageList control with the images you want to use onyour interface, usually at design time, and then you recall them by an index value at runtime.
The TreeView ControlLet’s start our discussion of the TreeView control with a few simple properties that you canset at design time. To experiment with the properties discussed in this section, open the Tree-ViewDemo project, available for download from www.sybex.com/go/masteringvb2010. Theproject’s main form is shown in Figure 7.14. After setting some properties (they are discussednext), run the project and click the Populate button to populate the control. After that, you canclick the other buttons to see the effect of the various property settings on the control.
Figure 7.14
The TreeViewDemoproject demonstratesthe basic properties andmethods of the Tree-View control.

290 CHAPTER 7 MORE WINDOWS CONTROLS
Here are the basic properties that determine the appearance of the control:
CheckBoxes If this property is True, a check box appears in front of each node. If the con-trol displays check boxes, you can select multiple nodes; otherwise, you’re limited to a singleselection.
FullRowSelect This True/False value determines whether a node will be selected even if theuser clicks outside the node’s caption.
HideSelection This property determines whether the selected node will remain highlightedwhen the focus is moved to another control. By default, the selected node doesn’t remain high-lighted when the control loses the focus.
HotTracking This property is another True/False value that determines whether nodes arehighlighted as the pointer hovers over them. When it’s True, the TreeView control behaves likea web document with the nodes acting as hyperlinks — they turn blue while the pointer hoversover them. Use the NodeMouseHover event to detect when the pointer hovers over a node.
Indent This property specifies the indentation level in pixels. The same indentation appliesto all levels of the tree — each level is indented by the same number of pixels with respect to itsparent level.
PathSeparator A node’s full name is made up of the names of its parent nodes separated bya backslash. To use a different separator, set this property to the desired symbol.
ShowLines The ShowLines property is a True/False value that determines whether the con-trol’s nodes will be connected to its parent items with lines. These lines help users visualize thehierarchy of nodes, and it’s customary to display them.
ShowPlusMinus The ShowPlusMinus property is a True/False value that determines whetherthe plus/minus button is shown next to the nodes that have children. The plus button is dis-played when the node is collapsed, and it causes the node to expand when clicked. Likewise,the minus sign is displayed when the node is expanded, and it causes the node to collapsewhen clicked. Users can also expand the current node by pressing the left-arrow button andcollapse it with the right-arrow button.
ShowRootLines This is another True/False property that determines whether there willbe lines between each node and root of the tree view. Experiment with the ShowLines andShowRootLines properties to find out how they affect the appearance of the control.
Sorted This property determines whether the items in the control will be automaticallysorted. The control sorts each level of nodes separately. In our globe example, it will sort thecontinents, then the countries within each continent, and then the cities within each country.
Adding Nodes at Design Time
Let’s look now at the process of populating the TreeView control. Adding an initial collectionof nodes to a TreeView control at design time is trivial. Locate the Nodes property in the Prop-erties window, and you’ll see that its value is Collection. To add items, click the ellipsis button,and the TreeNode Editor dialog box will appear, as shown in Figure 7.15. To add a root item,just click the Add Root button. The new item will be named Node0 by default. You can changeits caption by selecting the item in the list and setting its Text property accordingly. You canalso change the node’s Name property, and you can change the node’s appearance by using theNodeFont, FontColor, and ForeColor properties.

THE TREEVIEW AND LISTVIEW CONTROLS 291
Figure 7.15
The TreeNode Editordialog box
Follow these steps to enter the root node with the string Globe, a child node for Europe, andtwo more nodes under Europe: Germany and Italy. I’m assuming that you’re starting with aclean control. If your TreeView control contains any items, clear them all by selecting one itemat a time in the list and pressing the Delete key, or click the delete button (the one with the Xicon) on the dialog box.
Click the Add Root button first to add the node Node0. Select it with the mouse, and itsproperties appear in the right pane of the TreeNode Editor window. Here you can change thenode’s Text property to Globe. You can specify the appearance of each node by setting its fontand fore/background colors.
Then click the Add Child button, which adds a new node under the Globe root node. Selectit with the mouse as before, and change its Text property to Europe. Then select the newlyadded node in the list and click the Add Child button again. Name the new node Germany.You’ve successfully added a small hierarchy of nodes. To add another node under Europe,select the Europe node in the list and click the Add Child button again. Name the new itemItaly. Continue adding a few cities under each country to complete the tree.
Click the OK button to close the TreeNode Editor’s window and return to your form. Thenodes you added to the TreeView control are there, but they’re collapsed. Only the root nodesare displayed with the plus sign in front of their names. Click the plus sign to expand the treeand see its child nodes. The TreeView control behaves the same at design time as it does atruntime — as far as navigating the tree goes, at least.
Adding Nodes at Runtime
Adding items to the control at runtime is a bit more involved. All the nodes belong to the con-trol’s Nodes collection, which is made up of TreeNode objects. To access the Nodes collection,use the following expression, where TreeView1 is the control’s name and Nodes is a collectionof TreeNode objects:
TreeView1.Nodes

292 CHAPTER 7 MORE WINDOWS CONTROLS
This expression returns a collection of TreeNode objects and exposes the proper members foraccessing and manipulating the individual nodes. The control’s Nodes property is the collectionof all root nodes.
The following statements print the strings shown highlighted below them (these strings arenot part of the statements; they’re the output that the statements produce):
Debug.WriteLine(TreeView1.Nodes(0).Text)GlobeDebug.WriteLine(TreeView1.Nodes(0).Nodes(0).Text)EuropeDebug.WriteLine(TreeView1.Nodes(0).Nodes(0).Nodes(1).Text)Italy
Adding New Nodes
To add a new node to the Nodes collection use the Add method, which accepts as an argumenta string or a TreeNode object, and returns a TreeNode object that represents the newly addednode. The simplest form of the Add method is
newNode = Nodes.Add(nodeCaption)
where nodeCaption is a string that will be displayed on the control. Another form of the Addmethod allows you to add a TreeNode object directly (nodeObj is a properly initialized Tree-Node variable):
newNode = Nodes.Add(nodeObj)
To use this form of the method, you must first declare and initialize a TreeNode object:
Dim nodeObj As New TreeNodenodeObj.Text = "Tree Node"nodeObj.ForeColor = Color.BlueVioletTreeView1.Nodes.Add(nodeObj)
The last overloaded form of the Add method allows you to specify the index in the currentNodes collection, where the node will be added:
newNode = Nodes.Add(index, nodeObj)
The nodeObj TreeNode object must be initialized as usual.To add a child node to the root node, use a statement such as the following:
TreeView1.Nodes(0).Nodes.Add("Asia")
To add a country under Asia, use a statement such as the following:
TreeView1.Nodes(0).Nodes(1).Nodes.Add("Japan")
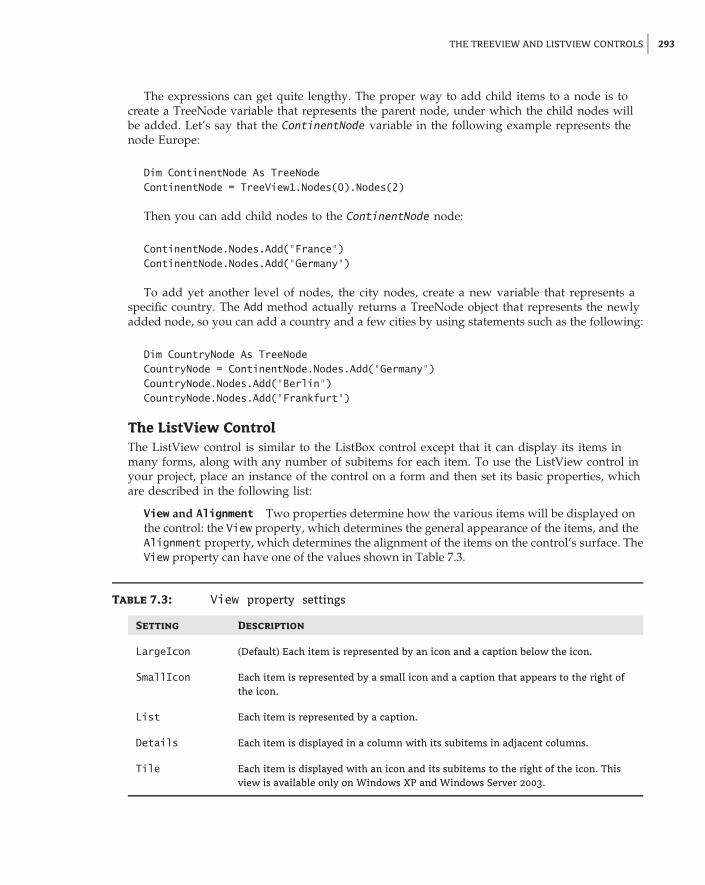
THE TREEVIEW AND LISTVIEW CONTROLS 293
The expressions can get quite lengthy. The proper way to add child items to a node is tocreate a TreeNode variable that represents the parent node, under which the child nodes willbe added. Let’s say that the ContinentNode variable in the following example represents thenode Europe:
Dim ContinentNode As TreeNodeContinentNode = TreeView1.Nodes(0).Nodes(2)
Then you can add child nodes to the ContinentNode node:
ContinentNode.Nodes.Add("France")ContinentNode.Nodes.Add("Germany")
To add yet another level of nodes, the city nodes, create a new variable that represents aspecific country. The Add method actually returns a TreeNode object that represents the newlyadded node, so you can add a country and a few cities by using statements such as the following:
Dim CountryNode As TreeNodeCountryNode = ContinentNode.Nodes.Add("Germany")CountryNode.Nodes.Add("Berlin")CountryNode.Nodes.Add("Frankfurt")
The ListView ControlThe ListView control is similar to the ListBox control except that it can display its items inmany forms, along with any number of subitems for each item. To use the ListView control inyour project, place an instance of the control on a form and then set its basic properties, whichare described in the following list:
View and Alignment Two properties determine how the various items will be displayed onthe control: the View property, which determines the general appearance of the items, and theAlignment property, which determines the alignment of the items on the control’s surface. TheView property can have one of the values shown in Table 7.3.
Table 7.3: View property settings
Setting Description
LargeIcon (Default) Each item is represented by an icon and a caption below the icon.
SmallIcon Each item is represented by a small icon and a caption that appears to the right ofthe icon.
List Each item is represented by a caption.
Details Each item is displayed in a column with its subitems in adjacent columns.
Tile Each item is displayed with an icon and its subitems to the right of the icon. Thisview is available only on Windows XP and Windows Server 2003.

294 CHAPTER 7 MORE WINDOWS CONTROLS
The Alignment property can have one of the settings shown in Table 7.4.
Table 7.4: Alignment property settings
Setting Description
Default When an item is moved on the control, the item remains where it is dropped.
Left Items are aligned to the left side of the control.
SnapToGrid Items are aligned to an invisible grid on the control. When the user moves an item,the item moves to the closest grid point on the control.
Top Items are aligned to the top of the control.
HeaderStyle This property determines the style of the headers in Details view. It has nomeaning when the View property is set to anything else because only the Details view hascolumns. The possible settings of the HeaderStyle property are shown in Table 7.5.
Table 7.5: HeaderStyle property settings
Setting Description
Clickable Visible column header that responds to clicking
Nonclickable (Default) Visible column header that does not respond to clicking
None No visible column header
AllowColumnReorder This property is a True/False value that determines whether the usercan reorder the columns at runtime, and it’s meaningful only in Details view. If this propertyis set to True, the user can move a column to a new location by dragging its header with themouse and dropping it in the place of another column.
Activation This property, which specifies how items are activated with the mouse, can haveone of the values shown in Table 7.6.
Table 7.6: Activation property settings
Setting Description
OneClick Items are activated with a single click. When the cursor is over an item, it changesshape and the color of the item’s text changes.
Standard (Default) Items are activated with a double-click. No change in the selected item’stext color takes place.
TwoClick Items are activated with a double-click and their text changes color as well.

THE TREEVIEW AND LISTVIEW CONTROLS 295
FullRowSelect This property is a True/False value, indicating whether the user can select anentire row or just the item’s text, and it’s meaningful only in Details view. When this propertyis False, only the first item in the selected row is highlighted.
GridLines Another True/False property. If it’s True, grid lines between items and subitemsare drawn. This property is meaningful only in Details view.
Groups The items of the ListView control can be grouped into categories. To use this feature,you must first define the groups by using the control’s Groups property, which is a collectionof strings. You can add as many members to this collection as you want. After that, as you additems to the ListView control, you can specify the group to which they belong. The control willgroup the items of the same category together and display the group title above each group.You can easily move items between groups at runtime by setting the Groups property for thecorresponding item to the name of the desired group.
LabelEdit The LabelEdit property lets you specify whether the user will be allowed to editthe text of the items. The default value of this property is False. Notice that the LabelEditproperty applies to the item’s Text property only; you can’t edit the subitems (unfortunately,you can’t use the ListView control as an editable grid).
MultiSelect A True/False value, indicating whether the user can select multiple items fromthe control. To select multiple items, click them with the mouse while holding down the Shiftor Ctrl key. If the control’s ShowCheckboxes property is set to True, users can select multipleitems by marking the check box in front of the corresponding item(s).
Scrollable A True/False value that determines whether the scroll bars are visible. Evenif the scroll bars are invisible, users can still bring any item into view. All they have to do isselect an item and then press the arrow keys as many times as needed to scroll the desired iteminto view.
Sorting This property determines how the items will be sorted, and its setting can be None,Ascending, or Descending. To sort the items of the control, call the Sort method, which sortsthe items according to their caption. It’s also possible to sort the items according to any of theirsubitems, as explained later in this chapter.
The Columns Collection
To display items in Details view, you must first set up the appropriate columns. The firstcolumn corresponds to the item’s caption, and the following columns correspond to itssubitems. If you don’t set up at least one column, no items will be displayed in Details view.Conversely, the Columns collection is meaningful only when the ListView control is used inDetails view.
The items of the Columns collection are of the ColumnHeader type. The simplest way to setup the appropriate columns is to do so at design time by using a visual tool. Locate and selectthe Columns property in the Properties window, and click the ellipsis button next to the prop-erty. The ColumnHeader Collection Editor dialog box, shown in Figure 7.16, will appear, andyou can use it to add and edit the appropriate columns.
Adding columns to a ListView control and setting their properties through the dialogbox shown in Figure 7.16 is quite simple. Don’t forget to size the columns according to the datayou anticipate storing in them and to set their headers. You can also add columns from withinyour code at runtime, a topic that’s discussed in the tutorial ‘‘The ListView and TreeViewControls,’’ available for download from www.sybex.com/go/masteringvb2010.

296 CHAPTER 7 MORE WINDOWS CONTROLS
Figure 7.16
The ColumnHeaderCollection Editordialog box
ListView Items and Subitems
As with the TreeView control, the ListView control can be populated either at design time or atruntime. To add items at design time, click the ellipsis button next to the ListItems propertyin the Properties window. When the ListViewItem Collection Editor dialog box pops up, youcan enter the items, including their subitems, as shown in Figure 7.17.
Figure 7.17
The ListViewItemCollection Editordialog box
Click the Add button to add a new item. Each item has subitems, which you can specify asmembers of the SubItems collection. To add an item with three subitems, you must populatethe item’s SubItems collection with the appropriate elements. Click the ellipsis button next tothe SubItems property in the ListViewItem Collection Editor; the ListViewSubItem Collection

THE TREEVIEW AND LISTVIEW CONTROLS 297
Editor will appear. This dialog box is similar to the ListViewItem Collection Editor dialog box,and you can add each item’s subitems. Assuming that you have added the item called Item 1in the ListViewItem Collection Editor, you can add these subitems: Item 1-a, Item 1-b, andItem 1-c. The first subitem (the one with zero index) is actually the main item of the control.
Notice that you can set other properties such as the color and font for each item, the checkbox in front of the item that indicates whether the item is selected, and the image of the item.Use this window to experiment with the appearance of the control and the placement of theitems, especially in Details view because subitems are visible only in this view. Even then, youwon’t see anything unless you specify headers for the columns. Note that you can add moresubitems than there are columns in the control. Some of the subitems will remain invisible.
Unlike the TreeView control, the ListView control allows you to specify a different appear-ance for each item and each subitem. To set the appearance of the items, use the Font, Back-Color, and ForeColor properties of the ListViewItem object.
The Items Collection
All the items on the ListView control form a collection: the Items collection. This collectionexposes the typical members of a collection that let you manipulate the control’s items. Thesemembers are discussed next.
Add method This method adds a new item to the Items collection. The syntax of the Addmethod is as follows:
ListView1.Items.Add(caption)
You can also specify the index of the image to be used, along with the item and a collectionof subitems to be appended to the new item, by using the following form of the Add method,where imageIndex is the index of the desired image on the associated ImageList control:
ListView1.Items.Add(caption, imageIndex)
Finally, you can create a ListViewItem object in your code and then add it to the ListView con-trol by using the following form of the Add method:
ListView1.Items.Add(listItemObj)
The following statements create a new item, set its individual subitems, and then add thenewly created ListViewItem object to the control:
Dim LItem As New ListViewItemLItem.Text = "new item"LItem.SubItems.Add("sub item 1a")LItem.SubItems.Add("sub item 1b")LItem.SubItems.Add("sub item 1c")ListView1.Items.Add(LItem)
Count property Returns the number of items in the collection.
Item property Retrieves an item specified by an index value.
Clear method Removes all the items from the collection.
Remove method Removes an item from the collection.

298 CHAPTER 7 MORE WINDOWS CONTROLS
The SubItems Collection
Each item in the ListView control may have one or more subitems. You can think of the itemas the key of a record and the subitems as the other fields of the record. The subitems are dis-played only in Details mode, but they are available to your code in any view. For example, youcan display all items as icons and, when the user clicks an icon, show the values of the selecteditem’s subitems on other controls.
To access the subitems of a given item, use its SubItems collection. The following statementsadd an item and three subitems to the ListView1 control:
Dim LItem As ListViewItemLItem = ListView1.Items.Add("Alfred’s Futterkiste")LItem.SubItems.Add("Maria Anders")LItem.SubItems.Add("030-0074321")LItem.SubItems.Add("030-0076545")
To access the SubItems collection, you need a reference to the item to which the subitemsbelong. The Add method returns a reference to the newly added item, the LItem variable, whichis then used to access the item’s subitems, as shown in the preceding code segment.
Displaying the subitems on the control requires some overhead. Subitems are displayed onlyin Details view mode. However, setting the View property to Details is not enough. You mustfirst create the columns of the Details view, as explained earlier. The ListView control displaysonly as many subitems as there are columns in the control. The first column, with the headerCompany, displays the items of the list. The following columns display the subitems. More-over, you can’t specify which subitem will be displayed under each header. The first subitem(Maria Anders in the preceding example) will be displayed under the second header, the sec-ond subitem (030-0074321 in the same example) will be displayed under the third header, andso on. At runtime, the user can rearrange the columns by dragging them with the mouse. Todisable the rearrangement of the columns at runtime, set the control’s AllowColumnReorderproperty to False (its default value is True).
Unless you set up each column’s width, they will all have the same width. The width ofindividual columns is specified in pixels, and you can set it to a percentage of the total widthof the control, especially if the control is docked to the form. The following code sets up aListView control with four headers, all having the same width:
Dim LWidth = ListView1.Width - 5Dim headers =
{New ColumnHeader() With {.Text = "Company", .Width = LWidth / 4},New ColumnHeader() With {.Text = "Contact", .Width = LWidth / 4},New ColumnHeader() With {.Text = "Phone", .Width = LWidth / 4},New ColumnHeader() With {.Text = "Fax", .Width = LWidth / 4}
}ListView1.Columns.AddRange(headers)ListView1.View = View.Details
The first header corresponds to the item (not a subitem). The number of headers you set upmust be equal to the number of subitems you want to display on the control, plus one. Theconstant 5 is subtracted to compensate for the width of the column separators. If the control

THE TREEVIEW AND LISTVIEW CONTROLS 299
is anchored to the vertical edges of the form, you must execute these statements from withinthe form’s Resize event handler so that the columns are resized automatically as the control isresized.
You can also sort a ListView control with the Sort method, which sorts the list’s items, andthe Sorting property, which determines how the items will be sorted. For more information onsorting the control’s items, see the tutorial ‘‘The ListView and TreeView Controls,’’ available fordownload from www.sybex.com/go/masteringvb2010.
Processing Selected Items
The user can select multiple items from a ListView control by default. Even though you candisplay a check mark in front of each item, it’s not customary. Multiple items in a ListViewcontrol are selected with the mouse while holding down the Ctrl or Shift key.
The selected items form the SelectedListItemCollection collection, which is a propertyof the control. You can iterate through this collection with a For … Next loop or through theenumerator object exposed by the collection. Listing 7.17 is the code behind the Selected Itemsbutton of the ListViewDemo project. It goes through the selected items with a For Each … Nextloop and displays each one of them, along with its subitems, in the Output window. Noticethat you can select multiple items in any view, even when the subitems are not visible. They’restill there, however, and they can be retrieved through the SubItems collection.
Listing 7.17: Iterating the selected items on a ListView control
Private Sub bttnIterate_Click(…) Handles bttnIterate.ClickDim LItem As ListViewItemDim LItems As ListView.SelectedListViewItemCollectionLItems = ListView1.SelectedItemsFor Each LItem In LItems
Debug.Write(LItem.Text & vbTab)Debug.Write(LItem.SubItems(0).ToString & vbTab)Debug.Write(LItem.SubItems(1).ToString & vbTab)Debug.WriteLine(LItem.SubItems(2).ToString & vbTab)
NextEnd Sub
VB 2010 at Work: The CustomExplorer ProjectTo demonstrate how to use the ListView and TreeView controls in tandem, which is how theycommonly used, see the discussion of the CustomExplorer sample application, which is dis-cussed in the tutorial ‘‘The ListView and TreeView controls.’’ It’s a fairly advanced example,but I included it for the most ambitious readers. It can also be used as the starting point formany custom applications, so give it a try.
The CustomExplorer project, shown in Figure 7.18, displays a structured list of folders in theleft pane and the files in the selected folder in the right pane. The left pane is populated whenthe application starts. You can expand any folder in this pane and view its subfolders. To viewthe files in a folder, click the folder name and the right pane will be populated with the namesof the selected folder’s files along with other data, such as the file size, date of creation, anddate of last modification.

300 CHAPTER 7 MORE WINDOWS CONTROLS
Figure 7.18
The CustomExplorerproject demonstrateshow to combinea TreeView and aListView control on thesame form.
The CustomExplorer project is not limited to displaying folders and files; you can populatethe two controls with data from several sources. For example, you can display customers in theleft pane (and organize them by city or state) and display their related data, such as invoicesand payments, in the right pane. Or you can populate the left pane with product names andthe right pane with the respective sales. In general, you can use the project as an interface formany types of applications. You can even use it as a custom Explorer to add features that arespecific to your applications.
The Bottom Line
Use the OpenFileDialog and SaveFileDialog controls to prompt users for filenames.Windows applications use certain controls to prompt users for common information, such asfilenames, colors, and fonts. Visual Studio provides a set of controls that are grouped in theDialogs section of the Toolbox. All common dialog controls provide a ShowDialog method,which displays the corresponding dialog box in a modal way. The ShowDialog method returnsa value of the DialogResult type, which indicates how the dialog box was closed, and youshould examine this value before processing the data.
Master It Your application needs to open an existing file. How will you prompt users forthe file’s name?
Master It You’re developing an application that encrypts multiple files (or resizes manyimages) in batch mode. How will you prompt the user for the files to be processed?
Use the ColorDialog and FontDialog controls to prompt users for colors and typefaces. TheColor and Font dialog boxes allow you to prompt users for a color value and a font, respec-tively. Before showing the corresponding dialog box, set its Color or Font property accordingto the current selection, and then call the control’s ShowDialog method.

THE BOTTOM LINE 301
Master It How will you display color attributes in the Color dialog box when you open it?How will you display the attributes of the selected text’s font in the Font dialog box whenyou open it?
Use the RichTextBox control as an advanced text editor to present richly formatted text.The RichTextBox control is an enhanced TextBox control that can display multiple fonts andstyles, format paragraphs with different styles, and provide a few more-advanced text-editingfeatures. Even if you don’t need the formatting features of this control, you can use it as analternative to the TextBox control. At the very least, the RichTextBox control provides moreediting features, a more-useful undo function, and more-flexible search features.
Master It You want to display a document with a title in large, bold type, followed by acouple of items in regular style. Which statements will you use to create a document likethis on a RichTextBox control?
Document’s Title
Item 1 Description for item 1
Item 2 Description for item 2
Create and present hierarchical lists by using the TreeView control. The TreeView con-trol is used to display a list of hierarchically structured items. Each item in the TreeView con-trol is represented by a TreeNode object. To access the nodes of the TreeView control, use theTreeView.Nodes collection. The nodes under a specific node (in other words, the child nodes)form another collection of Node objects, which you can access by using the expression Tree-View.Nodes(i).Nodes. The basic property of the Node object is the Text property, whichstores the node’s caption. The Node object exposes properties for manipulating its appearance(its foreground/background color, its font, and so on).
Master It How will you set up a TreeView control with a book’s contents at design time?
Create and present lists of structured items by using the ListView control. The ListViewcontrol stores a collection of ListViewItem objects, which form the Items collection, and can dis-play them in several modes, as specified by the View property. Each ListViewItem object has aText property and the SubItems collection. The subitems are not visible at runtime unless youset the control’s View property to Details and set up the control’s Columns collection. Theremust be a column for each subitem you want to display on the control.
Master It How will you set up a ListView control with three columns to display names,email addresses, and phone numbers at design time?
Master It How would you populate the same control with the same data at runtime?

Part 3
Working with CustomClasses and Controls◆ Chapter 8: Working with Objects
◆ Chapter 9: Building Custom Windows Controls
◆ Chapter 10: Applied Object-Oriented Programming


Chapter 8
Working with Objects
Classes are practically synonymous with objects and they’re at the very heart of programmingwith Visual Basic. The controls you use to build the visible interface of your application areobjects, and the process of designing forms consists of setting the properties of these objects,mostly with point-and-click operations. The Framework itself is an enormous compendium ofclasses, and you can import any of them into your applications and use them as if their mem-bers were part of the language. You simply declare a variable of the specific class type, initializeit, and then use it in your code.
Controls are also objects; they differ from other classes in that controls provide a visualinterface, whereas object variables don’t. However, you manipulate all objects by setting theirproperties and calling their methods.
In this chapter, you’ll learn how to do the following:
◆ Build your own classes
◆ Use custom classes in your projects
◆ Customize the usual operators for your classes
Classes and ObjectsWhen you create a variable of any type, you’re creating an instance of a class. The variablelets you access the functionality of the class through its properties and methods. Evenbase data types are implemented as classes (the System.Integer class, System.Double, andso on). An integer value, such as 3, is an instance of the System.Integer class, and youcan call the properties and methods of this class by using its instance. Expressions suchas Convert.ToDecimal(3).MinValue and #1/1/2000#.Today are odd but valid. The firstexpression returns the minimum value you can represent with the Decimal data type, whereasthe second expression returns the current date. The DataTime data type exposes the Todayproperty, which returns the current date. The expression #1/1/2000# is a value of theDataTime type, so you can find out the current date by calling its Today property. If you entereither one of the preceding expressions in your code, you’ll get a warning, but they will beexecuted.
Classes are used routinely in developing applications, and you should get into the habit ofcreating and using custom classes, even with simple projects. In team development, classes area necessity because they allow developers to share their work easily. If you’re working in a cor-porate environment, where different programmers code different parts of an application, you

306 CHAPTER 8 WORKING WITH OBJECTS
can’t afford to repeat work that someone else has already done. You should be able to get theircode and use it in your application as is. That’s easier said than done because you can guesswhat will happen as soon as a small group of programmers start sharing code — they’ll endup with dozens of different versions for each function, and every time a developer upgrades afunction, they will most likely break the applications that were working with the old version.Or each time they revise a function, they must update all the projects by using the old versionof the function and test them. It just doesn’t work.
The major driving force behind object-oriented programming (OOP) is code reuse. Classesallow you to write code that can be reused in multiple projects. You already know that classesdon’t expose their source code. The Framework itself is a huge collection of classes, whichyou can use without ever seeing its source code. As you’ll learn in Chapter 10, ‘‘AppliedObject-Oriented Programming,’’ you can even expand the functionality of an existing classwithout having access to its code. In other words, you can use a class without having access toits code, and therefore you can’t affect any other projects that use the class. You also know thatclasses implement complicated operations and make these operations available to programmersthrough properties and methods. The Array class, for example, exposes a Sort method, whichsorts its elements. This is not a simple operation, but fortunately you don’t have to knowanything about sorting. Someone else has done it for you and made this functionality availableto your applications. This is called encapsulation. Some functionality has been built into theclass (or encapsulated into the class), and you can access it from within your applications byusing a simple method call. The System.Security.Cryptography class of the Framework (whichisn’t discussed in this book) provides all the functionality you need to encrypt a secret code,or an entire document, by calling a method. Encryption is a very complicated operation, butyou don’t have to know anything about it except how to call the appropriate method and passa secret key to it.
What Is a Class?A class can be thought of as a program that doesn’t run on its own; it’s a collection of prop-erties and methods that must be used by another application. We exploit the functionality ofthe class by creating a variable of the same type as the class and then calling the class’s proper-ties and methods through this variable. The methods and properties of the class, as well as itsevents, constitute the class’s interface. It’s not a visible interface, like the ones you’ve learned todesign so far, because the class doesn’t interact directly with the user. To interact with the class,the application uses the class’s interface, just as users will be interacting with your applicationthrough its visual interface.
You have already learned how to use classes. Now is the time to understand what goes onbehind the scenes when you interact with a class and its members. Every object is an instanceof a class. When you declare an array, a Color object, or a collection, some code is executed inthe background to create the variable. It’s the code that actually implements the class. Whenyou declare an array, you’re invoking the System.Array class, which contains all the code formanipulating arrays (the method to sort the array’s elements, another method to reverse theorder of the elements in the array, and so on). Even simple variables of the Integer or Stringtype are implemented as classes.
The first time you use an object in your code, you’re instantiating the class that implementsit. The class’s code is loaded into memory, initializes its variables, and is ready to execute. Theimage of the class in memory is said to be an instance of the class, and this is an object.

WHAT IS A CLASS? 307
Classes versus Objects
Two of the most misused terms in OOP are object and class, and most people use theminterchangeably. You should think of the class as the template for the object. There’s onlyone System.Array class, but you can declare any number of arrays in your code. Every arrayis an instance of the System.Array class. All arrays in an application are implemented by thesame code, but they store different data. Each instance of a class is nothing more than a setof variables: The same code acts on different sets of variables, and each set of variables is aseparate and distinct instance of the class.
Consider three TextBox controls on the same form. They are all instances of the Sys-tem.Windows.Forms.TextBox class, but changing any property of a TextBox control doesn’taffect the other two controls. Every time you set the Text property of a TextBox control,you’re modifying a variable of a specific instance of the TextBox class. Classes are theblueprints on which objects are based. You can use the same blueprint to build multiplebuildings with the same structural characteristics but apply different properties (wall colors,doors, and so on) to individualize each structure.
Objects are similar to Windows controls except that they don’t have a visible interface. Con-trols are instantiated when the form loads. To use a control, you make it part of the project byadding its icon to the Toolbox, if it’s not already there. To manipulate a control from withinyour code, you call its properties and methods. You do the same with classes. To use a class,first declare it, then instantiate it (most commonly by using a New statement), then use itsproperties and methods. Finally, you program the various events raised by the controls tointeract with the users of your applications. Most classes don’t expose any events because theuser can’t interact with them, but some classes do raise events, which you can program justas you program the events of Windows controls.
At the beginning of this section I mentioned that classes can be thought of as ‘‘programs thatcan’t be executed on their own.’’ This is an oversimplification, which I can remedy now. Classesare made up of code, not visual elements, and are used as templates for objects. For example,there’s a single System.Array class and this class is invoked every time you create an array inyour code. The arrays you declare in your code are instances of the class. Yet, there’s only oneclass that implements arrays and all arrays are ‘‘serviced’’ by the same class.
Classes Combine Code with DataAnother way to view classes is to understand how they combine code and data. This simpleidea is the very essence of object-oriented programming. Data is data, and procedural lan-guages allow you to manipulate data in any way. Meaningful data, however, is processed inspecific ways.
Let’s consider accounting data. You can add or subtract amounts to or from an account,sum similar accounts (such as training and travel expenses), calculate taxes on certain accountamounts, and the like. Other types of processing may not be valid for this type of data. Younever multiply the amounts from two different accounts or calculate logarithms of accountbalances. These types of processing are quite meaningful with different data, but not withaccounting data.
Because the nature of the data itself determines to a large extent the type of processing thatwill take place on the data, why not ‘‘package’’ the data along with the code for processing it?

308 CHAPTER 8 WORKING WITH OBJECTS
Instead of simply creating structures for storing our data, we also write the code to processthem. The data and the code are implemented in a single unit, a class, and the result is anobject. After the class has been built, we no longer write code for processing the data; we sim-ply create objects of this type and call their methods. To transfer an amount from one accountto another, we call a method that knows how to transfer the amount, and the same methodalso makes sure the amount isn’t subtracted from one account unless it has been added to theother account (and vice versa). By the way, the process of completing multiple operations ina single step or canceling all the operations if one of them fails is known as a transaction. Atransaction will not subtract an amount from one account unless it has added the same amountto another account, and it won’t credit an account without debiting another one by the sameamount. You’ll learn more about transactions later in this book, when we’ll explore databaseprogramming.
To better understand how classes combine code with data, let’s take a close look at a classwe’re all too familiar with, the Array class. The role of the array is to store sets of data. Inaddition to holding data, the Array class also knows how to process data: how to retrieve anelement, how to extract a segment of the array, and even how to sort its elements. All theseoperations require a substantial amount of code. The mechanics of storing data in the array,the code that implements the properties, and the methods of the array are hidden from you,the developer. You can instruct the array to perform certain tasks by using simple statements.When you call the Sort method, you’re telling the array to execute some code that will sortits elements. As a developer, you don’t know how the data are stored in the array or howthe Sort method works. An overloaded form of the method allows you to sort a segment ofthe array by specifying the index of the first and last elements to be sorted. All you have toknow is how to call the Sort method, not how it works. Classes abstract many operations byhiding the implementation details; developers manipulate arrays by calling methods. And youcertainly can’t access the code of the class and edit it to accommodate the requirements of aspecific application.
With LINQ, a new technology for querying collections that was introduced with version 3.5of the Framework, the Array class was enhanced with a few new methods, like the Sum methodthat calculates the sum of the elements in a numeric array and the Select method that allowsyou to select elements that meet certain criteria, and a few more. You’ll learn a lot more aboutthese methods (they’re called extension methods) in Chapter 14, ‘‘An Introduction to LINQ.’’Although this is something you’ll understand better in Chapter 14, let me just mention that theteam that implemented LINQ did not have access to the source of the Array class!
In the following sections, you’ll learn how data and code coexist in a class and how you canmanipulate the data through the properties and methods exposed by the class. In Chapter 3,‘‘Visual Basic Programming Essentials,’’ you learned how to create structures to store data.Classes are similar to structures in that they represent custom data structures. In this chapter,I’ll take the idea of defining custom data structures one step further, by adding properties andmethods for manipulating the custom data, something you can’t do with structures. Let’s startby building a custom class and then using it in an application.
Building the Minimal ClassMy first example is the Minimal class; I’ll start with the minimum functionality class and keepadding features to it. The name of the class can be anything — just make sure that it’s sugges-tive of the class’s functionality.
A class may reside in the same file as a form, but it’s customary to implement customclasses in a separate module, a Class module. You can also create a Class project, which con-tains one or more classes. However, a class doesn’t run on its own and you can’t test it without

BUILDING THE MINIMAL CLASS 309
Figure 8.1
Adding a class itemto a project
a form. Start a new Windows project and name it SimpleClass (or open the SimpleClasssample project available for download from www.sybex.com/go/masteringvb2010). Thencreate a new class by adding a Class component to your project. Right-click the project name inthe Solution Explorer window and choose Add � Class from the context menu. In the dialogbox that pops up, select the Class item and enter a name for the class. Set the class’s name toMinimal, as shown in Figure 8.1.
The sample project contains a main form, as usual, the Form1 form. The code that imple-ments the class resides in the Minimal.vb file, which is part of the project, and you’ll use theproject’s main form to test your class. After you have tested and finalized the class code, youno longer need the form and you can remove it from the project.
When you open the class by double-clicking its icon in the Project Explorer window, youwill see the following lines in the code window:
Public Class Minimal
End Class
If you’d rather create a class in the same file as the application’s form, enter the Class key-word followed by the name of the class after the existing End Class in the form’s code window.The editor will insert the matching End Class for you. Insert a class definition in the form’scode window if the class is specific to this form only and no other part of the application willuse it. At this point, you already have a class, even if it doesn’t do anything.
Switch back to the Form Designer, add a button to the test form, and insert the followingcode in its Click event handler:
Dim obj1 As Minimal
Press Enter and type the name of the variable, obj1, followed by a period, on the followingline. will see a list of the methods your class exposes already:
EqualsGetHashCode
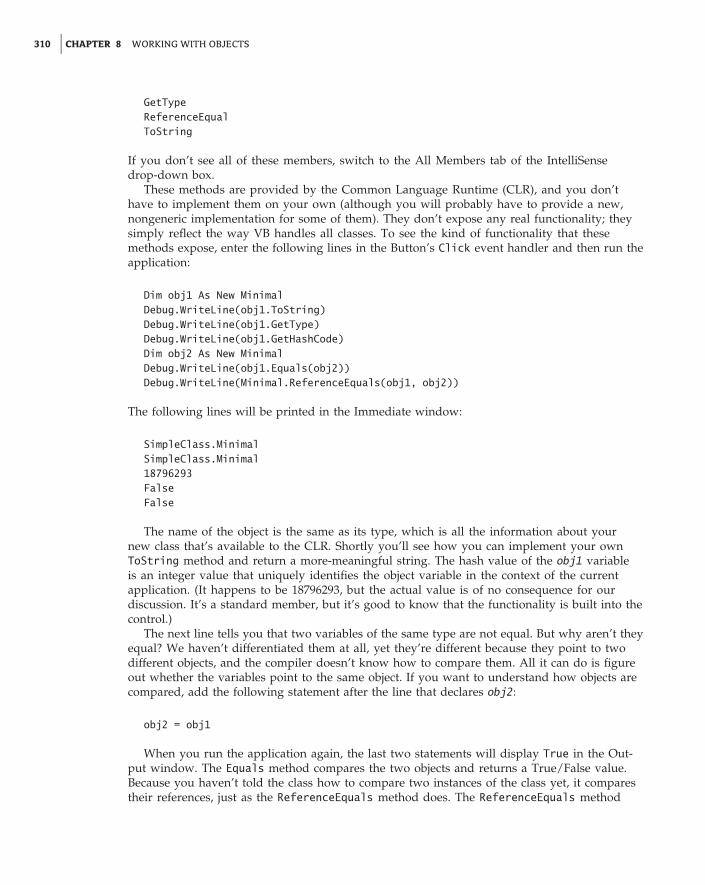
310 CHAPTER 8 WORKING WITH OBJECTS
GetTypeReferenceEqualToString
If you don’t see all of these members, switch to the All Members tab of the IntelliSensedrop-down box.
These methods are provided by the Common Language Runtime (CLR), and you don’thave to implement them on your own (although you will probably have to provide a new,nongeneric implementation for some of them). They don’t expose any real functionality; theysimply reflect the way VB handles all classes. To see the kind of functionality that thesemethods expose, enter the following lines in the Button’s Click event handler and then run theapplication:
Dim obj1 As New MinimalDebug.WriteLine(obj1.ToString)Debug.WriteLine(obj1.GetType)Debug.WriteLine(obj1.GetHashCode)Dim obj2 As New MinimalDebug.WriteLine(obj1.Equals(obj2))Debug.WriteLine(Minimal.ReferenceEquals(obj1, obj2))
The following lines will be printed in the Immediate window:
SimpleClass.MinimalSimpleClass.Minimal18796293FalseFalse
The name of the object is the same as its type, which is all the information about yournew class that’s available to the CLR. Shortly you’ll see how you can implement your ownToString method and return a more-meaningful string. The hash value of the obj1 variableis an integer value that uniquely identifies the object variable in the context of the currentapplication. (It happens to be 18796293, but the actual value is of no consequence for ourdiscussion. It’s a standard member, but it’s good to know that the functionality is built into thecontrol.)
The next line tells you that two variables of the same type are not equal. But why aren’t theyequal? We haven’t differentiated them at all, yet they’re different because they point to twodifferent objects, and the compiler doesn’t know how to compare them. All it can do is figureout whether the variables point to the same object. If you want to understand how objects arecompared, add the following statement after the line that declares obj2:
obj2 = obj1
When you run the application again, the last two statements will display True in the Out-put window. The Equals method compares the two objects and returns a True/False value.Because you haven’t told the class how to compare two instances of the class yet, it comparestheir references, just as the ReferenceEquals method does. The ReferenceEquals method

BUILDING THE MINIMAL CLASS 311
checks for reference equality; that is, it returns True if both variables point to the same object(the same instance of the class). If you change a property of the obj1 variable, the changes willaffect obj2 as well, because both variables point to the same object. We can’t modify the objectbecause it doesn’t expose any members that we can set to differentiate it from another object ofthe same type. We’ll get to that shortly.
Most classes expose a custom Equals method, which knows how to compare two objects ofthe same type (two objects based on the same class). The custom Equals method usually com-pares the properties of the two instances of the class and returns True if a set of basic properties(or all of them) are the same. You’ll learn how to customize the default members of any classlater in this chapter.
Notice the full name of the class: SimpleClass.Minimal. Within the current project, you canaccess it as Minimal. Other projects can either import the Minimal class and access it as Min-imal or specify the complete name of the class, which is the name of the project it belongs tofollowed by the class name. To use the Minimal class in another project, however, you mustadd a reference to it. (You’ll learn shortly how to reuse classes in other projects.)
Adding Code to the Minimal ClassLet’s add some functionality to our bare-bones class. We’ll begin by adding two trivial proper-ties and two methods to perform simple operations. The two properties are called strProperty(a string) and dblProperty (a double). To expose these two members as properties, you cansimply declare them as public variables. This isn’t the best method of implementing properties,but it really doesn’t take more than declaring something as public to make it available to codeoutside the class. The following statement exposes the two properties of the class:
Public strProperty As String, dblProperty As Double
The two methods you’ll implement in your sample class are the ReverseString andNegateNumber methods. The first method reverses the order of the characters in strPropertyand returns the new string. The NegateNumber method returns the negative of dblProperty.They’re two simple methods that don’t accept any arguments; they simply operate on thevalues of the properties. Methods are exposed as public procedures (functions or subroutines),just as properties are exposed as public variables. Enter the function declarations of Listing 8.1between the Class Minimal and End Class statements in the class’s code window. (I’mshowing the entire listing of the class here.)
Listing 8.1: Adding a few members to the Minimal class
Public Class MinimalPublic strProperty As String, dblProperty As DoublePublic Function ReverseString() As String
Return (StrReverse(strProperty))End FunctionPublic Function NegateNumber() As Double
Return (-dblProperty)End Function
End Class

312 CHAPTER 8 WORKING WITH OBJECTS
Figure 8.2
The members of theclass are displayedautomatically by theIDE, as needed.
Let’s test the members we’ve implemented so far. Switch back to your form and enter thelines shown in Listing 8.2 in a new button’s Click event handler. The obj variable is of theMinimal type and exposes the public members of the class, as shown in Figure 8.2. You can setand read its properties and call its methods. Your code doesn’t see the class’s code, just as itdoesn’t see any of the built-in classes’ code. You trust that the class knows what it is doing anddoes it right.
Listing 8.2: Testing the Minimal class
Dim obj As New Minimalobj.strProperty = "ABCDEFGHIJKLMNOPQRSTUVWXYZ"obj.dblProperty = 999999Debug.WriteLine(obj.ReverseString)Debug.WriteLine(obj.NegateNumber)
The New Keyword
The New keyword tells VB to create a new instance of the Minimal class. If you omit the Newkeyword, you’re telling the compiler that you plan to store an instance of the Minimal classin the obj variable but the class won’t be instantiated. All the compiler can do is prevent youfrom storing an object of any other type in the obj variable. You must still initialize the objvariable with the New keyword on a separate line:
obj = New Minimal
It’s the New keyword that creates the object in memory. If you omit the New keyword, anull reference exception will be thrown when the code attempts to use the variable. Thismeans that the variable is Nothing — it hasn’t been initialized yet. Even as you work in the

BUILDING THE MINIMAL CLASS 313
editor’s window, the name of the variable will be underlined and the following warning willbe generated: Variable ‘obj’ is used before it has been assigned a value. A null reference exceptioncould result at runtime. You can compile the code and run it if you want, but everything willproceed as predicted: As soon as the statement that produced the warning is reached, theruntime exception will be thrown.
Using Property ProceduresThe strProperty and dblProperty properties will accept any value as long as the type iscorrect and the value of the numeric property is within the acceptable range. But what if thegeneric properties were meaningful entities, such as email addresses, ages, or zip codes? Weshould be able to invoke some code to validate the values assigned to each property. To do so,we implement each property as a special type of procedure: the so-called property procedure.
Properties are implemented with a special type of procedure that contains a Get and a Setsection (frequently referred to as the property’s getter and setter, respectively). The Set sectionof the procedure is invoked when the application attempts to set the property’s value; the Getsection is invoked when the application requests the property’s value. The value passed to theproperty is usually validated in the Set section and, if valid, is stored to a local variable. Thesame local variable’s value is returned to the application when it requests the property’s value,from the property’s Get section. Listing 8.3 shows what the implementation of an Age propertymight look like.
Listing 8.3: Implementing properties with property procedures
Private m_Age As IntegerProperty Age() As Integer
GetAge = m_Age
End GetSet (ByVal value As Integer)
If value < 0 Or value >= 100 ThenMsgBox("Age must be positive and less than 100")
Elsem_Age = value
End IfEnd Set
End Property
The local variable where the age is stored is m_Age. When a statement such as the followingis executed in the application that uses your class, the Set section of the property procedure isinvoked:
obj.Age = 39

314 CHAPTER 8 WORKING WITH OBJECTS
Because the property value is valid, it is stored in the m_Age local variable. Likewise, when astatement such as the following one is executed, the Get section of the property procedure isinvoked, and the value 39 is returned to the application:
Debug.WriteLine(obj.Age)
The value argument of the Set segment represents the actual value that the calling code isattempting to assign to the property. The m_Age variable is declared as private because wedon’t want any code outside the class to access it directly. The Age property is, of course, publicso that other applications can set it, and external applications shouldn’t bypass the validationperformed by the property’s setter.
Fields versus Properties
Technically, any variables that are declared as Public in a class are called fields. Fields behavejust like properties in the sense that you can assign values to them and read their values, butthere’s a critical distinction between fields and properties: When a value is assigned to a field,you can’t validate that value from within your code. Properties should be implemented witha property procedure so you can validate their values, as you saw in the preceding example.Not only that, you can set other values from within your code. Consider a class that representsa contract with a starting and ending date. Every time the user changes the starting date, thecode can adjust the ending date accordingly (which is something you can’t do with fields).If the two dates were implemented as fields, users of the class could potentially specify anending date prior to the starting date.
Enter the property procedure for the Age property in the Minimal class and then switch tothe form to test it. Open the button’s Click event handler and add the following lines to theexisting ones:
Dim obj As New Minimalobj.Age = 39Debug.WriteLine("after setting the age to 39, age is " &
obj.Age.ToString)obj.Age = 199Debug.WriteLine("after setting the age to 199, age is " &
obj.Age.ToString)
The value 39 will appear twice in the Output window, which means that the class accepts thevalue 39. When the third statement is executed, a message box will appear with the error’sdescription:
Age must be positive and less than 100
The value 39 will appear in the Output window again. The attempt to set the age to 199 failed,so the property retains its previous value. You will also see the message box with the warning,which is invoked from within the class’s code.

BUILDING THE MINIMAL CLASS 315
Throwing Exceptions
The error-trapping code works fine, but what good is a message box displayed from within aclass? As a developer using the Minimal class in your code, you’d rather receive an exceptionand handle it from within your code, unless you’re writing classes to use in your own applica-tions. Normally, you don’t know who’s going to use your class, or how, so you can’t assumethat any messages displayed from within your class’s code will be seen by the end user. Theclass may be invoked on a remote server, in which case the error message will go unnoticed. Solet’s change the implementation of the Age property a little. The property procedure for the Ageproperty (Listing 8.4) throws an InvalidArgument exception if an attempt is made to assignan invalid value to it. The InvalidArgument exception is one of the existing exceptions, andyou can reuse it in your code. Later in this chapter, you’ll learn how to create and use customexceptions.
Listing 8.4: Throwing an exception from within a property procedure
Private m_Age As IntegerProperty Age() As Integer
GetAge = m_Age
End GetSet (ByVal value As Integer)
If value < 0 Or value >= 100 ThenDim AgeException As New ArgumentException()Throw AgeException
ElseM_Age = value
End IfEnd Set
End Property
You can test the revised property definition in your application; switch to the test form, andenter the statements from Listing 8.5 in a new button’s Click event handler. (This is the codebehind the Handle Exceptions button on the test form.)
Listing 8.5: Catching the Age property’s exception
Dim obj As New MinimalDim userAge as IntegerUserAge = InputBox("Please enter your age")Try
obj.Age = userAgeCatch exc as ArgumentException
MsgBox("Can’t accept your value, " & userAge.ToString & VbCrLf &"Will continue with default value of 30")
obj.Age = 30End Try

316 CHAPTER 8 WORKING WITH OBJECTS
This is a much better technique for handling errors in your class. The exceptions can beintercepted by the calling application, and developers using your class can write robust applica-tions by handling the exceptions in their code. When you develop custom classes, keep in mindthat you can’t handle most errors from within your class because you don’t know how otherdevelopers will use your class.
Handling Errors in a Class
When you design classes, keep in mind that you don’t know how another developer may usethem. In fact, you may have to use your own classes in a way that you didn’t consider whenyou designed them. A typical example is using an existing class with a web application. Ifyour class displays a message box, it will work fine as part of a Windows Forms application,but in the context of a web application, the message box won’t be displayed anywhere. Evenif you don’t plan to use a custom class with a web application, never interact with the userfrom within the class’s code. Make your code as robust as you can, but don’t hesitate tothrow exceptions for all conditions you can’t handle from within your code (as shown here).In general, a class’s code should detect abnormal conditions, but it shouldn’t attempt toremedy them.
The application that uses your class may inform the user about an error condition and givethe user a chance to correct the error by entering new data, disabling some options on theinterface, and so on. As a class developer, you can’t make this decision — another developermight prompt the user for another value, and a sloppy developer might let their applicationcrash (but this isn’t your problem). To throw an exception from within your class’s code,call the Throw statement with an Exception object as an argument. To play well with theFramework, you should try to use one of the existing exceptions (and the Framework providesquite a few of them). You can also throw custom exceptions by passing an error message tothe Exception class’ constructor with a statement such as the following:
Throw New Exception("your exception’s description")

BUILDING THE MINIMAL CLASS 317
Implementing Read-Only Properties
Let’s make our class a little more complicated. Age is not usually requested on official docu-ments because it’s valid only for a year (or less) after filling out a questionnaire. Instead, youare asked to furnish your date of birth, from which your current age can be calculated at anytime. We’ll add a BDate property in our class and make Age a read-only property.
To make a property read-only, you simply declare it as ReadOnly and supply code forthe Get procedure only. Revise the Age property code in the Minimal class to that shown inListing 8.6. Then, enter the property procedure from Listing 8.7 for the BDate property.
Listing 8.6: Implementing a read-only property
Private m_Age As IntegerReadOnly Property Age() As Integer
GetAge = m_Age
End GetEnd Property
Listing 8.7: The BDate property
Private m_BDate As DateTimePrivate m_Age As IntegerProperty BDate() As DateTime
GetBDate = m_BDate
End GetSet(ByVal value As Date)
If value > Now() Or _DateDiff(DateInterval.Year, value, Now()) >= 100 Then
Dim AgeException As New Exception("Can’t accept the birth date you specified")
Throw AgeExceptionElse
m_BDate = valuem_Age = DateDiff(DateInterval.Year, value, Now())
End IfEnd Set
End Property
As soon as you enter the code for the revised Age property, two error messages will appearin the Error List window. The code in the application form is attempting to set the value of aread-only property, so the editor produces the following error message twice: Property ‘Age’ is‘ReadOnly.’ As you probably figured out, we must set the BDate property in the code instead of
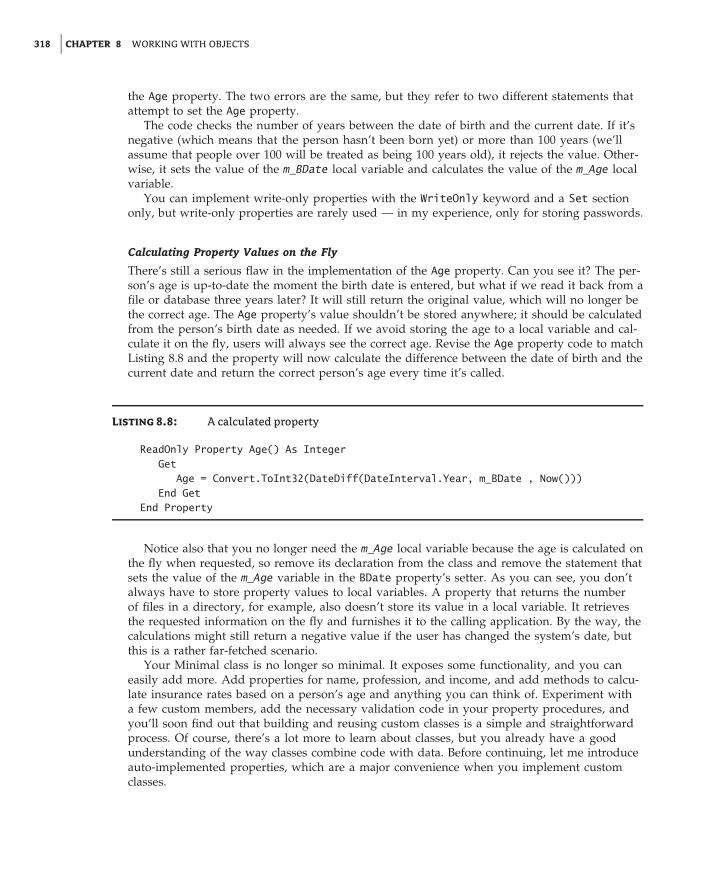
318 CHAPTER 8 WORKING WITH OBJECTS
the Age property. The two errors are the same, but they refer to two different statements thatattempt to set the Age property.
The code checks the number of years between the date of birth and the current date. If it’snegative (which means that the person hasn’t been born yet) or more than 100 years (we’llassume that people over 100 will be treated as being 100 years old), it rejects the value. Other-wise, it sets the value of the m_BDate local variable and calculates the value of the m_Age localvariable.
You can implement write-only properties with the WriteOnly keyword and a Set sectiononly, but write-only properties are rarely used — in my experience, only for storing passwords.
Calculating Property Values on the Fly
There’s still a serious flaw in the implementation of the Age property. Can you see it? The per-son’s age is up-to-date the moment the birth date is entered, but what if we read it back from afile or database three years later? It will still return the original value, which will no longer bethe correct age. The Age property’s value shouldn’t be stored anywhere; it should be calculatedfrom the person’s birth date as needed. If we avoid storing the age to a local variable and cal-culate it on the fly, users will always see the correct age. Revise the Age property code to matchListing 8.8 and the property will now calculate the difference between the date of birth and thecurrent date and return the correct person’s age every time it’s called.
Listing 8.8: A calculated property
ReadOnly Property Age() As IntegerGet
Age = Convert.ToInt32(DateDiff(DateInterval.Year, m_BDate , Now()))End Get
End Property
Notice also that you no longer need the m_Age local variable because the age is calculated onthe fly when requested, so remove its declaration from the class and remove the statement thatsets the value of the m_Age variable in the BDate property’s setter. As you can see, you don’talways have to store property values to local variables. A property that returns the numberof files in a directory, for example, also doesn’t store its value in a local variable. It retrievesthe requested information on the fly and furnishes it to the calling application. By the way, thecalculations might still return a negative value if the user has changed the system’s date, butthis is a rather far-fetched scenario.
Your Minimal class is no longer so minimal. It exposes some functionality, and you caneasily add more. Add properties for name, profession, and income, and add methods to calcu-late insurance rates based on a person’s age and anything you can think of. Experiment witha few custom members, add the necessary validation code in your property procedures, andyou’ll soon find out that building and reusing custom classes is a simple and straightforwardprocess. Of course, there’s a lot more to learn about classes, but you already have a goodunderstanding of the way classes combine code with data. Before continuing, let me introduceauto-implemented properties, which are a major convenience when you implement customclasses.

BUILDING THE MINIMAL CLASS 319
Auto-Implemented Properties
Quite often, actually more often than not, properties are implemented with straightforwardcode, without any validation code — just straight setters and getters like the following:
Private m_Occupation As StringProperty Occupation() As String
GetReturn (m_Occupation)
End GetSet (value As String)
m_Occupation = valueEnd Property
The definition of many properties is based on a standard template, or boilerplate, which isalways the same, except for the names of the properties and the corresponding local variables.If you don’t need any additional code, shouldn’t there be a simple method of defining a prop-erty? Indeed, with VB 2010 you can supply the name of the property and its type in a singlestatement like the following:
Public Property Occupation As String
And that’s all it takes to create a straightforward property. Properties declared this wayare known as auto-implemented properties, and they can simplify the coding of large classesconsiderably because most properties are usually implemented with the default setter andgetter. Behind the scenes, the VB compiler generates the appropriate Get and Set segments ofthe property for you. As for the matching local variable, the compiler uses the same nameas the property prefixed with an underscore. You can access this local variable from within thecode that implements other properties, as in the following example:
Public Class ContactPublic Property Name As StringPublic Property Company As StringPublic Property Occupation As StringPrivate _TitlePublic Property Title() As String
GetIf _Occupation.Trim.Length > 0 Then
Return _Occupation & "/" & _TitleElse
Return _TitleEnd If
End GetSet(ByVal value As String)
_Title = valueEnd Set
End PropertyEnd Class

320 CHAPTER 8 WORKING WITH OBJECTS
The Contact class exposes three auto-implemented properties, the Name, Company, andOccupation properties and a fully implemented property, the Title property. Note that theTitle property’s Get segment takes into consideration the _Occupation local variable thatholds the value of the Occupation auto-implemented property. Although the _Occupationvariable is not declared anywhere in the class, it’s being used in the Title property’simplementation.
Auto-implemented properties are just a shorthand notation for properties, and they’reconverted into actual code by the compiler on the fly. Actually, when you type thestatement
Public Property Company As String
the editor won’t insert the stubs for the Get and Set segments; you must type the Get keywordon the following line and then press Enter for the editor to emit the stubs for the two segmentsof the property procedure.
Customizing Default MembersAs you recall, when you created the Minimal class for the first time, before adding any code,the class exposed a few members — the default members, such as the ToString method (whichreturns the name of the class) and the Equals method (which compares two objects for refer-ence equality). You can (and should) provide your custom implementation for these members;this is what I’m going to do in the following sections.
Customizing the ToString Method
The custom ToString method is implemented as a public function, and it must override thedefault implementation. The implementation of a custom ToString method is shown next:
Public Overrides Function ToString() As StringReturn "The infamous Minimal class"
End Function
As soon as you enter the keyword Overrides, the editor will suggest the names of the threemembers you can override: ToString, Equals, and GetHashCode. Select the ToString method,and the editor will insert a default implementation for you. The default implementation returnsthe string MyBase.ToString. Just replace the statement inserted by the editor with the oneshown in the preceding code segment.
The Overrides keyword tells the compiler that this implementation overwrites the defaultimplementation of the class. The original method’s code isn’t exposed, and you can’t reviseit. The Overrides keyword tells the compiler to ‘‘hide’’ the original implementation and useyour custom ToString method instead. After you override a method in a class, the applicationusing the class can no longer access the original method. Ours is a simple method, but you canreturn any string you can build in the function. For example, you can incorporate the value ofthe BDate property in the string:
Return("MINIMAL: " & m_BDate.ToShortDateString)

BUILDING THE MINIMAL CLASS 321
The value of the local variable m_BDate is the value of the BDate property of the currentinstance of the class. Change the BDate property, and the ToString method will return adifferent string.
Customizing the Equals Method
The Equals method exposed by most of the built-in objects can compare values, not references.Two Rectangle objects, for example, are equal if their dimensions and origins are the same. Thefollowing two rectangles are equal:
Dim R1 As New Rectangle(0, 0, 30, 60)Dim R2 As New RectangleR2.X = 0R2.Y = 0R2.Width = 30R2.Height = 60If R1.Equals(R2) Then
MsgBox("The two rectangles are equal")End If
If you execute these statements, a message box confirming the equality of the two objectswill pop up. The two variables point to different objects (that is, different instances of the sameclass), but the two objects are equal because they have the same origin and same dimensions.The Rectangle class provides its own Equals method, which knows how to compare two Rect-angle objects. If your class doesn’t provide a custom Equals method, all the compiler can dois compare the objects referenced by the two variables. In the case of our Minimal class, theEquals method returns True if the two variables point to the same object (which is the sameinstance of the class). If the two variables point to two different objects, the default Equalsmethod will return False, even if the two objects are the same.
You’re probably wondering what makes two objects equal. Is it all their properties or per-haps some of them? Two objects are equal if the Equals method says so. You should comparethe objects in a way that makes sense, but you’re in no way limited as to how you do this. Ina very specific application, you might decide that two rectangles are equal because they havethe same area, or perimeter, regardless of their dimensions and origin, and override the Rect-angle object’s Equals method. In the Minimal class, for example, you might decide to comparethe birth dates and return True if they’re equal. Listing 8.9 is the implementation of a possiblecustom Equals method for the Minimal class.
Listing 8.9: A custom Equals method
Public Overrides Function Equals(ByVal obj As Object) As BooleanDim O As Minimal = CType(obj, Minimal)If O.BDate = m_BDate Then
Equals = TrueElse
Equals = FalseEnd If
End Function

322 CHAPTER 8 WORKING WITH OBJECTS
Know What You Are Comparing
The Equals method shown in Listing 8.9 assumes that the object you’re trying to compareto the current instance of the class is of the same type. Because you can’t rely on developersto catch all their mistakes, you should know what you’re comparing before you attempt toperform the comparison. A more-robust implementation of the Equals method is shownin Listing 8.10. This implementation tries to convert the argument of the Equals method toan object of the Minimal type and then compares it to the current instance of the Minimalclass. If the conversion fails, an InvalidCastException is thrown and no comparison isperformed.
Listing 8.10: A more-robust Equals method
Public Overrides Function Equals(ByVal obj As Object) As BooleanDim O As New Minimal()Try
O = DirectCast(obj, Minimal)Catch typeExc As InvalidCastException
Throw typeExcExit Function
End TryIf O.BDate = m_BDate Then
Equals = TrueElse
Equals = FalseEnd If
End Function
The Is Operator
The equals (=) operator can be used in comparing all built-in objects. The following statementis quite valid, as long as the R1 and R2 variables were declared of the Rectangle type:
If R1 = R2 ThenMsgBox("The two rectangles are equal")
End If
This operator, however, can’t be used with the Minimal custom class. Later in this chapter,you’ll learn how to customize operators in your class. In the meantime, you can use only the Isoperator, which compares for reference equality (whether the two variables reference the sameobject), and the Equals method. If the two variables R1 and R2 point to the same object, thefollowing statement will return True:
If R1 Is R2 ThenMsgBox("The two variables reference the same object")
End If

BUILDING THE MINIMAL CLASS 323
The Is operator tells you that the two variables point to a single object. There’s no compari-son here; the compiler simply figures out whether they point to same object in memory. It willreturn True if a statement such as the following has been executed before the comparison:
obj2 = obj1
If the Is operator returns True, there’s only one object in memory and you can set its prop-erties through either variable.
Custom EnumerationsLet’s add a little more complexity to our class. Because we’re storing birth dates to our cus-tom objects, we can classify persons according to their age. Most BASIC developers will seean opportunity to use constants here. Instead of using constants to describe the various agegroups, we’ll use an enumeration with the following group names:
Public Enum AgeGroupInfantChildTeenagerAdultSeniorOveraged
End Enum
These statements must appear outside any procedure in the class, and we usually place themat the beginning of the file, right after the declaration of the class. Public is an access modi-fier (we want to be able to access this enumeration from within the application that uses theclass). Enum is a keyword: It specifies the beginning of the declaration of an enumeration andit’s followed by the enumeration’s name. The enumeration itself is a list of integer values, eachone mapped to a name. In our example, the name Infant corresponds to 0, the name Childcorresponds to 1, and so on. The list of the enumeration’s members ends with the End Enumkeyword. You don’t really care about the actual values of the names because the very reasonfor using enumerations is to replace numeric constants with more-meaningful names. You’ll seeshortly how enumerations are used both in the class and the calling application.
Now add to the class the GetAgeGroup method (Listing 8.11), which returns the name of theage group to which the person represented by an instance of the Minimal class belongs. Thename of the group is a member of the AgeGroup enumeration.
Listing 8.11: Using an enumeration
Public Function GetAgeGroup() As AgeGroupSelect Case m_Age
Case Is < 3 : Return (AgeGroup.Infant)Case Is < 10 : Return (AgeGroup.Child)Case Is < 21 : Return (AgeGroup.Teenager)Case Is < 65 : Return (AgeGroup.Adult)

324 CHAPTER 8 WORKING WITH OBJECTS
Case Is < 100 : Return (AgeGroup.Senior)Case Else : Return (AgeGroup.Overaged)
End SelectEnd Function
The GetAgeGroup method returns a value of the AgeGroup type and you can compare it tomembers of the same enumeration. Switch to the form’s code window, add a new button, andenter the statements from Listing 8.12 in its event handler.
Listing 8.12: Using the enumeration exposed by the class
Protected Sub Button1_Click(…)Handles Button1.Click
Dim obj As Minimalobj = New Minimal()Try
obj.BDate = InputBox("Please Enter your birthdate")Catch ex As ArgumentException
MsgBox(ex.Message)Exit Sub
End TryDebug.WriteLine(obj.Age)Dim discount As SingleDim grp As Minimal.AgeGroup = obj.GetAgeGroupSelect Case grp
Case Minimal.AgeGroup.Infant, Minimal.AgeGroup.Childdiscount = 0.4
Case Minimal.AgeGroup.Teenagerdiscount = 0.5
Case Minimal.AgeGroup.Seniordiscount = 0.2
Case ElseEnd Select
MsgBox("Your age is " & obj.Age.ToString &" and you belong to the " &obj.GetAgeGroup.ToString &" group" & vbCrLf & "Your discount is " &Format(discount, "Percent"))
End Sub
This routine calculates discounts based on the person’s age. Notice that we don’t usenumeric constants in our code, just descriptive names. Moreover, the possible values of theenumeration are displayed in a drop-down list by the IntelliSense feature of the IDE as needed(Figure 8.3), and you don’t have to memorize them or look them up as you would with

BUILDING THE MINIMAL CLASS 325
Figure 8.3
The members of anenumeration are dis-played automatically inthe IDE as you type.
constants. I’ve used an implementation with multiple If statements in this example, but youcan perform the same comparisons by using a Select Case statement.
You’ve seen the basics of working with custom classes in a VB application. Let’s switch to apractical example that demonstrates not only the use of a real-world class, but also how classescan simplify the development of a project.
VB 2010 at Work: The Contacts Project
In Chapter 6, ‘‘Working with Forms,’’ I briefly discussed the Contacts application. This appli-cation uses a custom structure to store the contacts and provides four navigational buttons toallow users to move to the first, last, previous, and next contact. Now that you have learnedhow to program the ListBox control and how to use custom classes in your code, you can revisethe Contacts application. First, you’ll implement a class to represent each contact. The fields ofeach contact (company and contact names, addresses, and so on) will be implemented as prop-erties and they will be displayed in the TextBox controls on the form.
You’ll also improve the user interface of the application. Instead of the rather simplistic nav-igational buttons, you’ll place all the company names in a sorted ListBox control. The user caneasily locate the desired company and select it from the list to view its fields. The editing but-tons at the bottom of the form work as usual, but you no longer need the navigational buttons.Figure 8.4 shows the revised Contacts application.
Figure 8.4
The interface of theContacts applicationbased on the ListBoxcontrol

326 CHAPTER 8 WORKING WITH OBJECTS
Copy the contents of the Contacts folder you used when you worked on the Contactsproject in Chapter 6 under a new folder and open the project by double-clicking the solution’sname, Contacts.sln. You will also find the revised project in this chapter’s projects. First,delete the declaration of the Contact structure and add a class to the project. Name the newclass Contact and enter the code from Listing 8.13 into it. The names of the private membersof the class are the same as the actual property names, and they begin with an underscore.(This is a good convention that lets you easily distinguish whether a variable is private and theproperty value it stores.) The implementation of the properties is trivial, so I’m not showingthe code for all of them.
Listing 8.13: The Contact class
<Serializable()> Public Class ContactPrivate _companyName As StringPrivate _email As String
Property CompanyName() As StringGet
CompanyName = _companyNameEnd GetSet(ByVal value As String)
If value Is Nothing Or value = "" ThenThrow New Exception("Company Name field can’t be empty")Exit Property
End If_companyName = value
End SetEnd Property
Property ContactName As String
Property Address1 As String
Property Address2 As String
Property City As String
Property State As String
Property ZIP As String
Property tel As String
Property EMail As StringGet
EMail = _emailEnd GetSet(ByVal value As String)

BUILDING THE MINIMAL CLASS 327
If value.Contains("@") Or value.Trim.Length = 0 Then_email = Value
ElseThrow New Exception("Invalid e-mail address!")
End IfEnd Set
End Property
Property URL As String
Overrides Function ToString() As StringIf _contactName = "" Then
Return _companyNameElse
Return _companyName & vbTab & "(" & _contactName & ")"End If
End Function
Public Sub New()MyBase.New()
End Sub
Public Sub New(ByVal CompanyName As String,ByVal LastName As String, ByVal FirstName As String)
MyBase.New()Me.ContactName = LastName & ", " & FirstNameMe.CompanyName = CompanyName
End Sub
Public Sub New(ByVal CompanyName As String)MyBase.New()Me.CompanyName = CompanyName
End SubEnd Class
The first thing you’ll notice is that the class’s definition is prefixed by the <Serializable()>keyword. The topic of serialization is discussed in Chapter 13, ‘‘XML in Modern Program-ming,’’ but for now all you need to know is that the .NET Framework can convert objects toa text or binary format and then store them in files. Surprisingly, this process is quite simple;as you will see, we’ll be able to dump an entire collection of Contact objects to a file with asingle statement. The <Serializable()> keyword is an attribute of the class, and (as you willsee later in this book) there are more attributes you can use with your classes — or even withyour methods. The most prominent method attribute is the <WebMethod> attribute, which turnsa regular function into a web method.
The various fields of the Contact structure are now properties of the Contact class. Theimplementation of the properties is trivial except for the CompanyName and EMail properties,which contain some validation code. The Contact class requires that the CompanyName property

328 CHAPTER 8 WORKING WITH OBJECTS
have a value; if it doesn’t, the class throws an exception. Likewise, the EMail property mustcontain the symbol @. Finally, the class provides its own ToString method, which returns thename of the company followed by the contact name in parentheses. All other properties areauto-implemented.
The ListBox control, in which we’ll store all contacts, displays the value returned by theobject’s ToString method, which is why you have to provide your own implementation of thismethod to describe each contact. The company name should be adequate, but if there are twocompanies by the same name, you can use another field to differentiate them. I used the contactname, but you can use any of the other properties (the URL would be a good choice).
Although the ListBox displays a string, it stores the object itself. In essence, it’s used notonly as a navigational tool, but also as a storage mechanism for our contacts. Now, we mustchange the code of the main form a little. Start by removing the navigational buttons; we nolonger need them. Their function will be replaced by a few lines of code in the ListBox control’sSelectedIndexChanged event. Every time the user selects another item on the list, the state-ments shown in Listing 8.14 display the contact’s properties in the various TextBox controls onthe form. The currentContact variable is an integer that represents the index of the currentlyselected item, and it must be declared outside the subroutine because it must be accessed byother event handlers as well.
Listing 8.14: Displaying the fields of the selected Contact object
Private Sub ListBox1_SelectedIndexChanged(…)Handles ListBox1.SelectedIndexChanged
currentContact = ListBox1.SelectedIndexShowContact()
End Sub
The ShowContact() subroutine reads the object stored at the location specified by thecurrentContact variable and displays its properties in the various TextBox controls on theform. The TextBox controls are normally read-only, except when users are editing a contact.This action is signaled to the application when the user clicks the Edit or the Add button onthe form.
When a new contact is added, the code reads its fields from the controls on the form,creates a new Contact object, and adds it to the ListBox control. When a contact is edited, anew Contact object replaces the currently selected object on the control. The code is similar tothe code of the Contacts application. I should mention that the ListBox control is locked whilea contact is being added or edited because it doesn’t make sense to select another contact atthat time.
Adding, Editing, and Deleting Contacts
To delete a contact (Listing 8.15), we simply remove the currently selected object from theListBox control. In addition, we must select the next contact on the list (or the first contactif the deleted one was last in the list). The code of this event handler makes use of thecurrentContact variable to remove the currently selected item from the list.

BUILDING THE MINIMAL CLASS 329
Listing 8.15: Deleting an object from the ListBox
Private Sub bttnDelete_Click(…) Handles bttnDelete.ClickIf currentContact > -1 Then
ListBox1.Items.RemoveAt(currentContact)currentContact = ListBox1.Items.Count - 1If currentContact = -1 Then
ClearFields()MsgBox("There are no more contacts")
ElseShowContact()
End IfElse
MsgBox("No current contacts to delete")End If
End Sub
When you add a new contact, the following code is executed in the Add button’s Clickevent handler:
Private Sub bttnAdd_Click(…) Handles bttnAdd.Clickadding = TrueClearFields()HideButtons()ListBox1.Enabled = False
End Sub
The controls are cleared in anticipation of the new contact’s fields, and the adding variableis set to True. The OK button is clicked to end either the addition of a new record or an editoperation. The code behind the OK button is shown in Listing 8.16.
Listing 8.16: Committing a new or edited record
Private Sub bttnOK_Click(…) Handles bttnOK.ClickIf SaveContact() Then
ListBox1.Enabled = TrueShowButtons()
End IfEnd Sub
As you can see, the same subroutine handles both the insertion of a new record and the editingof an existing one. All the work is done by the SaveContact() subroutine, which is shown inListing 8.17.

330 CHAPTER 8 WORKING WITH OBJECTS
Listing 8.17: The SaveContact() subroutine
Private Function SaveContact() As BooleanDim contact As New ContactTry
contact.CompanyName = txtCompany.Textcontact.ContactName = txtContact.Textcontact.Address1 = txtAddress1.Textcontact.Address2 = txtAddress2.Textcontact.City = txtCity.Textcontact.State = txtState.Textcontact.ZIP = txtZIP.Textcontact.tel = txtTel.Textcontact.EMail = txtEMail.Textcontact.URL = txtURL.Text
Catch ex As ExceptionMsgBox(ex.Message)Return False
End TryIf adding Then
ListBox1.Items.Add(contact)Else
ListBox1.Items(currentContact) = contactEnd IfReturn True
End Function
The SaveContact() function uses the adding variable to distinguish between an add andan edit operation and either adds the new record to the ListBox control or replaces the cur-rent item in the ListBox with the values on the various controls. Because the ListBox is sorted,new contacts are automatically inserted in the correct order. If an error occurs during the opera-tion, the SaveContact() function returns False to alert the calling code that the operation failed(most likely because one of the assignment operations caused a validation error in the class’scode). Note that the SaveContact routine uses the currentContact variable to determine theselected item on the list.
The last operation of the application is the serialization and deserialization of the items inthe ListBox control. Serialization is the process of converting an object to a stream of bytes forstoring to a disk file, and deserialization is the opposite process. To serialize objects, we firststore them into an ArrayList object, which is a dynamic array that stores objects and can beserialized as a whole. Likewise, the disk file is deserialized into an ArrayList to reload the per-sisted data back to the application; then each element of the ArrayList is moved to the Itemscollection of the ListBox control. ArrayLists and other Framework collections are discussed inChapter 12, ‘‘Storing Data in Collections,’’ and object serialization is discussed in Chapter 13.You can use these features to test the application and examine the corresponding code afteryou read about ArrayLists and serialization.

BUILDING THE MINIMAL CLASS 331
Making the Most of the ListBox Control
This section’s sample application demonstrates an interesting technique for handling a set ofdata at the client. We usually need an efficient mechanism to store data at the client, whereall the processing takes place — even if the data comes from a database. In this example,we used the ListBox control because each item of the control can be an arbitrary object.Because the control displays the string returned by the object’s ToString method, we’re ableto customize the display by providing our own implementation of the ToString method.As a result, we’re able to use the ListBox control both as a data-storage mechanism and as anavigational tool. As long as the strings displayed on the control are meaningful descriptionsof the corresponding objects and the control’s items are sorted, the ListBox control can beused as an effective navigational tool. If you have too many items to display on the control,you should also provide a search tool to help users quickly locate an item in the list with-out having to scroll up and down a long list of items. Review the ListBoxFind project fromChapter 5, ‘‘Basic Windows Controls,’’ for information on searching the contents of the ListBoxcontrol.
When data are being edited, you have to cope with another possible problem. The user mayedit the data for hours and forget to save the edits every now and then. If the computer(or, even worse, the application) crashes, a lot of work will be wasted. Sure the applicationprovides a Save command, but you should always try to protect users from their mistakes. Itwould be nice if you could save the data to a temporary file every time the user edits, deletes,or adds an item to the list. This way, if the computer crashes, users won’t lose their edits.When the application starts, it should automatically detect the presence of the temporary fileand reload it. Every time the user saves the data by using the application’s Save command orterminates the application, the temporary file should be removed.
Object ConstructorsLet’s switch to a few interesting topics in programming with objects. Objects are instances ofclasses, and classes are instantiated with the New keyword. The New keyword can be used witha number of arguments, which are the initial values of some of the object’s basic properties. Toconstruct a rectangle, for example, you can use either of two statements. You can use this one:
Dim shape1 As Rectangle = New Rectangle()shape1.Width = 100shape1.Height = 30
Or you can use the following one:
Dim shape1 As Rectangle = New Rectangle(100, 30)
The objects in the Minimal class can’t be initialized to specific values of their properties, andthey expose the simple form of the New constructor — the so-called parameterless constructor.

332 CHAPTER 8 WORKING WITH OBJECTS
Every class has a parameterless constructor, even if you don’t specify it. You can implementparameterized constructors, which allow you to pass arguments to an object as you declareit. These arguments are usually the values of the object’s basic properties. Parameterized con-structors don’t pass arguments for all the properties of the object; they expect only enoughparameter values to make the object usable.
Parameterized constructors are implemented via public subroutines that have the nameNew(). You can have as many overloaded forms of the New() subroutine as needed. Most ofthe built-in classes provide a parameterless constructor, but the purists of OOP will argueagainst parameterless constructors. Their argument is that you shouldn’t allow users of yourclass to create invalid instances of it. A class for describing customers, for example, shouldexpose at least a Name property. A class for describing books should expose a Title and anISBN property. If the corresponding constructor requires that these properties be specifiedbefore you create an instance of the class, you’ll never create objects with invalid data. Thereare cases, however, where this isn’t possible. When you call a function that returns a customobject, for example, you must declare a variable of the same type and assign the function tothis variable:
Dim C As ContactC = ListBox1.SelectedItem
Here we can’t create a new Contact object because we want to store in the C variable anexisting object. Is there a good reason to create an object variable before you have an object tostore in it?
Let’s add a parameterized constructor to our Contact class. Each contact should have at leasta name; here’s a parameterized constructor for the Contact class:
Public Sub New(ByVal CompanyName As String)MyBase.New()Me.CompanyName = CompanyName
End Sub
The code is trivial, with the exception of the statement that calls the MyBase.New() sub-routine. MyBase is an object that lets you access the members of the base class (a topic that’sdiscussed in detail later in this chapter). The reason you must call the New method of the baseclass is that the base class might have its own constructor, which can’t be called directly. Youmust always insert this statement in your constructors to make sure any initialization tasksthat must be performed by the base class will not be skipped.
The Contact class’s constructor accepts a single argument: the company name (this propertycan’t be a blank string). Another useful constructor for the same class accepts two additionalarguments, the contact’s first and last names, as follows:
Public Sub New(ByVal CompanyName As String,ByVal LastName As String, ByVal FirstName As String)
MyBase.New()Me.ContactName = LastName & ", " & FirstNameMe.CompanyName = CompanyName
End Sub

BUILDING THE MINIMAL CLASS 333
With the two parameterized constructors in place, you can create new instances of the Con-tact class by using a statement such as the following:
Dim contact1 As New Contact("Around the Horn")
Or you can use a statement such as this:
Dim contact1 As New Contact("Around the Horn", "Hardy", "Thomas")
Notice the lack of the Overloads (or Overrides) keyword. Constructors can have multipleforms and don’t require the use of Overloads — just supply as many implementations of theNew() subroutine as you need.
One last but very convenient technique to initialize objects allows you to supply values foras many properties of the new object as you wish, using the With keyword. The With key-word is followed by the names of the properties you want to initialize and their values in acomma-separated list, as shown in the following statements, which create two new instances ofthe Person class, and they initialize each one differently:
Dim P1 As New Person With{.LastName = "Doe", .FirstName = "Joe"})
Dim P2 As New Person With{.LastName = "Doe", .Email = "[email protected]"})
Note that the property names are prefixed with the period. The With statement is a short-hand notation for accessing multiple members of an instance of a class without having to repeatthe class’s name. This syntax allows you to quickly initialize new objects regardless of theirconstructors; in effect, you can create your own constructor for any class. This technique willbe handy when combining object initialization with other statements, such as in the followingexample, which adds a new object to a list:
Persons.Add(New Person With {.LastName = "Doe", .FirstName = "Joe"})
While the New function is the class constructor, the syntax with the With keyword is not aconstructor, although it creates a new instance of the class and initializes its properties. Theprocess of initializing an instance of a class is known as object initialization. An advantage ofthe With keyword is that as soon as you type the opening bracket, the editor will display thelist of properties you can initialize in the IntelliSense box.
Using the SimpleClass in Other ProjectsThe projects we built in this section are Windows applications that contain a Class module. Theclass is contained within the project, and it’s used by the project’s main form. What if you wantto use this class in another project?
First, you must change the type of the project. A Windows project can’t be used as acomponent in another project. Right-click the SimpleClass project and choose Properties. Inthe project’s Property Pages dialog box, switch to the Application tab, locate the ApplicationType drop-down list, and change the project’s type from Windows Forms Application toClass Library, as shown in Figure 8.5. Then close the dialog box. When you return to the

334 CHAPTER 8 WORKING WITH OBJECTS
Figure 8.5
Setting a project’s prop-erties through the Prop-erty Pages dialog box
project, right-click the TestForm and select Exclude From Project. A class doesn’t have a visibleinterface, and there’s no reason to include the test form in your project.
From the main menu, choose Build � Build SimpleClass. This command will compile theSimpleClass project and create a DLL file (the file that contains the class’s code and the file youmust use in any project that needs the functionality of the SimpleClass class). The DLL file willbe created in the \bin\Release folder under the project’s folder.
Let’s use the SimpleClass.dll file in another project. Start a new Windows application,open the Project menu, and add a reference to the SimpleClass. Choose Project � Add Refer-ence and switch to the Projects tab in the dialog box that appears. Switch to the Browse taband locate the SimpleClass.dll file (see Figure 8.6). Select the name of the file and click OK toclose the dialog box.
The compiler will place the DLL in the folder obj\x86\Debug under the project’s folder. TheSimpleClass component will be added to the project. You can now declare a variable of theSimpleClass.Minimal type and call its properties and methods:
Dim obj As New SimpleClass.Minimalobj.BDate = #10/15/1992#obj.strProperty = 5544MsgBox(obj.NegateNumber())
If you want to keep testing the SimpleClass project, add the TestForm to the original project(right-click the project’s name, choose Add � Add Existing Item, and select the TestForm inthe project’s folder). Change the project’s type back to Windows Forms Application and thenchange its configuration from Release to Debug.
Adding references to multiple DLLs scattered through your disk or local network canbecome a nightmare, especially if multiple developers are working on the same projects. All

BUILDING THE MINIMAL CLASS 335
Figure 8.6
Adding a reference to anexisting class to a newproject
related items should belong to the same solution, so don’t be afraid to add multiple classes tothe same project. Actually, this is the recommended practice and it will simplify the task ofreferencing the classes from within the other projects.
Firing EventsIn addition to methods and properties, classes can also fire events. You will find that eventsare not quite as common with classes. Controls have many events because they expose a visibleinterface and the user interacts through this interface (clicks, drags and drops, and so on). Butclasses can also raise events. Class events can come from three different sources:
Progress events A class might raise an event to indicate the progress of a lengthy process orindicate that an internal variable or property has changed value. The PercentDone event isa typical example. A process that takes a while to complete reports its progress to the callingapplication with this event, which is fired periodically. These events, which are called progressevents, are the most common type of class events.
Time events Time events are based on a timer. They’re not very common, but you can imple-ment alarms, job schedulers, and similar applications. You can set an alarm for a specific timeor an alarm that will go off after a specified interval.
External events External events, such as the completion of an asynchronous operation, canalso fire events. For example, a class might initiate a file download and notify the applicationwhen the file arrives.
To fire an event from within a class, you must do the following:
1. First you must declare the event and its signature in your class. The declaration mustappear in the class, not in any procedure. A simple event, with no arguments, should

336 CHAPTER 8 WORKING WITH OBJECTS
be declared as follows (ShiftEnd is the name of the event — an event that signals theprocess):
Public Event ProcessCompleted()
2. Fire the event from within your class code with the RaiseEvent method:
RaiseEvent ProcessCompleted()
That’s all as far as the class is concerned.
3. The application that uses the custom class must declare it with the WithEvents keyword.Otherwise, it will still be able to use the class’s methods and properties, but the eventsraised by the class will go unnoticed. The following statement creates an instance of theclass and listens for any event:
Dim WithEvents obj As New Minimal
4. Finally, the calling application must provide a handler for the specific event. Becausethe class was declared with the WithEvents keyword, its name will appear in the listof objects in the editor window and its ProcessCompleted event will appear in the listof events (Figure 8.7). Insert the code you want to handle this event in the procedureobj.ProcessCompleted.
Events usually pass information to the calling application. In VB, all events pass two argu-ments to the application: a reference to the object that fired the event and another argument,which is an object that contains information specific to the event.
The arguments of an event are declared just as the arguments of a procedure are declared.The following statement declares an event that’s fired every few seconds to report the progress
Figure 8.7
Programming a customclass’s event
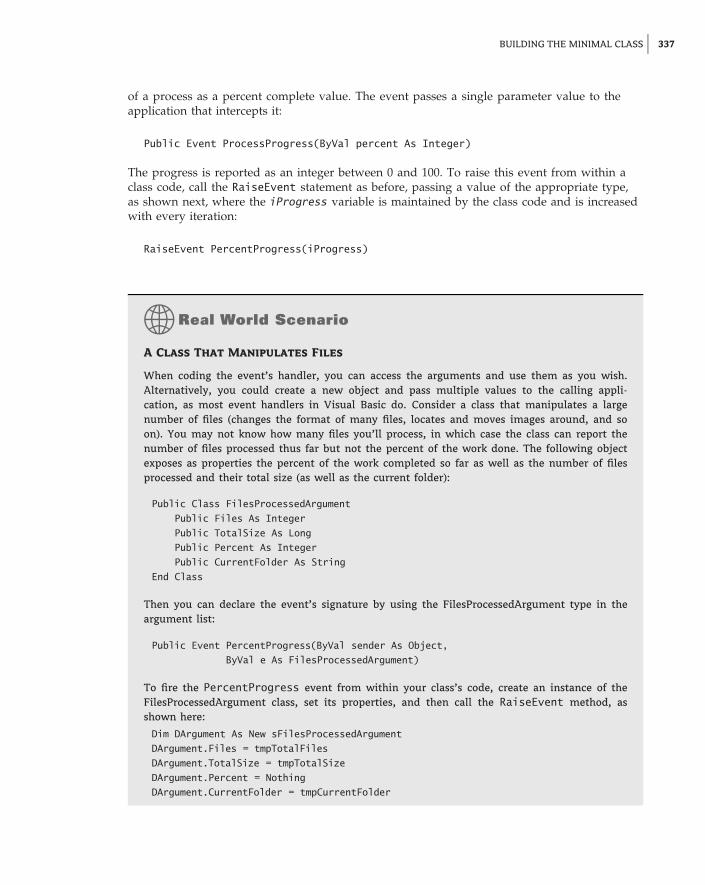
BUILDING THE MINIMAL CLASS 337
of a process as a percent complete value. The event passes a single parameter value to theapplication that intercepts it:
Public Event ProcessProgress(ByVal percent As Integer)
The progress is reported as an integer between 0 and 100. To raise this event from within aclass code, call the RaiseEvent statement as before, passing a value of the appropriate type,as shown next, where the iProgress variable is maintained by the class code and is increasedwith every iteration:
RaiseEvent PercentProgress(iProgress)
A Class That Manipulates Files
When coding the event’s handler, you can access the arguments and use them as you wish.Alternatively, you could create a new object and pass multiple values to the calling appli-cation, as most event handlers in Visual Basic do. Consider a class that manipulates a largenumber of files (changes the format of many files, locates and moves images around, and soon). You may not know how many files you’ll process, in which case the class can report thenumber of files processed thus far but not the percent of the work done. The following objectexposes as properties the percent of the work completed so far as well as the number of filesprocessed and their total size (as well as the current folder):
Public Class FilesProcessedArgumentPublic Files As IntegerPublic TotalSize As LongPublic Percent As IntegerPublic CurrentFolder As String
End Class
Then you can declare the event’s signature by using the FilesProcessedArgument type in theargument list:
Public Event PercentProgress(ByVal sender As Object,ByVal e As FilesProcessedArgument)
To fire the PercentProgress event from within your class’s code, create an instance of theFilesProcessedArgument class, set its properties, and then call the RaiseEvent method, asshown here:
Dim DArgument As New sFilesProcessedArgumentDArgument.Files = tmpTotalFilesDArgument.TotalSize = tmpTotalSizeDArgument.Percent = NothingDArgument.CurrentFolder = tmpCurrentFolder

338 CHAPTER 8 WORKING WITH OBJECTS
RaiseEvent PercentProgress(Me, DArgument)
To intercept this event in your test application, declare an object of the appropriate type withthe WithEvents keyword and write an event handler for the PercentProgress event:
Public WithEvents obj As New EventFiringClassPrivate Sub obj_Fired(ByVal sender As Object,
ByVal e As Firing.FilesProcessedArgument)Handles obj.PercentProgress
MsgBox("Event fired" & vbCrLf &e.Files.ToString & vbCrLf &e.TotalSize.ToStrng & vbCrLf &e.CurrentFolder)
End Sub
That’s all it takes to fire an event from within your custom class. In Chapter 9, ‘‘BuildingCustom Windows Controls,’’ you will find several examples of custom events.
Some events expose a Cancel argument, which you can set to True to cancel an operationthat takes place in the background. For example, users should be able to abort the process ofcounting the files in a volume, which can take minutes depending on the size of the volume. Inthe SimpleClass project (available for download from www.sybex.com/go/masteringvb2010),you will find the Form2. Form2 implements a method for counting files (the ProcessFilesmethod). This method raises the PercentProgress event every time it starts processing adifferent folder. The PercentProgress event exposes the Cancel argument, which the callingapplication can set to True to end the operation. Make Form2 the startup of the project toexperiment with a class that interacts with the calling application with events. The processtakes a while, but you can interrupt it by pressing the Escape key. The code is adequatelydocumented and will help you understand how to retrieve multiple parameters through anevent handler as well as how to pass information back to the class through its events.
Instance and Shared MethodsAs you have seen in earlier chapters, some classes allow you to call some of their memberswithout first creating an instance of the class. The DateTime class, for example, exposes theIsLeapYear method, which accepts as an argument a numeric value and returns a True/Falsevalue that indicates whether the year is a leap year. You can call this method through the Date-Time (or Date) class without having to create a variable of the DateTime type, as shown in thefollowing statement:
If DateTime.IsLeapYear(1999) Then{ process a leap year}
End If
A typical example of classes that can be used without explicit instances is the Math class. Tocalculate the logarithm of a number, you can use an expression such as this one:
Math.Log(3.333)

BUILDING THE MINIMAL CLASS 339
The properties and methods that don’t require you to create an instance of the class beforeyou call them are called shared methods. Methods that must be applied to an instance of theclass are called instance methods. By default, all methods are instance methods. To create ashared method, you must prefix the corresponding function declaration with the Shared key-word, just as you would a shared property.
Why do we need shared methods, and when should we create them? If a method doesn’tapply to a specific instance of a class, make it shared. In other words, if a method doesn’t act onthe properties of the current instance of the class, it should be shared. Let’s consider the Date-Time class. The DaysInMonth method returns the number of days in the month (of a specificyear) that is passed to the method as an argument. You don’t really need to create an instanceof a Date object to find out the number of days in a specific month of a specific year, so theDaysInMonth method is a shared method and can be called as follows:
DateTime.DaysInMonth(2010, 2)
Think of the DaysInMonth method this way: Do I need to create a new date to find out ifa specific month has 30 or 31 days? If the answer is no, then the method is a candidate for ashared implementation.
The AddDays method, on the other hand, is an instance method. We have a date to which wewant to add a number of days and construct a new date. In this case, it makes sense to applythe method to an instance of the class — the instance that represents the date to which we addthe number of days — rather than passing the date as argument to the AddDays method.
If you take a moment to reflect on shared and instance members, you’ll come to the conclu-sion that all members could have been implemented as shared members and accept the datathey act upon as arguments. This approach, however, would reduce classes to collections offunctions, just like the built-in functions of Visual Basic. The idea behind classes, however, isto combine data with code. If you implement a class with shared members, you lose one of themajor advantages of OOP. One of the reasons for turning to object-oriented programming wasthat languages were being enhanced with every new version to a point that they were bloatedand developers couldn’t memorize all the functions.
The SharedMembers sample project (available for download from www.sybex.com/go/mas-teringvb2010) is a simple class that demonstrates the differences between a shared and aninstance method. Both methods do the same thing: They reverse the characters in a string. TheIReverseString method is an instance method; it reverses the current instance of the class,which is a string. The SReverseString method is a shared method; it reverses its argument.Listing 8.18 shows the code that implements the SharedMembersClass component.
Listing 8.18: A class with a shared and an instance method
Public Class SharedMembersClassPrivate _strProperty As String
Sub New(ByVal str As String)_strProperty = str
End Sub
Sub New()

340 CHAPTER 8 WORKING WITH OBJECTS
End Sub
Public Property strProperty As StringGet
Return(_strProperty)End GetSet (ByVal value As String)
_strProperty = valueEnd Set
End PropertyPublic Function IReverseString() As String
Return (StrReverse(strProperty))End Function
Public Shared Function SReverseString(ByVal str As String) As StringReturn (StrReverse(str))
End FunctionEnd Class
Note that I had to declare the parameterless constructor in the class. This form of the con-structor should be included only if you add multiple forms of the constructor. If you don’t careabout constructors that accept parameters, you don’t have to list the default constructor explic-itly. The instance method acts on the current instance of the class. This means that the classmust be initialized to a string, and this is why the New constructor requires a string argument.To test the class, add a form to the project, make it the Startup object, and add two buttons toit. The code behind the two buttons is shown next:
Private Sub Button1_Click(…) Handles Button1.ClickDim testString As String = "ABCDEFGHIJKLMNOPQRSTUVWXYZ"Dim obj As New SharedMembersClass(testString)Debug.WriteLine(obj.IReverseString)
End Sub
Private Sub Button2_Click(…) Handles Button2.ClickDim testString As String = "ABCDEFGHIJKLMNOPQRSTUVWXYZ"Debug.WriteLine(SharedMembersClass.SReverseString(testString))
End Sub
The code behind the first button creates a new instance of the SharedMembersClass and callsits IReverseString method. The second button calls the SReverseString method through theclass’s name and passes the string to be reversed as an argument to the method.
A class can also expose shared properties. There are situations in which you want allinstances of a class to see the same property value. Let’s say you want to keep track of theusers currently accessing your class. You can declare a method that must be called to enablethe class, and this method signals that another user has requested your class. This methodcould establish a connection to a database or open a file. We’ll call it the Connect method.Every time an application calls the Connect method, you can increase an internal variableby one. Likewise, every time an application calls the Disconnect method, the same internal

BUILDING THE MINIMAL CLASS 341
variable is decreased by one. This internal variable can’t be private because it will be initializedto zero with each new instance of the class. You need a variable that is common to all instancesof the class. Such a variable should be declared with the Shared keyword.
Let’s add a shared variable to our Minimal class. We’ll call it LoggedUsers, and it will beread-only. Its value is reported via the Users property, and only the Connect and Disconnectmethods can change its value. Listing 8.19 is the code you must add to the Minimal class toimplement a shared property.
Listing 8.19: Implementing a shared property
Shared LoggedUsers As IntegerReadOnly Property Users() As Integer
GetUsers = LoggedUsers
End GetEnd Property
Public Function Connect() As IntegerLoggedUsers = LoggedUsers + 1‘ { your own code here}
End Function
Public Function Disconnect() As IntegerIf LoggedUsers > 1 Then
LoggedUsers = LoggedUsers - 1End If‘ { your own code here}
End Function
To test the shared variable, add a new button to the form and enter the code in Listing 8.20in its Click event handler. (The lines with the bold numbers are the values reported by theclass; they’re not part of the listing.)
Listing 8.20: Testing the LoggedUsers shared property
Private Sub Button3_Click(ByVal sender As Object,ByVal e As System.EventArgs)
Dim obj1 As New SharedMembersClassobj1.Connect()Debug.WriteLine(obj1.Users)
1obj1.Connect()Debug.WriteLine(obj1.Users)
2Dim obj2 As New SharedMembersClass

342 CHAPTER 8 WORKING WITH OBJECTS
obj2.Connect()Debug.WriteLine(obj1.Users)
3Debug.WriteLine(obj2.Users)
3Obj2.Disconnect()Debug.WriteLine(obj2.Users)
2End Sub
If you run the application, you’ll see the values displayed under each Debug.WriteLinestatement in the Output window. As you can see, both the obj1 and obj2 variables access thesame value of the Users property. Shared variables are commonly used in classes that run ona server and service multiple applications. In effect, they’re the class’s global variables, whichcan be shared among all the instances of a class. You can use shared variables to keep track ofconnection time, the total number of rows accessed by all users of the class in a database, andother similar quantities.
A ‘‘Real’’ ClassThe StringTools project, which is included with this chapter’s projects, contains the String-Tools class, which exposes a few interesting methods. The first two methods are theExtractPathName and ExtractFileName methods, which extract the filename and pathnamefrom a full filename. If the full name of a file is C:\Documents\Recipes\Chinese\Won Ton.txt,the ExtractPathName method will return the substring C:\Documents\Recipes\Chinese\,and the ExtractFileName method will return the substring Won Ton.txt.
A third method, called Num2String, converts numeric values (amounts) to the equivalentstrings. For example, it can convert the amount $12,544 to the string Twelve Thousand, FiveHundred And Forty Four dollars. No other class in the Framework provides this functionality,and any program that prints checks can use this class.
The Num2String method uses three properties of the StringTools class: the Case, Delimiter,and Padding properties. The Case property determines the case of the characters in the stringreturned by the method. The Delimiter property specifies the special characters that shouldappear before and after the string. Finally, the Padding property specifies the character thatwill appear between groups of digits. The values each of these properties can take on are mem-bers of the appropriate enumeration:
PaddingEnum DelimiterEnum CaseEnum
paddingCommas delimiterNone caseCaps
paddingSpaces delimiterAsterisk caseLower
paddingDashes delimiter3Asterisks caseUpper
The values for each of these properties are implemented as enumerations, and you neednot memorize their names. As you enter the name of the property followed by the equal sign,the appropriate list of values will pop up and you can select the desired member. Listing 8.21presents the UseCaseEnum enumeration and the implementation of the UseCase property.

A ‘‘REAL’’ CLASS 343
Listing 8.21: The CaseEnum enumeration and the UseCase property
Enum CaseEnumcaseCapscaseLowercaseUpper
End Enum
Private varUseCase As CaseEnumPublic Property [Case]() As CaseEnum
GetReturn (varUseCase)
End GetSet
varUseCase = ValueEnd Set
End Property
Notice that the name of the Case property is enclosed in square brackets. This is necessarywhen you’re using a reserved keyword as a variable, property, method, or enumeration mem-ber name. Alternatively, you can use a different name for the property to avoid the conflictaltogether.
To test the StringTools class, create a test form like the one shown in Figure 8.8. Then enterthe code from Listing 8.22 in the Click event handler of the two buttons.
Listing 8.22: Testing the StringTools class
Protected Sub Button1_Click(…) Handles Button1.ClickTextBox1.Text = Convert.ToDecimal(
TextBox1.Text).ToString("#,###.00")Dim objStrTools As New StringTools()objStrTools.Case = StringTools.CaseEnum.CaseCapsobjStrTools.Delimiter = StringTools.DelimitEnum.DelimiterNoneobjStrTools.Padding = StringTools.PaddingEnum.PaddingCommasTextBox2.Text = objStrTools.Num2String(Convert.ToDecimal(TextBox1.Text))
End Sub
Protected Sub Button2_Click(…) Handles Button2.ClickDim objStrTools As New StringTools()openFileDialog1.ShowDialog()Dim fName as StringfName = OpenFileDialog1.FileNameDebug.writeline(objStrTools.ExtractPathName(fName))Debug.WriteLine(objStrTools.ExtractFileName(fName))
End Sub

344 CHAPTER 8 WORKING WITH OBJECTS
Figure 8.8
The test form for theStringTools class
Nesting ClassesIn the examples so far, we used simple classes with properties that are basic data types. Prac-tical classes use nested classes and their properties are not basic data types. The very essenceof a class is to encapsulate the complexity of an entity and present a simplified view of thatparticular entity. Let’s consider a simple, yet quite practical example.
Stocking a Product
A class for representing products should expose properties like the product name, its price, thenumber of items in stock, and so on. Here’s a typical class that represents a product:
Public Class ProductPublic Property ProductName As StringPublic Property ProductPrice As DecimalPublic Property InStock As IntegerPublic Property OnOrder As Integer
End Class
This class is as straightforward as it gets. But you may notice that the last two properties arerelated to stocking. What if you created a class to represent a product’s in-stock and on-orderstatus and used it in the definition of the Product class? Consider the following Stock class,which represents both the in-stock and on-order quantities of a product:
Public Class StockPublic Property InStock As IntegerPublic Property OnOrder As Integer
End Class
With the Stock class in place, you can create a property of the Stock type in the Product class:
Public Class ProductPublic Property ProductName As StringPublic Property ProductPrice As Decimal

A ‘‘REAL’’ CLASS 345
Public Property ProductStock As StockEnd Class
The ProductStock property encapsulates all the complexity of the product’s stock. The Stockproperty could also contain the units that are reserved for orders that haven’t been shippedyet (and therefore are not available for sale, even though they belong to the actual stock) andmethods for manipulating the stock. By defining a custom class, ProductStock, we’ve isolatedthe stocking details from the product. When we create a new instance of the Product class, wecan assign value to the ProductStock property with statements like the following:
Dim P As New ProductP.ProductName = "New product"P.ProductPrice = 99.99P.ProductStock.InStock = 9P.ProductStock.OnOrder = 24
One item of interest here is where you should define the Stock class. Should you embed itsdefinition in the Product class, or should you implement it as an independent class? Here arethe two possible ways to implementing the Product and Stock classes:
Public Class ProductPublic Property ProductName As StringPublic Property Price As DecimalPublic Property ProductStock As StockPublic Class Stock
Public Property InStock As IntegerPublic Property OnOrder As Integer
End ClassEnd Class
Public Class ProductPublic Property ProductName As StringPublic Property Price As DecimalPublic Property ProductStock As Stock
End ClassPublic Class Stock
Public Property InStock As IntegerPublic Property OnOrder As Integer
End Class
If the Stock class will be used only in conjunction with the Product class, you can embed itsdefinition in the definition of the larger class. If the Stock class may be used by several otherclasses, then it should be defined as a separate class. The difference between the two methodsof nesting classes is in the way you create new instances of the nested class. If the Stock classis embedded in the Product class, its type is Product.Stock. Otherwise, it’s type is just Stock.
The Stock class example is fairly simple, but it demonstrates the use of nested classes. Typ-ically, an application uses high-level classes, such as Customer, Invoice, Product, and so on.These classes are usually too complicated to be built with the basic data types, so we nest the

346 CHAPTER 8 WORKING WITH OBJECTS
classes in many levels, creating a hierarchy of classes that reflects the hierarchy of the entitieswe’re modeling. Consider the Address property of the Customer class. Doesn’t it make senseto create an Address class with the details of the address and reuse it in the Customer class?We could also use it with the Supplier class and possibly other entities that have addresses. Aneven better example is that of an invoice. The invoice’s body contains the items sold: productcodes and names, prices, units, and so on.
Let’s create a Detail class that represents the details of an invoice:
Public Class DetailPublic Property ProductID As StringPublic Property ProductName As StringPublic Property UnitPrice As DecimalPublic Property Units As Integer
End Class
Then, we can create a class that represents the entire invoice and make use of the Detail class:
Public Class InvoicePublic InvoiceNumber As StringPublic CustomerID As LongPublic InvoiceDate As DateTimePublic Details() As Detail
Public Class DetailPublic Property ProductID As StringPublic Property ProductName As StringPublic Property UnitPrice As DecimalPublic Property Units As Integer
End ClassEnd Class
Since we’re on the topic of nesting classes, you should try to combine the ProductID andProductName properties into a new class, the Product class, and use this class in the definitionof the Detail class.
One more interesting topic I should mention briefly here is how to initialize objects withnontrivial members. Let’s consider an Invoice class, which exposes a member that is an array ofcustom objects. Could you initialize an instance of the Invoice class in a single statement? Youmay wish to give this a try before you look at the code.
The statement is a bit complicated, so let me introduce it gradually. To create an instance ofthe Invoice class, you’d use a statement like the following:
Dim detail = New Invoice.Detail With {.ProductID = 11, .ProductName = "item1",.UnitPrice = 9.95, .Units = 3}
To populate the Invoice.Detail property, you must create an array with as many elementsas there are detail lines in the invoice. The array’s type should be of the Invoice.Detail type, asin the following example:
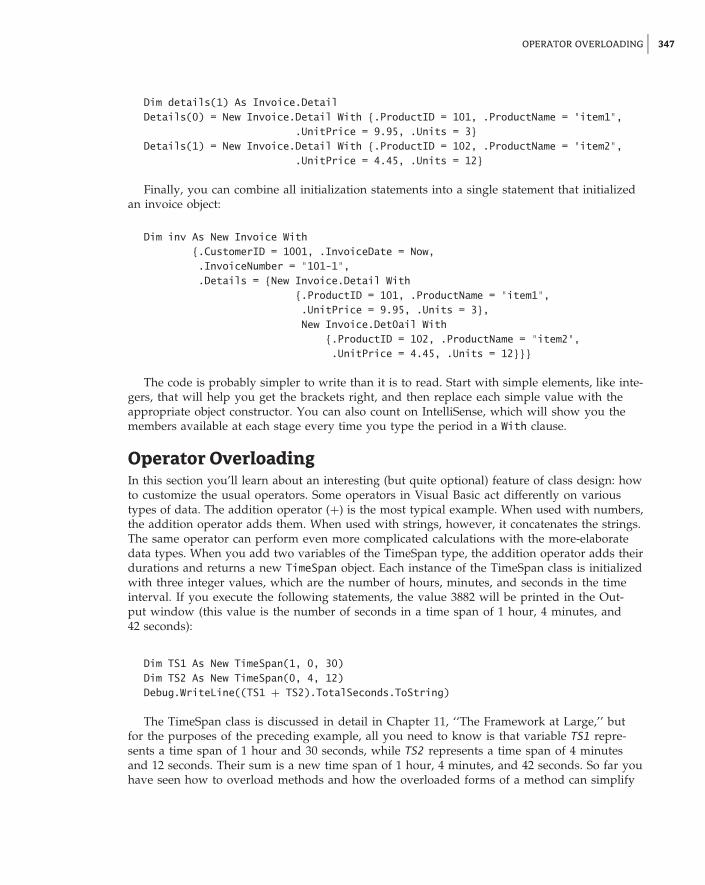
OPERATOR OVERLOADING 347
Dim details(1) As Invoice.DetailDetails(0) = New Invoice.Detail With {.ProductID = 101, .ProductName = "item1",
.UnitPrice = 9.95, .Units = 3}Details(1) = New Invoice.Detail With {.ProductID = 102, .ProductName = "item2",
.UnitPrice = 4.45, .Units = 12}
Finally, you can combine all initialization statements into a single statement that initializedan invoice object:
Dim inv As New Invoice With{.CustomerID = 1001, .InvoiceDate = Now,.InvoiceNumber = "101-1",.Details = {New Invoice.Detail With
{.ProductID = 101, .ProductName = "item1",.UnitPrice = 9.95, .Units = 3},New Invoice.Det0ail With
{.ProductID = 102, .ProductName = "item2",.UnitPrice = 4.45, .Units = 12}}}
The code is probably simpler to write than it is to read. Start with simple elements, like inte-gers, that will help you get the brackets right, and then replace each simple value with theappropriate object constructor. You can also count on IntelliSense, which will show you themembers available at each stage every time you type the period in a With clause.
Operator OverloadingIn this section you’ll learn about an interesting (but quite optional) feature of class design: howto customize the usual operators. Some operators in Visual Basic act differently on varioustypes of data. The addition operator (+) is the most typical example. When used with numbers,the addition operator adds them. When used with strings, however, it concatenates the strings.The same operator can perform even more complicated calculations with the more-elaboratedata types. When you add two variables of the TimeSpan type, the addition operator adds theirdurations and returns a new TimeSpan object. Each instance of the TimeSpan class is initializedwith three integer values, which are the number of hours, minutes, and seconds in the timeinterval. If you execute the following statements, the value 3882 will be printed in the Out-put window (this value is the number of seconds in a time span of 1 hour, 4 minutes, and42 seconds):
Dim TS1 As New TimeSpan(1, 0, 30)Dim TS2 As New TimeSpan(0, 4, 12)Debug.WriteLine((TS1 + TS2).TotalSeconds.ToString)
The TimeSpan class is discussed in detail in Chapter 11, ‘‘The Framework at Large,’’ butfor the purposes of the preceding example, all you need to know is that variable TS1 repre-sents a time span of 1 hour and 30 seconds, while TS2 represents a time span of 4 minutesand 12 seconds. Their sum is a new time span of 1 hour, 4 minutes, and 42 seconds. So far youhave seen how to overload methods and how the overloaded forms of a method can simplify

348 CHAPTER 8 WORKING WITH OBJECTS
development. Sometimes it makes sense to alter the default function of an operator. Let’s sayyou designed a class for representing lengths in meters and centimeters, something like thefollowing:
Dim MU As New MetricUnitsMU.Meters = 1MU.Centimeters = 78
The MetricUnits class allows you to specify lengths as an integer number of meters andcentimeters (presumably you don’t need any more accuracy). The most common operationyou’ll perform with this class is to add and subtract lengths. However, you can’t directly addtwo objects of the MetricUnits type by using a statement such as this:
TotalLength = MU1 + MU2
Wouldn’t it be nice if you could add two custom objects by using the addition operator? Forthis to happen, you should be able to overload the addition operator, just as you can overloada method. Indeed, it’s possible to overload an operator for your custom classes and write state-ments like the preceding one. Let’s design a class to express lengths in metric and English unitsand then overload the basic operators for this class.
To overload an operator, you must create an Operator procedure, which is basically a func-tion with an odd name: the name (this is usually a symbol) of the operator you want to over-load. The Operator procedure accepts as arguments two values of the custom type (the typefor which you’re overloading the operator) and returns a value of the same type. Here’s theoutline of an Operator procedure that overloads the addition operator:
Public Shared Operator + (ByVal length1 As MetricUnits,ByVal length2 As MetricUnits) As MetricUnits
End Operator
The procedure’s body contains the statements that add the two arguments as units of length,not as numeric values. Overloading operators is a straightforward process that can help youcreate elegant classes that can be manipulated with the common operators.
VB 2010 at Work: The LengthUnits ClassTo demonstrate the overloading of common operators, I included the LengthUnits project,which is a simple class for representing distances in English and metric units. Listing 8.23shows the definition of the MetricUnits class, which represents lengths in meters andcentimeters.
Listing 8.23: The MetricUnits class
Public Class MetricUnitsPrivate _Meters As IntegerPrivate _Centimeters As Integer

OPERATOR OVERLOADING 349
Public Sub New()
End Sub
Public Sub New(ByVal meters As Integer, ByVal centimeters As Integer)Me.Meters = metersMe.Centimeters = centimeters
End Sub
Public Property Meters As Integer
Public Property Centimeters() As Integer
GetReturn _Centimeters
End GetSet(ByVal Value As Integer)
If value > 100 Then_Meters += Convert.ToInt32(Math.Floor(Value / 100))_Centimeters = (Value Mod 100)
Else_Centimeters = value
End IfEnd Set
End Property
Public Overloads Function Tostring() As StringDim str As String = Math.Abs(_Meters).ToString & " meters, " &
Math.Abs(_Centimeters).ToString & " centimeters"If _Meters < 0 Or (_Meters = 0 And _Centimeters < 0) Then
str = "-" & strEnd IfReturn str
End FunctionEnd Class
The class uses the private variables _Meters and _Centimeters to store the two values thatdetermine the length of the current instance of the class. These variables are exposed as theMeters and Centimeters properties. Notice the two forms of the constructor and the customToString method. Because the calling application may supply a value that exceeds 100 for theCentimeters property, the code that implements the Centimeters property checks for this con-dition and increases the Meters property, if needed. It allows the calling application to set theCentimeters property to 252, but internally it increases the _Meters local variable by 2 andsets the _Centimenters local variable to 52. The ToString method returns the value of the cur-rent instance of the class as a string such as 1.98, but it inserts a minus sign in front of it if it’snegative. If you open the sample project, you’ll find the implementation of the EnglishUnits

350 CHAPTER 8 WORKING WITH OBJECTS
class, which represents lengths in feet and inches. The code is quite similar and I won’t repeatit here.
There’s nothing out of the ordinary so far; it’s actually a trivial class. We can turn it intoa highly usable class by overloading the basic operators for the MetricUnits class: namely theaddition and subtraction operators. Add the Operator procedures shown in Listing 8.24 to theclass’s code to overload the addition (+) and subtraction (-) operators. By the way, you can’tuse these operators with variable of the Metric type; the compiler just doesn’t know how toadd two instances of this class.
Listing 8.24: Overloading operators for the MetricUnits class
Public Shared Operator + (ByVal length1 As MetricUnits,ByVal length2 As MetricUnits) As MetricUnits
Dim result As New metricUnitsresult.Meters = 0result.Centimeters =
length1.Meters * 100 + length1.Centimeters +length2.Meters * 100 + length2.Centimeters
Return resultEnd Operator
Public Shared Operator - (ByVal length1 As MetricUnits,ByVal length2 As MetricUnits) As MetricUnits
Dim result As New MetricUnitsresult.Meters = 0result.Centimeters =
length1.Meters * 100 + length1.Centimeters -length2.Meters * 100 - length2.Centimeters
Return resultEnd Operator
These two procedures turn an ordinary class into an elegant custom data type. You can nowcreate MetricUnits variables in your code and manipulate them with the addition and subtrac-tion operators as if they were simple numeric data types. The following code segment exercisesthe MetricUnits class:
Dim MU1 As New MetricUnitsMU1.Centimeters = 194Debug.WriteLine("194 centimeters is " & MU1.Tostring & " meters")194 centimeters is 1.94 metersDim MU2 As New MetricUnitsMU2.Meters = 1
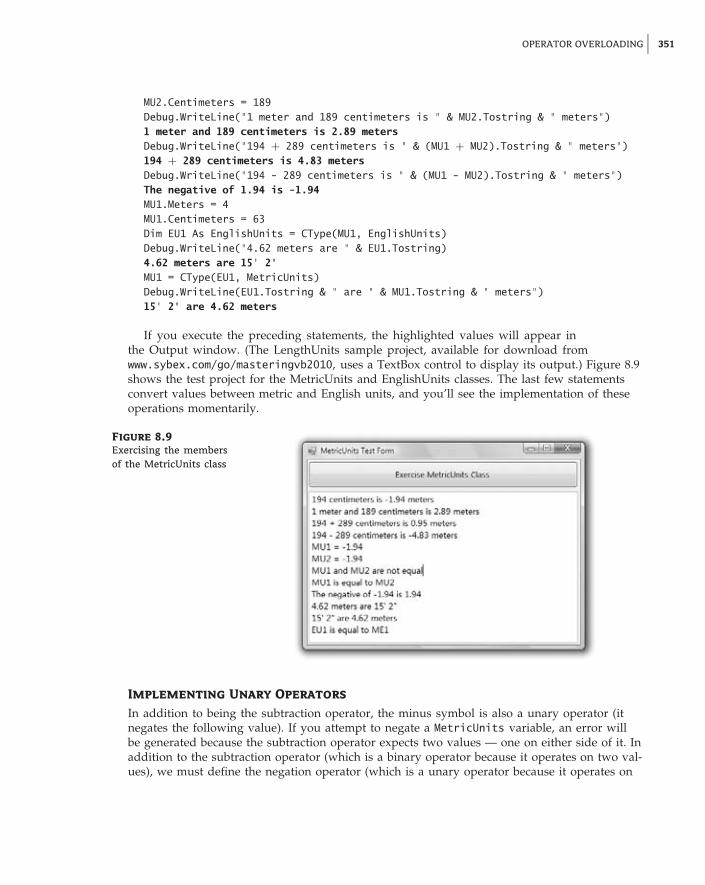
OPERATOR OVERLOADING 351
MU2.Centimeters = 189Debug.WriteLine("1 meter and 189 centimeters is " & MU2.Tostring & " meters")1 meter and 189 centimeters is 2.89 metersDebug.WriteLine("194 + 289 centimeters is " & (MU1 + MU2).Tostring & " meters")194 + 289 centimeters is 4.83 metersDebug.WriteLine("194 - 289 centimeters is " & (MU1 - MU2).Tostring & " meters")The negative of 1.94 is -1.94MU1.Meters = 4MU1.Centimeters = 63Dim EU1 As EnglishUnits = CType(MU1, EnglishUnits)Debug.WriteLine("4.62 meters are " & EU1.Tostring)4.62 meters are 15’ 2"MU1 = CType(EU1, MetricUnits)Debug.WriteLine(EU1.Tostring & " are " & MU1.Tostring & " meters")15’ 2" are 4.62 meters
If you execute the preceding statements, the highlighted values will appear inthe Output window. (The LengthUnits sample project, available for download fromwww.sybex.com/go/masteringvb2010, uses a TextBox control to display its output.) Figure 8.9shows the test project for the MetricUnits and EnglishUnits classes. The last few statementsconvert values between metric and English units, and you’ll see the implementation of theseoperations momentarily.
Figure 8.9
Exercising the membersof the MetricUnits class
Implementing Unary Operators
In addition to being the subtraction operator, the minus symbol is also a unary operator (itnegates the following value). If you attempt to negate a MetricUnits variable, an error willbe generated because the subtraction operator expects two values — one on either side of it. Inaddition to the subtraction operator (which is a binary operator because it operates on two val-ues), we must define the negation operator (which is a unary operator because it operates on

352 CHAPTER 8 WORKING WITH OBJECTS
a single value). The unary minus operator negates the following value, so a new definition ofthe subtraction Operator procedure is needed. This definition will overload the existing one, asfollows:
Public Overloads Shared Operator -(ByVal length1 As MetricUnits) As MetricUnits
Dim result As New MetricUnitsresult.Meters = -length1.Metersresult.Centimeters = -length1.CentimetersReturn result
End Operator
To negate a length unit stored in a variable of the MetricUnits type in your application’scode, use statements such as the following:
MU2 = -MU1Debug.Write(MU2.Tostring)Debug.Write((-MU1).Tostring)
Both statements will print the following in the Output window:
-1 meters, -94 centimeters
There are several unary operators, which you can overload in your custom classes asneeded. There’s the unary + operator (not a common operator), and the Not, IsTrue, andIsFalse operators, which are logical operators. The last unary operator is the CType operator,which is exposed as a method of the custom class and is explained next.
Handling Variants
To make your custom data type play well with the other data types, you must also provide aCType() function that can convert a value of the MetricUnits type to any other type. It doesn’tmake much sense to convert metric units to dates or any of the built-in objects, but let’s sayyou have another class: the EnglishUnits class. This class is similar to the MetricUnits class, butit exposes the Inches and Feet properties in place of the Meters and Centimeters properties.The CType() function of the MetricUnits class, which will convert metric units to English units,is shown next:
Public Overloads Shared Widening OperatorCType(ByVal MU As MetricUnits) As EnglishUnits
Dim EU As New EnglishUnitsEU.Inches = Convert.ToInt32(
(MU.Meters * 100 + MU.Centimeters) / 2.54)Return EU
End Operator
Do you remember the implicit narrowing and widening conversions we discussed inChapter 2, ‘‘Handling Data’’? An attempt to assign an integer value to a decimal variable willproduce a warning, but the statement will be executed because it’s a widening conversion(no loss of accuracy will occur). The opposite is not true. If the Strict option is on, the

THE BOTTOM LINE 353
compiler won’t allow narrowing conversions because not all decimal values can be mappedto integers. To help the compiler enforce strict types, you can use the appropriate keyword tospecify whether the CType() function performs a widening or a narrowing conversion. TheCType() procedure is shared and overloads the default implementation, which explains all thekeywords prefixing its declaration. The following statements exercise the CType method of theMetricUnits class:
Debug.Write(MU1.Tostring)1 meters, 94 centimetersDebug.WriteLine(CType(MU1, EnglishUnits).Tostring)6 feet, 4 inches
The output of the two statements is highlighted. In this code both classes expose integerproperties, so the Widening or Narrowing keyword isn’t really important. In other situations,you must carefully specify the type of the conversion to help the compiler generate the appro-priate warnings (or exceptions, if needed).
The CType operator we added to the MetricUnits class can only convert values of the Met-ricUnit type to values of the EnglishUnit type. If it makes sense to convert MetricUnits vari-ables to other types, you must provide more overloaded forms of the CType() procedure. Forexample, you can convert them to numeric values (the numeric value could be the length incentimeters or a double value that represents the same length in meters). The compiler seesthe return type(s) of the various overloaded forms of the CType operator, and since it knowswhether the requested conversion is possible, it will generate the appropriate exception.
In short, operator overloading isn’t complicated, adds a touch of elegance to a custom class,and enables variables of this type to mix well with the other data types. If you like math, youcould implement classes to represent matrices, or complex numbers, and overload the usualoperators for addition, multiplication, and so on. The downside of operator overloading (atleast in its current implementation) is that it requires quite a bit of code. Even so, the code isstraightforward. The LengthUnits sample application contains quite a bit of code that I haven’tdiscussed in this chapter, but I suggest you take a look at the application as it implementsmany operators, including equals (=), not equals (<>), greater than, and less than.
The Bottom Line
Build your own classes. Classes contain code that executes without interacting with the user.The class’s code is made up of three distinct segments: the declaration of the private variables,the property procedures that set or read the values of the private variables, and the methods,which are implemented as public subroutines or functions. Only the public entities (proper-ties and methods) are accessible by any code outside the class. Optionally, you can implementevents that are fired from within the class’s code. Classes are referenced through variables ofthe appropriate type, and applications call the members of the class through these variables.Every time a method is called, or a property is set or read, the corresponding code in the classis executed.
Master It How do you implement properties and methods in a custom class?
Master It How would you use a constructor to allow developers to create an instance ofyour class and populate it with initial data?

354 CHAPTER 8 WORKING WITH OBJECTS
Master It Which are the default methods of a custom class that you will most likely over-ride with more meaningful definitions?
Master It How should you handle exceptions in a class?
Overloading operators. Overloading is a common theme in coding classes (or plain proce-dures) with Visual Basic. In addition to overloading methods, you can overload operators.In other words, you can define the rules for adding or subtracting two custom objects, if thismakes sense for your application.
Master It When should you overload operators in a custom class, and why?
Chapter 9
Building Custom Windows Controls
Just as you can design custom classes, you can use Visual Studio to design custom controls.The process is very similar, in the sense that custom controls have properties, methods, andevents, which are implemented with code that’s identical to the code you’d use to implementthese members with classes. The difference is that controls have a visual interface and interactwith the user. In short, you must provide the code to draw the control’s surface as well as reactto selected user actions from within the control’s code.
In this chapter, you’ll learn how to enhance the functionality of existing controls, a commonpractice among developers, as well as how to build custom controls from scratch. Specifically,you will learn how to do the following:
◆ Extend the functionality of existing Windows Forms controls with inheritance
◆ Build compound custom controls that combine multiple existing controls
◆ Build custom controls from scratch
◆ Customize the rendering of the items in a ListBox control
On Designing Windows ControlsBefore I get to the details of how to build custom controls, I want to show you how they relateto other types of projects. I’ll discuss briefly the similarities and differences among Windowscontrols, classes, and Windows projects. This information will help you get the big picture andput together the pieces of the following sections.
An application interacts with the user through its interface. The developer decides how theforms interact with the user, and the user has to follow the rules. Something similar happenswith custom controls. The custom control provides a well-defined interface, which consists ofproperties and methods. This is the only way to manipulate the control. Just as users of yourapplications don’t have access to the source code and can’t modify the application, develop-ers can’t see the control’s source code and must access it through the interface exposed by thecontrol. After an instance of the custom control is placed on the form, the developer can manip-ulate it through its properties and methods, but you never get to see the code.
In preceding chapters, you learned how to implement interfaces consisting of properties andmethods and how to raise events from within a class. This is how you build the interface of acustom Windows control: You implement properties with Property procedures, and you imple-ment methods as Public procedures. Although a class can provide a few properties and anynumber of methods, a control must provide a large number of properties. A developer who

356 CHAPTER 9 BUILDING CUSTOM WINDOWS CONTROLS
places a custom control on a form expects to see the properties that are common to all the con-trols (properties to set the control dimensions, the color, and the text font; the Index and Tagproperties; and so on). Fortunately, many of the standard properties are exposed automatically.The developer also expects to be able to program all the common events, such as the mouseand keyboard events, as well as some events that are unique to the custom control.
The design of a Windows control is similar to the design of a form. You place controls ona form-like object, called UserControl, which is the control’s surface. It provides nearly all themethods of a standard form, and you can adjust its appearance with the drawing methods. Inother words, you can use familiar programming techniques to draw a custom control or youcan use existing controls to build a custom control.
The major difference between forms and custom controls is that custom controls can existin two runtime modes. When the developer places a control on a form, the control is actuallyrunning. When you set properties through the Properties window, something happens to thecontrol — its appearance changes or the control rejects the changes. It means that the codeof the custom control is executing, even though the project in which the control is used is indesign mode. When the developer starts the application, the custom control is already running.However, the control must be able to distinguish when the project is in design or executionmode and behave accordingly. Here’s the first property of the UserControl object you will beusing quite frequently in your code: the DesignMode property. When the control is positionedon a form and used in the Designer, the DesignMode property is True. When the developerstarts the project that contains the control, the DesignMode property is False.
This dual runtime mode of a Windows control is something you’ll have to get used to.When you design custom controls, you must also switch between the roles of Windowscontrol developer (the programmer who designs the control) and application developer (theprogrammer who uses the control).
In summary, a custom control is an application with a visible user interface as well as aninvisible programming interface. The visible interface is what the developer sees when aninstance of the control is placed on the form, and it’s also what the user sees on the formwhen the project is placed in runtime mode. The developer using the control can manipulateit through its properties and methods. The control’s properties can be set at both design timeand runtime, whereas methods must be called from within the code of the application thatuses the control. The properties and methods constitute the control’s invisible interface (or thedeveloper interface, as opposed to the user interface). You, the control developer, will developthe visible user interface on a UserControl object, which is almost identical to the Form object;it’s like designing a standard application. As far as the control’s invisible interface goes, it’s likedesigning a class.
Enhancing Existing ControlsThe simplest type of custom Windows control you can build is one that enhances the function-ality of an existing control. Fortunately, they’re the most common types of custom controls, andmany developers have their own collections of enhanced Windows controls. The Windows con-trols are quite functional, but you won’t be hard-pressed to come up with ideas to make thembetter.
The TextBox control, for example, is a text editor on its own, and you have seen how easyit is to build a text editor by using the properties and methods exposed by this control. Manyprogrammers add code to their projects to customize the appearance and the functionality ofthe TextBox control.
Let’s say you’re building data-entry forms composed of many TextBox controls. To helpthe user identify the current control on the form, it would be nice to change its color while

ENHANCING EXISTING CONTROLS 357
it has the focus. If the current control has a different color from all others, users will quicklylocate it.
Another thing you can do with the TextBox control is format its contents as soon as it losesfocus. Let’s consider a TextBox control that must accept dollar amounts. After the user entersa numeric value, the control could automatically format the numeric value as a dollar amountand perhaps change the text’s color to red for negative amounts. When the control receives thefocus again, you can display the amount without any special formatting so that users can editit quickly. As you will see, it’s not only possible but actually quite easy to build a control thatincorporates all the functionality of a TextBox and some additional features that you providethrough the appropriate code. You already know how to add features such as the ones describedhere to a TextBox from within the application’s code. But what if you want to enhance multipleTextBox controls on the same form or reuse your code in multiple applications?
The best approach is to create a new Windows control with all the desired functionality andthen reuse it in multiple projects. To use the proper terminology, you can create a new cus-tom Windows control that inherits the functionality of the TextBox control. The derived controlincludes all the functionality being inherited from the control, plus any new features you careto add to it. This is exactly what we’re going to do in this section.
Building the FocusedTextBox ControlLet’s call our new custom control FocusedTextBox. Start a new project, and in the New Projectdialog box, select the template Windows Forms Control Library. Name the project Focused-TextBox. The Solution Explorer for this project contains a single item, the UserControl1 item.UserControl1 (see Figure 9.1) is the control’s surface — in a way, it’s the control’s form. Thisis where you’ll design the visible interface of the new control using the same techniques youwould use to design a Windows form.
Figure 9.1
A custom control indesign mode

358 CHAPTER 9 BUILDING CUSTOM WINDOWS CONTROLS
Start by renaming the UserControl1 object to FocusedTextBox. Then save the project bychoosing File � Save All. To inherit all the functionality of the TextBox control into our newcontrol, we must insert the appropriate Inherits statement in the control’s code. Click theShow All button in the Solution Explorer to see all the files that make up the project. Underthe FocusedTextBox.vb file is the FocusedTextBox.Designer.vb file. Open this file bydouble-clicking its name and you’ll see that it begins with the following two statements:
Partial Public Class FocusedTextBoxInherits System.Windows.Forms.UserControl
The first statement says that the entire file belongs to the FocusedTextBox class; it’s the partof the class that contains initialization code and other statements that the user does not need tosee because it’s left unchanged in most cases. To design an inherited control, we must changethe second statement to the following:
Inherits System.Windows.Forms.TextBox
This statement tells the compiler that we want our new control to inherit all the func-tionality of the TextBox control. You must also modify the InitializeComponent methodin the FocusedTextBox.Designer.vb file by removing the statement that sets the control’sAutoScaleMode property. This statement applies to the generic UserControl object but not tothe TextBox control.
As soon as you specify that your custom control inherits the TextBox control, the UserCon-trol object will disappear from the Designer. The Designer knows exactly what the new controlmust look like (it will look and behave exactly like a TextBox control), and you’re not allowedto change its appearance.
If you switch to the FocusedTextBox.vb file, you’ll see that it’s a public class calledFocusedTextBox. The Partial class by the same name is part of this class; it contains the codethat was generated automatically by Visual Studio. When compiled, both classes will producea single DLL file. Sometimes we need to split a class’s code into two files, and one of themshould contain the Partial modifier. This keyword signifies that the file contains part of theclass. The FocusedTextBox.vb file is where you will insert your custom code. The Partial classcontains the code emitted by Visual Studio, and you’re not supposed to touch it. Inherited con-trols are an exception to this rule because we have to be able to modify the Inherits statement,but the role of the Partial modifier is to enable us to split classes into two separate files.
Let’s test the control and verify that it exposes the same functionality as the TextBoxcontrol. Figure 9.2 shows the IDE while you’re developing an inherited control. Notice thatthe FocusedTextBox control has inherited all the properties of the TextBox control, such as theMaxLength and PasswordChar properties.
To test the control, you must add it to a form. A control can’t be executed outside thecontext of a host application. Add a new project to the solution (a Windows Forms Applicationproject) with the File � Add � New Project command. When the Add New Project dialogbox appears, select the Windows Forms Application template and set the project’s name toTestProject. A new folder will be created under the project folder TextBox — the TestProjectfolder — and the new project will be stored there. The TestProject must also become thesolution’s startup object. (This is the very reason we added the project to our solution: to havean executable for testing the custom control.) Right-click the test project’s name in the SolutionExplorer and select Set As StartUp Object in the context menu.

ENHANCING EXISTING CONTROLS 359
Figure 9.2
The IDE during thedesign of an inheritedcontrol
To test the control you just designed, you need to place an instance of the custom control onthe form of the test project. First, you must build the control. Select the FocusedTextBox itemin the Solution Explorer, and from the Build menu, select the Build FocusedTextBox command(or right-click the FocusedTextBox component in the Solution Explorer and select Build fromthe context menu). The build process will create a DLL file with the control’s executable codein the Bin folder under the project’s folder.
Then switch to the test project’s main form and open the Toolbox. You will see a new tab,the FocusedTextBox Components tab, which contains all the custom components of the cur-rent project. The new control has already been integrated into the design environment, and youcan use it as you would any of the built-in Windows controls. Every time you edit the codeof the custom control, you must rebuild the control’s project for the changes to take effect andupdate the instances of the custom control on the test form. The icon that appears before thecustom control’s name is the default icon for all custom Windows controls. You can associate adifferent icon with your custom control, as explained in the section ‘‘Classifying the Control’sProperties,’’ later in this chapter.
Place an instance of the FocusedTextBox control on the form and check it out. It looks, feels,and behaves just like a regular TextBox. In fact, it is a TextBox control by a different name.It exposes all the members of the regular TextBox control: You can move it around, resize it,change its Multiline and WordWrap properties, set its Text property, and so on. It also exposesall the methods and events of the TextBox control.
Adding Functionality to Your Custom Control
As you can see, it’s quite trivial to create a new custom control by inheriting any of the built-inWindows controls. Of course, what good is a control that’s identical to an existing one? Theidea is to add some extra functionality to the TextBox control, so let’s do it. Switch to the

360 CHAPTER 9 BUILDING CUSTOM WINDOWS CONTROLS
control project and view the FocusedTextBox object’s code. In the code editor’s pane, expandthe Objects list and select the item FocusedTextBox Events. This list contains the events of theTextBox control because it is the base control for our custom control.
Expand the Events drop-down list and select the Enter event. The following event handlerdeclaration will appear:
Private Sub FocusedTextBox_Enter(…) Handles Me.Enter
End Sub
This event takes place every time our custom control gets the focus. To change the color ofthe current control, insert the following statement in the event handler:
Me.BackColor = Color.Cyan
(Or use any other color you like; just make sure it mixes well with the form’s default back-ground color. You can also use the members of the SystemColors enumeration, to help ensurethat it mixes well with the background color.) We must also program the Leave event so thatthe control’s background color is reset to white when it loses the focus. Enter the followingstatement in the Leave event’s handler:
Private Sub FocusedTextBox_Leave(…) Handles Me.LeaveMe.BackColor = Color.White
End Sub
Having a hard time picking the color that signifies that the control has the focus? Why notexpose this value as a property so that you (or other developers using your control) can set itindividually in each project? Let’s add the EnterFocusColor property, which is the control’sbackground color when it has the focus.
Because our control is meant for data-entry operations, we can add another neat feature.Some fields on a form are usually mandatory, and some are optional. Let’s add some visualindication for the mandatory fields. First, we need to specify whether a field is mandatory withthe Mandatory property. If a field is mandatory, its background color will be set to the valueof the MandatoryColor property, but only if the control is empty.
Here’s a quick overview of the control’s custom properties:
EnterFocusColor When the control receives the focus, its background color is set to thisvalue. If you don’t want the currently active control to change color, set its EnterFocusColorproperty to white.
Mandatory This property indicates whether the control corresponds to a required field ifMandatory is True or to an optional field if Mandatory is False.
MandatoryColor This is the background color of the control if its Mandatory property is setto True. The MandatoryColor property overwrites the control’s default background color. Inother words, if the user skips a mandatory field, the corresponding control is painted with thecolor specified by the MandatoryColor property, and it’s not reset to the control’s default back-ground color. Required fields behave like optional fields after they have been assigned a value.

ENHANCING EXISTING CONTROLS 361
If you read the previous chapter, you should be able to implement these properties easily.Listing 9.1 is the code that implements the four custom properties. The values of the propertiesare stored in the private variables declared at the beginning of the listing. Then the control’sproperties are implemented as Property procedures.
Listing 9.1: The Property procedures of the FocusedTextBox custom control
Dim _mandatory As BooleanDim _enterFocusColor, _leaveFocusColor As ColorDim _mandatoryColor As Color
Property Mandatory() As BooleanGet
Mandatory = _mandatoryEnd GetSet(ByVal value As Boolean)
_mandatory = ValueEnd Set
End Property
Property EnterFocusColor() As System.Drawing.ColorGet
Return _enterFocusColorEnd GetSet(ByVal value As System.Drawing.Color)
_enterFocusColor = valueEnd Set
End Property
Property MandatoryColor() As System.Drawing.ColorGet
Return _mandatoryColorEnd GetSet(ByVal value As System.Drawing.Color)
_mandatoryColor = valueEnd Set
End Property
The last step is to use these properties in the control’s Enter and Leave events. When thecontrol receives the focus, it changes its background color to EnterFocusColor to indicate thatit’s the active control on the form (the control with the focus). When it loses the focus, its back-ground is restored to the usual background color, unless it’s a required field and the user hasleft it blank. In this case, its background color is set to MandatoryColor. Listing 9.2 shows thecode in the two focus-related events of the UserControl object.

362 CHAPTER 9 BUILDING CUSTOM WINDOWS CONTROLS
Listing 9.2: Enter and Leave events
Private _backColor As ColorPrivate Sub FocusedTextBox_Enter(…) Handles MyBase.Enter
_backColor = Me.BackColorMe.BackColor = _enterFocusColor
End Sub
Private Sub FocusedTextBox_Leave(…) Handles MyBase.LeaveIf Trim(Me.Text).Length = 0 And _mandatory Then
Me.BackColor = _mandatoryColorElse
Me.BackColor = _backColorEnd If
End Sub
Testing the FocusedTextBox Control
Build the control again with the Build � Build FocusedTextBox command and switch to the testform. (To see the Build FocusedTextBox command in the menu, you must select the WindowsControl project in the Solution Explorer; otherwise, you will see the command Build TestPro-ject). Place several instances of the custom control on the form, align them, and then select eachone and set its properties in the Properties window. The new properties are appended at thebottom of the Properties window, on the Misc tab (for miscellaneous properties). You will seeshortly how to add each property under a specific category, as shown in Figure 9.3. Set the cus-tom properties of a few controls on the form and then press F5 to run the application. See howthe FocusedTextBox controls behave as you move the focus from one to the other and how theyhandle the mandatory fields.
Figure 9.3
Custom properties ofthe FocusedTextBox con-trol in the Propertieswindow
ENHANCING EXISTING CONTROLS 363
Pretty impressive, isn’t it? Even if you have no use for an enhanced TextBox control, you’llagree that building it was quite simple. Next time you need to enhance one of the Windowscontrols, you’ll know how to do it. Just build a new control that inherits from an existing con-trol, add some custom members, and use it. Create a project with all the ‘‘enhanced’’ controlsand use them regularly in your projects. All you have to do is add a reference to the DLL thatimplements the control in a new project, just like reusing a custom class.
Classifying the Control’s Properties
Let’s go back to the FocusedTextBox control — there are some loose ends to take care of. First,you must specify the category in the Properties window under which each custom propertyappears. By default, all the properties you add to a custom control are displayed in the Miscsection of the Properties window. To specify that a property be displayed in a different section,use the Category attribute of the Property procedure. As you will see, properties have otherattributes too, which you can set in your code as you design the control.
Properties have attributes, which appear in front of the property name and are enclosedin a pair of angle brackets. All attributes are members of the System.ComponentModel class,and you must import this class to the module that contains the control’s code. The followingattribute declaration in front of the property’s name determines the category of the Propertieswindow in which the specific property will appear:
<Category("Appearance")> Public Property
If none of the existing categories suits a specific property, you can create a new categoryin the Properties window by specifying its name in the Category attribute. If you have a fewproperties that should appear in a section called Conditional, insert the following attribute infront of the declarations of the corresponding properties:
<Category("Conditional")> Public Property
When this control is selected, the Conditional section will appear in the Properties window, andall the properties with this attribute will be under it.
Another attribute is the Description attribute, which determines the property’s descriptionthat appears at the bottom of the Properties window when the property is selected. You canspecify multiple attributes as follows:
<Description("Indicates whether the control can be left blank")><Category("Appearance")>Property Mandatory() As Boolean
‘ the property procedure’s codeEnd Property
The most important attribute is the DefaultValue attribute, which determines the property’sdefault (initial) value. The DefaultValue attribute must be followed by the default value inparentheses:
<Description("Indicates whether the control can be left blank")><Category("Appearance"), DefaultValue(False)>Property Mandatory() As Boolean
‘ the property procedure’s codeEnd Property

364 CHAPTER 9 BUILDING CUSTOM WINDOWS CONTROLS
Some attributes apply to the class that implements the custom controls. The DefaultPropertyand DefaultEvent attributes determine the control’s default property and event. To specifythat Mandatory is the default property of the FocusedTextBox control, replace the classdeclaration with the following:
<DefaultProperty("Mandatory")> Public Class FocusedTextBox
Events are discussed later in the chapter, but you already know how to raise an event fromwithin a class. Raising an event from within a control’s code is quite similar. Open the Focused-TextBox project, examine its code, and experiment with new properties and methods.
As you may have noticed, all custom controls appear in the Toolbox with the same icon.You can specify the icon to appear in the Toolbox with the ToolboxBitmap attribute, whosesyntax is as follows, where imagepath is a string with the absolute path to a 16×16-pixelbitmap:
<ToolboxBitmap(imagepath)> Public Class FocusedTextBox
The bitmap is actually stored in the control’s DLL and need not be distributed along with thecontrol.
Now we’re ready to move on to something more interesting. This time, we’ll build a con-trol that combines the functionality of several controls, which is another common scenario. Youwill literally design its visible interface by dropping controls on the UserControl object, just likedesigning the visible interface of a Windows form.
Building Compound ControlsA compound control provides a visible interface that consists of multiple Windows controls. Thecontrols that make up a compound control are known as constituent controls. As a result, thistype of control doesn’t inherit the functionality of any specific control. You must implement itsproperties and methods with custom code. This isn’t as bad as it sounds, because a compoundcontrol inherits the UserControl object, which exposes quite a few members of its own (theAnchoring and Docking properties, for example, are exposed by the UserControl object,and you need not implement these properties — thank Microsoft). You will add your ownmembers, and in most cases you’ll be mapping the properties and methods of the compoundcontrols to a property or method of one of its constituent controls. If your control containsa TextBox control, for example, you can map the custom control’s WordWrap property tothe equivalent property of the TextBox. The following property procedure demonstrateshow to do it:
Property WordWrap() As BooleanGet
WordWrap = TextBox1.WordWrapEnd GetSet(ByVal Value As Boolean)
TextBox1.WordWrap = ValueEnd Set
End Property

BUILDING COMPOUND CONTROLS 365
You don’t have to maintain a private variable for storing the value of the custom control’sWordWrap property. When this property is set, the Property procedure assigns the property’svalue to the TextBox1.WordWrap property. Likewise, when this property’s value is requested,the procedure reads it from the constituent control and returns it. In effect, the custom control’sWordWrap property affects directly the functionality of one of the constituent controls.
The same logic applies to events. Let’s say your compound control contains a TextBox anda ComboBox control, and you want to raise the TextChanged event when the user edits theTextBox control and the SelectionChanged event when the user selects another item in theComboBox control. First, you must declare the two events:
Event TextChangedEvent SelectionChanged
Then, you must raise the two events from within the appropriate event handlers:the TextChanged event from the TextBox1 control’s TextChanged event handler and theSelectionChanged event from the ComboBox1 control’s SelectedIndexChanged eventhandler:
Private Sub TextBox1_TextChanged(…)Handles FocusedTextBox1.TextChanged
RaiseEvent TextChanged()End Sub
Private Sub ComboBox1_SelectedIndexChanged(…)Handles ComboBox1.SelectedIndexChanged
RaiseEvent SelectionChanged()End Sub
VB 2010 at Work: The ColorEdit ControlIn this section, you’re going to build a compound control that’s similar to the Color dialog box.The ColorEdit control allows you to specify a color by adjusting its red, green, and blue com-ponents with three scroll bars or to select a color by name. The control’s surface at runtime ona form is shown in Figure 9.4.
Figure 9.4
The ColorEdit control ona test form
Create a new Windows Control Library project, the ColorEdit project. Save the solutionand then add a new Windows Application project, the TestProject, and make it the solution’sstartup project, just as you did with the first sample project of this chapter.

366 CHAPTER 9 BUILDING CUSTOM WINDOWS CONTROLS
Now, open the UserControl object and design its interface as shown in Figure 9.4. Place thenecessary controls on the UserControl object’s surface and align them just as you would dowith a Windows form. The three ScrollBar controls are named RedBar, GreenBar, and BlueBar,respectively. The Minimum property for all three controls is 0; the Maximum for all three is 255.This is the valid range of values for a color component. The control at the top-left corner is aLabel control with its background color set to black. (We could have used a PictureBox controlin its place.) The role of this control is to display the selected color.
The ComboBox at the bottom of the custom control is the NamedColors control, which ispopulated with color names when the control is loaded. The Color class exposes 140 properties,which are color names (beige, azure, and so on). Don’t bother entering all the color names inthe ComboBox control; just open the ColorEdit project and you will find the AddNamedColors()subroutine, which does exactly that.
The user can specify a color by sliding the three ScrollBar controls or by selecting an itemin the ComboBox control. In either case, the Label control’s background color will be set tothe selected color. If the color is specified with the ComboBox control, the three ScrollBars willadjust to reflect the color’s basic components (red, green, and blue). Not all possible colors thatyou can specify with the three ScrollBars have a name (there are approximately 16 million col-ors). That’s why the ComboBox control contains the Unknown item, which is selected when theuser specifies a color by setting its basic components.
Finally, the ColorEdit control exposes two properties: NamedColor and SelectedColor. TheNamedColor property retrieves the selected color’s name. If the color isn’t selected from theComboBox control, the value Unknown will be returned. The SelectedColor property returnsor sets the current color. Its type is Color, and it can be assigned any expression that repre-sents a color value. The following statement will assign the form’s BackColor property to theSelectedColor property of the control:
UserControl1.SelectedColor = Me.BackColor
You can also specify a color value with the FromARGB method of the Color object:
UserControl1.SelectedColor = Color.FromARGB(red, green, blue)
The implementation of the SelectedColor property (shown in Listing 9.3) is straight-forward. The Get section of the procedure assigns the Label’s background color to theSelectedColor property. The Set section of the procedure extracts the three color componentsfrom the value of the property and assigns them to the three ScrollBar controls. Then itcalls the ShowColor subroutine to update the display. (You’ll see shortly what this sub-routine does.)
Listing 9.3: SelectedColor property procedure
Property SelectedColor() As ColorGet
SelectedColor = Label1.BackColorEnd GetSet(ByVal Value As Color)
HScrollBar1.Value = Value.R

BUILDING COMPOUND CONTROLS 367
HScrollBar2.Value = Value.GHScrollBar3.Value = Value.BShowColor()
End SetEnd Property
The NamedColor property (see Listing 9.4) is read-only and is marked with the ReadOnlykeyword in front of the procedure’s name. This property retrieves the value of the ComboBoxcontrol and returns it.
Listing 9.4: NamedColor property procedure
ReadOnly Property NamedColor() As StringGet
NamedColor = ComboBox1.SelectedItemEnd Get
End Property
When the user selects a color name in the ComboBox control, the code retrieves the corre-sponding color value with the Color.FromName method. This method accepts a color name asan argument (a string) and returns a color value, which is assigned to the namedColor variable.Then the code extracts the three basic color components with the R, G, and B properties. (Theseproperties return the red, green, and blue color components, respectively.) Listing 9.5 shows thecode behind the ComboBox control’s SelectedIndexChanged event, which is fired every time anew color is selected by name.
Listing 9.5: Specifying a color by name
Private Sub ComboBox1_SelectedIndexChanged(…) Handles ComboBox1.SelectedIndexChangedDim namedColor As ColorDim colorName As StringcolorName = ComboBox1.SelectedItemIf colorName <> "Unknown" Then
namedColor = Color.FromName(colorName)HScrollBar1.Value = namedColor.RHScrollBar2.Value = namedColor.GHScrollBar3.Value = namedColor.BShowColor()
End IfEnd Sub
The ShowColor() subroutine simply sets the Label’s background color to the value specifiedby the three ScrollBar controls. Even when you select a color value by name, the control’s code

368 CHAPTER 9 BUILDING CUSTOM WINDOWS CONTROLS
sets the three ScrollBars to the appropriate values. This way, we don’t have to write additionalcode to update the display. The ShowColor() subroutine is quite trivial:
Sub ShowColor()Label1.BackColor = Color.FromARGB(255, HScrollBar1.Value,
HScrollBar2.Value, HScrollBar3.Value)End Sub
The single statement in this subroutine picks up the values of the three basic colors fromthe ScrollBar controls and creates a new color value with the FromARGB method of the Colorobject. The first argument is the transparency of the color (the alpha channel), and we set it to255 for a completely opaque color. You can edit the project’s code to take into consideration thetransparency channel as well. If you do, you must replace the Label control with a PictureBoxcontrol and display an image in it. Then draw a rectangle with the specified color on top ofit. If the color isn’t completely opaque, you’ll be able to see the underlying image and visuallyadjust the transparency channel.
Testing the ColorEdit Control
To test the new control, you must place it on a form. Build the ColorEdit control and switch tothe test project (add a new project to the current solution if you haven’t done so already). Addan instance of the new custom control to the form. You don’t have to enter any code in the testform. Just run it and see how you specify a color, either with the scroll bars or by name. Youcan also read the value of the selected color through the SelectedColor property. The codebehind the Color Form button on the test form does exactly that (it reads the selected color andpaints the form with this color):
Private Sub Button1_Click(…) Handles Button1.ClickMe.BackColor = ColorEdit1.SelectedColor
End Sub
Building User-Drawn ControlsThis is the most complicated but most flexible type of control. A user-drawn control consistsof a UserControl object with no constituent controls. You are responsible for updating thecontrol’s visible area with the appropriate code, which you must insert in the control’s OnPaintmethod. (This method is invoked automatically every time the control’s surface must beredrawn.)
To demonstrate the design of user-drawn controls, we’ll develop the Label3D control, whichis an enhanced Label control and is shown in Figure 9.5. It provides all the members of theLabel control plus the capability to render its caption in three-dimensional type. The new cus-tom control is called Label3D, and its project is the FlexLabel project. It contains the Label3Dproject (which is a Windows Control Library project) and the usual test project (which is a Win-dows Application project).
At this point, you’re probably thinking about the code that aligns the text and renders it ascarved or raised. A good idea is to start with a Windows project, which displays a string ona form and aligns it in all possible ways. A control is an application packaged in a way thatallows it to be displayed on a form instead of on the Desktop. As far as the functionality isconcerned, in most cases it can be implemented on a regular form. Conversely, if you can dis-play 3D text on a form, you can do so with a custom control.

BUILDING USER-DRAWN CONTROLS 369
Figure 9.5
The Label3D control isan enhanced Labelcontrol.
Designing a Windows form with the same functionality is fairly straightforward. Youhaven’t seen the drawing methods yet, but this control doesn’t involve any advanced drawingtechniques. All we need is a method to render strings on the control. To achieve the 3D effect,you must display the same string twice, first in white and then in black on top of the white.The two strings must be displaced slightly, and the direction of the displacement determinesthe effect (whether the text will appear as raised or carved). The amount of displacementdetermines the depth of the effect. Use a displacement of 1 pixel for a light effect and adisplacement of 2 pixels for a heavy one.
VB 2010 at Work: The Label3D ControlThe first step of designing a user-drawn custom control is to design the control’s interface: whatit will look like when placed on a form (its visible interface) and how developers can accessthis functionality through its members (the programmatic interface). Sure, you’ve heard thesame advice over and over, and many of you still start coding an application without spendingmuch time designing it. In the real world, especially if they are not a member of a program-ming team, people design as they code (or the other way around).
The situation is quite different with Windows controls. Your custom control must provideproperties, which will be displayed automatically in the Properties window. The developershould be able to adjust every aspect of the control’s appearance by manipulating the settingsof these properties. In addition, developers expect to see the standard properties shared bymost controls (such as the background color, the text font, and so on) in the Properties window.You must carefully design the methods so that they expose all the functionality of the controlthat should be accessed from within the application’s code, and the methods shouldn’t overlap.Finally, you must provide the events necessary for the control to react to external events. Don’tstart coding a custom control unless you have formulated a clear idea of what the control willdo and how developers will use it at design time.
Label3D Control Specifications
The Label3D control displays a caption like the standard Label control, so it must provide aFont property, which lets the developer determine the label’s font. The UserControl objectexposes its own Font property, so we need not implement it in our code. In addition, theLabel3D control can align its caption both vertically and horizontally. This functionality willbe exposed by the Alignment property, whose possible settings are the members of the Alignenumeration: TopLeft, TopMiddle, TopRight, CenterLeft, CenterMiddle, CenterRight,BottomLeft, BottomMiddle, and BottomRight. The (self-explanatory) values are the names thatwill appear in the drop-down list of the Alignment property in the Properties window.

370 CHAPTER 9 BUILDING CUSTOM WINDOWS CONTROLS
Similarly, the text effect is manipulated through the Effect property, whose possiblesettings are the members of the Effect3D custom enumeration: None, Carved, CarvedHeavy,Raised, and RaisedHeavy. There are basically two types of effects (raised and carved text) andtwo variations on each effect (normal and heavy).
In addition to the custom properties, the Label3D control should also expose the standardproperties of a Label control, such as Tag, BackColor, and so on. Developers expect to seestandard properties in the Properties window, and you should implement them. The Label3Dcontrol doesn’t have any custom methods, but it should provide the standard methods ofthe Label control, such as the Move method. Similarly, although the control doesn’t raise anyspecial events, it must support the standard events of the Label control, such as the mouse andkeyboard events.
Most of the custom control’s functionality exists already, and there should be a simple tech-nique to borrow this functionality from other controls instead of implementing it from scratch.This is indeed the case: The UserControl object, from which all user-drawn controls inherit,exposes a large number of members.
Designing the Custom Control
Start a new project of the Windows Control Library type, name it FlexLabel, and then renamethe UserControl1 object Label3D. Open the UserControl object’s code window and change thename of the class from UserControl1 to Label3D.
Every time you place a Windows control on a form, it’s named according to the UserCon-trol object’s name and a sequence digit. The first instance of the custom control you place on aform will be named Label3D1, the next one will be named Label3D2, and so on. Obviously, it’simportant to choose a meaningful name for your UserControl object. Note that although thiscustom control is basically a Label control, it won’t inherit from an existing control. You mustimplement it from scratch in your code.
As you will soon see, the UserControl is the ‘‘form’’ on which the custom control will bedesigned. It looks, feels, and behaves like a regular VB form, but it’s called a UserControl. User-Control objects have additional unique properties that don’t apply to a regular form, but tostart designing new controls, think of them as regular forms.
You’ve set the scene for a new user-drawn Windows control. Start by declaring the Alignand Effect3D enumerations, as shown in Listing 9.6.
Listing 9.6: Align and Effect3D enumerations
Public Enum AlignTopLeftTopMiddleTopRightCenterLeftCenterMiddleCenterRightBottomLeftBottomMiddleBottomRight
End Enum

BUILDING USER-DRAWN CONTROLS 371
Public Enum Effect3DNoneRaisedRaisedHeavyCarvedCarvedHeavy
End Enum
The next step is to implement the Alignment and Effect properties. Each property’s type isan enumeration. Listing 9.7 shows the implementation of the two properties.
Listing 9.7: Alignment and Effect properties
Private Shared mAlignment As AlignPrivate Shared mEffect As Effect3DPublic Property Alignment() As Align
GetAlignment = mAlignment
End GetSet(ByVal Value As Align)
mAlignment = ValueInvalidate()
End SetEnd Property
Public Property Effect() As Effect3DGet
Effect = mEffectEnd GetSet(ByVal Value As Effect3D)
mEffect = ValueInvalidate()
End SetEnd Property
The current settings of the two properties are stored in the private variables mAlignmentand mEffect. When either property is set, the Property procedure’s code calls the Invalidatemethod of the UserControl object to force a redraw of the string on the control’s surface. Thecall to the Invalidate method is required for the control to operate properly in design mode.You can provide a method to redraw the control at runtime (although developers shouldn’thave to call a method to refresh the control every time they set a property), but this isn’tpossible at design time. In general, when a property is changed in the Properties window, thecontrol should be able to update itself and reflect the new property setting, and this is donewith a call to the Invalidate method. Shortly, you’ll see an even better way to automaticallyredraw the control every time a property is changed.

372 CHAPTER 9 BUILDING CUSTOM WINDOWS CONTROLS
Finally, you must add one more property, the Caption property, which is the string to berendered on the control. Declare a private variable to store the control’s caption (the mCaptionvariable) and enter the code from Listing 9.8 to implement the Caption property.
Listing 9.8: Caption Property procedure
Private mCaption As StringProperty Caption() As String
GetCaption = mCaption
End GetSet(ByVal Value As String)
mCaption = ValueInvalidate()
End SetEnd Property
The core of the control’s code is in the OnPaint method, which is called automatically beforethe control repaints itself. The same event’s code is also executed when the Invalidate methodis called, and this is why we call this method every time one of the control’s properties changesvalue. The OnPaint method enables you to take control of the paint process and supply yourown code for painting the control’s surface. The single characteristic of all user-drawn controlsis that they override the default OnPaint method. This is where you must insert the code todraw the control’s surface — that is, draw the specified string, taking into consideration theAlignment and Effect properties. The OnPaint method’s code is shown in Listing 9.9.
Listing 9.9: UserControl object’s OnPaint method
Protected Overrides Sub OnPaint(ByVal e As System.Windows.Forms.PaintEventArgs)
Dim lblFont As Font = Me.FontDim lblBrush As New SolidBrush(Color.Red)Dim X, Y As IntegerDim textSize As SizeF =
e.Graphics.MeasureString(mCaption, lblFont)Select Case mAlignment
Case Align.BottomLeftX = 2Y = Convert.ToInt32(Me.Height - textSize.Height)
Case Align.BottomMiddleX = CInt((Me.Width - textSize.Width) / 2)Y = Convert.ToInt32(Me.Height - textSize.Height)
Case Align.BottomRightX = Convert.ToInt32(Me.Width - textSize.Width - 2)Y = Convert.ToInt32(Me.Height - textSize.Height)

BUILDING USER-DRAWN CONTROLS 373
Case Align.CenterLeftX = 2Y = Convert.ToInt32((Me.Height - textSize.Height) / 2)
Case Align.CenterMiddleX = Convert.ToInt32((Me.Width - textSize.Width) / 2)Y = Convert.ToInt32((Me.Height - textSize.Height) / 2)
Case Align.CenterRightX = Convert.ToInt32(Me.Width - textSize.Width - 2)Y = Convert.ToInt32((Me.Height - textSize.Height) / 2)
Case Align.TopLeftX = 2Y = 2
Case Align.TopMiddleX = Convert.ToInt32((Me.Width - textSize.Width) / 2)Y = 2
Case Align.TopRightX = Convert.ToInt32(Me.Width - textSize.Width - 2)Y = 2
End SelectDim dispX, dispY As IntegerSelect Case mEffect
Case Effect3D.None : dispX = 0 : dispY = 0Case Effect3D.Raised : dispX = 1 : dispY = 1Case Effect3D.RaisedHeavy : dispX = 2 : dispY = 2Case Effect3D.Carved : dispX = -1 : dispY = -1Case Effect3D.CarvedHeavy : dispX = -2 : dispY = -2
End SelectlblBrush.Color = Color.Whitee.Graphics.DrawString(mCaption, lblFont, lblBrush, X, Y)lblBrush.Color = Me.ForeColore.Graphics.DrawString(mCaption, lblFont, lblBrush, X + dispX, Y + dispY)
End Sub
This subroutine calls for a few explanations. The Paint method passes a PaintEventArgsargument (the ubiquitous e argument). This argument exposes the Graphics property, whichrepresents the control’s surface. The Graphics object exposes all the methods you can call tocreate graphics on the control’s surface. The Graphics object is discussed briefly in Chapter 11and in more detail in the tutorial ‘‘Drawing and Painting with Visual Basic 2010,’’ but for thischapter all you need to know is that the MeasureString method returns the dimensions of astring when rendered in a specific font and the DrawString method draws the string in thespecified font. The first Select Case statement calculates the coordinates of the string’s originon the control’s surface, and these coordinates are calculated differently for each type of align-ment. Then another Select Case statement sets the displacement between the two strings sothat when superimposed they produce a three-dimensional effect. Finally, the code draws thestring of the Caption property on the Graphics object. It draws the string in white first, thenin black. The second string is drawn dispX pixels to the left and dispY pixels below the firstone to give the 3D effect. The values of these two variables are determined by the setting of theEffect property.

374 CHAPTER 9 BUILDING CUSTOM WINDOWS CONTROLS
The event handler of the sample project contains a few more statements that are not shownhere. These statements print the strings DesignTime and RunTime in a light color on the con-trol’s background, depending on the current status of the control. They indicate whether thecontrol is currently in design (if the DesignMode property is True) or runtime (if DesignMode isFalse), and you will remove them after testing the control.
Testing Your New Control
To test your new control, you must first add it to the Toolbox and then place instances of it onthe test form. You can add a form to the current project and test the control, but you shouldn’tadd more components to the control project. It’s best to add a new project to the currentsolution.
A Quick Way to Test Custom Windows Controls
Visual Studio supports a simple method of testing custom controls. Instead of using a testproject, you can press F5 to ‘‘run’’ the Windows Control project. Right-click the name of theLabel3D project (the Windows Control project in the solution) in Solution Explorer, and fromthe context menu choose Set As Startup Project. Then press F5 to start the project. A dialogbox (shown in the following screen shot) will appear with the control at runtime and itsProperties window.
In this dialog box, you can edit any of the control’s properties and see how they affect thecontrol at runtime. If the control reacts to any user actions, you can see how the control’scode behaves at runtime.

BUILDING USER-DRAWN CONTROLS 375
You can’t test the control’s methods, or program its events, but you’ll get an idea of how thecontrol will behave when placed on a form. Use this dialog box while you’re developing thecontrol’s interface to see how it will behave when placed on a test form and how it reactswhen you change its properties. When you’re happy with the control’s interface, you shouldtest it with a Windows project from which you can call its methods and program its events.
Add the TestProject to the current solution and place on its main form a Label3D control aswell as the other controls shown earlier in Figure 9.5. If the Label3D icon doesn’t appear in theToolbox, build the control’s project and a new item will be added to the FlexLabel Componentstab of the Toolbox.
Now double-click the Label3D control on the form to see its events. Your new control hasits own events, and you can program them just as you would program the events of any othercontrol. Enter the following code in the control’s Click event:
Private Sub Label3D1_Click(…) Handles Label3D1.ClickMsgBox("My properties are " & vbCrLf &
"Caption = " Label3D1.Caption.ToString & vbCrLf &"Alignment = " Label3D1.Alignment.ToString & vbCrLf &"Effect = " Label3D1.Effect.ToString)
End Sub
To run the control, press F5 and then click the control. You will see the control’s propertiesdisplayed in a message box.
The other controls on the test form allow you to set the appearance of the custom controlat runtime. The two ComboBox controls are populated with the members of the appropriateenumeration when the form is loaded. In their SelectedIndexChanged event handler, you mustset the corresponding property of the FlexLabel control to the selected value, as shown in thefollowing code:
Private Sub AlignmentBox_SelectedIndexChanged(…)Handles AlignmentBox.SelectedIndexChanged
Label3D1.Alignment = AlignmentBox.SelectedItemEnd Sub
Private Sub EffectsBox_SelectedIndexChanged(…)Handles EffectsBox.SelectedIndexChanged
Label3D1.Effect = EffectsBox.SelectedItemEnd Sub
The TextBox control at the bottom of the form stores the Caption property. Every time youchange this string, the control is updated because the Set procedure of the Caption propertycalls the Invalidate method.
Changed Events
The UserControl object exposes many of the events you need to program the control, such asthe key and mouse events, and you need not insert a single line of code in the custom control’scode. In addition, you can raise custom events. The Windows controls raise an event every time

376 CHAPTER 9 BUILDING CUSTOM WINDOWS CONTROLS
a property value is changed. If you examine the list of events exposed by the Label3D con-trol, you’ll see the FontChanged and SizeChanged events. These events are provided by theUserControl object. As a control developer, you should expose similar events for your customproperties, the OnAlignmentChanged, OnEffectChanged, and OnCaptionChanged events. Thisisn’t difficult to do, but you must follow a few steps. Start by declaring an event handler foreach of the Changed events:
Private mOnAlignmentChanged As EventHandlerPrivate mOnEffectChanged As EventHandlerPrivate mOnCaptionChanged As EventHandler
Then declare the actual events and their handlers:
Public Event AlignmentChanged(ByVal sender As Object, ByVal ev As EventArgs)Public Event EffectChanged(ByVal sender As Object, ByVal ev As EventArgs)Public Event CaptionChanged(ByVal sender As Object, ByVal ev As EventArgs)
When a property changes value, you must call the appropriate method. In the Set section ofthe Alignment Property procedure, insert the following statement:
OnAlignmentChanged(EventArgs.Empty)
And finally, invoke the event handlers from within the appropriate OnEventName method:
Protected Overridable Sub OnAlignmentChanged(ByVal e As EventArgs)Invalidate()If Not (mOnAlignmentChanged Is Nothing) Then
mOnAlignmentChanged.Invoke(Me, e)End Sub
Protected Overridable Sub OnEffectChanged(ByVal e As EventArgs)Invalidate()If Not (mOnEffectChanged Is Nothing) Then
mOnEffectChanged.Invoke(Me, e)End Sub
Protected Overridable Sub OnCaptionChanged(ByVal e As EventArgs)Invalidate()If Not (mOnCaptionChanged Is Nothing) Then
mOnCaptionChanged.Invoke(Me, e)End Sub
As you can see, the OnPropertyChanged events call the Invalidate method to redrawthe control when a property’s value is changed. As a result, you can now remove the callto the Invalidate method from the Property Set procedures. If you switch to the test form,you will see that the custom control exposes the AlignmentChanged, EffectChanged, andCaptionChanged events. The OnCaptionChanged method is executed automatically every timethe Caption property changes value, and it fires the CaptionChanged event. The developerusing the Label3D control shouldn’t have to program this event.

BUILDING USER-DRAWN CONTROLS 377
Raising Custom EventsWhen you select the custom control in the Objects drop-down list of the editor and expand thelist of events for this control, you’ll see all the events that the UserControl object may fire. Let’sadd a custom event for our control. To demonstrate how to raise events from within a customcontrol, we’ll return for a moment to the ColorEdit control you developed a little earlier in thischapter.
Let’s say you want to raise an event (the ColorClick event) when the user clicks the Labelcontrol displaying the selected color. To raise a custom event, you must declare it in your con-trol and call the RaiseEvent method. Note that the same event may be raised from many dif-ferent places in the control’s code.
To declare the ColorClick event, enter the following statement in the control’s code. Thisline can appear anywhere, but placing it after the private variables that store the property val-ues is customary:
Public Event ColorClick(ByVal sender As Object, ByVal e As EventArgs)
To raise the ColorClick event when the user clicks the Label control, insert the followingstatement in the Label control’s Click event handler:
Private Sub Label1_Click(…) Handles Label1.ClickRaiseEvent ColorClick(Me, e)
End Sub
Raising a custom event from within a control is as simple as raising an event from withina class. It’s actually simpler to raise a custom event than to raise the usual PropertyChangedevents, which are fired from within the OnPropertyChanged method of the base control.
The RaiseEvent statement in the Label’s Click event handler maps the Click event of theLabel control to the ColorClick event of the custom control. If you switch to the test form andexamine the list of events of the ColorEdit control on the form, you’ll see that the new eventwas added. The ColorClick event doesn’t convey much information. When raising customevents, it’s likely that you’ll want to pass additional information to the developer.
Let’s say you want to pass the Label control’s color to the application through the secondargument of the ColorClick event. The EventArgs type doesn’t provide a Color property,so we must build a new type that inherits all the members of the EventArgs type and addsa property: the Color property. You can probably guess that we’ll create a custom class thatinherits from the EventArgs class and adds the Color member. Enter the statements of Listing9.10 at the end of the file (after the existing End Class statement).
Listing 9.10: Declaring a custom event type
Public Class ColorEventInherits EventArgsPublic color As Color
End Class
Then, declare the following event in the control’s code:
Public Event ColorClick(ByVal sender As Object, ByVal e As ColorEvent)

378 CHAPTER 9 BUILDING CUSTOM WINDOWS CONTROLS
And finally, raise the ColorClick event from within the Label’s Click event handler (seeListing 9.11).
Listing 9.11: Raising a custom event
Private Sub Label1_Click(…) Handles Label1.ClickDim clrEvent As ColorEventclrEvent.color = Label1.BackColorRaiseEvent ColorClick(Me, clrEvent)
End Sub
Not all events fired by a custom control are based on property value changes. You can fireevents based on external conditions or a timer, as discussed in Chapter 8.
Using the Custom Control in Other ProjectsBy adding a test project to the Label3D custom control project, we designed and tested the con-trol in the same environment. A great help, indeed, but the custom control can’t be used inother projects. If you start another instance of Visual Studio and attempt to add your customcontrol to the Toolbox, you won’t see the Label3D entry there.
To add your custom component in another project, open the Choose Toolbox Items dia-log box and then click the .NET Framework Components tab. Be sure to carry out the stepsdescribed here while the .NET Framework Components tab is visible. If the COM Componentstab is visible instead, you can perform the same steps, but you’ll end up with an error message(because the custom component is not a COM component).
Click the Browse button in the dialog box and locate the FlexLabel.dll file. It’s in the Binfolder under the FlexLabel project’s folder. The Label3D control will be added to the list of.NET Framework components, as shown in Figure 9.6. Select the check box in front of the con-trol’s name; then click the OK button to close the dialog box and add Label3D to the Toolbox.Now you can use this control in your new project.
Figure 9.6
Adding the Label3D con-trol to another project’sToolbox

DESIGNING IRREGULARLY SHAPED CONTROLS 379
Designing Irregularly Shaped ControlsThe UserControl object has a rectangular shape by default. However, a custom controlneed not be rectangular. It’s possible to create irregularly shaped forms too, but unlikeirregularly shaped controls, an irregularly shaped form is still quite uncommon. Irregularlyshaped controls are used in fancy interfaces, and they usually react to movement of themouse. (They may change color when the mouse is over them or when they’re clicked, forexample.)
To change the default shape of a custom control, you must use the Region object, which isanother graphics-related object that specifies a closed area. You can even use Bezier curves tomake highly unusual and smooth shapes for your controls. In this section, we’ll do somethingless ambitious: We’ll create controls with the shape of an ellipse, as shown in the upper halfof Figure 9.7. To follow the code presented in this section, open the NonRectangularControlproject; the custom control is the RoundControl Windows Control Library project, and Form1is the test form for the control.
Figure 9.7
A few instances of anellipse-shaped control
You can turn any control to any shape you like by creating the appropriate Region objectand then applying it to the Region property of the control. This must take place from withinthe control’s Paint event. Listing 9.12 shows the statements that change the shape of thecontrol.
Listing 9.12: Creating a nonrectangular control
Protected Sub PaintControl(ByVal sender As Object,ByVal pe As PaintEventArgs) Handles Me.Paint
pe.Graphics.TextRenderingHint = Drawing.Text.TextRenderingHint.AntiAliasDim roundPath As New GraphicsPath()Dim R As New Rectangle(0, 0, Me.Width, Me.Height)roundPath.AddEllipse(R)Me.Region = New Region(roundPath)
End Sub

380 CHAPTER 9 BUILDING CUSTOM WINDOWS CONTROLS
First, we retrieve the Graphics object of the UserControl; then we create a GraphicsPathobject, the roundPath variable, and add an ellipse to it. The ellipse is based on the enclosingrectangle. The R object is used temporarily to specify the ellipse. The new path is then used tocreate a Region object, which is assigned to the Region property of the UserControl object. Thisgives our control the shape of an ellipse.
Listing 9.12 shows the statements that specify the control’s shape. In addition, you mustinsert a few statements to display the control’s caption, which is specified by the control’sCaption property. The caption is rendered normally in yellow unless the mouse is hoveringover the control, in which case the same caption is rendered with a 3D effect. You alreadyknow how to achieve this effect: by printing the same string twice in different colors with aslight displacement between them.
Listing 9.13 shows the code in the control’s MouseEnter and MouseLeave events. When themouse enters the control’s area (this is detected by the control automatically — you won’t haveto write a single line of code for it), the currentState variable is set to State.Active (Stateis an enumeration in the project’s code), and the control’s caption appears in raised type. In thecontrol’s MouseLeave event handler, the currentState variable is reset to State.Inactive andthe control’s caption appears in regular font. In addition, each time the mouse enters and leavesthe control, the MouseInsideControl and MouseOutsideControl custom events are fired.
Listing 9.13: RoundButton control’s MouseEnter and MouseLeave events
Private Sub RoundButton_MouseEnter(…) Handles MyBase.MouseEntercurrentState = State.ActiveMe.Refresh()RaiseEvent MouseInsideButton(Me)
End Sub
Private Sub RoundButton_MouseLeave(…) Handles MyBase.MouseLeavecurrentState = State.InactiveMe.Refresh()RaiseEvent MouseOusideButton(Me)
End Sub
These two events set up the appropriate variables, and the drawing of the control takesplace in the Paint event’s handler, which is shown in Listing 9.14.
Listing 9.14: RoundButton control’s Paint event handler
Protected Sub PaintControl(ByVal sender As Object,ByVal pe As PaintEventArgs) Handles Me.Paint
pe.Graphics.TextRenderingHint = Drawing.Text.TextRenderingHint.AntiAliasDim roundPath As New GraphicsPath()Dim R As New Rectangle(0, 0, Me.Width, Me.Height)roundPath.AddEllipse(R)Me.Region = New Region(roundPath)

DESIGNING IRREGULARLY SHAPED CONTROLS 381
Dim Path As New GraphicsPathPath.AddEllipse(R)Dim grBrush As LinearGradientBrushIf currentState = State.Active Then
grBrush = New LinearGradientBrush(New Point(0, 0),New Point(R.Width, R.Height),Color.DarkGray, Color.White)
ElsegrBrush = New LinearGradientBrush(
New Point(R.Width, R.Height),New Point(0, 0), Color.DarkGray,Color.White)
End Ifpe.Graphics.FillPath(grBrush, Path)Dim X As Integer =
(Me.Width - pe.Graphics.MeasureString(currentCaption, currentFont).Width) / 2
Dim Y As Integer = (Me.Height - pe.Graphics.MeasureString(currentCaption, currentFont).Height) / 2
If currentState = State.Active Thenpe.Graphics.DrawString(currentCaption,
currentFont, Brushes.Black, X, Y)pe.Graphics.DrawString(currentCaption,
currentFont,New SolidBrush(currentCaptionColor), X - 1, Y - 1)
Elsepe.Graphics.DrawString(currentCaption,
currentFont,New SolidBrush(currentCaptionColor), X, Y)
End IfEnd Sub
The OnPaint method uses graphics methods to fill the control with a gradient and center thestring on the control. They’re the same methods we used in the example of the user-drawn con-trol earlier in this chapter. The drawing methods are discussed in detail in the tutorial ‘‘Draw-ing with VB 2010,’’ which can be found at www.sybex.com/go/masteringvb2010.
The code uses the currentState variable, which can take on two values: Active andInactive. These two values are members of the State enumeration, which is shown next:
Public Enum StateActiveInactive
End Enum
The test form of the project shows how the RoundButton control behaves on a form. Youcan use the techniques described in this section to make a series of round controls for a totallydifferent look and feel.

382 CHAPTER 9 BUILDING CUSTOM WINDOWS CONTROLS
The Play button’s Click event handler in the test form changes the caption of the buttonaccording to the control’s current state. It also disables the other RoundButton controls on thetest form. Here’s the Click event handler of the Play button:
Private Sub bttnplay_Click(…) Handles bttnPlay.ClickIf bttnPlay.Caption = "Play" Then
Label1.Text = "Playing…"bttnPlay.Caption = "STOP"bttnPlay.Color = Color.RedbttnRecord.Enabled = FalsebttnClose.Enabled = False
ElseLabel1.Text = "Stopped Playing"bttnPlay.Caption = "Play"bttnPlay.Color = Color.YellowbttnRecord.Enabled = TruebttnClose.Enabled = True
End IfEnd Sub
There are many methods for drawing shapes and paths, and you may wish to experimentwith other oddly shaped controls. How about a progress indicator control that looks like a ther-mometer? Or a button with an LED that turns on or changes color when you press the button,like the buttons in the lower half of Figure 9.7? The two rectangular buttons are instances of theLEDButton custom control, which is included in the NonRectangularControl project. Open theproject in Visual Studio and examine the code that renders the rectangular buttons emulatingan LED in the left corner of the control.
Customizing List ControlsNext, I’ll show you how to customize the list controls (such as the ListBox, ComboBox, andTreeView controls). You won’t build new custom controls; actually, you’ll hook custom codeinto certain events of a control to take charge of the rendering of its items.
Some of the Windows controls can be customized far more than it is possible through theirproperties. These are the list controls that allow you to supply your own code for drawing eachitem. You can use this technique to create a ListBox control that displays its items in differentfonts, uses alternating background colors, and so on. You can even put bitmaps on the back-ground of each item, draw the text in any color, and create items of varying heights. This isan interesting technique because without it, as you recall from our discussion of the ListBoxcontrol, all items have the same height and you must make the control wide enough to fit thelongest item (if this is known at design time). The controls that allow you to take charge of therendering process of their items are the ListBox, CheckedListBox, ComboBox, and TreeViewcontrols.
To create an owner-drawn control, you must program two events: the MeasureItem andDrawItem events. In the MeasureItem event, you determine the dimensions of the rectangle inwhich the drawing will take place. In the DrawItem event, you insert the code for rendering theitems on the control. Every time the control is about to display an item, it fires the MeasureItem

CUSTOMIZING LIST CONTROLS 383
event first and then the DrawItem event. By inserting the appropriate code in the two eventhandlers, you can take control of the rendering process.
These two events don’t take place unless you set the DrawMode property of the controlaccordingly. Because only controls that expose the DrawMode property can be owner drawn,you have a quick way of figuring out whether a control’s appearance can be customized withthe techniques discussed in this section. The DrawMode property can be set to Normal (thecontrol draws its own surface), OwnerDrawnFixed (you can draw the control, but the height ofthe drawing area remains fixed), or OwnerDrawnVariable (you can draw the control and use adifferent height for each item). The same property for the TreeView control has three differentsettings: None, OwnerDrawText (you provide the text for each item), and OwnerDrawAll (you’reresponsible for drawing each node’s rectangle).
Designing Owner-Drawn ListBox ControlsThe default look of the ListBox control will work fine with most applications, but you mighthave to create owner-drawn ListBoxes if you want to use different colors or fonts for differenttypes of items or populate the list with items of widely different lengths.
The example you’ll build in this section, shown in Figure 9.8, uses an alternating back-ground color, and each item has a different height, depending on the string it holds. Lengthystrings are broken into multiple lines at word boundaries. Because you’re responsible forbreaking the string into lines, you can use any other technique — for example, you can placean ellipsis to indicate that the string is too long to fit on the control, use a smaller font, and soon. The fancy ListBox of Figure 9.8 was created with the OwnerDrawnList project.
Figure 9.8
An unusual, but quitefunctional, ListBoxcontrol
To custom-draw the items in a ListBox control (or a ComboBox, for that matter), you use theMeasureItem event to calculate the item’s dimensions and the DrawItem event to actually drawthe item. Each item is a rectangle that exposes a Graphics object, and you can call any of theGraphics object’s drawing methods to draw on the item’s area. The drawing techniques we’lluse in this example are similar to the ones we used in the previous section.
Each time an item is about to be drawn, the MeasureItem and DrawItem events are firedin this order. In the MeasureItem event handler, we set the dimensions of the item with thestatements shown in Listing 9.15.

384 CHAPTER 9 BUILDING CUSTOM WINDOWS CONTROLS
Listing 9.15: Setting up an item’s rectangle in an owner-drawn ListBox control
Private Sub ListBox1_MeasureItem(ByVal sender As Object,ByVal e As System.Windows.Forms.MeasureItemEventArgs)Handles ListBox1.MeasureItem
If fnt Is Nothing Then Exit SubDim itmSize As SizeFDim S As New SizeF(ListBox1.Width, 200)itmSize = e.Graphics.MeasureString(ListBox1.Items(e.Index).ToString, fnt, S)e.ItemHeight = itmSize.Heighte.ItemWidth = itmSize.Width
End Sub
The MeasureString method of the Graphics object accepts as arguments a string, the font inwhich the string will be rendered, and a SizeF object. The SizeF object provides two properties:the Width and Height properties, which you use to pass to the method information about thearea in which you want to print the string. In our example, we’ll print the string in a rectan-gle that’s as wide as the ListBox control and as tall as needed to fit the entire string. I’m usinga height of 200 pixels (enough to fit the longest string that users might throw at the control).Upon return, the MeasureString method sets the members of the SizeF object to the width andheight actually required to print the string.
The two properties of the SizeF object are then used to set the dimensions of the currentitem (properties e.ItemWidth and e.ItemHeight). The custom rendering of the current itemtakes place in the ItemDraw event handler, which is shown in Listing 9.16. The Bounds propertyof the handler’s e argument reports the dimensions of the item’s cell as you calculated them inthe MeasureItem event handler.
Listing 9.16: Drawing an item in an owner-drawn ListBox control
Private Sub ListBox1_DrawItem(ByVal sender As Object,ByVal e As System.Windows.Forms.DrawItemEventArgs)Handles ListBox1.DrawItem
If e.Index = -1 Then Exit SubDim txtBrush As SolidBrushDim bgBrush As SolidBrushDim txtfnt As FontIf e.Index / 2 = CInt(e.Index / 2) Then‘ color even numbered items
txtBrush = New SolidBrush(Color.Blue)bgBrush = New SolidBrush(Color.LightYellow)
Else‘ color odd numbered items
txtBrush = New SolidBrush(Color.Blue)bgBrush = New SolidBrush(Color.Cyan)
End IfIf e.State And DrawItemState.Selected Then

THE BOTTOM LINE 385
‘ use red color and bold for the selected itemtxtBrush = New SolidBrush(Color.Red)txtfnt = New Font(fnt.Name, fnt.Size, FontStyle.Bold)
Elsetxtfnt = fnt
End Ife.Graphics.FillRectangle(bgBrush, e.Bounds)e.Graphics.DrawRectangle(Pens.Black, e.Bounds)Dim R As New RectangleF(e.Bounds.X, e.Bounds.Y,
e.Bounds.Width, e.Bounds.Height)e.Graphics.DrawString(ListBox1.Items(e.Index).ToString, txtfnt, txtBrush, R)e.DrawFocusRectangle()
End Sub
To test the custom-drawn ListBox control, place two buttons on the form, as shown inFigure 9.8. The Add New Item button prompts the user for a new item (a string) and adds it tothe control’s Items collection. Listing 9.17 shows the code that adds a new item to the list. Notethat the code is identical to the code you’d use to add items to a regular ListBox control.
Listing 9.17: Adding an item to the list at runtime
Private Sub Button1_Click(…) Handles Button1.ClickDim newItem As StringnewItem = InputBox("Enter item to add to the list")ListBox1.Items.Add(newItem)
End Sub
The Bottom Line
Extend the functionality of existing Windows Forms controls with inheritance. The sim-plest type of control you can build is one that inherits an existing control. The inherited controlincludes all the functionality of the original control plus some extra functionality that’s specificto an application and that you implement with custom code.
Master It Describe the process of designing an inherited custom control.
Build compound controls that combine multiple existing controls. A compound controlprovides a visible interface that combines multiple Windows controls. As a result, this type ofcontrol doesn’t inherit the functionality of any specific control; you must expose its propertiesby providing your own code. The UserControl object, on which the compound control is based,already exposes a large number of members, including some fairly advanced ones such as theAnchoring and Docking properties, and the usual mouse and key events.
Master It How will you map certain members of a constituent control to custom membersof the compound control?

386 CHAPTER 9 BUILDING CUSTOM WINDOWS CONTROLS
Build custom controls from scratch. User-drawn controls are the most flexible custom con-trols because you’re in charge of the control’s functionality and appearance. Of course, youhave to implement all the functionality of the control from within your code, so it takes sub-stantial programming effort to create user-drawn custom controls.
Master It Describe the process of developing a user-drawn custom control.
Customize the rendering of items in a ListBox control. The Windows controls that presentlists of items display their items in a specific manner. The Framework allows you to take con-trol of the rendering process and change completely the default appearance of the items onthese controls. The controls that allow you to take charge of the rendering process of their itemsare the ListBox, CheckedListBox, ComboBox, and TreeView controls.
To create an owner-drawn control, you must set the DrawMode property to a member ofthe DrawMode enumeration and insert the appropriate code in the events MeasureItem andDrawItem. The MeasureItem event is where you decide about the dimensions of the rectanglein which the drawing will take place. The DrawItem event is where you insert the code forrendering the items on the control.
Master It Outline the process of creating a ListBox control that wraps the contents oflengthy items.

Chapter 10
Applied Object-OrientedProgramming
This chapter continues the discussion of object-oriented programming (OOP) and covers someof its more-advanced, but truly useful, concepts: inheritance and polymorphism. Instead ofjumping to the topic of inheritance, I’ll start with a quick overview of what you learned in theprevious chapter and how to apply this knowledge.
Inheritance is discussed later in this chapter, along with polymorphism, another powerfulOOP technique, and interfaces. But first make sure you understand the basics of OOP becausethings aren’t always as simple as they look (but are quite often simpler than you think).
In this chapter, you’ll learn how to do the following:
◆ Extend existing classes using inheritance
◆ Develop flexible classes using polymorphism
Issues in Object-Oriented ProgrammingBuilding classes and using them in your code is fairly simple, but there are a few points aboutOOP that can cause confusion. To help you make the most of OOP and get up to speed, I’mincluding a list of related topics that are known to cause confusion to programmers — and notonly beginners. If you understand the topics of the following sections and how they relate tothe topics discussed in the previous chapter, you’re more than familiar with the principles ofOOP and you can apply them to your projects immediately.
Classes versus ObjectsClasses are templates that we use to create new objects. The class contains code and the localvariables, and every time you create a new variable based on a specific class, the compiler gen-erates a new set of local variables, where the object’s properties will be stored. The code isalways the same for all variables of this type. In effect, classes are the blueprints used to man-ufacture objects in your code. You can also think of classes as custom types. After you addthe class Customer to your project (or a reference to the DLL that implements the Customerclass), you can declare variables of the Customer type, just as you declare integers and strings.The code for the class is loaded into the memory, and a new set of local variables is created.This process is referred to as class instantiation: Creating an object of a custom type is the sameas instantiating the class that implements the custom type. For each object of the Customer

388 CHAPTER 10 APPLIED OBJECT-ORIENTED PROGRAMMING
type, there’s a set of local variables, as they’re declared in the class code. The various proce-dures of the class are invoked as needed by the Common Language Runtime (CLR) and theyact on the set of local variables that correspond to the current instance of the class. Some ofthe local variables may be common among all instances of a class: These are the variables thatcorrespond to shared properties (properties that are being shared by all instances of a class).
When you create a new variable of the Customer type, the New() procedure of the Cus-tomer class is invoked. The New() procedure is known as the class constructor. Each class hasa default constructor that accepts no arguments, even if the class doesn’t contain a New() sub-routine. This default constructor is invoked every time a statement similar to the following isexecuted:
Dim cust As New Customer
You can overload the New() procedure by specifying arguments, and you should try to pro-vide one or more parameterized constructors. Parameterized constructors allow you (or anydeveloper using your class) to create meaningful instances of the class. Sure, you can createa new Customer object with no data in it, but a Customer object with a name and companymakes more sense. The parameterized constructor initializes some of the most characteristicproperties of the object.
Objects versus Object VariablesAll variables that refer to objects are called object variables. (The other type of variables arevalue variables, which store base data types, such as characters, integers, strings, and dates.)In declaring object variables, we usually use the New keyword, which is the only way to cre-ate a new object. If you omit this keyword from a declaration, only a variable of the Customertype will be created, but no instance of the Customer class will be created in memory, and thevariable won’t point to an actual object. The following statement declares a variable of the Cus-tomer type, but doesn’t create an object:
Dim Cust As Customer
If you attempt to access a member of the Customer class through the Cust variable, the infa-mous NullReferenceException will be thrown. The description of this exception is Objectreference not set to an instance of an object, which means that the Cust variable doesn’t point toan instance of the Customer class. Actually, the editor will catch this error and will underlinethe name of the variable. If you hover over the name of the variable in question, the follow-ing explanation will appear on a ToolTip box: Variable Cust is used before it has been assigned avalue. A Null Reference exception could result at runtime. Why bother declaring variables that don’tpoint to specific objects? The Cust variable can be set later in the code to reference an existinginstance of the class:
Dim Cust As CustomerDim Cust2 As New CustomerCust = Cust2
After the execution of the preceding statements, both variables point to the same object inmemory, and you can set the properties of this object through either variable. You have twoobject variables but only one object in memory because only one of them was declared with the

ISSUES IN OBJECT-ORIENTED PROGRAMMING 389
New keyword. To set the Company property, you can use either one of the following statementsbecause they both point to the same object in memory:
Cust.CompanyName = "New Company Name"
or
Cust2.CompanyName = "New Company Name"
The Cust variable is similar to a shortcut. When you create a shortcut to a specific file onyour desktop, you’re creating a reference to the original file. You do not create a new file ora copy of the original file. You can use the shortcut to access the original file, just as you canuse the Cust variable to manipulate the properties of the Cust2 object in the preceding codesample.
It’s also common to declare object variables without the New keyword when you knowyou’re going to use them later in your code, as shown in the following loop, which creates 20items and adds them to a ListView control:
Dim LI As ListViewItemFor row = 0 To 20
LI = New ListViewItemLI.Text = "..."‘ more statements to set up the LI variableListView1.Items.Add(LI)
Next
The LI variable is declared once, and the code initializes it many times in the following loop.The first statement in the loop creates a new ListViewItem object, and the last statement addsit to the ListView control. Another common scenario is to declare an object variable withoutinitializing it at the form’s level and initialize it in a procedure while using its value in severalprocedures.
When to Use the New Keyword
Many programmers are confused by the fact that most object variables must be declared withthe New keyword, whereas some types don’t support the New keyword. If you want to create anew object in memory (which is an instance of a class), you must use the New keyword. Whenyou declare a variable without the New keyword, you’re creating a reference to an object, butnot a new object. Only shared classes must be declared without the New keyword. If in doubt,use the New keyword anyway, and the compiler will let you know immediately whether theclass you’re instantiating has a constructor. If the New keyword is underlined in error, youknow that you must delete it from the declaration. The Math class, for example, is sharedand you cannot create a new instance of it; instead, you can call its members as Math.Log,Math.Exp, and so on.

390 CHAPTER 10 APPLIED OBJECT-ORIENTED PROGRAMMING
Uninitialized and Nullable Variables
As you already know, an object variable may exist but not be initialized. The following state-ment creates a new variable for storing a Brush object (one of the drawing objects discussed inthe tutorial on graphics that accompanies this book):
Dim B As SolidBrush
The B variable’s value is Nothing because it hasn’t been initialized yet. After execut-ing the following statement, the B variable will have a value and can be used to drawsomething:
B = New SolidBrush(Color.Blue)
To find out whether a variable has been initialized or not, we use the Is operator to com-pare the variable to Nothing:
If B Is Nothing ThenMsgBox("Uninitialized Brush variable")
End If
Alternatively, you can use the IsNot operator before attempting to use the B variable:
If B IsNot Nothing Then‘ draw something with the brush
End If
When a variable is Nothing, we know that it has not been initialized yet — the variable hasno value. In my view, this is a state of a variable: a variable may have a value (any value) ornot have a value. Let’s consider an Integer and a String variable declared as follows:
Dim Age As IntegerDim Name As String
The Age and Name variables have not been initialized explicitly, but they do have a value.Integers are initialized to zero and strings are initialized to empty strings. But is this what wereally need? In many cases we want to know whether a variable has been initialized or not,and a default value just doesn’t cut it. A variable that has no value is not necessarily a numericzero or an empty string. To differentiate between the default values and the lack of value, theFramework supports the Nullable type, which indicates a variable of any of the basic types thatwill not be initialized implicitly. The Nullable keyword is followed by a pair of parenthesesand the Of keyword, followed by the actual type. The following statement declares an Integervariable that is not initialized:
Dim Age As Nullable(Of Integer)
Unfortunately, strings are not nullable. The advantage of using Nullable types in your codeis that this type exposes the HasValue property, which returns True if the variable has been

ISSUES IN OBJECT-ORIENTED PROGRAMMING 391
initialized, and the Value property that returns the actual variable type. This is how you wouldprocess the Age variable in your code:
Dim Age As Nullable(Of Integer)’ other statementsDim Qualifies As BooleanIf Age.HasValue Then
If Age.Value < 16 ThenQualifies = False
ElseQualifies = True
End If
There’s also a shorthand notation for declaring Nullable types; just append a question markto the variable’s name as in the following statement:
Dim Age? As Integer
Missing Information
As for a practical example of variables that might not have values, there are plenty. Databasesuse a special value to indicate that a field has no specific value, the Null value. If a product’sprice is not known yet, or if a book’s page count is unknown, this doesn’t mean the productwill be sold at no cost or that we’ll display that the book has zero pages when customers lookit up. These fields have a Null value and should be handled differently, as you will see inChapter 15, ‘‘Programming with ADO.NET.’’ The same is true for data we read from externalsources. An XML file with customer information may contain one or more entries withouta value for the EMail field. This customer’s email address is missing (Null or Nothing) andcertainly not an empty string. When you set up variables to receive data from a database, youwill find the Nullable type very accommodating because it allows you to match not only theusual values, but also the lack of a specific value.
Exploring Value Types
Okay, if the variables that represent objects are called object variables and the types they rep-resent are called reference types, what other variables are there? There are the regular variablesthat store the basic data types, and they’re called value variables because they store values.An integer, or a string, is not stored as an object for efficiency. An Integer variable contains anactual value, not a pointer to the value. Imagine if you had to instantiate the Integer class everytime you needed to use an integer value in your code. Not that it’s a bad idea, but it wouldscare away most VB developers. Value variables are so common in programming and they’renot implemented as classes for efficiency. Whereas objects require complicated structures inmemory, the basic data types are stored in a few bytes and are manipulated much faster thanobjects.

392 CHAPTER 10 APPLIED OBJECT-ORIENTED PROGRAMMING
Consider the following statements:
Dim age1, age2 As Integerage2 = 29age1 = age2age2 = 40
When you assign a value variable to another, the actual value stored in the variableoverwrites the current value of the other variable. The two variables have the same value afterthe statement that assigns the value of age2 to the variable age1, but they’re independentof one another. After the execution of the last statement, the values of age1 and age2 aredifferent again. If they were object variables, they would point to the same object after theassignment operation, and you wouldn’t be able to set their values separately. You’d be settingthe properties of the same object.
Value types are converted to objects as soon as you treat them as objects. As soon as youenter a statement like the following, the age1 variable is converted to an object:
age1.MinValue
You’ll rarely use the methods of the base types, except for the ToString method of course,but you can turn value variables into object variables at any time. This process is known asboxing (the conversion of a value type to a reference type).
Exploring Reference Types
To better understand how reference types work, consider the following statements that appenda new row with two subitems to a ListView control (the control’s item is an object of theListViewItem type):
ListView1.Items.ClearDim LI As New ListViewItemLI.Text = "Item 1"LI.SubItems.Add("Item 1 SubItem 1.a")LI.SubItems.Add("Item 1 SubItem 1.b")ListView1.Items.Add(LI)
After the execution of the preceding statements, the ListView control contains a single row.This row is an object of the ListViewItem type and exists in memory on its own. Only after theexecution of the last statement is the ListViewItem object referenced by the LI variable associ-ated with the ListView1 control.
To change the text of the first item, or its appearance, you can manipulate the control’s Itemscollection directly or change the LI variable’s properties. The following pairs of statements areequivalent:
ListView1.Items(0).Text = "Revised Item 1"ListView1.Items(0).BackColor = Color.CyanLI.Text = "Revised Item 1"LI.BackColor = Color.Cyan

ISSUES IN OBJECT-ORIENTED PROGRAMMING 393
There’s yet another method to access the ListView control’s items. Create an object variablethat references a specific item and set the item’s properties through this variable:
Dim selItem As ListViewItemselItem = ListView1.Items(0)selItem.Text = "new caption"selItem.BackColor = Color.Silver
(If you need more information on using the ListView and TreeView controls, please referto the tutorial ‘‘The ListView and TreeView Controls,’’ which is available for download fromwww.sybex.com/go/masteringvb2010.
A final question for testing your OOP skills: What do you think will happen if you set theLI variable to Nothing? Should the control’s row disappear? The answer is no. If you thoughtotherwise, take a moment now to think about why deleting a variable doesn’t remove the objectfrom memory. The LI variable points to an object in memory; it’s not the object. The New key-word created a new ListViewItem object in memory and assigned its address to the variableLI. The statement that added the LI variable to the control’s Items collection associated theobject in memory with the control. By setting the LI variable to Nothing, we simply removedthe pointer to the ListViewItem object in memory, not the object itself. To actually remove thecontrol’s first item, you must call the Remove method of the LI variable:
LI.Remove
This statement will remove the ListViewItem object from the control’s Items collection, butthe actual object still lives in the memory. If you execute the following statement, the item willbe added again to the control:
ListView1.Items.Add(LI)
So to sum up, the ListViewItem object exists in memory and is referenced by the LI variableas well as by the ListView control. The Remove method removes the item from the control; itdoesn’t delete it from the memory. If you remove the item from the control and then set the LIvariable to Nothing, the object will also be removed from memory.
Another way to look at the LI variable is as an intermediate variable. You could add a newrow to the ListView control in a single statement without the intermediate variable:
ListView1.Items.Add(New ListViewItem("item header"))
By the way, the ListViewItem object won’t be deleted instantly. The CLR uses a specialmechanism to remove objects from memory, the Garbage Collector (GC). The GC runs everyso often and removes from memory all objects that are not referenced by any variable. Theseobjects eventually will be removed from memory, but we can’t be sure when. (There’s no wayto force the GC to run on demand.) The CLR will start the GC based on various criteria (thecurrent CPU load, the amount of available memory, and so on). Because objects are removedautomatically by the CLR, we say that the lifetime of an object is nondeterministic. We knowwhen the object is created, but there’s no way to know, or specify, when it’s deleted. However,you can rest assured that the object will eventually be removed from memory. After you setthe LI variable to Nothing and remove the corresponding item from the ListView control,you’re left with a ListViewItem object in memory that’s not referenced by any other entity.

394 CHAPTER 10 APPLIED OBJECT-ORIENTED PROGRAMMING
This object will live a little longer in the memory, until the GC gets a chance to remove it andreclaim the resources allocated to it. Moreover, once you have removed the references to theobject, there’s no way to access the object any more, even though it will exist for a while inmemory before the GC gets a chance to destroy it.
Listing 10.1 shows the statements I’ve used for this experiment.
Listing 10.1: Creating and removing objects
’ Create a new ListViewItem objectDim LI As New ListViewItemLI.Text = "Item 1"LI.SubItems.Add("Item 1 SubItem 1.a")LI.SubItems.Add("Item 1 SubItem 1.b")’ add it to the ListView controlListView1.Items.Add(LI)MsgBox("Item added to the list." & vbCrLf &
"Click OK to modify the appearance " &"of the top item through the LI variable.")
’ Edit the object’s properties’ The new settings will affect the appearance of the’ item on the control immediatelyLI.Text = "ITEM 1"LI.Font = New Font("Verdana", 10, FontStyle.Regular)LI.BackColor = Color.AzureMsgBox("Item’s text and appearance modified. " &
vbCrLf & "Click OK to modify the " &"appearance of the top item through " &"the ListView1.Items collection.")
’ Change the first item on the control directly’ Changes also affect the object in memoryListView1.Items(0).BackColor = Color.LightCyanLI.SubItems(2).Text = "Revised Subitem"’ Remove the top item from the controlMsgBox("Will remove the top item from the control.")LI.Remove()MsgBox("Will restore the deleted item")’ The item was removed from list, but not deleted’ We can add it to the control’s Items collectionListView1.Items.Add(LI)MsgBox("Will remove object from memory")’ Remove it again from the controlLI.Remove()’ and set it to NothingLI = Nothing’ We can no longer access the LI object.MsgBox("Can I access it again?" & vbCrLf &
"NO, YOU’LL GET AN EXCEPTION WHEN THE " &"FOLLOWING STATEMENT IS EXECUTED!")
ListView1.Items.Add(LI)

ISSUES IN OBJECT-ORIENTED PROGRAMMING 395
Properties versus FieldsWhen you set or read a property’s value, the corresponding Get or Set segment of the Propertyprocedure is executed. The following statement invokes the Property Set segment of the EMailpublic property of the class:
cust.EMail = "[email protected]"
As a reminder, even if the EMail property is an auto-implemented property, a Property pro-cedure is invoked behind the scenes and sets the value of a local variable (the _EMail variable).Obviously, every time you call one of the class properties, the corresponding public procedurein the class is invoked. The following statement invokes both the Set and Get Property proce-dures of the Customer class Balance property:
cust.Balance = cust.Balance + 429.25
Trivial properties can also be implemented as public variables. These variables, which arecalled fields, behave like properties, but no code is executed when the application sets or readstheir value. We often implement properties of the enumeration type as fields because they canbe set only to valid values and there’s no need for validation code. If the Set method of a prop-erty doesn’t contain any validation code and simply assigns a new value to the local variablethat represents the specific property, there’s no difference between the property and a field. Ifyou don’t plan to validate the values of certain properties, use auto-implemented properties,which are as simple as fields.
Shared versus Instance MembersTo really understand classes and appreciate them, you must visualize the way classes com-bine code and data. Properties contain the data that live along with the code, which determinesthe object’s behavior — its functionality. The functionality of the object is implemented as anumber of methods and events. The properties, methods, and events constitute the class’s inter-face. Each instance of the class acts on its own data, and there’s no interference between twoobjects of the same type unless they contain shared properties. A shared property is commonto all instances of the class. In other words, there’s no local variable for this property, and allinstances of the class access the same variable. Shared properties are not common — after all,if many of the properties are common to all instances of the class, why create many objects?Shared methods, on the other hand, are quite common. The Math class is a typical example. Tocalculate the logarithm of a number, you call the Log method of the Math class:
Math.Log(123)
You need not create an instance of the Math class before calling any of its methods (whichare the common math functions). Actually, you can’t create a new instance of the Math classbecause the entire class is marked as shared.
Let’s say you’re building a class to represent customers, the Customer class. This classshould expose properties that correspond to the columns of the Customers table in a database.Each instance of the Customer class stores information about a specific customer. In addition tothe properties, the Customer class should expose a few methods to get data from the databaseand commit changes or new customers to the database. The GetCustomerByID method, forexample, should accept the ID of a customer as an argument, retrieve the corresponding

396 CHAPTER 10 APPLIED OBJECT-ORIENTED PROGRAMMING
customer’s data from the database, and use them to populate the current instance’s properties.Here’s how you use this class in your code:
Dim cust As New Customercust.GetCustomerByID("ALFKI")Debug.WriteLine cust.CompanyNameDebug.WriteLine cust.ContactName & " " & cust.ContactTitle
The GetCustomerByID method can retrieve the customer data from a local database, aremote web service, or even an XML file. The idea is that a single method call gets the dataand uses it to populate the properties of the current instance of the class. This method is aninstance method because it requires an instance of the class. It populates the properties of thisinstance, or object.
You could have implemented the GetCustomerByID method as a shared method, but thenthe method should return an object of the Customer type. The shared method can’t populateany object’s properties because it can’t be applied to an instance of the class. Here’s how you’duse the Customer class if the GetCustomerByID method were shared:
Dim cust As New Customercust = Customer.GetCustomerByID("ALFKI")Debug.WriteLine cust.CompanyNameDebug.WriteLine cust.ContactName & " " & cust.ContactTitle
As you can see, you call the method of the Customer class, not the method of an object. Youcould also call the method with the following statement, but the code becomes obscure (at thevery least, it’s not elegant):
cust = cust.GetCustomerByID("ALFKI")
The background compiler will detect that you’re attempting to access a shared methodthrough an instance of the class and will generate the following warning (the expression willbe evaluated at runtime, in spite of the warning):
Access of shared member, constant member,enum member or nested type through an instance;qualifying expression will not be evaluated.
Because the class needs to know the database in which the data is stored, you can provide aConnection property that’s shared. Shared properties are usually set when the class is initial-ized or from within a method that’s called before we attempt to access any other methods orany of the class’s properties. All the methods in the class use the Connection property to con-nect to the database. There’s no reason to change the setting of this property in the course of anapplication, but if you change it, all subsequent operations will switch to the new database.
In summary, a class may expose a few shared properties if all instances of the class shouldaccess the same property value. It may also expose a few shared methods, which can be calledthrough the class name if there’s no need to create an instance of the class in order to call amethod. In extreme situations, you can create a shared class: All properties and methods of thisclass are shared by default. To make the most of objects, however, you should create classesthat are instantiated with the New keyword and methods that manipulate the current instanceof the class.

ISSUES IN OBJECT-ORIENTED PROGRAMMING 397
Type CastingThe data type used most in earlier versions of the language up to VB 6 was the Variant (whichwas replaced in subsequent versions by the Object type). A variable declared as Object canstore anything, and any variable that hasn’t been declared explicitly is an Object variable. Evenif you turn on the Strict option, which forces you to declare the type of each variable (and youshould always have this option on), you will eventually run into Object variables. When youretrieve an item from a ListBox control, for example, you get back an object, not a specific datatype. In the previous chapter, we used the ListBox control to store Contact objects. Every timewe retrieved a contact from the control’s Items collection, however, we got back an Object vari-able. To use this object in our code, we had to convert it to a more specific type, the Contacttype, with the CType() or DirectCast function. The same is true for an ArrayList, which storesobjects, and we usually cast its members to specific types.
Variables declared without a specific type are called untyped variables. Untyped variablesshould be avoided — and here’s why. The following expression represents a ListBox item,which is an object:
ListBox1.Items(3)
Even if you add a Customer or a Product object to the list, when you retrieve the same item,it’s returned as a generic Object variable. If you type the preceding expression followed by aperiod, you will see in the IntelliSense drop-down list the members of the generic Object vari-able, which you hardly ever need. If you cast this item to a specific type, the IntelliSense boxwill show the members of the appropriate type.
The action of changing a variable’s type is known as casting, and there are two methods forcasting variable types — the old VB 6 CType() function and the new DirectCast() function:
Dim currentCustomer As CustomercurrentCustomer = DirectCast(ListBox1.Items(3), Customer)
From now on, you can access the members of the currentCustomer variable as usual.
The TryCast() Function
If the specified type conversion can’t be carried out, the CType() function will throwan InvalidCastException exception. As a reminder, a variation of the CType() andDirectCast() functions is the TryCast() function, which attempts to convert a variableinto another type. If the conversion is not possible, the TryCast() function doesn’t throw anexception but returns the Nothing value. Here’s how the TryCast() function is used:
Dim o As Objecto = New Customer("Evangelos Petroutsos", "SYBEX")c = TryCast(o, Contact)If c Is Nothing Then
MsgBox("Can’t convert " & o.GetType.Name & " to Contact")Exit Sub
End If’ statements to process the c object variable

398 CHAPTER 10 APPLIED OBJECT-ORIENTED PROGRAMMING
There are situations where you can’t avoid explicit casting of variable types. The IIf() func-tion, for example, returns a value of the Object type, regardless of the type of its arguments.The following expression returns the string ‘‘Unknown’’ if the variable Age has no value or thevalue of the Age variable if the variable is not Nothing:
IIf(Age Is Nothing, "unknown", Age)
If you attempt to assign the value returned by the preceding statement to a String variablewith the following statements, the code will work fine as long as the Strict option is off:
Dim showAge As String = IIf(Age Is Nothing, "unknown", Age)
If the Strict option is on, however, the compiler will underline the statement and will gen-erate an error message to the effect that the Strict option disallows the conversion of an Objectvalue to a String. You must explicitly cast the IIf() function’s value to a string before assign-ing it to a String variable:
Dim showAge As String = DirectCast(IIf(Age Is Nothing, "unknown", Age), String)
The explicit conversion is necessary only if the Strict option is off and the Age variable mustbe declared as Nullable or as Object.
Early versus Late BindingUntyped variables can’t be resolved at compile time; these variables are said to be late-bound.An expression such as the following can’t be resolved at compile time because the compiler hasno way of knowing whether the object retrieved from the ListBox control is of the Customertype (or any other type that exposes the LastName property):
ListBox1.Items(3).LastName
The preceding statement will compile (as long as the Strict option is off) and execute fine ifthe fourth item on the ListBox control is of the Customer type or any other type that providesa LastName property. If not, it will compile all right, but a runtime exception will be thrown.Moreover, you won’t see any members of interest in the IntelliSense box because the editordoesn’t know the exact type of the object retrieved from the ListBox control.
If you cast the object to a specific type, the compiler won’t let you reference a nonexistingmember, therefore eliminating the chances of runtime exceptions. The last expression in thefollowing code segment is said to be early-bound because the compiler knows its type and won’tcompile a statement that references nonexisting members:
Dim currentCustomer As CustomercurrentCustomer = CType(ListBox1.Items(3), Customer)Debug.WriteLine currentCustomer.LastName
If you plan to store objects to a ListBox control, you have to use late binding and convertthe items of the ListBox control to the appropriate type. Don’t forget to override the ToString

ISSUES IN OBJECT-ORIENTED PROGRAMMING 399
method of the corresponding class so that a meaningful string is displayed on the controlinstead of the default string returned by the generic ToString method.
Casting an object to the desired type won’t help you unless you know that the object isof the same type or can be cast to the desired type. Make your code as robust as it can be byusing the TryCast() function to make sure that the conversion succeeded before attempting touse the currentCustomer variable in your code. Late binding is not possible when the Strictoption is on. As I’ve mentioned earlier in this book, even when you’re working with the Strictoption off, you should turn it back on from time to time to spot the statements that may causeruntime errors.
Discovering a Variable’s TypeSometimes you need to figure out the type of a variable in your code. Even if you declareexplicitly all the variables in your code, you might have to discover a specific variable’s type atruntime.
The Form object exposes the ActiveControl property, which is the control that has thefocus. The ActiveControl property returns a Control object, and you will have to find outits exact type (whether it’s a TextBox, a ComboBox, or a Button, for example) from withinyour code.
All classes, including custom ones, expose the GetType() function, which returns the typeof the corresponding object. The GetType() function’s return value isn’t a string; it is an objectthat exposes a large number of properties. You can call the IsEnum and IsClass properties tofind out whether it’s been implemented as an enumeration or as a class as well as the Nameproperty to retrieve the variable’s type name.
Consider an event handler that handles the same event for multiple controls on a form. Thecontrol that raised the event is passed to the event handler through the sender argument, andyou can determine the type of the control that raised the event by using a statement such as thefollowing:
If sender.GetType Is GetType(System.Windows.Forms.Button) Then‘ process a button control
End If
This is a rather awkward syntax, but take it as is: Use the GetType method to request thetype of a variable and the GetType() function to request the type of a control. You can alsoretrieve the type’s name with the TypeName() function, which returns a string:
If TypeName(newContact).ToUpper="CONTACT" Then
Because the TypeName() function returns a string, you don’t have to use the Is operator, butit’s a good idea to convert this value to uppercase before attempting any comparisons.
At times, you may have to iterate through all controls on a form (or on a Panel control)and process the controls of a specific type — update the TextBox controls, for example. Thefollowing loop goes through all TextBox controls on the current form and cleans them up byconverting their contents to uppercase and trimming them:
For Each ctrl In Me.ControlsIf ctrl.GetType Is GetType(System.Windows.Forms.TextBox) Then
Dim TBox As TextBox = CType(ctrl, System.Windows.Forms.TextBox)

400 CHAPTER 10 APPLIED OBJECT-ORIENTED PROGRAMMING
TBox.Text = TBox.Text.ToUpper.TrimEnd If
Next
Notice that you can’t use the equals operator to compare types. To compare an object’s typeto another type, you must use the Is and IsNot keywords, as shown in the preceding example.
By now you should have a good understanding of writing code to manipulate objects. Inthe following sections, you’re going to learn about a powerful concept in OOP, namely how towrite new classes that inherit the functionality of existing ones.
InheritanceHere’s a scenario you’re all too familiar with: You’ve written some code, perhaps a collectionof functions that you want to reuse in another project. The key word here is reuse: write once,use many times. For years, VB developers were reusing code, even sharing it with others, witha very simple method: copying from one project and pasting it into another. The copy/pasteapproach to code reuse has never really worked because the code was never left untouched atits destination. When you’re reusing the original code in another project, you make changes tobetter accommodate the new project. In the process, you also improve the code. At some point,you decide that you should ‘‘return’’ the improved code to the original project and enhanceit. Unfortunately, the improved code doesn’t always fit nicely into a different project. Some ofthe improvements break applications that used to work with the not-so-good code. If this hashappened to you, imagine what a mess code sharing can be in a large environment with dozensof programmers. On a corporate level, this form of code reuse is a nightmare.
So what’s inheritance? Inheritance is a powerful concept in object-oriented programmingthat allows you to build classes on top of existing ones. You inherit the functionality of anexisting class and then add more functionality to it or overwrite some of its base functionality.Inheritance allows you to build hierarchies of classes that better represent physical entities, andit also enables you to reuse existing code (the holy grail of programming). Most importantly,you can inherit the functionality of an existing class without having access to its code.
Inheritance is a technique for reusing and improving code that doesn’t cause the applicationsthat use it to break. The idea is to export the code you want to reuse in a format that doesn’tallow editing. If more than two people can edit the same code (or if even a single person isallowed to edit the same code in two different projects), any benefits of code reuse evaporateimmediately. The code to be shared must be packaged as a DLL, which exposes all the func-tionality without the risk of being modified in a haphazard way. Only the original creator ofthe DLL can edit the code, and it’s likely that this person will make sure that the interface ofthe class doesn’t change. However, you should still be able to enhance the code in differentprojects. That’s where inheritance comes into the picture. Instead of getting a copy of the code,you inherit a class. The functionality of the class can’t change. The code in the DLL is well pro-tected, and there’s no way to edit the executable code; it’s the class’s functionality you inherit.
However, it’s possible to add new functionality to the inherited code or even override someof the existing functionality. You can add new functionality to the code by adding new mem-bers to the inherited classes. This doesn’t break any existing applications that use the originalDLL. You can also override some of the functionality by creating a new method that replacesan existing one. Applications that use the original version of the DLL won’t see the new mem-bers because they work with the old DLL. Newer projects can use the enhanced functionalityof the DLL. The current solution to the problem of code reuse is inheritance. It’s not a panacea,but it’s a step forward.

INHERITANCE 401
How to Apply InheritanceLet me give a simple but quite practical example. A lot of functionality has been built intoWindows itself, and we constantly reuse it in our applications. The various Windows Formscontrols are a typical example. The functionality of the TextBox control, which we all take forgranted, is packaged in a DLL (the System.Windows.Forms.TextBox class). Yet, many of usenhance the functionality of the TextBox control to address specific application requirements.Many developers add a few statements in the control Enter and Leave events to change thecolor of the TextBox control that has the focus. With VB 2010, it’s possible to write just two eventhandlers that react to these two events and control the background color of the TextBox with thefocus. These two handlers handle the corresponding events of all TextBox controls on the form.
A better approach is to design a ‘‘new’’ TextBox control that incorporates all the functional-ity of the original TextBox control and also changes its background color while it has the focus.The code that implements the TextBox control is hidden from us, but we can reuse it by build-ing a new control that inherits from the TextBox control. As you saw in Chapter 9, ‘‘BuildingCustom Windows Controls,’’ this is not only possible, it’s almost trivial; you were able to buildan enhanced TextBox control with a few lines of code, which I repeat here for the benefit ofreaders who weren’t interested in building custom controls:
Public Class FocusedTextBoxInherits System.Windows.Forms.TextBoxPrivate Sub FocusedTextBox_Enter(ByVal sender As Object,
ByVal e As System.EventArgs) Handles Me.EnterMe.BackColor = _enterFocusColor
End Sub
Private Sub FocusedTextBox_Leave(ByVal sender As Object,ByVal e As System.EventArgs) Handles Me.Leave
Me.BackColor = _leaveFocusColorEnd Sub
End Class
The _enterFocusColor and _leaveFocusColor variables are two local variables of the Colortype, which must be also be declared. As you understand, the two Color variables are proper-ties of the control (implemented with the usual setters and getters) so that different applicationscan use different colors for the active TextBox control on the form.
It took just a few lines of code and the keyword Inherits. With the Inherits statement, youinclude all the functionality of the original TextBox control without touching the control code.Any project that uses the FocusedTextBox control can take advantage of the extra functionality,yet all existing projects will continue to work with the original version of the control. We caneasily upgrade a project to take advantage of the enhanced TextBox control by replacing all theinstances of the TextBox control on a form with instances of the new control. Some projectsmay use the new control yet not take advantage of the new functionality and leave the defaultcolors — in which case the enhanced control behaves just like the original TextBox control.
Inheritance is simply the ability to create a new class based on an existing one. The exist-ing class is the parent class, or base class. The new class is said to inherit the base class and iscalled a subclass, or derived class. The derived class inherits all the functionality of the baseclass and can add new members and override existing ones. The replacement of existing mem-bers with other ones is called overriding. When you replace a member of the base class, you’re

402 CHAPTER 10 APPLIED OBJECT-ORIENTED PROGRAMMING
overriding it. Or, you can overload a method by providing multiple forms of the same methodthat accept different arguments.
Designing with InheritanceIn this section, we’ll tackle a very real problem by using inheritance. Consider a structure forstoring product information; in most applications, this structure is optimized for a specificproduct type. In my consulting days, I’ve seen designs that try to capture a ‘‘global’’ product:a structure that can store products of any type. This approach leads to unnecessarily largedatabase tables, name conflicts, and all kinds of problems that surface after the programhas been installed at your customer’s computers with different product types. Here’s mysuggestion for handling multiple types of products.
Every company makes money by selling products and services, and every company has dif-ferent requirements. Even two bookstores don’t store the same information in their databases.However, there are a few pieces of information that any company uses to sell its products:the product’s code, its description, and its price. This is the minimum information you need tosell something (it’s the information that’s actually printed in the invoice). The price is usuallystored to a different table, along with the company’s pricing policies. Without being too spe-cific, these are the three pieces of information for ordering and selling products. We use theseitems to maintain a list of orders and invoices and keep track of the stock, customer balances,and so on. The specifics of a product can be stored to different tables in the database, andthese tables will be implemented upon request. If your customer is a book seller, you’ll designtables for storing data such as publisher and author names, book descriptions, ISBNs, andthe like.
You’ll also have to write applications to maintain all this information. To sell the same appli-cation to an electronics store, you must write another module for maintaining a different typeof product, but the table with the basic data remains the same. Clearly, you can’t design a pro-gram for handling all types of products, nor can you edit the same application to fit differentproducts. You just have to write different applications for different types of products, but theparts of the application that deal with buying and selling products and with customers, suppli-ers, and other peripheral entities won’t change.
Let’s look at a custom class for storing products, which is part of the Products sampleproject, available for download from www.sybex.com/go/masteringvb2010. The application’smain form is shown in Figure 10.1.
The most basic class stores the information you’ll need in ordering and invoicing applica-tions: the product’s ID, its name, and its price. Here’s the implementation of a simple Productclass:
Public Class ProductPublic Description As StringPublic ProductID As StringPublic ProductBarCode As StringPublic ListPrice As Decimal
End Class
I included the product’s bar code because this is how products are usually sold at cash reg-isters. This class can represent any product for the purposes of buying and selling it. Populate acollection with objects of this type and you’re ready to write a functional interface for creatinginvoices and purchase orders.

INHERITANCE 403
Figure 10.1
Exercising the Book andSupply inherited classes
Now let’s take into consideration the various types of products. To keep the example sim-ple, consider a store that sells books and supplies. Each type of product is implemented witha different class, which inherits from the Product class. Supplies don’t have ISBNs, and booksdon’t have manufacturers — they have authors and publishers; don’t try to fit everything intoa single object or (even worse) into a single database table.
Figure 10.2 shows the base class, Product, and the two derived classes, Supply and Book, inthe Class Diagram Designer. The arrows (if they exist) point to the base class of a derived class,and nested classes (such as the Author and Publisher classes) are contained in the box of theirparent class.
Figure 10.2
Viewing a hierarchy ofclasses with the ClassDiagram Designer

404 CHAPTER 10 APPLIED OBJECT-ORIENTED PROGRAMMING
Listing 10.2 is a simple class for representing books, the Book class.
Listing 10.2: Simple class for representing books
Public Class BookInherits ProductPublic Subtitle As StringPublic ISBN As StringPublic pages As IntegerPublic PublisherID As LongPublic Authors() As Author
Public Class AuthorPublic AuthorID As LongPublic AuthorLast As StringPublic AuthorFirst As String
End Class
Public Class PublisherPublic PublisherID As LongPublic PublisherName As StringPublic PublisherPhone As String
End ClassEnd Class
In addition to its own properties, the Book class exposes the properties of the Product class.Because the book industry has a universal coding scheme (the ISBN), the product’s code is thesame as its ISBN. This, however, is not a requirement of the application. You will probably addsome extra statements to make sure that the ProductID field of the Product class and the ISBNfield of the Book class always have the same value.
The class that represents supplies is shown in Listing 10.3.
Listing 10.3: Simple class for representing supplies
Public Class SupplyInherits ProductPublic LongDescription As StringPublic ManufacturerCode As StringPublic ManufacturerID As Long
Public Class ManufacturerPublic ManufacturerID As LongPublic ManufacturerName As String
End ClassEnd Class

INHERITANCE 405
To make sure this class can accommodate all pricing policies for a company, you can imple-ment a GetPrice method, which returns the product’s sale price (which can be different at dif-ferent outlets or for different customers and for different periods). The idea is that some pieceof code accepts the product’s list (or purchase) price and the ID of the customer who buys it.This code can perform all kinds of calculations, look up tables in the database, or perform anyother action and return the product’s sale price: the price that will appear on the customer’sreceipt. We’ll keep our example simple and sell with the list price.
Let’s write some code to populate a few instances of the Book and Supply classes. The fol-lowing statements populate a HashTable with books and supplies. The HashTable is a structurefor storing objects along with their keys. In this case, the keys are the IDs of the products. TheHashTable can locate items by means of their keys very quickly, and this is why I chose thistype of collection to store the data. HashTables, as well as other collections, are discussed indetail in Chapter 12, ‘‘Storing Data in Collections.’’
Dim P1 As New BookP1.ListPrice = 13.24DP1.Description = "Book Title 1"P1.ProductID = "EN0101"P1.ISBN = "0172833223"P1.Subtitle = "Book Title 1 Subtitle"Products.Add(P1.ProductID, P1)
Dim P2 As New SupplyP2.Description = "Supply 1"P2.ListPrice = 2.25DP2.LongDescription = "Long description of item 1"P2.ProductID = "S0001-1"Products.Add(P2.ProductID, P2)
Products is the name of the collection in which the products are stored, and it’s declared asfollows:
Dim Products As New HashTable
Each item in the Products collection is either of the Book or of the Supply type, and you canfind out its type with the following expression:
If TypeOf Products.Item(key) Is Book …
Listing 10.4 shows the code behind the Display Products button on the sample application’sform. The code iterates through the items of the collection, determines the type of each item,and adds the product’s fields to the appropriate ListView control.
Listing 10.4: Iterating through a collection of book and supply products
Private Sub Button2_Click(…) Handles bttnDisplay.ClickDim key As StringDim LI As ListViewItemFor Each key In Products.Keys

406 CHAPTER 10 APPLIED OBJECT-ORIENTED PROGRAMMING
LI = New ListViewItemDim bookItem As Book, supplyItem As SupplyIf TypeOf Products.Item(key) Is Book Then
bookItem = CType(Products.Item(key), Book)LI.Text = bookItem.ISBNLI.SubItems.Add(bookItem.Description)LI.SubItems.Add("")LI.SubItems.Add(bookItem.ListPrice.ToString("#,##0.00"))ListView1.Items.Add(LI)
End IfIf TypeOf Products.Item(key) Is Supply Then
supplyItem = CType(Products.Item(key), Supply)LI.Text = supplyItem.ProductIDLI.SubItems.Add(supplyItem.Description)LI.SubItems.Add(supplyItem.LongDescription)LI.SubItems.Add( supplyItem.ListPrice.ToString("#,##0.00"))ListView2.Items.Add(LI)
End IfNext
End Sub
It’s fairly easy to take advantage of inheritance in your projects. The base class encapsulatesthe functionality that’s necessary for multiple classes. All other classes inherit from the baseclass and add members specific to the derived class.
As I mentioned earlier, for the purpose of selling products, you can use the Product class.You can search for both books and suppliers with their ID or bar code and use the product’sdescription and price to generate an invoice.
The following statements retrieve a product by its ID and print its description and price:
Dim id As Stringid = InputBox("ID")If Products.Contains(id) Then
Dim selProduct As ProductselProduct = CType(Products(id), Product)Debug.WriteLine("The price of " & selProduct.Description &
" is " & selProduct.ListPrice)End If
If executed, the preceding statements will print the following in the Output window (assum-ing that you have specified the ID S0001-1 of course). This is all the information you need toprepare invoices and orders, and it comes from the Product class, which is the base class for allproducts.
The price of Supply 2 is 5.99
Before ending this section, I should point out that you can convert the type of an inheritedclass only to that of the parent class. You can convert instances of the Book and Supply class toobjects of the Product type, but not the opposite. The only valid type conversion is a wideningconversion (from a narrower to a wider type).

EXTENSION METHODS 407
You won’t be hard-pressed to come up with real-world situations that call for inheritance.Employees, customers, and suppliers can all inherit from the Person class. Checking and sav-ings accounts can inherit from the Account class, which stores basic information such as cus-tomer info and balances. Later in this chapter, you’ll develop a class that represents shapes andyou’ll use it as a basis for classes that implement specific shapes such as circles, rectangles, andso on.
So, has inheritance solved the problem of code reuse? In large complex projects, yes, it hashelped a lot. Because designing with inheritance in mind has a substantial initial overhead,people don’t use it with small projects (not that this is a recommended practice). In my view,the most important advantage of inheritance is that it forces designers and developers to fullyunderstand the business model for the processes they’re modeling early in the game and nothave to revise their models substantially when they discover faults in their initial design whilethey’re in the implementation process.
Extension MethodsThe concept of extension methods is not based on inheritance, or even the design of classes, butit’s a related topic that was introduced to accommodate Language Integrated Query (LINQ).One of the major advantages of inheritance is that it allows you to extend existing classes byadding your custom members. As long as you design your classes carefully, you can createelaborate structures of classes that inherit from one another. Unfortunately, some of the classesin the Framework as not inheritable (and some of them happen to be the very classes you’d liketo enhance). The Array class, for example, can’t be inherited and neither can the String class.
If you need to add a few methods to a class that are specific to an application, you can useextension methods. With VB 2010 you can add a method to any class without even inheritingit. You don’t have to create a new class, just a module that contains one or more proceduresthat accept the type of the class you want to extend as their first argument. Let me demonstratethe process of creating extension methods with a trivial example and then I’ll show you a morepractical extension method.
In this first example I’ll add two simple methods to the Integer class, the Inc and Dec meth-ods, which increase and decrease an integer value by one (the older among you will actuallyrecognize the origins of the names of the two methods, you may even reminisce about them).In effect, I’ll introduce two methods to replace the statements: i += 1 and i -= 1 (where i isan integer variable). Create a new project and add a module to it. You can call the module any-thing; for this example I will use the name IntegerExtensions.
First import the following namespace, which will allow you to ‘‘decorate’’ the extensionmethods with the appropriate keywords:
Imports System.Runtime.CompilerServices
Now you’re ready to add the definitions of the extension methods. Each extension methodis just a procedure decorated with the following attribute:
<System.Runtime.CompilerServices.Extension()>
or
<Extension()>
if you have imported the System.Runtime.CompilerServices namespace.

408 CHAPTER 10 APPLIED OBJECT-ORIENTED PROGRAMMING
You must also make sure that the first argument you pass to the method is of the type youwant to extend. A method that extends the Integer class, for example, should accept an integertype as its first argument. This is the instance of the class that your extension method will actupon and it may be followed by any number of additional arguments. Here are the implemen-tations of the Inc and Dec methods:
<Extension()>Public Function Inc(ByVal i As Integer) As Integer
Return i + 1End Sub
<Extension()>Public Function Dec(ByVal i As Integer) As Integer
Return i - 1End Sub
With these definitions in place, switch to the project’s main form and insert the following ina button’s Click event handler:
Dim i As Integer = 13MsgBox(i.Inc.ToString)MsgBox(i.Dec.ToString)
As soon as you enter the name of an Integer variable and the following period, the Inc andDec methods will be included in the IntelliSense box, along with the built-in methods of theInteger class (they indeed extend the Integer class). The first message box will display the value14 (the original value plus 1) and the second message box will display the value 12 (the originalvalue minus 1).
You can also implement the same routines as subroutines, which accept their argument byreference and increase the actual value of the variable instead of returning a new value. Let’scall the two new methods Increase and Decrease:
<Extension()>Public Sub Increase(ByRef i As Integer)
i += 1End Sub
<Extension()>Public Sub Decrease(ByRef i As Integer)
i -= 1End Sub
To increase/decrease the values by another amount, rewrite the procedures so that theyaccept a second argument. The methods still apply to the Integer class because their first argu-ment is of the Integer type. Note that when we call an extension method, we don’t specify thefirst argument. This argument is used by the compiler to figure out which class the methodextends. The value on which the method acts is the value of the variable to which the methodis applied. In other words, extension methods are instance methods.
Now that you have seen the mechanics of implementing extension methods, let’s look at amore interesting application of extension methods. Some classes have been heavily extendedin version 4.0 of the Framework with this mechanism. A typical example is the Array class.

EXTENSION METHODS 409
Declare an array variable and then type on a new line the name of the array and a period. Inthe IntelliSense box you will see the methods of the Array class. Methods are marked with alittle cube. Some of them, however, are marked with a cube and a down arrow: These are theclass extension methods. These methods were introduced to extend the corresponding classes,and some typical examples are the Sum and Average methods of the Array class, which returnthe sum and the average of the elements in the array (provided that the array is of a numerictype). The following statement sets up a small array of integers:
Dim integers() = {1, 84, 12, 27, 3, 19, 73, 9, 16, 41, 53, 57, 13}
To calculate the sum of its elements you can write a For Each loop to iterate through all theelements of the array, as usual, or call the Sum method:
Dim sumOfIntegers = integers.Sum
Likewise, you can call the Min and Max methods to retrieve the numerically smaller andlarger elements respectively and the Average method to retrieve the average value of a set ofnumeric values.
The extension methods I just mentioned are not unique to the Array class. They apply toall classes that implement the IEnumerable interface — in other words, they apply to all col-lections. Not only that, but they’re quite flexible because they’re overloaded. Some of theseextension methods can be called with a function as an argument! The Sum extension methoditerates through the collection’s items and calculates their sum. It can also calculate the sum ofany transformation of the same elements. For example, you can calculate the sum of the squaresby passing to the method the definition of a function that returns the square of each element.The Sum method will apply this function to every item as it loops through the elements andtake the sum of the values returned by the function. The definition of a function that returnsthe square of a numeric value is trivial:
Function(v As Integer) As IntegerReturn(v * v)
End Function
To pass this function as an argument to the Sum method, you pass the body of the functionwithout the Return statement and without the End Function statement:
Dim sqSum = integers.Sum(Function(v As Integer) v ˆ 2)
The v argument is replaced by the current item’s value as the method iterates through thecollection’s elements. The functions you pass to a method are known as lambda expressions,and you’ll find a lot more information on lambda expressions in Chapter 13, ‘‘XML in ModernProgramming.’’
Another extension method is the Where method, which also accepts as argument a func-tion that returns a True/False value. This function is also known as predicate and it determineswhether an element of the collection will be included in the calculations or not. The functionyou pass to the Where method has a different role: It selects the value to be summed, and it’scalled selector. The following expression selects the values that are numerically less than 50:
integers.Where(Function(k) k < 50)

410 CHAPTER 10 APPLIED OBJECT-ORIENTED PROGRAMMING
The expression k < 50 is evaluated for each element of the array and, if smaller, the value isselected. Otherwise, it’s ignored. Having selected the ‘‘small’’ values in the array, we can applythe Sum method to calculate the sum of the selected values:
Dim smallSum = integers.Where(Function(k) k < 50).Sum
Okay, let’s combine predicates and selectors to create an expression that sums the squares ofselected elements in the array. To request the sum of the squares of all values that are numeri-cally less than 50, use the following expression:
Dim smallSqSum = integers.Where(Function(k) k < 50).Sum(Function(v) v ˆ 2)
The Where extension method selects the desired values and the Sum extension method actson them. The Where method returns an IEnumerable type to which you can apply the Summethod. The Sum method returns an integer.
I’m sure you got the idea behind extension methods. In Chapter 12 and then in Chapter 13,you will see how to apply lambda expressions to collections and how extension methods enablea new powerful querying technology known as LINQ.
Extending Framework Classes
In addition to inheriting and extending you own custom classes, you can extend many of theclasses of the Framework itself. To add a new method to the ArrayList class, all you have todo is create a new class and include this statement:
Inherits ArrayList
All the methods in the class will become methods of the ArrayList class and they will appear inthe IntelliSense box along with the built-in methods of the ArrayList class.
However, some of the core classes of the Framework are not inheritable. For example, youcan’t add new methods to the String class by inheriting it. By adding extension methods,you can easily extend any class, but only in the context of a project. To use the same exten-sion features in another project, you must include the module that contains the extensionmethods. In the preceding chapter you saw the implementation of a method that convertsnumeric values to strings. If you copy the code into a new module and prefix the methodswith the <Extension> attribute, you can make the Num2String method part of the Stringclass. Another interesting extension for the String class is a method that actually reads outtext. The Framework contains the Speech.Synthesis namespace, which provides all the toolsfor generating a synthetic voice with your computer. To extend the String class with a Speakmethod, create a new module and import the following namespace:
Imports System.Speech.Synthesis
Before you can import this class in your code, you must reference it in your project, becausethe Speech namespace isn’t referenced by default. Right-click the project name and select

POLYMORPHISM 411
Add Reference from the context menu. On the dialog box that opens, select the System.Speech.Synthesis component and then add the following method definition:
<Extension()> _Public Sub Speak(ByVal s As String)
Dim synth As New SpeechSynthesizerDim voices As
System.Collections.ObjectModel.ReadOnlyCollection(Of System.Speech.Synthesis.InstalledVoice) =synth.GetInstalledVoices()
synth.SelectVoice(voices(0).VoiceInfo.Name)synth.Speak(s)
End Sub
Easy enough? The first statement retrieves all installed voices (there’s only one voice installedby default) and uses the first of them to read out the text with the Speak method. If you’reinterested in adding voice capabilities to your application, look up the members of theSynthesis namespace. You can adjust the properties of the voice, call the Speak methodasynchronously, and even add voice recognition features to your applications.
PolymorphismA consequence of inheritance is another powerful OOP technique: polymorphism, which isthe capability of a base type to adjust itself to accommodate many different derived types.Let’s make it simpler by using some analogies in the English language. Take the word run,for example. This verb can be used to describe what athletes, cars, or refrigerators do; theyall run. In different sentences, the same word takes on different meanings. When you use itwith a person, it means going a distance at a fast pace. When you use it with a refrigerator,it means that it’s working. When you use it with a car, it may take on both meanings. So,in a sense the word run is polymorphic (and so are many other English words): Its exactmeaning is differentiated by the context. This is a simple definition of the terms polymor-phism and polymorphic (both of Greek origin, meaning ‘‘many forms’’). If you reflect on theessence of polymorphism, you’ll realize that it’s a characteristic that adds intelligence tolanguages. And languages, being the primary human tool, should match our intelligence.As you will see shortly, polymorphism adds a degree of intelligence to object-orientedprogramming.
To apply the same analogy to programming, think of a class that describes a basic objectsuch as a shape. This class would be very complicated if it had to describe and handle allshapes. It would be incomplete, too, because the moment you released it to the world, you’dcome up with a new shape that can’t be described by your class. To design a class thatdescribes all possible shapes, you build a simple class to describe shapes at large, and thenyou build a separate class for each individual shape: a Triangle class, a Square class, a Circleclass, and so on. As you can guess, all these classes inherit the Shape class. Let’s also assumethat all the classes that describe individual shapes have an Area method, which calculates thearea of the shape they describe. The name of the Area method is the same for all classes, but itcalculates a different formula for different shapes.

412 CHAPTER 10 APPLIED OBJECT-ORIENTED PROGRAMMING
Developers, however, shouldn’t have to learn a different syntax of the Area method for eachshape; they can declare a Square object and calculate its area with the following statements:
Dim shape1 As New Square(5)Dim area As Double = shape1.Area
If shape2 represents a circle, the same method will calculate the circle’s area. (I’m assum-ing that the constructors accept as an argument the square’s side and the circle’s radius,respectively.)
Dim shape2 As New Circle(9.90)Dim area As Double = shape2.Area
You can go through a list of objects derived from the Shape class and calculate their areasby calling the Area method. No need to know what shape each object represents — you justcall its Area method. Let’s say you created an array with various shapes. You can go throughthe collection and calculate the total area with a loop like the following:
Dim totalArea As Double = 0.0For Each s As Shape In Shapes totalArea += CType(s, Shape).AreaEnd While
The CType() function converts the current element of the collection to a Shape object; it’snecessary only if the Strict option is on, which prohibits VB from late-binding the expression.(Strict is off by default, but my suggestion is to turn it on.)
One rather obvious alternative is to build a separate function to calculate the area of eachshape (SquareArea, CircleArea, and so on). It will work, but why bother with so many func-tion names, not to mention the overhead in your code? You must first figure out the type ofshape described by a specific variable, such as shape1, and then call the appropriate method.The code will not be as easy to read, and the longer the application gets, the more If and Casestatements you’ll be coding. Not to mention that each method would require different argu-ments for its calculations.
This approach clearly offsets the benefits of object-oriented programming by reducing classesto collections of functions. Even worse, the code is no longer elegant.
The second, even less-efficient method is a really long Area() function that would be able tocalculate the area of all shapes. This function should be a very long Case statement, such as thefollowing one:
Public Function Area(ByVal shapeType As String) As DoubleSelect Case shapeType
Case "Square": { calculate the area of a square }Case "Circle": { calculate the area of a circle }{ . . . more Case statements }
End SelectEnd Function
The real problem with this approach is that every time you want to add a new segmentto calculate the area of a new shape to the function, you’d have to edit it. If other develop-ers wanted to add a shape, they’d be out of luck. The solution is a method by the name Area

POLYMORPHISM 413
that applies to all shapes. Each time we create a new shape by inheriting the base class, weshould be able to add a new implementation of the Area method for the specific shape. Thisway, no matter what a specific shape is, we can calculate its area by calling the polymorphicArea method.
In the following section, I’ll show you how to build the Shape class and then extend it withindividual classes for various shapes. You’ll be able to add your own classes to implementadditional shapes, and any code written using the older versions of the Shape class will keepworking.
Building the Shape ClassIn this section, you’ll build a few classes to represent shapes to demonstrate the advantagesof implementing polymorphism. Let’s start with the Shape class, which will be the base classfor all other shapes. This is a really simple class that’s pretty useless on its own. Its real useis to expose two methods that can be inherited: Area and Perimeter. Even the two methodsdon’t do much — actually, they do absolutely nothing. All they really do is provide a nam-ing convention. All classes that will inherit the Shape class will have an Area and a Perimetermethod, and they must provide the implementation of these methods.
The code shown in Listing 10.5 comes from the Shapes sample project. The application’smain form, which exercises the Shape class and its derived classes, is shown in Figure 10.3.
Figure 10.3
The main form of theShapes project
Listing 10.5: Shape class
Class ShapeOverridable Function Area() As DoubleEnd FunctionOverridable Function Perimeter() As DoubleEnd Function
End Class
If there are properties common to all shapes, you place the appropriate Property proce-dures in the Shape class. If you want to assign a color to your shapes, for instance, insert a

414 CHAPTER 10 APPLIED OBJECT-ORIENTED PROGRAMMING
Color property in this class. The Overridable keyword means that a class that inherits fromthe Shape class can override the default implementation of the corresponding methods or prop-erties. As you will see shortly, it is possible for the base class to provide a few members thatcan’t be overridden in the derived class. The methods that are declared but not implemented inthe parent class are called virtual methods, or pure virtual methods.
Next you must implement the classes for the individual shapes. Add another Class moduleto the project, name it Shapes, and enter the code shown in Listing 10.6.
Listing 10.6: Square, Triangle, and Circle classes
Public Class TriangleInherits ShapePrivate _side1, _side2, _side3 As Double
Property Side1() As DoubleGet
Return _side1End GetSet(ByVal Value As Double)
_side1 = ValueEnd Set
End Property
Property Side2() As DoubleGet
Return _side2End GetSet(ByVal Value As Double)
_side2 = ValueEnd Set
End Property
Public Property Side3() As DoubleGet
Return _side3End GetSet(ByVal Value As Double)
_side3 = ValueEnd Set
End Property
Public Overrides Function Area() As DoubleDim Perim As DoublePerim = Perimeter()Return (Math.Sqrt((Perim - _side1) * _
(Perim - _side2) * (Perim - _side3)))End Function

POLYMORPHISM 415
Public Overrides Function Perimeter() As DoubleReturn (_side1 + _side2 + _side3)
End Function
End Class
Public Class CircleInherits ShapePrivate _Radius As Double
Public Property Radius() As DoubleGet
Radius = _RadiusEnd GetSet(ByVal Value As Double)
_Radius = ValueEnd Set
End Property
Public Overrides Function Area() As DoubleReturn (Math.PI * _Radius ˆ 2)
End Function
Public Overrides Function Perimeter() As DoubleReturn (2 * Math.PI * _Radius)
End FunctionEnd Class
Public Class SquareInherits ShapePrivate _Side As Double
Public Property Side() As DoubleGet
Side = _SideEnd GetSet(ByVal Value As Double)
_Side = ValueEnd Set
End Property
Public Overrides Function Area() As DoubleArea = _Side * _Side
End Function
Public Overrides Function Perimeter() As DoubleReturn (4 * _Side)
End FunctionEnd Class

416 CHAPTER 10 APPLIED OBJECT-ORIENTED PROGRAMMING
The Shapes.vb file, available for download from www.sybex.com/go/masteringvb2010,contains three classes: the Square, Triangle, and Circle classes. All three expose their basicgeometric characteristics as properties. The Triangle class, for example, exposes the prop-erties Side1, Side2, and Side3, which allow you to set the three sides of the triangle. In areal-world application, you may opt to insert some validation code because not any three sidesproduce a triangle. You might also consider defining a triangle with three points (pairs of x-,y-coordinates), but I’d rather not turn this chapter into Geometry 101. You must also insertparameterized constructors for each shape. The implementation of these constructors is trivial,and I’m not showing it in the listing; you’ll find the appropriate constructors if you open theproject with Visual Studio. The Area and Perimeter methods are implemented differentlyfor each class, but they do the same thing: They return the area and the perimeter of thecorresponding shape. The Area method of the Triangle class is a bit involved, but it’s just aformula (the famous Heron’s formula for calculating a triangle’s area).
Testing the Shape Class
To test the Shape class, all you have to do is create three variables — one for each specificshape — and call their methods. Or, you can store all three variables into an array and iter-ate through them. If the collection contains Shape variables only, the current item is always ashape, and as such it exposes the Area and Perimeter methods. The code in Listing 10.7 doesexactly that. First, it declares three variables of the Triangle, Circle, and Square types. Then itsets their properties and calls their Area method to print their areas.
Listing 10.7: Testing the Shape class
Dim shape1 As New Triangle()Dim shape2 As New Circle()Dim shape3 As New Square()’ Set up a triangleshape1.Side1 = 3shape1.Side2 = 3.2shape1.Side3 = 0.94Console.WriteLine("The triangle’s area is " & shape1.Area.ToString)’ Set up a circleshape2.Radius = 4Console.WriteLine("The circle’s area is " & shape2.Area.ToString)’ Set up a squareshape3.Side = 10.01Console.WriteLine("The square’s area is " & shape3.Area.ToString)Dim shapes() As Shapeshapes(0) = shape1shapes(1) = shape2shapes(2) = shape3Dim shapeEnum As IEnumeratorDim totalArea As DoubleshapeEnum = shapes.GetEnumeratorWhile shapeEnum.MoveNext

POLYMORPHISM 417
totalArea = totalArea + CType(shapeEnum.Current, shape).AreaEnd WhileConsole.WriteLine("The total area of your shapes is " &
totalArea.ToString)
In the last section, the test code stores all three variables into an array and iterates throughits elements. At each iteration, it casts the current item to the Shape type and calls its Areamethod. The expression that calculates areas is CType(shapeEnum.Current, shape).Area, andthe same expression calculates the area of any shape.
Casting Objects to Their Parent Type
The trick that makes polymorphism work is that objects of a derived type can be cast to theirparent type. An object of the Circle type can be cast to the Shape type because the Shape typecontains less information than the Circle type. You can cast objects of a derived type to theirparent type, but the opposite isn’t true. The methods that are shared among multiple derivedclasses should be declared in the parent class, even if they contain no actual code. Just don’tforget to prefix them with the Overridable keyword. There’s another related attribute, theMustOverride attribute, which forces every derived class to provide its own implementationof a method or property.
Depending on how you will use the individual shapes in your application, you can addproperties and methods to the base class. In a drawing application, all shapes have an outlineand a fill color. These properties can be implemented in the Shape class because they applyto all derived classes. Any methods with a common implementation for all classes should alsobe implemented as methods of the parent class. Methods that are specific to a shape must beimplemented in one of the derived classes.
I should also point out here that you can declare variables of the Shape type and initializethem to specific shapes, as follows:
Dim triangle As Shapetriangle = New Triangle(1.2, 0.9, 1.3)
Dim circle As Shapecircle = New Circle(10)
Dim square As Shapesquare = New Square(23)
The circle variable’s type isn’t Shape; its type is determined by its constructor and thecircle variable is of the Circle type. Needless to say that all three variables expose thePerimeter and Area methods and the code is strongly typed (it will work even with the Strictoption on).

418 CHAPTER 10 APPLIED OBJECT-ORIENTED PROGRAMMING
Who Can Inherit What?The Shape base class and the Shapes derived class work fine, but there’s a potential problem.A new derived class that implements a new shape may not override the Area or the Perimetermethod. If you want to force all derived classes to implement a specific method, you canspecify the MustInherit modifier for the class declaration and the MustOverride modifier forthe member declaration. If some of the derived classes may not provide their implementationof a method, this method of the derived class must also be declared with the Overridablekeyword.
The Shapes project uses the MustInherit keyword in the definition of the Shape class. Thiskeyword tells the CLR that the Shape class can’t be used as is; it must be inherited by anotherclass. A class that can’t be used as is is known as an abstract base class, or a virtual class. Thedefinition of the Area and Perimeter methods are prefixed with the MustOverride keyword,which tells the compiler that derived classes (the ones that will inherit the members of the baseclass) must provide their own implementation of the two methods:
Public MustInherit Class ShapePublic MustOverride Function Area() As DoublePublic MustOverride Function Perimeter() As Double
End Class
Notice that there’s no End Function statement, just the declaration of the function that mustbe inherited by all derived classes. If the derived classes may override one or more methodsoptionally, these methods must be implemented as actual functions. Methods that must be over-ridden need not be implemented as functions — they’re just placeholders for a name. You mustalso specify their parameters, if any. The definitions of the methods you specify are known asthe methods’ signature.
There are other modifiers you can use with your classes, such as the NotInheritablemodifier, which prevents your class from being used as a base class by other developers. TheSystem.Array class is an example of a Framework class that can’t be inherited.
In the following sections, you’ll look at the class-related modifiers and learn when to usethem. The various modifiers are keywords, such as the Public and Private keywords that youcan use in variable declarations. These keywords can be grouped according to the entity theyapply to, and I used this grouping to organize them in the following sections.
Parent Class KeywordsThese keywords apply to classes that can be inherited, and they appear in front of the Classkeyword. By default, all classes can be inherited, but their members can’t be overridden. Youcan change this default behavior with the following modifiers:
NotInheritable This prevents the class from being inherited (also known as a sealed class).The base data types, for example, are not inheritable. In other words, you can’t create a newclass based on the Integer data type. The Array class is also not inheritable.
MustInherit This class must be inherited. Classes prefixed with the MustInherit attributeare called abstract classes, and the Framework contains quite a few of them. You can’t create anobject of this class in your code, and therefore, you can’t access its methods. The Shape class isnothing more than a blueprint for the methods it exposes and can’t be used on its own; that’swhy it was declared with the MustInherit keyword.

WHO CAN INHERIT WHAT? 419
Derived Class KeywordsThe following keywords may appear in a derived class; they have to do with the derived class’sparent class:
Inherits Any derived class must inherit an existing class. The Inherits statement tells thecompiler which class it derives from. A class that doesn’t include the Inherits keyword is bydefinition a base class.
MyBase Use the MyBase keyword to access a derived class’s parent class from within thederived class’s code.
Parent Class Member KeywordsThese keywords apply to the members of classes that can be inherited, and they appear in frontof the member’s name. They determine how derived classes must handle the members (that is,whether they can or must override their properties and methods):
Overridable Every member with this modifier can be overwritten. If a member is declaredas Public only, it can’t be overridden. You should allow developers to override as many of themembers of your class as possible, as long as you don’t think there’s a chance that they mightbreak the code by overriding a member. Members declared with the Overridable keyworddon’t necessarily need to be overridden, so they must provide some functionality.
NotOverridable Every member declared with this modifier can’t be overridden in the inher-iting class.
MustOverride Every member declared with this modifier must be overridden. You can skipthe overriding of a member declared with the MustOverride modifier in the derived classas long as the derived class is declared with the MustInherit modifier. This means that thederived class must be inherited by some other class, which then receives the obligation to over-ride the original member declared as MustOverride.
The two methods of the Shape class must be overridden, and we’ve done so in all the derivedclasses that implement various shapes. Let’s also assume that you want to create different typesof triangles with different classes (an orthogonal triangle, an isosceles triangle, and a generictriangle). And let’s assume that these classes would inherit the Triangle class. You can skip thedefinition of the Area method in the Triangle class, but you’d have to include it in the derivedclasses that implement the various types of triangles. Moreover, the Triangle class would haveto be marked as MustInherit.
Public This modifier tells the CLR that the specific member can be accessed from any appli-cation that uses the class. This, as well as the following keywords, are access modifiers and arestrictly inheritance related, but I’m listing them here for completeness.
Private This modifier tells the CLR that the specific member can be accessed only in themodule in which it was declared. All the local variables must be declared as Private, and noother class (including derived classes) or application will see them.
Protected Protected members have scope between public and private, and they can beaccessed in the derived class, but they’re not exposed to applications using either the parentclass or the derived classes. In the derived class, they have a private scope. Use the Protectedkeyword to mark the members that are of interest to developers who will use your class as abase class, but not to developers who will use it in their applications.

420 CHAPTER 10 APPLIED OBJECT-ORIENTED PROGRAMMING
Protected Friend This modifier tells the CLR that the member is available to the class thatinherits the class as well as to any other component of the same project.
Derived Class Member KeywordThe Overrides keyword applies to members of derived classes and indicates whether a mem-ber of the derived class overrides a base class member. Use this keyword to specify the memberof the parent class you’re overriding. If a member has the same name in the derived class asin the parent class, this member must be overridden. You can’t use the Overrides keywordwith members that were declared with the NotOverridable or Protected keywords in the baseclass.
VB 2010 At Work: The InheritanceKeywords ProjectA few examples are in order. The sample application of this section is the InheritanceKeywordsproject, and it contains a few classes and a simple test form. Create a simple class by enteringthe statements of Listing 10.8 in a Class module, and name the module ParentClass.
Listing 10.8: InheritanceKeywords class
Public MustInherit Class ParentClassPublic Overridable Function Method1() As String
Return ("I’m the original Method1")End FunctionProtected Function Method2() As String
Return ("I’m the original Method2")End FunctionPublic Function Method3() As String
Return ("I’m the original Method3")End FunctionPublic MustOverride Function Method4() As String
’ No code in a member that must be overridden !’ Notice the lack of the matching End Function here
Public Function Method5() As StringReturn ("I’m the original Method5")
End FunctionPrivate prop1, prop2 As StringProperty Property1() As String
GetProperty1 = "Original Property1"
End GetSet
prop1 = ValueEnd Set
End PropertyProperty Property2() As String
GetProperty2 = "Original Property2"

WHO CAN INHERIT WHAT? 421
End GetSet
prop2 = ValueEnd Set
End PropertyEnd Class
This class has five methods and two properties. Notice that Method4 is declared with theMustOverride keyword, which means it must be overridden in a derived class. Notice alsothe structure of Method4. It has no code, and the End Function statement is missing. Method4is declared with the MustOverride keyword, so you can’t instantiate an object of the Parent-Class type. A class that contains even a single member marked as MustOverride must also bedeclared as MustInherit.
Place a button on the class’s test form, and in its code window attempt to declare a variableof the ParentClass type. VB will issue a warning that you can’t create a new instance of a classdeclared with the MustInherit keyword. Because of the MustInherit keyword, you must cre-ate a derived class. Enter the lines from Listing 10.9 in the ParentClass module after the endof the existing class.
Listing 10.9: Derived class
Public Class DerivedClassInherits ParentClassOverrides Function Method4() As String
Return ("I’m the derived Method4")End FunctionPublic Function newMethod() As String
Console.WriteLine("<This is the derived Class’s newMethod " &"calling Method2 of the parent Class> ")
Console.WriteLine(" " & MyBase.Method2())End Function
End Class
The Inherits keyword determines the parent class. This class overrides the Method4 mem-ber and adds a new method to the derived class: newMethod. If you switch to the test form’scode window, you can now declare a variable of the DerivedClass type:
Dim obj As DerivedClass
This class exposes all the members of ParentClass except for the Method2 method, which isdeclared with the Protected modifier. Notice that the newMethod() function calls this methodthrough the MyBase keyword and makes its functionality available to the application. Normally,we don’t expose Protected methods and properties through the derived class.

422 CHAPTER 10 APPLIED OBJECT-ORIENTED PROGRAMMING
Let’s remove the MustInherit keyword from the declaration of the ParentClass class.Because it’s no longer mandatory that the ParentClass be inherited, the MustInherit keywordis no longer a valid modifier for the class’s members. So, Method4 must be either removedor implemented. Let’s delete the declaration of the Method4 member. Because Method4 is nolonger a member of the ParentClass, you must also remove the entry in the DerivedClass thatoverrides it.
MyBase and MyClassThe MyBase and MyClass keywords let you access the members of the base class and thederived class explicitly. To see why they’re useful, edit the ParentClass, as shown here:
Public Class ParentClassPublic Overridable Function Method1() As String
Return (Method4())End FunctionPublic Overridable Function Method4() As String
Return ("I’m the original Method4")End Function
Override Method4 in the derived class, as shown here:
Public Class DerivedClassInherits ParentClassOverrides Function Method4() As StringReturn("Derived Method4")
End Function
Switch to the test form, add a button, declare a variable of the derived class, and call itsMethod4:
Dim objDerived As New DerivedClass()Debug.WriteLine(objDerived.Method4)
What will you see if you execute these statements? Obviously the string Derived Method4.So far, all looks reasonable, and the class behaves intuitively. But what if we add the followingmethod in the derived class?
Public Function newMethod() As StringReturn (Method1())
End Function
This method calls Method1 in the ParentClass class because Method1 is not overridden in thederived class. Method1 in the base class calls Method4. But which Method4 gets invoked? Sur-prised? It’s the derived Method4! To fix this behavior (assuming you want to call the Method4of the base class), change the implementation of Method1 to the following:
Public Overridable Function Method1() As StringReturn (MyClass.Method4())
End Function

WHO CAN INHERIT WHAT? 423
If you run the application again, the statement
Console.WriteLine(objDerived.newMethod)
will print this string:
I’m the original Method4
Is it reasonable for a method of the base class to call the overridden method? It is reason-able because the overridden class is newer than the base class, and the compiler tries to use thenewest members. If you had other classes inheriting from the DerivedClass class, their mem-bers would take precedence.
Use the MyClass keyword to make sure you’re calling a member in the same class and notan overriding member in an inheriting class. Likewise, you can use the keyword MyBase tocall the implementation of a member in the base class rather than the equivalent member ina derived class. MyClass is similar to MyBase, but it treats the members of the parent class as ifthey were declared with the NotOverridable keyword.
Putting Inheritance to WorkInheritance isn’t just a theoretical concept that can be applied to shapes or other entities that haveno relation whatsoever with business applications. I’ve used a simple example to demonstratethat there are entities that can be modeled quite naturally with inherited classes. Now that youhave learned the mechanics of designing parent and derived classes and the keywords that affectinheritance, it’s time to explore a business-like scenario where inheritance may come in handy.
An interesting type of business application deals with reservations — be it hotel reserva-tions, flights reservation, car rentals, you name it. The same company usually provides all typesof reservations, and chances are you have used their services on the Web, either to make reser-vations or to simply look up hotels near certain attractions or conventions. Expedia.com andBookings.com are probably the most popular reservation sites for the retail market. There arealso many sites addressed to travel professionals.
Before designing the interface of an application, architects must come up with a model thatreflects the business objects and embeds the required business logic into them. They must alsodesign a database that reflects the hierarchy of the business objects. I will not show you anenormous data model for all entities you may run into while designing the model for a reser-vation system, just a simplified (if not oversimplified) object hierarchy for storing bookings.
There are several types of bookings a reservation system should accommodate, and eachtype has its own structure. However, there are a few fields that are common to all bookings.A booking must have a name (the name of the person staying at the hotel or flying), a price, aconfirmation number, and so on. Then there are fields that are unique to each type of booking.Hotel bookings have a hotel name and a destination, a check-in date and a check-out date. Carrental bookings share the same information, but no hotel name, and the destination is not acity, but a car pickup location. They also have a car drop location, which may or may not bethe same as the pickup location.
I’m sure you’ve got the idea; we’ll design a base class to represent a booking at large anda number of classes, one for each type of booking, all inheriting the same base class. Althoughthere are many ways to design classes for storing data related to bookings, the starting pointshould be the observation that all types of bookings share some common fields. If we collect theinformation that’s common to all bookings, we can build a parent class from which all types ofbookings will derive.

424 CHAPTER 10 APPLIED OBJECT-ORIENTED PROGRAMMING
First thing’s first. Since we must be able to differentiate several booking types, we mustcreate an enumeration with a member for each different booking type, as follows:
Public Enum ReservationTypeHotelReservationCarReservationFlightReservation
End Enum
Every time a new booking is created, its type should be set to the appropriate member of theReservationType enumeration. If the need for a new type of booking arises, you can updatethe ReservationType enumeration and create a new derived class to represent the attributesthat are unique to the new booking type.
We’ll now turn our attention to the parent class, which contains all the standard fields of abooking. Listing 10.10 shows a possible implementation of the Booking class:
Listing 10.10: The Booking parent class
Public MustInherit Class BookingProtected Property Type As ReservationTypePublic ReadOnly Property BookingType As ReservationType
GetReturn Type
End GetEnd PropertyPublic Property BookingRequestDate As DateProtected Property BookingStartDate As DateProtected Property BookingEndDate As DatePublic Property BookingName As StringPublic Property BookingNumber As StringPublic Property ProviderName As StringPublic Property Price As Decimal
End Class
Note that all properties are auto-implemented (I’ll leave it up to you to introduce reason-able validation, such as to reject inappropriate starting and ending dates, future request dates,and so on). Some of the properties are marked as Protected. These properties are internalto the class and not visible from the project that uses the Booking class. The Type property,for example, shouldn’t be visible outside the class. We don’t want users to create a new hotelbooking and set its Type property to any other value other than HotelReservation (you’ll seeshortly how we can do that). However, users of the class should be able to request the type ofa booking, so I’ve included the read-only property BookingType, which returns the value of theType protected property.
Note also that the BookingStartDate and BookingEndDate properties are also Protected.All bookings have a starting and an ending date (with a few exceptions, such as event book-ings), but they have different names. Why use a generic names for the two dates when we can

WHO CAN INHERIT WHAT? 425
call them CheckinDate and CheckoutDate for hotels, PickupDate and DropoffDate for cars,and so on?
Note that the Booking class is prefixed with the MustInherit modifier so that the applica-tions that use the derived classes can’t create generic objects. This keyword makes the Bookingclass an abstract one.
Let’s design now the HotelBooking class, which derives from the Booking class andadds a few properties to describe the hotel (the HotelName, DestinationCity, andDestinationCountry properties). In a production application, you’d have a Destination classwith a city code and a country code, but I’ve decided to keep the complexity of the class to aminimum.
Note the properties CheckinDate and CheckoutDate. These two properties are mapped tothe BookingStartDate and BookingEndDate of the parent class. I’m using the Protected mod-ifier along with the MyBase object to hide the names of the parent class and name them differ-ently in the derived class. Other than that, the code is almost trivial, as you can see inListing 10.11.
Listing 10.11: The FlightBooking class based on the Booking class
Public Class HotelBookingInherits Booking
Public Property DestinationCountry As StringPublic Property DestinationCity As StringPublic Property HotelName As StringPublic Property CheckInDate As Date
GetReturn MyBase.BookingStartDate
End GetSet(ByVal value As Date)
MyBase.BookingStartDate = valueEnd Set
End Property
Public Property CheckOutDate As DateGet
Return MyBase.BookingEndDateEnd GetSet(ByVal value As Date)
MyBase.BookingEndDate = valueEnd Set
End PropertyEnd Class
The FlightBooking class is even simpler. The two dates are now called DepartureDate andArrivalDate. In flights, we first depart, then we arrive, while at hotels we first arrive (checkin) and then depart (check out). Take a look at Listing 10.12.

426 CHAPTER 10 APPLIED OBJECT-ORIENTED PROGRAMMING
Listing 10.12: The FlightBooking Class based on the Booking class
Public Class FlightBookingInherits BookingPublic Property OriginCode As StringPublic Property DestinationCode As StringPublic Property DepartureDate As Date
GetReturn MyBase.BookingStartDate
End GetSet(ByVal value As Date)
MyBase.BookingStartDate = valueEnd Set
End Property
Public Property ArrivalDate As DateGet
Return MyBase.BookingEndDateEnd GetSet(ByVal value As Date)
MyBase.BookingEndDate = valueEnd Set
End PropertyPublic Property ConfirmationNumber As String
End Class
We’re almost done, except for a crucial detail. Every time the user declares a variable ofthe derived type (HotelBooking, FlightBooking, or CarBooking), we must set the Type prop-erty to the appropriate member of the ReservationType enumeration. You can’t rely on otherdevelopers to ensure the integrity of your data because they may create a HotelBooking objectand set its Type property to an inappropriate member of the enumeration.
The proper place to set the Type property is the constructor of each of the derived classes.The constructor of the HotelBooking class should be as follows:
Public Sub New()Type = ReservationType.HotelReservation
End Sub
There are similar constructors for the other derived classes, which I need not repeat here.Let’s see now how to use the Booking class in an application. Switch to the project’s main
form and enter the statements of Listing 10.13 in the Click event handler of a Button control.These statements create a hotel booking and a car booking. You should enter some of thesestatements in the editor and see how the members of each of the derived classes appear in theIntelliSense list. You will see that you can’t set the BookingStartDate and BookingEndDateproperties because they’re hidden in the derived classes.

WHO CAN INHERIT WHAT? 427
Listing 10.13: Exercising the members of the Booking derived classes
Dim htlBooking As New Reservation.HotelBookinghtlBooking.BookingName = "Joe Taveller"htlBooking.BookingNumber = "PRN01202148"htlBooking.BookingRequestDate = NowhtlBooking.checkInDate = #5/19/2010#htlBooking.checkOutDate = #5/22/2010#htlBooking.DestinationCountry = "Spain"htlBooking.DestinationCity = "Barcelona"htlBooking.HotelName = "Tower Hotel"htlBooking.Price = 680.99
Dim fltBooking As New Reservation.FlightBookingfltBooking.DepartureDate = #5/19/2010 7:30:00 AM#fltBooking.ArrivalDate = #5/19/2010 9:45:00 AM#fltBooking.DestinationCode = "BCN"fltBooking.OriginCode = "JFK"fltBooking.BookingName = "Joe Traveller"fltBooking.BookingNumber = "PRN01202149"fltBooking.ConfirmationNumber = "008-9823118 CA11"fltBooking.Price = 1099.0
If you want to process bookings of a specific type, just use the Type property to find out theexact type of a booking, as in the following loop that iterates through hotel bookings and printsout the hotel names for each booking:
For Each bk In BookingsIf bk.Type = Reservation.ReservationType.HotelReservation Then
Dim hotelBk As Reservation.HotelBooking =CType(bk, Reservation.HotelBooking)
TextBox1.AppendText("Reservation # " &hotelBk.BookingNumber & " " &hotelBk.HotelName & vbCrLf)
End IfNext
You can also iterate through the Bookings collection and access the members of the baseclass with a control variable of the Booking type. The following loop goes through all bookingsand calculates their total value:
Dim totalPrice As Decimal = 0For Each bk In Bookings
totalPrice += bk.PriceNext

428 CHAPTER 10 APPLIED OBJECT-ORIENTED PROGRAMMING
The classes I’ve presented here are adequate for demonstrating how to apply inheritance andpolymorphism in your code, but they’re quite trivial. You can expand the functionality of theseclasses by adding new properties on your own. You can add one or more room types in a hotelbooking (whether the booking is for a single room or a twin and a double, and so on). Flightsare not always a single segment. Flying from New York to Barcelona may include a layover inMadrid, and this information (along with the arriving and departing time) must also appear ina flight booking.
Adding Centralized Data Storage
The sample code presented in this section was written to demonstrate the basic principlesof designing with inheritance, and it’s not the type of code you’d use in a real application.For example, you can’t maintain the list of bookings at the client — there may be multipleclients using the same application. The class should also be responsible for maintaining the listof bookings as well as for persisting them. A reservation application uses a database to storebookings (as well as other static information, such as destinations, hotels, and prices).
The Bookings project, which you will find at www.sybex.com/go/masteringvb2010, con-tains additional code that’s closer to a real-world application. The Booking class maintainsthe list of bookings in a List collection. The topic of collections is discussed in Chapter12, but you can think of them as arrays. The client instantiates a booking (an instance ofthe HotelBooking, FlightBooking, or CarBooking class) and then calls the CreateBookingmethod to add the booking to the list. The class’s code is responsible for adding the book-ing to the collection or submitting it to the database. It’s also the class’s responsibility toretrieve a booking by its ID, the name of the traveler, or any other combination of criteria.I have added the GetBookingByID and GetAllBookings methods to all the classes. If youcall the GetBookingByID method of the Booking class, you’ll get back a Booking object.If you call the same method of a derived class, you’ll get back an object of the same class(a HotelBooking object, for example).
If you look up the code of the application, you’ll see that I have used some queries you havenot seen before in this book to select bookings by their type or their IDs. These queries areLINQ statements. LINQ is discussed in detail in Chapter 14, ‘‘Introduction to LINQ,’’ but Ididn’t want to write loops that go through every element in a collection to select the desiredone. LINQ is much more expressive and elegant. After reading Chapter 14, I don’t think you’llgo back to arcane querying techniques that involve loops and multiple comparisons.
As you will see, the client’s code doesn’t change. It’s the class that determines where the book-ings are stored and how they will be recalled. The sample application uses a List collection tostore the bookings, but you can modify it so that is uses a database to store and retrieve book-ings without touching the client code.

WHO CAN INHERIT WHAT? 429
The Class Diagram DesignerClasses are quite simple to build and use, and so is OOP. There are even tools to help youdesign and build your classes, which I’ll describe briefly here. You can use the Class DiagramDesigner available in Visual Studio to build your classes with point-and-click operations, butyou can’t go far on this tool alone. The idea is that you specify the name and the type of aproperty and the tool emits the Get and Set procedures for the property (the getters and set-ters, as they’re known in OOP jargon). The default implementation of getters and setters istrivial, and you’ll have to add your own validation code. You can also create new methods byspecifying their names and arguments, but the designer won’t generate any code for you; youmust implement the methods yourself. Tools such as the Class Diagram Designer and Visioallow you to visualize the classes that make up a large project and the relations between them,and they’re a necessity in large projects. Many developers, however, build applications of sub-stantial complexity without resorting to tools for automating the process of building classes.You’re welcome to explore these tools.
Right-click the name of a class in the Solution Explorer and choose View Class Diagramfrom the context menu. You’ll see a diagram of the class on the design surface, showing all themembers of the class. You can add new members, select the type of the properties, and editexisting members. The diagram of a trivial class like the Contact class is also trivial, but theclass diagram becomes more helpful as you implement more interrelated classes.
Figure 10.2, from earlier in the chapter, shows the Product, Book, and Supply classes in theClass Diagram Designer. You can use the commands of each class’s context menu to create newmembers and edit/remove existing ones. To add a new property, for example, you specify theproperty name and type, and the designer generates the outline of the Set and Get proceduresfor you. Of course, you must step in and insert your custom validation code in the propertysetter.
To add a new class to the diagram, right-click on the designer pane and choose Add � Classfrom the context menu. You’ll be prompted to enter the name of the class and its location (theVB file in which the autogenerated class code will be stored). You can specify a new name orselect an existing class file and add your new class to it. To create a derived class, you mustdouble-click the box that represents the new class and manually insert the Inherits statementfollowed by the name of the base class. After you specify the parent class, an arrow joining thetwo classes will be added to the diagram. The arrow points to the parent class. In addition toclasses, you can add items including structures, enumerations, and comments. You can alsocreate class diagrams from existing classes.
To add members to a class, right-click the box that represents the class and choose Addfrom the context menu. This will lead to a submenu with the members you can add to a class:Method, Property, Field, and Event. You can also add a constructor (although you will have tosupply the arguments and the code for parameterized constructors), a destructor, and a con-stant. To edit a member, such as the type of a property or the arguments of a method, switchto the Class Details window, where you will see the members of the selected class. Expand anymember to see its parameters: the type of a property and the arguments and the return valueof a method.
Experiment with the Class Diagram Designer tools to jump-start the process of designingclasses. At the very least, you should use this tool to document your classes, especially in ateam environment.

430 CHAPTER 10 APPLIED OBJECT-ORIENTED PROGRAMMING
The Bottom Line
Use inheritance Inheritance, which is the true power behind OOP, allows you to create newclasses that encapsulate the functionality of existing classes without editing their code. Toinherit from an existing class, use the Inherits statement, which brings the entire class intoyour class.
Master It Explain the inheritance-related attributes of a class’s members.
Use polymorphism Polymorphism is the ability to write members that are common to anumber of classes but behave differently, depending on the specific class to which they apply.Polymorphism is a great way of abstracting implementation details and delegating the imple-mentation of methods with very specific functionality to the derived classes.
Master It The parent class Person represents parties, and it exposes the GetBalancemethod, which returns the outstanding balance of a person. The Customer and Supplierderived classes implement the GetBalance method differently. How will you use thismethod to find out the balance of a customer and/or supplier?

Part 4
Working with the .NETFramework◆ Chapter 11: The Framework at Large
◆ Chapter 12: Storing Data in Collections
◆ Chapter 13: XML in Modern Programming
◆ Chapter 14: An Introduction to LINQ


Chapter 11
The Framework at Large
A major aspect of programming with VB 2010 is the knowledge of the .NET Framework. Thevast majority of the functionality of any language in Visual Studio is the Framework, whichis a massive collection of classes that address most of the common programming tasks, fromhandling dates to encryption and retrieving data from a remote web server. Even listing theclasses that make up the Framework and their members would take another book of compa-rable size, so I’ve decided to provide a single chapter as an introduction to the basic classes ofthe Framework and include several tutorials in PDF format that discuss specific aspects of theFramework. These tutorials, which you will find at this book’s site, discuss in detail topics likehandling folders and files, graphics, and printing with VB.
In this chapter, you’ll find an introduction to several major components of the Framework,including the following:
◆ How to use the My component
◆ The concept of Streams
◆ How to use the StringBuilder class
◆ How to use the Date and TimeSpan classes
◆ The basics of drawing with the Framework
◆ The basics of printing with the Framework
What Is the Framework?The Framework is a comprehensive collection of classes that encapsulate the most common(and many not so common) programming tasks. In essence, it’s the foundation on which .NETapplications are built. The Framework is a library of code organized into namespaces andclasses that address typical programming tasks.
As software development becomes more and more complex, developers face new challengeson a daily basis. To assist developers, language designers keep adding to their compilers to thepoint that languages have started to bloat with new features. And as you can guess, there’sno end to this trend. No matter how much functionality you build into a language, developersneed more. It is a challenge to just know (or look up) the proper function name for a specifictask. Now, add external libraries with hundreds, even thousands, of functions for all kinds of

434 CHAPTER 11 THE FRAMEWORK AT LARGE
programming tasks, from the less trivial formatting and math functions to encryption functions,specialized drawing routines, and so on and so forth. There was clearly a need for a more con-cise, more organized approach.
To address that need, engineers at Microsoft identified the functionality most developersneed in typical applications, organized it into ‘‘blocks’’ of related functionality, and theFramework was born. We’re already in version 4.0 of the Framework, which includes methodsfor mundane tasks like reading data from files, math functions, and drawing methods. It alsoincludes security-related methods, serialization methods (a powerful technique for convertingcomplex objects into XML or binary format), encryption, compression, speech synthesis, andjust about anything. Practically any routine that’s used somewhere by the operating systembelongs to the Framework. The Framework was an enormous software project on the surface,but in my opinion it was basically a classification project. Developers should be able to locatethe information they need quickly, otherwise the Framework wouldn’t be nearly as useful, orpopular.
It’s actually impossible to cover the entire Framework, so I’ve chosen a few partsof it to discuss in this book. You will also find several tutorials in PDF format atwww.sybex.com/go/masteringvb2010 that explain some of the most practical aspects ofthe Framework, such as the handling of files and folders and the drawing and printing meth-ods. This chapter contains an overview of these classes and a few shortcuts to the Framework,namely how to use the built-in snippets and the My component.
Using SnippetsThe Framework is the main reason developers love to work with Microsoft’s languages. It’salso the reason many developers have been reluctant to move from VB6 to VB.NET and follow-ing versions. The Framework is huge, and switching from a self-contained language like VB6into programming with the Framework requires a shift in thinking about programming. To dojustice to the Framework, developers who have made the switch wouldn’t even think of mov-ing back to an earlier version of VB. To address the qualms of developers considering movingaway from VB6 and into the .NET world, Microsoft introduced the My component (which isunique to Visual Basic) and the snippets. The My component is a collection of functions thataddress many of the most common operations developers need to implement in their applica-tions. With time, the My component along with the snippets have evolved into a productivitytool, worthy of the reputation of Visual Basic.
A code snippet is a predefined code segment that implements a very specific task. Everytime you need to perform a task, such as writing to or reading from a file or playing back asound, you can insert the appropriate snippet into your code and change a few variable namesto match the rest of the code. Let’s say you want to insert the statements for writing some textto a file, but you have no idea how to access files. Create an empty line in the listing (press theEnter key a couple of times at the end of a code line). Then, open the Edit menu and chooseIntelliSense � Insert Snippet (or right-click somewhere in the code window and choose InsertSnippet from the context menu).
You will see on the screen a list of the snippets, organized in folders according to func-tion, as shown in Figure 11.1. Select the Fundamentals folder, which will display another listof options: Collections, Data Types, File System, and Math. Double-click the File System item tosee a list of common file-related tasks, as shown in Figure 11.2. Locate the item Write Text ToA File in the list and double-click it to insert the appropriate snippet at the current location inthe code window.

USING SNIPPETS 435
Figure 11.1
The code snippets orga-nized according to theirfunction
Figure 11.2
Selecting a code snippetto insert in your code
The following snippet will be inserted in your code:
My.Computer.FileSystem.WriteAllText("C:\test.txt", "Text", True)
To write some text to a file, you need to call the WriteAllText method of theMy.Computer.FileSystem object. You can replace the strings shown in the snippet withactual values. The first string is the filename, the second string is the text to be written to thefile, and the last argument of the method determines whether the text will be appended tothe file (if False) or overwrite any existing text (if True).

436 CHAPTER 11 THE FRAMEWORK AT LARGE
The snippet shows you the basic statements for performing a common task, and you can editthe code inserted by Visual Studio as needed. Many of the snippets are one-liners. A real-worldapplication would probably prompt the user for a filename via the File common dialog box andthen use the filename specified by the user in the dialog box instead of a hard-coded filename.
Of course, there aren’t snippets for every conceivable task. If this were the case, then the col-lection of snippets would compete in complexity with the Framework itself. There are snippetsfor a relatively small number of tasks and all snippets make use of the My component. Wherethe snippets are meant to minimize the code you write, the My component is meant to simplifythe Framework by encapsulating the functionality of several statements into a single method.Let’s start with an overview of the My component and then we’ll move on to the Framework.
Using the My ComponentYou have probably noticed that the code snippets of Visual Studio use an entity called My,which is a peculiar object that was introduced with VB 2005 to simplify many programmingtasks. As you saw in the preceding code snippet, the My component allows you to write sometext to a file with a single statement, the WriteAllText method. If you’re familiar with earlierversions of Visual Basic, you know that you must first open a file, then write some text to it,and finally close the file. The My component allows you to perform all these operations with asingle statement, as you saw in the preceding example.
Another example is the Play method, which you can use to play back a WAV file fromwithin your code:
My.Computer.Audio.Play ("C:\Sounds\CountDown.wav")
You can also use the following expression to play back a system sound:
My.Computer.Audio.PlaySystemSound(System.Media.SystemSounds.Exclamation)
The method that plays back the sound is the Play method, and the method that writes textto a file is the WriteAllText method. However, you can’t call them directly through the Mycomponent; they’re not methods of the My component. If they were, you’d have to dig hard tofind out the method you need, and this is exactly what the My object attempts to remedy: theneed to dig deep into the Framework to find out the method for the task at hand.
The My component exposes six subcomponents, which contain their own subcomponents.Here’s a description of the basic components of the My component and the functionality youshould expect to find in each.
My.Application
The My.Application component provides information about the current application. TheCommandLineArgs property of My.Application returns a collection of strings, which arethe arguments passed to the application when it was started. Typical Windows applicationsaren’t called with command-line arguments, but it’s possible to start an application and pass afilename as an argument to the application (the document to be opened by the application, forexample). The Info property is an object that exposes properties such as DirectoryPath (theapplication’s default folder), ProductName, Version, and so on.

USING THE MY COMPONENT 437
My.Computer
This component exposes a lot of functionality via a number of properties, many ofwhich are objects. The My.Computer.Audio component lets you play back sounds. TheMy.Computer.Clipboard component lets you access the Clipboard. To find out whetherthe Clipboard contains a specific type of data, use the ContainsText, ContainsImage,ContainsData, and ContainsAudio methods. To retrieve the contents of the Clipboard, usethe GetText, GetImage, GetData, and GetAudioStream methods respectively. Assuming thatyou have a form with a TextBox control and a PictureBox control, you can retrieve text orimage data from the Clipboard and display it on the appropriate control with the followingstatements:
If My.Computer.Clipboard.ContainsImage ThenPictureBox1.Image = My.Computer.Clipboard.GetImage
End IfIf My.Computer.Clipboard.ContainsText Then
TextBox2.Text = My.Computer.Clipboard.GetTextEnd If
You may have noticed that using the My component in your code requires that you writelong statements. You can shorten them substantially via the With statement, as shown next:
With My.Computer.ClipboardIf .ContainsImage Then
PictureBox1.Image = .GetImageEnd IfIf .ContainsText Then
TextBox2.Text = .GetTextEnd If
End With
When you’re executing multiple statements on the same object, you can specify the objectin a With statement and call its methods in the block of the With statement by specifying themethod name prefixed with a period. The With statement is followed by the name of the objectto which all following methods apply and is terminated with the End With statement.
Another component of My.Computer is the FileSystem component that exposes all themethods you need to access and manipulate files and folders from within your code. If youenter the expression My.Computer.FileSystem followed by a period in the code window, youwill see all the methods exposed by the FileSystem component. Among them, you will findDeleteFile, DeleteDirectory, RenameFile, RenameDirectory, WriteAllText, ReadAllText,and many more. Select a method and then type the opening parenthesis. You will see thesyntax of the method in a ToolTip. The syntax of the CopyFile method, for example, is asfollows:
My.Computer.FileSystem.CopyFile(sourceFileName As String, destinationFileName As String)
Just specify the path of the file you want to copy with the first argument and the new file’sname with the second argument, and you’re finished. This statement will copy the specified fileto the specified location.

438 CHAPTER 11 THE FRAMEWORK AT LARGE
You will notice that the ToolTip box with the syntax of the CopyFile method has multi-ple versions, which are listed at the left side of the box along with arrow up and arrow downicons. Click these two buttons to see the next and previous versions of the method. The secondversion of the CopyFile method is as follows:
My.Computer.FileSystem.CopyFile(sourceFileName As String, destinationFileName As String,overwrite As Boolean)
The overwrite argument specifies whether the method should overwrite the destination fileif it exists. The first overloaded form of the method will not overwrite the specified file, if italready exists.
The third overloaded form of the method accepts a different third argument that determineswhether the usual copy animation will be displayed as the file is being copied. Try out thisform of the method by copying a large file to a slow drive, such as a flash card, to see howeasy it is to add a bit of the Windows look and feel to your application.
My.Forms
This component lets you access the forms of the current application. You can also access theapplication’s forms by name, as you recall from Chapter 4, ‘‘GUI Design and Event-DrivenProgramming.’’
My.Settings
This component lets you access the application settings. These settings apply to the entire appli-cation and are stored in an XML configuration file. The settings are created from within VisualStudio, and you use the Settings component to read them. The settings are variables you canuse in your code to parameterize the application. For example, you may store the user’s namein a variable, let’s say the UserName variable, so that you can display it initially when prompt-ing users for their name and password. This variable can be declared as in the Settings tab ofthe project’s Properties window, as shown in Figure 11.3.
Figure 11.3
Creating applicationsettings

USING THE MY COMPONENT 439
To read the value of the UserName variable, use the following expression:
My.Settings.UserName
Yes, the editor will create a class behind the scenes for your settings and make them avail-able to your application as strongly typed values. You can also change the values of the appli-cation settings from within your code.
My.User
This component returns information about the current user. The most important property ofthe User component is the CurrentPrincipal property, which is an object that represents thecredentials of the current user.
My.WebServices
The WebServices component represents the web services referenced by the current application.For more information on web services and how they’re used in an application, see Chapter 21,‘‘Building and Using Web Services.’’
How to Use the My ComponentThe My component gives VB developers of all levels unprecedented programming power andallows us to perform tasks that would require substantial code if implemented with earlierversions of the language, not to mention the research it would take to locate the appropriatemethods in the Framework. You can explore the My component on your own and use it asneeded. My is not a substitute for learning the language and the Framework. It can help youinitially, but you can’t go far without learning the methods of the Framework. It will help youaccomplish a whole lot with a few simple statements, and it will also give you a head start withthe Framework, as the My component is a miniature Framework.
Let’s say you want to locate all the files of a specific type in a folder, including its subfold-ers. Scanning a folder and its subfolders to any depth is quite a task (you’ll find the code in thetutorial ‘‘Accessing Folders and Files’’ at www.sybex.com/go/masteringvb2010). You can dothe same with a single statement by using the My component as follows:
Dim files As System.Collections.ObjectModel.ReadOnlyCollection(Of String)files = My.Computer.FileSystem.GetFiles("D:\Data", True, "*.txt")
The GetFiles method populates the files collection with the pathnames of the text filesin the folder D:\Data and its subfolders. The second argument determines whether the methodwill scan the specified folder recursively, and although you can pass a True/False value for thisargument, you can also set it to one of the members of the FileIO.SearchOption enumeration:SearchAllSubDirectories and SearchTopLevelOnly. However, it won’t help you if you wantto process each file in place. Moreover, this GetFiles method is synchronous: If the folder con-tains many subfolders with many files, it will block the interface until it retrieves all the files.Once you have retrieved the filenames you’re interested in, you can process them by iteratingthrough the files collection with a For Each loop. As for the method’s return type, you neednot remember it. You will see it in the IntelliSense box — not to mention that you can turn oninference and let the editor figure out the type of the files variable.

440 CHAPTER 11 THE FRAMEWORK AT LARGE
Want to save data to a file and read it back at a later session? It’s trivial with theFileSystem component. To send text to a file, call the WriteAllText method passing the textto be saved as an argument:
My.Computer.FileSystem.WriteAllText("file_name", your_text, False)
The first argument is the path of the file, the second argument is the text to be saved, andthe last argument is a True/False value that determines whether the text will overwrite thefile’s original contents or append the text to the existing contents.
To read back the data from the file and use it in your application, use the ReadAllTextmethod:
Dim txt As String = My.Computer.FileSystem.ReadAllText("file_name")
Of course, not all information we save to files is in text format. The WriteAllBytes andReadAllBytes methods move an array of bytes to and from a file. Converting data to anarray of bytes is no piece of cake. You can use the WriteAllText and ReadAllText methodsto quickly save and read text to a file, but if you need to create files with structured data,you must look into the methods of the IO namespace, which is discussed in detail in one ofthe tutorials you can download from www.sybex.com/go/masteringvb2010. You can alsotake advantage of the serialization techniques discussed in Chapter 12, ‘‘Storing Data inCollections.’’
If you’re already familiar with VB, you may think that the My component is an aid for theabsolute beginner or the nonprogrammer. This isn’t true. VB is about productivity, and theMy component can help you be more productive with your daily tasks regardless of yourknowledge of the language or programming skills. If you can use My to save a few (or a fewdozen) statements, do it. There’s no penalty for using the My component because the compilerreplaces the methods of the My component with the equivalent method calls to the Framework.If you’re not familiar with the My component, or if you’re new to the Framework, pleaseexplore this component on your own. It will simplify your coding effort, as long as you canlocate the method you need for the task at hand.
In the next sections we’ll explore the most commonly used classes of the Framework. Theclasses discussed here are a very small part of the Framework, but they’re the classes you’ll beusing the most. I have chosen the topics I believe you will find most useful and focused on them.Once you start working with the Framework and you learn to navigate through its classes, you’llfind it much easier to explore other parts of the Framework on your own.
The IO NamespaceThe IO namespace contains all the classes that manipulate folders and files as well as accessfiles. For a detailed discussion of the classes of the IO namespace, please download the tutorial‘‘Accessing Files and Folders’’ from www.sybex.com/go/masteringvb2010. Table 11.1 containsa brief overview of the basic components for manipulating files and folders, more of a roadmap to the IO namespace.
To use the IO namespace in your code, you must import the System.IO namespace with thisstatement:
Using System.IO

THE IO NAMESPACE 441
Otherwise, you will have to fully qualify the property and method names in your code.
Table 11.1: IO namespace classes
Class Description
Directory The Directory class exposes all the members you need to manipulate folders(retrieve the folders on a drive and their subfolders, retrieve the files in a folder,and other similar operations).
File The File class exposes methods for manipulating files (copy and move themaround, open and close them), similar to the methods of the Directory class.
DriveInfo The DriveInfo class provides basic information about a drive. It also exposes theGetAllDrives method, which returns all the drives on the target computer.
DirectoryInfo The DirectoryInfo class provides information about the attributes of a specificfolder.
FileInfo The FileInfo class provides information about the attributes of a specific file. Thisclass also exposes the Encrypt and Decrypt methods for encrypting anddecrypting existing files.
Path The Path class exposes methods for performing simple tasks with file and folderpath names, including methods for creating random file paths.
The Directory ClassThe System.IO.Directory class exposes all the members you need to manipulate folders. It’s ashared class, which means that you can call its methods without having to create an instance ofthe Directory class. The methods of the Directory class are listed in Table 11.2.
Table 11.2: System.IO.Directory methods
Method Description
CreateDirectory This method creates a new folder whose path is passed to themethod as a string argument. The CreateDirectory methodreturns a DirectoryInfo object, which contains information aboutthe newly created folder.
Delete This method deletes a folder and all the files in it. If the foldercontains subfolders, the Delete method will optionally removethe entire directory tree under the node you’re removing. Thesimplest form of the Delete method accepts as an argument thepath of the folder to be deleted. You can pass the value True asa second argument to delete a folder recursively.

442 CHAPTER 11 THE FRAMEWORK AT LARGE
Table 11.2: System.IO.Directory methods (CONTINUED)
Method Description
Exists This method accepts a path as an argument and returns aTrue/False value indicating whether the specified folder exists.
Move This method moves an entire folder to another location in thefile system. The folder to be moved and its destination arepassed as arguments.
GetCurrentDirectory,SetCurrentDirectory
Use these methods to retrieve and set the path of the currentdirectory. By default, the GetCurrentDirectory method returnsthe folder in which the application is running.
GetDirectories This method retrieves all the subfolders of a specific folder andreturns their names as an array of strings.
GetFiles This method returns the names of the files in the specified folderas an array of strings.
GetFileSystemEntries This method returns an array of all items (files and folders) in apath, which is passed to the method as argument.
GetLogicalDrives This method returns an array of strings, which are the names ofthe logical drives on the computer.
The File ClassThe IO.File class exposes methods for manipulating files. The names of the methods areself-descriptive, and most of them accept as an argument the path of the file on which they act.Use these methods to implement from within your application the common operations thatusers normally perform through the Windows interface. To get an idea about the functionalityof the File class, I’m listing its most important methods in Table 11.3.
The DriveInfo ClassThe DriveInfo class provides basic information about a drive. Its constructor accepts as an argu-ment a drive name, and you can use the object returned by the method to retrieve informationabout the specific drive, as shown here:
Dim Drive As New DriveInfo("C")
The argument is the name of a drive (you can include the colon if you want). Notice thatyou can’t specify a Universal Naming Convention (UNC) path with the constructor of theDriveInfo object. You can only access local drives or network drives that have been mapped toa drive name on the target system.
To retrieve information about the specified drive, use the properties of the DriveInfo classlisted in Table 11.4.

THE IO NAMESPACE 443
Table 11.3: IO.File class methods
Method Description
AppendText Appends text to an existing file (both the file’s path and the text to bewritten are passed as arguments).
Copy Copies an existing file to a new location and accepts two arguments,the paths of the source and destination files.
Create Creates a new file and returns a FileStream object, which you can useto write to or read from the file.
CreateText Similar to the Create method, this method creates a text file andreturns a StreamWriter object for writing to the file.
Delete Removes the specified file from the file system and accepts the path ofthe file to be deleted as an argument.
Exists Accepts a file’s path and returns a True/False value depending onwhether the file exists or not.
GetAttributes Accepts a file path as an argument and returns the attributes of thespecified file as a FileAttributes object.
Move Moves the specified file to a new location.
Open Opens an existing file for read-write operations.
OpenRead Opens an existing file in read mode and returns a FileStream objectassociated with this file.
OpenText Opens an existing text file for reading and returns a StreamReaderobject associated with this file.
OpenWrite Opens an existing file for output.
The DirectoryInfo ClassTo create a new instance of the DirectoryInfo class that references a specific folder, supply thefolder’s path in the class’s constructor:
Dim DI As New DirectoryInfo(path)
The members of the DirectoryInfo class are equivalent to the members of the Directoryclass, and you will recognize them as soon as you see them in the IntelliSense drop-down list.A few methods that are unique to the DirectoryInfo class are the CreateSubdirectory andGetFileSystemInfos methods. The CreateSubdirectory method creates a subfolder underthe folder specified by the current instance of the class, and its syntax is as follows:
DI.CreateSubdirectory(path)

444 CHAPTER 11 THE FRAMEWORK AT LARGE
Table 11.4: DriveInfo class members
Member Description
DriveFormat property A string describing the drive’s format (FAT32, NTFS).
DriveType property A string describing the drive’s type (fixed, CD-ROM, and so on).
TotalSize, TotalFreeSize,AvailableFreeSpaceproperties
These properties return the drive’s total capacity, in bytes, thetotal free space, and the available free space on the drive.
VolumeLabel property This property returns, or sets, the drive’s volume name.
GetDrives method The DriveInfo class exposes the GetDrives method, whichreturns an array of DriveInfo objects, one for each drive on thesystem. This method is similar to the GetLogicalDrivesmethod of the Directory object, which is a shared method anddoesn’t require that you create an object explicitly.
The CreateSubdirectory method returns a DirectoryInfo object that represents the newsubfolder. The GetFileSystemInfos method returns an array of FileSystemInfo objects, one foreach item in the folder referenced by the current instance of the class. The items can be eitherfolders or files. To retrieve information about all the entries in a folder, create an instance of theDirectoryInfo class and then call its GetFileSystemInfos method:
Dim DI As New DirectoryInfo(path)Dim itemsInfo() As FileSystemInfoitemsInfo = DI.GetFileSystemInfos()
You can also specify an optional search pattern as an argument when you call this method:
itemsInfo = DI.GetFileSystemInfos(pattern)
Notice the differences between the GetFileSystemInfos method of the Directory-Info class and the GetFileSystemEntries of the Directory object. GetFileSystemInfosreturns an array of objects that contains information about the current item (file or folder).GetFileSystemEntries returns an array of strings (the names of the folders and files).
The Path ClassThe Path class’s methods perform simple tasks such as retrieving a file’s name and extension,returning the full path description of a relative path, and so on. The Path class’s members areshared, and you must specify the path on which they will act as an argument. The most use-ful methods exposed by the Path class are utilities for manipulating filenames and pathnames,described in the following sections. Notice that the methods of the Path class are shared: Youmust specify the path on which they will act as an argument. The most important methods ofthe Path class are listed in Table 11.5.

THE IO NAMESPACE 445
Table 11.5: Path class methods
Method Description
ChangeExtension Changes the file name extension of the file you specify to anew extension, which is also specified as an argument.
Combine Combines two path specifications into one by appending thesecond path to the first one and inserting a backslash ifnecessary.
GetDirectoryName Extracts the directory name from a path passed to themethod as an argument.
GetFileName,GetFileNameWithoutExtension
Return the file name with and without extension from a fullpath passed to each method as an argument.
GetTempFile,GetTempPath
Return a temporary file and path name, which you can use tostore data during the course of execution of your application.
Streaming DataTo access files for reading and writing data with the Framework, you must first understand theconcept of streams. A stream is a channel between your application and the source of the data.The source of the data need not be a file, although in most cases we use streams to work withfiles. If you’ve been around for a while, you’re probably expecting to read about commandsthat open a file, write to it (or read from it), and then close the file. The reason for introducingthe concept of streams in the Framework is that streams can be connected to one another andperform multiple operations sequentially. A typical example is the cryptographic stream, whichaccepts data, encrypts it, and spits out a series of bytes. This stream can be connected to a filestream and send encrypted data to the file.
Let’s start by looking at the process of writing data to a file. First, you must import the IOnamespace with the Imports System.IO statement. Then create a StreamWriter object, which isassociated with a file:
Dim streamOut As New StreamWriter(file_name)
In this statement, file_name is the name of the file you want to write to.To write something to the file, you call the streamOut variable’s Write method. Everything
you write to the stream is saved automatically to the file. To save the contents of a TextBoxcontrol to a file, use the following statement:
streamOut.Write(TextBox1.Text)
When you’re done, you must close the Stream object by calling its Close method. The fol-lowing statements prompt the user to select a file name with the Save dialog box and then savethe contents of the TextBox control to the selected file:
SaveFileDialog1.Filter = "Text Files|*.txt|All Files|*.*"SaveFileDialog1.FilterIndex = 0

446 CHAPTER 11 THE FRAMEWORK AT LARGE
SaveFileDialog1.DefaultExt = ".txt"SaveFileDialog1.FileName = ""If SaveFileDialog1.ShowDialog = Windows.Forms.DialogResult.OK Then
Dim strmOut As New StreamWriter(SaveFileDialog1.FileName)strmOut.Write(TextBox1.Text)strmOut.Close()
End If
To read back the data in a later session, you must display the OpenFile dialog box to allowusers to select the file and then create the StreamReader object and call its ReadToEnd method.Here’s the code that reads back the contents of the TextBox1 control:
OpenFileDialog1.Filter = "Text Files|*.txt|All Files|*.*"OpenFileDialog1.FilterIndex = 0OpenFileDialog1.DefaultExt = ".txt"OpenFileDialog1.FileName = ""If OpenFileDialog1.ShowDialog = Windows.Forms.DialogResult.OK Then
Dim strmIn As New StreamReader(OpenFileDialog1.FileName)TextBox1.Text = strmIn.ReadToEndstrmIn.Close()
End If
This concludes the brief introduction to the System.IO namespace. You will find much moreinformation on the topic in the tutorial ‘‘Accessing Folders and Files’’ at www.sybex.com/go/masteringvb2010, but you should also explore the My.Computer.FileSystem component,which provides may shortcuts to the Framework for simple tasks.
Drawing and PaintingAn interesting aspect of the Framework is dedicated to the generation of graphics. There arenumerous methods for drawing and printing and they’re discussed in detail in the tutorials‘‘Creating Graphics with VB 2010’’ and ‘‘Printing with VB 2010,’’ which are available fordownload from www.sybex.com/go/masteringvb2010. This section contains an overview ofthe graphics printing classes of the Framework and their basic functionality.
The Graphics Object
The Graphics object is the drawing surface — your canvas. All the controls you can drawon expose a Graphics property, which is an object, and you can retrieve it with theCreateGraphics method. Most of the controls provide a CreateGraphics method, but wenormally draw on the Form object and the PictureBox control.
The Graphics object exposes all the methods and properties you need to create graphics onthe control. Start by declaring a variable of the Graphics type and initialize it to the Graphicsobject returned by the control’s CreateGraphics method:
Dim G As GraphicsG = PictureBox1.CreateGraphics

DRAWING AND PAINTING 447
At this point, you’re ready to start drawing on the PictureBox1 control with the methodsdiscussed in the following section. To draw a rectangle, for example, call the DrawRectanglemethod of the G variable, passing the origin and dimensions of the rectangle as arguments. Todisplay a string, call the DrawString method, which requires several arguments, such as thestring to be drawn, the font in which it will be rendered, its location, and the brush object thatwill be used for the drawing. You’ll see how to use these methods shortly.
Two properties of the Graphics object you should know about are the TextRenderingHintand the SmoothingMode properties. The TextRenderingHint method specifies howthe Graphics object will render text, and its value is AntiAlias, AntiAliasGridFit,ClearTypeGridFit, SingleBitPerPixel, SingleBitPerPixelGridFit, or SystemDefault.The SmoothingMode property is similar to the TextRenderingHint, but it applies to shapesdrawn with the Graphics object’s drawing methods. Its value is one of the members of theSmoothingMode enumeration: AntiAlias, Default, HighQuality, HighSpeed, Invalid, andNone.
Before showing some drawing examples, I must present a few classes that are used routinelyin creating graphics.
The Point Class
The Point class represents a point on the drawing surface and is expressed as a pair of (x, y)coordinates. The x-coordinate is its horizontal distance from the origin, and the y-coordinate is itsvertical distance from the origin. The origin is the point with coordinates (0, 0), and this is thetop-left corner of the drawing surface.
The constructor of the Point class is as follows, where X and Y are the point’s horizontal andvertical distances from the origin:
Dim P1 As New Point(X, Y)
The Rectangle Class
Another class that is often used in drawing is the Rectangle class. The Rectangle object is usedto specify areas on the drawing surface. Its constructor accepts as arguments the coordinates ofthe rectangle’s top-left corner and its dimensions:
Dim box As Rectanglebox = New Rectangle(X, Y, width, height)
The following statement creates a rectangle whose top-left corner is 1 pixel to the right and1 pixel down from the origin, and its dimensions are 100 by 20 pixels:
box = New Rectangle(1, 1, 100, 20)
The box variable represents a rectangle, but it doesn’t generate any output on the monitor.If you want to draw the rectangle, you can pass it as an argument to the DrawRectangle orFillRectangle method, depending on whether you want to draw the outline of the rectangleor a filled rectangle.

448 CHAPTER 11 THE FRAMEWORK AT LARGE
The Size Class
The Size class represents the dimensions of a rectangle; it’s similar to a Rectangle object, but itdoesn’t have an origin, just dimensions. To create a new Size object, use the followingconstructor:
Dim S1 As New Size(100, 400)
Another form of the Rectangle constructor uses a Point and a Size object to specify thelocation and dimensions of the rectangle:
box = New Rectangle(point, size)
The point and size arguments are properly initialized Point and Size objects.
The Color Class
The Color class represents colors, and there are many ways to specify a color. The simplestmethod to specify a color is to declare a variable of the Color type and initialize it to one ofthe named colors exposed as properties of the Color class:
Dim myColor As ColormyColor = Color.Azure
The 128 color names of the Color class will appear in the IntelliSense box as soon as youenter the period following the keyword Color. You can also use the FromARGB method, whichcreates a new color from its basic color components (the red, green, and blue components). Tocreate a color that’s mostly red, use a statement like the following:
Mycolor = Color.FrmARGB(255, 128, 128, 255)
The first argument is the opacity of the color (255 for maximum opacity, 0 for a totally trans-parent color), and the remaining three arguments are the intensities of the color’s red, greenand blue components (0 for minimum intensity, 255 for maximum intensity). For a more for-mal discussion of the Color class, see the tutorial on creating graphics with VB, available fordownload at www.sybex.com/go/masteringvb2010.
The Font Class
The Font class represents fonts, which are used when rendering strings via the DrawStringmethod. To specify a font, you must create a new Font object; set its family name, size, andstyle; and then pass it as an argument to the DrawString method. Alternatively, you canprompt the user for a font via the Font common dialog box and use the object returned by thedialog box’s Font property as an argument with the DrawString method. To create a new Fontobject in your code, use a statement like the following:
Dim drawFont As New Font("Verdana", 12, FontStyle.Bold)
The Font constructor has 13 forms in all, as you will see in the IntelliSense box once youdeclare a new variable of the Font type.

DRAWING AND PAINTING 449
The Pen Class
The Pen class represents virtual pens, which you use to draw on the Graphics object’s sur-face. To construct a new Pen object, you must specify the pen’s color and width in pixels. Thefollowing statements declare three Pen objects with the same color and different widths:
Dim thinPen, mediumPem, thickPen As PenthinPen = New Pen(Color.Black, 1)mediumPen = New Pen(Color.Black, 3)thickPen = New Pen(Color.Black, 5)
The quickest method of creating a new Pen object is to use the built-in Pens collection, whichcreates a pen with a width of 1 pixel and the color you specify. The following statement canappear anywhere a Pen object is required and will draw shapes in blue color (the second state-ment is optional and it changes the default width of the pen):
thinPen = Pens.BluethinPen.Width = 3
The Brush Class
The Brush class represents the instrument for filling shapes, including text; you can createbrushes that fill with a solid color, a pattern, or a bitmap. In reality, there’s no Brush object.The Brush class is actually an abstract class that is inherited by all the classes that implementa brush, but you can’t declare a variable of the Brush type in your code. Instead, you candeclare a variable of the following type: SolidBrush, HatchBrush, LinearGradientBrush,PathGradientBrush, and TextureBrush. To fill a shape with a solid color, create a SolidBrushobject with the following constructor, where brushColor is a color value, specified with thehelp of the Color object:
Dim sBrush As SolidBrushsBrush = New SolidBrush(brushColor)
Every filled object you draw with the sBrush variable will be filled with the color of thebrush. A gradient brush fills a shape with a specified gradient. The LinearGradientBrush fills ashape with a linear gradient, and the PathGradientBrush fills a shape with a gradient that hasone starting color and one or more ending colors.
Drawing MethodsNow that I’ve covered the auxiliary drawing objects, we can look at the drawing methods ofthe Graphics class. Before getting into the details of the drawing methods, however, let’s writea simple application that draws a couple of simple shapes on a form. First, create a Graphicsobject with the following statements:
Dim G As GraphicsG = Me.CreateGraphics

450 CHAPTER 11 THE FRAMEWORK AT LARGE
Everything drawn on the surface represented by the G object will appear on the form. Then,create a Pen object to draw with. The following statement creates a Pen object that’s 1 pixelwide and draws in blue:
Dim P As New Pen(Color.Blue)
You just created the two basic objects for drawing: the drawing surface and the drawinginstrument. Now you can draw shapes by calling the Graphics object’s drawing methods. Thefollowing statement will print a rectangle with its top-left corner near the top-left corner of theform (at a point that’s 10 pixels to the right and 10 pixels down from the form’s corner) and is200 pixels wide and 150 pixels tall:
G.DrawRectangle(P, 10, 10, 200, 150)
Let’s add the two diagonals of the rectangle with the following statements:
G.DrawLine(P, 10, 10, 210, 160)G.DrawLine(P, 210, 10, 10, 160)
That’s all the statements to create a shape on the form, but where do you insert them? Theproper handler to create graphics is the form’s Paint event handler, as the Paint event is firedevery time the form is shown or resized, and this is when the graphics must be regenerated.
The Paint event handler passes the e argument, which (among other properties) exposesthe form’s Graphics object. You can create a Graphics object in the Paint event handler andthen draw on this object. Take a look at the code in Listing 11.1.
Listing 11.1: Drawing simple shapes in the Paint event
Private Sub Form1_Paint(...) Handles Me.PaintDim G As GraphicsG = e.GraphicsDim P As New Pen(Color.Blue)G.DrawRectangle(P, 10, 10, 200, 150)G.DrawLine(P, 10, 10, 210, 160)G.DrawLine(P, 210, 10, 10, 160)
End Sub
If you run the application now, it works like a charm. The shapes appear to be permanent,even though they’re redrawn every time you switch to the form. A caveat of drawing fromwithin the Paint event is that the event isn’t fired when the form is resized. To force a refreshwhen the form is resized, you must insert the following statement in the form’s Load eventhandler:
Me.SetStyle(ControlStyles.ResizeRedraw, True)

DRAWING AND PAINTING 451
It is possible to make the graphics permanent by drawing not on the Graphics object, butdirectly on the control’s (or the form’s) bitmap. This technique is discussed in the tutorial‘‘Creating Graphics with VB 2010’’ that is available for download from www.sybex.com/go/masteringvb2010.
The drawing methods can be categorized in two major groups: the methods that drawstroked shapes (outlines) and the methods that draw filled shapes. The methods in the firstgroup start with the Draw prefix (DrawRectangle, DrawEllipse, and so on). The methods ofthe second group start with the Fill prefix (FillRectangle, FillEllipse, and so on). Ofcourse, some DrawXXX methods don’t have equivalent FillXXX methods. For example, youcan’t fill a line or an open curve, so there are no FillLine or FillCurve methods.
Another difference between the drawing and filling methods is that the filling methods usea Brush object to fill the shape — you can’t fill a shape with a pen. So, the first argument ofthe methods that draw filled shapes is a Brush object, not a Pen object. The remaining argu-ments are the same because you must still specify the shape to be filled. To view the drawingmethods, enter the expression:
Me.CreateGraphics.
and you will see the names of the shape drawing methods (they start with the Draw prefix)and the shape filling methods (they start with the Fill prefix). The DrawLine method drawsa straight-line segment between two points with a pen supplied as an argument. The simplestforms of the DrawLine method are the following, where point1 and point2 are either Point orPointF objects, depending on the coordinate system in use:
Graphics.DrawLine(pen, X1, Y1, X2, Y2)Graphics.DrawLine(pen, point1, point2)
The two most commonly used drawing methods are the DrawString and MeasureStringmethods. The DrawString method renders a string in a single line or multiple lines. The sim-plest form of the DrawString method is as follows:
Graphics.DrawString(string, font, brush, X, Y)
The first argument is the string to be rendered in the font specified by the second argu-ment. The text will be rendered with the Brush object specified by the brush argument. X andY, finally, are the coordinates of the top-left corner of a rectangle that completely encloses thestring.
While working with strings, you need to know the actual dimensions of the string whenrendered with the DrawString method in the specified font so you can determine its place-ment. The MeasureString method allows you to retrieve the metrics of a string before actu-ally drawing it. This method returns a SizeF structure with the width and height, in pixels, ofthe string when rendered on the same Graphics object with the specified font. We’ll use thismethod extensively in the tutorial ‘‘Printing with Visual Basic 2010’’ (available for downloadfrom www.sybex.com/go/masteringvb2010) to position text precisely on the printed page. Youcan also pass a Rectangle object as an argument to the MeasureString method to find out howmany lines it will take to render the string on the rectangle.

452 CHAPTER 11 THE FRAMEWORK AT LARGE
The simplest form of the MeasureString method is the following, where string is the stringto be rendered and font is the font in which the string will be rendered:
Dim textSize As SizeFtextSize = Me.Graphics.MeasureString(string, font)
To center a string on the form, use the x-coordinate returned by the MeasureString method,as in the following code segment:
Dim textSize As SizeFDim X As Integer, Y As Integer = 0textSize = Me.Graphics.MeasureString(string, font)X = (Me.Width - textSize.Width) / 2G.DrawString("Centered string", font, brush, X, Y)
To center a string, you must subtract the rendered string’s length from the form’s width,split the difference, and render half on each side of the string.
Figure 11.4 shows a string printed at the center of the form and the two lines passingthrough the same point. Listing 11.2 shows the statements that produced Figure 11.4.
Listing 11.2: Printing a string centered on the form
Private Sub Form1_Paint(...) Handles Me.PaintDim G As GraphicsG = Me.CreateGraphicsG.FillRectangle(New SolidBrush(Color.Silver), ClientRectangle)G.TextRenderingHint = Drawing.Text.TextRenderingHint.AntiAliasDim txtFont As New Font("Verdana", 36, FontStyle.Bold)G.DrawLine(New Pen(Color.Green), CInt(Me.Width / 2), CInt(0),
CInt(Me.Width / 2), CInt(Me.Height))G.DrawLine(New Pen(Color.Green), 0, CInt(Me.Height / 2),
CInt(Me.Width), CInt(Me.Height / 2))Dim str As String = "Visual Basic 2010"Dim txtSize As SizeFtxtSize = G.MeasureString(str, txtFont)Dim txtX, txtY As IntegertxtX = (Me.Width - txtSize.Width) / 2txtY = (Me.Height - txtSize.Height) / 2G.DrawString(str, txtFont,
New SolidBrush(Color.Red), txtX, txtY)End Sub
For more information on the DrawString and MeasureString methods, please see the tuto-rial on generating graphics with VB 2010. You will find more examples of these two methodslater in this chapter.

DRAWING AND PAINTING 453
Figure 11.4
Centering a string on aform
The DrawImage method renders an image on the Graphics object and its simplest syntax isas follows:
Graphics.DrawImage(img, point)
Both the image and the location of its top-left corner are passed to the method as arguments(as Image and Point arguments, respectively). Another form of the method draws the specifiedimage within a rectangle. If the rectangle doesn’t match the original dimensions of the image,the image will be stretched to fit in the rectangle. The rectangle should have the same aspectratio as the Image object to avoid distorting the image in the process:
Graphics.DrawImage(img, rectangle)
The rectangle argument determines not only the placement of the image on the Graphicsobject, but also its dimensions.
GradientsAnother very useful and interesting aspect of graphics is the generation of gradients. In addi-tion to filling shapes with a solid color, you can fill them with various types of gradients. Youcan even fill text with a gradient, a topic that’s demonstrated in the tutorial ‘‘Creating Graphicswith VB 2010.’’ The simplest yet most common type of gradient is the linear gradient. To fill ashape with a linear gradient, you must create an instance of the LinearGradientBrush class withstatements like the following:
Dim lgBrush As LinearGradientBrushlgBrush = New LinearGradientBrush(rect, startColor, endColor, gradientMode)
This method creates a gradient that fills a rectangle, specified by the rect variable passed asthe first argument. This rectangle isn’t filled with any gradient; it simply tells the method howlong (or how tall) the gradient should be. The gradient starts with the startColor at the left

454 CHAPTER 11 THE FRAMEWORK AT LARGE
side of the rectangle and ends with the endColor at the opposite side, while its colorchanges slowly as it moves from one end to the other. The last argument, gradientMode,specifies the direction of the gradient and its setting is a member of the LinearGradientModeenumeration: BackwardDiagonal, ForwardDiagonal, Horizontal, and Vertical. You willfind an example of filling a shape with a linear gradient in the following section. The othertypes of gradients are discussed in the tutorial on graphics available for download fromwww.sybex.com/go/masteringvb2010.
The Image ClassImages are two-dimensional arrays that hold the color values of the pixels making up theimage. This isn’t how images are stored in their respective files — JPG or JPEG (Joint Photo-graphic Experts Group), GIF (Graphics Interchange Format), TIFF (Tagged Image File Format),and so on — but it’s a convenient abstraction for the developer. To access a specific pixel of animage, you need to specify only the horizontal and vertical coordinates of that pixel. Each pixelis a Long value; the first byte is the pixel’s alpha value and the other three bytes are the red,green, and blue components.
The Image property of the PictureBox or Form control is an Image object, and there areseveral ways to create such an object. You can declare a variable of the Image type and thenassign the Image property of the PictureBox control or the Form object to the variable:
Dim img As Imageimg = PictureBox1.Image
The img Image variable holds the bitmap of the PictureBox1 control. This code segmentassumes that an image was assigned to the control at design time. You can also create a newImage object from an image file by using the Image class’s FromFile method:
Dim img As Imageimg = Image.FromFile("Butterfly.jpg")
After the img variable has been set up, you can assign it to the Image property of a Picture-Box control:
PictureBox1.Image = img
Or you can save the image to a file with the Save method, which also accepts as argumentthe name of the file where the bitmap will be saved. If you need to change the format of animage, all you have to do is open it with the FromFile method and save it to a file with adifferent extension.
The Image class exposes several members and here are the most important:
Width, Height These are the dimensions of the image in pixels.
HorizontalResolution, VerticalResolution These properties are the resolutions of theimage in the two directions and are expressed as pixels per inch. If you divide the width ofan image by its horizontal resolution, you’ll get the actual horizontal size of the image in inches(the size of the image when printed).

PRINTING 455
The methods exposed by the Image class are the RotateFlip method (which rotatesand/or flips an image), the GetThumbnailImage method (which returns a thumbnail withuser-specified dimensions for the specified image), and the Save and FromFile methods (whichsave an image and reload an image from a disk file, respectively).
PrintingThe topic of printing with Visual Basic is not trivial. Just consider the fact that none of the stan-dard controls comes with built-in printing capabilities. It would be nice if certain controls, suchas the TextBox or the ListView control, would print their contents, but this is not the case. Evento print a few text paragraphs entered by the user on a TextBox control, you must provide yourown code.
Printing is identical to creating graphics. You must carefully calculate the coordinates ofeach graphic element placed on the paper, take into consideration the settings of the printerand the current page, and start a new page when the current one is filled. I’ll start the explo-ration of Visual Basic’s printing capabilities with an overview of the printing process, which isthe same no matter what you print.
You will find a tutorial in PDF format at www.sybex.com/go/masteringvb2010. It explainsthe printing process in detail. The tutorial includes several examples to address the commonprinting tasks, such as printing plain and formatted text, tabular data, and bitmaps.
The PrintDocument ControlThe PrintDocument control represents your printer, and you must add a PrintDocument con-trol to any project that generates printouts. In effect, everything you draw on the PrintDocu-ment object is sent to the printer. The PrintDocument control represents the printing device,and it exposes a Graphics object that represents the printing surface, just like the Graphicsproperty of all Windows controls. You can program against the Graphics object by using allthe graphics methods discussed earlier in this chapter. To print text, for example, you mustcall the DrawString method. You can also print frames around the text with the DrawLineor DrawRectangle method. In general, you can use all the methods of the Graphics object toprepare the printout.
The PrintDocument control is invisible at runtime, and its icon will appear in the Com-ponents tray at design time. When you’re ready to print, call the PrintDocument con-trol’s Print method. This method doesn’t produce any output, but it does raise the control’sBeginPrint and PrintPage events. The BeginPrint event is fired as soon as you call thePrint method, and this is where you insert the printout’s initialization code. The PrintPageevent is fired once for every page of the printout, and this is where you must insert the codethat generates output for the printer. Finally, the EndPrint event is fired when the printoutends, and this is where you insert the code to reset any global variables.
The following statement initiates the printing:
PrintDocument1.Print
This statement is usually placed in a button’s or a menu item’s Click event handler. To experi-ment with simple printouts, create a new project, place a button on the form, add an instance ofthe PrintDocument control to the form, and enter the preceding statement in the button’s Clickevent handler.

456 CHAPTER 11 THE FRAMEWORK AT LARGE
After the execution of this statement, the PrintDocument1_PrintPage event handler takesover. This event is fired for each page, so you insert the code to print the first page in thisevent’s handler. The PrintPage event provides the usual e argument, which gives you accessto the Graphics property of the current Printer object. The printer has its own Graphics object,which represents the page you print on, and you will see shortly how to create graphics to beprinted.
If you need to print additional pages, you set the e.HasMorePages property to Truejust before you exit the PrintPage event handler. This will fire another PrintPage event.The same process will repeat until you’ve printed everything. After you finish, you set thee.HasMorePages property to False, and no more PrintPage events will be fired. Instead, theEndPrint event will be fired and the printing process will come to an end. Figure 11.5 outlinesthe printing process.
Figure 11.5
All printing takes placein the PrintPage eventhandler of the PrintDoc-ument object.
PrintPageInsert code to print next page.
PrintDocument.Print
HasMorePages = True
HasMorePages = False
Event Handlers
EndPrintInsert clean-up code here.
Initializing the printing process... and program these events to handle the printing.
BeginPrintInsert initialization code here.
The code in Listing 11.3 shows the structure of a typical PrintPage event handler. ThePrintPage event handler prints three pages with the same text but a different page number oneach page.
Listing 11.3: A simple PrintPage event handler
Private Sub PrintDocument1_PrintPage(...) Handles PrintDocument1.PrintPageStatic pageNum As IntegerDim prFont As New Font("Verdana", 24, GraphicsUnit.Point)e.Graphics.DrawString(
"PAGE " & pageNum + 1, prFont,Brushes.Black, 700, 1050)
e.Graphics.DrawRectangle(Pens.Blue, 0, 0, 300, 100)e.Graphics.DrawString( _
"Printing with VB 2010", prFont,Brushes.Black, 10, 10)

PRINTING 457
‘ Following is the logic that determines whether we’re done printingpageNum = pageNum + 1If pageNum <= 3 Then
e.HasMorePages = TrueElse
e.HasMorePages = FalsepageNum = 0
End IfEnd Sub
The pageNum variable is declared as Static, so it retains its value between invocations ofthe event handler and isn’t reset automatically. The last statement, which is executed after youhave printed the last page, resets the pageNum variable in anticipation of another printout. With-out this statement, the first page of the second printout (if you clicked the button again) wouldbecome page 4, and so on.
The entire printout is generated by the same subroutine, one page at a time. Because pagesare not totally independent of one another, you need to keep some information in variablesthat are not initialized every time the PrintPage event handler is executed. The page num-ber, for example, must be stored in a variable that will maintain its value between successiveinvocations of the PrintPage event handler, and it must be increased every time a new page isprinted. If you’re printing a text file, you must keep track of the last printed line so that eachpage will pick up where the previous one ended, not from the beginning of the document.
To add printing features that adhere to the Windows standards to your applications, youmust also use the PrintDialog and PageSetupDialog controls, which are discussed in the follow-ing section.
The PrintDialog ControlThe PrintDialog control displays the standard Print dialog box, which allows users to select aprinter and set its properties. If you don’t display this dialog box, the output will be sent auto-matically to the default printer and will use the default settings of the printer.
To display the Print dialog box, call the PrintDialog control’s ShowDialog method. However,you must first set the control’s PrinterSettings property, as shown in the following code seg-ment; if you do not, a runtime exception will be thrown:
PrintDialog1.PrinterSettings = PrintDocument1.PrinterSettingsIf PrintDialog1.ShowDialog() = Windows.Forms.DialogResult.OK Then
PrintDocument1.PrinterSettings = PrintDialog1.PrinterSettingsEnd If
When users select a printer in this dialog box, it automatically becomes the active printer.Any printout generated after the printer selection will be sent to that printer; you don’t have toinsert any code to switch printers.
The PageSetupDialog ControlThe PageSetupDialog control displays the Page Setup dialog box, which allows users to set upthe page (its orientation and margins). The dialog box returns the current page settings in aPageSettings object, which exposes the user-specified settings as properties. These settings don’t

458 CHAPTER 11 THE FRAMEWORK AT LARGE
take effect on their own; you simply read their values and take them into consideration as youprepare the output for the printer from within your code.
To use this dialog box in your application, drop the PageSetupDialog control on the formand call its ShowDialog method from within the application’s code. The single property of thiscontrol that you’ll be using exclusively in your projects is the PageSettings property, whichexposes a number of properties reflecting the current settings of the page (margins and orienta-tion). These settings apply to the entire document. The PrintDocument control has an analogousproperty: the DefaultPageSettings property. After the user closes the Page Setup dialog box,we assign its PageSettings property to the DefaultPageSettings property of the PrintDocu-ment object to make the user-specified settings available to our code.
The PrintPreviewDialog ControlPrint Preview is another dialog box that displays a preview of the printed document. It exposesa lot of functionality and allows users to examine the output and, optionally, to send it to theprinter. After you write the code to generate the printout, you can direct it to the PrintPre-viewDialog control. You don’t have to write any additional code; just place an instance of thecontrol on the form and set its Document property to the PrintDocument control on the form.Then show the PrintPreviewDialog control instead of calling the Print method of the Print-Document object:
PrintPreviewDialog1.Document = PrintDocument1PrintPreviewDialog1.ShowDialog
After the execution of these two lines, the PrintDocument control takes over. It fires thePrintPage event as usual, but it sends its output to the Print Preview dialog box, not to theprinter. The dialog box contains a Print button, which the user can click to send the documentbeing previewed to the printer. The exact same code that generated the preview document willprint the document on the printer.
The first example of this chapter (refer to Listing 11.3) prints three simple pages to theprinter. To redirect the output of the program to the PrintPreview control, add an instance ofthe PrintPreview control to the form and replace the statement that calls the PrintDocument1.Print method in the button’s Click event handler with the following statements:
PrintPreviewDialog1.Document = PrintDocument1PrintPreviewDialog1.ShowDialog
Run the project, and this time you will be able to preview the document on your monitor. Ifyou’re satisfied with its appearance, you can click the Print button to send the document to theprinter.
Page GeometryLike the drawing surface on the monitor (the client area), the page on which you’re printinghas a fixed size and resolution. The most challenging aspect of printing is the calculation of thecoordinates and dimensions of each graphic element on the page.
To access the margins of the current page, use the Margins property of the PrintDocument1.DefaultPageSettings object. This property, which is also an object, exposes the Left,Right, Top, and Bottom properties, which are the values of the four margins. Another

PRINTING 459
property exposed by the DefaultSettings object is the PageSize property, which repre-sents the dimensions of the page. The width and height of the page are given by thefollowing expressions:
PrintDocument1.DefaultPageSettings.PaperSize.WidthPrintDocument1.DefaultPageSettings.PaperSize.Height
The top of the page is at coordinates (0, 0), which correspond to the top-left corner of thepage. We never actually print at this corner. The coordinates of the top-left corner of the print-able area of the page are given by the following expressions:
PrintDocument1.DefaultPageSettings.Margins.TopPrintDocument1.DefaultPageSettings.Margins.Left
Basic Printing MethodsThe basic methods you’ll use to create printouts are no different than the methods you use tocreate graphics. The method for printing text is the DrawString method, which has the follow-ing syntax:
Graphics.DrawString(string, font, brush, X, Y)
This method will render its string argument in the font specified in the second argument,using a Brush object as specified by the brush argument at the coordinates specified by the lasttwo arguments. To position multiple elements on the page, you need to know how much spaceeach element takes so you can advance accordingly on the page. To find out the size of a stringwhen rendered on the page, use the MeasureString method. The two methods are used in tan-dem and this is a common theme in printing text.
The simplest form of the MeasureString method is the following, where string is the stringto be rendered and font is the font in which the string will be rendered:
Dim textSize As SizeFtextSize = Graphics.MeasureString(string, font)
To center a string on the form, subtract the string’s width and height from the page’s widthand height and then split the difference equally between the two sides of the strings, verticallyand horizontally. If the string’s width is 320 pixels and the page’s printable width is 780 pixels,you must start printing at the x-coordinate (780-320)/2. This will center the string on the page,leaving 320 pixels on either side. Basically, perform the following calculations using the x- andy-coordinates returned by the MeasureString method, as shown here:
Dim textSize As SizeFDim X As Integer, Y As Integer = 0textSize = Me.Graphics.MeasureString(string, font)X = (Me.Width – textSize.Width) / 2Y = (Me.Height – textSize.Height) / 2G.DrawString("Centered string", font, brush, X, Y)

460 CHAPTER 11 THE FRAMEWORK AT LARGE
To position your strings on the page you need to know the size of each string when ren-dered on the printer in a specific font. You can obtain this information with the MeasureStringmethod, as discussed in the preceding section. As you will read in detail in the tutorial onprinting with VB, a printing routine must first determine the printable area on the page.
VB 2010 at Work: Generating a Simple PrintoutIn this section, we’re going to build a simple, but certainly not trivial, printout to demonstratethe use of many of the print-related concepts discussed in the preceding sections. The printout,which contains centered strings and an image as well as a gradient, is shown in Figure 11.6.
Figure 11.6
Previewing a simpleprintout
Start a new form and drop on it a button and the PageSetupDialog, PrintDocument, andPrintDialog controls. Although we will add preview capabilities to the application, we won’tuse an instance of the PrintPreviewDialog control. Instead, we’ll create an instance of this con-trol from within the application’s code.
The code for the application is shown in Listing 11.4. The Click event handler for the but-ton displays the PrintDialog control to allow users to select a printer and set the properties ofthe printout. The PrintDialog control has a Preferences button, where users can set the pageorientation. If you want users to be able to set the page’s margins, you must also display thePageSetupDialog. Windows applications provide a Page Setup menu item, which displays thePageSetup dialog box.
After the user has selected a printer and set the orientation of the page, the code creates anew instance of the PrintPreviewDialog control, the prn variable, and assigns the PrintDoc-ument control to the Document property of the prn object and calls the same object’s Showmethod to initiate the printout.

PRINTING 461
Then the PrintPage event takes over. This event’s handler contains quite a bit of code, butit’s straightforward. First, it extracts the coordinates of the printable area’s upper-left corner,taking into consideration the page’s margins. These two values are stored in the variables topXand topY. Then it calculates the width and height of the page’s printable area and stores thesevalues in the pageWidth and pageHeight properties.
The following few statements create a LinearGradientBrush object, the LGBrush variable,which is then used to fill a large rectangle with the FillRectangle method. The follow-ing statements print the text and the image on the page. To print text, the code uses theMeasureString method to calculate the size of each string and center it horizontally on thepage. Then, it advances to the y-coordinate of the next string by incrementing the Y variable.
The image is printed with the DrawImage method, but there’s a slight trick here. Becausethe image has a portrait orientation, I’ve decided to reduce its size when it’s printed in land-scape mode because it would take up most of the page. The code examines the property of thee.PageSettings.Landscape property, and if it’s True, it fits the image into a rectangle that’shalf as tall and half as wide as the original image. You can experiment with the SimplePrintoutproject’s code and add more elements to the printout, possibly arrange differently the elementson the page, and break the printout into multiple pages.
Listing 11.4: The code that generated the printout of Figure 11.5
Private Sub Button1_Click(...) Handles Button1.ClickPrintDialog1.PrinterSettings = PrintDocument1.PrinterSettingsIf PrintDialog1.ShowDialog() = Windows.Forms.DialogResult.OK Then
PrintDocument1.PrinterSettings = PrintDialog1.PrinterSettingsEnd IfDim prn As New PrintPreviewDialogprn.Document = PrintDocument1prn.Show()
End Sub
Private Sub PrintDocument1_PrintPage(...) HandlesPrintDocument1.PrintPage
Dim msg1 As String = "Mastering Visual Basic 2010"Dim msg2 As String = "Published by SYBEX"Dim topX = e.PageSettings.Margins.LeftDim topY = e.PageSettings.Margins.TopDim pageWidth = e.PageSettings.Bounds.Width –
e.PageSettings.Margins.Left –e.PageSettings.Margins.Right
Dim pageHeight = e.PageSettings.Bounds.Height –e.PageSettings.Margins.Top –e.PageSettings.Margins.Bottom
Dim R As New RectangleF(topX, topY, pageWidth, pageHeight)Dim startColor As Color = Color.BlueVioletDim EndColor As Color = Color.LightYellowDim LGBrush As New System.Drawing.Drawing2D.LinearGradientBrush(

462 CHAPTER 11 THE FRAMEWORK AT LARGE
R, startColor, EndColor,Drawing2D.LinearGradientMode.ForwardDiagonal)
e.Graphics.FillRectangle(LGBrush, R)e.Graphics.DrawRectangle(Pens.Red,
New Rectangle(New Point(topX, topY),New Size(pageWidth, pageHeight)))
Dim size = e.Graphics.MeasureString(msg1,New Font("Verdana", 28, FontStyle.Bold))
Dim X = topX + (pageWidth - size.Width) / 2Dim Y = 150e.Graphics.DrawString(msg1,
New Font("Verdana", 28, FontStyle.Bold),Brushes.White,New RectangleF(X, Y, size.Width, size.Height))
size = e.Graphics.MeasureString(msg2,New Font("Microsoft YaHei", 18, FontStyle.Regular))
X = topX + (pageWidth - size.Width) / 2Y = Y + 70e.Graphics.DrawString(msg2,
New Font("Microsoft YaHei", 18, FontStyle.Regular),Brushes.Yellow,New RectangleF(X, Y, 2 * size.Width, 2 * size.Height))
Dim img As Imageimg = My.Resources.MVB2010Dim imgSize As SizeIf e.PageSettings.Landscape Then
imgSize = New Size(img.Width / 2, img.Height / 2)Else
imgSize = New Size(img.Width, img.Height)End IfY = Y + 80X = topX + (pageWidth - imgSize.Width) / 2e.Graphics.DrawImage(img,
New Rectangle(New Point(X, Y), imgSize))e.HasMorePages = FalseDim bookDescription As String =
"This expert guide covers … .NET Framework. " &vbCrLf &"In a clear, easy-to-follow style, … " & vbCrLf
Y = Y + imgSize.Height + 25X = topX + 40Dim txtRectangle As New Rectangle(X, Y, pageWidth - 80, 280)e.Graphics.DrawString(bookDescription, _
New Font("Microsoft YaHei", 9, FontStyle.Regular),Brushes.Black, txtRectangle)
e.HasMorePages = FalseEnd Sub

HANDLING STRINGS AND CHARACTERS 463
Handling Strings and CharactersThe .NET Framework provides two basic classes for manipulating text: the String and String-Builder classes.
The String class exposes a large number of practical methods, and they’re all reference meth-ods: They don’t act on the string directly but return another string instead. After you assign avalue to a String object, that’s it. You can examine the string, locate words in it, and parse it,but you can’t edit it. The String class exposes methods such as the Replace and Remove meth-ods, which replace a section of the string with another and remove a range of characters fromthe string, respectively. These methods, however, don’t act on the string directly: They replaceor remove parts of the original string and then return the result as a new string.
The StringBuilder class is similar to the String class: It stores strings, but it can manipulatethem in place. In other words, the methods of the StringBuilder class are instance methods.
The distinction between the two classes is that the String class is better suited for staticstrings, whereas the StringBuilder class is better suited for dynamic strings. Use the Stringclass for strings that don’t change frequently in the course of an application, and use theStringBuilder class for strings that grow and shrink dynamically. The two classes exposesimilar methods, but the String class’s methods return new strings; if you need to manipulatelarge strings extensively, using the String class might fill the memory quite quickly.
Any code that manipulates strings must also be able to manipulate individual characters.The Framework supports the Char class, which not only stores characters but also exposesnumerous methods for handling them. Both the String and StringBuilder classes provide meth-ods for storing strings into arrays of characters as well as for converting character arrays intostrings. After extracting the individual characters from a string, you can process them with themembers of the Char class. I’ll start the discussion of the text-handling features of the Frame-work with an overview of the Char data type and continue with the other two major compo-nents, the String and StringBuilder classes.
The Char ClassThe Char data type stores characters as individual, double-byte (16-bit), Unicode values, and itexposes methods for classifying the character stored in a Char variable. You can use methodssuch as IsDigit and IsPunctuation on a Char variable to determine its type and other similarmethods that can simplify your string validation code.
To use a character variable in your application, you must declare it with a statement such asthe following one:
Dim ch As Charch = Convert.ToChar("A")
The expression "A" represents a string, even if it contains a single character. Everything youenclose in double quotes is a string. To convert it to a character, you must cast it to the Chartype. If the Strict option is off (the default value), you need not perform the conversion explic-itly. If the Strict option is on, you must use one of the CChar() or the CType() functions (or theConvert class) to convert the single-character string in the double quotes to a character value.There’s also a shorthand notation for converting one-character strings to characters — justappend the c character to a single-character string:
Dim ch As Char = "A"c

464 CHAPTER 11 THE FRAMEWORK AT LARGE
If you let the compiler decipher the type of the variable from its value, a single-characterstring will be interpreted as a string, not as a Char data type. If you later assign a string valueto a Char variable by using a statement such as the following, only the first character of thestring will be stored in the ch variable:
ch = "ABC" ‘ the value "A" is assigned to ch!
Properties
The Char class provides two trivial properties: MaxValue and MinValue. They return the largestand smallest character values you can represent with the Char data type.
Methods
The Char data type exposes several useful methods for handling characters. All the methodsdescribed in Table 11.6 have the same syntax: They accept either a single argument, whichis the character they act upon, or a string and the index of a character in the string on whichthey act.
Table 11.6: Char data type methods
Method Description
GetNumericValue This method returns a positive numeric value if called with anargument that is a digit and the value –1 otherwise. If you callGetNumericValue with the argument 5, it will return the numericvalue 5. If you call it with the symbol @, it will return the value –1.
GetUnicodeCategory This method returns a numeric value that is a member of theUnicodeCategory enumeration and identifies the Unicode group towhich the character belongs. The Unicode groups characters intocategories such as math symbols, currency symbols, and quotationmarks. Look up the UnicodeCategory enumeration in thedocumentation for more information.
IsLetter, IsDigit,IsLetterOrDigit
These methods return a True/False value indicating whether theirargument, which is a character, is a letter, decimal digit, or letter/digit,respectively. You can write an event handler by using the IsDigitmethod to accept numeric keystrokes and to reject letters andpunctuation symbols.
IsLower, IsUpper These methods return a True/False value indicating whether thespecified character is lowercase or uppercase, respectively.
IsNumber This method returns a True/False value indicating whether thespecified character is a number. The IsNumber method takes intoconsideration hexadecimal digits (the characters 0123456789ABCDEF) inthe same way as the IsDigit method does for decimal numbers.

HANDLING STRINGS AND CHARACTERS 465
Table 11.6: Char data type methods (CONTINUED)
Method Description
IsPunctuation,IsSymbol, IsControl
These methods return a True/False value indicating whether thespecified character is a punctuation mark, symbol, or control character,respectively. The Backspace and Esc keys, for example, are ISO(International Organization for Standardization) control characters.
IsSeparator This method returns a True/False value indicating whether thecharacter is categorized as a separator (space, new-line character, andso on).
IsWhiteSpace This method returns a True/False value indicating whether thespecified character is white space. Any sequence of spaces, tabs, linefeeds, and form feeds is considered white space. Use this method alongwith the IsPunctuation method to remove all characters in a stringthat are not words.
ToLower, ToUpper These methods convert their argument to a lowercase or uppercasecharacter, respectively, and return it as another character.
ToString This method converts a character to a string. It returns asingle-character string, which you can use with otherstring-manipulation methods or functions.
IsLetter, IsDigit, IsLetterOrDigit
The IsLetter, IsDigit, and IsLetterOrDigit methods deserve a bit more discussion. Icommonly use these methods to intercept keystrokes from within a control’s KeyPress (orKeyUp and KeyDown) events. The e.KeyChar property of the e argument returns the characterthat was pressed by the user and that fired the KeyPress event. To reject non-numeric keysas the user enters text in a TextBox control, use the event handler shown here:
Private Sub TextBox1_KeyPres(ByVal sender As Object,ByVal e As System.Windows.Forms.KeyPressEventArgs)Handles TextBox1.KeyPress
Dim c As Charc = e.KeyCharIf Not (Char.IsDigit(c) or Char.IsControl(c)) Thene.Handled = True
End IfEnd Sub

466 CHAPTER 11 THE FRAMEWORK AT LARGE
This code ignores any keystrokes that don’t represent numeric digits and are not controlcharacters. Control characters are not rejected because we want users to be able to edit thetext on the control. The Backspace key, for example, is captured by the KeyPress event,and you shouldn’t ‘‘kill’’ it. For more information on handling keystrokes from within yourcode, see the section ‘‘Capturing Keystrokes’’ in Chapter 5, ‘‘Basic Windows Controls.’’ If theTextBox control is allowed to accept fractional values, you should allow the period characteras well, by using the following If clause:
Dim c As Charc = e.KeyCharIf Not (Char.IsDigit(c) or c = "." or
Char.IsControl(c)) Thene.Handled = True
End If
The String ClassThe String class implements the String data type, which is one of the richest data types in termsof the members it exposes. We have used strings extensively in earlier chapters, and you’remore than familiar with the String class by now, but I will review the basic members of theString class here for reasons of completeness.
To create a new instance of the String class, you simply declare a variable of the String type.You can also initialize it by assigning to the corresponding variable a text value:
Dim title As String = "Mastering VB2010"
Everything enclosed in double quotes is a string, even if it’s the representation of a number.String objects are immutable: Once created, they can’t be modified. The names of some of themethods of the String class may lead you to think that they change the value of the string, butthey don’t; instead, they return a new string. The Replace method, for example, doesn’t replaceany characters in the original string, but it creates a new string, replaces some characters, andthen returns the new string. The Replace method, like all other methods of the String class,doesn’t operate directly on the string to which it’s applied. Instead, it creates a new string andreturns it as a new string.
If you plan to create and manipulate long strings in your code often, use the StringBuilderclass instead, which is extremely fast compared to the String class and VB’s string-manipulationfunctions. This doesn’t mean that the String data type is obsolete, of course. The String classexposes many more methods for handling strings (such as locating a smaller string in a largerone, comparing strings, changing individual characters, and so on). The StringBuilder class, onthe other hand, is much more efficient when you build long strings bit by bit, when you needto remove part of a string, and so on. To achieve its speed, however, it consumes considerablymore memory than the equivalent String variable.
Properties
The String class exposes only two properties, the Length and Chars properties, which return astring’s length and its characters, respectively. Both properties are read-only. The Chars prop-erty returns an array of characters, and you can use this property to read individual characters

HANDLING STRINGS AND CHARACTERS 467
from a string. Note that the Chars property returns the characters in the string, no matter whatthe encoding is (UTF7, UTF8, Unicode, and so on).
Methods
All the functionality of the String class is available through methods, which are described next.They are all shared methods: They act on a string and return a new string with the modifiedvalue.
Compare This method compares two strings and returns a negative value if the first string isless than the second, a positive value if the second string is less than the first, and zero if thetwo strings are equal. Of course, the simplest method of comparing two strings is to use thecomparison operators, as shown here:
If name1 < name 2 Then‘ name1 is alphabetically smaller than name 2
Else If name 1 > name 2 Then‘ name2 is alphabetically smaller than name 1
Else‘ name1 is the same as name2
End If
The Compare method is overloaded, and the first two arguments are always the two strings tobe compared. The method’s return value is 0 if the two strings are equal, 1 if the first string issmaller than the second, and –1 if the second is smaller than the first. The simplest form of themethod accepts two strings as arguments:
String.Compare(str1, str2)
The following form of the method accepts a third argument, which is a True/False value anddetermines whether the search will be case sensitive (if True) or not:
String.Compare(str1, str2, case)
Another form of the Compare method allows you to compare segments of two strings. Its syn-tax is as follows:
String.Compare(str1, index1, str2, index2, length)
index1 and index2 are the starting locations of the segment to be compared in each string. Thetwo segments must have the same length, which is specified by the last argument.
The following statements return the values highlighted below each:
Debug.WriteLine(str.Compare("the quick brown fox", _"THE QUICK BROWN FOX"))
-1

468 CHAPTER 11 THE FRAMEWORK AT LARGE
Debug.WriteLine(str.Compare("THE QUICK BROWN FOX", _"the quick brown fox"))
1Debug.WriteLine(str.Compare("THE QUICK BROWN FOX", _
"THE QUICK BROWN FOX"))0
CompareOrdinal The CompareOrdinal method compares two strings, which is similar to theCompare method, but it doesn’t take into consideration the current locale. This method returnszero if the two strings are the same and a positive or negative value if they’re different. Thesevalues, however, are not 1 and –1; they represent the numeric difference between the Unicodevalues of the first two characters that are different in the two strings.
Concat This method concatenates two or more strings (places them one after the other) andforms a new string. The simpler form of the Concat method has the following syntax and it isequivalent to the & operator:
newString = String.Concat(string1, string2)
A more-useful form of the same method concatenates a large number of strings stored in anarray:
newString = String.Concat(strings())
To use this form of the method, store all the strings you want to concatenate into a string arrayand then call the Concat method. If you want to separate the individual strings with specialdelimiters, append them to each individual string before concatenating them. Or you can usethe Join method, discussed shortly.
EndsWith, StartsWith These two methods return True if their argument ends or starts witha user-supplied substring. The syntax of these methods is as follows:
found = str.EndsWith(string)found = str.StartsWith(string)
These two methods are equivalent to the Left() and Right() functions, which extract a givennumber of characters from the left or right end of the string, respectively. The two statementsfollowing the declaration of the name variable are equivalent:
Dim name As String = "Visual Basic.NET"If Left(name, 3) = "Vis" Then …If String.StartsWith("Vis") Then …
Notice that the comparison performed by the StartsWith method is case sensitive. If you don’tcare about the case, you can convert both the string and the substring to uppercase, as in thefollowing example:
If name.ToUpper.StartsWith("VIS") Then …

HANDLING STRINGS AND CHARACTERS 469
IndexOf, LastIndexOf These two methods locate a substring in a larger string. The IndexOfmethod starts searching from the beginning of the string and stops when it reaches the tar-get (or it fails to locate the substring), and the LastIndexOf method starts searching from theend of the string. Both methods return an integer, which is the position of the substring’s firstcharacter in the larger string (the position of the first character is zero).
To locate a string within a larger one, use the following forms of the IndexOf method:
pos = str.IndexOf(searchString)pos = str.IndexOf(SearchString, startIndex)pos = str.IndexOf(SearchString, startIndex, endIndex)
The startIndex and endIndex arguments delimit the section of the string where the searchwill take place, and pos is an integer variable.
The last three overloaded forms of the IndexOf method search for an array of characters in thestring:
str.IndexOf(Char())str.IndexOf(Char(), startIndex)str.IndexOf(Char(), startIndex, endIndex)
The following statement will return the position of the string Visual in the text of theTextBox1 control or will return –1 if the string isn’t contained in the text:
Dim pos As Integerpos = TextBox1.IndexOf("Visual")
IndexOfAny This is an interesting method that accepts as an argument an array of argumentsand returns the first occurrence of any of the array’s characters in the string. The syntax of theIndexOfAny method is
Dim pos As Integer = str.IndexOfAny(chars)
where chars is an array of characters. This method attempts to locate the first instance ofany member of the chars array in the string. If the character is found, its index is returned.If not, the process is repeated with the second character, and so on until an instance is foundor the array has been exhausted. If you want to locate the first delimiter in a string, call theIndexOfAny method with an array such as the following:
Dim chars() As Char = {"."c, ","c, ";"c, " "c}Dim mystring As String = "This is a short sentence"Debug.WriteLine(mystring.IndexOfAny(chars))
When the last statement is executed, the value 4 will be printed in the Output window. This isthe location of the first space in the string. Notice that the space delimiter is the last one in thechars array.

470 CHAPTER 11 THE FRAMEWORK AT LARGE
Insert The Insert method inserts one or more characters at a specified location in a stringand returns the new string. The syntax of the Insert method is as follows:
newString = str.Insert(startIndex, subString)
startIndex is the position in the str variable, where the string specified by the second argu-ment will be inserted. The following statement will insert a dash between the second and thirdcharacters of the string CA93010.
Dim Zip As String = "CA93010"Dim StateZip As StringStateZip = Zip.Insert(2, "-")
Join This method joins two or more strings and returns a single string with a separatorbetween the original strings. Its syntax is the following, where separator is the string that willbe used as the separator, and strings is an array with the strings to be joined:
newString = String.Join(separator, strings)
The following statement will create a full path by joining folder names:
Dim path As StringDim folders(3) As String = {"My Documents", "Business", "Expenses"}path = String.Join("/", folders)
Split Just as you can join strings, you can split a long string into smaller ones by using theSplit method, whose syntax is the following, where delimiters is an array of characters andstr is the string to be split:
strings() = String.Split(delimiters, str)
The string is split into sections that are separated by any one of the delimiters specified withthe first argument. These strings are returned as an array of strings.
Splitting Strings with Multiple Separators
The delimiters array allows you to specify multiple delimiters, which makes it a great tool forisolating words in a text. You can specify all the characters that separate words in text (spaces,tabs, periods, exclamation marks, and so on) as delimiters and pass them along with the text tobe parsed to the Split method.

HANDLING STRINGS AND CHARACTERS 471
The statements in the following listing isolate the parts of a path, which are delimited by abackslash character:
Dim path As String = "c:\My Documents\Business\Expenses"Dim delimiters() As Char = {"\"c}Dim parts() As Stringparts = path.Split(delimiters)Dim iPart As IEnumeratoriPart = parts.GetEnumeratorWhile iPart.MoveNext
Debug.WriteLine(iPart.Current.tostring)End While
If the path ends with a slash, the Split method will return an extra empty string. If you wantto skip the empty strings, pass an additional argument to the function, which is a member ofthe StringSplitOptions enumeration: None or RemoveEmptyEntries.
Notice that the parts array is declared without a size. It’s a one-dimensional array that willbe dimensioned automatically by the Split method, according to the number of substringsseparated by the specified delimiter(s).
Remove The Remove method removes a given number of characters from a string, starting ata specific location, and returns the result as a new string. Its syntax is the following, wherestartIndex is the index of the first character to be removed in the str string variable andcount is the number of characters to be removed:
newSrting = str.Remove(startIndex, count)
Replace This method replaces all instances of a specified string in another string with a newone. It creates a new instance of the string, replaces the characters as specified by its arguments,and returns this string. The syntax of this method is
newString = str.Replace(oldString, newString)
where oldString is the part of the str variable to be replaced and newString is the string toreplace the occurrences of oldString. The following statements replace all instances of the tabcharacter with a single space. You can change the last statement to replace tabs with a specificnumber of spaces — usually three, four, or five spaces:
Dim txt, newTxt As StringDim vbTab As String = vbCrLftxt = "some text with two tabs"newTxt = txt.Replace(vbTab, " ")

472 CHAPTER 11 THE FRAMEWORK AT LARGE
PadLeft, PadRight These two methods align the string left or right in a specified field andreturn a fixed-length string with spaces to the right (for right-padded strings) or to the left (forleft-padded strings). After the execution of these statements
Dim LPString, RPString As StringRPString = " [" & "Mastering VB2010".PadRight(20) & "]"LPString = " [" & "Mastering VB2010".PadLeft(20) & "]"
the values of the LPString and RPString variables are as follows:
[Mastering VB2010 ][ Mastering VB2010]
The StringBuilder ClassThe StringBuilder class stores dynamic strings and exposes methods to manipulate them muchfaster than the String class. As you will see, the StringBuilder class is extremely fast, but ituses considerably more memory than the string it holds. To use the StringBuilder class in anapplication, you must import the System.Text namespace (unless you want to fully qualifyeach instance of the StringBuilder class in your code). Assuming that you have imported theSystem.Text namespace in your code module, you can create a new instance of the String-Builder class via the following statement:
Dim txt As New StringBuilder
Because the StringBuilder class handles dynamic strings in place, it’s good to declare inadvance the size of the string you intend to store in the current instance of the class. Thedefault capacity is 16 characters, and it’s doubled automatically every time you exceed it. Toset the initial capacity of the StringBuilder class, use the Capacity property.
To create a new instance of the StringBuilder class, you can call its constructor withoutany arguments or pass the initial string as an argument:
Dim txt As New StringBuilder("some string")
If you can estimate the length of the string you’ll store in the variable, you can specify thisvalue by using the following form of the constructor so that the variable need not be resizedcontinuously as you add characters to it:
Dim txt As New StringBuilder(initialCapacity)
The size you specify is not a hard limit; the variable might grow longer at runtime, and theStringBuilder will adjust its capacity.
If you want to specify a maximum capacity for your StringBuilder variable, use the follow-ing constructor:
Dim txt As New StringBuilder (Intialcapacity, maxCapacity)

HANDLING STRINGS AND CHARACTERS 473
Finally, you can initialize a new instance of the StringBuilder class by using both aninitial and a maximum capacity, as well as its initial value, by using the following form ofthe constructor:
Dim txt As New StringBuilder(string, intialcapacity, maxCapacity)
Properties
You have already seen the two basic properties of the StringBuilder class: the Capacity andMaxCapacity properties. In addition, the StringBuilder class provides the Length and Charsproperties, which are the same as the corresponding properties of the String class. The Lengthproperty returns the number of characters in the current instance of the StringBuilder class,and the Chars property is an array of characters. Unlike the Chars property of the String class,this one is read/write. You can not only read individual characters, you can also set them fromwithin your code. The index of the first character is zero.
Methods
Many of the methods of the StringBuilder class are equivalent to the methods of the Stringclass, but they act directly on the string to which they’re applied, and they don’t return a newstring:
Append The Append method appends a base type to the current instance of the StringBuilderclass, and its syntax is the following, where the value argument can be a single character, astring, a date, or any numeric value:
SB.Append(value)
When you append numeric values to a StringBuilder, they’re converted to strings; the valueappended is the string returned by the type’s ToString method. You can also append anobject to the StringBuilder — the actual string that will be appended is the value of the object’sToString property.
AppendFormat The AppendFormat method is similar to the Append method. Before appendingthe string, however, AppendFormat formats it. The syntax of the AppendFormat method is asfollows:
SB.AppendFormat(string, values)
The first argument is a string with embedded format specifications, and values is an arraywith values (objects, in general) — one for each format specification in the string argument.If you have a small number of values to format, up to four, you can supply them as separatearguments separated by commas:
SB.AppendFormat(string, value1, value2, value3, value4)

474 CHAPTER 11 THE FRAMEWORK AT LARGE
The following statement appends the string
Your balance as of Thursday, August 2, 2007 is $19,950.40
to a StringBuilder variable:
Dim statement As New StringBuilderstatement.AppendFormat(
"Your balance as of {0:D} is ${1: #,###.00}",#8/2/2007#, 19950.40)
Each format specification is enclosed in a pair of curly brackets, and they’re numbered sequen-tially (from zero). Then there’s a colon followed by the actual specification. The D format spec-ification tells the AppendFormat method to format the specified string in long date format. Thesecond format specification, #,###.00, uses the thousands separator and two decimal digitsfor the amount.
Insert This method inserts a string into the current instance of the StringBuilder class, andits syntax is as follows:
SB.Insert(index, value)
The index argument is the location where the new string will be inserted in the currentinstance of the StringBuilder, and value is the string to be inserted. A variation of the syntaxshown here inserts multiple copies of the specified string into the StringBuilder:
SB.Insert(index, string, count)
Remove This method removes a number of characters from the current StringBuilder, startingat a specified location; its syntax is the following, where startIndex is the position of the firstcharacter to be removed from the string and count is the number of characters to be removed:
SB.Remove(startIndex, count)
Replace This method replaces all instances of a string in the current StringBuilder object withanother string. The syntax of the Replace method is the following, where the two argumentscan be either strings or characters:
SB.Replace(oldValue, newValue)
Unlike with the String class, the replacement takes place in the current instance of theStringBuilder class and the method doesn’t return another string. Another form of the Replacemethod limits the replacements to a specified segment of the StringBuilder instance:
SB.Replace(oldValue, newValue, startIndex, count)

HANDLING STRINGS AND CHARACTERS 475
This method replaces all instances of oldValue with newValue in the section starting at locationstartIndex and extending count characters from the starting location.
ToString Use this method to convert the StringBuilder instance to a string and assign it toa String variable. The ToString method returns the string represented by the StringBuildervariable to which it’s applied.
VB 2010 at Work: Test-Driving the StringBuilder Class
The code segment included in Listing 11.5 demonstrates the efficiency of the StringBuilderclass. The code extracts the words in a large text file and reverses their order. It’s not a terriblypractical demonstration of string operations, but it demonstrates very clearly the efficiency ofthe StringBuilder class. The code extracts the words with the Split method, using the spaceas separator, and stores them in the words array. Once the words have been extracted, the twoloops go through each word in the array and build two variables with the words in the wordsarray in reverse order: one of them a String variable and the other a StringBuilder variable.
Listing 11.5: Reversing the order of words in a large string
Dim newString As String = ""Dim words() = TextBox1.Text.Split(" ")Dim SW As New StopwatchSW.Start()For Each wrd In words
newString = wrd & " " & newStringNextSW.Stop()MsgBox("Reversed word order with the String class in " &
(SW.ElapsedMilliseconds / 1000).ToString)
Dim newSB As New System.Text.StringBuilderSW = New StopwatchSW.Start()For wrd = words.Count - 1 To 0 Step -1
newSB.Append(words(wrd) & " ")NextSW.Stop()MsgBox("Reversed word order with the StringBuilder class in " &
(SW.ElapsedMilliseconds / 1000).ToString)
I’ve copied the text of this chapter and pasted it three times on a TextBox control. It took15 seconds to reverse the words in the String class and less than half a second to do the samewith the StringBuilder class. If you manipulate strings extensively in your code, you shoulddefinitely consider the StringBuilder class. If you’re reading pieces of information from a fileor other source, such as an XML file, and append them to a string, you should definitely use aStringBuilder class. I frequently have to build large strings that include formatting informationand display them on a RichTextBox control, and the StringBuilder class is the only option. Keep

476 CHAPTER 11 THE FRAMEWORK AT LARGE
in mind, however, that the StringBuider class doesn’t provide nearly as many string manipula-tion methods as the String class. The StringBuilder class shines in applications that build longstrings piecewise, an operation at which the String class has never been especially efficient.
Handling Dates and TimeAnother common task in coding business applications is the manipulation of dates and time.To aid the coding of these tasks, the Framework provides the DateTime and TimeSpan classes.The DateTime class handles date and time values, whereas the TimeSpan class handles date andtime intervals and differences. Variables that represent dates and times must be declared as Date-Time, which is one of the basic data types of the Framework.
The DateTime ClassThe DateTime class is used for storing date and time values, and it’s one of the Framework’sbase data types. Date and time values are stored internally as Double numbers. The integerpart of the value corresponds to the date, and the fractional part corresponds to the time. Toconvert a DateTime variable to a Double value, use the method ToOADateTime, which returns avalue that is an OLE (Object Linking and Embedding) Automation-compatible date. The value0 corresponds to midnight of December 30, 1899. The earliest date you can represent as an OLEAutomation-compatible date is the first day of the year 100; it corresponds to the Double value–657,434.
To initialize a DateTime variable, a date value is enclosed in a pair of pound symbols. If thevalue contains time information, separate it from the date part by using a space:
Dim date1 As Date = #4/15/2011#Dim date2 As Date = #4/15/2011 2:01:59#
If you have a string that represents a date and you want to assign it to a DateTime vari-able for further processing, use the DateTime class Parse and ParseExact methods. The Parsemethod parses a string and returns a date value if the string can be interpreted as a date value.Let’s say your code prompts the user for a date and then it uses it in date calculations. Theuser-supplied date is read as a string, and you must convert it to a date value:
Dim sDate As StringDim dDate As DateTimesDate = InputBox("Please enter a date")Try
dDate = DateTime.Parse(sDate)‘ use dDate1 in your calculations
Catch exc As ExceptionMsgBox("You’ve entered an invalid date")
End Try
The Parse method will convert a string that represents a date to a DateTime value regard-less of the format of the date. You can enter dates such as 1/17/2011, Jan. 17, 2011, or January17, 2011 (with or without the comma). The ParseExact method allows you to specify moreoptions, such as the possible formats of the date value.

HANDLING DATES AND TIME 477
Different Cultures, Different Dates
Different cultures use different date formats, and Windows supports them all. However, youmust make sure that the proper format is selected in Regional And Language Options. Bydefault, dates are interpreted as specified by the current date format in the target computer’sregional settings. The Parse method allows you to specify the culture to be used in theconversion. The following statements prompt the user for a date value and then interpret it ina specific culture (the en-GB culture, which is used in the United Kingdom):
Dim sDate1 As StringDim dDate1 As DateTimesDate1 = InputBox("Please enter a date")Try
Dim culture As CultureInfo = _New CultureInfo("en-GB", True)
dDate1 = DateTime.Parse(sDate1, culture)MsgBox(dDate1.ToLongDateString)
Catch exc As ExceptionMsgBox("You’ve entered an invalid date")
End Try
To use the CultureInfo class in your code, you must import the System.Gobalizationnamespace in your project. These statements will convert any English date regardless of theregional settings. If you enter the string 16/3/2011 in the input box, the preceding statementswill produce the following output:
Wednesday, March 16, 2011
Let’s see how the same date will be parsed in two different cultures. Insert the following codesegment in a button’s Click event handler:
Dim sDate1 As StringDim dDate1 As DateTimesDate1 = InputBox("Please enter a date")Try
Dim culture As CultureInfo = _New CultureInfo("en-GB", True)
dDate1 = DateTime.Parse(sDate1, culture)Debug.WriteLine(dDate1.ToLongDateString)culture = New CultureInfo("en-US", True)dDate1 = DateTime.Parse(sDate1, culture)Debug.WriteLine(dDate1.ToLongDateString)
Catch exc As ExceptionMsgBox("You’ve entered an invalid date")
End Try

478 CHAPTER 11 THE FRAMEWORK AT LARGE
The method ToLongDateString returns the verbose description of the date so that wecan read the name of the month instead of guessing it. Run the code and enter a datethat can be interpreted differently in the two cultures, such as 4/9/2011. The following outputwill be produced:
Saturday, September 04, 2011Friday, April 09, 2011
If the month part of the date exceeds 12, the exception handler will be activated. Dates arealways a tricky issue in programming, and you should include the appropriate culture inthe Parse method so that user-supplied dates will be converted correctly, even if the user’sculture hasn’t been set correctly in the regional settings or if you’re processing a file thatoriginated in a computer with different culture settings. You should also not prompt users fordates with a TextBox control; use the DateTimePicker control instead so that users can enteronly valid dates.
Properties
The DateTime class exposes the properties listed in Table 11.7.
Table 11.7: DateTime class properties
Property Description
Date, TimeOfDay The Date property returns the date from a date/time value and sets thetime to midnight. The TimeOfDay property returns the time part ofthe date.
DayOfWeek,DayOfYear
These two properties return the day of the week (a string such asMonday) and the number of the day in the year (an integer from 1 to365, or 366 for leap years), respectively.
Hour, Minute,Second, Millisecond
These properties return the corresponding time part of the date valuepassed as an argument. If the current time is 9:47:24 p.m., the threeproperties of the DateTime class will return the integer values 9, 47, and24 when applied to the current date and time as Date.Now.Hour,Date.Now.Minute, and Date.Now.Second.
Day, Month, Year These three properties return the day of the month, the month, and theyear of a DateTime value, respectively. The Day and Month properties arenumeric values, but you can convert them to the appropriate string (thename of the day or month) with the WeekDayName() and MonthName()functions. They also accept a second optional argument that is aTrue/False value and indicates whether the function should return theabbreviated name (if True) or full name (if False). The WeekDayName()function accepts a third optional argument, which determines the firstday of the week (by default, the first day of the week is Sunday).

HANDLING DATES AND TIME 479
Table 11.7: DateTime class properties (CONTINUED)
Property Description
Ticks This property returns the number of ticks from a date/time value. Each tick is100 nanoseconds (or 0.0001 milliseconds). To convert ticks to milliseconds,multiply them by 10,000 (or use the TimeSpan object’sTicksPerMillisecond property, discussed later in this chapter). We use thisproperty to time operations precisely: The Ticks property is a long value, andyou can read its value before and after the operation you want to time. Thedifference between the two values is the duration of the operation in tenths ofa nanosecond. Divide it by 10,000 to get the duration in milliseconds.
Methods
The DateTime class exposes several methods for manipulating dates, as listed in Table 11.8. Themost practical methods add and subtract time intervals to and from an instance of the Date-Time class.
Table 11.8: DateTime class methods
Method Description
Compare Compare is a shared method that compares two date/time values and returns an in-teger value indicating the relative order of the two values. The syntax of the Comparemethod is as follows, where date1 and date2 are the two values to be compared:
order = System.DateTime.Compare(date1, date2)
DaysInMonth This shared method returns the number of days in a specific month. Because Februarycontains a variable number of days depending on the year, the DaysInMonth methodaccepts as arguments both the month and the year:
monDays = DateTime.DaysInMonth(year, month)
IsLeapYear This shared method returns a True/False value that indicates whether the specifiedyear is a leap year:
Dim leapYear As Boolean = DateTime.IsLeapYear(year)
Add This method adds a TimeSpan object to the current instance of the DateTime class.The TimeSpan object represents a time interval, and there are many methods to createa TimeSpan object, which are all discussed in The TimeSpan Class section. To create anew TimeSpan object that represents 3 days, 6 hours, 2 minutes, and 50 seconds andadd this TimeSpan object to the current date and time, use the following statements.
Dim TS As New TimeSpan()Dim thisMoment As Date = Now()TS = New TimeSpan(3, 6, 2, 50)Debug.WriteLine(thisMoment)
480 CHAPTER 11 THE FRAMEWORK AT LARGE
Table 11.8: DateTime class methods (CONTINUED)
Method Description
Subtract This method is the counterpart of the Add method; it subtracts a TimeSpan objectfrom the current instance of the DateTime class and returns another Date value.
Addxxx Various methods add specific intervals to a date/time value. Each method accepts thenumber of intervals to add (days, hours, milliseconds, and so on) to the currentinstance of the DateTime class. These methods are as follows: AddYears, AddMonths,AddDays, AddHours, AddMinutes, AddSeconds, AddMilliseconds, and AddTicks.As stated earlier, a tick is 100 nanoseconds and is used for really fine timing ofoperations. None of the Addxxx methods act on the current instance of the DateTimeclass; instead, they return a new DateTime value with the appropriate value.
ToString This method converts a date/time value to a string, using a specific format. TheDateTime class recognizes numerous format patterns, which are listed in Table 11.9and Table 11.10.
Table 11.9 lists the standard format patterns, and Table 11.10 lists the characters that canformat individual parts of the date/time value. You can combine the custom format charactersto format dates and times in any way you wish.
The syntax of the ToString method is as follows, where formatSpec is a formatspecification:
aDate.ToString(formatSpec)
The D named date format, for example, formats a date value as a long date; the followingstatement will return the highlighted string shown below the statement:
Debug.Writeline(#9/17/2010#.ToString("D"))Friday, September 17, 2010
Table 11.9 lists the named formats for the standard date and time patterns. The format char-acters are case sensitive — for example, g and G represent slightly different patterns.
The following examples format the current date by using all the format patterns listed inTable 11.9. An example of the output produced by each statement is shown under each state-ment, indented and highlighted.
Debug.WriteLine(now().ToString("d"))2/2/2010
Debug.WriteLine(Now().ToString("D"))Tuesday, February 02, 2010
Debug.WriteLine(Now().ToString("f"))Tuesday, February 02, 2010 10:51 PM
Debug.WriteLine(Now().ToString("F"))Tuesday, February 02, 2010 10:51:16 PM
Debug.WriteLine(Now().ToString("g"))2/2/2010 10:51 PM
Debug.WriteLine(Now().ToString("G"))2/2/2010 10:51:16 PM

HANDLING DATES AND TIME 481
Debug.WriteLine(Now().ToString("m"))February 02
Debug.WriteLine(Now().ToString("r"))Tue, 02 Feb 2010 22:51:16 GMT
Debug.WriteLine(Now().ToString("s"))2010-02-02T22:51:16
Debug.WriteLine(Now().ToString("t"))10:51 PM
Debug.WriteLine(Now().ToString("T"))10:51:16 PM
Debug.WriteLine(Now().ToString("u"))2010-02-02 22:51:16Z
Debug.WriteLine(Now().ToString("U"))Tuesday, February 02, 2010 8:51:16 PM
Debug.WriteLine(Now().ToString("y"))February, 2010
Table 11.9: The date and time named formats
Named Format Output Format Name
d MM/dd/yyyy ShortDatePattern
D dddd, MMMM dd, yyyy LongDatePattern
F dddd, MMMM dd, yyyyHH:mm:ss.mmm
FullDateTimePattern (long dateand long time)
f dddd, MMMM dd, yyyy HH:mm.ss FullDateTimePattern (long dateand short time)
g MM/dd/yyyy HH:mm general (short date and short time)
G MM/dd/yyyy HH:mm:ss General (short date and long time)
M, m MMMM dd MonthDayPattern (month and day)
r, R ddd, dd MMM yyyy HH:mm:ssGMT
RFC1123Pattern
s yyyy-MM-dd HH:mm:ss SortableDateTimePattern
t HH:mm ShortTimePattern (short time)
T HH:mm:ss LongTimePattern (long time)
u yyyy-MM-dd HH:mm:ss UniversalSortableDateTimePattern(sortable GMT value)
U dddd, MMMM dd, yyyy HH:mm:ss UniversalSortableDateTimePattern(long date, long GMT time)
Y, y MMMM, yyyy YearMonthPattern (month and year)

482 CHAPTER 11 THE FRAMEWORK AT LARGE
Table 11.10: Date format specifier
Format Character Description
d The date of the month
ddd The day of the month with a leading zero for single-digit days
ddd The abbreviated name of the day of the week (a member of theAbbreviatedDayNames enumeration)
dddd The full name of the day of the week (a member of the DayNamesFormatenumeration)
M The number of the month
MM The number of the month with a leading zero for single-digit months
MMM The abbreviated name of the month (a member of theAbbreviatedMonthNames enumeration)
MMMM The full name of the month
y The year without the century (the year 2001 will be printed as 1)
yy The year without the century (the year 2001 will be displayed as 01)
yyyy The complete year
gg The period or era (pattern ignored if the date to be formatted does nothave an associated period as A.D. or B.C. have)
h The hour in 12-hour format
hh The hour in 12-hour format with a leading zero for single-digit hours
H The hour in 24-hour format
HH The hour in 24-hour format with a leading zero for single-digit hours
m The minute of the hour
mm The minute of the hour with a leading zero for single-digit minutes
s The second of the hour
ss The second of the hour with a leading zero for single-digit seconds
t The first character in the a.m./p.m. designator
tt The a.m./p.m. designator

HANDLING DATES AND TIME 483
Table 11.10: Date format specifier (CONTINUED)
Format Character Description
z The time-zone offset (applies to hours only)
zz The time-zone offset with a leading zero for single-digit hours (applies tohours only)
zzz The full time-zone offset (hour and minutes) with leading zeros forsingle-digit hours and minutes
Table 11.10 lists the format characters that can be combined to build custom format date andtime values. The patterns are case sensitive. If the custom pattern contains spaces or charactersenclosed in single quotation marks, these characters will appear in the formatted string.
To display the full month name and the day in the month, for instance, use the followingstatement:
Debug.WriteLine(now().ToString("MMMM d"))July 27
You may have noticed some overlap between the named formats and the format characters.The character d signifies the short date pattern when used as a named format and the numberof the day when used as a format character. The compiler figures out how it’s used based onthe context. If the format argument is d/mm, it will display the day and month number, whereasthe format argument d, mmm will display the number of the day followed by the month’s name.If you use the character d on its own, however, it will be interpreted as the named format forthe short date format.
Date Conversion Methods
The DateTime class supports methods for converting a date/time value to many of the otherbase types, which are presented briefly in Table 11.11.
Dates as Numeric Values
The Date type encapsulates complicated operations, and it’s worth taking a look at the innerworkings of the classes that handle dates and times. Let’s declare two variables to experiment alittle with dates: a Date variable, which is initialized to the current date, and a Double variable:
Dim Date1 As Date = Now()Dim dbl As DoubleInsert a couple of statements to convert the date to a Double value and print it:
dbl = Date1.ToOADateDebug.WriteLine(dbl)

484 CHAPTER 11 THE FRAMEWORK AT LARGE
Table 11.11: DateTime class conversion methods
Methods Description
ToLongDateString,ToShortDateString
These two methods convert the date part of the current DateTimeinstance to a string with the long (or short) date format. The followingstatement will return a value like the one highlighted, which is the longdate format:
Debug.WriteLine(Now().ToLongDateString)Tuesday, July 14, 2009
ToLongTimeString,ToShortTimeString
These two methods convert the time part of the current instance of theDate class to a string with the long (or short) time format. The followingstatement will return a value like the one highlighted:
Debug.WriteLine(Now().ToLongTimeString)6:40:53 PM
ToUniversalTime,ToLocalTime
ToUniversalTime converts the current instance of the DateTime classinto Coordinated Universal Time (UTC). If you convert the local time of asystem in New York to UTC, the value returned by this method will be adate/time value that’s five hours ahead. The date may be the same orthe date of the following day. If the statement is executed after 7 p.m.local time, the date will be that of the following day. The methodToLocalTime converts a UTC time value to local time.
On the date I tested this code, February 2, 2010, the value was 40211.9442577662. The inte-ger part of this value is the date, and the fractional part is the time. If you add one day to thecurrent date and then convert it to a double again, you’ll get a different value:
dbl = (Now().AddDays(1)).ToOADateDebug.WriteLine(dbl)
This time, the value 40212.9452653704 was printed; its integer part is tomorrow’s value. Youcan add two days to the current date by adding (48 × 60) minutes. The original integer part ofthe numeric value will be increased by two:
dbl = Now().AddMinutes(48 * 60).ToOADateDebug.WriteLine(dbl)
The value printed this time will be 40213.9456303588.Let’s see how the date-manipulation methods deal with leap years. We’ll add 10 years to the
current date via the AddYears method, and we’ll print the new value with a single statement:
Debug.WriteLine(Now().AddYears(10).ToLongDateString)

HANDLING DATES AND TIME 485
The value that will appear in the Immediate window will be Sunday, February 02, 2020. TheDouble value of this date is 40211.9459967361. If you add 3,650 days, you’ll get a different valuebecause the 10-year span contains at least two leap years:
Debug.WriteLine(Now().AddDays(3650).ToLongDateString)Debug.WriteLine(Now().AddDays(3650).ToOADate)
The new value that will be printed in the Immediate window will be Friday, January 31,2020, and the corresponding Double value will be 43861.9468961111.
Can you figure out what time it was when I executed the preceding statements? If you mul-tiply the fractional part (0.9468957639) by 24, you’ll get 22.7254983336, which is 56.813745834hours and some minutes. If you multiply the fractional part of this number by 60, you’ll get56.813745834, which is 56.813745834 minutes and some seconds. Finally, you can multiply thenew fractional part by 60 to get the number of seconds: 48.82475004. So, it was 10:56:48 p.m.And the last fractional part corresponds to 824 milliseconds.
The TimeSpan ClassThe last class discussed in this chapter is the TimeSpan class, which represents a time intervaland can be expressed in many different units — from ticks or milliseconds to days. The Time-Span is usually the difference between two date/time values, but you can also create aTimeSpan for a specific interval and use it in your calculations.
To use the TimeSpan variable in your code, just declare it with a statement such asthe following:
Dim TS As New TimeSpan
To initialize the TimeSpan object, you can provide the number of days, hours, minutes, sec-onds, and milliseconds that make up the time interval. The following statement initializes aTimeSpan object with a duration of 9 days, 12 hours, 1 minute, and 59 seconds:
Dim TS As TimeSpan = New TimeSpan(9, 12, 1, 59)
As you have seen, the difference between two dates calculated by the Date.Subtractmethod returns a TimeSpan value. You can initialize an instance of the TimeSpan object bycreating two date/time values and getting their difference, as in the following statements:
Dim TS As New TimeSpanDim date1 As Date = #4/11/1994#Dim date2 As Date = Now()TS = date2.Subtract(date1)Debug.WriteLine(TS)
Depending on the day on which you execute these statements, they will print something likethe following in the Output window:
5585.17:05:12.7623000

486 CHAPTER 11 THE FRAMEWORK AT LARGE
The days are separated from the rest of the string with a period, whereas the time partsare separated with colons. Notice that a TimeSpan object might represent an interval of manyyears, but it doesn’t provide members to report months or years. The difference represented byTS variable in the preceding example is 5,585 days, 17 hours, 5 minutes, 12 seconds, and 762,300nanoseconds (or 762.3 milliseconds).
Properties
The TimeSpan class exposes the properties described in the following sections. Most of theseproperties are shared (you don’t have to create an instance of the TimeSpan class to use them).
Field Properties
TimeSpan exposes the simple properties shown in Table 11.12, which are known as fields andare all shared. You’ll use these field values to convert the time difference represented by aTimeSpan object to common time units.
Table 11.12: The fields of the TimeSpan object
Property Returns
Empty An empty TimeSpan object
MaxValue The largest interval you can represent with a TimeSpan object
MinValue The smallest interval you can represent with a TimeSpan object
TicksPerDay The number of ticks in a day
TicksPerHour The number of ticks in an hour
TicksPerMillisecond The number of ticks in a millisecond
TicksPerMinute The number of ticks in one minute
TicksPerSecond The number of ticks in one second
Zero A TimeSpan object of zero duration
Interval Properties
In addition to the fields, the TimeSpan class exposes two more groups of properties that returnthe various intervals in a TimeSpan value (shown in Tables 11.13 and 11.14). The members ofthe first group of properties return the number of specific intervals (days, hours, and so on) ina TimeSpan value. The second group of properties returns the entire TimeSpan duration in oneof the intervals recognized by the TimeSpan method.
If a TimeSpan value represents 2 minutes and 10 seconds, the Seconds property will returnthe value 10. The TotalSeconds property, however, will return the value 130, which is the totalduration of the TimeSpan in seconds.

HANDLING DATES AND TIME 487
Table 11.13: The Intervals of a TimeSpan value
Property Returns
Days The number of whole days in the current TimeSpan.
Hours The number of whole hours in the current TimeSpan.
Milliseconds The number of whole milliseconds in the current TimeSpan. Thelargest value of this property is 999.
Minutes The number of whole minutes in the current TimeSpan. Thelargest value of this property is 59.
Seconds The number of whole seconds in the current TimeSpan. Thelargest value of this property is 59.
Ticks The number of whole ticks in the current TimeSpan.
Table 11.14: The total intervals of a TimeSpan value
Property Returns
TotalDays The number of days in the current TimeSpan
TotalHours The number of hours in the current TimeSpan
TotalMilliseconds The number of whole milliseconds in the current TimeSpan
TotalMinutes The number of whole minutes in the current TimeSpan
TotalSeconds The number of whole seconds in the current TimeSpan
Similar Method Names, Different Results
Be very careful when choosing the property to express the duration of a TimeSpan in a specificinterval. The Seconds property is totally different from the TotalSeconds property. Becauseboth properties will return a value (which also happens to be the same if the entire TimeSpanduration is less than a minute), you may not notice that you’re using the wrong property forthe task at hand.
The Duration property returns the duration of the current instance of the TimeSpan class.The duration is expressed as the number of days followed by the number of hours, minutes,seconds, and milliseconds. The following statements create a TimeSpan object of a few seconds(or minutes, if you don’t mind waiting) and print its duration in the Output window. The first

488 CHAPTER 11 THE FRAMEWORK AT LARGE
few statements initialize a new instance of the DateTime type, the T1 variable, to the currentdate and time. Then a message box is displayed that prompts to click the OK button to con-tinue. Wait for several seconds before closing the message box. The last group of statementssubtracts the T1 variable from the current time and displays the duration (how long you keptthe message box open on your screen):
Dim T1, T2 As DateTimeT1 = NowMsgBox("Click OK to continue")T2 = NowDim TS As TimeSpanTS = T2.Subtract(T1)Debug.WriteLine("Total duration = " & TS.Duration.ToString)Debug.WriteLine("Minutes = " & TS.Minutes.ToString)Debug.WriteLine("Seconds = " & TS.Seconds.ToString)Debug.WriteLine("Ticks = " & TS.Ticks.ToString)Debug.WriteLine("Milliseconds = " & TS.TotalMilliseconds.ToString)Debug.WriteLine("Total seconds = " & TS.TotalSeconds.ToString)
If you place these statements in a button’s Click event handler and execute them, you’ll seea series of values like the following in the Immediate window:
Total duration = 00:01:34.2154752Minutes = 1Seconds = 34Ticks = 942154752Milliseconds = 94215,4752Total seconds = 94,2154752
The duration of the TS TimeSpan is 1 minute and 34 seconds. Its total duration in milli-seconds is 94,215.4752, or 94.2154752 seconds.
Methods
There are various methods for creating and manipulating instances of the TimeSpan class, andthey’re described in the following list.
Interval methods The methods in Table 11.15 create a new TimeSpan object of a specificduration. The TimeSpan duration is specified as a number of intervals, accurate to the nearestmillisecond.
All methods accept a single argument, which is a Double value that represents the number ofthe corresponding intervals (days, hours, and so on).
Add This method adds a TimeSpan object to the current instance of the class; its syntax is asfollows, where TS, TS1, and newTS are all TimeSpan variables:
newTS = TS.Add(TS1)

HANDLING DATES AND TIME 489
Table 11.15: Interval methods of the TimeSpan object
Method Creates a New TimeSpan of This Length
FromDays Number of days specified by the argument
FromHours Number of hours specified by the argument
FromMinutes Number of minutes specified by the argument
FromSeconds Number of seconds specified by the argument
FromMilliseconds Number of milliseconds specified by the argument
FromTicks Number of ticks specified by the argument
The following statements create two TimeSpan objects and then add them:
Dim TS1 As New TimeSpan(1, 0, 1)Dim TS2 As New TimeSpan(2, 1, 9)Dim TS As New TimeSpanTS = TS1.Add(TS2)
The duration of the new TimeSpan variable is 3 hours, 1 minute, and 10 seconds.
Subtract The Subtract method subtracts a TimeSpan object from the current instance of theTimeSpan class, similar to the Add method.
The StopWatch ClassTo simplify the task of timing operations, a new class was introduced with the .NET Frame-work version 4, the StopWatch class. This class implements a stopwatch, which you can startjust before the code segment you want to time and stop it after the last statement in this codesegment. In addition, you can pause the stopwatch (you may wish to exclude some debuggingstatements from the code to be timed).
To use the StopWatch class, declare a new variable of this type:
Dim SW As New StopWatch
Use the Start method to start the stopwatch and the Stop method to stop it or pauseit. While the stopwatch is stopped or paused, you can request the elapsed time with theElapsed property, which returns the elapsed time as a TimeSpan object. You can also retrievethe elapsed time in milliseconds with the ElapsedMilliseconds method, and in ticks of theinternal clock with the ElapsedTicks method (as a reminder, a tick is 1/10 of a millisecond).
You can also use the Reset method to stop the stopwatch and zero the elapsed time or theStartNew method to zero the elapsed time and start the stopwatch.
Listing 11.6 demonstrates the basic members of the StopWatch class. Initially, the samplecode declares and starts a new instance of the StopWatch class and then displays a message box
490 CHAPTER 11 THE FRAMEWORK AT LARGE
prompting you to close the dialog box and stop the stopwatch. Leave the message box open fora few seconds before clicking the OK button to simulate some delay. Then the code displaysanother dialog box, prompting you to close it. Then it starts the stopwatch again and displaysyet another message box. The time between stopping and restarting the stopwatch won’t beincluded in the total elapsed time. When you close the last dialog box, you can see the resultsof the operation in the Output window.
Listing 11.6: Timing operations with the StopWatch class
Private Sub timeButton_Click(...) Handles timeButton.ClickDim sw As New Stopwatchsw.Start()‘ This is where the statements to be timed should appear‘ Use the MsgBox() function to simulate a delayMsgBox("Stopwatch is running. Press any key to pause it")‘ End of timing operationssw.Stop()Debug.WriteLine("Elapsed time")Debug.WriteLine(sw.Elapsed.ToString)Debug.WriteLine(sw.ElapsedMilliseconds.ToString)MsgBox("Stopwatch is not running. " &
"Wait a few seconds and press any key to restart it")‘ Continue timing the operationssw.Start()MsgBox("And now press a key to stop the stopwatch")Debug.WriteLine("Total elapsed time")Debug.WriteLine(sw.Elapsed.ToString)Debug.WriteLine(sw.ElapsedMilliseconds.ToString)
End Sub
The Bottom Line
Handle files with the My component. The simplest method of saving data to a file is tocall one of the WriteAllBytes or WriteAllText methods of the My.Computer.FileSystemcomponent. You can also use the IO namespace to set up a Writer object to send data to a fileand a Reader object to read data from the file.
Master It Show the statements that save a TextBox control’s contents to a file and the state-ments that reload the same control from the data file. Use the My.Computer.FileSystem com-ponent.
Write data to a file with the IO namespace. To send data to a file you must set up aFileStream object, which is a channel between the application and the file. To send data to afile, create a StreamWriter or BinaryWriter object on the appropriate FileStream object.

THE BOTTOM LINE 491
Likewise, to read from a file, create a StreamReader or BinaryReader on the appropriateFileStream object. To send data to a file, use the Write and WriteString methods of theappropriate StreamWriter object. To read data from the file, use the Read, ReadBlock,ReadLine, and ReadToEnd methods of the StreamReader object.
Master It Write the contents of a TextBox control to a file using the methods of theIO namespace.
Manipulate folders and files. The IO namespace provides the Directory and File classes,which represent the corresponding entities. Both classes expose a large number of methodsfor manipulating folders (CreateDirectory, Delete, GetFiles, and so on) and files (Create,Delete, Copy, OpenRead, and so on).
Master It How will you retrieve the attributes of a drive, folder, and file using the IOnamespace’s classes?
Use the Char data type to handle characters. The Char data type, which is implementedwith the Char class, exposes methods for handling individual characters (IsLetter, IsDigit,IsSymbol, and so on). We use the methods of the Char class to manipulate users’ keystrokesas they happen in certain controls (mostly the TextBox control) and to provide immediatefeedback.
Master It You want to develop an interface that contains several TextBox controls thataccept numeric data. How will you intercept the user’s keystrokes and reject any charactersthat are not numeric?
Use the StringBuilder class to manipulate large or dynamic strings. The StringBuilder classis very efficient at manipulating long strings, but it doesn’t provide as many methods for han-dling strings. The StringBuilder class provides a few methods to insert, delete, and replacecharacters within a string. Unlike the equivalent methods of the String class, these methodsact directly on the string stored in the current instance of the StringBuilder class.
Master It Assuming that you have populated a ListView control with thousands of linesof data from a database, how will you implement a function that copies all the data to theClipboard?
Use the DateTime and TimeSpan classes to handle dates and time. The Date class repre-sents dates and time, and it exposes many useful shared methods (such as the IsLeap method,which returns True if the year passed to the method as an argument is leap; the DaysInMonthmethod; and so on). It also exposes many instance methods (such as AddYears, AddDays,AddHours, and so on) for adding time intervals to the current instance of the Date class as wellas many options for formatting date and time values.
The TimeSpan class represents time intervals — from milliseconds to days — with theFromDays, FromHours, and even FromMilliseconds methods. The difference between twodate variables is a TimeSpan value, and you can convert this value to various time units by

492 CHAPTER 11 THE FRAMEWORK AT LARGE
using methods such as TotalDays, TotalHours, TotalMilliseconds, and so on. You can alsoadd a TimeSpan object to a date variable to obtain another date variable.
Master It How will you use the TimeSpan class to accurately time an operation?
Generate graphics by using the drawing methods. Every object you draw on, such as formsand PictureBox controls, exposes the CreateGraphics method, which returns a Graphicsobject. The Paint event’s e argument also exposes the Graphics object of the control or form.To draw something on a control, retrieve its Graphics object and then call the Graphics object’sdrawing methods.
Master It Show how to draw a circle on a form from within the form’s Paintevent handler.
Use the printing controls and dialog boxes. To print with the .NET Framework, you mustadd an instance of the PrintDocument control to your form and call its Print method. To pre-view the same document, you simply assign the PrintDocument object to the Document prop-erty of the PrintPreviewDialog control and then call the ShowDialog method of the PrintPre-viewDialog control to display the preview window. You can also display the Print dialog box,where users can select the printer to which the output will be sent, and the Page Setup dia-log box, where users can specify the page’s orientation and margins. The two dialog boxes areimplemented with the PrintDialog and PageSetupDialog controls.
Master It Explain the process of generating a simple printout. How will you handle multi-ple report pages?
Master It Assuming that you have displayed the Page Setup dialog box control to the user,how will you draw a rectangle that delimits the printing area on the page, taking into con-sideration the user-specified margins?

Chapter 12
Storing Data in Collections
One of the most common operations in programming is storing large sets of data. Traditionally,programmers used arrays to store related data. Because arrays can store custom data types, theyseem to be the answer to many data-storage and data-manipulation issues. Arrays, however,don’t expose all the functionality you might need in your application. To address the issues ofdata storage outside databases, the Framework provides, in addition to arrays, certain classesknown as collections.
There are databases, of course, that can store any type of data and preserve their structureas well, but not all applications use databases. Although databases store data permanently,collections live in memory and must be persisted to a disk file between sessions. Collectionscan also be used to store data you read from a database in the target computer’s memory. Ifyour application needs to store custom objects, such as the ones you designed in Chapter 8,‘‘Working with Objects,’’ or a few names and contact information, you shouldn’t have to set upa database. A simple collection like the ones described in this chapter will suffice.
In this chapter, you’ll learn how to do the following:
◆ Make the most of arrays
◆ Store data in specialized collections such as List and Dictionary collections
◆ Sort and search collections with custom comparers
Advanced Array TopicsArrays are indexed sets of data, and this is how we’ve used them so far in this book. In thischapter, you will learn about additional members that make arrays extremely flexible. The Sys-tem.Array class provides methods for sorting arrays, searching for an element, and more. In thepast, programmers spent endless hours writing code to perform the same operations on arrays,but the Framework frees them from similar counterproductive tasks.
This chapter starts with a brief discussion of the advanced features of the Array class. Withso many specialized collections supported by the Framework, arrays are no longer the primarymechanism for storing sets of data. However, because many developers are still using arrays,I’ve decided to include a brief presentation of the advanced techniques that will simplify themanipulation of arrays.

494 CHAPTER 12 STORING DATA IN COLLECTIONS
Sorting ArraysTo sort an array, call its Sort method. This method is heavily overloaded, and as you will see,it is possible to sort an array based on the values of another array or even to supply your owncustom sorting routines. If the array is sorted, you can call the BinarySearch method to locatean element very efficiently. If not, you can still locate an element in the array by using theIndexOf and LastIndexOf methods. The Sort method is a reference method: It requires thatyou supply the name of the array to be sorted as an argument and sorts the array in place (inother words, it doesn’t return another array with the same elements in a different order). Thesimplest form of the Sort method accepts a single argument, which is the name of the array tobe sorted:
Array.Sort(arrayName)
This method sorts the elements of the array according to the type of its elements, as longas the array is strictly typed and was declared as a simple data type (String, Decimal, Date,and so on). If the array contains data that are not of the same type or that are objects, the Sortmethod will fail. The Array class just doesn’t know how to compare integers to strings or dates,so don’t attempt to sort arrays whose elements are not of the same type. If you can’t be surethat all elements are of the same type, use a Try…Catch statement.
You can also sort a section of the array by using the following form of the Sort method,where startIndex and endIndex are the indices that delimit the section of the array to besorted:
System.Array.Sort(arrayName, startIndex, endIndex)
An interesting variation of the Sort method sorts the elements of an array according to thevalues of the elements in another array. Let’s say you have one array of names and another ofmatching Social Security numbers. It is possible to sort the array of names according to theirSocial Security numbers. This form of the Sort method has the following syntax:
System.Array.Sort(array1, array2)
array1 is the array with the keys (the Social Security numbers), and array2 is the arraywith the actual elements to be sorted. This is a very handy form of the Sort method. Let’s sayyou have a list of words stored in one array and their frequencies in another. Using the firstform of the Sort method, you can sort the words alphabetically. With the third form of theSort method, you can sort them according to their frequencies (starting with the most com-mon words and ending with the least common ones). The two arrays must be one-dimensionaland have the same number of elements. If you want to sort a section of the array, just sup-ply the startIndex and endIndex arguments to the Sort method, after the names of the twoarrays.
Another form of the Sort method relies on a user-supplied function to sort arrays of customobjects. As you recall, arrays can store all types of objects. But the Framework doesn’t knowhow to sort your custom objects, or even its built-in objects. To sort an array of objects, youmust provide your own class that implements the IComparer interface (basically, a functionthat can compare two instances of a custom class). This form of the Sort method is describedin detail in the section titled ‘‘The IEnumerator and IComparer Interfaces’’ later in thischapter.

ADVANCED ARRAY TOPICS 495
Searching ArraysArrays can be searched in two ways: with the BinarySearch method, which works onsorted arrays and is extremely fast, and with the IndexOf and LastIndexOf methods, whichwork regardless of the order of the elements. All three methods search for an instance of anitem and return its index, and they’re all reference methods. The IndexOf and LastIndexOfmethods are similar to the methods by the same name of the String class. They return theindex of the first (or last) instance of an object in the array, or they return the value –1 if theobject isn’t found in the array. Both methods are overloaded, and the simplest form of theIndexOf method is the following, where arrayName is the name of the array to be searchedand object is the item you’re searching for:
itemIndex = System.Array.IndexOf(arrayName, object)
Another form of the IndexOf and LastIndexOf methods allows you to begin the search at aspecific index:
itemIndex = System.Array.IndexOf(arrayName, object, startIndex)
This form of the method starts searching in the segment of the array from startIndex to theend of the array. Finally, you can specify a range of indices in which the search will take placeby using the following form of the method:
itemIndex = System.Array.IndexOf(arrayName, object, startIndex, endIndex)
You can search large arrays more efficiently with the BinarySearch method if the array issorted. The simplest form of the BinarySearch method is the following:
System.Array.BinarySearch(arrayName, object)
The BinarySearch method returns an integer value, which is the index of the object you’vebeen searching for in the array. If the object argument is not found, the method returns a neg-ative value, which is the negative of the index of the next larger item minus one. This transfor-mation, the negative of a number minus one, is called the one’s complement, and other languagesprovide an operator for it: the tilde (∼). The one’s complement of 10 is –11, and the one’s com-plement of –3 is 2.
Why all this complexity? Zero is a valid index, so only a negative value could indicate afailure in the search operation. A value of –1 would indicate that the operation failed, but theBinarySearch method does something better. If it can’t locate the item, it returns the index ofthe item immediately after the desired item (the first item in the array that exceeds the itemyou’re searching for). This is a near match, and the BinarySearch method returns a negativevalue to indicate near matches. A near match is usually the same string with different charactercasing or a slightly different spelling. It may also be a string that’s totally irrelevant to the oneyou’re searching for. Notice that there will always be a near match unless you’re searching for avalue larger than the last value in the array. In this case, the BinarySearch method will returnthe one’s complement of the array’s upper bound (–100 for an array of 100 elements, if youconsider that the index of the last element is 99).

496 CHAPTER 12 STORING DATA IN COLLECTIONS
Arrays Perform Case-Sensitive Searches
The BinarySearch, IndexOf, and LastIndexOf methods perform case-sensitive searches.However, because the BinarySearch method reports near matches, it appears as if it per-forms case-insensitive searches. If the array contains the element Charles and you search forcharles, the IndexOf method will not find the string and will report a no-match, whereasthe BinarySearch method will find the element Charles and report it as a near match. Myrecommendation is to standardize the case of the data and the search argument when youplan to perform searches (such as uppercase for titles, camel case for names, and so on). As analternative, you can use String.ToUpper() on both arguments. To perform case-insensitivesearches, you must implement your own custom comparer, a process that’s described later inthis chapter. Also, the Option Compare statement has no effect on the comparisons performedby either the BinarySearch method or the IndexOf and LastIndexOf methods.
VB 2010 at Work: The ArraySearch Application
The ArraySearch application, shown in Figure 12.1, demonstrates how to handle exact and nearmatches reported by the BinarySearch method. The Populate Array button populates an arraywith 10,000 random strings. The same strings are also displayed in a sorted ListBox control,so you can view them. The elements have the same order in both the array and the ListBox, soyou can use the index reported by the BinarySearch method to locate and select instantly thesame item in the ListBox.
Figure 12.1
Searching an array andhighlighting the sameelement in the ListBoxcontrol
Each of the 10,000 random strings has a random length of 3 to 15 characters. When you runthe application, message boxes will pop up, displaying the time it took for each operation: howlong it took to populate the array, how long it took to sort it, and how long it took to populatethe ListBox. You might want to experiment with large arrays (100,000 elements or more) to getan idea of how efficiently VB handles arrays.
The Search Array button prompts the user for a string via the InputBox() function and thenlocates the string in the array by calling the BinarySearch method in the array. The result is

ADVANCED ARRAY TOPICS 497
either an exact or a near match, and it’s displayed in a message box. At the same time, the itemreported by the BinarySearch method is also selected in the ListBox control.
Run the application, populate the ListBox control, and then click the Search Array button.Enter an existing string (you can use lowercase or uppercase characters; it doesn’t make a dif-ference), and verify that the application reports an exact match and locates the item in the List-Box. The program appears to perform case-insensitive searches because all the strings stored inthe array are in uppercase, and the search argument is also converted to uppercase before theBinarySearch method is called.
Now, enter a string that doesn’t exist in the list (or the beginning of an existing string) andsee how the BinarySearch handles near matches.
The code behind the Search Array button calls the BinarySearch method and stores theinteger returned by the method to the wordIndex variable. Then it examines the value of thisvariable. If wordIndex is positive, there was an exact match, and it’s reported. If wordIndexis negative, the program calculates the one’s complement of this value, which is the index ofthe nearest match. The element at this index is reported as a near match. Finally, regardlessof the type of the match, the code selects the same item in the ListBox and scrolls it into view.Listing 12.1 is the code behind the Search Array button.
Listing 12.1: Locating exact and near matches with BinarySearch
Private Sub bttnSearch_Click(…) Handles bttnSearch.ClickDim srchWord As String ‘ the word to search forDim wordIndex As Integer ‘ the index of the wordsrchWord = InputBox(
"Enter word to search for").ToUpperwordIndex = System.Array.BinarySearch(words, srchWord)If wordIndex >= 0 Then ‘ exact match!
ListBox1.TopIndex = wordIndexListBox1.SelectedIndex = wordIndexMsgBox("An exact match was found for " &
" the word [" & words(wordIndex) &"] at index " & wordIndex.ToString,,"EXACT MATCH")
Else ‘ Near matchListBox1.TopIndex = -wordIndex - 1ListBox1.SelectedIndex = -wordIndex - 1MsgBox("The nearest match is the word [" &
words(-wordIndex - 1) & "] at index " &(-wordIndex - 1).ToString, , "NEAR MATCH")
End IfEnd Sub
Notice that all methods for sorting and searching arrays work with the base data types only.If the array contains custom data types, you must supply your own functions for comparingelements of this type, a process described in detail in the section ‘‘The IEnumerator and ICom-parer Interfaces’’ later in this chapter.

498 CHAPTER 12 STORING DATA IN COLLECTIONS
The Binary Search Algorithm
The BinarySearch method uses a powerful search algorithm, the binary search algorithm, butit requires that the array be sorted. You need not care about the technical details of the imple-mentation of a method, but in the case of the binary search algorithm, a basic understanding ofhow it works will help you understand how it performs near matches.
To locate an item in a sorted array, the BinarySearch method compares the search string tothe array’s middle element. If the search string is smaller, you know that the element is in thefirst half of the array, and you can safely ignore the second half. The same process is repeatedwith the remaining half of the elements. The search string is compared with the middle elementof the reduced array, and after the comparison, you can ignore one-half of the reduced array.At each step, the binary search algorithm rejects one-half of the items left until it reduces thelist to a single item. This is the item you’re searching for. If not, the item is not in the list. Tosearch a list of 1,024 items, the binary search algorithm makes 10 comparisons. At the first step,it’s left with an array of 512 elements, then 256 elements, then 128 elements, and so on, until itreaches a single element. For an array of 1,024 × 1,024 (that’s a little more than a million) items,the algorithm makes 20 comparisons to locate the desired item.
If you apply the BinarySearch method to an array that hasn’t been sorted, the method willcarry out all the steps and report that the item wasn’t found, even if the item belongs to thearray. The algorithm doesn’t check the order of the elements; it just assumes that they’re sorted.The binary search algorithm always halves the number of elements in which it attempts tolocate the search argument. That’s why you should never apply the BinarySearch method toan array that hasn’t been sorted yet.
To see what happens when you apply the BinarySearch method to an array that hasn’tbeen sorted, remove the statement that calls the Sort method in the ArraySearch sample appli-cation. The application will keep reporting near matches, even if the string you’re searchingfor is present in the array. Of course, the near match reported by the BinarySearch methodin an unsorted array isn’t close to the element you’re searching for — it’s just an element thathappens to be there when the algorithm finishes.
Performing Other Array OperationsThe Array class exposes additional methods, which are described briefly in this section. TheReverse method reverses the order of the elements in an array. The Reverse method acceptsthe array to be reversed as an argument and returns another array:
reversedArray = System.Array.Reverse(arrayName)
The Copy and CopyTo methods copy the elements of an array (or segment of an array) toanother array. The syntax of the Copy method is as follows:
System.Array.Copy(sourceArray, destinationArray, count)
sourceArray and destinationArray are the names of the two arrays, and count is thenumber of elements to be copied. The copying process starts with the first element of the sourcearray and ends after the first count elements have been copied. If count exceeds the length ofeither array, an exception will be thrown.

ADVANCED ARRAY TOPICS 499
Another form of the Copy method allows you to specify the range of elements in the sourcearray to be copied and a range in the destination array in which these elements will be copied.The syntax of this form of the method is as follows:
System.Array.Copy(sourceArray, sourceStart,destinationArray, destinationStart, count)
This method copies count elements from the source array, starting at location sourceStart,and places them in the destination array, starting at location destinationStart. All indicesmust be valid, and there should be count elements after the sourceStart index in the sourcearray, as well as count elements after the destinationStart in the destination array. If not, anexception will be thrown.
The CopyTo method is similar, but it doesn’t require the name of the source array. It copiesthe elements of the array to which it’s applied into the destination array, where sourceArray isa properly dimensioned and initialized array:
sourceArray.CopyTo(destinationArray, sourceStart)
Finally, you can filter array elements by using the Filter() function, which is not a methodof the Array class; it’s a VB function that acts on arrays. The Filter() function performs anelement-by-element comparison and rejects the elements that don’t meet the user-specified cri-teria. The filtered elements are returned as a new array, while the original array remains intact.The syntax of the Filter() function is as follows:
filteredArray = Filter(source, match, include, compare)
source is the array to be searched, and it must be a one-dimensional array of stringsor objects. The match argument is the string to search for. Every element that includes thespecified string is considered a match. The remaining arguments are optional: include isa True/False value indicating whether the method will return the elements that include (ifTrue) or exclude (if False) the matching elements. The compare argument is a member of theCompareMethod enumeration: It can be Binary (for binary or case-sensitive comparisons) orText (for textual or case-insensitive comparisons). If no match is found, the method will returnan empty array.
The following code segment filters out the strings that don’t contain the word visual fromthe words array:
Dim words() As String = {"Visual Basic", "Java", "Visual Studio"}Dim selectedWords() As StringselectedWords = Filter(words, "visual", True, CompareMethod.Text)Dim selword As StringDim msg As String = ""For Each selword In selectedWords
msg &= selword & vbCrLfNextMsgBox(msg)

500 CHAPTER 12 STORING DATA IN COLLECTIONS
If you execute the preceding statements, the message box will display the following:
Visual BasicVisual Studio
There are a few more interesting array methods, such as the FindAll method, which findsthe elements that meet arbitrary conditions, and the TrueForAll method, which returns Trueif all elements in the array meet the criteria you supply. With the introduction of LINQ, a topicthat’s discussed in detail in Chapter 14, ‘‘Introduction to LINQ,’’ there’s very little reason to usethese methods. LINQ provides a straightforward syntax for selecting elements from an array. Ifyou haven’t seen the LINQ syntax before, here the code segment extracts the strings that con-tain the word visual, similar to the preceding sample:
Dim words() As String = {"Visual Basic", "Java", "Visual Studio"}Dim selectedWords = From word In words
Where word.ToUpper.Contains("VISUAL")Select word
I will not discuss this syntax any further in this chapter, but it’s easy to see that the code ismore intuitive and that the filtering expression may contain any of the Framework’s functionsand methods, allowing for much more flexible pattern-matching techniques. As you may recallfrom Chapter 10, ‘‘Applied Object-Oriented Programming,’’ the functionality of arrays, as wellas all other collections, has been enhanced with extension methods. One of Chapter 10’s sampleprojects is the Extension Methods project, which demonstrates some of the array’s extensionmethods.
Array Limitations
As implemented in version 4.0 of the Framework, arrays are more flexible than ever. They’revery efficient, and the most demanding tasks programmers previously had to perform witharrays are now implemented as methods of the Array class. However, arrays aren’t perfectfor all types of data storage. The most important shortcoming of arrays is that they’re notdynamic. Inserting or removing elements entails moving all the following elements up ordown. Arrays are the most efficient collection in the Framework, but when you need a dynamicstructure for adding and removing elements in the course of an application, you should use acollection, such as the List or ArrayList collection, described in detail in the next section.
Collection TypesCollections are structures for storing sets of data, similar to arrays, but they are more flexible,and there are several types of collections to choose from. Let’s start with a rough classifica-tion of collections. There are collections that store just data, like the List and ArrayList col-lections, and there are collections that store pairs of keys and data values, like the Dictionaryand HashTable collections. If each data value has a unique key, you can use this key to quicklyretrieve the matching data value. An ArrayList collection can store temperatures, just like anarray. It can also store objects with properties such as city names and their temperatures, but itdoesn’t allow you to retrieve the temperature in a specific city. If you’re interested in tempera-tures only, you can use an ArrayList or even an array. If you need to access the temperatures in

COLLECTION TYPES 501
specific cities, however, you must use a Dictionary collection that stores temperatures indexedby the corresponding city names.
Another way to classify the collections is as typed and untyped. Untyped collections, such asthe ArrayList collection, allow you to store objects of any type. Typed collections, on the otherhand, such as the List collection, allow you to store objects of a specific type only. The advan-tage of using typed collections is that their elements expose the properties of the specific type.Consider an ArrayList that contains Rectangle objects. To access the width of the third elementin the collection, you must use an expression like the following:
Dim AL As New ArrayListCType(AL(2), Rectangle).Width
This expression may cause a runtime error if the third element in the AL collection is not of theRectangle type (AL is a properly initialized ArrayList).
If you use a List collection to store the same objects, then you can access the width of anelement of the collection with a much simpler expression:
Dim LST As New List(Of Rectangle)’ statements to populate the LST collectionLST(2).Width
(LST is a properly initialized List collection, populated with Rectangle objects.) The members ofthe Rectangle class will appear in the IntelliSense list as you type. Because the LST List collec-tion will not accept any objects other than Rectangles, all errors will be caught at design time,and they will not generate runtime errors.
Now I’ll cover the specialized collections of the Framework starting with the simpler ones,the ArrayList and List collections. The two collections are functionally equivalent, and theyexpose identical members. The ArrayList and List collections allow you to maintain multipleelements, similar to an array; however, Lists and ArrayLists allow the insertion of elementsanywhere in the collection, as well as the removal of any element. In other words, they’redynamic structures that can also grow automatically as you add or remove elements. Like anarray, the collection’s elements can be sorted and searched. You can also remove elements byvalue, not only by index. If you have a collection populated with names, you remove the itemCharles by passing the string itself as an argument. Notice that Charles is not an index value;it’s the element you want to remove.
Creating CollectionsTo use an ArrayList in your code, you must first create an instance of the ArrayList class byusing the New keyword, as in the following statement:
Dim aList As New ArrayList
The aList variable represents an ArrayList that can hold only 16 elements (the default size).You can set the initial capacity of the ArrayList by setting its Capacity property, which is thenumber of elements the ArrayList can hold. Notice that you don’t have to prepare the collec-tion to accept a specific number of items. Every time you exceed the collection’s capacity, it’sdoubled automatically. However, it’s not decreased automatically when you remove items.

502 CHAPTER 12 STORING DATA IN COLLECTIONS
The exact number of items currently in the ArrayList is given by the Count property, whichis always less than (or, at most, equal to) the Capacity property. (Both properties are expressedin terms of items.) If you decide that you will no longer add more items to the collection, youcan call the TrimToSize method, which will set the collection’s capacity to the number of itemsin the list.
Where the ArrayList collection can store objects of any type, a variation of the ArrayListstores objects of the same type. This collection is called List, and it’s a typed ArrayList. Theonly difference between ArrayLists and Lists is in the way they’re declared: When you declarea List collection, you must supply the type of the objects you intend to store in it, using the Ofkeyword in parentheses, as shown in the following statements, which declare two List collec-tions for storing Rectangle objects (the Rects collection) and custom objects of the Student type(the Students collection):
Dim Rects As New List(Of Rectangle)Dim Students As New List(Of Student)
Other than that, the List collection is identical to the ArrayList collection. Of course, becausethe List collection stores objects of a specific type, it integrates nicely with IntelliSense. Ifyou type the name of an element in the collection (such as Rects(3)) and the followingperiod, IntelliSense will display the members of the Rectangle class in a drop-down list. In thefollowing section, you’ll learn about the methods they expose and how to use both types ofcollections in your code. I will be using mostly the List class in the sample code and suggestthat you do the same in your code whenever possible, but the same techniques apply to theArrayList class as well.
Adding and Removing List Items
To add a new item to a List, use the Add method, whose syntax is as follows:
index = lst.Add(obj)
lst is a properly declared List (or ArrayList) variable, and obj is the item you want to addto the collection. The type of the obj object should be the same as the one you used in the dec-laration of the List collection. The Add method appends the specified item to the collection andreturns the index of the new item. If you’re using a List named Capitals to store the names ofthe state capitals, you can add an item by using the following statement:
Capitals.Add("Sacramento")
Let’s say you created a structure called Person by using the following declaration:
Structure PersonDim LastName As StringDim FirstName As StringDim Phone As StringDim EMail As String
End Structure
To store a collection of Person items in a List, create a variable of the Person type, set itsfields, and then add it to the List, as shown in Listing 12.2.

COLLECTION TYPES 503
Listing 12.2: Adding a structure to an ArrayList
Dim Persons As New List(Of Person)Dim p As New Personp.LastName = "Last Name"p.FirstName = "First Name"p.Phone = "Phone"p.EMail = "[email protected]"Persons.Add(p)p = New Personp.LastName = "another name"{ statements to set the other fields}Persons.Add(p)
If you execute these statements, the List collection will hold two items, both of the Persontype. Notice that you can add multiple instances of the same object to the List collection. Tofind out whether an item belongs to the collection already, use the Contains method, whichaccepts as an argument an object and returns a True or False value, depending on whether theobject belongs to the list:
If Persons.Contains(p) ThenMsgBox("Duplicate element rejected")
ElsePersons.Add(p)MsgBox("Element appended successfully")
End If
By default, items are appended to the collection. To insert an item at a specific location, usethe Insert method, which accepts as an argument the location at which the new item will beinserted and, of course, an object to insert in the ArrayList, as shown next:
aList.Insert(index, object)
Unlike the Add method, the Insert method doesn’t return a value — the location of the newitem is already known.
You can also add multiple items via a single call to the AddRange method. This methodappends to the collection of a set of items, which could come from an array or from anotherlist. The following statement appends the elements of an array to the Lst collection:
Dim colors() As Color = {Color.Red, Color.Blue, Color.Green}Lst.AddRange(colors)
To insert a range of items anywhere in the collection, use the InsertRange method. Its syntaxis the following, where index is the index of the collections where the new elements will beinserted, and objects is a collection of the elements to be inserted:
Lst.InsertRange(index, objects)

504 CHAPTER 12 STORING DATA IN COLLECTIONS
Finally, you can overwrite a range of elements in the collection with a new range by usingthe SetRange method. To overwrite the items in locations 5 through 9 in an collection, use afew statements like the following:
Dim words() As String ={"Just", "a", "few", "more", "words"}
Lst.SetRange(5, words)
This code segment assumes that the Lst collection contains at least 10 items, and it replaces halfof them.
To remove an item, use the Remove method, whose syntax is the following:
aList.Remove(object)
The object argument is the value to be removed, not an index value. If the collection containsmultiple instances of the same item, only the first instance of the object will be removed.
Notice that the Remove method compares values, not references. If the collection contains aRectangle object, you can search for this item by creating a new variable of this type and settingits properties to the properties of the Rectangle object you want to remove:
Dim R1 As New Rectangle(10, 10, 100, 100)Dim R2 As Rectangle = R1Lst.Add(R1)Lst.Add(R2)Dim R3 As RectangleR3 = New Rectangle(10, 10, 100, 100)Lst.Remove(R3)
If you execute these statements, they will add two identical rectangles to the Lst collection. Thelast statement will remove the first of the two rectangles.
If you attempt to remove an item that doesn’t exist, no exception is thrown — simply, noitem is removed from the list. You can also remove items by specifying their index in the listvia the RemoveAt method. This method accepts as an argument the index of the item to remove,which must be less than the number of items currently in the list.
To remove more than one consecutive item, use the RemoveRange method, whose syntax isthe following:
Lst.RemoveRange(startIndex, count)
The startIndex argument is the index of the first item to be removed, and count is the num-ber of items to be removed.
The following statements are examples of the methods that remove items from a collec-tion. The first two statements remove an item by value. The first statement removes an object,and the second removes a string item. The following statement removes the third item, and thelast one removes the third through the fifth items.
aList.Remove(Color.Red)aList.Remove("Richard")

COLLECTION TYPES 505
aList.RemoveAt(2)aList.RemoveRange(2, 3)
Collection Initializers
You can also declare and populate a collection in a single statement, with a collection initial-izer. The collection initializer is a sequence of elements enclosed in a pair of curly brackets. Thefollowing statement declares and initializes a new ArrayList collection with strings:
Dim letters As New ArrayList({"quick", "dog", "fox", "lazy", "brown"})
As you recall from Chapter 8, ‘‘Working with Objects,’’ you can initialize an object by supply-ing a set of values in parentheses as an argument to its constructor. The curly brackets indicatethat you’re supplying a collection of values. As a reminder, here’s the simplest form of collec-tion initializer, the array initializer:
Dim numbers() As Decimal = {2.0, 12.99, 0.001, 1000.0, 10.01}
If this were a List collection, the initialization would be a little more complicated. Let’s ini-tialize a List collection of strings. You first must declare the collection with a statement like thefollowing:
Dim words = New List(Of String)
To initialize the collection, you must supply a list of strings in a pair of curly brackets. Thefollowing statement creates an array of strings:
{"the", "quick", "brown", "fox", "jumped", "over", "the", "lazy", "dog"}
To initialize the List collection, all you have to do is append the array with the values to thecollection’s initializer:
Dim words = New List(Of String)({"the", "quick", "brown","fox", "jumped", "over", "the", "lazy", "dog"})
Collection initializers allow you to declare and initialize a collection similar to all scalarobjects. You can also supply the constructors of more complex objects to the collection initial-izer. The following statement will create a List of Rectangle objects:
Dim Rects = New List(Of Rectangle)({New Rectangle(0, 0, 4, 14),New Rectangle(0, 0, 101, 101),New Rectangle(100, 100, 10, 20)})
This looks fairly complicated, almost C#-like, but here’s how you read the statement. Theconstructor of the Rects collection accepts its initial values in a pair of parentheses. In theparentheses themselves, you can embed an array of object initializers. Note that all objectinitializers must be embedded in a pair of curly brackets.

506 CHAPTER 12 STORING DATA IN COLLECTIONS
Finally, you can initialize a collection with anonymous types, a topic discussed inChapter 10. An anonymous type is a type that’s created while it’s being declared. Here’s ananonymous type that may appear anywhere in your code:
Dim P = New With {.First = "Evangelos", .Last = "Petroutsos"}
Note that the variable P is of an anonymous type, because there’s no type name. However, ithas two fields that you can access as if the P variable were based on a custom class:
P.First = "Richard"
The next statement creates a new collection of objects, each one representing a city:
Dim cities = New ArrayList({New With {.city = "a city", .population = 201213},New With {.city = "a small city", .population = 101320},New With {.city = "a town", .population = 39210}})
You may find the number of curly brackets overwhelming, but the trick to using initializerseffectively is to build them step-by-step. The following expression creates a new variable of theanonymous type with two fields:
New With {.city = "a city", .population = 201213}
Then you embed several of these expressions with different field values in a pair of curly brack-ets to create a collection of objects of this anonymous type, and finally you embed the collectionin a pair of parentheses to pass them as arguments to the collection’s initializer. To standardizethe collection initializers, consider the following rule: All values you add to the collection mustbe embedded in a pair of curly brackets:
{object1, object2, object3, …}
Each object in the collection must be initialized with its own constructor. Replace object1with its initializer, object2 with the same initializer and different values, and so on, to create acollection of objects. Then embed the entire expression, along with the outer curly brackets, ina pair of parentheses following the collection’s declaration. If the objects are of an anonymoustype, insert the appropriate anonymous initializer for each object. As for the curly brackets,think of them as delimiters for sets of values for arrays (or sets of properties for objects).In Visual Basic, curly brackets are used only with collection initializers and anonymousconstructors.
Of course, you can’t create a List collection of an anonymous type, because the List is astrongly typed collection.
Extracting Items from a Collection
To access the items in the collection, use an index value, similar to the array. The first item’sindex is 0, and the last item’s index is Lst.Count-1, where Lst is a properly initialized List orArrayList collection. You can also extract a range of items from the list by using the GetRange

COLLECTION TYPES 507
method. This method extracts a number of consecutive elements from the Lst collection andstores them to a new collection, the newLst collection, where index is the index of the first itemto copy, and count is the number of items to be copied:
newLst = Lst.GetRange(index, count)
The GetRange method returns another collection with the proper number of items. The follow-ing statement copies three items from the Lst collection and inserts them at the beginning ofthe bLst collection. The three elements copied are the fourth through sixth elements in the orig-inal collection:
bLst.InsertRange(0, aLst.GetRange(3, 3))
The Repeat method, which fills a list with multiple instances of the same item, has thefollowing syntax:
newList = ArrayList.Repeat(item, count)
This method returns a new list with count elements, all of them being identical to the itemargument. The Reverse method, finally, reverses the order of the elements in a collection, or aportion of it.
Sorting ListsTo sort an ArrayList or List collection, use the Sort method, which has three overloadedforms:
aLst.Sort()aLst.Sort(comparer)aLst.Sort(startIndex, endIndex, comparer)
The Sort method doesn’t require you to pass the name of the list to be sorted as an argument;unlike the Sort method of the Array class, this is an instance method and it sorts the collectionto which it’s applied. aLst is a properly declared and initialized List or ArrayList variable. Thefirst form of the Sort method sorts the list alphabetically or numerically, depending on the datatype of the objects stored in it. If the items are not all of the same type, an exception will bethrown. You’ll see how you can handle this exception in just a moment.
If the items stored in the collection are of a data type other than the base data types, youmust supply your own mechanism to compare the objects. The other two forms of the Sortmethod use a custom function for comparing items; you will see how they’re used in thesection ‘‘The IEnumerator and IComparer Interfaces’’ later in this chapter.
If the list contains items of widely different types, the Sort method will fail. To preventa runtime exception (the InvalidOperationException), you must make sure that all itemsare of the same type. If you can’t ensure that all the items are of the same type, catch thepossible errors and handle them from within a structured exception handler, as demonstratedin Listing 12.3. (The listing doesn’t show the statements for populating the ArrayList, just theuse of a structured exception handler for the Sort method.)

508 CHAPTER 12 STORING DATA IN COLLECTIONS
Listing 12.3: Foolproof sorting
Dim sorted As Boolean = TrueTry
aLst.Sort()Catch SortException As InvalidOperationException
MsgBox("You can’t sort an ArrayList whose items " &"aren’t of the same type")
sorted = FalseCatch GeneralException As Exception
MsgBox("The following exception occurred: " &vbCrLf & GeneralException.Message) sorted = False
End TryIf sorted Then
{ process sorted list}Else
{ process unsorted list}End If
The sorted Boolean variable is initially set to True because the Sort method will most likelysucceed. If not, an exception will be thrown, in which case the code sets the sorted variable toFalse and uses it later to distinguish between sorted and unsorted collections. Notice the twoclauses of the Catch statement that distinguish between the invalid operation exception andany other type of exception.
The Sort method can’t even sort a collection of various numeric data types. If some of itselements are doubles and some are integers or decimals, the Sort method will fail. You musteither make sure that all the items in the ArrayList are of the same type or provide your ownfunction for comparing the ArrayList’s items. The best practice is to make sure that your collec-tion contains items of the same type by using a List collection. If a collection contains items ofdifferent types, however, how likely is it that you’ll have to sort such a collection?
Searching ListsLike arrays, ArrayList and List collections expose the IndexOf and LastIndexOf methods tosearch in an unsorted list and the BinarySearch method for sorted lists. The IndexOf andLastIndexOf methods accept as an argument the object to be located and return an index:
Dim index As Integer = Lst.IndexOf(object)
Here, object is the item you’re searching. The LastIndexOf method has the same syntax,but it starts scanning the array from its end and moves backward toward the beginning. TheIndexOf and LastIndexOf methods are overloaded as follows:
Lst.IndexOf(object, startIndex)Lst.IndexOf(object, startIndex, length)
The two additional arguments determine where the search starts and ends. Both methodsreturn the index of the item if it belongs to the collection. If not, they return the value –1. The

COLLECTION TYPES 509
IndexOf and LastIndexOf methods of the List and ArrayList classes perform case-sensitivesearches, and they report exact matches only.
If the list is already sorted, use the BinarySearch method, which accepts as an argumentthe object to be located and returns its index in the collection, where object is the item you’relooking for:
Dim index As Integer = Lst.BinarySearch(object)
There are two more overloads of this method. To search for an item in a list with customobjects, use the following form of the BinarySearch method:
Dim index As Integer = Lst.BinarySearch(object, comparer)
The first argument is the object you’re searching for, and the second is the name of an ICom-parer object. Another overload of the BinarySearch method allows you to search for an itemin a section of the collection; its syntax is as follows:
Dim index As Integer = _Lst.BinarySearch(startIndex, length, object, comparer)
The first argument is the index at which the search will begin, and the second argument isthe length of the subrange. object and comparer are the same as with the second form of themethod.
Iterating Through a ListTo iterate through the elements of a collection, you can set up a For…Next loop:
For i = 0 To Lst.Count - 1{ process item Lst(i)}
Next
or a For Each loop:
For Each itm In aLst{ process item itm }
Next
This is a trivial operation, but the processing itself can get as complicated as requiredby the type of objects stored in the collection. The current item at each iteration is theLst(i). It’s recommended that you cast the object to the appropriate type and thenprocess it.
You can also use the For Each…Next loop with an Object variable, as shown next:
Dim itm As ObjectFor Each itm In aLst
{ process item itm}Next

510 CHAPTER 12 STORING DATA IN COLLECTIONS
If you’re iterating through an ArrayList collection, you must cast the control variable itmto the appropriate type. If you’re iterating through a List collection, then the itm variable isof the same type as the one you used in the declaration of the List collection, as long as theInfer option is on. Alternatively, you can declare the control variable in the For Each statement:
Dim Lst AS New List(Of String)’ statements to populate listFor Each itm As String In Lst’ process item lstNext
An even better method is to create an enumerator for the collection and use it to iteratethrough its items. This technique applies to all collections and is discussed in the ‘‘The IEnu-merator and IComparer Interfaces’’ section later in this chapter.
The List and ArrayList classes address most of the problems associated with the Array class,but one last problem remains — that of accessing the items in the collection through a mean-ingful key. This is the problem addressed by the Dictionary and HashTable collections.
The Dictionary CollectionAs you saw, the List and ArrayList classes address most of the problems of the Array class,while they support all the convenient array features. Yet, the two lists, like the Array, have amajor drawback: You must access their items by an index value. Another collection, the Dictio-nary collection, is similar to the List and ArrayList collections, but it allows you to access theitems by a meaningful key.
Each item in a Dictionary has a value and a key. The value is the same value you’d storein an array, but the key is a meaningful entity for accessing the items in the collection, andeach element’s key must be unique. Both the values stored in a Dictionary and their keys canbe objects. Typically, the keys are short strings (such as Social Security numbers, ISBN values,product IDs, and so on) or integers.
The Dictionary collection exposes most of the properties and methods of the List, with a fewnotable exceptions. The Count property returns the number of items in the collection as usual,but the Dictionary collection doesn’t expose a Capacity property. The Dictionary collectionuses fairly complicated logic to maintain the list of items, and it adjusts its capacity automat-ically. Fortunately, you need not know how the items are stored in the collection.
To create a Dictionary in your code, declare it with the New keyword, and supply the type ofthe keys and values you plan to store in the collection with a statement like the following:
Dim Students As New Dictionary(Of Integer, Student)
The first argument is the type of the keys, and the second argument is the type of the valuesyou plan to store in the collection. Dictionaries are typed collections, unless you declare themwith the Object type. To add an item to the Dictionary, use the Add method with the followingsyntax:
Students.Add(key, value)
value is the item you want to add (it can be an object of the type specified in the collection’sdeclaration), and key is an identifier you supply, which represents the item. After populating

THE DICTIONARY COLLECTION 511
the collection you will use the key to access specific elements of the collection. For example,you will use city names to locate their temperature as shown in the following statements:
Dim Temperatures As New Dictionary(Of String, Decimal)Temperatures.Add("Houston", 81.3)Temperatures.Add("Los Angeles", 78.5)
To find out the temperature in Houston, use the following statement:
MsgBox(Temperatures("Houston").ToString)
Notice that you can have duplicate values, but the keys must be unique. If you attempt toreuse an existing key as you populate the collection, an InvalidArgumentException exceptionwill be thrown. To find out whether a specific key or value is already in the collection, use theContainsKey and ContainsValue methods. The syntax of the two methods is quite similar,and they return True if the specified key or value is already in use in the collection:
Dictionary.ContainsKey(object)Dictionary.ContainsValue(object)
The Dictionary collection exposes the Contains method, too, which returns True if the col-lection contains a pair of a key and a value. If the collection contains the same value with adifferent key, the Contains method will return False.
To find out whether a specific key is in use already, use the ContainsKey method, as shownin the following statements, which add a new item to the Dictionary only if its key doesn’t existalready:
Dim value As New Rectangle(100, 100, 50, 50)Dim key As String = "Rect1"If Not Rects.ContainsKey(key) Then
Rects.Add(key, value)End If
If the key exists already, you might want to change its value. In this case, use the followingnotation, which adds new elements to the list if the key isn’t present or changes the value ofthe element that corresponds to the specified key:
Rects(key) = value
The Values and Keys properties allow you to retrieve all the values and the keys in theDictionary, respectively. Both properties are collections and expose the usual members of a col-lection. To iterate through the values stored in a Dictionary, use the following loop:
Dim itm As ObjectFor Each itm In Dict.Values
Debug.WriteLine(itm)Next

512 CHAPTER 12 STORING DATA IN COLLECTIONS
Listing 12.4 demonstrates how to scan the keys of a Dictionary through the Keys propertyand then use these keys to access the matching items through the Item property.
Listing 12.4: Iterating a Dictionary collection
Private Function ShowDictionaryContents(ByVal table As Dictionary(Of String, Decimal)) As String
Dim msg As StringDim element, key As Objectmsg = "The HashTable contains " &
table.Count.ToString & " elements: " & vbCrLfFor Each key In table.Keys
element = table.Item(key)msg = msg & vbCrLf & " Element Key= " &
key.ToStringmsg = msg & " Element Value= " &
element.ToString & vbCrLfNextReturn (msg)
End Function
To print the contents of a Dictionary collection in the Output window, call theShowHashTableContents() function, passing the name of the Dictionary as an argument, andthen print the string returned by the function:
Dim Dict As New Dictionary{ statements to populate Dictionary}MsgBox(ShowDictionaryContents(Dict))
The specific implementation of the ShowDictionaryContents() function applies to Dictionarycollections that use strings as keys and decimals as values. For Dictionary collections that storedifferent types, you must edit the function to accommodate the appropriate data types.
The HashTable CollectionAnother collection, very similar to the Dictionary collection, is the HashTable collection.The HashTable is an untyped Dictionary. To populate a HashTable with temperature valuesindexed by city names, use a few statements like the following:
Dim tmps As New Hashtabletmps("Houston") = 81.3tmps("Los Angeles") = 78.5
If an element with the same key you’re trying to add exists already, then no new item willbe added to the list. Instead, the existing item’s value will be changed. After executing the

THE HASHTABLE COLLECTION 513
following statements, for example, the Temperatures HashTable will contain a single elementwith the key Houston and the value 79.9:
Dim temperatures As New Hashtabletmps("Houston") = 81.3tmps("Houston") = 79.9
You can always use the Add method to add elements to a HashTable collection, and thesyntax of this method is identical to the Add method of the Dictionary collection. Like the Dic-tionary collection, it exposes the Add method that accepts a key and a value as arguments, aRemove method that accepts the key of the element to be removed, and the Keys and Valuesproperties that return all the keys and values in the collection, respectively. The major differ-ence between the Dictionary and HashTable collections is that the Dictionary class is a stronglytyped one, while the HashTable can accept arbitrary objects as values and is not as fast as theDictionary class. Another very important difference is that the Dictionary collection class is notserializable, a topic discussed in detail in the following chapter. Practically, this means that aDictionary collection can’t be persisted to a disk file with a single statement, which is true forthe HashTable collection.
VB 2010 at Work: The WordFrequencies ProjectIn this section, you’ll develop an application that counts word frequencies in a text. The Word-Frequencies application (available for download from www.sybex.com/go/masteringvb2010)scans text files and counts the occurrences of each word in the text. As you will see, theHashTable collection is the natural choice for storing this information because you want toaccess a word’s frequency by using the actual word as the key. To retrieve (or update) thefrequency of the word elaborate, for example, you will use this expression:
Words("ELABORATE").Value
where Words is a properly initialized HashTable object.When the code runs into another instance of the word elaborate, it simply increases the
matching item of the Words HashTable by one:
Words("ELABORATE").Value += 1
Arrays and Lists (or ArrayLists) are out of the question because they can’t be accessed by akey. You could also use the SortedList collection (described later in this chapter), but this col-lection maintains its items sorted at all times. If you need this functionality as well, you canmodify the application accordingly. The items in a SortedList are also accessed by keys, so youwon’t have to introduce substantial changes in the code.
Let me start with a few remarks. First, all words we locate in the various text files willbe converted to uppercase. Because the keys of the HashTable are case sensitive, convertingthem to uppercase eliminates the usual problem of case sensitivity (hello being a different wordthan Hello and HELLO) by eliminating multiple possible variations in capitalization for thesame word.
The frequencies of the words can’t be calculated instantly because we need to know thetotal number of words in the text. Instead, each value in the HashTable is the number of occur-rences of a specific word. To calculate the actual frequency of the same word, we must divide

514 CHAPTER 12 STORING DATA IN COLLECTIONS
this value by the number of occurrences of all words, but this can happen only after we havescanned the entire text file and counted the occurrences of each word.
Figure 12.2 shows the application’s interface. To scan a text file and process its words, clickthe Read Text File button. The Open dialog box will prompt you to select the text file to beprocessed, and the application will display in a message box the number of unique words readfrom the file. Then you can click the Show Word Count button to count the number of occur-rences of each word in the text. The last button on the form calculates the frequency of eachword and sorts the words according to their frequencies.
Figure 12.2
The WordFrequen-cies project demon-strates how to use theHashTable collection.
The application maintains a single HashTable collection, the Words collection, and it updatesthis collection rather than counting word occurrences from scratch for each file you open. TheFrequency Table menu contains the commands to save the words and their counts to a diskfile and read the same data from the file. The commands in this menu can store the data eitherto a text file (Save XML/Load XML commands) or to a binary file (Save Binary/Load Binarycommands). Use these commands to store the data generated in a single session, load the datain a later session, and process more files.
The WordFrequencies application uses techniques and classes I haven’t discussed yet.Serialization is discussed in detail in the next chapter, whereas reading from (or writing to)files is discussed in the tutorial ‘‘Accessing Folders and Files.’’ (You’ll find that tutorial onlineat www.sybex.com/go/masteringvb2010.) You don’t really have to understand the code thatopens a text file and reads its lines; just focus on the segments that manipulate the items of theHashTable.
To test the project, I used some large text files I downloaded from the Project Gutenbergwebsite (http://promo.net/pg/). This site contains entire books in electronic format (plain-textfiles), and you can borrow some files to test any program that manipulates text. (Choose somebooks you will enjoy reading.)
The code reads the text into a string variable, and then it calls the Split method of theString class to split the text into individual words. The Split method uses the space, comma,

THE HASHTABLE COLLECTION 515
period, quotation mark, exclamation mark, colon, semicolon, and new-line characters asdelimiters. The individual words are stored in the Words array; after this array has beenpopulated, the program goes through each word in the array and determines whether it’s avalid word by calling the IsValidWord() function. This function returns False if one of thecharacters in the word is not a letter; strings such as B2B or U2 are not considered properwords. IsValidWord() is a custom function, and you can edit it as you wish to handle thespecific content (my assumption that a word may not contain digits is quite reasonable to textfiles but totally wrong if you’re handling code listings, for example).
Any valid word becomes a key to the wordFrequencies HashTable. The correspondingvalue is the number of occurrences of the specific word in the text. If a key (a new word) isadded to the table, its value is set to 1. If the key exists already, its value is increased by 1 viathe following If statement:
If Not wordFrequencies.ContainsKey(word) ThenwordFrequencies.Add(word, 1)
ElsewordFrequencies(word) = CType(wordFrequencies(word), Integer) + 1
End If
Listing 12.5 is the code that reads the text file and splits it into individual words. The codereads the entire text into a string variable, the txtLine variable, and the individual words areisolated with the Split method of the String class. The Delimiters array stores the charac-ters that the Split method will use as delimiters, and you can add more delimiters depend-ing on the type of text you’re processing. If you’re counting keywords in program listings, forexample, you’ll have to add the math symbols and parentheses as delimiters.
Listing 12.5: Splitting a text file into words
Private Sub bttnRead_Click(…) Handles bttnRead.ClickOpenFileDialog1.DefaultExt = "TXT"OpenFileDialog1.Filter = "Text|*.TXT|All Files|*.*"If OpenFileDialog1.ShowDialog() <>
Windows.Forms.DialogResult.OK Then Exit SubDim str As StreamReader = File.OpenText(OpenFileDialog1.FileName)Dim txtLine As StringDim words() As StringDim Delimiters() As Char =
{CType(" ", Char), CType(".", Char), CType(",", Char),CType("?", Char), CType("!", Char), CType(";", Char),CType(":", Char), Chr(10), Chr(13), vbTab}
txtLine = str.ReadToEndwords = txtLine.Split(Delimiters)Dim uniqueWords As IntegerDim iword As Integer, word As StringFor iword = 0 To Words.GetUpperBound(0)
word = words(iword).ToUpperIf IsValidWord(word) Then

516 CHAPTER 12 STORING DATA IN COLLECTIONS
If Not wordFrequencies.ContainsKey(word) ThenwordFrequencies.Add(word, 1)uniqueWords += 1
ElsewordFrequencies(word) =
CType(wordFrequencies(word), Integer) + 1End If
End IfNextMsgBox("Read " & words.Length & " words and found " &
uniqueWords & " unique words")RichTextBox1.Clear()
End Sub
This event handler keeps track of the number of unique words and displays them in a Rich-TextBox control. In a document with 90,000 words, it took less than a second to split the textand perform all the calculations. The process of displaying the list of unique words in the Rich-TextBox control was very fast, too, thanks to the StringBuilder class. The code behind the ShowWord Count button (see Listing 12.6) displays the list of words along with the number of occur-rences of each word in the text.
Listing 12.6: Displaying the count of each word in the text
Private Sub bttnCount_Click(…) Handles bttnCount.ClickDim wEnum As IDictionaryEnumeratorDim allWords As New System.Text.StringBuilderwEnum = WordFrequencies.GetEnumeratorWhile wEnum.MoveNext
allWords.Append(wEnum.Key.ToString &vbTab & "-->" & vbTab & _wEnum.Value.ToString & vbCrLf)
End WhileRichTextBox1.Text = allWords.ToString
End Sub
The last button on the form calculates the frequency of each word in the HashTable,sorts the words according to their frequencies, and displays the list. Its code is detailed inListing 12.7.
Listing 12.7: Sorting the words according to frequency
Private Sub bttnShow_Click(…) Handles bttnSort.ClickDim wEnum As IDictionaryEnumeratorDim words(wordFrequencies.Count) As StringDim frequencies(wordFrequencies.Count) As DoubleDim allWords As New System.Text.StringBuilder
THE HASHTABLE COLLECTION 517
Dim i, totCount As IntegerwEnum = wordFrequencies.GetEnumeratorWhile wEnum.MoveNext
words(i) = CType(wEnum.Key, String)frequencies(i) = CType(wEnum.Value, Integer)totCount = totCount + Convert.ToInt32(Frequencies(i))i = i + 1
End WhileFor i = 0 To words.GetUpperBound(0)
frequencies(i) = frequencies(i) / totCountNextArray.Sort(frequencies, Words)RichTextBox1.Clear()For i = words.GetUpperBound(0) To 0 Step -1
allWords.Append(words(i) & vbTab & "-->" &vbTab & Format(100 * frequencies(i),"#.000") & vbCrLf)
NextRichTextBox1.Text = allWords.ToString
End Sub
Handling Large Sets of Data
Incidentally, my first attempt was to display the list of unique words in a ListBox control.The process was incredibly slow. The first 10,000 words were added in a couple of seconds,but as the number of items increased, the time it took to add them to the control increasedexponentially (or so it seemed). Adding thousands of items to a ListBox control is a veryslow process. You can call the BeginUpdate/EndUpdate methods, but they won’t help a lot.It’s likely that sometimes a seemingly simple task will turn out to be detrimental to yourapplication’s performance.
You should try different approaches but also consider a total overhaul of your user interface.Ask yourself this: Who needs to see a list with 10,000 words? You can use the applicationto do the calculations and then retrieve the count of selected words, display the 100 mostcommon ones, or even display 100 words at a time. I’m displaying the list of words becausethis is a demonstration, but a real application shouldn’t display such a long list. The core ofthe application counts unique words in a text file, and it does it very efficiently.
Even if you decide to display an extremely long list of items on your interface, you shouldperform some worst-case scenarios (that is, attempt to load the control with zero or toomany items), and if this causes serious performance problems, consider different controls.I’ve decided to append all the items to a StringBuilder variable and then display thisvariable in a RichTextBox control. I could have used a plain TextBox control — after all, I’mnot formatting the list of words and their frequencies — but the RichTextBox allowed meto specify the absolute tab positions. The tab positions of the TextBox control are fixed andweren’t wide enough for all words.

518 CHAPTER 12 STORING DATA IN COLLECTIONS
The SortedList CollectionThe SortedList collection is a combination of the Array and HashTable classes. It maintains alist of items that can be accessed either with an index or with a key. When you access itemsby their indices, the SortedList behaves just like an ArrayList; when you access items by theirkeys, the SortedList behaves like a HashTable. What’s unique about the SortedList is that thiscollection is always sorted according to the keys. The items of a SortedList are always orderedaccording to the values of their keys, and there’s no method for sorting the collection accordingto the values stored in it.
To create a new SortedList collection, use a statement such as the following:
Dim sList As New SortedList
As you might have guessed, this collection can store keys that are of the base data types. Ifyou want to use custom objects as keys, you must specify an argument of the IComparer type,which tells VB how to compare the custom items. This information is crucial; without it, theSortedList won’t be able to maintain its items sorted. You can still store items in the SortedList,but they will appear in the order in which they were added. This form of the SortedList con-structor has the following syntax, where comparer is the name of a custom class that imple-ments the IComparer interface (which is discussed in detail later in this chapter):
Dim sList As New SortedList(New comparer)
There are also two more forms of the constructor, which allow you to specify the initialcapacity of the SortedList collection, as well as a Dictionary object, whose data (keys and val-ues) will be automatically added to the SortedList.
To add an item to a SortedList collection, use the Add method, whose syntax is the following,where key is the key of the new item and item is the item to be added:
sList.Add(key, item)
Both arguments are objects. But remember, if the keys are objects, the collection won’t beautomatically sorted; you must provide your own comparer, as discussed later in this chapter.The Add method is the only way to add items to a SortedList collection, and all keys must beunique; attempting to add a duplicate key will throw an exception.
The SortedList class also exposes the ContainsKey and ContainsValue methods, whichallow you to find out whether a key or item already exists in the list. To add a new item, usethe following statement to make sure that the key isn’t in use:
If Not sList.ContainsKey(myKey) ThensList.Add(myKey, myItem)
End If
To replace an existing item, use the SetByIndex method, which replaces the value at a spe-cific index. The syntax of the method is the following, where the first argument is the index atwhich the value will be inserted, and item is the new item to be inserted in the collection:
sList.SetByIndex(index, item)

THE IENUMERATOR AND ICOMPARER INTERFACES 519
This object will replace the value that corresponds to the specified index. The key, however,remains the same. There’s no equivalent method for replacing a key; you must first remove theitem and then insert it again with its new key.
To remove items from the collection, use the Remove and RemoveAt methods. The Removemethod accepts a key as an argument and removes the item that corresponds to that key. TheRemoveAt method accepts an index as an argument and removes the item at the specified index.To remove all the items from a SortedList collection, call its Clear method.
Other CollectionsThe System.Collections class exposes a few more collections, including the Queue and Stackcollections. The main characteristic of these two collections is how you add and remove itemsto them. When you add items to a Queue collection, the items are appended to the collection.When you remove items, they’re removed from the top of the collection. Queues are knownas last in, first out (LIFO) structures because you can extract only the oldest item in the queue.You’d use this collection to simulate the customer line in a bank or a production line.
The Stack collection inserts new items at the top, and you can remove only the top item. TheStack collection is a first in, first out (FIFO) structure. You’d use this collection to emulatethe stack maintained by the CPU, one of the most crucial structures for the operating systemand applications alike. The Stack and Queue collections are used heavily in computer sciencebut hardly ever in business applications, so I won’t discuss them further in this book.
The IEnumerator and IComparer InterfacesIEnumerator and IComparer are two classes that unlock some of the most powerful features ofcollections. The proper term for IEnumerator and IComparer is interface, a term I will describeshortly. Every class that implements the IEnumerator interface is capable of retrieving a list ofpointers for all the items in a collection, and you can use this list to iterate through the itemsin a collection. Every collection has a built-in enumerator, and you can retrieve it by callingits GetEnumerator method. And every class that implements the IComparer interface exposesthe Compare method, which tells the compiler how to compare two objects of the same type.After the compiler knows how to compare the objects, it can sort a collection of objects with thesame type.
The IComparer interface consists of a function that compares two items and returns a valueindicating their order (which one is the smaller item or whether they’re equal). The Frameworkcan’t compare objects of all types; it knows only how to compare the base types. It doesn’teven know how to compare built-in objects such as two rectangles or two color objects. If youhave a collection of colors, you might want to sort them according to their luminance, satura-tion, brightness, and so on. Rectangles can be sorted according to their area or perimeter. TheFramework can’t make any assumptions as to how you might want to sort your collection, andof course, it doesn’t expose members to sort a collection in all possible ways. Instead, it givesyou the option to specify a function that compares two colors (or two objects of any other type,for that matter) and uses this function to sort the collection. The same function is used by theBinarySearch method to locate an item in a sorted collection. In effect, the IComparer interfaceconsists of a single function that knows how to compare two specific custom objects.
So, what is an interface? An interface is another term in object-oriented programming thatdescribes a very simple technique. When you write the code for a class, you might not knowhow to implement a few operations, but you do know that they’ll have to be implementedlater. You insert a placeholder for these operations (one or more function declarations) and

520 CHAPTER 12 STORING DATA IN COLLECTIONS
expect that the application that uses the class will provide the actual implementation of thesefunctions. All collections expose a Sort method, which sorts the items in the collection bycomparing them to one another. To do so, the Sort method calls a function that comparestwo items and returns a value indicating their relative order. Custom objects must providetheir own comparison function — or more than a single function, if you want to sort them inmultiple ways. Because you can’t edit the collection’s Sort method code, you must supply yourcomparison function through a mechanism that the class can understand. This is what theIComparer interface is all about.
Enumerating CollectionsAll collections expose the GetEnumerator method. This method returns an object of theIEnumerator type, which allows you to iterate through the collection without having to knowanything about its items, not even the count of the items. To retrieve the enumerator for acollection, call its GetEnumerator method by using a statement like the following:
Dim ALEnum As IEnumeratorALEnum = aList.GetEnumerator
The IEnumerator class exposes two methods: the MoveNext and Reset methods. TheMoveNext method moves to the next item in the collection and makes it the current item(property Current). When you initialize the IEnumerator object, it’s positioned in front of thevery first item, so you must call the MoveNext method to move to the first item. The Resetmethod does exactly the same thing: It repositions the IEnumerator in front of the first element.
The MoveNext method doesn’t return an item, as you might expect. It returns a True/Falsevalue that indicates whether it has successfully moved to the next item. After you have reachedthe end of the collection, the MoveNext method will return False. Here’s how you can enumer-ate through a List collection by using an enumerator:
Dim listItems As IEnumeratorlistItems = list.GetEnumeratorWhile listItems.MoveNext
{ process item listItems.Current}End While
At each iteration, the current item is given by the Current property of the enumerator. Afteryou reach the last item, the MoveNext method will return False, and the loop will terminate. Torescan the items, you must reset the enumerator by calling its Reset method.
The event handler in Listing 12.8 populates an ArrayList with Rectangle objects and theniterates through the collection and prints the area of each Rectangle using the collection’senumerator.
Listing 12.8: Iterating an ArrayList with an enumerator
Dim aList As New ArrayList()Dim R1 As New Rectangle(1, 1, 10, 10)aList.Add(R1)R1 = New Rectangle(2, 2, 20, 20)

THE IENUMERATOR AND ICOMPARER INTERFACES 521
aList.Add(R1)aList.add(New Rectangle(3, 3, 2, 2))Dim REnum As IEnumeratorREnum = aList.GetEnumeratorDim R As RectangleWhile REnum.MoveNext
R = CType(REnum.Current, Rectangle)Debug.WriteLine((R.Width * R.Height).ToString)
End While
The REnum variable is set up and used to iterate through the items of the collection. At eachiteration, the code stores the current Rectangle to the R variable, and it uses this variable toaccess the properties of the Rectangle object (its width and height).
Of course, you can iterate a collection without the enumerator, but with a For Each…Nextor For Each loop. To iterate through a HashTable, you can use either the Keys or Values col-lection. The code shown in Listing 12.9 populates a HashTable with Rectangle objects. Then itscans the items and prints their keys, which are strings, and the area of each rectangle. Notehow it uses each item’s Key property to access the corresponding item in the collection.
Listing 12.9: Iterating a HashTable with its keys
Dim hTable As New HashTable()Dim r1 As New Rectangle(1, 1, 10, 10)hTable.Add("R1", r1)r1 = New Rectangle(2, 2, 20, 20)hTable.Add("R2", r1)hTable.add("R3", New Rectangle(3, 3, 2, 2))Dim key As ObjectDim R As RectangleFor Each key In hTable.keys
R = CType(hTable(key), Rectangle)Debug.WriteLine(String.Format( _
"The area of Rectangle {0} is {1}" _key.ToString, R.Width * R.Height))
Next
The code adds three Rectangle objects to the HashTable and then iterates through the collectionusing the Keys properties. Each item’s key is a string (R1, R2, and R3). The Keys property isitself a collection and can be scanned with a For Each…Next loop. At each iteration, you accessa different item through its key with the expression hTable(key). The output produced by thiscode is shown here:
The area of Rectangle R1 is 100The area of Rectangle R3 is 4The area of Rectangle R2 is 400

522 CHAPTER 12 STORING DATA IN COLLECTIONS
Alternatively, you can iterate a HashTable with an enumerator, but be aware that theGetEnumerator method of the HashTable collection returns an object of the IDictionary-Enumerator type, not an IEnumerator object. The IDictionaryEnumerator class is quite similarto the IEnumerator class, but it exposes additional properties. They are the Key and Valueproperties, and they return the current item’s key and value. The IDictionaryEnumerator classalso exposes the Entry property, which contains both the key and the value.
Assuming that you have populated the hTable collection with the same three Rectangleobjects, you can use the statements in Listing 12.10 to iterate through the collection’s items.
Listing 12.10: Iterating a HashTable with an enumerator
Dim hEnum As IDictionaryEnumeratorhEnum = hTable.GetEnumeratorWhile hEnum.MoveNext
Debug.WriteLine(String.Format("The area of rectangle " &"{0} is {1}", hEnum.Key, _CType(hEnum.Value, Rectangle).Width *CType(hEnum.Value, Rectangle).Height))
End While
If you execute these statements after populating the HashTable collection with three Rectan-gles, they will produce the same output as Listing 12.8.
Custom SortingThe Sort method of the various collections allows you to sort collections, as long as the itemsare of the same base data type. If the items are objects, however, the collection doesn’t knowhow to sort them. If you want to sort objects, you must help the collection a little by tellingit how to compare the objects. A sorting operation is nothing more than a series of compar-isons. Sorting algorithms compare items and swap them if necessary.
All the information needed by a sorting algorithm to operate on an item of any type is afunction that compares two objects of the same custom type. Let’s say you have a list of per-sons, and each person is a structure that contains names, addresses, e-mail addresses, and soon. The System.Collections class can’t make any assumptions as to how you want your listsorted, not to mention that a collection can be sorted by any field (name, e-address, postal code,and so on).
The comparer is implemented as a separate class, outside all other classes in the project, andis specific to a custom data type. Let’s say you have created a custom structure for storing con-tact information. The Person object is declared as a structure with the following fields:
Structure PersonDim Name As StringDim BirthDate As DateDim EMail As String
End Structure

THE IENUMERATOR AND ICOMPARER INTERFACES 523
You’ll probably build a class to represent persons, but I’m using a structure to simplify thecode. To add an instance of the Person object to a collection, create a variable of Person type,initialize its fields, and then add it to the appropriate collection (a List, or Dictionary collection,for example). This collection can’t be sorted with the simple forms of the Sort method becausethe compiler doesn’t know how to compare two Person objects. You must provide your ownfunction for comparing two variables of the Person type. After this function is written, thecompiler can call it to compare items and therefore sort the collection. This custom function,however, can’t be passed to the Sort and BinarySearch methods by name. You must create anew class that implements the IComparer interface and pass an instance of this class to the twomethods.
Implementing the IComparer Interface
Here’s the outline of a class that implements the IComparer interface:
Class customComparer : Implements IComparerPublic Function Compare(
ByVal o1 As Object, ByVal o2 As Object)As Integer Implements IComparer.Compare
{ function’s code }End Function
End Class
The name of the class can be anything; I’m using the name customComparer to indicate thatthe class compares custom types. It should be a name that indicates the type of comparison itperforms or the type of objects it compares. After the class declaration, you must specify theinterface implemented by the class. As soon as you type the first line of the preceding codesegment, the editor will insert automatically the stub of the Compare() function. That’s becauseevery class that implements the IComparer interface must provide a Compare method with thespecific signature. The interface declares a placeholder for a function, whose code must be pro-vided by the developer.
To use the custom function to compare items, you must create an object of the custom-Comparer type (or whatever you have named the class) and then pass it to the Sort andBinarySearch methods as an argument:
Dim CompareThem As New customCompareraList.Sort(CompareThem)
You can combine the two statements in one by initializing the customComparer variable inthe line that calls the Sort method:
aList.Sort(New customComparer)
You can also use the equivalent syntax of the BinarySearch method to locate a customobject that implements its own IComparer interface:
aList.BinarySearch(object, New customComparer)

524 CHAPTER 12 STORING DATA IN COLLECTIONS
This is how you can use a custom function to compare two objects. Everything is the same,except for the name of the comparer, which is different every time.
The last step is to implement the function that compares the two objects and returns an inte-ger value, indicating the order of the elements. This value should be –1 if the first object issmaller than the second object, 0 if the two objects are equal, and 1 if the first object is largerthan the second object. Smaller here means that the element appears before the larger one whensorted in ascending order. Listing 12.11 is the function that sorts Person objects according tothe BirthDate field. The sample code for this and the following section comes from the Cus-tomComparer project (available for download from www.sybex.com/go/masteringvb2010). Themain form contains a single button, which populates the collection and then prints the originalcollection, the collection sorted by name, and the collection sorted by birth date.
Listing 12.11: A custom comparer
Class PersonAgeComparer : Implements IComparerPublic Function Compare(
ByVal o1 As Object, ByVal o2 As Object)As Integer Implements IComparer.CompareDim person1, person2 As PersonTry
person1 = CType(o1, Person)person2 = CType(o2, Person)
Catch compareException As system.ExceptionThrow (compareException)Exit Function
End TryIf person1.BirthDate < person2.BirthDate Then
Return -1Else
If person1.BirthDate > person2.BirthDate ThenReturn 1
ElseReturn 0
End IfEnd If
End FunctionEnd Class
The code could have been considerably simpler, but I’ll explain momentarily why the Trystatement is necessary. The comparison takes place in the If statement. If the first person’sbirth date is chronologically earlier than the second person’s, the function returns the value –1.If the first person’s birth date is chronologically later than the second person’s birth date, thefunction returns 1. Finally, if the two values are equal, the function returns 0.
The code is straightforward, so why the error-trapping code? Before you perform the neces-sary comparisons, you convert the two objects into Person objects. It’s not unthinkable that thecollection with the objects you want to sort contains objects of different types. If that’s the case,the CType() function won’t be able to convert the corresponding argument to the Person type,

THE IENUMERATOR AND ICOMPARER INTERFACES 525
and the comparison will fail. The same exception that would be thrown in the function’s codeis raised again from within the error handler, and it’s passed back to the calling code.
Implementing Multiple Comparers
Person objects can be sorted in many ways. You might want to sort them by ID, name, age, andso on. To accommodate multiple sorts, you must implement several classes, each one with adifferent implementation of the Compare() function. Listing 12.12 shows two classes that imple-ment two different Compare() functions for the Person class. The PersonNameComparer classcompares the names, whereas the PersonAgeComparer class compares the ages. Both classes,however, implement the IComparer interface.
Listing 12.12: A class with two custom comparers
Class PersonNameComparer : Implements IComparerPublic Function Compare(
ByVal o1 As Object, ByVal o2 As Object)As Integer Implements IComparer.Compare
Dim person1, person2 As PersonTry
person1 = CType(o1, Person)person2 = CType(o2, Person)
Catch compareException As system.ExceptionThrow (compareException)Exit Function
End TryIf person1.Name < person2.Name Then
Return -1Else
If person1.Name > person2.Name ThenReturn 1
ElseReturn 0
End IfEnd If
End FunctionEnd Class
Class PersonAgeComparer : Implements IComparerPublic Function Compare(
ByVal o1 As Object, ByVal o2 As Object)As Integer Implements IComparer.Compare
Dim person1, person2 As PersonTry
person1 = CType(o1, Person)person2 = CType(o2, Person)
Catch compareException As system.ExceptionThrow (compareException)

526 CHAPTER 12 STORING DATA IN COLLECTIONS
Exit FunctionEnd TryIf person1.BDate > person2.BDate Then
Return -1Else
If person1.BDate < person2.BDate ThenReturn 1
ElseReturn 0
End IfEnd If
End FunctionEnd Class
To test the custom comparers, create a new application, and enter the code of Listing 12.12(it contains two classes) in a separate Class module. Don’t forget to include the declaration ofthe Person structure. Then place a button on the form and enter the code of Listing 12.13 in itsClick event handler. This code adds three persons with different names and birth dates to aList collection.
Listing 12.13: Testing the custom comparers
Private Sub Button1_Click(…) Handles Button1.ClickDim Lst As New List()Dim p As Person‘ Populate collectionp.Name = "C Person"p.EMail = "[email protected]"p.BDate = #1/1/1961#If Not Lst.Contains(p) Then Lst.Add(p)p.Name = "A Person"p.EMail = "[email protected]"p.BDate = #3/3/1961#If Not Lst.Contains(p) Then Lst.Add(p)p.Name = "B Person"p.EMail = "[email protected]"p.BDate = #2/2/1961#If Not Lst.Contains(p) Then Lst.Add(p)‘ Print collection as isDim PEnum As IEnumeratorPEnum = Lst.GetEnumeratorListBox1.Items.Add("Original Collection")While PEnum.MoveNext
ListBox1.Items.Add(CType(PEnum.Current, Person).Name &vbTab & CType(PEnum.Current, Person).BDate)
End While‘ Sort by name, then print collection

THE IENUMERATOR AND ICOMPARER INTERFACES 527
ListBox1.Items.Add(" ")ListBox1.Items.Add("Collection Sorted by Name")Lst.Sort(New PersonNameComparer())PEnum = Lst.GetEnumeratorWhile PEnum.MoveNext
ListBox1.Items.Add(CType(PEnum.Current, Person).Name &vbTab & CType(PEnum.Current, Person).BDate)
End While‘ Sort by age, then print collectionListBox1.Items.Add(" ")ListBox1.Items.Add("Collection Sorted by Age")Lst.Sort(New PersonAgeComparer())PEnum = Lst.GetEnumeratorWhile PEnum.MoveNext
ListBox1.Items.Add(CType(PEnum.Current, Person).Name &vbTab & CType(PEnum.Current, Person).BDate)
End WhileEnd Sub
The four sections of the code are delimited by comments in the listing. The first sectionpopulates the collection with three variables of the Person type. The second section prints theitems in the order in which they were added to the collection:
C Person 1/1/1961A Person 3/3/1961B Person 2/2/1961
The third section of the code calls the Sort method, passing the PersonNameComparer customcomparer as an argument, and it again prints the contents of the List. The names are listed nowin alphabetical order:
A Person 3/3/1961B Person 2/2/1961C Person 1/1/1961
In the last section, it calls the Sort method again — this time to sort the items by age — andprints them:
C Person 1/1/1961B Person 2/2/1961A Person 3/3/1961
It is straightforward to write your own custom comparers and sort your custom object inany way that suits your application. Custom comparisons might include more complicated cal-culations, not just comparisons. For example, you can sort Rectangles by their area, color valuesby their hue or saturation, and customers by the frequency of their orders.

528 CHAPTER 12 STORING DATA IN COLLECTIONS
The Bottom Line
Make the most of arrays. The simplest method of storing sets of data is to use arrays. They’revery efficient, and they provide methods to perform advanced operations such as sorting andsearching their elements. Use the Sort method of the Array class to sort an array’s elements.To search for an element in an array, use the IndexOf and LastIndexOf methods, or use theBinarySearch method if the array is sorted. The BinarySearch method always returns an ele-ment’s index, which is a positive value for exact matches and a negative value for near matches.
Master It Explain how you can search an array and find exact and near matches.
Store data in collections such as List and Dictionary collections. In addition to arrays, theFramework provides collections, which are dynamic data structures. The most commonlyused collections are the List and the Dictionary. Collections are similar to arrays, but they’redynamic structures. List and ArrayList collections store lists of items, whereas Dictionary andHashTable collections store key-value pairs and allow you to access their elements via a key.You can add elements by using the Add method and remove existing elements by using theRemove and RemoveAt methods.
Dictionary collections provide the ContainsKey and ContainsValue methods to find outwhether the collection already contains a specific key or value as well as the GetKeys andGetValues methods to retrieve all the keys and values from the collection, respectively. As areminder, the List and Dictionary collections are strongly typed. Their untyped counterpartsare the ArrayList and HashTable collections.
Master It How will you populate a Dictionary with a few pairs of keys/values and theniterate though the collection’s items?
Sort and search collections with custom comparers. Collections provide the Sort methodfor sorting their items and several methods to locate items: IndexOf, LastIndexOf, andBinarySearch. Both sort and search operations are based on comparisons, and the Frameworkknows how to compare values’ types only (Integers, Strings, and the other primitive datatypes). If a collection contains objects, you must provide a custom function that knows how tocompare two objects of the same type.
Master It How do you specify a custom comparer function for a collection that containsRectangle objects?

Chapter 13
XML in Modern Programming
XML has gained so much in popularity and acceptance that Microsoft has decided topromote XML to a basic data type. Yes, XML is a data type like integers and strings! Tounderstand how far VB has taken XML, type the following in a procedure or event handler:
Dim products = <Books><Book ISBN="0000000000001">
<Title>Book Title 1</Title><Price>11.95</Price>
</Book><Book ISBN="000000000002">
<Title>Book Title 2</Title><Price>10.25</Price>
</Book></Books>
You need not worry too much about getting the document exactly right, because the VisualStudio’s editor works just like the XML editor. Every time you type an opening tag, it insertsthe matching closing tag and ensures that what you’re typing is a valid XML document.
The language has been extended to support XML with features that bridge the gap betweenVB programming and XML, and XML has become a ‘‘first-class citizen’’ of the Framework. Asyou will see in this and the following chapter, manipulating XML documents from within yourVB application is simpler than ever before. If you haven’t used the DOM object in the past tomanipulate XML documents, rest assured that the new tools make this task as straightforwardas it can be for VB developers. In this chapter, you’ll find an introduction to the topic of XML(for readers who are not yet familiar with XML) and the classes that allow you to manipulateXML with VB code.
In this chapter, you’ll learn how to do the following:
◆ Create XML documents
◆ Navigate through an XML document and locate the information you need
◆ Convert arbitrary objects into XML documents and back with serialization
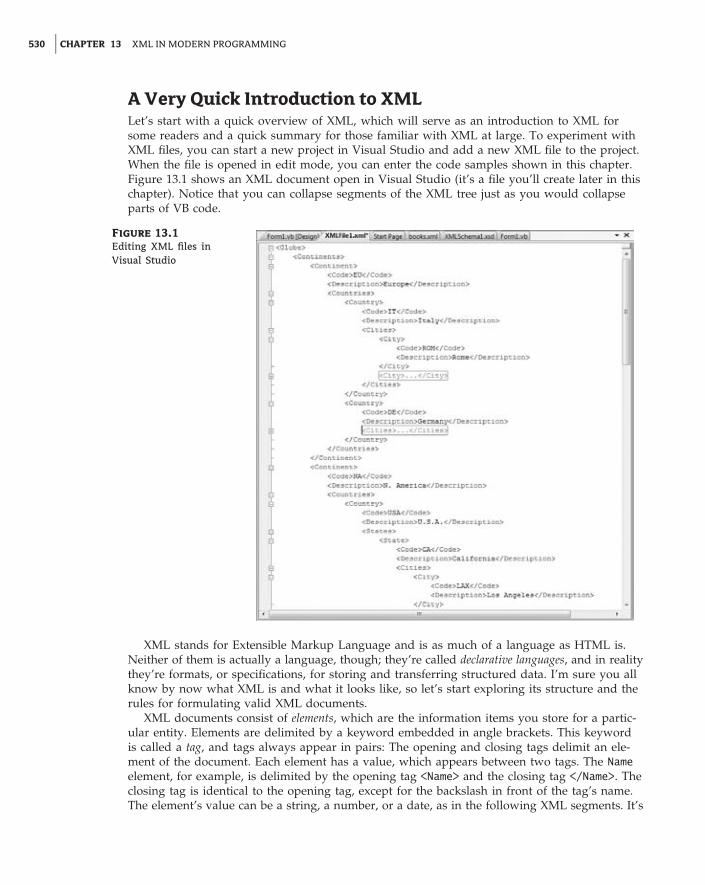
530 CHAPTER 13 XML IN MODERN PROGRAMMING
A Very Quick Introduction to XMLLet’s start with a quick overview of XML, which will serve as an introduction to XML forsome readers and a quick summary for those familiar with XML at large. To experiment withXML files, you can start a new project in Visual Studio and add a new XML file to the project.When the file is opened in edit mode, you can enter the code samples shown in this chapter.Figure 13.1 shows an XML document open in Visual Studio (it’s a file you’ll create later in thischapter). Notice that you can collapse segments of the XML tree just as you would collapseparts of VB code.
Figure 13.1
Editing XML files inVisual Studio
XML stands for Extensible Markup Language and is as much of a language as HTML is.Neither of them is actually a language, though; they’re called declarative languages, and in realitythey’re formats, or specifications, for storing and transferring structured data. I’m sure you allknow by now what XML is and what it looks like, so let’s start exploring its structure and therules for formulating valid XML documents.
XML documents consist of elements, which are the information items you store for a partic-ular entity. Elements are delimited by a keyword embedded in angle brackets. This keywordis called a tag, and tags always appear in pairs: The opening and closing tags delimit an ele-ment of the document. Each element has a value, which appears between two tags. The Nameelement, for example, is delimited by the opening tag <Name> and the closing tag </Name>. Theclosing tag is identical to the opening tag, except for the backslash in front of the tag’s name.The element’s value can be a string, a number, or a date, as in the following XML segments. It’s

A VERY QUICK INTRODUCTION TO XML 531
also valid for an element to have no value at all. The following XML segment describes salarydata for a person whose SSN is not known at the time.
<Name>Richard Manning</Name><Rate>39.95</Rate><BirthDate>1982-08-14</BirthDate><SSN></SSN>
The preceding elements have simple values. It just so happens that Richard’s social securitynumber was not known at the time (it has an empty value). An element may also contain asequence of elements, as in the following:
<Name><First>Richard</First><Last>Manning</Last>
</Name><BirthDate>1982-08-14</BirthDate><Rate>
<Type>Hourly</Type><Amount>39.95</Amount>
</Rate>
The Name element here contains two elements, each one with their own value. Here are thefirst two rules about XML authoring:
Tags are case sensitive, and they always appear in pairs. It goes without saying that the tags must beproperly nested; otherwise, the document wouldn’t have a structure.
VB developers should be especially careful about the first rule, because their favorite lan-guage has never had issues with character casing. When you work with XML, you must payattention to case because <Name> and <name> are two totally different tags.
Entity References
Some characters have a special meaning in XML, and the symbols < and > are two of them.These characters may not appear as part of an element’s name, or value, because it will throwoff the compiler. These characters must be replaced by a special string, known as an entityreference. The following table shows the characters that have special meaning in XML and thecorresponding entity references:
< (less than) <
> (greater than) >
& (ampersand) &
’ (apostrophe) '
’’ (quotation mark) "
Actually, only two of these symbols are strictly illegal in XML (the < and & symbols), but it’squite common to escape all five symbols.

532 CHAPTER 13 XML IN MODERN PROGRAMMING
In addition to values, elements may have attributes, too. Attributes belong to specific ele-ments, and they appear in the element’s opening tag, as follows:
<Book ISBN = "978001234567">
The Book element has an ISBN attribute with the value specified with the string followingthe equals sign. And here’s the third rule about XML:
All attribute values must be enclosed in quotes.
You can also insert multiple attributes into an element by placing the elements next to oneanother:
< Book ISBN = "978001234567" Publisher = "SYBEX"><Person LastName = "Doe" FirstName = "Joe" SSN = "555-00-1234">
Because elements many contain attributes, which are specified by name, you can’t use spacesin an element name. If you do, the compiler will think that the second word is the name ofan attribute, not followed by its value. In fact, most XML editors will automatically insert theequals sign followed by two quotes to indicate an attribute without a value.
The value of an element is inserted between its opening and closing tags, and it may (andusually does) contain additional elements. Here’s another way to express the preceding Personelement:
<Person><Last>Doe</Last><First>Joe</First><SSN>555-00-1234</SSN>
</Person>
There’s no clear-cut distinction as to when you should use elements and when you shoulduse attributes, but you usually store information that identifies the element as attributes and thedetails of the element as its value. Consider the following typical examples of XML segmentswith attributes:
<Hotel ID = "STR001"><HotelName>Hotel of the Stars</HotelName><Rating ID = "3">3 Stars</Rating><Address> address details </Address>
</Hotel>
<Book ISBN="1234567890"><Title>Mastering XML Internals</Title><Publisher ID="323">XMLers Int’l.</Publisher><Authors>
<Author>J. Element</Author><Author>J. Attribute</Author>
</Authors></Book>

A VERY QUICK INTRODUCTION TO XML 533
<Country Code = "IT" Name = "Italy"><City Code = "MIL" Name = Milan" /><City Code = "ROM" Name = "Rome" />. . . more cities under Italy
</Country><Country Code = "FR" Name = "France">
<City Code = "PRS" Name = Paris" /><City Code = "LYN" Name = "Lyon" />. . . more cities under France
</Country>
<Employee SSN = "55 22 9999" Sex="M" Status = "Single"><Name>Peter Evans</Name><Position>Finance Director</Position><HiredOn>7/15/1989</HiredOn>
</Employee>
More often than not, you will see XML documents made up entirely out of elements,without any attributes. You will also see XML documents made up of one element per entityand attributes for all of their properties. Once you understand the nature of XML and youare ready to create your own XML documents, you’ll have a good feeling about elements andattributes. It’s much more important to properly nest elements to keep relevant informationunder the same root element than worrying about whether a specific item should be defined asan attribute or an element.
It’s also possible for an element to contain one or more attributes, but no value. For thesespecial cases, there’s a shorthand notation for avoiding the closing tag: You just insert the back-slash character before the opening element’s closing angle bracket. The following element
<Product ProductID="39"Name="Chartreuse verte" Price="18.50" >
</Product>
can also be written as follows:
<Product ProductID="39"Product="Chartreuse verte" Price="18.50" />
The line breaks were introduced to help you read the XML segment, they’re not mandatory,and they’re not taken into consideration when processing an XML document, just like whitespace in HTML. If the spaces (tabs, line feeds, and multiple spaces) appear in an element’svalue, they will be preserved.
As you can see in the few examples so far, XML is just plain text that can be safelyexchanged between computers using the HTTP stack. As you probably know, XML is usedjust about everywhere today, but in its roots it remains a simple data exchange protocol. Youcan think of the tags as delimiters that separate items of information. It’s actually the very factthat the delimiters are specified by the user and that they can be nested that made XML sopowerful and suitable for all types of information. XML delimiters are unusual in the sensethat they appear before and after each data item, and they occur in pairs: the opening and

534 CHAPTER 13 XML IN MODERN PROGRAMMING
closing tags. The closing tag is always the same as the opening tag, prefixed with a backslash.The most important aspect of XML, though, is that you can specify the delimiters and theirstructure: You determine the names of the elements, and you’re allowed to nest them sothat they reflect the structure, or hierarchy, of the information. The fact that XML tags havemeaningful names is a major convenience, but words like book, author, country, and so on, arenot especially meaningful to computers. They help you understand the data stored in the fileand write code to extract the items of information you’re interested in, but no software willprocess XML documents automatically.
XML SchemaFor an XML document to be meaningful and useful to others, you must use element andattribute names consistently. Even though it’s possible to use sometimes the <Last> elementand other times the <LastName> element, the resulting XML document will be practicallyunusable. Before you start writing an XML document, you must decide on the names of the ele-ments in it and use them consistently. The structure of the document, along with the names ofthe elements and attributes, is referred to as the document schema. The schema of the documentis another XML document. To get a feel for XML schemas and how they used, start a new VBproject in Visual Studio, and add a new XML file to the solution (just right-click the project’sname, and select Add � New Item; in the dialog box that appears, select the XML File option).The new XML file will contain the following statement, which identifies a file as an XMLdocument (oddly, this tag that begins with the question mark doesn’t require a closing tag; itidentifies the file as an XML document.):
<?xml version="1.0" encoding="utf-8" ?>
Then enter the XML document shown in Listing 13.1 in the file, following the initial tag. Thedocument is a short segment of a report from the Northwind database, and you will find it inthe NWProducts.xml file in this chapter’s folder.
Listing 13.1: An XML document with products, organized by category and supplier
<Categories_Products><Category CategoryID="1" Category="Beverages">
<Supplier Supplier="Aux joyeux ecclésiastiques"><Product ProductID="39"
Product="Chartreuse verte" Price="18.0000" /><Product ProductID="38"
Product="Côte de Blaye" Price="263.5000" /></Supplier><Supplier Supplier="Bigfoot Breweries">
<Product ProductID="34"Product="Sasquatch Ale" Price="14.0000" />
<Product ProductID="35"Product="Steeleye Stout" Price="18.0000" />
</Supplier></Category>
<Category CategoryID="2" Category="Condiments">

A VERY QUICK INTRODUCTION TO XML 535
<Supplier Supplier="Exotic Liquids"><Product ProductID="3"
Product="Aniseed Syrup" Price="10.0000" /></Supplier><Supplier Supplier="Forêts d’érables">
<Product ProductID="61"Product="Sirop d’érable" Price="28.5000" />
</Supplier></Category>
</Categories_Products>
Now open the XML menu, and select the Create Schema command. Visual Studio will cre-ate a schema that matches the XML document and will open it in a new window. Listing 13.2shows the schema of the preceding XML document.
Listing 13.2: The schema of the XML document of Listing 31.1
<?xml version="1.0" encoding="utf-8"?><xs:schema attributeFormDefault="unqualified" elementFormDefault="qualified"xmlns:xs="http://www.w3.org/2001/XMLSchema">
<xs:element name="Categories_Products"><xs:complexType>
<xs:sequence><xs:element maxOccurs="unbounded" name="Category">
<xs:complexType><xs:sequence>
<xs:element maxOccurs="unbounded" name="Supplier"><xs:complexType>
<xs:sequence><xs:element maxOccurs="unbounded"
name="Product"><xs:complexType>
<xs:attributename="ProductID"type="xs:unsignedByte"use="required" />
<xs:attribute name="Product"type="xs:string"use="required" />
<xs:attribute name="Price"type="xs:decimal"use="required" />
</xs:complexType></xs:element>
</xs:sequence><xs:attribute

536 CHAPTER 13 XML IN MODERN PROGRAMMING
name="Supplier"type="xs:string"use="required" />
</xs:complexType></xs:element>
</xs:sequence><xs:attribute name="CategoryID"
type="xs:unsignedByte"use="required" />
<xs:attribute name="Category"type="xs:string" use="required" />
</xs:complexType></xs:element>
</xs:sequence></xs:complexType>
</xs:element></xs:schema>
The automatically generated schema is stored in a file with the same name as the XML doc-ument and the extension .xsd. Designing a schema is not a simple task, but there are tools toassist you. The most important aspect of the schema is that it can be applied to an XML docu-ment and help you make sure that the document follows its design guidelines. The editor willdo its best to decipher the schema of a document based on the data at hand, but the schemamay not describe another document with similar data. The use property of the schema, forexample, is always required, because all attributes in the XML segment have a value. If oneof the elements didn’t have a Price attribute, for example, then the use property of the Priceattribute would be optional.
Now, switch back to the XML document, and look up its Schemas property in the Propertieswindow. You will see that the file you just created has been applied to the document. If not,click the button next to the Schemas property, and you will see the XML Schemas dialogbox, shown in Figure 13.2. Click the Add button, and locate the newly generated XSD filein the project’s folder. Open the drop-down list in the Use column, select Use This Schemato apply the newly added schema to the document, and then click OK to close the dialogbox. The schema will be applied to the XML document, and any elements or attributes inthe document that don’t comply with the schema will be highlighted. Of course, becausethe schema was generated for the specific document, no errors will be found, but this isthe purpose of the schema validation: to locate any items that do comply with the specifiedschema. If you edit the document, the editor will not allow you to deviate from the document’sschema.
If you edit the XML document now, the editor will assist you in creating a valid XML doc-ument that complies with its schema. The proper elements at each place in the document willappear in the usual IntelliSense drop-down list as you type. When you type the opening anglebracket, the editor will suggest the valid element names (actually it will display only the firstelement name; the second time it will suggest the second element name, and so on). If youselect an element name and then type a space, the editor will suggest the attribute names, asshown in Figure 13.3. In general, the built-in XML editor of Visual Studio will assist you asbest as it can in creating XML documents and will make sure they comply with the specifiedschema.

A VERY QUICK INTRODUCTION TO XML 537
Figure 13.2
Selecting and applyinga schema to an XMLdocument
Figure 13.3
Editing an XML docu-ment in Visual Studio.The IntelliSense box ispopulated with the aidof the current schema.
Of course, you don’t create a document and then derive its schema as I did here. Normally,when you’re asked to produce an XML document, you’ll be given a schema. If you’re the doc-ument designer, you’ll have to produce the schema too. One very useful tool for automatingschema generation is SQL Server. It’s possible to retrieve the results of a SQL query in XMLformat, and the output may include not only the data, but the schema itself. Actually, this ishow I created the sample document NWProducts.xml. If you’re curious about schemas and therelated keywords, add a new XML Schema item to the project (with the project’s Add � NewItem command), and start editing it. The editor will suggest the valid tags at each step, andyou’ll be able to create a simple schema without knowing anything about them. How does theeditor know about XSD? Well, it’s all in the schema! XSD has its own schema, which is storedin the xsdschema.xsd file that comes with Visual Studio. Isn’t XML fun<?>
Numbers and Dates in XMLBesides strings, element values can be numeric values or dates. The basic numeric data typein XML is the Decimal type, but XML supports all the usual numeric types, including floats,short/long/signed/unsigned integers, and so on. There’s also a Boolean data type, whosevalue is ‘‘true’’ or ‘‘false’’ (not 0/1, not TRUE/FALSE — just the values shown with that exactspelling).
Dates are quite tricky. An XML document can be created anywhere, and dates do not obey aspecific locale. That’s true of any document that contains dates, but XML addresses this issueelegantly. Consider the following XML segment that has a different meaning in the UnitedStates than in the United Kingdom:
<Date>4/9/2011</Date>
This segment would present perfectly clear, if different, information to users in the UnitedStates and in the United Kingdom; the US reading would be April 9, 2011, while the UK

538 CHAPTER 13 XML IN MODERN PROGRAMMING
reading would be 4 September 2011. If that cultural understanding of the format causes a userto enter day information in the month position and the value exceeds 12, then the date wouldbe invalid. To address the issue of dates, XML supports the Date, Time, and DateTime datatypes. The Date data type specifies dates with the unambiguous format YYYY-MM-DD. The Timedata type specifies times with the format HH:MM:SS. You can optionally append the time’smilliseconds. Here are some examples of Time values:
<start>09:05:32</start><start>17:11:45.510</start>
Time values are rather uncommon on their own; you’ll usually combine date and time infor-mation in a DateTime value. DateTime values are Date and Time values separated by the Tcharacter:
<startdate>2011-09-04T09:30:10</startdate>
Another time-related issue is that of the time zone. If you’re processing an XML documentgenerated in a different time zone, you should be able to take the time difference into consid-eration. If you request that a response arrive within four hours, for example, you should beable to convert the time specified in the document into local time. The time zone is specifiedwith the + or – sign followed by a number of hours and, optionally, minutes. The time zonesare usually hours apart, but there are a few exceptions (Newfoundland is 3.5 hours behindGMT). Alternatively, you can append a Z character followed by the UTC time. Here are a fewDateTime values that include time zone information:
<startdate>2011-09-04T09:30:10-06:00</startdate><startdate>2011-09-04T09:30:10Z</startdate>
The first example refers to 9:30:10 in the Central time zone in the United States (six hoursbehind the GMT time). The second example refers to 9:30:10 GMT time. If you’re exchangingXML files that include time information with users in different time zones, you should includethe time zone to make them unambiguous.
Manipulating XML with VBYou have seen the basics of generating XML documents from scratch (and in the second half ofthis chapter you’ll see how to convert your custom objects into XML documents), and you’veseen that you can create valid XML documents easily with the help of Visual Studio’s XMLeditor. But what good is an XML document without some tools to extract information from it?You will need some simple tools for creating and manipulating XML documents from withinVB code, and these tools are available through the following XML helper classes:
◆ XDocument represents the XML document.
◆ XComment represents a comment in the XML document.
◆ XElement represents an XML element.
◆ XAttribute represents an attribute in an XML element.

MANIPULATING XML WITH VB 539
You can use these classes to access the document but also to create it from within your code.Instead of embedding an XML document directly in your code, you can use the XML helperclasses and a structural approach to create the same document from within your code. To createa new XElement object, pass the element’s name and value to its constructor:
New XElement(element_name, element_value)
The following statement will create a very simple XML document:
Dim XmlDoc = New XElement("Books")MsgBox(XmlDoc.ToString)
You will see the string <Books /> in a message box. This is a trivial, yet valid, XML document.To create an XML segment with books by using the helper classes, insert the statements fromListing 13.3 in a button Click event handler.
Listing 13.3: A simple XElement describing a collection of books
Dim doc = _New XElement("Books", _
New XElement("Book", _New XAttribute("ISBN", "0000000000001"), _New XElement("Price", 11.95), _New XElement("Title", "Book Title 1"), _New XElement("Stock", _
New XAttribute("InStock", 12), _New XAttribute("OnOrder", 24))), _
New XElement("Book", _New XAttribute("ISBN", "0000000000002"), _
New XElement("Price", 10.25), _New XElement("Title", "Book Title 2"), _New XElement("Stock", _
New XAttribute("InStock", 7), _New XAttribute("OnOrder", 10))))
I’ve added a twist to this new document to demonstrate the use of multiple attributes in thesame element. The Stock element contains two attributes, InStock and OnOrder. The Priceelement is a decimal value, and the Title element is a string. The Book element, however, con-tains three subelements: the Price, Title, and Stock elements.
If you look at the code of Listing 13.3 and ignore the XElement and XAttribute items, thecode looks a lot like the document we’re constructing. This type of construction is called func-tional construction, because the code is very similar to the XML document we have in mind. Ifyou haven’t worked with XML in the past, the functional construction (or functional compo-sition) approach to building XML documents is an enormous improvement over the tools VBprogrammers had to use until very recently. If you haven’t been exposed to XML before, you’llprobably think it’s typical VB. But wait, it gets even better.

540 CHAPTER 13 XML IN MODERN PROGRAMMING
XML as a Data TypeThe functional composition of an XML document resembles the actual document you’re cre-ating, but the Visual Basic editor can do even better. You can create an XML document andassign it to an XElement variable with a statement like the one shown in Listing 13.4.
Listing 13.4: The document of Listing 13.3 created explicitly
Dim xDoc = _<Books>
<Book ISBN="0000000000001"><Price>11.95</Price><Title>Book Title 1</Title><Stock InStock="12" OnOrder="24"/>
</Book><Book ISBN="0000000000002">
<Price>10.25</Price><Title>Book Title 2</Title><Stock> InStock="7" OnOrder="10"/>
</Book</Books>
As soon as you type the first opening angle bracket, the editor will switch to XML mode andwill assist you by inserting the matching closing tags and by indenting the document for you.The two methods of creating XML documents with VB are demonstrated in Figure 13.4.
Figure 13.4
The two methods forcreating XML segmentsin Visual Studio
<Books>
</Books>
<Book ISBN="0000000000001">
<Price>11.95</Price> <Name>Book Title 1</Name> <Stock InStock= "12" OnOrder="24" />
</Book><Book ISBN="0000000000002">
<Price>10.25</Price> <Name>Book Title 2</Name> <Stock InStock= "7" OnOrder="10" />
</Book>
New XElement("Books", _New XElement("Book", _ New XAttribute("ISBN", "0000000000001"), _New XElement("Price", 11.95), _New XElement("Name", "Book Title 1"), _New XElement("Stock", _ New XAttribute("InStock", 12), _ New XAttribute("OnOrder", 24))), _
New XElement("Book", _ New XAttribute("ISBN", "0000000000002"), _New XElement("Price", 10.25), _New XElement("Name", "Book Title 2"), _New XElement("Stock", _ New XAttribute("InStock", 7), _ New XAttribute("OnOrder", 10))), _
Compositional Construction Functional Construction
The XML document you create in-line is not an island, entirely isolated from the rest of thecode. You can embed VB expressions right into the XML document, and these expressions willbe replaced with their values at runtime. To embed an expression in an XML document, use thespecial tags <%= and %> (yes, the same tags we used with ASP 1.0 to mix HTML and VBScriptcode). Here’s the same document with the prices replaced by embedded expressions:

MANIPULATING XML WITH VB 541
Dim price1 As Decimal = 11.95Dim price2 As Decimal = 10.25Dim xDoc = _
<Books><Book ISBN="0000000000001">
<Price><%= price1 %></Price><Title>Book Title 1</Title><Stock InStock="12" OnOrder="24"/>
</Book><Book ISBN="0000000000002">
<Price><%= price2 %></Price><Title>Book Title 2</Title><Stock> InStock="7" OnOrder="10"/>
</Book></Books>
The prices need not be hard-coded in variables. You can call a function to retrieve themfrom a database based on the book’s ISBN. You can use other simple VB expressions to insertthe current date into your document, call built-in functions, and so on. However, you can’tembed large segments of code with conditional or looping statements (you’ll see how this canbe done with LINQ in the next chapter).
The following XML segment generates an XML segment with the parameters of a loan. Theloan parameters are specified with the help of variables, but the actual monthly payment is cal-culated with a call to the Pmt() function right from within the XML code. The tag <%= switchesyou to VB, and the %> tag switches you back to XML.
Dim loanAmount As Decimal = 135000Dim loanInterest As Decimal = 8.75Dim loanDuration = 6Dim loanXML = <Loan>
<Amount><%= loanAmount %></Amount><Duration><%= loanDuration %>6</Duration><DurationUnit>Years</DurationUnit><Interest><%= loanInterest %></Interest><Payment><%= Financial.Pmt( loanInterest / 10 * 12, _
loanDuration * 12, loanAmount) %></Payment>
</Loan>MsgBox(loanXML)
If you execute the preceding statements, they will print the following XML document on amessage box:
<Loan><Amount>135000</Amount><Duration>6</Duration><DurationUnit>Years</DurationUnit><Interest>8.75</Interest><Payment>2,416.73</Payment>
</Loan>

542 CHAPTER 13 XML IN MODERN PROGRAMMING
The embedded expression calls a financial function, the Pmt() function, to calculate theloan’s payment. The result is even formatted appropriately by calling the ToString methodof the Double data type (the Pmt() function returns a Double, as was discussed in Chapter 1,‘‘Getting Started with Visual Basic 2010’’).
Saving and Loading XML DocumentsThe variable that holds an XML segment is of the XElement type. An XML document is notnecessarily based on the XDocument class. The two basic operations you can perform with anXElement (and XDocument) object are saving a file and reloading an XElement object from afile. The operations are performed with the Save and Load methods, which accept the filenameas an argument.
The following statements will save an XML document to a file and then open it with thedefault application, which on most computers is Internet Explorer, as shown in Figure 13.5. Ifyou have associated XML extensions with another application, then the document will open inthat application (it could be Visual Studio or any other XML editor you have installed on yourcomputer).
XElement.Save(file_name)Process.Start(file_name)
Figure 13.5
Viewing an XML docu-ment in your browser

TRAVERSING XML DOCUMENTS 543
To load the contents of a file to an XElement variable, use the Load method, which acceptsas an argument the name of the file:
Dim XDoc = XElement.Load(file_name)
One more related method is the Parse method, which allows you to load an XElement vari-able from a string. As the code in Listing 13.4 should have convinced you, there’s no reason toever create strings with XML data in your code. You may retrieve an existing XML documentas a string. In this case, you can just pass the string to the Parse method to create an XML treeand process it with the techniques discussed in this chapter. The Parse method accepts a stringas an argument and returns an XElement object:
Dim XDoc = XElement.Parse(xml_string)
Traversing XML DocumentsLet’s look at how you can process an XML document using XML helper objects. ProcessingXML consists of navigating to the items of interest in the document, extracting element andattribute values, and editing the contents of an existing XML document.
The basic methods for navigating through an XML document are known as axis methods(they allow you to quickly move to any part of the document, just as you can describe anypoint in the space with the help of the x-, y-, and z-axes). Let me start the discussion of the axismethods by making it clear that all axis methods are relevant to the current position in the XML tree.If you request the immediate descendant of a continent, for example, you’ll get a country ele-ment, not a city. If you’re currently on a country element, the same method will return a cityelement.
The Element and Elements MethodsThe Element method allows you to locate an element by name. This method returns the firstXElement segment by the name specified as an argument to the method, if such an elementexists under the current element. The Elements method is similar, only instead of the firstmatching element, it returns all matching elements. Note that while the Element methodreturns an XElement object, the Elements method returns a collection of XElement objects(actually, an IEnumerable of XElement objects).
Ancestors and Descendants MethodsEach element may have one or more parent elements, which you can access via the Ancestorsproperty, and one or more child elements, which you can access via the Descendants property.Both methods return a collection of XElement objects. To retrieve the desired child or parentelements, you must pass to the method the name of the desired element. The following expres-sion will return all Book elements in the sample document:
xDoc.Descendants("Book")

544 CHAPTER 13 XML IN MODERN PROGRAMMING
If you call the Descendants method without an argument, it will return all nodes under thecurrent element. I will demonstrate the use of the Elements and Descendants methods andtheir differences through sample code shortly.
Attribute PropertyIn addition, elements may have attributes, which you can access via the Attribute property.The Attribute method applies to an XElement node in the document and extracts the value ofthe attribute whose name you pass to the method as an argument.
Let’s write a loop to iterate through our simple collection of books which are in the xDocvariable:
For Each book In xDoc.Elements("Book")Debug.WriteLine("ISBN " & book.Attribute("ISBN").Value.ToString)Debug.WriteLine(" Title: " & book.Element("Name").Value.ToString)Debug.WriteLine(" Price: " & book.Element("Price").Value.ToString)Dim stock = book.Element("Stock")Debug.WriteLine(" Books in stock " & stock.Attribute("InStock").Value)Debug.WriteLine(" Books on order " & stock.Attribute("OnOrder").Value)
Next
The loop iterates through the Book elements in the XML file. The expression xDoc.Elements("Book") returns a collection of XElement objects, each one representing a book. We then callthe Attribute method of each Book element to access the element’s attributes by name. TheDescendants method returns a collection of XElement objects, one for each subelement of theelement represented by the book XElement. One of the elements, the Stock element, has itsown attributes. To read their values, the code creates a variable that represents the Stock ele-ment and uses its Attribute method to retrieve an attribute by name. The output of the pre-ceding code segment is shown here:
ISBN 0000000000001Title: Book Title 1Price: 11.95
Books in stock 12Books on order 24
ISBN 0000000000002Title: Book Title 2Price: 10.25
Books in stock 7Books on order 10
VB Axis PropertiesThere’s a shorthand notation for accessing attributes, elements, and descendants in an XML file:The @ symbol is shorthand for the Attribute property, a pair of angle brackets (<>) is short-hand for the Element property, and two dots (..) are shorthand for the Descendants prop-erty. The following code segment is identical to the preceding one, only this time I’m using theshorthand notation. The output will be the same as before.

TRAVERSING XML DOCUMENTS 545
For Each book In doc.Elements("Book")Debug.WriteLine("ISBN " & [email protected])Debug.WriteLine(" Title: " & book…<Name>.Value.ToString)Debug.WriteLine(" Price: " & book…<Price>.Value.ToString)Dim stock = book.Element("Stock")Debug.WriteLine(" Books in stock " & [email protected])Debug.WriteLine(" Books on order " & [email protected])
Next
Notice that attributes are returned as strings and have no Value property.
Editing XML DocumentsIn addition to traversing XML documents, you can edit them. To add a new element under anexisting one, use the Add method, which accepts as an argument the new XElement:
XElement.Add(New XElement (element_name, element_value))
To add a new element that represents a new book to the xDoc variable, call the Add methodon the root element, passing the appropriate XElement and XAttribute objects that represent theproperties of the new book:
xDoc.Add(New XElement("Book", New XAttribute("ISBN", "0000000003"),New XElement("Price", 19.99),New XElement("Title", "Book Title 3"),New XElement("Stock",
New XAttribute("InStock", 2),New XAttribute("OnOrder", 5))))
If you execute these statements, the following XML segment will be added to the document:
<Book ISBN="0000000003"><Price>19.99</Price><Title>Book Title 3</Title><Stock InStock="2" OnOrder="5" />
</Book>
To change an element’s value, call the SetElementValue method, which accepts as an argu-ment the element’s new value:
XElement.SetElementValue(new_value)
The SetElementValue method can replace simple content; you can’t use it to replace an ele-ment’s value with a collection of nested elements. If you’re at the Price XElement of the firstbook in the document, you can change the book’s price with a statement like the following:
XElement.SetElementValue("9.99")

546 CHAPTER 13 XML IN MODERN PROGRAMMING
To remove an element from a document, call the Remove method. This method doesn’taccept any arguments; it just removes the XElement object to which it’s applied. You navigateto the element you want to remove as discussed earlier in this section and call the Removemethod. You can also apply this method to an XElements collection to quickly remove a largersection of the document.
Two methods to edit attributes are available to you from within VB. The Add method of theXElement class can accept as an argument an XAttribute object. When applied to an XElementobject, it will add the XAttribute to the XElement object. To change the value of an attribute,call the XElement class SetAttributeValue, and pass the attribute value as an argument.
Both the SetElementValue and SetAttributeValue methods can be called with a Nothingvalue in the place of the second argument (the value argument) to remove a specified elementor attribute. An empty string will change the value of the element or attribute but notremove it.
VB 2010 at Work: Manipulating XML DataNow is a good time to look at some VB code that exercises all the methods and properties dis-cussed so far. Instead of dwelling on the descriptions of the various axis methods, I designedan XML document that will demonstrate the use of the axis methods and will allow you toexperiment with them, as well as with the methods discussed in the following section of thischapter. The XML fragment we’ll use for our samples describes a hierarchy of countries andcities and is shown in Listing 13.5.
Listing 13.5: AN XML fragment of geographical data
Dim countries = <Countries><Country>
<Code>IT</Code><Description>Italy</Description><Cities>
<City><Code>ROM</Code><Description>Rome</Description>
</City><City>
<Code>FLR</Code><Description>Florence</Description>
</City></Cities>
</Country><Country>
<Code>DE</Code><Description>Germany</Description><Cities>
<City><Code>BRL</Code><Description>Berlin</Description>

VB 2010 AT WORK: MANIPULATING XML DATA 547
</City><City>
<Code>MUN</Code><Description>Munich</Description>
</City><City>
<Code>FRN</Code><Description>Frankfurt</Description>
</City></Cities>
</Country></Countries>
It’s a very short segment with two countries and a couple of cities in each country, but we’llextend it shortly. Notice that each item, whether it’s a country or a city, is described by two ele-ments by the same name: the Code and Description elements. Each country is identified by acode and a description, and the same is true for each city; their tags are Code and Descriptionin both cases. This is not uncommon in XML, as long as no two identical tags appear under thesame element. Personally, I recommend that you differentiate the element names in all cases(using names like countryName and cityName in our examples), but it’s not always up to you.Sometimes you may also have to use identical element names, so just be sure that they do notbelong to the same parent element.
Locating Information in the DocumentThe following loop retrieves the values of all Description elements in the document (they’reall the elements by that name under the root element, Country):
For Each destination In countries.Descendants("Description")TextBox1.AppendText(destination.Value & vbCrLf)
Next
The output generated by the preceding loop is shown next:
ItalyRomeFlorenceGermanyBerlinMunichFrankfurt
As you can see, the expression countries.Descendants("Description") retrieves allDescription elements, regardless of whether they represent countries or cities. Had you useddifferent tag names for countries and cities, it would have simplified things, but this contrivedexample will better demonstrate the use of the various axis methods. The reason I chose thisstructure is because I ran into documents with tag names like Price or Code, which might

548 CHAPTER 13 XML IN MODERN PROGRAMMING
appear more than once under different parents. When this happens, your code will appear towork as expected, but sometimes it will return the wrong price or code.
To retrieve all the country names, you must select all descendants (or all elements) with theCountry name. The following expression is a collection with all countries:
countries.Descendants("Country")
To retrieve the country names, write a loop that iterates through the items of this collectionand prints the value of their Description element:
For Each destination In countries.Descendants("Country")TextBox1.AppendText(destination.Descendants("Description").Value & vbCrLf)
Next
If you replace the call to the Descendants property with a call to the Elements property, theresult will be the same, because you’re retrieving elements under a country node.
To retrieve all city names, regardless of the country to which they belong, start with the fol-lowing expression:
countries.Elements("Country").Elements("Cities").Elements("City")
which retrieves all City elements under each Cities element under each Country element.This expression retrieves all Country nodes and then retrieves the Cities element under eachnode and finally all the City elements under the Cities node. The following loop iteratesthrough all cities:
For Each destination In countries.Elements("Country").Elements("Cities").Elements("City")
TextBox1.AppendText(destination.Element("Description").Value & vbCrLf)Next
And here’s the output produced by the preceding statements:
RomeFlorenceBerlinMunichFrankfurt
You can also move to a specific element in the hierarchy by indexing the appropriate Ele-ments collection. To access the second country in the document, Germany, use this expression:
countries.Elements("Country")(1)
If you call the ToString method of this expression, you will get the XML of the secondcountry, which is shown here:
<Country><Code>DE</Code>

VB 2010 AT WORK: MANIPULATING XML DATA 549
<Description>Germany</Description><Cities>
<City><Code>BRL</Code><Description>Berlin</Description>
</City><City>
<Code>MUN</Code><Description>Munich</Description>
</City><City>
<Code>FRN</Code><Description>Frankfurt</Description>
</City></Cities>
</Country>
Usually, to simplify our code, we assign the segment of the document we’re interested in toan XElement variable and work with it by applying the same methods to the XElement withthe document’s segment. To access the cities of Germany, retrieve the Cities element and thenthe elements under it. Here’s the loop that iterates through the German cities:
For Each city In countries.Elements("Country")(1).Element("Cities").ElementsDebug.WriteLine(city.Element("Description").Value)
Next
While you’re at a German city, you can call the Ancestors property to retrieve the entireCities element under the Germany node with the following expression:
city.Ancestors.ElementAt(0)
To retrieve the element that represents the entire Germany node, call the second element ofthe city’s Ancestors collection:
city.Ancestors.ElementAt (1)
Both properties return a collection of XElement objects, and you can iterate through them asusual.
Editing the DocumentTo add a new country to the countries document, call the Add method as follows:
countries.Add(New XElement ("Country", "Spain"))
The new XElement can contain multiple nested elements, as in Listing 13.6, which adds anentire new country (including its code and the cities under it) to the countries document with asingle statement.

550 CHAPTER 13 XML IN MODERN PROGRAMMING
Listing 13.6: Adding a new country with a single statement
countries.Add(New XElement("Country",New XElement("Code", "FR"),New XElement("Description", "France"),New XElement("Cities",
New XElement("City",New XElement("Code", "PAR"),New XElement("Description", "Paris")),
New XElement("City",New XElement("Code", "NIC"),New XElement("Description", "Nice")))))
I’ve nested this statement to make it easier to visualize. The idea is rather simple: To addmultiple elements at the same level, you just supply their values and separate them with com-mas. To add nested elements, you insert a New XElement declaration in place of the parentelement’s value. Of course, you can always create intermediate variable to store individualelements and then add them one after the other. Just remember that the constructor of the XEle-ment object accepts the element’s name as its first argument and the element’s value as the sec-ond argument. The element’s value can be another XElement (as in the case of the Cities andCity elements) or an array of XElement objects (as in the case of the Code and Descriptionelements).
The alternative approach is to create city nodes, then add them to a country node, andfinally add the country to the countries document. The statements in Listing 13.7 create a newcountry (Spain), then two new cities (Madrid and Barcelona), and then add the two cities tothe Cities element of Spain. Finally, they add the new country, the countrySpain element, tothe countries document.
Listing 13.7: Adding a new country by building all intermediate elements
’ Create an XElement to represent SpainDim countrySpain = New XElement("Country",
New XElement("Code", "ES"),New XElement("Description", "Spain"))
’ Create XElement to represent MadridDim cityMadrid = New XElement("City",
New XElement("Code", "MAD"),New XElement("Description", "Madrid"))
’ Create XElement to represent BarcelonaDim cityBarcelona = New XElement("City",
New XElement("Code", "BAR"),New Element("Description", "Barcelona"))
’ Create XElement to represent the cities of the SpainDim citiesSpain = New XElement("Cities")’ and add Madrid and Barcelona elements to itcitiesSpain.Add(cityMadrid)

VB 2010 AT WORK: MANIPULATING XML DATA 551
citiesSpain.Add(cityBarcelona)’ add the spanish cities under Spain elementcountrySpain.Add(citiesSpain)’ and finally add the complete Spain element to the countries documentcountries.Add(countrySpain)MsgBox(countries.ToString)
The last statement displays the entire countries document, from which I’ve extracted thesegment that corresponds to Spain:
<Country><Code>ES</Code><Description>Spain</Description><Cities>
<City><Code>MAD</Code><Description>Madrid</Description>
</City><City>
<Code>BAR</Code><Description>Barcelona</Description>
</City></Cities>
</Country>
Compare the statements in Listing 13.6 and Listing 13.7 to see the differences betweenthe two approaches. They’re functionally equivalent, but when you’re building a complexXElement in a single statement, you have to make sure that the parenthesized expressions endproperly.
Using XML Segments as LiteralsNow we’ll edit our XML document by adding a few more countries and embedding our initialcountries collection into a larger collection with continents. We want to create a new documentwith the following structure:
GlobeContinents
ContinentCountries
CountryStates
StateCities
CityCity...
State

552 CHAPTER 13 XML IN MODERN PROGRAMMING
...Country...
Continent...
It’s a straightforward document that you can easily create with the functional compositionapproach. Since you already have a segment of the document, you should be able to reuse thecountries document, right? Indeed, this is the case. Start typing a new XElement with thenew structure, and when you get to Europe, just embed the existing document, as shown inListing 13.8 (the bold statement inserts the contents of the XElement that represents Europeancountries into the document).
Listing 13.8: Functional composition of an XML document
Dim Globe =<Globe>
<Continents><Continent>
<Code>EU</Code><Description>Europe</Description><%= countries %>
</Continent><Continent>
<Code>NA</Code><Description>N. America</Description><Countries>
<Country><Code>USA</Code><Description>U.S.A.</Description><States>
<State><Code>CA</Code><Description>California</Description><Cities>
<City><Code>LAX</Code><Description>Los Angeles</Description>
</City><City>
<Code>SD</Code><Description>San Diego</Description>
</City><City>
<Code>SF</Code><Description>San Francisco</Description>
</City></Cities>

VB 2010 AT WORK: MANIPULATING XML DATA 553
</State><State>
<Code>NY</Code><Description>New York</Description><Cities>
<City><Code>NYC</Code><Description>New York City</Description>
</City><City>
<Code>ALB</Code><Description>Albany</Description>
</City></Cities>
</State></States>
</Country><Country>
<Code>MX</Code><Description>Mexico</Description><Cities>
<City><Code>MXC</Code><Description>Mexico City</Description>
</City><City>
<Code>TIJ</Code><Description>Tijuana</Description>
</City><City>
<Code>GDJ</Code><Description>Guadalajara</Description>
</City></Cities>
</Country></Countries>
</Continent></Continents>
</Globe>
Figure 13.6 shows how you can mix VB and XML in the code editor and switch from one tothe other by opening and closing the <% and %> tags.
Note that I included state information in the USA country to add a twist to the document.When you process it, you must take into consideration that some countries are separated intostates, while others aren’t. You’ll start with a loop that iterates through the continents and theirsubordinate elements and prints out continents, countries, and cities. For the time being, you’llignore the states; you just want to print the cities under each country. The code shown inListing 13.9 consists of three nested loops: The outer one goes through the continents, the next

554 CHAPTER 13 XML IN MODERN PROGRAMMING
inner one countries under each continent, and the innermost loop goes through the cities undereach country.
Figure 13.6
The gap between tradi-tional programming andXML has suddenly nar-rowed with VB’s supportof XML.
Listing 13.9: Iterating through the globe document’s continents, countries, and cities
For Each continent In Globe.Elements("Continents").Elements("Continent")TextBox1.AppendText(continent.Element("Description").Value & vbCrLf)For Each country In continent.Elements("Countries").Elements("Country")
TextBox1.AppendText(vbTab & country.Element("Description").Value & vbCrLf)For Each city In country.Descendants("Cities").Elements("City")
TextBox1.AppendText(vbTab & vbTab &city.Elements("Description").Value & vbCrLf)
NextNext
Next
The expression Globe.Elements("Continents").Elements("Continent") returns a collec-tion of all continents in the globe document. The continent control variable is an XElementitself that represents the current continent in the outer loop. To extract the current continent’scountries, the code uses the expression continent.Elements("Country"), which returns acollection of countries. The country control variable is also an XElement that represents thecurrent continent’s states and cities. Although all expressions use the Elements axis to locatethe corresponding elements, the innermost loop uses the Descendants axis to retrieve the cities,whether they belong to a country or a state. The code of Listing 13.9 will produce the followingoutput:
EuropeItaly
RomeFlorence

VB 2010 AT WORK: MANIPULATING XML DATA 555
GermanyBerlinMunichFrankfurt
FranceParis
SpainMadrid
N. AmericaU.S.A.
Los AngelesSan DiegoSan FranciscoNew York CityAlbany
MexicoMexico CityTijuanaGuadalajara
If you replace the line
For Each city In country.Descendants("Cities").Elements("City")
with the following:
For Each city In country.Elements("Cities").Elements("City")
you will get the same results for all countries, except the United States, where the cities arenested under their states (there will be no cities under the US node).
If the preceding code segment is not clear to you or if you’d prefer a more verbose versionof the same code segment, here’s an alternate method of producing the same output. This timeI create two intermediate variables to store countries and cities: the continentCountries andcountryCities variables. These variables are collections that hold the appropriate elements ateach iteration of the corresponding loop:
For Each continent In Globe.Elements("Continents").Elements("Continent")TextBox1.AppendText(continent.Element("Description").Value & vbCrLf)Dim continentCountries = continent.Elements("Countries")For Each country In continentCountries.Elements("Country")
TextBox1.AppendText(vbTab & country.Element("Description").Value & vbCrLf)
Dim countryCities = country.Descendants("Cities")For Each city In countryCities.Elements("City")
TextBox1.AppendText(vbTab & vbTab & _city.Elements("Description").Value & vbCrLf)
NextNext
Next

556 CHAPTER 13 XML IN MODERN PROGRAMMING
If you want to include the states (and this is obviously the proper method of iteratingthrough this document), you must differentiate the countries with states from the countrieswithout states. To do so, you must retrieve the States descendants of each country node andexamine their count. If the count is zero, which means there are no states under the currentcountry, the code should proceed with the cities of the country. If the count is positive, thecode must first iterate through the States descendants and then through the cities in eachstate. Listing 13.10 shows the final loop that iterates through the globe document, taking intoconsideration the different organization schema of certain countries.
Listing 13.10: Iterating through the globe document’s continents, countries, states, and cities
For Each continent In Globe.Descendants("Continents").Descendants("Continent")TextBox1.AppendText(continent.Element("Description").Value & vbCrLf)For Each country In continent.Descendants("Country")
TextBox1.AppendText(vbTab & country.Element("Description").Value & vbCrLf)If country.Descendants("States").Count = 0 Then
Dim CountryCities = country.Descendants("Cities")For Each city In CountryCities.Descendants("City")
TextBox1.AppendText(vbTab & vbTab &city.Elements("Description").Value & vbCrLf)
NextElse
For Each state In country.Descendants("State")TextBox1.AppendText(vbTab & vbTab & _
state.Element("Description").Value & vbCrLf)Dim CountryCities = state.Descendants("Cities")For Each city In CountryCities.Descendants("City")
TextBox1.AppendText(vbTab & vbTab & vbTab &city.Elements("Description").Value & vbCrLf)
NextNext
End IfNext
Next
The output produced by the preceding code segment is shown next (I’m showing only asingle country in Europe in the interest of saving some space on the printed page):
EuropeItaly
RomeFlorence
N. AmericaU.S.A.
CaliforniaLos Angeles

VB 2010 AT WORK: MANIPULATING XML DATA 557
San DiegoSan Francisco
New YorkNew York CityAlbany
MexicoMexico CityTijuanaGuadalajara
Using Lambda ExpressionsTo make the most of the XElement class, you must familiarize yourself with the concept oflambda expressions. Lambda expressions are inline functions you can embed in some of themethods, most notably in the Where method. This method selects certain elements from anXElements collection based on criteria you specify.
The syntax of the Where method requires that you pass as an argument a function thatdetermines whether an element will be selected by the Where method. This function will becalled once for each element in the collection, and it must return a True/False value to indicatewhether the current element passed the selection criteria. Now, how do you pass a functionto a method? Lambda expressions to the rescue. To specify a lambda function, you declare afunction without a name but with an argument list and a statement. Here’s a lambda functionthat evaluates to a True/False value and can be used with the Where extension method:
Function(Bk As Book) Book.Price >= 30
This lambda function accepts as an argument an object of the Book type and returns Trueif the price of the book represented by the Bk variable is $30 or more. To use this function in aWhere method, just pass the entire statement as an argument:
Books.Elements("Book").Where(Function(Bk As Book) Bk.Price >= 30)
The preceding expression will extract from the Books collection all books with a value of $30or more.
Let’s return to the countries example and write a lambda function that will be used with theWhere method to retrieve the cities in Germany:
Dim germanCities =countries.Elements("Country").Where(Function(ctry) ctry.Element("Code").Value = "DE").Descendants("Cities").Descendants("City")
The germanCities variable is a collection that contains all cities in Germany, and you caniterate through them with a loop as usual. To find out the number of cities under the Germanynode, call the Count property of the germanCities collection.
In the next chapter, you’ll learn an even better method of selecting elements in an XMLdocument, namely, the LINQ syntax. LINQ, however, is based on the methods exposed by the

558 CHAPTER 13 XML IN MODERN PROGRAMMING
XElements and Descendants classes, which is why I’ve chosen to show you the hard methodfirst.
Let’s apply the Where method of the IEnumerable type to this chapter’s main sample doc-ument, the globe document. The following statement uses a lambda expression to locate theXElement that represents the entire node of Europe:
Dim Europe As XElement =Globe.Descendants("Continent").Where(Function(cnt) cnt.Element("Code").Value = "EU").First
Now, this statement contains a method you haven’t seen before, the First method. TheFirst method returns the first element in a collection of XElement objects. The Where clausein our sample code will always return a single XElement, but this is just a special case. In gen-eral, the Where method may (and it usually does) return multiple elements as an IEnumerable(basically, a collection you can enumerate over). To make sure that you retrieve a single ele-ment (and not a collection by mistake), we call the First method. The Europe variable is anXML segment that represents Europe.
To add new countries to Europe, you can use the Add method of the XElement as discussedearlier in this chapter. Let’s prepare a couple of XElement objects that represent countries inEurope:
Dim France =New XElement("Country",
New XElement("Code", "FR"),New XElement("Description", "France"),New XElement("Cities",
New XElement("City",New XElement("Code", "PAR"),New XElement("Description", "Paris"))))
Dim Spain =New XElement("Country",
New XElement("Code", "ES"),New XElement("Description", "Spain"),New XElement("Cities",
New XElement("City",New XElement("Code", "MAD"),New XElement("Description", "Madrid"))),
New XElement("City",New XElement("Code", "BCN"),New XElement("Description", "Barcelona")))
To add the two countries to the Europe element, just call the Add method once for eachcountry, as shown in Figure 13.7.
Here ends the introduction to XML and the VB methods for manipulating XML. In thenext chapter, you’ll learn an even better method of working with XML documents, namely,LINQ. LINQ is a querying language you can apply not only to XML but to collections ofobjects, simple arrays, and even databases. It’s the new method of querying data, and it’s an

XML SERIALIZATION 559
exciting topic. Before moving on to LINQ, however, I must present a very special topic in theFramework — serialization.
Figure 13.7
Adding two countriesunder the Europe nodeof the globe XMLdocument
XML SerializationIn Chapter 12, ‘‘Storing Data in Collections,’’ you learned how to use collections to store items,how to access their elements, and even how to sort and search the collections. To make themost of collections and to use them to store large sets of data, you should also learn how topersist collections to disk files or databases.
Persisting data means storing them on disk at the end of one session and reloading them intothe same application in a later session. The persisted data can also be shared among differentapplications and even different computers, as long as there’s an application that knows whatto do with the data. What good is it to create a large collection if your application can’t save itand retrieve it from session to session?
Since time immemorial, programmers had to write code to save their data to disk. The mostchallenging aspect of the data persisting was the format used to store the data. With XML beinga universal format, what better method of persisting data than converting them to XML docu-ments? Indeed, it’s possible to convert any object or collection to an XML document and saveit to a file or exchange it with any other system. By the way, the XML format is quite verboseand wouldn’t have caught up earlier, when storage was expensive.
In this chapter, you’ll see how to convert objects to streams with a technique known as seri-alization, which is the process of converting arbitrary objects to streams of bytes. After youobtain the serialized stream for a specific object, you can persist the object to disk, as well asread it back. The process of reconstructing an object from its serialized form is called deserializa-tion. It makes so much sense to convert objects to XML and back; that the process is supportednatively by the Framework. The System.Xml.Serialization class can convert arbitrary objects toXML and back, and you’ll see shortly how easy it is to use this class — no, you won’t have touse any of the techniques discussed so far to create your own XML. You just call the Serializeand Deserialize methods of this class to do the work for you.

560 CHAPTER 13 XML IN MODERN PROGRAMMING
Other Serialization Types
There are three types of serialization: binary serialization, Simple Object Access Protocol(SOAP, also called Service Oriented Architecture Protocol) serialization, and Extensible MarkupLanguage (XML) serialization. Binary and SOAP serialization are very similar; XML serializationis a little different, but it allows you to customize the serialization process.
Binary serialization is performed with the BinaryFormatter class, and it converts the values ofthe object properties into a binary stream. The result of the binary serialization is compact andefficient. However, binary-serialized objects can be used only by applications that have accessto the class that produced the objects and can’t be used outside .NET. Another limitation ofbinary serialization is that the output it produces is not human readable, and you can’t domuch with a file that contains a binary serialized object without access to the original appli-cation code. Because binary serialization is very compact and very efficient, it’s used almostexclusively to persist objects between sessions of an application or between applications thatshare the same classes.
SOAP serialization produces a SOAP-compliant envelope that describes its contents and serial-izes the objects in SOAP-compliant format. SOAP-serialized data are suitable for transmissionto any system that understands SOAP; it’s implemented by the SoapFormatter class. Unlikebinary serialization, SOAP-serialized data are firewall friendly, and SOAP serialization is usedto remote objects to a server on a different domain. The process of serializing objects is thesame, no matter which method you’ll use. So, let’s start with XML serialization, and I’ll brieflycover the classes for the other types of serialization toward the end of the chapter.
The Serialization ProcessTo use XML serialization, you must create an instance of the XmlSerializer class and thencall its Serialize method (or the Deserialize method to extract data from an XMLstream and populate an instance of a custom class). The XmlSerializer class belongs to theXmlSerialization namespace, which is not imported by default in a new project. To useit, import the Serialization class by inserting the following statement at the beginning of themodule that needs the serialization services:
Imports System.Xml.Serialization
To set up a new instance of the class, you must call the XmlSerializer class constructor, pass-ing as an argument the type of objects it will serialize or deserialize. You can’t use the sameinstance of the XmlSerializer class to serialize arbitrary objects; instead, you must tell the com-piler the type of object you need to serialize in the XmlSerializer constructor. Here’s how to setup a new instance of the XmlSerializer class:
Dim serializer As New XmlSerializer(custom_type)
The custom_type argument represents a custom (or built-in for that matter) type,whose instances are intended to be serialized through the XmlSerializer class. You can

XML SERIALIZATION 561
also pass the name of the class itself to the constructor by using a statement such as thefollowing:
Dim serializer As New XmlSerializer(GetType(CustomClass))
The serializer object can be used to serialize only instances of the specific class, and it willthrow an exception if you attempt to serialize a different class with it. Note also that all classesare XML-serializable by default. I’m mentioning this here because with the other serializationtypes, you must prefix the classes with the <Serializable> attribute to make them serializable.
In the background, CLR will create a temporary assembly, a process that will take a fewmoments. The temporary assembly, however, will remain in memory as long as the applicationis running. After the initial delay, XML serialization will be quite fast.
Once the serializer variable has been set up, you can call the Serialize method, passingtwo arguments: a stream that will accept the serialized data and the object to be serialized:
serializer.Serialize(stream, object)
That’s all it takes to convert an object or collection of objects to an XML document. To recon-struct the original object, call the Deserialize method, and pass the stream with the serializeddata as an argument. This stream points to the file to which the serialization data has beenstored:
object = serializer.Deserialize(stream)
The Deserialize method returns an Object data type, which you must cast to the appro-priate type, as with the following statement:
object = CType(serializer.Deserialize(stream), object_type)
As for setting up the Stream object that will accept the serialization data (or provide theserialized data to the Deserialize method), that’s also straightforward. If you’re not famil-iar with the concept of streams, please read the tutorial ‘‘Accessing Files and Folders’’ (avail-able for download from http://www.sybex.com/go/masteringvb2010). Start by importing theSystem.IO namespace, and then create a new FileStream object that points to the file that willaccept the serialization data:
Dim saveFile As New FileStream("Objects.xml", FileMode.Create)
The saveFile variable represents a stream and must be passed to the Serialize methodalong with the object to be serialized. To create a stream for reading data, use a statement likethe following:
Dim Strm As New FileStream("Objects.xml", FileMode.Open)
Let’s serialize a few simple objects to get a feel of the functionality of the XmlSerializationnamespace and how to use it to move objects to their XML equivalents and back.

562 CHAPTER 13 XML IN MODERN PROGRAMMING
Serializing Individual ObjectsLet’s serialize a single Rectangle object using the following statements:
Dim saveFile As FileStreamsaveFile = File.OpenWrite("Rectangles.xml")Dim serializer As New XmlSerializer(GetType(Rectangle))Dim R As New Rectangle(10, 10, 100, 160)serializer.Serialize(saveFile, R)saveFile.Close()
If you execute the preceding statements, the following data will be stored in theRectangles.xml file:
<?xml version="1.0" encoding="utf-8"?><Rectangle xmlns:xsi="http://www.w3.org/2001/XMLSchema-instance"xmlns:xsd="http://www.w3.org/2001/XMLSchema"><Location>
<X>10</X><Y>10</Y>
</Location><Size>
<Width>100</Width><Height>160</Height>
</Size><X>10</X><Y>10</Y><Width>100</Width><Height>160</Height>
</Rectangle>
This is a well-formed XML document. As you can see, the XmlSerializer extracted thebasic properties of the Rectangle object and used them to create an XML document withthe basic properties of the Rectangle as elements. Note that all relevant information has beenstored in elements, and there are no attributes in the XML generated by the XmlSerializerclass’s Serialize method.
There’s some redundancy in this file because the values of the properties appear twice. Thisisn’t part of the XML specification; the document contains the values of the following proper-ties: Location, Size, X, Y, Width, and Height. The Rectangle object exposes additional prop-erties, such as the Top, Bottom, and so on, but these values aren’t serialized. The Locationproperty is an object, which in turn exposes the X and Y properties. The values of these proper-ties appear within the Location segment of the document and as separate values near the endof the file. The same happens with the Size property.
Which Members Are Serialized?
I mentioned earlier that the XmlSerializer class serializes all public properties in a class.However, quite a few properties of the Rectangle class weren’t serialized. Who determines

XML SERIALIZATION 563
the properties that will be serialized? When you build a custom class, you can specify thatcertain classes will not be serialized by decorating them with the <NonSerialized> attribute.Obviously, the properties of the built-in objects that aren’t serialized are marked with thisattribute.
To deserialize the data and create a new Rectangle object with the same properties as theoriginal one, set up a Stream object and an XMLSerializer object, and then call the XmlSerializerobject’s Deserialize method:
Imports System.Xml.SerializationDim serializer As New XmlSerializer(GetType(Rectangle))Dim FS As FileStreamFS = New FileStream("Rectangles.xml", FileMode.Open)Dim R As RectangleR = serializer.Deserialize(FS)FS.Close()
Not surprisingly, if you examine the properties of the R object that was created by the dese-rialization process, you’ll see that it’s identical to the Rectangle object you serialized earlierto disk.
Serializing Custom ObjectsLet’s move on to a more interesting example. This time we’ll serialize a more elaborate customobject. Listing 13.11 shows a class that describes books. The Book class is quite trivial, exceptthat each book can have any number of authors. The authors are stored in an array of Authorobjects, where Author is a nested class (Book.Author).
Listing 13.11: The Book class definition
Public Class BookPrivate _title As StringPrivate _pages As IntegerPrivate _price As DecimalPrivate _authors() As Author
Public Sub New()
End Sub
Public Property Title() As StringGet
Return _titleEnd GetSet(ByVal Value As String)
If Value.Length > 100 Then
564 CHAPTER 13 XML IN MODERN PROGRAMMING
_title = Value.Substring(0, 99)Else
_title = ValueEnd If
End SetEnd Property
Public Property Pages() As IntegerGet
Return _pagesEnd GetSet(ByVal Value As Integer)
_pages = ValueEnd Set
End Property
Public Property Price() As DecimalGet
Return _priceEnd GetSet(ByVal Value As Decimal)
_price = ValueEnd Set
End Property
Public Property Authors() As Author()Get
Return (_authors)End GetSet(ByVal Value As Author())
_authors = ValueEnd Set
End Property
Public Class AuthorPrivate _firstname As StringPrivate _lastname As String
Public Property FirstName() As StringGet
Return _firstnameEnd GetSet(ByVal Value As String)
If Value.Length > 50 Then_firstname = Value.Substring(0, 49)
Else_firstname = Value

XML SERIALIZATION 565
End IfEnd Set
End Property
Public Property LastName() As StringGet
Return _lastnameEnd GetSet(ByVal Value As String)
If Value.Length > 50 Then_lastname = Value.Substring(0, 49)
Else_lastname = Value
End IfEnd Set
End PropertyEnd Class
End Class
The following statements create a new Book object, which includes three authors:
Dim BK0 As New BookDim authors(2) As Book.Authorauthors(0) = New Book.Authorauthors(0).FirstName = "Author1 First"authors(0).LastName = "Author1 Last"authors(1) = New Book.Authorauthors(1).FirstName = "Author2 First"authors(1).LastName = "Author2 Last"authors(2) = New Book.Authorauthors(2).FirstName = "Author3 First"authors(2).LastName = "Author3 Last"BK0.Title = "Book Title"BK0.Pages = 234BK0.Price = 29.95BK0.Authors = authors
To exercise some of the new ‘‘convenience’’ features of VB 2010, we’ll add another bookusing object initializers, this time with more meaningful data:
Dim authors() = {New Author With{.FirstName = "Evangelos", .LastName = "Petroutsos"}, _
New Author With {.FirstName = "Richard", .LastName = "Manning"}}Dim BK1 = New Book1 With { _
.ISBN = "0-470-53287-4",.Title = "Mastering Visual Basic 2010", .Authors = authors}

566 CHAPTER 13 XML IN MODERN PROGRAMMING
To serialize the BK0 and BK1 variables, create a new XmlSerializer object, and call itsSerialize method as usual:
Dim serializer As New XmlSerializer(BK1.GetType)Dim strm As New FileStream("books.xml", FileMode.Create)serializer.Serialize(strm, BK0)strm.Close()
To serialize two objects in the same file, call the Serialize method twice, passing as anargument the appropriate instance of the Book object, as shown here:
serializer.Serialize(strm, BK0)serializer.Serialize(strm, BK1)
As you can understand, serialization would be severely limited without the ability to seri-alize arrays and collections, and this is the topic we’ll explore in the next section. However,it’s worth taking a look at the contents of the books.xml file generated by the XmlSerializerclass. If you open the books.xml file, shown in Listing 13.12, you’ll see that it contains twoXML documents (the <?xml> tag appears twice in the file). This certainly isn’t a valid XMLdocument because it doesn’t contain a unique root element. However, you can see the equiv-alence between the structure of the class and the XML document. The serializer takes all thepublic properties and converts them to elements. Nested classes, like the Authors under theBook class, are converted to nested elements. Moreover, there are no attributes to the resultingXML; all properties are translated into elements.
Listing 13.12: Typical XML-serialized data
<?xml version="1.0"?><Book xmlns:xsi=http://www.w3.org/2001/XMLSchema-instancexmlns:xsd="http://www.w3.org/2001/XMLSchema"><Title>Book Title</Title><ISBN>1234567890</ISBN><Price>29.95</Price><Pages>0</Pages><Authors>
<Author><FirstName>Author1 First</FirstName><LastName>Author1 Last</LastName>
</Author><Author>
<FirstName>Author2 First</FirstName><LastName>Author2 Last</LastName>
</Author><Author>
<FirstName>Author3 First</FirstName><LastName>Author3 Last</LastName>
</Author>

XML SERIALIZATION 567
</Authors></Book><?xml version="1.0"?><Book xmlns:xsi="http://www.w3.org/2001/XMLSchema-instance"xmlns:xsd="http://www.w3.org/2001/XMLSchema"><Title>Mastering Visual Basic 2010</Title><ISBN>0-470-53287-4</ISBN><Price>0</Price><Pages>0</Pages><Authors>
<Author><FirstName>Evangelos</FirstName><LastName>Petroutsos</LastName>
</Author><Author>
<FirstName>Richard</FirstName><LastName>Manning</LastName>
</Author></Authors>
</Book>
Each book has been serialized as a separate entity; the serialization process did not createa new root element that encloses the serialized objects. Even though this isn’t a well-formedXML document, you can deserialize the two objects by calling the Deserialize method twice,as shown in the following code segment:
Dim serializer As New XmlSerializer(GetType(Book))Dim strm As New FileStream("books.xml", FileMode.Open)Dim book1 = CTpe(serializer.Deserialize(strm), Book)Dim book2 = CTpe(serializer.Deserialize(strm), Book)strm.Close()
Serializing Collections of ObjectsLet’s see how to serialize collections of objects in XML format, starting with a hard rule:
The collection to be serialized must be strongly typed.
You can use XML serialization with typed arrays, Lists and Dictionaries, but you can’t seri-alize ArrayLists or arrays of arbitrary objects. All the elements of the collection should havethe same type, which must match the type you pass to the constructor of the XmlSerializerclass. If you pass to the serializer an array of objects of different types, no warning will beissued at design time, but a runtime exception will be thrown as soon as your code reachesthe Serialize method. The XmlSerializer instance is constructed by the compiler on the fly fora specific type of object, and any given instance of this class can handle objects of the specifictype and nothing else.
Let’s start by creating an array of Book objects and then serialize it. First, we’ll create anarray of the Book type and store a few properly initialized instances of the Book class to its
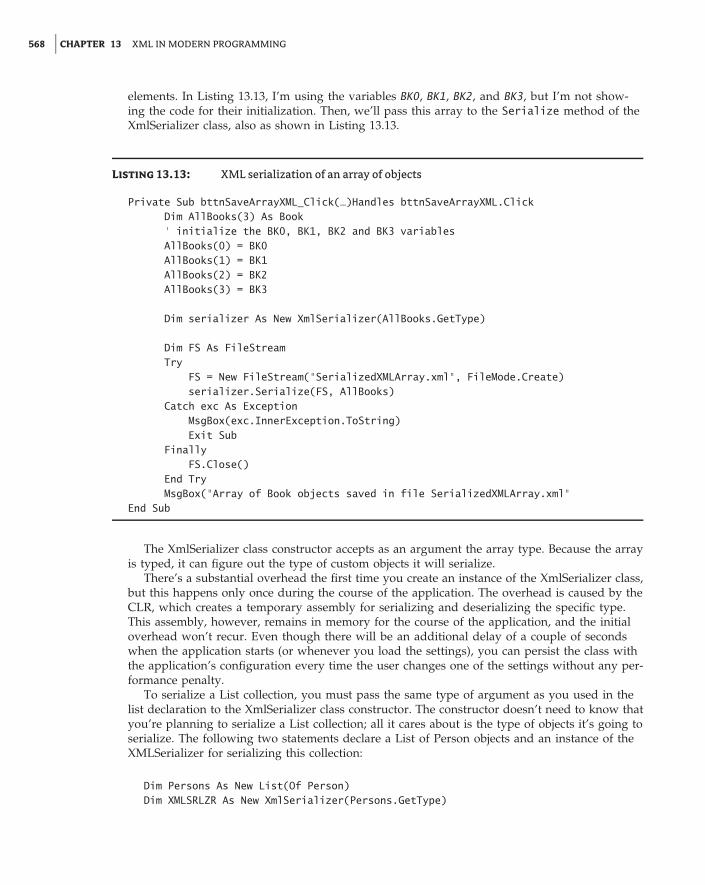
568 CHAPTER 13 XML IN MODERN PROGRAMMING
elements. In Listing 13.13, I’m using the variables BK0, BK1, BK2, and BK3, but I’m not show-ing the code for their initialization. Then, we’ll pass this array to the Serialize method of theXmlSerializer class, also as shown in Listing 13.13.
Listing 13.13: XML serialization of an array of objects
Private Sub bttnSaveArrayXML_Click(…)Handles bttnSaveArrayXML.ClickDim AllBooks(3) As Book‘ initialize the BK0, BK1, BK2 and BK3 variablesAllBooks(0) = BK0AllBooks(1) = BK1AllBooks(2) = BK2AllBooks(3) = BK3
Dim serializer As New XmlSerializer(AllBooks.GetType)
Dim FS As FileStreamTry
FS = New FileStream("SerializedXMLArray.xml", FileMode.Create)serializer.Serialize(FS, AllBooks)
Catch exc As ExceptionMsgBox(exc.InnerException.ToString)Exit Sub
FinallyFS.Close()
End TryMsgBox("Array of Book objects saved in file SerializedXMLArray.xml"
End Sub
The XmlSerializer class constructor accepts as an argument the array type. Because the arrayis typed, it can figure out the type of custom objects it will serialize.
There’s a substantial overhead the first time you create an instance of the XmlSerializer class,but this happens only once during the course of the application. The overhead is caused by theCLR, which creates a temporary assembly for serializing and deserializing the specific type.This assembly, however, remains in memory for the course of the application, and the initialoverhead won’t recur. Even though there will be an additional delay of a couple of secondswhen the application starts (or whenever you load the settings), you can persist the class withthe application’s configuration every time the user changes one of the settings without any per-formance penalty.
To serialize a List collection, you must pass the same type of argument as you used in thelist declaration to the XmlSerializer class constructor. The constructor doesn’t need to know thatyou’re planning to serialize a List collection; all it cares about is the type of objects it’s going toserialize. The following two statements declare a List of Person objects and an instance of theXMLSerializer for serializing this collection:
Dim Persons As New List(Of Person)Dim XMLSRLZR As New XmlSerializer(Persons.GetType)

OTHER TYPES OF SERIALIZATION 569
The statements for serializing and deserializing the collection are identical to the ones you’duse to serialize any other object. To serialize a collection, create a StreamWriter for a new file,and then call the Serialize method, passing the stream as an argument:
’ To serialize a typed collection:Dim WStrm As New IO.StreamWriter(file_path)XMLSRLZR.Serialize(WStrm, Persons)
(In the preceding sample code I used the StreamWriter class, which is equivalent to a Streamobject opened for writing to a file). To deserialize the same collection, create a FileStream forthe file where the serialization data has been stored, and call its Deserialize method. Thismethod returns an object, which you must cast to the appropriate type as usual (in our caseto a List of Book objects):
Dim RStrm As New IO.FileStream(file_path, IO.FileMode.Open)newPersons = CType(XMLSRLZR.Deserialize(Rstrm), List(Of Person))
Other Types of SerializationAs I mentioned earlier, XML serialization is the most common form of serialization, but it’snot the only one. You can use two more types of serialization, namely, binary and SOAPserialization.
Binary serialization is performed with the BinaryFormatter class, and it converts the values ofthe object’s properties into a binary stream. The result of the binary serialization is compact andefficient. However, the output it produces is not human readable, and you can’t do much witha file that contains a binary serialized object without access to the original application code.Because binary serialization is very compact and very efficient, it’s used almost exclusively topersist objects between sessions of an application or between applications that share the sameclasses.
The other serialization type, SOAP serialization, is very similar to XML serialization, but theresulting document is more structured and contains information about the properties that havebeen serialized. Each book’s authors, for example, are marked as an array. The Authors prop-erty will be serialized as follows:
<_authors href="#ref-5"/>
This is a reference to another element with the generic name ref-5 in the same document, andhere’s the definition of this element:
<SOAP-ENC:Array id="ref-5" SOAP-ENC:arrayType="a1:Author[2]"><item href="#ref-6"/><item href="#ref-7"/></SOAP-ENC:Array>
The array contains two elements, which are also referenced in the array. Finally, here are thedefinitions of the two elements of the Authors array in the same file:
<a1:Author id="ref-6" ><_firstname id="ref-8">Evangelos</_firstname>

570 CHAPTER 13 XML IN MODERN PROGRAMMING
<_lastname id="ref-9">Petroutsos</_lastname></a1:Author><a1:Author id="ref-7"><_firstname id="ref-10">Richard</_firstname><_lastname id="ref-11">Manning</_lastname></a1:Author>
Let’s start with binary serialization, which is implemented in the following namespace (youmust import it into your application):
Imports System.Runtime.Serialization.Formatters.Binary
This namespace isn’t loaded by default, and you must add a reference to the correspondingnamespace. Right-click the project’s name in the Solution Explorer, and choose Add Referencefrom the context menu. In the Add Reference dialog box that appears, select the same name-space as in the Imports statement shown earlier.
To use a SOAP serializer in your application, reference the assembly System.Runtime.Serialization.Formatters.Soap.dll and import the following namespace:
Imports System.Runtime.Serialization.Formatters.Soap
You can serialize individual objects as well as collections of objects. To serialize an object,you must call the Serialize method of the System.Runtime.Serialization.Formatters.Binaryobject. First declare an object of this type with a statement like the following:
Dim BFormatter As New BinaryFormatter()
The BinaryFormatter class persists objects in binary format. You can also persist objects in textformat by using the SoapFormatter class. SoapFormatter persists the objects in XML format,which is quite verbose, and the corresponding files are considerably lengthier. To use the Soap-Formatter class, declare a SoapFormatter variable with the following statement:
Dim SFormatter As Soap.SoapFormatter
SOAP is a protocol for accessing objects over HTTP; in other words, it’s a protocol thatallows the encoding of objects in text format. SOAP was designed to enable distributedcomputing over the Internet. SOAP uses text to transfer all kinds of objects, including imagesand audio, and it’s not rejected by firewalls.
The BinaryFormatter and SoapFormatter methods are equivalent, so I will useBinaryFormatter for the examples in this section. To serialize an object, call the Serializemethod of the appropriate formatter, where stream is a variable that represents a stream andobject is the object you want to serialize. Here’s the syntax:
BFormatter.Serialize(stream, object)
Because we want to persist our objects to disk, the stream argument represents a stream to afile where the serialized data will be stored. It can be created with statements like the following:

OTHER TYPES OF SERIALIZATION 571
Dim saveFile As FileStreamsaveFile = File.Create("Shapes.bin", IO.FileMode.Create)
The saveFile variable represents the stream to a specific file on the disk, and the Createmethod of the same variable creates a stream to this file.
After you have set up the Stream and BinaryFormatter objects, you can call the Serializemethod to serialize any object. To serialize a Rectangle object, for example, use the followingstatements:
Dim R As New Rectangle(0, 0, 100, 100)BFormatter.Serialize(saveFile, R)
Listing 13.14 serializes two Rectangle objects to the Shapes.bin file. The file’s extension canbe anything. Because the file is binary, I used the .bin extension.
Listing 13.14: Serializing distinct objects
Dim R1 As New Rectangle()R1.X = 1R1.Y = 1R1.Size.Width = 10R1.Size.Height = 20Dim R2 As New Rectangle()R2.X = 10R2.Y = 10R2.Size.Width = 100R2.Size.Height = 200Dim saveFile As FileStreamsaveFile = File.Create("Shapes.bin")Dim formatter As BinaryFormatterformatter = New BinaryFormatter()formatter.Serialize(saveFile, R1)formatter.Serialize(saveFile, R2)saveFile.Close()
Notice that the Serialize method serializes a single object at a time. To save the two rectan-gles, the code calls the Serialize method once for each rectangle. To serialize multiple objectswith a single statement, you must create a collection, append all the objects to the collection,and then serialize the collection itself, as explained in the following section. If you serializemultiple objects of different types into the same stream, you can’t deserialize them unless youknow the order in which the objects were serialized and then deserialize them in the sameorder.
Deserializing Individual ObjectsTo deserialize a serialized object, you must create a new binary or SOAP formatter object andcall its Deserialize method. Because the serialized data doesn’t contain any information about

572 CHAPTER 13 XML IN MODERN PROGRAMMING
the original object, you can’t reconstruct the original object from the serialized data, unless youknow the type of object that was serialized. Deserialization is always more difficult than seri-alization. Whereas the Serialize method will serialize any object you pass as an argument,the Deserialize method won’t reconstruct the original object unless you know the type of theobject you’re deserializing. The Shapes.bin file of Listing 13.14 contains the serialized versionsof two Rectangle objects. The Deserialize method needs to know that it will deserialize twoRectangle objects. If you attempt to extract the information of this file into any other type ofobject, a runtime exception will occur.
To deserialize the contents of a file, create a formatter object as you did for the serializationprocess, by using one of the following statements (depending on the type of serialization):
Dim SFormatter As Soap.SoapFormatterDim BFormatter As BinaryFormatter
Then establish a stream to the source of the serialized data, which in our case is theShapes.bin file:
Dim Strm As New FileStream("Shales.Bin", FileMode.Open)
Finally, deserialize the stream’s data by calling the Deserialize method. Since theDeserialize method returns an object, you must also cast its value appropriately:
Dim R1, R2 As RectangleR1 = CType(SFormatter.Deserialize(Strm), Rectangle)R2 = CType(SFormatter.Deserialize(Strm), Rectangle)
You can serialize as many objects as you like into the same stream, one after the other, andread them back in the same order. With binary and SOAP serialization, you’re limited to asingle type, as long as you deserialize the data in the proper order.
You can open the files with the serialized data and view their data. The contents of the filewith two serialized Rectangle objects is shown next:
<SOAP-ENV:Envelope xmlns:xsi="http://www.w3.org/2001/XMLSchema-instance"xmlns:xsd="http://www.w3.org/2001/XMLSchema"xmlns:SOAP-ENC="http://schemas.xmlsoap.org/soap/encoding/"xmlns:SOAP-ENV="http://schemas.xmlsoap.org/soap/envelope/"xmlns:clr="http://schemas.microsoft.com/soap/encoding/clr/1.0"SOAP-ENV:encodingStyle="http://schemas.xmlsoap.org/soap/encoding/">
<SOAP-ENV:Body><a1:Rectangle id="ref-1" xmlns:a1="http://schemas.microsoft.com/clr/nsassem
/System.Drawing/System.Drawing%2C%20Version%3D2.0.3600.0%2C%20Culture%3Dneutral%2C%20PublicKeyToken%3Db03f5f7f11d50a3a">
<x>0</x><y>0</y><width>100</width><height>100</height></a1:Rectangle>

OTHER TYPES OF SERIALIZATION 573
</SOAP-ENV:Body></SOAP-ENV:Envelope><SOAP-ENV:Envelope xmlns:xsi="http://www.w3.org/2001/XMLSchema-instance"
xmlns:xsd="http://www.w3.org/2001/XMLSchema"xmlns:SOAP-ENC="http://schemas.xmlsoap.org/soap/encoding/"xmlns:SOAP-ENV="http://schemas.xmlsoap.org/soap/envelope/"xmlns:clr="http://schemas.microsoft.com/soap/encoding/clr/1.0"SOAP-ENV:encodingStyle="http://schemas.xmlsoap.org/soap/encoding/">
<SOAP-ENV:Body><a1:Rectangle id="ref-1" xmlns:a1="http://schemas.microsoft.com/clr/nsassem
/System.Drawing/System.Drawing%2C%20Version%3D2.0.3600.0%2C%20Culture%3D
neutral%2C%20PublicKeyToken%3Db03f5f7f11d50a3a"><x>65</x><y>30</y><width>19</width><height>199</height></a1:Rectangle></SOAP-ENV:Body></SOAP-ENV:Envelope>
You’ll never have to create your own SOAP files, so don’t panic if they look complicated.There are, however, a few points of interest. First, you see a reference to the System.Drawingclass, which indicates that the serialized data can’t be used outside the context of the Frame-work; this file contains serialized data describing an instance of a specific class. The section ofthe file with the data contains the values of the two basic properties of the Rectangle object.Second, the SOAP format uses an XML notation to delimit its fields, but it’s not an XML file. Ifyou attempt to open the same file with Internet Explorer, you’ll see a message indicating thatit’s not a valid XML document.
Serializing Collections
Serializing a collection is quite similar to serializing any single object, because collectionsare objects themselves. The second argument to the Serialize method is the object youwant to serialize, and this object can be anything, including a collection. To demonstrate theserialization of an ArrayList, modify the previous code a little so that instead of persistingindividual items, it will persist an entire collection. Declare the two Rectangle objects asbefore, but append them to an ArrayList collection. Then add a few Color values to thecollection, as shown in Listing 13.15, which serializes an ArrayList collection to the fileC:\ShapesColors.bin.
Listing 13.15: Serializing a collection
Private Sub Button2_Click(…) Handles Button2.ClickDim R1 As New Rectangle()R1.X = 1R1.Y = 1R1.Width = 10

574 CHAPTER 13 XML IN MODERN PROGRAMMING
R1.Height = 20Dim R2 As New Rectangle()R2.X = 10R2.Y = 10R2.Width = 100R2.Height = 200Dim shapes As New ArrayList()shapes.Add(R1)shapes.Add(R2)shapes.Add(Color.Chartreuse)shapes.Add(Color.DarkKhaki.GetBrightness)shapes.Add(Color.DarkKhaki.GetHue)shapes.Add(Color.DarkKhaki.GetSaturation)Dim saveFile As FileStreamsaveFile = File.OpenWrite("C:\ShapesColors.bin")saveFile.Seek(0, SeekOrigin.End)Dim formatter As BinaryFormatter = New BinaryFormatter()formatter.Serialize(saveFile, shapes)saveFile.Close()MsgBox("ArrayList serialized successfully")
End Sub
The last three calls to the Add method add the components of another color to the collection.Instead of adding the color as is, I’ll add three color components, from which we can recon-struct the color Color.DarkKhaki. Then I proceed to save the entire collection to a file by usingthe same statements as before. The difference is that I don’t call the Serialize method for eachobject. I call it once and pass the entire ArrayList as an argument.
To read a file with the description of an object that has been persisted with the Serializemethod, simply call the formatter object’s Deserialize method, and assign the resultto an appropriately declared variable. In the preceding example, the value returned bythe Deserialize method must be assigned to an ArrayList variable. The syntax of theDeserialize method is the following, where str is a Stream object pointing to the file withthe data:
object = Bformatter.Deserialize(str)
Because the Deserialize method returns an Object variable, you must cast it to theArrayList type with the CType() function. To use the Deserialize method, declare a variablethat can hold the value returned by the method. If the data to be deserialized is a Rectangle,declare a Rectangle variable. If it’s a collection, declare a variable of the same collection type.Then call the Deserialize method, and cast the value returned to the appropriate type. Thefollowing statements outline the process:
Dim object As <type>{ code to set up a Stream variable (str) and BinaryFormatter}object = CType(Bformatter.Serialize(str), <type>)
Listing 13.16 is the code that retrieves the items from the ShapesColors.bin file and storesthem into an ArrayList. I added a few statements to print all the items of the ArrayList.

THE BOTTOM LINE 575
Listing 13.16: Deserializing a collection
Private Sub Button1_Click(…) Handles Button1.ClickDim readFile As FileStreamreadFile = File.OpenRead("C:\ShapesColors.bin")Dim BFormatter As BinaryFormatterBFormatter = New BinaryFormatter()Dim Shapes As New ArrayList()Dim R1 As RectangleShapes = CType(BFormatter.Deserialize(readFile), ArrayList)Dim i As IntegerTextBox1.AppendText("The ArrayList contains " & Shapes.Count & _
" objects " & vbCrLf & vbCrLf)For i = 0 To Shapes.Count - 1
TextBox1.AppendText(Shapes(i).ToString & vbCrLf)Next
End Sub
The Bottom Line
Create XML documents. XML documents can be built easily with the XElement and XAt-tribute classes. XElement represents an element, and its constructor accepts as arguments theelement’s name and either the element’s value or a series of attributes and nested elements.XAttribute represents an attribute, and its constructor accepts as arguments the attribute’sname and its value. You can also assign an XML document directly to an XElement.
Master It Create the XML segment that describes an object of the Item type, defined by thefollowing class:
Class ItemProperty ID As StringProperty Name As StringProperty Prices As PriceProperty Name As String
Class PriceProperty Retail As PriceDetailsProperty WholeSale As PriceDetailsClass PriceDetails
Property Price As DecimalProperty VolumeDiscount As Decimal
End ClassClass Dimension
Property Width As DecimalProperty Height As DecimalProperty Depth As Decimal
End Class

576 CHAPTER 13 XML IN MODERN PROGRAMMING
Navigate through an XML document and locate the information you need. The XElementclass provides a number of methods for accessing the contents of an XML document. TheElements method returns the child elements of the current element by the name specified withthe argument you pass to the method as a string. The Element method is quite similar, butit returns the first child element by the specified name. The Descendants method returns allthe elements by the specified name under the current element, regardless of whether they’redirect children of the current element. Finally, the Attribute method returns the value of theattribute by the specified name of the current element.
Master It Assuming an XML document with the following structure, write the expressionsto retrieve all cities in the document and all cities under the third country in the document.
<Countries><Country>
<City> … </City><City> … </City>
</Country><Country>…</Country>…
</Countries>
Master It Assuming that both country and city names are specified in the document withthe Name element, explain the difference between the queries:
Dim q1 = countries.Elements("Country").Elements("Name")Dim q2 = countries.Descendants("Name")
Convert arbitrary objects into XML documents and back with serialization. Serialization isthe process of converting an object into a stream of bytes. This process (affectionately knownas dehydration) generates a stream of bytes or characters, which can be stored or transported.To serialize an object, you can use the BinaryFormatter or SoapFormatter class. You can alsouse the XmlSerializer class to convert objects into XML documents. All three classes exposea Serialize class that accepts as arguments the object to be serialized and a stream object andwrites the serialized version of the object to the specified stream. The opposite of serializationis called deserialization. To reconstruct the original object, you use the Deserialize method ofthe same class you used to serialize the object.
Master It Describe the process of serializing an object with the XmlSerializer class.

Chapter 14
An Introduction to LINQ
In Chapter 12, ‘‘Storing Data in Collections,’’ you learned how to create collections, from simplearrays to specialized collections such as HashTables and Lists, and how to iterate through themwith loops to locate items. Typical collections contain objects, and you already know how tocreate and manipulate custom objects. In Chapter 13, ‘‘XML In Modern Programming,’’ youlearned how to serialize these collections into XML documents, as well as how to create XMLdocuments from scratch. And in Part V of this book, you’ll learn how to manipulate largeamounts of data stored in databases.
Each data source provides its own technique for searching and manipulating individualitems. What is common in all data sources are the operations we perform with the data; wewant to be able to query the data, select the values we’re interested in, and update the datasources by adding new data or editing the existing data. It’s therefore reasonable to assume acommon query language for all data sources. This common query language was introducedwith version 3.5 of the Framework and is now part of all .NET languages. It’s the LINQcomponent.
LINQ stands for Language Integrated Query, a small language for querying data sources. Forall practical purposes, it’s an extension to Visual Basic. More specifically, LINQ consists of state-ments that you can embed into a program to select items from a collection based on variouscriteria. Unlike a loop that examines each object’s properties and either selects or rejects theobject, it, LINQ is a declarative language: It allows you to specify the criteria, instead of spec-ifying how to select the objects. A declarative language, as opposed to a procedural language,specifies the operation you want to perform, and not the steps to take. VB is a procedural lan-guage; the language of SQL Server, T-SQL, is a declarative language.
In this chapter, you’ll learn how to do the following:
◆ Perform simple LINQ queries.
◆ Create and process XML files with LINQ to XML.
◆ Process relational data with LINQ to SQL.

578 CHAPTER 14 AN INTRODUCTION TO LINQ
What Is LINQ?Although defining LINQ is tricky, a simple example will demonstrate the structure of LINQand what it can do for your application. Let’s consider an array of integers:
Dim data() As Int16 = {3, 2, 5, 4, 6, 4, 12, 43, 45, 42, 65}
To select specific elements of this array, you’d write a For…Next loop, examine each elementof the array, and either select it by storing it into a new array or ignore it. To select the ele-ments that are numerically smaller than 10, you’d write a loop like the following:
Dim smallNumbers As New ArrayListDim itm As IntegerFor Each itm In data
If itm < 10 ThensmallNumbers.Add(itm)
End IfNext
Can you see why I’m using an ArrayList to store the selected values? I could haveused another array, but arrays must be declared with dimensions, and I’d have to resizethe array or start with an array large enough to store all the elements. Let’s do the samewith LINQ:
Dim smallNumbers = From n In dataWhere n < 10Select n
This is a peculiar statement indeed, unless you’re familiar with SQL, in which case you caneasily spot the similarities. LINQ, however, is not based on SQL, and not every operation hasan equivalent in both. Both SQL and LINQ, however, are declarative languages that have manysimilarities. If you’re familiar with SQL, you have already spotted the similarities and the factthat LINQ rearranges the basic elements. Whereas SQL can be used only with database tables,LINQ can be applied to collections, XML files, and SQL tables. It’s a uniform language forquerying data from several data sources.
Let’s look at the LINQ query in greater detail:
Dim smallNumbers = From n In dataWhere n < 10Select n
Start with the structure where the selected elements will be stored; this structure will hold theresult of the query. The smallNumbers variable is declared without a type, because its type isdetermined by the type of the collection you’re querying. Type inference, which must be turnedon for this statement to work, makes this possible. If type inference is off, you must declare thevariable that will accept the result of the query.

WHAT IS LINQ? 579
Because the query selects elements from the data array, the smallNumbers variable can’trepresent anything but an array of integers. Actually, it’s not exactly an array of integers; it’s atyped collection of integers that implements the IEnumerable interface. If you hover the pointerover the name of the collection, you’ll see that its type is IEnumerable(Of Short).
The LINQ query starts after the equals sign with the From keyword, which is followed bya variable that represents the current item in the collection, followed by the In keyword andthe name of the collection. The variable is called the control variable, just like the variable of aFor…Next or For Each loop, and it represents the entity you’re working with. If the collectionis an array of integers, the control variable is an integer; if the collection is a List of Customerobjects, then the control variable is a Customer object. The first part of the query specifies thecollection we’re going to query.
Then comes the Where clause that limits the selection. The Where keyword is followed byan expression that involves the control variable; this expression limits your selection. In thisextremely trivial example, I select the elements that are less than 10. The expression of theWhere clause can become quite complicated, as you will see shortly. It’s a VB-like expressionthat’s evaluated for every element in the collection; it returns a True/False value; and itdetermines which elements will be selected, and which elements will be ignored.
The last keyword in the expression, the Select keyword, determines what you’re selecting.In most cases, you will select the control variable itself but not always. Here’s a variation of theprevious query expression:
Dim evenValues = From n In data _Where m mod 2 = 0Select "Number " & n.ToString & " is even"
Here, I select the even numbers from the original array and then form a string for each ofthe selected values. This time, the result of the query (the evenValues variable) is an IEnumer-able of strings, as determined by the compiler. The Select clause is optional; if you omit it, thequery will return the control variable itself.
But why bother with a new component to select values from an array? A For Each loopthat processes each item in the collection is not really complicated and is quite efficient. LINQis a universal approach to querying data, and it can be used to query all kinds of data, fromXML documents to databases. When you work with databases, for example, you can’t afford tomove all the data to the client, select a few of them from within a loop, and ignore the rest. Adatabase table may contain thousands and thousands of rows, and you may end up selecting afew hundred of them. LINQ is smart enough to execute the appropriate statements against thedatabase and return to the client only the data you’re interested in. I’ll discuss these aspects ofLINQ and databases (LINQ to SQL) in much detail later in this chapter.
As I have mentioned in the introduction, LINQ isn’t limited to arrays and collections.Although iterating through an array of integers, or even objects, may be trivial, the same isn’ttrue for XML documents. LINQ allows you to select the elements of an XML document you’reinterested in without having to navigate through the nodes of the document, as we did in theprevious chapter. At any rate, LINQ is the latest and hottest technology from Redmond — itmay very well become a universal language, just like SQL. It’s a very powerful and flexibletool that can be used in many diverse situations. It’s certainly much more flexible than straightVB code, because it’s a declarative language. Remember that with LINQ, you specify what youwant to do, not how the computer will do it.

580 CHAPTER 14 AN INTRODUCTION TO LINQ
LINQ ComponentsTo support such a wide range of data sources, LINQ is comprised of multiple components,which are the following:
LINQ to XML This component enables you to create and process XML documents. In effect,it replaces XQuery expressions that are used today to select the items of interest in an XMLdocument. It also replaces the Where method of the Elements and Descendants properties. Ineffect, the compiler calls these methods behind the scenes, and LINQ is only ‘‘syntactic sugar’’that hides much of the complexity of querying collections with extension methods. Because ofLINQ to XML, some new classes that support XML were introduced to Visual Basic, and XMLhas become a basic data type of the language, as discussed in the preceding chapter. In thischapter, you’ll learn how to use LINQ to XML to create, query, and transform XML files.
LINQ to Objects This component enables you to search any collection of built-in or customobjects. If you have a collection of Color objects, for example, you can select the colors with abrightness of 0.5 or more via the following expression:
Dim colors() As Color = {Color.White, _Color.LightYellow, Color.Cornsilk, _Color.Linen, Color.Blue, Color.Violet}
Dim brightColors = From c In colors _Where c.GetBrightness > 0.5
Likewise, you can select the rectangles with a minimum or maximum area by using a querylike the following:
Dim rects() As Rectangle = _{New Rectangle(0, 0, 100, 120), _New Rectangle(10, 10, 6, 8)}
Dim query = From R In rects _Where R.Width * R.Height > 100
In addition to querying data, you can also group related data together, calculate aggregates,and even transform the original data (creating an HTML or XML file with the data of a collec-tion is a trivial process, as you will see later in this chapter).
LINQ to SQL This component enables you to query relational data by using LINQ ratherthan SQL. If you’re familiar with SQL, you recognize the following statement that retrieves theproducts in a specific category of the Northwind database:
SELECT * FROM ProductsWHERE Products.CategoryID = 2
To execute this statement against the Northwind database, however, you must set up a Con-nection object to connect to the database, a Command object to execute the command, and aDataReader object to read the results returned by the query. (Don’t worry if you’re not familiarwith SQL and databases, which are discussed later in this chapter.) With LINQ to SQL, you can

LINQ TO OBJECTS 581
set up a DataContext object, which is roughly equivalent to the Connection object, and then useit to execute LINQ queries against the database.
customers = From prod In db.GetTable(Of Product)()Where prod.CategoryID = 2Select New Product With _
{.ID = prod.ProductID,.Name = prod.ProductName,.Price = prod.UnitPrice}
In the preceding statement, db is a properly initialized DataContext object. This query returnsa collection of an anonymous type with three properties (ID, Name, and Price). This is a triv-ial example, meant to demonstrate how you can access diverse data sources and query themin a consistent way with the basic LINQ syntax; the details of LINQ to SQL are discussed indetail later in this chapter. The point I’m trying to make here is that LINQ allows you to workagainst database tables as if they were collections of typed objects. The same query would haveworked with a collection of Product objects. All you have to do is change the source of the databy replacing the expression db.GetTable(Of Product) with the name of the collection.
LINQ to DataSet This component is similar to LINQ to SQL, in the sense that they both queryrelational data. The LINQ to DataSet component allows you query data that have already beenstored in a DataSet at the client. DataSets are discussed in detail later in this book, but I won’tdiscuss the LINQ to DataSet component, because the DataSet is an extremely rich object andquite functional on its own.
LINQ to Entities This is similar to the LINQ to Objects component, only the objects are basedon relational data. Entities are discussed in the last part of this book, and they’re classes thatreflect the tables in a database. These classes are generated automatically, and they handle thebasic data operations: querying tables and updating, deleting or inserting rows in the tables.The LINQ to Entities component is discussed in detail in Chapter 17, ‘‘Using the Data EntityModel,’’ of this book. Actually, LINQ is one of the empowering technologies for data entities.
New flavors of LINQ keep coming up — you may end up designing your own flavor ofLINQ to support your custom data so that other developers can use them with standard tools.There’s already a LINQ to Amazon component that allows you to query the books at Ama-zon.com using LINQ. The essence of LINQ is that it allows developers to query widely differ-ently data sources using the same syntax. You can even query database using LINQ.
LINQ to ObjectsThis section focuses on querying collections of objects. Although you can query many types ofcollections, including arrays, in this section I’ll focus on List collections to promote the useof strongly typed data and to show you how nicely typed data integrate with LINQ. As youcan guess, the most interesting application of LINQ to Objects is to select items from a collec-tion of custom objects. Let’s create a custom class to represent products:
Public Class ProductPublic Property ProductID() As StringPublic Property ProductName() As String

582 CHAPTER 14 AN INTRODUCTION TO LINQ
Public Property ProductPrice() As DecimalPublic Property ProductExpDate() As DateEnd Class
I’m not showing the implementation of various properties; let’s work with auto-implementedproperties for now. This class definition may appear in a class file or in a form outside anyprocedure. The Products collection is a List(Of Product) collection, and it’s populated withstatements like the following:
Dim Products As New List(Of Product)Dim P As ProductP = New ProductP.ProductID = "10A-Y"P.ProductName = "Product 1"P.ProductPrice = 21.45P.ProductExpDate = #8/1/2009#Products.add(P)
Assuming that you have added a few more custom objects to your list, you can use LINQ toquery your collection of products based on any property (or combination of properties) of itsitems. To find the products that cost more than $20 and are expired already, you can formulatethe following query:
Dim query = From prod In productsWhere prod.ProductPrice < 20
And Year(prod.ProductExpDate) < 2010Select prod
The result of the query is also a List collection, and it contains the products that meet the spec-ified criteria. To iterate through the selected items and display them in a TextBox control, weuse a For…Each loop, as shown next:
For Each prod In queryTextBox1.AppendText(prod.ProductID & vbTab &
prod.ProductName & vbTab &prod.ProductPrice.ToString("##0.00") & vbTab &prod.ProductExpDate.ToShortDateString & vbCrLf)
Next
Another component of a LINQ expression is the Order By clause, which determines howthe objects will be ordered in the output list. To sort the output of the preceding example indescending order, append the following Order By clause to the expression:
Dim query = From prod In productsWhere prod.ProductPrice < 20
And Year(prod.ProductExpDate) < 2010Select prodOrder By prod.ProductName

LINQ TO OBJECTS 583
Anonymous Types and Extension MethodsLINQ is based on three pillars that are not related to each other — they aren’t even partof LINQ. These pillars are anonymous types, extension methods, and object and collectioninitializers. You’re already familiar with all three of them. Object initializers and anonymoustypes were presented in Chapter 8, ‘‘Working with Objects.’’ Extension methods were intro-duced in Chapter 13, ‘‘XML in Modern Programming.’’ I’ll now review these topics and howthey’re combined in LINQ.
Anonymous types allow you to create typed objects on the fly; this is what the Select key-word of LINQ does. It allows you to create arbitrary objects and form collections of anonymoustypes. The compiler knows their properties (it actually generates classes that describe thesearbitrary objects on the fly) and incorporates them in IntelliSense. Object initializers allow youto create anonymous types using the With keyword right in the Select clause of a LINQ query.You may be querying a collection of Product objects but are only interested in their IDs andprices. Instead of selecting the control variable that contains all the fields of each product, youcan create a new anonymous type on the fly with an expression like the following:
Select New With {.ProductName = prod.Name, .ProductPrice = prod.UnitPrice}
As you will see in the following sections, it’s quite common to create anonymous types withselected fields on the fly in LINQ queries, because we rarely need all the fields of the objectswe’re querying. If you’re familiar with SQL, you already know that it’s a bad practice to selectall fields from one or more tables. They are called anonymous because they have no name youcan use to create instances of these types; other than that, they’re regular types with stronglytyped properties.
Extension methods are methods that you implement for specific types without seeing the codeof the original type. The Array class, for example, was extended by the addition of several suchmethods, including the Count, Skip, and Take methods. These methods are not actual mem-bers of the array; they’re extension methods that apply to all collections that implement theIEnumerable interface.
As you recall from the previous chapter, the collections expose the Where method, whichaccepts a lambda expression as an argument to select specific elements. The syntax of the Wheremethod, however, is quite awkward. The Where keyword of LINQ does the same, but it does soin a more elegant and intuitive manner. In effect, the compiler translates the LINQ queries intoexpressions with extension methods.
As you recall from the previous chapter, lambda expressions are what make extension meth-ods so powerful. Let’s look at a few more interesting extension methods that make collections,including arrays, extremely flexible and powerful. The Sum method returns the sum of theelements in a collection that holds numeric data. This is a pretty limited aggregate operator,however. What if you wanted the sum of the squares or another metric of the collection’smembers? An overloaded form of the Sum method accepts a lambda expression as an argu-ment; this allows you to specify your own aggregate. To calculate the sum of the squares, forexample, use the following expression:
Dim numbers = {1.01, 31.93, 8.12, 5.05, 21.81, 17.33, 2.45}Dim sumOfSquares = numbers.Sum(Function(n) n ˆ 2)
This returns the sum of the squares in the numbers array. If you wanted to calculate the sum ofthe logarithms, you’d use a lambda function like this: Function(n) Math.Log(n).

584 CHAPTER 14 AN INTRODUCTION TO LINQ
To calculate averages instead of sums, use the Average extension method. The average ofthe squares of the numeric values is as follows:
Dim averageOfSquares = numbers.Average(Function(n) n ˆ 2)
Experiment with the extension methods of the Array class, or any collection you wish. Theextension methods are shown in the IntelliSense box with the same icon as the regular methodand a little arrow pointing down.
Querying Arbitrary CollectionsAs I mentioned already, you can apply LINQ to all classes that implement the IEnumerableinterface. Many methods of the Framework return their results as a collection that implementsthe IEnumerable interface. As discussed in the tutorial ‘‘Accessing Folders and Files,’’ (availablefor download from www.sybex.com/go/masteringvb2010), the GetFiles method of theIO.Directory class retrieves the files of a specific folder and returns them as a collection ofstrings:
Dim files = Directory.GetFiles("C:\")
I’m assuming that you have turned on type inference for this project (it’s on by default), soI’m not declaring the type of the files collection. If you hover over the files keyword, you’llsee that its type is String() — an array of strings. This is the GetFiles method’s return type,so you need not declare the files variable with the same type. The variable type is inferredfrom its value.
To find out the properties of each file, create a new FileInfo object for each file, and thenexamine the values of the FileInfo object’s properties. To create an instance of the FileInfo classthat represents a file, you’d use the following statement:
Dim FI As New FileInfo(file_name)
(As a reminder, the FileInfo class as well as the DirectoryInfo class belong to the IO namespace.You must either import the namespace into the current project or prefix the class names withthe IO namespace: IO.FileInfo.) The value of the FI variable can now be used in the Whereclause of the expression to specify a filter for the query:
Dim smallFiles = _From file In Directory.GetFiles("C:\")Where New FileInfo(file).Length < 10000Order By fileSelect file
The file control variable is local to the query, and you cannot access it from the rest of thecode. You can actually create a new file variable in the loop that iterates through the selectedfiles, as shown in the following code segment:
For Each file In smallFilesDebug.WriteLine(file)
Next

LINQ TO OBJECTS 585
The selection part of the query is not limited to the same variable as specified in the Fromclause. To select the name of the qualifying files, instead of their paths, use the following selec-tion clause:
Select New FileInfo(file).Name
The smallFiles variable should still be an array of strings, right? Not quite. This time, ifyou hover the pointer over the name of the smallFiles variable, you’ll see that its type isIEnumerable(Of String). And this makes sense, because the result of the query is not of thesame type as its source. This time we created a new string for each of the selected items, sosmallFiles is an IEnumerable of strings. Let’s select each file’s name and size with the follow-ing query:
Dim smallFiles = _From file In Directory.GetFiles("C:\")Where New FileInfo(file).Length > 10000Select New FileInfo(file).Name,
New FileInfo(file).Length
This time, smallFiles is of the IEnumerable(Of <anonymous type>) type. The anonymoustype isn’t really anonymous; the compiler generates a class to represent the anonymous typeinternally and gives it a name like VB_AnonymousType_1’3 or something — and yes, thesingle quote is part of the name, not a typo. However, you can’t use this class to declarenew objects. Anonymous types are very convenient (like auto-implemented properties,in a way), but they can’t be used outside their scope (the module in which they werecreated).
Because I selected the two properties of interest in the query (the file’s name and size), I candisplay them with the following loop:
For Each file In smallFilesDebug.WriteLine(file.Name & vbTab & file.Length.ToString)
Next
As soon as you type in the name of the file variable and the following period, you will seethe Name and Length properties of the anonymous type in the IntelliSense box (proof that thecompiler has generated a new type on the fly).
The properties of the new type are named after the items specified in the Select clause, andthey have the same type. You can also control the names of the properties of the anonymoustype with the following syntax:
Select New With {.FileName = New FileInfo(file).Name,.FileSize = New FileInfo(file).Length}
This time you select a new object, and a new variable is created on the fly and has two prop-erties named FileName and FileSize. The values of the two properties are specified as usual.Note that, although you can specify the names of the properties of the anonymous type, you

586 CHAPTER 14 AN INTRODUCTION TO LINQ
can’t specify the anonymous type’s name. To display each selected file’s name and size, modifythe For…Each loop as follows:
For Each file In smallFilesDebug.WriteLine(file.FileName & vbTab &
file.FileSize.ToString)Next
As you can see, LINQ is not a trivial substitute for a loop that examines the properties ofthe collection items; it’s a powerful and expressive syntax for querying data in your code thatcreates data types on the fly and exposes them in your code.
You can also limit the selection by applying the Where method directly to the collection:
Dim smallFiles = Directory.GetFiles("C:\").Where (Function(file) (New FileInfo(file).Length > 10000))
The functions you specify in certain extended methods are called lambda functions, and they’redeclared either inline, if they’re single-line functions, or as delegates.
Let me explain how the Where extension method of the previous sample code segmentworks. The Where method should be followed by an expression that evaluates to a True/Falsevalue — the lambda function. First specify the signature of the function; in our case, thefunction accepts a single argument, which is the current item in the collection. Obviously, theWhere clause will be evaluated for each item in the collection, and for each item, the functionwill accept a different object as an argument. In the following section, you’ll see lambdafunctions that accept two arguments. The name of the argument can be anything; it’s a namethat you will use in the definition of the function to access the current collection item. Thencomes the definition of the function, which is the expression that compares the current file’ssize to 10,000 bytes. If the size exceeds 10,000 bytes, the function will return True — otherwise,False.
In this example, the lambda function is implemented in-line. To implement more compli-cated logic, you can write a function and pass the address of this function to the Where clause.Let’s consider that the function implementing the filtering is the following:
Private Function IsLargeTIFFFile(ByVal fileName As String) As BooleanDim file As FileInfofile = New FileInfo(fileName)If file.Length > 10000 And file.Extension.ToUpper = ".TIF" Then
Return TrueElse
Return FalseEnd If
End Function
To call this function from within a LINQ expression, use the following syntax:
Dim largeImages =Directory.GetFiles("C:\").Where(AddressOf IsLargeTIFFFile)
MsgBox(smallFiles.Count)

LINQ TO OBJECTS 587
Aggregating with LINQAnother very important aspect of LINQ is that it allows you to query for aggregates. Moreoften than not, you’re not interested in the qualifying rows in a database (or objects in a col-lection) but rather in their aggregates. In many scenarios, the orders placed by each customerare not nearly as important as the total monthly revenue or the average of the orders in a givenperiod. Aggregate data can be easily compared and used to allow managers to adjust their mar-keting or selling strategies. Likewise, the total cost of discontinued items is a useful metric, asopposed to a list of discontinued items and prices, and so on. Now that you can write LINQqueries to select objects based on any criteria, you can certainly iterate through the selectedobjects and calculate all the metrics you’re interested in. LINQ can do better than that; it allowsyou to select the desired aggregates, rather than individual objects. And it’s much faster to letLINQ perform the calculations, rather than doing it yourself by looping through the data. If thedata resides in a database, LINQ can calculate the aggregates over millions of records, with-out moving all the qualifying rows from the database to the client computer and processingthem there.
By default, LINQ adds a few extension methods for calculating aggregates to any collectionthat supports the IEnumerable interface. Let’s return to the array of integers, the data array. Tocalculate the count of all values, call the Count method of the data array. The count of elementsin the data array is given with the following expression:
Dim count = data.Count
In addition to the Count method, any LINQ-capable class exposes the Sum method, whichsums the values of a specific element or attribute in the collection. To calculate the sum of theselected values from the data array, use the following LINQ expression:
Dim sum = From n dataWhere n > 10Select n.Sum
You can also calculate arbitrary aggregates by using the Aggregate method, which acceptsa lambda expression as an argument. This expression, in turn, accepts two arguments: thecurrent value and the aggregate. The implementation of the function, which is usually asingle-liner, calculates the aggregate. Let’s consider a lambda expression that calculates the sumof the squares over a sequence of numeric values. The declaration of the function is as follows:
Function(aggregate, value)
Its implementation is shown here. (This is just the code that increases the aggregate at eachstep; no function declaration is needed.)
aggregate + value ˆ 2
Note that the preceding expression evaluates the aggregate by adding a new value (thesquare of the current number in the collection) to the aggregate; it doesn’t actually update theaggregate. In other words, you can’t use a statement like this one (as intuitive as it may look):
aggregate += value ˆ 2

588 CHAPTER 14 AN INTRODUCTION TO LINQ
To calculate the sum of the squares of all items in the data array, use the following LINQexpression:
Dim sumSquares = data.Aggregate(Function(sumSquare As Long, n As Integer)
sumSquare + n ˆ 2
The single statement that implements the aggregate adds the square of the current elementto the sumSquare argument. When you’re done, the sumSquare variable holds the sum of thesquares of the array’s elements. If you hover the pointer over the sumSquare variable, you’ll seethat it is an Integer or Double type, depending on the type of the values in the collection you’reaggregating. In short, the lambda expression for evaluating aggregates accepts two arguments:the aggregate and the current value. The code is an expression that updates the aggregate, andthis is the function’s return value, which is assigned to the aggregate.
Aggregates are not limited to numeric values. Here’s an interesting example of a LINQexpression that reverses the words in a sentence. The code starts by splitting the sentence intowords, which are returned in an array of strings. Then, it calls the Aggregate method, passinga lambda expression as an argument. This expression is a function that prefixes the aggregate(a new string with the words in reverse order) with the current word:
Dim sentence ="The quick brown fox jumped over the lazy dog"
Dim reverseSentence =sentence.Split(" "c).Aggregate(Function(newSentence, word) (word & " " & newSentence))
This code segment is a bit complicated and calls for an explanation. It starts by creating anarray of strings: The words in the sentence are extracted by the Split method into an array ofstrings. Then we apply the Aggregate extension method to the array. The Aggregate methodaccepts the lambda expression as an argument, which creates a new string, the newSentencestring, by inserting each new word at the beginning of the sentence. If you were appendingthe words to the newSentence variable, you’d be re-creating the original string from its pieces;here, I reversed the order of the words.
The lambda expression you pass to the Aggregate method is a function that accepts twoarguments: the control variable and the aggregate variable. The function is executed for eachitem in the collection, and the value of the current item is the control variable (in our case,each consecutive word in the sentence). The aggregate variable newSentence is the variable inwhich you aggregate the desired quantity. At the end of the loop, the newSentence variablecontains the words extracted from the string but in reverse order.
The following are a few more interesting extension methods:
Take (N), TakeWhile (Expression) This method selects a number of elements from the col-lection. The first form selects the first n elements, while the second form continues selectingelements from the collection while the expression is True. To select values while they’re smallerthan 10, use the following lambda expression:
Function(n) n < 10
This expression selects values until it finds one that exceeds 10. The selection stops there,regardless of whether some of the following elements drop below 10.

LINQ TO OBJECTS 589
Skip and SkipWhile The Skip and SkipWhile methods are equivalent to the Take andTakeWhile methods: They skip a number of items and select the remaining ones. You can usethe Skip and Take methods in tandem to implement paging. Assuming that pageSize is thenumber of items you want to display at once and page is the number of the current page, youcan retrieve any page’s data with a statement like the following:
Data.Skip((pageSize – 1) * page).Take(pageSize)
Distinct The Distinct method, finally, returns the distinct values in the collection:
Dim uniqueValues = data.Distinct
Some Practical LINQ ExamplesAt this point, you can create an array of simple objects to explore some of the more advancedfeatures of LINQ to Objects. The sample code presented in this section comes from the IEnu-merables project (available for download from www.sybex.com/go/masteringvb2010), whoseinterface is shown in Figure 14.1. Each button generates some output, which is displayed onthe TextBox that takes up most of the form.
Figure 14.1
The IEnumerablessample application
The following array contains a number of objects representing people, but they’re anony-mous types (there’s no collection that implements the specific type). In the IEnumerables

590 CHAPTER 14 AN INTRODUCTION TO LINQ
project, the ArrayOfPersons array is declared outside any procedure so that multiple eventhandlers can access it.
Dim ArrayOfPersons() = {New With {.SSN = "555-00-9001",.First = "Peter", .Last = "Evans", .Age = 27},
New With {.SSN = "555-00-9002", .First = "James", .Last = "Dobs", .Age = 42},
New With {.SSN = "555-00-9003", .First = "Richard",.Last = "Manning", .Age = 33},
New With {.SSN = "555-00-9004",.First = "Rob", .Last = "Johnson", .Age = 52},
New With {.SSN = "555-00-9005",.First = "Peter", .Last = "Smith", .Age = 38},
New With {.SSN = "555-00-9006",.First = "John", .Last = "Tall", .Age = 22},
New With {.SSN = "555-00-9007",.First = "Mike", .Last = "Johnson", .Age = 33},
New With {.SSN = "555-00-9008",.First = "Peter", .Last = "Larson", .Age = 43},
New With {.SSN = "555-00-9009",.First = "James", .Last = "Smith", .Age = 37}}
The basic age statistics for the array (minimum, maximum, and average values) can beobtained with the following expressions:
ArrayOfPersons.Average(Function(p) p.Age)ArrayOfPersons.Min(Function(p) p.Age)ArrayOfPersons.Max(Function(p) p.Age)
There’s no need to iterate through the array’s elements; the Average, Min, and Max extensionmethods return the desired aggregates. To select items from the array based on some criteria,use the Where method. The following queries extract the young and not-so-young people in thearray (the threshold is 30 years):
Dim youngPersons = From p In ArrayOfPersons Where p.Age < 30 Select pDim notSoYoungPersons = From p In ArrayOfPersons Where p.Age >= 30 Select p
To combine two IEnumerable collections, use the Concat method, which is applied to acollection and accepts as an argument another collection:
Dim allPersons = youngPersons.Concat(notSoYoungPersons)
If you don’t care about the names and other data for the ‘‘not-so-young’’ people, you cancalculate the average age in this age group with the following query:
Dim youngPersonsAvgAge =(From p In ArrayOfPersons Where p.Age < 30 Select p.Age).Average

LINQ TO OBJECTS 591
Pretty simple. First determine the segment of the population you want to aggregate over,and then call the Average method. Another, less obvious and certainly less recommendedapproach is to calculate the sum of the ages and their count and divide the two values:
Dim youPersonsAvgAge2 =(From p In ArrayOfPersons Where p.Age < 30 Select p.Age).Sum /(From p In ArrayOfPersons Where p.Age < 30).Count
Aggregates are the most useful operations you can perform on a collection, but you’llrarely aggregate over the entire collection. The average age of an entire population or thepurchases of an entire population often are not as useful as the aggregates of specific segmentsof a population. In the preceding example, I created a second collection made up only of thepeople we were interested in and then applied the aggregation operators over that entirepopulation. Let’s do the same without an intermediate collection.
Grouping and Aggregating
To demonstrate the grouping operator of LINQ, let’s break down the population according toage. Specifically, let’s break the population into segments by decade (people in their 20s, 30s,and so on). Breaking a set of data into groups of related items is known as grouping, and it’ssupported by the GroupBy extension method. The GroupBy extension method accepts as anargument a lambda expression, which indicates the various groups. To group ages accordingto their decade, you’d use an expression like the following:
Math.Floor(Age / 10) * 10
Consider the ages 41 and 49. The Floor function returns the largest integer that doesn’texceed its argument, and in this case it will return 4 for both values (4.1 and 4.9). Then, mul-tiply this integer value by 10 to obtain the actual decade (40). Once you have come up withan expression to group people according to their age, you can write the query to retrieve thegroups:
Dim grouped = ArrayOfPersons.GroupBy(Function(p) Math.Floor(p.Age / 10) * 10)
If you hover the cursor over the grouped variable, you will see that its type is IEnumerable.But what does it contain? The exact type of the return value is IEnumerable(Of Double,anonymous_type). The return value of the GroupBy method is an IEnumerable collection withthe keys of the groups (the age decade) and the actual items. As you can see, the compiler hasfigured out that the key is a Double value (the age), and the actual object is of an anonymoustype — the exact same type as the elements of the array.
The following loop prints the names of the groups and their count (number of people in thatage decade):
For Each grp In groupedTextBox1.AppendText("Group: " & grp.Key &
" contains " & grp.Count.ToString & " persons" & vbCrLf)Next

592 CHAPTER 14 AN INTRODUCTION TO LINQ
Each item in the collection has a Key property (the value according to which the items aregrouped) and a Count property. The actual value of the grp variable is a collection of Personobjects. To print the people in each age group, write a loop like the following:
TextBox1.AppendText("GROUPS AND THEIR MEMBERS" & vbCrLf)For Each group In grouped
TextBox1.AppendText("GROUP OF " & group.Key.ToString & vbCrLf)TextBox1.AppendText("Group Members:" & vbCrLf)For Each person In group.OrderBy(Function(p) p.Age)
TextBox1.AppendText(vbTab & person.First & " " &person.Last & " : " & person.Age.ToString & vbCrLf)
NextNext
The outer loop goes through each group. At this level, you access the Key property and use itas a header. The inner loop goes through items in the current group. The preceding statementswill generate the following output:
GROUP OF 20Group Members:
John Tall : 22Peter Evans : 27
GROUP OF 30Group Members:
Richard Manning : 33Mike Johnson : 33James Smith : 37Peter Smith : 38
GROUP OF 40Group Members:
James Dobs : 42Peter Larson : 43
GROUP OF 50Group Members:
Rob Johnson : 52
How about calculating aggregates on each group? To perform aggregates on the groups,you must create another collection of anonymous types, just like the original, with an extrafield that groups the items together. The following statement generates a new collection ofobjects that includes each person’s age group (the ageGroup property):
Dim tmpGroups = From person In ArrayOfPersonsSelect New With {.SSN = person.SSN, .First = person.First,
.Last = person.Last, .Age = person.Age,
.ageGroup = Math.Floor(person.Age / 10) * 10}

LINQ TO OBJECTS 593
Now, you can calculate the average age in each group. The following query goes througheach group and calculates the average age in each group. To make the query a little more inter-esting, I’ve added the number of members in each group:
Dim ageGroups = From P In tmpGroupsOrder By P.ageGroupGroup By P.ageGroup Into G = Group,
AgeGroupCount = Count(),ageGroupAverage = Average(System.Convert.ToDecimal(P.Age))
This query groups the members of the tmpGroups collection into groups based on theageGroup property and then calculates the count of the members and the average age in eachgroup. If you iterate through the members of the collection and print the age group and thetwo statistics, you’ll get something like this:
AGE GROUP: 20 COUNT: 2 AVERAGE AGE IN GROUP: 24.50AGE GROUP: 30 COUNT: 4 AVERAGE AGE IN GROUP: 35.25AGE GROUP: 40 COUNT: 2 AVERAGE AGE IN GROUP: 42.50AGE GROUP: 50 COUNT: 1 AVERAGE AGE IN GROUP: 52.00
If you’re wondering why you had to create an intermediate collection to add the group-ing field instead of grouping by the expression Math.Floor(P.Age / 10) * 10, the answer isthat you can’t use functions or methods in a group’s control variable. Some readers may havenoticed that the collection should hold birth dates, not ages. Try to perform the same queriesafter replacing the Age property with a BirthDate property.
You have seen quite a few nontrivial LINQ queries, and you should have a good idea aboutLINQ and how flexible it is. Writing efficient queries will take a bit of effort, and you shouldexplore on your own as many sample queries as you can. A good starting point is the 101LINQ Samples page at http://msdn.microsoft.com/en-us/vbasic/bb688088.aspx (a greatresource on LINQ by Microsoft). You won’t find any explanations on the queries (not as ofthis writing, at least), but try to understand as many of the queries as you can. Personally,I find it very convenient to use LINQ in my code whenever possible, even with anonymoustypes.
Keep in mind that LINQ is a declarative language: It tells the compiler what to do, not howto do it. And that’s what makes it very flexible. LINQ statements are executed in a single step,and you can’t place a breakpoint inside a LINQ query to follow its execution. You just try towrite a syntactically correct query and then test the results to make sure you got what youaimed for from the collection.
Transforming Objects with LINQIn this section, you’ll learn how to use LINQ to transform collections of objects. I’ll start witha collection of custom objects and transform them into objects with a different structure. You’llalso see how easy it is to create HTML or XML files to describe the same collection using LINQ.
In the examples so far, I used anonymous types, which are quite common and convenient.In large applications, however, where the same data may be reused in several parts of the
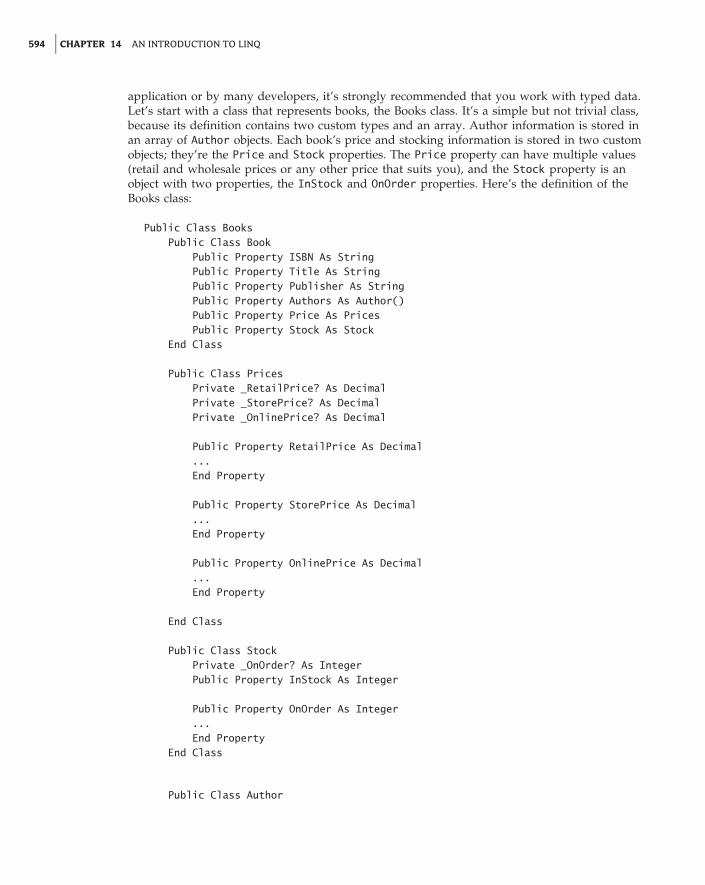
594 CHAPTER 14 AN INTRODUCTION TO LINQ
application or by many developers, it’s strongly recommended that you work with typed data.Let’s start with a class that represents books, the Books class. It’s a simple but not trivial class,because its definition contains two custom types and an array. Author information is stored inan array of Author objects. Each book’s price and stocking information is stored in two customobjects; they’re the Price and Stock properties. The Price property can have multiple values(retail and wholesale prices or any other price that suits you), and the Stock property is anobject with two properties, the InStock and OnOrder properties. Here’s the definition of theBooks class:
Public Class BooksPublic Class Book
Public Property ISBN As StringPublic Property Title As StringPublic Property Publisher As StringPublic Property Authors As Author()Public Property Price As PricesPublic Property Stock As Stock
End Class
Public Class PricesPrivate _RetailPrice? As DecimalPrivate _StorePrice? As DecimalPrivate _OnlinePrice? As Decimal
Public Property RetailPrice As Decimal...End Property
Public Property StorePrice As Decimal...End Property
Public Property OnlinePrice As Decimal...End Property
End Class
Public Class StockPrivate _OnOrder? As IntegerPublic Property InStock As Integer
Public Property OnOrder As Integer...End Property
End Class
Public Class Author

LINQ TO OBJECTS 595
Public Property FirstName As StringPublic Property LastName As String
End ClassEnd Class
Some of properties are auto-implemented, while others are implemented with the usual set-ters and getters. The latter includes some business logic, such that prices can’t be negative, butI’m not showing the equivalent code (which you can find in the IEnumerables project).
Create a few objects of the Book type and add them to a List collection. I’m using object ini-tializers in the code, because that’s the most compact notation, but you can create individualBook objects and add them to the collection if you want. Listing 14.1 shows the statements thatinitialize the allBooks collection.
Listing 14.1: Initializing a list of Book objects
Dim allBooks As New List(Of Books.Book)allBooks.Add(New Books.Book With
{.ISBN = "1000000100", .Title = "Book 100",.Publisher = "Wiley",.Stock = New Books.Stock With
{.InStock = 14, .OnOrder = 20},.Authors = {New Books.Author With
{.FirstName = "Richard",.LastName = "Dobson"}},
.Price = New Books.Prices With{.StorePrice = 12.95,.RetailPrice = 15.95}})
allBooks.Add(New Books.Book With{.ISBN = "1000000101", .Title = "Book 101",.Publisher = "Sybex",.Stock = New Books.Stock With
{.InStock = 8, .OnOrder = 25},.Authors = {New Books.Author With
{.FirstName = "Bob",.LastName = "Smith"}},
.Price = New Books.Prices With{.StorePrice = 24.95,.RetailPrice = 29.99}})
Let’s start by transforming the list of books into an HTML document, like the one shown inFigure 14.2. We’ll write a LINQ query as usual, but we’ll embed it into an XMLElement variable.I’ll start with the query that transforms the data and then explain it in detail. Listing 14.2 showsthe code that creates the HTML document that produced the page shown in Figure 14.2.

596 CHAPTER 14 AN INTRODUCTION TO LINQ
Listing 14.2: Transforming a collection into an XML segment
Dim html = <html><h2>List of Books</h2><table border="all">
<tr><td margin="10" width="90px">ISBN</td><td margin="10" width="280px">Title</td><td margin="10" width="140px">Author(s)</td><td margin="10" width="70px">Price</td>
</tr><%= From bk As Books.Book In allBooks
Select <tr><td><%= bk.ISBN %></td><td><%= bk.Title %></td><td><table>
<%= From au As Books.Author In bk.AuthorsOrder By au.LastName, au.FirstNameSelect <tr><td><%= au.LastName & ", " &
au.FirstName %></td></tr> %></table>
</td><td align="right" valign="middle"><%= bk.Price.RetailPrice.ToString %></td>
</tr>%>
</table></html>
Figure 14.2
A collection of simpleobjects rendered as anHTML document
ISBN
List of BooksTitle Author(s) Price
1000000100 Book 100 Dobson, Richard 15.95
1000000101 Book 101 Smith, Bob 29.99
1000000101 Book 101 29.99Emilia, TrampMike, Sonders
1000000102 Book 102 29.99Jack, SimpsonMargot, StappMike, Tyler
The code is really simple. It starts by generating an XML document and embeds the actualdata in expression holes, which are delimited with the <%= and %> tags. The html variable isan XML document, and the first expression hole is a LINQ query. In the Select clause of thequery, I created another XML document, which in turn contains expression holes. If you find

LINQ TO XML 597
this code segment complicated, please refer to the material in Chapter 12, where I discuss indetail how to build XML documents with expression holes. To read an expression like the onethat defines the html variable, keep in mind the following simple rules:
Every time you see the opening angle bracket, you switch into XML mode.
Every time you see the <% tag, you switch into VB mode.
Note that while in VB mode, you can switch to XML mode without the closing %> tag; allit takes is another opening bracket to switch into XML mode. Of course in the end, all opening<% tags must be closed with the matching %> tag.
HTML tags are no different to the compiler than XML tags, so you easily create an XMLdocument with the same data and the structure you want. After all, HTML documents are spe-cial cases of XML documents. You can use the XMLSerializer class to convert the collection ofcustom objects to an XML document with a single statement, but LINQ allows you to transformyour data in just about any way you see fit. Try to create a comma-delimited file with the bookdata or a file with fixed-length columns for each of the properties.
Our next LINQ stop is LINQ to XML. In the following section, you’ll learn how to combinethe basic methods of the XElement class with LINQ to retrieve the desired elements and/orattributes from an XML document using LINQ. As you will see, you can use LINQ to queryXML documents just as you did with collections.
LINQ to XMLThe second component of LINQ is the LINQ to XML component. XML is gaining in popularityand acceptance, and Microsoft has decided to promote XML to a basic data type. Yes, XML is adata type like integers and strings! To understand how far VB is taking XML, type the follow-ing in a procedure or event handler:
Dim products = <Books><Book ISBN="0000000000001"><Name>Book Title 1</Name><Price>11.95</Price>
</Book><Book ISBN="000000000002"><Name>Book Title 2</Name><Price>10.25</Price>
</Book></Books>
You need not worry too much about getting the document exactly right, because the editorworks just like the XML editor. Every time you type an opening tag, it inserts the matchingclosing tag and ensures that what you’re typing is a valid XML document. You can’t apply aschema to the XML document you’re creating, but you should expect this feature in a futureversion of Visual Studio.
You can create a new XML document in your code, but what can you do with it? You needa mechanism to manipulate the XML document with simple tools, and these tools are availablethrough the following XML helper objects:
◆ XDocument represents the XML document.
◆ XComment represents a comment in the XML document.

598 CHAPTER 14 AN INTRODUCTION TO LINQ
◆ XElement represents an XML element.
◆ XAttribute represents an attribute in an XML element.
These objects can be used to access the document but also to create it. Instead of creatingan XML document directly in your code, you can use the XML helper objects and a structuralapproach to create the same document. A simple XML document consists of elements, whichmay include attributes. To create a new XElement object, pass the element’s name and value toits constructor:
New XElement(element_name, element_value)
The following statement will create a very simple XML document:
Dim XmlDoc = New XElement("Books")MsgBox(XmlDoc.ToString)
You will see the string <Books /> in a message box. This is a trivial, yet valid, XML document.To create the same book collection as we did earlier by using the helper objects, insert the fol-lowing statements in a button’s Click event handler:
Dim doc = _New XElement("Books", _
New XElement("Book", _New XAttribute("ISBN", "0000000000001"), _New XElement("Price", 11.95), _New XElement("Name", "Book Title 1"), _New XElement("Stock", _
New XAttribute("InStock", 12), _New XAttribute("OnOrder", 24))), _
New XElement("Book", _New XAttribute("ISBN", "0000000000002"), _
New XElement("Price", 10.25), _New XElement("Name", "Book Title 2"), _New XElement("Stock", _
New XAttribute("InStock", 7), _New XAttribute("OnOrder", 10))))
I’ve added a twist to the new document to demonstrate the use of multiple attributes inthe same element. The Stock element contains two attributes, InStock and OnOrder. Each ele-ment’s value can be a basic data type, such as a string or a number, or another element. ThePrice element is a decimal value, and the Name element is a string. The Book element, however,contains three subelements: the Price, Name, and Stock elements.
The doc variable is of the XElement type. An XML document is not necessarily basedon the XDocument class. The two basic operations you can perform with an XElement (andXDocument) object are to save it to a file and reload an XElement object from a file. Theoperations are performed with the Save and Load methods, which accept the file’s name as anargument.

LINQ TO XML 599
Adding Dynamic Content to an XML DocumentThe XML documents we’ve built in our code so far were static. Because XML support is builtinto VB, you can also create dynamic context, and this is where things get quite interesting. Toinsert some dynamic content into an XML document, insert the characters <%=. The editor willautomatically insert the closing tag, which is %>. Everything within these two tags is treatedas VB code and compiled. The two special tags create a placeholder in the document (or anexpression hole), and the expression you insert in them is an embedded expression: You embeda VB expression in your document, and the compiler evaluates the expression and inserts theresult in the XML document.
Here’s a trivial XML document with an embedded expression. It’s the statement that createsa document with a Book element (I copied it from a code segment presented in the precedingchapter), and I inserted the current date as an element:
Dim doc = _New XElement("Books", _
New XElement("Book", _New XAttribute("ISBN", "0000000000001"), _New XAttribute("RecordDate", <%= Today %>), _New XElement("Price", 11.95), _New XElement("Name", "Book Title 1"), _New XElement("Stock", _
New XAttribute("InStock", 12), _New XAttribute("OnOrder", 24))))
Let’s say you have an array of Product objects and you want to create an XML documentwith these objects. Listing 14.3 shows the array with the product names.
Listing 14.3: An array of Product objects
Dim Products() As Product = _{New Product With
{.ProductID = 3, .ProductName = "Product A", _.ProductPrice = 8.75, _.ProductExpDate = #2/2/2009#}, _
New Product With _{.ProductID = 4, .ProductName = "Product B", _.ProductPrice = 19.5}, _
New Product With _{.ProductID = 5, .ProductName = "Product C", _.ProductPrice = 21.25, _.ProductExpDate = #12/31/2010#}}
The code for generating an XML document with three elements is quite short, but what ifyou had thousands of products? Let’s assume that the Products array contains instances ofthe Product class. You can use the XMLSerializer class to generate an XML document with the

600 CHAPTER 14 AN INTRODUCTION TO LINQ
array’s contents. An alternative approach is to create an inline XML document with embeddedexpressions, as shown in Listing 14.4.
Listing 14.4: An XML document with Product objects
Dim prods = <Products><%= From prod In Products _Select <Product>
<ID><%= prod.ProductID %></ID><Name><%= prod.ProductName %></Name><Price><%= prod.ProductPrice %></Price><ExpirationDate>
<%= prod.ProductExpDate %></ExpirationDate></Product> %></Products>
This code segment looks pretty ugly, but here’s how it works: In the first line, we start anew XML document. (The prods variable is actually of the XElement type, but an XElementis in its own right an XML document.) Notice that there’s no line continuation character atthe end of the first line of the XML document. Then comes a LINQ query embedded in theXML document with the <%= and %> tags. Notice the line continuation symbol at the end ofthis line(_). When we’re in an expression hole, we’re writing VB code, so line breaks matter.That makes the line continuation symbol necessary. Here’s a much simplified version of thesame code:
Dim prods = <Products><%= From prod In Products _
Select <Product>some product</Product> %></Products>
This code segment will generate the following XML document:
<Products><Product>some product</Product><Product>some product</Product><Product>some product</Product>
</Products>
The file contains no real data but is a valid XML document. The two tags with the percentsign switch into VB code, and the compiler executes the statements embedded in them. Theembedded statement of our example is a LINQ query, which iterates through the elementsof the Products array and selects literals (the XML tags shown in the output). To insert databetween the tags, we must switch to VB again and insert the values we want to appear in theXML document. In other words, we must replace the string some product in the listing withsome embedded expressions that return the values you want to insert in the XML document.These values are the properties of the Product class, as shown in Listing 14.3. The code shownin Listing 14.4 will produce the output shown in Listing 14.5.

LINQ TO XML 601
Listing 14.5: An XML document with the data of the array initialized in Listing 14.4
<Products><Product>
<ID>3</ID><Name>Product A</Name><Price>8.75</Price><ExpirationDate>2009-02-02T00:00:00</ExpirationDate>
</Product><Product>
<ID>4</ID><Name>Product B</Name><Price>19.5</Price><ExpirationDate>0001-01-01T00:00:00</ExpirationDate>
</Product><Product>
<ID>5</ID><Name>Product C</Name><Price>21.25</Price><ExpirationDate>2010-12-31T00:00:00</ExpirationDate>
</Product></Products>
Transforming XML Documents
A common operation is the transformation of an XML document. If you have worked withXML in the past, you already know Extensible Stylesheet Language Transformations (XSLT),which is a language for transforming XML documents. If you’re new to XML, you’ll probablyfind it easier to transform XML documents with the LINQ to XML component. Even if you’refamiliar with XSLT, you should be aware that transforming XML documents with LINQ isstraightforward. The idea is to create an inline XML document that contains HTML tags andan embedded LINQ query, like the following:
Dim HTML = <htlm><b>Products</b><table border="all"><tr><td>Product</td><td>Price</td><td>Expiration</td></tr><%= From item In Products.Descendants("Product") _
Select <tr><td><%= item.<Name> %></td><td><%= item.<Price> %></td><td><%= Convert.ToDateTime( _item.<ExpirationDate>.Value). _
ToShortDateString %></td></tr> %></table></htlm>
HTML.Save("Products.html")Process.Start("Products.html")

602 CHAPTER 14 AN INTRODUCTION TO LINQ
The HTML variable stores plain HTML code. HTML is a subset of XML, and the editorwill treat it like XML: It will insert the closing tags for you and will not let you nest tags inthe wrong order. The Select keyword in the query is followed by a mix of HTML tags andembedded holes for inline expressions, which are the fields of the item object. Note the VB codefor formatting the date in the last inline expression. The output of the previous listing is shownin Figure 14.3.
Figure 14.3
A simple XML seg-ment (top) viewed asan HTML table (bottom).Transformation courtesyof LINQ.
<products> <product ProductID=“1” ProductName=“Chai” UnitPrice=“18.0000” UnitsInStock=“39” UnitsOnOrder=“0” > </product> <product ProductID=“2” ProductName=“Chang” UnitPrice=“19.0000” UnitsInStock=“19” UnitsOnOrder=“40” > </product> <product ProductID=“3” ProductName=“Aniseed Syrup” UnitPrice=“10.0000” UnitsInStock=“26” UnitsOnOrder=“70” > </product> <product ProductID=“4” ProductName=“Chef Anton’s Cajun Seasoning” UnitPrice=“22.0000” UnitsInStock=“128” UnitsOnOrder=“0” > </product> <product ProductID=“5” ProductName=“Chef Anton’s Gumbo Mix” UnitPrice=“21.3600” UnitsInStock=“46” UnitsOnOrder=“0” > </product>
Products
Product Price On Order
Chai
Chang
Aniseed Syrup
Chef Anton’s Cajun Seasoning
Chef Anton’s Gumbo Mix
Grandma’s Boysenberry Spread
Uncle Bob’s Organic Dried Pears
Northwoods Cranberry Sauce
Mishi Kobe Niku
Queso Cabrales
Queso Manchego La Pastora
Konbu
0
40
70
0
0
0
0
0
0
30
0
0
39
19
26
128
46
179
27
164
50
154
184
95
18.00
19.00
10.00
22.00
21.36
25.01
30.01
40.00
97.00
21.00
38.00
6.00
In Stock
The last two statements save the HTML file generated by our code and then open it inInternet Explorer (or whichever application you’ve designated to handle by default the HTMLdocuments).

LINQ TO XML 603
Using Custom Functions with LINQ to XML
The embedded expressions are not limited to simple, inline expressions. You can call customfunctions to transform your data. In a hotel reservation system I developed recently, I had totransform an XML file with room details to an HTML page. The transformation involved quitea few lookup operations, which I implemented with custom functions. Here’s a simplifiedversion of the LINQ query I used in the project. I’m showing the query that generates a simpleHTML table with the elements of the XML document. The RoomType element is a numericvalue that specifies the type of the room. This value may differ from one supplier to another,so I had to implement the lookup operation with a custom function.
Dim hotels = <html><table><tr><td>Hotel</td<td>Room Type</td><td>Price</td></tr><%= From hotel In Hotels _
Select <tr><td><%= hotel.<HotelName>.Value %></td><td><%= GetRoomType(hotel.<RoomTypeID>)</td><td><%= CalculatePrice(hotel.<Base>)</td>
</tr>%>
</table></html>
The GetRoomType() and CalculatePrice() functions must be implemented in the samemodule that contains the LINQ query. In my case, they accept more arguments than shownhere, but you get the idea. To speed up the application, I created HashTables using the IDsof the various entities in their respective tables in the database. The CalculatePrice()function, in particular, is quite complicated, because it incorporates the pricing policy. Yet,all the business logic implemented in a standard VB function was easily incorporated into theLINQ query that generates the HTML page with the available hotels and prices.
Another interesting application of XML transformation is the transformation of XML datainto instances of custom objects. Let’s say you need to work with an XML file that containsproduct information, and you want to create a list of Product objects out of it. Let’s also assumethat the XML file has the following structure:
<Products><product ProductID="1" ProductName="Chai"
CategoryID="1" UnitPrice="18.0000"UnitsInStock="39" UnitsOnOrder="0" >
</product><product ProductID="2" ProductName="Chang"
CategoryID="1" QuantityPerUnit="24 - 12 oz bottles"UnitPrice="19.0000"UnitsInStock="19" UnitsOnOrder="40" >
</product>...</Products>

604 CHAPTER 14 AN INTRODUCTION TO LINQ
First, you must load the XML file into an XElement variable with the following statement(I’m assuming that the XML file is in the same folder as the project):
Dim XMLproducts = XElement.Load("../../Products.xml")
Now, you can write a LINQ query that generates anonymous types, like the following:
Dim prods = From prod In XMLproducts.Descendants("product")Select New With {.Name = prod.Attribute("ProductName").Value,
.Price = prod.Attribute("UnitPrice").Value,
.InStock = prod.Attribute("UnitsInStock").Value,
.OnOrder = prod.Attribute("UnitsOnOrder").Value}}
The prods collection consists of objects with the four scalar properties. To make the examplea touch more interesting, let’s say that you don’t want to create a ‘‘flat’’ object. The InStockand OnOrder properties will become properties of another object, the Stock property. The newanonymous type will have the following structure:
Product.Name
Product.Price
Product.Stock.InStock
Product.Stock.OnOrder
To create an anonymous type with the revised structure, you must replace the InStock andOnOrder properties with a new object, the Stock object, which will expose the InStockand OnOrder properties. The revised query is shown next:
Dim prods =From prod In XMLproducts.Descendants("product")Select New With {.Name = prod.Attribute("ProductName").Value,
.Price = prod.Attribute("UnitPrice").Value,
.Stock = New With {.InStock = prod.Attribute("UnitsInStock").Value,
.OnOrder = prod.Attribute("UnitsOnOrder").Value}}
A simple LINQ query allows you to move from XML into objects and replace the code thatwould normally use the XML axis methods (Elements and Descendents) with pure objects. Ofcourse, anonymous types can be used only in the context of the procedure in which they werecreated. If you want to pass the prods collection between procedures, you should create a newProduct class and use it to create instances of this object, because the anonymous types can’t beused outside the routine in which they were created. The definition of the Product class, andthe accompanying Stock class, is quite trivial:
Public Class ProductPublic Property Name As StringPublic Property Price As DecimalPublic Property Stock As Stock
End Class
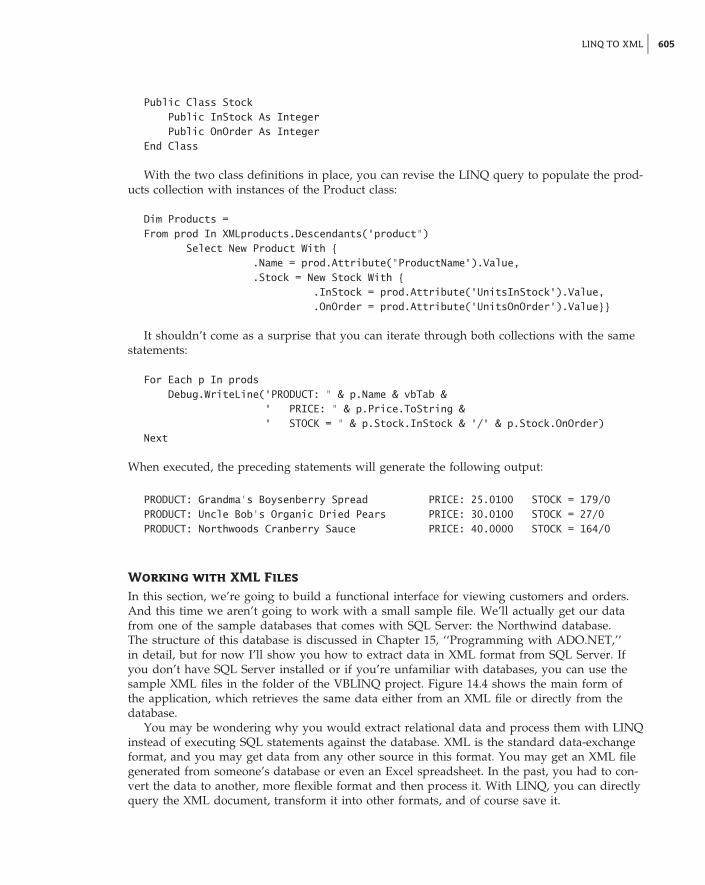
LINQ TO XML 605
Public Class StockPublic InStock As IntegerPublic OnOrder As Integer
End Class
With the two class definitions in place, you can revise the LINQ query to populate the prod-ucts collection with instances of the Product class:
Dim Products =From prod In XMLproducts.Descendants("product")
Select New Product With {.Name = prod.Attribute("ProductName").Value,.Stock = New Stock With {
.InStock = prod.Attribute("UnitsInStock").Value,
.OnOrder = prod.Attribute("UnitsOnOrder").Value}}
It shouldn’t come as a surprise that you can iterate through both collections with the samestatements:
For Each p In prodsDebug.WriteLine("PRODUCT: " & p.Name & vbTab &
" PRICE: " & p.Price.ToString &" STOCK = " & p.Stock.InStock & "/" & p.Stock.OnOrder)
Next
When executed, the preceding statements will generate the following output:
PRODUCT: Grandma’s Boysenberry Spread PRICE: 25.0100 STOCK = 179/0PRODUCT: Uncle Bob’s Organic Dried Pears PRICE: 30.0100 STOCK = 27/0PRODUCT: Northwoods Cranberry Sauce PRICE: 40.0000 STOCK = 164/0
Working with XML Files
In this section, we’re going to build a functional interface for viewing customers and orders.And this time we aren’t going to work with a small sample file. We’ll actually get our datafrom one of the sample databases that comes with SQL Server: the Northwind database.The structure of this database is discussed in Chapter 15, ‘‘Programming with ADO.NET,’’in detail, but for now I’ll show you how to extract data in XML format from SQL Server. Ifyou don’t have SQL Server installed or if you’re unfamiliar with databases, you can use thesample XML files in the folder of the VBLINQ project. Figure 14.4 shows the main form ofthe application, which retrieves the same data either from an XML file or directly from thedatabase.
You may be wondering why you would extract relational data and process them with LINQinstead of executing SQL statements against the database. XML is the standard data-exchangeformat, and you may get data from any other source in this format. You may get an XML filegenerated from someone’s database or even an Excel spreadsheet. In the past, you had to con-vert the data to another, more flexible format and then process it. With LINQ, you can directlyquery the XML document, transform it into other formats, and of course save it.

606 CHAPTER 14 AN INTRODUCTION TO LINQ
Figure 14.4
Displaying related datafrom XML files
Start SQL Server, and execute the following query:
SELECT * FROM Customers FOR XML AUTO
This statement selects all columns and all rows for the Customers table and generates anelement for each row. The field values are stored in the document as attributes of the corre-sponding row. The output of this statement is not a valid XML document because its elementsare not embedded in a root element. To request an XML document in which all elements areembedded in a root element, use the ROOT keyword:
SELECT * FROM Customers FOR XML AUTO, ROOT(’AllCustomers’)
I’m using the root element AllCustomers because the elements of the XML document arenamed after the table. The preceding statement will generate an XML document with thefollowing structure:
<AllCustomers><Customers CustomerID="…" CompanyName="xxx" … /><Customers CustomerID="…" CompanyName="xxx" … />…
</AllCustomers>
It would make more sense to generate an XML document with the Customers root elementand name the individual elements Customer. To generate this structure, use the followingstatement:
SELECT * FROM Customers Customer FOR XML AUTO, ROOT(’Customers’)

LINQ TO XML 607
Here’s a segment of the XML document with the customers:
<Customers><Customer CustomerID="ALFKI" CompanyName="Alfreds Futterkiste" ContactName="Maria Anders"ContactTitle="Sales Representative"Country="Germany" />
<Customer CustomerID="ANATR" CompanyName="Ana Trujillo Emparedados y helados"ContactName="Ana Trujillo" ContactTitle="Owner"Country="Mexico" />
Finally, you can create an XML document where the fields are inserted as elements, ratherthan attributes. To do so, use the ELEMENTS keyword:
SELECT * FROM Customers Customer FOR XML AUTO,ELEMENTS ROOT(’Customers’)
The other statements that generated the XML files with the rows of the tables Orders, OrderDetails, and Products are as follows:
SELECT * FROM Orders Order FOR XML AUTO, ROOT(’Orders’)SELECT * FROM [Order Details] Detail FOR XML AUTO,
ELEMENTS, ROOT(’Details’)SELECT ProductID, ProductName FROM Products
FOR XML AUTO, ELEMENTS ROOT(’Products’)
Notice that all files are attribute based, except for the Details.xml file, which is elementbased. I had no specific reason for choosing this structure; I just wanted to demonstrate bothstyles for processing XML in the sample project’s code. Also, the reason I’ve included the Prod-ucts table is because the Order Details table, which contains the lines of the order, stores theIDs of the products, not the product names. When displaying orders, as shown in Figure 14.4,you must show product names, not just product IDs. The four collections with the entities weextracted from the Northwind database are declared and populated at the form’s level via thefollowing statements:
Dim customers As XElement = XElement.Load("..\..\..\Customers.xml")Dim orders As XElement = XElement.Load("..\..\..\Orders.xml")Dim details As XElement = XElement.Load("..\..\..\Details.xml")Dim products As XElement = XElement.Load("..\..\..\Products.xml")
As is apparent from the code, I’ve placed the four XML files created with the SQL state-ments shown earlier in the project’s folder. The Display Data button populates the top ListViewcontrol with the rows of the Customers table, via the following statements:
Private Sub bttnShow_Click(…) Handles bttnShow.ClickFor Each c In customers.Descendants("Customer")
Dim LI As New ListViewItem

608 CHAPTER 14 AN INTRODUCTION TO LINQ
LI.Text = [email protected](c.@CompanyName)LI.SubItems.Add(c.@ContactName)LI.SubItems.Add(c.@ContactTitle)ListView1.Items.Add(LI)
NextEnd Sub
The code is quite simple. It doesn’t even use LINQ; it iterates through the Customer ele-ments of the customers collection and displays their attributes on the control. Notice the useof the shortcut for the Attribute property of the current XElement.
When the user clicks a customer name, the control’s SelectedIndexChanged event is fired.The code in this handler executes a LINQ statement that selects the rows of the Orders tablethat correspond to the ID of the selected customer. Then, it iterates through the selected rows,which are the orders of the current customer, and displays their fields on the second ListViewcontrol via the following statements:
Private Sub ListView1_SelectedIndexChanged(…) _Handles ListView1.SelectedIndexChanged
If ListView1.SelectedItems.Count = 0 Then Exit SubListView2.Items.Clear()Dim scustomerID = ListView1.SelectedItems(0).TextDim query = From o In orders.Descendants("Order")
Where Convert.ToString(o.@CustomerID) = scustomerIDSelect o
For Each o In queryDim LI As New ListViewItemLI.Text = [email protected](Convert.ToDateTime
(o.@OrderDate).ToShortDateString)LI.SubItems.Add(Convert.ToDecimal(o.@Freight).ToString("#,###.00"))LI.SubItems.Add([email protected])ListView2.Items.Add(LI)
NextEnd Sub
The LINQ query selects Order elements based on their CustomerID attribute. Finally, whenan order is clicked, the following LINQ query retrieves the selected order’s details:
Dim query = From itm In details.Descendants("Detail")Where Convert.ToInt32(itm.<OrderID>.Value) = orderIDSelect itm
The Details.xml file contains elements for all columns, not attributes, and I use statementssuch as <dtl.UnitPrice> to access the subelements of the current element. To display

LINQ TO SQL 609
product names, the code selects the row of the Products collection that corresponds to the IDof each detail line as follows:
Dim product = _From p In products.Descendants("Product")Where Convert.ToInt32(p.@ProductID) =
Convert.ToInt32(dtl.<ProductID>.Value)Select p
The product variable is actually a collection of XElements, even though it can never con-tain more than a single element (product IDs are unique). You access the ProductName columnof the selected row with the expression product(0).@productName. You can call the Firstmethod to make sure you’ve selected a single product, no matter what:
Dim product = _(From p In products.Descendants("Product")Where Convert.ToInt32(p.@ProductID) =
Convert.ToInt32(dtl.<ProductID>.Value)Select p).First
LINQ to SQLSQL stands for Structured Query Language, a language for querying databases. SQL is dis-cussed in the last part of this book, and as you will see, SQL resembles LINQ. SQL is a simplelanguage, and I will explain the SQL statements used in the examples; readers who are some-what familiar with databases should be able to follow along.
Now, let’s build another application for displaying customers, orders, and order details. Thedifference is that this time you won’t get your data from an XML document; you’ll retrievethem directly from the database. As you will see, the same LINQ queries will be used to pro-cess the rows returned by the queries. The code won’t be identical to the code presented in thepreceding section, but the differences are minor. The same principles will be applied to a verydifferent data source.
You need a mechanism to connect to the database so you can retrieve data, and this mech-anism is the DataContext class. The DataContext class talks to the database, retrieves data, andsubmits changes back to the database. To create a DataContext object, pass a string with theinformation about the database server, the specific database, and your credentials to the Data-Context class’s constructor, as shown here:
Dim db As New DataContext("Data Source=localhost;initial catalog=northwind;Integrated Security=True")
To use the DataContext class in your code, you must add a reference to the System.Data.Linq namespace and then import it into your code with this statement:
Imports System.Data.Linq

610 CHAPTER 14 AN INTRODUCTION TO LINQ
You will find more information on connecting to databases in Chapter 15. For the purposesof this chapter, the preceding connection string will connect your application to the Northwinddatabase on the local database server, provided that you have SQL Server or SQL ServerExpress installed on the same machine as Visual Studio. If you do not, replace ‘‘localhost’’in the connection string with the name or IP address of the machine on which SQL Server isrunning.
After you have initialized the DataContext object, you’re ready to read data from tables intovariables. To do so, call the GetTable method of the db object to retrieve the rows of a table.Note that the name of the table is not specified as an argument. Instead, the table is inferredfrom the type passed to the GetTable method as an argument. The GetTable(Of Customer)method will retrieve the rows of the Customers table, because the name of the table is specifiedin the definition of the class, as you will see shortly.
customers = From cust In db.GetTable(Of Customer)()Select New Customer With{.CustomerID = cust.CustomerID,.CompanyName = cust.CompanyName,.ContactName = cust.ContactName,.ContactTitle = cust.ContactTitle}
orders = From ord In db.GetTable(Of Order)()Select New Order With{.OrderID = ord.OrderID,.OrderDate = ord.OrderDate,.CustomerID = ord.CustomerID,.Freight = ord.Freight,.ShipName = ord.ShipName}
details = From det In db.GetTable(Of Detail)()Select New Detail With{.OrderID = det.OrderID,.ProductID = det.ProductID,.Quantity = det.Quantity,.UnitPrice = det.UnitPrice,.Discount = det.Discount}
products = From prod In db.GetTable(Of NWProduct)()Select New NWProduct With{.ProductID = prod.ProductID,.ProductName = prod.ProductName}
The type of the customers, orders, details, and products variables is IQueryable(of entity),where entity is the appropriate type for the information you’re reading from the database. Thefour variables that will store the rows of the corresponding tables must be declared at the formlevel with the following statements:
Dim customers As System.Linq.IQueryable(Of Customer)Dim orders As System.Linq.IQueryable(Of Order)Dim details As System.Linq.IQueryable(Of Detail)Dim products As System.Linq.IQueryable(Of NWProduct)
The variables must be declared explicitly at the form level, because they will be accessed fromwithin multiple event handlers.

LINQ TO SQL 611
To make the most of LINQ to SQL, you must first design a separate class for each table thatyou want to load from the database. You can also specify the mapping between your classesand the tables from which their instances will be loaded, by prefixing them with the appropri-ate attributes. The Customer class, for example, will be loaded with data from the Customerstable. To specify the relationship between the class and the table, use the Table attribute, asshown here:
<Table(Name:="Customers")>Public Class CustomerEnd Class
Each property of the Customer class will be mapped to a column of the Customers table. Ina similar manner, decorate each property with the name of the column that will populate theproperty:
<Column(Name:="CompanyName")>Public Property NameEnd Property
If the name of the property matches the name of the relevant column, you can omit the col-umn’s name:
<Column()>Public Property NameEnd Property
Listing 14.6 shows the definition of the four classes we’ll use to store the four tables (Cus-tomers, Orders, Order Details, and Products).
Listing 14.6: The classes for storing customers and orders
<Table(Name:="Customers")> Public Class CustomerPrivate _CustomerID As StringPrivate _CompanyName As StringPrivate _ContactName As StringPrivate _ContactTitle As String
<Column()> Public Property CustomerID() As StringGet
Return _customerIDEnd GetSet(ByVal value As String)
_customerID = valueEnd Set
End Property
<Column()> Public Property CompanyName() As StringGet
Return _CompanyNameEnd GetSet(ByVal value As String)
_CompanyName = value

612 CHAPTER 14 AN INTRODUCTION TO LINQ
End SetEnd Property
<Column()> Public Property ContactName() As String….
End Property
<Column()> Public Property ContactTitle() As String….
End PropertyEnd Class
<Table(Name:="Orders")> Public Class OrderPrivate _OrderID As IntegerPrivate _CustomerID As StringPrivate _OrderDate As DatePrivate _Freight As DecimalPrivate _ShipName As String
<Column()> Public Property OrderID() As Integer….
End Property
<Column()> Public Property CustomerID() As String….
End Property
<Column()> Public Property OrderDate() As Date….
End Property
<Column()> Public Property Freight() As Decimal….
End Property
<Column()> Public Property ShipName() As String….
End PropertyEnd Class
<Table(Name:="Order Details")> Public Class DetailPrivate _OrderID As IntegerPrivate _ProductID As IntegerPrivate _Quantity As IntegerPrivate _UnitPrice As DecimalPrivate _Discount As Decimal
<Column()> Public Property OrderID() As Integer

LINQ TO SQL 613
….
End Property
<Column()> Public Property ProductID() As Integer….
End Property
<Column()> Public Property Quantity() As Short….
End Property
<Column()> Public Property UnitPrice() As Decimal….
End Property
<Column()> Public Property Discount() As Double….
End PropertyEnd Class
<Table(Name:="Products")> Public Class NWProductPrivate _ProductID As IntegerPrivate _ProductName As String
<Column()> Public Property ProductID() As Integer….
End Property
<Column()> Public Property ProductName() As String….
End Property
End Class
I didn’t show the implementation of most properties, because it’s trivial. What’s interest-ing in this listing are the Table and Column attributes that determine how the instances of theclasses will be populated from the database, as you saw earlier.
The code that displays the selected customer’s orders and the selected order’s details is sim-ilar to the code you saw in the previous section that displays the data from the XML files. Itselects the matching rows in the relevant table and shows them in the corresponding ListViewcontrol.
Retrieving Data with the ExecuteQuery MethodYou can also retrieve a subset of the table, or combine multiple tables, by executing a SQLquery against the database. The ExecuteQuery method, which accepts as arguments the SELECTstatement to be executed and an array with parameter values, returns a collection with the
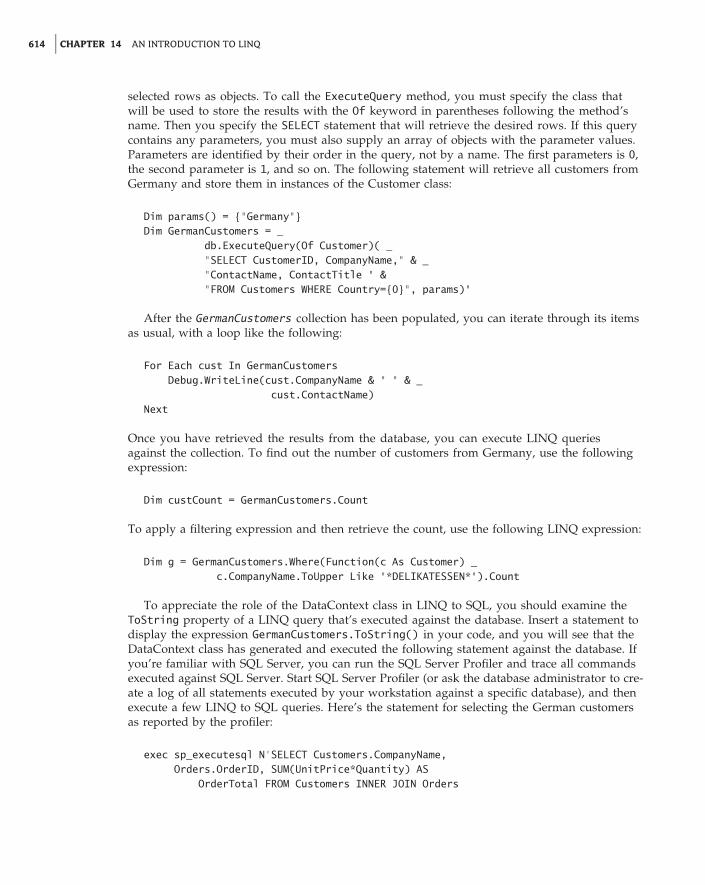
614 CHAPTER 14 AN INTRODUCTION TO LINQ
selected rows as objects. To call the ExecuteQuery method, you must specify the class thatwill be used to store the results with the Of keyword in parentheses following the method’sname. Then you specify the SELECT statement that will retrieve the desired rows. If this querycontains any parameters, you must also supply an array of objects with the parameter values.Parameters are identified by their order in the query, not by a name. The first parameters is 0,the second parameter is 1, and so on. The following statement will retrieve all customers fromGermany and store them in instances of the Customer class:
Dim params() = {"Germany"}Dim GermanCustomers = _
db.ExecuteQuery(Of Customer)( _"SELECT CustomerID, CompanyName," & _"ContactName, ContactTitle " &"FROM Customers WHERE Country={0}", params)"
After the GermanCustomers collection has been populated, you can iterate through its itemsas usual, with a loop like the following:
For Each cust In GermanCustomersDebug.WriteLine(cust.CompanyName & " " & _
cust.ContactName)Next
Once you have retrieved the results from the database, you can execute LINQ queriesagainst the collection. To find out the number of customers from Germany, use the followingexpression:
Dim custCount = GermanCustomers.Count
To apply a filtering expression and then retrieve the count, use the following LINQ expression:
Dim g = GermanCustomers.Where(Function(c As Customer) _c.CompanyName.ToUpper Like "*DELIKATESSEN*").Count
To appreciate the role of the DataContext class in LINQ to SQL, you should examine theToString property of a LINQ query that’s executed against the database. Insert a statement todisplay the expression GermanCustomers.ToString() in your code, and you will see that theDataContext class has generated and executed the following statement against the database. Ifyou’re familiar with SQL Server, you can run the SQL Server Profiler and trace all commandsexecuted against SQL Server. Start SQL Server Profiler (or ask the database administrator to cre-ate a log of all statements executed by your workstation against a specific database), and thenexecute a few LINQ to SQL queries. Here’s the statement for selecting the German customersas reported by the profiler:
exec sp_executesql N’SELECT Customers.CompanyName,Orders.OrderID, SUM(UnitPrice*Quantity) AS
OrderTotal FROM Customers INNER JOIN Orders

LINQ TO SQL 615
ON Customers.CustomerID = Orders.CustomerIDINNER JOIN [Order Details] ON
[Order Details].OrderID = Orders.OrderIDWHERE Customers.Country=@p0GROUP BY Customers.CompanyName,Orders.OrderID’,N’@p0 nvarchar(7)’,@p0=N’Germany’
Working with LINQ to SQL ClassesThe process of getting data out of a database and into a custom class is as straightforward as itcan get. You create a class with properties that match the columns of the equivalent table, andthen you use the DataContext object to populate these classes. You may be thinking alreadyabout a class generator that will take care of the mapping between the class properties andthe table columns. Visual Studio does that for you with a component called LINQ to SQLClasses.
A LINQ to SQL Classes component encapsulates a segment of a database, or the entiredatabase, and lets you work against a database as if the database entities were objects. Whilein traditional database programming you code against tables that are made up of rows, withLINQ to SQL Classes you will work against the same database, only this time the tables willbe collections made up of custom objects. The Customers table of the Northwind database,for example, contains rows that represent customers. When you work with a LINQ to SQLClasses component, the Customers table becomes a collection, and its rows become instances ofCustomer objects. As you will see shortly, the idea behind LINQ to SQL Classes is to bridgethe gap between traditional database programming and the object-oriented features of modernprogramming languages. You’ll see the advantages of accessing databases as collections ofstrongly typed objects in just a few pages.
To add this component to your solution, right-click the solution name, and from the contextmenu select Add New Item. In the Add New Item dialog box, select the LINQ to SQL Classescomponent, as shown in Figure 14.5, and set the component’s name (use the NWind name forthis example).
Figure 14.5
Start by adding a LINQto SQL Classes compo-nent to your project.

616 CHAPTER 14 AN INTRODUCTION TO LINQ
Once the new component has been added to the project, the Server Explorer windowwill open. Here you can select a connection to one of the databases on your system (I’massuming you have installed either SQL Server or SQL Server Express). Create a newconnection to the Northwind database if you don’t already have a connection to thisdatabase, and open it. If you don’t know how to create connections to databases, follow thisprocedure:
1. Switch to Server Explorer, and right-click the Data Connections item. From the contextmenu, select Add Connection to open the dialog box shown in Figure 14.6.
2. In the Add Connection dialog box that appears, select the name of the database server youwant to use. I’m assuming that most readers have a version of SQL Server 2008 installedon their machines, so you can specify localhost as the server name. If you’re connected toa remote database server on the network, the database administrator will give the properdatabase name and credentials.
Figure 14.6
Creating a new databaseconnection
3. Select the authentication method for the database server. Again, most readers can select theoption Use Windows Authentication. To connect to a remote server, you will most likely

LINQ TO SQL 617
have to select Use SQL Server Authentication and supply your credentials, as shown inFigure 14.6.
4. Expand the list of databases in the drop-down list in the lower pane of the dialog box,and select Northwind. If you haven’t installed the Northwind database, then you shoulddownload and install it, as explained in Chapter 15.
As soon as you close the Add Connection dialog box, the designer will add a newcomponent to the class, the DataClasses1.dbml component, and will open it in designmode. DataClasses1 is the default name of a LINQ to SQL Classes component, and I suggestyou change the name to something more meaningful. The VBLINQ project uses the nameTableClasses.
The designer is initially an empty space. But here’s how easy it is to create custom objectsbased on the database entities, as shown in Figure 14.7.
Figure 14.7
Designing a LINQ to SQLClasses class with visualtools
Server Explorer will display all the items in the database. Select the Customers, Ordersand Order Details tables from Server Explorer, and drop them onto the designer’s sur-face. The designer will pick up the relations between the tables from the databaseand will depict them as arrows between related classes. It will also create the appro-priate classes on the fly, one for each table. Specifically, the designer will create theCustomer, Order, and Order_Detail classes that represent the entities stored in the Customers,Orders, and Order Details tables. Notice how the designer singularized the names of theentities.
The designer has also created three collections to represent the three tables, as well as aDataContext object to connect to the database. To exercise the autogenerated classes, build thesample form shown in Figure 14.8. This form loads the countries and uses their names to pop-ulate the ComboBox control at the top. Every time the user selects a country, the applicationmakes another trip to the database, retrieves the customers in the selected country, and displaysthe customer names on the Select Customer ListBox control.

618 CHAPTER 14 AN INTRODUCTION TO LINQ
Figure 14.8
A form for viewing cus-tomers, their orders,and the details for eachorder
Once a customer has been selected, the application makes another trip to the databaseand selects the customer’s orders, which are displayed on the top ListView control.Finally, when an order is selected, the application reads the order’s details and dis-plays them on the lower ListView control on the right. The idea is to get as littleinformation as possible from the database depending on the user’s action. There’s noneed to retrieve all the customers when the application starts, because the user manynot even view any customer. In general, you should try to limit the user’s selection sothat you can minimize the information you request from the database and downloadat the client. Although there will be times you need to minimize trips to the database,in that case you will pull data that you might need and then possibly throw some of itaway.
The DataContext Object
The following statement creates a new DataContext object for accessing the Northwinddatabase:
Dim ctx As New NwindDataContext
The NWindDataContext class was generated by the designer; it gives you access to thedatabase’s tables (and stored procedures). The database tables are properties of the ctxvariable, and they return an IQueryable collection with the rows of each table. To access theCustomers table, for example, request the Customers property:
Ctx.Customers
Each item in the Customers collection is an object of the Customer type. The designer also gen-erated a class for the entities stored in each of the tables. Not only that, but it singularized thenames of the tables.

LINQ TO SQL 619
Accessing the Tables with LINQ
Since the Customers property of the ctx variable returns the rows of the Customers table asa collection, you can use LINQ to query the table. The following query returns the Germancustomers:
Dim germanCustomers = From cust In ctx.CustomersWhere cust.Country = "Germany"Select cust
The compiler knows that cust is a variable of the Customer type, so it displays the fieldsof the Customers table (which are now properties of the Customer object) in the IntelliSensedrop-down list. In effect, the LINQ to SQL component has mapped the selected tables intoobjects that you can use to access your database using OOP techniques.
But the LINQ to SQL Classes component has done much more. germanCustomers is a querythat isn’t executed until you request its elements. The expression ctx.Customers doesn’t movethe rows of the Customers table to the client so you can query them. Instead, it parses yourLINQ query, builds the appropriate SQL query, and executes it when you iterate through thequery results. To see the queries that are executed as per your LINQ query when they’re sub-mitted to the database, insert the following simple statement right after the declaration of thectx variable:
ctx.Log = Console.Out
This statement tells the compiler to send all the commands that the DataContext object submitsto the database to the Output window. Place a button on the main form of the project, and inits Click event handler insert the following statements:
ctx.Log = Console.OutDim selCustomers = From cust In ctx.Customers
Where cust.Country = "Germany"Select cust
MsgBox("No query executed so far!")For Each cust In selCustomers
ListBox1.Items.Add(cust.CustomerID & vbTab & cust.CompanyName)Next
Execute these statements, and watch the Output window. The message box will be displayedand nothing will be shown in the Output window, because no data has been requested fromthe database yet. selCustomers is just a query that the compiler has analyzed, but it hasn’tbeen executed yet. As soon as you close the message box, the following SQL statement will besubmitted to the database to request some data:
SELECT [t0].[CustomerID], [t0].[CompanyName], [t0].[ContactName],[t0].[ContactTitle], [t0].[Address], [t0].[City], [t0].[Region],[t0].[PostalCode], [t0].[Country], [t0].[Phone], [t0].[Fax]FROM [dbo].[Customers] AS [t0]

620 CHAPTER 14 AN INTRODUCTION TO LINQ
WHERE [t0].[Country] = @p0-- @p0: Input NVarChar (Size = 4000; Prec = 0; Scale = 0) [Germany]-- Context: SqlProvider(Sql2008) Model: AttributedMetaModel Build: 4.0.20506.1
If you’re not familiar with SQL, don’t panic. You’ll find the basics later in this book. If you’rea totally result-oriented developer, don’t even bother with the SQL statement; VB does it all foryou. It knows how to request the data you need, and it won’t bring even one extra row fromthe Customers table back to the client. Of course, you shouldn’t iterate through all the rows ofthe table, because this could ruin application performance. Never, never bring an entire tableto the client, unless it’s a small table (categories, state names, and so on). Even then, it’s not agood idea to keep the data at the client for long periods of time; other users may edit the dataat the database, and when that happens, the data at the client become ‘‘stale,’’ because thedata at the client are not directly associated with the database and will not be updated. Theshort of the story is that the DataContext object establishes a connection to the database andlets you view your database tables as collections of objects. Use it to grab the data you need,and submit changes as the user edits the data.
To limit the number of rows you bring to the client, try to give users the option to specifyselection criteria. The sample application you’ll build in this section requests that users selecta country and then brings only the customers from that particular country to the client. Actu-ally, you don’t even need to bring all the fields of the Customers table. All you will need isthe CompanyName that’s displayed on the ListBox control and the ID that you’ll use in subse-quent queries to identify the selected customer. If you have too much data, you can limit thenumber of rows you bring to the client (to an arbitrary value, say, 1,000 rows). If the user hasselected more rows, they should specify a more specific search pattern to limit the number ofrows. After all, who needs to see thousands and thousands of rows just because they exist?
Navigation MethodsTables are rarely isolated in a database, and no one ever really cares about the rows of a sin-gle table. Tables are (almost always) related to one another. Customers place orders, and orderscontain products and prices. Orders belong to customers, but they’re created by employees.The most common operation in data-driven applications is not entering new rows or editingexisting ones. Instead, data-driven applications spend most of their time going from a row ina specific table to one or more related rows in another table. Of course, retrieving the relatedrows implies that you will also design an interface to display the data you gather from mul-tiple tables to the user. Let’s say you have landed on a specific customer, represented by theselCustomer variable (it’s a variable of the Customer type, of course). You could select a cus-tomer by index, with a LINQ query, or let the user select it from a list. The idea is that youhave retrieved the customer you’re interested in.
To access the related rows in other tables, you can request the property of the Customerobject that corresponds to the related table. To access the orders of the customer representedby the cust object, use the following expression:
cust.Orders
This expression returns an IQueryable collection as usual, with the rows of the Orders tablethat correspond to the selected customer. The Orders property represents the Orders table andreturns an IQueryable collection of Order objects, each representing an order, as you mightexpect. However, it doesn’t return all rows of the Orders table — just the ones that belong tothe selected customer. Each Order object in turn exposes the columns of the Orders table as

LINQ TO SQL 621
properties. To access the OrderDate field of the first order of the first customer in the german-Customers collection, you’d use an expression like the following:
selCustomers.ToList(0).Orders.ToList(0).OrderDate
You have to apply the ToList operator to every collection to force the execution of theappropriate query and then select a specific item of the collection.
Now we can take a closer look at the code of the sample project code. The following codeloads all countries and displays their names on the ListBox control:
Private Sub Button1_Click(...) Handles Button1.Clickctx = New NWindDataContextctx.Log = Console.OutDim countries = From cust In ctx.Customers
Select cust.Country DistinctFor Each country As String In countries
cbCountries.Items.Add(country)Next
End Sub
The very first query is peculiar indeed. The Northwind database doesn’t store the countriesin a separate table, so you have to go through the Customers table and collect all the uniquecountry names. This is what the Distinct keyword does: It forces the query to return eachunique country name from the Customers table only once. LINQ doesn’t download all the rowsof the Customers table to the client to select the unique country names. The actual query sentto the database by LINQ is the following, which instructs SQL Server to return only the uniquecountry names:
SELECT DISTINCT [t0].[Country]FROM [dbo].[Customers] AS [t0]
LINQ is very efficient when it comes to talking to the database, and you will see shortly howyou can monitor the queries it submits to the database.
When the user selects a customer on the ListBox control, the statements included inListing 14.7 are executed to display the number of orders placed by the customer and the totalrevenue generated by the selected customer, as well as the headers of all orders.
Listing 14.7: Retrieving the orders of the selected customer
Private Sub ListBox1_SelectedIndexChanged(...)Handles ListBox1.SelectedIndexChanged
If ListBox1.SelectedItem Is Nothing Then Exit SubDim custID As String = ListBox1.SelectedItem.ToString.Substring(0, 5)Dim custName As String = ListBox1.SelectedItem.ToString.Substring(5).TrimDim customerOrders = From ord In ctx.Orders
Where ord.CustomerID = custIDSelect New With {.order = ord, .details = ord.Order_Details}
Dim orders = customerOrders.CountIf orders > 0 Then

622 CHAPTER 14 AN INTRODUCTION TO LINQ
Dim tot = From o In customerOrdersSelect Aggregate det In o.details Into
Sum(det.UnitPrice * det.Quantity * (1 - det.Discount))TextBox1.Text = "Customer " & custName & " has placed " &
orders.ToString & " orders totalling $" &tot.Sum.ToString
ElseTextBox1.Text = "There are no order for customer " & custName
End IflvOrders.Items.Clear()For Each ord In customerOrders
Dim LI As New ListViewItemLI.Text = ord.order.OrderID.ToStringLI.SubItems.Add(ord.order.OrderDate.Value.ToShortDateString)LI.SubItems.Add((Aggregate dtl In ord.details Into
Sum(dtl.UnitPrice * dtl.Quantity *(1 - dtl.Discount))).ToString)
LI.SubItems.Add(Aggregate dtl In ord.details Into Sum(dtl.Quantity))LI.SubItems.Add(ord.order.Freight.ToString)lvOrders.Items.Add(LI)
NextEnd Sub
The code extracts the selected customer’s ID from the ListBox control and stores it to thecustID variable. It uses this variable to select the customer’s orders into the customerOrderscollection. Next, it calculates the number of orders and the total revenue generated by the cus-tomer and displays it on the form. Finally, it iterates through the customerOrders collectionand displays the orders on a ListView control. One of the items shown in the ListView con-trol is the total of each order, which is calculated by another LINQ query that aggregates thecurrent order’s details:
Aggregate dtl In ord.details IntoSum(dtl.UnitPrice * dtl.Quantity * (1 - dtl.Discount))
This query returns a Double value, which is formatted and displayed like a variable. The queryisn’t assigned to a variable, and there’s no Select clause — just the aggregate value.
You may be tempted to write a loop that iterates through all the rows in the Customers tableto calculate aggregates. Just don’t! Use LINQ to formulate the appropriate query, and then letthe compiler figure out the statement that must be executed against the database to retrieve theinformation you need, and no more. If you execute a loop at the client, LINQ to SQL will moveall the rows of the relevant tables to the client, where the loop will be executed. Although thismay work for Northwind, as the database grows larger it will be an enormous burden on thedatabase and the local network. The query might get a little complicated, but it saves you fromthe performance issues you’d face when the application is released to many clients. Eventually,you will be forced to go back and rewrite your code.
Let’s say you need to know the revenue generated by all customers in each country and ina specific year. The following LINQ query does exactly that and returns a collection of anony-mous types with just two fields: the country name and the total revenue per country.

LINQ TO SQL 623
Dim revenueByCountry = From cust In ctx.Customers,ord In cust.Orders,det In ord.Order_DetailsGroup By cust.Country Into countryTotals = Group,countryRev =
Sum(det.Quantity * det.UnitPrice * (1 - det.Discount))Select Country, countryRev
This statement returns a collection of country names and totals like this:
Austria 57401.84Belgium 11434.48Brazil 41941.19Canada 31298.06Denmark 25192.54
To execute this query, which in effect scans a large segment of the database and returns afew totals, LINQ generates and executes the following SQL statement:
SELECT [t4].[Country], [t4].[value] AS [countryRev]FROM (
SELECT SUM([t3].[value]) AS [value], [t3].[Country]FROM (
SELECT (CONVERT(Real,(CONVERT(Decimal(29,4),CONVERT(Int,[t2].[Quantity]))) *[t2].[UnitPrice]))
* (@p0 - [t2].[Discount]) AS [value],[t1].[OrderDate], [t1].[CustomerID], [t0].[CustomerID] AS[CustomerID2],[t2].[OrderID], [t1].[OrderID] AS [OrderID2], [t0].[Country]
FROM [dbo].[Customers] AS [t0], [dbo].[Orders] AS [t1],[dbo].[Order Details] AS [t2]) AS [t3]
WHERE (DATEPART(Year, [t3].[OrderDate]) = @p1) AND([t3].[CustomerID] = [t3].[CustomerID2]) AND([t3].[OrderID] = [t3].[OrderID2])
GROUP BY [t3].[Country] ) AS [t4]ORDER BY [t4].[Country]-- @p0: Input Real (Size = -1; Prec = 0; Scale = 0) [1]-- @p1: Input Int (Size = -1; Prec = 0; Scale = 0) [1997]
This is a fairly complicated SQL query, unless you’re familiar with SQL. If not, try to masterLINQ and let the compiler generate the SQL queries for you. If you haven’t used SQL before,you’ll find an introduction to SQL in the following chapter.
Likewise, when you click an order, the program retrieves the details of the selected orderand displays them on the second ListView control, using the following query:
Dim selectedDetails = From det In ctx.Order_Details, prod In ctx.ProductsWhere prod.ProductID = det.ProductID And

624 CHAPTER 14 AN INTRODUCTION TO LINQ
det.OrderID = OrderIDSelect New With {.details = det}
Note that this query combines the Products table, because the Order Details table contains onlythe IDs of the products, not their names. This is how the data are organized in the database,but not how you want to present the data to the user.
UpdatesIn addition to querying the database, you can also update it by inserting new rows orupdating and deleting existing rows. To insert a new row into a table, create a new objectof the appropriate type and then add it to its table by calling the InsertOnSubmit method.The InsertOnSubmit method doesn’t submit the new row to the database; the new row livesat the client and is submitted to the database when you call the SubmitChanges method. Thefollowing statements create a new product and add it to the Products table:
Dim P As New ProductP.ProductName = "New Product"P.CategoryID = 3P.UnitPrice = 9.45ctx.Products.InsertOnSubmit(P)ctx.SubmitChanges
You can accumulate multiple changes to the Products table (or any other table for thatmatter) and submit them all at once to the database with a single call to the SubmitChangesmethod. The compiler will figure out the appropriate order for submitting the rows. Forexample, it will first insert new categories and then products, because a new product maycontain a reference to a new category.
To update a row, just change some of its properties, and the edits will be submitted tothe database when the SubmitChanges method is called. Finally, to delete a row, call theDeleteOnSubmit method and pass the Product object to be deleted as an argument. There arealso two related methods, the InsertAllOnSubmit and DeleteAllOnSubmit methods, whichaccept an IEnumerable collection of objects as an argument.
Submitting updates to the database isn’t a trivial topic. For example, one or more other usersmight have edited or deleted the row you’re trying to update since your application read it.You can’t take it for granted that all updates will be submitted successfully to the database.Consider, too, one of the restrictions in the Northwind database is that product prices can’t benegative. The Product class generated by the designer doesn’t enforce this restriction at theclient. At the client, it’s perfectly legal to assign a negative value to a product’s UnitPriceproperty, but a row that contains a negative price value will fail to update the database. Thedatabase itself will reject any updates that violate any database constraint. You can also set aproduct’s CategoryID field to an arbitrary value, but unless this value matches the ID of anexisting category in the Categories table, the changes will be rejected by the database. Handlingthese conditions requires additional code. The topic of handling update errors is discussed indetail in Part V of this book. This section is a quick introduction to a component that allowsyou to handle database tables as objects and manipulate them with LINQ.
The VBLINQ2SQL project (available for download from www.sybex.com/go/masteringvb2010)contains a form that displays all products on a ListView control, as shown in Figure 14.9.

LINQ TO SQL 625
The Add Another Product button brings up the form shown in the same figure, which allowsyou to specify a new product and submit it to the database. The new product is addedautomatically to the list with the products. You can also click the Reload All Products button toconfirm that the product has been committed to the database. If the new product violates oneof the database constraints (for example, it has a negative value), the operation will fail, andyou will see an appropriate error message.
Figure 14.9
Viewing all productsand inserting/editingindividual products
If you double-click a product row in the Northwind Products form, the auxiliary form willbe displayed again, this time populated with the fields of the selected product, and you canedit them.
Creating a New Order
I’ll complete the presentation of the VBLINQ2SQL sample application by discussing the codethat creates a new order. The Order object combines several tables and the most interestingobject in the Northwind database. Orders are placed by customers and credited to employ-ees. They also contain a number of products, along with their quantities and prices. A properinterface should allow users to specify all these items, and you will see a suitable interface forcreating orders in Chapter 15. For the purposes of this sample application, I’ve decided to selectthe appropriate items at random, but the application does generate actual orders and submitsthem to the database. The Add New Order button on Form2, which is shown in Figure 14.10,does exactly that with the statements included in Listing 14.8.
Listing 14.8: Adding a new order to the Northwind database
Dim RND As New Random’ select a customer at randomDim cust = CType(ctx.Customers.Skip(
RND.Next(1, 50)).Take(1).First, Customer)’ select an employee at randomDim emp = CType(ctx.Employees.Skip(

626 CHAPTER 14 AN INTRODUCTION TO LINQ
RND.Next(1, 10)).Take(1).First, Employee)’ and create order’s headerDim order As New Orderorder.OrderDate = Noworder.Customer = custorder.Employee = emp’ select a random freight for the order in the range from $3 to $75order.Freight = RND.Next(300, 7500) / 100Dim discount As Decimal’ select a random discount value for the orderdiscount = RND.Next(0, 45) / 100Dim prod As Product’ create a random number of detail lines in the range from 10 to 50For i As Integer = 1 To RND.Next(10, 50)
prod = CType((From p As Product In ctx.ProductsWhere p.ProductID = RND.Next(1, 50) Select p).Single, Product)
’ add product to order only if it doesn’t exist already’ because the Order Details table has a unique costraint’ on fields OrerID + ProductID
If order.Order_Details.Where(Function(d) d.ProductID = prod.ProductID).Count = 0 Then
order.Order_Details.Add(New Order_Detail With
{.ProductID = prod.ProductID,.Quantity = RND.Next(5, 15),.UnitPrice = prod.UnitPrice,.Discount = discount})
End IfNext
’ and now submit the order to the databasectx.Orders.InsertOnSubmit(order)ctx.SubmitChanges()frmOrder.txtOrderID.Text = order.OrderID.ToStringfrmOrder.txtOrderDate.Text = order.OrderDate.Value.ToShortDateStringfrmOrder.txtOrderCustomer.Text = order.Customer.CompanyName &
" / " & order.Customer.ContactNamefrmOrder.txtEmployee.Text = order.Employee.LastName & ", " &
order.Employee.FirstName’ statement to display order on frmOrder auxiliary formfrmOrder.ShowDialog()
Since I’m only interested in showing you how to create a new order, the code selects a cus-tomer at random. It does so by skipping a random number of rows in the Customers table withthe Skip method and then selecting the following one. Next, it selects a random number ofproducts. Because of a constraint in the Orders table, the code must verify that each new prod-uct appears only once in the order. In other words, if the product chosen at random belongs

LINQ TO SQL 627
to the order already, the code ignores it, and it does so by calling the Where extension methodof the order collection with this statement:
If order.Order_Details.Where(Function(d) d.ProductID = prod.ProductID).Count = 0
Figure 14.10
Adding a new order tothe Northwind databasewith LINQ to SQL
The lambda expression passed to the method selects the row with the product ID you’reabout to add. If it doesn’t exist on that particular order, then the code adds it to the order col-lection. Other than this detail, the code is straightforward. If you open the sample applicationand examine its code, you will see that it contains straightforward code that manipulates cus-tom types and collections and only a couple of database-related statements. The new order isrepresented by an object of the Order type:
Dim order As New Order
To create the order, the code sets the properties of this object. To specify the customer, the codeassigns a Customer object to the Customer property of the Order variable. The class generatedby the wizard knows that it has to submit just the CustomerID field to the database.
Order.Order_Details is a collection of Order_Detail objects, one for each product inthe order. The application creates and initializes the order’s detail lines, one at a time, and addsthem to the Order.Order_Details collection. When done, it submits the order to the databaseby calling the SubmitChanges method. LINQ to SQL knows how to submit all the items in thenew order to the database in the proper order. Not only that, but it also retrieves the order’sID (a value that’s generated by the database) and updates the order variable at the client. Thecode that displays the order on an auxiliary form has access to the order’s ID without makinganother trip to the database.
LINQ to SQL is the most important component of LINQ, because it encapsulates the com-plexity of a database and allows us to work with the database tables as if they were collections

628 CHAPTER 14 AN INTRODUCTION TO LINQ
of custom types. It bridges the gap between the object-oriented world of Visual Basic and therealm of relational databases. There’s another similar component, LINQ to Entities, which isdiscussed in detail in Chapter 17, ‘‘Using the Entity Data Model.’’ LINQ to Entities takes thesame principles one step further by allowing you to create your own objects and map them todatabase tables. LINQ to Entities takes LINQ to SQL one step further in the direction of pro-gramming databases with the object-oriented features of modern languages like VB.
The Bottom Line
Perform simple LINQ queries. A LINQ query starts with the structure From variableIncollection, where variable is a variable name and collection is any collection thatimplements the IEnumerable interface (such as an array, a typed collection, or any methodthat returns a collection of items). The second mandatory part of the query is the Select part,which determines the properties of the variable you want in the output. Quite often you selectthe same variable that you specify in the From keyword. In most cases, you apply a filteringexpression with the Where keyword. Here’s a typical LINQ query that selects filenames from aspecific folder:
Dim files =From file In
IO.Directory.GetFiles("C:\Documents")Where file.EndsWith("doc")
Select file
Master It Write a LINQ query that calculates the sum of the squares of the values in anarray.
Create and process XML files with LINQ to XML. LINQ to XML allows you to create XMLdocuments with the XElement and XAttribute classes. You simply create a new XElementobject for each element in your document and create a new XAttribute object for each attributein the current element. Alternatively, you can simply insert XML code in your VB code. Tocreate an XML document dynamically, you can insert embedded expressions that will beevaluated by the compiler and replaced with their results.
Master It How would you create an HTML document with the filenames in a specificfolder?
Process relational data with LINQ to SQL. LINQ to SQL allows you to query relational datafrom a database. To access the database, you must first create a DataContext object. Then youcan call this object’s GetTable method to retrieve a table’s rows or the ExecuteQuery methodto retrieve selected rows from one or more tables with a SQL query. The result is stored in aclass designed specifically for the data you’re retrieving via the DataContext object.
Master It Explain the attributes you must use in designing a class for storing a table.

Part 5
Developing Data-DrivenApplications◆ Chapter 15: Programming with ADO.NET
◆ Chapter 16: Developing Data-Driven Applications
◆ Chapter 17: Using the Data Entity Model
◆ Chapter 18: Building Data-Bound Applications


Chapter 15
Programming with ADO.NET
With this chapter, we start exploring applications that manipulate large sets of data stored ina database. After a quick introduction to databases, you’ll learn about the basic mechanisms ofinteracting with databases. As you will see, it’s fairly straightforward to write a few VB state-ments to execute SQL queries against the database in order to either edit or retrieve selectedrows. The real challenge is the design and implementation of functional interfaces that dis-play the data requested by the user, allow the user to navigate through the data and edit it,and finally submit the changes to the database. You’ll learn how to execute queries against thedatabase, retrieve data, and submit modified or new data to the database.
In this chapter, you’ll learn how to do the following:
◆ Store data in relational databases
◆ Query databases with SQL
◆ Submit queries to the database using ADO.NET
What Is a Database?A database is a container for storing relational, structured information. The same is true for afile or even for the file system on your hard disk. What makes a database unique is that it isdesigned to preserve relationships and make data easily retrievable. The purpose of a databaseis not so much the storage of information as its quick retrieval. In other words, you must struc-ture your database so that it can be queried quickly and efficiently. It’s fairly easy to create adatabase for storing products and invoices and add new invoices every day. In addition to juststoring information, you should also be able to retrieve invoices by period, retrieve invoices bycustomer, or retrieve invoices that include specific products. Unless the database is designedproperly, you won’t be able to retrieve the desired information efficiently.
Databases are maintained by special programs, such as Microsoft Office Access and SQLServer. These programs are called database management systems (DBMSs), and they’re amongthe most complicated applications. A fundamental characteristic of a DBMS is that it isolatesmuch of the complexity of the database from the developer. Regardless of how each DBMSstores data on disk, you see your data organized in tables with relationships between tables.To access or update the data stored in the database, you use a special language, the StructuredQuery Language (SQL). Unlike other areas of programming, SQL is a truly universal language,and all major DBMSs support it.

632 CHAPTER 15 PROGRAMMING WITH ADO.NET
The recommended DBMS for Visual Studio 2010 is SQL Server 2008. In fact, the VisualStudio 2008 setup program offers to install a developer version of SQL Server 2008 called SQLServer 2008 Express. However, you can use Access as well as non-Microsoft databases such asOracle. Although this chapter was written with SQL Server 2008, most of the examples willwork with Access as well.
Data is stored in tables, and each table contains entities of the same type. In a database thatstores information about books, there could be a table with titles, another table with authors,and a table with publishers. The table with the titles contains information such as the title of thebook, the number of pages, and the book’s description. Author names are stored in a differenttable because each author might appear in multiple titles. If author information were storedalong with each title, we’d be repeating author names. So, every time we wanted to changean author’s name, we’d have to modify multiple entries in the titles table. Even retrieving alist of unique author names would be a challenge because you’d have to scan the entire tablewith the titles, retrieve all the authors, and then get rid of the duplicate entries. Of course, youneed a mechanism to associate titles with their authors, and you’ll see how this is done in thefollowing section. The same is true for publishers. Publishers are stored in a separate table, andeach title contains a pointer to the appropriate row in the publishers table.
The reason for breaking the information we want to store in a database into separate tablesis to avoid duplication of information. This is a key point in database design. Duplication ofinformation will sooner or later lead to inconsistencies in the database. The process of breakingthe data into related tables that eliminate all possible forms of information duplication is callednormalization, and there are rules for normalizing databases. The topic of database normaliza-tion is not discussed further in this book. However, all it really takes to design a functionaldatabase is common sense. In short, you identify the entities you want to store in the database(such as customers, products, hotels, books, and the like) and store them in separate tables. Youalso avoid duplicating information at all costs. If you design a table for storing books alongwith their authors, you’ll soon realize that the same author names are repeated in multiplebooks. Data duplication means that you have combined entities, and you need to break theoriginal table into one with books and another with authors. Of course, you’ll have to estab-lish a relationship between the two tables so you can locate a book’s author(s) or an author’sbooks. This is done through relations between the tables; hence the term relational databases.Don’t worry if you haven’t worked with databases before; the following sections demonstratethe structure of a database through examples. After you learn how to extract data from yourdatabase’s tables with SQL statements, you’ll develop a much better understanding of the waydatabases should be structured.
Using Relational DatabasesThe databases we’re interested in are called relational because they are based on relationshipsamong the data they contain. The data is stored in tables, and tables contain related data, orentities, such as people, products, orders, and so on. Of course, entities are not independent ofeach other. For example, orders are placed by specific customers, so the rows of the Customerstable must be linked to the rows of the Orders table that stores the orders of the customers.Figure 15.1 shows a segment of a table with customers (top) and the rows of a table with ordersthat correspond to one of the customers (bottom).
As you can see in Figure 15.1, relationships are implemented by inserting columns withmatching values in the two related tables; the CustomerID column is repeated in both tables.
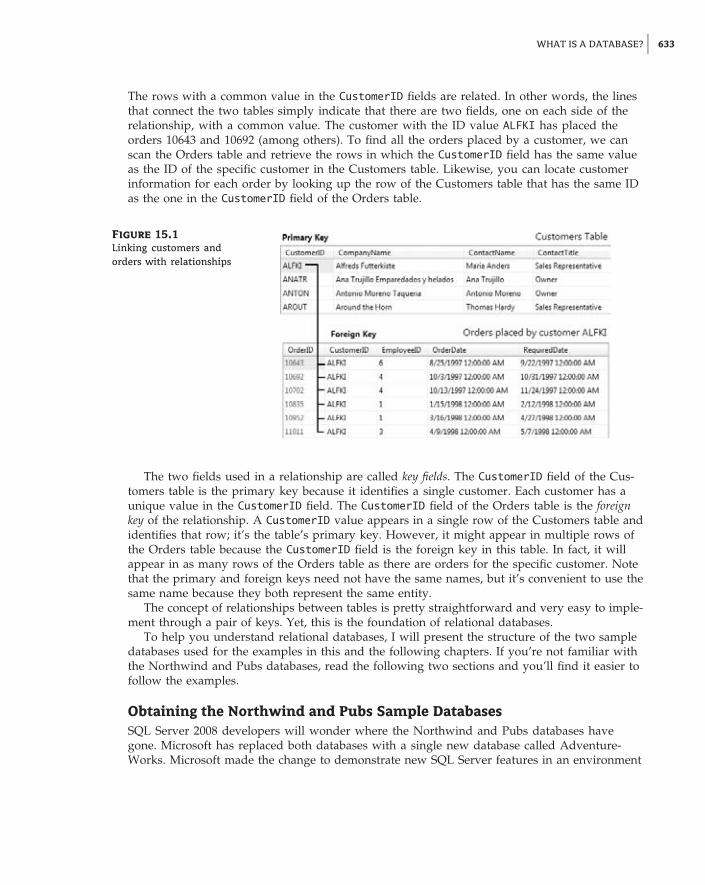
WHAT IS A DATABASE? 633
The rows with a common value in the CustomerID fields are related. In other words, the linesthat connect the two tables simply indicate that there are two fields, one on each side of therelationship, with a common value. The customer with the ID value ALFKI has placed theorders 10643 and 10692 (among others). To find all the orders placed by a customer, we canscan the Orders table and retrieve the rows in which the CustomerID field has the same valueas the ID of the specific customer in the Customers table. Likewise, you can locate customerinformation for each order by looking up the row of the Customers table that has the same IDas the one in the CustomerID field of the Orders table.
Figure 15.1
Linking customers andorders with relationships
The two fields used in a relationship are called key fields. The CustomerID field of the Cus-tomers table is the primary key because it identifies a single customer. Each customer has aunique value in the CustomerID field. The CustomerID field of the Orders table is the foreignkey of the relationship. A CustomerID value appears in a single row of the Customers table andidentifies that row; it’s the table’s primary key. However, it might appear in multiple rows ofthe Orders table because the CustomerID field is the foreign key in this table. In fact, it willappear in as many rows of the Orders table as there are orders for the specific customer. Notethat the primary and foreign keys need not have the same names, but it’s convenient to use thesame name because they both represent the same entity.
The concept of relationships between tables is pretty straightforward and very easy to imple-ment through a pair of keys. Yet, this is the foundation of relational databases.
To help you understand relational databases, I will present the structure of the two sampledatabases used for the examples in this and the following chapters. If you’re not familiar withthe Northwind and Pubs databases, read the following two sections and you’ll find it easier tofollow the examples.
Obtaining the Northwind and Pubs Sample DatabasesSQL Server 2008 developers will wonder where the Northwind and Pubs databases havegone. Microsoft has replaced both databases with a single new database called Adventure-Works. Microsoft made the change to demonstrate new SQL Server features in an environment

634 CHAPTER 15 PROGRAMMING WITH ADO.NET
that more closely matches large enterprise systems. Because the AdventureWorks database isextremely complex and not very friendly for teaching database principles, this book won’t relyon it. However, you might want to look at the AdventureWorks database anyway to see whatit provides and understand how complex databases can become.
Many developers are used to working with the Northwind and Pubs databases withother Microsoft products. These two databases have become so standard that manyauthors, including myself, rely on the presence of these databases to ensure that every-one can see example code without a lot of extra effort. Unfortunately, you won’t findan option for installing them as part of the standard SQL Server 2008 installation. How-ever, you can find scripts for creating these databases in SQL Server Express online athttp://www.microsoft.com/downloads/details.aspx?FamilyID=06616212-0356-46A0-8DA2-EEBC53A68034&displaylang=en. The name of the file you’ll receive is SQL2000SampleDb.MSI.Even though Microsoft originally created this file for SQL Server 2000, it works just fine withSQL Server 2008.
After you download the script files, you need to install them. Right-click the file, and chooseInstall from the context menu. You will see a Welcome dialog box, telling you that this filecontains the sample databases for SQL Server 2000. Click Next, read the licensing agreement,and agree to it. Keep following the prompts until you install the sample database scripts in theappropriate directory.
At this point, you have two scripts for creating the sample databases. If you used the defaultinstallation settings, these files appear in the \Program Files\Microsoft SQL Server 2000Sample Database Scripts folder of your machine. The InstNwnd.SQL file will create the North-wind database, and the InstPubs.SQL file will create the Pubs database.
Double-click the name of each SQL file, and each will open in SQL Server Management Stu-dio. Then click the Execute button in the toolbar (it’s the button with the icon of an exclamationmark) to run the script, which will install the appropriate database.
To install the databases for the Express version of SQL Server 2008, open a commandprompt. Type OSQL -E -i InstNwnd.SQL, and press Enter. The OSQL utility will create theNorthwind database for you (this process can take quite some time). After the Northwinddatabase is complete, type OSQL -E -i InstPubs.SQL, and press Enter. The process will repeatitself.
If you try to run the OSQL utility and receive an error message at the command prompt,the SQL Server 2008 installation didn’t modify the path information for your system as itshould have. In some cases, this makes your installation suspect, and you should reinstall theproduct if you experience other problems. To use the installation scripts, copy them from theinstallation folder to the \Program Files\Microsoft SQL Server\90\Tools\binn folder. Youcan run the OSQL utility at the command prompt from this folder to create the two sampledatabases.
You’ll want to test the installation to make sure it worked. Open Visual Studio, and chooseView � Server Explorer to display Server Explorer. Right-click Data Connections, and chooseAdd Connection from the context menu. Server Explorer will display the Add Connection dia-log box shown in Figure 15.2 (this one already has all the information filled out).
In the Server Name field, type the name of your machine, or select one with the mouse.Click the down arrow in the Select Or Enter A Database Name field. You should see both theNorthwind and Pubs databases, as shown in Figure 15.2. If you don’t see these entries, it meansthat an error occurred. Try running the scripts a second time.

WHAT IS A DATABASE? 635
Figure 15.2
Use the Add Connectiondialog box to check forthe two databases.
Exploring the Northwind DatabaseIn this section, you’ll explore the structure of the Northwind sample database. The Northwinddatabase stores products, customers, and sales data, and many of you are already familiar withthe structure of the database.
To view a table’s contents, expand the Table section of the tree under the Northwind con-nection in Server Explorer, and locate the name of the table you want to examine. Right-clickthe name, and choose Show Table Data from the context menu. This will open the table, andyou can view and edit its rows. If you choose the Open Table Definition command from thesame menu, you will see the definitions of the table’s columns. You can change the type ofthe columns (each column stores items of the same type), change their length, and set a fewmore properties that are discussed a little later in this chapter. To follow the description of thesample databases, open the tables in view mode.
If you have installed SQL Server 2008, you can use SQL Server Management Studio toexplore the same database. Just right-click the Northwind database, and from the context menuselect Open Table to view the data or select Design to change the table definition.

636 CHAPTER 15 PROGRAMMING WITH ADO.NET
Products Table
The Products table stores information about the products of the fictional Northwind corpo-ration. This information includes the product name, packaging information, price, and otherrelevant fields. Each product (or row) in the table is identified by a unique numeric ID. Becauseeach ID is unique, the ProductID column is the table’s primary key. This column is an Identitycolumn: It’s a numeric value, which is generated automatically by the database every time youinsert a new row to the table. The rows of the Products table are referenced by invoices (theOrder Details table, which is discussed later), so the product IDs appear in the Order Detailstable as well. The ProductID column, as well as most primary keys in any database, has aunique property: It’s an Identity column. Every time you add a new product to the table, SQLServer assigns the next available value to this column. If the ID of the last row in the Productstable is 72, the first product that will be added will take the primary key value of 73 automat-ically. SQL Server will always assign the proper value to this column, and it will always beunique.
Suppliers Table
Each product has a supplier, too. Because the same supplier can offer more than one product,the supplier information is stored in a different table, and a common field, the SupplierIDfield, is used to link each product to its supplier (as shown in Figure 15.3). For example, theproducts Chai, Chang, and Aniseed Syrup are purchased from the same supplier: Exotic Liq-uids. Its SupplierID fields all point to the same row in the Suppliers table.
Figure 15.3
Linking products totheir suppliers and theircategories
Categories Table
In addition to having a supplier, each product belongs to a category. Categories are not storedalong with product names; they are stored separately in the Categories table. Again, each cate-gory is identified by a numeric value (field CategoryID) and has a name (field CategoryName).In addition, the Categories table has two more columns: Description, which contains text, and

WHAT IS A DATABASE? 637
Picture, which stores a bitmap. The CategoryID field in the Categories table is the primarykey, and the field by the same name in the Products table is the corresponding foreign key.
Customers Table
The Customers table stores information about the company’s customers. Each customer isstored in a separate row of this table, and customers are referenced by the Orders table. Unlikeproduct IDs, customer IDs are five-character strings and are stored in the CustomerID column.This is an unusual choice for IDs, which are usually numeric values. The CustomerID columnisn’t an Identity column; the user must determine the key of each customer and submit italong with the other customer data. The database has a unique constraint for this column:The customer’s ID must be unique, and the database won’t accept any rows with a duplicateCustomerID value.
Orders Table
The Orders table stores information about the orders placed by Northwind’s customers. TheOrderID field, which is an integer value, identifies each order. Orders are numbered sequen-tially, so this field is also the order’s number. Each time you append a new row to the Orderstable, the value of the new OrderID field is generated automatically by the database. Not onlyis the OrderID column the table’s primary key, but it’s also an Identity column.
The Orders table is linked to the Customers table through the CustomerID column. Bymatching rows that have identical values in their CustomerID fields in the two tables, we canrecombine customers with their orders. Refer back to Figure 15.1 to see how customers arelinked to their orders.
Order Details Table
The Orders table doesn’t store any details about the items ordered; this information is storedin the Order Details table (see Figure 15.4). Each order consists of one or more items, and eachitem has a price, a quantity, and a discount. In addition to these fields, the Order Details tablecontains an OrderID column, which holds the ID of the order to which the detail line belongs.
The reason why details aren’t stored along with the order’s header is that the Orders andOrder Details tables store different entities. The order’s header, which contains informationabout the customer who placed the order, the date of the order, and so on, is quite differentfrom the information you must store for each item ordered. If you attempt to store the entireorder into a single table, you’ll end up repeating a lot of information. Notice also that the OrderDetails table stores the IDs of the products, not the product names.
Employees Table
This table holds employee information. Each employee is identified by a numeric ID, whichappears in each order. When a sale is made, the ID of the employee who made the sale isrecorded in the Orders table. An interesting technique was used in the design of the Employeestable: Each employee has a manager, which is another employee. The employee’s manageris identified by the ReportsTo field, which is set to the ID of the employee’s manager. Therows of the Employees table contain references to the same table. This table contains a foreignkey that points to the primary key of the same table, a relation that allows you to identify thehierarchy of employees in the corporation.
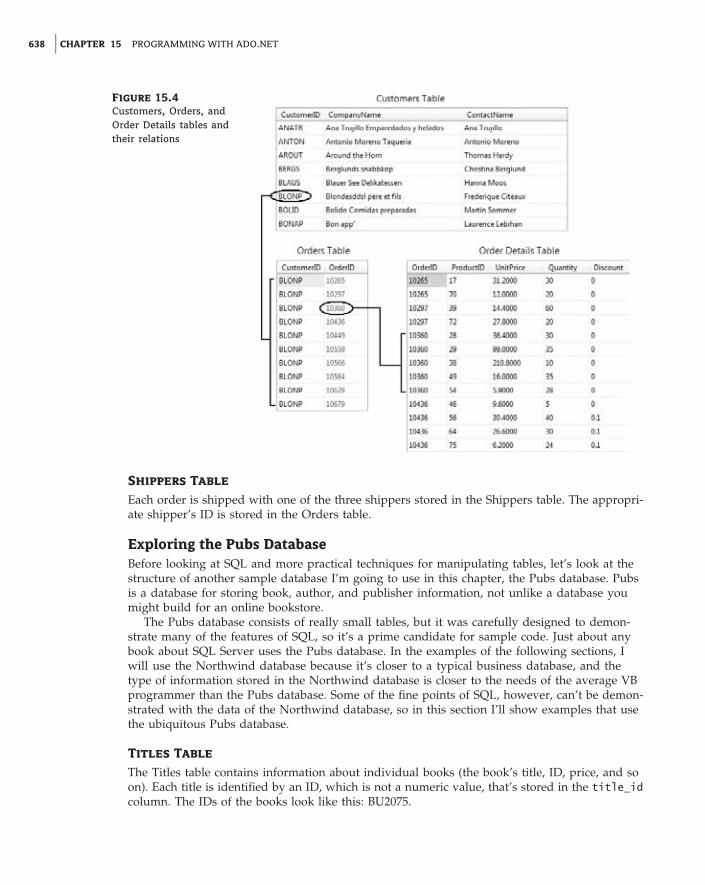
638 CHAPTER 15 PROGRAMMING WITH ADO.NET
Figure 15.4
Customers, Orders, andOrder Details tables andtheir relations
Shippers Table
Each order is shipped with one of the three shippers stored in the Shippers table. The appropri-ate shipper’s ID is stored in the Orders table.
Exploring the Pubs DatabaseBefore looking at SQL and more practical techniques for manipulating tables, let’s look at thestructure of another sample database I’m going to use in this chapter, the Pubs database. Pubsis a database for storing book, author, and publisher information, not unlike a database youmight build for an online bookstore.
The Pubs database consists of really small tables, but it was carefully designed to demon-strate many of the features of SQL, so it’s a prime candidate for sample code. Just about anybook about SQL Server uses the Pubs database. In the examples of the following sections, Iwill use the Northwind database because it’s closer to a typical business database, and thetype of information stored in the Northwind database is closer to the needs of the average VBprogrammer than the Pubs database. Some of the fine points of SQL, however, can’t be demon-strated with the data of the Northwind database, so in this section I’ll show examples that usethe ubiquitous Pubs database.
Titles Table
The Titles table contains information about individual books (the book’s title, ID, price, and soon). Each title is identified by an ID, which is not a numeric value, that’s stored in the title_idcolumn. The IDs of the books look like this: BU2075.

WHAT IS A DATABASE? 639
Authors Table
The Authors table contains information about authors. Each author is identified by an ID,which is stored in the au_id field. This field is a string with a value such as 172-32-1176 (theyresemble U.S. Social Security numbers).
TitleAuthor Table
The Titles and Authors tables are not directly related because they can’t be joined via aone-to-many relationship; the relationship between the two tables is many-to-many. Therelations you have seen so far are one-to-many because they relate one row in the table that hasthe primary key to one or more rows in the table that has the foreign key: One order containsmany detail lines, one customer has many orders, one category contains many products,and so on.
The relation between titles and authors is many-to-many because each book may have mul-tiple authors, and each author may have written multiple titles. If you stop to think about therelationship between these two tables, you’ll realize that it can’t be implemented with a pri-mary key and a foreign key (like the Order-Customer relationship or the Order-Shipper rela-tionship in the Northwind database). To establish a many-to-many relationship, you must cre-ate a join table between the other two, and this table must have a one-to-many relationshipwith both tables.
Figure 15.5 shows how the Titles and Authors tables of the Pubs database are related to oneanother. The table between them holds pairs of title IDs and author IDs. If a book was writtenby two authors, the TitleAuthor table contains two entries with the same title ID and differ-ent author IDs. The book with a title_id of BU1111 was written by two authors. The IDsof the authors appear in the TitleAuthor table along with the ID of the book. The IDs of thesetwo authors are 267-41-2394 and 724-80-9391. Likewise, if an author has written more than onebook, the author’s ID will appear many times in the TitleAuthor table — each time paired witha different title ID.
Figure 15.5
The TitleAuthor tablelinks titles to authors.
At times you won’t be able to establish the desired relationship directly between two tablesbecause the relationship is many-to-many. When you discover a conflict between two tables,you must create a join table between them. A many-to-many relation is actually implementedas two one-to-many relations.

640 CHAPTER 15 PROGRAMMING WITH ADO.NET
Publishers Table
The Publishers table contains information about publishers. Each title has a pub_id field, whichpoints to the matching row of the Publishers table. Unlike the other major tables of the Pubsdatabase, the Publishers table uses a numeric value to identify each publisher.
Understanding RelationsIn a database, each table has a field with a unique value for every row. As indicated earlier inthis chapter, this field is the table’s primary key. The primary key does not have to be a mean-ingful entity because in most cases there’s no single field that’s unique for each row. Books canbe identified by their ISBNs and employees by their SSNs, but these are exceptions to the rule.In general, you can’t come up with a meaningful key that’s universally unique. The primarykey need not resemble the entity it identifies. The only requirement is that primary keys beunique in the entire table. In most designs, we use an integer as the primary key. To make surethey’re unique, we even let the DBMS generate a new integer for each row added to the table.Each table can have one primary key only, and the DBMS can automatically generate an inte-ger value for a primary key field every time a new row is added. SQL Server uses the termIdentity for this data type, and there can be only one Identity field in each table.
Database designers sometimes use unique global identifiers, which are lengthy strings like281167b3-7cbc-41a0-ad89-8c0995ac2d07 to identify the rows. These strings, which are guaran-teed to be globally unique, are generated automatically by both Visual Basic and SQL Server.To generate a GUID value with Visual Basic, call the Guid.NewGuid method. GUIDs are notas easy to handle as integers, and they entail some performance penalty. If you need a uniqueidentity across multiple databases, you have to use GUIDs.
The related rows in a table repeat the primary key of the row they are related to in anothertable. The copies of the primary keys in all other tables are called foreign keys. Foreign keysneed not be unique (in fact, by definition they aren’t), and any field can serve as a foreignkey. What makes a field a foreign key is that it matches the primary key of another table. TheCategoryID field is the primary key of the Categories table because it identifies each category.The CategoryID field in the Products table is the foreign key because the same value mightappear in many rows (many products can belong to the same category). Whereas the primarykey refers to a table, the foreign key refers to a relationship. The CategoryID column of theProducts table is the foreign key in the relationship between the Categories and Productstables. The Products table contains another foreign key, the SupplierID column, which formsthe relationship between the Suppliers and Products tables.
Referential Integrity
Maintaining the links between tables is not a trivial task. When you add an invoice line, forinstance, you must make sure that the product ID that you insert in the Order Details tablecorresponds to a row in the Products table. An important aspect of a database is its integrity.To be specific, you must ensure that the relations are always valid, and this type of integrityis called referential integrity. There are other types of integrity (for example, setting a product’svalue to a negative value will compromise the integrity of the database), but this is not nearlyas important as referential integrity. The wrong price can be easily fixed. But issuing an invoiceto a customer who doesn’t exist isn’t easy (if even possible) to fix. Modern databases come withmany tools to help ensure their integrity, especially referential integrity. These tools are con-straints you enter when you design the database, and the DBMS makes sure that the constraintsare not violated as the various programs manipulate the database.

WHAT IS A DATABASE? 641
When you relate the Products and Categories tables, for example, you must also ensure thefollowing:
◆ Every product added to the foreign table must point to a valid entry in the primary table. Ifyou are not sure which category the product belongs to, you can leave the CategoryID fieldof the Products table empty (the field will have a null value). Or, you can create a genericcategory, the UNKNOWN or UNDECIDED category, and use this category if no informa-tion is available.
◆ No rows in the Categories table should be removed if there are rows in the Products tablepointing to the specific category. This situation would make the corresponding rows ofthe Products table point to an invalid category (the rows that have no matching row in theprimary table are called orphan rows).
These two restrictions would be quite a burden on the programmer if the DBMS didn’t pro-tect the database against actions that could impair its integrity. The referential integrity of yourdatabase depends on the validity of the relations. Fortunately, all DBMSs can enforce rules tomaintain their integrity, and you’ll learn how to enforce rules that guarantee the integrity ofyour database later in this chapter. In fact, when you create the relationship, you can select acouple of check boxes that tell SQL Server to enforce the relationship (that is, not to accept anychanges in the data that violate the relationship). If you leave these check boxes deselected, beready to face a real disaster sooner or later.
Visual Database Tools
To simplify the development of database applications, Visual Studio 2010 comes with somevisual tools, the most important of which are briefly described in Table 15.1 and then discussedin the following sections.
Table 15.1: Visual database tools
Name Description
Server Explorer This is the most prominent tool. Server Explorer is the toolbox for data-base applications, in the sense that it contains all the basic tools forconnecting to databases and manipulating their objects.
Query Builder This is a tool for creating SQL queries (statements that retrieve the datayou want from a database or update the data in the database). SQL is alanguage in its own right, and we’ll discuss it later in this chapter. QueryBuilder lets you specify the operations you want to perform on the tablesof a database with point-and-click operations. In the background, QueryBuilder builds the appropriate SQL statement and executes it against thedatabase.
Database Designer andTables Designer
These tools allow you to work with an entire database or its tables. Whenyou work with the database, you can add new tables, establishrelationships between the tables, and so on. When you work withindividual tables, you can manipulate the structure of the tables, edit theirdata, and add constraints. You can use these tools to manipulate acomplicated object — the database — with point-and-click operations.

642 CHAPTER 15 PROGRAMMING WITH ADO.NET
SQL: An OverviewSQL is a universal language for manipulating data in database tables. Every DBMS supportsit, so you should invest the time and effort to learn it. You can generate SQL statements withpoint-and-click operations (Query Builder is a visual tool for generating SQL statements), butthis is no substitute for understanding SQL and writing your own statements. The visual toolsare nothing more than a user-friendly interface for specifying SQL statements. In the back-ground, they generate the appropriate SQL statement, and you will get the most out of thesetools if you understand the basics of SQL. I will start with an overview of SQL, and then I’llshow you how to use the Query Builder utility to specify a few advanced queries. If you’refamiliar with SQL, you can skip this section or just glance through it and take a look at theexamples.
By the way, the SQL version of SQL Server is called T-SQL, which stands for Transact-SQL.T-SQL is a superset of SQL and provides advanced programming features that are not availablewith SQL. I’m not going to discuss T-SQL in this book, but once you understand SQL, you’llfind it easy to leverage this knowledge to T-SQL.
SQL is a nonprocedural language, which means that SQL doesn’t provide traditional pro-gramming structures such as If statements or loops. Instead, it’s a language for specifying theoperation you want to perform against a database at a high level. The details of the implemen-tation are left to the DBMS. SQL is an imperative language, like Language Integrated Query(LINQ), as opposed to a traditional programming language, such as VB. Traditional languagesare declarative: The statements you write tell the compiler how to perform the desired actions.This is good news for nonprogrammers, but many programmers new to SQL might wish it hadthe structure of a more traditional language. You will get used to SQL and soon be able to com-bine the best of both worlds: the programming model of VB and the simplicity of SQL. Besides,there are many similarities between SQL and LINQ, and you’ll be able to leverage your skillsin any of the two areas.
SQL Is Not Case Sensitive
SQL is not case sensitive, but it’s customary to use uppercase for SQL statements and key-words. In the examples in this book, I use uppercase for SQL statements. This is just a style tohelp you distinguish between the SQL keywords and the table/field names of the query. Also,unlike VB, SQL literals must be embedded in single quotes, not double quotes.
To retrieve all the company names from the Customers table of the Northwind database,you issue a statement like this one:
SELECT CompanyNameFROM Customers
To select customers from a specific country, you must use the WHERE clause to limit theselected rows, as in the following statement:
SELECT CompanyNameFROM CustomersWHERE Country = ‘Germany’

SQL: AN OVERVIEW 643
The DBMS will retrieve and return the rows you requested. As you can see, this is not theway you’d retrieve rows with Visual Basic. With a procedural language such as VB, you’dhave to write loops to scan the entire table, examine the value of the Country column, andeither select or reject the row. Then you would display the selected rows. With SQL, you don’thave to specify how the selection operation will take place; you simply specify what you wantthe database to do for you — not how to do it. As a reminder, the equivalent LINQ statementwould be as follows (I’m using LINQ to SQL syntax):
Dim selectedCustomers = From cust In CustomersWhere cust.Country = "Germany"Select cust
SQL statements are divided into two major categories, which are actually considered sep-arate languages: the statements for manipulating the data, which form the Data Manipula-tion Language (DML), and the statements for defining database objects, such as tables or theirindexes, which form the Data Definition Language (DDL). The DDL is not of interest to everydatabase developer, and I will not discuss it in this book. The DML is covered in depth becauseyou’ll use these statements to retrieve data, insert new data into the database, and edit or deleteexisting data.
The statements of the DML part of the SQL language are also known as queries, and thereare two types of queries: selection queries and action queries. Selection queries retrieve infor-mation from the database. A selection query returns a set of rows with identical structure. Thecolumns can come from different tables, but all the rows returned by the query have the samenumber of columns. Action queries modify the database’s objects or create new objects and addthem to the database (new tables, relationships, and so on).
Executing SQL StatementsIf you are not familiar with SQL, I suggest that you follow the examples in this chapter andexperiment with the sample databases. To follow the examples, you have two options: SQLServer Management Studio (SSMS) and Query Designer of Visual Studio. SSMS helps you man-age databases in various ways, including creating queries to extract data. Query Designer is aneditor for SQL statements that also allows you to execute them and see the results. In additionto Query Designer, you can also use Query Builder, which is part of SSMS and Visual Studio.Query Builder lets you build the statements with visual tools, and you don’t have to know thesyntax of SQL in order to create queries with Query Builder. After a quick overview of the SQLstatements, I will describe Query Builder and show you how to use its interface to build fairlyelaborate queries.
Using SQL Server Management Studio
One of the applications installed with SQL Server is SQL Server Management Studio. To startit, choose Start � Programs � SQL Server � SQL Server Management Studio. When this appli-cation starts, you see the Connect To Server dialog box (Figure 15.6). Choose Database Enginein the Server Type field so you can work with databases on your system. Select the server youwant to use in the Server Name field. Provide your credentials, and click Connect.

644 CHAPTER 15 PROGRAMMING WITH ADO.NET
Figure 15.6
SSMS provides accessto all the databaseengine objects, includingdatabases.
After you’re connected, right-click the database you want to use, and choose New Queryfrom the context menu. Enter the SQL statement you want to execute in the blank query thatSSMS creates. The SQL statement will be executed against the selected database when youpress Ctrl+E or click the Execute button (it’s the button with the exclamation point icon). Alter-natively, you can prefix the SQL statement with the USE statement, which specifies the databaseagainst which the statement will be executed. To retrieve all the Northwind customers locatedin Germany, enter this statement:
USE NorthwindSELECT CompanyName FROM CustomersWHERE Country = ‘Germany’
The USE statement isn’t part of the query; it simply tells SSMS the database against which itmust execute the query. I’m including the USE statement with all the queries so you know thedatabase used for each example. If you’re executing the sample code from within Visual Stu-dio, you need not use the USE statement, because all queries are executed against the selecteddatabase. Actually, the statement isn’t supported by Query Designer of Visual Studio.
The results of the query, known as the result set, will appear in a grid in the lower pane.An action query that updates a table (adds a new row, edits a row, or deletes an existing row)doesn’t return any rows; it simply displays the number of rows affected on the Messages tab.
To execute another query, enter another statement in the upper pane, or edit the previousstatement and press Ctrl+E again. You can also save SQL statements into files so that youwon’t have to type them again. To do so, open the File menu, choose Save As or Save, andenter the name of the file in which the contents of the Query pane will be stored. The statementwill be stored in a text file with the extension .sql.
Using Visual Studio
To execute the same queries with Visual Studio, open the Server Explorer window, andright-click the name of the database against which you want to execute the query. From thecontext menu, choose New Query, and a new query window will open. You will also see a

SQL: AN OVERVIEW 645
dialog box prompting you to select one or more tables. For the time being, close this dialogbox, because you will supply the names of the tables in the query; later in this chapter, you’lllearn how to use the visual tools to build queries.
Query Designer of Visual Studio consists of four panes (Figure 15.7). The upper pane(which is the Table Diagram pane) displays the tables involved in the query, their fields, andthe relationships between the tables — if any. The next pane shows the fields that will beincluded in the output of the query. Here you specify the output of the query, as well as theselection criteria. This pane is Query Builder, the tool that lets you design queries visually.It’s discussed later in this chapter. In the next pane, the SQL pane, you see the SQL statementproduced by the visual tools. If you modify the query with the visual tools, the SQL statementis updated automatically; likewise, when you edit the query, the other two panes are updatedautomatically to reflect the changes. The last pane, the Results pane, contains a grid with thequery’s output. Every time you execute the query by clicking the button with the exclamationmark in the toolbar, the bottom pane is populated with the results of the query. For theexamples in this section, ignore the top two panes. Just enter the SQL statements in the SQLpane, and execute them.
Figure 15.7
Executing queries withVisual Studio
Selection QueriesWe’ll start our discussion of SQL with the SELECT statement. After you learn how to expressthe criteria for selecting the desired rows with the SELECT statement, you can apply this infor-mation to other data-manipulation statements. The simplest form of the SELECT statement is
SELECT fieldsFROM tables

646 CHAPTER 15 PROGRAMMING WITH ADO.NET
where fields and tables are comma-separated lists of the fields you want to retrieve fromthe database and the tables they belong to. The list of fields following the SELECT statement isreferred to as the selection list. To select the contact information from all the companies in theCustomers table, use this statement:
USE NorthwindSELECT CompanyName, ContactName, ContactTitleFROM Customers
To retrieve all the fields, use the asterisk (*). The following statement selects all the fieldsfrom the Customers table:
SELECT * FROM Customers
As soon as you execute a statement that uses the asterisk to select all columns, QueryDesigner will replace the asterisk with the names of all columns in the table.
Limiting the Selection with WHERE
The unconditional form of the SELECT statement used in the previous section is quite trivial.You rarely retrieve data from all rows in a table. Usually you specify criteria, such as ‘‘all com-panies from Germany,’’ ‘‘all customers who have placed three or more orders in the last sixmonths,’’ or even more-complicated expressions. To restrict the rows returned by the query,use the WHERE clause of the SELECT statement. The most common form of the SELECT statementis the following:
SELECT fieldsFROM tablesWHERE condition
The fields and tables arguments are the same as before, and condition is an expressionthat limits the rows to be selected. The syntax of the WHERE clause can get quite complicated,so we’ll start with the simpler forms of the selection criteria. The condition argument can be arelational expression, such as the ones you use in VB. To select all the customers fromGermany, use the following condition:
WHERE Country = ‘Germany’
To select customers from multiple countries, use the OR operator to combine multipleconditions:
WHERE Country = ‘Germany’ ORCountry = ‘Austria’
You can also combine multiple conditions with the AND operator.
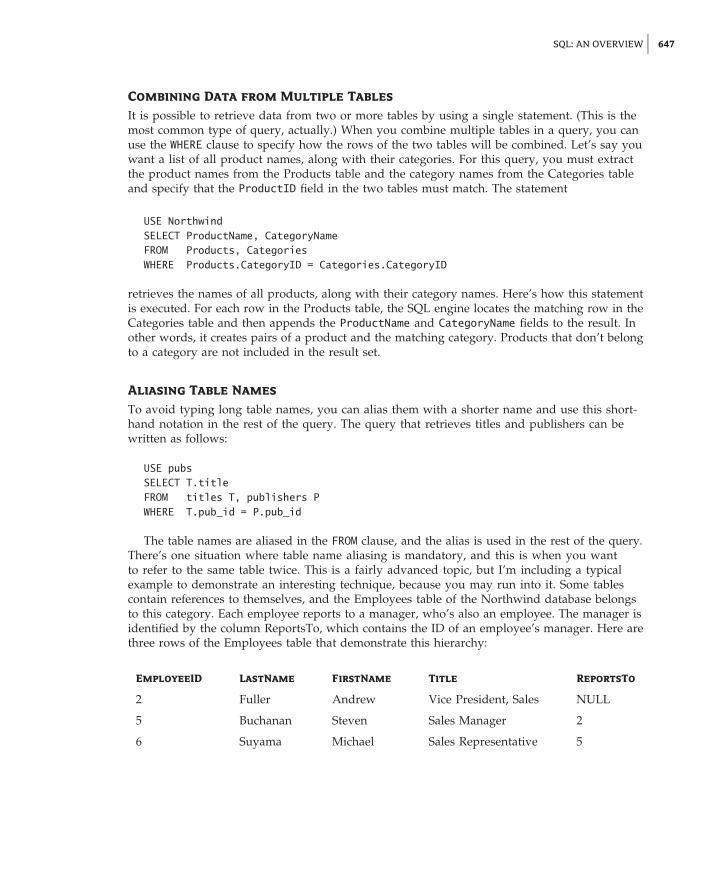
SQL: AN OVERVIEW 647
Combining Data from Multiple Tables
It is possible to retrieve data from two or more tables by using a single statement. (This is themost common type of query, actually.) When you combine multiple tables in a query, you canuse the WHERE clause to specify how the rows of the two tables will be combined. Let’s say youwant a list of all product names, along with their categories. For this query, you must extractthe product names from the Products table and the category names from the Categories tableand specify that the ProductID field in the two tables must match. The statement
USE NorthwindSELECT ProductName, CategoryNameFROM Products, CategoriesWHERE Products.CategoryID = Categories.CategoryID
retrieves the names of all products, along with their category names. Here’s how this statementis executed. For each row in the Products table, the SQL engine locates the matching row in theCategories table and then appends the ProductName and CategoryName fields to the result. Inother words, it creates pairs of a product and the matching category. Products that don’t belongto a category are not included in the result set.
Aliasing Table Names
To avoid typing long table names, you can alias them with a shorter name and use this short-hand notation in the rest of the query. The query that retrieves titles and publishers can bewritten as follows:
USE pubsSELECT T.titleFROM titles T, publishers PWHERE T.pub_id = P.pub_id
The table names are aliased in the FROM clause, and the alias is used in the rest of the query.There’s one situation where table name aliasing is mandatory, and this is when you wantto refer to the same table twice. This is a fairly advanced topic, but I’m including a typicalexample to demonstrate an interesting technique, because you may run into it. Some tablescontain references to themselves, and the Employees table of the Northwind database belongsto this category. Each employee reports to a manager, who’s also an employee. The manager isidentified by the column ReportsTo, which contains the ID of an employee’s manager. Here arethree rows of the Employees table that demonstrate this hierarchy:
EmployeeID LastName FirstName Title ReportsTo
2 Fuller Andrew Vice President, Sales NULL
5 Buchanan Steven Sales Manager 2
6 Suyama Michael Sales Representative 5

648 CHAPTER 15 PROGRAMMING WITH ADO.NET
As you can see here, Suyama reports to Buchanan, and Buchanan in turn reports to Fuller.How would you retrieve each employee’s name and title along with his manager’s name? Here,we must make a query that involves two tables, one with the employee names and another onewith the manager names. It just so happens that the two tables are in reality the same table.The trick is to treat the Employees table as two separate tables using aliases. Here’s the querythat retrieves employees and managers in a single result set:
SELECT Employees.EmployeeID,Employees.LastName + ‘ ‘ + Employees.FirstName,Employees.Title,Managers.FirstName + ‘ ‘ + Managers.LastName,Managers.Title
FROM Employees, Employees ManagersWHERE Employees.ReportsTo = Managers.EmployeeID
If the database contained two different tables, one for employees and another one for man-agers, you’d have no problem coding the query. Because we want to use the same table forboth managers and employees, we use aliases to create two virtual tables and associate themwith the ReportsTo and EmployeeID columns. The result is a neat list of names that showsclearly the hierarchy of the Northwind corporation’s employees:
1 Davolio Nancy Sales Representative Andrew Fuller3 Leverling Janet Sales Representative Andrew Fuller4 Peacock Margaret Sales Representative Andrew Fuller5 Buchanan Steven Sales Manager Andrew Fuller6 Suyama Michael Sales Representative Steven Buchanan7 King Robert Sales Representative Steven Buchanan8 Callahan Laura Inside Sales Coordinator Andrew Fuller9 Dodsworth Anne Sales Representative Steven Buchanan
I skipped the manager’s title in the listing because it wouldn’t fit on the printed page. Notethat because the Last Name and First Name column names contain spaces, they’re embedded insquare brackets. The same is true for table names that contain spaces.
Aliasing Column Names
By default, each column of a query is labeled after the actual field name in the output. If a tablecontains two fields named CustLName and CustFName, you can display them with differentlabels by using the AS keyword. The following SELECT statement produces two columns labeledCustLName and CustFName:
SELECT CustLName, CustFName
The query’s output looks much better if you change the labels of these two columns with astatement like the following:
SELECT CustLName AS [Last Name],CustFName AS [First Name]
It is also possible to concatenate two fields in the SELECT list with the concatenation oper-ator. Concatenated fields are labeled automatically as Expr1, Expr2, and so on, so you must

SQL: AN OVERVIEW 649
supply your own name for the combined field. The following statement creates a single columnfor the customer’s name and labels it Customer Name:
SELECT CustLName + ‘, ‘ + CustFName AS [Customer Name]
Skipping Duplicates with DISTINCT
The DISTINCT keyword eliminates from the cursor any duplicates retrieved by the SELECT state-ment. Let’s say you want a list of all countries with at least one customer. If you retrieve allcountry names from the Customers table, you’ll end up with many duplicates. To eliminatethem, use the DISTINCT keyword, as shown in the following statement:
USE NorthwindSELECT DISTINCT CountryFROM Customers
The LIKE Operator
The LIKE operator uses pattern-matching characters like the ones you use to select multiple filesin DOS. The LIKE operator recognizes several pattern-matching characters (or wildcard charac-ters) to match one or more characters, numeric digits, ranges of letters, and so on. Table 15.2describes these characters.
Table 15.2: SQL wildcard characters
Wildcard Character Description
% Matches any number of characters. The pattern program% will findprogram, programming, programmer, and so on. The pattern %program%will locate strings that contain the words program, programming,nonprogrammer, and so on.
_ (Underscore character.) Matches any single alphabetic character. Thepattern b_y will find boy and bay, but not boysenberry.
[ ] Matches any single character within the brackets. The pattern Santa[YI]nez will find both Santa Ynez and Santa Inez.
[ ˆ ] Matches any character not in the brackets. The pattern %q[ ˆ u]% will findwords that contain the character q not followed by u (they are misspelledwords).
[ - ] Matches any one of a range of characters. The characters must beconsecutive in the alphabet and specified in ascending order (A to Z, not Zto A). The pattern [a-c]% will find all words that begin with a, b, or c (inlowercase or uppercase).
# Matches any single numeric character. The pattern D1## will find D100 andD139, but not D1000 or D10.

650 CHAPTER 15 PROGRAMMING WITH ADO.NET
You can use the LIKE operator to retrieve all titles about Windows from the Pubs database,by using a statement like the following one:
USE pubsSELECT titles.titleFROM titlesWHERE titles.title LIKE ‘%Windows%’
The percent signs mean that any character(s) may appear in front of or after the word Win-dows in the title.
To include a wildcard character itself in your search argument, enclose it in square brackets.The pattern %50[%]% will match any field that contains the string 50%.
Null Values and the ISNULL Function
A common operation for manipulating and maintaining databases is to locate null values infields. The expressions IS NULL and IS NOT NULL find field values that are (or are not) null. Tolocate the rows of the Customers table that have a null value in their CompanyName column, usethe following WHERE clause:
WHERE CompanyName IS NULL
You can easily locate the products without prices and edit them. The following statementlocates products without prices:
USE NorthwindSELECT * FROM Products WHERE UnitPrice IS NULL
A related function, the ISNULL() function, allows you to specify the value to be returnedwhen a specific field is null. The ISNULL() SQL function accepts two arguments: a columnname and a string. The function returns the value of the specified column, unless this valueis null, in which case it returns the value of the second argument. To return the string *** forcustomers without a company name, use the following expression:
USE NorthwindSELECT CustomerID,
ISNULL(CompanyName, ‘***’) AS Company, ContactNameFROM Customers
Sorting the Rows with ORDER BY
The rows of a query are not in any particular order. To request that the rows be returned in aspecific order, use the ORDER BY clause, which has this syntax:
ORDER BY col1, col2, . . .
You can specify any number of columns in the ORDER BY list. The output of the query isordered according to the values of the first column. If two rows have identical values in thiscolumn, they are sorted according to the second column, and so on. The following statementdisplays the customers ordered by country and then by city within each country:
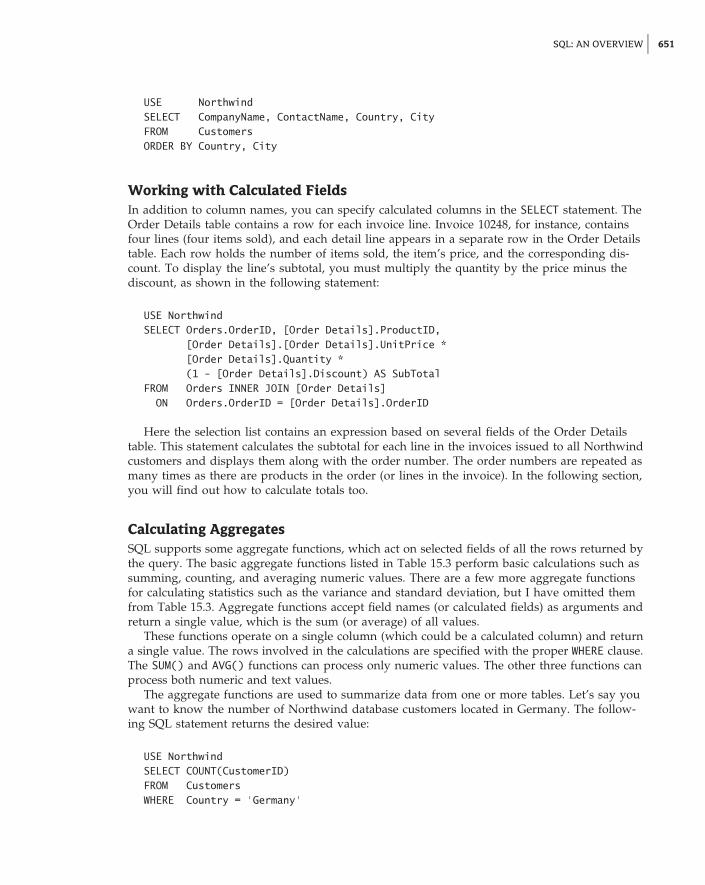
SQL: AN OVERVIEW 651
USE NorthwindSELECT CompanyName, ContactName, Country, CityFROM CustomersORDER BY Country, City
Working with Calculated FieldsIn addition to column names, you can specify calculated columns in the SELECT statement. TheOrder Details table contains a row for each invoice line. Invoice 10248, for instance, containsfour lines (four items sold), and each detail line appears in a separate row in the Order Detailstable. Each row holds the number of items sold, the item’s price, and the corresponding dis-count. To display the line’s subtotal, you must multiply the quantity by the price minus thediscount, as shown in the following statement:
USE NorthwindSELECT Orders.OrderID, [Order Details].ProductID,
[Order Details].[Order Details].UnitPrice *[Order Details].Quantity *(1 - [Order Details].Discount) AS SubTotal
FROM Orders INNER JOIN [Order Details]ON Orders.OrderID = [Order Details].OrderID
Here the selection list contains an expression based on several fields of the Order Detailstable. This statement calculates the subtotal for each line in the invoices issued to all Northwindcustomers and displays them along with the order number. The order numbers are repeated asmany times as there are products in the order (or lines in the invoice). In the following section,you will find out how to calculate totals too.
Calculating AggregatesSQL supports some aggregate functions, which act on selected fields of all the rows returned bythe query. The basic aggregate functions listed in Table 15.3 perform basic calculations such assumming, counting, and averaging numeric values. There are a few more aggregate functionsfor calculating statistics such as the variance and standard deviation, but I have omitted themfrom Table 15.3. Aggregate functions accept field names (or calculated fields) as arguments andreturn a single value, which is the sum (or average) of all values.
These functions operate on a single column (which could be a calculated column) and returna single value. The rows involved in the calculations are specified with the proper WHERE clause.The SUM() and AVG() functions can process only numeric values. The other three functions canprocess both numeric and text values.
The aggregate functions are used to summarize data from one or more tables. Let’s say youwant to know the number of Northwind database customers located in Germany. The follow-ing SQL statement returns the desired value:
USE NorthwindSELECT COUNT(CustomerID)FROM CustomersWHERE Country = ‘Germany’

652 CHAPTER 15 PROGRAMMING WITH ADO.NET
Table 15.3: SQL’s common aggregate functions
Function Returns
COUNT() The number (count) of values in a specified column
SUM() The sum of values in a specified column
AVG() The average of the values in a specified column
MIN() The smallest value in a specified column
MAX() The largest value in a specified column
The aggregate functions ignore the null values unless you specify the * argument. The fol-lowing statement returns the count of all rows in the Customers table, even if some of themhave a null value in the Country column:
USE NorthwindSELECT COUNT(*)FROM Customers
The SUM() function is used to total the values of a specific field in the specified rows. Tofind out how many units of the product with ID = 11 (queso Cabrales) have been sold, use thefollowing statement:
USE NorthwindSELECT SUM(Quantity)FROM [Order Details]WHERE ProductID = 11
The SQL statement that returns the total revenue generated by a single product is a bit morecomplicated. To calculate it, you must multiply the quantities by their prices and then add theresulting products together, taking into consideration each invoice’s discount:
USE NorthwindSELECT SUM(Quantity * UnitPrice * (1 - Discount))FROM [Order Details]WHERE ProductID = 11
Product QuesoCabrales generated a total revenue of $12,901.77. If you want to know thenumber of items of this product that were sold, add one more aggregate function to the queryto sum the quantities of each row that refers to the specific product ID:
USE NorthwindSELECT SUM(Quantity),
SUM(Quantity * UnitPrice * (1 - Discount))

SQL: AN OVERVIEW 653
FROM [Order Details]WHERE ProductID = 11
If you add the ProductID column in the selection list and delete the WHERE clause to retrievethe totals for all products, the query will generate an error message to the effect that thecolumns haven’t been grouped. You will learn how to group the results a little later in thischapter.
Using SQL JoinsJoins specify how you connect multiple tables in a query. There are four types of joins:
◆ Left outer, or left, join
◆ Right outer, or right, join
◆ Full outer, or full, join
◆ Inner join
A join operation combines all the rows of one table with the rows of another table. Joins areusually followed by a condition that determines which records on either side of the join appearin the result. The WHERE clause of the SELECT statement is similar to a join, but there are somefine points that will be explained momentarily.
The left, right, and full joins are sometimes called outer joins to differentiate them from aninner join. Left join and left outer join mean the same thing, as do right join and right outer join.
Left Joins
The left join displays all the records in the left table and only those records of the table on theright that match certain user-supplied criteria. This join has the following syntax:
FROM (primary table) LEFT JOIN (secondary table) ON(primary table).(field) = (secondary table).(field)
The left outer join retrieves all rows in the primary table and the matching rows from a sec-ondary table. The following statement retrieves all the titles from the Pubs database along withtheir publisher. If some titles have no publisher, they will be included in the result:
USE pubsSELECT title, pub_nameFROM titles LEFT JOIN publishers
ON titles.pub_id = publishers.pub_id
Right Joins
The right join is similar to the left outer join, except that it selects all rows in the table on theright and only the matching rows from the left table. This join has the following syntax:
FROM (secondary table) RIGHT JOIN (primary table)ON (secondary table).(field) = (primary table).(field)

654 CHAPTER 15 PROGRAMMING WITH ADO.NET
The following statement retrieves all the publishers from the Pubs database along with theirtitles. If a publisher has no titles, the publisher name will be included in the result set. Noticethat this statement is almost the same as the example of the left outer join entry. I changed onlyLEFT to RIGHT:
USE pubsSELECT title, pub_nameFROM titles RIGHT JOIN publishers
ON titles.pub_id = publishers.pub_id
Full Joins
The full join returns all the rows of the two tables, regardless of whether there are matchingrows. In effect, it’s a combination of left and right joins. To retrieve all titles and all publishersand to match publishers to their titles, use the following join:
USE pubsSELECT title, pub_nameFROM titles FULL JOIN publishers
ON titles.pub_id = publishers.pub_id
This query will include titles without a publisher, as well as publishers without a title.
Inner Joins
The inner join returns the matching rows of both tables, similar to the WHERE clause, and hasthe following syntax:
FROM (primary table) INNER JOIN (secondary table)ON (primary table).(field) = (secondary table).(field)
The following SQL statement combines records from the Titles and Publishers tables of thePubs database if their pub_id fields match. It returns all the titles and their publishers. Titleswithout publishers, or publishers without titles, will not be included in the result.
USE pubsSELECT titles.title, publishers.pub_name FROM titles, publishersWHERE titles.pub_id = publishers.pub_id
You can retrieve the same rows by using an inner join, as follows:
USE pubsSELECT titles.title, publishers.pub_nameFROM titles INNER JOIN publishers ON titles.pub_id = publishers.pub_id

SQL: AN OVERVIEW 655
Do Not Join Tables with the WHERE Clause
The proper method of retrieving rows from multiple tables is to use joins. It’s not uncommonto write a dozen joins one after the other (if you have that many tables to join). You canalso join two tables by using the WHERE clause. Here are two statements that return the totalrevenue for each of the customers in the Northwind database. The first one uses the INNERJOIN statement, and the second one uses the WHERE clause. The INNER JOIN is equivalent tothe WHERE clause: They both return the same rows.
Query 1
SELECTC.CompanyName,SUM((OD.UnitPrice * OD.Quantity) * (1 - OD.Discount)) AS Revenue
FROM Customers AS CINNER JOIN Orders AS O ON C.CustomerID = O.CustomerIDINNER JOIN [Order Details] AS OD ON O.OrderID = OD.OrderID
GROUP BY C.CompanyName
Query 2
SELECTC.CompanyName,SUM((OD.UnitPrice * OD.Quantity) * (1 - OD.Discount)) AS Revenue
FROM Customers AS C, Orders AS O, [Order Details] AS ODWHERE C.CustomerID = O.CustomerIDAND O.OrderID = OD.OrderID
GROUP BY C.CompanyName
Both statements assume that all customers have placed an order. If you change the INNERJOIN in the first statement to a LEFT JOIN, the result will contain two more rows: The cus-tomers FISSA and PARIS have not placed any orders, and they’re not included in the output.If you know that all your customers have placed an order or you don’t care about customerswithout orders, use the WHERE clause or an inner join. It’s important to keep in mind thatif you want to see all customers, regardless of whether they have placed an order, you mustuse joins.
An even better example is that of retrieving titles along with their authors. An inner join willreturn titles that have one or more authors. A left join will return all titles, even the oneswithout authors. A right join will return all authors, even if some of them are not associatedwith any titles. Finally, a full outer join will return both titles without authors and authorswithout titles. Here’s the statement that retrieves titles and authors from the Pubs database.Change the type of joins to see how they affect the result set.

656 CHAPTER 15 PROGRAMMING WITH ADO.NET
SELECT titles.title,authors.au_lname + ‘, ‘ + authors.au_fname AS Author
FROM authorsINNER JOIN titleauthor ON authors.au_id = titleauthor.au_idINNER JOIN titles ON titleauthor.title_id = titles.title_id
ORDER BY titles.title
There’s a shorthand notation for specifying left and right joins with the WHERE clause. Whenyou use the operator *= in a WHERE clause, a left join will be created. Likewise, the =*operator is equivalent to a right join.
Grouping RowsSometimes you need to group the results of a query so that you can calculate subtotals. Let’ssay you need not only the total revenues generated by a single product but also a list of allproducts and the revenues they generated. The example in the earlier section ‘‘Working withCalculated Fields’’ calculates the total revenue generated by a single product. It is possible touse the SUM() function to break the calculations at each new product ID, as demonstrated inthe following statement. To do so, you must group the product IDs together with the GROUP BYclause:
USE NorthwindSELECT ProductID,
SUM(Quantity * UnitPrice *(1 - Discount)) AS [Total Revenues]FROM [Order Details]GROUP BY ProductIDORDER BY ProductID
The preceding statement produces the following output:
ProductID Total Revenues1 12788.102 16355.963 3044.04 8567.895 5347.206 7137.07 22044.29
The aggregate functions work in tandem with the GROUP BY clause (when there is one) toproduce subtotals. The GROUP BY clause groups all the rows with the same values in the spec-ified column and forces the aggregate functions to act on each group separately. SQL Serversorts the rows according to the column specified in the GROUP BY clause and starts calculat-ing the aggregate functions. Every time it runs into a new group, it generates a new row andresets the aggregate function(s).

SQL: AN OVERVIEW 657
If you use the GROUP BY clause in a SQL statement, you must be aware of the following rule:
All the fields included in the SELECT list must be either part of an aggregate function or part of theGROUP BY clause.
Let’s say you want to change the previous statement to display the names of the productsrather than their IDs. The following statement does just that. Notice that the ProductName fielddoesn’t appear as an argument to an aggregate function, so it must be part of the GROUP BYclause:
USE NorthwindSELECT ProductName,
SUM(Quantity * [Order Details].UnitPrice * (1 - Discount))AS [Total Revenues]
FROM [Order Details], ProductsWHERE Products.ProductID = [Order Details].ProductIDGROUP BY ProductNameORDER BY ProductName
These are the first few lines of the output produced by this statement:
ProductName Total RevenuesAlice Mutton 32698.38Aniseed Syrup 3044.0Boston Crab Meat 17910.63Camembert Pierrot 46927.48Carnarvon Tigers 29171.87
If you omit the GROUP BY clause, the query will generate an error message indicating that theProductName column in the selection list is not involved in an aggregate or a GROUP BY clause.
You can also combine multiple aggregate functions in the selection list. The following state-ment calculates the total number of items sold for each product, along with the revenue gener-ated and the number of invoices that contain the specific product:
USE NorthwindSELECT ProductID AS Product,
COUNT(ProductID) AS Invoices,SUM(Quantity) AS [Units Sold],SUM(Quantity * UnitPrice *(1 - Discount)) AS Revenue
FROM [Order Details]GROUP BY ProductIDORDER BY ProductID
Here are the first few lines returned by the preceding query:
Product Invoices Units Sold Revenue1 38 828 12788.10005950922 44 1057 16355.9600448608

658 CHAPTER 15 PROGRAMMING WITH ADO.NET
You should try to revise the preceding statement so that it displays product names insteadof IDs, by adding another join to the query as explained already.
Limiting Groups with HAVING
The HAVING clause limits the groups that will appear at the cursor. In a way, it is similar to theWHERE clause, but the HAVING clause is used with aggregate functions and the GROUP BY clause,and the expression used with the HAVING clause usually involves one or more aggregates. Thefollowing statement returns the IDs of the products whose sales exceed 1,000 units:
USE NORTHWINDSELECT ProductID, SUM(Quantity)FROM [Order Details]GROUP BY ProductIDHAVING SUM(Quantity) > 1000
You can’t use the WHERE clause here, because no aggregates may appear in the WHERE clause.However, you can use the WHERE clause as usual to limit the number of rows involved in thequery (for example, limit the aggregate to the products of a specific category, or the productssold to customers in Germany). To see product names instead of IDs, join the Order Detailstable to the Products table by matching their ProductID columns. Note that the expressionin the HAVING clause need not be included in the selection list. You can change the previousstatement to retrieve the total quantities sold with a discount of 10 percent or more with thefollowing HAVING clause:
HAVING Discount >= 0.1
However, the Discount column must be included in the GROUP BY clause as well, becauseit’s not part of an aggregate.
Action QueriesIn addition to the selection queries we examined so far, you can also execute queries that alterthe data in the database’s tables. These queries are called action queries, and they’re quite simplecompared with the selection queries. There are three types of actions you can perform againsta database: insertions of new rows, deletions of existing rows, and updates (edits) of existingrows. For each type of action, there’s a SQL statement, appropriately named INSERT, DELETE,and UPDATE. Their syntax is very simple, and the only complication is how you specify theaffected rows (for deletions and updates). As you can guess, the rows to be affected are speci-fied with a WHERE clause, followed by the criteria discussed with selection queries.
The first difference between action and selection queries is that action queries don’t returnany rows. They return the number of rows affected, but you can disable this feature by callingthe following statement:
SET NOCOUNT ON
This statement can be used when working with a SQL Server database. Let’s look at the syntaxof the three action SQL statements, starting with the simplest: the DELETE statement.

ACTION QUERIES 659
Deleting RowsThe DELETE statement deletes one or more rows from a table; its syntax is as follows:
DELETE table_name WHERE criteria
The WHERE clause specifies the criteria that the rows must meet in order to be deleted. Thecriteria expression is no different from the criteria you specify in the WHERE clause of the selec-tion query. To delete the orders placed before 1998, use a statement like this one:
USE NorthwindDELETE OrdersWHERE OrderDate < ‘1/1/1998’
Of course, the specified rows will be deleted only if the Orders table allows cascade dele-tions or if the rows to be deleted are not linked to related rows. If you attempt to execute thepreceding query, you’ll get an error with the following description:
The DELETE statement conflicted with the REFERENCEconstraint "FK_Order_Details_Orders". The conflictoccurred in database "Northwind",table "dbo.Order Details", column ‘OrderID’.
This error message tells you that you can’t delete rows from the Orders table that are refer-enced by rows in the Order Details table. If you were allowed to delete rows from the Orderstable, some rows in the related table would remain orphaned (they would refer to an order thatdoesn’t exist). To delete rows from the Orders table, you must first delete the related rowsfrom the Order Details table and then delete the same rows from the Orders table. Here are thestatements that will delete orders placed before 1998. (Do not execute this query unless you’rewilling to reinstall the Northwind database; there’s no undo feature when executing SQL state-ments against a database.)
USE NorthwindDELETE [Order Details]WHERE (OrderID IN
( SELECT OrderIDFROM OrdersWHERE (OrderDate < ‘1/1/1998’)))
DELETE Orders WHERE OrderDate < ‘1/1/1998’
As you can see, the operation takes two action queries: one to delete rows from the OrderDetails table and another to delete the corresponding rows from the Orders table.
The DELETE statement returns the number of rows deleted. You can retrieve a table with thedeleted rows by using the OUTPUT clause:
DELETE CustomersOUTPUT DELETED.*WHERE Country IS NULL

660 CHAPTER 15 PROGRAMMING WITH ADO.NET
To test the OUTPUT clause, insert a few fake rows in the Customers table:
INSERT Customers (CustomerID, CompanyName)VALUES (’AAAAA’, ‘Company A’)INSERT Customers (CustomerID, CompanyName)VALUES (’BBBBB’, ‘Company B’)
And then delete them with the following statement:
DELETE CustomersOUTPUT DELETED.*WHERE Country IS NULL
If you execute the preceding statements, the deleted rows will be returned as the output ofthe query. If you want to be safe, you can insert the deleted rows into a temporary table soyou can insert them back into the database (should you delete more rows than intended). Mysuggestion is that you first execute a selection query that returns the rows you plan to delete,examine the output of this query, and, if you see only the rows you want to delete and nomore, write a DELETE statement with the same WHERE clause. To insert the deleted rows to atemporary table, use the INSERT INTO statement, which is described in the following section.
Inserting New RowsThe INSERT statement inserts new rows in a table; its syntax is as follows:
INSERT table_name (column_names) VALUES (values)
column_names and values are comma-separated lists of columns and their respective values.Values are mapped to their columns by the order in which they appear in the two lists.
Notice that you don’t have to specify values for all columns in the table, but the values listmust contain as many items as there are column names in the first list. To add a new row tothe Customers table, use a statement like the following:
INSERT Customers (CustomerID, CompanyName) VALUES (’FRYOG’, ‘Fruit & Yogurt’)
This statement inserts a new row, provided that the FRYOG key isn’t already in use. Only twoof the new row’s columns are set, and they’re the columns that can’t accept null values.
If you want to specify values for all the columns of the new row, you can omit the list ofcolumns. The following statement retrieves a number of rows from the Products table andinserts them into the SelectedProducts table, which has the same structure:
INSERT INTO SelectedProducts VALUES (values)
If the values come from a table, you can replace the VALUES keyword with a SELECTstatement:
INSERT INTO SelectedProductsSELECT * FROM Products WHERE CategoryID = 4

ACTION QUERIES 661
The INSERT INTO statement allows you to select columns from one table and insert theminto another one. The second table must have the same structure as the output of the selectionquery. Note that you need not create the new table ahead of time; you can create a new tablewith the CREATE TABLE statement. The following statement creates a new table to accept theCustomerID, CompanyName, and ContactName columns of the Customers table:
DECLARE @tbl table(ID char(5),name varchar(100),contact varchar(100))
After the table has been created, you can populate it with the appropriate fields of the deletedrows:
DELETE CustomersOUTPUT DELETED.CustomerID,
DELETED.CompanyName, DELETED.ContactNameINTO @tblWHERE Country IS NULLSELECT * FROM @tbl
Execute these statements, and you will see in the Results pane the two rows that wereinserted momentarily into the Customers table and then immediately deleted.
Editing Existing RowsThe UPDATE statement edits a row’s fields; its syntax is the following:
UPDATE table_name SET field1 = value1, field2 = value2,. . .WHERE criteria
The criteria expression is no different from the criteria you specify in the WHERE clause ofselection query. To change the country from UK to United Kingdom in the Customers table,use the following statement:
UPDATE Customers SET Country=’United Kingdom’WHERE Country = ‘UK’
This statement will locate all the rows in the Customers table that meet the specified criteria(their Country field is UK) and change this field’s value to United Kingdom.
Before you execute a DELETE or UPDATE statement, use a SELECT statement to see therows that will be affected. Verify that these are the rows you intend to change and then deleteor update them. Once an action query has been executed against the database, there’s no wayback (sorry, no Undo here).
This concludes our overview of SQL, and we’re (at last) ready to explore the data accessmechanisms of the Framework. In the following section, you’ll learn how to submit queries toa database from within your VB application and how to retrieve the results of a query.

662 CHAPTER 15 PROGRAMMING WITH ADO.NET
Stream- versus Set-Based Data AccessThe component of the Framework we use to access databases is known as ADO.NET(ADO stands for Active Data Objects) and it provides two basic methods of accessing data:stream-based data access, which establishes a stream to the database and retrieves the data fromthe server, and set-based data access, which creates a special data structure at the client and fillsit with data. This structure is the DataSet, which resembles a section of the database: It containsone or more DataTable objects, which correspond to tables and are made up of DataRowobjects. These DataRow objects have the same structure as the rows in their correspondingtables. DataSets are populated by retrieving data from one or more database tables into thecorresponding DataTables. As for submitting the data to the database with the stream-basedapproach, you must create the appropriate INSERT/UPDATE/DELETE statements and thenexecute them against the database.
The stream-based approach relies on the DataReader object, which makes the data re-turned by the database available to your application. The client application reads the datareturned by a query through the DataReader object and must store it somehow at the client.Quite frequently, we use custom objects to store the data at the client.
The set-based approach uses the same objects as the stream-based approach behind thescenes, and it abstracts most of the grunt work required to set up a link to the database,retrieve the data, and store it in the client computer’s memory. So, it makes sense to start byexploring the stream-based approach and the basic objects provided by ADO.NET for accessingdatabases. After you understand the nature of ADO.NET and how to use it, you’ll find it easyto see the abstraction introduced by the set-based approach and how to make the most ofDataSets. As you will see in the following chapter, you can create DataSets and the supportingobjects with the visual tools of the IDE.
The Basic Data-Access ClassesA data-driven application should be able to connect to a database and execute queries againstit. The selected data is displayed on the appropriate interface, where the user can examine it oredit it. Finally, the edited data is submitted to the database. This is the cycle of a data-drivenapplication:
1. Retrieve data from the database.
2. Present data to the user.
3. Allow the user to edit the data.
4. Submit changes to the database.
Of course, many issues are not obvious from this outline. Designing the appropriateinterface for navigating through the data (going from customers to their orders and from theselected order to its details) can be quite a task. Developing a functional interface for editingthe data at the client is also a challenge, especially if several related tables are involved. Wemust also take into consideration that there are other users accessing the same database.What will happen if the product we’re editing has been removed in the meantime by anotheruser? Or what if a user has edited the same customer’s data since our application read it? Dowe overwrite the changes made by the other user, or do we reject the edits of the user whosubmits the edits last? I’ll address these issues in this chapter and in Chapter 18, but we needto start with the basics: the classes for accessing the database.

THE BASIC DATA-ACCESS CLASSES 663
To connect to a database, you must create a Connection object, initialize it, and then call itsOpen method to establish a connection to the database. The Connection object is the channelbetween your application and the database; every command you want to execute against thesame database must use this Connection object. When you’re finished, you must close the con-nection by calling the Connection object’s Close method. Because ADO.NET maintains a poolof Connection objects that are reused as needed, it’s imperative that you keep connections openfor the shortest possible time.
The object that will actually execute the command against the database is the Commandobject, which you must configure with the statement you want to execute and associate witha Connection object. To execute the statement, you can call one of the Command object’smethods. The ExecuteReader method returns a DataReader object that allows you to read thedata returned by the selection query, one row at a time. To execute a statement that updatesa database table but doesn’t return a set of rows, use the ExecuteNonQuery method, whichexecutes the specified command and returns an integer, which is the number of rows affectedby the statement. The following sections describe the Connection, Command, and DataReaderclasses in detail.
To summarize, ADO.NET provides three core classes for accessing databases: the Connec-tion, Command, and DataReader classes. There are more data access–related classes, but they’reall based on these three basic classes. After you understand how to interact with a database byusing these classes, you’ll find it easy to understand the additional classes, as well as the codegenerated by the visual data tools that come with Visual Studio.
The Connection ClassThe Connection class is an abstract one, and you can’t use it directly. Instead, you must use oneof the classes that derive from the Connection class. Currently, there are three derived classes:SqlConnection, OracleConnection, and OleDbConnection. Likewise, the Command class is anabstract class with three derived classes: SqlCommand, OracleCommand, and OleDbCommand.
The SqlConnection and SqlCommand classes belong to the SqlClient namespace, whichyou must import into your project via the following statement:
Imports System.Data.SqlClient
The examples in this book use the SQL Server 2008 DBMS, and it’s implied that theSqlClient namespace is imported into every project that uses SQL Server.
To connect the application to a database, the Connection object must know the name of theserver on which the database resides, the name of the database itself, and the credentials thatwill allow it to establish a connection to the database. These credentials are either a usernameand password or a Windows account that has been granted rights to the database. You obvi-ously know what type of DBMS you’re going to connect to so you can select the appropriateConnection class. The most common method of initializing a Connection object in your code isthe following:
Dim CN As New SqlConnection("Data Source = localhost;" &"Initial Catalog = Northwind; uid = user_name;" &"password = user_password")
localhost is a universal name for the local machine, Northwind is the name of thedatabase, and user_name and user_password are the username and password of an account

664 CHAPTER 15 PROGRAMMING WITH ADO.NET
configured by the database administrator. The Northwind sample database isn’t installed alongwith SQL Server 2008, but you can download it from MSDN and install it yourself. The processwas described in the section ‘‘Obtaining the Northwind and Pubs Sample Databases’’ earlierin this chapter. I’m assuming that you’re using the same computer both for SQL Server andto write your VB applications. If SQL Server resides on a different computer in the network,use the server computer’s name (or IP address) in place of the localhost name. If SQL Serveris running on another machine on the network, use a setting like the following for the DataSource key:
Data Source = \\PowerServer
If the database is running on a remote machine, use the remote machine’s IP address. Ifyou’re working from home, for example, you can establish a connection to your company’sserver with a connection string like the following:
Data Source = "213.16.178.100; Initial Catalog = BooksDB; uid = xxx; password= xxx"
The uid and password keys are those of an account created by the database administrator,and not a Windows account. If you want to connect to the database by using each user’s Win-dows credentials, you should omit the uid and password keys and instead use the IntegratedSecurity key. If your network is based on a domain controller, you should use integratedsecurity so that users can log in to SQL Server with their Windows account. This way youwon’t have to store any passwords in your code or even have an auxiliary file with the appli-cation settings.
If you’re using an IP address to specify the database server, you may also have to includeSQL Server’s port by specifying an address such as 213.16.178.100, 1433. The default portfor SQL Server is 1433, and you can omit it. If the administrator has changed the default portor has hidden the server’s IP address behind another IP address for security purposes, youshould contact the administrator to get the server’s address. If you’re connecting over a localnetwork, you shouldn’t have to use an IP address. If you want to connect to the companyserver remotely, you will probably have to request the server’s IP address and the propercredentials from the server’s administrator.
The basic property of the Connection object is the ConnectionString property, which is asemicolon-separated string of key-value pairs that specifies the information needed to establisha connection to the desired database. It’s basically the same information you provide in variousdialog boxes when you open SQL Server Management Studio and select a database to workwith. An alternate method of setting up a Connection object is to set its ConnectionStringproperty:
Dim CN As New SqlConnectionCN.ConnectionString =
"Data Source = localhost; Initial Catalog = Northwind; " &"Integrated Security = True"
One of the Connection class’s properties is the State property, which returns the state ofa connection; its value is a member of the ConnectionState enumeration: Connecting, Open,Executing, Fetching, Broken, and Closed. If you call the Close method on a Connection

THE BASIC DATA-ACCESS CLASSES 665
object that’s already closed or the Open method on a Connection object that’s already open, anexception will be thrown. To avoid the exception, you must examine the Connection’s Stateproperty and act accordingly.
The following code segment outlines the process of opening a connection to a database:
Dim CNstring As String ="Data Source=localhost;Initial " &"Catalog=Northwind;Integrated Security=True"
CNstring = InputBox("Please enter a Connection String","CONNECTION STRING", CNstring)
If CNstring.Trim = "" Then Exit SubDim CN As New SqlConnection(CNstring)Try
CN.Open()If CN.State = ConnectionState.Open Then
MsgBox("Workstation " & CN.WorkstationId &" connected to database " & CN.Database &" on the " & CN.DataSource & " server")
End IfCatch ex As Exception
MsgBox( _"FAILED TO OPEN CONNECTION TO DATABASE DUE TO THE FOLLOWING ERROR" &
vbCrLf & ex.Message)End Try’ use the Connection object to execute statements’ against the database and then close the connectionIf CN.State = ConnectionState.Open Then CN.Close()
The Command ClassThe second major component of the ADO.NET model is the Command class, which allows youto execute SQL statements against the database. The two basic parameters of the Commandobject are a Connection object that specifies the database where the command will be executedand specifies the actual SQL command. To execute a SQL statement against a database, youmust initialize a Command object and set its Connection property to the appropriate Connec-tion object. It’s the Connection object that knows how to connect to the database; the Commandobject simply submits a SQL statement to the database and retrieves the results.
The Command object exposes a number of methods for executing SQL statements againstthe database, depending on the type of statement you want to execute. The ExecuteNonQuerymethod executes INSERT/DELETE/UPDATE statements that do not return any rows, just an inte-ger value, which is the number of rows affected by the query. The ExecuteScalar methodreturns a single value, which is usually the result of an aggregate operation, such as the countof rows meeting some criteria, the sum or average of a column over a number of rows, and soon. Finally, the ExecuteReader method is used with SELECT statements that return rows fromone or more tables.
To execute an UPDATE statement, for example, you must create a new Command object andassociate the appropriate SQL statement with it. One overloaded form of the constructor of the

666 CHAPTER 15 PROGRAMMING WITH ADO.NET
Command object allows you to specify the statement to be executed against the database, aswell as a Connection object that points to the desired database as arguments:
Dim CMD As New SqlCommand("UPDATE Products SET UnitPrice = UnitPrice * 1.07 " &"WHERE CategoryID = 3", CN)
CN.OpenDim rows As Integerrows = CMD.ExecuteNonQueryIf rows = 1 Then
MsgBox("Table Products updated successfully")Else
MsgBox("Failed to update the Products table")End IfIf CN.State = ConnectionState.Open Then CN.Close
The ExecuteNonQuery method returns the number of rows affected by the query, and it’s thesame value that appears in the Output window of SQL Server Management Studio when youexecute an action query. The preceding statements mark up the price of all products in the Con-fections category by 7 percent. You can use the same structure to execute INSERT and DELETEstatements; all you have to change is the actual SQL statement in the SqlCommand object’s con-structor. You can also set up a Command object by setting its Connection and CommandTextproperties:
Command.Connection = ConnectionCommand.CommandText = "SELECT COUNT(*) FROM Customers"
After you’re finished with the Command object, you should close the Connection object.Although you can initialize a Connection object anywhere in your code, you should call itsOpen method as late as possible (that is, just before executing a statement) and its Closemethod as early as possible (that is, as soon as you have retrieved the results of the statementyou executed).
The ExecuteScalar method executes the SQL statement associated with the Commandobject and returns a single value, which is the first value that the SQL statement would printin the Output window of SQL Server Management Studio. The following statements read thenumber of rows in the Customers table of the Northwind database and store the resultin the count variable:
Dim CMD As New SqlCommand("SELECT COUNT(*) FROM Customers", CN)
Dim count As IntegerCN.Opencount = CMD.ExecuteScalarIf CN.State = ConnectionState.Open Then CN.Close
If you want to execute a SELECT statement that retrieves multiple rows, you must use theExecuteReader method of the Command object, as shown here:

THE BASIC DATA-ACCESS CLASSES 667
Dim CMD As New SqlCommand("SELECT * FROM Customers", CN)
CN.OpenDim Reader As SqlDataReaderReader = CMD.ExecuteReaderWhile Reader.Read
‘ process the current row in the result setEnd WhileIf CN.State = ConnectionState.Open Then CN.Close
You’ll see shortly how to access the fields of each row returned by the ExecuteReadermethod through the properties of the SqlDataReader class.
Executing Stored Procedures
The command to be executed through the Command object is not always a SQL statement;it could be the name of a stored procedure, or the name of a table, in which case it retrievesall the rows of the table. You can specify the type of statement you want to execute with theCommandType property, whose value is a member of the CommandType enumeration: Text (forSQL statements), StoredProcedure (for stored procedures), and TableDirect (for a table). Youdon’t have to specify the type of the command you want to execute, but then the Commandobject will have to figure it out, a process that will take a few moments, and you can avoid thisunnecessary delay. The Northwind database comes with the Ten Most Expensive Productsstored procedure. To execute this stored procedure, set up a Command object with thefollowing statements:
Dim CMD As New SqlCommandCMD.Connection = CNCMD.CommandText = "[Ten Most Expensive Products]"CMD.CommandType = CommandType.StoredProcedure
Finally, you can retrieve all the rows of the Customers table by setting up a Command objectlike the following:
Dim CMD As New SqlCommandCMD.Connection = CNCMD.CommandText = "Customers"CMD.CommandType = CommandType.TableDirect
Executing Selection Queries
The most common SQL statements, the SELECT statements, retrieve a set of rows from oneor more joined tables, the result set. These statements are executed with the ExecuteReadermethod, which returns a DataReader object — a SqlDataReader object for statements executedagainst SQL Server databases. The DataReader class provides the members for reading theresults of the query in a forward-only manner. The connection remains open while you read

668 CHAPTER 15 PROGRAMMING WITH ADO.NET
the rows returned by the query, so it’s imperative to read the rows and store them in a struc-ture in the client computer’s memory as soon as possible and then close the connection. TheDataReader object is read-only (you can’t use it to update the underlying rows), so there’s noreason to keep it open for long periods. Let’s execute the following SELECT statement to retrieveselected columns of the rows of the Employees table of the Northwind database:
SELECT LastName + ‘ ‘ + FirstName AS Name,Title, Extension, HomePhone
FROM Employees
Here are the VB statements that set up the appropriate Command object and retrieve theSqlDataReader object with the result set:
Dim CMD As New SqlCommandDim CN As New SqlConnection("Data Source = localhost;Initial Catalog=Northwind;" &
"Integrated Security=True")CMD.Connection = CNCMD.CommandText =
"SELECT LastName + ‘ ‘ + FirstName AS Name, " &"Title, Extension, HomePhone FROM Employees"
CN.Open()Dim Reader As SqlDataReaderReader = Command.ExecuteReaderDim str As String = ""Dim cont As Integer = 0While Reader.Read
str &= Convert.ToString(Reader.Item("Name")) & vbTabstr &= Convert.ToString(Reader.Item("Title")) & vbTabstr &= Convert.ToString(Reader.Item("Extension")) & vbTabstr &= Convert.ToString(Reader.Item("HomePhone")) & vbTabstr &= vbCrLfcount += 1
End WhileDebug.WriteLine(vbCrLf & vbCrLf & "Read " & count.ToString &
" rows: " & vbCrLf & vbCrLf & str)CN.Close()
The DataReader class provides the Read method, which advances the current pointer to thenext row in the result set. To read the individual columns of the current row, you use the Itemproperty, which allows you to specify the column by name and returns an object variable. It’syour responsibility to cast the object returned by the Item property to the appropriate type. Ini-tially, the DataReader is positioned in front of the first line in the result set, and you must callits Read method to advance to the first row. If the query returns no rows, the Read method willreturn False, and the While loop won’t be executed at all. In the preceding sample code, thefields of each row are concatenated to form the str string, which is printed in the Immediatewindow; it looks something like this:
Davolio Nancy Sales Representative 5467 (206) 555-9857Fuller Andrew Vice President, Sales 3457 (206) 555-9482Leverling Janet Sales Representative 3355 (206) 555-3412

THE BASIC DATA-ACCESS CLASSES 669
Using Commands with Parameters
Most SQL statements and stored procedures accept parameters, and you should pass valuesfor each parameter before executing the query. Consider a simple statement that retrieves thecustomers from a specific country, whose name is passed as an argument:
SELECT * FROM Customers WHERE Country = @country
The @country parameter must be set to a value, or an exception will be thrown as you attemptto execute this statement. Stored procedures also accept parameters. The Sales By Year storedprocedure of the Northwind database, for example, expects two Date values and returns salesbetween the two dates. To accommodate the passing of parameters to a parameterized query orstored procedure, the Command object exposes the Parameters property, which is a collectionof Parameter objects. To pass parameter values to a command, you must set up a Parameterobject for each parameter; set its name, type, and value; and then add the Parameter object tothe Parameters collection of the Command object. The following statements set up a Commandobject with a parameter of the varchar type with a maximum size of 15 characters:
Dim Command As New SqlCommandCommand.CommandText = "SELECT * FROM Customers WHERE Country = @country"Command.Parameters.Add("@country", SqlDbType.VarChar, 15)Command.Parameters("@country").Value = "Italy"
At this point, you’re ready to execute the SELECT statement with the ExecuteReader methodand retrieve the customers from Italy. You can also configure the Parameter object in itsconstructor:
Dim param As New SqlParameter(paramName, paramType, paramSize)
Here’s the constructor of the @country parameter of the preceding example:
Dim param As New SqlParameter("@country", SqlDbType.VarChar, 15)param.Value = "Italy"
CMD.Parameters.Add param
Finally, you can combine all these statements into a single one:
CMD.Parameters.Add("@country", SqlDbType.VarChar, 15).Value = "Italy"
In the last statement, I initialize the parameter as I add it to the Parameters collection andthen set its value to the string Italy. Oddly, there’s no overloaded form of the Add methodthat allows you to specify the parameter’s value, but there is an AddWithValue method, whichadds a new parameter and sets its value. This method accepts two arguments: a string withthe parameter’s name and an object with the parameter’s value. The actual type of the valueis determined by the type of the query or stored procedure’s argument, and it’s resolved atruntime. The simplest method of adding a new parameter to the CMD.Parameters collection isthe following:
CMD.Parameters.Add("@country", "Italy")

670 CHAPTER 15 PROGRAMMING WITH ADO.NET
After the parameter has been set up, you can call the ExecuteReader method to retrieve thecustomers from the country specified by the argument and then read the results through aninstance of the DataReader class.
Retrieving Multiple Values from a Stored Procedure
Another property of the Parameter class is the Direction property, which determines whetherthe stored procedure can alter the value of the parameter. The Direction property’s settingis a member of the ParameterDirection enumeration: Input, Output, InputOutput, andReturnValue. A parameter that’s set by the procedure should have its Direction property setto Output: The parameter’s value is not going to be used by the procedure, but the procedure’scode can set it to return information to the calling application. If the parameter is used to passinformation to the procedure, as well as to pass information back to the calling application, itsDirection property should be set to InputOutput.
Let’s look at a stored procedure that returns the total of all orders, as well as the total num-ber of items ordered by a specific customer. This stored procedure accepts as a parameter theID of a customer, obviously, and it returns two values: the total of all orders placed by thespecified customer and the number of items ordered. A procedure (be it a SQL Server storedprocedure or a regular VB function) can’t return two or more values. The only way to retrievemultiple results from a single stored procedure is to pass output parameters so that the storedprocedure can set their value. To make the stored procedure a little more interesting, we’ll adda return value, which will be the number of orders placed by the customer. Listing 15.1 showsthe implementation of the CustomerTotals stored procedure.
Listing 15.1: The CustomerTotals stored procedure
CREATE PROCEDURE CustomerTotals@customerID varchar(5),@customerTotal money OUTPUT,@customerItems int OUTPUTASSELECT @customerTotal = SUM(UnitPrice * Quantity * (1 - Discount))FROM [Order Details] INNER JOIN OrdersON [Order Details].OrderID = Orders.OrderIDWHERE Orders.CustomerID = @customerIDSELECT @customerItems = SUM(Quantity)FROM [Order Details] INNER JOIN OrdersON [Order Details].OrderID = Orders.OrderIDWHERE Orders.CustomerID = @customerID
DECLARE @customerOrders intSELECT @customerOrders = COUNT(*) FROM OrdersWHERE Orders.CustomerID = @customerID
RETURN @customerOrders

THE BASIC DATA-ACCESS CLASSES 671
To attach the CustomerTotals stored procedure to the database, create a new storedprocedure, paste the preceding statements in the code window, and press F5 to execute it.Make sure the database is Northwind (not master). The stored procedure calculates three totalsfor the specified customer and stores them to three local variables. The @customerTotal and@customerItems variables are output parameters, which the calling application can read afterexecuting the stored procedure. The @customerOrders variable is the procedure’s return value.We can return the number of orders for the customer through the stored procedure’s returnvalue, because this variable happens to be an integer, and the return value is always an integer.In more-complex stored procedures, we’d use output parameters for all the values we wantto return to the calling application, and the procedure would return a value to indicate theexecution status: 0 or 1 if the procedure completed its execution successfully and a negativevalue to indicate the error, should the procedure fail to execute.
Before using the CustomerTotals stored procedure with our VB application, let’s test it inSQL Server Management Studio. We must declare a variable for each of the output parameters:the @Total, @Items, and @Orders variables. These three variables must be passed to the storedprocedure with the OUTPUT attribute, as shown here:
DECLARE @Total moneyDECLARE @Items intDECLARE @Orders intDECLARE @custID varchar(5)DECLARE @CustomerTotal decimalDECLARE @CustomerItems intSET @custID = ‘BLAUS’EXEC @orders = CustomerTotals @custID,
@customerTotal OUTPUT, @customerItems OUTPUTPRINT ‘Customer ‘ + @custId + ‘ has placed a total of ‘ +
CAST(@orders AS varchar(8)) + ‘ orders ‘ +‘ totaling $’ + CAST(ROUND(@customerTotal, 2) AS varchar(12)) +‘ and ‘ + CAST(@customerItems AS varchar(4)) + ‘ items.’
Open a new query window in SQL Server Management Studio, and enter the precedingstatements. Press F5 to execute them, and you will see the following message printed in theOutput window:
Customer BLAUS has placed a total of 8 orders totaling $10355.45 and 653 items.
The customer’s ID is an INPUT parameter, and we could pass it to the procedure as a literal.You can omit the declaration of the @custID variable and call the stored procedure with thefollowing statement:
DECLARE @CustomerTotal decimalDECLARE @CustomerItems intEXEC @orders = _
CustomerTotals ‘BLAUS’, @customerTotal OUTPUT, @customerItems OUTPUT

672 CHAPTER 15 PROGRAMMING WITH ADO.NET
Now that we’ve tested our stored procedure and know how to call it, we’ll do the samefrom within our sample application. To execute the CustomerTotals stored procedure, wemust set up a Command object, create the appropriate Parameter objects (one Parameter objectper stored procedure parameter plus another Parameter object for the stored procedure’s returnvalue), and then call the Command.ExecuteNonQuery method. Upon return, we’ll read thevalues of the output parameters and the stored procedure’s return value. Listing 15.2 showsthe code that executes the stored procedure (see the SimpleQueries sample project available fordownload from www.sybex.com/go/masteringvb2010).
Listing 15.2: Executing a stored procedure with output parameters
Private Sub bttnExecSP_Click(…) Handles bttnExecSP.ClickDim customerID As String = InputBox("Please enter a customer ID",
"CustomerTotals Stored Procedure", "ALFKI")If customerID.Trim.Length = 0 Then Exit SubDim CMD As New SqlCommandCMD.Connection = CNCMD.CommandText = "CustomerTotals"CMD.CommandType = CommandType.StoredProcedureCMD.Parameters.Add(
"@customerID", SqlDbType.VarChar, 5).Value = customerIDCMD.Parameters.Add("@customerTotal", SqlDbType.Money)CMD.Parameters("@customerTotal").Direction = ParameterDirection.OutputCMD.Parameters.Add("@customerItems", SqlDbType.Int)CMD.Parameters("@customerItems").Direction = ParameterDirection.OutputCMD.Parameters.Add("@orders", SqlDbType.Int)CMD.Parameters("@orders").Direction = ParameterDirection.ReturnValueCN.Open()CMD.ExecuteNonQuery()CN.Close()Dim items As IntegerItems = Convert.ToInt32(CMD.Parameters("@customerItems").ValueDim orders As IntegerOrders = Convert.ToInt32(CMD.Parameters("@orders").ValueDim ordersTotal As DecimalordersTotal = Convert.ToDouble(
CMD.Parameters("@customerTotal").ValueMsgBox("Customer BLAUS has placed " &
orders.ToString & " orders " &"totaling $" & Math.Round(ordersTotal, 2).ToString("#,###.00") &" and " & items.ToString & " items")
End Sub
In most applications, the same Command object will be reused again and again with differ-ent parameter values, so it’s common to add the parameters to a Command object’s Parameterscollection and assign values to them every time we want to execute the command. Let’s say

THE BASIC DATA-ACCESS CLASSES 673
you’ve designed a form with text boxes, where users can edit the values of the various fields;here’s how you’d set the values of the UPDATECMD variable’s parameters:
UPDATECMD.Parameters("@CustomerID").Value = txtID.Text.TrimUPDATECMD.Parameters("@CompanyName").Value = txtCompany.Text.Trim
After setting the values of all parameters, you can call the ExecuteNonQuery method to sub-mit the changes to the database. To update another customer, just assign different values to theexisting parameters, and call the UPDATECMD object’s ExecuteNonQuery method.
Security Issue: SQL Injection Attacks
You may be wondering why we have to go through the process of creating SQL statementswith parameters and setting up Parameter objects, instead of generating straightforward SQLstatements on the fly. A statement that picks some user-supplied values and embeds them ina SQL statement can be exploited by a malicious user as a Trojan horse to execute any SQLstatement against your database. Can you guess what will happen when the user enters aSQL statement in one of the TextBox controls on the form and your code uses this string tobuild a SQL statement on the fly? The code will pick it up, insert it into the larger statement,and then execute it against the database. This technique is known as SQL injection, and I’llshow you how it works with a simple example. It’s a known issue with any DBMS that canexecute multiple SQL statements in a batch mode, and SQL Server is certainly vulnerable toSQL injection attacks.
How would you validate the users of an application? You’d most likely store the usernamesand passwords in a table and execute a few statements to locate the row with the specifiedID and password, right? If you didn’t know any better, you’d probably write some code toextract the values from two TextBox controls and build the following SQL statement:
Dim CMD As New SqlClient.SqlCommand("SELECT COUNT(*) FROM Customers WHERE CompanyName = " ‘ &txtName.Text & "’ AND CustomerID = "’ & txtPsswd.Text & "’")
Then you’d execute this statement and examine the number of rows that match the specifiedcriteria:
Dim count As Integercount = Convert.ToInt32(CMD.ExecuteScalar)
If the value of the count variable is 1, the user can log in. (I’ve assumed that the CompanyNamefield is the username and that the password for each user is the CustomerID field of the Cus-tomers table.) If the values in the two text boxes are Frankenversan and FRANK, thefollowing statement will be executed against the database and will return the numeric value 1:
SELECT COUNT(*) FROM CustomersWHERE CompanyName = ‘Frankenversan’ AND CustomerID = ‘FRANK’
674 CHAPTER 15 PROGRAMMING WITH ADO.NET
A malicious user might enter the following username (and no password at all):
xxx’ ; DROP TABLE [Orders] --
If you examine the value of the Command.CommandText property before this statement is exe-cuted, you’ll see the following SQL statement:
SELECT COUNT(*) FROM CustomersWHERE CompanyName = ‘xxx’ ;DROP TABLE [Orders] --’ AND CustomerID = "
This statement contains two SQL statements and a comment: the SELECT statement, followedby another statement that drops the Orders table! The comments symbol (the two dashes)is required to disable the last part of the original statement, which otherwise would cause asyntax error. The Orders table can’t be dropped, because it contains related rows in the OrderDetails table, but nothing will stop you from dropping the Order Details table.
If you want to demonstrate to someone that their software isn’t secure, you can replace theDROP TABLE statement with the SHUTDOWN statement. The following statement shuts downthe server immediately (and they can restart it immediately by running SQL Server Agentfrom the SQL Server Configuration Manager utility):
SHUTDOWN WITH NOWAIT
Handling Special Characters
Another problem you will avoid with parameterized queries and stored procedures is that ofhandling single quotes, which are used to delimit literals in T-SQL. Consider the followingUPDATE statement, which picks up the company name from a TextBox control and updates asingle row in the Customers table:
CMD.CommandText ="UPDATE Customers SET CompanyName = ‘" &txtCompany.Text & "’" &"WHERE CustomerID = "’ & txtID.Text & "’"
If the user enters a company name that contains a single quote, such as B’s Beverages, the com-mand will become the following:
UPDATE Customers SET CompanyName = ‘B’s Beverages’ WHERE CustomerID = ‘BSBEV’
If you attempt to execute this statement, SQL Server will reject it because it contains a syntaxerror (you should be able to figure out the error easily by now). The exact error message is asfollows:
Msg 102, Level 15, State 1, Line 1Incorrect syntax near ‘s’.Msg 105, Level 15, State 1, Line 1Unclosed quotation mark after the character string ".

THE BASIC DATA-ACCESS CLASSES 675
The single quote is used to delimit literals, and there should be an even number of singlequotes in the statement. The compiler determines that there’s an unclosed quotation mark inthe statement and doesn’t execute it. If the same statement was written as a parameterizedquery, such as the following, you could pass the same company name to the statement as anargument without a hitch:
CMD.CommandText ="UPDATE Customers SET CompanyName = @CompanyName " &"WHERE CustomerID = @ID"
CMD.Parameters.Add("@CompanyName",SqlDbType.VarChar, 40).Value = "B’s Beverages"
CMD.Parameters.Add("@ID",SqlDbType.Char, 5).Value = "BSBEV"
CMD.ExecuteNonQuery
The same is true for other special characters, such as the percentage symbol. It’s possible toescape the special symbols; you can replace the single-quote mark with two consecutive singlequotes, but the most elegant method of handling special characters, such as quotation marks,percent signs, and so on, is to use parameterized queries or stored procedures. You just assigna string to the parameter and don’t have to worry about escaping any characters; the Commandobject will take care of all necessary substitutions.
Empty Strings versus Null Values
The values you assign to the arguments of a query or stored procedure usually come fromcontrols on a Windows form and in most cases from TextBox controls. The following state-ment reads the text in the txtFax TextBox control and assigns it to the @FAX parameter of aCommand object:
Command.Parameters("@FAX").Value = txtFax.Text
But what if the user has left the txtFax TextBox blank? Should we pass to the INSERT state-ment an empty string or a null value? If you collect the values from various controls on a formand use them as parameter values, you’ll never send null values to the database. If you wantto treat empty strings as null values, you must pass a null value to the appropriate parame-ter explicitly. Let’s say that the txtFax TextBox control on the form corresponds to the @FAXparameter. You can use the IIf() statement of Visual Basic to assign the proper value to thecorresponding parameter as follows:
UPDATECommand.Parameters("@FAX").Value =IIf(txtFax.Text.Trim.Length = 0,
System.DBNull.Value, txtFax.Text)
This is a lengthy statement, but here’s how it works: The IIf() function evaluates the specifiedexpression. If the length of the text in the txtFax control is zero, it returns the value speci-fied by its second argument, which is the null value. If not — in other words, if the TextBoxcontrol isn’t empty — it returns the text on the control. This value is then assigned to the @FAXparameter of the UPDATECommand object.

676 CHAPTER 15 PROGRAMMING WITH ADO.NET
The DataReader ClassTo read the rows returned by a selection query, you must call the Command object’s Execute-Reader method, which returns a DataReader object (a SqlDataReader object for queries exe-cuted against SQL Server). The DataReader is a stream to the data retrieved by the query, andit provides many methods for reading the data sent to the client by the database. The underly-ing Connection object remains open while you read the data off the DataReader, so you mustread it as quickly as possible, store it at the client, and close the connection as soon as possible.
To read a set of rows with the DataReader, you must call its Read method, which advancesthe pointer to the next row in the set. Initially, the pointer is in front of the first row, so youmust call the Read method before accessing the first row. Despite its name, the Read methoddoesn’t actually fetch any data; to read individual fields, you must use the various Get methodsof the DataReader object, described next (GetDecimal, GetString, and so on). After readingthe fields of the current row, call the Read method again to advance to the next row. There’sno method to move to a previous row, so make sure you’ve read all the data of the currentrow before moving to the next one. Table 15.4 explains the basic properties and methods of theDataReader object.
Table 15.4: Properties and methods of a DataReader object
Name Description
HasRows This is a Boolean property that specifies whether there’s a result set to read datafrom. If the query selected no rows at all, the HasRows property will return False.
FieldCount This property returns the number of columns in the current result set. Note thatthe DataReader object doesn’t know the number of rows returned by the query.Because it reads the rows in a forward-only fashion, you must iterate through theentire result set to find out the number of rows returned by the query.
Read This method moves the pointer in front of the next row in the result set. Use thismethod to read the rows of the result set, usually from within a While loop.
Get<type> There are many versions of the Get method with different names, depending onthe type of column you want to read. To read a Decimal value, use theGetDecimal method; to retrieve a string, use the GetString method; to retrievean integer, call one of the GetInt16, GetInt32, or GetSqlInt64 methods; and soon. To specify the column you want to read, use an integer index value thatrepresents the column’s ordinal, such as Reader.GetString(2). The index of thefirst column in the result set is zero.
GetSql<type> There are many versions of the GetSql method with different names, dependingon the SQL type of the column you want to read. To read a Decimal value, use theGetSqlDecimal method; to retrieve a string, use the GetSqlString method; toretrieve an integer, call one of the GetSqlInt16, GetSqlInt32, or GetSqlInt64methods; and so on. To specify the column you want to read, use an integer indexvalue that represents the column’s ordinal, such as Reader.GetSqlString(2).The index of the first column in the result set is zero.
GetValue If you can’t be sure about the type of a column, use the GetValue method, whichreturns a value of the Object type. This method accepts as an argument the ordinalof the column you want to read.

THE BASIC DATA-ACCESS CLASSES 677
Table 15.4: Properties and methods of a DataReader object (CONTINUED)
Name Description
GetValues This method reads all the columns of the current row and stores them into an arrayof objects, which is passed to the method as an argument. This method returns aninteger value, which is the number of columns read from the current row.
GetName Use this method to retrieve the name of a column, which must be specified by itsorder in the result set. To retrieve the name of the first column, use the expressionReader.GetName(0). The column’s name in the result set is the original columnname, unless the SELECT statement used an alias to return a column with adifferent name.
GetOrdinal This is the counterpart of the GetName method, and it returns the ordinal of aspecific column from its name. To retrieve the ordinal of the CompanyName column,use the expression Reader.GetName("CompanyName").
IsDbNull This method returns True if the column specified by its ordinal in the current row isnull. If you attempt to assign a null column to a variable, a runtime exception willbe thrown, so you should use this method to determine whether a column has avalue and handle the null values from within your code.
CLR Types versus SQL Types
The Get<Type> methods return data types recognized by the Common Language Runtime(CLR), whereas the GetSql<Type> methods return data types recognized by SQL Server.There’s a one-to-one correspondence between most types but not always. In most cases, weuse the Get<Type> methods and store the values in VB variables, but you may want to storethe value of a field in its native format. Use the SQL data types only if you’re planning tomove the data into another database. For normal processing, you should read them with theGet<type> methods, which return CLR data types recognized by VB. The following tablesummarizes the CLR and SQL data types:
CLR Data Type SQL Data Type
Byte SqlByte
Byte() SqlBytes
Char() SqlChars
DateTime SqlDateTime
Decimal SqlDecimal
Double SqlDouble
SqlMoney
Single SqlSingle
String SqlString
SqlXml

678 CHAPTER 15 PROGRAMMING WITH ADO.NET
The following table summarizes the methods that read data off the DataReader as CLR or SQLdata types:
CLR Data Type Sql Data Type Description
GetSqlBinary Reads column as a binary (usually imagecolumns)
GetBoolean GetSqlBoolean Reads column as a Boolean value
GetByte GetSqlByte Reads column as a single Byte
GetBytes GetSqlBytes Reads column as an array of Byte
GetChars GetSqlChars Reads column as an array of Char
GetDateTime GetSqlDateTime Reads column as a DateTime value
GetDecimal GetSqlDecimal Reads column as a Decimal value
GetDouble GetSqlDouble Reads column as a Double value
GetFloat GetSqlSingle Reads column as a Single value
GetInt16 GetSqlInt16 Reads column as an Int16 value
GetInt32 GetSqlInt32 Reads column as an Int32 value
GetInt64 GetSqlInt64 Reads column as an Int64 value
GetString GetSqlString Reads column as a string value
GetSqlMoney Reads column as a money value (noequivalent type in VB)
GetSqlXml Reads column as a XML value (no equivalentin VB)
Note that you can’t reset the DataReader object and reread the same result set. To gothrough the same rows, you must execute the query again. However, there’s no guaranteethat the same query executed a few moments later will return the same result set. Rows mayhave been added to, or removed from, the database, so your best bet is to go through theresult set once and store all the data to a structure at the client computer’s memory. Moreover,while you’re using the DataReader, the connection to the server remains open. This means thatyou shouldn’t process the data as you read it, unless it is a trivial form of processing, suchas keeping track of sums and counts. If you need to perform some substantial processing onyour data, read the data into an ArrayList or other structure in the client computer’s memory,close the connection, and then access the data in the ArrayList. In the following chapter, you’lllearn about the DataSet object, which was designed to maintain relational data at the client.The DataSet is a great structure for storing relational data at the client; it’s almost like a smalldatabase that resides in the client computer’s memory. However, the DataSet is not ideal for allsituations.
Listing 15.3 shows the code that retrieves all products along with category names andsupplier names and populates a ListView control. The ListView control’s columns aren’tspecified at design time; the code adds the appropriate columns at runtime (as long as the Viewproperty has been set to Details). The code goes through the columns of the result set andadds a new column to the ListView control for each data column. Then it reads the rows

THE BASIC DATA-ACCESS CLASSES 679
returned by the query and displays them on the control. The statements in Listing 15.3 are partof the SimpleQueries sample project.
Listing 15.3: Displaying product information on a ListView control
Dim Command As New SqlCommandCommand.Connection = CN’ a simple SELECT queryCommand.CommandText =
"SELECT ProductName AS Product, " &"CategoryName AS Category, " &"CompanyName AS Supplier, UnitPrice AS Price " &"FROM Products LEFT JOIN Categories " &"ON Products.CategoryID = Categories.CategoryID " &"LEFT JOIN Suppliers ON Products.SupplierID = Suppliers.SupplierID"
Connection.Open()Dim count As Integer = 0Dim Reader As SqlDataReaderReader = Command.ExecuteReaderListView1.Clear()Dim i As Integer’ setup ListView control to display the headers’ of the columns read from the databaseFor i = 0 To Reader.FieldCount - 1
ListView1.Columns.Add(Reader.GetName(i), 130)NextWhile Reader.Read
Dim LI As New ListViewItemLI.Text = Convert.ToString(Reader.Item("Product"))LI.SubItems.Add(Convert.ToString(
Reader.Item("Category")))LI.SubItems.Add(Convert.ToString(
Reader.Item("Supplier")))LI.SubItems.Add(Convert.ToString(
Reader.Item("Price")))ListView1.Items.Add(LI)Count += 1
End WhileMsgBox("Read " & count.ToString & " Product rows")Connection.Close()
Reading Multiple Result Sets
Another interesting aspect of the DataReader object is that you can use it to read multipleresult sets, such as the ones returned by multiple queries. You can execute a batch query suchas the following with a single Command object:
Command.CommandText = "SELECT * FROM Customers; SELECT * FROM Employees"Dim Reader As SqlDataReader = Command.ExecuteReader

680 CHAPTER 15 PROGRAMMING WITH ADO.NET
We’ll use the same DataReader object to read the rows of both tables, but we need to knowwhen we’re finished with the first result set (the customers) and start reading the second resultset. The NextResult property of the DataReader does exactly that: After exhausting the firstresult set (by iterating through its rows with the Read method), we can request the NextResultproperty to find out whether the DataReader contains additional result sets. If so, we can startreading the next result set with the Read method. Here’s the outline of the code for reading tworesult sets from the same DataReader:
While Reader.Read‘ read the fields of the current row in the 1st result set
End WhileIf Reader.NextResult
While Reader.Read‘ read the fields of the current row in the 2nd result set
End WhileEnd If
VB 2010 at Work: Building a Simple Data-Driven Application
In this section I’ll put together all the information presented so far in this chapter to builda data-driven application — an application that actually talks to a database, retrieves data,and displays it on a Windows form. The application is not new to you. In Chapter 5, ‘‘BasicWindows Controls,’’ you created an application for maintaining a list of contacts, based on aListBox control, where you stored the names of the contacts. The same ListBox control wasalso used as a navigational tool, because users could select a contact and view their details, asshown in Figure 15.8.
Figure 15.8
The Contacts applica-tion’s interface
The contacts were stored in a List of Contact objects, and they were persisted to a file. Nowlet’s revise this application so that it works with a database, namely, the Customers table of

THE BASIC DATA-ACCESS CLASSES 681
the Northwind database. The columns of the Customers table are almost identical to the fieldsof the Contact object, so you’ll use the same data type to store the data. Instead of persistingthe data to a file, you’ll read your contacts from the database and submit the edited rows backto the same database. Because you’ll use a central data storage, the revised application can beused by multiple users at the same time.
Start by copying the Contacts project folder to a new folder with a different name. Then editthe menu, as follows:
1. Delete the New and Save items, because the new application doesn’t maintain a copy ofthe contacts in memory. Instead, it retrieves the requested contact from the Customer tableas requested and submits the updates to the database as soon as the user edits an existingcontact or inserts a new one. The New command is meaningless with a database. You’llnever have to remove all rows from a table, unless you’re reinitializing a test database, inwhich you will probably run a script that initializes all tables.
2. Change the Open command of the File menu to Load Customers. Instead of loading thecontacts from a file, we’ll load them from the Customers table of the Northwind database.
3. Add the CustomerID field to the main form, because the Customers table usesuser-supplied strings as primary keys.
Most of the code remains the same. You only need to replace the routines that perform thebasic operations against the database. We no longer read the data from an external file. Instead,we must execute a query against the database and retrieve the company names along with theirIDs. The Load command’s code follows in Listing 15.4.
Listing 15.4: Loading the Customers table
Private Sub LoadToolStripMenuItem_Click(...) HandlesLoadToolStripMenuItem.Click
CMD.CommandText = "SELECT * FROM Customers"CN.Open()Dim RDR As SqlDataReaderRDR = CMD.ExecuteReaderListBox1.Items.Clear()While RDR.Read
Dim C As New ContactC.CustomerID = RDR.Item("CustomerID")C.CompanyName = RDR.Item("CompanyName")C.ContactName = Convert.ToString(
IIf(RDR.IsDBNull(RDR.GetOrdinal("ContactName")),"", RDR.Item("ContactName")))
C.Address1 = Convert.ToString(IIf(RDR.IsDBNull(
RDR.GetOrdinal("Address")),"", RDR.Item("Address")))
‘ Similar statements for the remaining fieldsListBox1.Items.Add(C)

682 CHAPTER 15 PROGRAMMING WITH ADO.NET
End WhileCN.Close()currentContact = 0ShowContact()
End Sub
The code executes a simple SELECT query against the database and then loads the ListBoxcontrol with Contact objects as before. The only difference is that now the data comes fromthe DataReader. You will also notice the lengthy expressions that assign the values readfrom the database to the TextBox controls on the form. The expression RDR.Item(field_name)reads the corresponding column’s value from the current row. This row, however, may be null,and you can’t assign a null value to the Text property. So, the code uses the IIf() functionto determine whether the current field’s value is null. If the method IsDBNull returns True,then the current field is null, and the IIf() function returns an empty string. If not, it returnsthe actual field value, which is the expression RDR.Item(field_name). But what about the callto the GetOrdinal method? Well, the IsDBNull method doesn’t accept a column name as anargument, only an integer that is the order of the column in the result. Instead of hard-codingnumeric values to our code (and make it impossible to maintain later), we can retrieve theordinal of a column with the GetOrdinal method. The expression GetOrdinal("CustomerID")returns 0 because the CustomerID column is the first one, GetOrdinal("CompanyName") returns1, and so on. Finally, because the IIf() function returns an object, we must cast it to a stringbefore assigning it to the Text property.
Now, this is the type of code that can be streamlined, and there are tools that do it for you.Even better, there are tools that convert each row to a custom object (a Contact object, in ourexample), so you can handle the data you retrieve from the database with the object-orientedtechniques you have learned in this book. The new data access technologies, including LINQto SQL that was discussed in Chapter 14, ‘‘An Introduction to LINQ,’’ bridge the gap betweendatabases and object-oriented programming. As you have already noticed, there’s a mismatchbetween objects and the way we access databases. Having to set up a DataReader, execute com-mands directly against the database, and then having to worry about null and converting thefields to the proper type takes a lot of code, and the entire approach just isn’t elegant. You’llsee better techniques for accessing databases in the following chapter, but I wanted to showyou the basic data access mechanisms first (actually you already saw how to access databaseswith LINQ to SQL queries in the preceding chapter).This may not be so elegant, but they’re thefoundation on which more elaborate tools were built. Moreover, they’re the fastest way to getdata out of a database and back. That said, let’s continue with our sample application.
Next, we must implement the procedures for adding a new contact (the SubmitContactsubroutine), for updating an existing contact (the UpdateContact subroutine), and for deletinga contact (the RemoveContact subroutine). The first two subroutines accept as an argumenta variable of the Contact type, form the appropriate SQL statement, and execute it againstthe database. The RemoveContact subroutine accepts the ID of the row to be deleted, formsthe appropriate DELETE statement, and executes it likewise. You may wonder why I haven’timplemented these routines as functions that return a True/False value indicating whether theoperation completed successfully. The reason is that a simple indication about the success ofan operation won’t suffice; we need to display a more specific error message to the user, soI’ve decided to throw an exception with the error description, as shown in Listings 15.5, 15.6,and 15.7.

THE BASIC DATA-ACCESS CLASSES 683
Listing 15.5: Adding a new row to the Customers table
Private Sub SubmitContact(ByVal C As Contact)CMD.CommandText = "INSERT Customers " &
"(CustomerID, CompanyName, ContactName, Address, " &" City, Region, PostalCode, Country) " &"VALUES (@CustomerID, @CompanyName, @ContactName, " &"@Address, @City, @Region, @PostalCode, @Country) "
CMD.Parameters.Clear()CMD.Parameters.AddWithValue("@CustomerID", C.CustomerID)CMD.Parameters.AddWithValue("@CompanyName", C.CompanyName)CMD.Parameters.AddWithValue("@ContactName", C.ContactName)CMD.Parameters.AddWithValue("@Address", C.Address1)CMD.Parameters.AddWithValue("@City", C.City)CMD.Parameters.AddWithValue("@Region", C.State)CMD.Parameters.AddWithValue("@PostalCode", C.ZIP)CMD.Parameters.AddWithValue("@Country", C.ZIP)CN.Open()Try
CMD.ExecuteNonQuery()Catch ex As Exception
Throw New Exception("Failed to update contact in database. " &vbCrLf & "ERROR MESSAGE: " & vbCrLf & ex.Message)
FinallyCN.Close()
End TryCN.Close()
End Sub
Listing 15.6: Updating a row in the Customers table
Private Sub UpdateContact(ByVal C As Contact)CMD.CommandText = "UPDATE Customers " &
"SET CompanyName = @CompanyName, " &" ContactName = @ContactName, " &" Address = @Address, " &" City = @City, " &" Region = @Region, " &" PostalCode = PostalCode" &" Country = @Country " &"WHERE CustomerID = @CustomerID"
CMD.Parameters.Clear()CMD.Parameters.AddWithValue("@CustomerID", C.CustomerID)CMD.Parameters.AddWithValue("@CompanyName", C.CompanyName)CMD.Parameters.AddWithValue("@ContactName", C.ContactName)

684 CHAPTER 15 PROGRAMMING WITH ADO.NET
CMD.Parameters.AddWithValue("@Address", C.Address1)CMD.Parameters.AddWithValue("@City", C.City)CMD.Parameters.AddWithValue("@Region", C.State)CMD.Parameters.AddWithValue("@PostalCode", C.ZIP)CN.Open()Try
CMD.ExecuteNonQuery()Catch ex As Exception
Throw New Exception("Failed to update contact in database. " & vbCrLf &"ERROR MESSAGE: " & vbCrLf & ex.Message)
End TryCN.Close()
End Sub
Listing 15.7: Removing a row from the Customers table
Private Sub RemoveContact(ByVal ContactID As String)CMD.CommandText = "DELETE Customers WHERE CustomerID=@contactID "CMD.Parameters.Clear()CMD.Parameters.AddWithValue("@contactID", ContactID)CN.Open()Try
CMD.ExecuteNonQuery()Catch ex As Exception
Throw New Exception("Failed to delete contact in database. " & vbCrLf &"ERROR MESSAGE: " & vbCrLf & ex.Message)
FinallyCN.Close()
End TryEnd Sub
The rest of the code is basically the same. We started with an application that manipulatesContact objects in a List and converted it to an application that manipulates the rows of adatabase table. We changed the routines that read data and submit data to the database. Theroutines that read the data from the database create Contact objects that are stored to theListBox control as with the original application. Likewise, every time the user inserts a newcontact or updates an existing one, instead of modifying an item in the List control, we submitit to the database and update the underlying source (the Customers table). Finally, when acontact is removed, the application removes it directly from the Customers table. The deletionoperation may fail if the customer has placed an order. As you realize, we’re no longer dealingwith an isolated table but with a larger system with related tables, and the DBMS maintainsthe integrity of our data.

THE BOTTOM LINE 685
This application has a serious flaw, though. What if the Customers table has thousandsof customers and there are a few dozen users who may need access the database? Wouldit make sense to download the entire table to the client and maintain such an enormouslist of customers at every client? The first improvement I’d suggest is to download only thecustomer names and display them on the ListBox control. Every time the user clicks a differentcustomer’s name, your code should execute a SELECT statement for the specific customer andbring the entire row to the client and display its fields.
Even so, the table may grow so large that it wouldn’t make sense to display all companynames in a list. In this case, you should provide some selection mechanism to force users todownload the names of selected companies only. For example, you could display a list ofcountries and download only customers from the selected customer every time users selectedanother country. You could also filter by company or contact name or provide combinationsof criteria. If you decide to modify the application, here are the SELECT statements that limitcustomers by country and company name:
SELECT CustomerID, CompanyName FROM Customers WHERE Country = @countrySELECT CustomerID, CompanyName FROM Customers WHERE CompanyName LIKE @name + ‘%’
(The percent symbol at the end of the string is a wildcard, indicating that the company nameshould start with the string stored in the @name variable, followed by any other combination ofcharacters.)
One last hitch in this application is the following: What will happen if other users delete acontact you’re editing or someone else updates the contact you’re editing? Issues of concur-rency are very important in designing data-driven applications, and we’ll look at this in thefollowing chapter. The Contacts project assumes that the same row won’t be edited by multipleusers at once. Even when this happens, the last user to save the edits overwrites the edits of theother users. It’s a bit of a crude approach, but it’s quite appropriate in many situations. In othersituations, most notably in reservation applications, it’s unacceptable.
The Bottom Line
Store data in relational databases. Relational databases store their data in tables and arebased on relationships between these tables. The data are stored in tables, and tables containrelated data, or entities, such as persons, products, orders, and so on. Relationships are imple-mented by inserting columns with matching values in the two related tables.
Master It How will you relate two tables with a many-to-many relationship?
Query databases with SQL. Structured Query Language (SQL) is a universal language formanipulating tables. SQL is a nonprocedural language, which specifies the operation you wantto perform against a database at a high level, unlike a traditional language such as Visual Basic,which specifies how to perform the operation. The details of the implementation are left to theDBMS. SQL consists of a small number of keywords and is optimized for selecting, inserting,updating, and deleting data.

686 CHAPTER 15 PROGRAMMING WITH ADO.NET
Master It How would you write a SELECT statement to retrieve selected data from multi-ple tables?
Submit queries to the database using ADO.NET. ADO.NET is the component of theFramework that provides the mechanism to contact a database, submit queries, and retrievethe results of a query. There are two types of queries you can execute against a database:selection queries that retrieve data from the database based on certain criteria you supplyand action queries that manipulate the data at the database. Action queries do not return anyresults, except for the number of rows that were affected by the query.
Master It Describe the basic mechanism for submitting a selection query to the databaseand reading the results returned by the query.

Chapter 16
Developing Data-Driven Applications
In Chapter 15, ‘‘Programming with ADO.NET,’’ you learned how to access data stored indatabases with the basic classes of ADO.NET: the Connection and Command classes. A thirdclass, the DataReader class, allows you to read the data retrieved by your command in theclient application. Most applications today use a database to store data. These applicationsare known as front-end applications, because they interact with the user and update the dataon a database server, or a back-end data store. They’re also known as data-driven applications,because they interact not only with the user but primarily with the database.
Although executing commands and reading the selected data is a straightforward process,you still have to decide where to store the data at the client and how to present it to theuser. One approach is to write custom classes that represent the business objects you want towork with and then populate instances of these classes with data. Once the objects have beenpopulated, you can work with familiar business objects. You can even use LINQ to Objectsto query collections of custom objects or LINQ to SQL to query database tables directly withLINQ queries, as discussed in Chapter 14, ‘‘An Introduction to LINQ.’’
Finally, there’s a standard mechanism for storing data at the client, the DataSet class. ADataSet is an in-memory database, which you can populate with the data you’re interested inand work with it at the client.
In this chapter, you’ll learn how to do the following:
◆ Create and populate business objects
◆ Establish relations between tables in the DataSet
◆ Submit changes in the DataSet to the database
Using Business ObjectsBy now you should be more than familiar with object-oriented programming. One of the ideasbehind object-oriented programming is the transformation of flat data (whether they live infiles or relational databases) into meaningful objects that reflect the hierarchy of the businessobjects you’re dealing with. As you recall from the preceding chapter, the orders in the North-wind database are stored in two different tables: the order headers in the Orders table and theirdetails in the Order Details table. Books and their authors are spread over three different tables

688 CHAPTER 16 DEVELOPING DATA-DRIVEN APPLICATIONS
in the Pub database: the Titles table, which stores titles; the Authors table, which stores authornames; and the TitleAuthor table, which relates titles to their authors.
If you ignore the data-storage aspect of the application for a moment, you’d probably designan Order object to store orders with the following structure:
Public Class OrderDim OrderID As IntegerDim OrderDate As DateDim Employee As EmployeeDim Customer As CustomerDim Details As List(Of Detail)
End ClassPublic Class Detail
Dim ProductID As IntegerDim ProductPrice As DecimalDim ProductQuantity As Integer
End ClassPublic Class Employee
Dim EmployeeID As IntegerDim EmployeeName As Strng
End ClassPublic Class Customer
Dim CustomerID As StringDim CompanyName As Strng
End Class
The Order class can be populated with single statements like the following:
Dim newOrder As New OrdernewOrder.OrderDate = Now.TodaynewOrder.Details = New List(Of Detail)Dim det As New Detaildet.ProductID=12det.ProductPrice = 21.90det.ProductQuantity = 10newOrder.Details.Add(det)
This is a straightforward approach to modeling an order with a custom object that doesn’ttake into consideration the structure of the information in the database. The Order class repre-sents an order as a business object, regardless of how the information is stored in the database.Note that the order’s ID isn’t stored anywhere, because there’s no need to associate the order’sheader with its details. The details simply belong to the order. At a later point we’ll have towrite some code to extract the various properties of the Order object and submit them to thedatabase with the proper SQL statements, and this is what this section is all about: how to mapour data into custom business objects, build our application with object-oriented techniques,and then submit the data to the database. The code that actually contacts the database andeither retrieves data or submits edited and new data to the database is the application’s datalayer, as opposed to the application’s user interface (UI), which is the code that manipulatesthe data at the client.

USING BUSINESS OBJECTS 689
This object-oriented approach is also more elegant than the structure of the two tables in thedatabase. Some people talk about the impedance mismatch between object-oriented program-ming and databases. One of the advantages of using business objects to store your data at theclient is that the custom objects can be manipulated with traditional programming techniques(and not-so traditional techniques, like LINQ).
The main theme in designing data-driven applications is how to get the relational data outof a database and map it to a business object like Order and how to get the data from a busi-ness object and submit it to the database. And as you will see in this and the following chapter,there are many techniques for mapping database data to custom objects. To better understandhow to bridge the gap between traditional database data and custom objects, we’ll explore thisprocess through a sample application.
VB 2010 at Work: The NWOrders ApplicationIn this section, you’ll develop a real-world application, which isn’t very complicated, to serveas an example in a textbook, but it’s by no means trivial. The NWOrders application (availablefor download from www.sybex.com/go/masteringvb2010) allows you to create new orders forthe Northwind database. Although the applications for manipulating the other tables of thedatabase, such as the Products or Customers/Employees tables, are fairly simple and you havealready seen a few examples, the application for entering new invoices is entirely different. Tobegin with, the user interface is the most critical aspect of the application. Users should be ableto add new items to the order easily and quickly. The interface should be simple and intuitive,and all operations should be performed with the keyboard. Ideally, users should be able to scanthe product’s bar code and append the scanned item to the order.
Inserting the new order to the database is also a bit involved. An order is stored in two sep-arate tables: the order’s header (the data that usually appear at the top of an invoice, such asthe invoice’s date and customer) is stored in the Orders table, and the order’s details (the itemssold that appear in a grid that takes up most of the invoice) are stored in the Order Detailstable. Moreover, the order’s header and its details must be inserted into the correspondingtables in the context of a transaction: All rows must be inserted successfully, or the insertionof an order must fail as a whole. Even if the insertion of a single detail line fails, then the entireorder must fail. Otherwise, you may end up with a partial order.
I’ve implemented the same application with two different techniques to demonstratethe steps of building data-driven applications, as well as the parts of the application thatcan be streamlined by the Framework. The interface of the application is identical in bothversions, because it’s a functional interface that shouldn’t be tied to a particular implemen-tation of the data-access layer. Likewise, the data-access layer shouldn’t be tied to a specificinterface. One of the major themes in designing data-driven applications is the separationof the user interface from the data-access layer. The data layer is the code that interacts withthe database by retrieving the data requested by the user and submitting the edits to thedatabase.
The UI, on the other hand, is responsible for interacting with the user. Every time it needsto fetch some data from the database or submit data to the database, it calls a method of thedata-access layer, which is usually implemented as a class. As you will see shortly, the twoapplications have an identical UI; even the code is the same. The data-access layer, however,is very different. Yet, the code that implements the UI calls a few methods that have the samesignature but are implemented very differently. You can even make the same application workwith a different database by rewriting the data-access layer without editing a single line of codein the UI code.

690 CHAPTER 16 DEVELOPING DATA-DRIVEN APPLICATIONS
The Application’s Interface
Figure 16.1 shows the interface of the application, and I suggest you open the application tosee how it works. To specify the order’s header, you simply select the customer who placed theorder and the employee who made the sale from the appropriate ComboBox controls and enterthe order’s shipping address in the TextBox control at the bottom of the form. Then you mustenter the products purchased; this is the most challenging part of the application because usersshould be able to enter new products quickly and safely.
Figure 16.1
The user interface of theNWOrders application
The NWOrders application assumes that you’re using an instance of SQL Server running onthe same machine and that you have installed the Northwind sample database. If SQL Serveris running on a remote machine, you must edit the NorthwindConnectionString setting in theapplication’s configuration file accordingly. To do so, open the app.config file, and edit theconnectionString setting in the connectionStrings section:
<connectionStrings><add name="NWOrders.My.MySettings.NorthwindConnectionString"
connectionString="Data Source=(local);Initial Catalog=Northwind;Integrated Security=True"providerName="System.Data.SqlClient" />
</connectionStrings>
This application will most likely be used as a point-of-sale (POS) system and must beintuitive, easy to use, and extremely fast. The user of the application is probably a cashierand shouldn’t be expected to open the Products table, select the desired one, and then add itto the invoice. With the interface I’m suggesting, users enter the product ID in the TextBoxabove the ID column of the grid. As soon as the user presses the Enter key, the applicationretrieves the desired product and displays its description and price. The two TextBoxes areread-only, and the user can’t change either. You may want to allow users to edit the price, butthis isn’t a recommended practice. A general discount that’s applied to all items is probably

USING BUSINESS OBJECTS 691
the simplest way to go, but it’s trivial to add another TextBox control for entering a differentdiscount for each detail line (along with a new column in the ListView control with the order’sdetails). As soon as the item is retrieved and displayed on the TextBox controls at the top, thefocus is moved to the TextBox for the quantity, where the user can type the number of items.After pressing the Enter key for a second time, the new row is added to the grid with theorder’s details, and the focus is moved automatically to the ID field in anticipation of the nextproduct’s ID.
Users aren’t expected to know the IDs of the products, obviously. In a real-world scenario,the application should accept the product’s bar code instead of the ID. You can use a barcodereader with this application without any modifications. The barcode reader reads the bar’s char-acters and sends them to the computer via the serial or USB port, but to the application theyappear as if they were typed at the keyboard. The whole process is transparent, and you neednot write a single additional line of code. Since the unique identifier in the Products table is theproduct ID, we’ll use the ID as a bar code for this application.
Occasionally, the reader might fail to read a product ID. In that case, users can type afew characters from the product name, and the application will retrieve matching rows anddisplay them so the user can select the desired one. Although searching with an ID will returna single product, searching with a product name may result in multiple matches, so someuser intervention is needed to guarantee that the proper product is selected. In the discussionof the application, I will ignore this feature, which isn’t trivial, and will focus on the otheraspects of the application. If you’re interested in the implementation of this feature, pleaseopen the NWOrders project with Visual Studio and examine the code; it is well documented.The code retrieves all the products whose name contains the characters specified in the ID boxand displays them on a second ListView control, which is normally hidden but remains visibleuntil the user selects the desired product. Figure 16.2 shows the application when a product isselected by name.
Figure 16.2
Selecting a product byname in the NWOrdersapplication
While entering new products, the user may decide to delete a product that was added tothe grid by mistake or modify the quantity. Although most of the time users work with the

692 CHAPTER 16 DEVELOPING DATA-DRIVEN APPLICATIONS
TextBox controls located at the top of the grid, in this case they must move the focus to thegrid to select a row. This operation doesn’t require the use of the mouse. By pressing the downarrow key while they’re in the ID TextBox, users can move the focus to the first row of the gridand select it. Once they’ve landed on the grid with the order’s details, users can move up anddown with the arrow keys, and the currently selected row’s fields are displayed in the TextBoxcontrols on the top of the grid. To delete the selected row, they can simply press the Deletekey. They can also use the mouse to locate the row to be removed on the grid, but it will takelonger. Data-entry operators just don’t like using their mouse. To return to the ID box and entera new detail, they can press Escape.
Depending on the nature of the business, you may skip the quantity too and add anew row to the grid with a quantity of 1. If the same product is added multiple times, theapplication will generate multiple detail lines. You can edit the application’s code to increasethe quantity of the existing row, instead of adding a new row with the same product anda quantity of 1. If the application is going to be used at a bookstore, where people usuallypurchase a single copy of each title, the alternate approach will work better. You can use thisapplication as your starting point for a POS system and add all the features required by yourbusiness needs.
The NWOrders application consists of two forms, the frmLINQ and frmSQL forms. ThefrmSQL form uses the basic ADO.NET objects to interact with the database, while frmLINQuses the classes generated by the LINQ to SQL component of Visual Studio. You’ll have tochange the application’s startup form to the desired one to test it.
We have discussed the application’s interface, but before you start writing code, you mustidentify the requests you want to make to the database and implement them as methodsin a separate class. The code behind the form will call these methods to retrieve data orsubmit data to the database and should not know anything about the database. This is nota requirement for small projects, but in a large project there will be different developersworking on the data-access layer and different developers working on the user interface. Byseparating the data-access logic from the user interface, you can also implement multipleinterfaces (a Windows application and a Web application, for example) that use the samedata-access methods.
When you work on the application UI, you shouldn’t need to care about the structure of thetables in the database. Your class should expose the business objects you need for the applica-tion and map them to the database tables. For example, the class you’ll create shortly for theNWOrders application should expose an Order object that combines an order’s header anddetails. Your UI code will populate an Order object and pass it as an argument to a methodof the class that will submit it to the database. When the interface requests an order by its ID,the class should return an object of the Order type. This object will contain all the informa-tion about the order but with a structure that’s totally different from the structure of the rel-evant tables in the database. In effect, the custom class will isolate the user interface from thedata-access layer; should you have to implement the same application with a different database,you’ll only have to revise the class that implements the data-access layer.
The class with the data-access components is referred to as the data-access layer, while theapplication’s interface is the UI layer. In most applications, there’s a third layer that implementsthe business logic. This layer is not related to the database, but it can’t be part of the user inter-face either. You can implement it in either the UI or data-access layer, but logically it doesn’tbelong there and should be implemented as a separate class. If you ever decide to change someof the business rules, you will revise a specific class and not the entire application. Likewise, ifyou decide to move to a different database, you only need to revise the data-access layer andnot the UI layer.

USING BUSINESS OBJECTS 693
The business layer contains functionality that’s specific to a corporation. For example, youmay implement the discount calculations or a customer’s credit line as a business layer. Allmethods that require this functionality, whether they reside in the UI or the data-access layer,should call the appropriate method of the class that implements the business logic.
The most basic rule in the design of data-driven applications is that the UI should not con-tain code that interacts with the database. Ideally, you must create classes that represent thebusiness objects that represent the entities in your application. These business objects are classesthat implement customers, employees, orders, and so on. Let’s jump to a practical example tosee how the application is structured.
Implementing the Data-Access Layer with Custom Objects
The data-access layer of the frmSql form of the NWOrder application is implemented in theNWOrder class. The two simpler business objects of the NWOrder class are the NWEmployeeand NWCustomer objects, which are implemented with two trivial classes by the same name.Both classes expose two properties, the ID and name of the corresponding entity and a customimplementation of the ToString method. I needed a custom implementation of the ToStringmethod because the code in the UI application needs to add customers and employees to aComboBox control and display their names.
In addition to their properties, the two classes provide the GetAllEmployees andGetAllCustomers methods, which return a strongly typed List of NWCustomer and NWEm-ployee objects, respectively. Listing 16.1 shows the code of the NWEmployee and NWCustomerclasses (I’ve skipped the implementation of the two methods, which are fairly lengthy).
Listing 16.1: The outline of the NWEmployee and NWCustomer business objects
Public Class NWEmployeePublic EmployeeID As IntegerPublic EmployeeName As StringPublic Overrides Function ToString() As String
Return EmployeeNameEnd Function
Public Shared Function GetAllEmployees() As List(Of NWEmployee)End Function
End Class
Public Class NWCustomerPublic CustomerID As StringPublic CustomerName As StringPublic Overrides Function ToString() As String
Return CustomerNameEnd Function
Public Shared Function GetAllCustomers() As List(Of NWCustomer)End Function
End Class

694 CHAPTER 16 DEVELOPING DATA-DRIVEN APPLICATIONS
Another class, the NWProduct class, represents the products that can appear in the order’sdetails. Although the Products table contains a large number of columns, for the purposesof selling products we only need the product’s ID, name, and price. The NWProduct classshould also expose a method that allows us to retrieve a product by its ID, the GetProductByIDmethod. All methods used in this application are shared: You can call them without having tocreate a new instance of the corresponding class.
Public Class NWProductPublic ProductID As IntegerPublic ProductName As StringPublic ProductPrice As Decimal
Public Shared Function GetProductByID(ByVal productID As Integer) As NWProduct
End FunctionEnd Class
Finally, the core class of the application is the NWOrder class, which represents an orderand its details (see Listing 16.2). This class exposes the columns of the Orders table as proper-ties and the columns of the Order Details table as a collection of NWOrderDetail objects.
Listing 16.2: The implementation of the NWOrder business object
Public Class NWOrderPublic Class NWOrderDetail
Public ProductID As IntegerPublic ProductPrice As DecimalPublic ProductQuantity As IntegerPublic ProductDiscount As Decimal
End Class
Public OrderDate As DatePublic EmployeeID As IntegerPublic CustomerID As StringPublic Details As New List(Of NWOrderDetail)
Public Shared Function SaveOrder(ByVal newOrder As NWOrder) As IntegerEnd Function
End Class
The implementation of the SaveOrder method is not trivial and is described in detail next.
Creating a New Order
To create a new order with the data entered by the user on the main form, the applicationdeclares a variable of the NWOrder type and populates it. Most of the properties are scalar andare populated with a single statement. The order’s details, however, are stored in a propertythat is a List of NWOrderDetail objects. The code creates a new NWOrderDetail object for each

USING BUSINESS OBJECTS 695
item in the order, populates its properties, and then appends it to the Details property of theorder. Listing 16.3 shows the code that iterates through the ListView control with the order’sdetails and appends them to the newOrder variable, as shown in Listing 16.3.
Listing 16.3: Appending the details of a new order
For Each LI As ListViewItem In ListView1.ItemsDim newDetail As New NWOrder.NWOrderDetailnewDetail.ProductID = LI.TextnewDetail.ProductPrice =
System.Convert.ToDecimal(LI.SubItems(2).Text)newDetail.ProductQuantity =
System.Convert.ToInt32(LI.SubItems(3).Text)newOrder.Details.Add(newDetail)
Next
Saving the New Order
Once the newOrder variable has been initialized to the fields of the order on the form, the appli-cation submits it to the database by calling the SaveOrder method of the data-access layer,whose code is shown in Listing 16.4.
Listing 16.4: The SaveOrder method of the NWData class
Public Shared Function SaveOrder(ByVal newOrder As NWOrder) As IntegerDim CN As New SqlClient.SqlConnection(
My.Settings.NorthwindConnectionString)Dim CMD As New SqlClient.SqlCommandCN.Open()CMD.Connection = CNDim TR As SqlClient.SqlTransaction = CN.BeginTransactionCMD.Transaction = TRCMD.CommandText = "INSERT Orders (OrderDate, EmployeeID, " &
"CustomerID) VALUES (@orderDate, @employeeID, " &"@customerID);SELECT Scope_Identity()"
CMD.Parameters.AddWithValue("@orderDate", Today)CMD.Parameters.AddWithValue("@employeeID", newOrder.EmployeeID)CMD.Parameters.AddWithValue("@customerID", newOrder.CustomerID)Dim OrderID As Int32Try
OrderID = System.Convert.ToInt32(CMD.ExecuteScalar)Catch ex As Exception
TR.Rollback()CN.Close()Throw ex
End Try

696 CHAPTER 16 DEVELOPING DATA-DRIVEN APPLICATIONS
For Each det As NWOrderDetail In newOrder.DetailsCMD.CommandText = "INSERT [Order Details] " &
"(OrderID, ProductID, UnitPrice, Quantity) " &"VALUES(@OrderID, @productID, @price, @quantity)"
CMD.Parameters.Clear()CMD.Parameters.AddWithValue("@orderID", OrderID)CMD.Parameters.AddWithValue("@productID", det.ProductID)CMD.Parameters.AddWithValue("@price", det.ProductPrice)CMD.Parameters.AddWithValue("@quantity", det.ProductQuantity)Try
CMD.ExecuteNonQuery()Catch ex As Exception
TR.Rollback()CN.Close()Throw ex
End TryNextTR.Commit()CN.Close()Return OrderID
End Function
Listing 16.4 contains a large number of trivial statements, such as the statements that pre-pare the SQL command to be executed and initialize its parameters, which you can ignore;instead, focus on the statements that execute all SQL commands in transactional mode. Thestatements of interest are shown in bold in Listing 16.4.
To execute a number of statements in the context of a transaction, you must do thefollowing:
1. Set up a Transaction object by calling the BeginTransaction method on the Connectionobject that will be used to submit the commands to the database.
2. Assign the Transaction object to the Transaction property of the Command object.
3. Submit multiple commands through the Command object’s ExecuteNonQuery method.
4. Should an error condition prevent one of the commands from completing successfully, youcan call the Rollback method of the Transaction object to abort the transaction.
5. If all goes well and none of the exception handlers is entered, the transaction will be com-mitted when the Transaction object’s Commit method is called.
Let’s take a closer look at the code that commits the new order to the database. First itinserts the order’s header to the Orders table and retrieves the ID of the newly created order.This ID will be used as a foreign key with the Order Details table to associate the details of thenew order with its header. The INSERT statement is executed from within an exception handler,and in the case of an error, the transaction is aborted.
If the INSERT statement returns the ID of the new order, the code goes through the detailsof the newOrder variable and submits each one to the database through the same Command

USING BUSINESS OBJECTS 697
object, which is associated with the TR Transaction object. Again, the transaction can be abortedas soon as a detail line fails to update the Order Details table. If all details are inserted success-fully, then the code calls the Commit method to finalize the insertions and update the database.
You can easily test the transactional features of the application by adding two detail lineswith the same product ID. One of the constraints in the Order Details table is that no ordershould contain the same product more than once. To comply with this constraint, you canupdate the quantities of each detail line, rather than attempt to insert multiple lines that referto the same product. Anyway, I have ignored this constraint in the implementation of thesample application. If you attempt to submit an order that contains the same product twice, thetransaction will be aborted with the error message shown in Figure 16.3.
Figure 16.3
A violation of thedatabase constraints willcause the transaction tobe aborted.
If the order can’t be committed to the database, you should display a friendlier error mes-sage and either allow the user to further edit the order or clear the fields in anticipation of thenext order.
Implementing the Data-Access Layer with LINQ to SQL
Now, we can switch our attention to the second implementation of the NWOrders applications,which uses LINQ to SQL to implement the data-access layer. The frmLINQ form is based ona LINQ to SQL component, which converts the relevant tables into custom business objects.In effect, the LINQ to SQL component will create the classes for the application objects, whichwe’ll simply use in our application. Our new data layer doesn’t contain any code to implementthe Product, Order, and Order_Detail classes. The component will expose these three objectsfor us, and all we have to do is add the GetProductByID, GetProducts, and GetEmployeesmethods to the class. The code is quite short, because we don’t have to request the desired rowsand then iterate through them with a DataReader.
Start by adding a new item to the project, a LINQ to SQL Class component. Whenprompted, enter NW as the name of the new component, and Visual Studio will open it in thedesigner. Drop the Customers, Employees, Products, Orders, and Order Detail tables onto

698 CHAPTER 16 DEVELOPING DATA-DRIVEN APPLICATIONS
the design surface, and the designer will generate a class for each table. Once you drop thetables on the designer surface, the designer will create a class for each table and will expose thecontents of each table as a collection of typed objects. Each row of the Customers table will bemapped to an object of the Customer type, and the rows of the Customers table will be storedin the Customers collection, which is a List of Customer objects.
To access the collections that represent the tables of the Northwind database, use theDataContext object, which also will be exposed by the same class. Create a variable of theNWDataContext type. (This is an autogenerated class named after the LINQ to SQL Classcomponent with the suffix DataContext appended.)
Dim ctx As New NWDataContext
To access the Customers table, use the following expression, which returns a List of Cus-tomer objects, and each element in the List is a variable of the Customer type. Because thecollection is typed, you can use LINQ to query its elements, as discussed in Chapter 14. Thefollowing query will select a customer by its ID:
Dim cust = (From c In ctx.CustomersWhere c.CustomerID = "ALFKI"Select c).FirstOrDefault
The LINQ query will not be executed at the client. Instead, the compiler will convert theLINQ query into a SQL query and will execute it against the database as needed. For moreinformation on LINQ and how LINQ to SQL queries are transformed into SQL queries, seeChapter 14.
Listing 16.5 shows the implementation of the methods of the NWData class. Becausethe methods are implemented as LINQ queries, they require very little, and straight-forward, code.
Listing 16.5: The data-access layer of the Orders project implemented with LINQ to SQL
Public Class NWDataPublic Function GetProductByID(
ByVal productID As Integer) As ProductDim ctx As New NWDataContextDim prod = (From p In ctx.Products
Where p.ProductID = productIDSelect p).FirstOrDefault
Return prodEnd Function
Public Function GetEmployees() As List(Of Employee)Dim ctx As New NWDataContextDim emps = (From emp In ctx.Employees
Select emp).ToListReturn emps
End Function

USING BUSINESS OBJECTS 699
Public Function GetCustomers() As List(Of Customer)Dim ctx As New NWDataContextDim customers = (From cust In ctx.Customers
Select cust).ToListReturn customers
End Function
End Class
The SaveOrder method of the NWData class uses the SubmitChanges method of the Data-Context object generated by the designer, the NWDataContext object, to submit the new orderto the database. The SubmitChanges method will insert the header in the Orders table and thedetails in the Order Details table. It will also handle the identity issue automatically.
Using the TransactionScope Class
The implementation of the SaveOrder method is trivial compared to the SaveOrder method ofthe NWOrder class we use with the frmSQL form, because now we don’t have to perform theINSERT statements ourselves. To submit the changes made to a table back to the database, youmust call the InsertOnSumbit/DeleteOnSubmit method of the appropriate table. These twomethods do not submit any data to the database. They accept an entity that represents a newor deleted row as an argument and add it to the collection that represents the table. The rowsare submitted to the database when you call the SubmitChanges method.
Even though all the rows will be inserted to the database with a single method, theSubmitChanges method, you must still execute this method in the context of a transaction. Thistime I’ll use a different, and simpler, approach to the transactional update. The Frameworkprovides the TransactionScope object, which initiates a transaction automatically. To useTransactionScope, you must first add a reference to the System.Transactions namespaceto the project. Then, you must create a new instance of this class and embed the statementsthat must be executed in the transaction’s scope in a Using statement. Listing 16.6 shows theimplementation of the SaveOrder method of the NWData class.
Listing 16.6: Implementing a transaction with a TransactionScope object
Public Shared Function SaveOrder(ByVal newOrder As Order) As IntegerDim ctx As New NWDataContextUsing TR As New System.Transactions.TransactionScope
ctx.Orders.InsertOnSubmit(newOrder)Try
ctx.SubmitChanges()TR.Complete()
Catch ex As ExceptionReturn (-1)
End TryEnd UsingReturn newOrder.OrderID
End Function

700 CHAPTER 16 DEVELOPING DATA-DRIVEN APPLICATIONS
One statement that may not be clear in the listing is the line that returns the value −1 whenthe transaction fails. Normally, the method returns the ID of the newly inserted row, and ourapplication expects a positive value. The ID can also be accessed through the OrderID prop-erty of the newOrder object. This property has no value when the method is called, but theSubmitChanges method updates the fields of the newOrder object for us.
The newOrder.OrderID property is updated when the SubmitChanges method submits theorder header to the Orders table. If this operation succeeds, the ID of the new order is assignedto the OrderID property. Should the transaction fail while inserting the row details, the value ofthe OrderID property won’t change automatically. It will still have a valid value, even thoughno rows will be committed either to the Orders or Order Details table. That’s why you need areturn value from the SaveOrders method to indicate the success or failure of the operation.
The data-access layer of the form that uses the LINQ to SQL component to interact withthe database is quite short and much easier to understand. I repeat it here for your conve-nience so you can compare it to the custom NWData class you developed earlier. As you canunderstand, the code is so much simpler because of the DataContext object, which abstractsthe database tables and much of the functionality of the operations that are performed againstthese tables.
Listing 16.7: The implementation of the data-access layer with a DataContext object
Public Class NWDataPublic Function GetProductByID(ByVal productID As Integer) As Product
Dim ctx As New NWDataContextDim prod = (From p In ctx.Products
Where p.ProductID = productIDSelect p).FirstOrDefault
Return prodEnd Function
Public Function GetEmployees() As List(Of Employee)Dim ctx As New NWDataContextDim emps = (From emp In ctx.Employees
Select emp).ToListReturn emps
End Function
Public Function GetCustomers() As List(Of Customer)Dim ctx As New NWDataContextDim customers = (From cust In ctx.Customers
Select cust).ToListReturn customers
End Function
Public Shared Function SaveOrder(ByVal newOrder As Order) As IntegerDim ctx As New NWDataContext
Using TR As New System.Transactions.TransactionScopectx.Orders.InsertOnSubmit(newOrder)

STORING DATA IN DATASETS 701
Tryctx.SubmitChanges()TR.Complete()
Catch ex As ExceptionReturn (-1)
End TryEnd UsingReturn newOrder.OrderID
End FunctionEnd Class
This concludes the first part of the chapter where you’ve learned how to use objects to rep-resent the data stored in the database tables as custom objects. In the second half, you’ll learnabout DataSets, which are a standard mechanism for storing data at the client. DataSets arenot new to Visual Studio; they have been around for many years, and they are used heavilyin data-driven applications.
Storing Data in DataSetsThe process of building data-driven applications isn’t complicated and to a large extent is abs-tracted by the Connection, Command, and DataReader classes. You have seen a few interestingexamples of these classes and should be ready to use them in your applications. The problemwith these classes is that they don’t offer a consistent method for storing the data at the client.The approach of converting the data into business objects and working with classes is fine, butyou must come up with a data-storage mechanism at the client. The LINQ to SQL componentsimplifies this task, and you saw how to automatically convert tables into custom objects.
You can store the data in a ListBox control, as we have done in some examples. You can alsocreate a List of custom objects, as we did in the preceding section. The issue of storing data atthe client isn’t pressing when the client application is connected to the database and all updatestake place in real time. As soon as the user edits a row, the row is submitted to the database,and no work is lost.
In some situations, however, the client isn’t connected at all times. There’s actually a classof applications that are referred to as occasionally connected or disconnected, and the techniquespresented so far do not address the needs of these applications. Disconnected applications readsome data when a connection is available, and then they disconnect from the server. Users areallowed to interact with the data at the client, but they work with a local cache of the data; theycan insert new rows, edit existing ones, and delete selected rows. The changes, however, arenot submitted immediately to the server. It’s imperative that the data is persisted at the client.(We don’t want users to lose their edits because their notebooks ran out of battery power orbecause of a bug in the application.) When a connection becomes available again, the applica-tion should be able to figure out the rows that have been edited and submit all changes to theserver. To simplify the storage of data at the client, ADO.NET offers a powerful mechanism,the DataSet.
You can think of the DataSet as a small database that lives in memory. It’s not actually adatabase, but it’s made up of related tables that have the same structure as database tables. Thesimilarities end there, however, because the DataSet doesn’t impose all types of constraints,and you can’t exploit its data with SQL statements. It’s made up of DataTable objects, and eachDataTable in the DataSet corresponds to a separate query. Like database tables, the DataTable

702 CHAPTER 16 DEVELOPING DATA-DRIVEN APPLICATIONS
objects consist of DataColumn and DataRow objects. The DataColumn objects specify thestructure of the table, and the DataRow objects contain the rows of the table. You can alsoestablish relations between the tables in the DataSet, and these relations are represented withDataRelation objects. As you realize, the DataSet lets you copy a small section of the databaseat the client, work with it, and then submit the changes made at the client back to the database.
The real power of the DataSet is that it keeps track of the changes made to its data. It knowswhich rows have been modified, added, or deleted, and it provides a mechanism for submittingthe changes automatically. Actually, it’s not the DataSet that submits the changes but a classthat’s used in tandem with the DataSet: the DataAdapter class. Moreover, the DataSet class pro-vides the WriteXml and ReadXml methods, which allow you to save its data to a local file. Notethat these methods save the data to a local file so you can reload the DataSet later, but they donot submit the data to the database.
With the new data-related technologies introduced during the past few years, such asLINQ to SQL, the Entity Framework (EF), and LINQ to Entities (discussed in the next chapter),DataSets will soon become obsolete. Yet, there are only a few data-driven applications out therethat are not based on DataSets. I’ve decided to include this section because you’ll inevitablyrun into applications that use DataSets.
Filling DataSetsDataSets are filled with DataAdapters, and there are two ways to create a DataSet: You can usethe visual tools of Visual Studio or create a DataSet entirely from within your code. DataSetscreated at runtime are not typed, because the compiler doesn’t know what type of informationyou’re going to store in them. DataSets created at design time with the visual tools are stronglytyped, because the compiler knows what type of information will be stored in them.
The following statements demonstrate the difference between untyped and typed DataSets.To access the ProductName column of the first row in the Products table in an untyped DataSet,you’d use an expression like the following:
Dim row As DataRow = Products1.Products.Rows(0).Item("ProductName")
If the Products1 DataSet is typed, you can create an object of the Products.ProductsRowtype with the following statement:
Dim productRow As Products.ProductsRow = Products1.Products.Rows(0)
Then use the productRow variable to access the columns of the corresponding row:
productRow.ProductNameproductRow.UnitPrice
The difference between typed and untyped DataSets is also demonstrated by the declara-tion of the row and productRow variables. Where row is a variable that represents a row ina DataSet, the productRow variable represents a row in a DataSet that stores the rows of theProducts table.
As you can see, the visual tools generate a number of classes on the fly, such as the Prod-uctsRow class, and expose them to your code. As soon as you enter the string productRow andthe following period in the code window, you will see the members of the ProductsRow class,which include the names of the columns in the corresponding table. In this chapter, I discuss

STORING DATA IN DATASETS 703
untyped DataSets. In the following chapter, I’ll discuss in detail typed DataSets and how to usethem in building data-bound applications.
The DataAdapter Class
To use DataSets in your application, you must first create a DataAdapter object, which is thepreferred technique for populating the DataSet. The DataAdapter is nothing more than a col-lection of Command objects that are needed to execute the various SQL statements against thedatabase. As you recall from our previous discussion, we interact with the database by usingfour different command types: one to select the data and load them to the client computer withthe help of a DataReader object (a Command object with the SELECT statement) and three moreto submit to the database the new rows (a Command object with the INSERT statement), updateexisting rows (a Command object with the UPDATE statement), and delete existing rows (a Com-mand object with the DELETE statement). A DataAdapter is a container for Connection andCommand objects. If you declare a SqlDataAdapter object with a statement like the following:
Dim DA As New SqlDataAdapter
you’ll see that it exposes the properties described in Table 16.1.
Table 16.1: SqlDataAdapter object properties
Property Description
InsertCommand A Command object that’s executed to insert a new row
UpdateCommand A Command object that’s executed to update a row
DeleteCommand A Command object that’s executed to delete a row
SelectCommand A Command object that’s executed to retrieve selected rows
Each of these properties is an object and has its own Connection property, because each maynot act on the same database (as unlikely as it may be). These properties also expose their ownParameters collection, which you must populate accordingly before executing a command.
The DataAdapter class performs the two basic tasks of a data-driven application: It retrievesdata from the database to populate a DataSet and submits the changes to the database.To populate a DataSet, use the Fill method, which fills a specific DataTable object. There’sone DataAdapter per DataTable object in the DataSet, and you must call the correspondingFill method to populate each DataTable. To submit the changes to the database, use theUpdate method of the appropriate DataAdapter object. The Update method is overloaded, andyou can use it to submit a single row to the database or all edited rows in a DataTable. TheUpdate method uses the appropriate Command object to interact with the database.
Passing Parameters Through the DataAdapter
Let’s build a DataSet in our code to demonstrate the use of the DataAdapter objects. As withall the data objects mentioned in this chapter, you must add a reference to the System.Datanamespace with the Imports statement.

704 CHAPTER 16 DEVELOPING DATA-DRIVEN APPLICATIONS
Start by declaring a DataSet variable:
Dim DS As New DataSet
To access the classes discussed in this section, you must import the System.Data namespacein your module. Then create the various commands that will interact with the database:
Dim cmdSelectCustomers As String = "SELECT * FROM Customers " &"WHERE Customers.Country=@country"
Dim cmdDeleteCustomer As String = "DELETE Customers WHERE CustomerID=@CustomerID"Dim cmdEditCustomer As String = "UPDATE Customers " &
"SET CustomerID = @CustomerID, CompanyName = @CompanyName, " &"ContactName = @ContactName, ContactTitle = @ContactTitle " &"WHERE CustomerID = @CustID"
Dim cmdInsertCustomer As String = "INSERT Customers " &" (CustomerID, CompanyName, ContactName, ContactTitle) " &"VALUES(@CustomerID, @CompanyName, @ContactName, @ContactTitle) "
You can also create stored procedures for the four basic operations and use their names inthe place of the SQL statements. It’s actually a bit faster, and safer, to use stored procedures.I’ve included only a few columns in the examples to keep the statements reasonably short.The various commands use parameterized queries to interact with the database, and you mustadd the appropriate parameters to each Command object. After the SQL statements are inplace, we can build the four Command properties of the DataAdapter object. Start by declaring aDataAdapter object:
Dim DACustomers As New SqlDataAdapter()
Because all Command properties of the DataAdapter object will act on the same database, youcan create a Connection object and reuse it as needed:
Dim CN As New SqlConnection(ConnString)
The ConnString variable is a string with the proper connection string. Now we can create thefour Command properties of the DACustomers DataAdapter object.
Let’s start with the SelectCommand property of the DataAdapter object. The following state-ments create a new Command object based on the preceding SELECT statement and then set upa Parameter object for the @country parameter of the SELECT statement:
DACustomers.SelectCommand = New SqlClient.SqlCommand(cmdSelectCustomers)DACustomers.SelectCommand.Connection = CNDim param As New SqlParameterparam.ParameterName = "@Country"param.SqlDbType = SqlDbType.VarCharparam.Size = 15param.Direction = ParameterDirection.Inputparam.IsNullable = Falseparam.Value = "Germany"DACustomers.SelectCommand.Parameters.Add(param)

STORING DATA IN DATASETS 705
This is the easier, if rather verbose, method of specifying a Parameter object. You are familiarwith the Parameter object properties and already know how to configure and add parametersto a Command object via a single statement. As a reminder, an overloaded form of the Addmethod allows you to configure and attach a Parameter object to a Command object Parameterscollection with a single, if lengthy, statement:
DA.SelectCommand.Parameters.Add(New System.Data.SqlClient.qlParameter(paramName, paramType, paramSize, paramDirection,paramNullable, paramPrecision, paramScale,columnName, rowVersion, paramValue)
The paramPrecsion and paramScale arguments apply to numeric parameters, and youcan set them to 0 for string parameters. The paramNullable argument determines whetherthe parameter can assume a Null value. The columnName argument is the name of the tablecolumn to which the parameter will be matched. (You need this information for the INSERTand UPDATE commands.) The rowVersion argument determines which version of the field inthe DataSet will be used — in other words, whether the DataAdapter will pass the currentversion (DataRowVersion.Current) or the original version (DataRowVersion.Original)of the field to the parameter object. The last argument, paramValue, is the parameter’svalue. You can specify a value as we did in the SelectCommand example, or you can setthis argument to Nothing and let the DataAdapter object assign the proper value to eachparameter. (You’ll see in a moment how this argument is used with the INSERT and UPDATEcommands.)
Finally, you can open the connection to the database and then call the DataAdapter’s Fillmethod to populate a DataTable in the DataSet:
CN.OpenDACustomers.Fill(DS, "Customers")CN.Close
The Fill method accepts as arguments a DataSet object and the name of the DataTableit will populate. The DACustomers DataAdapter is associated with a single DataTable andknows how to populate it, as well as how to submit the changes to the database. TheDataTable name is arbitrary and need not match the name of the database table where thedata originates. The four basic operations of the DataAdapter (which are none other thanthe four basic data-access operations of a client application) are also known as CRUDoperations: Create/Retrieve/Update/Delete.
The CommandBuilder Class
Each DataAdapter object that you set up in your code is associated with a single SELECT query,which may select data from one or multiple joined tables. The INSERT/UPDATE/DELETE queriesof the DataAdapter can submit data to a single table. So far, you’ve seen how to manually setup each Command object in a DataAdapter object. There’s a simpler method to specify thequeries: You start with the SELECT statement, which selects data from a single table, and thenlet a CommandBuilder object infer the other three statements from the SELECT statement. Let’ssee this technique in action.

706 CHAPTER 16 DEVELOPING DATA-DRIVEN APPLICATIONS
Declare a new SqlCommandBuilder object by passing the name of the adapter for which youwant to generate the statements:
Dim CustomersCB As SqlCommandBuilder =New SqlCommandBuilder(DA)
This statement is all it takes to generate the InsertCommand, UpdateCommand, andDeleteCommand objects of the DACustomers SqlDataAdapter object. When the compilerruns into the previous statement, it will generate the appropriate Command objects and attachthem to the DACustomers SqlDataAdapter. Here are the SQL statements generated by theCommandBuilder object for the Products table of the Northwind database:
UPDATE CommandUPDATE [Products] SET [ProductName] = @p1,
[CategoryID] = @p2, [UnitPrice] = @p3,[UnitsInStock] = @p4, [UnitsOnOrder] = @p5
WHERE (([ProductID] = @p6))
INSERT CommandINSERT INTO [Products]
([ProductName], [CategoryID],[UnitPrice], [UnitsInStock],[UnitsOnOrder])VALUES (@p1, @p2, @p3, @p4, @p5)
DELETE CommandDELETE FROM [Products] WHERE (([ProductID] = @p1))
These statements are based on the SELECT statement and are quite simple. You may noticethat the UPDATE statement simply overrides the current values in the Products table. TheCommandBuilder can generate a more elaborate statement that takes into considerationconcurrency. It can generate a statement that compares the values read into the DataSet tothe values stored in the database. If these values are different, which means that anotheruser has edited the same row since the row was read into the DataSet, it doesn’t perform theupdate. To specify the type of UPDATE statement you want to create with the CommandBuilderobject, set its ConflictOption property, whose value is a member of the ConflictOptionenumeration: CompareAllSearchValues (compares the values of all columns specified inthe SELECT statement), CompareRowVersion (compares the original and current versionsof the row), and OverwriteChanges (simply overwrites the fields of the current row in thedatabase).
The OverwriteChanges option generates a simple statement that locates the row to beupdated with its ID and overwrites the current field values unconditionally. If you set theConflictOption property to CompareAllSearchValues, the CommandBuilder will generatethe following UPDATE statement:
UPDATE [Products]SET [ProductName] = @p1, [CategoryID] = @p2,
[UnitPrice] = @p3, [UnitsInStock] = @p4,

STORING DATA IN DATASETS 707
[UnitsOnOrder] = @p5WHERE (([ProductID] = @p6) AND ([ProductName] = @p7)
AND ((@p8 = 1 AND [CategoryID] IS NULL) OR([CategoryID] = @p9)) AND((@p10 = 1 AND [UnitPrice] IS NULL) OR([UnitPrice] = @p11)) AND((@p12 = 1 AND [UnitsInStock] IS NULL) OR([UnitsInStock] = @p13)) AND((@p14 = 1 AND [UnitsOnOrder] IS NULL) OR([UnitsOnOrder] = @p15)))
This is a lengthy statement indeed. The row to be updated is identified by its ID, but the oper-ation doesn’t take place if any of the other fields don’t match the value read into the DataSet.This statement will fail to update the corresponding row in the Products table if it has alreadybeen edited by another user.
The last member of the ConflictOption enumeration, the CompareRowVersion option,works with tables that have a TimeStamp column, which is automatically set to the time ofthe update. If the row has a time stamp that’s later than the value read when the DataSet waspopulated, it means that the row has been updated already by another user and the UPDATEstatement will fail.
The SimpleDataSet sample project, which is discussed later in this chapter and demon-strates the basic DataSet operations, generates the UPDATE/INSERT/DELETE statements forthe Categories and Products tables with the help of the CommandBuilder class and displaysthem on the form when the application starts. Open the project to examine the code, andchange the setting of the ConflictOption property to see how it affects the autogenerated SQLstatements.
Accessing the DataSet’s TablesThe DataSet consists of one or more tables, which are represented by the DataTable class. EachDataTable in the DataSet may correspond to a table in the database or a view. When you exe-cute a query that retrieves fields from multiple tables, all selected columns will end up in asingle DataTable of the DataSet. You can select any DataTable in the DataSet by its index orits name:
DS.Tables(0)DS.Tables("Customers")
Each table contains columns, which you can access through the Columns collection. TheColumns collection consists of DataColumn objects, with one DataColumn object for eachcolumn in the corresponding table. The Columns collection is the schema of the DataTableobject, and the DataColumn class exposes properties that describe a column. ColumnName is thecolumn’s name, DataType is the column’s type, MaxLength is the maximum size of textcolumns, and so on. The AutoIncrement property is True for Identity columns, and theAllowDBNull property determines whether the column allows Null values. In short, all theproperties you can set visually as you design a table are also available to your code throughthe Columns collection of the DataTable object. You can use the DataColumn class’s propertiesto find out the structure of the table or to create a new table. To add a table to a DataSet, youcan create a new DataTable object. Then create a DataColumn object for each column, set its

708 CHAPTER 16 DEVELOPING DATA-DRIVEN APPLICATIONS
properties, and add the DataColumn objects to the DataTable Columns collection. Finally, addthe DataTable to the DataSet. The process is described in detail in the online documentation, soI won’t repeat it here.
Working with RowsAs far as data are concerned, each DataTable consists of DataRow objects. All DataRow objectsof a DataTable have the same structure and can be accessed through an index, which is therow’s order in the table. To access the rows of the Customers table, use an expression likethe following:
DS.Customers.Rows(iRow)
where iRow is an integer value from zero (the first row in the table) up to DS.Customers.Rows.Count – 1 (the last row in the table). To access the individual fields of a DataRow object, usethe Item property. This property returns the value of a column in the current row by either itsindex,
DS.Customers.Rows(0).Item(0)
or its name:
DS.Customers.Rows(0).Item("CustomerID")
To iterate through the rows of a DataSet, you can set up a For…Next loop like the following:
Dim iRow As IntegerFor iRow = 0 To DSProducts1.Products.Rows.Count - 1
‘ process row: DSProducts.Products.Rows(iRow)Next
Alternatively, you can use a For Each…Next loop to iterate through the rows ofthe DataTable:
Dim product As DataRowFor Each product In DSProducts1.Products.Rows
‘ process prodRow row:‘ product.Item("ProductName"),‘ product.Item("UnitPrice"), and so on
Next
To edit a specific row, simply assign new values to its columns. To change the value of theContactName column of a specific row in a DataTable that holds the customers of the North-wind database, use a statement like the following:
DS.Customers(3).Item("ContactName") = "new contact name"

STORING DATA IN DATASETS 709
The new values are usually entered by a user on the appropriate interface, and in yourcode you’ll most likely assign a control’s property to a row’s column with statements likethe following:
If txtName.Text.Trim <> "" ThenDS.Customers(3).Item("ContactName") = txtName.Text
ElseDS.Customers(3).Item("ContactName") = DBNull.Value
End If
The code segment assumes that when the user doesn’t supply a value for a column, this col-umn is set to null (if the column is nullable, of course, and no default value has been specified).If the control contains a value, this value is assigned to the ContactName column of the fourthrow in the Customers DataTable of the DS DataSet.
Handling Null ValuesAn important (and quite often tricky) issue in coding data-driven applications is the handlingof Null values. Null values are special, in the sense that you can’t assign them to control prop-erties or use them in other expressions. Every expression that involves Null values will throw aruntime exception. The DataRow object provides the IsNull method, which returns True if thecolumn specified by its argument is a Null value:
If customerRow.IsNull("ContactName") Then‘ handle Null value
Else‘ process value
End If
In a typed DataSet, DataRow objects provide a separate method to determine whether a spe-cific column has a Null value. If the customerRow DataRow belongs to a typed DataSet, youcan use the IsContactNameNull method instead:
If customerRow.IsContactNameNull Then‘ handle Null value for the ContactName
Else‘ process value: customerRow.ContactName
End If
If you need to map Null columns to specific values, you can do so with the ISNULL() func-tion of T-SQL, as you retrieve the data from the database. In many applications, you want todisplay an empty string or a zero value in place of a Null field. You can avoid all the compar-isons in your code by retrieving the corresponding field with the ISNULL() function in yourSQL statement. Where the column name would appear in the SELECT statement, use an expres-sion like the following:
ISNULL(customerBalance, 0.00)

710 CHAPTER 16 DEVELOPING DATA-DRIVEN APPLICATIONS
If the customerBalance column is Null for a specific row, SQL Server will return the numericvalue zero. This value can be used in reports or other calculations in your code. Notice that thecustomer’s balance shouldn’t be Null. A customer always has a balance, even if it’s zero. Whena product’s price is Null, it means that we don’t know the price of the product (and there-fore can’t sell it). In this case, a Null value can’t be substituted with a zero value. You mustalways carefully handle Null columns in your code, and how you’ll handle them depends onthe nature of the data they represent.
Adding and Deleting RowsTo add a new row to a DataTable, you must first create a DataRow object, set its column val-ues, and then call the Add method of the Rows collection of the DataTable to which the newrow belongs, passing the new row as an argument. If the DS DataSet contains the CustomersDataTable, the following statements will add a new row for the Customers table:
Dim newRow As New DataRow = dataTable.NewRownewRow.Item("CompanyName") = "new company name"newRow.Item("CustomerName") = "new customer name"newRow.Item("ContactName") = "new contact name"DS.Customers.Rows.Add(newRow)
Notice that you need not set the CustomerID column. This column is defined as an Identitycolumn and is assigned a new value automatically by the DataSet. Of course, when the rowis submitted to the database, the ID assigned to the new customer by the DataSet may alreadybe taken. SQL Server will assign a new unique value to this column when it inserts it intothe table. It’s recommended that you set the AutoIncrementSeed property of an Identitycolumn to 0 and the AutoIncrement property to –1 so that new rows are assigned consecutivenegative IDs in the DataSet. Presumably, the corresponding columns in the database have apositive Identity setting, so when these rows are submitted to the database, they’re assignedthe next Identity value automatically. If you’re designing a new database, use globally uniqueidentifiers (GUIDs) instead of Identity values. A GUID can be created at the client and isunique: It can be generated at the client and will also be inserted in the table when the row iscommitted. To create GUIDs, call the NewGuid method of the Guid class:
newRow.Item("CustomerID") = Guid.NewGuid
To delete a row, you can remove it from the Rows collection with the Remove or RemoveAtmethod of the Rows collection, or you can call the Delete method of the DataRow object thatrepresents the row. The Remove method accepts a DataRow object as an argument and removesit from the collection:
Dim customerRow As DS.CustomerRowcustomerRow = DS.Customers.Rows(2)DS.Customers.Remove(customerRow)
The RemoveAt method accepts as an argument the index of the row you want to delete in theRows collection. Finally, the Delete method is a method of the DataRow class, and you mustapply it to a DataRow object that represents the row to be deleted:
customerRow.Delete

STORING DATA IN DATASETS 711
Deleting versus Removing Rows
The Remove method removes a row from the DataSet as if it were never read when theDataSet was filled. Deleted rows are not always removed from the DataSet, becausethe DataSet maintains its state. If the row you’ve deleted exists in the underlying table(in other words, if it’s a row that was read into the DataSet when you filled it), the row willbe marked as deleted but will not be removed from the DataSet. If it’s a row that was addedto the DataSet after it was read from the database, the deleted row is actually removed fromthe Rows collection.
You can physically remove deleted rows from the DataSet by calling the DataSet’sAcceptChanges method. However, after you’ve accepted the changes in the DataSet, youcan no longer submit any updates to the database. If you call the DataSet RejectChangesmethod, the deleted rows will be restored in the DataSet.
Navigating Through a DataSetThe DataTables making up a DataSet may be related — they usually are. There are methodsthat allow you to navigate from table to table following the relations between their rows. Forexample, you can start with a row in the Customers DataTable, retrieve its child rows in theOrders DataTable (the orders placed by the selected customer), and then drill down to thedetails of each of the selected orders.
The relations of a DataSet are DataRelation objects and are stored in the Relations propertyof the DataSet. Each relation is identified by a name, the two tables it relates to, and thefields of the tables on which the relation is based. It’s possible to create relations in yourcode, and the process is really quite simple. Let’s consider a DataSet that contains the Cate-gories and Products tables. To establish a relation between the two tables, create two instancesof the DataTable object to reference the two tables:
Dim tblCategories As DataTable = DS.CategoriesDim tblProducts As DataTable = DS.Products
Then create two DataColumn objects to reference the columns on which the relation is based.They’re the CategoryID columns of both tables:
Dim colCatCategoryID As DataColumn =tblCategories.Columns("CategoryID")
Dim colProdCategoryID As DataColumn =tblProducts.Columns("CategoryID")
And finally, create a new DataRelation object, and add it to the DataSet:
Dim DR As DataRelationDR = New DataRelation("Categories2Products",
colCatCategoryID, colProdCategoryID)
Notice that you need to specify only the columns involved in the relation, and not the tablesto be related. The information about the tables is derived from the DataColumn objects. Thefirst argument of the DataRelation constructor is the relation’s name. If the relation involves

712 CHAPTER 16 DEVELOPING DATA-DRIVEN APPLICATIONS
multiple columns, the second and third arguments of the constructor become arrays of Data-Column objects.
To navigate through related tables, the DataRow object provides the GetChildRowsmethod, which returns the current row’s child rows as an array of DataRow objects, andthe GetParentRow/GetParentRows methods, which return the current row’s parent row(s).GetParentRow returns a single DataRow object, and GetParentRows returns an array ofDataRow objects. Because a DataTable may be related to multiple DataTables, you mustalso specify the name of the relation. Consider a DataSet with the Products, Categories, andSuppliers tables. Each row of the Products table can have two parent rows, depending onwhich relation you want to follow. To retrieve the product category, use a statement likethe following:
DS.Products(iRow).GetParentRow("CategoriesProducts")
The product supplier is given by the following expression:
DS.Products(iRow).GetParentRow("SuppliersProducts")
If you start with a category, you can find out the related products with the GetChildRowsmethod, which accepts as an argument the name of a Relation object:
DS.Categories(iRow).GetChildRows("CategoriesProducts")
To iterate through the products of a specific category (in other words, the rows of the Prod-ucts table that belong to a category), set up a loop like the following:
Dim product As DataRowFor Each product In DS.Categories(iRow).
GetChildRows("CategoriesProducts")’ process productNext
Row States and Versions
Each row in the DataSet has a State property. This property indicates the row’s state, andits value is a member of the DataRowState enumeration, whose members are described inTable 16.2.
You can use the GetChanges method to find the rows that must be added to the under-lying table in the database, the rows to be updated, and the rows to be removed from theunderlying table.
If you want to update all rows of a DataTable, call an overloaded form of theDataAdapter Update method, which accepts as an argument a DataTable and submitsits rows to the database. The edited rows are submitted through the UpdateCommandobject of the appropriate DataAdapter, the new rows are submitted through the Insert-Command object, and the deleted rows are submitted through the DeleteCommand object.

STORING DATA IN DATASETS 713
Instead of submitting the entire table, however, you can create a subset of a DataTable that con-tains only the rows that have been edited, inserted, or deleted. The GetChanges method of theDataTable object retrieves a subset of rows, depending on the argument you pass to it, and thisargument is a member of the DataRowState enumeration:
Dim DT As New DataTable =Products1.Products.GetChanges(DataRowState.Deleted)
Table 16.2: DataSet state property members
Property Member Description
Added The row has been added to the DataTable, and the AcceptChanges methodhas not been called.
Deleted The row was deleted from the DataTable, and the AcceptChanges methodhas not been called.
Detached The row has been created with its constructor but has not yet been added toa DataTable.
Modified The row has been edited, and the AcceptChanges method has not beencalled.
Unchanged The row has not been edited or deleted since it was read from the database orthe AcceptChanges was last called. (In other words, the row’s fields areidentical to the values read from the database.)
This statement retrieves the rows of the Customers table that were deleted and stores themin a new DataTable. The new DataTable has the same structure as the one from which therows were copied, and you can access its rows and their columns as you would access anyDataTable of a DataSet. You can even pass this DataTable as an argument to the appropriateDataAdapter’s Update method. This form of the Update method allows you to submit selectedchanges to the database.
In addition to a state, rows have a version. What makes the DataSet such a powerful toolfor disconnected applications is that it maintains not only data but also the changes in itsdata. The Rows property of the DataTable object is usually called with the index of the desiredrow, but it accepts a second argument, which determines the version of the row you wantto read:
DS.Tables(0).Rows(i, version)
This argument is a member of the DataRowVersion enumeration, whose values are describedin Table 16.3.

714 CHAPTER 16 DEVELOPING DATA-DRIVEN APPLICATIONS
Table 16.3: DataRowVersion enumeration members
Enumeration Member Description
Current Returns the row’s current values (the fields as they were editedin the DataSet).
Default Returns the default values for the row. For added, edited, andcurrent rows, the default version is the same as the current version.For deleted rows, the default versions are the same as the originalversions. If the row doesn’t belong to a DataTable, the default versionis the same as the proposed version.
Original Returns the row’s original values (the values read from the database).
Proposed Returns the row’s proposed value (the values assigned to a row thatdoesn’t yet belong to a DataTable).
If you attempt to submit an edited row to the database and the operation fails, you can givethe user the option to edit the row’s current version or to restore the row’s original values. Toretrieve the original version of a row, use an expression like the following:
DS.Tables(0).Row(i, DataRowVersion.Original)
Although you can’t manipulate the version of a row directly, you can use theAcceptChanges and RejectChanges methods to either accept the changes or reject them.These two methods are exposed by the DataSet, DataTable, and DataRow classes. The dif-ference is the scope: Applying RejectChanges to the DataSet restores all changes made to theDataSet (not a very practical operation), whereas applying RejectChanges to a DataTableobject restores the changes made to the specific table rows; applying the same method to theDataRow object restores the changes made to a single row.
The AcceptChanges method sets the original value of the affected row(s) to the proposedvalue. Deleted rows are physically removed. The RejectChanges method removes the pro-posed version of the affected row(s). You can call the RejectChanges method when the userwants to get rid of all changes in the DataSet. Notice that after you call the AcceptChangesmethod, you can no longer update the underlying tables in the database, because the DataSetno longer knows which rows were edited, inserted, or deleted. Call the AcceptChanges methodonly for DataSets you plan to persist on disk and not submit to the database.
Performing Update OperationsOne of the most important topics in database programming is how to submit changes to thedatabase. There are basically two modes of operation: single updates and multiple updates.A client application running on a local-area network along with the database server can (andshould) submit changes as soon as they occur. If the client application is not connected to thedatabase server at all times, changes may accumulate at the client and can be submitted inbatch mode when a connection to the server is available.
From a developer’s point of view, the difference between the two modes is how you handleupdate errors. If you submit individual rows to the database and the update operation fails,
PERFORMING UPDATE OPERATIONS 715
you can display a warning and let the user edit the data again. You can write code to restorethe row to its original state, or not. In any case, it’s fairly easy to handle isolated errors. If theapplication submits a few dozen rows to the database, several of these rows may fail to updatethe underlying table, and you’ll have to handle the update errors from within your code. At thevery least, you must validate the data as best as you can at the client before submitting it to thedatabase. No matter how thoroughly you validate your data, however, you can’t be sure thatthey will be inserted into the database successfully.
Another factor you should consider is the nature of the data you work with. Let’s consideran application that maintains a database of books and an application that takes orders. Thebook maintenance application handles publishers, authors, translators, and related data. If twodozen users are entering and editing titles, they will all work with the same authors. If youallow them to work in disconnected mode, the same author name may be entered several times,because no user can see the changes made by any other user. This application should be con-nected: Every time a user adds a new author, the table with the author names in the databasemust be updated so that other users can see the new author. The same goes for publishers,translators, topics, and so on. A disconnected application of this type should also include utili-ties to consolidate multiple author and publisher names.
An order-taking application can safely work in a disconnected mode, because orders enteredby one user are not aware of and don’t interfere with the orders entered by another user. Youcan install the client application on several salespersons’ notebooks so they can take orders onthe go and upload them after establishing a connection between the notebook and the databaseserver (which may even happen when the salespeople return to the company’s offices).
Updating the Database with the DataAdapterThe simplest method of submitting changes to the database is to use each DataAdapter’sUpdate method. The DataTable object provides the members you need to retrieve the rowsthat failed to update the database, as well as the messages returned by the database server,and you’ll see how these members are used in this section. The Update method may not haveupdated all the rows in the underlying tables. If a product was removed from the Productstable in the database in the meantime, the DataAdapter’s UpdateCommand will not be ableto submit the changes made to that specific product. A product with a negative value mayvery well exist at the client, but the database will reject this row, because it violates one ofthe constraints of the Products table. It’s also important to validate the data at the client tominimize errors when you submit changes to the database.
If the database returned any errors during the update process, the HasErrors propertyof the DataSet object will be set to True. You can retrieve the rows in error from each tablewith the GetErrors method of the DataTable class. This method returns an array of DataRowobjects, and you can process them in any way you see fit. The code shown in Listing 16.8iterates through the rows of the Categories table that are in error and prints the description ofthe error in the Output window.
Listing 16.8: Retrieving and displaying the update errors
If Products1.HasErrors ThenIf Products1.Categories.GetErrors.Length = 0 Then
Console.WriteLine("Errors in the Categories DataTable")Else

716 CHAPTER 16 DEVELOPING DATA-DRIVEN APPLICATIONS
Dim RowsInError() As Products.CategoriesRowRowsInError = Products1.Categories.GetErrorsDim row As Products.CategoriesRowConsole.WriteLine("Errors in the Categories table")For Each row In RowsInError
Console.WriteLine(vbTab & row.CategoryID & vbTab &row.RowError)
NextEnd If
Endif
The DataRow object exposes the RowError property, which is a description of the errorthat prevented the update for the specific row. It’s possible that the same row has more thana single error. To retrieve all columns in error, call the DataRow object’s GetColumnsInErrormethod, which returns an array of DataColumn objects that are the columns in error.
Handling Identity ColumnsAn issue that deserves special attention while coding data-driven applications is the handlingof Identity columns. Identity columns are used as primary keys, and each row is guaranteedto have a unique Identity value because this value is assigned by the database the moment therow is inserted into its table. The client application can’t generate unique values. When newrows are added to a DataSet, they’re assigned Identity values, but these values are unique inthe context of the local DataSet. When a row is submitted to the database, any Identity columnwill be assigned its final value by the database. The temporary Identity value assigned by theDataSet is also used as a foreign key value by the related rows, and we must make sure thatevery time an Identity value is changed, the change will propagate to the related tables.
Handling Identity values is an important topic, and here’s why: Consider an applicationfor entering orders or invoices. Each order has a header and a number of detail lines, whichare related to a header row with the OrderID column. This column is the primary key in theOrders table and is the foreign key in the Order Details table. If the primary key of a header ischanged, the foreign keys of the related rows must change also.
The trick in handling Identity columns is to make sure that the values generated by theDataSet will be replaced by the database. You do so by specifying that the Identity column’sstarting value is –1 and its autoincrement is –1. The first ID generated by the DataSet willbe –1, the second one will be –2, and so on. Negative Identity values will be rejected bythe database, because the AutoIncrement properties in the database schema are positive. Bysubmitting negative Identity values to SQL Server, you ensure that new, positive values will begenerated and used by SQL Server.
You must also make sure that the new values will replace the old ones in the related rows.In other words, we want these values to propagate to all related rows. The DataSet allows youto specify that changes in the primary key will propagate through the related rows with theUpdateRule property of the Relation.ChildKeyConstraint property. Each relation exposesthe ChildKeyConstraint property, which determines how changes in the primary key of arelation affect the child rows. This property is an object that exposes a few properties of itsown. The two properties we’re interested in are UpdateRule and DeleteRule (what happensto the child rows when the parent row’s primary key is changed or when the primary key isdeleted). You can use one of the rules described in Table 16.4.
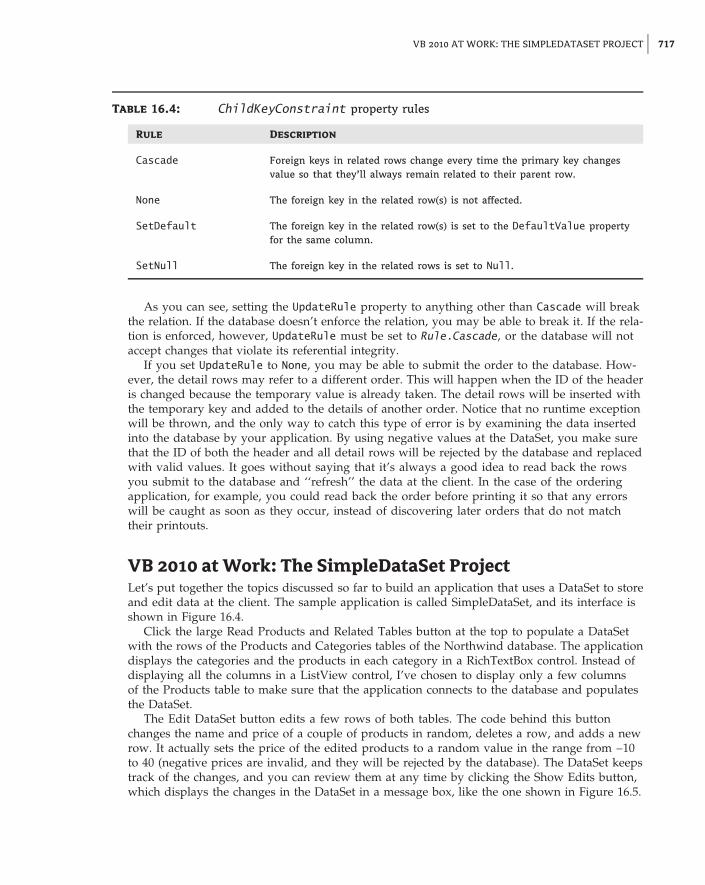
VB 2010 AT WORK: THE SIMPLEDATASET PROJECT 717
Table 16.4: ChildKeyConstraint property rules
Rule Description
Cascade Foreign keys in related rows change every time the primary key changesvalue so that they’ll always remain related to their parent row.
None The foreign key in the related row(s) is not affected.
SetDefault The foreign key in the related row(s) is set to the DefaultValue propertyfor the same column.
SetNull The foreign key in the related rows is set to Null.
As you can see, setting the UpdateRule property to anything other than Cascade will breakthe relation. If the database doesn’t enforce the relation, you may be able to break it. If the rela-tion is enforced, however, UpdateRule must be set to Rule.Cascade, or the database will notaccept changes that violate its referential integrity.
If you set UpdateRule to None, you may be able to submit the order to the database. How-ever, the detail rows may refer to a different order. This will happen when the ID of the headeris changed because the temporary value is already taken. The detail rows will be inserted withthe temporary key and added to the details of another order. Notice that no runtime exceptionwill be thrown, and the only way to catch this type of error is by examining the data insertedinto the database by your application. By using negative values at the DataSet, you make surethat the ID of both the header and all detail rows will be rejected by the database and replacedwith valid values. It goes without saying that it’s always a good idea to read back the rowsyou submit to the database and ‘‘refresh’’ the data at the client. In the case of the orderingapplication, for example, you could read back the order before printing it so that any errorswill be caught as soon as they occur, instead of discovering later orders that do not matchtheir printouts.
VB 2010 at Work: The SimpleDataSet ProjectLet’s put together the topics discussed so far to build an application that uses a DataSet to storeand edit data at the client. The sample application is called SimpleDataSet, and its interface isshown in Figure 16.4.
Click the large Read Products and Related Tables button at the top to populate a DataSetwith the rows of the Products and Categories tables of the Northwind database. The applicationdisplays the categories and the products in each category in a RichTextBox control. Instead ofdisplaying all the columns in a ListView control, I’ve chosen to display only a few columnsof the Products table to make sure that the application connects to the database and populatesthe DataSet.
The Edit DataSet button edits a few rows of both tables. The code behind this buttonchanges the name and price of a couple of products in random, deletes a row, and adds a newrow. It actually sets the price of the edited products to a random value in the range from –10to 40 (negative prices are invalid, and they will be rejected by the database). The DataSet keepstrack of the changes, and you can review them at any time by clicking the Show Edits button,which displays the changes in the DataSet in a message box, like the one shown in Figure 16.5.

718 CHAPTER 16 DEVELOPING DATA-DRIVEN APPLICATIONS
Figure 16.4
The SimpleDataSetproject populates aDataSet at the clientwith categories andproducts.
Figure 16.5
Viewing the changes inthe client DataSet
You can undo the changes and reset the DataSet to its original state by clicking the RejectChanges button, which calls the RejectChanges method of the DataSet class to reject the editsin all tables. It removes the new rows, restores the deleted ones, and undoes the edits in themodified rows.

VB 2010 AT WORK: THE SIMPLEDATASET PROJECT 719
The Save DataSet and Load DataSet buttons persist the DataSet at the client so that you canreload it later without having to access the database. The code shown in Listing 16.9 calls theWriteXml and ReadXml methods and uses a hard-coded filename. WriteXml and ReadXml savethe data only, and you can’t create a DataSet by calling the ReadXml method; this method willpopulate an existing DataSet.
To actually create and load a DataSet, you must first specify its structure. Fortunately, theDataSet exposes the WriteXmlSchema and ReadXmlSchema methods, which store and readthe schema of the DataSet. WriteXmlSchema saves the schema of the DataSet, so you canregenerate an identical DataSet with the ReadXmlSchema method, which reads an existingschema and structures the DataSet accordingly. The code behind the Save DataSet and LoadDataSet buttons first calls these two methods to take care of the DataSet’s schema and thencalls the WriteXml and ReadXml methods to save/load the data.
Listing 16.9: Saving and loading the DataSet
Private Sub bttnSave_Click(…) Handles bttnSave.ClickTry
DS.WriteXmlSchema("DataSetSchema.xml")DS.WriteXml("DataSetData.xml", XmlWriteMode.DiffGram)
Catch ex As ExceptionMsgBox("Failed to save DataSet" & vbCrLf & ex.Message)Exit Sub
End TryMsgBox("DataSet saved successfully")
End Sub
Private Sub bttnLoad_Click(…) Handles bttnLoad.ClickTry
DS.ReadXmlSchema("DataSetSchema.xml")DS.ReadXml("DataSetData.xml", XmlReadMode.DiffGram)
Catch ex As ExceptionMsgBox("Failed to load DataSet" & vbCrLf & ex.Message)Exit Sub
End TryShowDataSet()
End Sub
The Submit Edits button, finally, submits the changes to the database. The code attempts tosubmit all edited rows, but some of them may fail to update the database. The local DataSetdoesn’t enforce any check constraints, so when the application attempts to submit a productrow with a negative price to the database, the database will reject the update operation.The DataSet rows that failed to update the underlying tables are shown in a message boxlike the one shown in Figure 16.6. You can review the values of the rows that failed toupdate the database and the description of the error returned by the database and edit themfurther. The rows that failed to update the underlying table(s) in the database remain inthe DataSet. Of course, you can always call the RejectChanges method for each row thatfailed to update the database to undo the changes of the invalid rows. As is, the applicationdoesn’t reject any changes on its own. If you click the Show Edits button after an update

720 CHAPTER 16 DEVELOPING DATA-DRIVEN APPLICATIONS
operation, you will see the rows that failed to update the database, because they’re marked asinserted/modified/deleted in the DataSet.
Figure 16.6
Viewing the rows thatfailed to update thedatabase and the errormessage returned by theDBMS
Let’s start with the code that loads the DataSet. When the form is loaded, the code initializestwo DataAdapter objects, which load the rows of the Categories and Products tables. Thenames of the two DataAdapters are DACategories and DAProducts. They’re initialized tothe CN connection object and a simple SELECT statement, as shown in Listing 16.10.
Listing 16.10: Setting up the DataAdapters for the Categories and Products tables
Private Sub Form1_Load(…) Handles MyBase.LoadDim CN As New SqlClient.SqlConnection(
"data source=localhost;initial catalog=northwind; " &"Integrated Security=True")
DACategories.SelectCommand = New SqlClient.SqlCommand("SELECT CategoryID, CategoryName, Description FROM Categories")
DACategories.SelectCommand.Connection = CNDim CategoriesCB As SqlCommandBuilder = New SqlCommandBuilder(DACategories)CategoriesCB.ConflictOption = ConflictOption.OverwriteChangesDAProducts.SelectCommand = New SqlClient.SqlCommand(
"SELECT ProductID, ProductName, " &"CategoryID, UnitPrice, UnitsInStock, " &"UnitsOnOrder FROM Products ")
DAProducts.SelectCommand.Connection = CNDAProducts.ContinueUpdateOnError = TrueDim ProductsCB As SqlCommandBuilder = New SqlCommandBuilder(DAProducts)ProductsCB.ConflictOption = ConflictOption.CompareAllSearchableValues
End Sub

VB 2010 AT WORK: THE SIMPLEDATASET PROJECT 721
I’ve specified the SELECT statements in the constructors of the two DataAdapter objects andlet the CommandBuilder objects generate the update statement. You can change the value ofthe ConflictOption property to experiment with the different styles of update statements thatthe CommandBuilder will generate. When the form is loaded, all the SQL statements generatedfor the DataAdapters are shown in the RichTextBox control. (The corresponding statements arenot shown in the listing, but you can open the project in Visual Studio to examine the code.)
The Read Products and Related Tables button populates the DataSet and then displays thecategories and products in the RichTextBox control by calling the ShowDataSet() subroutine,as shown in Listing 16.11.
Listing 16.11: Populating and displaying the DataSet
Private Sub bttnCreateDataSet_Click(…) Handles bttnCreateDataSet.ClickDS.Clear()DACategories.Fill(DS, "Categories")DAProducts.Fill(DS, "Products")DS.Relations.Clear()DS.Relations.Add(New Data.DataRelation("CategoriesProducts",
DS.Tables("Categories").Columns("CategoryID"),DS.Tables("Products").Columns("CategoryID")))
ShowDataSet()End Sub
Private Sub ShowDataSet()RichTextBox1.Clear()Dim category As DataRowFor Each category In DS.Tables("Categories").Rows
RichTextBox1.AppendText(category.Item("CategoryName") & vbCrLf)
Dim product As DataRowFor Each product In category.GetChildRows("CategoriesProducts")
RichTextBox1.AppendText(product.Item("ProductID") & vbTab &product.Item("ProductName" & vbTab)
If product.IsNull("UnitPrice") ThenRichTextBox1.AppendText(" " & vbCrLf)
ElseRichTextBox1.AppendText(
Convert.ToDecimal(product.Item("UnitPrice")).ToString("#.00") & vbCrLf)
End IfNext
NextEnd Sub
After calling the Fill method to populate the two DataTables, the code sets up a Data-Relation object to link the products to their categories through the CategoryID column andthen displays the categories and the corresponding products under each category. Notice the

722 CHAPTER 16 DEVELOPING DATA-DRIVEN APPLICATIONS
statement that prints the products. Because the UnitPrice column may be Null, the code callsthe IsNull method of the product variable to find out whether the current product’s price isNull. If so, it doesn’t attempt to call the product.Item("UnitPrice") expression, which wouldresult in a runtime exception, and prints three asterisks in its place.
The Edit DataSet button modifies a few rows in the DataSet. Here’s the statement thatchanges the name of a product selected at random (it appends the string NEW to the product’sname):
DS.Tables("Products").Rows(RND.Next(1, 78)).Item("ProductName") &= " - NEW"
The same button randomly deletes a product, sets the price of another row to a randomvalue in the range from –10 to 40, and inserts a new row with a price in the same range.If you click the Edit DataSet button a few times, you’ll very likely get a few invalid rows.The Show Edits button retrieves the edited rows of both tables and displays them. It usesthe DataRowState property to discover the state of the row (whether it’s new, modified,or deleted) and displays the row’s ID and a couple of additional columns. Notice that youcan retrieve the proposed and original versions of the edited rows (except for the deletedrows, which have no proposed version) and display the row’s fields before and afterthe editing on a more elaborate interface. Listing 16.12 shows the code behind the ShowEdits button.
Listing 16.12: Viewing the edited rows
Private Sub bttnShow_Click(…)Handles bttnShow.ClickDim product As DataRowDim msg As String = ""For Each product In DS.Tables("Products").Rows
If product.RowState = DataRowState.Added Thenmsg &= "ADDED PRODUCT: " &
product.Item("ProductName") & vbTab &product.Item("UnitPrice").ToString & vbCrLf
End IfIf product.RowState = DataRowState.Modified Then
msg &= "MODIFIED PRODUCT: " &product.Item("ProductName") & vbTab &product.Item("UnitPrice").ToString & vbCrLf
End IfIf product.RowState = DataRowState.Deleted Then
msg &= "DELETED PRODUCT: " &product.Item("ProductName",DataRowVersion.Original) & vbTab &product.Item("UnitPrice",DataRowVersion.Original).ToString & vbCrLf
End IfNextIf msg.Length > 0 Then

THE BOTTOM LINE 723
MsgBox(msg)Else
MsgBox("There are no changes in the dataset")End If
End Sub
I only show the statements that print the edited rows of the Products DataTable in the listing.Notice that the code retrieves the proposed versions of the modified and added rows but theoriginal version of the deleted rows.
The Submit Edits button submits the changes to the two DataTables to the database bycalling the Update method of the DAProducts DataAdapter and then the Update method ofthe DACategories DataAdapter. After that, it retrieves the rows in error with the GetErrorsmethod and displays the error message returned by the DBMS with statements similar to theones shown in Listing 16.12.
The Bottom Line
Create and populate DataSets. DataSets are data containers that reside at the client and arepopulated with database data. The DataSet is made up of DataTables, which correspond todatabase tables, and you can establish relationships between DataTables, just like relatingtables in the database. DataTables, in turn, consist of DataRow objects.
Master It How do you populate DataSets and then submit the changes made at the clientto the database?
Establish relations between tables in the DataSet. You can think of the DataSet as a smalldatabase that resides at the client, because it consists of tables and the relationships betweenthem. The relations in a DataSet are DataRelation objects, which are stored in the Relationsproperty of the DataSet. Each relation is identified by a name, the two tables it relates, and thefields of the tables on which the relation is based.
Master It How do you navigate through the related rows of two tables?
Submit changes in the DataSet to the database. The DataSet maintains not only data at theclient but their states and versions too. It knows which rows were added, deleted, or modified(the DataRowState property), and it also knows the version of each row read from the databaseand the current version (the DataRowVersion property).
Master It How will you submit the changes made to a disconnected DataSetto the database?


Chapter 17
Using the Entity Data Model
In Chapter 16, ‘‘Developing Data-Driven Applications,’’ you learned how to use DataSets, howto perform data binding, and how to use LINQ to SQL. As it happens, LINQ to SQL is not theonly object-relational technology Microsoft has to offer.
In this chapter, you’ll discover Microsoft’s latest data technology, the Entity Framework.Released initially with Service Pack 1 of Microsoft .NET Framework 3.5, it is the 2010 versionof Visual Studio that ships with this data technology out of the box for the first time. WhileLINQ to SQL is a somewhat lightweight, code-oriented data technology, the Entity Frameworkis a comprehensive, model-driven data solution.
The Entity Framework represents a central piece of Microsoft’s long-term data accessstrategy. With its emphasis on modeling and on the isolation of data and application layers, itpromises to deliver a powerful data platform capable of supporting the applications through acomplete application life cycle.
For a Visual Basic programmer, it brings working with the data under the familiarobject-oriented mantle and provides numerous productivity enhancements. You will be ableto construct ‘‘zero SQL code’’ data applications, leverage LINQ when working with data,and change the underlying data store without any impact on your application. In a few shortwords, using the Entity Framework to work with data is a whole different ballgame.
In this chapter, you’ll learn how to do the following:
◆ Employ deferred loading when querying the Entity Data Model
◆ Use entity inheritance features in the Entity Framework
◆ Create and query related entities
The Entity Framework: Raising the Data Abstraction BarIn Chapter 15, ‘‘Programming with ADO.NET,’’ you saw traditional .NET Framework tech-niques for working with data. In stream-based data access, you use a DataReader to read fromthe data store (typically a relational database) and can use the Command object to modify thedata in the data store. Set-based data access encapsulates data operations through the DataSetobject, whose collection of DataTable objects closely mimics the structure of tables or views inthe database. A DataSet lets you work with data in disconnected mode, so you can load the

726 CHAPTER 17 USING THE ENTITY DATA MODEL
data from the database into the application, disconnect, work on the data, and finally connectand submit modifications to the database in a single operation.
Both techniques provide a well-known way to work with data in your Visual Basicapplication. The DataSet goes one step further than stream-based data access in providingthe programming abstraction for data access that hides many of the complexities of low-leveldata access. As a result, you will have to write a lot less SQL code. Neither method, however,provides a higher-level abstraction of the underlying database structure. This interdependencebetween your application and the data layer is problematic for several reasons, as you will seein the next section.
The Entity Framework brings another level of abstraction to the data layer. It lets you workwith a conceptual representation of data, also known as a conceptual schema, instead of work-ing with the data directly. This schema is then projected to your application layer, where codegeneration is used to create a .NET representation of your conceptual schema. Next, the EntityFramework generates a relational (or logical) schema used to describe the data model in rela-tional terms. Finally, mapping between the relational schema and .NET classes is generated.Based on this data, the Entity Framework is capable of creating and populating .NET objectswith the data from a data store and persisting modifications made on the object data back tothe data store.
How Will You Benefit from the Entity Framework?One famous programming aphorism states that ‘‘all problems in computing can be solved byanother level of indirection.’’ Although the Entity Framework introduces new level of indirec-tion (and abstraction), you will see that this additional level is actually put to a good use. I’llshow you the problems that the folks at Microsoft tried to tackle with the Entity Frameworkand how they managed to resolve them.
Preserving the Expressiveness of the Data Model
If you have a lot of experience working with relational databases, especially with databasesthat have been around for some time and have been through numerous modifications, youmust have been puzzled by the actual meaning of some elements in a database. Questions likethe following might ring a bell: What is this column used for? Why is this set of data dupli-cated between tables? Why is this set of columns in a table empty in certain rows?’’
A good understanding of your customer’s needs and business is crucial for the success ofthe application you will be developing. This understanding can be written down in the formof requirements and together with the description of the business (or problem domain) will beindispensable for the design of your application.
An important part of the design of many applications is the data structure that the systemwill use. One of the most popular methods for designing the data is the entity-relationshipmodel (ERM). The ERM is a conceptual representation of data where the problem domain isdescribed in the form of entities and their relationships. In Visual Studio, this model is calledthe Entity Data Model (EDM), and you will learn how to create the EDM in the next section.Figure 17.1 shows the sample Entity Data Model diagram inside Visual Studio 2010.
Entities generally can be identified by the primary key and have some important character-istics known as attributes. For example, a person entity might have a primary key in the formof their Social Security number (SSN) and attributes First and Last Name. (Although an SSNconceptually fits well in the role of a primary key and therefore I chose it for the primary keyin the Person table in the example Books and Authors project later in this chapter, in practiceits use is discouraged. See ‘‘Using a Social Security Number as a Primary Key’’ in the followingsidebar for more information.)

THE ENTITY FRAMEWORK: RAISING THE DATA ABSTRACTION BAR 727
Figure 17.1
Entity Data Model dia-gram in Visual Studio2010’s EDM Designer
Using a Social Security Number as a Primary Key
Although a Social Security number might seem like the natural first choice for the primarykey in a table representing some kind of a ‘‘person’’ entity — a Customer, Client, Employee,or User table, for example — its use in practice is actually strongly discouraged. Because ofprivacy concerns, security threats like identity theft, and recent regulatory guidelines, SSNsshould be kept in a database only in encrypted form — or not kept at all. You should alsobe aware that people can change their SSNs during their lifetime. As such, an SSN is not aparticularly good choice for a primary key.
If there is no good natural key, you can always resort to a surrogate, database-generatedkey. An artificial key, however, does not resolve the issue of duplicate entries that a numberlike an SSN seems to resolve. Namely, there is nothing to prevent one person’s data frombeing inserted into the database twice. Inserting duplicate entities can present a serious dataconsistency flaw, and as such it is best controlled on the database level.
If there is no natural key that can be used to control a duplicate entry, you can resort toplacing a UNIQUE constraint on a combination of person attributes. For example, it is highlyunlikely that you will find two persons with the same full name, date and place of birth, andtelephone number. If you do not have all of these attributes at your disposal, you might needto relinquish the control of duplication to some other application layer or even to the user.

728 CHAPTER 17 USING THE ENTITY DATA MODEL
An entity can be in a relationship with another entity. During the analysis, you can oftenhear this relationship expressed in the form of a simple sentence, such as ‘‘A person owns apet.’’ In such a sentence, nouns are entities, and verbs represent a relationship. In this case,a person is related to a pet. An important characteristic of a relationship is cardinality, or thenumeric aspect of the relation between entities. In our example, a person can own many pets,but a pet usually belongs to a single person, thus being a one-to-many relationship between theperson and pet entities.
The most popular method used to work with the ERM is an entity-relationship diagram.Many tools have smart entity-relationship diagramming capabilities, including the ERwin DataModeler, Microsoft Visio, Toad Data Modeler, and Visual Studio. I will describe the Visual Stu-dio entity-relationship capabilities in the ‘‘Creating a New Entity Data Model’’ section. Thesetools are typically capable of transforming the conceptual to a physical model — generatingData Definition Language (DDL) scripts that can be used to generate a physical databasestructure.
When working with relational databases on an implementation level, you create tablesand columns, constraints, and primary and foreign keys to hold your data, and you createindices to optimize data access and manipulation. Although these database concepts can berelated to a problem domain so that table roughly corresponds to entity, column correspondsto attribute, and foreign key constraint corresponds to relationship, they are not as expressiveas the entity-relationship model. In addition, the physical design of a relational database isgoverned by a different set of principles and needs. Databases are very good at preservingdata integrity, performing transactions, providing fast access to a data, and reducing dataredundancy. As a result, the relational database’s physical design is often refined througha process of normalization and denormalization. This process is typically in the domain ofdatabase administrators, who use their knowledge of database engines to optimize databaseperformance, often with little regard for the problem domain at hand.
It is during this process that the link between the problem domain (described in the form ofan Entity Data Model) and the physical database structure is watered down. Later in the appli-cation life cycle, the Entity Data Model is often completely disregarded. As a result, databasestructure becomes a cryptic artifact, difficult to relate to a problem domain. This often has anadverse effect on application maintainability and evolution. When the link between the two isweakened, small changes to the application can require a huge amount of implementation workjust to understand the inner workings of the database.
With the Entity Framework, Microsoft has tackled this problem by making the Entity DataModel an integral part of your application. The Entity Data Model is to generate native .NETclasses used to access the data store. These classes are mapped to tables in the database. TheEntity Framework uses the Entity Data Model as a basis for .NET code and database structuregeneration; this sets it apart from typical modeling tools. The model becomes integral part ofthe project, driving the database and .NET code design.
A Richer Set of Modeling Constructs for Representing Data
To represent an entity in a relational database, you use a table construct. The table itself repre-sents an entity type, while each row represents one specific instance of an entity. Columns areused to represent entity attributes. When you define an attribute, you choose a data type forit. To refine attribute definition, you can apply a constraint on an attribute, or you can makethe attribute a primary key, meaning that it will uniquely identify the entity. You can relatedifferent entities by defining foreign keys between two tables.

THE ENTITY FRAMEWORK: RAISING THE DATA ABSTRACTION BAR 729
Following this approach (I am sure you are already very familiar with it), you can easily rep-resent customers and product categories in a simple CRM system. The system will store basiccustomer data and information on a customer’s favorite product categories. You can define aCustomers table to represent the customers in your database. Important customer attributes arethe first and last names, and in order to save this information in the Customer table, you candefine FirstName and LastName columns whose data type is varchar with maximum lengthof 50. You can use a Social Security number or a database-generated integer as a primary key.For product categories, you can define a ProductCategories table with an Id column for theprimary key and a Name column as varchar with a maximum length of 20.
In simple scenarios like the one I just described, at first glance objects in relational data-base will represent your entities fairly well. However, there are many situations where thisapproach will fall short. Let’s examine a few such situations in our simple CRM system.
Complex Type for Complex Properties
You will want to keep each customer’s telephone number in the database. Keep one telephonenumber per customer, but split that telephone number into country code, area code, andlocal number columns. This way, you can easily add checks on the validity of the dataand perform some area code–related customer analysis. There are two ways to add telephoneinformation: You can add three new columns to the existing Customers table, or you can createa new Telephones table for these three columns. The Telephones table can have a one-to-onerelation with the Customers table.
In the first scenario, in order to keep the meaning of the columns clear, you will haveto prefix the column names with Telephone, so you will have TelephoneCountryCode,TelephoneAreaCode, and TelephoneNumber columns. Although keeping long column names isnot such a terrible burden, it is a good indicator that the attributes that these columns representin fact belong to another entity — Telephone.
Representing Telephone as a separate entity is achieved by placing the columns in separatetable called Telephones with the addition of a customer primary key column so that eachtelephone is tied to a single customer. Now there is no need to prefix column names with theword Telephone, since the purpose of the columns is clearly stated through a table name.Note that there is no difference on the database level in representing a one-to-one relation ora one-to-many relation. If you use a separate table for the Telephone entity, then the samestructure used for storing a single telephone number per customer can be used for storingmultiple telephone numbers for an individual customer.
Unfortunately, keeping two entities with a one-to-one relationship in separate tables in adatabase will probably result in processing overhead: The database engine needs to join thetwo tables and duplicate the Social Security number in order to join them. As such, in the eyesof the database administrator, the Telephones table is a good candidate for merging with theCustomers table during the performance optimization process. If the merger happens, it iseven possible that the original column names are kept. You end up with a mysterious Numbercolumn in the Customers table. Since the Number column no longer belongs to the Telephonetable, the purpose of the column is not easily understood from its name.
In the Entity Framework, you can use a complex type construct as an attribute of an entity.In our example, you can declare a new Telephone complex type and add a Telephone attribute(of type Telephone) to the Customer entity. Thanks to this feature of the Entity Framework, youwill be able to reference telephone number–related properties in your Visual Basic code in theform of Customer.Telephone.AreaCode.

730 CHAPTER 17 USING THE ENTITY DATA MODEL
Many-to-Many as a Simple Relation Between Entities
I am sure that it comes as no surprise that you will need an additional table, called a jointable, to relate the customers and product categories. The CustomersProductCategoriesrelation table will have only two columns: SSN and ProductCategoriesId. To complete thesolution, two foreign keys are added. The first foreign key is established between the SSNcolumn in Customer and the SSN column in CustomersProductCategories. The second one isbetween the Id column in ProductCategories and the ProductCategoriesId column in theCustomersProductCategories table. What I have just described is a typical approach used torepresent a many-to-many relationship in a relational database. You can see the EDM entitiesand database tables representing many-to-many relation between customers and productcategories in Figure 17.2.
Figure 17.2
Many-to-many relation-ship table structure (left)and Entity Data Modelrepresentation (right)
As you can see, the additional table in this case is necessary to represent a relation betweentwo entities. Sometimes this relation can grow into a full-blown entity, such as when it needs tobe described with some attributes. For example, imagine you need to store an amount spent oneach category for each customer. Such a need would result in adding an AmountSpent columnto the CustomersProductCategories table and would warrant treating CustomersProductCate-gories as an entity. However, in the scenario I just described, a relation between customers andproduct categories is just a relation and should be represented as such. In relational databases,you are left with no choice but to use the table to represent a many-to-many relation, eventhough tables are generally used to represent full-blown entities.
In the Entity Framework, as long as you do not need to store any relation attributes, therelation will be treated as such. You will see how the many-to-many relation is created inthe ‘‘Creating a New Entity Data Model’’ section later in this chapter.
Inheritance Applied to Data
As a Visual Basic programmer, you are quite familiar with the concept of inheritance. Inheri-tance combined with polymorphism is a powerful mechanism for harnessing reuse in software.

THE ENTITY FRAMEWORK: RAISING THE DATA ABSTRACTION BAR 731
With the Entity Framework, a similar inheritance concept can be applied to entities in theEntity Data Model. Since entities are mapped to generated .NET classes, the inheritance relationbetween entities is harnessed in your application code.
Data Store Technology and Brand Independence
Standard ADO .NET classes are doing a good job of encapsulating access to different datastores. If you are careful enough and you follow the ‘‘Program to an interface, not animplementation’’ principle, you will significantly reduce the amount of the application codeyou need to modify in case you need to change the data store used by your application.The ‘‘Program to an abstraction’’ principle applied to ADO .NET means writing code usingtop-level interfaces from the System.Data namespace, like in the following example:
Dim connection As System.Data.IDbConnection = CreateConnection(connectionString)Dim command As System.Data.IDbCommand = connection.CreateCommand()
As long you do not reference any class from any concrete ADO .NET provider namespace(like System.Data.SqlClient in the case of a Microsoft SQL Server provider), switching yourapplication to another data store can be as simple as changing the connection string — thatis, as long as you are able to write your SQL code in a dialect that all data stores are able tounderstand. If you write command text along the same lines as the previous example, like this:
command.CommandText = "Select top 10 * from Customers"
you might find that your database does not support the TOP keyword. Although there aredifferent standards trying to regulate SQL, the truth is that there are many proprietaryextensions to the language. Writing portable SQL is difficult and often impractical.
With the Entity Framework, you have a number of query options. You can use Entity SQL(eSQL), LINQ, or Query Builder methods. Whatever your choice, you are guaranteed thatthe query will return the same result no matter the data store under scrutiny. Thanks to theADO.NET Entity Framework provider architecture, new data stores can be easily incorporatedand made available to .NET programmers. What’s more, there is no restriction on the under-lying data store technology. Most will be relational databases, but as long as the appropriateprovider is available, other technologies such as object-oriented databases, databases basedon BigTable technology, Excel spreadsheets, and so on, will be available through the EntityFramework. Now you know why I insisted on using the term data store instead of database sofar in this chapter.
The ‘‘Program to an Abstraction’’ Principle
‘‘Program to an abstraction, not an implementation’’ is a software design principle coinedby the authors of the seminal Design Patterns book (Design Patterns: Elements of ReusableObject-Oriented Software by Erich Gama et al., Addison-Wesley Professional, 1995). When youprogram to an interface, the client code does not depend on a particular implementationof a library. The implementation can vary without affecting the client. This way, you canachieve an important amount of flexibility in dependencies between different componentsof an application. This principle becomes especially relevant in larger applications consisting ofmany components.

732 CHAPTER 17 USING THE ENTITY DATA MODEL
In the previous code snippet, only interfaces from the System.Data namespace are refer-enced. Code need not be changed no matter which concrete provider it works with. It willwork with Oracle, Microsoft SQL, OLE DB, or any other provider implementation that isimplementing interfaces from the System.Data namespace.
Isolating the Application from the Data Structural Changes
During the application lifetime, the data and programmatic layers are generally exposed todifferent forces governing their evolution. The object-oriented layer accommodates evolutionby preserving modularity and providing extensibility, while the data layer is influenced byforces such as referential integrity, normalization, and performance optimization.
As a database is exposed to more intensive use and the quantity of the stored data increases,the database structure often has to be re-accommodated to respond to an increase in demand.One such common scenario is table partitioning.
A table might be split so that rarely used columns containing less used but weighty piecesof information are placed in a separate table. This type of data partitioning strategy is knownas vertical partitioning. By contrast, horizontal partitioning involves placing rows into different,identically structured tables. It is often used as a form of archiving; historic data that cannot bedeleted but is rarely used is placed in a separate table.
The Entity Framework supports a number of mapping scenarios. It is capable of mapping asingle entity to multiple tables and can use any or all of the following forms:
◆ Horizontal or vertical partitioning
◆ Complex types that structure the data contained in a single table
◆ Entity type hierarchies
◆ Mapping views
◆ Stored procedures for database interaction
With all these mapping options at your disposal, many of the typical database modifications,especially those that are the result of performance tuning, can be accommodated at the map-ping layer. This way, even though the database structure changes, no changes need be appliedto your .NET code. The Entity Framework’s mapping capability can isolate your code fromstructural changes in the database layer.
Entity Data Model: Model-First ApproachThe fundamental concept in the Entity Framework is the Entity Data Model (EDM). The EDMis an implementation of the entity-relationship model, and it defines entities and their relation-ships. Entities and relationships define a conceptual model. In addition, the EDM contains alogical model, known as the storage schema model, that defines the data store structure. Finally, asection in the EDM defines the mapping between the conceptual and logical schemas.
In the first release of the Entity Framework (.NET 3.5 Service Pack 1), the only way to createan EDM was to connect to an existing database and let Visual Studio create entities basedon the existing database structure. Although this approach can work for existing projects,for a new project that is based on reverse engineering, it would result in a loss of importantinformation in the conceptual model.

THE ENTITY FRAMEWORK: RAISING THE DATA ABSTRACTION BAR 733
In Visual Studio 2010, you can start with a blank EDM. You use the EDM Designer to createand modify the EDM. The EDM Designer is a visual modeling tool that displays the model inthe form of a entity-relationship diagram.
Using the EDM Designer
The EDM Designer is displayed by default when you add a new ADO .NET EDM to yourproject or click an EDM file (.edmx extension) in Visual Studio. Figure 17.3 shows the EDMDesigner with the Northwind EDM open.
Figure 17.3
The EDM Designer inVisual Studio 2010
The EDM diagram is displayed in the central window. You can access many options of theEDM Designer through a context menu that appears if you right-click anywhere on the emptysurface of an EDM diagram.
You can add new items to the EDM diagram by dragging and dropping tools from theToolbox window. The Toolbox window is the window shown on the left side in Figure 17.3.Once you select an item in the EDM diagram, you can change its properties in the Prop-erties window, pictured on the right side in Figure 17.3 and positioned below the ModelBrowser window.
You can see elements of the EDM grouped by type in the Model Browser window. If anEDM is complex, then right-clicking a relationship or an entity in the Model Browser andselecting Show In Designer from the context menu can be a much more practical option forfinding your way around the model.
Finally, at the bottom of the Figure 17.3 you can see a Mapping Details window. In thiswindow, you can define how entities and relations from your conceptual model are mapped totables in the logical model. Let’s start by creating a new project with a fresh EDM.

734 CHAPTER 17 USING THE ENTITY DATA MODEL
Creating a New Entity Data Model
You can add an EDM to a majority of project types supported by Visual Studio 2010. For thisexercise, you will start by creating a new Windows Forms project:
1. Open a new instance of Visual Studio 2010, and choose File � New Project. From the NewProject dialog box, choose Windows Forms Application, rename the project to MyEF-Project, and then click OK.
2. Choose Project � Add New Item. When the Add New Item dialog box opens, clickthe menu item Data on the Installed Templates menu. This will reduce the number ofoptions in the dialog box. The ADO.NET Entity Data Model item now should be visiblein the list of new items. Select the ADO.NET Entity Data Model item, and rename it toBooksAndAuthors.edmx. Click Add.
3. When the Entity Data Model Wizard opens, choose Empty Model in response to the ‘‘Whatshould the model contain?’’ prompt. Click Finish, and save the project.
You have just created a new EDM. After you created a new EDM, Visual Studio displays theEDM Designer with your BooksAndAuthors.edmx file open in the active window.
Connecting the EDM to a Database
You can create and model your entities in the EDM Designer on a conceptual level withoutever using it to connect to a real database. This way, however, your model will be no morethan a dead diagram. To breathe some life into your EDM, you need to connect it to adatabase. Start by creating a new BooksAndAuthors database in SQL Server 2005 or newer.Use the instructions that follow:
1. In your SQL Server instance, create a BooksAndAuthors database.
2. In your Visual Studio Server Explorer window, right-click the Data Connections item, andclick the Add Connection item on the context menu.
3. Add a new connection to the BooksAndAuthors database you just created.
4. Right-click the BooksAndAuthors.edmx item in the Model Browser window, and selectModel � Generate Database Script from the context menu.
5. In the Generate Database Script Wizard window, select the BooksAndAuthors connectionin the Connection combo box. Confirm that the Save Entity Connection Settings In App.Config File As check box is selected. Click Next.
6. Click Finish.
7. Click Yes on any warning windows that appear.
Check the Solution Explorer. You should see that a new BooksAndAuthors.edmx.sql filehas been added to the MyEFProject. This SQL file contains a Data Definition Language (DDL)script that can be used to create a database structure that can accommodate the BooksAnd-Authors EDM.
Note that the EDM Designer only creates the DDL file; it does not execute it against thedatabase. Don’t execute it just yet. Let’s add some entities to our model first.

THE ENTITY FRAMEWORK: RAISING THE DATA ABSTRACTION BAR 735
Creating an Entity
You can now add your first entity to BooksAndAuthors EDM. In this exercise, you willcreate an entity model for a publishing company. It will contain information on book titlesand authors. Start by creating a new Book entity:
1. Open the Toolbox, and drag an Entity item to the BooksAndAuthors.edmx designer surface.You will see a new square figure called Entity1 appear on the EDM Designer surface.
2. Click the entity name, and rename it from Entity1 to Book.
3. Rename the Entity Set Name property in the Properties window to Books.
Notice that an important characteristic of an entity is that it can be uniquely identified. Anentity is generally identified by an attribute or a combination of attributes known as a primarykey. The EDM Designer uses the term property for attributes.
Creating a Primary Key
In the case of the Book entity, the EDM Designer automatically created an Id property andmarked it as a primary key. If you select the Id property in the EDM Designer, the Propertieswindow will display characteristics of the Id property of the Book entity. The important char-acteristics of the Id property are Type and Entity Key. The Type = Int32 entry in the Propertieswindows indicates that the data type of the Id property is Integer. The Entity Key = True entrytells you that Id is a primary key.
Although you could use an artificial primary key, in the case of a Book entity, there isanother property that is a better candidate for the primary key. All book titles can be uniquelyidentified by their ISBN numbers.
To use the ISBN for a primary key of Book entity, follow these steps.
1. In the Properties window, change the name of the Id property to ISBN.
2. Then, change the Type value of the ISBN property to String.
3. Finally, since ISBN numbers have a maximum length of 13 characters, set the Max Sizecharacteristic of the ISBN property to 13.
Creating a Scalar Property
The most important property of the Book entity is the title. The title is a simple string, so it canbe well represented as a scalar property of the Book entity. Let’s add a Title scalar property tothe Book entity.
1. On the EDM Designer surface, right-click the word Properties on the Book entity, and selectthe Add item from the context menu.The Add item expands to two subitems: Scalar Property and Complex Property.
2. Click Scalar Property.
3. Enter the word Title for the newly added property name.
4. In the Properties window, set the Max Length value of the Title property to 4000.(According to WikiAnswers.com, the longest book title consists of 3,999 characters; it is toolong to be reproduced here!)

736 CHAPTER 17 USING THE ENTITY DATA MODEL
While you are at it, use the same process to add another scalar property calledPublishingDate to the Book entity. Select DateTime as the property type.
Yet another important property for a book is the page count. It is a good idea to preservethis information, so add another scalar property named PageCount to the Book entity, andselect Int32 as the Type.
Entity Data Model Under the Hood
Most of the time, you will be interacting with the EDM through the EDM Designer. Never-theless, you should have a basic understanding of the artifacts that comprise the EDM and itsstructure. The EDM native format is XML, and it can also be viewed and edited manually, ascan any XML file. To see the Visual Studio–generated EDM XML, first refresh the model andthen open the EDM file in the Visual Studio XML Editor:
1. Refresh the EDM by regenerating the database DDL and by following the process describedin steps 4 to 7 in the ‘‘Connecting the EDM to a Database’’ section earlier in this chapter.
2. Close the EDM diagram.
3. In Solution Explorer, right-click the BooksAndAuthors.edmx file, and select Open Withfrom the context menu.
4. In the Open With dialog box, select the XML Editor, and click OK.
Listing 17.1 shows the content of the BooksAndAuthors.edmx file. Although the contentmight look bewildering at first, it is actually not that complex; it is even easier to understand ifyou ignore the XML namespace declaration. You can see that the content is divided into fourmain sections:
◆ SSDL content
◆ CSDL content
◆ C-S mapping content
◆ EF Designer content
Listing 17.1: The BooksAndAuthors.edmxmodel XML content
<?xml version="1.0" encoding="utf-8"?><edmx:Edmx Version="2.0"xmlns:edmx="http://schemas.microsoft.com/ado/2008/10/edmx"><!-- EF Runtime content --><edmx:Runtime>
<!-- SSDL content --><edmx:StorageModels><Schema Namespace="BooksAndAuthors.Store" Alias="Self"Provider="System.Data.SqlClient"ProviderManifestToken="2008"xmlns:store="http://schemas.microsoft.com/ado/2007/12/edm/EntityStoreSchemaGenerator"xmlns="http://schemas.microsoft.com/ado/2009/02/edm/ssdl">

THE ENTITY FRAMEWORK: RAISING THE DATA ABSTRACTION BAR 737
<EntityContainer Name="BooksAndAuthorsStoreContainer"><EntitySet Name="Books" EntityType="BooksAndAuthors.Store.Books"store:Type="Tables" Schema="dbo" />
</EntityContainer><EntityType Name="Books">
<Key><PropertyRef Name="ISBN" />
</Key><Property Name="ISBN" Type="varchar" Nullable="false" MaxLength="13" /><Property Name="Title" Type="nvarchar" Nullable="false" MaxLength="4000" /><Property Name="PublishingDate" Type="datetime" Nullable="false" /><Property Name="PageCount" Type="int" Nullable="false" />
</EntityType></Schema></edmx:StorageModels>
<!-- CSDL content --><edmx:ConceptualModels>
<Schema xmlns="http://schemas.microsoft.com/ado/2008/09/edm"xmlns:store="http://schemas.microsoft.com/ado/2007/12/edm/EntityStoreSchemaGenerator"Namespace="BooksAndAuthors" Alias="Self"><EntityContainer Name="BooksAndAuthorsContainer" >
<EntitySet Name="Books"EntityType="BooksAndAuthors.Book" />
</EntityContainer><EntityType Name="Book">
<Key><PropertyRef Name="ISBN" /></Key>
<Property Type="String" Name="ISBN" Nullable="false"MaxLength="13" Unicode="false" FixedLength="false" />
<Property Type="String" Name="Title"Nullable="false" MaxLength="4000" />
<Property Type="DateTime" Name="PublishingDate"Nullable="false" Precision="29" />
<Property Type="Int32" Name="PageCount"Nullable="false" /></EntityType></Schema>
</edmx:ConceptualModels><!-- C-S mapping content --><edmx:Mappings><Mapping Space="C-S" xmlns="http://schemas.microsoft.com
/ado/2008/09/mapping/cs"><EntityContainerMapping StorageEntityContainer="BooksAndAuthorsStoreContainer"CdmEntityContainer="BooksAndAuthorsContainer"><EntitySetMapping Name="Books">
<EntityTypeMapping TypeName="IsTypeOf(BooksAndAuthors.Book)"><MappingFragment StoreEntitySet="Books">
<ScalarProperty Name="ISBN" ColumnName="ISBN" /><ScalarProperty Name="Title" ColumnName="Title" /><ScalarProperty Name="PublishingDate" ColumnName="PublishingDate" />

738 CHAPTER 17 USING THE ENTITY DATA MODEL
<ScalarProperty Name="PageCount" ColumnName="PageCount" /></MappingFragment>
</EntityTypeMapping></EntitySetMapping>
</EntityContainerMapping></Mapping></edmx:Mappings>
</edmx:Runtime><!-- EF Designer content (DO NOT EDIT MANUALLY BELOW HERE) --><edmx:Designer xmlns="http://schemas.microsoft.com/ado/2008/10/edmx">
<edmx:Connection><DesignerInfoPropertySet><DesignerProperty Name="MetadataArtifactProcessing"Value="EmbedInOutputAssembly" />
</DesignerInfoPropertySet></edmx:Connection><edmx:Options>
<DesignerInfoPropertySet><DesignerProperty Name="ValidateOnBuild" Value="true" />
</DesignerInfoPropertySet></edmx:Options><!-- Diagram content (shape and connector positions) --><edmx:Diagrams>
<Diagram Name="BooksAndAuthors" ><EntityTypeShape EntityType="BooksAndAuthors.Book"
Width="1.5" PointX="3.375" PointY="2"Height="1.592306315104167" />
</Diagram></edmx:Diagrams>
</edmx:Designer></edmx:Edmx>
So far, the file contains information on a single entity. As we continue working on themodel, it will grow and become more complex. Fortunately, you can edit most of the modeldetails through the EDM Designer and rarely need to edit the file manually.
The Conceptual Model: The CSDL Content
CSDL stands for Conceptual Schema Definition Language. This section contains information onthe conceptual data model and corresponds directly to the content of the EDM diagram. Thisschema is the basis for the object model that is generated by Visual Studio as a .NET projectionof a conceptual model.
The important elements of the CSDL schema are EntityType with Key and Property nodes.At this point you have a single Book entity in the model, and that entity has several proper-ties, as you can see in Listing 17.1. The Key node references the ISBN property. Each Propertynode contains information, including property name, type, and nullability. This section alsocontains the information on the EntitySet, which is used to represent a set of entities. In thiscase, you’ll find the Books EntitySet, as you defined it earlier in step 3 of the ‘‘Creating anEntity’’ section.

THE ENTITY FRAMEWORK: RAISING THE DATA ABSTRACTION BAR 739
The Logical Model: The SSDL Content
This section is written in the Store Schema Definition Language (SSDL) and is a description ofdatabase structure that will be used to persist the data for the application build on the EntityFramework.
The structure of the SSDL section is quite similar to the CSDL section; it describes entitiesand associations. This section is used to generate DDL code and defines a store projection ofthe conceptual model. Entities and associations in the SSDL section define tables and columnsin the storage model.
The Mapping Specification: C-S Mapping Content
The mapping specification is defined in the Mapping Specification Language (MSL). This is theplace where the two worlds — .NET objects and the storage schema — meet. You can see howeach entity maps to a table in the database and each property maps to a column.
Take a look the EntityTypeMapping tag inside the BooksAndAuthors.edmx file provided inListing 17.1. Notice that the TypeName attribute has the value IsTypeOf(BooksAndAuthors.Book).IsTypeOf is just a way of saying that the type for this entity is Book (or any other class thatinherits the Book type).
The MappingFragment inside the EntityTypeMapping defines the table to which the Bookentity will be mapped via the StoreEntitySet attribute. In this case, the StoreEntitySet hasthe value Books, as you defined when you created the Book entity via the EntitySet property.
Finally, inside the MappingFragment you can see how different properties are mappedto columns in the table. For example, the ISBN property is mapped to a ISBN column:<ScalarProperty Name="ISBN" ColumnName="ISBN" />.
Data as Objects in the Entity Framework
The typical way to interact with the Entity Framework is through Object Services. ObjectServices is the component in the Entity Framework in charge of providing the .NET view of thedata. For example, you will access the entity Book as a class Book in your .NET code. The codefor the Book class is generated by the Entity Framework and is already available in the project.As with any other objects in .NET, you will be able to use LINQ to query these objects. Take alook at Listing 17.2; it shows how you can use LINQ to find a specific book based on ISBN.
Listing 17.2: Using the Entity Framework–generated code to access the EDM
Dim context As New BooksAndAuthorsContainerDim books = context.BooksDim myBook As Book = From book In booksWhere (book.ISBN = "455454857")
Select book
To provide a native .NET view of the data in the EDM, the Entity Framework will generateVisual Basic code for partial classes that represent entities in your EDM. To take a look at thistool-generated code, follow these steps:
1. Click the Show All Files icon in your Solution Explorer.

740 CHAPTER 17 USING THE ENTITY DATA MODEL
2. Expand the BooksAnAuthors.edmx item in Solution Explorer.
3. Click the BooksAndAuthors.Designer.vb file.
For brevity’s sake, Listing 17.3 provides a portion of the code contained in theBooksAndAuthors.Designer.vb file. The listing will make much more sense if you keepin mind the way that classes are used; think about what you learned as you reviewed the codein Listing 17.2.
Listing 17.3: Entity Framework–generated .NET code
Public Partial Class BooksAndAuthorsContainerInherits ObjectContext‘...Public ReadOnly Property Books() As ObjectSet(Of Book)
GetIf (_Books Is Nothing) Then
_Books = MyBase.CreateObjectSet(Of Book)("Books")End IfReturn _Books
End GetEnd Property
Private _Books As ObjectSet(Of Book)‘...
End Class
<EdmEntityTypeAttribute(NamespaceName:="BooksAndAuthors", Name:="Book")><Serializable()><DataContractAttribute(IsReference:=True)>Public Partial Class Book
Inherits EntityObject#Region "Factory Method"
‘" <summary>‘" Create a new Book object.‘" </summary>Public Shared Function CreateBook(iSBN As Global.System.String,
title As Global.System.String,publishingDate As Global.System.DateTime,pageCount As Global.System.Int32) As Book
Dim book as Book = New Bookbook.ISBN = iSBN
book.Title = title
book.PublishingDate = publishingDate

THE ENTITY FRAMEWORK: RAISING THE DATA ABSTRACTION BAR 741
book.PageCount = pageCount
Return bookEnd Function
<EdmScalarPropertyAttribute(EntityKeyProperty:=true, IsNullable:=false)><DataMemberAttribute()>Public Property ISBN() As Global.System.String
GetReturn _ISBN
End GetSet
If (ISBN <> value) ThenOnISBNChanging(value)ReportPropertyChanging("ISBN")_ISBN = StructuralObject.SetValidValue(value, False)ReportPropertyChanged("ISBN")OnISBNChanged()
End IfEnd Set
End Property
Private _ISBN as Global.System.StringPrivate Partial Sub OnISBNChanging(value As Global.System.String)End Sub
Private Partial Sub OnISBNChanged()End Sub
<EdmScalarPropertyAttribute(EntityKeyProperty:=false, IsNullable:=false)><DataMemberAttribute()>Public Property Title() As Global.System.String
GetReturn _Title
End GetSet
OnTitleChanging(value)ReportPropertyChanging("Title")_Title = StructuralObject.SetValidValue(value, False)ReportPropertyChanged("Title")OnTitleChanged()
End SetEnd Property
Private _Title as Global.System.StringPrivate Partial Sub OnTitleChanging(value As Global.System.String)End Sub

742 CHAPTER 17 USING THE ENTITY DATA MODEL
Private Partial Sub OnTitleChanged()End Sub
<EdmScalarPropertyAttribute(EntityKeyProperty:=false, IsNullable:=false)><DataMemberAttribute()>Public Property PublishingDate() As Global.System.DateTime
GetReturn _PublishingDate
End GetSet
OnPublishingDateChanging(value)ReportPropertyChanging("PublishingDate")_PublishingDate = StructuralObject.SetValidValue(value)ReportPropertyChanged("PublishingDate")OnPublishingDateChanged()
End SetEnd Property
Private _PublishingDate as Global.System.DateTimePrivate Partial Sub OnPublishingDateChanging(value As Global.System.DateTime)End Sub
Private Partial Sub OnPublishingDateChanged()End Sub
<EdmScalarPropertyAttribute(EntityKeyProperty:=false, IsNullable:=false)><DataMemberAttribute()>Public Property PageCount() As Global.System.Int32
GetReturn _PageCount
End GetSet
OnPageCountChanging(value)ReportPropertyChanging("PageCount")_PageCount = StructuralObject.SetValidValue(value)ReportPropertyChanged("PageCount")OnPageCountChanged()
End SetEnd Property
Private _PageCount as Global.System.Int32Private Partial Sub OnPageCountChanging(value As Global.System.Int32)End Sub
Private Partial Sub OnPageCountChanged()End Sub
End Class

THE ENTITY FRAMEWORK: RAISING THE DATA ABSTRACTION BAR 743
The BooksAndAuthorsContainer class is the entry point for accessing Object Services in ourexample. This class inherits the ObjectContext class from the System.Data.Objects namespaceand has a property called Books. The Books property represents a set of Book objects.
The Book class represents a Book entity. The Book class has to inherit the EntityObject classfrom the System.Data.Objects namespace. The class has a number of properties, and eachproperty of the class corresponds to a property of the Book entity in Books and Authors EDM.You will see how the classes are used in detail in the ‘‘Putting the EDM to Work’’ section laterin this chapter.
Adding an Inheritance Relationship Between Entities
Now that you are finished creating the Book entity, as you might expect, the Author entity isthe next to be created. It will be important to collect and store author data, such as name, con-tact information, and so forth, in this entity. Before you create the Author entity, however, a bitof analysis is in order.
As it happens, the publishing company in question also works with foreign language titles.In the case of a foreign language title, it is important to collect and store information about thetranslator: name, contact information, languages translated, and the like. Surely, this warrantsanother entity in our system — a Translator entity.
If you compare the Author and the Translator entities, you will see that they have a lot ofcommon properties. If we were to add the Translator and Author entities to the EDM now,we would have to duplicate these properties on each. There must be some more efficient wayto deal with replicated properties.
The solution is the same as it would be in a situation when you design classes where there‘‘is a kind of’’ relationship between the entities in Visual Basic. A common parent entity can beextracted; that parent entity will contain the common properties. Let’s call this entity Person.Once the Person entity exists, you can add Author and Translator entities and make theminherit the Person entity. Start by adding a new Person entity to the EDM:
1. Add new entity to the EDM, and name it Person.
2. Rename the Id property to SSN. Change Type to String, set Max Length to 9, and set theFixed Length value to True.
3. Add a FirstName scalar property (Type: String, Max Length: 50).
4. Add a LastName scalar property (Type: String, Max Length: 50).
5. Add a new entity to the EDM, and name it Author.
6. Select the Inheritance arrow in the Toolbox, and connect Author and Person, going fromAuthor to Person.
7. Delete the Id property in the Author entity.
8. Add another new entity to the EDM, and name it Translator.
9. Select the Inheritance arrow in the Toolbox, and connect Translator and Person, goingfrom Translator to Person.
10. Delete the Id property in the Translator entity.
You have just created an inheritance hierarchy with one base entity, Person, and two childentities, Translator and Author. Let’s add a few more details to our model.

744 CHAPTER 17 USING THE ENTITY DATA MODEL
Since you will never instantiate a Person entity in your code because you will always workwith a more specific type, a Translator or an Author, you can mark the Person entity asabstract. In the Properties window, select the Person entity, and set the Abstract propertyto True.
There are a few more bits of information you need to store for each child type. For authors,the publishing company would like to store the date that the author first signed with thecompany. To accommodate this, add a new property called Signed (Type: DateTime) to theAuthor entity. For translators, you will also want to keep the information on languages thatthey translate from. Since this requires defining another related table, you can create this tableafter you see how many-to-many associations are defined in the ‘‘Adding a Many-to-ManyAssociation’’ section later in this chapter.
The inheritance feature you have just used is one of the Entity Framework’s most powerfulcapabilities. It solves the problem of mapping the inheritance relationship in an object-orientedsense to tables in a relational database and lets you leverage the inheritance and polymorphismcapacities of .NET code without any friction with the data store.
Entity Framework Inheritance Mapping
Mapping a group of classes from an object-oriented paradigm to tables in a relational databasecan be accomplished intuitively, if the classes have some kind of an association relationship.For example, a class might have a property whose type is some other class, like a Car class thathas a Wheels property whose type is a list of wheels. In such a case, each class maps to a tablein a relational database, and the association between classes maps to a one-to-many relationshipin the database that is enforced by a foreign key constraint.
The situation becomes much more complex if there is an inheritance relationship betweenclasses. In our Books and Authors model, both the Author entity and the Translator entityinherit the Person entity. Such a relationship is not easily represented in a relational store.
The Entity Framework supports several strategies for mapping an inheritance hierarchy to arelational store. I will describe the two most commonly used:
Table-per-type inheritance Under the table-per-type inheritance strategy, each type has itsown table. The parent table (in our example, the Person table) contains all the common prop-erties for all the entities in the hierarchy. The tables representing the child entities (Authorand Translator in our example) contain only those properties that are unique to a particularentity. To be able to relate parent and child tables, the primary key column (named SSN in ourexample) must exist in all the tables in the hierarchy. Additionally, a foreign key constraint canbe established between the parent and child tables. Foreign keys guarantee that a child table(Author or Translator in our example) can be inserted only if there is a related record in theparent (Person) table. To be able to retrieve a single Author from the data store, the query hasto join the Person and Author columns using the primary key.
In other words, if the row with value 569125274 of the SSN column exists in both the Personand the Author tables, then the person is an author. If such a row exists in both the Person andthe Translator tables, then the person is a translator. And since we marked the Person entity asAbstract, if the row with a value of 569125274 in the SSN column exists in the Person table,then there has to be exactly one row in either the Author or Translator table with the samevalue in the SSN column.
If the child tables (the Author and Translator tables in our example) contain a lot of columns,then this scenario represents a more efficient storage mechanism. Queries on a table-per-typestructure, on the other hand, can be slower than on those in a table-per-hierarchy structure.

THE ENTITY FRAMEWORK: RAISING THE DATA ABSTRACTION BAR 745
In each query, at least two tables have to be joined. Let’s compare this to a table-per-hierarchymapping scenario.
Table-per-hierarchy inheritance In the table-per-hierarchy inheritance mapping scenario,all entities in the hierarchy are mapped to a single table. A special discriminatory columnis used to discern which entity each individual row represents. In the mapping sectionof an EntityTypeMapping element, this row is represented by a Condition element. Forexample, inside the EntityTypeMapping for an Author entity, this element could be written as<Condition ColumnName="PersonCategory" Value="0" />. This means that each row with avalue of 0 in the PersonCategory column is an instance of an Author entity.
In our example, this means that both the Translator and Author entities are mapped to thePerson table. In such scenario, the Person table has to contain both Author and Translatorentity-specific columns. As a consequence and since each row in a table represents either anauthor or a translator, there will always be a number of empty cells in each row. In the casewhere a row represents an author, the translator-specific data will be empty, and vice versa.This is the weakness of this scenario; it is not the most efficient storage model. However, incases where there are a small number of specific columns, the storage inefficiency is more thancompensated for by query efficiency. Since there are no tables to be joined, queries tend to exe-cute much faster.
At this point, you might be curious to see the scenario chosen to represent inheritance in ourmodel by default and the exact database structure generated by the EDM Designer. You canregenerate the database script from the model using the process described in steps 4 through7 in the ‘‘Connecting the EDM to a Database’’ section earlier in this chapter. Once that is com-plete, open the BooksAndAuthors.edmx.sql file. You should see a file that contains the sectionof code shown in Listing 17.4.
Listing 17.4: DDL code for tables in the inheritance hierarchy
-- Creating table ‘Persons’CREATE TABLE [dbo].[Persons] (
[SSN] char(9) NOT NULL,[FirstName] nvarchar(50) NOT NULL,[LastName] nvarchar(50) NOT NULL
);GO-- Creating table ‘Persons_Translator’CREATE TABLE [dbo].[Persons_Translator] (
[SSN] char(9) NOT NULL);GO-- Creating table ‘Persons_Author’CREATE TABLE [dbo].[Persons_Author] (
[Signed] datetime NOT NULL,[SSN] char(9) NOT NULL
);GO
746 CHAPTER 17 USING THE ENTITY DATA MODEL
-- ---------------------------------------------------- Creating all Primary Key Constraints-- --------------------------------------------------
-- Creating primary key on [SSN] in table ‘Persons’ALTER TABLE [dbo].[Persons] WITH NOCHECKADD CONSTRAINT [PK_Persons]
PRIMARY KEY CLUSTERED ([SSN] ASC)ON [PRIMARY]
GO-- Creating primary key on [SSN] in table ‘Persons_Translator’ALTER TABLE [dbo].[Persons_Translator] WITH NOCHECKADD CONSTRAINT [PK_Persons_Translator]
PRIMARY KEY CLUSTERED ([SSN] ASC)ON [PRIMARY]
GO-- Creating primary key on [SSN] in table ‘Persons_Author’ALTER TABLE [dbo].[Persons_Author] WITH NOCHECKADD CONSTRAINT [PK_Persons_Author]
PRIMARY KEY CLUSTERED ([SSN] ASC)ON [PRIMARY]
GO
-- ---------------------------------------------------- Creating all Foreign Key Constraints-- --------------------------------------------------
-- Creating foreign key on [SSN] in table ‘Persons_Translator’ALTER TABLE [dbo].[Persons_Translator] WITH NOCHECKADD CONSTRAINT [FK_Translator_inherits_Person]
FOREIGN KEY ([SSN])REFERENCES [dbo].[Persons]
([SSN])ON DELETE NO ACTION ON UPDATE NO ACTION
GO-- Creating foreign key on [SSN] in table ‘Persons_Author’ALTER TABLE [dbo].[Persons_Author] WITH NOCHECKADD CONSTRAINT [FK_Author_inherits_Person]
FOREIGN KEY ([SSN])REFERENCES [dbo].[Persons]
([SSN])ON DELETE NO ACTION ON UPDATE NO ACTION
GO
If you analyze the DDL code in Listing 17.4, you can see that separate tables for Authorand Translator were created. In our model, the strategy chosen to map inheritance in theexample is table-per-type. (In case you are wondering whether this model would be able toaccommodate those poor souls that work both as authors and translators, the answer is ‘‘yes!’’

THE ENTITY FRAMEWORK: RAISING THE DATA ABSTRACTION BAR 747
There is nothing preventing the same SSN from existing in both the Persons_Author andPersons_Translator tables.)
With this code, you have a hierarchy in place to represent authors and translators in thedatabase. You aren’t finished with these entities yet; there is still some personal data that thesystem needs to keep as part of a complete record of the authors and translators. Let’s see howyou can use a complex property to structure some entity property information.
Adding a Complex Property to an Entity
One important piece of contact information for authors and translators is a telephone number.The publishing house needs to maintain a record of one telephone number for each author andtranslator. This requirement can be easily solved by adding another property to the Personentity. By adding a Telephone property to the Person entity, both the Author and Translatorentities will inherit it.
Instead of simply adding a string property to a Person entity, you can provide additionalintegrity and meaning to data if you structure the telephone number information. Typically, atelephone number consists of a country code, an area code, and a local number. Sometimes, youalso need additional information, such as an extension number or daytime/evening qualifier.
In the EDM Designer, you can use a complex property to structure the information you donot want to model as a separate entity. You can add a scalar property to the Person entity byfollowing these steps:
1. Right-click the word Properties on the Person entity on the EDM Designer surface, andselect the Add item in the context menu.The Add item is expanded into two subitems: Scalar Property and Complex Property.
2. Click the Complex Property subitem.A new property named Complex Property is added to Person.
3. Select and then rename the property to Phone.
4. Click an empty area on the EDM Designer surface, and select the Add � Complex Typemenu item.A new complex type named ComplexType1 is added to the model.
5. Select ComplexType1 in the Model Browser window, and rename it to PhoneNumber in theProperties window.
6. Right-click PhoneNumber in the Model Browser, and select Add � Scalar Property � String.
7. Rename the property to CountryCode in the Properties window, and assign Max Length avalue of 3 and Default Value a value of 1.
8. Repeat steps 6 and 7, adding an Area Code property (type String with a maximum lengthof 3) and a Number property (type String with a maximum length of 15 — this should beenough for any out-of-ordinary international number). Finally, add an Extension for con-sistency property (type String with maximum length of 20).
9. Go back to the Person entity in the EDM Designer, and select the Phone property.
10. Click the combo Type in the Properties window. It should now contain a single value:PhoneNumber. Select PhoneNumber as the type for the Phone property of the Personentity.
Select the Person entity in the EDM Designer, and take a look at the Mapping Details win-dow. You will see that properties of the Phone property are mapped to the same Persons table

748 CHAPTER 17 USING THE ENTITY DATA MODEL
as rest of the Person scalar properties. The only difference is the column name. The Phone_prefix is used to mark them as belonging to the Phone complex type. This will suffice tokeep telephone numbers for authors and translators. Note that in the case where more thanone telephone number for each Author/Translator needs to be kept in a database, you canmodel Telephone as a separate entity in a one-to-many relationship with Person, as describedin the next section.
Another important part of contact information is an address. The publisher often needsto keep multiple addresses for authors and translators. The next section explains just how todo that.
Adding a One-to-Many Association
Start by adding a new entity called Address to the Books and Authors EDM. As with telephonenumbers, you should bear in mind the international character of address information. Keepthe Id primary key added by default, and set the StoreGeneratedPatter property to Identity.Now add the following scalar properties to the Address entity:
◆ FirstLine (Type String, Max Length 50)
◆ SecondLine (Type String, Max Length 50, Nullable True)
◆ City (Type String, Max Length 50)
◆ PostalCode (Type Sting, Max Length 20)
◆ State (Type Sting, Max Length 20)
◆ Country (Type Sting, Max Length 20)
Now perform the following steps:
1. Select the Association tool in the Toolbox window.
2. Connect the Person and Address entities; start dragging from the Person entity.
You will see the line connecting the Person and Address entities with 1, which is used tosignify one side in a one-to-many association on the side of Person, and an asterisk, which isused to signify the many side in a one-to-many association on the side of Address.
Now, select the line in the EDM diagram, and take a look at Properties window. You willsee that the name of the association is PersonAddress. Since the association is one-to-many,rename it to PersonAddresses so that the cardinality of association can be easily understoodfrom its name. You have just created a one-to-many association in your model.
Entities in a one-to-many association expose a stronger type of relationship. They often havea dependant life cycle. For example, if you eliminate a person from the database, it makes nosense to keep the addresses that belong to that person in the database. The Entity Frameworkcan take care of this issue for you. If you set the End1 OnDelete property to Cascade, the EntityFramework will delete all addresses belonging to the deleted person automatically. Make surethat the End1 OnDelete property of the PersonAddresses association is set to Cascade.
Adding a Many-to-Many Association
At this point, you have created the main entities in your model. You have modeled the Author,Translator, and Book entities. But, a crucial piece of the puzzle is still missing. You must havea means to connect authors and translators with their books. Typically, you expect to have a

THE ENTITY FRAMEWORK: RAISING THE DATA ABSTRACTION BAR 749
single author per book. However, it is not uncommon (especially for nonfiction titles) to haveseveral authors per book. And it is to be expected that an author will deliver more than onetitle in his lifetime. There is a similar relationship between translators and titles.
You can say that the nature of the relation between books and authors and between booksand translators is many-to-many. Since the relation with books is common to both authors andtranslators, the best way to represent it in our model without incurring repetition is to associatethe Person entity with the Book entity using a many-to-many association.
1. Select the Association tool in the Toolbox window.
2. Connect the Person and Book entities; drag from the Person entity to the Book entity.
3. Select the newly added association.
4. In the Properties window, make sure that End 1 Multiplicity has the value of * (Collectionof Person) and End 2 Multiplicity has the value of * (Collection of Book).
5. Pluralize the names of the navigation properties. Rename the End1 navigation property toBooks and the End2 navigation property to Persons.
The diagram in the EDM Designer should show the diamond and an asterisk on both sidesof the line connecting the Person and Book entities. Also, both the Person entity and the Bookentity should display some newly created navigation properties: Books for the Person entityand Persons for the Book entity. Navigation properties are a special kind of properties in asense that they hold a reference to another entity or set of entities.
If you select the line connecting the Person and Book entities, you will see in the MappingDetails window that it maps to a separate table called PersonBook.
Now that you have seen how to establish a many-to-many association between entities, youcan add a new entity called Language, with Id and Name scalar properties. Create a many-to-many association between the Language and Translator entities. This way, you will be able tostore information on the languages that an individual translator works with, making translatorinformation much more useful to the publisher.
Generate the Database Structure
So far, you only used the EDM Designer to generate the DDL code. You haven’t actually exe-cuted the DDL against the database. By following these steps, you can easily use Visual Studio2010 to execute the DDL script.
1. Open BooksAndAuthors.edmx.sql in Visual Studio.
2. Make sure that the T-SQL Editor toolbar is visible. If it is not, right-click the toolbar area,and make sure that T-SQL Editor is selected.
3. In the T-SQL Editor toolbox, select the BooksAndAuthors database in the Database combo.(the BooksAndAuthors database was created in the ‘‘Connecting the EDM to a Database’’earlier section.)
4. Click the Execute SQL button in T-SQL Editor toolbox.
At this point, it would be interesting to compare the structure of the EDM with the struc-ture of the database generated for the model. You can take a look at the database structure inFigure 17.4.

750 CHAPTER 17 USING THE ENTITY DATA MODEL
Figure 17.4
Books and Authorsdatabase structure
Figure 17.5 shows the EDM.
Figure 17.5
Books and Authors EDM

PUTTING THE EDM TO WORK 751
Although there is a correspondence between the diagrams, there are some significant dif-ferences. The EDM diagram shows the many-to-many association as a line between the twotables, while on the database diagram the many-to-many relation materializes in a joined table.Although the EDM diagram shows a single complex property, Phone, in a database, these arematerialized as a group of columns clustered around the same Phone_ prefix.
In conclusion, the EDM is capable of providing a cleaner conceptual view of the data, canhide many low-level implementation details, and provides a much richer set of features forworking with data.
With this, you have successfully generated your first Entity Data Model and used most ofthe available constructs while doing so. The model itself, though, is not much use if you arenot able to interact with it and use it to store the data. In the next section, you will see howyou can use the Entity Framework to obtain data from the data store and how you can modifythat same data with the help of the Entity Framework.
Putting the EDM to WorkIn a way, working with the Entity Framework is similar to working with DataSets. You querythe EDM in order to obtain the objects representing the data. Next you display the objects; thenyou perform any updates, inserts, or deletes on objects; and finally you commit changes to thedata store. The difference is that instead of working with objects such as a DataTable that rep-resents the data store structure directly, you work with your entities that represent the objectsin your business layer.
As I mentioned in the introductory section, the Entity Framework introduces another layerof abstraction when you are working with data. Although there are numerous benefits in pro-ductivity and simplification to be found in such an approach, an additional layer inevitablymeans letting go of some low-level control features. I am not obsessed by keeping things com-pletely in control, but I do like to understand what is going on underneath the surface.
One very good tool that can help you understand how the Entity Framework interacts withthe database is the SQL Server Profiler. It displays the exact SQL query that the Entity Frame-work issues to the database. This can help you understand a number of subtleties related tothe Entity Framework and will allow you to optimize the way you use it. I suggest you use theSQL Server Profiler to monitor Entity Framework–to–database conversations until you becomefamiliar with the Entity Framework’s behavior.
In the next section, I will, from time to time, use the SQL Server Profiler trace output to cor-roborate some statements that I make about the inner workings of the Entity Framework.
Querying the Entity Data ModelAt this point, you must be aching to write some Visual Basic code. In the following section,you will see some very interesting options that the Entity Framework provides for accessing thedata. You will typically use LINQ to Entities to query the EDM. In this case, you see data in theform of strongly typed .NET objects exposed via the ObjectContext class and made availablethrough the Object Services infrastructure. In cases where you need more granular control orneed to write some dynamically generated queries, you can use the Entity SQL language. Youcan issue Entity SQL queries to query the ObjectContext class, or for more low-level access, youcan use the EntityClient data provider. Finally, you can query the ObjectContext class by usingEntity SQL with the help of the ObjectQuery class or by constructing your queries with the helpof ObjectQuery Query Builder methods. Let’s start with LINQ to Entities.

752 CHAPTER 17 USING THE ENTITY DATA MODEL
Using LINQ to Entities
In Chapter 14, ‘‘An Introduction to LINQ,’’ you familiarized yourself with LINQ. Thanks to theObject Services layer and the .NET code generated by the Entity Framework (shown in List-ing 17.3), you can query the data in the EDM as objects and unleash all the power of LINQsyntax in your Visual Basic code.
It is time you put to use the form added automatically to MyEFProject that contains theBooksAndAuthors EDM. Start by renaming the form to QueryEDM.vb, and add a button namedListAllBooks.
Listing All of the Entities in a Database
If you go back to Listing 17.3, you will see that the EDM Designer generated a class namedBooksAndAuthorsContainer that inherits the ObjectContext class and that I introduced as the‘‘entry point’’ to EDM Object Services. This class has a property, Books, of type ObjectSet(OfBook) that essentially represents a set of entities and implements interfaces like IQueryable andIEnumerable. With those in place, listing all book entities should be as easy as traversing allof the objects in the Books set of BooksAndAuthorsContainer instance. Let’s do just that in aListAllBooks button event handler. Take a look at Listing 17.5. It writes the title of all booksin the database to the console. To see the result, make sure that the Output window in VisualStudio is visible.
Listing 17.5: Listing all Book entities
Private Sub ListAllBooks_Click(ByVal sender As System.Object,ByVal e As System.EventArgs) Handles ListAllBooks.Click
Dim context As New BooksAndAuthorsContainerFor Each book In context.Books
Console.WriteLine("Title: " & book.Title)Next
End Sub
This was actually very simple — a kind of Entity Framework Hello Word application. Let’snow try something a bit more complicated. Let’s see whether we can actually use some LINQsyntax.
Finding an Entity Using a LINQ Query
LINQ can be very expressive when writing queries. If you use it prudently, it can be also veryefficient. Take a look at the code in Listing 17.6. It finds the longest book by ordering books bythe PageCount property and then selecting the first Book entity on the list.
Listing 17.6: Find the longest book LINQ query
Private Sub LongestBook_Click(ByVal sender As System.Object,ByVal e As System.EventArgs) Handles LongestBook.Click

PUTTING THE EDM TO WORK 753
Dim context As New BooksAndAuthorsContainerDim books = context.BooksDim longestBook As Book = (From book In books
Order By book.PageCount).FirstConsole.WriteLine("The longest book is: " +longestBook.ISBN + " " + longestBook.Title)
End Sub
If you take a look at Listing 17.7, you can see the SQL code issued to the database andcaptured by SQL Server Profiler.
Listing 17.7: SQL Server Profiler–captured SQL code
SELECT TOP (1)[Extent1].[ISBN] AS [ISBN],[Extent1].[Title] AS [Title],[Extent1].[PublishingDate] AS [PublishingDate],[Extent1].[PageCount] AS [PageCount]FROM [dbo].[Books] AS [Extent1]ORDER BY [Extent1].[PageCount] ASC
Notice that the Entity Framework was intelligent enough to delegate the ordering operationto the database engine and to limit the result to a single row with the TOP statement. This is amuch more efficient way to obtain the desired result than to write Visual Basic code that oper-ates on the Books set. For example, you can obtain the same result by filtering the book by thePageCount property inside the For Each loop in Listing 17.5. This would result in fetching allthe records in a table. Such code, however, would hardly be of production quality.
Finding an Entity of a Specific Type in the Inheritance Hierarchy
If you now open the BooksAndAuthors.Designer.vb file, you will see that it contains muchmore code than when we started building our Books and Authors EDM. If you inspect theBooksAndAuthorsContainer class, you might note something curious. The class has the Personproperty but no Translator or Author properties. So, how can you write the queries thatreference a child type in an inheritance hierarchy?
The solution comes in the form of the LINQ OfType query operator. Take a look at List-ing 17.8. It shows the code that fetches all translators stored in the Translators table.
Listing 17.8: Fetch translators
Private Sub FetchTranslators_Click(ByVal sender As System.Object,ByVal e As System.EventArgs) Handles FetchTranslators.Click
Dim context As New BooksAndAuthorsContainerDim translators = context.Persons.OfType(Of Translator)()

754 CHAPTER 17 USING THE ENTITY DATA MODEL
For Each Translator In translatorsConsole.WriteLine("Translator: " & Translator.FirstName &
" " & Translator.LastName)Next
End Sub
It is interesting to observe how this query resolves on the database level. Listing 17.9 showsthe SQL issued to the database. Since the Person–Translator hierarchy is modeled through atable-per-type inheritance modeling method, a join between the Persons and Translators tableshas to be performed in order to fetch Translator entity rows from the database.
Listing 17.9: Fetch translators SQL code
SELECT’1X0X’ AS [C1],[Extent1].[SSN] AS [SSN],[Extent2].[FirstName] AS [FirstName],[Extent2].[LastName] AS [LastName],1 AS [C2],[Extent2].[Phone_CountryCode] AS [Phone_CountryCode],[Extent2].[Phone_AreaCode] AS [Phone_AreaCode],[Extent2].[Phone_Number] AS [Phone_Number],[Extent2].[Phone_Extension] AS [Phone_Extension]FROM [dbo].[Persons_Translator] AS [Extent1]INNER JOIN [dbo].[Persons] AS [Extent2] ON [Extent1].[SSN] = [Extent2].[SSN]
As you can see in the last line in the listing, each time you need to obtain an instance of aTranslator or Author entity, a join between Person and Translator or Person and Authorhas to be performed on the database level.
Using Entity SQL
If you have spent some time writing the SQL code, you will immediately feel familiar witheSQL. You can think of it as a data store–agnostic SQL used to query the EDM. Take a lookat the code in Listing 17.10. It shows a simple query issued to the Books and Authors EDMusing the Entity Client classes. The code has the familiar, traditional, ADO.NET ‘‘open connec-tion, execute command’’ feel to it.
Listing 17.10: eSQL query issued using the Entity Client library
Private Sub FindBookByISBN_Click(ByVal sender As System.Object,ByVal e As System.EventArgs) Handles FindBookByISBN.Click
Using connection As New EntityConnection("Name=BooksAndAuthorsContainer")connection.Open()Dim command = connection.CreateCommand()

PUTTING THE EDM TO WORK 755
command.CommandText = "SELECT VALUE book FROM" &"BooksAndAuthorsContainer.Books " &"As book Where book.ISBN = @isbn"
command.Parameters.AddWithValue("isbn", "9780470187425")Dim reader = command.ExecuteReader(CommandBehavior.SequentialAccess)reader.Read()Console.WriteLine("Book title is: " & reader("Title"))
End UsingEnd Sub
If you take a look at the SQL Profiler trace, you will see how eSQL was transformed to theparameterized SQL query. Listing 17.11 shows the trace.
Listing 17.11: eSQL command transformed to parameterized query SQL
exec sp_executesql N’SELECT[Extent1].[ISBN] AS [ISBN],[Extent1].[Title] AS [Title],[Extent1].[PublishingDate] AS [PublishingDate],[Extent1].[PageCount] AS [PageCount]FROM [dbo].[Books] AS [Extent1]WHERE [Extent1].[ISBN] = @isbn’,N’@isbn nvarchar(4000)’,@isbn=N’9780470187425’
eSQL is a programming language in its own right, and, as such, getting into more detailsabout eSQL programming is outside the scope of this book. For more information on eSQL,try the Microsoft Developer Network at http://msdn.microsoft.com/en-us/library/bb399560.aspx.
Advanced Search Forms with eSQL Dynamic Queries
Advanced search forms typically present a user with a number of search criteria. The userwill generally employ only a few criteria options with each query, but the exact combinationof criteria options cannot be known beforehand. Nor does it make sense programming all thepossible criteria combinations, since there are too many.
A good alternative to implementing queries based on numerous criteria options is to usedynamic queries. With each new search, a new query is constructed ‘‘on the fly.’’ The‘‘where’’ portion of the query is generated by concatenating comparison statements expressingthe condition on the form. Only those chosen by the user are included in the generated eSQLcode.
The book search form, shown here, can be used to search for titles in the Books and AuthorsEntity Data Model.

756 CHAPTER 17 USING THE ENTITY DATA MODEL
It offers four different criteria for book search: book ISBN, book title, and a date range forpublishing date. At each click of the Find button, each criteria is inspected and included in thequery only if the user has entered the search criteria. To make the search more flexible, theISBN and title are included in the query using wildcards and the LIKE condition. This way, ifthe user enters Mastering in the Title text box, all books containing the word Mastering in thetitle are selected by the query. Here’s the complete code to make this form work; thanks todynamic query construction, the whole sample can fit the single screen:
Imports System.Data.ObjectsImports System.Data.EntityClient
Public Class eSQLDynamicQuery
Dim command As EntityCommandDim eSqlSelect = "SELECT book.ISBN, book.Title, book.PublishingDate " &
"from BooksAndAuthorsContainer.Books as book"Dim eSqlWhere As String
Private Sub btnFind_Click(ByVal sender As System.Object,ByVal e As System.EventArgs) Handles btnFind.Click
gridResult.Rows.Clear()Using connection As New EntityConnection("Name=BooksAndAuthorsContainer")

PUTTING THE EDM TO WORK 757
connection.Open()command = connection.CreateCommand()AddISBNCondition()AddTitleCondition()AddPublishedBeforeCondition()AddPublishedAfterCondition()command.CommandText = eSqlSelect & eSqlWhereDim reader = command.ExecuteReader(CommandBehavior.SequentialAccess)While (reader.Read())
gridResult.Rows.Add(New String() {reader("ISBN"), reader("Title"),reader("PublishingDate")})
End WhileEnd Using
End Sub
Private Sub AddISBNCondition()If String.IsNullOrEmpty(txtISBN.Text) Then Exit SubConcatenateAndOrWhere()eSqlWhere = eSqlWhere & "book.ISBN LIKE @isbn"command.Parameters.AddWithValue("isbn", "%" + txtISBN.Text + "%")
End Sub
Private Sub AddTitleCondition()If String.IsNullOrEmpty(txtTitle.Text) Then Exit SubConcatenateAndOrWhere()eSqlWhere = eSqlWhere & "book.Title LIKE @title"command.Parameters.AddWithValue("title", "%" + txtTitle.Text + "%")
End Sub
Private Sub AddPublishedAfterCondition()If txtAfter.Text.Equals(" / /") Then Exit SubConcatenateAndOrWhere()eSqlWhere = eSqlWhere & "book.PublishingDate > @after"command.Parameters.AddWithValue("after", CDate(txtAfter.Text))
End Sub
Private Sub AddPublishedBeforeCondition()If txtBefore.Text.Equals(" / /") Then Exit SubConcatenateAndOrWhere()eSqlWhere = eSqlWhere & "book.PublishingDate < @before"command.Parameters.AddWithValue("before", CDate(txtBefore.Text))
End Sub
Private Sub ConcatenateAndOrWhere()If Not (String.IsNullOrEmpty(eSqlWhere)) Then
eSqlWhere = eSqlWhere & " AND "Else

758 CHAPTER 17 USING THE ENTITY DATA MODEL
eSqlSelect = eSqlSelect & " WHERE "End If
End Sub
Private Sub Button2_Click(ByVal sender As System.Object,ByVal e As System.EventArgs) Handles Button2.Click
gridResult.Rows.Clear()End Sub
End Class
Using Query Builder Methods and the ObjectQuery Class
Yet another alternative you have at your disposal for querying the EDM is the ObjectQueryclass. You can build your queries in a standard object-oriented manner using the ObjectQuerybuilder methods. The ObjectQuery API permits writing chained methods following the Builderpattern. It is best to illustrate this with an example. Listing 17.12 demonstrates query construc-tion employing the Object Query API.
Listing 17.12: ObjectQuery’s builder methods
Private Sub QueryBuilder_Click(ByVal sender As System.Object,ByVal e As System.EventArgs) Handles QueryBuilder.Click
Dim context As New BooksAndAuthorsContainerDim query As ObjectQuery(Of Book)query = context.Books.
Where("it.PublishingDate > DATETIME’1999-01-01 00:00’").OrderBy("it.PublishingDate").Top(10)
Console.WriteLine(query.ToTraceString())For Each book As Book In query.ToList()
Console.WriteLine(book.Title)Next
End Sub
ObjectQuery has a ToTraceString method that permits visualizing the SQL that is beingissued to the database directly inside the Visual Studio. Using ToTraceString is a more sim-ple SQL debug method than monitoring the trace in SQL Server Profiler. Listing 17.13 showsthe SQL trace.
Listing 17.13: ObjectQuery’s ToTraceString method output
SELECT TOP (10)[Extent1].[ISBN] AS [ISBN],[Extent1].[Title] AS [Title],

PUTTING THE EDM TO WORK 759
[Extent1].[PublishingDate] AS [PublishingDate],[Extent1].[PageCount] AS [PageCount]FROM [dbo].[Books] AS [Extent1]WHERE [Extent1].[PublishingDate] > convert(datetime2,’1999-01-01 00:00:00.0000000’, 121)ORDER BY [Extent1].[PublishingDate] ASC
Deferred Loading and Navigation Properties
So far, I haven’t demonstrated how you can use navigation properties to obtain a reference of arelated entity. Now that you cannot use navigation properties (not using navigation propertieswould pretty much defeat the purpose of having the EDM), you just need to be explicit aboutthe relations you will be using on entities obtained from your queries. There are severalways to tell the Entity Framework to fetch related entities as well as the resulting entity. Forexample, you can use the Include method of the ObjectQuery class, you can explicitly loadrelated entities, or you can activate the deferred loading feature of the Entity Framework.
A very common scenario with the Books and Authors EDM would be to list all booksauthored by a certain author. Had I not spoiled the surprise in the previous paragraph, youmight have expected the code in Listing 17.14 to list all books authored by the randomlyselected first author in the database.
Listing 17.14: Unsuccessful attempt of listing all books belonging to an author
Private Sub DefferedLoading_Click(ByVal sender As System.Object,ByVal e As System.EventArgs) HandlesDefferedLoading.Click
Dim context As New BooksAndAuthorsContainerDim author = context.Persons.OfType(Of Author).First()For Each book As Book In author.Books
Console.WriteLine(book.Title)Next
End Sub
If you take a look at the Output window after executing the code in Listing 17.14, you willnotice it lists no books, even though all authors have at least one book that they have authoredin the database.
Using the Include Method
The first alternative at your disposal that you can use to read or to materialize (as retrievingentities from the database is more commonly called in EDM jargon) the related entities isthe Include method. This loading strategy is also known as eager loading. Take a look atListing 17.15; it demonstrates the Include method used to materialize related Book entities.
Listing 17.15: Using the Include, method to materialize related entities
Private Sub DefferedLoading_Click(ByVal sender As System.Object,ByVal e As System.EventArgs) HandlesDefferedLoading.Click

760 CHAPTER 17 USING THE ENTITY DATA MODEL
Dim context As New BooksAndAuthorsContainerDim author = context.Persons.OfType(Of Author).Include("Books").First()For Each book As Book In author.Books
Console.WriteLine(book.Title)Next
End Sub
If you take a look at the Output window, you will see titles of the books belonging to theauthor printed to the console. More interesting, however, is the SQL generated by the EntityFramework. Listing 17.16 shows the SQL code.
Listing 17.16: SQL code resulting from the Include method
SELECT[Limit1].[Signed] AS [Signed],[Limit1].[SSN] AS [SSN],[Limit1].[SSN1] AS [SSN1],[Limit1].[FirstName] AS [FirstName],[Limit1].[LastName] AS [LastName],[Limit1].[Phone_CountryCode] AS [Phone_CountryCode],[Limit1].[Phone_AreaCode] AS [Phone_AreaCode],[Limit1].[Phone_Number] AS [Phone_Number],[Limit1].[Phone_Extension] AS [Phone_Extension],[Limit1].[C1] AS [C1],[Limit1].[C2] AS [C2],[Limit1].[C3] AS [C3],[Project2].[C1] AS [C4],[Project2].[ISBN] AS [ISBN],[Project2].[Title] AS [Title],[Project2].[PublishingDate] AS [PublishingDate],[Project2].[PageCount] AS [PageCount]FROM (SELECT TOP (1)
[Extent1].[Signed] AS [Signed],[Extent1].[SSN] AS [SSN],[Extent2].[SSN] AS [SSN1],[Extent2].[FirstName] AS [FirstName],[Extent2].[LastName] AS [LastName],[Extent2].[Phone_CountryCode] AS [Phone_CountryCode],[Extent2].[Phone_AreaCode] AS [Phone_AreaCode],[Extent2].[Phone_Number] AS [Phone_Number],[Extent2].[Phone_Extension] AS [Phone_Extension],‘1X0X’ AS [C1],1 AS [C2],1 AS [C3]FROM [dbo].[Persons_Author] AS [Extent1]INNER JOIN [dbo].[Persons] AS [Extent2] ON
[Extent1].[SSN] = [Extent2].[SSN] ) AS [Limit1]LEFT OUTER JOIN (SELECT

PUTTING THE EDM TO WORK 761
[Extent3].[Persons_SSN] AS [Persons_SSN],[Extent4].[ISBN] AS [ISBN],[Extent4].[Title] AS [Title],[Extent4].[PublishingDate] AS [PublishingDate],[Extent4].[PageCount] AS [PageCount],1 AS [C1]FROM [dbo].[PersonBook] AS [Extent3]INNER JOIN [dbo].[Books] AS [Extent4] ON
[Extent4].[ISBN] = [Extent3].[Books_ISBN] )AS [Project2] ON [Limit1].[SSN] = [Project2].[Persons_SSN]
ORDER BY [Limit1].[SSN] ASC, [Limit1].[SSN1] ASC, [Project2].[C1] ASC
Listing 17.16 is quite long, but for our purpose, it is important to note that the code includesa join with the Books table. It is also the only query visible in the SQL Profiler trace, meaningthat all the data was fetched in one go — meaning it was loaded eagerly. Loading can also bedeferred, as you will see in the ‘‘Using Deferred Loading’’ section very soon.
Using Explicit Loading
Instead of including the whole path in your query, you can tell the navigation property to loadjust when you need it. Listing 17.17 shows how books related to an author can be materializedusing the Load method of the EntityCollection class.
Listing 17.17: Using explicit loading to materialize related entities
Private Sub DefferedLoading_Click(ByVal sender As System.Object,ByVal e As System.EventArgs) HandlesDefferedLoading.Click
Dim context As New BooksAndAuthorsContainerDim author = context.Persons.OfType(Of Author).First()author.Books.Load()For Each book As Book In author.Books
Console.WriteLine(book.Title)Next
End Sub
Again, it is the SQL Server Profiler that tells the true story of the code resolution on thedatabase level. The trace includes two queries and is shown in Listing 17.18.
Listing 17.18: SQL code resulting from the Load method
-- first traceSELECTSELECT[Limit1].[C1] AS [C1],[Limit1].[SSN] AS [SSN],

762 CHAPTER 17 USING THE ENTITY DATA MODEL
[Limit1].[FirstName] AS [FirstName],[Limit1].[LastName] AS [LastName],[Limit1].[C2] AS [C2],[Limit1].[Phone_CountryCode] AS [Phone_CountryCode],[Limit1].[Phone_AreaCode] AS [Phone_AreaCode],[Limit1].[Phone_Number] AS [Phone_Number],[Limit1].[Phone_Extension] AS [Phone_Extension],[Limit1].[Signed] AS [Signed]FROM ( SELECT TOP (1)
[Extent1].[Signed] AS [Signed],[Extent1].[SSN] AS [SSN],[Extent2].[FirstName] AS [FirstName],[Extent2].[LastName] AS [LastName],[Extent2].[Phone_CountryCode] AS [Phone_CountryCode],[Extent2].[Phone_AreaCode] AS [Phone_AreaCode],[Extent2].[Phone_Number] AS [Phone_Number],[Extent2].[Phone_Extension] AS [Phone_Extension],‘1X0X’ AS [C1],1 AS [C2]FROM [dbo].[Persons_Author] AS [Extent1]INNER JOIN [dbo].[Persons] AS [Extent2] ON [Extent1].[SSN] = [Extent2].[SSN]
) AS [Limit1]
-- second traceexec sp_executesql N’SELECT[Extent2].[ISBN] AS [ISBN],[Extent2].[Title] AS [Title],[Extent2].[PublishingDate] AS [PublishingDate],[Extent2].[PageCount] AS [PageCount]FROM [dbo].[PersonBook] AS [Extent1]INNER JOIN [dbo].[Books] AS [Extent2] ON[Extent1].[Books_ISBN] = [Extent2].[ISBN]WHERE [Extent1].[Persons_SSN] =@EntityKeyValue1’,N’@EntityKeyValue1 char(9)’,@EntityKeyValue1=’568845586’
In this case, each time a book entity is referenced in the For Each loop, a new SQL statement isissued to a database. Had our author authored more than one book, you would end up with asignificant number of queries issued to the database just to print this simple information.
Using Deferred Loading
More commonly known as lazy loading, this is the pattern that loads data from the databaseonly upon the request. To put it simply, only when you call the Getter method of thenavigation property is the data fetched from the database.
In this case, using navigation properties is quite transparent, and the code looks quitelike the code in Listing 17.15. One missing detail has to do with activating the deferredloading, since it is deactivated by default. Listing 17.19 shows the code for deferredloading.

PUTTING THE EDM TO WORK 763
Listing 17.19: Using deferred loading to materialize related entities
Private Sub DefferedLoading_Click(ByVal sender As System.Object,ByVal e As System.EventArgs) HandlesDefferedLoading.Click
Dim context As New BooksAndAuthorsContainercontext.ContextOptions.DeferredLoadingEnabled = TrueDim author = context.Persons.OfType(Of Author).First()For Each book As Book In author.Books
Console.WriteLine(book.Title)Next
End Sub
As you would expect, the resulting SQL is identical to that shown in Listing 17.18, meaningthat a new query is issued for each referenced Book entity.
Choosing the Right Loading Strategy
Now that you have seen how different loading strategies are resolved at a database level, youmust be already guessing the impact of choosing the right loading strategy on the performanceof your application. In our sample code, deferring the loading of book information would resultin abysmal performance if such code was ever put into production.
If you had no prior experience with ORM frameworks like the Entity Framework, then atthis point you might be asking yourself, ‘‘Does deferred loading make sense at all?’’ It doesprovide some coding benefits, since you use navigation properties just like any other proper-ties, but this coding gain is certainly not worth the possible negative impact on the applicationperformance.
Deferred (or lazy loading) is the default loading strategy in many object-relational mapping(ORM) frameworks similar to the Entity Framework. As it happens, the sample code I haveshown in this section serves to illustrate different loading strategies, but it is not very represen-tative of how real-life applications work.
In a typical application scenario, you use simple properties on an entity to display the entityinformation to the user. In our example, you use Author information (probably a name) tolet the user select the correct author. (At this point, eagerly loading book information fromthe database would mean loading almost all the database data in one go!) Only after the userhas selected the author is the related data (in our example list of books) fetched from thedatabase. At this point, it does make sense to fetch all the books belonging to an author in onego, since you will show the list of all titles on the Author Details page. Imagine the Book hassome related Sales information. It does not make sense to fetch this information until the userselects the specific title. With lazy loading, all the data is timely fetched.
The more complex the application becomes, the more complicated it is to understand allthe scenarios where navigation properties will be used. For best results, fine-tune your queries,choose the correct loading strategy for each individual query, and profile the Entity FrameworkSQL generation to grasp how the Entity Framework queries are translated into the SQL issuedto database.
Modifying the Data with the Entity FrameworkThe Entity Framework provides a strongly typed, object-oriented view of the data, and as such,it enables you to insert, update, and delete data by working with instances of entity types.All of the entity type instances are bound to a context (through an ObjectContext class) that

764 CHAPTER 17 USING THE ENTITY DATA MODEL
tracks the changes made to these objects. Once you tell ObjectContext to commit changes to thedatabase by calling the SaveChanges method, it calculates the differences between the data inthe application and the data in the data store and will commit the changes to the data store.
In the Books and Authors EDM, the class inheriting the ObjectContext class is calledBooksAndAuthorsContainer. As in the previous examples, when querying the data, Books-AndAuthorsContainer is the central class that permits access to all the objects’ methods relatedto data modifications. Let’s start with a simple insert of a new entity.
Inserting New Instances
We can insert a new instance of an entity in several ways. Each entity class in the EDM has astatic CreateEntityName method. For example, the Book entity has a CreateBook static methodthat can be used for the purpose of adding a new book to a context. Alternatively, you cancreate a new entity using the New operator and then use the AddObject method that’s avail-able on each EntitySet class. Listing 17.20 shows the latter method where first a new instanceof the Language entity is created, then it is added to the Languages entity set, and finally it iscommitted to the database by calling ObjectContext.SaveChanges().
Listing 17.20: Adding a new Language entity
Private Sub InsertNewLanguage_Click(ByVal sender As System.Object,ByVal e As System.EventArgs) HandlesInsertNewLanguage.Click
Dim context As New BooksAndAuthorsContainerDim arabic As New Languagearabic.Name = "Arabic"context.Languages.AddObject(arabic)context.SaveChanges()
End Sub
Deleting an Entity Instance
Deletion of an entity instance can be easily performed with the help of the Delete method ofObjectContext. Listing 17.21 shows how this is performed using the instance of the Languageentity inserted in the previous listing.
Listing 17.21: Deleting a Language entity
Private Sub DeleteLanguage_Click(ByVal sender As System.Object,ByVal e As System.EventArgs) HandlesDeleteLanguage.Click
Dim context As New BooksAndAuthorsContainerDim arabic As Language = (From language In context.Languages
Where language.Name = "Arabic").FirstOrDefault()
context.DeleteObject(arabic)context.SaveChanges()
End Sub

PUTTING THE EDM TO WORK 765
Updating an Entity Instance
You will not be surprised by the code included in Listing 17.22. It follows a pattern that issimilar to that found in the entity insertion and deletion code. An Entity property is updated,and changes are committed by calling the ObjectContext SaveChanges method.
Listing 17.22: Updating a Language entity
Private Sub UpdateLanguage_Click(ByVal sender As System.Object,ByVal e As System.EventArgs) HandlesUpdateLanguage.Click
Dim context As New BooksAndAuthorsContainerDim arabic As Language = (From language In context.Languages
Where language.Name = "Arabic").FirstOrDefault()
arabic.Name = "Arabic Language"context.SaveChanges()
End Sub
Establishing Relationship Between Entity Instances
The final piece of the data modification puzzle has to do with establishing the relationshipbetween the entity instances. If I have a Book instance and an Author instance, how do I relatethem so that the book appears in the list of books authored by that specific author?
You can perform this in a standard object-oriented manner. Just add the Book instance to theset of books belonging to the Author, and call SaveChanges on the ObjectContext. Listing 17.23shows that exact scenario.
Listing 17.23: Establishing a relationship between an Author and a Book instance
Private Sub InsertsInTransaction_Click(ByVal sender As System.Object,ByVal e As System.EventArgs) HandlesInsertsInTransaction.Click
Dim context As New BooksAndAuthorsContainer
Dim book As New Book With {.ISBN = "9780470179796",.Title = "Professional Refactoring in Visual Basic",.PageCount = "517", .PublishingDate = "April 7, 2008"}
Dim author As New Author With {.SSN = "423235332",.FirstName = "Danijel",.LastName = "Arsenovski",.Phone = New PhoneNumber With {.CountryCode = "56",
.AreaCode = "2", .Number = "8588656", .Extension = " "},.Signed = "January 1, 2007"}
context.Persons.AddObject(author)context.Books.AddObject(book)

766 CHAPTER 17 USING THE ENTITY DATA MODEL
author.Books.Add(book)context.SaveChanges()
End Sub
By calling the Add method on the set of Books belonging to an Author — author.Books.Add(book) — the Entity Framework becomes aware that two instances are related and adds therecord to the PersonBook join table in the database.
Using Transactions in the Entity Framework
If you look back at Listing 17.23, you might wonder what exactly happens if the Entity Frame-work is not capable of performing all the operations in the listing. If you analyze the listing,you can see that the code will be resolved as three Insert operations on the database level:the insert of an author instance to the Author table, the insert of a book instance into the Booktable, and the insert of the record relating the book and the author into the PersonBook table.So, what happens if one of these operations fails?
The Entity Framework generates implicit transactions for all changes performed fromone SaveChanges method call to the next. In our example, all inserts will be committed tothe database under the same transaction. If any of them fails, the others are automaticallyrolled back.
You can test this by executing the code in Listing 17.23 twice in a row. For the secondexecution, modify the author’s Social Security number, but leave the book data as it is. Sinceyou have modified the SSN, you will be able to insert the author, but the book insert will fail.ISBN is the primary key on the Book entity, and the same value cannot be inserted twice. Theexecution will end up in an error. If you then take a look at the database, you will observe thatneither the book nor the author instance was inserted.
Coordinating Transactions with External Operations
In some scenarios, the transaction control that ObjectContext implicitly provides is not enough.There are situations where you need to enroll operations external to the ObjectContext into thesame transaction. In such cases, you can use the TransactionScope class. Listing 17.24 showssome mock-up code that demonstrates how the TransactionScope class can be used.
Listing 17.24: Using TransactionScope for enlisting external operations
Using transaction As New TransactionScope()context.Persons.AddObject(author)context.Books.AddObject(book)author.Books.Add(book)context.SaveChanges()‘Do some external operation that can be enroled inside the transactiontransaction.Complete()
End Using
Note that you need to reference the System.Transactions assembly and import theSystem.Transactions namespace in order to gain access to the TransactionScope class.

THE BOTTOM LINE 767
Reverse-Engineering an Entity Data ModelThe approach I followed thus far in this chapter starts with the premise that you are building acompletely new EDM. The EDM is then used to generate the DDL scripts for the database usedto store the EDM data.
Very often, though, you will have to construct your application on the top of an existingdatabase. The Entity Framework supports that scenario, as well; in that case, the EDM Designerwill use the database structure as a starting point for automated EDM generation.
Let’s explore this scenario by creating an EDM from the Northwind database. I explainedhow you can obtain and install the sample Northwind database in Chapter 15, so I will assumethat the database is present in your Microsoft SQL Server.
1. Choose Project � Add New Item. Select the ADO .NET Entity Data Model item, andrename it to Northwind.edmx. Click Add.
2. When the Entity Data Model Wizard opens, choose Generate From Database as your replyto the ‘‘What should the model contain?’’ prompt. Click Next.
3. Select a connection to the Northwind database. If the connection is not present inthe Connection combo box, use the New Connection button to create a connection to theNorthwind database, and then click Next.
4. When the Choose Your Database Objects window opens, select all the objects displayedunder the Tables, Views, and Stored Procedures nodes, and click Finish.
The part of the Northwind EDM diagram showing entities generated from tables in theNorthwind database was shown earlier in Figure 17.1.
The Entity Framework is capable of making use of already constructed databases includingother database objects, such as views and stored procedures. In the case of views, a separateEntityType and EntitySet are generated for each view. Stored procedures are represented asfunctions in the EDM and can be mapped as custom CRUD operations for an entity. In thatcase, instead of generating the appropriate SQL, the Entity Framework is capable of invokingthe stored procedure to delete, update, insert, or read the entity.
The Bottom Line
Employ deferred loading when querying the Entity Data Model. The Entity Frameworksupports the deferred loading (lazy loading) of entities. When deferred loading is activated,entities in navigation properties are loaded on demand, only after they are accessed. In caseswhen you are not certain that the related entity will be accessed (for example, when loadingis dependent on a user action), you can initially load only the root entity and load the relatedentities only when they are requested.
Master It How do you activate deferred loading in the Entity Framework?
Use entity inheritance features in the Entity Framework. In the EDM, an inheritance rela-tionship can be established between entities. When two entities participate in an inheritancerelationship, the child entity inherits all the properties of the parent entity. When working withsuch an entity in .NET code, you can get major benefits from code reuse based on inheritance.

768 CHAPTER 17 USING THE ENTITY DATA MODEL
Master It Explain how the Entity Framework can map an inheritance relationship betweenentities to tables in the database. Why is maintaining the inheritance relationship betweenthe entities not easily accomplished with relational databases?
Create and query related entities. In the Entity Data Model, you can establish one-to-manyor many-to-many associations between entities. The association can be established by connect-ing related entities with the Association tool in the EDM diagram. When querying such entities,a related entity or set of entities can be accessed through generated navigation properties.
Master It In the Books and Authors application (used as a sample application in thischapter), add a SalesByMonth form that will display the number of copies sold in a monthfor each title in the database. Modify the Books and Authors EDM so that the model canaccommodate monthly sales information for each title.
Chapter 18
Building Data-Bound Applications
In Chapter 15, ‘‘Programming with ADO.NET,’’ you learned about the two basic classes forinteracting with databases: The Connection class provides the members you need to connect tothe database, and the Command class provides the members you need to execute commandsagainst the database. A data-driven application also needs to store data at the client, and youknow how to use a DataReader to grab data from the database and how to use a DataAdapterto populate a DataSet at the client.
In addition to the DataSets you created in Chapter 17, ‘‘Using the Data Entity Model,’’Visual Studio also allows you to create typed DataSets. A typed DataSet is designed withvisual tools at design time, and its structure is known to the compiler, which can generate veryefficient code for the specific type of data you’re manipulating in your application. Anotheradvantage of typed DataSets is that they can be bound to Windows controls on a form. Whena field is bound to a Windows control, every time you move to another row in the table, thecontrol is updated to reflect the current value of the field. When the user edits the control onthe form, the new value replaces the original value of the field in the DataSet. The form is saidto be bound to the data source, which is usually a DataSet.
Data binding is a process for building data-driven applications with visual tools: Youmap the columns of a table to controls on the form, and Visual Studio generates the code fordisplaying the data on the bound controls, as well as updating the DataSet when the user editsthe value of a bound control. These applications are called data bound, and they’re similar tothe applications you designed in the previous chapter. The difference is that Visual Studiogenerates the necessary code for you.
In this chapter, you’ll learn how to do the following:
◆ Design and use typed DataSets
◆ Bind Windows forms to typed DataSets
◆ Compare a LINQ query used to filter data with an eSQL dynamic query
Working with Typed DataSetsThe DataSets you explored in the preceding chapter were untyped: Their exact structure wasdetermined at runtime, when they were populated through the appropriate DataAdapters. Inthis chapter, I’ll discuss typed DataSets in detail. A typed DataSet is a DataSet with a known

770 CHAPTER 18 BUILDING DATA-BOUND APPLICATIONS
structure because it’s created at design time with visual tools. The compiler knows the structureof the DataSet (that is, the DataTables it contains and the structure of each DataTable), and itgenerates code that’s specific to the data at hand.
The most important characteristic of typed DataSets is that they allow you to write stronglytyped code and practically eliminate the chances of exceptions due to syntax errors. Whereasin an untyped DataSet you had to access the DataTables by name with an expression such asDS.Tables ("Products"), the equivalent typed DataSet exposes the name of the table as aproperty: DS.Products. To find out whether a specific field of an untyped DataSet is Null, youmust use an expression like the following:
DS.Tables ("Products").Rows (0).Item ("UnitPrice").IsNull
With a typed DataSet, you can declare a variable that represents a row of the Products tablelike this:
Dim prod As NorthwindDataSet.ProductsRow =DS.Products.Rows(0)
You can then access the fields of the row as properties, with expressions like this:prod.ProductName, prod.UnitPrice, and so on. To find out whether the UnitPrice field isNull, call the method prod.IsUnitPriceNull. You can also set a field to Null with a methodcall: prod.SetUnitPriceNull. As you can guess, after the structure of the DataSet is known,the editor can generate a class with many members that will enormously simplify the codingof the application using the typed DataSet. You can count on IntelliSense to help you referencetable columns, represented as properties on a generated Row class. The code you will have towrite will be a lot terser and easier to understand. The typed DataSet is a class that’s generatedby a wizard on the fly, and it becomes part of your solution.
Let’s start by looking at the process of generating typed DataSets with visual data tools.Then you’ll see how to bind Windows controls to typed DataSets and generate functionalinterfaces with point-and-click operations.
Generating a Typed DataSetIn this section, you’ll create a typed DataSet with the three basic tables of the Northwinddatabase: Products, Categories, and Suppliers. Create a new Windows Forms Applicationproject, the DataSetOperations project. (This is the same name as the sample project you candownload from www.sybex.com/go/masteringvb2010.) Then open the Data menu, and choosethe Add Data Source command. You will see the Data Source Configuration Wizard, whichwill take you through the steps of building a DataSet at design time. In the first page of thewizard, you’ll be asked to select the data source type; it can be a database, a service (such as aweb service), or an object, as in Figure 18.1. Select the Database icon, and click the Next button.
The Service option on the page shown in Figure 18.1 creates a DataSet that retrieves its datafrom a service (usually a web service). The Object option allows you to create a DataSet from acollection of custom objects.
On the next page of the wizard, shown in Figure 18.2, you must specify a connection stringfor the database you want to use. Click the New Connection button to create a new connectiononly if there’s no connection for the database you want to use. If you’ve experimented alreadywith the visual tools of Visual Basic, you may already have an existing connection, in whichcase you simply select it from the drop-down list.

WORKING WITH TYPED DATASETS 771
Figure 18.1
Choosing the data sourcetype in the Data SourceConfiguration Wizard
Figure 18.2
Choosing yourdata connection inthe Data SourceConfiguration Wizard
To create a new connection, you must specify your credentials: whether you’ll connect witha username and password or use Windows authentication. Once connected to the server, youcan select the desired database from a ComboBox control. If you click the New Connection but-ton to create a new connection to the Northwind database, you will see the Add Connectiondialog box, as shown in Figure 18.3. This dialog box is not new to you; it’s the same dialog boxyou use to create a new data connection in Server Explorer window. If you haven’t created aconnection to the Northwind database yet, do it now. Otherwise, select the existing connection.

772 CHAPTER 18 BUILDING DATA-BOUND APPLICATIONS
Figure 18.3
Using the AddConnection dialog boxto specify a new con-nection to the North-wind database
It’s recommended that you use Windows authentication to connect to the database. Ifthis isn’t possible because the database server is not in the local network, you must specify ausername and password in the boxes shown in Figure 18.3. In this case, the wizard will askwhether you want to store sensitive information (the account’s password) to the connectionstring. You can choose to either include the password in the connection string (not a very safeapproach) or supply it from within your code. You can always set the Password propertyof a Connection object in your code. To secure the password, you can prompt the user fora password when the application starts and save it to an application variable. This way,the password isn’t persisted anywhere; it only exists in computer memory as long as theapplication is running. Alternatively, you can store an encrypted version of the password anddecrypt and use it from within your code. The best approach for a local network is to useWindows authentication.
Click the OK button to close the Add Connection dialog box, and then click Next; you willsee a dialog box with the default connection name: NorthwindConnectionString. This is thename of a new application setting that will store the connection information. You can edit this,as well as the other application settings, on the Settings tab of the project’s Properties pages.(To see the project’s Properties pages, choose Project Properties from the Project menu.)
Click Next again, and you will see the Choose Your Database Objects page, shown inFigure 18.4, where you can select the tables and columns you want to load to the DataSet.Notice that you can’t use a SELECT statement to select the data you want from a table: Youmust select the entire table. Of course, you can write a stored procedure to limit your selectionand then select it in the dialog box. If you select multiple tables and they’re related, therelationship between them will also be imported for you (no need to create a DataRelation

WORKING WITH TYPED DATASETS 773
object for each relationship between the DataSet tables). For this example, select the Categories,Suppliers, and Products tables of the Northwind database. Select all columns of the Productsand Categories tables, except for the Picture column of the Categories table. From theSuppliers table, select the SupplierID and CompanyName columns.
At the bottom of the dialog box shown in Figure 18.4, you can specify the name of theDataSet that will be generated for you. I’ll use the default name, NorthwindDataSet. ClickFinish to close the wizard and create the DataSet, which will be added automatically to theSolution Explorer window.
In the Data Sources window, shown in Figure 18.5, you will see a tree that represents thetables in the DataSet. The DataSet contains three DataTables, and each DataTable is made ofthe columns you selected in the wizard. This DataSet is typed, because it knows the structureof the data you’re going to store in it. The interesting part of this tree is that it contains theProducts table three times: in the first level along with the Categories table, as its own table,and once again under the Categories and Suppliers tables. (You must expand these tables to seeit, as in Figure 18.5.) Whereas the Products table on the first level represents the entire table, thenested ones represent the products linked to their categories and their suppliers, respectively.You will see later in the chapter how to use the multiple Products DataTables.
The typed DataSet is actually a class that is generated on the fly. It’s no longer a genericDataSet we will populate at runtime with any table we want through a DataAdapter; it’s aspecific object that can be populated only with the tables we specified in its design. If you want
Figure 18.4
Selecting the tablesand columns you wantto include in yourtyped DataSet

774 CHAPTER 18 BUILDING DATA-BOUND APPLICATIONS
Figure 18.5
The Northwind Data-Set created by theData Source Confi-guration Wizard
to see the code of the class generated by the wizard, click the Show All Files button in SolutionExplorer window, and double-click the NorthwindDataSet.Designer.vb item under the North-wind DataSet. You shouldn’t edit the code, because if you decide to edit the DataSet (you’ll seehow you can edit it with visual tools), the wizard will create a new class, and your changes willbe lost. If you want to add some custom members to the Northwind class, create a new Partialclass with the custom members, and name it NorthwindDataSet.vb.
Exploring the Typed DataSetLet’s exercise the members of the typed DataSet a little and see how the typed DataSet differsfrom the equivalent untyped DataSet. The operations we’ll perform are similar to the ones weperformed in the preceding chapter with an untyped DataSet; you should focus on the differentsyntax. The code shown in this section belongs to the DataSetOperations sample project. Thisproject contains three forms, and you will have to change the project’s Startup object to vieweach one.
Figure 18.6 shows Form1 of the project, which demonstrates the basic operations on a typedDataSet, including how to populate it, edit some of its tables, and submit the changes to thedatabase. They’re basically the same operations you’d perform with an untyped DataSet, butyou will see that it’s much simpler to work with typed DataSets.
To populate the three DataTables of the DataSet, you need three DataAdapter objects.Instead of the generic DataAdapter, the class generated by the wizard has created aTableAdapter class for each DataTable: the CategoriesTableAdapter, SuppliersTableAdapter,and ProductsTableAdapter classes. Declare three objects of the corresponding type at theform level:
Dim CategoriesTA As New _NorthwindDataSetTableAdapters.CategoriesTableAdapter
Dim SuppliersTA As New _NorthwindDataSetTableAdapters.SuppliersTableAdapter
Dim ProductsTA As New _NorthwindDataSetTableAdapters.ProductsTableAdapter

WORKING WITH TYPED DATASETS 775
Figure 18.6
Form1 of the Data-SetOperations projectdemonstrates thebasic operations ona typed DataSet.
The classes create the three objects that will retrieve the data from the database and submitthe edited rows to the database from the SELECT statements you specified with point-and-clickoperations. These objects derive from the TableAdapter class, which in turn is based on theDataAdapter class. If you examine the code of the Northwind class, you will find the code thatcreates the SQL statements for querying and updating the three tables and how these state-ments are used to create a DataAdapter object. The code is similar to the code we used in thepreceding chapter to create DataAdapters from within our code.
You must also create a DataSet object to store the data. This time, however, you can use aspecific type that describes the structure of the data you plan to store at the client, not a genericDataSet. Insert the following declaration at the form level:
Dim DS As New NorthwindDataSet
Now place the Populate Tables button on the form, and insert the code shown in Listing 18.1in its Click event handler.
Listing 18.1: Populating a typed DataSet with the proper TableAdapters
Private Sub bttnPopulate_Click(…) Handles bttnPopulate.ClickDim categories As Integer = CategoriesTA.Fill(DS.Categories)Dim suppliers As Integer = SuppliersTA.Fill(DS.Suppliers)Dim products As Integer = ProductsTA.Fill(DS.Products)

776 CHAPTER 18 BUILDING DATA-BOUND APPLICATIONS
As you can see, the Fill method doesn’t accept any DataTable as an argument; instead, thetype of its argument is determined by the TableAdapter object to which it’s applied. The Fillmethod of the ProductsTA TableAdapter accepts as an argument an object of the Products-DataTable type. The event handler of the sample project includes a few more statements thatprint the count of rows in each of the three tables.
To go through the rows of the Products table, write a simple loop like the following:
Dim prod As NorthwindDataSet.ProductsRowFor Each prod In DS.Products.Rows
TextBox1.AppendText(prod.ProductName & vbTab &prod.UnitPrice.ToString("#,###.00") & vbCrLf)
Next
As you can see, the names of the fields are properties of the ProductsRow class. Someproducts may have no price (a Null value in the database). If you attempt to access theUnitPrice property of the ProductsRow class, a NullReferenceException exception will bethrown. To prevent it, you can make sure that the field is not Null from within your code,with an IIf function like the following:
TextBox1.AppendText(IIf(prod.IsUnitPriceNull,"Not for sale!",prod.UnitPrice.ToString("#,###.00")))
To read data from linked tables in a hierarchical way, you don’t have to specify the rela-tionship between the tables as you did with untyped DataSets, because the typed DataTablesexpose the appropriate methods.
Now place another button on your form, the Read Products By Supplier button, and in itsClick handler insert the code shown in Listing 18.2 to iterate through suppliers and relatedproducts. Notice that the SuppliersRow class exposes the GetProductsRows method, whichretrieves the Products rows that are associated with the current supplier. The GetProductsRowsmethod is equivalent to the GetChildRows of an untyped DataSet, only with the latter you haveto supply a relationship name as an argument. Moreover, the GetProductsRows method returnsan array of ProductsRow objects, not generic DataRow objects.
Listing 18.2: Iterating through linked DataTables
Private Sub bttnSuppliersProducts_Click(…) HandlesbttnSuppliersProducts.Click
TextBox1.Clear()Dim supp As NorthwindDataSet.SuppliersRowFor Each supp In DS.Suppliers.Rows
TextBox1.AppendText(supp.CompanyName & vbCrLf)Dim prod As NorthwindDataSet.ProductsRowFor Each prod In supp.GetProductsRows
TextBox1.AppendText(vbTab &prod.ProductName & vbTab &

WORKING WITH TYPED DATASETS 777
prod.UnitPrice.ToString("#,###.00") & vbCrLf)Next
NextEnd Sub
The ProductsRow object exposes the SuppliersRow and CategoriesRow methods, whichreturn the current product’s parent rows in the Suppliers and Categories DataTables.
The most useful method of the typed DataTable is the FindByID method, which locatesa row by its ID in the DataTable. To locate a product by its ID, call the FindByProductIDmethod, passing a product ID as an argument. The method returns a ProductsRow object thatrepresents the matching product. The method’s return value is not a copy of the found row butinstead is a reference to the actual row in the DataTable, and you can edit it. The code behindthe Update Products button, which is shown in Listing 18.3, selects a product at random by itsID and prompts the user for a new price. Then it sets the UnitPrice field to the user-suppliedvalue.
Listing 18.3: Updating a row of a typed DataTable
Private Sub bttnUpdate_Click(…) Handles bttnUpdate.ClickDim selProduct As NorthwindDataSet.ProductsRowDim RND As New System.RandomselProduct = DS.Products.FindByProductID(RND.Next(1, 77))Dim newPrice As DecimalnewPrice = Convert.ToDecimal(InputBox(
"Enter product’s new price",selProduct.ProductName,selProduct.UnitPrice.ToString))
selProduct.UnitPrice = newPriceEnd Sub
As you can see, manipulating the rows of typed DataTables is much simpler than the equiv-alent operations with untyped DataSets, because the fields are exposed as properties of theappropriate class (the ProductsRow class for rows of the Products DataTable, the Categories-Row class for rows of the Categories DataTable, and so on).
Let’s look at the code for updating the database. The first step is to retrieve the edited rowswith the GetChanges method, which returns a typed DataTable object, depending on the Data-Table to which it was applied. To retrieve the modified rows of the Products DataTable, usethe following statements:
Dim DT As NorthwindDataSet.ProductsDataTableDT = DS.Products.GetChanges
You can pass an argument of the DataRowState type to the GetChanges method to retrievethe inserted, modified, or deleted rows. Because this is a typed DataSet, you can write a ForEach loop to iterate through its rows (they’re all of the ProductsRow type) and find the edits.One feature you’d expect to find in a typed DataTable is a method for retrieving the original

778 CHAPTER 18 BUILDING DATA-BOUND APPLICATIONS
versions of a row by name. Unfortunately, the class generated by the wizard doesn’t includesuch a method; you must use the Item property, passing as an argument the name of the row.A row’s original field versions are given by the following expression:
prod.Item("UnitPrice", DataRowVersion.Original)
To submit the edited rows to the database, you can call the appropriate TableAdapterUpdate method. The code behind the Submit Edits button does exactly that, and it’s shown inListing 18.4.
Listing 18.4: Submitting the edited rows of a typed DataTable to the database
Private Sub bttnSubmit_Click(…) Handles bttnSubmit.ClickIf DS.HasChanges Then
Dim DT As NorthwindDataSet.ProductsDataTable =DS.Products.GetChanges
If DT IsNot Nothing ThenTry
ProductsTA.Update(DT)Catch ex As Exception
MsgBox(ex.Message)Exit Sub
End TryMsgBox(DT.Rows.Count.ToString &
" rows updated successfully.")End If
End IfEnd Sub
Typed DataSets are quite convenient when it comes to coding. The real advantage of typedDataSets is that they can simplify enormously the generation of data-bound forms, which is themain topic of this chapter.
Data BindingData binding is the process of linking the contents of a field to a control on the form. Every timethe application modifies the field’s value, the control is updated automatically. Likewise, everytime the user edits the control’s value on the form, the underlying field in the DataSet is alsoupdated. Sometimes, this two-way linking of the data is referred to as bidirectional data binding.The DataSet keeps track of the changes (the modified, added, and deleted rows), regardless ofhow they were changed. In short, data binding relieves you from having to map field valuesto controls on the form when a row is selected and from moving values from the controlsback to the DataSet when a row is edited.
In addition to binding simple controls such as TextBox controls to a single field, you canbind an entire column of a DataTable to a list control, such as the ListBox or ComboBox control.And of course, you can bind an entire DataTable to a special control, the DataGridView control.

DATA BINDING 779
You can build a data-browsing and data-editing application by binding the Products DataTableto a DataGridView control without a single line of code.
To explore the basics of data binding, add a second form to the project, and make it theproject’s startup object. Figure 18.7 shows the new form of the DataSetOperations project,Form2.
Then drop a DataGridView control on the form, and set the control’s DataSource propertyto bind it to the Products DataTable. Select the DataGridView control on the form, and locateits DataSource property in the Properties window. Expand the DataSource property, and youwill see the project’s data sources. The form contains no data source for the time being, so alldata sources are listed under Other Data Sources. Expand this item of the tree to see the ProjectData Sources item, which in turn contains the NorthwindDataSet data source (or whatever youhave named the typed DataSet). Expand this item, and you will see the names of the Data-Tables in the DataSet, as shown in Figure 18.8. Select the Products DataTable.
The editor will populate the DataGridView control with the table’s columns: It will mapeach column in the Products DataTable to a column in the DataGridView control. All columnshave the same width and are displayed as text boxes, except for the Discontinued column,which is mapped to a CheckBox control. (This is the last column of the controls, and you willsee it at runtime, because you can’t scroll the control at design time.) The control’s columnswere named after the DataTable columns, but we’ll change the appearance of the grid shortly.Press F5 to run the application, and the form will come up populated with the Products rows!Obviously, the editor has generated some code for us to populate the control. The code gener-ated by the editor is a single statement in the form’s Load event handler:
Me.ProductsTableAdapter.Fill(Me.NorthwindDataSet.Products)
As far as browsing the data, we’re all set. All we have to do is adjust the appearance of theDataGridView control with point-and-click operations. You can also edit the rows, but there’sno code to submit the edits to the database. Submitting the changes to the database shouldn’tbe a problem for you; just copy the corresponding code statement from Form1 of the project.
Figure 18.7
Viewing an entireDataTable on adata-bound DataGrid-View control

780 CHAPTER 18 BUILDING DATA-BOUND APPLICATIONS
Figure 18.8
Binding the Data-GridView control to aDataTable
Place the Submit Edits button on the form, and in its Click handler insert the followingstatements:
If NorthwindDataSet.HasChanges ThenDim DT As NorthwindDataSet.ProductsDataTable =
NorthwindDataSet.Products.GetChangesIf DT IsNot Nothing Then
TryProductsTableAdapter.Update(DT)
Catch ex As ExceptionMsgBox(ex.Message)Exit Sub
End TryMsgBox(DT.Rows.Count.ToString &
" rows updated successfully.")End If
End If
I changed the name of the DataSet from DS to NorthwindDataSet and the name of theTableAdapter from ProductsTA to ProductsTableAdapter. And where did these names comefrom? If you switch to the form’s Designer, you’ll see that while you were setting the Data-GridView control’s properties, three items were added to the Components tray of the form:the NorthwindDataSet component (which is the typed DataSet), the ProductsTableAdapter(which is responsible for populating the control and submitting the edited rows to thedatabase), and the ProductsBindingSource (which is the liaison between the DataGridViewcontrol and the DataSet). The ProductsBindingSource is basically a data source, and it’sdiscussed in the following section.

DATA BINDING 781
Using the BindingSource ClassTo understand the functionality of the BindingSource class, look up its members. Enter itsname and the following period in the code window, and you will see a list of members. ThePosition property reads (or sets) the current item’s index in the underlying DataTable. TheDataGridView control doesn’t maintain the order of the rows in the underlying table; besides,you can sort the DataGridView control rows in any way you like, but the DataTable rowswon’t be sorted. Use the Position property to find out the index of the selected row in theDataTable. The MoveFirst, MovePrevious, MoveNext, and MoveLast methods are simplenavigational tools provided by the BindingSource class. You can place four buttons on theform and insert a call to these methods to move to the first, previous, next, and last rows,respectively. The four navigational buttons at the lower-left corner of the form shown inFigure 18.7 call these methods to select another row on the grid.
The two most interesting members of the BindingSource class are the Find method and theFilter property. The Filter property is set to an expression similar to the WHERE clause ofa SQL statement to filter the data on the grid. Place a new button on the form, set its captionto Filter, set its name to bttnFilter, and insert the following statements in its Click eventhandler to filter the rows of the grid with their product names:
Private Sub bttnFilter_Click(…) Handles bttnFilter.ClickDim filter As Stringfilter = InputBox("Enter product name, or part of it")ProductsBindingSource.Filter =
"ProductName LIKE ‘%" & filter.Trim & "%’"End Sub
Run the application, and click the Filter button to limit the rows displayed on the grid bytheir product names. If you’re searching for products that contain the string sauce in theirname, the Filter property limits the selection as if you had requested products with thefollowing WHERE clause (the percent sign is a SQL wildcard that matches any string):
WHERE ProductName LIKE ‘%sauce%’
To restore the original selection, set the filter expression to a blank string. You can designan auxiliary form on which users can enter multiple criteria and filter products by their priceor stock, their supplier, and so on. With a bit of programming effort, you can apply multiplecriteria, such as products of a specific category that are on order, out-of-stock items from aspecific supplier, and so on.
The Find method searches a value in a specific column. Both the column name and searchargument are specified as arguments to the method, and the return value is the row’s positionin the DataTable. To select the row, set the BindingSource object’s Position property to thevalue returned by the Find method. The code behind the Find button in the sample project isthe following:
Dim search As Stringsearch = InputBox("Enter exact product name")Dim idx As Integer =
ProductsBindingSource.Find("ProductName", search)ProductsBindingSource.Position = idx

782 CHAPTER 18 BUILDING DATA-BOUND APPLICATIONS
The Find method is not the most convenient search tool, because you have to specify theexact value of the field you’re looking for. To retrieve the current row in the DataTable mappedto the BindingSource, use the Current property; to determine the number of rows in the sameDataTable, read the value of the Count property. The Current property returns an object, whichyou must cast to the DataRowView type and call its Row property:
CType(ProductsBindingSource.Current, DataRowView).Row
This expression returns a DataRow object, which you can cast to a ProductsRow type. You willsee examples of using the Current property of the BindingSource class to access the underlyingrow in the DataTable later in this chapter.
Handling Identity Columns
If you attempt to add a row to the DataGridView control, the new row’s ID will be –1 (oranother negative value if you have added multiple rows). This is a valid value for an Identitycolumn, as long as its AutoIncrement property is set to –1. But the ProductID column in thedatabase has an AutoIncrement value of 1 — why is it different in the DataSet? When the edi-tor created the DataSet, it changed this setting to avoid conflicts during the updates. If newproducts were assigned valid IDs (positive values following the last ID in the DataSet) at theclient, consider what might happen when the edits were submitted to the database. The IDsprovided by the DataSet might be taken in the database, and the Insert operation would fail.To avoid this conflict, the DataSet uses negative identity values. When these rows are submittedto the database, they’re assigned a new ID by the database, which is a positive value.
However, a problem remains. The new ID isn’t transferred back to the client, and theDataSet displays negative IDs. One solution is to populate the DataSet again; however, there’sa lot more to learn about submitting edited rows to the database, and we’ll return to this topiclater in this chapter.
You can experiment with this form in the DataSetOperations project by editing the products,adding new ones, and deleting rows. If you attempt to add a new row, you’ll get an error mes-sage indicating that the Discontinued column doesn’t accept nulls. The default value of thecheck box on the DataGrid control is neither True nor False (it’s Null), and you must validateits value. The simplest solution to the problem is to apply a default value to the Discontinuedcolumn, and the following section describes how to edit the properties of the DataSet.
Adjusting the DataSet
To adjust the properties of the DataSet, right-click the DataSet in the Data Sources window,and choose Edit DataSet With Designer from the context menu. The DataSet Designer window,shown in Figure 18.9, will appear.
Right-click the header of the Discontinued column in the Products table, and chooseProperties to see the properties of the DataColumn. One of them is the DefaultValue property,which is set by default to Null. Change it to 0 or False to impose a default value for thiscolumn. In the DataSet Designer, you can examine the data types of the columns of each table,drop or create new relations between tables, and set other interesting properties, such as theCaption property of a column, which will be used to name the column of the bound Data-GridView control, or the NullValue property, which determines how the DataSet will handleNull values. The default value of the NullValue property is Throw Exception. Every time theapplication requests the value of a Null field, a runtime exception is thrown. You can set it to
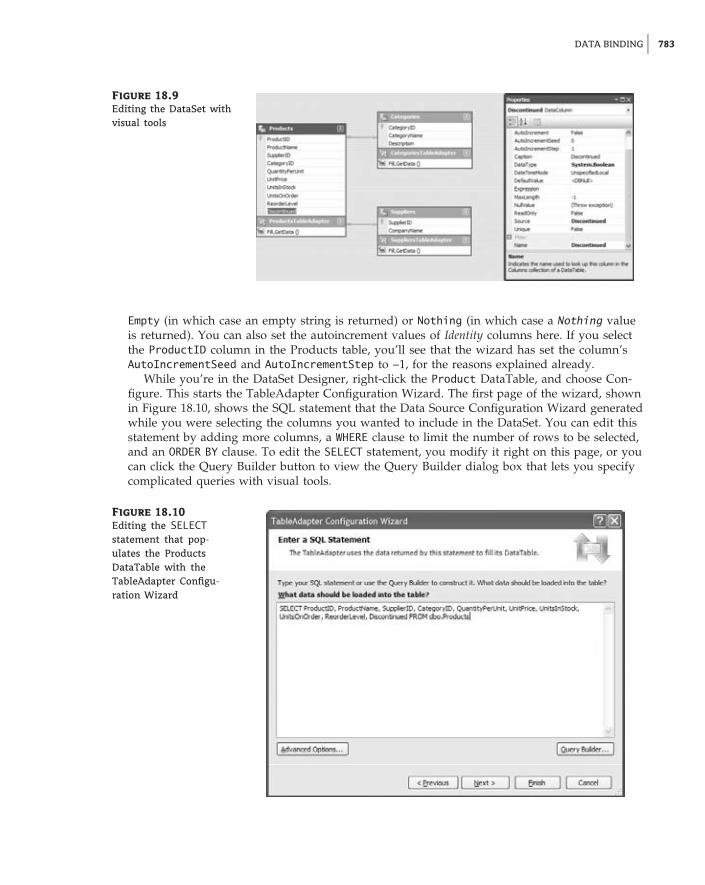
DATA BINDING 783
Figure 18.9
Editing the DataSet withvisual tools
Empty (in which case an empty string is returned) or Nothing (in which case a Nothing valueis returned). You can also set the autoincrement values of Identity columns here. If you selectthe ProductID column in the Products table, you’ll see that the wizard has set the column’sAutoIncrementSeed and AutoIncrementStep to –1, for the reasons explained already.
While you’re in the DataSet Designer, right-click the Product DataTable, and choose Con-figure. This starts the TableAdapter Configuration Wizard. The first page of the wizard, shownin Figure 18.10, shows the SQL statement that the Data Source Configuration Wizard generatedwhile you were selecting the columns you wanted to include in the DataSet. You can edit thisstatement by adding more columns, a WHERE clause to limit the number of rows to be selected,and an ORDER BY clause. To edit the SELECT statement, you modify it right on this page, or youcan click the Query Builder button to view the Query Builder dialog box that lets you specifycomplicated queries with visual tools.
Figure 18.10
Editing the SELECTstatement that pop-ulates the ProductsDataTable with theTableAdapter Configu-ration Wizard

784 CHAPTER 18 BUILDING DATA-BOUND APPLICATIONS
If you click the Advanced Options button, you will see the Advanced Options dialog box,shown in Figure 18.11. Here you must specify which statements should be generated by thewizard. If you’re developing a browser application, deselect the first check box: Generate Insert,Update, And Delete Statements. If you clear this option, the other two options will be disabled.
Figure 18.11
The Advanced Optionsdialog box lets you knowhow the TableAdapterwill submit the updatesto the underlying tables.
The Use Optimistic Concurrency option affects the UPDATE and DELETE statements generatedby the wizard. If this check box is selected, the two statements will not update or delete arow if it has been edited by another user since it was read. The wizard will generate two longstatements that take into consideration the values read from the database into the DataSetat the client (the row’s original values), and if any of the row’s columns in the databaseare different from the original version of the same row in the DataSet, it won’t update ordelete the row. By using optimistic concurrency, you’re assuming that it’s rather unlikelythat two users will update the same row at the same time. If the row being updated hasalready been modified by another user, the update operation fails. If you clear this option, theUPDATE/DELETE statements take into consideration the row’s primary key and are executed,even if the row has been modified since it was read. In effect, the last user to update a rowoverwrites the changes made by other users.
The last option in the Advanced Options dialog box specifies whether the TableAdapterreads back the inserted/updated rows. You should leave this check box selected so thatthe identity values assigned by the database to new rows will be read back and update theDataSet.
Implementing Optimistic Concurrency
Curious about the statements that take into consideration the original values of the row beingupdated? Here’s the DELETE statement for the Products row that uses optimistic concurrency:
DELETE FROM [dbo].[Products]WHERE (([ProductID] = @Original_ProductID) AND
([ProductName] = @Original_ProductName) AND

DATA BINDING 785
((@IsNull_SupplierID = 1 AND[SupplierID] IS NULL) OR([SupplierID] = @Original_SupplierID)) AND
((@IsNull_CategoryID = 1 AND[CategoryID] IS NULL) OR([CategoryID] = @Original_CategoryID)) AND
((@IsNull_QuantityPerUnit = 1 AND[QuantityPerUnit] IS NULL) OR([QuantityPerUnit] = @Original_QuantityPerUnit)) AND
((@IsNull_UnitPrice = 1 AND[UnitPrice] IS NULL) OR([UnitPrice] = @Original_UnitPrice)) AND
((@IsNull_UnitsInStock = 1 AND[UnitsInStock] IS NULL) OR([UnitsInStock] = @Original_UnitsInStock)) AND
((@IsNull_UnitsOnOrder = 1 AND[UnitsOnOrder] IS NULL) OR
([UnitsOnOrder] = @Original_UnitsOnOrder)) AND((@IsNull_ReorderLevel = 1 AND
[ReorderLevel] IS NULL) OR([ReorderLevel] = @Original_ReorderLevel)) AND
([Discontinued] = @Original_Discontinued))
The same statement with the optimistic concurrency off is quite short:
DELETE FROM [dbo].[Products]WHERE ([ProductID] = @Original_ProductID)
Examine the long statement to understand how optimistic concurrency is handled. The firstterm in the WHERE clause locates a single row based on the product ID, which is unique.This is the row that should be deleted (or updated by the UPDATE statement). However, thestatement will not select the row if any of its fields have been edited since you read it fromthe database. If another user has changed the price of a specific product, the following termwill evaluate to false, and the WHERE clause will return no row to be deleted.
When you return to the configuration wizard, click Next, and you will see the dialog boxshown in Figure 18.12, where you can specify the methods that the wizard will generate foryou. The Fill method populates a DataTable, and the GetData method returns a DataTableobject with the same data; the last option in the dialog box specifies whether the DataSet willexpose methods for inserting/updating/deleting rows directly against the database.
Click Next again, and the wizard will regenerate the NorthwindDataSet class, taking intoconsideration the options you specified in the steps of the wizard.
In the following section, we’ll let the editor build simple data-driven applications for us.You’re going to see how to bind other controls to typed DataSets and how to customize theDataGridView control.

786 CHAPTER 18 BUILDING DATA-BOUND APPLICATIONS
Figure 18.12
Selecting the methodsto be generated by theTableAdapter Configura-tion Wizard
Designing Data-Driven Interfaces the Easy WayInstead of binding the DataGridView control through its properties, you can let Visual Studioperform the binding for you:
1. Add a third form to the DataSetOperations sample project, the Form3 form, and make it theproject’s Startup object.
2. To display the rows of the Products table on a DataGridView control, open the DataSources window, and select the Products table. As soon as you select it, an arrow appearsnext to its name. Click this arrow to open a drop-down list with the binding options for theDataTable. The DataTable can be bound to the following:
◆ A DataGridView control, which will display all rows and all columns of the table
◆ A ListBox or ComboBox control, which will display a single column of all rows
◆ A number of TextBox controls (the Details option), one for each column
3. Select the DataGridView option, and then drop the Products DataTable on the form.
The editor will create a DataGridView control and bind it to the Products DataTable. Inaddition, it will create a toolbar at the top of the form with a few navigational and editing but-tons, as shown in Figure 18.13 (shown at design time so you can see the components generatedby the editor). Notice that the toolbar contains one button for deleting rows (the button withthe X icon) and one button for submitting the edits to the database (the button with the diskicon). The Filter, Find, and Refresh Data buttons were not generated by the editor; I’ve addedthem to the toolbar and inserted the appropriate code in their Click event handlers. You’vealready seen the code that implements all three operations.

DESIGNING DATA-DRIVEN INTERFACES THE EASY WAY 787
Figure 18.13
Binding a form to aDataTable
The Designer will also generate the components listed in Table 18.1; these will appear in theComponents tray.
As for the code generated by the editor, here it is:
Private Sub ProductsBindingNavigatorSaveItem_Click(…) HandlesProductsBindingNavigatorSaveItem.Click
Me.Validate()Me.ProductsBindingSource.EndEdit()Me.TableAdapterManager.UpdateAll(Me.DSProducts)
End Sub
Private Sub Form2_Load(…) Handles MyBase.Load‘TODO: This line of code loads data into the ‘NorthwindDataSet.Products’ table.‘You can move, or remove it, as needed.Me.ProductsTableAdapter.Fill( Me.DSProducts.Products)
End Sub
In the form Load event handler, the Products DataTable is filled with a call to the Products-TableAdapter class’s Fill method. The other event handler corresponds to the Click eventof the Save button on the toolbar, and it calls the TableAdapterManager class’s UpdateAllmethod. This is all it takes to submit the changes made to the data at the client.

788 CHAPTER 18 BUILDING DATA-BOUND APPLICATIONS
Table 18.1: Designer-generated components
Component Description
NorthwindDataSet This is the typed DataSet for the data specified with the Data SourceConfiguration Wizard.
ProductBindingSource This is a BindingSource object for the Products table.
ProductsTableAdapter This is an enhanced DataAdapter that exposes the methods forreading data from the database and submitting the changes made atthe client to the database. The TableAdapter class differs from theDataAdapter class in that its Fill method accepts as an argumentan object of the Products type, and not generic DataSet andDataTable objects. The methods of the TableAdapter object knowhow to handle rows of the specific type and not any DataRow object.
TableAdapterManager This encapsulates the functionality of all TableAdapter objects onthe form. If you drop additional tables on the form, the editor willcreate the corresponding TableAdapter for each one. The Table-AdapterManager encapsulates the functionality of all individualTableAdapter objects and exposes the UpdateAll method, whichsubmits the entire DataSet to the database. The UpdateAll methodof the TableAdapterManager calls the Update method of eachindividual TableAdapter in the proper order.
ProductsBindingNavigator This component represents the toolbar added to the form. Thetoolbar is a ToolStrip control with custom items and the appropriatecode. The navigational tools generated by the editor are ratherprimitive, and you can remove them from the control. Just keep thecode for the Save button, which you’ll need if your applicationallows editing of the data.
Let’s see how far this autogenerated application will take us. Run the application, andedit a few products. Change a few names, set a couple of prices to negative values, set aproduct’s category to an invalid category ID (any value exceeding 7 is invalid, unless youhave added new categories), add a couple of new products (they will be assigned negativeIDs, as expected), and delete some products. As you can guess, you can’t delete rows from theProducts table, because they’re all referenced by the Order Details table, but this table doesn’texist in the DataSet, so it’s perfectly legal to delete products in the context of the DataSet.When the edits are submitted to the database, the deletions will be rejected, of course.
Let’s see how the Save button on the toolbar handles the updates. Click the Save button onthe toolbar, and you will get an error message indicating that a row has violated a referentialor check constraint, depending on the order in which the rows were submitted to the database.The UpdateAll method of the ProductsTableAdapter object will give up after the first failure.
As you recall, the DataAdapter class, on which the TableAdapter class is based, exposes theContinueUpdateOnError property. Unfortunately, the TableAdapter class doesn’t expose thisproperty. However, you can access the underlying DataAdapter through the Adapter property,and set the ContinueUpdateOnError property to True. Insert the following method in front ofthe statement that calls the UpdateAll method:

DESIGNING DATA-DRIVEN INTERFACES THE EASY WAY 789
Me.TableAdapterManager.ProductsTableAdapter.Adapter.ContinueUpdateOnError = True
Run the application again, edit the data on the grid, and submit the changes to the data-base. This time the application won’t crash with an error message. Instead, the rows that failedto update the underlying table in the database will be marked with an exclamation markicon in the row’s header, as shown in Figure 18.14. We managed to submit all the rows tothe database, regardless of whether they successfully updated the Products table, through theProductsTableAdapter object. The UpdateAll method retrieved the error messages returnedby the DBMS and displayed them on the control. To see the reason why each row failedto update the Products table, hover the pointer over the error icon, and you will see thedescription of the error in a ToolTip box.
Figure 18.14
Viewing the updateerrors on the DataGrid-View control
You can also create a list of the rows that failed to update their underlying table along withthe error message returned by the database. The code for iterating through a table’s rows andexamining the RowError property was presented in the preceding chapter. You can easily addan extra button on the toolbar and use it to display an auxiliary form with the update errors.
By the way, the error messages displayed on the DataGridView control are the onesreturned by the DBMS (SQL Server in our case). If you want, you can set each row’s RowErrorproperty to a different, more meaningful description.
Enhancing the Navigational ToolsThe navigational tools on the BindingNavigator are quite primitive. Let’s enhance the tool-bar at the top of the form by adding two buttons, the Filter and Find buttons of the precedingsection. Stop the application, and open Form3 in design mode.

790 CHAPTER 18 BUILDING DATA-BOUND APPLICATIONS
To add a new element to the ToolBar control, expand the combo box that’s displayed atdesign time after the existing elements. From the drop-down list, select the Button item toadd a Button control to the toolbar. Select the newly added button, and set its DisplayStyleproperty to Text. (Normally this property is set to Image, because the items on a toolbar areidentified by an icon; you should find a few good icons and use them in your applications.)Set its Text property to Filter and its name to bttnFilter. Follow similar steps for the Findbutton as well. Then copy the code of the two buttons in Form2, and paste it in the Click eventhandlers of the two ToolStrip buttons. You just added a filtering and search feature to yourapplication.
The Find feature isn’t very practical with product names, because users have to specify thefull and exact product name. This feature should be used with fields such as IDs, book ISBNs,and email addresses. To find a product by name, most users would use the Filter button tolimit the selection on the grid and then locate the desired product.
You can also use two TextBox controls in place of the two Button controls on the toolbar.If you’d rather allow users to enter their search and filter arguments on the toolbar, you mustintercept the Enter keystroke from within the respective control’s KeyUp event and call the samecode to filter or search the rows of the grid.
Now, add yet another button to the toolbar, and set its caption to Refresh Data. This buttonwill reload the data from the database by calling the Fill method of the TableAdapter. Beforeloading the data, however, you must make sure that the DataSet doesn’t contain any changesby examining the HasChanges property. If it’s True, you must prompt the user accordingly.Notice that if a row failed to update the database, the DataSet will contain changes, eventhough the edits were submitted to the database. Some of the changes can be undone, but notall of them. A deleted row, for example, is no longer visible on the control, and users can’trestore it. Listing 18.5 shows the code behind the Refresh Data button.
Listing 18.5: Refreshing the DataSet
Private Sub bttnRefreshData_Click(...) Handles bttnRefreshData.ClickIf NorthwindDataSet.HasChanges Then
Dim reply As MsgBoxResult =MsgBox("The DataSet contains changes." &vbCrLf & "Reload data anyway?",MsgBoxStyle.YesNo Or MsgBoxStyle.Exclamation)
If reply = MsgBoxResult.No Then Exit SubEnd IfMe.ProductsTableAdapter.Fill(
Me.NorthwindDataSet.Products)
End Sub
We developed a fairly functional application for browsing and editing one of the basictables of the Northwind database, the Products table. The interface of the application is a bitrough around the edges (that’s the least you can say about an interface that displays categoryand supplier IDs instead of category and supplier names), but we’ll come back and adjust theinterface of the application in a moment. First, I’d like to discuss another way of using the

DESIGNING DATA-DRIVEN INTERFACES THE EASY WAY 791
DataGridView control, namely, how to bind related tables to two or more DataGridView con-trols. This arrangement is the most common one, because we rarely work with a single table.
Binding Hierarchical TablesIn this section, you’ll build an interface to display categories and products on two Data-GridView controls, as shown in Figure 18.15. The top DataGridView control is bound to theCategories DataTable and displays all the category rows. The lower DataGridView controldisplays the products of the category selected in the top control. In effect, you’ll create twoDataGridView controls linked together.
Figure 18.15
Viewing related data ontwo DataGridView con-trols with the Linked-DataTables application
Follow these steps:
1. Start a new Windows Forms Application project (it’s the LinkedDataTables project avail-able for download from www.sybex.com/go/masteringvb2010), and create a new DataSetthat contains the Products, Categories, and Suppliers tables. Uncheck the Picture columnfrom the Categories table. Name it DS.
2. In the Data Sources window, select each table, and set its binding option to DataGridView.
3. Drop the Categories table on the form. The editor will place an instance of the DataGrid-View control on the form and will bind it to the Categories table. It will also create aBindingNavigator object, which we don’t really need, so you can delete it. When you dropmultiple tables on a form, the editor generates a single toolbar. The navigational buttonsapply to the first DataGridView control, but the Save button submits the changes made inall DataTables.
4. Locate the Products table under the Categories table in the Data Sources window, and dropit onto the form. If you drop the Products table of the original DataSet onto the form, you’ll

792 CHAPTER 18 BUILDING DATA-BOUND APPLICATIONS
end up with two grids that are independent of one another. For a more meaningful inter-face, you must link the two grids so that when the user selects a category in the upper grid,the corresponding products are shown automatically in the lower grid. The Products tableunder the Categories table in the data source represents the rows of the Products table thatare related to each row of the Categories table. Just drag the Products table under the Cat-egories table, and drop it onto the form to add the grid and show the Product data in alinked fashion.
Now you can run the application and see how it behaves. Every time you select a category,the selected category’s products appear in the lower grid. If you change the CategoryID fieldof a product, that particular product disappears from the grid, as expected, since it belongsto another category after the CategoryID changes. You must select the category with theCategoryID you assigned to a product to see the product in the Products grid. Obviously, thisis not the best way to edit the category of a product. You will see how to handle lookup tablesin the ‘‘Displaying Lookup Columns in a DataGridView Control’’ section later in the chapter.
Experiment with the new interface. Start editing the two tables on the form. Add newcategories, and then add products that belong to these categories. If you attempt to delete acategory, the DataGridView will happily remove the row from its table. But didn’t the DataSetpick the relationships from the database’s definition? Now that both tables are at the client asDataTables with a relationship between them, shouldn’t the DataSet reject this operation?
Let’s take a look at the properties of the relationship between the two tables. Right-click theDS DataSet in the Data Sources window, and from the context menu, select Edit DataSet InDesigner to see the DataSet Designer window. Right-click the line that connects the Productsand Categories tables (this line represents the relationship between the two tables), and selectEdit Relation to open the Relation dialog box, shown in Figure 18.16.
Figure 18.16
Setting relationproperties

DESIGNING DATA-DRIVEN INTERFACES THE EASY WAY 793
The FK_Products_Categories relation is marked as Relation Only. In the database, thisis a relation and a foreign key constraint. The relation simply relates the two tables if theirCategoryID fields match. Most importantly, the constraint won’t let you insert a product thatpoints to a nonexisting category or delete a category that has related rows in the Productstable. Select the radio button Both Relation And Foreign Key Constraint, and then close thedialog box.
Try to run the application. If you receive the following error:
"ConstraintException was unhandled: Failed to enable constraints. One or more rowscontain values violating non-null, unique, or foreign-key constraints."
right after running the application, make sure that the data is loaded in the right order in theform Load event. The Categories DataTable should be filled first, and the Products DataTableshould be filled second:
Private Sub Form1_Load(...) Handles MyBase.LoadMe.CategoriesTableAdapter.Fill(Me.DS.Categories)Me.ProductsTableAdapter.Fill(Me.DS.Products)
End Sub
Foreign key constraints are subject to three rules: the Update, Delete, and Accept/Rejectrules, as shown in Figure 18.16. These rules determine what should happen when a parent rowis removed from its table (the Delete rule), when a parent ID is modified (the Update rule), andwhen users accept or reject changes in the DataSet (the last rule). A rule can be set to None(no action is taken, which means that a runtime exception will be thrown), Cascade (the childrows are updated or deleted), SetNull (the foreign keys of the related rows are set to Null), andSetDefault (the foreign keys of the related rows are set to their default value).
I usually don’t change the rules of a relationship in the DataSet, unless I’ve used rules in thedatabase. Leave them set to None, and run the application again. You should avoid setting theDelete and Update rules to Cascade, because this can lead to irrecoverable errors. If you deletea category, for example, it will take with it the related products, and each deleted product willtake with it the related rows in the Order Details table. A simple error can ruin the database.There are other situations, which aren’t as common, where the Cascade rule can be used safely.When you delete a book in the Pubs database, for example, you want the book’s entries inthe TitleAuthors table to be removed as well. No rows in the Authors table will be removed,because they’re primary, and not foreign, keys in the relation between the TitleAuthors andAuthors tables.
Let’s return to the interface for editing products and categories. Attempt again to remove acategory. This time you’ll get a lengthy error message that ends with the following suggestion:
To replace this default dialog please handle the DataError event.
Let’s do exactly that to avoid displaying a totally meaningless message to our users. Openthe DataError event handler for both controls, and insert the following statement:
MsgBox(e.Exception.Message)
Run the application again, and delete a category. This time you’ll see the following errormessage, and the program won’t remove the category from the DataGridView, because it can’tremove it from its DataSet:
Cannot delete this row because constraints are enforcedon relation FL_Products_Categories, and deleting thisrow will strand child rows.

794 CHAPTER 18 BUILDING DATA-BOUND APPLICATIONS
You can still delete products and set their prices to negative values. These two operationsare invalid in the context of the database but quite valid in the client DataSet.
Using the BindingSource as a Data Source
As you recall, binding a DataGridView control to a DataTable is possible by setting thecontrol’s DataSource property. Binding to two related tables is a bit more involved, so let’s seehow it’s done (short of dropping the two tables on the form and letting the editor handle thedetails).
To link the two DataGridView controls, you must create a BindingSource object for eachone. The BindingSource class encapsulates a data source and is itself a data source. Initialize aninstance of this class by setting its DataSource and DataMember properties for the Categoriestable:
Dim categoriesBS As New BindingSourcecategoriesBS.DataSource = DScategoriesBS.DataMember = "Categories"
Then set the upper grid’s DataSource property to the categoriesBS object. As for the lowergrid, you must create a new BindingSource object and set its DataSource property not to theactual DataSet but to the BindingSource object of the upper grid:
Dim productsBS As New BindingSourceproductsBS.DataSource = categoriesBS
Now here’s the tricky part: The DataMember property must be set to the name of the rela-tionship between the two tables in the DataSet so that it’s linked to the products of the categoryselected in the upper control:
productsBS.DataMember = "FK_Categories_Products"
After the two BindingSource objects have been set up, assign them to the DataSourceproperty of their corresponding controls:
DataGridView1.DataSource = categoriesBSDataGridView2.DataSource = productsBS
These actions were performed for you automatically, as you dropped the two tables onthe form. If you want to bind two related tables of an untyped DataSet, you must set theseproperties from within your code.
Adjusting the Appearance of the DataGridView ControlThe DataGridView control is bound to a single table as soon as you drop the table on the form,but its default appearance leaves a lot to be desired. To begin with, we must set the widthsof the columns and hide certain columns. The product IDs, for example, don’t need to bedisplayed. The numeric fields should be formatted properly and aligned to the right, and the

DESIGNING DATA-DRIVEN INTERFACES THE EASY WAY 795
foreign key fields should be replaced by the corresponding descriptions in the primary table.We also should display category and supplier names, instead of IDs.
The DataGridView control exposes a large number of properties, and you can experimentwith them in the Properties window. They have obvious names, and you can see the effectsof each property on the control as you edit it. Beyond the properties that apply to the entirecontrol, you can also customize the individual columns through the Edit Columns dialog box.
To tweak the appearance of the columns of the DataGridView control, select the controlwith the mouse, and open the Tasks menu by clicking the little arrow in the upper-right cornerof the control. This menu contains four check boxes that allow you to specify whether the useris allowed to add/edit/delete rows and reorder columns. To adjust the appearance of the grid’scolumns, click the Edit Columns hyperlink in the menu, and you will see the Edit Columnsdialog box, shown in Figure 18.17, where you can set the properties for each column.
Figure 18.17
Use the Edit Columnsdialog box to customizethe appearance of theDataGridView control.
In the Edit Columns dialog box, you can set each column’s header and width, as well as theminimum width of the column. (Users won’t be allowed to make the column narrower thanits minimum width.) You can also set the AutoSize property to True to let the control decideabout column widths, but this may result in a very wide control. You can lock certain columnsduring editing by setting their ReadOnly property, or you can make other columns invisiblewith the Visible property.
To make the appearance of two grids more uniform on the Products per Category form inyour LinkedDataTables projects, make both grids of the same width. This will leave the Cate-gories grid with some empty, grayed-out space, since it has a smaller number of columns thanthe Products grid. This space can be easily covered by Category’s Description property. Openthe Edit Columns dialog box, and set the AutoSizeMode of the Description column to Fill.
The most interesting setting in this dialog box is the ColumnType property, which is the typeof the column. By default, all columns are of the DataGridViewTextBoxColumn type, unless

796 CHAPTER 18 BUILDING DATA-BOUND APPLICATIONS
the corresponding field is a Boolean or Image type. A DataGridView column can be one of thefollowing types:
DataGridViewButtonColumn This displays a button whose caption is the bound field. Usebuttons to indicate that users can click them to trigger an action. To program the Click event ofa button column, insert the appropriate code in the control’s CellContentClick event handler.Your code must detect whether a column with buttons was clicked and, if so, act accordingly.Change the column that displays the product names into a button column, and then insert thefollowing statements in the CellContentClick event handler of the DataGridView control:
Private Sub ProductsDataGridView_CellContentClick(ByVal sender As System.Object,ByVal e As System.Windows.Forms.DataGridViewCellEventArgs)
Handles ProductsDataGridView.CellContentClickIf e.ColumnIndex = 1 Then
MsgBox(ProductsDataGridView.Rows(e.RowIndex).Cells(e.ColumnIndex).Value.ToString)
End IfEnd Sub
The code shown here reads the caption of the button that was clicked. You can just as easilyread the product’s ID and use it to retrieve product details and display them on another form.
DataGridViewCheckBoxColumn This column type is used with True/False columns (thebit data type in SQL Server). The Discontinued column of the Products table, for example, ismapped automatically to a DataGridView column of this type.
DataGridViewComboBoxColumn This column type is used for foreign keys or lookupfields. You will shortly see how to change the CategoryID and SupplierID columns intoComboBox columns so that users can see category and supplier names instead of IDs. Whenediting the table, users can expand the list and select another item, instead of having to enterthe ID of the corresponding item. Figure 18.18 shows the DataGridView control for displayingproducts with a ComboBox column for categories and suppliers.
Figure 18.18
Displaying productcategories and sup-pliers in a ComboBoxcontrol on the Data-GridView control

DESIGNING DATA-DRIVEN INTERFACES THE EASY WAY 797
DataGridViewLinkColumn This is similar to the DataGridViewButtonColumn type, only itdisplays a hyperlink instead of a button. Use the same technique outlined earlier for the Buttoncolumns to detect the click of a hyperlink.
DataGridViewImageColumn Use this column type to display images. In general, youshouldn’t store images in your databases. Use separate files for your images, and include onlytheir paths in the database. Keep in mind that all rows of a DataGridView control have thesame height, and if one of them contains an image, the remaining cells will contain a lot ofwhite space.
DataGridViewTextBoxColumn This is the most common column type, and it displays thefield in a text box.
Notice that as you change the style of a column, the Bound Column Properties paneof the Edit Columns dialog box is populated with the properties that apply to the specificcolumn type. For a combo box column, for example, you can set the DropDownWidth andMaxDropDownItems properties. You can even populate the combo box with a set of valuesthrough the Items property, just as you would with a regular combo box on the form.
There aren’t any properties in the Edit Columns dialog box to adjust the appearance of theselected column. To change the appearance of a column, select the DefaultCellStyle property,and click the button with the ellipses next to it to see the CellStyle Builder dialog box, which isshown in Figure 18.19.
In the CellStyle Builder dialog box, you can set the column’s font, set its foregroundand background colors, specify whether the text should wrap in its cell, and determine thealignment of the cell’s contents. Turning on the wrap mode with the WrapMode propertydoesn’t cause the rows to be resized automatically to the height of the tallest cell. To haverows resized automatically, you must set the control’s AutoSizeRowsMode property to All.
Figure 18.19
Use this dialog box toadjust the appearance ofa column in a DataGrid-View control.

798 CHAPTER 18 BUILDING DATA-BOUND APPLICATIONS
The other possible settings for this property are None, AllHeaders, AllCellsExceptHeaders,DisplayedHeaders, DisplayedCellsExceptHeaders, and DisplayedCells. Finally, you mustset the Format property for all numeric and date fields and size the columns according to thedata that will be displayed on the control.
This feast of customization techniques is possible because the DataGridView control isbound to a typed DataSet. If you want to use the techniques of the previous chapter to bind aDataGridView control to an untyped DataSet, you can still use the Edit Columns dialog box toadd and customize the control’s columns, but the process isn’t nearly as convenient. You mustalso remember to set the control’s AutoGenerateColumns property to False and each column’sDataPropertyName property to the name of the database column that will be mapped to thecorresponding grid column. If the AutoGenerateColumns property is left to its default value,which is True, the control will generate a new column for each data column in its data source.
Displaying Lookup Columns in a DataGridView Control
In this section, you’re going to change the way a product’s category and supplier are displayed.Instead of IDs, you must display category and supplier names. Moreover, you will display eachproduct’s category and supplier in a ComboBox control so that users can quickly select anothervalue when editing the product. Let’s return to the LinkedDataTables project and set up thebottom GridView control.
Select the DataGridView control with the products, and from the Task menu choose EditColumns. In the Edit Columns dialog box, select the CategoryID column, and make it invisibleby setting its Visible property to False. Then click the Add button to add a new column. Inthe Add Column dialog box, which is shown in Figure 18.20, click the Unbound Column radiobutton, and set the column’s Name property to colCategory and its HeaderText property toCategory. Click Add to add the column to the DataGridView control and then Close to closethe dialog box.
Back in the Edit Columns dialog box, move the new column to the desired positionby using the arrow buttons. You must now set up the new column so that it displays thename of the category that corresponds to the CategoryID column of the selected product.Locate the DataSource property, and click the arrow to expand the data sources. Select theCategoriesBindingSource entry. Then set the DisplayName property to CategoryName and
Figure 18.20
Adding a new columnto the DataGridViewcontrol

DESIGNING DATA-DRIVEN INTERFACES THE EASY WAY 799
the ValueMember to CategoryID. Click OK to close the dialog box. If you run the applicationnow, you’ll see that the CategoryID column has been replaced by the Category column, whichdisplays a ComboBox with the list of all categories. However, the product’s category isn’t auto-matically selected; you have to drop down the items in the combo box to see the categories, andyou still don’t know the selected product’s category. To link the appropriate category nameto the selected product’s CategoryID value, you must set yet another property, the Data-PropertyName property. If you expand the list of available columns for this property, you’llsee the columns of the Products table. Select the CategoryID column so that the combo boxwill display the category name that corresponds to the category ID of the selected productrow. Now you have a much better interface for editing the products. You no longer need toenter IDs; you see the name of the selected product’s category, and you can select a product’scategory from a drop-down list by using the mouse.
Of course, you must do the same with the Suppliers table. Right-click the NorthwindDataSetobject in the Data Sources window, and choose Edit DataSet With Designer from the contextmenu to open the DataSet in design mode.
Editing the Data in Hierarchical TablesTo be able to display the meaningful column (typically the Name column) of the lookuptable entry, you need to make the data in the lookup table available to the application. Ifthe table with the lookup values isn’t part of your DataSet, you can easily add a new DataTableto the DataSet. Right-click somewhere on the DataSet Designer’s surface, and choose Add �TableAdapter from the context menu. A new DataTable will be added to the DataSet, andyou’ll be prompted with a wizard similar to the Data Source Configuration Wizard to select therows that will be used to populate the DataTable. Alternatively, you can right-click the DataSetin the Data Sources view, and select the Edit DataSet With Designer option. Take a look at the‘‘Adjusting the DataSet’’ section earlier in this chapter and Figure 18.9 to see how to edit theDataSet in DataSet Designer.
In the case of lookup tables, you would choose the ID column so that the relationship canbe maintained and the Name column whose value will be displayed in the grid. In your Linked-DataTables project, you added the Suppliers table when you created the DS DataSet.
Let’s make the lookup table data available for an update operation on the Products grid.The following steps are similar to the steps performed when making categories displayed usingthe ComboBox inside the DataGridView in the previous section.
Hide the SupplierID column of the Suppliers table, and replace it on a grid with aComboBox column that contains the names of the suppliers. Select the Edit Column commandfrom the Products grid’s Tasks menu, and set the properties for a newly added Supplierscolumn as listed in Table 18.2.
Notice that the ValueMember property is the SupplierID column of the Suppliers table,but the PropertyName property’s value is the SupplierID column of the Products DataTable,because the control is bound to the Products table. The Designer will replace the name of theSuppliers DataTable with the SupplierBindingSource object. Run the application now, edit afew products, and then save the edits. You can also edit the categories (names and descriptionsonly). As a reminder, even the DataSet that was generated by the wizard doesn’t enforce checkconstraints, and you can set the price of a product to a negative value. When you attempt tosubmit the changes to the database, a runtime exception will be thrown.
The code behind the Submit Edits button isn’t new to you. The code sets the Continue-UpdateOnError property of the underlying DataAdapter objects to True and then calls theUpdateAll method of the TableAdapterManager to submit the changes made to all tables.

800 CHAPTER 18 BUILDING DATA-BOUND APPLICATIONS
Table 18.2: Column settings for the Supplier column
Property Setting
ColumnType DataGridViewComboBoxColumn
DataSource SuppliersBindingSource
DisplayMember CompanyName
ValueMember SupplierID
PropertyName SupplierID
The rows that will fail to update the underlying tables in the database will be marked aserrors. The DataGridView control marks the rows in error with an icon of an exclamation markin the column’s header, as shown earlier in Figure 18.14. If you hover over this icon, you’ll seea description of the error in a ToolTip box.
Updating Hierarchical DataSets
Updating hierarchical DataSets isn’t as simple as calling the Update or UpdateAll method. Inthe LinkedDataTables sample project, I’ve called the UpdateAll method of the TableAdapter-Manager class, which submits first the changes in the parent table (the Categories table) andthen the changes in the related table(s). Unless you commit the new rows to the Categoriestable first, the database will refuse to insert any products that use the IDs of the categories thatdo not exist in the Categories table. But even if you update the Categories table first and thenthe Products table, it’s not guaranteed that all updates will take place. The order of updatesin a hierarchical DataSet is very important, and here’s why: Let’s say you’ve deleted allproducts of a specific category and then the category itself. As soon as you attempt to removethe specific row from the Categories table in the database, the database will return an errorindicating that you can’t delete a category that has related rows, because the relevant productshaven’t been removed from the Products table in the database yet.
The proper update order is to submit the deleted rows of the Products table, then performall updates in the Categories table, and finally submit the insertions and modifications in theProducts table. You’ll see shortly how to retrieve deleted/modified/new rows from a Data-Table at the client (we’ll use each row’s DataRowVersion property) and then how to pass theserows to the Update method.
In the meantime, you can experiment with the LinkedDataTables project and perform a fewupdates at a time. Let’s say you want to delete all products in a specific category and then thecategory itself. To submit the changes without violating the primary/foreign key relationshipbetween the two tables, you must first delete the products and then update the database byclicking the Submit Edits button. After the Products table is updated, you can delete the cate-gory from the Categories table and then submit the changes to the database again.
In this section, you’ve built a functional interface for editing the categories and products ofthe Northwind database. You started by creating a DataSet with the three tables, then droppedthem on the form to instantiate two DataGridView controls, and then tweaked the appearanceof the two controls with point-and-click operations. We even managed to display comboboxes right in the DataGridView control without a single line of code. The DataGridView

DESIGNING DATA-DRIVEN INTERFACES THE EASY WAY 801
control provides the basic editing features, and you were able to put together an interface foryour data without any code. You did have to write a bit of code to submit the changes to thedatabase, because the code generated by the wizard couldn’t handle anything but the best-casescenario. Real-world applications must take into consideration all possible scenarios and handlethem gracefully.
Data binding allows you to write data-driven applications quickly, mostly with point-and-click operations, but the default interfaces generated by the wizards are not perfect. You’ll seeshortly how to use data binding to produce more-elegant interfaces, but they’ll require a bitof code. Another problem with data binding is that in most cases you’ll end up filling largeDataSets at the client — and this is not the best practice with data-driven applications. If yourapplication is going to be used by many users against a single server, you must retrieve a rela-tively small number of rows from the database and submit the edits as soon as possible. If youkeep too much data at the client and postpone the submission of edited rows to the database,you’re increasing the chances of concurrency errors. Other users may already have changed thesame rows that your application is attempting to update. Of course, you can disable optimisticconcurrency and overwrite the changes made by other users, if the nature of the data allows it.
The most common approach is to design a form with search criteria, on which users willspecify as best as they can the rows they need. Then you can populate the client DataSetwith the rows that meet the specified criteria. If you’re writing a connected application, submitthe changes to the database as soon as they occur. If you want the users to control when theupdates are submitted to the database, display the number of modified/inserted/deleted rowsin the form’s status bar. You can even pop up a message when the number of edited rowsexceeds a limit.
Building More-Functional InterfacesEditing large tables on a grid isn’t the most flexible method. In this section, you’ll build analternate interface for editing the Products table, as shown in Figure 18.21. This is the form ofthe Products sample project, which uses a data-bound ListBox control to display product namesand text boxes for the individual fields. The toolbar at the top allows you to add new rows,
Figure 18.21
An alternate inter-face for editing theProducts table

802 CHAPTER 18 BUILDING DATA-BOUND APPLICATIONS
delete existing ones, and submit the changes to the database. All the controls on the form aredata bound, and the application contains very little code.
Here’s how to get started:
1. Start a new Windows Forms Application project, the Products project, and create anew DataSet, NorthwindDataSet, with the three usual tables: Products, Categories, andSuppliers.
2. Change the binding option for the Products DataTable to ListBox. First, select theProducts DataTable in the DataSources window. After selecting the Products DataTable,a ComboBox-style arrow will become visible for the Products DataTable that you canexpand. Click the arrow. Next, select the Customize option in the Data Sources view on theProducts DataTable to open the Options window. Expand the Windows Forms Designernode in the Options list. Select the Data UI Customization node. Select List For Data Type.In the Associated Controls list, select the ListBox.
3. Drop the Products DataTable onto the form. In the Properties window, you must makesure that the ListBox control is properly bound: Its DataSource property has been setto the ProductsBindingSource object that was generated by the editor when you droppedthe DataTable on the form, its DisplayMember property has been set to ProductName(because it’s the first text column in the table), and its ValueMember property has beenset to ProductID (because it’s the table’s key). If you want to display a different field toidentify the products, change the DisplayMember property.
4. Now drop all the fields of the Products DataTable onto the form. The editor will create theappropriate text boxes and bind them to their fields.
5. Rearrange the controls on the form, and delete the text boxes that correspond to theCategoryID and SupplierID columns. Place two ComboBox controls in their place. By theway, even if you set the binding option for the CategoryID and SupplierID columns toComboBox, you’ll end up displaying IDs in the corresponding controls, not category andsupplier names. You can’t use any data-binding techniques to automatically set up twolookup fields.
6. Drop two instances of the ComboBox control on the form, and name them cbCategory-Name and cbCompanyName. Select the first one, and set the data-binding properties asfollows:
◆ The DataSource is where the control will get its data, and it should be Categories-BindingSource, because we want to populate the control with all the category names.
◆ The DisplayMember property is the column you want to view on the control and mustbe set to the CategoryName column of the Categories DataTable.
◆ The ValueMember property is the column that will bind the contents of the combobox control to the related table and must be set to the CategoryID column of theCategories DataTable.
◆ Finally, you must set the SelectedValue property, in the DataBindings section of theProperties window, to the matching column of the child table, which is the CategoryIDcolumn of the ProductsBindingSource. The control will automatically select the rowof the Categories table whose category ID matches the CategoryID column of theProducts DataTable.

DESIGNING DATA-DRIVEN INTERFACES THE EASY WAY 803
7. Perform similar steps with the other combo box, which displays the CompanyName columnof the Suppliers DataTable and is bound to the SupplierID column of the ProductsTable.
Run the application, and see how it behaves. Every time you select a product in the list,the product’s details appear in the data-bound text boxes, and its category and supplier aredisplayed in the two combo box controls. Use the list to navigate through the products, theAdd button to add a new product, and the Delete button to delete a product. You can editthe product’s fields on the form, and the edits will be written to the DataSet as soon as youmove to another row.
You have created a functional application for selecting products and viewing their details.If all you need is a browsing application for the products, you can set the ReadOnly propertyof all TextBox controls on the form to True.
If you attempt to enter a new product and leave its Discontinued column set to Null, a run-time exception will be raised. This problem is easy to fix by specifying a default value for theDiscontinued column. To do so, open the DataSet in the Designer, locate the Discontinuedcolumn in the Products table, and select Properties from the context menu. The DefaultValueproperty’s value is DBNull. Set it to False so that unspecified fields will be automatically setto False.
You’ll also get an error message if you attempt to submit the edits and the DataSet containsa product with a negative price. Such trivial errors can be caught and handled from withinyour code — no need to send the rows to the database and get an error message. Write a fewstatements to detect trivial errors, such as negative prices (or negative stocks, for that matter).First, decide how to handle these errors. Do you want to pop up a message box every time youdetect an error condition? This will drive users crazy. Do you want to reject changes until theuser enters a valid value? It’s a better approach, but remember that data-entry operators don’tlook at the monitor. They expect that the Tab (or Enter) key will take them to the next field.The best approach is to do what the DataGridView control does: display an error icon next tothe control in error.
Add an instance of the ErrorProvider control on the form. This control displays the exclama-tion mark icon next to a control. To display the error icon, you must call the control’s SetErrormethod, passing as arguments the control in error and the message for the error. (The messagewill be displayed in a ToolTip box when users hover over the icon.)
To detect errors from within your code, you need to insert some code in the Current-ItemChanged event handler of the ProductsBindingSource. Insert the statements shown inListing 18.6 in this event handler.
Listing 18.6: Catching data-entry errors in your code
Private Sub ProductsBindingSource_CurrentItemChanged(ByVal sender As System.Object,ByVal e As System.EventArgs) HandlesProductsBindingSource.CurrentItemChanged
If Not IsNothing(queryResult) AndAlso queryResult.Count < 1 Then Exit SubErrorProvider1.Clear()Dim product As NorthwindDataSet.ProductsRowproduct = CType(CType(
ProductsBindingSource.Current,DataRowView).Row, NorthwindDataSet.ProductsRow)

804 CHAPTER 18 BUILDING DATA-BOUND APPLICATIONS
If Not product.IsUnitPriceNull AndAlsoConvert.ToDecimal(product.UnitPrice) < 0 Then
ErrorProvider1.SetError(UnitPriceTextBox,"PRICE CAN’T BE NEGATIVE!")
End IfIf ProductNameTextBox.Text.Trim.Length = 0 Then
If CType(ProductsBindingSource.Current,DataRowView).Row.RowState <>DataRowState.Detached ThenErrorProvider1.SetError(
ProductNameTextBox,"PRODUCT NAME CAN’T BE BLANK!")
End IfEnd If
End Sub
This code segment requires some explanation. The CurrentItemChanged event is fired everytime the user selects another row or column on the control. The code in this event handlerretrieves the current row with the Current property of the ProductBindingSource object.This property returns an object, which is a DataRowView object. This is why I cast it to theDataRowView type, then retrieve its Row property, and finally cast it to the ProductsRow type.The product variable represents the currently selected row in the DataSet. This is a typedvariable, and I can access the columns of the current row as properties. If the UnitPricecolumn has a negative value, the code sets an ErrorProvider control to display the error next tothe corresponding text box.
Viewing the Deleted Rows
One unique aspect of this interface is that it provides a button to display the deleted rows.These rows exist in the DataSet, but they’re not shown on the interface. The inserted andmodified rows are on the ListBox control, and users can review them. You may even provide abutton to display the old and new versions of the edited rows. But users have no wayof reviewing the deleted rows. You can resolve this by showing the deleted rows in theauxiliary form:
1. Add a new button to the ProductsBindingNavigator ToolStrip, and set its name tobttnShowDeleted.
2. Set the text of the button to Show Deleted.
3. Add a new form (Form2) to the project.
4. Add a CheckListBox control to Form2.
5. Add a button called button1 to Form2, set the button’s Text property to Restore SelectedRows, and close Form2 in the button’s default event handler.
The Show Deleted Rows button in the ToolStrip opens an auxiliary form (Form2), like theone shown in Figure 18.22, which displays the deleted rows in a CheckedListBox control. Usersare allowed to select some of the deleted rows and restore them.

DESIGNING DATA-DRIVEN INTERFACES THE EASY WAY 805
Figure 18.22
Reviewing the deletedrows in the DataSet
Listing 18.7 shows the code that retrieves the deleted rows and displays them on theauxiliary form.
Listing 18.7: Retrieving and displaying the deleted rows
Private Sub bttnShowDeleted_Click(...) Handles bttnShowDeleted.ClickForm2.CheckedListBox1.Items.Clear()For Each row As DataRow In NorthwindDataSet.Products.Rows
If row.RowState = DataRowState.Deleted ThenForm2.CheckedListBox1.Items.Add(row.Item("ProductID",DataRowVersion.Original) & " " &row.Item("ProductName",DataRowVersion.Original))
End IfNextForm2.ShowDialog()Dim SelectedIDs As New ArrayListFor Each itm As String In Form2.CheckedListBox1.CheckedItems
SelectedIDs.Add(Convert.ToInt32(itm.Substring(0, itm.IndexOf(" ") + 1)))
NextDim cust As NorthwindDataSet.ProductsRowFor Each cust In NorthwindDataSet.Products
If cust.RowState = DataRowState.DeletedAndAlso SelectedIDs.Contains(cust.Item("ProductID", DataRowVersion.Original)) Thencust.RejectChanges()
End IfNext
End Sub

806 CHAPTER 18 BUILDING DATA-BOUND APPLICATIONS
The code goes through the Rows collection of the Products DataTable and examines theRowState property of each row. If its value is RowState.Deleted, it adds the row’s ProductIDand ProductName fields to the CheckedListBox control of the auxiliary form. Then it displaysthe form modally, and when the user closes it, the code retrieves the IDs of the selected rowsinto the SelectedIDs ArrayList. The last step is to restore the selected rows. The code goesthrough all rows again, examines their RowState properties, and if a row is deleted and its IDis in the SelectedIDs ArrayList, it calls the RejectChanges method to restore the row. Therestored rows are automatically displayed in the ListBox control because this control is boundto the DataSet.
Handcrafting an Application’s Interface
A practical feature you can add to the interface of a disconnected application is the abilityto review the modifications. You can display the original and proposed versions of theinserted/modified rows, as well as the original versions of the deleted rows on an auxiliaryform, as we have done in the preceding example.
If you don’t mind writing a bit of code, you can display the original values of the edited rowsin the same controls on your form. Because the controls are data bound, you can’t displayany different values on them; if you do, they’ll be stored in the DataSet as well. But you canplace nonbound controls, such as Label controls, in the place of the data-bound control. TheLabels normally will be invisible, but when the user presses a function key, they can becomevisible, hiding the regular editable controls. When the user requests the original versions ofthe fields, you must populate the Labels from within your code and display them by togglingtheir Visible properties. You must also hide the regular controls on the form.
Another approach would be to suspend data binding momentarily by calling the Suspend-Binding method of the BindingSource class. After data binding has been suspended, you canpopulate the text boxes on the form at will, because the values you display on them won’tpropagate to the DataSet. To display the bound values again, call the ResumeBinding method.
Another interesting feature you can add to a data-driven application is to display the state ofthe current row in the form’s status bar. You can also give users a chance to undo the changesby clicking a button on the status bar. All you have to do in this button’s Click event handleris to call the RejectChanges method on the current row. Use the Current property of theProductsBindingSource to retrieve the current row and cast it to the ProductsRow type, andthen call the RejectChanges method.
You can select one of the data-editing applications presented in this chapter, perhaps theProducts application, and add as many professional features as you can to it. Start by addinga status bar to the form, and display on it the state of the current row. For modified rows,display a button on the toolbar that allows users to view and/or undo the changes to thecurrent row. Program the form’s KeyUp event handler, as explained in Chapter 4, ‘‘GUI Designand Event-Driven Programming,’’ so that the Enter key behaves like the Tab key. Users shouldbe able to move to the next field by pressing Enter. Finally, you can display an error message

DESIGNING DATA-DRIVEN INTERFACES THE EASY WAY 807
for the current row on a label in the form’s status bar. Or display a message such as Row haserrors as a hyperlink and show the actual error message when users click the hyperlink. Testthe application thoroughly, and insert error handlers for all types of errors that can be caughtat the client. Finally, make the edited rows a different color in the two DataGridView controlson the form of the LinkedDataTables sample project. To do so, you must insert some code inthe control’s RowValidated event, which is fired after the validation of the row’s data. You’llneed to access the same row in the DataSet and examine its RowState property by retrievingthe Current property of the ProductsBindingSource object, as shown in Listing 18.8.
Listing 18.8: Coloring the edited and inserted rows on the DataGridView control
Private Sub ProductsDataGridView_RowValidated(…)Handles ProductsDataGridView.RowValidated
Dim row As DS.ProductsRowrow = CType(CType(ProductsBindingSource.Current,
DataRowView).Row, DS.ProductsRow)If row.RowState = DataRowState.Modified Then
ProductsDataGridView.Rows(e.RowIndex).DefaultCellStyle.ForeColor = Color.Green
ElseProductsDataGridView.Rows(e.RowIndex).
DefaultCellStyle.ForeColor = Color.BlackEnd IfIf row.RowState = DataRowState.Added Then
ProductsDataGridView.Rows(e.RowIndex).DefaultCellStyle.ForeColor = Color.Blue
ElseProductsDataGridView.Rows(e.RowIndex).
DefaultCellStyle.ForeColor = Color.BlackEnd If
End Sub
The code in the listing sets the foreground color of modified rows to green and the fore-ground color of inserted rows to blue. From within the same event’s code, you can set the textof a Label on the form’s status bar to the row’s error description. If you run the applicationnow, you’ll see that it paints modified and inserted cells differently, but only while you’reworking with products of the same category. If you select another category and then return tothe one whose products you were editing, they’re no longer colored differently, because theRowValidated event is no longer fired. To draw rows differently, you must duplicate the samecode in the control’s RowPostPaint event as well.
If you carefully test the revised application, you’ll realize that the DataGridView controldoesn’t keep track of modified rows very intelligently. If you append a character to theexisting product name and then delete it (without switching to another cell between the twooperations), the DataGridView control considers the row modified, even though the originaland proposed versions are identical. As a result, the application will render the row in green.Moreover, the UpdateAll method will submit the row to the database.

808 CHAPTER 18 BUILDING DATA-BOUND APPLICATIONS
For a truly disconnected application, you should give users a chance to store the data locallyat the client. The LinkedDataTables application’s main form contains two more buttons: theSave Data Locally and Load Local Data buttons. The first one saves the DataSet to a localfile via the WriteXml method of the DataSet, and the second button loads the DataSet via theReadXml method. The application uses the tmpData.#@# filename in the application’s folderto store the data. It also uses an overloaded form of the two methods to accept an additionalargument that stores not only the data but the changes as well. Here’s the code behind the twobuttons:
Private Sub Button1_Click(…) Handles Button1.ClickDS.WriteXml("tmpData.#@#", XmlWriteMode.DiffGram)
End Sub
Private Sub Button2_Click(…) Handles Button2.ClickProductsBindingSource.SuspendBinding()DS.ReadXml("tmpData.#@#", XmlReadMode.DiffGram)ProductsBindingSource.ResumeBinding()
End Sub
Let’s explore now how data binding can be used in combination with Language IntegratedQuery (LINQ) query syntax.
Data Binding with LINQYou are surely convinced by now that LINQ is a fundamental part of .NET query infrastruc-ture. You have explored LINQ in detail in Chapter 14, ‘‘An Introduction to LINQ,’’ where Ialso mentioned the LINQ to DataSet technology.
The great thing about LINQ is that once you learn how to write queries, you can apply thesame syntax to any data source that supports LINQ. DataSets and typed DataSets also supportLINQ, and you can apply the same syntax you saw used to query objects in LINQ to Objectsand in LINQ to SQL to typed DataSets.
So far in this chapter you saw how data binding can make life a lot easier for a programmerdeveloping data-centric applications. And you have already witnessed the power of LINQ. Thetwo can be used in combination as a powerful tool for data manipulation.
Enabling the Binding with the DataView Class
The central class for binding support is the DataView class. It represents a bindable andcustomizable view of data and provides a number of data manipulation methods. UsingDataView, data can be filtered, searched, sorted, edited, used for navigation, and so on.
LINQ to DataSet queries are capable of returning the DataView instance by means of theAsDataView extension method. Thanks to this extension method, you can set the query as aDataSource of a BindingDataSource class like this:
mybindingSource.DataSource = (From product In NorthwindDataSet.ProductsSelect product).AsDataView()
Now you see how you will be able to add some sophisticated querying capabilities to yourdata bound applications. Let’s illustrate this by adding some querying features to our Productsapplication, as shown earlier in the chapter in Figure 18.21.

DESIGNING DATA-DRIVEN INTERFACES THE EASY WAY 809
Using LINQ to Filter Products Data
In cases where data operators have to manage a large number of entries, listing all of these onthe form with navigation capability can prove not to be very practical. Users will be forced tospend a lot of time while navigating between records. In such cases, providing some filteringcapability can prove to be very beneficial.
Let’s add some filtering features to our form in the Products project. I will use followingcriteria for the filtering functionality:
◆ Category selected by user
◆ Units in stock less than the number entered by the user
◆ Units on order greater than the number entered by the user
This way, users will be able to filter products by category and by some important opera-tional data. They will be able to see when the numbers of units in stock is low or what productunits for an order are piling up. Figure 18.23 shows the new version of the Products interface.
Figure 18.23
Reviewing the deletedrows in the DataSet
You can use these criteria in any kind of combination. To know whether criteria should beapplied or not, it is best to count on some special value. If the Units In Stock Less and Units OnOrder Greater text boxes are empty, then they should not be used in a query. For the category,the special value of the combo box is the text All. To add this value to Combobox, it has to bepopulated by your application and not through the data binding. The following code populatesthe Categories Combobox and is placed inside the Form_Load event handler:
cboCategoryFilter.DisplayMember = "CategoryName"cboCategoryFilter.ValueMember = "CategoryID"cboCategoryFilter.Items.Insert(0, "All")

810 CHAPTER 18 BUILDING DATA-BOUND APPLICATIONS
For Each category In NorthwindDataSet.CategoriescboCategoryFilter.Items.Insert(category.CategoryID, category)
Next
Now you are ready to write the LINQ query that uses these criteria. Because these criteriacan be used in any combination, writing the query might prove to be a bit trickier than youinitially thought.
The solution is to use the special value of criteria inside the query itself. For example, theexpression cboCategoryFilter.Text = "All" is true if the user does not want to applythe categories criteria. As you can see, I have named the categories ComboBox cboCategory-Filter. If you combine this statement with product.CategoryID = categoryId using theOrElse operator, then you can use the cboCategoryFilter.Text = "All" expression to turnoff the categories criteria when the user selects All in the Categories combo. The completestatement to be put in the Where part of the LINQ query for Categories combo is as follows:cboCategoryFilter.Text = "All" OrElse product.CategoryID = categoryId.
The same pattern can be applied to rest of conditions. For other criteria, the special value isan empty string. You can take a look at the complete code for the Filter button in Listing 18.9.
Listing 18.9: Coloring the edited and inserted rows on the DataGridView control
Private Sub bttnFilter_Click(...) Handles bttnFilter.ClickDim categoryId As IntegerIf Not cboCategoryFilter.Text = "All" Then
categoryId = CType(cboCategoryFilter.SelectedItem,NorthwindDataSet.CategoriesRow).CategoryID
End If
queryResult = From product In NorthwindDataSet.ProductsWhere ((cboCategoryFilter.Text = "All" OrElse
product.CategoryID = categoryId) And
(String.IsNullOrEmpty(txtUnitsOnOrderFilter.Text) OrElseproduct.UnitsOnOrder >
CInt(txtUnitsOnOrderFilter.Text)) And
(String.IsNullOrEmpty(txtUnitsInStockFilter.Text) OrElseproduct.UnitsInStock <
CInt(txtUnitsInStockFilter.Text)))Select product
ProductsBindingSource.DataSource = queryResult.AsDataView()
End Sub

THE BOTTOM LINE 811
The Bottom Line
Design and use typed DataSets. Typed DataSets are created with visual tools at design timeand allow you to write type-safe code. A typed DataSet is a class created by the wizard on thefly, and it becomes part of the project. The advantage of typed DataSets is that they exposefunctionality specific to the selected tables and can be easily bound to Windows forms. Thecode that implements a typed DataSet adds methods and properties to a generic DataSet, so allthe functionality of the DataSet object is included in the autogenerated class.
Master It Describe the basic components generated by the wizard when you create atyped DataSet with the visual tools of Visual Studio.
Bind Windows forms to typed DataSets. The simplest method of designing a data-boundform is to drop a DataTable, or individual columns, on the form. DataTables are bound toDataGridView controls, which display the entire DataTable. Individual columns are boundto simple controls such as TextBox, CheckBox, and DateTimePicker controls, depending on thecolumn’s type. In addition to the data-bound controls, the editor generates a toolbar controlwith some basic navigational tools and the Add/Delete/Save buttons.
Master It Outline the process of binding DataTables to a DataGridView control.
Compare a LINQ query used to filter data with an eSQL dynamic query. You can use theAsDataView extension method of the DataTable class to enable binding of the LINQ queryresults when querying the DataSet in LINQ to DataSet technology. In this chapter, you haveseen how a LINQ query can be used to provide filtering capabilities on a data-entry form.
Entity SQL (eSQL) is a query language with syntax similar to Transact-SQL. Entity SQL queriescan be embedded inside the Visual Basic code and can be used to query the Entity Data Modelprovided by the Entity Framework. You saw how to use Entity SQL to construct dynamicqueries in Chapter 17.
Master It Compare LINQ queries to queries written in Entity SQL. Explain the mainbenefits and drawbacks of each technology.


Part 6
Developing for the Web◆ Chapter 19: Accessing the Web
◆ Chapter 20: Building Web Applications
◆ Chapter 21: Building and Using Web Services


Chapter 19
Accessing the Web
The Internet has changed our everyday lives in many ways, and it has changed the program-ming landscape completely. It is hardly imaginable today to develop any application that is notat least in some way related to the Internet. HTTP, the underlying protocol of the Internet, is astandard protocol for application interoperability and distributed application development.
The Internet provides a wealth of information and functionality available in different forms.Most of this information is structured with a human user in mind; a user who will access awebsite using a web browser. Sometimes, information is useful as is, and you will see how it iseasy to incorporate such information into your applications using the WebBrowser control.
In other situations, you need to access and extract information from unstructured HTMLpages. This process is often referred to as HTML screen scraping. The .NET Framework pro-vides all you need to simulate the browser and access such pages without having the serversever discover that they are not communicating with a web browser but with your Visual Basicprogram instead. Support for such access comes in the form of the WebClient class and, in sit-uations where you need more low-level control, the HttpWebRequest and HttpWebResponseclasses. These classes can be used to access applications that provide structured informationmeant to be accessed by other applications but use some more lightweight forms of interop-erability, like XML over HTTP, as opposed to a dedicated information exchange protocol likeSOAP. (You will learn more about SOAP in Chapter 21, ‘‘Building and Using Web Services.’’)
In the Chapter 20, ‘‘Building Web Applications,’’ you will learn how to develop webapplications — applications made to serve the clients over the Internet. In this chapter, we’lltake a look at how you can be on the other side, the consuming side of the wire. You will learnhow to access different resources and applications on the Internet through your code and howto integrate browser functionality inside your applications.
In this chapter, you’ll learn how to do the following:
◆ Add browser functionality to your Windows Forms applications using the WebBrowsercontrol
◆ Access information and services on the Web from within your code using WebClient orHttpWebRequest and HttpWebResponse classes

816 CHAPTER 19 ACCESSING THE WEB
The WebBrowser ControlThe WebBrowser control is the simplest option for adding some browser functionality to a Win-dows Forms application. It is capable of presenting HTML content with all the usual browserfeatures: hyperlinks, navigation, multimedia content, Favorites, and the like.
There can be a number of reasons you would want to add web browser functionality toyour application. The Internet provides a wealth of useful information and ready-to-use func-tionalities like address validation, weather forecasts, online calendars, and stock quotes, just toname a few. Many times this information is tailored so it can be included like a ‘‘widget’’ ora ‘‘gadget’’ inside some other web page. These make it especially easy to embed Internet con-tent inside your Windows Forms application, as you will see in the section ‘‘VB 2010 at Work:The Stock Quotes Project’’ later in this chapter. Once you see how easy it is to integrate webbrowser functionality with the WebBrowser control, I am sure you will think of many otheruseful ways to enrich your applications with Internet content.
With a little bit of work, the WebBrowser control can be used to make a full-fledged customweb browser. This can be useful in situations in which your client needs to restrict the access tointranet-only sites or only to selected Internet sites. Or you might use a WebBrowser controlto make a child-friendly browser that can eliminate adult content. Before I show you how touse the WebBrowser control in a plausible application scenario, let’s inspect some of its mostimportant properties.
WebBrowser Control under the HoodThe WebBrowser control is a managed .NET wrapper over the Internet Explorer ActiveXdynamic link library. This is the same library that the Internet Explorer executable usesinternally and is available on any Windows machine.
As a consequence, you will not be able to exhort the usual level of control over you appli-cation. Since Internet Explorer is essentially part of the Windows operating system, it will beupdated through the Windows Automatic Updates service, so you cannot control the versionof Internet Explorer that is being used to render the HTML in your application. While mostInternet Explorer versions still in circulation work in a similar manner, there are some knowndifferences in how they render the HTML.
The browser operations a user performs on a WebBrowser control will affect the InternetExplorer installation. For example, a Favorite added to the list of Favorites through a Web-Browser control will appear in the Internet Explorer list of Favorites. Pages accessed througha WebBrowser control will appear in the Internet Explorer history. Adding a shortcut using aWebBrowser control will create a new Windows shortcut. And so on.
One important aspect to consider when using a WebBrowser control is security. In thisrespect, the control behaves in the same manner as Internet Explorer and will run scripts andembedded controls inside web pages. In such situations, the WebBrowser control is, accordingto MSDN, ‘‘no less secure than Internet Explorer would be, but the managed WebBrowsercontrol does not prevent such unmanaged code from running.’’
Now that you have seen what a WebBrowser control is really made of, let’s take a look atits properties.
WebBrowser Control PropertiesLike any other visible Windows Forms control, the WebBrowser control has a number ofcommon layout-related properties, including Size, MaximumSize, MinimumSize, Location,Margin, and Anchor. They all work as you would expect from your experience with other

THE WEBBROWSER CONTROL 817
Windows Forms controls, so I will not go into more details on any of these. While belonging tothis group, a small note is in order for the Dock property.
Dock
The Dock property determines how the WebBrowser control is positioned in relation to a con-tainer and how it will behave as the container is resized. Anchoring and docking controls arediscussed in detail in Chapter 6, ‘‘Working with Forms.’’
When a WebBrowser control is added to an empty form or a container control, the defaultvalue for the Dock property is Fill. As a result, the whole form area will be covered by the Web-Browser control. The WebBrowser control drops into your form as a square with no visibleclues as to its position. Although the control’s white background will stand out, you still mightbe confused at first as to where it is positioned on the form. Just change the default value ofthe Dock property to some other value, like None, and the control will become visible as youchange the form’s size.
URL
The URL property lets you specify the target URL address for the WebBrowser control in thedesign time. When you display the form, the WebBrowser control will load that URL bydefault. If you change the property at runtime, the control will navigate to the new URL. Inthis respect, setting the URL property works the same as calling the WebBrowser control’sNavigate method (described in the section ‘‘WebBrowser Control Methods’’ later in thischapter).
The URL property type is the System.Uri class. A URI (Uniform Resource Identifier) can rep-resent a unique identifier or an address (familiar URL) on the Internet. You will typically useinstances of this class to represent an Internet address. When doing so, do not forget to spec-ify the protocol part of the address, otherwise you will get an Invalid URI exception. You caninstantiate the Uri class by passing a string representation of the URL to its constructor. Here isthe correct way to set the WebBrowser URL property in your code:
WebBrowser1.Url = New Uri("http://www.google.com")
AllowNavigation
The AllowNavigation property sets the WebBrowser control behavior in regards to navigation.If you set the AllowNavigation property to False, the WebBrowser control will not react whena user clicks a hyperlink and will not load the page specified in the hyperlink. It will not reactto navigation attempts from within your code either. Calling the Navigate method on a Web-Browser control when AllowNavigation is set to False will have no effect. The only page thecontrol will display is the one that was loaded initially.
Bear in mind that AllowNavigation does not alter the visual representation of the page orthe cursor. Hyperlinks are still rendered distinctly as hyperlinks (underlined blue text), and themouse cursor will change to a hand shape when hovering over the hyperlink. Finally, whilethe AllowNavigation property can prevent users from following a standard HTML hyperlink,it will not prevent the browser from opening a new window as directed by JavaScript code, as,for example, when calling the window.open JavaScript function. Finally, if the user presses F5(Refresh), the page loaded initially will reload.

818 CHAPTER 19 ACCESSING THE WEB
ScrollBarsEnabled
Internet Explorer will display the scroll bars when the loaded page is not fully visible. By set-ting ScrollBarsEnabled to False, you can prevent scroll bars from appearing even if the pageloaded into the WebBrowser control is not fully visible.
AllowBrowserDrop
The AllowBrowserDrop property controls the WebBrowser control’s drag-and-drop behavior.When it’s set to True, you can open the HTML file in Internet Explorer by dragging the filefrom Windows Explorer and dropping it on the browser. The WebBrowser control behavesin the same manner by default. To disable drag-and-drop behavior in the WebBrowsercontrol, you can set AllowBrowserDrop to False. You should be aware, however, that thisproperty is superseded by the AllowNavigation property; if AllowNavigation is set toFalse and AllowBrowserDrop is set to True, the WebBrowser control will not react to adrag-and-drop. This is to be expected because dropping the file on a WebBrowser control isjust another way of telling the WebBrowser control to navigate to a certain address — in thiscase a local HTML file.
WebBrowserShortcutsEnabled
In Internet Explorer, you can use a number of key combinations as keyboard shortcutsor accelerators. For example, Alt + the left arrow key combination is a shortcut for click-ing the Back button in Internet Explorer and Alt + the right arrow key is a shortcut forclicking Forward. You can disable accelerators in the WebBrowser control by setting theWebBrowserShortcutsEnabled property to False. This property is enabled by default.
IsWebBrowserContextMenuEnabled
IsWebBrowserContextMenuEnabled controls the display of a context-sensitive, shortcut menuwhen a user right-clicks the control. The shortcut menu contains some standard browsershortcuts, but it can also contain some shortcuts contributed by various Internet Exploreradd-ons and accelerators. You can see a context menu displayed over a WebBrowser control ina custom WebBrowser control–based implementation of a web browser in Figure 19.1.
ScriptErrorsSuppressed
Modern web pages typically contain large quantities of JavaScript code in addition to theHTML code. As with any other code, bugs in JavaScript code are not rare. The probabilityof an error in JavaScript code is enhanced by the differences in the way different browsersinterpret it. Some JavaScript code can be perfectly legal in one browser but will throw an errorin another.
When Internet Explorer encounters an error in JavaScript code (or some other script code),it will by default display a dialog window with detailed error information and prompt theuser to decide whether to continue to run the script code. In a WebBrowser control, you cancontrol this behavior through the ScriptErrorsSuppressed property. Set it to False and theWebBrowser control will bear any error in the script code silently.
Script error messages are rarely of any help to the end user, so it is best to set this propertyto False in the final version of your application. Even if errors in JavaScript code are present,the pages often still display and provide some limited functionality. You can take a look at aScript Error dialog window displayed by the WebBrowser control in Figure 19.2.
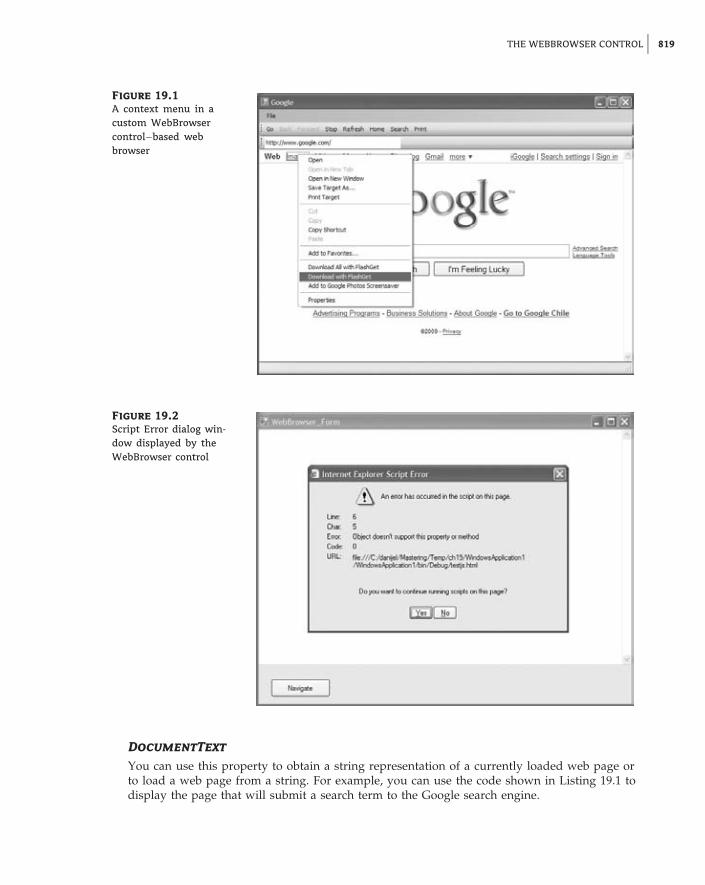
THE WEBBROWSER CONTROL 819
Figure 19.1
A context menu in acustom WebBrowsercontrol–based webbrowser
Figure 19.2
Script Error dialog win-dow displayed by theWebBrowser control
DocumentText
You can use this property to obtain a string representation of a currently loaded web page orto load a web page from a string. For example, you can use the code shown in Listing 19.1 todisplay the page that will submit a search term to the Google search engine.

820 CHAPTER 19 ACCESSING THE WEB
Listing 19.1: Loading a WebBrowser control with HTML content from a string literal
WebBrowser1.DocumentText ="<html><body>Search in Google:<br/>" &"<form method=’get’ action=’http://www.google.com/search’>" &"<input type=’text’ name=’as_q’/><br/>" &"<input type=’submit’ value=’Search’/>" &"</form></body></html>"
Just place a WebBrowser control named WebBrowser1 onto a form and write the code inListing 19.1 into the Form Load event to see the snippet in action.
DocumentStream
The DocumentStream property is similar to the DocumentText property. Instead of a string,it uses a System.IO.Stream instance as a property value. Using the stream interface, youcan easily load content from a file (and from numerous other sources) into a WebBrowsercontrol.
Document
The Document property is the pivotal property for manipulating a currently loaded HTML pagefrom within your code. The method returns a System.Windows.Forms.HtmlDocument instancerepresenting the current page’s Document Object Model (DOM) document — a structured rep-resentation of a web page. If you have ever manipulated an HTML page in JavaScript, you willfind this object quite familiar.
You can accomplish pretty much anything using a web page’s DOM. You can obtain andmanipulate values on forms, invoke embedded scripts, manipulate page structure, and so on.
The code in Listing 19.2 adds simple validation to the Google search form code displayed inListing 19.1.
Listing 19.2: Validating an HTML form through the WebBrowser Document property
Private Sub webBrowser1_Navigating(ByVal sender As Object,ByVal e As WebBrowserNavigatingEventArgs) HandlesWebBrowser1.Navigating
Dim document = WebBrowser1.DocumentIf document IsNot Nothing And
document.All("as_q") IsNot Nothing AndString.IsNullOrEmpty( _document.All("as_q").GetAttribute("value")) Thene.Cancel = TrueMsgBox("Please enter a search term.")
End IfEnd Sub
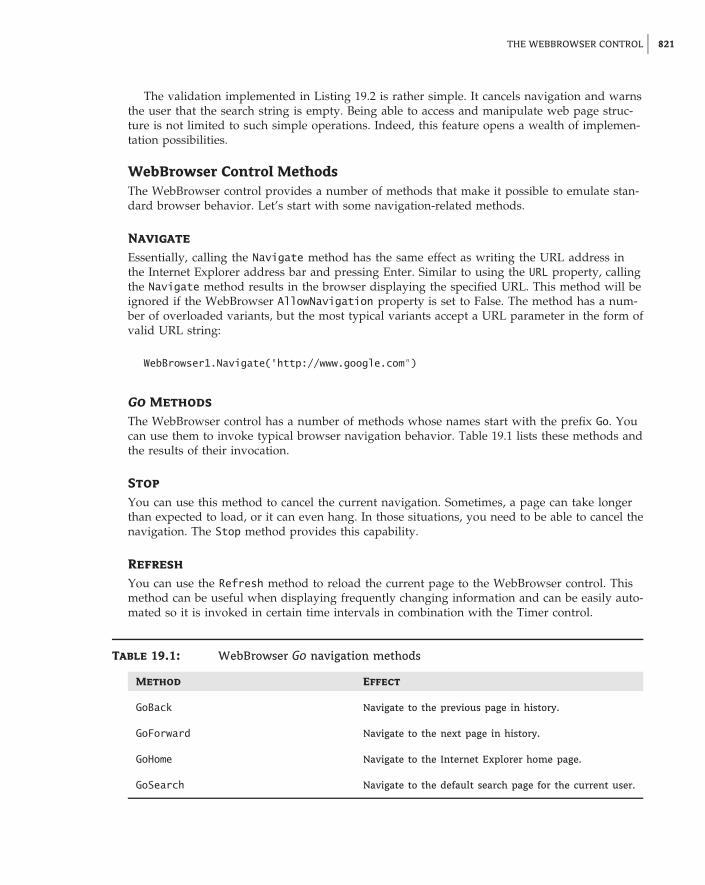
THE WEBBROWSER CONTROL 821
The validation implemented in Listing 19.2 is rather simple. It cancels navigation and warnsthe user that the search string is empty. Being able to access and manipulate web page struc-ture is not limited to such simple operations. Indeed, this feature opens a wealth of implemen-tation possibilities.
WebBrowser Control MethodsThe WebBrowser control provides a number of methods that make it possible to emulate stan-dard browser behavior. Let’s start with some navigation-related methods.
Navigate
Essentially, calling the Navigate method has the same effect as writing the URL address inthe Internet Explorer address bar and pressing Enter. Similar to using the URL property, callingthe Navigate method results in the browser displaying the specified URL. This method will beignored if the WebBrowser AllowNavigation property is set to False. The method has a num-ber of overloaded variants, but the most typical variants accept a URL parameter in the form ofvalid URL string:
WebBrowser1.Navigate("http://www.google.com")
Go Methods
The WebBrowser control has a number of methods whose names start with the prefix Go. Youcan use them to invoke typical browser navigation behavior. Table 19.1 lists these methods andthe results of their invocation.
Stop
You can use this method to cancel the current navigation. Sometimes, a page can take longerthan expected to load, or it can even hang. In those situations, you need to be able to cancel thenavigation. The Stop method provides this capability.
Refresh
You can use the Refresh method to reload the current page to the WebBrowser control. Thismethod can be useful when displaying frequently changing information and can be easily auto-mated so it is invoked in certain time intervals in combination with the Timer control.
Table 19.1: WebBrowser Go navigation methods
Method Effect
GoBack Navigate to the previous page in history.
GoForward Navigate to the next page in history.
GoHome Navigate to the Internet Explorer home page.
GoSearch Navigate to the default search page for the current user.

822 CHAPTER 19 ACCESSING THE WEB
Show Methods
The WebBrowser control supports a number of methods for displaying different dialog win-dows with some advanced browser functionality. Table 19.2 lists these methods and explainstheir purpose.
This method prints the current web page using the default print settings and without display-ing the print dialog window.
WebBrowser Control EventsA WebBrowser control operates in asynchronous mode. Loading a page will not freeze yourapplication; the application will continue to run while the WebBrowser control is downloadingand rendering a page. This is why events play an important role in the WebBrowser program-matic model. Let’s take a look at a few important ones.
Navigating
You have already seen the Navigating event at work in Listing 19.2. This event is raisedto signal the navigation. You can use this event to cancel the navigation if necessary, bysetting the Cancel property of WebBrowserNavigatingEventArgs parameter to True. You canobtain the URL that the navigation is targeting through the TargetFrameName property of theWebBrowserNavigatingEventArgs parameter. If you wish to measure the time a certain webpage takes to load, you can use the Navigating event to signal the start of navigation and theDocumentCompleted event to signal the end of the page load process.
DocumentCompleted
The DocumentCompleted event occurs when a web page is completely loaded inside the Web-Browser control. It means that the Document property is available and will return the completestructure of the loaded document.
Table 19.2: WebBrowser Show navigation methods
Method Effect
ShowPrintDialog Displays browser’s print dialog used to print the current webpage
ShowPrintPreviewDialog Displays browser’s print preview dialog
ShowPageSetupDialog Displays page setup dialog window used to set printingoptions like Paper Option, Margins, Header, and Footer
ShowSaveAsDialog Displays browser’s Save As dialog used to save the currentweb page to a file
ShowPropertiesDialog Displays current page’s Properties window
THE WEBBROWSER CONTROL 823
VB 2010 at Work: The Stock Quotes ProjectA WebBrowser control opens the world of the Internet to your Windows Forms projects in asimple and direct manner. Popular websites often offer a way to embed a part of their function-ality inside another website. Such widgets can be easily integrated into your Windows Formsprojects.
In the Stock Quotes project, you will use the WebBrowser control to display quotes forselected stocks on a Windows form. Yahoo! Finance offers free Yahoo! badges that display thelatest news, stock tickers, charts, and other types of information that are specifically designedto be integrated into your website. You can find out more about Yahoo! badges at the followingURL: http://finance.yahoo.com/badges/. If you plan to use this feature in a productionenvironment, please read the terms of service carefully. While the Yahoo! website clearly statesthat the service is free, I am no expert on legal matters and there might be limitations andconditions on how the service may be used.
Obtaining the HTML Widget
You will need a Yahoo.com account to complete the following steps, and you will be promptedto create one if you do not have one. Start by navigating to http://finance.yahoo.com/badges/,click the Start Now button, and follow these steps to obtain the HTML code needed to embedthe stock ticker inside the web page:
1. Choose a module to embed. I chose the most compact module, called Quotes.
2. Customize the module.
Option 1: Enter MSFT, GOOG, IBM, and ORCL. Delete the default entry.
Option 2: Select the Medium (200 px) value for the width of the badge.
Option 3: Select the first (black) color theme.
Option 4: Check the check box signaling that you agree to the terms of service and pressthe Get Code button.
3. Once the code is displayed, copy and save it in some temporary file. You’ll need it soon.
Creating the Stock Quotes Project
Create a new Windows Forms project and name it StockQuotes. You will display the Yahoo!badge inside a WebBrowser control. To do so, perform the following steps:
1. Add a WebBrowser control to Form1. Leave the name of the control as is — WebBrowser1.
2. Disable the scroll bars on the WebBrowser1 control by setting the ScrollBarsEnabledproperty to False.
3. Change the Dock property to None. Now you can resize and position the WebBrowsercontrol.
4. Position the WebBrowser control somewhere on the right side of the form. That way, theform will take on a look that’s similar to the structure of web pages — nonessential infor-mation positioned on the right edge of the form.

824 CHAPTER 19 ACCESSING THE WEB
5. Add a new quotes.html file to the project. While I could embed the HTML code for thestock ticker badge inside my Visual Basic code, it will be easier to edit it inside a separateHTML file.
Now that you have created all the items you will need for the StockQuotes project, youneed to load the quotes.html file content into the WebBrowser control. You can accomplishthis by setting the WebBrowser.Url property with a Uri instance representing the quotes.htmlfile location. Since the quotes.html file is part of your project, you can obtain its locationthrough a My.Application object. Here is the code for the Form_Load event, used to set theWebBrowser.Url property:
Private Sub Form1_Load(ByVal sender As System.Object,ByVal e As System.EventArgs) Handles MyBase.LoadWebBrowser1.Url = New Uri(
My.Application.Info.DirectoryPath.ToString() &"\quotes.html")
End Sub
Just to make sure everything works as expected, add some text (for example, ‘‘Hello fromquotes.html!’’) to the quotes.html file and run the project. When the form is displayed, theWebBrowser control should show the text contained in the quotes.html file.
Displaying the Stock Quotes Badge inside the WebBrowser Control
As you are already guessing, instead of embedding the stock quotes badge inside HTML pageon some website, you will display the badge inside the local HTML file distributed with yourWindows Forms application. You can accomplish this by making the quotes.html a properlystructured HTML file. (You will learn more about HTML in the next chapter.) For now, youshould know that a typical HTML page has html, head, and body elements. Add the followingHTML code to the quotes.html file:
<html><head><title>Stock Quotes</title></head><body><!-- add Yahoo badge code here! --></body></html>
Remember that HTML code obtained from Yahoo! in the section ‘‘Obtaining the HTML Wid-get’’? Take that code and replace the line <!-- add Yahoo badge code here! --> with it.
Run the project. The WebBrowser control should now display the stock quotes badge withfresh values obtained from the Yahoo! site.
Although the application is now working, I would like to show you how to tweak the visualappearance of the badge. First, we’ll minimize the margins surrounding the badge, and thenwe’ll set the color of the HTML page so it blends better with the badge itself. I guess the graycolor will do.

THE WEBBROWSER CONTROL 825
To minimize the margins and change the background color, we will add some CSS code tothe quotes.html page. (You will learn more about the CSS in the next chapter.) For now, justmodify the quotes.html file so it includes a style tag:
<html><head><title>Stock Quotes</title><style type="text/css">
body {margin-left: 0px;margin-top: 0px;margin-right: 0px;margin-bottom: 0px;background-color: Gray;
}</style></head><body><!-- add Yahoo badge code here! --></body></html>
Again, you should replace the line <!-- add Yahoo badge code here! --> with HTML codeobtained from the Yahoo! site. Run the project again. Now you can adjust the WebBrowser con-trol size so it displays the complete stock badge widget. When you’ve finished, the form shouldlook similar to one shown in Figure 19.3.
Figure 19.3
Windows form withembedded Yahoo!Finance badge

826 CHAPTER 19 ACCESSING THE WEB
Fiddler — HTTP Debugging Proxy
While you are developing applications that communicate over the network, you often need totake a peek at the traffic going over the wire. Fiddler is one tool that can help you do exactlythat, and it’s available as a free download from www.fiddler2.com.
Fiddler installs itself between your web browser and web server. It fools the browser intobelieving it is communicating directly with the web server, while the server is convinced itis communicating with the browser. In the meantime, you will be able to observe and evenmodify the communication between the two sides.
Fiddler’s purpose is not malicious. It can be of great help to web developers. It providesnumerous statistics on request/response size, time, performance, and so forth and can helpyou monitor and debug the conversation.
The Fiddler window consists of two main areas, as shown here.
On the left side, you will find a listing of all the HTTP requests and responses. On the rightside, you can inspect each request and response. You can visualize HTTP headers and displaythe body as text, XML, or even as it would appear in the browser by way of a tab calledWebView. Further, you can modify and reissue the request from Fiddler itself, automate thewhole process through the Fiddler scripting support, or even extend Fiddler with extensionsprogrammed in the .NET Framework.

ACCESSING THE WEB WITH THE WEBCLIENT AND HTTPWEBREQUEST/RESPONSE CLASSES 827
Accessing the Web with the WebClient andHttpWebRequest/Response ClassesThe simplest way to publish services on the Internet is to make proper use of HTTP. HTTP isthe underlying protocol for all kinds of web services, and web services come in different shapesand forms. Some make more direct use of HTTP, while others use it with a lot of overhead.
Lightweight web services typically use HTTP to transport data in XML or JSON format.JavaScript Object Notation (JSON) is a data format similar to XML but more bandwidth effi-cient. Lightweight web services can be by orders of magnitude more efficient than more ubiqui-tous SOAP web services. (You will read more about web services and SOAP in Chapter 21.) Forlightweight web services, the WebClient class and the HttpWebRequest and HttpWebResponseclasses will help you program simple and efficient client applications.
A lot of information and services available on the Internet today are not properly structuredfor machine consumption. While humans can make use of it, it is difficult to consume suchservices programmatically. In such situations, the only way to access these services program-matically is to behave in the same way as an Internet browser application. The WebClient classand the HttpWebRequest and HttpWebResponse classes provide an API that can accomplishexactly that. Accessing information contained inside standard HTML pages is generally knownas HTML screen scraping.
The WebClient ClassWebClient is a lightweight, simple alternative for accessing the Web. It represents a higher-levelwrapper over the WebRequest and WebResponse classes. You will find that it can handle mostof the cases that the HttpWebRequest and HttpWebResponse combination can.
WebClient Class PropertiesThe WebClient class gives you a lot of control over the HTTP communication. You can accessrequest and response headers, configure a proxy, set your credentials, and more.
QueryString
You can always set query parameters manually by concatenating strings and adding the queryas the final part of a URL. A more structured way to accomplish this uses name-value pairs andthe QueryString property. The following code snippet illustrates how a q parameter can beadded to a query string. The q parameter is often used in search engines to convey the searchcriteria.
Dim webClient As New WebClientDim queryParameters As New System.Collections.Specialized.NameValueCollection()queryParameters.Add("q", "SearchCriteria")webClient.QueryString = queryParameters
As you can see, the QueryString property is a NameValueCollection type from the System.Collections.Specialized namespace.

828 CHAPTER 19 ACCESSING THE WEB
Headers
The Headers property represents a collection of request headers. Response headers can beaccessed through the ResponseHeaders property. Headers are an important part of HTTP.
For example, a user-agent header is used to convey a lot of client-related information to theserver. A user-agent header can include information on the browser version and type, the oper-ating system, even the version of the .NET Framework that has been installed on the machinewhere the browser is running.
The WebClient class does not set any headers by default. Some servers might expect somestandard headers with the request, so if you are experiencing any problems accessing certainservers with the WebClient class, be sure to add some standard headers, like user-agent.
Servers will often use user-agent header information to render the response that bestaccommodates the reported browser type. For example, the server might exclude JavaScriptcode from pages if the browser does not support JavaScript, or it might render the pageso it fits smaller displays if it detects that the request is coming from a mobile device. Alisting of standard request and response headers is available on Wikipedia at following URL:http://en.wikipedia.org/wiki/List of HTTP headers.
ResponseHeaders
ResponseHeaders provides access to headers included in the response by server. These head-ers can include a lot of information regarding the response, like mime type, encoding, contentlength, and so forth. The ETag and Cache-Control headers can affect the caching mechanism.Responding with a value of ‘‘no-cache’’ in the Cache-Control header indicates to the browserand to any other HTTP intermediary that the content should not be cached.
Another important response header is Set-Cookie. Although, if you need to manipulateor receive cookies, you are better off using the HttpWebRequest and HttpWebResponse classesbecause they have better support for this feature.
WebClient Class MethodsThe WebClient class provides a number of methods for sending a request for a resource undera given URI and receiving the requested data. Most of these methods come in two flavors:
◆ Synchronous
◆ Asynchronous
Asynchronous methods permit the background execution of request-response operations.Since the calling (for example, UI) thread is not blocked, the main line of execution can proceedwithout waiting for the download to finish. This feature can be used for implementing appli-cations with a more responsive user interface, permitting the user to continue working withthe application in the same time that communication is performed or to cancel the request inprogress if they wish to do so.
Download Methods
The WebClient class has a number of methods with names that start with Download. Thesemethods essentially perform the same operation — download a resource from a specified URI.The main difference is in the type of the method’s return value. Table 19.3 lists the methodsand return types.

ACCESSING THE WEB WITH THE WEBCLIENT AND HTTPWEBREQUEST/RESPONSE CLASSES 829
Table 19.3: Download methods return types
Method Return Type
DownloadData Byte
DownloadString String
DownloadFile Void (downloads to a local file specified as a method parameter)
Download*Async Methods
Download*Async methods have the same function as the standard Download methods. The dif-ference is that employing these methods causes the resource download operation to be per-formed asynchronously. To receive the data asynchronously, you need to provide an eventhandling routine for Download*Completed events. Take a look at the code in Listing 19.5 for anexample of using the DownloadStringAsync method in an address visualization form projectand in Listing 19.3 in the WebClient asynchronous download example for a simple illustrationof an asynchronous operation of the WebClient class.
OpenRead and OpenReadAsync Methods
These methods perform similar functions to the Download methods. Each returns a readablestream from a resource specified as the method parameter.
Upload and Upload*Async Methods
These methods have their counterparts in the Download group of methods. Instead of down-loading the data, these methods are used to upload it.
CancelAsync Method
The CancelAsync method aborts the current asynchronous download or upload operation.It bears noting that the corresponding Download*Completed and Upload*Completed eventsare still raised by the class. It is possible for an operation to complete successfully even afterCancelAsync has been called — after all, you can have no control over how the remote call wasfinalized on the other side of the wire. To check the outcome of asynchronous operation, checkthe Canceled property of the Download*CompletedEventArgs or Upload*CompletedEventArgsevent handler parameter.
WebClient Class EventA majority of WebClient class events has to do with asynchronous modus-operandi of the down-load and upload operations.
Download*Completed and Upload*Completed events
These events are used to signal the completion of the asynchronous operation. Results ofthe download operation can be accessed through an event handler’s property as well asthrough the outcome of the asynchronous operation, presented in the Canceled property of theDownload*CompletedEventArgs or Upload*CompletedEventArgs parameter.

830 CHAPTER 19 ACCESSING THE WEB
WebClient Asynchronous Download ExampleThe code in Listing 19.3 shows the Windows form with a simple example of an asynchronousdownload operation using the WebClient’s asynchronous programming model. The formincludes two buttons: bttnDownload, used to initiate the download operation, and bttnCancel,which can be used to cancel the download operation in progress.
Listing 19.3: Asynchronous download with WebClient
Imports System.ComponentModel
Public Class Form1
Dim webClient As New WebClient()
Private Sub Form1_Load(ByVal sender As System.Object,ByVal e As System.EventArgs) Handles MyBase.Load
AddHandler webClient.DownloadStringCompleted,AddressOf webClient_DownloadStringCompleted
End Sub
Private Sub webClient_DownloadStringCompleted(ByVal sender As Object,ByVal e As DownloadStringCompletedEventArgs)
Dim asyncCompletedParam As AsyncCompletedEventArgs =TryCast(e, AsyncCompletedEventArgs)
If Not asyncCompletedParam.Cancelled = True ThenConsole.WriteLine(CStr(e.Result))
ElseConsole.WriteLine("Asynchronous download canceled by user!")
End IfMsgBox("Download operation completed. See the Output window.")
End Sub
Private Sub bttnDownload_Click(ByVal sender As System.Object,ByVal e As System.EventArgs) Handles bttnDownload.Click
webClient.DownloadStringAsync(New Uri("http://www.google.com"))End Sub
Private Sub bttnCancel_Click(ByVal sender As System.Object,ByVal e As System.EventArgs) Handles bttnCancel.Click
webClient.CancelAsync()End Sub
End Class

PUTTING IT ALL TOGETHER: THE ADDRESS VISUALIZATION FORM 831
The DownloadStringCompleted event handler routine is assigned to a WebClient in a formload routine. The event handler first checks the outcome of the download operation through theAsyncCompletedEventArgs parameter’s Cancel property and, if the operation was successful,prints the download result from the www.google.com URL to the console output.
Finally, the bttnCancel event handling routine is used to call the WebClient’s CancelAsyncmethod. If the asynchronous download is in progress, it is canceled; otherwise, calling theCancelAsync has no effect.
HttpWebRequest and HttpWebResponse ClassesThese classes from the System.Net namespace are used internally by the WebClient for down-load and upload operations over HTTP and HTTPS. While you should prefer the WebClientclass because of its simplicity, you can always make use of the HttpWebRequest and Http-WebResponse classes where more granular control over the communication is necessary. TheHttpWebRequest and HttpWebResponse classes provide an explicit manner for handling theHTTP cookies.
Managing Cookies with HttpWebRequest and HttpWebResponse
To manage cookies with HttpWebRequest and HttpWebResponse, you first need to create theinstance of the CookieContainer class and attach it to HttpWebRequest. Then you can accessthe cookies set by the server through the HttpWebRequest Cookies property. The followingcode illustrates how you can list all of the cookies set by the Hotmail server to the consoleoutput:
Dim request As HttpWebRequest = CType(WebRequest.Create("http://www.hotmail.com"), HttpWebRequest)
request.CookieContainer = New CookieContainer()Using response As HttpWebResponse =
CType(request.GetResponse(), HttpWebResponse)Console.WriteLine("Server set {0} cookies", response.Cookies.Count)Dim cookie As CookieFor Each cookie In response.Cookies
Console.WriteLine("Cookie: {0} = {1}", cookie.Name, cookie.Value)Next
End Using
Putting It All Together: The Address Visualization FormIn the following sections, I will show you how to find the map coordinates of a street addressand display them on a map. I decided to name the sample project ViewAddressOnAMap. Youcan download the project from www.sybex.com/go/masteringvb2010.
The business case for such functionality is more than common; many call centers have torecord clients’ addresses. This can be an error-prone process, so being able to see the addresson the map while talking to a client can be a real plus for a call center attendant. Also, someaddresses are difficult to find without additional information. (‘‘The street sign blew down inlast night’s storm, so look for the pink house with purple trim and then turn right at the nextstreet.’’) Field employees can really benefit from the additional information that goes along withthe address. Again, a call center attendant can easily enter these indications while talking to a

832 CHAPTER 19 ACCESSING THE WEB
client and looking at the map. Fortunately, there are services on the Internet today that makesuch an application possible.
Composing Web ServicesYou will learn more about web services and especially SOAP web services in Chapter 21. In abroader sense, a web service is any service that can be consumed by a program (as opposed toa human) over the Internet. So, to implement the address visualization form, we will make useof two web services:
◆ Address coordinates search (geocoding) service
◆ Mapping service
Let’s look at the services I chose for the ViewAddressOnAMap sample project in moredetail.
Yahoo! Geocoding API
A geocoding service returns the exact latitude and longitude for a street address. These coor-dinates can then be used as parameters for a mapping service, which will return the map for agiven coordinate.
Yahoo! provides a geocoding API as a part of its Yahoo! Maps web services. You can findmore information about the Geocoding API at http://developer.yahoo.com/maps/rest/V1/geocode.html.
To run the ViewAddressOnAMap sample project, you should follow the Get An App IDlink found on the Geocoding API page (at the URL in the preceding paragraph) and replacethe YahooAppId in the sample code with the Yahoo! ID you obtained this way.
The Yahoo! Geocoding API is a RESTful web service. REST stands for Representational StateTransfer and is actually the simplest way to use HTTP as an application protocol and not justas a transport protocol like SOAP. This means that to obtain the coordinates, you can submitaddress parameters as a part of a URL query string. It also means that you can make use ofthis service with a simple browser because it uses HTTP as a native, application-level protocol.To test the service, you can write the following URL into your browser:
http://local.yahooapis.com/MapsService/V1/geocode?appid= APFGN10xYiHINOslptpcZsrgFbzsTHKr8HgBk7EA81QRe_&street=701+First+Ave&city=Sunnyvale&state=CA
Please note that I have split the actual URL into a five lines to fit the book format; youshould enter this address as a single line in the browser’s address bar. You should alsoreplace the appid parameter provided in the snippet with the Yahoo! App ID obtained fromhttp://developer.yahoo.com/maps/rest/V1/geocode.html.
At that same URL, you can find another example of the Yahoo! Geocoding URL, and itmight be easier to copy and paste that link to use for testing.
The Yahoo! Geocoding Web Service query URL is pretty much self-explanatory. You passthe address information as parameters inside the URL query. You can pass street, city, stateand zip together with the Yahoo! App ID as parameters. You should encode the spaces insidethe parameter values with a plus sign, so 701 First Ave becomes 701+First+Ave.
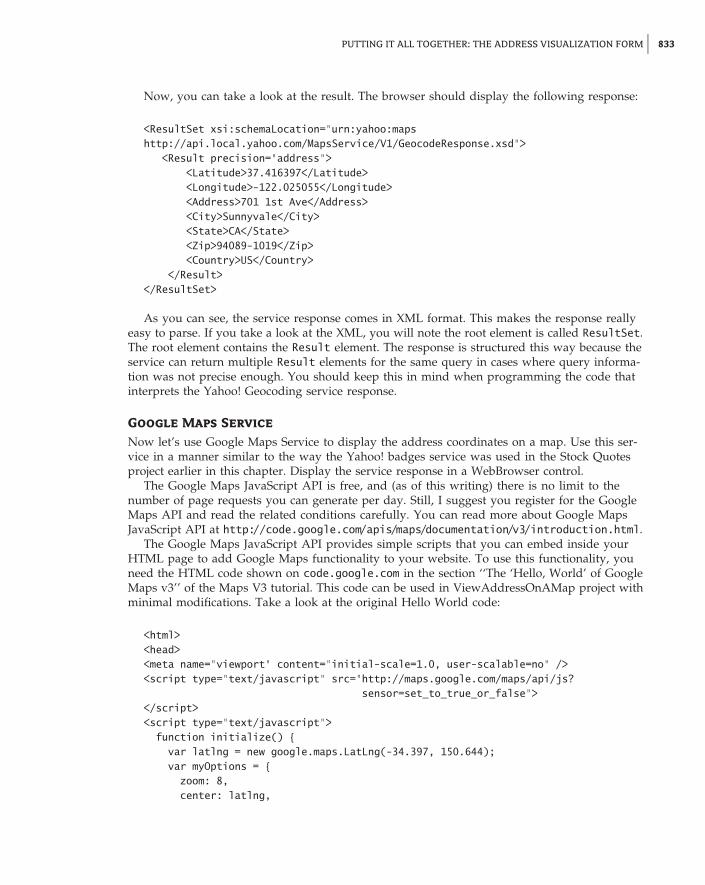
PUTTING IT ALL TOGETHER: THE ADDRESS VISUALIZATION FORM 833
Now, you can take a look at the result. The browser should display the following response:
<ResultSet xsi:schemaLocation="urn:yahoo:mapshttp://api.local.yahoo.com/MapsService/V1/GeocodeResponse.xsd">
<Result precision="address"><Latitude>37.416397</Latitude><Longitude>-122.025055</Longitude><Address>701 1st Ave</Address><City>Sunnyvale</City><State>CA</State><Zip>94089-1019</Zip><Country>US</Country>
</Result></ResultSet>
As you can see, the service response comes in XML format. This makes the response reallyeasy to parse. If you take a look at the XML, you will note the root element is called ResultSet.The root element contains the Result element. The response is structured this way because theservice can return multiple Result elements for the same query in cases where query informa-tion was not precise enough. You should keep this in mind when programming the code thatinterprets the Yahoo! Geocoding service response.
Google Maps Service
Now let’s use Google Maps Service to display the address coordinates on a map. Use this ser-vice in a manner similar to the way the Yahoo! badges service was used in the Stock Quotesproject earlier in this chapter. Display the service response in a WebBrowser control.
The Google Maps JavaScript API is free, and (as of this writing) there is no limit to thenumber of page requests you can generate per day. Still, I suggest you register for the GoogleMaps API and read the related conditions carefully. You can read more about Google MapsJavaScript API at http://code.google.com/apis/maps/documentation/v3/introduction.html.
The Google Maps JavaScript API provides simple scripts that you can embed inside yourHTML page to add Google Maps functionality to your website. To use this functionality, youneed the HTML code shown on code.google.com in the section ‘‘The ‘Hello, World’ of GoogleMaps v3’’ of the Maps V3 tutorial. This code can be used in ViewAddressOnAMap project withminimal modifications. Take a look at the original Hello World code:
<html><head><meta name="viewport" content="initial-scale=1.0, user-scalable=no" /><script type="text/javascript" src="http://maps.google.com/maps/api/js?
sensor=set_to_true_or_false"></script><script type="text/javascript">
function initialize() {var latlng = new google.maps.LatLng(-34.397, 150.644);var myOptions = {
zoom: 8,center: latlng,

834 CHAPTER 19 ACCESSING THE WEB
mapTypeId: google.maps.MapTypeId.ROADMAP};var map = new google.maps.Map(
document.getElementById("map_canvas"), myOptions);}
</script></head><body onload="initialize()">
<div id="map_canvas" style="width:100%; height:100%"></div></body></html>
Even without much JavaScript knowledge, you can see that the LatLng function defines thecoordinates where the map will be centered based on two literal numbers. With a little bit ofluck, changing these literals will be enough to visualize the map over a specific latitude andlongitude. Notice the value of the sensor query parameter in a URL. According to the docu-mentation, this can be set to False for devices that do not use a sensor to determine the location,as in this case.
Coding Address Visualization FormNow that you have all necessary information for the project, you can create a new WindowsForms project and name it ViewAddresOnAMap. The project will have a single form, and theclient’s address will be both saved and shown on the map. Since we are interested in onlythe address visualization functionality for this exercise, you do not have to implement the codeto actually save or maintain the address data.
Assembling the Address Visualization Form
Let’s start by adding all the necessary controls to the form. You will need a number of textboxes where users can enter the address information, buttons to save the address and to showthe address on the map, and finally, one WebBrowser control to display the map. The formshould look like one shown in Figure 19.4.
The large white area on the right side of the form is the WebBrowser control. Text boxcontrols in the Address GroupBox have the following names: txtStreet, txtSecondLine, txtCity,txtState, txtZip, and txtObservations. The buttons are names bttnSave and bttnShow. Now youare ready to add some behavior to the form.
For the txtState control, you should limit the length to 2. A text box with verification of thevalue entered is a much better option than a states ComboBox control. For txtObservations, youshould set the Multiline property to True.
Finally, you can add a label named lblError to the bottom of the form. Here you can dis-play the errors related to address visualization functionality. This functionality should not inter-fere with the main form functionality consisting of address data entry.
Constructing the Geocoding Service URL and Query Parameters
To obtain the address coordinates, you can use the WebClient class to query the Yahoo! geocod-ing service. To do so, you should first construct the URL. You can declare the Yahoo! service

PUTTING IT ALL TOGETHER: THE ADDRESS VISUALIZATION FORM 835
Figure 19.4
Address visualizationform
URL as a constant and create the query parameters. Listing 19.4 shows how to construct theNameValueCollection with query parameters for the Yahoo! Geocoding Web Service.
Listing 19.4: Form code with constructed Yahoo! geocoding service URL and query parameters
Public Class Form1
Private Shared YahooAppId As String = "BPdn3S7V34GMfMZ5ukBuHAMYuj" &"APFGN10xYiHINOslptpcZsrgFbzsTHKr8HgBk7EA81QRe_"
Private Shared YahooGeocodeServiceUrl = "http://local.yahooapis.com" &"/MapsService/V1/geocode"
Dim yahooGeoCodeParameters As NameValueCollection
Private Sub GenerateYahooGeoCodeParameters(ByVal street As String,ByVal city As String, ByVal state As String,ByVal zip As String)
yahooGeoCodeParameters = New NameValueCollectionyahooGeoCodeParameters.Add("appid", YahooAppId)yahooGeoCodeParameters.Add("street", street.Replace(" "c, "+"c))yahooGeoCodeParameters.Add("city", city.Replace(" "c, "+"c))yahooGeoCodeParameters.Add("zip", zip)yahooGeoCodeParameters.Add("state", state)
End Sub
End Class

836 CHAPTER 19 ACCESSING THE WEB
Since generated URL query parameters should not contain spaces, space characters arereplaced with a plus sign using the Replace method of the String class. Now, you are ready toinvoke the Yahoo! geocoding service in an asynchronous manner.
Invoking the Yahoo! Geocoding Web Service
Since address visualization is not a principal feature on the form, you should not make userswait for the map to appear before they can save the address. It is quite possible that the userknows the address well; in that case, waiting for the visualization would be more of a hin-drance than a help.
If you use the asynchronous capacities of the WebClient class, you will not block the mainthread of execution and users will be able to proceed with their work while the map is loadedin the background. Listing 19.5 shows the bttnRefresh button event handling code invokingthe FindLocation routine that uses the WebClient class to code the Yahoo! Geocoding WebService asynchronously.
Listing 19.5: Form with constructed Yahoo! Geocoding Web Service URL and query parameters
Imports System.NetImports System.IOImports System.Collections.Specialized
Public Class Form1
Private Shared YahooAppId As String = "BPdn3S7V34GMfMZ5ukBuHAMYuj" &"APFGN10xYiHINOslptpcZsrgFbzsTHKr8HgBk7EA81QRe_"
Private Shared YahooGeocodeServiceUrl = "http://local.yahooapis.com" &"/MapsService/V1/geocode"
Dim yahooGeoCodeParameters As NameValueCollection
Private Sub bttnShow_Click(ByVal sender As System.Object,ByVal e As System.EventArgs) HandlesbttnShow.Click, txtZip.Leave
lblError.Text = ""GenerateYahooGeoCodeParameters(txtStreet.Text.Trim(), txtCity.Text.Trim(),
txtState.Text.Trim(), txtZip.Text.Trim())FindLocation()
End Sub
Private Sub GenerateYahooGeoCodeParameters(ByVal street As String,ByVal city As String, ByVal state As String,ByVal zip As String)
yahooGeoCodeParameters = New NameValueCollectionyahooGeoCodeParameters.Add("appid", YahooAppId)

PUTTING IT ALL TOGETHER: THE ADDRESS VISUALIZATION FORM 837
yahooGeoCodeParameters.Add("street", street.Replace(" "c,"+"c))
yahooGeoCodeParameters.Add("city", city.Replace(" "c, "+"c))yahooGeoCodeParameters.Add("zip", zip)yahooGeoCodeParameters.Add("state", state)
End Sub
Private Sub FindLocation()Dim client As New WebClient()client.QueryString = yahooGeoCodeParametersAddHandler client.DownloadStringCompleted,
AddressOf webClient_DownloadStringCompletedclient.DownloadStringAsync(New Uri(YahooGeocodeServiceUrl))
End Sub
End Class
If you look at the code carefully, you will note that bttnShow_Click handles both thebttnShow.Click and the txtZip.Leave events. This way, the address will be shown on themap automatically once the user has filled all the address fields. Since the service invocationcode is asynchronous, it will not prevent the user from continuing to operate on the form.
Now you need to take care of the DownloadStringAsync event handler.
Processing the Yahoo! Geocoding Service Response
Before you can process the geocoding service response, you will need to create a structure thatcan hold the geocoding information. In this case, a simple structure will do; name the structureCoordinates and set up two String properties: Latitude and Longitude. Add the new classnamed Coordinates to the project. Listing 19.6 shows the code for the Coordinates structure.
Listing 19.6: The Coordinates structure
Public Structure CoordinatesProperty Latitude As StringProperty Longitude As String
End Structure
Now you can code the DownloadStringCompleted event handler. You should bear in mindthat the Yahoo! geocoding service responds in XML format. The easiest way to process it is touse LINQ to XML. (I explained how you can work with XML in Visual Basic .NET in detail inChapter 13, ‘‘XML in Modern Programming,’’ and Chapter 14, ‘‘An Introduction to LINQ.’’)To process the Yahoo! geocoding service response with LINQ to XML, you should import theXML namespace for the response using the Imports directive at the top of the form code in thefollowing manner:
Imports <xmlns="urn:yahoo:maps">

838 CHAPTER 19 ACCESSING THE WEB
When implementing the functionality, be sure to check for errors and handle multiple resultresponses. In the event of an error or multiple result responses, the best bet is to display thefirst location encountered while informing the user that the coordinates displayed on a map arenot very precise because the service responded with multiple locations. Listing 19.7 shows thecode that handles the Yahoo! geocoding service response.
Listing 19.7: DownloadStringCompleted event handling code
Sub webClient_DownloadStringCompleted(ByVal sender As Object,ByVal e As DownloadStringCompletedEventArgs)
If e.Error IsNot Nothing ThenlblError.Text = "Address could not be located on a map"Return
End IfyahooResponse = XDocument.Parse(CStr(e.Result))ValidateResponseAndProceede()
End Sub
Private Sub ValidateResponseAndProceede()If (yahooResponse...<Result>.Count = 0) Then
lblError.Text = "Address could not be located on a map"Return
End IfIf (yahooResponse...<Result>.Count > 1) Then
lblError.Text = "Multiple locations found - showing first." &" Correct the address and press Refresh"
End IfGenerateLocation()ShowLocationOnMap()
End Sub
Private Sub GenerateLocation()addressLocation.Latitude = yahooResponse...<Result>.First.<Latitude>.ValueaddressLocation.Longitude = yahooResponse...<Result>.First.<Longitude>.Value
End Sub
As you can see, the code handles errors that occur in communication or while querying theYahoo! geocoding service and displays a message when the results are not very precise and theservice responds with multiple results.
Displaying Coordinates on the Map
To show the location on the map, you need to load the WebBrowser control with the simpleHTML page that contains the Google Maps Service code. Since this code contains coordinates,it cannot be loaded from the static HTML file. You can, however, use the static HTML file as

PUTTING IT ALL TOGETHER: THE ADDRESS VISUALIZATION FORM 839
a template, load the file, and then replace latitude and longitude tokens with informationobtained from the Yahoo! geocoding service before loading it into the WebBrowser control.
Add the new gmapsTemplate.html file to the ViewAddressOnAMap project. Make surethe ‘‘Copy to Output Directory file’’ property is set to ‘‘Copy if newer’’. With this, VisualStudio will make the copy of the file inside the bin/Debug folder and you will be able toaccess the file while debugging the solution. The code for gmapsTemplate.html is shown inListing 19.8.
Listing 19.8: Google Maps HTML code templates
<html><head><meta name="viewport" content="initial-scale=1.0, user-scalable=no" /><script type="text/javascript"
src="http://maps.google.com/maps/api/js?sensor=false"></script><script type="text/javascript">
function initialize() {var latlng = new google.maps.LatLng(replace_me_latitude, replace_me_longitude);var myOptions = {
zoom: 16,center: latlng,mapTypeId: google.maps.MapTypeId.ROADMAP
};var map = new google.maps.Map(document.getElementById("map_canvas"), myOptions);
}</script></head><body onload="initialize()">
<div id="map_canvas" style="width:100%; height:100%"></div></body></html>
You will note that the template contains replace_me_longitude and replace_me_latitudestrings instead of real coordinates. You will use these strings as tokens and replace them withreal coordinate information before loading the HTML inside the WebBrowser control. Tokenreplacement code can be implemented in a GenerateMapsHtml routine:
Private Sub GenerateMapsHtml()googleMapsHtml = googleMapsHtmlTemplate.
Replace("replace_me_latitude", addressLocation.Latitude).Replace("replace_me_longitude", addressLocation.Longitude)
End Sub

840 CHAPTER 19 ACCESSING THE WEB
With this, you have finished implementing the address visualization functionality. You cantake a look at the complete code of the form in Listing 19.9.
Listing 19.9: Address visualization form code
Imports System.NetImports System.IOImports System.LinqImports System.Xml.LinqImports <xmlns="urn:yahoo:maps">Imports System.Collections.Specialized
Public Class Form1
Private Shared YahooAppId As String = "BPdn3S7V34GMfMZ5ukBuHAMYuj" &"APFGN10xYiHINOslptpcZsrgFbzsTHKr8HgBk7EA81QRe_"
Private Shared YahooGeocodeServiceUrl = "http://local.yahooapis.com" &"/MapsService/V1/geocode"
Private Shared googleMapsHtmlTemplate As String
Private Shared applicationDirectory =My.Application.Info.DirectoryPath.ToString()
Private Shared googleMapsHtmlTemplatePath = applicationDirectory &"\gmapsTemplate.html"
Private googleMapsHtml As String
Private addressLocation As Coordinates
Private yahooResponse As XDocument
Dim yahooGeoCodeParameters As NameValueCollection
Public Sub New()
InitializeComponent()googleMapsHtmlTemplate = My.Computer.FileSystem.ReadAllText(
googleMapsHtmlTemplatePath)Console.WriteLine(googleMapsHtmlTemplate)
End Sub
Private Sub bttnShow_Click(ByVal sender As System.Object,ByVal e As System.EventArgs) Handles

PUTTING IT ALL TOGETHER: THE ADDRESS VISUALIZATION FORM 841
bttnShow.Click, txtZip.Leave
lblError.Text = ""GenerateYahooGeoCodeParameters(txtStreet.Text.Trim(), txtCity.Text.Trim(),
txtState.Text.Trim(), txtZip.Text.Trim())FindLocation()
End Sub
Private Sub GenerateYahooGeoCodeParameters(ByVal street As String,ByVal city As String, ByVal state As String,ByVal zip As String)
yahooGeoCodeParameters = New NameValueCollectionyahooGeoCodeParameters.Add("appid", YahooAppId)yahooGeoCodeParameters.Add("street", street.Replace(" "c, "+"c))yahooGeoCodeParameters.Add("city", city.Replace(" "c, "+"c))yahooGeoCodeParameters.Add("zip", zip)yahooGeoCodeParameters.Add("state", state)
End Sub
Private Sub FindLocation()Dim client As New WebClient()client.QueryString = yahooGeoCodeParametersAddHandler client.DownloadStringCompleted,
AddressOf webClient_DownloadStringCompletedclient.DownloadStringAsync(New Uri(YahooGeocodeServiceUrl))
End Sub
Sub webClient_DownloadStringCompleted(ByVal sender As Object,ByVal e As DownloadStringCompletedEventArgs)
If e.Error IsNot Nothing ThenlblError.Text = "Address could not be located on a map"Return
End IfyahooResponse = XDocument.Parse(CStr(e.Result))ValidateResponseAndProceede()
End Sub
Private Sub ValidateResponseAndProceede()If (yahooResponse...<Result>.Count = 0) Then
lblError.Text = "Address could not be located on a map"Return
End IfIf (yahooResponse...<Result>.Count > 1) Then
lblError.Text = "Multiple locations found - showing first." &" Correct the address and press Refresh"
End If

842 CHAPTER 19 ACCESSING THE WEB
GenerateLocation()ShowLocationOnMap()
End Sub
Private Sub GenerateLocation()addressLocation.Latitude = yahooResponse...<Result>.First.<Latitude>.ValueaddressLocation.Longitude =yahooResponse...<Result>.First.<Longitude>.Value
End Sub
Private Sub ShowLocationOnMap()GenerateMapsHtml()mapBrowser.DocumentText = googleMapsHtml
End Sub
Private Sub GenerateMapsHtml()googleMapsHtml = googleMapsHtmlTemplate.
Replace("replace_me_latitude", addressLocation.Latitude).Replace("replace_me_longitude", addressLocation.Longitude)
End Sub
Private Sub bttnSave_Click(ByVal sender As System.Object,ByVal e As System.EventArgs) Handles bttnSave.Click
MsgBox("Unimplemented on purpose. " &"See ‘Coding Address Visualization Form’" &"section in Chapter 20. Try the ‘Show’ button.")
End SubEnd Class
When you run the application, enter the address data on the form, and click the Show but-ton, the form should look like the one shown on Figure 19.5.
The Bottom Line
Access a website on the Internet using the WebClient class. The WebClient class providesan easy and simple way to access resources on the Web programmatically from Visual Basiccode. The WebClient class implements many features of HTTP, making it easy to access thesites on the Web in the same way the browser application does. The web server will not dis-tinguish a request coming from a WebClient site from one coming from a user-operated webbrowser.
The WebClient class can be very useful in HTML screen scraping scenarios, where the data tobe extracted from HTML is meant to be read by a human, or in lightweight web service proto-cols like REST and/or AJAX-styled XML and JSON over HTTP.

THE BOTTOM LINE 843
Figure 19.5
Address visualizationform showing theaddress on the map
Master It Use the Headers property of the WebClient class to fine-tune HTTP requests.Trick Google into believing that a request that you are sending from your Visual Basic appli-cation is coming from some mobile device.
Use a WebBrowser control to add web browser functionality to your Windows Forms appli-cation. The WebBrowser control provides all the basic functionality of a browser in a formof Windows Forms control. Visually, it consists only of a main browser window. To provideadditional functionality, like an address bar and Back, Forward, Refresh, and other buttons,you will have to add the appropriate controls and program them yourself. The WebBrowsercontrol uses the same browser engine as Internet Explorer.
A WebBrowser control’s behavior can be customized to a large degree. You can decide to showor not show the scroll bars, allow or disallow navigation, show or not show the context menu,and so forth. Finally, since the control does not contain the address bar, you can also controlwhich sites a user can access.
Master It Create a custom web browser that can navigate to a limited number of URLs.


Chapter 20
Building Web Applications
Developing web applications in Visual Studio 2010 is similar to developing traditional desktopapplications. You drag and drop controls onto a form and build your business logic with yourlanguage of choice — in our case, Visual Basic 2010. However, as you will see, there are alsomany differences. There are underlying technologies of which you, the developer, should havea solid understanding, and there are additional control sets to work with and some fundamen-tal differences in the way the standard controls behave. Another important difference betweenweb and desktop applications is the way the application state is managed. In desktop appli-cations, the application state is implicit and it is managed by the .NET runtime environment.In web applications, on the other hand, the situation is much more complex. A web server canattend to numerous clients simultaneously, but thanks to ASP .NET internal mechanisms, youprogram your application as if you have only one user to serve. Another issue is the statelessnature of the underlying communication (HTTP) protocol. There is nothing to link two HTTPrequests. In ADO .NET, the link is provided in the form of a connection object. While all ofthe state-related issues are resolved by ASP .NET technology, it is important to understand theunderlying mechanisms because of the numerous implications for application characteristics,like performance and security.
In this chapter, you will learn how to do the following:
◆ Create a basic XHTML/HTML page
◆ Format a page with CSS
◆ Set up a master page for your website
◆ Use some of the ASP.NET intrinsic objects
Developing for the WebIn the early days of web development (not all that long ago!), a developer could earn bigmoney creating what were essentially online brochures by using a basic knowledge ofHypertext Markup Language (HTML) and some simple design skills.
These days, we expect a great deal from websites and web applications. Entertainment sitesare now fully equipped to engage the visitor with rich user interfaces incorporating a widerange of visual and aural experiences. Members of the corporate world expect their virtualpresence to mirror their full range of business practices.

846 CHAPTER 20 BUILDING WEB APPLICATIONS
In addition, web development, although still seen as a specialized area, is now part of thecorporate mainstream, and the developer is expected to be well versed across a range of tech-nologies and techniques.
The modern web application combines a wide range of sophisticated technologies graftedonto the HTTP/HTML backbone. Cascading Style Sheets (CSS) are used to control the layoutand appearance of a website. Data is managed with the use of Extensible Markup Language(XML) and back-end databases such as SQL Server, while rich user interfaces are developedusing XML, JavaScript, and other technologies such as Adobe Flash. AJAX, a clever implemen-tation of existing technologies, combines XML, JavaScript, and asynchronous technologies toenable the developer to create online applications that exhibit traditional desktop behavior.XML web services, multimedia content, RSS feeds, and the use of microformats to assist dataaggregators have all become typical features of modern websites.
In addition, developers can now expect a website to be accessed by more than just a desktopcomputer. Mobile phones, PDAs, and other small form factor devices are all used to access theWeb in the twenty-first century. Websites, to be truly ubiquitous, are increasingly expected tobe able to dynamically render their content into an appropriate format.
Visual Studio 2010 provides a range of tools that enable the modern developer to meet thedemands of website creation from the comfort of a Visual Basic environment. Database connec-tivity is simplified from the traditional complexity of hand-coding scripted server-side pages,and you don’t need to build multiple versions of an individual site to dynamically render tosuit a wide range of devices. By compiling much of the code used to drive a site, you can avoidmany of the security issues that plagued scripted sites.
Typically, a modern website or web application relies on code that is executed both at theclient (web browser) and server (web server) ends. In addition, there may be a whole range ofother services provided by other servers on the hosting network, such as media or databasesand even services sourced from other websites. Visual Studio 2010 provides the tools to tie allthis together.
This chapter gives an overview of the core technologies that drive the modern web applica-tion and demonstrates the basic tools available to the developer in Visual Studio 2010.
I will begin with some basic concepts. If you are already familiar with HTML, JavaScript,and server technologies, you may wish to skip ahead to material that is new to you, such asthe material in the section ‘‘Creating a Web Application.’’
Understanding HTML and XHTMLHTML is essentially a language to describe text formatting and enable linking of documents(web pages) delivered over the Web. HTML has grown since its original inception but is stillfundamentally limited. The area where it does excel is in its ability to act as a framework inwhich other technologies such as JavaScript can be embedded.
Extensible HTML (XHTML) is the latest incarnation of HTML. It was developed by theWorld Wide Web Consortium (W3C) to bring HTML syntax into line with other markuplanguages such as XML. Most of the tags from HTML 4 (the most recent update to HTML)remained the same, but much stricter syntax rules apply. The basic changes are as follows:
◆ XHTML is case sensitive, and all tags are in lowercase.
◆ All tags must be closed. You can no longer get away with using multiple <p> tags withoutcorresponding closing </p> tags. This includes tags such as <img> that previously had no

UNDERSTANDING HTML AND XHTML 847
corresponding closing tag. Close these tags with a trailing backslash before the final anglebracket, as shown in this example:
<img src =’my_picture.jpg’ alt =’picture’ \>
◆ All tag attributes must be enclosed in quotation marks (either single or double).
◆ All pages must include an XHTML !DOCTYPE definition and an XML version declaration.
◆ JavaScript must also conform to case syntax — for example, onmouseover notonMouseOver.
The W3C encourages developers to use XHTML over HTML. However, for practical pur-poses, web browsers still support HTML, and you can get away with not updating older sitesand continuing to work with HTML’s lack of strict syntax. See the sidebar ‘‘Upgrading fromHTML to XHTML’’ if you wish to upgrade older sites.
Upgrading from HTML to XHTML
Converters exist for porting your HTML sites to XHTML. There are also tools to assist in theprocess manually. The W3C provides an online validator at http://validator.w3.org.
You can use the validator to initially ensure that your pages conform to the HTML 4 specifica-tion and that they all contain a !DOCTYPE definition such as the following:
<!DOCTYPE HTML PUBLIC "-//W3C//DTD HTML 4.01//EN""http://www.w3.org/TR/html4/strict.dtd">
After your pages are validated for HTML 4, you will need to add the XML declaration to thetop of each page:
<?xml version="1.0" encoding="iso-8859-1"?>
Then convert the !DOCTYPE definition to the XHTML version:
<!DOCTYPE html PUBLIC "-//W3C//DTD XHTML 1.0 Transitional//EN""http://www.w3.org/TR/xhtml1/DTD/xhtml1-transitional.dtd">
Finally, modify the <HTML> tag to read as follows:
<HTML xmlns="http://www.w3.org/1999/xhtml">
Now that you have made all the correct syntax changes, run the validator again and see howyour page performs.

848 CHAPTER 20 BUILDING WEB APPLICATIONS
Working with HTMLAs a Visual Studio programmer, you will find that knowledge of HTML and XHTML can proveinvaluable when you are sorting out the inevitable formatting and design issues that arise whendeveloping complex web applications. In addition, understanding the technologies involved canaid in optimizing the interactions between server and client.
To keep things simple, I will dispense with some of the finer points of XHTML and focusmainly on ‘‘straight’’ HTML. This section is meant as a basic HTML primer (and is by nomeans comprehensive), so feel free to skip ahead if you are already familiar with the language.
More information on HTML can be found easily on the Web or in Mastering IntegratedHTML and CSS by Virginia DeBolt (Sybex, 2007). Useful websites for tutorials includewww.w3schools.com and www.htmlcodetutorial.com.
You can use any standard text editor to author your HTML. Notepad is fine. More sophisti-cated tools that indent and highlight code, such as Notepad2 or EditPad Pro, are availableon the Web. EditPad Pro is a commercial application available from www.editpadpro.com.Notepad2 is freeware and available from www.flos-freeware.ch/notepad2.html. Yet anotherfairly mature tool is NotePad++, available from http://notepad-plus.sourceforge.net.
Remember to save your files with an .html filename extension so they will be recognized asHTML pages.
Page ConstructionHTML pages have two main sections nested between the opening and closing <html>…</html>tags.
The first section is known as the header area, and it is used to contain information not usuallydisplayed on the page. (The main exception to this is the page title.) The header area is createdby using the <head>…</head> tags and contains meta-information about the page such as the!DOCTYPE definition, author details, keywords, and the like. It is also used to hold style sheetinformation and scripts that may be called later in the page.
The second section of the page is the body, and it contains information that is typically dis-played on the page in a web browser. The body is declared by using the <body>…</body> tags.
HTML tags are used to describe the formatting or nature of the information containedwithin the opening and closing tags. Tags may also contain attributes, which are used to applyfurther information to the content between the opening and closing tags. For example, the bodytag can use the attribute bgcolor to set the background color of the web page. The syntax forsetting a page color to blue is <body bgcolor ="blue">.
A basic page may appear as shown in Listing 20.1. Some long lines are wrapped here inprint, but you can leave them all on one line in your code.
Listing 20.1: A basic HTML page
<!DOCTYPE HTML PUBLIC "-//W3C//DTD HTML 4.01//EN" _"http://www.w3.org/TR/html4/strict.dtd"><html>
<head><title>Basic Page</title><meta name="description" content="basic page" />
</head>

WORKING WITH HTML 849
<body bgcolor="cornsilk"><p>Hello World</p>
</body></html>
Save the page as index.html. You must include the .html as the filename extension.Figure 20.1 illustrates how such a page might appear in a web browser.
Figure 20.1
A simple web page run-ning in a web browserwindow
The <title> tag enables the title of the page to appear in the title bar of Internet Explorer.The <meta> tag provides a description phrase that can be accessed by search engines. Thebgcolor attribute of the <body> tag sets the background color to blue, and the <p> tag is usedto denote a simple block of text.
Note that I have used the !DOCTYPE definition for HTML 4. Also note that not closing the<title> tag correctly can cause the rest of the page to break.
Text ManagementThere are a range of text management tags, including the previously mentioned <p> tag. Theprincipal tags are as follows:
◆ The heading tags — <h1>…</h1>, <h2>…</h2> through to <h6>…</h6> — are used to con-trol the size of text. <h1> is the largest format.
◆ The font tag, <font>…</font>, has a number of attributes including face for font type,color for text color, and size for font size. Font sizes range from 1 to 7, where 7 is thelargest. An example of the tag’s usage is <font face ="verdana" color ="red" size="3">Hello World</font>.
◆ The small and big tags — <small>…</small>, <big>…</big> — can be used to quicklyadjust the relative size of text.
Styles can be managed with tags such as the following:
◆ Bold: <b>…</b>
◆ Underline: <u>…</u>

850 CHAPTER 20 BUILDING WEB APPLICATIONS
◆ Italic: <i>…</i>
◆ Strong: <strong>…</strong>
Another useful tag for working with text is the line break tag, <br>. In HTML, this tag doesnot require a closing tag.
You can generate and control spaces between text with more precision than simply relyingon the client browser to insert your preferred amount of white space by using the followingspecial character: .
A number of other special characters exist to accommodate symbols such as quotes, ques-tion marks, and copyright symbols. A comprehensive list of HTML tags and their attributes canbe found at www.w3schools.com/tags/default.asp. You can also refer to the W3C specifica-tion for HTML 4.01 at www.w3.org/TR/html401/. The XHTML 1.1 specification can be found atwww.w3.org/TR/2007/CR-xhtml-basic-20070713/.
Horizontal RulesThe <hr> tag can be used to draw a line across the page. Its attributes include align, noshade,size, and width. Width can be declared as a percentage or as an exact amount in pixels. InHTML 4, there is no closing tag.
ImagesYou can add images to web pages by using the <img> tag. This tag is not typically closed underHTML 4. This tag includes the following attributes:
◆ The path to the image, src, which can be relative or absolute (required).
◆ A text alternative to the image, alt, which is normally recommended for accessibility.
◆ align is used to align an image on a page and to wrap text around the image.
◆ border is used to create a border around the image.
◆ width and height are used to help the page load more quickly and can also be used toscale an image.
◆ usemap is used to create image maps.
Here is an example of a typical use of the <img> tag:
<img src=’images/myimage.jpg’ border=’0’ width=’150’ _height=’150’ align=’left’ alt=’Test Image’>
For use in web pages, images must be in one of the following formats: GIF, PNG, or JPG.You usually use the GIF or PNG formats for drawings or line art and the JPG format forphotographs.
LinksLinks can be created on web pages that link to other web pages within the site, other websites,other types of documents, email, or other locations within the host page. Links are created byusing the <a>…</a> tag.
Typically, the <a> tag is used with the href attribute to define the destination of the link, asin the following example:
<a href=’http://www.microsoft.com’>Microsoft</a>

WORKING WITH HTML 851
The text contained between the tags (Microsoft) is what appears as the link on the page. Thetext can be formatted by using the <font> tag inside the <a> tags.
Other attributes commonly used include target (used inside framesets) and name (used forsetting up in-page links such as tables of contents).
Embedding MediaMedia objects such as Windows Media Player, Apple’s QuickTime, and Flash can be embeddedin a page with the <embed> tag. At its very simplest, the tag can be made to work by simplyspecifying the source file for the media and the display size and then trusting the browser tohave the required plug-in and to be able to sort it out:
<embed src=’multimedia/myvideo.avi’ height=’200’ width=’200’></embed>
At a more sophisticated level, you can specify a range of options, including the type ofplug-in, the controls to display, whether it should start automatically, and loop properties.
CommentsTo insert comments into your HTML, use <!-- … -->, as in the following example:
<!-- This is a comment -->
Comments enclosed in this tag are not displayed within the web page.
ScriptsThe <script>…</script> tag can be used to insert non-HTML script code such as JavaScriptinto your pages. Scripts can be written into the header area and called from the body or useddirectly in the body of the page. Before support for more-recent HTML versions and beforeJavaScript could be found in virtually every web browser, developers would typically commentout the code by using <!-- … --> to prevent the code from appearing in the browser page. Thisis still common practice, although it is no longer usually necessary.
Here is a simple example of the script tag’s usage:
<script language=’javascript’>function mygreatscript(){
etc etc}
</script>
ListsBulleted and numbered lists can be displayed in a web page with the list tags <ul>…</ul> for abulleted list or <ol>…</ol> for a numbered list. Individual items within the list are denoted byusing the <li>…</li> tags. The following example creates a bulleted list:
<ul><li>Item 1</li><li>Item 2</li>
</ul>

852 CHAPTER 20 BUILDING WEB APPLICATIONS
TablesTables are used extensively in HTML, not only to display data but also to reassemble slicedimages (a technique for minimizing the file size of large images) and to format pages. How-ever, the W3C no longer recommends using tables to format pages. For accessibility reasons,technologies such as CSS are now the recommended method for creating sophisticated layouts.
Tables are still used for displaying tabular data and here is what you should know aboutconstructing them. Tables are made of rows of cells. When constructing your table, you needto consider the desired width of the table, the number of rows, and the number of columnsrequired. Other factors that you may wish to take into account are the padding between cellsand the padding between the border of a cell and its contents.
Another important consideration is that a badly constructed table is one of the few thingsthat can truly break an HTML page. You must ensure that all your tags are correctly closed.Tables can be nested within one another, but excessive nesting can place undue strain on therendering engine of the browser and cause unexpected results.
A range of tags are used to create a typical table, and each has its own family of attributes:
◆ The <table>…</table> tag acts as the major framework for the table.
◆ <tr>…</tr> tags are used to create rows.
◆ Within a given row, <td>…</td> tags are used to create the individual cells. The numberof cells defined in the first row sets the number of columns in the table. This is importantto consider in subsequent rows if you wish to add or subtract from the number of cells.The rowspan and colspan attributes are used to alter the number of columns and rowsemployed at various points in the table. For example, colspan = ‘2’ will force a cell to spanover two columns.
◆ For headings, you can use <th>…</th> tags to create cells in the first row. These offer aslightly different format than the <td> cells offer.
The following code snippet demonstrates a simple data table of three rows (one header) andthree columns. The resulting table is shown in Figure 20.2.
<table width=’400’ border=’1’><tr bgcolor=’silver’>
<th width=’100’>ID</th><th width=’200’>Name</th><th width=’100’>Age</th>
</tr><tr align=’center’>
<td valign=’middle’>1</td><td valign=’middle’>Fred</td><td valign=’middle’>23</td>
</tr><tr align=’center’>
<td valign=’middle’ bgcolor=’lightblue’>2</td><td valign=’middle’ bgcolor=’lightblue’>Mary</td><td valign=’middle’ bgcolor=’lightblue’>21</td>
</tr><tr align=’center’>

WORKING WITH HTML 853
<td valign=’middle’>3</td><td valign=’middle’>Wilma</td><td valign=’middle’>25</td>
</tr></table>
Figure 20.2
A simple data table
The following code snippet illustrates how a table might be used to reconstruct a slicedimage. Note the use of the align attribute to set horizontal alignment and the valign attributeto set vertical alignment:
<table width=’400’ border=’0’ cellspacing=’0’ cellpadding=’0’><tr>
<td valign=’bottom’ align=’right’><img src=’image1.gif’></td><td valign=’bottom’ align=’left’><img src=’image2.gif’></td>
</tr><tr>
<td valign=’top’ align=’right’><img src=’image3.gif’></td><td valign=’top’ align=’left’><img src=’image4.gif’></td>
</tr></table>
Figure 20.3 illustrates how this image will appear in a web page (the left-hand image) andhow the table cells come together to reassemble the image (the right-hand image). Cellspacingand cellpadding was increased when creating the right-hand image to make the individualparts of the image visible.
Figure 20.3
A sliced image reassem-bled using an HTMLtable
Page FormattingVarious methods can be used to format pages in HTML. They all have inherent limitations, butthe <div> tag offers the most flexibility. Table 20.1 describes the methods.

854 CHAPTER 20 BUILDING WEB APPLICATIONS
Table 20.1: HTML methods for formatting pages
Method Description
Flow format This relies on the browser to format the page according to the order ofitems in the HTML. Flow format is easy to implement but of limitedusefulness.
A table This is one of the more popular methods, although it is no longer officiallyrecommended by the W3C for accessibility reasons.
Frames These effectively create the different parts of your page in separate HTMLdocuments. You would use a frameset to reassemble them as a single pagein the browser.
Inline frames (iFrames) These create a floating frame that can be placed within an HTML page.This is a popular method of displaying content from another website (suchas a news feed) within your web page.
<div> tags These can be used to precisely locate content on your page. Combined withCSS, <div> tags offer a powerful and flexible method of organizing a page.The output of ASP.NET is largely driven by <div> tags for layout purposes.
Later, when you look at Cascading Style Sheets, you will see how <div> tags can be used tolay out a page.
Forms and Form ElementsForms are the traditional method by which users can communicate information back to the webserver that is hosting the website being viewed. Information sent back by a form can then beprocessed in some way at the server, and the outcome can be dynamically incorporated into anew page that the user can view.
For example, a login page would likely use a form to collect the username and passwordfrom the user and return this information to the server for authentication before access to therest of the site is granted. In addition, personal preferences for the site can be applied to thereturned pages according to the stored preferences of the registered user.
A form is created by using the <form>…</form> tags. The following attributes are the onesmost commonly used:
Name The Name attribute defines a unique name for the form.
Action The Action attribute specifies the Uniform Resource Locator (URL), or Internetaddress, of the resource to process the form’s response (required).
Method Either post or get (default) will be specified by the Method attribute. This specifiesthe HTTP method used to return the form’s data. The get method sends the data as part of theURL (limited to a maximum of 100 ASCII characters), and post sends the form’s content in thebody of the request.
Within the form, you create your HTML as usual. However, information that you wish to beprocessed by the form needs to be collected by using form controls. The controls that are avail-able include the following:

WORKING WITH HTML 855
Buttons Your form must have at least one button for submitting data. Another button thatis commonly used clears the form’s contents. Syntax for the buttons are as follows:
<input type=’submit’ value=’Submit data’><input type=’reset’ value=’Reset form’>
It is not necessary to include the value attribute because this sets the text that will appear inthe button, and there are default text values of Submit and Reset.
You can use the following to create other buttons on your forms to run client-side scripts:
<input type=’button’ value=’Mybutton’ onclick=’myscript’>
A more flexible control, however, is the <button> tag. This can be used anywhere on theHTML page to run scripts and can replace the traditional Submit and Reset buttons in yourforms. It offers greater flexibility for formatting its appearance (especially when used withCSS). Its basic syntax is as follows:
<button type=’button’ name=’name’ onclick=’myscript’>Click Here</button>
By using an image tag in place of Click Here, you can set an image to be the button. Syntaxfor using the button as a submit button is simply the following:
<button type=submit’ >Submit</button>
Text The Text control enables the user to enter a single line of text. This can be set as apassword field to mask the user’s entry. The syntax is as follows:
<input type=’text’ name=’identity of input data’value=’data to be initially displayed in field’>
The name attribute specifies the identity of the data to be processed at the server end (forexample, the username). The value attribute displays text that you may wish to appear ini-tially in the field (for example, Type user name here). You can also set other attributes such assize and maxlength. To create a password field, set the type attribute to password.
TextArea For larger amounts of text, use the <textarea> tag. Its syntax is as follows:
<textarea name=’details’ rows=’10’ cols=’40’ >Type your details here
</textarea>
Note that this control requires a closing tag.
Lists To create lists, use the <select> tag. Lists can be either single select or multipleselect, which is created by using the multiple attribute (simply typing multiple). The sizeattribute specifies the number of rows to display. Omitting the size attribute renders the

856 CHAPTER 20 BUILDING WEB APPLICATIONS
control as a drop-down combo box. The contents of the value attribute are returned to theserver. Individual items are denoted by using the <option> tags. When you type selectedwithin one of the option tags, that item is automatically highlighted in the list. The syntaxfor the tag is as follows:
<select name=’items’ size=’4’ multiple><option value=’1’ selected>Chair</option><option value=’2’>Couch</option><option value=’3’>Arm Chair</option><option value=’4’>Lounge Chair</option>
</select>
Check boxes To create a check box, you use a variation on the <input> tag and set thetype attribute to ‘checkbox’. To initially select a check box, type the attribute checked. Thesyntax is <input type = ‘checkbox’ name = ‘Check1’ checked>.
Radio buttons These are yet another variation on the <input> tag. Set the type attributeto ‘radio’. If you are using a set of linked radio buttons, type the same name attribute foreach radio button in the set. The value attribute is used to return appropriate data when theradio button is selected. Here is the syntax:
<input type=’radio’ name=’radioset’ value=’1’ checked><input type=’radio’ name=’radioset’ value=’2’><input type=’radio’ name=’radioset’ value=’3’>
Hidden fields Hidden fields contain information that you may want to make the round-trip to the server but that you do not want displayed on the client’s web page. You can usethis field to help maintain state (discussed later in this chapter in the section ‘‘Maintain-ing State’’). This field is particularly useful when a client has disabled cookies or when theinformation is too long or sensitive to incorporate into the URL. For example, you may wishto maintain information gathered in previous forms from the client. ASP.NET uses hiddenfields extensively. Here is the syntax:
<input type=’hidden’ name=’name of information’value=’information to be stored’>
Cascading Style Sheets (CSS)Cascading Style Sheets offer a powerful method of controlling the format and layout of thepages and content of your websites. Styles can be written directly into your HTML pages orcreated in a separate text document with the .css filename extension. The advantage to thedeveloper of using separate CSS pages is that the format and layout of an entire site can be con-trolled from a single page. In large sites, consisting of tens or even hundreds of pages, this canbe a huge time-saver as well as introducing a much higher level of consistency and reliability.
In addition, styles are applied sequentially and can override previously set styles. Thisenables the web developer to create specific styles for specific sections of the site that may

CASCADING STYLE SHEETS (CSS) 857
modify the global settings. You can create and apply multiple style sheets in this mannerand even write individual style settings onto individual pages if necessary. Styles can also beapplied directly to individual elements within a page. As long as the desired settings are thelast to be applied, the page will appear as required.
Syntax for CSS is quite different from syntax for HTML and is quite strict. You can applystyles directly to HTML tags (for example, you may wish to format the <h1> tag with a partic-ular font and color) or set them up in their own classes that can be applied when required. Forexample, you may wish to create your own <h8> class.
You can include an external style sheet in an HTML page by using the <link> tag, which istypically placed in the head area of the web page. The following example incorporates a stylesheet titled mystylesheet.css from the styles directory into the web page:
<link rel=’stylesheet’ type=’text/css’ href=’styles/mystylesheet.css’>
You can create an internal style sheet directly in the HTML page by using the<style>…</style> tags. Again, this is typically created in the header area of the document.
If you wish to create a style locally to a particular tag, you add the style attributes insidethe tag. For example, to extend the style of the <p> tag, you would use the following:
<p style=’font-size:18pt; color:red;’>
Formatting Styles with CSSListing 20.2 illustrates a sample style sheet. It demonstrates several simple style attributes thatcan be applied to text. You can use the styles directly in a web page by inserting the listingbetween <style>…</style> tags or you can use it externally by saving the listing out to a sep-arate text document with a .css filename extension (for example, mystylesheet.css). Somelong lines are wrapped here in print, but you can leave them all on one line in your code.
Listing 20.2: A sample style sheet
h1 {font-weight: bold; font-size: 24pt; color:red;background: silver; text-align: center;}p {font-family: arial, sans serif; font-size: 120%;}p.quote {font-face:verdana; font-size: 10pt; font-style: italic;}a {text-decoration:none; color:blue;}a:visited {text-decoration:none; color:blue;}a:hover {text-decoration:none; font-weight: bold;font-size: 120%; color:darkblue;}a:active {text-decoration:none; color:blue;}
If you were to use Listing 20.2 as an external style sheet, you could link it to your web pageby inserting <link rel = ‘stylesheet’ type = ‘text/css’ href = ‘mystylesheet.css’>somewhere in the header area of your web page. This also assumes that the style sheet is sittingin the same directory as your web page.

858 CHAPTER 20 BUILDING WEB APPLICATIONS
In Listing 20.2, note the following points:
◆ The creation of a separate quote class for use with the <p> tag. To employ this class in yourHTML, simply use <p class = ‘quote’>…</p>.
◆ By setting styles for the various permutations of the <a> tag, I have also created a simplerollover effect for use with links. (The order in which these are applied is important forthe rollover effect to work.)
Rollovers can be created by using other methods, such as JavaScript, but CSS offers a simpleway of globally controlling the effect. You can also create quite sophisticated-looking buttonsaround your links by using the formatting and style properties of CSS.
Page Formatting with CSSCSS also can be used to define page formatting and layout for an HTML document. CSS is typ-ically used to define and control <div> tags for this purpose, although you can also use it to setand control table properties.
Listing 20.3 demonstrates a CSS style sheet used to control basic formatting. Most of theitems should be self-explanatory. (I have used named colors for the background colors forthe purpose of clarity. Usually it is preferable to use the hexadecimal equivalents.)
Listing 20.3: Style sheet to control page layout
title{height:80px;background:lightblue;margin:5px 10px 10px 10px;text-align: center;}
menu{position: absolute;top: 110px;left: 20px;width: 130px;background: silver;padding: 10px;bottom: 20px;}
content{background: lightblue;padding: 30px;position: absolute;top: 110px;bottom: 20px;left: 180px;right: 20px}

CASCADING STYLE SHEETS (CSS) 859
I have created three classes — title, menu, and content — to describe the three main areasof my page. The size of the area can be defined as well as its precise location. In the case of thetitle class, I haven’t specified an exact location, and the title area will appear relative to where itis written into the code. Other properties of the areas can also be defined, such as padding (dis-tance between the area’s border and its internal elements) and background color. We use themargin property to set the width of the title area by defining how far it is located from adjacentelements and the page border.
Using the margin property in this context can be a little confusing. If four values are listed,they refer to top, right, bottom, and left, respectively. However, listing just one value will applyit to all four borders. Listing two values will apply them to the top/bottom and right/left incombination. If there are three values listed, the missing values are taken from the oppositeside. It is sometimes easier to refer specifically to the margin-right, margin-top (and so on)properties.
You can either embed Listing 20.3 into an HTML page or access it by using an external stylesheet. Listing 20.4 demonstrates the code embedded into an HTML page and utilized to set thelayout of the page.
Listing 20.4: Using a style sheet to set the layout of a web page
<!DOCTYPE HTML PUBLIC "-//W3C//DTD HTML 4.01//EN""http://www.w3.org/TR/html4/strict.dtd"><html><head><title>Layout Page</title>
<style>
title{height:80px;background:lightblue;margin:5px 10px 10px 10px;text-align: center;}
menu{position: absolute;top: 110px;left: 20px;width: 130px;background: silver;padding: 10px;bottom: 20px;}
content{background: lightblue;padding: 30px;position: absolute;top: 110px;

860 CHAPTER 20 BUILDING WEB APPLICATIONS
bottom: 20px;left: 180px;right: 20px}
</style></head>
<body><div class=’title’>
<h1>Heading</h1></div><div class=’menu’>
<p>Menu Item 1</p><p>Menu Item 2</p>
</div><div class=’content’>
<p>Some Content</p></div>
</body></html>
Figure 20.4 illustrates how the layout from Listing 20.4 appears in a web page. Carefullylook at the code and you will see how the individual layout classes are used inside the <div>tags to generate the layout structure of the page.
Figure 20.4
Listing 20.4 running as aweb page
This is a very brief overview of CSS. For more-comprehensive coverage, please referto Mastering Integrated HTML and CSS by Virginia DeBolt (published by Sybex and men-tioned earlier). There are also many online tutorials available, such as those available atwww.w3schools.com/css/.

JAVASCRIPT 861
JavaScriptYou can embed JavaScript into your HTML pages to create interactive and dynamic elements atthe client end. JavaScript can be used to create named functions inside the script tags that canbe called later in the page. You can also use JavaScript attached directly to HTML elements.
Currently, 18 events specified in HTML 4 and XHTML 1 can be used as triggers to run indi-vidual scripts. Table 20.2 lists these events.
Table 20.2: Events available for use in HTML
Event Description
Keyboard Events Not Valid in Base, BDO, BR, Frame, Frameset, Head, HTML,iFrame, Meta, Param, Script, Style, and Title Elements
onkeydown When a keyboard key is pressed
onkeypress When a keyboard key is pressed and released
onkeyup When a keyboard key is released
Mouse Events () Not Valid in Base, BDO, BR, Frame, Frameset, Head, HTML,iFrame, Meta, Param, Script, Style, and Title Elements
onclick When an object is clicked with the mouse
ondblclick When an object is double-clicked with the mouse
onmousedown When the mouse is clicked on an object
onmousemove When the mouse is moved
onmouseover When the mouse is moved over an object
onmouseout When the mouse is moved away from an object
onmouseup When the mouse button is released
Form Element Events Valid Only in Forms
onchange When the content of the field changes
onsubmit When the submit button is clicked to submit the form
onreset When the reset button is clicked to reset the form
onselect When some content of the field is selected
onblur When an object loses focus
onfocus When an object gains focus as the user selects the object

862 CHAPTER 20 BUILDING WEB APPLICATIONS
Table 20.2: Events available for use in HTML (CONTINUED)
Event Description
Window Events Valid Only in Body and Frameset Elements
onload When the page is loaded
onunload When the page is unloaded
The following code snippet gives an example of using JavaScript to create a rollover effecton a link:
<a href="newpage.html" ><font color=’blue’ face="verdana" onmouseover="this.style.color =’lightblue’;"onmouseout="this.style.color =’blue’;" size=1>New Page</font></a>
This script sets the link color to blue. Rolling the mouse over the link changes it to a lightblue. Moving the mouse off the link resets it to the normal blue.
Listing 20.5 demonstrates how a JavaScript function can be embedded into a web page andthen called from a button press. In this example, clicking the Test button will set the back-ground color of the web page to blue. Note that the use of bgColor in the JavaScript functionis case sensitive. Some long lines are wrapped here in print, but you can leave them all on oneline in your code.
Listing 20.5: Demonstration of a JavaScript function
<!DOCTYPE HTML PUBLIC "-//W3C//DTD HTML 4.01//EN""http://www.w3.org/TR/html4/strict.dtd<html><head><title>Javascript example</title><script language=’javascript’>
function changecolor(){document.bgColor=’blue’
}</script></head>
<body><button type=’button’ onclick=’changecolor()’>Test</button></body></html>
We have only touched on the possibilities of JavaScript in these examples. Please refer toJavaScript Bible, Sixth Edition, by Danny Goodman and Michael Morrison (Wiley, 2007) for

SERVER-SIDE TECHNOLOGIES 863
more-thorough coverage. There are many online tutorials also available. A good starting pointis at www.w3schools.com/js/.
AJAXAsynchronous JavaScript and XML (AJAX) enables the web developer to create online applica-tions that behave more like standard desktop apps in that the entire page need not be refreshedevery time there is a round-trip between the browser and the web server. This eliminates the‘‘flicker’’ users see when a page is refreshed/reloaded. The asynchronous nature of the technol-ogy enables you to make an HTTP request to the server and continue to process data whilewaiting for the response. Data transfers are handled by using the XMLHTTPRequest object.This combines with the Document Object Model (DOM), which combines with JavaScript todynamically update page elements without the need for a browser refresh.
A detailed exploration of AJAX is beyond the scope of this book. For our purposes, it isimportant to note that AJAX has been incorporated into ASP.NET 4.0 and can be leveraged intoyour web applications from Visual Studio 2010.
An online AJAX tutorial is available from www.w3schools.com/ajax/default.asp.
MicroformatsYou can use microformats to list data on your website so that it can be accessed by variousdata-aggregation tools. Microformats are really just specifications for formatting data suchas address book details or calendar information. Thousands of microformats exist. TheMicroformats.org website (http://microformats.org) is a good starting point for the variousspecifications.
The hCard is an example of how microformats work. The hCard specification is modeled onthe vCard specification, which is widely used for address books. You can use the hCard creatoron the Microformats website to automatically generate the code for use on your own site. Youcan also roll your own according to the specification. The advantage of listing your addressdetails in the hCard format is that anyone visiting your site can automatically add your detailsto their own address book according to the vCard specification.
Server-Side TechnologiesThus far, you have looked mainly at the technologies that drive the client side of a web-basedapplication. This is only half of the equation. The website itself is normally hosted on someform of server platform and managed with a web server package. On a Microsoft platform,the web server is typically Microsoft’s Internet Information Services (IIS). Requests from the clientare processed by the web server and appropriate web pages are supplied. The server can alsobe used to process information supplied by the client as part of the request to provide a moreinteractive experience.
Although the range of technologies available at the client end is fairly limited, the server-side applications can be written in any language or form supported by the web server. Inthe case of IIS running an ASP.NET application, the application may be written in any of the.NET-supported languages.
Prior to ASP.NET, developers working in the Microsoft platform created web applicationsmainly using Active Server Pages (ASP). Pages written in ASP are scripted pages that combinea variety of technologies including HTML, JavaScript, server objects, Structured Query Lan-guage (SQL), and Visual Basic Script (VBScript). They are created as plain-text files and saved
864 CHAPTER 20 BUILDING WEB APPLICATIONS
with the .asp filename extension. ASP is powerful and flexible, but maintaining large sitescan be time consuming, and achieving and maintaining a decent level of security can beproblematic.
With the introduction of ASP.NET, Microsoft gave developers a much tidier approach to cre-ating their web applications. You can use Visual Studio to create your applications, and super-ficially at least, the process of building the application is not terribly different from buildingstandard Windows applications. Much of the plumbing for connecting to back-end databasesor sophisticated objects (which in ASP you would have to lovingly handcraft) is now taken careof. You also have the option to write much of the code into code-behind, where it can be safelycompiled away from prying eyes and offer the performance enhancements integral to a com-piled environment. A code-behind is a code file like the kind normally used to develop desktopapplications. Code written into the code-behind is compiled into a library that is kept physi-cally distinct from the scripted pages of the web application. At the scripted end of ASP.NET,files are plain text and saved with the .aspx filename extension.
However, there are differences between the desktop and web development environments,and to really take advantage of .NET and fully optimize your web applications, you need to beaware of the differences and how they can be accommodated and exploited.
My favorite example of the differences between desktop and web development in VisualStudio is in the use of fragment caching. Fragment caching can be used to cache portions of anASPX page that are constantly reused (such as headings). This helps create a performance boostover an equivalent page that is completely regenerated each time it is called.
Another area where I have seen developers caught unprepared while making the transitionfrom desktop to web applications is in the use of view state. View state is used to maintaininformation about the current property state of the various controls on a page. It is stored onthe client’s web page in a hidden field and thus makes the round-trip to the server. Dependingon the application, it can get very big very quickly, and even fairly plain pages can suddenlystart taking long periods to download to the client if view state is not managed correctly.
For the remainder of this chapter, I will discuss how to begin creating a web applicationin Visual Studio 2010 and examine the available web form and HTML controls. Finally, at theend of the chapter, I will put all of these together and guide you through creating a Northwindonline orders application.
Creating a Web ApplicationDevelopers have two project models in Visual Studio 2010. You can use either the ASP.NETWeb Application from the New Project dialog box or the New Web Site option from the Filemenu. It is mainly a matter of preference. In the Web Application option, project resources aredefined explicitly, and the developer has tighter control over the project. It tends to suit the VBprogrammer coming into web programming. The New Web Site option is more flexible andtends to suit the web programmer migrating to Visual Studio.
To create a web application, open Visual Studio and select the New Project option from theFile menu. From the New Project dialog box, expand the Visual Basic tree and select the Weboption. From this screen, choose ASP.NET Web Application, as shown in Figure 20.5.
To create a new website project, open Visual Studio and select New Web Site from the Filemenu. This will open the New Web Site dialog box. From here, choose ASP.NET Web Site, asshown in Figure 20.6.
After the new project is open, the main difference between the interface for buildinga web application and that used for building a standard Windows application is that theDesigner for web applications has three views: Design, Split, and Source. This enables you to

CREATING A WEB APPLICATION 865
alternate between a graphical view of the page and controls, an ASPX view, and a split viewshowing both.
Figure 20.5
Choosing an ASP.NETweb application fromthe New Projectdialog box
Figure 20.6
Choosing an ASP.NETwebsite from the NewWeb Site dialog box
The contents of the Toolbox also include HTML controls. You use the Standard controlsmainly to create interactive applications, while the HTML controls are essentially client-sidecontrols that mimic many of the traditional HTML elements such as tables and horizontal rules.
You can drag and drop controls onto the page in design view and edit properties by usingthe traditional Properties window, or you can switch to Source or Split view and directly editthe code.
You can actually do most of your coding directly onto the ASPX page in Source view.This includes not only your design elements but also your business logic. However, it makes

866 CHAPTER 20 BUILDING WEB APPLICATIONS
sense to separate your business logic from your design and use code-behind by hitting F7,by choosing View Code from the Solution Explorer, or by double-clicking the control inquestion.
When you view your application, it will open in your default browser. You may get amessage warning Debugging Not Enabled if you have used F5 or the green arrow. You canchoose to either run the project without debugging or enable debugging in the Web.configfile. You can either modify Web.config manually or choose to allow Visual Studio to do itfor you. However, you will need to remember to disable debugging when you go to deployyour project. To manually modify Web.config, double-click the Web.config entry in SolutionExplorer. Web.config should open as a page of code. Under compilation, set debug ="true"as shown in the following code snippet:
<compilation debug="true" strict="false" explicit="true">
The Web.config file is a text file that holds many of the global settings for your website orapplication. The file is automatically generated when you create a new project and it can beedited manually or through various Visual Studio 2010 wizards. You need to be careful whenediting the file because unlike HTML, the XML in the Web.config file is case sensitive. Makinga mistake in Web.config can break your whole application.
You may also need to enable script debugging in Internet Explorer. From the Tools menu,choose Internet Options and click the Advanced tab. Under Browsing, deselect the DisableScript Debugging check box, as shown in Figure 20.7.
Figure 20.7
Enabling script debug-ging in Internet Explorer

CONTROLS 867
ControlsSeveral sets of controls are available to the developer when creating web applications. These areaccessible from the traditional Toolbox and are separated into several categories. These includeStandard, Data, Validation, Navigation, Login, WebParts, AJAX Extensions, Reporting, andHTML. Many of these controls exhibit behavior similar to that of their desktop counterparts.
Standard ControlsThe Standard controls are also known as web form controls and have intrinsic server-side func-tionality that you can program against. Table 20.3 contains a list of the Standard controls and abrief description of each.
Table 20.3: Standard controls
Control Description
AdRotator Randomly inserts content (advertisements) within a specified areaaccording to a weighted index.
BulletedList Displays a bulleted list.
Button Displays a command-style button to enact code back on the server.
Calendar Renders a calendar with calendar-style functionality on the target page.
CheckBox Displays a single check box.
CheckBoxList Renders a list with check box functionality against each item.
ContentPlaceHolder Used in master pages for replaceable content.
DropDownList Enables creation of a drop-down list of items from which the user canmake a selection.
FileUpload Creates a text box and button combination that can be used to upload afile from the client to the server.
HiddenField Creates an <input type = ‘hidden’> element that can be programmedwith server code.
HyperLink Creates links for navigating internally and externally to the site.
Image Places an image on a page.
ImageButton Enables a graphic to be specified as a button.
ImageMap Displays an image with clickable regions.
Label Standard control for rendering text on a page.
LinkButton Renders a button as a link. Effectively creates a link that posts back to theserver and executes whatever code has been set for it.

868 CHAPTER 20 BUILDING WEB APPLICATIONS
Table 20.3: Standard controls (CONTINUED)
Control Description
ListBox Displays a list of items that may be selected individually or in multiples bythe user.
Literal Similar to the Label control in that it is used to render text to a web page,but does so without adding any additional HTML tags.
Localize Displays text in a specific area of the page — similar to the Literal control.
MultiView Contains View controls and allows you to programmatically display differentcontent.
Panel Container control that can be used to set global properties (style, etc.) for agroup of controls.
PlaceHolder Used as a container by controls that are added at runtime and that may varyin number.
RadioButton Displays a single radio button control.
RadioButtonList Renders a list with radio button functionality against each item.
Substitution Contains updateable cache content.
Table Enables the establishment of dynamically rendered tables at runtime. Shouldnot be used for page layout — use the HTML version of the control.
TextBox Provides a data-entry field on a web page. Can be set as a password box withthe contents obscured.
View A panel to display a MultiView control.
Wizard Creates a multipane control for creating wizards.
XML Can be used to write an XML document into a web page.
Data ControlsTable 20.4 lists the controls available for data access, display, and manipulation in ASP.NET.
Validation ControlsValidation controls are used to establish rules for validating data entry in web forms. Table 20.5lists the Validation controls available.
Navigation ControlsThree controls exist for assisting in the creation of navigation menus in ASP.NET. Table 20.6lists the Navigation controls available.

CONTROLS 869
Table 20.4: Data controls
Control Description
AccessDataSource For connecting to an Access database.
DataList Control for displaying and interacting with data as a list.
DataPager Provides paging functionality for controls such as ListView.
DetailsView Renders a single record as a table and allows the user to page throughmultiple records. Used for master-details forms. Provides ability to create,delete, and modify records.
FormView Similar to DetailsView without predefined layout.
GridView Displays data as a table.
LinqDataSource For connecting to a LINQ data source.
ListView Displays data as a list and supports create, delete, and update functionality.
ObjectDataSource For connecting to a business object as a data source.
Repeater For creating customized lists out of any data available to a page. List formatis specified by the developer.
SiteMapDataSource For use with site navigation. Retrieves navigation information from asite-map provider.
SqlDataSource For connecting to a SQL database.
XmlDataSource For connecting to an XML data source.
Table 20.5: Validation controls
Control Description
CompareValidator Compares the contents of two fields — for example, whenconstructing a password-creation confirmation check
CustomValidator Enables customized validation requirements to be set
RangeValidator Checks that specified content or entries fall within a set range ofvalues
RegularExpressionValidator Checks that a field entry follows a particular specifiedtemplate — for example, zip code
RequiredFieldValidator Checks that a user has made an entry into a specified field
ValidationSummary Reports validation status of other validation controls being used onthe form

870 CHAPTER 20 BUILDING WEB APPLICATIONS
Table 20.6: Navigation controls
Control Description
Menu Creates static and/or dynamic menus
SiteMapPath Displays the navigation path and obtains information from the site map
TreeView Displays hierarchical data (such as an index)
Login ControlsASP.NET includes a membership system that can be used to look after authentication, autho-rization, and member details on your site. It is enabled by default and can be configured byusing the Web Site Administration tool. You access this tool by choosing ASP.NET Configu-ration from the Website menu. (Note that if you are using the Web Application developmentenvironment, ASP.NET Configuration is accessed from the Project menu.)
Figure 20.8 illustrates the Web Site Administration tool. Table 20.7 lists the Login controlsavailable.
Figure 20.8
The Web Site Adminis-tration tool
WebParts ControlsWebParts enable users to personalize their view of your website by modifying the content,appearance, and behavior of the web pages from their browsers. Table 20.8 lists the WebPartscontrols available.
AJAX Extensions ControlsTo fully utilize AJAX in your applications, you will also need to download the ASP.NET AJAXControl Toolkit from the ASP.NET Ajax website at http://asp.net/ajax/. Table 20.9 lists theavailable AJAX Extensions controls that ship in Visual Studio 2010.
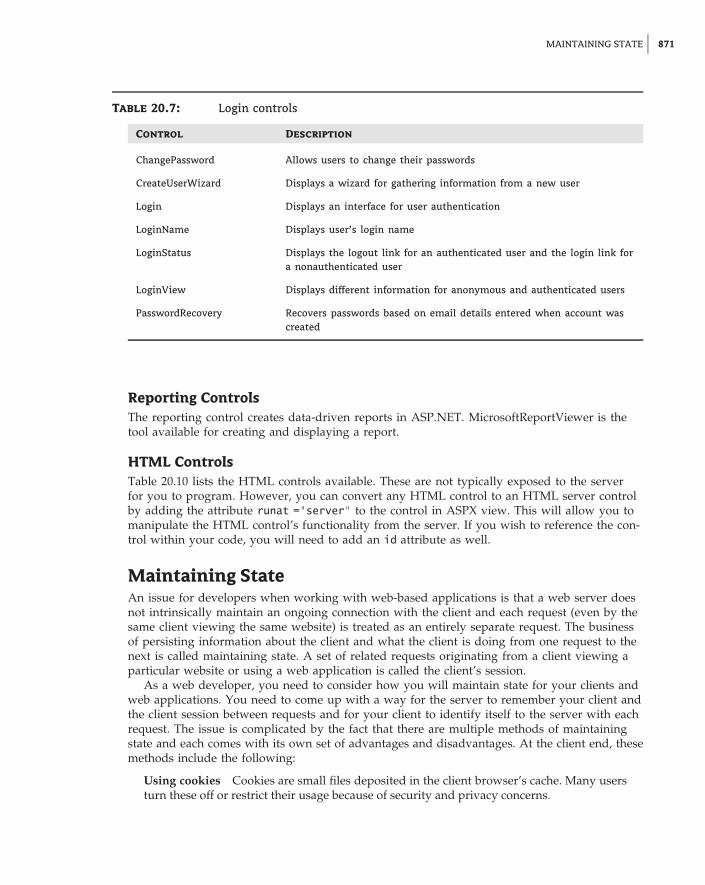
MAINTAINING STATE 871
Table 20.7: Login controls
Control Description
ChangePassword Allows users to change their passwords
CreateUserWizard Displays a wizard for gathering information from a new user
Login Displays an interface for user authentication
LoginName Displays user’s login name
LoginStatus Displays the logout link for an authenticated user and the login link fora nonauthenticated user
LoginView Displays different information for anonymous and authenticated users
PasswordRecovery Recovers passwords based on email details entered when account wascreated
Reporting ControlsThe reporting control creates data-driven reports in ASP.NET. MicrosoftReportViewer is thetool available for creating and displaying a report.
HTML ControlsTable 20.10 lists the HTML controls available. These are not typically exposed to the serverfor you to program. However, you can convert any HTML control to an HTML server controlby adding the attribute runat ="server" to the control in ASPX view. This will allow you tomanipulate the HTML control’s functionality from the server. If you wish to reference the con-trol within your code, you will need to add an id attribute as well.
Maintaining StateAn issue for developers when working with web-based applications is that a web server doesnot intrinsically maintain an ongoing connection with the client and each request (even by thesame client viewing the same website) is treated as an entirely separate request. The businessof persisting information about the client and what the client is doing from one request to thenext is called maintaining state. A set of related requests originating from a client viewing aparticular website or using a web application is called the client’s session.
As a web developer, you need to consider how you will maintain state for your clients andweb applications. You need to come up with a way for the server to remember your client andthe client session between requests and for your client to identify itself to the server with eachrequest. The issue is complicated by the fact that there are multiple methods of maintainingstate and each comes with its own set of advantages and disadvantages. At the client end, thesemethods include the following:
Using cookies Cookies are small files deposited in the client browser’s cache. Many usersturn these off or restrict their usage because of security and privacy concerns.

872 CHAPTER 20 BUILDING WEB APPLICATIONS
Table 20.8: WebParts controls
Control Description
AppearanceEditorPart Enables end user to edit certain appearance properties of an associatedWebPart control
BehaviorEditorPart Enables end user to edit certain behavior properties of an associatedWebPart control
CatalogZone Hosts CatalogPart controls — catalog of controls that users can select toadd to a page.
ConnectionsZone Contains WebPartConnection controls — two web part controls thatare linked
DeclarativeCatalogPart Used with CatalogZone control to enable you to add a catalog of webparts to your web page
EditorZone Area in which users can personalize controls
ImportCatalogPart Imports a description file for a WebPart control, enabling the user to addthe web part with predefined settings
LayoutEditorPart Editor control for users to edit layout properties of a web part
PageCatalogPart Provides a catalog of all web parts that a user has closed on a web pageenabling the user to add the controls back again
PropertyGridEditorPart Editor control for user to edit properties of a web part
ProxyWebPartManager For use in a content page to declare static connections when a WebPartManager has been used in the associated master page
WebPartManager Used once on a page to manage all WebParts controls on that page
WebPartZone Provides overall layout for WebPart controls
Table 20.9: AJAX extensions controls
Control Description
ScriptManager Manages script resources for clients — required for Timer, UpdatePane,and UpdateProgress controls. Use only once on a page.
ScriptManagerProxy For use in circumstances where a page already has a ScriptManagercontrol.
Timer Performs postbacks at specified interval.
UpdatePanel Enables you to asynchronously refresh portions of a page.
UpdateProgress Provides progress details on partial page updates.

MAINTAINING STATE 873
Table 20.10: HTML controls
Control Default HTML Generated
Div <div style="width: 100px; height: 100px"> </div>
Horizontal Rule <hr />
Image <img alt="" src="" />
Input (Button) <input id="Button2" type="button" value="button" />
Input (Reset) <input id="Reset1" type="reset" value="reset" />
Input (Submit) <input id="Submit1" type="submit" value="submit" />
Input (Text) <input id="Text1" type="text" />
Input (File) <input id="File1" type="file" />
Input (Password) <input id="Password1" type="password" />
Input (Checkbox) <input id="Checkbox1" type="checkbox" />
Input (Radio) <input id="Radio1" checked="checked" name="R1" type="radio"value="V1" />
Input (Hidden) <input id="Hidden1" type="hidden" />
Select <select id="Select1" name="D1"> <option></option> </select>
Table <table style="width:100%;"> <tr> <td> </td><td> </td> <td> </td> </tr> <tr> <td> </td><td> </td> <td> </td> </tr> <tr> <td> </td><td> </td> <td> </td> </tr> </table>
Textarea <textarea id="TextArea1" cols="20" name="S1"rows="2"></textarea>
Using hidden fields in the web page This method is reliable, but you will need to codespecifically at the server to read the content. Hidden fields can also end up carrying a lotof data, can pose a security risk because the information is available in cleartext in the pagesource code, and can get messy if your client uses unexpected navigation techniques such asthe browser’s back button rather than your built-in site navigation.
Incorporating state information into the URL This method is reliable but restrictive. It alsocan be a security risk (with data stored in a browser’s history, for example) and may causeissues with unexpected navigation techniques.
At the server end, the following methods of maintaining state (after the client has been iden-tified) are typical:
Using session variables This is the simplest method. It uses the Session object. Session vari-ables behave a bit like global variables, and all the usual warnings apply.

874 CHAPTER 20 BUILDING WEB APPLICATIONS
Storing information in a database This is a powerful and flexible method, but it adds over-head, particularly for a simple site.
For simple sites, ASP.NET takes care of most of these issues for you by using a combina-tion of techniques. You can use session variables to manage small amounts of data betweenpages and a database for anything more involved. It is, however, a good idea for you to keepan eye on the ViewState settings of your controls so as to minimize the amount of data makingthe round-trip from server to client and back again. You can enable/disable ViewState for anyindividual control by using the EnableViewState property in that control’s Properties window.
To create a session variable, simply type Session("MyVariableName") ="variable content".Insert a relevant name and content. Be careful that you do not reuse a variable name foranother purpose because the contents of the original variable will be overwritten.
To access the session variable, you refer to the full Session("MyVariableName").If you are setting up a site that will employ identification of its users, require some form
of authentication, and/or offer customization of settings, it is a good idea to use Microsoft’smembership system, which is available through the Web Site Administration tool and the Logincontrols. Refer to the section ‘‘Login Controls’’ earlier in this chapter.
Master PagesASP.NET 2 introduced the idea of master pages as a method of maintaining a consistent lookand feel for a website or application. This approach has been continued with ASP.NET 4.0.
The idea is to create a page (or a number of pages), known as a master page, from whichyour web pages derive their common elements. Web pages linked to master pages are knownas content pages. It is a little like using CSS style sheets to control your web page styles andstructure in a scripted setting.
To add a master page to a site, simply choose the Master Page template from the Add NewItem option in the Website (for ASP.NET Web Site) or Project (for ASP.NET Web Application)menu. The master page has the filename extension .master. You can rename the master pageappropriately, but do not change the filename extension!
In the master page, you can set up standard items that remain consistent across your site,such as headers, footers, and navigation bars. You can also place ContentPlaceHolder controlsin those areas where you are planning on customizing your content pages. The ContentPlace-Holder controls provide editable locations where you can add additional controls and informa-tion. You will need to right-click the master controls and choose the Create Custom Contentoption. In addition, you can create a style sheet to control the appearance of your master page(and hence its attached content pages).
If you make changes to your master pages, these changes will be reflected in your attachedcontent pages. (You will need to save your changes to the master page before the updates arereflected through the content pages.)
A master page is not automatically added to your pages. You must explicitly attach it. Forexample, to attach it to a new page, choose Web Form from the Add New Item dialog box andselect the Select Master Page check box. Click the Add button and this will open another dialogfrom which you can choose the appropriate master page. Click OK and you are ready to go.You can add content into the ContentPlaceHolder controls inherited from the master page.

ASP.NET OBJECTS 875
If you already have your master page open in the IDE, you can simply use the Add ContentPage option from the Website menu to directly create a content page attached to the particularmaster page you are browsing.
Trying to connect an existing page, such as the default.aspx page initially created in theapplication, to a master page can be problematic, so it is often a good idea to delete it. To set anew default page for your website, right-click the desired page in Solution Explorer and choosethe Set As Start Page option.
ASP.NET ObjectsObjects are available in ASP.NET that can be used to provide you with information about thestate of your application, each user session, HTTP requests, and more. You need to be familiarwith some of these because they can be useful in your code. Many of them also expose usefulutility methods for managing your web application. For example, you have already seen howyou can use the Session object to create a session variable. In this section, you will briefly lookat the main objects and some of their methods and properties.
Application object The Application object stores information related to the full web applica-tion, including variables and objects that exist for the lifetime of the application.
Context object The Context object provides access to the entire current context and can beused to share information between pages. This includes the current Request and Responseobjects.
Request object The Request object stores information related to the HTTP request, such ascookies, forms, and server variables. You can use this object to see everything passed back tothe server from the client.
The Request object includes the properties shown in Table 20.11. Table 20.12 shows the meth-ods for the Request object.
Response object The Response object contains the content sent to the client from your server.You can use the Response object to send data such as cookies to your client. The Responseobject includes the properties shown in Table 20.13 and the methods shown in Table 20.14.
Server object The Server object exposes methods that can be used to handle various servertasks. You can use these methods to create objects, to map paths, and to get error conditions.
The properties for the Server object are shown in Table 20.15, and the methods are inTable 20.16.
Session object The Session object stores information related to the user’s session, includingvariables, session ID, and objects. Properties for the Session object are shown in Table 20.17;methods are in Table 20.18.
Trace object The Trace object can be used to display system and custom diagnostics in thepage output. Properties for the Trace object are shown in Table 20.19 and a single method forthe Trace object is shown in Table 20.20.

876 CHAPTER 20 BUILDING WEB APPLICATIONS
Table 20.11: Properties for the Request object
Property Description
ApplicationPath Indicates the virtual path of the application
Browser Gets or sets information about the client’s browser and its capabilities
ClientCertificate Gets the client’s security certificate
Cookies Gets the cookies sent by the client
FilePath Gets the virtual path of the request
Form Gets a collection of form variables
IsAuthenticated Indicates whether the request has been authenticated
IsLocal Indicates whether the request originates from a local computer
Item Gets specified object from Cookies, Form, QueryString, or ServerVariables
LogonUserIdentity Gets Windows identity for user
QueryString Gets the collection of HTTP query string variables
ServerVariables Gets the collection of web server variables
URL Gets the URL of the request
UserHostAddress Gets the IP address of the client
UserHostName Gets the DNS name of the client
MapPath Maps the virtual path in the requested URL to the physical path on the server
SaveAs Saves the request to disk
Table 20.12: Methods for the Request object
Method Description
BinaryRead Returns the data sent to the server during post in the formof a byte array
InsertEntityBody Used to insert modified entity body into memory
MapImageCoordinates Retrieves the coordinates of a form image that is sent to the server as apart of the current request
SaveAs Saves the request to a file
ValidateInput Used to call validation feature from code if the validation was disabledby the page directive

ASP.NET OBJECTS 877
Table 20.13: Properties for the Response object
Property Description
Buffer Gets or sets the value that determines whether to buffer output
Cookies Returns the response cookies collection
ContentType Gets or sets HTTP MIME type in output
Expires Gets or sets the cache expiration of a page (in minutes)
IsClientConnected Indicates whether a client is still connected
Table 20.14: Methods for the Response object
Method Description
AppendCookie Adds a cookie to the collection
AppendHeader Adds an HTTP header
ApplyAppPathModifier Adds the session ID to the virtual path if a cookieless session is being used
Clear Clears all content output from the buffer
End Sends all buffered output to the client and stops execution of the page
Flush Sends all buffered output to the client
Redirect Redirects the client to a new URL
SetCookie Updates an existing cookie
Write Writes additional text to the response output
Table 20.15: Properties for the Server object
Property Description
MachineName Returns the server’s name
ScriptTimeout Gets and sets time-out value for requests in seconds

878 CHAPTER 20 BUILDING WEB APPLICATIONS
Table 20.16: Methods for the Server object
Method Description
Execute Commonly used to execute a URL to open another page from within your code
HTMLDecode Decodes a string that has been encoded to remove illegal HTML characters
HTMLEncode Encodes a string to display in a browser
MapPath Gets physical file path of the specified virtual path on the server
UrlEncode Encodes a string for transmission through the URL
UrlDecode Decodes a string encoded for transmission through a URL
Table 20.17: Properties for the Session object
Property Description
Count Returns the number of items in the current session state collection
Item Gets or sets individual session values
LCID Gets or sets the locale identifier
SessionID Gets the identifier for the session
Timeout Gets or sets the time between requests in minutes before the session terminates
Table 20.18: Methods for the Session object
Method Description
Abandon Terminates the current session
Add Adds a new item to the session state collection
Clear Clears all values from the session state collection
Remove Removes an item from the session state collection
RemoveAll Removes all items from the session state collection

VB 2010 AT WORK: ONLINE ORDERING APPLICATION 879
Table 20.19: Properties for the Trace object
Property Description
IsEnabled Gets or sets whether tracing is enabled
TraceMode Gets or sets the order in which trace messages are written to the browser
Table 20.20: Method for the Trace object
Method Description
Write Writes trace information to the trace log
PostbackAn important aspect of the way that ASP.NET operates is that controls that run on the serverare able to post back to the same page. This process is called postback. This is different from theold ASP model, in which often there would be two or three pages set up to host the controls,process the code, and provide a response.
Any ASP.NET page that has at least one visible control will include the JavaScript function_doPostBack. This function records the control that initiated the postback, plus additionalinformation about the initiating event, and includes it in the data submitted back to theserver.
The Postback property is a read-only value that is set to False when a page is first loadedand is then set to True when the page is subsequently submitted and processed. At the serverend, you can use the function Page.IsPostBack() to determine the state of a page’s postbackand write code accordingly — this is particularly useful when deriving your page content froma database.
VB 2010 at Work: Online Ordering ApplicationNow that you have learned about main elements used to construct ASP .NET applications,let’s put these to work by building the online order placement application for the Northwinddatabase. The application is based on a typical online shipping cart design. First, the useris presented with a list of products. They can choose a product from the list to add to ashopping cart. After they select the product, they need to decide on a quantity and thus theorder item is placed inside the shopping cart. On a shopping cart page, they can choose toproceed to checkout or to return to a list of products to place some additional items into theshopping cart.
To implement this functionality, you will use Typed Dataset technology described inChapter 18 for data access technology and some standard ASP .NET controls to implement theweb GUI.

880 CHAPTER 20 BUILDING WEB APPLICATIONS
Creating the ProjectLet’s start by creating a new Web Application Project:
1. Choose File � New � Project and then select ASP.NET Web Application.
2. Add a new DataSet named Northwind to the project by choosing Project � Add New Itemand selecting the Data Set item.
To place the orders inside the Northwind database, you need to make several tables fromthe database available to the application. Follow the steps described in ‘‘Generating a TypedDataSet’’ in Chapter 18, ‘‘Building Data-Bound Applications,’’ and add the following tablesto the Northwind DataSet: Categories, Products, Orders, and Order_Details. Make sure thatthe Refresh The Data Table option is checked in the Advanced Options window when you’readding the Orders table.
Be sure to build the solution at this point; you can do so by pressing F6 or by invoking theBuild command from the main menu: Build � Build Solution. Unless you do so, you might notbe able to configure the ObjectDataSource in the next section.
You are now ready to construct the first application web form; it will display the list ofproducts to the user.
Creating the Products Web FormTo facilitate the product search, the Products form will include the DropDownList control usedto display a list of categories. When the user clicks the Search button, Category Id is used to fil-ter the list of products. The filtered list of products is displayed in a GridView control. Performthe following steps to create the Products Web Form:
1. Add a new web form to the project by choosing Project � Add New Item and selecting theweb form item. Name the form Products.
2. Open the form in design view. Add a Label control (from the Toolbox) to the form and setthe Text property of Label to Categories.
3. Add a DropDownList to the web form. Name it ddlCategories. It should initially displaythe text Unbound in the design view.
4. Add an ObjectDataSource control, found in the Data section of the Toolbox menu, and setthe ID property to odsCategories. Configure the data source for odsCategories by invok-ing the Configure Data Source Wizard. Select the CategoriesTableAdapter business objectin the Configure Data Source window. In the Define Data Methods window, set the methodto None on the Update, Insert, and Delete tabs. On the Select tab, leave the default GetDatamethod.
5. Configure the ddlCategories control data source by selectingodsCategories as the datasource for the control. Set DataTextField for ddlCategories to CategoryName and Data-ValueField to CategoryID. The ddlCategories should now display the text Databound indesign view.
You can now run the form for the first time; be sure the Products web form window isselected as active in Visual Studio and then press F5. You should see the form with a singledrop-down list displaying all product categories.
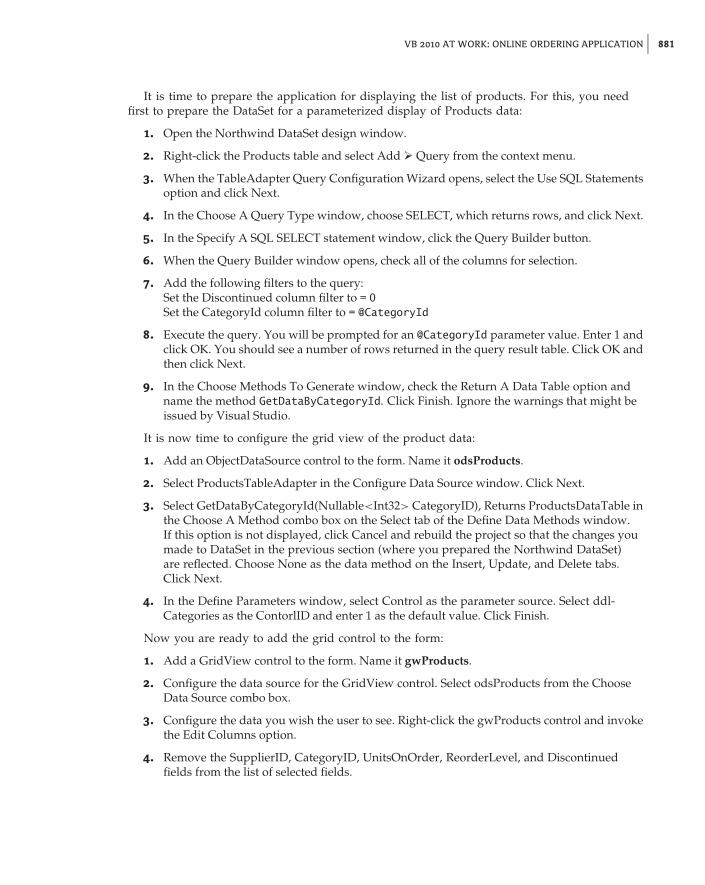
VB 2010 AT WORK: ONLINE ORDERING APPLICATION 881
It is time to prepare the application for displaying the list of products. For this, you needfirst to prepare the DataSet for a parameterized display of Products data:
1. Open the Northwind DataSet design window.
2. Right-click the Products table and select Add � Query from the context menu.
3. When the TableAdapter Query Configuration Wizard opens, select the Use SQL Statementsoption and click Next.
4. In the Choose A Query Type window, choose SELECT, which returns rows, and click Next.
5. In the Specify A SQL SELECT statement window, click the Query Builder button.
6. When the Query Builder window opens, check all of the columns for selection.
7. Add the following filters to the query:Set the Discontinued column filter to = 0Set the CategoryId column filter to = @CategoryId
8. Execute the query. You will be prompted for an @CategoryId parameter value. Enter 1 andclick OK. You should see a number of rows returned in the query result table. Click OK andthen click Next.
9. In the Choose Methods To Generate window, check the Return A Data Table option andname the method GetDataByCategoryId. Click Finish. Ignore the warnings that might beissued by Visual Studio.
It is now time to configure the grid view of the product data:
1. Add an ObjectDataSource control to the form. Name it odsProducts.
2. Select ProductsTableAdapter in the Configure Data Source window. Click Next.
3. Select GetDataByCategoryId(Nullable<Int32> CategoryID), Returns ProductsDataTable inthe Choose A Method combo box on the Select tab of the Define Data Methods window.If this option is not displayed, click Cancel and rebuild the project so that the changes youmade to DataSet in the previous section (where you prepared the Northwind DataSet)are reflected. Choose None as the data method on the Insert, Update, and Delete tabs.Click Next.
4. In the Define Parameters window, select Control as the parameter source. Select ddl-Categories as the ContorlID and enter 1 as the default value. Click Finish.
Now you are ready to add the grid control to the form:
1. Add a GridView control to the form. Name it gwProducts.
2. Configure the data source for the GridView control. Select odsProducts from the ChooseData Source combo box.
3. Configure the data you wish the user to see. Right-click the gwProducts control and invokethe Edit Columns option.
4. Remove the SupplierID, CategoryID, UnitsOnOrder, ReorderLevel, and Discontinuedfields from the list of selected fields.

882 CHAPTER 20 BUILDING WEB APPLICATIONS
5. Set the ProductID field Visible property to False.
6. Set the header text for the selected columns so it represents the column content. The wizardwill use the table column names by default. You can add space characters to these nameswhere necessary. For example, you can change ProductName to Product Name.
7. Click OK.
8. When the GridView Tasks window opens, check the Enable Paging, Enable Sorting, andEnable Selection options.
9. Make sure the DataKeyNames property has the values ProductID and ProductName.
You can explore further by setting any of the numerous display and paging options of Grid-View to your liking. You can now run the application. The products web form should displaya grid populated with product data. In the browser, the form should look similar to the HTMLpage shown in Figure 20.9.
Figure 20.9
Main product selec-tion web formProducts.aspx
All that is left to do to finish the web form is to make the DropDownList filter the griddata. To that end, add the button to the form and change the button’s Text property to Search.Notice that there is no need to implement any event-handling code for the Search button’sclick event. Even without an event handler, clicking the Search button will result in the webform being posted back to the server with the currently selected value in ddlCategories con-trol. When the page is rendered again, it will show only the products belonging to the currently

VB 2010 AT WORK: ONLINE ORDERING APPLICATION 883
selected category. You are done with filtering functionality! When the user clicks the button, thenew request is issued to the server and ddlCategories SelectedValue is passed to a parameter toodsProducts.
Now you need to handle the product selection. The user should be redirected to a newweb form called Quantity.aspx to select the desired quantity for the product. This can beaccomplished by writing an event handler for SelectedIndexChanged event of gwProducts.The product ID and product name data for the selected row is made available throughGridView’s SelectedDataKey property. You can take a look at the SelectedIndexChangedevent handler in Listing 20.6.
Listing 20.6: Handling of product selection
Protected Sub gwProducts_SelectedIndexChanged(ByVal sender As Object,ByVal e As System.EventArgs) HandlesgwProducts.SelectedIndexChanged
Dim quantityUrl = "Quantity.aspx?productId=" &gwProducts.DataKeys.Item(gwProducts.SelectedIndex).Values("ProductID").ToString &"&productName=" &gwProducts.DataKeys.Item(gwProducts.SelectedIndex).Values("ProductName").ToString
Response.Redirect(quantityUrl)End Sub
Retrieving data keys of the selected row in a GridView is a bit involved. You need to use theSelectedIndex value of a GridView as an index for the DataKeys collection. Then you retrievea value of DataKey by passing the name of the key. The product ID and product name arepassed to the Quantity web form through the URL query string using the Redirect methodof the Response object. Next let’s take care of the Quantity.aspx web form.
Creating the Quantity Web FormOn the Quantity.aspx web form, the user needs to decide on the quantity of the product theyare ordering. To implement the form, the first thing you need to do is obtain the selectedproduct ID and product name. As you can see in Listing 20.6, this information is passed toQuantity.aspx as a parameter in the query string. This parameter is made available to youthrough the QueryString property of a Request object, as in this example: Request.QueryString("productId").
The Quantity.aspx web form can be accessed by someone writing the Quantity web formURL directly in the browser in an uncontrolled manner and meddling with the productIdparameter in an query string. Therefore, you must first make sure a valid product ID andproduct name is being passed with the query string. This validation is performed in theValidateProduct method. If the product ID or name is invalid, the user is redirected back tothe Products.aspx web form. Notice that this scenario is used only to handle some inquisitiveuser (should I say hacker?) who decided to experiment with what should be application inter-nal data. (This is one of the reasons you should favor submitting data with web forms insteadof using the query string parameters.) And while you usually want to give an explanation for

884 CHAPTER 20 BUILDING WEB APPLICATIONS
a redirect to your user, there is no need to give any explanation here; redirecting the browserback to the Products.aspx page is polite enough for a user with such questionable intentions.Take a look at ValidateProductId method in Listing 20.7. This method is called from the webform Page_Load event.
Listing 20.7: Query string parameter validation method
Private Sub ValidateProduct()If String.IsNullOrEmpty(Request.QueryString("productId")) Then
Response.Redirect("Products.aspx")End IfIf Not IsNumeric(Request.QueryString("productId")) Then
Response.Redirect("Products.aspx")End IfIf String.IsNullOrEmpty(Request.QueryString("productName")) Then
Response.Redirect("Products.aspx")End If
End Sub
You can store the product ID in a web form field and display the product name on the form.Now you can add the necessary controls to the Quantity.aspx web form:
1. Add a Label named lblProduct to the form.
2. Add a TextBox named txtQuantity to the web form and set the Text property to 1.
3. Add a button named bttnAdd.
4. Add a button named bttnCancel.
5. Add a RangeValidator to the form to validate that the quantity entered by the user is avalid value. Set the ControlToValidate property of the RangeValidator to txtQuantity, theMinimumValue property to 0, and the MaximimValue to 10000. Finally, set the ErrorMessageproperty to Enter a value between 0 and 10 000.
The Quantity.aspx web form as appears in the browser is shown in Figure 20.10.Now, you can use the data passed from the Products web form in the Page Load event. You
will display the product name to the user in lblProduct and store the product ID in a webform field. You can take a look at the Page Load event handler in Listing 20.8, which shows thecomplete code listing for the Quantity.aspx web form.
You can implement the Cancel button event handler by redirecting the user back to theProducts.aspx web form and displaying a message confirming the cancellation for the user.
Finally, you need to implement the Add button event handler. Since you will need theentered product quantity in the final web form, store this information inside the Session object.As the information on selected products accumulates during user visits to the site, you can usethe Dictionary structure to store selected product quantities.
You can use the product ID as the key and the quantity as the value of the productQuantitiesDictionary. You can create the productQuantities instance inside the bttnAdd_Click routineif it was not created already. You should always check for the productQuantities instancebefore creating the new one. Since users can navigate back and forth between forms, you might

VB 2010 AT WORK: ONLINE ORDERING APPLICATION 885
be erasing some products that were already added to a cart if you were to simply create anew instance. After that, you can add the productQuantities instance to Session collection.This way, the productQuantities instance can be accessed in a cart web form, as shownin Listing 20.9. Take a look at the Add and Cancel button event handler implementations inListing 20.8.
Figure 20.10
The Quantity.aspxproduct quantity entryweb form
Listing 20.8: Quantity.aspxWeb Form code-behind
Public Partial Class QuantityInherits System.Web.UI.Page
Dim productId As Integer
Protected Sub Page_Load(ByVal sender As Object,ByVal e As System.EventArgs) Handles Me.Load
ValidateProduct()lblProduct.Text = Request.QueryString("productName")productId = CInt(Request.QueryString("productId"))
End Sub
Private Sub ValidateProduct()If String.IsNullOrEmpty(Request.QueryString("productId")) Then
Response.Redirect("Products.aspx")End IfIf Not IsNumeric(Request.QueryString("productId")) Then
Response.Redirect("Products.aspx")End IfIf String.IsNullOrEmpty(Request.QueryString("productName")) Then

886 CHAPTER 20 BUILDING WEB APPLICATIONS
Response.Redirect("Products.aspx")End If
End Sub
Protected Sub bttnCancel_Click(ByVal sender As Object,ByVal e As EventArgs) Handles bttnCancel.Click
Response.Redirect("Products.aspx")End Sub
Protected Sub bttnAdd_Click(ByVal sender As Object,ByVal e As EventArgs) Handles bttnAdd.Click
Dim productQuantities As Dictionary(Of Integer, Integer)productQuantities = Session("productQuantities")If IsNothing(productQuantities) Then
productQuantities = New Dictionary(Of Integer, Integer)Session("productQuantities") = productQuantities
End IfDim quantity As Integer = CInt(txtQuantity.Text)If quantity = 0 Then
productQuantities.Remove(productId)Response.Redirect("Cart.aspx")
End IfIf productQuantities.ContainsKey(productId) Then
productQuantities.Remove(productId)End IfproductQuantities.Add(productId, quantity)Response.Redirect("Cart.aspx")
End SubEnd Class
You are ready to implement the final web form (called Cart.aspx) where the user will beable to review and check out ordered items.
Creating the Cart Web Form
On the final cart web form, the user will be able to review products in the cart, check out andplace the order, edit the quantity of the selected product, or go back to initial products webform to add more products to the cart.
Start by placing a GridView control with ID gwCart on the form. The grid will displayproducts added to the cart. It should display the Product Name, Unit Price, Quantity, OnlineDiscount Price, and Product Total columns. As you saw in the quantity web form code inListing 20.8, selected products’ identifiers and quantities are kept in the session variableproductQuantities. To obtain the rest of the fields that need to be displayed in the gwCartgrid, you will need to consult the database using the ProductID field as the selection criteria.
Matching selected products in the productQuantities Dictionary with products in theProducts table in the Northwind DataSet and retrieving the rest of the product fields can beefficiently accomplished using a LINQ statement. Take a look at Listing 20.9. It shows a LINQexpression that matches the product IDs in the productQuantities object with product IDs in

VB 2010 AT WORK: ONLINE ORDERING APPLICATION 887
the Products table. It selects an anonymous type using a Select New With construct with anumber of fields retrieved from the table and a number of calculated fields.
Listing 20.9: Cart LINQ expression
queryResult = From p In tableWhere productQuantities.Keys.Contains(p.ProductID)Select New With {p.ProductID,p.ProductName,.Quantity = productQuantities.Item(p.ProductID),p.UnitPrice,.Discount = 0.02,.DiscountedUnitPrice = p.UnitPrice * DiscountIndex,.ProductTotal = p.UnitPrice * DiscountIndex *
productQuantities.Item(p.ProductID),.Edit = "Quantity.aspx?productId=" &p.ProductID.ToString & "&productName=" & p.ProductName
You’ll want to pay special attention to several of the fields. The Discount field is set to a con-stant value of 0.02 — a standard discount for online orders. The DiscountedUnitPrice field iscalculated based on the discount and original unit price. ProductTotal is calculated by multiply-ing the discounted price by the ordered quantity. Finally, the Edit fields are used to constructthe URL that redirects the user to the quantity web form so that the quantity can be changedfor any product on the order. This expression is used as a data source for the gwCart grid.
Now, you can add columns to the gwCart GridView control by following the proceduredescribed in ‘‘Creating the Products Web Forms’’ section earlier in this chapter. A few thingsto bear in mind:
◆ Keep the ProductID field visibility set to False.
◆ When configuring the column used to display the Edit field, use the HyperLinkFiledfield type. Name it Change and set the Text property to Change. Most importantly,set DataNavigateUrlFields to ProductID and ProductName and set DataNavigateUrlFormatString to Quantity.aspx?productId={0}&productName={1}. This way,the final column of the grid will display the hyperlink that will redirect users to theQuantity.aspx web form where they will be able to edit the quantity of selected product.
Next, you need to display the total for the cart. Again, this is best calculated using LINQ.The LINQ expression to calculate the cart total is shown in Listing 20.10.
Listing 20.10: LINQ expression used to calculate cart total
total = (From p In tableWhere productQuantities.Keys.Contains(p.ProductID)).
Sum(Function(p) p.UnitPrice * DiscountIndex *productQuantities.Item(p.ProductID))

888 CHAPTER 20 BUILDING WEB APPLICATIONS
The result of this expression can be shown as text in the Label control. Add the label withID lblTotal to the form and assign the result of the total LINQ query to the lblTotal Textproperty in the Page_Load event handler.
You need to add few more buttons to the web form and you are done. Let’s start with CheckOut button.
When the user clicks the Check Out button, a new row should be inserted in the Orderstable in the Northwind database. For each product, a row should be inserted in the Order_Details table.
Add a new button control to the web form. Name it bttnCheckOut. Implement the code thatadds rows to the Orders and Order_Details tables. First, insert a row in the Orders table andthen use that same row as the parent row when inserting rows in the Order_Details table sincethe Orders and Order_Details tables are in a one-to-many relationship. You can take a look atthe bttnCheckOut event handler code in Listing 20.11.
You need to add two more buttons to the cart web form. Add a button named bttnEmptyand set the Text property to Empty. This button is used to empty the cart. To accomplish this,you need to empty the productQuantities Dictionary that was kept as a session scoped vari-able. The code for emptying the dictionary in the bttnEmpty event handling routine is shownin Listing 20.11.
Finally, users often want to go back to the product list and add more products after inspect-ing the cart. Add a button named bttnAddMore, set the Text property to Add More Products,and in the button event handler routine, redirect the user to products web form. The completecode for the Cart.aspx web form is shown in Listing 20.11.
Listing 20.11: Cart.aspx code-behind
Imports OnlineOrdering.Northwind.OrdersRowImports OnlineOrdering.Northwind.Order_DetailsRow
Partial Public Class CartInherits System.Web.UI.Page
Dim queryResult As EnumerableRowCollectionDim total As DecimalPrivate Const DiscountIndex = 0.98
Protected Sub Page_Load(ByVal sender As Object,ByVal e As System.EventArgs) Handles Me.Load
‘Set to real user Id after implementing Login functionalitySession("userId") = "ALFKI"‘Add "Online Employee" to database and set employeeId accordinglySession("employeeId") = 10GenerateOrder()lblTotal.Text = total.ToString()gwCart.DataSource = queryResultgwCart.DataBind()
End Sub

VB 2010 AT WORK: ONLINE ORDERING APPLICATION 889
Private Sub GenerateOrder()Dim adapter As New NorthwindTableAdapters.ProductsTableAdapterDim table As Northwind.ProductsDataTableDim productQuantities As Dictionary(Of Integer, Integer)
productQuantities = Session("productQuantities")If IsNothing(productQuantities) Then
Response.Redirect("Products.aspx")End If
table = adapter.GetData
queryResult = From p In tableWhere productQuantities.Keys.Contains(p.ProductID)Select New With {p.ProductID,p.ProductName,.Quantity = productQuantities.Item(p.ProductID),p.UnitPrice,.Discount = 0.02,.DiscountedUnitPrice = p.UnitPrice * DiscountIndex,.ProductTotal = p.UnitPrice * DiscountIndex *
productQuantities.Item(p.ProductID),.Edit = "Quantity.aspx?productId=" &p.ProductID.ToString & "&productName=" & p.ProductName}
total = (From p In tableWhere productQuantities.Keys.Contains(p.ProductID)).
Sum(Function(p) p.UnitPrice * DiscountIndex *productQuantities.Item(p.ProductID))
End Sub
Protected Sub bttnAddMore_Click(ByVal sender As Object,ByVal e As EventArgs) Handles bttnAddMore.Click
[aligning left is fine - DA]Response.Redirect("Products.aspx")
End Sub
Protected Sub bttnCheckOut_Click(ByVal sender As Object,ByVal e As EventArgs) Handles bttnCheckOut.Click
Dim productsAdapter As New NorthwindTableAdapters.ProductsTableAdapterDim products As Northwind.ProductsDataTable = productsAdapter.GetData
Dim ordersAdapter As New NorthwindTableAdapters.OrdersTableAdapterDim orders = ordersAdapter.GetData

890 CHAPTER 20 BUILDING WEB APPLICATIONS
Dim orderDetailsAdapter As NewNorthwindTableAdapters.Order_DetailsTableAdapter
Dim orderDetails = orderDetailsAdapter.GetData
Dim order = orders.AddOrdersRow(Session("userId"),CInt(Session("employeeId")),Date.Now.Date,Date.Now.AddDays(7).Date,Date.MinValue, 1,Nothing, Nothing, Nothing, Nothing,Nothing, Nothing, Nothing)
order.SetShippedDateNull()ordersAdapter.Update(orders)orders.AcceptChanges()For Each orderDetail In queryResult
Dim product = products.FindByProductID(orderDetail.ProductID)
orderDetails.AddOrder_DetailsRow(order, product, orderDetail.UnitPrice,orderDetail.Quantity, orderDetail.Discount)
NextorderDetailsAdapter.Update(orderDetails)orderDetails.AcceptChanges()Response.Redirect("Confirmation.aspx")
End Sub
Protected Sub bttnEmpty_Click(ByVal sender As Object,ByVal e As EventArgs) Handles bttnEmpty.Click
Dim productQuantities As Dictionary(Of Integer, Integer) =Session("productQuantities")
productQuantities.Clear()Response.Redirect("Products.aspx")
End SubEnd Class
If you inspect the code in Listing 20.11 carefully, you will see that there are a few hard-coded features. Namely, since I did not implement the login feature, I assigned the value ALFKIto userId and used it when creating the order. Once the Login feature is implemented, a realuser ID can be assigned to the userId variable.
Since the purpose of the online ordering application is to have users create their ownorders without employee intervention, the employeeId variable is assigned a value of 10. Thisemployee ID does not exist in the Northwind database, but you can generate it by adding arow to the Employees table and naming the user Online Ordering Application.

THE BOTTOM LINE 891
Figure 20.11
The Cart.aspx webform
The Bottom Line
Create a basic XHTML/HTML page. Building a basic HTML page is a straightforward pro-cess using a simple text editor such as Notepad. Knowledge of XHTML/HTML is still a majorasset when developing web applications with Visual Studio 2010.
Master It Develop a web page using HTML that features a heading, some text, an image,and a link to another page. Convert the page to XHTML and verify it by using the W3C ver-ification tool at http://validator.w3.org. You might find that you will need to run thevalidation a couple of times to get everything right. If you attach and use the style sheet inthe following Master It challenge, you will find that validation will be less problematic.
Format a page with CSS. Cascading Style Sheets (CSS) is a powerful tool for controlling thestyles and format of a website. You can manually create style sheets by using a text editor. Anunderstanding of their operation and syntax is a useful skill when manipulating CSS in VisualStudio 2010.
Master It Create a CSS style sheet that defines the layout of the web page that you devel-oped in the previous task, including a header section, a left-hand navigation section, and amain content section. Include a rollover for the link and apply formatting to the tags thatyou have used for your heading and text tags. Attach the style sheet to your web page.

892 CHAPTER 20 BUILDING WEB APPLICATIONS
Set up a master page for your website. Using master pages is a reliable method of controllingthe overall layout and look and feel of your websites and applications. Master pages enableyou to achieve a high level of consistency in your design and are particularly useful if the sitehas multiple developers working on it.
Master It Create a website with a master page and attached content page. Use appropriatecontrols to give the master page a page heading, My Page, which will appear on all attachedcontent pages. Use a combination of Button and Label controls on the content page to createa simple Hello World application.
Use some of the ASP.NET intrinsic objects. ASP.NET objects such as the Response, Request,Session, and Server objects offer a range of important utilities in developing, running, andmaintaining your websites and applications. In addition, they give you access to vital infor-mation about the client, the server, and any current sessions at runtime.
Master It Create a simple website with a master page and two attached content pages. Usethe Server.Execute method attached to a LinkButton control to navigate between the twocontent pages.

Chapter 21
Building and Using Web Services
A web service is a program capable of communicating across a network by using a combinationof the open standard Simple Open Access Protocol (SOAP) and XML technologies.
Web services are ideal for creating data-, content-, or processing-related services that canbe made available to associated or third-party applications and clients across distributed net-works such as the Internet. There are two flavors of web services, the ASP.NET web servicesand the newer WCF services, which are based on the Windows Communications Foundationcomponent of the Framework.
In this chapter, you will see how to create a simple ASP.NET web service and a client appli-cation to consume (use) the web service. You’ll also learn how to build, configure, and consumeWCF services.
In addition, this chapter covers the technologies associated with ASP.NET web services,such as SOAP and the Web Services Description Language (WSDL). The chapter briefly coversMicrosoft’s latest addition to the web service stable — the Windows Communication Founda-tion (WCF) — and you will see how to use Asynchronous JavaScript and XML (AJAX) technol-ogy to create seamless interactions between web services and their consuming applications.
In this chapter, you’ll learn how to do the following:
◆ Create a simple ASP.NET web service
◆ Consume an ASP.NET web service
◆ Create and consume WCF services
◆ Create and consume ADO.NET Data Services
Using ASP.NET and WCF Web ServicesMicrosoft offers two flavors of web service technology:
◆ ASP.NET web services
◆ Windows Communication Foundation (WCF)
ASP.NET web services (also known as XML web services) have been around through all theincarnations of ASP.NET and offer a simple and effective methodology for making softwarecomponents and other resources available over the Internet.

894 CHAPTER 21 BUILDING AND USING WEB SERVICES
WCF is a recent inclusion into the .NET Framework and is built around the web servicesarchitecture. WCF enables broader integration and interoperability with all the .NET Frame-work distributed system technologies, including Microsoft Message Queuing (MSMQ), Com-mon Object Model Plus (COM+), ASP.NET web services, and .NET Framework Remoting.WCF also offers improved performance and secure data transmission.
What Is a Service?Modern software is moving away from stand-alone applications into distributed applications.Users can interact with web applications that run on a remote server. The interface is hostedin the browser, known as a thin client, but the bulk of the processing takes place on a remotecomputer. Some logic is implemented at the client to minimize the trips to the client. Unfortu-nately, the client can execute only scripts written in JavaScript. You can also create SilverLightapplications, which are basically web applications that execute VB code at the client. SilverLightapplications are not nearly as common as web applications because they require users to installthe SilverLight runtime on their computers.
The problem with web applications is that users are confined by the application’s interface.The information is processed at a remote site, but users can interact with it only through a pre-defined interface. In the early days of the Web, developers used to write code to download webpages and ‘‘scrape’’ data off the HTML document transmitted by the server to the client. Actu-ally, data scraping is used today a lot because people need access to raw information, whichthey can use as they see fit in their applications.
Consider sites like Booking.com and Expedia.com that allow users to make hotel and flightreservations. You connect to these sites, specify the dates of your trip, retrieve numerousoptions (flights and/or hotels), and make your selection. While all this works fine on yourbrowser, you’re restricted to the existing interface. What if you could submit the same requeststo the remote server but instead of a static page you could get back the raw information?You could implement your own interface, which could be a different web application, a richclient application, even a mobile application. This would offer more power to you, but howabout the provider of the information? In effect, the provider of the information also wants tofurnish the same information through a programmatic interface and sell its products throughadditional channels. Amazon.com does so already — and very successfully. Web services allowcompanies to make their services available to all consumers, and it’s up to the consumers toexploit these services. To get a better idea of how services are being used and how they enabledistributed computing, let’s start by looking at an example of consuming an existing, publicweb service.
Consuming Web ServicesBefore we explore the server side of a web service, let’s see how easy it is to consumeexisting web services. Perhaps you’ll never develop your own web service, but it’s verylikely that you will use other people’s services in your code. In a corporate environment, forexample, you might be asked to develop data-driven applications based on a data model that’shosted as a web service. Instead of talking directly to a database, you will be invoking methodsof a web service that exposes the company data. Or, you might be asked to write an appli-cation that consumes information from web services published on the Internet. Calling a webservice that performs automatic text translation and adding weather data on a travel site aretwo trivial examples. Business examples include services that provide hotels and flights. Theseservices are quite popular these days, and they allow consumers to search for prices andavailability and make reservations on a remote computer. There are currently many travel

USING ASP.NET AND WCF WEB SERVICES 895
sites on the Internet, and they’re all using the services of a few large providers. Let’s look at aless-ambitious yet quite useful web service you can incorporate in many types of applications.It’s a service that provides weather forecasts, and there’s no charge, or even a registrationrequirement, to use it.
Many sites provide weather forecasts, and I’ve chosen one that exposes a few simple meth-ods to retrieve the forecasts to present in this section. The URL that follows takes you to a sitethat hosts a small number of web services, which you may find interesting:
http://www.webservicex.net/WCF/ServiceDetails.aspx?SID=44
One of the services hosted at this site provides weather forecasts; you will find it by clickingthe Web Services link at the top of the page and choosing the Utilities category. Once youswitch to the USA Weather Forecast service’s site, you’ll see that the service exposes twomethods:
◆ GetWeatherByPlaceName, which gets a week’s forecast for a place by name (USA)
◆ GetWeatherByZipCode, which gets a week’s forecast for a valid zip code (USA)
Click the GetWeatherByPlaceName link and you’ll see a page prompting you to enterthe name of a place. Enter your favorite destination here (I used the city of Santa Barbara)and you’ll see a weekly weather forecast for that destination in XML format, as shownin Figure 21.1. This is straight XML, and you can contact the same site from within a VBapplication using the HttpWebRequest/HttpWebResponse classes, read the XML document,and process it with LINQ, as we discussed in Chapter 14, ‘‘An Introduction to LINQ.’’
Figure 21.1
Retrieving weatherforecast information inXML format
As you will recall from Chapter 19, ‘‘Accessing the Web,’’ it is feasible (and nearly trivial) tocontact a remote server, request a XML document, and process it with LINQ. One method of

896 CHAPTER 21 BUILDING AND USING WEB SERVICES
contacting the weather forecast service is to place a request through a WebRequest object andread the server’s response through a pair of WebRequest/WebResponse objects, as shown here:
Dim rq As System.Net.WebRequest = System.Net.WebRequest.Create(http://www.webservicex.net/WeatherForecast.asmx/ &GetWeatherByPlaceName?PlaceName=Santa Barbara")
Dim rs As System.Net.WebResponse = rq.GetResponse
Now that you have the service’s response, you can read it as a long string into a variable,the xmlData variable:
Dim strm As IO.Stream = rs.GetResponseStreamDim rdr As New IO.StreamReader(strm, System.Text.Encoding.UTF8)Dim xmlData As String = rdr.ReadToEndrdr.Close()strm.Close()
Finally, you can load the data into an XElement variable and process the data with LINQ.The following few statements generate a list of data and min/max temperatures:
Dim xml As XElement = XElement.Parse(xmlData)Dim ns As XNamespace = "http://www.webservicex.net"For Each forecast In xml.Descendants(ns + "Details").
Descendants(ns + "WeatherData")Debug.WriteLine(forecast.Descendants(ns + "Day").Value & vbTab &
forecast.Descendants(ns + "MinTemperatureF").Value &" - " & forecast.Descendants(ns + "MaxTemperatureF").Value)
Next
The code is very simple, but you can’t process it without knowing, or figuring out, thestructure of the XML document returned by the service. As you have undoubtedly noticed,Microsoft likes to simplify things and Visual Studio can take care of all the plumbing necessaryto contact the web service and retrieve its results. Instead of contacting the web service throughHTTP from within your code, you can add a reference to the web service and then use it as ifit were a local method. Let’s follow the process step by step.
Start a new project, the WeatherService project, which you can download from www.sybex.com/go/masteringvb2010. Right-click the project name, and from the context menu, selectAdd Service Reference. When the Add Service Reference dialog box appears, you can specify aremote web service, as shown in Figure 21.2. In the Address box, enter the URL of the Weath-erForecast web service, which is as follows:
http://www.webservicex.net/WeatherForecast.asmx?WSDL
(The extension WSDL stands for Web Service Discovery Language and it’s a parameter thatinstructs the web service to return its methods.) Then, click the Go button to locate the web ser-vices at the specified URL; these services will appear in the left pane of the dialog box. If youdouble-click a web service on this pane, the components of the selected web service will appearunder the service’s name. Double-click the WeatherForecastHttpGet class to see the names ofthe methods it exposes in the right pane, as shown in Figure 21.2.

USING ASP.NET AND WCF WEB SERVICES 897
Figure 21.2
Adding a reference to aremote web service
The web service exposed by the remote server can be accessed using three different proto-cols: HTTP Get, HTTP Post, and SOAP. All three classes expose the same methods: GetWeatherByPlaceName and GetWeatherByZipCode. The names are quite descriptive, and you’ll seeshortly how to call them. Finally, in the Namespace box, enter a meaningful name for thereference, such as WeatherService, and click the OK button to close the dialog box.
To use the WeatherService web service in your code, you simply treat it as a class, regardlessof whether it resides on the local machine or a remote server. Create a new instance of the classwith a statement like the following:
Dim client As New WeatherService.WeatherForecastSoapClient
Now, you can use the methods of the service through the client variable. Enter the nameof the client variable followed by a period and you’ll see names of the methods it exposes,including the GetWeatherByPlaceName method. If you select this method, you will see that itaccepts a string argument, which is the name of a place (such as a city) in the U.S. (and a fewmajor cities in Europe). To retrieve the forecast for the next six days for Santa Barbara, enter thefollowing statement:
Dim forecast = client.GetWeatherByPlaceName("Santa Barbara")
The forecast variable type is WeatherService.WeatherForecast. This type is exposed by theweb service along with the methods and several properties. Enter the name of the forecastvariable followed by a period to see the members of the WeatherForecast class. One of themis the Details property, which is an array of WeatherData objects, and there is one Weather-Data object for each of the following days. The WeatherData property is a complex one, whichexposes a number of properties on its own. These properties include the Day property (the date

898 CHAPTER 21 BUILDING AND USING WEB SERVICES
for which the forecast is given); the MaxTemperatureC, MaxTemperatureF, MinTemperatureC,and MinTemperatureF properties; and the WeatherImage property, which is the URL of animage describing the day’s weather.
I’ve designed a simple interface to display the forecast for the selected location based onLabel and PictureBox controls, and it’s shown in Figure 21.3. The application’s code is quitetrivial; it retrieves the forecast with the two statements shown earlier and then assigns valuesto the various controls. Here are a few statements that display the forecast for the second day(the first day of the forecast being today):
lblDate2.Text = forecast.Details(1).DayPictureBox2.ImageLocation = forecast.Details(1).WeatherImagelblMax2.Text = forecast.Details(1).MaxTemperatureF.ToStringlblMin2.Text = forecast.Details(1).MinTemperatureF.ToString
Figure 21.3
A Windows applicationthat displays a weatherforecast based on data itretrieves from a remoteserver
The two numbers under the city name are the geocoordinates (or geographic coordinates) ofSanta Barbara (its longitude and latitude, which are also returned by the GetWeatherByPlaceName method).
As you can see, using a web service from within your application is straightforward andvery similar to using any other component, such as the Framework or a custom class. The webservice is a class that resides on a server and applications can contact it. The web service itselfis nothing but a class with methods that can be called remotely. The service’s code is executedon the computer on which the service resides. No code is downloaded to the client, and youdon’t have to worry about the origin of the data. To you, the developer, a web service lookslike any other class you reference in your project. As for the providers of the web services, theyprovide a software service — a way to request specific data that are maintained and servicedon a remote computer. The service provider allows you to perform specific requests withoutexposing its raw data.
ASP.NET Web ServicesASP.NET web services are software resources and components through which you can exposecertain functionality and/or deliver data over a network such as the Internet by using a com-bination of XML and SOAP. You can restrict a component so that it’s available to only certainapplications or specific users, or you can make it available to many users. The component canbe limited to the local computer or the local network or be made available across the Internet.Services can be delivered free of charge or for a fee.

UNDERSTANDING TECHNOLOGIES ASSOCIATED WITH WEB SERVICES 899
Virtually any program that can be encapsulated as a component can be expressed asan ASP.NET web service. For production purposes, you will need a web server to deliveryour ASP.NET web service. However, for development purposes, the built-in ASP.NETDevelopment Server that ships with Visual Studio 2010 is quite sufficient.
The advantages of using ASP.NET web services are as follows:
◆ Data and commands are communicated across the standard Internet port: port 80. Thisgreatly simplifies passage around the Internet and most networks.
◆ The common standards of XML and SOAP are widely supported.
◆ Early problems with web services, such as lack of a robust security model, have beenresolved.
◆ Visual Studio provides a simple and straightforward environment in which to create andconsume web services.
WCFWindows Communications Foundation (WCF) is built on ASP.NET web services andextends their functionality by integrating with a number of distributed .NET Frameworktechnologies.
WCF offers an integrated approach to situations in which you would previously haveemployed a range of different distributed .NET Framework technologies. Typically, you useWCF as a unified solution that enables you to avoid having to employ different distributedtechnologies for each requirement of a distributed application. For example, you may haveemployed message queuing for use with portable devices that are not permanently connected,ASP.NET web services for communication across the Internet, and .NET Framework Remotingfor tightly coupled communication within the local network. Employing multiple technologiesin this manner results in a complex and potentially unwieldy solution. WCF offers a methodof achieving a simpler unified approach. The weather forecasting web service used in the firstexample of this chapter contained three subclasses to support three different data exchangeprotocols: HttpGet, HttpPost, and SOAP. With WCF services, the same service can supportmultiple protocols. You don’t have to write any additional code, you just edit the service’sconfiguration file.
Understanding Technologies Associated with Web ServicesSeveral technologies underlie and support ASP.NET web services. They include SOAP, WSDL,SOAP Discovery, and Universal Description, Discovery, and Integration (UDDI).
SOAPSOAP stands for the Simple Object Access Protocol and it’s a lightweight protocol for exchang-ing XML messages over Hypertext Transfer Protocol/Secure Hypertext Transfer Protocol(HTTP/HTTPS). It forms the basis of the web services stack, which is the set of protocols usedto define, locate, and deliver web services.
SOAP is an open standard, enabling web services to be developed and supported acrossa range of platforms and environments. There are other services attached to SOAP, includ-ing WSDL and SOAP Discovery. Although you are no longer required to work directly withSOAP when developing ASP.NET web services in Visual Studio, you will continue to encounter

900 CHAPTER 21 BUILDING AND USING WEB SERVICES
references to the protocol because it underlies the whole web service creation, delivery, andconsumption process.
A SOAP tutorial can be found at www.w3schools.com/soap/.
WSDLWeb Services Description Language (WSDL) is the language used to create an XML documentthat describes a web service. Specifically, the document describes the location of the serviceand the methods exposed by the service. When you connect to a site that provides one or moreweb services, applications read the WSDL file to discover the methods supported by eachservice.
You can create and edit WSDL documents directly by using a text editor, but they can usu-ally be generated automatically by Visual Studio when you add either a web reference or ser-vice reference to your ASP.NET web service.
SOAP DiscoverySOAP Discovery is used to locate the WSDL documents that provide the descriptions forASP.NET web services. Use SOAP Discovery when you want to make your web servicepublicly available for consumption by third-party applications. For example, you might beproviding a weather service for third-party providers to incorporate into their websites. Thereare two types of discovery: static discovery and dynamic discovery.
In the case of static discovery, an XML document with the .DISCO filename extension isused. This file contains information about the location of the WSDL documents.
If you wish to enable dynamic discovery for your website, you add a specific reference intothe Web.config file. Dynamic discovery enables users to discover all web services and discov-ery files beneath the requested URL.
Discovery files (and particularly dynamic discovery) can be a security risk on a productionserver because they potentially allow users to search the entire directory tree. Static discoveryfiles are the safer of the two types because they allow the user to search only those resourcesthat you choose to nominate. In Visual Studio 2010, you can explicitly generate a static discov-ery file by adding a web reference or a service reference.
UDDIUniversal Description, Discovery, and Integration (UDDI) was originally created as part of theweb service specification to act as a form of yellow pages for web services. Several major play-ers in developing the web services specification (including Microsoft, IBM, SAP, and OASIS)combined to develop an XML-based registry for businesses to promote themselves and theirweb services to both the public and the corporate world. In 2006, Microsoft, IBM, and SAPclosed their public UDDI nodes. However, you can still create UDDI servers on your local net-work to provide directory services for web services available within your network.
Creating a Simple ASP.NET Web ServiceCreating and consuming web services in Visual Studio 2010 is a relatively simple and straight-forward process. In this example, you will create a simple Hello World–style ASP.NET webservice within a website entitled HelloWebServiceDemo. You will then see how to consume theweb service from within the same website.

CREATING A SIMPLE ASP.NET WEB SERVICE 901
Opening Visual Studio in Administrator Mode
Visual Studio often requires elevated privileges when you’re creating and accessing applica-tions and resources. If you are logged in as a standard user, you may not have those privilegesavailable.
To increase your privileges, from the Start menu, right-click the Visual Studio 2010 entry.From the context menu, choose Run As Administrator. You may be required to entercredentials.
Setting Up the Web ServiceThis simple web service will have one service, HelloWorld, with a single method, Hello. To setup the web service, complete the following steps:
1. Launch Visual Studio and choose File � New Web Site.
2. From the New Web Site dialog box, choose ASP.NET Web Site. In the location text box,name the website HelloWebServiceDemo. Click OK.
3. Right-click the solution, choose Add New Item from the context menu, and select the webservice template. In the Name text box, delete the default WebService.asmx and renamethe web service HelloWorld.asmx. Click the Add button. This opens the App_Code/HelloWorld.vb page, where default code for a Hello World–style web service is alreadyset up.
4. Make one minor change to the default code. In the <WebMethod()> section of the code,change the function name from HelloWorld() to Hello(). This enables you to distinguishbetween the service name and the method. The code should now read as shown in the fol-lowing snippet:
<WebMethod()>Public Function Hello() As String
Return "Hello World"End Function
5. Save your work.
Next, you will run and test the web service.
Testing the Web ServiceAfter you have created your web service, it is a good idea to test the service to ensure that itbehaves as expected. This presentation of the testing process lacks the polish that you mightwish for your web service after it is utilized or consumed by a client application, but it willdemonstrate the service’s inherent functionality. The product of the test is returned as straightXML. But don’t worry — when you finally consume the service, the XML markup will bestripped away from the returned data. Follow these steps:
1. In the Solution Explorer window, right-click HelloWorld.asmx and choose the Set As StartPage option.

902 CHAPTER 21 BUILDING AND USING WEB SERVICES
2. Click the green arrow in the Standard toolbar (or press F5) to start the web service indebugging mode. Click OK in the Debugging Not Enabled dialog box to automaticallymodify the Web.config file to enable debugging.
The ASP.NET web service should now open in your web browser as shown in Figure 21.4.
Figure 21.4
HelloWorld web servicein Internet Explorer
You can check the service description for HelloWorld by clicking the Service Descriptionlink. This opens a WSDL description for the web service.
You will also see a warning about using the default namespace of http://tempuri.org.This is the default Microsoft namespace, and you would usually replace it with a reference to aURL that you control before publicly deploying the web service.
To call the Hello method, click the Hello link. This opens a new page, which displays infor-mation concerning the Hello method. To run the Hello method, click the Invoke button. Thisopens the full XML page returned by the method, as shown in Figure 21.5.
Figure 21.5
Invoking the Hellomethod
Consuming the Web ServiceThe next step is to consume the HelloWorld web service from within a standard ASPX page.Close any running instances of the HelloWorld web service to stop debugging and return tothe HelloWebServiceDemo website in Visual Studio. Complete the following steps:
1. In Solution Explorer, double-click Default.aspx to open the page in design view.

DEVELOPING A STAND-ALONE WEB SERVICE 903
2. From the Toolbox, drag and drop a Button control into the default Div control on the form.
3. Click the Enter button twice to introduce two line breaks, and add a Label control from theStandard toolbox.
4. In the Properties window for the Label control, delete the default Label text from the Textproperty.
5. Double-click the Button control to open the code skeleton for the Button1_Click event incode-behind.
6. Complete the Button1_Click event with the following code:
Protected Sub Button1_Click(...) Handles Button1.ClickDim myHello As New HelloWorldLabel1.Text = myHello.Hello()
End Sub
In this example, I declared a local instance of the HelloWorld service and tied the Textproperty of the Label control to the Hello method.
7. In Solution Explorer, right-click Default.aspx and choose the Set As Start Page option.
8. Run the application. Default.aspx should render initially as a page displaying a singlebutton. Clicking the button should display the Hello World text. Figure 21.6 shows the run-ning application.
Figure 21.6
The running HelloWeb-ServiceDemo application
Developing a Stand-Alone Web ServiceWeb services are designed to run separately from their consuming applications. In thisexample, you will see how to build a slightly less-trivial example of an ASP.NET webservice as a stand-alone application. You will then see how to consume the web servicefrom a separate web application.
The example involves building a web service that performs two operations. It returns thecurrent server time and also provides a tool for calculating a percentage. The web serviceis named MyWebService, and the two methods are named ServerTime and CalculatePercentage.
Later in this chapter, you will see how to create a simple AJAX implementation that enablesthe client to automatically and asynchronously update the displayed server time from the webservice.

904 CHAPTER 21 BUILDING AND USING WEB SERVICES
Building MyWebServiceYou will begin by creating the web service. Unlike the previous example, in which the webservice and consuming application were built within the same project, this web service is astand-alone project. Follow these steps:
1. Open Visual Studio 2010 and choose File � New Web Site. From the New Web Site dialogbox, choose ASP.NET Web Service.
2. In the Location text box of the New Web Service dialog box, keep the default path butchange the name of the web service to MyWebService. Click the OK button to exit thedialog box.
3. The web service should now be opened to the App_Code/Service.vb page in the VisualStudio designer. Look through the default code and change the Namespace entry fromhttp://tempura.org/ to either a URL that you control or, for the purposes of this exam-ple, http://mywebservice.org. This will prevent the warning message about using thedefault Microsoft namespace from appearing when you run the web service. The line ofcode should now read as follows:
<WebService(Namespace:="http://mywebservice.org/")>
4. Move down to the <WebMethod()> section of the code skeleton. Delete the followingdefault HelloWorld() public function:
Public Function HelloWorld() As StringReturn "Hello World"
End Function
5. Add the following code to the <WebMethod()> section. This method will return the currentserver time as the time of day in hours, minutes, and seconds:
<WebMethod()>Public Function ServerTime() As String
ServerTime = Left(Now.TimeOfDay().ToString(), 8)End Function
6. Now, create the percentage calculator method (CalculatePercentage). Underneath theServerTime method, add the following code:
<WebMethod()>Public Function CalculatePercentage(
ByVal myTotal As Integer, ByVal myValue As Integer) As IntegerCalculatePercentage = CInt(myValue * 100 / myTotal)
End Function
This method calculates a percentage based on the myValue and myTotal parameters. Thecalculated percentage is returned as an integer.
This completes the code for the MyWebService web service. Listing 21.1 gives the full codefor the web service as it should appear in App_Code/Service.vb.

DEVELOPING A STAND-ALONE WEB SERVICE 905
Listing 21.1: Full code listing for MyWebService
Imports System.WebImports System.Web.ServicesImports System.Web.Services.Protocols
’ To allow this Web Service to be called from script, using ASP.NET AJAX’ uncomment the following line.’ <System.Web.Script.Services.ScriptService()><WebService(Namespace:="http://mywebservice.org/")><WebServiceBinding(ConformsTo:=WsiProfiles.BasicProfile1_1)><Global.Microsoft.VisualBasic.CompilerServices.DesignerGenerated()>Public Class Service
Inherits System.Web.Services.WebService
<WebMethod()>Public Function ServerTime() As String
ServerTime = Left(Now.TimeOfDay().ToString(), 8)End Function
<WebMethod()>Public Function CalculatePercentage(ByVal myTotal As Integer,
ByVal myValue As Integer) As IntegerCalculatePercentage = CInt(myValue * 100 / myTotal)
End Function
End Class
To make this the default start page, right-click Service.asmx in the Solution Explorer andchoose Set As Start Page from the context menu.
Test the web service by clicking the green arrow on the Standard toolbar or by pressingF5. The web service should display links to the two web methods, as shown in Figure 21.7.Test the two web methods by clicking the links and then clicking the Invoke button on eachof the respective service information pages. ServerTime should return the current time of dayin 24-hour format (as an XML page). The service information page for CalculatePercentageshould provide you with input boxes to enter values for MyValue and MyTotal before youinvoke the service. Entering values such as 20 for MyValue and 50 for MyTotal should return avalue of 40 (within an XML page) when you click Invoke.
Deploying MyWebServiceIn a production environment, you typically deploy the web service to Microsoft’s Internet Infor-mation Services (IIS) web server. In order for the web service to run on IIS, you need to have.NET Framework 4.0 registered with IIS. You can also set up appropriate security and accessprivileges such as Windows authentication, secure socket encryption (HTTPS), and so forth onIIS. For further information on setting up and working with IIS, see Microsoft IIS 7 Implementa-tion and Administration by John Paul Mueller (Sybex, 2007) which gives thorough coverage. Youcan also refer to Microsoft’s community portal for IIS at www.iis.net.

906 CHAPTER 21 BUILDING AND USING WEB SERVICES
Figure 21.7
The runningMyWebService
Before you can deploy your web service, you must have all the relevant files and directoriesassembled into a suitable directory without the various development and debugging files. Theeasiest way to create a folder containing all the production files necessary for a deployment ofyour web service is to use the Publish Web Site option from the Build menu. This opens thePublish Web Site dialog box, where you can choose to publish to a specific location (includingan FTP location) or keep the default location and move the folder later.
Using the ASP.NET Development Server
Visual Studio 2010 comes equipped with its own built-in web server for testing web applica-tions: the ASP.NET Development Server. Although the ASP.NET Development Server is idealfor testing web applications as you develop them, it does have its limitations. One of thoselimitations is that you need to have a separate instance of the web server running for eachweb application running concurrently on your development machine.
Thus, to consume MyWebService from another application, you need to have opened MyWeb-Service in Visual Studio 2010 and run the application to fire up the ASP.NET DevelopmentServer. You can close the web browser running the web service, but you must keep VisualStudio open to MyWebService. To create a separate project to consume MyWebService, youmust open another instance of Visual Studio 2010 from the Start menu.
An advantage of using the ASP.NET Development Server is that you do not need to publish orphysically deploy your application to a web server before you have tested it.
Consuming MyWebServiceAs discussed in the previous section, unless you are using IIS to test your web applications,you must have MyWebService open in Visual Studio 2010 and have run the web service at leastonce to open an instance of the ASP.NET Development Server so that you can link to the webservice from another application.
Keep this instance of Visual Studio open and use the Start menu to open another instanceof Visual Studio. Depending on the account restrictions on your machine, it may be necessary

DEVELOPING A STAND-ALONE WEB SERVICE 907
to open the second instance of Visual Studio in Administrator mode so you can connect to theweb service.
After Visual Studio opens, complete the following steps:
1. Choose File � New Web Site. In the New Web Site dialog box, choose ASP.NET Web Site.Name the site MyConsumer in the Location text box (keeping the rest of the default path).Click the OK button.
2. MyConsumer should open to Default.aspx in design mode. (If you last used the editor ina different mode, switch to design mode.) Drag a TextBox from the Standard toolbox ontothe form. In the Properties window, set the ID property for the TextBox to tbMyValue.
3. From the Standard toolbox, drop a Label control on the form to the right of tbMyValue. Setthe Text property of the Label control to My Value. Click to the right of the Label and pressthe Enter key to drop to the next line.
4. Drop a second TextBox control onto the form immediately under tbMyValue. Set the IDproperty for the second TextBox control to tbMyTotal.
5. Place a Label control immediately to the right of tbMyTotal. Set the Text property of theLabel control to My Total. Click to the right of the Label control and press the Enter keytwice to drop down two lines.
6. From the Standard toolbox, drop a Button control onto the form two lines below the tbMy-Total control. In the Properties window for the Button, set the ID property to btnCalculate.Set the Text property to Calculate. Press the Enter key to drop down one more line.
7. Immediately beneath btnCalculate, place a Label control and set its ID property to lblPer-centage. Delete the default contents of the Text property for the control.
8. Place another Label control to the right of lblPercentage. Set the ID property to lblPercent-ageLabel. Set the Text property to = Calculated Percentage and set the Visible propertyto False. Click to the right of this control and use the Enter key to drop down two morelines.
9. Place a Label control two lines beneath lblPercentage. Set the ID property to lblServerTimeand delete the default Text property entry.
10. Place a final Label control to the right of lblServerTime. Set the Text property to = ServerTime.
Figure 21.8 illustrates how the final page should look with all the controls in place.
Figure 21.8
Layout forDefault.aspx

908 CHAPTER 21 BUILDING AND USING WEB SERVICES
Adding a Web Reference
Use a web reference created in the Solution Explorer to provide the connection to the web ser-vice. For web services within the local domain, you could also use the Service Reference optionavailable in the Solution Explorer. Using a service reference is an advantage when you wantto fully exploit the AJAX potential in connecting to a web service because a service referenceallows you to call the web service methods by using JavaScript functions from within the con-suming application. Using a client script to call web service methods is entirely asynchronousand prevents your page or portions of your page from being locked out from user interactionwhile waiting for the web service to respond.
For this example, you will add a web reference to the MyWebService web service created inthe previous section. Unless you are using IIS to test your web applications, you must have aninstance of the ASP.NET Development Server running the MyWebService web service. (Refer tothe sidebar ‘‘Using the ASP.NET Development Server’’ earlier in this chapter for details.)
Complete the following steps:
1. In the Solution Explorer, right-click the project heading (and path) at the top of the SolutionExplorer tree. From the context menu, choose Add Web Reference to open the Add WebReference dialog box.
2. If you are using IIS and have appropriately placed discovery documents, you could usethe Browse To: Web Services On The Local Machine option. You will also see a link thatenables you to refer to any UDDI servers set up on your network. However, because thisexercise uses the ASP.NET Development Server, you will need to switch to the instance ofVisual Studio that is running MyWebService and open the web service in Internet Explorer.Copy the URL for the MyWebService web service from the address bar of Internet Explorer.
3. Switch back to your MyConsumer build and paste the URL of MyWebService into the URLtext box of the Add Web Reference dialog box. The URL should be something like this:
http://localhost:49733/MyWebService/Service.asmx
If you are using the sample project to follow along, delete the existing web reference andadd it again, using the port chosen by your ASP.NET Development Server. When you startthe web service project, the URL of the service is displayed in the address bar of InternetExplorer. Copy the service’s address from the address box onto the Add Reference dialogbox and the client application (MyConsumer) will see the service as long as it’s running onthe same machine.
4. Click the Go button. This should now establish a connection to MyWebService, as shown inFigure 21.9. Click the Add Reference button to exit the dialog box. Solution Explorer shouldnow feature an App_WebReferences folder with appropriate entries for MyWebService.Included in these are a discovery (DISCO) and a WSDL file that you can copy, edit, andemploy in your deployment of MyWebService.
The DISCO document created by adding a web reference can be used to enable static dis-covery of your web service by placing it in a suitable location in your folder hierarchy for thesite. If you examine the code in the automatically generated file, you can see how to add andremove XML entries. You can then add a link to the page from some point in your site. If youdo not wish to set up static discovery files, you can enable dynamic discovery by editing theMachine.config file for your web server. Remember that dynamic discovery potentially allowsusers to browse your directory tree; unless your web server is suitably protected, dynamic dis-covery is not recommended for production servers.

DEVELOPING A STAND-ALONE WEB SERVICE 909
Figure 21.9
The Add Web Referencedialog box
For precise details on enabling dynamic discovery, please refer to the relevant Help topics inVisual Studio 2010. Type dynamic discovery in the Search field.
Adding the Code-Behind
The next step is to add the code to make the application work. From design mode, double-clickthe btnCalculate control to enter code-behind and complete the following steps:
1. Begin by declaring a local instance of the web service. At the top of the page, directly underthe Inherits System.Web.UI.Page entry, add the following:
Dim MyWebService As New localhost.Service
2. Next is the code to call the ServerTime method. In the code skeleton for Form1_Load, addthe following line of code:
lblServerTime.Text = MyWebService.ServerTime
3. Next is the code to collect the input values from the user and call the CalculatePercentagemethod. The code also attaches a percentage sign onto the displayed percentage value andunhides lblPercentageLabel. In the code skeleton for the btnCalculate Click event, addthe following code snippet:
Dim myValue As Integer = CInt(tbMyValue.Text)Dim myTotal As Integer = CInt(tbMyTotal.Text)lblPercentageLabel.Visible = TruelblPercentage.Text = MyWebService.CalculatePercentage(myTotal, myValue) & "%"
The final code should appear as shown in Listing 21.2.

910 CHAPTER 21 BUILDING AND USING WEB SERVICES
Listing 21.2: Full code listing for Default.aspx.vb
Partial Class _DefaultInherits System.Web.UI.PageDim MyWebService As New localhost.Service
Protected Sub form1_Load(...) Handles form1.LoadlblServerTime.Text = MyWebService.ServerTime
End Sub
Protected Sub btnCalculate_Click(...) Handles btnCalculate.ClickDim myValue As Integer = CInt(tbMyValue.Text)Dim myTotal As Integer = CInt(tbMyTotal.Text)
lblPercentageLabel.Visible = TruelblPercentage.Text =
MyWebService.CalculatePercentage(myTotal, myValue) & "%"End Sub
End Class
Setting up this part of the project is now complete. In Solution Explorer, right-click Default.aspx and choose Set As Start Page. Run the application and test the methods.
Figure 21.10 illustrates the running application after 20 has been entered as MyValue and 56has been entered as MyTotal.
Figure 21.10
The runningMyConsumer application
Simple AJAX ImplementationASP.NET 3.0 and 3.5 integrate AJAX to enable developers to easily perform partial updatesof web pages accessing ASP.NET web services. These updates not only do not require a fullrefresh of the page, they also can be performed asynchronously so as not to interfere with otheroperations on the page.

SIMPLE AJAX IMPLEMENTATION 911
In this example, I will use a simple combination of the AJAX controls to enable the ServerTime method from MyWebService to be continuously updated on a page in MyConsumer. Amore sophisticated implementation enables the developer to access the methods in the web ser-vice from client script (JavaScript). This latter implementation is fully asynchronous, whereasour example will have some limitations that are explained later in this section.
Open MyWebService in Visual Studio and run the application to open an instance of theASP.NET Development Server. Next, open a separate instance of Visual Studio 2010 from theStart menu and open the MyConsumer website. Complete the following steps:
1. From the Website menu, click Add New Item. From the Add New Item dialog box, selectAJAX Web Form and rename it myAjax.aspx. Click the Add button.
2. When myAjax.aspx opens in design mode, you will see that it has a default ScriptManagercontrol on the page. Do not delete this control because it is necessary for the AJAX func-tionality to work. From the AJAX Extensions toolbox, drop an UpdatePanel control ontoyour page underneath the ScriptManager control. The UpdatePanel control acts as an areathat can be partially refreshed without involving an entire page refresh. Keep the defaultID property of UpdatePanel1.
3. From the AJAX Extensions toolbox, drop a Timer control into UpdatePanel1. In the Proper-ties window, set the Interval property to 1000 (1 second). When you place the Timer con-trol inside the UpdatePanel control, UpdatePanel1 automatically responds to Tick eventsfrom the Timer. You can also set the UpdatePanel control to respond to events from exter-nal controls by using the UpdatePanel Triggers property.
4. From the Standard toolbox, drop a Label control into UpdatePanel1. Set the ID property tolblServerTime and delete the default entry in the Text property.
5. Double-click Timer1 to enter code-behind for the application. This should openmyAjax.aspx.vb.
6. MyConsumer already has a web reference for MyWebService, so at the top of the page,directly under the Inherits System.Web.UI.Page entry, add the following:
Dim MyWebService As New localhost.Service
7. In the code skeleton for the Timer1_Tick event, add the following line of code:
lblServerTime.Text = MyWebService.ServerTime
This part of the application is now complete. Listing 21.3 gives the full code listing formyAjax.aspx.vb.
Listing 21.3: Full code listing for the myAjax.aspx.vb partial class myAjax
Inherits System.Web.UI.PageDim MyWebService As New localhost.Service

912 CHAPTER 21 BUILDING AND USING WEB SERVICES
Protected Sub Timer1_Tick(...) Handles Timer1.TicklblServerTime.Text = MyWebService.ServerTime
End SubEnd Class
Right-click the entry for myAjax.aspx in the Solution Explorer and choose Set As Start Pagefrom the context menu. Click the green arrow or press F5 to run the application. The runningpage should display the current server time, which is automatically updated every second.
You can now add to the page further controls and functionality that are separate fromthe UpdatePanel control. These controls will not be affected by the partial page refreshesperformed by the UpdatePanel control. The main limitation of this approach is that any othercontrol placed inside the UpdatePanel (or any other UpdatePanel control on the page) will belocked out while waiting for MyWebService to complete its business (every second!).
You can test this behavior by adding a second UpdatePanel control to the page and drop-ping a TextBox control into it. Drop a second TextBox control onto the page, but not inside theUpdatePanel. Run the application and try typing into the TextBoxes. You will find that it isdifficult to type text into the TextBox inside the UpdatePanel.
Building and Using WCF ServicesNow that you have seen how to build a basic web service, we’ll switch our attention to Win-dows Communication Foundation (WCF) services. WCF is a well-structured approach to build-ing web services, and the process is straightforward, but there are a few rigid steps you haveto follow.
A WCF service encompasses three basic principles, known as the ABC of WCF:
A is for address Each service has an address (a URL) where it can be found. You can movethe service to a different computer and all you have to do is change the configuration file of theclient to see the same web service at its new host.
B is for binding There are many protocols you can use to talk to the service, and the clientmust specify the binding to the service. The same service can talk to multiple clients using dif-ferent bindings: some clients may use Basic HTTP, other might use Named Pipes (if the webservices are running on the same machine as the service).
C is for contract The contract describes the data types and messages that can be exchangedbetween the client and the server. The service tells the client its capabilities.
Visual Studio will configure these settings almost automatically for you; all you have to dois edit the service configuration file. The service is written once and it will support multiplebindings. Moving the service to another computer is also very simple because you can specifythe new endpoint by editing the configuration file.
Building a WCF ServiceTo demonstrate the steps to build a WCF service, we’ll build a simple service to manipulateproducts and categories. The service will maintain two lists, one with categories and anotherwith products. Each product has a field that points to a row in the categories table. For thepurpose of this sample application, we’ll store our data in two List collections. If you want tomodify the application to work with a database, you’ll only have to change the implementation

BUILDING AND USING WCF SERVICES 913
of the service’s methods; instead of using the collections as its data source, the service willcontact a database. In between sessions, you can persist the collections to an XML file, as dis-cussed in Chapter 13, ‘‘XML in Modern Programming.’’
Start a fresh instance of Visual Studio and select File � New � New Project. Click WCF inthe Installed Templates pane, and in the pane with the matching project types, select WCF Ser-vice Library. Name the new project WCFProducts and click OK to create the project. The newproject that Visual Studio will create for you contains two files: the IService1.vb class, whichis an interface that contains the signatures of the service methods, and the Service1.vb class,which contains the implementation of the methods. The methods are some extremely trivialsample methods and you can delete them right away.
The first step is the design of a class that represents the entities our service knows about.Obviously, we need a Product and a Category class and I have nested the Category class withinthe Product class. Both classes contain just a few properties to identify products and categories.Add the Product class to the WCF project and insert in it the code of Listing 21.4.
Listing 21.4: The Product.vb class
<DataContract()>Public Class Product
<DataMember()> Public ProductID As Integer<DataMember()> Public ProductName As String<DataMember()> Public ProductPrice As Decimal<DataMember()> Public ProductCategoryID As Integer
Public Overrides Function ToString() As StringReturn ProductName & " (" & ProductID & ")"
End Function
<DataContract()> Public Class Category<DataMember()> Public CategoryID As Integer<DataMember()> Public CategoryName As StringPublic Overrides Function ToString() As String
Return CategoryName & " (" & CategoryID.ToString & ")"End Function
End ClassEnd Class
This is a very simple class that describes products and categories, if you ignore the deco-rations of the various members. The entire class is marked with the DataContract attribute,which tells the compiler that the following class contains the service’s contract: the entities ourservice knows about. The clients of the service will communicate with our class by submit-ting objects from the Product and Product.Category classes, and the service will return datato the client application using instances of these two classes. The DataMember attribute tellsthe compiler that the corresponding property is a member of the contract and that it should beexposed to the clients. If you have properties that you want to use in your code but not exposeto clients, just don’t mark them with the DataMember attribute.

914 CHAPTER 21 BUILDING AND USING WEB SERVICES
The next step is the definition of the methods that the clients will use to contact our ser-vice. The methods must be defined in an interface class, which contains the method definitionsbut not their actual implementation. This interface class contains the service’s metadata — theinformation required by a client to figure out the service’s capabilities. Add the IProduct classto the project and insert the statements shown in Listing 21.5 in it (the IProduct.vb file).
Listing 21.5: Describing the Product class with an interface
Imports System.ServiceModel<ServiceContract()>
Public Interface IProduct<OperationContract()> Function
GetAllCategories() As List(Of Product.Category)<OperationContract()> Function
GetAllProducts() As List(Of Product)<OperationContract()> Function
AddProduct(ByVal prod As Product) As Product<OperationContract()> Function
RemoveProduct(ByVal ID As Integer) As Boolean<OperationContract()> Function
GetCategoryProducts(ByVal ID As Integer)As List(Of Product)
End Interface
This is another trivial class, except that it’s marked with the ServiceContract attribute,which tells the compiler that the class contains the service’s operations (as opposed to the ser-vice’s data structure, which was defined in the Product class). The methods are also markedwith the OperationContract attribute, which makes them available to clients. Without thisattribute, the procedures would be internal methods and clients wouldn’t be able to see them.
If the service exchanges simple data types with the client, this interface would be adequate.However, practical services are not limited to simple data types like integers and strings. Theycommunicate with the client using business objects, which are based on custom classes. Theseobjects represent customers, products, invoices, and the like. If you want to make use of customobjects, you must declare them in a separate class like the Product class shown earlier.
Finally, you must add yet another class to the project — this time a class that contains theactual code and implements the service. This is the ProductService class in the sample project,and its code is shown in Listing 21.6. The ProductService class implements the IProduct inter-face, taking into consideration the classes defined in the Product class.
Listing 21.6: The implementation of the ProductService class
<ServiceBehavior()> Public Class ProductService :Implements IProduct
Shared _products As New List(Of Product)Shared _categories As New List(Of Product.Category)

BUILDING AND USING WCF SERVICES 915
Public Function AddProduct(ByVal prod As Product) As ProductImplements IProduct.AddProduct
‘ grab the next ID in _products listprod.ProductID =
(From p In _productsSelect p.ProductIDOrder By ProductID Descending).
FirstOrDefault + 1‘ If category field is not set to a valid category, ignore it
If (From c In _categoriesWhere c.CategoryID = prod.ProductCategoryID).Count = 0 Then
prod.ProductCategoryID = NothingEnd Ifproducts.Add(prod)Return prod
End Function
Public Function GetAllCategories() AsSystem.Collections.Generic.List(Of Product.Category)Implements IProduct.GetAllCategories
Return _categoriesEnd Function
Public Function GetAllProducts() AsSystem.Collections.Generic.List(Of Product)Implements IProduct.GetAllProducts
Return _productsEnd Function
Public Function RemoveProduct(ByVal ID As Integer)As Boolean Implements IProduct.RemoveProduct
products.Remove(_products.Find(Function(p) p.ProductID = ID))End Function
Protected Overrides Sub Finalize()MyBase.Finalize()
End Sub
Public Function GetCategoryProduct(ByVal categoryID As Integer)As List(Of Product)Implements IProduct.GetCategoryProducts
Return (From p In _productsWhere p.ProductCategoryID = categoryID).ToList
End Function
Public Sub New()

916 CHAPTER 21 BUILDING AND USING WEB SERVICES
_categories.Add(New Product.Category With{.CategoryID = 101, .CategoryName = "Electronics"})
_categories.Add(New Product.Category With{.CategoryID = 102, .CategoryName = "Cameras"})
_categories.Add(New Product.Category With{.CategoryID = 103, .CategoryName = "Software"})
End SubEnd Class
The data are stored in the _products and _categories collections, which are private to theclass, and no client can manipulate these collections directly. This is the essence of the service:It allows clients to view and manipulate the data through a well-defined interface, and the ser-vice itself is in charge of maintaining the integrity of the data. Since we don’t have a databaseat the back end, we’re also responsible for maintaining the IDs of the various entities. Everytime a new product is added, the code retrieves the largest product ID from the _productscollection, adds 1 to it, and forms the ID of the new product. The same is true for the IDs ofthe categories. Notice also that every time the service is initialized, it adds three rows to the_categories table. It goes without saying that you can change the implementation of the ser-vice so that it interacts directly with the Northwind database instead of custom collections. Todo so, you will change the implementation of the ProductService class without having to touchthe other two classes. As a consequence, client applications will continue using your service,but with the new implementation of the service, they will be seeing the data of the Northwinddatabase.
The two collections must be declared with the Shared keyword so that all instances of theservice will see the same data. Had we declared the two collections with a Dim statement, anew set of collections would be created for each instance of the class invoked by a client. Inother words, every client application would see its own data source.
Your WCF service is ready to service clients. To test it, press F5 and you will see an iconin the lower-right corner of your screen informing you that the WcfSvcHost utility has started.This utility, which comes with Visual Studio, hosts the service and makes it available to clientsat a specific IP address and port. Since WcfSvcHost is meant for testing purposes, only appli-cations running on the same machine can connect to it. Once the service has been debugged, itcan be deployed as an IIS application.
A few moments later you will see another window, the WCF Test Client utility, whichallows you to test your new service without writing a client application. The first time yourun the project you’ll see an error message to the effect that the service doesn’t expose anymetadata. This happened because you haven’t configured your application yet. Right-clickthe App.config file in the Solution Explorer, and from the shortcut menu, select Edit WCFConfiguration. The Configuration Editor window appears, as shown in Figure 21.11.
Configuring WCF Services
A WCF service is defined by three parameters: an address where it can be reached (the end-point), a binding protocol, and a contract. All three parameters are configurable, and you neednot edit the service code to redeploy it or to support additional bindings. You only need to editthe configuration file.
The address is an IP address or URL that specifies where the service is located. It’s theaddress of the machine on which the service is running and, consequently, the address to

BUILDING AND USING WCF SERVICES 917
which clients must connect to make requests. The binding determines how the clients willtalk to a service and WCF supports multiple bindings. The contract, finally, specifies what theservice does; in other words, the methods it provides. The contract is the service interface,much like the classes and methods of a namespace. If you want to totally abstract a WCFservice, think of it as a namespace that’s being hosted on a remote computer. Just as you cancall a method in a namespace, you can call a method of a WCF service. As you saw in the firstexample of this chapter, you can access a remote service from within your project by addinga reference to the service. With that reference in place, Visual Studio will take care of thehousekeeping needed to connect to the remote service (what’s also known as the plumbing).
Figure 21.11
The Configuration Edi-tor’s window allows youto configure the parame-ters of a WCF service.
The binding tells the client how the messages will be transmitted between the client and theservice. Web services use HTTP to exchange data with the clients. This, however, is not perfectfor all cases. HTTP is a universal protocol, and it’s been implemented on every operating sys-tem, but it’s the most generic protocol. Windows, as well as other operating systems, supportmessaging: a mechanism for reliably transmitting information between two computers, even ifone of them is offline. When the receiving computer is connected, the message will be deliveredand processed. This mechanism, which relies on Microsoft’s Message Queues, is the most reli-able mechanism for exchanging data between two computers, but this type of communicationisn’t synchronous.
There are situations where the WCF service and its client are deployed on the same localarea network. For these cases, there are protocols, such as Named Pipes, that perform muchfaster than HTTP. I can’t discuss the merits of all available bindings in this chapter. This isan advanced topic, and the goal of this chapter is to introduce you to a technique for writingapplications as services. The basic techniques are within the reach of the average VB devel-oper, and I will limit the discussion to the basic techniques for building WCF services and

918 CHAPTER 21 BUILDING AND USING WEB SERVICES
deploying them on a web server. WCF allows you to build a service following the steps dis-cussed so far and then configure them. The configuration involves the specification of the end-point (the service’s address) and the binding protocol. You can even implement multiple bind-ings on the same service so that different clients can contact the same service using differentprotocols.
To configure the sample WCF service, you must first change the name of the service.Although you changed the default name of the service, the configuration file still remembersthe original name, Service1, which was the name of the sample class that was generated auto-matically and that we removed from the project. Click the WCFProducts.Service1 item in theleft pane of the Configuration Editor, which was shown in Figure 21.11, and then select theName property in the right pane. Click the button with the ellipsis next to the service’s nameand the Service Type Browser dialog box will open, as shown in Figure 21.12. This dialog boxis similar to the Open dialog box, which allows you to select a file. Navigate to the project’sBin/Debug folder and select the WCFProducts.dll file. Click open, or double-click the file’sname to see the names of all services implemented in the DLL. You will see a single servicename, the WCFProducts.ProductService name. Select it and the close the dialog box byclicking the OK button.
Figure 21.12
Configuring the name ofthe WCF service
You will notice that the new service has two predefined endpoints. Click the first oneand the endpoint’s properties will be displayed on the editor’s right pane. The first end-point uses the wsHttpBinding binding and implements the contract WCFProducts.Service1service. There’s no Service1 service, so you must change the name of the service with thesame process described earlier. Locate the project’s DLL and set the endpoint’s contractto WCFProducts.IProduct interface. While configuring the first endpoint, set its name toHTTPBinding.
Now select the second endpoint and you’ll see that it implements the mexHttpBinding, asshown in Figure 21.13. This binding provides the service’s metadata and you need not changeits settings. Just set its name to MEXBinding, so that it won’t be displayed as (Empty Name).

BUILDING AND USING WCF SERVICES 919
Figure 21.13
Configuring an endpointof a WCF service
Save the configuration with the Save command from the File menu and close the Config-uration Editor. Now you’re ready to test the service. Press F5 again and this time the WCFTest Client window appears, as shown in Figure 21.14. The WCF Test Utility window con-sists of two panes: on the left pane you see all the methods of the service (you must expandthe service’s interface to see the names of the methods), and on the right pane you can call theselected method and see the results. To see the categories shown in Figure 21.14, for example,I double-clicked the GetAllCategories item in the left pane and then I clicked the Invoke but-ton. The utility called the GetAllCategories method and displayed the results in the lowerpart of the pane.
You can use the WCF Test Client utility to test the methods of your new service, but even-tually you must host your service to a web server, or an application, and call it from anotherWindows or web client.
You can also test the methods that submit data to the service. If you double-click theAddProduct method name, a new tab will open in the right pane, as shown in Figure 21.15, andyou’ll be prompted to enter values for the method parameters. Specify the parameter values(you don’t have to provide a value for the ProductID parameter; this value is assigned auto-matically by the service) and then click the Invoke button. The utility will call the AddProductmethod, and if executed successfully, it will display the new product in the lower half of thetab, as shown in the figure.
Note that the new product’s ID is included in the result of the method because the methodreturns an object of the Product type that represents the newly inserted row.
Implementing a web or WCF service is no different from implementing a class that exposescertain functionality through a set of methods and communicates with another application byexchanging specific types. The only difference between a class you’d use in a Windows applica-tion and a service is that the members of the service are marked with special attributes. More-over, when it comes to WCF services, you must also configure them with the ConfigurationEditor.

920 CHAPTER 21 BUILDING AND USING WEB SERVICES
Figure 21.14
Testing the methods ofthe new WCF servicein the WCF Test Clientutility
Figure 21.15
Submitting a newproduct to the Product-Service service throughthe WCF Test Client
ADO.NET Data ServicesBefore ending this chapter, I’d like to show you briefly how to create services that expose anentire database. This type of service comes as a special project component of Visual Studio, theADO.NET Data Services component. An ADO.NET Data service is a web service that exposesan entire database, or part of it, as a web service. What’s special about this component is thatit’s generated automatically for you; all you have to do is specify the tables you want to expose

ADO.NET DATA SERVICES 921
and a wizard will generate the service for you. The data source can be a database, an EntityData Model (EDM), or a collection of custom objects. There’s nothing new to learn and you cancreate and use data services immediately, with the exception of some techniques for securingyour data. The data service will expose methods to both query and update the data source, butyou obviously don’t want to give access to your database to anyone on the Web.
Let’s start the exploration of data services by building a new project, the DataService project;you can download it from this URL: www.sybex.com/go/masteringvb2010. Create a new pro-ject of the ASP.NET Web Site type, since your data will be exposed over HTTP. As you willsee, you have no need for a website per se, just a web service that will expose the data of aspecific database (or part of it). As soon as the project is created, delete the ASPX page thatVisual Studio adds by default to any project of this type.
First, you must create a data source. For the purpose of this example, you’ll expose datafrom the Northwind database, and to do so, you’ll create an ADO.NET Entity Data Modelby adding a new component of this type to the project. Keep the default name, which isModel1.edmx. When the wizard starts, select all of the tables in the database, as you learnedin Chapter 19. For this example, I’ve included all 12 tables of the Northwind database. I justdropped them on the EDM design surface and Visual Studio generated the Model1.edmx datamodel.
Now that you have the data source, you can add an ADO.NET Data Service component toyour project to expose the selected tables through a web service. Right-click the project nameand select Add New Item. When the Add New Item dialog box opens, select the ADO.NETData Service. Name the new service NWWebDataService. Visual Studio will create theNWWebDataService.svc file for you and will open the new data service’s code window. Youwill see that the new class contains just a few lines of code:
Imports System.Data.ServicesImports System.LinqImports System.ServiceModel.Web
Public Class NWWebDataService‘ TODO: replace [[class name]] with your data class nameInherits DataService(Of [[class name]])
‘ This method is called only once to initialize service-wide policies.Public Shared Sub InitializeService(
ByVal config As IDataServiceConfiguration)‘ TODO: set rules to indicate which entity sets‘ and service operations are visible, updatable, etc.‘ Examples:‘ config.SetEntitySetAccessRule("MyEntityset", EntitySetRights.AllRead)‘ config.SetServiceOperationAccessRule(‘ "MyServiceOperation", ServiceOperationRights.All)
End SubEnd Class
The NWWebDataService inherits from another class, whose name you must supplyby replacing class name in the code line that reads: Inherits DataService(Of [[classname]]). The class it derives from should be NorthwindEntities, which is the name of the

922 CHAPTER 21 BUILDING AND USING WEB SERVICES
Data Entity class you created as the project’s data source. Technically, you didn’t specify theNorthwindEntities name, but Visual Studio created this class and named it after the database.
The statements that are commented out specify the data you want to expose through yourdata service. By default, the data service won’t expose any data unless you tell it to do so.Replace the last two statements of the InitializeService routine with the following:
config.SetEntitySetAccessRule("*", EntitySetRights.All)
This statement instructs the service to expose all resources. Obviously, this is the last thingyou want to do with a real service that will be accessed from outside your test machine,and I’ll come back to the issue of security, but for now let’s grant unconditional access to alltables through your service. For the purpose of this chapter, the service will be hosted by theASP.NET Development Server, which can be accessed from the same machine only.
You’re probably thinking it’s time to add some real code, or look at a few thousand lines ofcode generated by the wizard. This isn’t the case; your data service is complete. Right-click theNWWebDataService component name, and from the context menu, select View In Browser. Afew seconds later you will see a new Internet Explorer window displaying a list of all tables inthe database, as shown in Figure 21.16.
Figure 21.16
The service exposes thenames of all tables in itsdata source.
Each table, which is an EntitySet in the data source, is exposed as a collection. By appendingthe entity name to the base URL of the service, you can view the rows in the correspondingtables. Change the URL in the browser address bar to any of the following to see the products,categories, and customers in the Northwind database:
http://localhost:51000/NWWebDataService.svc/Products
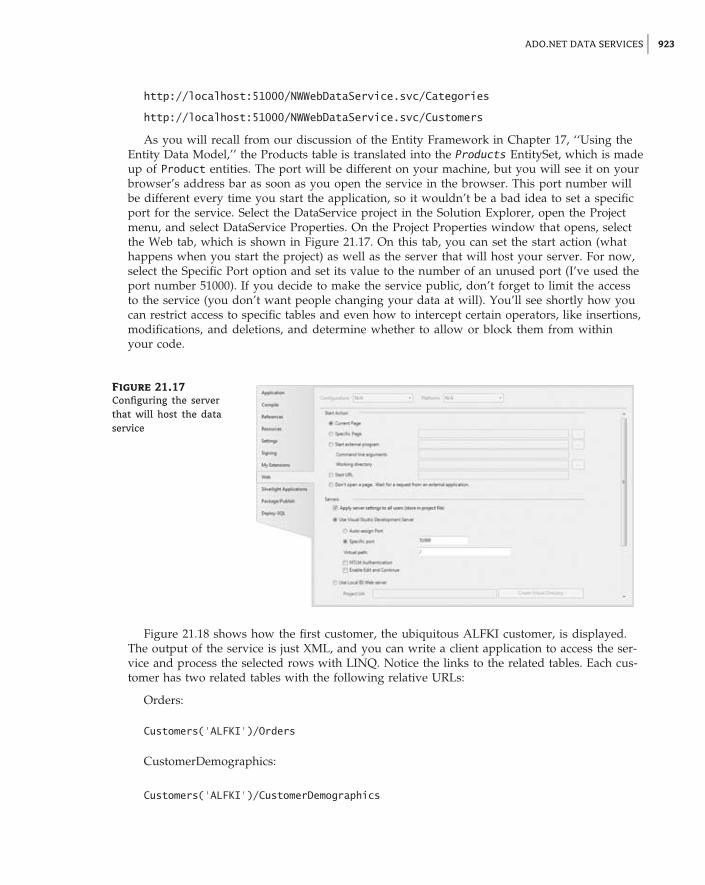
ADO.NET DATA SERVICES 923
http://localhost:51000/NWWebDataService.svc/Categories
http://localhost:51000/NWWebDataService.svc/Customers
As you will recall from our discussion of the Entity Framework in Chapter 17, ‘‘Using theEntity Data Model,’’ the Products table is translated into the Products EntitySet, which is madeup of Product entities. The port will be different on your machine, but you will see it on yourbrowser’s address bar as soon as you open the service in the browser. This port number willbe different every time you start the application, so it wouldn’t be a bad idea to set a specificport for the service. Select the DataService project in the Solution Explorer, open the Projectmenu, and select DataService Properties. On the Project Properties window that opens, selectthe Web tab, which is shown in Figure 21.17. On this tab, you can set the start action (whathappens when you start the project) as well as the server that will host your server. For now,select the Specific Port option and set its value to the number of an unused port (I’ve used theport number 51000). If you decide to make the service public, don’t forget to limit the accessto the service (you don’t want people changing your data at will). You’ll see shortly how youcan restrict access to specific tables and even how to intercept certain operators, like insertions,modifications, and deletions, and determine whether to allow or block them from withinyour code.
Figure 21.17
Configuring the serverthat will host the dataservice
Figure 21.18 shows how the first customer, the ubiquitous ALFKI customer, is displayed.The output of the service is just XML, and you can write a client application to access the ser-vice and process the selected rows with LINQ. Notice the links to the related tables. Each cus-tomer has two related tables with the following relative URLs:
Orders:
Customers(’ALFKI’)/Orders
CustomerDemographics:
Customers(’ALFKI’)/CustomerDemographics

924 CHAPTER 21 BUILDING AND USING WEB SERVICES
Figure 21.18
Requesting a specificcustomer through a URLmade up of the service’sURL and the table name
To view the orders of the customer ALFKI, enter the following URL in your browser:
http://localhost:51000/NWWebDataService.svc/Customers(’ALFKI’)/Orders
To isolate a specific column, append it to the table’s URL. The following URL will return thecity of the ALFKI customer:
http://localhost:51000/NWWebDataService.svc/Customers(’ALFKI’)/City
The service will return it as an XML element:
<City xmlns="http://schemas.microsoft.com/ado/2007/08/dataservices">Berlin</City>
You can also request just the value (in this case, Berlin) by appending a dollar sign fol-lowed by the keyword value:
http://localhost:51000/NWWebDataService.svc/Customers(’ALFKI’)/City/$value
And you can navigate through related rows using this URL syntax. To view the IDs of theorders placed by the customer BLAUS, connect to the following URL:
http://localhost:51000/NWWebDataService.svc/Customers(’BLAUS’)/Orders
Here I used the URL that retrieves the customer and appended the name of the related tables(the Orders table). The URL so far returns the orders of the specified customer. You can select

ADO.NET DATA SERVICES 925
a specific order by its ID and request its detail lines. The following URL does exactly that (theURL should be entered as a single line; it’s been broken here to fit the printed page):
http://localhost:51000/NWWebDataService.svc/Customers(’BLAUS’)/Orders(10501)/Order_Details
The service will return the following XML document:
<?xml version="1.0" encoding="utf-8" standalone="yes" ?>- <feed xml:base=http://localhost:51000/NWWebDataService.svc/xmlns:d=http://schemas.microsoft.com/ado/2007/08/dataservicesxmlns:m=http://schemas.microsoft.com/ado/2007/08/dataservices/metadataxmlns="http://www.w3.org/2005/Atom"><title type="text">Order_Details</title><id>http://localhost:51000/NWWebDataService.svc/Customers(’BLAUS’)
/Orders(10501)/Order_Details</id><updated>2009-11-30T22:59:21Z</updated><link rel="self" title="Order_Details" href="Order_Details" />
- <entry><id>http://localhost:51000/NWWebDataService.svc/
Order_Details(OrderID=10501,ProductID=54)</id><title type="text" /><updated>2009-11-30T22:59:21Z</updated>
- <author><name /></author><link rel="edit" title="Order_Detail"
href="Order_Details(OrderID=10501,ProductID=54)" /><link rel="http://schemas.microsoft.com/ado/2007/08/dataservices/related/Order" type="application/atom+xml;type=entry" title="Order"href="Order_Details(OrderID=10501,ProductID=54)/Order" /><link rel=http://schemas.microsoft.com/ado/2007/08/dataservices/related/Product
type="application/atom+xml;type=entry" title="Product"href="Order_Details(OrderID=10501,ProductID=54)/Product" /><category term="NorthwindModel.Order_Detail"
scheme="http://schemas.microsoft.com/ado/2007/08/dataservices/scheme" />- <content type="application/xml">- <m:properties>
<d:OrderID m:type="Edm.Int32">10501</d:OrderID><d:ProductID m:type="Edm.Int32">54</d:ProductID><d:UnitPrice m:type="Edm.Decimal">7.4500</d:UnitPrice><d:Quantity m:type="Edm.Int16">20</d:Quantity><d:Discount m:type="Edm.Single">0</d:Discount></m:properties></content></entry></feed>

926 CHAPTER 21 BUILDING AND USING WEB SERVICES
If you examine it, you’ll see that it includes two related entities: the Order entity (the orderto which all detail lines belong) and the Product entity (the product listed in each detail line).
By default, the data service doesn’t move the related rows from the database to the client. Ifyou want to view the related data, you must use the expand keyword followed by the name(s)of the entities you wish to retrieve along with each product. The following URL will bring asingle product, along with its category and supplier:
http://localhost:51000/WebDataService1.svc/Products(12)?$expand=Category,%20Supplier
If you examine the XML returned by this query, you’ll see that it has three <link> elements,which represent the related rows in other tables: the Order Details, Categories, and Supplierstables. The links to the Categories and Suppliers tables have a plus symbol in front of them,and if you click it to expand the corresponding entity, you’ll see the details of the product’scategory or supplier, as shown in Figure 21.19.
Figure 21.19
Retrieving related rowswith the $expandoption
Likewise, the following statement will bring up an order along with its detail lines and aproduct for each detail line:
http://localhost:51000/WebDataService1.svc/Customers(’BLAUS’)/Orders(10501)/Order_Details?$expand=Product
Filtering
Querying your data through a URL may seem odd at first, but it’s sure easy to understand thenotation of querying through URLs. You can also filter the results returned by the query with

ADO.NET DATA SERVICES 927
the filter keyword, which must be followed by a filtering expression. The following statementwill return all products with a price that exceeds $100:
http://localhost:51000/WebDataService1.svc/Products?$filter=UnitPrice gt 100
Note that the comparison operator is not the greater than sign (>) but the gt operator. The fil-tering expressions can get quite complicated because the URL syntax isn’t flexible enough forexpressing multiple criteria, joining tables together, and so on. The data service allows us to getthe data we need with a simple HTTP request, but for many operations you’ll have to down-load the desired data at the client and process them locally with LINQ.
The data service works very nicely, and it took us no time at all to write. You’ll see shortlyhow to write client applications against this service and how to submit updates to the databaseas well. For now, keep in mind that an ADO.NET Data service exposes (or ‘‘surfaces’’) the datain a data source. We have used a Data Entity Model as our data source in this example, butyou can use any data source such as LINQ to SQL, or even a collection of custom objects. Nomatter how you specify the data source, the data service will expose it through HTTP requests.
The Basic Query Operators
For those of you who are interested in exploring the notation for URL querying further,Table 21.1 provides a quick overview of the various operators.
Table 21.1: Basic query operators
Type Operators
Logic operators eq (equals), ne (not equals)gt (greater than), gteq (greater than or equal to)lt (less than), lteq (less than or equal to)and, or, and not
Arithmetic operators add (addition), sub (subtraction), mul (multiplication), div (division),mod (remainder)round (round decimal digits)floor (returns the largest integer that doesn’t exceed a value)ceiling (returns the smallest integer that exceeds a value)
String operators contains, endswith, startswith, length, indexof, insert,replace, substring, tolower, toupper, trim, concat
Date/time operators Second, hour, minute, day, month, year
Type operators Isof, cast
Here are a few simple examples of the operators you can use in your filtering expres-sions. (I’m only showing the part of the URL that follows the service’s address, which ishttp://localhost:51000/WebDataService1.svc/)

928 CHAPTER 21 BUILDING AND USING WEB SERVICES
Products?$filter=startswith(ProductName, Sir’)Orders?$filter=month(OrderDate) eq 2Orders?$filter=endswith(ShipName,’markt’)
ADO.NET Data Services allows you to expose (or surface) an entire database and buildclient applications that use the service as the data source. The database has already beenexposed, and you can write code to exploit the data using the HttpWebRequest/HttpWebResponse objects, as you saw in the preceding chapter. The data are exposed through thesimplest possible mechanism, namely through HTTP. But expressing conditions and statementsto retrieve our data using the URL syntax is rather awkward. There are more structured tools,LINQ being one of them. Can you access the data exposed by your service with LINQ? Theanswer is Yes! And LINQ can translate the standard query operators into the equivalent URLsyntax. This URL querying syntax is convenient for testing the service, but no one expects youto write applications using the query syntax (not in this day and age, at least). There are toolsto use the same data as business objects from a client application, and this is what you’re aboutto do next.
Building a Windows ClientIn this section, I’ll guide you through the process of building a Windows client that consumesthe data of the data service. As you can guess, Microsoft didn’t go to the trouble of developingADO.NET Data Services so we would have to process the XML returned by the queries on ourown. There are tools that simplify the process enormously, and you’ll see them in this section.
The tool that will allow us to see the entities of the new Entity Data Model at the client is acommand-line tool. This tool is the DataSvcUtil.exe utility, which reads the service’s meta-data and creates a class that encapsulates the functionality of the service. Open a commandprompt window and run the DataSvcUtil.exe utility, which resides in the folder Windows\Microsoft.NET\Framework.NET\v.4.0.xxx, where xxx is the latest revision of the framework.This value as of this writing is 4.0.30138, but it will most likely be a little different by the timeVisual Studio 2010 is released. Choose the most recent version of the Framework and switchto that folder. In this folder you’ll find the DataSvcUtil.exe utility, which you must execute,passing as an argument the URL of the data service for which you want to generate a proxy (aproxy is a class that exposes the data model and the appropriate methods to access the service’sdata).
To generate the proxy, start the DataSvcUtil.exe utility with a statement similar to the fol-lowing in the command prompt window:
DataSvcUtil.exe /out:"C:\Project\DataServices\NWProxy.vb"/uri:"http://localhost:51000/NWWebDataService.csv" /language:vb
This creates the proxy file in the root folder of one of my drives, so I can locate it easily later.Be sure to change the path to a folder that’s easy for you to locate later because you will haveto include this file with your solution.
Before you execute this command, however, you must start the service for the new port totake effect. Open the service in the browser as usual, and as soon as you see the list of tablesexposed by the service, close the browser. The service will continue to run in Visual Studio andthe browser is not required. The DataSvcUtil.exe utility will generate the file NWProxy.vbin the specified folder. Move this file to the folder that contains the Windows project you’re

ADO.NET DATA SERVICES 929
building, and then add it to the same project with the Add � Existing Item command. Youcould add the proxy to your current project without moving it, but then the project files willbe scattered all over your drives.
To simplify matters, I’ve added a Windows project to the solution, and its main form isshown in Figure 21.20. This is the client application that will contact the data service to inter-act with the Northwind database. To see the newly created data model in action, you must addthe auto-generated proxy file to the Windows project by copying the NWProxy.vb file into thefolder of the Windows application. Then place a button on the main form of the test project,the Read Data From Service button, and create a variable to reference the proxy class with thefollowing declaration in your code (just make sure to change the port to the appropriate value):
Dim service As New NorthwindModel.NorthwindEntities(New Uri("http://localhost:51000/NWWebDataService.svc"))
Figure 21.20
Consuming an ADO.NETData service through aWindows client
Now you’re ready to access the tables in the Northwind database through the service. YourWindows application is a client that connects to the service through the URL of a web service.It has no direct access to the database, which means you don’t have to open any ports to SQLServer on your database server and no credentials are stored at the client application. All itneeds is a so-called HTTP stack (basically, any computer that can access the Internet can hostthe application). You can view the methods exposed by the NWProxy server (which are thesame as the methods of the underlying service) by entering the name of the service variableand a period.
You probably recall that you granted access to all tables for all users. I’ll come back to thistopic shortly and show you how to limit the access to your service, but let’s see how the proxy

930 CHAPTER 21 BUILDING AND USING WEB SERVICES
allows you to access the data. With the service variable in place, you can access the tables inthe Northwind database as collections of typed objects.
To access a table, use a loop like the following, which iterates through the rows of the Cus-tomers table:
For Each p In service.ProductsDebug.WriteLine(p.ProductName)
Next
As you can see, the collections returned by the service are typed and so the p variable exposesthe names of the columns of the Customers table as properties.
In a similar manner, you can iterate through the Categories table:
For Each c In categoriesDebug.WriteLine(c.CategoryName)
Next
If you want to access the products in each category, you must explicitly request these rowsof the Products table as you iterate through the categories. The data service doesn’t moveall data to the client. To request the matching rows of a related table, use the LoadPropertymethod, which accepts two arguments: an entity name, which is a row of the current table, andthe name of the related table. To iterate through the categories and their related products, writetwo nested loops like the following:
For Each c In categoriesDebug.WriteLine(c.CategoryName)service.LoadProperty(c, "Products")For Each p In c.Products
Debug.WriteLine(p.ProductName & vbTab & p.UnitPrice.ToString)Next
Next
Since you’re working with typed collections, you can use all LINQ operators to process yourdata. The following loop selects the customers from Germany and then the orders they haveplaced:
For Each c In service.Customers.Where(Function(cust) cust.Country = "Germany")service.LoadProperty(c, "Orders")Debug.WriteLine(c.CompanyName)For Each o In c.Orders
Debug.WriteLine(vbTab & o.OrderID)Next
Next
To use the data service efficiently, you must execute the appropriate queries and retrieveonly the relevant data and not entire tables or even related rows that aren’t needed. Let’s sayyou want to retrieve the orders from all customers in Germany that were placed in a specificyear. Instead of using the LoadProperty method to move all related rows from the Orderstable on the server to the client, you can use the CreateQuery method to pass a query to the

ADO.NET DATA SERVICES 931
server. You’ll specify your query in LINQ, but the data service will translate it to the appropri-ate SQL query and execute it against the server. The following expression retrieves the rows ofthe Orders table as a DataServiceQuery object, which is a typed collection:
service.CreateQuery(Of NorthwindModel.Order)("Orders")
Then you can apply any filtering on this query to limit the number of rows with the Whereoperator:
Dim selOrders = service.CreateQuery(Of NorthwindModel.Order)("Orders").Where( _Function(o) Year(o.OrderDate) = 1998 And
o.Customer.CustomerID = c)
Let’s say you need all customers in Italy ordered by their company name. To request thisinformation from the database, you’d write a query like the following:
Dim ItalianCustomers = From c In service.CustomersWhere c.Country = "Italy"OrderBy c.CompanyNameSelect c
The preceding LINQ expression was translated into the following URI query:
{http://localhost:51000/NWWebDataService.svc/Customers()?$filter=Country eq ‘Italy’&$orderby=CompanyName}
Your regular LINQ statements are being automatically translated into URIs that can be pro-cessed by the service. It looks like a new variation of LINQ, LINQ to URI, but I haven’t seenthis term being used in the documentation. Anyway, the LINQ component knows how to talkto ADO.NET Data Services, but not always with success because not all expressions you canuse with LINQ have a counterpart in SQL. To retrieve the orders with a freight charge of morethan $20, use the following trivial LINQ query:
Dim q = From o In service.OrdersWhere o.Freight > 20Select o
The preceding LINQ query is translated into the following URI by the service:
http://localhost:51000/NWWebDataService.svc/Orders()?$filter=cast(Freight gt 10M,’Edm.Boolean’)
In general, it’s much simpler to write queries using LINQ than to try to construct the properURL for any given query. The following LINQ query retrieves the products that contain theword sauce in their name, regardless of spelling:
Dim q = From p In service.ProductsWhere p.ProductName.Contains("sauce")Select p

932 CHAPTER 21 BUILDING AND USING WEB SERVICES
When this query is translated into a URI query, the service makes use of the substringof oper-ator, as shown here:
{http://localhost:51000/NWWebDataService.svc/Products()?$filter=substringof(’Sauce’,ProductName)}
If you’re wondering how I found the URI query for these LINQ queries, it’s really simple.Place a breakpoint before the LINQ query you want to monitor, and when the program breaks,add a new watch on the variable that represents the result of the query (the q variable in mostof this section’s examples). As soon as the LINQ statement is executed, the SQL statement thatwill be executed against the database will appear in the Watches window.
Submitting UpdatesUsing an ADO.NET data service to explore the data in a database is a fairly straightforwardapproach. Surfacing your data with a data service is ideal for reporting and other applicationsthat need not modify the database. Of course, the data service allows you to submit updates aswell, although this isn’t the best implemented feature of an ADO.NET data service — not yet,that is. My main objection to updating a database through a data service is that the methodsthat perform the updates do not return the error messages generated by the database. Whatyou get back is a generic error telling you that ‘‘an error occurred while processing thisrequest.’’ Whether the error occurred because the data violated some constraint or whetherit occurred because a field value was inappropriate for the corresponding column, the errormessage is the same. If you decide to use a data service to submit updates to the database, beprepared to validate the data as best as you can at the client, because the server won’t helpyou determine the source of the update errors.
Since it’s only a question of time before Microsoft brings ADO.NET Data Services up to parwith the other data access technologies, let’s look at the process of submitting updates to thedatabase. Since the underlying data source is an Entity Data Model, the process of submittingdata to the service is more or less familiar to you. To insert new rows, you create new entitiesat the client and submit them to the server with the service’s SaveChanges method. To updateexisting rows, you just change the desired fields and then call the same method. To delete rows,you delete entities at the client and then call the SaveChanges method.
To create a new product, for example, you must first create a Product object:
Dim prod As New NorthwindModel.Product
And then set the object’s properties with statements like the following:
prod.ProductName = "NEW PRODUCT NAME"prod.UnitPrice = 11.2prod.UnitsInStock = 1prod.UnitsOnOrder = 12
Some of the properties are also entities, and they must be set to the appropriate entity. Theproduct category is specified in the database with the CategoryID field, but the entity Productis related to the entity Category, so you must create a new Category entity and assign it tothe Category property of the prod variable. The same is true for the product’s supplier: You

ADO.NET DATA SERVICES 933
can set the prod.SupplierID field; you must set the Supplier property to an entity of theSupplier type. The following statements create the Category entity by reading a row from theCategories table and set up the Category property of the new product:
Dim cat = service.Categories.Where(Function(c) c.CategoryID = 4).Firstprod.Category = cat
For the product supplier, I followed a different approach to better demonstrate the processof updating the Data service. This time I created a new Supplier entity, which provides onlyscalar properties, and then I set the new product’s Supplier property to this value:
Dim supplier As New NorthwindModel.Suppliersupplier.CompanyName = "New Supplier"supplier.ContactName = "Contact name"supplier.ContactTitle = "Contact title"supplier.Address = "Supplier address"supplier.City = "City"supplier.Country = "Country"service.AddToSuppliers(supplier)service.SetLink(prod, "Supplier", supplier)
Note that this time the new entity is added to the Suppliers entity set at the client with theAddToSuppliers method. The last statement associates the product with its supplier. This linkdoes not exist at the client and must be added explicitly. Note that you don’t have to specifythe fields that take part in the relationship.
At this point you can submit the new product to the database by calling the SaveChangesmethod. The SaveChanges method doesn’t accept any arguments; it submits all changes to thedata service. Obviously, it will first submit the new supplier and then the new product. But thisisn’t something you have to worry about; the data service knows how to insert the rows in thecorrect order.
You may have noticed that the code didn’t set the IDs of the two new rows. The IDs areassigned by the database and the client has no way of knowing the next available ID in thedatabase. Other users may have inserted rows into any table and the client can’t make anyassumptions as to the next available ID. You could also use globally unique identifiers (GUIDs)as primary keys, which would allow you to generate the primary key values at the client, butfor most databases in use today this isn’t the case. Windows generates a long string that’sunique every time you create one (as the term suggests, it’s a globally unique identifier, not inyour computer or your network).
After the SaveChanges method is called, the properties prod.ProductID and supp.SupplierID will have the correct values, which will be transmitted to the client by the data service. Thisis why we had to explicitly add the appropriate links between the entities at the client with theSetLink method. As a reminder, this is necessary for new rows only. If the ID of the relatedrow is known, as was the case with the Category entity, there’s no need to call the SetLinkmethod.
The Simple Updates button of the sample application contains the statements presented sofar in this chapter. Open the project to see the code that implements the simple operations, likeupdates and deletions.

934 CHAPTER 21 BUILDING AND USING WEB SERVICES
Performing TransactionsReal data-driven applications perform updates in a transactional manner. As you will recallfrom Chapter 15, ‘‘Programming with ADO.NET,’’ an order has to be committed to the data-base in a transactional manner; the entire order must fail if a single row fails to be committedto the database. Data services allow you to perform multiple updates in the context of a trans-action as long as all the updates that belong to the transaction are submitted with a single callto the SaveChanges method. In addition, you must set the SaveChangesDefaultOptions prop-erty of the entity set to Batch.
Let’s consider the example of committing an order to the Northwind database, a ratherfamiliar example in this book. You have seen how to perform transactions with ADO.NET aswell as with data entities. To perform a transaction with a data service, you first create all theobjects that take part in the transaction: the order’s header and its detail lines. You should notcall the SaveChanges method until all entities have been created at the client, as discussed inthe preceding section. When the entire order has been set up at the client, you can submit itto the database by calling the SaveChanges method.
Let’s review the actual code that submits a new order to the database. You can find the codediscussed in this section in the Transactional Updates button of the DataServices project. Asusual, start with a reference to the data service, the service variable:
Dim service As New NorthwindModel.NorthwindEntities(New Uri("http://localhost:51000/NWWebDataService.svc"))
Then, create a new Order object, the newOrder variable, and add it to the Orders table. The newrow is appended to the Orders entity set at the client. Moreover, the new order has no ID yet.The OrderID value will be assigned by the database when the transaction is submitted to thedatabase. Here are the statements that create the newOrder object:
Dim newOrder As New NorthwindModel.Orderservice.AddToOrders(newOrder)
Now create a customer object that represents the customer that placed the order. In a realapplication, the user will most likely select the customer from a list, but since this applicationdoesn’t have an elaborate user interface, I retrieve a row from the Customers entity set at theclient. You can’t simply set the newOrder.CustomerID property, even though the newOrdervariable exposes the CustomerID property. The newOrder object has a Customer property too,and there’s a relationship between the Orders and Customers tables. To associate a customerwith the new order, we must set the order’s Customer property to a Customer object and thenestablish a relationship between the two. The following statement creates the Customer objectthat represents the Customer ANTON:
Dim cust = service.Customers.Where(Function(p) p.CustomerID = "ANTON").First()
Next, assign the cust object to the new order’s Customer property and then create a linkbetween the order and the customer:
newOrder.Customer = custservice.SetLink(newOrder, "Customer", cust)

ADO.NET DATA SERVICES 935
Follow similar steps to associate an employee with the order:
Dim emp = service.Employees.Where(Function(p) p.EmployeeID = 3).FirstnewOrder.Employee = empservice.SetLink(newOrder, "Employee", emp)
And then you can set the remaining (scalar) properties of the order with simple statements likethe following:
newOrder.OrderDate = NownewOrder.ShipAddress = cust.AddressnewOrder.ShipCity = cust.City
Now you can create the order details. Each detail is a variable of the Detail type, and eachmust be added to the Order_Details property of the newOrder object. The Order_Detailsproperty is a collection, and as such it provides an Add method. The following statement createsa new variable, the dtl variable, that represents an order detail:
Dim dtl As New NorthwindModel.Order_Detail
This variable must be added to the Order_Details entity set:
service.AddToOrder_Details(dtl)
You must also associate the new detail line with the new order:
dtl.Order = newOrder
Now you can set the properties of the detail line with statements like the following. Again,the product is selected from the Products table by its ID, while in a real application you’d prob-ably allow the user to select it from a list or another lookup mechanism:
Dim dtlProd = service.Products.Where(Function(p) p.ProductID = 31).First
Set the Product property of the new order to the dtlProduct object:
dtl.Product = dtlProd
And create a link between the detail line and the corresponding row in the Products entity set:
service.SetLink(dtl, "Product", dtlProd)
Then, you can set the remaining properties of the detail line with simple statements like thefollowing:
dtl.Product = dtlProddtl.UnitPrice = 11.2dtl.Quantity = 9
936 CHAPTER 21 BUILDING AND USING WEB SERVICES
And finally, associate the new detail line with the new order:
service.SetLink(dtl, "Order", newOrder)
Let’s add a second detail line to the order with the following statements:
dtl = New NorthwindModel.Order_DetaildtlProd = New NorthwindModel.ProductdtlProd = service.Products.Where(Function(p) p.ProductID = 56).First()dtl.Order = newOrderdtl.Product = dtlProddtl.UnitPrice = dtlProd.UnitPrice * 0.9dtl.Discount = 0.1dtl.Quantity = -5service.AddToOrder_Details(dtl)newOrder.Order_Details.Add(dtl)service.SetLink(dtl, "Product", dtlProd)service.SetLink(dtl, "Order", newOrder)
This time I’ve chosen to include a discount as well. Other than that, the process of creating anew detail line is the same. The new detail line is linked to a Product entity because it containsthe ID of a product and to the Order entity to which is belongs.
At last, you can commit the new order to the data service by calling the SaveChangesmethod of the service variable. All the objects you have created at the client will be submittedto the database in the proper order by the data service. To ensure that all rows will be insertedin a transactional manner, you must also set the service.SaveChangesDefaultOptionsproperty to the value shown in the code:
service.SaveChangesDefaultOptions = Services.Client.SaveChangesOptions.BatchTryservice.SaveChanges()Catch ex As Exception
MsgBox("FAILED TO COMMIT NEW ORDER")End Try
To see for yourself that the order is submitted in a transactional manner, set the price of theproduct of the first detail line to a negative value. The database will reject this value and theentire transaction will fail. The error that will be raised by the data service will have a verygeneric description, which won’t help you locate the bug in your code. With a straight ADOtransaction, you get back the error message generated by the database, which clearly states thevalue that the database couldn’t accept.
Once the transaction has been committed, the data service will return the ID of the order aswell as the IDs of all entities involved in the transaction. In this case, there’s only one ID valueto be set by the database.
Through the examples in this section, it’s clear that a data service is quite trivial to build andvery easy to use for selection queries. When it comes to updating the database, however, thedata service doesn’t provide all the mechanisms you’ve come to expect with other data accesstechnologies. You must establish relationships between entities in your code and you can’t relyon meaningful error descriptions to debug your code.

ADO.NET DATA SERVICES 937
Securing Your Data ServiceExposing a database as a web service on the Internet is not the best idea. To secure thedatabase from malicious users, you must set up some security measures. As you recall, theSetEntitySetAccessRule method sets the access rule for the various entities exposed by theservice. So far, you allowed users to access all entities for all operations with the followingstatement:
config.SetEntitySetAccessRule("*", EntitySetRights.All)
The first argument is the name of an entity and the second argument is a member of theEntitySetRight enumeration: None, All, AllRead, AllWrite, ReadMultiple, ReadSingle,WriteAppend, WriteDelete, WriteMerge, WriteReplace. The names of most members areself-descriptive. The ReadMultiple and ReadSingle members determine whether users canread multiple rows or a single row of the corresponding entity set.
Limiting Data Access
Whenever possible, you should limit the number of rows a client application can requestbecause sloppy developers will retrieve an entire table to select a few rows at the client. Thefollowing method call enables clients to read all rows, insert new rows, and replace existingrows in the Orders entity set:
config.SetEntitySetAccessRule("Orders", EntitySetRights.AllRead OrEntitySetRights.WriteAppend Or EntitySetRights.WriteReplace)
Notice that multiple options are combined with the Or operator.
The SetServiceOperationAccessRule specifies the access rules for the various operations.The first argument is a method name and the second argument is a member of theServiceOperationRights enumeration: All, AllRead, None, OverrideSetEntityRights,ReadMultiple, or ReadSingle.
The two methods are quite useful for specifying simple access rules but not nearly adequateenough for implementing more advanced security rules. Typical access rules, such as allowingusers to view their own orders only, must be implemented with the appropriate procedures.These procedures are called interceptors because they intercept a query and alter the query’sdefault behavior. To intercept a selection query, for example, use the QueryInterceptorattribute followed by the name of an entity set in parentheses:
<QueryInterceptor("Orders")>Public Function OnQueryOrders() As Expression(Of Func(Of Orders, Boolean))
‘ statementsEnd Function
The OnQueryOrders function will be called every time a client selects one or more rows fromthe Orders table and it’s implemented as a lambda expression that accepts as arguments a

938 CHAPTER 21 BUILDING AND USING WEB SERVICES
collection of the Orders entity set (the original result of the query) and a Boolean variable.The function’s body should set the second argument to True or False for each member ofthe collection, depending on whether the member should be included in the result or not.Note that the interceptor applies to all queries to the specific table, whether they query theOrders entity set directly or they query the same set indirectly — for example, a query to theCustomers table that expands the customer’s orders.
The following interceptor for the Orders entity set eliminates all orders except for the onesplaced by the customer that makes the request. It assumes that the service is hosted as an IISapplication with authentication and the user has connected to the service with the same user-name as the company name, which is rarely the case. In a realistic scenario, the service wouldlook up the user’s company name in a table and then use it to filter the results of the query:
<QueryInterceptor("Orders")>Public Function OnQueryOrders() As Expression(Of Func(Of Orders, Boolean))
Return Function(o) o.Customers.ContactName =HttpContext.Current.User.Identity.Name
End Function
You can implement interceptors for all types of queries, including insertion, modification,and deletion queries. To define a change interceptor for the Products entity set in the North-wind data service project, open the Northwind.svc file and define a service operation methodnamed OnChangeProducts as follows:
<ChangeInterceptor("Products")>Public Sub OnChangeProducts(ByVal product As Products,
ByVal operations As UpdateOperations)
The interceptor for operations that submit edits to the database includes an argument thatdetermines the update operation that fired the interceptor. You can determine the type ofoperation from within the interceptor code and react differently to different operations. Youmay reject a delete operation, for example, but accept insertions and updates. The methodthat intercepts all modifications is the ChangeInterceptor, and it provides two arguments:the row that’s about to be modified and the operation. The operation is a member of theUpdateOperations enumeration, whose members are Add, Update, Change, and Delete. Whatmakes this type of interceptor especially useful is that you can access the fields of the rowbeing modified and reject certain operations based on the value of the row’s columns. Thisinformation is passed to the method as a row of the corresponding table and it’s the firstargument of the ChangeInterceptor interceptor.
The Products table of the Northwind database, for example, has a column that specifieswhether a product has been discontinued or not, the Discontinued column. It probably doesn’tmake a lot of sense to create a new product that’s already discontinued. This is a business deci-sion, of course, but here’s an interceptor for the Add operation that disallows the insertion of aproduct that has its Discontinued column set to True:
<ChangeInterceptor("Products")> _Public Sub OnChangeProducts(

THE BOTTOM LINE 939
ByVal product As Products, ByVal operation As UpdateOperations)If operation = UpdateOperations.Add Then
If product.Discontinued ThenThrow New DataServiceException(
400, "Can’t modify a discontinued product!")End If
End IfEnd Sub
If this exception is raised, the service will return an error message with the specified descrip-tion. If the same error were raised while testing the service from the browser, the error wouldhave been a 400 error (the ‘‘page not found’’ error).
The Bottom Line
Create a simple ASP.NET web service. Creating ASP.NET web services is straightforwardwith Visual Studio. ASP.NET web services provide a great method for delivering data andfunctionality within a distributed environment, including the Internet.
Master It Develop an ASP.NET web service that enables the user to add two numbers.
Consume an ASP.NET web service. Adding a web reference or service reference to a webservice is a key element to creating an application that can consume the web service.
Master It Create a new website and add a service reference to a web service on yourmachine.
Create a WCF service. WCF services are similar to web services, but they give developersmore options for deployment and they support more data exchange protocols.
Master It Outline the steps involved in building a WCF service.
Work with ADO.NET Data Services. ADO.NET Data Services is a project component thatexposes, or surfaces, data as a service through HTTP. Data services are built automatically byVisual Studio based on any data source, and you can access them through URI requests.
Master It How do you access the methods of an ADO.NET data service?


Appendix
The Bottom Line
Each of The Bottom Line sections in the chapters suggest exercises to deepen skills and under-standing. Sometimes there is only one possible solution, but often you are encouraged to useyour skills and creativity to create something that builds on what you know and lets youexplore one of many possible solutions.
Chapter 1: Getting Started with Visual Basic 2010
Navigate the integrated development environment of Visual Studio. To simplify the pro-cess of application development, Visual Studio provides an environment that’s common to alllanguages, known as an integrated development environment (IDE). The purpose of the IDEis to enable the developer to do as much as possible with visual tools before writing code. TheIDE provides tools for designing, executing, and debugging your applications. It’s your seconddesktop, and you’ll be spending most of your productive hours in this environment.
Master It Describe the basic components of the Visual Studio IDE.
Solution The basic components of the Visual Studio IDE are the Form Designer, whereyou design the form by dropping and arranging controls, and the code editor, where youwrite the code of the application. The controls you can place on the form to design theapplication’s interface are contained in the Toolbox window. To set the properties of acontrol, you must select it on the form and locate the appropriate property in the Propertieswindow.
Understand the basics of a Windows application. A Windows application consists of avisual interface and code. The visual interface is what users see at runtime: a form with con-trols with which the user can interact — by entering strings, checking or clearing check boxes,clicking buttons, and so on. The visual interface of the application is designed with visualtools. The visual elements incorporate a lot of functionality, but you need to write some codeto react to user actions.
Master It Describe the process of building a simple Windows application.
Solution First, you must design the form of the application by dropping controls fromthe Toolbox window onto the form. Size and align the controls on the form, and then settheir properties in the Properties window. The controls include quite a bit of functional-ity right out of the box. A TextBox control with its MultiLine property set to True and itsScrollBars property set to Vertical is a complete, self-contained text editor.

942 APPENDIX THE BOTTOM LINE
After the visual interface has been designed, you can start coding the application. Win-dows applications follow an event-driven model: Code the events to which you want yourapplication to react. The Click events of the various buttons are typical events to whichan application reacts.
Then, there are events that are ignored by developers. The TextBox control, for example,fires some 60 events, but most applications don’t react to more than one or two of them.Select the actions to which you want your application to react and program these eventsaccordingly. When an event is fired, the appropriate event handler is automatically invoked.
Event handlers are subroutines that pass two arguments to the application: the senderargument, which is the control that fired the event, and the e argument which carries addi-tional information about the event (information such as the mouse button that was pressed,the character typed by the user, and so on). To program a specific event for a control,double-click the control on the design surface and the editor window will come up with thedefault event for the control. You can select any other event for the same control to programin the Events combo box at the top of the editor’s window.
Chapter 2: Handling Data
Declare and use variables. Programs use variables to store information during their execu-tion, and different types of information are stored in variables of different types. Dates, forexample, are stored in variables of the Date type, while text is stored in variables of the Stringtype. The various data types expose a lot of functionality that’s specific to a data type; the meth-ods provided by each data type are listed in the IntelliSense box.
Master It How would you declare and initialize a few variables?
Solution To declare multiple variables in a single statement, append each variable’s nameand type to the Dim statement.
Dim speed As Single, distance As Integer
Variables of the same type can be separated with commas, and you need not repeat the typeof each variable:
Dim First, Last As String, BirthDate As Date
To initialize the variables, append the equals sign and the value as shown here:
Dim speed As Single = 75.5, distance As Integer = 14902
Master It Explain briefly the Explicit, Strict, and Infer options.
Solution These three options determine how Visual Basic handles variable types, and theycan be turned on or off. The Explicit option requires that you declare all variables in yourcode before using them. When it’s off, you can use a variable in your code without declaring

CHAPTER 2: HANDLING DATA 943
it. The compiler will create a new variable of the Object type. The Strict option requires thatyou declare variables with a specific type. If the Strict option if off, you can declare variableswithout a type, with a statement like this:
Dim var1, var2
The last option, Infer, allows you to declare and initialize typed variables without speci-fying their type. The compiler infers the variable’s type from the value assigned to it. Thefollowing declarations will create a String and a Date variable as long as the Infer option ison. Otherwise, they will create two object variables:
Dim D = #3/5/1008#, S=′′my name′′
Use the native data types. The CLR recognized the following data types, which you can usein your code to declare variables: String, numeric data types (Integer, Double, and so on), Date,Char and Boolean types.
All other variables, or variables that are declared without a type, are Object variables and canstore any data type or any object.
Master It How will the compiler treat the following statement?
Dim amount = 32
Solution The amount variable is not declared with a specific data type. With the defaultsettings, the compiler will create a new Object variable and store the value 32 in it. If theInfer option is on, the compiler will create an Integer variable and store the value 32 in it. Ifyou want to be able to store amounts with a fractional part in this variable, you must assigna floating-point value to the variable (such as 32.00) or append the R type character to thevalue (32R).
Create custom data types. Practical applications need to store and manipulate multiple dataitems, not just integers and strings. To maintain information about people, we need to storeeach person’s name, date of birth, address, and so on. Products have a name, a description, aprice, and other related items. To represent such entities in our code, we use structures, whichhold many pieces of information about a specific entity together.
Master It Create a structure for storing products and populate it with data.
Solution Structures are declared with the Structure keyword and their fields with theDim statement:
Structure ProductDim ProductCode As StringDim ProductName As StringDim Price As DecimalDim Stock As Integer
End Structure

944 APPENDIX THE BOTTOM LINE
To represent a specific product, declare a variable of the Product type and set its fields,which are exposed as properties of the variable:
Dim P1 As ProductP1.ProductCode = ′′SR-0010′′
P1.ProductName = ′′NTR TV-42′′
P1.Price = 374.99P1.Stock = 3
Use arrays. Arrays are structures for storing sets of data as opposed to single-valuedvariables.
Master It How would you declare an array for storing 12 names and another one for stor-ing 100 names and Social Security numbers?
Solution The first array stores a set of single-valued data (names) and it has a single di-mension. Since the indexing of the array’s elements starts at 0, the last element’s index forthe first array is 11, and it must be declared as follows:
Dim Names(11) As String
The second array stores a set of pair values (names and SSNs), and it must be declared as atwo-dimensional array:
Dim Persons(100,1) As String
If you’d rather avoid the index 0, you can declare the two arrays as follows:
Dim Names(1 To 11) As StringDim Persons(1 To 100, 1 To 1) As String
Chapter 3: Visual Basic Programming Essentials
Use Visual Basic’s flow-control statements. Visual Basic provides several statements forcontrolling the flow of control in a program: decision statements, which change the course ofexecution based on the outcome of a comparison, and loop statements, which repeat a numberof statements while a condition is true or false.
Master It Explain briefly the decision statements of Visual Basic.
Solution The basic decision statement in VB is the If…End If statement, which executesthe statements between the If and End If keywords if the condition specified in the If partis true. A variation of this statement is the If…Then…Else statement.
If the same expression must be compared to multiple values and the program should exe-cute different statements depending on the outcome of the comparison, use the Select Casestatement.
Write subroutines and functions. To manage large applications, break your code into small,manageable units. These units of code are the subroutines and functions. Subroutines performactions and don’t return any values. Functions, on the other hand, perform calculations andreturn values. Most of the language’s built-in functionality is in the form of functions.

CHAPTER 4: GUI DESIGN AND EVENT-DRIVEN PROGRAMMING 945
Master It How will you create multiple overloaded forms of the same function?
Solution Overloaded functions are variations on the same function with different argu-ments. All overloaded forms of a function have the same name, and they’re prefixed withthe Overloads keyword. Their lists of arguments, however, are different — either in thenumber of arguments or in the argument types.
Pass arguments to subroutines and functions. Procedures and functions communicate withone another via arguments, which are listed in a pair of parentheses following the procedure’sname. Each argument has a name and a type. When you call a procedure, you must supplyvalues for each argument, and the types of the values should match the types listed in the pro-cedure’s definition.
Master It Explain the difference between passing arguments by value and passing argu-ments by reference.
Solution The first mechanism, which was the default mechanism with earlier versionsof the language, passes a reference to the argument. Arguments passed by reference areprefixed by the keyword ByRef in the procedure’s definition. The procedure has access tothe original values of the arguments passed by reference and can modify them. The sec-ond mechanism passes to the procedure a copy of the original value. Arguments passed byvalue are prefixed with the keyword ByVal in the procedure’s definition. The proceduremay change the values of the arguments passed by value, but the changes won’t affect thevalue of the original variable.
Chapter 4: GUI Design and Event-Driven Programming
Design graphical user interfaces. A Windows application consists of a graphical user inter-face and code. The interface of the application is designed with visual tools and consists ofcontrols that are common to all Windows applications. You drop controls from the Toolboxwindow onto the form, size and align the controls on the form, and finally set their propertiesthrough the Properties window. The controls include quite a bit of functionality right out of thebox, and this functionality is readily available to your application without a single line of code.
Master It Describe the process of aligning controls on a form.
Solution To align controls on a form, you should select them in groups, according totheir alignment. Controls can be aligned to the left, right, top, and bottom. After selecting agroup of controls with a common alignment, apply the proper alignment with one of thecommands of the Format � Align menu. Before aligning multiple controls, you shouldadjust their spacing. Select the controls you want to space vertically or horizontally and ad-just their spacing with one of the commands of the Format � Horizontal Spacing andFormat � Vertical Spacing menus. You can also align controls visually, by moving themwith the mouse. As you move a control around, a blue snap line appears every time thecontrol is aligned with another one on the form.
Program events. Windows applications follow an event-driven model: We code the events towhich we want our application to respond. For example, an application reacts to Click eventsof the various buttons. You select the actions to which you want your application to react andprogram these events accordingly.
When an event is fired, the appropriate event handler is automatically invoked. Event handlersare subroutines that pass two arguments to the application: the sender argument (which is
946 APPENDIX THE BOTTOM LINE
an object that represents the control that fired the event) and the e argument (which carriesadditional information about the event).
Master It How will you handle certain keystrokes regardless of the control that receivesthem?
Solution You can intercept all keystrokes at the form’s level by setting the form’s Key-Preview property to True. Then insert some code in the form’s KeyPress event handlerto examine the keystroke passed to the event handler and to process it. To detect the keypresses in the KeyPress event handler, use an If statement like the following:
If e.KeyChar = "A" Then’ process the A keyEnd If
Write robust applications with error handling. Numerous conditions can cause an applica-tion to crash, but a well-written application should be able to detect abnormal conditions andhandle them gracefully. To begin with, you should always validate your data before you attemptto use them in your code. A well-known computer term is ‘‘garbage in, garbage out,’’ whichmeans you shouldn’t perform any calculations on invalid data.
Master It How will you execute one or more statements in the context of a structuredexception handler?
Solution A structured exception handler has the following syntax:
Try‘ {statements}
Catch ex As Exception‘ {statements to handle exception}
Finally‘ {clean-up statements}
End Try
The statements you want to execute must be inserted in the Try block of the statement. If thestatements are executed successfully, program execution continues with the statements fol-lowing the End Try statement. If an error occurs, the Catch block is activated, where you candisplay the appropriate message and take the proper actions. At the very least, you shouldsave the user data and then terminate the application. In many cases, it’s even possible toremedy the situation that caused the exception in the first place. No matter what the Tryblock execution outcome (error or no error) is, the Finally block is executed, making it aconvenient location for release and cleanup of reserved resources.
Chapter 5: Basic Windows Controls
Use the TextBox control as a data-entry and text-editing tool. The TextBox control is themost common element of the Windows interface, short of the Button control, and it’s usedto display and edit text. You can use a TextBox control to prompt users for a single line oftext (such as a product name) or a small document (a product’s detailed description). You can

CHAPTER 5: BASIC WINDOWS CONTROLS 947
actually implement a functional text editor by placing a TextBox control on a form and settinga few of its properties.
Master It What are the most important properties of the TextBox control? Which oneswould you set in the Properties windows at design time?
Solution The first property you’ll most likely change is the MultiLine property, whosedefault value is False. To set the initial text on the control, use the Text or Lines properties.The Text property returns or sets the text on the control. The Lines property is an arrayof string that holds each text line in a separate element. To interact with the user, use thetext-selection properties SelectedText, SelectionLength, and SelectionStart. You canuse these properties to retrieve and manipulate the text selected by the user on the controlor to select text from within your code.
Master It How would you implement a control that suggests lists of words matching thecharacters entered by the user?
Solution Use the autocomplete properties AutoCompleteMode, AutoCompleteSource, andAutoCompleteCustomSource. The AutoCompleteMode property determines whether thecontrol will suggest the possible strings, automatically complete the current word as youtype, or do both. The AutoCompleteSource property specifies where the strings that willbe displayed will come from and its value is a member of the AutoCompleteSource enu-meration. If this property is set to AutoCompleteSoure.CustomSource, you must set upan AutoCompleteStringCollection collection with your custom strings and assign it to theAutoCompleteCustomSource property.
Use the ListBox, CheckedListBox, and ComboBox controls to present lists of items. TheListBox control contains a list of items from which the user can select one or more, dependingon the setting of the SelectionMode property.
Master It How would you locate an item in a ListBox control?
Solution To locate a string in a ListBox control, use the FindString and FindStringExact methods. The FindString method locates a string that partially matches the oneyou’re searching for; FindStringExact finds an exact match. Both methods performcase-insensitive searches and return the index of the item they’ve located in the list.
We usually call the FindStringExact method and then examine its return value. If an exactmatch is found, we select the item with the index returned by the FindExact method. Ifan exact match is not found, in which case the method returns –1, we call the FindStringmethod to locate the nearest match.
Use the ScrollBar and TrackBar controls to enable users to specify sizes and positions withthe mouse. The ScrollBar and TrackBar controls let the user specify a magnitude by scrollinga selector between its minimum and maximum values. The ScrollBar control uses some visualfeedback to display the effects of scrolling on another entity, such as the current view in a longdocument.
Master It Which event of the ScrollBar control would you code to provide visual feedbackto the user?
Solution The ScrollBar control fires two events: the Scroll event and the ValueChangedevent. They’re very similar and you can program either event to react to the changes in the

948 APPENDIX THE BOTTOM LINE
ScrollBar control. The advantage of the Scroll event is that it reports the action that causedit through the e.Type property. You can examine the value of this property in your codeand react to actions like the end of the scroll:
Private Sub blueBar_Scroll(ByVal sender As System.Object,ByVal e As System.Windows.Forms.ScrollEventArgs)Handles blueBar.Scroll
If e.Type = ScrollEventType.EndScroll Then‘ perform calculations and provide feedbackEnd If
End Sub
Chapter 6: Working with Forms
Visual form design Forms expose a lot of trivial properties for setting their appearance. Inaddition, they expose a few properties that simplify the task of designing forms that can beresized at runtime. The Anchor property causes a control to be anchored to one or more edgesof the form to which it belongs. The Dock property allows you to place on the form controlsthat are docked to one of its edges. To create forms with multiple panes that the user can resizeat runtime, use the SplitContainer control. If you just can’t fit all the controls in a reasonablysized form, use the AutoScroll properties to create a scrollable form.
Master It You’ve been asked to design a form with three distinct sections. You should alsoallow users to resize each section. How will you design this form?
Solution The type of form required is easily designed with visual tools and the help of theSplitContainer control. Place a SplitContainer control on the form and set its Dock propertyto Fill. You’ve just created two vertical panes on the form, and users can change their rel-ative sizes at any time. To create a third pane, place another SplitContainer control on oneof the first control’s panes and set its Dock property to Fill and its Orientation propertyto Horizontal. At this point, the form is covered by three panes and users can change eachpane’s size at the expense of its neighboring panes.
Design applications with multiple forms. Typical applications are made up of multipleforms: the main form and one or more auxiliary forms. To show an auxiliary form from withinthe main form’s code, call the auxiliary form’s Show method, or the ShowDialog method if youwant to display the auxiliary form modally (as a dialog box).
Master It How will you set the values of selected controls in a dialog box, display them,and then read the values selected by the user from the dialog box?
Solution Create a Form variable that represents the dialog box and then access any controlon the dialog box through its name as usual, prefixed by the form’s name:
Dim Dlg As AuxFormDlg.txtName = "name"

CHAPTER 6: WORKING WITH FORMS 949
Then call the form’s ShowDialog method to display it modally and examine the Dialog-Result property returned by the method. If this value is OK, process the data on the dialogbox; if it isn’t, do not process the dialog box:
If Dlg.ShowDialog = DialogResult.OK ThenUserName = Dlg.TxtName
End If
To display an auxiliary form, just call the Show method. This method doesn’t return avalue, and you can read the auxiliary form’s contents from within the main form’s codeat any time. You can also access the controls of the main form from within the auxiliaryform’s code.
Design dynamic forms. You can create dynamic forms by populating them with controls atruntime through the form’s Controls collection. First, create instances of the appropriate con-trols by declaring variables of the corresponding type. Then set the properties of each of thesevariables that represent controls. Finally, place the control on the form by adding the corre-sponding variable to the form’s Controls collection.
Master It How will you add a TextBox control to your form at runtime and assign a han-dler to the control’s TextChanged event?
Solution Create an instance of the TextBox control, set its Visible property and then addit to the form’s Controls collection:
Dim TB As New TextBoxTB.Visible = True’ statements to set other properties,’ including the control’s location on the formMe.Controls.Add(TB)
Then write a subroutine that will handle the TextChanged event. This subroutine, let’s call itTBChanged(), should have the same signature as the TextBox control’s TextChanged event.Use the AddHandler statement to associate the TBChanged() subroutine with the new con-trol’s TextChanged event:
AddHandler TB.TextChanged, _New SystemEventHandler(AddressOf TBChanged)
Design menus. Both form menus and context menus are implemented through the Menu-Strip control. The items that make up the menu are ToolStripMenuItem objects. The ToolStrip-MenuItem objects give you absolute control over the structure and appearance of the menus ofyour application.
Master It What are the two basic events fired by the ToolStripMenuItem object?
Solution When the user clicks a menu item, the DropDownOpened and Click events arefired in this order. The DropDownOpened event gives you a chance to modify the menu that’sabout to be opened. After the execution of the DropDownOpened event handler, the Clickevent takes place to indicate the selection of a menu command. We rarely program the

950 APPENDIX THE BOTTOM LINE
DropDownOpened event, but every menu item’s Click event handler should contain somecode to react to the selection of the item.
Chapter 7: More Windows Controls
Use the OpenFileDialog and SaveFileDialog controls to prompt users for filenames.Windows applications use certain controls to prompt users for common information, suchas filenames, colors, and fonts. Visual Studio provides a set of controls that are grouped inthe Dialogs section of the Toolbox. All common dialog controls provide a ShowDialog method,which displays the corresponding dialog box in a modal way. The ShowDialog method returnsa value of the DialogResult type, which indicates how the dialog box was closed, and youshould examine this value before processing the data.
Master It Your application needs to open an existing file. How will you prompt users forthe file’s name?
Solution First you must drop an instance of the OpenFileDialog control on the form. Tolimit the files displayed in the Open dialog box, use the Filter property to specify the rele-vant file type(s). To display text files only, set the Filter property to Text files|*.txt.If you want to display multiple filename extensions, use a semicolon to separate exten-sions with the Filter property; for example, the string Images|*.BMP;*.GIF;*.JPG willcause the control to select all the files of these three types and no others. The first part of theexpression (Images) is the string that will appear in the drop-down list with the file types.You should also set the CheckFileExists property to True to make sure the file specifiedon the control exists. Then display the Open dialog box by calling its ShowDialog method,as shown here:
If FileOpenDialog1.ShowDialog =Windows.Forms.DialogResult.OK{process file FileOpenDialog1.FileName}
End If
To retrieve the selected file, use the control’s FileName property, which is a string with theselected file’s path.
Master It You’re developing an application that encrypts multiple files (or resizes manyimages) in batch mode. How will you prompt the user for the files to be processed?
Solution There are two techniques to prompt users for multiple filenames. Both tech-niques, however, are limited in the sense that all files must reside in the same folder. Thefirst technique is to set the MultiSelect property of the OpenFileDialog control to True.Users will be able to select multiple files by using the Ctrl and Shift keys. The selected fileswill be reported to your application through the FileNames property of the control, whichis an array of strings.
OpenFileDialog1.Multiselect = TrueOpenFileDialog1.ShowDialog()Dim filesEnum As IEnumeratorListBox1.Items.Clear()filesEnum =

CHAPTER 7: MORE WINDOWS CONTROLS 951
OpenFileDialog1.FileNames.GetEnumerator()While filesEnum.MoveNext
‘ current file’s name is filesEnum.CurrentEnd While
The other technique is to use the FolderBrowserDialog control, which prompts users toselect a folder, not individual files. Upon return, the control’s SelectedPath property con-tains the pathname of the folder selected by the user from the dialog box, and you can usethis property to process all files of a specific type in the selected folder.
Use the ColorDialog and FontDialog controls to prompt users for colors and typefaces. TheColor and Font dialog boxes allow you to prompt users for a color value and a font, respec-tively. Before showing the corresponding dialog box, set its Color or Font property accordingto the current selection, and then call the control’s ShowDialog method.
Master It How will you display color attributes in the Color dialog box when you open it?How will you display the attributes of the selected text’s font in the Font dialog box whenyou open it?
Solution To prompt users to specify a different color for the text on a TextBox control,execute the following statements:
ColorDialog1.Color = TextBox1.ForeColorIf ColorDialog1.ShowDialog = DialogResult.OK Then
TextBox1.ForeColor = ColorDialog1.ColorEnd If
To populate the Font dialog box with the font in effect, assign the TextBox control’s Fontproperty to the FontDialog control’s Font property by using the following statements:
FontDialog1.Font = TextBox1.FontIf FontDialog1.ShowDialog = DialogResult.OK Then
TextBox1.Font = FontDialog1.FontEnd If
Use the RichTextBox control as an advanced text editor to present richly formatted text.The RichTextBox control is an enhanced TextBox control that can display multiple fonts andstyles, format paragraphs with different styles, and provide a few more-advanced text-editingfeatures. Even if you don’t need the formatting features of this control, you can use it as analternative to the TextBox control. At the very least, the RichTextBox control provides moreediting features, a more-useful undo function, and more-flexible search features.
Master It You want to display a document with a title in large, bold type, followed by acouple of items in regular style. Which statements will you use to create a document likethis on a RichTextBox control?
Document’s Title
Item 1 Description for item 1
Item 2 Description for item 2
Solution To append text to a RichTextBox control, use the AppendText method. Thismethod accepts a string as an argument and appends it to the control’s contents. The text is

952 APPENDIX THE BOTTOM LINE
formatted according to the current selection’s font, which you must set accordingly throughthe SelectionFont property. To switch to a different font, set the SelectionFont propertyagain and call the AppendText method.
Assuming that the form contains a control named RichTextBox1, the following statementswill create a document with multiple formats. In this sample, I’m using three different type-faces for the document.
Dim fntTitle AsNew Font("Verdana", 12, FontStyle.Bold)
Dim fntItem AsNew Font("Verdana", 10, FontStyle.Bold)
Dim fntText AsNew Font("Verdana", 9, FontStyle.Regular)
Editor.SelectionFont = fntTitleEditor.AppendText("Document’s Title" & vbCrLf)Editor.SelectionFont = fntItemEditor.SelectionIndent = 20Editor.AppendText("Item 1" & vbCrLf)Editor.SelectionFont = fntTextEditor.SelectionIndent = 40Editor.AppendText(
"Description for item 1" & vbCrLf)Editor.SelectionFont = fntItemEditor.SelectionIndent = 20Editor.AppendText("Item 2" & vbCrLf)Editor.SelectionFont = fntTextEditor.SelectionIndent = 40Editor.AppendText(
"Description for item 2" & vbCrLf)
Create and present hierarchical lists by using the TreeView control. The TreeView controlis used to display a list of hierarchically structured items. Each item in the TreeView controlis represented by a TreeNode object. To access the nodes of the TreeView control, use theTreeView.Nodes collection. The nodes under a specific node (in other words, the child nodes)form another collection of Node objects, which you can access by using the expressionTreeView.Nodes(i).Nodes. The basic property of the Node object is the Text property, whichstores the node’s caption. The Node object exposes properties for manipulating its appearance(its foreground/background color, its font, and so on).
Master It How will you set up a TreeView control with a book’s contents at design time?
Solution Place an instance of the TreeView control on the form and then locate its Nodesproperty in the Properties window. Click the ellipsis button to open the TreeNode Editordialog box, where you can enter root nodes by clicking the Add Root button and child nodesunder the currently selected node by clicking the Add Child button. The book’s chaptersshould be the control’s root nodes, and the sections should be child nodes of those chapternodes. If you have nested sections, add them as child nodes of the appropriate node. Whilea node is selected in the left pane of the dialog box, you can specify its appearance in theright pane by setting the font, color, and image-related properties.

CHAPTER 8: WORKING WITH PROJECTS 953
Create and present lists of structured items by using the ListView control. The ListViewcontrol stores a collection of ListViewItem objects, which forms the Items collection, and candisplay them in several modes, as specified by the View property. Each ListViewItem objecthas a Text property and the SubItems collection. The subitems are not visible at runtime unlessyou set the control’s View property to Details and set up the control’s Columns collection.There must be a column for each subitem you want to display on the control.
Master It How will you set up a ListView control with three columns to display names,email addresses, and phone numbers at design time?
Solution Drop an instance of the ListView control on the form and set its View propertyto Details. Then locate the control’s Columns property in the Properties window and addthree columns to the collection through the ColumnHeader Collection Editor dialog box.Don’t forget to set their headers and their widths for the fields they will display.
To populate the control at design time, locate its Items property in the Properties windowand click the ellipsis button to open the ListViewItem Collection Editor dialog box. Add anew item by clicking the Add button. When the new item is added to the list in the left paneof the dialog box, set its Text property to the desired caption. To add subitems to this item,locate the SubItems property in the ListViewItem Collection Editor dialog box and click theellipsis button next to its value. This will open another dialog box, the ListViewSubItemsCollection Editor dialog box, where you can add as many subitems under the current itemas you wish. You can also set the appearance of the subitems (their font and color) in thesame dialog box.
Master It How would you populate the same control with the same data at runtime?
Solution The following code segment adds two items to the ListView1 control at runtime:
Dim LItem As New ListViewItem()LItem.Text = "Alfred’s Futterkiste"LItem.SubItems.Add("Anders Maria")LItem.SubItems.Add("030-0074321")LItem.SubItems.Add("030-0076545")LItem.ImageIndex = 0ListView1.Items.Add(LItem)
LItem = New ListViewItem()LItem.Text = "Around the Horn"LItem.SubItems.Add("Hardy Thomas")LItem.SubItems.Add(" (171) 555-7788")LItem.SubItems.Add("171) 555-6750")LItem.ImageIndex = 0ListView1.Items.Add(LItem)
Chapter 8: Working with Projects
Build your own classes. Classes contain code that executes without interacting with theuser. The class’s code is made up of three distinct segments: the declaration of the private
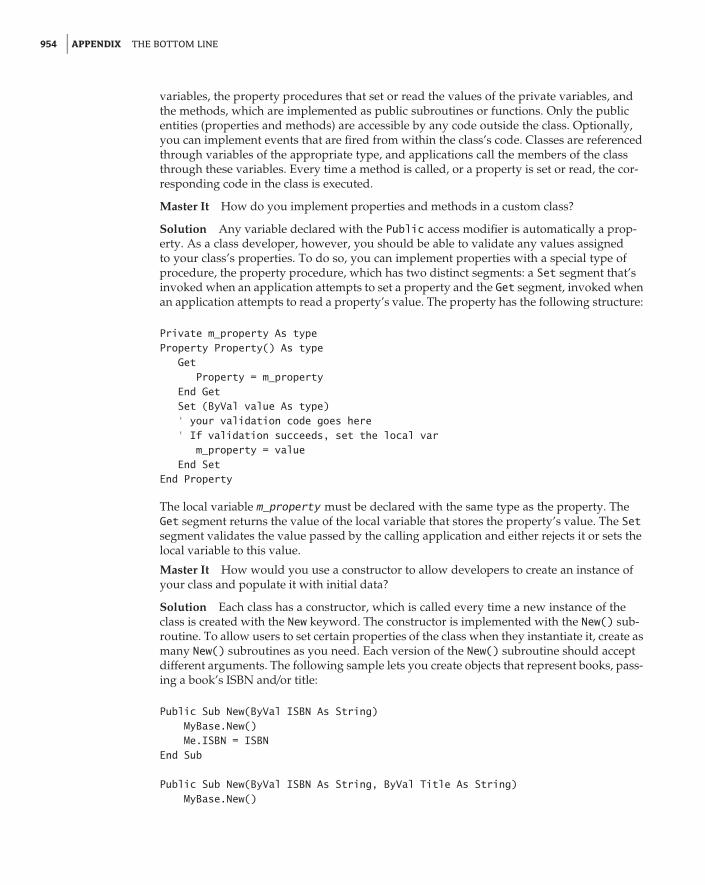
954 APPENDIX THE BOTTOM LINE
variables, the property procedures that set or read the values of the private variables, andthe methods, which are implemented as public subroutines or functions. Only the publicentities (properties and methods) are accessible by any code outside the class. Optionally,you can implement events that are fired from within the class’s code. Classes are referencedthrough variables of the appropriate type, and applications call the members of the classthrough these variables. Every time a method is called, or a property is set or read, the cor-responding code in the class is executed.
Master It How do you implement properties and methods in a custom class?
Solution Any variable declared with the Public access modifier is automatically a prop-erty. As a class developer, however, you should be able to validate any values assignedto your class’s properties. To do so, you can implement properties with a special type ofprocedure, the property procedure, which has two distinct segments: a Set segment that’sinvoked when an application attempts to set a property and the Get segment, invoked whenan application attempts to read a property’s value. The property has the following structure:
Private m_property As typeProperty Property() As type
GetProperty = m_property
End GetSet (ByVal value As type)‘ your validation code goes here‘ If validation succeeds, set the local var
m_property = valueEnd Set
End Property
The local variable m_property must be declared with the same type as the property. TheGet segment returns the value of the local variable that stores the property’s value. The Setsegment validates the value passed by the calling application and either rejects it or sets thelocal variable to this value.
Master It How would you use a constructor to allow developers to create an instance ofyour class and populate it with initial data?
Solution Each class has a constructor, which is called every time a new instance of theclass is created with the New keyword. The constructor is implemented with the New() sub-routine. To allow users to set certain properties of the class when they instantiate it, create asmany New() subroutines as you need. Each version of the New() subroutine should acceptdifferent arguments. The following sample lets you create objects that represent books, pass-ing a book’s ISBN and/or title:
Public Sub New(ByVal ISBN As String)MyBase.New()Me.ISBN = ISBN
End Sub
Public Sub New(ByVal ISBN As String, ByVal Title As String)MyBase.New()

CHAPTER 8: WORKING WITH PROJECTS 955
Me.ISBN = ISBNMe.Title = Title
End Sub
This technique bypasses the New constructor, but the appropriate Property procedures areinvoked, as each property is initialized.
Master It Which are the default methods of a custom class that you will most likely over-ride with more meaningful definitions?
Solution The first method to override is the ToString method, which returns a string thatdescribes the class. By default, this method returns the name of the class. Your implemen-tation should return a more meaningful string. The Equals method, which compares twoinstances of the same class, is another candidate for overriding because the default Equalsmethod performs a reference comparison, not an instance comparison.
To override one of the default methods, enter the string
Public Overrides
in the code window and press the spacebar to see the signatures of the overridable methodsin the IntelliSense drop-down box.
Master It How should you handle exceptions in a class?
Solution In general, you should avoid handling all errors in your class because you can’tbe sure how your classes will be used by other developers. It’s also important that you avoidinteracting with the user from within your class’s code with messages boxes or other tech-niques. The best method of handling errors in a custom class is to raise exceptions and letthe developer of the calling application handle the errors.
Overloading operators. Overloading is a common theme in coding classes (or plain proce-dures) with Visual Basic. In addition to overloading methods, you can overload operators.In other words, you can define the rules for adding or subtracting two custom objects, if thismakes sense for your application.
Master It When should you overload operators in a custom class, and why?
Solution It may make absolute sense to add two instances of a custom class (it mayrepresent length, matrices, vectors, and so on), but the addition operator doesn’t workwith custom classes. To redefine the addition operator so that it will add two instances ofyour custom class, you must override the addition operator with an implementation thatadds two instances of a custom class. The following is the signature of a function thatoverloads the addition operator:
Public Shared Operator + (ByVal object1 As customType,ByVal object2 As customType)As customType
Dim result As New customType‘ Insert the code to "add" the two

956 APPENDIX THE BOTTOM LINE
‘ arguments and store the result to‘ the result variable and return it.Return result
End Operator
The function that overrides the addition operator accepts two arguments, which are the twovalues to be added, and returns a value of the same type. The operator is usually overloadedbecause you may wish to add an instance of the custom class to one of the built-in data typesor objects.
Chapter 9: Building Custom Windows Controls
Extend the functionality of existing Windows Forms controls with inheritance. The sim-plest type of control you can build is one that inherits an existing control. The inherited controlincludes all the functionality of the original control plus some extra functionality that’s specificto an application and that you implement with custom code.
Master It Describe the process of designing an inherited custom control.
Solution To enhance an existing Windows Forms control, insert an Inherits statementwith the name of the control you want to enhance in the project’s Designer.vb file. Theinherited control interface can’t be altered; it’s determined by the parent control. However,you can implement custom properties and methods, react to events received by the parentcontrol, or raise custom events from within your new control.
The process of implementing custom properties and methods is identical to building customclasses. The control’s properties, however, can be prefixed by a number of useful attributes,like the <Category> and <Description> attributes, which determine the category of theProperties Browser where the property will appear and the control’s description that will beshown in the Properties window when the custom property is selected.
Build compound controls that combine multiple existing controls. A compound controlprovides a visible interface that combines multiple Windows controls. As a result, this type ofcontrol doesn’t inherit the functionality of any specific control; you must expose its propertiesby providing your own code. The UserControl object, on which the compound control is based,already exposes a large number of members, including some fairly advanced ones such as theAnchoring and Docking properties, and the usual mouse and key events.
Master It How will you map certain members of a constituent control to custom membersof the compound control?
Solution If the member is a property, you simply return the constituent control’s propertyvalue in the Get section of the Property procedure and set the constituent control’s prop-erty to the specified value in the Set section of the same procedure. The following Propertyprocedure maps the WordWrap property of the TextBox1 constituent control to the TextWrapproperty of the custom compound control:
Public Property TextWrap() As BooleanGet
Return TextBox1.WordWrap

CHAPTER 9: BUILDING CUSTOM WINDOWS CONTROLS 957
End GetSet(ByVal value As Boolean)
TextBox1.WordWrap = valueEnd Set
End Property
If the member is a method, you just call it from within one of the compound control’s meth-ods. To map the ResetText method of the TextBox constituent control to the Reset methodof the compound control, add the following method definition:
Public Sub Reset()TextBox1.ResetText
End Sub
In the UserControl object’s Load event handler, insert the statements that create theroundPath object, which is an ellipse, and then assign it to the UserControl’s Regionproperty. Here’s the Load event handler for the EllipticalButton custom control:
Private Sub RoundButton_Load(ByVal sender As System.Object,ByVal e As System.EventArgs)Handles MyBase.Load
Dim G As GraphicsG = Me.CreateGraphicsDim roundPath As New GraphicsPath()Dim R As New Rectangle(0, 0, Me.Width, Me.Height)roundPath.AddEllipse(R)Me.Region = New Region(roundPath)
End Sub
Build custom controls from scratch. User-drawn controls are the most flexible custom con-trols because you’re in charge of the control’s functionality and appearance. Of course, youhave to implement all the functionality of the control from within your code, so it takes sub-stantial programming effort to create user-drawn custom controls.
Master It Describe the process of developing a user-drawn custom control.
Solution Since you are responsible for updating the control’s visible area from withinyour code, you must provide the code that redraws the control’s surface and insert it in theUserControl object’s Paint event handler. In drawing the control’s surface, you must takeinto consideration the settings of the control’s properties.
Private Sub Label3D_Paint(ByVal sender As Object,ByVal e As System.Windows.Forms.PaintEventArgs)Handles Me.Paint
End Sub
The e argument of the Paint event handler exposes the Graphics property, which youmust use from within your code to draw on the control’s surface. You can use any of the

958 APPENDIX THE BOTTOM LINE
drawing methods you’d use to create shapes, gradients, and text on a Form object or Pic-tureBox control.
Because custom controls aren’t redrawn by default when they’re resized, you must alsoinsert the following statement in the control’s Load event handler:
Private Sub Label3D_Load(ByVal sender As System.Object,ByVal e As System.EventArgs)Handles MyBase.Load
Me.SetStyle(ControlStyles.ResizeRedraw, True)End Sub
If the control’s appearance should be different at design time than at runtime, use theMe.DesignMode property to determine whether the custom control is used in design time(DesignMode = True), or runtime (DesignMode = False).
Customize the rendering of items in a ListBox control. The Windows controls that presentlists of items display their items in a specific manner. The Framework allows you to take con-trol of the rendering process and change completely the default appearance of the items onthese controls. The controls that allow you to take charge of the rendering process of their itemsare the ListBox, CheckedListBox, ComboBox, and TreeView controls.
To create an owner-drawn control, you must set the DrawMode property to a member of theDrawMode enumeration and insert the appropriate code in the events MeasureItem and Draw-Item. The MeasureItem event is where you decide about the dimensions of the rectangle inwhich the drawing will take place. The DrawItem event is where you insert the code for ren-dering the items on the control.
Master It Outline the process of creating a ListBox control that wraps the contents oflengthy items.
Solution By default, all items in a ListBox control have the same height, which is theheight of a single line of text in the control’s font. To display the selected items in cells ofvarying height, do the following:
1. Set the control’s DrawMode property to OwnerDrawVariable.
2. In the control’s MeasureItem event handler, which is invoked every time the control isabout to display an item, insert the statements that calculate the desired height of thecurrent item’s cell. You will most likely call the MeasureString method of the control’sGraphics object to retrieve the height of the item (the item may take multiple lines on thecontrol). Set the e.Height and e.Width properties before exiting the MeasureItem eventhandler.
3. In the control’s DrawItem event handler, which displays the current item, insert theappropriate statements to print the item in a cell with the dimensions calculated instep 2. The dimensions of the cell in which you must fit the caption of the currentitem are given by the property Bounds of the event handler’s e argument. Use theDrawString method of the control’s Graphics object to draw the item’s caption.

CHAPTER 11: THE FRAMEWORK AT LARGE 959
Chapter 10: Applied Object-Oriented Programming
Use inheritance. Inheritance, which is the true power behind OOP, allows you to create newclasses that encapsulate the functionality of existing classes without editing their code. Toinherit from an existing class, use the Inherits statement, which brings the entire class intoyour class.
Master It Explain the inheritance-related attributes of a class’s members.
Solution Any class can be inherited by default. However, you can prevent developersfrom inheriting your class with the NonIheritable attribute or by creating an abstract classwith the MustInherit attribute. Classes marked with this attribute can’t be used on theirown; they must be inherited by another class. The parent class members can be optionallyoverridden if they’re marked with the Overridable attribute. To prevent derived classesfrom overriding specific members, use the NotOverridable attribute. Finally, methods thatoverride the equivalent methods of the base class must be prefixed with the Overridesattribute.
Use polymorphism. Polymorphism is the ability to write members that are common to anumber of classes but behave differently, depending on the specific class to which they apply.Polymorphism is a great way of abstracting implementation details and delegating the imple-mentation of methods with very specific functionality to the derived classes.
Master It The parent class Person represents parties, and it exposes the GetBalancemethod, which returns the outstanding balance of a person. The Customer and Supplierderived classes implement the GetBalance method differently. How will you use thismethod to find out the balance of a customer and/or supplier?
Solution If you have a Customer or Supplier object, you can call the GetBalance methoddirectly. If you have a collection of objects of either type, you must first cast them to theirparent type and then call the GetBalance method.
Chapter 11: The Framework at Large
Handle files with the My component. The simplest method of saving data to a file is to callone of the WriteAllBytes or WriteAllText methods of the My.Computer.FileSystem com-ponent. You can also use the IO namespace to set up a Writer object to send data to a file and aReader object to read data from the file.
Master It Show the statements that save a TextBox control’s contents to a file and the state-ments that reload the same control from the data file. Use the My.Computer.FileSystemcomponent.
Solution The following statement saves the control’s Text property to a file whose path isstored in the filename variable. Prompt users with the File Open dialog box for the path ofthe file and then use it in your code:
My.Somputer.FileSystem.WriteAllText(filename, TextBox1.Text, True)

960 APPENDIX THE BOTTOM LINE
To read the data back and display it on the same control, use the following statement:
TextBox1.Text = My.Computer.FileSystem.ReadAllText(filename)
Write data to a file with the IO namespace. To send data to a file you must set up a File-Stream object, which is a channel between the application and the file. To send data to a file,create a StreamWriter or BinaryWriter object on the appropriate FileStream object. Likewise,to read from a file, create a StreamReader or BinaryReader on the appropriate FileStreamobject. To send data to a file, use the Write and WriteString methods of the appropriateStreamWriter object. To read data from the file, use the Read, ReadBlock, ReadLine, andReadToEnd methods of the StreamReader object.
Master It Write the contents of a TextBox control to a file using the methods of the IOnamespace.
Solution Begin by setting up a FileStream object to connect your application to a data file.Then create a StreamWriter object on top of the FileStream object and use the Write methodto send data to the file. Don’t forget to close both streams when you’re done.
Dim FS As FileStreamFS = New FileStream(filename, FileMode.Create)Dim SW As New StreamWriter(FS)SW.Write(TextBox1.Text)SW.CloseFS.Close
To read the data back and reload the TextBox control, set up an identical FileStream object,then create a StreamReader object on top of it, and finally call its ReadToEnd method:
Dim FS As New FileStream(filename,IO.FileMode.OpenOrCreate, IO.FileAccess.Write)
Dim SR As New StreamReader(FS)TextBox1.Text = SR.ReadToEndFS.CloseSR.Close
Manipulate folders and files. The IO namespace provides the Directory and File classes,which represent the corresponding entities. Both classes expose a large number of methodsfor manipulating folders (CreateDirectory, Delete, GetFiles, and so on) and files (Create,Delete, Copy, OpenRead, and so on).
Master It How will you retrieve the attributes of a drive, folder, and file using the IOnamespace’s classes?
Solution Start by creating a DriveInfo, DirectoryInfo, and FileInfo object for a specificdrive, folder, and file respectively by specifying the name of the appropriate entity as anargument:
Dim DrvInfo As New DriveInfo("C:\")Dim DirInfo As New DirectoryInfo("C:\Program Files")Dim FInfo As New FileInfo("C:\Program Files\My Apps\Readme.txt")

CHAPTER 11: THE FRAMEWORK AT LARGE 961
Then enter the name of any of these variables and the following period to see the membersthey expose in the IntelliSense list. The available space on drive C: is given by the propertyDrvInfo.AvailableFreeSpace. The attributes of the Program Files folder are given by theDirInfo.Attributes property. Finally, the length of the Readme.txt file is given by theproperty FInfo.Length.
Use the Char data type to handle characters. The Char data type, which is implementedwith the Char class, exposes methods for handling individual characters (IsLetter, IsDigit,IsSymbol, and so on). We use the methods of the Char class to manipulate users’ keystrokesas they happen in certain controls (mostly the TextBox control) and to provide immediatefeedback.
Master It You want to develop an interface that contains several TextBox controls thataccept numeric data. How will you intercept the user’s keystrokes and reject any charactersthat are not numeric?
Solution You must program the control’s KeyPress event handler, which reports the char-acter that was pressed. The following event handler rejects any non-numeric charactersentered in the TextBox1 control:
Private Sub TextBox1_KeyPress(ByVal sender As Object,ByVal e As System.Windows.Forms.KeyPressEventArgs)Handles TextBox1.KeyPress
Dim c As Char = e.KeyCharIf Not (Char.IsDigit(c) Or Char.IsControl(c)) Then
e.Handled = TrueEnd If
End Sub
Use the StringBuilder class to manipulate large or dynamic strings. The StringBuilder classis very efficient at manipulating long strings, but it doesn’t provide as many methods for han-dling strings. The StringBuilder class provides a few methods to insert, delete, and replacecharacters within a string. Unlike the equivalent methods of the String class, these methodsact directly on the string stored in the current instance of the StringBuilder class.
Master It Assuming that you have populated a ListView control with thousands of linesof data from a database, how will you implement a function that copies all the data to theClipboard?
Solution To copy the ListView control’s data, you must create a long string that containstab-delimited strings and then copy it to the Clipboard. Each cell’s value must be convertedto a string and then appended to a StringBuilder variable. Consecutive rows will be sepa-rated by a carriage return/line feed character.
Start by declaring a StringBuilder variable:
Dim SB As New System.Text.StringBuilder
Then write a loop that iterates through the items in the ListView control:
Dim LI As ListViewItemFor Each LI In ListView1.Items

962 APPENDIX THE BOTTOM LINE
‘ append current row’s cell values to SBSB.Append(vbCrLf)
Next
In the loop’s body, insert another loop to iterate through the subitems of the current item:
Dim LI As ListViewItemFor Each LI In ListView1.Items
Dim subLI As ListViewItem.ListViewSubItemFor Each subLI In LI.SubItems
SB.Append(subLI.Text & vbTab)NextSB.Remove(SB.Length – 1, 1) ‘ remove last tabSB.Append(vbCrLf)
Next
Use the DateTime and TimeSpan classes to handle dates and time. The Date class repre-sents dates and time, and it exposes many useful shared methods (such as the IsLeap method,which returns True if the year passed to the method as an argument is leap; the DaysInMonthmethod; and so on). It also exposes many instance methods (such as AddYears, AddDays, Add-Hours, and so on) for adding time intervals to the current instance of the Date class as well asmany options for formatting date and time values.
The TimeSpan class represents time intervals — from milliseconds to days — with the From-Days, FromHours, and even FromMilliseconds methods. The difference between two datevariables is a TimeSpan value, and you can convert this value to various time units by usingmethods such as TotalDays, TotalHours, TotalMilliseconds, and so on. You can also add aTimeSpan object to a date variable to obtain another date variable.
Master It How will you use the TimeSpan class to accurately time an operation?
Solution To time an operation, you must create a DateTime variable and set it to the cur-rent date and time just before the statements you want to execute:
Dim TStart As DateTime = Now
Right after the statements you want to time have been executed, create a new TimeSpanobject that represents the time it took to execute the statements. The duration of the Time-Span object is the difference between the current time and the time stored in the TStartvariable:
Dim duration As New TimeSpanDuration = Now.Subtract(TStart)
The duration variable is a time interval, and you can use the methods of the TimeSpan classto express this interval in various units: duration.MilliSeconds, duration.Seconds, andso on.
Generate graphics by using the drawing methods. Every object you draw on, such as formsand PictureBox controls, exposes the CreateGraphics method, which returns a Graphics

CHAPTER 11: THE FRAMEWORK AT LARGE 963
object. The Paint event’s e argument also exposes the Graphics object of the control or form.To draw something on a control, retrieve its Graphics object and then call the Graphics object’sdrawing methods.
Master It Show how to draw a circle on a form from within the form’s Paint eventhandler.
Solution The following statements in the form’s Paint event handler will draw a circle atthe center of Form1:
Private Sub Form1_Paint(ByVal sender as Object,ByVal e As System.Windows.Forms.PaintEventArgs)Handles Me.Paint
Dim diameter = Math.Min(Me.Width, Me.Height)/2e.Graphics.DrawEllipse(Pens.Blue,
New RectangleF((Me.Width – diameter) / 2,(Me.Height – diameter) / 2, diameter, diameter))
End Sub
There’s no DrawCircle method; the DrawEllipse method accepts as arguments a Pen objectand a rectangle that encloses the circle to be drawn. If the rectangle is a square, then the equiv-alent ellipse will be a circle. To force the form to be redrawn every time it’s resized, you mustalso insert the following statement in the form’s Load event handler:
Me.SetStyle(ControlStyles.ResizeRedraw, True)
Use the printing controls and dialog boxes. To print with the .NET Framework, you mustadd an instance of the PrintDocument control to your form and call its Print method. To pre-view the same document, you simply assign the PrintDocument object to the Document prop-erty of the PrintPreviewDialog control and then call the ShowDialog method of the PrintPre-viewDialog control to display the preview window. You can also display the Print dialog box,where users can select the printer to which the output will be sent, and the Page Setup dia-log box, where users can specify the page’s orientation and margins. The two dialog boxes areimplemented with the PrintDialog and PageSetupDialog controls.
Master It Explain the process of generating a simple printout. How will you handle multi-ple report pages?
Solution Both the PrintDocument.Print and the PrintPreviewDialog.ShowDialogmethods fire the PrintPage event of the PrintDocument control. The code that generatesthe actual printout must be placed in the PrintPage event handler, and the same code willgenerate the actual printout on the printer (if you’re using the PrintDocument control) or apreview of the printout (if you’re using the PrintPreviewDialog control).
It’s your responsibility to terminate each page and start a new one every time you completethe current page by setting the HasMorePages property when you exit the PrintPage eventhandler. If the HasMorePages property is True, the PrintPage event is fired again, until theHasMorePages property becomes False.

964 APPENDIX THE BOTTOM LINE
Any static variables you use to maintain state between successive invocations of thePrintPage event handler, such as the page number, must be reset every time you start anew printout. A good place to initialize these variables is the BeginPrint event handler.
Master It Assuming that you have displayed the Page Setup dialog box control to the user,how will you draw a rectangle that delimits the printing area on the page, taking into con-sideration the user-specified margins?
Solution First, set up a few variables to store the page’s margins, as specified by the useron the Page Setup dialog box:
Dim LeftMargin, RightMargin, TopMargin, BottomMargin as IntegerWith PrintDocument1.DefaultPageSettings
LeftMargin = .LeftRightMargin = .RightTopMargin = .TopBottomMargin = .Bottom
End With
Then calculate the dimensions of the rectangle that delimits the printable area on the page:
Dim PrintWidth, PrintHeight As IntegerWith PrintDocument1.DefaultPageSettings.PaperSize
PrintWidth = .Width – LeftMargin – RightMarginPrintHeight = .Height – TopMargin – BottomMargin
End With
The rectangle you want to draw should start at the point (LeftMargin, TopMargin) andextend PrintWidth points to the right and PrintHeight points down.
Finally, insert the following statements in the PrintPage event handler to draw therectangle:
Dim R As New Rectangle(LeftMargin, TopMargin, PrintWidth, PrintHeight)e.Graphics.DrawRectangle(Pens.Black, R)
Chapter 12: Storing Data in Collections
Make the most of arrays. The simplest method of storing sets of data is to use arrays. They’revery efficient, and they provide methods to perform advanced operations such as sorting andsearching their elements. Use the Sort method of the Array class to sort an array’s elements.To search for an element in an array, use the IndexOf and LastIndexOf methods, or usethe BinarySearch method if the array is sorted. The BinarySearch method always returnsan element’s index, which is a positive value for exact matches and a negative value for nearmatches.
Master It Explain how you can search an array and find exact and near matches.

CHAPTER 12: STORING DATA IN COLLECTIONS 965
Solution The most efficient method of searching arrays is the BinarySearch method,which requires that the array is sorted. The simplest form of the BinarySearch method isthe following:
Dim idx As Integeridx = System.Array.BinarySearch(arrayName, object)
The BinarySearch method returns an integer value, which is the index of the object you’researching for in the array. If the object argument is not found, the method returns anegative value, which is the negative of the index of the next larger item minus one. Thefollowing statements return an exact or near match for the word srchWord in the wordsarray:
Dim wordIndex As Integer =Array.BinarySearch(words, srchWord)
If wordIndex >= 0 Then ‘ exact match!MsgBox("An exact match was found for " &
" at index " & wordIndex.ToString)Else ‘ Near match
MsgBox("The nearest match is the word " &words(-wordIndex - 1) &" at " & (-wordIndex - 1).ToString)
End If
Store data in collections such as List and Dictionary collections. In addition to arrays, theFramework provides collections, which are dynamic data structures. The most commonlyused collections are the List and the Dictionary. Collections are similar to arrays, but they’redynamic structures. List and ArrayList collections store lists of items, whereas Dictionary andHashTable collections store key-value pairs and allow you to access their elements via a key.You can add elements by using the Add method and remove existing elements by using theRemove and RemoveAt methods.
Dictionary collections provide the ContainsKey and ContainsValue methods to find outwhether the collection already contains a specific key or value as well as the GetKeys andGetValues methods to retrieve all the keys and values from the collection, respectively. As areminder, the List and Dictionary collections are strongly typed. Their untyped counterpartsare the ArrayList and HashTable collections.
Master It How will you populate a Dictionary with a few pairs of keys/values and theniterate though the collection’s items?
Solution To populate the Dictionary, call its Add method and pass the item’s key andvalue as arguments:
Dim Dict As New Dictionary(Of Object, Object)Dict.Add("key1", item1)Dict.Add("key2", item2)
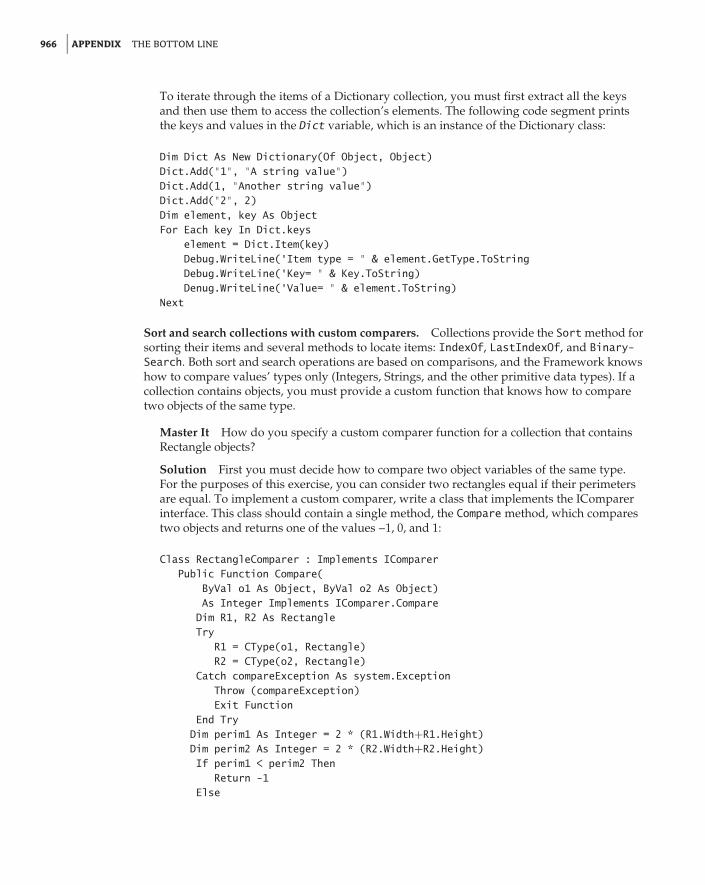
966 APPENDIX THE BOTTOM LINE
To iterate through the items of a Dictionary collection, you must first extract all the keysand then use them to access the collection’s elements. The following code segment printsthe keys and values in the Dict variable, which is an instance of the Dictionary class:
Dim Dict As New Dictionary(Of Object, Object)Dict.Add("1", "A string value")Dict.Add(1, "Another string value")Dict.Add("2", 2)Dim element, key As ObjectFor Each key In Dict.keys
element = Dict.Item(key)Debug.WriteLine("Item type = " & element.GetType.ToStringDebug.WriteLine("Key= " & Key.ToString)Denug.WriteLine("Value= " & element.ToString)
Next
Sort and search collections with custom comparers. Collections provide the Sort method forsorting their items and several methods to locate items: IndexOf, LastIndexOf, and Binary-Search. Both sort and search operations are based on comparisons, and the Framework knowshow to compare values’ types only (Integers, Strings, and the other primitive data types). If acollection contains objects, you must provide a custom function that knows how to comparetwo objects of the same type.
Master It How do you specify a custom comparer function for a collection that containsRectangle objects?
Solution First you must decide how to compare two object variables of the same type.For the purposes of this exercise, you can consider two rectangles equal if their perimetersare equal. To implement a custom comparer, write a class that implements the IComparerinterface. This class should contain a single method, the Compare method, which comparestwo objects and returns one of the values –1, 0, and 1:
Class RectangleComparer : Implements IComparerPublic Function Compare(
ByVal o1 As Object, ByVal o2 As Object)As Integer Implements IComparer.Compare
Dim R1, R2 As RectangleTry
R1 = CType(o1, Rectangle)R2 = CType(o2, Rectangle)
Catch compareException As system.ExceptionThrow (compareException)Exit Function
End TryDim perim1 As Integer = 2 * (R1.Width+R1.Height)Dim perim2 As Integer = 2 * (R2.Width+R2.Height)If perim1 < perim2 Then
Return -1Else

CHAPTER 13: XML IN MODERN PROGRAMMING 967
If perim1 > perim2 ThenReturn 1
ElseReturn 0
End IfEnd If
End FunctionEnd Class
Once this class is in place, you can pass an instance of it to the Sort method. The followingstatement sorts the items of the Rects ArrayList collection, assuming that it contains onlyRectangles:
Rects.Sort(New RectangleComparer)
If you want to search the collection for a Rectangle object with the BinarySearch method,you must pass as arguments to the method not only the object you’re searching for but alsoan instance of the custom comparer:
Rects.BinarySearch(New Rectangle(0, 0, 33, 33), comparer)
Chapter 13: XML in Modern Programming
Create XML documents. XML documents can be built easily with the XElement and XAt-tribute classes. XElement represents an element, and its constructor accepts as arguments theelement’s name and either the element’s value or a series of attributes and nested elements.XAttribute represents an attribute, and its constructor accepts as arguments the attribute’sname and its value. You can also assign an XML document directly to an XElement.
Master It Create the XML segment that describes an object of the Item type, defined by thefollowing class:
Class ItemProperty ID As StringProperty Name As StringProperty Prices As PriceProperty Name As String
Class PriceProperty Retail As PriceDetailsProperty WholeSale As PriceDetailsClass PriceDetails
Property Price As DecimalProperty VolumeDiscount As Decimal
End ClassClass Dimension
Property Width As Decimal
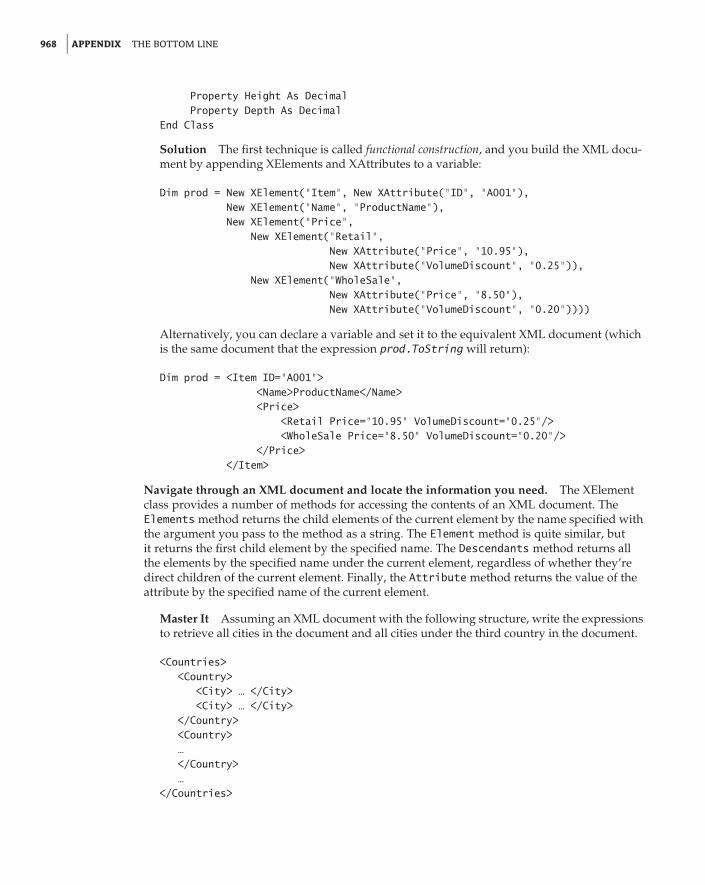
968 APPENDIX THE BOTTOM LINE
Property Height As DecimalProperty Depth As Decimal
End Class
Solution The first technique is called functional construction, and you build the XML docu-ment by appending XElements and XAttributes to a variable:
Dim prod = New XElement("Item", New XAttribute("ID", "A001"),New XElement("Name", "ProductName"),New XElement("Price",
New XElement("Retail",New XAttribute("Price", "10.95"),New XAttribute("VolumeDiscount", "0.25")),
New XElement("WholeSale",New XAttribute("Price", "8.50"),New XAttribute("VolumeDiscount", "0.20"))))
Alternatively, you can declare a variable and set it to the equivalent XML document (whichis the same document that the expression prod.ToString will return):
Dim prod = <Item ID="A001"><Name>ProductName</Name><Price>
<Retail Price="10.95" VolumeDiscount="0.25"/><WholeSale Price="8.50" VolumeDiscount="0.20"/>
</Price></Item>
Navigate through an XML document and locate the information you need. The XElementclass provides a number of methods for accessing the contents of an XML document. TheElements method returns the child elements of the current element by the name specified withthe argument you pass to the method as a string. The Element method is quite similar, butit returns the first child element by the specified name. The Descendants method returns allthe elements by the specified name under the current element, regardless of whether they’redirect children of the current element. Finally, the Attribute method returns the value of theattribute by the specified name of the current element.
Master It Assuming an XML document with the following structure, write the expressionsto retrieve all cities in the document and all cities under the third country in the document.
<Countries><Country>
<City> … </City><City> … </City>
</Country><Country>…</Country>…
</Countries>

CHAPTER 13: XML IN MODERN PROGRAMMING 969
Solution The following expression returns all cities in the document:
Dim cities =countries.Elements("Country").Elements("Cities").Elements("City")
The cities variable is an IEnumerable collection of XElement objects. Likewise, to retrieve thecities of the third country, you must retrieve the Elements collection of the third element:
Dim countryCities =countries.Elements("Country")(2).Elements("Cities").Elements("City")
Master It Assuming that both country and city names are specified in the document withthe Name element, explain the difference between the queries:
Dim q1 = countries.Elements("Country").Elements("Name")Dim q2 = countries.Descendants("Name")
Solution The first query returns all country names in the document, because the Elementsmethod retrieves all elements that are directly under the element to which it’s applied(not their children’s children, even if the same element name is repeated). The secondquery returns all country and city names, because the Descendants method retrieves allelements by the specified name under the element to which it’s applied (regardless of theirnesting).
Convert arbitrary objects into XML documents and back with serialization. Serialization isthe process of converting an object into a stream of bytes. This process (affectionately knownas dehydration) generates a stream of bytes or characters, which can be stored or transported.To serialize an object, you can use the BinaryFormatter or SoapFormatter class. You can alsouse the XmlSerializer class to convert objects into XML documents. All three classes exposea Serialize class that accepts as arguments the object to be serialized and a stream object andwrites the serialized version of the object to the specified stream. The opposite of serializationis called deserialization. To reconstruct the original object, you use the Deserialize method ofthe same class you used to serialize the object.
Master It Describe the process of serializing an object with the XmlSerializer class.
Solution First create a Stream object to accept the result of serialization; this stream isusually associated with a file:
Dim saveFile As New FileStream("Objects.xml", FileMode.Create)
Then create an instance of the XmlSerializer class, passing to its construction the type ofobject you want to serialize:
Dim serializer As New XmlSerializer(custom_type)
And finally call the serializer object’s Serialize method, passing as an argument the objectyou want to serialize:
serializer.Serialize(stream, object)

970 APPENDIX THE BOTTOM LINE
Chapter 14: An Introduction to LINQ
Perform simple LINQ queries. A LINQ query starts with the structure From variableIncollection, where variable is a variable name and collection is any collection thatimplements the IEnumerable interface (such as an array, a typed collection, or any methodthat returns a collection of items). The second mandatory part of the query is the Select part,which determines the properties of the variable you want in the output. Quite often you selectthe same variable that you specify in the From keyword. In most cases, you apply a filteringexpression with the Where keyword. Here’s a typical LINQ query that selects filenames from aspecific folder:
Dim files =From file In
IO.Directory.GetFiles("C:\Documents")Where file.EndsWith("doc")
Select file
Master It Write a LINQ query that calculates the sum of the squares of the values in anarray.
Solution To calculate a custom aggregate in a LINQ query, you must create a lambdaexpression that performs the aggregation and passes it as an argument to the Aggregatemethod. The lambda expression accepts two arguments, the current value of the aggregateand the current value, and returns the new aggregate. Such a function would have the fol-lowing signature and implementation:
Function(aggregate, value)Return(aggregate + value ˆ 2)
End Function
To specify this function as a lambda expression in a LINQ query, call the collection’sAggregate method as follows:
Dim sumSquares = data.Aggregate(Function(sumSquare As Long, n As Integer)
sumSquare + n ˆ 2)
Create and process XML files with LINQ to XML. LINQ to XML allows you to create XMLdocuments with the XElement and XAttribute classes. You simply create a new XElementobject for each element in your document and create a new XAttribute object for each attributein the current element. Alternatively, you can simply insert XML code in your VB code. Tocreate an XML document dynamically, you can insert embedded expressions that will beevaluated by the compiler and replaced with their results.
Master It How would you create an HTML document with the filenames in a specificfolder?

CHAPTER 14: AN INTRODUCTION TO LINQ 971
Solution To generate a directory listing, you must first implement the LINQ query thatretrieves the desired information. The query selects the files returned by the GetFilesmethod of the IO.Directory class:
Dim files = From file InIO.Directory.GetFiles(path)
Select New IO.FileInfo(file).Name,New IO.FileInfo(file).Length
Now you must embed this query into an XML document using expression holes. The XMLdocument is actually an HTML page that displays a table with two columns, the file’s nameand size, as shown next:
Dim smallFilesHTML = <html><table><tr>
<td>FileName</td><td>FileSize</td></tr><%= From file In
IO.Directory.GetFiles("C:\")Select <tr><td><%= file %></td> ,<td><%= New IO.FileInfo(file).Length %></td></tr>
%></table></html>
Process relational data with LINQ to SQL. LINQ to SQL allows you to query relational datafrom a database. To access the database, you must first create a DataContext object. Then youcan call this object’s GetTable method to retrieve a table’s rows or the ExecuteQuery methodto retrieve selected rows from one or more tables with a SQL query. The result is stored in aclass designed specifically for the data you’re retrieving via the DataContext object.
Master It Explain the attributes you must use in designing a class for storing a table.
Solution The class must be decorated with the <Table> attribute that specifies the nameof the table that will populate the class:
<Table(Name:="Customers")>Public Class Customers...End Class
Each property of this table must be decorated with the <Column> attribute that specifies thename of the column from which the property will get its value:
<Column(Name:= "CompanyName")>Public Property Company
...End Property

972 APPENDIX THE BOTTOM LINE
When you call the GetTable method of the DataContext class, pass the name of the classas an argument, and the DataContext class will create a new instance of the class andpopulate it.
Chapter 15: Programming with ADO.NET
Store data in relational databases. Relational databases store their data in tables and arebased on relationships between these tables. The data are stored in tables, and tables containrelated data, or entities, such as persons, products, orders, and so on. Relationships are imple-mented by inserting columns with matching values in the two related tables.
Master It How will you relate two tables with a many-to-many relationship?
Solution A many-to-many relationship can’t be implemented with a primary/foreignkey relationship between two tables. To create a many-to-many relationship, you mustcreate a new table that relates the other two tables to one another by implementing twoone-to-many relationships. Consider the Titles and Authors tables, which have a many-to-many relationship, because a title can have many authors and the same author mayhave written multiple titles. To implement this relationship, you must create an intermedi-ate table, the TitleAuthors table, which is related to both the Titles and Authors table witha one-to-many relationship. The TitleAuthors table should store title and author IDs. TheTitleAuthor.TitleID column is the foreign key to the relationship between the Titles andTitleAuthors tables. Likewise, the TitleAuthor.AuthorID column is the foreign key to therelationship between the TitleAuthor and Authors tables.
Query databases with SQL. Structured Query Language (SQL) is a universal language formanipulating tables. SQL is a nonprocedural language, which specifies the operation you wantto perform against a database at a high level, unlike a traditional language such as Visual Basic,which specifies how to perform the operation. The details of the implementation are left to theDBMS. SQL consists of a small number of keywords and is optimized for selecting, inserting,updating, and deleting data.
Master It How would you write a SELECT statement to retrieve selected data from multi-ple tables?
Solution The SELECT statement’s FROM clause should include the names of two or moretables, which must be somehow related. To relate the tables, use the JOIN clause, and specifythe primary/foreign keys of the join:
SELECT column1, column2, …FROM table1 T1 INNER JOIN table2
ON T1.primaryKey = T2.foreignKeyINNER JOIN table3 T3
ON T2.primaryKey = T3.foreignKeyWHERE criteria
Pay attention to the type of join you specify. An inner join requires that the two columnsmatch and excludes null values. A left join takes into consideration all the qualifying

CHAPTER 15: PROGRAMMING WITH ADO.NET 973
rows of the left table, including the ones that have null in their foreign key column. Aright join takes into consideration all the qualifying rows of the right table, including theones that have null in their foreign key column. A full outer join is a combination ofthe right and left joins — it takes into consideration null values from both tables involvedin the query.
Submit queries to the database using ADO.NET. ADO.NET is the component of theFramework that provides the mechanism to contact a database, submit queries, and retrievethe results of a query. There are two types of queries you can execute against a database:selection queries that retrieve data from the database based on certain criteria you supplyand action queries that manipulate the data at the database. Action queries do not return anyresults, except for the number of rows that were affected by the query.
Master It Describe the basic mechanism for submitting a selection query to the databaseand reading the results returned by the query.
Solution First you must connect to the database with a SqlConnection object. TheSqlConnection class’s constructor accepts as argument the credentials it must use toconnect to the database. Then you must create a SqlCommand object, which exposes theCommandText property. Assign the query you want to execute against the database, andoptionally set the CommandType property. You must also set the Connection object to theSqlConnection object, open the connection to the database, and finally call the SqlCommandobject’s ExecuteQuery method for selection queries or call the ExecuteNonQuery methodfor action queries.
The ExecuteNonQuery method returns an integer, which is the number of rows affected bythe query. The ExecuteQuery method returns a DataReader object, which you can use toiterate through the results of the query. Call the Read method to read the next row, andaccess each row’s column’s with the Item property of the DataReader class. Here is thepseudocode for accessing the rows of a query that retrieves customer information fromthe Northwind database:
CMD.CommandText = "SELECT * FROM Customers WHERE Country = ‘Germany’"CN.Open()Dim RDR As SqlDataReaderRDR = CMD.ExecuteReaderWhile RDR.Read
‘ Call the RDR.Item(col_name) method‘ to read a specific column of the current row‘ RDR.Item("CustomerID"), RDR.Item("Country") and so on‘ Use the RDR.IsDBNull method to determine whether‘ a column is Null, because Null values must be‘ handled specially
End WhileCN.Close()
It’s imperative that you read the data off the DataReader as soon as possible and then closethe connection to the database as soon as you are done.

974 APPENDIX THE BOTTOM LINE
Chapter 16: Developing Data-Driven Applications
Create and populate DataSets. DataSets are data containers that reside at the client and arepopulated with database data. The DataSet is made up of DataTables, which correspond todatabase tables, and you can establish relationships between DataTables, just like relatingtables in the database. DataTables, in turn, consist of DataRow objects.
Master It How do you populate DataSets and then submit the changes made at the clientto the database?
Solution To populate a DataSet, you must create a DataAdapter object for each Data-Table in the DataSet. The DataAdapter class provides the SelectCommand, InsertCommand,UpdateCommand, and DeleteCommand properties, which are initialized to the SQL statementsthat retrieve, set, update, and delete rows from the corresponding database tables. You canuse the CommandBuilder object to build the INSERT, UPDATE, and DELETE statements fromthe SELECT statement, which you must supply. After these properties have been set, youcan populate the corresponding DataTable by calling the Fill method of its DataAdapterobject. If the DataSet contains relationships, you must fill the parent tables before the childtables.
Establish relations between tables in the DataSet. You can think of the DataSet as a smalldatabase that resides at the client, because it consists of tables and the relationships betweenthem. The relations in a DataSet are DataRelation objects, which are stored in the Relationsproperty of the DataSet. Each relation is identified by a name, the two tables it relates, and thefields of the tables on which the relation is based.
Master It How do you navigate through the related rows of two tables?
Solution To navigate through the rows of two related tables, the DataRow object that rep-resents a row in a DataTable provides the GetChildRows method, which returns the currentrow’s child rows as an array of DataRow objects, and the GetParentRow/GetParentRowsmethods, which return the current row’s parent row(s). GetParentRow returns a singleDataRow, and GetParentRows returns an array of DataRow objects. Because a DataTablemay be related to multiple DataTables, you must also specify the name of the relation as anargument to these methods. The following statements retrieve the child rows of a specificcategory row in the DataTable with the rows of the Categories table and a specific supplier,respectively.
DS.Categories(iRow).GetChildRows("CategoriesProducts")DS.Suppliers(iRow).GetChildRows("SupplierProducts")
Submit changes in the DataSet to the database. The DataSet maintains not only data at theclient but their states and versions too. It knows which rows were added, deleted, or modified(the DataRowState property), and it also knows the version of each row read from the databaseand the current version (the DataRowVersion property).
Master It How will you submit the changes made to a disconnected DataSet to thedatabase?
Solution To submit the changes made to an untyped DataSet, you must call the Updatemethod of each DataAdapter object. You must call the Update method of the DataAdapterobjects that correspond to the parent tables first and then the Update method of the
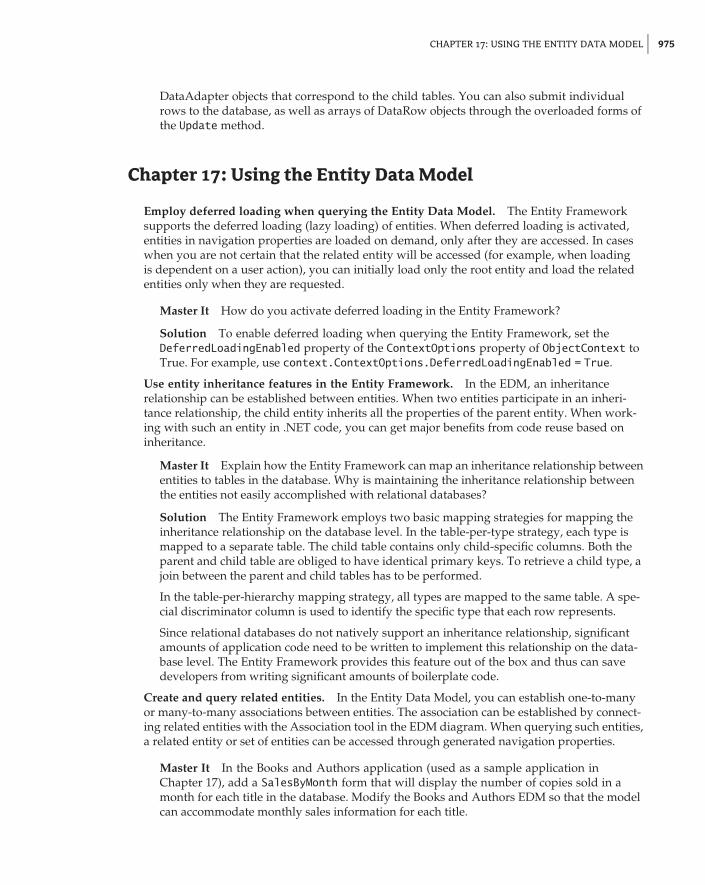
CHAPTER 17: USING THE ENTITY DATA MODEL 975
DataAdapter objects that correspond to the child tables. You can also submit individualrows to the database, as well as arrays of DataRow objects through the overloaded forms ofthe Update method.
Chapter 17: Using the Entity Data Model
Employ deferred loading when querying the Entity Data Model. The Entity Frameworksupports the deferred loading (lazy loading) of entities. When deferred loading is activated,entities in navigation properties are loaded on demand, only after they are accessed. In caseswhen you are not certain that the related entity will be accessed (for example, when loadingis dependent on a user action), you can initially load only the root entity and load the relatedentities only when they are requested.
Master It How do you activate deferred loading in the Entity Framework?
Solution To enable deferred loading when querying the Entity Framework, set theDeferredLoadingEnabled property of the ContextOptions property of ObjectContext toTrue. For example, use context.ContextOptions.DeferredLoadingEnabled = True.
Use entity inheritance features in the Entity Framework. In the EDM, an inheritancerelationship can be established between entities. When two entities participate in an inheri-tance relationship, the child entity inherits all the properties of the parent entity. When work-ing with such an entity in .NET code, you can get major benefits from code reuse based oninheritance.
Master It Explain how the Entity Framework can map an inheritance relationship betweenentities to tables in the database. Why is maintaining the inheritance relationship betweenthe entities not easily accomplished with relational databases?
Solution The Entity Framework employs two basic mapping strategies for mapping theinheritance relationship on the database level. In the table-per-type strategy, each type ismapped to a separate table. The child table contains only child-specific columns. Both theparent and child table are obliged to have identical primary keys. To retrieve a child type, ajoin between the parent and child tables has to be performed.
In the table-per-hierarchy mapping strategy, all types are mapped to the same table. A spe-cial discriminator column is used to identify the specific type that each row represents.
Since relational databases do not natively support an inheritance relationship, significantamounts of application code need to be written to implement this relationship on the data-base level. The Entity Framework provides this feature out of the box and thus can savedevelopers from writing significant amounts of boilerplate code.
Create and query related entities. In the Entity Data Model, you can establish one-to-manyor many-to-many associations between entities. The association can be established by connect-ing related entities with the Association tool in the EDM diagram. When querying such entities,a related entity or set of entities can be accessed through generated navigation properties.
Master It In the Books and Authors application (used as a sample application inChapter 17), add a SalesByMonth form that will display the number of copies sold in amonth for each title in the database. Modify the Books and Authors EDM so that the modelcan accommodate monthly sales information for each title.

976 APPENDIX THE BOTTOM LINE
Solution Add the SaleByMonth entity to the Books and Authors EDM, and use it to storethe monthly sales information. Establish a one-to-many relationship between the Book andSaleByMonth entities. Write the query to retrieve the necessary information and display iton the form.
Start by modifying the EDM:
1. Add a new entity to the EDM, and name it SaleByMonth.
2. Rename the entity set of SaleByMonth to SalesByMonth.
3. Add a Month scalar property of type Int16 to the SaleByMonth entity.
4. Add a Year scalar property of type Int16 to the SaleByMonth entity.
5. Add a CopiesSold scalar property of type Int64 to the SaleByMonth entity.
6. Establish a one-to-many association between the Book and SaleByMonth entities.
7. Add a form named SaleByMonthForm to the project. Add one DataGridView controland one button control named Display to the SaleByMonthForm form.
8. Fill the DataGridView from the query in the Display button’s Click event handler.
Listing A.1 shows the code for the Display button event handler.
Listing A.1: Using TransactionScope for enlisting external operations
Private Sub Display_Click(ByVal sender As System.Object,ByVal e As System.EventArgs) HandlesDisplay.Click
Dim context As New BooksAndAuthorsContainerDim books = context.Books.Include("Sales")For Each book As Book In books
For Each saleByMonth In book.SalesgridResult.Rows.Add(New String() {
book.ISBN, book.Title,saleByMonth.Month.ToString & saleByMonth.Year.ToString(),saleByMonth.CopiesSold.ToString()})
NextNext
End Sub
Chapter 18: Building Data-Bound Applications
Design and use typed DataSets. Typed DataSets are created with visual tools at design timeand allow you to write type-safe code. A typed DataSet is a class created by the wizard on thefly, and it becomes part of the project. The advantage of typed DataSets is that they exposefunctionality specific to the selected tables and can be easily bound to Windows forms. The

CHAPTER 18: BUILDING DATA-BOUND APPLICATIONS 977
code that implements a typed DataSet adds methods and properties to a generic DataSet, so allthe functionality of the DataSet object is included in the autogenerated class.
Master It Describe the basic components generated by the wizard when you create atyped DataSet with the visual tools of Visual Studio.
Solution The basic components of the class that implements a typed DataSet are as fol-lows: the DataSet, which describes the entire DataSet; the BindingNavigator, which linksthe data-bound controls on the form to the DataSet; and the TableAdapter, which links theDataSet to the database. The DataSet component is based on the DataSet class and enhancesthe functionality of an untyped DataSet by adding members that are specific to the data con-tained in the DataSet. If the DataSet contains the Products table, the typed DataSet exposesthe ProductsRow class, which represents a row of the Products table. The ProductsRowclass, in turn, exposes the columns of the table as properties.
The BindingSource class allows you to retrieve the current row with its Current property,move to a specific row by setting the Position property, and even suspend temporarily andrestore data binding with SuspendBinding and ResumeBinding.
The TableAdapter class, which is based on the DataAdapter class, provides methods forloading a DataTable (the Fill method) and submitting the changes made to the DataSetto the database (the Update method). The TableAdapterManager class, which encapsulatesthe functionality of all TableAdapters on the form, provides the UpdateAll method, whichsubmits the changes in all DataTables to the database.
Bind Windows forms to typed DataSets. The simplest method of designing a data-boundform is to drop a DataTable, or individual columns, on the form. DataTables are bound toDataGridView controls, which display the entire DataTable. Individual columns are boundto simple controls such as TextBox, CheckBox, and DateTimePicker controls, depending on thecolumn’s type. In addition to the data-bound controls, the editor generates a toolbar controlwith some basic navigational tools and the Add/Delete/Save buttons.
Master It Outline the process of binding DataTables to a DataGridView control.
Solution To bind a DataTable to a DataGridView control, locate the desired table in theData Sources window, set its binding option to DataGridView, and drop the DataTable onthe form. The editor will create a DataGridView control on the form and map the control’scolumns according to the columns of the DataTable. It will also add a toolbar with the basicnavigational and editing controls on the form.
To bind two related DataTables on the same form, drop the parent DataTable on the form,and then select the child DataTable under this parent and drop it on the form. To mod-ify the appearance of the DataGridView controls, open their Tasks menu, and choose EditColumns to see the Edit Columns dialog box, where you can set the appearance of the con-trol’s columns.
Compare a LINQ query used to filter data with an eSQL dynamic query. You can use theAsDataView extension method of the DataTable class to enable binding of the LINQ queryresults when querying the DataSet in LINQ to DataSet technology. In this chapter, you haveseen how a LINQ query can be used to provide filtering capabilities on a data-entry form.
Entity SQL (eSQL) is a query language with syntax similar to Transact-SQL. Entity SQL queriescan be embedded inside the Visual Basic code and can be used to query the Entity Data Model

978 APPENDIX THE BOTTOM LINE
provided by the Entity Framework. You saw how to use Entity SQL to construct dynamicqueries in Chapter 17.
Master It Compare LINQ queries to queries written in Entity SQL. Explain the main bene-fits and drawbacks of each technology.
Solution LINQ to DataSet technology provides a rich set of querying features for query-ing the data in the DataSet. LINQ syntax is an integral part of Visual Basic syntax andas such is processed and verified during the compilation process and supported byIntelliSense.
Entity SQL is used inside the Visual Basic code as an embedded query language. SinceEntity SQL code is essentially written in the form of string literals inside Visual Basic code,it is not compiled. Such code can count only on reduced IntelliSense support. This andhaving to learn new language syntax (although fairly similar to Transact-SQL and thereforeprobably familiar to Visual Basic .NET programmers) are the main drawbacks of EntitySQL compared to LINQ.
Since Entity SQL code is not compiled, Entity SQL code can be constructed at runtime. Thisis especially handy for writing queries with a large number of criteria combinations that canonly be known at runtime. When writing similar queries in LINQ, you have to include allthe criteria in the query and then provide the means to activate or deactivate certain crite-ria. Alternatively, you can write chained LINQ queries. LINQ code can be more complex towrite and less efficient to execute than Entity SQL code.
Chapter 19: Accessing the Web
Access a website on the Internet using the WebClient class. The WebClient class providesan easy and simple way to access resources on the Web programmatically from Visual Basiccode. The WebClient class implements many features of HTTP, making it easy to access thesites on the Web in the same way the browser application does. The web server will not dis-tinguish a request coming from a WebClient site from one coming from a user-operated webbrowser.
The WebClient class can be very useful in HTML screen scraping scenarios, where the data tobe extracted from HTML is meant to be read by a human, or in lightweight web service proto-cols like REST and/or AJAX-styled XML and JSON over HTTP.
Master It Use the Headers property of the WebClient class to fine-tune HTTP requests.Trick Google into believing that a request that you are sending from your Visual Basic appli-cation is coming from some mobile device.
Solution The WebClient class permits adding different headers to your HTML requeststhrough its Headers property. The header used to identify the type of client sending therequest is the "user-agent" header. You need to add this header to your HTTP request. Thevalue of the header should be the string sent by some mobile device. Browsing the Internet,I found that some LG mobile phones send the following string value as their "user-agent":"L1G-CU920/V1.0p Obigo/Q05A Profile/MIDP-2.0 Configuration/CLDC-1.1".

CHAPTER 19: ACCESSING THE WEB 979
If you create a new Windows Forms application and add a Download button to the form,here is the code you need to add to Download button’s event handler in order to receiveGoogle’s default search page formatted for mobile devices:
Dim client As New WebClientclient.Headers.Add("user-agent","L1G-CU920/V1.0p Obigo/Q05A Profile/MIDP-2.0 Configuration/CLDC-1.1")Dim response = client.DownloadString("http://www.google.com")Console.WriteLine(response)
This code will write the response to the Output window. Now, if you copy this output, saveit to a googlemobile.html file, and open the file with your web browser, you will see theGoogle search page as shown in Figure A.1.
Figure A.1
Google search pageformatted for amobile device
Use a WebBrowser control to add web browser functionality to your Windows Forms appli-cation. The WebBrowser control provides all the basic functionality of a browser in a formof Windows Forms control. Visually, it consists only of a main browser window. To provideadditional functionality, like an address bar and Back, Forward, Refresh, and other buttons,you will have to add the appropriate controls and program them yourself. The WebBrowsercontrol uses the same browser engine as Internet Explorer.
A WebBrowser control’s behavior can be customized to a large degree. You can decide to showor not show the scroll bars, allow or disallow navigation, show or not show the context menu,and so forth. Finally, since the control does not contain the address bar, you can also controlwhich sites a user can access.
Master It Create a custom web browser that can navigate to a limited number of URLs.

980 APPENDIX THE BOTTOM LINE
Solution Use the WebBrowser control to create a browser that can navigate to a limitednumber of URLs. Start by creating a new Windows Forms project:
1. Create a new Windows Forms project and name it LimitedBrowser.
2. Add a ComboBox named cboUrls to the form and set its Dock property to Top.
3. Add a WebBrowser control to the form.
4. Fill the Items property of the cboUrls control with the following items:
http://www.google.comhttp://www.msdn.comhttp://www.yahoo.comhttp://www.sybex.com
5. Set the Text property of cboUrls to http://www.sybex.com.
If you run the project now, you will see a form with a combo box at the top and a Web-Browser control covering the rest of the form, like the one shown in Figure A.2.
Figure A.2
Limited web browserform
All that is left to be done is to make the WebBrowser control navigate as the user selects adifferent item in the combo box cboUrls. To implement navigation functionality, add thefollowing code to cboUrls’s SelectedIndexChanged event hander:

CHAPTER 20: BUILDING WEB APPLICATIONS 981
Private Sub cboUrls_SelectedIndexChanged(ByVal sender As System.Object,ByVal e As System.EventArgs) Handles cboUrls.SelectedIndexChanged
WebBrowser1.Navigate(cboUrls.Text)End Sub
Chapter 20: Building Web Applications
Create a basic XHTML/HTML page. Building a basic HTML page is a straightforward pro-cess using a simple text editor such as Notepad. Knowledge of XHTML/HTML is still a majorasset when developing web applications with Visual Studio 2010.
Master It Develop a web page using HTML that features a heading, some text, an image,and a link to another page. Convert the page to XHTML and verify it by using the W3C ver-ification tool at http://validator.w3.org. You might find that you will need to run thevalidation a couple of times to get everything right. If you attach and use the style sheet inthe following Master It challenge, you will find that validation will be less problematic.
Solution Note that this solution includes the style sheet created in the next Master It chal-lenge. As in the examples with other listings in this book, some long lines are wrapped herein print, but you can leave them all on one line in your code.
<?xml version="1.0" encoding="iso-8859-1"?><!DOCTYPE html PUBLIC "-//W3C//DTD XHTML 1.0Strict//EN" "http://www.w3.org/TR/xhtml1/DTD/xhtml1-strict.dtd"><html xmlns="http://www.w3.org/1999/xhtml" lang="en">
<head><link rel="stylesheet" type="text/css" href="stylesheet.css" /><title>Basic Page</title>
</head><body>
<div class="title"><h1>Heading</h1>
</div><div class="content">
<p>Text</p><img src="myimage.jpg" height="100" _
width="100" alt="myimage" /><br/>
</div><div class="menu">
<a href="http://www.microsoft.com">Microsoft</a></div>
</body></html>

982 APPENDIX THE BOTTOM LINE
Format a page with CSS. Cascading Style Sheets (CSS) is a powerful tool for controlling thestyles and format of a website. You can manually create style sheets by using a text editor. Anunderstanding of their operation and syntax is a useful skill when manipulating CSS in VisualStudio 2010.
Master It Create a CSS style sheet that defines the layout of the web page that you devel-oped in the previous task, including a header section, a left-hand navigation section, and amain content section. Include a rollover for the link and apply formatting to the tags thatyou have used for your heading and text tags. Attach the style sheet to your web page.
Solution The following code represents the CSS style sheet:
title{height:80px;background:lightblue;margin:5px 10px 10px 10px;text-align: center;}
menu{position: absolute;top: 110px;left: 20px;width: 130px;background: silver;padding: 10px;bottom: 20px;}
content{background: lightblue;padding: 30px;position: absolute;top: 110px;bottom: 20px;left: 180px;right: 20px}
a {text-decoration:none;color:blue;}
a:visited {text-decoration:none;color:blue;}

CHAPTER 20: BUILDING WEB APPLICATIONS 983
a:hover {text-decoration:none;font-weight: bold;color:darkblue;}
a:active {text-decoration:none;color:blue;}
Set up a master page for your website. Using master pages is a reliable method of controllingthe overall layout and look and feel of your websites and applications. Master pages enableyou to achieve a high level of consistency in your design and are particularly useful if the sitehas multiple developers working on it.
Master It Create a website with a master page and attached content page. Use appropriatecontrols to give the master page a page heading, My Page, which will appear on all attachedcontent pages. Use a combination of Button and Label controls on the content page to createa simple Hello World application.
Solution Start a new website and delete the default.aspx page. Create a new masterpage and add a Label control to it above the default ContentPlaceHolder control. Formatthe Label control appropriately as a heading and add a page heading: My Page.
Add a content page to your project. Name the page default.aspx. In the content page,add a Button control and a Label control to the ContentPlaceHolder. (You may need toright-click the ContentPlaceHolder control and choose the Create Custom Content option.)Double-click the button and write the following code to set the text property of the labelcontrol to Hello World:
Protected Sub Button1_Click(ByVal sender As Object,ByVal e As System.EventArgs) Handles Button1.Click
Label1.Text = "Hello World"End Sub
Use some of the ASP.NET intrinsic objects. ASP.NET objects such as the Response, Request,Session, and Server objects offer a range of important utilities in developing, running, andmaintaining your websites and applications. In addition, they give you access to vital infor-mation about the client, the server, and any current sessions at runtime.
Master It Create a simple website with a master page and two attached content pages. Usethe Server.Execute method attached to a LinkButton control to navigate between the twocontent pages.
Solution Create a new website and delete the default.aspx page. Create a new masterpage and attach two content pages. Name one of the pages default.aspx and right-click itin Solution Explorer to set the page as the startup page from the drop-down context menu.Name the second page Page2.aspx. Place some distinguishing features on the two pages,such as Label controls with appropriate text content.

984 APPENDIX THE BOTTOM LINE
Add a LinkButton control to the ContentPlaceHolder in default.aspx. Double-click theLinkButton control and use Server.Execute in the sub for the Click method to create alink to page 2.
Protected Sub LinkButton1_Click(ByVal sender As Object,ByVal e As System.EventArgs) Handles LinkButton1.Click
Server.Execute("Page2.aspx")End Sub
Chapter 21: Building and Using Web Services
Create a simple ASP.NET web service. Creating ASP.NET web services is straightforwardwith Visual Studio. ASP.NET web services provide a great method for delivering data andfunctionality within a distributed environment, including the Internet.
Master It Develop an ASP.NET web service that enables the user to add two numbers.
Solution
1. Open Visual Studio 2010 and choose File � New �Web Site.
2. On the New Web Site dialog box, select ASP.NET Web Service and click OK.
3. In the App_Code/Service.vb file, change the default reference http://tempuri.org tosomething more relevant to your service.
4. Replace the default web method, HelloWorld(), with a method of your own. A webmethod is implemented like a function in VB, and it’s decorated with the <WebMethod>attribute.
Consume an ASP.NET web service. Adding a web reference or service reference to a webservice is a key element to creating an application that can consume the web service.
Master It Create a new website and add a service reference to a web service on yourmachine.
Solution
1. Open an existing web service with Visual Studio 2010. Run the application to open aninstance of the ASP.NET Development Server that will host the service.
2. Open a new instance of Visual Studio 2010 and create a new website project.
3. Right-click the name of the new project in the Solution Explorer and select Add ServiceReference from the context menu.
4. In the Add Service Reference dialog box, type the URL of the web service running in thefirst instance of Visual Studio (the web service being hosted by the ASP.NET Develop-ment Server).
5. After the service has been discovered, click the OK button to close the dialog box. Nowyou can create a variable of the same type in your code and access the service’s membersthrough this variable.

CHAPTER 21: BUILDING AND USING WEB SERVICES 985
Create a WCF service. WCF services are similar to web services, but they give developersmore options for deployment and they support more data exchange protocols.
Master It Outline the steps involved in building a WCF service.
Solution A WCF service must contain a data contract that specifies the service’s data typesand is implemented as a class with public properties; an operation contract that specifiesthe methods of the service and is implemented as an interface; and the actual service that’simplemented as a class that contains the code of the various methods. The class that imple-ments the data contract must be marked with the DataContract attribute and the class thatimplements the interface must be marked with the ServiceContract attribute. Finally, theclass that implements the methods must be marked with the ServiceBehavior attribute.
Work with ADO.NET Data Services. ADO.NET Data Services is a project component thatexposes, or surfaces, data as a service through HTTP. Data services are built automatically byVisual Studio based on any data source, and you can access them through URI requests.
Master It How do you access the methods of an ADO.NET data service?
Solution You can access the methods of an ADO.NET data service through your browserusing URL syntax to pass parameters to the method. To access a table, append the name ofthe table after the service’s name. To access a specific row in the table, specify the desiredrow’s primary key in a pair of parentheses following the table name. To filter a table’s rows,use the $filter keyword, passing the filtering expression as parameter value.
You can also create a proxy class that encapsulates the functionality of the data service withthe DataSvcUtil.exe utility. Once you have created the proxy, you can create a variableof this type in your code and use it to access the methods of the data service and use LINQstatements to query your data.


IndexNote to reader: Bolded page numbers refer to main discussions and definitions. Italicized page numbers referto illustrations.
Symbols# (pound) character, 53, 66, 649% (percent) wildcard character, 649& (ampersand) character, 531 : character, 850[ - ] wildcard character, 649[ ] wildcard character, 649[ ∧ ] wildcard character, 649_ (underscore) wildcard character, 649< (less than) character, XML, 531<%= and %> tags, XML, 599–600<!--...--> (comments), HTML, 851> (greater than) character, XML, 531‘ (apostrophe) character, XML, 531‘‘ (quotation mark) character, XML, 531
AABC principles of WCF, 912Abort value, DialogResult enumeration, 228, 228AcceptButton property, 205Accept/Reject Rule, foreign key constraints, 792,
793AcceptsReturn property, 164AcceptsTab property, 164access keys, 247–248Action attribute, HTML forms, 854action queries
defined, 973deleting rows, 659–660editing existing rows, 661inserting new rows, 660–661overview of, 658
Activated event, 221–222Activation property, ListView control, 294, 294Active Server Pages (ASP), 863–864Add Connection dialog box
checking for sample databases, 634, 635generating typed DataSet, 771–772, 772
Add Data Source command, 770Add Item buttons, ListBox, 189Add method
adding nodes at runtime, 292–293appending new items to collection, 81
Controls collection, 234DateTime class, 479, 480Items collection, 185–186, 297TimeSpan class, 488–489
Add New Item dialog boxaccessing ASP.NET web services with AJAX,
911adding ADO.NET Data Service, 921creating master page, 876creating new EDM, 734working with LINQ to SQL classes, 615
Add Reference command, 24–25, 334, 570Add Service Reference dialog box, 896Add Web Reference command, 24–25Add Web Reference dialog box, 908, 909AddDays method, 339AddExtension property,
OpenFileDialog/SaveFileDialog controls, 262AddRange method, collections, 503address, WCF web services, 912, 916–920, 917–920address visualization form, 833–843
assembling, 834, 835composing web services, 832–834constructing geocoding web service
URL/query parameters, 834–836displaying coordinates on map, 838–842, 843invoking geocoding web service, 836–837overview of, 831–832processing geocoding web service response,
837–838AddToSuppliers method, ADO.NET Data
Services, 933ADO.NET, programming with
action queries. see action queriesbasic data-access classes. see classes, basic data
accessdatabases. see databasesoverview of, 631SQL. see SQL (Structured Query Language)storing data in relational databases, 972stream- vs. set-based data access, 662

988 ADO.NET DATA SERVICES • ARRAYS
ADO.NET Data Services, 920–938accessing methods of, 985building Windows client, 928–932, 929filtering, 926–928, 927overview of, 920–926, 922–924, 926performing transactions, 934–936real-world scenario, 937–938securing, 937–939submitting updates, 932–933
Advanced Options dialog box, TableAdapterConfiguration Wizard, 784, 784
Advanced submenu, Edit, 22aggregates
calculating with LINQ, 587–589, 592–593calculating with SQL, 651–653, 652
AJAX (Asynchronous JavaScript and XML)Extensions controls, 871, 872overview of, 863web services implementation, 910–912
algorithms, binary search, 498align attribute, <img> tag, 850alignment
Label3D, 369, 371ListView, 293, 294LoanCalculator GUI controls, 135–136, 136MathCalculator GUI buttons, 146
All method, Controls collection, 234AllowBrowserDrop property, WebBrowser, 818AllowColumnReorder property, ListView, 294AllowFullOpen property, ColorDialog, 257AllowNavigation property, WebBrowser control,
817, 818AllowScriptChange property, 259AllowVerticalFonts property, 259AllSystemSources property, 179AllUrl property, 179alt attribute, <img> tag, 850Amazon.com, 894American National Standards Institute (ANSI), 52Amount argument, Pmt( ) function, 132–133ampersand (&) character, 531Ancestors methods, traversing XML documents,
543–544Anchor property, forms, 216–217, 216–217anonymous types, LINQ and, 583–584ANSI (American National Standards Institute), 52AnyColor property, ColorDialog, 257apostrophe (’) character, XML, 531appearance, form
anchoring controls, 216–217, 216–217Contacts project, 212, 212–213docking controls, 216, 217–218, 218elements of, 203–204, 204form events, 221–223Form object properties, 204–209, 205, 207handling keystrokes, 213–214placing controls, 209–210, 210processing keys from within code, 214–216setting TabIndex property, 211, 211splitting into multiple panes, 219–221, 220–221
Append/AppendFormat methods, 473–474AppendText method, 443, 951–952application generator, 242–243Application object, 875arguments, 106–125
built-in functions, 111–113custom functions, 113–115, 114overloading functions, 118–125, 120, 123–124overview of, 106–108passing, 108–111, 115–118, 945
Array classadditional operations of, 498–500ArraySearch application, 496, 496–497binary search algorithm, 498extension methods, 408–411limitations, 500overview of, 493searching arrays, 495–496sorting arrays, 494XML serialization of, 567–569
ArrayList classadding/removing items from, 502–505collection initializers, 505–506creating collections, 501–502extracting items from, 505–506iterating through collections, 509–510iterating with enumerators, 520–521searching collections in, 508–509serialization, 573–575sorting collections in, 507–508
arrays, 75–82collections vs., 81–82declaring, 75–76, 944defined, 964functions returning, 117–118initializing, 76–78multidimensional, 78–79, 78–81

ARRAYS, ADVANCED TOPICS • BUSINESS OBJECTS 989
overview of, 75, 75searching, 964–965
arrays, advanced topicsadditional operations, 498–500ArraySearch application, 496, 496–497binary search algorithm, 498limitations, 500overview of, 493searching arrays, 495–496sorting arrays, 494
As keyword, 39, 105ASP (Active Server Pages), 863–864ASP.NET
creating web applications, 875–879, 876–879Development Server, 906overview of, 864Web Application option, 864
ASP.NET web serviceadding simple AJAX implementation, 910–912creating simple, 900–903, 902–903, 984defined, 893overview of, 898–899technologies, 899–900
asynchronous download,WebClient class, 830–831Asynchronous JavaScript and XML. see AJAX
(Asynchronous JavaScript and XML)asynchronous methods, WebClient class, 828Attribute property, XML documents, 544attributes
adding images to web page, 850entity, 726HTML form, 854–855HTML tag, 848XHTML tag, 847XML document, 532–534
audio, accessing using My component, 34authentication, generating typed DataSet, 772AutoCompleteSource property, TextBox controls,
179–180, 179–180, 947AutoGenerateColumns property, 798auto-implemented properties, 319AutoScaleMode property, 205AutoScroll property, 205, 205–206, 218–219AutoScrollMargin property, 206AutoScrollMinSize property, 206AutoScrollPosition property, 206AutoSize property, 11, 14auxiliary form, MultipleForms project, 229–233AvailableFreeSpace property, 442, 444
Average extension method, 409AVG() function, aggregates, 652axis methods, 543–545
Bbarcode reader, 691baseline alignment, controls, 210, 210BeginTransaction method, Connection object,
696bidirectional data binding, 778binary serialization, 560, 569–571BinaryFormatter method, 569–571, 572BinarySearch method, 965
ArraySearch application, 496, 496–497binary search algorithm, 498searching arrays, 495–496searching collections, 508–509
BinaryWriter object, 960binding. see data binding; data-bound applicationsBindingSource class, 781–786
adjusting DataSet properties, 782–784, 783–784designing data-driven interfaces, 788handling Identity columns, 782overview of, 781–782using as data source, 794
block-level scope, 72, 72–73body, HTML pages, 848Booking.com, 894Books and Authors EDM application, 764–766Boolean operators, 49, 50Boolean variables, 50border attribute, <img> tag, 850BorderStyle property, 145boxing, 61, 392brand independence, Entity Framework, 731breakpoints, 27, 153browser. see WebBrowser controlBrush class, 449bulleted lists (<ol>...<ol>), displaying, 851BulletIndent property, RichTextBox, 271, 273business layer, 692–693business objects, 687–701
application’s interface, 690–691, 690–693implementing data-access layer with custom
objects, 693–697, 697implementing data-access layer with LINQ to
SQL, 697–699NWOrders application, 689

990 BUTTON CONTROL • CLASSES, CUSTOM
overview of, 687–689using TransactionScope class, 699–701
Button controladding to toolbar, 790address visualization form, 834, 835creating HTML forms, 855first VB application, 14–17, 15LoanCalculator GUI, 135MathCalculator GUI, 145–146
Byte variable, 49ByVal keyword, 108–109
CCache-Control response header, 828CalculateStatistics( ) function, 109–110calculators. see LoanCalculator project;
MathCalculator projectCancel value, DialogResult, 228, 228–229CancelAsync method, WebClient class, 829CancelButton property, 205CanUndo/CanRedo properties, RichTextBox, 276Caption property
DataSet, 782designing custom controls, 372
capturingfunction keys, 177–178keystrokes, 176–177
cardinality, 728cart web form, 886–891, 891Cascading Style Sheets (CSS), 848, 856–860,
982–983Case statements, 90–91case-sensitivity
arrays, 496first VB application, 17–18SQL, 642XHTML, 846
casting, 397–398, 417Catch Exception block, 156–157Categories table, 636, 636–637, 791–792, 791–794cells, HTML table, 852CellStyle Builder dialog box, 797, 797Changed events, custom Windows controls,
375–376ChangeExtension method, 444, 445ChangeInterceptor method, 938Char class, 463–464, 464–465Char data type, 51–52, 961Character variables, 51–52
CharacterCasing property, 164characters
handling with Char data type, 51–52, 961strings and. see strings and characterstext management, 850type, 45, 45wildcard, 649, 649–650
CheckBox controlcreating HTML forms, 856designing LoanCalculator GUI, 135designing Windows applications, 130
CheckBoxes property, TreeView, 290Checked property, 246CheckedListBox control
basic properties, 183–184, 184customizing, 382–383overview of, 182, 182–183selecting items, 187–188
CheckFileExists property,OpenFileDialog/SaveFileDialog, 262
CheckPathExists property,OpenFileDialog/SaveFileDialog, 262
child nodes, tree structure, 287–288ChildKeyConstraint property rules, 716–717, 717Choose Toolbox Items command, 25Choose Your Database Objects page, Data Source
Configuration Wizard, 772–773, 773Class Diagram Designer, 403, 403, 429class instantiation, 387classes
ADO.NET Data Service, 921–922building WCF service, 913–916combining code with data, 307–308defined, 306objects vs., 305–307, 387–388
classes, basic data accessCommand class. see Command classConnection class, 663–665data-driven applications, 680, 680–687DataReader class. see DataReader classoverview of, 662–663SQL injection attacks, 673–674
classes, customadding code, 311–313, 312auto-implemented properties, 319–320building Minimal. see Minimal classbuilding own, 952–953Class Diagram Designer, 429combining code with data, 307–308

CLASS-RELATED MODIFIERS • COLOR 991
custom enumerations, 323–325, 325customizing Equals method, 321–322customizing ToString method, 320–321extension methods, 407–411firing events, 335–338, 336inheritance and, 401–402instance and shared methods in, 338–342Is operator in, 322–323nesting classes, 344–347object constructors and, 331–333objects and, 305–306, 307overloading operators, 347–351, 351overview of, 306–307property procedures, 313–314read-only properties, 317–318revising Contacts project, 325, 325–330StringTools class, 342–344, 344throwing exceptions, 315–316unary operators, 351–352using SimpleClass in other projects, 333–335,
334–335variants, 352–353working with, 953–956
class-related modifiers, 418–420cleanup statements, structured exception handlers,
156Clear button, 146, 148Clear method
Controls collection, 234Items collection, 186, 297
clearDisplay variable, MathCalculator GUI, 148,150–151
Click event handler, Button controlLoanCalculator GUI, 136–137, 137MathCalculator GUI, 147–149programming, 15, 15–17, 19–20
Click event, ToolStripMenuItem, 949–950Clickable value, HeaderStyle property, 294client
building Windows, 928–932, 929maintaining state, 871, 873
client variable, consuming web services, 897Clipboard, 34Close command, Control menu, 204, 204Cloud tab, Start page, 5CLR (Common Language Runtime), 65, 677–678code
adding to Minimal class, 311–313, 312data combined with, 307–308
processing keys from within, 214–216programming first VB application, 14–18, 15reuse of, 306. see also inheritance
code editor, 15, 15code snippets
calculating monthly loan payment, 139–140in Framework, 434–436, 435Insert Snippet command, 23using My component, 33–34working with, 32–33
code-behindcreating cart web form, 888–890defined, 864developing stand-alone web service, 909–910,
910collection initializers, Array class, 505–506collections
adding/removing list items, 502–505additional, 519advanced array topics. see Array classcollection types. see collectionscreating, 501–502Dictionary, 510–512, 965–966dynamic data storage, 81–82extracting items from, 506–507HashTable, 512–513IComparer interface. see IComparer interfaceIEnumerator interface. see IEnumerator
interfaceimplementing custom comparers, 966–967iterating through lists, 509–510List, 965overview of, 493, 500–501querying with LINQ, 584–586searching arrays, 964–965searching lists, 508–509serialization, 573–575SortedList, 518–519sorting lists, 507–508transforming into XML segments, 596–597WordFrequencies application, 513–517, 514XML serialization of, 567–569
colorcreating graphics, 448as important design element, 12MathCalculator GUI, 145prompting users for, 951

992 COLOR PROPERTY • CONTACTS PROJECT
Color propertyColorDialog, 257FontDialog, 259
ColorClick event, 377–378ColorDialog control
function of, 255prompting users for colors, 951properties, 256, 256–258
ColorEdit control, 365, 365–368, 377–378Colors project, 198, 198–200Column attribute, LINQ to SQL, 611–613column names, aliasing, 648–649ColumnHeader Collection Editor dialog box,
ListView, 295–296, 296columns
creating HTML tables, 852customizing appearance, 794–798, 795–797data binding, 778–780, 779–780displaying lookup, DataGridView, 798,
798–799handling Identity, 716retrieving database update errors, 716
Columns collection, DataTable class, 707–708ColumnType property, 795–796Combine method, 444, 445ComboBox control
adding items at runtime, 195, 195–196creating user friendly application, 18–19, 18–21customizing, 382–383displaying options, 18FlexCombo project design, 196–197NWOrders application UI, 690–691overview of, 182, 182–183properties, 183–184, 184selecting items, 187–188types, 193–194, 193–195Windows application design, 130
Command classapplication of, 665–667empty strings vs. null values, 675executing selection queries, 667–668executing statements during transactions, 696executing stored procedures, 667handling special characters, 674–675retrieving multiple values from stored
procedures, 670–673using Commands with parameters, 669–670
command prompt window, 30–32, 31Command window, 24, 27–28
CommandBuilder class, 705–707commands, Control menu, 204, 204CommandText property, 973CommandType property, 973comments, 22, 851Commit method, Transaction object, 696Common Controls tab, Toolbox window, 8, 8, 26Common Language Runtime (CLR), 65, 677–678Compare method
DateTime class, 479features of, 467–468implementing custom comparers, 966
CompareOrdinal method, 468comparers, custom, 966–967Complete Word, IntelliSense, 23complex property, adding to entity, 747–748complex types, Entity Framework, 729compound controls
ColorEdit, 365, 365–368mapping members to, 956–957overview of, 364–365
Concat method, 468concatenation operator (&), variants, 60conceptual model, EDM structure, 738conditions, 86Configuration Editor, WCF services, 917–919,
917–919configuration wizard, 5connection
Data Source Configuration Wizard, 770–772,771–772
to web services, 908Connection class, 663–665connectionString setting, NWOrders application,
690console application, building, 30–32constants, 74constituent controls, 364constraints, aborting transactions, 697, 697constructors, 331–333, 954–955consuming web services
ADO.NET Data service, 928–929, 929ASP.NET, 902–903, 984overview of, 894–898, 895, 897–898
contacts, 328–330Contacts project
revising for database, 680, 680–687revising with custom classes, 325, 325–330TabIndex property, 212, 212–213

CONTAINS METHOD, ITEMS COLLECTION • CUSTOM CLASSES 993
Contains method, Items collection, 187content pages, 874context menus, 251, 818, 819Context object, 875Continue statement, 102ContinueUpdateOnError property, DataAdapters,
788contract, WCF web service, 912, 916–920, 917–920Control menu commands, 204, 204control structures, nested, 99–102control variable, LINQ queries, 579ControlBox property, 207controls. see also Windows controls
address visualization form, 834, 835AJAX Extensions, 870, 872alignment of, 130, 135–136, 136consuming web services, 907creating first VB application, 13–18, 14–15creating web applications, 865, 867–871,
867–871data, 868, 869dialog, 950HTML, 871, 873LoanCalculator GUI, 134, 134–135login, 870, 871manipulating in Intermediate window, 28navigation, 868, 870reporting, 871Standard (web form), 867, 867–868TextBox, 946–947understanding. see Windows Form Designervalidation, 868, 869WebParts, 870, 872Windows applications, 941–942
Controls collection, 234–236, 235, 949conversions
handling dates between locales, 54–55of strings and numbers, 51variable type, 62, 62–63widening and narrowing, 64, 64–65
Convert class, 62, 62–63Convert To Upper/Lower commands, 170cookies
classes supporting, 828maintaining state using, 871managing with HttpWebRequest and
HttpWebResponse, 831Copy command, 170–171, 170–171, 244Copy method
Array class, 498–499IO.File class, 442, 443RichTextBox control, 276–277
CopyTo methodArray class, 498–499manipulating Items collection, 187
COUNT() function, aggregates, 652Count property
Controls collection, 234Items collection, 186, 297
counter variable, 93–95CountFiles( ) function, 121–124, 124–125Create Directory For Solution check box, 6Create/CreateText methods, IO.File class, 442,
443CreateDirectory method, IO.Directory class, 441,
441CreateEntityName method, EDM, 764CreateGraphics method, 962–963CreateQuery method, Windows client, 930–931CRM system, Entity Framework, 729–731, 730C-S mapping content. EDM structure, 739CSDL (Conceptual Schema Definition Language),
738CSS (Cascading Style Sheets), 848, 856–860,
982–983CType() function, 352–353cultural differences, date formats, 477–478,
537–538curly brackets, collection initializers, 502–505cursor position, 167–168custom classes
adding code, 311–313, 312auto-implemented properties, 319–320building Minimal. see Minimal classClass Diagram Designer, 429combining code with data, 307–308custom enumerations, 323–325, 325customizing Equals method, 321–322customizing ToString method, 320–321extension methods, 407–411firing events, 335–338, 336implementing read-only properties, 317–318implementing unary operators, 351–352inheritance, 401–402instance and shared methods, 338–342Is operator, 322–323nesting classes, 344–347object constructors and, 331–333

994 CUSTOM COMPARER FUNCTION • DATA TYPES
objects and, 305–306, 307overloading operators, 347–351, 351overview of, 306–307, 953–956property procedures, 313–314revising Contacts project, 325, 325–330StringTools class, 342–344, 344throwing exceptions, 315–316using SimpleClass in other projects, 333–335,
334–335variants, 352–353
custom comparer function, 966–967custom data types, 942–943custom enumerations, Minimal classes, 323–325custom events, 377–378custom functions, 113–115custom functions, LINQ to XML, 603custom objects, XML serialization of, 563–567custom sorting, IComparer interface, 522–523custom Visual Studio IDE, 29custom Windows controls. see Windows controls,
building customCustomColors property, ColorDialog, 257–258Customers table, Northwind database, 637, 638CustomerTotals stored procedure, 670–673CustomExplorer project, 299–300, 300Customize command, 7CustomSource property, AutoCompleteSource,
179Cut command, 170–171, 170–171, 244Cut method, RichTextBox, 276–277
Ddata
code combined with, 307–308combining from multiple tables, 647displaying delimited, 274ListBox control for storage of, 331persisting, 559querying with LINQ. see LINQ (Language
Integrated Query)streaming in Framework, 445–446
data, handlingdata types. see data typeslarge sets of, 517repeated items, 239–241, 240variables. see variables
data, storing in collectionsadditional collections, 519Array class. see Array class
collection types. see collectionsDictionary collection, 510–512HashTable collection, 512–513IComparer. see IComparer interfaceIEnumerator. see IEnumerator interfaceoverview of, 493SortedList collection, 518–519WordFrequencies application, 513–517, 514
data binding, 778–786. see also data-boundapplications
BindingSource class, 781–786, 783–784, 786of DataGridView to DataTable, 779–780overview of, 778–780real-world scenario, 784–785WCF web service, 912, 916–920, 917–920
data controls, 868, 869Data Manipulation Language (DML), 643data manipulation, XML
editing documents, 549–551lambda expressions, 557–559, 559locating information, 547–549overview of, 546–547segments as literals, 551–557, 554
Data menu, 25, 770data model, and Entity Framework, 726–728, 727data source
adding ADO.NET Data Service, 921–922using BindingSource class as, 794
Data Source Configuration Wizard, 770–771, 771Data Sources window
binding hierarchical tables, 791, 791–792generating typed DataSet, 773, 774
Data tab, Start page, 5data types
Boolean, 50Byte, 49CLR vs. SQL, 677–678converting variable, 62, 62–63creating custom, 68, 68–70, 70, 942–943Date, 53–54native, 942now part of CLR, 65numeric, 42, 42objects vs. basic, 61Signed Byte (SByte)e, 49String, 50–51user-defined, 68, 68–70, 70variable, 37–38XML as, 540, 540–542

DATA VALIDATION. SEE VALIDATING DATA • DATAREADER CLASS 995
data validation. see validating datadata-access classes
building data-driven applications, 680, 680–687Command class. see Command classConnection class, 663–665DataReader class. see DataReader classoverview of, 662–663SQL injection attacks, 673–674
data-access layerwith DataContext object, 700–701defined, 692implementing with custom objects, 693–697,
697implementing with LINQ to SQL, 697–699
DataAdaptersDataAdapter class, 703, 703–705designing data-driven interfaces, 788filling DataSets, 702–703loading DataSets, 720–721populating DataTables of typed DataSet with,
774–775udpating database, 715–716
Database Designer tool, 641Database icon, Data Source Configuration Wizard,
770, 771database management system (DBMS), 631databases
classes for accessing. see data-access classesconnecting EDM to, 734Contacts application with, 680, 680–687generating structure with EDM Designer,
749–750, 750obtaining Northwind/Pubs sample databases,
633–635, 635overview of, 631–632submitting changes in DataSet to, 974–975understanding relations, 640–641, 641using relational, 632–633, 633
data-bound applicationsdata binding. see data bindingdesigning and using typed DataSets. see typed
DataSetsoverview of, 769, 975–976
data-bound applications, interface designadjusting DataGridView appearance, 794–799,
795–798binding hierarchical tables, 791–792, 791–794building more-functional interfaces, 801,
801–808, 805
data binding with LINQ, 808–810, 809editing data in hierarchical tables, 799–801, 800enhancing navigational tools, 789–791overview of, 786–789, 787–789
DataColumn class, 707–708DataContext object
creating, 618implementing data-access layer with, 700–701role in LINQ to SQL, 609–610, 614
data-driven applications, 687–723creating and populating DataSet, 974creating simple DataSet, 717–723defined, 687establish relations between tables in DataSet,
974performing update operations, 714–717storing data in DataSets. see DataSetsusing business objects. see business objects
data-entryContacts application, 212, 212–213Enter keystroke and, 211–212TextBox control and, 181, 181–182
DataGridView controladjusting appearance, 794–799, 795–798binding hierarchical tables, 791–792, 791–794binding to DataTable, 786–787, 787building more-functional interfaces, 801–804customizing column appearance, 794–798,
795–797data binding, 778–780, 779–780displaying lookup columns, 798, 798–799enhancing navigational tools, 789–791using BindingSource as data source, 794viewing deleted rows, 804–808, 805viewing update errors, 787–789, 789
DataGridViewButtonColumn, 796DataGridViewCheckBoxColumn, 796DataGridViewComboBoxColumn, 796, 796DataGridViewImageColumn, 797DataGridViewLinkColumn, 797DataGridViewTextBoxColumn, 797DataReader class
application of, 678–679CLR types vs. SQL types, 677–678overview of, 676properties/methods, 676–677reading multiple result sets, 679–680

996 DATAROW OBJECTS • DECISION STATEMENTS
DataRow objectsadding and deleting rows, 710–711navigation through DataSet, 711–712row states and versions, 712–714, 713working with rows, 708–709
DataRowState enumeration, 712–713, 713, 722DataRowVersion enumeration, 714, 714, 722DataService project. see ADO.NET Data ServicesDataSet, LINQ to, 581DataSet Designer window, 782–784, 783–784DataSetOperations project, 770–778
adding third form to, 786generating typed DataSet, 770–774, 771–774iterating through linked DataTables, 776,
776–777manipulating rows of typed DataTables, 777,
777–778operations on typed DataSet, 774–776, 775
DataSets, 701–714accessing tables, 707–708adding and deleting rows, 710–711creating and populating, 974creating SimpleDataSet project. see
SimpleDataSet projectestablishing relations between tables in, 974handling null values, 709–710navigating through, 711–714, 713overview of, 701–702populating and displaying, 721submitting changes to database, 974–975typed. see typed DataSetstyped vs. untyped, 769–770working with Entity Framework vs., 751working with rows, 708–709
DataSets, filling, 702–707CommandBuilder class, 705–707DataAdapter class, 703, 703–705overview of, 702–703
DataSource property, data binding, 779DataSvcUtil.exe utility, 928–932DataTables
accessing DataSet’s tables, 707–708adding and deleting rows, 710–711data binding, 778–780, 779–780establishing relations between tables in
DataSet, 974generating typed DataSet, 773, 774iterating through linked, 776–777, 776–777
navigation through DataSet, 711–714, 713populating DataSet using Fill method, 703populating typed DataSet, 774–775updating row of typed, 777, 777working with rows, 708–709
DataView class, 808date formats, 477–478, 537–538Date property, 478Date variables, 53–54, 54–55DateTime class
date conversion methods, 483, 484dates as numeric values, 483–485defined, 962for different cultures, 477–478format characters, 482–483, 483methods, 479–480overview of, 476properties, 478–479standard format patterns, 480–481, 481
DateTime values, XML documents, 538Day property, WeatherForecast class, 897–898DayOfWeek/DayOfYear properties, 478Day(s) property
DateTime class, 478TimeSpan value, 487
DaysInMonth methodDateTime class, 479as shared method, 339
dblProperty, Minimal class, 311–313DBMS (database management system), 631Deactivate event, 221–222Debug menu, 25debugging
defined, 155MathCalculator GUI, 152–155by printing to Intermediate window, 27–28Web applications, 866Web applications using Fiddler, 826, 826
Debug.Write method, 27Debug.WriteLine statement, 27, 155Decimal data type, 44–46decision statements
defined, 86If...Then, 86–87If...Then...Else, 87–90nested control structures, 99–102overview of, 944Select Case, 90–91

DECLARATIONS • DOWNLOAD*COMPLETED EVENTS, WEBCLIENT CLASS 997
declarationsarray, 75–76constant, 74variable, 38–40
declarative languages, 530Default value, Alignment property, 294DefaultCellStyle property, 797–798DefaultExt property, 262DefaultValue attribute, 363DefaultValue property, DataSet, 782deferred (lazy) loading, 762–763, 975dehydration, 969. see also serializationDelete method
entity instances, 764of IO.Directory class, 441, 441of IO.File class, 442, 443rows, 710–711
Delete rule, foreign key constraints, 792, 793DELETE statement
optimistic concurrency, 784rows, 659–660TableAdapter Configuration Wizard, 784, 784
delimited data, 274delimiters, 470deploying web service, 905–906, 906DereferenceLinks property, 262–263derived class keywords, 419, 420Descendants methods, traversing XML
documents, 543–544deserialization, 559, 969Deserialize method
with collections, 574–575with custom objects, 567with individual objects, 563, 571–573serialization process and, 560–561
Design Patterns: Elements of Reusable Object-OrientedSoftware (Gama et al.), 731
Details property, WeatherForecast class, 897–898Details value, View property, 293dialog boxes
forms vs., 226–229, 227–228MultipleForms project, 229–233, 230testing custom Windows controls, 374, 374–375
dialog controlsColorDialog, 256, 256–258FolderBrowser demo project, 267–269FolderBrowserDialog, 266, 266–267FontDialog, 258FontDialog control, 258–261
MultipleFiles project, 265, 265–266OpenDialog/SaveDialog, 261–265OpenFileDialog/SaveFileDialog, 261overview of, 254, 254–255using, 255–256
DialogResult property, 228, 228–229Dictionary collection
creating, 81–82populating, 965–966storing data in, 510–512XML serialization of, 567–569
DigitClick event handler, Button control, 148Dim statement
declaring arrays, 75–76declaring variables, 39declaring variants, 59
DirectCast( ) function, 63Directory class, 441, 441–442DirectoryInfo class, 443–444DiscardChanges() function, 280DISCO document, 908DisplayStyle property, ComboBox control, 22DISTINCT keyword, 649Distinct method, LINQ, 589<div> tag, CSS, 858–860, 860<div> tag, HTML, 854<div> tags, CSS, 854, 858–860, 860DML (Data Manipulation Language), 643Dock property
form design, 216, 217–218, 218WebBrowser, 817, 823
docked windows, IDE, 9–10, 10!DOCTYPE definition, 847, 848Document Object Model (DOM), AJAX, 863Document property, WebBrowser, 820–821documentation, overloaded functions and
methods, 124–125DocumentCompleted event, WebBrowser, 822DocumentStream property, WebBrowser, 820DocumentText property, WebBrowser, 819–820Do...Loop statement, 96–98DOM (Document Object Model), AJAX, 863_doPostBack function, 879double data type, 41–44, 143, 143double-precision numbers, 41–44Download methods, WebClient class, 828, 829Download*Async methods, WebClient class, 829,
830, 837Download*Completed events, WebClient class, 829

998 DOWNLOADSTRINGCOMPLETED EVENT HANDLER • EMPLOYEES TABLE, NORTHWIND DATABASE
DownloadStringCompleted event handler,837–838
drag-and-drop behavior, WebBrowser, 818DrawImage method, 453, 461–462drawing, in Framework. see also graphicsgenerating gradients, 453–454
generating printouts, 460, 460–462Graphics object, 446–447Image class, 454–455methods, 449–453, 453overview of, 446Pen/Brush classes, 449Point/Rectangle classes, 447Size/Color/Font classes, 448
DrawItem event handler, 958DrawItem events, 382–383DrawMode property, 383, 386DrawMode property, 958DrawString method, 451–452, 459DriveFormat/DriveType properties, 442, 444DriveInfo class, 442, 444DropDown/DropDownLists, 193–194, 193–195DropDownOpened event, 949–950Due argument, Pmt( ) function, 132dynamic content, adding, 599–601dynamic forms
creating event handlers at runtime, 241–242designing application generators, 242–243DynamicForm project, 236–239, 237Form’s Controls collection, 234handling repeated data items, 239–241, 240overview of, 233, 949ShowControls project, 234–236, 235
Dynamic Help command, 26dynamic queries, advanced search forms with
eSQL, 755–758DynamicForm project, 236–239, 237
Ee argument, event handlers, 16early-bound variables, 398–399edge alignment, controls, 210, 210Edit Columns dialog box, 795, 795–799, 798Edit DataSet button, 717, 718, 722Edit menu
Advanced, 22captions and names, 243–244, 244IntelliSense, 22–23, 23
Outlining, 24in RTFPad project, 281–283
editingcolumns, 795, 795commands, TextPad application, 169–171,
170–171data in hierarchical tables, 799–801, 800RichTextBox control, 275–276TextBox control, 168
EditPad Pro, 848EDM (Entity Data Model), 975
adding complex property to entity, 747–748adding many-to-many association, 748–749,
975–976adding one-to-many association, 748, 975–976connecting to database, 734creating entity, 735creating new, 734creating primary key, 735creating scalar property, 735–736deferred (lazy) loading, 759–763, 975entity inheritance, 743–747, 975generating database structure, 749–751, 750modifying data with Entity Framework,
763–767overview of, 732–733querying, 751reverse-engineering, 767using EDM Designer, 733, 733using eSQL, 754–758using LINQ to Entities, 752–754using Query Builder methods and
ObjectQuery class, 758–759EDM (Entity Data Model), structure, 736–743
C-S mapping content, 739CSDL content, 738SSDL content, 739XML content, 736–738
EDM Designer, 733, 733–734EDM diagram, 733, 733Effect property, Label3D control, 370, 371Element/Elements methods, 543elements, XML documents, 530–534elliptical controls, 379, 379–382Else keyword, 87–90ElseIf statement, 87–90<embed> tag, media, 851embedding media, HTML, 851Employees table, Northwind database, 637

EMPTY PROPERTY, TIMESPAN • EXPEDIA.COM 999
Empty property, TimeSpan, 486, 486empty strings, 675Enabled property, 246encapsulation ,306end nodes, tree structure, 287End Try statement, exception handling, 156, 158end variable, For...Next loops, 93–95endpoints, WCF services, 918–919, 919EndsWith method, 468enhanced label controls. see Label3D controlEnter key, 181, 181–182, 211–212EnterFocusColor property, 360–361entities
adding complex property to, 747–748adding inheritance between, 743–747creating new instances, 764creating to add to EDM, 735defined, 632deleting, 764EDM defining, 732establishing relationship between, 728, 765–766identifying by primary key, 726LINQ to, 581many-to-many association between, 748–749one-to-many association between, 748updating, 765
Entity Data Model. see EDM (Entity Data Model)Entity Data Model Wizard, 734Entity Framework, 725–732
data store and brand independence, 731–732EDM. see EDM (Entity Data Model)expressiveness of data model, 726–728, 727inheritance mapping, 744–747isolation of application from data structural
changes, 732modifying data, 763–767overview of, 725–726rich modeling constructs for representing data,
728–731entity references, XML documents, 531Entity SQL (eSQL), 754–758, 977–978entity-relationship diagram, 728Enum keyword, 137–138enumeration types, 137–138enumerations, custom, 323–325, 325environment, setting options, 29–30Equals button, 150, 151, 158Equals method, 321–322ERM (entity-relationship model)
designing data, 726–727EDM implementing. see EDM (Entity Data
Model)entity-relationship diagram, 728
error handlingin classes, 315–316data-entry, 803–804exceptions vs. errors, 155overview of, 143–144updating database, 715writing robust applications, 946
Error List window, 28–29error propagation, 43eSQL (Entity SQL), 754–758, 977–978ETag response header, 828event handlers
changing name of controls after inserting codein, 16
creating at runtime, 241–242creating first VB application, 16defined, 14designing Windows applications, 130overview of, 942programming events, 945–946programming loan calculator GUI, 136–140,
137programming MathCalculator GUI, 147–149
eventsChanged, 375–376firing class, 335–338, 336HTML, 861, 861–862overview of, 942programming, 945–946raising custom, 377–378WebBrowser control, 822WebClient class, 829
exceptionserrors vs., 155MathCalculator project, 155–158within property procedures, 315–316
ExecuteNonQuery method, 696, 973ExecuteQuery method, 613–615, 973Exists method
IO.Directory class, 441, 442IO.File class, 442, 443
Exit command, 170, 244Exit statement, 102Exit Sub statement, 103–104Expedia.com, 894

1000 EXPLICIT LOADING • FONT PROPERTY
explicit loading, 761–762Explicit option, 55–59, 942Expression Blend, 12expressions, 27, 91–93extensible HTML (XHTML), 846–847Extensible Markup Language. see XML (Extensible
Markup Language)extension methods, 407–411, 583–584external events, 333ExtractFileName method, 342ExtractPathName method, 342
Ffetch translators, 753–754Fiddler tool, 826, 826FieldCount property, DataReader object, 676fields
calculated, 651hidden in web page, 873properties vs., 314, 395relational database, 633selection list, 646TimeSpan object, 486
File class, 442, 443File menu
captions and names, 243–244, 244overview of, 21–22in RTFPad project, 279–281
filenames, prompting users for multiple, 950FileName(s) properties, 263, 264, 950–951files
handling with My component, 959–960manipulating in IO namespace, 960–961writing data with IO namespace to, 960
FileStream object, 960FileSystem property, 179Fill method
adding Refresh Data button to call, 790populating and displaying DataSet, 703, 721populating typed DataSet with proper
TableAdapters, 775–776Filter() function, Array class, 499–500Filter property, BindingSource class, 781Filter/FilterIndex properties, 263filtering
ADO.NET Data Services and, 926–928, 927with LINQ vs. eSQL dynamic query, 977–978product data with LINQ, 809, 809–810
Finally block, 156, 158Find & Replace command, 170Find button, adding to toolbar, 790Find method, BindingSource class, 781–782Find/Find Next buttons, TextPad application,
172–175FindString method, ListBox control, 947FindStringExact method, ListBox control, 947FindStringFindStringExact methods, 191FixedPitchOnly property, FontDialog control, 259FixedToolWindow value, 207, 207FlexComboBox project, 195, 196–197flow format, HTML, 854flow-control, defined, 944flow-control statements, 85–102
Continue statement, 102Do...Loop loop, 96–98For Each...Next loop, 95–96Exit statement, 102For...Next loop, 93–95If...Then statements, 86–87If...Then...Else statements, 87–90nesting, 99–102overview of, 85–86Select Case statements, 90–91short-circuiting expression evaluation, 91–93While...End While loop, 98–99
FocusedTextBox controladding functionality, 359–362building, 357, 357–359, 359classifying properties, 363–364inheritance and, 401–402testing, 362, 362–363
FolderBrowserDialog controldefined, 951function, 255properties, 266, 266–267sample application, 267–269
folderscreating in Solution Explorer window, 26creating/removing project, 6manipulating in IO namespace, 960–961
Font class, 448Font command, 170font families, 11–12Font property
FontDialog control, 259–260Label3D control, 369

FONTDIALOG CONTROL • FUNCTIONS 1001
FontDialog controlfunction, 254, 255overview of, 951properties, 258, 258–261
FontMustExist property, FontDialog control, 260fonts
creating first VB application, 14as design element, 11–12designing LoanCalculator GUI, 133–135, 134designing MathCalculator GUI, 145HTML text management tags, 849
footers, master page setup, 874For Each...Next loop statement, 95–96, 708For Next loop statement, 708forecast variable, consuming web services, 897foreign key constraints, 793, 793foreign keys, relational databases, 640form design
anchoring controls, 216–217, 216–217Contacts project, 212, 212–213docking controls, 216, 217–218, 218dynamic forms, 949elements of, 203–204, 204form events, 221–223Form object properties, 204–209, 205, 207handling keystrokes, 213–214multiple forms, 948–949placing controls, 209–210, 210processing keys from within code, 214–216setting TabIndex property, 211, 211splitting into multiple panes, 219–221, 220–221working with, 948
Form Designer, 7<form> tag, HTML, 854–855<form>...</form> tags, HTML, 854–855Format menu, 25Format menu commands, 171–172, 283–284formats
microformats on websites, 863number, 65–68, 66–67pages in HTML, 853–854, 854pages with CSS, 858–860, 860
formatString argument, 65–66FormBorderStyle property, 207, 207FormClosed event, 222FormClosing event, 222forms
appearance of. see form designbinding to typed DataSets, 977
building dynamic. see dynamic formscontrols. see controlsdesigning menus. see menus, designingevents triggered by Form objects, 221–223HTML. see HTML formsHTML element events, 861overview of, 203
forms, loading and showingforms vs. dialog boxes, 226–229, 227–228multiple instances of single form, 226MultipleForms project, 229–233, 230overview of, 223–224sharing variables, 225–226Startup Form, 224–225
form-wide variables, 150For...Next loop statement, 93–95, 101fragment caching, 864frames, HTML, 854Framework
drawing and painting. see graphicsextending classes, 410–411handling dates. see DateTime classhandling files with My component, 436–440,
959–960handling strings and characters. see strings and
charactershandling time. see TimeSpan classIO namespace. see IO namespacemanipulating folders and files, 960–961overview of, 433–434printing controls and dialog boxes, 963using code snippets, 434–436, 435
front-end applications, 687full joins, in SQL, 654FullRowSelect property
ListView control, 295TreeView control, 290
function keys, 153Function keyword, 105functional construction, 539Function...End Function statements, 104–106functions
accepting arguments. see argumentsbuilt-in, 111–113custom, 113–115, 603documenting overloaded, 124–125overloading, 118–125, 120, 123–124passing arguments to, 945returning arrays, 117–118

1002 FUTUREVALUE ARGUMENT, PMT( ) FUNCTION • HEADERS
returning multiple values, 109–110subroutines vs., 103validating user input, 71–72writing and using, 104–106, 944–945
FutureValue argument, Pmt( ) function, 132–133
GGarbage Collector (GC), 393–394geocoding service. see Yahoo! Geocoding APIGet section
auto-implemented properties, 319–320ColorEdit control, 366–367property procedures, 313–314, 395
Get<type> method, 676, 677GetAttributes method, 442, 443GetChanges method, 712–713, 777–778GetChildRows method, DataRow object, 712GetColumsInError method, DataRow object, 716GetCurrentDirectory method, 441, 442GetDirectoryName method, 444, 445GetDrives method, 442, 444GetEnumerator method, 520–522GetErrors property, 715GetFiles/GetFileName methods, 441, 442, 444,
445GetName method, DataReader, 677GetNumericValue method, 464, 464GetOrdinal method, DataReader, 677GetParentRow method, DataRow object, 712GetParentRows method, DataRow object, 712GetProcesses method, 95GetRange method, collections, 506–507GetSql<type> method, DataReader, 676GetTempFile/GetTempPath methods, 444, 445getting started
building console application, 30–32creating first VB application, 13–18, 14–15creating user friendly application, 18–19, 18–21exploring IDE. see IDE (integrated
development environment)IDE components, 21–29overview of, 3setting environment options, 29–30using code snippets, 32–33using My component, 33–36
GetType method, 58–59, 70GetType operator, 70–71GetUnicodeCategory method, 464, 464GetValue(s) method, DataReader, 676–677
Go navigation methods, WebBrowser, 821, 821Google Maps service, 833–834, 838–842, 843gradients, 453–454graphical user interface. see GUI (graphical user
interface) designgraphics
drawing methods, 449–453, 453, 962–963gradients, 453–454Graphics object, 446–447Image class, 454–455overview of, 446Pen/Brush classes, 449Point/Rectangle classes, 447printing. see printingprintouts, 460, 460–462Size/Color/Font classes, 448
Graphics object, 446–447greater than (>) character, XML, 531grid control, adding, 881–883Gridlines property, ListView, 295grids, customizing appearance, 795GROUP BY clause, rows, 656–658grouping
with LINQ, 591–592rows with SQL, 656–658
Groups property, ListView, 295GUI (graphical user interface) design
alignment of controls on form, 945building calculator. see MathCalculator projectbuilding loan calculator. see LoanCalculator
projectdesigning Windows applications, 129–130NWOrders application, 690–691, 690–693overview of, 945programming events, 945–946
HHandles keyword, 16HasErrors property, updating database, 715HashTable collection
iterating with enumerators, 521–522storing data in, 512–513for WordFrequencies project, 513–517, 514
HasRows property, DataReader, 676HAVING clause, 658hCard specification, 863headers
HTML page. see controlsmaster page, 874

HEADERS PROPERTY, WEBCLIENT CLASS • IIF( ) FUNCTION 1003
Headers property, WebClient class, 828HeaderStyle property, ListView, 294headings
HTML table, 852HTML text management tags, 849
height attribute, <img> tag, 850Hello method, ASP.NET web service, 901–902,
902HelloWorld web service, 901–903, 902–903Help menu, 26hidden fields, 873HideSelection property, 168, 290hierarchical tables
binding, 791–792, 791–794editing data in, 799–801, 800
hierarchy of classes, 403, 403HistoryList property, 179horizontal partitioning, 732horizontal resolution, Image class, 454horizontal rules (<hr> tag), HTML, 850HotTracking property, TreeView, 290Hour(s) property, DateTime class, 478Hour(s) property, TimeSpan value, 487href attribute, <a> tag, 850HTML (Hypertext Markup Language)
comments, 851creating basic page, 981defined, 871embedding media, 851forms and form elements, 854–856horizontal rules, 850images, 850links, 850–851lists, 851overview of, 847, 873page construction, 848–849, 849page formatting, 853–854, 854RTF comparison, 270–271scripts, 851tables, 852–853, 853tags for transforming XML documents,
601–605, 602text management, 849–850upgrading to XHTML from, 847web development and, 845–846
HTML formselements, 854–856embedding Yahoo! Finance badge, 824–825,
825
overview of, 854WebBrowser Document property, 820–821
HTTPdebugging proxy, 826, 826publishing services on Internet, 827web services using, 917
HttpWebRequest class, 831HttpWebResponse class, 831
IIComparer interface
custom sorting, 522–523implementing, 523–525implementing custom comparers, 966–967implementing multiple comparers, 525–527overview of, 519–520
IDE (integrated development environment), 3–15font as design element, 11–12overview of, 3–4rearranging windows, 9Start Page, 4, 4–5starting new project, 5–7, 6–7using Windows Form Designer, 7–13, 8–11, 13
IDE (integrated development environment)components, 5–15
Command and Immediate windows, 27–28components, 941Error List window, 28–29menus, 22–26Output window, 27overview of, 941Properties window, 26–27Solution Explorer window, 26Toolbox window, 26
Identity columnsadjusting DataSet properties, 783BindingSource class and, 782data-driven applications, 716–717, 717
IEnumerable interfaceLINQ and, 584–586sample application, 589–591
IEnumerator interfaceenumerating collections, 520–522overview of, 519–520
iFrames (inline frames), 854If...Then statement, 86–87, 101–102If...Then...Else statement, 87–90Ignore value, DialogResult, 228, 228IIf( ) function, 89

1004 IIS (INTERNET INFORMATION SERVICES) • ISNULL( ) FUNCTION
IIS (Internet Information Services), 863, 905–906,906
Image class, 454–455images (<img> tag), 850, 853, 853Immediate window
debugging by printing to, 27–28, 155defined, 24
Inches application, TrackBar, 200–201Include method, EDM, 759–761increment variable, For...Next loops, 93–95Indent property, TreeView, 290Index command, 26IndexOf method
applying to any string, 149features of, 469searching arrays, 495–496searching collections, 508–509
IndexOfAny method, 469Infer option, 55–59, 942Infinity value, 46–49inheritance
adding between entities, 743–747class-related modifiers and, 418–420designing with, 402–407, 403Entity Framework and, 730–731, 975finding entity of specific type, 753–754how to apply, 401–402InheritanceKeywords application, 420–423overview of, 400sample application, 423–428understanding, 959
InheritanceKeywords project, 420–423Inherits statement, 419, 959InitialDirectory property, 263–264initialization
ArrayList collection, 505–506arrays, 76–78multidimensional arrays, 79–80variables, 40, 74
inline frames (iFrames), 854inner joins, SQL, 654<input> tag, HTML, 856Insert method
adding items to collection, 503features, 470, 474manipulating Items collection, 186
Insert Snippet, IntelliSense, 23, 32–33INSERT statement, rows, 660–661InsertRange method, collections, 503
instance methodscustom classes, 338–342shared methods vs., 395–396
Integer values, Unicode or ANSI, 52Integer variables, 41IntegralHeight property, 183integrated development environment. see IDE
(integrated development environment)IntelliSense submenu, Edit, 22–23, 23interceptors, 937InterestRate argument, Pmt( ) function, 132–133interface
data-bound applications. see data-boundapplications, interface design
defined, 519–520designing modern, 12GUI. see GUI (graphical user interface) design
Internet Explorerscript debugging, 866, 866WebBrowser and, 816
Internet Information Services (IIS), 863, 905–906,906
Interval methods, TimeSpan, 488intervals, TimeSpan, 486, 487IO namespace
Directory class in, 441, 441–442manipulating folders and files in, 960–961overview of, 440, 441streaming data with, 445–446writing data to file with, 960
IO.Directory class, 441, 441–442IO.DirectoryInfo class, 443–444IO.DriveInfo class, 442, 444IO.File class, 442, 443IO.Path class, 444, 445irregularly shaped controls, 379, 379–382Is operator, Minimal class, 322–323ISBNCheckDigit( ) function, 113–115IsContactNameNull method, DataRows, 709IsDate( ) function, validating user input, 71IsDbNull method, DataReader, 677IsLeapYear method, 479IsLetter/IsDigit/IsLetterOrDigit methods,
464, 465–466IsLower/IsUpper methods, 464, 464ISNULL( ) function
DataRows, 709selection queries, 650T-SQL, 709

ISNUMERIC( ) FUNCTION, VALIDATION • LINQ (LANGUAGE INTEGRATED QUERY) 1005
IsNumeric( ) function, validation, 71IsOnDropDown property, 246_IsPostBack( ) function, 879IsPunctuation/IsSymbol/IsControl methods,
464, 465IsWebBrowserContextMenuEnabled property,
818, 819Item property, Items collection, 297Items collection, 184–187, 297Items Collection Editor, 245, 245Items property
ComboBox control, 18, 19defined, 185populating control at design time, 183
JJavaScript
AJAX. see AJAX (Asynchronous JavaScriptand XML)
conforming to XHTML case syntax, 847displaying code errors in WebBrowser,
818–819, 819embedding into HMTL pages, 861–862,
861–863JavaScript Bible, Sixth Edition (Goodman and
Morrison), 862JavaScript Object Notation (JSON), 827Join method, 470join table, 730joins, 653–656JSON (JavaScript Object Notation), 827
Kkey fields, 633keyboard events, 861keyboard shortcuts, 153, 818KeyPress event, 15–16, 152, 176–177KeyPreview property, 152, 208–209keys
capturing, 176–177capturing function, 177–178Dictionary collection, 510–512foreign, 633, 633handling, 213–214processing from within code, 214–216SortedList collection and, 518–519using Access and Shortcut, 247–248
keystrokes, at form level, 152
KeyUp/KeyDown events, 177–178, 181–182, 213–214known issues, 155
LLabel control
address visualization form, 834, 835consuming web service, 907LoanCalculator GUI, 134, 134MathCalculator GUI, 145
Label3D controlChanged events, 375–376designing, 370–374in other projects, 378, 378overview of, 368–369, 369specifications, 369–370testing, 374, 374–375
LabelEdit property, ListView, 295lambda expressions, 557–559, 559Language Integrated Query. see LINQ (Language
Integrated Query)language variable, 17, 17LargeChange property, ScrollBar, 198LargeChange property, TrackBar, 200–201LastIndexOf method
features, 469searching arrays, 495–496
LastIndexOf method, collections, 508–509late-bound variables, 398–399leaf nodes, tree structure, 287–288left joins, SQL, 653Left value, Alignment property, 294LengthUnits project, 348–351LengthUnits sample project, 351less than (<) character, XML, 531lifetime, variable, 73–74, 73–74lightweight web services, 827LIKE operator, 649, 649–650line break tag (<br>), 850Lines property, 166<link> tag, HTML, 857LinkedDataTables project, 791–792, 791–794,
800–801links, 850–851. see also HTML (Hypertext Markup
Language)LINQ (Language Integrated Query)
building Windows client, 930–932components, 580–581creating cart web form, 886–888data binding with, 808–810, 809

1006 LINQ TO OBJECTS • LOADPROPERTY METHOD, WINDOWS CLIENT
to DataSet, 581to Entities, 581, 752–754filtering data with eSQL dynamic query vs.,
977–978overview of, 577performing simple queries, 970queries, 578–579
LINQ to Objectsaggregating with, 587–589anonymous types/extension methods, 583–584examples, 589, 589–591grouping and aggregating, 591–593LINQ component, 580overview of, 581–582querying arbitrary collections, 584–586transforming objects, 593–597, 596
LINQ to SQLaccessing tables. see tables, accessing with
LINQClasses component, 580–581, 615–618, 615–618DataContext object, 618implementing data-access layer, 697–699processing relational data with, 971–972retrieving data with ExecuteQuery method,
613–615sample application, 609–613
LINQ to XMLadding dynamic content to XML, 599–601consuming web services, 895, 895–896LINQ component, 580overview of, 597–598transforming XML documents, 601–605, 602working with XML files, 605–609, 606, 970–971
List classadding/removing items from, 502–505collection initializers, 505–506creating collections, 501–502extracting items from, 505–506iterating through collections, 509–510sorting collections in, 507–508XML serialization of, 567–569
list controls, customizing, 382–385, 383List Members, IntelliSense, 22–23, 23list structure, ListView, 288–289, 289List value, View property, 293ListBox control
adding, editing and deleting contacts from,328–330
ArraySearch application, 496, 496–497
customizing rendering of items, 958–959for data storage/as navigational tool, 331Demo application, 188, 188–191designing owner-drawn, 382–385, 383ListBoxFind application, 191, 191–193locating item in, 947manipulating Items collection, 184–187overview of, 182, 182–183properties, 183–184, 184revising Contacts project, 325–328selecting items, 187–188
ListBox Demo projectAdd Item buttons, 189moving items between lists, 190overview of, 188, 188–189removing items from two lists, 189–190searching ListBox, 191
ListBoxFind application, 191, 191–193lists, HTML, 851, 855–856ListView control
Columns collection, 295–296, 296CustomExplorer application, 299–300, 300items and subitems, 296, 296–297Items collection, 297list structure, 289nested loop example, 101populating with data, 952processing selected items, 299properties, 293–294, 293–295reference types, 392–394SubItems collection, 298–299tree and list structures, 288–289with TreeView control, 286, 286–287
ListViewItem Collection Editor dialog box, 296,296–297
Load DataSet button, 718, 719–721Load event handler, 20, 787Load method, EDM, 761–762LoadFile method, RichTextBox, 274–275, 275loading, querying Entity Data Model, 761–763loading forms
forms vs. dialog boxes, 226–229, 227–228multiple instances of single form, 226MultipleForms project, 229–233, 230overview of, 223–224sharing variables, 225–226Startup Form, 224–225
LoadProperty method, Windows client, 930

LOANCALCULATOR PROJECT • METHOD ATTRIBUTE, HTML FORMS 1007
LoanCalculator projectbuilding loan calculator, 130–131designing user interface, 133–136how it works, 131–133, 132programming, 136–140, 137validating data, 140, 140–144, 143
local variables, lifetime, 73, 73–74Location property, 209Locked property, 164logical model, EDM structure, 739login controls, 870, 871, 874long menus, 249, 249Long variables, 41lookup columns
displaying in DataGridView, 798, 798–799editing in hierarchical tables, 799–801, 800
loop statementsDo...Loop , 96–98For Each...Next, 95–96For...Next, 93–95nested control structures, 99–102using Exit and Continue statements, 102While...End While, 98–99
MMacros command, 25Main( ) subroutine, 31Mandatory/MandatoryColor properties, controls,
360–361many-to-many association
between entities, 748–749Entity Data Model, 975–976Entity Framework, 730, 730generating database structure, 751
many-to-many relationshipdefined, 639relating two tables with, 972
mapping, Entity Framework inheritance, 744–747Mapping Details window, EDM diagram, 733, 733Mapping Specification Language (MSL), EDM
structure, 739.master filename, 874master pages, 874–875, 983Mastering Integrated HTML and CSS (DeBolt),
848, 860materialize, EDM, 759–760math operations, coding, 149, 149–152MathCalculator project, 144–158
basic debugging, 152–155
coding math operations, 149, 149–152designing user interface, 145–146exception handling, 155–158overview of, 144–145, 145programming, 147–149
MathOperator variable, 149–152, 154–155MAX() function, aggregates, 652Maximize command, 204, 204MaximizeBox property, 207MaximizeSize property, 207–208Maximum property, ScrollBar, 197–198MaxLength property, 162–163MaxSize property, FontDialog, 260MaxValue property, TimeSpan, 486, 486MeasureItem event handler, 382–383, 958MeasureString method, 451–452, 459–460media, embedding in web page, 851members
BindingSource class, 781variable, 61WeatherForecast class, 897–898
memory leak problem, exception handling,156–157
menus, designingadding/removing commands at runtime,
250–251creating context menus, 251creating short and long, 249, 249menu editor, 243–246, 244–245overview of, 243programming menu commands, 246–247with ToolStripMenuItem events, 949–950with ToolStripMenuItem properties, 246using access and shortcut keys, 247–248
menus, IDE, 22–26Data, 25Debug, 25Edit, 22–24File, 21–22Format, 25Help, 26Project, 24–25Tools, 25View, 24Window, 25
Menus & Toolbars tab, Toolbox window, 26<meta> tag, HTML, 849Method attribute, HTML forms, 854

1008 METHODS • MY.WEBSERVICE COMPONENT
methodscustom class, 954data-type conversion, 62, 62–63documenting overloaded, 124–125Request object, 876Response object, 877Server object, 878Session object, 878Trace object, 879variable, 61WCF web service, 914–915WebBrowser control, 821–822WebClient class, 828–829
MetricUnits class, 348–351, 351microformats, 863Microsoft IIS 7 Implementation and Administration
(Mueller), 905MicrosoftReportViewer, 871Millisecond(s) property
DateTime class, 478TimeSpan value, 487
Min( ) functioncalculating aggregates, 652implementing arguments, 106–108overloaded implementations of, 119–120
Minimal classadding code to, 311–313auto-implemented properties, 319–320building, 308–311, 309custom enumerations, 323–325, 325customizing Equals method, 321–322customizing ToString method, 320–321implementing read-only properties, 317–318Is operator, 322–323shared variable, 341–342throwing exceptions, 315–316using property procedures, 313–314
Minimize command, Control menu, 204, 204MinimizeBox property, 207MinimizeSize property, 207–208Minimum property, ScrollBar, 197–198MinSize property, FontDialog, 260Minute(s) property
DateTime class, 478TimeSpan, 487
MinValue property, TimeSpan, 486, 486missing information, Nullable variables for, 391mobile phones, accessing web, 846Model Browser window, EDM diagram, 733
modifiers, class-related, 418–420module-level scope, 72monthly payments
building loan calculator GUI, 132–133calculating using code snippet, 139–140programming loan calculator GUI, 136–140,
137validating data, 140, 140–144, 143
MonthName( ) built-in function, 112mouse events, HTML, 861Move command, 204, 204Move method, 441, 442, 442–443MoveNext method, collections, 520–522MsgBox( ) function, 17MSL (Mapping Specification Language), EDM
structure, 739MultiColumn property, 183–184multidimensional arrays, 78–79, 78–81MultiExtended property, SelectionMode, 184Multiline property, 12–13, 13MultiLine property, 162multiple forms, 948–949multiple result sets, 679–680MultipleFiles project, 265, 265–266MultipleForms project, 229–233, 230MultiSelect property
ListView control, 295OpenFileDialog control, 950OpenFileDialog/SaveFileDialog controls, 264SaveFileDialog control, 264
MultiSimple property, SelectionModeenumeration, 184
MustInherit keyword, 418MustOverride keyword, 419My component
handling files, 959–960how to apply, 439–440overview of, 436subcomponents of, 436–439, 438using, 33–36
My.Application component, 33–34, 436MyBase keyword, 419, 422–423MyClass keyword, 422–423My.Computer component, 33–35, 437–438My.Forms component, 35, 438My.Settings component, 35, 438, 438–439My.User component, 35, 439My.WebService component
adding code-behind, 909–910, 910

NAME ATTRIBUTE, <A> TAG • NUMERIC VALUES, DATES AS 1009
adding simple AJAX implementation, 910–912adding web reference, 908–909, 909building, 904–905consuming, 906–907, 907defined, 35deploying, 905–906, 906functions of, 439overview of, 903
Nname attribute, <a> tag, 851Name attribute, HTML forms, 854named arguments, 116–117Named Pipes, 917NamedColor property, ColorEdit control, 366–367naming conventions
changing name of controls, 16constants, 74functions, 105LoanCalculator TextBox control, 134, 134typed DataSets, 773variables, 37, 39–40WCF web service, 918, 918–919
NaN value, 46–48narrowing conversions, 64–65Navigate method, WebBrowser, 817, 821Navigating event, WebBrowser, 822navigation
accessing tables with LINQ, 620–624defined, 868enhancing tools, 789–791ListBox control, 331master page, 874overview of, 870through DataSet, 711–714, 713WebBroswer events, 822WebBrowser control, 979–981, 980WebBrowser methods, 821–822
NegateNumber method, Minimal class, 311–313nested control structures, 99–102nesting classes, 344–347New( ) subroutine, 954–955New command, 170, 244New Connection button, Data Source
Configuration Wizard, 770–771New keyword
creating ArrayList class, 501–502creating variables as true objects, 81declaring object variables, 388–389
with Minimal class, 312–313multiple instances of single form, 226
new order, databases, 625–628, 627New() procedure, 388New Project dialog box
building console application, 30–32, 31choosing ASP.NET web application, 864, 865creating new EDM, 734starting new project, 6, 6
New() subroutine, 331–333New Web Site dialog box
choosing ASP.NET website, 864, 865consuming web service, 907developing stand-alone web service, 904setting up ASP.NET web service, 901
New Web Site option, File menu, 864newOrder variable, 695–697Next method, System.Random class, 118–119nodes
adding at design time, 290–291, 291adding at runtime, 291–293in tree structure, 287, 287–288
Nodes collection, 292–293Nonclickable value, HeaderStyle property, 294nondeterministic lifetime, objects, 393None value
DialogResult enumeration, 228FormBorderStyle enumeration, 207, 207HeaderStyle property, 294
NonRectangularControl project, 379–382<NonSerialized> attribute, XML, 562–563normalization, 632Notepad2, 848NotInheritable keyword, 418NotOverridable keyword, 419Now( ) function, 53null values
in data-driven applications, 709–710vs. empty strings, 675in SQL, 650
Nullable variables, OOP, 390–391NullValue property, DataSet, 782Num2String method, 342Number Lines command, 170, 172numbered lists (<li>...<li>), 851numbers
formatting, 65–68, 66–67in XML documents, 537–538
numeric values, dates as, 483–485
1010 NUMERIC VARIABLES • OOP (OBJECT-ORIENTED PROGRAMMING)
numeric variables, 41–49Boolean, 50Byte, 49Decimal data type, 44–46double-precision numbers, 41–44formatting numbers, 65–68, 66–67Infinity and NaN, 46–49Integer, 41overview of, 41Signed Byte, 49single-precision numbers, 41–44type characters, 45, 45types of, 42
NWOrders applicationapplication’s interface, 690–691, 690–693developing, 689implementing with custom objects, 693–697,
697implementing with LINQ to SQL, 697–699TransactionScope class and, 699–701
OObject icon, Data Source Configuration Wizard,
770, 771Object Services, Entity Framework, 739–743object variables (variants)
objects vs., 388–389overloading of, 352–353overview of, 59–60
ObjectContext class, 763–766ObjectQuery class, 758–759objects
ASP.NET, 875–876basic data types vs., 61building Minimal class. see Minimal classclasses vs., 305–308, 387–388constructors, 331–333Garbage Collector removing, 393–394nesting classes, 344–347object variables vs., 388–389operator overloading. see operator overloadingoverview of, 305serialization of individual, 571–573StringTools class, 342–344, 344transforming collections of, 593–597, 596variables as. see variables as objectsXML serialization of, 562–563
Objects, LINQ toaggregating with, 587–589
anonymous types/extension methods, 583–584examples, 589, 589–591grouping and aggregating, 591–593LINQ component, 580overview of, 581–582querying arbitrary collections, 584–586transforming objects, 593–597, 596
offending operation (statement), 158Office tab, Start page, 5OfType operator, 753–754OK value, DialogResult enumeration, 228,
228–229One property, SelectionMode enumeration, 184OneClick value, Activation property, 294one-dimensional arrays, 78, 78one-to-many association
defined, 639Entity Data Model, 975–976establishing between entities, 748
online ordering application, 879–891creating cart web form, 886–891, 891creating Products web form, 880–883, 882creating project, 880creating Quantity web form, 883–886, 885overview of, 879
online referencesAJAX tutorial, 863ASP.NET AJAX Control Toolkit, 871Cascading Style Sheets, 860eSQL language, 755Expression Blend, 12Google Maps service, 833GUI guidelines for Windows 7 and Windows
Vista, 133HTML, 848HTML text editors, 848HTML text management tags, 850IIS, 905Internet Information Services, 905JavaScript tutorial, 863microformats, 863request/response headers, 828Yahoo! badges, 823Yahoo! Geocoding API, 832
OnPaint method, controls, 372–373OnQueryOrders function, 937–938OOP (object-oriented programming)
Class Diagram Designer, 429classes vs. objects, 387–388

OPEN COMMAND • PEN CLASS 1011
class-related modifiers. see class-relatedmodifiers
early vs. late binding, 398–399extension methods, 407–411inheritance. see inheritanceInheritanceKeywords project, 420–423objects vs. object variables, 388–389polymorphism. see polymorphismproperties vs. fields, 395reference types, 392–394shared vs. instance members, 395–396type casting, 397–398uninitialized and Nullable variables, 390–391value types, 391–392variable types, 399–400
Open command, 170, 244Open dialog box, 265, 265–266OpenFile method, 264–265OpenFileDialog control
function of, 254, 254overview of, 261, 261–262prompting users for filenames with, 950properties, 262–265
OpenRead method, WebClient class, 829OpenReadAsync method, WebClient class, 829OpenRead/OpenText methods, 442, 443Operand1 variable, 149–152, 153–154Operand2 variable, 149–152, 153–154operator overloading
addition and subtraction operators, 348–351,351
overview of, 347–348unary operators, 351–352variants, 352–353
optimistic concurrency, 784, 784–785Option Explicit statement, 56Options command, 25Options dialog box
customizing work environment, 29–30, 29–30setting variable-related options, 56–57, 57
order, new, 625–628ORDER BY clause, rows, 650–651Order class, 688Order Details table, 637, 638Orders table, 637, 638Others window command, View, 24Outlining submenu, Edit, 24output, sending to Intermediate window, 27Output window, 24, 27
overflow error, 142–143, 143overloaded functions, 945overloading operators, 118–125, 120, 123–124,
955–956Overridable keyword, 414–415, 419Overrides keyword, 69, 320–321, 420owner-drawn controls, 382–385, 383
Ppadding, HTML tables, 852PadLeft/PadRight methods, 472Page Color command, 170page construction, HTML, 848–849, 849page formatting, HTML, 853–854, 854page geometry, printing, 458–459PageSetupDialog control, 457–458Paint event handler, 223, 380–381, 963painting, Framework
drawing methods, 449–453, 453generating gradients, 453–454generating printouts, 460, 460–462Graphics object, 446–447Image class, 454–455overview of, 446Pen/Brush classes, 449Point/Rectangle classes, 447Size/Color/Font classes, 448
ParamArray keyword, 115–116Parameter class, 669–670Parameter Info feature, IntelliSense, 23, 133parameterized constructors, 331–333, 388parameterized queries, 674–675parent class keywords, 418parent class member keywords, 419–420parent nodes, 288Parse method, 53–54, 477–478passing arguments
functions returning arrays, 117–118named arguments, 116–117unknown number of, 115–116by value vs. reference, 108–111
PasswordChar property, 164passwords, typed DataSet, 772Paste command, 170–171, 170–171, 244Paste method, RichTextBox control, 276–277Path class, 444, 445PathSeparator property, TreeView, 290PDAs, accessing web, 846Pen class, 449

1012 PERCENT (%) WILDCARD CHARACTER • PROPERTIES
percent (%) wildcard character, 649Period button, 146, 149persisting data, 559picture numeric format strings, 67, 67–68PictureBox contol, 218–219pixels, creating graphics, 454–455PlainText format, 275Play method, My component, 33–34Plus button, 149–150Pmt( ) function
as built-in function, 111–112loan calculator GUI, 132–133, 139–140
Point class, graphics, 447polymorphism
building Shape classes, 413, 413–416overview of, 411–413, 959testing Shape classes, 416–417
postback, 879pound (#) character, 53, 66, 649predicates, 409–410primary keys
creating, 735identifying entities by, 726in relational databases, 633, 633, 640using Social Security number as, 726–727
Print command, 170, 244Print method, WebBrowser, 822PrintDialog control, 457PrintDocument control, 455–457, 456printing
basic methods, 459–460generating simple printout, 963–964to Immediate window, 155overview of, 455page geometry, 458–459PageSetupDialog control, 457–458PrintDialog control, 457PrintDocument control, 455–457, 456PrintPreviewDialog control, 458
Printing tab, Toolbox window, 26printouts, 460, 460–462PrintPage event handler, 456, 456–457, 461–462PrintPreviewDialog control, 458Private keyword, 419problem domain, 726, 728procedures
functions, 104–106subroutines, 103–104writing and using, 102–103
Process menu commands, TextPad application,171–172
product orders. see NWOrders application; onlineordering application
product storage, 402–407, 403Products table, 636, 636Products.aspx web form, 880–883, 882ProductStock property, 344–345‘‘program to an abstraction’’ principle, 731–732‘‘program to an interface, not an implementation’’
principle, 731programming
arguments. see argumentsflow-control. see flow-control statementsLoanCalculator GUI, 136–140, 137MathCalculator GUI, 147–149writing and using procedures, 102–106
programming, with ADO.NETaction queries. see action queriesbasic data-access classes. see data-access classesdatabases. see databasesoverview of, 631SQL. see SQL (Structured Query Language)stream- vs set-based data access, 662
progress events, 333Project menu, 24–25Project Properties command, 24projects
building own classes, 952–953creating first VB application, 13–18, 14–15creating user friendly application, 18–19, 18–21starting new, 5–7, 6
Projects and Solutions options, 29–30, 30properties
adding to entities, 747–748autocomplete, 179–180, 179–180auto-implemented, 319–320binding hierarchical tables, 791–792, 792calculating values on fly, 318column appearance, 795control appearance, 8–11, 10control function, 12custom classes, 954DataColumn class, 707–708DataReader object, 676–677DataSet state members, 712–713, 713DateTime class, 478–479displaying in Solution Explorer window, 26fields vs., 314, 395

PROPERTIES WINDOW (PROPERTIES BROWSER) • RELATIONSHIPS 1013
FocusedTextBox control, 363–364Form object, 204–209, 205, 207implementing read-only, 317–318implementing with procedures, 313–314items in EDM diagrams, 733, 733ListBox/CheckedListBox/ComboBox control,
183–184, 184ListView control, 293–294, 293–295Request object, 876Response object, 877Server object, 877Session object, 878SqlDataAdapter object, 703, 703TextBox control, 947TextBox control basic, 162–164text-manipulation, 165–166text-selection, 167–168TimeSpan class, 486–488Trace object, 879TreeView control, 289, 289–290variable, 61WebBrowser, 816–821WebClient class, 827–828
Properties window (Properties Browser), 26–27property procedures
auto-implemented properties, 319–320defined, 954implementing properties with, 313–314implementing read-only properties, 317–318throwing exceptions, 315–316
Protected/ProtectedFriend keywords, 419, 420prototypes, 131proxy, Windows client, 928–930, 929Public keyword, 225–226, 419Public statement, 75–76Public variables, 73Publishers table, 640Pubs database, 633–635, 635, 638–640, 639pushpin icon, 11
QQuantity.aspx web form, 883–886, 885queries
action. see action queriesEntity Data Model, with eSQL, 754–758, 755Entity Data Model, with LINQ to Entities,
752–754Entity Data Model, with ObjectQuery class,
758–759
Entity Framework options, 731selection. see selection queriestypes of SQL, 643using Query Designer of Visual Studio,
644–645, 645using SQL Server Management Studio,
643–644, 644Query Builder tool, 641Query Designer of Visual Studio, 644–645, 645QueryInterceptor attribute, 937–938QueryString property, WebClient class, 827Queue collection, 519Quick Info, IntelliSense, 23quotation mark (’’) character, XML, 531
Rradio buttons, 856Read method, DataReader object, 676Read Products and Related Tables button,
DataSets, 721ReadOnly property
functions of, 164implementing, 317–318LoanCalculator TextBox control, 134NamedColor property, 367
ReadOnlyChecked property, 264Recent Projects tab, Start page, 5RecentlyUsedList property,AutoCompleteSource, 179
Rectangle class, 447Redo command, 175–176, 244Redo/RedoActionName properties, RichTextBox,
276refactoring code, 110–111reference
adding to remote web service, 896–897, 897developing stand-alone web service, 908–909,
909exploring types, 392–394passing arguments by, 108–111
referential integrity, 640–641Refresh Data button, 790Refresh method, WebBrowser, 821–822Reject Changes button, 718, 718relational databases, 632–633, 633, 972relationships
binding hierarchical tables, 792, 792–793entity, 728

1014 REMOVE METHOD • SAVEFILEDIALOG CONTROL
Entity Data Model defining, 732establishing between entity instances, 765–766
Remove methodControls collection, 234features of, 471, 474Items collection, 81, 187, 297, 504SortedList collection, 519
Remove Selected Item(s) buttons, 189–190RemoveAt method, 187, 710–711Replace method, 471, 474–475Replace/Replace All buttons, TextPad application,
172–175reporting controls, 871Representational State Transfer (RESTful) web
service, 832request headers, WebClient class, 828Request object, 875, 876Reset method, 520–522Resize/ResizeBegin/ResizeEnd events, 222–223Response object, 875, 877ResponseHeaders property, WebClient class, 828RESTful (Representational State Transfer) web
service, 832Restore command, Control menu, 204, 204RestoreDirectory property, 264result variable, 151, 154Retry value, DialogResult, 228, 228return values
functions, 104–106passing arguments, 115–118
Reverse method, Array class, 498reverse-engineering, EDM, 767ReverseString method, Minimal class, 311–313Rich Text format (RTF)
basics, 270–271RTFPad application. see RTFPad project
RichNoOLEObjs format, 275RichTextBox control
advanced editing features, 275–276appending text to, 951–952cutting, copying and pasting, 276–277displaying delimited data, 274methods, 274–275, 275overview of, 269–270, 270RTF language, 270–271RTFPad project. see RTFPad projecttext manipulation/formatting properties, 271,
271–273
RichTextBoxStreamType enumeration, 274–275,275
right joins, SQL, 653–654Rollback method, Transaction object, 696root nodes, tree structure, 287, 287RootFolder property, FolderBrowserDialog, 267RoundButton control, 379, 379–382rows
adding and deleting DataSet, 710–711creating HTML tables, 852deleting, 659–660editing existing, 661grouping, 656–658inserting new, 660–661limiting data access, 937–938navigation through DataSet, 711–712rejecting changes in all, 718, 718retrieving database update errors, 715–716sorting with ORDER BY, 650–651states and versions, 712–714, 713viewing deleted, 804–808, 805viewing update errors on, 789working with DataSet, 708–709
RTF (Rich Text format)basics, 270–271RTFPad application. see RTFPad project
RTFPad projectEdit menu, 281–283File menu, 279–281Format menu, 283–284overview of, 277–279Search & Replace dialog box, 284, 284–286
runtimeadding nodes at, 291–293building dynamic forms at. see dynamic formscreating event handlers at, 241–242DynamicForm project and, 236–239, 237manipulating menus at, 248–251
SSave button, toolbar, 787Save DataSet button, 718, 719SaveChanges method, 764–766, 933, 936SaveContact function, 329–330SaveFile method, 264–265, 274SaveFileDialog control
function of, 255overview of, 261, 261–262prompting users for filenames, 950

SAVEORDER METHOD • SERIALIZE METHOD 1015
SaveOrder method, 695–696Save/Save As commands, 170, 244SByte data type, 42, 51scalar property, 735–736scancode, 177schema, XML document, 534–537, 537scope (visibility)
constants, 74variables, 71–73, 72
<script> tag, HTML, 851<script>...<script> tag, HTML, 851ScriptErrorsSuppressed property, WebBrowser,
818, 819scripts, inserting non-HTML code into pages, 851Scroll event, 223Scroll method, 206Scrollable property, ListView, 295ScrollBar control
Colors application, 198, 198events, 199–200function of, 197–198overview of, 197providing visual feedback to user, 947–948
ScrollBars property, 12, 163ScrollBarsEnabled property, WebBrowser,
818, 823Seago font, 12, 134Search and Replace operations
RTFPad project, 284, 284–286TextPad application, 172–175
Second(s) propertyDateTime class, 478TimeSpan value, 487
securityADO.NET Data Services, 937–939WebBrowser and, 816
Select All command, 170, 244Select Case statement, 90–91SELECT statement
Data Source Configuration Wizard, 783, 783querying databases with SQL, 972–973for selection queries. see selection queries
<select> tag, HTML, 855–856SelectedIndex property, ComboBox control, 20SelectedListItemCollection collection,
ListView, 299SelectedPath property, FolderBrowserDialog, 267SelectedText property
functions of, 167RichTextBox, 271, 272
selection list, 646selection queries
aliasing column names, 648–649aliasing table names, 647–648calculating aggregates, 651–653, 652combining data from multiple tables, 647executing with Command class, 667–668grouping rows, 656–658LIKE operator, 649, 649–650limiting with WHERE, 646not joining tables with WHERE clause, 655–656null values and ISNULL() function, 650SELECT statement in, 645–646skipping duplicates with DISTINCT, 649sorting rows with ORDER BY, 650–651submitting queries to database in ADO.NET,
973using SQL joins, 653–654working with calculated fields, 651
SelectionAlignment property, RichTextBox, 271,272
SelectionBullet property, RichTextBox, 271, 273SelectionHangingIndent property, RichTextBox,
271, 272–273, 273SelectionIndent property, RichTextBox, 271,
272–273, 273SelectionLength property, 167–168, 271, 272SelectionMode property, 184, 184, 187–188SelectionRightIndent property, RichTextBox,
271, 272–273, 273SelectionStart property, 167–168, 271, 272SelectionTabs property, RichTextBox, 271, 273selectors, 409–410Select/SelectAll methods, RichTextBox, 275sender argument, event handlers, 16serialization
of collections, 573–575of collections of objects, 567–569of custom objects, 563–567defined, 330of individual objects, 562–563other serialization types, 560overview of, 559process of, 560–561types, 560, 569–571with XMLSerializer class, 969
Serialize method, 560–561

1016 SERVER, ADO.NET DATA SERVICE • SPLIT METHOD
server, ADO.NET Data Service, 923, 923Server Explorer tool, 641Server object
defined, 875methods, 878properties, 877
server-sidemaintaining state, 873–874technologies, 863–864
Service option, Data Source Configuration Wizard,770, 771
Session object, 875, 878session variables, 873, 874Set section
auto-implemented properties, 319–320ColorEdit control, 366–367property procedures, 313–314, 395
set-based data access, 662Set-Cookie response header, 828SetCurrentDirectory method, 441, 442SetEntitySetAccessRule method, 937SetRange method, 504SetServiceOeprationAccess Rule method, 937Shape classes, 413, 413–417Shared Members sample project, 339–340shared methods
custom classes, 338–342instance methods vs., 395–396
SharePoint tab, Start page, 5Shippers table, Northwind database, 638short menus, 249, 249Short variables, 41short-circuiting expression evaluation, 91–93shortcut keys, 247, 248Show Deleted Rows button, 804–807, 805Show Edits button, 717–718, 718, 722–723Show navigation methods, WebBrowser, 822, 822ShowApply property, FontDialog, 260ShowColor property, FontDialog, 259ShowColor() subroutine, ColorEdit, 366–368ShowControls project, 234–236, 235ShowDataSet( ) subroutine, 721ShowDialog method, 950–951ShowEffects property, FontDialog, 260–261ShowLines property, TreeView, 290ShowNewFolderButton property,
FolderBrowserDialog, 267ShowPlusMinus property, TreeView, 290
ShowReadOnly property,OpenFileDialog/SaveFileDialog, 264
ShowRootLines property, TreeView, 290Signed Byte (SByte) data type, 42, 51SilverLight applications, 894Simple ComboBox style, 193–194, 193–195SimpleClass project, 333–335, 334–335SimpleDataSet project, 717–723
populating and displaying DataSet, 721populating DataSet at client, 717, 718saving and loading DataSet, 719, 719setting up DataAdapters, 720–721viewing changes in client DataSet, 717, 718viewing edited rows, 722–723viewing rows failing to update, 719–720, 720
single data type, 41–44single quotes, 674–675single-precision numbers, 41–44SizableSizableToolWindow values, 207
of FormBorderStyle enumeration, 207Size class, graphics, 448Size command, Control menu, 204, 204Size property, 209SizeGripStyle property, 209Skip/SkipWhile methods, LINQ, 589SmallChange property
ScrollBar, 198TrackBar, 200–201
SmallIcon value, View property, 293snap lines, 14, 145–146SnapToGrid value, Alignment property, 294snippets. see code snippetsSOAP (Simple Object Access Protocol)
ASP.NET web services, 899–900Discovery, 900serialization, 560, 569–571
SoapFormatter method, 570, 572–573Social Security number, as primary key, 726–727SolidColorOnly property, ColorDialog, 258Solution Explorer window, 26, 908solutions, starting new project, 6Sort method, 494, 507–509Sorted property, 184, 290SortedList collection, 518–519Sorting property, ListView, 295special characters
handling, 674–675text management, 850
Split method, 470–471, 514–516

SPLITCONTAINER CONTROL • STYLES 1017
SplitContainer control, 219–221, 220–221SQL (Structured Query Language)
data types, 677–678executing statements, 643–645, 644–645overview of, 642–643processing relational data with LINQ.
see LINQ to SQLquerying databases with, 972selection queries. see selection querieswildcard characters, 649, 649–650
SQL, LINQ toaccessing tables. see tables, accessing with
LINQDataContext object, 618as LINQ component, 580–581LINQ to SQL classes, 615–618, 615–618retrieving data with ExecuteQuery method,
613–615sample application, 609–613
SQL Serverextracting data in XML format from, 605–609,
606Management Studio, 643–644, 644NWOrders application, 690SQL injection attacks against, 673–674
SQL Server Profiler, 751SQL statement, Data Source Configuration
Wizard, 783, 783SqlConnection object, 973src attribute, <img> tag, 850SSDL (Store Schema Definition Language), 739Stack collection, 519stand-alone web services, 903–910
adding code-behind, 909–910, 910adding web reference, 908–909, 909building MyWebService, 904–905consuming MyWebService, 906–907, 907deploying MyWebService, 905–906, 906overview of, 903real-world scenario, 906
Standard (web form) controlscreating web applications, 867, 867–868defined, 867–868overview of, 867
Standard value, Activation property, 294Start Page, 4, 4–6start variable, For...Next loops, 93–95StartPosition property, 209StartsWith method, 468
Startup Form combo box, 224–225state, maintaining, 871, 873–874statements, executing, 27statements block, exception handling, 156–157states, row, 712–713, 713Static keyword, preserving variable lifetime, 73,
73–74Statistics( ) function, 117–118Stock Quotes project, 823–825stocking products, 344–345Stop method, WebBrowser, 821–822StopWatch class, 489–490storage
data. see DataSetsEDM schema model, 732
Store Schema Definition Language (SSDL), 739stored procedures, 667, 670–673stream-based data access, 662streaming, 445–446StreamWriter object, 960Strict option, 55–59, 942strictly typed variables, 57–58String class
methods, 467–472overview of, 466properties, 466–467
String Collection Editor dialog box, 19, 19StringBuilder class
efficiency of, 475–476manipulating large or dynamic strings,
961–962overview of, 472–473properties and methods, 473–475
strings and charactersChar data type, 463–466, 464–465, 961overview of, 463String class, 466–472StringBuilder class, 472–476, 961–962
StringTools class, 342–344, 344strProperty, Minimal class, 311–313structured exception handlers, 156, 946structures
creating custom data types, 68, 68–70, 70,942–943
using array of, 78<style> tag, CSS, 857–858styles
formatting with CSS, 857–858HTML text management tags, 849–850

1018 SUB...END SUB STATEMENTS, SUBROUTINES • TEXT PROPERTY
Sub...End Sub statements, subroutines, 103–104SubItems collection, ListView, 298–299Submit Edits button, 718, 719–720, 723SubmitChanges method, TransactionScope,
699–700subroutines
accepting arguments. see argumentsfunctions gradually replacing, 105functions vs., 103passing arguments to, 945writing and using, 103–104, 944
Subtract methodDateTime, 480TimeSpan, 489
Sum extension method, 409–410SUM() function, aggregates, 652Suppliers table, Northwind database, 636, 636synchronous methods, WebClient, 828SystemInformation object, Form objects, 208System.Uri class, 817
TTabIndex property
Contacts project, 211–213form controls, 211–212
Table attribute, LINQ to SQL, 611–613table partitioning, 732<table> tag, HTML, 852<table>...<> tags, HTML, 852TableAdapter Configuration Wizard, 783–784,
783–786TableAdapters, 774–776, 788table-per-hierarchy inheritance, 745table-per-type inheritance mapping, 744–745tables
accessing DataSet, 707–708adding ADO.NET Data Service, 922, 922–923adding and deleting rows, 710–711aliasing names in, 647–648binding hierarchical, 791–792, 791–794combining data from multiple, 647editing data in hierarchical, 799–801, 800establishing relations between DataSet, 974formatting pages in HTML, 854generating typed DataSet, 773, 774HTML, 852–853, 853navigation through DataSet, 711–714, 713not joining with WHERE clause, 655–656
rejecting changes in all, 718, 718working with rows, 708–709
tables, accessing with LINQ, 632–633creating a new order, 625–628, 627navigation methods, 620–624overview of, 619–620updates, 624–625, 625
Tables Designer tool, 641tags
applying styles to HTML, 857HTML page construction, 848–849HTML text management, 849–850inserting dynamic content, 599–600table, 852transforming XML documents, 601–605, 602XHTML, 846–847XML documents, 530–534
Take(N),TakeWhile(Expression) method, 588target attribute, <a> tag, 851<td> tag, HTML, 852<td>...</td> tags, HTML, 852testing
ASP.NET web service, 901–902ColorEdit control, 368custom comparers, 526–527custom Windows controls, 374, 374–375FocusedTextBox control, 362, 362–363for Infinity or NaN value, 48–49Shape classes, 416–417short code segments with console applications,
32StringTools class, 343–344, 344using Boolean variables in, 50WCF web service, 916, 919–920, 920web services, 905, 906
textformatting on web. see HTML (Hypertext
Markup Language)managing with HTML tags, 849–850manipulation properties, 165–166selection properties, 167–168String data type storing only, 50–51
Text Color command, 170Text control, 855text editors, 163–164, 848Text property
ComboBox, 21functions of, 165–166ListBox/CheckedListBox/ComboBox, 184

TEXTALIGN PROPERTY • TREEVIEW CONTROL 1019
TextAlign property, 162<textarea> tag, HTML, 855TextBox control
autocomplete properties, 179–180, 179–180basic properties, 162–164capturing function keys, 177–178capturing keystrokes, 176–177data entry with, 181, 181–182, 946–947designing address visualization form, 834, 835designing dynamic forms, 949designing LoanCalculator GUI, 134, 134–135designing Windows applications, 130enhancing, 401–402NWOrders application UI, 690–692overview of, 161, 162replacing Button controls on toolbar with, 790as text editor, 163–164text-manipulation properties, 165–166TextPad project. see TextPad applicationtext-selection properties, 167–168undoing edits, 168Undo/Redo commands, 175–176writing contents to file with IO namespace, 960
TextChanged event, dynamic forms, 949TextPad application
editing commands, 169–171, 170–171overview of, 168–169, 169Process and Format menus, 171–172Search and Replace, 172–175
TextTextOLEObjs format, 275<th> tag, HTML, 852<th>...</th> tags, HTML, 852thin client, 894TickFrequency property, Inches application,
200–201Ticks property
DateTime, 479TimeSpan, 487
TicksPerDay/TicksPerHour properties,TimeSpan, 486, 486
Tile value, View property, 293time events, 333TimeOfDay property, 478TimeSpan class
defined, 53–54methods, 488–489, 489overloading operators in, 347–348overview of, 485–486properties, 486–488
StopWatch class, 489–490timing operation with, 962
<title> tag, HTML, 849Title/TitleAuthor tables, 638, 639, 639Today( ) function, 53ToLower/ToUpper methods, 464, 465toolbars
designing data-driven interfaces, 787–787enhancing navigation, 789–791toggling IDE, 7
Toolbox, Windows Forms, 7–8, 8, 22Toolbox window, 26, 733Tools menu, 25ToolStripMenuItem class, 246ToolStripMenuItem object, 949–950Top value, Alignment property, 294TopMost property, 209ToString method
Char data type, 464, 465customizing, 320–321DateTime class, 480features of, 475formatting numbers, 65–66, 66overriding default implementation of, 69standard numeric format strings, 66, 66–67
TotalSize/TotalFreeSize properties, 442, 444ToTraceString method, ObjectQuery, 758–759<tr> tag, HTML, 852<tr>...</tr> tags, HTML, 852Trace object, 875, 879TrackBar control
defined, 947function of, 200Inches application, 200–201overview of, 197
transactionsADO.NET Data Services, 934–936implementing with custom objects, 693–697,
697implementing with LINQ to SQL, 697–699implementing with TransactionScope, 699–701using in Entity Framework, 766
TransactionScope class, 699–701, 766tree structure, TreeView, 287–288, 287–288TreeNode Editor dialog box, TreeView, 290–291,
291TreeView control
adding nodes at design time, 290–291, 291, 952adding nodes at runtime, 291–293

1020 TRYCAST() FUNCTION • VALUES
CustomExplorer application, 299–300, 300customizing, 382–383with ListView control, 286, 286–287properties, 289, 289–290tree structure in, 287–288, 287–288
TryCast() function, 397, 399TwoClick value, Activation property, 294type casting, 397–398, 417type characters, 45, 45type inference, 58–59typed collections, 501typed DataSets, 769–778
basic operations, 774–776, 775binding Windows forms to, 977creating, 976–977filtering data with LINQ query vs. eSQL
dynamic query, 977–978generating, 770–774, 771–774iterating through linked DataTables, 776,
776–777manipulating rows of typed DataTables, 777,
777–778untyped vs., 702, 769–770
UUDDI (Universal Description, Discovery, and
Integration), ASP.NET, 900UI layer, 692unary operators, 351–352underscore (_) wildcard character, 649Undo command, 170, 175–176, 244Undo/UndoActionName properties, RichTextBox,
276Unicode, Integer values, 52UnicodePlainText format, 275uninitialized variables, OOP, 390–391Universal Description, Discovery, and Integration
(UDDI), ASP.NET, 900untyped collections, 501untyped DataSets, 702Update method, 778Update method, DataAdapter, 703, 715Update rule, foreign key constraints, 792, 793UPDATE statement, 661, 784, 784, 784UpdateRule property, ChildKeyConstraint,
716–717, 717updates
accessing tables with LINQ, 624–625, 625ADO.NET Data Services, 932–933
with DataAdapter, 715–716entity instances, 765handling Identity columns, 716–717, 717hierarchical DataSet, 800–801overview of, 714–715submitting changes in DataSet, 974–975viewing errors on form control, 787–789, 789
Upload methods, WebClient class, 829Upload*Async methods, WebClient class, 829Upload*Completed events, WebClient class, 829URI (Uniform Resource Identifier), 817URL
configuring ADO.NET Data Service, 923–925,924
filtering data through, ADO.NET Data Service,926–928, 927
incorporating state information in, 873URL property, WebBrowser, 817, 824URL query, 832–833usemap attribute, <img> tag, 850user-defined data types, 68, 68–70, 70user-drawn controls
Changed events in, 375–376control specifications, 369–370creating, 957–958designing, 370–374overview of, 368–369, 369testing, 374, 374–375using in other projects, 378, 378
Vvalidating data
HTML forms, 820–821LoanCalculator project, 140, 140–144, 143writing well-behaved applications, 142
validation controls, 868, 869Value property, ScrollBar, 197–198value types, 391–392values
dates as numeric, 483–485DialogResult property, 228, 228–229Dictionary collection, 510–512editing DataTable rows, 708–709FormBorderStyle property, 207, 207handling Identity columns, 716–717, 717multiple, retrieving from stored procedures,
670–673null, 650, 675Parameter class, 669–670

VARIABLES • WEB SERVICES 1021
passing arguments by, 108–111TimeSpan, 486, 487using variables to store, 61variable, 37
variablesarrays. see arraysBoolean, 50Byte, 49character, 51–53coding math operations, 149, 149–152constants, 74creating first VB application, 17, 17date, 53–55declaring, 38–40declaring and using, 942form-wide, 150initialization, 40naming conventions, 39–40numeric. see numeric variablesobject, 59–60Object, 388–389overview of, 37–38sharing public, 225–226Strict, Explicit, and Infer options, 55–59, 942string, 50–51uninitialized and Nullable, 390–391value, 391–392
variables as objects, 60–74basic data types vs. objects, 61casting variable types, 397–398converting variable types, 62, 62–65, 64discovering variable types, 399–400early vs. late binding of, 398–399examining variable types, 70–71formatting numbers, 65–68, 66–67lifetime, 73–74, 73–74overview of, 60–62scope, 71–73, 72user-defined data types, 68, 68–70, 70
variants. see object variables (variants)VB axis properties, 544–545Verdana font, 12, 134versions, row, 713–714vertical partitioning, 732vertical resolution, Image class, 454View menu, 24View property, ListView, 293, 293view state, 864
ViewAddressOnAMap project. see addressvisualization form
ViewState settings, 874Visible property, 246visual database tools, 641, 641VolumeLabel property, 442, 444
WWCF (Windows Communication Foundation) web
services, 912–920building, 912–916, 985configuring, 916–920, 917–920defined, 894overview of, 899, 912
WCF Test Client Utility, 916, 919–920, 920WcfSvcHost utility, 916weather forecast web services, 895, 895–898,
897–898WeatherData property, 897–898WeatherImage property, 898WeatherService project, 896–898, 897Web access, 815–843
address visualization. see address visualizationform
HttpWebRequest and HttpWebResponseclasses, 831
using Fiddler, 826WebBrowser control, 816–821, 979–981WebBrowser control methods, 821–822WebClient class, 827–831, 978
Web applications, creating, 845–892. see also onlineordering application
AJAX, 863with ASP.NET intrinsic objects, 983–984ASP.NET objects, 875–879, 876–879Cascading Style Sheets, 856–860, 982controls, 867–871, 867–871developing for web, 845–846JavaScript, 861–862, 861–863maintaining state, 871–874, 872–873master page, 874–875, 983microformats, 863overview of, 864–866, 865–866postback, 879server-side technologies, 863–864understanding HTML and XHTML, 846–847working with HTML. see HTML (Hypertext
Markup Language)web services, 893–938

1022 WEB SITE ADMINISTRATION TOOL • WSDL (WEB SERVICES DESCRIPTION LANGUAGE)
ADO.NET Data Services. see ADO.NET DataServices
AJAX implementation, 910–912ASP.NET, 898–903, 902–903, 984composing address visualization form,
832–834consuming, 894–898, 895, 897–898consuming ASP.NET, 902–903, 984stand-alone, 903–910, 906–907, 909–910technologies associated with, 899–900types of, 893–894understanding, 894using HTTP to transport data in lightweight,
827WCF, 899, 912–920, 917–920, 985
Web Site Administration tool, 870, 870Web tab, Start page, 5WebBrowser control
adding functionality of, 979–981, 980events, 822methods, 821–822overview of, 816properties, 816–821Stock Quotes project, 823–825
WebBrowserShortcutsEnabled property, 818WebClient class
accessing Web with, 827–831, 978–979, 979asynchronous download, 830–831defined, 827events, 829methods, 828–829properties, 827–828
Web.config file, 866WebParts controls, 870, 872WebRequest object, 896WebResponse object, 896WeekDayName( ) function, 112–113Welcome tab, Start page, 5WHERE clause, 646, 655–656Where extension method, 409–410, 557–558Where operator, 931white space, 22, 850widening conversions, 64, 64–65width attribute, <img> tag, 850wildcard characters, 649, 649–650window events, HTML, 862Window menu, 25windows, rearranging IDE, 9Windows applications
basics, 941console applications vs., 31consuming web services, 898, 898designing, 129–130, 941–942
Windows authentication, 772Windows Communication Foundation. see WCF
(Windows Communication Foundation) webservices
Windows controlsanchoring, 216–217, 216–217Checked ListBox. see CheckedListBox controlComboBox. see ComboBox controlcommon dialog. see dialog controlsdocking, 216, 217–218, 218ListBox. see ListBox controlListView. see ListView controloverview of, 161, 253placing on forms, 209–210, 210RichTextBox. see RichTextBox controlScrollBar, 197–200TextBox. see TextBox controlTrackBar, 197, 200, 200–201TreeView. see TreeView control
Windows controls, building customcompound controls, 364–368, 956customizing list controls, 382–385, 383irregularly shaped, 379, 379–382overview of, 955–956raising custom events, 377–378rendering of items, 958user-drawn. see user-drawn controlsuser-drawn controls. see user-drawn controls
Windows controls, enhancedadding functionality, 359–362, 956building FocusedTextBox control, 357, 357–359,
359classifying properties, 363–364overview of, 355–357testing FocusedTextBox control, 362, 362–363
Windows Form Designerbuilding interface, 7–13, 8–11, 13first VB application, 13, 15
Windows forms. see formsWindows tab, Start page, 5With statement, My component, 34word wrap, 22, 170WordWrap property, 12, 163, 364–365WSDL (Web Services Description Language), 900
XATTRIBUTE • ZERO PROPERTY, TIMESPAN 1023
XXAttribute, 538–539, 545–546XComment, 538x-coordinate, Point class, 447XDocument, 538XElement class
accessing contents of XML document, 968–969editing XML documents, 545–546, 549–550Element method and, 543function of, 538–539saving/loading XML documents and, 542–543using lambda expressions, 557–559, 559
XHTML (extensible HTML), 846–847XML (Extensible Markup Language)
accessing contents of document, 968–969consuming web services, 895, 895–896creating and processing files with LINQ. see
LINQ to XMLcreating documents, 967–968as data type, 540, 540–542editing XML documents, 545–546EDM structure, 736–738introduction to, 530, 530–534LINQ to XML component. see LINQ to XMLmanipulating. see XML data manipulationnumbers and dates, 537–538overview of, 529saving and loading, 542, 542–543schema, 534–537, 537serialization. see XML serializationtransforming collections into, 596–597
traversing, 543–545web services. see ASP.NET web service
XML data manipulationediting documents, 549–551locating information, 547–549overview of, 546–547using lambda expressions, 557–559, 559using segments as literals, 551–557, 554
XML serializationof collections of objects, 567–569of custom objects, 563–567of individual objects, 562–563other serialization types, 560overview of, 559, 969process of, 560–561
XMLSerializer class, 560–563, 568–569, 969
YYahoo! badges, 823–825, 825Yahoo! Geocoding API
constructing URL and query parameters,834–836
implementing address visualization form,832–833
invoking web service, 836–837processing response, 837–838
y-coordinate, Point class, 447Yes value, DialogResult, 228, 228
ZZero property, TimeSpan, 486, 486

The Visual Basic Book Programmers Count On
If you want to learn how to use Visual Basic 2010, you’ve come to the right place. New users, you’ll build a simple VB application in the very fi rst chapter, getting you quickly up to speed on the VB user interface and simple coding. Intermediate and advanced users, you can bypass the basics and jump straight to building data-driven applications, working with .NET 4.0 framework, creating rich client and web applications, programming with web services, and much more. Packed with step-by-step instruction and real-world scenarios for users of all levels, this book is what you need to build top-level skills in Visual Basic 2010.
COVERAGE INCLUDES:
• Getting started with Visual Basic 2010• Mastering VB programming essentials, including GUI design,
event-driven programming, basic Windows controls, and more• Working with custom classes, controls, and objects• Understanding the .NET framework, including XML, LINQ, and
storing data in collections• Programming with ADO.NET, using the data entity model, and
understanding DataSets• Building web applications and programming with web services• Getting the most out of advanced Windows controls such as ListView
and TreeView controls
Master Visual Basic 2010 and .NET Framework 4.0
Understand the Core Language and User Interface
Find a Wealth of Content for All Users
Create Custom, Practical, Data-Driven Applications and Web Apps
Reinforce Your Skills with Real-World Examples
ABOUT THE AUTHOR
Evangelos Petroutsos is a computer engineer who has worked for the California Institute of Technology and MCI. Currently, he writes computer books and articles, teaches networking and programming courses, and works as a computer communications consultant. He is the author of the Sybex titles Mastering Microsoft Visual Basic 2008 and Mastering Microsoft Visual Basic 2005, among other books.
CATEGORY
COMPUTERS/Programming Languages/Visual Basic
$59.99 US$71.99 CAN SERIOUS SKILLS.
Visual Basic® 2010
MASTERING
Build Rich Client and Web Applications with Visual Basic
Work with the .NET Framework 4.0
ISBN 978-0-470-53287-4
www.sybex.com/go/masteringvb2010www.sybex.com
MASTERING
Visual B
asic® 2010
Petroutsos
spine=2.11”
Microsoft®
Microsoft®
Evangelos Petroutsos