MANUAL SMT TRILINGUE versao impressao.cdr - Taurus ...
128
THE INFORMATION IN THIS MANUAL IS USEFUL FOR BOTH BEGINNER AND EXPERIENCED SHOOTERS. LA INFORMACIÓN CONTENIDA EN ESTE MANUAL ES ÚTIL TANTO PARA TIRADORES PRINCIPIANTES COMO PARA EXPERIMENTADOS. ESTE MANUAL CONTIENE INFORMACIÓN IMPORTANTE SOBRE EL FUNCIONAMIENTO, LA LIMPIEZA Y EL CUIDADO DE SU ARMA. THIS MANUAL CONTAINS IMPORTANT INFORMATION ABOUT THE OPERATION, CLEANING AND CARE OF YOUR WEAPON. AS INFORMAÇÕES CONTIDAS NESTE MANUAL SÃO ÚTEIS, TANTO PARA ATIRADORES INICIANTES QUANTO PARA EXPERIENTES. ESTE MANUAL CONTÉM INFORMAÇÕES IMPORTANTES SOBRE O FUNCIONAMENTO, LIMPEZA E CUIDADOS DE SUA ARMA. LEIA COM ATENÇÃO ESTE MANUAL ANTES DE UTILIZAR SUA ARMA PLEASE READ THIS MANUAL CAREFULLY BEFORE USING YOUR GUN LEA CON ATENCIÓN ESTE MANUAL ANTES DE UTILIZAR SU ARMA SMT/CTT MANUAL DE INSTRUÇÕES INSTRUCTION MANUAL MANUAL DE INSTRUCCIONES
-
Upload
khangminh22 -
Category
Documents
-
view
0 -
download
0
Transcript of MANUAL SMT TRILINGUE versao impressao.cdr - Taurus ...

THE INFORMATION IN THIS MANUAL IS USEFUL FOR BOTH BEGINNER AND EXPERIENCED SHOOTERS.
LA INFORMACIÓN CONTENIDA EN ESTE MANUAL ES ÚTIL TANTO PARA TIRADORES PRINCIPIANTES COMO PARA EXPERIMENTADOS. ESTE MANUAL CONTIENE INFORMACIÓN IMPORTANTE SOBRE EL FUNCIONAMIENTO, LA LIMPIEZA Y EL CUIDADO DE SU ARMA.
THIS MANUAL CONTAINS IMPORTANT INFORMATION ABOUT THE OPERATION, CLEANING AND CARE OF YOUR WEAPON.
AS INFORMAÇÕES CONTIDAS NESTE MANUAL SÃO ÚTEIS, TANTO PARA ATIRADORES INICIANTES QUANTO PARA EXPERIENTES. ESTE MANUAL CONTÉM INFORMAÇÕES IMPORTANTES SOBRE O FUNCIONAMENTO, LIMPEZA E CUIDADOS DE SUA ARMA.
LEIA COM ATENÇÃO ESTE MANUAL ANTES DE UTILIZAR SUA ARMAPLEASE READ THIS MANUAL CAREFULLY BEFORE USING YOUR GUNLEA CON ATENCIÓN ESTE MANUAL ANTES DE UTILIZAR SU ARMA
SMT/CTTMANUAL DE INSTRUÇÕESINSTRUCTION MANUALMANUAL DE INSTRUCCIONES


3
ÍNDICE
SEMPRE MANTENHA A ARMA DIRECIONADA PARA UM LOCAL SEGURO E O DEDO AFASTADO DO GATILHO.
AVISOS DE SEGURANÇA...................................................4
MUNIÇÃO........................................................................10
LISTA DE PEÇAS................................................................40
NOTAS...............................................................................44
PRINCIPAIS COMPONENTES...........................................16
GARANTIA.........................................................................43
ESPECIFICAÇÕES............................................................38
PROCEDIMENTO DE MANUTENÇÃO................................18
MONTAGEM.......................................................................25
AVISOS..............................................................................12
LUBRIFICAÇÃO.................................................................23
OPERAÇÃO/MANUSEIO...................................................26
VISTA EXPLODIDA............................................................39
MANUTENÇÃO PREVENTIVA...........................................17
LIMPANDO SUA ARMA......................................................22
ASSISTÊNCIA TÉCNICA...................................................41
ENGLISH.........Pg. 45
ESPAÑOL........Pg. 86

4
Guarde sua arma e munição em LOCAL SEGURO, inacessível à outras pessoas.
Armas de fogo são, por natureza, instrumentos potencialmente letais. O manuseio IMPRÓPRIO OU DESCUIDADO pode causar acidentes graves, inclusive fatais.
LEIA ATENTAMENTE ESTE MANUAL – Ele foi elaborado para auxiliar usuários a realizar a manutenção adequada em armas de fogo TAURUS.
Mantenha o dedo LONGE DO GATILHO sempre que a arma não estiver em uso ou não haja a necessidade de efetuar o disparo.
O manuseio seguro de uma arma de fogo requer TREINAMENTO, DISCIPLINA E CAUTELA .
Armas são equipamentos mecânicos de precisão e devem ser submetidas a MANUTENÇÃO CONSTANTE para evitar funcionamento inadequado que coloque em risco a vida do usuário e de terceiros.
Assegure-se que leu e compreendeu TODAS as informações e avisos deste manual ANTES de utilizar sua arma.
Oriente-se com um instrutor habil i tado sobre o funcionamento de sua arma de fogo ANTES DE USÁ-LA.
Utilizar uma arma requer MUITO CUIDADO E ATENÇÃO. O usuário não deve ter qualquer dúvida a respeito da correta operação da arma e deve SABER UTILIZAR ARMAS COM SEGURANÇA.
Todas as armas devem SEMPRE ser tratadas como se estivessem CARREGADAS E PRONTAS PARA USO.
O usuário não deve NUNCA, EM QUALQUER HIPÓTESE, apontar sua arma – carregada ou não – para pessoas ou objetos que não deseja atingir.
AVISOS DE SEGURANÇA
SEMPRE MANTENHA A ARMA DIRECIONADA PARA UM LOCAL SEGURO E O DEDO AFASTADO DO GATILHO.

5
AVISOS DE SEGURANÇA
EVITE ATIRAR EM SUPERFÍCIES RÍGIDAS OU LÍQUIDAS, pois conforme o ângulo de incidência, poderá haver um ricochete.
Ao entregar uma arma de fogo ou ao recebê-la, faça-o com o FERROLHO ABERTO E SEM CARREGADOR.
Use somente a MUNIÇÃO NOVA e indicada para a arma.
Evite MUNIÇÕES RECARREGADAS, VELHAS OU COM ALTERAÇÃO no estojo ou no projétil.
Carregue e descarregue sua arma com o CANO APONTADO PARA UM LUGAR SEGURO.
NUNCA PUXE O GATILHO PARA TESTAR sua arma antes de verificar se ela está descarregada.
SEMPRE MANTENHA A TRAVA MANUAL EXTERNA ACIONADA quando não estiver utilizando a arma.
Em caso de suspeita de obstrução do cano, imediatamente DESCARREGUE A ARMA para só então verificar o interior do cano.
Caso utilize sua arma para serviço, com munição na câmara, SEMPRE MANTENHA A TRAVA MANUAL EXTERNA ACIONADA.
A maneira mais segura de portar uma arma é com A CÂMARA VAZIA E A TRAVA MANUAL EXTERNA ACIONADA.
Por te sempre sua arma de maneira segura, em COLDRE/MALETA APROPRIADO.
Use sempre ÓCULOS DE PROTEÇÃO E PROTETORES AURICULARES, mesmo em ambiente aberto.
ARMAS, ÁLCOOL E DROGAS NÃO COMBINAM.
SEMPRE MANTENHA A ARMA DIRECIONADA PARA UM LOCAL SEGURO E O DEDO AFASTADO DO GATILHO.

6
AVISOS DE SEGURANÇA
Não utilize ou empunhe armas de fogo APÓS CONSUMIR MEDICAMENTOS que possam afetar sua habilidade.
NUNCA COLOQUE A MÃO À FRENTE DO CANO de uma arma de fogo.
Nunca tente modificar o curso do gatilho de uma arma, isso pode AFETAR O SISTEMA DE TRAVAMENTO e causar disparos acidentais.
A arma PODE DISPARAR COM O CARREGADOR REMOVIDO CASO HAJA MUNIÇÃO NA CÂMARA. Certifique-se que toda a munição foi consumida ou retirada após o uso.
As armas Taurus são projetadas para atender os testes presentes na norma NEB/T E-267A
Ao acionar a trava manual, certifique-se que o GATILHO ESTEJA NA POSIÇÃO INICIAL DE SEU CURSO, caso contrário, a trava pode ficar na posição de segurança sem ter sido de fato acionada.
SEMPRE MANTENHA A ARMA DIRECIONADA PARA UM LOCAL SEGURO E O DEDO AFASTADO DO GATILHO.

7
EM CASO DE QUEDA DA ARMA,
P O D E R Á O C O R R E R D I S PA RO
ACIDENTAL. MANTENHA A TRAVA
M A N U A L E X T E R N A S E M P R E
ACIONADA.
SEMPRE MANTENHA A ARMA DIRECIONADA PARA UM LOCAL SEGURO E O DEDO AFASTADO DO GATILHO.
QUALQUER ARMA
P O D E D I S PA R A R
EM CASO DE QUEDA
AVISOS DE SEGURANÇA

8
Acidentes com armas de fogo são relativamente raros, normalmente causados por desrespeito às regras básicas de segurança. Infelizmente, atiradores experientes costumam ignorar essas regras com mais frequência que os iniciantes. Independentemente da familiaridade com o uso de armamentos, é imprescindível sempre seguir as orientações de segurança.
Leia, releia e pratique os princípios básicos de segurança para que se tornem um hábito e, assim, nunca sejam esquecidos. Busque sempre orientação especializada caso tenha dúvida sobre seu conhecimento ou habilidade para utilizar uma arma de fogo.
Caso o tiro falhe, mantenha o cano apontado para um lugar seguro durante pelo menos 30 segundos para o caso de haver ignição retardada da espoleta. Caso sinta recuo diferente do normal, proceda da mesma forma.
Ao utilizar uma arma de fogo, o usuário é responsável em tempo integral pelas consequências de seu uso. Por isso, tem a OBRIGAÇÃO DE SABER como fazer a MANUTENÇÃO CORRETA E ADEQUADA e como UTILIZÁ-LA DE FORMA SEGURA. É sua responsabilidade TOMAR TODAS AS PRECAUÇÕES NECESSÁRIAS. Essa responsabilidade é toda do atirador e não pode ser transferida para qualquer outra pessoa.
LEMBRE-SE: Armas de fogo são equipamentos complexos e sensíveis, projetadas para oferecer um nível de segurança adequado ao tipo de função que vão desempenhar, mas não absolutamente infalíveis. Armas não passam de instrumentos mecânicos, sendo que as consequências de seu uso são de total responsabilidade do atirador.
Ao praticar tiro, verifique sempre a área atrás do alvo para se certificar que pessoas ou animais não serão atingidos.
Acionar continuamente o mecanismo de disparo sem munição é prejudicial para sua arma de fogo.
AVISOS DE SEGURANÇA
SEMPRE MANTENHA A ARMA DIRECIONADA PARA UM LOCAL SEGURO E O DEDO AFASTADO DO GATILHO.
9
NUNCA faça ou tente reparos caseiros em sua arma. Eles podem danificar sua arma e torná-la insegura para o uso. Sempre que necessário, dirija-se à Assistência Técnica Autorizada mais próxima.
Sempre que adquirir acessórios não-originais Taurus (cabos, coldres, miras, etc.), certifique-se que são compatíveis com sua arma.
Em caso de dúvida, entre em contato imediatamente com a Assistência Técnica Autorizada mais próxima.
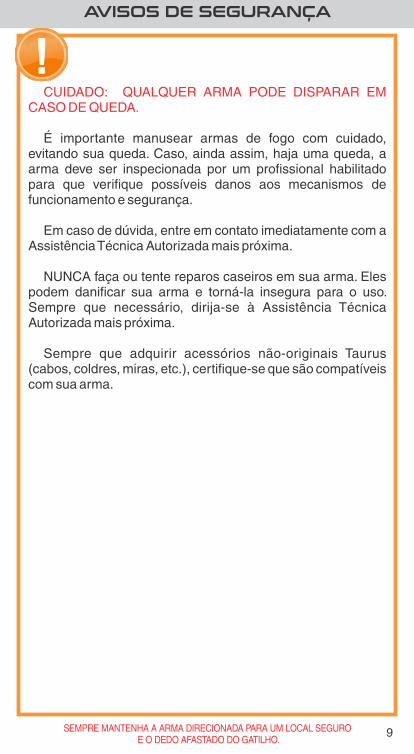
CUIDADO: QUALQUER ARMA PODE DISPARAR EM CASO DE QUEDA.
É importante manusear armas de fogo com cuidado, evitando sua queda. Caso, ainda assim, haja uma queda, a arma deve ser inspecionada por um profissional habilitado para que verifique possíveis danos aos mecanismos de funcionamento e segurança.
AVISOS DE SEGURANÇA
SEMPRE MANTENHA A ARMA DIRECIONADA PARA UM LOCAL SEGURO E O DEDO AFASTADO DO GATILHO.

10
- For constatada a existência de pólvora de explosão não queimados, espalhados pelo mecanismo.
- O cartucho não disparar;
O uso de munição recarregada (recic lada) de carregamento manual ou outro tipo que não seja o padrão anula todas as garantias. O municiamento impróprio pode ser extremamente perigoso. A utilização dessas munições pode causar danos severos à arma e ferimentos graves ao atirador ou a terceiros. Sempre use munição que atenda aos padrões de desempenho industrial estabelecidos pelo Sporting Arms and Ammunition Manufacturers Institute, Inc. dos Estados Unidos (SAAMI) ou entidade equivalente em outros países (C.I.P.)
Use apenas munições de alta qualidade, originais de fábrica. Não use cartuchos sujos, úmidos, corroídos, deformados ou danificados. Não lubrifique os cartuchos. Lubrificantes ou outros materiais estranhos podem causar alterações potencialmente perigosas à munição. Use somente munição do calibre para o qual sua arma foi projetada. O calibre adequado fica permanentemente gravado em sua arma.
- Um tiro soar fraco ou anormal.
- Você tiver dificuldade ou sentir resistência incomum ao inserir o cartucho;
A pressão excessiva no interior da câmara ou do cano durante o disparo pode causar danos severos à arma e ferimentos graves para o atirador e terceiros. A pressão excessiva pode ser resultado de obstruções no cano, excesso de pólvora ou uso de cartuchos inadequados ou montados de forma incorreta.
Pare imediatamente de atirar e verifique o cano com relação a uma possível obstrução sempre que:
- O mecanismo deixar de extrair um estojo;
MUNIÇÃO
SEMPRE MANTENHA A ARMA DIRECIONADA PARA UM LOCAL SEGURO E O DEDO AFASTADO DO GATILHO.

11
MUNIÇÃO
SE UM PROJÉTIL FICAR NO CANO, NÃO TENTE
REMOVÊ-LO DISPARANDO OUTRO CARTUCHO,
MUNIÇÃO DE FESTIM OU COM CARTUCHO COM
PROJÉTIL REMOVIDO. ISSO PODE CAUSAR PRESSÃO
E XC E S S I VA , RU P T U R A DA A R M A , P O D E N D O
OCASIONAR LESÕES CORPORAIS GRAVES.
Se o projétil puder ser retirado com uma vareta de limpeza, retire quaisquer grãos de pólvora não queimados do orifício, câmara e mecanismo antes de continuar a disparar. Se o projétil não puder ser desalojado com uma vareta de limpeza, leve a arma para uma Assistência Técnica Autorizada.
Caso haja qualquer motivo para suspeitar que um projétil esteja obstruindo o cano, descarregue imediatamente a arma e olhe através do orifício. Não é suficiente meramente olhar na câmara. Um projétil pode ficar alojado a alguma distância, ao longo do cano, onde não pode ser facilmente observado.
Utilize lubrificantes de maneira moderada sobre partes móveis de sua arma. Evite o borrifo excessivo de qualquer produto de manutenção de armas na forma de aerossol, especialmente nos casos em que possa entrar em contato com munição. Todos os lubrificantes, particularmente lubrificantes em spray na forma de aerossol, podem penetrar na espoleta do cartucho e causar falhas de disparo. Alguns lubrificantes de alta penetração podem também migrar para o interior dos estojos e deteriorar a pólvora, impedindo seu correto funcionamento. Caso apenas a espoleta explodir, há o perigo de o projétil ficar alojado no cano.
Não lubrifique os cartuchos e certifique-se de ter deixado a câmara livre de qualquer óleo ou conservante antes de começar a atirar. O óleo interfere na fricção entre o estojo e a parede da câmara, necessária para o funcionamento seguro, e sujeita a arma a estresse similar ao imposto pela pressão excessiva.
SEMPRE MANTENHA A ARMA DIRECIONADA PARA UM LOCAL SEGURO E O DEDO AFASTADO DO GATILHO.

12
Para , o gatilho deve ativar efetivamente a trava manualestar em sua , caso contrário, a trava posição mais à frenteficará na posição de segurança, .mas não de fato acionada
AVISOS:
A arma sempre deve ser portada de maneira segura, em coldre/maleta apropriado: em caso de queda, pode ocorrer um disparo acidental.
, a arma deverá ser No caso de ocorrer queda inspecionada por um profissional habilitado, para verificar possíveis danos no mecanismo e dispositivos de segurança.
Gerais:
Não faça consertos caseiros. Sempre que necessário, dirija-se à Assistência Técnica Autorizada.
Não tente modificar o curso do gatilho de sua arma de fogo, pois alterações deste tipo geralmente afetam o sistema de travamento disparos acidentais. e podem causar
SEMPRE MANTENHA A ARMA DIRECIONADA PARA UM LOCAL SEGURO E O DEDO AFASTADO DO GATILHO.
AVISOS

13
SEGURANÇA EM PRIMEIRO LUGAR:
Disparando sua arma:
Sempre mantenha a arma apontada em uma direção segura.
Sempre mantenha a arma apontada em uma direção segura.
PERIGO:
Antes de municiar a arma, sempre limpe todo o óleo lubrificante que possa ter acumulado no cano e na câmara e cheque se não existem obstruções no cano. Qualquer material estranho no interior do cano pode resultar em dano à arma e, em consequência, ao atirador e pessoas próximas.
AVISO:
Nunca municie ou desmunicie sua arma dentro de um veículo, salas ou qualquer outro espaço confinado (exceto em áreas destinadas ao tiro).
SEGURANÇA EM PRIMEIRO LUGAR:
Municiando:
Se durante o disparo sua arma apresentar QUALQUER falha de funcionamento, se está perfurando a espoleta, se está rompendo o cartucho ou se está apresentando um som fora do normal, . Não tente PARE DE ATIRAR IMEDIATAMENTEcontinuar disparando. Pode ser perigoso continuar utilizando sua arma. Descarregue sua arma. Leve sua arma e munição a um armeiro credenciado ou assistência técnica autorizada para avaliação.
PERIGO:
Sempre utilize óculos de segurança e protetores auriculares.
PERIGO:
AVISOS
SEMPRE MANTENHA A ARMA DIRECIONADA PARA UM LOCAL SEGURO E O DEDO AFASTADO DO GATILHO.

14
SEGURANÇA EM PRIMEIRO LUGAR:
AVISO:
O risco de um acidente é muito maior quando sua arma de fogo - não importando o quão segura ela seja - for manuseada com um cartucho na câmara. Esta prática não é recomendada e pode ser justificada, somente em circunstância de claro perigo presente ou durante a prática do serviço policial (quando assim for estipulado pela corporação) e pode ser necessária a utilização imediata da arma.
Cuidados com sua arma
SEGURANÇA:
Nunca manuseie sua arma de fogo com cartuchos na câmara a menos que a trava esteja acionada, você esteja preparado para disparar e a arma esteja apontada para o alvo.
A trava de segurança manual deve estar totalmente na posição travada ou na posição de não travada. A arma não deve ser disparada com a trava de segurança manual entre as duas posições. Danos à arma e, consequentemente, ao atirador podem ocorrer caso a trava não esteja no seu fim de curso.
SEGURANÇA EM PRIMEIRO LUGAR:Sempre mantenha a arma apontada em uma direção segura quando for movimentar o ferrolho para alimentar a primeira munição à câmara. Mau funcionamento durante o processo de municiamento da câmara é raro, porém pode ocorrer, portanto, mantenha sua mão, seu rosto ou qualquer parte do seu corpo atrás da culatra e empunhe corretamente a sua arma, mantendo-a a frente do seu corpo.
AVISOS
SEMPRE MANTENHA A ARMA DIRECIONADA PARA UM LOCAL SEGURO E O DEDO AFASTADO DO GATILHO.

15
Nunca permita que alguém fique ao seu lado, na direção da ejeção dos cartuchos deflagrados. O cartucho é ejetado em uma temperatura elevada e pode causar ferimentos. Certifique-se de que a linha de ejeção está desobstruída.
AVISO:
CUIDADO:
AVISO:Nunca t ranspor te, manuseie ou deixe sua arma desacompanhada sem que esteja acionada a trava de segurança. Caso a arma não esteja travada, ela irá disparar por ação de pressão no gatilho que pode ser proveniente de você cair com a arma, a arma cair ao chão ou ainda se a arma for atingida por alguém ou algum objeto.
Nunca disparar sua arma com o dedo, mão, rosto ou qualquer outra parte do corpo por cima da janela de ejeção ou em qualquer outra posição que você possa ser atingido pelo movimento do ferrolho ou pelos cartuchos deflagrados.
AVISOS
SEMPRE MANTENHA A ARMA DIRECIONADA PARA UM LOCAL SEGURO E O DEDO AFASTADO DO GATILHO.

16
PRINCIPAIS COMPONENTES
SEMPRE MANTENHA A ARMA DIRECIONADA PARA UM LOCAL SEGURO E O DEDO AFASTADO DO GATILHO.
GU
AR
DA
MÃ
O
CA
RR
EG
AD
OR
RE
TÉ
M D
OC
AR
RE
GA
DO
R
EM
PU
NH
AD
UR
A
SIS
TE
MA
DE
CO
RO
NH
AR
ET
RÁ
TIL
E R
EB
AT
ÍVE
L
VÉ
RT
ICE
DE
MIR
A
TE
CL
A
SE
LE
TO
RA
DE
T
IRO
AM
BID
ES
TR
A
RE
TÉ
M D
OF
ER
RO
LH
OA
MB
IDE
ST
RO
AL
AV
AN
CA
DE
MA
NE
JO
(R
EV
ER
SÍV
EL
) CA
IXA
DA
CU
LA
TR
A
GA
TIL
HO
QU
EB
RA
-CH
AM
AS
PU
NH
O
FIX
AÇ
ÃO
DA
BA
ND
OL
EIR
A(R
EV
ER
SÍV
EL
)
MA
SS
A D
EM
IRA
17
4. No mínimo uma vez por mês;
Sua arma, assim como qualquer outra máquina, deve receber manutenção adequada para garantir seu funcionamento e preservar sua vida útil. Este manual irá explicar como desmontar, limpar, lubrificar para realizar a manutenção de sua Taurus.
1.Quando nova, antes de utilizá-la pela primeira vez;
3. Após cada 200 disparos;
Os produtos Taurus são resistentes a condições adversas. Mesmo assim, sua arma deve ser limpa e lubrificada para prevenir a corrosão e remover partículas indesejadas que podem prejudicar o funcionamento.
A manutenção deve ser feita respeitando a frequência abaixo:
2.Após cada utilização;
5. Sempre que necessário.
Qualquer arma deve ser inspecionada e receber manutenção sempre que sofrer uma queda ou houver qualquer suspeita de mau funcionamento.
Condições para armazenagem da arma:
1. Guarde a arma limpa e lubrificada.
A necessidade de manutenção está ligada à exposição da arma a intempéries como – mas não restritas a – chuva, neve, água salina, poeira e areia.
2. Guarde a arma sem munições na câmara.
3. Com a alavanca de manejo para frente e o cão desarmado.
4. O mais tardar após doze (12) meses descarregue todas as munições do carregador e substitua-as por novas munições.
5. Limpe e lubrifique a arma e o carregador a cada seis (6) meses enquanto está armazenada.
6. Guarde a arma em local limpo, seco e com temperatura controlada.
INTRODUÇÃO
MANUTENÇÃO PREVENTIVA
FREQUÊNCIA DE MANUTENÇÃO
SEMPRE MANTENHA A ARMA DIRECIONADA PARA UM LOCAL SEGURO E O DEDO AFASTADO DO GATILHO.

18
DESMONTAGEM 1º ESCALÃO
PROCEDIMENTO DE MANUTENÇÃO
SEMPRE MANTENHA A ARMA DIRECIONADA PARA UM LOCAL SEGURO E O DEDO AFASTADO DO GATILHO.
Manuseie sua arma sempre com ocano apontado para um lugar seguro.
• Ciclar o ferrolho (fig. 2) para retirar a munição da câmara.
Para a desmontagem de primeiro escalão seguir a seguinte sequência:
• Colocar o Seletor de Tiro na posição “S” (Segurança). Retirar o carregador (fig. 1), pressionando o retém do carregador.
• Verificar visualmente, pela janela de ejeção, que não há munição na câmara (fig. 3).
NOTA: A submetralhadora/carabina SMT/CTT pode ser desmontada
e montada sem o uso de ferramentas. O usuário desta arma poderá
fazer a desmontagem conforme sugerida neste manual. A
desmontagem além desta etapa, se necessária, deverá ser feita por
um armeiro treinado.
1
2
3

19
DESMONTAGEM 1º ESCALÃO
SEMPRE MANTENHA A ARMA DIRECIONADA PARA UM LOCAL SEGURO E O DEDO AFASTADO DO GATILHO.
5
4
• Desmontar o pino traseiro da caixa da culatra
pressionando-o, com o dedo ou um estojo vazio, na
face com menor diâmetro e retirar pelo outro lado;
• Levantar a caixa da culatra para permitir o acesso
ao seu interior;
• Retirar o conjunto ferrolho/mola recuperadora; (Observar a orientação dos componentes visando a remontagem)
• Fechar o ferrolho, liberando-o do retém do ferrolho.
6
7

20
DESMONTAGEM 1º ESCALÃO
SEMPRE MANTENHA A ARMA DIRECIONADA PARA UM LOCAL SEGURO E O DEDO AFASTADO DO GATILHO.
• Retire o fundo do carregador, a chapa com a mola e o
transportador;
• Com um punção ou pino, pressionar a chapa da mola do
carregador pelo orifício no fundo; (figura 1)
• Deslizar o fundo do carregador para frente, tomando cuidado
para impedir a ejeção forçada da chapa pressionada pela mola;
(figura 2)
• Para remontar o carregador proceder de forma inversa.
Assegure-se de que o fundo do carregador está corretamente retido
pelo apoio da mola.
1 2
CORPO DO
CARREGADOR
TRANSPORTADOR
MOLA DO
CARREGADOR
CHAPA DA MOLA
DO CARREGADOR
FUNDO DO
CARREGADOR
DESMONTAGEM DO CARREGADOR

21
DESMONTAGEM 1º ESCALÃO
SEMPRE MANTENHA A ARMA DIRECIONADA PARA UM LOCAL SEGURO E O DEDO AFASTADO DO GATILHO.
Não se recomenda a desmontagem da arma além dessas etapas, a menos que feita por um armeiro treinado.
ATENÇÃO:ATENÇÃO:
CO
NJU
NT
O D
O F
ER
RO
LH
O
PIN
O T
RA
SE
IRO
DA
CA
IXA CA
RR
EG
AD
OR

22
LIMPANDO SUA ARMA
SEMPRE MANTENHA A ARMA DIRECIONADA PARA UM LOCAL SEGURO E O DEDO AFASTADO DO GATILHO.
Esteja certo que a arma está descarregada
antes de iniciar qualquer procedimento de
Manutenção ou Limpeza.
ATENÇÃO:ATENÇÃO:
5.1. A limpeza diária após o serviço compreende:
5.2 Condições para armazenagem da arma
A limpeza correta da arma faz parte da manutenção necessária para
garantir o seu perfeito funcionamento, inclusive prevenindo desgastes
prematuros, ataque por agentes corrosivos, elevando a vida útil do
equipamento.
São duas as classes de limpeza necessárias nesta arma:
• Desmuniciar a arma, conforme descrito na página 23;
• Limpar todas as superfícies metálicas externas da arma e do
carregador, mantendo-as lubrificadas com uma fina camada de óleo.
• Guarde a arma limpa e lubrificada.
• Guarde a arma sem munições na câmara.
• Com a alavanca de manejo para frente e o cão desarmado.
• Limpe e lubrifique a arma e o carregador a cada seis (6) meses
enquanto está armazenada.
• O mais tardar após doze (12) meses descarregue todas as munições
do carregador e substitua-as por novas munições.
• Guarde a arma em local limpo, seco e com temperatura controlada.

23
LUBRIFICAÇÃO
SEMPRE MANTENHA A ARMA DIRECIONADA PARA UM LOCAL SEGURO E O DEDO AFASTADO DO GATILHO.
Esteja certo que a arma está descarregada
antes de iniciar qualquer procedimento de
Manutenção ou Limpeza.
ATENÇÃO:ATENÇÃO:
A limpeza após o uso (após o tiro) compreende:
• Remover, com auxílio de uma escova apropriada, todos os resíduos
encontrados no interior do cano, da caixa do mecanismo e da caixa
da culatra;
• Montar os conjuntos e verificar o seu correto funcionamento.
• Desmuniciar a arma, conforme descrito na página 18;
• Desmontar conforme explicado nas páginas 18 e 19;
• Desmontar o carregador e fazer o mesmo procedimento;
• Aplicar uma gota de óleo fino de origem mineral nos pontos
indicados nas figuras e bem como nos pontos de contato da dobradiça
da coronha.
• Manter todas as superfícies metálicas, lubrificadas com uma fina
camada de óleo;
Se possível, usar ar comprimido para melhor limpeza da caixa do
mecanismo.
ATENÇÃO:ATENÇÃO:
LEMBRE-SE:LEMBRE-SE:

24
LUBRIFICAÇÃO
SEMPRE MANTENHA A ARMA DIRECIONADA PARA UM LOCAL SEGURO E O DEDO AFASTADO DO GATILHO.
• Amortecedor do ferrolho.
Cuidados especiais:
ATENÇÃO:
Para assegurar a durabilidade e manter a confiabilidade do armamento,
as seguintes peças deverão ser substituídas a cada 5.000 disparos:
b) Cano
• Mola do cão;
Certifique-se de ter deixado o interior do cano livre de qualquer óleo ou
conservante antes de começar a atirar. O óleo interfere na fricção entre o
estojo e a parede da câmara que é necessária para o funcionamento
seguro, e sujeita a arma a estresse similar ao imposto pela pressão
excessiva.
• Mola do percussor;
• Mola do extrator;
• Pino do extrator;
Todos os lubrificantes, e particularmente lubrificantes em spray na forma
de aerossol, podem penetrar na espoleta do cartucho e ocasionar falhas
de disparo. Alguns lubrificantes de alta penetração podem também
migrar para o interior dos estojos e causar deterioração da pólvora; ao
disparar, a pólvora pode não explodir. Se apenas a espoleta explodir,
existe o perigo da munição ficar alojada no cano.
a) Carregador
• Somente uma pequena quantidade de óleo deve ser usada para
conservar o equipamento;
• Evitar o excesso de óleo no interior do:
Seguir instruções adicionais de manutenção e limpeza, quando
houverem, de acordo com indicações específicas da corporação
ou academia.
IMPORTANTE:IMPORTANTE:

25
MONTAGEM
SEMPRE MANTENHA A ARMA DIRECIONADA PARA UM LOCAL SEGURO E O DEDO AFASTADO DO GATILHO.
O conjunto do ferrolho/mola deve ficar completa-
mente inserido na caixa da culatra, isto é,
ferrolho apoiado no cano. O cão deve estar
engatilhado.
ATENÇÃO:ATENÇÃO:
• Fechar a caixa da culatra com o cano apontado levemente para
baixo, conforme a figura, evitando assim que o conjunto do ferrolho/
mola se desloque;
• Ciclar o ferrolho, verificando a correta montagem do conjunto;
A remontagem da submetralhadora/carabina deve ser feita na ordem
inversa a da desmontagem, conforme a seguir:
• Introduzir o conjunto ferrolho/mola recuperadora na caixa da
culatra;
• Inserir o pino traseiro na caixa da culatra;
• Inserir o carregador.

26
OPERAÇÃO/MANUSEIO
SEMPRE MANTENHA A ARMA DIRECIONADA PARA UM LOCAL SEGURO E O DEDO AFASTADO DO GATILHO.
O seletor de Tiro e Segurança das submetralhadoras SMT e
carabina CTT é ambidestro e pode possuir até 4 posições (SMT)
com as seguintes funções:
S (Segurança): nesta posição o mecanismo de disparo da submetralhado-ra/carabina fica completamente bloqueado, impedindo o disparo. Obs: A posição “S” só pode ser selecionada com o cão na condição armado.
1 (Tiro intermitente): nesta posição a submetralhadora/carabina funcionará no modo semi-automático, ou seja, tiro a tiro.
2 (Rajada limitada): nesta posição a submetralhadora dispara uma rajada de 2 tiros se o gatilho for mantido acionado durante o ciclo completo. A arma continua disparando rajadas de 2 tiros a cada novo acionamento do gatilho enquanto tiver munição no carregador. Obs: liberando o gatilho ou esgotando-se a munição em qualquer momento dentro do ciclo, os disparos serão interrompidos, podendo ter realizado somente 1 disparo. Acionando o gatilho, após esta situação, o ciclo interrompido será completado, não é iniciado um novo ciclo. Assim, é possível que apenas 1 disparo ocorra. Este efeito não é uma falha. O “desconector do gatilho” possui um mecanismo de came que continuamente rotaciona a cada disparo. Baseado na posição do came do desconector, o primeiro acionamento de gatilho (após a seleção prévia do seletor na posição RAJADA LIMITADA) pode realizar 1 ou 2 disparos antes que o gatilho seja acionado novamente. Isto acontecerá apenas na primeira série com o seletor na posição RAJADA LIMITADA.
F (Rajada total): nesta posição a submetralhadora funciona no modo automático. A arma dispara repetidamente enquanto o gatilho for mantido acionado.
2
1S
SELETOR DE TIRO E SEGURANÇA
1S
SMT CTT

27
OPERAÇÃO/MANUSEIO
SEMPRE MANTENHA A ARMA DIRECIONADA PARA UM LOCAL SEGURO E O DEDO AFASTADO DO GATILHO.
CORONHA AJUSTÁVEL
• liberar a presilha de regulagem.
A coronha da submetralhadora/carabina pode ter seu comprimento
ajustado conforme abaixo:
• pressionar a presilha de regulagem;
• deslocar a coronha até o comprimento desejado;
Para facilitar o transporte da submetralhadora/carabina, a coronha pode
ser rebatida para a direita pressionando a tecla de liberação e
rebatendo a coronha.
A coronha permanecerá rebatida sob força de mola. Para retorná-la à
posição original, basta forçar para vencer a resistência da mola até
encaixar a coronha na posição original, estendida.
NOTA: assegure-se do correto engate da coronha na tecla de liberação.

28
OPERAÇÃO/MANUSEIO
SEMPRE MANTENHA A ARMA DIRECIONADA PARA UM LOCAL SEGURO E O DEDO AFASTADO DO GATILHO.
MIRA REGULÁVEL
A visada pode ser feita através do orifício do visor ou da vértice
aberta. Basta rebater o visor de mira conforme a figura.
Rebatimento da vértice de mira
Para realizar ajustes na vértice de mira assegu-
re-se que a arma está em segurança (travada,
seletor em ‘S’ de segurança) e sempre aponte o
cano para uma direção segura. Se possível
mantenha o ferrolho aberto durante os ajustes.
ATENÇÃO:ATENÇÃO:

29
OPERAÇÃO/MANUSEIO
SEMPRE MANTENHA A ARMA DIRECIONADA PARA UM LOCAL SEGURO E O DEDO AFASTADO DO GATILHO.
MIRA REGULÁVEL
A vértice de mira pode ser ajustada lateralmente através do
parafuso de regulagem mostrado na figura ao lado.
Ajuste de direção:
• Para deslocar o visor, e os impactos no alvo, para direita, o
parafuso de regulagem deve ser girado no sentido anti-horário.
• Para deslocar o visor, e os impactos no alvo, para esquerda, o
parafuso de regulagem deve ser girado no sentido horário.
Nota: 1 click no parafuso de regulagem lateral desloca
em 1,15 cm o ponto de impacto em um alvo a 25 m.
Para realizar ajustes na vértice de mira
assegure-se que a arma está em segurança
(travada, seletor em ‘S’ de segurança) e sempre
aponte o cano para uma direção segura. Se
possível mantenha o ferrolho aberto durante
os ajustes.
ATENÇÃO:ATENÇÃO:

30
OPERAÇÃO/MANUSEIO
SEMPRE MANTENHA A ARMA DIRECIONADA PARA UM LOCAL SEGURO E O DEDO AFASTADO DO GATILHO.
MIRA REGULÁVEL
Para realizar ajustes na vértice de mira assegu-
re-se que a arma está em segurança (travada,
seletor em ‘S’ de segurança) e sempre aponte o
cano para uma direção segura. Se possível
mantenha o ferrolho aberto durante os ajustes.
ATENÇÃO:ATENÇÃO:
Ajuste de elevação
• Para elevar o visor de mira, e os impactos, o parafuso de
regulagem deve ser girado no sentido anti-horário.
O ajuste de elevação (ajuste vertical) deve ser feito através do
parafuso de regulagem mostrado na figura ao lado.
• Para baixar o visor mira, e os impactos, o parafuso de regulagem
deve ser girado no sentido horário.
Nota: 1 click no parafuso de regulagem vertical desloca em 2,15 cm o
ponto de impacto em um alvo a 25 m.

31
OPERAÇÃO/MANUSEIO
SEMPRE MANTENHA A ARMA DIRECIONADA PARA UM LOCAL SEGURO E O DEDO AFASTADO DO GATILHO.
MUNICIAMENTO
Segurar o carregador com uma das mãos e, com a outra, introduzir
os cartuchos pressionando-os para baixo, até o máximo de
cartuchos, indicado na lateral do carregador;
CUIDADO:CUIDADO: Usar apenas munição comercial e do calibre
correspondente à sua arma.
Posicionar o Seletor de tiro na posição "S" (Segurança);
NOTA: Inserir quantidade de munições acima do indicado pode
dificultar ou impedir a correta introdução do carregador na arma.

32
OPERAÇÃO/MANUSEIO
SEMPRE MANTENHA A ARMA DIRECIONADA PARA UM LOCAL SEGURO E O DEDO AFASTADO DO GATILHO.
CARREGAMENTO
B. Retire o carregador desmuniciado mantendo pressionado o retém.
A. Mantenha o dedo afastado do gatilho e a arma direcionada para
uma área segura. Coloque o seletor em posição de segurança “S”.
Condição: câmara vazia, ferrolho aberto, carregador desmunicia-
do.
NÃO CONDUZA a alavanca de manejo durante essa operação, pois
poderão ocorrer falhas no carregamento (verificar o fechamento
completo do ferrolho).
C. Insira o carregador municiado no alojamento e certifique-se que
esteja realmente encaixado e retido pelo retém.
D. Com a mão livre, libere o retém do ferrolho ou puxe a alavanca de
manejo até o final do curso e solte-a.
A arma está com munição na câmara e pronta para
continuar os disparos.
ATENÇÃO:ATENÇÃO:

33
OPERAÇÃO/MANUSEIO
SEMPRE MANTENHA A ARMA DIRECIONADA PARA UM LOCAL SEGURO E O DEDO AFASTADO DO GATILHO.
RECARREGAMENTO
Condição 2: arma com munição na câmara, ferrolho fechado,
carregador inserido com pouca ou sem munição.
A. Mantenha o dedo afastado do gatilho e direcionado para uma
área segura. Coloque o seletor de tiro na posição de segurança “S”.
B. Retire o carregador mantendo pressionado o retém (o carregador
pode estar municiado ou desmuniciado).
C. Insira o carregador municiado no alojamento e certifique-se que
esteja realmente encaixado e retido pelo retém.
Lembre que a arma está com munição na
câmara e pronta para continuar os disparos.
ATENÇÃO:ATENÇÃO:

34
OPERAÇÃO/MANUSEIO
SEMPRE MANTENHA A ARMA DIRECIONADA PARA UM LOCAL SEGURO E O DEDO AFASTADO DO GATILHO.
VISADA
VISADA CORRETA
VISADAS INCORRETAS
Ponto de impacto centralizado
ATENÇÃO:ATENÇÃO:
35
OPERAÇÃO/MANUSEIO
SEMPRE MANTENHA A ARMA DIRECIONADA PARA UM LOCAL SEGURO E O DEDO AFASTADO DO GATILHO.
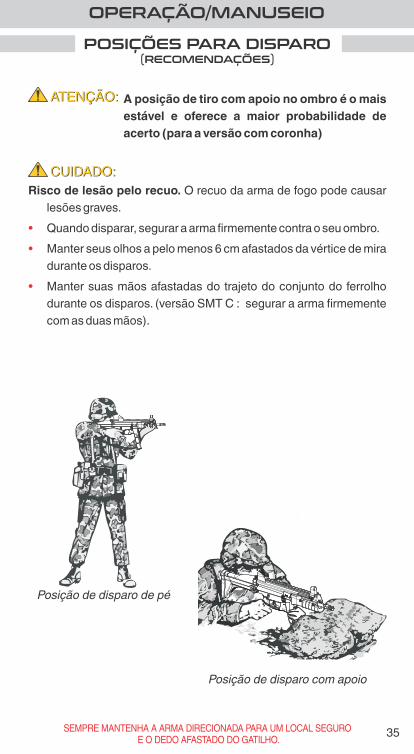
POSIÇÕES PARA DISPARO(RECOMENDAÇÕES)
ATENÇÃO:ATENÇÃO:
CUIDADO:CUIDADO:
• Quando disparar, segurar a arma firmemente contra o seu ombro.
Risco de lesão pelo recuo. O recuo da arma de fogo pode causar
lesões graves.
• Manter seus olhos a pelo menos 6 cm afastados da vértice de mira
durante os disparos.
• Manter suas mãos afastadas do trajeto do conjunto do ferrolho
durante os disparos. (versão SMT C : segurar a arma firmemente
com as duas mãos).
Posição de disparo de pé
Posição de disparo com apoio
A posição de tiro com apoio no ombro é o mais
estável e oferece a maior probabilidade de
acerto (para a versão com coronha)

36
OPERAÇÃO/MANUSEIO
SEMPRE MANTENHA A ARMA DIRECIONADA PARA UM LOCAL SEGURO E O DEDO AFASTADO DO GATILHO.
BANDOLEIRA
A bandoleira garante ao usuário diferentes modos de transporte e
permitindo ter a arma de fogo imediatamente pronta para o uso em
todos os modos de transporte.
Sobre o ombro
Nas costas No tórax

37
OPERAÇÃO/MANUSEIO
SEMPRE MANTENHA A ARMA DIRECIONADA PARA UM LOCAL SEGURO E O DEDO AFASTADO DO GATILHO.
FALHAS: CAUSAS E SOLUÇÕES
Falha
Cau
saSo
lução
Carregad
or n
ão en
caixado
corretam
ente.
Certificar-se
do
encaixe co
rreto d
o
carregado
r.
Carregad
or co
m d
efeito.
Utilizar o
utro
carregado
r.
Câm
ara suja.
Descarregar a arm
a. Limp
ar a câmara.
Cartu
cho
defo
rmad
o.
Utilizar o
utro
cartuch
o.
Cartu
cho
não
disp
arou
.M
un
ição d
efeituo
sa.
Esperar p
elo m
eno
s 1 m
inu
to.
Desm
un
iciar a arma. N
ão reu
tilizar
cartuch
os q
ue ap
resentaram
falhas.
Ferrolh
o n
ão ab
riu ap
ós o
disp
aro.
Mu
nição
defeitu
osa.
Desm
un
iciar a arma. Lim
par se
necessário
. Enviar p
ara um
armeiro
.
Câm
ara suja.
Descarregar a arm
a. Limp
ar a câmara.
Mu
nição
carregada in
corretam
ente.
Utilizar o
utro
cartuch
o.
Mu
nição
ficou
alojad
a no
cano
.U
so d
e mu
nição
inap
rop
riada.
Enviar a arm
a para u
m arm
eiro.
Cartu
cho
não
é ejetado
.
Cartu
cho
não
é carregado
para d
entro
da câm
ara.
Carregad
or n
ão alim
enta a câm
ara.

38
ESPECIFICAÇÕES
SEMPRE MANTENHA A ARMA DIRECIONADA PARA UM LOCAL SEGURO E O DEDO AFASTADO DO GATILHO.
Mod
eloS
MT9
SM
T40S
MT9 C
Calib
re9 m
m.40 S&
W9 m
m
Funcionamento
Mod
os de d
isparo (*)
Cap
acidad
e10 ou 30
10, 15 ou 3010 ou 30
Com
prim
ento do cano
Raiam
ento do cano
6 raias à direita, passo 250 m
m6 raias à direita, passo
420 mm
6 raias à direita, passo 250 m
m6 raias à direita,
Com
prim
ento total (**)
Distância entre m
iras (**)
Peso sem
carregad
or (***)
Peso com
carregad
or vazio (***)30t - 3,550 kg10t - 3,480 kg
30t - 3,550 kg15t - 3,480 kg10t - 3,480 kg
30t - 2,700 kg10t - 2,630 kg
Peso com
carregad
or cheio (***)30t - 3,920 kg10t - 3,600 kg
30t - 4,075 kg15t - 3,740 kg10t - 3,655 kg
30t - 3,070 kg10t - 2,750 kg
Esforço no g
atilho para o d
isparo
Cad
encia (mod
alidad
e rajada)
Outros
(*) combinação de m
odos pode variar de acordo com a versão da arm
a.
Blow
back, disparos com ferrolho fechado
3,350 kg
Trilhos Picatinny (MIL-STD
-1913) para acessórios
Semi-autom
ático, Rajada 2 tiros, A
utomático166 m
m
410 mm
200 mm
475 mm
(com coronha rebatida)
681 até 760 mm
(com coronha estendida)
aproximadam
ente 750 tiros / minuto 270 m
m2,5 kg
(3,8 +- 0,8) kgf
Altura
233 mm
- sem carregador
293 mm
- com carregador de 30
Largura75±
3 mm
- sem trilho lateral Picatinny
80±3 m
m - com
trilho lateral Picatinny
SM
T40 CC
TT40 C
.40 S&W
.40 S&W
10, 15 ou 3010, 15 ou 30
passo 420 mm
6 raias à direita, passo 420 m
m
30t - 2,700 kg15t - 2,630 kg10t - 2,630 kg
15t - 3,480 kg
30t - 3,225 kg15t - 2,890 kg10t - 2,805 kg
30t - 4,075 kg15t - 3,740 kg10t - 3,655 kg
200 mm
475 mm
(com coronha rebatida)
681 até 760 mm
(com coronha estendida)
3,350 kg
Semi-autom
ático
N/A
233 mm
- sem carregador
302 mm
- com carregador de 30
233 mm
- sem carregador
293 mm
- com carregador de 30
233 mm
- sem carregador
302 mm
- com carregador de 30
(**) tolerância ±5 m
m(***) tolerância ±
200 g
30t - 3,550 kg
10t - 3,480 kg

39
VISTA EXPLODIDA
SEMPRE MANTENHA A ARMA DIRECIONADA PARA UM LOCAL SEGURO E O DEDO AFASTADO DO GATILHO.
11
10
10
12
13
14
13
15
16
17
18
19
20
21
2218
23
24
25
26
27
28
29
30
31
32
33
34
35
36
37
38
39
40 4
1
42
43
44
45
46
47
48
56
57
586
7
66
68
69
71
72
7374
75
76
77
7879
8081
82
13
83
84
85
86
5554
70
87
1
2
4 5 6
3
4
5
6
78
9
49
50
51
52
53
59
60
60
61
62
62
63
64
65
88
89
90
91
92
5455

40SEMPRE MANTENHA A ARMA DIRECIONADA PARA UM LOCAL SEGURO E O DEDO AFASTADO DO GATILHO.
LISTA DE PEÇAS
7 PORCA DO QUEBRA CHAMAS
9 CANO
4 SUPORTE DO PREPARADOR 5 DEDAL PREPARADOR
1 MASSA DE MIRA DE AÇO
6 QUEBRA CHAMAS
8 FIXADOR DA BANDOLEIRA NO CANO
36 BATENTE DO SUPORTE DA CORONHA REBATIVEL 37 PARAFUSO 38 MOLA RECUPERADORA
25 BUCHA INSERTO ROSCADO
12 TRAVA DO PREPARADOR
2 VÉRTICE DE MIRA DE AÇO3 PARAFUSO PREPARADOR DEDAL
10 PARAFUSO
16 PARAFUSO DO SUPORTE DA BANDOLEIRA 17 SUPORTE DA BANDOLEIRA
21 PINO DA DOBRADIÇA DA CORONHA 22 MOLA DA DOBRADIÇA
20 SUPORTE DA CORONHA REBATIVEL
23 RAIZ DA CORONHA REBATIVEL
26 MOLA DO GATILHO DE TRAVAMENTO DO SISTEMA TELESCÓPIO
15 CAIXA DA CULATRA
27 SOLEIRA
19 AMORTECEDOR DO FERROLHO
28 PARAFUSO
18 PORCA
24 CORONHA MOVEL
29 TECLA DE TRAVAMENTO DO SIS. TELESCOPICO
13 PARAFUSO
11 SUPORTE DO CANO
30 EIXO TECLA DE TRAVAMENTO DO SIS. TELESCOPOCO 31 EIXO DO GATILHO DESLIZANTE 32 GATILHO DESLIZANTE 33 EIXO TECLA TRAVA DE REBATIMENTO 34 MOLA DA TRAVA DA CORONHA REBATIVEL
14 EJETOR
35 TECLA DA TRAVA DO REBATIMENTO
54 RETÉM DO PINO DE FIXAÇÃO
47 ANEL ORING
70 PUNHO 71 MOLA DA CATRACA
50 TRAVA DO PINO DA BANDOLEIRA
64 MOLA DO RETÉM DO CARREGADOR
78 DESCONECTOR BURST
57 MOLA DE RETENÇÃO DO PINO TRAVA
73 CÃO BURST
75 DISPARADOR
44 PINO DO EXTRATOR
40 PONTEIRA M5 DA GUIA DA MOLA RECUPERADORA
68 EMPUNHADURA
84 MOLA DO CLICK SELETOR
48 PINO RETÉM DO PERCUSSOR
85 EIXO DO CÃO E GATILHO
79 MOLA DO GATILHO
58 PINO TRAVA DO BASCULAMENTO
39 HASTE M5 DA GUIA DA MOLA RECUPERADORA
43 FERROLHO
46 MOLA DO EXTRATOR
53 EIXO DO RETÉM DO FERROLHO
55 MOLA DO PINO FIXAÇÃO DA CORONHA
42 MOLA DO PERCUSSOR
45 EXTRATOR
56 TAMPA DO PINO
52 GUARDA MÃO 51 MOLA TRAVA DO PINO DA BANDOLEIRA
59 TECLA DIREITA RETÉM DO FERROLHO
49 PINO DO SUPORTE DA BANDOLEIRA
61 TECLA ESQUERDA RETÉM DO FERROLHO 62 PINO DE FIXAÇÃO DA CAIXA 63 EIXO DO RETÉM DO CARREGADOR
65 RETÉM DO CARREGADOR 66 PARAFUSO
41 PERCUSSOR
60 MOLA DO RETÉM DO FERROLHO
67 ARRUELA DENTADA EXTERNA
69 PINO FIXAÇÃO MECANISMO DO GATILHO
72 CATRACA
74 MOLA DO CÃO BURST
76 MOLA 77 DESCONECTOR FULL
80 MOLA DO DESCONECTOR 81 GATILHO BURST 82 CLICK DO SELETOR 83 TECLA SELETORA DIREITA
86 TECLA SELETORA ESQ. FULL BURST 87 CAIXA DISPOSITIVO DE DISPARO 88 TRANSPORTADOR
90 CHAPA DA MOLA DO CARREGADOR 91 FUNDO DO CARREGADOR
89 MOLA DO CARREGADOR
92 CORPO DO CARREGADOR

41
ACRE
DUPLO IMPACTORua Belém, 1097
Fone: (68) 3228-4823
AMAZONAS
TIRO CERTO Rua dos Andradas, 170 CEP 69.005-180 – Manaus
BAHIA
Rua Antero de Brito, 148
Fone: (92) 3234-7787
CEP 69.912-408 – Rio Branco
CEP 40.300-680 – Salvador
MAGNUM COMÉRCIO DE ARMAS E ACESSÓRIOS LTDA
CEP 72.425-010 – GAMA Quadra 1, Lote 6
Fone: (85) 3253-6622
CEARÁ
CEP: 48.901-080 - Juazeiro/BA
Rua Pinto Madeira, 1166
CEP 74.825-210 – Goiânia
Fone: (73) 3526-4607 / 9123-6371
Lot. Piranga II, caminho 19, nº 20
Av. Buritis, Quadra 603, SN, LT 17 Sala 102 Recanto das Emas
Fone: (61) 3245-4155
CEP 45.200-191 – JEQUIÉ
Fone: (74)3612.6617
Fone: (71) 3244-4905
CALIBRE
CEP 70.361-530 – BRASÍLIA
CEP 60.150-000 – FORTALEZA
Fone: (61) 9 8410-2491
MOURA ARMAS
DISTRITO FEDERAL
Rua Itália, 03 A
GUNS SPORT COMÉRCIO DE ARTIGOS DE PESCA E CAÇA LTDA
CENTRAL ARMAS SERVIÇOS TÉCNICOS LTDA
A OFICIAL COMÉRCIO DE ARMAS E MUNIÇÕES
MR. GUN TIRO & PESCA LTDA
GOIÁS
SHCS CR QD. 511 Bloco. C Loja. 68.
Q03, Lote 75b, Sala 216 – Ed. Business
TOP TIRO
Fone: (61) 3556-4152
CEP 72.640-320 – BRASÍLIA/DF.Fone: (61) 3082-1555 / (61) 98648-8590
SPECIAL SERVICES AND MAINTENACE – SSM Rua 1057, lote 125, quadra 3
Fone: (62) 3093-6448
Fone: (32)9 9167-5042
GUIMARÃES SEGURANÇA
CEP 30.535-520 – BELO HORIZONTE/ MG
Rua Dos Tupinambas, 607 – Bairro Jardim Imá Cep 79102-400 – CAMPO GRANDE
Rua Treze de Maio, 3095
Fone: (67) 3253-1394 / 99146-4079
Av. Silva Lobo, 245, Calafate,
CENTRAL ARMAS
Fone: (67) 3382-9939
CEP: 30.411-335 - Belo Horizonte / MG
MINAS GERAIS
ARSENAL ARMAS E CIAAv. Carlos Otto, 160, lj. 148 – Costa Carvalho
CEP 79.002-351 – CAMPO GRANDE
ARSENAL ARMERIA LTDA
ARLINDO DE ANDRADE NETO ME
CEP: 36070-050 – JUIZ DE FORA / MG
Rua Saldanha da Gama, 322
Fone: (31) 3309-3149 / 98455-2294
ALVO ARMERIA EQUIPAMENTOS DE SEGURANÇA
CEP 31.110-210 – BELO HORIZONTEFone: (31) 3425-6894
GRUPO PROTECT / PROTECT CUSTOMRua General Andrade Neves, 622 – Bairro GutierrezCEP 30441-011 – BELO HORIZONTE/ MGFone: (31) 3371-8500 (R.: 31)
CENTER ARMAS LTDA Rua Halfeld, 608 loja 114 CEP 36.010-002 – JUIZ DE FORAFone: (32) 3215-0718
Rua Dom José Pereira Lara, 258 – Bairro Coração Eucarístico
Fone: (31) 99126.0591
Rua da Areia, 438
Rua Maciel Pinheiro, 164 CEP 58.010-130 – JOÃO PESSOA
Fone: (83) 3513-7836 CEP 58.010-640 – JOÃO PESSOA
Fone (83) 3222-0235
PARAÍBA
ART ARMAS
TUDO EM COMPRESSORES LTDA
MARANHÃO
P.G.C. MACHADO – ME Av. Tales Neto, 46 A CEP 65.057-470 – SÃO LUÍS
MATO GROSSO DO SUL
Fone: (98) 3245-5747
SEMPRE MANTENHA A ARMA DIRECIONADA PARA UM LOCAL SEGURO E O DEDO AFASTADO DO GATILHO.
ASSISTÊNCIA TÉCNICA

42
PARANÁ
Av. Paraná, 4366 CEP 87.501-030 – UMUARAMAFone: (44) 3624-4939
A NAVALHA DE OURO
A T STATTER – ARMERIA – STATTER CUSTOMRua Rockfeller, 1298, Casa 02 – Curitiba / PRFone: (41)9 9917-6232 PERNAMBUCO
GUNTEC
ARMASINOS CONSERTO DE ARMAS LTDA
Av. Graça Aranha, 81, Sala 301 e 302 –
RIO GRANDE DO SUL
OLMIRO TEIXEIRA DE OLIVEIRA
ARMERIA SPORTS
PONTO 40
TECNO ARMA
CEP 95.032-501 – CAXIAS DO SUL
CEP 97.050-750 – SANTA MARIA
CEP 50670-280 – RECIFE
CEP 26550-070 – MESQUITA
Fone: (51) 3594-5426
Rua Pituba, 45
Fone: (21) 2796-6000
SOFT POINT
CEP 93.310-002 – NOVO HAMBURGO
CEP 20.030-002 – RIO DE JANEIROFone: (21) 2215-8779
Rua Joaquim Nabuco, 1205
Av. Getúlio Moura, 3512
ARSENAL ARMAS E MUNIÇÕESRua Cel. João Pinto, 2566 CEP 95.600-000 – TAQUARA
Fone: (81) 3271-2196
Rua Dr. Valentim Fernandes, 50
Av. Dr. Mário Sperb, 2143
Fone: (51) 3541-5426
CEP 93.032-080 – SÃO LEOPOLDO
MARCOS JOSE FERNANDES VIEIRA
Fone: (55) 3221-4302
RIO DE JANEIRO
Fone: (51) 3566-1101
ARMA ARTERua Iraí, 86 CEP 99.034-110 – PASSO FUNDOFone (54) 3314-3875
Rua Fernando Machado, 325 – Bairro Centro CEP 96.400-450 – BAGÉ/RS.Fone: (53) 3242-5079 / 3311-2707
Rua Nilson Teobaldo Schaeffer, 108
Rua São Benedito, 336 CEP 93.520-040 – NOVO HAMBURGOFone: (51) 3594-2177
Fone: (54) 3225-7879
VISÃO CUSTOM
DT PRO ARMAS
Fone: (54)9 9687-5013
ARTGUN ARMERIA
CEP: 95590-000 – Tramandaí / RS
RONDÔNIA
CEP 95334-000 – VILA FLORES / RS
Rua Saldanha da Gama, nº 1373 LJ 02 - Tiroleza
Rua dos Hibiscos, 22 – Bairro São Luiz
Fone: (51)3158-0000 / (51)9 9828-9135
ARMAMEC- COMÉRCIO E MANUTENÇÃO DE ARMAS LTDA
SÃO PAULO
CEP 09.010-160 – SANTO ANDRÉ
Rua Agostinho Gomes, 2308 JOHN LENIN CUSTOM ARMAS LTDA – ME
Fone: (11) 3667-8419
Rua do Bosque, 1024
Fone: (49) 3533-1882
CEP 04.206-001 – SÃO PAULO
CEP 18.030-225 – SOROCABA
Fone: (11)4419-1840 / (11)9 4785-9669
Estrada Municipal CRD 439, 500
CEP 01.216-000 – SÃO PAULO
Estrada Municipal Olho D’Agua, nº 50 – MAIRIPORÁ / SP
PROPOINT CENTRO DE TREINAMENTO TÁTICO E DESPORTIVO LTDA
Alameda Nothmann, 1209
Fone: (69) 3641-3976 / (69) 99904-0231
SAUER TEC COMÉRCIO E SERVIÇOS LTDA
CEP 01.136-000 – SÃO PAULO
Fone: (18) 99123-6123
Rua João Contini, 272
RAID – Centro de Treinamento (V.T. Hemerly)Av. Rondônia, Nº 4307, Centro, Alta Floresta D' Oeste - RO
CASA DO CAÇADOR
CEP 89560-000 – VIDEIRA
REPARME Rua Gustavo Magalhães, 43 D
CEP: 76.954-000
SANTA CATARINA
Fone: (15) 3388-6751
Rua Sen. Flaquer,734
Fone: (11) 4436-0688
CEP 16.260-000 – COROADOS
Fone: (11) 2273-0732
MASSAROPPI ARTIGOS DE CAÇA E PESCA LTDA
Fone: (11) 3392-1592
RISCO DE FOGO MANUTENÇÃO E REPARAÇÃO DE ARMAS LTDA
SEMPRE MANTENHA A ARMA DIRECIONADA PARA UM LOCAL SEGURO E O DEDO AFASTADO DO GATILHO.
ASSISTÊNCIA TÉCNICA

43
Assumimos garantia quanto à qualidade das armas Taurus,
comprometendo-nos corrigir todos os eventuais defeitos de
fabricação ou de material, pelo prazo de um ano após a
compra. Não assumimos responsabilidade alguma por
anormalidade proveniente de mau uso, falta de conservação,
munições inadequadas ou recarregadas fora dos padrões da
SAAMI e CIP e de desgaste normal que apareçam pelo uso da
mesma.
GARANTIA
SEMPRE MANTENHA A ARMA DIRECIONADA PARA UM LOCAL SEGURO E O DEDO AFASTADO DO GATILHO.

44
NOTAS
___________________________________________________________________________________________________________________________________________________________________________________________________________________________________________________________________________________________________________________________________________________________________________________________________________________________________________________________________________________________________________________________________________________________________________________________________________________________________________________________________________________________________________________________________________________________________________________________________________________________________________________________________________________________________________________________________________________________________________________________________________________________________________________________________________________________________________________________________________________________________________________________________________________________________________________________________________________________________________________________________________________________________________________________________________________________________________________________________________________________________________________________________________________________________________________________________________________________________________________________________________________________________________________________________________________________________________________________________________________________________________________________________________________________________________________________________________________________________________________________________________________________________________________________________________________________________________________________________________________________________________________________________________________________________________________________________________________________________________________________________________________________________________________________________________________________________________________________________________________________________________________________________________________________________________________________________________________________________________________________________________________________________________________________________________________________________________________________________________________________________________________________________________________________________________________________________________________________________________________________________________________________________________________________________________________________________________________________________________________________________________________________________________________________________________________________________________________________________________________________________________________________________________________________________________________________________________________________________________________________________________________________________________________________________________________________________________________________________________________________________________________________________________________________________________________________________________________________________________________________________________________________________________________________________________________________________________________________________________________________________________________________________________________________________________________________________________________________________________________________________________________________________________________________________________________________________________________________________
SEMPRE MANTENHA A ARMA DIRECIONADA PARA UM LOCAL SEGURO E O DEDO AFASTADO DO GATILHO.

45
INSTRUCTION MANUAL

46
CONTENTS
PORTUGUÊS... Pg. 3
ESPAÑOL........Pg. 86
SAFETY WARNINGS........................................................47
AMMUNITION...................................................................53
WARNINGS.......................................................................55
MAIN COMPONENTS.................................................59
PREVENTIVE MAINTENANCE.........................................60
MAINTENANCE PROCEDURES....................................61
OPERATION/HANDLING...................................................69
EXPLODED VIEW................................................82
LIST OF PARTS................................................................83
WARRANTY CERTIFICATE...............................................85
REASSEMBLY.....................................................................68
LUBRICATION....................................................................66
SPECIFICATIONS......................................................81
CLEANING YOUR GUN...........................................65
TECHNICAL ASSISTANCE................................................84
ALWAYS KEEP THE MUZZLE POINTED IN A SAFE DIRECTION AND FINGER OFF THE TRIGGER.

47
Firearms are, by nature, potentially lethal instruments. Improper or careless handling can cause serious and even fatal accidents.
Make sure you have read and understood all the information and warnings in this manual before using your gun.
Safe handling of a firearm requires training, discipline, and caution.
Using a gun requires a lot of care and attention. The user must not have any doubt about the correct operation of the gun and must know how to use guns with safety.
All guns must always be treated as if they were loaded and ready for use.
Get training from a qualified instructor about the operation of your firearm before using it.
Guns are precision mechanical pieces of equipment and must be subjected to constant maintenance to prevent improper operation that endangers the life of the user and of others.
The user must never, in any event, point his gun - loaded or not - to people or objects he does not want to hit.
Please read this manual carefully - It was designed to help users to properly perform maintenance on Taurus guns.
SAFETY WARNINGS
ALWAYS KEEP THE MUZZLE POINTED IN A SAFE DIRECTION AND FINGER OFF THE TRIGGER.

48
.
Never pull the trigger to test your gun before checking that it is unloaded.
Load and unload your gun with the barrel pointing to a safe location.
Keep your gun and ammunition in a safe place, inaccessible to other people.
When handing a gun or receiving it, do it with the slide open, without magazine and without ammunition in the chamber.
Use only new and indicated ammunition for the gun.
Keep your finger away from the trigger whenever the gun is not in use or there is no need to fire.
Avoid shooting hard or liquid surfaces, because depending on the angle of incidence, there may be a rebound.
Reloaded or old ammunition or a tampered case or bullet can cause malfunction and compromise the safety of the user or third parties.
In case of suspected obstruction of the barrel, immediately unload the gun to only then check the inside of the barrel.
If you use your gun at work, with ammunition in the chamber, always keep the safety lock engaged.
Always keep safety lock engaged when you are not using the gun.
The safest way to carry a gun is with the chamber empty and safety lock engaged.
Always carry your gun safely in an appropriate holster.
SAFETY WARNINGS
ALWAYS KEEP THE MUZZLE POINTED IN A SAFE DIRECTION AND FINGER OFF THE TRIGGER.
49
Always wear goggles and ear protectors, even in the open.
Guns, alcohol and drugs do not go together.
Never place your hand in front of the barrel of a firearm.
Never try to modify the trigger stroke of a gun, this can affect the locking system and cause accidental shots.
Do not use or hold firearms after consuming medication that may affect your ability.
The gun can fire without the magazine if there is ammunition in the chamber. Make sure that all the ammunition has been consumed or withdrawn after use.
Taurus guns are designed to meet NEB/T E-267A tests.
When engaging the manual lock, make sure that the trigger is in the initial position of its stroke, otherwise the lock may be in the safety position without actually being engaged.
SAFETY WARNINGS
ALWAYS KEEP THE MUZZLE POINTED IN A SAFE DIRECTION AND FINGER OFF THE TRIGGER.

50
IF THE GUN IS DROPPED, AN
ACCIDENTAL SHOT MAY OCCUR.
ALWAYS KEEP THE SAFETY LOCK
ENGAGED.
ANY GUN CAN FIRE IF IT FALLS.
SAFETY WARNINGS
ALWAYS KEEP THE MUZZLE POINTED IN A SAFE DIRECTION AND FINGER OFF THE TRIGGER.

51
Continuously triggering the trigger mechanism without ammunition can damage your gun.
If the shot fails, keep the barrel pointed to a safe place for at least 30 seconds in case there is a delayed ignition of the fuse. If you feel recoil different from normal, proceed in the same way.
Read, re-read, and practice the basics of safety so that they become a habit and thus never be forgotten. Always seek expert advice if you have questions about your knowledge or ability to use a firearm.
When practicing shooting, always check the area behind the target to make sure that people or animals will not be hit.
When using a firearm, the user is responsible full time for the consequences of its use. Therefore, you must know how to perform the correct and proper maintenance and how to use it safely. It is your responsibility to take all necessary precautions. This responsibility is the entirely the shooter's and cannot be transferred to any other person.
Accidents with firearms are relatively rare, usually caused by disrespect to the basic safety rules. Unfortunately, experienced shooters often ignore these rules more often than beginners. Regardless of familiarity with the use of weapons, it is imperative to always follow safety guidelines.
Remember: Firearms are complex and sensitive pieces of equipment, and designed to provide a level of safety appropriate to the type of job they will perform, but not absolutely infallible. Guns are simply mechanical instruments, and the shooter is entirely responsible for the consequences of their use.
If the shot fails, keep the barrel pointed to a safe place for at least 30 seconds in case there is a delayed ignition of the fuse. If you feel recoil different from normal, proceed in the same way.
SAFETY WARNINGS
ALWAYS KEEP THE MUZZLE POINTED IN A SAFE DIRECTION AND FINGER OFF THE TRIGGER.

52
Caution: Any gun can fire if it falls.
When purchasing non-original Taurus accessories (cables, holsters, sights, etc.), make sure they are compatible with your gun.
If in doubt, immediately contact the nearest Authorized Technical Assistance.
It is important to grip firearms with care, avoiding their fall. If there is still a fall, the gun must be inspected by a qualified professional to check for possible damage to the operation and safety mechanisms.
Never make or try home repairs on your gun. They can damage your gun and make it unsafe to use. Whenever necessary, contact the nearest Authorized Technical Assistance.
SAFETY WARNINGS
ALWAYS KEEP THE MUZZLE POINTED IN A SAFE DIRECTION AND FINGER OFF THE TRIGGER.

53
Excessive pressure inside the chamber or barrel during firing can cause severe damage to the gun and serious injury to the shooter and others. Excessive pressure may be a result of barrel obstructions, excess gunpowder or the use of improper or incorrectly assembled ammo.
Stop shooting immediately and check the barrel for possible obstruction whenever:
- The ammo does not fire;
Use only high quality original ammunition from the factory. Do not use dirty, damp, corroded, deformed or damaged ammo. Do not lubricate the ammo. Lubricants or other foreign materials may cause potentially hazardous changes to the ammunition. Use only the ammunition of the caliber for which your gun was designed. The proper caliber is permanently engraved on your gun.
- The mechanism stops extracting ammo;
- You have difficulty or feel unusual resistance when inserting the ammo;
- If unburned gunpowder is found on the mechanism.
The use of reloaded (recycled) ammunition of manual loading or any other type other than the standard will void all warranties. Improper loading can be extremely dangerous. Using these ammunitions can cause severe damage to the gun and serious injury to the shooter or others. Always use ammunition that complies with the standards of industrial performance established by the United States Sporting Arms and Ammunition Manufacturers Institute (SAAMI) or equivalent entity in other countries (C.I.P.)
- A shot sounds weak or abnormal.
AMMUNITION
ALWAYS KEEP THE MUZZLE POINTED IN A SAFE DIRECTION AND FINGER OFF THE TRIGGER.

54
If there is any reason to suspect that a bullet is obstructing the barrel, immediately unload the gun and look through the hole. It is not enough to simply look into the chamber. A bullet may be housed some distance along the barrel where it cannot be easily seen.
If the bullet can be removed with a cleaning rod, remove any unburned gunpowder from the hole, chamber and mechanism before continuing to fire. If the bullet cannot be removed with a cleaning rod, take the gun to an Authorized Technical Assistance.
IF A BULLET IS IN THE BARREL, DO NOT TRY TO REMOVE IT BY FIRING OTHER AMMO, BLANK, OR AMMO WITH A BULLET REMOVED. THIS CAN CAUSE EXCESSIVE PRESSURE, RUPTURE OF THE GUN AND CAN CAUSE SERIOUS INJURY.
Do not lubricate the ammo and make sure you have left the chamber free of any oil or preservative before you start firing. The oil interferes with the friction between the case and the wall of the chamber, necessary for safe operation, and subjects the gun to stress similar to that imposed by excessive pressure.
Use lubricants moderately on moving parts of your gun. Avoid excessive spray of any gun maintenance product in the form of an aerosol, especially in cases where it may contact ammunition. All lubricants, particularly spray lubricants in aerosol form, can penetrate the ammo's fuse and shooting failures. Some high penetration lubricants may also migrate into the case and deteriorate the gunpowder, preventing its correct operation. If only the fuse explodes, there is a danger that the bullet will be lodged in the barrel.
AMMUNITION
ALWAYS KEEP THE MUZZLE POINTED IN A SAFE DIRECTION AND FINGER OFF THE TRIGGER.

55
WARNINGS
Checking the Safety Device:
Press the lock downwards, checking its return to the starting position.
When performing maintenance on the gun, always check the operation of the Fire Pin Block by following the steps below:
Warnings:
General:
The gun must always be carried in a safe manner in a suitable holster: if it falls, it may fire accidentally.
If it falls, the gun must be inspected by a qualified professional to check for damage to the mechanism and Safety Devices.
With the Fire Pin Block in the normal (not pressed) position, make sure it blocks the advance of the Fire Pin. To do this, push the Fire Pin forward. It must not appear on the breech of the slide, being blocked by the lock. If this does not happen, do not use the gun and look for the nearest Authorized Technical Assistance.
Do not make home repairs. If necessary, contact the Authorized Technical Assistance.
Do not attempt to modify the trigger stroke of your firearm, as changes of this kind generally affect the locking system and may cause accidental firing.
To effectively activate the manual lock, the trigger must be in its most forward position, otherwise the lock will be in the safe position, but not actually engaged.
ALWAYS KEEP THE MUZZLE POINTED IN A SAFE DIRECTION AND FINGER OFF THE TRIGGER.

56
Safety first:
Danger:
Danger:
Never load or unload gun inside a vehicle, room or any other confined space (except in areas intended for shooting).
Always keep the gun pointed in a safe direction.
Always keep the gun pointed in a safe direction.
Loading:
Warning:
Safety first:
Firing your gun:
Danger:
Before loading the gun, always clean any lubricating oil that may have accumulated in the barrel and chamber and check that there are no obstructions in the barrel. Any foreign material inside the barrel can result in damage to the gun and, consequently, to the shooter and people nearby.
Always wear safety glasses and ear protectors.
If during firing your gun presents any malfunction, if it is perforating the fuse, breaking the ammo or presenting an unusual sound, stop firing immediately. Do not try to keep firing. It can be dangerous to continue using your Gun. Unload your gun. Take your gun and ammunition to an accredited gunsmith or authorized Technical Assistance for evaluation.
WARNINGS
ALWAYS KEEP THE MUZZLE POINTED IN A SAFE DIRECTION AND FINGER OFF THE TRIGGER.

57
Safety first:
Care with your Pistol
Safety:The risk of an accident is much greater when your gun - no matter how safe it is - is handled with ammo in the chamber. This practice is not recommended and may be justified only under circumstances of clear danger or during police service (when stipulated by the corporation) and immediate use of the gun may be required.
The manual safety lock must be fully in the locked position or in the unlocked position. The gun must not be fired with the manual safety lock between the two positions. Damage to the gun and, consequently, to the shooter can occur if the lock is not at its end of stroke.
Safety first:Always keep the gun pointed in a safe direction when moving the slide to feed the first ammunition to the chamber. Malfunctions during the loading process are rare, but they can occur, so keep your hand, face, or any part of your body behind the breech and properly hold your gun, keeping it in front of your body.
Never handle your gun with ammo in the chamber unless the lock is engaged, you are ready to fire and the gun is aimed at the target.
Warning:
WARNINGS
ALWAYS KEEP THE MUZZLE POINTED IN A SAFE DIRECTION AND FINGER OFF THE TRIGGER.

58
Never shoot your gun with your finger, hand, face, or any other part of your body over the ejection port or any other position you may be hit by the movement of the slide or the used ammo.
Warning:
Never allow anyone to stand by you, toward the ejection of the used ammo. The ammo is ejected at a high temperature and may cause injury. Make sure the eject line is unobstructed.
Never carry, handle or leave your gun unattended without the safety lock engaged. If the gun is not locked, it will fire by the pressure on the trigger that may come by falling with the gun, by dropping the gun, or if the gun is hit by someone or an object.
Caution:
Warning:
WARNINGS
ALWAYS KEEP THE MUZZLE POINTED IN A SAFE DIRECTION AND FINGER OFF THE TRIGGER.

59
MAIN COMPONENTS
HA
ND
GU
AR
D
MA
GA
ZIN
ER
EL
EA
SE
MA
GA
ZIN
EG
RIP
FO
LD
ING
AN
D
RE
TR
AC
TAB
LE
BU
TT
ST
OC
K
SY
ST
EM
RE
AR
SIG
HT
FIR
E S
EL
EC
TO
R
(AM
BID
EX
TR
OU
S)
BO
LT C
AT
CH
(A
MB
IDE
XT
RO
US
)
(RE
VE
RS
IBL
E)
CO
CK
ING
LE
VE
R
UP
PE
R R
EC
EIV
ER
TR
IGG
ER
FR
ON
T
SIG
HT
FL
AS
H S
UP
PR
ES
SO
R
LO
WE
R
RE
CE
IVE
R
SL
ING
SU
PP
OR
T -
RE
AR
SL
ING
SU
PP
OR
T -
FR
ON
T
(RE
VE
RS
IBL
E)
60
Your gun, like any other machine, must receive proper maintenance to ensure its operation and to preserve its useful life. This manual will explain how to disassemble, clean, lubricate and perform maintenance on your Taurus.
INTRODUCTION
PREVENTIVE MAINTENANCE
MAINTENANCE FREQUENCY
Maintenance must be performed respecting the frequency below:
Taurus guns are resistant to adverse conditions. Even so, your gun must be cleaned and lubricated to prevent corrosion and to remove unwanted particles that may impair operation.
1. When new, before using it for the first time;
3. After every 200 shots;
Any gun must be inspected and receive maintenance whenever it is dropped or if a malfunction is suspected.
2. After each use;
4. At least once a month;
5. Whenever necessary.
The need for maintenance is linked to exposure of the gun to bad weather such as - but not limited to - rain, snow, salt water, dust and sand.
Conditions for storing the weapon:
1. Keep the firearm clean and oiled.
3. Keep the cocking lever forward and the hammer uncocked.
2. Keep the firearm without ammunition in the chamber.
4. At least every twelve (12) month remove all ammunition from the magazine and replace them with new ammunition.
5. Clean and lubricate the firearm and magazine every six (6) months while stored.
6. Keep the firearm in an enclosed, weather resistant room.
ALWAYS KEEP THE MUZZLE POINTED IN A SAFE DIRECTION AND FINGER OFF THE TRIGGER.

61
FIRST-STEP DISASSEMBLY
MAINTENANCE PROCEDURES
Always handle your gun with thebarrel pointed to a safe place.
NOTE: The SMT/CTT submachine gun can be disassembled and
assembled without the use of tools. The user of this weapon may
disassemble as suggested in this manual. Disassembly beyond this
step, if necessary, should be done by a trained gunsmith.
• Place the selector in "S" (Safe). Remove the magazine (Fig. 1) by
pressing the magazine release;
• Visually check, by the ejection window, if there is no ammunition in
the chamber (Fig. 3);
For the field stripping follow the sequence:
• Cycle the bolt (Fig. 2) to remove the ammunition from the chamber;
1
2
3
ALWAYS KEEP THE MUZZLE POINTED IN A SAFE DIRECTION AND FINGER OFF THE TRIGGER.

62
5
4
FIRST-STEP DISASSEMBLY
• Remove the rear pin of the upper receiver by pressing it, with your finger or an empty cartridge case, in the smaller face and remove by the other side;
• Raise the upper receiver to allow access to its interior;
(Observe the position of components for correct reassembly);
• Remove the bolt / recoil spring set
• Close the bolt, releasing it from the bolt catch (Fig. 4);
6
7
ALWAYS KEEP THE MUZZLE POINTED IN A SAFE DIRECTION AND FINGER OFF THE TRIGGER.

63
1 2
MAGAZINE DISASSEMBLY
Make sure that the magazine bottom is properly retained by the
magazine spring plate.
• With a pin or punch press the magazine spring plate through the
magazine bottom opening (Fig. 1);
• Slide the magazine bottom to the front, taking care to prevent the
forceful ejection of the plate and spring (Fig. 2);
• Remove the magazine bottom plate with the spring and the
follower;
• Reassemble in reverse order;
FIRST-STEP DISASSEMBLY
MAGAZINE BODY
FOLLOWER
MAGAZINE SPRING
MAGAZINE SPRING
PLATE
MAGAZINE BOTTOM
ALWAYS KEEP THE MUZZLE POINTED IN A SAFE DIRECTION AND FINGER OFF THE TRIGGER.

64
FIRST-STEP DISASSEMBLY
Not recommended the disassembly of the firearm beyond these steps, unless made by a trained gunsmith.
BO
LT A
SS
EM
BLY
MA
GA
ZIN
E
TA
KE
DO
WN
PIN
ATTENTION:ATTENTION:
ALWAYS KEEP THE MUZZLE POINTED IN A SAFE DIRECTION AND FINGER OFF THE TRIGGER.

65
CLEANING YOUR GUN
Be sure the firearm is unloaded before starting any maintenance
or cleaning.
ATTENTION:ATTENTION:
There are two classes of cleaning required for this firearm:
• Unload the firearm: remove the magazine and the cartridge from chamber (see page 61 for more details);
The correct cleaning of the firearm is part of the maintenance required to ensure flawless performance, including preventing premature wear, attacking by corrosive agents, resulting in equipment life increasing.
6.1 Daily cleaning:
• Clean all external metal surfaces of the firearm and the magazine, keeping them lubricated with a thin layer of oil.
6.2 Storage: • Keep the firearm clean and oiled. • Keep the firearm without ammunition in the chamber. • Keep the cocking lever forward and the hammer uncocked. • At least every twelve (12) month remove all ammunition from the magazine and replace them with new ammunition. • Clean and lubricate the firearm and magazine every twelve (12) months while stored. • Keep the firearm in an enclosed, weather resistant room.
ALWAYS KEEP THE MUZZLE POINTED IN A SAFE DIRECTION AND FINGER OFF THE TRIGGER.

66
LUBRICATION
Be sure the firearm is unloaded before starting any maintenance
or cleaning.
ATTENTION:ATTENTION:
• Disassemble as explained in chapter 5, page 62 and 63;
• Remove the magazine and do the same procedure;
• Assemble the sets and check its correct functioning.
• Apply a thin drop of mineral oil at the points indicated in the figure and in the contact points of the stock hinge.; • Keep all metal surfaces lubricated with a thin layer of oil;
• With a properly brush, remove all residues found inside the barrel, upper receiver and lower receiver;
• Unload the firearm: remove the magazine and the cartridge from chamber (see page 61 for more details);
If possible, use compressed air for better cleaning of the mechanism housing.
ATTENTION:ATTENTION:
REMEMBER:REMEMBER:
Cleaning after use (after the shot) comprises:
ALWAYS KEEP THE MUZZLE POINTED IN A SAFE DIRECTION AND FINGER OFF THE TRIGGER.

67
LUBRICATION
Special care:
• Only a small amount of oil should be used to conserve the equipment;
• Avoid the excess oil in the interior of:
a) Magazine
ATTENTION:
To ensure durability and maintain the armament reliability, the following
parts should be replaced every 5000 shots:
• Firing pin spring;
All lubricants and aerosol spray, lubricants in particular, can penetrate
cartridge primers and cause misfires. Some highly penetrative lubricants
can also migrate inside cartridge cases and cause deterioration of the
propellant powder; on firing, the powder may not ignite. If only the primer
ignites, there is danger that the bullet may become lodged in the barrel.
• Hammer spring;
• Extractor pin;
• Bolt buffer.
b) Barrel
• Extractor spring;
Make sure that inside of barrel is free of any oil or preservative before
starting to shoot. The oil interferes with the friction between the cartridge
and the chamber wall, that is necessary for secure operation, and subject
the firearm to stress similar to the imposed by excessive pressure.
Follow additional instructions for maintenance and cleaning, if
any, in accordance with specific indications of the corporation
or academy.
IMPORTANT:IMPORTANT:
ALWAYS KEEP THE MUZZLE POINTED IN A SAFE DIRECTION AND FINGER OFF THE TRIGGER.

68
REASSEMBLY
The reassembly of the SMT/CTT must be made in the reverse order of
disassembly, as follows:
• Insert the bolt / recoil spring set in the upper receiver (see figure
below);
The bolt / recoil spring set should be fully
inserted into the upper receiver, ie, bolt backed
in the barrel. The hammer should be cocked.
ATTENTION:ATTENTION:
• Insert the magazine.
• Insert the pin back in the upper receiver;
• Cycle the bolt, to check the correct operation;
• Close the upper receiver with the barrel pointed slightly
downward, according to the figure;
ALWAYS KEEP THE MUZZLE POINTED IN A SAFE DIRECTION AND FINGER OFF THE TRIGGER.

69
OPERATION/HANDLING
The fire and safety selector of the SMT/CTT is ambidextrous and
can have up to four positions with the following positions:
FIRING AND SAFETY SELECTOR
S (Safe): In this position, the firearm firing mechanism is completely blocked, preventing to fire. Note: The "S" position can be selected only with the hammer cocked.
1 (Semi-automatic): In this position the firearm operates in semi-automatic mode, i.e., shot to shot.
2 (Limited Burst): In this position the submachine gun fires a burst of two shots if the trigger is kept pulled during the entire cycle. The firearm fires bursts of two shots each pull of the trigger while you have ammo in the magazine. Note: releasing the trigger, or running out of ammunition at any time during the cycle, the shots are stopped and may have made only one shot. Pressing the trigger, after this, the interruped cycle will be completed, does not start a new cycle. So, it is possible that only one shot occurs. This effect is not a failure. The trigger disconector has a cam mechanism that continuously rotates with each shot. Based on the position of the disconnector cam, the first trigger pull (after the previous selection of the selector in LIMITED BURST) can perform one or two shots before pull the trigger again. This will only happen in the first series with the selector in LIMITED BURST.
F (Full Auto): In this position the firearm operates in automatic mode. The firearm fires while trigger is kept pressed.
2
1S
1S
SMT CTT
ALWAYS KEEP THE MUZZLE POINTED IN A SAFE DIRECTION AND FINGER OFF THE TRIGGER.

70
ADJUSTABLE BUTTSTOCK(*)
OPERATION/HANDLING
• press the adjustment button;
The buttstock of the submachine gun may have their length adjusted
as follows:
• move the buttstock to the desired length and
• release the adjustment button.
To facilitate carrying of the firearm, the buttstock can be folded to the
right side by pressing the folding button and retracting the buttplate.
The buttstock will remain folded under spring force. To return it to its
original position, just to overcome the resistance force of the spring to
fit the buttstock to its original position, extended.
(*) for version with folding and retractable buttstock.
ALWAYS KEEP THE MUZZLE POINTED IN A SAFE DIRECTION AND FINGER OFF THE TRIGGER.

71
ADJUSTABLE SIGHT
OPERATION/HANDLING
The aiming may be done through the square notch or a hole. Simply
fold the sight according to figure.
Folding the rear sight
To make sight adjustments be sure the
firearm is locked and always point the
muzzle in a safe direction. If possible, keep
the bolt open for adjustments.
ATTENTION:ATTENTION:
ALWAYS KEEP THE MUZZLE POINTED IN A SAFE DIRECTION AND FINGER OFF THE TRIGGER.

72
ADJUSTABLE SIGHT
OPERATION/HANDLING
• Turn the adjusting screw counter clockwise to move the notch, and
point of impact, to right side.
ATTENTION:ATTENTION:
• Turn the adjusting screw clockwise to move the notch, and point of
impact, to left side.
Note: 1 click on the windage adjustment screw moves 1.15 cm the point
of impact at a range of 25 m.
Windage Adjustment: The rear sight can be adjusted for windage
through the adjustment screw shown in the figures.
To make sight adjustments be sure the
firearm is locked and always point the muzzle
in a safe direction. If possible, keep the bolt
open for adjustments.
ALWAYS KEEP THE MUZZLE POINTED IN A SAFE DIRECTION AND FINGER OFF THE TRIGGER.

73
ADJUSTABLE SIGHT
OPERATION/HANDLING
• Turn the elevation adjusting screw counter clockwise to raise the
notch.
When raising the sight, the point of impact rises.
Lowering the sight, the point of impact is lowered.
• Turn the elevation adjusting screw clockwise to lower the notch.
Note: 1 click on a vertical adjustment screw moves 2.15 cm the point of
impact at a range of 25 m.
Elevation adjustment: The rear sight can be adjusted in elevation to
raise or lower the point of impact. The elevation adjustment (vertical
adjustment) should be done through the adjustment screw shown in
the figure.
ATTENTION:ATTENTION: To make sight adjustments be sure the
firearm is locked and always point the muzzle
in a safe direction. If possible, keep the bolt
open for adjustments.
ALWAYS KEEP THE MUZZLE POINTED IN A SAFE DIRECTION AND FINGER OFF THE TRIGGER.

74
MAGAZINE LOADING
OPERATION/HANDLING
Hold the magazine with one hand and, with the other one, insert the
cartridge by pressing it down according the figure. Verify the quantity
of cartridges inserted through the indicator holes in the magazine side.
Please do not exceed the maximum quantity indicated.
WARNING:WARNING: Use only commercial ammunition and of the
caliber corresponding to your firearm.
Place the firing selector in position "S" (Safe).
NOTE: Overloading the magazine may avoid the correct insertion of
the magazine into the firearm.
ALWAYS KEEP THE MUZZLE POINTED IN A SAFE DIRECTION AND FINGER OFF THE TRIGGER.

75
FEEDING
OPERATION/HANDLING
Condition: firearm unloaded, bolt open, magazine empty and
selector in safe position "S".
A. Keep your finger off the trigger and the firearm pointed to a safe
direction.
B. Remove empty magazine by pressing the magazine release.
D. With the free hand, release the bolt catch or pull the cocking lever
until its rearward position and release it.
DO NOT DRIVE the cocking lever during this operation since this
may result in loading failure.
C. Insert loaded magazine into the firearm and check that is correctly
inserted and retained.
The firearm is loaded and ready to continue shooting.
ATTENTION:ATTENTION:
ALWAYS KEEP THE MUZZLE POINTED IN A SAFE DIRECTION AND FINGER OFF THE TRIGGER.

76
RELOADING
OPERATION/HANDLING
A. Keep your finger off the trigger and the firearm pointed in a safe
direction.
Condition 2: firearm loaded (ammunition in the chamber), bolt
closed, magazine attached and selector in safety position "S".
B. Remove the magazine pressing the magazine release (the
magazine may be loaded or unloaded).
C. Insert the loaded magazine in housing and check that is correctly
inserted and retained.
The firearm is loaded and ready to continue shooting.
ATTENTION:ATTENTION:
ALWAYS KEEP THE MUZZLE POINTED IN A SAFE DIRECTION AND FINGER OFF THE TRIGGER.

77
AIMING
CORRECT AIMING
OPERATION/HANDLING
Point of impact centred
AIMING ERRORSATTENTION:ATTENTION:
ALWAYS KEEP THE MUZZLE POINTED IN A SAFE DIRECTION AND FINGER OFF THE TRIGGER.

78
FIRING POSITION(RECOMMENDATIONS)
OPERATION/HANDLING
ATTENTION:ATTENTION:The supported shoulder firing position is the
most stable and provides the best probability
of hitting (for version with buttstock)
WARNING:WARNING:
• Keep your hands out of the path of the bolt
group when firing.
• When firing, pull the firearm firmly into your
shoulder.
( SMT C version: hold the firearm firmly with two
hands at the level of your hip).
Risk of injury from recoil. The firearm’s recoil can
cause serious injury.
• Keep your eye at least 6 cm away from the sight
when firing.
Standing firing position
Modified supported firing position.
ALWAYS KEEP THE MUZZLE POINTED IN A SAFE DIRECTION AND FINGER OFF THE TRIGGER.

79
CARRYING SLING
OPERATION/HANDLING
The carrying sling allows different carrying modes by the user and
enables to have the firearm immediately ready to use in all carrying
modes.
Over the shoulder
On the back Across the chest
ALWAYS KEEP THE MUZZLE POINTED IN A SAFE DIRECTION AND FINGER OFF THE TRIGGER.

80
FAULTS: CAUSES AND REMEDIES
OPERATION/HANDLING
Fault
Cau
seRemedy
Magazin
e no
t correctly in
serted.
Insert m
agazine co
rrectly.
Magazin
e is dam
aged.
Use an
oth
er magazin
e.
Ch
amb
er is fou
led.
Un
load
the firearm
. Clean
the
firearm.
Cartrid
ge defo
rmed
.U
se ano
ther cartrid
ge.
Cartrid
ge has n
ot fired
.D
efective amm
un
ition
.
Wait at least o
ne m
inu
te. Un
load
the firearm
. Do
no
t re-use cartrid
ges
that h
ave failed to
fire.
Bo
lt do
es no
t op
en after firin
g.D
efective amm
un
ition
.
Un
load
the firearm
. Clean
the
firearm if n
ecessary. Send
the
firearm fo
r repair if n
ecessary.
Ch
amb
er is fou
led.
Clean
the ch
amb
er.
Am
mu
nitio
n in
correctly lo
aded
.U
se ano
ther am
mu
nitio
n.
Bu
llet is stuck in
the ch
amb
er.Im
pro
perly lo
aded
amm
un
ition
.Sen
d th
e firearm fo
r repair.
Cartrid
ge or cartrid
ge case is no
t
ejected.
Magazin
e is no
t load
ed in
to th
e
cham
ber.
Cartrid
ge do
es no
t feed.
ALWAYS KEEP THE MUZZLE POINTED IN A SAFE DIRECTION AND FINGER OFF THE TRIGGER.

81
SPECIFICATIONSM
odelSM
T9 SM
T40SM
T9 CSM
T40 CC
TT40 C
Caliber
9 mm
.40 S&W
9 mm
.40 S&W
.40 S&W
Operation
Firing modes
Capacity
10 or 3010, 15 or 30
10 or 3010, 15 or 30
10, 15 or 30
Barrel length
Rifling
6 grooves, right hand tw
ist 1 turn in 10 in (250 m
m)
6 grooves, right hand tw
ist 1 turn in 16.5 in (420 m
m)
6 grooves, right hand tw
ist 1 turn in 10 in (250 m
m)
6 grooves, right hand tw
ist 1 turn in 16.5 in (420 m
m)
6 grooves, right hand tw
ist 1 turn in 16.5 in (420 m
m)
Total length (**)
Distance betw
een sights
Weight w
ithout mag (***)
Weight w
ith empty m
ag (***)30t - 3,350 kg10t - 3,480 kg
30t - 3,350 kg15t - 3,480 kg10t - 3,480 kg
30t - 2,700 kg10t - 2,630 kg
30t - 2,700 kg15t - 2,630 kg10t - 2,630 kg
Weight w
ith fully mag (***)
30t - 3,920 kg10t - 3,600 kg
30t - 4,075 kg15t - 3,740 kg10t - 3,655 kg
30t - 3,070 kg10t - 2,750 kg
30t - 3,225 kg15t - 2,890 kg10t - 2,805 kg
30t - 4,075 kg15t - 3,740 kg10t - 3,665 kg
Trigger Pull
Rate of fire (full auto m
ode)
Rem
arks
18.7 in (475 mm
) with folded buttstock
26.81 to 29.92 in (681 to 760 mm
) with
extended buttstock
3,350 kg3,350 kg
Blow
back, closed-breech firing
Semi-auto
18.7 in (475 mm
) with folded buttstock
26.81 to 29.92 in (681 to 760 mm
) with
extended buttstock
Picatinny Rail (M
IL-STD-1913) build in upper receiver
N/A
Semi-auto, lim
ited burst (2 shots), full auto
6.6 in (166 mm
)
16.1 in (410 mm
)
7.87 in (200 mm
)approx. 750 rounds/min
10.6 in (270 mm
)
2,5 kg
(3,8 +- 0,8) kgf
(3,8 +- 0,8) kgf
7.87 in (200 mm
)
(3,8 +- 0,8) kgf
Height
233 mm
- without m
ag 293 m
m - w
ith 30 round mag
233 mm
- without m
ag 302 m
m - w
ith 30 round mag
233 mm
- without m
ag293 m
m - w
ith 30 round mag
233 mm
- without m
ag 302 m
m - w
ith 30 round mag
Width
75 mm
- without Picatinny rail
80 mm
- with Picatinny rail
(*) mode com
bination may vary depending on the w
eapon version.(**) general tolerance ±
5 mm
ALWAYS KEEP THE MUZZLE POINTED IN A SAFE DIRECTION AND FINGER OFF THE TRIGGER.
(***) weight tolerance ±
200 g
30t - 3,350 kg15t - 3,480 kg10t - 3,480 kg

82
EXPLODED VIEW
11
10
10
12
13
14
13
15
16
17
18
19
20
21
2218
23
24
25
26
27
28
29
30
31
32
33
34
35
36
37
38
39
40 4
1
42
43
44
45
46
47
48
56
57
586
7
66
68
69
71
72
7374
75
76
77
7879
8081
82
13
83
84
85
86
5554
70
87
1
2
4 5 6
3
4
5
6
78
9
49
50
51
52
53
59
60
60
61
62
62
63
64
65
88
89
90
91
92
5455
ALWAYS KEEP THE MUZZLE POINTED IN A SAFE DIRECTION AND FINGER OFF THE TRIGGER.

83
PARTS LIST
7 MUZZLE BREAK LOCK NUT
2 STEEL REAR SIGHT1 STEEL FRONT SIGHT
3 COCKING LEVER SCREW
19 BOLT BUFFER
22 BUTTSTOCK HINGE SPRING
6 MUZZLE BREAK
10 BARREL SUPPORT SCREW
4 COCKING LEVER SUPPORT 5 COCKING LEVER KNOB
8 FRONT CARRYING SLING
11 BARREL SUPPORT 12 COCKING LEVER LOCK
9 BARREL
13 EJEACTOR SCREW / COCKING LEVER LOCK SCREW14 EJECTOR 15 LOWER RECEIVER 16 CARRYING SLING SUPPORT 17 CARRYING SLING SUPPORT SCREW 18 CARRYING SLING SUPPORT NUT
20 BUTTSTOCK SUPPORT 21 BUTTSTOCK HINGE PIN
23 BUTTSTOCK CORE
26 LOCKING TRIGGER SPRING27 BUTTPLATE
24 RETRACTABLE STOCK
28 BUTETPLATE SCREW29 BUTTSTOCK RETRACTABLE HANDLE 30 BUTTSTOCK RETRACTABLE HANDLE PIN 31 BUTTSTOCK RETRACTABLE DETENT PIN 32 BUTTSTOCK RETRACTABLE DETENT 33 FOLDING BUTTON PIN 34 BUTTSTOCK FOLDING BUTTON SPRING
25 THREADED INSERT BUSH
35 FOLDING BUTTON 36 BUTTSTOCK SUPPORT STOP
65 MAGAZINE RELEASE
72 LIMITED BURST STROKE
42 FIRING PIN SPRING
70 GRIP
57 TAKE DOWN PIN DETENT SPRING
47 RING
55 MOUNTING PIN DETENT SPRING
67 PISTOL GRIP DENTED WASHER
38 RECOIL SPRING
41 FIRING PIN
46 EXTRACTOR SPRING
54 MOUNTING PIN DETENT
56 TAKE DOWN PIN CAP
59 BOLT CATCH RIGHT LEVER
61 BOLT CATCH LEFT LEVER
43 BOLT
39 RECOIL SPRING GUIDE
63 MAGAZINE RELEASE PIN 64 MAGAZINE RELEASE SPRING
53 BOLT CATCH PIN
50 CARRYING SLING PIN LOCK
69 TRIGGER MECHANISM PIN
40 RECOIL SPRING GUIDE CHAPE
45 EXTRACTOR
71 LIMITED BURST STROKE SPRING
51 CARRYING SLING PIN LOCK SPRING
60 BOLT CATCH SPRING
62 LOWER RECEIVER FIXATION PIN
37 RECOIL SPRING GUIDE SCREW
48 FIRING PIN RETAINED PIN
52 HANDGUARD
58 TAKE DOWN PIN
66 PISTOL GRIP SCREW
49 CARRYING SLING SUPPORT PIN
44 EXTRACTOR PIN
68 LOWER RECEIVER
78 DISCONNECTOR BURST
82 SELECTOR INDEX
74 HAMMER SPRING
83 FIRE SELECTOR RIGHT LEVER
85 HAMMER / TRIGGER / FULL AUTO SEAR PIN
76 FULL AUTO SEAR SPRING75 FULL AUTO SEAR
77 DISCONNECTOR FULL
81 TRIGGER BURST
84 SELECTOR INDEX SPRING
80 DISCONNECTOR SPRING
87 TRIGGER MECHANISM HOUSING
89 MAGAZINE SPRING 90 MAGAZINE SPRING PLATE
73 HAMMER
86 FIRE SELECTOR LEFT LEVER
91 MAGAZINE BOTTOM CAP 92 MAGAZINE BODY
88 FOLLOWER
79 TRIGGER SPRING
ALWAYS KEEP THE MUZZLE POINTED IN A SAFE DIRECTION AND FINGER OFF THE TRIGGER.

84
TECHNICAL ASSISTANCE
In case of problem, please contact the
nearest dealer to repair your firearm or
contact the factory.
TAURUS ARMAS S.A.
Av. São Borja, 2181 – Prédio A
São Leopoldo/Distrito Industrial
Rio Grande do Sul
93.032-000
Brasil
E-mail: [email protected]
Phone: (51)30213000
ALWAYS KEEP THE MUZZLE POINTED IN A SAFE DIRECTION AND FINGER OFF THE TRIGGER.

85
WARRANTY CERTIFICATE
We guarantee the quality of the Taurus guns, committing
ourselves to correct any defects in workmanship or material for a
period of one year after purchase.
We do not assume any liability, for abnormality arising from
misuse, lack of conservation, inadequate or reloaded
ammunition and normal wear and tear arising from its use.
ALWAYS KEEP THE MUZZLE POINTED IN A SAFE DIRECTION AND FINGER OFF THE TRIGGER.

86
MANUAL DE INSTRUCCIONES

87
INDICE
SIEMPRE DEJE EL ARMA DIRIGIDA A UN LUGAR SEGUROY EL DEDO LEJOS DEL GATILLO
PORTUGUÊS... Pg. 3
ENGLISH...........Pg. 45
AVISOS DE SEGURIDAD...................................................88
PROCEDIMIENTO DE MANTENIMIENTO......................102
MUNICIÓN.........................................................................94
AVISOS..............................................................................96
MANUTENCIÓN PREVENTIVA.......................................101
COMPONENTES PRINCIPALES......................................100
LUBRICACIÓN DEL ARMA..............................................107
LIMPIEZA DE SU ARMA...................................................106
OPERACIÓN / MANEJO...................................................110
DESPIECE................................................................123
LISTA DE PIEZAS.............................................................124
ASISTENCIA TÉCNICA....................................................125
GARANTIA.......................................................................126
ESPECIFICACIONES......................................................122
MONTAJE.........................................................................109

88
LEA ATENTAMENTE ESTE MANUAL – Se lo elaboró para ayudar a los usuarios a realizar el mantenimiento adecuado en armas TAURUS.
Guarde su arma y munición en LUGAR SEGURO, inaccesible a otras personas.
Armas son equipos mecánicos de precisión y deben ser cometidas a MANTENIMIENTO CONTANTE para evitar funcionamiento inadecuado que coloque en riesgo la vida del usuario y de terceros.
El manejo seguro de un arma de fuego requiere ENTRENAMIENTO, DISCIPLINA Y CAUTELA.
Armas de fuego son, por naturaleza, instrumentos potencialmente letales. El manejo IMPROPIO O DESCUIDADO puede causar accidentes graves, incluso fatales.
Oriéntese con un instructor habilitado sobre el funcionamiento de su arma de fuego ANTES DE USARLA.
Todas las armas SIEMPRE deben ser tratadas como si estuviesen CARGADAS Y LISTAS PARA USO.
Utilizar un arma requiere MUCHO CUIDADO Y ATENCIÓN. El usuario no debe tener cualquier duda sobre la correcta operación del arma y debe SABER UTILIZAR ARMAS CON SEGURIDAD.
El usuario no debe NUNCA, EN CUALQUIER HIPÓTESIS, apuntar su arma - cargada o no - a personas u objetos que no desea alcanzar.
Mantenga el dedo LEJOS DEL GATILLO siempre que el arma no esté en uso o no exista la necesidad de efectuar el disparo.
Asegúrese que leyó y comprendió TODAS las informaciones y avisos de este manual ANTES de utilizar su arma.
NUNCA TIRE DEL GATILLO PARA PONER A PRUEBA su arma antes de verificar si ella está descargada.
AVISOS DE SEGURIDAD
SIEMPRE DEJE EL ARMA DIRIGIDA A UN LUGAR SEGUROY EL DEDO LEJOS DEL GATILLO

89
AVISOS DE SEGURIDAD
EVITE TIRAR EN SUPERFICIES RÍGIDAS O LÍQUIDAS, pues de acuerdo con el ángulo de incidencia, podrá haber un rebote.
ARMAS, ALCOHOL Y DROGAS NO COMBINAN.
SIEMPRE MANTENGA EL SEGURO MANUAL EXTERNO ACCIONADA cuando no esté utilizando el arma.
Al entregar un arma o al recibirla, hágalo con el CERROJO ABIERTO, SIN CARGADOR Y SIN MUNICIÓN EN LA RECÁMARA.
Use solamente MUNICIÓN NUEVA e indicada para el arma. MUNICIONES RECARGADAS, VIEJAS O CON ALTERACIÓN en la vaina o en el proyectil pueden ocasionar y comprometer la seguridad del usuario o terceros.
En caso de sospecha de obstrucción del cañón, inmediatamente DESCARGUE EL ARMA para recién así verificar el interior del cañón y cilindro.
Cargue y descargue su arma con el CAÑÓN APUNTADO HACIA UN LUGAR SEGURO.
La manera más segura de portar un arma es con la RECÁMARA VACÍA Y LA TRABA MANUAL EXTERNA ACCIONADA.
Si utiliza su arma para servicio, con munición en la recámara, SIEMPRE MANTENGA EL SEGURO MANUAL EXTERNA ACCIONADA.
U s e s i e m p r e L E N T E S D E P ROT E C C I Ó N Y PROTECTORES AURICULARES, incluso en ambiente abierto.
No utilice ni empuñe armas de fuego DESPUÉS DE CONSUMIR MEDICAMENTOS que puedan afectar su habilidad.
SIEMPRE DEJE EL ARMA DIRIGIDA A UN LUGAR SEGUROY EL DEDO LEJOS DEL GATILLO

90
AVISOS DE SEGURIDAD
Nunca intente modificar el curso del gatillo de un arma, eso puede AFECTAR EL SISTEMA DE TRABADO y causar disparos accidentales.
El arma PUEDE DISPARAR CON EL CARGADOR REMOVIDO CASO TAMBIÉN MUNICIÓN EN LA CÁMARA. Asegúrese de que toda la munición ha sido consumida o retirada después del uso.
Las armas Taurus están diseñadas para atender las pruebas presentes en la norma NEB / T E-267A
NUNCA COLOQUE LA MANO DELANTE DEL CAÑÓN de una arma de fuego.
Al accionar la traba manual, asegúrese de que el GATILLO ESTÉ EN LA POSICIÓN INICIAL DE SU CURSO, de lo contrario, el bloqueo puede quedar en la posición de seguridad sin haber sido de hecho accionado.
SIEMPRE DEJE EL ARMA DIRIGIDA A UN LUGAR SEGUROY EL DEDO LEJOS DEL GATILLO

91
EN CASO DE CAIDA DEL ARMA, P U E D E O C U R R I R D I S PA R O ACCIDENTAL. MANTENGA LA TRAVA M A N UA L E X T E R N A S I E M P R E ACCIONADA.
AVISOS DE SEGURIDAD
CUALQUIER ARMAPUEDE DISPARAREN CASO DE CAÍDA.
SIEMPRE DEJE EL ARMA DIRIGIDA A UN LUGAR SEGUROY EL DEDO LEJOS DEL GATILLO

92
Los accidentes con armas de fuego son relativamente raros, normalmente causados por incumplimiento de las reglas básicas de seguridad. Desafortunadamente, los tiradores experimentados suelen ignorar estas reglas con más frecuencia que los principiantes. Independientemente de la familiaridad con el uso de armamentos, es imprescindible siempre seguir las directrices de seguridad.
Al practicar tiro, verifique siempre el área detrás del blanco para asegurarse de que las personas o los animales no serán alcanzados.
Al utilizar un arma de fuego, el usuario es responsable a tiempo completo por las consecuencias de su uso. Por eso, t iene la OBLIGACIÓN DE SABER cómo hacer el MANTENIMIENTO CORRECTA E ADECUADA y cómo UTILIZARLA DE FORMA SEGURA. Es su responsabilidad TOMAR TODAS LAS PRECAUCIONES NECESARIAS. Esta responsabilidad es toda del tirador y no puede ser transferida a cualquier otra persona.
Accionar continuamente el mecanismo de disparo sin munición es perjudicial para su arma de fogo.
Lea, revise y practique los principios básicos de seguridad para que se convierten en un hábito y, por lo tanto, nunca se olviden. Busque siempre orientación especializada si tiene alguna duda sobre su conocimiento o habilidad para utilizar un arma de fuego.
Si el disparo falla, mantenga el cañón apuntado hacia un lugar seguro durante al menos 30 segundos para el caso de que haya una ignición retardada de la espoleta. Si sienta un retroceso diferente de lo normal, proceda de la misma forma.
RECUERDE: Armas de fuego son equipos complejos y sensibles, diseñados para ofrecer un nivel de seguridad adecuado al tipo de función que van a desempeñar, pero no absolutamente infalibles. Las armas no pasan de instrumentos mecánicos, siendo que las consecuencias de su uso son de total responsabilidad del tirador.
AVISOS DE SEGURIDAD
SIEMPRE DEJE EL ARMA DIRIGIDA A UN LUGAR SEGUROY EL DEDO LEJOS DEL GATILLO

93
PRECAUCIÓN: CUALQUIER ARMA PUEDE DISPARAR EN CASO DE CAÍDA.
En caso de duda, póngase en contacto inmediatamente con la Asistencia Técnica Autorizada más cercana.
NUNCA haga o intente reparaciones caseras en su arma. Pueden dañar su arma y hacerla insegura para su uso. Siempre que sea necesario, diríjase a la Asistencia Técnica Autorizada más cercana.
Es importante manipular armas de fuego con cuidado, evitando su caída. En caso de que haya una caída, el arma debe ser inspeccionada por un profesional habilitado para verificar posibles daños a los mecanismos de funcionamiento y seguridad.
Siempre que compre accesorios no originales Taurus (cables, fundas, miras, etc.), asegúrese de que son compatibles con su arma.
AVISOS DE SEGURIDAD
SIEMPRE DEJE EL ARMA DIRIGIDA A UN LUGAR SEGUROY EL DEDO LEJOS DEL GATILLO

94
La presión excesiva en el interior de la recámara o del cañón durante el disparo puede causar daños severos al arma y lesiones graves para el tirador y otros. La presión excesiva puede ser el resultado de obstrucciones en el cañón, exceso de pólvora o uso de cartuchos inadecuados o montados de forma incorrecta.
- Usted tiene dificultad o siente resistencia inusual al insertar el cartucho;
-El mecanismo deja de extraer un estuche;
Utilice sólo municiones de alta calidad, originales de fábrica. No utilice cartuchos sucios, húmedos, corroídos, deformados o dañados. No lubrique los cartuchos. Los lubricantes u otros materiales extraños pueden causar cambios potencialmente peligrosos a la munición. Utilice solamente munición del calibre para el cual su arma fue proyectada. El calibre adecuado queda permanentemente grabado en su arma.
El uso de munición recargada (reciclada) de carga manual u otro tipo que no sea el estándar anula todas las garantías. El suministro impropio puede ser extremadamente peligroso. La utilización de estas municiones puede causar daños severos al arma y lesiones graves al tirador oa terceros. Siempre use munición que cumpla con los estándares de desempeño industrial establecidos por el Sporting Arms and Ammunition Manufacturers Institute, Inc. de los Estados Unidos (SAAMI) o entidad equivalente en otros países (C.I.P.)
Deje inmediatamente de disparar y verifique el caño con respecto a una posible obstrucción siempre que:
-Un tiro sonar débil o anormal.
-El cartucho no dispara;
-For constatada la existencia de granos de pólvora de explosión no quemados, esparcidos por el mecanismo.
MUNICIÓN
SIEMPRE DEJE EL ARMA DIRIGIDA A UN LUGAR SEGUROY EL DEDO LEJOS DEL GATILLO

95
Si hay algún motivo para sospechar que un proyectil esté obstruyendo el cañón, descargue inmediatamente el arma y mire a través del orificio. No es suficiente simplemente mirar en la recámara. Un proyectil puede alojarse a cierta distancia, a lo largo del cañón, donde no se puede observar fácilmente.
Si el proyectil se puede retirar con una varilla de limpieza, retire cualquier grano de pólvora no quemado del orificio, recámara y mecanismo antes de continuar disparando. Si el proyectil no puede ser desalojado con una varilla de limpieza, lleve el arma a una Asistencia Técnica Autorizada.
No lubrique los cartuchos y asegúrese de que haya dejado la recámara libre de cualquier aceite o conservante antes de empezar a disparar. El aceite interfiere en la fricción entre el estuche y la pared de la recámara, necesaria para el funcionamiento seguro, y sujeta el arma a estrés similar al impuesto por la presión excesiva.
SI UN PROYECTIL FICAR EN EL CAÑÓN, NO INTENTO REMOVIRLO DISPARANDO OTRO CARTUCHO. ESO PUEDE CAUSAR PRESIÓN EXCESIVA, RUPTURA DEL ARMA PODIENDO OCASIONAR LESIONES CORPORAIS GRAVES.
Utilice lubricantes de manera moderada sobre las partes móviles de su arma. Evite el rocío excesivo de cualquier producto de mantenimiento de armas en forma de aerosol, especialmente en los casos en que pueda entrar en contacto con munición. Todos los lubricantes, particularmente lubricantes en spray en forma de aerosol, pueden penetrar en la espoleta del cartucho y causar fallos de disparo. Algunos lubricantes de alta penetración pueden también migrar al interior de los estuches y deteriorar la pólvora; impidiendo su correcto funcionamiento. Si sólo la espoleta explota, existe el peligro de que el proyectil esté alojado en el cañón.
MUNICIÓN
SIEMPRE DEJE EL ARMA DIRIGIDA A UN LUGAR SEGUROY EL DEDO LEJOS DEL GATILLO
96
El arma siempre debe ser portada de manera segura, en una funda apropiada: en caso de caída, puede ocurrir un disparo accidental.
ADVERTENCIAS:
Presione el pestillo hacia abajo, verificando su retorno a la posición inicial.
Con el bloqueo del percutor en la posición normal (no presionada), compruebe si bloquea el avance del percutor. Para ello, empuje el percutor hacia adelante. Debe quedar inmóvil, siendo bloqueado por la traba. Si esto no ocurre, no utilice el arma y busque la Asistencia Técnica Autorizada más cercana.
En general:
Conferencia de dispositivos de seguridad:
Al realizar el mantenimiento de la arma de fogo, se debe siempre verificar el funcionamiento de la traba del percutor, siguiendo los pasos abajo:
No haga reparaciones caseras. Siempre que sea necesario, diríjase a la Asistencia Técnica Autorizada.
Para el gatillo activar efectivamente el bloqueo manual, debe estar en su de lo contrario, la posición más adelante, traba quedará en la posición de seguridad, pero no de hecho accionada.
No intente modificar el curso del gatillo de su arma de fuego, ya que los cambios de este tipo generalmente afectan al sistema de bloqueo disparos accidentales.y pueden causar
En caso de caída, inspeccionada por un el arma deberá ser profesional habilitado, el para verificar posibles daños en mecanismo y dispositivos de seguridad.
AVISOS
SIEMPRE DEJE EL ARMA DIRIGIDA A UN LUGAR SEGUROY EL DEDO LEJOS DEL GATILLO

97
Nunca munición o desmembra su arma dentro de un vehículo, salas o cualquier otro espacio confinado (excepto en áreas destinadas al tiro).
PELIGRO:Siempre mantenga el arma apuntada en una dirección segura.
SEGURIDAD EN PRIMER LUGAR:
SEGURIDAD EN PRIMER LUGAR:
Municiando:
Disparando su arma:
PELIGRO:
Siempre mantenga el arma apuntada en una dirección segura.
ADVERTENCIA:
Antes de depositar el arma, siempre limpie todo el aceite lubricante que pueda haber acumulado en el cañón y en la recámara y verifique si no hay obstrucciones en el cañón. Cualquier material extraño en el interior del cañón puede resultar en daño al arma y, en consecuencia, al tirador y personas cercanas.
Siempre utilice gafas de seguridad y protectores auriculares.
PELIGRO:
Si durante el disparo su arma presenta CUALQUIER falla de funcionamiento, si está perforando la espoleta, si está rompiendo el cartucho o si está presentando un sonido fuera de lo normal, No PARE DE ATIRAR INMEDIATAMENTE.intentes seguir disparando. Puede ser peligroso continuar utilizando su arma. Descargue su arma. Lleve su arma y munición a un armero acreditado o asistencia técnica autorizada para su evaluación.
AVISOS
SIEMPRE DEJE EL ARMA DIRIGIDA A UN LUGAR SEGUROY EL DEDO LEJOS DEL GATILLO

98
SEGURIDAD EN PRIMER LUGAR:
SEGURIDAD EN PRIMER LUGAR:Siempre mantenga el arma apuntada en una dirección segura cuando mueva la corredera para alimentar la primera munición a la recámara. El mal funcionamiento durante el proceso de cargamento de la recámara son raros, pero pueden ocurrir, por lo tanto, mantenga su mano, su cara o cualquier parte de su cuerpo detrás de la culata y empuje correctamente su arma, manteniéndola delante de su cuerpo.
Cuidados con su arma
SEGURIDAD:
ADVERTENCIA:
Nunca manipule su pistola con cartuchos en la recámara a menos que la traba esté activada, esté preparado para disparar y el arma esté apuntada hacia el objetivo.
El bloqueo de seguridad manual debe estar totalmente en la posición trabada o en la posición de no trabada. El arma no debe dispararse con el seguro de seguridad manual entre las dos posiciones. Daños al arma y, consecuentemente, al tirador pueden ocurrir si el bloqueo no está en su fin de carrera
El riesgo de un accidente es mucho mayor cuando su arma de fogo - sin importar lo segura que sea - se manipule con un cartucho en la recámara. Esta práctica no es recomendable y puede ser justificada, sólo en circunstancias de claro peligro presente o durante la práctica del servicio policial (cuando así lo estipula la corporación) y puede ser necesaria la utilización inmediata del arma.
AVISOS
SIEMPRE DEJE EL ARMA DIRIGIDA A UN LUGAR SEGUROY EL DEDO LEJOS DEL GATILLO

99
Nunca transporte, maneje o deje su arma desatornillada sin que esté activada la traba de seguridad. Si el arma no está bloqueada, se disparará por acción de presión en el gatillo que puede provenir de ti caer con el arma, si deja el arma caer al suelo o si el arma es golpeada por alguien o algún objeto.
PRECAUCIÓN:
Nunca disparar su arma con el dedo, la mano, la cara o cualquier otra parte del cuerpo por encima de la ventana de eyección o en cualquier otra posición que pueda ser alcanzado por el movimiento de la corredera o de los cartuchos desencadenados.
ADVERTENCIA:
ADVERTENCIA:
Nunca permita que alguien quede a su lado, en la dirección de la eyección de los cartuchos desencadenados. El cartucho se expulsa a una temperatura elevada y puede causar lesiones. Asegúrese de que la línea de eyección está clara.
AVISOS
SIEMPRE DEJE EL ARMA DIRIGIDA A UN LUGAR SEGUROY EL DEDO LEJOS DEL GATILLO

100
COMPONENTES PRINCIPALES
SIEMPRE DEJE EL ARMA DIRIGIDA A UN LUGAR SEGUROY EL DEDO LEJOS DEL GATILLO
GU
AR
DA
MA
NO
CA
RG
AD
OR
CA
RG
AD
OR
RE
TÉ
N D
EL
EN
PU
ÑA
DU
RA
SIS
TE
MA
DE
CU
LA
TA
PL
EG
AB
LE
Y T
EL
ES
CÓ
PIC
A
AL
ZA
DE
M
IRA
AM
BID
EX
TR
A
TE
CL
A
SE
LE
CT
OR
A
DE
L C
IER
RE
RE
TÉ
N
AM
BID
EX
TR
O
PA
LA
NC
A D
E
MA
NE
JO
(RE
VE
RS
IBL
E)
CA
JÓN
DE
CIE
RR
E
DIS
PA
RA
DO
R
PU
NT
O
DE
MIR
A
QU
IEB
RA
LL
AM
AS
CA
JA D
E L
OS
ME
CA
NIS
MO
S
FIJA
CIÓ
N
PO
RT
A C
OR
RE
A
FIJA
CIÓ
N
PO
RT
A C
OR
RE
A(R
EV
ER
SÍV
EL
)

101 SIEMPRE DEJE EL ARMA DIRIGIDA A UN LUGAR SEGUROY EL DEDO LEJOS DEL GATILLO
Los productos Taurus son resistentes a condiciones adversas. Sin embargo, su arma debe ser limpiada y lubricada para prevenir la corrosión y eliminar partículas no deseadas que pueden perjudicar el funcionamiento.
1.Cuando sea nueva, antes de utilizarla por primera vez;
Su arma, así como cualquier otra máquina, debe recibir el mantenimiento adecuado para garantizar su funcionamiento y preservar su vida útil. Este manual explicará cómo desmontar, limpiar, lubricar y realizar el mantenimiento de su Taurus.
El mantenimiento debe realizarse respetando la frecuencia siguiente:
2.Al menos una vez al mes;
3.Después de cada uso;
4.Después de cada 200 disparos.
5. Limpie y lubrique el arma y el cargador cada seis (6) meses mientras esté almacenado.
La necesidad de mantenimiento está ligada a la exposición del arma a intemperie como - pero no restringida a - lluvia, nieve, agua salina, polvo y arena.
6. Guarde el arma en un lugar limpio, seco y con temperatura controlada.
Cualquier arma debe ser inspeccionada y recibir mantenimiento siempre que sufra una caída o haya sospechas de mal funcionamiento.
Condiciones para el almacenamiento del arma:
1. Guarde el arma limpia y lubricada.
3. Con la palanca de manejo hacia delante y el martillo desarmado.
2. Guarde el arma sin municiones en la cámara.
4. A más tardar doce meses (12), descargue todas las municiones del cargador y sustituirlas por nuevas municiones.
5.Cuando sea necesario.
INTRODUCCIÓN
MANUTENCIÓN PREVENTIVA
FRECUENCIA DE MANTENIMIENTO

102 SIEMPRE DEJE EL ARMA DIRIGIDA A UN LUGAR SEGUROY EL DEDO LEJOS DEL GATILLO
DESMONTAJE DE 1º ESCALÓN
PROCEDIMIENTO DE MANTENIMIENTO
Maneje el arma siempre con el cañón apuntado para un lugar seguro.
Para el desmontaje de primer escalón, seguir los siguientes pasos:
• Poner el Seletor de Tiro en la posición “S” (Seguridad). Retire el
cargador (fig. 1), presionando el retén del cargador.
• Verificar visualmente, por la ventana de eyección, que no haya
munición en la cámara. (fig. 3)
• Ciclar el cierre (fig. 2) para retirar la munición de la cámara;
NOTA: La subametralladora SMT puede montarse y desmontarse sin
el uso de herramientas. El usuario puede hacer la desmontaje como
se sugiere en este manual. La desmontaje más allá de este paso, si es
necesario, debe ser realizado por un armero capacitado.
1
2
3
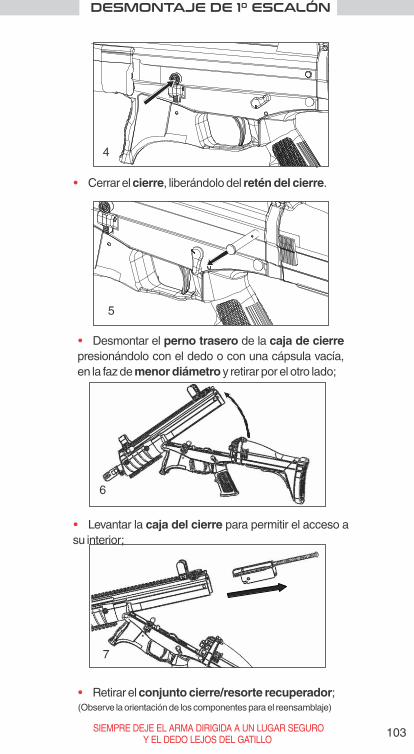
103 SIEMPRE DEJE EL ARMA DIRIGIDA A UN LUGAR SEGUROY EL DEDO LEJOS DEL GATILLO
DESMONTAJE DE 1º ESCALÓN
5
4
• Desmontar el perno trasero de la caja de cierre
presionándolo con el dedo o con una cápsula vacía,
en la faz de menor diámetro y retirar por el otro lado;
• Levantar la caja del cierre para permitir el acceso a
su interior;
• Retirar el conjunto cierre/resorte recuperador;(Observe la orientación de los componentes para el reensamblaje)
• Cerrar el cierre, liberándolo del retén del cierre.
6
7

104 SIEMPRE DEJE EL ARMA DIRIGIDA A UN LUGAR SEGUROY EL DEDO LEJOS DEL GATILLO
DESMONTAJE DEL CARGADOR
DESMONTAJE DE 1º ESCALÓN
• Con un punzón o perno, presionar la chapa del resorte del
cargador por el orificio en el fondo; (figura 1)
• Para remontar el cargador proceder de manera inversa.
Asegurarse de que el fondo del cargador está correctamente retenida
por el soporte del resorte.
• Deslizar el fondo del cargador hacia adelante, teniendo cuidado
para impedir la eyección forzada de la chapa presionada por el
resorte; (figura 2)
• Retire el fondo del cargador, la chapa con el resorte y el
transportador;
1 2
CUERPO DELCARGADOR
TRANSPORTADOR
RESORTE DEL CARGADOR
CHAPA DEL RESORTEDEL CARGADOR
FONDO DEL
CARGADOR

105
CO
NJU
NT
O D
E C
IER
RE
CA
RG
AD
OR
PE
RN
O T
RA
SE
RO
DE
LA
CA
JA D
E C
IER
RE
SIEMPRE DEJE EL ARMA DIRIGIDA A UN LUGAR SEGUROY EL DEDO LEJOS DEL GATILLO
DESMONTAJE DE 1º ESCALÓN
No se recomienda el desmontaje del arma más allá de estas etapas, a menos que realizada por un armero experto.
ATENCIÓN:ATENCIÓN:
DESMONTAJE BÁSICA

106 SIEMPRE DEJE EL ARMA DIRIGIDA A UN LUGAR SEGUROY EL DEDO LEJOS DEL GATILLO
LIMPIEZA DE SU ARMA
Esté seguro de que el arma está descargada
antes de iniciar cualquier procedimiento de
Mantenimiento o Limpieza.
ATENCIÓN:ATENCIÓN:
La limpieza correcta del arma hace parte de la manutención necesaria
para garantir su perfecto funcionamiento,
del equipamiento.
5.1. La limpieza diaria luego después del servicio comprende:
• Descargar el arma, conforme descripto en la página 95;
incluso previniendo desgastes prematuros, ataque por agentes
corrosivos, elevando la vida útil
Son dos las clases de limpieza necesarias en esta arma:
5.2 Condiciones para almacenar del arma
• Mantenga el arma limpia y engrasada.
• Mantenga el arma sin munición en la recámara.
• Con la palanca de manejo hacia adelante y el martillo desarmado;.
una fina capa de aceite.
• Limpiar todas las superficies metálicas externas del arma y del
cargador, manteniendo-las lubricadas con
• Limpiar y lubricar el arma y el cargador cada seis (6) meses durante su
almacenamiento.
• Mantenga el arma en un local limpio, seco y con la temperatura
controlada.
• El más tardar después de doce (12) meses descargar las municiones
del cargador y reemplazarlos por nuevas.

107 SIEMPRE DEJE EL ARMA DIRIGIDA A UN LUGAR SEGUROY EL DEDO LEJOS DEL GATILLO
LUBRICACIÓN
La limpieza luego después del uso (después del tiro) comprende:
• Mantener todas las superficies metálicas, internas y externas,
lubricadas con una fina capa de aceite;
Si es posible, utilizar aire comprimido para mejor limpieza de la
caja de mecanismos.
• Descargar el arma, conforme descripto en la página 102;
• Armar los conjuntos y verificar su correcto funcionamiento.
• Remover, con auxilio de un cepillo apropiado, todos los residuos
encontrados en el interior del cañón, de la caja de mecanismos y del
cajón de cierre;
• Desarmar el cargador y realizar el mismo procedimiento;
• Aplicar una gota de aceite de máquina de origen mineral en los puntos
indicados en la figura y así como los puntos de contacto de la culata;
• Desarmar conforme explicado en las páginas 103 y 104;
ATENCIÓN:ATENCIÓN:
RECUERDE:RECUERDE:
Esté seguro de que el arma está descargada
antes de iniciar cualquier procedimiento de
Mantenimiento o Limpieza.
ATENCIÓN:ATENCIÓN:

108 SIEMPRE DEJE EL ARMA DIRIGIDA A UN LUGAR SEGUROY EL DEDO LEJOS DEL GATILLO
LUBRICACIÓN
Cuidados especiales:
• Solamente una pequeña cantidad de aceite debe ser usada para
conservar el equipamiento;
• Evitar el exceso de aceite en el interior del:
b) Cañón
Todos los lubricantes, especialmente en forma de aerosol, pueden
penetrar en el tapón del cartucho y causar fallas en el disparo. Algunos
lubricantes de alta penetración también pueden migrar en el interior de
los casos y causar el deterioro de la pólvora, al fuego, la pólvora puede no
explotar. Si sólo el fusible explotar, existe el peligro de la munición queda
alojada en el cañón..
Asegúrese de que ha dejado el interior del cañón libre de aceite o
conservante antes de comenzar a disparar. El aceite interfiere con la
fricción entre el cartucho y la pared de la cámara que es necesaria para
un funcionamiento seguro, y se sometió el arma una tensión similar la
impuesta por la presión excesiva.
PRECAUCIÓN:
Para garantizar la durabilidad y mantener la fiabilidad del armamento, las
siguientes piezas deben ser reemplazadas cada 5.000 disparos:
• Resorte del percutor;
• Pasador del extractor;
• Amortiguardo del cierre.
• Resorte del martillo;
• Resorte del extractor;
a) Cargador
Seguir instrucciones adicionales de manutención y limpieza,
cuando existan, de acuerdo con indicaciones específicas de la
corporación o academia.
IMPORTANTE:IMPORTANTE:

109 SIEMPRE DEJE EL ARMA DIRIGIDA A UN LUGAR SEGUROY EL DEDO LEJOS DEL GATILLO
MONTAJE
El conjunto del cierre/resorte debe estar
completamente insertado en la caja del cierre,
es decir, cierre apoyado en el cañón. El martillo
debe ser activado.
ATENCIÓN:ATENCIÓN:
El reensamblaje de la subametralladora SMT/CTT debe ser realizada
siguiendo el orden inverso del montaje, conforme sigue:
• Introducir el conjunto cierre/resorte recuperador en la caja de
cierre;
• Cerrar la caja de cierre con el cañón apuntado ligeramente hacia
abajo, de
• Inserir el cargador.
• Inserir el perno trasero en la caja de cierre;
• Ciclar el cierre, verificando el correcto montaje del conjunto;
acuerdo con la figura, evitando así que el conjunto del cier-
re/resorte se mueve;

110 SIEMPRE DEJE EL ARMA DIRIGIDA A UN LUGAR SEGUROY EL DEDO LEJOS DEL GATILLO
OPERACIÓN / MANEJO
SELECTOR DE TIRO Y SEGURIDAD
El selector de tiro y seguridad de las subametralladoras SMT y
carabina CTT es ambidextro y posee 4 posiciones con las siguien-
tes funciones:
S (Seguridad): En esta posición, el mecanismo de disparo de la subametrallado-ra/carabina está completamente bloqueada, no permitiendo el disparo. Nota: La posición "S" sólo se puede seleccionar con el martillo armado.
1 (Tiro a tiro): En esta posición la subametralladora/carabina funcionará en el modo semiautomático, o sea, el de tiro intermitente.
2 (Ráfaga limitada): En esta posición la subametralladora/carabina dispara una ráfaga de dos disparos cuando el disparador se mantiene presionado durante todo el ciclo. El arma sigue disparando ráfagas de dos tiros a cada nuevo accionamiento del disparador mientras que se tenga munición en el cargador. Obs: liberando el disparador o quedarse sin municiones en cualquier momento durante el ciclo, los disparos se interrumpirá, pudiendo han hecho solo un disparo. Accionando el disparador, después de esto, el ciclo interrumpido será completa-do, no se inicia un nuevo ciclo. Así, es posible que solamente 1 disparo ocurra. Este efecto no es una falla. El "disparador reflujo" tiene un mecanismo de came que gira continuamente en cada disparo. Basado en la posición del came del desconectador, el primero accionamiento del disparador (después de la selección previa del selector en la posición RÁFAGA LIMITADA) puede realizar uno o dos disparos antes de que el disparador sea accionado nuevamente. Esto sólo ocurrirá en la primera serie con el selector en la posición RÁFAGA LIMITADA.
F (Ráfaga total): En esta posición la subametralladora funcionará en modo automático. El arma irá a disparar mientras se mantenga el disparador accionado.
2
1S
1S
SMT CTT

111 SIEMPRE DEJE EL ARMA DIRIGIDA A UN LUGAR SEGUROY EL DEDO LEJOS DEL GATILLO
CULATA AJUSTABLE
OPERACIÓN / MANEJO
• pulse el clip de reglamento;
• mover la culata hasta la longitud deseada;
• liberar el clip de reglamento.
La culata de la subametralladora puede tener su longitud ajustada de la
siguiente manera:
Para facilitar el transporte de la subametralladora, la culata puede ser
plegada para la derecha presionando la tecla de liberación y plegando la
culata.
La culata permanecerá plegada con auxilio de un resorte. Para retornar
a la posición original, basta aplicarle fuerza suficiente para vencer la
fuerza del resorte hasta el encaje de la culata en la posición original.
NOTA: asegúrese del correcto acoplamiento de la culata en la llave de
desbloqueo.
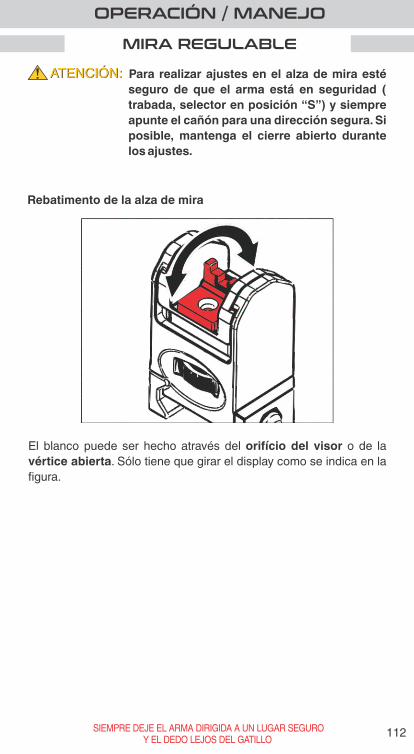
112 SIEMPRE DEJE EL ARMA DIRIGIDA A UN LUGAR SEGUROY EL DEDO LEJOS DEL GATILLO
MIRA REGULABLE
OPERACIÓN / MANEJO
El blanco puede ser hecho através del orifício del visor o de la
vértice abierta. Sólo tiene que girar el display como se indica en la
figura.
Rebatimento de la alza de mira
Para realizar ajustes en el alza de mira esté
seguro de que el arma está en seguridad (
trabada, selector en posición “S”) y siempre
apunte el cañón para una dirección segura. Si
posible, mantenga el cierre abierto durante
los ajustes.
ATENCIÓN:ATENCIÓN:

113 SIEMPRE DEJE EL ARMA DIRIGIDA A UN LUGAR SEGUROY EL DEDO LEJOS DEL GATILLO
MIRA REGULABLE
OPERACIÓN / MANEJO
Para realizar ajustes en el alza de mira esté
seguro de que el arma está en seguridad (
trabada, selector en posición “S”) y siempre
apunte el cañón para una dirección segura. Si
posible, mantenga el cierre abierto durante
los ajustes.
ATENCIÓN:ATENCIÓN:
El alza de mira puede ser ajustada lateralmente con el auxilio del
tornillo de regulación mostrado en la figura al lado.
Ajuste de dirección:
• Para desplazar el visor, y los impactos en el blanco hacia la
derecha, el tornillo de regulación debe ser girado en sentido anti-
horario.
• Para desplazar el visor, y los impactos en el blanco hacia la
izquierda, el tornillo de regulación debe ser girado en sentido
horario.
Nota: 1 click en el tornillo de regulación lateral mueve a 1.15 cm el
punto de impacto en un blanco a 25 m.

114 SIEMPRE DEJE EL ARMA DIRIGIDA A UN LUGAR SEGUROY EL DEDO LEJOS DEL GATILLO
MIRA REGULABLE
OPERACIÓN / MANEJO
Para realizar ajustes en el alza de mira esté
seguro de que el arma está en seguridad (
trabada, selector en posición “S”) y siempre
apunte el cañón para una dirección segura. Si
posible, mantenga el cierre abierto durante
los ajustes.
ATENCIÓN:ATENCIÓN:
• Para elevar el visor de mira, y los impactos, el tornillo de regulación
debe ser girado en sentido anti-horario.
El ajuste de elevación (ajuste vertical) debe ser hecho con el auxilio
del tornillo de regulación mostrado en la figura al lado.
Ajuste de elevación
• Para bajar el visor de mira, y los impactos, el tornillo de regulación
debe ser girado en sentido horario.
Nota: 1 click en el tornillo de regulación vertical mueve a 2.15 cm el
punto de impacto en un blanco a 25 m.

115 SIEMPRE DEJE EL ARMA DIRIGIDA A UN LUGAR SEGUROY EL DEDO LEJOS DEL GATILLO
MUNICIAMENTO
OPERACIÓN / MANEJO
Sostener el cargador con una de las manos y con la otra introducir los
cartuchos haciendoles presión hacia abajo, hasta el máximo de
municiones, indicado en la lateral del cargador;
CUIDADO:CUIDADO: Utilizar solamente munición comercial y del
calibre correspondiente al arma.
Posicionar el Selector de Tiro en la posición "S" (Seguridad);
NOTA: El cargamento de munición arriba do que se indica pueden
dificultar o impedir la introducción correcta del cargador en el arma.

116 SIEMPRE DEJE EL ARMA DIRIGIDA A UN LUGAR SEGUROY EL DEDO LEJOS DEL GATILLO
CARGAMENTO
OPERACIÓN / MANEJO
A. Mantenga el dedo lejos del disparador y el arma dirigida a una
área segura.
C. Inserte el cargador lleno en el alojamiento y asegurarse que
realmente este fijado y retenido por el retén.
D. Con su mano libre, soltar el cierre accionando el retén del cierre o
desplazándolo levemente para atrás con el auxilio de la palanca de
manejo y soltarlo bruscamente;
B. Retire el cargador vacío presionando el retén del cargador.
Condición 1: arma descargada, cierro abierto, cargador vacío y
selector en posición de seguridad “S”.
NO CONDUCIR la palanca de manejo durante esta operación, ya que
esto puede resultar en fallas en el cargamento.
ATENCIÓN:ATENCIÓN:
El arma está cargada y lista para seguir disparando.

117 SIEMPRE DEJE EL ARMA DIRIGIDA A UN LUGAR SEGUROY EL DEDO LEJOS DEL GATILLO
RECARGAMENTO
OPERACIÓN / MANEJO
B. Retire el cargador presionando el retén del cargador (el cargador
puede ser lleno o vacío).
C. Inserte el cargador lleno en el alojamiento y asegurarse que
realmente este fijado y retenido por el retén.
A. Mantenga el dedo lejos del disparador y el arma dirigida a una
área segura.
Condición 2: arma cargada (munición en la recamara), cierro
cerrado, cargador insertado y selector de tiro en la posición de
seguridad “S”.
El arma está cargada y listo para seguir disparando.
ATENCIÓN:ATENCIÓN:

118 SIEMPRE DEJE EL ARMA DIRIGIDA A UN LUGAR SEGUROY EL DEDO LEJOS DEL GATILLO
APUNTANDO
EL OBJETIVO CORRECTO
VISADAS INCORRECTAS
Punto de impacto central
ATENCIÓN:ATENCIÓN:
Disparo desviado abajo y a la izquierda
OPERACIÓN / MANEJO
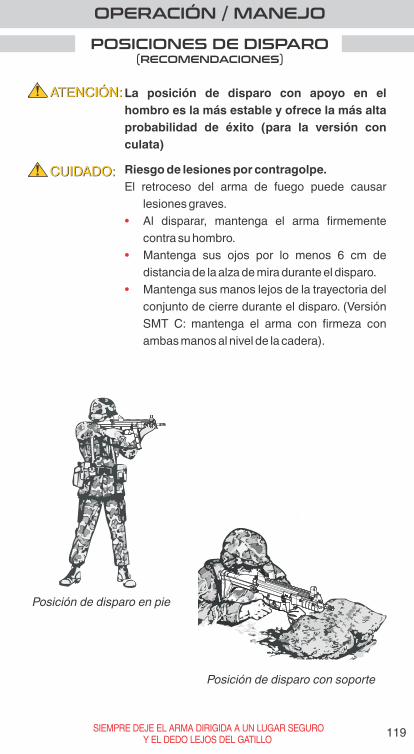
119 SIEMPRE DEJE EL ARMA DIRIGIDA A UN LUGAR SEGUROY EL DEDO LEJOS DEL GATILLO
POSICIONES DE DISPARO(RECOMENDACIONES)
OPERACIÓN / MANEJO
ATENCIÓN:ATENCIÓN: La posición de disparo con apoyo en el
hombro es la más estable y ofrece la más alta
probabilidad de éxito (para la versión con
culata)
CUIDADO:CUIDADO:
• Mantenga sus ojos por lo menos 6 cm de
distancia de la alza de mira durante el disparo.
• Mantenga sus manos lejos de la trayectoria del
conjunto de cierre durante el disparo. (Versión
SMT C: mantenga el arma con firmeza con
ambas manos al nivel de la cadera).
El retroceso del arma de fuego puede causar
lesiones graves.
Riesgo de lesiones por contragolpe.
• Al disparar, mantenga el arma firmemente
contra su hombro.
Posición de disparo en pie
Posición de disparo con soporte
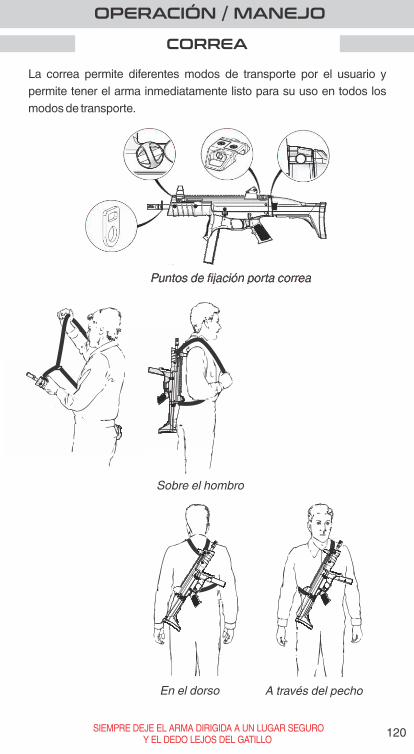
120 SIEMPRE DEJE EL ARMA DIRIGIDA A UN LUGAR SEGUROY EL DEDO LEJOS DEL GATILLO
CORREA
OPERACIÓN / MANEJO
La correa permite diferentes modos de transporte por el usuario y
permite tener el arma inmediatamente listo para su uso en todos los
modos de transporte.
Sobre el hombro
En el dorso A través del pecho

121 SIEMPRE DEJE EL ARMA DIRIGIDA A UN LUGAR SEGUROY EL DEDO LEJOS DEL GATILLO
FALLAS: CAUSAS Y SOLUCIONES
OPERACIÓN / MANEJO
FallaCau
saSo
lució
n
Cargad
or n
o está b
ien co
nectad
o.
Asegú
rese de q
ue el co
rrecta
instalació
n d
el cargado
r.
Cargad
or co
n d
efecto.
Utilizar o
tro cargad
or.
Recâm
ara sucia.
Descargar el arm
a. Limp
iar la
recámara.
Cartu
cho
defo
rmad
o.
Utilizar o
tro cartu
cho
.
Cartu
cho
no
disp
aró.
Mu
nició
n d
efectuo
sa.
Espere p
or lo
men
os 1
min
uto
.
Desm
un
iciar el arma. N
o u
tilice los
cartuch
os q
ue h
an fracasad
os.
El cierre no
se abrió
desp
ués d
e
disp
arar.M
un
ición
defectu
osa.
Desm
un
iciar el arma. Lim
piar si es
necesario
. Enviar a la asisten
cia
técnica.
Recám
ara sucia.
Descargar el arm
a. Limp
iar la
recámara.
Mu
nició
n cargad
a inco
rrectamen
te.U
tilizar otro
cartuch
o.
Mu
nicio
nes fu
e alojad
a en el
cañó
n.
Uso
de m
un
ición
inap
rop
iada.
Enviar a la asisten
cia técnica.
Cartu
cho
no
es expu
lsado
.
El cartuch
o n
o se carga en
la
recámara.
Cargad
or n
o alim
enta la recám
ara.

122 SIEMPRE DEJE EL ARMA DIRIGIDA A UN LUGAR SEGUROY EL DEDO LEJOS DEL GATILLO
ESPECIFICACIONES
Semi-autom
ático, Ráfaga 2 tiros, A
utomático
SM
T9 S
MT40
SM
T9 C
9 mm
.40 S&W
9 mm
10 ou 3010, 15 ou 30
10 ou 30
6 estrias la derecha, paso 250 m
mpaso 420 m
m
30t - 3,550 kg10t - 3,480 kg
30t - 3,550 kg15t - 3,480 kg10t - 3,480 kg
30t - 2,700 kg10t - 2,630 kg
30t - 3,920 kg10t - 3,600 kg
30t - 4,075 kg15t - 3,740 kg10t - 3,655 kg
30t - 3,070 kg10t - 2,750 kg
Esfuerzo en el disparador
Cad
encia (m
odo ráfaga)
(*) La combinación de m
odos puede variar de acuerdo con la versión del arma.
3,350 kg
Riel Picatinny (M
IL-STD-1913) para accesorios
166 mm
410 mm
200 mm
475 mm
(con culata plegada)681 até 760 m
m (con culata extendida)
aproximadam
ente 750 tiros / minuto
270 mm
2,5 kg
(3,8 +- 0,8) kgf
233 mm
- sin cargador293 m
m - con cargador 30 tiros
75 mm
- sin riel lateral Picatinny80 m
m - con riel lateral Picatinny
SM
T40 C
.40 S&W
10, 15 ou 30
30t - 2,700 kg15t - 2,630 kg10t - 2,630 kg30t - 3,225 kg15t - 2,890 kg10t - 2,805 kg
475 mm
(con culata plegada)681 até 760 m
m (con culata extendida)
Semi-autom
ático
233 mm
- sin cargador 302 m
m - con cargador 30 tiros
233 mm
- sin cargador 293 m
m - con cargador 30 tiros
233 mm
- sin cargador 302 m
m - con cargador 30 tiros
Blow
back, disparos con cierre cerrado
6 estrias la derecha, paso 250 m
m6 estrias la derecha,
6 estrias la derecha, 6 estrias la derecha,
paso 420 mm
paso 420 mm
Mod
elo
Calib
re
Funcionamento
Mod
os de d
isparo (*)
Cap
acidad
Longitud del cañón
Estrias del cañón
Longitud total (**)
Distancia entre m
iras
Peso sin cargador (***)
Peso con cargador vacío (***)
Peso con cargador lleno (***)
Otros
Altura
Ancho
CTT40 C
.40 S&W
10, 15 ou 30
30t - 4,075 kg15t - 3,740 kg10t - 3,655 kg
200 mm
3,350 kg
N/A
(**) tolerancia general ±5 m
m(***) tolerancia de peso ±
200 g
30t - 3,550 kg15t - 3,480 kg10t - 3,480 kg

123 SIEMPRE DEJE EL ARMA DIRIGIDA A UN LUGAR SEGUROY EL DEDO LEJOS DEL GATILLO
DESPIECE
11
10
10
12
13
14
13
15
16
17
18
19
20
21
2218
23
24
25
26
27
28
29
30
31
32
33
34
35
36
37
38
39
40 4
1
42
43
44
45
46
47
48
56
57
586
7
66
68
69
71
72
7374
75
76
77
7879
8081
82
13
83
84
85
86
5554
70
87
1
2
4 5 6
3
4
5
6
78
9
49
50
51
52
53
59
60
60
61
62
62
63
64
65
88
89
90
91
92
5455

124 SIEMPRE DEJE EL ARMA DIRIGIDA A UN LUGAR SEGUROY EL DEDO LEJOS DEL GATILLO
LISTA DE PIEZAS
11 SOPORTE DEL CAÑÓN
22 RESORTE DE LA BISAGRA
24 CULATA
27 SOLEIRA
6 CUBRELLAMAS
26 RESORTE DEL GATILLO DE TRABAMIENTO TELESCÓPICO
14 EXPULSOR
35 BOTÓN TRABA DEL ABATIMIENTO
13 TORNILLO DEL PREPARADOR
38 RESORTE RECUPERADOR
18 TUERCA DEL SOPORTE PORTA CORREA
41 PERCUTOR
15 CAJA DE LA CULATA
44 PASADOR DEL EXTRACTOR
19 AMORTIGUADOR
31 EJE DEL GATILLO CORREDIZO
2 ALZA DE MIRA DE ACERO
32 GATILLO CORREDIZO
50 TRABA DEL PASADOR DA PORTA CORREA
8 PORTA CORREA
12 TRABA DEL PREPARADOR
21 PERNO DE LA BISAGRA DE LA CULATA
7 TUERCA DEL CUBRELLAMAS
5 BOTÓN DEL PREPARADOR
10 TORNILLO DE FIJACIÓN SOPORTE CAÑÓN
16 TORNILLO DEL SOPORTE PORTA CORREA
3 TORNILLO DEL PREPARADOR
1 PUNTO DE MIRA DE ACERO
20 SOPORTE DE LA CULATA
4 SOPORTE DEL PREPARADOR
9 CAÑÓN
17 SOPORTE DE PORTA CORREA
23 RAÍZ DE LA CULATA
25 BUCHA INSERTO ROSCADO
28 TORNILLO DE LA SOLEIRA 29 BOTÓN DE TRABAMIENTO TELESCÓPICO 30 EJE DEL BOTÓN DE TRABAMIENTO TELESCÓPICO
33 EJE DEL BOTÓN DE ABATIMIENTO 34 RESORTE DE LA TRABA DE LA CULATA
36 PARADA DEL SOPORTE DE LA CULATA 37 TORNILLO DEL RESORTE RECUPERADOR
39 GUIA DEL RESORTE RECUPERADOR 40 PONTEIRA DEL GUIA DEL RESORTE RECUPERADOR
42 RESORTE DEL PERCUTOR43 CIERRE
45 EXTRACTOR 46 RESORTE DEL EXTRACTOR 47 ANILLO48 PASADOR RETÉN DEL PERCUTOR 49 PASADOR DEL SOPORTE PORTA CORREA
52 GUARDAMÃNO 53 EJE DEL RETÉN DEL CIERRE 54 RETÉN DEL PASADOR FIJADOR 55 RESORTE DEL PASADOR FIJADOR DE LA CULATA
51 RESORTE TRABA DEL PASADOR PORTA CORREA
56 TAPA DEL PASADOR 57 RESORTE DE RETENCIÓN DEL PERNO TRABA
74 RESORTE DEL MARTILLO BURST
84 RESORTE DEL CLICK SELECTOR
90 CHAPA DEL RESORTE DEL CARGADOR
72 TRINQUETE
64 RESORTE DEL RETÉN DEL CARGADOR
69 PASADOR FIJADOR DEL MECANISMO DEL GATILLO
73 MARTILLO BURST
77 DESCONECTOR FULL
79 RESORTE DEL GATILLO
83 SELECTOR DERECHO
91 TAPA DEL FONDO DEL CARGADOR 92 CUERPO DEL CARGADOR
70 MANGO
87 CAJA DE DISPOSITIVO DE DISPARO
82 CLICK DEL SELECTOR
75 DISPARADOR
71 RESORTE DEL TRINQUETE
65 RETÉN DEL CARGADOR
85 EJE DEL MARTILLO Y GATILLO
89 RESORTE DEL CARGADOR 88 TRANSPORTADOR
63 EJE DEL RETÉN DEL CARGADOR
59 RETÉN DERECHO DE LA CORREDERA
66 TORNILLO FIJ. DE LA EMPUÑADURA 67 ARANDELA DENTADA EXTERNA
60 RESORTE DEL RETÉN DE LA CORREDERA
58 PERNO TRABA DEL BASCULAMIENTO
61 RETÉN IZQUIERDO DE LA CORREDERA
68 EMPUÑADURA
76 RESORTE DEL DISPARADOR
78 DESCONECTOR BURST
80 RESORTE DEL DESCONECTOR
62 PASADOR FIJADOR DE LA CAJA
81 GATILLO BURST
86 SELECTOR IZQUIERDO

125 SIEMPRE DEJE EL ARMA DIRIGIDA A UN LUGAR SEGUROY EL DEDO LEJOS DEL GATILLO
ASISTENCIA TÉCNICA
En caso de problema, por favor contactar el distribuidor más cercano para reparar su arma de fuego o con la fábrica.
TAURUS ARMAS S.A.
Av. São Borja, 2181 – Prédio A
São Leopoldo/Distrito Industrial
Rio Grande do Sul
93.032-000
Brasil
E-mail: [email protected]
Phone: (51)30213000

126 SIEMPRE DEJE EL ARMA DIRIGIDA A UN LUGAR SEGUROY EL DEDO LEJOS DEL GATILLO
CERTIFICADO DE GARANTÍA
Asumimos garantía cuanto a la calidad de las armas Taurus, comprometiéndonos corregir todos los eventuales defectos de fabricación o de material, por el plazo de un año tras su compra.No asumimos responsabilidad alguna, por anormalidad proveniente de malo uso, falta de conservación, municiones inadecuadas o recargadas y de desgaste normal que surjan por el uso de la misma.

127 SIEMPRE DEJE EL ARMA DIRIGIDA A UN LUGAR SEGUROY EL DEDO LEJOS DEL GATILLO
NOTAS
___________________________________________________________________________________________________________________________________________________________________________________________________________________________________________________________________________________________________________________________________________________________________________________________________________________________________________________________________________________________________________________________________________________________________________________________________________________________________________________________________________________________________________________________________________________________________________________________________________________________________________________________________________________________________________________________________________________________________________________________________________________________________________________________________________________________________________________________________________________________________________________________________________________________________________________________________________________________________________________________________________________________________________________________________________________________________________________________________________________________________________________________________________________________________________________________________________________________________________________________________________________________________________________________________________________________________________________________________________________________________________________________________________________________________________________________________________________________________________________________________________________________________________________________________________________________________________________________________________________________________________________________________________________________________________________________________________________________________________________________________________________________________________________________________________________________________________________________________________________________________________________________________________________________________________________________________________________________________________________________________________________________________________________________________________________________________________________________________________________________________________________________________________________________________________________________________________________________________________________________________________________________________________________________________________________________________________________________________________________________________________________________________________________________________________________________________________________________________________________________________________________________________________________________________________________________________________________________________________________________________________________________________________________________________________________________________________________________________________________________________________________________________________________________________________________________________________________________________________________________________________________________________________________________________________________________________________________________________________________________________________________________________________________________________________________________________________________________________________________________________________________________________________________________________________________________________________________________________
127

www.taurusarmas.com.br
BRBRBR
CertificadoNBR ISO 9001
TAURUS ARMAS S.A.Av. São Borja, 2181 – Prédio ASão Leopoldo/Distrito IndustrialRio Grande do Sul93.035-411BrasilE-mail: [email protected]: (51)30213000
ESSE MANUAL SEMPRE DEVE ACOMPANHAR A ARMA.
THIS MANUAL MUST ALWAYS ACCOMPANY THE GUN.
ESTE MANUAL SIEMPRE DEBE ACOMPAÑAR EL ARMA.
30004998 REV 01-2019
IMPORTANTE: NÃO DESCARTE dO NOT THROW AWAYIMPORTANT:
NO DESCARTEIMPORTANTE: