manual of gynecological laparoscopic surgery - WebSurg
257
-
Upload
khangminh22 -
Category
Documents
-
view
3 -
download
0
Transcript of manual of gynecological laparoscopic surgery - WebSurg


MANUAL OF GYNECOLOGICALLAPAROSCOPIC SURGERY
IInd Edition
Prof. Luca MENCAGLIA, M.D.Scientifi c Head of the “Centro Oncologico Fiorentino” (CFO),
Florence, I taly
Dr. Luca MINELLI, M.D.Head of Department of Gynecology and Obstetrics
“Sacro Cuore” General Hospital, Negrar, Italy
Prof. Arnaud WATTIEZ, M.D.Head of Department of Gynecology and Obstetrics
Faculty of Medicine, University Hospital of Strasbourg, France
Co-authors:
Elizabet ABDALLAPaulo AYROZA
Department of Gynecology and Obstetrics,Medical School of the Santa Casa University
of São Paulo, Brazil
Fabrizio BARBIERIStefano LANDI
Department of Gynecology and Obstetrics,“Sacro Cuore” General Hospital, Negrar, Italy
Cristiana BARBOSASabrina CONSIGLIEmmanuel LUGO
Centro Oncologico Fiorentino,Florence, Italy
Fabio IMPERATOMario MALZONI
Malzoni Medical Center “Villa dei Platani”,Avellino, Italy
Carlo TANTINIDepartment of Gynecology and Obstetrics,
Hospital of Cecina, Italy
Daiana TONELLOTTOBarra D’Or Hospital, Rio de Janeiro, Brazil
Beatrice VIDELALeopoldo Carlos VIDELACallao Surgical Institute,Buenos Aires, Argentina

Manual of Gynecological Laparoscopic Surgery4
Please note:Medical knowledge is constantly changing. As new research and clinical experience broaden our knowledge, changes in treatment and therapy may be required. The authors and editors of the material herein have consulted sources believed to be reliable in their efforts to provide information that is complete and in accordance with the standards accepted at the time of publication. However, in view of the possibility of human error by the authors, editors, or publisher of the work herein, or changes in medical knowledge, neither the authors, editors, publisher, nor any other party who has been involved in the preparation of this work, can guarantee that the information contained herein is in every respect accurate or complete, and they cannot be held responsible for any errors or omissions or for the results obtained from use of such information. The information contained within this brochure is intended for use by doctors and other health care professionals. This material is not intended for use
Manual of Gynecological Laparoscopic SurgeryIInd Edition
Prof. Luca MENCAGLIA, M.D.Scientifi c Head of „Centro Oncologico Fiorentino“, Florence, Italy
Dr. Luca MINELLI, M.D.Head of Department of Gynecology and Obstetrics,“Sacro Cuore” General Hospital, Negrar, Italy
Prof. Arnaud WATTIEZ, M.D.Head of Department of Gynecology and Obstetrics,Faculty of Medicine, University Hospital of Strasbourg, Strasbourg, France
© 2013 ®, Tuttlingen, GermanyPrinted in Germany, ISBN 978-3-89756-405-3P.O. Box, D-78503 Tuttlingen, GermanyPhone: +49 7461/14590Fax: +49 7461/708-529E-mail: [email protected]
Editions in languages other than English and German are in preparation. For up-to-date information, please contact
®, Tuttlingen, Germany, at the address given above.
Typesetting and color image processing:®, 78532 Tuttlingen, Germany
Printed by:Straub Druck+Medien AG, 78713 Schramberg, Germany
Correspondence Addresses:Prof. Dr. Luca MencagliaCentro Oncologico Fiorentino,Via Ragionieri, 101, 50019 Sesto Fiorentino, Firenze, ItalyPhone: +39/05553010E-mail: info@centroncologicofi orentino.itWeb: www.centrocologicofi orentino.it
Dr. Luca MinelliDirettore U.O. di Ginecologia e Ostetricia,Ospedale “Sacro Cuore”, Negrar – VeronaVia Don A. Sempreboni, 537024 Negrar (VR), Italy
Prof. Dr. Arnaud WattiezIRCAD/EITS, Hôpitaux Universitaires de StrasbourgService de Gynécologie-Obstétrique1, place de l‘Hôpital67091 Strasbourg Cedex, France
All rights reserved. No part of this publication may be translated, reprinted or reproduced, transmitted in any form or by any means, electronic or mechanical, now known or hereafter invented, including photocopying and recording, or utilized in any information storage or retrieval system without the prior written permission of the copyright holder. 01
.13-
0.5
as a basis for treatment decisions, and is not a substitute for professional consultation and/or use of peer-reviewed medical literature.Some of the product names, patents, and registered designs referred to in this booklet are in fact registered trademarks or proprietary names even though specifi c reference to this fact is not always made in the text. Therefore, the appearance of a name without designation as proprietary is not to be construed as a representation by the publisher that it is in the public domain.

Manual of Gynecological Laparoscopic Surgery 5
01.1
3-0.
5
Contents
I Instrumentation and Operating Room SetupCristiana Barbosa and Luca Mencaglia . . . . . . . . . . . . . . . . . . . . . . . . . . . . . . . . . . . . . . . . . . . 7
II Use of Electricity in LaparoscopyPaulo Ayroza and Elizabet Abdalla . . . . . . . . . . . . . . . . . . . . . . . . . . . . . . . . . . . . . . . . . . . . . . . 39
III Ergonomics in LaparoscopyArnaud Wattiez. . . . . . . . . . . . . . . . . . . . . . . . . . . . . . . . . . . . . . . . . . . . . . . . . . . . . . . . . . . . . . . 47
IV Gynecologic Laparoscopic Surgical AnatomyCristiana Barbosa, Arnaud Wattiez and Luca Mencaglia. . . . . . . . . . . . . . . . . . . . . . . . . . . . . . . 57
V Suturing Techniques in Gynecologic LaparoscopyDaiana Tonellotto, Paulo Ayroza, Arnaud Wattiez and Luca Mencaglia . . . . . . . . . . . . . . . . . . . 73
VI The Role of Diagnostic Laparoscopy and Transvaginal Endoscopy (TVE) in Infertilityand Assisted Reproduction Technology (ART)Emmanuel Lugo, Carlo Tantini and Luca Mencaglia . . . . . . . . . . . . . . . . . . . . . . . . . . . . . . . . . . 87
VII Techniques of Laparoscopic Tubal SterilizationEmmanuel Lugo and Luca Mencaglia . . . . . . . . . . . . . . . . . . . . . . . . . . . . . . . . . . . . . . . . . . . . . 97
VIII Laparoscopic Tubal SurgeryEmmanuel Lugo and Luca Mencaglia . . . . . . . . . . . . . . . . . . . . . . . . . . . . . . . . . . . . . . . . . . . . . 103
IX Laparoscopic Management of Ectopic PregnancyCristiana Barbosa and Luca Mencaglia . . . . . . . . . . . . . . . . . . . . . . . . . . . . . . . . . . . . . . . . . . . 115
X Laparoscopic Surgery for Symptomatic EndometriosisLuca Mencaglia, Arnaud Wattiez and Sabina Consigli . . . . . . . . . . . . . . . . . . . . . . . . . . . . . . . . 123
XI Laparoscopic Management of Deep EndometriosisLuca Minelli and Stefano Landi . . . . . . . . . . . . . . . . . . . . . . . . . . . . . . . . . . . . . . . . . . . . . . . . . . 129
XII Technique of Laparoscopic MyomectomyStefano Landi and Luca Minelli . . . . . . . . . . . . . . . . . . . . . . . . . . . . . . . . . . . . . . . . . . . . . . . . . . 139
XIII Laparoscopic Treatment of Adnexal MassesMario Malzoni and Fabio Imperato . . . . . . . . . . . . . . . . . . . . . . . . . . . . . . . . . . . . . . . . . . . . . . . 151
XIV Laparoscopic Management of Borderline Ovarian TumorsPaulo Ayroza and Elizabet Abdalla . . . . . . . . . . . . . . . . . . . . . . . . . . . . . . . . . . . . . . . . . . . . . . . 165
XV Laparoscopic HysterectomyArnaud Wattiez. . . . . . . . . . . . . . . . . . . . . . . . . . . . . . . . . . . . . . . . . . . . . . . . . . . . . . . . . . . . . . . 173
XVI Laparoscopic Surgery of the Pelvic FloorArnaud Wattiez. . . . . . . . . . . . . . . . . . . . . . . . . . . . . . . . . . . . . . . . . . . . . . . . . . . . . . . . . . . . . . . 187
XVII Laparoscopic Surgical Staging of Endometrial CarcinomaFabrizio Barbieri and Luca Minelli . . . . . . . . . . . . . . . . . . . . . . . . . . . . . . . . . . . . . . . . . . . . . . . . 201
XVIII Laparoscopic Pelvic and Lumbo-aortic LymphadenectomyFabrizio Barbieri and Luca Minelli . . . . . . . . . . . . . . . . . . . . . . . . . . . . . . . . . . . . . . . . . . . . . . . . 207
XIX Complications in Laparoscopic SurgeryLeopoldo Carlos Videla Rivero and Beatrice Videla Rivero . . . . . . . . . . . . . . . . . . . . . . . . . . . . 213
Recommended Set for Gynecological Laparoscopic Surgery . . . . . . . . . . . . . . . . . . . . . . . 227


Manual of Gynecological Laparoscopic Surgery30
The AUTOCON® II 400 is a versatile, state-of-the-art high frequency electrosurgical unit designed for both unipolar and bipolar electrosurgical applications. The opera tional parameters of various cutting and coagulation settings can be preselected on the frontpanel display, thus providing the user with a highly accurate and reproducible method to obtain good results. Exact fi ne-tuning in 1 W-steps is enabled for procedures that require maximum precision at very low power. Up to 8 hemostatic effects for unipolar and bipolar cutting, each with up to 370 W output, permit optimal control of coagulation and the intended surgical effect. In the bipolar coagulation mode, the autostart function auto-matically activates the coagulation current as soon as the electrode has touched the tissue with both branches. The various safety circuits of the unit provide a very high level of safety for both the patient and staff. Software- supported test programs ensure easy and rapid servicing. The color touch-screen with its modern and user-friendly design allows for easy operability, maintenance and cleaning (Fig. 47).
12.0 High FrequencyElectrosurgical Units
The most commonly used type of laser is the CO2 laser, which is also considered to be the most precise which causes the least thermal injury. Even though the CO2 laser is considered to be highly effi cient in terms of tissue vaporization, cutting or excision, but has only minimal coagulating properties. Lasers with a short wavelength such as Argon, Neodymium:Yttrium-Aluminum Garnet (Nd:YAG) and KTP 532 lasers (Potassium Titanyl Phosphate; KTiOPO4, KTP) have good coagulating properties but are less effi cient in terms of vaporization. The degree and extent of thermal damage produced by laser irradiation depends on the structure, water content, pigmen-tation and the state of tissue perfusion. In addition, user-determined operational parameters can have a considerable
impact on the outcome of the laser treatment, such as the inherent absorption characteristics / wavelength of the laser system specifi cally selected for the intended application, spot size, power density, mode of delivery (contact/ no contact) and exposure time (intermittent or continuous).
In summary, each of the various laser systems available on the market has a specifi c clinical application. Laser generators are much more expensive than electrosurgical systems, and there are many safety aspects, such as the potential risk of cumulative thermal effects, burns due to inappropriate expo-sure and retinal damage, that speak against the widespread use of laser technology.
13.0 Laser Systems
The use of ultrasonic energy for cutting and coagulation is an alternative to electrosurgery. Ultrasound is the unique energy form that allows both cutting and coagulation of tissues without exposing the patient to the risks associated with the application of high frequency current. The major benefi t of this alternative technique is that only a minor degree of lateral heat-induced tissue damage occurs. Ultrasonic systems that are operated at low power settings cleave water-containing tissues through cavitation sparing organized structures of low water content without coagulating vessels (frequently applied
in liver surgery). High power settings can be applied to cleave the loose surrounding tissues by frictional heat while simulta-neously coagulating the wound margins (frequently applied in colon surgery). High-power ultrasonic dissection can cause collateral damage by excessive generation of heat. However, in view of the high level of operational reliability and safety feasible with this alternative technology, the anticipated advances in the further development will certainly make it a valuable tool in the future.
14.0 Ultrasonic Dissection and Coagulation Systems
Fig. 47The high frequency electrosurgical unit AUTOCON® II 400,(KARL STORZ Tuttlingen, Germany).


Manual of Gynecological Laparoscopic Surgery32
Advanced laparoscopic procedures can be performed safely and effectively only if the surgeon or gynecologist has gone through the initial stages of surgical training and has gained an adequate level of profi ciency in intracorporeal suturing and knot tying techniques. Laparoscopic suturing and knot tying should be practiced on a good quality endotrainer with an experienced tutor. There are two suturing methods: the intra-corporeal and the extracorporeal technique. The major steps of the intracorporeal technique are: introduction of the needle and intraabdominal suturing, placement of suture ligatures, knot tying, either extracorporeal or intracorporeal.
Intracorporeal suturing techniques involve that each knot is formed and tied inside the cavity with the aid of needle holders. There are many different types of needle holders that essentially vary in handle design and tip confi guration (Figs. 51–52). In our opinion, intracorporeal knots should be reserved to experienced surgeons, because advanced procedures require a good command of microsurgical suture techniques. Once an adequate level of profi ciency in intracor-poreal suture and ligature has been achieved, the surgeon’s conversion rate will certainly decrease.
16.0 Suture Techniques
Fig. 52aVarious needle holders with curved jaws.
Fig. 52bThe KOH Macro Needle Holder with curved jaws, ergonomic pistol handle and disengageable ratchet.
Fig. 51The SZABO-BERCI Needle Holder PARROT-JAW® with straight handle and adjust able ratchet.
ba

Manual of Gynecological Laparoscopic Surgery 33
As the term denotes, extracorporeal suturing and knot tying is performed outside the body cavity. Once the tissue is sutured, the needle is removed through the trocar cannula and the suture is completed extracorporeally. In this case, a knot tier is required. Even though pre-tied loops are available in the market, surgeons-in-training should learn the basic skills of extracorporeal knot tying. For extracorporeal knotting various types of knot pushers can be used. Knot pushers are of either closed-jaw or of open-jaw type (Fig. 53). For a trainee who has strong convictions to pursue a surgic al career it is essential to make every effort to perfect his/her skills to achieve an adequate level of profi ciency in suturing techniques. The correct extracorporeal Roeder knot is very useful. For major or safety sutures, e.g., for ligature of a uterine vascular pedicle in hysterectomy, the extracorporeal Roeder knot is necessary. To push the knot, a specifi c open-jaw knot pusher is used. The endoloop is the oldest device used for laparoscopic-guided ligature; it is a loop with a pre-formed slipknot that can be positioned around the structure that needs to be removed.
In some cases, a laparoscopic clip applicator may be neces-sary. In minimally invasive surgery, surgical clips are used for tissue approximation. Most of them are made of pure titanium or of titanium alloys. Surgical clips are easy to apply and can be left inside the abdominal cavity. After a few weeks, the clip is covered by fi brous tissue. The jaw of the clip appli-cator should be located perpendicular to the wound site before deploying the clip, the surgeon should take care that both jaws are in view. Two clips are usually deployed over the structure that needs to be secured. One clip is deployed over the tissue which the surgeon wants to remove to prevent spillage of fl uid. The clips should not be applied very close to each other.
Disposable extraction bags are very important to prevent contamination of the abdominal wall during extraction of specimens from the abdominal cavity (Fig. 54). Extraction protected by an endoscopic bag is mandatory to obviate the risk of benign dissemination (e.g., in the case of endometriosis, ectopic pregnancy, and benign ovarian cysts), spillage during removal of a benign teratoma, risks of infection (pyosalpinx), and risks of malignant dissemination (suspected cysts). The extraction bag must be very strong so that it can resist the force that is exerted by the surgeon while pulling it through a small opening.
Fig. 53Knot tier for extracorporeal knotting. The close-up views show the various types of open-end, and closed-end tip design.
Fig. 54Disposable extraction bag.
17.0 Extraction Bag

Manual of Gynecological Laparoscopic Surgery34
An electronic or manual morcellator can be used for piecemeal removal of large specimens, such as fi broids or the uterus during laparoscopic hysterectomy, and particularly, supracervical hysterectomy (Figs. 55a, b). The fully auto clavable ROTOCUT G1 morcellator is an effi cient and time- saving alternative to previous systems. Rapid removal of large tissue segments is facilitated by the highly effi cient cutting performance of the disposable cutting blades, which can be changed intraoperatively. The blades are available in sizes of 12-mm or 15-mm. Optimal weight distribution and direct activation ensure a straight-forward and smooth operation. A specially designed trocar sleeve protects tissue from inadvertent blade contact. The powerful ROTOCUT G1has a direct drive motor that produces a maximum speed of 1200 rpm, minimizing the amount of effort required of surgeons and reducing procedure times. The control unit that optimizes Rotocut’s performance is the UNIDRIVE®
S III, which is compatible with all previous generations of KARL STORZ morcellators.
The removal of large portions of tissue may also be accom-plished with the aid of endoscopic cold knives introduced through a minimal abdominal incision or vaginal puncture. These shielded blade carriers permit endoscopic insertion and application of cold knives in the abdominal cavity. There is a great variety of extraction devices on the market. One, that should be mentioned is the vaginal extractor. It allows intra-abdominal specimens to be retrieved via the vagina, while maintaining the integrity of the pneumoperitoneum and, therefore, endoscopic-assisted retrieval under optimal viewing conditions. During laparoscopic myomectomy, it is essential to have a screw- or spiral-tipped instrument that allows for proper fi xation and removal of subserous or intra-mural fi broids (Fig. 56).
18.0 Morcellator Systems
Fig. 55 aThe morcellator system ROTOCUT G1, laparoscopy set.
Fig. 55 bThe hollow shaft motor of the ROTOCUT G1 mocellator is used in conjunction with the control unit UNIDRIVE® S III.
Fig. 56Myoma fi xation instrument with screw-shaped tip.

Manual of Gynecological Laparoscopic Surgery 35
Various instruments and auxiliary devices may be used for mobilizing or stabilizing the uterus and adnexae during both diagnostic and operative laparoscopic surgery.
A uterine manipulator is used in the majority of advanced laparoscopic-assisted gynecological procedures, be it for
diagnostic assessment or surgical interventions. The uterine manipulator is of crucial importance because it facilitates visualization of the pelvic organs and permits endoscopic ally-controlled injection of methylene blue in the case of chro mo -pertubation for assessment of tubal patency (Figs. 57–59).
19.0 Uterine Manipulators
Fig. 57The TINTARA uterine manipulator (KARL STORZ Tuttlingen, Germany).
Fig. 59The CLERMONT-FERRAND uterine manipulator(KARL STORZ Tuttlingen, Germany).
Fig. 58Proper placement of the uterine manipulator.

Manual of Gynecological Laparoscopic Surgery36
20.0 Operating Room Setup and Preparation of the Patient
Fig. 60Schematic drawing of the room setup illustrating the optimal arrangement of the surgical team and equipment during gynecologicallaparoscopic procedures. ! – operating surgeon; @ – fi rst assistant; # – second assistant; $ – scrub nurse; % – anaesthesiologist.
Endoscopic surgery requires a perfect technological environ-ment. Knowledge of the instruments and operating room setup is essential for optimizing the workfl ow of endoscopic procedures and the facilitating the interaction between surgeons, medical personnel, and all areas inside and outside of the hospital. A well organized operating room is not only an essential prerequisite for the successful outcome of lapa-roscopy, but also reduces costs. The operat ing room should be large enough to accommodate the necessary equipment. Before starting surgery, it is necessary to check the instru-mentation, particularly the insuffl ation unit, as well as the high frequency surgery unit and the suction-irrigation system. The number of persons forming the surgical team depends on the surgical indication. As a rule, one assistant and one surgical nurse are suffi cient. Certain procedures require an additional assistant (Fig. 60). It is essential that all members of the surgical team (including the surgeon) be trained and capable of solving all technical problems which could occur before and during the intervention.
Patients must be informed of the therapeutic benefi ts and all potential risks (informed consent). The possibility that a laparotomy may be required must always be mentioned. Intestinal preparation is often useful. Bowel preparation can minimize the need for an accessory port to retract the bowel. Its purpose is to empty the small intestine and facilitate vision by fl attening the intestinal loops and pushing them out of the way. In all cases associated with an increased inherent risk of intestinal injury is (endometriosis of the rectovaginal septum or major adhesiolysis), preoperative bowel preparation is more complete and resembles the preparatory measures applied prior to bowel surgery. Before being admitted to the operating room, the patient should always void. The full urinary bladder may be inadvertantly perforated during insertion of the Veress needle or trocar. If gynecological surgery or any general lower abdominal surgery is planned (such as hernia repair or adhesiolysis) it is advisable to insert a Foley catheter. If any upper abdominal procedure has been scheduled, it is good practice to have a nasogastric tube in place.
#
$
!@
%

Manual of Gynecological Laparoscopic Surgery 37
21.0 Patient Positioning
Fig. 61Correct preoperative placement of the patient on the operating table in low dorsolithotomic position.
Fig. 62The legs are gently placed in well-padded boot-type stirrups forroutine deep vein thrombosis prophylaxis.
Fig. 63Placement of the patient in low dorsolithotomic position enables proper manipulation of thelaparoscopic instruments via the accessory ports.
Positioning of the patient is also important for the successful outcome of surgery. The patient is placed in a low dorso-lithotomic position (gynecological position) with her legs positioned to provide vaginal access (Fig. 61). The patient’s legs should be comfortably supported by padded obstetric knee braces or Allen stirrups to minimize the risk of deep vein thrombosis (Fig. 62). The Trendelenburg position should be used only after the main trocar has been inserted, because the Trendelenburg position brings the sacral promontory, and therefore the major vessels (bifurcation of the aorta and left common iliac vein) into the axis of trocar insertion. In gyneco-logical laparoscopic procedures or if laparoscopy is to be performed together with hysteroscopy, the patient should be positioned in the lithotomy position which enables an assis-tant to stand between the patient’s legs allowing for free access to the lower abdomen (Fig. 63). In these procedures, the surgeon needs to use a uterine manipulator for proper visualization of the female reproductive organs.
The assistant seated between the legs of the patient watches the hand movements of the surgeon on the monitor and should maintain traction in the appropriate direction with the handle of the uterine manipulator.
Proper make-up assignement of the surgical team is also a basic prerequisite for the successful outcome of any laparo-scopic operation. In the majority of cases, the surgeon stands on the left side of the patient. A surgeon who is left handed, should stand to the right of the patient during creation of the primary port. This facilitates inserting the Veress nee-dle or primary trocar towards the pelvis with the dominant hand. The camera assistant should be positioned opposite to the surgeon, but it is always recommended to have two video monitors, one for the surgeon, and one for the camera assistant and other members of the surgical team. If only one monitor is available, it should be located between the legs of the patient.

Manual of Gynecological Laparoscopic Surgery38
Professionals in charge of cleaning, decontamination, sterili -zation, and inspection of surgical instruments, devices, and implants should be adequately trained so that they are fully aware of the delicacy and cost of endoscopic equipment. Setting up the operating room prior to surgery includes testing the camera equipment, the light source, the insuffl ation unit and CO2 tanks, the suction-irrigation system and – taking great care – the bipolar and unipolar electro-coagulation system.
Because of the importance of having optimized instrument management quality and economy, KARL STORZ has de veloped the EndoProtect1™ service, consisting of modular services that ensure the optimal deployment of instruments sets in the hospital, the replacement of instruments and their proper and careful handling by personnel. Also a database-supported management and monitoring system is offered for the entire range of instruments in offi ces and hospitals. This new system is the KARL STORZ instrument manage-ment platform, which enables each individual instrument to be accurately registered using a special data matrix code and rapid, error-free identifi cation with a scan camera.
Disposable instruments shall not be resterilized for reuse in laparoscopic surgery because such practice is associated with an elevated risk of pathogen transmission compared to the effectiveness of cleaning and sterilization procedures applied to reusable instruments.
Disposable instruments are not designed to be cleaned in a similar way as their reusable counterparts, e.g., the c series of dismantling instruments. Reusable surgic al instru-ments must be safely cleaned and sterilized immediately after surgery. Instruments must be dismantled prior to cleaning. After decontamination, every small piece and recess must be cleaned and dried with water and compressed air. For lenses and telescopes, alcohol or special soap should be used. The majority of up-to-date instruments are designed for steam heat sterilization (autoclaving). Other validated sterilization procedures currently in use:
• Sterilization via autoclave is the most widely used and inexpensive method. In the case of endoscopes and instru-ments expressly manufactured and sold as autoclavable, sterilization cycles of 121°C for 20 minutes, or 134°C for7 minutes are used.
• Gas sterilization with ethylene oxide is generally considered to be the ideal method of sterilization, because it acts at a relatively low temperature and is not detrimental to endo-scopic instrumentation. Unfortunately, the technique is relatively expensive and time-consuming (72 hours prior to reuse of instruments). Therefore, only a few centers use gas sterilization, because multiple sets of laparoscopic instruments should always be held available.
22.0 Maintenance and Sterilization
Recommended Literature:MENCAGLIA L, WATTIEZ A: Manual of GynaecologicalLaparoscopic Surgery. (2000); Endo-Press® Tuttlingen,Germany
HULKA J, REICH H: Textbook of laparoscopy,Third edition (USA). (2002); 53–56, 69–81, 276–283

Chapter II
Use of Electricity in Laparoscopy
Paulo Ayroza and Elizabet AbdallaDepartment of Gynecology and Obstetrics,
Medical School of the Santa Casa University of São Paulo, Brazil
Return plate
Electrosurgical unit

Manual of Gynecological Laparoscopic Surgery40
1.0 HistoryThe therapeutic use of heat in the treatment of human beings has been known for a very long time. The Egyptians used cauterization to treat tumors three thousand years B.C. Four hundred years before the Christian era, Hippocrates discussed the use of heat to treat diseases. In this context, he described the use of cauterization to treat joint problems and haemorrhoids. He also recommended applying seven or eight little pieces of heated iron to the hemorrhoid to arrest bleeding. However, it was only at the start of the 20th century that Koch described cauterization using electricity. In this technique, an electric current heated the tip of a forceps and the hot metal was applied to the tissue to cauterize it. In 1878, Koch also described the fi rst tubal sterilization by means of cauterization with a wire heated by an electric current.
In fact, there is a great difference between electrocautery and electrosurgery. In the former, electricity heats a metal instru-ment, which is then applied to the tissue. In electrosurgery, the opposite occurs, with the current producing heat as it passes through the tissue.
Electrosurgery developed in the 20th century. It causes the electric current to pass through the body, producing heat due to tissue impedance. Unlike cauterization, during electro-surgery the forceps does not heat to the point of burning but is limited to transmitting the electric current to the tissues. The development of electrosurgery passed through various periods and various discoveries were made. It is worth recalling how a few concepts that are today regarded as very simple were established.
Experiments with static electricity, which began in 1786, used direct current, also known as galvanic current, which produced muscle contractions.
The specific current induction developed by Faraday and Henry was integrated in 1891 by D’Arsonval, who described the use of high frequency current to counteract muscle contractions.
An electrosurgical generator was used for the fi rst time in the operating room by Cushing in 1926. Although he was not the fi rst to try it, William Bovie was the one responsible for developing the modern concept of electro surgery.
In 1934, Werner described tissue coagulation using high frequency electrical energy. This concept represented an important step forward in surgery and is still used widely today.
The use of electrosurgical energy in laparoscopy dates from the 1960s when gynecologists were the fi rst to use laparos-copy for minor surgical procedures such as tubal sterilization. At the start, there were some mishaps, which discouraged the use of the monopolar modality of electrosurgery for the next two decades. Technical developments led to the production of new electrosurgical generators and laparoscopic instru-ments specially designed for this modality. Thus, at the end of the 1980s, electrosurgery came back to fi ll an indispensable space in gynecological endoscopy.
Electrosurgery is the most frequently used form of energy in all branches of surgery. In 1995, Odell demonstrated how the use of electrosurgery in laparoscopy optimizes the proce-dures, reducing operation time and blood loss.
Over the years, some doubts have emerged regarding possibleinjuries caused by heat in healthy tissue. In 1982, Riedel and Semm described the risks of inappropriate use of electro-surgery and they emphasized the need for appropriate monitoring of this technique.
Various studies have analyzed injuries caused to the tissues by monopolar and bipolar electrocoagulation. In 1995, with different devices, Baggish and Tucker evaluated histologically the extent of necrosis caused by monopolar and bipolar electrocoagulation.
2.0 Principles of Electrosurgery Several properties of electricity must be understood in order to understand electrosurgery. Electrons orbit the nucleus of an atom. When the electrons fl ow from one atom to the orbit of an adjacent atom, there is a fl ow of current. Voltage is the “force” or “push” that provides electrons with the ability to travel from atom to atom. If the electrons encounter resis-tance, heat is produced. The resistance to the fl ow of electrons is called impedance. A complete (or closed) electrical circuit is required to make electrons to fl ow through. In other words, only an un interrupted pathway allows electrons to circulate.
The common terms used to describe the principles of electro-surgery include:
Current: flow of electrons in a certain period of time, measured in amperes.
Voltage: the force that drives the current or flow of electrons, measured in volts.
Resistance: obstacle to the fl ow of current, measured in ohms (resistance = impedance).
The following principles apply specifi cally in electrosurgery:
The electrosurgical generator (ESG) is the source of the electron fl ow and voltage.
A monopolar circuit consists of the generator, an active electrode, the patient and the patient return electrode.
There are numerous pathways to ground for leakage current and these may include the OR table, stirrups, staff members and equipment.
The patient’s tissues provide the impedance, producing heat when the electrons overcome the impedance.

Manual of Gynecological Laparoscopic Surgery 41
2.1 Various Forms of Electric Current
Various forms of electric current are associated with surgic al applications.
Direct current (DC): the electron exchange occurs continuously in a single direction. This type of current can be used in medicine for therapeutic purposes (for example, acupuncture and pain electrotherapy).
Pulsed current: a relatively high amount of energy is discharged at short intervals. This is useful for nerve stimulation, for example, in electromyography.
Alternating current (AC): the electron exchange between the two electrodes is bidirectional. This is the electric current used in electrosurgery.
When an electric current fl ows through biological tissue, the following effects can be observed:
Thermal effect: as electricity passes through the tissue it generates heat, which is the only effect desired in electro-surgery. The amount of heat generated depends on the intensity of the electric current, the resistance of the tissue and the duration of current fl ow.
Electrolytic effect: when a direct electric current passes through a tissue with a high electrolyte concentration, it can cause polarization of the electrolytic compounds. The
ions can fl ow in the direction corresponding to their polarity and in this way the concentration of ions can increase in direct relation with the intensity and duration of the electric current. To avoid the electrolytic effect, electrosurgery uses alternating current, where the constant reversal of polarity reduces the potential damage caused by polarization.
Faradic effect: when passing through the tissue, the electric current can stimulate the nerve endings, inducing reactions such as muscle contraction and pain. This is caused by the frequency of the electrical current; low frequencies in particular stimulate nerve endings.
The modern concept of electrosurgery involves using a high frequency electric current to avoid the negative effects of neuromuscular stimulation. Since nerve and muscle stimu lation ceases at 10,000 cycles/second (10 kHz), electro-surgery can be performed safely at “radio” frequencies above 100 kHz. An electrosurgical generator produces a 60-cycle current and increases the frequency to over 300,000 cycles per second. At this frequency, electrosurgic al energy can pass through the patient with minimal neuromuscular stimulation and no risk of electrocution.
Monopolar electric current reaches the human body through an active electrode and leaves it through a neutral electrode.
2.2 Waveform
An electrical wave has a sine form that can be modifi ed, resulting in waves with different forms and different effects. Two types of electrical wave are normally used in electro-surgery:
Non-modulated (Fig. 1), also called pure wave, obtained using a free alternating current of continuous form, which is responsible for the cutting effect. It can also be used for coagulation.
Modulated (Fig. 2), so called because this waveform produces some modifi cations in frequency and amplitude. This waveform is used especially for coagulation.
A third waveform, the so-called “blended current“, can be used. This is not a mixture of cutting and coagulation
currents but rather a variation of the duty cycle. Moving from blend 1 to blend 3, the duty cycle is reduced progressively. A lower duty cycle produces less heat. Consequently, blend 1 is able to vaporize tissue with minimal hemostasis whereas blend 3 is less effective at cutting but provides maximum hemostasis.
The only variable that determines whether a waveform vapo-rizes tissue or causes coagulation is the rate at which heat is produced. A high amount of thermal energy released rapidly induces vaporization, whereas a low amount released more slowly induces coagulation. Any one of the fi ve waveforms (non-modulated, modulated and the 3 blends) can accom-plish both tasks by modifying the variables that infl uence the tissue effect.
Fig. 1Pure or unmodulated wave form.
Fig. 2Modulated electrical wave.

Manual of Gynecological Laparoscopic Surgery42
High frequency surgery uses the thermal effect caused by the passage of an electric current through the tissue. There are two basic methods of thermal tissue destruction: cutting and coagulation.
Cutting
When a high current density is applied to a tissue, the heating of the intracellular fl uid from 37° to 100° C is so fast that there is no time for the water to evaporate. The resulting vapor pressure leads to explosion of the cellular membranes. This phenomenon is called vaporization. The separation of tissues by means of heat can be used to cut and has many advan-tages compared to mechanical cutting (for example, minor bleeding and minimal coagulation effect at the incision). This modality is more powerful and generally less penetrating. When used with fi ne electrodes, it allows precise cutting with minimal coagulation. It can also reduce operating times. With thicker or wider electrodes the contact area and also the potential for thermal injury are increased.
To obtain a suitable cutting effect, the generator must be activated before the electrode touches the tissue. A layer of vapor and carbon particles is created between the electrode and the tissue to create a current pathway. The electrosurgical cutting effect is similar to dissection without touching the tissue. If the electrode is used slowly or is held stationary, the risk of thermal damage to the tissue is increased.
The electrosurgical cutting effect is used on vascular tissue such as in adhesiolysis and also for peritoneal endometriosis resection.
Coagulation
For coagulation a low current density is usually applied so that the tissue temperature increases slowly giving the water enough time to evaporate. Meanwhile, the tissue undergoes thermal coagulation. In this process, the heat fi rst causes coagulation of the connective tissue, denaturing proteins but preserving cellular architecture. After that an amorphous coagulum is formed when disintegration is complete. This is indicated by the visual effect of carbonization. The gradual cellular retraction that occurs during thermal hemostasis allows the closure of small vessels. The result is creation of a coagulum rather than cellular vaporization. In order to over-come the high impedance of air, the coagulation waveform has signifi cantly higher voltage than the cutting current. Use of a high voltage coagulation current has implications during minimally invasive surgery.
Electrosurgical desiccation occurs when the electrode is in direct contact with the tissue. Desiccation is achieved most effi ciently with the cutting current. By touching the tissue with the electrode, the current density is reduced. Less heat is generated and no cutting action occurs. The cells dry out and form a coagulum rather than vaporize and explode.
Some surgeons cut with the coagulation current. Likewise, it is possible to coagulate with the cutting current by holding the electrode in direct contact with the tissue. It may be necessary to adjust power settings and electrode size to achieve the desired surgical effect. The advantage of coa gulating with the cutting current is that a much lower voltage is used.
2.3 Use of the thermal effect in electrosurgery
By modalities of electrosurgery is meant the way the electric al current is applied to the tissue. High frequency electrical current can traditionally be applied with two different modalities: monopolar or bipolar. While tissue separation is obtained mostly with the monopolar technique, coagulation can be obtained with both modalities.
Monopolar: monopolar is the most commonly used electro-surgical modality due to its versatility and clinical effective-ness. In monopolar electrosurgery, the active electrode is at the surgical site. The patient return electrode is elsewhere on the patient’s body. The current passes through the patient as it completes the circuit from the active electrode to the patient return electrode (Fig. 3).
2.4 Different Electrosurgery Modalities
Fig. 3Monopolar modality.
Return plate
Electrosurgical unit

Manual of Gynecological Laparoscopic Surgery 43
Bipolar: in bipolar electrosurgery, the two tines of the forceps perform the functions of both the active electrode and the return electrode at the site of surgery. Only the tissue grasped by the forceps is included in the electrical circuit. Because the return function is performed by one tip of the forceps, a patient return electrode is not needed. The current passes through the tissue held by the forceps and returns directly to the electrosurgical unit without getting into contact with other tissues. In this case, the damage produced in the tissues is limited and the risk of thermal injury in distant tissues is infi nitely lower (Fig. 4).
The bipolar modality presents some advantages compared to the monopolar:
The current fl ow through tissue is restricted to the area between the two jaws of the electrode, which is under the direct vision of the surgeon. In the monopolar tech-nique, the current passes through many tissues outside the surgeon’s visual control before it can return to the electro-surgical generator.
The risk of thermal injuries in distant tissues due to direct contact of instruments, faulty insulation or diffusion of the electrical current is reduced in the bipolar technique.
The risk of interference with other electronic equipment, (ECG, pacemakers and others) connected to the patient at the same time, is lower.
When it is understood that the electrical current is essentially a continuous fl ow of electrons with an entry and exit site, it is easy to understand that the current must return to some place along some pathway. The place is the unit and the pathway is the return plate. Through the phenomenon known as current division, the current can split and follow more than one path to ground. The circuit to ground is completed whether it travels the intended electrosurgical circuit to the patient return electrode or to an alternative ground.
This would put patients at risk of burns at an alternative site because:
the current follows the easiest and most conductive path,
any grounded object can complete the circuit, not just the electrosurgical generator,
the surgical environment offers many alternative routes to ground,
if the resistance of the alternative path is suffi ciently low and the current fl owing to ground in that path is suffi ciently concentrated, an accidental burn may occur at the alter-native grounding site.
3.0 Electrosurgery: General Safety Aspects3.1 Grounded Electrosurgical Systems
3.2 Isolated Electrosurgical Systems
If the circuit to the patient return electrode is interrupted, an isolated generator will deactivate the system because the current cannot return to its source. Generators with insulated circuits reduce the risk of burns at alternative sites but do not protect the patient from burns caused by the return electrode.
Historically, patient return electrode burns have accounted for 70% of the injuries reported during the use of electro surgery.
Patient return electrodes are not “inactive” or “passive”. The only differences between the “active” electrode and the patient return electrode are their size and re lative conductivity. The quality of the conductivity and contact area at the plate/patient interface must be maintained to prevent injury at the return electrode site.
Fig. 4Bipolar modality.
Electrosurgical unit

Manual of Gynecological Laparoscopic Surgery44
3.3 Patient Return Electrodes
Function of the patient return electrode.
The function of the patient return electrode is to collect and remove current from the patient safely. A return elec-trode burn occurs when the heat produced over time is not safely dissipated by the size or conductivity of the patient return electrode.
Ideal return electrode contact with current dispersion.
The ideal patient return electrode safely collects current delivered to the patient during electrosurgery and carries that current away. To eliminate the risk of current density, the plate should present a large contact area to the patient associated with low impedance (Fig. 5). It should be placed on conductive tissue as close as possible to the operative site.
It should be recalled that the only difference between the “active” electrode and the patient return electrode is their relative size and conductivity. If the electrons are concen-trated at the active electrode, a lot of heat is produced. If this current is dispersed over a comparatively large patient return electrode, little heat is produced.
If the surface contact area between the patient and the return electrode is reduced or if the impedance of that contact is increased, a dangerous condition can develop. In the case of a reduced contact area, the current fl ow is concentrated in a smaller area (Fig. 6). This causes an increase in the temperature of the return electrode. If the temperature of the return electrode increases suffi ciently, the patient may sustain a burn. Many factors can cause an increase in impedance, including excessive hair on the contact surface, adipose tissue, bony prominences, the presence of liquid, poor adhesion and scar tissue.
Fig. 5The return electrode plate provides an adequate contact area.
Fig. 6If the plate contact is faulty, the density of the return current increases dangerously and with it the risk of local burns.
Check the plate site, which should be a well vascularized muscle mass. Avoid irregular bony contours and bony prominences. The incision site, patient positioning and any other equipment connected to the patient should also be considered.
Patient electrode plate monitoring.
Contact quality monitoring was developed to protect patients from burns due to inadequate contact of the return electrode. Plate site burns are caused by a decreased contact area at the return electrode site. New generators
are equipped with patient plate monitoring, which actively monitors the amount of impedance at the patient/plate interface because there is a direct relationship between this impedance and the contact area. The system is designed to deactivate the generator before an injury can occur if it detects a dangerously high level of impedance at the patient/plate interface.
In order to work properly, such generators must use a patient return electrode that is compatible. This type of electrode is divided into two separate areas.

Manual of Gynecological Laparoscopic Surgery 45
Many surgeons routinely use the coagulation current. This waveform has a relatively high voltage. This voltage or “push” can spark across an area of compromised insulation. Moreover, high voltage can “blow holes” in weak insulation. Breaks in insulation can create an alternative route for the current to fl ow. If this current is concentrated, it can cause signifi cant injury.
The surgeon can obtain the desired coagulation effect without high voltage, simply by using the “cutting” current while holding the electrode in direct contact with tissue. This technique will reduce the likelihood of insulation failure. Recall that coagulation can be obtained with the cutting current by holding the electrode in direct contact with tissue, thereby lowering the current density. By lowering current density the rate at which heat is produced is reduced, allowing effective coagulation with the cutting current.
3.5 Insulation Failure
3.4 Direct Coupling
Direct coupling occurs when the user accidentally activates the generator while the active electrode is near another metal instrument. The secondary instrument will become energized. This energy will seek a pathway to complete the circuit to the
patient return electrode. There is a potential risk of signifi cant patient injury. The generator should not be activated while the active electrode is touching or in close proximity to another metal object.
3.6 Capacitative Coupling during Laparoscopy
Metal trocar system
A capacitor is not a part labeled “capacitor” in an electrical device. It occurs whenever a nonconductor separates two conductors. During laparoscopy an “inadvertent capacitor” may be created by the surgical instruments. The conductive active electrode is surrounded by nonconductive insulation. This, in turn, is surrounded by a conductive metal trocar. A capacitor creates an electrostatic fi eld between the two conductors and, as a result, a current in one conductor can, through the electrostatic fi eld, induce a current in the second conductor. In laparoscopy a capacitor may be created by the composition and placement of the surgical instruments.
Plastic trocar system
Capacitance cannot be entirely eliminated with an all-plastic cannula. The patient’s conductive tissue completes the defi nition of a capacitor. Capacitance is reduced, but is not eliminated.
Hybrid trocar system
The worst case occurs when a metal cannula is held in place by a plastic anchor (hybrid cannula system). The metal cannula still creates a capacitor with the active electrode. However, the plastic abdominal wall anchor prevents the current from dissipating through the abdominal wall. The capacitative coupled current may exit from adjacent tissue on its way to the patient return electrode. This can cause signi-fi cant injury.
The majority of potential problems can be avoided by following these simple guidelines:
4.0 Recommendations for Avoiding Electrosurgical Complications in the Patient During Operations
Inspect all the insulation carefullyUse the lowest possible power settingUse a low voltage waveform (cutting)Use brief intermittent activation rather thanprolonged activation
Do not activate in an open circuitDo not activate in close proximity to or direct contact with another instrumentUse bipolar electrosurgery where possibleSelect an all-metal trocar system as the safest option and do not use hybrid trocar systems that combine metal with plastic.

Manual of Gynecological Laparoscopic Surgery46
Recommended Reading
1. BAGGISH MS: Is it necessary to repeat history?J Gynecol Surg 1989; 5: 323
2. BAGGISH MS, TUCKER RD: Tissue actions of bipolar scissors compared with monopolar devices. Fertil Steril 1995; 63: 422–6
3. BERGDAHL B, VÄLLFORS B: Studies on coagulation and the development of an automatic computerized bipolar coagulation. J Neurosurg 1991; 75: 148–51
4. BÜHLER K, KATO K, KLESSEN C, KOCH R, et al.: Die temperatur-geregelte bipolare Elektrokoagulation Zent bl Gynäkol,1991; 113: 713–22
5. CORSON SL: Electrosurgical hazards in laparoscopy. JAMA 1974; 227: 1261–3
6. CUSHING H: Electrosurgery as an aid to the removal of intracranial tumors. Surg Gynecol Obstet 1928; 47: 751–84
7. CURCIE DJ, CRAELIUS W: The role of thermal feedback in electrosurgical tissue heating. Tech Health Care 1995; i 3: 111–6
8. Di GIOVANNI M, VASILENKO P, BELSKY D: Laparoscopic tubal sterilization. The potential for thermal bowel injury. J Reprod Med 1990; 35: 951–4
9. FARNWORTH TK, BEALS SP, MANWARING KH, TREPETA RW: Comparison of skin necrosis in rats by using a new microneedle electrocautery, standard-size needle electrocautery and the shaw hemostatic scalpel. Ann Plast Surg 1993; 31: 164–7
10. GIORDANO BP: Don’t be a victim of surgical smoke. AORN J 1996; 63: 520–22
11. GOLDWYN RM: Bovie. The man and the machine. Annals Plast Surg 1979; 2: 135–53
12. GROSSKINSKY CM, RYDER RM, PENDERGRASS HM, HULKA JF: Laparoscopic capacitance: A mysterymeasured. Am J Obstet Gynecol 1993; 169: 1632–5
13. HOGLAN M: Potential Hazards from electrosurgery plume. Recomendations for surgical smoke evacuation. Can Oper Room Nurs J 1995; 13: 10–6
14. HUKKI J, LIPASTI J, CASTREN M, PUOLAKKAINEN P, et al: Lactate dehydrogenase in laser incisions. Laser Surg Med 1989; 9: 589–94
15. KAPLUN A, ARONSON M, HALPERIN B, GRIFFEL B: Cellular events in adhesion formation due to Thermal Trauma. Eur Surg Res 1984a; 16: 136–40
16. KAPLUN A, GRIFFEL B, HALPERIN B, ARONSON M: A model for adhesion formation by thermal injury in the abdominal cavity of the mouse. Eur Surg Res 1984b; 16: 131–5
17. KOCKS J: Eine neue Methode der Sterilisation der Frau. ZBL Gynäk 1878; 2: 617
18. LEVY BS, SODERSTROM RM, DAIL DH: Bowel injuries during laparoscopy. Gross anatomy and histology. J Reprod Med 1985; 30: 168–72
19. LUCIANO AA, WHITMAN G, MAIER DB, RANDOLPH J, et al: A comparison of thermal injury, healingpatterns, and postoperative adhesion formation following CO2 laser and electromicrosurgery. Fert Steril 1987 48: 1025–9 1987
20. LUCIANO AA: Power sources. Obstet Gynecol Clin N Am 1995; 22: 423–43
21. MECKE H, SCHÜNKE M, SCHULZ S, SEMM K:Incidence of adhesions following thermal tissuedamage. Res Exp Med 1991; 191: 405–11
22. NIELSEN PH, NYLAND MH, ISTRE O, MAIGAARD S,et al: Acute tissue effects during transcervicalendometrial resection. Gynecol Obstet Invest 1993; 36: 119–23
23. O ‘CONNOR JL, BLOOM DA: William T. Bovie andelectrosurgery. Surgery 1996; 119: 390–6
24. ODELL RC: Electrosurgery: principles and safety issues. Clin Obstet Gynecol 1995; 38: 610–2
25. PEREIRA FEL: Degenerações. Morte celular. Alterações do interstício. In: BRASILEIRO FILHO, G.; PITTELLA, J.E.H.; PEREIRA, F.E.L.; BAMBIRRA, E.A; BARBOSA, A.J.A – Bogliolo Patologia. 5ª ed. Rio de Janeiro, Guanabara Koogan 1996,. p.46–81.
26. RAPPAPORT WD, HUNTER GC, ALLEN R, LICK S,et al.: Effect of eletrocautery on wound healing in midline laparotomy incisions. Am J Surg 1990; 160: 618–20
27. RIEDEL HH, SEMM K: An initial comparison ofcoagulation techniques of sterilization. J Reprod Med 1982; 27: 26 1–7
28. RIEDEL HH, LEHMANN-WILLENBROCK E, MECKE H, AHMELS E: Histologische und enzymhistochemischeUntersuchungen am Kaninchenuterushorn nach anwendung unterschiedlicher Koagulationsmethoden. Zent bl Gynäkol 1990; 112: 189–205
29. RYDER RM, HULKA JF: Bladder and Bowel injury after electrodesiccation with Kleppinger Bipolar forceps.J Reprod Med 1993; 38: 595–8
30. SODERSTROM RM: Principles of Eletrosurgery During Endoscopy. In:Sammarco MJ, Stovall TG, Steege JF. Gynecologic Endoscopy. Baltimore, 1996,Williams & Wilkins, p. 179–92.
31. SEMM K: Endocoagulation: A new and completely safe medical current for sterilization. Int J Fertil 1977; 22: 238
32. SIGEL B, DUNN MR: The mechanism of blood vesselclosure by high frequency electrocoagulation.Surg Gynecol Obstet 1965; October: 823–31
33. TUCKER RD, STASZ PS, KRAMOLOWSKY EV: A simple and inexpensive method for measuring electrosurgical variables. Biomed Instrum Tech 1989; 23: 54–7
34. TUCKER RD, KRAMOLOWSKY EV, PLATZ CE: In vivo effect of 5 french bipolar and mono polar electrosurgic al probles on the porcine bladder. Urol Res 1990;18: 29 1–4
35. TUCKER RD, BENDA JA, MARDAN A, ENGEL T:The interaction of electrosurgical bipolar forceps and generators on an animal model of fallopian tubesterilization. Am J Obstet Gynecol 1991; 165: 443–9
36. VECK S: An introduction to the principles and safety of electrosurgery. Br J Hosp Med 1996; 55: 27–30
37. VOYLES CR, TUCKER RD: Education and engineering solutions for potencial problem with laparoscopicmonopolar electrosurgery Am J Surg 1992; 164: 57–62
38. WERNER R: Sterilisierung der Frau durchTubenverkochung. Chirurg 1934; 6: 843–5
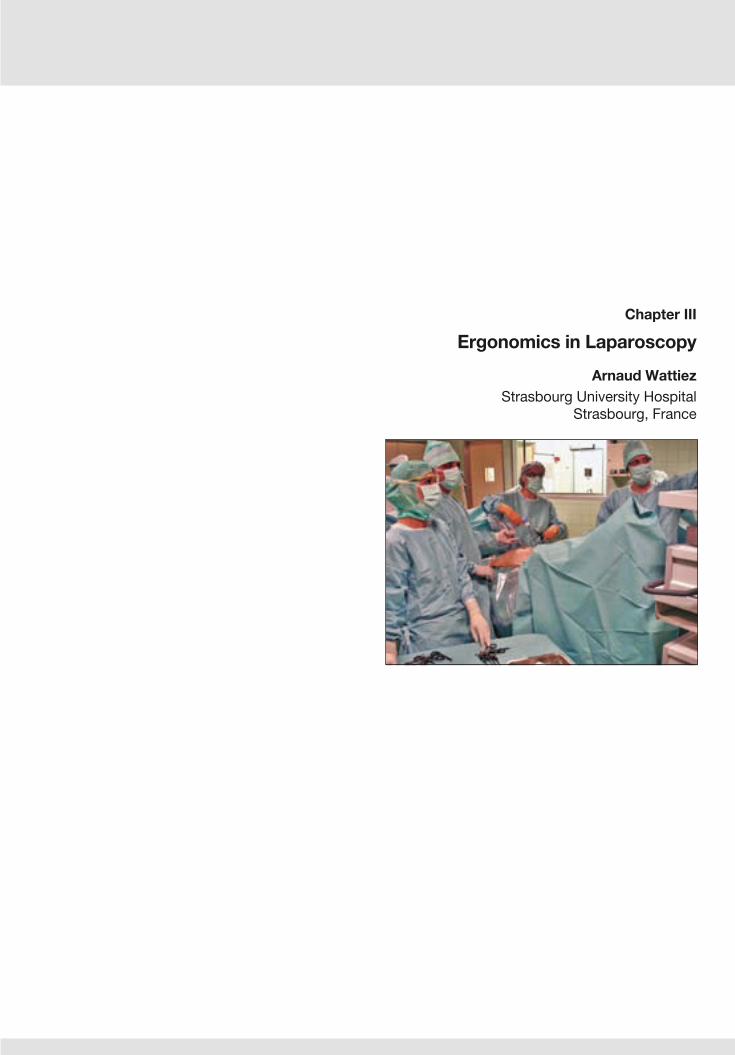
Chapter III
Ergonomics in Laparoscopy
Arnaud WattiezStrasbourg University Hospital
Strasbourg, France


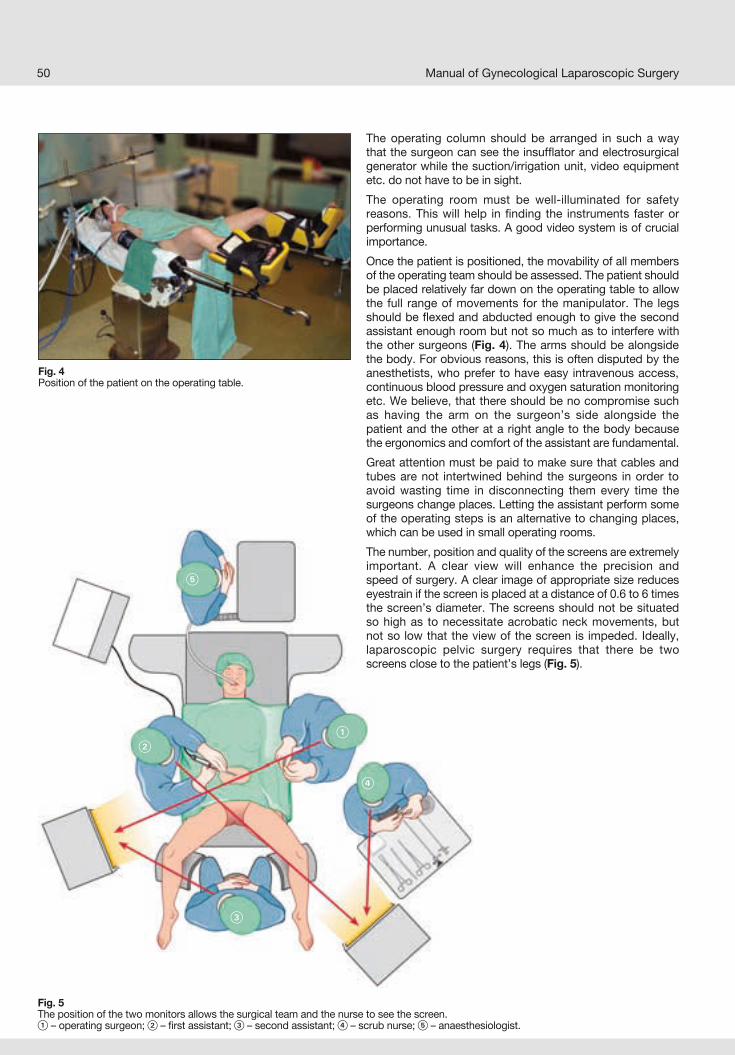
Fig. 5The position of the two monitors allows the surgical team and the nurse to see the screen.! – operating surgeon; @ – fi rst assistant; # – second assistant; $ – scrub nurse; % – anaesthesiologist.
Manual of Gynecological Laparoscopic Surgery50
Fig. 4Position of the patient on the operating table.
#
$
!@
%
The operating column should be arranged in such a way that the surgeon can see the insuffl ator and electrosurgical generator while the suction/irrigation unit, video equipment etc. do not have to be in sight.
The operating room must be well-illuminated for safety reasons. This will help in fi nding the instruments faster or performing unusual tasks. A good video system is of crucial importance.
Once the patient is positioned, the movability of all members of the operating team should be assessed. The patient should be placed relatively far down on the operating table to allow the full range of movements for the manipulator. The legs should be fl exed and abducted enough to give the second assistant enough room but not so much as to interfere with the other surgeons (Fig. 4). The arms should be alongside the body. For obvious reasons, this is often disputed by the anesthetists, who prefer to have easy intravenous access, continuous blood pressure and oxygen saturation monitoring etc. We believe, that there should be no compromise such as having the arm on the surgeon’s side alongside the patient and the other at a right angle to the body because the ergonomics and comfort of the assistant are fundamental.
Great attention must be paid to make sure that cables and tubes are not intertwined behind the surgeons in order to avoid wasting time in disconnecting them every time the surgeons change places. Letting the assistant perform some of the operating steps is an alternative to changing places, which can be used in small operating rooms.
The number, position and quality of the screens are extremely important. A clear view will enhance the pre cision and speed of surgery. A clear image of appropriate size reduces eyestrain if the screen is placed at a distance of 0.6 to 6 times the screen’s diameter. The screens should not be situated so high as to necessitate acrobatic neck movements, but not so low that the view of the screen is impeded. Ideally, laparoscopic pelvic surgery requires that there be two screens close to the patient’s legs (Fig. 5).

Manual of Gynecological Laparoscopic Surgery 51
Fig. 6a, bTrocar ports in the case of a bulky uterus.
Hysterectomy Myomectomy
1 Trocar 10 mm, 2–3–4 Trocar 5 mm 1–3 Trocar 10 mm, 2–4 Trocar 5 mma b
3.1 Position of the Primary Trocar
Virtuality has the great advantage that the image can be assessed and changed, if the visual fi eld is inadequate. For example, during hysterectomy, after inserting the primary trocar, a mass blocking the view from side to side may be found in the case of a bulky uterus. There are three solutions to this situation. The fi rst is to give a GnRH analogue for 3 months and then re-operate. The second is to convert to laparotomy. The third solution is to change the position of the
trocar. If the trocar is in sub-xyphoid position, the uterus will look smaller and vital structures (such as the uterine arteries) will appear in a better position to allow vision (Fig. 6). Another option is to change from a 0°-straight forward laparoscope to a 30°-forward-oblique scope to enable surgery on the uterine arteries or the utero-sacral ligaments. By virtualizing the diffi culties, operating times can be reduced.
The number of trocars: four hands are usually available for surgery (if optic robots are not used) so the time de dicated to placing more than four trocars is wasted time. The surgeon involved in the pre-operative planning must carefully consider and set up the points of trocar insertion. We normally use four trocars for all laparoscopic procedures including adnexal surgery (Fig. 7). Using this method systematically is helpful in anticipating the procedure and reducing operating times. On the other hand, adding a fi fth trocar can be justifi ed if this facilitates or shortens the operation.
The position of the trocars: did you ever stop to think why laparoscopic instruments are 43 cm in length? The abdominal wall acts as a lever for the trocar. The balance between force (= fatigue) and precision depends on the ratio between the intra-abdominal and the extra abdominal part of the instrument: the more the ratio is shifted in favor of the extraabdominal part, the more precision will be gained, but the greater length means larger movements of the hands, which brings on fatigue more rapidly. Unfortun ately, many consider this ratio to be constant although it is not.
3.2 Accessory Trocars
Fig. 7Positioning the trocars for 4 hands.

Manual of Gynecological Laparoscopic Surgery52
The afore-mentioned ratio can be altered easily by shifting the point of trocar insertion away from the operating fi eld (e.g. cranially in the midline during pelvic operations).
Consequently, the trocar site must be different for delicate procedures such as tubal surgery and for those requiring force such as myomectomy or Burch’s operation. The most effi cient balance is achieved when the ratio is 1:1, because the hand can feel the pressure of the tissue and the force exerted. With any other ratio, this feeling is lost. This is why it is important to take your time to plan each point of trocar insertion; this time is not wasted. Symmetrical insertion is not important.
Other ergonomic rules, which may shorten operating times, are: placing two lateral trocars in a triangle with the primary trocar, never introducing more than one trocar parallel to the primary trocar, taking into account the axis of work and angles of approach (especially while suturing), etc. Remember, that the right lower quadrant trocar is usually controlled by the assistant, so the assistant’s parameters as well as the anticipated function and level of the port must be considered during pre-operative planning. Letting the assistant perform some tasks that are better performed from his side (e.g. right uterine artery coagulation during hysterectomy) eliminates the need for the surgeon to change sides.
Fig. 8Introduction of the accessory trocar.
Fig. 9Topographical anatomy of vessels and organs relative to the trocar’s angle of insertion.
3.4 Trocar Size
Using 5 mm-instruments in a 11-mm trocar with a reducer will impair precision of handling. When an instrument of appropriate size is used, the contact point between the trocar and the abdominal wall corresponds with the pivot point, whereas the use of an instrument of smaller diameter involves that there are two contact points with the trocar (in the reducer and at the trocar tip). A third contact point is located between the trocar and the abdominal wall, and between the trocar and the reducer. As a result, there are two pivot points, one between the trocar and abdominal wall, and the other
between the trocar and the reducer. This con dition inherently entails imprecision. It is better to begin the operation with 5 mm-trocars and change to 11 mm-trocars when a 10 mm-instrument is needed. Changing the trocar to 11 mm for suturing is not done automatically and depends on the number of sutures. If the need arises to make four or less sutures, it is preferable to maintain the small incisions for faster suturing although it is essential to change the trocar if a greater number of sutures is required.
3.3 Type of Trocar and Mode of Insertion
There are many trocar types available today; each surgeon must be familiar with those that best answer his needs. A very important property that is often forgotten is being able to introduce instruments into the trocar without looking away from the screen. For this to happen, the trocar must be at a right angle to the skin when there is no instrument inside it and it must have a wide opening. This means that trocars
should be inserted not in the direction of the pelvis but at a right angle to the skin, the muscles and the aponeurosis, as shown in Figs. 8 and 9. We use disposable trocars with valves that permit suturing without CO2 leakage. Other surgeons, who frequently apply monopolar electrosurgery during which a lot of smoke is generated, prefer a trocar with a valve that allows to connect a smoke evacuation system.

Manual of Gynecological Laparoscopic Surgery 53
4.1 Multifunctional Instruments
4.0 Instrumentation
The three basic actions are dissection, hemostasis and cutting. All of these actions can be performed easily when multifunctional instruments are used (such as bipolar forceps or monopolar scissors) in the following order:
The surgeon holds the bipolar forceps in one hand and curved scissors, connected to the monopolar electrosurgical generator, in the other. In this way, the dominant hand is able to dissect, grasp, apply traction and coagulate while
the non-dominant hand can cut (mechanically or electri-cally), coagulate by use of monopolar technique, lateralize and dissect. Thus, the surgeon is able to perform nine different actions and rarely needs to change instruments so as to enable performing a specific action. There are other acceptable ways of holding laparoscopic instruments provided this is done logically.
4.2 Maintenance of Instruments
Appropriate, fully functioning instruments shorten opera ting times and prevent complications. Scissors must always cut properly and bipolar forceps must always be kept clean. Having a second bipolar forceps readily available allows the
clean instrument to be used at all times without delay. Every surgeon must be responsible for checking the condition of the instruments in use to ensure their effective function.
Surgical strategy must be logical and strict but always modi-fi able. It should be decided upon during the fi rst few minutes of the operation immediately after examining the operating fi eld. It is not rare to see surgeons start on one side and then change sides when faced with an obstacle that frequently
needs to be overcome, and probably could have been antici-pated through careful strategy planning. An operation with a lot of stops, changes and pauses is much slower than a planned operation. Because of its special nature, laparos-copy requires that a few basic rules be observed.
5.0 Surgical Strategy
5.1 Strict Hemostasis
Bleeding interferes with surgical maneuvers. In laparotomy and vaginal surgery the management of minor bleedings without hemodynamic signifi cance may be delayed with the temporary placement of a suction tube nearby. This is not the case in laparoscopy, because the technique depends completely on boundary conditions such as video camera and lighting system, confined working space, the few operating ports and the inherent diffi culty associated with the need for changing instruments.
This is why strict and meticulous hemostasis is essential in laparoscopy. Meticulous dissection and coagulation, anato-mical cleavage planes, perfect knowledge of anatomy and good profi ciency in bipolar coagulation are the basic competences needed to translate the appropriate laparo-scopic strategy into practice.
5.2 Do not Irrigate (Apply Only Suction) !
This statement may sound strange to many laparoscopic surgeons because lavage has been used extensively for over 20 years. It is clear, that there are situations which require lavage, such as in the event of extensive hemorrhage or at the end of the surgery, but lavage also has dis advantages:
loss of exposure: the operating space is reduced when it is filled with liquid and pneumoperitoneum pressure decreases when it is suctioned out. Light is absorbed and refl ected by the liquid
loss of anatomical planes due to tissue edema
loss of electrical effi ciency when an electrolyte solution is used
spread of the liquid throughout the abdominal cavity, which is particularly hazardous in the presence of malignancy, infection and dermoid cysts.
Finally, suction and lavage are time-consuming procedures.
To avoid lavage, the surgeon must follow a surgical stra tegy that allows to avoid situations where the use of irrigation is indispensable.

5.3 Correct Position of the Laparoscope
5.4 Optimal Use of Accessory Trocars
6.0 Selecting Information
The lack of a third dimension becomes more obvious when the image is distant and at the periphery of the screen. The tip of the instrument must be kept as close as possible to the center of the screen. When suturing distant structures such as the levator ani, one should try to keep the needle holder
close to the distal lens of the laparoscope in order to align the needle correctly.
Since red absorbs colors, blood should be aspirated as soon as possible as it reduces brightness.
Manual of Gynecological Laparoscopic Surgery54
Trocars should never be used to mobilize an organ that obscures vision. This can be the case with the sigmoid during prolapse surgery, with the adnexa during excision of a recto-vaginal nodule and may also occur during uterovagin al prolapse surgery afterr subtotal hysterectomy. If a trocar is used to mobilize these organs, it is lost for surgery along with the aid of the assistant who assumes a static role and may lose his/her concentration. It also constitutes a source of risk and harm when it is outside the operating fi eld.
Alternative strategies include:
tilting the operating table,
suspension to the abdominal wall
the use of an uterine manipulator.
These measures, applied at the beginning of the operation, take a few seconds and can save precious time during surgery.
During laparoscopy the surgeon should select the essential information required for the work and ignore what is not useful as it may interfere with the concentration. By doing so the surgeon is able to anticipate diffi culties, as will be explained below.
For methodological reasons, information is divided intoon-screen and off-screen information.
7.0 Surgeon’s Ergonomics and Convenience During lengthy operations the surgeon suffers from muscul ar strain and fatigue. This can cause errors and slowness. Research has shown that muscles can work for hours if they employ 15% of their maximum strength but they will fatigue if they use more power. In a recent study, we demonstrated that highly profi cient surgeons, aware of surgical ergonomics, use about 15% of the muscle strength of their arms and shoulders while less experien ced surgeons use a higher percentage of their muscular strength. Application of ergonomic principles reduces the amount of muscle power applied during surgery, which will reduce fatigue and enhance safety and operating times.
The operating table position and height are of great impor-tance in laparoscopic surgery. The table should be low enough for the surgeon and allow a proper working position to reduce fatigue. The correct arm position should be with the arm lying alongside the chest with the elbow at an angle of 90 degrees or more. The height of the abdomen should also be considered. Since most operating tables are manufactured for laparotomy, it is often necessary to use a foot support, which must be wide enough for the surgeon’s feet and the pedals.
In laparoscopy as in laparotomy, the hands must be in the middle of the operating fi eld. In other words, the screen must be aligned in the same visual direction as the operating fi eld. If this is not the case, the surgeon will be operating at a different angle from the one shown on the screen. This will impair orientation and can result in protracted, clumsy movements, and prolonged duration of surgery.
The axis between the screen, the surgeon’s hands and the surgeon’s eyes should be kept as straight as possible. The greater the shift, the greater is the distortion of the movements. We can draw two lines, one between the surgeon’s eyes and the screen, and one between his eyes and hands. The greater the angle between those lines, the more distorted are the directions. The distortion is very noticeable at angles greater then 60 degrees. In case of a right angle (90°), e.g., from the patient’s right, the instrument must be pushed in order to achieve a movement to the left. This lack of orientation makes the surgeon’s movements slow and imprecise.
To sum up, two screens positioned nearby the patient’s legs should be used during pelvic operations, as shown in Figs. 10 and 11.

Manual of Gynecological Laparoscopic Surgery 55
8.0 Quality of the ImageTo obtain good quality information from the video screen, the best possible video technology should be used. In short, we use IMAGE1™ (KARL STORZ Tuttlingen, Germany) or a 3-CCD video camera connected to a xenon cold light source
and a 21-inch fl atscreen monitor. The screen must be coupled directly to the video camera via the best available connection (RGB, YC or PAL/NTSC). If RGB is not available, the cables should be as short as possible.
9.0 Staff Training Staff training and regular equipment checks are obvious though often overlooked measures for speeding up surgery.
To reduce operating times, it is very important to have an active and well-trained theater nurse who holds the trocar straight while instruments are changed, who puts the right
instrument in the right trocar opening at the right time, who is always ready for the next step and who has the needle holders loaded inside a trocar before suturing begins, allowing the surgeon to keep his eyes on the screen.
10.0 Preoperative PreparationBowel preparation: a low fi ber diet for 7 days prior to surgery will assist good exposure of the operative fi eld. Properly prepared bowels take up less space, are easier to retract and slide into the pelvis less. On the other hand, preparation with liquids the evening before surgery fi lls the bowel with liquid and has the opposite effect. For this reason, we do not recommend this type of preparation if opening the intestine is unlikely, as in the case of simple hysterectomy.
All of the equipment used for laparoscopic surgery, including more rarely used instruments such as cysto-scopes, ureter catheters and instruments for intestinal surgery, should be readily available within a short time. Special procedures and personnel, such as needed, e.g., for the frozen section technique, must be available on standby.
Fig. 10Operating room set up.
Main table
Vaginal tray
Instrument tray
Anesthesia unit
Instrument pockets
Second Assistant
Scrub nurse
Operating surgeon First Assistant
Anesthesiologist
ScreenVideocameraCold light sourceCO2 insuffl ator
Irrigation-suction system for ISC and LPS
2nd monitor2nd camera2nd light sourcemyomamorcellator 1st coagulator2nd coagulator
L R
Fig. 11Alternative operating room setup.
Instrument tray
Anesthesia unit
Instrument pockets
Second Assistant
Scrub nurse
Operating surgeon First Assistant
Anesthesiologist
ScreenVideocameraCold lightsourceCO2 insuffl ator
Irrigation-suction system forISC and LPS
2nd Screen2nd Videocamera2nd Cold light sourceMyoma morcellator 1st Coagulator2nd Coagulator
L R

Manual of Gynecological Laparoscopic Surgery56

Chapter IV
Gynecologic LaparoscopicSurgical Anatomy
Cristiana Barbosa1, Arnaud Wattiez2
and Luca Mencaglia1
1Centro Oncologico Fiorentino, Florence, Italy2Strasbourg University Hospital
Strasbourg, France

Manual of Gynecological Laparoscopic Surgery58
1.0 Introduction
2.0 Anterior Abdominal Wall 2.1 Anatomical Area
2.2 Layers of the Anterior Abdominal Wall
2.3 The Umbilicus
Laparoscopy allows a highly magnifi ed and close-up view of the abdominal and pelvic cavity, making it possible to visualize and study the anatomical structures and pelvic spaces that in the past were diffi cult to visualize at laparotomy.
The anterior abdominal wall is the entrance to the abdominal cavity. The anterior abdominal wall is usually traversed blindly so knowledge of the anatomy is crucial to avoid any compli-cations while doing so.
The anterior abdominal wall is bounded superiorly by the xiphoid process medially and by the inferior margin of the intercostal cartilages of the 7th to 10th ribs. Inferiorly, it is limited by the pubic symphysis and laterally by the inguinal ligament and the anterior superior iliac spine.
The anterolateral abdominal wall consists of muscle and fascia. From the skin to the peritoneal cavity, there are various layers: the skin, subcutaneous fat, the anterior layer of fascia covering the rectus abdominis muscles medially, the external oblique muscles laterally and the internal oblique and trans-versus abdominis laterally.
The external oblique is the most superfi cial of the muscles and the transversus is the deepest in the anterolateral abdominal wall.
Transversalis fascia: covers the posterior layer of the rectus sheath and the transversus abdominis muscle.
The preperitoneal space: contains connective tissue and fat.
Peritoneum: The internal part of the parietal peritoneum is in contact with the internal organs thanks to the negative pressure inside the abdominal cavity.
Fig. 1Drawing of the various anatomical layers of the anterior abdomin al wall.
Cutis Subcutaneous fat
Peritoneum Fascia
Rectusabdominis muscle
Fig. 2Drawing of the abdominal wall at the level of the umbilicus.
Umbilicus
Peritoneum Fascia
Rectusabdominis muscle
The umbilicus is located in the midline, usually 2 to 2.5 cmbelow the level of the tubercles of the iliac crests. The umbilicus is at the level of the intervertebral discs of L3 and L4.
The bifurcation of the abdominal aorta into the right and left common iliac arteries is located a few centimetres below the umbilicus. The left common iliac vein crosses in front of the body of the fi fth lumbar vertebra and behind the aortic bifurcation.
In slim patients, the distance between the anterior abdominal wall and the large vessels is short so attention must be redoubled when the principal trocar is being introduced.

Manual of Gynecological Laparoscopic Surgery 59
It is also necessary to pay attention to the superfi cial blood supply of the umbilicus, which is usually in the form of a circle to the right of the umbilicus. Because of this, the umbilical incision is preferably made on the left.
The difference between the fascia above and below the umbilicus must be recalled. In the upper part, the posterior layer of the internal oblique fascia and the aponeurosis of the transversus abdominis muscle pass behind the rectus abdominis muscles, while the anterior layer of the internal oblique fascia passes in front. Below the umbilicus, all the fasciae pass together anterior to the rectus abdominis muscles (Figs. 1, 2). These anatomical relations are important when the Veress needle is introduced during laparoscopy. In fact, if it is introduced in or below the umbilicus, a distinct tactile sensation is felt when the fascia and peritoneum is crossed. If it is introduced above the umbilicus, lateral to the midline, passage through the anterior fascia, posterior fascia and peritoneum can be felt distinctly.
The umbilicus is the most suitable site for introducing the primary trocar and the Veress needle because the anterior abdominal wall here contains less subcutaneous tissue and does not contain any muscle, and the distance between the skin and peritoneum is shortest.
However, the umbilicus, entered through its upper part, is the location of choice for “open laparoscopy”, a technique preferred by some and favoured by general surgeons.
The peritoneal layer is adherent with the layers above so once the fascia has been identifi ed, clamped and incised, it is easy to open the serosa bluntly and enter the abdominal cavity using a round-tipped Hasson trocar.
This technique is indicated in patients who have previously undergone pelvic and/or abdominal surgery or where post-infl ammatory adhesions are suspected because it allows direct inspection of the structures beneath the trocar’s entry site.
The rectus abdominis muscles can be identified in the muscle wall. They are located lateral to the midline from the xiphoid process to the border of the pubic symphysis. They are divided centrally by the linea alba, which is a tendinous raphe forming a central groove between the rectus muscles. The lateral angle of the rectus abdominis muscle is called the semilunar line. The rectus abdominis muscles have tendinous
intersections, which divide the rectus muscles into segments at the level of the xiphoid process, the umbilicus and between these two points.The external oblique muscle is located lateral to the rectus abdominis muscle between the lateral part of the lower ribs and the iliac crest. The inferior margin of its fascia forms the inguinal ligament.
2.4 Muscle Wall
Fig. 3View of the superfi cial blood supply of the abdominal wall bytransillumination (insert picture showing the external view).
Fig. 4Drawing of the superfi cial blood supply of the abdominal wall which can be visualized by transillumination.
The anterior abdominal wall has a deep and superficial blood supply. The superfi cial vascular network is formed by the superfi cial epigastric artery, the superfi cial cirumfl ex iliac artery and the corresponding veins. These vessels are branches of the femoral artery, which emerge caudal to the inguinal ligament. The epigastric artery runs medial to the rectus abdominis muscles, while the circumfl ex artery is lateral. These vessels can be seen by transillumination, especially in thin patients (Figs. 3–4).
The deep vascular system is formed by the superior epigastric artery, the inferior epigastric artery and by the deep circumfl ex iliac arteries and their corresponding veins. The superior epigastric artery is a branch of the internal thoracic artery while the inferior epigastric artery is a branch of the external iliac. They are found beneath the rectus abdominis muscles.
2.5 Blood Supply of the Anterior Abdominal Wall

Manual of Gynecological Laparoscopic Surgery60
The uterus is located deep in the pelvic cavity. It is pear-shaped and divided into two parts: the upper part, the body, is bulkier and the lower part consists of the cervix (Fig. 5). Between these two parts, a transitional zone known as the uterine isthmus is identifi ed; this corresponds to the internal os of the cervix.
The long axis of the uterus corresponds to the axis of the pelvic wall. Since the organ is mobile, its position varies with the possible alterations in the distension of contiguous organs such as the bladder and rectum. There is usually an angle of 100° to 120° between the body and cervix. If this is anterior, it is defi ned as uterine anteversion, while it is described as retroversion when it is posterior.
The uterus is about 7.5 cm in length, 5 cm in its transverse diameter and about 2.5 cm thick. It weighs about 30–40 gr in nulliparous and 70 gr in multiparous women. It is located between the bladder anteriorly and the rectosigmoid poste-riorly. Its upper part is suspended from the round ligaments, while the inferior part is held by the vesicouterine ligaments, the parametria and the uterosacral ligaments bilaterally, which form the “retinaculum uteri” or paracervical ring.
The shape, size, weight and position of the uterus vary according to the different periods of the woman’s life.
3.1 The Uterine Corpus
3.0 The Uterus
The body of the uterus becomes gradually smaller from the fundus toward the isthmus, The anterior wall is covered by the visceral peritoneum, which is continuous with the vesic al peritoneum anteriorly, forming the vesicouterine space.
The posterior wall is convex and covered by the visceral peritoneum which continues inferiorly to cover the cervix and upper vagina. The tubes and round ligaments, which fi x the uterus to the wall of the pelvis, emerge bilaterally from the upper and lateral ends of the uterine body. The utero-ovarian ligaments emerge posteriorly. These three structures are covered by a layer of peritoneum, which passes from the lateral margin of the uterine wall to the wall of the pelvis and is called the broad ligament (Fig. 6).
Fig. 5Uterus, view of the fundus.
Fig. 6Broad ligament of the uterus.
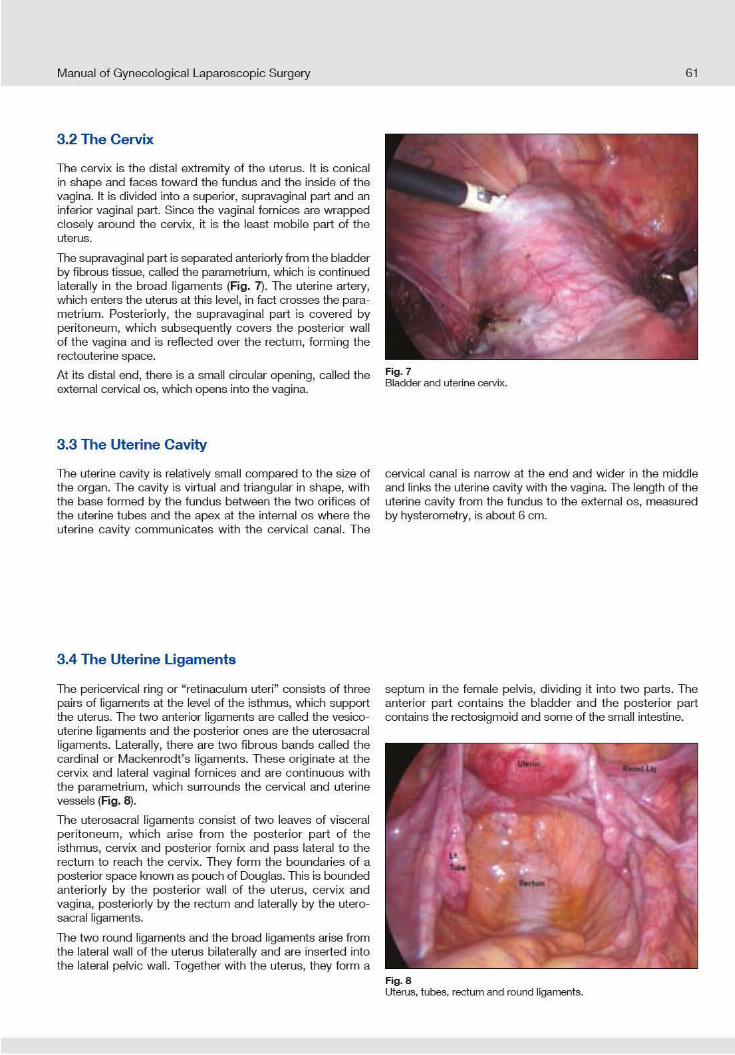

4.1 The Uterine Artery
4.0 Vessels and Nerves
The uterine artery arises from the anterior trunk of the internal iliac (or hypogastric) artery. It crosses the medial part of the levator ani muscle and enters the uterus at the level of the cervix. It provides the blood supply to all of the uterus. It has a wavy course. In the cervix, it is located 2 cm above and anterior to the ureter to which it supplies a small branch(Fig. 10).
From its cervical insertion, it ascends tortuously along the lateral wall of the uterus between the two layers of the broad ligament as far as the tubes. It then extends as far as the ovarian hilum where it terminates in an anastomosis with the ovarian artery. It gives descending branches to the cervix and vagina, which anastomose with branches of the vaginal artery.
Anatomical variations of the uterine artery are uncommon. Just 1% of patients have two uterine arteries on one side while the presence of two uterine veins for each artery is a constant fi nding. Pelage et al. in 1999 demonstrated that the blood supply to the uterus could originate from the ovarian artery or from the artery of the round ligament. On the other hand, it is more common for the blood supply to the ovary to originate from the uterine artery in about 2–4% of woman. The uterine artery usually arises from the hypogastric artery, but it may also arise from the vaginal artery or middle rectal artery.
Fig. 10Uterine artery.
Manual of Gynecological Laparoscopic Surgery62
Fig. 9Right anterior broad ligament.
The tubes, the round ligaments, the utero-ovarian ligaments, vessels and nerves are located between the anterior and posterior leaves of peritoneum of the broad ligament (Fig. 9). The portion of the broad ligament below the tube is called the mesosalpinx. The insertion of the broad ligament on the lateral wall of the pelvis has a concave border, known as the pelvic infundibulum, traversed by the ovarian vessels and nerves.
The round ligaments arise from the lateral part of the uterus and pass through the broad ligaments below and anterior to the tubes above the iliac vessels, then course through the internal inguinal ring to traverse the inguinal canal and terminate in the labia majora. They are about 10–12 cm in length and are formed by muscle fi bers mixed with fi brous tissue arising from the uterus. Vessels and nerves run in the round ligaments.


Manual of Gynecological Laparoscopic Surgery 65
To prevent injury to the ureter during hysterectomy, the following is advisable:
Use of a uterine manipulator sturdy enough to elevate and lateralize the uterus with the aim of exposing the angle where it meets the uterine artery. Incorrect ex posure of the uterine artery can easily lead to injuries to the ureter when the artery is divided, ligated or coagulated by use of bipolar electrosurgery.
Fenestration of the broad ligament, which allows the ureterto be moved, which is located very close to the posterior leaf of the peritoneum.
Adequate dissection of the posterior leaf of the broad ligament is essential to better visualize and localize the uterine artery and vein.
The uterine artery is coagulated at the level of the isthmusand at the point where it passes between the cervix and the body of the uterus.
Knowledge of the principles of electrosurgery is essential for preventing the potential risk of ureter injuries. In particular, the use of bipolar electrosurgery with suitable instruments is recommended.
The anatomical proximity of the ureter to the pelvic infun-dibulum requires great care during adnexectomy when ligating or coagulating this ligament, especially in the case of adhesions or pelvic endometriosis.
Where possible, always visualize the ureter by trans-illumination, as described above.
6.0 The Pelvic VesselsFor the pelvic surgeon, knowledge about the anatomy of the pelvic vessels is crucial regarding the proportions of pelvic organs and the caliber of these vessels. Surgical compli-cations involving these vessels inevitably produce major hemorrhage.
The aorta descends in the retroperitoneal space to the left of the midline. At the level of the fourth lumbar vertebra, it divides into three branches: two large lateral ones, the common iliac arteries, and medially a smaller terminal branch, the middle sacral artery.
The ovarian artery arises directly from the anterolateral part of the aorta at the level of the vertebral bodies of L2 and L3, caudal to the origin of the renal arteries. The ovarian artery has an oblique and lateral retroperitoneal course. On the left it traverses the psoas muscle and on the right the inferior vena cava. The ovarian artery crosses the external iliac vessels2 cm inferior to the ureter. The smaller branches supply the ureter and uterine tubes and fi nally anastomose with the uterine artery at the level of the uterine body.
The ovarian vessels, lymphatics and related nerve endings are located in the pelvic infundibulum (Fig. 18).
6.1 Aorta, Inferior Vena cava and Bifurcation
Fig. 18Right ovarian artery and right pelvic infundibulum.
Another important artery that originates directly from the aorta is the inferior mesenteric artery, which supplies the left half of the transverse colon, all the descending colon, the sigmoid and part of the rectum. The mesenteric artery originates from the aorta 3–4 cm superior to the bifurcation of the common iliac arteries. It then crosses the left common iliac artery and continues in the pelvis as superior hemorrhoidal artery, which descends between the layers of the sigmoid and terminates in the superior part of the rectum.

Manual of Gynecological Laparoscopic Surgery66
The abdominal aorta divides into two branches, the common iliac arteries, to the left of the body of the fourth lumbar vertebra. They are about 5 cm long and divide in turn into the external and internal iliac arteries bilaterally.
The right common iliac artery is retroperitoneal with the small intestine, sympathetic nerves and the ureter anterior to it. Posteriorly are the bodies or the fourth and fi fth lumbar vertebrae, the terminal part of the two common iliac veins and the start of the inferior vena cava. Laterally, the right common iliac vein and the psoas major muscle can be identifi ed. The left common iliac vein passes medially.
The left common iliac artery is retroperitoneal with the small intestine, sympathetic nerves and superior hemorrhoidal artery in front of it, and at this point it is crossed by the ureter. The bodies of the fourth and fi fth lumbar vertebrae are posterior. The left common iliac vein runs medial to the psoas major muscle (Fig. 21).
The branches of the common iliac arteries provide the blood supply to the ureter, psoas muscle, lymph nodes and perito-neum.
Fig. 20Principal vessels at the level of the sacral promontory.
Fig. 21The iliac vessels and psoas muscle.
6.3 The Iliac Arteries
Fig. 19Common iliac arteries and inferior vena cava.
The inferior vena cava is a large venous trunk, which drains the subdiaphragmatic part of the human body as far as the right atrium. The abdominal portion of the inferior vena cava has a caliber of 22 mm and is 20 cm long (Fig. 19).
The inferior vena cava is located to the right of the lumbar spine. It is formed by the union of the right and left common iliac veins at the level of the fi fth lumbar vertebra. The left of the two branches of the common iliac vein is of major impor-tance to the pelvic surgeon because this crosses the midline very close to the sacral promontory (Fig. 20). Injury to this vein can occur when the primary trocar is introduced through the umbilicus or during surgical maneuvers at the level of the sacral promontory.
Perforation or injury of the large vessels during introduction of the Veress needle or primary trocar is of low incidence, but nonetheless one of the most feared and dangerous complications of laparoscopic surgery. The major risk factorscontributing to the occurence of this complication are low intra-abdominal pressure, insuffi cient pneumoperitoneum, rapid or uncontrolled entry, incorrect position of the operating table or a patient with a very large abdominal girth. It must be recalled how important close attention is during this phase as a good third of complications of laparoscopic surgery occur during introduction of the Veress needle or primary trocar.
6.2 The Inferior Vena cava

Manual of Gynecological Laparoscopic Surgery 67
This artery arises from the posterior part of the aorta, a little above its bifurcation. It courses in the midline anterior to the lumbar vertebræ, sacrum and coccyx. It supplies small branches to the rectum. In front of the sacrum it anastomoses with the lateral sacral arteries. It is crossed by the left common iliac vein.
The median sacral artery and the left common iliac vein may be accidently injured by surgical maneuvers at the level of the sacral promontory. In the case of promonto-sacral surgery, it is advisable to make a true and proper fenestration of the retroperitoneum. A small retroperitoneal incision is made and after a short time, distension with CO2 allows these vessels to be visualized better and identifi ed (Fig. 22).
The common iliac artery divides into internal and external. The external iliac artery is bigger and passes obliquely and lateral to the border of the psoas muscle (Fig. 23). It then enters the inguinal canal where it tapers and is called the femoral artery. At its origin it is crossed by the ovarian vessels and, in some cases, by the ureter. The round ligament crosses it at the end of its course before it enters the inguinal canal. The external iliac vein runs below the artery together with numerous vessels and lymph nodes that are located along its course.
Apart from the small branches to the psoas muscle, it divides into two large branches, the inferior epigastric artery and the deep circumfl ex iliac artery.
The inferior epigastric artery arises from the medial part of the external iliac artery, 1 cm above the inguinal ligament. It forms a curve anterior to the subperitoneal tissue of the medial border of the internal inguinal ring, crosses the transversalis fascia and runs upward towards the rectus abdominis muscles and posterior fascia, fi nally dividing into numerous branches. Below the umbilicus, it anastomoses with the superior epigastric artery, a branch of the internal mammary artery, and with the inferior intercostal arteries (Fig. 24). This artery produces a prominence in the parietal peritoneum, known as the lateral umbilical fold. It supplies the rectus abdominis muscle and the anterior abdominal wall and gives a branch to the round ligament.
6.4 The Median Sacral Artery
6.5 The External Iliac Artery
6.6 The Branches of the External Iliac Artery
Fig. 22The sacral vessels at the level of the promontory.
Fig. 23Left external iliac artery.
Fig. 24Inferior epigastric artery.


Manual of Gynecological Laparoscopic Surgery 69
The obturator artery is an important anatomical boundary during lymphadenectomy along the external iliac artery. It is accompanied by the obturator nerve and vein. It is located deeply and laterally in the pelvis toward the upper part of the obturator foramen on both sides. Inside the obturator foramen, the nerve runs more laterally compared to the artery (Fig. 27). The artery passes through the obturator foramen and divides into an anterior and posterior branch. The obturator artery is related laterally to the obturator fascia and medially to the ureter. Anatomic variants of this vessel are common and to identify it the umbilical artery and external iliac artery are used as reference points as the obturator artery is located between these two vessels.
The middle rectal (or hemorrhoidal) artery descends lateral to the rectum in the pararectal space. It supplies the rectum and anastomoses with the superior and inferior rectal arteries.
The internal pudendal artery is the smallest of the terminal branches of the internal iliac and supplies the external genitalia and perineum. It passes downward and external to the inferior part of the greater sciatic foramen, behind the sciatic spines, and leaves the pelvis through the coccygeus and piriformis muscles. It then crosses the sciatic spine and inferior pubic ramus to terminate in the middle of the fascia of the urogenital diaphragm and the area of the clitoris. In its course it is accompanied medially by the pudendal nerve, the inferior rectal nerve and the inferior gluteal vessels and laterally by the sciatic nerve, the inferior gluteal nerve and the internal obturator nerve.
The inferior gluteal artery is the most important of the terminal branches of the internal iliac (hypogastric) artery. It descends anterior to the nerves of the sacral plexus and piriformis muscle, posterior to the internal pudendal artery and passes
toward the lower part of the greater sciatic foramen. It supplies the piriformis muscle, the coccygeus and levator ani with the rectal vessels.
The vaginal artery arises from the internal iliac artery in a common trunk with the uterine artery and middle rectal artery. The ureter crosses it posteriorly and from this point the artery descends in the direction of the vagina medial to the ureter. It ends in the middle third of the vagina in small anastomosing branches and supplies all of the vagina.
The superior vesical artery arises from the proximal part of the anterior trunk of the internal iliac artery and supplies numerous branches to the upper part of the bladder and ureter.
The middle vesical artery is a branch of the superior vesical artery and supplies the base of the bladder (Fig. 28).
The inferior vesical artery normally arises in common with the middle hemorrhoidal artery or the vaginal artery. It supplies the base and inferior part of the bladder and the trigone.
The posterior branches of the internal iliac or hypogastric artery:
The iliolumbar artery is a branch of the posterior trunk and passes behind the obturator nerve and external iliac vessels toward the medial border of the psoas major muscle, where it divides into a lumbar branch and an iliac branch.
The lateral sacral arteries are branches of the posterior trunk, normally two in number, one superior and one inferior, which descend to the lateral border of the sacrum.
The superior gluteal artery goes to the gluteal area, running behind the lumbosacral trunk at the level of the fi rst sacral nerve and leaving the pelvis through the piriformis, dividing into a superfi cial and deep branch.
Fig. 27Obturator fossa.
Fig. 28Superior vesical artery.

Manual of Gynecological Laparoscopic Surgery70
Fig. 30 Paravesical space.
Fig. 31 Lateral view of the paravesical space: the internal obturator muscle, puborectalis muscle and the two tendinous arches can be seen.
Fig. 32Space of Retzius.
The space of Retzius or retropubic space is located between the posterior part of the pubic bone and Cooper’s ligament, which is its anterior boundary. The anterior part of the bladder is the posterior boundary of this space. The lateral boundary is formed by the internal obturator muscle and it is continuous posteriorly with the vesicovaginal space. The fl oor of the space of Retzius is the pubocervical (paravaginal) fascia, which is inserted into the tendinous arch (connective tissue located medial to the insertion of the iliococcygeus muscle) in the internal obturator fascia (Fig. 32).
7.2 The Paravesical Space
7.3 Space of Retzius
The pararectal spaces are lateral to the rectum bilaterally. They are located posterior to the base of the broad ligament, which forms the anterior boundary of these spaces. The lateral boundary is formed by the ureter and internal iliac artery. The base consists of the puborectalis muscle (part of the levator ani). This space contains the uterosacral ligament laterally, which passes posteriorly in the direction of the sacrum (Fig. 29).
Laparoscopic operations for uterine prolapse or endo-metriosis of the rectovaginal septum are procedures require a solid knowledge of the anatomy of these spaces. Correct dissection of the pararectal space is of crucial importance to prevent iatrogenic injury to the vesical and rectal nerve plexuses, which cross this space.
The paravesical space is located anteriorly at the base of the broad ligaments bilaterally. The medial boundary is the bladder, the lateral boundary is the internal obturator fascia while its inferior boundary consists of the fi bres of the iliococ-cygeus muscle, which terminate in the tendinous arch of the levator ani.
This space contains, from medial to lateral, the obliterated umbilical artery, the obturator artery and vein and the obturator nerve, together with lymph nodes and lymphatic vessels (Figs. 30–31). The paravesical space is particularly important in pelvic lymphadenectomy.
Fig. 29 Pararectal space.
7.0 The Pelvic Spaces7.1 The Pararectal Space

Manual of Gynecological Laparoscopic Surgery 71
This space is found between the anterior part of the vagina and the posterior part of the bladder. It contains the bladder trigone and the vesicovaginal fascia. It is bounded laterally by the vesicouterine ligaments or vesical pillars(Fig. 33). The inferior vesical arteries and veins and ureters pass beneath the pillars toward the bladder neck.
This space is also virtual and it is dissected during hysterectomy to free the bladder; the surgeon must avoid lateral dissection because of the risk of ureter injury.
7.4 The Vesicovaginal Space
Fig. 33Vesicovaginal space.
7.5 The Rectovaginal Space
The recto-vaginal space is another virtual space located between the posterior part of the vagina and the anterior part of the rectum. It begins at the medial junction of the utero-sacral ligaments and the pouch of Douglas. It is bounded laterally by the iliococcygeus muscles of the levator ani.
Fig. 34Presacral space.
7.6 The Presacral Space
This is located posterior to the parietal peritoneum in front of the vertebral column at sacral level. It is bounded posteriorly by the anterior longitudinal ligament, the sacral promon tory and the sacrum (Fig. 34). The right lateral boundary is the right common iliac artery and the right ureter. On the left are found the left common iliac artery, left ureter and the inferior mesenteric artery and vein. It contains fat and the presacral nerves, which receive multiple afferent and efferent connec-tions from the sympathetic, parasympathetic and somatic system of the sacral nerves. Dissection of this space is necessary when presacral neurectomy is performed.
Recommended Reading
1. DUBREUIL-CHAMBARDEL, L: (1925) Traité des Variations du System Artériel Variations des Artères du Pelvis et du Membre Inferieur, Masson et Cie., Paris
2. GASPARRI F, MASSI GB: (1976) Trattato italiano di ginecologia
3. PELAGE JP, LE DREF O, JACOB D, SOYER P, ROSSIGNOL M, TRUC J, PAYEN D, RYMER R: Uterine artery embolization: anatomical and technical con siderations, indications, results, and complicationsJ Radiol. 200 Dec;81 (12 Suppl): 1863–72.
4. PELAGE JP, LE DREF O, SOYER P, JACOB D, KARDACHE M, DAHAN H, LASSAU JP, RYMER R: Arterial anatomy of the female genital tract: veriations and relevance to trascatheter embolization of the uterus. AJR Am J Roentgenol.1999 Apr;172(4): 989–94.

Manual of Gynecological Laparoscopic Surgery72

Chapter V
Suturing Techniques inGynecologic Laparoscopy
Daiana Tonellotto1, Paulo Ayroza2,Arnaud Wattiez3 and Luca Mencaglia4
1Barra D’Or Hospital, Rio de Janeiro, Brazil2Department of Gynecology and Obstetrics,
Medical School of the Santa Casa University of São Paulo, Brazil3Strasbourg University Hospital, Strasbourg, France
4Centro Oncologico Fiorentino, Florence, Italy

Manual of Gynecological Laparoscopic Surgery74
1.0 ErgonomicsTo make suturing easier it is important for the surgeon to adopt as ergonomic a position as possible.
The surgeon must be at a height where the angle between his upper arm and forearm is > 90 degrees. It must be borne in mind that the patient’s abdominal wall is distended by the pneumoperitoneum and is further elevated by the Trendelen-burg position and also that the surgeon’s hands are situated about 20 cm higher because of the presence of the trocars and instruments. If the operating table cannot be lowered suffi ciently, the surgeon may use a footrest to assume the correct position.
Suturing techniques in laparoscopy do not require large movements of the trunk and arms but only control of the
instruments by the hands and fi ngers. The arms must be relaxed and the elbows beside the trunk.
It is extremely important that all of the surgical team is arranged correctly around the table and that the surgeon’s line of vision (eye-monitor) always passes between the surgeon’s hands.
Moreover, for correct ergonomics during laparoscopic suturing, the trocar ports should be positioned relative to the tissue to be sutured to take into account as far as possible the hand holding the needle holder, the plane of suturing and the angle of incidence between needle and tissue.
2.0 SuturingSuturing is defi ned as any surgical step intended to approxi-mate the edges of a tissue that is discontinuous with its anatomical planes. Its function can be mechanical (opposing the forces that tend to separate the wound edges), joining different anatomical planes together or isolation (preventing bacterial contamination).
Essentially there are two traditional suturing techniques:
interrupted
continuous
Interrupted (noncontinuous) sutures are placed to approxi-mate the wound edges, placing individual sutures equidistant from each other.
The interrupted suture can be simple, when the purpose is simply to approximate the tissue, double (two simple sutures without breaking the continuity of the thread) when hemostasis is also desired or inverting when it is necessary to invaginate the tissue more deeply.
This type of suture has certain advantages: if a knot comes undone, this is not enough to cause suture dehiscence, it is well tolerated by the tissues because less foreign material is present and, in the event of infection, it prevents this from spreading to the entire wound following the course of the suture. At the same time, however, it must be borne in mind that it takes longer compared to a continuous suture, is less hemostatic and provides relatively lower resistance.
Continuous suture allows approximation of the edges with an uninterrupted series of stitches using one thread. It can be a straight line, and in this case the suture is stopped by a knot at either end, or circular (also called purse-string), where the knot is tied with the two ends of the suture. For this type of suture, it is preferable to use a smooth and fl exible thread. The advantage of the continuous suture is that it is fast and provides optimal tensile strength retention but the disadvan-tage is that if a suture gives way, this is more likely to produce dehiscence of the entire suture and in the event of infection, it favors spread along the suture.
Fig. 1Types of suture needles.
3.0 MaterialsThe materials used in the traditional suturing technique are needles and suture threads.
3.1 Surgical Needles
Surgical needles are available in six different geometric forms: straight, ½ curve, ½ circle, ¼ circle, 3/8 circle, 5/8 circle and they are distinguished by the type of point: rounded, conic al, diamond point and by the body: circular, oval, triangular, lancet, hexagonal (Figs. 1–2).
1/4 circle
Ophthalmic (surgery of the eyes and muscles
Skin suture
Skin and muscles
Suture of the skin and intestine
General, gynecologic and vascular surgery
Urology
3/8 circle
1/2 circle
1/2 curve
straight5/8 circle
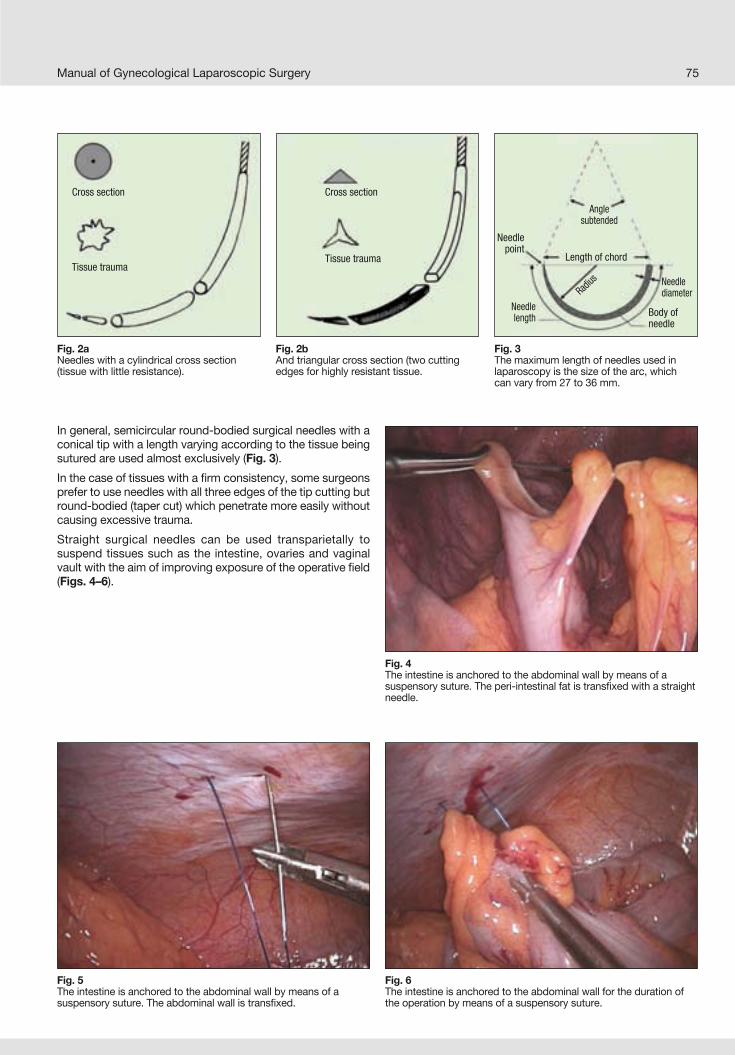
Manual of Gynecological Laparoscopic Surgery 75
In general, semicircular round-bodied surgical needles with a conic al tip with a length varying according to the tissue being sutured are used almost exclusively (Fig. 3).
In the case of tissues with a fi rm consistency, some surgeons prefer to use needles with all three edges of the tip cutting but round-bodied (taper cut) which penetrate more easily without causing excessive trauma.
Straight surgical needles can be used transparietally to suspend tissues such as the intestine, ovaries and vaginal vault with the aim of improving exposure of the operative fi eld (Figs. 4–6).
Fig. 5The intestine is anchored to the abdominal wall by means of a suspensory suture. The abdominal wall is transfi xed.
Fig. 6The intestine is anchored to the abdominal wall for the duration of the operation by means of a suspensory suture.
Fig. 4The intestine is anchored to the abdominal wall by means of asuspensory suture. The peri-intestinal fat is transfi xed with a straight needle.
Fig. 2aNeedles with a cylindrical cross section(tissue with little resistance).
Tissue trauma
Cross section
Fig. 3The maximum length of needles used in laparoscopy is the size of the arc, whichcan vary from 27 to 36 mm.
Anglesubtended
Length of chord
Needlelength
Needle point
Needle diameterRadi
us
Body of needle
Fig. 2bAnd triangular cross section (two cutting edges for highly resistant tissue.
Cross section
Tissue trauma


Manual of Gynecological Laparoscopic Surgery 77
The most important physical properties of a suture material are:
tensile strength retention: ability of a thread to oppose tractionsmoothness: force necessary to make a suture glide in a tissue. Strictly correlated with the friction coeffi cient of the suture materialelasticity: capacity of a suture to elongate under tractioncapillarity: physical property by which molecules of liquid are induced to move inside a tube independently of gravityhydrophilia: chemical phenomenon denoting the greater or lesser affi nity for water of various materialsflexibility: property by which a suture is capable of supporting acute angulation without breaking or opposing excessive resistanceplasticity: this is the lack of recovery of the initial dimen-sions of the suture after forced lengtheninghandling: this is a property that cannot be measured with instruments but is a special and subjective quality assessed only by the surgeon’s hand; it is the resultant of all the physical properties described above.
The sutures most commonly used in laparoscopy are:
Vicryl (Polyglactin 910). Braided absorbable synthetic suture. Also produced in a form coated with calcium stearate to make it water-repellent and more rigid.
Advantages: optimal handling good knot retention predictable absorption very versatile minimal tissue reaction
Disadvantages: braided and capillary retention reduced in the presence of urine
Vicryl is the most commonly used suture in gynecologic laparoscopy because of its optimal handling and versatility.
Polyester (Dacron). Commercial names: Ethibond (polyester coated with polybutylate), Mersilene (polyester), Micron (polyester covered with silicone). Non-absorbable synthetic monofi lament suture.
Advantages: optimal tensile strength retention low reactivity good fl exibility optimal smoothnessDisadvantages: asepsis of the tissue removal of the sutures if infectedPolyester, because of its smoothness and non-absorbability, fi nds its greatest use in surgery of the pelvic fl oor.
Monocryl (polyglecaprone 25). Absorbable synthetic mono-fi lament suture.
Advantages: high tensile strength retention absorbableDisadvantages: low knot retention 50% absorbed in 7 daysParticularly indicated for suturing delicate tissues such as the tube and ovary as it produces less tissue reaction.
Polypropylene Commercial names: Prolene, Surgilene.Non-absorbable synthetic monofi lament suture.
Advantages: good knot retention optimal smoothness low tissue reaction optimal tissue resistance versatile applicabilityDisadvantages: memory low fl exibility
knot tying diffi cult with bigger suturediameters
Small-diameter material is used for vascular sutures while larger diameters are used for temporary suspension of the ovaries or sigmoid.
4.1 Trocars
The trocar allows various types of laparoscopic devices to be passed into and used in the abdominal cavity.
The 6-mm trocars allow finer and more precise move-ments so 5-mm instruments are usually employed; however, needles are introduced and removed more easily through11-mm trocars. It is therefore possible to use a 11-mm trocar with reducer although 11–13 mm trocars are currently available that do not require reduction from 13 to 6 mm because they come with a special valve, though this is extremely fragile and easily damaged when needles are passed through it. When suturing delicate small structures such as the ureter or tube, where it is preferable to use3-mm instruments, 3.9-mm trocars can be used.
The trocars have different types of valves:
multifunctional valve: this is opened by pressure exert ed by an external plunger
automatic valve fl aps: this opens automatically when the instrument is pushed against it
silicone leaflet valve: with a membrane, bicuspid or tricuspid shape
When suturing, attention should be paid to the type of trocar valve; the silicone leafl et valve remains open when two sutures are passed inside it, causing gas to leak. When using extracorporeal knots, trocars with a tricuspid valve are therefore preferable.
4.0 InstrumentationTo speed up and facilitate as much as possible the suturing process, perfect knowledge of the required laparoscopic instruments is essential.

Manual of Gynecological Laparoscopic Surgery78
4.2 Needle holders
The needle holder is the fundamental instrument for laparo-scopic suturing as it must carry the needle, place the stitch and tie the intracorporeal knot (Fig. 8).
There are different versions depending on the handle design (curved, straight), opening and closing ratchet mechanism (central position, right, left), stitch (straight, curved, single or double) and jaws but in general, they must all be easy to
handle, lightweight and sturdy at the same time. They must allow the needle to be grasped fi rmly but also to scale the force while the suture is being manipulated.
There are needle holders capable of straightening the needle but they have the disadvantage of not allowing any variation of the angle of impact on the tissue being sutured.
The assistant needle holder is the instrument that assists the needle holder in placing the suture (Figs. 9–10).
In general, a second needle holder is used to allow good control of the needle and at the same time allow both hands to be used equally. Any forceps can be chosen as assistant needle holder, preferably with fl at jaws that allow both the suture and the tissues to be grasped securely.
Figs. 8a, bNeedle holders with straight and curved handles.
a b
4.3 Assistant Needle Holder
Fig. 9Needle holder and assistant needle holder.
Figs. 10a–cJaws of different needle holders.
a b c

Manual of Gynecological Laparoscopic Surgery 79
4.4 Knot Pusher
4.5 Scissors
The knot pusher is an instrument that allows a previously tied extracorporeal knot to be introduced into the abdominal cavity. There are different knot pushers (Fig. 11) depending on the type of knot: simple half hitch, Roeder.
The scissors used to cut suture material must not be the same as those used for dissection because they are extremely deli cate.
Using dissecting scissors to cut suture material can result in a dramatic decrease of their cutting performance. This effect becomes even more evident at an earlier stage if the scissors are used in combination with electrosurgical instruments.
Scissors vary according to the design of the blades: straight, curved, hooked. Hooked scissors are preferable for cutting sutures (Fig. 12).
Fig. 11Knot pusher.
Fig. 12Different types of laparoscopic scissors.
5.0 Insertion and Removal of the Needle from the Abdominal Cavity
Figs. 13a–cThe sequence demonstrates how the needle holder is inserted in the cannula (a)
and fi nally protrudes from the distalopening of the 13-mm trocar (c).
a b c
The insertion and removal of the needle depend on its shape and size, and not least, on the trocar size.
Straight needles can be inserted in any type of trocar or even directly through the abdominal wall, while curved needles
can be introduced in 6-mm trocars up to 12 mm in length, in 11-mm trocars up to 28 mm, in 13-mm trocars up to 34 mm and in 15-mm trocars up to 40 mm in length (Figs. 13–15).

Manual of Gynecological Laparoscopic Surgery80
Figs. 14a–cSequence demonstrating loading of the suture and thus of the needle inside the cannula.
Figs. 15a–d �Sequence demonstrating the subsequent insertion of the cannula loaded with suture and needle inside the trocar.
Figs. 16a, b �When the length of the needle exceeds the inner diameter of the cannula, this can pose problems of its own, such as the needle becoming impacted inside the cannula.
During insertion and removal of the needle from the abdominal cavity, constant videoendosopic monitoring of the port in use is mandatory, because there is always a risk of the needle becoming impacted in the valve and dropping into the abdominal cavity (Fig. 16).
The ideal would be to use trocars with an automatic valve. There are specific introducers on the market, which are inserted in the trocars and allow the needle to be passed through safely.
The needles can be introduced directly through the cutan eous ports but with the risk of iatrogenic injury to the abdominal wall, bleeding and subcutaneous emphysema. To do this, it is necessary to remove the trocar from the abdominal wall, introduce the needle holder in the trocar and pick up the end
of the suture, then withdraw the needle holder from the trocar until the needle is located about 10 cm from the distal end of the trocar; at this point, the needle holder is reinserted in the trocar and the suture is grasped about 3 cm from the swage of the needle. The needle holder, needle, suture and trocar can then be introduced into the abdominal wall, seeking to fi nd the correct route.
To remove the needle, apart from the methods described above, taking care not to mount the needle in the needle holder but handling it by the suture to provide it with some freedom of motion, it is possible to straighten the needle in the abdominal cavity using two needle holders so that it can be removed directly through the 6-mm trocar but with the risk of breakage of the needle itself or of the needle holders.
b c
a
d
b
c
ba
a

Manual of Gynecological Laparoscopic Surgery 81
Fig. 17Coordinates of the suture plane.
Fig. 18Suture angles.
6.0 The StitchThe stitch is one of the most diffi cult steps in laparoscopic suturing.
It is always necessary to refer to the “ideal stitch” which is obtained when the angles between the wound, needle and needle holder are each 90 degrees and the suture line is parallel to the needle holder. To come as close as possible to this situation, there are three variables:
choice of principal needle holder (central or lateral trocar)straight or reverse mounting of the needle in the needle holder
angle between the needle and needle holder
Once the needle has been introduced into the abdomen and the principal needle holder has been adjusted relative to the suture plane, the needle is mounted in the needle holder without locking at the level of its maximum curve. At this point the assistant needle holder, grasping the suture 2 cm from the needle swage, causes the needle to rotate forward or backward through 180 degrees, in this way allowing the
orientation of the needle to be changed from forward to back or vice versa.
The assistant needle holder will be able to perfect the angle between needle and needle holder with traction on the suture close to the swage or small pushes on the tip of the needle. The same maneuver may be performed by the same needle holder supporting the needle on suffi ciently rigid tissue.
After locking the needle by closing the needle holder, it is then possible to place the stitch. The movement transmitted to the needle holder and needle must consist of rotation only (Figs. 17–23).
If it is desired to place the suture more deeply it is possible to externally rotate the wrist or move the grip of the needle holder as far as possible toward the swage.
When the needle is extracted from the tissue, one should attempt to grasp the needle with the needle holder imme-diately, avoiding letting it drop and losing time required for repositioning.
P is the axis of rotation of the needle holderF is the central axis of the opening in the tissueT is the plane of the needle
Fig. 19Ideal suture angles.
Fig. 20Modifi cations of the suture angle: tip opened 110°.
A = ALPHA = 90°B = BETA = 0°G = GAMMA = 90°
A = ALPHA = 90°B = BETA = 0°G = GAMMA = 90°
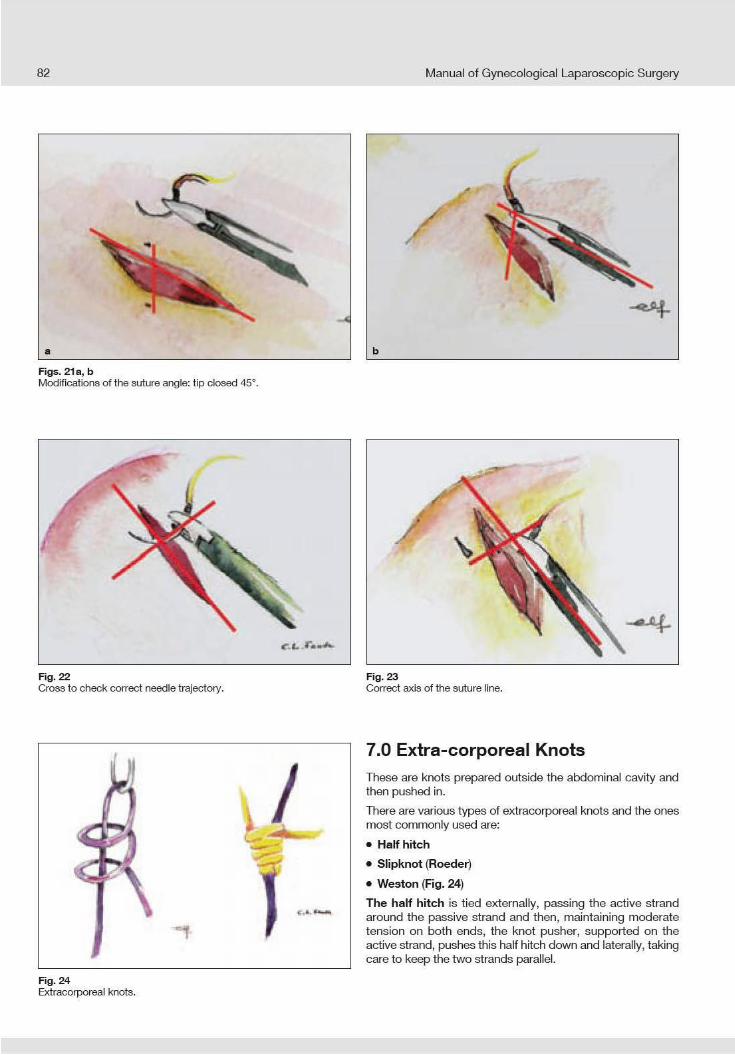


Manual of Gynecological Laparoscopic Surgery84
Fig. 29The margins are approximated by the knot.
Fig. 30Suture placed at the infundibulum.
Fig. 28The stitch is placed in sequence.
Fig. 31Final outcome of the suture.
The Roeder knot is tied as follows:
A fi rst half knot is tied,
the active strand of the suture makes three turns around both strands of the previously formed loop,
the active strand makes a second half knot on the passive strand of the loop,
the knot is tightened.
It is important to avoid crossing the two strands of the knot by asking the assistant to place a fi nger on the trocar to separate the two ends of the suture.
This knot is secure and easy to tie with a good sliding capacity and at the same time optimal holding strength so it provides a high level of safety when ligating vascular pedicles (Figs. 28–31).
The Weston knot is made with
an initial half knot
the active strand is fi rst wrapped around the passive strand of the previously formed loop
then twisted around both strands of the loop, making the active strand pass through the loop that has just been made
and finally the active strand passes from anterior to posterior in the loop closest to the surgeon’s hands
It is pushed into the abdomen by simply pulling the passive strand and locked pulling the two ends in opposite directions.
As with the Roeder knot, it is important to keep the two ends of the suture separate. This is a knot with optimal smoothness but the holding strength of the knot is not optimal especially with suture sizes less than zero.

Manual of Gynecological Laparoscopic Surgery 85
To tie an intracorporeal knot, it is important to perform the following steps in order:
the needle holder picks up the suture 2 cm from the swage and moves it from the opposite side with respect to the needle’s exit point, passing above the suture hole
the assistant needle holder wraps twice around the suture after which it grasps the end of the suture
the two ends are then pulled in opposite directions with the two needle holders to pull the fi rst square knot taut.
the maneuver can be repeated with a single turn each time until the surgical knot is complete (Figs. 32, 33).
The result should be a surgical knot defi ned classically as a succession of half knots and/or half hitches in which the last should be the reverse of the previous one. However, the fi rst must be a double half knot, that is, a half knot made by passing the end of the suture twice through the same loop; this prevents the knot from becoming slack while the next is being tied.
In this step it is very important never to mount the needle in the needle holder because this is associated with the risk of iatrogenic injure to adjacent organs.
8.0 Intracorporeal Knots
Fig. 32Preparation of the knot.
Fig. 33Preparation of the knot.
Fig. 34Intracorporeal knot-tying depends on correct preparation.
Fig. 35The line of the suture (green line) allows the knot to be tied rapidly.

Manual of Gynecological Laparoscopic Surgery86
There are ready-made loops that can be used in laparoscopy for hemostasis of vascular pedicles and pedunculated fi bromas.
They are available in Vicryl, Prolene and PDS and usually employ the Roeder knot. The guiding aid in which the suture runs also acts as knot pusher.
The endoloop, used for ligatures, is a variation of the Roeder knot suitable for tonsillectomy operations. This is a preformed
loop for making a fi sherman’s knot. The free end is mounted in a plastic guide tube and caught at the detachable proximal end of the guiding tube. If it is not possible to use a trocar with a silicone leafl et valve, an adaptor must be used to prevent gas leakage. After placing the loop around the tissue that is to be ligated, the proximal end of the guiding tube is broken off and used to exert traction on the free end of the thread while the distal part of the tube is used to push the knot.
1. AL FALLOUJI M: Making loops in laparoscopic surgery: state of art. Surg Laparosc Endosc 1993; 3(6):477–81
2. BABETTY Z, SUMER A, ALTINTAS S: Knot properties of alternating sliding knots. J Am Coll Surg 1998;186 (4):485–9
3. BONARDINI L, ROSATO S: Suture e fi li chirurgici,Ed Mediche Italiane, 1989
4. BROWN RP: Knotting technique and suture materials, Br J Surg 1992;79(5):399–400
5. DORSEY JH, SHARP HT, CHOVAN JD, HOLTZ PM: Laparoscopic knot strength: a comparison withconventional knots. Obstet Gynecol. 1995 Oct;86(4 Pt 1):536–40.
6. EMAM TA, HANNA GB, KIMBER C, DUNKLEY P,CUSCHIERI A: Effect of intracorporeal-extracorporeal instrument length ratio on endoscopic task performance and surgeon movements. Arch Surg 2000; 135(1):62–5
7. FREDE T, STOCK C, RENNER C, BUDAIR Z,ABDEL-SALAM Y, RASSWEILER J: Geometry of laparo scopic suturing and knotting techniques.J Endourol 1999; 13(3):191–8
8. GOMEL V, TAYLOR PJ: Laparoscopia ginecologica. Diagnostica e chirurgia, UTET, 1998
9. HANNA GB, SHIMI S, CUSCHIERI A: Optimal port locations for endoscopic intracorporeal knotting. Surg Endosc 1997; 11(4):397–401
10. HANNA GB, FRANK TG, CUSCHIERI A: Objective assessment of endoscopic knot quality. Am J Surg 1997; 174(4):410–3
11. KADIRKAMANATHAN SS, SHELTON JC, HEPWORTH CC, LAUFER JC, SWAIN CP: A comparison of the strength of knots tied by hand and at laparoscopy. J Am Coll Surg 1996;182(1):46–54
12. LUKS FI, DEPREST J, BROSENS I, LERUT T: Extracorporeal surgical knot. J Am Coll Surg 1994;179(2) :220–2
13. MEDINA M: Analysis and physics of laparoscopicintracorporeal square-knot tying. JSLS 2005;9(1):113–21.
14. ROMEO A, MINELLI L: Manuale dei nodi e delletecniche d’annodamento in laparoscopia, EGES Edizioni, Verona, 2006
15. SHARP HT, DORSEY JH, CHIVAN JD, HOLTZ PM: The effect of knot geometry on the strength of laparo scopic slip knots. Obstet Gynecol 1996;88(3):408–11
16. TRIMBOS JB, RIJSSEL EJ, KLOPPER PJ: Per formance of sliding knots in monofi lament and multi fi lament suture material. Obstet Gynecol 1986; 68(3): 425–30
17. VAN RIJSSEL EJ, TRIMBOS JB, BOOSTER MH: Mechanical performance of square knots and sliding knots in surgery: comparative study, Am J Obstet Gynecol 1990;162(1):93–7
9.0 Endoloop
Recommended Reading

Chapter VI
The Role of Diagnostic Laparoscopy and Transvaginal Endoscopy (TVE) in Infertility and
Assisted Reproduction Technology (ART)
Emmanuel Lugo1, Carlo Tantini2 and Luca Mencaglia1
Centro Oncologico Fiorentino, Florence, Italy2Department of Gynecology and Obstetrics,
Hospital of Cecina, Italy

Manual of Gynecological Laparoscopic Surgery88
1.0 IntroductionExploring the peritoneal cavity and visualizing its organs is essential in the diagnosis of female pelvic pathology, especially in the case of infertility or pelvic pain of non- specifi c etiology.
The pelvis can be visualized endoscopically by diagnostic laparoscopy or transvaginal endoscopy.
Both techniques have benefi ts and drawbacks so that it is not possible to choose defi nitively between them. In summary, it can be stated that both are minimally invasive endoscopic techniques that require general anesthesia in the vast majority of cases (even if performed as day surgery) and the use of a fully equipped operating room. Although many authors have suggested the use of local anesthesia for these outpatient
procedures applying either technique, general anesthesia is nearly always necessary in our experience.
Diagnostic laparoscopy provides a panoramic view of the pelvis – not feasible by transvaginal endoscopy (TVE) – and facilitates switching to endoscopic surgery in the event of pelvic pathology. From the surgical point of view, trans-vaginal endoscopy has certain limitations. With the aid of a 30°- hysteroscope and fl uid medium for distension of the peritoneal cavity, the transvaginal approach undisputably provides some absolutely unique angles of vision and types of images. Nonetheless, it must be said, that TVE allows salpingoscopy of the distal tubal segment to be performed only in selected cases.”
2.0 Laparoscopic DiagnosisDiagnostic laparoscopy is indicated in infertile patients if tubo-peritoneal pathology is suspected to be the primary cause of inhibited female reproduction. Among the most common indications are suspected tubal defects or irregularities on the hysterosalpingogram, previous abdominal surgery suggesting the tentative diagnosis of adhesions, and signs of endome-triosis or hydrosalpinx on ultrasound. Diagnostic laparoscopy allows conversion to open surgery and immediate surgical treatment of any unexpected pelvic pathology prior to initiating Assisted Reproductive Technology (ART) procedures.
Laparoscopy combined with diagnostic hysteroscopy is therefore considered the gold standard for the assessment of the pelvis and female reproductive tract. Even in the case of Mullerian malformation, the combined use of laparoscopy and hysteroscopy is ideal for a defi nite diagnosis since it allows assessment of the exterior contour of the uterine corpus. In fact, hysteroscopy on its own does not allow differential
diagnosis between a septate uterus and bicornuate uterus so it must always be supplemented by diagnostic laparoscopy or transvaginal ultrasound.
Diagnostic laparoscopy is also indicated in infertile patients to exclude the presence of pelvic pathology when 1st level ART procedures for a period of 6–8 months did not yield a positive result. Laparoscopy must be scheduled during ovulation or the second phase of the cycle and must always be combined with diagnostic hysteroscopy to evaluate the condition of the uterine cavity and allow endometrial biopsy sampling, if needed.
The diagnostic measures above must be performed with utmost care and precision to prevent iatrogenic trauma to the tissue being examined. Modern technology allows minimallyinvasive diagnostic laparoscopy by use of miniaturized tele scopes, instruments and trocars.
Figs. 1a, bLaparoscopes with diameters of 1 mm, 2 mm, 5 mm and 10 mm.
a b

Manual of Gynecological Laparoscopic Surgery 89
Fig. 2Panoramic view of the pelvis.
Fig. 3Endoscopic view of the tube and ovary.
Fig. 4Endoscopic view of the ovary.
Fig. 5The left tube is positioned prior tochromopertubation.
Fig. 6Injection of methylene blue dye.
Fig. 7Abnormal dilatation of the tube,sactosalpinx or hydrosalpinx.
Fig. 8Salpingitis of the isthmus.
Fig. 9Appendix.
However, the surgeon must be readily prepared for endoscopic-guided surgical treatment of any pathology encountered during the diagnostic session.
Diagnostic laparoscopy is normally performed as day surgery with the patient being discharged on the same day (Figs. 1–9).

Manual of Gynecological Laparoscopic Surgery90
2.1 Patient Positioning
3.0 AnesthesiaDiagnostic laparoscopy can be performed under both local and general anesthesia.
Various authors have suggested using local anesthesia with periumbilical skin infi ltration and intravenous sedation. In this case it is vitally important to keep abdominal distension very low with insuffl ation of 1–2 liters of CO2 at the most to avoid pain caused by abdominal distension and problems related to spontaneous respiration.
In the case of general anesthesia, agents that guarantee rapid recovery can be used so that the patient can be discharged a few hours after the procedure. In this case, too, local infi ltration anesthesia applied to the trocar insertion area has proven to be useful to reduce postoperative pain.
5 mm-laparoscope and videocamera Insuffl ation system Xenon cold light source 6 mm-trocar
Veress needle Atraumatic grasping forceps Suction / irrigation system Uterus manipulator
4.0 Instrumentation
Pelvic endoscopy allows visual inspection of the peritoneal cavity and the female genital tract involved in the reproductive process.
An extensive diagnostic laparoscopy must include full visualization of the entire peritoneal cavity, a panoramic view of the pelvis and pouch of Douglas, the peritoneal liquid, the uterosacral ligaments, thorough inspection of the ovarian and tubal surfaces (including the fi mbriae) and chromopertubation.
Various types of instruments can be used for laparoscopy in infertile patients:
Traditional laparoscopy, performed by using 5 mm- or10 mm-laparoscopes, provides optimal visibility at relatively low expenditures. The second port is a 5 mm-trocar through which an atraumatic grasping forceps can be used.
Minilaparoscopy is performed with a laparoscope, 3 mm or even 1.2 mm in diameter. The laparoscope may be introduced through the Veress needle; the atraumatic grasping forceps (diameter 3 mm) may be used through a second port. The principal technical problem in this particular case is related to the extremely reduced diameter of the laparoscope which provides only low-level lighting conditions in the operative fi eld, even given the use of a xenon light source. It is therefore necessary to keep the laparoscope close to the area to be inspected to obtain enough light. In addition, this type of laparoscope is particularly fragile and delicate (Figs. 10–12).
5.0 Technique
Positioning on the operating table involves the cooperation of the awake patient. The patient must be placed in gyneco-logical position with her arms close to the body and her legs placed in stirrups, avoiding positions that might cause compression of the plexuses or peripheral nerves. In addition, the legs must be positioned low to prevent interference with the surgeon’s maneuvers conducted through the lateral ports. It is preferable to use a uterine manipulator to facilitate viewing the pelvic organs and for injecting methylene blue dye for chromopertubation.
Normally, diagnostic laparoscopy is performed through a double access:
periumbilical port for the laparoscope and videocamera;
along the midline of the lower abdomen for the atraumatic forceps needed to manipulate the pelvic organs.
The diameter of the trocars varies according to the diameter of the chosen instruments and laparoscope.


9.0 Anesthesia
10.0 Technique
Various authors have reported that this technique can be performed under local anesthesia, suggesting a routine outpatient setting. Unfortunately, this is possible only in selected cases with a particularly high pain threshold since
the maneuvers to visualize the pelvic organs are quite painful demanding for general anesthesia in the vast majority of cases.
Manual of Gynecological Laparoscopic Surgery92
8.0 Patient Selection CriteriaThis method is indicated mainly for infertile patients or those with pelvic pain.
Potential indications for diagnostic TVE:
Diagnostic assessment of infertilityVisualization of the pelvis after conservative medical therapy or surgical treatment.
Pain mappingDiagnostic assessment of patients with pelvic endo metriosis
Study of tubal and ovarian physiology Early diagnosis of extrauterine pregnancy Visualization of the appendix
Initially, bimanual vaginal examination and transvaginal ultra-sound are performed to assess the position of the uterus
and to exclude the presence of pathology in the pouch of Douglas. The purpose of the technique is to visualize and assess the relationships between the tubes and ovaries, the mucosa of the fi mbria and ampulla, presence of adhesions or pelvic endometriosis and tubal patency (Figs. 14–16).
The contraindications to this technique are an intact hymen, a particularly narrow vagina, vaginal infection, obliteration of the pouch of Douglas or the presence of prolapsed structures in the pouch of Douglas, retroverted uterus and hemoperito-neum.
Emergency situations, such as acute pelvic infl ammation or ectopic pregnancy with hemoperitoneum are not indica-tions for TVE because the presence of adhesions or hemor-rhage can severely impede visibility. Undoubtedly, TVE and, in particular, transvaginal salpingoscopy are useful modalities for diagnostic purposes.
Fig. 15Microadhesions.
Fig. 16Microadhesions.
Fig. 14Tubo-ovarian adhesion.
Transvaginal endoscopy is usually performed from the seventh day of the cycle onwards. After placing the patient in dorsal lithotomy position and vaginal disinfection with aqueous chlorhexidine solution, the procedure commences with a diagnostic hysteroscopy. A 30°-hystero scope (diam.2.7 mm with a 3.5 mm-sheath) is introduced into the vagina. The vaginal walls are gently expanded by continuous infl ow of normal saline solution up to a maxi mum pressure of120 mmHg. After identifi cation of the cervix, the hysteroscope is introduced into the cervical canal and a traditional diagnostic hysteroscopy is performed.
To carry out TVE, after insertion of a Collin speculum in the vagina, the posterior vaginal fornix and the posterior lip of the
cervix are infi ltrated with 1.8 ml of local anesthetic (articaine 40 mg with epinephrine 0.006 mg/ml), and the posterior lip is then grasped with a Pozzi forceps and placed under traction. At this point, a trocar needle system designed particularly for this technique is used; the device consists of a type of Veress needle (length 25 cm) (Fig. 17), a dilator and an external trocar of diameter 3.9 mm, which are put together before starting the procedure. The system is positioned in the midline 10–15 mmbelow the insertion of the posterior vaginal wall on the cervix. The release button of a trigger mechanism is actuated which causes the Veress needle to penetrate the vaginal wall. This modality reduces pain and allows the vagina to be perforated without traction. Finally, the distal tip of the needle and dilating sheath are located in the pouch of Douglas.

Manual of Gynecological Laparoscopic Surgery 93
The Veress needle and dilating sheath are then removed and the same endoscope used for diagnostic hystero scopy is introduced through the trocar. Once, the correct intra-abdominal position of the hysteroscope’s distal tip has been visually confirmed, continuous flow of prewarmed saline solution (37° C) can be started.
Unlike traditional laparoscopy, it is not possible to obtain a panoramic view, so it is appropriate to proceed with imaging in the standard manner. The examination begins with localizing the posterior surface of the uterine corpus. The adnexae are then visualized by on-axis rotation of the hyst eroscope and movements to the right and left. Once, the ovary and utero-ovarian ligament have been identifi ed, the tubal isthmus and ampulla are identifi ed and inspected gradually advancing toward the fi mbrial tubal portion. The posterior surface of the uterine corpus serves as a guide for moving the endoscope to the contralateral side where the same procedure is repeated. Finally, the pouch of Douglas and uterosacral ligaments are thoroughly inspected (Figs. 18–20).
Tubal patency is assessed similarly to traditional laparo scopy by injection of methylene blue dye via a no. 14 Foley catheter previously placed in the uterine cavity (Fig. 21).
Fig. 17Preparation of instrumentation used for transvaginal endoscopy.
Fig. 19Ovarian fossa.
Fig. 20Surface of the ovary.
Fig. 18Posterior surface of the uterine corpus.
Figs. 21a-cChromopertubation.
a b c

Manual of Gynecological Laparoscopic Surgery94
With suffi cient experience in the technique, it is possible to perform salpingoscopy of a few centimeters of the distal tubal segment. The ampulla and the proximal tubal ostium are identifi ed and the endoscope is then inserted. The infundibulum is easily identified by its characteristic concentric folds. The endoscope is gradually advanced and, as a result of the reduced infl ow of saline, the ampulla is distended until the longitudinal folds come into view. Visuali-zation of the folds and intra-tubal microanatomy is con tinued while the endoscope is withdrawn slowly. Canalization of the abdominal tubal ostium is easier in the post-ovulatory phase when the fi mbriae are more congested and stiff (Figs. 22–24).
Infl ow of saline is continued throughout the procedure as this allows the intestine and tubo-ovarian structures to remain fl oating. The volume of liquid required for distension varies from 200 to 400 ml depending on the duration of the examination (average time 45 min). At the end of the procedure, the liquid is evacuated via the trocar. The point of trocar insertion in the vaginal fornix rarely requires suturing, unless there is bleeding.
11.0 Salpingoscopy
12.0 Complications
Fig. 23Infundibulum of the Fallopian tube.
Fig. 24Major and minor folds.
Fig. 22Fimbriae.
The needle-dilator-trocar system used for TVE has been specially designed to reduce to the minimum accidental injuries which may occur during insertion of the instrument. Moreover, the use of this special TVE instrumentation set is capable to prevent iatrogenically-induced sequelae, such as pelvic infections, rectal or intestinal perforation, bleeding of the vaginal fornix or injury of the posterior surface of the uterine corpus.
To keep to a minimum the potential risk of bleeding in the vagina, it is advisable not to incise the vaginal mucosa but to insert the appropriate-sized needle directly, dilating the vagina a second time and using a vasoconstricting agent in combination with the local anesthetic. In fact, minimal bleeding can give rise to serious problems in terms of unimpeded vision, hence it follows that this complication should be avoided.
13.0 Post-operative Follow-upThe patient is informed of the possibility of watery or bloody vaginal discharge and is advised not to use intra vaginal tampons and to abstain from sexual intercourse for one day. Prophylactic antibiotic medication is administered (azithro-
mycin 500 mg/day for 3 days). The patient can be discharged at the end of the procedure or when she has adequately recovered from general anesthesia.
Manual of Gynecological Laparoscopic Surgery 95
Recommended Reading
1. DURRUTY G, VERA C, MACAYA R, BIANCHI M, MANZUR A: Resultados de la salpingoneostomìa laparoscòpica en infertilidad por hidrosalpinx.Departamento de Obstetricia y Ginecología, Unidad de Reproducción Humana, Hospital Clinico Pontifi cio. Universidad Catòlica de Chile.Revista chilena deobstetricia y ginecologìa. Santiago (Chile). 2002. 67(6): 488–493
2. GOMEL V: Reproductive surgery. Departament of Obstetrics and Ginecology. Faculty of Medicine.University of British Columbia. Vancouver (Canada). 2005. Minerva. 57:21–8
3. GOMEL V, ZOUVES C: Laparoscopìa quirùrgica en las enfermedades de las trompas. Cirugìa Laparoscòpica en Ginecologìa. Soderstrom. Segunda ediciòn Marban. (Philadelphia) 1999. (1):87–95.
4. GORDON AG: Tubal Endoscopy. Consultant Gynaecologist, BUPA Hospital Hull and East Riding, Lowfi eld Road, Anlaby,Hull HU10 7AZ. 2004
5. GORDTS S, CAMPO R, BROSENS I: Microcirugìa endoscòpica en medicina reproductiva. Cuadernos de medicina reproductiva. Pellicer Antonio. Primera ediciòn. Madrid (España). 2002. 8 (1): 55–72
6. HULKA and REICH: Textbook of laparoscopy. (USA). 2002. (1): 285–300
7. LEVINE R: Laparoscopic tubal Sterilization. A practical manual of Laparoscopy. A clinical Cook book. Kentucky (USA). 2002. (1): 107–114
8. MARCONI G., VILELA M., GOMEZ RN, BUZZI J., De ZUNIGA I, QUINTANA R: Salpingoscopia. Cuadernos de medicina reproductiva. Pellicer Antonio. Primera ediciòn. Madrid (Espana). 2002. 8 (1): 213–237
9. YOUNG E, VAN TRILLO: Hidrosalpinx e Infertilidad. Cuadernos de medicina reproductiva. Pellicer Antonio. Primera ediciòn. (Madrid) 2002. 8 (1): 89–100

Manual of Gynecological Laparoscopic Surgery96

Chapter VII
Techniques of LaparoscopicTubal Sterilization
Emmanuel Lugo and Luca MencagliaCentro Oncologico Fiorentino, Florence, Italy

Manual of Gynecological Laparoscopic Surgery98
1.0 IntroductionFemale surgical sterilization is the most widely employed method of family planning in the world and the laparo-scopic technique is currently used the most. The historical development of this technique dates from the 1970s with Rioux and Corson. After that came Kleppinger (bipolar), Layand Yoon (silastic rubber ring), Hulka and Clemens (plastic clip), Semm (endocoagulator), up to Filshie who in 1996 suggested the use of a titanium clip with a silicone rubber lining and a kind of “memory function”. Basically, all the laparoscopic techniques are simple, they do not leave an external scar, the costs are lower compared to other
methods, all of the abdominal cavity can be visualized panoramically and the procedure is usually performed as day surgery. In most cases, the period of convalescence is short, which explains the widespread patient acceptance of laparoscopic techniques. Anesthesia is normally general, especially in industrialized countries. In a few cases, patients receive spinal and/or epidural anesthesia. The best form of anesthesia is certainly local anesthesia since it is safer, more economical and without late effects, and can be combined with a sedative and antiemetic.
2.0 Patient SelectionPotential candidates for tubal sterilization are women who want an irreversible method of contraception or those for whom pregnancy itself constitutes a risk factor of potential clinical signifi cance. The sterilization procedure can be performed during or outside the postnatal period. Today, clinicians have the choice among a wide range of endoscopic tech-niques and it is possible to choose the most suitable time for sterilization. There are a few contraindications, obviously apart from the presence of a gynecologic malignancy or
any other major gynecologic disease. According to the literature, the main contraindications relating to the technique are adhesions following multiple laparotomies, severe obesity, previous history of peritonitis or salpingitis and any other pelvic disease. Ileus and large abdominal tumors are reported in association with a high rate of complications and failures. Severe cardiopulmonary disease or dysfunction can be generic contraindications to tubal sterilization and to the creation of a pneumoperitoneum.
3.0 Patient PositioningThe patient should be placed in gynecologic position with the legs positioned so as not to interfere with maneuvers performed through the lateral trocar ports. An uterine manipulator should be used to facilitate vision and ex posure of the fallo pian tubes. The Trendelenburg position makes the procedure easier.
Laparoscopic tubal sterilization is normally performed via the following three ports:
periumbilical primary port, for laparoscope and video camera
two other lateral ports in the lower quadrant of the ab domen, used for grasping forceps holding the tube and the instrument required for tubal sterilization. The trocar size varies according to the instruments required.
4.0 Instrumentation
5 mm laparoscope and videocameraInsuffl atorElectrosurgical unitXenon light source6 mm trocarVeress needle
5 mm atraumatic grasping forceps5 mm scissorsSuction/irrigation system for irrigation andhydrodissection
Uterine manipulator

Manual of Gynecological Laparoscopic Surgery 99
5.0 TechniqueThere are various techniques of tubal sterilization, which employ electricity, heat or mechanical devices. Surgical interruption of the tubes by transection via a laparotomy
or laparoscopy approach has been found to account for recanalization in up to 4% of cases. For this reason, mere transection with scissors is not recommended.
5.1 Unipolar Electrocoagulation
This is probably the most widely employed method and has a very low failure rate. A panoramic view of the operating fi eld is imperative before proceeding to sterilization. A distorted video image and the loss of overall vision that can occur if the distal lens of the laparoscope is too close to the operating fi eld can confuse even the most experienced laparoscopist. After removing the intestine from the operating fi eld, the junction zone between the proximal and midtubal segments is grasped to dislodge it from the pelvic cavity toward the anterior abdominal wall. Once, the fi mbriae have been visualized and the forceps is in correct position, the electro surgical unit can be connected (Fig. 1) to the grasping forceps (Fig. 2), a precaution that prevents inadvertent pedal activation, which might cause electrical injury to a vital intra-abdominal organ. In general, a power of 50 W is suffi cient to induce complete tubal occlusion by unipolar electro coagulation of the tubal
tissue between the jaws of the forceps. The tissue damage extends 0.5 – 1 cm laterally. The tube becomes whitish and the passage of electrons through the tissue leads to cellular vaporization and creates a clean cutting effect.
It is appropriate to coagulate about 3 cm of tube. Further applications are frequently required to achieve this effect; they should be toward the medial part of the tube, that is, in the direction of the uterine body to avoid electrical injury to the bowel close to the distal segment or tubal fi mbriae.
The tube must be viewed from all sides to confi rm that coagu-lation is appropriate. “Missed spots” in the coagulated target area can be coagulated again. At least 0.5 cm of the adjacent mesosalpinx should also be coagulated, thus cutting off the vascular supply.
Fig. 1The high frequency electrosurgical unit AUTOCON® II 400,(KARL STORZ Tuttlingen, Germany).
Fig. 2Grasping forceps.

Manual of Gynecological Laparoscopic Surgery100
5.2 Bipolar Electrocoagulation
The Waters instrument is used for thermal sterilization or real cauterization. This is a thermal hook, which re sembles the resistance of a toaster, sheathed in a heat-resistant plastic protector. The hook is used to grasp the tube and pull it inside the plastic protector where the energy can be activated to induce thermal damage to the tissue. However, the extent of tissue destruction is less than 1 cm.
Another instrument, suggested by Kurt Semm, is called the Semm Endotherm. This consists of a type of forceps coated with Teflon, which produces a temperature of120° C to 160° C and performs cauterization of the tubal segment during an exposure time of 60–90 seconds. The area of thermal injury is limit ed to the width of the forceps so repeated applications are required to achieve coagulation of 2 to 3 cm of tube.
5.3 Thermal Sterilization
Tubal sterilization with Yoon rings
Inbae Yoon first published successful occlusion of the fallopian tubes using a silastic ring in 1974. This technique was then adapted to operative laparoscopy with an applicator 8 mm in diameter, which allows a tubal segment to be lifted up with a pronged forceps inside the applicator sheath and the silastic ring to be put on (Figs. 5–7).
Various complications have been reported with this technique, the majority associated with possible injury to the posterior mesosalpinx and with hemorrhage. Rigid or large tubes can be divided by the applicator and bleed. The bleeding can be controlled with bipolar coagulation.
5.4 Mechanical Devices
The principles of the bipolar mode represent an extremely important element in techniques of female sterilization. Even if the macroscopic appearance of a tube coagulated by bipolar energy can appear the same as that coagulated by means of unipolar energy, it must be considered that the depth of destruction and lateral extension of the thermal trauma is certainly reduced, so the maneuver has to be performed for a longer time to achieve the same effect. In reality, the outcome of any method of electrocoagulation, unipolar or bipolar, depends more on the length of the tubal segment destroyed than on the number of applications. Most authors consider that coagulation of a tubal segment of at least 3 cm is necessary.
The isthmic tubal portion must be grasped with the bipolar forceps (Fig. 3) approximately 2 cm from the uterine cornu (Fig. 4) so as not to cause injury to the uterine corpus. The HF electrosurgical unit should be set to a power no greater than 25 W using direct current. 2 or 3 applications are often required to achieve coagulation of a 3 cm tubal segment. In the literature there is still controversy whether or not to transect the tube following coagulation.
Fig. 3Various types of bipolar forceps.
Fig. 4Point where sterilization is performed using bipolar high frequency current.

Manual of Gynecological Laparoscopic Surgery 101
Fig. 5Tubal sterilization with Yoon rings.
Fig. 6Detailed view of the site of tubalsterilization with Yoon rings.
Fig. 7Methylene blue test following tubalsterilization.
Sterilization with Clips
This method offers the greatest reversibility since only a few millimeters (Fig. 8) of the tube are damaged, if properly applied in the isthmic portion. Therefore, the technique can be recommended in women under 30 years who request sterilization. The clips that have proven effective are Filshie and Hulka-Clemens clips. The Filshie clips are made of titanium coated on the inside with silicone, while the Hulka-Clemens clips are made of 3 mm Lexan plastic with jaws articulated by a small metal spring.
An operative laparoscope designed for clip application is available although the clip can be applied through a second port using an applicator. Application through a second port also facilitates exposure, rotating from one side to the other. The clip must be applied at an angle of 90° in the isthmic tubal segment 2 or 3 cm from the uterine cornu. Application of the clip to a different part of the tube can be ineffective due to the diameter of the tubal lumen which may not be occluded completely while pinched between the jaws of the clip. Following application, the clip remains closed owing to a spring mechanism. It is always necessary to reconfi rm proper placement of the clip. If residual tubal patency is suspected, a second clip should be applied.
6.0 Postoperative CareThe patients are usually discharged 2 to 6 hours after the surgical procedure. It is advisable to give postoperative analgesia to prevent pain due to acute necrosis of the tissue following ring / clip application.
Recommended Reading
1. HULKA AND REICH: Textbook of laparoscopy. (USA). 2002. (1): 285–300
2. LEVINE RONALD: Laparoscopic tubal Sterilization. A practical manual of Laparoscopy. A clinical Cook book. Kentucky (USA). 2002. (1): 107–114
3. SODERSTROM M. RICHARD, RIOUX JACQUES:Esterilizaciòn laparoscòpica. Cirugìa laparoscòpica en ginecologìa. Philadelphia (USA).1999. (1): 183–196
Fig. 8Hulka-Clemens clip.

Manual of Gynecological Laparoscopic Surgery102

Chapter VIII
Laparoscopic Tubal Surgery
Emmanuel Lugo and Luca MencagliaCentro Oncologico Fiorentino, Florence, Italy

Manual of Gynecologic Laparoscopic Surgery104
4.0 Instrumentation
1.0 IntroductionThe most recent technical developments provide surgeons working in the fi eld of infertility with ever more sophisti-cated and effective methods of surgical reconstruction including endoscopic procedures. On the other hand, it should be borne in mind that the outcomes of assisted reproduction technology (ART) procedures are improving constantly, raising the question of whether surgical repair of a tubal defect may be useful. In practice, if tubal damage is suspected or confi rmed, it is necessary to decide whether to directly proceed to ART procedures or to diagnostic laparos-copy and endoscopic surgical treatment of confi rmed tubal infertility. This decision is infl uenced by a range of secondary factors, such as the patient’s age, presence of other pathology or changes in semen quality. Younger patients with distal tubal occlusion should consider surgery fi rst and then ART, whereas ART procedures should start directly in women
between 37 and 43 years. Moreover, the indication for laparos-copic tubal reconstructive surgery is inversely proportional to the extent and severity of the tubal damage. In other words, the “typical” patient for surgical laparoscopy will be young, with tubal damage of modest degree and preferably located distally. However, it should be noted that adequate decision-making often calls for diagnostic laparoscopy in view of the inherent limitations of other diagnostic techniques such as hysterosalpingography or transvaginal ultrasound, which do not allow defi nitive assessment in the majority of cases. Another crucial factor infl uencing the choice between recon-structive tubal surgery and ART procedures is the logistical and economic factor, since the latter requires the patient to be close to specialized and highly reliable centers, where the costs are usually high.
2.0 Preoperative AssessmentThe diagnostic follow-up in couples with infertility problemsmust be performed within a short time and should be as non-invasive as possible for emotional reasons. They should include a complete clinical history, transvaginal ultrasound with sonohysterosalpingography and diagnostic hysteroscopy with the goal of assessing the uterine cavity accurately.
The possible presence of pelvic inflammatory disease (PID) should be considered; this can lead to tubal infertility in
more than 20% of cases. In all infertile women, cervical and vaginal swabs are advisable to detect the presence of micro-organisms commonly responsible for pelvic inflam-matory disease such as Chlamydia trachomatis, Neisseria gonorrheae and Mycoplasma hominis.
Diagnostic laparoscopy should be performed in all patients with a high probability of pelvic or tubal pathology.
3.0 Patient PositioningThe classical position for gynecologic laparoscopy is lithotomy with uterine manipulator, including the option to change to the Trendelenburg position if required by the
surgeon. Two accessory 6-mm trocar ports are usually required, one in each lower abdominal quadrant.
5-mm or 10-mm laparoscope and video cameraLaparoinsuffl atorElectrosurgical unitXenon light source
6-mm or 11-mm trocarsVeress needle5-mm atraumatic grasping forceps
5-mm scissorsSuction/irrigation system for irrigation andhydrodissection Bipolar forcepsLaparoscopic suturing instrumentsUterine manipulator


Manual of Gynecological Laparoscopic Surgery 107
Fig. 3Hydrosalpinx and ovarian cyst.
Fig. 2Dense pelvic adhesions.
Fig. 4Large hydrosalpinx.
Fig. 6Preparation for chromopertubation.
Fig. 5Lysis of uterine adhesions can cause bleeding.
Fig. 7Chromopertubation.


Manual of Gynecological Laparoscopic Surgery 109
7.0 Reconstructive Laparoscopic Tubal SurgeryThe fallopian tubes can be occluded proximally or distally, i.e., at the fimbrial ends. The condition can coexist with peri-adnexal adhesions. Tubal blockage can also be correlated with an infl ammatory process or a medical history of surgical interruption. Reconstructive surgery is feasible only in cases of a minor, circumscribed damage, and if possible, not bilateral. Some pathological fi ndings, such as
salpingitis isthmica nodosa and/or genital tuberculosis, which by defi nition is associated with severe tubal damage, rule out the option of reconstructive laparosco pic surgery, mainly because they are considered to have a poor prognosis regarding the predictable degree of functional recovery (Figs. 14–15).
Fig. 13Adhesiolysis by use of scissors.
Fig. 12Periovarian adhesions.
Fig. 14Salpingitis isthmica nodosa.
Fig. 15Uterine tuberculosis.
Following complete lysis of adhesions, the tubo-ovarian abscess must be aspirated and drained (Figs. 12–13). Aspiration is performed with a laparoscopic suction tube or by introducing a 5–10 mm trocar through the abdominal wall, perforating the wall of the abscess and aspirating it through the trocar. Once the purulent liquid has been completely evacuated, copious lavage is performed with Ringer lactate
through the trocar cannula which is left in place until the aspirated liquid is completely clear. Assessment of the tube will permit a decision on whether or not removal is indicated. At the end of the procedure, it is important to introduce a drain (e.g., Jackson-Pratt) into the pelvis. The drain should be removed 24 to 48 h after the operation.

Manual of Gynecologic Laparoscopic Surgery110
7.1 Fimbrioplasty
Fimbrial phimosis (agglutination of the fi mbriae) often coexists with peri-adnexal adhesions and is repaired by laparoscopy. The intrauterine pregnancy rate after laparoscopic fi mbrioplasty varies between 40% and 48% depending on its severity and extent, with an extrauterine pregnancy rate ranging between 5% and 6%. In cases where the mucosal folds are densely adherent or in the presence of ampullary mucosal adhesions, the prognosis is very poor.
The principle of fi mbrioplasty is anatomical and functional repair of the infundibulum. To visualize the phimotic region, it is often necessary to perform perioperative chromo-pertubation to distend the tube. Surgical repair can be achieved with a fi ne atraumatic grasping forceps, introducing the closed tip into the area of phimosis extremely careful and
gradually opening the jaws. The maneuver must be repeated several times, changing the direction in which the forceps is opened. Manipulation of the tissues must be very gentle to avoid bleeding (Figs. 16–22).
Rarely, even though the fi mbrial ends appear normal, proxi mal stenosis can be found at the abdominal opening of the tube (prefi mbrial phimosis). This stenosis can be diagnosed by chromopertubation only. The surgical management involves dissecting along the antimesenteric border of the tube from the fi mbriae as far as the distal ampulla, traversing the area of stenosis. Dissection is performed by use of electrosurgery. As a fi nal step, the site of repair is sutured with a very fi ne suture (6/0).
Fig. 16Introduction of forceps into the phimotic ostium of the tube.
Fig. 17Opening the jaws of the forceps.
Fig. 18Normal appearance of the abdominal tubal ostium at the end of the procedure.
Fig. 19Hydrosalpinx with fi mbrial phimosis.
Fig. 20Methylene blue injection for perioperative chromopertubation.


Manual of Gynecologic Laparoscopic Surgery112
The management of hydrosalpinx is based essentially on the quality of the tubal mucosa:
For thin-walled hydrosalpinx with normal mucosa and without mucosal adhesions, salpingostomy via the laparo-scopic approach is indicated. The majority of pregnancies occur within the fi rst year post-operatively.
For thin-walled hydrosalpinx with focal adhesions, either reconstructive surgery or ART procedures are indicated. Reconstructive surgery in these cases is associated with an increase in the risk of extrauterine pregnancy.
For thin-walled hydrosalpinx with extensive mucosal adhesions (> 50% of the mucosal folds), ART procedures only are indicated, more specifi cally in vitro fertilization. Many authors, including ourselves, regard it as appropriate in these cases to perform laparoscopic salpingectomy because this has been found to considera bly improve the outcomes of ART.
In the presence of adnexal adhesions, diagnostic laparo-scopy is followed by adhesiolysis with gentle maneuvers using closed atraumatic forceps in the case of fi lmy and avascular adhesions; if they are dense and vascular, it is advisable to use bipolar coagulation and scissors. The tubo-ovarian liga ments must be exposed to confi rm patency of the fi mbriated tubal portion. If the tube is fi xed to the ovary, the two structures must be separated.
Once adnexal adhesiolysis has been completed, the tube should be distended by transcervical instillation of methy lene blue dye using the uterine manipulator. In the area of occlusion, scar tissue can frequently be found. The target site of the cross- or star-shaped neo-ostium should be located at the thinnest and most avascular area possible, which usually corresponds to the original site of the ostium. The cruciate incision at this level is made using scissors, electro surgery or by laser application with the aim of creating eversion of the mucosa of the distal tubal portion. Closed atraumatic grasping forceps can be introduced in the opening to gently incise the margins of the neo-ostium. To make the margins evert properly, fi ne bi polar forceps may be used at low current setting; this is performed by touching the serosa at the base of the margins previously creat ed to induce shrinking and simultaneous eversion. If the tubal wall is thick, sero-serous sutures can be placed alternatively with atraumatic sutures (Vicryl 5–7/0).
In conclusion, the surgical procedure to create a neo-ostium involves two steps, incision and eversion:
To create the neo-ostium, two to four 1–2 cm incisions are made parallel to the longitudinal mucosal folds, in an avascular area.
Eversion is obtained with various techniques, such as bipolar coagulation of the serosa or placement of a few sutures.
True pathological occlusion of the proximal tube necessitates a microsurgical procedure with tubo-cornual re-anasto-mosis, which can be performed laparoscopically. Laparo-scopic techniques of tubal anastomosis have recently been described in patients who had a previous history of tubal sterilization. The image magnifi cation properties of video-endoscopy and the unique angles of vision offered by modern laparoscopes, together with the option of bringing the video image close to the operating field, provides advantages superior to traditional microsurgery.
The major application of laparoscopic microsurgery is tubo-tubal anastomosis regardless of its site and regardless of whether it is done because of the presence of occlusion or to reverse previous tubal sterilization. The surgic al technique of tubo-tubal anastomosis does not vary from the laparotomy approach with a traditional microscope. In the case of adhesions, salpingo-ovariolysis is fi rst performed. This is followed by infi ltration of the mesosalpinx in the area chosen for the anastomosis with 1 or 2 ml of a solution of vasopressin to reduce bleeding and facilitate accurate hemostasis.
The proximal end of the tube is distended by means of transcervical injection of methylene blue, which facilitates localization of the occluded segment of the proximal tube. At this point, a cut is made at the level of the occlusion using laparoscopic scissors. It is very important to avoid damage to meso salingeal vessels. The tubal segment is separated from the mesosalpinx by electrosurgery. Hemostasis of the tubal segment of tube is accomplished by electrocoagulation (microelectrode) of the most important bleeding points.
Continuous irrigation allows even small bleeding points to be visualized rapidly. The distal tubal segment is prepared in a similar way so that there is no difference or asymmetry between the two stumps to be anastomosed. In this case, too, transcervical instillation of methylene blue can be used to facilitate delineating the margins. The two stumps are then approximated and sutured in two layers. The fi rst layer joins the endotubal epithelium and muscle and the second joins the serosa. The distal suture must be placed at the antimes-enteric border, and can be placed perfectly on the other stump also.
7.3 Tubo-tubal Anastomosis

Manual of Gynecological Laparoscopic Surgery 113
Recommended Reading
1. DURRUTY G, VERA C, MACAYA R, BIANCHI M, MANZUR A: Resultados de la salpingoneostomìa laparoscòpica en infertilidad por hidrosalpinx.Departamento de Obstetricia y Ginecología, Unidad de Reproducción Humana, Hospital Clinico Pontifi cio.Universidad Catòlica de Chile. Revista chilena de obstetricia y ginecologìa. Santiago (Chile). 2002. 67(6): 488–493
2. GOMEL V: Reproductive surgery. Departament of Obstetrics and Ginecology. Faculty of Medicine. University of British Columbia. Vancouver (Canada). 2005. Minerva. 57:21–8
3. GOMEL V, ZOUVES CG: Laparoscopìa quirùrgica en las enfermedades de las trompas. Cirugìa Laparoscòpica en Ginecologìa. Soderstrom. Segunda ediciòn Marban. (Philadelphia) 1999. (1):87–95.
4. GORDON A G: Tubal Endoscopy. ConsultantGynaecologist, BUPA Hospital Hull and East Riding, Lowfi eld Road, Anlaby, Hull HU10 7AZ. 2004
5. HULKA and REICH: Textbook of laparoscopy. (USA). 2002. (1): 285–300
6. MARCONI G, VILELA M, GOMEZ RUEDA N, BUZZI J, DE ZUNIGA I, QUINTANA R: Salpingoscopia.Cuadernos de medicina reproductiva. Pellicer Antonio. Primera ediciòn. Madrid (Espana). 2002. 8 (1): 213–237
7. YOUNG E, VAN TRILLO: Hidrosalpinx e Infertilidad. Cuadernos de medicina reproductiva. Pellicer Antonio. Primera ediciòn. (Madrid) 2002. 8 (1): 89–100

Manual of Gynecologic Laparoscopic Surgery114

Chapter IX
Laparoscopic Managementof Ectopic Pregnancy
Cristiana Barbosa and Luca MencagliaCentro Oncologico Fiorentino, Florence, Italy

Manual of Gynecological Laparoscopic Surgery116
1.0 IntroductionImplantation of the zygote outside the uterus occurs in approximately 1 in 200 pregnancies and the incidence appears to be increasing. This increase in ectopic pregnancy correlates with the high incidence of sexually transmitted disease, delayed median age of fi rst pregnancy and improved accuracy of diagnosis.
The most common site of ectopic pregnancy is at the ampullary tubal portion where fertilization normally occurs (Fig. 1) and then, less frequently, other parts of the tube, the cervix, the ovary and the abdominal cavity.
All variants of extrauterine pregnancy can be treated by a minimally invasive approach in the majority of cases. In the last decade, laparoscopic surgery has become very widespread in both gynecology and general surgery. The main advantages of the minimally invasive approach are reduced postoperative morbidity, less postoperative pain, and accordingly, less analgesic medication, early resumption of intestinal activity, reduced length of hospital stay and a rapid return to normal activity.
2.0 Preoperative AssessmentThe clinical picture includes nausea, amenorrhea, lower abdominal pain, cramps and abnormal uterine bleeding. Pain in the shoulder raises the suspicion of tubal rupture with hemoperitoneum. Diagnostic preoperative assessment must include the history and bimanual gynecologic examination (which is able to diagnose an adnexal mass in 50% of cases). However, early diagnosis of ectopic pregnancy can be made with the combination of transvaginal ultrasound and measurement of the serum beta-HCG. The sensitivity of beta-HCG allows the diagnosis to be made only 10–15 days after ovulation. The growth curve of this hormone is abnormal in 46% of patients. A delayed increase in beta-HCG
should raise the suspicion of extrauterine pregnancy. The most recent generation of ultrasound allows visualization and localization of the gestational sac before the sixth week in 98% of cases. The pre sence or absence of a gestational sac on transvaginal ultrasound should be correlated with the pregnancy week and the serum levels of beta-HCG.
Other useful tests in diagnosing ectopic pregnancy are: endometrial thickness (cut off < 8mm), sonohysterography, color Doppler and blood progesterone level (cut off 17.5 ng/ml). Unfortunately, progesterone is not of use in patients who have undergone induction of ovulation.
3.0 Positioning of the PatientThe patient is positioned on the table in the classic gyneco-logic position. An intrauterine manipulator and Foley bladder catheter can be used.
5 mm-or 10 mm-laparoscope with the primary trocar intro-duced at the umbilicus. Two accessory 6 mm-ports in the right and left iliac fossa and a 6 mm suprapubic port for the grasping forceps, bipolar forceps and suction cannula.
4.0 Instrumentation
Laparoscope, diameter 5 mm or 10 mmVideocameraMicroprocessor-controlled insuffl ation systemElectrosurgical unitXenon cold light sourceTrocars, diameter 6 mm or 11 mmVeress needle
Atraumatic grasping forcepsScissorsSuction and irrigation systemMonopolar hook electrodeBipolar forcepsDisposable extraction bagUterine manipulator
Fig. 1Ectopic gestation in the ampullary tubal segment.

Manual of Gynecological Laparoscopic Surgery 117
A 5 mm suction cannula is usually suffi cient for evacuating the hemoperitoneum. If the tube has ruptured and/or the patient is in shock with a large hemoperitoneum, an 11 mm-trocar may be used to introduce the suction tube.
The surgical management essentially involves partial or total sal pingectomy, however, depending on each individual case, preservation of the organ may well be the approach of choice.
5.0 Surgical Technique5.1 Evacuation of the Hemoperitoneum
5.2 Salpingectomy
Extensive tubal dilatation is not necessarily an absolute contraindication to laparoscopic treatment. Unilateral or bilateral adhesiolysis is often performed in the same setting.
Salpingectomy is the method of choice in women who abandoned the desire for future pregnancies or in the case of tubal rupture. Other indications for salpingectomy are extrauterine pregnancy following failed sterilization, in a blocked tube, in a previously reconstructed tube, in a woman
requesting sterilization, in the case of persistent bleeding after salpingotomy, when the beta HCG > 100,000 mU/ml, in the case of recurrent tubal pregnancy and in the case of tubal pregnancy > 5 cm.
Following evacuation of the hemoperitoneum, the bipolar forceps and scissors are introduced into the abdominal cavity to coagulate and dissect the tube and mesosalpinx (Figs.2, 3).
Fig. 2Electrocoagulation of the tube and mesosalpinx.
Fig. 3Electrosurgical dissection of the mesosalpinx.
The tube containing the gestational sac is then removed from the peritoneal cavity through the 11 mm-umbilical port with the aid of forceps located in the suprapubic port. However, it is preferable to use an endobag for removing the tube and product of conception (Fig. 10). After reinsertion of
the laparoscope, fi nal inspection of the abdominal cavity is recommended because in some cases, while grasping the tube for removal, the product of conception may slip out unnoticed which requires either aspiration with a suction tube or extraction by use of forceps.
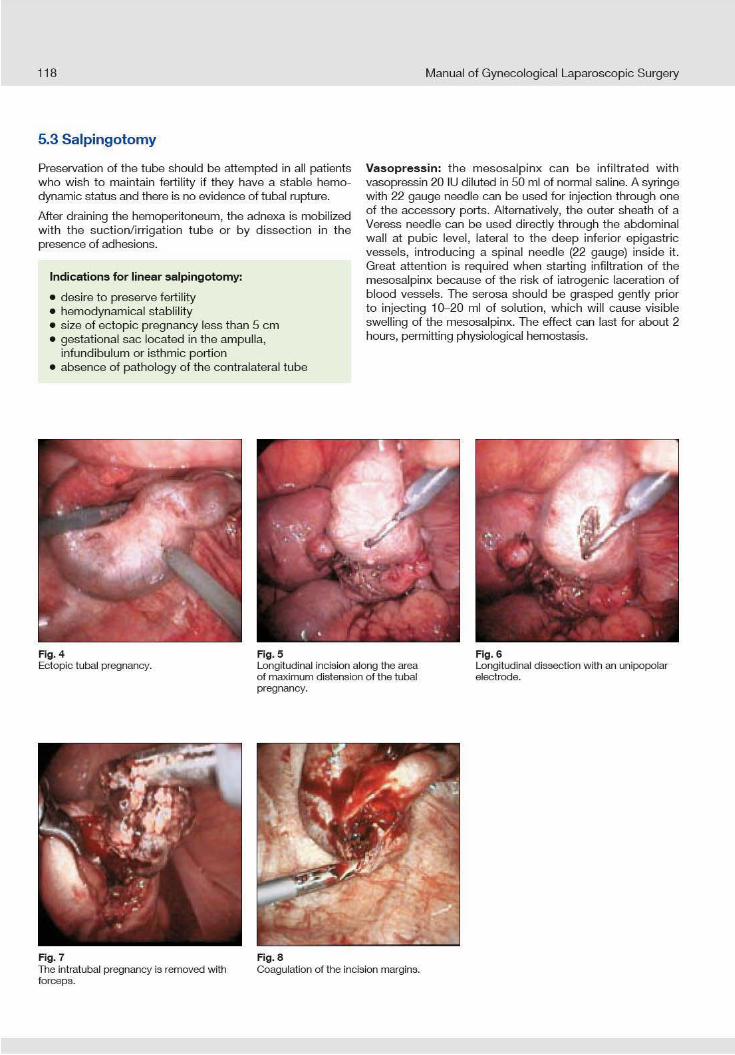

Manual of Gynecological Laparoscopic Surgery 119
Fig. 9Linear incision.
Because of its high metabolic rate, the trophoblast requires oxygen and the cells cannot withstand anoxia. It is most probable that vasopressin, by reducing the oxygen supply for about an hour, has fatal consequences for the tropho blast that has inadvertently left behind, reducing by a factor of fi ve the 15% risk of persistence of ectopic pregnancy in the case of conservative salpingotomy. Use of vasopressin is contrain-dicated in patients with ischemic heart disease.
Incision and evacuation: with an unipolar knife electrode introduced through the 6 mm port, a 1–2 cm incision is made in the antimesenteric tubal wall at the site of maximum distension, using a cutting or blended current (20 or 70 W). In general, it is possible to identify the different layers of the tubal wall: serosa, muscularis externa and mucosa.
If the product of conception cannot be localized when the serosa is incised at the point of maximum dilation, it will be necessary to incise the still intact muscularis externa and mucosa to advance to the lumen of the tube. Once the ectopic pregnancy, which is usually of very friable consis-tency, has been identifi ed, it can be evacuated by aspiration. If a mass surrounded by clot is encountered, the product of conception must be delivered through the tubal incision with the aid of pressurized irrigation or with grasping or biopsy forceps (Figs. 4–10).
The site of implantation and the tubal incision are then irrigated, making sure that the liquid introduced through the salpingotomy incision drains from the fi mbrial end and vice versa.
Transcervical instillation of methylene blue will allow demon-stration of tubal patency.
It should be borne in mind that when the ectopic pregnancy is located in the extraluminal space, it is possible that the tubal surface exhibits dilation without intraluminal involvement. It
is often easier to make a small in cision for evacuation of a distinct, large-sized intraluminal ectopic pregnancy of friable consistency, compared to one of small size and poorly visible in the thickness of the tubal wall. The preferred route for removing the product of conception with or without the tube is through the 11-mm umbilical port. Alternatively, it can be reduced piecemeal by use of a biopsy forceps or suction cannula. In a few cases, it is advisable to use an extraction bag for removing the pro duct of conception.
The salpingotomy incision usually does not require suturing. Seromuscular suturing will be necessary only if the incision is very large or in the case of mucosal eversion.
Hemostasis: if there is bleeding from the incision margins or site of implantation, hemostatic tamponade can be applied with grasping forceps prior to electrocoagulation, laser appli-cation or placing a suture. Often, 5 minutes of compression are suffi cient for hemostasis. Even elevating the adnexa out of the pelvis can produce the same result as by compressing the vessels of the mesosalpinx.
Arterial bleeding can be present after removal of blood clot. In this case, the best hemostatic effect can be achieved by selective and targeted use of bipolar coagulation forceps, particularly if combined with continuous irrigation. Diffuse venous bleeding, especially from the site of implantation in the muscle layer in the case of extraluminal location, can be controlled readily with electrocoagulation. The super fi cial eschar in the extra luminal space does not interfere with normal healing of the tubal epithelium.
Following removal of an ampullary pregnancy, uncontrollable bleeding can occur. In such cases, an endoloop may be used, which is removed after 5–10 minutes; this makes it possible to localize and coagulate the source of bleeding. In severe cases, the mesosalpingeal vessels can be ligat ed selectively.
Fig. 10Removal of the product of conception.

Manual of Gynecological Laparoscopic Surgery120
Interstitial ectopic pregnancy can be treated laparoscopically by electrosurgical resection of the uterine cornu. This proce-dure will allow the greater part of the tube to be preserved on the one hand, but on the other hand, the complete destruction of the interstitial part will make it highly probable that any anastomosis will fail. Coagulation of the ascending branch of the uterine artery and utero-ovarian arteries can be necessary to achieve good hemostasis. Use of vasopressin is not considered in this case.
In both laparotomy and laparoscopy, the approach is piecemeal resection of the uterine cornu using cutting or blend current (Figs. 10–14). The technique is very similar to myoma removal. Hemostasis must be obtained with bi polar coagulation and hydrodissection of the tissue planes using pressurized normal saline.
5.6 Extraluminal Ectopic Pregnancy
5.7 Interstitial or Cornual Ectopic Pregnancy
This occurs when the ectopic gestation while growing rapidly infi ltrates the tubal wall until occupying the space between the muscularis externa and serosa. In the majority of cases, as soon as the serosa is incised at the point of maximum distension, the gestational sac slips out without the need to enlarge the opening. Irrigation in this case will not produce a fl ow of liquid from the distal part of the tube. Rarely, the surgeon will be faced with the dilemma of having to enter the tubal lumen which should be avoided as much as possible.
Occasionally, it is possible to infi ltrate 360° of the space between serosa and muscularis. In this case, after remo ving the trophoblast and achieving hemostasis with the aid of compression or electrocoagulation, the surgeon can conclude the operation and follow the patient carefully with serial beta HCG measurements. Methotrexate can be considered as possible adjuvant treatment.
5.4 Partial Salpingectomy
5.5 Extirpation of Tubal Pregnancy through the Fimbrial End
Partial laparoscopic salpingectomy can be attempted to preserve the tube in the case of failed salpingotomy, tubal rupture, isthmic pregnancy, distal interstitial pregnancy or recurrent tubal pregnancy.
The procedure involves coagulation with bipolar forceps followed by division of both ends of the distended part of
the tube and corresponding mesosalpinx with subsequent removal of the tubal segment through the umbilical port. Alternatively, to avoid thermal (but not ischemic) injury, two endoloops, and if required, bipolar coagulation can be applied to complete hemostasis.
Extirpation of the tubal pregnancy through the fi mbrial end, tubal aspiration or tubal abortion without salpingotomy are procedures that involve removal of the product of conception located at the fimbrial end or distal tubal segment. This is accomplished by aspiration or use of grasping forceps operating from inside or outside, gently pushing the product of conception until it is extruded. In certain cases tubal abortion has already occurred.
Since many ectopic pregnancies have actually not implanted in the intraluminal tubal portion, this type of procedure is often associated with incomplete removal of the trophoblast and damage to the tubal wall. For this reason, even though some
authors have reported excellent results when the pregnancy is located in the fi mbrial portion, these techniques are not commonly recommended, neither by way of laparoscopy nor by laparotomy.
The technique may be applied in selected cases of intra-luminal ectopic pregnancy not yet visible (invasion of the muscularis and serosa has not yet occurred) by introducing the suction tip into the tube from the distal ostium and instillation of liquid, that acts mechanically to dislodge and expel the product of conception into the peritoneal cavity eliminating the need for making an incision in the tubal wall.
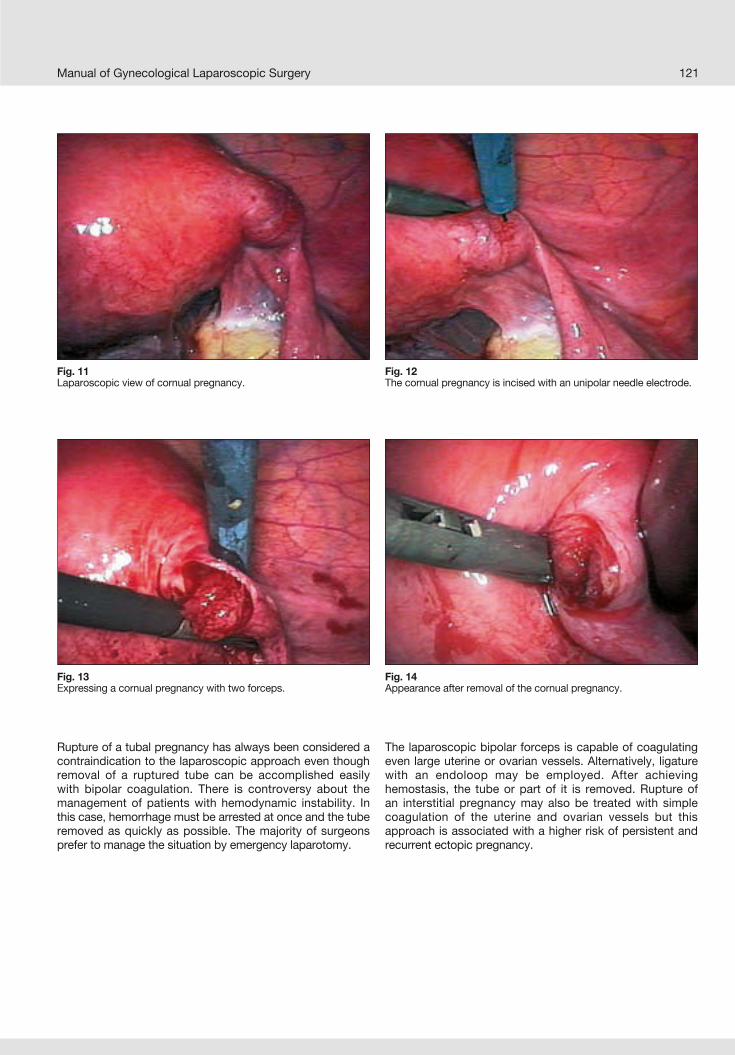
Manual of Gynecological Laparoscopic Surgery 121
Rupture of a tubal pregnancy has always been considered a contraindication to the laparoscopic approach even though removal of a ruptured tube can be accomplished easily with bipolar coagulation. There is controversy about the management of patients with hemodynamic instability. In this case, hemorrhage must be arrested at once and the tube removed as quickly as possible. The majority of surgeons prefer to manage the situation by emergency laparotomy.
The laparoscopic bipolar forceps is capable of coagulating even large uterine or ovarian vessels. Alternatively, ligature with an endoloop may be employed. After achieving hemostasis, the tube or part of it is removed. Rupture of an interstitial pregnancy may also be treated with simple coagulation of the uterine and ovarian vessels but this approach is associated with a higher risk of persistent and recurrent ectopic pregnancy.
Fig. 11Laparoscopic view of cornual pregnancy.
Fig. 12The cornual pregnancy is incised with an unipolar needle electrode.
Fig. 13Expressing a cornual pregnancy with two forceps.
Fig. 14Appearance after removal of the cornual pregnancy.
Manual of Gynecological Laparoscopic Surgery122
5.8 Ectopic Ovarian Pregnancy
5.9 Ectopic Abdominal Pregnancy
6.0 Methotrexate
7.0 Postoperative Follow-up Care
Ectopic ovarian pregnancy, when diagnosed, must be treated like any ovarian cyst of unknown origin and must therefore be enucleated intact through a small incision in the ovarian cortex. Ovarian function usually remains unchanged. An ovarian pregnancy should be suspected when the serum levels of beta HCG exceed 6000 mU/ml, ultrasound shows an empty endometrial cavity and tubal pregnancy is not found
on laparoscopy. With monopolar forceps, the ovarian surface is incised along its major axis at the point where the neofor-mation appears most super fi cial. The trophoblastic material can then be dissected and removed, using a suction/irrigation system. The gestational sac is usually removed as a whole and suturing of the ovarian parenchyma is not necessary.
Patients may be discharged a few hours after the surgery. The bladder catheter is removed at the end of the operation. Antibiotic medication should be administered post operatively. The fi rst serum beta-HCG test is performed on the second day and the reduction compared to the preoperative value should be at least 70%. The test is repeated after seven days
to exclude the persistence of trophoblastic tissue. If the level is not below 20 mU/ml, the test is repeated two weeks later and if it is still positive, the patient should undergo further medical or surgical treatment. Persistent trophoblastic tissue can be treated successfully with methotrexate, ensuring that any anemia present is treated preventively.
In selected cases, medical treatment with methotrexate can be as effective as laparoscopic surgery. However, the possible side effects associated with methotrexate therapy can adversely affect patient compliance to a higher degree than the surgical treatment option. As regards infertility, the prognosis after ectopic pregnancy does not appear to correlate with the characteristics of the extrauterine pregnancy but rather with the patient’s age and medical history. Medical treatment is to be preferred in patients with
pre vious surgery, diffuse adhesions, contraindications to anesthesia, cornual pregnancy or failure of surgical treatment. Medical treatment is indicated if the levels of beta HCG are between 5000 and 10000 mU/ml and the diameter of the adnexal swelling is less than 4 cm. Methotrexate should be administered locally or systemically by intra muscular injection of 1 mg/kg or 50 mg/m2. Patients with a hematocrit < 35% should take ferrous sulfate 325 mg twice daily.
Ectopic abdominal pregnancy is a rare event and accounts for 1.1% of all ectopic pregnancies. Since it is a condition with high maternal and fetal morbidity and mortality, early diagnosis using transvaginal ultrasound, magnetic resonance imaging and laparoscopy is essential. It is a condition that
can be treated readily by laparoscopy if this is done early and if the pregnancy does not involve vascular structures that can cause uncontrollable bleeding. In the case of abdominal pregnancy with a live fetus, the approach must be by laparotomy.
Chapter X
Laparoscopic Surgery forSymptomatic Endometriosis
Luca Mencaglia1, Arnaud Wattiez2 and Sabina Consigli11Centro Oncologico Fiorentino, Florence, Italy
2Department of Gynecology and Obstetrics,Strasbourg University Hospital, Strasbourg, France

Manual of Gynecological Laparoscopic Surgery124
3.0 Patient Positioning
1.0 Laparoscopic Surgery for Symptomatic Endometriosis
Endometriosis is the presence of endometrial glands and stroma in an heterotopic location. Endometriosis is a progressive, debilitating disease that affects 10–15% of women during their reproductive years. Among gyneco -lo gical disorders, endometriosis is second only after uterine myomas in frequency, and accounts for 25% of all laparotomies performed by gynecologists. In the planning of
treatment, many variables must be considered, such as age of the patients, extent of disease, degree of symptoms, and desire for immediate or deferred fertility. In most instances the indications for therapy include pain or infertility or both, and the treatment may be surgical or medical, or a combination of both.
2.0 Preoperative AssessmentThe diagnosis of endometrioma is revealed by the presence of ovarian cyst fl uid that can be suspected by trans vaginal and transabdominal ultrasound (TU) and physical examination. The most common symptoms are infertility and/or pelvic pain which should facilitate establishing the final diagnosis. However, the diagnosis of peritoneal endometriosis is confi rmed only by direct visualization with
the aid of laparoscopy and histological examination of biopsy specimens. Unfortunately, blood serum levels of anti-endo-metrial antibodies, placental proteins PP 14 and CA 125 marker do not have suffi cient sensibility or specifi city to be routinely used for diagnostic evaluation. Diagnostic preope-rative examination must include in all patients a thorough history-taking, physical examination and TU.
Classical gynecological laparoscopic position, with intra-uterine manipulator. Two accessory 6 mm trocars should be used, one in either quadrant, medial to the umbilical
artery ligament. If a third accessory trocar is needed, this is placed in the midline, suprapubically.
4.0 Instrumentation
The surgical treatment options for endometriosis are radical or conservative surgery. The aims of conservative surgery are: removal of both typical and atypical endometriotic
implants; complete removal of endometriotic cysts
(endometrioma)
complete adhesiolysis, with restoration of normaltubo ovarian relationship to enhance fertility potential;
relief of pain; minimize the risk of disease recurrence.
5.0 Technique
Introduction
Laparoscope and video camera 5 mm grasping forceps Scissors Bipolar or unipolar HF electrosurgery unit or laser
system 6 mm trocars Suction-irrigation system for hydrodissection

Manual of Gynecological Laparoscopic Surgery 125
6.0 Laparoscopy6.1 Diagnostic Laparoscopy
The fi rst stage of the procedure involves exploring the pelvic anatomy and mapping out the extent of disease and the location and boundaries of the bladder, ureter, colon, rectum, utero sacral ligaments and major blood vessels.
6.2 Operative LaparoscopyPeritoneal implants may be coagulated using unipolar or bipolar electrosurgery, vaporized by laser application or may be excised (Figs. 1–2).
The hydrodissection technique permits treatment of endo-metriotic implants on the ureter or major vessels without causing any damage to these structures (Figs. 3–5).
Fig. 1Typical red spot of peritoneal endometriosis.
Fig. 4Atypical peritoneal endometriosis.
Fig. 2Black spots of peritoneal endometriosis.
Fig. 5Atypical peritoneal endometriosis.
Fig. 3Atypical peritoneal endometriosis.

Manual of Gynecological Laparoscopic Surgery126
Initially, a small port is made into the retroperitoneum using either the laser or scissors. Ringer‘s lactate or saline solution is injected next to the lesion to create a protective cushion of fl uid between the lesion to be excised and the underlying ureter, bladder or blood vessels. Excision of large endo-metriotic implants is superior to coagulation or vaporization because the technique is not associated with problems related to contamination by smoke and combustion residues. An additional advantage is, that it allows for the collection of specimen for histological diagnosis.
Ovarian Endometriosis
Ovarian implants of endometriosis or small endometrioma of less than 2 cm in diameter may be cauterized, resected by laser application or excised using scissors, biopsy forceps or electrodes (Figs. 6–7).
For endometrioma larger than 2 cm in diameter, the fi rst step of the procedure involves adhesiolysis of the ovary on the posterior leaf of the broad ligament. In most cases, the cyst is ruptured during this step, which requires that the liquid be aspirated immediately to prevent pelvic contamination.
The cystic cavity is repeatedly irrigated with a suction-irri gation tube (Figs. 8–9).
Fig. 6Ovarian implants of endometriosis.
Fig. 7Small ovarian endometrioma.
Fig. 8Large ovarian endometrioma.
Fig. 9Aspiration of ovarian endometrioma.

Manual of Gynecological Laparoscopic Surgery 127
Fig. 10Bilateral ovarian endometriomas.
Examine the cystic wall for malignant lesions. Drainage of the cyst must be followed by removal of the capsule to prevent recurrences. The capsule of the cyst must be separated from the surrounding ovarian stroma and removed by grasping its base with forceps and pulling it away from and out of the ovarian capsule (Figs. 10–13).
Exposure of the right plane will permit blunt dissection by applying contralateral traction with two 5 mm-forceps. If stripping of the capsule is incomplete or difficult to accomplish, the residual part must be eradicated by laser application or electrocoagulation.
Presurgical treatment with GnRH analogues is useless in ovarian endometriomas, because it is not effective in reducing the size and volume of cysts and not even in facili tating the surgery.
Adnexectomy
Adnexectomy could be necessary even in fertile patients when endometriosis has infi ltrated most of the parenchyma. After coagulation with a bipolar forceps, the proximal portion of the tube and of the uteroovarian ligament must be dissected with scissors. In addition, the infundibulo-pelvic ligament is coagulated and dissected applying traction to the ovary with grasping forceps. Therefore, the mesosalpinx should be completely dissected, after coagulation, to liberate the adnexa and to extract it by use of a disposable bag.
Fig. 11Right ovarian endometrioma.
Fig. 12Stripping of the endometriotic capsule.
Fig. 13Blunt dissection of the endometriotic capsule.

Manual of Gynecological Laparoscopic Surgery128
7.0 Postoperative Care
Adhesiolysis
Adhesiolysis may be performed using hydrodissection, scissors, CO2 laser or atraumatic forceps. Before cutting the tissue it is important to mobilize and identify the relevant anatomical structures. Mechanical dissection with forceps or hydrodissection is not associated with any thermal effect, therefore this technique should be preferred.
Cul-de-sac obliteration is an important problem. It suggests rectovaginal involvement, with deep endometriosis and dense adhesions, and signifi cant distortion of the regional anatomy involving bowel, vaginal apex, posterior cervix, ureter, and major blood vessels (Fig. 14).
To facilitate localization of anatomic landmarks and identi-fi cation of tissue planes, we usually place a loaded sponge forceps in the posterior fornix, and, if necessary, insert a rectal probe. In diffi cult cases, ureteral probes can be placed preoperatively (Figs. 15–16).
According to the diffi culties encountered during surgery, patients should be discharged 24 to 48 hours after surgery. Mild narcotic analgetics are usually sufficient to control postoperative pain. Postoperative therapy may include
administration of GnRH analogues, Danazol or Gestrinone to prevent recurrences, to reduce pelvic pain and to facilitate subsequent induction of ovulation in infertile patients.
Fig. 14Severe endometriosis with adhesions.
Fig. 16Intestinal endometriotic nodule with stenosis.
Fig. 15Intestinal endometriotic nodule.

Chapter XI
Laparoscopic Management ofDeep Endometriosis
Luca Minelli and Stefano LandiDepartment of Gynecology and Obstetrics
“Sacro Cuore” General Hospital, Negrar, Italy

10-mm laparoscope with 3 CCD videocameraOne 11-mm trocarTwo 6-mm trocarsOne 11/6 mm reducerBipolar forceps
Bipolar scissors with electrosurgical unitSuction and irrigation systemDissecting forceps (Schnaider)Grasping forceps (Dorsey)Maxon sutures with straight needle
Manual of Gynecological Laparoscopic Surgery130
Endometriosis is a highly debilitating disease that affectsmainly women of childbearing age, characterized bysymptoms such as pelvic pain, dysmenorrhea, painfuldefecation, dysuria and infertility. To date, all medical treat-ment options directed toward suppression of the diseaseand the pain associated with endometriosis have had similareffects in terms of symptom alleviation. None of them have proven long-term efficacy. Interruption of medical treat-ment is associated with a high risk of recurrence. However, evidence-based data suggest that complete laparoscopicex cision of the endometriosis offers good long-term results with regard to the degree of regression, especially in those patients with severe and debilitating symptoms. “The surgic altreatment of endometriosis should aim at removing all visibleareas of endometriosis …. with margins free from disease as
is the case in oncologic surgery … better with excision en bloc” (Redwine) and restoration of the anatomy, removal of adhesions.
Although it is difficult to know the real incidence of deeply infiltrating endometriosis, in a study on 132 patients, cover ingthe predefined depth of endometriotic infiltration, we found deeply infiltrating lesions in 33%. Involvement of the gastro-intestinal tract is present in about 3–36% of women affectedby endometriosis and 50% of these are affected by severe disease. The gastro intestinal predilection sites are the rectumand sigmoid, accounting for 72–85% of cases. This means that to ensure complete removal of the disease and thusimprove the outcome in terms of quality of life, surgery on the bowel with or without bowel resection can be necessary.
1.0 Introduction
2.0 Instrumentation
3.0 Preoperative AssessmentPre-operative assessment of endometrial implants playsa key role in the decision-making on the most effectivestrate gy planning, possibly with the assistance of a general surgeon or urologist. Our pre-operative assessmentcomprises a questionnaire, physical work-up, instrumen -taided investigations and serum markers. Particular attentionis paid to the patient’s history and symptoms, such asdysmenorrhea, pelvic pain, dyspareunia, painful defecation, covered by a specific questionnaire and assessed on a 10–point analog scale: 0 = absent 10 = unbearable. In addition,rect al and vaginal examinations are performed. Rectalexamination allows the physician to reach 2.5 cm into the pelvis and assess a good portion of the rectal mucosa (about7–8 cm of the rectum’s length of 11 cm), palpate any massesand assess the thickness of the recto-vaginal septum and the nodular structure of the uterosacral ligaments. Rectalexamination has a failure rate of 17–64% and is not suffi cienton its own to diagnose deep endometriosis. Factors that caninfluence the diagnosis are the type of lesion, the depth of infiltration, the dimensions and the site of the lesion. Even ifthe examination is performed under general anesthesia, the sensitivity remains very low; its function as a screening test is limited and always requires another test for confi rmation. Accurate data regarding co-involvement of the bladder and bowel cannot be obtained with a simple rectal and vaginal examination and a negative examination does not rule out involvement of these organs. The validity of the examinationmay be improved if performed during menstruation.
Instrument-aided investigations are essential: transvaginalultrasound, ultrasound of the bladder and ureters, double-contrast enema, CA 125 and CA 199. As an alternative to thecontrast enema, transrectal ultrasound can be performed butthis requires specifi c instruments.
All patients should have stopped treatment with progestogens,GnRH agonists or the contraceptive pill 3–4 months before surgery. If intestinal involvement is suspected, specificpreoperative preparation is necessary.
Preparation begins 24 hours beforehand. When intestinalsurgery is highly likely, the patient must take 40 ml ofPhosfo-Lax orally, diluted in a glass of water, followed by 1 liter of water at 2 p.m. and then at 4 p.m., or else 2 liters ofSelg-Esse 1000 in the morning and 2 liters in the afternoon and 40 Mylicon tablets at once. Antibiotic prophylaxis consistsof 2g of cefazoline at induction of anesthesia followed by 1g3 times a day and metronidazole 500 mg 3 times a day for 3 days. If intestinal involvement and thus intestinal surgery are ruled out, an enema is administered on the day prior to surgery and 2g of cefazoline are given with induction of anes-thesia as antibiotic prophylaxis. A Foley catheter is left in thebladder throughout surgery and until the patient is able to reach the toilet independently (usually on day 1 after surgery).After spontaneous urination, the post-voiding residual urine is measured until it is less than 100 cc in two successivemeasurements. If the post-voiding residual urine remainssignificant for more than 3–4 days after surgery, the patient isdischarged after being instructed in self-catheterization.

Manual of Gynecological Laparoscopic Surgery 131
Before starting the operation, the patient usually has a second vaginal and rectal examination under anesthetia.
Laparoscopy begins with the creation of a pneumoperito-neum using a Veress needle through the umbilicus, insertion of the 11-mm umbilical trocar for the laparoscope and placement of two accessory 6-mm ports lateral to the in ferior epigastric vessels bilaterally and a third 6-mm suprapubic port. Complete resection of endometriotic lesions is achieved by use of bipolar scissors. In general, if bowel surgery is required, this is performed by a general surgeon specialist assisted by one of the two gynecological surgeons. At the end of the operation, copious lavage of the peritoneal cavity is performed with 500–1000 ml of Ringer’s lactate solution and 4% icodextrin solution is left in the abdomen for adhesion
prevention. In these cases, a drain is left in place close to the anastomosis for 8–12 hours. The drain is usally removed after the fi rst bowel movement. In general, a nasogastric tube is not required. During post operative day 1, the patient is given continuous epidural analgesia through an elastomeric pump, after which analgesia is replaced by 100 mg of ketoprofen and 100 mg of tramadol i.m. or 0.3 mg of buprenorphine s.c., as required. Intravenous fl uids are administered on the day of the opera tion and the next day patients can start to take food orally with a gradual increase in diet. The patients are discharged without a special diet. Prior to surgery, the patients are informed of the potential risks and benefi ts of the procedure by a written informed consent form.
4.0 The Surgical TechniqueThe type of surgery depends on the depth of invasion and the topographic distribution of endometriosis. The “classic al” steps of the technique are as follows:
The laparoscopic procedure begins with laparoscopic inspection of the pelvic anatomy and systematic mapping of the endometriotic lesions (Figs. 1–3).
Fig. 1 Mapping of adhesions and endometriotic lesions.
Fig. 2 Endometrioma with diffuse adhesions and lesions.
Fig. 3 Endometriotic lesions on the peritoneum.

Manual of Gynecological Laparoscopic Surgery132
Fig. 4 Adhesions involving the ovary and the tube.
Fig. 5 Adhesions to the pelvic wall.
Fig. 6 Adhesions between the abdominal wall and intestine.
The caecum must always be inspected for the presence of endometriotic implants which could not be confi rmed by preoperative double-contrast enema.
The operation proceeds with adhesiolysis, drainage and stripping of endometriomas, excision of endometriotic implants and other parietal implants, making sure that adequate healthy margins of retroperitoneal tissue are
included. Our standard method is to remove endometrio mas completely without coagulating or vaporizing super ficial peritoneal implants to be sure that there is no deep endo-metriosis.
Adhesions can be removed with various techniques but we prefer to use mechanical dissection with cold or bipolar scissors (Figs. 4–6).
Traction and blunt dissection can assist greatly in mobilizing and localizing structures that must be separated. We re commend avoiding hydrodissection and use of liquids because lavage of the peritoneum is much more diffi cult when distended with CO2. In case of hermorrhage, application of a suction tube or a dry gauze pledget is recommended.
Very small endometriomas can be coagulated but in general, the “stripping” technique is preferred to avoid recurrence (Figs. 7–11).
Fig. 9 Ovarian endometrioma with adhesions.
Fig. 7 Bilateral endometrioma.
Fig. 8 Endometrioma of multilobular appearance.

Manual of Gynecological Laparoscopic Surgery 133
Fig. 10 Giant endometrioma.
Fig. 11 Giant endometrioma of the right ovary.
Fig. 12 Appearance of the endometrioma capsule.
Fig. 13 Following incision, the contents are aspirated and the cavity of the cyst is irrigated.
Fig. 14 The adjacent cyst capsule is removed by stripping.
The fi rst step is to mobilize the ovary from the posterior leaf of the broad ligament to which it frequently forms dense adhesions. In the majority of cases, the cyst ruptures during this maneuver, which requires, that the chocolate-colored fl uid be aspirated promptly. Ensuingly, the cavity of the cyst is irrigated several times. The cyst capsule is removed by grasping the margin of the fenestration and stripped off from the ovarian stroma to which counter-traction is applied with a 5-mm forceps. The correct plane of dissection is chosen when the capsule appears white or slightly yellow without red streaks; this allows bloodless dissection without any hemorrhage (Figs. 12–14).

Manual of Gynecological Laparoscopic Surgery134
Following stripping, meticulous and highly selective coagu-lation is required, holding the ovary with a forceps and visualizing each bleeding site by dripping saline on the base of the cyst. The capsule is extracted by use of a disposable bag. Very often, the ovary adheres to the pelvic wall and the peritoneum underneath can obscure additional endome triotic implants. These lesions must also be excised. It must be taken into account that the retroperitoneal fi brosis caused by the overlying adhesions frequently involves the ureter which often necessitates careful ureterolysis. Many endometriotic cysts are fi xed to the ipsilateral uterosacral ligament by dense adhesions so the entire adhesion area between the cyst wall and the uterosacral ligament is removed en bloc.
In rare cases, adnexectomy is required. It is usually possible to maintain to some extent the ovarian follicular reserve and function. When surgery is performed on the ovaries, they are suspended temporarily at the end of the operation using non-absorbable 2/0 polypropylene sutures that are removed on the third postoperative day, as described by Abuzeid. This procedure allows better access to the pouch of Douglas and prevents formation of adnexal adhesions to sites of the pelvic cavity that were denuded of peritoneum (Fig. 15).
Starting from the pelvic area, the ureters and large vessels are localized and the ureter is then exposed down to the muscle wall following its course in the pelvis until healthy tissue is reached. If endometriosis extends deeply and laterally in the uterosacral cardinal ligament, it is sometimes necessary to sacrifi ce branches of the internal iliac artery, usually the uterine artery, or expose it as far as the intersection with the ureter. In extreme cases, the ureteric muscularis can be invaded by endometriosis, leading to partial constriction. In these cases, resection of the involved segment of the ureter may become necessary, followed by reanastomosis.
The basic principle is to liberate the obliterated cul-de-sac by en-bloc excision of the deep pelvic endometriosis.
The line of resection in healthy non-fibrosed peritoneum starts laterally and runs parallel to the base of the uterosacral ligament. The area is then exposed by blunt dissection. A transverse incision is made at the uterine isthmus superior to the point of adherence to the bowel, and is carried down-wards along the posterior cervical wall with intrafascial dissection. The plane of dissection is continued caudally as far as the rectovaginal septum so that the healthy rectal wall can be liberated from the endometriotic nodule. The uterosacral ligaments are resected at the site of insertion in the cervix. As it is often diffi cult to fi nd the correct planes of dissection, it is necessary to operate behind the nodule.
Fig. 15 At the end of the surgery, the pelvic cavity is completely denuded of peritoneum.
Every adhesion of fi brous or fat tissue between the rectum and the lateral pelvic wall is gradually divided until the bowel has been suffi ciently mobilized.
In this way, the entire endometriotic nodule remains adherent to the anterior wall of the bowel forming a single mass with the uterosacral ligaments and obliterated cul-de-sac. Where the disease invades the posterior vaginal fornix, the vagina is opened. In the case of endometriotic infi ltration of the vaginal mucosa itself, a vaginal approach can be useful to delineate and mobilize the nodule by digital dissection prior to initiating laparoscopic dissection; this follows the posterior lip of the cervix fi rst and then the vaginal incision, making sure that all of the vaginal lesion is included in the mass adherent to the bowel.
Bowel surgery is performed at this point and can involve superficial, partial thickness, full thickness or segmental resection. Given the frequent involvement of the submucosal layer, to ensure complete excision of the endometriosis we recommend full thickness or segmental intestinal resection. We consider superfi cial “peeling” or peeling of the mucosa only in selected cases.
Even if full thickness bowel resection can be performed stepwise while the nodule is excised from the bowel and sutured in double layers, we consider the use of a linear stapler positioned perpendicular to the bowel axis is extremely safe and, beyond that, not expensive (Figs. 16–20).

Manual of Gynecological Laparoscopic Surgery 135
Fig. 16 The rectum is densely adherent to the uterine corpus obliterating the cul-de-sac.
Fig. 17 Adhesiolysis and exposure of the deep rectovaginal endometriotic nodule.
Fig. 18 The nodule is completely excised.
Fig. 19 En bloc excision of the endometriotic lesion.
Fig. 20 Bowel resection with introduction of a transanal stapler.

Manual of Gynecological Laparoscopic Surgery136
4.1 Protection of the Sympathetic Mesorectum Nerve Fibers; Superior Hypogastric Plexus, Hypogastric Nerves and Lumbosacral Sympathetic Trunk
The bowel segment invaded by the endometriotic nodule is grasped with a forceps while positioning a linear stapler and firing precisely below the nodule. The technique is limit ed in that it can be used only for small-sized lesions(< 3 cm) and if the reduction in bowel lumen is less than 50%. To completely remove an anterior rectal lesion smaller than 3 cm, which would require an ultralow resection (up to 6 cm from the anal sphincter), we suggest the use of a circular stapler (CEEA) as described by H. Reich. The nodule is trans-fi xed perpendicular to the bowel axis in such a way that it can be pushed between the anvil and the body of the circular stapler which has been inserted through the anal canal.
When transanal resection is planned, after placing a fourth trocar in the right upper outer quadrant, the bowel is mobilized laparoscopically using an ultrasonic scalpel (Ultra cision).
The involved bowel segment is exposed, safeguarding the mesentery and the vessels close to the intestinal wall. The fat is stripped away from the healthy distal bowel segment, exposing the intact muscularis propria through 360 degrees so that the sutures for colorectal anastomosis can be placed very safely with the circular stapler using the Knight-Griffen technique. A linear endoscopic stapler is then applied with a safety margin of 1 cm away from the nodule in the healthy distal bowel. Then, the proximal segment of rectosigmoid colon with the endometriotic nodule at its stapled end is extracted through the suprapubic port, which is prophylactically extended. The bowel segment involved is transected at about 1 cm proximal to the endometriotic mass. The anvil of the circular stapler is secured with a purse string suture to the distal bowel opening and reintroduced into the abdominal cavity. Next, a28 or 32 mm circular end-to-end anastomosis (CEEA) stapling
device is introduced transanally to complete the procedure. Occasionally, for rectosigmoid lesions, a segmental bowel resection through a Pfannenstiel minilaparotomy with end-to-end hand-sewn anastomosis is performed under direct visual control.
Alternatively, the proximal bowel segment can be exteriorized transvaginally, resected and placed in the anvil of the circular stapler. After completing the end-to-end anastomosis the vagina is closed laparoscopically and an omental flap is created and interposed between vagina and colon to prevent the two sutures from getting into contact. The integrity of the anastomosis is tested by fi lling the pelvic cavity with saline and insuffl ating air into the rectum while the more proximal part of the sigmoid is occluded mechanically with forceps.
In our experience of 600 cases of complete excision of advanced endometriosis, we have found negative effects on the bladder, rectum and sexual activity. In this respect, the results of studies recently published by Thomassin and Darai, do not correspond with our own. There may be various rationales for this inconsistency. However, all authors agree on the signifi cance of sparing the pelvic nerve plexuses.
The autonomic pelvic nerves in fact provide neurogenic control of the rectum, bladder and sexual area (vaginal lubrication and sweating). Among position-related iatrogenic nerve injuries, the inferior hypogastric plexus is most often affected during excision of endometriotic nodules from the uterosacral ligaments and the lateral adjacent area. To reduce to a minimum the risk of inadvertent nerve injury at this level the best safeguard is to observe certain rules that will be described below.
The superior hypogastric plexus is formed by sympathetic nerve fi bers lying in the presacral space at the level of the promontory, covered by peritoneum and by the anterior layer of the visceral pelvic fascia. The right and left hypogastric nerves originate from this plexus and descend 8–10 cm lateral to the mesorectum in the visceral pelvic fascia following the cranio-caudal course of the ureter. These nerves can be localized by opening the peritoneum at the level of the sacral promontory to gain access to the presacral space. Blunt dissection of the loose adipose tissue in the rectosacral space as far as the rectosacral fascia allows identifi cation of the superior hypogastric plexus and the hypogastric nerves close to the sacrum and distant from the mesorectum, which is drawn ventrally and caudally with the rectum. If this is done, innervation is preserved completely during dissection of the upper part of the meso rectum. To mobilize the rectosigmoid
fully and reach the inferior part of the mesorectum as far as the rectal wings, the pararectal fossae must be unifi ed in the retrorectal space by blunt dissection as far as the space known as “The Holy Plane of Heald” located in the midline; when this has been identified, the posterior and lateral mesorectal fascia is preserved by dissecting the loose and relatively avascular connective tissue between the visceral meso rectal fascia and the parietal endopelvic fascia. The medial and distal segments of the hypogastric nerves adhere to the mesorectum fascia at this level and can be injured if they are not exposed. Dissection is continued as far as the fl oor of the pararectal spaces, always staying close to the rectum to preserve the superior hypogastric plexus and the hypogastric nerves medially and cranially, and the ganglia and lumbosacral sympathetic trunks laterally and dorsally, close to the sacrum.

Manual of Gynecological Laparoscopic Surgery 137
4.2 Protection of the Sympathetic Fibers of the Inferior Mesorectum:the Inferior-most Aspect of the Hypogastric Nerves andthe Proximal Aspect of the Inferior Hypogastric Plexus
It is extremely important to localize and lateralize the hypogastric nerves and their connections to the proximal part of the inferior hypogastric plexus. After opening the retroperitoneum of the presacral space and prior to initiating dissection of the uterosacral ligaments and rectal pillars, the thin and delicate lateral part of the visceral presacral pelvic fascia between the prerectal space and the pararectal space is mobilized and lateralized carefully. This lateral part is crossed by the hypogastric nerves, the anterior branches of the sacral sympathetic trunks, the para sympathetic pelvic splanchnic nerves and more ventrally and caudally
by the proximal aspect of the inferior hypogastric plexus. It is not always easy to identify the hypogastric nerves in the presacral space because their thickness varies greatly(4–7 mm), they are completely surrounded by fatty tissue and they sometimes give off multiple nerve fi bers. However, clear identifi cation, exposure and preservation of these nerves are feasible through laparoscopy and should always be attempted.At this level, they run from lateral to medial in a cranio-caudal direction approximately 20 mm to 5 mm inferior to the ureter.
4.3 Protection of the Splanchnic Nerves and of the Medial and Inferior Aspectsof the Hypogastric Plexus in the Inferior Mesorectal Spaces
The parasympathetic innervation of the pelvic organs, recto sigmoid and anal canal is provided by the splanchnic nerves which originate from the S2–S4 sacral roots.3–5 branches originate from the pelvic splanchnic nerves 3–4 and 1–2 cm laterally and inferior to the pouch of Douglas; they perforate the endopelvic fascia, cross the ventral aspect of the piriformis muscle and then converge with the terminal branches of the ipsilateral hypogastric nerve about 1 cm ventral to the inferior hypogastric plexus. The plexus is located bilaterally in the presacral aspect of the endopelvic fascia between the posterior vaginal fornix and the rectum in the ventral part of the lateral rectal ligaments. When the inferior-most aspect of the posterolateral parametrium is involved by endometriosis, it is resected sparing the dense connective tissue and the fatty tissue surrounding the nerve fi bers of the cranial and medial aspect of the inferior hypogastric plexus. Ideally, the plane of dissection should not enter the space, similar to the keel of a boat, which is located between the anterolateral planes of the mesorectum and the rectal wings. A surgical anatomical reference point that we use to separate the lateral parametrium and the vascular part (ventral and cranial) of the nerve (dorsal and caudal) is the deep uterine vein.
The lateral ligaments of the rectum run close to the splanchnic nerves in 30% of cases, cross the pelvic plexus and then
continue with the medial efferent bundle of the pelvic plexus up to the lateral or anterolateral surface of the rectum. In a recent study, Ercoli showed, that the pelvic splanchnic nerves are at high position-related risk of iatrogenic injury because they are in close proximity to these ligaments in 70% of cases. Proper identifi cation of the splanchnic nerves at their origin from the sacral roots allows safe dissection of the rectal wings and the inferior mesorectal planes.
Always keeping the parasympathetic nerves under vision allows the nerve fi bers to be kept distant from the debulking planes.
Moreover, by following their course until they converge with the hypogastric nerves it is possible to localize the origin of the pelvic plexus, caudal to the course of the deep uterine vein, particularly the efferent branches and the visceral afferent branches of the uterus, vagina and bladder. During bowel resection, after excision of the meso sigmoid with sparing of the innervation described above, only selective neuroablation of a small quantity of nerve fi bers of the medial efferent bundle of the pelvic plexus is performed, directed medially towards the rectum and traversing the meso rectum. In fact, only the rectal fi bers of the resected segment of bowel are transected, minimizing rectal denervation.
4.4 Protection of the Caudal Aspect of the Inferior Hypogastric Plexus
The distal aspect of the inferior hypogastric plexus is located in the posterior part of the vesico-uterine ligament, lateral and caudal to the distal ureter. To preserve it, after preparing the ureteric tunnel and the so-called space of Morrow medial and central to the ureter, the lateral aspect of the nerves and the medial vascular part of the vesico-uterine ligament are
dissected. It is necessary to divide the pubocervical fascia consisting of the cranial and caudal part of the vesico-uterine and vesico-vaginal ligaments at the point where its refl ection will form the ureteric tunnel. In this way, the surgeon gains safe access to the paravaginal space.

Manual of Gynecological Laparoscopic Surgery138

Chapter XII
Technique of Laparoscopic Myomectomy
Stefano Landi and Luca MinelliDepartment of Gynecology and Obstetrics
“Sacro Cuore” General Hospital, Negrar, Italy
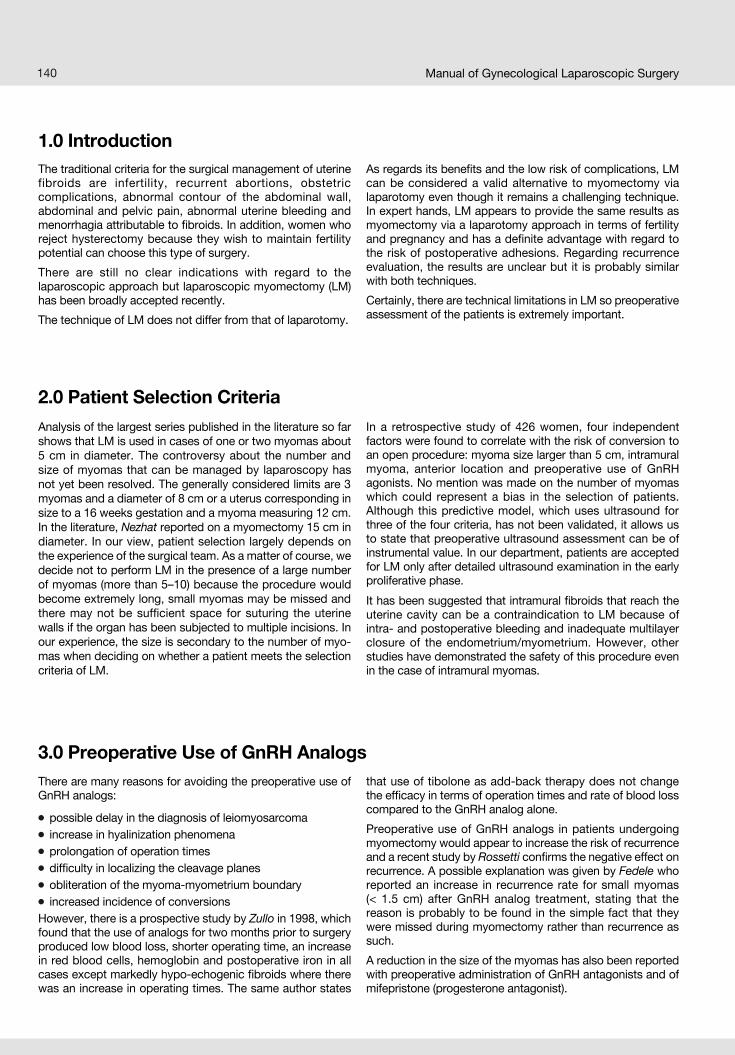
Manual of Gynecological Laparoscopic Surgery140
The traditional criteria for the surgical management of uterinefibroids are infertility, recurrent abortions, obstetric complications, abnormal contour of the abdominal wall, abdominal and pelvic pain, abnormal uterine bleeding and menorrhagia attributable to fi broids. In addition, women who reject hysterectomy because they wish to maintain fertility potential can choose this type of surgery.
There are still no clear indications with regard to the laparoscopic approach but laparoscopic myomectomy (LM) has been broadly accepted recently.
The technique of LM does not differ from that of laparotomy.
As regards its benefi ts and the low risk of complications, LM can be considered a valid alternative to myomectomy via laparotomy even though it remains a challenging technique. In expert hands, LM appears to provide the same results as myomectomy via a laparotomy approach in terms of fertility and pregnancy and has a defi nite advantage with regard to the risk of postoperative adhesions. Regarding recurrence evaluation, the results are unclear but it is probably similar with both techniques.
Certainly, there are technical limitations in LM so preoperative assessment of the patients is extremely important.
1.0 Introduction
2.0 Patient Selection Criteria
3.0 Preoperative Use of GnRH Analogs
Analysis of the largest series published in the literature so far shows that LM is used in cases of one or two myomas about 5 cm in diameter. The controversy about the number and size of myomas that can be managed by laparoscopy has not yet been resolved. The generally considered limits are 3 myomas and a diameter of 8 cm or a uterus corresponding in size to a 16 weeks gestation and a myoma measuring 12 cm. In the literature, Nezhat reported on a myomectomy 15 cm in diameter. In our view, patient selection largely depends on the experience of the surgical team. As a matter of course, we decide not to perform LM in the pre sence of a large number of myomas (more than 5–10) because the procedure would become extremely long, small myomas may be missed and there may not be suffi cient space for suturing the uterine walls if the organ has been subjected to multiple incisions. In our experience, the size is secondary to the number of myo-mas when deciding on whether a patient meets the selection criteria of LM.
In a retrospective study of 426 women, four independent factors were found to correlate with the risk of conversion to an open procedure: myoma size larger than 5 cm, intramural myoma, anterior location and preoperative use of GnRH agonists. No mention was made on the number of myomas which could represent a bias in the selection of patients. Although this predictive model, which uses ultrasound for three of the four criteria, has not been validated, it allows us to state that preoperative ultrasound assessment can be of instrumental value. In our department, patients are accepted for LM only after detailed ultrasound examination in the early proliferative phase.
It has been suggested that intramural fi broids that reach the uterine cavity can be a contraindication to LM because of intra- and postoperative bleeding and inadequate multilayer closure of the endometrium/myometrium. However, other studies have demonstrated the safety of this procedure even in the case of intramural myomas.
There are many reasons for avoiding the preoperative use of GnRH analogs:
possible delay in the diagnosis of leiomyosarcoma increase in hyalinization phenomena prolongation of operation times diffi culty in localizing the cleavage planes obliteration of the myoma-myometrium boundary increased incidence of conversions
However, there is a prospective study by Zullo in 1998, which found that the use of analogs for two months prior to surgery produced low blood loss, shorter operating time, an increase in red blood cells, hemoglobin and postoperative iron in all cases except markedly hypo-echogenic fi broids where there was an increase in operating times. The same author states
that use of tibolone as add-back therapy does not change the effi cacy in terms of operation times and rate of blood loss compared to the GnRH analog alone.
Preoperative use of GnRH analogs in patients undergoing myomectomy would appear to increase the risk of recurrence and a recent study by Rossetti confi rms the negative effect on recurrence. A possible explanation was given by Fedele who reported an increase in recurrence rate for small myomas(< 1.5 cm) after GnRH analog treatment, stating that the reason is probably to be found in the simple fact that they were missed during myomectomy rather than recurrence as such.
A reduction in the size of the myomas has also been reported with preoperative administration of GnRH antagonists and of mifepristone (progesterone antagonist).


Manual of Gynecological Laparoscopic Surgery142
5.1 Injection of up to 40 ml of 9-arginine Vasopressin at a Concentration of 0.6 U/mlin Saline into the Pedicle or Body of Each Myoma
Fig. 2 Injection of up to 40 ml of 9-arginine vasopressin at a concentrationof 0.6 U/ml in saline into the myoma pedicle. Remember always toaspirate prior to administration of the vasoconstrictive agent to makesure that it is not injected in a blood vessel.
Fig. 3 Injection of up to 40 ml of 9-arginine vasopressin at a concentrationof 0.6 U/ml in saline into the body of a myoma.
The use of vasoconstrictive agents has been shown to be as effective in laparoscopy as in laparotomy. They allow faster and easier enucleation with occasional use of bipolar electro surgery for hemostasis, and above all, they reduce blood loss and thus the need for transfusions. In our experience, the real advantage is that they provide a clear view of the operative fi eld. Unfortunately, the use of vaso-constrictors is not permitted in many European countries. Traditionally, Por-8 (8-ornithine vasopressin), a synthetic derivative of vasopressin, a strong vasoconstrictor with weak antidiuretic effects, has been used for many years but is no longer commercially available. Subsequently, some authors suggested using glypressin (triglycyl-lysine vaso-pressin, triglycyl- vasopressin), which is usually employed to treat bleeding esophageal varices. It is an analog of antidiuretic hormone with about 3% of the antidiuretic effect of vasopressin. The theoretical advantage is that it does not cause constriction of the coronary arteries as it is a pharmacologically inactive drug precursor that must be biotransformed to lysopressin (40–60 minutes) by endo- and exopeptidases in the liver and kidney.
Pitressin (8-arginine vasopressin), a derivative of vaso-pressin, is used widely in the United States. In the past, it was used in different concentrations, even up to 20 U in
20 ml of saline. Its period of activity is 20–30 minutes and should be metabolized before the end of surgery. Use of the vasoconstrictor is often not well tolerated and cases of bronchoconstriction, urticaria, anaphylactic reaction and myocardial infarction have been reported. When used, this must be under the strict control of the anesthetists.
During laparoscopic myomectomy, one case of hyper tension followed by hypotension after 3–5 ml at 0.6 U/ml, one case of pulmonary edema after 10 ml at 0.5 U/ml and one case of transitory hypertension after 70 ml at 0.05 U/l of Por-8 have been reported.
Recently, use of bupivacaine hydrochloride 0.25% + 0.5 ml of epinephrine (1/2 ampoule of 1 mg/ml) has been shown to be effective and safe in reducing hemorrhage, operating time and time required for myoma enucleation. The problem is that the constrictive effect lasts for 5–6 hours so there is a hypothetical risk of not obtaining accurate hemostasis with delayed postoperative bleeding and tissue damage due to the prolonged hypo-oxygenation. The hypothesis that bupivacaine produces compensatory vasodilatation has yet to be demonstrated. Methyl ergometrine maleate and sulprostone should be used only in study protocols as their safety and effi cacy in gynecologic surgery have yet to be demonstrated.
One to three injections per myoma may be necessary (Figs. 2, 3). A few seconds after injection, the myometrium begins to turn pale. If excessive resistance is encountered during injection it is better to draw back the needle until the resistance disappears, which signifi es that the needle is
between the myoma and pseudocapsule; hydrodissection can also be useful. If the liquid escapes through a previously made needle opening, this confi rms that the hydrodissection cannula is in the proper cleavage plane.

Manual of Gynecological Laparoscopic Surgery 143
5.2 Myometrial Incision with Unipolar Hook Electrode or ScissorsUsing Pure High-Power Cutting Current
Fig. 4 Elliptical incision in a pedunculated myoma by use of a unipolar hook electrode (60-watt cutting current). An elliptical incision is advantageous because the very thin myometrium would be toodiffi cult to suture.
Fig. 5 Myometrial incision at the level of the most prominent part ofthe myometrium with a unipolar hook electrode using a 60-wattcutting current. The assistant is using a suction cannula toaspirate and maintain clear vision of the operating fi eld.
Fig. 6 Anterior myoma: the line of incision should be aligned on-axis with the needle holder placed in the lateral port.
Fig. 7 Anterior myoma (lateral view): the incision cannot be alignedon-axis with the needle holder in the suprapubic port becausethe needle would not be able to penetrate deeply into themyo metrium.
A linear or elliptical incision (Fig. 4) for very large or peduncu-lated myomas should be made over the myoma. The standard incision is vertical (oblique in the case of an anterior myoma) at the level of the most prominent part of the myometrium and is carried down to the surrounding pseudocapsule until the pearly structure of the myoma is exposed (Fig. 5). Even if the arteries and arterioles of the myometrium have a trans-verse course, a vertical incision is preferred because suturing is more effective and easier to accomplish. Reduced blood loss has been reported with transverse incision of the uterus.
Koh suggests ultra lateral placement of the ports with two working trocars, both on the right side. With the traditional set-up of the sites of trocar insertion, the incision should be oblique in the case of anterior myoma in line with the needle holder located in the lateral port. In the case of fundal or posterior myoma, the incision must be vertical in line with the needle holder, which in this case will be in the suprapubic port so that the needle can be passed deeply in the myome-trium (Figs. 6–7).

Manual of Gynecological Laparoscopic Surgery144
When placing the myometrial incision, the surgeon must limit the use of electrocautery. Many cases of uterine rupture after leiomyoma coagulation or simple unipolar cauterization have been reported. Bipolar electrosurery may be applied selectively to the blood vessels. Hemostasis must be achieved preferably by means of endoscopic suture and the use of vasoconstrictive agents. The ultrasonic scalpel is used by some surgeons. Stringer was the fi rst to use it for LM and its use for uterine incision appears to be as effective as the knife electrode; however, it appears to produce greater tissue damage compared to the unipolar mode using 35 watt for cutting and 30 watt for coagulation. We prefer to use a 30–60 watt unipolar hook electrode with unblended cutting current
producing a sharp and clean cut with minimal lateral diffusion of energy. In theory, the ideal choice would be a cold surgical knife. In the case of intraligamentary myomas, the fi rst step is to incise the broad ligament to assist in spontaneous protrusion.
Pedunculated myomas are resected with unipolar scissors and then sutured like intramural or subserous myomas. An endoloop positioned around the myoma pedicle can help to reduce bleeding before starting to suture.
However, we advise against only using two endoloops because they slip off the pedicle easily, producing major secondary bleeding.
5.3 Enucleation of the Myoma
Fig. 8 Enucleation of the myoma. The myoma is enucleated by pulling and rotating the fi broid with a spiral-tipped fi xation instrument inserted through the suprapubic port, applying countertraction and using blunt dissection with a strong forceps and a suction cannula. In the case of major bleeding, the surgeon may use the bipolar forceps.
Fig. 9 The handle of the spiral-tipped fi xation instrument is pulled towards the patient’s feet along an imaginary arc so as to apply traction to the myoma.
After identification of the cleavage plane, the myoma is enucleat ed, pulling it with a 10 mm tenaculum or spiral-tipped fi xation instrument inserted through the suprapubic port, exerting countertraction and performing dissection with a sturdy forceps and with a suction cannula (Figs. 8, 9). Given proper identifi cation and exposure of the cleavage planes, the myoma can be removed without any bleeding vessels. Traction should allow the myoma to be rotated toward the anterior abdominal wall (in the case of anterior myoma) so that the point of insertion of the fi xation instrument should be as low as possible in the fi broid. Only signifi cant bleeding is
coagulated with the bipolar forceps; hemostasis should be achieved by suture and vasoconstrictive agents. An effort must be made not to enter the endometrial cavity to avoid the formation of synechiae or iatrogenic adenomyosis. We do not recommend suture of the endometrial cavity to prevent adenomyosis as reported by Koh, but antibiotic prophylactic cover for two days and diagnostic hysteroscopy at the end of the operation are worthwhile. Small adjacent myomas can be enucleated by tunnelling through the previous incision (Figs. 10, 11) making sure that formation of hematomas is not facilitated.


Manual of Gynecological Laparoscopic Surgery146
Fig. 12 Schematic drawing of a fi gure-of-eight zigzag suture that has proven effective and safe in our series. The suture line is usually placed with an intracorporeal knot.
13 14
15 16
Figs. 13–16 Interrupted fi gure of eight sutures with Serafi t 0 are used toobliterate the bed of the myoma and ensure hemostasis.
As shown, each individual suture requires four steps starting from the right side and is then tied intracorporeally.

Manual of Gynecological Laparoscopic Surgery 147
We use interrupted fi gure of eight sutures to approximate the bed of the myoma and ensure correct hemostasis (Figs. 13–16). The serosa is closed with a continuous inverting suture (Figs. 17–19) or interrupted inverting sutures. The sutures are placed with a 36 needle slightly straightened (maximum size of needle that can be introduced through a 15 mm trocar) or with a size 27 curved needle. If there is abundant myometrium, it is possible before closure to trim the excess to allow normal reconstruction of the uterus. However, since involution of the hypertrophic myometrium takes place spontaneously in the fi rst weeks post myomectomy it is advisable to avoid removing myometrial tissue as much as possible.
17 18
19
Figs. 17–19 The superfi cial layer is approximated with a continuous inverting PDS 0 or 2/0 suture.
inverting suture on the right side of the incision inverting suture on the left sidefi nal result
The assistant cuts the suture and the surgeon can remove theneedle from the abdomen via the 15 mm subprapubic trocar.

Manual of Gynecological Laparoscopic Surgery148
5.5 Morcellation
Fig. 20 Activation of the blade of the morcellator inside a trocar with an oblique end: the myoma is rotated and “peeled” like an orangewithout the aid of the assistant and with the production of very few fragments.
Fig. 21 Correct position of the blade relative to the end of the trocar:the blade must be in about the middle of the oblique part of the trocar.
Use of an electromechanical morcellator to remove the myomas is obligatory. We recommend activating the blade of the morcellator inside a trocar with an oblique end(Figs. 20, 21). In this way, with simple traction the myoma is “peeled” like an orange into a few or even no fragments.
This technique should prevent the “Swiss cheese“ effect of perforating the myoma with a number of holes, loss of the fragments in the pelvis, repeated grasping of the myoma with forceps and thus loss of time.
5.6 End of the Procedure
The peritoneal cavity must be irrigated copiously with Ringer lactate to obtain correct hemostasis and remove all the fragments; leaving a small piece of myoma can cause
intestinal obstruction following formation of adhesions. A device to avoid the formation of adhesions is to suture the suprapubic fascial defect under vision.
Manual of Gynecological Laparoscopic Surgery 149
1. ACIEN P, QUEREDA F: Abdominal myomectomy: Results of a simple operative technique. Fertil Steril 65:41-51, 1996
2. ARCANGELI S, PASQUARETTE MM.: Gravid uterinerupture after myolysis. Obstet Gynecol. May;89(5 Pt 2):857, 1997.
3. BEYTH Y: Gonadotropin-releasing hormone analog treatment should not precede conservativemyomectomy. Fertil Steril 53:187-188, 1990
4. BULLETTI C, POLLI V, NEGRINI V, GIACOMUCCI E, FLAMIGNI C: Adhesion formation after laparoscopic myomectomy. J Am Assoc Gynecol Laparosc. Aug;3(4): 533-6, 1996.
5. CAMPO S, GARCEA N: Laparoscopic myomectomy in premenopausal women with and without preoperative treatment using gonadotrophin-releasing hormone analogues. Hum Reprod 14(1):44-48, 1999
6. COHEN D, MAZUR MT, JOZEFCZYK MA, et al: Hyalinization and cellular changes in uterine leiomyo mata after gonadotropin-releasing hormone against therapy. J Reprod Med 39:377-380, 1994
7. DARAI E, DECHAUD H, BENIFLA JL, ET AL: Fertility after laparoscopic myomectomy: Preliminary resultsHum Reprod 12(9):1931-1934, 1997
8. DELIGDISCH L, HIRSCHMANN S, ALTCHEK A: Pathologic changes in gonadotropin releasing hormone agonist analogue treated uterine leiomyomata.Fertil Steril 67:837-841, 1997
9. DUBUISSON JB, CHAPRON C, CHAVET X, et al:Fertility after laparoscopic myomectomy of large intramural myomas, preliminary results. Hum Reprod 11(3):518-522, 1996
10. DUBUISSON JB, CHAVET X, CHAPRON C, et al:Uterine rupture during pregnancy after laparoscopic myomectomy. Hum Reprod 10:1475-1477, 1995
11. DUBUISSON JB, FAUCONNIER A, CHAPRON C, KREIKER G, NORGAARD C.: Second look after laparoscopic myomectomy. Hum Reprod. Aug;13 (8):2102-6, 1998.
12. DUNNIHOO DR, OTTERSON WN, MAILHES JB, LEWIS DF JR, GRAFTON WD, BROWN CC.: An evaluation of uterine scar integrity after cesarean section in rabbits. Obstet Gynecol. Mar;73(3 Pt 1):390-4, 1989.
13. FELBERBAUM RE, KUPKER W, KRAPP M, GEHL B, LUDWIG M, DIEDRICH K: Preoperative reduction of uterine fi broids in only 16 days by administration of a gonadotrophin-releasing hormone antagonist(Cetrotide). Reprod Biomed Online.;3(1):14-18, 2001.
14. FREDERICK J, FLETCHER H, SIMEON D, MULLINGS A, HARDIE M: Intramyometrial vasopressin as ahaemostatic agent during myomectomy. Br J Obstet Gynaecol. May;101(5):435-7, 1994.
15. FRIEDMAN W, MAIER RF, LUTTKUS A, et al: Uterine rupture after laparoscopic myomectomy. Acta Obstet Gynecol Scand 75:683-684, 1996
16. GEORGAKOPULOS PA, BERCI G: Sigmoido-uterine rupture in pregnancy after multiple myomectomy.Int Surg 66:367-368, 1981
17. HARRIS WJ: Uterine dehiscence following laparoscopic myomectomy. Obstet Gynecol 80:545-546, 1992
18. HASSON HM, ROTMAN C, RANA N, SISTOS F, DMOWSKI WP: Laparoscopic myomectomy. Obstet Gynecol. Nov;80(5):884-8, 1992.
19. IGARASHI M: Value of myomectomy in the treatmentof infertility. Fertil Steril. Jun;59(6):1331-2, 1993
20. KIMURA T, KUSUI C, MATSUMURA Y, OGITA K,ISAKA S, NAKAJIMA A, OHASHI K, KOYAMA M, AZUMA C, MURATA Y: Effectiveness of hormonaltourniquet by vasopressin during myomectomy through vasopressin V1a receptor ubiquitously expressed in myometrium. Gynecol Obstet Invest. 54(3):125-31, 2002.
21. KOH C, JANIK G: Laparoscopic myomectomy: thecurrent status Curr Opin Obstet Gynecol, 15:295-301, 2003
22. KWOK A, NEVELL D, FERRIER A, GRAF N, LAM A, FORD R: Comparison of tissue injury betweenlaparosonic coagulating shears and electrosurgicalscissors in the sheep model. J Am Assoc Gynecol Laparosc. Aug;8(3):378-84, 2001.
23. LETHABY A, VOLLENHOVEN B, SOWTER M:Pre-operative GnRH analogue therapy beforehysterectomy or myomectomy for uterine fi broids. Cochrane Database Syst Rev. (2):CD000547, 2000.
24. LIN PC, THYER A, SOULES MR.: Intraoperativeultrasound during a laparoscopic myomectomy. Fertil Steril Jun;81(6):1671-4, 2004.
25. LOONG EPL, WONG FWS: Uterine leiomyosarcoma diagnosed during treatment with an agonist of luteinizing hormone-releasing hormone for presumed uterine fi broid. Fertil Steril 54:530-531, 1990
26. MAIS V, AJOSSA S, GUERRIERO S, et al: Laparoscopic versus abdominal myomectomy: A prospective,randomized trial to evaluate benefi ts in early outcome. Am J Obstet Gynecol 174:654-658, 1996
27. NEZHAT C, NEZHAT F, SILFEN SL, SCHAFFER N, EVANS D: Laparoscopic myomectomy. Int J Fertil 36:275-280, 1991
28. NEZHAT CH, NEZHAT F, ROEMISCH M, et al:Pregnancy following laparoscopic myomectomy:Preliminary results. Hum Reprod 14(5):1219-1221, 1999
29. NEZHAT F, ROEMISCH M, NEZHAT CH, et al:Recurrence rate after laparoscopic myomectomy.J Am Assoc Gynecol Laparosc 5(3):237-240, 1998
30. NEZHAT F, SEIDMAN DS, NEZHAT C, et al: Laparoscopic myomectomy today: Why, when and for whom? Hum Reprod 11(5):933-937, 1996
Recommended Reading

31. NKEMAYIM DC, HAMMADEH ME, HIPPACH M,MINK D, SCHMIDT W: Uterine rupture in pregnancy sub sequent to previous laparoscopic electromyolysis. Case report and review of the literature. Arch Gynecol Obstet. Nov;264(3):154-6, 2000.
32. OSTRZENSKI A.: Uterine leiomyoma particle growing in an abdominal-wall incision after laparoscopic re trieval. Obstet Gynecol. May;89(5 Pt 2):853-4, 1997.
33. OU CS, HARPER A, LIU YH, ROWBOTHAM R:Laparoscopic myomectomy technique. Use ofcolpotomy and the harmonic scalpel. J Reprod Med. Oct;47(10):849-53, 2002.
34. PALOMBA S, PELLICANO M, AFFINITO P, DI CARLO C, ZULLO F, NAPPI C: Effectiveness of short-termadministration of tibolone plus gonadotropin-releasing hormone analogue on the surgical outcome oflaparoscopic myomectomy. Fertil Steril. Feb;75(2):429-33, 2001.
35. PELERME GR, FRIEDMAN EA: Rupture of the gravid uterus in the third trimester. Am J Obstet Gynecol 94:571-576, 1996
36. PELOSI MAIII, PELOSI MA: Spontaneous uterine rupture at thirty-three weeks subsequent to previous superfi ciallaparoscopic myomectomy. Am J Obstet Gynecol 177:1547-1549, 1997
37. RIBEIRO SC, REICH H, ROSENBERG J, GUGLIELMINETTI E, VIDALI A.: Laparoscopicmyomectomy and pregnancy outcome in infertile patients. Fertil Steril. 1999 Mar;71(3):571-4.
38. ROSSETTI A, PACCOSI M, SIZZI O, ZULLI S, MANCUSO S, LANZONE A: Dilute ornitin vasopressin and a myoma drill for laparoscopic myomectomy. J Am AssocGynecol Laparosc. May;6(2):189-93, 1999.
39. ROSSETTI A, SIZZI O, SORANNA L, CUCINELLI F, MANCUSO S, LANZONE A: Long-term results of laparoscopic myomectomy: recurrence rate incomparison with abdominal myomectomy.Hum Reprod. Apr;16(4):770-4, 2001.
40. ROSSETTI A, SIZZI O, SORANNA L, MANCUSO S, LANZONE A: Fertility outcome: long-term results after laparoscopic myomectomy. Gynecol Endocrinol. Apr;15(2):129-34, 2001
41. LANDI S, FIACCAVENTO A, ZACCOLETTI R, BARBIERI F,SYED R, MINELLI L: Pregnancy Outcomes andDeliveries after Laparoscopic Myomectomy. J Am Assoc Gynecol Laparosc 10(2):177–181, 2003
42. S. LANDI, R. ZACCOLETTI, L. FERRARI, L. MINELLI: Laparoscopic Myomectomy: Technique, Complications, and Ultrasound Scan Evaluations. J Am Assoc Gynecol Laparosc 8(2):231–240, 2001
43. SEINERA P, ARISIO R, DECKO A, et al: Laparoscopic myomectomy: Indications, surgical technique and complications. Hum Reprod 12:1927-1930, 1997
44. SEINERA P, GAGLIOTI P, VOLPI E, et al: Ultrasound evaluation of uterine wound healing followinglaparoscopic myomectomy: Preliminary results. Hum Reprod 14(10):2460-2463, 1999
45. SERACCHIOLI R, ROSSI S, GOVONI F, ROSSI E, VENTUROLI S, BULLETTI C, FLAMIGNI C: Fertility and obstetric outcome after laparoscopic myomectomy of large myomata: a randomized comparison withabdominal myomectomy. Hum Reprod. Dec; 15(12): 2663-8, 2000.
46. SORIANO D, DESSOLLE L, PONCELET C, BENIFLA JL, MADELENAT P, DARAI E: Pregnancy outcome after laparoscopic and laparoconverted myomectomy. Eur J Obstet Gynecol Reprod Biol. Jun 10; 108(2):194-8, 2003.
47. STEINAUER J, PRITTS E, JACKSON R, JACOBY A: Systematic review of Mifeprisone for the treatment of uterine myoma. Obstet Gynecol, 10: 1331-6, 2004
48. STRINGER NH, WALKER JC, MEYER PM:Comparison of 49 laparoscopic myomectomies with 49 open myomectomies. J Am Assoc Gynecol Laparosc. Aug; 4(4):457-64, 1997.
49. SWEETEN KM, GRAVES WK, ATHANASSIOU A.:Spontaneous rupture of the unscarred uterus. Am J Obstet Gynecol. Jun;172(6):1851-5, 1995
50. TAKEUCHI H, KINOSHITA K: Evaluation of adhesion formation after laparoscopic myomectomy bysystematic second-look microlaparoscopy. J Am Assoc Gynecol Laparosc 9:442-446, 2002
51. TULANDI T, BEIQUE F, KIMIA M: Pulmonary edema:A complication of local injection of vasopressin atlaparoscopy. Fertil Steril 66:478-480, 1996
52. VILOS GA, DALY LJ, TSE BM: Pregnancy outcome after laparoscopic electromyolisis. J Am Assoc Gynecol Laparosc 5: 289-292, 1998
53. ZIMBRIS L, HEDON B, LAFRARGUE F: Myomectomie par coelioscopie. J Obstet Gynecol 2:219-223, 1994
54. ZULLO F, PALOMBA S, COREA D, PELLICANO M, RUSSO T, FALBO A, BARLETTA E, SARACO P, DOLDO P, ZUPI E: Bupivacaine plus epinephrine for laparoscopic myomectomy: a randomized placebo-controlled trial. Obstet Gynecol. Aug;104(2):243-9, 2004
55. ZULLO F, PELLICANO M, DE STEFANO R, et al: A prospective randomized study to evaluate leuprolide acetate treatment before laparoscopic myomectomy: Effi cacy and ultrasonographic predictors. Am J Obste Gynecol 178:108-112, 1998
Manual of Gynecological Laparoscopic Surgery150

Chapter XIII
Laparoscopic Treatment of Adnexal Masses
Mario Malzoni and Fabio Imperato Malzoni Medical Center “Villa dei Platani”
Avellino, Italy

Manual of Gynecologic Laparoscopic Surgery152
In recent years, minimally invasive laparoscopic surgery has changed the therapeutic management of adnexal masses to such an extent, that it can be considered the standard therapeutic option.
Despite several very promising publications suggesting the increasing diagnostic value of ultrasonography and color Doppler, the preoperative diagnosis of malignant lesions provides too many false-positive results. Laparoscopy is of signifi cant value in the diagnostic assessment of adnexal masses in that it allows for elective biopsy and histopatho-logic evaluation including the option of ovarian tumor removal.
However, the rate of confi rmed malignancy in patients with adnexal masses ranges from 0.3 to 1.2% (Tab. 1) and the publication of case histories describing undetected ovarian cancers treated via laparoscopy has given rise to criticism
of this type of procedure. In fact, accidental rupture of the thin ovarian cyst capsule in patients with missed diagnosis of proven malignancy can involve intraoperative spillage of tumor cells. The objection to laparoscopic surgery for ovarian tumors is based on the hypothesis, that a missed stage IA ovarian cancer could transform into a stage IC tumor (FIGO classifi cation) which would require adjunctive chemo therapy.
However, does the incidence of intraoperative spillage constitute a prognostic risk factor that could adversely affect the patient’s survival? In patients with stage I ovarian cancer, some authors consider that this risk factor is not signifi cant compared to others, e.g., the histological tumor type. According to other authors, spiallage does not seem to adversely affect the patient’s prognosis provided that copious lavage is performed and the patient is treated by surgery within a week of the laparoscopy.
1.0 Introduction
Tab. 1Diagram showing the experience of the authors with laparoscopic management of adnexal masses.
It is very diffi cult to defi ne the limits of laparoscopic surgery. A few authors state that laparoscopic management is indicated only for adnexal masses that present without any signs of malignancy, while for other study groups, this can include ovarian cancer at an early stage. An expert laparoscopist, after diagnosing that the lesion is malignant, could stage the
tumor laparoscopically completely without compromising the extent (Tab. 2).
In our experience, nearly all adnexal masses can be treated laparoscopically. This is because of the method’s dual role: diagnostic and therapeutic.
2.0 Indications
Tab. 2Laparoscopic management of ovarian cancer.
Functional ovarian cysts tend to undergo spontaneous or drug-induced remission (suppressive hormonal therapy) within 8 weeks. Persistence of the cysts is an indication for laparoscopy.
Follicular Cysts
These develop because of accumulation of follicular liquid following distention of a Graafi an follicle. They vary in size up to a diameter of 5–6 cm (< 10 cm) and are unilateral, unilocular and thin-walled. They are characterized by a smooth outer surface, which is translucent and whitish-gray in color (Fig. 1). The contents are lemon yellow in color. The internal surface is smooth and shiny and greyish in color.
Corpus luteum Cysts
These are due to fl uid collection inside the corpus luteum at the end of ovulation (Fig. 2). They are roundish cystic swellings, which rarely exceed 4 cm in diameter. The outer surface is yellowish in color. The serous-hemorrhagic contents vary in color from brownish red, if recent, to serous when they are older. The internal surface is smooth, sometimes with remnants of adherent fi brous blood clots. They nearly always undergo spontaneous regression. In these cases, a corpus albicans cyst can be seen on the surface of the ovary, consisting of fi brous collagen.
2.1 Functional Ovarian Cysts

Manual of Gynecologic Laparoscopic Surgery 153
Fig. 1Functional ovarian cyst.
Fig. 2Corpus luteum.
Serous Cysts
These are the most frequent of all benign ovarian cysts, and are predominantly unilateral and unilocular with thin, smooth walls. Their diameter is usually less than 15 cm. The outer translucent surface is covered with a fi ne vascular network (Fig. 3). The internal surface can appear smooth and shiny (simple cystadenoma) or projecting as papillary structure (papillary cystadenoma). Sometimes, the outer surface also has numerous papillary proliferations (surface papilloma of the ovary). If the serous epithelium has an abundant stromal component, that is, at least a quarter of the tumor mass is solid and fi bromatous, this is called a cystadenofi broma.
Mucinous Cysts
Less frequent than the previous ones, they are usually unilateral, pedunculated and thus very mobile with a diameter that can reach 30–50 cm or even more (giant cystadenomas). They are usually multilocular with cystic cavities of varying sizes, separated by fine fibrous septa, complete and incomplete (Fig. 4). The contents are usually fl uid, mucinous, clear and fi brous.
2.2 Epithelial Cysts
Fig. 3Serous ovarian cyst.
Fig. 4Mucinous ovarian cyst.
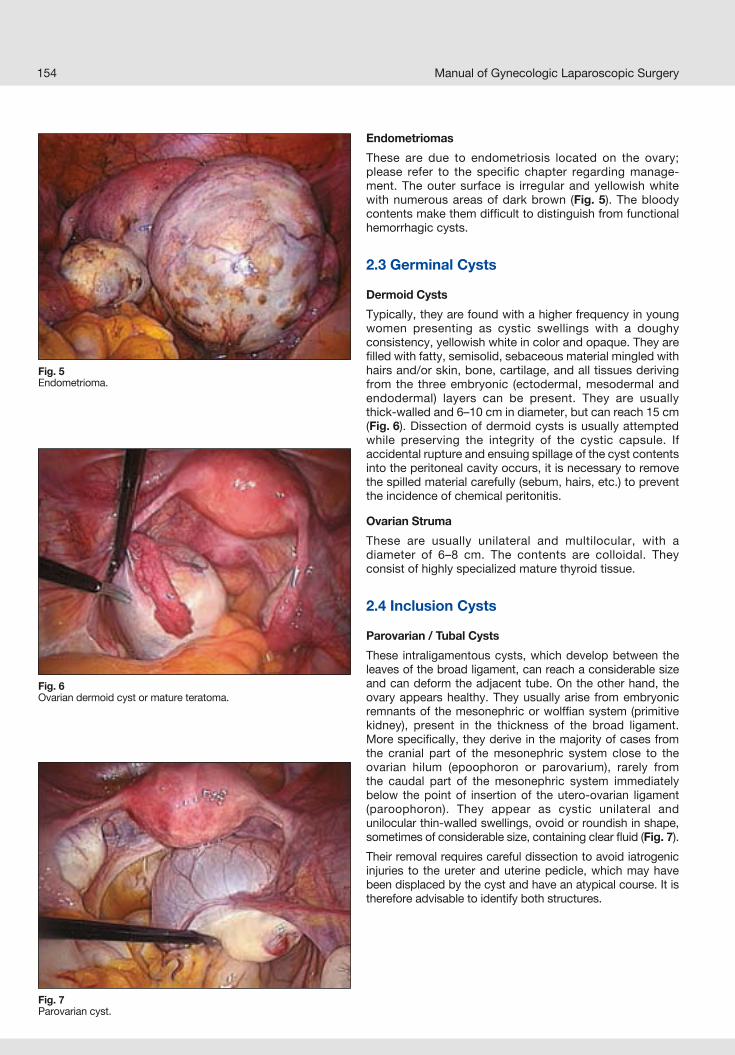
Manual of Gynecologic Laparoscopic Surgery154
Fig. 5Endometrioma.
Fig. 6Ovarian dermoid cyst or mature teratoma.
Fig. 7Parovarian cyst.
Endometriomas
These are due to endometriosis located on the ovary; please refer to the specifi c chapter regarding manage-ment. The outer surface is irregular and yellowish white with numerous areas of dark brown (Fig. 5). The bloody contents make them diffi cult to distinguish from functional hemorrhagic cysts.
2.3 Germinal Cysts
Dermoid Cysts
Typically, they are found with a higher frequency in young women presenting as cystic swellings with a doughy consistency, yellowish white in color and opaque. They are fi lled with fatty, semisolid, sebaceous material mingled with hairs and/or skin, bone, cartilage, and all tissues deriving from the three embryonic (ectodermal, mesodermal and endodermal) layers can be present. They are usually thick-walled and 6–10 cm in diameter, but can reach 15 cm (Fig. 6). Dissection of dermoid cysts is usually attempted while preserving the integrity of the cystic capsule. If accidental rupture and ensuing spillage of the cyst contents into the peritoneal cavity occurs, it is necessary to remove the spilled material carefully (sebum, hairs, etc.) to prevent the incidence of chemical peritonitis.
Ovarian Struma
These are usually unilateral and multilocular, with a diameter of 6–8 cm. The contents are colloidal. They consist of highly specialized mature thyroid tissue.
2.4 Inclusion Cysts
Parovarian / Tubal Cysts
These intraligamentous cysts, which develop between the leaves of the broad ligament, can reach a considerable size and can deform the adjacent tube. On the other hand, the ovary appears healthy. They usually arise from embryonic remnants of the mesonephric or wolffi an system (primitive kidney), present in the thickness of the broad ligament. More specifi cally, they derive in the majority of cases from the cranial part of the mesonephric system close to the ovarian hilum (epoophoron or parovarium), rarely from the caudal part of the mesonephric system immediately below the point of insertion of the utero-ovarian ligament (paroophoron). They appear as cystic unilateral and unilocul ar thin-walled swellings, ovoid or roundish in shape, sometimes of considerable size, containing clear fl uid (Fig. 7).
Their removal requires careful dissection to avoid iatrogenic injuries to the ureter and uterine pedicle, which may have been displaced by the cyst and have an atypical course. It is therefore advisable to identify both structures.

Manual of Gynecologic Laparoscopic Surgery 155
Fig. 8Visualization of the peritoneum to be incised for removal of the paratubal cyst.
The peritoneum is incised with Metzenbaum scissors in anarea distant from the tube (Fig. 8). The margin of the peritoneal incision is grasped with a fi ne grasping forceps and the layer of cleavage between the peritoneum and the cyst is identifi ed. Then, the cyst is dissected bluntly from the loose connective tissue with the scissors by opening and closing the blades.
2.5 Infl ammatory Cysts
Pyosalpinx
This is a collection of purulent exudate in the lumen of the uterine tube due to complete occlusion of its ostium as a result of purulent salpingitis. The tube appears considerably distended, full of a thick creamy exudate that is greenish yellow in color. The tubal wall is usually thickened and closely adherent to adjacent organs.
Hydrosalpinx
This is a collection of serous fl uid in the lumen of the uterine tube because of complete occlusion of its distal ostium as a result of a weak and/or chronic infl ammatory tubal process. The tube appears distended and full of clear fl uid, 2–5 cm in diameter, with a smooth pinkish white surface and thin, transparent walls (Fig. 9). In the presence of hydrosalpinx, the outcomes of reconstructive surgery performed by laparo-scopic approach are not encouraging in terms of pregnancy rate. Therefore, in these cases, an assisted reproduction technology (ART) program is the method of choice. In fact, in the decision-making process, whether or not to refer the patient to an ART program, some authors suggest removing the affected tube as a prophylactic measure, performing salpingectomy (Fig. 10) or alternatively, cauterizing the intra-mural and isthmic tubal portion.
Tubo-Ovarian Abscess (TOA)
The infectious process presents with a collection of purulent exudate involving the tube and nearby ovary as a result of salpingo-oophoritis. It usually originates from chronic and advanced stages of salpingitis. In patients with TOA, the adnexae assume the appearance of a complex mass, in which it is no longer possible to distinguish the two adjacent organs, which is why a single swelling, irregularly elongated and red-brown in color (Fig. 11) is visible at laparoscopy.
Fig. 9Hydrosalpinx.
Fig. 10Left salpingectomy.
Fig. 11Tubo-ovarian abscess.

Manual of Gynecologic Laparoscopic Surgery156
Laparoscopic management of TOA involves aspiration and drainage of all purulent collections of the mass. A sample of the material is sent for bacteriological work-up. Next, the abdominal and pelvic cavities are carefully irrigated with saline. Adhesiolysis is performed to release the reproductive organs from the infl ammatory process. At this point, the case is evaluated clinically and a decision is made on how to proceed. At times, it is suffi cient simply to eliminate the source of infection, but other times an organ-preserving approach is not feasible. In this case, it is mandatory that adnexectomy be performed. Finally, intraperitoneal tube drains are placed.
Ovarian Torsion
Torsion of the adnexa at the site of its pedicle is a surgical emergency. It is more frequently found in an ovary with concomitant cyst formation. In patients with suspected ovarian torsion, and if diagnostic confirmation can be provided promptly, the immediate therapeutic management involves detorsion of the pedicle for restoration of normal anatomical conditions. After surgical detorsion, the ovary is inspected to confi rm that blood fl ow has been re-established and the organ has regained its normal color.
Ovarian Fibroma
This is the most frequent connective-tissue tumor (5%) growing from the ovarian cortex. It affects mainly women over 40 years of age, with a mean of 55 years. Generally unilateral, it appears as a solid or mixed solid-cystic mass and is mobile and sometimes pedunculated. The outer surface can be both smooth and nodular and appears brownish white in color. It is often associated with ascites or ascites and pleural effusion (Demons-Meigs syndrome) which regresses after surgical removal.
Benign Brenner Tumor
This surface epithelial-stromal tumor of transitional cells (resembling urinary bladder epithelium) is of very rare occurrence; it affects mainly women in the fi fth and sixth decade. Usually unilateral, it appears as a solid, hard and encapsulated mass. The outer surface is greyish white in color. Complete surgical excision of the benign Brenner tumor appears to be curative.
2.6 Solid Ovarian Masses
Before a patient undergoes laparoscopic surgical treatment of an adnexal mass, it is necessary to exclude the presence of cancer. Nonetheless, laparoscopic inspection alone of the adnexae often allows the surgeon to make a benign-malig-nant differentiation (Fig. 12).
3.0 Diagnosis
Fig. 12Multilocular ovarian cyst.
The physician must ask the woman about any menstrual irregularities and the presence of any urinary or bowel disturbances.
Pelvic pain is the most frequent symptom although asymp-tomatic patients are not rare. In fact, it is only when the cysts reach a considerable size and produce pain in the ipsilateral iliac fossa that they become apparent and spur the patient to consult a doctor.
Rarely, the pelvic pain can present as an acute abdomen, secondary to rupture of a cyst or ovarian torsion.
3.1 History
Before the procedure, a local physical examination is carried out. The adnexa or adnexae may be tender to both superfi cial and deep palpation. Deep palpation reveals the outline, consistency, increased volume and mobility of the adnexal mass.
Benign Adnexal Mass
It can be considered benign when a unilateral, mobile swell-ing with a smooth surface is found on examination.
Adnexal Mass Suspicious for Malignancy
A fi xed mass with irregular margins, possibly bilateral, raises the suspicion of a malignant ovarian neoplasm.
3.2 Clinical Examination
Transvaginal ultrasound contributes greatly to the preoperativeassessment of an adnexal mass.
Benign Adnexal MassThe ultrasonic characteristics that suggest a benign nature of the lesion include: size < 6 cm, unilocular structure, homo-geneous contents, absence of internal proliferations and
3.3 Transvaginal Ultrasound
In advanced malignant disease, patients complain of abdo-minal distension, swelling, constipation, nausea and anorexia.

Manual of Gynecologic Laparoscopic Surgery 157
septa (possibly thin ones, < 2-3 mm), presence of smooth walls and well-defi ned margins. Dermoid cysts can contain hyperechogenic structures such as bone and cartilage. Hemorrhagic cysts can contain internal echoes of variable intensity, both focal and diffuse.
Adnexal Mass Suspicious for Malignancy
The presence of bilateral masses with irregular margins, multiple thick intracyst septa (> 4 mm), papillary projections, solid areas and the presence of ascites raise the suspicion of a malignant ovarian neoplasm.
3.4 Color Doppler Recently, use of color Doppler has made it possible to visualize the vascular patterns of adnexal masses based on the pathophysiological reasoning that malignant tumors are characterized by rapid growth and contain new vessels. The muscle layer of the walls of these vessels is reduced so resistance to blood flow is low. Quantification of the blood fl ow impedance and the presence, distribution and architecture of neovascularization inside the adnexal mass can be utilized in the differential diagnosis of these lesions. However, color Doppler studies can give false-negative results due, for example, to areas of avascular necrosis in malignant tumors. Conversely, complex adnexal masses with a solid and vascularized part (dermoid cysts, Brenner tumors) can give false-positive results.
Benign Adnexal Mass
Benign lesions tend to be less vascularized, with isolated vessels, mainly located peripherally, which have an increased blood fl ow impedance (RI >0.55).
Adnexal Mass Suspicious for Malignancy
A lesion can be considered malignant when there is a new vasculature network centrally at the level of the septa, and proliferations, arranged anarchically and abnormal in form (dilated vessels, arteriovenous shunts) with reduced fl ow impedance (RI <0.45).
Prior to the surgical procedure, specifi c tumor markers should be measured: CEA, CA 19-9, CA 125, aFP. Because of their low specifi city and sensitivity, the tumor markers may only be used as an adjunct measure for predictive purposes that can help to differentiate benign from malignant adnexal masses.
The most widely available tumor marker test is measurement of CA 125. Levels greater than 35 U/ml are arbitrarily regarded as positive. However, specifi city is lower in women of child-bearing age, since some adnexal or peritoneal conditions (PID, endometriosis) and menstruation increase the levels.
3.5 Tumor Markers
3.6 CT and MRI
Adjunctive imaging modalities are often used in an attempt to improve diagnosis. However, measurement of CA 125 serum levels, transvaginal ultrasound and color Doppler have an acceptable sensitivity and specifi city, so that additional
instrumental investigations are not necessary. Sometimes, MRI is indicated to assess tumor infi ltration and abdomino-pelvic CT for lymph node assessment.
3.7 Intra-operative Assessment
Laparoscopic findings suspicious for malignancy are papillary and/or solid lesions on the outer surface of the
ovary (Fig. 13) and the presence of suspicious peritoneal implants (Fig. 14).
Fig. 13Laparoscopic appearance of ovarian cancer on intra-operative inspection.
Fig. 14Peritoneal implants suspicious for malignancy.

Manual of Gynecologic Laparoscopic Surgery158
Faced with this type of disease, the choice must not be between laparoscopy and laparotomy but between conser-vative and non-conservative treatment. Surgical therapy must thus be tailored to the individual case, applying the basic principle of preserving as much ovarian tissue as possible.
The advantages of laparoscopy are obvious when applied to establish a differential diagnosis in terms of the benign/malig-nant nature of the adnexal mass. In young women who wish to preserve their fertility, laparoscopy allows intraoperative biopsies to be taken from the ovarian surface without causing rupture of the cyst. The histologic al result will decide the defi nite surgical therapy.
In the presence of a suspicious adnexal mass, intraopera-tive laparoscopic assessment may assist in choosing the type of abdominal incision, which should extend from the xiphoid process to the pubic symphysis in the presence of a malignant neoplasm. Both accurate tumor staging and debulking surgery (Tab. 3) require a midline incision. , this pathology should be treated only in tertiary centers where oncologic surgery is performed as a matter of routine, and where adequate treatment can be ensured. In fact, two thirds
of ovarian cancers are stage III and IV when diagnosed and require conversion to laparotomy to allow adequate debulking.
4.0 Surgical Therapy
Tab. 3Surgical management of ovarian cancer.
Fig. 15Prophylactic aspiration of a giant ovarian cyst.
Fig. 16Grasping the ovarian ligament with an endoclinch forceps and exposure of the antimesenteric margin.
4.1 Aspiration
General Principles
Simple puncture and aspiration of the cyst should be avoided since this is associated with an increase in recurrence rate. Aspiration is re commended only for dysfunctional cysts.
Aspiration is often performed prior to cystectomy. En-bloc enucleation of an endometrioma, a mucinous cyst or ovarian lesion larger than 10 cm is very diffi cult to manage laparoscopically. Under the aforementioned conditions, it is preferable to perform controlled prophylactic aspiration rather than risk accidental spillage of the cyst contents due
to rupture, which occurs frequently (Fig. 15). Above all, cyst aspiration facilitates cystectomy by reducing the tension of the cyst and allows inspection of its internal walls.
The suction cannula is introduced directly into the cyst on the antimesenteric side after immobilizing the ovary, grasping the ovarian ligament with an endoclinch grasping forceps (Fig. 16). It is sometimes suffi cient to compress the ovary against the uterus. After removing the cyst contents with a suction cannula, the cyst cavity is lavaged. It is then possible to introduce the laparoscope through the opening to assess the inner surface.
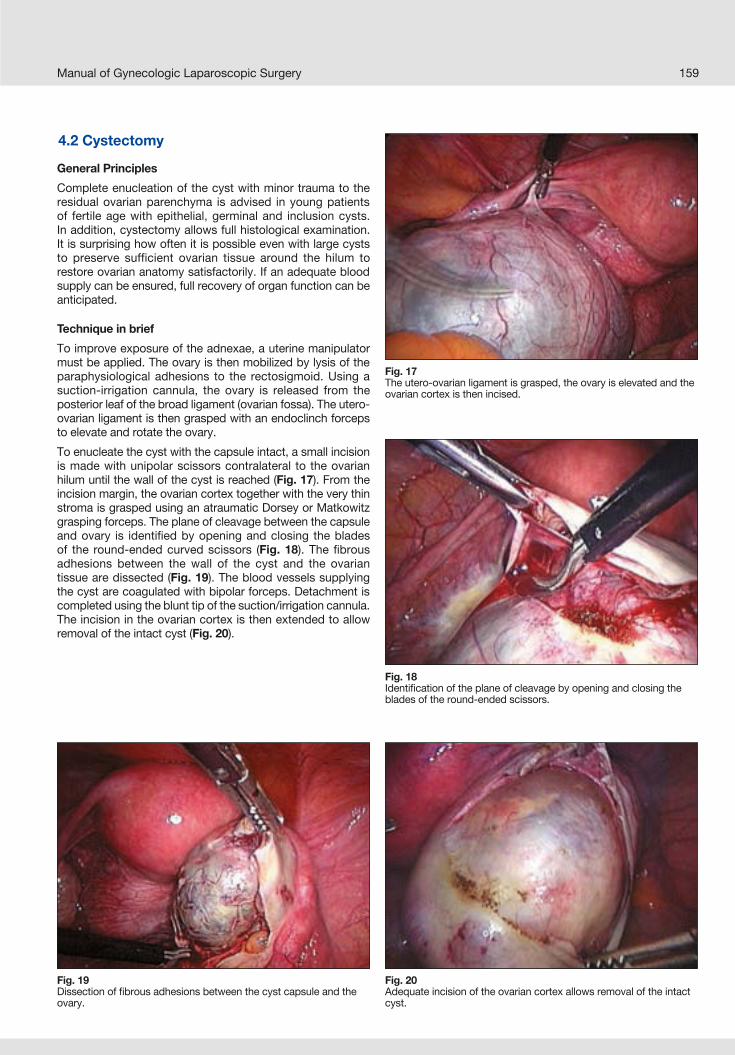
Manual of Gynecologic Laparoscopic Surgery 159
Fig. 17The utero-ovarian ligament is grasped, the ovary is elevated and the ovarian cortex is then incised.
Fig. 18Identifi cation of the plane of cleavage by opening and closing the blades of the round-ended scissors.
General Principles
Complete enucleation of the cyst with minor trauma to the residual ovarian parenchyma is advised in young patients of fertile age with epithelial, germinal and inclusion cysts. In addition, cystectomy allows full histological examination. It is surprising how often it is possible even with large cysts to preserve sufficient ovarian tissue around the hilum to restore ovarian anatomy satisfactorily. If an adequate blood supply can be ensured, full recovery of organ function can be anticipated.
Technique in brief
To improve exposure of the adnexae, a uterine manipulator must be applied. The ovary is then mobilized by lysis of the paraphysiological adhesions to the rectosigmoid. Using a suction-irrigation cannula, the ovary is released from the posterior leaf of the broad ligament (ovarian fossa). The utero-ovarian ligament is then grasped with an endoclinch forceps to elevate and rotate the ovary.
To enucleate the cyst with the capsule intact, a small incision is made with unipolar scissors contralateral to the ovarian hilum until the wall of the cyst is reached (Fig. 17). From the incision margin, the ovarian cortex together with the very thin stroma is grasped using an atraumatic Dorsey or Matkowitz grasping forceps. The plane of cleavage between the capsule and ovary is identifi ed by opening and closing the blades of the round-ended curved scissors (Fig. 18). The fi brous adhesions between the wall of the cyst and the ovarian tissue are dissected (Fig. 19). The blood vessels supplying the cyst are coagulated with bipolar forceps. Detachment is completed using the blunt tip of the suction/irrigation cannula. The incision in the ovarian cortex is then extended to allow removal of the intact cyst (Fig. 20).
4.2 Cystectomy
Fig. 19Dissection of fi brous adhesions between the cyst capsule and the ovary.
Fig. 20Adequate incision of the ovarian cortex allows removal of the intact cyst.

Manual of Gynecologic Laparoscopic Surgery160
Fig. 21Identifi cation of the proper cleavage plane for enucleation of the endometrioma.
Fig. 22Cystectomy with the stripping technique.
Fig. 23Hemostasis of the ovarian bed using a bipolar coagulation electrode.
Fig. 24Overlapping ovarian margins.
In other cases (endometrioma, mucinous cyst), enucleation of the cyst is preceded by “controlled prophylactic aspiration” of the cyst contents. After this step, it is useful to incise the cyst capsule and ovarian cortex with cold scissors. Two atraumatic grasping forceps are used to exert traction and countertraction to the incision margins. In this way it is possible to discriminate the proper cleavage plane located between the aforementioned structures (Fig. 21). The cyst capsule is then detached from the ovarian parenchyma by stripping (Fig. 22). This part of the operation is performed with the aid of two instruments, a Manhes forceps for a deep fi rm grip of the cyst and a toothed atraumatic forceps for the ovarian tissue, which must not be damaged. Hemostasis of the ovarian bed is obtained with a bipolar coagulation electrode (Fig. 23).
Protruding ovarian tissue is coagulated with bipolar forceps to invert the margins of the cortex and reduce the potential risk of adhesion formation. If the ovarian margins overlap, this is usually left to heal by primary intention without the need for suturing so that it closes spontaneously. In this way, the incidence of postoperative adhesions can be limited (Fig. 24). If the ovarian cortex does not tend to reapproximate spontaneously, one or two absorbable monofi lament sutures can be placed to reconstruct the cortex. The sutures are transfi xed and tied inside the ovary.
This is followed by repeated irrigation with saline for full peritoneal toilet.

Manual of Gynecologic Laparoscopic Surgery 161
General Principles
Adnexectomy is reserved for postmenopausal patients. In addition, the decision to remove the tube together with the ovary is indicated where the tube is also infi ltrated by the pathology. However, removal of the entire adnexa is frequently performed because it is easier.
Technique in brief
The adnexa is elevated with a certain degree of traction. This avoids accidental injury to the lateral walls of the pelvis and to the underlying retroperitoneal structures.
The course of the ureter should always be identifi ed. The ovarian vessels and common iliac vessels cross the ureter at its junction with the superior pelvic aperture. Descending in the pelvis, it runs inside the broad ligament just beside the uterosacral ligament. If it is not possible to identify the ureter clearly through the peritoneum, it is necessary to incise the peritoneum to access the retroperitoneal space and expose it (Fig. 25).
The next step involves fenestration of the posterior leaf of the broad ligament to mobilize the ureter away from the infundibulo-pelvic ligament. Next, the infundibulo-pelvic ligament is coagulated with the aid of bipolar forceps and transected by use of a cold knife. This can be accomplished more effectively if preceded by adequate vascular pedicle skeletonization (Fig. 26). The utero-ovarian ligament and the tubal isthmus are then coagulated and divided (Fig. 27).
The uterine vascular pedicles should always be inspected at the end of surgery as they can bleed when the hemostatic effect of positive intra-abdominal pressure has subsided.
4.3 Oophorectomy
General Principles
Oophorectomy is indicated in young patients only if a conservative approach is not feasible due to insufficient residual ovarian tissue.
Technique in brief
After mobilizing the ovary, the ovarian pedicle is first coa gulated and then divided. To achieve coagulation of larger vascular pedicles, it is preferable to use bipolar forceps with adequately wide jaws. The mesovarium and meso salpinx are then coagulated and divided starting at the uterine side and proceeding toward the fi mbrial tubal portion. The tube, which should be preserved, must be protected from iatrogenic injury.
Fig. 25Exposure of the ureter.
Fig. 26Skeletonization of the infundibulo-pelvic ligament.
Fig. 27Left adnexectomy.
4.4 Adnexectomy

Manual of Gynecologic Laparoscopic Surgery162
The standard approach in the laparoscopic management of suspicious adnexal masses includes cytology testing of peritoneal fl uid, inspection of the abdominal and pelvic cavity combined with peritoneal biopsy, adnexectomy avoiding-rupture of the capsule, extraction of the operative specimen with the aid of an endobag without morcellation of solid areas, and frozen section.
General Principles
To distinguish benign from malignant lesions, cytology testing of the peritoneal fl uid is performed. The cytolgoy samples of peritoneal fl uid are taken with a suction needle attached to a syringe at the start of the procedure when the peritoneal fl uid is free from blood. If the peritoneal fl uid is insuffi cient, washing is performed, that is, the pelvis and abdomen are irrigated with saline (Fig. 28).
Fig. 28Intraperitoneal washing for cytology testing.
5.0 Guidelines for the Managementof Suspicious Adnexal Masses
5.1 Cytology Testing
General principles
Inspection of the abdominal and pelvic cavity (Fig. 29) to look for neoplastic lesions is completed with peritoneal biopsy of suspicious areas. When the peritoneal cavity appears normal (diaphragm, liver, intestine, omentum, peritoneum) random biopsies must be taken. On the other hand, if areas suspicious for malignant neoplastic lesions are detected (Fig. 30), the diagnosis of ovarian carcinoma stage III can be made. The procedure is converted immediately to laparotomy.
Technique in brief
The suspicious peritoneal area is grasped with forceps to obtain a suffi cient amount for histological assessment. When this fold of tissue has been grasped, the peritoneal margin is incised. This gives access to the retroperitoneal space, which is dissected bluntly. Bleeding ceases spontan eously or can be controlled with bipolar coagulation.
5.2 Inspection of the Peritoneal Cavityand Biopsy Sampling
Fig. 29Inspection of the peritoneal cavity.
Fig. 30Neoplastic lesions suspected for malignancy.

Manual of Gynecologic Laparoscopic Surgery 163
General Principles
In patients with ovarian tumors, even of low malignancy, extraction of the operative specimen can favor the dissemi-nation of malignant cells, particularly implantation at the point of trocar insertion. To reduce this risk, endoscopic bags are used with the aim of protecting the abdominal wall (Fig. 31). During extraction of the specimen, morcellation to reduce the size of the solid tissue and facilitate the maneuver is not advisable because of the increased risk of dissemination of malignant cells. It follows that in the presence of suspicious adnexal masses with a diameter greater than about 7–8 cm, the laparoscopic approach is contra indicated. However, despite the use of these two precautions, cases of metastasis at the point of trocar insertion have been described (port-site recurrences, PSR).
Technique in brief
To introduce the endobag, the accessory trocar (6 mm) is removed, the accessory skin incision is extended to 10 mm and the bag cannula is introduced through the parietal port. After placing the extracted material in the bag, the edges of the endobag are pulled outside the wall and clamped with two Klemmer forceps. To allow passage of the bag with its contents through the abdominal wall, it is sometimes necessary to aspirate the cyst contents.
Frozen Section
Frozen section has been reintroduced by laparoscopist to reduce the incidence of unnecessary conversions.
However, frozen section diagnosis of ovarian tumors is diffi cult and has a false-negative rate of 5%, with the majority due to inadequate sampling by the surgeon or pathologist. Thus, in the presence of a laparoscopically suspicious
ovarian lesion, frozen section should not be included in the criteria used for setting up the individual therapeutic stra tegy, whether conservative or ablative. In these cases, it is preferable to perform adnexectomy and thereby prevent the risk of neoplastic dissemination because of a false-negative frozen section result. Young patients with an adnexal mass with a small solitary lesion are an exception; these can be biopsied.
On the other hand, biopsy with frozen section is essential in re-staging and avoids reoperation which is poorly acceptable for the patient.
Where frozen section is not available, any ovarian lesion suspected for malignancy at laparoscopy, must be removed intact by adnexectomy. The type of subsequent treatment will be decided after surgery.
5.3 Endobag
Fig. 31Laparoscopic extraction bag.

Manual of Gynecologic Laparoscopic Surgery164

Chapter XIV
Laparoscopic Management of Borderline Ovarian Tumors
Paulo Ayroza and Elizabet AbdallaDepartment of Gynecology and Obstetrics,
Medical School of the Santa Casa University ofSão Paulo, Brazil

Manual of Gynecologic Laparoscopic Surgery166
Among all gynecologic diseases, the topic of ovarian tumors is perhaps one of the most controversial with regard to diagnosis, classification, and treatment modalities. Undoubtedly, this reflects the great significance of this disease among female patients. Whether benign or not, all ovarian tumors must be examined thoroughly. Functional cysts may regress within months, whether or not any medication is used. On the other hand, nonfunctional tumors tend to persist and require an accurate workup.
Since the advent of the laparoscopic technique many years ago, we have been able to identify benign cysts and subsequently treat them laparoscopically. Today, it is even possible to manage by laparoscopy some ovarian malignancies that required laparotomy until a few years back.
Nevertheless, it is not at all unusual to fi nd statements of authors in the literature advising against laparoscopic treatment of benign ovarian cysts such as endometriomas and dermoid cysts.
There are numerous reports in the literature justifying the use of laparoscopy as a diagnostic and therapeutic tool for benign ovarian tumors. In the authors’ group, use a routine diagnostic protocol is used, which requires that all patients with ovarian tumors are submitted to clinical and laboratory work-up (clinical examination, transvaginal ultrasound, and serum marker levels), followed by laparoscopy.
1.0 Introduction
Fig. 1Bilateral ovarian endometriotic cysts.
Fig. 3Large ovarian cyst and uterine myomas.
Fig. 4Functional ovarian cyst.
Fig. 2Ovarian endometriotic cyst.

Manual of Gynecologic Laparoscopic Surgery 167
During the laparoscopic procedure, we recommend that a strict protocol for the pelvic examination be observed to ensure the highest level of security. The laparoscopic appearance of ovarian cysts can be highly variable depending on their nature (endometriosis, functional, teratoma, etc.), which is why visual inspection plays a vital role in establishing a defi nitive diagnosis and differentiating between malignant or borderline lesions (Figs. 1–8).
Our routine use of this protocol over the past 15 years has resulted in a false-negative rate of 0.5%. This means, that in 99.5% of patients, the result of our clinical investigation proved to be correct. The method of laparoscopic visualization of ovarian cysts in conjunction with intraoperative histological
examination has demonstrated to be effective in the detection of all ovarian malignancies.
Laparoscopic surgery has shown to be a safe and helpful modality for both ovarian cystectomy and oophorectomy or adnexectomy in that it provides all benefi ts of mini mally invasive surgery while at the same time preserving patient safety and fertility.
Which steps should be taken when ovarian malignancies or borderline tumors are detected is more controversial. The main question is whether these tumors may be treated laparoscopically. In this chapter, we will discuss only borderline ovarian tumors.
Fig. 5Solid ovarian cyst.
Fig. 7Surface proliferations of an ovarian borderline tumor.
Fig. 8Surface proliferations of an ovarian borderline tumor.
Fig. 6Bilateral ovarian teratoma.

Manual of Gynecologic Laparoscopic Surgery168
“Our goal is to perform laparoscopically a good oncologic procedure”Paulo Ayroza Ribeiro
Borderline ovarian tumors are a subset of epithelial ovarian tumors, which have a very favorable prognosis. The univer-sally accepted treatment is surgical removal of the tumor and histological examination. However, the postoperative management protocol is highly controversial. To date, no medical therapy has been shown to clearly improve outcomes.
In 1929, Taylor fi rst described a subset of ovarian tumors that he termed semi-malignant. Although these lesions had a more favorable prognosis than other ovarian cancers, it was not until the early 1970s that they were classifi ed separately as borderline tumors.
One woman in 55 (1.8%) develops some form of ovarian cancer in her lifetime. Approximately 90% of these cancers are tumors of epithelial origin. If benign lesions are included, epithelial tumors account for 60% of all ovarian tumors.
Borderline tumors account for approximately 15% of all epithelial ovarian tumors. The mean age of occurrence is approximately 10 years below that of women with ovarian cancer of distinctly malignant nature. Predisposing factors believed to be associated with borderline tumors include oral contraceptive use, menarche, age at fi rst pregnancy, age at fi rst delivery, menstrual history, smoking and family history of ovarian cancer. None of these factors, however, has been shown to be statistically signifi cant.
Borderline ovarian cancer is staged according to the FIGO classifi cation of ovarian cancer. Many clinicians combine stages II to IV when assessing prognosis. Another common component of staging is the description of the type of implants as these have signifi cant prognostic value.
2.0 Borderline Ovarian Tumors (Tumors of Low Malignant Potential)
Fig. 9Ovarian borderline lesion.
Fig. 10Borderline tumor of cerebroid appearance.
Fig. 11Multilobulated borderline ovarian cyst.
Fig. 12Removal of a borderline tumor: coagulation of the mesovarium with a bipolar instrument.

Manual of Gynecologic Laparoscopic Surgery 169
Fig. 13Removal of a borderline tumor: division of the mesovarium.
Fig. 16Exposure and double ligature of the appendix before dividing it.
Fig. 14Removal of borderline tumor: transection of the round ligament and tube.
Fig. 15Exposure of the appendix.
In contrast to epithelial ovarian carcinoma, its true malignant counterpart, borderline ovarian tumors are often detected at an early stage, and this is probably one of the factors that encourage the clinician to opt for conservative treatment and also to use laparoscopy as a therapeutic tool.
The etiology of the disease remains unclear because of the small number of cases and the lack of randomized controlled studies. The two major histologic tumor subtypes are serous and mucinous, with the serous subtype being more common. Other far less common tumors include clear cell and endo-metrioid forms. Serous tumors are presumed to originate from the germinal epithelium. Mucinous tumors do not have a clearly defi ned origin. Many authors consider that borderline tumors occupy an intermediate position between their benign and frankly malignant counterparts.
These tumors, like other ovarian tumors, are difficult to detect clinically until they are advanced in size or stage. The most common presenting symptoms are abdominal pain, abdominal distension and the presence of an abdomin al mass. Approximately 23% of patients are completely asymp-tomatic.
Surgery is always indicated when a complex ovarian mass is discovered, except in special cases when the patient has clinical contraindications to surgery. Preoperative diagnosis of borderline tumors is extremely rare, if not impossible, and they are nearly always believed to be benign or malignant ovarian masses. The use of laparoscopy as an early diagnostic tool is particularly re commended as it allows differential diagnosis between benign, malignant and borderline tumors (Figs. 9–11).
As mentioned above, preoperative diagnosis is very diffi cult, if not impossible. Measurement of certain parameters, such as cancer antigen 125 (CA125) is of little diagnostic value as they are not specifi c for borderline tumors. Imaging studies using transvaginal color Doppler ultrasound have been suggested to assess the malignant potential of ovarian masses. The detection rate from intratumoral blood fl ow characteristics in borderline tumors is similar to that of malignant neoplasms,

Manual of Gynecologic Laparoscopic Surgery170
Fig. 18Removal of borderline tumor: extraction in plastic bag.
Fig. 19Invasive peritoneal implants.
i.e. 90% and 92%, respectively. Doppler indices, such as the resistance (RI) and pulsatility indices (PI) are also signifi cantly reduced in carcinoma and borderline ovarian tumors as compared to benign tumors. While useful in some situations, this modality is not currently part of the standard work-up. In terms of specifi ty and sensitivity its diagnostic value is not suffi cient, i.e., it cannot be recommended as a screening tool in the normal patient population. CT scanning and MRI studies may be also useful in the pre-operative work-up.As with other malignant neoplasms, staging is performed surgically. Many sources recommend complete staging if a borderline tumor is found. Current guidelines include biopsy specimens of the pelvic peritoneum (pouch of Doug-las, pelvic wall and bladder peritoneum) and abdominal peritoneum (paracolic gutters and diaphragmatic surfaces). Some authors also suggest biopsy of the omentum, intestinal serosa and mesentery, and retroperitoneal lymph nodes (pelvic and para-aortic).The histologic appearance of borderline tumors is quite complex because it is not always easy to differentiate them
from benign lesions. The number of cell layers, percentage of mitoses and nuclear atypia are the criteria which are used to defi ne these tumors. Approximately 25% of borderline tumors have cell proliferations on the outer surface of the lesion, with no evidence of growth from the inner surface. Of these, approximately 90% develop peritoneal implants. Only 4% of cases with peritoneal implants do not have surface proliferation. Peritoneal implants are described as invasive or noninvasive. Noninvasive implants are glandular or papillary proliferations with cell detachments.
As regards surgical treatment, complete excision of the lesion must be achieved if at all possible. Secondary procedures, such as appendectomy, can be performed at the same surgery (Figs. 12–19). Comprehensive staging, as described above, should be a part of every operation of this type. Even though the stage may or may not affect future treatment, it is of signifi cant prognostic value and, therefore, is of high relevance for both clinician and patient. In 77% of patients with invasive peritoneal implants, noninvasive implants are also found. Surgical excision and full staging decrease the risk of biopsy error, which could result in an inaccurate diagnosis and prognosis. Some authors have concluded that fertility-preserving surgery can be offered to patients with stage IA disease with serous or mucinous tumors.
The optimal treatment of early-stage borderline ovarian tumors is controversial. Only a few randomized trials evaluating adjuvant treatment for this disease have been published. A Norwegian study concluded that stage I borderline tumors should not receive any adjuvant treatment.
Surgical laparoscopy can be used in cases where the tumor is limited to the ovary without any sign of dissemination. In the past, various authors maintained that laparoscopic management of borderline ovarian tumors should be reserved for early-stage disease but that this was associated with a high risk of recurrence, especially due to an increased rate of cyst rupture with possible dissemination of potentially neoplastic cells.
Fig. 17Removal of borderline tumor: the operating fi eld at the end of the surgery.

Manual of Gynecologic Laparoscopic Surgery 171
In a recent study, a French group stated that conservative treatment and cyst rupture occurred more frequently in the laparoscopy group than in the laparotomy groups. Staging was incomplete more often in the laparoscopy group than in the laparoconversion and laparotomy groups. They concluded that the laparoscopic management of borderline ovarian tumors is associated with a higher rate of cyst rupture and incomplete staging. It is known that recurrence is more frequent after conservative treatment or incomplete initial staging, whatever the surgical approach.
This study emphasizes the importance of FIGO staging in borderline tumors. The majority of laparoscopic surgeons are more conservative by nature and have a background in infertility, and this may have a negative infl uence on the quality and radicality of surgery. In the case of borderline tumors, the surgeon must combine accurate knowledge of oncologic aspects with the reproductive concepts of fertility preservation. Bearing this in mind, it will be possible to offer all the benefi ts of laparoscopic surgery even in the area of oncology.
As stated by our authors, surgeons still can provide repro-ductive surgery solutions for these patients. Conservative laparoscopic management of borderline ovarian tumors is a potentially safe alternative for young women who want to retain their fertility potential. Fertility and pregnancy outcomes remain excellent in these women. Preliminary data suggest, that the recurrence rate following pregnancy was not infl uenced by this approach.
An important contribution to this topic was also offered by an Italian group suggesting that the laparoscopic management of borderline ovarian tumors should be reserved for masses not greater than 5 cm. When conservative therapy is desired, they recommend removal of the entire affected ovary. Furthermore, they suggest that if the neoplasia is bilateral, cystectomy could be allowed in women who wish to preserve fertility, although they are at high risk of recurrence.
One of the most important complications of laparoscopic surgery in oncologic situations is port-site metastasis. In a recent study, the authors concluded that unlike port-site metastasis in other gynecologic malignancies, the prognos is in patients with a port-site implant after laparoscopic management of borderline ovarian tumors is excellent. The treatment of this complication is surgical resection.
It is important to emphasize that independent of the technique employed in these cases, suspicious ovarian cysts should never be punctured. Extreme care must be taken to
remove the tumor without any rupture. In these situations we recommend the use of plastic extraction bags when removing the cysts to prevent any spillage into the peritoneal cavity or port site. Furthermore, in some instances, we perform enucleation of the entire tumor inside the bag.
Some groups maintain that conservative surgery remains a therapeutic option in selected patients with borderline ovarian tumors. Even if the rate of new lesions/recurrence is relatively high with laparoscopy, especially in patients treated with simple ovarian cystectomy, mortality from cancer remains low. Many patients are able to conceive and carry a normal pregnancy to term after conservative surgery.
In most instances, laparoscopic surgery is curative for patients with stage I disease. If the tumor is unilateral and there is still some healthy ovarian tissue, unilateral cystectomy can be performed with preservation of the healthy part of the ovary; however, inspection of the cyst capsule for signs of rupture should be performed before resection. If it is not feasible to preserve healthy ovarian tissue, oophorectomy or salpingo-oophorectomy should be performed.
Because of the possible association between borderline ovarian tumors and peritoneal implants, the peritoneum should be explored carefully. Peritoneal assessment must be must be performed with great care. Any suspicious peritoneal lesion detected at laparoscopy, should be biopsied for histology (invasive or noninvasive) and then removed surgically. The histological type is of signifi cant prognostic value.
Most of the complications of this disease are caused by the operation itself, adjunctive therapy and by recurrence.
From the results in the literature, it is apparent that it is diffi cult to give an accurate prognosis for an individual patient without full surgical staging. In one study of stage I disease, all recurrences occurred in patients who were inadequately staged. Many, if not all, of these patients probably did not actually have stage I disease.
Pathologic diagnosis is diffi cult to confi rm by frozen section. Borderline tumors are correctly diagnosed by frozen section in 58–86% of cases, depending on the experience of the pathologist. In one very large study, frozen section indicated probable malignancy in 94% of cases subsequently diagnosed as borderline tumors. Thus, the proper operation and staging procedures should have been performed during the initial surgery in most cases, even though diagnosis by frozen section was not completely accurate.

Manual of Gynecologic Laparoscopic Surgery172
1. ATALLAH D, MORICE P, CAMATTE S, et al: Place et résultats de l’examen extemporané dans la stratégie chirurgicale des tumeurs épithéliales malignes et à la limite de la malignité de l’ovaire. Gynecol Obstet Fertil 2004; 32 651-6, 2004
2. CHARLES L, ALGARA A, RAMÍREZ P, FLORES C: Manejo Laparoscopico del Tumor Ovarico Limitrofe (Borderline). Analisis de la Literatura y Presentacion de un Caso. Ginecol Obstret Mex 2001; 69: 355-358
3. DARAI E, TEBOUL J, FAUCONNIER A, SCOAZEC JY, et al: Management and outcome of borderlineovarian tumors incidentally discovered at or after laparo scopy. Acta Obstet Gynecol Scand 1998; 77: 451-7
4. FAUVET R, BOCCARA J, DUFOURNET C, PONCELET C, et al.: Laparoscopic management of borderlineovarian tumors: results of a French multicenter study.Ann Oncol 2005; 16: 403-10
5. GREEN AE, SOGOR L: Borderline Ovarian Tumore-medicine.com
6. KOERN J, TROPE CG, ABELER VM: A retrospective study of 370 borderline tumors of the ovary treated at the Norwegian Radium Hospital from 1970 to 1982. Cancer 1993; 71: 1810-1820
7. MANEO A, VIGNALI M, CHIARI S, COLOMBO A, et al: Are borderline tumors of the ovary safely treated by laparoscopy? Gynecol Oncol 2004; 94: 387-92
8. MORICE P, CAMATTE S, LARREGAIN-FOURNIER D, THOURY A, et al: Port-Site implantation afterlaparoscopic treatment of borderline ovarian tumors. Obstet & Gynecol 2004; 104: 1167-1170
9. MORRIS RT, GERSHENSON DM, SILVA EG, FOLLEN M, et al: Outcome and reproductive function after conservative surgery for borderline ovarian tumors. Obstet & Gynecol 2000; 95: 541-547
10. TROPE C, KAERN J, VERGOTE IB, et al.Are borderline tumors of the ovary overtreated both surgically and systematically? A review of fourprospective randomized trials including 253 patients with borderline tumors. Gynecol Oncol 1993; 51:236-243,
11. SERACCHIOLI R, VENTUROLI S, COLOMBO FM, GOVONI F, et al: Fertility and tumor recurrence rate after conservative laparoscopic management of young women with early-stage borderline ovarian tumors. Fertil Steril 2001; 76: 999-1004
Recommended Reading

Chapter XV
Laparoscopic Hysterectomy
Arnaud WattiezStrasbourg University Hospital
Strasbourg, France

Manual of Gynecological Laparoscopic Surgery174
Hysterectomy is currently the most frequently practised surgery not related to pregnancy in women. In the United States alone about 600,000 operations are carried out per year.
Historically, the fi rst surgical approach for hysterectomy was abdominal, carried out in 1843 by Charles Clay in Manchester, England. The alternative to the abdominal route has always been the vaginal route: the fi rst vaginal hysterectomy was reported by Soranus of Ephesus in 120 BC. Apart from this historical curiosity, the vaginal approach has certainly always been the route of choice, if possible with abdominal hysterec-tomy being the alternative when the vaginal approach proves not feasible.
This surgical approach remained unchanged until 1988 when Harry Reich, in Kingston, carried out the fi rst laparoscopic hysterectomy. The fi rst procedure described was laparos-copic assisted vaginal hysterectomy (LAVH), followed by supracervical laparoscopic subtotal hysterectomy (SLH) and fi nally total laparoscopic hysterectomy (TLH). Over recent years various types of instruments have been produced to facilitate TLH, in particular the uterine manipulator, which we introduced in 1995.
Today, there are many indications for laparoscopic hysterec-tomy. In benign conditions, it has major advantages, for example in uterine fibromatosis and in the treatment of genital prolapse, as the fi rst stage of promontory fi xation. Malignant conditions now also benefi t from the laparoscopic approach, particularly endometrial cancer and, in the hands of an experienced surgeon, cancer of the uterine cervix.
Nevertheless, even today in the United States, only 10–15% of hysterectomies are carried out by laparoscopy, and most are only laparoscopic-assisted vaginal hysterec tomies (LAVH). The ACOG (American College of Obstetrics and Gynecology) indications state that, in order to choose the approach, the anatomy of the patient and the surgeon’s experience of the different techniques must be considered. Indeed, most surgeons still prefer the laparoscopic-assisted approach to a totally laparoscopic technique. However,
there has been a significant increase in the numbers of laparoscopic hysterectomies over the past ten years; in the United States the percentage was 0.3% in 1990 and 9.9% in 1997. Some authors report a high rate of complications during laparoscopic hysterectomy: 5.8%–11.5% for all complications taken together and a rate of 2.2%–2.7% for major complications. These statistics have led certain schools of surgery to limit strictly the indication for the laparoscopic approach in hysterec tomy. The fi gures are often distorted by incorrectly selecting patients who are obese or have a large uterus; moreover, the experience of the surgeon is of funda-mental importance, particularly during the learning period. More recent studies have shown that after a period of training of about thirty hysterectomies, the rate of complications is equivalent to that using other approaches. The average duration of surgery is also comparable to that required for the vaginal route in the hands of an expert surgeon.
It is true to say, that nowadays there is no major contra-indication to the laparoscopic approach in hysterectomy, not even the dimensions of the uterus; indeed, provided proper application of the technique, successful laparoscopic hysterec tomy of a very bulky uterus is possible using different types of morcellators and laparoscopic instruments.
A surgeon’s lack of experience and dexterity nevertheless remain relative contraindications. It is evident, that choosing the laparoscopic approach depends on the surgeon’s experience and the level of difficulty of each individual case. Finally, it is incorrect to unduly extend the length of the procedure, thus exposing the patient to excessively prolonged anesthesia.
The only absolute contraindication is the size of the uterus in the case of endometrial carcinoma, as it is essential to remove the uterus intact in the presence of neoplasia. However, this is of fairly rare occurence since endometrial carcinoma is mostly found in a uterus of normal dimensions.
Finally, if general anesthesia is absolutely contraindicated, the vaginal route may be proposed as a suitable alternative.
1.0 Introduction

Manual of Gynecological Laparoscopic Surgery 175
Both arms are arranged alongside the body; this avoids the risk of brachial plexus injury due to the position of the surgeon or assistant. The right arm must be well protected. The use of shoulder braces is advisable especially if an extreme Trendelenburg position is required.
A bladder catheter should be in place throughout the proce-dure.
The patient is placed at the edge of the table (ideally, the soft perineal parts will be off the table and the patient will lie on it
only from the tip of the coccyx); this position is very important since it facilitates manipulation of the uterus and, conse-quently, exposure of the tissues.
Each leg will be semifl exed to free a conical manipulation area.
The operating fi elds are disinfected and adequately draped for both a vaginal and abdominal approach, allowing the surgeon to perform uterine manipulations under strict aseptic conditions.
The surgeon is on the patient’s left; he/she operates with both hands and should stand upright with both elbows close to the body, the line of sight passing between both hands.
The fi rst assistant will be to the right; he/she holds the camera with the non-dominant hand and operates the instrument positioned in the pelvic port.
The second assistant will be positioned between the patient’s legs; his/her function is to assist in exposing the operating field to the surgeon. He/she should be seated to avoid
impeding the surgeon’s view and to ensure effective presen-tation.
A scrub nurse will be particularly useful when sutures are being placed; she is positioned on the surgeon’s left.
The table, fi tted with stirrups, should be lowered as far as possible to allow the surgeon to adopt a correct ergonomic angle for his arms. One video screen should be positioned by the patient’s right foot for the surgeon and another screen by the patient’s left foot for the fi rst assistant.
2.0 Operating Room Setup2.1 The Patient
2.2 The Surgical Team
The choice of trocars and their placement depends on the technique used, the size of the uterus, cost and availability.
Once the patient is anesthetized, the surgeon conducts a clinical examination. Vaginal inspection allows the size of the uterus to be determined. This infl uences the position of the trocars. At the same time uterine mobility is assessed.
The distance betwenn umbilicus and symphysis pubis must measure at least 30 cm. If this distance is shorter or if the uterus is large, the central operating trocar will be inserted through the umbilical port and an 11 mm-trocar will be placed in the midline between the xiphoid process and the umbilicus for the laparoscope.
The primary trocar is usually inserted through the umbilical port. Once the laparoscope with coupled video camera has been passed through this port, the operating surgeon visual ly determines the size of the uterus and confi rms uterine mobility by use of the manipulator. Access to the adnexa and the pouch of Douglas is also assessed. The upper quadrants of the abdominal cavity should be systematically explored.
Next, the lateral accessory ports are placed. Special attention must be paid to the following anatomical landmarks:
the epigastric pedicle: a branch of the iliac pedicle, emanat ing from the parietal surface at the level of the deep inguinal ring. It continues upwards on the deep surface of the rectus abdominis muscle. At the level of the umbilicus,
it penetrates deep into the muscle and anastomoses with the internal mammary artery. In most cases, this artery is clearly set off against the contour of the umbilical artery;
the lateral edge of the rectus abdominis muscle: this border is essential, because the port must be placed outside the muscle;
the area of the oblique muscles: a triangular-shaped area beyond the lateral edge of the rectus abdominis muscle. The thickness in this area is reduced, with only a few muscle fi bres;
the anterior superior iliac spine situated about 3 cm outside the oblique muscle area.
The lateral accessory ports are placed in the centre of the oblique muscle area. These two trocars are 6 mm in dia meter. We prefer to use lightweight plastic disposable trocars. They have the advantage of remaining straight in the abdominal wall, facilitating single-handed insertion of operating instruments. The trocar valve allows sutures to be placed with a minimum of gas loss. At this point, the use of a high fl ow insuffl ation unit (20–30 L/min.; e.g., KARL STORZ THERMOFLATOR®) is especially recommended to maintain clear vision even in the case of gas loss (vaginal opening and sutures).
Once the lateral ports are in place, the third accessory port is created. This port does not need to be placed below
3.0 Hysterectomy Technique3.1 Positioning the Trocars

Manual of Gynecological Laparoscopic Surgery176
The role of the uterine manipulator must be completely under-stood in the particular context of laparoscopic surgery. In laparoscopy the access routes are limited and therefore each time an operator handles an instrument to expose tissues an access route is lost. Correct use of the uterine manipulator allows tissues to be well exposed, thus leaving the operating trocars free during the procedure.
In detail the manipulator permits:
mobilization of the uterus (pulsion, lateral movements, anteversion, retroversion, on-axis rotation);
good visualization of the vaginal fornices (allowing their identifi cation while keeping the ureter clear);
sealing of the pelvic aperture while opening the vagina;
possible help in morcellating a large uterus at the end of the procedure;
visualization of the vaginal cuff and sealing to facilitate vaginal closure.
The uterine manipulator plays an even more essential role when the hysterectomy is diffi cult. This may be the case with a large uterus, when correct use of the uterine mani pulator will allow the procedure to be carried out with the best tissue exposure and a signifi cant reduction in surgical risks.
Various uterine manipulators are available. We use a manipu-lator with a threaded distal tip which is “screwed” into the uterus. The threaded tip is chosen depending on the size of the uterus. Non-threaded tips are used in the case of malignant disease and these are simply advanced into the uterus.
The distal tip of the manipulator insert can be deflected at varying angles (0° to 90° relative to the main axis of the device); defl ection is controlled with the main handle.
Inserting the manipulator into the uterus requires cervical dilatation up to bougie no. 9. The device is locked into the zero position and the manipulator insert is screwed in as far as the anatomical base guard. The anatomical base itself can be inserted into the cervical os, elevating the axis of fl exion as far as the interior of the cervix.
The second component of the manipulator is the manipulator rod. For good visualization of the fornices the insert can be rotated through 360° exposing the whole circumference of the vagina. As it is made from a non-conductive material, it can be exposed to unipolar current without risk of an electric arc. The manipulator insert is available in various lengths and widths fi tting all kinds of vaginal shapes. The lockable handle at the proximal end of the longitudinal axis allows the mani-pulator insert to be controlled precisely. The position of the proximal manipulator rod matches with the distal orientation of the insert. In this way, the assistant maintains constant visual control of the position of the manipulator insert. The combination of active defl ection of the manipulator tip and on-axis rotation via the manipulator rod helps in reducing iatrogenic injuries to the ureter during laparoscopic hysterec-tomies.
Finally, the device has a sealing system consisting of 3 soft plastic discs; this has the advantage of not obstructing the vagina during fi nal manipulations facilitating posterior opening of the vagina.
3.2 The Uterine Manipulator
The surgeon, located to the left of the patient, controls the instruments introduced through the central and left operating ports. The fi rst assistant located to the right controls the camera and the instrument placed in the right trocar. The second assistant situated between the legs of the patient is seated and mobilizes the uterus by operating the uterine manipulator.
The surgeon usually begins the procedure by inserting bipolar forceps into the left trocar and scissors into the central trocar.
The scissors can be connected to the uni polar electrosurgical unit. It is advisable to use grasping bipolar forceps which permit to combine as many functions as possible in the same instrument. The operating surgeon thus has various functional options available to his two hands: on the left, manipulation, grasping and electrocoagulation; on the right, dissection, mechanical dissection and electrocoagulation.
The assistant inserts forceps, usually atraumatic forceps, in the right trocar.
3.3 The Role of the Operating Team
the horizontal line between the two lateral ports. Ideally, it should be slightly higher than this line giving the surgeon a more ergonomic working position and a greater variety of working angles for use of operating instruments. The distance between the operating trocar and the camera trocar must be as great as possible and should never be less than 8 cm.
If the uterus is bulky or if the distance between the umbilicus and the pubis symphysis is short, the umbilical port is used for the operating instruments, and another port is placed superiorly.
One ergonomic criterion that must be observed during laparoscopy is bringing together the eye-instrument axis; consequently, the size of the uterus becomes relatively less
important during the procedure. In fact, if the ports are placed at a higher level and the operating fi eld is limited during the different stages of the procedure, the laparoscopic technique may also be applied easily even in the case of a very large uterus.
The diameter of the central port varies depending on the technique applied. A 6 mm trocar is suffi cient for techniques using solely electrosurgical coagulation and sutures.
The use of atraumatic forceps, mechanical suturing devices or 10 mm-clip applicators requires the use of a 10/12 mm trocar. In this case, the umbilical entry site for the central trocar is advisable.

Manual of Gynecological Laparoscopic Surgery 177
The fi rst part of the procedure is the same for hysterectomy both with and without adnexectomy. It consists of coagulation and division of the round ligaments, followed by opening of the vesicouterine space with dissection of the bladder.
The second assistant mobilizes the uterus to the right without antefl exion, applying a well-measured thrust. The surgeon grasps the left round ligament at its origin anterolateral to the uterus and exerts traction to the right and upwards. This reveals a triangle bordered by the round ligament at the top, iliac vessels laterally, and adnexal vein medially. By placing the round ligament under tension, the center of this triangle
3.4 The Round Ligaments
Fig. 1Transection of the round ligament.
Fig. 2Transection of the round ligament after bipolar coagulation.
Fig. 3A fenestration is created in the leaf of the broad ligament.
was exposed, made up of the juxtaposition of two anterior and posterior peritoneal layers of the broad ligament. This area appears grey owing to the presence of CO2 and an empty space under the posterior leaf of the broad ligament. The surgeon should coagulate the round ligament at the center of this triangle. In this way, the surgeon keeps a safe distance from the adnexal vein and limits the risks of bleeding. The round ligament is divided in the midline by intermittent coagulation and section. It should be noted that an arteriole is sometimes present behind the ligament, and this must be carefully coagulated (Figs. 1–3).

Manual of Gynecological Laparoscopic Surgery178
Once the round ligament has been transected, the access to the vesicouterine space is open.
The fi rst assistant now directs traction downwards to provide a clear view and access to this space. The surgeon should then divide the vesicouterine peritoneum by simple traction. He introduces his two instruments into the prevesical space taking care to remain in contact with the peritoneum above; then, separating the instruments, he opens the space progressing downwards and inwards. The peritoneal capillaries are gradually coagulated. The peritoneum is divided using cold scissors or by coagulation and cutting in one step if the scissors are connected to the unipolar electro-surgical unit. This dissection should stop about 1 cm from the midline.
At this point the second assistant moves the uterus towards the surgeon, while the first assistant grasps the round ligament as close as possible to the wall. Traction to this ligament applied outwards and upwards creates the triangle described above.
The same technique is employed to reach about 1 cm from the midline. At this point the uterus is pushed upwards
and slightly retroverted while the fi rst assistant grasps the prevesical peritoneum in the midline. It is grasped 1 cm below the junction of the peritoneum and the uterine serosa. It must be divided in a plane strictly perpendicular to the uterus while the latter is pushed fi rmly upwards to avoid any iatrogenic visceral injury. Ideally, the bipolar forceps, resting on the uterine isthmus, grasps the peritoneal falx and it is then divided with scissors in the same plane as far as the isthmus.
This action together with the momentum applied to the uterus automatically reveals the plane of vesicovaginal dissection once the incision has been made. When this plane is reached, blunt dissection of the bladder is carried down-wards. The two internal bladder pillars are put under tension by upward traction on the bladder and are coagulated and dissected.
This space must be dissected carefully especially in the case of previous surgery, in particular previous cesarean section.
In these cases the fi rst assistant must elevate the prevesical peritoneum well while the second assistant pushes the uterus. The surgeon must create a plane which is strictly
3.5 Dissection of the Vesicouterine Pouch
Fig. 4Identifi cation of the vesicouterine fold.
Fig. 6Complete division of the vesicouterine peritoneum.
Fig. 7Identifi cation of the vesical pillars.
Fig. 5The vesicouterine fold is elevated prior to being incised.

Manual of Gynecological Laparoscopic Surgery 179
perpendicular to the uterus. During dissection of the left vesicouterine peritoneum, care must be taken as the surgeon, on the patient’s left, has a tendency to dissect the
peritoneum too close to the bladder. To prevent this error, the uterus must be well centred and pushed slightly down-wards by the second assistant (Figs. 4–7).
The surgeon now fenestrates the broad ligaments on the right and left. The uterus is again elevated and mobilized to the right, putting the left adnexa under tension. The surgeon carefully coagulates the capillaries of the broad ligament to separate the posterior leaf of the broad ligament. This should
appear grey, indicating that the intestine is not interposed behind it. The peritoneal leaf is opened by blunt dissection or is divided. Once the opening has been made, the surgeon’s two instruments are introduced into the fene stration which is enlarged by divergent traction.
3.6 Fenestration of the Broad Ligaments
Hysterectomy without Adnexectomy
The opening is extended towards the uterosacral ligaments. In a total hysterectomy, it is extended towards the suspen-sory ligament of the ovary. Indeed, once the fenestration has been created, the ureter is found on the external side of the window (against the wall). Whatever technique is chosen to detach the adnexa or the suspensory ovarian ligament, the ureter is not endangered.
In a hysterectomy without adnexectomy, the adnexa may be coagulated and divided where it merges with the uterus by a succession of bipolar coagulations followed by division. For effective coagulation, it is preferable to set the power at 35 watts and to increase exposure time.
In hysterectomy without adnexectomy linear cutting staplers are most appropriate. In this case, a blue cartridge should be used (closed staple size equal to 1.5 mm). The stapler is best introduced via a 12 mm trocar situated in a high central position. As a general rule, a single cartridge is suffi cient for the adnexal transection. Often a residual peritoneal adhesion must be lysed to complete the transection.
Today other instruments are also available which coagulate and cut simultaneously, either using ultrasound or radiofrequency. They can be helpful, especially in diffi cult hysterectomies, but using the bipolar modality is still the classic technique of choice.
Hysterectomy with Adnexectomy
The fi rst assistant should grasp the ovary and put the suspen-sory ligament of the ovary under traction. The surgeon then coagulates and divides the ligament close to the ovary. Once the vascular pedicle has been divided and before completing division of the ligament, the traction is slightly reduced and any hemostasis completed. Once division is complete and the ligament has retracted, absolute hemostasis must be confi rmed.
Adequate venous hemostasis must always be secured to order to avoid problems related to impeded vision, which can lengthen the duration of surgery.
3.7 Treatment of the Adnexae
Once the problem of the adnexa has been resolved, the uterine vascular pedicles are dissected. The objective is to produce an anatomical situation which separates the ureter from the pedicle of the uterine artery. The fi rst step is posterior dissection. The uterus is fi rst pushed upwards and to the right. The fi rst assistant grasps the stump of the left round ligament and applies traction to it which is directed inwards.
In a total hysterectomy it may be preferable to apply traction to the adnexa. The surgeon applies traction to the posterior peritoneum by introducing the bipolar forceps between the posterior peritoneum and the base of the parametrium. The forceps moves in contact with the peritoneum towards the left cardinal and uterosacral ligaments. The peritoneum is separated by back-and-forth movements, releasing the parts of the parametrium which are moved clear. The peritoneum is then coagulated and divided.
Progression continues towards the uterosacral ligament. In the process the cardinal ligament is coagulated and cut, releasing the arch of the uterine artery which is isolated. The uterosacral ligament is sectioned in its turn. This step can be made easier by antefl exion of the uterus. The situation is
then as follows: the uterine arteries can be seen with behind them the vaginal fornix freed from the cardinal ligament.
The surgeon then moves to the front of the uterine pedicle. The uterus is slightly retroverted and pushed fi rmly upwards. Starting from the internal pillar of the bladder, all the tissue in front of the uterine pedicle is coagulated and divided.
At the end of this procedure the uterine pedicle stands out on the lateral surface of the uterine isthmus, between the vaginal fornices to the front and rear. The dissection is complete apart from the pedicle and the ureter is clearly visible.
The same technique is used on the opposite side. The uterus is moved to the left and the fi rst assistant pulls the uterus towards the left via the stump of the round ligament. On this side, the angle of approach of the surgeon‘s instruments is often inadequate and, consequently, a risk of injury to the ureter can arise. To avoid this risk, the arrangement of instru-ments has to be changed: the bipolar forceps is given to the fi rst assistant, the scissors are in the center and the forceps is moved to the left. The surgeon puts traction on the uterus via the stump of the right round ligament and the assistant carries out the same dissection as that carried out by the surgeon on the left. The surgeon retains control of the pedal.
3.8 Treatment of the Uterine Artery

Manual of Gynecological Laparoscopic Surgery180
Fig. 9Identifi cation by careful dissection of the site where the uterine artery crosses the ureter.
Fig. 11Identifi cation of the uterine artery and hemostatic suture.
Fig. 8Anatomic view of the uterine artery and relations with the ureter.
Fig. 10Identifi cation of the relations between the ureter and uterine artery.
In this way, the right and left uterine pedicles are treated. At the end of this step the ureters are at least 4 cm away from the ascending branch of the uterine artery where hemostasis will occur.
The uterine artery and vein can be dealt with using various techniques. The fi rst hysterectomies were carried out using bipolar coagulation for the uterine vessels. The large number of cases treated successfully has demonstrated the effi cacy of this technique. The only risk is electrical tissue damage extending to the ureter.
The rules to be observed to avoid injuries of the ureter are:
issection as previously described so that the uterine vessels are dissected clear in front, to the sides and behind;
coagulation should be applied only to the ascending branch of the uterine artery;
the time of exposure to coagulation should be as brief as possible. Short repeated coagulation is preferable to long sustained coagulation;
since coagulation makes the tissue resistant to the passage of current, this tissue should be resected and coagulation carried out again on non-coagulated tissue.
Technically, the assistant draws the uterus towards the right by means of the left arterial pedicle while the manipulator is pushed fi rmly upwards and to the right. Using the bipolar forceps in the left lateral trocar, the surgeon grasps the mass of the uterine pedicle at the level of the ascending branch. After global coagulation, the surgeon concentrates on the superfi cial layers which are then incised using little scissor cuts. The pedicle is thus incised gradually. This produces perfect coagulation of the veins of the periarterial uterine plexus and the artery is more easily seen and in turn coagulated and transected.
Once the artery has been divided, the surgeon should continue with dissection in front and behind to lower the pedicle beyond the boundary of the vaginal fornix. This is thus a true interfascial hysterectomy. During this step the last parts of the cardinal ligament are coagulated and divided.
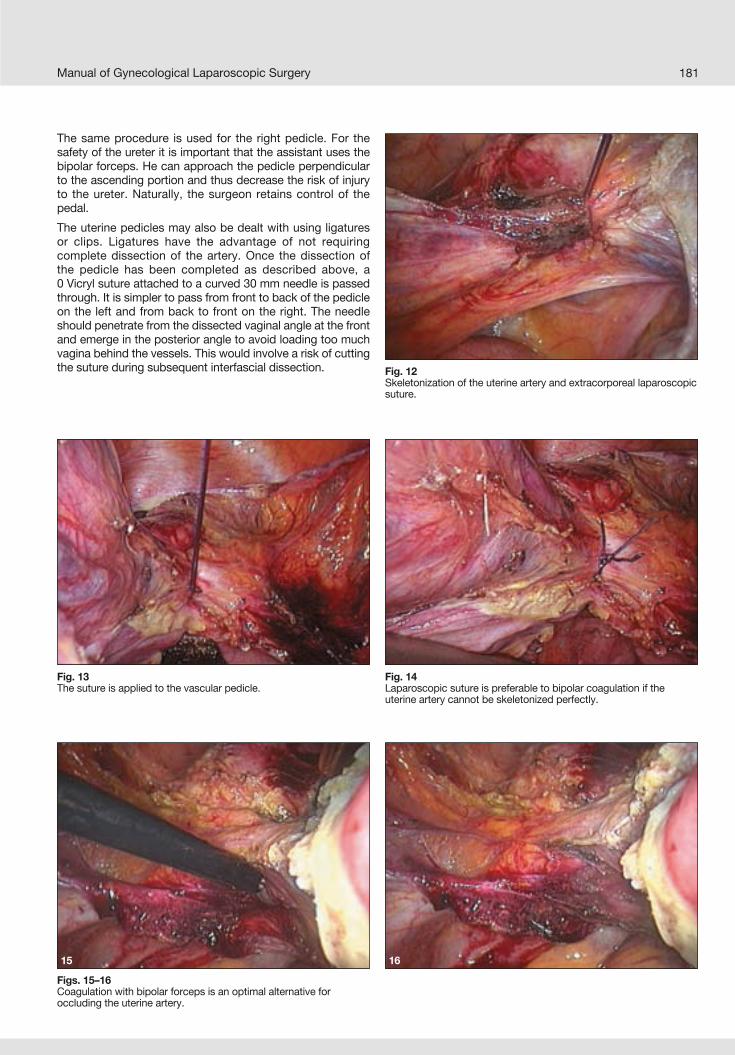
Manual of Gynecological Laparoscopic Surgery 181
The same procedure is used for the right pedicle. For the safety of the ureter it is important that the assistant uses the bipolar forceps. He can approach the pedicle perpendicular to the ascending portion and thus decrease the risk of injury to the ureter. Naturally, the surgeon retains control of the pedal.
The uterine pedicles may also be dealt with using ligatures or clips. Ligatures have the advantage of not requiring complete dissection of the artery. Once the dissection of the pedicle has been completed as described above, a0 Vicryl suture attached to a curved 30 mm needle is passed through. It is simpler to pass from front to back of the pedicle on the left and from back to front on the right. The needle should penetrate from the dissected vaginal angle at the front and emerge in the posterior angle to avoid loading too much vagina behind the vessels. This would involve a risk of cutting the suture during subsequent interfascial dissection.
Figs. 15–16Coagulation with bipolar forceps is an optimal alternative foroccluding the uterine artery.
15
Fig. 12Skeletonization of the uterine artery and extracorporeal laparoscopic suture.
Fig. 13The suture is applied to the vascular pedicle.
Fig. 14Laparoscopic suture is preferable to bipolar coagulation if the uterine artery cannot be skeletonized perfectly.
16

182 Manual of Gynecological Laparoscopic Surgery
At this point in the operation the uterus is no longer vascularised and becomes pale. The uterine manipulator rod, which is turned through 360°, shows that the uterine pedicles have been dissected lower than the vaginal fornices.
The sealing ceramic cylinder of the manipulator is advanced into the vagina, after being lubricated with gel or vaseline oil. The three silicone seals that can be mounted to the cylinder should be inside the vagina. The surgeon must open the vagina through 360°. The more the vagina is open the more the second assistant loses control of the uterus with the manipulator.
Usually the incision is started from the anterior vaginal wall. At the start the surgeon is equipped with the bipolar forceps on the left and disposable scissors in the centre. For the incision the scissors are connected to the monopolar current. The fi rst assistant uses a suction cannula to aspirate blood and evacuate the smoke generated by the high frequency current. The second assistant manipulates the uterus using the rod to expose the various parts of the vagina to the surgeon for division.
He does this by rotating the rod in the same direction as the division. It is important that the rod should be rotated before
3.9 Opening and Division of the Vagina
Fig. 18Dividing the vagina with the high frequency unipolar electrode.
Fig. 19The incision follows the porcelain margin of the uterine manipulator.
In this case intracorporeal sutures seem to be contra indicatedand it is preferable to use extracorporeal sutures, either half-hitches or Roeder knots. However, after cutting and isolating the uterine pedicle it is sometimes necessary to place a second ligature using an endoloop.
The use of sutures for the uterine pedicles seems to be particularly indicated in the case of a bulky uterus both for controlling hemostasis better and for reducing the risk of injury to the ureter, which is a major risk when the uterus is very large.
The use of clips requires dissection of the whole surface of the artery. There are two possible solutions: remaining with the ascending branch or starting at the point where the artery moves away from the uterus.
For the ascending branch, repeated coagulation of the peripheral veins around the artery should be carried out; then, by dividing them successively, the artery is exposed and clipped. Away from the uterus, the artery and vein are more easily separated. Dissection should be carried out with as little coagulation as possible due to the proximity of the ureter.
Fig. 17In some cases, the openings of the uterine vessels can be identifi ed perfectly.
In all cases the clip should be closed under visual control. The artery should be only partially blocked to confi rm the effi cacy of the clip (Figs. 8–17).
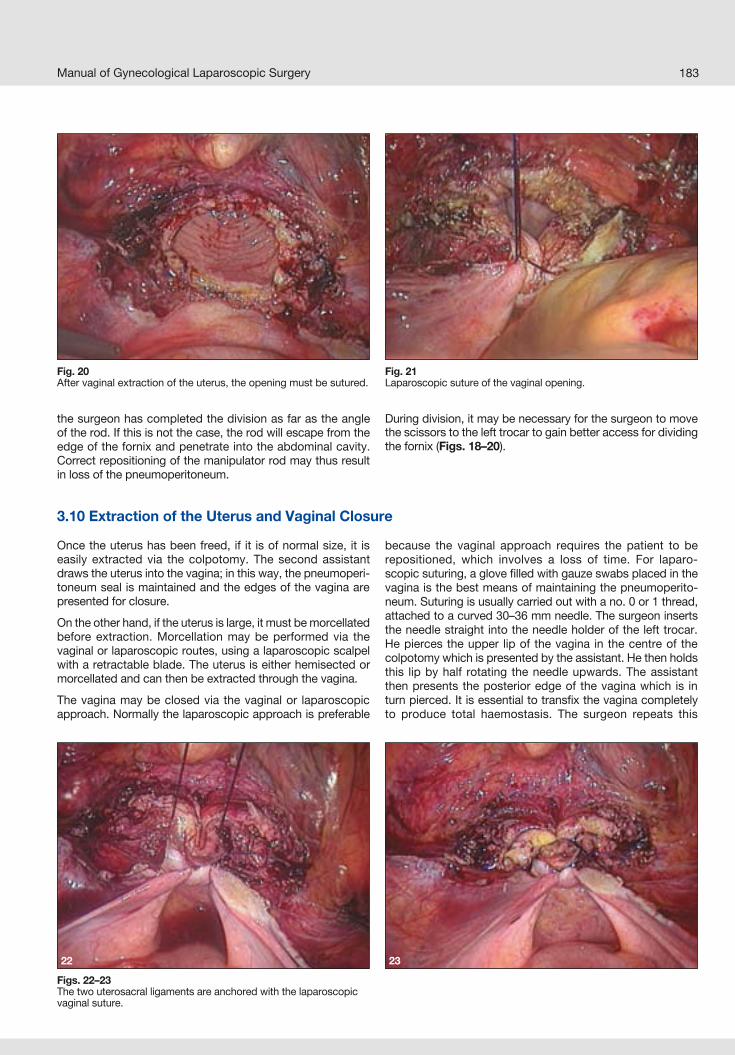
Manual of Gynecological Laparoscopic Surgery 183
Fig. 20After vaginal extraction of the uterus, the opening must be sutured.
Fig. 21Laparoscopic suture of the vaginal opening.
Figs. 22–23The two uterosacral ligaments are anchored with the laparoscopic vaginal suture.
Once the uterus has been freed, if it is of normal size, it is easily extracted via the colpotomy. The second assistant draws the uterus into the vagina; in this way, the pneumoperi-toneum seal is maintained and the edges of the vagina are presented for closure.
On the other hand, if the uterus is large, it must be morcellated before extraction. Morcellation may be performed via the vaginal or laparoscopic routes, using a laparoscopic scalpel with a retractable blade. The uterus is either hemisected or morcellated and can then be extracted through the vagina.
The vagina may be closed via the vaginal or laparoscopic approach. Normally the laparoscopic approach is preferable
because the vaginal approach requires the patient to be repositioned, which involves a loss of time. For laparo-scopic suturing, a glove fi lled with gauze swabs placed in the vagina is the best means of maintaining the pneumoperito-neum. Suturing is usually carried out with a no. 0 or 1 thread, attached to a curved 30–36 mm needle. The surgeon inserts the needle straight into the needle holder of the left trocar. He pierces the upper lip of the vagina in the centre of the colpotomy which is presented by the assistant. He then holds this lip by half rotating the needle upwards. The assistant then presents the posterior edge of the vagina which is in turn pierced. It is essential to transfi x the vagina completely to produce total haemostasis. The surgeon repeats this
3.10 Extraction of the Uterus and Vaginal Closure
the surgeon has completed the division as far as the angle of the rod. If this is not the case, the rod will escape from the edge of the fornix and penetrate into the abdominal cavity. Correct repositioning of the manipulator rod may thus result in loss of the pneumoperitoneum.
During division, it may be necessary for the surgeon to move the scissors to the left trocar to gain better access for dividing the fornix (Figs. 18–20).
22 23

Manual of Gynecological Laparoscopic Surgery184
In general we prefer total hysterectomy, except where the hysterectomy is associated with the management of a uterine prolapse or a suprapubic suspension operation.
In any case, in a subtotal hysterectomy the cervix is divided at the isthmus after dealing with the uterine arteries. This
division may be performed in various ways. We prefer to use a cold scalpel with an endoscopic blade holder. Closure of the uterine cervix is carried out with interrupted Vicryl 0 stitches.
4.0 Subtotal Hysterectomy
Antibiotic Treatment
All patients receive a single dose of antibiotics during the operation. Postoperative treatment is not systematic in our experience. We only treat infections confi rmed after taking samples and an antibiogram.
Prevention of Postoperative Thrombophlebitis
Our patients systematically receive prophylactic antithrom-botic treatment. Low dosis heparin is started on the day of admittance prior to surgery and is continued for 15 days.
Period of Foley catheterization
This is continued only for the duration of the operation except in cases with associated subpubic suspension.
Length of hospital stay
This varies from 2 to 3 days.
Postoperative Hygiene
In the postoperative period, the patient should avoid effort, at least for the fi rst month. Sexual activity should not recom-mence until after the fi rst postoperative check-up, one month after surgery.
5.0 Postoperative Care
We started to perform total laparoscopic hysterectomy in 1989, but only in 1995, with the introduction of the uterine manipulator, did our technique become standardized and reproducible. The operating technique is now well estab-lished and this surgical guide, in our opinion, should allow a laparoscopic hysterectomy to be carried out completely safely. A fi nal consideration is that even if hysterectomy is
regarded as a basic procedure for a gynecological surgeon, it should be considered an advanced procedure if performed through the laparoscopic approach. This does not indicate any real diffi culty in the procedure but rather a poor under-standing of laparoscopic surgical technique which should nowadays be an integral part of the basic knowledge of the gynecological surgeon.
6.0 Conclusions
operation to produce an X suture. As a rule, extraction of the thread poses no problem. This suture is placed on the right and left. There are thus two X sutures taking in the center and then the angle of the colpotomy on either side.
In some cases a third central X stitch may be made which also includes the ends of the uterosacral ligaments to provide better support for the vaginal vault. Removal of the uterus or the intravaginal glove acts as a test of the seal.
We prefer to use extracorporeal sutures for closing the vagina, but intracorporeal sutures may also be used. In this case, it is
advisable to use two semicontinuous sutures which will then be joined in the middle of the suture. It is also advisable in this case, to strengthen the vaginal vault by including the end of the uterosacral ligaments in the suture.
A fi nal lavage completes the operation. Bleeding of the vaginal section is carefully dealt with using bipolar current. The ureters can then be checked. Peristalsis is not a guarantee of their integrity, but the combination of an absence of dilatation and presence of peristalsis means that the risk of injury is unlikely (Figs. 21–23).

185Manual of Gynecological Laparoscopic Surgery
1. WATTIEZ A, CANIS M, POULY JL, MAGE G, BRUHAT MA: Technique coelioscopique de l’hystérectomie. Journal de Coeliochirurgie. 1996 Sep; 19: 19-27.
2. REICH H.: Laparoscopic hysterectomy. Surg Laparosc Endosc. 1992 Mar; 2(1): 85-8.
3. WATTIEZ A, GOLDCHMIT R, DURRUTY G, MAGE G, CANIS M, CUCINELLA G, POULY JL, BRUHAT MA: Minilaparoscopic hysterectomy. J Am Assoc Gynecol Laparosc. 1999 Feb; 6(1):97-100.
4. WATTIEZ A, SORIANO D, COHEN SB, NERVO P, CANIS M, BOTCHORISHVILI R, MAGE G, POULY JL, MILLE P, BRUHAT MA: The learning curve of totallaparoscopic hysterectomy: comparative analysis of 1647 cases. J Am Assoc Gynecol Laparosc. 2002 Aug; 9(3):339-45.
5. WATTIEZ A, SORIANO D, FIACCAVENTO A, CANIS M, BOTCHORISHVILI R, POULY J, MAGE G, BRUHAT MA: Total laparoscopic hysterectomy for very enlarged uteri. J Am Assoc Gynecol Laparosc. 2002 May; 9(2):125-30.
6. WATTIEZ A, COHEN SB, SELVAGGI L: Laparoscopic hysterectomy. Curr Opin Obstet Gynecol. 2002 Aug; 14(4):417-22. Review.
7. CHAPRON C, DUBUISSON JB, ANSQUER Y: Total laparoscopic hysterectomy. Indications, results, and complications. Ann N Y Acad Sci. 1997 Sep 26; 828:341-51. Review.
8. CHAPRON C, DUBUISSON JB: Total hysterectomy:laparoscopy or vaginal route? Arguments in favor of laparoscopy Gynecol Obstet Fertil. 2000 Sep; 28(9):672-8.
9. CHAPRON C, DUBUISSON JB.: Ureteral injuries after laparoscopic hysterectomy. Hum Reprod. 2000 Mar; 15(3):733-4.
10. COSSON M, LAMBAUDIE E, BOUKERROU M, QUERLEU D, CREPIN G.: Vaginal, laparoscopic, or abdominal hysterectomies for benign disorders: immediate and early postoperative complications. Eur J Obstet Gynecol Reprod Biol. 2001 Oct; 98(2):231-6.
11. DONNEZ J, SQUIFFLET J, JADOUL P, SMETS M: Results of evaluate study of hysterectomy techniques: high rate of complications needs explanation. BMJ. 2004 Mar 13; 328(7440):643.
12. KOH CH.: A new technique and system for simplifying total laparoscopic hysterectomy. J Am Assoc Gynecol Laparosc. 1998 May; 5(2):187-92.
13. KOH LW, KOH PH, LIN LC, NG WJ, WONG E, HUANG MH: A simple procedure for the prevention of ureteral injury in laparoscopic-assisted vaginal hysterectomy. J Am Assoc Gynecol Laparosc. 2004 May; 11(2):167-9.
14. KOVAC SR, BARHAN S, LISTER M, TUCKER L, BISHOP M, DAS A.: Guidelines for the selection of the route of hysterectomy: application in a resident clinic population. Am J Obstet Gynecol. 2002 Dec; 187(6):1521-7.
15. AL-JUBOURI MA.: Laparoscopic assisted vaginalhysterectomy versus abdominal hysterectomy. Ann Clin Biochem. 1998 Jan; 35 ( Pt 1):156-7.
16. GARRY R, FOUNTAIN J, MASON S, NAPP V, et al: The eVALuate study: two parallel randomized trials, one comparing laparoscopic with abdominalhysterectomy, the other comparing laparoscopic with vaginal hysterectomy. BMJ. 2004 Jan 17; 328 (7432): 129.
17. SCULPHER M, MANCA A, ABBOTT J, FOUNTAIN J,et al: Cost effectiveness analysis of laparoscopic hysterectomy compared with standard hysterectomy: results from a randomised trial. BMJ. 2004 Jan 17; 328 (7432): 134.
18. LIU CY, REICH H.: Complications of total laparoscopic hysterectomy in 518 cases. Gynecol Endosc. 1994; 2:203-8.
19. CANIS MJ, WATTIEZ A, MAGE G, BRUHAT MA.: Results of eVALuate study of hysterectomy techniques: laparoscopic hysterectomy may yet have a bright future. BMJ. 2004 Mar 13; 328(7440):642-3.
20. CHAPRON C, LAFOREST L, ANSQUER Y, FAUCONNIER A, FERNANDEZ B, BREART G, DUBUISSON JB: Hysterectomy techniques used for benign pathologies: results of a French multicentre study. Hum Reprod. 1999 Oct; 14(10):2464-70.
21. DAVIES A, HART R, MAGOS A, HADAD E, MORRIS R.: Hysterectomy: surgical route and complications. Eur J Obstet Gynecol Reprod Biol. 2002 Sep 10; 104(2):148-51.
22. HARKKI P, KURKI T, SJOBERG J, TIITINEN A.: Safety aspects of laparoscopic hysterectomy. Acta Obstet Gynecol Scand. 2001 May; 80(5):383-91. Review.
23. HERTEL H, KOHLER C, MICHELS W, POSSOVER M, TOZZI R, SCHNEIDER A.: Laparoscopic-assisted radical vaginal hysterectomy (LARVH): prospective evaluation of 200 patients with cervical cancer.Gynecol Oncol. 2003 Sep; 90(3):505-11.
24. LYONS TL.: Laparoscopic supracervical hysterectomy. Obstet Gynecol Clin North Am. 2000 Jun; 27(2):441-50. Review.
25. MALZONI M, PERNIOLA G, HANNUNA K, IUELE T, FRUSCELLA ML, BASILI R, EBANO V, MARZIANI R.:A review of 445 cases of laparoscopic hysterectomy: benefi ts and outcome Clin Ter. 2004 Jan; 155(1):9-12.
26. MEEKS GR, HARRIS RL.: Surgical approach tohysterectomy: abdominal, laparoscopy-assisted, or vaginal. Clin Obstet Gynecol. 1997 Dec; 40(4):886-94. Review.
27. PARKER WH.: Total laparoscopic hysterectomy. Obstet Gynecol Clin North Am. 2000 Jun; 27(2):431–40. Review.
28. POSSOVER M.: Options for laparoscopic surgery in cervical carcinomas. Eur J Gynaecol Oncol. 2003; 24(6):471-2. Review.
29. WOOD C.: The AAGL classifi cation system forlaparoscopic hysterectomy. J Am Assoc GynecolLaparosc. 2000 Feb;7(1):5-7.
Recommended Reading

Manual of Gynecological Laparoscopic Surgery186

Chapter XVI
Laparoscopic Surgery of the Pelvic Floor
Arnaud Wattiez Strasbourg University Hospital
Strasbourg, France

Manual of Gynecological Laparoscopic Surgery188
The laparoscopic management of uterine prolapse began in our department in 1991 and there has been considerable development in the technique since then. It was initially limited to faithful reproduction of the techniques employed at laparotomy but numerous complementary features were added subsequently, allowing us to deal with any circum-stances that arise during female prolapse surgery.
The common benefi ts of the laparoscopic approach, such as rapid postoperative recovery and short hospitalization, were soon surpassed by the innovative aspect of this technique. Indeed, the combined effects of various factors – mainly,
the outstanding quality of videoendoscopic images and the positive pressure of the pneumoperitoneum – have granted access to anatomical spaces that were hitherto very diffi cult to reach and allows surgical repair under direct visual control.
The results, which were encouraging overall, are now excellent owing to repair surgery that is perfect from the anatomical aspect and provides exceptional functional results.
The only issue that remains to be resolved is to simplify this technique so that it can be performed in acceptable operating times.
1.0 Introduction
2.0 Preoperative Workup
2.1 Assessment of Uterine Prolapse
Preoperative workup must be particularly careful and precise. Only a thorough evaluation of all defects that need to be treated will allow surgical repair in a single operative session and minimize the risks of postoperative functional sequelae and recurrences.
Diagnosis of all the defects is the crucial moment of the clinical workup. It is essential to stage the defects for each
compartment. Standard clinical examination must attempt to define the degree of prolapse involving the uterus, bladder and rectum. Lateral cystocele with the vaginal rugae preserved must be distinguished from central cystoceles with elimination of the vaginal rugae. The former is due to detachment of the vagina from the tendinous arc of the pelvic fascia while the latter is due to a break of the vesicovaginal fascia. A systematic exploration must make sure that any enterocele is detected. The muscular tonus of the levator ani muscles must be assessed in terms of quality and quantity.
3.0 Preparation of the Patient
3.1 Bowel Preparation
Preparation of the patient is essential to obtain optimum results from this type of surgery. Preparation of the vaginal tissues to promote healing and bowel preparation to optimize the endoscopic space are particularly useful.
The purpose of this preparation is to empty the bowel so that the loops of intestine can be better seen and to defl ate and fl atten them to increase intra-abdominal space. However, it can also be useful in the event of accidental bowel injury. Preparation begins with a classical low-fi ber diet for the fi ve days prior to surgery. Two evenings before the operation, a laxative Xprep® enema is administered. Finally, lavage of the lower bowel is performed the evening before surgery. This chronological order is particularly important in order to avoid anal leakage on the operating table during surgery, which exposes the patient to a greater risk of infection.
3.2 Vaginal Estrogens Administration of vaginal estrogens for at least a month prior to the operation is useful for improving vaginal nutrition. Improvement of vaginal nutrition will allow better and faster healing.
3.3 Vaginal disinfectionVaginal disinfection is particularly important and must be carried out the evening before the operation by vaginal lavage with an antiseptic solution and administration of a Betadine vaginal ovule. The abdominal wall is also disinfected. After a shower, the evening before the operation, the patient’s pubic hair is shaved and the abdominal wall and inside the umbilicus are cleaned and disinfected with an antiseptic solution. Finally, immediately before surgery, a solution of Betadine is applied prior to sterile draping.

Manual of Gynecologic Laparoscopic Surgery 189
4.0 Positioning of the PatientLaparoscopic surgery is often long and diffi cult. Optimizing the surgical technique and reducing operating times require ergonomic management of the operation, and correct arrangement of the patient is fundamental.
4.1 AnesthesiaGeneral anesthesia with endotracheal intubation is usually employed. Muscle relaxation is necessary only where it is not possible to obtain suffi cient distension of the abdomin al wall with a pneumoperitoneum of 12 mmHg. General anesthesia can be combined with locoregional epidural or spinal anesthesia to improve the postoperative course.
4.2 Patient PositioningThe patient is placed in dorsal decubitus with the legs apart and semi-fl exed. This position allows three surgeons to take up position: The operating surgeon is situated on the left of the patient. The fi rst assistant stands opposite to the surgeon on the right side of the patient, and the second assistant is positioned between the patient‘s legs. The patient’s two arms are placed alongside her body to avoid injuries of the brachial plexus. Shoulder braces are placed at the level of
the acromion prominence, avoiding compression of cervical muscles. Attention must also be paid to the position of the patient’s hands to avoid compression of the fi ngers. In some cases, a warming system is used to prevent sudden drops in the patient’s body temperature.
The patient must be positioned well down the table the better to allow movements of the uterine manipulator. The greater the possibilities for moving the uterine manipulator, the better will be the exposure of the different organs during surgery.
The abdominal wall and vagina are disinfected carefully and the operation area is prepared prior to introduction of the Foley catheter and uterine manipulator. It is imperative that the perineal region is sterile and accessible to the surgeon, who should perform a vaginal or rectal examination during the operation and position the uterine manipulator.
4.3 Bladder CatheterizationAn indwelling no. 18 Foley catheter is placed. The balloon is infl ated with 15cc of saline and the catheter is placed under traction to make it easier to demonstrate the bladder neck. The catheter is connected to a collecting bag which is placed in visible position so that the urine can be monitored (volume, color, presence of air in the bag).
5.0 Preoperative Assessment5.1 Clinical ExaminationIt is absolutely essential to reassess the uterine prolapse on the operating table as soon as the patient is anesthetized. This reassessment under anesthesia can provide new information that may modify the operative strategy. The assessment is performed with the aid of vaginal dilators and will allow evaluation of the line of the vagina and better distinction of its upward and downward movements. This will also allow a better assessment of the retrovaginal space and its mobility.
In the event of hysterectomy, assessment of the size and mobility of the uterus will allow correct choice of trocar positions.
5.2 Appearance of the AbdomenThe patient’s general build and the appearance of the abdomen determine the organization of the surgical fi eld and the placement of the trocars. The ergonomics of the operative maneuvers will depend on this.
Numerous aspects must be considered:
1 The patient’s build. The fi rst thing to consider is the distance from the umbilicus to the pubic symphysis, which will determine the distance between the umbilical and suprapubic trocars. The latter, in particular, must be placed suffi ciently high up to allow access to the promontory and the space of Retzius and allow the vari-ous sutures to be placed. If the patient is of short stature, the camera trocar must be placed in supra umbilical posi-tion and the suprapubic trocar is placed at umbilical level.
2 The inter-iliac distance. Suturing is facilitated by the position of the trocars. A short patient will mean that the trocars are positioned higher to gain space.
3 The obesity of the abdominal wall must be assessed because the trocars are easier to position where the wall is thinner. However, more elastic areas should be avoided because of the diffi culty if they need to be reinserted.
4 The laxity of the peritoneum will give an idea of the operation space and the positioning of the trocars will therefore depend on this.
5.3 Placement of TrocarsIn general, 4 trocars are necessary, three suprapubic(6 mm) and one umbilical (11 mm). The fi rst trocar, 11 mm in diameter, is normally positioned at umbilical level. Following internal inspection and comparison of the size of the uterus and the patient’s build, the fi nal position of this trocar is defi ned. If the size of the uterus is normal or below normal and the pubis-umbilicus distance is suffi cient, this trocar will be used for the laparoscope; if, on the contrary, the uterus is large and the pubis-umbilicus line is short, this trocar will be the central operating port. In the great majority of cases, the position is therefore as follows: three suprapubic trocars and one umbilical trocar.

Manual of Gynecological Laparoscopic Surgery190
6.0 Organization of the Operating Field6.1 Positioning of the Uterine Manipulator
The CLERMONT-FERRAND uterine manipulator is essential for demonstrating the uterus. It allows the uterus to be mobi-lized in all its axes: advance motion, anteversion, retroversion, lateralization and fl exion of the uterus forwards and laterally. It also permits: exposure of the vaginal cul de sac maintenance of the pneumoperitoneum sealing of the vagina after extraction of the uterus
The device comprises a series of concentric rods. The cent ral rod is threaded at the distal end, which is inserted in the uterus. The manipulator inserts are available in various sizes to match the size of the uterus. The threaded distal end of the insert can be defl ected by use of the mani pula tor handle. Outside this rod there is a sealing ceramic cylinder, which can rotate through 360 degrees to allow exposure of the cul-de-sac. This cylinder can be mounted with three silicone seals. Once hysterectomy is complete, the manipulator with its silicone seals is pushed toward the vaginal vault preventing gas loss and making sure that pneumoperitoneum will be maintained.
The CLERMONT-FERRAND manipulator must be positioned when the patient is asleep and the operation area has been
prepared because the surgeon must be able to manipulate under completely aseptic conditions.
After demonstrating the cervix, hysterometry gives the size of the uterus so that the appropriate manipulator insert can be selected. The cervix is dilated with Hegar dilators up to size 8. With the manipulator locked in zero position, a twisting motion is applied to push the device through the cervical os until the threaded part of the insert is completely within the cervical canal. At the end of this maneuver, the handle locking mechanism must be on the right.
Most of the time, the manipulation movement must be preceded by a pushing movement in the direction of the patient’s head. This is because anteversion of the uterus is achieved by a combination of two movements: pushing the uterus and anteversion by lowering the handle. In this way, the uterosacral ligaments are placed under tension and the cul-de-sac of the pouch of Douglas is exposed. The adnexae are exposed the same way with a movement of pushing and lateral defl ection of the handle towards the patient’s legs, which are in gynecologic lithotomy position.
The dilator can be pushed any time and allows correct exposure of the vaginal cul-de-sac.
6.2 Fixation of the Intestine
At the start of the operation, organization of the operation fi eld is highly important to achieve stability and exposure without the assistant’s intervention. The pouch of Douglas is exposed by fi xing the sigmoid to the abdominal wall. For this maneuver, we use two different techniques. The fi rst employs a nylon suture with a straight needle, which is introduced through the abdominal wall about 5 cm above the left lateral trocar. The needle then passes through the parasigmoid fat from one side of the sigmoid to the other and then comes out again through the abdominal wall through the same hole.
The sigmoid is elevated with the aid of forceps and the suture is tied on the outside. The same can be done with a curved needle introduced into the abdomen; the sigmoid fat is trans-fi xed and the needle is then brought out again through the same trocar and the suture is then tied. A Reverden needle is then used to bring the sutures out transparietally always more or less 5 cm above the left lateral trocar and they are fi xed using a forceps. In the same way, following hysterectomy, the vagina or remaining cervix can be suspended from the anterior wall using a Reverden needle.
1 Suprapubic trocars: we prefer to use mtp® disposable6 mm trocars. They have the advantage of being light and transparent and being threaded on the outside, which ensures that they are stable in the abdominal wall; they have a star-shaped valve which prevents gas leakage even during suturing. Their cost is also acceptable. The lateral trocars are placed anterior to the anterior superior iliac spine, two fi ngers medial to the spine and lateral to the outer border of the rectus abdominis muscle. They are passed through the oblique and transverse abdominal muscles. At this level, the thickness of the abdominal wall is usually reduced which facilitates the maneuvers. The central trocar is positioned along the pubis-umbilicus line more or less in the middle. The minimum distance between the umbilical primary port and the central port is 6 cm. In any case, it should be positioned below a line joining the two outer trocars.
2 The umbilical trocar is a simple reusable trocar, which holds the laparoscope. In fact, this model has a valve, which can be lowered for introducing the laparoscope; this allows the distal lens to be kept clean during introduction so it is an economic factor with regard to effi cient use of operating time. If the umbilical entry site is used as central port for operating instruments, we prefer the use of a disposable trocar with a removable reducer attached to the proximal end of the trocar.
In the classical situation (three suprapubic trocars and one umbilical trocar), we prefer to begin the operation with three6 mm trocars for dissection and then replace the central trocar for suturing (after the hysterectomy is complete).

Manual of Gynecological Laparoscopic Surgery 191
6.3 Division of the Insertion ofthe Uterosacral Ligaments
The insertion of the uterosacral ligaments can be divided at the start of the operation. Culdoplasty commences from this point. They can be divided simply by touching them with bipolar coagulation or better with a suture.
7.0 Surgical Strategy PlanningThe strategic order of the surgical steps is important and the phases of dissection must fi rst be distinguished from the phases of fi xation.
Phases of Dissection. The chronological order is as follows: dissection of the promontory, right lateral peri-toneal dissection, the rectovaginal space followed by hysterectomy, during which vesical dissection is pushed far downwards. This order is logical. Dissection of the promontory fi rst is essential and to do this, an increased Trendelenburg position is important, which is often possible only at the start of the operation. Once this dissection is complete, the patient can be placed level if required by the anesthetist. Dissection of the spaces where the meshes will be placed is made easier by the presence of the manipulator, which assists access to the different spaces; this is therefore performed prior to hysterectomy.
Phases of Fixation. The posterior mesh is fixed first and culdoplasty is performed before the mesh is fi xed anteriorly. Low peritonization is then carried out until half of the right peritoneal opening is closed. At this point, the need for Burch colposuspension is assessed.
If the classical technique is desired with suspension of the bladder neck before fi xation of the mesh to the promontory, the meshs are left free until the Burch proce-dure and any vaginal repair are performed. More often, it is fi xed to the promontory; this is followed by peritonization and cervical suspension is then performed in a further step.
7.1 Hysterectomy
Classically, the uterus is left in position to avoid opening the vagina with the risk of infecting the mesh. This technique is possible by the laparoscopic route; the spaces are dissected with sparing of the round ligaments and with the meshs crossed by the broad ligaments. The current trend is to perform total or subtotal hysterectomy. In our experience subtotal hysterectomy has proven better because the vagina is not opened. In the case of total hysterectomy, the vaginal vault is closed in two layers.
As stated above, the essential difference compared with a simple hysterectomy is the chronology of the operating phases. When treating a prolapse, dissection of the rectovaginal and vesicovaginal spaces needs to be performed fi rst, and the uterus is removed only after all these spaces have been dissected.
7.2 Preoperative Antibiotic Prophylaxis
Our patients usually receive preoperative antibiotic prophy-laxis consisting of an injection of a recent generation cephalosporin; this is repeated if the operation takes more than4 hours.
8.0 Operative Technique8.1 Dissection of the Sacral Promontory
The surgical approach to the promontory is best made when the patient is in increased Trendelenburg position after displacing the loops of intestine and fi xing the sigmoid to the abdominal wall. A position between L5-S1 or the upper part of S1 is identifi ed, where the common anterior vertebral ligament can be viewed. The middle sacral artery and vein are exposed and coagulated if necessary. In obese patients or those with a low aortic bifurcation, dissection begins from the left common iliac vein. The promontory is identifi ed by instrumental palpation. After identifying the right ureter and the inferior border of the left common iliac vein, the posterior prevertebral parietal peritoneum is drawn upwards by the assistant and incised vertically towards the right ureter starting from the promontory. Once the peritoneum has been opened,
Fig. 1 Panoramic view of the pelvis.

Manual of Gynecological Laparoscopic Surgery192
Fig. 2 Identifi cation of the right ureter.
Fig. 4 Identifi cation of the various structures at the level of the sacral promontory.
Fig. 3 Incision of the peritoneum at the level of the sacral promontory.
the pneumoperitoneum gas enters the retroperitoneal space, providing an initial dissection. The organs adherent to the posterior plane remain fi xed while movable structures are moved away from the promontory (Figs. 1–4).
8.2 Incision of the Right Lateral Peritoneum
The dissection follows a vertical axis as far as the cul-de-sac of the Douglas pouch. In the course of this dissection, attention should be paid to the internal iliac vein, which is crossed, and to the area of the uterosacral ligament, which is usually diffi cult to dissect. This incision, which is made to enable peritonization of the mesh, must free the ureter. This is mobilized from the peritoneum to gain tissue so that the mesh can later be covered without stretching the ureter.
8.3 Dissection of the Rectovaginal Space
The junction of the uterosacral ligaments with the uterus is divided. The rectum is elevated and at the same time stretched towards the sacrum by the assistant with the aid of intestinal forceps. The peritoneum is put under tension, coagulated and then divided two centimeters above the insertion in the uterus. Dissection continues as far as the posterior vaginal wall which facilitates the access to the rectovaginal junction. Dissection is carried downward remaining in contact with the vagina anteriorly until the perineal body is reached. At this point, dissection is directed laterally towards the pelvic wall where the subobturator area is reached. In this lateral area, the median rectal vessels will be found and can be left intact or coagulated depending on the space available. At this
The technique of hysterectomy is as follows:
Placement of the uterine manipulator
The various phases of dissection are part of the preparation of the bed required for placing the mesh: the vesicovaginal and rectovaginal space.Coagulation and division of the round ligaments and dissection of the lateral vesical spaces. Fenestration of the posterior leaf of the broad ligament.
Integrity of the adnexae may be preserved or not, depending on the patient‘s age. The utero-ovarian ligament, tube and adnexal vessels are coagulated and dissected if the adnexae are to be spared, whereas the lumbo-ovarian ligament is coagulated and dissected if the adnexae are to be removed.
Bladder dissection is taken lower than normal to facilitate placement of the mesh.
8.4 Hysterectomy
point, the surgeon turns again towards the rectum to identify the recto pubic bundles of the levator ani muscles. At the end of the dissection, it is important that the levator ani musc les (pubococcygeus, puborectalis, and iliococcygeus) can be identifi ed. The dissected space is bounded by:
the levator ani muscles and the pelvic wall laterally
the perineal body inferiorly
the vagina anteriorly
the rectum posteriorly (Figs. 5–8).

Manual of Gynecological Laparoscopic Surgery 193
Fig. 5 Dissection of the rectovaginal space.
Fig. 6 Identifi cation of the levator ani muscles.
Fig. 7 Posterior dissection complete.
Fig. 8 Left levator muscles.
Dissection of the posterior leaf of the broad ligament as far as the origin of the uterosacral ligaments.
Identifi cation of the uterine pedicles, which are coagulated with bipolar forceps or ligated with 0 Vicryl®.
Intrafascial dissection with coagulation of the cervico- vaginal vessels. If total hysterectomy is being performed, Halban’s fascia must be identifi ed to allow closure in two planes.
Opening of the vagina through 360° under the guidance of the uterine manipulator.
Extraction of the uterus via the vagina
Two-layer suture of the vagina: the fi rst layer takes only the vaginal mucosa and the second approximates the pericervical fascia. A 0 Vicryl® suture is used. These two layers are essential to protect the mesh against contamination of vaginal origin.
If a subtotal hysterectomy is being performed, the cervix is divided at the level of the isthmus after coagulating the uterine vessels. Division of the cervix can be performed in various ways. We prefer to use a cold knife held in an endoscopic blade holder.
The posterior portion of the mesh is fi xed fi rst.
Once the hysterectomy has been completed, it is convenient to suspend the vagina to the anterior abdominal wall so that the assistant‘s instrument is more readily available for suturing.
Each of the levator ani muscles is included in the suture using Ethibond® 0 on a 30 mm-needle. The mesh is fi xed on both lateral sides. At this point, myorrhaphy is performed; this
should never be total but should rather be a partial closure of the inter-levator hiatus. This closure is more or less complete depending on the situation. It will constitute the low support point where the vagina will be attached. Once the mesh has been stretched between the left-side and right-side puborectalis muscles, the hiatus between the mesh and the vagina is closed by suturing the mesh to the vaginal wall at the level of the perineal body.
8.5 Fixation of the Posterior Mesh

Manual of Gynecological Laparoscopic Surgery194
Fig. 9 Placement of the suture in the right puborectalis muscle.
Fig. 10 The left levator muscle is picked up with the needle.
Fig. 11 Fixation of the mesh on the right.
Fig. 12 Caudal and posterior fi xation is complete.
Fig. 13 Fixation of the posterior mesh to the cardinal ligaments and vagina.
Fig. 14 Boundary of posterior fi xation.
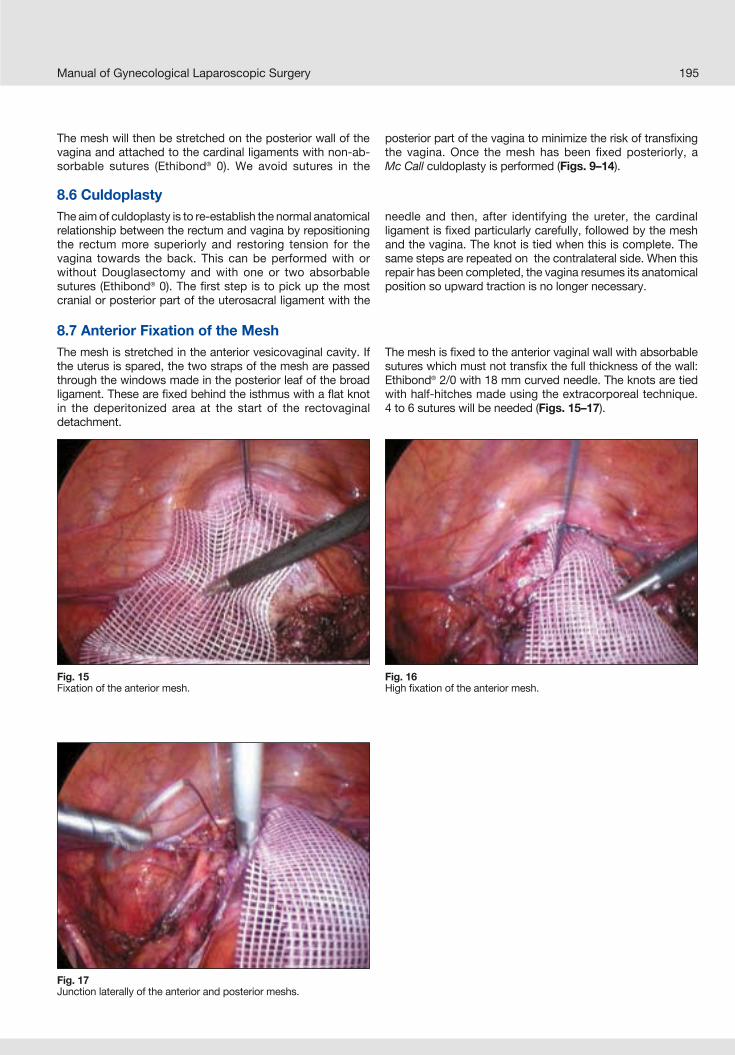
Manual of Gynecological Laparoscopic Surgery 195
Fig. 15 Fixation of the anterior mesh.
Fig. 16 High fi xation of the anterior mesh.
Fig. 17 Junction laterally of the anterior and posterior meshs.
8.6 CuldoplastyThe aim of culdoplasty is to re-establish the normal anatomical relationship between the rectum and vagina by repositioning the rectum more superiorly and restoring tension for the vagina towards the back. This can be performed with or without Douglasectomy and with one or two absorbable sutures (Ethibond® 0). The fi rst step is to pick up the most cranial or posterior part of the uterosacral ligament with the
needle and then, after identifying the ureter, the cardinal ligament is fi xed particularly carefully, followed by the mesh and the vagina. The knot is tied when this is complete. The same steps are repeated on the contralateral side. When this repair has been completed, the vagina resumes its anatomical position so upward traction is no longer necessary.
The mesh will then be stretched on the posterior wall of the vagina and attached to the cardinal ligaments with non-ab-sorbable sutures (Ethibond® 0). We avoid sutures in the
posterior part of the vagina to minimize the risk of transfi xing the vagina. Once the mesh has been fi xed posteriorly, aMc Call culdoplasty is performed (Figs. 9–14).
8.7 Anterior Fixation of the Mesh The mesh is stretched in the anterior vesicovaginal cavity. If the uterus is spared, the two straps of the mesh are passed through the windows made in the posterior leaf of the broad ligament. These are fi xed behind the isthmus with a fl at knot in the deperitonized area at the start of the rectovaginal detachment.
The mesh is fi xed to the anterior vaginal wall with absorbable sutures which must not transfi x the full thickness of the wall: Ethibond® 2/0 with 18 mm curved needle. The knots are tied with half-hitches made using the extracorporeal technique.4 to 6 sutures will be needed (Figs. 15–17).

Manual of Gynecological Laparoscopic Surgery196
8.8 Low Peritonization At vaginal level the purpose of the peritonization is to exclude the mesh from the abdominal cavity, placing the bladder over the prosthesis. The surgeon begins with a 0 Vicryl® suture with 30 mm curved needle in the prevesical peritoneum, then the bladder pillar, the lateral vaginal peritoneum and then the
inner margin of the lateral incision. Using the same suture, this procedure is repeated on the right side. A series of half-hitches tie the purse string to close the peritoneum and provide suspension of the bladder (Figs. 18–19).
8.10 High Peritonization The mesh must be completely retroperitoneal in position. A continuous suture joins the outer and inner layers of the lateral peritoneal incision. We use a 0 Monocryl suture with30 mm curved needle. The smoothness of this suture makes
for ease of suturing. An adequate number of half-hitches is used for closure.These steps conclude the anterior part. It may also be necessary to open the space of Retzius (Figs. 22–23).
8.9 Sacral ColpopexySacral colpopexy involves fi xing the anterior and posterior portions of the mesh to the promontory or anterior vertebral ligament with two sutures of Ethibond® and a 30 mm-curved needle or with staples or Tacker®.
The needle must remain discernable by transparency including only the fi brous layer of the aponeurosis to reduce to a minimum the risk of spondylodiscitis.
Once the sutures have been placed, slight traction is applied to confi rm that they are anchored fi rmly.
The mesh needs to be fixed in position. When all the corrections have been made, the mesh will be stretched on the promontory and fi xed at this level. The surgeon’s experience is extremely important at this point (Figs. 20–21).
Fig. 18 Start of low peritonization.
Fig. 19 End of low peritonization.
Fig. 20 Placement of the suture in the promontory.
Fig. 21 Fixation of the mesh to the promontory.

Manual of Gynecological Laparoscopic Surgery 197
8.11 Opening the Space of RetziusIn the case of a transperitoneal approach, the procedure begins with identifi cation of the landmarks:
Pubis
Cooper’s ligament
Superior margin of the bladder dome where the urachus originates
The peritoneum is incised above the bladder dome. The incision must be horizontal, from one umbilical artery to the other. The assistant applies downward traction to the peritoneum using forceps, while the surgeon draws the plane vertical with the right hand and incises it with monopolar scissors held in the left hand.
The urachus is coagulated and transected while the surgeon proceeds along a vertical plane towards the abdomin al wall. The umbilico-prevesical aponeurosis must be passed
to penetrate the space of Retzius. This space is completely avascular and is dissected with simple divergent traction. The pneumoperitoneum aids in opening the space. Remaining in contact with the aponeurosis, a series of tissue layers must be passed until the fatty tissues anterior to Cooper‘s ligament indicate that the superior boundary of the space of Retzius is reached.
Cooper’s ligament is localized bilaterally. At this point, the space of Retzius is easily opened down to the tendinous arc of the pelvic fascia. The dissection must reach the obturator foramina.
The vaginal walls are palpated with the aid of a finger placed in the vagina. The bladder margin is highlighted by the presence of a vein running along it, which must then be carefully separated from the vagina appearing pearly white (Figs. 24–25).
Fig. 22 High peritonization.
Fig. 23 Peritonization completed.
Fig. 24 Identifi cation of the upper border of the bladder.
Fig. 25 Space of Retzius.

Manual of Gynecological Laparoscopic Surgery198
8.12 Paravaginal Repair The positive pressure of the pneumoperitoneum allows visualization of the paravaginal defect which is nearly always present with high-grade prolapse. It appears as a herniation between the vaginal wall and the tendinous arc of the pelvic fascia. If there is indeed a paravaginal hernia, the defect
is closed using separate stitches or a running suture of Ethibond® 0 on a 18 mm-needle. This suture should run from the pubo-urethral ligaments anteriorly to the ischial spine posteriorly. Repair can be uni- or bilateral.
8.13 Burch Colposuspension Following this repair, colposuspension is performed. The suture employed is Ethibond® 3.5 (0) with a 26 mm needle.
The suture passes through Cooper’s ligament from above downwards and then through the vagina from within outwards, ensuring that the full thickness of the wall is not transfi xed. Transfi xion of the vagina must be wide enough to
preserve a certain degree of fi rmness. In the event of bleeding after the fi rst passage, an X suture can be placed. In the case of promontory fi xation, a single suture per side is placed and the tension is reduced. Where paravaginal repair has also been performed, this will necessitate hypercorrection of the cervical suspension.
8.14 PeritonizationThis must always be performed in full. The aim is to prevent loops of intestine from becoming trapped in the space of Retzius. We use Vicryl® 0 with a 46 mm curved needle. Closure is achieved with three passes from right to left and we join this to the high and low peritonization with half-hitches.
9.0 Final Procedures9.1 Uterine Morcellation
10.0 Postoperative Care10.1 Antibiotic Therapy
Morcellation is required in the case of subtotal hysterectomy. We use the Rotocut Morcellator (KARL STORZ, Tutt lingen, Germany). The uterus, which is normally small, is cut into strips 10 mm in diameter and removed and sent for histological examination.
9.2 Release of Fixation SuturesThe previously suspended intestine is released and hemo-stasis is ensured.
9.3 Peritoneal ToiletThis is best performed with Ringer lactate. Any blood clots are aspirated and careful hemostasis is performed. At the end of the procedure, the Ringer lactate must be completely clear.
9.4 CystoscopyThe ureters are checked repeatedly during the procedure: after hysterectomy, after peritonization and after Burch suspension. These repeated controls make it possible that any iatrogenic injury caused by operating maneuvers can be immediately detected and thus allow for a more accurate repair. The color of the urine and air fi lling the collecting bag are important checks if bladder or ureter injury is suspected.
The role of cystoscopy is controversial. Some authors perform it systematically and others only in case of doubt, but in all cases, the indications should be broad. It will confi rm the patency of the ureter orifi ces and thus ureter integrity.
We do not use this systematically but treat infections only as they are identifi ed and according to the antibiogram.
10.2 Prevention of Postoperative phlebitisAll of our patients receive antithrombotic prophylaxis, which starts on the evening of the operation and continues for 15 days postoperatively.
10.3 Foley CatheterThe catheter is left in for at least 24 hours depending on the patient’s age and mobilization. When it is removed, urinalysis and urine culture are performed routinely and antibiotic therapy is started if necessary.
10.4 Duration of Hospital Stay3 to 5 days
10.5 Postoperative PeriodThe postoperative period should be quiet, avoiding undue effort and excessive weights.
The diet is normal with plentiful hydration to reduce the constipation that is nearly always present in the first 3 postoperative weeks. Sexual activity can be resumed after 6 weeks.

Manual of Gynecological Laparoscopic Surgery 199
11.0 ConclusionsLaparoscopy allows to combine the benefi ts of prolapse repair via laparotomy with the low morbidity of the vaginal approach. Operating times are long initially but in the hands
of expert surgeons, the duration is about 2 hours. Certainly, studies of long-term effi cacy and reliability are still needed to fully assess the value of this technique.
1. AMELINE A, HUGUIER J: La suspension postérieure du disque lombo-sacré : techniques de remplacement des ligaments utéro-sacrés par par voie abdominale.Gynecol Obstet, 1957 ; 56 :94–98
2. RANDALL C: Surgical treatment of vaginal inversion. Obstet Gynecol, 1971;38: 327–332
3. NICHOLS D, MILLEY P: Signifi cance of restauration of vaginal depth and axis. Obstet Gynecol, 1970; 36: 251–255
4. HOFF S, MANELFE A, PORTET R; GIROT C: Promonto-fi xation ou suspension par bandelettes trans versales ? Etude comparée de ces deux techniques dans le traitement des prolapsus génitaux. Ann Chir, 1984 ;38 : 363–367.
5. BAKER KR, BERESFORD JM, CAMPBELL C: Colposacropexy with Prolene Mesh. Gynecol Obstet, 1990; 171: 51–54
6. ROBERT HG: Nouveau traité de techniques chirurgicales gynécologiques. Masson et Cie, 1969, 820 pages, p 128–130.
7. ADDISON WA, LIVENGOOD CH, SUTTON GP, PARKER RT: Abdominal sacral colpopexy withMercilene mesh in the. retroperitoneal position in the management of posthysterectomy vaginal vault prolapse and enterocele. Am J Obstet Gynecol, 1985; 15: 140–146
8. SUTTON JP, ADDISON WA, LIVENGOOD CH, HAMMOND CB: Life threatening hemorrhage complicating sacral colpopexy. Am J Obstet Gynecol 1981; 140 : 836–837
9. CAUBEL P, LEFRANC JP, FOULKES H, PUI A,BLONDON J: Traitement par voie vaginale desprolapsus génitaux récidivés. J Chir, 1989 ; 126 :446–470
10. ADDISON WA, TIMMONS C, WALL LL, LIVENGOOD CH: Failed abdominal sacral colpopexy: observations and recommendations. Gynecol Obstet, 1989; 74: 480–842.
11. QUERLEU D, PARMENTIER D, DELODINANCE P:Premiers essais de la coelio-chirurgie dans le traitement du prolapsus génital et de l’incontinence urinaire d’effort. In : Les troubles de la statiques pelviennes. Blanc., boubli, Baudrant E., D’Ercale C. : 219 pages, Arnette. Paris Ed p 155–158.
12. WATTIEZ A, BOUGHIZANE S, ALEXANDRE F, CANIS M,MAGES G, POULY JL, BRUHAT MA: Laparsocopicprocedures for stress incontinence and prolapse.Current Opinion in Obstetrics and Gynecology. A. DeCherney and Stuart Cambell Editors. 1995, Vol 7, n° 4, 317–21.
13. WATTIEZ A, AIMI G, FINKELTIN F, CANIS M, POULY JL, POMEL C, GERARD CH, MAGE G, BRUHAT MA: Cure chirurgicale des prolapsus velico-uterins par voie coelioscopie exclusive Gunaikeia, 1997, 2, 2, 50–5
14. WATTIEZ A, CUCINELLA G, GIAMBELLI F, MENCAGLIA L: Laparoscopic burch procedure for retropubiccolpo suspension. It J Gynecol Obstet 1997, 9, 3, 114–7.
15. WATTIEZ A, CANIS M, MAGE G, POULY JL, BRUHAT MA:Promontofi xation dans le traitement des prolapsus : intérêt et technique de la voie coelioscopique.Le Journal de Coeliochirugie. 1999, 31, 7–11.
Recommended Reading

Manual of Gynecological Laparoscopic Surgery200
Chapter XVII
Laparoscopic Surgical Staging of Endometrial Carcinoma
Fabrizio Barbieri and Luca Minelli Department of Gynecology and Obstetrics
“Sacro Cuore” General Hospital, Negrar, Italy


Manual of Gynecologic Laparoscopic Surgery 203
extent. For instance, the extent of lymphadenectomy has not yet been defi ned: biopsy of the pelvic and lumbo-aortic lymph nodes, systematic pelvic and lumbo-aortic lymph-adenectomy or removal only of enlarged lymph nodes. If, on the one hand, pelvic and lumbo-aortic lymphadenectomy is essential for correct staging, on the other hand it does not appear to infl uence overall survival (at present there is only one meaningful scientifi c study published by Kilgore et al in 1995 that supports the therapeutic value of LND).
As stated above, the operative staging procedure usuallyincludes total extrafascial hysterectomy, bilateral adnexec-tomy, intraperitoneal exploration / cytological washing and lymphadenectomy. In the majority of cases, pelvic lymphade-nectomy is suffi cient; however, the lumbo-aortic lymph nodes would be removed in the following situations: positive pelvic lymph nodes, ovarian metastases and clear cell or serous papillary histological type. For many authors, intraoperative pathological assessment can provide guidance on whether to go ahead with lymphadenectomy particularly based on infi ltration of the myometrium.
During the past 10 years numerous studies have assessed the value of the laparoscopic approach as compared to traditional laparotomy in the staging and treatment of endo-
metrial carcinoma. Laparoscopy has been shown to be capable of implementing all steps of the surgical staging system in accordance with the FIGO guidelines.
Numerous studies have shown that with laparoscopic surgery the incidence of postoperative complications such as pyrexia, paralytic ileus and wound infection is reduced; the duration of hospitalization is also reduced with an early return to normal activity.
The fi rst study of laparoscopic treatment of endometrial carci-noma was published in 1990. In the following period, various authors demonstrated the feasibility of laparoscopic surgic al staging taking into account potential limiting factors related to patient (anatomy, body mass index, presence of adhesions) and surgeon (experience and training) factors. Subsequently, a single randomized study with a short follow-up period reported that laparotomy and laparoscopy were equivalent in terms of overall survival and disease-free survival.
In recent years, therefore, entirely laparoscopic or vaginally assisted laparoscopic surgical staging has become more and more widespread for the first stages of endometrial carcinoma. Obviously, it is extremely important for the surgeon to have a profound knowledge of both laparoscopy and gynecologic oncology.
2.0 Preoperative Management When endometrial carcinoma is suspected clinically, usually because of abnormal uterine bleeding, it must be confi rmed by endometrial histology. Where endometrial biopsy cannot be performed in an outpatient setting because of stenosis of the cervical canal or poor patient compliance, it must be carried out under general anesthesia.
Although they are insuffi cient for diagnosis, gynecological examination and transvaginal ultrasound must be performed to rule out concomitant adnexal pathology.
Cytological examination of the endocervix and ectocervix can exclude the presence of cervical pathology.
Given the confi rmed diagnosis of endometrial carcinoma, the next step is to determine the extent of the disease so
that the correct surgical management and any adjunctive therapy can be planned. In 80% of cases, there is no clinic al evidence of extrauterine disease so the only tests needed are chest radiograph and routine preoperative labora tory tests. However, transvaginal ultrasound and/or MRI scan are useful for assessing myometrial infi ltration and can indicate cases at risk of metastatic spread. If the liver function tests are altered or advanced-stage disease is suspected, imaging procedures such as MRI, computed tomography (CT) and abdominal and pelvic ultrasound can be useful in tracing metastases. In patients with characteristic symptoms of disease in certain organs, cystoscopy, contrast enema, cerebral CT or bone scan may be necessary.
3.0 Surgical TechniqueIn the majority of cases, total laparoscopic extrafascial hysterectomy with bilateral adnexectomy and pelvic lymph-adenectomy is suffi cient. In a few cases, radical laparoscopic hysterectomy may be indicated (Figs. 1–12 and Tab. 1).

Manual of Gynecological Laparoscopic Surgery204
Fig. 1 Laparoscopic incision of the vaginal wall.
Fig. 2 External iliac artery and vein. External iliac lymph nodes.
Fig. 3 Internal iliac lymph nodes located medial to the external iliacvessels.
Fig. 4 Sampling of an internal iliac lymph node.
Fig. 5 The external iliac artery and vein, and the internal iliac lymph nodes. The internal iliac artery is visible.
Fig. 6 After sampling the lymph nodes the external iliac artery and vein,the uterine artery and internal iliac artery can be localized.

Diagram 1 Exposure and occlusion of the uterine artery by coagulation at its origin, the anterior division of the internal iliac artery.
Manual of Gynecological Laparoscopic Surgery 205
Fig. 7 The uterine vessels are distinct anatomical landmarks that highlight the boundary between the paravesical space anteriorly and the pararectal space posteriorly.
Fig. 8 The ureter can be followed laterally as far as the pelvis where it crosses the uterine artery.
Fig. 9 The ureter can be skeletonized safely.
Fig. 10 Opening the rectovaginal space between the cul-de-sac and the uterosacral ligaments.
Fig. 11 Coagulation of the origin of the uterine artery with bipolar forceps.
Internal iliac artery(hypogastric artery)
Ureter
Obturator vesselsUterine artery

Manual of Gynecological Laparoscopic Surgery206
4.0 ConclusionsThe problems emphasized most frequently with the laparo-scopic approach are:
Peritoneal Dissemination
Thanks to the studies by Vergote and Possover, it has been demonstrated fully that there is no significant statistical difference between laparotomy and laparoscopy with regard to the incidence of positive peritoneal cytology. It should be stressed that in both series the uterine manipulator was not used and the tubes were coagulated at the start to avoid intraoperative dissemination. Finally, it has been shown that positive peritoneal cytology on its own is not an unfavorable prognostic factor.
Recurrence in the Vaginal Vault
Numerous studies have shown that there is no increase in vaginal vault recurrence in patients with laparoscopically staged endometrial cancer.
Laparoscopic Port-site Metastases
Recurrence at the port-site following laparoscopic surgery has been described for all types of gynecologic cancers, even in patients with early disease. The incidence has not yet been accurately assessed because surgeons often do not achieve long-term patient follow-up and this type of recurrence is often considered to be of little prognostic value in the presene of concomitant distant metastases. In the literature, the incidence is 2.3% with gynecologic carcinomas and as regards endometrial cancer, a recent review reports 4 cases of port-site metastasis in patients with laparoscopically staged endometrial carcinoma. Numerous hypotheses about promoting factors have been proposed: the pneu-moperitoneum, carbonic anhydride, the “pathway effect”, the local immune system, the surgical technique and also trocar contamination. It is essential to emphasize that there is nothing at present to explain whether the cause of these metastases is linked to the particular aggressiveness of the tumor or to laparoscopic surgery per se.
Some authors report a reduced incidence of port-site metas-tases with peritoneal closure and/or surgical repair of the incision site.
1. BEREK J, HACKER NF: Practical gynecologic oncology. Third edition 2000. Ed Lippincott Williams and Wilkins. Philadelphia
2. BENEDET JL, BENDER H, JONES H, NGAN HY, PECORELLI S: FIGO staging classifi cations and clinical practise guidelines in the management of gynecologic cancer. Int J Gynecol Obstet 2000, 70:209–62
3. RAMIREZ PT, FRUMOVITZ M, WOLF JK, LEVENBACK C: Laparoscopic port-site metastases in patients with gynecological malignancies. Int J gynecologicalmalignancies 2004, 14:1070–7
4. VAISBUCH E, DGANI R, BEN-ARIE A, HAGAY Z: The role of laparoscopy in ovarian tumors of low malignant potential and early-stage ovarian cancer. Obstet Gynecol Surv. 2005 May;60(5):326–30
5. AGOSTINI A, ROBIN F, JAIS JP, AGGERBECK M,VILDE F, BLANC B, LECURU F: Peritoneal closure reduces port site metastases. Surg Endosc 2002,16:289-91
6. KILGORE LC, PARTRIDGE EE, ALVAREZ RD, et al:Adenocarcinoma of the endometrium: Survivalcomparisons of patients with and without pelvic node sampling. Gynecol Oncol 1995, 56:29-33
Recommended Reading

Chapter XVIII
Laparoscopic Pelvic and Lumbo-aortic Lymphadenectomy
Fabrizio Barbieri and Luca Minelli Department of Gynecology and Obstetrics
“Sacro Cuore” General Hospital, Negrar, Italy


Manual of Gynecologic Laparoscopic Surgery210
Fig. 3 The external iliac vessels are excised to the level of the deepcircumfl ex iliac vein.
Fig. 4 Identifi cation of the origin of the uterine artery.
Fig. 5 Dissection of the prevesical space.
Fig. 6 Exposure of the external iliac vessels from the lateral pelvic wall.
Fig. 7 En bloc removal of the external iliac lymph nodes.
Fig. 8 Removal of the obturator lymph nodes.

Manual of Gynecologic Laparoscopic Surgery 211
5.2 Lumbo-aortic Lymphadenectomy
6.0 Sentinel Lymph Node
Surgical landmarks:
1. round ligament (antero-superfi cial)2. infundibulo-pelvic ligament ( medial superfi cial)3. genitofemoral nerve (lateral and medial)4. external iliac vessels (lateral and medial)5. obliterated or blind umbilical artery (caudal and medial)6. Cooper’s ligament (deep caudal and lateral)7. uterine artery (medial)8. ureter (medial)9. obturator muscle (dorsomedial)10. internal iliac vessels (superfi cial dorsal)11. lumbosacral plexus (deep dorsal)
A retroperitoneal approach has also been described. This would have certain advantages for exposure of the operative fi eld because the bowel is within the peritoneum and because of the reduced incidence of adhesions (a major advantage especially in patients who must have radio therapy) but at the expense of a greater incidence of lympho cele, which can be reduced by opening the peritoneum of the paracolic gutters at the end of the operation.
The fi rst surgeon is at the patient’s right to remove the left para-aortic lymph nodes, and at the left to remove the right-sided and pelvic nodes.
Following creation of the CO2 pneumoperitoneum, an 11 mm umbilical port is placed, with three 6-mm ports in the right and left iliac and suprapubic regions, and another 11-mm port in the left hypochondrium, which is used to apply traction to the bowel and to extract the lymph nodes with an endobag.
Lymphadenectomy begins in the right para-aortic region by making an incision in the peritoneum covering the uppermost part of the ipsilateral iliac artery.
The video camera is orientated so that the aorta and inferior vena cava appear horizontal with the inferior vena cava above
The sentinel lymph node is the fi rst node in the lymphatic system draining lymph from the primary tumor. If this lymph node is not invaded by metastasis, all other lymph nodes should be tumor-negative. The sentinel lymph node can be identifi ed by peritumor injection of blue dye, which usually stains the first draining lymph node, or by a peri tumor injection of a radioactive tracer (e.g., techne tium 99), which diffuses and accumulates in the sentinel lymph node where it can be visualized with a gammacamera.
Sentinel lymph node sampling can be indicated in the case of malignant melanoma, breast cancer and carcinoma of the vulva. The procedure can be performed laparos copically for surgical staging of other gynaecologic tumors such as endometrial and cervical cancer. In early-stage cervical carcinoma, in particular, biopsy sampling of the sentinel lymph node allows frozen section analysis for determination of the lymph node status. The metastasic status of the SN can help to triage patients between radiochemotherapy or radical hysterectomy, thus reducing morbidity and post-operative hospitalization.
Left lumbar lymph nodes: above, lateral to and belowthe aorta
Intermediate lymph nodes: between the aorta and the inferior vena cava
Right lumbar lymph nodes: above, lateral to and below the inferior vena cava
the aorta. The ureter is localized and pushed laterally. The precaval and paracaval lymph nodes are dissected starting to the right of the common iliac artery and continuing as far as the right ovarian vein using bipolar forceps. If the lymph nodes are positive or there is right ovarian cancer, the lymph-adenectomy is extended as far as the renal vessels.
For dissection to the left of the aorta, the camera is rotated through 180° and the fi rst surgeon stands at the patient’s right side. After identifying the ipsilateral ureter and inferior mesenteric artery and elevating the mesosigmoid – being careful to preserve the superior hypogastric plexus – the left para-aortic, presacral and common iliac lymph nodes are removed (inframesenteric lymphadenectomy). In the case of left ovarian carcinoma, the lymphadenectomy is extended as far as the left renal vein, removing the entire infundibulo- pelvic ligament as far as its origin but sparing the inferior mesenteric artery.
In patients at high risk of lymph node recurrence or with ovarian tumors, the lymphadenectomy is extended to the region between the aorta and the inferior vena cava as far as the renal vessels (infrarenal lymphadenectomy).

Manual of Gynecologic Laparoscopic Surgery212

Chapter XIX
Complications inLaparoscopic Surgery
Leopoldo Carlos Videla Rivero and Beatrice Videla Rivero
Callao Surgical InstituteBuenos Aires, Argentina


Manual of Gynecological Laparoscopic Surgery216
Fig. 3Assessment of intra-abdominal pressure by applying cephalic tractionto the anterior abdominal wall.
Fig. 2Safety test performed with syringe and normal saline.
Fig. 4Introduction of the fi rst intra-umbilical trocar.
As in ablative laparoscopic surgery, it is essential to restore the anatomical conditions as much as possible and to place sutures appropriately. In surgery for infertility, the use of microsurgical techniques is highly important.
The fi rst laparoscopic access merits a separate paragraph. This is the step in laparoscopic surgery that requires particular care. Creation of the fi rst port can be accomplished by establishing the pneumoperitoneum with the Veress needle and using the open laparoscopy technique, with direct insertion of the abdominal trocar or by use of a specifi c optical trocar that allows constant visual control. However, all of these techniques involve the inherent risk of complications. Those, associated with the fi rst laparoscopic access are the risk of perforating or injuring vessels or organs during entry and the possibility of a viscus remaining incarcerated in the incision during removal which entails a postoperative wound hernia.
Although the fi rst laparoscopic access route offers various alternatives, the surgeon’s choice is often influenced by
a few subjective aspects. There is no single answer to the question which of the given options in terms of technique could be “best” for the laparoscopic approach: the best surgical technique is the one the surgeon is familiar with and the best surgical maneuver is the one that he controls best. The surgeon should have a good command of the technique to be applied. Besides, there are further aspects that should be considered: the way how the technique is performed, the surgeon’s experience with the technique, conviction of its surgical usefulness, its choice and safety in performing it, and fi nally the personal competences and aspects of technical feasibility as related to the infrastructure available.
The technique that is most universally employed and accepted in gynecologic laparoscopic surgery, especially in Europe, is the one with the Veress needle, which is followed by the classical safety maneuvers, intra-umbilical incision and introduction of a trocar with a conical tip. Introduction of the accessory trocars for the instruments is carried out under visual control (Figs. 1–9).
Fig. 1Introduction of the Veress needle.

Manual of Gynecological Laparoscopic Surgery 217
Fig. 5Removal of the conical trocar with the cannula left in place.
Fig. 6Insertion of the laparoscope with coupled video camera.
a b
Figs. 7a–cSequence showing the passage of the laparoscope through the fi rst trocar under visualcontrol.
c
Figs. 8a–cSequence demonstrating the insertion of the second trocar. This is always performed under visual control.
a b c


The Ibero-American Gynecologic Endoscopy Society SIAEGI in 2002 on the occasion of its IX Congress in Quito, Ecuador collected the Latin American records of laparoscopic compli-cations in Argentina and Chile (Tab. 6).
Manual of Gynecological Laparoscopic Surgery 219
As institutional and personal publications, we present a few case series with the percentage of complications. In some cases the complications that occurred are listed (Tab. 7–11).
copies performed by surgeons at different levels of training/ stages of the learning curve, with an incidence of 381 complications (2.06%) (Tab. 5), 54 of which were reported as potentially lethal (0.29%).
Extraperitoneal insufflation 118 Hematoma of the abdominal wall 80 Vascular injury 72 Infection 34 Postoperative bleeding 21 Connected with anesthesia 16 Urologic injury 14 Intestinal injury 10 Transitory nerve paralysis 5 Pericholecystitis 3 Hematoma of the vaginal vault 3 Hyperthermia (48 h) 2 Chemical peritonitis (dextran) 2 Hypothermia 1
Total complications 381 (2.06%)
Tab. 5Argentine Laparoscopic Surgery Society.
Argentina5,183 cases 42 complications 0.81% (LC Videla Rivero)
Chile2,140 cases 16 complications 0.74% (C Miranda)
Tab. 6Ibero-American Gynecologic Endoscopy Society SIAEGI.
1 injury of the aorta 1 injury of the ureter 1 injury of the bladder 1 postoperative hemorrhage + brachial plexus 1 immunologic peritonitis (dextran) 1 nerve compression with paresis of the lower limb 1 pericholecystitis 1 injury of the ileum (fistula) 1 hematoma of the vault
Surgical laparoscopies 2,401Complications 10 (0.42%)
Tab. 7LC Videla Rivero Private Gynecology Service.
Surgical laparoscopies 2,500Total complications 38 (1.5%)Major complications 0.25%Death or serious consequences 0
Tab. 11Gynecology Service, Lagomaggiore Hospital, Mendoza, Argentina.
2 injuries of the aorta (first trocar) 3 injuries of the ureter or bladder 3 injuries of the intestine 1 related to anesthesia 1 intraoperative hemorrhage 1 epigastric artery hemorrhage 5 postoperative
Surgical laparoscopies 2,140Complications 16 (0.74%)
Tab. 10University of Chile Hospital Clinic, Santiago de Chile.
Surgical laparoscopies 2.711Complications 28 (1.03%)
Tab. 8Gynecology Service, University of Buenos Aires Hospital Clinic, Argentina.
3 postoperative hemorrhages 2 at the vaginal vault, hysterectomy 1 from the myomectomy bed
1 intestinal injury first trocar
3 injuries of the bladder 1 during Burch suspension 1 during hysterectomy 1 during myomectomy
2 vascular injuries 1 first trocar, mesenteric artery 1 epigastric vein, second port
1 fistola uretero-vaginale during radical hysterectomy
Surgical laparoscopies 1,261Complications 10 (0.79%)
Tab. 9Gynecology Service of Private Institute specializing in Endoscopic Surgery, Buenos Aires, Argentina.


Manual of Gynecological Laparoscopic Surgery 221
Figs. 10 a–dSequence demonstrating iatrogenic injury of the aorta during introduction of the fi rst trocar (immediate conversion) in 1995.c d
a b
Figs. 11a–c Sequence demonstrating accidental injury of the right ureter during endometrioma removal, 1987.
ca b
Figs. 12 a–c Sequence demonstrating iatrogenic injury to the external iliac artery during surgery for deep endometriosis, 2004.
ba c

Manual of Gynecological Laparoscopic Surgery222
Intraoperative complications
3 injuries of the bladder in 1996, 1997 and 2004, the fi rst during total hysterectomy, the second during a Burch suspension. Dealt with in all cases by laparoscopic suture and indwelling catheter in the postoperative period. Good recovery (Fig. 13).
1 uterine hemorrhage in 1993 during laparoscopic hysterectomy. Due to nonavailability of bipolar forceps, the injury was repaired laparoscopically by hemostatic suture of the left uterine artery. Good recovery (Fig. 14).
1 hypotension of anesthetic origin
Postoperative complications
1 injury common peroneal nerve (lateral popliteal sciatic nerve) with paresis of the right lower limb for 3 months. Occurred in 1990 following excision of a large myoma by colpotomy and consequent compression. The patient made a full recovery (Fig. 15).
1 pericholecystitis in 1991 following rupture of a dermoid cyst and spillage of its contents in the peritoneal cavity. The patient presented with an acute abdomen in the right hypochondrium known as pericholecystitis. The complication resolved with simple medical treatment (Fig. 16).
1 chemical peritonitis in 1998. In conservative adnexal surgery, it is customary to leave dextran in the peri-toneal cavity to prevent the formation of adhesions. This high molecular weight polymer can provoke a peritoneal reaction known as chemical peritonitis. It was treated by laparoscopy with aspiration of 10 l ascitic fluid and lavage with saline. The patient made a good recovery (Figs. 17–18).
1 injury of the ileum in 2003 which turned into an ileal fistula on the second postoperative day. After laparo-tomy, the patient made a good recovery.
1 umbilical herniation in 1994. A week after laparo-scopy when the sutures were being removed, the patient had umbilical herniation with prolapse of the omentum. The umbilical hernia was repaired after resection of the omentum and the patient made a good recovery.
Figs. 13 a, bSequence demonstrating iatrogenic injury of the bladder, injection of methylene blue and suture, 1994. a
Figs. 14 a, bSequence demonstrating bleeding from the left uterine artery during hysterectomy, 1993. a
b
b

Manual of Gynecological Laparoscopic Surgery 223
Figs. 15 a, bSequence demonstrating iatrogenic injury of the sciatic nerve during extraction of myoma via colpotomy, 1993.a b
Figs. 16 a, bSequence demonstrating pericholecystitis after rupture of a dermoid cyst, 1993.a b
Figs. 17 a, bSequence demonstrating a patient with dextran in the peritoneal cavity, 1988.a b
Fig. 18Second-look laparoscopy in the patient with chemical peritonitis due to dextran, 1988.


Manual of Gynecological Laparoscopic Surgery 225
The following is a module which is used on the www.endo-gin.net website to classify and document the complications that can occur in laparoscopic surgery. The specifi c aim of the module is to simplify data collection. It can also form part of a multicenter project for collecting data via the Internet,
in which individuals, teams, institutions and scientific associations can participate. When the data have been collected according to our module, it will be possible to have precise qualitative and quantitative consistency regarding the incidence of complications according to time and place.
9.0 Module for Recording Data on Complications inGynecologic Endoscopic Surgery (endogin.net)
Diagnosis of the complication
During surgeryDuring hospitalizationAfter discharge� Within 3 days� After 3 days
Importance of the complication
major, potentially lethalminor
Resolution of the complication
phase of resolution� immediate� deferredroute of resolution� laparoscopy� hysteroscopy� laparotomy� vaginalsurgical team� same team� with gynecologic consultation� with multidisciplinary consultation� with a different teamhospital admission� in the same place as the surgery
� normal� intensive therapy
� transferred to a different center� of greater complexity� immediate� deferred
re-operation� number� route of operation
� laparoscopic� hysteroscopic� laparotomy� vaginal� radiologic
procedure performed� description
� electrosurgery� burns
� light source and laparoscope� burns
� various� CO2
� operating lamp� electrical equipmentType of complication
Site of the complicationAnesthesiological� related to the anesthesia itself� related to the surgical procedure
Related to the access route� laparoscopic� hysteroscopica� THL� laparotomy� vaginal
Related to the surgical procedure� hemorrhage
� without blood transfusion� with blood transfusion
� infection� general
septicemiaperitonitis
� localsurgical woundurinary
� collectionabdominalpelvicretroperitoneal
� mechanical injury� ileus� torsion� adhesion� obliteration
� traumatic injury� perforation� division� laceration� electrosurgical injury
Operating room and instruments� operating table
� nerve compression� joint injuries� muscle injuries� stretching of plexuses
Abdominal wall� emphysema� hematoma� infection� eventration
Urinary� ureter� bladder
Vascular� small vessels� large vessels
Neural� plexuses
� motor� sensory� sympathetic� parasympathetic
� nerves
Intestinal� stomach� intestine� colon
Uterine� perforation� synechiae� hematometra� pyometra� metrorrhagia
Tubes� section� removal
� unilateral� bilateral
Ovary� removal
� unilateral� bilateral
Progress of the complication
without consequenceswith consequences
� slight� moderate, interfering with ordinary life� disabling� type of consequence� description
lethal
Analysis of the complication
Description

Manual of Gynecological Laparoscopic Surgery226
Recommended Reading
To sum up, it can be concluded that complications exist and are inherent in surgical practice. In laparoscopic surgery there are complications specific to this technique. The complications are usually due to a sum of factors, which should be analyzed and discussed even if this often appears to be diffi cult for surgeons. We must accept the idea that it is essential to communicate our complications in order to contribute to a better knowledge of them. Classifi cation and an appropriate record of these events will improve under-standing. The best way to prevent complications is surgical
knowledge of how they can be avoided. However, the best treatment of complications is intraoperative.
From 1998 to 2005 in the gynecology service of the Callao Surgical Institute in Buenos Aires, the complication rate was 10/1261 (0.79%) and the rate of major complications was 3/1261 (0.23%). In a French multicenter study, the percentages were similar, with 0.89% for complications in general and 0.22–0.34% for major ones. A few studies have reported higher percentages.
10.0 Conclusions
1. BARBOSA C: Manual Ilustrado de Cirurgia Videolapa-roscopica em Ginecologia Texto e atlas. 1998; Cap 10, Livraria e Editora RevienteR Ltda.
2. BATEMAN BG, KOLP LA, HOEGER K: Complications of laparoscopy-operative and diagnostic. Fertility andSterility 1996; 66: 30–35.
3. BONGARD F, DUBECZ S, KLEIN S: Complications of therapeutic laparoscopy. Current Problems in Surgery 1994: 862–924
4. CANDIANI M, CANIS M, LUCIANO A, MARANA R, MENCAGLIA L, WATTIEZ A, ZUPI E: Testo Atlante di Chirugia Laparoscopica in Ginecologia. 1997; Cap.7.1, Poli industria Chimica SpA. Edicione fuori commercio. Mosby Doyma Italia Srl. Milano, Italia
5. CHAPRON CM, PIERRE F, LACROIX S, QUERLEU D, LANSAC J, DUBUISSON J-B: Major vascular injuries during gynecologic laparoscopy. J Am Coll Surg 1997; 185:461–65.
6. GARRY R, PHILLIPS G: How safe is the laparoscopic approach to hysterectomy? Gynaecological Endoscopy 1995, 4:77–79.
7. GARRY R, PHILLIPS G: How safe is the laparoscopic approach to hysterectomy? Gynaecological Endoscopy. 1995; 4:77–79.
8. HASSON HM: Open laparoscopy as a Method of Access in Laparoscopic Surgery. Gynaecological Endoscopy, 1999; 8:353–62
9. HASSON HM: Open laparoscopy: In Gynecology and Obstetrics, J.J. Sciarra, Ed., Harper & Row, Philadelphia, 1992, Vol. 6, Ch.44, p.1–8.
10. HILL DJ: Complications of the laparoscopic approach. Bailliers Clin Obstet Gynaecol 1994; 8:865–79.
11. LEHEMANN-WILLENBROCK E, RIEDEL HH, MECKE H AND SEMM K: Pelviscopy/Laparoscopy and its Compli-cations in Germany, 1949-1988; The Journal of Repro-ductive Medicine 37(8): 671–677, Ref 10, Ago 1992.
12. LIU C.Y: Laparoscopic Hysterectomy and Pelvic Floor Reconstruction. 1996; Cap 15, Blackwell Science Inc.
13. MENEIRO M, MELOTTI G, MOURET PH: CirugíaLaparoscopica. 1996; Cap2:34–38, Editorial Médica Panamericana.
14. MIRANDA CS, CARVAJAL A: Complication of operative Gynecological Laparoscopy. Journal SocietyLaparoscopic Surgeons 2003 Jan-Mar; 7(1):53–8.
15. NEZHAT C, CHILDERS J, NEZHAT F, NEZHAT C.H, SEIDMAN D.S: Major retroperitoneal vascular injury during laparoscopic surgery. : Hum-Reprod. 1997 Mar; 12(3): 480–3
16. NORDESTGAARD AG, BODILY KC, OSBORNE RW, BUTTORFF JD: Mayor vascular injuries during laparoscopic procedures. The American Journal of Surgery 1995; 169: 543–545
17. PETERSON HB, HULKA JF, PHILLIPS JM: American Asociation of Gynecoligic Laparoscopists’ 1988 Menbership Survey on Operative Laparoscopy. The Journal of Reproductive Medicine, 586–598.
18. Primera Cátedra de Ginecologia, Hospital de Clínicas Universidad de Buenos Aires: Memoria anual de 1994
19. QUERLEU D: y col. (conversiones) Gynecol. Endosc. 2:3–6, 1993.
20. QUERLEU D, CHAPRON C: Complications ofgynecologic laparoscopic surgery. Current Opinion in Obstetrics and Gynecology 1995, 7: 257–261
21. SADEGHI-NEJAD H, KAVOUSSI LR, PETERS CA: Bowel injury in open technique laparoscopic cannula placement. Urology 1996; 43:559–60.
22. SARROUF J: Complicaciones en Laparoscopia- 2002, XIV Congreso Peruano de Obstetricia y Ginecologia Lima, Perú en: Docencia, www.endogin.net.
23. SEMM K: Cutting versus conical tip designs Endosc-Surg-Allied-Technol. 1995 Feb; 3(1): 39–47
24. TERNAMIAN A M: Laparoscopy without trocars. Surg-Endosc. 1997 Aug; 11(8): 815–8
25. VANCAILLIE TG: Active electrode monitoring. How to prevent unintentional thermal injury associated with monopolar electrosurgery at laparoscopy. Surg-Endosc. 1998 Aug; 12(8): 1009–12
26. VIDELA RIVERO LC. ORTIZ J: Encuesta sobre Compli-caciones en Cirugía Laparoscopica. Revista de la Socie-dad Argentina de Cirugía Laparoscopica. 1995, 2: 16–21
27. VIDELA RIVERO LC: Base de datos de Complicaciones en Endoscopia Ginecológica 2005, www.endogin.net.

Recommended Setfor Gynecological Laparoscopic Surgery
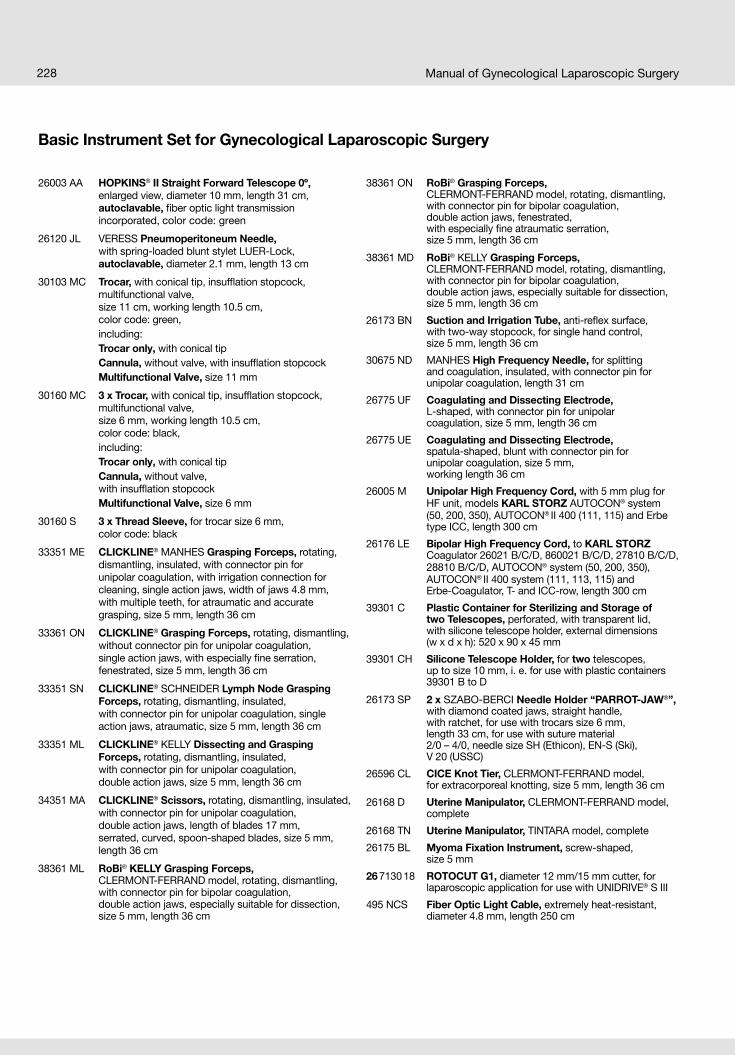
Manual of Gynecological Laparoscopic Surgery228
Basic Instrument Set for Gynecological Laparoscopic Surgery
26003 AA HOPKINS® II Straight Forward Telescope 0º, enlarged view, diameter 10 mm, length 31 cm,autoclavable, fi ber optic light transmissionincorporated, color code: green
26120 JL VERESS Pneumoperitoneum Needle,with spring-loaded blunt stylet LUER-Lock,autoclavable, diameter 2.1 mm, length 13 cm
30103 MC Trocar, with conical tip, insuffl ation stopcock,multifunctional valve, size 11 cm, working length 10.5 cm,color code: green,
including: Trocar only, with conical tip Cannula, without valve, with insuffl ation stopcock Multifunctional Valve, size 11 mm
30160 MC 3 x Trocar, with conical tip, insuffl ation stopcock,multifunctional valve,size 6 mm, working length 10.5 cm,color code: black,
including: Trocar only, with conical tip Cannula, without valve,
with insuffl ation stopcock Multifunctional Valve, size 6 mm
30160 S 3 x Thread Sleeve, for trocar size 6 mm, color code: black
33351 ME CLICKLINE® MANHES Grasping Forceps, rotating,dismantling, insulated, with connector pin forunipolar coagulation, with irrigation connection for cleaning, single action jaws, width of jaws 4.8 mm,with multiple teeth, for atraumatic and accurategrasping, size 5 mm, length 36 cm
33361 ON CLICKLINE® Grasping Forceps, rotating, dismantling, without connector pin for unipolar coagulation, single action jaws, with especially fi ne serration, fenestrated, size 5 mm, length 36 cm
33351 SN CLICKLINE® SCHNEIDER Lymph Node GraspingForceps, rotating, dismantling, insulated,with connector pin for unipolar coagulation, singleaction jaws, atraumatic, size 5 mm, length 36 cm
33351 ML CLICKLINE® KELLY Dissecting and GraspingForceps, rotating, dismantling, insulated, with connector pin for unipolar coagulation,double action jaws, size 5 mm, length 36 cm
34351 MA CLICKLINE® Scissors, rotating, dismantling, insulated, with connector pin for unipolar coagulation, double action jaws, length of blades 17 mm, serrated, curved, spoon-shaped blades, size 5 mm,length 36 cm
38361 ML RoBi® KELLY Grasping Forceps, CLERMONT-FERRAND model, rotating, dismantling, with connector pin for bipolar coagulation, double action jaws, especially suitable for dissection, size 5 mm, length 36 cm
38361 ON RoBi® Grasping Forceps,CLERMONT-FERRAND model, rotating, dismantling, with connector pin for bipolar coagulation,double action jaws, fenestrated, with especially fi ne atraumatic serration,size 5 mm, length 36 cm
38361 MD RoBi® KELLY Grasping Forceps, CLERMONT-FERRAND model, rotating, dismantling, with connector pin for bipolar coagulation, double action jaws, especially suitable for dissection, size 5 mm, length 36 cm
26173 BN Suction and Irrigation Tube, anti-refl ex surface,with two-way stopcock, for single hand control,size 5 mm, length 36 cm
30675 ND MANHES High Frequency Needle, for splittingand coagulation, insulated, with connector pin for unipolar coagulation, length 31 cm
26775 UF Coagulating and Dissecting Electrode,L-shaped, with connector pin for unipolar coagulation, size 5 mm, length 36 cm
26775 UE Coagulating and Dissecting Electrode,spatula-shaped, blunt with connector pin forunipolar coagulation, size 5 mm,working length 36 cm
26005 M Unipolar High Frequency Cord, with 5 mm plug for HF unit, models KARL STORZ AUTOCON® system (50, 200, 350), AUTOCON® II 400 (111, 115) and Erbe type ICC, length 300 cm
26176 LE Bipolar High Frequency Cord, to KARL STORZ Coagulator 26021 B/C/D, 860021 B/C/D, 27810 B/C/D, 28810 B/C/D, AUTOCON® system (50, 200, 350),AUTOCON® II 400 system (111, 113, 115) andErbe-Coagulator, T- and ICC-row, length 300 cm
39301 C Plastic Container for Sterilizing and Storage oftwo Telescopes, perforated, with transparent lid,with silicone telescope holder, external dimensions (w x d x h): 520 x 90 x 45 mm
39301 CH Silicone Telescope Holder, for two telescopes,up to size 10 mm, i. e. for use with plastic containers 39301 B to D
26173 SP 2 x SZABO-BERCI Needle Holder “PARROT-JAW®”, with diamond coated jaws, straight handle,with ratchet, for use with trocars size 6 mm, length 33 cm, for use with suture material2/0 – 4/0, needle size SH (Ethicon), EN-S (Ski),V 20 (USSC)
26596 CL CICE Knot Tier, CLERMONT-FERRAND model,for extracorporeal knotting, size 5 mm, length 36 cm
26168 D Uterine Manipulator, CLERMONT-FERRAND model, complete
26168 TN Uterine Manipulator, TINTARA model, complete
26175 BL Myoma Fixation Instrument, screw-shaped, size 5 mm
26 7130 18 ROTOCUT G1, diameter 12 mm/15 mm cutter, for laparoscopic application for use with UNIDRIVE® S III
495 NCS Fiber Optic Light Cable, extremely heat-resistant, diameter 4.8 mm, length 250 cm


Manual of Gynecological Laparoscopic Surgery230
30103 MC Trocar, with conical tip, insuffl ation stopcock,multifunctional valve,size 11 cm, working length 10.5 cm,color code: green,
including: Trocar only, with conical tip Cannula, without valve,
with insuffl ation stopcock Multifunctional Valve, size 11 mm
330160 MC Trocar, with conical tip, insuffl ation stopcock,multifunctional valve,size 6 mm, working length 10.5 cm,color code: black,
including: Trocar only, with conical tip Cannula, without valve,
with insuffl ation stopcock Multifunctional Valve, size 6 mm
30160 S Thread Sleeve, for trocar size 6 mm, color code: black
Trocars and AccessoriesSize 6 mm, 11 mm


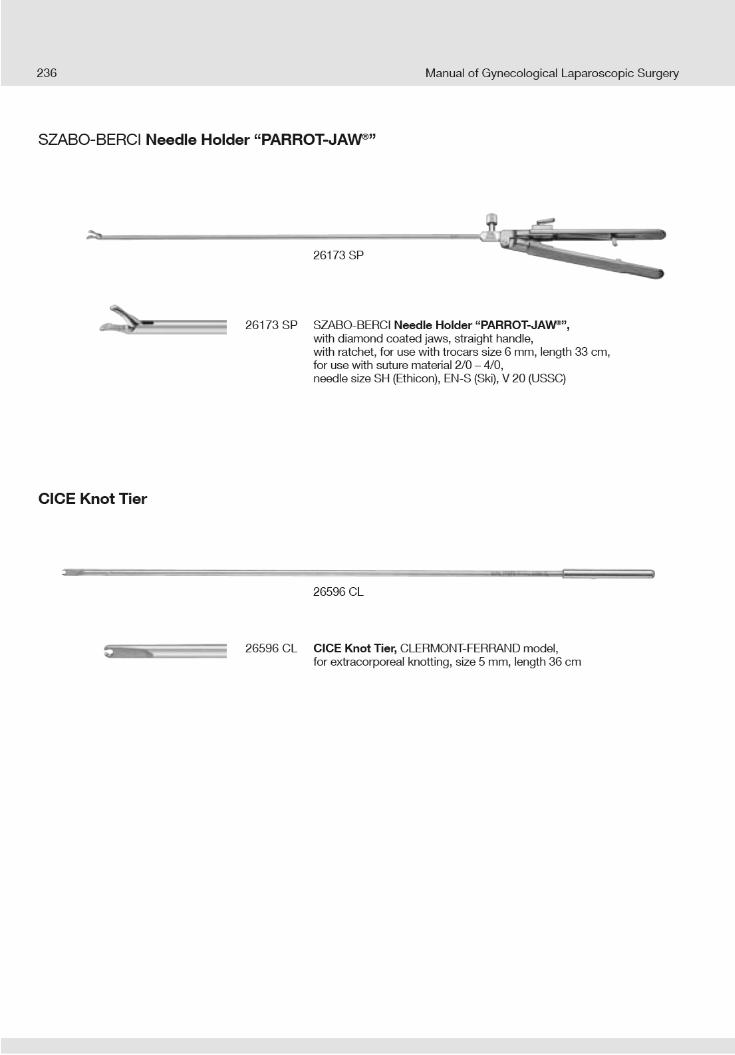


Manual of Gynecological Laparoscopic Surgery238
Myoma Fixation Instrument
26175 BL Myoma Fixation Instrument, screw-shaped, size 5 mm
26175 BL
TINTARA Uterine Manipulator
26168 TN TINTARA Uterine Manipulator, complete including: Handle Working Insert, size 4.0 mm,
length 50 mm Working Insert, size 4.5 mm,
length 50 mm Working Insert, size 4.8 mm,
length 80 mm Tube Support
26168 TN
26168 TNB
26168 TND
26168 TNF
26168 TNC
Optional Accessories:
26168 TNF Working Insert, size 4 mm, length 40 mm, for use with 26168 TN
26168 TNS Pertubation Tube, with LUER-Lock Tube Connector 600008
26168 V Uterine Tenaculum Forceps, length 22 cm
n
n

Manual of Gynecological Laparoscopic Surgery 239
ROTOCUT G1 Morcellator
26 7130 18 ROTOCUT G1, diameter 12 mm/15 mm cutter,for laparoscopic application, for use with UNIDRIVE® S III
including: 1x Hollow shaft motor 1x Obturator, with blunt tip, diameter 12 mm
1x Same, diameter 15 mm 1x Trocarbush, askew, diameter 12 mm
1x Same, diameter 15 mm 1x Handle, laparoscopic 1x Cutter, laparoscopic, diameter 12 mm
1x Same, diameter 15 mm 1x Protective cap, diameter 12 mm
1x Same, diameter 15 mm 1x Motor valve, diameter 12 mm
1x Same, diameter 15 mm 1x Sealing cap, for single use, 10 pieces 1x CLICKLINE® Tenaculum Forceps, diameter 12 mm
1x Same, diameter 15 mm 1x Spacer, package of 5 pcs
Maintenance and care of the motor components (Rotocut G1, EC-motor),must be carried out with the universal spray 280052 B+C).Please order separately.

Manual of Gynecological Laparoscopic Surgery240
26 7130 80 Cleaning Adaptor with cone adaption for cleaning pistol for fast and easy manual rinsing or drying of hollow shaft motor ROTOCUT G1 26 7130 30
26 7130 81 Cleaning Adaptor with LUER-Lock connector for cleaning machine for fast and easy mechanically rinsing of hollow shaft motor ROTOCUT G1 26 7130 30
Manual Cleaning
Machine Cleaning
AccessoriesCleaning Adaptor for ROTOCUT G1

Manual of Gynecological Laparoscopic Surgery 241
39510 G Wire Tray System for ROTOCUT G1, for cleaning, sterilization and storage of one ROTOCUT G1 Morcellator system,
including:Base TrayUpper TrayLidExternal dimensions (w x d x h): 535 x 250 x 210 mm(ROTOCUT G1 articles not included)
AccessoriesTray system for cleaning, sterilization and storage of ROTOCUT G1 Morcellator system for laparoscopic use.
39510 GA Bottom Level to wire tray system 39510 G(forceps level), external dimensions (w x d x h): 535 x 250 x 100 mm(ROTOCUT G1 articles not included)
39510 GB Upper Level to wire tray system 39510 G (motor level), external dimensions (w x d x h): 535 x 250 x 100 mm(ROTOCUT G1 articles not included)
39510 GL Lid for wire tray system 39510 G,with handles, external dimensions (w x d): 530 x 250 mm(can be mounted either on Base Tray or on Upper Tray)
Special features: � Ensures a suitable, validated reprocessing of the ROTOCUT G1
morcellator system� Combined or separate use of trays� Lid with opening for cleaning adaptor � Mechanical cleaning and disinfection is facilitated by cleaning ports � Safe transport and handling during routine use in the OR and CSSD (Central Sterile Supply Department)� Protection of the whole ROTOCUT G1 system during transportation, cleaning and storage

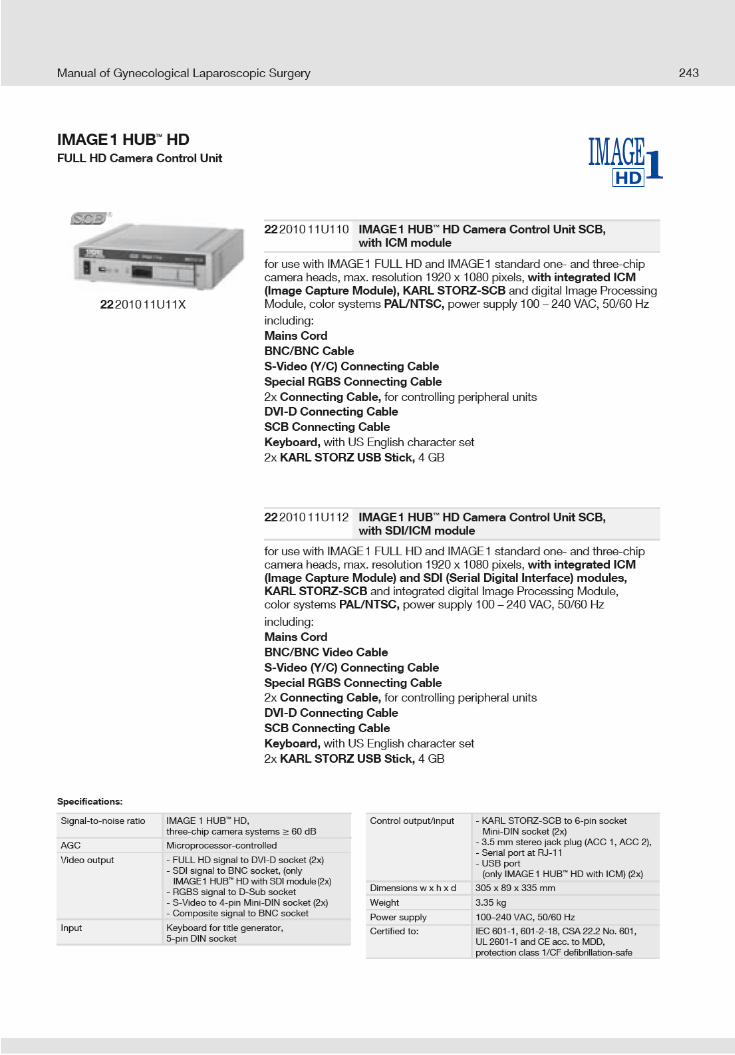
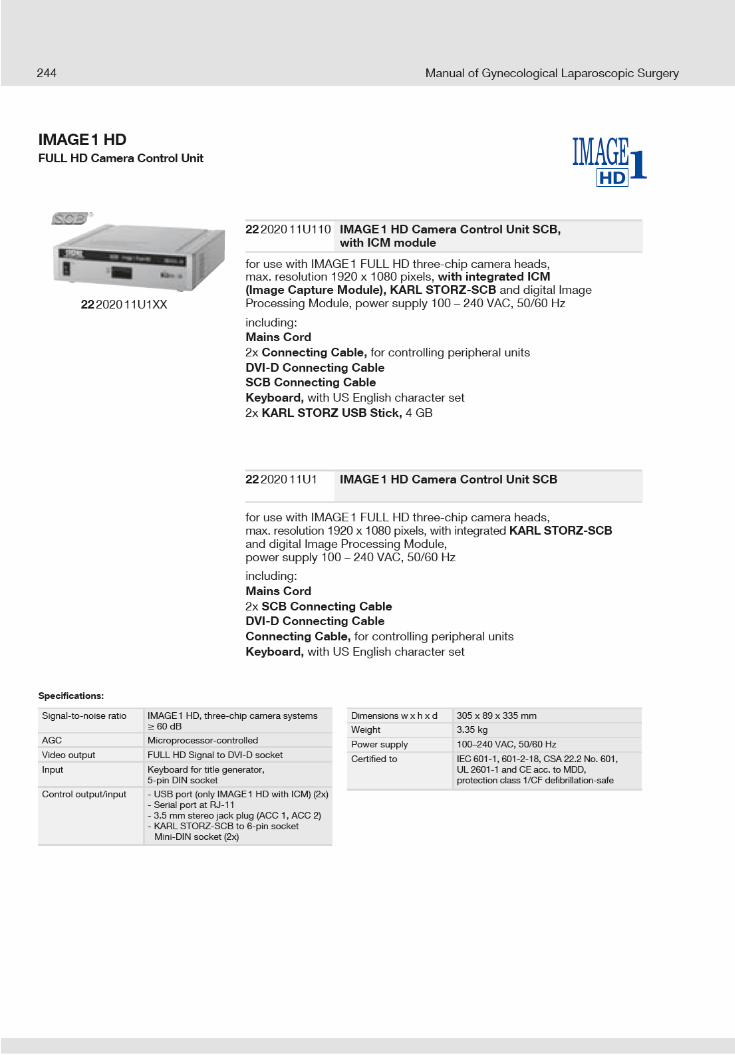

Manual of Gynecological Laparoscopic Surgery 245
IMAGE 1 HUB™ HDFULL HD Camera Heads
22 2200 55-3
22 2200 55-3 50 Hz IMAGE 1 H3-Z60 Hz Three-Chip FULL HD Camera Head
max. resolution 1920 x 1080 pixels, progressive scan, soakable,gas- and plasma-sterilizable, with integrated Parfocal Zoom Lens,focal length f = 15 – 31 mm (2x),2 freely programmable camera head buttons
IMAGE 1 FULL HD Camera Heads
50 Hz
60 Hz
Image sensor
Pixel output signal H x V
Dimensions (w x h x l)
Weight
Optical interface
Min. sensitivity
Grip mechanism
Cable
Cable length
H3-Z
22 2200 55-3 (50/60 Hz)
–
3x 1/3" CCD chip
1920 x 1080
39 x 49 x 114 mm
270 g
integrated Parfocal Zoom Lens,f = 15-31 mm (2x)
F 1.4/1.17 Lux
standard eyepiece adaptor
non-detachable
300 cm
Specifications:
IMAGE1 FULL HD Camera Heads
50/60 Hz
Image sensor
Pixel output signal H x V
Dimensions (w x h x l)
Weight
Optical interface
Min. sensitivity
Grip mechanism
Cable
Cable length
H3-P
22 2200 56-3 (PAL/NTSC)
3x 1/3" CCD chip
1920 x 1080
35 x 47 x 88 mm
226 g
pendulum system,fi xed focus f = 16 mm
F 1.4/1.17 Lux
standard eyepiece adaptor
non-detachable
300 cm
Specifications:
22 2200 56-3
22 2200 56-3 50 Hz IMAGE 1 H3-P Three-Chip60 Hz FULL HD Pendulum Camera Head
with pendulum system and fi xed focus, max. resolution 1920 x 1080pixels, progressive scan, soakable, gas- and plasma-sterilizable,focal length f = 16 mm, 2 freely programmable camera head buttons, for use with color systems PAL/NTSC
For use with IMAGE 1 HUB™ HD Camera Control Unit SCB 22 2010 11U1xx and IMAGE1 HD Camera Control Unit SCB 22 2020 11U1xx
n

Manual of Gynecological Laparoscopic Surgery246
IMAGE 1 HUB™ HDFULL HD Camera Heads – autoclavable
n
22 2200 61-3
22 2200 61-3 50 Hz IMAGE 1 H3-ZA60 Hz Three-Chip FULL HD Camera Head
autoclavable, max. resolution 1920 x 1080 pixels, progressive scan, soakable, gas- and plasma-sterilizable, with integrated Parfocal Zoom Lens, focal length f = 15 – 31 mm (2x), 2 freely programmable camera head buttons, for use with color systems PAL/NTSC
IMAGE 1 FULL HD Camera Heads
50 Hz
Image sensor
Pixels output signal H x V
Dimensions (w x h x l)
Weight
Optical interface
Min. sensitivity
Grip mechanism
Cable
Cable length
H3-ZA
22 2200 61-3 (50/60 Hz)
3x 1/3" CCD chip
1920 x 1080
39 x 49 x 100 mm
299 g
integrated Parfocal Zoom Lens,f = 15-31 mm
F 1.4/1.17 Lux
standard eyepiece adaptor
non-detachable
300 cm
H3-FA
22 2200 60-3 (50/60 Hz)
3x 1/3" CCD chip
1920 x 1080
39 x 49 x 93 mm
261 g
fi xed focus f = 17 mm
F 1.4/1.17 Lux
standard eyepiece adaptor
non-detachable
300 cm
Specifications:
For use with IMAGE 1 HUBTM HD Camera Control Unit SCB 22 2010 11-1xx andIMAGE 1 HD Camera Control Unit SCB 22202011-1xx
22 2200 60-3 50 Hz IMAGE 1 H3-FA60 Hz Three-Chip FULL HD Camera Head
autoclavable, max. resolution 1920 x 1080 pixels, progressive scan, soakable, gas- and plasma- sterilizable, fi xed focus,focal length f = 17 mm, 2 freely programmable camera head buttons, for use with color systems PAL/NTSC22 2200 60-3
39301 Z3TS Plastic Container for Sterilization and Storageof camera heads IMAGE1 H3-Z, H3-ZA and H3-FA, autoclavable, suitable for use with steam, gas andhydrogen peroxide sterilization, Sterrad® compatible,external dimensions (w x d x h): 385 x 255 x 75 mm
39301 PHTS Plastic Container for Sterilization and Storageof camera heads IMAGE1 H3-P and H3-ZI,autoclavable, suitable for use with steam, gas and hydrogen peroxide sterilization, Sterrad® compatible,external dimensions (w x d x h): 385 x 255 x 75 mm
Please note: The instrument displayed is notincluded in the plastic container.
Only camera heads marked “autoclave” can beplaced in the tray for steam sterilization.
Please note: The instrument displayed is not included in the plastic container.
Only camera heads marked “autoclave” can beplaced in the tray for steam sterilization.
n


Manual of Gynecological Laparoscopic Surgery250
Electronic CO2-ENDOFLATOR with KARL STORZ SCB
26 4305 08-1 Electronic CO2-ENDOFLATOR SCB including: Electronic CO2-ENDOFLATOR®
with KARL STORZ SCBpower supply: 100 – 240 VAC, 50/60 Hz
Mains Cord Silicone Tubing Set, sterilizable Universal Wrench SCB Connecting Cable, length 100 cm * CO2/N2O-Gas Filter, sterile, for single use,
package of 10
Subject to the needs of the customer, additional accessories must be ordered and acquired separately.
Please note: For fully utilizing maximum insuffl ation capacity ofthe Electronic ENDOFLATOR® SCB the use ofKARL STORZ HiCap® Trocars is recommended.For additional information see catalog LAPARO SCOPY.
*) This product is marketed by mtp.For additional information, please apply to:mtp medical technical promotion gmbh, Take-Off Gewerbepark 46,D-78579 Neuhausen ob EckE-mail: [email protected]
26 4305 20-1


Manual of Gynecological Laparoscopic Surgery252
20 53520x-12x AUTOCON® II 400with KARL STORZ SCB
including: Mains Cord SCB Connecting Cable, length 100 cm
AUTOCON® II 400 SCB
20 535201-125 AUTOCON® II 400 High-End, Set SCB,power supply 220 - 240 VAC, 50/60 Hz,HF connecting sockets: Bipolar combination,Multifunction, Unipolar 3-pin + Erbe,Neutral electrode combination 6.3 mm,jack and 2-pin, System requirements:SCB R-UI Software, Release 20090001-43 or higher
including: AUTOCON® II 400 with KARL STORZ SCB
Mains Cord SCB Connecting Cable, length 100 cm
Cold Light Fountain XENON 300 SCB
20 133101-1 Cold Light Fountain XENON 300 SCBwith built-in antifog air-pump, and integrated KARL STORZ Communication Bus System SCBpower supply:100 –125 VAC/220 –240 VAC, 50/60 Hz
including: Mains Cord Silicone Tubing Set, autoclavable, length 250 cm SCB Connecting Cable, length 100 cm20133027 Spare Lamp Module XENON
with heat sink, 300 watt, 15 volt20133028 XENON Spare Lamp, only,
300 watt, 15 volt
Fiber Optic Light Cable
495 NCS Fiber Optic Light Cable,with straight connector, extremely heat-resistant,diameter 4.8 mm, length 250 cm


Manual of Gynecological Laparoscopic Surgery 255
Recommended Accessories for Equipment Cart
29005 KKM Special Power Cord,length 100 cm,with IEC-plug and socket,with UL-approval,for usage with isolation transformer29005 TBG and 29003 TBK
29005 KKM
29005 TBG Isolation Transformer, 2000 VA, with 8 IEC-sockets, 8 potential earth connectors,230 VAC (50/60 Hz)
29005 TBG
29003 IW Earth Leakage Monitor,for mounting at equipment cart,for usage with isolation transformer29005 TBG and 29003 TBK
29003 IW
29005 MZD Monitor Holding Arm,height and side adjustable,swiveling and tilting,centrally mountable, swivel range 190°,overhang 300 mm,load capacity max. 15 kg, with monitor fi xation VESA 75/100,for usage with equipment cart 29005 DRB
29005 MZD


Manual of Gynecological Laparoscopic Surgery258
Notes: