manual for Pace DS810XE - User Guide - English DS810XE_(502-1008122)
41
DS810 HIGH DEFINITION DIGITAL-RECEIVER
Transcript of manual for Pace DS810XE - User Guide - English DS810XE_(502-1008122)

DS810 HIGH DEFINITION DIGITAL-RECEIVER
502-1008123
DS810XE Germ/Fre Manual.q 12/6/06 3:34 pm Page 1

ELECTRICAL INFORMATION (UK AND EIRE ONLY)
Mains plug and its fuse
The supplied mains plug is a non-rewireable type. If you need to replace the fuse, you must use an ASTA- or BSI-approved BS 1362 fuse, rated at 3 A and marked as shown below.
or
The plug has its fuse beneath a fuse cover on its face. Use a screwdriver to lever off the fuse cover, replace the fuse with a new one and refit its cover. Never use a plug if its fuse cover is missing.
AM
The fuse is inside the rewireable plug. Use a screwdriver to remove the plug’s back cover. Never put the plug into the mains socket when its cover is removed. Lever out the fuse and replace it with a new one. Replace the plug’s back cover.
3 AMP
LN
E
FUSE of correct value
WARNING
If the supplied mains plug is not suitable for your mains socket-outlet, DO NOT plug it in. Remove its fuse and then cut the plug off the lead. Destroy the severed plug immediately to avoid the shock hazard which would exist if this were to be plugged into a mains socket.
Fit an appropriate mains plug on the lead. If this plug contains a fuse, it should be as described left. If you are using a non-fused plug, an external fuse must not exceed 5 A.

�
Contents
Recommendations. . . . . . . . . . . . . . . . . . . . . . . . . . . . . . .2Environmental.issues. . . . . . . . . . . . . . . . . . . . . . . . . . . . .2Copyright.notices. . . . . . . . . . . . . . . . . . . . . . . . . . . . . . . .2Using.equipment.safely. . . . . . . . . . . . . . . . . . . . . . . . . .3Connecting.to.the.mains.supply. . . . . . . . . . . . . . . . . .3Your.set-top.box’s.front.panel . . . . . . . . . . . . . . . . . . . .4Your.set-top.box’s.rear.panel . . . . . . . . . . . . . . . . . . . . .5Connecting.your.set-top.box. . . . . . . . . . . . . . . . . . . . .6
High-definition (HD) video connections . . . . . . . . . 6Standard-definition (SD) video connections . . . . . 7Audio connections . . . . . . . . . . . . . . . . . . . . . . . . . . . . . . 8LNB and mains connections . . . . . . . . . . . . . . . . . . . . . 8
Inserting.your.remote.control’s.batteries. . . . . . . . . .9Replacing the batteries in your remote control . . 9
Switching.on.your.set-top.box. . . . . . . . . . . . . . . . . . . .9Switch-on channel setting . . . . . . . . . . . . . . . . . . . . . . 9
Opening.the.CI-module.door. . . . . . . . . . . . . . . . . . . �0Using.a.CI.module . . . . . . . . . . . . . . . . . . . . . . . . . . . . . �0Your.set-top.box.tomorrow. . . . . . . . . . . . . . . . . . . . . �0Setting.up.your.set-top.box . . . . . . . . . . . . . . . . . . . . �0
Language screen . . . . . . . . . . . . . . . . . . . . . . . . . . . . . . 10Resolution settings screen . . . . . . . . . . . . . . . . . . . . . 11Reception screen . . . . . . . . . . . . . . . . . . . . . . . . . . . . . . 12Network scan . . . . . . . . . . . . . . . . . . . . . . . . . . . . . . . . . . 13
Using.your.remote.control . . . . . . . . . . . . . . . . . . . . . �4Daily use . . . . . . . . . . . . . . . . . . . . . . . . . . . . . . . . . . . . . . . 14Occasional use . . . . . . . . . . . . . . . . . . . . . . . . . . . . . . . . . 14Remote control buttons . . . . . . . . . . . . . . . . . . . . . . . . 15
TV.and.radio.channels. . . . . . . . . . . . . . . . . . . . . . . . . . �6Changing.channel . . . . . . . . . . . . . . . . . . . . . . . . . . . . . �6What.are.Favourite.channels? .. .. .. .. .. .. .. .. .. .. .. .. .. .. .. .. .. .. �6What.is.the.Channel.List?. . . . . . . . . . . . . . . . . . . . . . . �7
Using the Channel List . . . . . . . . . . . . . . . . . . . . . . . . . 17Viewing channel information . . . . . . . . . . . . . . . . . . 17
Using.the.Zapping.Window . . . . . . . . . . . . . . . . . . . . �8Navigating around . . . . . . . . . . . . . . . . . . . . . . . . . . . . . 19Symbols and codes that display . . . . . . . . . . . . . . . . 19Showing information . . . . . . . . . . . . . . . . . . . . . . . . . . 19Displaying Options . . . . . . . . . . . . . . . . . . . . . . . . . . . . . 19Favourite Channels in the Zapping Window . . . . 19Removing the Zapping Window . . . . . . . . . . . . . . . 19
Using.the.EPG.. . . . . . . . . . . . . . . . . . . . . . . . . . . . . . . . . 20Navigating around the EPG Grid . . . . . . . . . . . . . . . . 20Symbols and codes that display . . . . . . . . . . . . . . . . 21Showing information . . . . . . . . . . . . . . . . . . . . . . . . . . 21Choosing a programme to watch . . . . . . . . . . . . . . 21Removing the EPG Grid . . . . . . . . . . . . . . . . . . . . . . . . 21
Using.the.Options.Window. . . . . . . . . . . . . . . . . . . . . 22Using.the.Main.menu. . . . . . . . . . . . . . . . . . . . . . . . . . 23
Using the settings screens . . . . . . . . . . . . . . . . . . . . . 23Displaying Help . . . . . . . . . . . . . . . . . . . . . . . . . . . . . . . . 23
The.Setup.Menu. . . . . . . . . . . . . . . . . . . . . . . . . . . . . . . 24CI-module . . . . . . . . . . . . . . . . . . . . . . . . . . . . . . . . . . . . . 24System . . . . . . . . . . . . . . . . . . . . . . . . . . . . . . . . . . . . . . . . 24Software update . . . . . . . . . . . . . . . . . . . . . . . . . . . . . . . 24Antenna . . . . . . . . . . . . . . . . . . . . . . . . . . . . . . . . . . . . . . . 24TV settings . . . . . . . . . . . . . . . . . . . . . . . . . . . . . . . . . . . . . 24Digital Audio Output . . . . . . . . . . . . . . . . . . . . . . . . . . . 24Factory reset . . . . . . . . . . . . . . . . . . . . . . . . . . . . . . . . . . . 24
Using.the.Setup.menu . . . . . . . . . . . . . . . . . . . . . . . . . 24Displaying the Setup menu . . . . . . . . . . . . . . . . . . . . 25Viewing CI module Information . . . . . . . . . . . . . . . . 25Viewing System information . . . . . . . . . . . . . . . . . . . 25Updating the software . . . . . . . . . . . . . . . . . . . . . . . . . 25Changing antenna settings . . . . . . . . . . . . . . . . . . . . 25Changing the TV settings . . . . . . . . . . . . . . . . . . . . . . 26Changing the digital-audio output settings . . . . 28Resetting your set-top box . . . . . . . . . . . . . . . . . . . . . 28
Using.the.other.menus. . . . . . . . . . . . . . . . . . . . . . . . . 29Types of scan . . . . . . . . . . . . . . . . . . . . . . . . . . . . . . . . . . 29Carrying out a network scan . . . . . . . . . . . . . . . . . . . 29Organising your Favourites . . . . . . . . . . . . . . . . . . . . . 30Selecting the switch-on channel . . . . . . . . . . . . . . . 31Changing the display settings . . . . . . . . . . . . . . . . . . 31Changing the local time setting . . . . . . . . . . . . . . . . 32Choosing a language . . . . . . . . . . . . . . . . . . . . . . . . . . 32
Updating.the.software. . . . . . . . . . . . . . . . . . . . . . . . . 33Using the menus to update the software . . . . . . . 33
Troubleshooting. . . . . . . . . . . . . . . . . . . . . . . . . . . . . . . 34HDCP.content.protection . . . . . . . . . . . . . . . . . . . . . . 37Technical.specification. . . . . . . . . . . . . . . . . . . . . . . . . 38
General . . . . . . . . . . . . . . . . . . . . . . . . . . . . . . . . . . . . . . . . 38Rear-panel connectors . . . . . . . . . . . . . . . . . . . . . . . . . 38Front-panel connector . . . . . . . . . . . . . . . . . . . . . . . . . 38
2
Please follow the instructions in this manual carefully to enjoy all the advantages of high-definition (HD) digital television. We advise following the user instructions and recommendations supplied with your set-top box, especially for first-time use.
Your set-top box fully complies with international DVB (Digital Video Broadcasting) standards. In order to view programmes broadcast in high-definition, you must connect your set-top box to a suitable HDtV or computer monitor. (this is why the menus and screens sometimes refer to an HD device.) Your set-top box is also compatible with standard-definition televisions and VCRs equipped with a sCARt connector.
RECOMMEnDaTIOnSSTORaGEIf your set-top box is not used directly after purchase, it can be stored in its original packaging, in a cool dry place, at a temperature between –25 °C and +55 °C . Before use, wait until your set-top box has reached room temperature .
MaInTEnanCEBefore cleaning, always disconnect the mains power from your set-top box and disconnect the LNB input . To clean your set-top box, dust with either a clean dry cloth, or one that has been slightly dampened with distilled water . Never use detergents of any kind .
COPYRIGHT.nOTICESThis document is copyrighted and may not, in whole or part, be copied, photocopied, reproduced, translated or reduced to any electronic or machine-readable form without prior consent in writing from Pace Micro Technology plc .
© Pace Micro Technology 2006 . All rights reserved .
Pace and are trademarks and/or registered trademarks of Pace Micro Technology plc .
The set-top box software includes certain open-source software . Open-source software is licensed to you on the licence terms of the applicable licensor, available to view at:
http://www .pacemicro .com/opensource/DS810XE
EnVIROnMEnTaL.ISSUESPackaging - When disposing of this product packaging, please ensure that it is recycled
This will reduce the demand for virgin wood pulp, whilst diverting material that would otherwise end up in landfill .
set-top Box Recycling - Do not dispose of this product with your domestic rubbish
At the end of its useful life, this product contains materials that, when processed correctly, can be recovered and recycled . By participating in the responsible recycling of this product, you will be reducing the requirement for new raw materials and reducing the amount of material that would otherwise end up in landfill .
When you purchase a new, similar product your retailer may offer to take this old one from you . Alternatively, you can take it to your local recycling centre . Your retailer or local municipal authority will advise you of the collection facilities available in your area for waste electronic products . Use of this service will be free to you .
IntRoDuCtIon

3
ImPoRtAnt
USInG.EqUIPMEnT.SaFELYYour set-top box has been manufactured to meet international safety standards, but you must take care to operate it safely .
It is important that you read these safety instructions .
WARnInG: Remember that contact with AC mains can be lethal or can cause severe electric shock. to avoid the risk of electric shock:
Never remove the top cover from your set-top box as there are high-voltage live parts inside . There are no user-serviceable parts inside your set-top box .
On the rear panel of your set-top box there is a tamper-evident label that states ‘Warranty void if broken or removed’ .
Make sure all electrical connections are properly made .
Do not connect any equipment to the mains supply until you have properly connected all the other leads .
Disconnect your set-top box from the mains supply (by disconnecting its mains lead from the mains socket on the wall) before you disconnect any other equipment from its rear panel .
Never push anything into holes, slots or other openings in the case (except a CI module into the slot provided, and only when you are requested to do so) .
CAutIon:
Do not use or store your set-top box in hot, cold, damp or dusty places .
Do not block the ventilation holes of your set-top box . Leave a gap of at least 5 cm above and around it to allow for adequate ventilation . Never stand it on soft furnishings .
Do not put anything on your set-top box which might drip or spill into it . Never stand objects filled with liquids, such as vases, on top of your set-top box .
Do not place your set-top box in an unventilated cabinet or on top of a unit which emits heat (e .g . a VCR) .
Never place naked flame sources, such as lighted candles, on top of your set-top box .
COnnECTInG.TO.THE.MaInS.SUPPLY• Your set-top box operates with a 230 V AC, 50 Hz
mains supply .
• Do not connect your set-top box to any supply other than this .
• The supplied mains lead has a 2-way connector at one end and a mains plug at the other . You should always insert the 2-way connector into your set-top box before you insert the plug into the mains supply .
• The only way to disconnect your set-top box from the mains is to remove the mains lead . Your set-top box must therefore be installed near to the mains socket-outlet, which should be easily accessible .
• If you are in any doubt about the mains lead, its plug or its connection, consult a competent electrician .
• Please follow the instructions in the following sections, which guide you through connecting and setting it up .
• See also pages 14 and 15, which describe your set-top box’s remote control .

4
YOUR.SET-TOP.bOx’S.FROnT.PanEL
U.D.(arrow.buttons).To display the Zapping WindowTo highlight the previous or next item in a list or on-screen menu
L R.(arrow.buttons).To move to the left and the right through on-screen menus, lists or itemsTo change settings on the screens
OK.To display the on-screen channel listTo confirm a choiceTo save settings
EPG.button.To display the EPG (Electronic Programme Guide)
ExIT.button.To remove the EPG or channel list from the screen
LED.display.- shows the current time when your set-top box is in standby- shows the channel number when tuned to a TV or radio channel
Standby.button.(S).To switch your set-top box on and off
Indicator.lightRed = in standbyBlue = switched on and out of standby
CI-module.doorPush to open door to access the CI-module slot .See page 10 for details
Before you start installing your set-top box, please check you have the following items:
Your Pace set-top box;
Your remote control;
1 SCART lead;
1 HDMI lead;
1 mains lead;
2 ‘AA’ batteries for the remote control .
note: the front panel of your set-top box is covered with a protective clear plastic film.
You should carefully remove this film before using your set-top box.
IR.RECEIVE.lightRed - flashes when your set-top box is receiving a signal from your remote control
YouR PACe set-toP Box
5
YouR PACe set-toP Box
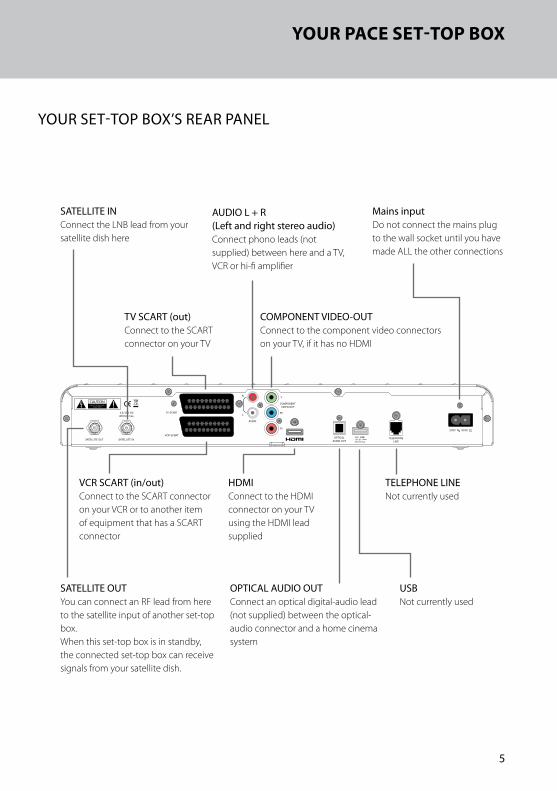
YOUR.SET-TOP.bOx’S.REaR.PanEL
COMPONENTVIDEO-OUT
USB+5V DC 500mA Max.
OPTICALAUDIO OUTSATELLITE OUT SATELLITE IN
TV SCART
VCR SCARTTELEPHONE
LINE
230V 50HzPr
Pb
YR
L
AUDIO
13/18V DC400mA max.
Mains.inputDo not connect the mains plug to the wall socket until you have made ALL the other connections
VCR.SCaRT.(in/out)Connect to the SCART connector on your VCR or to another item of equipment that has a SCART connector
TV.SCaRT.(out)Connect to the SCART connector on your TV
aUDIO.L.+.R(Left.and.right.stereo.audio)Connect phono leads (not supplied) between here and a TV, VCR or hi-fi amplifier
OPTICaL.aUDIO.OUT.Connect an optical digital-audio lead (not supplied) between the optical-audio connector and a home cinema system
SaTELLITE.InConnect the LNB lead from your satellite dish here
SaTELLITE.OUTYou can connect an RF lead from here to the satellite input of another set-top box .When this set-top box is in standby, the connected set-top box can receive signals from your satellite dish .
USbNot currently used
HDMIConnect to the HDMI connector on your TV using the HDMI lead supplied
TELEPHOnE.LInENot currently used
COMPOnEnT.VIDEO-OUTConnect to the component video connectors on your TV, if it has no HDMI

6
COnnECTInG.YOUR.SET-TOP.bOxBefore starting, choose a suitable position for your set-top box, observing the ventilation requirements set out on page 3 .
WARnInG: Before you connect or disconnect your set-top box to/from any other equipment, make sure you disconnect all the equipment from the mains supply.
HIGH-DEFInITIOn.(HD).VIDEO.COnnECTIOnSIf you have a high-definition TV (HDTV), use only one of the following HD-video connection methods . The methods are listed in order of preference .
A Connect the supplied HDMI lead between the HDmI socket on your set-top box and the HDMI socket on your HDTV .
or:
B Connect the supplied HDMI lead to the HDmI socket on your set-top box, then use an HDMI-DVI adapter (not supplied) between the HDMI lead and the DVI socket on your HDTV .
or:
C Connect component video leads (not supplied) between the connectors marked ComPonent VIDeo-out (YPbPr) and the component video connectors on your HDTV .
note: If you use method B or C, you must also make additional audio connections between your set-top box and your HDtV or audio equipment. see page 8.
If you also want to connect a VCR or DVD recorder to your set top box, use the connection method shown on page 7.
COMPONENTVIDEO-OUT
USB+5V DC 500mA Max.
OPTICALAUDIO OUTSATELLITE OUT SATELLITE IN
TV SCART
VCR SCARTTELEPHONE
LINE
230V 50HzPr
Pb
YR
L
AUDIO
13/18V DC400mA max.
HDTV
Set-top.boxLnb.lead
Mains.lead
abC
Mains.lead
ConneCtInG uP

7
ConneCtInG uP
STanDaRD-DEFInITIOn.(SD).VIDEO.COnnECTIOnSIf you have a standard-definition TV, a VCR or a DVD recorder, use the connection methods described below .
• Connect the supplied SCART lead between the tV sCARt socket on your set-top box and the SCART socket on your TV .
• Connect another SCART lead (not supplied) between the VCR sCARt socket on your set-top box and the SCART socket on your VCR or DVD recorder .
note: If you want to make additional audio connections between your set-top box and your audio equipment, see page 8.
COMPONENTVIDEO-OUT
USB+5V DC 500mA Max.
OPTICALAUDIO OUTSATELLITE OUT SATELLITE IN
TV SCART
VCR SCARTTELEPHONE
LINE
230V 50HzPr
Pb
YR
L
AUDIO
13/18V DC400mA max.
TV
Set-top.boxLnb.lead
Mains.lead
Mains.leadSCaRT.lead
SCaRT.lead
VCR.or.DVD.recorder
Mains.lead
8
Lnb.anD.MaInS.COnnECTIOnS• Connect the LNB lead from your satellite dish to
the connector marked sAteLLIte In on your set-top box .
• Plug the 2-way connector on the supplied mains lead into the mains socket (marked 230V
50Hz) on your set-top box .
• When all the connections are properly made, connect all the equipment to the mains supply .
COMPONENTVIDEO-OUT
USB+5V DC 500mA Max.
OPTICALAUDIO OUTSATELLITE OUT SATELLITE IN
TV SCART
VCR SCARTTELEPHONE
LINE
230V 50HzPr
Pb
YR
L
AUDIO
13/18V DC400mA max.
Optical.digital.audio.lead
Hi-fi.amplifier
Home.cinema.system
HDTV
Stereo.phono.leads
ConneCtInG uP
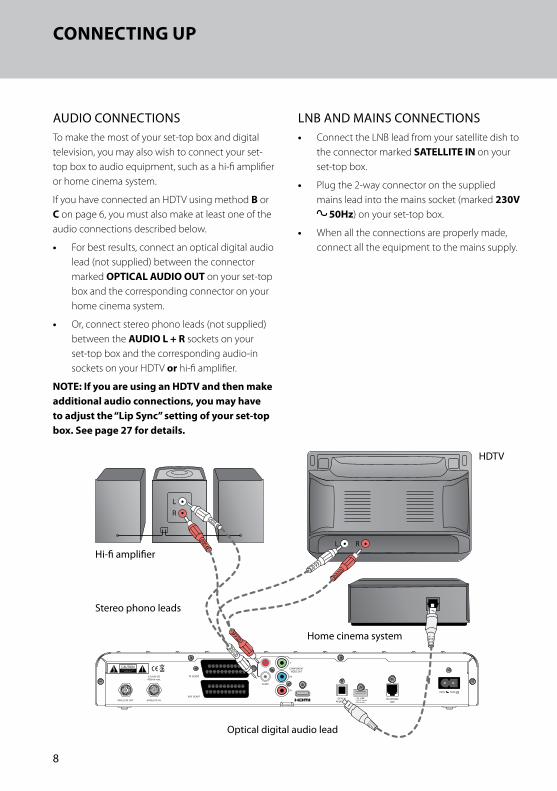
aUDIO.COnnECTIOnSTo make the most of your set-top box and digital television, you may also wish to connect your set-top box to audio equipment, such as a hi-fi amplifier or home cinema system .
If you have connected an HDTV using method B or C on page 6, you must also make at least one of the audio connections described below .
• For best results, connect an optical digital audio lead (not supplied) between the connector marked oPtICAL AuDIo out on your set-top box and the corresponding connector on your home cinema system .
• Or, connect stereo phono leads (not supplied) between the AuDIo L + R sockets on your set-top box and the corresponding audio-in sockets on your HDTV or hi-fi amplifier .
note: If you are using an HDtV and then make additional audio connections, you may have to adjust the “Lip sync” setting of your set-top box. see page 27 for details.

9
GettInG stARteD
InSERTInG.YOUR.REMOTE.COnTROL’S.baTTERIES.Insert the two batteries into your remote control .
Make sure you insert them the correct way round, as shown by the + and – symbols in the battery compartment .
REPLaCInG.THE.baTTERIES.In.YOUR.REMOTE.COnTROL• Always replace both batteries at the same time .
• Please dispose of batteries in an environmentally-friendly way .
• Used alkaline batteries must never be thrown into a fire .
SWITCHInG.On.YOUR.SET-TOP.bOxWhen you have connected your set-top box to the mains supply, its indicator light, just below the standby button (S), will light up .
If your set-top box is in standby, the light will be red; if your set-top box is out of standby, the light will be blue .
If the indicator light is red, switch on your TV, then press the standby button (S) on the front panel of your set-top box .
Whenever you are not using your set-top box, you should put it into standby by pressing the standby button (S) .
SWITCH-On.CHannEL.SETTInGThe factory setting for your set-top box is for it to always tune to the last-viewed channel when you bring it out of standby . You can change this setting, so that your set-top box tunes to a specific channel instead (see page 31) .

�0
YOUR.SET-TOP.bOx.TOMORROWYour set-top box comes with the latest digital TV technology . To keep up with new technology, new features may be developed which may then be transmitted to your set-top box as software updates .
For more information, see page 33 .
SETTInG.UP.YOUR.SET-TOP.bOxLanGUaGE.SCREEnWhen you first switch your set-top box on, the Language screen appears (factory setting is English) . This allows you to choose the language you want to appear on all menus and screens .
Use the U D buttons on your remote control (see page 14) to highlight a language, then press the oK button to save the setting .
OPEnInG.THE.CI-MODULE.DOORPush on the top left-hand side of the CI-module door to open it, as shown below .
USInG.a.CI.MODULEIf you want to view encrypted channels, you can use a common interface (CI) module (with associated smartcard inside it) to provide the appropriate conditional access .
Open the CI-module door (see previous section) .
Hold your CI module with the arrow pointing towards the slot in the front panel of your set-top box .
Insert your CI module into the slot, as far as it will go without forcing it . The CI module is designed to go in only one way round .
Close the CI-module door .
To.open,.push.here
GettInG stARteD

��
GettInG stARteD
RESOLUTIOn.SETTInGS.SCREEnOn this screen, you set up your set-top box to match your HDTV with regard to resolution (how crisp and clear the picture appears) . Generally, higher resolution settings give better quality pictures . However, the quality will also always depend on how the programme was originally transmitted .
YPbPr.video
If your HDTV is connected to your set-top box by component video (YPbPr) leads, use the L R buttons to set YPbPr video to “On” . Otherwise, change this setting to “Off” .
note: When YPbPr video is set to “on”, CVBs video is automatically output at your set-top box’s sCARt connector.
auto.zoom
(This feature is not yet enabled .)
HD.resolution
You can also choose the method that your set-top box uses to handle different video resolutions . Use the U D buttons to highlight the HD resolution setting . The available settings are .
• original – your set-top box will always output the same resolution as the original video input, with one exception: an input resolution of 576i becomes 576p at the output .
• standard – your set-top box will always output 720p, regardless of the input video resolution .
• user-defined – in this case, you can choose the resolution (576p, 720p or 1080i) that will be output to your HDTV, regardless of the input resolution .
Use the L R buttons to display the setting you want .
If you need to go back to the previous screen, press exIt . Or, press oK to continue .
�2
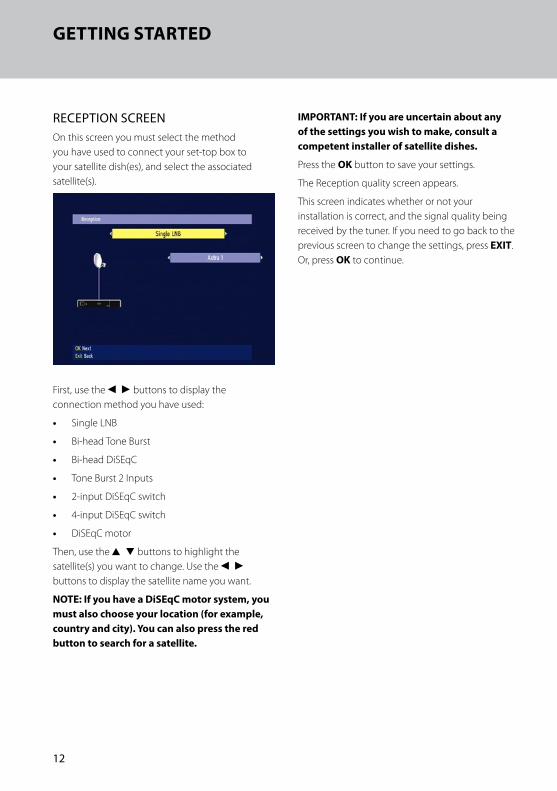
RECEPTIOn.SCREEnOn this screen you must select the method you have used to connect your set-top box to your satellite dish(es), and select the associated satellite(s) .
First, use the L R buttons to display the connection method you have used:
• Single LNB
• Bi-head Tone Burst
• Bi-head DiSEqC
• Tone Burst 2 Inputs
• 2-input DiSEqC switch
• 4-input DiSEqC switch
• DiSEqC motor
Then, use the U D buttons to highlight the satellite(s) you want to change . Use the L R buttons to display the satellite name you want .
note: If you have a DiseqC motor system, you must also choose your location (for example, country and city). You can also press the red button to search for a satellite.
GettInG stARteD
ImPoRtAnt: If you are uncertain about any of the settings you wish to make, consult a competent installer of satellite dishes.
Press the oK button to save your settings .
The Reception quality screen appears .
This screen indicates whether or not your installation is correct, and the signal quality being received by the tuner . If you need to go back to the previous screen to change the settings, press exIt . Or, press oK to continue .

�3
nETWORK.SCanThe Network scan screen appears, with the type of scan highlighted in yellow . If you need to go back to the previous screen, press exIt .
Press the L R buttons until the type of scan you want (Fast scan, nIt scan, exhaustive or Frequency) is displayed .
If you have a dish positioner, you can select the satellite you want . Use the U D buttons to highlight the satellite setting, then press the L R buttons until the one you want to scan is displayed .
To change any of the Frequencies or symbol rates, first use the U D buttons to highlight the one you want to edit . Then use the L R buttons to underline each digit, and the number buttons to enter digits .
To change a highlighted Polarisation, use the L R buttons until the polarisation you want is displayed .
To start the scan, using the values you have entered, press the oK button .
When the scan is complete, the network scan screen appears again. You can now choose new values and scan again to find more channels, for example from a different satellite. Alternatively, press menu to quit scanning for channels and begin using your set-top box.
GettInG stARteD

�4
YouR Remote ContRoL
USInG.YOUR.REMOTE.COnTROLThis page shows the buttons on your remote control that you need to set up your set-top box . All the other buttons are described on page 15 .
After you have set up your set-top box, you use your remote control as follows:
DaILY.USE• switching on and off;
• changing channel;
• adjusting the volume;
• displaying the Channel List;
• displaying the Zapping Window to see what’s on now and next;
• displaying the Information Window to see information about a programme;
• displaying the ePG (Electronic Programme Guide) to see what’s on for the next few days .
OCCaSIOnaL.USE• organising your Favourite Channels;
• using the main menu and setup menu to view information about your set-top box and change its settings;
• displaying help text to assist you when you use menus;
• updating the software .
1 2 3
4 5 6
7 8 9
0
OK
P
MENU
EXIT
V-FORMAT
OPT
TEXT
EPG
LIST
TV / RADIO
i
ABC
GHI
DEF
JKL
PQRS
MNO
TUV WXYZ
TIMERS
Use the U D and L R buttons to highlight/ choose a setting
Press the oK button to save your chosen setting

�5
REMOTE.COnTROL.bUTTOnSS (standby)
To put your set-top box into, or take it out of standby
LIst
To display (or hide) the on-screen Channel List
tImeRs
Not currently used
ePG
To display the EPG (Electronic Programme Guide)
V-FoRmAt
To step through the video resolutions that your set-top box can output to your HDTV
tV / RADIo
To change from a TV channel to a radio channel
To change between information for TV and radio channels when the Channel List is displayed
exIt
To return to the previous selection or screen (without saving any changes)
menu
To display (or hide) the Main menu
oPt
To display (or hide) the Options Window associated with the current programme (if available)
U D (arrow buttons)
To highlight the previous or next item in a list or on-screen menu
L R (arrow buttons)
To move to the left and the right through on-screen menus, lists or items
To change settings on the screens
oK
To confirm a choice
To save settings
P + / –
To change channel up or down
+ / –
To increase or decrease the volume, only on the TV SCART and phono connectors (the audio on the VCR SCART, digital audio and HDMI connectors is not affected)
i
To display the Zapping Window
To display additional information about a programme
To display Help, if the Main menu or sub-menus and screens are displayed
Colour buttons (red, green, yellow, blue)
To perform special functions – these will be explained on the screen when they are required
number buttons
To change channel
To enter on-screen numbers
text
Not currently used
To switch the sound off/on
YouR Remote ContRoL

�6
tunInG to CHAnneLs
TV.anD.RaDIO.CHannELSYour set-top box offers not only TV channels, but also radio channels (along with information about them, displayed on the TV screen) .
To switch from TV channels to radio channels (or back again), press the tV / RADIo button on your remote control .
note: everything in the following descriptions applies to radio as well as to tV channels.
CHanGInG.CHannELYou can change channel by:
• using the number buttons to enter a channel number (the main channel numbers are all 3-digit numbers, for example, 103);
• using the number buttons to enter a 1- or 2-digit Favourite channel number (see right);
note: to change channel more quickly, press oK after you enter the last digit of the channel number you want.
• using the P + / – button;
• selecting a channel from the Channel List (see page 17);
• selecting a channel from the ePG Grid (see page 20) .
WHaT.aRE.FaVOURITE.CHannELS?You can use numbers 0 to 99 to create ‘short-cuts’ to your Favourite channels, so that you can select them more quickly .
When your set-top box is new, your Favourite-channels list is empty .
For more information about setting up your Favourite channels, see pages 19 and 30 .

�7
WHaT.IS.THE.CHannEL.LIST?Your set-top box uses a Channel List as a way of organising channels . To display the list on your TV screen, press the LIst button (or press oK) .
There are separate lists for TV and Radio channels . To switch between the TV and Radio Channel Lists, press the tV / RADIo button on your remote control .
USInG.THE.CHannEL.LISTPress the LIst button to display the Channel List on your TV screen . The channel you were just watching is shown highlighted in yellow .
To change channel, you must first highlight the channel you want to watch .
note: the name of currently tuned channel appears in yellow text.
Use the U D buttons to highlight the previous/next channel on the list .
note: You can also use the L R buttons to view the previous/next page of channels.
To tune to a channel, highlight it, then press oK .
If you know the number of the channel you want to watch, you can use the number buttons to enter the channel number .
To remove the Channel List without changing channel, press LIst .
VIEWInG.CHannEL.InFORMaTIOnTo view information about the highlighted channel in the Channel List, press the i button . The channel information appears to the right of the Channel List .
To hide the channel information, press the i button again .
tunInG to CHAnneLs
�8
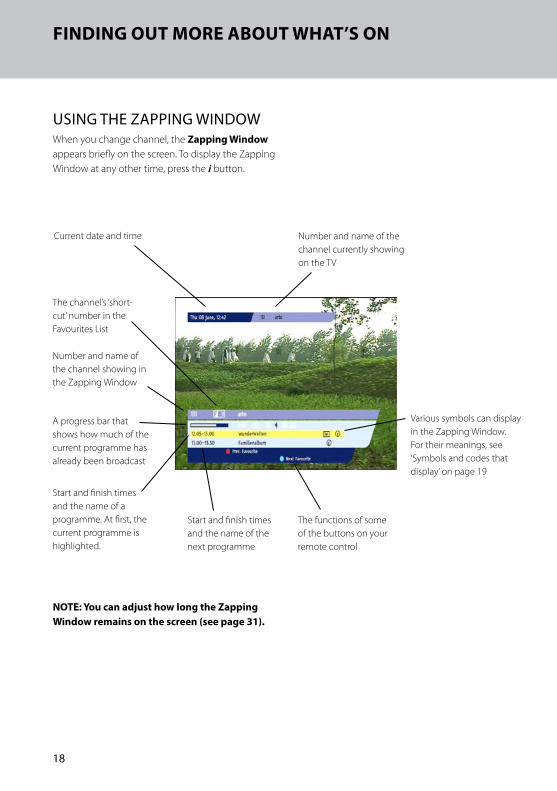
USInG.THE.ZaPPInG.WInDOWWhen you change channel, the Zapping Window appears briefly on the screen . To display the Zapping Window at any other time, press the i button .
FInDInG out moRe ABout WHAt’s on
Current date and time
note: You can adjust how long the Zapping Window remains on the screen (see page 31).
The channel’s ‘short-cut’ number in the Favourites List
Number and name of the channel showing in the Zapping Window
Start and finish times and the name of a programme . At first, the current programme is highlighted .
Start and finish times and the name of the next programme
The functions of some of the buttons on your remote control
Number and name of the channel currently showing on the TV
Various symbols can display in the Zapping Window . For their meanings, see ‘Symbols and codes that display’ on page 19
A progress bar that shows how much of the current programme has already been broadcast

�9
naVIGaTInG.aROUnDUse the D button to move the highlight down to the next programme, and use the U button to move the highlight back up again .
SYMbOLS.anD.CODES.THaT.DISPLaY
symbol/Code meaning
The currently showing programme is broadcast in a high-definition video format
The currently showing programme is broadcast with a Dolby Digital soundtrack
The channel’s number in the Favourites List
Shows that you can press the oPt button for further options (see page 22)
Video options are available
Audio options are available
Teletext options are available
NVOD (Near Video On Demand) options are available
Shows that you can press the i button for further information about the highlighted programme
If one or more features or options are available, these are indicated by bold symbols that display in the Zapping Window (when features or options are unavailable, their symbols display in a much paler colour) . See the table on the left for details of the various symbols .
SHOWInG.InFORMaTIOnIf there is a symbol next to a programme, you can press the i button to display the programme’s Information Window .
To remove the Information Window and redisplay the Zapping Window, press oK .
To remove the Information Window and redisplay a TV or Radio channel, press i again .
DISPLaYInG.OPTIOnSIf there is a symbol next to a programme, you can press the oPt button to display the Options Window (see page 22) .
FaVOURITE.CHannELS.In.THE.ZaPPInG.WInDOWTo display the previous or next channel in your Favourite Channels List in the Zapping Window, press the red or blue button .
If the currently tuned channel is not one of your Favourite Channels, you can press the red button to add it to your Favourite Channels List . Then, use the L R buttons to highlight Yes or no in the pop-up question box that appears, and press oK .
REMOVInG.THE.ZaPPInG.WInDOWTo remove the Zapping Window from the screen, press the exIt button .
FInDInG out moRe ABout WHAt’s on

20
USInG.THE.EPG.The ePG is your Electronic Programme Guide to what’s on . To see the EPG, press the ePG button on your remote control .
naVIGaTInG.aROUnD.THE.EPG.GRIDUse the L R buttons to move the highlight to see what programmes are on at different times .
Use the D U buttons to move the highlight through the list of channels .
To view the previous/next page of channels, use the P + / – button .
You can also use the blue and yellow buttons on your remote control to move forwards and backwards by 1 day through the EPG Grid .
ePG
Current date and time
Start and end times of the programme highlighted in the grid
The functions of some of the buttons on your remote control
Symbols: see ‘Symbols and codes that display’ on page 21
Channel List
Highlighted programme
Details of the highlighted channel and programme
Programmes

2�
SYMbOLS.anD.CODES.THaT.DISPLaY
symbol/Code meaning
Shows that you can press the i button for further information about the programme
SHOWInG.InFORMaTIOnIf the symbol is showing next to a programme, you can press the i button to display the programme’s Information Window .
To remove the Information Window and redisplay the EPG Grid, press i again, or press oK or exIt .
CHOOSInG.a.PROGRaMME.TO.WaTCHWhen you highlight a programme on the EPG Grid, you can press oK to tune to the channel on which the programme is showing .
REMOVInG.THE.EPG.GRIDTo remove the EPG Grid and redisplay the current channel, press the exIt button .
ePG

22
oPtIons
USInG.THE.OPTIOnS.WInDOWWhen you press the oPt button from the Zapping Window, an options Window appears, showing the Options for that programme (if options are available) .
note: If options are available, you can also display the options Window while you are watching a programme, by pressing the oPt button.
Use the L R buttons to highlight the option you wish to change .
Use the D U buttons to highlight your chosen setting for a particular option .
You must press oK to save the setting you want for each of the available options .
If you do not want to save your changes, press oPt or exIt .
The options and settings that are available will depend on the programme . The possible options are shown below .
option to make your selection...
Video
If more than one view or camera angle is available for this programme, choose your preferred view .
Audio
Choose your preferred soundtrack for this programme . You can choose between different languages and/or different audio outputs, for example stereo or mono .
Teletext
If digital Teletext is available in more than one language, choose your preferred digital Teletext language .
NVOD
(Near Video On Demand) If more than one start time is available for this programme, choose your preferred time .
Available options Settings

23
USInG.THE.MaIn.MEnUYou gain access to some of your set-top box’s features, particularly those which you use only occasionally, by means of the main menu .
To display the Main menu, press the menu button .
When the Main menu first appears, the item at the top of the list is highlighted in yellow .
Press the U D buttons to move the highlighting up or down the list of items . To select an item, press oK . Either the selected item’s screen appears on the right-hand side, or in some cases a sub-menu appears .
From the Main menu, you can display the following:
• setup menu - to change the set-top box service settings;
• Channels - to search for available channels, and to organise your Favourite channels (see page 30);
• miscellaneous - to choose the switch-on channel number, the Zapping Window display time, menu transparency and the local time setting (see pages 31 and 32);
• Language - to change the language setting (see page 32) .
USInG.THE.SETTInGS.SCREEnSOn a screen where you can change the setting for an item, use the U D buttons to highlight the setting, then use the L R buttons to change the setting until the one you want is displayed .
Sometimes you will see information at the bottom of the screen showing you which remote-control buttons you can use to carry out particular actions .
On most screens, you use the oK button to save any changes you have made to the settings, but sometimes a different button is used for saving .
You use the exIt button to return to the previous menu without saving any changes you may have made .
To remove the Main menu and screens and redisplay the channel you were watching, press menu again .
DISPLaYInG.HELPWhile you are using the Main menu and screens, you can press the i button to display a Help page about the screen .
To remove the Help page, press oK or i again .
usInG tHe mAIn menu

24
usInG tHe setuP menu
THE.SETUP.MEnUIn the setup menu you can find important information concerning the reception of channels . Within the Setup menu you can change the settings of your set-top box so as to optimise the reception of channels .
As you press the D U buttons to move the highlighting up or down the setup menu, additional information appears to the right of the menu .
Each of the screens you can display from the setup menu is described briefly below .
CI-MODULEYou may need to display this screen and supply the information on it if a Customer Advisor asks you to . See also page 25 .
SYSTEMYou may need to display this screen and supply the information on it if a Customer Advisor asks you to . From the system screen you can display the Version number screen by pressing the blue button . See also page 25 .
SOFTWaRE.UPDaTEPlease see page 33 .
anTEnnaOn this screen you can select the method you have used to connect your set-top box to your satellite dish(es) . See also page 25 .
TV.SETTInGSThis menu allows you to specify the type of standard-definition (SD) TV you have connected to your set-top box . You can also specify high-definition (HD) output resolution settings, and Lip Sync settings . Making the correct settings on these screens will ensure you have the best picture available . See also pages 26 and 27 .
DIGITaL.aUDIO.OUTPUTYou can use this screen to automatically send Dolby Digital audio (if it is available for the current programme) to any equipment you have connected to the oPtICAL AuDIo out connector . See also page 28 .
FaCTORY.RESETPlease see page 28 .
USInG.THE.SETUP.MEnU
You use the setup menu to:
• view CI-module information;
• view system information;
• carry out a software update (see page 33);
• change antenna settings;
• change TV settings to make your set-top box compatible with your TV;
• change the digital-audio output setting;
• carry out a factory reset .
25
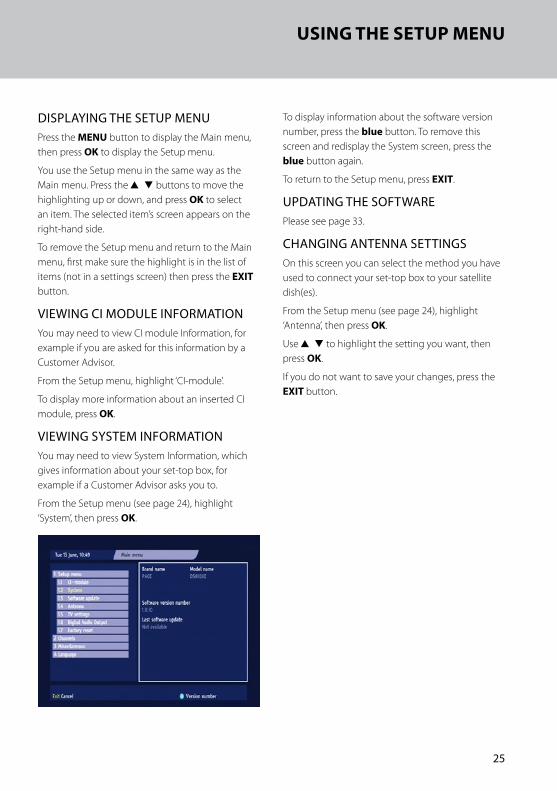
To display information about the software version number, press the blue button . To remove this screen and redisplay the System screen, press the blue button again .
To return to the Setup menu, press exIt .
UPDaTInG.THE.SOFTWaREPlease see page 33 .
CHanGInG.anTEnna.SETTInGSOn this screen you can select the method you have used to connect your set-top box to your satellite dish(es) .
From the Setup menu (see page 24), highlight ‘Antenna’, then press oK .
Use U D to highlight the setting you want, then press oK .
If you do not want to save your changes, press the exIt button .
DISPLaYInG.THE.SETUP.MEnUPress the menu button to display the Main menu, then press oK to display the Setup menu .
You use the Setup menu in the same way as the Main menu . Press the U D buttons to move the highlighting up or down, and press oK to select an item . The selected item’s screen appears on the right-hand side .
To remove the Setup menu and return to the Main menu, first make sure the highlight is in the list of items (not in a settings screen) then press the exIt button .
VIEWInG.CI.MODULE.InFORMaTIOnYou may need to view CI module Information, for example if you are asked for this information by a Customer Advisor .
From the Setup menu, highlight ‘CI-module’ .
To display more information about an inserted CI module, press oK .
VIEWInG.SYSTEM.InFORMaTIOnYou may need to view System Information, which gives information about your set-top box, for example if a Customer Advisor asks you to .
From the Setup menu (see page 24), highlight ‘System’, then press oK .
usInG tHe setuP menu

26
CHanGInG.THE.TV.SETTInGS
SD.settings
This screen allows you to specify the type of standard-definition (SD) TV you have connected to your set-top box . Making the correct settings at this screen will ensure you have the best picture available .
From the Setup menu (see page 24), highlight ‘TV settings’ then press oK . Then highlight ‘SD settings’ and press oK . The SD settings screen appears (see right) .
Use U D to highlight the item you want to change, then use L R to select the setting .
Use the table below to help you choose the settings you want . The factory settings (when your set-top box is new or if you reset your set-top box as described on page 28), are shown with a star * against them .
Item settings Comments
TV screen format *4:3
16:9
If you have a widescreen TV, set this to ‘16:9’ . If you have a standard TV, set it to ‘4:3’ .
Scaling Auto
*LetterBox
Pan & Scan
Your choice of setting affects widescreen transmissions shown on standard (4:3) TVs . With ‘LetterBox’ the whole of a widescreen transmission displays, but the picture does not fill the screen . With ‘Pan & Scan’, the screen is filled, but only part of the widescreen transmission displays .
SCART video *CVBS
RGB
If you set YPbPr video “On” (see page 27), SCART video is automatically set to “CVBS” . If your TV is RGB-compatible, but not connected by component video leads, you can select the setting “RGB” to improve picture quality .
SCART AV control *On
Off
If this is set ‘On’, your TV should switch automatically to show digital channels from your set-top box on the TV screen, whenever your set-top box is on . You may prefer to use your TV’s remote control to select the appropriate AV channel on your TV (in which case, set ‘Off’) .
usInG tHe setuP menu
To test changed configuration settings, before you save them, press the red button . Your set-top box will temporarily display the effect of any changes .
When you have made the changes you wish to make, press oK . If you do not want to save your changes, press the exIt button .

27
Resolution.settings
From the Setup menu (see page 24), highlight ‘TV settings’ then press oK . Then highlight ‘Resolution settings’ and press oK . The Resolution settings screen appears .
On this screen, you set up your set-top box to match your HDTV with regard to resolution (how crisp and clear the picture appears) . Generally, higher resolution settings give better quality pictures . However, the quality will also always depend on how the programme was originally transmitted .
For full details, see page 11 .
When you have made the changes you wish to make, press oK . If you do not want to save your changes, press the exIt button .
Lip.Sync.settings
If you have an HDTV, and you use a separate amplifier and loudspeakers for the audio output from your set-top box, you may have to adjust the “Lip Sync” setting .
This is because the length of time your HDTV takes to display the video information may be slightly greater than the time taken for the audio signal to reach the loudspeakers . In this case, you would hear someone speaking just before his/her lips moved . To correct this situation, a delay must be added to the audio signal, until it is “in sync” with the on-screen video .
From the Setup menu (see page 24), highlight ‘TV settings’ then press oK . Then highlight ‘Lip Sync settings’ and press oK . The Lip Sync settings screen appears .
On your HDTV’s screen, you see a clapperboard that opens and closes at regular intervals .
Through the loudspeakers of your audio system, you hear a recurring sound .
If you do not hear the sound at the same moment as the clapperboard closes, you can make adjustments to the delay setting as follows:
• To increase the delay quickly, press U
• To increase the delay slowly, press R
• To decrease the delay quickly, press D
• To decrease the delay slowly, press L
When you are happy with the Lip Sync setting, press oK .
Or, if you decide that you do not want to change the original setting, press the exIt button .
usInG tHe setuP menu

28
CHanGInG.THE.DIGITaL-aUDIO.OUTPUT.SETTInGSThis screen allows you to set your set-top box to automatically send Dolby Digital audio (if it is available for the current programme) to any equipment you have connected to the oPtICAL AuDIo out connector .
From the Setup menu (see page 24), highlight ‘Digital Audio Output’ then press oK . The Digital Audio screen appears (see right) .
Use the table below to help you choose the setting you want . Then use the L R buttons to select the setting . The factory setting (when your set-top box is new or if you reset your set-top box as described below), is shown with a star * against it .
Saving.your.changes
When you have made the changes you wish to make, press oK .
If you do not want to save your changes, press the exIt button .
Item settings Comments
Auto-handling *Off
On
You should set this to ‘On’ only if you have connected suitable audio equipment to the oPtICAL AuDIo out connector .
The setting ‘On’ means that, if Dolby Digital audio is being transmitted, this will automatically be sent to the oPtICAL AuDIo out connector .
The setting ‘Off’ means that your set-top box will automatically select the first-available audio stream for the programme .
RESETTInG.YOUR.SET-TOP.bOxYou can reset your set-top box if necessary .
It will return to the state it was in when you plugged it in for the first time .
ImPoRtAnt: All the settings you have changed and any Favourite channels you have created will be lost when you carry out a full reset.
If you wish to carry out a full reset, press menu to display the Main menu .
Highlight ‘Setup menu’ then press oK to display the Setup menu .
usInG tHe setuP menu
Highlight ‘Factory reset’ then press oK to display the Factory reset screen .
To confirm the full reset, use the L R buttons to highlight Yes then press oK .
Or, to cancel the reset, highlight no then press oK .
After the set-top box has reset itself, you will have to choose the Language and Resolution settings again . Then, your set-top box will carry out its Network scan, using the satellite dish configuration you have
selected (see pages 10 - 13) .
29
USInG.THE.OTHER.MEnUSTYPES.OF.SCanEach of the types of scan described below scans only one satellite at a time . If your system can receive channels from more than one satellite, you must select and scan each satellite in turn .
If you carry out a network scan you need to understand the technical details of what you wish to scan for, so you may need to consult a magazine that gives this kind of information .
Fast.scan
This uses default transponder values for faster results .
nIT.scan
This uses a network Information table to scan all of the satellite’s transponders that are included in the NIT . For a NIT scan, information about one transponder (frequency, polarisation and symbol rate) is needed and the other transponders are scanned automatically .
This scan finds all the available TV and radio channels and puts them on their respective channel lists, starting at number 100 .
Exhaustive.scan
This searches for all channels on the satellite and may take up to 20 minutes .
Frequency.scan
This is a very specific scan, which searches just a single transponder for all the TV and radio channels transmitted by that transponder . You must set the frequency, polarisation and symbol rate for the transponder you want .
CaRRYInG.OUT.a.nETWORK.SCanTo scan for channels, press the menu button to display the Main menu (see page 23) .
Use D to highlight ‘Channels’, press oK, then highlight ‘Channel search’ and press oK .
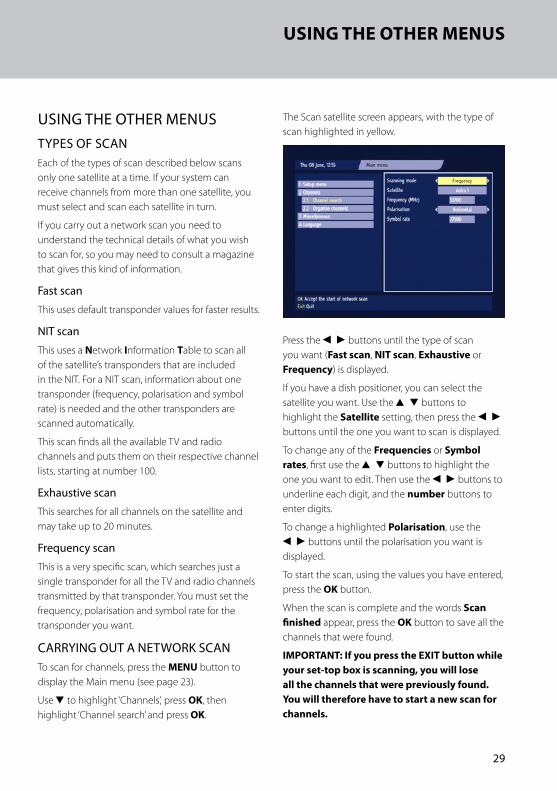
The Scan satellite screen appears, with the type of scan highlighted in yellow .
Press the L R buttons until the type of scan you want (Fast scan, nIt scan, exhaustive or Frequency) is displayed .
If you have a dish positioner, you can select the satellite you want . Use the U D buttons to highlight the satellite setting, then press the L R buttons until the one you want to scan is displayed .
To change any of the Frequencies or symbol rates, first use the U D buttons to highlight the one you want to edit . Then use the L R buttons to underline each digit, and the number buttons to enter digits .
To change a highlighted Polarisation, use the L R buttons until the polarisation you want is displayed .
To start the scan, using the values you have entered, press the oK button .
When the scan is complete and the words scan finished appear, press the oK button to save all the channels that were found .
ImPoRtAnt: If you press the exIt button while your set-top box is scanning, you will lose all the channels that were previously found. You will therefore have to start a new scan for channels.
usInG tHe otHeR menus

30
ORGanISInG.YOUR.FaVOURITESYou use the Favourites screen to organise your Favourite channels .
Displaying.the.Favourites.screen
Press the menu button to display the Main menu (see page 23) .
Use D to highlight ‘Channels’, press oK, then highlight ‘Organise channels’ and press oK .
The Favourites screen appears .
This contains the full list of channels on the left, and your Favourites List on the right .
There are separate lists for TV and Radio channels . To switch between the TV and Radio channel lists, press the tV / RADIo button on your remote control .
To view the previous/next page of channels, use the L R buttons .
adding.a.channel.to.your.Favourites.List
Make sure the highlight is in the full channels list, then use the U D buttons to highlight the channel you want to add to your Favourites List .
Press the green button on your remote control . The channel is added to your Favourites List .
Removing.a.channel.from.your.Favourites.List
Press the blue button to move the highlight to the Favourites List . (To move the highlight back to the full channel list, press the blue button again .)
Use the U D buttons to highlight the channel you want to remove .
Press the green button on your remote control .
The channel is removed from your Favourites List .
To remove ALL channels from your Favourites List, press the yellow button .
Changing.the.order.of.your.Favourites.List
You can move Favourite channels around to change the order that they appear in your Favourites List .
Make sure the highlight is in your Favourites List, then use the U D buttons to highlight the channel you want to move .
Press the oK button to select the channel .
Use the U D buttons to move the channel to its new position .
Press the oK button to de-select the channel . It will now be in the new position .
Saving.your.changes
When you have made the all changes you wish to make to your Favourites List, press the red button .
note: You must save your changes before you switch between the tV and Radio channel lists.
If you do not want to save your changes, press the exIt button .
usInG tHe otHeR menus

3�
SELECTInG.THE.SWITCH-On.CHannELThis screen allows you to select the channel your set-top box tunes to whenever it comes out of standby . You can choose a specific channel or set your set-top box so that it tunes to the channel it was tuned to when it went into standby .
Press the menu button to display the Main menu (see page 23) . Use D to highlight ‘Miscellaneous’ then press oK . The Miscellaneous sub-menu appears . Highlight ‘Switch-on channel’ then press oK . The Switch-on channel screen appears .
If you want your set-top box to tune to a specific channel from standby, use the L R buttons to select ‘On’ . Then press the D button to highlight the channel number . Use the L button to delete the existing number and then use the number buttons to enter the switch-on channel number you want .
If you want your set-top box to tune from standby to the channel it was tuned to when it went into standby, use the L R buttons to select ‘Off’ for ‘Chosen switch-on channel’ . The option to set a channel number then disappears from the screen .
Saving.your.changes
When you have made the changes you wish to make, press oK .
If you do not want to save your changes, press the exIt button .
CHanGInG.THE.DISPLaY.SETTInGSYou can change the length of time the Zapping Window appears on your screen and the transparency of on-screen menus etc .
Press the menu button to display the Main menu (see page 23) . Use D to highlight ‘Miscellaneous’ then press oK . The Miscellaneous sub-menu appears . Highlight ‘Display settings’ then press oK . The Display settings screen appears .
Highlight the Display time setting, then use L R to select the preferred time, either ‘0 seconds / Off’, ‘3’, ‘5’ or ‘10’ seconds .
note: If you make the setting “0 seconds / off”, the Zapping Window will not appear when you change channel. It will however appear when you press the i button. In this case, you must press the exIt button to remove the Zapping Window from the screen.
Use D to highlight the Transparency setting, then use L R to select the preferred amount (None, 10%, 20%, 30%, 40%, 50% or 60%) .
When you have made the changes you wish to make, press oK .
If you do not want to save your changes, press the exIt button .
usInG tHe otHeR menus

32
CHanGInG.THE.LOCaL.TIME.SETTInGThis is the local time for the country where you live .
Press the menu button to display the Main menu (see page 23) . Use D to highlight ‘Miscellaneous’ then press oK . The Miscellaneous sub-menu appears . Highlight ‘Local time’ then press oK . The Local time screen appears .
Use D to highlight the local time setting, then use the L R buttons to change it .
You can set the local time between GMT–12 and GMT+12 at various intervals .
You must alter the setting twice a year to take account of winter- and summer-time .
When you have made the changes you wish to make, press oK .
If you do not want to save your changes, press the exIt button .
usInG tHe otHeR menus
CHOOSInG.a.LanGUaGEYou can change the display language for menus and on-screen displays such as the Zapping Window and EPG Grid .
Press the menu button to display the Main menu (see page 23) . Use D to highlight ‘Language’ then press oK . The Language screen appears .
Use U D to choose a language .
Saving.your.changes
To save the change, press oK . The menus display in the new language .
If you do not want to save the change, press the exIt button .

33
UPDaTInG.THE.SOFTWaRETo keep you up-to-date with the latest developments in digital television, new features may be made available to your set-top box in the form of a software update .
You should regularly check for a software update, so you will need to remember the name of the satellite from which your dish receives signals .
note: software updates may be available from the following satellites; others may be added at a later date:
• Astra 1 (19 .2 ° East)
• Hotbird (13 ° East)
• Nilesat (7 ° West)
To be informed about future software updates, as soon as they become available, please register your details at: www.pacemicro.com/ds810xe
USInG.THE.MEnUS.TO.UPDaTE.THE.SOFTWaREPress the menu button to display the Main menu, highlight ‘Setup menu’ and press oK, then highlight ‘Software update’ and press oK .
note: If the satellite is one of the three listed above, there is no need to change any other settings on the software update screen.
If, in future, you are able to use a satellite that is not listed above, you may need to change one or more of these settings:
• If you have a dish positioner, you can select the satellite you want . Use the U D buttons to highlight the satellite setting, then press the L R buttons until the one you want to scan is displayed .
• To change any of the Frequencies or symbol rates or PID, first use the U D buttons to highlight the one you want to edit . Then use the L R buttons to underline each digit, and the number buttons to enter digits .
• To change a highlighted Polarisation, use the L R buttons until the polarisation you want is displayed .
Press oK to start the software update process .
If there is no update available, you will see a message to tell you .
If there is an update available, press oK to accept it . The update will take about 30 minutes to complete .
CAutIon! Do not interrupt the update process. Do not switch off your set top box. If the process is interrupted, your set-top box will attempt to reload the software from the beginning when it is next switched on.
After a successful update, your set-top box will restart using its new software .
For the latest information, please visit: www.pacemicro.com/ds810xe
uPDAtInG tHe soFtWARe

34
TROUbLESHOOTInGIf you are experiencing difficulty with your set-top box, check the troubleshooting table below – this may provide the answer you are looking for .
Problem Possible cause suggested remedy
The standby light on the front panel of your set-top box is not lit .
Your set-top box is not receiving power .
Make sure that the mains lead is properly plugged into the back of your set-top box and the mains supply, and that the mains supply is switched on .
Check that the mains wall socket has power (try plugging in a lamp) . If it is OK, there may be a problem with your set-top box .
Your remote control will not operate your set-top box .
(i) Your set-top box is still in standby .
(ii) Something is blocking the path between your remote control and your set-top box .
(iii) The batteries in your remote control need replacing .
(i) Press the standby (S) button on your remote control .
(ii) Check that nothing is blocking the path .
(iii) Replace both batteries in your remote control . Please remember that used alkaline batteries must never be thrown into a fire . We recommend disposing of them in an environmentally-friendly way .
When your set-top box first tries to find and store the digital channels, you see the message ‘No signal’ (or some of the publicised channels are missing from the Channel Lists) .
(i) Your satellite dish is not properly connected to your set-top box .
(ii) Your satellite dish is not pointing in the right direction .
(i) Make sure that your satellite dish is properly connected to your set-top box .
(ii) Use the Antenna menu (see page 25) to make sure that the set-up shown there correctly reflects your installed satellite dish system . Change the settings if it does not . (You may need to consult a competent satellite installation engineer .)
Finally, try scanning for channels again (see page 29) .
When you take your set-top box out of standby, the digital channels do not automatically appear on your TV .
The AV control setting on the TV Settings screen may be set to ‘Off’ .
Set the SCART AV control to ‘On’ (see page 26), but note that some TVs do not respond to this AV control setting, so you may have to use your TV’s remote control to choose the appropriate AV input on your TV .
tRouBLesHootInG

35
Problem Possible cause suggested remedy
You cannot see the Zapping Window .
The Display time setting has been set to ‘0 seconds / Off’ .
Set it to ‘3’, ‘5’ or ‘10’ seconds (as required) instead (see page 31) .
You see the on-screen message: ‘Unknown TV channel’ .
You have selected a channel number that currently has no channel associated with it .
In the future, this channel number may be used for a channel . In the meantime, select a different channel .
The picture appears to be either:
(i) ‘squashed’ (from side to side or from top to bottom); or
(ii) cut off at the top and bottom of the screen .
The TV screen format setting on the SD settings screen has not been set to match your TV .
Display the SD settings screen (see page 26) . If you have a widescreen TV, set ‘16:9’ . Otherwise set ‘4:3’ .
note: If you have a widescreen tV, its remote control may have a ‘zoom’ button which alters the way that the picture appears on the screen, so you may also need to use this button.
You cannot hear Dolby Digital audio from equipment attached to the optical digital-audio connector .
(i) The programme is not transmitted with the required Dolby Digital audio stream .
(ii) The Dolby Digital audio stream is available, but Auto-handling is set to ‘Off’ on the Digital Audio Output screen (this is the factory setting) .
Check that audio options are available as follows . While you are watching the programme, press the oPt button .
If Options are available, the Options Window appears . Highlight the ‘Audio’ option, then use the U D buttons to highlight ‘Dolby Digital’ (if present), then press oK .
If, generally, you wish to hear Dolby Digital audio when it is available, change Auto-handling to ‘On’ .
tRouBLesHootInG
36
tRouBLesHootInG
Problem Possible cause suggested remedy
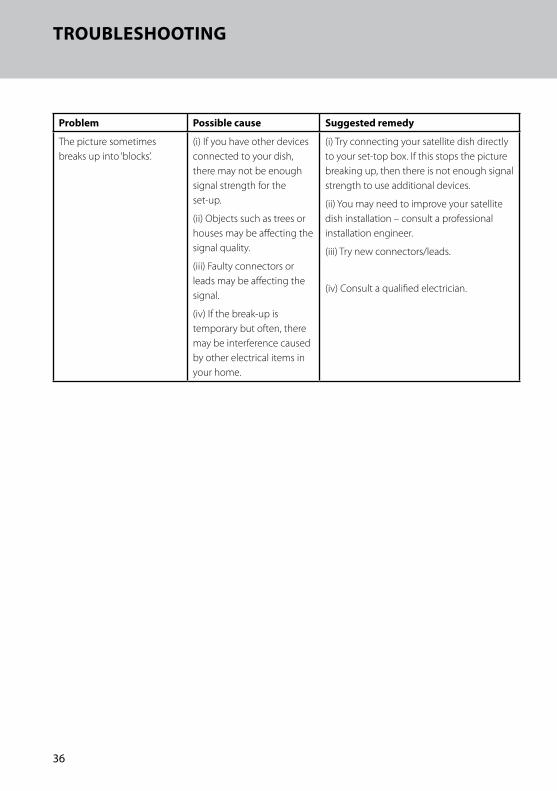
The picture sometimes breaks up into ‘blocks’ .
(i) If you have other devices connected to your dish, there may not be enough signal strength for the set-up .
(ii) Objects such as trees or houses may be affecting the signal quality .
(iii) Faulty connectors or leads may be affecting the signal .
(iv) If the break-up is temporary but often, there may be interference caused by other electrical items in your home .
(i) Try connecting your satellite dish directly to your set-top box . If this stops the picture breaking up, then there is not enough signal strength to use additional devices .
(ii) You may need to improve your satellite dish installation – consult a professional installation engineer .
(iii) Try new connectors/leads .
(iv) Consult a qualified electrician .

37
DIGItAL RIGHts mAnAGement (DRm)
HDCP.COnTEnT.PROTECTIOnThis is a type of Digital Rights Management (DRM) that prevents or restricts the copying of high-definition content . Some high-definition programmes may be transmitted with HDCP content protection enabled .
The DVI and/or HDMI inputs on your HDTV must support HDCP Content Protection, in order for you to view protected programmes . If your HDTV does not support HDCP, your set-top box will display the message “HD output disabled due to Content Protection” on its front panel, and your HDTV will not display a picture for HDCP-protected programmes .
In addition to the above, the output from your set-top box’s component video connectors (YPbPr) may be disabled or restricted . When the output is disabled, the message “HD output disabled due to Content Protection” displays on your set-top box’s front panel . When the output is restricted, the component video output is downscaled to 576 i 25, and the message “Component output is downscaled due to Content Protection” displays on your set-top box’s front panel .
note: HDCP Content Protection does not disable or restrict the video output from your set-top box’s sCARt connectors.

38
sPeCIFICAtIon
TECHnICaL.SPECIFICaTIOnDue to continued product improvement, this specification may change without notice .
GEnERaLOperating voltage 230 V AC ± 15%; 50 Hz
Power consumption 35 W (max)
Dimensions (W x H x D) 389 mm x 58 mm x 265 mm
Weight 4 .0 kg (packed, including accessories)
Operating temperature range 0 ºC to +40 ºC
Storage temperature range –25 ºC to +55 ºC
REaR-PanEL.COnnECTORS230V 50Hz (Mains input) IEC 60320-1 C8
SATELLITE IN (LNB input) IEC 60169-24 (female)
SATELLITE OUT (LNB loop-through) IEC 60169-24 (female)
TV SCART SCART (composite video-out, RGB-out)
VCR SCART SCART (composite video-in/out, RGB-in)
AUDIO L + R Phono audio-out sockets
COMPONENT VIDEO-OUT Phono component video-out sockets (Y Pb Pr)
HDMI High-definition (HD) video/audio-out connector
OPTICAL AUDIO OUT Optical S/PDIF digital audio-out socket
USB 2 .0 USB Type ‘A’ socket
TELEPHONE LINE RJ11 telephone connection socket
FROnT-PanEL.COnnECTORDVB COMMON INTERFACE PCMCIA connector for plug-in CI modules (behind door)
This product complies with the following European Council Directives:– 73/23/EEC (the Low Voltage Directive) as amended;– 89/336/EEC (the EMC Directive) as amended;– 1999/5/EC (the R&TTE Directive) as amended .
HDMI, the HDMI logo and High-Definition Multimedia Interface are trademarks or registered trademarks of HDMI Licensing LLC .
Dolby and the double-D symbol are registered trademarks of Dolby Laboratories .
Trade Mark of the DVB Digital Video Broadcasting Project (1991 to 1996) .
The Logo is a trademark of EICTA .

DS810 HIGH DEFINITION DIGITAL-RECEIVER
502-1008123
DS810XE Germ/Fre Manual.q 12/6/06 3:34 pm Page 1