Reflective Leadership: Learning to Manage and Lead Human ...
Upload
khangminh22Category
view
2download
0
Service Promotion Recherche Chemin du Musée 8 CH - 1700 Fribourg
W : www.unifr.ch/research T : +41 26 / 300 7330 E : [email protected]
ORCID
Manage your digital identity with
ORCID
Version of July 2021

Unifr: SPR: Manual: Manage your digital identity with ORCID, 10.2020 2
Table of Contents
1 Why create your ORCID Researcher ID ............................................................................ 4
2 How to obtain an ORCID identifier .................................................................................. 5
2.1 Existing user ............................................................................................................................. 5
2.2 New user .................................................................................................................................. 6
3 Set up your ORCID Profile ............................................................................................... 8
3.1 Enrich your record ................................................................................................................... 8
3.2 Account setting ........................................................................................................................ 9
3.3 ORCID record visibility settings ................................................................................................ 9
3.4 Default visibility settings on registration ............................................................................... 10
3.5 Change the visibility of individual items on your ORCID record ............................................ 10
3.6 Add a personal email ............................................................................................................. 10
3.7 Delegate the management of your profile in ORCID ............................................................. 11
3.8 Did you accidentally register two ORCID iDs? Delete the duplicate ...................................... 12
3.9 Add keywords to your ORCID record ..................................................................................... 12
3.10 Add and edityour name to your ORCID record ...................................................................... 14
3.11 Add other person identifiers to your ORCID record .............................................................. 15
3.12 Add links to personal websites to your ORCID record ........................................................... 15
4 Import works in your ORCID record .............................................................................. 17
4.1 Add works from another systems .......................................................................................... 17
4.1.1 Add works from Scopus – Elsevier ................................................................................ 17
4.1.2 Add works from CrossRef Metadata search .................................................................. 20
4.1.3 Add works from ISNI ...................................................................................................... 21
4.1.4 Add works from MLA International Bibliography .......................................................... 24
4.2 Adding works using another identifier .................................................................................. 25
4.2.1 Add works with DOI, ArXiv ID, PubMedID ..................................................................... 25
4.3 Adding works with a BibTeX file ............................................................................................ 26
4.3.1 Importing works from Google Scholar .......................................................................... 28
4.3.2 Importing works from Zotero ........................................................................................ 29
4.3.3 Importing works from Citavi .......................................................................................... 29
4.3.4 Importing works from EndNote .................................................................................... 30

Unifr: SPR: Manual: Manage your digital identity with ORCID, 10.2020 3
4.3.5 Importing works from Mendeley .................................................................................. 31
4.4 BibTeX import errors .............................................................................................................. 31
4.5 Add works manually ............................................................................................................... 32
5 Edit works .................................................................................................................... 33
5.1 Edit Works manually .............................................................................................................. 33
5.2 Group multiple versions of the same work together ............................................................ 34
5.3 Eliminate the duplicated records ........................................................................................... 35
5.4 Delete works .......................................................................................................................... 36
6 Add peer review works ................................................................................................ 36
7 Add funding ................................................................................................................. 37
8 More supports for building your ORCID records ............................................................ 38
9 Link ORCID iD with Unifr directory ................................................................................ 39
9.1 Link your works via ORCID to Unifr directory ........................................................................ 39
9.1.1 Display all your works .................................................................................................... 40
9.1.2 Display your work by category ...................................................................................... 40
10 Annexe: ....................................................................................................................... 42
10.1 Trusted organisations, update research ................................................................................ 42
10.2 List of organisations that get your ORCID iD.......................................................................... 43
10.3 List of reference managers, import your works in ORCID in a BibTex file ............................. 43

Unifr: SPR: Manual: Manage your digital identity with ORCID, 10.2020 4
1 Why create your ORCID Researcher ID
ORCID is a not-for-profit organization, sustained by fees from member organizations (https://orcid.org/about).
ORCID provides a persistent digital identifier (an ORCID iD) throughout the career for all persons involved in research, innovation or academic activities. The ORCID ID is a unique alphanumeric code assigned to the researcher's name.
You can connect your iD with your professional information — affiliations, grants, publications,
peer review, and more. You can use your iD to share your information with other systems,
ensuring you get recognition for all your contributions, saving you time and hassle, and reducing
the risk of errors.
ORCID allows:
- solving author name ambiguity in scientific publications
- minimizing the time spent by the researcher filling out forms and personal information
- simplifying reporting and analysis
- increasing visibility with the international scientific communities
- interoperability with numerous institutions, funders and publishers as well as data
providers.
The University of Fribourg recommends creating the ORCID identifier and linking it to the directory
web page through MyUnifr (§.9).
The Swiss National Science Foundation asks applicants to enter their ORCID iD when applying for
funds.

Unifr: SPR: Manual: Manage your digital identity with ORCID, 10.2020 5
2 How to obtain an ORCID identifier
Before creating your ORCID ID, first check if you already have one, via the search engine on the
ORCID site. You may have created an ORCID identifier, for example by publishing in a journal that
uses it, and then forgotten it.
2.1 Existing user
- On the webpage: https://orcid.org/
- Search for your name in the “Registry” case on the top right of the page
- If your name is displayed, check that you are behind it
If you have previously created an ORCID account, and you wish to retrieve your ID
- On the webpage: https://orcid.org/
- Click on “Sign in/ Register” on the top right of the page, you can also choose the language
- Sign in with your registered email address, or ORCID iD. If you forgot your password, retrieve
it via "Forgotten your password"
- You can also sign in with a social media account such as Google or Facebook

Unifr: SPR: Manual: Manage your digital identity with ORCID, 10.2020 6
- Report your ORCID ID on your personal page on “MyUnifr”. See below §9.1
2.2 New user
If you are new to ORCID and haven't got an ORCID account, register on https://orcid.org/ in 3 easy
steps.
- Click on the button “register now”
- Input your name, email, and create an ORCID password.
- Choose the visibility setting: everyone, trusted parties, or only me.
- Your ORCID iD is always publicly visible, and you control the visibility settings for all other content in your ORCID record see §3.3
- Check the box for accepting Terms of Use. Then click on the Register button to complete the
process.
- After registration, you can now add your publications into your ORCID profile and report your
ORCID ID on your personal page on “MyUnifr” see §9.

Unifr: SPR: Manual: Manage your digital identity with ORCID, 10.2020 7

Unifr: SPR: Manual: Manage your digital identity with ORCID, 10.2020 8
3 Set up your ORCID Profile
3.1 Enrich your record
After registering in ORCID, you can add in more information to enrich your profile, including:
- Name variants (if any)
- Keywords (research interests)
- Websites (e.g. Dept profile, ResearchGate, Mendeley, Google Scholar)
- Email : an email address where you could be joined even after leaving the institution
- Other IDs (e.g. Scopus Author ID, ResearcherID). These author identifiers will be automatically added after linking ORCID with the database system (Scopus, Publons, CrossRef…).
Video “How to register to ORCID”

Unifr: SPR: Manual: Manage your digital identity with ORCID, 10.2020 9
3.2 Account setting
In “Account settings” in your ORCID record, edit your email address(es), notification
preferences, password, visibility preferences, and two-factor authentication. You can
also remove a duplicate record by merging it into your primary record, deactivate your account,
or download all data on your ORCID account.
3.3 ORCID record visibility settings
Your ORCID iD is always publicly visible, and you control the visibility settings for all other content
in your record.
There are three visibility settings: everyone, trusted parties, or only me.
- Everyone: Information marked as everyone can be viewed by anyone who comes to
the orcid.org website.
- Trusted parties: Limited-access information that can be seen by any organisation or
individual whom you have granted access to your ORCID record. These connections
require explicit action on your part.

Unifr: SPR: Manual: Manage your digital identity with ORCID, 10.2020 10
Once you have granted permission, the trusted organization will be able to see information that
you have set as visible to trusted parties in addition to the information set as visible to everyone.
- Only me: Private information can only be seen by you and trusted individuals you have granted access to help administer your ORCID record on your behalf.
3.4 Default visibility settings on registration
When you register:
- the default visibility setting of your name is everyone,
- the default visibility setting of your email address(es) is only me.
You can immediately update the visibility of these items after registration by changing the
visibility selector next to them.
You can update your default visibility settings for any new information added to your ORCID
record in the visibility preferences tab of your ORCID account settings.
3.5 Change the visibility of individual items on your ORCID record
Visibility setting for each item individually could be change at any time, for the existing data or
new added items.
3.6 Add a personal email
Register at least two email addresses, including a permanent personal email, so you don't lose
access to your record.
- In “Account Settings” click “Edit” next to "Email and notification preferences".

Unifr: SPR: Manual: Manage your digital identity with ORCID, 10.2020 11
- Add your permanent email and click “Add.”
- A verification email will be sent to that address. Check your email and click the link to verify.
- In your record, set your primary email
- and decide which can be seen by everyone, trusted parties, or just yourself
3.7 Delegate the management of your profile in ORCID
You can delegate the management of your profile to another person, designated as a trusted
person. This person must be registered with ORCID. The designated trusted person will be able to
update all sections of your profile.
- Log in in your ORCID account
- Go to your “Account settings”, on the top right of the page under your name

Unifr: SPR: Manual: Manage your digital identity with ORCID, 10.2020 12
- Go to the section “Trusted individuals”
- Find the person's account by entering their name, email or ORCID iD
- Click “Search” to the right of the person's name.
- You can revoke a delegation at any time. Simply click on the trash icon to the right of the
trusted name.
- The trustworthy can switch between his/her account and the account entrusted to
him/her.
3.8 Did you accidentally register two ORCID iDs? Delete the
duplicate
If you have two ORCID records, you can remove the duplicate and make it refer to one you want
to keep.
All information will be deleted from the duplicate an its associated email address(es) will be added
to the main record.
To remove your second record, log into the in the primary account/iD you want to keep, go to
“Account settings”, and select “Remove duplicate record”.
More details to remove duplicated records.
3.9 Add keywords to your ORCID record
Add keywords which describe your research activities.
Keywords can help someone identify you, and keyword search is an option for searching the
ORCID Registry.

Unifr: SPR: Manual: Manage your digital identity with ORCID, 10.2020 13
- Log in to your account
- click on the pen next to “Keywords” on the left hand bar
- You can enter as many keywords as you wish, and each keyword can be up to 100
characters long
- Set up the “visibility”

Unifr: SPR: Manual: Manage your digital identity with ORCID, 10.2020 14
3.10 Add and edityour name to your ORCID record
How you prefer your name to appear at the top of your ORCID record. You can use an
initial or second family name, names you may be known by. This can include an
abbreviated first name, variants including middle name(s), former or alternate name(s),
or name(s) in a different character set. You can add as many other names as needed.
- Log in to your account
- Click on the pen next to "Also known as" on the left-hand column
- Add each name as a single item
- You can change the order of display using the up and down buttons,
- and set the visibility of each individual name.

Unifr: SPR: Manual: Manage your digital identity with ORCID, 10.2020 15
3.11 Add other person identifiers to your ORCID record
Person identifiers are other identifiers that systems use to identify you, such as ResearcherID
or Scopus Author ID.
Person identifiers can only be added by trusted organizations.
Some identifiers are added when you connect to systems using the Search and Link wizards
from your personal ORCID record: ISNI, Scopus Author ID, Publon,….
3.12 Add links to personal websites to your ORCID record
You can add links to web pages such as your personal website, department profile, Wikipedia
page, or social media accounts on Twitter, LinkedIn, Facebook, Google+, and others. You may
reorder the list as you wish.
- Log in to your account

Unifr: SPR: Manual: Manage your digital identity with ORCID, 10.2020 16
- Click on the pen next to " Websites & Social Links" on the left-hand column
- Add a short “description “ of the site
- Add the “URL” to the site
- You can change the order of display using the up and down buttons,
- and set the visibility of each individual site.

Unifr: SPR: Manual: Manage your digital identity with ORCID, 10.2020 17
4 Import works in your ORCID record
Works are your research outputs: publications, data sets, conference presentations, videos...
Allowing trusted organizations to add information to your record ensures the data connected with
your ORCID iD is trustworthy, as well as saving you time entering information manually.
There are four ways to add works to your ORCID record:
- Add works by direct import from other systems to import links to your publications and
other works to your ORCID record from other databases. This is the recommended process
because it reduces or eliminates errors, and enables a reliable connection between your
ORCID iD and your works
- Add works using an identifier
- Importing works from a BibTeX file
- Add works manually
4.1 Add works from another systems
Several organizations have built search and link tools that allow you to import information about
publications and other works into your ORCID record from other databases and also allow auto-
update. The linking process can begin on the ORCID site, or at the organization's website .
“Search and Link “wizards make adding works easy and accurate and allow the addition of
contributor information.
In general, the login process is simple and intuitive to follow.
Currently supported search and link wizards are: Airiti, BASE, CrossRef Metadata Search, DataCite, DNB, Europe PubMed Central, ISNI, MLA International Bibliography, Redalyc, Research Data Australia, Publons (ex-ResearcherID), Scopus - Elsevier, …Auto-update is triggered when the researcher submits an article to a journal and provides ORCID ID.
4.1.1 Add works from Scopus – Elsevier
All publications indexed in Scopus can be added to ORCID ID, either through “connect to ORCID”
from Scopus, or “Search & link” from ORCID.
- Login to ORCID

Unifr: SPR: Manual: Manage your digital identity with ORCID, 10.2020 18
- Under “Works” >” + Add Works” > “Search & link”. Then click on “Scopus - Elsevier”.
- Select the profile(s) that contain publications authored by you, click on “Next”
- Select the preferred profile name then “Next”
- Review your authored publications and remove those that do not belong to you.

Unifr: SPR: Manual: Manage your digital identity with ORCID, 10.2020 19
- Click on “Search for missing documents” to search for publications that are not on the
list.
- Check if all your publications are included in your profile before clicking on Next. If not,
click back and search again.
- Enter your email address and click “Send Author ID”
- Click on “Send my publication” list to add your publications to ORCID. Your publications in
Scopus will then be added to your ORCID profile.
- You can click on “return to ORCID” to see the publications added to your ORCID

Unifr: SPR: Manual: Manage your digital identity with ORCID, 10.2020 20
- You can only add publications from Scopus to ORCID, not the other way around.
4.1.2 Add works from CrossRef Metadata search
Crossref is an official Digital Object Identifier (DOI) Registration Agency. CrossRef Metadata
Search via ORCID platform allows you to search the metadata of millions of journal articles, books,
etc, by title or DOI, and add works to ORCID profile
If you have some publications that cannot be retrieved from Scopus or Web of Science
(ResearcherID), you may try CrossRef before doing it manually.
- Under Works, click on “+ Add Works” and then “Search & link”.
- Select “CrossRef Metadata Search” from the list.
- Click “Authorize” to allow CrossRef Metadata Search to add publications to your ORCID.
- Search by DOI or title to locate the article. Then, select the work you wish to add and click
on Add to ORCID.
- CrossRef indicate if the work is already in your profile.

Unifr: SPR: Manual: Manage your digital identity with ORCID, 10.2020 21
- The publications will appear listed under works in your record with CrossRef Metadata
listed as the source.
4.1.3 Add works from ISNI
The International Standard Name Identifier (ISNI) is a recognized global ISO standard for the
unique identification of contributors to creative activity.
By linking your ORCID with your ISNI record, you link information from both records.
- Under Works, click on “+ Add Works” and then “Search & link”.
- Select “ISNI” from the list.
- Click “Authorize access” to allow ISNI Search to add publications to your ORCID.

Unifr: SPR: Manual: Manage your digital identity with ORCID, 10.2020 22
- If the search did not return any results, you can attempt a manual name in the search
- Select manually the record belong to your name and choose ‘add ORCID to ISNI’ once you
identify your ISNI record; and save the result

Unifr: SPR: Manual: Manage your digital identity with ORCID, 10.2020 23

Unifr: SPR: Manual: Manage your digital identity with ORCID, 10.2020 24
- after you have added your ORCID iD to ISNI, choose ‘add ISNI to ORCID’ and be directed
to your ORCID record.
- To remove ORCID from ISNI: Within your ISNI record, choose ‘remove ORCID from ISNI’
and save the updated record.
4.1.4 Add works from MLA International Bibliography
Search the MLA International Bibliography for your works, including those published under variant
names, and add them to your ORCID profile with one click.
- Under Works, click on “+ Add Works” and then “Search & link”.
- Select “MLA International Bibliography” from the list.
- Click “Authorize access” to allow ISNI Search to add publications to your ORCID.
Unifr: SPR: Manual: Manage your digital identity with ORCID, 10.2020 25
- If your search did not return any results, refine your search and try again.
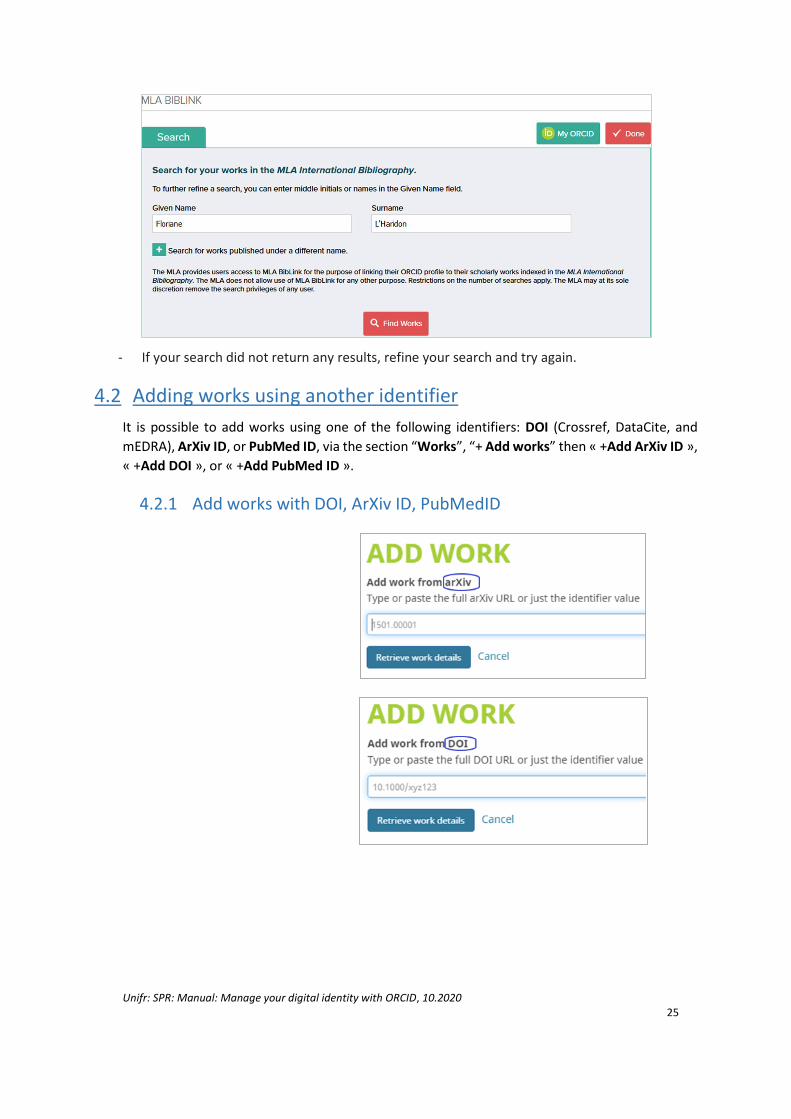
4.2 Adding works using another identifier
It is possible to add works using one of the following identifiers: DOI (Crossref, DataCite, and
mEDRA), ArXiv ID, or PubMed ID, via the section “Works”, “+ Add works” then « +Add ArXiv ID »,
« +Add DOI », or « +Add PubMed ID ».
4.2.1 Add works with DOI, ArXiv ID, PubMedID

Unifr: SPR: Manual: Manage your digital identity with ORCID, 10.2020 26
4.3 Adding works with a BibTeX file
Many databases allow the export of references in “.bib” format. These .bib files should include as
much information as possible.
You can import works from different tools such as Reference Manager, RefWorks, Papers, Google
Scholar Library, ReadCube, etc., by exporting to a standardized reference format BibTeX format
(.bib), and then importing into ORCID to integrate the references into the profile.
You will be listed as the source for works added using the BibTeX import tool, and you can
manually edit these works after you have imported them.
- Start from the Works section, go to “Add works”, then select “Import BibTeX”.
- Click “Choose File” to open the file menu, then select the BibTeX (.bib) file you want to
import.

Unifr: SPR: Manual: Manage your digital identity with ORCID, 10.2020 27
- The publications from the file will appear in a list. Select save (“disk” icon) or delete
("trash can" icon) to add or delete the work individually, or “save all” to add all of the
publications at once.
- The publications will appear listed under « works « in your record with you clearly listed
as the source.

Unifr: SPR: Manual: Manage your digital identity with ORCID, 10.2020 28
4.3.1 Importing works from Google Scholar
If you have a Google Scholar profile, you can export your works in BibTeX file from Google
Scholar and import them into ORCID. Google Scholar, is interesting as long as the researcher has
an up-to-date profile in Google Scholar. If the researcher has significant amount of grey literature
in his or her profile, the use of Google Scholar can be useful.
- Select “My profile” in “scholar google”
- Select works to exports
BibTex format exported from Google Scholar do not contain DOIs. ORCID mainly uses DOI to de-
duplicate publication records. The same works will be shown in two records: one with DOI (e.g.
from Scopus) and one without from Google scholar. Try to selectively import publications from
Google Scholar only for those are not covered by other sources.
- “Export” the BibTex file, right click and select “Save as” to save the file

Unifr: SPR: Manual: Manage your digital identity with ORCID, 10.2020 29
- Login to your ORCID
- Under Works >“+ Add Works” > “ Import BibTex”.
- “Choose file” and locate the file you saved
4.3.2 Importing works from Zotero
To import a list of works from Zotero.
- In Zotero, select the library or collection to be exported;
- Click on File > “Export Library”
- Select the BibTex format in the window and the desired converter options and click Ok;
- In the window that appears, select the directory where the LaTeX file is located;
- Give the file a name and save.
- Upload the file in ORCID
4.3.3 Importing works from Citavi
To create a BibTeX file, in Citavi,
- on the “File menu”, click “Export”
- Export all of the references in your project as a BibTeX file
Unifr: SPR: Manual: Manage your digital identity with ORCID, 10.2020 30
- Select BibTeX as the format. Click “Next”
- Save the file and upload it in ORCID.
- By default, Citavi exports the contents in BibTeX.
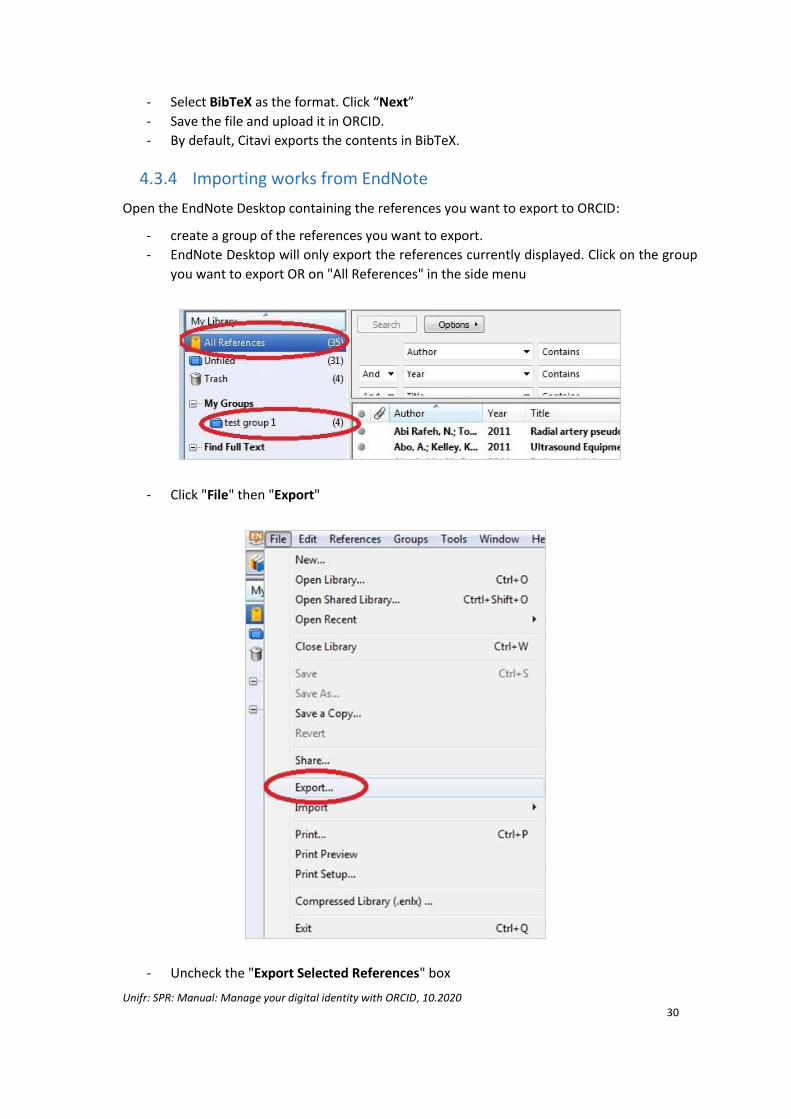
4.3.4 Importing works from EndNote
Open the EndNote Desktop containing the references you want to export to ORCID:
- create a group of the references you want to export.
- EndNote Desktop will only export the references currently displayed. Click on the group
you want to export OR on "All References" in the side menu
- Click "File" then "Export"
- Uncheck the "Export Selected References" box
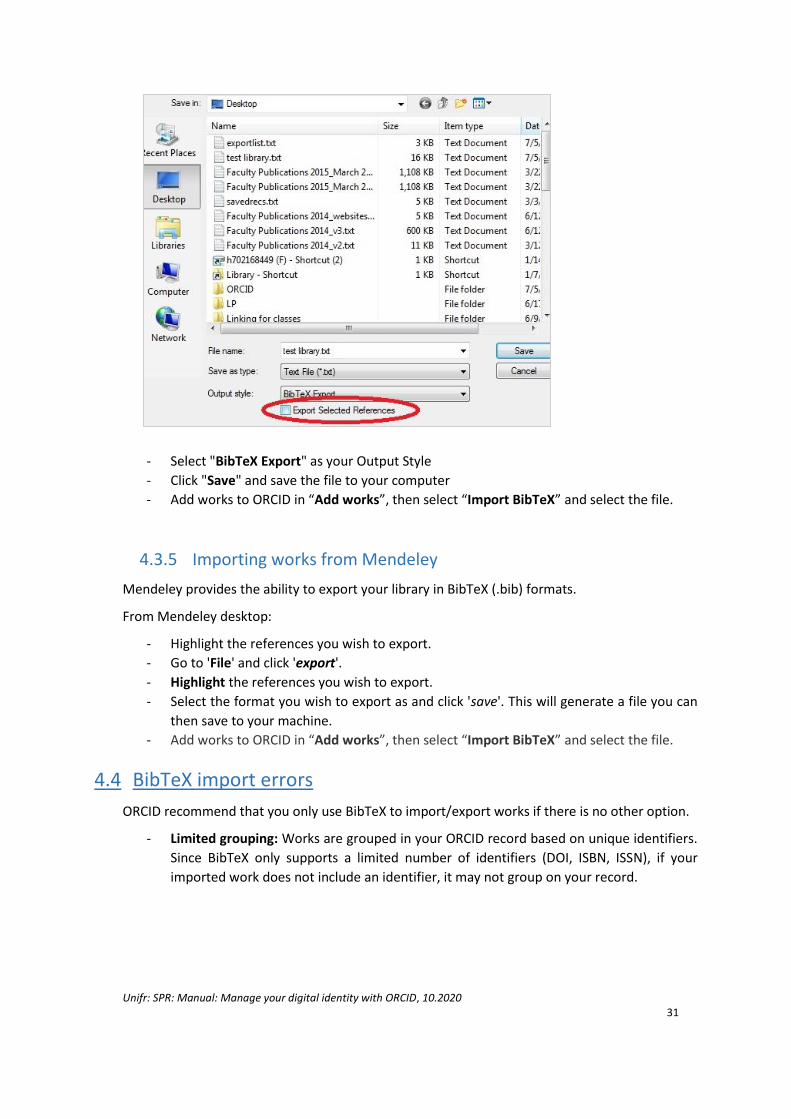
Unifr: SPR: Manual: Manage your digital identity with ORCID, 10.2020 31
- Select "BibTeX Export" as your Output Style
- Click "Save" and save the file to your computer
- Add works to ORCID in “Add works”, then select “Import BibTeX” and select the file.
4.3.5 Importing works from Mendeley
Mendeley provides the ability to export your library in BibTeX (.bib) formats.
From Mendeley desktop:
- Highlight the references you wish to export.
- Go to 'File' and click 'export'.
- Highlight the references you wish to export.
- Select the format you wish to export as and click 'save'. This will generate a file you can
then save to your machine.
- Add works to ORCID in “Add works”, then select “Import BibTeX” and select the file.
4.4 BibTeX import errors
ORCID recommend that you only use BibTeX to import/export works if there is no other option.
- Limited grouping: Works are grouped in your ORCID record based on unique identifiers.
Since BibTeX only supports a limited number of identifiers (DOI, ISBN, ISSN), if your
imported work does not include an identifier, it may not group on your record.

Unifr: SPR: Manual: Manage your digital identity with ORCID, 10.2020 32
4.5 Add works manually
To add a work yourself,
- click on "+Add work", then on "Add manually", a box will appear enabling you to
complete for a manual work quotation.
- Fill in the required information
- ORCID allows adding different categories of works: Publications, Conference, Intellectual
properties, Others).
- It is highly recommended to also fill in the identifier of the work, e.g. DOI for journal
articles, or ISBN for books. If no identifier is available, fill in a URL.
- After completing the form, click Add to list to submit.

Unifr: SPR: Manual: Manage your digital identity with ORCID, 10.2020 33
5 Edit works
5.1 Edit Works manually
You can edit works that you have added to your record (manually or via BibTeX) yourself. Your
name will be shown as the source for these works. Click on the “pencil” icon to open the editing
window.

Unifr: SPR: Manual: Manage your digital identity with ORCID, 10.2020 34
Works added by another source, such as via a Search & Link wizard, cannot be edited directly.
- “copy and edit” icon create a copy of the information added by the third-party source,
which you can then edit. This copy will be saved as a new version of the work, with you
as the source. Only works that have an external identifier can be copied.
5.2 Group multiple versions of the same work together
The same work can be added to ORCID record from different sources. Where these works have a common identifier (such as a DOI, ISBN, etc.), they are automatically grouped together. If a work does not have an identifier, it cannot be grouped.
Each group of works is shown in a single box. To see other versions of the work, click on the number next to the Preferred source indicator.
You can toggle between different versions of the work by clicking on the source information.
You can set which version of the work you would like to display publicly by clicking on” Make preferred”.

Unifr: SPR: Manual: Manage your digital identity with ORCID, 10.2020 35
The full details of the work can be displayed by toggling the “arrow”.
5.3 Eliminate the duplicated records
Check for duplicated records
- By clicking on the number of duplicates, you can see the “Source” of the record
- When it is possible give preferences to the Editor source
- Otherwise check the metadata and give preference to the most complete metadata

Unifr: SPR: Manual: Manage your digital identity with ORCID, 10.2020 36
5.4 Delete works
Next to each version of a work in your record, there are buttons to set the visibility and delete ("trash can" icon), which can be used to delete the work. You will be asked to confirm the deletion before the work is removed. If you have multiple versions of a work, you will need to delete each version individually.
6 Add peer review works
Peer reviews can only be added by a trusted organization.
This can be done by the organizer of the review or evaluation, such as a publisher, society, funder,
or research institution, or it can be done by a third-party review recognition service, such as
Publons.
In order for your ORCID record to be updated, you will need to grant the review organizer
recognition to update your ORCID record with information about your review contribution.

Unifr: SPR: Manual: Manage your digital identity with ORCID, 10.2020 37
7 Add funding
Import your awarded grants from funding organizations worldwide such as the SNSF in
Switzerland, NIH and NSF in the United States, the UK Research Councils and Wellcome Trust in
the UK, the Austrian Research Council, and over fifty others.
Two ways to add funding :
- DimensionsWisard , add your grants to your ORCID record with a few simple clicks.
- Or manually

Unifr: SPR: Manual: Manage your digital identity with ORCID, 10.2020 38
8 More supports for building your ORCID records
- “Works” and “Peer Review”
- Exporting works into a BibTeX file
- BibTeX issues and troubleshooting
- Group multiple versions of the same work together
- Edit works
- Peer Review
Short videos on https://orcid.org/help show how to register for ORCID iD, and how to make
changes to the folder, such as changing the name and adding publications and other work using
the "Search and Link" wizards.

Unifr: SPR: Manual: Manage your digital identity with ORCID, 10.2020 39
9 Link ORCID iD with Unifr directory
Unifr recommends that researchers register their ORCID in "MyUnifr".
- In the page https://my.unifr.ch/informations-personnelles
- Enter the ORCID alphanumeric code (4x4 characters) in the appropriate box under your
name.
- Scroll down to "Mes recherches, Publications et Engagements" (My Research,
Publications and Commitments) and follow the procedure in "Ajouter une liste" (Add a
List).
9.1 Link your works via ORCID to Unifr directory
- Scroll down to "Mes recherches, Publications et Engagements" (My Research,
Publications and Commitments) and follow the procedure in "Ajouter une liste" (Add a
List).
- Give a title to the list of works

Unifr: SPR: Manual: Manage your digital identity with ORCID, 10.2020 40
- in « Type de contenu » / « Inhaltstyp » (Type of content)
- Select “ORCID”
9.1.1 Display all your works
- Select « Tous » / « Alle »
- Select the format in which the references will be displayed « Format Présentation » /
« Präsentationsformat » (« Qu’est-ce que c’est? » / “Wast ist das?” shows the format
template)
- « Enregistrer » / « Speichen »
9.1.2 Display your work by category
Or if you prefer to show only some types of your works:
- Select « A définir » / « Zu definieren » (Define)
- « Add a work type » / « Work type hinzufügen», Select the “Work category”:
Publications, Conférences, Propriétés intellectuelles et autres / Publikationen, Konferenz,
Geistiges Eigentum, Andere.
- Choose the « Work type(s) » to be added (all categories of work types defined by ORCID
are listed). You can also choose "all work types in the category", / « alle Work Types der
Work Category » and eliminate the unnecessary ones later.
- Choose the format for the display of the references in « Format Presentation » /
« Präsentationsformat» (qu’est-ce que c’est? / Was isr das ? shows the format template)
see above.

Unifr: SPR: Manual: Manage your digital identity with ORCID, 10.2020 41
Once you register, lists of your works appear in MyUnifr under "My Research, Publications and Commitments" as well as on your web page in the directory of the University.

Unifr: SPR: Manual: Manage your digital identity with ORCID, 10.2020 42
10 Annexe:
10.1 Trusted organisations, update research
ORCID Read your information with visibility set to Trusted Parties, add/update your research
activities (works, affiliations, etc)
Trusted organisation Trusted organisation
BASE - Bielefeld Academic Search Engine https://www.base-search.net
Loop http://loop.frontiersin.org
CAB abstracts https://www.cabdirect.org/
MLA International Bibliography http://biblink.mla.org
Clarivate https://www.clarivate.com/
Multidisciplinary Digital Publishing Institute http://susy.mdpi.com
Crossref Metadata Search https://search.crossref.org
Protocols.io https://www.protocols.io/
DataCite https://www.datacite.org
SSRN
https://www.ssrn.com/index.cfm/en/
DBPL https://dblp.org/
ResearcherID https://www.researcherid.com
Deutsche Nationalbibliothek (DNB) http://www.dnb.de/EN/gnd
ScholarOne Manuscripts http://scholarone.com/
Elsevier Editorial https://ees.elsevier.com
Scopus – Elsevier http://orcid.scopusfeedback.com
Europe PubMed Central http://europepmc.org
Publons https://publons.com
ISNI https://isni.oclc.org
DimensionsWizard https://orcid.uberresearch.com/

Unifr: SPR: Manual: Manage your digital identity with ORCID, 10.2020 43
10.2 List of organisations that get your ORCID iD
Organisation Organisation
DMP Canvas Generator
https://dmp.vital-it.ch
MLA International Bibliography
http://biblink.mla.org
Dove Medical Press
http://www.dovepress.com
OpenAire2020 Portal
https://www.openaire.eu
Elsevier Editorial
https://ees.elsevier.com
PubFacts
https://www.pubfacts.com
ezDMP
http://dev.ezdmp.org
ProQuest
https://www.proquest.com/index
H2020
https://ec.europa.eu/programmes/horizon2020/en
Wellcome
https://wellcome.org/
SNF
http://www.snf.ch/fr/Pages/default.aspx
ScholarOne Manuscripts
http://scholarone.com/
IDNum
https://huma-num.fr
SciCV
https://scicv.ch
Impactstory
https://impactstory.org
SONAR
https://sonar.test.rero.ch/global/
Loop
http://loop.frontiersin.org
Swiss edu-ID
http://projects.switch.ch/eduid/
SSRN
ZENODO
http://zenodo.org
10.3 List of reference managers, import your works in ORCID in a
BibTex file
By exporting to a standardized reference format, BibTeX, and then importing into ORCID by
clicking
Refrence Managers Refrence Managers
Citavi
https://www.citavi.com/fr
JabRef
http://dev.ezdmp.org
EndNote
https://endnote.com/
Mendeley
https://www.mendeley.com/
Figshare (DataCite)
https://figshare.com/
ReadCube
https://www.readcube.com/home
Google Scholar
https://scholar.google.com/
Zotero
https://www.zotero.org/
Copyright © 2022 FDOKUMEN