Leica Application Suite LAS V3.3 - LAS Installation Guide
49
LAS Installation Guide Leica Application Suite LAS V3.3
-
Upload
khangminh22 -
Category
Documents
-
view
4 -
download
0
Transcript of Leica Application Suite LAS V3.3 - LAS Installation Guide

LAS Installation Guide
Leica Application SuiteLAS V3.3


LAS Installation Guide
All reasonable steps have been taken to ensure that this publication is correctand complete, but should any user be in doubt about any detail, clarification maybe sought from Leica Microsystems (Switzerland) Ltd., or their accreditedrepresentative. The information in this document is subject to change withoutnotice and should not be construed as a commitment by Leica Microsystems(Switzerland) Ltd.. Leica Microsystems (Switzerland) Ltd.accepts noresponsibility for any errors that may appear in this document.
No part of this publication may be reproduced, transmitted, transcribed, storedin any retrieval system or translated into any human or computer language byany means or in any form, without the prior written permission of LeicaMicrosystems (Switzerland) Ltd.
Due to a policy of continuous development, we reserve the right to changespecifications without notice.
Microsoft and MS-DOS are registered trademarks and Windows, the Windowslogo, the Windows Vista logo, the Windows 2000 logo and the Windows XPlogo are trademarks of Microsoft Corporation.
Date: November 2008
Software Version: LAS V3.3
© 2008 Leica Microsystems (Switzerland) Ltd
Leica Microsystems (Switzerland) Ltd.Stereo and Macroscope SystemsCH 9435 HeerbruggSwitzerland
Telephone: +44 1223 411411FAX +44 1223 412526Hotline: +44 1223 401824di.support@leica-microsystems.comwww.microscopy-imaging.com

At Leica Microsystems Cambridge Ltd. we are continually striving to improve thestandards of our manuals and would welcome customer feedback. If you wouldlike to comment on any aspect of this manual or our manuals in general, pleasesend email to:
Alternatively, send a fax to (+44) (0)1223 412526, or write to
Manual FeedbackMarketing DepartmentLeica Microsystems Cambridge LtdPO Box 80515 Coldhams LaneCB1 3YZUnited Kingdom
Please quote the title and date of the manual. These can be found on theprevious page.
LAS Installation Guide

Table of Contents
LAS Installation Guide ......................... 1-3
................................................................... 1-4Starting Installation
................................................................... 1-5Preparatiion
................................................................... 1-6Installing with Windows XP
........................................................................................... 1-7Installing with Windows XP (continued)
........................................................................................... 1-8Sentinel Protection Installer Warning
........................................................................................... 1-9Minimum and Custom Setup
........................................................................................... 1-10Microsoft Security Update
........................................................................................... 1-11Connecting Camera and Microscope
................................................................... 1-12Installing with Windows Vista
........................................................................................... 1-13Enhanced Security Features
........................................................................................... 1-14Minimum and Custom Setup
........................................................................................... 1-15Vista Aero
........................................................................................... 1-16Connecting Camera and Microscope
................................................................... 1-17Selecting Hardware
........................................................................................... 1-18Selecting Hardware (continued)
........................................................................................... 1-19Selecting Microscope
.......................................................................................... 1-20Selecting Microscope (continued)
........................................................................................... 1-21Selecting Camera
................................................................... 1-22Optional Modules (Evaluation)
........................................................................................... 1-23Evaluation (continued)
........................................................................................... 1-24Demo Licence
........................................................................................... 1-25Licensing
.......................................................................................... 1-26Licensing (continued)
.......................................................................................... 1-27Licensing (continued)
................................................................... 1-28Installing Power Mosaic Hardware
........................................................................................... 1-29Oasis-blue Board
.......................................................................................... 1-30Oasis-blue Board (continued)
........................................................................................... 1-31Power Mosaic with Windows XP
........................................................................................... 1-32Oasis-blue with Other Hardware
.......................................................................................... 1-33Oasis-blue with Other Hardware (continued)
.......................................................................................... 1-34Oasis-blue with Other Hardware (continued )
.......................................................................................... 1-35Oasis-blue with Other Hardware (continued)
........................................................................................... 1-36Check Oasis-blue Settings
.......................................................................................... 1-37Check Oasis-blue Settings (continued)
........................................................................................... 1-38Installing Stage with Encoders
.......................................................................................... 1-39Installing Stage with Encoders (continued)
.......................................................................................... 1-40Installing Stage with Encoders (continued)
.......................................................................................... 1-41Installing Stage with Encoders (continued)
........................................................................................... 1-42Further Support


Chapter 1LAS Installation Guide

1-3 © 2008 Leica Microsystems (Switzerland) Ltd
LAS Installation Guide: Introduction:
This document describes how to installthe Leica Application Suite: Please readit before installing your copy of thissoftware.
It also acts as a supplement to theUser Guide that is on the LASinstallation disk.
All reasonable steps have been takento ensure that this publication is correctand complete, but in case of doubtplease seek clarification from LeicaMicrosystems (Switzerland) Limited, ortheir accredited representative.
The information in this document issubject to change without notice andshould not be construed as acommitment by Leica Microsystems(Switzerland) Limited.
Leica Microsystems (Switzerland)Limited accepts no responsibility for anyerrors that may appear in thisdocument.
Copyright © 2008 Leica Microsystems(Switzerland) Limited.
All rights reserved. The contents ofthis publication may not be reproducedin any form, or communicated to a thirdparty without prior written permission ofLeica Microsystems (Switzerland)Limited.
Due to a policy of continuousdevelopment, we reserve the right tochange specifications without notice.
Microsoft and MS-DOS are registeredtrademarks and Windows, the Windowslogo, the Windows Vista logo theWindows XP logo are trademarks ofMicrosoft Corporation. November 2008. Issue: 2. Printed inUK.

1-4LAS Installation Guide
LAS Installation Guide : Starting Installation:
Leica Application Suite Version issupplied on DVD.
Please read the SystemRequirements and Release Notesbefore starting the installation. AdobeAcrobat Reader must be installed on thecomputer to display the files. If it is not,the program is available on the DVDfrom the Documents and Driverssection..
1: Insert the DVD drive. The start upscreen should appearautomatically.
2: Click on the Drivers, Examples andDocuments button and then SystemRequirements for Using LAS buttonwhich will start Adobe AcrobatReader and display the file.
3: Click on the Release Notes buttonand again, Acrobat will start anddisplay the file.
4: If the DVD does not start upautomatically, double-click the DVDdrive in Windows Explorer.
5: From the list of files on the DVD,double click either SystemRequirements.pdf or ReleaseNotes.pdf to display the files.
If LAS Power Mosaic is to be used,please see the installation information inthis document. LAS Power Mosaiccannot run until the appropriateinstallation is complete. This mustinclude the installation and configuringof the Oasis drivers.

1-5 © 2008 Leica Microsystems (Switzerland) Ltd
LAS Installation Guide: Preparation:
The LAS software to control amicroscope and Leica DFC camera, canbe used in accordance with the softwarelicense. Optional modules may be usedfor a 60-day evaluation period but afterthat they must be licensed for continueduse.
If Leica AF6000 software is also to beused then it must be installed beforeLAS. If Leica AF6000 is subsequentlyre-installed, LAS must also bere-installed afterward.
Preparation:Ensure the computer conforms to theSystem Requirements. If Windows Vistais the operating system, make sure theWindows Experience Index is 3.5 orhigher.
System Restore: (1)Create a System Restore Point usingthe wizard. For guidance read theinstructions in Windows Help.
Languages:Windows installs different languages forits user interface by means of theMulti-lingual pack. Check that theversion of Windows you are usingsupports the multi-lingual pack for thelanguage you require for Japanese andChinese. Make sure you have installedthe language you require before youinstall LAS. The language selected forWindows operation determines the userinterface language used by LAS. If LASsupports the Windows selectedlanguage, LAS will use this. If LAS doesnot support this language, the userinterface will be displayed in English.

1-6LAS Installation Guide
LAS Installation Guide: Installing with Windows XP:
Leica DFC Twain camera software is installed for thelanguage being used by Windows at the time of LASinstallation. If the language is subsequently changed LAS will change accordingly, but the camera softwarewill not. It must be re-installed with the appropriatelanguage selected.
Please note that if you are to install Leica AF6000software on the same PC, then it must be installedbefore LAS. If you later reinstall Leica AF6000, itwill be necessary to reinstall LAS afterwards.
The installation procedures assumes that all thesoftware components are installed on the first harddisk drive (i.e. C: ) and for this release of LAS themain application is installed there also. Thedestination directory cannot be changed.
The computer must be started with a user having ‘Administrator’ privileges to be able to install softwareor change the camera on Windows XP.
LAS V3.2 or earlier versions do not have to beuninstalled before installing LAS V3.3 but this isrecommended. After installing LAS V3.3, it is notpossible to revert to LAS V3.2.
Before installing LAS V3.3, we recommend that abackup is made of any existing archives using theLAS V3.2 Backup tool.
Do not delete archives before installing V3.3 asthey can only be imported into V3.3 if they are left inan unchanged state.
Installation for Windows XP and Vista are treatedseparately as follows:
Installation Steps: Windows XP only:
· Install the microscope following the instructionsprovided.
· Do NOT connect the interface cable betweenthe microscope and the computer.
· Do NOT connect the FireWire cable to the LeicaDFC camera until the software has beeninstalled.
· Disconnect the computer from a network duringinstallation to prevent accidental loading ofdrivers from the Internet if an incorrect option ischosen. All LAS microscope and camera driversare on the supplied LAS DVD. Do not load anyfrom the Internet.
Continued...

1-7 © 2008 Leica Microsystems (Switzerland) Ltd
LAS Installation Guide: Installing with Windows XP (continued):
Close any other programs that arerunning. The best way of ensuring thisis to re-boot the computer.
1: Place the DVD drive. Usually, thestart up screen will appearautomatically.
2: Click on the Install LeicaApplication Suite and DFC Twain button.
3: If the program does not startautomatically, navigate to the DVDdrive in Windows Explorer anddouble-click it.
4: From the list of files on the DVD,double-click the LeicaApplicationSuite.exe file andthe start up screen will appear.Click on the Install LeicaApplication Suite button (2).
Follow the instructions that appear onscreen. Normally it is only necessary toselect the default options.
Some required Windowscomponents may be installed beforeLAS, typically .Net and DirectX.These can take several minutes soplease be patient.
After .Net has been installed, the PCmust be rebooted. After the PC bootprocess is finished the LASinstallation process must berestarted. Go back to Step 1 on thispage. This time the .Net files arealready loaded so the reboot will notoccur and the installation willproceed.

1-8LAS Installation Guide
LAS Installation Guide: Sentinel Protection Installer Warning
Please note that if you are installingLAS V3.3 on a PC that already hasLeica MM AF installed, then themessage shown may appear duringinstallation.
Please ignore this advice as LAS V3.3is compatible with the newer version ofthe Sentinel Protection software that isdetected.
Do NOT remove the newer version,simply click OK and continue.

1-9 © 2008 Leica Microsystems (Switzerland) Ltd
LAS Installation Guide: Minumum and Custom Setup: XP:
If Minimum Setup is selected duringinstallation, no optional modules will beinstalled and LAS can be used in theLAS Core mode for use with LAS ImageExplorer (Folders). This installationprovides the simplest operation and donot require a license file.
If Custom Setup is selected duringinstallation, the optional modules maybe chosen individually. Select onlythose that are required immediately;others can be added later (1).
By default, the Leica DFC cameradrivers are installed in the currentoperating system language. It is notnecessary to specifically select ‘InstallDFC Drivers’ from the start up screen.This option is provided for users who donot wish to install LAS but do want touse the cameras with another program.
Make sure that any Leica DFCcamera is disconnected whilst installingthe DFC Drivers. If the camera isconnected, the installation may failpreventing image capture or colour loss.
To install Leica EZ4D first completethe LAS installation and then click InstallEZ4D on the Documents and Driversscreen. Then follow the screeninstructions.

1-10LAS Installation Guide
LAS Installation Guide: MultiTime Movie: XP:
If the LAS MultiTime Movie module isinstalled with Windows XP(SP2), it maybe necessary to install a MicrosoftSecurity Update. A warning appears (1)but do not reboot the system if asked todo so.
If the Security Update (2) is notavailable for the language of yourWindows XP, then please download itfrom the Microsoft download centre.Find this by searching for the articleKB904706.
See Release Notes underRestrictions: MultiTime for furtheradvice.
When module installation is completethe start up screen appears again. Clickon the Exit button to complete theinstallation.
The fonts used by LAS require the ClearType option to be enabled. Right-clickthe computer Desktop and…
3: …select Properties from the menu.
4: On the dialog select Appearanceand then Effects (5).
6: Enable the Use the followingmethods to smooth edges of screenfonts check box.
7: Click on the arrow to the right of thelist box and from the drop downselect Clear Type.
8: Click OK. Restart the computer.

1-11 © 2008 Leica Microsystems (Switzerland) Ltd
LAS Installation Guide: Connecting the Camera and Microscope: XP:
Connecting the Camera andMicroscope:
Connect the FireWire cable to thecomputer and the Leica DFC camera.
1: The first time a camera is used, the‘Welcome to the Found NewHardware Wizard will appear.
2: Select the No, not this time optionto prevent connecting to theInternet to find a camera driversoftware.
3: Click Next and follow theinstructions.
Connect the Leica microscope cable tothe computer. The first time a USBinterfaced microscope is used, the Welcome to the Found New HardwareWizard will appear. Select the No, notthis time option to prevent connecting tothe Internet to find a camera driversoftware. Click Next and follow the instructions.
Go to Selecting Hardware.

1-12LAS Installation Guide
LAS Installation Guide: Installing with Windows Vista:
Installation Steps: Windows Vistaonly:Install the microscope following theinstructions provided.
· Do NOT connect the interfacecable between the microscopeand the computer.
· Do NOT connect the FireWirecable to the Leica DFC camerauntil the software has beeninstalled.
· Disconnect the computer from anetwork during installation toprevent accidental loading ofdrivers from the Internet if anincorrect option is chosen. All LASmicroscope and camera driversare on the supplied LAS DVD.
Close any other programs that arerunning. The best way of ensuring thisis to re-boot the computer.
1: Place the LAS DVD in the drive.Usually, the start up screen willappear automatically.
2: Click on the Install LeicaApplication Suite and DFC Twain button.
3: If the program does not startautomatically, navigate to the DVDdrive in Windows Explorer anddouble-click it.
4: From the list of files on the DVD,double-click the LeicaApplicationSuite.exe file andthe start up screen will appear.Click on the Install LeicaApplication Suite button (2).

1-13 © 2008 Leica Microsystems (Switzerland) Ltd
LAS Installation Guide: Enhanced Security Features: Vista:
The Windows Vista operating systemincludes enhanced security features.Extra confirmation dialogs occur duringthe installation and you must run LAS inAdministrator Mode to modify itslicence. You must have full WindowsAdministrator privileges to install LASsoftware. In a corporate networkenvironment, it may be necessary toobtain assistance from the customer’sIT department.
After a short delay, the screendarkens and a Windows security dialogappears. This dialog blocks the systemuntil it is dismissed, so it’s not possibleto provide a screenshot. The dialog iscalled User Account Control and warnsAn unidentified program wants accessto your computer.
· Check that the program is called: vcredist_x86_ENU.exe …then select Allow.
· The User Account Control dialogappears again. Check theprogram concerned is:
Setup.exe…then select Allow.
1: If DFC Twain is not installed, thedialog appears.
2: Click Install. If Vista warns that it cannot verify
the publisher of the driver software.Select Install this driver anyway andafter it has installed click Finish.
Follow the instructions that appear onscreen for the remainder of theinstallation. Normally it is onlynecessary to select the default options.Some required Windows componentsmay be installed before LAS, typically .NET and DirectX.
After .Net has been installed, the PCmust be rebooted. After the PC bootprocess is finished the LASinstallation process must berestarted. Go back to Step 1 on thispage. This time the .Net files arealready loaded so the reboot will notoccur and the installation willproceed.

1-14LAS Installation Guide
LAS Installation Guide: Minimum and Custom Setup: Vista:
If Minimum Setup is selected duringinstallation, no optional modules will beinstalled and LAS can be used in theLAS Core mode for use with LAS ImageExplorer (Folders). This installationprovides the simplest operation and donot require a license file.
If Custom Setup is selected duringinstallation, the optional modules maybe chosen individually. Select onlythose that are required immediately;others can be added later (1).
By default, the Leica DFC cameradrivers are installed in the currentoperating system language. It is notnecessary to specifically select ‘InstallDFC Drivers’ from the start up screen.This option is provided for users who donot wish to install LAS but do want touse the cameras with another program.
Make sure that any Leica DFC
camera is disconnected whilst installingthe DFC Drivers. If the camera isconnected, the installation may failpreventing image capture or colour loss.
To install Leica EZ4D: First completethe LAS installation and then click InstallEZ4D on the Documents and Driversscreen. Then follow the screeninstructions.

1-15 © 2008 Leica Microsystems (Switzerland) Ltd
LAS Installation Guide: Vista Aero:
When module installation is completethe start up screen appears again. Clickon the Exit button to complete theinstallation.
Windows Vista Aero:Aero is the type of graphics used byVista. Some graphics cards do notperform as expected when Aero isrunning. For example the sliders barsdo not update properly. If this is thecase:
1: Use Windows Vista Basic graphicsinstead of Aero.
Restart the computer.

1-16LAS Installation Guide
LAS Installation Guide: Connecting Camera and Microscope: Vista:
Connecting the Camera andMicroscope:
Connect the FireWire cable to thecomputer and the Leica DFC camera.Windows Vista recognises the cameraimmediately and there is no NewHardware wizard.
Connect the Leica microscope cableto the computer. The first time a USBinterfaced microscope is used, the Welcome to the Found New HardwareWizard (1) will appear.
2: Select the No, not this time optionto prevent connecting to theInternet to find a camera driversoftware.
3: Click Next and follow theinstructions.
Go to Selecting Hardware in the nextsection.

1-17 © 2008 Leica Microsystems (Switzerland) Ltd
LAS Installation Guide: Selecting Hardware:
Selecting Hardware:The first time Leica Application Suiteruns, the microscope and cameramodels and settings have to be set upand to do this it must be started from anaccount with Administrator privileges.
If a Desktop icon for LAS is not present,refer to the next page.
Starting LAS: Windows XP:If the current account has Administratorprivileges, double-click the left mousebutton on the Desktop icon createdduring the installation and LAS will startnormally.For Limited User accounts:
1: Right click the LAS Desktop icon.2: Select Run as… from the drop
down menu.3: Select a user with Administrator
privileges, enter the password andclick OK (4). LAS will start.
Starting LAS: Windows Vista:
Double clicking the left mouse button onthe Desktop icon will not launch LASeven if Administrator privileges arecurrent, so for a first-time run:
1: Right click the LAS Desktop icon.2: Select Run As Admin… from the
drop down menu.3: Complete the Administrator
credentials and click OK (4). LASwill start.
Continued...

1-18LAS Installation Guide
LAS Installation Guide: Selecting Hardware (continued):
If a Desktop icon for LAS is not present,it can be launched from the computerprogram list. Administrator privilegesare still required.
1: Position the cursor over theStart>All Programs button.
2: Navigate to the Leica ApplicationSuite V3 entry and position thecursor over it. The Leica menuappears.
3: Locate the Leica Application Suiteitem and right click it.
4: From the menu click to select Runas…
5: Complete the dialog, selecting auser with Administrator privileges.Click OK (6). The program will run.

1-19 © 2008 Leica Microsystems (Switzerland) Ltd
LAS Installation Guide: Selecting Microscope:
If you want to setup the microscope andcamera, start LAS in the 'framework' orlicensing mode. Do this by selectingLicense LAS from the Start menu groupfor LAS. In this mode you can changethe Hardware Setup, make amicroscope Firmware Update andperform registration tasks.
1: Select Options on the main headerand...
2: …from the drop down menu selectHardware Setup by clicking it.
3: Click on the arrows to the right ofthe Microscope window. Themicroscope selection list appears.
4: Use the up/down arrows to scrollthrough the list.
5: Click on the required microscope.The list will close and themicroscope selected will appear inthe window.
Continued...
1-20LAS Installation Guide
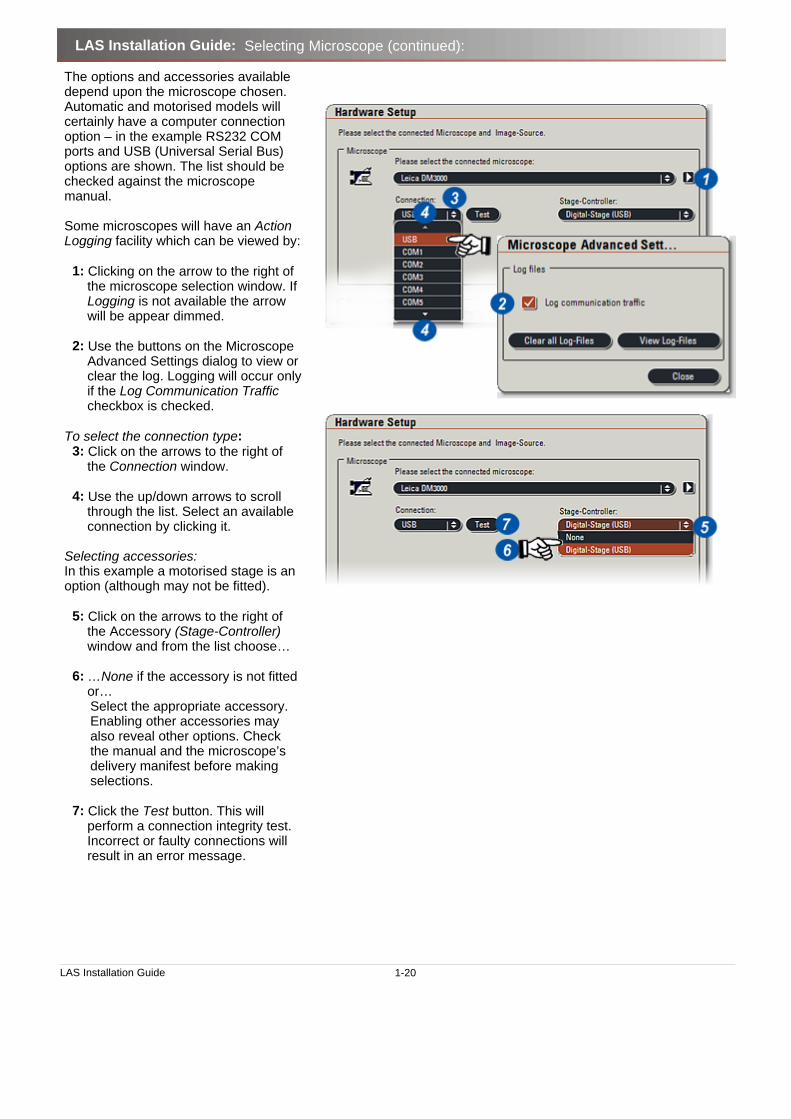
LAS Installation Guide: Selecting Microscope (continued):
The options and accessories availabledepend upon the microscope chosen.Automatic and motorised models willcertainly have a computer connectionoption – in the example RS232 COMports and USB (Universal Serial Bus)options are shown. The list should bechecked against the microscopemanual.
Some microscopes will have an ActionLogging facility which can be viewed by:
1: Clicking on the arrow to the right ofthe microscope selection window. If Logging is not available the arrowwill be appear dimmed.
2: Use the buttons on the MicroscopeAdvanced Settings dialog to view orclear the log. Logging will occur onlyif the Log Communication Trafficcheckbox is checked.
To select the connection type:3: Click on the arrows to the right of
the Connection window.
4: Use the up/down arrows to scrollthrough the list. Select an availableconnection by clicking it.
Selecting accessories:In this example a motorised stage is anoption (although may not be fitted).
5: Click on the arrows to the right ofthe Accessory (Stage-Controller)window and from the list choose…
6: …None if the accessory is not fittedor… Select the appropriate accessory.Enabling other accessories mayalso reveal other options. Checkthe manual and the microscope’sdelivery manifest before makingselections.
7: Click the Test button. This willperform a connection integrity test.Incorrect or faulty connections willresult in an error message.

1-21 © 2008 Leica Microsystems (Switzerland) Ltd
LAS Installation Guide: Selecting Camera:
A few microscope models do not have acamera option so there will not be animage source (= camera) list. For thosemicroscopes that may be fitted with acamera:
1: Click on the arrows to the right ofthe Image Source window.
2: Use the up/down arrows to scrollthrough the list.
3: If a camera is fitted to themicroscope, find the model type onthe list and click to select it. For microscopes without a camera,select the Demo Camera or Noneoption.
4: Click Save to save the microscopeand camera settings and exit.
1-22LAS Installation Guide
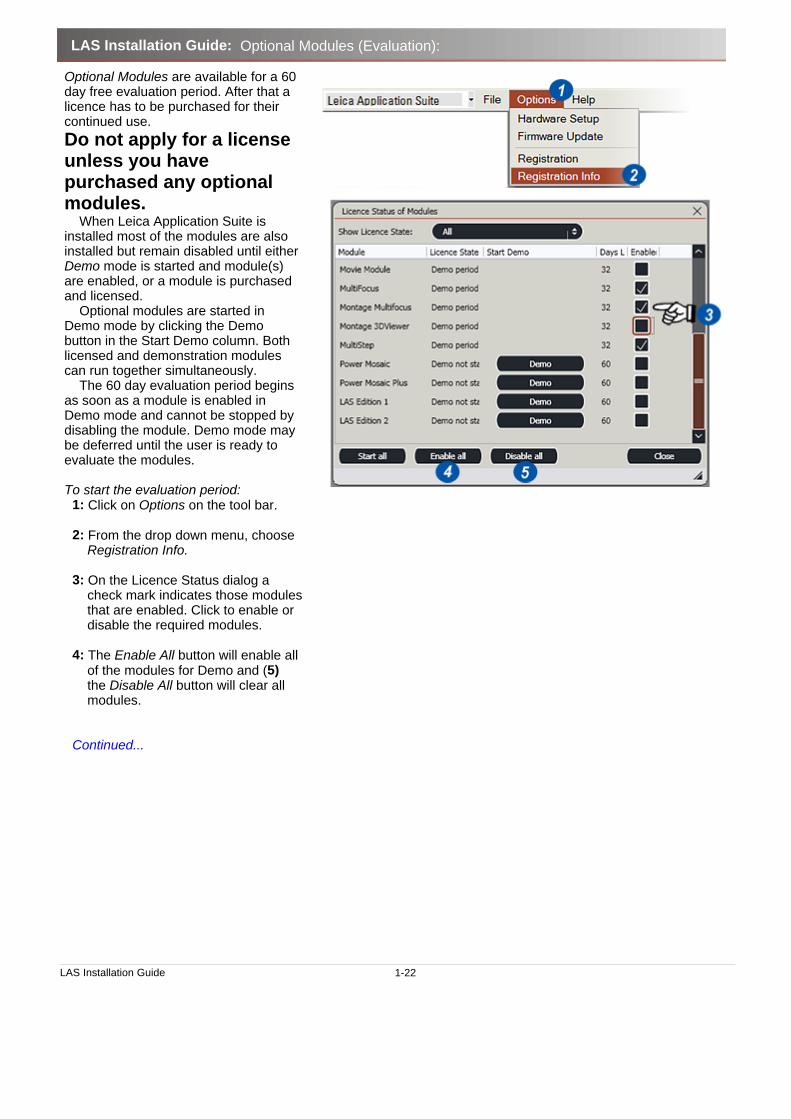
LAS Installation Guide: Optional Modules (Evaluation):
Optional Modules are available for a 60day free evaluation period. After that alicence has to be purchased for theircontinued use.
Do not apply for a licenseunless you havepurchased any optionalmodules.
When Leica Application Suite isinstalled most of the modules are alsoinstalled but remain disabled until either Demo mode is started and module(s)are enabled, or a module is purchasedand licensed.
Optional modules are started inDemo mode by clicking the Demobutton in the Start Demo column. Bothlicensed and demonstration modulescan run together simultaneously.
The 60 day evaluation period beginsas soon as a module is enabled inDemo mode and cannot be stopped bydisabling the module. Demo mode maybe deferred until the user is ready toevaluate the modules.
To start the evaluation period:1: Click on Options on the tool bar.
2: From the drop down menu, chooseRegistration Info.
3: On the Licence Status dialog acheck mark indicates those modulesthat are enabled. Click to enable ordisable the required modules.
4: The Enable All button will enable allof the modules for Demo and (5)the Disable All button will clear allmodules.
Continued...

1-23 © 2008 Leica Microsystems (Switzerland) Ltd
LAS Installation Guide: Optional Modules (Evaluation) continued:
6: To start a module in Demo mode,click the button in the Start Democolumn. The enable/disable checkbox is automatically checked.
7: Clicking the Start All button willenable all of the modules and startthe evaluation period. Aconfirmation warning is displayedbecause this action cannot beundone.
8: Click Close.
9: The Status dialog can be checkedat any time. Use the drop down toselect an appropriate status filter.With the modules selected the nextstep is to licence the Demo period.

1-24LAS Installation Guide
LAS Installation Guide: Optional Modules (Demo Licence):
With the required modules selected onthe Registration Info: Licence Statusdialog, the Demo licence has to beinstalled for the modules to becomeenabled and active:
1: Click on Options on the header barand…
2: …select Registration.
The DVD supplied with the LeicaApplication Suite must be in thecomputer drive.
3: Click on the Install demo licencebutton. The Demo licence numberwill be automatically retrieved fromthe DVD and installed on themachine.
4: Click on the Start Demo button andthe Demo period for the selectedmodules will start.
5: Click Close.

1-25 © 2008 Leica Microsystems (Switzerland) Ltd
LAS Installation Guide: Optional Modules (Licensing):
Optional Modules are purchasedthrough local Leica Sales centres whichwill provide a Module Licence Numberwhen the sale is complete. A singleModule Licence Number can relate toone or several modules.
The user sends the Module LicenceNumber to the Leica ConfigurationCentre either by e-mail or by fax. Theyreturn a Licence file either as an e-mailattachment, or a CD. The Licence fileprovides a code which, when enteredinto the computer will allow OptionalModules to perform normally after the60 day evaluation period.
1: Position the cursor over theStart>All Programs button.
2: Navigate to the Leica ApplicationSuite V3 entry and position thecursor over it. The Leica menuappears.
3: Locate the Licence LAS item andright click it.
4: From the menu click to select Runas…
5: Complete the dialog, selecting auser with Administrator privileges.Click OK (6). The program will run.
Continued...

1-26LAS Installation Guide
LAS Installation Guide: Optional Modules (Licensing) continued:
To obtain a Licence file:
1: Click on Options on the mainheader.
2: Select Registration from the dropdown menu.
3: On the Select Licence File dialogthe Site Code is generatedautomatically either from a singleuser machine or from a network. If acoded Dongle has been purchasedit will have to be in a USB port everytime LAS is running. Fit the Dongleand click the Use Dongle check box (3). The site code is different forDongle users.
4: Click the Register button and…
5: …on the Registration Formcomplete the Contact Details. Thereis a drop down menu from which toselect a country name.
6: Enter the number printed on thesoftware packing.
! Keep the packaging in a safeplace.
Dongle users go to the next pageitem (7).
7: Click on the Save button.
Continued...

1-27 © 2008 Leica Microsystems (Switzerland) Ltd
LAS Installation Guide: Optional Modules (Licensing) continued 2:
With the Registration Form completeand the Save button clicked, the formdetails have to be saved prior to eithere-mailing or faxing to Leica.
1: The Windows Save As dialogappears. Navigate to a folder inwhich to save the RegistrationForm.
2: Type a name for the form and…
3: …click Open.
Send the Registration Form as anattachment to an e-mail or as a fax.The e-mail address and fax numberare shown on the top of theRegistration Form (4).Leica will respond with either ane-mail or CD containing the Licencefile. Start the licensing procedure(please see Running theFramework etc.) and selectRegistration from Options:
E-mail users:On the returned e-mail, click on thelicensing attachment and save it toan appropriate location on the harddrive. The location is unimportantbut the licence file name must notbe altered.
All users:Back on the Select Licence Filedialog, click the Browse for Licencebutton (5) and on the WindowsNavigator locate the Licence Keyfile and click to select it. CD usersshould navigate to the CD, andselect Explore to locate the file.Thefile name and location (path) willappear in the Licence File widow (6).
7: Click the Validate Licencebutton. If the file is valid theappropriate optional modules willusable and free from anyrestrictions. An invalid key file willresult in an error message. ContactLeica for further assistance.
Dongle users do not have to applyfor a file - it is supplied on the CDthat came with the dongle.

1-28LAS Installation Guide
LAS Installation Guide: Installing Power Mosaic Hardware:
LAS Power Mosaic requires an Oasis-blue StageController board (12 730 193) and the cablessupplied with the board. For details see SystemRequirements.pdf on the LAS Installation DVD..
Oasis-blue is a universal PCI board designed todirectly control and drive stage and focus steppermotors of the two or four phase variety, which aresuitable for micro-stepping. The board does notrequire additional power supply or amplifiers.
After the board is installed, Leica Application Suitecontrols all of the Oasis functions.
For use with an IsoPro stage, please refer to theadditional notes that are in the root folder of the LASDVD.
Computer Requirements:
· The computer must conform to the specificationdetailed in System Requirements and:
· Have one half-length PCI or PCI-X slot availablethat is not obstructed by an adjacent board.
· Windows operating system compatible withLAS.
· One free power connector (4 pin hard drive) with2A at 12V available.
· Cross-head screwdriver. · LAS software disk.
Hardware Installation Procedure
· Switch off the microscope and unplug theelectrical supply.
· Switch off the PC and unplug the electricalsupply to disable any standby power.
· If the microscope has a CtrMic box, connect themicroscope Z-breakout cable between the ‘Microscope’ connector on the rear of the CtrMicbox and the equivalent connector on themicroscope.
· Remove the computer casing cover or sidepanel. Select a PCI slot with no obstructions(preferably one with adequate air-flow from theauxiliary fan), and remove the rear blankingpanel.
NOTE: The Oasis drive software must be installedfrom the DVD and configured before startingLAS and using Power Mosaic.

1-29 © 2008 Leica Microsystems (Switzerland) Ltd
LAS Installation Guide: Oasis-blue Board:
Important: For safety reasons alwaysuse an antistatic mat or othergrounded source to discharge staticelectricity before handling the board.
Pick up the board (still in its anti-staticsleeve), by grasping the metal edgebracket with one hand, and remove thesleeve. If the microscope has a CtrMic box:
1: Connect the pass-through ribboncable to PL2 on the rear of theOasis-blue board.
2: Fit the MIC Pass-through plateholding the 15-way D-typeconnector at other end of thisribbon cable into a free access sloton the rear of the PC. Holding the edges of the boardonly, position it over the PCI slotand locate the tip of the metalbracket in the access slot of the PCchassis, before pushing the boardfirmly but gently home with a slightrocking action. Secure the bracket with a retainingscrew or clip as necessary.
3: Connect the spare powerconnector from the PC powersupply to PL1 at the rear of theboard. The Oasis-blue must bethe only device drawing powerfrom this lead. The on-boardmotor drive components get theirpower via the +12V from thisconnector. There is an extensioncable provided with theOasis-blue in case the powercable is too short.
Refit the computer cover.
Continued...

1-30LAS Installation Guide
LAS Installation Guide: Oasis-blue Board (continued):
All three connectors on the Oasis-blueare identical and are not keyed, so caremust be taken to fit the cables correctly.If they are not, the Oasis-blue softwarewill not work at all.
4: Connect a Leica SmartMove orjoystick or other compatible controldevice to SK1 (marked I/O on frontpanel) as required.
5: Connect the Focus/Trigger cable toSK2 (marked Z/F).
6: Connect the Focus cable to thefocus motor connector. If themicroscope uses a Leica CtrMicbox, the focus connector is on theCtrMic microscope Z-breakoutcable. Otherwise it is on theexternal focus motor.
7: Connect the trigger cable to theLeica DFC 4-pin trigger port on therear of the camera. This cable isrequired only for DFC FX camerasor DFC400 and must not beconnected for DFC290 or DFC420.
8: Connect the XY stage cable to SK3(marked X/Y on front panel) and tothe connectors on the steppermotor stage.
If a CtrMic box is being used,connect the SmartMove passthorough cable to the D-typeconnector and the other end to theCtrMic where the SmartMove wouldnormally be connected.
Switch on the PC and microscopeto proceed with the driverinstallation for your operatingsystem.
1-31 © 2008 Leica Microsystems (Switzerland) Ltd
LAS Installation Guide: Power Mosaic with Windows XP:
If the Oasis drivers have not been installed during theLAS installation, please follow this procedure to installthem.
· Switch on PC and boot into Windows XP.
· The Add New Hardware Wizard should appear.
· Insert the LAS disk and select Searchautomatically for best driver for your device andclick Next
· The installation wizard should detect theOasis-blue controller and install the relevantfiles.
· After drivers and files have been copied to therelevant directories, click Finish.
· Run the program \Oasis\Setup.exe on the LASdisk.
· Click on the Install Oasis Controller Device Driveroption. A message will indicate the drivers wereinstalled and registered correctly.
· Click on the Install Utilities option to install theConfiguration Wizard, the Flash Configurationprogram and the Oasis.exe utility.
· Run the Oasis.exe utility program to check theOasis-blue is functioning properly

1-32LAS Installation Guide
LAS Installation Guide: Oasis-blue with Other Hardware:
Run the Oasis Configuration Wizard from its icon andfollow the on-screen instructions. Some parts of theprocess take a few seconds, so please be patient afterclicking the Next button; otherwise you may skip pastan important dialog.
The Wizard screens showing typical settings areshown on the following pages.
Check that lenses and cables are well clear of thestage because the Auto-detect XY section will move itto its limit switches.
· Selecting an XY stage type indicates the size ofthe stage and calculates the lead-screw pitch -how far the stage moves for one turn of an axismotor. If the stage type is not properly specified,or is not present in the list, the lead-screw pitchmay be calculated incorrectly. In this case it willbe necessary to key in a value. Consult theinformation provided by the stage manufacturer.
· The stage limit switch polarity and orientation will beautomatically noted and programmed into theOasis-blue Flash memory, so that it is notnecessary to repeat this process unless the stagetype is changed.
· The preferred direction of travel for each axis canbe set using the wizard, to suit the hardwareconfiguration. The defaults generally suit amicroscope with the camera oriented in such a waythat the view on the monitor is the same as the viewthrough the eyepieces, and with a motorised focusadapter mounted on the left hand side.
· The Axis pitch setting in the focus dialog should beset to the distance Z is raised or lowered for oneturn of the motor. This is usually one turn of themicroscope fine focus knob normally calibrated inmicrons (typically 100 microns per revolution) soenter 0.1mm. For a Leica DM microscope withinternal focus motor enter 0.78 mm.
Continued...

1-33 © 2008 Leica Microsystems (Switzerland) Ltd
LAS Installation Guide: Oasis-blue with Other Hardware (continued):

1-34LAS Installation Guide
LAS Installation Guide: Oasis-blue with Other Hardware (continued 2):

1-35 © 2008 Leica Microsystems (Switzerland) Ltd
LAS Installation Guide: Oasis-blue with Other Hardware (continued 3):

1-36LAS Installation Guide
LAS Installation Guide: Check Oasis-blue Settings:
The Oasis utility software can check ifthe board is working properly. The mostuseful screens are illustrated here:
1: Stage X/Y Settings.
2: Focus (Z) Drive Settings.
If the focus (Z) drive limit switches on aDM microscope are configuredincorrectly, when a limit is reached, itwill not be possible to move away fromit. It will appear as though the focusdrive is stuck despite the ‘clicking’ asthe from the limit switch as the motorpresses against it.
The solution is to reverse the limits byopening the Oasis Status dialog byclicking on Show Status button (1 and2).
Continued...

1-37 © 2008 Leica Microsystems (Switzerland) Ltd
LAS Installation Guide: Check Oasis-blue Settings (continued):
3: Set the User Neg Set and User PosSet to the values shown in the Zcolumn.
If an inverted microscope is used,these values will need to beinverted due to the direction of thestage Z movement.

1-38LAS Installation Guide
LAS Installation Guide: Installing Stage with Encoders:
The 12 730 196 Märzhäuser ScanningStage, 100x80mm, 2mm with Encoders,requires the 12 730 195 Oasis-blueEncoder kit for Power Mosaic to befitted to the Oasis-blue board.
1: The Oasis-blue Encoder is adaughter board that fits on theOasis-Blue board as shown in theillustration:
2: A modified XY Cable, that carriesthe Encoder signals, is connectedbetween the XY connector on theOasis-blue board and the stage.Run the Oasis ConfigurationWizard from its icon, select theEncoder Setup Wizard and followthe steps shown on the followingpages.
Continued...
1-39 © 2008 Leica Microsystems (Switzerland) Ltd
LAS Installation Guide: Installing Stage with Encoders (continued):
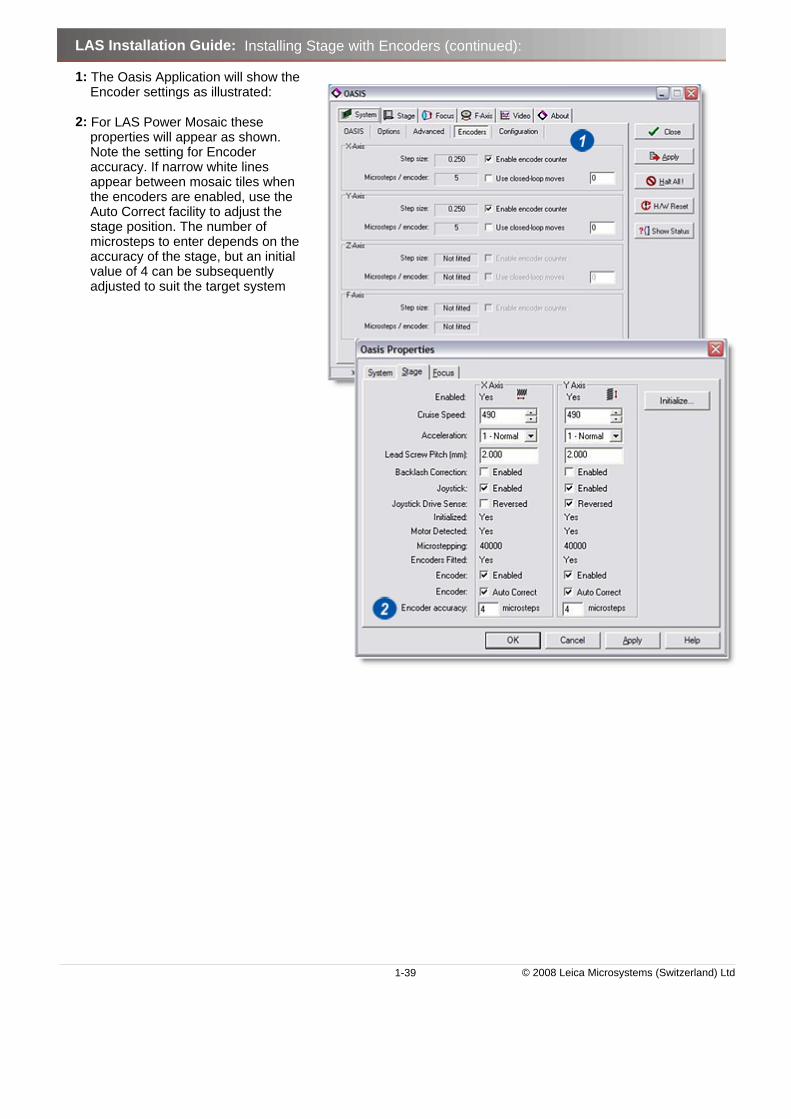
1: The Oasis Application will show theEncoder settings as illustrated:
2: For LAS Power Mosaic theseproperties will appear as shown. Note the setting for Encoderaccuracy. If narrow white linesappear between mosaic tiles whenthe encoders are enabled, use theAuto Correct facility to adjust thestage position. The number ofmicrosteps to enter depends on theaccuracy of the stage, but an initialvalue of 4 can be subsequentlyadjusted to suit the target system

1-40LAS Installation Guide
LAS Installation Guide: Installing Stage with Encoders (continued 2):

1-41 © 2008 Leica Microsystems (Switzerland) Ltd
LAS Installation Guide: Installing Stage with Encoders (continued 3):

1-42LAS Installation Guide
LAS Installation Guide: Further Support:
Your purchase also gives you access to the LeicaApplication Suite e-mail Hotline in case of technicalquestions: [email protected] or [email protected]
When using the Hotline please mention the exactconfiguration you are working with and your softwareversion/release. You will find this information byselecting the About command from the Help menu.This will facilitate the analysis of your query andaccelerate our response time.

Leica Microsystems (Switzerland) Ltd.Stereo and Macroscope SystemsCH 9435 HeerbruggSwitzerland
Telephone: +44 1223 411411FAX +44 1223 412526Hotline: +44 1223 401824di.support@leica-microsystems.comwww.microscopy-imaging.com