LegisWrite - European Commission - europa.eu
136
User Guide LegisWrite version: Modified on: Version of the manual: 6.0 25.10.2017 3.0 LegisWrite
-
Upload
khangminh22 -
Category
Documents
-
view
3 -
download
0
Transcript of LegisWrite - European Commission - europa.eu

User Guide
LegisWrite version:
Modified on:
Version of the manual:
6.0
25.10.2017
3.0
LegisWrite


© 2017 Copyright Commission of the European Union
Design and text by the Informatics Directorate of the Commission of the European Union
All rights reserved. Reproduction in whole or part is prohibited without the written consent of the copyright holder.


User Guide- LegisWrite
Version 3 of the document – 25/10/2017 page 1
TABLE OF CONTENTS
USING THIS BOOK ...........................................................................................................5
“DECIDE” PRESENTATION.............................................................................................6
1. TYPES OF DOCUMENTS .........................................................................................8
2. CREATING A FULL LEGISWRITE DOCUMENT (C/COM/JOIN) .......................9
3. CREATING A LEGISWRITE COVER PAGE DOCUMENT (C/COM/JOIN) ..........................................................................................................13
4. CREATING AN ANNEX..........................................................................................17
5. CREATING A LETTER (AVAILABILITY TO BE CONFIRMED) ......................21
6. UPDATING THE DOCUMENT – COVER PAGE..................................................23
1. Updating the Cover Page .................................................................................23
7. FORMATTING .........................................................................................................27
1. Standard automatic numbering ........................................................................27
1.1. Standard numbering on normal text...................................................27
1.1.1. Simple numbering 1., 2.,… ................................................27
1.1.2. Numbering (1), (2),… ........................................................27
1.1.3. numbering (a), (b),… .........................................................28
1.2. Standard numbering on titles .............................................................28
1.3. Standard numbering in articles ..........................................................29
2. Manual numbering ...........................................................................................29
2.1. Specific numbering on titles: (a); a ....................................................29
2.2. Specific numbering on standard text: (a), a .......................................30
2.3. Toggle Numbering Mode...................................................................31
3. Single, double and triple numbering ................................................................31
3.1. Introduction ........................................................................................31
3.2. Method ...............................................................................................33
4. Management of lists .........................................................................................34
4.1. Dashes ................................................................................................34
4.2. Bullets ................................................................................................35
5. Converting "List Number" styles and automatic "Point" styles into manual numbering............................................................................................35
User Guide- LegisWrite
Version 3 of the document – 25/10/2017 page 2
6. Automatic management of the numbering in the manual "Point" styles.................................................................................................................37
7. Inserting titles without numbering ...................................................................39
8. LegisWrite Quick Styles ..................................................................................40
8. MARKERS ................................................................................................................42
1. Introduction ......................................................................................................42
2. Method .............................................................................................................42
9. INSERTING FOOTNOTES ......................................................................................44
1. Introduction ......................................................................................................44
2. Method .............................................................................................................44
10. STRUCTURE CHECK..............................................................................................48
1. Introduction ......................................................................................................48
2. Method .............................................................................................................48
11. DOCUMENT QUALITY CHECK............................................................................52
1. Introduction ......................................................................................................52
2. Method .............................................................................................................55
3. Manual correction ............................................................................................59
3.1. How to avoid embedded objects? ......................................................69
4. Interactive correction .......................................................................................70
5. Automatic correction........................................................................................74
12. PREPARE FOR DISTRIBUTION ............................................................................78
1. Introduction ......................................................................................................78
2. Method .............................................................................................................78
13. ADD AN ELEMENT IN THE STRUCTURE ..........................................................82
1. Method .............................................................................................................82
2. Main comments................................................................................................83
14. LEVEL OF SENSITIVITY .......................................................................................85
15. PAGE NUMBERING ................................................................................................94
1. Modification of the starting number ................................................................95
2. Modification of the numbering, starting from a particular section. .................95
16. TABLE OF CONTENTS...........................................................................................97
3. Insertion ...........................................................................................................97
4. Defining the table.............................................................................................97

User Guide- LegisWrite
Version 3 of the document – 25/10/2017 page 3
5. Updating...........................................................................................................99
17. CONVERTING AN OLD LEGISWRITE DOCUMENT TO VERSION 6.0 ........100
1. Method. ..........................................................................................................100
2. Elements that cannot be converted into 6.0: ..................................................101
18. PRINTING ...............................................................................................................102
1. Method (as used in Word)..............................................................................102
2. Special printing from LegisWrite ..................................................................102
19. COMPARISON TOOL............................................................................................104
20. UTILITIES COMMAND ........................................................................................108
1. Switch cover Page ..........................................................................................108
2. Utilities for DGT ............................................................................................112
Translation process ........................................................................................112
3. Utilities...........................................................................................................112
"Change language" command ........................................................................112
"Create Skeleton Document" command ........................................................114
21. DISPLAY OPTIONS ...............................................................................................118
22. LEGISWRITE ABOUT ...........................................................................................120
23. OFFICIAL MODIFICATIONS ...............................................................................121
ANNEX 1 CONVERTING WORD DOCUMENTS INTO LEGISWRITE..........................................................................................................122
ANNEX 2 USEFUL LINKS.............................................................................125
ANNEX 3 STRUCTURE OF LEGISWRITE DOCUMENTS ........................126
ANNEX 4: EXAMPLE STYLES FROM QRC ................................................129

User Guide- LegisWrite
Version 3 of the document – 25/10/2017 page 4

User Guide- LegisWrite
Version 3 of the document – 25/10/2017 page 5
Using this book
This course book is designed to present you the various LegisWrite commands.
Version 6.0 features:
A new document type “Letter” allows the creation of official letters. It is fully integrated into LegisWrite. (availability to be confirmed)
The document title (“Titre objet”) can now be formatted easier during document creation and in the “Update document” dialog.
The previous Classification was replaced by a more detailed Level of sensitivity. Upon opening a document created with a previous LegisWrite version, the old
Classification is automatically converted. The new level of sensitivity allows for a variety of levels, each with individual properties.
The Prepare for distribution command now allows withdrawing the level of
sensitivity from sensitive documents, or to declassify several documents at once (SG users only). For cover page documents, some of the options already available for LegisWrite documents have also been made available.
The Utilities command now allows changing the cover page of the document for
certain LegisWrite document types. Applying two difference cover pages for document exchange with external stakeholders is feasible, featuring a watermark and a disclaimer information.
For easing the creation of footnotes with a custom footnote sign, LegisWrite
offers a new Insert special footnote command.
The page numbering of documents was changed: the cover page is not counted any more, meaning that the first page with textual content is now page 1.
The Sous-titre objet element has been removed from all documents. Upon opening a document created with a previous LegisWrite version, this element is
added to the Titre objet element.
For non-LegisWrite documents featuring a cover page, some alternative wordings can be chosen for the document type displayed in the Add cover page and Update document dialogs. SG users additionally now have the possibility to
modify this document type label via an Unprotect button.
The overview dialog on all supported LegisWrite document types shown during document creation now can link to websites containing additional information (GoPro or others).
User Guide- LegisWrite
Version 3 of the document – 25/10/2017 page 6
“Decide” presentation
Aims
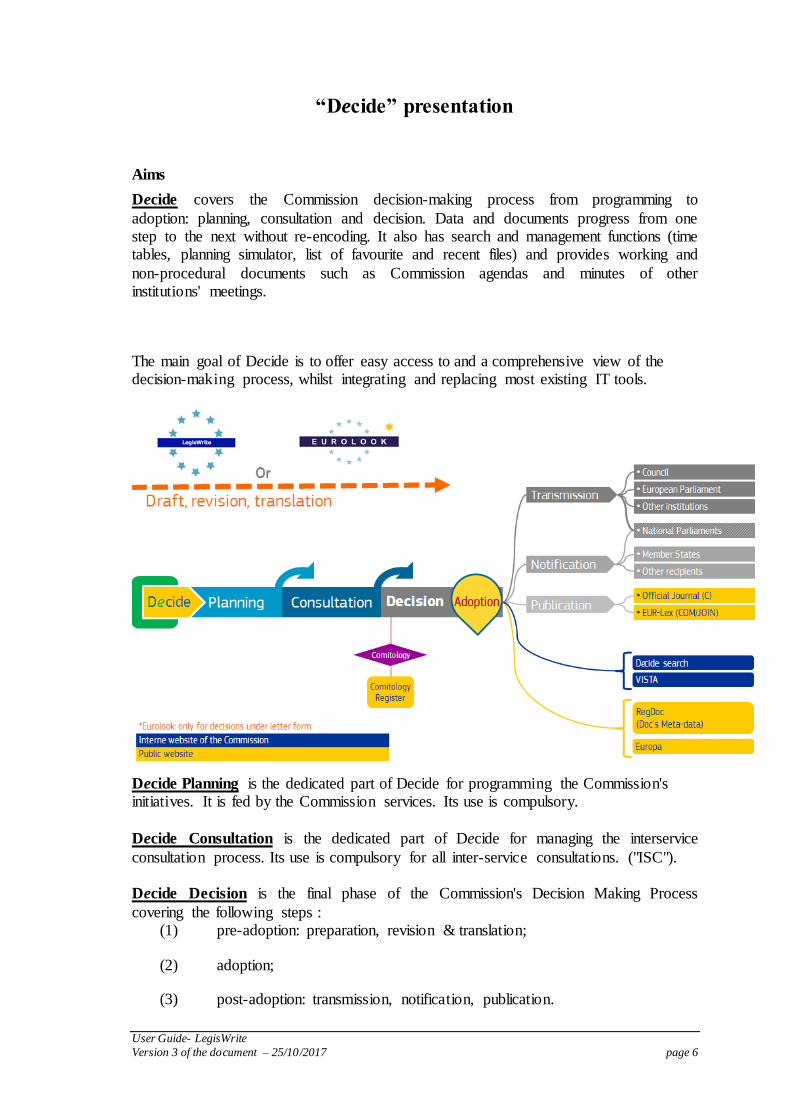
Decide covers the Commission decision-making process from programming to
adoption: planning, consultation and decision. Data and documents progress from one step to the next without re-encoding. It also has search and management functions (time tables, planning simulator, list of favourite and recent files) and provides working and
non-procedural documents such as Commission agendas and minutes of other institutions' meetings.
The main goal of Decide is to offer easy access to and a comprehensive view of the decision-making process, whilst integrating and replacing most existing IT tools.
Decide Planning is the dedicated part of Decide for programming the Commission's initiatives. It is fed by the Commission services. Its use is compulsory.
Decide Consultation is the dedicated part of Decide for managing the interservice
consultation process. Its use is compulsory for all inter-service consultations. ("ISC"). Decide Decision is the final phase of the Commission's Decision Making Process
covering the following steps : (1) pre-adoption: preparation, revision & translation;
(2) adoption;
(3) post-adoption: transmission, notification, publication.
User Guide- LegisWrite
Version 3 of the document – 25/10/2017 page 7
covering all types of acts and procedures (written, oral, by habilitation and by delegation). It also covers the transmisson of the staff working documents "stand alone".
For more details please consult:
https://webgate.ec.europa.eu/fpfis/wikis/display/REGISTRY/DECIDE+EN

User Guide- LegisWrite
Version 3 of the document – 25/10/2017 page 8
1. Types of documents
In LegisWrite (both full LegisWrite and LegisWrite Cover Page documents), all types
of acts and staff working documents are covered:
Interinstitutional proposals - Law Initiative (COM/JOIN)
Autonomous acts (C)
Annexes
Letters
Staff working documents (linked or stand-alone)
For more details, please consult GoPro:
https://webgate.ec.europa.eu/fpfis/wikis/display/REGISTRY/Acts+and+documents
User Guide- LegisWrite
Version 3 of the document – 25/10/2017 page 9
2. Creating a full LegisWrite document (C/COM/JOIN)
To create a full LegisWrite document such as an autonomous act (C) or an interinstitutional proposal (COM/JOIN), use the LegisWrite ribbon to obtain a basic
skeleton for your document. You can then fill out the text.
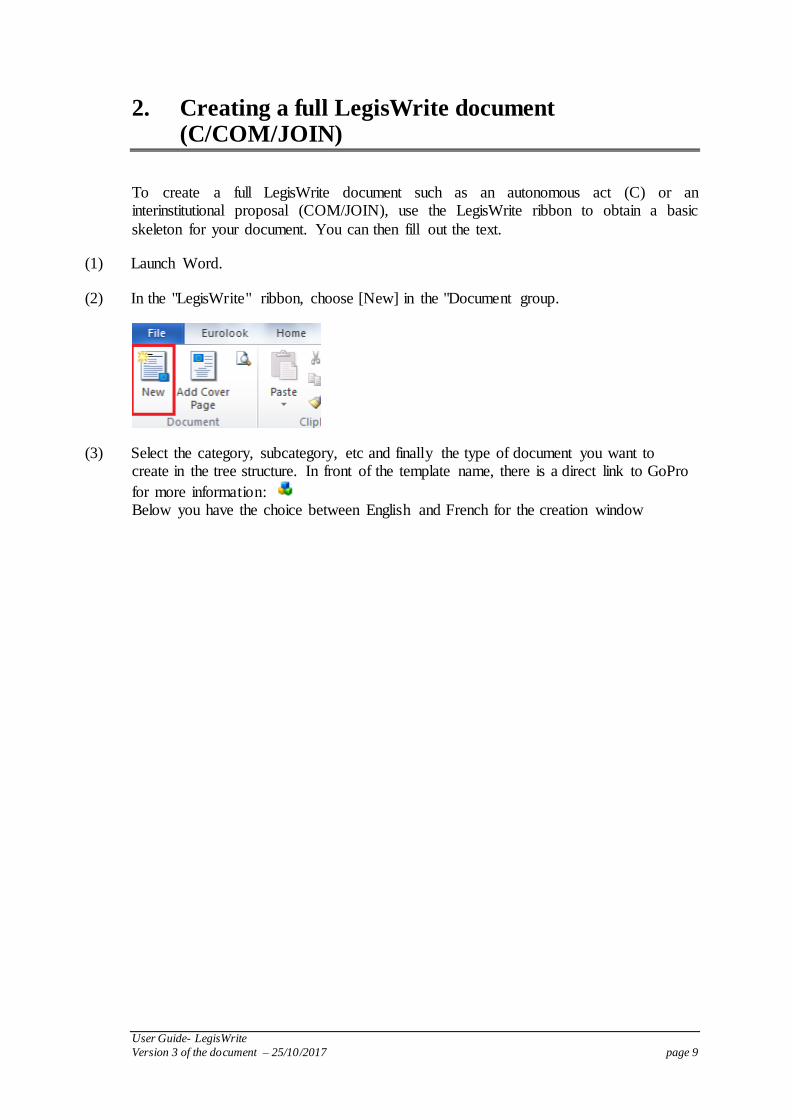
(1) Launch Word.
(2) In the "LegisWrite" ribbon, choose [New] in the "Document group.
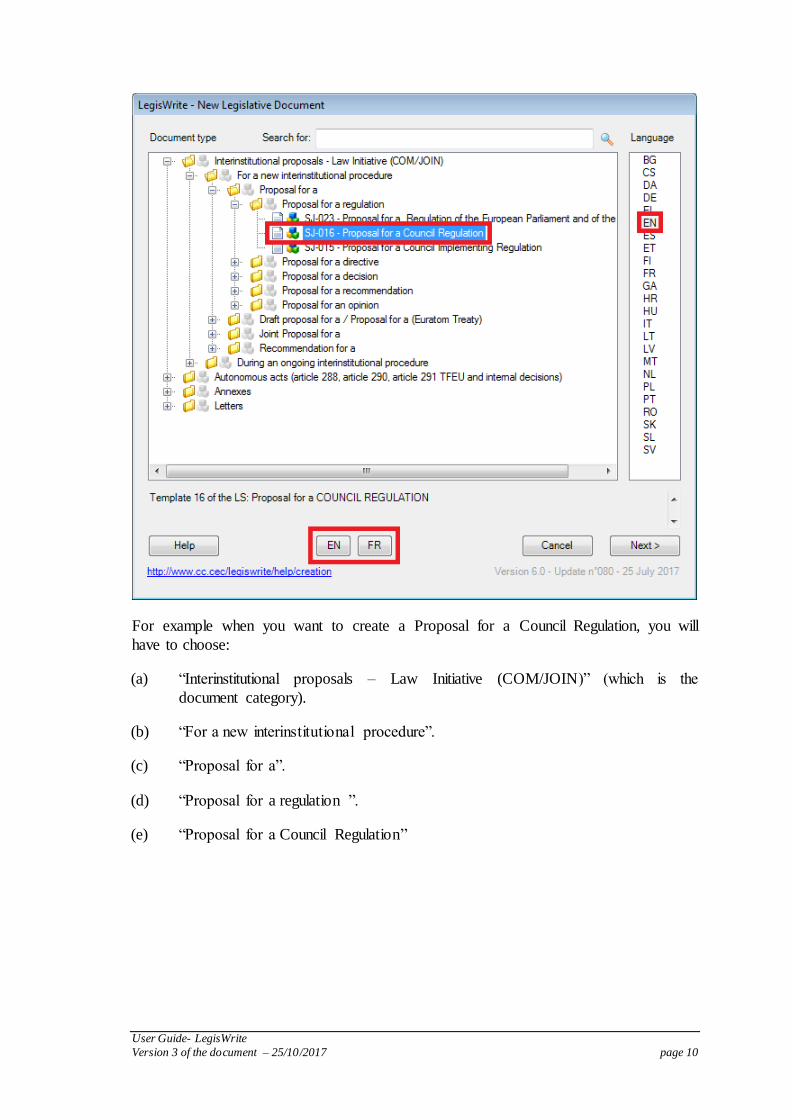
(3) Select the category, subcategory, etc and finally the type of document you want to create in the tree structure. In front of the template name, there is a direct link to GoPro
for more information: Below you have the choice between English and French for the creation window
User Guide- LegisWrite
Version 3 of the document – 25/10/2017 page 10
For example when you want to create a Proposal for a Council Regulation, you will
have to choose:
(a) “Interinstitutional proposals – Law Initiative (COM/JOIN)” (which is the
document category).
(b) “For a new interinstitutional procedure”.
(c) “Proposal for a”.
(d) “Proposal for a regulation ”.
(e) “Proposal for a Council Regulation”

User Guide- LegisWrite
Version 3 of the document – 25/10/2017 page 11
(4) You can also search for a specific type of document, or for its number (e.g. "SJ 023"). Type your search criterion into the search box that appears on top of the window and choose one of the options that are displayed in the search result.
(5) Select a language.
(6) Click on the [<Next » >] button.
You get the following window :

User Guide- LegisWrite
Version 3 of the document – 25/10/2017 page 12
(7) You can already fill out the parts: "internal reference", "interinstitutional reference",
"Level of sensitivity", "Package title" (style Supertitre) and "Document title" (style Titre objet). The Document title can be formatted directly in this window using the
formatting buttons on top .
(8) "Statut" and "Document type" are fixed and cannot be changed any more.
Further on you can choose the different parts your document will consist of: "Explanatory memorandum", "Text of the act" and "Financial statement".
Click on the [<Create Document >] button to confirm your choices.
Comment:
The [<Back>] button allows you to come back to the previous creation window

User Guide- LegisWrite
Version 3 of the document – 25/10/2017 page 13
3. Creating a LegisWrite cover page document (C/COM/JOIN)
When you are working in a Word document, you have the possibility to insert a LegisWrite Cover Page without actually converting it. The purpose is preserving the
formatting of the existing Word document, and avoiding the numerous errors that would be generated on converting the document into LegisWrite, but still being able to register
it in e-greffe. Please beware that this action will not transform your Word document into a LegisWrite document: as a consequence only a limited functionality is available for these documents.
(a) To insert a Cover Page into a Word document go to the LegisWrite ribbon and
choose:
"Add Cover Page" in the "Document" group

User Guide- LegisWrite
Version 3 of the document – 25/10/2017 page 14
A window will open, similar to the LegisWrite creation window, in which you will have to specify the type of document in the tree structure, as well as the language in the right column.
User Guide- LegisWrite
Version 3 of the document – 25/10/2017 page 15
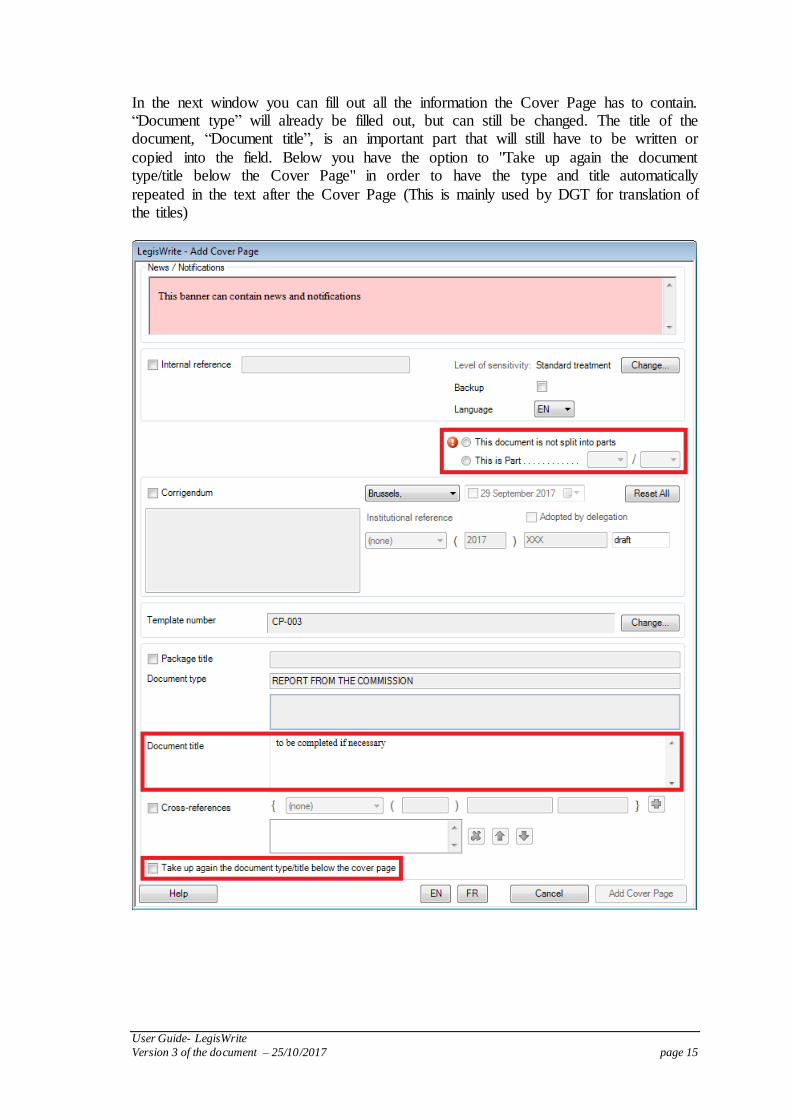
In the next window you can fill out all the information the Cover Page has to contain. “Document type” will already be filled out, but can still be changed. The title of the document, “Document title”, is an important part that will still have to be written or
copied into the field. Below you have the option to "Take up again the document type/title below the Cover Page" in order to have the type and title automatically
repeated in the text after the Cover Page (This is mainly used by DGT for translation of the titles)

User Guide- LegisWrite
Version 3 of the document – 25/10/2017 page 16
The button below called “Add Cover Page” will remain greyed out as long as you did not specify if the document is split into parts or not. The reason for splitting documents is the size limit of 3.7 MB. As soon as your document exceeds this size limit, you will
have to split it into different parts. If you have to split the document, you will have to indicate the total number of parts and the number of the part which is put in that specific
document. After clicking on "Add Cover Page" the result will be the original Word document (without LegisWrite footers) together with a LegisWrite Cover Page, which can also be
updated later on if needed. In Word documents with a LegisWrite Cover Page, the Update document function will
be displayed together with a traffic light, just like the Document Quality Check funtion in LegisWrite documents.
Here only two possibilities exist:
(a) a green light, when the Cover Page has been updated, the document is ready to be sent to e-greffe
(b) and a red light, when the Cover page should still be updated.

User Guide- LegisWrite
Version 3 of the document – 25/10/2017 page 17
4. Creating an annex
Annexes always have to be separated from the Act. To create a LegisWrite annex, use
the LegisWrite ribbon to obtain a basic skeleton for your document. You can then fill out the text.
(1) Launch Word.
(2) In the "LegisWrite" ribbon, choose [New] in the "Document group.
(3) Select the category, subcategory, etc and finally the type of document you want to
create in the tree structure. In front of the template name, there is a direct link to GoPro
for more information:
Below you have the choice between English and French for the creation window
User Guide- LegisWrite
Version 3 of the document – 25/10/2017 page 18
For example when you want to create an Annex to a proposal, you will have to choose:
(a) “Annexes” (which is the document category).
(b) “Annex to a proposal / to another proposal”
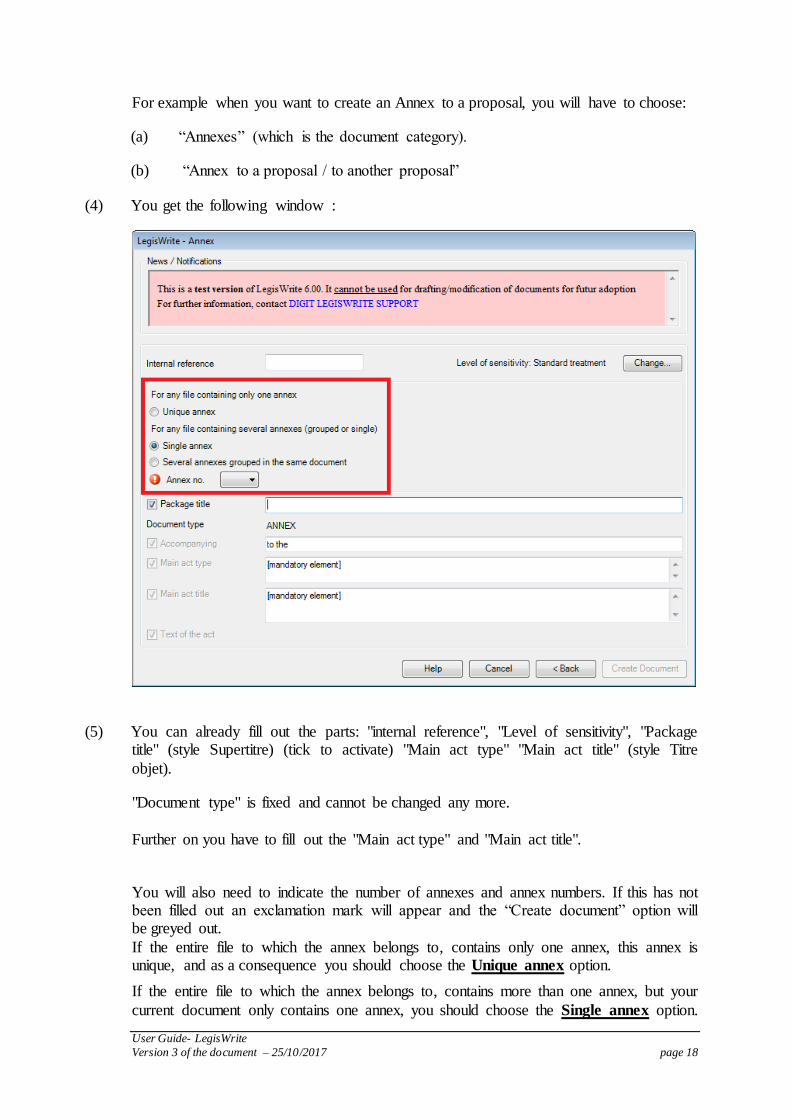
(4) You get the following window :
(5) You can already fill out the parts: "internal reference", "Level of sensitivity", "Package title" (style Supertitre) (tick to activate) "Main act type" "Main act title" (style Titre
objet).
"Document type" is fixed and cannot be changed any more.
Further on you have to fill out the "Main act type" and "Main act title".
You will also need to indicate the number of annexes and annex numbers. If this has not been filled out an exclamation mark will appear and the “Create document” option will be greyed out.
If the entire file to which the annex belongs to, contains only one annex, this annex is unique, and as a consequence you should choose the Unique annex option.
If the entire file to which the annex belongs to, contains more than one annex, but your
current document only contains one annex, you should choose the Single annex option.
User Guide- LegisWrite
Version 3 of the document – 25/10/2017 page 19
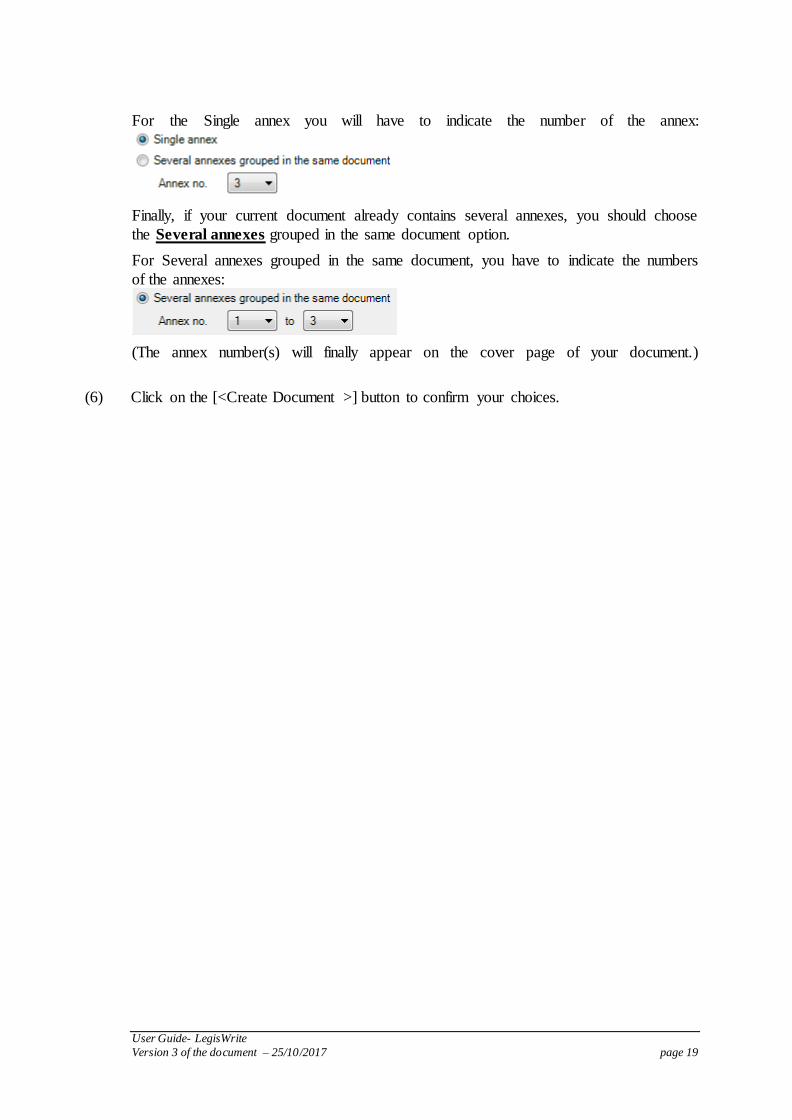
For the Single annex you will have to indicate the number of the annex:
Finally, if your current document already contains several annexes, you should choose
the Several annexes grouped in the same document option.
For Several annexes grouped in the same document, you have to indicate the numbers
of the annexes:
(The annex number(s) will finally appear on the cover page of your document.)
(6) Click on the [<Create Document >] button to confirm your choices.

User Guide- LegisWrite
Version 3 of the document – 25/10/2017 page 20
Comment:
As soon as you have created the annex, and you press the option “Update
document” you will also have Part options on the right.
The combination of both annex and part options is shown in a preview and will
finally appear on the cover page of your document.
The number of annexes you indicate on the cover page will be inserted in the
document, divided by section breaks. If you indicate the document contains 2 annexes for example, the system will put 2 sections with an annex title at the
top:
User Guide- LegisWrite
Version 3 of the document – 25/10/2017 page 21
5. Creating a letter (availability to be confirmed)
To create a LegisWrite letter, use the LegisWrite ribbon to obtain a basic skeleton for
your document. You can then fill out the text.
(1) Launch Word.
(2) In the "LegisWrite" ribbon, choose [New] in the "Document group.
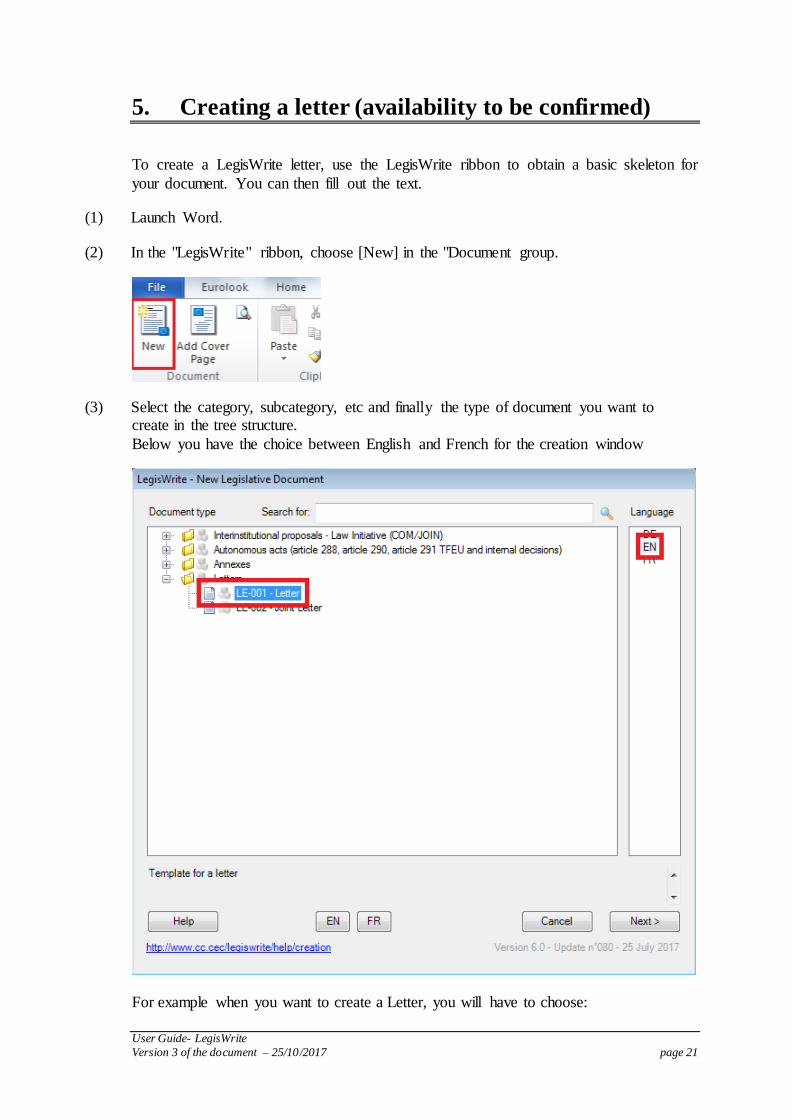
(3) Select the category, subcategory, etc and finally the type of document you want to create in the tree structure.
Below you have the choice between English and French for the creation window
For example when you want to create a Letter, you will have to choose:
User Guide- LegisWrite
Version 3 of the document – 25/10/2017 page 22
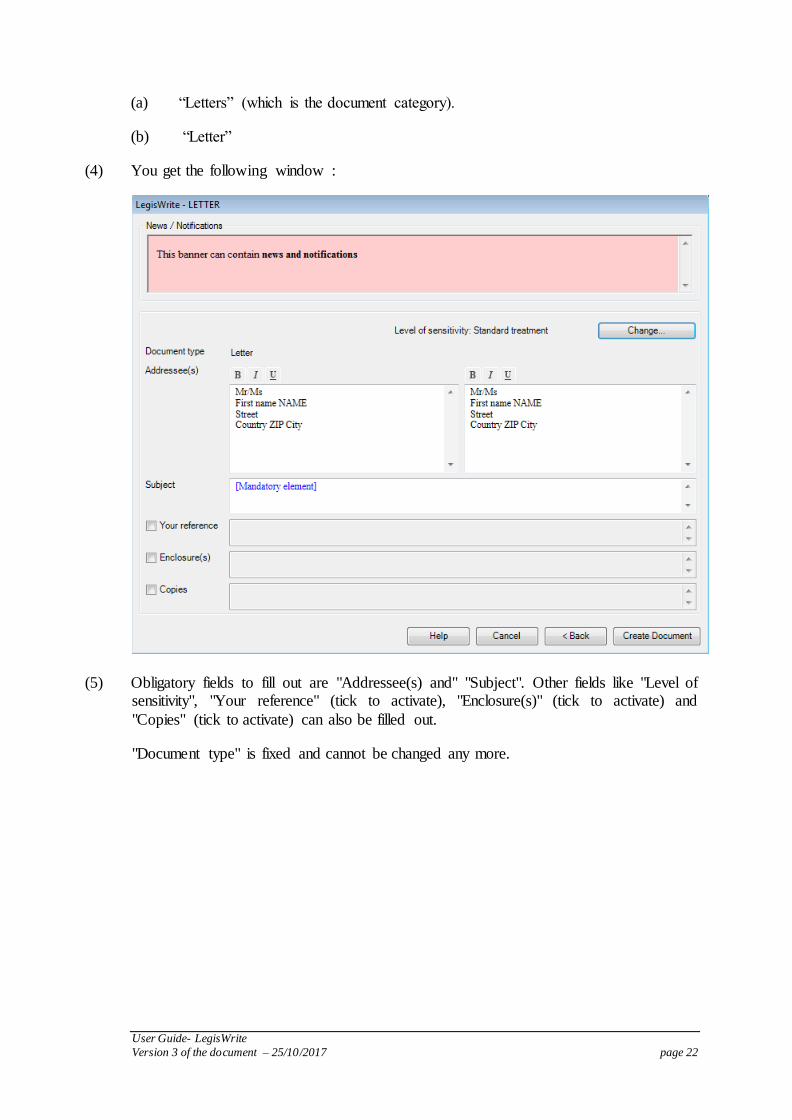
(a) “Letters” (which is the document category).
(b) “Letter”
(4) You get the following window :
(5) Obligatory fields to fill out are "Addressee(s) and" "Subject". Other fields like "Level of sensitivity", "Your reference" (tick to activate), "Enclosure(s)" (tick to activate) and
"Copies" (tick to activate) can also be filled out.
"Document type" is fixed and cannot be changed any more.

User Guide- LegisWrite
Version 3 of the document – 25/10/2017 page 23
6. Updating the document – Cover Page
1. UPDATING THE COVER PAGE
The cover page will always appear as an image in your text, with the purpose of protecting some fixed fields like "Statut" and "Type du document". Because the Cover
Page is turned into an image, it is not possible to click on it to change the text. In order to change the content of the Cover Page, you can click on the "Update Document" button in the "Document" group.

User Guide- LegisWrite
Version 3 of the document – 25/10/2017 page 24
When you have clicked on "Update Document" this window will open:
(c) Some parts in the Cover Page will be greyed out or fixed in order to protect them. "Document type" and "Adoption date" for example, can never be changed. If you
would change these parts in the act, LegisWrite will always restore the original data from the Cover Page.
The language of the document is also fixed once it has been created. Other parts can only be changed by Secretary General, as they are linked to the adoption of the document. The adoption date for example and the "Institutional
reference".
(d) Parts that you can change are e.g. “Internal reference”, “Level of security” (explained in chapter 9 “Security level and Timbre/Marking”) and “Document title”. The
Document title can be (re)formatted directly in this window using the formatting
buttons on top .
User Guide- LegisWrite
Version 3 of the document – 25/10/2017 page 25
(e) By default the option "This document is not split into parts" (top right) is ticked. Should an act / annex consist of several LegisWrite documents, then you can tick the second option and choose the number of the part you are working in and after that
choose the total number of parts.
(f) In the lower part of the window you can tick and fill out the text for the parts that you
need in the document, e.g. "Package title", "EEA relevance" and "Authentic languages".
(g) Cross references can be added at the bottom of the window.
Doubleclicking an existing reference will duplicate it. In this way you can edit just a part of the previous reference and save time when similar references have to be
added.
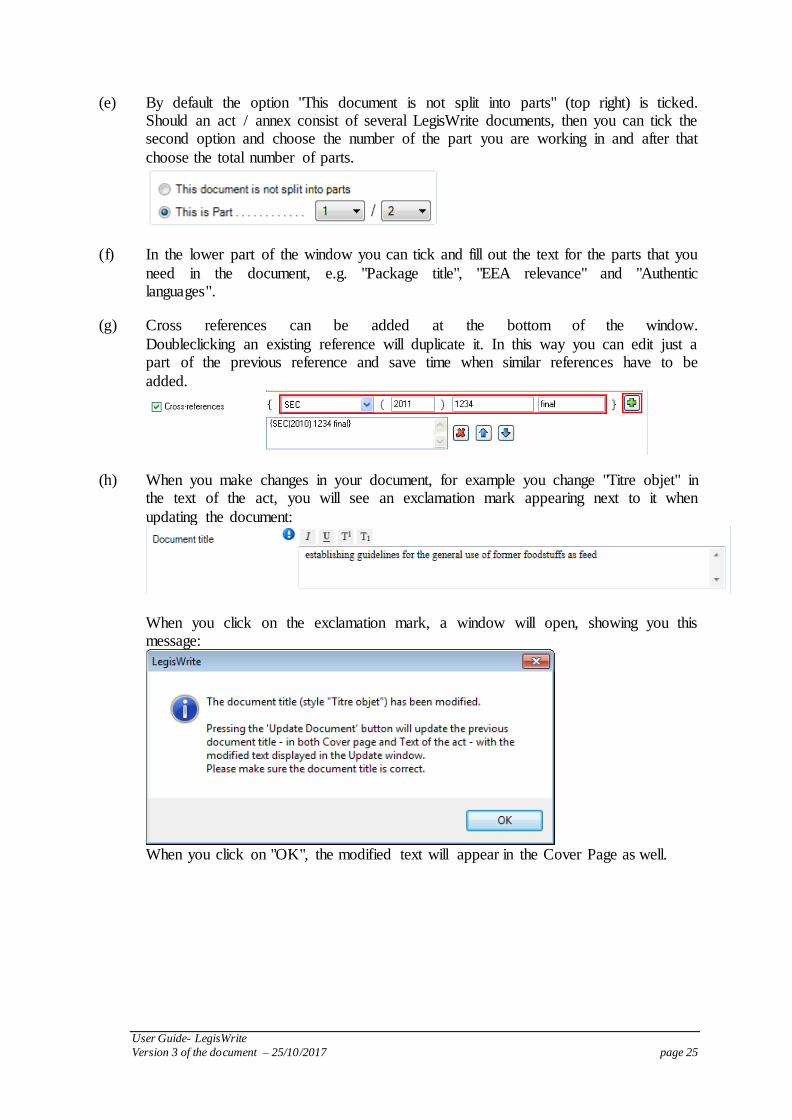
(h) When you make changes in your document, for example you change "Titre objet" in the text of the act, you will see an exclamation mark appearing next to it when
updating the document:
When you click on the exclamation mark, a window will open, showing you this message:
When you click on "OK", the modified text will appear in the Cover Page as well.
User Guide- LegisWrite
Version 3 of the document – 25/10/2017 page 26
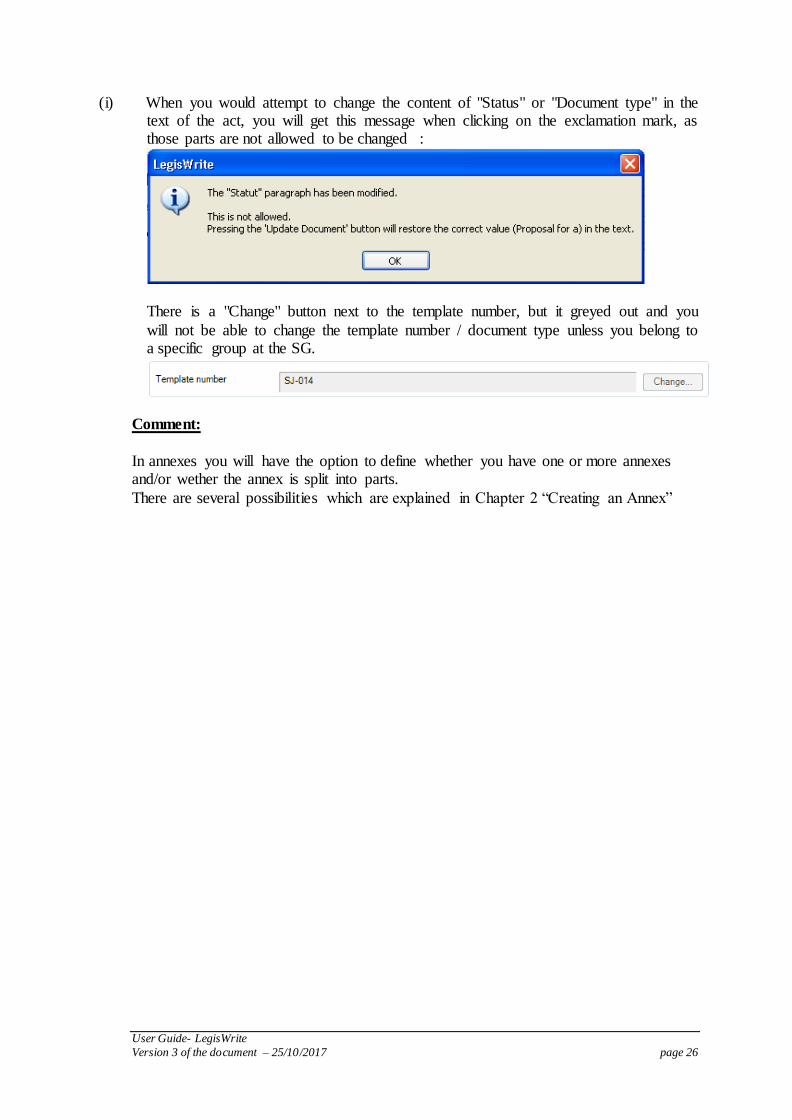
(i) When you would attempt to change the content of "Status" or "Document type" in the text of the act, you will get this message when clicking on the exclamation mark, as those parts are not allowed to be changed :
There is a "Change" button next to the template number, but it greyed out and you
will not be able to change the template number / document type unless you belong to a specific group at the SG.
Comment:
In annexes you will have the option to define whether you have one or more annexes and/or wether the annex is split into parts.
There are several possibilities which are explained in Chapter 2 “Creating an Annex”
User Guide- LegisWrite
Version 3 of the document – 25/10/2017 page 27
7. Formatting
Introduction
A LegisWrite document meets the wish to standardize formatting. The formatting rules allowed in LegisWrite documents have been defined by the General Secretariat and
have been made available for the LegisWrite users with the help of styles. When you define the layout of a document, it is out of the question to select the text
and apply direct formatting. (that means applying some Word formatting as automatic numbering, margins setup, and so on). You have to select one style from the available
list (and a style allowed in this document part) to get the presentation you want.
1. STANDARD AUTOMATIC NUMBERING
1.1. Standard numbering on normal text
1.1.1. Simple numbering 1., 2.,…
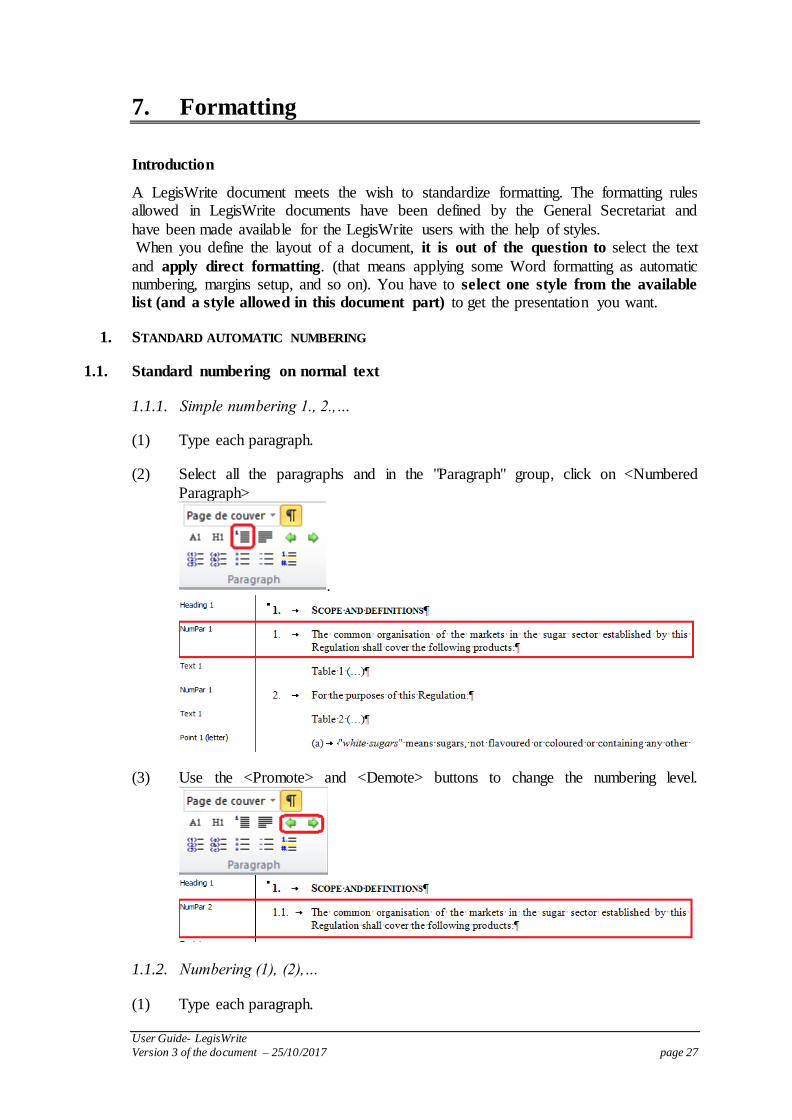
(1) Type each paragraph.
(2) Select all the paragraphs and in the "Paragraph" group, click on <Numbered
Paragraph>
.
(3) Use the <Promote> and <Demote> buttons to change the numbering level.
1.1.2. Numbering (1), (2),…
(1) Type each paragraph.

User Guide- LegisWrite
Version 3 of the document – 25/10/2017 page 28
(2) Select all the paragraphs and in the "Paragraph" group, click on Point (number), an automatic style for numbering paragraphs with (1), (2), etc:
(3) Use the <Promote> and <Demote> buttons to change the numbering level.
1.1.3. numbering (a), (b),…
(1) Type each paragraph.
(2) Select all the paragraphs and in the "Paragraph" group, click on Point (letter): an automatic style for numbering paragraphs with (a), (b), etc
(3) Use the <Promote> and <Demote> buttons to change the numbering
level.
1.2. Standard numbering on titles
METHOD

User Guide- LegisWrite
Version 3 of the document – 25/10/2017 page 29
(1) Type each paragraph.
(2) Select all the paragraphs and in the "Paragraph" group, click on <Heading> .
(3) Use the <Promote> and <Demote> buttons to change the numbering
level.
1.3. Standard numbering in articles
METHOD
(1) create articles manually, or by clicking on
in the "Paragraph" group.
(2) To renumber all the articles automatically after you've created them, you can go into the Legiswrite ribbon, the "Tools" group and choose "Lists" > "Renumber
articles":
2. MANUAL NUMBERING
Introduction
Automatic numbering is limited to 1., 1.1., etc., or (1) or (a). Paragraphs with special numbering like 1) (a), a, can not have automatic numbering. You will apply a manual numbering on those paragraphs.
2.1. Specific numbering on titles: (a); a
METHOD

User Guide- LegisWrite
Version 3 of the document – 25/10/2017 page 30
(1) Move the cursor to the right place in the document.
(2) Insert the numbering you require, and then press "Tab".
(3) Select the paragraphs and go into the Word style box in the "Paragraph" group:
select one <Manual Heading x> style.
(4) Use the <Promote> and <Demote> buttons to change the numbering levels.
There are four levels of indentation: <Manual Heading 1> to <Manual Heading 4>. All those titles will be aligned left.
2.2. Specific numbering on standard text: (a), a
METHOD
(1) Move the cursor to the right place in the document
(2) Insert the numbering you require, and then press "Tab".
(3) Select the paragraphs and go into the Word style box in the "Paragraph" group: select one <Manual NumPar x> style.

User Guide- LegisWrite
Version 3 of the document – 25/10/2017 page 31
(4) Use the <Promote> and <Demote> buttons to change the numbering levels.
There are four levels of indentation: <Manual NumPar 1> to <Manual NumPar 4>. All those titles will be aligned left.
2.3. Toggle Numbering Mode
When your paragraphs are in « Numpar X » styles, « Heading X » styles or «Point (number)» or «Point (letter)» styles, a shortcut in the "Paragraph" group enables you to
switch to manual numbering.
(1) From the LegisWrite ribbon select [Toggle Numbering Mode] in the "Paragraph" group.
automatically generated number will disappear.
(2) Insert the numbering you require, and then press "Tab".
For example: the original "NUMPAR xx" style is replaced by "MANUAL NUMPAR xx".
Note:
This command can be used to switch from manual numbering ("MANUAL NUMPAR xx") to automatic numbering ("NUMPAR xx"). In this situation, you have to delete the
manual numbering and the tab.
3. SINGLE, DOUBLE AND TRIPLE NUMBERING
3.1. Introduction
Authors sometimes need to create numbering which you can not achieve with LegisWrite standard styles.
Numbering can, for example, comprise several numbers and/or letters separated by tabulation, with the number as a whole also separated from the text by tabulation.

User Guide- LegisWrite
Version 3 of the document – 25/10/2017 page 32
Authors might also need to create numbering on several levels of indentation.
LegisWrite has special styles enabling you to obtain this kind of numbering.
Combining them allows you to create an advanced ranking system over several
paragraphs.
Point style creates numbering comprising one number or one letter; the paragraph can be moved up to five places across.
PointDouble style creates numbering with two numbers and/or letters separated by tabular spacing; the paragraph can be moved up to five places across. PointTriple style creates numbering with three numbers and/or letters separated by
tabular spacing; the paragraph can be moved up to five places across. These tools are semi-automatic: the layout is automatic, the numbering, manual.
User Guide- LegisWrite
Version 3 of the document – 25/10/2017 page 33
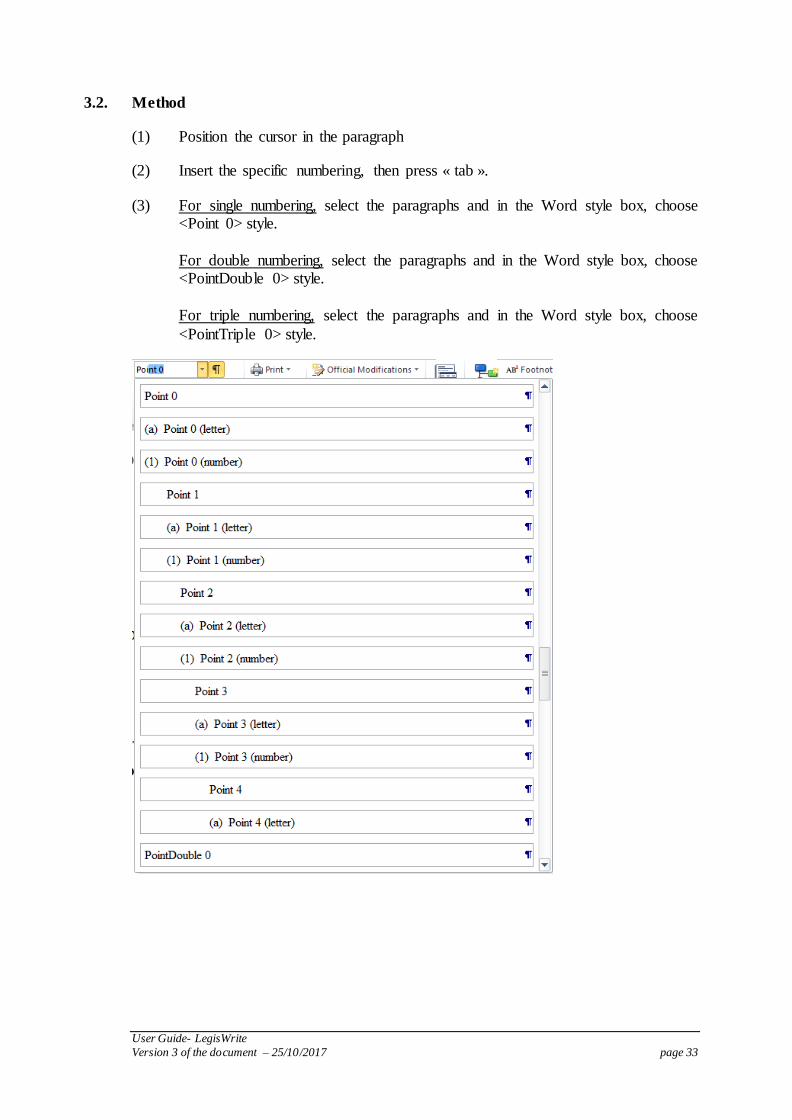
3.2. Method
(1) Position the cursor in the paragraph
(2) Insert the specific numbering, then press « tab ».
(3) For single numbering, select the paragraphs and in the Word style box, choose <Point 0> style.
For double numbering, select the paragraphs and in the Word style box, choose <PointDouble 0> style.
For triple numbering, select the paragraphs and in the Word style box, choose
<PointTriple 0> style.
User Guide- LegisWrite
Version 3 of the document – 25/10/2017 page 34
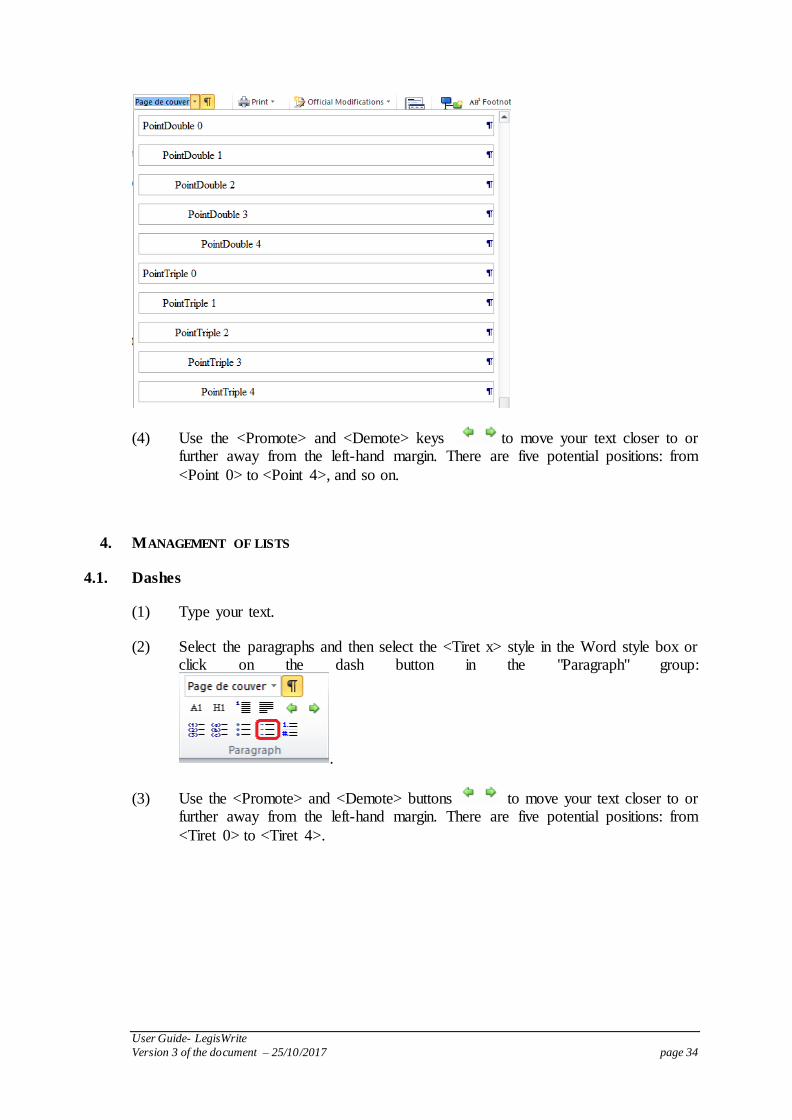
(4) Use the <Promote> and <Demote> keys to move your text closer to or further away from the left-hand margin. There are five potential positions: from
<Point 0> to <Point 4>, and so on.
4. MANAGEMENT OF LISTS
4.1. Dashes
(1) Type your text.
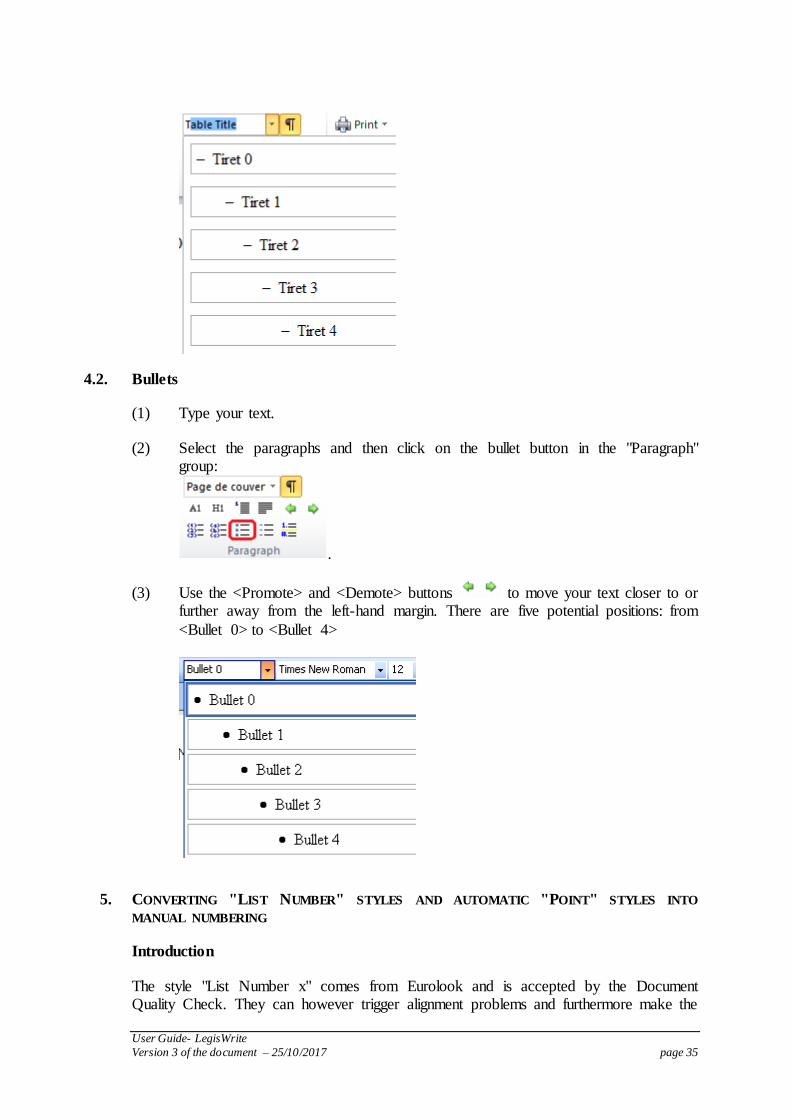
(2) Select the paragraphs and then select the <Tiret x> style in the Word style box or click on the dash button in the "Paragraph" group:
.
(3) Use the <Promote> and <Demote> buttons to move your text closer to or further away from the left-hand margin. There are five potential positions: from
<Tiret 0> to <Tiret 4>.
User Guide- LegisWrite
Version 3 of the document – 25/10/2017 page 35
4.2. Bullets
(1) Type your text.
(2) Select the paragraphs and then click on the bullet button in the "Paragraph" group:
.
(3) Use the <Promote> and <Demote> buttons to move your text closer to or further away from the left-hand margin. There are five potential positions: from
<Bullet 0> to <Bullet 4>
5. CONVERTING "LIST NUMBER" STYLES AND AUTOMATIC "POINT" STYLES INTO
MANUAL NUMBERING
Introduction
The style "List Number x" comes from Eurolook and is accepted by the Document Quality Check. They can however trigger alignment problems and furthermore make the

User Guide- LegisWrite
Version 3 of the document – 25/10/2017 page 36
work of translators more difficult when translating the documents: in some languages the number of brackets around the numbering is will change. We strongly advise you to use the "Point" styles with manual numbering, so brackets can be added or removed
without any problem.
The "Convert List" command allows you to perform this operation automatically.
It also allows you to convert the "Point" styles with automatic numbering (number and letter) into a manual Point style.
METHOD
(1) Select the paragraph(s) for which you find a "List Number" style ("List Number" is included in the name of the style), Point (letter) or Point (number).
(2) Go into the Legiswrite ribbon, the "Tools" group and choose "Lists" > "Convert List":
The numbering that was previously applied on the paragraphs (lists (1) or (a) or bullets or ,dashes) is kept. The "List Number" styles and the automatic Point (number/letter)
styles are replaced by the "Point" styles.They allow to keep the paragraph indentation. The automatic numbering is converted into manual numbering. You can now easily delete a bracket or change the numbering if necessary.
Example:
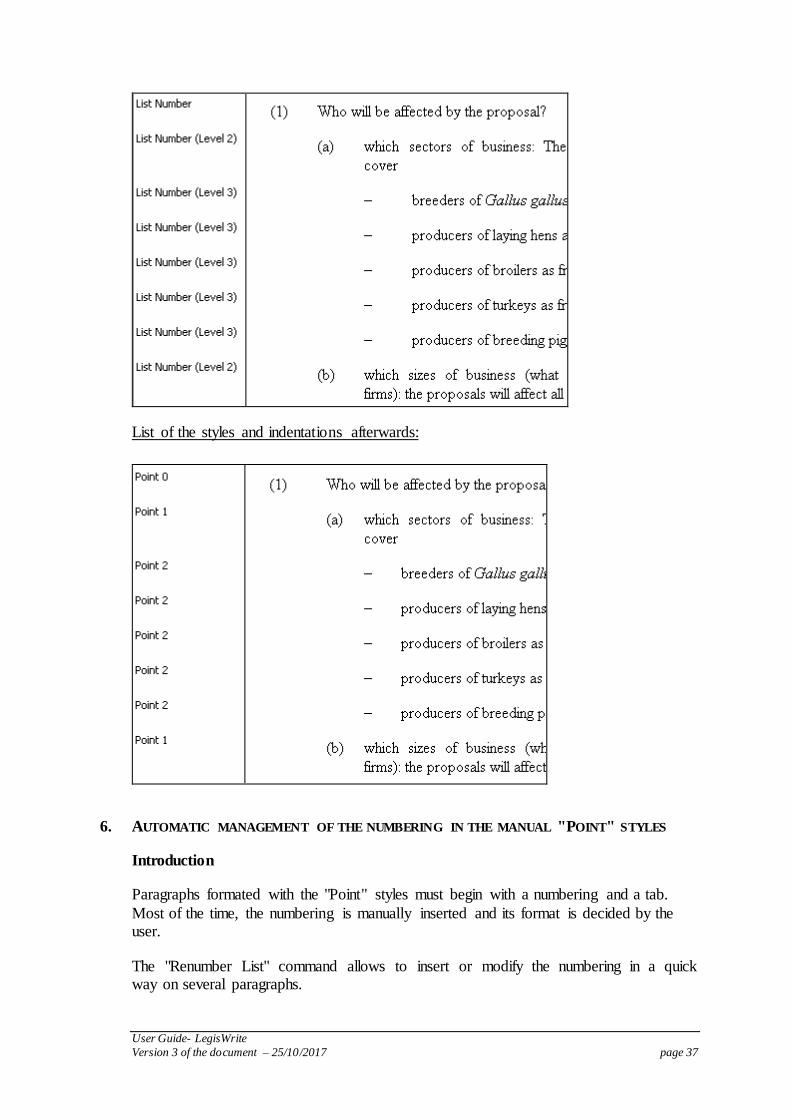
List of the styles and indentations before:
User Guide- LegisWrite
Version 3 of the document – 25/10/2017 page 37
List of the styles and indentations afterwards:
6. AUTOMATIC MANAGEMENT OF THE NUMBERING IN THE MANUAL "POINT" STYLES
Introduction
Paragraphs formated with the "Point" styles must begin with a numbering and a tab.
Most of the time, the numbering is manually inserted and its format is decided by the user.
The "Renumber List" command allows to insert or modify the numbering in a quick way on several paragraphs.
User Guide- LegisWrite
Version 3 of the document – 25/10/2017 page 38
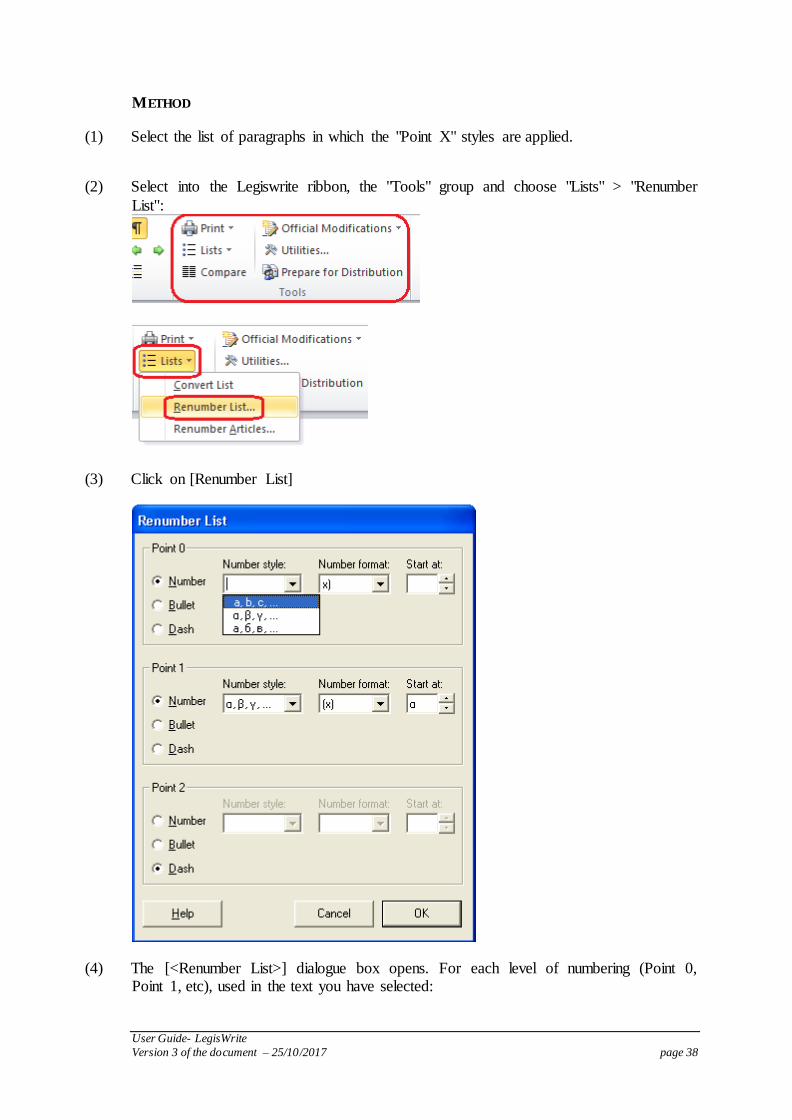
METHOD
(1) Select the list of paragraphs in which the "Point X" styles are applied.
(2) Select into the Legiswrite ribbon, the "Tools" group and choose "Lists" > "Renumber
List":
(3) Click on [Renumber List]
(4) The [<Renumber List>] dialogue box opens. For each level of numbering (Point 0, Point 1, etc), used in the text you have selected:
User Guide- LegisWrite
Version 3 of the document – 25/10/2017 page 39
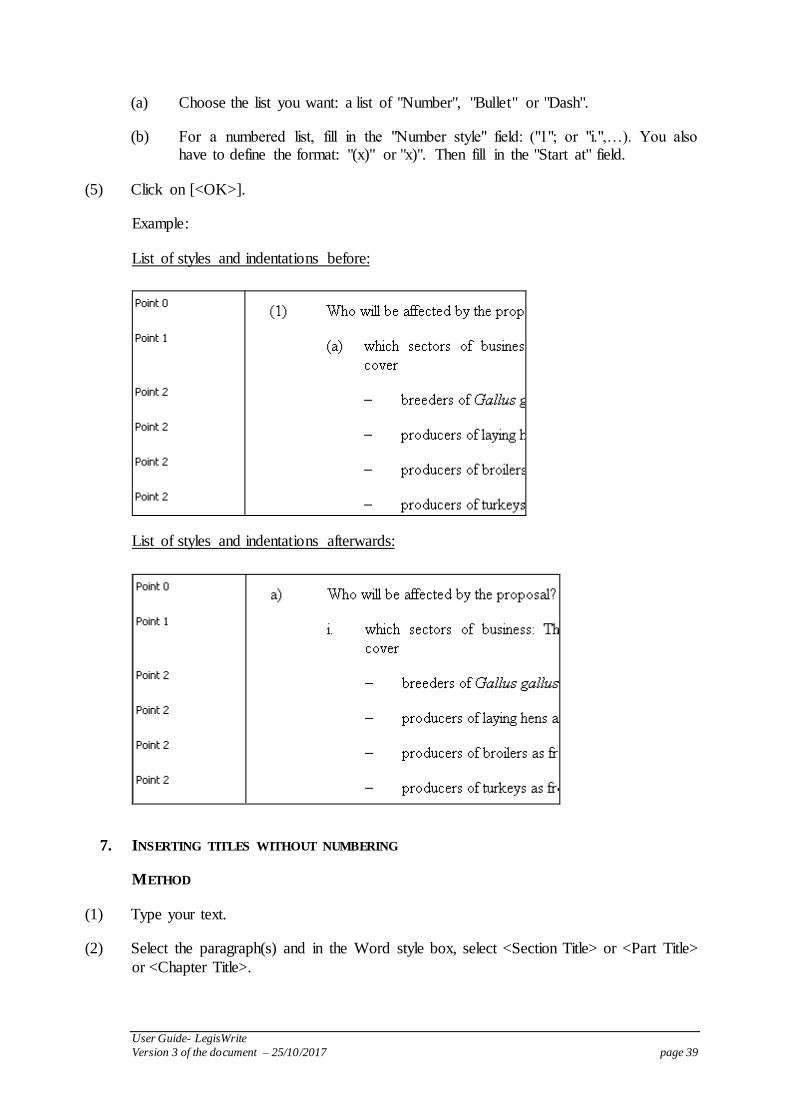
(a) Choose the list you want: a list of "Number", "Bullet" or "Dash".
(b) For a numbered list, fill in the "Number style" field: ("1"; or "i.",…). You also have to define the format: "(x)" or "x)". Then fill in the "Start at" field.
(5) Click on [<OK>].
Example:
List of styles and indentations before:
List of styles and indentations afterwards:
7. INSERTING TITLES WITHOUT NUMBERING
METHOD
(1) Type your text.
(2) Select the paragraph(s) and in the Word style box, select <Section Title> or <Part Title>
or <Chapter Title>.
User Guide- LegisWrite
Version 3 of the document – 25/10/2017 page 40
8. LEGISWRITE QUICK STYLES
Introduction
All LegisWrite styles, described here above, can be applied using keyboard shortcuts:
you will then use the « Quick Styles ». QuickStyles are two-letter codes that are associated with LegisWrite style names.
LegisWrite provides two possibilities for applying a QuickStyle, depending on the QuickStyle option selected. To define the method you prefer, do the following:
(1) Select [Options] in the LegisWrite ribbon and in the "About" group.
(2) In the dialog box, tick the [<Inline>] radio button to type the code yourself or the [<Dialog Box >] radio button to get a predefined list.
(3) Click on [<OK>].
METHOD: Inline
(1) Position your cursor at the beginning of the paragraph you want to format.
(2) Type the QuickStyle code.
As the text can not be selected, this method is only suitable for individual paragraphs but not for formatting a text selection.
(3) Then Press F6 (key on your keyboard).
The paragraph is formatted with the style associated with the QuickStyle you typed in, and the two-letter code is removed from the text.
METHOD: Dialog Box
(1) Position your cursor in the paragraph or select the paragraph.
(2) Press F6.
(3) The list shows the two-character code combinations available in the current document. Select the code of the QuickStyle desired.
(4) Press RETURN on your keyboard or click on [<OK>].
User Guide- LegisWrite
Version 3 of the document – 25/10/2017 page 41
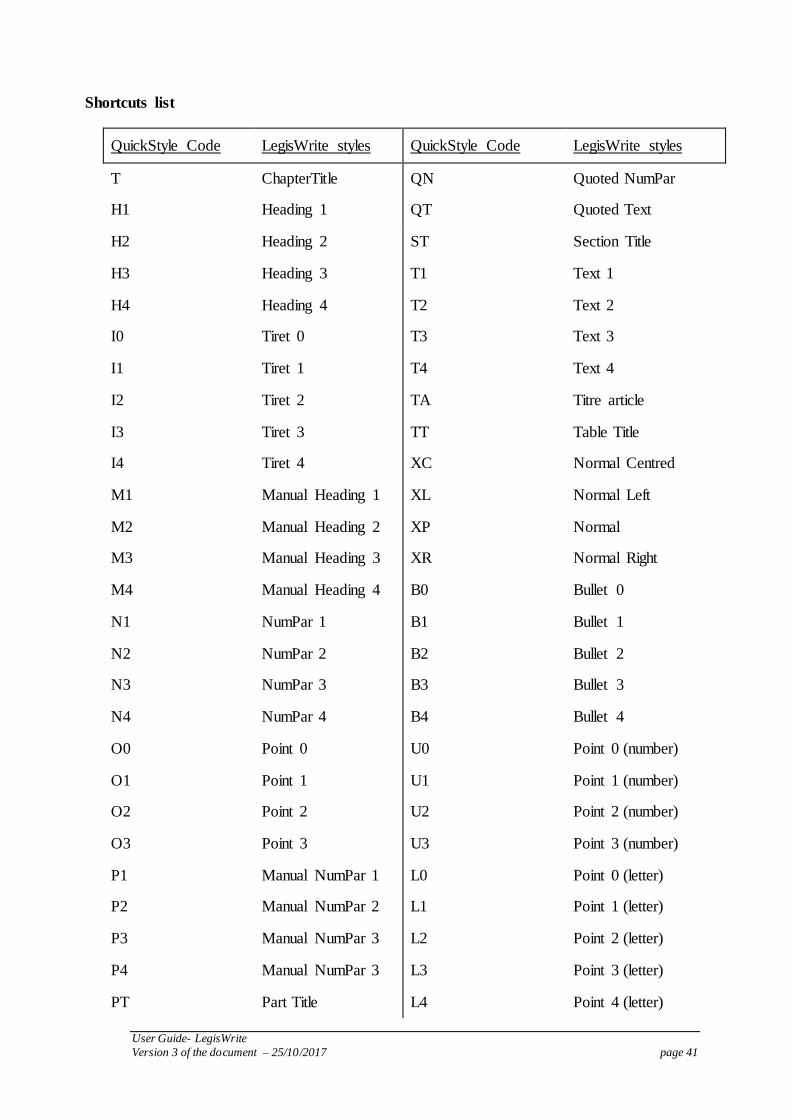
Shortcuts list
QuickStyle Code LegisWrite styles QuickStyle Code LegisWrite styles
T ChapterTitle QN Quoted NumPar
H1 Heading 1 QT Quoted Text
H2 Heading 2 ST Section Title
H3 Heading 3 T1 Text 1
H4 Heading 4 T2 Text 2
I0 Tiret 0 T3 Text 3
I1 Tiret 1 T4 Text 4
I2 Tiret 2 TA Titre article
I3 Tiret 3 TT Table Title
I4 Tiret 4 XC Normal Centred
M1 Manual Heading 1 XL Normal Left
M2 Manual Heading 2 XP Normal
M3 Manual Heading 3 XR Normal Right
M4 Manual Heading 4 B0 Bullet 0
N1 NumPar 1 B1 Bullet 1
N2 NumPar 2 B2 Bullet 2
N3 NumPar 3 B3 Bullet 3
N4 NumPar 4 B4 Bullet 4
O0 Point 0 U0 Point 0 (number)
O1 Point 1 U1 Point 1 (number)
O2 Point 2 U2 Point 2 (number)
O3 Point 3 U3 Point 3 (number)
P1 Manual NumPar 1 L0 Point 0 (letter)
P2 Manual NumPar 2 L1 Point 1 (letter)
P3 Manual NumPar 3 L2 Point 2 (letter)
P4 Manual NumPar 3 L3 Point 3 (letter)
PT Part Title L4 Point 4 (letter)

User Guide- LegisWrite
Version 3 of the document – 25/10/2017 page 42
8. Markers
1. INTRODUCTION
In some cases, the elements you insert in your document contain placeholders in addition to normal text.
Marker buttons can be found in the LegisWrite ribbon in the "Markers" group:
.
Those fields are available in all LegisWrite templates that contain automatic insertions of text. You can also find them in some internal documents.
You will recognize these elements by their blue, green or red colour. (Blue) Marker style: with blue brackets […] indicates where you are to make your
entry. When you have finished making your entry you can replace all the blue formatting with black formatting and delete the remaining empty fields by using the
Clear All .
(Green) Marker1 style is comments on the current text model, such as explanations
about the financial statements. Using the Clear All button causes all marker1 fields to be removed.
(Red) Marker2 style is bracket fields used by the SG-Finalisation Group. The Clear
All button replaces the red markers only in the SG-Finalisation Group's version.
2. METHOD
(1) Open the document.
(2) Go to the field of your choice (blue brackets) to fill it in:
To move upwards in the document, click on <Goto Previous Field>
To move towards the bottom of the document, click on <Goto Next Field>
The field is automatically highlighted.
(3) Fill in the text. It will appear in blue colour.
(4) When you want to insert a new marker you can click on the <Insert Empty Field>
button

User Guide- LegisWrite
Version 3 of the document – 25/10/2017 page 43
Comments
a) At the end of your work, you can remove all blue formatting and delete remaining
empty fields (= blue fields) as well as delete the comments (green text). Use the <Clear
All> button.
b) When using this <ClearAll> command and also when using this command in the [Prepare for Distribution], a warning message is displayed if some text has been formatted using the Marker1 style and if the colour setting of this text has been
changed (back to black for example).
Three options are available:
(a) “Cancel and review …”: resets all the marker 1 text colours and cancels the <ClearAll> or [Prepare for Distribution] command. You have then the
opportunity to review the document with the marker 1 text distinguishable by its specific green colour.
(b) “Continue but keep …”: removes Marker1 formatting on text parts on which the colour has been modified. Then it continues performing the <ClearAll> or [Prepare for Distribution] command.
(c) The <Cancel> button leaves the document unchanged and cancels the <ClearAll> or [Prepare for Distribution] command.

User Guide- LegisWrite
Version 3 of the document – 25/10/2017 page 44
9. Inserting footnotes
1. INTRODUCTION
Inserting footnotes in LegisWrite has to be done using the Footnote button in the LegisWrite ribbon. You have the possibility to insert both standard (1, 2, 3, etc.) and
special (e.g. symbols) footnotes.
2. METHOD
(1) Place your cursor where you would like to insert the footnote
(2) In the "LegisWrite" ribbon, choose [Footnote] in the "Insert" group.
You can also click on the dropdown arrow on the right and choose the option
[Footnote]
A LegisWrite footnote will be inserted:
(3) In order to insert a special footnote click on the dropdown arrow on the right and
choose the option [Special Footnote]
You can then directly type the reference of your footnote or click on the button
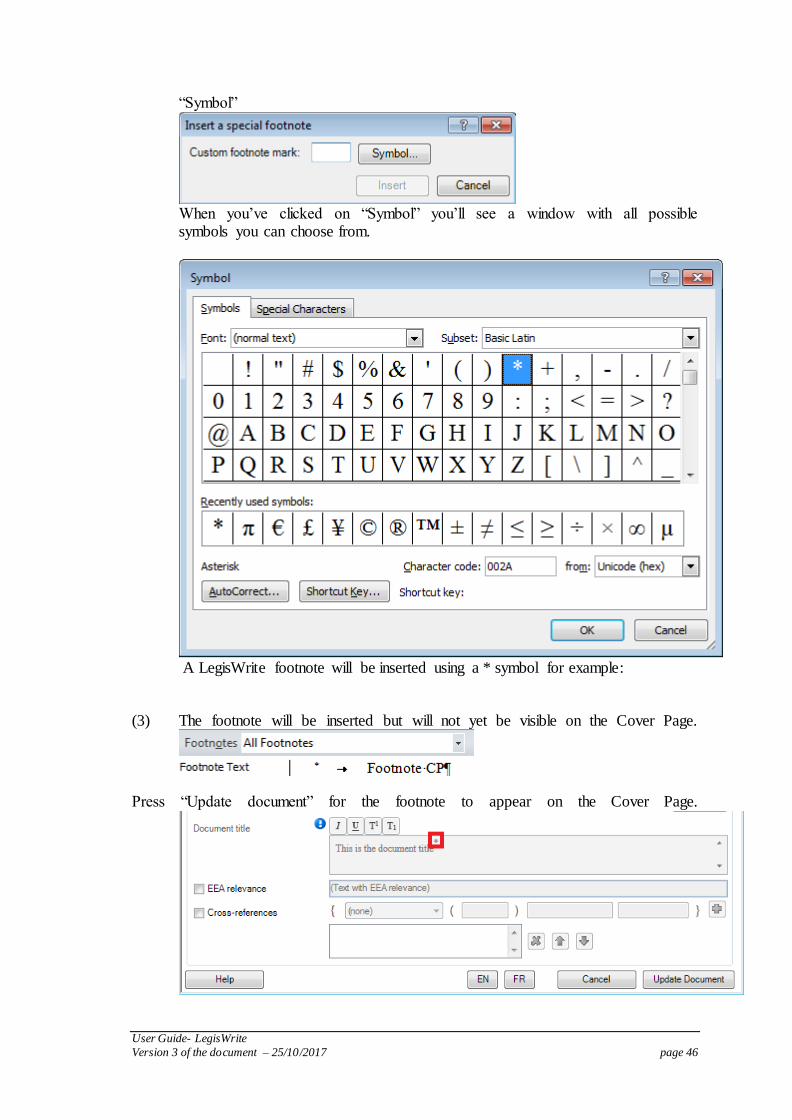
“Symbol”
When you’ve clicked on “Symbol” you’ll see a window with all possible symbols you can choose from.

User Guide- LegisWrite
Version 3 of the document – 25/10/2017 page 45
A LegisWrite footnote will be inserted using a * symbol for example:
Comment:
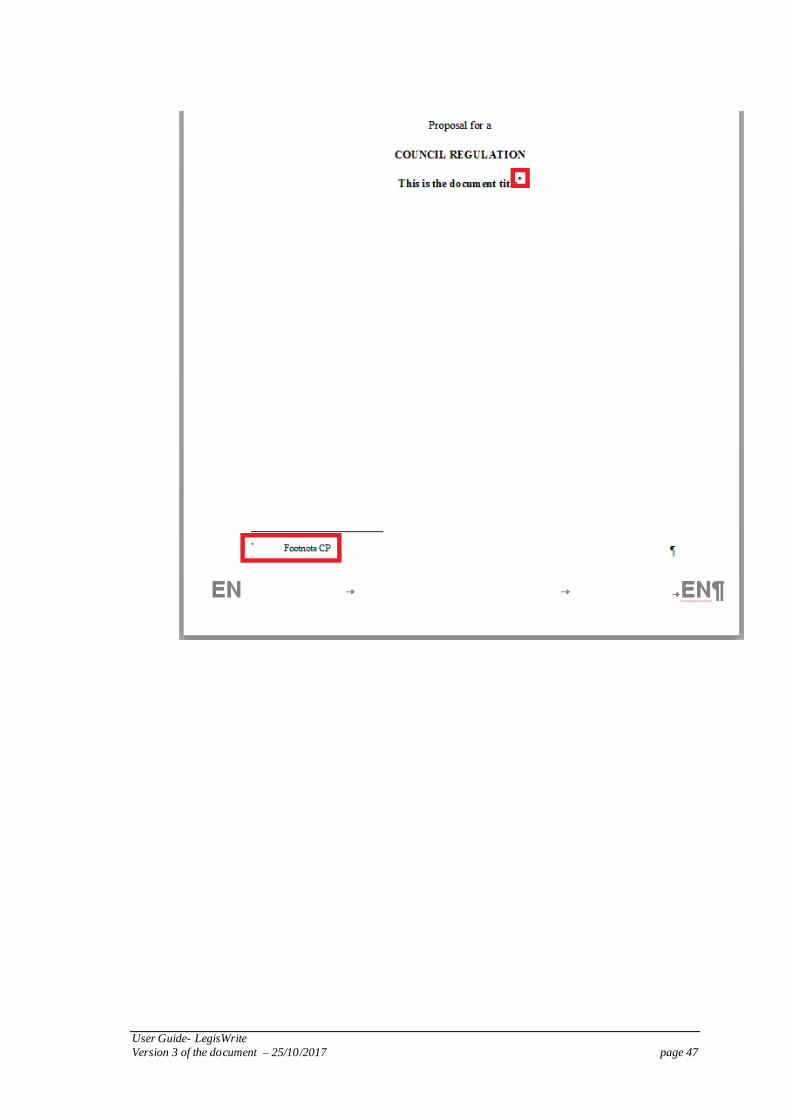
You can also insert a footnote on the Cover Page, more specifically in the document
title. (1) Place your cursor in the document title in text of the act
(2) In order to insert a special footnote click on the dropdown arrow on the right and choose the option [Special Footnote]
You can then directly type the reference of your footnote or click on the button
User Guide- LegisWrite
Version 3 of the document – 25/10/2017 page 46
“Symbol”
When you’ve clicked on “Symbol” you’ll see a window with all possible symbols you can choose from.
A LegisWrite footnote will be inserted using a * symbol for example:
(3) The footnote will be inserted but will not yet be visible on the Cover Page.
Press “Update document” for the footnote to appear on the Cover Page.
User Guide- LegisWrite
Version 3 of the document – 25/10/2017 page 47

User Guide- LegisWrite
Version 3 of the document – 25/10/2017 page 48
10. Structure Check
1. INTRODUCTION
A LegisWrite document is first and foremost a Microsoft Word document. Its particularity comes from its additional properties. Indeed, LegisWrite documents
contain a predefined structure; each element of the official document must be put at a specific position (for instance a preamble always precedes the enacting terms). To apply on the different paragraphs the structural information, LegisWrite
analyses the styles names. For example, the « institution qui agit » style will be specifically linked to the preamble, the « Fait à » style will be found in the signature,
and so on. On the first pages of the “Quick Reference card”, you find an example of LegisWrite document with the required styles for each paragraph and then the full diagram structure
of a LegisWrite document: Styles define
the layout (see previous heading) and,
the structure
The Structure Check command displays the paragraphs hierarchy, enables you to navigate through it and enables you to select one specific part. If the styles sequence
does not match with the predefined structure, the Structure Check highlights the faulty styles.
It is compulsory to get a perfect structure check in all LegisWrite documents.
It is important to understand that a structure error in a LegisWrite document corresponds to the wrong use of a style and must be corrected by applying another style
on the appropriate paragraph. It is compulsory to get a correct structure check before sending your document. The SG
and DGT will reject any incorrect documents and send them back to you for
correction.
In the SC (Structure Check) window, we find, sequentially, all the components of the
document.
When the structure is correct, you get yellow icons. When there are problems, you get
red icons.
2. METHOD
(1) In the LegisWrite ribbon, click on [Structure Check] in the "Check" group.
User Guide- LegisWrite
Version 3 of the document – 25/10/2017 page 49
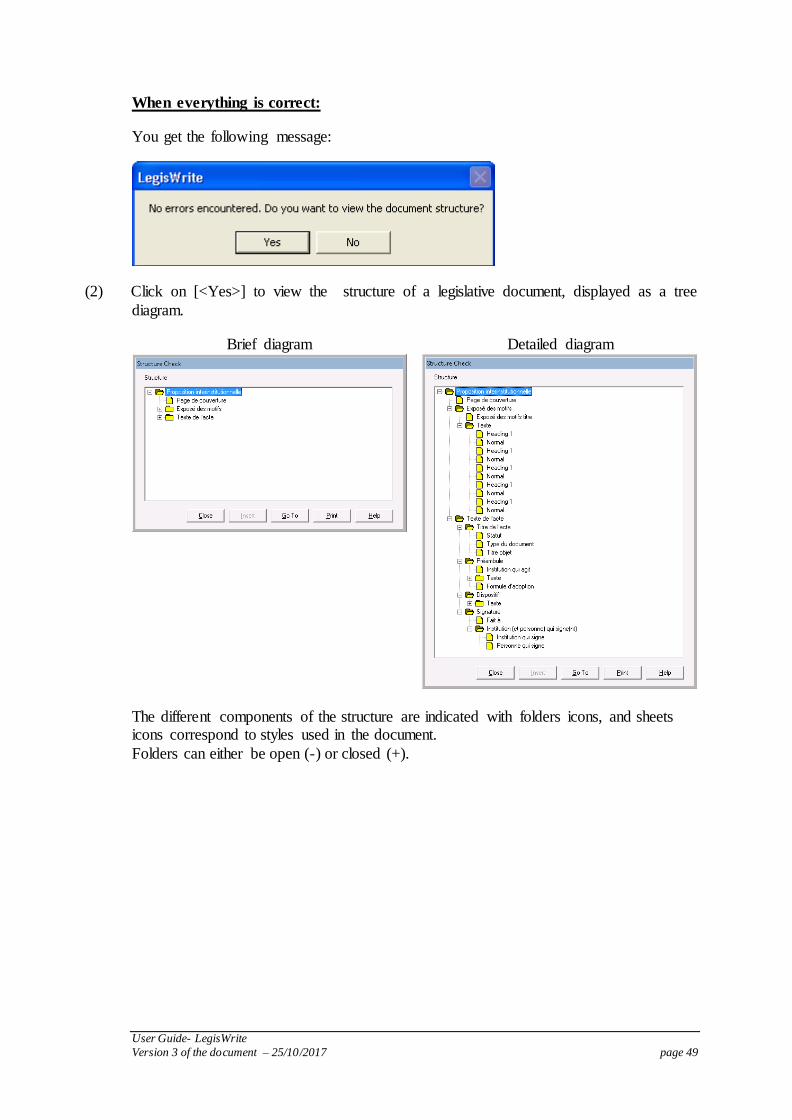
When everything is correct:
You get the following message:
(2) Click on [<Yes>] to view the structure of a legislative document, displayed as a tree
diagram.
Brief diagram Detailed diagram
The different components of the structure are indicated with folders icons, and sheets icons correspond to styles used in the document.
Folders can either be open (-) or closed (+).

User Guide- LegisWrite
Version 3 of the document – 25/10/2017 page 50
When there is a problem,
The structure is automatically displayed and you find a tree diagram with yellow and red icons.
Correct styles are indicated with yellow icons, wrong styles with a red icon.
(1) Analyse the structure suggested by LegisWrite and find out the area where you find the
first problem. To be successful, it is important to have the main structure of official documents in
mind. You must also know that the check is performed style by style, from the very beginning of the document up to the end.
As soon as the checker finds some incoherence according to the upper element in the hierarchy, you get a red icon.
(2) Select the first red icon (or the yellow icon preceding it).
(3) Click on [<Go To>].
The cursor is placed in the document, in the paragraph selected in the window, which means in the area where the problem1 lies.
(4) Find out in which component you are and compare its styles sequence with the one your find in the Quick Reference Card for the same component. (If you don’t have one, find
it on the LegisWrite wiki: http://www.cc.cec/wikis/display/Cable/LegisWrite+documentation
1 The mistake can be on this paragraph or the preceding one or the next one.

User Guide- LegisWrite
Version 3 of the document – 25/10/2017 page 51
(5) Correct the structure.
The correction will differ according to the error type: replace a style by another one, delete a paragraph, and so on.
(6) Check the structure again.
Some comments
Never use manual formatting or personal styles to recreate the layout.
Always use the LegisWrite styles. You find the list in the Quick Reference Card.
Never add additional empty paragraphs.
User Guide- LegisWrite
Version 3 of the document – 25/10/2017 page 52
11. Document Quality Check
1. INTRODUCTION
The aim of the quality check is to ensure that the document meets the presentation and the quality standards established by SG for LegisWrite documents.
This tool checks the used styles, section and paragraphs formatting, margins, graphs, objects document size, etc. It enables you to get homogeneous standardized documents for further transmission and publications.
Quality problems are displayed with the help of comments in the text and they must be solved before sending the document to DGT and SG.
Find here detailed explanation of the features detected by the Document Quality Check.
Modified styles (error)
This feature compares the settings of the document styles with the LegisWrite default styles. They will be automatically
corrected by the system and you will have to opportunity to show the changes by comments.
The "modified styles" errors might occur in the following situations :
- Manual modification of the style features by the user. - Document handling by another application. - Document created with an old LegisWrite version (in which
styles were defined in a different way).
Modified margins (warning)
It is important to have similar margins in all LegisWrite documents. Those margins are defined in the applied styles.
Nevertheless, Word enables the user to modify the paragraph margin, regardless of the applied style. This is called direct formatting. This one might be the consequence of some actions
done by the user, or of document handling by another application or the result of a « copy/paste » coming from
another document. The Document Quality Check compares the paragraph margins with the definition of the margins for the applied style. If they
differ, the following comments are displayed: "Modified Margins".
Modified numbering
(error)
Some LegisWrite styles feature "Bullets and Numbering". The
styles involved are Heading (1 to 4), Numpar (1 to 4), Tiret (0 to 4), Point (number) (0 to 4), Point (letter) (0 to 4), List number, List dash and List bullet. If the user modifies the item
automatically inserted at the beginning of the paragraph (digit, letter, bullet or dash), the Document Quality Check displays the
error message "Modified Numbering".

User Guide- LegisWrite
Version 3 of the document – 25/10/2017 page 53
Unknown fonts Limiting the number of allowed fonts in the LegisWrite
documents contribute to get homogeneous presentation in the official documents. LegisWrite styles are defined with the 'Times New Roman"
font. LegisWrite also accepts "Arial" and "Wingdings" (symbols) fonts. Using another font (direct formatting) will be
detected as an error. The message will be "Unknown Font".
Odd/even section breaks In a LegisWrite document, each new section must start on a new page. In Word, sections are separated with "Section Break – next page". If, by mistake, the user inserts a "Section break of
another type, it will be detected as an error by LegisWrite.
Superfluous white space Spaces and multiple tabulations can not be used to align words or paragraphs. All the same, empty paragraphs can not be used
to increase the space between two paragraphs. In those situations, the Document Quality Check displays a warning.
Document version Word enables to save several versions of a document inside the
same Word file. A LegisWrite document may contain only one version. The Document Quality Check will display this message: "Document Versions Detected” if you have several
versions in the same file.
Unknown styles These are personal styles, not accepted by LegisWrite.
Existence of Macros A macro is a Word function that enables you to record a series of Word commands and instructions together. You group them
together as a single command to accomplish a task automatically and repeat the command at different positions in the document.
Those macros are recorded in the document and must be deleted before sending the document to SG. If you have some, the
Document Quality Check displays a "Macros Detected" message.
Document size To guarantee efficient work of the different tools used in the
adoption process of official documents, (Mail, CISnet, e-Greffe,), it is important to limit the size to 3.7 MB. A bigger size will result in an error message: "Document is too big"
when performing the Document Quality Check.
Modified markers Markers are specific styles (characters styles) that modify the colour of some text areas: see the Chapter about markers. DQC
Checks whether the marker colour was changed manually. If the colour is changed to black for instance, some text might be automatically deleted while they had to be kept.
The Document Quality Check checks the colours of those parts and displays a message:"Marker has modified colour settings"
when a problem occurs.

User Guide- LegisWrite
Version 3 of the document – 25/10/2017 page 54
Invalid footnotes Footnotes are formatted with 2 styles. "Footnote reference" for
the number and "Footnote Text" for the text itself. LegisWrite verifies that those 2 styles have not been modified. Between the footnote number and the footnote text, only one tab is allowed.
Objects "Embedded objects" are elements coming from other Ms-
Office applications (for instance, tables, graphs, charts) that have been inserted in LegisWrite documents.
When clicking twice on those objects, the other Ms-Office application opens inside Word. As an example, an Excel worksheet might open inside Word for the table to be edited.
This function does not comply with the tools that will be used for the publication of LegisWrite documents. And so, an error
message will be displayed: "Embedded Object Detected".
"Floating objects" are tables or images that are not put "In line with text"
Distribution Distribution errors are errors that are related to the criteria in the "Prepare for distribution" funtion in LegisWrite. These criteria are also used by DGT to decide if documents will be
accepted for translation or not. Errors in this category are for example: presence of revisions, comments, hidden text and
markers. It will also detect a non-LegisWrite ToC.
Document content The "Document content" criterion will check if the content of the titles (Statut, Type du document, Titre objet) in the Cover
Page correspond to the titles in the text of the act. When this information is not identical, an error will be shown, urging the
user to click on "Update document". The system will also check if the Cover Page image has not been copied from another document.
Linked styles Linked styles can be recognised by the word "Char" in the style
name; they are created when paragraphs are not selected properly while changing a style. Upon opening a document
containing linked styles, a message will appear asking you if you want to repair.
Structure Check Structure check is included in the DQC, as it should influence the traffic light. The DQC will just indicate that there are
structural errors, the correction will have to be done using Structure Check.
User Guide- LegisWrite
Version 3 of the document – 25/10/2017 page 55
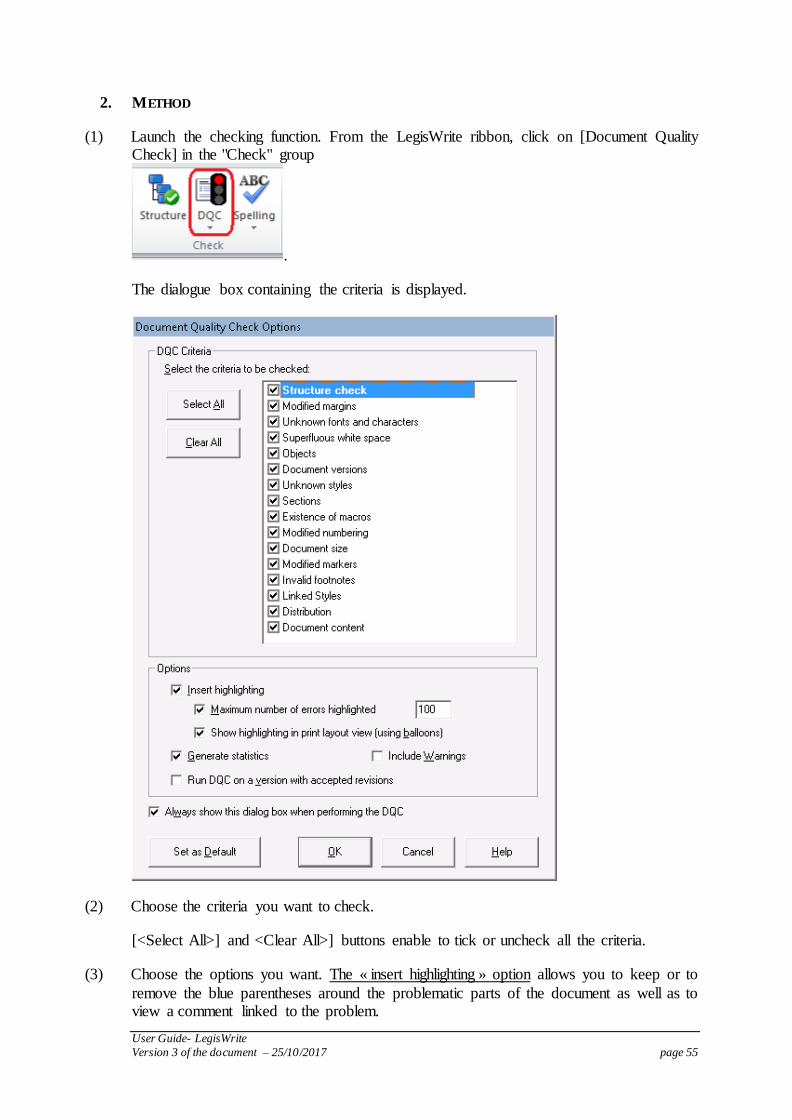
2. METHOD
(1) Launch the checking function. From the LegisWrite ribbon, click on [Document Quality Check] in the "Check" group
.
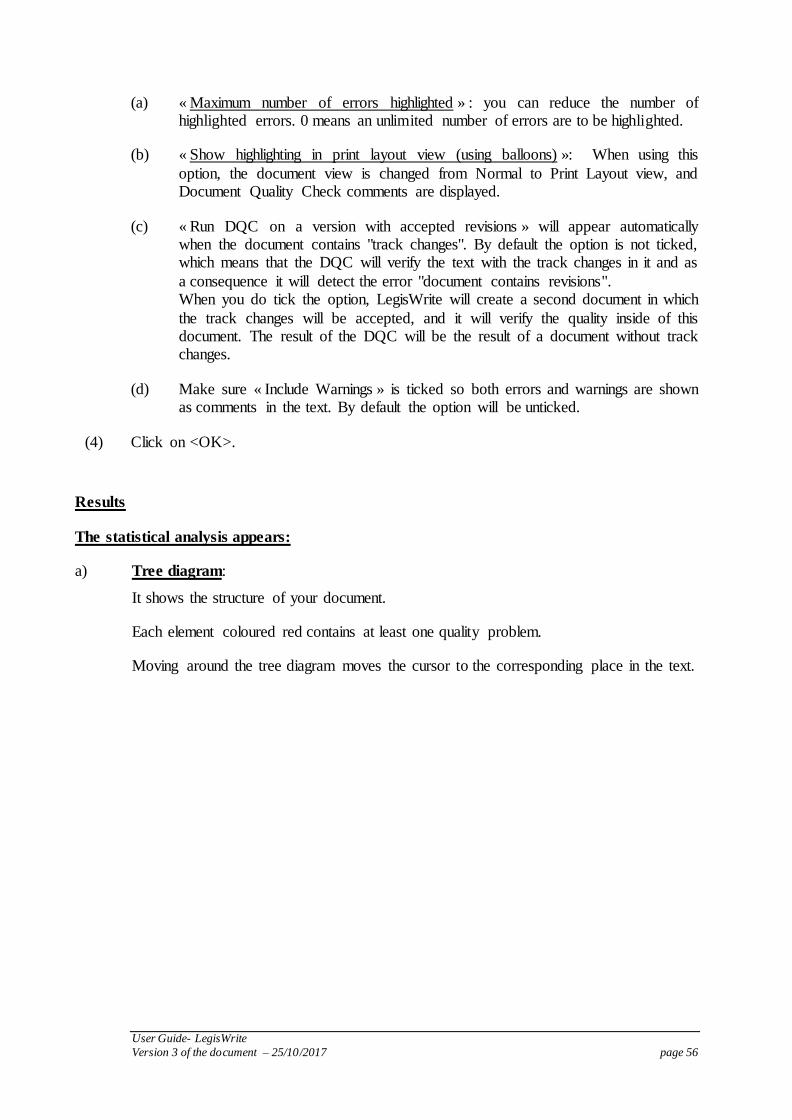
The dialogue box containing the criteria is displayed.
(2) Choose the criteria you want to check.
[<Select All>] and <Clear All>] buttons enable to tick or uncheck all the criteria.
(3) Choose the options you want. The « insert highlighting » option allows you to keep or to
remove the blue parentheses around the problematic parts of the document as well as to view a comment linked to the problem.
User Guide- LegisWrite
Version 3 of the document – 25/10/2017 page 56
(a) « Maximum number of errors highlighted » : you can reduce the number of highlighted errors. 0 means an unlimited number of errors are to be highlighted.
(b) « Show highlighting in print layout view (using balloons) »: When using this
option, the document view is changed from Normal to Print Layout view, and Document Quality Check comments are displayed.
(c) « Run DQC on a version with accepted revisions » will appear automatically when the document contains "track changes". By default the option is not ticked, which means that the DQC will verify the text with the track changes in it and as
a consequence it will detect the error "document contains revisions". When you do tick the option, LegisWrite will create a second document in which
the track changes will be accepted, and it will verify the quality inside of this document. The result of the DQC will be the result of a document without track changes.
(d) Make sure « Include Warnings » is ticked so both errors and warnings are shown as comments in the text. By default the option will be unticked.
(4) Click on <OK>.
Results
The statistical analysis appears:
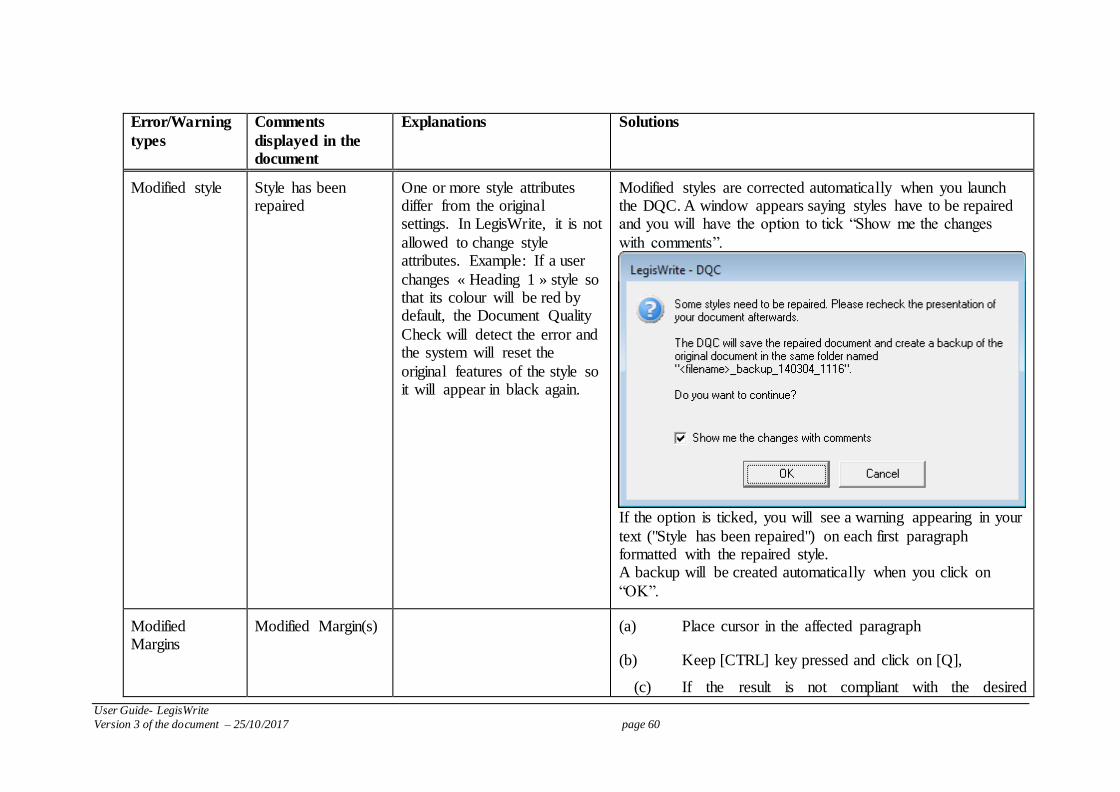
a) Tree diagram:
It shows the structure of your document.
Each element coloured red contains at least one quality problem.
Moving around the tree diagram moves the cursor to the corresponding place in the text.

User Guide- LegisWrite
Version 3 of the document – 25/10/2017 page 57
b) The counters:
They indicate how many errors or warnings of each type there are in the element selected in the tree diagram.
The traffic light in the LegisWrite ribbon is adjusted
a) A green light:
Your document is correct and does not contain any errors. Warnings will be accepted.
b) A yellow light:
The document has been modified and saved without relaunching the DQC. It is also possible that after an update, the LegisWrite criteria have been modified. Clicking on DQC once more to start the check is necessary.
c) A red light:
Your document is either not correct and contains errors either it has never been checked
before. Make sure to repair all these errors before sending the document to e-greffe.

User Guide- LegisWrite
Version 3 of the document – 25/10/2017 page 58
Result in the text:
When an error is detected, the checker highlights the problematic text in the document
as it inserts brackets; By default, the document is visible in the 'Print Layout' view mode and "Word" attaches a LegisWrite comment to the different highlighted errors;
Notes
(a) In the DQC window:
The « always show this dialog box when performing the Document Quality Check » option allows you to view the "Document Quality Check Options"
dialogue box each time you launch the Document Quality Check. The selection is memorised by LegisWrite and is applied until amended via the "LegisWrite" ribbon. Select [document quality] and click on "DQC options".
The « Set as default » button allows you to define the options you always want to be selected.
(b) In the Document Quality drop down list:

User Guide- LegisWrite
Version 3 of the document – 25/10/2017 page 59
The [Check Document Quality] option launches the Document Quality Check.
The [Remove Highlighting] option deletes all comments all at once.
The [DQC Options] option allows to modify the list of the options your have selected in the [[DQC criteria]] window.
The [Repair highlighted DQC Errors] option allows to correct interactively
or automatically the Document Quality Check. Go to point 4 for further details.
The [Repair Options] option allows to modify the list of the options your have selected in the [[Repair document options]] window.
3. MANUAL CORRECTION
Here is a table with quick solutions to manually correct all kinds of errors.
This is suitable when you only find few mistakes in the document.
User Guide- LegisWrite
Version 3 of the document – 25/10/2017 page 60
Error/Warning
types
Comments
displayed in the
document
Explanations Solutions
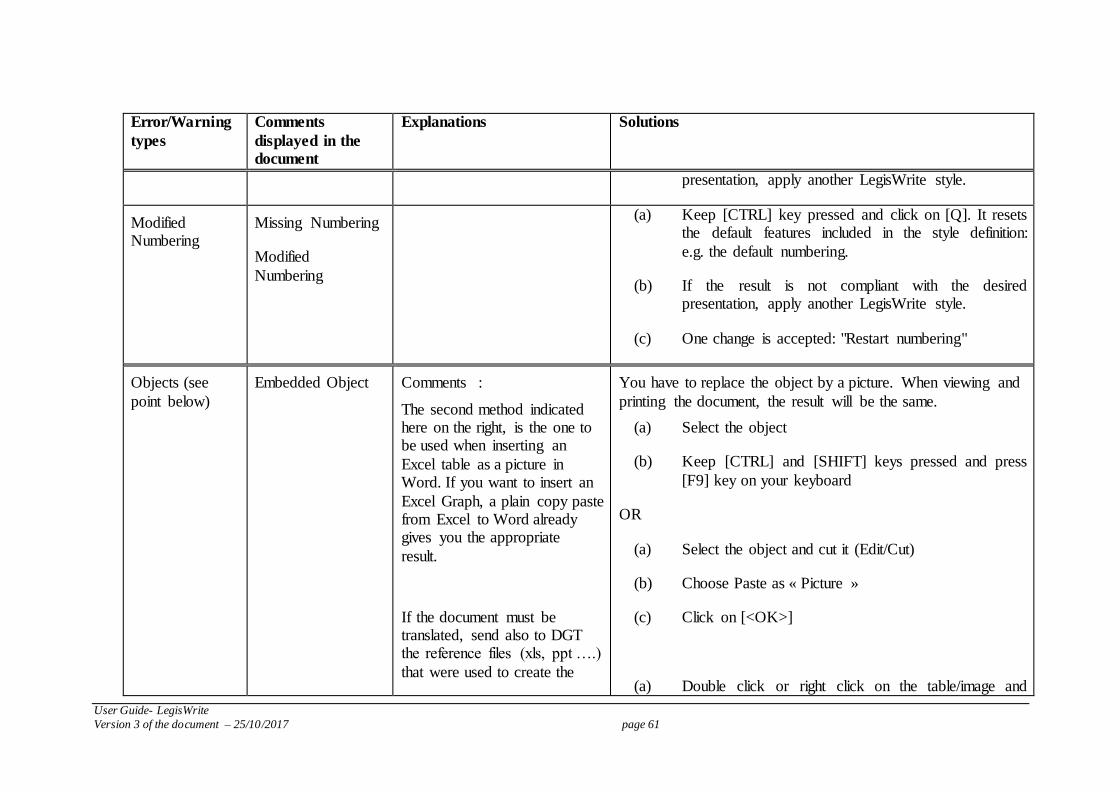
Modified style Style has been repaired
One or more style attributes differ from the original settings. In LegisWrite, it is not
allowed to change style attributes. Example: If a user
changes « Heading 1 » style so that its colour will be red by default, the Document Quality
Check will detect the error and the system will reset the
original features of the style so it will appear in black again.
Modified styles are corrected automatically when you launch the DQC. A window appears saying styles have to be repaired and you will have the option to tick “Show me the changes
with comments”.
If the option is ticked, you will see a warning appearing in your
text ("Style has been repaired") on each first paragraph formatted with the repaired style. A backup will be created automatically when you click on
“OK”.
Modified Margins
Modified Margin(s)
(a) Place cursor in the affected paragraph
(b) Keep [CTRL] key pressed and click on [Q],
(c) If the result is not compliant with the desired
User Guide- LegisWrite
Version 3 of the document – 25/10/2017 page 61
Error/Warning
types
Comments
displayed in the
document
Explanations Solutions
presentation, apply another LegisWrite style.
Modified Numbering
Missing Numbering
Modified
Numbering
(a) Keep [CTRL] key pressed and click on [Q]. It resets the default features included in the style definition:
e.g. the default numbering.
(b) If the result is not compliant with the desired presentation, apply another LegisWrite style.
(c) One change is accepted: "Restart numbering"
Objects (see
point below)
Embedded Object
Comments :
The second method indicated here on the right, is the one to be used when inserting an
Excel table as a picture in Word. If you want to insert an
Excel Graph, a plain copy paste from Excel to Word already gives you the appropriate
result.
If the document must be translated, send also to DGT the reference files (xls, ppt ….)
that were used to create the
You have to replace the object by a picture. When viewing and
printing the document, the result will be the same.
(a) Select the object
(b) Keep [CTRL] and [SHIFT] keys pressed and press
[F9] key on your keyboard
OR
(a) Select the object and cut it (Edit/Cut)
(b) Choose Paste as « Picture »
(c) Click on [<OK>]
(a) Double click or right click on the table/image and

User Guide- LegisWrite
Version 3 of the document – 25/10/2017 page 62
Error/Warning
types
Comments
displayed in the
document
Explanations Solutions
Floating object
pictures.
Images or tables that are not
put "In line with text"
choose the Tab "Layout"
(b) Change the Layout to "In line with text"
(c) The repair tool will also apply the correct layout
setting
Existence of macros
Macro(s) Detected (a) In the "Developer" ribbon, click on Macros in the
"Code" group
(b) Select your personal macros and click on [Delete]
Document size (max. 4 MB)
Document is too big Contact your legislative coordinator
Split the document in several volumes or limit the size of the images (save them as .png before inserting them for example).
Modified
Markers
Marker has
modified colour settings
(a) Select the text
(b) Keep [CTRL] pressed, and click once on the space bar. It removes the marker styles from the selected
text and keeps the text.
Unknown fonts Unknown font "x" used
(a) Select the text,
(b) Keep [CTRL] pressed, and click once on the space

User Guide- LegisWrite
Version 3 of the document – 25/10/2017 page 63
Error/Warning
types
Comments
displayed in the
document
Explanations Solutions
bar. It resets the font foreseen by default in the style
Superfluous
white space
Paragraph is empty
Multiple white space
(a) Delete spaces, tabs, or empty paragraphs
(b) If the paragraph is no longer at the suitable place, use one of the following method to get it at the correct
position:
Choose "Text" style or "Point" style to get the appropriate indentation according to the left
margin.
Use a Word table to align columns.
Use "Part Title", "Chapter Title" or "Section Title" style to increase the space between
titles and text.
Insert a "section break next page" or a page
break to start the text on the following page.
Document Versions
Document versions detected
(a) File – Versions,
(b) Select the previous version,
(c) Press <Delete>.

User Guide- LegisWrite
Version 3 of the document – 25/10/2017 page 64
Error/Warning
types
Comments
displayed in the
document
Explanations Solutions
Unknown style Invalid Style "x" used
Replace the style by a LegisWrite style
Odd/even
section breaks
Odd/even section
breaks detected
Do a "print preview"
Invalid Footnotes
The document contains endnotes
footnote settings
The message is displayed at the top of the document.
In one or several section, the footnotes presentation is not compliant with the LegisWrite
standards.
(a) In the "References" ribbon, in the "Footnotes" group, click on the arrow in the bottom right corner to open
the Footnote and endnote dialog box
(b) Tick “Endnotes” and click on [<Convert>]
(c) Select "Convert all endnotes to footnotes" and click on [<OK>]
(a) In the "References" ribbon, in the "Footnotes" group, click on the arrow in the bottom right corner to open
the Footnote and endnote dialog box
(b) Check the attributes :
(a) Location : footnotes /bottom of the pages
(b) Format:
– Number format : 1,2,3,
User Guide- LegisWrite
Version 3 of the document – 25/10/2017 page 65
Error/Warning
types
Comments
displayed in the
document
Explanations Solutions
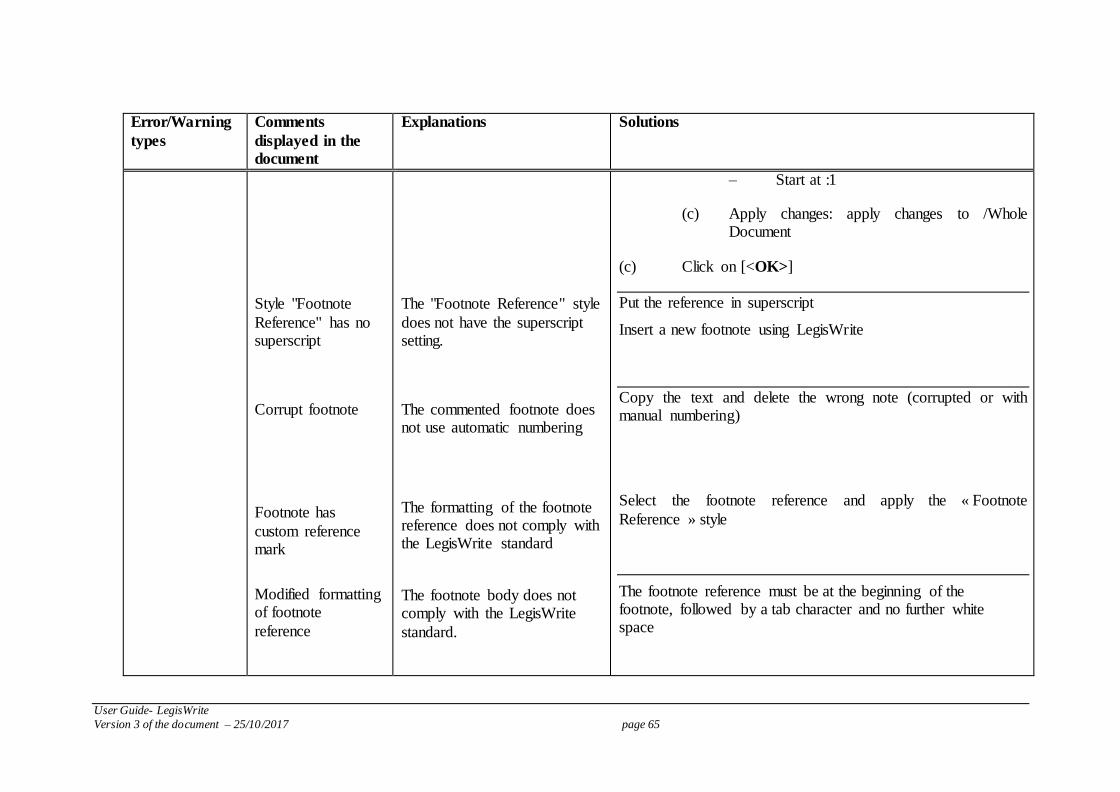
Style "Footnote
Reference" has no superscript
Corrupt footnote
Footnote has
custom reference mark
Modified formatting of footnote
reference
The "Footnote Reference" style
does not have the superscript setting.
The commented footnote does not use automatic numbering
The formatting of the footnote reference does not comply with the LegisWrite standard
The footnote body does not comply with the LegisWrite
standard.
– Start at :1
(c) Apply changes: apply changes to /Whole Document
(c) Click on [<OK>]
Put the reference in superscript
Insert a new footnote using LegisWrite
Copy the text and delete the wrong note (corrupted or with manual numbering)
Select the footnote reference and apply the « Footnote
Reference » style
The footnote reference must be at the beginning of the footnote, followed by a tab character and no further white space

User Guide- LegisWrite
Version 3 of the document – 25/10/2017 page 66
Error/Warning
types
Comments
displayed in the
document
Explanations Solutions
Malformed footnote Make sure there is a tab between the footnote number and the footnote text, no regular space.
The “Track
Changes” function is turned on
document contains comments
document contains
hidden text
document contains
markers
non-LegisWrite ToC detected
document contains revisions
In the "Review" ribbon go to "Track Changes", and click on it
to deactivate.
In the "Review" ribbon in the "Comments" group click on the button to "Delete all comments in document"
Select the text, click Format > Font and untick "hidden"
Choose "Clear all markers" in the "Marker" group
Delete the Word table of contents and click on ToC to add a LegisWrite table of contents
In the "Review" ribbon go to "Accept", and click on the button
"Accept all changes in document"
Or tick the box "Run DQC on a version with accepted
revisions" in the first window of the DQC, in order to verify the document without track changes and to avoid having the error "document contains revisions".
User Guide- LegisWrite
Version 3 of the document – 25/10/2017 page 67
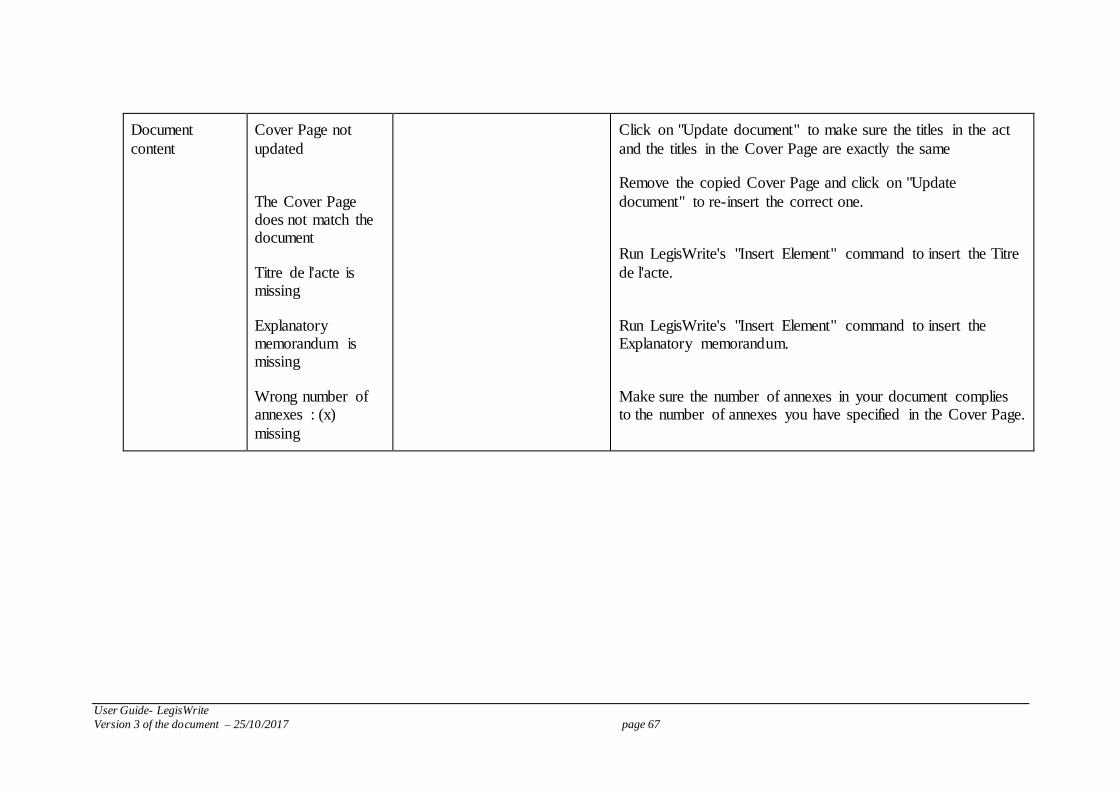
Document
content
Cover Page not
updated
The Cover Page does not match the document
Titre de l'acte is missing
Explanatory memorandum is missing
Wrong number of annexes : (x)
missing
Click on "Update document" to make sure the titles in the act
and the titles in the Cover Page are exactly the same
Remove the copied Cover Page and click on "Update
document" to re-insert the correct one.
Run LegisWrite's "Insert Element" command to insert the Titre
de l'acte.
Run LegisWrite's "Insert Element" command to insert the Explanatory memorandum.
Make sure the number of annexes in your document complies to the number of annexes you have specified in the Cover Page.

User Guide- LegisWrite
Version 3 of the document – 25/10/2017 page 68
Sections Odd/even section
break detected
Page numbers restarted
The document contains a
section break that forces the new section to start on an odd
or an even page. This is not allowed in LegisWrite
Pages can be restarted in split documents or annexes
Place the cursor after the affected section break, into the next
section. In the "Page Layout" ribbon, click on the arrow in the bottom right corner of the Page Setup group, and go to the
Layout tab in the window that opens. Change the Section start setting to "New Page".
Place the cursor after the section break into the next section, where the page numbers are restarted.
In the "Insert" ribbon, "Header and footer" group, click on the drop down arrow next to "Page Number" and choose "Format page numbers".
Select the "Continue from previous section" option.

User Guide- LegisWrite
Version 3 of the document – 25/10/2017 page 69
3.1. How to avoid embedded objects?
Introduction
Microsoft Office applications enable to insert for instance Excel objects into Word
Inserting an Excel object generates a link in the Word file towards the Excel file. For technical reasons, this method is not accepted in LegisWrite documents.
Inserting Excel graphs or tables in a LegisWrite document must be achieved by Copy paste: Copy in Excel (Edit / Copy, CTRL + C,), Then Paste in Word (Edit / Paste, CTRL + V,).
When you have a graph, the result in Word is a picture. You can not edit the content in Word. If you still need to modify the graph, you must edit it in Excel and insert the
modified version in the LegisWrite document. When you have a table, the result in Word is a Word table. You can edit the table and cells directly in the LegisWrite document and you no longer need the Excel source
document. It is also possible if you have a table, to get as result a picture in Word. To do this,
follow the instructions below. In this specific case, you can not edit the contents in Word. If you still need to modify the table, you must edit it in Excel and insert the modified version in the LegisWrite document. This procedure also enables you to
convert embedded object into picture. When sending LegisWrite documents that include graphs or tables inserted as
« pictures » to DG translation, send the Excel source as well. DG Translation will work in the excel file and will then insert the translated table/ graph as a picture in the LegisWrite document.
METHOD
(a) Open the document in Excel (transfer) or in Word according to the situation (conversion).
(b) Select the table.
(c) « Copy » the table if you are in Excel or « cut » the table if you are in Word.
(d) Position you cursor in the LegisWrite Document (where you want to find the table).
(e) When you click paste, choose [Picture] in the paste options that appear.

User Guide- LegisWrite
Version 3 of the document – 25/10/2017 page 70
4. INTERACTIVE CORRECTION
This interactive mode is best applied when you are not sure which errors or warnings
your document contains. To avoid mistakes due to an automatic repair by the system, always choose the “All interactive” mode.
It enables you to choose among a range of solutions suggested by LegisWrite.
METHOD:
(1) To launch the correction, there is a button in the DQC window that is called « Repair »:

User Guide- LegisWrite
Version 3 of the document – 25/10/2017 page 71
(2) You also have the option to go to the LegisWrite ribbon after doing the Document Quality Check, choose DQC in the "Check" group and click on [Repair highlighted
DQC Errors]
A window displays the criteria that can be interactively or automatically corrected.

User Guide- LegisWrite
Version 3 of the document – 25/10/2017 page 72
The criteria that can be corrected automatically in the document are in black, the greyed out ones are not available.
« Always show this dialog box when performing the Repair Command» option
enables you to activate or deactivate the display of the options dialog box when performing the command. This option is memorised by LegisWrite and applied until
next modification via "LegisWrite" ribbon, "Check" group: [document quality /Repair options]
« Set as default » option enables to define which options you permanently want to keep selected.
(3) Click on [<select all>] or [<Unselect all>] to tick or uncheck the criteria your want to correct.
(4) Click on [<All Interactive>].
(5) Click on [<OK>].
The [[select repair actions]] window is displayed.
For each error type selected, you get a list of solutions.
(6) « Review each result » will be ticked automatically in order to view the result after the correction.
(7) You can use the arrows to navigate through your text while you are running the repair tool.
(8) Tick the appropriate solution.
(9) Click on [<Repair>] to correct the error you see on the screen.
(10) Click [<Undo>] when you want to undo the previous repair action.(only available if you
have ticked « Review each result »

User Guide- LegisWrite
Version 3 of the document – 25/10/2017 page 73
(11) Click on [<Next>] to jump to the following error (only available and necessary if you have not unticked « Review each result »)
Comments:
(a) [<Repair All>] applies the selected solution on all errors of the active DQC error type in one go.
(b) [<Ignore>] button enables to skip individual errors to go to the following error.
(c) [<Ignore all>] button allows skipping correction of all errors of the active DQC error type.
(12) Click on [<Close>] when all options are greyed out (end of the repairing pocess).
(13) The errors that could not be automatically or interactively corrected remain highlighted in the document. Go through the document to repair them manually. To ease navigation
between the remaining comments, click on next in the "Comments" group of the Word « Review » ribbon.
.
User Guide- LegisWrite
Version 3 of the document – 25/10/2017 page 74
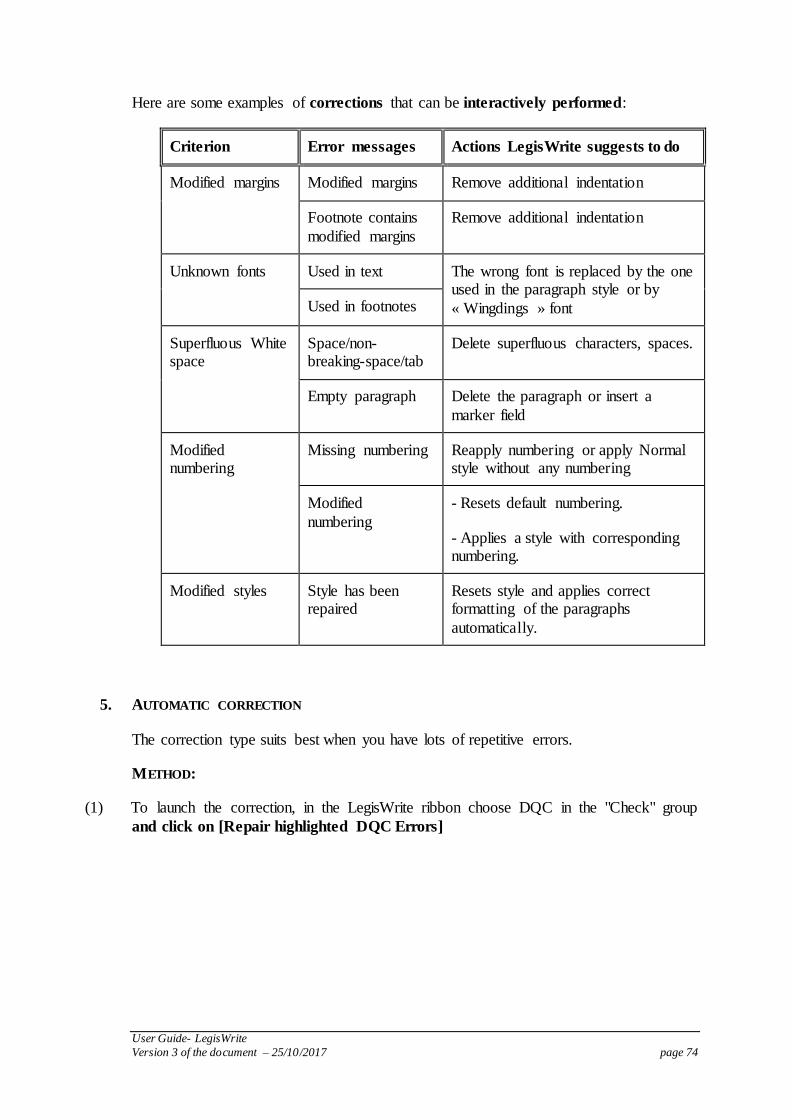
Here are some examples of corrections that can be interactively performed:
Criterion Error messages Actions LegisWrite suggests to do
Modified margins Modified margins Remove additional indentation
Footnote contains
modified margins
Remove additional indentation
Unknown fonts Used in text The wrong font is replaced by the one used in the paragraph style or by
« Wingdings » font Used in footnotes
Superfluous White space
Space/non-breaking-space/tab
Delete superfluous characters, spaces.
Empty paragraph Delete the paragraph or insert a
marker field
Modified numbering
Missing numbering Reapply numbering or apply Normal style without any numbering
Modified
numbering
- Resets default numbering.
- Applies a style with corresponding numbering.
Modified styles Style has been repaired
Resets style and applies correct formatting of the paragraphs
automatically.
5. AUTOMATIC CORRECTION
The correction type suits best when you have lots of repetitive errors.
METHOD:
(1) To launch the correction, in the LegisWrite ribbon choose DQC in the "Check" group
and click on [Repair highlighted DQC Errors]

User Guide- LegisWrite
Version 3 of the document – 25/10/2017 page 75
A window displays the criteria that can be interactively or automatically corrected.
The criteria that can be corrected automatically in the document are in black, the
other ones are not available.
« Always show this dialog box when performing the Repair Command» option
enables you to activate or deactivate the display of the options dialog box when performing the command. This option is memorised by LegisWrite and applied until
next modification via "LegisWrite" ribbon, "Check" group : [document quality /Repair options]
« Set as default » option enables to define which options you permanently want to keep selected.
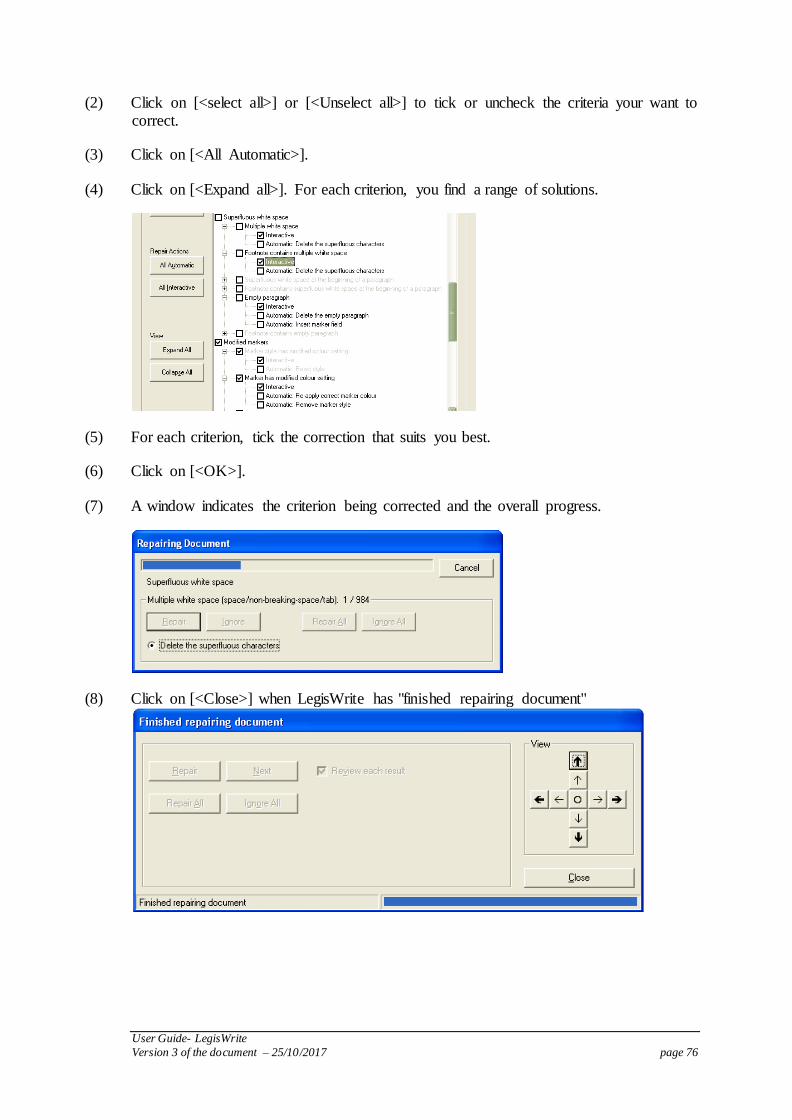
User Guide- LegisWrite
Version 3 of the document – 25/10/2017 page 76
(2) Click on [<select all>] or [<Unselect all>] to tick or uncheck the criteria your want to correct.
(3) Click on [<All Automatic>].
(4) Click on [<Expand all>]. For each criterion, you find a range of solutions.
(5) For each criterion, tick the correction that suits you best.
(6) Click on [<OK>].
(7) A window indicates the criterion being corrected and the overall progress.
(8) Click on [<Close>] when LegisWrite has "finished repairing document"
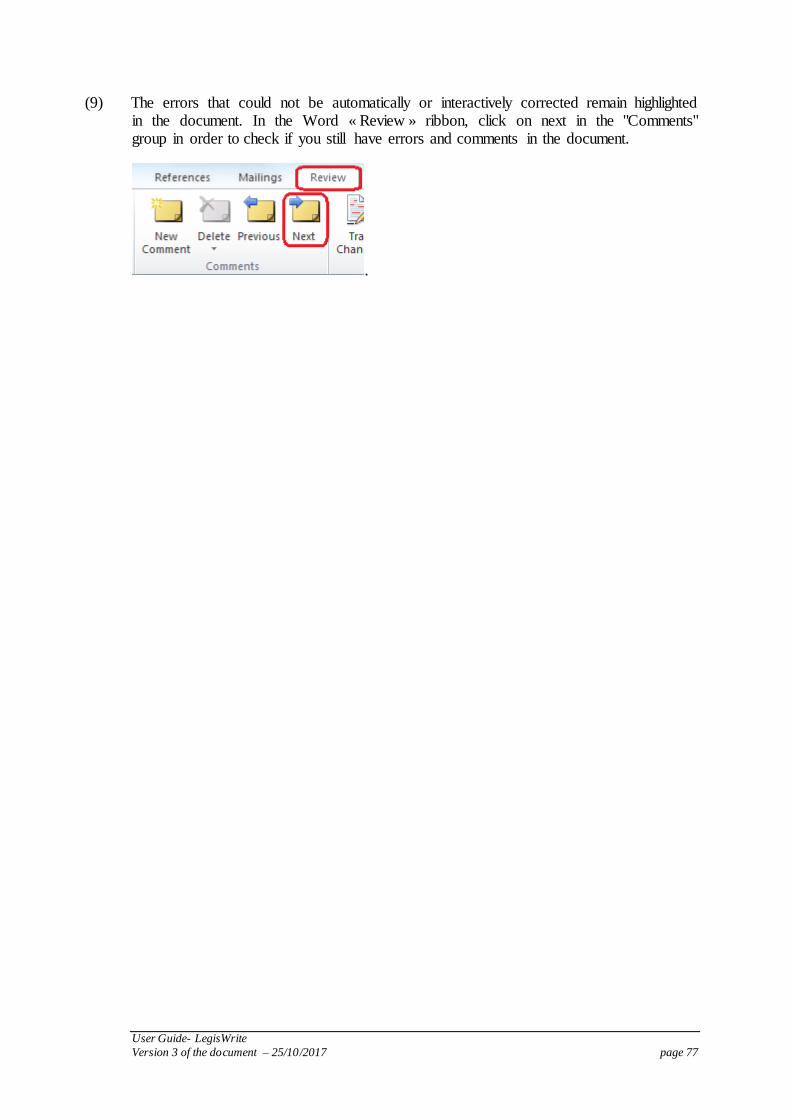
User Guide- LegisWrite
Version 3 of the document – 25/10/2017 page 77
(9) The errors that could not be automatically or interactively corrected remain highlighted in the document. In the Word « Review » ribbon, click on next in the "Comments" group in order to check if you still have errors and comments in the document.
.

User Guide- LegisWrite
Version 3 of the document – 25/10/2017 page 78
12. Prepare for Distribution
1. INTRODUCTION
When you have finished working, you can improve the quality of certain parts of your document (footer, front page, etc)
2. METHOD
(1) Open the document.
(2) In the LegisWrite ribbon, choose [Prepare for Distribution] in the "Tools" group.
(3) Tick the options you want to apply.
In the [[Prepare for Distribution]] window, select the actions that can be achieved in
your document, they are in black.

User Guide- LegisWrite
Version 3 of the document – 25/10/2017 page 79
(4) Confirm your choices by a click on [<OK>].
The options are:
Start page numbering at :
It allows you to choose the number of the page that follows the Cover Page. The number of the Cover Page itself is not displayed.
Clean up headers and footers :
It removes any non-"LegisWrite" information from the headers and footers.
The headers are blank.
The footers contain the page number, the classification if it's other than 'normal' and the language code (twice a page).
Delete "Référence interne" :
It deletes the internal reference number from your document. This option is greyed out
if your document does not contain any internal reference.
User Guide- LegisWrite
Version 3 of the document – 25/10/2017 page 80
Freeze numbering :
It replaces all automatic numbering by manual numbering. The NUMPAR X styles become MANUAL NUMPAR X styles and the automatic numbering in your text is
converted into character.
It is better not to use this option until your document has been fully approved by the
Secretariat General.
Remove level of sensitivity:
This option can be used by the SG to remove the level of sensitivity of a document that used to be marked as “Sensitive treatment”. This command is not available for other levels of sensitivity.
Accept all revisions :
It accepts all the changes made by the "Track Changes" option. Texts marked for
addition are added. Texts marked for deletion are deleted.
Delete comments :
It deletes all the comments inserted into your text.
Delete documents versions :
If you used the Word option [File/Version] when you created your document, LegisWrite keeps as the final version the version of your document which is open and deletes the other version.
Delete hidden text :
It deletes the "hidden" paragraph(s) from your document.
Delete user related properties :
It blanks out the statistical data from your Word file. It is no longer possible to identify
who created the file.
Clear all marker fields :
It clears all the blue insertion marks ([…]) added by LegisWrite to the standard texts and the financial statement of your document. All text left in blue in your document will become black.
Any green markers will be completely deleted from the document. Red markers remain untouched as they are reserved for SG.
User Guide- LegisWrite
Version 3 of the document – 25/10/2017 page 81
Language versions
In this window you can add other language versions of the same document, in order to perform the prepare for distribution on all of them at the same time.
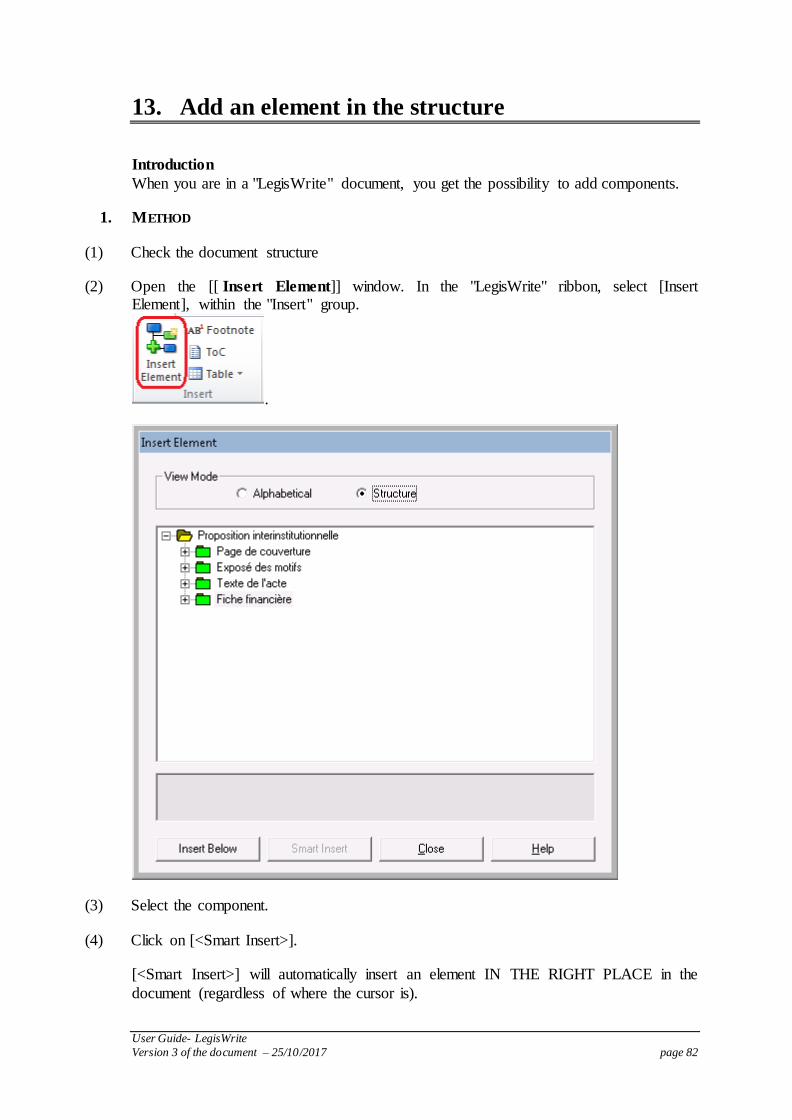
User Guide- LegisWrite
Version 3 of the document – 25/10/2017 page 82
13. Add an element in the structure
Introduction
When you are in a "LegisWrite" document, you get the possibility to add components.
1. METHOD
(1) Check the document structure
(2) Open the [[ Insert Element]] window. In the "LegisWrite" ribbon, select [Insert Element], within the "Insert" group.
.
(3) Select the component.
(4) Click on [<Smart Insert>].
[<Smart Insert>] will automatically insert an element IN THE RIGHT PLACE in the
document (regardless of where the cursor is).

User Guide- LegisWrite
Version 3 of the document – 25/10/2017 page 83
2. MAIN COMMENTS
There are two ways to display the elements . To switch from one way to the other on, click on the [<Structure>] or [<Alphabetical>] buttons.
(a) In the "Structure" display, a legislative document is displayed in the form of a tree
structure diagram.
(b) In the "Alphabetical" display, the information does not appear as a skeleton document;
it is simply listed alphabetically from A to Z.
When using the [<Smart Insert>] button, for a component that can be inserted at different places, (add an extra annex to a document of the type "Annex to a proposal"
for example), "LegisWrite" will ask you where you want to insert the new element and will show you the possible positions. You get this window :
.
(a) The [<Next » >] button takes you to the next possible insertion point.
(b) The [<Previous>] button takes you to the previous one.
(c) [<Insert>] inserts at the position shown on the screen.
(d) [<Show Structure>] displays the tree diagram with the various possible insertion
positions.
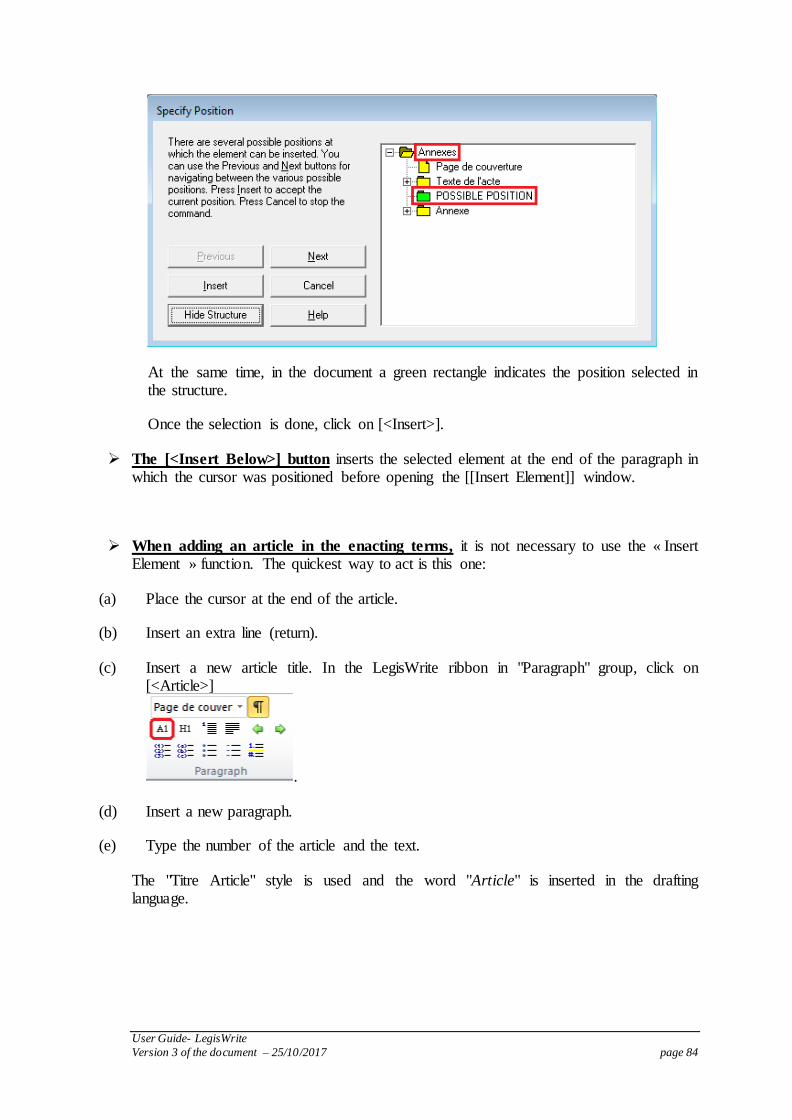
User Guide- LegisWrite
Version 3 of the document – 25/10/2017 page 84
At the same time, in the document a green rectangle indicates the position selected in the structure.
Once the selection is done, click on [<Insert>].
The [<Insert Below>] button inserts the selected element at the end of the paragraph in which the cursor was positioned before opening the [[Insert Element]] window.
When adding an article in the enacting terms, it is not necessary to use the « Insert Element » function. The quickest way to act is this one:
(a) Place the cursor at the end of the article.
(b) Insert an extra line (return).
(c) Insert a new article title. In the LegisWrite ribbon in "Paragraph" group, click on [<Article>]
.
(d) Insert a new paragraph.
(e) Type the number of the article and the text.
The "Titre Article" style is used and the word "Article" is inserted in the drafting language.
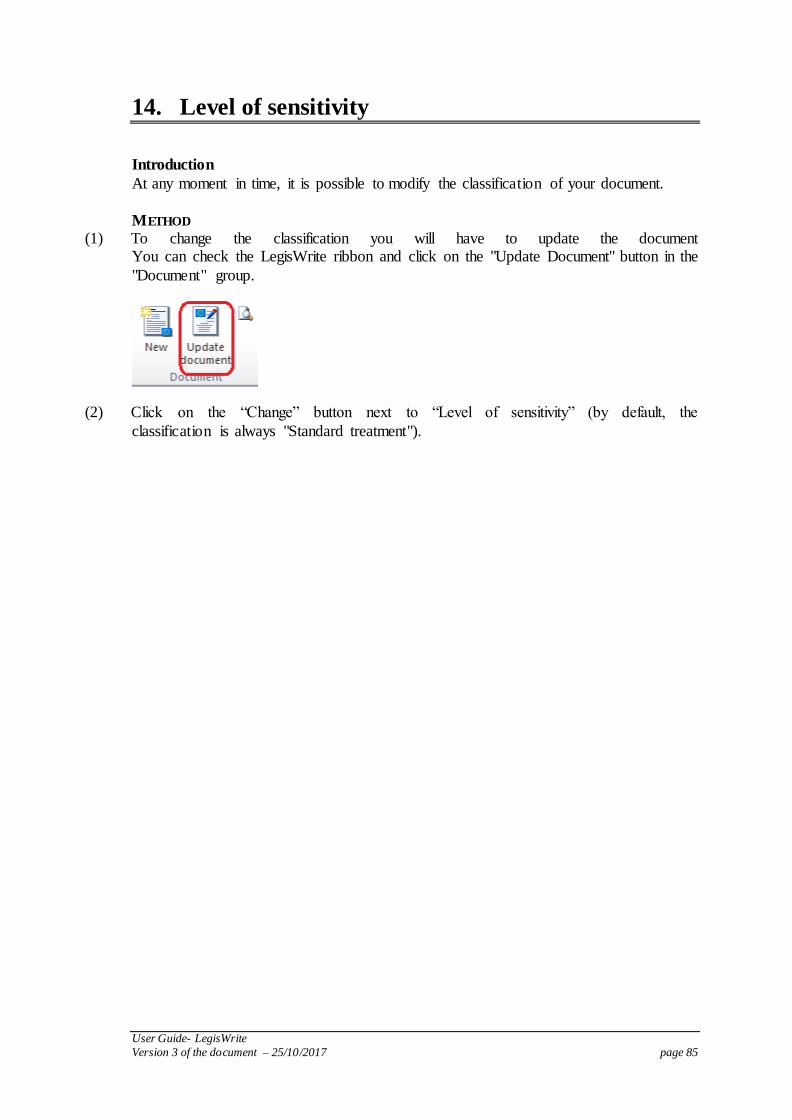
User Guide- LegisWrite
Version 3 of the document – 25/10/2017 page 85
14. Level of sensitivity
Introduction
At any moment in time, it is possible to modify the classification of your document.
METHOD
(1) To change the classification you will have to update the document You can check the LegisWrite ribbon and click on the "Update Document" button in the
"Document" group.
(2) Click on the “Change” button next to “Level of sensitivity” (by default, the
classification is always "Standard treatment").
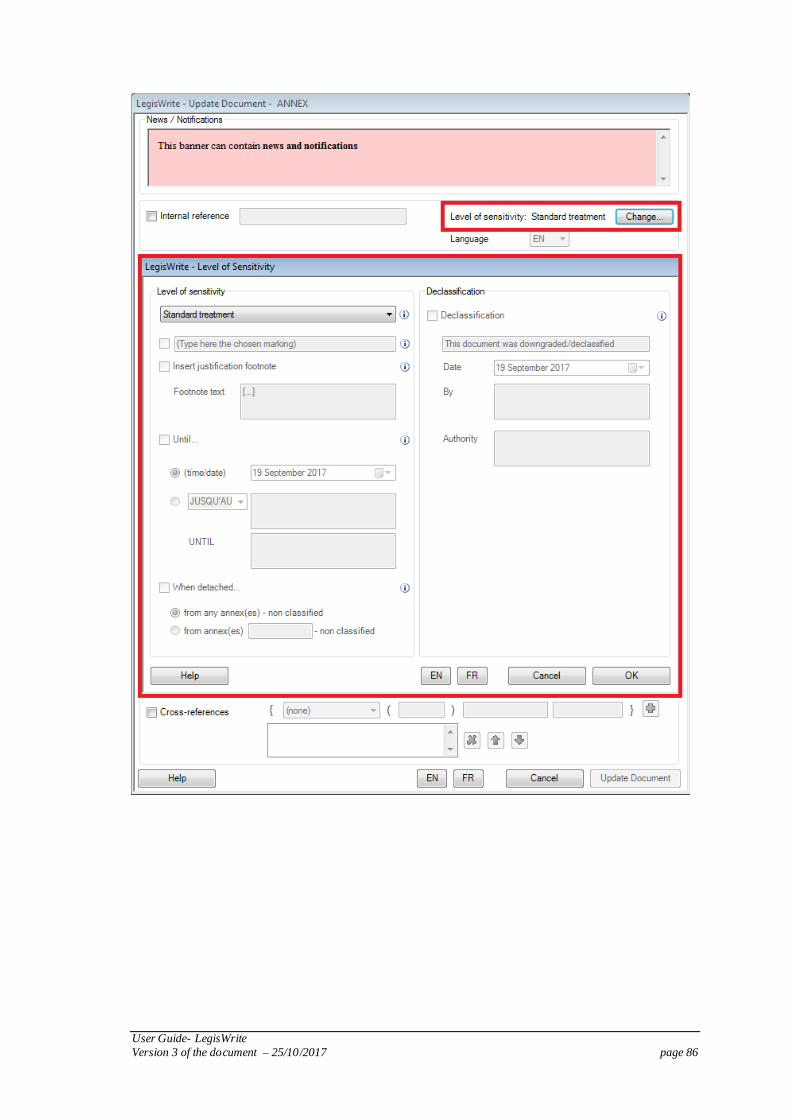
User Guide- LegisWrite
Version 3 of the document – 25/10/2017 page 86
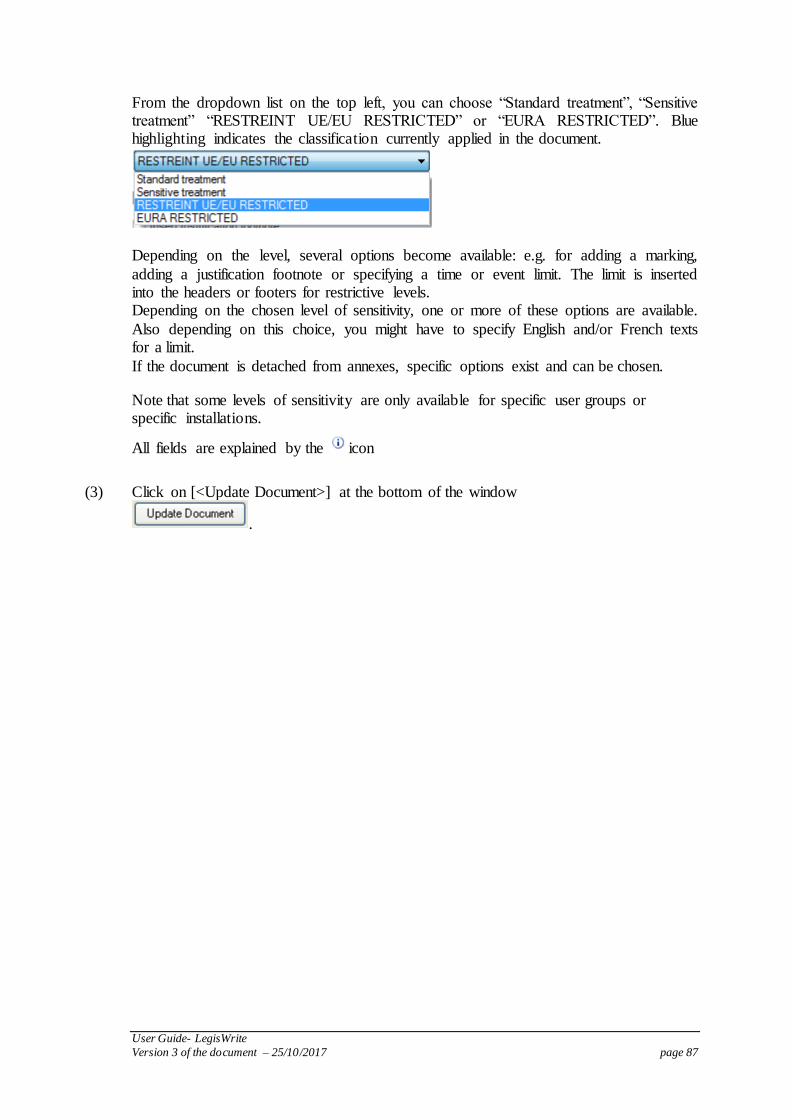
User Guide- LegisWrite
Version 3 of the document – 25/10/2017 page 87
From the dropdown list on the top left, you can choose “Standard treatment”, “Sensitive treatment” “RESTREINT UE/EU RESTRICTED” or “EURA RESTRICTED”. Blue highlighting indicates the classification currently applied in the document.
Depending on the level, several options become available: e.g. for adding a marking,
adding a justification footnote or specifying a time or event limit. The limit is inserted into the headers or footers for restrictive levels. Depending on the chosen level of sensitivity, one or more of these options are available.
Also depending on this choice, you might have to specify English and/or French texts for a limit.
If the document is detached from annexes, specific options exist and can be chosen.
Note that some levels of sensitivity are only available for specific user groups or specific installations.
All fields are explained by the icon
(3) Click on [<Update Document>] at the bottom of the window
.
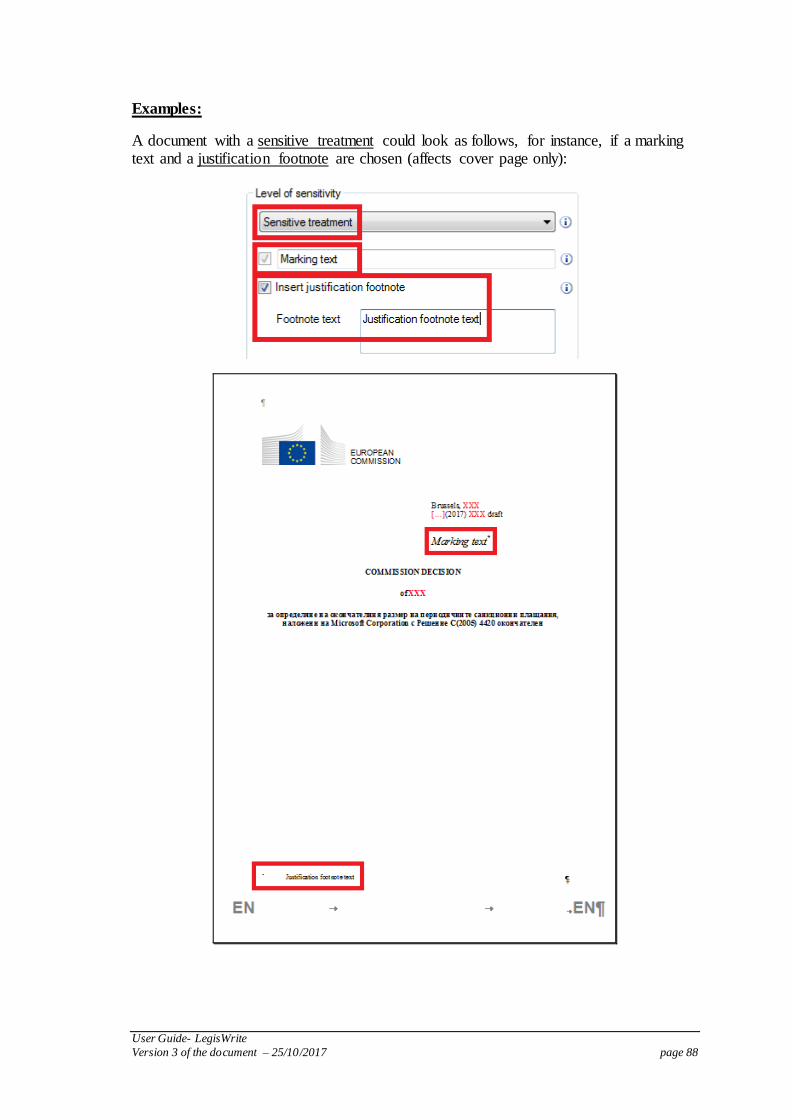
User Guide- LegisWrite
Version 3 of the document – 25/10/2017 page 88
Examples:
A document with a sensitive treatment could look as follows, for instance, if a marking text and a justification footnote are chosen (affects cover page only):

User Guide- LegisWrite
Version 3 of the document – 25/10/2017 page 89
A document with a RESTREINT UE/EU RESTRICTED level of sensitivity and an event limit with French and English texts could look as follows, for instance:

User Guide- LegisWrite
Version 3 of the document – 25/10/2017 page 90
A document with RESTREINT UE/EU RESTRICTED level of sensitivity being detached could look as follows, for instance:
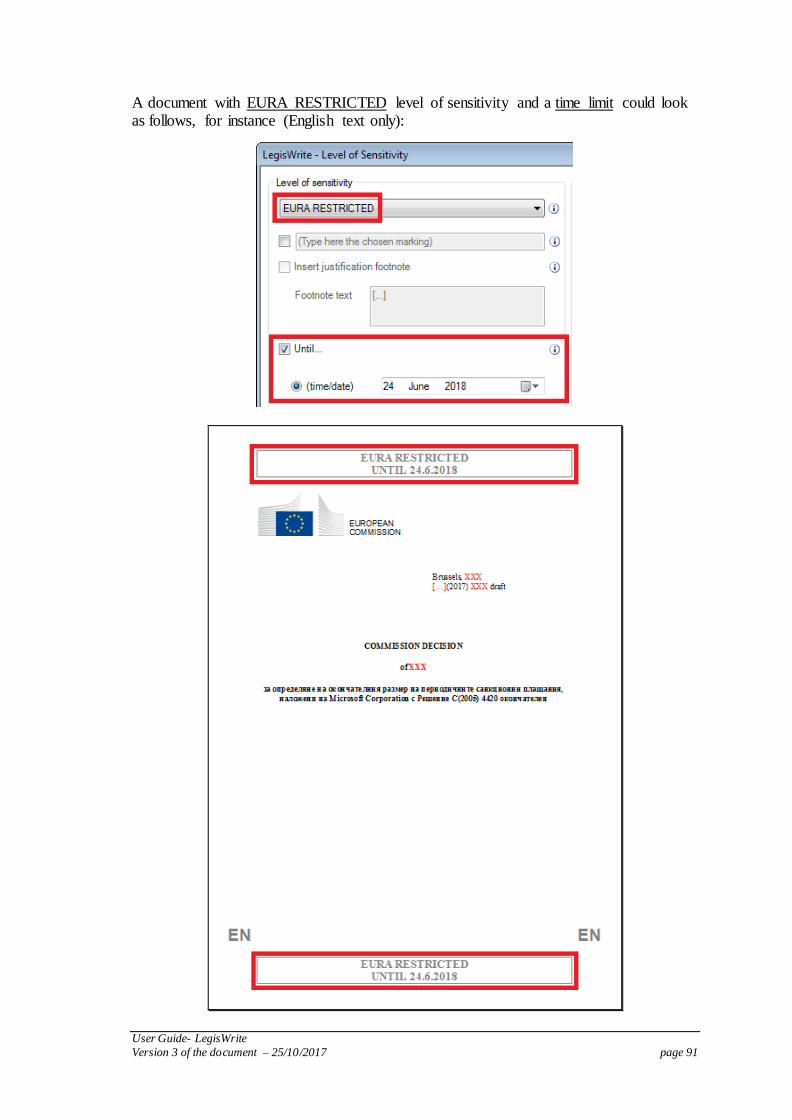
User Guide- LegisWrite
Version 3 of the document – 25/10/2017 page 91
A document with EURA RESTRICTED level of sensitivity and a time limit could look as follows, for instance (English text only):
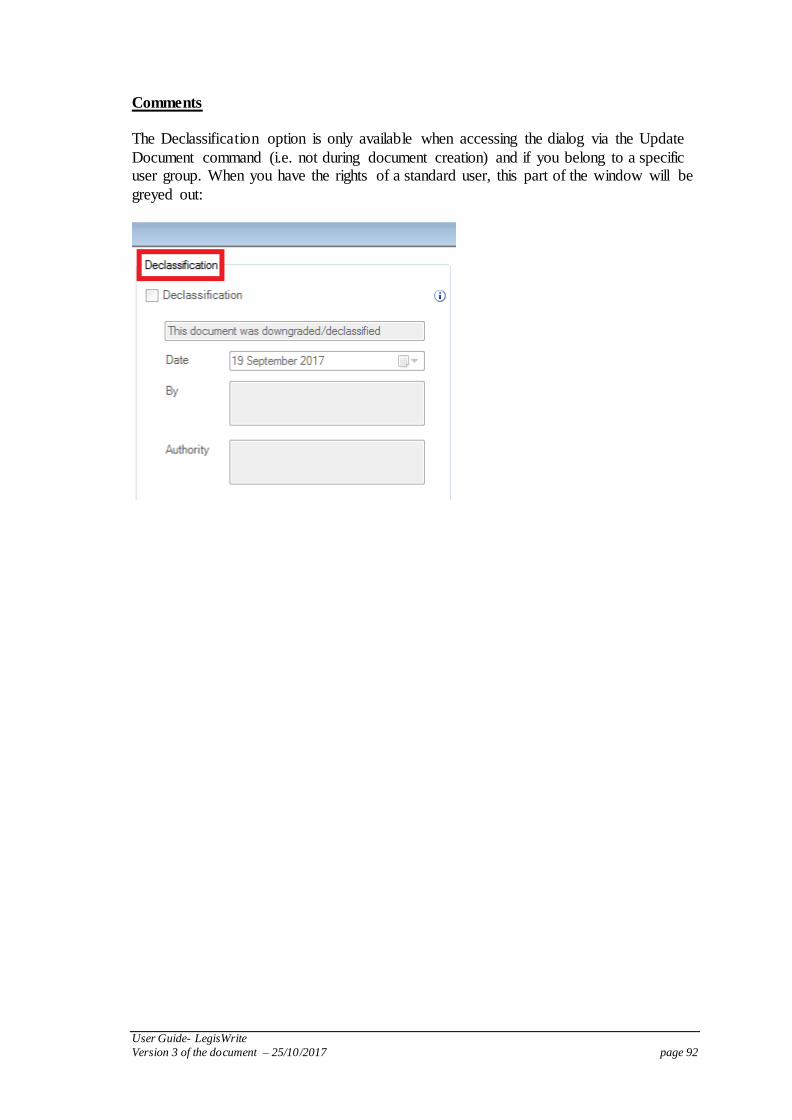
User Guide- LegisWrite
Version 3 of the document – 25/10/2017 page 92
Comments
The Declassification option is only available when accessing the dialog via the Update
Document command (i.e. not during document creation) and if you belong to a specific user group. When you have the rights of a standard user, this part of the window will be
greyed out:
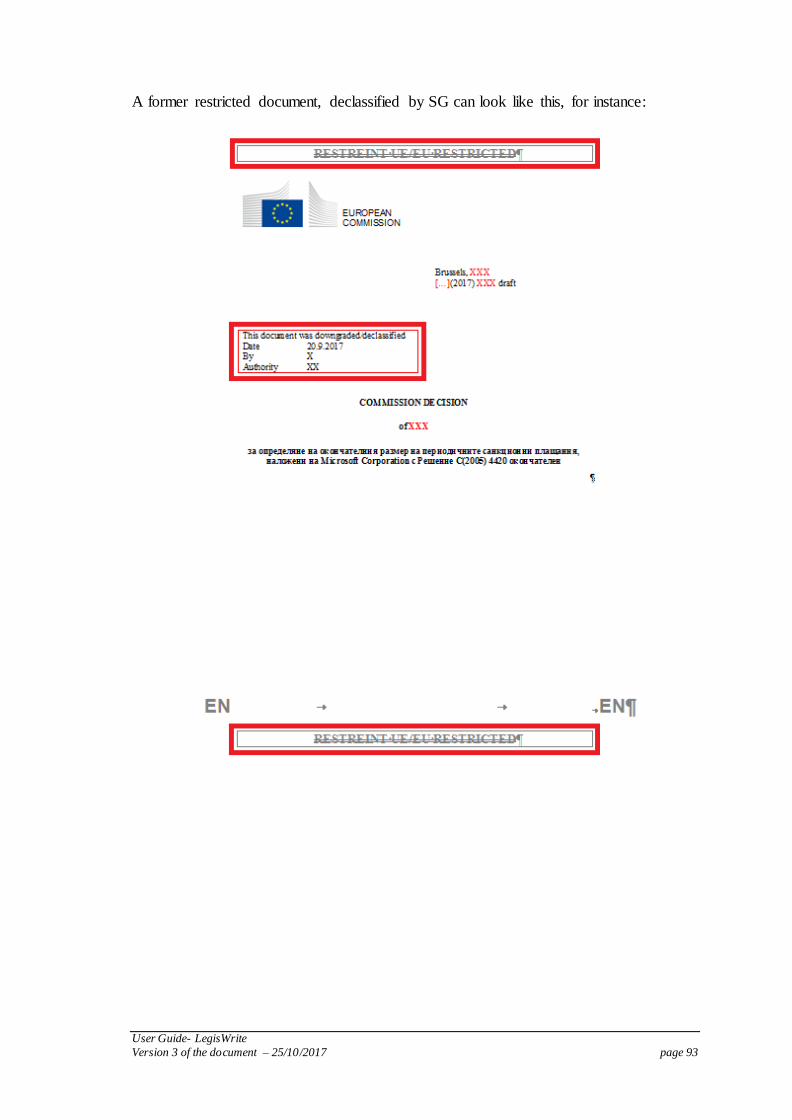
User Guide- LegisWrite
Version 3 of the document – 25/10/2017 page 93
A former restricted document, declassified by SG can look like this, for instance:

User Guide- LegisWrite
Version 3 of the document – 25/10/2017 page 94
15. Page numbering
Introduction
LegisWrite manages page numbering as well as headers and footers. Page numbering is automatically updated when printing or launching a "print preview"
PAGE NUMBERING RULES
(a) By default the Cover Page is not numbered.
(b) The first page of text is numbered with number 1 by default. The following pages will
have continuous numbering.
Automatic page numbering is based on the use of sections. To ensure correct
numbering, there must be a minimum number of sections. The Cover Page is the first section, the text corresponds to the following section (or sections).
– Cover Page = first section
– Text = second section, with "same as previous"
METHOD TO RESTORE CORRECT PAGE NUMBERING
(1) In the "LegisWrite" ribbon, go to the "Tools" group and click on "Prepare for distribution"
(2) In "Start numbering at", check if the number starts at 1 (correct, if necessary)
(3) Untick others possible options
(4) Click on <OK>
OR (5) Launch the 'Print Preview' ICON

User Guide- LegisWrite
Version 3 of the document – 25/10/2017 page 95
POSSIBLE MODIFICATIONS
1. MODIFICATION OF THE STARTING NUMBER
The function "prepare for distribution" allows you to change the starting number. This
number is 1 by default.
Example : "Start the page numbers at 36"
(1) In the "LegisWrite" ribbon, in the "Tools" group, click on "Prepare for distribution"
(1) In "Start numbering at", put 36
The Cover Page will get "36." It will not be displayed on the page however.
The first page of the text will get number "37." The numbering on the following pages will be continuous.
2. MODIFICATION OF THE NUMBERING, STARTING FROM A PARTICULAR SECTION.
(1) In the "Insert" ribbon, in the "Page Number" part, click on "Format Page Numbers"

User Guide- LegisWrite
Version 3 of the document – 25/10/2017 page 96
Instead of "Continue from previous section", you will have to choose "Start at", which is put on "1" by default. In this case the LegisWrite Document Quality Check will display a warning: "Page
number restarted".

User Guide- LegisWrite
Version 3 of the document – 25/10/2017 page 97
16. Table of Contents
3. INSERTION
(1) Position your cursor anywhere in the text and click on the <TOC> button in the "Insert" group:
(2) A message will appear to ask you if the table of contents can be inserted at the standard position, meaning at the beginning of the document, right after the Cover Page. We advise you to always insert the table of contents at this standard
position by clicking "Yes".
Result
The table of contents is inserted and contains 4 levels of titles as well as all the titles
with specific LegisWrite styles.
4. DEFINING THE TABLE
(1) To specify the levels of titles you want to make visible in the table of contents
go into the LegisWrite ribbon and click on <OPTIONS> in the "About" group. .
(2) Click on the [ToC] tab

User Guide- LegisWrite
Version 3 of the document – 25/10/2017 page 98
(3) Define the level of titles using the ""Show Heading levels" option":
level 1,2,3,4 Level 1 enables to display in the TOC the paragraphs on which Heading1 and Manual Heading 1 styles are
applied. Level 2 - the paragraphs on which Heading 2 and Manual Heading 2 styles are applied and so on.
(4) Select in the drop-down list in front of "Document type" the document type you
are working in.
(5) Other special LegisWrite styles you want to find back in the TOC: by default,
can all be ticked in the list below.
(6) Click on [<OK>]
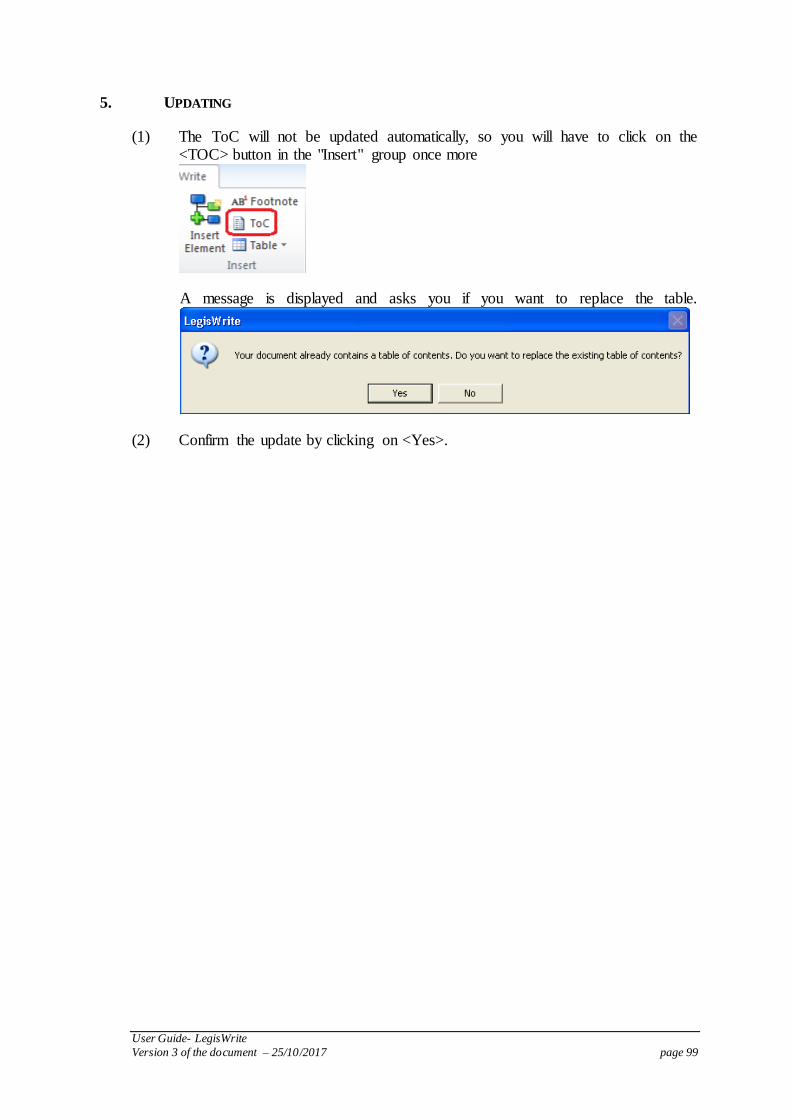
User Guide- LegisWrite
Version 3 of the document – 25/10/2017 page 99
5. UPDATING
(1) The ToC will not be updated automatically, so you will have to click on the <TOC> button in the "Insert" group once more
A message is displayed and asks you if you want to replace the table.
(2) Confirm the update by clicking on <Yes>.
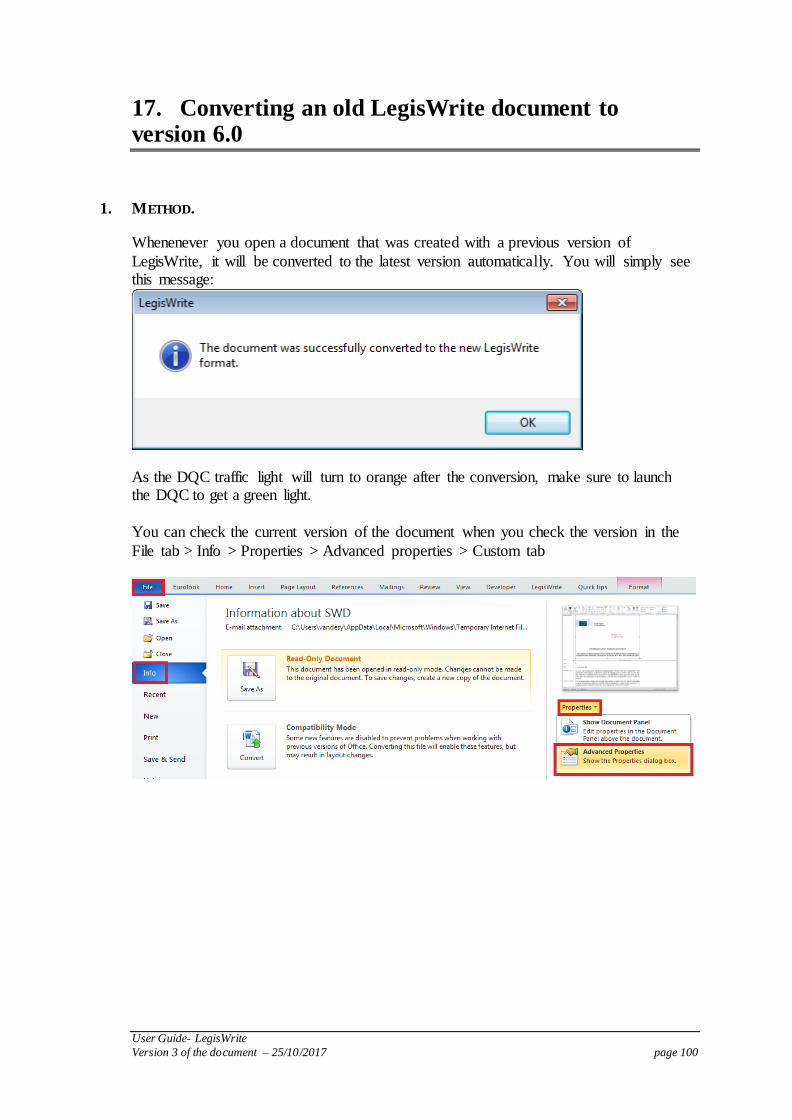
User Guide- LegisWrite
Version 3 of the document – 25/10/2017 page 100
17. Converting an old LegisWrite document to version 6.0
1. METHOD.
Whenenever you open a document that was created with a previous version of
LegisWrite, it will be converted to the latest version automatically. You will simply see this message:
As the DQC traffic light will turn to orange after the conversion, make sure to launch the DQC to get a green light.
You can check the current version of the document when you check the version in the
File tab > Info > Properties > Advanced properties > Custom tab
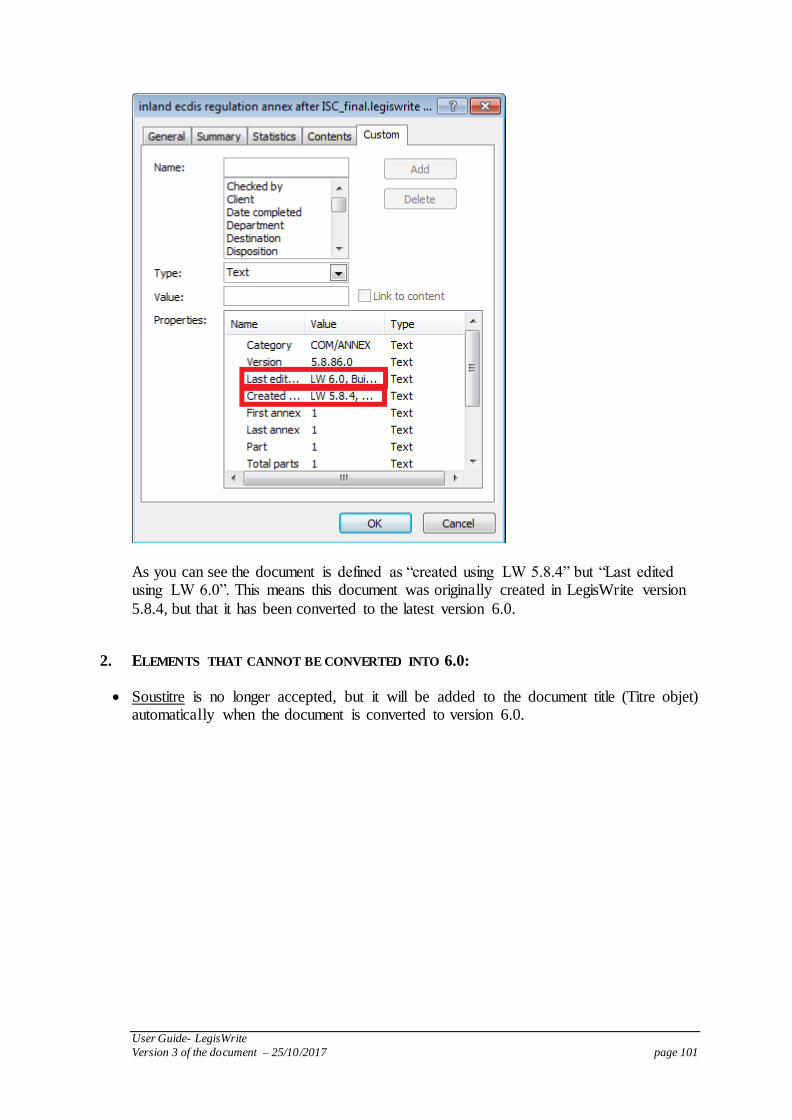
User Guide- LegisWrite
Version 3 of the document – 25/10/2017 page 101
As you can see the document is defined as “created using LW 5.8.4” but “Last edited using LW 6.0”. This means this document was originally created in LegisWrite version
5.8.4, but that it has been converted to the latest version 6.0.
2. ELEMENTS THAT CANNOT BE CONVERTED INTO 6.0:
Soustitre is no longer accepted, but it will be added to the document title (Titre objet) automatically when the document is converted to version 6.0.
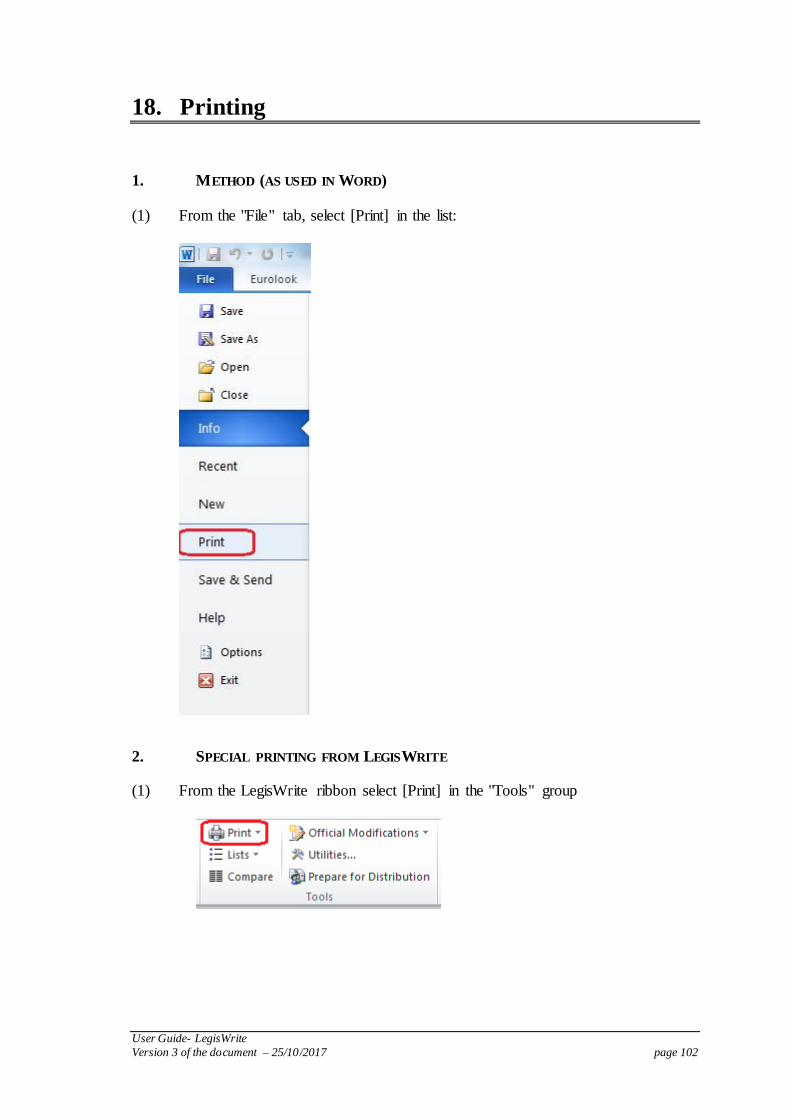
User Guide- LegisWrite
Version 3 of the document – 25/10/2017 page 102
18. Printing
1. METHOD (AS USED IN WORD)
(1) From the "File" tab, select [Print] in the list:
2. SPECIAL PRINTING FROM LEGISWRITE
(1) From the LegisWrite ribbon select [Print] in the "Tools" group

User Guide- LegisWrite
Version 3 of the document – 25/10/2017 page 103
(2) Choose one of the settings
(a) Print with 1.5 line spacing
It prints with wider line spacing. This option is used by the lawyer-revisers so that they can insert corrections and notes directly into the text.
(b) Print style & text
It prints the document with a column to the left of the text indicating the correct styles. This option is designed mainly for translators, so that they can see the
styles of the original document, and comply with the original structure when producing their translation.
(c) Create style & text document
This simply creates a file containing the text and accompanying styles. This option is designed for trainers.

User Guide- LegisWrite
Version 3 of the document – 25/10/2017 page 104
19. Comparison tool
Introduction
You can compare several documents in one go and comparing documents in different languages is also an option. Only documents of the same category, i.e. with a similar
structure can be compared. C and COM documents cannot be compared for example. A new document is created with several columns. Each column contains the legislative document in a different language. In each column paragraphs with the same style are
aligned.
METHOD
(1) Open the source document
(2) Launch the comparison. From the LegisWrite ribbon select [Compare] in the
"Tools" group .
A new window will be displayed in which you can select the documents.
Only the LegisWrite documents which are open on your pc at that moment and which are from the same category (and as a consequence have a similar
structure) will be available in the list.
(3) Select the document(s)
Click on [<Browse>] if the document(s) are not available in the list and select them in the Word window. Click then on [<Open>]
(4) Click on [<OK>]
LegisWrite opens a window that displays a statistical table and the structure of
the documents.

User Guide- LegisWrite
Version 3 of the document – 25/10/2017 page 105
You always view the comparison result between the source document and ONE other language version.
Explanations of the counters in the statistics table:
For both documents,
Pages : counts the number of pages in each of the documents
Paragraphs: counts the number of paragraphs;
Footnotes: counts the number of footnotes;
Tables: counts the number of tables;
Articles: counts the number of articles in each of the documents;
Numbers: counts how many numbers there are;
Total of numbers: adds up all the numbers;
These counters refer to whichever part of the tree structure has been selected. To
move through the structure, use the mouse or the arrows you find on the right in the window.
The cursor follows the changes in the active document.
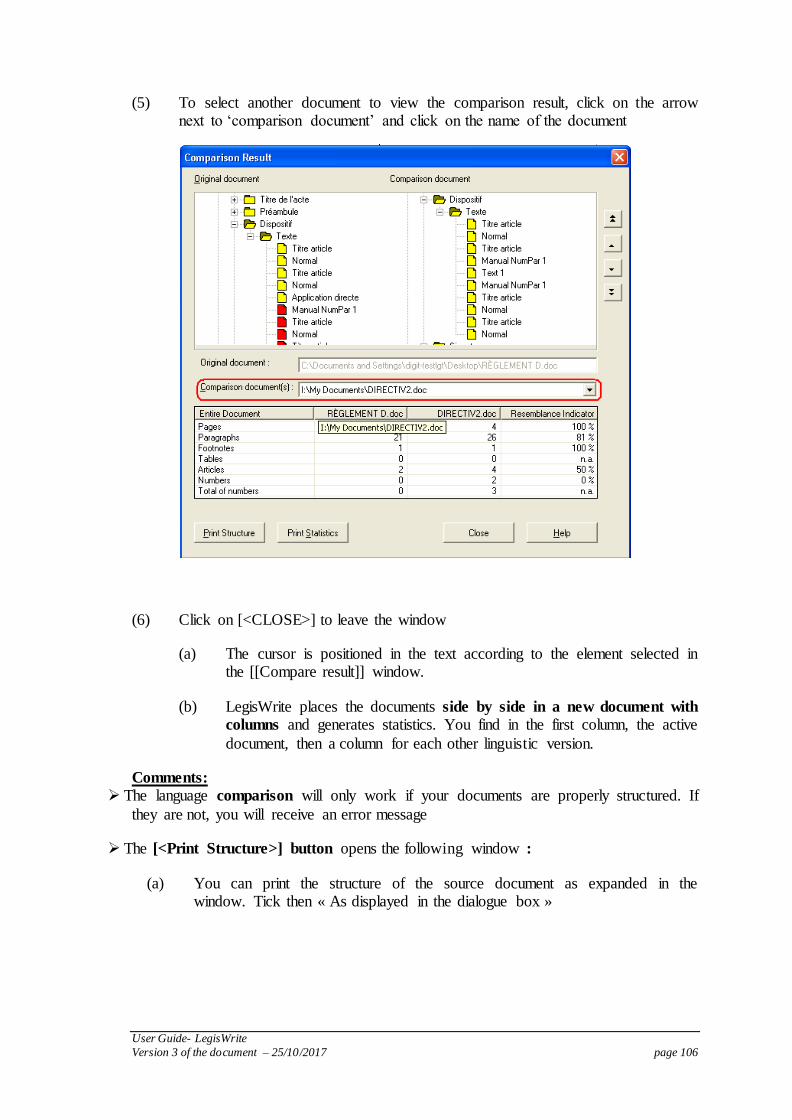
User Guide- LegisWrite
Version 3 of the document – 25/10/2017 page 106
(5) To select another document to view the comparison result, click on the arrow next to ‘comparison document’ and click on the name of the document
(6) Click on [<CLOSE>] to leave the window
(a) The cursor is positioned in the text according to the element selected in the [[Compare result]] window.
(b) LegisWrite places the documents side by side in a new document with
columns and generates statistics. You find in the first column, the active
document, then a column for each other linguistic version.
Comments:
The language comparison will only work if your documents are properly structured. If
they are not, you will receive an error message
The [<Print Structure>] button opens the following window :
(a) You can print the structure of the source document as expanded in the window. Tick then « As displayed in the dialogue box »

User Guide- LegisWrite
Version 3 of the document – 25/10/2017 page 107
(b) You can also print the complete structure of the source document. Tick then « Fully expanded ».
The [< Print Statistics>] table prints the statistical table of all the linguistic versions included in the comparison.
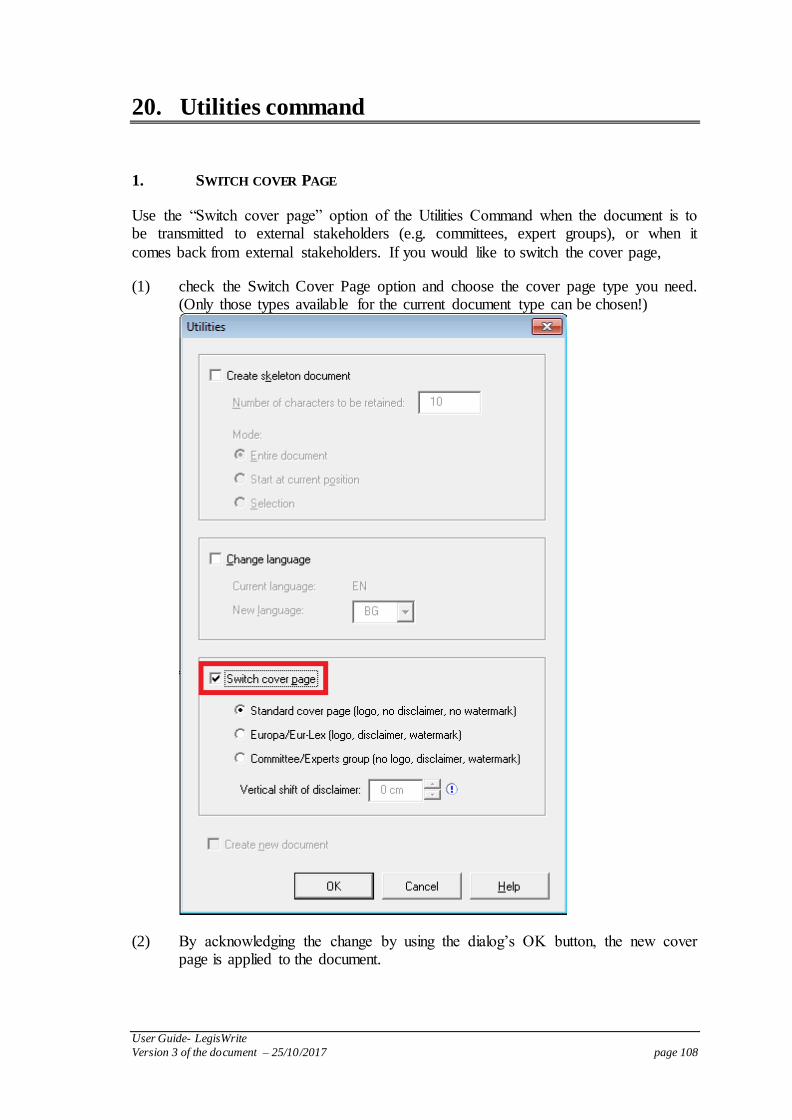
User Guide- LegisWrite
Version 3 of the document – 25/10/2017 page 108
20. Utilities command
1. SWITCH COVER PAGE
Use the “Switch cover page” option of the Utilities Command when the document is to be transmitted to external stakeholders (e.g. committees, expert groups), or when it
comes back from external stakeholders. If you would like to switch the cover page,
(1) check the Switch Cover Page option and choose the cover page type you need. (Only those types available for the current document type can be chosen!)
(2) By acknowledging the change by using the dialog’s OK button, the new cover page is applied to the document.

User Guide- LegisWrite
Version 3 of the document – 25/10/2017 page 109
By choosing the standard cover page, the document looks as usual, as it looks directly after document creation:
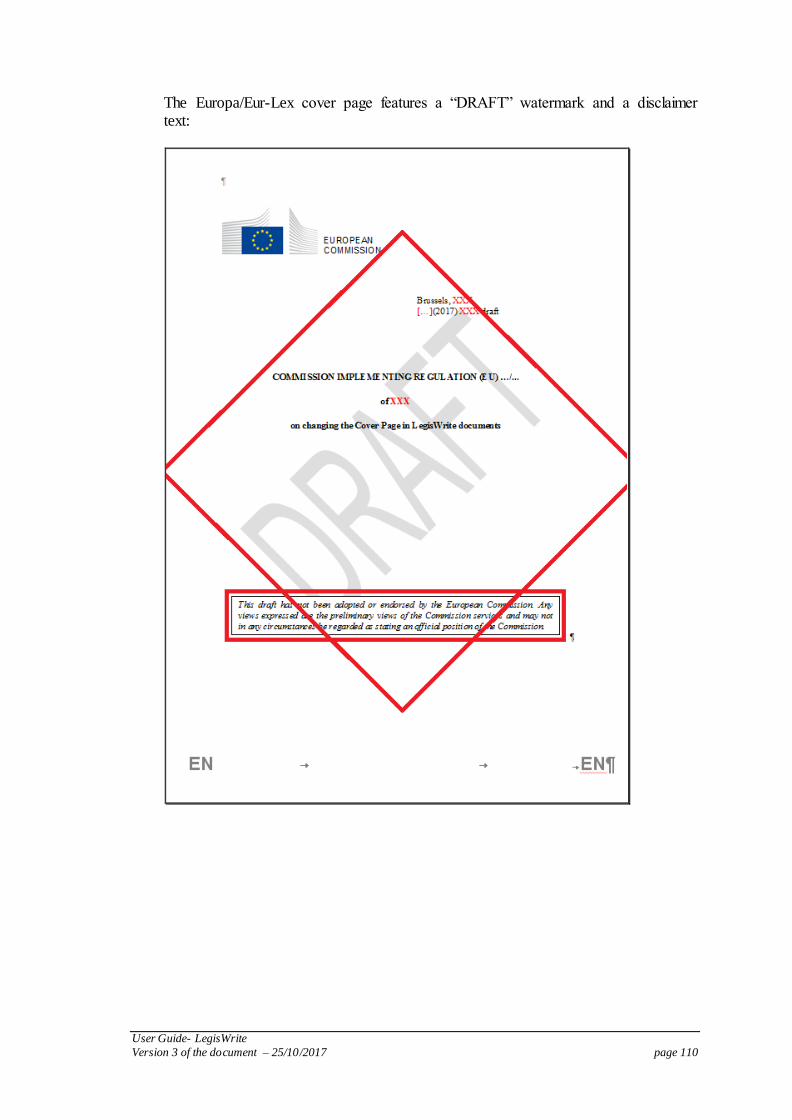
User Guide- LegisWrite
Version 3 of the document – 25/10/2017 page 110
The Europa/Eur-Lex cover page features a “DRAFT” watermark and a disclaimer text:
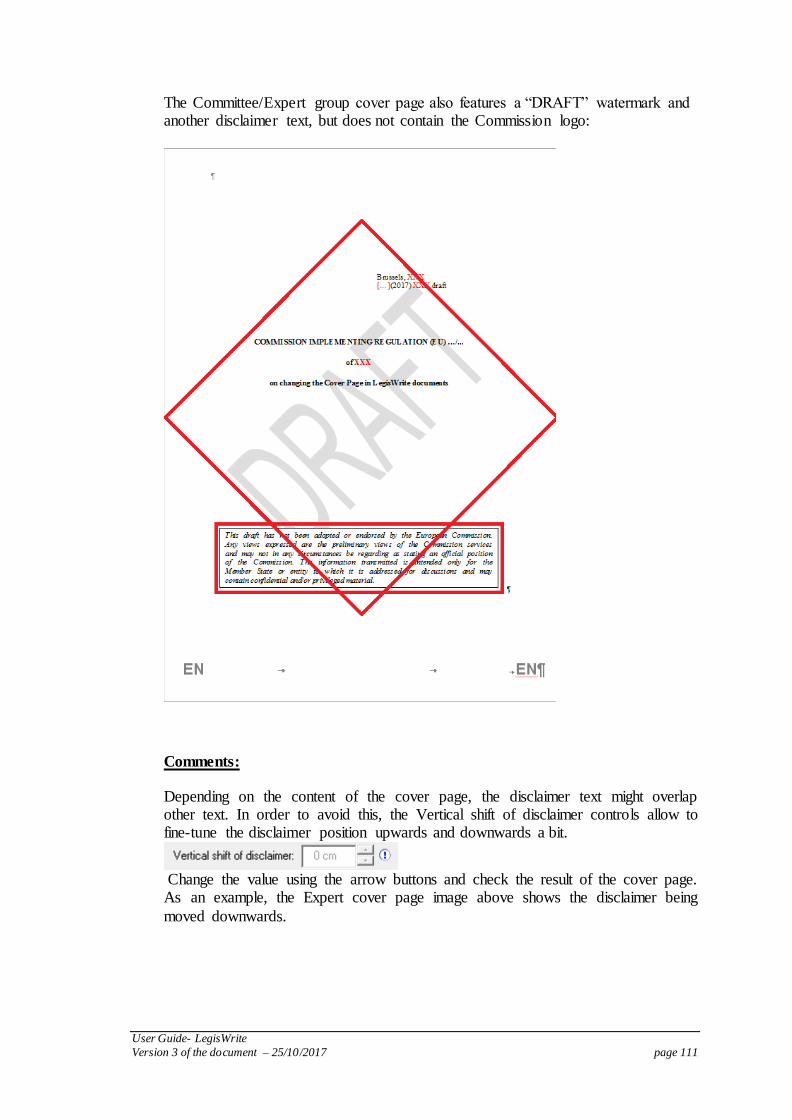
User Guide- LegisWrite
Version 3 of the document – 25/10/2017 page 111
The Committee/Expert group cover page also features a “DRAFT” watermark and another disclaimer text, but does not contain the Commission logo:
Comments:
Depending on the content of the cover page, the disclaimer text might overlap other text. In order to avoid this, the Vertical shift of disclaimer controls allow to fine-tune the disclaimer position upwards and downwards a bit.
Change the value using the arrow buttons and check the result of the cover page. As an example, the Expert cover page image above shows the disclaimer being
moved downwards.

User Guide- LegisWrite
Version 3 of the document – 25/10/2017 page 112
2. UTILITIES FOR DGT
Translation process
Here are the different steps you might follow to organise the translation of a
"LegisWrite" document.
Step 1:
The translation is done in SDL Studio 2011, where the source text will be extracted from Word/LegisWrite and translated in a special editor.
Formatting, footnotes, hyperlinks are applied to translation with tags in the editor:
Step 2:
When translation is completed and the content has been revised, a target Word/LegisWrite document is created by replacing the original text with the translated one. This means that the paragraph styles used in the original are kept and not changed
in any way. As the original text had already passed structure check and DQC before arriving at DGT, the new target document will also be correct at the level of styles.
Step 3:
After the creation of the final translated document, an assistant will open this text in Word/LegisWrite from Translator's Desktop (aka TraDesk, replacing the former Dossier
Manager), in order to be able to use the "Change Language" utility (see Point 2 "Utilities"), as well as "Update Cover Page" and to go through the Action2 checklist (a
series of verifications to insure quality, including structure, DQC and the use of the LW Compare function). The translation is then sent to the requester using e-Greffe.
3. UTILITIES
"Change language" command
(1) Call up the document to be translated via Dossier Manager.

User Guide- LegisWrite
Version 3 of the document – 25/10/2017 page 113
(2) In the "LegisWrite" ribbon, click on [UTILITIES] in the "Tools" group.
(3) Tick "Change language".
(4) Select the language you are translating into. For some types of
documents, the choice of languages will be limited, depending on the languages available in the creation dialog.
(5) NEVER TICK "Create New Document".

User Guide- LegisWrite
Version 3 of the document – 25/10/2017 page 114
(6) Click on [<OK>]
(7) We also advise you to update the Cover Page after this action, to make sure the changes in the text (in this case translation) are reflected in the Cover Page as well.
Results
"LegisWrite" keeps the styles of the original document and translates some
standard texts
It uses the right spelling and grammatical dictionaries for the target language.
"Create Skeleton Document" command
(1) Call up the document to be translated via Dossier Manager.
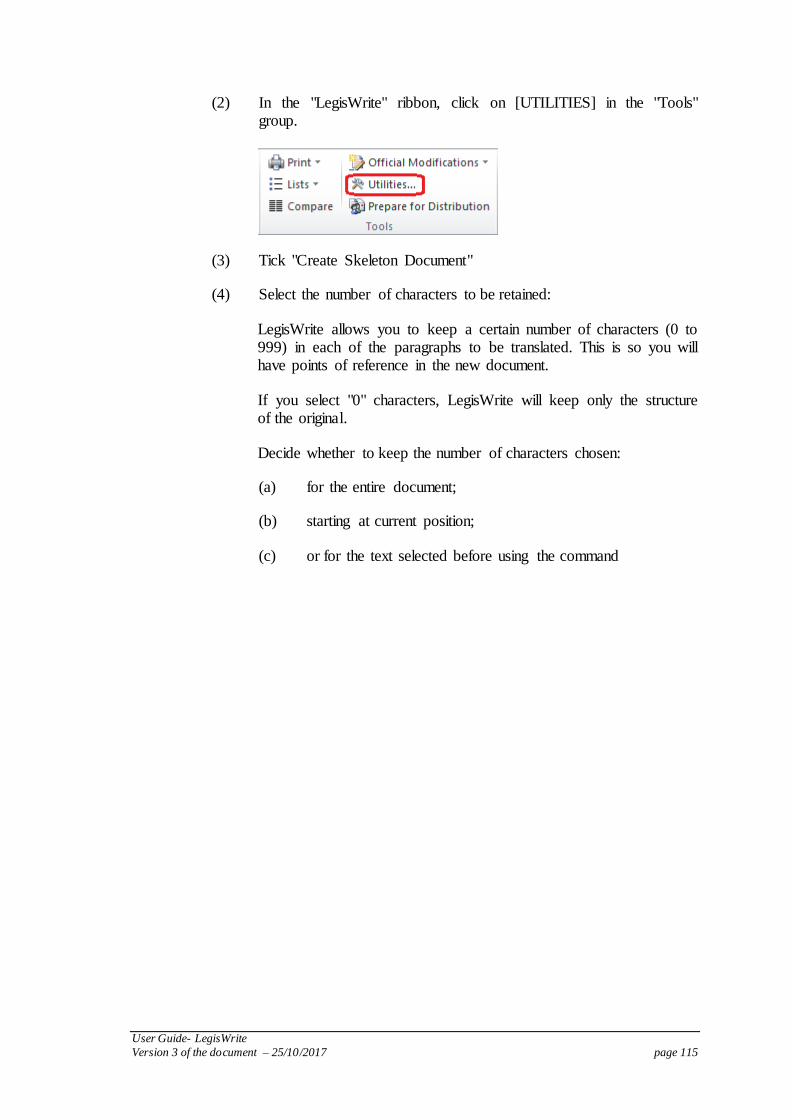
User Guide- LegisWrite
Version 3 of the document – 25/10/2017 page 115
(2) In the "LegisWrite" ribbon, click on [UTILITIES] in the "Tools" group.
(3) Tick "Create Skeleton Document"
(4) Select the number of characters to be retained:
LegisWrite allows you to keep a certain number of characters (0 to 999) in each of the paragraphs to be translated. This is so you will have points of reference in the new document.
If you select "0" characters, LegisWrite will keep only the structure of the original.
Decide whether to keep the number of characters chosen:
(a) for the entire document;
(b) starting at current position;
(c) or for the text selected before using the command

User Guide- LegisWrite
Version 3 of the document – 25/10/2017 page 116
(5) (If necessary) tick "Change Language"
(6) Click on [<OK>].
Result:
It keeps the styles of the original document even if you select 0 characters when
creating the skeleton document.
Main comments:
It is important not to delete structural elements (format /style); in the event of an "accident", don't forget the Word [<undo>] function.
It is important not to modify the skeleton structure (e.g., do not put in unnecessary
carriage returns).
User Guide- LegisWrite
Version 3 of the document – 25/10/2017 page 117
Take care not to delete paragraph marks, as they contain the style applied to the paragraph. We recommend using the SHOW/HIDE button so that you can see them
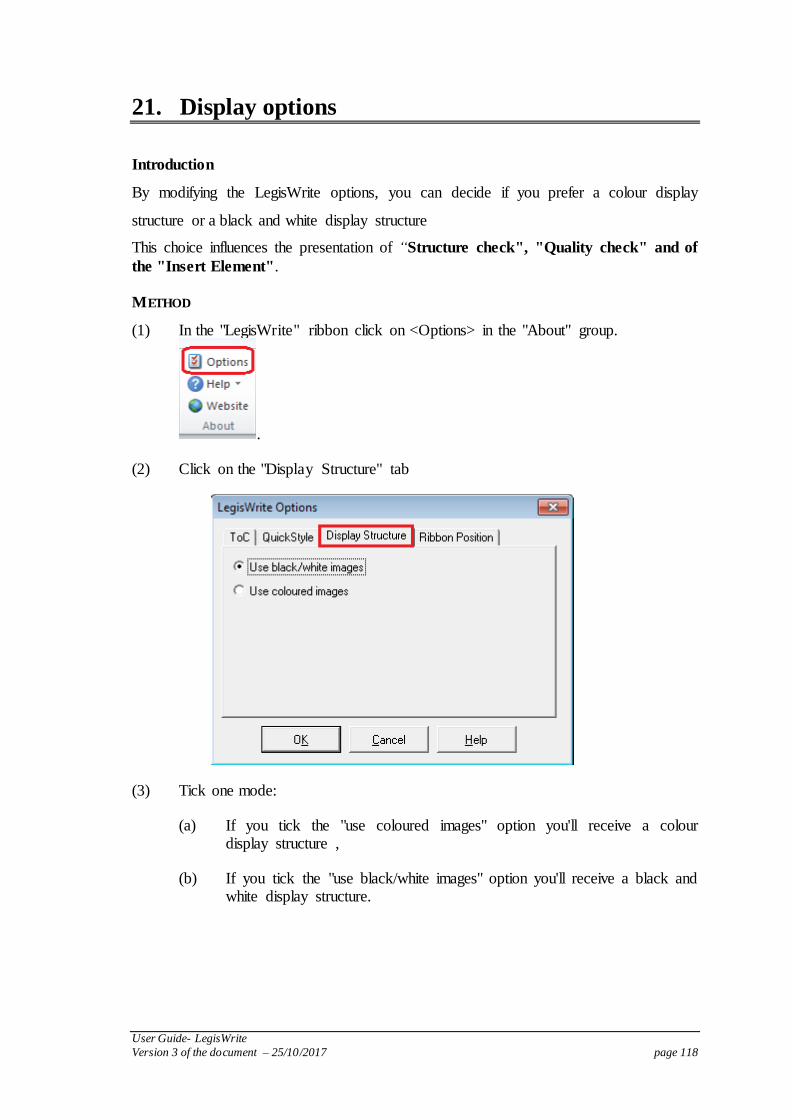
User Guide- LegisWrite
Version 3 of the document – 25/10/2017 page 118
21. Display options
Introduction
By modifying the LegisWrite options, you can decide if you prefer a colour display
structure or a black and white display structure
This choice influences the presentation of “Structure check", "Quality check" and of
the "Insert Element". METHOD
(1) In the "LegisWrite" ribbon click on <Options> in the "About" group.
.
(2) Click on the "Display Structure" tab
(3) Tick one mode:
(a) If you tick the "use coloured images" option you'll receive a colour display structure ,
(b) If you tick the "use black/white images" option you'll receive a black and white display structure.

User Guide- LegisWrite
Version 3 of the document – 25/10/2017 page 119
(4) Click on [<OK>].

User Guide- LegisWrite
Version 3 of the document – 25/10/2017 page 120
22. LegisWrite about
Introduction
It is important to always use the last LegisWrite version. The tool is permanently enhanced and reflects the latest requirements, evolutions requested by the SG, legal
service, dg Budget. That might mean new structures for documents but also new templates for financial statements, and so on.
The current LegisWrite version is version 5.8.3 METHOD
(a) Go into the LegisWrite ribbon and click on [Help] and [About] in the "About" group
(b) Check the « Release » number
(c) Click on [<OK>] to leave the window.
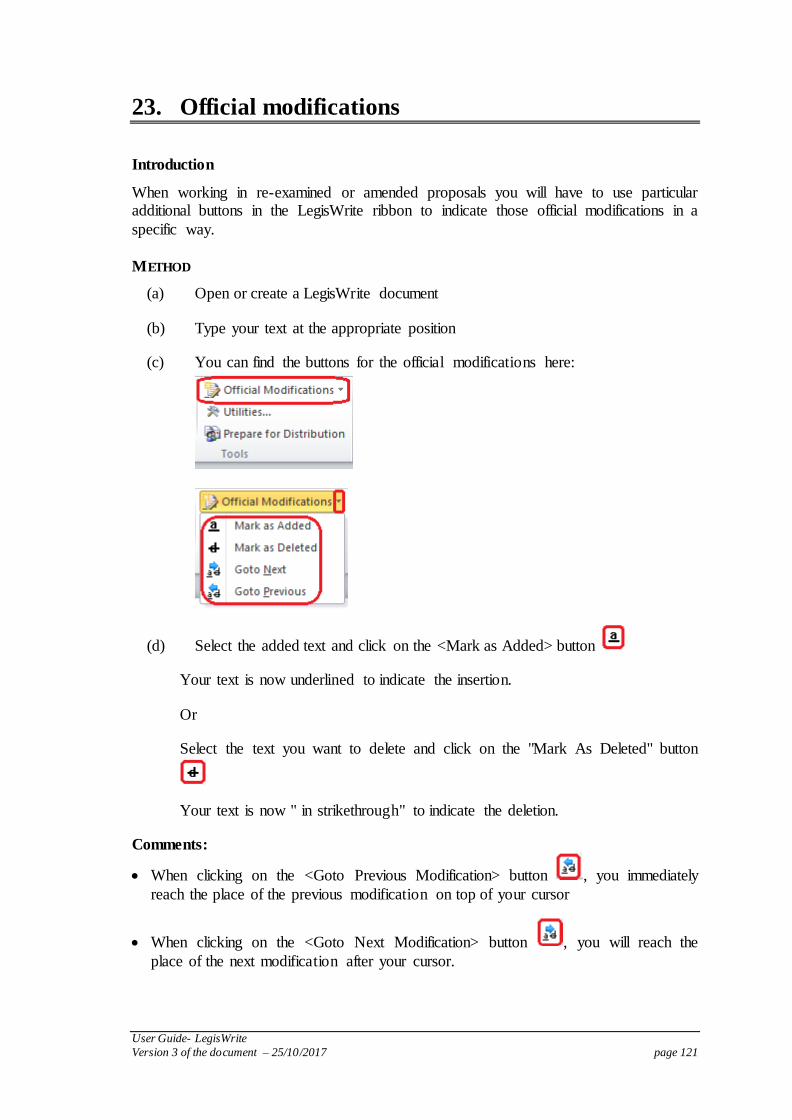
User Guide- LegisWrite
Version 3 of the document – 25/10/2017 page 121
23. Official modifications
Introduction
When working in re-examined or amended proposals you will have to use particular additional buttons in the LegisWrite ribbon to indicate those official modifications in a
specific way.
METHOD
(a) Open or create a LegisWrite document
(b) Type your text at the appropriate position
(c) You can find the buttons for the official modifications here:
(d) Select the added text and click on the <Mark as Added> button
Your text is now underlined to indicate the insertion.
Or
Select the text you want to delete and click on the "Mark As Deleted" button
Your text is now " in strikethrough" to indicate the deletion.
Comments:
When clicking on the <Goto Previous Modification> button , you immediately
reach the place of the previous modification on top of your cursor
When clicking on the <Goto Next Modification> button , you will reach the
place of the next modification after your cursor.
User Guide- LegisWrite
Version 3 of the document – 25/10/2017 page 122
Annex 1 Converting Word documents into LegisWrite
Introduction
When you create a legislative document, parts of it often already exist in other documents and parts of it are sent to you by other departments.
It is therefore important to develop a working method whereby you can retrieve parts of existing documents and insert them into a LegisWrite document In some cases documents have completely been drafted in Word or Eurolook. In this
chapter, a workflow in which an existing document is converted into "LegisWrite" documents is described.
The goal of this module is to present you with a working method which will help you to perform these tasks.
METHOD
(a) Step 1: Create a LegisWrite document skeleton (template)
For complete conversion, create an appropriate LegisWrite skeleton for the document you have in the old format
(a) Find out the main titles and components of the document
(b) Create the LegisWrite document. Follow the instruction given in chapter one of this user guide.
In case of partial retrieval, insert the « new » component into the LegisWrite document
(a) Use the [Insert Element] command to create the additional component.
Refer to chapter 7 in this user guide
(b) Step 2: import the text into the LegisWrite document
Import by copy/paste the contents of the different components. Take care to
keep the LegisWrite styles as they have been inserted and selected by LegisWrite.
So when you want to copy one paragraph and the style in LegisWrite is not the same as in the source document, you have to select the text without taking the
paragraph mark (that contains the paragraph's style). Then paste this part of text in the LegisWrite paragraph. Use Copy / Paste > Keep Text Only or Ctrl C / Ctrl V in order to keep the (structure) styles in the LegisWrite template.
If the text is correct and there are only some styles that are different in a big part of text, you can Copy/Paste the entire text and afterwards reformat it by
applying the LegisWrite styles.
As far as titles are concerned, it is compulsory to always maintain the LegisWrite styles. Never replace them by other styles.

User Guide- LegisWrite
Version 3 of the document – 25/10/2017 page 123
(c) Step 3: format the text
Check the formatting of the imported text and if necessary, reformat.
(d) Launch a Structure check
(e) Launch a Document Quality Check.
Advice:
(a) Delete any blank paragraphs
(b) Delete any paragraphs which have been inserted automatically but not
used
(c) Apply the appropriate styles to ensure the structure is as it should be
examples :
– Use the "Titre article" style for the titles of all the articles of the
act.
(d) Use the appropriate styles to obtain the right indentation levels for the
various levels of numbering
– The automatic numbering styles 'Heading x', 'NumPar x', 'Point (number)' and 'Point (letter)'
– The semi-automatic numbering styles in LegisWrite: 'Point', 'PointDouble', 'PointTriple'
(e) Remove any manual formatting
(f) Check the layout of the footnotes
– Use the 'footnote reference' style for the numbering of the
footnotes in your text and in the footnote window;
– use the 'footnote text' style for the text of the footnote and separate the numbering from the text using the "Tab" key if
necessary
Reminder: Word shortcuts that can be used in LegisWrite documents
If a style must be applied on separate paragraphs, you can for instance, apply this style once. Then, put your cursor on the other paragraph and press the F4 key. The format painter can also be used.
The shortcut " CTRL key pressed + one click on the SPACE BAR" removes direct formatting from the characters in the selected text, e.g. character size, colour
of the text, bold, underline, etc.

User Guide- LegisWrite
Version 3 of the document – 25/10/2017 page 124
The shortcut " CTRL key pressed + one click on Q" removes direct formatting from the paragraph wherein the cursor is positioned, e.g. margins, alignments, etc

User Guide- LegisWrite Version 3 of the document – 25/10/2017 page 125
Annex 2 Useful links
LegisWrite Wiki: news, workbooks on-line
training, FAQ, … :
https://webgate.ec.europa.eu/fpfis/wikis
/display/DIGITB2Support/LegisWrite+documentation+-+Current+release+6.0
E-Greffe information site with the list of legislative
coordinators:
https://webgate.ec.europa.eu/fpfis/wikis
/display/REGISTRY/List+of+Legislative+coordinators
Legislative technical rules manuals released by the legal service: Drafter’s Assistance Package
http://www.cc.cec/wikis/display/dap/Home
Inter-institutional Style Guide of the OPOCE: http://publications.europa.eu/code/en/en-000500.htm
Manual of operating procedures of the Commission: GoPro
https://webgate.ec.europa.eu/fpfis/wikis/display/REGISTRY/Home

User Guide- LegisWrite Version 3 of the document – 25/10/2017 page 126
Annex 3 Structure of LegisWrite documents
Structure of the categories
INTERINSTITUTIONAL PROPOSAL
AUTONOMOUS ACT

User Guide- LegisWrite Version 3 of the document – 25/10/2017 page 127
LETTER
ANNEX

User Guide- LegisWrite Version 3 of the document – 25/10/2017 page 128
Structure of the common elements
EXPLANATORY MEMORANDUM
PREAMBULE
ENACTING TERMS
SIGNATURE

User Guide- LegisWrite Version 3 of the document – 25/10/2017 page 129
Annex 4: Example styles from QRC
The following text provides examples and explanations on the usage of LegisWrite styles.
Part Title
Chapter Title
SECTION TITLE
3. HEADINGS
Headings are automatically numbered paragraphs. There are 4 possible levels.
Similar to all LegisWrite styles, numbering, margins and formatting are predefined. They cannot be changed without creating a LegisWrite Quality Check error.
3.1. Heading Level 2
All heading styles can be used in the table of contents.
3.1.1. Heading Level 3
By default the paragraph coming just below a heading style is formatted with "Text 1" style, which aligns properly with the title text.
3.1.1.1. Heading Level 4
Heading 4 is the last possible level of heading.
1 BIS. MANUAL HEADING
In order to change the numbering of a given heading, the corresponding "Manual Heading" style can be used. In such a case, the desired number must be typed
manually and must be followed by a tab.
4. ARTICLES
Articles in a legal text begin with the article number which is formatted with the
style "titre article". When using a manual line break (Shift+Enter) after the "titre article" an optional title can be added on the following line that has just been
created.

User Guide- LegisWrite Version 3 of the document – 25/10/2017 page 130
Article 1 Optional Title
5. THE CONTENT OF THE ARTICLE MAY BE SUBDIVIDED INTO NUMBERED
PARAGRAPHS. THE STYLE "NUMPAR" WILL BE USED FOR THIS PURPOSE.
5.1. Up to 4 levels of sub-numbering are available.
6. NUMPAR STYLE IS DEFINED WITH ARABIC NUMBERS FOLLOWED BY A FULL STOP.
2bis. As for heading styles, "Manual Numpar" styles are provided for a specific
numbering.
7. THE NUMPAR STYLES ARE NOT INDENTED. THIS MEANS THAT THE NUMBERS WILL
ALWAYS BE ALIGNED ALONG THE LEFT MARGIN OF THE TEXT.
Article 2 Renumbering
Article numbers are inserted manually. The LegisWrite function "Renumber Articles" allows changing the number of a series of articles in one go. This is helpful in case a new article has to be inserted in the middle of the existing ones.
8. ENUMERATIONS
Specific families of styles have been defined for enumerations: Point, Bullet and
Tiret styles. These styles feature indentation: changing their level will change the alignment with regard to the left margin.
8.1. Automatic numbering
Point styles offer two possibilities of automatic numbering: "Point (number)" and "Point (letter)"
(1) This paragraph is formatted with "Point 1 (number)". The level 1 has been
chosen to achieve a proper alignment with the preceding text.
A new paragraph without any number can be inserted. The style "Text 2"
aligns with the text of the Point 1 style.
(2) Another list is included in the following lines :
(a) Point (letter) style with a level 2 has been chosen.
"Text 3" style at this position allows some text without any number.
(b) Point (letter) produces an alphabetic list of items.

User Guide- LegisWrite Version 3 of the document – 25/10/2017 page 131
(c) It is defined with small Latin letters as well as two surrounding brackets
8.2. Manual numbering
For more numbering possibilities, the "Point" styles offer a manual mode:
i) The style name is "Point" followed by the desired indentation level.
ii) The numbering must be typed at the beginning of each line followed by a tab.
a) Indentation is made possible by changing the level of the style.
b) Manual numbering allows you to choose any combination of brackets
iii) The LegisWrite function "renumber list" helps you to renumber manual lists.
8.3. Bullets and Dashes
The styles "Bullet" and "Tiret" are used for non-numbered lists.
Tiret 1 aligns below Text 1 style
Another list is indented below
Bullet style has been chosen here.
Up to 4 level are available.
8.4. Advanced numbering
"PointDouble" and "PointTriple" styles allow having two or three numbers at the beginning of the line.
I. A) (i) PointTriple 1 has one indentation from the margin and is
foreseen for 3 manually inserted numbers before the text. Each of them is followed by a tab.
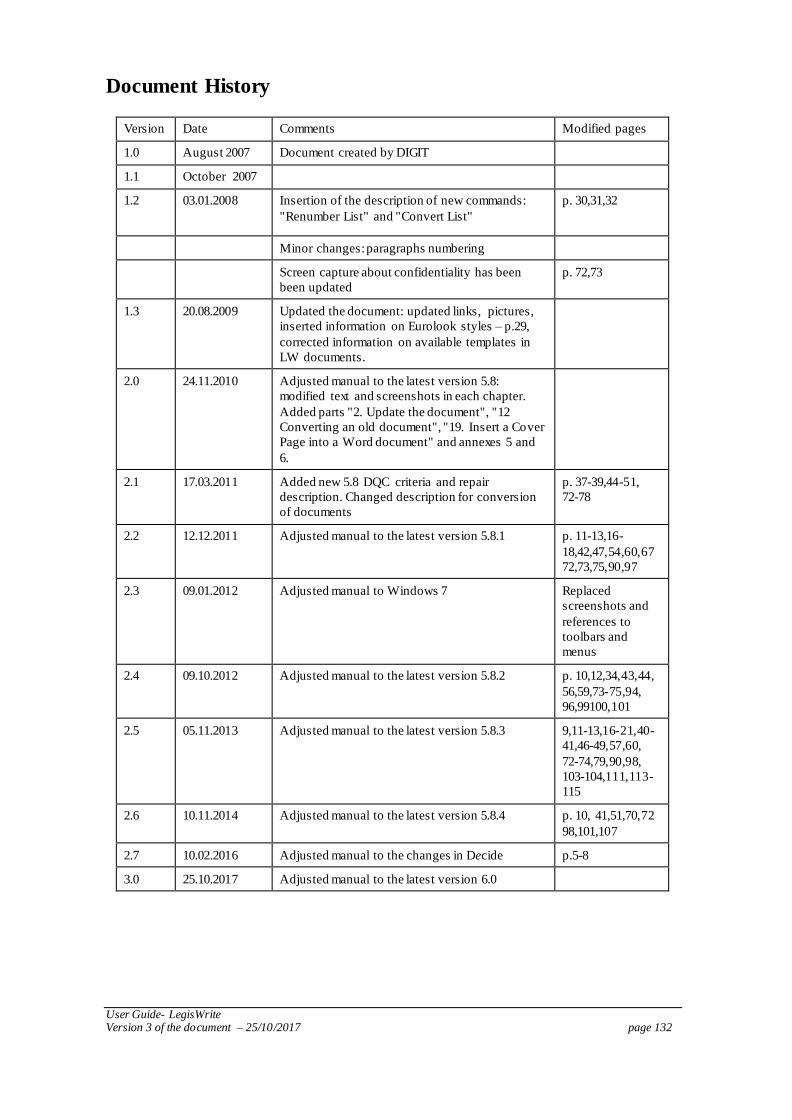
User Guide- LegisWrite Version 3 of the document – 25/10/2017 page 132
Document History
Version Date Comments Modified pages
1.0 August 2007 Document created by DIGIT
1.1 October 2007
1.2 03.01.2008 Insertion of the description of new commands:
"Renumber List" and "Convert List"
p. 30,31,32
Minor changes: paragraphs numbering
Screen capture about confidentiality has been
been updated
p. 72,73
1.3 20.08.2009 Updated the document: updated links, pictures,
inserted information on Eurolook styles – p.29,
corrected information on available templates in
LW documents.
2.0 24.11.2010 Adjusted manual to the latest version 5.8:
modified text and screenshots in each chapter.
Added parts "2. Update the document", "12
Converting an old document", "19. Insert a Cover
Page into a Word document" and annexes 5 and
6.
2.1 17.03.2011 Added new 5.8 DQC criteria and repair
description. Changed description for conversion
of documents
p. 37-39,44-51,
72-78
2.2 12.12.2011 Adjusted manual to the latest version 5.8.1 p. 11-13,16-
18,42,47,54,60,67
72,73,75,90,97
2.3 09.01.2012 Adjusted manual to Windows 7 Replaced
screenshots and
references to
toolbars and
menus
2.4 09.10.2012 Adjusted manual to the latest version 5.8.2 p. 10,12,34,43,44,
56,59,73-75,94,
96,99100,101
2.5 05.11.2013 Adjusted manual to the latest version 5.8.3 9,11-13,16-21,40-
41,46-49,57,60,
72-74,79,90,98,
103-104,111,113-
115
2.6 10.11.2014 Adjusted manual to the latest version 5.8.4 p. 10, 41,51,70,72
98,101,107
2.7 10.02.2016 Adjusted manual to the changes in Decide p.5-8
3.0 25.10.2017 Adjusted manual to the latest version 6.0