Leeloo-Dallas-Costume-Thermal-Bandages.pdf - Instructables
11
instructables Leeloo Dallas Costume - Thermal Bandages by Claytasticvictoria Leeloo Dallas Costume - Thermal Bandages: Page 1
-
Upload
khangminh22 -
Category
Documents
-
view
1 -
download
0
Transcript of Leeloo-Dallas-Costume-Thermal-Bandages.pdf - Instructables

instructables
Leeloo Dallas Costume - Thermal Bandages
by Claytasticvictoria
Leeloo Dallas Costume - Thermal Bandages: Page 1

Leeloo Dallas Multipass! The Fifth Element by LucBesson is my all time favorite movie, and MillaJovovic my big crush. Who doesn't want to be thesupreme being - if only for one night...? This is a fairlyeasy costume to make, not very expensive, but youdo have to be thorough taking the measurements andfitting it as you make it, so it stays in place while youare wearing it. Depending on your body type, youmay need to adjust the width of the bandages so youfeel comfortable wearing it. It needs to fit snuggly, butnot too tightly - after all the Supreme Being is able tomove like a ninja wearing it, so should you be.Ready? Let's start!
You will need:
For drafting the pattern:
Some kind of paper - a roll of brown paper, largersheets or just tape several sheets of regular printerpaper together if you dont have large enough sheetsto draw out your pattern.
A pencil/pen - I really like the kind that fades awayby itself after 24 hours. If you use a normal pen, makesure you draw on the wrong side of the fabric so youdont mess up the right side with pencil marks.
An old sheet - optional, but will save you a lot ofgrief. Or use any scrap fabric to make a mock up ofyour costume that you can pin/stich together and fiton yourself before starting cutting into your actualfabric. If you do get the good, thick twill, it will not bevery cheap so you might want to use the old sheet tomess up before cutting into your good fabric... I had toadjust quite a few things before making the final
people in the craft or fabric store in your country tosee what you have available there.
(An orange wig - I used very diluted wood glue andhairspray to make dread locks on it. In retrospect,mine isn't as messy as it should have been and I
version. Just saying....
For the costume:
A sewing machine. I guess you could hand stichthis, but a machine will make your life sooo mucheasier.
Fabric: NB! I would advice you not to buy the fabricbefore you made your mock up and can lay your fittedpieces out to see how much fabric you will actuallyneed. DON'T FORGET TO ADD THE SEEMALLOWANCE!!!! You want a snow white, preferablysomewhat stretchy (two way stretch if you can get it),thickish cotton fabric, like a stretchy cotton twill, thekind a pair of thinner, stretchy cotton pants would bemade of. Ideally this is what you would use, but if youcan't find it, you can probably make it from a non-stretch meterial. It will be more difficult to get to fitsnuggly and you will be less comfortable though. So Iwould invest some time in finding a suitable fabric.
Sewing utensils: Measuring tape, thread, pins,needles, good pair of fabric cutting scissors, an iron ishelpful etc etc...
A dowel rod (not Ruby Rod, although you can neverhave too much Ruby Rod in your life! Super Green!)or something similar, about 1,5cm/1/2" thick, to helpyou turn the bandages inside out.
Velchro - the iron on kind is easiest to use, white. Igot the one that comes in a small sheet and cut outmy pieces so they exactly fit my needs.
Some sort of (double sided) fabric adhesive. I usedthe kind called Vliesofix that I could iron on. Talk to
could have thinned out the wig more than I did. Ohwell, next time. I used acrylic paint to paint the rootsat the parting lighter, to make it look lke Leeloos hair.)
Leeloo Dallas Costume - Thermal Bandages: Page 2

Leeloo Dallas Costume - Thermal Bandages: Page 3

Step 1: Taking Measurements - Boring But Necassary
OK, I've uploaded some pdf files that you can print tohelp you figure out where you need to take themeasurements and schematics of the costume to seehow it should look in the end. The one called"LeelooMeasurements" has lines indicating whereyou want to measure and you can fill in your ownmeasurements. If you have a friend who can help youwith this, it'll be easier, but since I lived in the middleof nowhere when I made this I did it myself. Thetrickiest part, if you ask me, was to get the panty-bit tofit well. I ended up sacrificing a pair of old panties thathad the fit I wanted, cutting them at the sides so Icould lay them out flat and see what shape the"diaper" shaped piece between the legs should have.You definately will want to make a mock up of thispiece and the lower waist piece/upper part of thepanty that you will attch it to so you can see it covers
up enough of the areas you'll want to keep private,but not too much so you'll look like Supreme Grannyinstead... :-) I actually wore a pair of no seem smalllycra thongs that didn't show under my custume - justin case there would be a malfunction of some sort....
Mind you, I went clubbing in this costume and dancedall night with a giant cymbal-clanking monkey, it stillheld up and covered up what it needed to the wholetime, with a few adjustments of the bra-part now andagain after some particularly vigorous moving around.If needed, double sided skin friendly tape could beused to stick the bra-bandage to your boobs, becauseof my moderate boob size I didn't and still managedto keep my dignity intact.
Download (https://www.instructables.com/files/orig/FTC/JGNT/J34PCFC2/FTCJGNTJ34PCFC2.pdf)
Download (https://www.instructables.com/files/orig/F6A/LMG4/J34PCFC3/F6ALMG4J34PCFC3.pdf)
Download (https://www.instructables.com/files/orig/FMA/B4LS/J34PCFC4/FMAB4LSJ34PCFC4.pdf)
Download (https://www.instructables.com/files/orig/F6B/VSD0/J34PCFC5/F6BVSD0J34PCFC5.pdf)
http://www.instructables.com/files/orig/FTC/JGNT/J34PCFC2/FTCJGNTJ34PCFC2.pdf…
(https://www.instructables.com/files/orig/FTC/JGNT/J34PCFC2/FTCJGNTJ34PCFC2.pdf)
http://www.instructables.com/files/orig/F6A/LMG4/J34PCFC3/F6ALMG4J34PCFC3.pdf…
(https://www.instructables.com/files/orig/F6A/LMG4/J34PCFC3/F6ALMG4J34PCFC3.pdf)
http://www.instructables.com/files/orig/FMA/B4LS/J34PCFC4/FMAB4LSJ34PCFC4.pdf…
(https://www.instructables.com/files/orig/FMA/B4LS/J34PCFC4/FMAB4LSJ34PCFC4.pdf)
http://www.instructables.com/files/orig/F6B/VSD0/J34PCFC5/F6BVSD0J34PCFC5.pdf…
(https://www.instructables.com/files/orig/F6B/VSD0/J34PCFC5/F6BVSD0J34PCFC5.pdf)
Leeloo Dallas Costume - Thermal Bandages: Page 4

Step 2: Draw Up Your Bandages
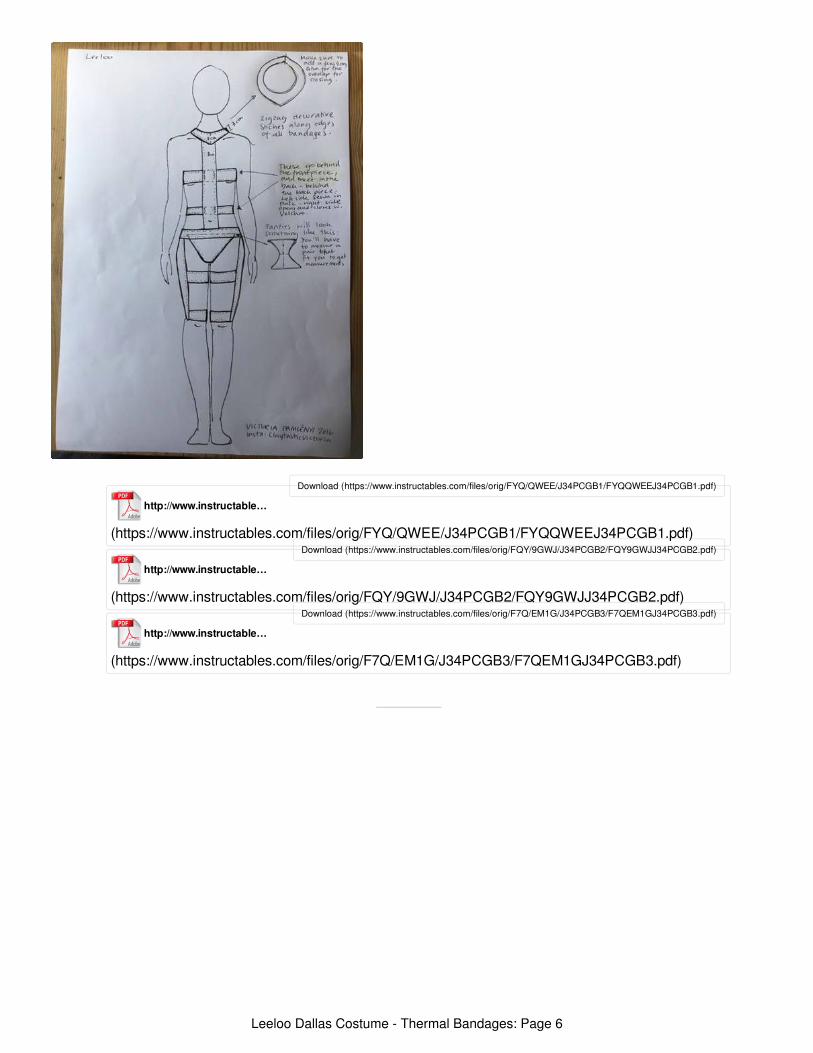
Get out a large sheet of paper or tape some printerpaper into larger sheets and draw out the piecesyou'll need according to your measurements. Seeattached pics (or PDFs if you want to print them) formore tips on sizing etc of the bandages - althoughyou may want to adjust these to fit your body. Theseare the measurements of the bandages I used. I'm161cm tall and a smallish person, you'll want to scaleit up and make the bandages wider if you are not astiny as I am... Supreme Beings come in all shapesand sizes!
The width of the vertical thigh pieces should covermost of the side of your leg and almost go all the wayto the "diaper"/panty piece. It should be somewhat
tapered, wider on top, nerrower by the knee, but thewidth will of course depend on your measurements.
The "diaper"/panty piece needs to be a little longerthan the measurement from the bottom edge of thewaist band and between your legs front to back ofcourse since it will be tucked in between the twosides of it waistband when sewn in place. Add about2 cm extra there so you can adjust this piece asneeded in the end.
Make the horisontal bands a little too long at first soyou can adjust them when you try the costume on.
Leeloo Dallas Costume - Thermal Bandages: Page 5
Download (https://www.instructables.com/files/orig/FYQ/QWEE/J34PCGB1/FYQQWEEJ34PCGB1.pdf)
Download (https://www.instructables.com/files/orig/FQY/9GWJ/J34PCGB2/FQY9GWJJ34PCGB2.pdf)
Download (https://www.instructables.com/files/orig/F7Q/EM1G/J34PCGB3/F7QEM1GJ34PCGB3.pdf)
http://www.instructables.com/files/orig/FYQ/QWEE/J34PCGB1/FYQQWEEJ34PCGB1.pdf…
(https://www.instructables.com/files/orig/FYQ/QWEE/J34PCGB1/FYQQWEEJ34PCGB1.pdf)
http://www.instructables.com/files/orig/FQY/9GWJ/J34PCGB2/FQY9GWJJ34PCGB2.pdf…
(https://www.instructables.com/files/orig/FQY/9GWJ/J34PCGB2/FQY9GWJJ34PCGB2.pdf)
http://www.instructables.com/files/orig/F7Q/EM1G/J34PCGB3/F7QEM1GJ34PCGB3.pdf…
(https://www.instructables.com/files/orig/F7Q/EM1G/J34PCGB3/F7QEM1GJ34PCGB3.pdf)
Leeloo Dallas Costume - Thermal Bandages: Page 6

Step 3: Make a Mock Up - Optional But Makes Things Easier in the Long Run
So, now that you have all your pieces drawn out onpaper, transfer them to a scrap fabric, old sheet orsimilar, and cut them out. NB! Do not add a seemallowance along the edges for the test pieces, only atthe ends! Also, you only need to do this on singlelayer fabric of course.
Stitch, duct tape and/or pin the pieces together andtry the costume on. Remember to leave the neck,chest and upper waist bandages open on one end soyou can get into it and adjust the length. Again,getting into the costume and adjusting it is easier if afriend helps you, but it can be done even when youralone, although there will be a lot more cursing along
the way.
Once you are happy with the fit (make new pieces ifyou change something to try it on again so you aresure about the change), you can lay out your piecesto see how much fabric you will need for the costume.Remember that you will use a double layer of fabric tomake the bandages sturdy, a little stiffer and not toosee through...
Now go buy your fabric! Hope you'll find a good one!And get a snack while you're out. Chiiiickeeen -goooooood!
Leeloo Dallas Costume - Thermal Bandages: Page 7

Step 4: Cut Out the Pieces and Start Sewing!
All my pieces are double fabric. I drew out my pieces,adding 0,5cm seem allowance all around, even atthe ends, on the double layer of fabric pinnedtogether so it wouldn't move around while I wascutting them out.
Now, sew all the thigh pieces, the upper waist band,the bra-piece and both the vertical front and backpieces together front to front like a tube. Then turnedthem right side out, sometimes using a wooden dowelrod to help you do that.This is boring, put on a goodshow, I watched the excellent Warehouse 13, tookeep you company while you do this.
What I did so I wouldn't get too many layers at theends of the fabric (if I folded them double there Imight be visible lumps along the seems on thecostume and I didn't want that) so I used an iron onfabric adhesive that both keeps the fabric fromunravelling and sticks it in place so the pieces stayclosed and you can adjust where you cut the piecesomewhat even after gluing it closed. Here in Europe
it is called Vliesofix - and it's an iron on, double sidedfabric adhesive. You iron one side on, remove theprotective paper, and iron the two pieces of fabrictogether. It forms a strong bond, but the fabric stillstays somewhat flexible. You could also use someother type of fabric adhesive of course to glue theends closed.
The neck piece is difficult to turn inside out if you sewboth sides together at once because its so narrow atthe sides, but if you leave an opening along the upperedge you can turn it right through there and then handstich the opening shut.
The lower waist bandage/upper part of thediaper/panty piece: Put the pieces front to front. Sewalong one, what will be the upper, side. Fold the loweredges up at the seem allowance, and iron them sothey stay in place.
Sew your diaper/panty piece and turn it right side out.
Leeloo Dallas Costume - Thermal Bandages: Page 8

Step 5: Assemble the Pieces
Assemble and sew the thigh pieces, horisontal andvertical, together so they are finished.
Fold the waistband double, make sure the lower edgethat you folded in and ironed stays folded in, and stickthe upper part of the panty, front and back, betweenthe two parts of the waistband. Pin it in place in frontand in the back. See tip-pics in previous step for anillustration.
Wait! Dont sew it closed yet - the top of the verticalside thigh pieces go in there too before sewing itclosed. Pin those in place too. If you dare - its a goodidea to try this piece on before the final sewingtogether. Try to wiggle into it and not get pricked toomuch by the pins. I found I had to adjust the length ofthe thigh piece a second time at this point.
I used the double sided fabric adhesive to glue thevertical bandages in place at the inside of the lowerwaist band at the front and back. You will have toadjust the exact length of them at the top the lastthing you do so make sure you dont cut them off tooshort to start with.
Pin the upper waist bandage, the boob-bandage tothe INSIDE of the front vertical bandage. Try it all onto see they are at the right height. See the PDFs withtips in one of the previous steps.
While still wearing the costume, pin the right end ofthe waist and boob bandage to the INSIDE of thevertical back piece. The horisontal band should end
half way in on the vertical band, the other end of it willbe meeting it there and that's where you'll glue thevelchro for opening/closing the costume. You couldoverlap, but I found that made the costume look toobulky there.
Now, wiggle out of this prickly contraption and glue allthe pieces into place. Wait for the glue to set. Theglue alone will not hold up very well in the long run,we'll be stiching along the edges of all the pieces witha zigzag soon so its permanently stuck together. Nowput on the costume again (sigh...I feel I was halfnaked most of the time making this costume. I endedup sitting in my robe sewing it to be able to try it oneasily...) and fit the collar/neck piece in place. Itshould be pulled a little tight by the verticle bandages,but not to a point where it's uncomfortable of course.The vertical bands go in UNDER the collar. UseVelchro at one of the ends at the back to make theclosure. I used the iron on kind.
Now, last thing to do is to zigzag the whole costumealong both edges of all the bandage pieces - se thepics of my costume. This will both be a decorativefeature, but will also secure your bandages for a morepermanent adhesion than with the glue only. Almostthere, hang in there!
Ta da! Done! Wait for your invitation to PhlostonParadise to drop down into your mailbox and time togo party!
Leeloo Dallas Costume - Thermal Bandages: Page 9

Step 6: Super Green! Finish Up Your Costume and Go Clubbing!
Add an orange wig, lenses (Leeloo has greenisheyes, mine are brown) and an optional Multipass tocomplete your costume. (I had a monkey friend wholaser cut one quickly out of acrylic for me, Iphotoshoped some pics and painted it. It was a prettyquick thing. Don't seem to have any pics of it forsome reason... There are tutorials on that alredy outthere if you search for them. 3D printing one might be
even better.
Just throw yourself quickly through the autowash,than go and enjoy your costume and let me know ifyou have any questions! And remember - don't pushthe red button!
Leeloo Dallas Costume - Thermal Bandages: Page 10

LeelooClubbing.jpeg
LeelooVigo.jpeg
Leeloo Dallas Costume - Thermal Bandages: Page 11