Kyphoplasty Surgical Technique - Spine Market Group
10
Balloon Kyphoplasty Operating Technique
-
Upload
khangminh22 -
Category
Documents
-
view
4 -
download
0
Transcript of Kyphoplasty Surgical Technique - Spine Market Group

Balloon KyphoplastyOperating Technique

�Vertebral Access
Pedicle Access Extra-pedicle Access
Kyphoplasty Traditional Approach
Through radiographic control of a C-arm insert the Pedicle Access Cannula. Rotate the top of the handle to the right, remove the troacar and insert the Kirshner wire. Once wire positioned remove the Pedicle Access Cannula keeping the wire in vertebra body.
Using wire as a guide slice in the working cannula and position it using C-Arm. Remove the top of the needle, remove the troacar and remove Kirscher wire.

�
Kyphoplasty–Direct Approach
Enter the pedicle through radiographic control of a C-arm Check the depth of the cannula of work, up to the correct position.
Rotate the top of the handle to the right to remove the mandrel and leaving the working cannula in right position.
Drilling the first cavity
Through the use of the drill included create the cavity for housing the balloon. The drill has a marker depth scale.
NOTE: The drill is an invasive tool, be careful!

�
Balloon
Depth
Luer-lock
Contrast Injection Port
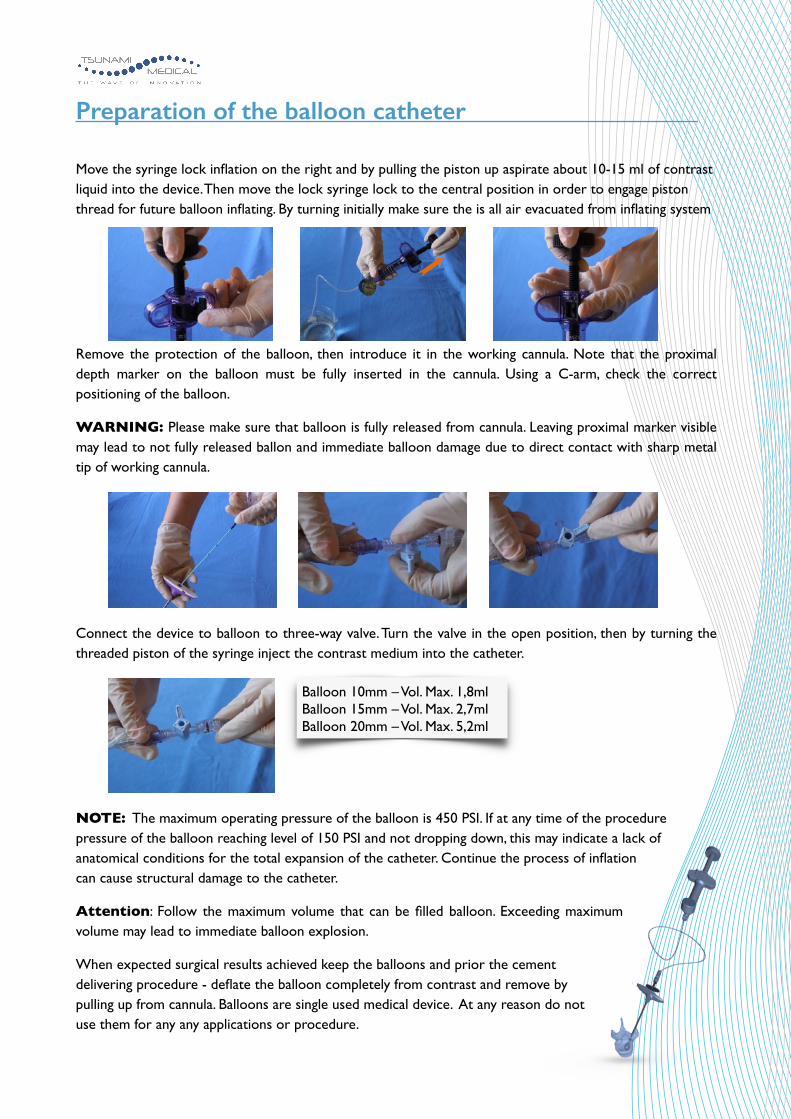
�Preparation of the balloon catheter
Move the syringe lock inflation on the right and by pulling the piston up aspirate about 10-15 ml of contrast liquid into the device. Then move the lock syringe lock to the central position in order to engage piston thread for future balloon inflating. By turning initially make sure the is all air evacuated from inflating system
Remove the protection of the balloon, then introduce it in the working cannula. Note that the proximal depth marker on the balloon must be fully inserted in the cannula. Using a C-arm, check the correct positioning of the balloon.
WARNING: Please make sure that balloon is fully released from cannula. Leaving proximal marker visible may lead to not fully released ballon and immediate balloon damage due to direct contact with sharp metal tip of working cannula.
Connect the device to balloon to three-way valve. Turn the valve in the open position, then by turning the threaded piston of the syringe inject the contrast medium into the catheter.
NOTE: The maximum operating pressure of the balloon is 450 PSI. If at any time of the procedure pressure of the balloon reaching level of 150 PSI and not dropping down, this may indicate a lack of anatomical conditions for the total expansion of the catheter. Continue the process of inflation can cause structural damage to the catheter.
Attention: Follow the maximum volume that can be filled balloon. Exceeding maximum volume may lead to immediate balloon explosion.
When expected surgical results achieved keep the balloons and prior the cement delivering procedure - deflate the balloon completely from contrast and remove by pulling up from cannula. Balloons are single used medical device. At any reason do not use them for any any applications or procedure.
Balloon 10mm – Vol. Max. 1,8mlBalloon 15mm – Vol. Max. 2,7mlBalloon 20mm – Vol. Max. 5,2ml
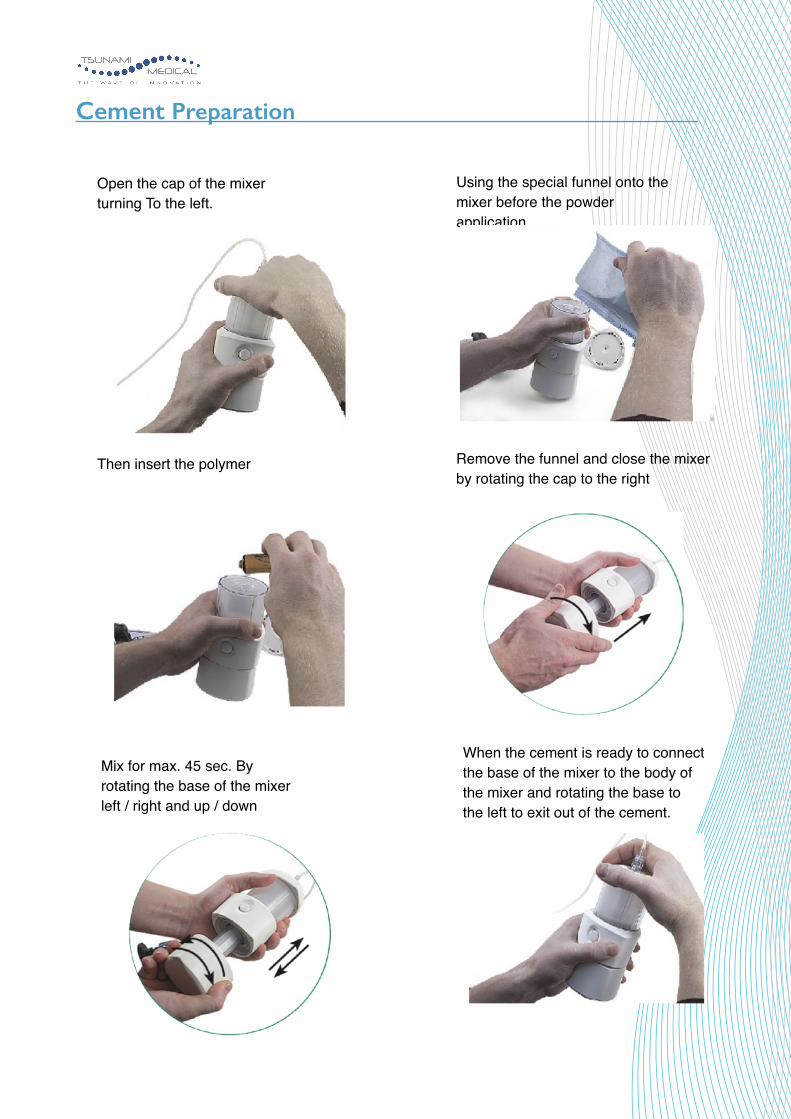
�Cement Preparation
Using the special funnel onto the mixer before the powder application
Open the cap of the mixer turning To the left.
Remove the funnel and close the mixer by rotating the cap to the right
Then insert the polymer
When the cement is ready to connect the base of the mixer to the body of the mixer and rotating the base to the left to exit out of the cement.
Mix for max. 45 sec. By rotating the base of the mixer left / right and up / down

�Filling Bone Filler Cannulas
Turn the white tap in the open position (vertical position). Rotate the base of the mixer clockwise until cement will be seen in the valve. As soon as the cement is between the two-way valve, close the tap white (horizontal position) and remove the filter.
After removing the filter round, connect two-way connector male / male in the kit, and then connect the first filling cannula. After connecting the filling cannula, open the tap two-way (vertical position) and rotate the base of the mixer clockwise to load the cement into cannula.
Fill the cannula until you see the exit out of cement from the tip. Then close the the tap. Fill all cannula which are required to perform the procedure.
NOTE: The cannulas 8 gauge has an internal capacity of 1.5 ml. while those from 11 gauge have an internal capacity of 0.8 ml.

�
Filling vertebral bone cement
NOTE: The manufacturer points out that the density of concrete is strongly dependent on the temperature of the operating room. Before performing the augmentation procedure is highly recommended to refer to the polymerisation time table which is described in the package insert.
Release the inflating mechanism of piston by turning the locking mechanism counterclockwise. Deflate the balloon completely from contrast and remove by pulling up from cannula. Balloons are single used medical device. At any reason do not use them for any any applications or procedure.
NOTE:
Before removing the balloon catheter from the vertebral body and then the cannula work, make sure you have aspirated all liquid out from the balloon catheter to avoid bulges and ballon breaks during the extraction.
Under fluoroscopic control, insert the filling cannula into working cannula.
Once inserted the filling cannula push down the metal plunge and inject the cement into the vertebral body. It is highly recommended to perform this procedure under fluoroscopic control. The surgeon should decide the volume of cement to be injected into the vertebral body based on previous patient evaluation. Cannulas have marked volume markers which allows to evaluate the volume of cement.
When procedure completed it is recommended to keep patient in unchanged position until cement is fully polymerised. Please refer to technical data of the cement attached in Cement Manual.

�

�
Ref
. LIT
EUK
YPH
03 ©
201
6 T
suna
mi -
All
Rig
hts
Res
erve
d N
ot fo
r di
stri
butio
n in
Uni
ted
Stat
es
Tsunami Medical S.r.l.Via XXV Aprile 22
41037 Mirandola (MO)Italy
tel. +39 0535 38397Fax +39 0535 38399 Design & Quality
UNI EN ISO 13485:2016