
Kintana Create User's Guide - Support
126
Processing Requests Version 5.0.0 Publication Number: ProcessRequest-0603A
-
Upload
khangminh22 -
Category
Documents
-
view
3 -
download
0
Transcript of Kintana Create User's Guide - Support
Processing Requests
Version 5.0.0Publication Number: ProcessRequest-0603A

Kintana, Inc. and all its licensors retain all ownership rights to the software programs and related documentation offered by Kintana. Use of Kintana’s software is governed by the license agreement accompanying such Kintana software. The Kintana software code is a confidential trade secret of Kintana and you may not attempt to decipher or decompile Kintana software or knowingly allow others to do so. Information necessary to achieve the interoperability of the Kintana software with other programs may be obtained from Kintana upon request. The Kintana software and its documentation may not be sublicensed and may not be transferred without the prior written consent of Kintana.
Your right to copy Kintana software and this documentation is limited by copyright law. Making unauthorized copies, adaptations, or compilation works (except for archival purposes or as an essential step in the utilization of the program in conjunction with certain equipment) is prohibited and constitutes a punishable violation of the law.
THIS DOCUMENTATION IS PROVIDED “AS IS” WITHOUT WARRANTY OF ANY KIND. IN NO EVENT SHALL KINTANA BE LIABLE FOR ANY LOSS OF PROFITS, LOSS OF BUSINESS, LOSS OF USE OR DATA, INTERRUPTION OF BUSINESS, OR FOR INDIRECT, SPECIAL, INCIDENTAL, OR CONSEQUENTIAL DAMAGES OF ANY KIND, ARISING FROM ANY ERROR IN THIS DOCUMENTATION.
Kintana may revise this documentation from time to time without notice.
Copyright © 1997, 1998, 1999, 2000, 2001, 2002, 2003 Kintana, Incorporated. All rights reserved.
Kintana, Kintana Deliver, Kintana Create, Kintana Drive, Kintana Dashboard, Kintana Accelerator, Kintana Demand Management (DM), Kintana Portfolio Management (PFM), Kintana Program Management Office (PMO), Kintana Enterprise Change Management (ECM), Object*Migrator, GL*Migrator and the Kintana logo are trademarks of Kintana, Incorporated. All other products or brand names mentioned in this document are the property of their respective owners.
Kintana Version 5.0.0
© Kintana, Incorporated 1997 - 2003All rights reserved. Printed in USA
Kintana, Inc.1314 Chesapeake Terrace, Sunnyvale, California 94089
Telephone: (408) 543-4400Fax: (408) 752-8460
http://www.kintana.com
ContentsProcessing Requests
Chapter 1Introduction to Kintana Create....................................................................................... 1
Kintana Create Features ......................................................................................................1Request Routing ..............................................................................................................2Easy Accessibility ............................................................................................................3Increased Visibility ..........................................................................................................3Knowledgebase for Resolution and Reporting ....................................................................4Integration with Kintana Deliver........................................................................................4Integration with Kintana Drive ..........................................................................................4Integration with the Kintana Dashboard ............................................................................5
Manual Conventions............................................................................................................5
Additional Resources ...........................................................................................................5Kintana Documentation..............................................................................................6
Kintana Business Application Guides....................................................................6User Guides ........................................................................................................7Kintana Application Reference Guides..................................................................7Kintana Instance Administration Guides ...............................................................7External System Integration Guides: .....................................................................8Kintana Solution Guides ......................................................................................8Kintana Accelerator Guides .................................................................................8
Kintana Services ........................................................................................................9Kintana Education .....................................................................................................9Kintana Support ........................................................................................................9
..........................................................................................................................................9
Chapter 2Key Concepts and Definitions ...................................................................................... 11
Requests ...........................................................................................................................11
Request Types ...................................................................................................................13
Request Header Types .......................................................................................................14
Workflows ........................................................................................................................15
Workflow Steps ................................................................................................................16
Request Status...................................................................................................................17
Kintana i
Dashboard........................................................................................................................18
Portlets .............................................................................................................................19
References ........................................................................................................................20Attachments ..................................................................................................................20Requests .......................................................................................................................21Packages ......................................................................................................................21Task .............................................................................................................................21Project..........................................................................................................................21Documents (URL) ...........................................................................................................21
Displaying Kintana Data....................................................................................................22
Chapter 3Accessing Kintana Create ............................................................................................ 23
Logging on to Kintana .......................................................................................................23Changing Your Password...............................................................................................25
Launching the Kintana Workbench.....................................................................................26
Chapter 4Creating a Request...................................................................................................... 29
Creating a Request ............................................................................................................29Creating a Request from the References Section ...............................................................32Copying Requests..........................................................................................................33
Adding References ............................................................................................................34Attaching Requests ........................................................................................................35
Creating a New Request.....................................................................................37Attaching Packages .......................................................................................................37
Creating a New Package .........................................................................................39Attaching Releases ........................................................................................................41Attaching Projects .........................................................................................................41Attaching Tasks.............................................................................................................43Referencing a URL in Kintana Create ..............................................................................44Referencing an Attachment in Kintana Create..................................................................45Valid References ...........................................................................................................46Reference Dependency Relationships ..............................................................................47
Saving an Un-Submitted Request .......................................................................................48
Adding and Editing Contacts..............................................................................................49Adding a Contact..........................................................................................................49Editing an Existing Contact ............................................................................................50
Chapter 5Viewing Request Status and Details ............................................................................. 53
Searching for Requests ......................................................................................................53
Kintana ii
Simple Search...............................................................................................................53Viewing the Details for a Specific Request..................................................................56Setting the Results Display ........................................................................................56
Advanced Search..........................................................................................................57Saving your Search .......................................................................................................59
Organizing Saved Searches .....................................................................................60Running Saved Searches ..........................................................................................61
Viewing Request Information .............................................................................................62Viewing the Workflow Step Information URL....................................................................63Viewing the Graphical View of the Request .....................................................................63Viewing the % Complete ................................................................................................64Viewing the Approval Details of a Step ...........................................................................66Viewing the Members of a Security Group for a Step .......................................................66Viewing the Request Transaction History .........................................................................68Viewing the Request Execution Log .................................................................................69
Using Dashboard Portlets to View Request Information .......................................................70
Chapter 6Processing Requests .................................................................................................... 71
Request Processing - Data Integrity ....................................................................................71
Locating In Progress Requests ............................................................................................72Using the Search ...........................................................................................................72Using the Notifications...................................................................................................72
Updating Request Information............................................................................................73Updating the Request Header.........................................................................................74
Changing the Request Type ......................................................................................74Updating Request Details and Notes ...............................................................................76Updating Request References .........................................................................................76
Viewing a Reference ................................................................................................77Changing a Reference .............................................................................................77Deleting a Reference................................................................................................77
Updating Request Status ................................................................................................78Delegating a Decision ..............................................................................................80Bypassing a Decision or Execution ............................................................................80Scheduling an Execution ..........................................................................................81Overriding Reference Relationships...........................................................................82
Spawning a New Request from a Request .......................................................................83Creating a New Package From the Request .....................................................................84Re-Opening Closed Requests..........................................................................................86
Configuring Workflow Display...........................................................................................87
Chapter 7Managing Requests .................................................................................................... 89
Deleting Requests ..............................................................................................................89
Kintana iii

Canceling Requests............................................................................................................90
Using Reports to Manage Requests ....................................................................................91Resource Load Report by Priority ....................................................................................91Request Detail Report.....................................................................................................91Request Summary Report ...............................................................................................92Submitting a Report.......................................................................................................93
Using the Kintana Dashboard to Manage Requests .............................................................93
Chapter 8Kintana Create Reports ............................................................................................... 95
Kintana Reports Overview .................................................................................................95Standard Reports ..........................................................................................................96Decision Support System (DSS) Reports ...........................................................................98
Understanding the Reports .......................................................................................99Graphical Data Representation ...........................................................................99Textual Data ....................................................................................................100
DSS Reports in Kintana Create ...............................................................................100
Processing Kintana Reports..............................................................................................101Submitting a Report from the Kintana Workbench..........................................................102Submitting a Report from the HTML Interface .................................................................103Viewing Previously Submitted Reports ...........................................................................104
Viewing Reports from the Kintana Workbench .........................................................105Viewing Reports from the HTML Interface.................................................................105
Appendix AIntegrating Requests and Projects .............................................................................. 107
Referencing Requests from Projects ...................................................................................108
Creating Tasks from Requests ...........................................................................................108
Dependencies Between Tasks and Requests .......................................................................110Making Tasks Dependent on Requests ...........................................................................111
Task Waits on Request Closure (Successor Relationship) ...........................................112Task Can’t Complete Until Request Closes (FF Predecessor) .......................................112Task Auto-Updated by Request ...............................................................................113
Making Requests Dependent on Tasks...........................................................................114Request Waits on Task Closure (Predecessor) ...........................................................114
Visibility into Tasks and Requests ......................................................................................115Requests Holding Up Progress ......................................................................................115Project References Portlet .............................................................................................115
Kintana iv
Processing Requests
Chapter
Introduction to Kintana Create
Kintana Create allows an organization to model its request processes for managing technology initiatives from inception to implementation using a graphical workflow business modeler. Complex business rules can be modeled using approval methods, prioritization and delegation features that allow requests to efficiently advance through their specific workflow, routing them to relevant departments, groups or individuals. Kintana Create is designed to capture data by prompting users for Request and process-specific information, ensuring that required information is collected and validated at the appropriate time in the process.
For example, a request for a new feature to an eBusiness system could be routed for review and approval to the business manager responsible for the budget. The request could then be routed to the technology analysts responsible for implementing the enhancement. Users can monitor the status of the Request from their desktop using a Web browser. Email and pager notifications are generated as the Request passes through various stages of the process, keeping all project members informed. Throughout the process, users are prompted to enter additional information, appropriate to their specific task. Management reports and Dashboard views are also available to help monitor technology initiatives and service levels.
This chapter provides a brief overview of Kintana Create and its features. Included is information on the conventions used within the manual and a list of additional resources.
Kintana Create FeaturesThe following key elements of Kintana Create allow you to efficiently and effectively manage your business processes:
Introduction to Kintana Create 1
Processing Requests
• Request Routing
• Easy Accessibility
• Increased Visibility
• Knowledgebase for Resolution and Reporting
• Integration with Kintana Deliver
• Integration with Kintana Drive
• Integration with the Kintana Dashboard
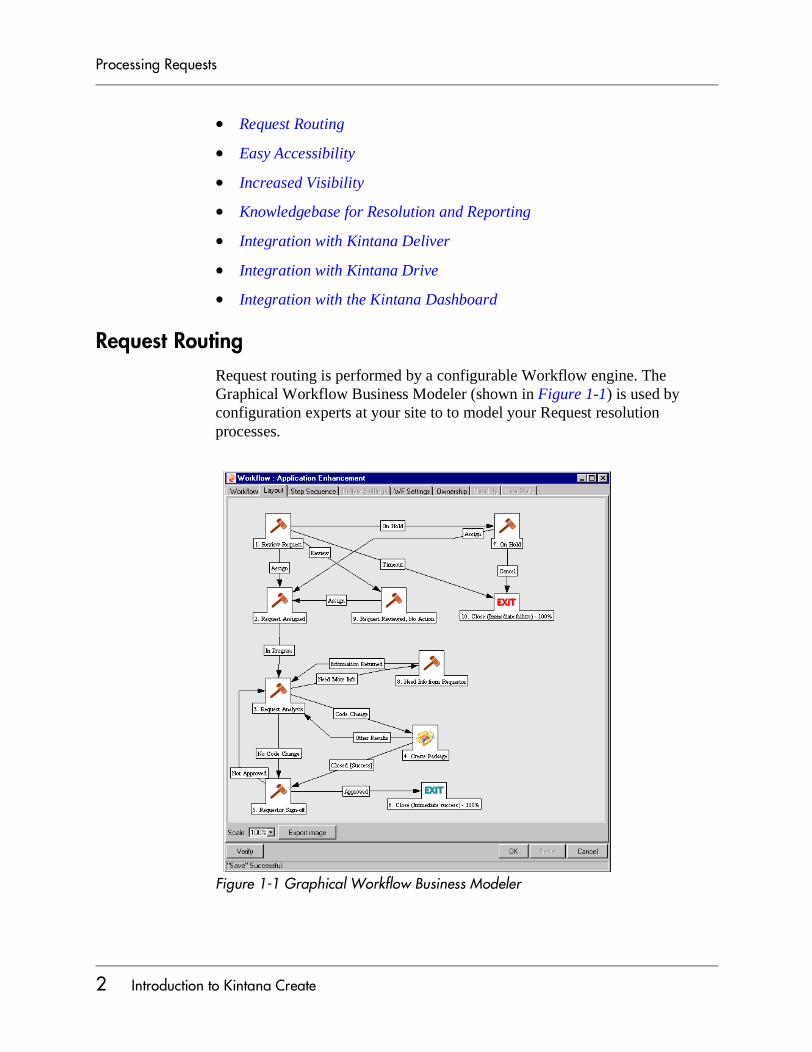
Request RoutingRequest routing is performed by a configurable Workflow engine. The Graphical Workflow Business Modeler (shown in Figure 1-1) is used by configuration experts at your site to to model your Request resolution processes.
Figure 1-1 Graphical Workflow Business Modeler
2 Introduction to Kintana Create
Processing Requests
Using rules defined by the Request Type, Requests are initially routed to an appropriate Workflow and an assigned party, either an individual or a group. The Workflow engine allows Requests to be routed to relevant departments, groups or individuals along with email or pager notifications.
For example, a ERP-ENHANCEMENT Request Type could be routed for review and approval to the business manager responsible for the budget, and then routed to the IS Analysts responsible for making the enhancement.
Kintana’s Workflow allows you to layout a process using standard point-click and drag-and-drop procedures. Complex business rules can be modeled using the branching, voting, escalations and parallel execution features of the Workflow builder. Flexible approval methods, escalation, and delegation features allow you to efficiently advance a Request through a Workflow.
See "Configuring a Request Resolution System" for details on configuring Request Types.
Easy AccessibilityBuilt using 100% Pure Java technology, Kintana Create is accessible through any standard Web browser. Access to Kintana Create can be controlled at the user logon stage and through the Workflow security model. This restricts users from performing certain tasks and controls access to mission critical information.
Layouts for entering and updating Requests are customized, allowing users to optimize the user interface to match the company’s needs.
Request progress is now easily and instantly accessed through theMy Requests portlet in the Kintana HTML interface. This feature provides Request creators with a convenient point from which to check on their Requests.
Increased VisibilityKintana Create allows users to view the exact status of a Request as it is processed through the system. As the request passes through the various stages in the workflow, email notifications are sent to relevant individuals informing them of the status of the Request. These notifications can easily be sent to email enabled devices such as pagers and mobile phones. Once the software is deployed to the final destination, the status of the Request is automatically updated and the Request can be closed.
Introduction to Kintana Create 3
Processing Requests
Everyone on the notification list can see where the Request has been and where it is going, avoiding confusion regarding Request status.
Knowledgebase for Resolution and ReportingA knowledgebase of past Requests helps to quickly resolve the new Requests reported. In addition, information about the different types of Requests reported and the resolution process for each of the Requests helps to analyze your staffing levels, Service Level Agreements, and bottlenecks.
Both text reports and graphical reports are available with Kintana Create. Additional reports can also be developed to meet the company’s requirements. Reports can be scheduled to run periodically and automatically distributed to appropriate groups. Information can also be exported to a spreadsheet for further analysis.
Integration with Kintana DeliverKintana Create is tightly integrated with Kintana Deliver. This provides a closed-loop system for Requests that require software changes. Kintana Create Workflows can be configured so that at specific points in the Request resolution process, a Kintana Deliver Package is generated. This Package is used to process the actual deployment of the software change. Kintana Deliver interfaces with all major version control systems to retrieve files and automatically install them in the appropriate environment. Once the Package is completed, Kintana Deliver automatically updates the Kintana Create Request with its completion information. At that time, the Request continues with the rest of the resolution process. During the resolution process, users can drill down and find out the exact status of a reported Request. Email notifications can be sent as the Request passes through various stages in the Workflow in order to keep everyone informed.
Integration with Kintana DriveKintana Create is also tightly integrated with Kintana Drive. Kintana Drive Projects and Tasks can be linked to Requests through a variety of relationships. A Task can be configured to wait until a Request closes or to auto-update its% Complete based on the Request’s progress. In addition, a Request can be configured not to close until a Task is complete. Tasks can also be created from Requests in the Kintana Workbench, allowing Requests to become Tasks in a Project with concrete target dates and deliverables.
4 Introduction to Kintana Create
Processing Requests
Integration with the Kintana DashboardKintana Create provides an additional level of efficiency when used in conjunction with the Kintana Dashboard. The Kintana Dashboard is a highly configurable, high-level application that offers greater visibility and control over request processes. As a complement to the HTML interface, the Kintana Dashboard seamlessly integrates with the core Kintana products in a way that allows for the delivery of real-time status and exception information on IT initiatives and operational activities.
Manual ConventionsThe following conventions are used when presenting information in the User’s Guide text that refers to Kintana products user interface components:
• All buttons, tabs, menu items, and any system data selected from a drop down list or auto-complete list are shown in BOLD SMALL CAPS text.
• Each menu item is represented with the top-level menu name followed by a greater than symbol “>” followed by subsequent sub-menu names separated with the “>” symbol. For example, FUNCTIONS > BROWSE represents the BROWSE menu item contained within the top-level FUNCTIONS menu.
• Images depicting the Kintana interface used throughout this book may vary slightly from your installation, depending on which Kintana products you have installed on your system.
Additional ResourcesKintana provides the following additional resources to help you successfully implement, configure, maintain and fully utilize your Kintana installation:
• Kintana Documentation
• Kintana Services
• Kintana Education
• Kintana Support
Introduction to Kintana Create 5
Processing Requests
Kintana DocumentationKintana product documentation is linked from the Kintana Library page. This page is accessed by:
• Selecting HELP > KINTANA LIBRARY from the Kintana Workbench menu.
• Selecting HELP > CONTENTS AND INDEX from the menu bar on the HTML interface. You can then click the KINTANA LIBRARY link to load the full list of product documents.
Kintana organizes their documents into a number of user-based categories. The following section defines the document categories and lists the documents currently available in each category.
• Kintana Business Application Guides
• User Guides
• Kintana Application Reference Guides
• Kintana Instance Administration Guides
• External System Integration Guides:
• Kintana Solution Guides
• Kintana Accelerator Guides
Kintana Business Application Guides
Provides instructions for modeling your business processes in Kintana. These documents contain process overviews, implementation instructions, and detailed examples.
• Configuring a Request Resolution System (Create)
• Configuring a Deployment and Distribution System (Deliver)
• Configuring a Release Management System
• Configuring the Kintana Dashboard
• Managing Your Resources with Kintana
• Kintana Reports
6 Introduction to Kintana Create
Processing Requests
User Guides
Provides end-user instructions for using the Kintana products. These documents contain comprehensive processing instructions.
• Processing Packages (Deliver) User Guide
• Processing Requests (Create) User Guide
• Processing Projects (Drive) User Guide
• Navigating the Kintana Workbench:Provides an overview of using the Kintana Workbench
• Navigating Kintana:Provides an overview of using the Kintana (HTML) interface
Kintana Application Reference Guides
Provides detailed reference information on other screen groups in the Kintana Workbench. Also provides overviews of Kintana’s command usage and security model.
• Reference: Using Commands in Kintana
• Reference: Kintana Security Model
• Workbench Reference: Deliver
• Workbench Reference: Configuration
• Workbench Reference: Create
• Workbench Reference: Dashboard
• Workbench Reference: Sys Admin
• Workbench Reference: Drive
• Workbench Reference: Environments
Kintana Instance Administration Guides
Provides instructions for administrating the Kintana instances at your site. These documents include information on user licensing and archiving your Kintana configuration data.
Introduction to Kintana Create 7

Processing Requests
• Kintana Migration
• Kintana Licensing and Security Model
External System Integration Guides:
Provides information on how to use Kintana’s open interface (API) to access data in other systems. Also discusses Kintana’s Reporting meta-layer which can be used by third party reporting tools to access and report on Kintana data.
• Kintana Open Interface
Kintana Solution Guides
Provides information on how to configure and use functionality associated with the Kintana Solutions. Each Kintana Solution provides a User Guide for instructions on end-use and a Configuration Guide for instructions on installing and configuring the Solution.
Kintana Accelerator Guides
Provides information on how to configure and use the functionality associated with each Kintana Accelerator. Kintana Accelerator documents are only provided to customers who have purchased a site-license for that Accelerator.
Kintana provides documentation updates in the Download Center section of the Kintana Web site (http://www.kintana.com/support/download/download_center.htm).
A username and password is required to access the Download Center. These were given to your Kintana administrator at the time of product purchase. Contact your administrator for information on Kintana documentation or software updates.
8 Introduction to Kintana Create
Processing Requests
Kintana ServicesKintana is a strategic partner to its clients, assisting them in all aspects of implementing a Kintana technology chain - from pilot project to full implementation, education, project turnover, and ongoing support. Our Total Services Model tailors solution and service delivery to specific customer needs, while drawing on our own knowledgebank and best practices repository. Learn more about Kintana Services from our Web site:
http://www.kintana.com/services/services.shtml
Kintana EducationKintana has created a complete product training curriculum to help you achieve optimal results from your Kintana applications. Learn more about our Education offering from our Web site:
http://www.kintana.com/services/education/index.shtml
Kintana SupportKintana provides web-based interactive support for all products in the Kintana product suite via Contori.
http://www.contori.com
Login to Contori to enter and track your support issue through our quick and easy resolution system. To log in to Contori you will need a valid email address at your company and a password that will be set by you when you register at Contori.
Introduction to Kintana Create 9

Processing Requests
10 Introduction to Kintana Create
Processing Requests
Chapter
Key Concepts and Definitions
This chapter defines the common concepts and terms used in Kintana Create. An understanding of these concepts and terms is necessary when using the Kintana Create interfaces.
• Requests
• Request Types
• Request Header Types
• Workflows
• Workflow Steps
• Request Status
• Dashboard
• Portlets
• References
• Displaying Kintana Data
RequestsThe Request is the fundamental work unit of Kintana Create. The Request window contains all of the information that is typically required to complete a specific business process. Requests with similar or related functions can be grouped into Request Categories, making them easier to locate and use.
The Request has an associated Request Type that determines which fields are included in the Request window. As the Request goes through its steps, you are prompted for all of the information necessary to bring the Request to closure.
Key Concepts and Definitions 11
Processing Requests
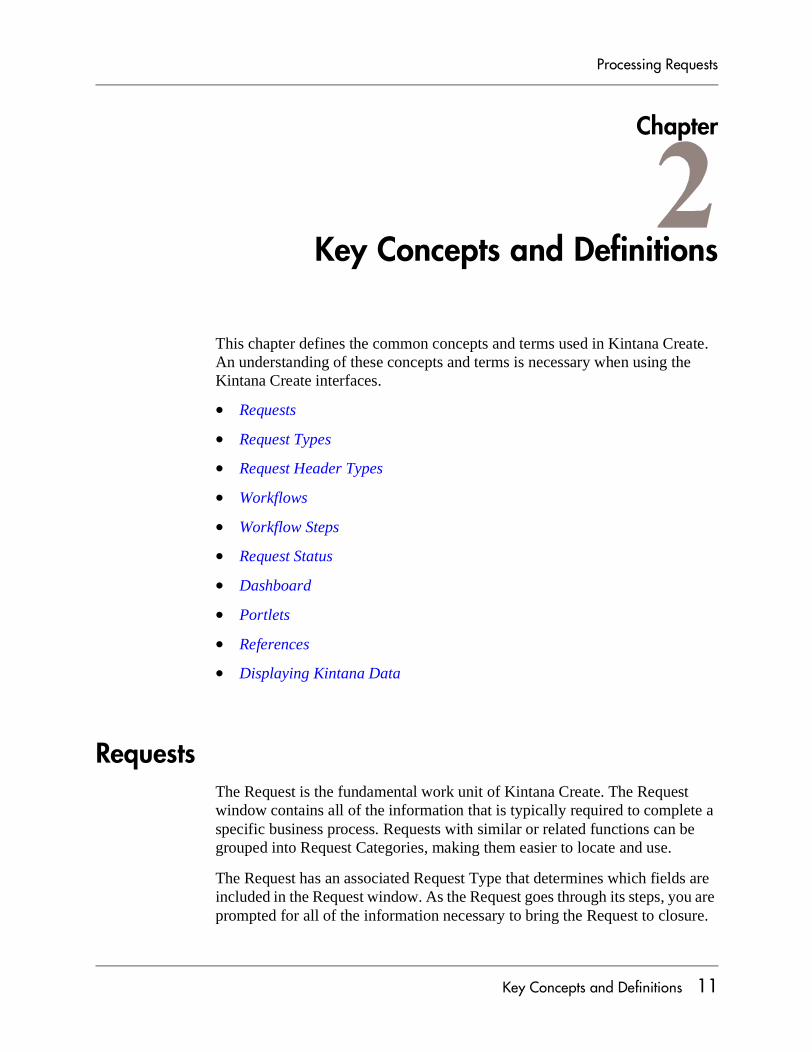
Once the basic Request information has been entered, the corresponding Workflow is automatically selected based on the Request Type.
Figure 2-1 Kintana Create Request
A Request:
• Is the fundamental “work unit” within Kintana Create.
• Is the repository for all of the information necessary to take a series of actions and move through a standard business process.
• Is a specific execution of a business process. Each Request is identified by a unique Request Number.
12 Key Concepts and Definitions
Processing Requests
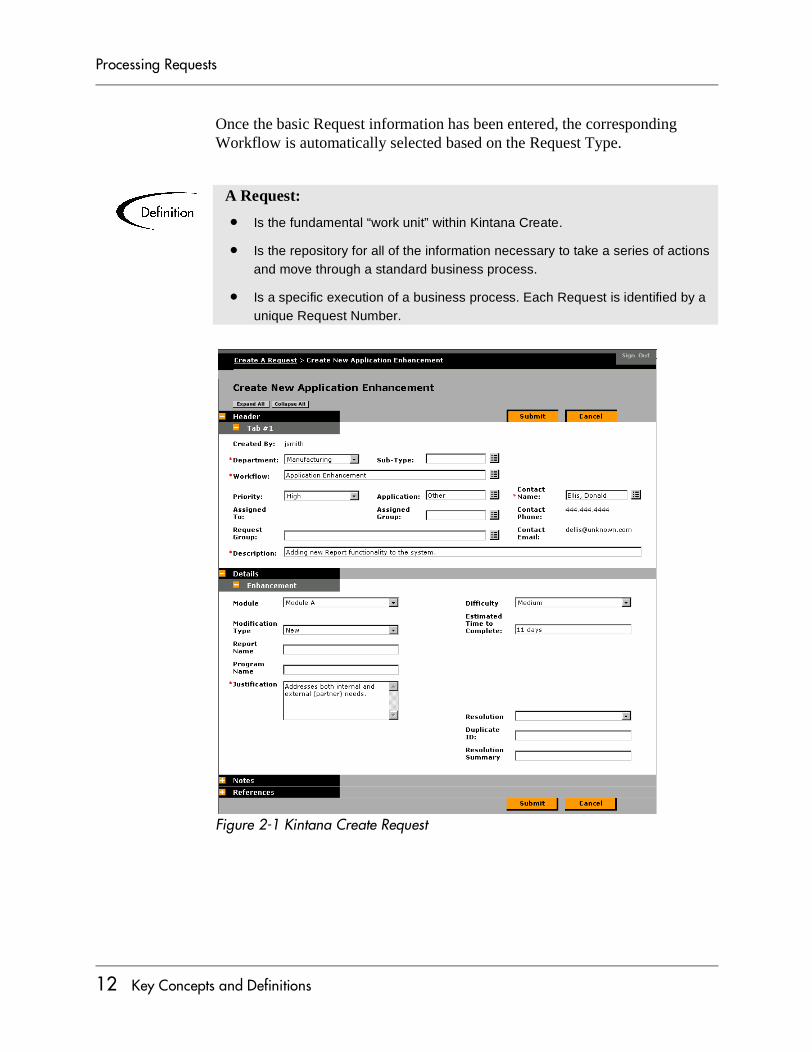
Request TypesA Request Type is a general category that defines the structure of a Request in Kintana Create. Kintana Create includes such pre-defined system Request Types as the BUG Request Type, ENHANCEMENT Request Type and PATCH Request Type. The fields that are used when a Request is created are customizable based on the Request Type. The base installation of Kintana Create is seeded with default Request Types and Request Header Types that can be modified to meet your business needs. Custom Request Types and custom Request Header Types can be copied from default configurations and modified or created from scratch. The Request Type is also used to determine the default Workflow through which a Request is routed, as well as the Request Category of the Request.
A Request Type:
• Is the framework that defines the behavior of a Request as it moves through a business process.
• Determines the logic behind (and provides the framework for) the storage and manipulation of data within a Request.
• Represents a different process within a business. The Request Type can be defined to capture different kinds of data and follow different business and resolution processes.
Key Concepts and Definitions 13
Processing Requests
Figure 2-2 Kintana Create Request Type
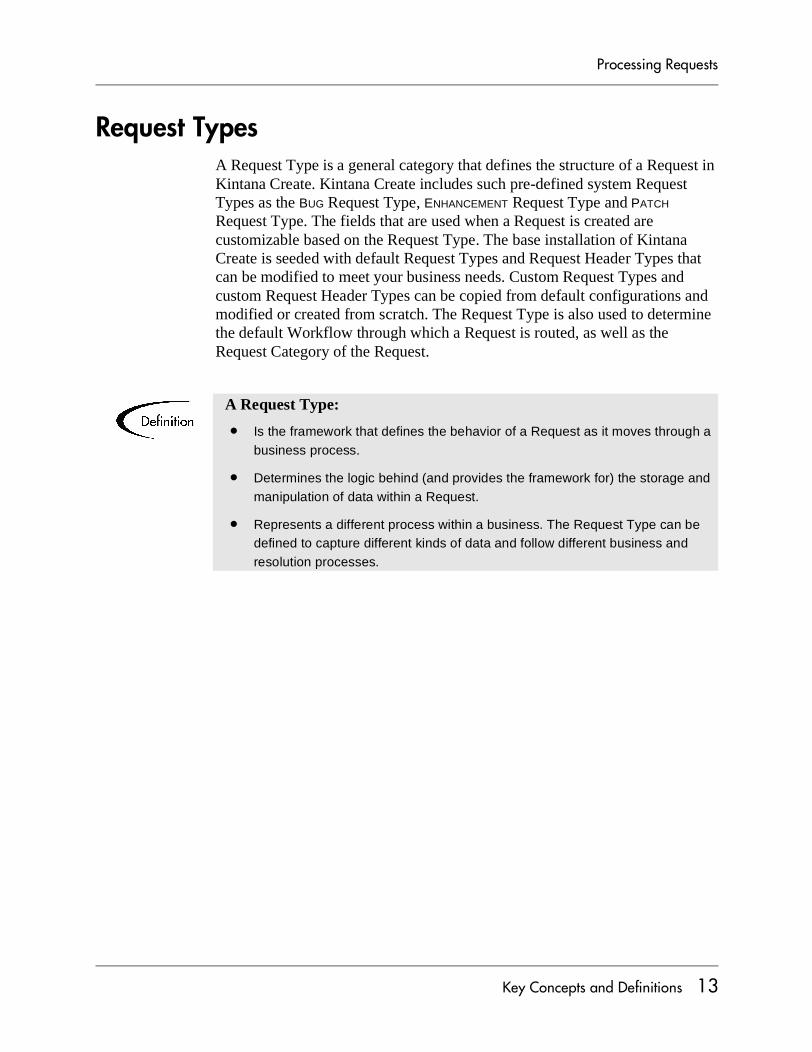
Request Header TypesRequest Header Types define the collection of fields that appear in the header region of the Requests using that Request Type. The presentation and validation of these Header Data fields in a Request Header Type depends upon the type of business process from which the Request Type is gathering information. When creating or configuring a new Request Type, you associate a Request Header Type with that Request Type.
14 Key Concepts and Definitions

Processing Requests
Figure 2-3 Request Header Type
WorkflowsA Workflow is a logical series of steps that define the process that Requests follow. Workflow configurations and routings are configurable features of Kintana Create. The Workflow engine can handle virtually any business practice. This allows a department to create Workflows to automate existing processes, rather than forcing users to adopt a fixed set of processes to perform their work.
Request Header Type
A Request Header Type can be thought of as a basic template for the header area that appears atop a Request. Request Header Types have the following characteristics:
• Provides a framework for the storage and manipulation of Request header data.
• Represents attributes common to multiple types of Requests. Header data is useful for locating and reporting certain types of Requests. Examples of Header Data are Creator, Assigned User, Description, Summary, and Department.
• Labels and arranges header fields in a manner most familiar to specific Business Units.
Key Concepts and Definitions 15
Processing Requests
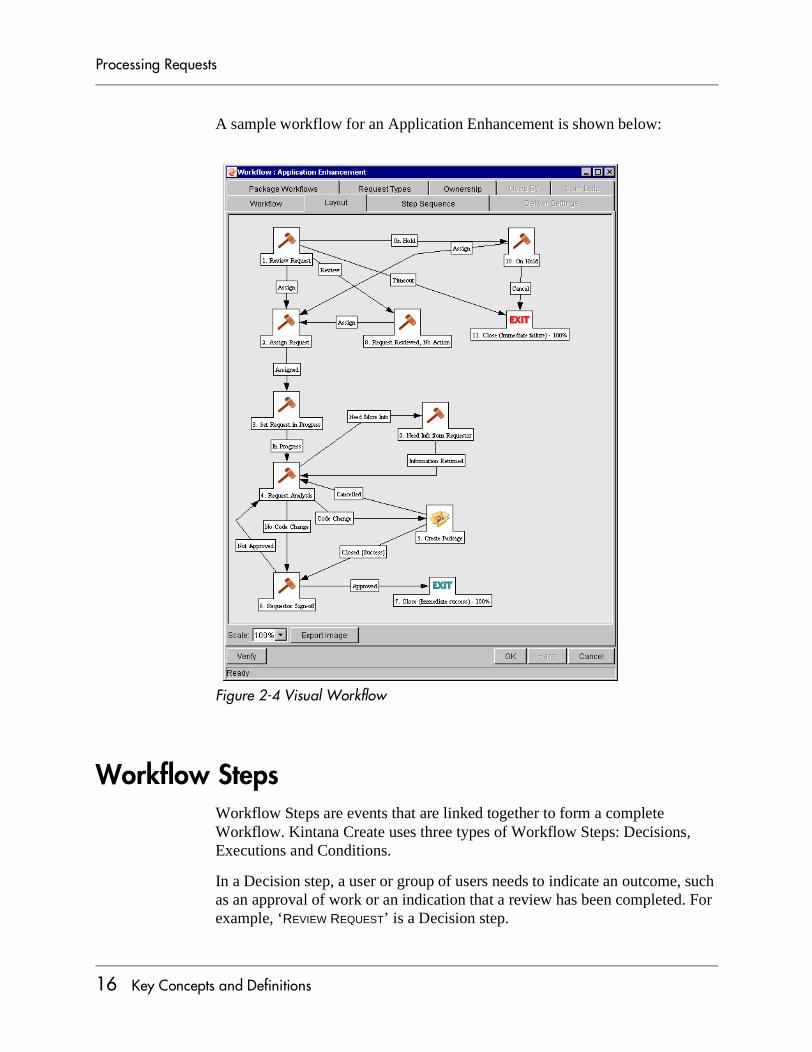
A sample workflow for an Application Enhancement is shown below:
Figure 2-4 Visual Workflow
Workflow StepsWorkflow Steps are events that are linked together to form a complete Workflow. Kintana Create uses three types of Workflow Steps: Decisions, Executions and Conditions.
In a Decision step, a user or group of users needs to indicate an outcome, such as an approval of work or an indication that a review has been completed. For example, ‘REVIEW REQUEST’ is a Decision step.
16 Key Concepts and Definitions
Processing Requests
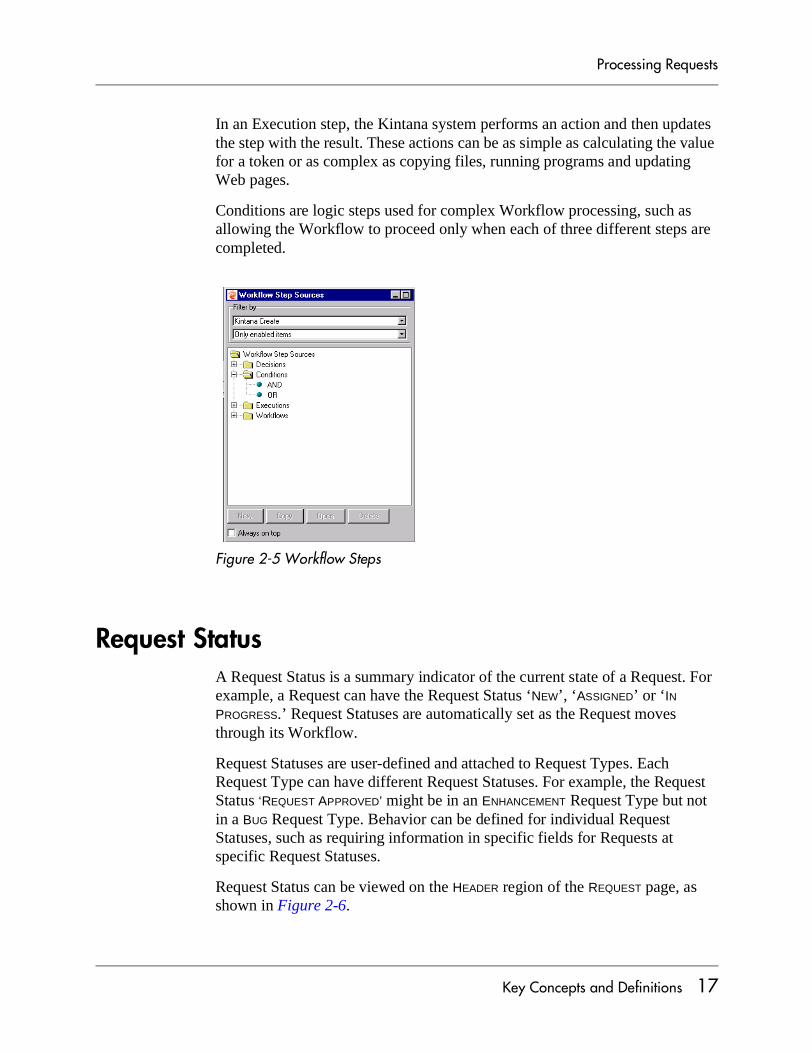
In an Execution step, the Kintana system performs an action and then updates the step with the result. These actions can be as simple as calculating the value for a token or as complex as copying files, running programs and updating Web pages.
Conditions are logic steps used for complex Workflow processing, such as allowing the Workflow to proceed only when each of three different steps are completed.
Figure 2-5 Workflow Steps
Request StatusA Request Status is a summary indicator of the current state of a Request. For example, a Request can have the Request Status ‘NEW’, ‘ASSIGNED’ or ‘IN PROGRESS.’ Request Statuses are automatically set as the Request moves through its Workflow.
Request Statuses are user-defined and attached to Request Types. Each Request Type can have different Request Statuses. For example, the Request Status ‘REQUEST APPROVED’ might be in an ENHANCEMENT Request Type but not in a BUG Request Type. Behavior can be defined for individual Request Statuses, such as requiring information in specific fields for Requests at specific Request Statuses.
Request Status can be viewed on the HEADER region of the REQUEST page, as shown in Figure 2-6.
Key Concepts and Definitions 17

Processing Requests
Figure 2-6 Request Status on the Request Page
DashboardThe Kintana Dashboard consists of a set of configurable, role-based visual displays called portlets that provide relevant summary information and highlight exception conditions. From these displays, users can drill down to any desired level of detail. The Dashboard displays the true status of initiatives and Requests, based on current data captured automatically as part of actually performing the work.
The Kintana Dashboard is designed for use by participants throughout the Technology Chain. For example, developers can use the Kintana Dashboard to view all their own action items, and end-users can consult their own Dashboards to see the status of all the Requests they have submitted. Tabs in the Kintana Dashboard interface allow users to group portlets according to
18 Key Concepts and Definitions
Processing Requests
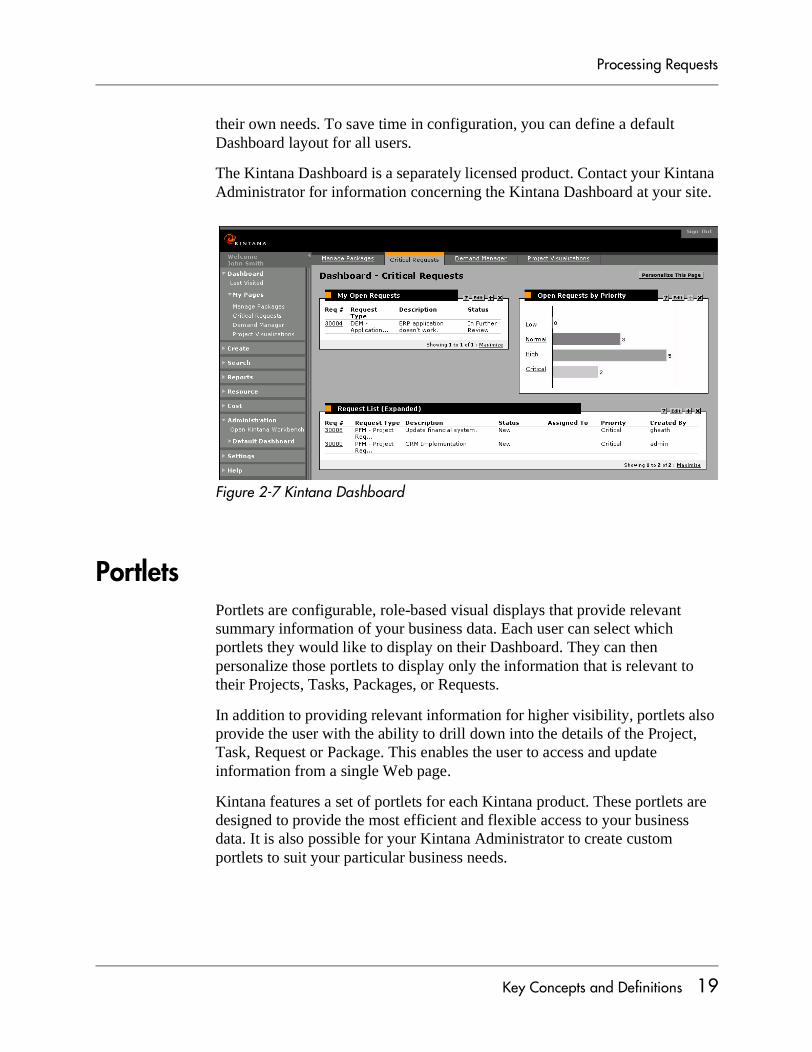
their own needs. To save time in configuration, you can define a default Dashboard layout for all users.
The Kintana Dashboard is a separately licensed product. Contact your Kintana Administrator for information concerning the Kintana Dashboard at your site.
Figure 2-7 Kintana Dashboard
PortletsPortlets are configurable, role-based visual displays that provide relevant summary information of your business data. Each user can select which portlets they would like to display on their Dashboard. They can then personalize those portlets to display only the information that is relevant to their Projects, Tasks, Packages, or Requests.
In addition to providing relevant information for higher visibility, portlets also provide the user with the ability to drill down into the details of the Project, Task, Request or Package. This enables the user to access and update information from a single Web page.
Kintana features a set of portlets for each Kintana product. These portlets are designed to provide the most efficient and flexible access to your business data. It is also possible for your Kintana Administrator to create custom portlets to suit your particular business needs.
Key Concepts and Definitions 19
Processing Requests
Figure 2-8 Kintana Portlet
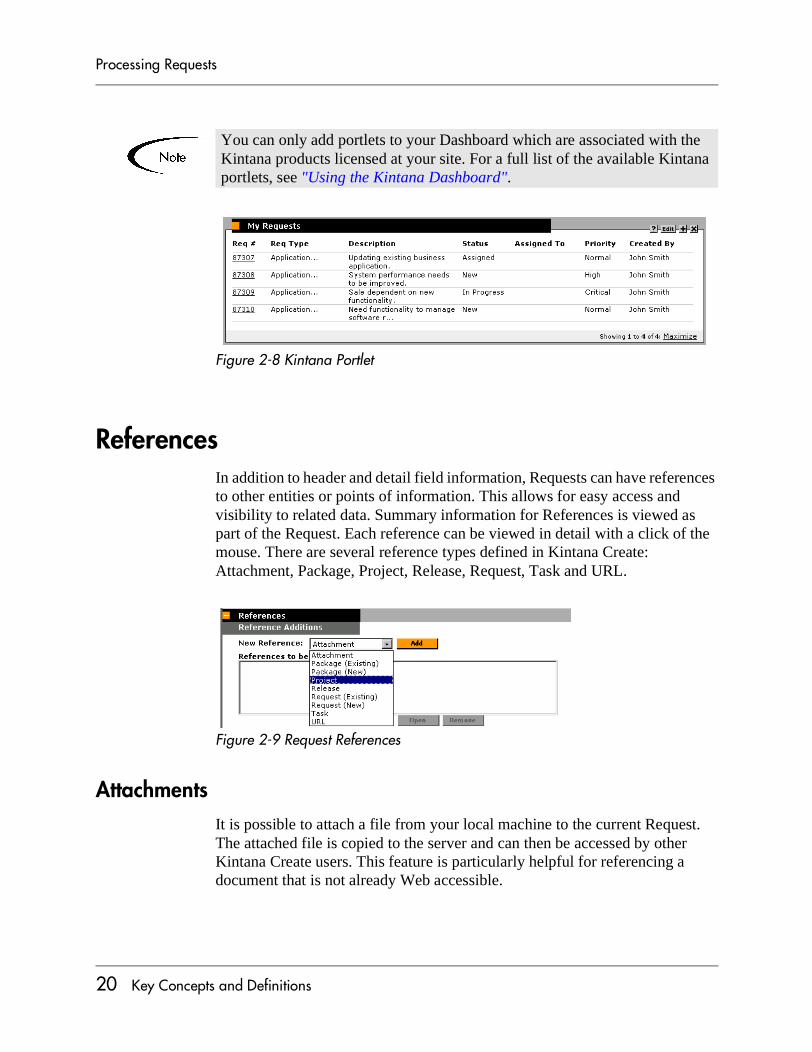
ReferencesIn addition to header and detail field information, Requests can have references to other entities or points of information. This allows for easy access and visibility to related data. Summary information for References is viewed as part of the Request. Each reference can be viewed in detail with a click of the mouse. There are several reference types defined in Kintana Create: Attachment, Package, Project, Release, Request, Task and URL.
Figure 2-9 Request References
AttachmentsIt is possible to attach a file from your local machine to the current Request. The attached file is copied to the server and can then be accessed by other Kintana Create users. This feature is particularly helpful for referencing a document that is not already Web accessible.
You can only add portlets to your Dashboard which are associated with the Kintana products licensed at your site. For a full list of the available Kintana portlets, see "Using the Kintana Dashboard".
20 Key Concepts and Definitions
Processing Requests
RequestsYou can add a reference to a Request to relate to another Requests. In addition to referencing existing Requests, you can also create a new Request to be referenced from the REFERENCES tab. You can then specify a relationship (informational or dependent) between the Request and the new reference. See “Adding References” on page 34 for more details.
For Requests that were spawned from a step in the Request Workflow step, references to the Requests are automatically generated, establishing a two-way tie between the spawned Request and the original Request.
PackagesYou can add a reference to an existing Package. For Requests that spawn Kintana Deliver Packages, references to the Package(s) are automatically created. This establishes a two-way tie between the Request and Package.
You can also create a new Package to be referenced from the REFERENCES tab. You can then specify a relationship (informational or dependent) between the Request and the new reference. See “Adding References” on page 34 for more details.
TaskYou can associate the current Request to a Kintana Drive Task using Kintana Drive. You can then set varying dependencies between the Request and the Task. Tasks can also be created from Requests in Kintana Drive. See “Adding References” on page 34 for more details.
ProjectYou can attach the current Request to a Kintana Drive Project. The Project is then associated with this Request.
Documents (URL)It is possible to reference an unlimited number of documents to a given Request. Documents need to be Web accessible and are referenced by simply entering the Web address (URL) of the document. Once attached, the documents can be opened by selecting the reference.
Key Concepts and Definitions 21
Processing Requests
Displaying Kintana DataAs more of your business processes and solutions are modeled on the Kintana Product Suite, the data in the system will grow.
The Kintana Product Suite can be configured to display only information that is most relevant to your business role. Depending on this configuration and the access grants you have been given by your Kintana Administrator, some Kintana data will not display when, for instance, you click on an auto-complete list or perform a search for a particular entity.
For more information on access grants and Kintana data, refer to the "Kintana Security Model".
You may use Kintana to automate 200 different processes — thus potentially introducing 200 Workflows into Kintana. Sifting through 200 entries in an auto-complete list or 200 search results could be cumbersome.
Additionally, an employee.in a company’s IT division does not need to work with Requests or Packages relating to Marketing or Finance. It may be advantageous to keep such extraneous information from showing up every time an auto-complete or search is run.
A Project Manager and a Software Developer will each have different access grants. Each will see different sets of Request Types and Workflows when clicking on auto-complete lists or running searches, with each set suited to their particular business role.
22 Key Concepts and Definitions
Processing Requests
Chapter
Accessing Kintana Create
Kintana Create is a Web-enabled software system. The software can be executed using certain Java-enabled Web browsers, such as Netscape Communicator 7.02+, or Microsoft Internet Explorer 5.0+.
The Kintana Product Suite features two interfaces: the standard Kintana interface and the Kintana Workbench interface. The Kintana interface uses HTML and Javascript to provide users with access to many key areas of functionality, such as creating and processing Requests and running reports.
The Kintana Workbench is a Java applet designed to help Kintana Administrators, product configuration personnel, and Power Users to perform advanced configuring and processing tasks, such as creating Request Types and Workflows.
Kintana Create users will interact mostly with the standard Kintana interface. The following sections provide instructions for logging onto Kintana:
• Logging on to Kintana
• Launching the Kintana Workbench
Logging on to KintanaKintana is accessed using a Web browser over a network. To access Kintana:
1. Contact your Kintana Administrator or Webmaster to obtain the URL where Kintana is installed.
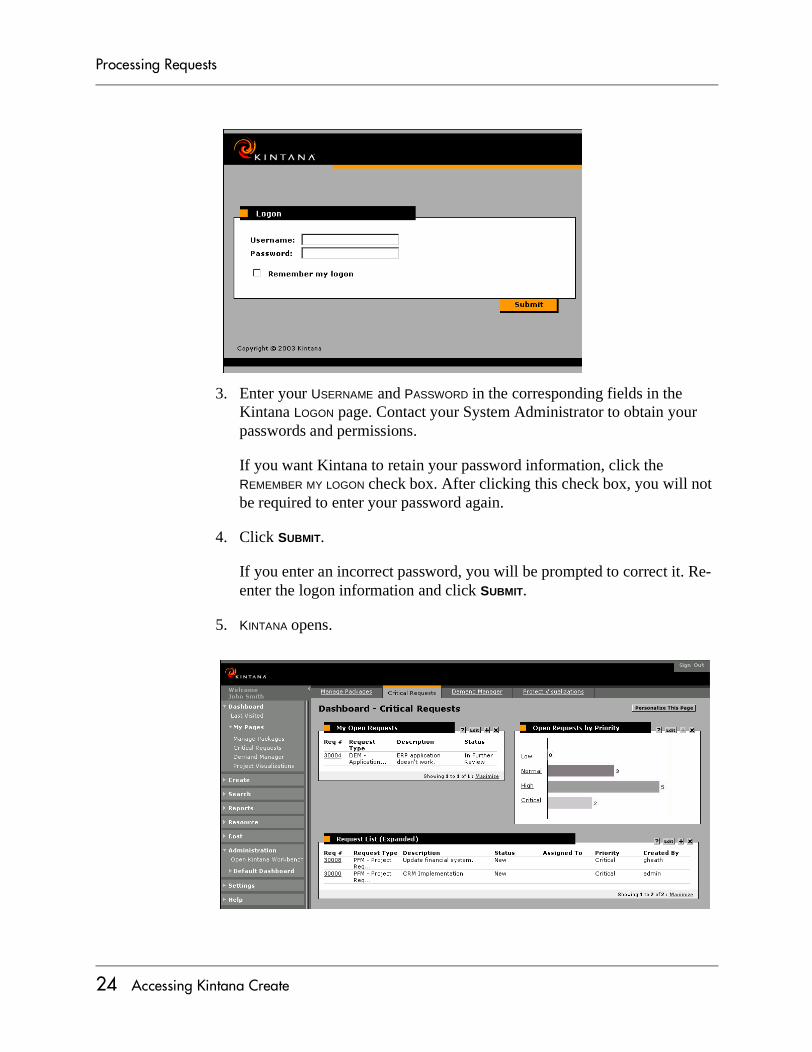
2. Enter the information in the LOCATION or ADDRESS field of your Web browser. The Kintana LOGON page opens.
Accessing Kintana Create 23
Processing Requests
3. Enter your USERNAME and PASSWORD in the corresponding fields in the Kintana LOGON page. Contact your System Administrator to obtain your passwords and permissions.
If you want Kintana to retain your password information, click the REMEMBER MY LOGON check box. After clicking this check box, you will not be required to enter your password again.
4. Click SUBMIT.
If you enter an incorrect password, you will be prompted to correct it. Re-enter the logon information and click SUBMIT.
5. KINTANA opens.
24 Accessing Kintana Create

Processing Requests
Changing Your PasswordAfter logging onto Kintana, you may wish to change your password. Also, depending on how your user account was configured, you may be forced to change your password upon initial logon.
To change your password in Kintana:
1. From the Kintana menu bar, select SETTINGS -> EDIT MY PROFILE.
2. Enter your old password in the OLD PASSWORD field.
The initial KINTANA page may appear differently at your site, depending on your system data and default configuration. The various portlets might not contain information until you personalize them.
If you have licensed the Kintana Dashboard, you receive the benefit of additional portlets that offer a more comprehensive view of Kintana data. For more detailed information, see "Using the Kintana Dashboard".
Accessing Kintana Create 25
Processing Requests
3. Enter your new password in both the NEW PASSWORD and REPEAT NEW PASSWORD fields.
4. Click DONE.
You will receive an error message if:
• You did not enter your old password correctly.
• The NEW PASSWORD and REPEAT NEW PASSWORD fields do not contain the same exact entry.
• The new password you entered is identical to your old password.
If you do not receive an error message, your password has been accepted by the system.
Launching the Kintana WorkbenchThe Kintana Workbench provides an interface accessing advanced processing and configuration functionality in Kintana. This interface is available to users with a product Power License.
The Kintana Workbench is accessed from the navigation bar in the Kintana interface. Users with a Power license can launch the Workbench by clicking the ADMINISTRATION > OPEN KINTANA WORKBENCH menu item in the navigation bar.
To launch the Workbench:
1. Logon to Kintana.
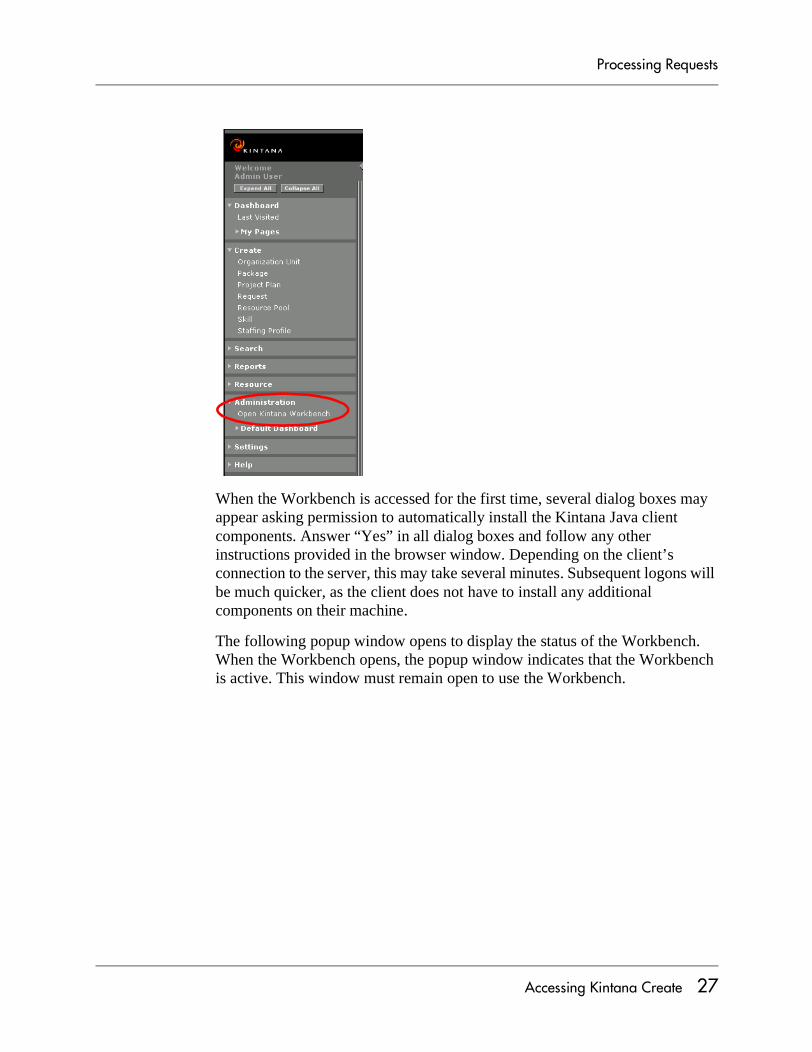
2. Select ADMINISTRATION > OPEN KINTANA WORKBENCH from the menu.
26 Accessing Kintana Create
Processing Requests
When the Workbench is accessed for the first time, several dialog boxes may appear asking permission to automatically install the Kintana Java client components. Answer “Yes” in all dialog boxes and follow any other instructions provided in the browser window. Depending on the client’s connection to the server, this may take several minutes. Subsequent logons will be much quicker, as the client does not have to install any additional components on their machine.
The following popup window opens to display the status of the Workbench. When the Workbench opens, the popup window indicates that the Workbench is active. This window must remain open to use the Workbench.
Accessing Kintana Create 27

Processing Requests
If you have installed a pop-up blocker in your web browser, the Kintana Workbench will not open.
28 Accessing Kintana Create
Processing Requests
Chapter
Creating a Request
Requests are the repositories for all of the information necessary to take a series of actions and move through a standard business process. As the fundamental work unit of Kintana Create, Requests are created and processed using the standard Kintana interface.
The following topics are discussed in greater detail below:
• “Creating a Request” on page 29
• “Adding References” on page 34
• “Saving an Un-Submitted Request” on page 48
• “Adding and Editing Contacts” on page 49
Creating a RequestUsers create Requests every time a standard business process is invoked. The Request is given a unique number and is tracked from start to finish, ensuring task completion and accountability for all steps within the selected business process.
To create a new Request:
1. Logon to Kintana.
2. Select CREATE > REQUEST from the menu. The CREATE NEW REQUEST page opens.
Creating a Request 29
Processing Requests
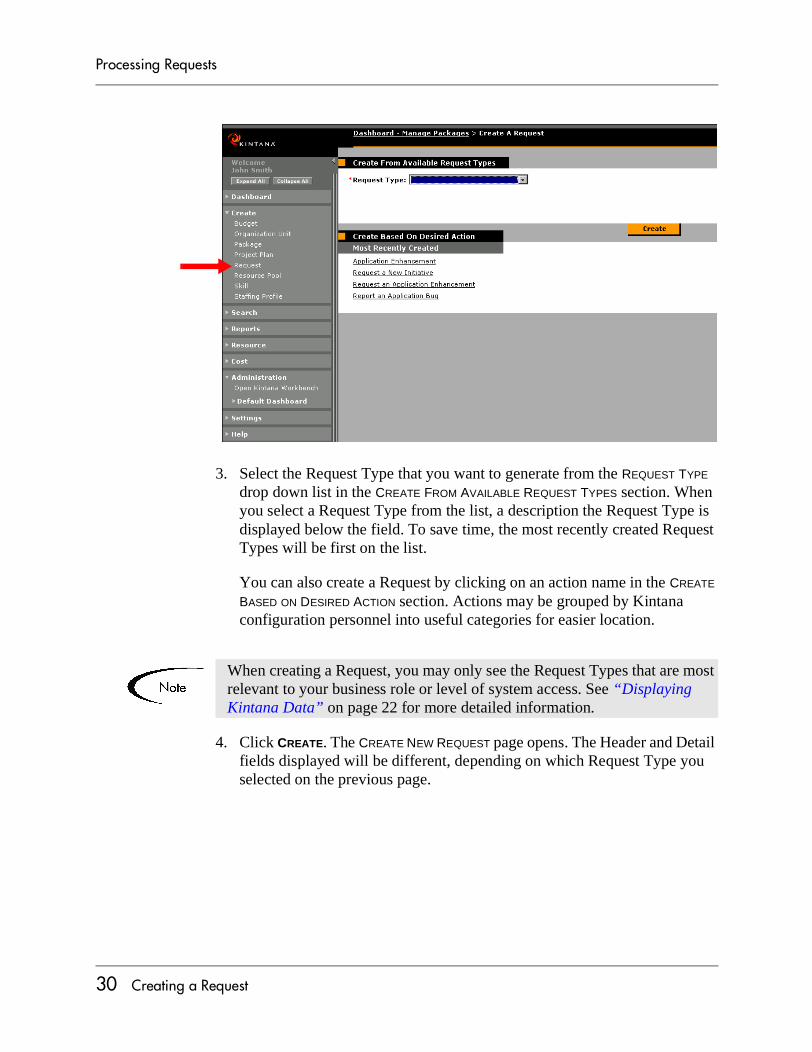
3. Select the Request Type that you want to generate from the REQUEST TYPE drop down list in the CREATE FROM AVAILABLE REQUEST TYPES section. When you select a Request Type from the list, a description the Request Type is displayed below the field. To save time, the most recently created Request Types will be first on the list.
You can also create a Request by clicking on an action name in the CREATE BASED ON DESIRED ACTION section. Actions may be grouped by Kintana configuration personnel into useful categories for easier location.
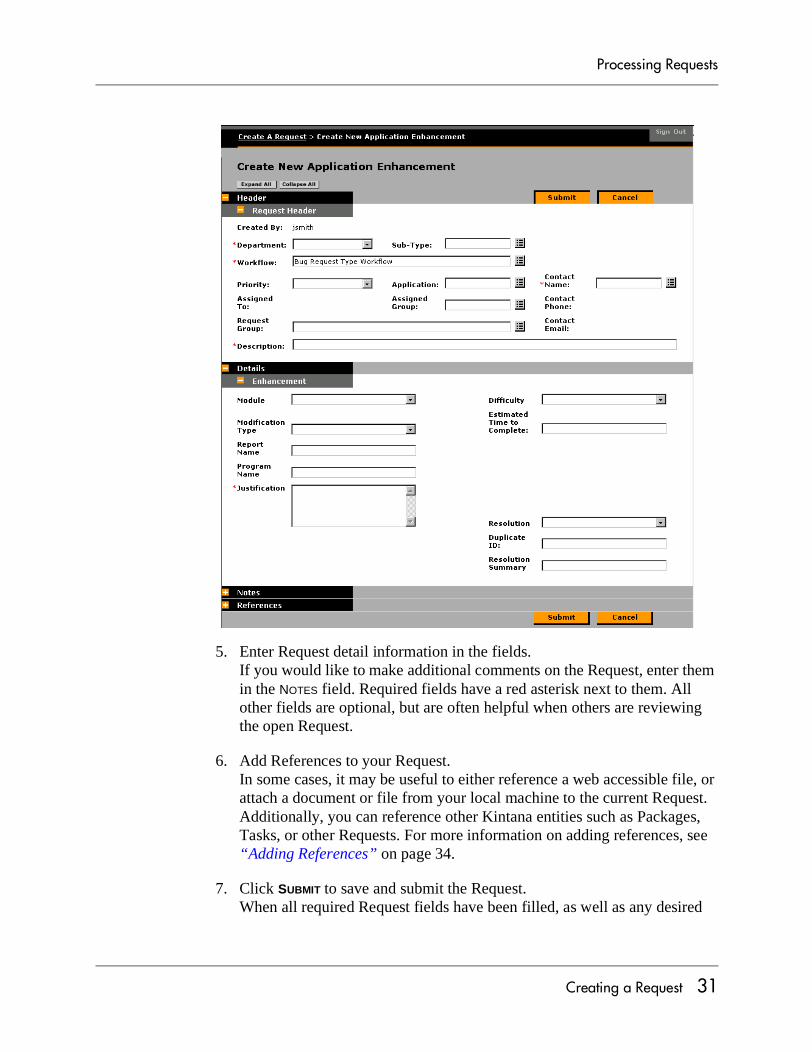
4. Click CREATE. The CREATE NEW REQUEST page opens. The Header and Detail fields displayed will be different, depending on which Request Type you selected on the previous page.
When creating a Request, you may only see the Request Types that are most relevant to your business role or level of system access. See “Displaying Kintana Data” on page 22 for more detailed information.
30 Creating a Request
Processing Requests
5. Enter Request detail information in the fields.If you would like to make additional comments on the Request, enter them in the NOTES field. Required fields have a red asterisk next to them. All other fields are optional, but are often helpful when others are reviewing the open Request.
6. Add References to your Request. In some cases, it may be useful to either reference a web accessible file, or attach a document or file from your local machine to the current Request. Additionally, you can reference other Kintana entities such as Packages, Tasks, or other Requests. For more information on adding references, see “Adding References” on page 34.
7. Click SUBMIT to save and submit the Request.When all required Request fields have been filled, as well as any desired
Creating a Request 31
Processing Requests
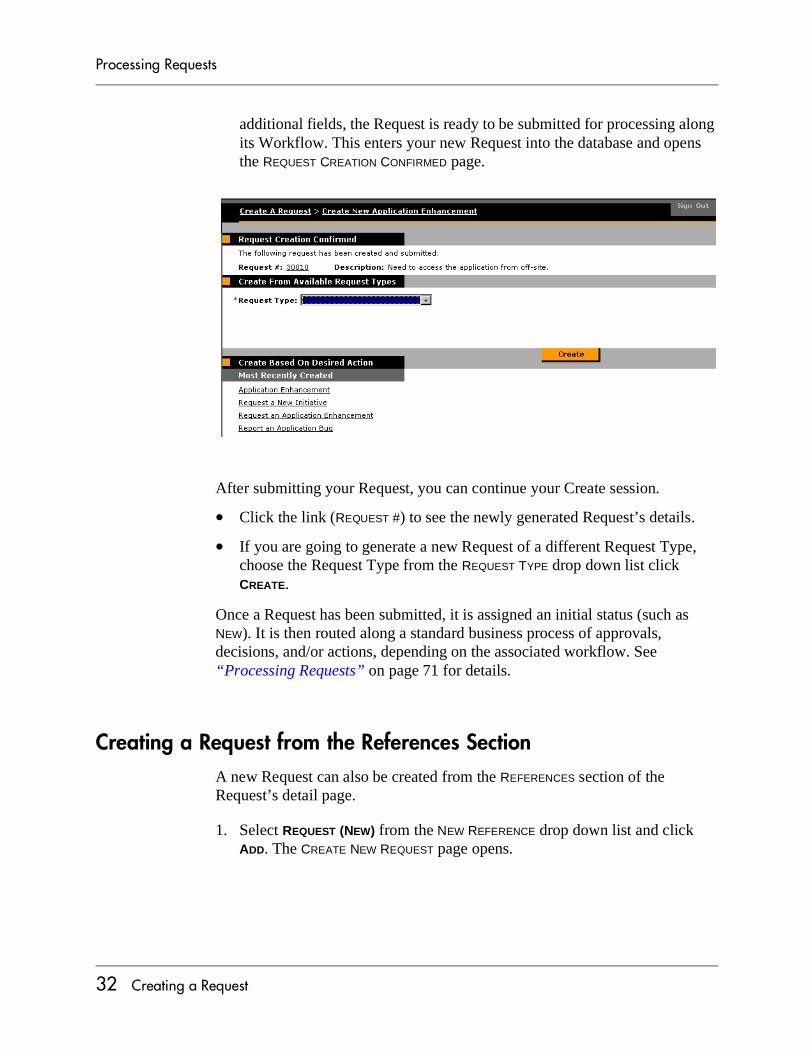
additional fields, the Request is ready to be submitted for processing along its Workflow. This enters your new Request into the database and opens the REQUEST CREATION CONFIRMED page.
After submitting your Request, you can continue your Create session.
• Click the link (REQUEST #) to see the newly generated Request’s details.
• If you are going to generate a new Request of a different Request Type, choose the Request Type from the REQUEST TYPE drop down list click CREATE.
Once a Request has been submitted, it is assigned an initial status (such as NEW). It is then routed along a standard business process of approvals, decisions, and/or actions, depending on the associated workflow. See “Processing Requests” on page 71 for details.
Creating a Request from the References SectionA new Request can also be created from the REFERENCES section of the Request’s detail page.
1. Select REQUEST (NEW) from the NEW REFERENCE drop down list and click ADD. The CREATE NEW REQUEST page opens.
32 Creating a Request

Processing Requests
2. Choose the Request Type that you want to generate from the REQUEST TYPE drop down list.
3. Select a RELATIONSHIP by select the appropriate radio button.
4. Click CREATE. The CREATE NEW REQUEST page opens.
5. Enter the information related to your new Request.
6. Save and submit the new Request.
Copying RequestsYou can create a new Request by copying an existing Request. This can save you time by eliminating the need to re-enter information that is common between the Requests.
To generate a new Request using the copy feature:
1. Open an existing Request.
2. Scroll to the bottom of the Request detail page.
3. Click COPY. The Copy Request window opens.
Creating a Request 33
Processing Requests
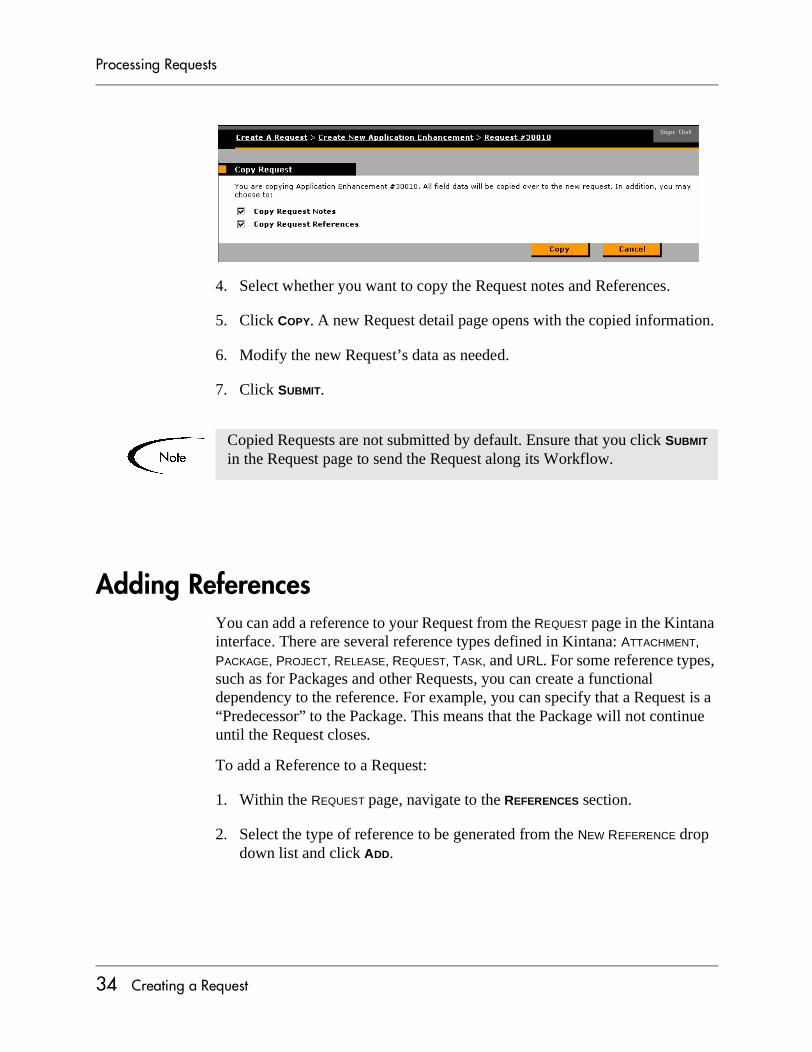
4. Select whether you want to copy the Request notes and References.
5. Click COPY. A new Request detail page opens with the copied information.
6. Modify the new Request’s data as needed.
7. Click SUBMIT.
Adding ReferencesYou can add a reference to your Request from the REQUEST page in the Kintana interface. There are several reference types defined in Kintana: ATTACHMENT, PACKAGE, PROJECT, RELEASE, REQUEST, TASK, and URL. For some reference types, such as for Packages and other Requests, you can create a functional dependency to the reference. For example, you can specify that a Request is a “Predecessor” to the Package. This means that the Package will not continue until the Request closes.
To add a Reference to a Request:
1. Within the REQUEST page, navigate to the REFERENCES section.
2. Select the type of reference to be generated from the NEW REFERENCE drop down list and click ADD.
Copied Requests are not submitted by default. Ensure that you click SUBMIT in the Request page to send the Request along its Workflow.
34 Creating a Request
Processing Requests
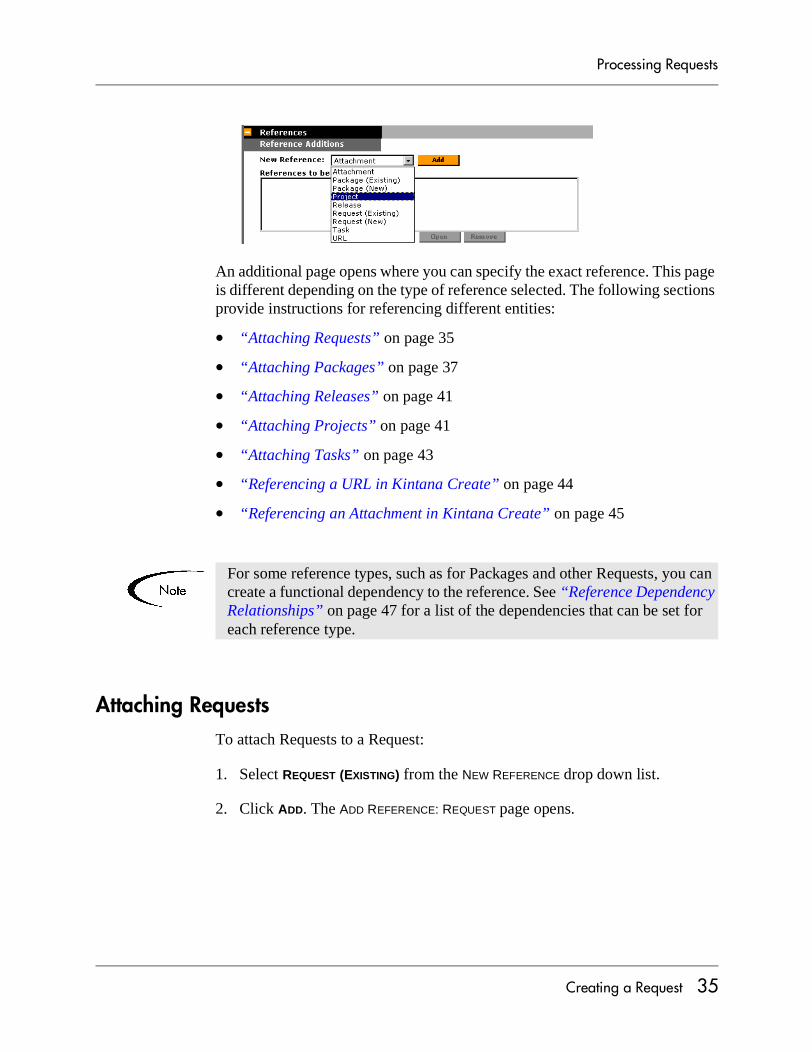
An additional page opens where you can specify the exact reference. This page is different depending on the type of reference selected. The following sections provide instructions for referencing different entities:
• “Attaching Requests” on page 35
• “Attaching Packages” on page 37
• “Attaching Releases” on page 41
• “Attaching Projects” on page 41
• “Attaching Tasks” on page 43
• “Referencing a URL in Kintana Create” on page 44
• “Referencing an Attachment in Kintana Create” on page 45
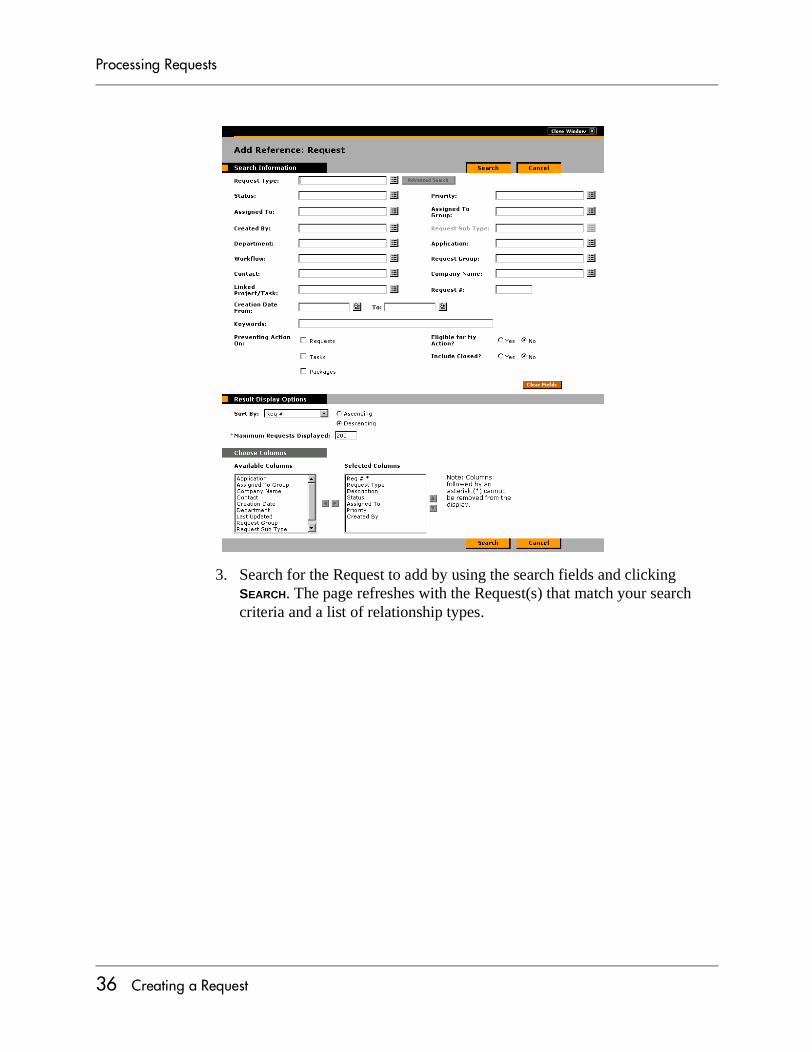
Attaching RequestsTo attach Requests to a Request:
1. Select REQUEST (EXISTING) from the NEW REFERENCE drop down list.
2. Click ADD. The ADD REFERENCE: REQUEST page opens.
For some reference types, such as for Packages and other Requests, you can create a functional dependency to the reference. See “Reference Dependency Relationships” on page 47 for a list of the dependencies that can be set for each reference type.
Creating a Request 35
Processing Requests
3. Search for the Request to add by using the search fields and clicking SEARCH. The page refreshes with the Request(s) that match your search criteria and a list of relationship types.
36 Creating a Request

Processing Requests
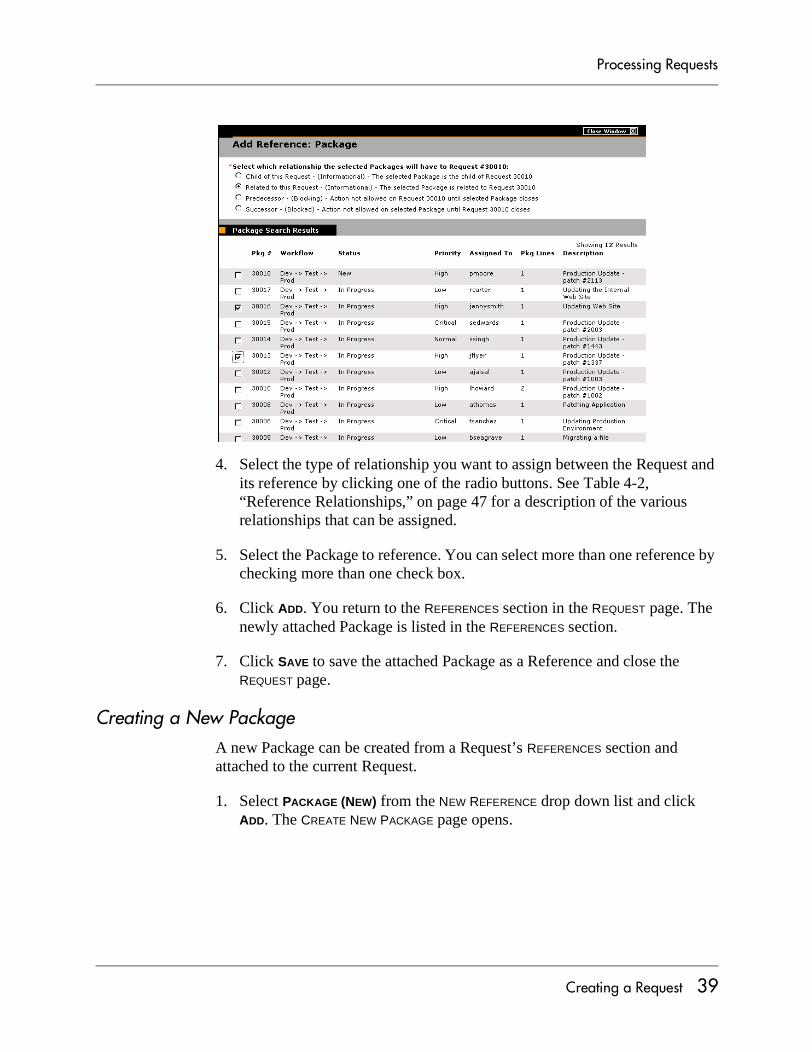
4. Select the type of relationship you want to assign between the Request and its reference by clicking one of the radio buttons. See Table 4-2, “Reference Relationships,” on page 47 for a description of the various relationships that can be assigned.
5. Select the Request to reference. You can select more than one reference by checking more than one check box.
6. Click ADD. You return to the REFERENCES section in the REQUEST page. The newly attached Request is listed in the References section.
7. Click SAVE to save the attached Request as a Reference and close the REQUEST page.
Creating a New Request
A new Request can be created from a Request’s REFERENCES section and attached to the current Request. See “Creating a Request from the References Section” on page 32 for detailed instructions.
Attaching PackagesTo attach a Package to a Request:
Creating a Request 37
Processing Requests
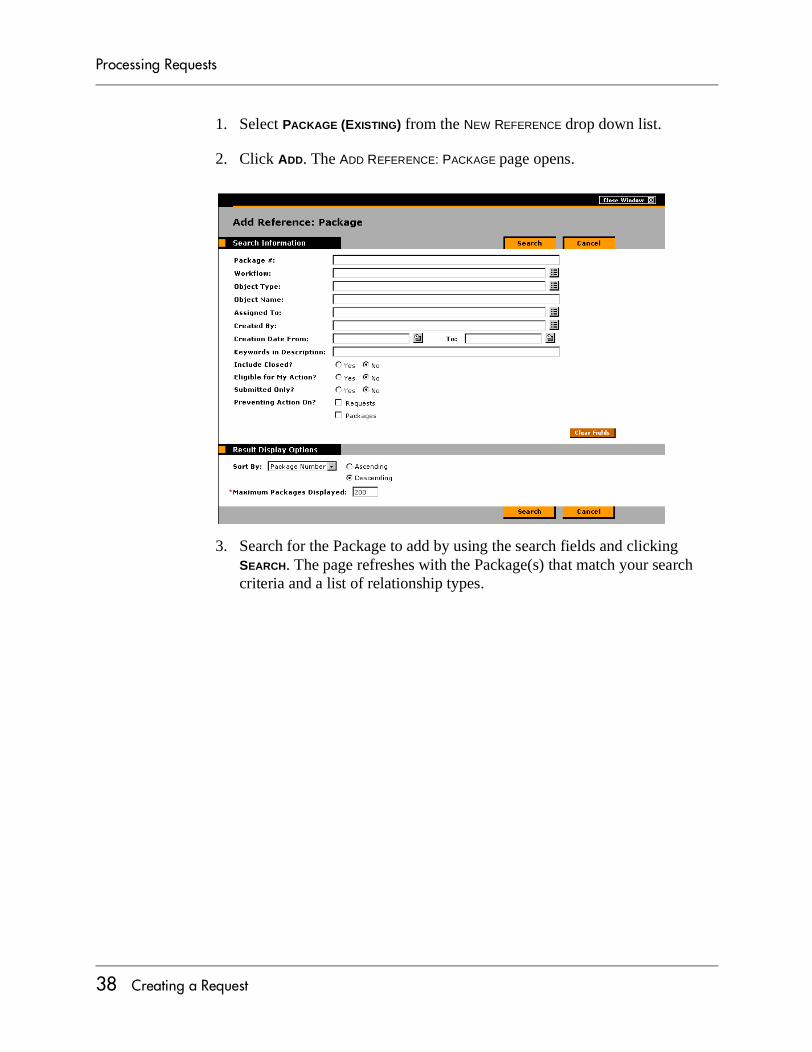
1. Select PACKAGE (EXISTING) from the NEW REFERENCE drop down list.
2. Click ADD. The ADD REFERENCE: PACKAGE page opens.
3. Search for the Package to add by using the search fields and clicking SEARCH. The page refreshes with the Package(s) that match your search criteria and a list of relationship types.
38 Creating a Request
Processing Requests
4. Select the type of relationship you want to assign between the Request and its reference by clicking one of the radio buttons. See Table 4-2, “Reference Relationships,” on page 47 for a description of the various relationships that can be assigned.
5. Select the Package to reference. You can select more than one reference by checking more than one check box.
6. Click ADD. You return to the REFERENCES section in the REQUEST page. The newly attached Package is listed in the REFERENCES section.
7. Click SAVE to save the attached Package as a Reference and close the REQUEST page.
Creating a New PackageA new Package can be created from a Request’s REFERENCES section and attached to the current Request.
1. Select PACKAGE (NEW) from the NEW REFERENCE drop down list and click ADD. The CREATE NEW PACKAGE page opens.
Creating a Request 39
Processing Requests
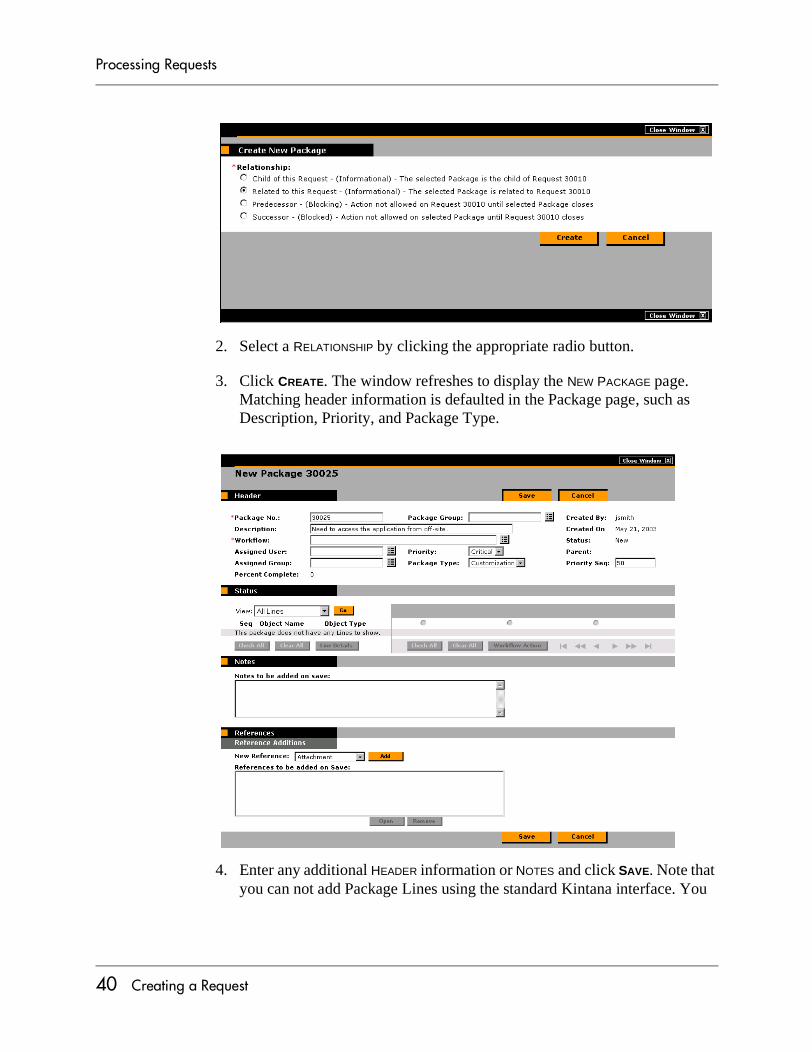
2. Select a RELATIONSHIP by clicking the appropriate radio button.
3. Click CREATE. The window refreshes to display the NEW PACKAGE page. Matching header information is defaulted in the Package page, such as Description, Priority, and Package Type.
4. Enter any additional HEADER information or NOTES and click SAVE. Note that you can not add Package Lines using the standard Kintana interface. You
40 Creating a Request

Processing Requests
must add Package Lines using the Kintana Workbench. See "Processing Packages" for details.
The NEW PACKAGE page closes and the new Package is displayed in the Request’s REFERENCE section.
Attaching Releases
1. Select RELEASE from the NEW REFERENCE drop down list.
2. Click ADD. The REFERENCE RELEASE page opens.
3. Select the Release to reference from the RELEASE field.
4. Click ADD. You return to the REFERENCES section in the REQUEST page. The newly attached Release is listed in the REFERENCES section.
5. Click SAVE to save the attached Release as a Reference and close the REQUEST page.
Attaching Projects
1. Select PROJECT from the NEW REFERENCE drop down list.
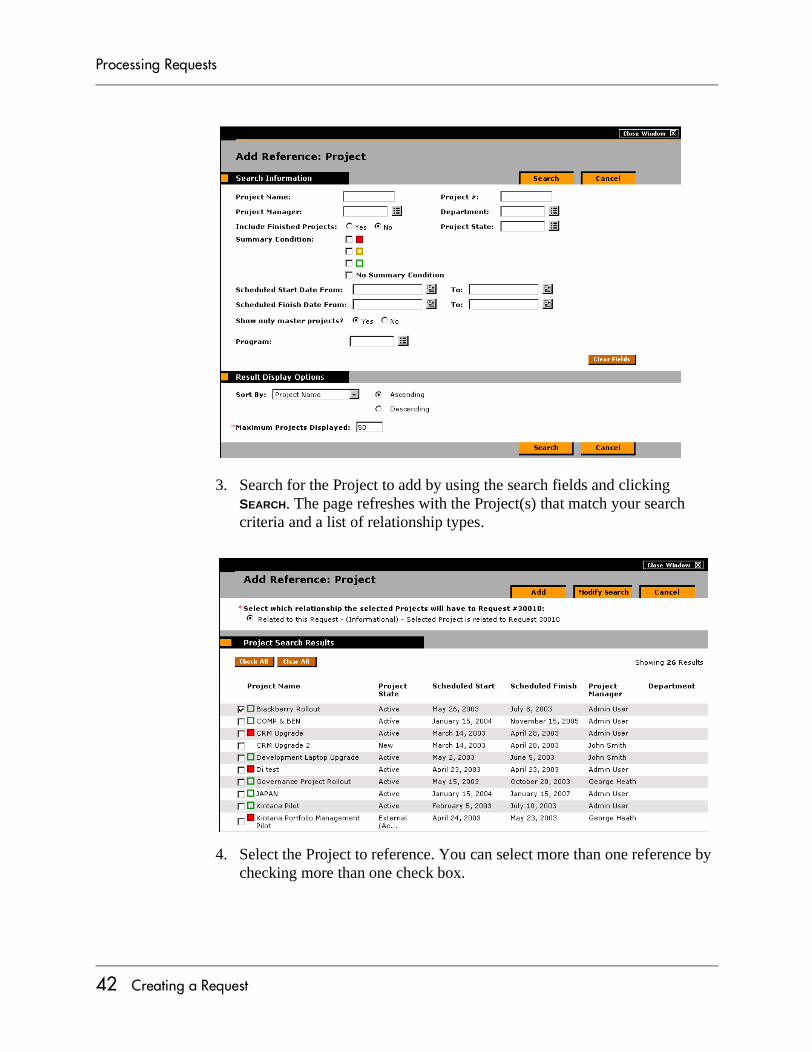
2. Click ADD. The ADD REFERENCE: PROJECT page opens.
Creating a Request 41
Processing Requests
3. Search for the Project to add by using the search fields and clicking SEARCH. The page refreshes with the Project(s) that match your search criteria and a list of relationship types.
4. Select the Project to reference. You can select more than one reference by checking more than one check box.
42 Creating a Request

Processing Requests
5. Click ADD. You return to the REFERENCES section in the REQUEST page. The newly attached Project is listed in the REFERENCES section.
6. Click SAVE to save the attached Project as a Reference and close the REQUEST page.
Attaching Tasks
1. Select TASK from the NEW REFERENCE drop down list.
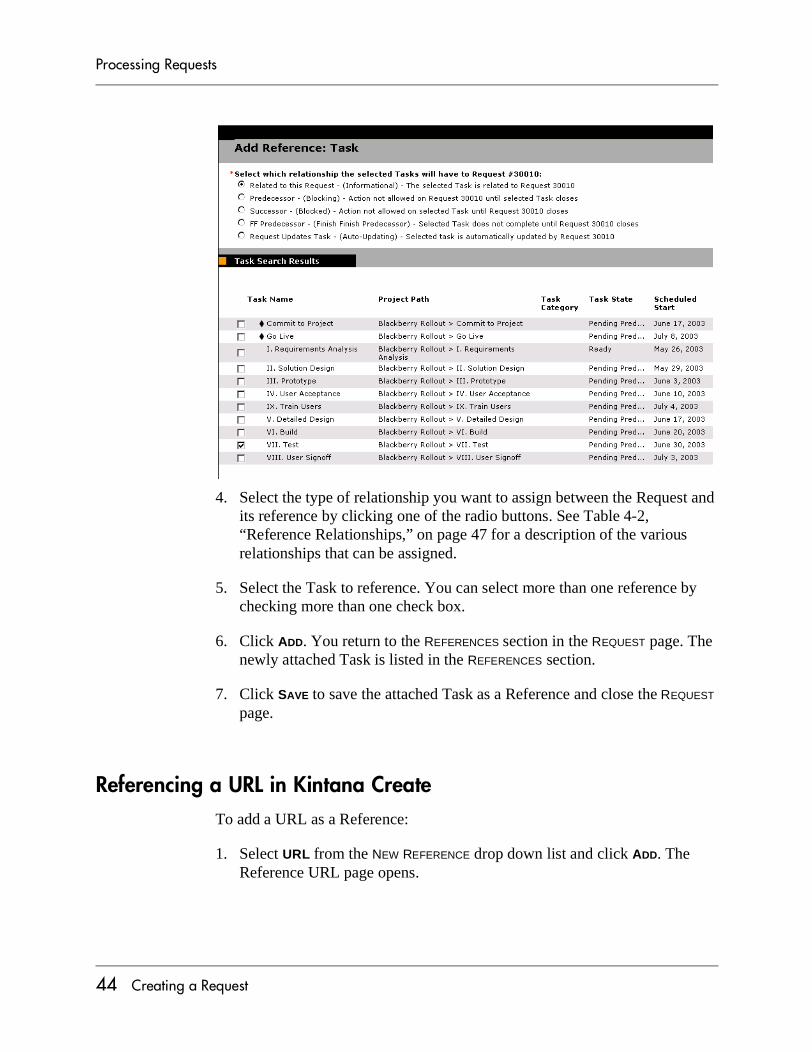
2. Click ADD. The ADD REFERENCE: TASK page opens.
3. Search for the Task to add by using the search fields and clicking SEARCH. The page refreshes with the Task(s) that match your search criteria and a list of relationship types.
Creating a Request 43
Processing Requests
4. Select the type of relationship you want to assign between the Request and its reference by clicking one of the radio buttons. See Table 4-2, “Reference Relationships,” on page 47 for a description of the various relationships that can be assigned.
5. Select the Task to reference. You can select more than one reference by checking more than one check box.
6. Click ADD. You return to the REFERENCES section in the REQUEST page. The newly attached Task is listed in the REFERENCES section.
7. Click SAVE to save the attached Task as a Reference and close the REQUEST page.
Referencing a URL in Kintana CreateTo add a URL as a Reference:
1. Select URL from the NEW REFERENCE drop down list and click ADD. The Reference URL page opens.
44 Creating a Request

Processing Requests
2. Type the URL into the URL field and enter a description if desired.
3. Click OK to add the specified URL as a Reference.
4. The referenced URL appears in the REFERENCES TO BE ADDED ON SAVE list on the REQUEST page. The Reference has not been added yet.
5. Click SAVE to add the Reference to the Request.
Referencing an Attachment in Kintana CreateTo add an attachment as a Reference:
1. Select ATTACHMENT from the NEW REFERENCE drop down list and click ADD. The REFERENCE ATTACHMENT page opens.
Creating a Request 45
Processing Requests
2. Click BROWSE to locate and select the desired file from your local machine and enter a description if desired.
3. Click OK to add the selected Attachment as a Reference.
4. The referenced Attachment appears in the REFERENCES TO BE ADDED ON SAVE list on the REQUEST page. The Reference has not been added yet.
5. Click SAVE to add the Attachment to the Request.
Valid References
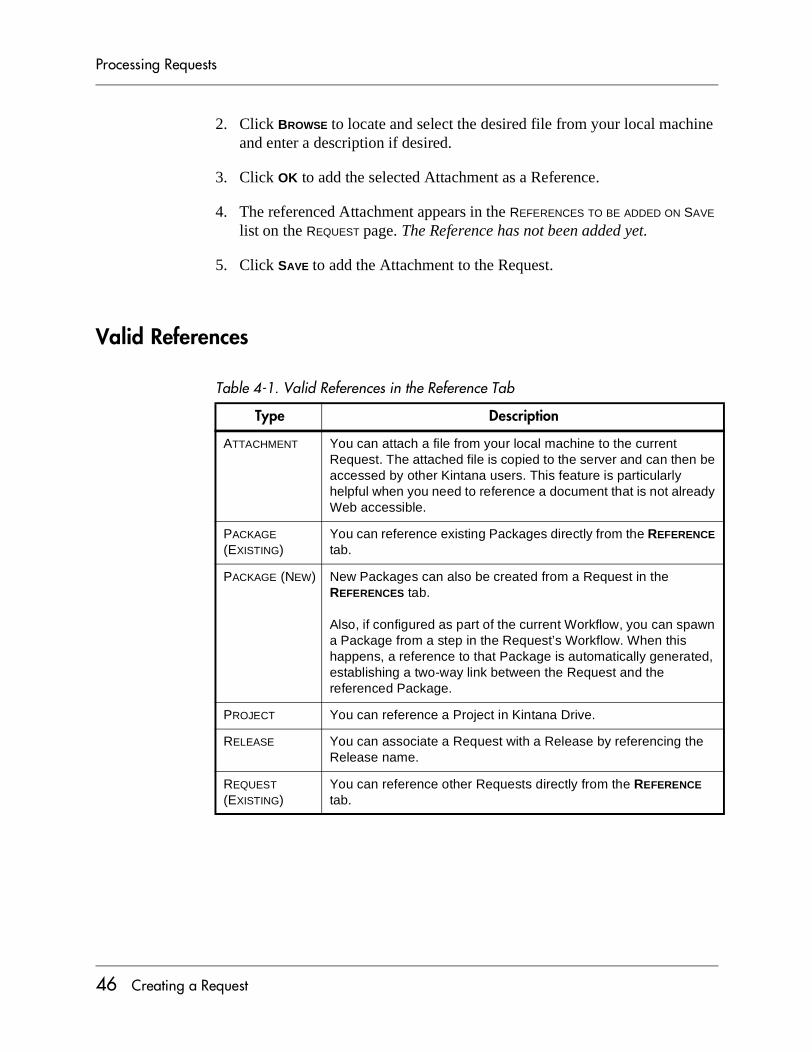
Table 4-1. Valid References in the Reference Tab
Type Description
ATTACHMENT You can attach a file from your local machine to the current Request. The attached file is copied to the server and can then be accessed by other Kintana users. This feature is particularly helpful when you need to reference a document that is not already Web accessible.
PACKAGE (EXISTING)
You can reference existing Packages directly from the REFERENCE tab.
PACKAGE (NEW) New Packages can also be created from a Request in the REFERENCES tab.
Also, if configured as part of the current Workflow, you can spawn a Package from a step in the Request’s Workflow. When this happens, a reference to that Package is automatically generated, establishing a two-way link between the Request and the referenced Package.
PROJECT You can reference a Project in Kintana Drive.
RELEASE You can associate a Request with a Release by referencing the Release name.
REQUEST (EXISTING)
You can reference other Requests directly from the REFERENCE tab.
46 Creating a Request

Processing Requests
Reference Dependency RelationshipsThe relationships that can exist between a Request and a Reference are listed below in table Table 4-2.
REQUEST (NEW) New Requests can be created from an existing Request in the REFERENCES tab.
Also, if configured as part of the Kintana Create Workflow, you can spawn a Request from a Request. When this happens, a reference to that Request is automatically generated, establishing a two-way link between the Requests.
TASK You can reference a Task in a Kintana Project.
URL You can reference URLs from a Package. Once attached, click on the Web address to open the document in your Web browser. The document must be in a MIME format recognized by your Web browser (Word, Excel, etc.)
Use URLs to include more detailed information than what is included in the Package notes, such as a screenshot for a Bug or a report.
Table 4-1. Valid References in the Reference Tab
Type Description
Table 4-2. Reference Relationships
Entity Relationships Description
Attachment Standard Attachment interaction
The attachment is related to this Request.
Packages Child of this Request (Informational) - The selected Package is the child of the Request.
Related to this Request (Informational) - The selected Package is related to the Request.
Predecessor (Blocking) - Action is not allowed on the Request until the referenced Package closes.
Successor (Blocking) - Action is not allowed on the referenced Package until the Request closes.
Projects Related to This Request (Informational) Selected Project is related to this Request.
Releases Contains This Package The Request is contained in the selected Release.
Creating a Request 47

Processing Requests
Saving an Un-Submitted RequestKintana can be configured to enable you to save an un-submitted Request. This feature requires that your Kintana administrator alter a server configuration parameter. Enabling this feature may not be desirable for your business situation. Contact your Kintana administrator for help with this setting.
Requests Duplicate Request (Informational) The referenced Request is a duplicate of the Request.
Original Duplicate Requests (Informational) The referenced Request is the original of the two duplicate Requests.
Parent of this Request (Informational) The referenced Request is the parent of the Request.
Child of this Request (Informational) The referenced Request is the child of the Request.
Related to this Request (Informational) Referenced Request is related to this Request.
Predecessor (Blocking) Action not allowed on this Request until the referenced Request closes.
Successor (Blocking) Action not allowed on the referenced Request until this Request closes.
Tasks Related to This Request (Informational) The referenced Task is related to this Request.
Predecessor (Blocking) Action not allowed on this Request until the referenced Task closes.
Successor (Blocking) Action not allowed on the referenced Task until this Request closes.
FF Predecessor (Finish Finish Predecessor)
(Blocking) The referenced Task does not complete until the Request closes.
Request Updates Task (Auto-updating) The referenced Task is automatically updated by the Request.
URL Standard URL interaction (Informational) The URL is related to this Request.
Table 4-2. Reference Relationships
Entity Relationships Description
48 Creating a Request

Processing Requests
Adding and Editing ContactsUsers belonging to appropriate Security Groups (KINTANA CREATE CONTACT MANAGER and USER MANAGER) can add or edit a Contact using the CONTACTS WORKBENCH. Open the CONTACT WORKBENCH by selecting ADMINISTRATION > OPEN KINTANA WORKBENCH menu. Then click CREATE in the shortcut bar and click the CONTACTS icon.
Adding a ContactTo add a new Contact:
1. Click CREATE in the shortcut bar and click the CONTACTS icon. The CONTACT WORKBENCH opens.
The server parameter used to enable this feature is ALLOW_SAVE_REQUEST_DRAFT.
Creating a Request 49
Processing Requests
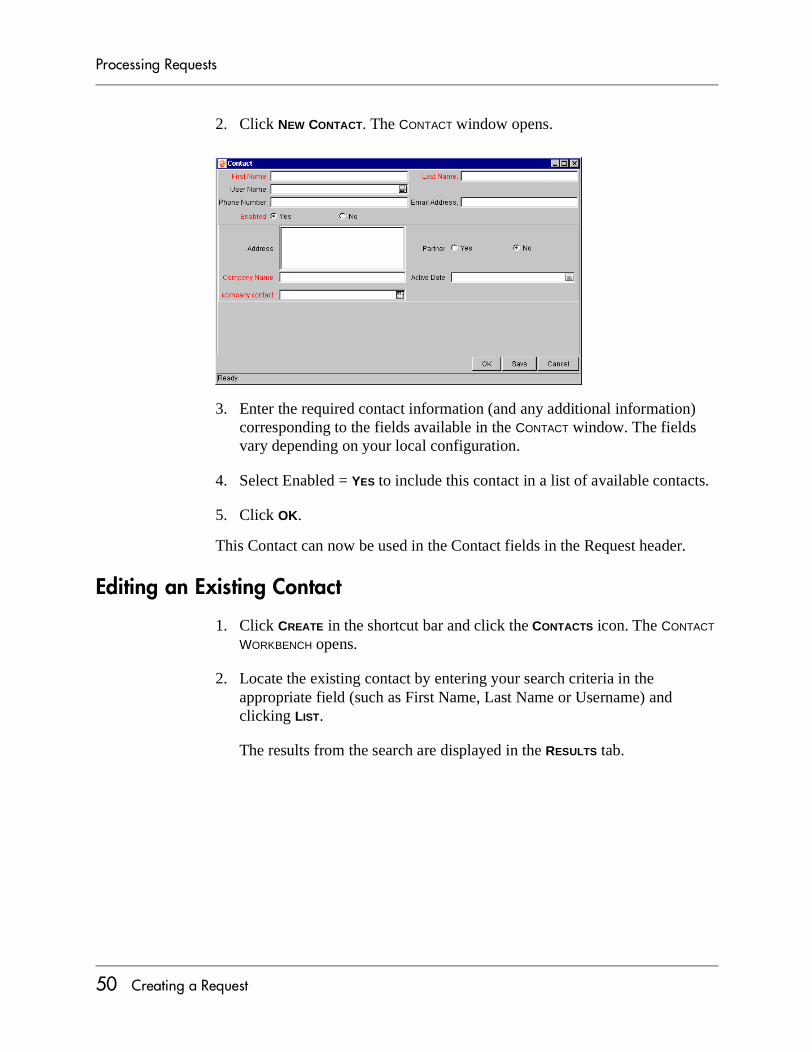
2. Click NEW CONTACT. The CONTACT window opens.
3. Enter the required contact information (and any additional information) corresponding to the fields available in the CONTACT window. The fields vary depending on your local configuration.
4. Select Enabled = YES to include this contact in a list of available contacts.
5. Click OK.
This Contact can now be used in the Contact fields in the Request header.
Editing an Existing Contact
1. Click CREATE in the shortcut bar and click the CONTACTS icon. The CONTACT WORKBENCH opens.
2. Locate the existing contact by entering your search criteria in the appropriate field (such as First Name, Last Name or Username) and clicking LIST.
The results from the search are displayed in the RESULTS tab.
50 Creating a Request

Processing Requests
3. Select the desired user.
4. Click OPEN. The CONTACT window opens with the user’s info loaded.
5. Make any desired changes.
6. Click OK.
The edited contact information is saved.
Creating a Request 51

Processing Requests
52 Creating a Request

Processing Requests
Chapter
Viewing Request Status and Details
Once a Request has been created, it begins moving towards completion along its designated Workflow. Kintana Create users can search for and view a Request at any point in the Request’s lifecycle, provided they have the appropriate permissions. The following sections discuss the ways in which a user can locate and view Requests:
• Searching for Requests
• Viewing Request Information
• Using Dashboard Portlets to View Request Information
Searching for RequestsThe following sections discuss different Request search features:
• Simple Search
• Advanced Search
• Saving your Search
Simple SearchTo locate a Request:
1. Logon to Kintana.
Viewing Request Status and Details 53

Processing Requests
2. Select SEARCH > REQUESTS from the menu at the top of the page. The SEARCH REQUESTS page opens.
3. Enter the search criteria for the Request. You can limit the maximum number of results in the MAXIMUM REQUESTS DISPLAYED field. In general, you can search for a Request based on any parameters appearing in the REQUESTS SEARCH page, such as REQUEST NUMBER, REQUEST TYPE, or CREATED BY.
4. (Optional) To save the search criteria for future searches, enter a unique name for the search query in the SAVE THIS SEARCH AS field and click SAVE. Entering a non-unique name will prompt you to replace the existing saved search query of the same name. See “Saving your Search” on page 59 for more information about saving searches.
Click Request toopen the SearchRequest page.
54 Viewing Request Status and Details
Processing Requests
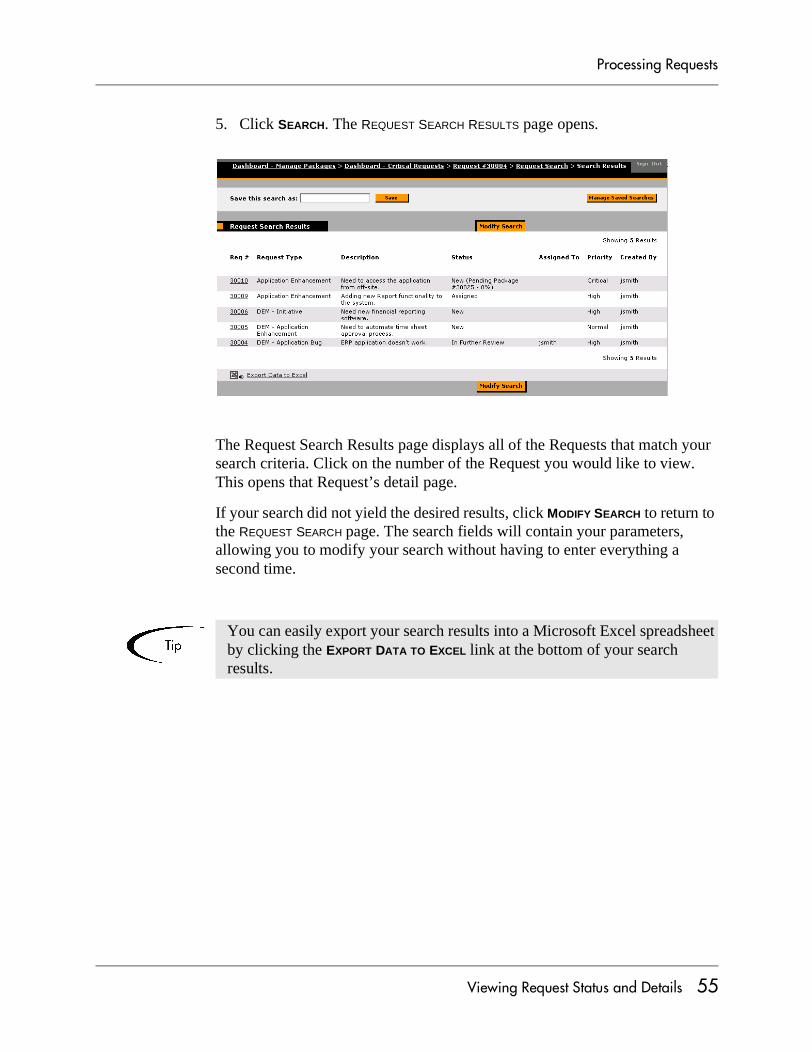
5. Click SEARCH. The REQUEST SEARCH RESULTS page opens.
The Request Search Results page displays all of the Requests that match your search criteria. Click on the number of the Request you would like to view. This opens that Request’s detail page.
If your search did not yield the desired results, click MODIFY SEARCH to return to the REQUEST SEARCH page. The search fields will contain your parameters, allowing you to modify your search without having to enter everything a second time.
You can easily export your search results into a Microsoft Excel spreadsheet by clicking the EXPORT DATA TO EXCEL link at the bottom of your search results.
Viewing Request Status and Details 55

Processing Requests
Viewing the Details for a Specific RequestIf you already know the number of the Request, you can enter it into the VIEW DETAILS FOR REQUEST # field at the top of the REQUEST SEARCH page.
Figure 5-1 View Details for Request # Field
Click GO after entering the Request number to proceed to the Request’s detail page.
Setting the Results DisplayYou can specify which columns appear in the REQUEST SEARCH RESULTS page. At the bottom of the REQUEST SEARCH page, the CHOOSE COLUMNS section allows you to select columns to display.
If the Request you open in the Request’s detail page has not been submitted, a SUBMIT button displays in the area above the HEADER section and at the bottom of the page. The Request Status field displays ‘NOT SUBMITTED.’
Click the SUBMIT button to submit the Request to begin processing the Request through its Workflow.
56 Viewing Request Status and Details

Processing Requests
Figure 5-2 Request Search Result Display Options
All columns in the SELECTED COLUMNS list will be shown in the REQUEST SEARCH RESULTS page.
• Use the buttons to move columns between the AVAILABLE and SELECTED lists.
• Use the buttons to order columns in the SELECTED list.
• The REQUEST # column and any other column marked with an asterisk (*) cannot be removed from the display.
Advanced SearchEach Request Type contains Request fields that are specific to that Request Type. The ADVANCED SEARCH functionality allows you to perform searches using any field contained in a Request Type.
If you are searching for a Request of a particular Request Type, fill in the REQUEST TYPE field and click ADVANCED SEARCH. The ADVANCED SEARCH page opens, containing fields specific to the desired Request Type for more precise searches.
Viewing Request Status and Details 57

Processing Requests
Figure 5-3 Advanced Search Page for ‘Application Enhancement’ Request Type
58 Viewing Request Status and Details

Processing Requests
Saving your SearchYou can save, organize, and reuse search queries in Kintana Create. This eliminates the need to re-enter search criteria for any searches you perform on a regular basis. A search query can be saved from the following HTML interface pages:
• SEARCH REQUESTS page
• ADVANCED SEARCH REQUESTS page
• REQUEST SEARCH RESULTS page
You can access the MANAGE YOUR SAVED SEARCHES page from any of these pages by clicking MANAGE SAVED SEARCHES or selecting SEARCH > SAVED SEARCHES > MANAGE SAVED SEARCHES from the menu. The MANAGE YOUR SAVED SEARCHES page lets you create categories for organizing saved searches. See “Organizing Saved Searches” on page 60 for more information on organizing saved searches.
To save search queries from any of these pages:
1. Enter a unique name for the search query in the SAVE THIS SEARCH AS field.
The search query name can be entered:
• In the SEARCH RESULTS page or ADVANCED SEARCH RESULTS page before you perform the search.
• In the REQUEST SEARCH RESULTS page after you perform the search.
2. Click SAVE. The SAVE SEARCH confirmation window opens.
3. From the SAVE SEARCH confirmation window, you can:
Viewing Request Status and Details 59
Processing Requests
• Return to the page where you initiated the search.
• Go to the MANAGE YOUR SAVED SEARCHES page by clicking MANAGE SAVED SEARCHES.
The search query has been saved under the default NO CATEGORY section of the MANAGE YOUR SAVED SEARCHES page.
Organizing Saved SearchesSaved searches can be organized under different categories that you create in the MANAGE YOUR SAVED SEARCHES page.
To organize your saved searches:
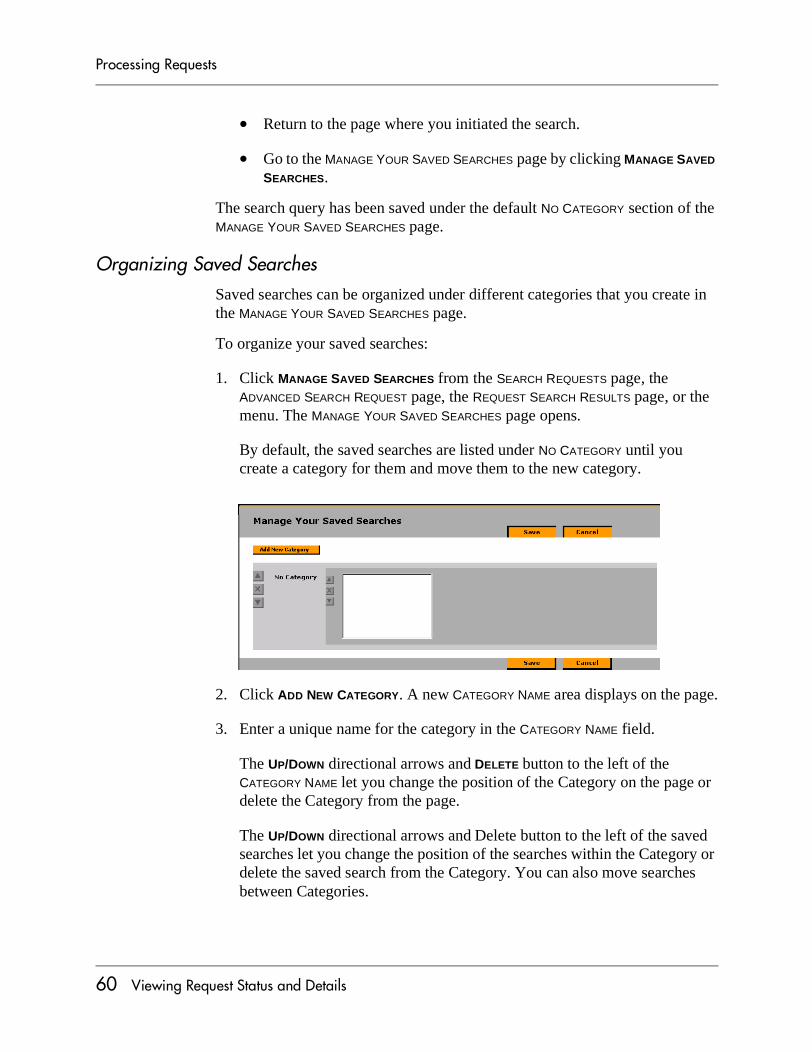
1. Click MANAGE SAVED SEARCHES from the SEARCH REQUESTS page, the ADVANCED SEARCH REQUEST page, the REQUEST SEARCH RESULTS page, or the menu. The MANAGE YOUR SAVED SEARCHES page opens.
By default, the saved searches are listed under NO CATEGORY until you create a category for them and move them to the new category.
2. Click ADD NEW CATEGORY. A new CATEGORY NAME area displays on the page.
3. Enter a unique name for the category in the CATEGORY NAME field.
The UP/DOWN directional arrows and DELETE button to the left of the CATEGORY NAME let you change the position of the Category on the page or delete the Category from the page.
The UP/DOWN directional arrows and Delete button to the left of the saved searches let you change the position of the searches within the Category or delete the saved search from the Category. You can also move searches between Categories.
60 Viewing Request Status and Details
Processing Requests
You can change the name of the Category by editing it in the Category Name field. However, the names of the saved searches cannot be changed.
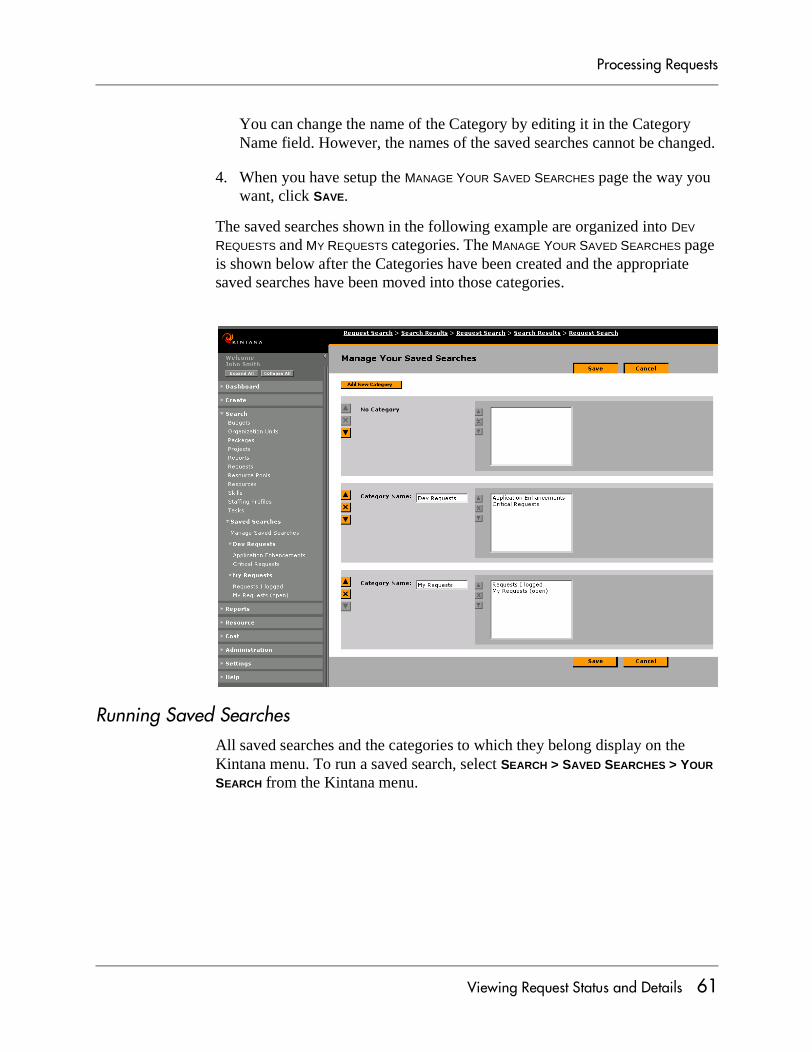
4. When you have setup the MANAGE YOUR SAVED SEARCHES page the way you want, click SAVE.
The saved searches shown in the following example are organized into DEV REQUESTS and MY REQUESTS categories. The MANAGE YOUR SAVED SEARCHES page is shown below after the Categories have been created and the appropriate saved searches have been moved into those categories.
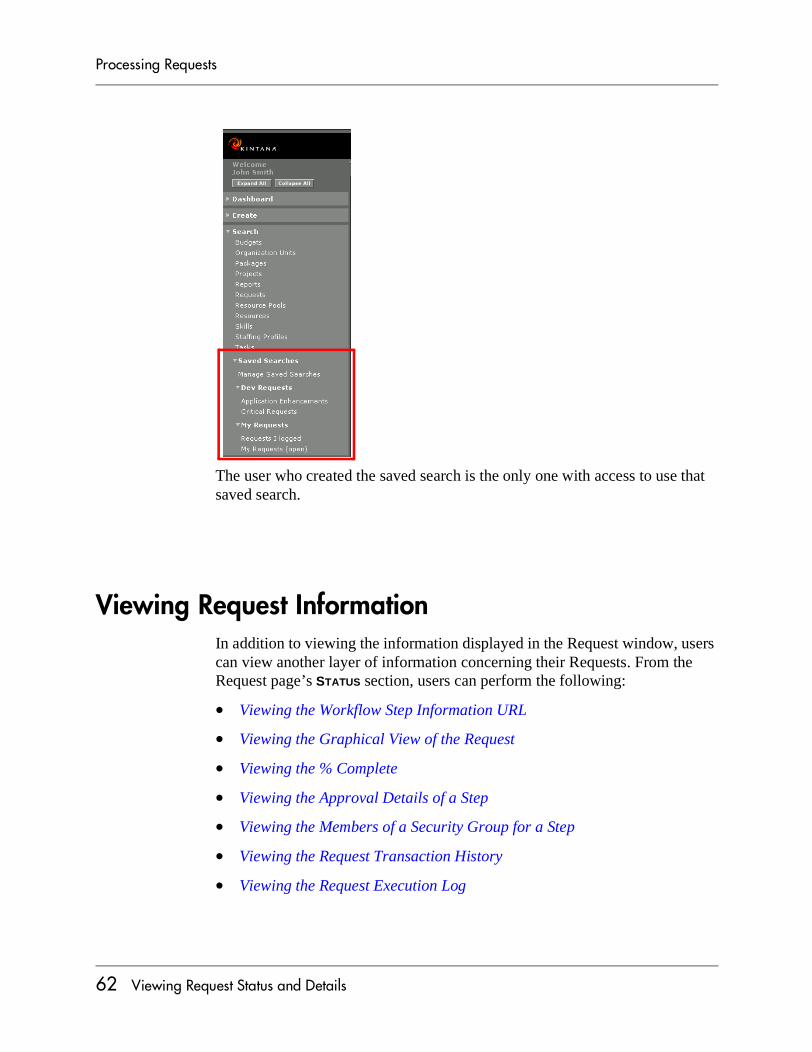
Running Saved SearchesAll saved searches and the categories to which they belong display on the Kintana menu. To run a saved search, select SEARCH > SAVED SEARCHES > YOUR SEARCH from the Kintana menu.
Viewing Request Status and Details 61
Processing Requests
The user who created the saved search is the only one with access to use that saved search.
Viewing Request InformationIn addition to viewing the information displayed in the Request window, users can view another layer of information concerning their Requests. From the Request page’s STATUS section, users can perform the following:
• Viewing the Workflow Step Information URL
• Viewing the Graphical View of the Request
• Viewing the % Complete
• Viewing the Approval Details of a Step
• Viewing the Members of a Security Group for a Step
• Viewing the Request Transaction History
• Viewing the Request Execution Log
62 Viewing Request Status and Details

Processing Requests
Viewing the Workflow Step Information URLEach Workflow Step can be associated with a Web address (URL) during Workflow configuration. This can help provide more instructions or background information on the specific step. If a URL is associated with the Workflow Step, the WORKFLOW STEP NAME will appear as a hyperlink. Click the link to display more information on the step.
Viewing the Graphical View of the RequestTo graphically view a Request’s process and its status:
1. Open the Request and scroll down to the STATUS region or click the VIEW FULL STATUS BELOW link at the top of the page.
.
2. Click GRAPHICAL VIEW. The GRAPHICAL WORKFLOW page for this Request opens.
Viewing Request Status and Details 63

Processing Requests
3. Click DONE to return to the Request page.
Viewing the % CompleteWorkflows can be configured to include a ‘CURRENT % COMPLETE’ value. A CURRENT % COMPLETE can be assigned to individual Workflow Steps. As the Request moves along the Workflow, its % Complete is updated according to each Step’s configured value. To view the CURRENT % COMPLETE information for a Request:
1. Open the Request and scroll down to the STATUS region.
64 Viewing Request Status and Details
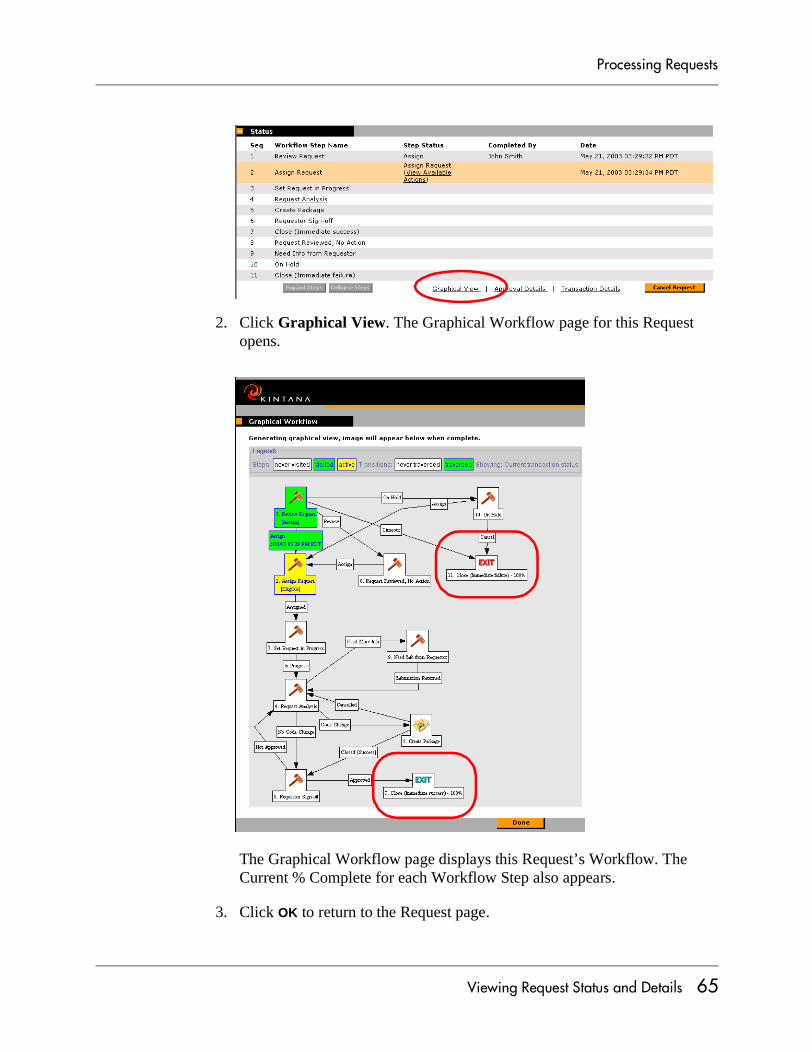
Processing Requests
.
2. Click Graphical View. The Graphical Workflow page for this Request opens.
The Graphical Workflow page displays this Request’s Workflow. The Current % Complete for each Workflow Step also appears.
3. Click OK to return to the Request page.
Viewing Request Status and Details 65
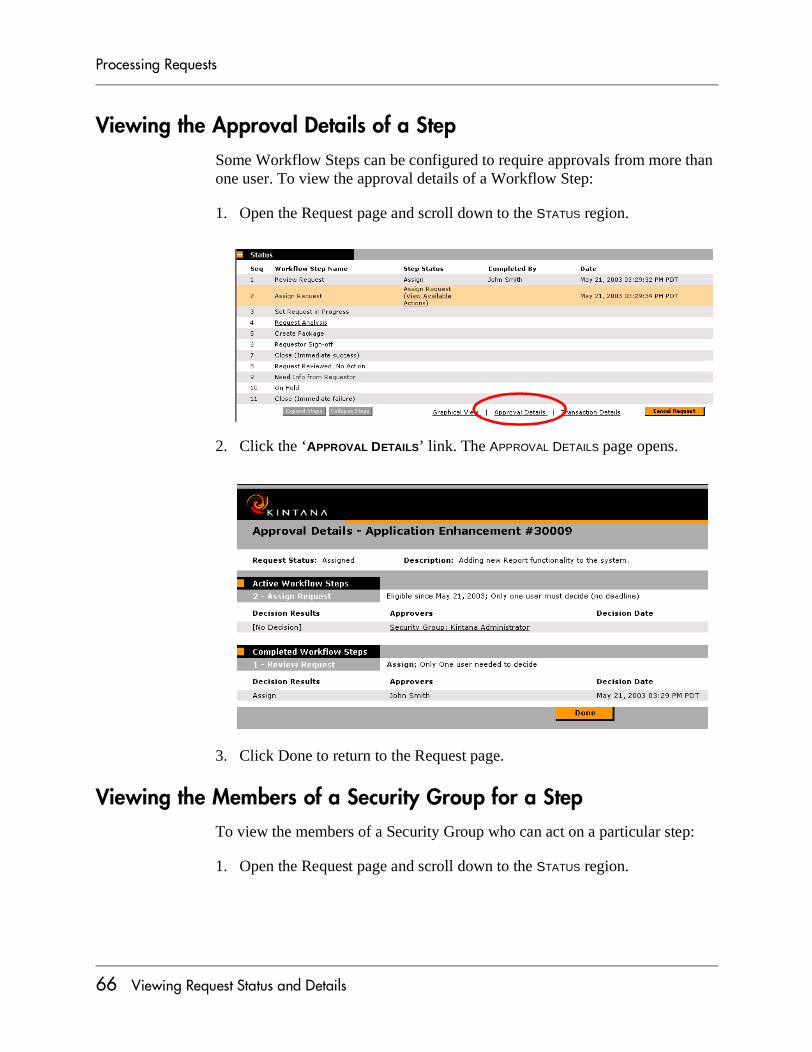
Processing Requests
Viewing the Approval Details of a StepSome Workflow Steps can be configured to require approvals from more than one user. To view the approval details of a Workflow Step:
1. Open the Request page and scroll down to the STATUS region.
2. Click the ‘APPROVAL DETAILS’ link. The APPROVAL DETAILS page opens.
3. Click Done to return to the Request page.
Viewing the Members of a Security Group for a StepTo view the members of a Security Group who can act on a particular step:
1. Open the Request page and scroll down to the STATUS region.
66 Viewing Request Status and Details

Processing Requests
2. Click the ‘APPROVAL DETAILS’ link. The APPROVAL DETAILS page opens.
3. Click the name of the Security Group you wish to view. The SECURITY GROUP MEMBERS page opens. This page opens the Security Group page in a new browser window and the names of all its members.
Viewing Request Status and Details 67

Processing Requests
4. Click OK to return to the APPROVAL DETAILS page.
Viewing the Request Transaction HistoryTo view the Request Transaction History for a particular Request:
1. Open the Request’s detail page and scroll down to the STATUS region.
2. Click the TRANSACTION DETAILS link. The REQUEST TRANSACTION HISTORY page opens.
68 Viewing Request Status and Details
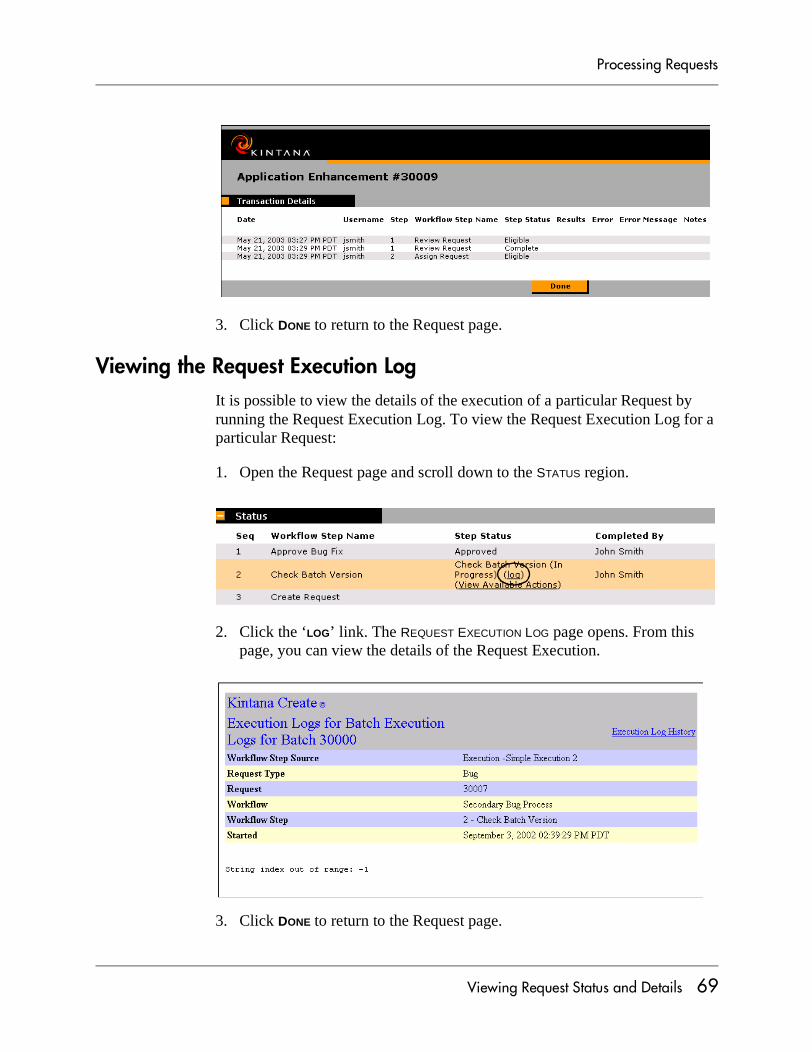
Processing Requests
3. Click DONE to return to the Request page.
Viewing the Request Execution LogIt is possible to view the details of the execution of a particular Request by running the Request Execution Log. To view the Request Execution Log for a particular Request:
1. Open the Request page and scroll down to the STATUS region.
2. Click the ‘LOG’ link. The REQUEST EXECUTION LOG page opens. From this page, you can view the details of the Request Execution.
3. Click DONE to return to the Request page.
Viewing Request Status and Details 69
Processing Requests
Using Dashboard Portlets to View Request InformationThe Kintana Dashboard enhances the interaction with your business data by providing configurable views into Kintana. Each licensed Kintana product has a number of associated portlets which can be added to a user’s Dashboard.
The Kintana Dashboard can be personalized to meet the goals of a variety of users. The Dashboard can be configured to communicate expectations to all levels of Kintana users. The Dashboard provides a central location from which managers, executives and participants can view track and update their business activity statuses. "Using the Kintana Dashboard" provides instructions for common portlet personalization tasks and highlight a few possible portlet configurations that will provide specific advantages related to a variety of business roles.
The quickest way to locate open Requests is through your Kintana Dashboard. For example, the My Requests portlet can be used to display all of your assigned requests. The Kintana Dashboard features additional portlets that can help users manage Requests. See "Using the Kintana Dashboard" for more detailed information.
70 Viewing Request Status and Details
Processing Requests
Chapter
Processing Requests
Once a Request has been submitted, it is routed along a standard business process of approvals, decisions, and actions, depending on the associated workflow. You can track and process Requests using the following procedures:
• Request Processing - Data Integrity
• Locating In Progress Requests
• Updating Request Information
• Configuring Workflow Display
Request Processing - Data IntegrityThe information gathered for a business process is necessary for the Request to reach a point of resolution. While much of the information for a Request might be available at the time of initial entry, there are other pieces of information that are acquired only after the Request starts processing. Some of this data might be crucial to the resolution of the Request.
In order to make allowances for these requirements, Kintana Create incorporates the concept of conditional behavior for fields. This ensures that the correct information, according to the defined business process, is always obtained.
Processing Requests 71

Processing Requests
Locating In Progress RequestsRequests are sometimes routed through a business process involving testing, various approvals and rework. Kintana Create users can locate any Requests that require their attention by:
• Using the Search
• Using the Notifications
Using the SearchYou can search for Requests using the SEARCH REQUESTS page. Select SEARCH > REQUEST from the menu to access this page. See “Searching for Requests” on page 53 for details.
Using the NotificationsAs a Request proceeds through its life, email notifications can be sent to alert users of pending actions. Notifications can be sent:
• At a specific step in the Request resolution process. The logic regarding when emails are sent and the content for each email is defined in the Workflow. For example, notifications can be sent when a step becomes ELIGIBLE, alerting specific users that they need to perform an action or decision. They can also be sent after a step is completed to inform assigned users of the specific outcome.
When a Request is first entered into Kintana, it might be by a non-technical person trying to solve a technical issue. For example, a user might report a problem using a Request Type called ‘SOFTWARE BUG.’ At this stage, the field by the name of ‘ESTIMATED TIME TO FIX’ is not required and appears as black text.
However, after the user submits the Request, it proceeds to the next step and is assigned a Request Status of ‘NEW.’ In this step, the person working on the problem is REQUIRED to fill in the ‘ESTIMATED TIME TO FIX’ field. The (now required) field is displayed with a red asterisk by it and does not allow the technician to advance the Request to the next step of the workflow until the field is filled in.
72 Processing Requests

Processing Requests
• When a specific field value changes.Certain fields on the Request Type can be configured to send a notification when a field changes to a specific value or any value. The following fields can be configured to send a notification: COMPANY, REQUEST GROUP, ASSIGNED GROUP, PRIORITY, APPLICATION, ASSIGNED TO, DEPARTMENT, SUB-TYPE, and CONTACT NAME.
Notifications typically instruct the user to review a Request or act on a pending Workflow step. Follow the instructions detailed in the notification for the appropriate course of action.
The notification may include a hyper-link to the Request. Enter this URL into your Web browser to proceed to this destination. If you are currently logged onto Kintana, the referenced Request opens. If you are not currently running Kintana, the Kintana logon page opens. After you logon, the referenced Request opens. Figure 6-1 shows a sample notification.
Figure 6-1 Sample Notification
Updating Request InformationIn addition to creating new Requests, you can update existing Requests in Create. You can perform the following tasks:
• Updating the Request Header
• Updating Request Details and Notes
• Updating Request References
• Updating Request Status
Processing Requests 73
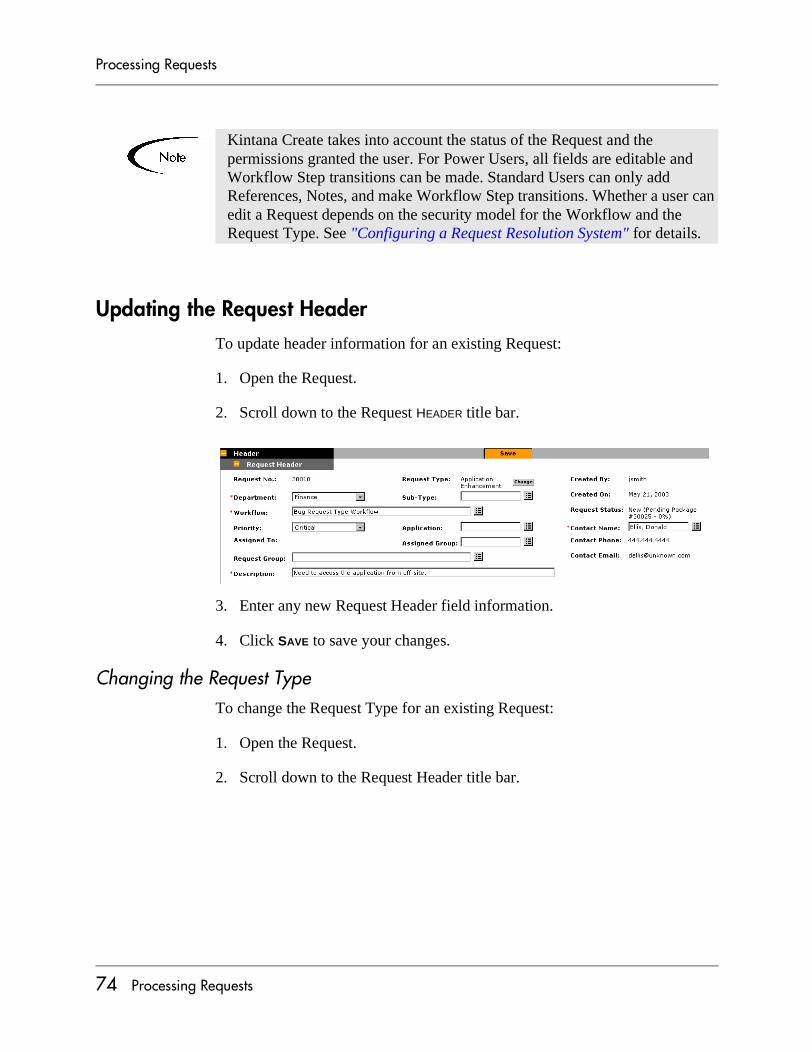
Processing Requests
Updating the Request HeaderTo update header information for an existing Request:
1. Open the Request.
2. Scroll down to the Request HEADER title bar.
3. Enter any new Request Header field information.
4. Click SAVE to save your changes.
Changing the Request TypeTo change the Request Type for an existing Request:
1. Open the Request.
2. Scroll down to the Request Header title bar.
Kintana Create takes into account the status of the Request and the permissions granted the user. For Power Users, all fields are editable and Workflow Step transitions can be made. Standard Users can only add References, Notes, and make Workflow Step transitions. Whether a user can edit a Request depends on the security model for the Workflow and the Request Type. See "Configuring a Request Resolution System" for details.
74 Processing Requests
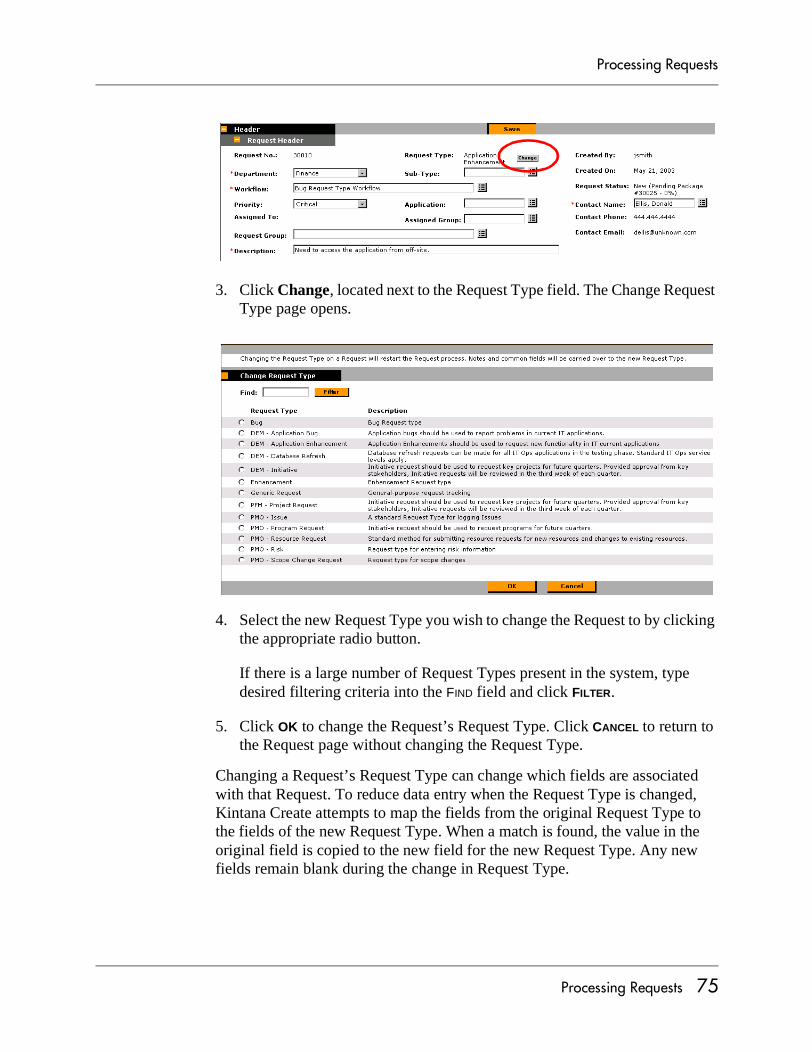
Processing Requests
3. Click Change, located next to the Request Type field. The Change Request Type page opens.
4. Select the new Request Type you wish to change the Request to by clicking the appropriate radio button.
If there is a large number of Request Types present in the system, type desired filtering criteria into the FIND field and click FILTER.
5. Click OK to change the Request’s Request Type. Click CANCEL to return to the Request page without changing the Request Type.
Changing a Request’s Request Type can change which fields are associated with that Request. To reduce data entry when the Request Type is changed, Kintana Create attempts to map the fields from the original Request Type to the fields of the new Request Type. When a match is found, the value in the original field is copied to the new field for the new Request Type. Any new fields remain blank during the change in Request Type.
Processing Requests 75
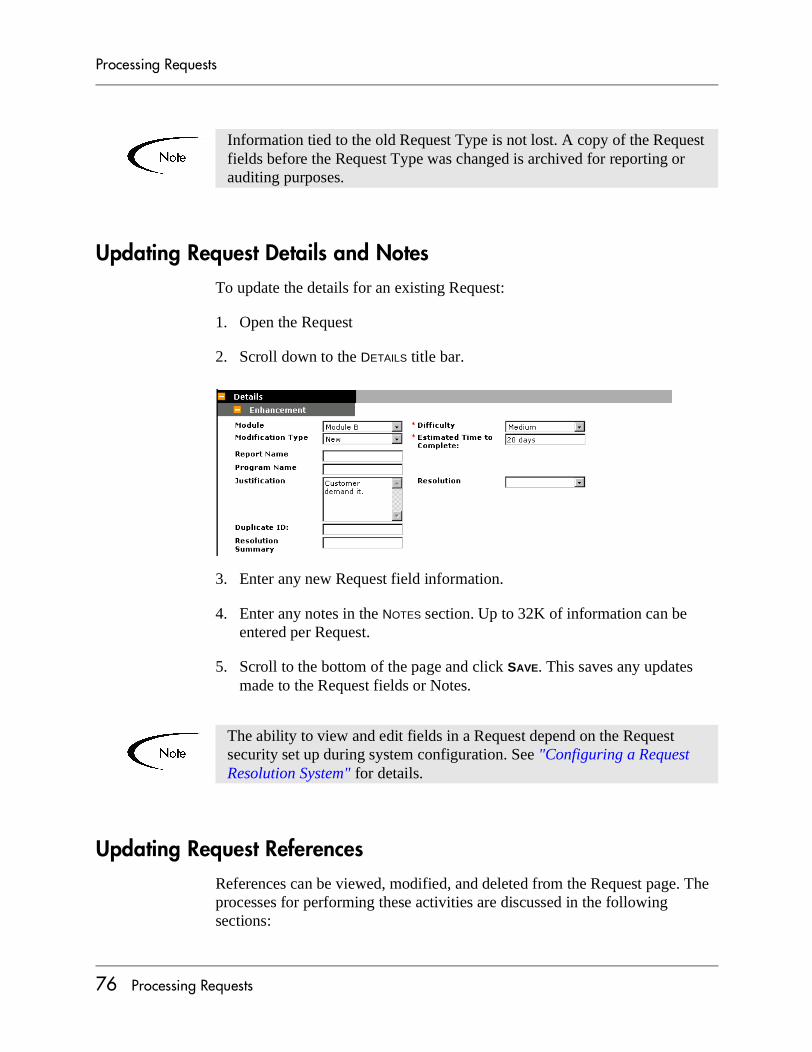
Processing Requests
Updating Request Details and NotesTo update the details for an existing Request:
1. Open the Request
2. Scroll down to the DETAILS title bar.
3. Enter any new Request field information.
4. Enter any notes in the NOTES section. Up to 32K of information can be entered per Request.
5. Scroll to the bottom of the page and click SAVE. This saves any updates made to the Request fields or Notes.
Updating Request ReferencesReferences can be viewed, modified, and deleted from the Request page. The processes for performing these activities are discussed in the following sections:
Information tied to the old Request Type is not lost. A copy of the Request fields before the Request Type was changed is archived for reporting or auditing purposes.
The ability to view and edit fields in a Request depend on the Request security set up during system configuration. See "Configuring a Request Resolution System" for details.
76 Processing Requests
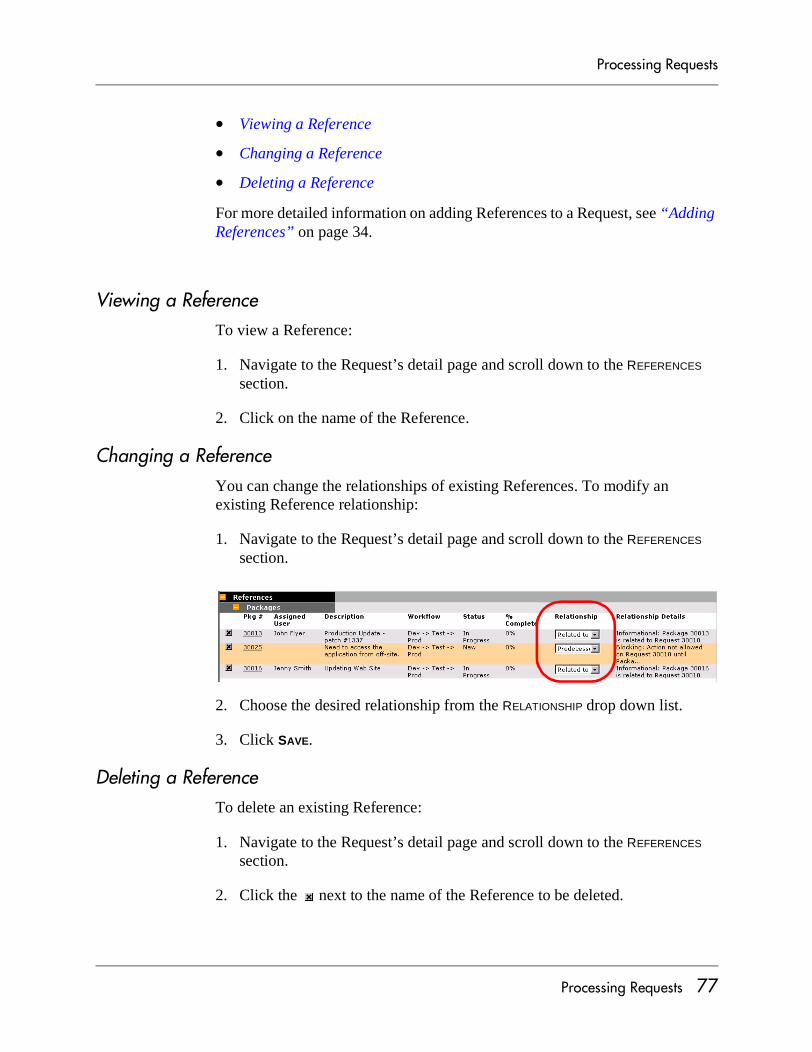
Processing Requests
• Viewing a Reference
• Changing a Reference
• Deleting a Reference
For more detailed information on adding References to a Request, see “Adding References” on page 34.
Viewing a ReferenceTo view a Reference:
1. Navigate to the Request’s detail page and scroll down to the REFERENCES section.
2. Click on the name of the Reference.
Changing a ReferenceYou can change the relationships of existing References. To modify an existing Reference relationship:
1. Navigate to the Request’s detail page and scroll down to the REFERENCES section.
2. Choose the desired relationship from the RELATIONSHIP drop down list.
3. Click SAVE.
Deleting a ReferenceTo delete an existing Reference:
1. Navigate to the Request’s detail page and scroll down to the REFERENCES section.
2. Click the next to the name of the Reference to be deleted.
Processing Requests 77

Processing Requests
Updating Request StatusTo update the status of a particular Request:
1. Open the Request. Any AVAILABLE ACTIONS are displayed at the top of the page.
Click an Action button (for example, ASSIGN) to perform the Workflow Step it specifies.
Depending on the nature of the action, the Workflow Action page may open, presenting more detailed choices. For example, if you select the Assign transition, you may be required to specify the Assigned To user. In this case, a page would open to gather this information.
78 Processing Requests
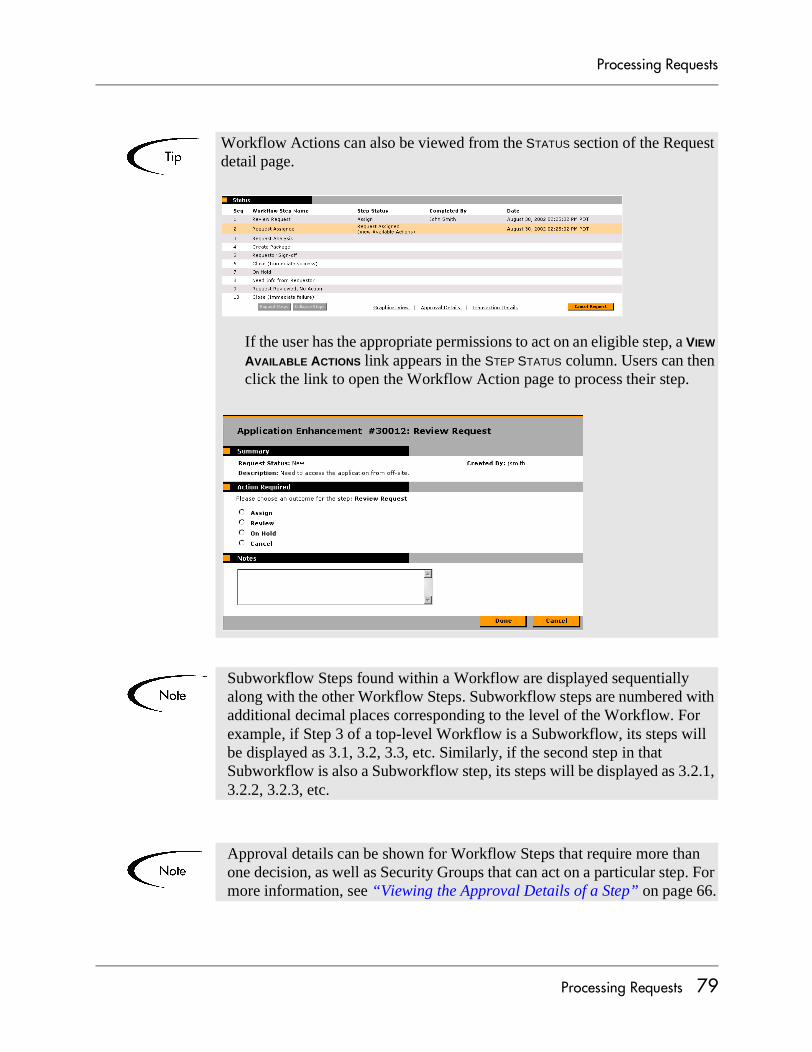
Processing Requests
Workflow Actions can also be viewed from the STATUS section of the Request detail page.
If the user has the appropriate permissions to act on an eligible step, a VIEW AVAILABLE ACTIONS link appears in the STEP STATUS column. Users can then click the link to open the Workflow Action page to process their step.
Subworkflow Steps found within a Workflow are displayed sequentially along with the other Workflow Steps. Subworkflow steps are numbered with additional decimal places corresponding to the level of the Workflow. For example, if Step 3 of a top-level Workflow is a Subworkflow, its steps will be displayed as 3.1, 3.2, 3.3, etc. Similarly, if the second step in that Subworkflow is also a Subworkflow step, its steps will be displayed as 3.2.1, 3.2.2, 3.2.3, etc.
Approval details can be shown for Workflow Steps that require more than one decision, as well as Security Groups that can act on a particular step. For more information, see “Viewing the Approval Details of a Step” on page 66.
Processing Requests 79
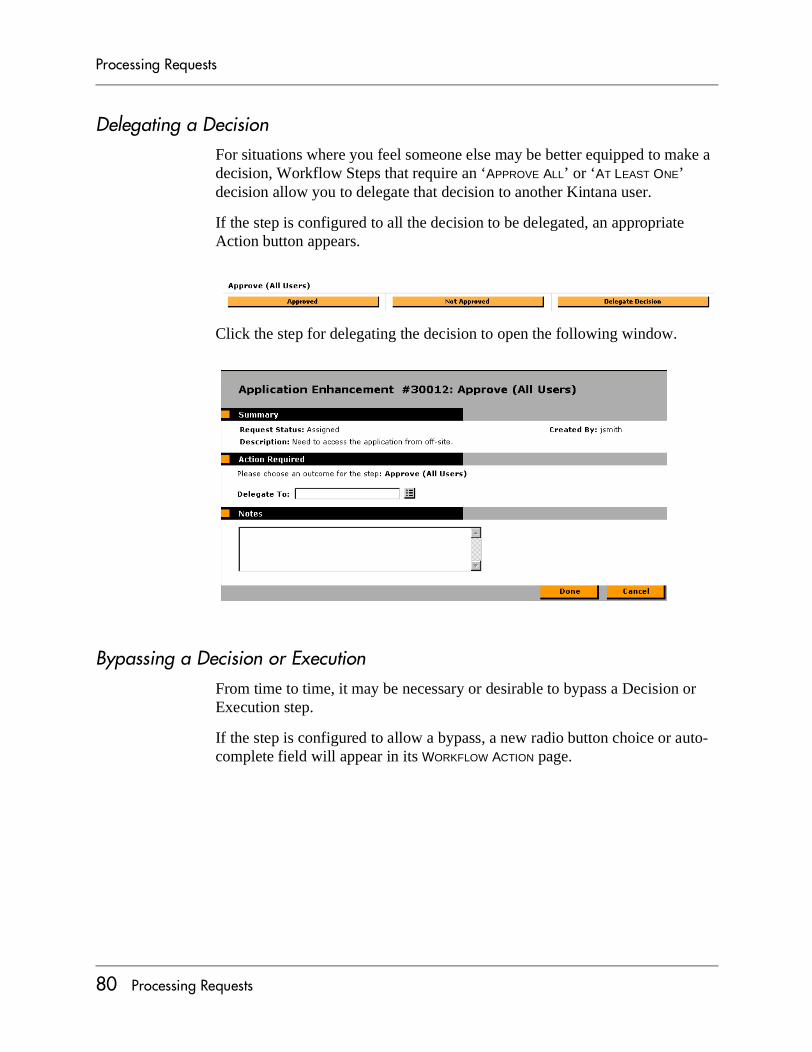
Processing Requests
Delegating a DecisionFor situations where you feel someone else may be better equipped to make a decision, Workflow Steps that require an ‘APPROVE ALL’ or ‘AT LEAST ONE’ decision allow you to delegate that decision to another Kintana user.
If the step is configured to all the decision to be delegated, an appropriate Action button appears.
Click the step for delegating the decision to open the following window.
Bypassing a Decision or ExecutionFrom time to time, it may be necessary or desirable to bypass a Decision or Execution step.
If the step is configured to allow a bypass, a new radio button choice or auto-complete field will appear in its WORKFLOW ACTION page.
80 Processing Requests
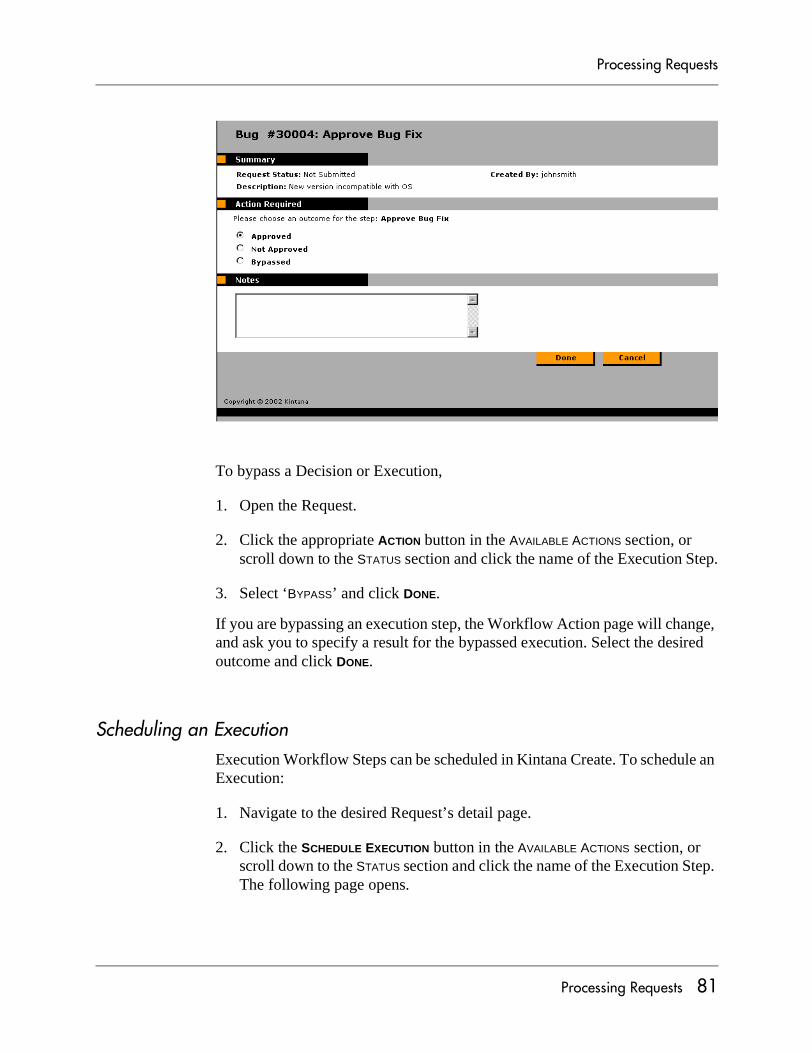
Processing Requests
To bypass a Decision or Execution,
1. Open the Request.
2. Click the appropriate ACTION button in the AVAILABLE ACTIONS section, or scroll down to the STATUS section and click the name of the Execution Step.
3. Select ‘BYPASS’ and click DONE.
If you are bypassing an execution step, the Workflow Action page will change, and ask you to specify a result for the bypassed execution. Select the desired outcome and click DONE.
Scheduling an ExecutionExecution Workflow Steps can be scheduled in Kintana Create. To schedule an Execution:
1. Navigate to the desired Request’s detail page.
2. Click the SCHEDULE EXECUTION button in the AVAILABLE ACTIONS section, or scroll down to the STATUS section and click the name of the Execution Step. The following page opens.
Processing Requests 81
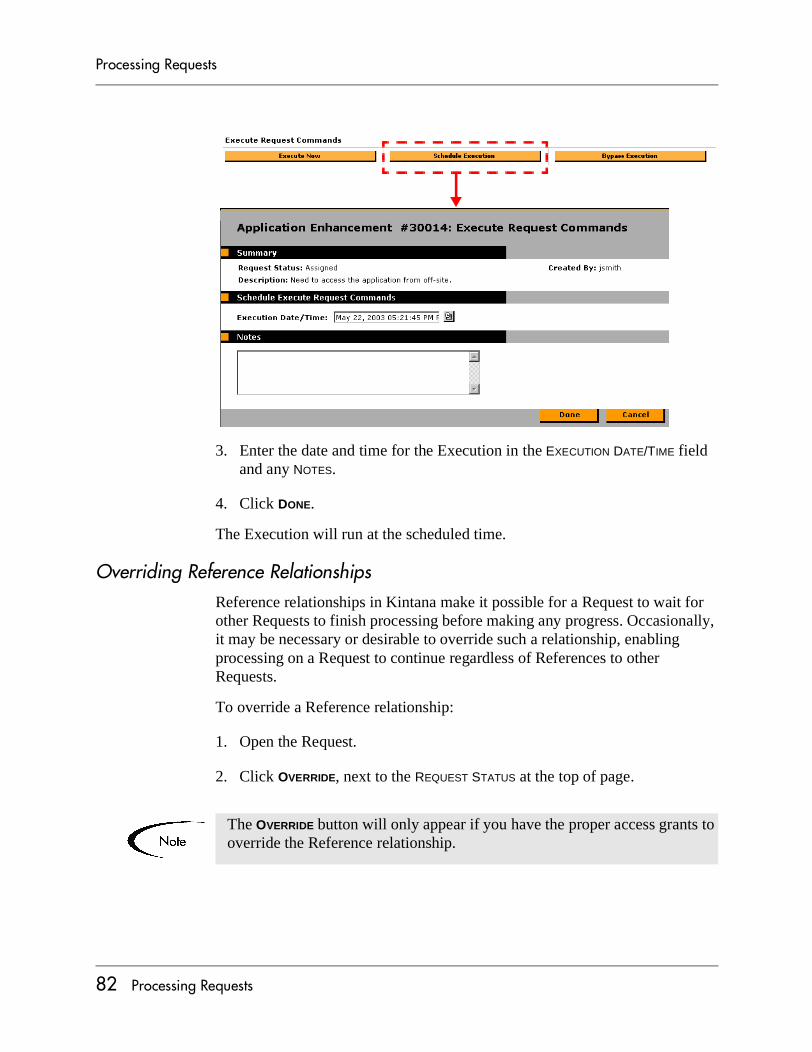
Processing Requests
3. Enter the date and time for the Execution in the EXECUTION DATE/TIME field and any NOTES.
4. Click DONE.
The Execution will run at the scheduled time.
Overriding Reference RelationshipsReference relationships in Kintana make it possible for a Request to wait for other Requests to finish processing before making any progress. Occasionally, it may be necessary or desirable to override such a relationship, enabling processing on a Request to continue regardless of References to other Requests.
To override a Reference relationship:
1. Open the Request.
2. Click OVERRIDE, next to the REQUEST STATUS at the top of page.
The OVERRIDE button will only appear if you have the proper access grants to override the Reference relationship.
82 Processing Requests
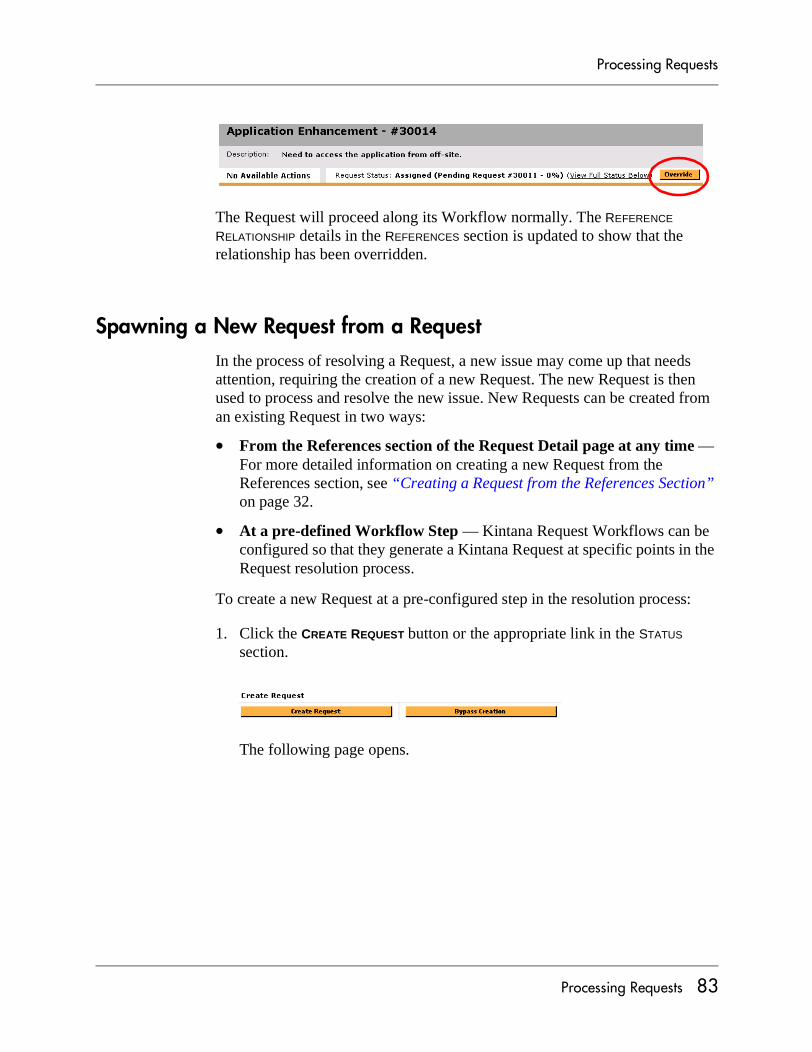
Processing Requests
The Request will proceed along its Workflow normally. The REFERENCE RELATIONSHIP details in the REFERENCES section is updated to show that the relationship has been overridden.
Spawning a New Request from a RequestIn the process of resolving a Request, a new issue may come up that needs attention, requiring the creation of a new Request. The new Request is then used to process and resolve the new issue. New Requests can be created from an existing Request in two ways:
• From the References section of the Request Detail page at any time — For more detailed information on creating a new Request from the References section, see “Creating a Request from the References Section” on page 32.
• At a pre-defined Workflow Step — Kintana Request Workflows can be configured so that they generate a Kintana Request at specific points in the Request resolution process.
To create a new Request at a pre-configured step in the resolution process:
1. Click the CREATE REQUEST button or the appropriate link in the STATUS section.
The following page opens.
Processing Requests 83

Processing Requests
2. Select a Request Type from the REQUEST TYPE field and click CREATE. The Request Submission page opens.
3. Fill in all appropriate fields.
At this point, the new Request has been created but not submitted.
4. Submit the new Request by clicking SUBMIT.
This moves the CREATE REQUEST step of the original Request to a step status of SUCCESSFUL. The new Request is referenced as the child of the original Request.
Users can then view the details of the Request in the newly created Request’s STATUS section. Overall Request information can also be viewed from the References section of the original Request.
Creating a New Package From the RequestKintana Create is tightly integrated with Kintana Deliver, providing a closed loop system for Requests that might require software changes. In the process of resolving a Request, you may need to deploy some code using a Kintana Package. From the Request, you can create a Package in one of two ways:
• From the References section of the Request Detail page at any time — For more detailed information on creating a new Package from the REFERENCES section, see “Attaching Packages” on page 37.
• At a pre-defined Workflow Step — Kintana Request Workflows can be configured so that they generate a Kintana Package at specific points in the Request resolution process.
84 Processing Requests
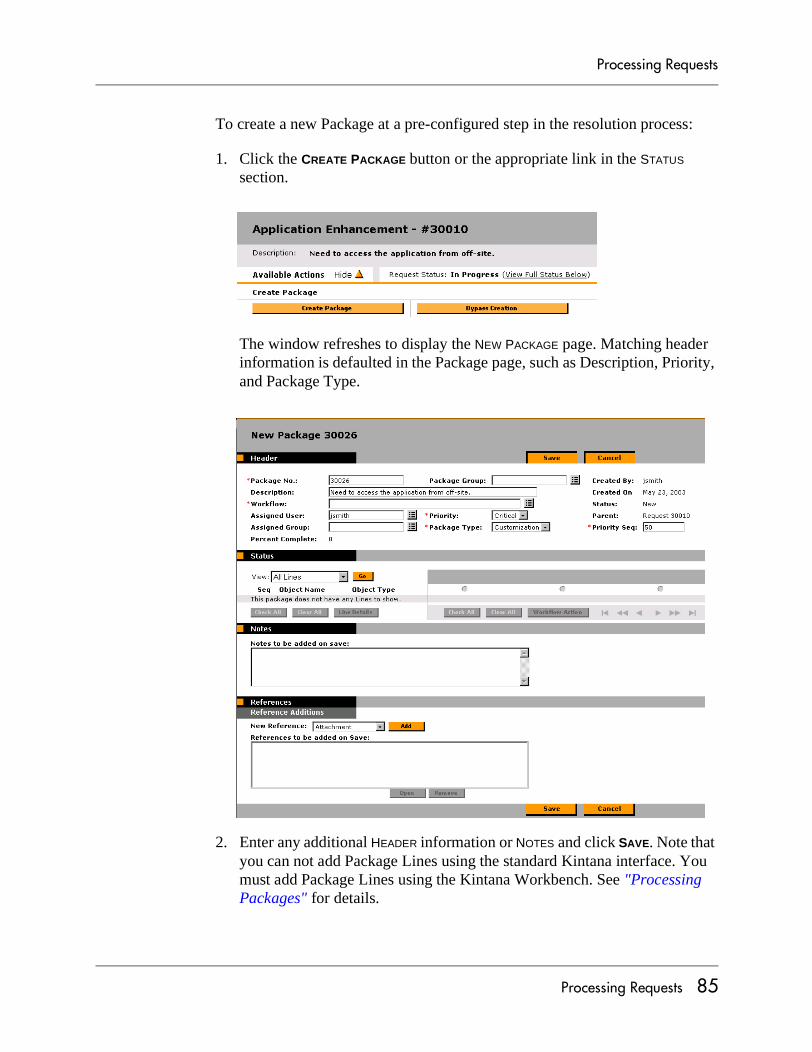
Processing Requests
To create a new Package at a pre-configured step in the resolution process:
1. Click the CREATE PACKAGE button or the appropriate link in the STATUS section.
The window refreshes to display the NEW PACKAGE page. Matching header information is defaulted in the Package page, such as Description, Priority, and Package Type.
2. Enter any additional HEADER information or NOTES and click SAVE. Note that you can not add Package Lines using the standard Kintana interface. You must add Package Lines using the Kintana Workbench. See "Processing Packages" for details.
Processing Requests 85

Processing Requests
Once the Package is completed, it automatically sends its final state (Closed - Success, Closed - Failed, Closed - Mixed, Cancelled) back to the Request. The Request then uses this final state as the result for the CREATE PACKAGE Workflow Step and moves forward based on the given Workflow definition.
Re-Opening Closed RequestsA Request can be re-opened at a pre-configured step in the process. For example, if a bug Request is generated which is subsequently closed and the bug reoccurs, the Request can be re-opened instead of creating or copying a new one.
Only the following users can re-open a Request:
• Kintana Create Managers
• Creators of the Request
• Assigned Users
• Members of the Assigned Group
• Members of one of the Groups authorized to act on the Workflow
To re-open a Request:
1. Open the page for the closed Request that you would like to re-open.
2. Click REOPEN REQUEST.
86 Processing Requests
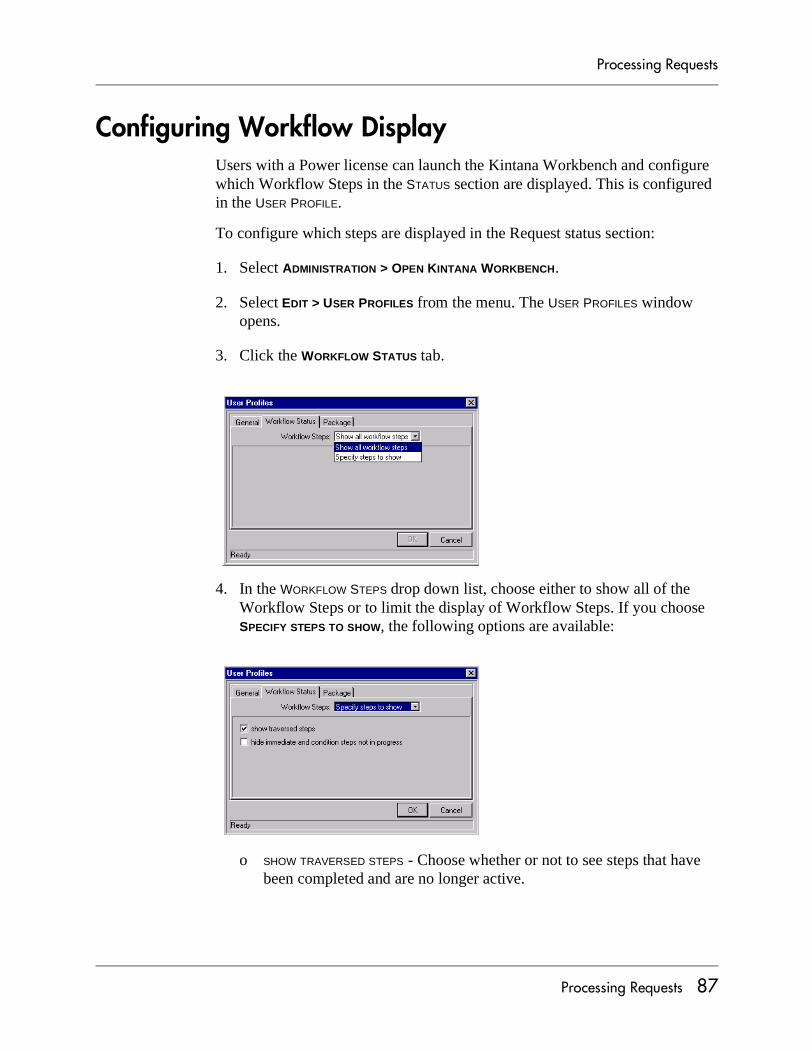
Processing Requests
Configuring Workflow DisplayUsers with a Power license can launch the Kintana Workbench and configure which Workflow Steps in the STATUS section are displayed. This is configured in the USER PROFILE.
To configure which steps are displayed in the Request status section:
1. Select ADMINISTRATION > OPEN KINTANA WORKBENCH.
2. Select EDIT > USER PROFILES from the menu. The USER PROFILES window opens.
3. Click the WORKFLOW STATUS tab.
4. In the WORKFLOW STEPS drop down list, choose either to show all of the Workflow Steps or to limit the display of Workflow Steps. If you choose SPECIFY STEPS TO SHOW, the following options are available:
o SHOW TRAVERSED STEPS - Choose whether or not to see steps that have been completed and are no longer active.
Processing Requests 87

Processing Requests
o HIDE IMMEDIATE AND CONDITION STEPS NOT IN PROGRESS - Since immediate Execution or Condition steps typically cannot be acted on, you can hide these steps.
88 Processing Requests
Processing Requests
Chapter
Managing Requests
In Kintana Create, users define and submit Requests through an automated business process. Kintana Create also lets you manage Requests by:
• Viewing them at any time
• Changing the information when necessary
• Deleting or cancelling Requests
• Running pre-defined reports that display the Request's current status
To learn more about these tools for managing Requests, see the following sections:
• Deleting Requests
• Canceling Requests
• Using Reports to Manage Requests
• Using the Kintana Dashboard to Manage Requests
Deleting RequestsRequests can be deleted from Kintana. In order for a user to delete a Request, the user must have the CREATE: MANAGE REQUESTS ACCESS GRANT. Only saved Requests can be deleted.
To delete a Request:
1. Open the Request.
Managing Requests 89
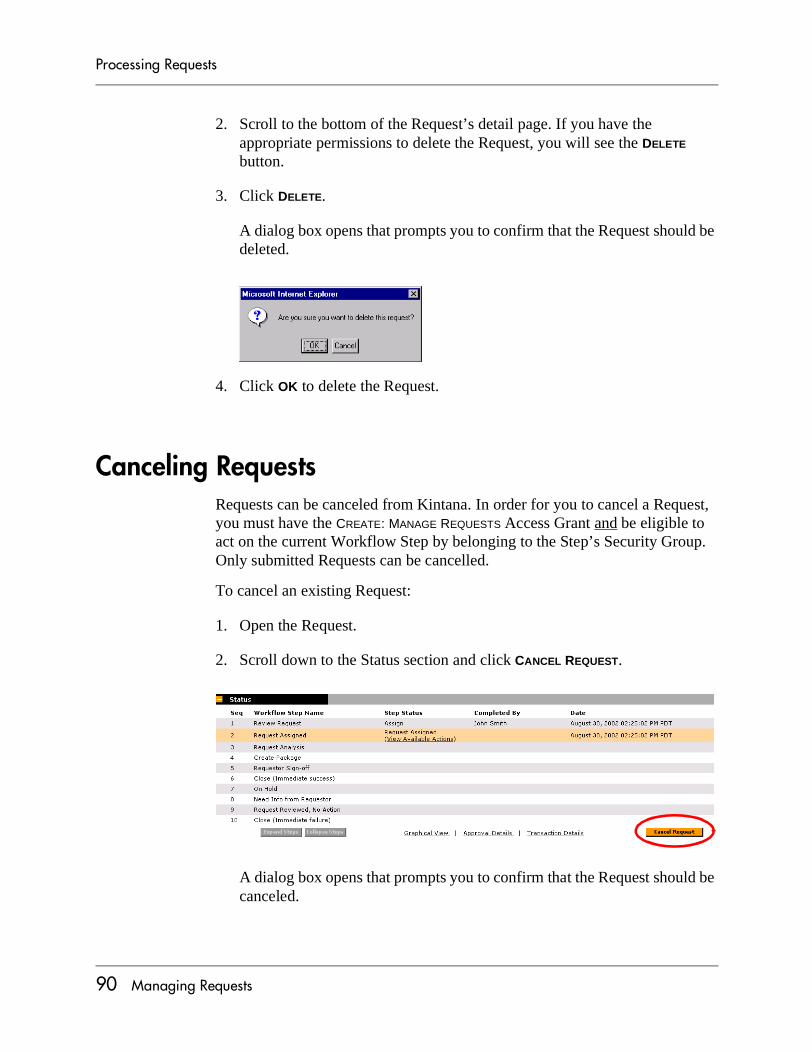
Processing Requests
2. Scroll to the bottom of the Request’s detail page. If you have the appropriate permissions to delete the Request, you will see the DELETE button.
3. Click DELETE.
A dialog box opens that prompts you to confirm that the Request should be deleted.
4. Click OK to delete the Request.
Canceling RequestsRequests can be canceled from Kintana. In order for you to cancel a Request, you must have the CREATE: MANAGE REQUESTS Access Grant and be eligible to act on the current Workflow Step by belonging to the Step’s Security Group. Only submitted Requests can be cancelled.
To cancel an existing Request:
1. Open the Request.
2. Scroll down to the Status section and click CANCEL REQUEST.
A dialog box opens that prompts you to confirm that the Request should be canceled.
90 Managing Requests

Processing Requests
3. Click OK to cancel the Request. This cancels each Workflow Step and sets the Request Status to CANCELLED.
Using Reports to Manage RequestsKintana Create features a pre-defined set of HTML-based Reports that can be accessed using a Web browser. The Reports provided with Kintana Create display current detailed status of the Request’s activity at any point in time. The following reports will help track and manage your Requests.
Resource Load Report by PriorityThe Resource Load Report by Priority lists open Requests assigned to users based on the filtering criteria that is entered. The report lists the Request count per priority as well as the average age (from Request creation) of the Requests in each priority bucket.
Request Detail ReportThe REQUEST DETAIL Report is the primary report in Kintana Create. It reports on Requests by a large number of selection criteria. For each Request, the report can display:
• All the notes and/or References attached to the Request
• The current status of the Request
• A listing of transacted steps
• All the populated detail fields for the Request
The reports listed in this section are defined in greater detail in "Kintana Reports". See this document for detailed information on the Report screens and extended functionality.
Managing Requests 91
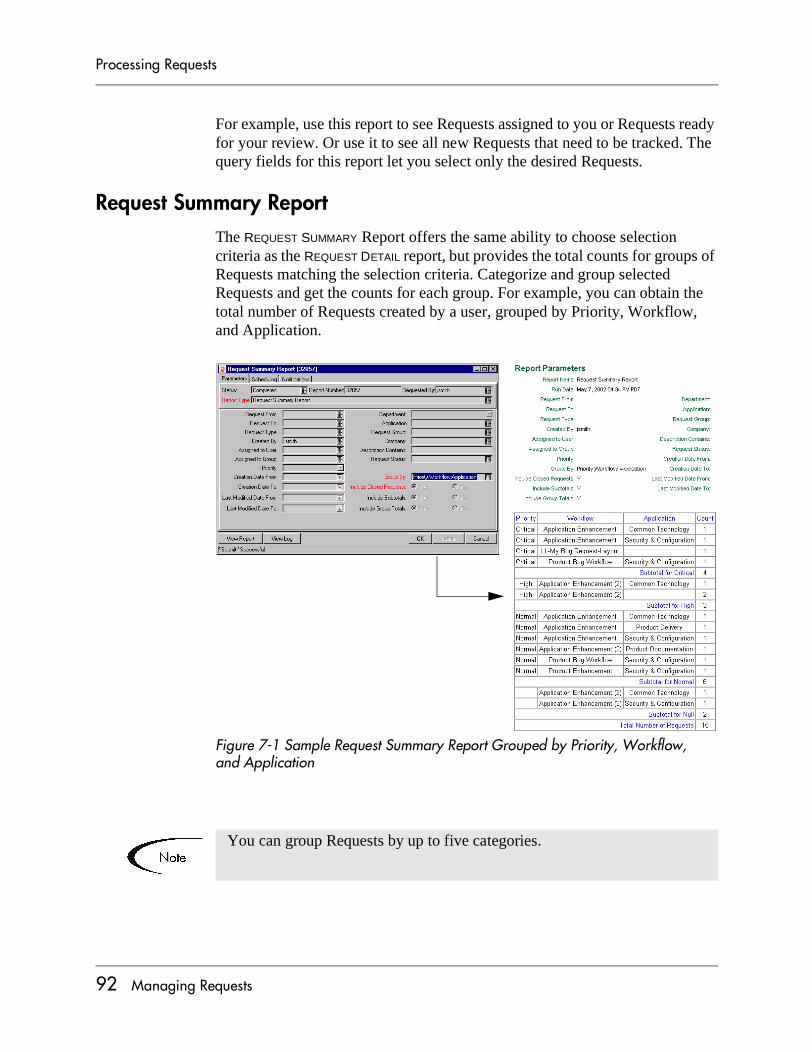
Processing Requests
For example, use this report to see Requests assigned to you or Requests ready for your review. Or use it to see all new Requests that need to be tracked. The query fields for this report let you select only the desired Requests.
Request Summary ReportThe REQUEST SUMMARY Report offers the same ability to choose selection criteria as the REQUEST DETAIL report, but provides the total counts for groups of Requests matching the selection criteria. Categorize and group selected Requests and get the counts for each group. For example, you can obtain the total number of Requests created by a user, grouped by Priority, Workflow, and Application.
Figure 7-1 Sample Request Summary Report Grouped by Priority, Workflow, and Application
You can group Requests by up to five categories.
92 Managing Requests

Processing Requests
Submitting a ReportFor information on submitting a Request specific report, refer to “Kintana Create Reports” on page 95.
Using the Kintana Dashboard to Manage RequestsThe Dashboard provides a powerful tool for managing your Kintana Create Requests. From the Dashboard, managers can quickly view all incoming Requests and assign them to team members. They can also configure additional portlets to monitor the Request activity based on the assigned to user, priority or Request Type.
For more detailed information, see "Using the Kintana Dashboard".
Managing Requests 93

Processing Requests
94 Managing Requests
Processing Requests
Chapter
Kintana Create Reports
Kintana Create features a pre-defined set of HTML-based reports that are accessed through a Web browser. The reports provided with Kintana Create allow users to view the current detailed status of their Kintana data at any point in time. Kintana’s Decision Support System (DSS) reports provide users with a high level overview of their initiatives through graphical summary reports. Kintana Create also allows users to build their own reports.
This chapter describes the procedures used to submit and view reports in Kintana Create using both the Kintana Workbench and Kintana’s HTML interface. The following topics are discussed:
• “Kintana Reports Overview” on page 95
• “Processing Kintana Reports” on page 101
Kintana Reports OverviewKintana features two types of reports: standard reports and Decision Support System (DSS) reports. Kintana’s standard reports output text that provides information on your specific entities or configurations. Kintana’s DSS reports feature a graphical data display which helps evaluate key system and process performance. The following sections discuss each type of Kintana report and list the reports commonly used in Kintana Create:
• Standard Reports
• Decision Support System (DSS) Reports
Kintana Create Reports 95

Processing Requests
Standard ReportsThe standard reports that ship with Kintana Create are listed in the following table. These reports can be accessed through both the Kintana Workbench and the HTML interface. A complete list of Kintana Reports, including details for parameters in each report, are in "Kintana Reports".
The following table lists all standard Report Types that have a product scope of KINTANA CREATE or ALL PRODUCTS.
Table 8-1. Standard Kintana Create Reports (Non-DSS)
Report Description
Contact Detail Report Queries the Contacts entered in your Kintana Create system as you enter and update Requests.
Contact Synchronization Report Provides an interface for ensuring that the Create contacts are properly defined. This report can detect all Kintana users with no corresponding contact record and then create a contact record for them. This report also searches for and corrects discrepancies between the contact and user information within the Kintana system.
Notification History Report Workflow report that lets you view notifications that have been sent or are pending. It contains such information as: Notification Date, Entity Type, Subject of the Notification, and Recipient List.
Portlet Detail Report This is a System Administrator Report used to return the details of a Portlet or range of Portlets. It lists the Portlet’s columns, as well as the SQL query used by the Portlet to retrieve data from the system. The Portlet’s filter fields and security configuration can also be listed.
Report Type Detail Report Displays the parameters and parameter details for each Report Type. It also displays the exact commands used to run the report.
Request Detail (Filter by Custom Fields) Report
Similar to the Request Detail Report except that you can filter for Requests by values in custom fields. Specify the particular Request Type to report on, select up to four of the custom fields for that Request Type and run the report for specific values for each of those fields.
Request Detail Report Displays Requests based on a large number of selection criteria.
Request Header Type Detail Report Administration report that lists the detailed set-up information for the Request Header Types. This report can be used to audit your set-up as well as help debug any problems with Requests using a given Request Header Type. You can also display information about field filters that have been selected for the Assigned To, Assigned Group and Contacts fields.
96 Kintana Create Reports
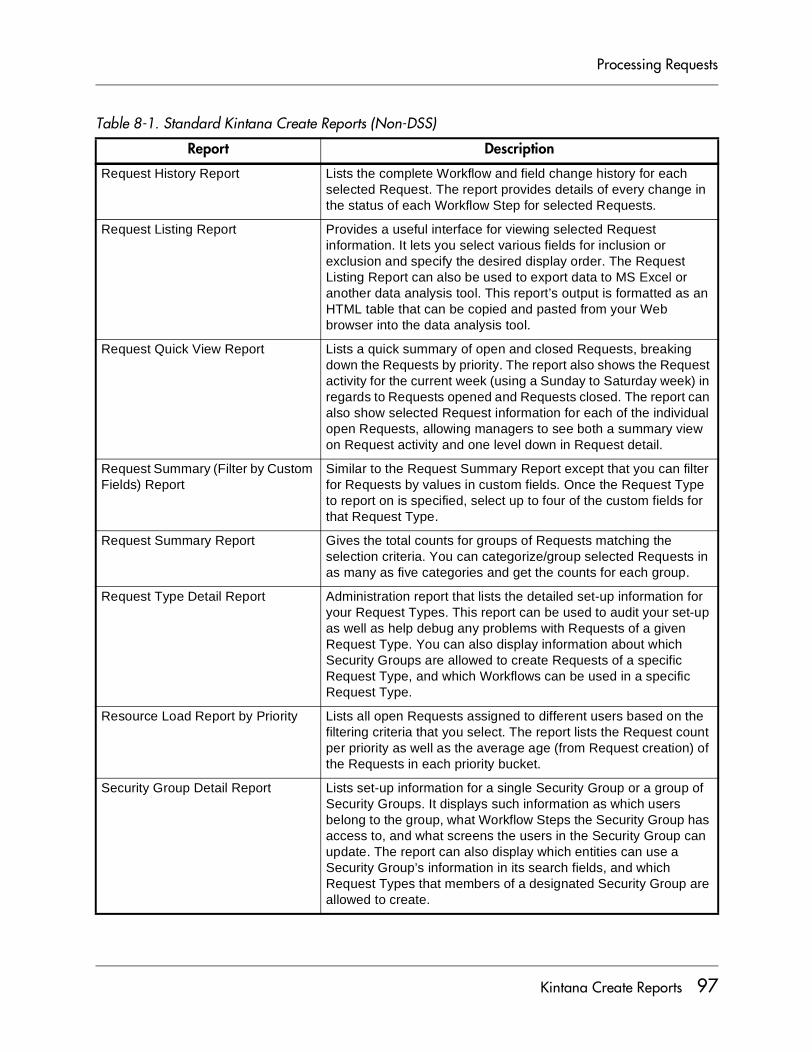
Processing Requests
Request History Report Lists the complete Workflow and field change history for each selected Request. The report provides details of every change in the status of each Workflow Step for selected Requests.
Request Listing Report Provides a useful interface for viewing selected Request information. It lets you select various fields for inclusion or exclusion and specify the desired display order. The Request Listing Report can also be used to export data to MS Excel or another data analysis tool. This report’s output is formatted as an HTML table that can be copied and pasted from your Web browser into the data analysis tool.
Request Quick View Report Lists a quick summary of open and closed Requests, breaking down the Requests by priority. The report also shows the Request activity for the current week (using a Sunday to Saturday week) in regards to Requests opened and Requests closed. The report can also show selected Request information for each of the individual open Requests, allowing managers to see both a summary view on Request activity and one level down in Request detail.
Request Summary (Filter by Custom Fields) Report
Similar to the Request Summary Report except that you can filter for Requests by values in custom fields. Once the Request Type to report on is specified, select up to four of the custom fields for that Request Type.
Request Summary Report Gives the total counts for groups of Requests matching the selection criteria. You can categorize/group selected Requests in as many as five categories and get the counts for each group.
Request Type Detail Report Administration report that lists the detailed set-up information for your Request Types. This report can be used to audit your set-up as well as help debug any problems with Requests of a given Request Type. You can also display information about which Security Groups are allowed to create Requests of a specific Request Type, and which Workflows can be used in a specific Request Type.
Resource Load Report by Priority Lists all open Requests assigned to different users based on the filtering criteria that you select. The report lists the Request count per priority as well as the average age (from Request creation) of the Requests in each priority bucket.
Security Group Detail Report Lists set-up information for a single Security Group or a group of Security Groups. It displays such information as which users belong to the group, what Workflow Steps the Security Group has access to, and what screens the users in the Security Group can update. The report can also display which entities can use a Security Group’s information in its search fields, and which Request Types that members of a designated Security Group are allowed to create.
Table 8-1. Standard Kintana Create Reports (Non-DSS)
Report Description
Kintana Create Reports 97
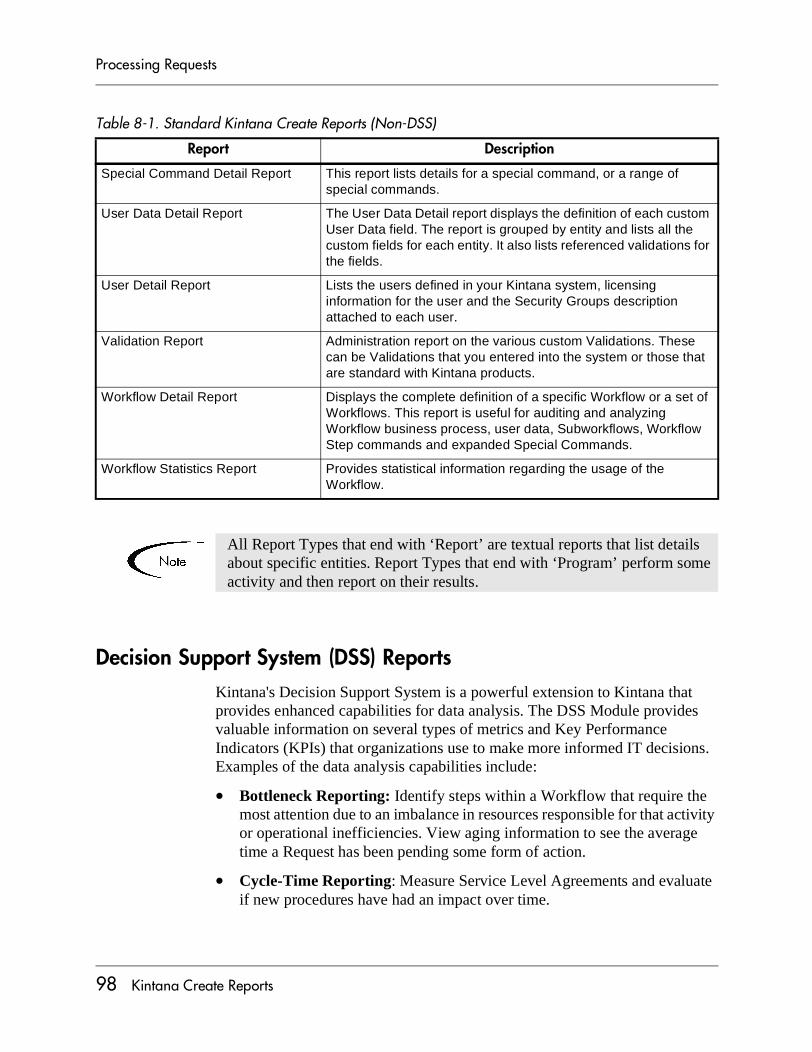
Processing Requests
Decision Support System (DSS) ReportsKintana's Decision Support System is a powerful extension to Kintana that provides enhanced capabilities for data analysis. The DSS Module provides valuable information on several types of metrics and Key Performance Indicators (KPIs) that organizations use to make more informed IT decisions. Examples of the data analysis capabilities include:
• Bottleneck Reporting: Identify steps within a Workflow that require the most attention due to an imbalance in resources responsible for that activity or operational inefficiencies. View aging information to see the average time a Request has been pending some form of action.
• Cycle-Time Reporting: Measure Service Level Agreements and evaluate if new procedures have had an impact over time.
Special Command Detail Report This report lists details for a special command, or a range of special commands.
User Data Detail Report The User Data Detail report displays the definition of each custom User Data field. The report is grouped by entity and lists all the custom fields for each entity. It also lists referenced validations for the fields.
User Detail Report Lists the users defined in your Kintana system, licensing information for the user and the Security Groups description attached to each user.
Validation Report Administration report on the various custom Validations. These can be Validations that you entered into the system or those that are standard with Kintana products.
Workflow Detail Report Displays the complete definition of a specific Workflow or a set of Workflows. This report is useful for auditing and analyzing Workflow business process, user data, Subworkflows, Workflow Step commands and expanded Special Commands.
Workflow Statistics Report Provides statistical information regarding the usage of the Workflow.
Table 8-1. Standard Kintana Create Reports (Non-DSS)
Report Description
All Report Types that end with ‘Report’ are textual reports that list details about specific entities. Report Types that end with ‘Program’ perform some activity and then report on their results.
98 Kintana Create Reports

Processing Requests
• Throughput Reporting: Measure the volume of Requests over a period of time, and categorize them to determine where most of your organization's time and effort has been spent.
• Trend & Exception Reporting: Quickly identify trends and exceptions in summarized reports that are based on the transactional data captured by Kintana Create.
Key features of the Decision Support System include:
• Real time graphical reporting in a Web-based interface
• Access to the summarized and detailed data behind each graphical report
• Exporting data in a textual format that can be easily imported into Microsoft Excel
Understanding the ReportsEvery DSS report provides a graphical summary of Request transaction-level data. Many reports display data over a specified time range (weeks, months or years). Others display information by Workflow or Environment. Report parameters can be specified to further refine the data retrieved by the reports.
Graphical Data Representation
Each DSS report provides a graphical representation of the data included in the report. Graphical representations provide several benefits over data presented in a text-only format:
• Trends in the data are more easily identified
• Exceptions in the data can be quickly identified
• Data can be summarized concisely and more easily interpreted
An example of graphical report output is shown below in Figure 8-1.
Kintana Create Reports 99
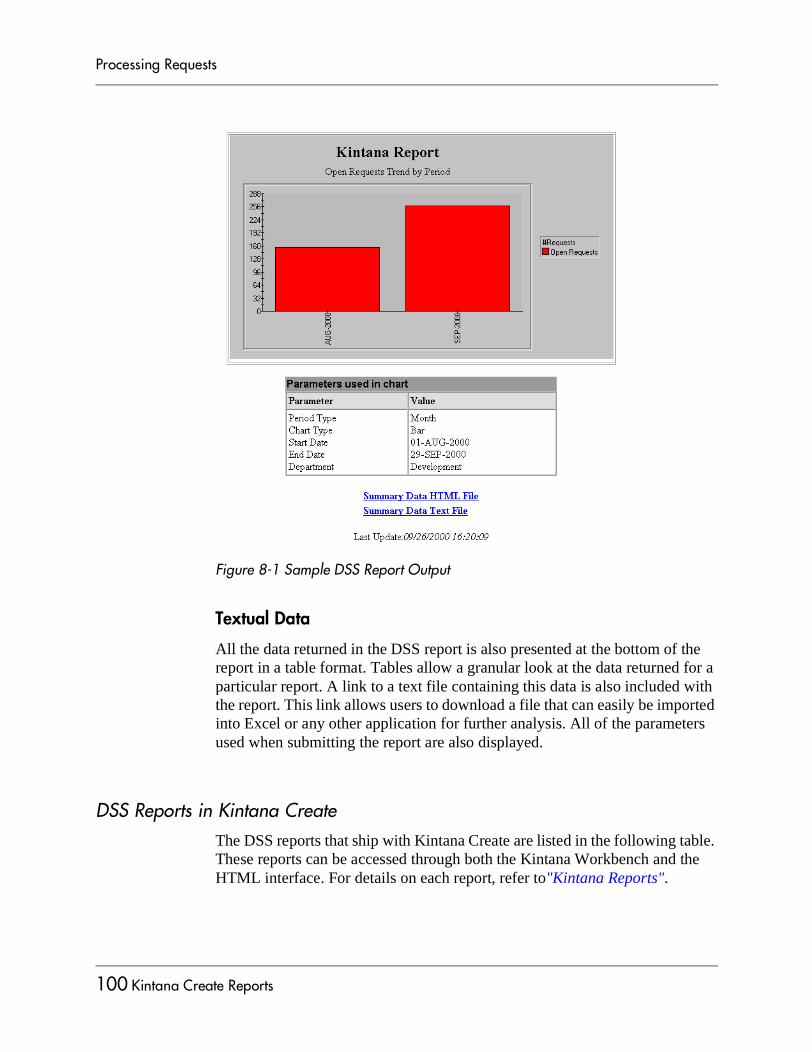
Processing Requests
Figure 8-1 Sample DSS Report Output
Textual Data
All the data returned in the DSS report is also presented at the bottom of the report in a table format. Tables allow a granular look at the data returned for a particular report. A link to a text file containing this data is also included with the report. This link allows users to download a file that can easily be imported into Excel or any other application for further analysis. All of the parameters used when submitting the report are also displayed.
DSS Reports in Kintana CreateThe DSS reports that ship with Kintana Create are listed in the following table. These reports can be accessed through both the Kintana Workbench and the HTML interface. For details on each report, refer to"Kintana Reports".
100 Kintana Create Reports

Processing Requests
Processing Kintana ReportsKintana reports can be run either from the Kintana Workbench or the Kintana HTML interface. Similarly, previously run reports can be viewed from either interface. The following sections provide instructions for processing and viewing Kintana reports:
Table 8-2. Kintana Create DSS Reports
DSS Report Description
Request Cycle Time Distribution Displays the distribution of Request cycle times in user-specified time buckets. The duration is specified in days. This report is useful in identifying the typical cycle times for Requests in a specific Workflow. It can also be used to identify incorrect data points.
Requests Closed By Period Displays the number of Requests that have been closed or canceled per time unit (week, month or year) over a specified time span. The option is available for specifying a particular Workflow, or compiling composite data for all Workflows. This report allows an organization to judge its overall throughput, and identify trends in activity.
Requests Submitted by Period Displays the number of Requests that have been created during a particular time period. The results can be divided into specific time units (week, month or year). You have the option of running the report for a specific Workflow or for all Workflows. The purpose of this report is to identify increases or decreases in the quantity of pending Requests within your organization and to assess the causes of these trends.
Requests Summary Displays the number of Requests that have been completed. They are grouped based on a variety of Request information including Request Type, Request Group, and Request Status.
Open Requests Trend by Period Indicates the number of Requests that were open during the specified time period, with results reported by the specified time unit. This report can be run for one or all Workflows. Using this report, managers are able to identify the overall Request workload during a certain time period.
Pending Workflow Steps Displays the number of Requests for a specific Workflow at each status level. The report displays each status in the format Step Name - Status. Specify the Workflow, time period and the user for the report.
Kintana Create Reports 101
Processing Requests
• Submitting a Report from the Kintana Workbench
• Submitting a Report from the HTML Interface
• Viewing Previously Submitted Reports
Submitting a Report from the Kintana WorkbenchTo submit a report from the Kintana Workbench:
1. Click the CREATE shortcut and click the REPORTS (or DSS REPORTS) icon to open the REPORT SUBMISSION WORKBENCH.
2. Click NEW REPORT. The NEW REPORT SUBMISSION window opens.
3. Select the type of report to submit from the REPORT TYPE auto-complete list.
After selecting the Report Type, report-specific parameters appear in the PARAMETERS tab of the NEW REPORT SUBMISSION window.
4. Fill in all the required parameters (as indicated by the red field label) and any optional parameters for the report.
5. (Optional) Set up the schedule for running the report:
a. Click the SCHEDULING tab and specify when the report is to be run. If no scheduling information is entered, the report runs immediately.
b. Enter the frequency with which the report should be re-run.
6. (Optional) Set up the Notification:
a. Click the NOTIFICATIONS tab.
b. Click NEW.
c. Select any users who should be informed of the report results.
d. Click OK to close the ADD NOTIFICATION FOR REPORT SUBMISSION window.
7. Click SUBMIT to run the report.
You may not have access to all Report Types. If you need access to a Report Type, but do not see it listed, contact your administrator for permission.
102 Kintana Create Reports
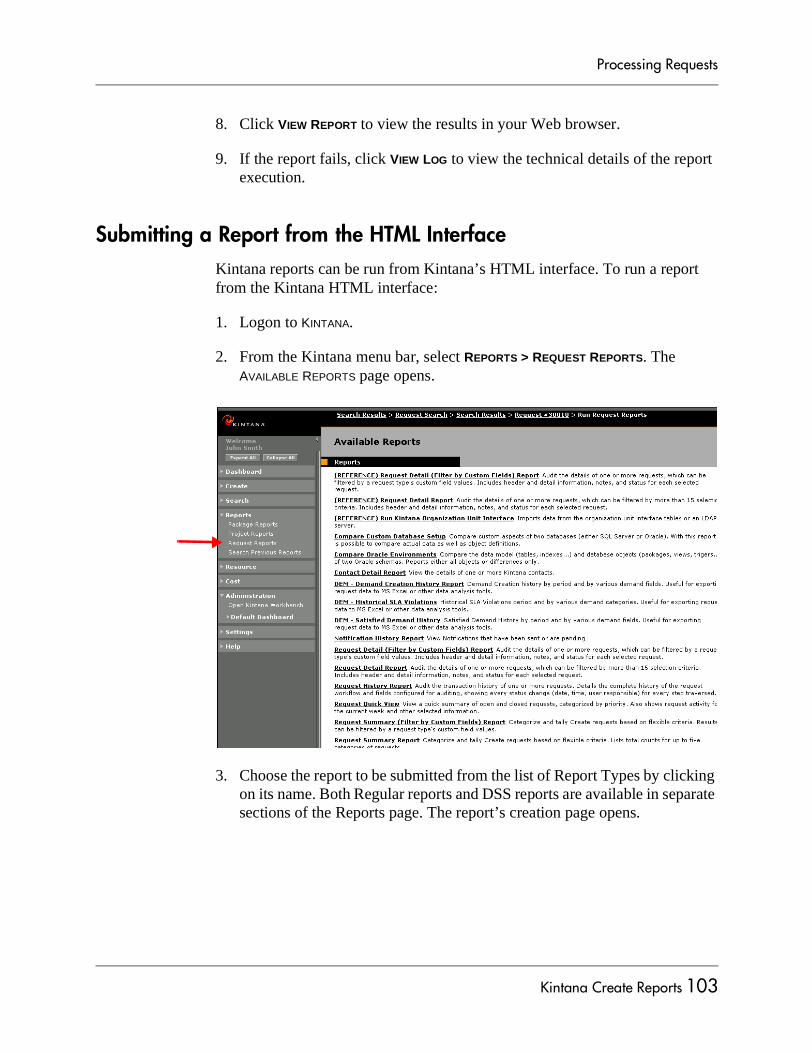
Processing Requests
8. Click VIEW REPORT to view the results in your Web browser.
9. If the report fails, click VIEW LOG to view the technical details of the report execution.
Submitting a Report from the HTML InterfaceKintana reports can be run from Kintana’s HTML interface. To run a report from the Kintana HTML interface:
1. Logon to KINTANA.
2. From the Kintana menu bar, select REPORTS > REQUEST REPORTS. The AVAILABLE REPORTS page opens.
3. Choose the report to be submitted from the list of Report Types by clicking on its name. Both Regular reports and DSS reports are available in separate sections of the Reports page. The report’s creation page opens.
Kintana Create Reports 103
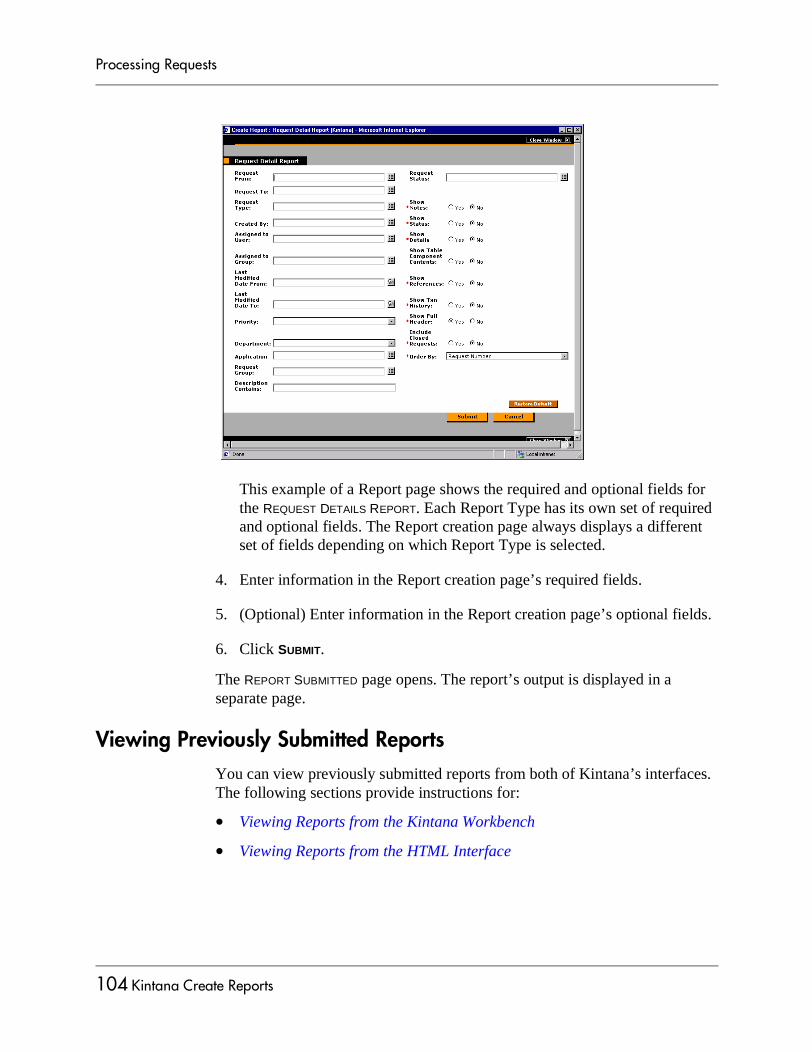
Processing Requests
This example of a Report page shows the required and optional fields for the REQUEST DETAILS REPORT. Each Report Type has its own set of required and optional fields. The Report creation page always displays a different set of fields depending on which Report Type is selected.
4. Enter information in the Report creation page’s required fields.
5. (Optional) Enter information in the Report creation page’s optional fields.
6. Click SUBMIT.
The REPORT SUBMITTED page opens. The report’s output is displayed in a separate page.
Viewing Previously Submitted ReportsYou can view previously submitted reports from both of Kintana’s interfaces. The following sections provide instructions for:
• Viewing Reports from the Kintana Workbench
• Viewing Reports from the HTML Interface
104 Kintana Create Reports
Processing Requests
Viewing Reports from the Kintana WorkbenchTo view previously submitted reports:
1. Enter search criteria in the QUERY tab of the REPORTS WORKBENCH.
2. Click SEARCH. All matching report submissions are listed in the RESULTS tab.
3. Click OPEN to view the criteria used for the report.
4. Click VIEW REPORT to view the report output.
Viewing Reports from the HTML InterfaceTo view a previously submitted report from the Kintana HTML interface:
1. Logon to the KINTANA HOME page.
2. Select SEARCH > REPORTS. The REPORT SEARCH page opens.
You may not have permission to view all reports. If that is the case, contact your System Administrator to get permission for reports that are restricted by Security Groups. You may also not have access to any reports that are restricted to Creator only.
It is not possible to modify the values used for a previous report submission. However, it is possible to select a particular report submission on the RESULTS tab of the REPORT SUBMISSIONS WORKBENCH and click COPY. This makes an exact duplicate of the report submission. The duplicate report submission can be modified and submitted.
Kintana Create Reports 105

Processing Requests
3. In the SEARCH INFORMATION section, enter search criteria in the appropriate fields. None of the fields are required.
4. Under RESULT DISPLAY OPTIONS, enter the maximum number of results to be displayed.
5. Click SEARCH.
The REPORT SEARCH RESULTS page opens. The page displays summary information about any reports that match your search criteria.
6. Click the Report Number under the REPORT # column to see the output details of any report.
106 Kintana Create Reports
Processing Requests
Appendix
Integrating Requests and Projects
The Kintana Product Suite lets you integrate issue tracking with project management using Kintana Create and Kintana Drive. Kintana Create Requests and Kintana Drive Projects and Tasks can be linked to each other through a variety of dependent and informational relationships. Utilizing these relationships, Requests can be folded seamlessly into a scalable framework of interlocking initiatives. Linking Tasks to Requests from Kintana Create also gives instant visibility to detailed activities supporting an overall project.
Kintana Drive - A Project Management System
Kintana Drive enables collaborative project management for both repetitive projects, such as installing a new release of your HRMS applications, and one-time projects, such as developing a new e-commerce capability. With Kintana, you accelerate project delivery while reducing your project costs.
Kintana Create - A Request Resolution System
Kintana Create is a Workflow-driven Request resolution system for business applications. It allows you to effectively capture, route and resolve business Requests.
Integration
Companies with both Kintana Create and Kintana Drive can create processes that take advantage of each product’s functionality. The following sections provide some background for setting up this interaction and illustrate the most common user processing events:
• “Referencing Requests from Projects” on page 108
• “Creating Tasks from Requests” on page 108
• “Dependencies Between Tasks and Requests” on page 110
• “Visibility into Tasks and Requests” on page 115
107
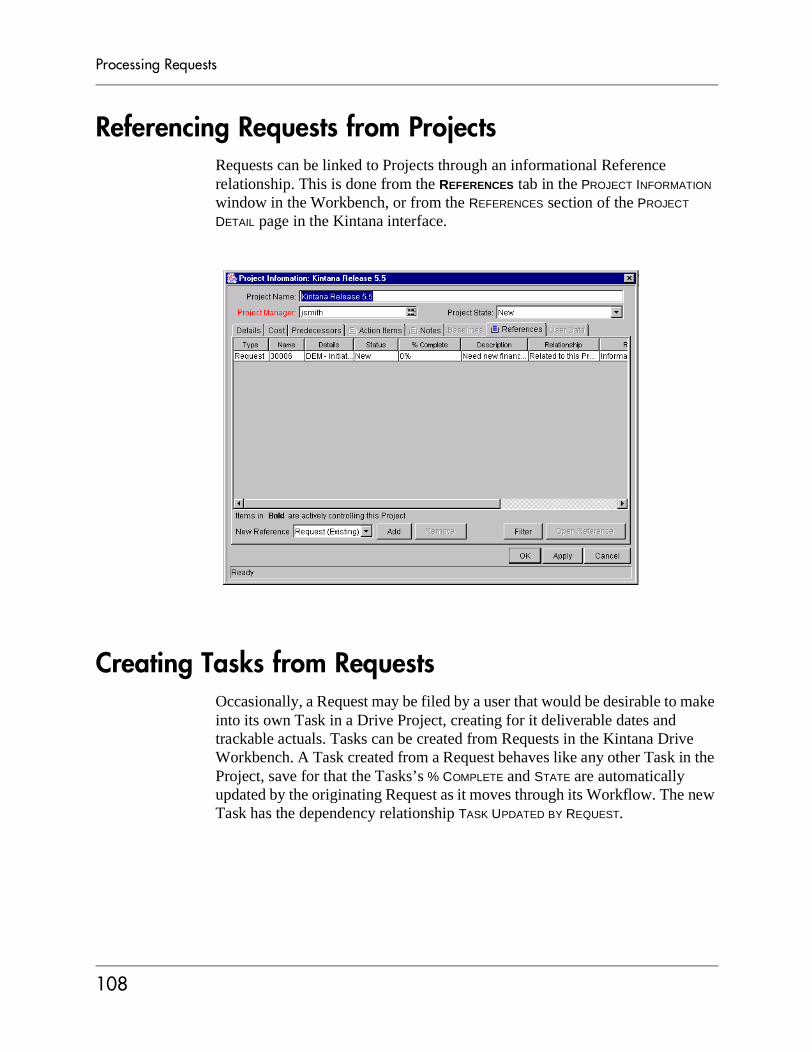
Processing Requests
Referencing Requests from ProjectsRequests can be linked to Projects through an informational Reference relationship. This is done from the REFERENCES tab in the PROJECT INFORMATION window in the Workbench, or from the REFERENCES section of the PROJECT DETAIL page in the Kintana interface.
Creating Tasks from RequestsOccasionally, a Request may be filed by a user that would be desirable to make into its own Task in a Drive Project, creating for it deliverable dates and trackable actuals. Tasks can be created from Requests in the Kintana Drive Workbench. A Task created from a Request behaves like any other Task in the Project, save for that the Tasks’s % COMPLETE and STATE are automatically updated by the originating Request as it moves through its Workflow. The new Task has the dependency relationship TASK UPDATED BY REQUEST.
108
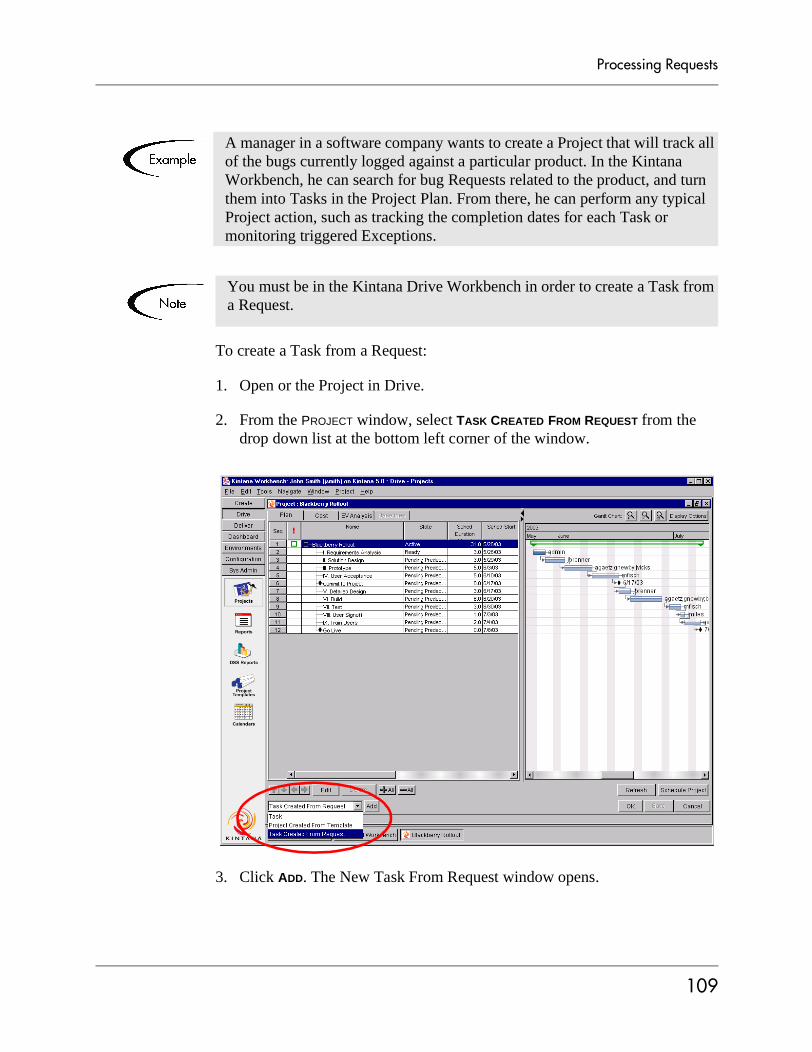
Processing Requests
To create a Task from a Request:
1. Open or the Project in Drive.
2. From the PROJECT window, select TASK CREATED FROM REQUEST from the drop down list at the bottom left corner of the window.
3. Click ADD. The New Task From Request window opens.
A manager in a software company wants to create a Project that will track all of the bugs currently logged against a particular product. In the Kintana Workbench, he can search for bug Requests related to the product, and turn them into Tasks in the Project Plan. From there, he can perform any typical Project action, such as tracking the completion dates for each Task or monitoring triggered Exceptions.
You must be in the Kintana Drive Workbench in order to create a Task from a Request.
109
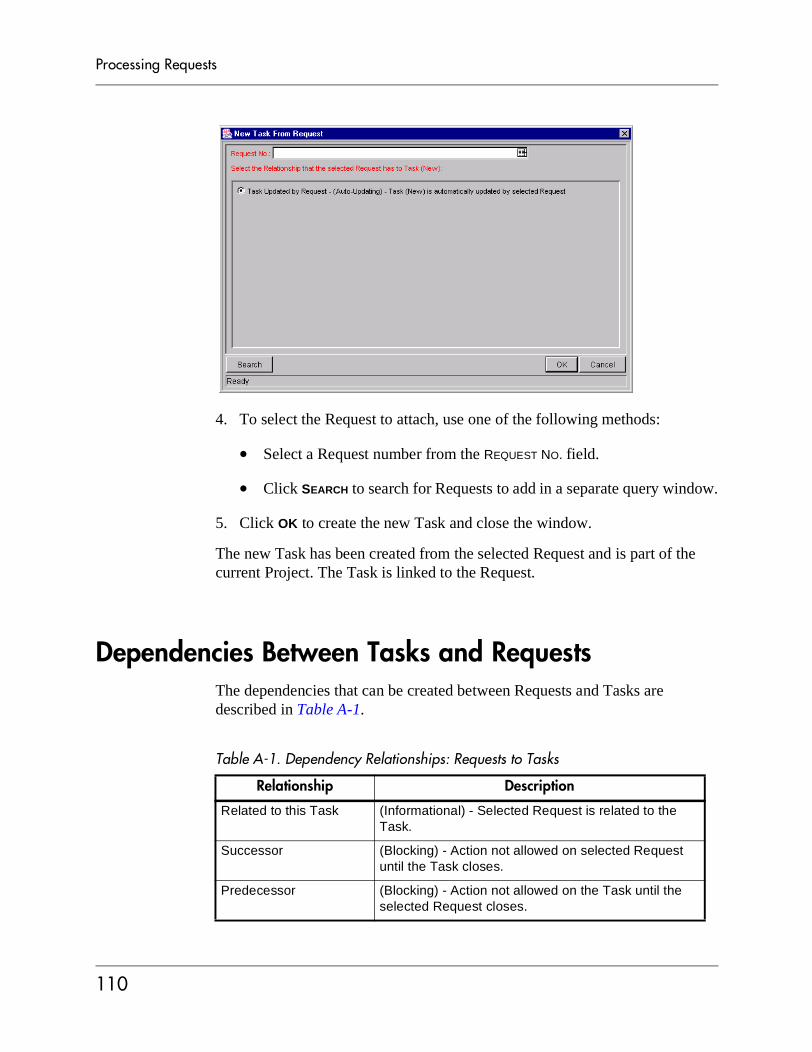
Processing Requests
4. To select the Request to attach, use one of the following methods:
• Select a Request number from the REQUEST NO. field.
• Click SEARCH to search for Requests to add in a separate query window.
5. Click OK to create the new Task and close the window.
The new Task has been created from the selected Request and is part of the current Project. The Task is linked to the Request.
Dependencies Between Tasks and RequestsThe dependencies that can be created between Requests and Tasks are described in Table A-1.
Table A-1. Dependency Relationships: Requests to Tasks
Relationship Description
Related to this Task (Informational) - Selected Request is related to the Task.
Successor (Blocking) - Action not allowed on selected Request until the Task closes.
Predecessor (Blocking) - Action not allowed on the Task until the selected Request closes.
110
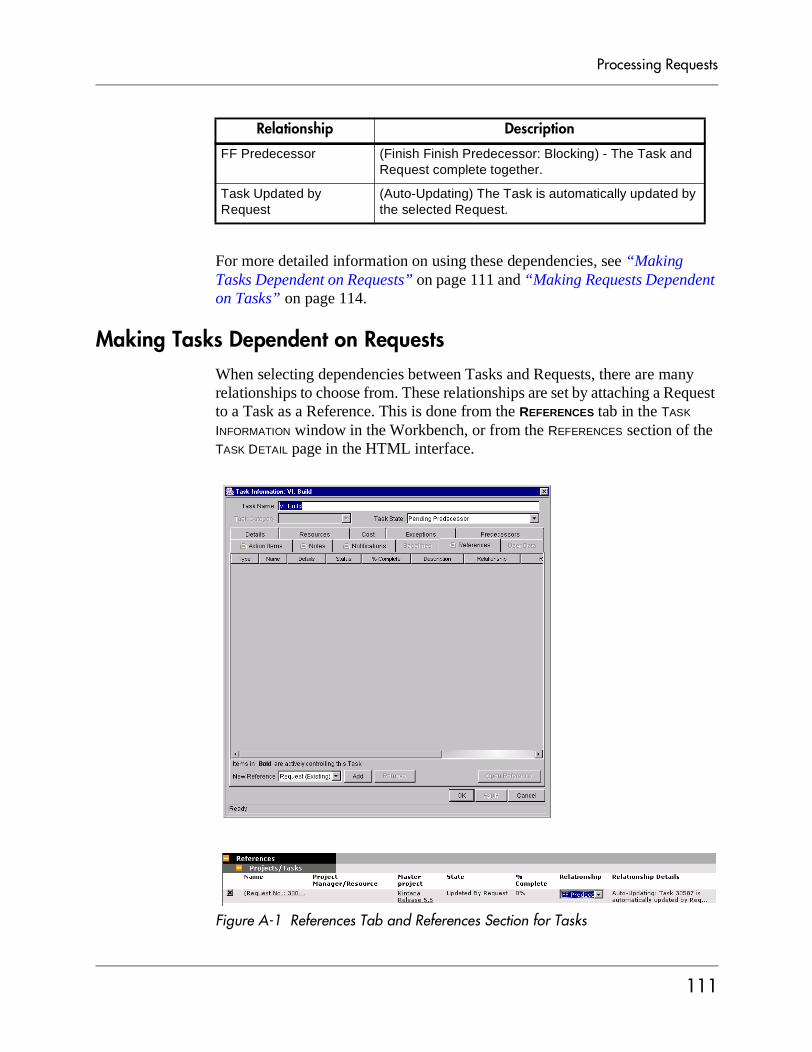
Processing Requests
For more detailed information on using these dependencies, see “Making Tasks Dependent on Requests” on page 111 and “Making Requests Dependent on Tasks” on page 114.
Making Tasks Dependent on RequestsWhen selecting dependencies between Tasks and Requests, there are many relationships to choose from. These relationships are set by attaching a Request to a Task as a Reference. This is done from the REFERENCES tab in the TASK INFORMATION window in the Workbench, or from the REFERENCES section of the TASK DETAIL page in the HTML interface.
Figure A-1 References Tab and References Section for Tasks
FF Predecessor (Finish Finish Predecessor: Blocking) - The Task and Request complete together.
Task Updated by Request
(Auto-Updating) The Task is automatically updated by the selected Request.
Relationship Description
111

Processing Requests
The following sections contain more detailed information on dependencies for Tasks created from Requests:
• “Task Waits on Request Closure (Successor Relationship)” on page 112
• “Task Can’t Complete Until Request Closes (FF Predecessor)” on page 112
• “Task Auto-Updated by Request” on page 113
Task Waits on Request Closure (Successor Relationship)This Relationship dictates that the Task state cannot change until the associated Request is closed. The Task will immediately move into a "Pending Request" state. When the Request is closed, the Task may be acted upon once more. This does not stop other fields from being edited.
Task Can’t Complete Until Request Closes (FF Predecessor)This Relationship dictates that the Task state cannot change to ‘COMPLETE’ until the associated Request is closed. When the Resource working on the Task is finished with it, and the State is set to ‘COMPLETED’ (% Complete will be set to 100%), this Task will move into a ‘COMPLETED (PENDING REQUEST)’ state. When the Request is closed, the Task is then set to ‘COMPLETED.’ This does not stop other fields from being edited.
A software company’s Support Division makes the decision that no patches will be released without accompanying documentation. The company has an unfortunate history, however, of changing its mind about patches that are to be released, and numerous times there have been documentation changes made to accommodate patches that were cancelled after being initially approved. Patch A’s approval Request is moving through its resolution process in Create. The Documentation team is ready to begin making changes to all documents to account for Patch A, and has created a Project in Drive. The Project includes the Task ‘BEGIN DOC CHANGES FOR PATCH A.’
The Documentation Team’s manager creates a Reference to Patch A’s Request from the BEGIN DOC CHANGES FOR PATCH A Task, with the relationship ‘SUCCESSOR.’ This way, the Task cannot be moved from its status of ‘READY’ to ‘IN PROGRESS’ until Patch A’s approval Request is closed, ensuring that the documentation changes are valid and needed.
112
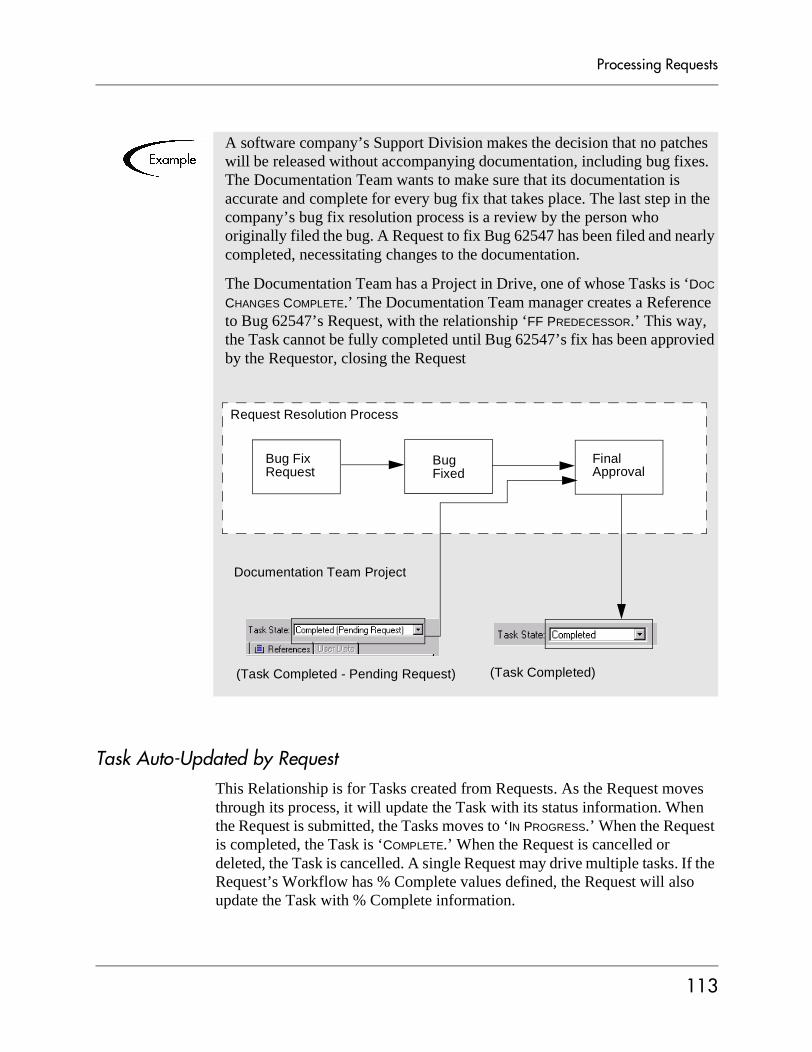
Processing Requests
Task Auto-Updated by RequestThis Relationship is for Tasks created from Requests. As the Request moves through its process, it will update the Task with its status information. When the Request is submitted, the Tasks moves to ‘IN PROGRESS.’ When the Request is completed, the Task is ‘COMPLETE.’ When the Request is cancelled or deleted, the Task is cancelled. A single Request may drive multiple tasks. If the Request’s Workflow has % Complete values defined, the Request will also update the Task with % Complete information.
A software company’s Support Division makes the decision that no patches will be released without accompanying documentation, including bug fixes. The Documentation Team wants to make sure that its documentation is accurate and complete for every bug fix that takes place. The last step in the company’s bug fix resolution process is a review by the person who originally filed the bug. A Request to fix Bug 62547 has been filed and nearly completed, necessitating changes to the documentation.
The Documentation Team has a Project in Drive, one of whose Tasks is ‘DOC CHANGES COMPLETE.’ The Documentation Team manager creates a Reference to Bug 62547’s Request, with the relationship ‘FF PREDECESSOR.’ This way, the Task cannot be fully completed until Bug 62547’s fix has been approvied by the Requestor, closing the Request
.
Bug FixRequest
Request Resolution Process
FinalApproval
Documentation Team Project
BugFixed
(Task Completed)(Task Completed - Pending Request)
113

Processing Requests
Making Requests Dependent on TasksRequests can be made dependent on Tasks. This is done from the REFERENCES section of the Request page in the HTML interface.
Figure A-2 References Tab and References Section for Requests
The following section contains more detailed information on dependencies for Requests set by Tasks:
• “Request Waits on Task Closure (Predecessor)” on page 114
Request Waits on Task Closure (Predecessor)This Relationship dictates that the Request’s user cannot perform any Workflow Actions until the associated Task is closed (completed, bypassed, or cancelled). The Request will immediately move into a ‘PENDING TASK’ status. When the Task is closed, the Request may be acted upon once more. This does not stop other fields from being edited.
Since % COMPLETE and TASK STATE are automatically updated by the driving Request(s), users cannot update these two fields. The text “(UPDATED BY REQUEST)” will be appended to the READY and IN PROGRESS states to indicate this.
A software company’s Support Division makes the decision that no patches will be released without accompanying documentation. The Documentation Team wants to make sure that any patch Request won’t close until the patch documentation is finished. A Kintana Create user is assigned a Request going through the company’s patch approval/release process. At the same time, the Documentation Team has a Project in Drive, one of whose Tasks is ‘PATCH DOCS COMPLETED.’ The user creates a Reference to that Task, with the dependency ‘FF Predecessor.’ This way, the patch Request will not close until the ‘Patch Docs Completed’ Task is complete.
114

Processing Requests
Visibility into Tasks and RequestsKintana provides the following for enabling visibility into Request and Task integration.
Requests Holding Up ProgressYou can search for Requests that are holding up progress on your projects. Each portlet in the Kintana Dashboard that deals with Requests includes the field ‘Preventing Action on Requests/Tasks.’ This field can be set to display Requests that are preventing action on other Requests or Tasks.
Figure A-3 Request Portlet Filter Page Showing ‘Preventing Action On’ Field
Project References PortletYou can also view References related to your Tasks and Projects using the Project References portlet on your Kintana Dashboard. Add the portlet to your Dashboard and then personalize it to show the References that are relevant to your activities. The portlet can be personalized to display References based on the following information: Reference Types, Relationship, time period when they were added, and whether or not they are preventing actions on Tasks.
Figure A-4 Project References Portlet
115

Processing Requests
Appendix
116

Index
Index
AAccessing Kintana Create 23Adding a Contact 49Additional Resources
Kintana documentation 6Kintana education 9Kintana services 9Kintana support 9
Advanced ConfigurationGuides 6
Advanced Search 57Approval Details
Requests viewing the ap-proval details 66
AttachingPackages 37Projects 41Releases 41Tasks 43
Attachment 46definition 20referencing 45
BBottleneck Reporting 98
CCancelling Requests 90Changing Passwords 25Closed Requests
reopening 86
Configuring the WorkflowDisplay 87
Configuring Workflow Dis-play 87
Contactsadding 49adding and editing 49editing 50
CreateReports overview 95
Creating a New Package 39,84
Creating a Request 29Cycle-Time Reporting 98
DDashboard
defined 18Data Integrity 71Decision
bypassing 80delegating 80
Definitionsattachments 20Dashboard 18document 21Packages 21Portlets 19Project 21References 20references 20Request Header Types 14Request Statuses 17
Request Type 11Request Types 13Requests 11Tasks 21Workflow Steps 16Workflows 15
Delegate Decision 80Delete Requests 89Dependencies
between Tasks and Re-quests 110
Detailsupdating 76
Document definition 21Documentation 6DSS Report 98
key features 98
EEditing Contacts 49, 50Email Notification 72Execution
bypassing 80log 69scheduling 81
GGraphical Data Representa-
tion 99Graphical View 63
Kintana I-117
Index
HHeader
updating 74Hide Immediate and Condi-
tion Steps 88HTML Interface
submitting a report 103
IIn Progress Requests locating
72Integration with Kintana
dashboard 5
KKey Concepts 11Kintana Create
accessibility 3Features 1integrating with Dash-
board 5integrating with Deliver 4,
84integrating with Drive 4introduction 1key concepts 11request routing 2resolution and reporting 4
Kintana Datadisplaying 22
Kintana Drive 107Kintana Reports Overview 95
LLocating In Progress Requests
72Locating Open Requests 72Logon
to Kintana HTML Inter-face 23
to Kintana Workbench 26
MManage Requests 93Managing Requests 89
helpful reports 91Manual Conventions 5
PPackage 46Packages
adding to Requests 37attaching 37definition 21
Passwordchanging 25
Portletsdefined 19
Preventing Action 115Processing Requests 71Project 46Project definition 21Project References Portlet 115Projects
adding to Requests 41
RReference
changing 77deleting 77
viewing 77Reference Dependency Rela-
tionships 47Reference Relationships 47
Attachment 47Packages 47Projects 47Releases 47Requests 48Tasks 48URL 48
Reference Types 46References
adding 34attachments 20, 45creating a request 32defined 20documents 21duplicate Request 21overriding relationships
82Packages 21Projects 21Tasks 21updating 76URL 44
Release 46Releases adding to Requests
41Report
Import Into Excel 100list of standard reports 96Overview 95processing 101Request detail 91Request summary 92Submission 95submitting from HTML
103submitting from work-
bench 102
Kintana I-118
Index
Textual Data 100viewing from HTML 105viewing from the Work-
bench 105Reports
list of DSS reports 100Request
creating 29creating from the Refer-
ence section 37simple search 53
Request (Existing) 46Request (New) 47Request Detail Report 91Request Details
updating 76viewing 53
Request Headerupdating 74
Request Header Typesdefinition 15
Request Information 62Request Processing
data integrity 71Request References
updating 76Request Status
defined 17viewing 53
Request Summary Report 92Request Type
changing 74defined 11
Requests 11adding to Requests 35attaching Packages 37attaching Releases 41attaching Requests 35canceling 90changing type 74
creating 29creating at workflow step
83creating from Reference
section 32defined 11deleting 89dependent on Tasks 114managing 89organizing saved searches
60processing 71processing data 71referencing from Projects
108referencing Projects 41referencing Tasks 43reopening 86routing 2running saved searches 61searching 53setting search result dis-
play 56updating 73updating details 76updating header 74updating in HTML 73updating references 76updating status 78updating status in HTML
78viewing execution log 69viewing graphically 63viewing Security Groups
66viewing specific 56viewing transaction histo-
ry 68wait on Task closure 114
Resource Load Report by Pri-ority 91
SSaving an Un-Submitted Re-
quest 48Saving Your Search 59Searches
organizing saved 60running saved 61setting result display 56
Searching for Requests 53Security 22Security Group 66Show And Hide Steps 87Simple Search 53Standard Reports 96Status
updating 78Submitting a Report 93Submitting a Report from the
HTML Interface 103
TTasks 47
adding to Requests 43can not complete until Re-
quest closes 112creating from Requests
108definition 21dependent on Requests
111updated by Request 113waits on Request closure
112Throughput Reporting 99Transaction History 68Trend & Exception Reporting
99
Kintana I-119
Index
UUnderstanding the Reports 99Update Status 78Updating Request Details 76Updating Request References
76Updating Requests 73Updating the Request Header
74URL 47
referencing 44Using Dashboard Portlets to
View Request 70Using Reports to Manage Re-
quests 91Using the Notifications 72Using the Search 72
VValid References 46Viewing Previously Submit-
ted Reports 104Viewing Request Information
62Viewing Request Status and
Details 53
WWorkflow
configuring display 87defined 15sample 16step information URL 63steps 87steps defined 16
Kintana I-120