
KENZA MAX Biochemistry USER'S GUIDE - Medisis Medikal ...
43
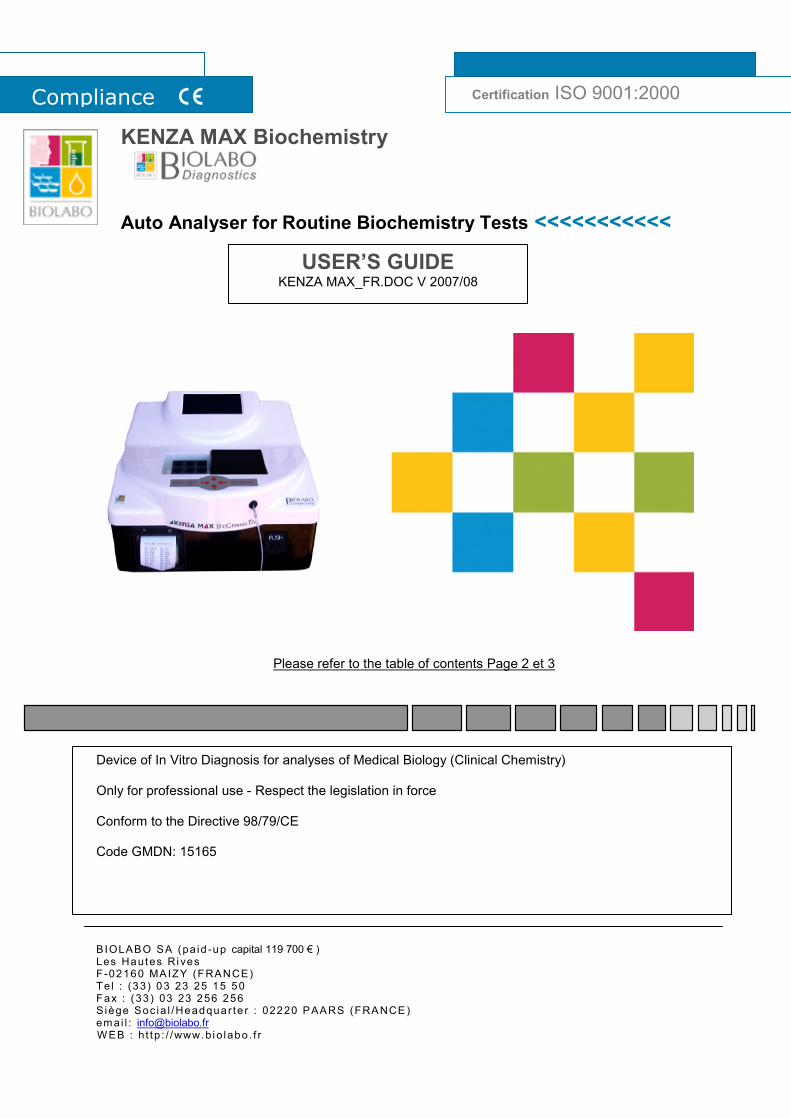
Certification ISO 9001:2000 Compliance | KENZA MAX Biochemistry Auto Analyser for Routine Biochemistry Tests <<<<<<<<<<< USER’S GUIDE KENZA MAX_FR.DOC V 2007/08 Please refer to the table of contents Page 2 et 3 Device of In Vitro Diagnosis for analyses of Medical Biology (Clinical Chemistry) Only for professional use - Respect the legislation in force Conform to the Directive 98/79/CE Code GMDN: 15165 BIOLABO SA (paid-up capital 119 700 € ) Les Hautes Rives F-02160 MAIZY (FRANCE) Tel : (33) 03 23 25 15 50 Fax : (33) 03 23 256 256 Siège Social/Headquarter : 02220 PAARS (FRANCE) email: [email protected] WEB : http://www.biolabo.fr
-
Upload
khangminh22 -
Category
Documents
-
view
0 -
download
0
Transcript of KENZA MAX Biochemistry USER'S GUIDE - Medisis Medikal ...
Certification ISO 9001:2000 Compliance |
KENZA MAX Biochemistry
Auto Analyser for Routine Biochemistry Tests <<<<<<<<<<<
USER’S GUIDE KENZA MAX_FR.DOC V 2007/08
Please refer to the table of contents Page 2 et 3
Device of In Vitro Diagnosis for analyses of Medical Biology (Clinical Chemistry) Only for professional use - Respect the legislation in force Conform to the Directive 98/79/CE Code GMDN: 15165
BIOLABO SA (pa id -up capital 119 700 € ) Les Hautes Ri ves F-02160 MAIZY (FRANCE) Te l : (33) 03 23 25 15 50 Fax : (33 ) 03 23 256 256 S iège Soc ia l /Headquar te r : 02220 PAARS (FRANCE) emai l : [email protected] EB : h t tp : / /www.b io labo. f r
2
BIOLABO S.A., Les Hautes Ri ve, Mai zy (FRANCE ) - Te l : (33 ) 03 23 25 15 50 - Fax : (33) 03 23 256 256 R.C. Soissons B 317 398 832 - SIRET 317 398 832 00020 - TVA : FR 82 317 398 832 - APE 244D
TABLE OF CONTENTS
1. INTRODUCTION 4
1.1 Instrument description 5
1.2 How to change the voltage according to the country 110V/220V 8
2. INSTALLATION 9
2.1. Installation and maintenance of the instrument 9
2.2. Before daily work: preliminary operations 11
2.3. Modifying settings 11
2.4. Erasing data memory 13
2.5. Thermostat 13
2.6. Pump calibration 13
2.7. Diagnostic & Service 14
3. PRINTING OPERATIONS 14
3.1. Printing and display of the analysis name list 14
3.2. Printing of analytic parameters of one analysis 14
3.3. Printing of results 15
3.4. Printing of result in memory 16
4. CALCULATION PROCEDURES performed BY KENZA MAX BIOCHEMISTRY 17
4.1. End-point analysis 17
4.2. Kinetic analysis 17
4.3. Fixed-time analysis 17
4.4. Multi-standard analysis 18
4.5. Absorbance calculation when bichromatism is used 18
5. HOW TO READ THE ANALYSIS 19
5.1. Absorbance readings 19
5.2. Selection of the analysis 20
5.3. Execution of an End-point analysis with K 20
5.4. Execution of an End-point analysis using standard 20
5.5. Execution of a Multi-standard analysis 21
5.6. Execution of a Kinetic analysis 21
5.7. Execution of a Fixed-time analysis with K 22
5.8. Execution of a Fixed-time analysis with standard 22
5.9. Reading at incubator temperature different from the programmed one 22
5.10. Modifying the progressive number 22
5.11. Recalling memory result 23
5.12. Waste Processing 24
6. ANALYSIS PARAMETERS 24
6.1. Bichromatic filter 25
6.2. How to use the decimal point 25
6.3. Programming Flow Cell aspiration volume 25
3
BIOLABO S.A., Les Hautes Ri ve, Mai zy (FRANCE ) - Te l : (33 ) 03 23 25 15 50 - Fax : (33) 03 23 256 256 R.C. Soissons B 317 398 832 - SIRET 317 398 832 00020 - TVA : FR 82 317 398 832 - APE 244D
7. MODIFYING THE PARAMETERS AND PROGRAMMING A NEW ANALYSIS 26
7.1. Modifying only K-factor or the standard 30
7.2. Quality Control 31
7.3. Blank Storage Features 34
8. TECHNICAL FEATURES 35
9. DESCRIPTION OF MECHANICAL PARTS: 36
APPENDIX A: Troubleshooting 37
APPENDIX B: Measuring Units 39
APPENDIX C : Serial Transmission protocol 40
APPENDIX D: Reducing Carry-Over and Working volume using Air-Gap 41
APPENDIX E: Reading in Standard cuvettes with less than 1500 µL 42
APPENDIX F: WEE and ROHS DIRECTIVE 42
APPENDIX G: Important Notice about Biohazardous 43
4
BIOLABO S.A., Les Hautes Ri ve, Mai zy (FRANCE ) - Te l : (33 ) 03 23 25 15 50 - Fax : (33) 03 23 256 256 R.C. Soissons B 317 398 832 - SIRET 317 398 832 00020 - TVA : FR 82 317 398 832 - APE 244D
1. INTRODUCTION
KENZA MAX BiochemisTry is an interferential filter analyzer, completely managed by microprocessors. This instrument has been designed to perform spectroscopic measurements at predetermined wavelengths of analyte concentration and enzyme activity using various reagents. It performs optical measurements and processes them according to programs with parameters that can be entered by the operator. It executes, in a rapid and precise manner, most of important biochemistry tests. Particularly, the following determinations can be carried out:
• ABSORBANCE
• END-POINT
• KINETICS
• FIXED-TIME
• MULTISTANDARD
The instrument is equipped with a two-way flow cell system; it ensures low carry-over values even with limited sample volumes. Disposable macro and micro cuvettes (glass or plastic), with an optical path of 1 cm, can be used by simply removing the flow cell from the reading compartment and placing it on the right-side one. Seven filters are included in the instrument. The selection of the interferential filter is automatic, with powered handling managed by a microprocessor. This feature makes reading easier and eliminates filter selection errors that may occur in instruments which have a manual selection. The optical part is very sophisticated: it consists of a high-power halogen lamp (20 W) whose light beam is centred by a quartz lens, thus allowing a high accuracy in measurements even when reduced-volume cuvettes are used. A 9-positions dry incubator which can contain both square and cylindrical cuvettes allow the sample incubation before reading. The temperature of the incubator is equal to the one of the reading cell and it is selectable from 20°C to 40°C. The execution of the analysis and instrument programming are simple and performed by means of a keyboard, following the instructions shown on the display. This display also shows the status and error/fault messages. The analytical results are directly displayed in the measuring units selected by the current program. The language of instructions can be selected between English, French or Italian language that can be reprogrammed or customized in a different one (contact your distributors for this operation). The instrument is provided with a 24-columns thermal printer that can print analytical results as well as program parameters (multistandard and kinetics results are also available in a graphic plot). All printed information is sent to a serial RS-232 standard output. The printer can be also completely disconnected as well as can be disabled the graphic plot. An advanced software guides and controls all operations carried out by the user. An acoustic signal further helps the user, by emitting a sound of a different tone from the usual one, it means you pushed the wrong key. 120 (a hundred and twenty) programs can be stored. To carry out an analysis, it is important to enter all the parameters correctly, including the K and standard values where necessary. The instrument is supplied already programmed. Anyway, it is advisable to check that the entered parameter values correspond to those stated in the methods. A modification of the analytical parameters can be done by the operator before carrying out the analysis. The instrument is entirely re-programmable. All KENZA MAX BiochemisTry are subjected to a double quality control, electronical and clinical-chemical. The instrument has an internal memory that can store up to 400 results. Tests are automatically stored in memory every time they are executed. Results can be recalled in every moment (see p.23). In this way the instrument can printout results as a batch or a profile analyser. The instrument is provided with two levels QC program, available for 30 independent tests (see p.31).
5
BIOLABO S.A., Les Hautes Ri ve, Mai zy (FRANCE ) - Te l : (33 ) 03 23 25 15 50 - Fax : (33) 03 23 256 256 R.C. Soissons B 317 398 832 - SIRET 317 398 832 00020 - TVA : FR 82 317 398 832 - APE 244D
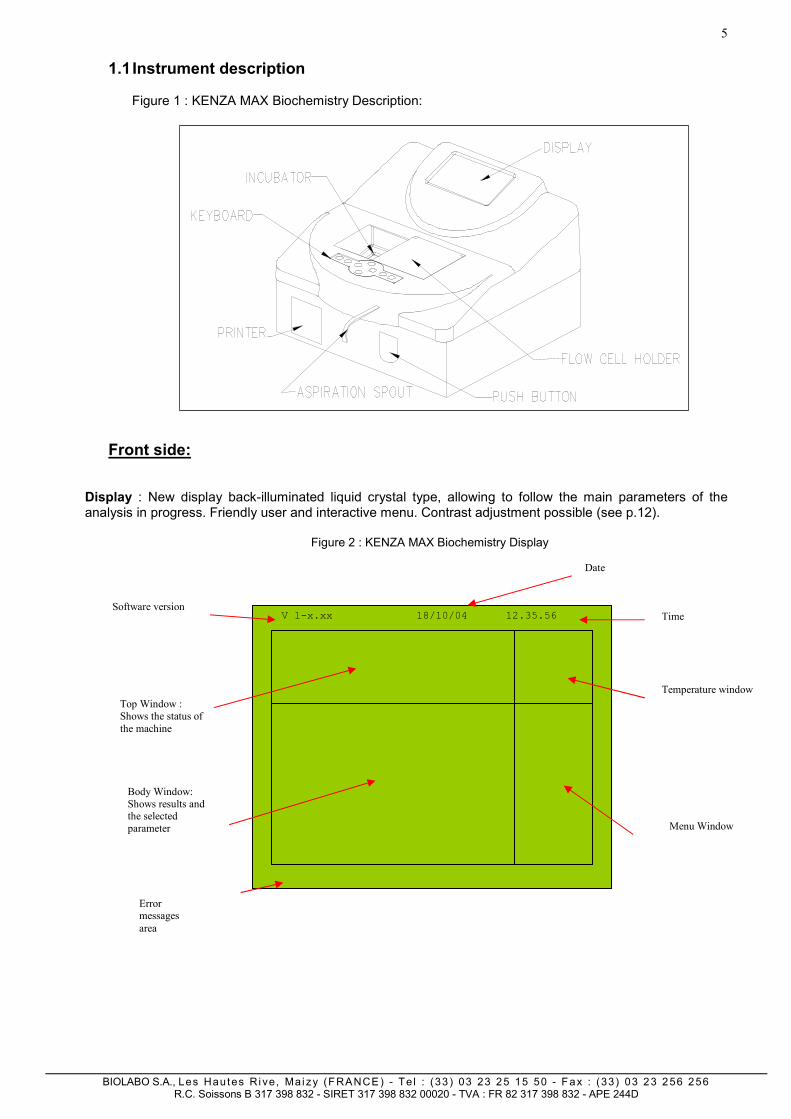
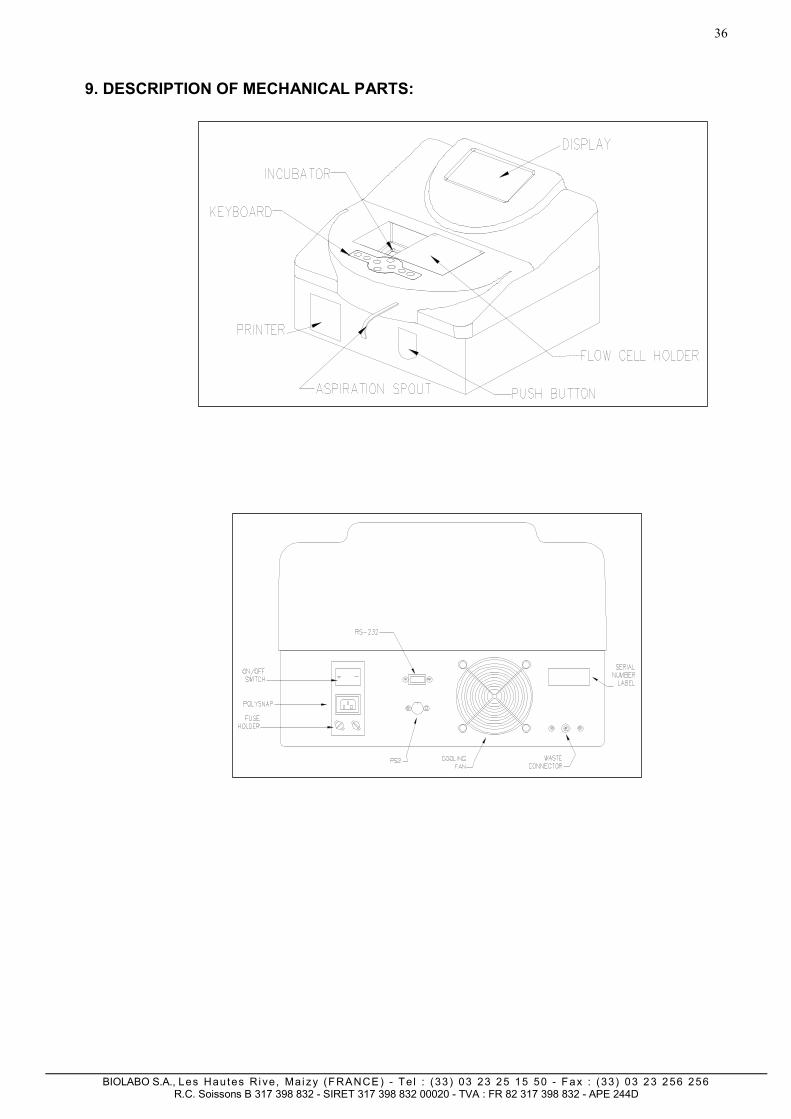
1.1 Instrument description
Figure 1 : KENZA MAX Biochemistry Description:
Front side:
Display : New display back-illuminated liquid crystal type, allowing to follow the main parameters of the analysis in progress. Friendly user and interactive menu. Contrast adjustment possible (see p.12).
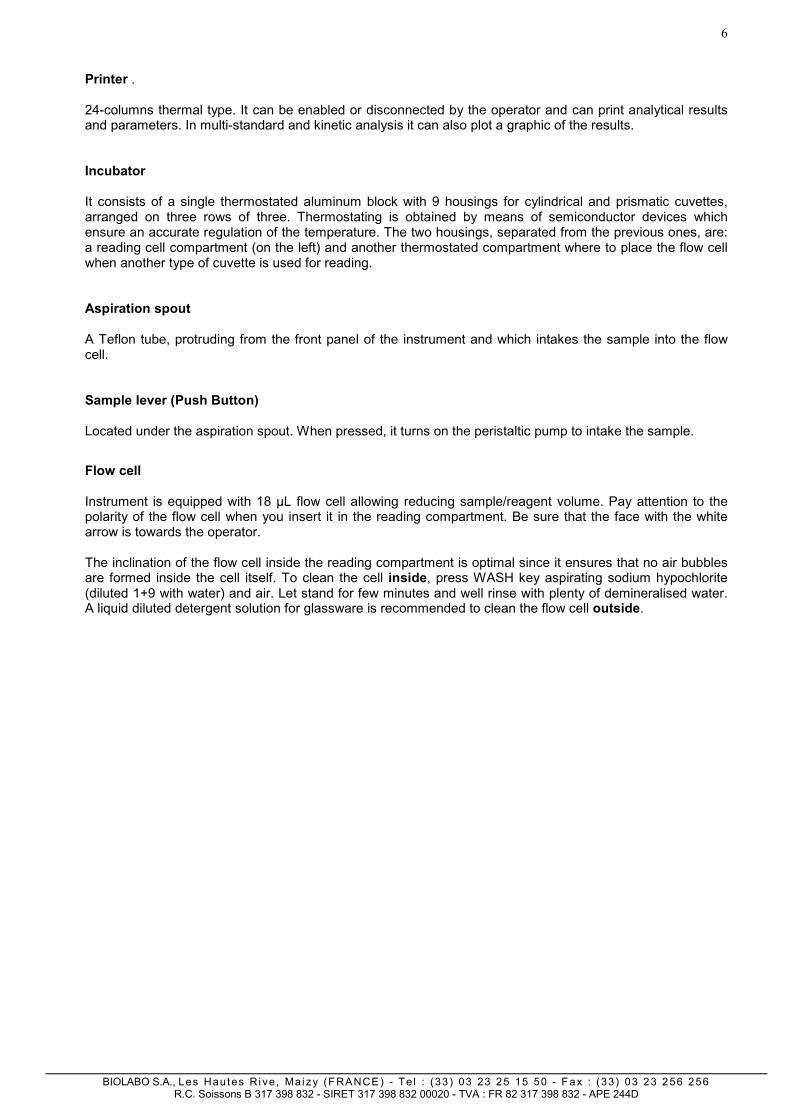
Figure 2 : KENZA MAX Biochemistry Display
18/10/04 12.35.56V 1-x.xxSoftware version
Top Window : Shows the status of the machine
Body Window: Shows results and the selected parameter
Date
Time
Temperature window
Menu Window
Error messages area
6
BIOLABO S.A., Les Hautes Ri ve, Mai zy (FRANCE ) - Te l : (33 ) 03 23 25 15 50 - Fax : (33) 03 23 256 256 R.C. Soissons B 317 398 832 - SIRET 317 398 832 00020 - TVA : FR 82 317 398 832 - APE 244D
Printer .
24-columns thermal type. It can be enabled or disconnected by the operator and can print analytical results and parameters. In multi-standard and kinetic analysis it can also plot a graphic of the results.
Incubator
It consists of a single thermostated aluminum block with 9 housings for cylindrical and prismatic cuvettes, arranged on three rows of three. Thermostating is obtained by means of semiconductor devices which ensure an accurate regulation of the temperature. The two housings, separated from the previous ones, are: a reading cell compartment (on the left) and another thermostated compartment where to place the flow cell when another type of cuvette is used for reading.
Aspiration spout A Teflon tube, protruding from the front panel of the instrument and which intakes the sample into the flow cell.
Sample lever (Push Button) Located under the aspiration spout. When pressed, it turns on the peristaltic pump to intake the sample.
Flow cell Instrument is equipped with 18 µL flow cell allowing reducing sample/reagent volume. Pay attention to the polarity of the flow cell when you insert it in the reading compartment. Be sure that the face with the white arrow is towards the operator. The inclination of the flow cell inside the reading compartment is optimal since it ensures that no air bubbles are formed inside the cell itself. To clean the cell inside, press WASH key aspirating sodium hypochlorite (diluted 1+9 with water) and air. Let stand for few minutes and well rinse with plenty of demineralised water. A liquid diluted detergent solution for glassware is recommended to clean the flow cell outside.
7
BIOLABO S.A., Les Hautes Ri ve, Mai zy (FRANCE ) - Te l : (33 ) 03 23 25 15 50 - Fax : (33) 03 23 256 256 R.C. Soissons B 317 398 832 - SIRET 317 398 832 00020 - TVA : FR 82 317 398 832 - APE 244D
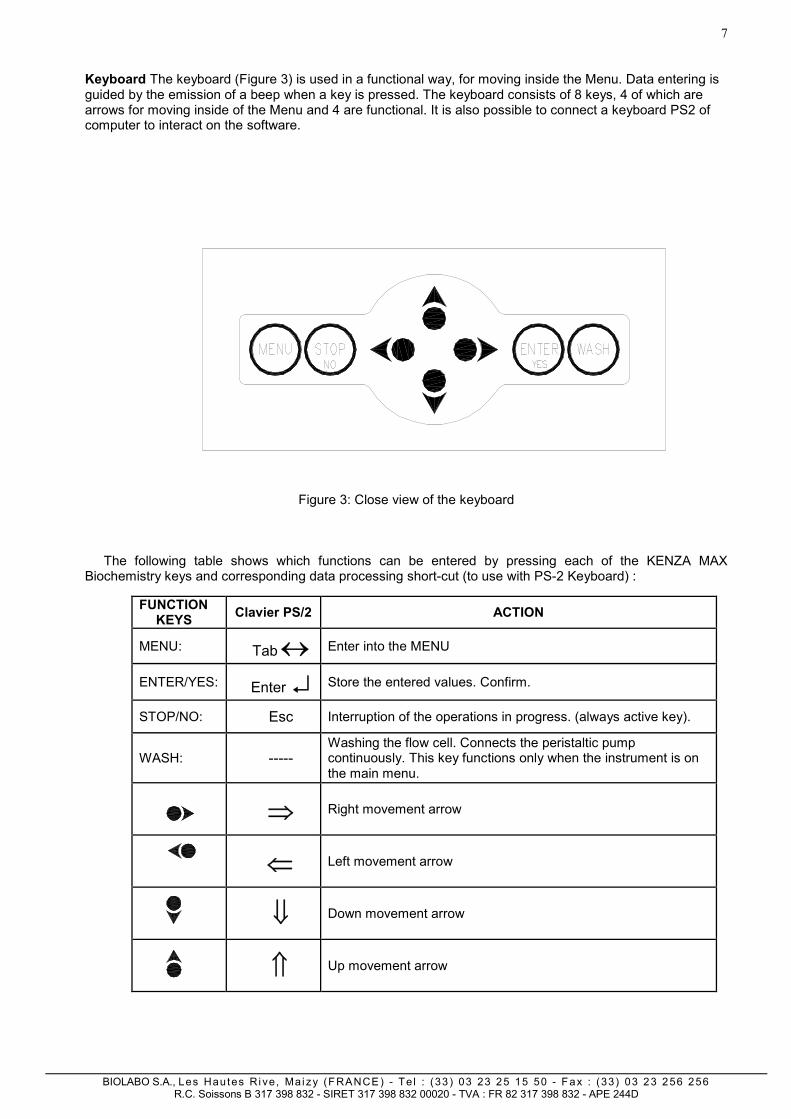
Keyboard The keyboard (Figure 3) is used in a functional way, for moving inside the Menu. Data entering is guided by the emission of a beep when a key is pressed. The keyboard consists of 8 keys, 4 of which are arrows for moving inside of the Menu and 4 are functional. It is also possible to connect a keyboard PS2 of computer to interact on the software.
Figure 3: Close view of the keyboard
The following table shows which functions can be entered by pressing each of the KENZA MAX Biochemistry keys and corresponding data processing short-cut (to use with PS-2 Keyboard) :
FUNCTION KEYS
Clavier PS/2 ACTION
MENU: Tab ↔ Enter into the MENU
ENTER/YES: Enter ↵ Store the entered values. Confirm.
STOP/NO: Esc Interruption of the operations in progress. (always active key).
WASH: ----- Washing the flow cell. Connects the peristaltic pump continuously. This key functions only when the instrument is on the main menu.
⇒ Right movement arrow
⇐ Left movement arrow
⇓ Down movement arrow
⇑ Up movement arrow
8
BIOLABO S.A., Les Hautes Ri ve, Mai zy (FRANCE ) - Te l : (33 ) 03 23 25 15 50 - Fax : (33) 03 23 256 256 R.C. Soissons B 317 398 832 - SIRET 317 398 832 00020 - TVA : FR 82 317 398 832 - APE 244D
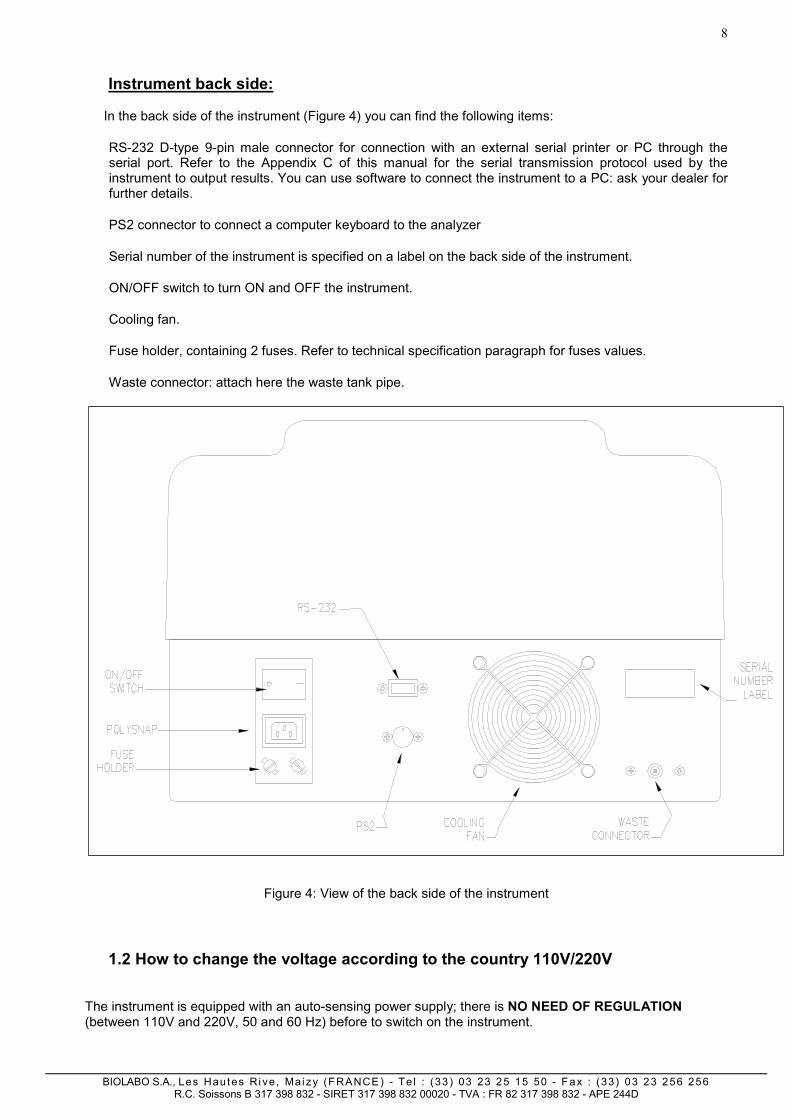
Instrument back side:
In the back side of the instrument (Figure 4) you can find the following items: • RS-232 D-type 9-pin male connector for connection with an external serial printer or PC through the
serial port. Refer to the Appendix C of this manual for the serial transmission protocol used by the instrument to output results. You can use software to connect the instrument to a PC: ask your dealer for further details.
• PS2 connector to connect a computer keyboard to the analyzer • Serial number of the instrument is specified on a label on the back side of the instrument. • ON/OFF switch to turn ON and OFF the instrument. • Cooling fan. • Fuse holder, containing 2 fuses. Refer to technical specification paragraph for fuses values. • Waste connector: attach here the waste tank pipe.
Figure 4: View of the back side of the instrument
1.2 How to change the voltage according to the country 110V/220V
The instrument is equipped with an auto-sensing power supply; there is NO NEED OF REGULATION (between 110V and 220V, 50 and 60 Hz) before to switch on the instrument.
9
BIOLABO S.A., Les Hautes Ri ve, Mai zy (FRANCE ) - Te l : (33 ) 03 23 25 15 50 - Fax : (33) 03 23 256 256 R.C. Soissons B 317 398 832 - SIRET 317 398 832 00020 - TVA : FR 82 317 398 832 - APE 244D
2. INSTALLATION
2.1. Installation and maintenance of the instrument
Procedure to install the instrument. Please, in the case of any doubt or ambiguity in understanding this procedure, contact your nearest distributor since an improper installation may damage seriously the instrument. The instrument can work either with 220 V – 50 Hz (working range is from 170 to 264 V) power supply or 110 V – 60 Hz (working range is from 85 to 132 V) and automatically identifies the applied power supply.
INSTALLATION:
• Place the instrument on a stable and vibration-free support. Avoid its placing near heat sources (e.g. heaters, ovens, under high power lamps), under direct sunlight, near strong electromagnetic sources (e.g. motors) or with the instrument’s back close to a wall, which would block the cooling air flow. The operational temperature range is 15-30Cº and humidity must be under 80%.
• Before connecting the instrument to the power supply, make sure that it is switched off. In this case, the
switch on the polysnap module in the backside of the instrument must be in the 0 position. • Connect the waste discharge tube to the outlet on the instrument back panel and place its cap inside the
waste tank. • Remove the stick on the flow cell compartment and open it. • Open the flow cell compartment and remove the protection used for the package of the flow cell. • Switch on the instrument (polysnap on position1). The display will show the number of software version,
the date and the time in their correct position.
• As indicated on the display, put the aspiration spout inside about 1.5 ml of distilled water (or more) to realize internal blanking and to initialize the flow cell. Press the ‘Push’ button on the front side of the instrument to enter the Self -test.
• Wait for Self-test to complete: the instrument performs an auto-diagnostic test which should end, if no
error occurs, prompting for programmed analysis, date and time setting. If Self-test is not successful, the error message is hard-copied on the printer: in this case, refer to Appendix A (Troubleshooting) for further details and possible solutions.
• Set date and time by SETUP Menu (refer below) • When the main prompt is displayed start aspirating distilled water by pressing the WASH key until the
whole hydraulic circuit is full with water (until distilled water begins to flow into the Waste Tank).
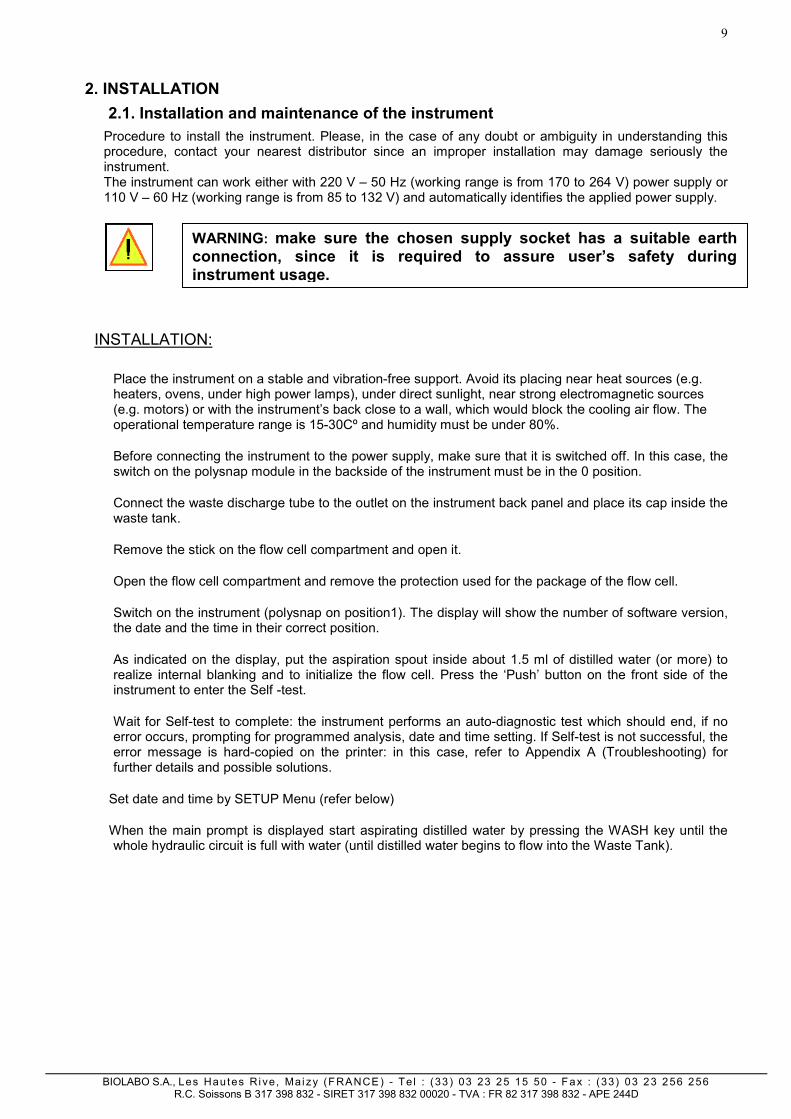
WARNING: make sure the chosen supply socket has a suitable earth connection, since it is required to assure user’s safety during instrument usage.

10
BIOLABO S.A., Les Hautes Ri ve, Mai zy (FRANCE ) - Te l : (33 ) 03 23 25 15 50 - Fax : (33) 03 23 256 256 R.C. Soissons B 317 398 832 - SIRET 317 398 832 00020 - TVA : FR 82 317 398 832 - APE 244D
• If you have any problem during this step (like pump seems not to have enough power to aspirate this distilled water) you can use a syringe (Figure 5) to inject the first 5 ml water directly in the aspiration spout, while pressing the WASH key to keep the peristaltic pump motor running. In such a way you will initialize the peristaltic pump hydraulic and the flow cell, and you will be able to aspirate normally using the WASH button and the SAMPLE LEVER (PUSH BUTTON).
Figure 5: External injection of water towards the peristaltic pump • Aspirate sodium hypochlorite (concentration between 6% and 10%) using the WASH key, for a volume
amount of 20-30 ml. • Aspirate distilled water using the WASH key for a volume amount of 20-30 ml. • Now the instrument is installed and ready to work.
INSTRUMENT MAINTENANCE:
It is recommended to follow these operations for a correct maintenance of the instrument: • Avoid cleaning the instrument with water or alcohol. Use a dry cloth. • A periodic cleaning of the reading cell is however advised, by means of aspiration of sodium
hypochlorite. • At the end of a working session it is recommended to aspirate distilled water inside the flow cell in
order to clean peristaltic pump and remove dirty solution outside flow cell. Use the WASH button and 10-20 mL of distilled water for this purpose. Leave the instrument with distilled water inside the flow cell for the night.
• If you plan not to work with the instrument for more than 3 days, prepare it for a long inactivity time (refer to the section below).
• Avoid dropping moisture and water in the reading hole and in the incubator. • Clean the incubator and the reading hole with sodium hypochlorite or standard detergent (for example
glass detergent). • Clean the cover with detergent. • Avoid dust and cover the instrument with its plastic cover. INACTIVITY PERIOD:
If the instrument has to be prepared for long inactivity time (more than one week), it is recommended to follow this procedure:
• Aspirate sodium hypochlorite using the WASH key, for a volume amount of 20-30 mL. • Aspirate distilled water using the WASH key for a volume amount of 20-30 mL. • Completely deplete the instrument inside (this means press the WASH button and let the instrument
aspirate air, until no more water is output to the waste tank). • Use always original package to pack/ship the instrument. • Store the instrument between 0°C to 50 °C, avoiding moisture and wet place.
IMPORTANT: WAIT AT LEAST 15 MINUTES BEFORE EXECUTING ANY ANALYSIS, THUS ALLOWING THE INCUBATOR TO REACH AN OPTIMAL THERMAL STATUS.
CAUTION: BIOLABO declines any responsibility in the event of misuse of the material or non-observance of the instructions indicated above.
11
BIOLABO S.A., Les Hautes Ri ve, Mai zy (FRANCE ) - Te l : (33 ) 03 23 25 15 50 - Fax : (33) 03 23 256 256 R.C. Soissons B 317 398 832 - SIRET 317 398 832 00020 - TVA : FR 82 317 398 832 - APE 244D
2.2. Before daily work: preliminary operations
At every power on, the instrument performs a calibration and a self-test. Because the wall of an empty flow cell may be dirty, which can result in bad transmission of the light beam, and to avoid the users to replace frequently the flow cell, the instrument, as it is switched on, asks the user to insert 1.5 ml of distilled water in the aspiration spout to perform calibration and self-test. In the Body Window will appear the request:
If you press SAMPLE LEVEL (PUSH BUTTON), the instrument automatically aspirates distilled water into the flow cell. If you press [STOP/NO] the instrument skips this step and avoids water aspiration. Whatever is your choice the instrument automatically selects the 340 nm filter, displaying “BLANKING....” on the display. Then it performs its first reading, in order to get the value of the blank and complete its calibration.
2.3. Modifying settings
NOTE: when you are using an external PS-2 keyboard, the “TAB” key corresponds to button [MENU], the
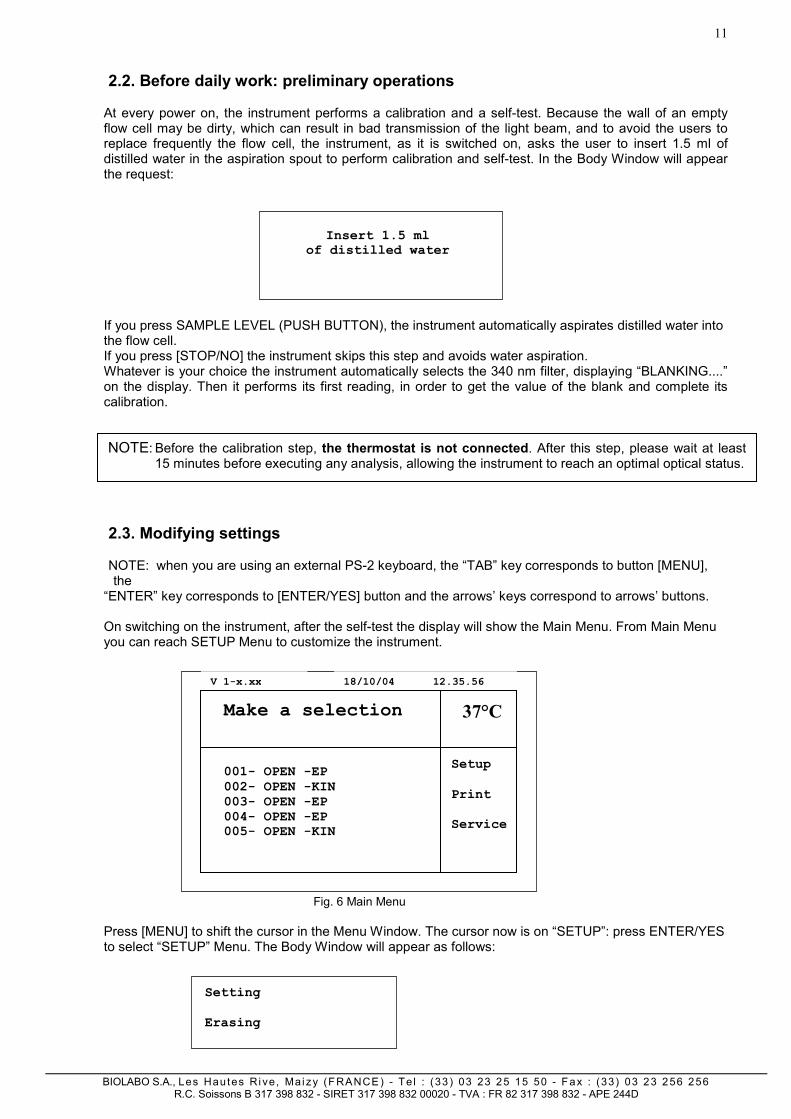
“ENTER” key corresponds to [ENTER/YES] button and the arrows’ keys correspond to arrows’ buttons. On switching on the instrument, after the self-test the display will show the Main Menu. From Main Menu you can reach SETUP Menu to customize the instrument.
Fig. 6 Main Menu Press [MENU] to shift the cursor in the Menu Window. The cursor now is on “SETUP”: press ENTER/YES to select “SETUP” Menu. The Body Window will appear as follows:
NOTE: Before the calibration step, the thermostat is not connected. After this step, please wait at least 15 minutes before executing any analysis, allowing the instrument to reach an optimal optical status.
Insert 1.5 ml of distilled water
Setting Erasing
18/10/04 12.35.56V 1-x.xx
Make a selection
001- OPEN -EP 002- OPEN -KIN 003- OPEN -EP 004- OPEN -EP 005- OPEN -KIN
37°C
Setup Print Service
12
BIOLABO S.A., Les Hautes Ri ve, Mai zy (FRANCE ) - Te l : (33 ) 03 23 25 15 50 - Fax : (33) 03 23 256 256 R.C. Soissons B 317 398 832 - SIRET 317 398 832 00020 - TVA : FR 82 317 398 832 - APE 244D
Press [ENTER/YES] to enter in the “Setting” Menu and then scroll it pressing UP or DOWN arrows. Select the feature you want to change pressing [ENTER/YES] button. The modifications will be done through the arrows’ buttons. This is the complete list of the feature you can modify:
Set Language Select the language of the instructions on the display. Set Date & Time Set current date and time. Contrast Select the contrast value for the display. Enable Print Connect or disconnect the printer. When the printer is disconnected,
it is not possible to execute any printing operation. Enable Plot Enable or disable the plot on kinetic and multi-standard analysis. When the plot is disabled only analytical results and program parameters are printed (if printer is enabled). Lamp Save If Lamp Save is enabled, the lamp is automatically switched off
when, in main menu, the instrument is not used for 2 minutes. Print Method Select OFF to disconnect the printer completely when entering into a
a program; PRZ to obtain an automatic print of date, time, analysis name and number, reference values and linear limits of the test, each time an analysis is selected, TOT to obtain an automatic printing of all stored parameters, each time an analysis is selected, REP to obtain an automatic printing of the test name every time a result is calculated.
Print Result Enable or disconnect the automatic printing of analytical result.. Number Rows You can insert the number of white rows between one printed row and the next one. Autoreset ID If enabled ID number will be reset every time user executes a new test. Air aspiration Select the air-gap volume. It is advisable to enter up to 00100 Above this volume air may enter into the cuvette. Delay (s) Enter the delay time between sample intake and air-gap intake. Temperature (°C) Enter the default Temperature (from 20°C to 40°C). This function is useful to maintain temperature to a specified value between different series of measurement. Enter 00 disconnect the thermostat. When you modified a feature, press [ENTER/YES] to confirm. Then you can continue scrolling the Menu using UP and DOWN arrows and select a new feature which should to be changed. When you finish to modify the features, press [STOP/NO] to exit from “Setting” Menu. On the Body Window appears the following message:
You have to press [ENTER/YES] to save in memory the modifications or [STOP/NO] if you don’t want to save the changes. Press [STOP/NO] until the analysis list appears on the Body window.
Save in Memory? Yes=ENTER No=STOP

13
BIOLABO S.A., Les Hautes Ri ve, Mai zy (FRANCE ) - Te l : (33 ) 03 23 25 15 50 - Fax : (33) 03 23 256 256 R.C. Soissons B 317 398 832 - SIRET 317 398 832 00020 - TVA : FR 82 317 398 832 - APE 244D
2.4. Erasing data in memory
If you want to erase old data stored in the memory, you have to select the “SETUP” menu as explained in paragraph 2.3 and then select “ERASING”. Press [ENTER/YES], then the Body Window will have this feature:
If you press [ENTER/YES], a message will appear in the middle of the display : “Erase memory?” Press [STOP/NO] and then [STOP/NO] to exit without erasing. Press [ENTER/YES] and then [STOP/NO] to exit and erase data in memory. If you select again “ERASING”, the display will show the message “Memory Empty”. Memory space is 400 tests.
If you want to erase all QC data, when on the display appears the previous message, press DOWN arrow to scroll Erasing Menu, the message on the Body Window will be:
If you press [ENTER/YES], a message will appear in the middle of the display : “Erase memory?” Press [STOP/NO] and then [STOP/NO] to exit without erasing. Press [ENTER/YES] and then [STOP/NO] to exit and erase data in memory.
Press [STOP/NO] until the body window shows the analysis list. NOTE: When memory is full, tests are overwritten starting from the older without prompting.
2.5. Thermostat
The target temperature is that configured for the test. Note : If you want to disconnect the thermostat, you have to select 00 when you select the temperature for the test (see chapter 8 for further details). It is recommended to wait at least for 15 minutes after any change of temperature, allowing the instrument to reach an optimal optical status.
2.6. Pump calibration The peristaltic pump guarantees the maximum precision in the intake volume of the liquid (or air) into the flow cell. The pump must be calibrated when the instrument is used for the first time and also periodically. The calibration of the intake system can be carried out following this procedure: • In the main menu press [MENU] button, select “SERVICE” and press [ENTER/YES]. • Select “PUMP CALIBRATION” and then press [ENTER/YES]. • The script “EXECUTING…” will appear in a window in the middle of the display. • Place a tube containing exactly 5 ml of distilled water under the intake spout. • Press the sample lever. The pump is now in action and draws the liquid from this tube (make sure it
does not draw air). • When the pump has drawn all the liquid, press again the sample lever. Intake stops and on the display
will appear, only for a few seconds, a number. Such a number indicates, in ms, the time necessary for the intake of 5 ml of liquid.
The instrument now returns automatically into the previous menu. Press [STOP/NO] until the body window shows the analysis list.
Initiate QC
Result Mem Erase Memory not empty
14
BIOLABO S.A., Les Hautes Ri ve, Mai zy (FRANCE ) - Te l : (33 ) 03 23 25 15 50 - Fax : (33) 03 23 256 256 R.C. Soissons B 317 398 832 - SIRET 317 398 832 00020 - TVA : FR 82 317 398 832 - APE 244D
2.7. Diagnostic & Service
You can reach “Diagnostic & Service” selecting “Diagnostic & Service” in the “Service” Menu. The Body Window will appear as follows:
If you select “QUICK DIAGNOSTIC” the analyser will print some self-diagnostic parameters, which could be helpful when you call service to solve any problem. Do not ever select “SERVICE ONLY”, this area has access reserved for service engineer. If for mistake you access to this area, press STOP/NO button to exit safely.
3. PRINTING OPERATIONS
3.1. Printing and display of the analysis’ name list
When the display shows the Main Menu (see Fig. 6), press [MENU] button and then select “PRINT”. The Body Window appears as follows:
Select Test List using UP and DOWN arrows’ buttons and then press [ENTER/YES]. The instrument prints the list of the names of analyses. To return in the main menu, press [STOP/NO] button until the tests’ list appears on the body window.
3.2. Printing of analytic parameters of one analysis
It is possible to print the list of parameters of all the stored analyses as follows. The parameters will be printed in partial or total way, depending on the printer set-up. In the Main Menu press [MENU] and then select “PRINT”. The Body Window will have this feature:
Select “TEST PARMETER” and then chose the analysis and press [ENTER/YES]: the instrument will print the parameter of the chosen test.
Quick Diagnostic Service Only
Test list Result Printout Test Parameter
Test List Result Printout Test Parameter
This section is generally reserved for the engineering department of BIOLABO or its approved retailer
15
BIOLABO S.A., Les Hautes Ri ve, Mai zy (FRANCE ) - Te l : (33 ) 03 23 25 15 50 - Fax : (33) 03 23 256 256 R.C. Soissons B 317 398 832 - SIRET 317 398 832 00020 - TVA : FR 82 317 398 832 - APE 244D
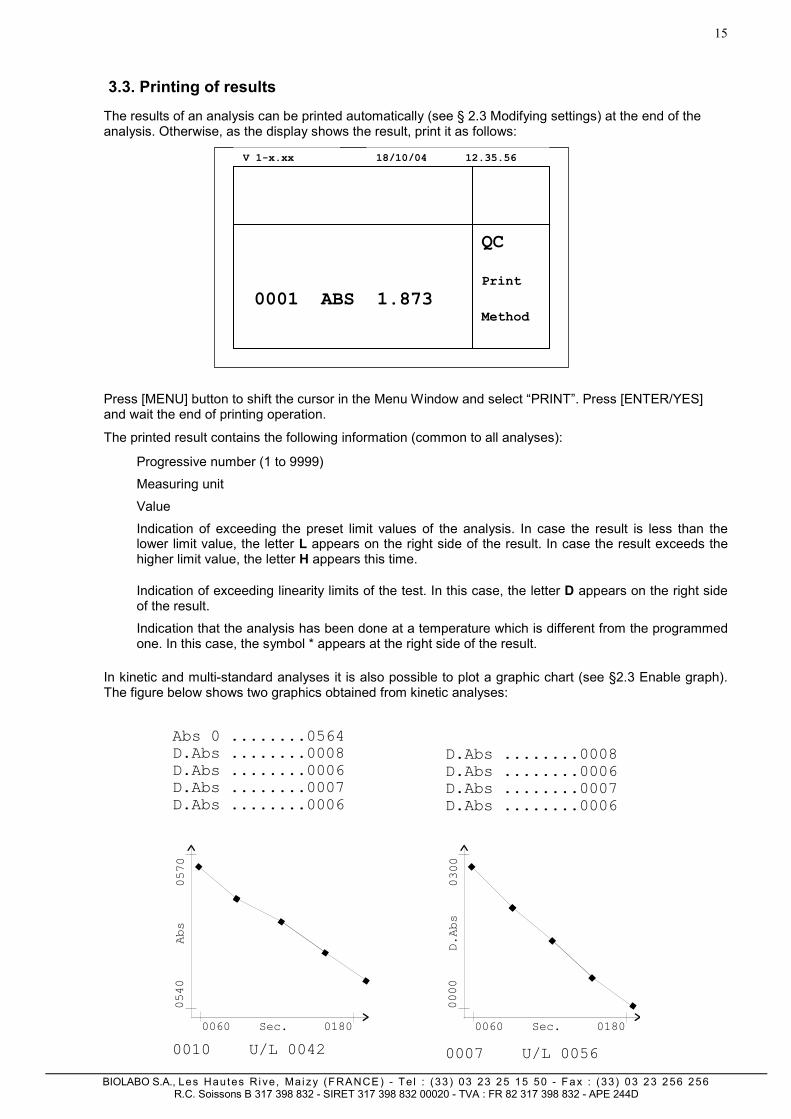
3.3. Printing of results
The results of an analysis can be printed automatically (see § 2.3 Modifying settings) at the end of the analysis. Otherwise, as the display shows the result, print it as follows:
Press [MENU] button to shift the cursor in the Menu Window and select “PRINT”. Press [ENTER/YES] and wait the end of printing operation.
The printed result contains the following information (common to all analyses):
• Progressive number (1 to 9999)
• Measuring unit
• Value
• Indication of exceeding the preset limit values of the analysis. In case the result is less than the lower limit value, the letter L appears on the right side of the result. In case the result exceeds the higher limit value, the letter H appears this time.
• Indication of exceeding linearity limits of the test. In this case, the letter D appears on the right side
of the result.
• Indication that the analysis has been done at a temperature which is different from the programmed one. In this case, the symbol * appears at the right side of the result.
In kinetic and multi-standard analyses it is also possible to plot a graphic chart (see §2.3 Enable graph). The figure below shows two graphics obtained from kinetic analyses:
D.Abs ........0008D.Abs ........0006D.Abs ........0007D.Abs ........0006
Abs 0 ........0564D.Abs ........0008D.Abs ........0006D.Abs ........0007D.Abs ........0006
0010 U/L 0042 0007 U/L 0056
0000
D .Ab
s03
00
0060 Sec. 0180
0540
Abs
0570
0060 Sec. 0180
18/10/04 12.35.56V 1-x.xx
QCPrint Method
0001 ABS 1.873
16
BIOLABO S.A., Les Hautes Ri ve, Mai zy (FRANCE ) - Te l : (33 ) 03 23 25 15 50 - Fax : (33) 03 23 256 256 R.C. Soissons B 317 398 832 - SIRET 317 398 832 00020 - TVA : FR 82 317 398 832 - APE 244D
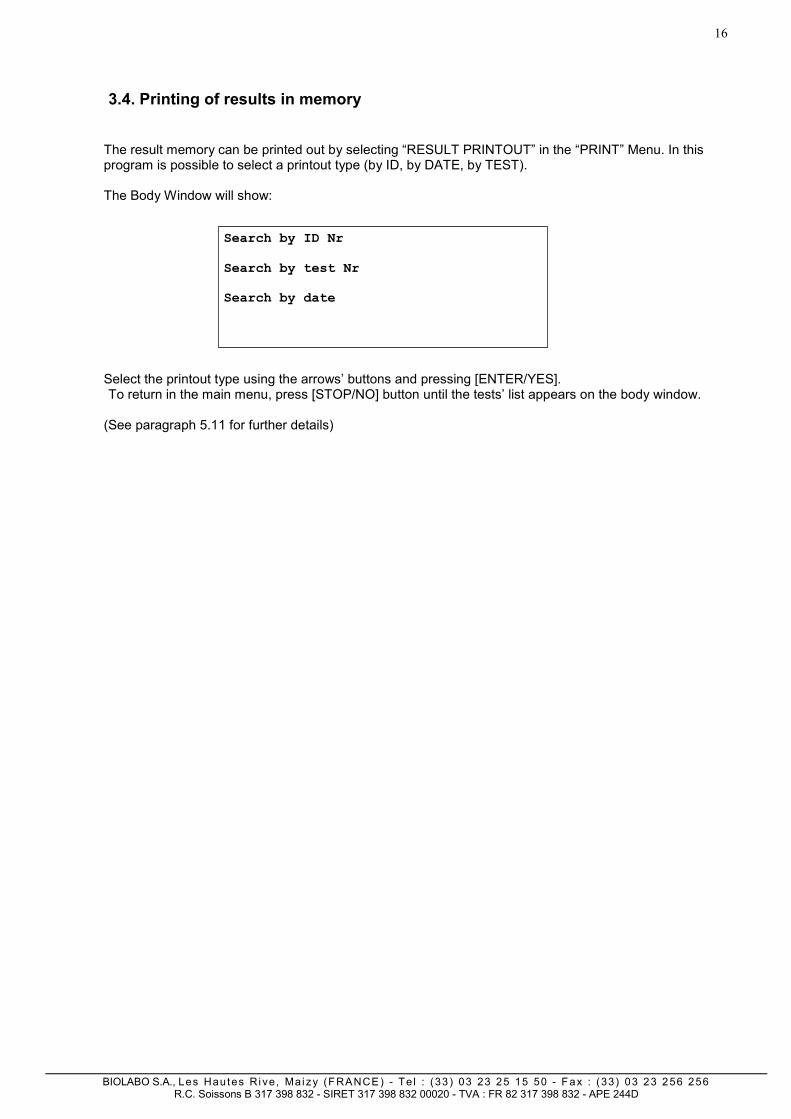
3.4. Printing of results in memory
The result memory can be printed out by selecting “RESULT PRINTOUT” in the “PRINT” Menu. In this program is possible to select a printout type (by ID, by DATE, by TEST). The Body Window will show:
Select the printout type using the arrows’ buttons and pressing [ENTER/YES]. To return in the main menu, press [STOP/NO] button until the tests’ list appears on the body window.
(See paragraph 5.11 for further details)
Search by ID Nr Search by test Nr Search by date
17
BIOLABO S.A., Les Hautes Ri ve, Mai zy (FRANCE ) - Te l : (33 ) 03 23 25 15 50 - Fax : (33) 03 23 256 256 R.C. Soissons B 317 398 832 - SIRET 317 398 832 00020 - TVA : FR 82 317 398 832 - APE 244D
4. CALCULATION PROCEDURES performed BY KENZA MAX BIOCHEMISTRY
4.1. End-point analysis
The instrument measures the assay ABSORBANCE (Reagent+Sample), multiplies it by a factor (K) and displays the results directly in the programmed concentration unit. The calculation factor can be entered directly or obtained by the instrument if a standard is used. In this case the factor is obtained by the formula:
K = C std C std = value of the standard used
ABS std ABS std = absorbance of standard
Such K-factor value then is used for the calculation of Sample concentration as follows:
Csample = ABSassay x K Csample = Sample concentration
ABSassay = Assay Absorbance
4.2. Kinetic analysis
In a kinetic analysis the reaction speed is determined by taking series of measurements of assay ABSORBANCE. The instrument begins to read after a preset wait time (delay). It reads continuously during the reaction time and calculates as many absorbance variations as the set number of readings (reading nr). The instrument then calculates the ABSORBANCE difference between one measurement and the previous one (ABS) and determines the average value, referred to 1 minute (D ABS/min.). Therefore, the following relation is valid:
Enzymatic activity (U/L) = D ABS/min. x K x n° readings /( n° readings +1)
4.3. Fixed-time analysis
In this operating mode the instrument does 2 ABS measurements on each assay:
- The first one after a delay time from the moment [ENTER/YES] is pressed.
- The second one after a reaction time from the first reading.
The instrument calculates the Absorbance difference between both readings (ABS). The concentration calculation is similar to the one used for End-point analyses. The K can be:
1) Entered directly by the operator (Fixed-time with K) 2) Calculated by the instrument, using a standard (Fixed-time with standard)
K = CStd CStd = value of the standard used
Abs1Std – Abs2Std Abs1Std = absorbance of standard (First reading)
Abs2Std = absorbance of standard (Second reading)
The resulting calculation formula is:
CSample = Abs1Assay – Abs2Assay x K CSample = Sample concentration Abs1Assay = Assay Absorbance (First reading)
Abs2Assay = Assay Absorbance (Second reading)

18
BIOLABO S.A., Les Hautes Ri ve, Mai zy (FRANCE ) - Te l : (33 ) 03 23 25 15 50 - Fax : (33) 03 23 256 256 R.C. Soissons B 317 398 832 - SIRET 317 398 832 00020 - TVA : FR 82 317 398 832 - APE 244D
4.4. Multi-standard analysis
In this operating mode the instrument does a linear interpolation between the various points of the calibration curve; the instrument can interpolate up to 7 calibration points. Starting from the interval in which the absorbance value of sample is, the result is given by the following formula:
Csample = Cn + ((Cn+1 - Cn) x (ABSassay - ABSn)) / (ABSn+1 - ABSn)
Csample = Sample concentration Cn = Concentration of standard n
Cn+1 = Concentration of standard n+1 ABSassay = Assay absorbance ABSn = Absorbance of standard n ABSn+1 = Absorbance of standard n+1
n is the number of the standard according to the following relations:
0 < n < 7
ABSn < ABS<assay < ABSn+1
4.5. Absorbance calculation when bichromatism is used
For the End-point and multi-standard methods, the reading can be done by using bichromatism; in this case the calculation procedure is the same as described before, the only parameter which varies is the absorbance calculation, according to the following formula:
ABS = ABSF1 – ABSF2 ABS = Absorbance value ABSF1 = Absorbance of reading filter (F1) ABSF2 = Absorbance of bichromatism filter (F2)
19
BIOLABO S.A., Les Hautes Ri ve, Mai zy (FRANCE ) - Te l : (33 ) 03 23 25 15 50 - Fax : (33) 03 23 256 256 R.C. Soissons B 317 398 832 - SIRET 317 398 832 00020 - TVA : FR 82 317 398 832 - APE 244D
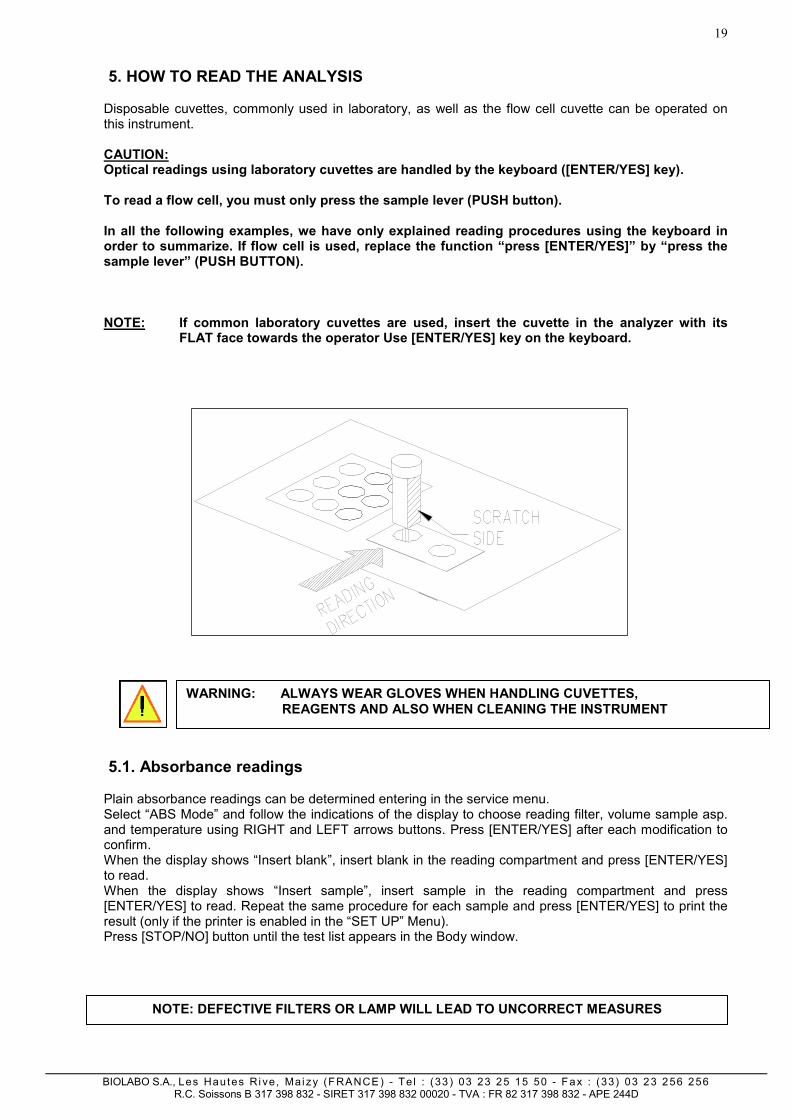
5. HOW TO READ THE ANALYSIS
Disposable cuvettes, commonly used in laboratory, as well as the flow cell cuvette can be operated on this instrument. CAUTION:Optical readings using laboratory cuvettes are handled by the keyboard ([ENTER/YES] key). To read a flow cell, you must only press the sample lever (PUSH button). In all the following examples, we have only explained reading procedures using the keyboard in order to summarize. If flow cell is used, replace the function “press [ENTER/YES]” by “press the sample lever” (PUSH BUTTON).
NOTE: If common laboratory cuvettes are used, insert the cuvette in the analyzer with its FLAT face towards the operator Use [ENTER/YES] key on the keyboard.
5.1. Absorbance readings
Plain absorbance readings can be determined entering in the service menu. Select “ABS Mode” and follow the indications of the display to choose reading filter, volume sample asp. and temperature using RIGHT and LEFT arrows buttons. Press [ENTER/YES] after each modification to confirm. When the display shows “Insert blank”, insert blank in the reading compartment and press [ENTER/YES] to read. When the display shows “Insert sample”, insert sample in the reading compartment and press [ENTER/YES] to read. Repeat the same procedure for each sample and press [ENTER/YES] to print the result (only if the printer is enabled in the “SET UP” Menu). Press [STOP/NO] button until the test list appears in the Body window.
WARNING: ALWAYS WEAR GLOVES WHEN HANDLING CUVETTES,REAGENTS AND ALSO WHEN CLEANING THE INSTRUMENT
NOTE: DEFECTIVE FILTERS OR LAMP WILL LEAD TO UNCORRECT MEASURES
20
BIOLABO S.A., Les Hautes Ri ve, Mai zy (FRANCE ) - Te l : (33 ) 03 23 25 15 50 - Fax : (33) 03 23 256 256 R.C. Soissons B 317 398 832 - SIRET 317 398 832 00020 - TVA : FR 82 317 398 832 - APE 244D
5.2. Selection of the analysis
When switching on the instrument, after self-test completion, the display shows the Main Menu (Fig. 6): you can select the analysis using arrows’ buttons and then press [ENTER/YES]. With UP and DOWN you can scroll the analysis menu in the current page, with LEFT and RIGHT arrows you will scroll the analysis menu page by page (the 120 test are distributed in 20 pages). Once an analysis is selected, its parameters are printed (if automatic printing has been enabled). On the display, in the Top Window, the first line indicates the name of the analysis, the analysis kind, the symbol K and the constant K value; the second line shows the Low limit Value and the High Limit Value with the correct unit.
5.3. Reading of an End-point analysis with K
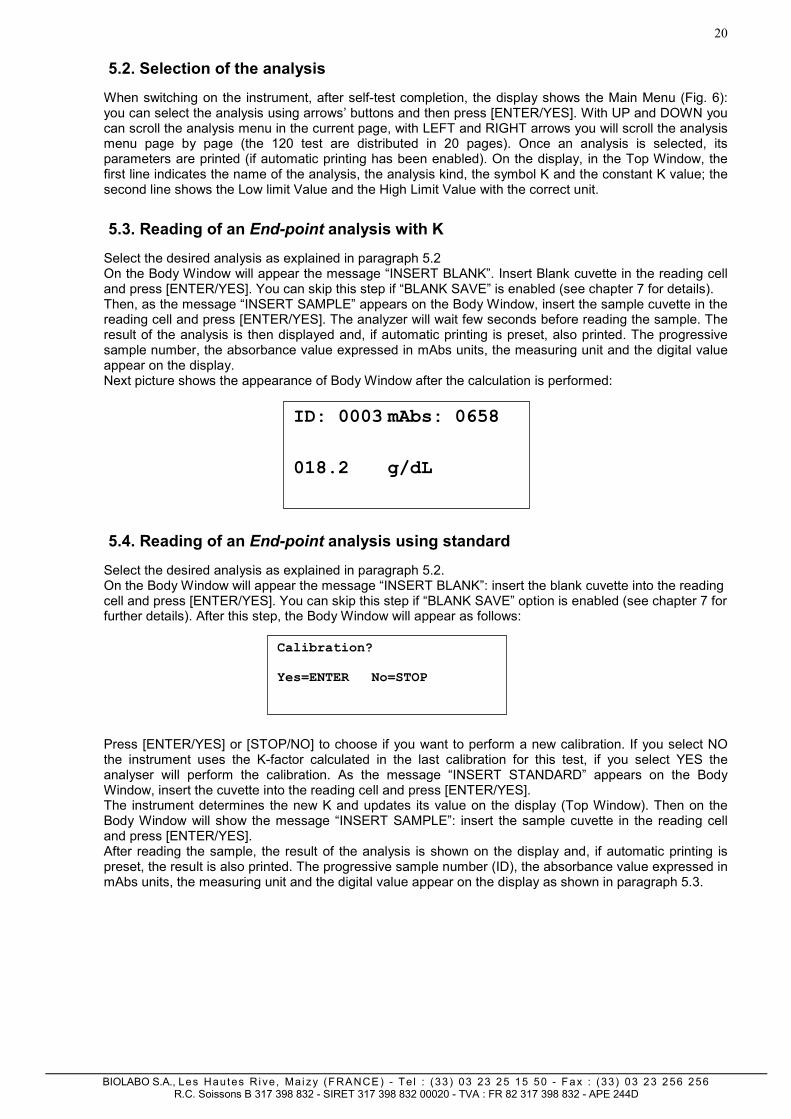
Select the desired analysis as explained in paragraph 5.2 On the Body Window will appear the message “INSERT BLANK”. Insert Blank cuvette in the reading cell and press [ENTER/YES]. You can skip this step if “BLANK SAVE” is enabled (see chapter 7 for details). Then, as the message “INSERT SAMPLE” appears on the Body Window, insert the sample cuvette in the reading cell and press [ENTER/YES]. The analyzer will wait few seconds before reading the sample. The result of the analysis is then displayed and, if automatic printing is preset, also printed. The progressive sample number, the absorbance value expressed in mAbs units, the measuring unit and the digital value appear on the display. Next picture shows the appearance of Body Window after the calculation is performed:
5.4. Reading of an End-point analysis using standard
Select the desired analysis as explained in paragraph 5.2. On the Body Window will appear the message “INSERT BLANK”: insert the blank cuvette into the reading cell and press [ENTER/YES]. You can skip this step if “BLANK SAVE” option is enabled (see chapter 7 for further details). After this step, the Body Window will appear as follows:
Press [ENTER/YES] or [STOP/NO] to choose if you want to perform a new calibration. If you select NO the instrument uses the K-factor calculated in the last calibration for this test, if you select YES the analyser will perform the calibration. As the message “INSERT STANDARD” appears on the Body Window, insert the cuvette into the reading cell and press [ENTER/YES]. The instrument determines the new K and updates its value on the display (Top Window). Then on the Body Window will show the message “INSERT SAMPLE”: insert the sample cuvette in the reading cell and press [ENTER/YES].
After reading the sample, the result of the analysis is shown on the display and, if automatic printing is preset, the result is also printed. The progressive sample number (ID), the absorbance value expressed in mAbs units, the measuring unit and the digital value appear on the display as shown in paragraph 5.3.
ID: 0003 mAbs: 0658
018.2 g/dL
Calibration? Yes=ENTER No=STOP

21
BIOLABO S.A., Les Hautes Ri ve, Mai zy (FRANCE ) - Te l : (33 ) 03 23 25 15 50 - Fax : (33) 03 23 256 256 R.C. Soissons B 317 398 832 - SIRET 317 398 832 00020 - TVA : FR 82 317 398 832 - APE 244D
5.5. Reading of a Multi-standard analysis
CAUTION : Analyses 51 à 120 are open and should be used for multi-standard-type.
In this case, the operator must program them correctly (see chapter 6 for further details) before he can perform them. After the analysis has been correctly programmed, select the test as explained in paragraph 5.2. • As the message “INSERT BLANK” appears on the Body Window, insert the blank cuvette into the
reading cell and press [ENTER/YES]. This step may be skipped if BLANK SAVE is enabled (see chapter 7 or further details).
• Then the message “INSERT STANDARD 1” will appear on the display: insert the standard 1 cuvette into the reading cell and press [ENTER/YES].
• Repeat these operations for each standard required by the analysis. The number of standards is chosen in the analysis programmation (see chapter 6).
• After the last standard cuvette required, the instrument requests the sample cuvette displaying “INSERT SAMPLE” on the Body Window: insert the sample cuvette into the reading cell and press [ENTER/YES].
• Repeat this step as much as necessary
The instrument executes a linear interpolation between each pair of concentration values of the various standards. If the concentration of the sample is less than that of the lowest standard, LLL is shown on the display. On the contrary, if the concentration of the sample is greater than that of the highest standard, HHH is shown on the display: in this case, dilute the sample and repeat the analysis. 5.6. Reading of a Kinetic analysis
Select the desired analysis as explained in paragraph 5.2. • On the Body Window appears the message “INSERT SAMPLE XXXX” • Insert the sample cuvette and press [ENTER/YES]. • While the machine executes the test, the display draws the graphic of the kinetic of the reaction, as
shown in the following picture:
The timer indicates the residual time (in seconds) to complete the analysis. When the sample analysis is at the end the result is visualized on the display; if automatic printing is preset, this result is also printed. The display shows the absorbance value read at second 0 (Abs 0), the absorbance variation referred to 1minute (D ABS/min) and the measuring unit and the result:
Particular of Body Window of the display
18/10/04 12.35.56V 1-x.xx
SGOT –KIN K = 01746 0000 – 0037 U/L
37.0 °C
QC PRINT METHOD
SEC = 2 ABS = 2325
Timer
Absorbance value
Abs 0 . . . . . . . . . . . . 1979 Abs/m . . . . . . . . . . . . 000.6 0.125 U/L

22
BIOLABO S.A., Les Hautes Ri ve, Mai zy (FRANCE ) - Te l : (33 ) 03 23 25 15 50 - Fax : (33) 03 23 256 256 R.C. Soissons B 317 398 832 - SIRET 317 398 832 00020 - TVA : FR 82 317 398 832 - APE 244D
5.7. Reading of a Fixed-time analysis with K
Select the desired analysis as explained in paragraph 5.2.
• As on the Body Window appears the message “INSERT SAMPLE XXXX” • Insert the sample cuvette into the reading cell and press [ENTER/YES]. • The test will start and the display will show the graphic as in Kinetic analysis. • The timer indicates the residual time (in seconds) to complete the analysis. • When the sample analysis has been completed the result is visualized on the display; if automatic
printing is preset, this result is also printed. The progressive number (ID), the measuring unit and the analytical result appear on the display.
5.8. Reading of a Fixed-time analysis with standard
Select the desired analysis as explained in paragraph 5.2. On the Body Window appears the following message:
Press [ENTER/YES] or [STOP/NO] to choose if you want to perform a new calibration.. If you select NO, the instrument will use the K-factor calculated in the last calibration for this test. If you select YES the message “INSERT STANDARD” will appear on the Body Window: insert the standard cuvette and press [ENTER/YES].
The timer on the display indicates the residual time (in seconds) to achieve the calibration. When the timer indicates 0, the calibration is completed. The instrument determines the new K and shows its value on the display.
Then on the Body Window will appear the message “INSERT SAMPLE”: insert the sample cuvette and press [ENTER/YES]. The test will start and the display will show the graphic as in Kinetic analysis.
The timer indicates the residual time (in seconds) to complete the analysis. When the timer indicates 0, the sample analysis is completed and the result is visualized on the display; if automatic printing is preset, this result is also printed. The progressive number (ID), the measuring unit and the analytical value appear on the display. 5.9. Reading at incubator temperature different from the programmed one
If a measurement is realised at a temperature which is different from the one entered in the program, the temperature indicated on the display blinks. An asterisk (*) will be printed beside the analytical result.
5.10. Modifying the progressive number (ID Number)
The progressive number is a four-digit number that increases automatically by 1 unit whenever an analysis is carried out. This number is displayed and printed before the measuring unit. This value can be modified when this message appears on the second Body Window:
“INSERT SAMPLE XXXX” Use arrow keys to modify ID number
Every time the user is performing a test the instrument is storing in memory the result of the test with the corresponding ID number. For this reason, every time the user is asked of inserting a sample, the instrument will automatically display also the corresponding ID number:
The procedure is the same if you are reading using or not using the flow cell:
Calibration ? ENTER/YES STOP/NO
23
BIOLABO S.A., Les Hautes Ri ve, Mai zy (FRANCE ) - Te l : (33 ) 03 23 25 15 50 - Fax : (33) 03 23 256 256 R.C. Soissons B 317 398 832 - SIRET 317 398 832 00020 - TVA : FR 82 317 398 832 - APE 244D
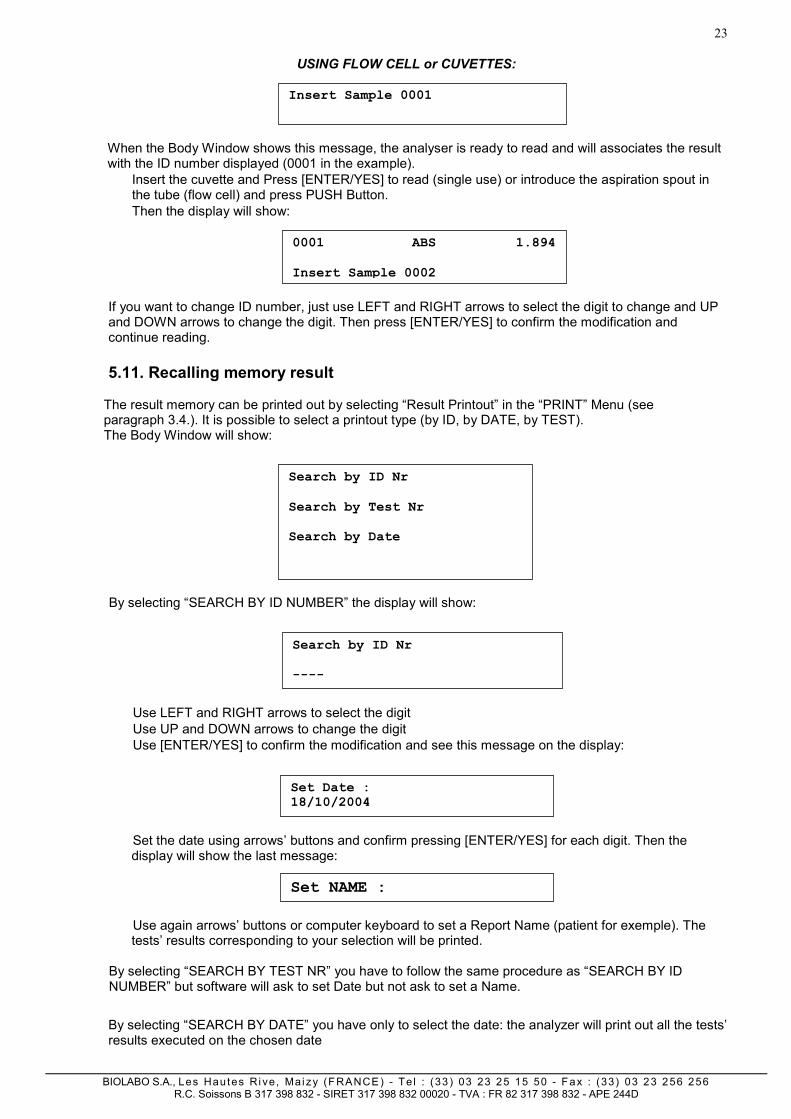
USING FLOW CELL or CUVETTES:
When the Body Window shows this message, the analyser is ready to read and will associates the result with the ID number displayed (0001 in the example). • Insert the cuvette and Press [ENTER/YES] to read (single use) or introduce the aspiration spout in
the tube (flow cell) and press PUSH Button. • Then the display will show:
If you want to change ID number, just use LEFT and RIGHT arrows to select the digit to change and UP and DOWN arrows to change the digit. Then press [ENTER/YES] to confirm the modification and continue reading. 5.11. Recalling memory result
The result memory can be printed out by selecting “Result Printout” in the “PRINT” Menu (see paragraph 3.4.). It is possible to select a printout type (by ID, by DATE, by TEST). The Body Window will show:
By selecting “SEARCH BY ID NUMBER” the display will show:
• Use LEFT and RIGHT arrows to select the digit • Use UP and DOWN arrows to change the digit • Use [ENTER/YES] to confirm the modification and see this message on the display:
• Set the date using arrows’ buttons and confirm pressing [ENTER/YES] for each digit. Then the display will show the last message:
• Use again arrows’ buttons or computer keyboard to set a Report Name (patient for exemple). The
tests’ results corresponding to your selection will be printed.
By selecting “SEARCH BY TEST NR” you have to follow the same procedure as “SEARCH BY ID NUMBER” but software will ask to set Date but not ask to set a Name.
By selecting “SEARCH BY DATE” you have only to select the date: the analyzer will print out all the tests’ results executed on the chosen date
Insert Sample 0001
0001 ABS 1.894 Insert Sample 0002
Search by ID Nr Search by Test Nr Search by Date
Search by ID Nr ----
Set Date : 18/10/2004
Set NAME :

24
BIOLABO S.A., Les Hautes Ri ve, Mai zy (FRANCE ) - Te l : (33 ) 03 23 25 15 50 - Fax : (33) 03 23 256 256 R.C. Soissons B 317 398 832 - SIRET 317 398 832 00020 - TVA : FR 82 317 398 832 - APE 244D
5.12. Waste processing
Always follow the common clinical laboratories rules to process the waste bottle content, exhaust reagents, used cuvettes and any other object that may be contaminated with organic and/or chemical fluids.
6. ANALYSIS PARAMETERS
Parameters of analysis refer to all information required by the instrument to carry out that analysis according to the preset methods. The following table shows all the necessary parameters to be entered for each type of analysis procedure.
Displayed Parameters
End-point
(EP) with K
End-point
(EP) with standard
Kinetic
(KIN)
Fixed-time
(FXT) with K
Fixed-time
(FXT) with standard
Multi-standard
(MSD)
Type method × × × × × ×
New method name
× × × × × ×
New K Factor × × ×
Use Standard x x x
Value Standard × × ×
Read Filter (nm)
× × × × × ×
Bichr. Filter (nm)
× × ×
Units × × × × × ×
Nr Decimal points
× × × × × ×
Temperature (°C)
× × × × × ×
Delay (sec) × × × × × ×
Reaction time (sec)
× × ×
Reading Nr ×
Standard number
×
Repeat blank × × ×
Blank Save × × ×
Low limit value × × × × × ×
High limit value × × × × × ×
Linearity limit value
× × × × × ×
Sample volume × × × × × ×
Reactive 1 volume
× × × × × ×
Reactive 2 volume
× × × × × ×
Vol. Sample Asp.
× × × × × ×
25
BIOLABO S.A., Les Hautes Ri ve, Mai zy (FRANCE ) - Te l : (33 ) 03 23 25 15 50 - Fax : (33) 03 23 256 256 R.C. Soissons B 317 398 832 - SIRET 317 398 832 00020 - TVA : FR 82 317 398 832 - APE 244D
6.1. Bichromatic filter
In End-point methods (using K or standard) and multi-standard ones, it is possible to perform the optical measurement using the bichromatic filter as well as the reading one. The use of such filter reduces the optical background noise in the chemical reaction. The instrument measures the absorbance of the reading filter at the corresponding wavelength and that of the bichromatic filter at another wavelength. It determines the difference between these two absorbance values and gives the final result. 6.2. How to use the decimal points
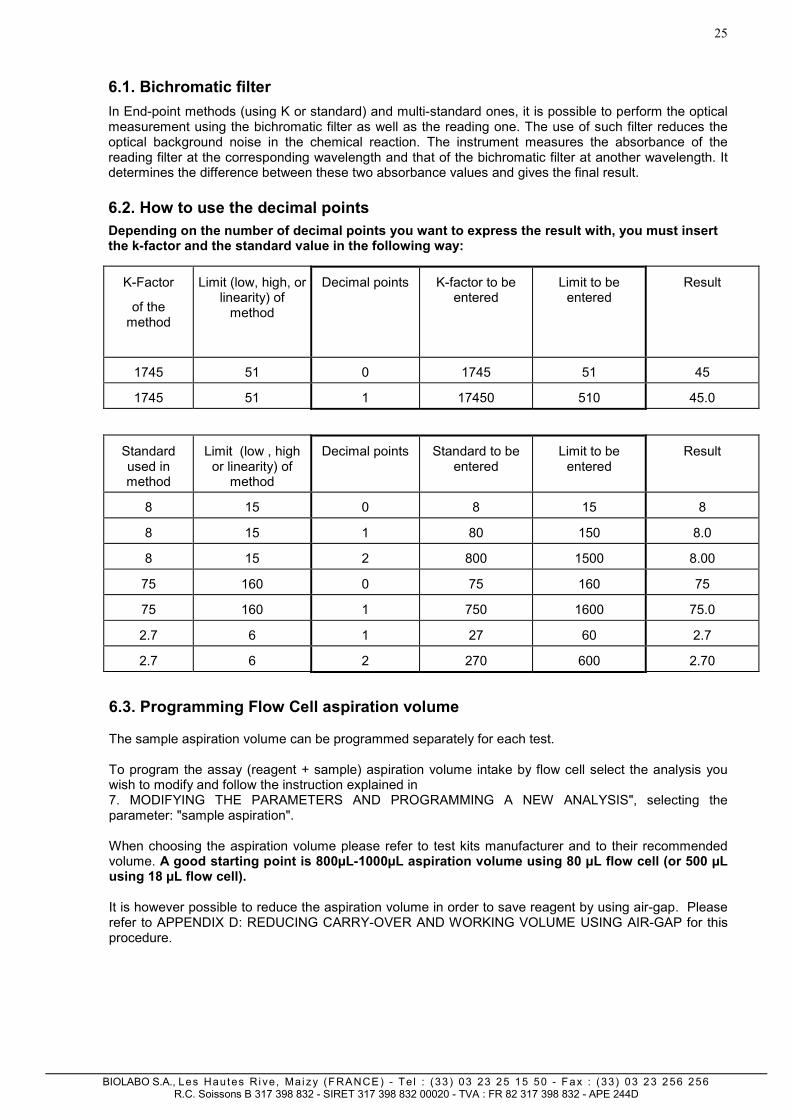
Depending on the number of decimal points you want to express the result with, you must insert the k-factor and the standard value in the following way:
K-Factor
of the method
Limit (low, high, or linearity) of
method
Decimal points K-factor to be entered
Limit to be entered
Result
1745 51 0 1745 51 45
1745 51 1 17450 510 45.0
Standard used in method
Limit (low , high or linearity) of
method
Decimal points Standard to be entered
Limit to be entered
Result
8 15 0 8 15 8
8 15 1 80 150 8.0
8 15 2 800 1500 8.00
75 160 0 75 160 75
75 160 1 750 1600 75.0
2.7 6 1 27 60 2.7
2.7 6 2 270 600 2.70
6.3. Programming Flow Cell aspiration volume
The sample aspiration volume can be programmed separately for each test.
To program the assay (reagent + sample) aspiration volume intake by flow cell select the analysis you wish to modify and follow the instruction explained in 7. MODIFYING THE PARAMETERS AND PROGRAMMING A NEW ANALYSIS", selecting the parameter: "sample aspiration".
When choosing the aspiration volume please refer to test kits manufacturer and to their recommended volume. A good starting point is 800µL-1000µL aspiration volume using 80 µL flow cell (or 500 µLusing 18 µL flow cell).
It is however possible to reduce the aspiration volume in order to save reagent by using air-gap. Please refer to APPENDIX D: REDUCING CARRY-OVER AND WORKING VOLUME USING AIR-GAP for this procedure.
26
BIOLABO S.A., Les Hautes Ri ve, Mai zy (FRANCE ) - Te l : (33 ) 03 23 25 15 50 - Fax : (33) 03 23 256 256 R.C. Soissons B 317 398 832 - SIRET 317 398 832 00020 - TVA : FR 82 317 398 832 - APE 244D
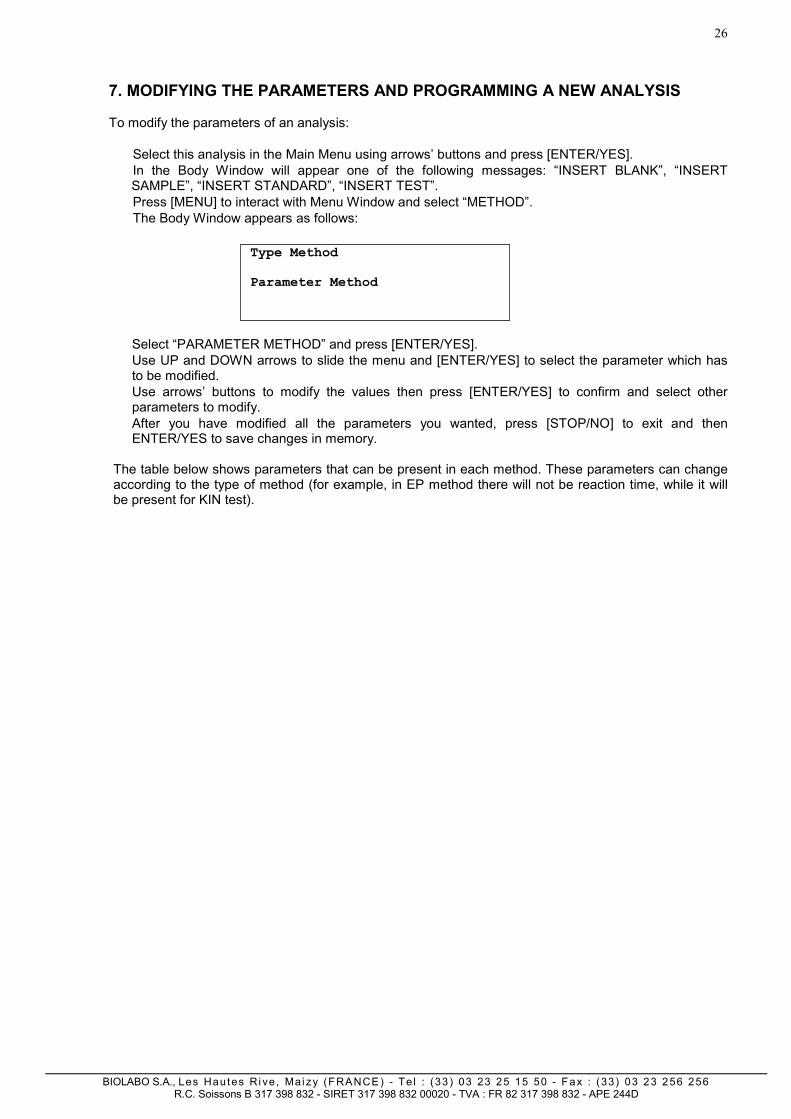
7. MODIFYING THE PARAMETERS AND PROGRAMMING A NEW ANALYSIS
To modify the parameters of an analysis:
• Select this analysis in the Main Menu using arrows’ buttons and press [ENTER/YES]. • In the Body Window will appear one of the following messages: “INSERT BLANK”, “INSERT
SAMPLE”, “INSERT STANDARD”, “INSERT TEST”. • Press [MENU] to interact with Menu Window and select “METHOD”. • The Body Window appears as follows:
• Select “PARAMETER METHOD” and press [ENTER/YES]. • Use UP and DOWN arrows to slide the menu and [ENTER/YES] to select the parameter which has
to be modified. • Use arrows’ buttons to modify the values then press [ENTER/YES] to confirm and select other
parameters to modify. • After you have modified all the parameters you wanted, press [STOP/NO] to exit and then
ENTER/YES to save changes in memory. The table below shows parameters that can be present in each method. These parameters can change according to the type of method (for example, in EP method there will not be reaction time, while it will be present for KIN test).
Type Method Parameter Method
27
BIOLABO S.A., Les Hautes Ri ve, Mai zy (FRANCE ) - Te l : (33 ) 03 23 25 15 50 - Fax : (33) 03 23 256 256 R.C. Soissons B 317 398 832 - SIRET 317 398 832 00020 - TVA : FR 82 317 398 832 - APE 244D
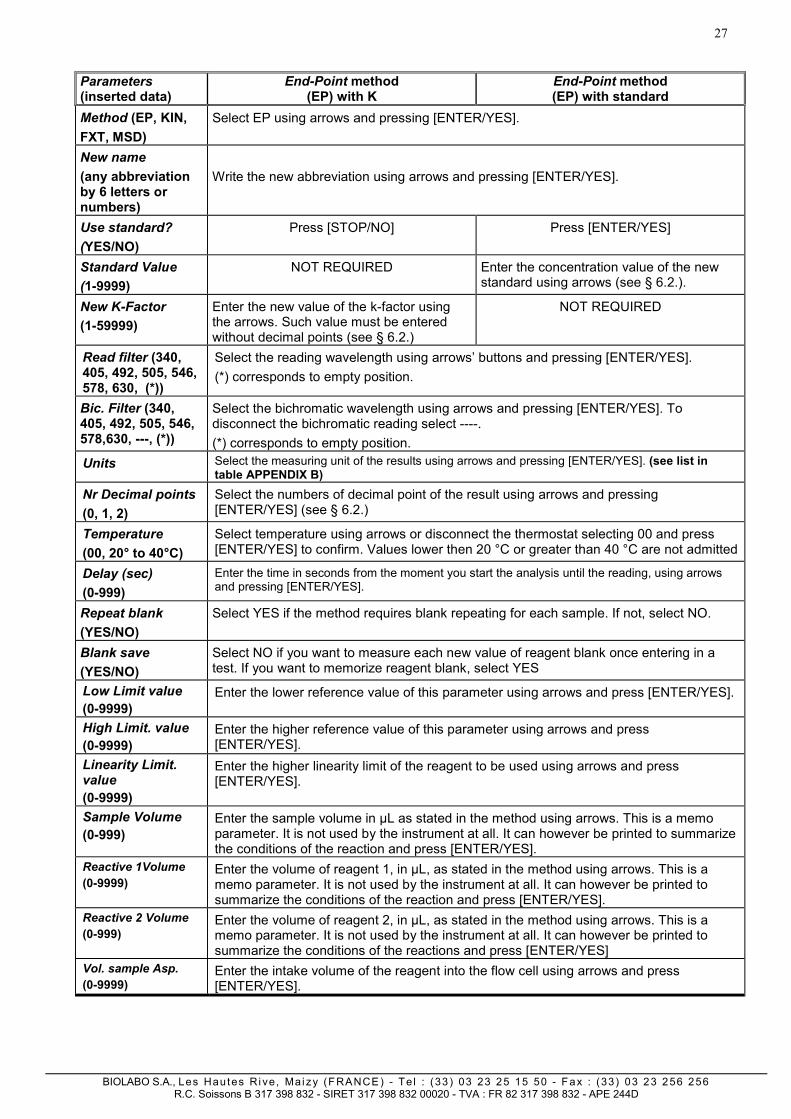
Parameters (inserted data)
End-Point method (EP) with K
End-Point method (EP) with standard
Method (EP, KIN, FXT, MSD)
Select EP using arrows and pressing [ENTER/YES].
New name (any abbreviation by 6 letters or numbers)
Write the new abbreviation using arrows and pressing [ENTER/YES].
Use standard? (YES/NO)
Press [STOP/NO] Press [ENTER/YES]
Standard Value (1-9999)
NOT REQUIRED Enter the concentration value of the new standard using arrows (see § 6.2.).
New K-Factor (1-59999)
Enter the new value of the k-factor using the arrows. Such value must be entered without decimal points (see § 6.2.)
NOT REQUIRED
Read filter (340, 405, 492, 505, 546, 578, 630, (*))
Select the reading wavelength using arrows’ buttons and pressing [ENTER/YES]. (*) corresponds to empty position.
Bic. Filter (340, 405, 492, 505, 546, 578,630, ---, (*))
Select the bichromatic wavelength using arrows and pressing [ENTER/YES]. To disconnect the bichromatic reading select ----. (*) corresponds to empty position.
Units Select the measuring unit of the results using arrows and pressing [ENTER/YES]. (see list in table APPENDIX B)
Nr Decimal points (0, 1, 2)
Select the numbers of decimal point of the result using arrows and pressing [ENTER/YES] (see § 6.2.)
Temperature (00, 20° to 40°C)
Select temperature using arrows or disconnect the thermostat selecting 00 and press [ENTER/YES] to confirm. Values lower then 20 °C or greater than 40 °C are not admitted
Delay (sec) (0-999)
Enter the time in seconds from the moment you start the analysis until the reading, using arrows and pressing [ENTER/YES].
Repeat blank (YES/NO)
Select YES if the method requires blank repeating for each sample. If not, select NO.
Blank save (YES/NO)
Select NO if you want to measure each new value of reagent blank once entering in a test. If you want to memorize reagent blank, select YES
Low Limit value (0-9999)
Enter the lower reference value of this parameter using arrows and press [ENTER/YES].
High Limit. value (0-9999)
Enter the higher reference value of this parameter using arrows and press [ENTER/YES].
Linearity Limit. value (0-9999)
Enter the higher linearity limit of the reagent to be used using arrows and press [ENTER/YES].
Sample Volume (0-999)
Enter the sample volume in µL as stated in the method using arrows. This is a memo parameter. It is not used by the instrument at all. It can however be printed to summarize the conditions of the reaction and press [ENTER/YES].
Reactive 1Volume (0-9999)
Enter the volume of reagent 1, in µL, as stated in the method using arrows. This is a memo parameter. It is not used by the instrument at all. It can however be printed to summarize the conditions of the reaction and press [ENTER/YES].
Reactive 2 Volume (0-999)
Enter the volume of reagent 2, in µL, as stated in the method using arrows. This is a memo parameter. It is not used by the instrument at all. It can however be printed to summarize the conditions of the reactions and press [ENTER/YES]
Vol. sample Asp. (0-9999)
Enter the intake volume of the reagent into the flow cell using arrows and press [ENTER/YES].
28
BIOLABO S.A., Les Hautes Ri ve, Mai zy (FRANCE ) - Te l : (33 ) 03 23 25 15 50 - Fax : (33) 03 23 256 256 R.C. Soissons B 317 398 832 - SIRET 317 398 832 00020 - TVA : FR 82 317 398 832 - APE 244D
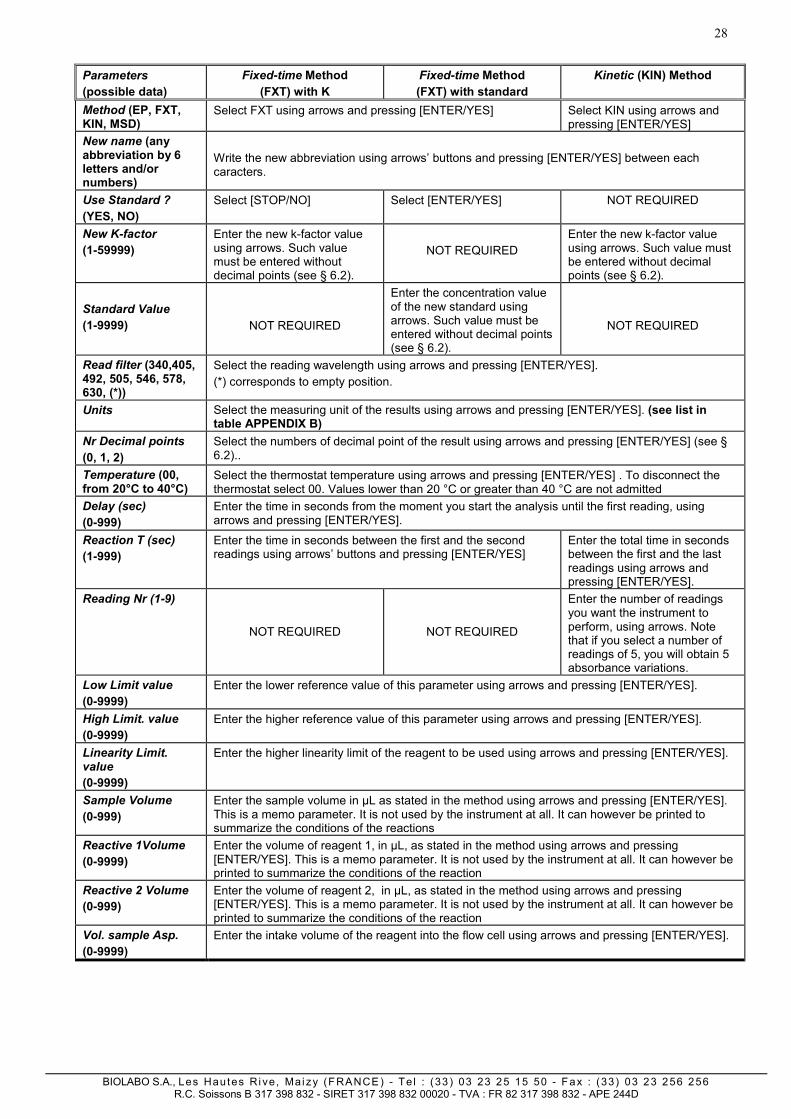
Parameters (possible data)
Fixed-time Method (FXT) with K
Fixed-time Method (FXT) with standard
Kinetic (KIN) Method
Method (EP, FXT, KIN, MSD)
Select FXT using arrows and pressing [ENTER/YES] Select KIN using arrows and pressing [ENTER/YES]
New name (any abbreviation by 6 letters and/or numbers)
Write the new abbreviation using arrows’ buttons and pressing [ENTER/YES] between each caracters.
Use Standard ? (YES, NO)
Select [STOP/NO] Select [ENTER/YES] NOT REQUIRED
New K-factor (1-59999)
Enter the new k-factor value using arrows. Such value must be entered without decimal points (see § 6.2).
NOT REQUIRED
Enter the new k-factor value using arrows. Such value must be entered without decimal points (see § 6.2).
Standard Value (1-9999) NOT REQUIRED
Enter the concentration value of the new standard using arrows. Such value must be entered without decimal points (see § 6.2).
NOT REQUIRED
Read filter (340,405, 492, 505, 546, 578, 630, (*))
Select the reading wavelength using arrows and pressing [ENTER/YES]. (*) corresponds to empty position.
Units Select the measuring unit of the results using arrows and pressing [ENTER/YES]. (see list in table APPENDIX B)
Nr Decimal points (0, 1, 2)
Select the numbers of decimal point of the result using arrows and pressing [ENTER/YES] (see § 6.2)..
Temperature (00, from 20°C to 40°C)
Select the thermostat temperature using arrows and pressing [ENTER/YES] . To disconnect the thermostat select 00. Values lower than 20 °C or greater than 40 °C are not admitted
Delay (sec) (0-999)
Enter the time in seconds from the moment you start the analysis until the first reading, using arrows and pressing [ENTER/YES].
Reaction T (sec) (1-999)
Enter the time in seconds between the first and the second readings using arrows’ buttons and pressing [ENTER/YES]
Enter the total time in seconds between the first and the last readings using arrows and pressing [ENTER/YES].
Reading Nr (1-9)
NOT REQUIRED
NOT REQUIRED
Enter the number of readings you want the instrument to perform, using arrows. Note that if you select a number of readings of 5, you will obtain 5 absorbance variations.
Low Limit value (0-9999)
Enter the lower reference value of this parameter using arrows and pressing [ENTER/YES].
High Limit. value (0-9999)
Enter the higher reference value of this parameter using arrows and pressing [ENTER/YES].
Linearity Limit. value (0-9999)
Enter the higher linearity limit of the reagent to be used using arrows and pressing [ENTER/YES].
Sample Volume (0-999)
Enter the sample volume in µL as stated in the method using arrows and pressing [ENTER/YES]. This is a memo parameter. It is not used by the instrument at all. It can however be printed to summarize the conditions of the reactions
Reactive 1Volume (0-9999)
Enter the volume of reagent 1, in µL, as stated in the method using arrows and pressing [ENTER/YES]. This is a memo parameter. It is not used by the instrument at all. It can however be printed to summarize the conditions of the reaction
Reactive 2 Volume (0-999)
Enter the volume of reagent 2, in µL, as stated in the method using arrows and pressing [ENTER/YES]. This is a memo parameter. It is not used by the instrument at all. It can however be printed to summarize the conditions of the reaction
Vol. sample Asp. (0-9999)
Enter the intake volume of the reagent into the flow cell using arrows and pressing [ENTER/YES].
29
BIOLABO S.A., Les Hautes Ri ve, Mai zy (FRANCE ) - Te l : (33 ) 03 23 25 15 50 - Fax : (33) 03 23 256 256 R.C. Soissons B 317 398 832 - SIRET 317 398 832 00020 - TVA : FR 82 317 398 832 - APE 244D
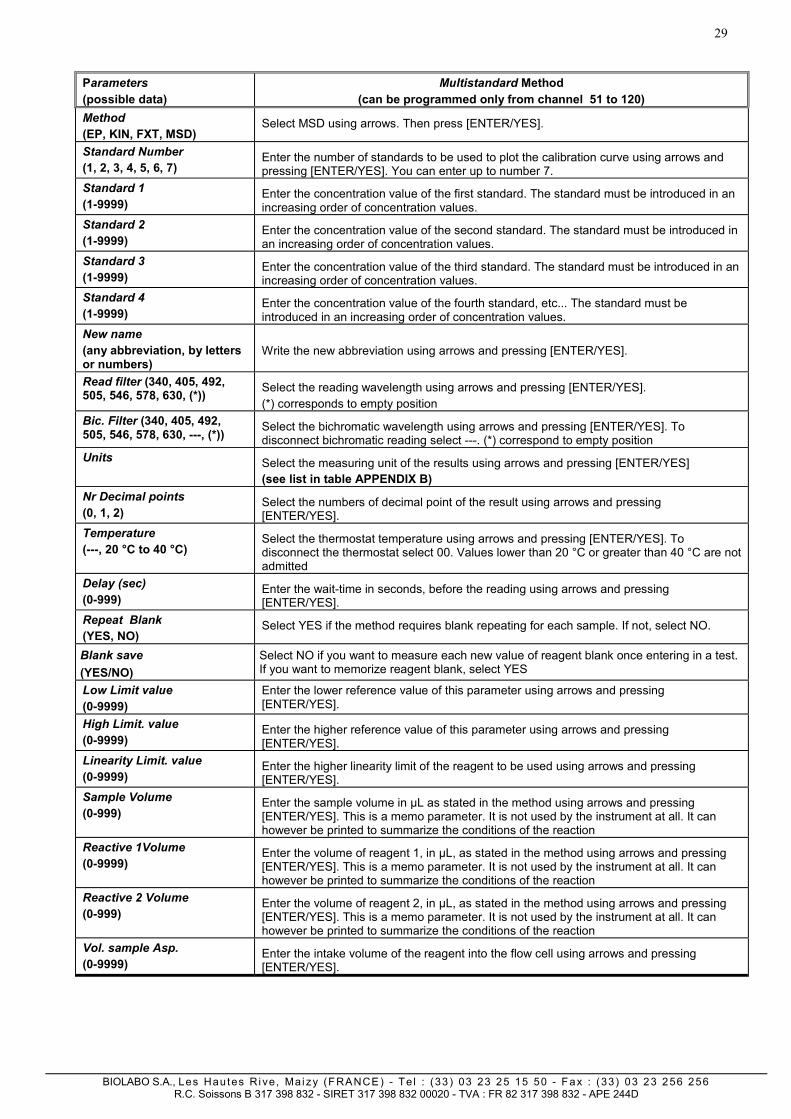
Parameters (possible data)
Multistandard Method (can be programmed only from channel 51 to 120)
Method (EP, KIN, FXT, MSD)
Select MSD using arrows. Then press [ENTER/YES].
Standard Number (1, 2, 3, 4, 5, 6, 7)
Enter the number of standards to be used to plot the calibration curve using arrows and pressing [ENTER/YES]. You can enter up to number 7.
Standard 1 (1-9999)
Enter the concentration value of the first standard. The standard must be introduced in an increasing order of concentration values.
Standard 2 (1-9999)
Enter the concentration value of the second standard. The standard must be introduced in an increasing order of concentration values.
Standard 3 (1-9999)
Enter the concentration value of the third standard. The standard must be introduced in an increasing order of concentration values.
Standard 4 (1-9999)
Enter the concentration value of the fourth standard, etc... The standard must be introduced in an increasing order of concentration values.
New name (any abbreviation, by letters or numbers)
Write the new abbreviation using arrows and pressing [ENTER/YES].
Read filter (340, 405, 492, 505, 546, 578, 630, (*)) Select the reading wavelength using arrows and pressing [ENTER/YES].
(*) corresponds to empty position Bic. Filter (340, 405, 492, 505, 546, 578, 630, ---, (*)) Select the bichromatic wavelength using arrows and pressing [ENTER/YES]. To
disconnect bichromatic reading select ---. (*) correspond to empty position Units Select the measuring unit of the results using arrows and pressing [ENTER/YES]
(see list in table APPENDIX B) Nr Decimal points (0, 1, 2)
Select the numbers of decimal point of the result using arrows and pressing [ENTER/YES].
Temperature (---, 20 °C to 40 °C)
Select the thermostat temperature using arrows and pressing [ENTER/YES]. To disconnect the thermostat select 00. Values lower than 20 °C or greater than 40 °C are not admitted
Delay (sec) (0-999)
Enter the wait-time in seconds, before the reading using arrows and pressing [ENTER/YES].
Repeat Blank (YES, NO)
Select YES if the method requires blank repeating for each sample. If not, select NO.
Blank save (YES/NO)
Select NO if you want to measure each new value of reagent blank once entering in a test. If you want to memorize reagent blank, select YES
Low Limit value (0-9999)
Enter the lower reference value of this parameter using arrows and pressing [ENTER/YES].
High Limit. value (0-9999)
Enter the higher reference value of this parameter using arrows and pressing [ENTER/YES].
Linearity Limit. value (0-9999)
Enter the higher linearity limit of the reagent to be used using arrows and pressing [ENTER/YES].
Sample Volume (0-999)
Enter the sample volume in µL as stated in the method using arrows and pressing [ENTER/YES]. This is a memo parameter. It is not used by the instrument at all. It can however be printed to summarize the conditions of the reaction
Reactive 1Volume (0-9999)
Enter the volume of reagent 1, in µL, as stated in the method using arrows and pressing [ENTER/YES]. This is a memo parameter. It is not used by the instrument at all. It can however be printed to summarize the conditions of the reaction
Reactive 2 Volume (0-999)
Enter the volume of reagent 2, in µL, as stated in the method using arrows and pressing [ENTER/YES]. This is a memo parameter. It is not used by the instrument at all. It can however be printed to summarize the conditions of the reaction
Vol. sample Asp. (0-9999)
Enter the intake volume of the reagent into the flow cell using arrows and pressing [ENTER/YES].

30
BIOLABO S.A., Les Hautes Ri ve, Mai zy (FRANCE ) - Te l : (33 ) 03 23 25 15 50 - Fax : (33) 03 23 256 256 R.C. Soissons B 317 398 832 - SIRET 317 398 832 00020 - TVA : FR 82 317 398 832 - APE 244D
7.1. Modifying only K-factor or the standard
In case all inserted parameters of a method are correct and you want to modify only the K-factor or the standard value, it is not necessary to enter into the program. You only have to:
• Select the method you wish to modify and press [ENTER/YES] • Press [MENU] key and select “METHOD” using UP and DOWN arrows and press [ENTER/YES]. • Select “Method parameters” using arrows and press [ENTER/YES]. • Use UP and DOWN arrows to slide the menu and [ENTER/YES] to select and modify the standard
value or the K-factor • Press [STOP/NO] until the display shows the message: “Save in memory? YES= Enter NO= Stop” • Press [ENTER/YES] to save data in memory and [STOP/NO] to exit if you want to save the
modifications. • Press [STOP/NO] 2 times to exit without saving the modifications.
31
BIOLABO S.A., Les Hautes Ri ve, Mai zy (FRANCE ) - Te l : (33 ) 03 23 25 15 50 - Fax : (33) 03 23 256 256 R.C. Soissons B 317 398 832 - SIRET 317 398 832 00020 - TVA : FR 82 317 398 832 - APE 244D
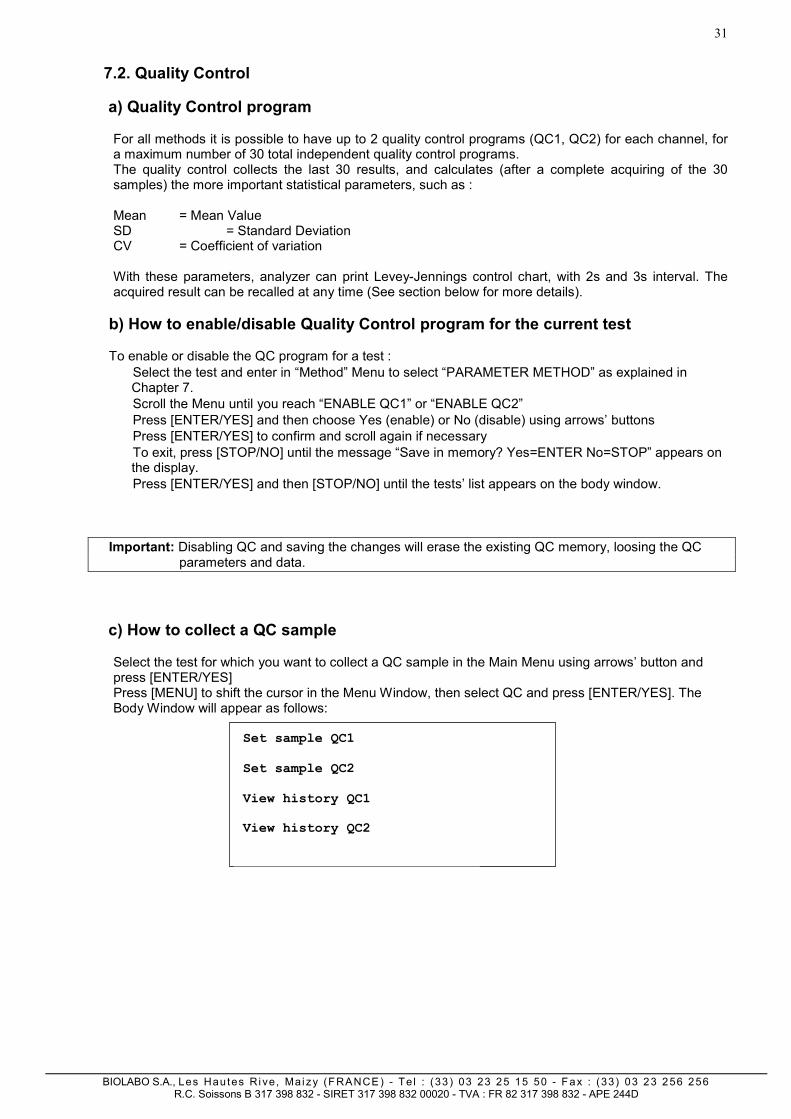
7.2. Quality Control
a) Quality Control program For all methods it is possible to have up to 2 quality control programs (QC1, QC2) for each channel, for a maximum number of 30 total independent quality control programs. The quality control collects the last 30 results, and calculates (after a complete acquiring of the 30 samples) the more important statistical parameters, such as : Mean = Mean Value SD = Standard Deviation CV = Coefficient of variation With these parameters, analyzer can print Levey-Jennings control chart, with 2s and 3s interval. The acquired result can be recalled at any time (See section below for more details).
b) How to enable/disable Quality Control program for the current test
To enable or disable the QC program for a test : • Select the test and enter in “Method” Menu to select “PARAMETER METHOD” as explained in
Chapter 7. • Scroll the Menu until you reach “ENABLE QC1” or “ENABLE QC2” • Press [ENTER/YES] and then choose Yes (enable) or No (disable) using arrows’ buttons • Press [ENTER/YES] to confirm and scroll again if necessary • To exit, press [STOP/NO] until the message “Save in memory? Yes=ENTER No=STOP” appears on
the display. • Press [ENTER/YES] and then [STOP/NO] until the tests’ list appears on the body window.
Important: Disabling QC and saving the changes will erase the existing QC memory, loosing the QC parameters and data.
c) How to collect a QC sample
Select the test for which you want to collect a QC sample in the Main Menu using arrows’ button and press [ENTER/YES] Press [MENU] to shift the cursor in the Menu Window, then select QC and press [ENTER/YES]. The Body Window will appear as follows:
Set sample QC1 Set sample QC2 View history QC1 View history QC2
32
BIOLABO S.A., Les Hautes Ri ve, Mai zy (FRANCE ) - Te l : (33 ) 03 23 25 15 50 - Fax : (33) 03 23 256 256 R.C. Soissons B 317 398 832 - SIRET 317 398 832 00020 - TVA : FR 82 317 398 832 - APE 244D
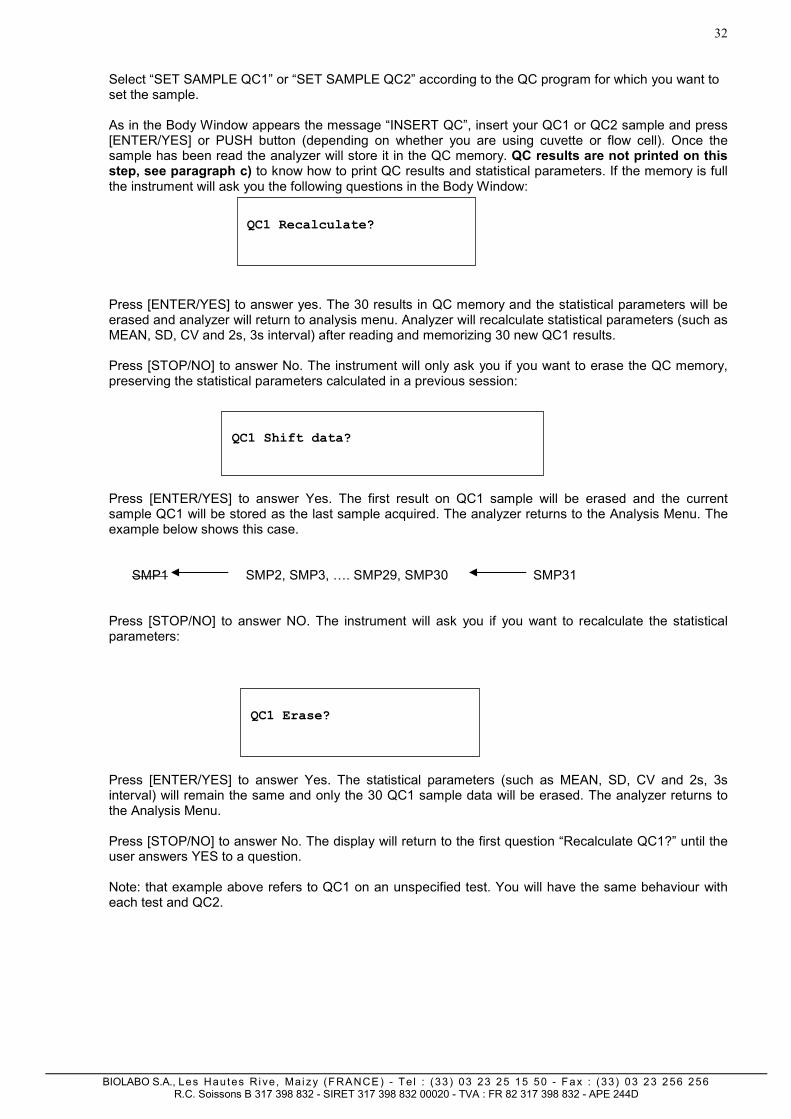
Select “SET SAMPLE QC1” or “SET SAMPLE QC2” according to the QC program for which you want to set the sample.
As in the Body Window appears the message “INSERT QC”, insert your QC1 or QC2 sample and press [ENTER/YES] or PUSH button (depending on whether you are using cuvette or flow cell). Once the sample has been read the analyzer will store it in the QC memory. QC results are not printed on this step, see paragraph c) to know how to print QC results and statistical parameters. If the memory is full the instrument will ask you the following questions in the Body Window:
Press [ENTER/YES] to answer yes. The 30 results in QC memory and the statistical parameters will be erased and analyzer will return to analysis menu. Analyzer will recalculate statistical parameters (such as MEAN, SD, CV and 2s, 3s interval) after reading and memorizing 30 new QC1 results.
Press [STOP/NO] to answer No. The instrument will only ask you if you want to erase the QC memory, preserving the statistical parameters calculated in a previous session:
Press [ENTER/YES] to answer Yes. The first result on QC1 sample will be erased and the current sample QC1 will be stored as the last sample acquired. The analyzer returns to the Analysis Menu. The example below shows this case.
SMP1 SMP2, SMP3, …. SMP29, SMP30 SMP31
Press [STOP/NO] to answer NO. The instrument will ask you if you want to recalculate the statistical parameters:
Press [ENTER/YES] to answer Yes. The statistical parameters (such as MEAN, SD, CV and 2s, 3s interval) will remain the same and only the 30 QC1 sample data will be erased. The analyzer returns to the Analysis Menu.
Press [STOP/NO] to answer No. The display will return to the first question “Recalculate QC1?” until the user answers YES to a question.
Note: that example above refers to QC1 on an unspecified test. You will have the same behaviour with each test and QC2.
QC1 Shift data?
QC1 Recalculate?
QC1 Erase?
33
BIOLABO S.A., Les Hautes Ri ve, Mai zy (FRANCE ) - Te l : (33 ) 03 23 25 15 50 - Fax : (33) 03 23 256 256 R.C. Soissons B 317 398 832 - SIRET 317 398 832 00020 - TVA : FR 82 317 398 832 - APE 244D
d) Viewing and printing QC data and graph
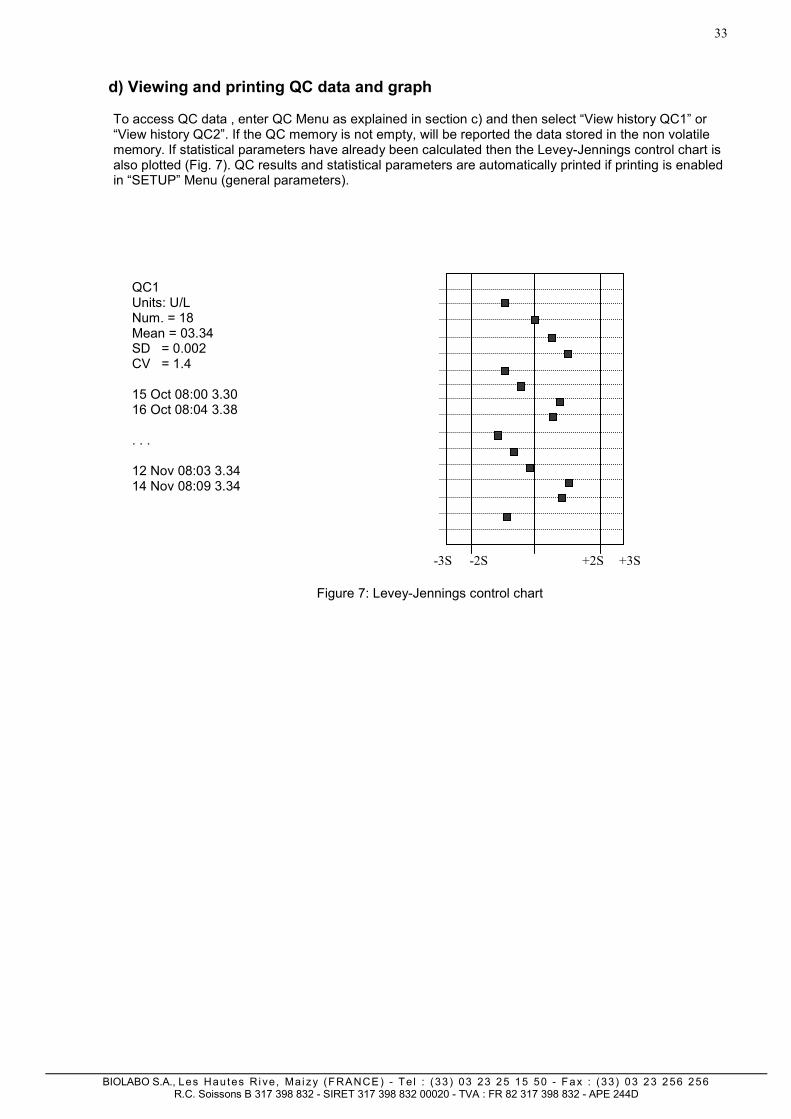
To access QC data , enter QC Menu as explained in section c) and then select “View history QC1” or “View history QC2”. If the QC memory is not empty, will be reported the data stored in the non volatile memory. If statistical parameters have already been calculated then the Levey-Jennings control chart is also plotted (Fig. 7). QC results and statistical parameters are automatically printed if printing is enabled in “SETUP” Menu (general parameters).
QC1 Units: U/L Num. = 18 Mean = 03.34 SD = 0.002 CV = 1.4 15 Oct 08:00 3.30 16 Oct 08:04 3.38 . . .
12 Nov 08:03 3.34 14 Nov 08:09 3.34
Figure 7: Levey-Jennings control chart
-2S +2S -3S +3S
34
BIOLABO S.A., Les Hautes Ri ve, Mai zy (FRANCE ) - Te l : (33 ) 03 23 25 15 50 - Fax : (33) 03 23 256 256 R.C. Soissons B 317 398 832 - SIRET 317 398 832 00020 - TVA : FR 82 317 398 832 - APE 244D
7.3. Blank storage Features
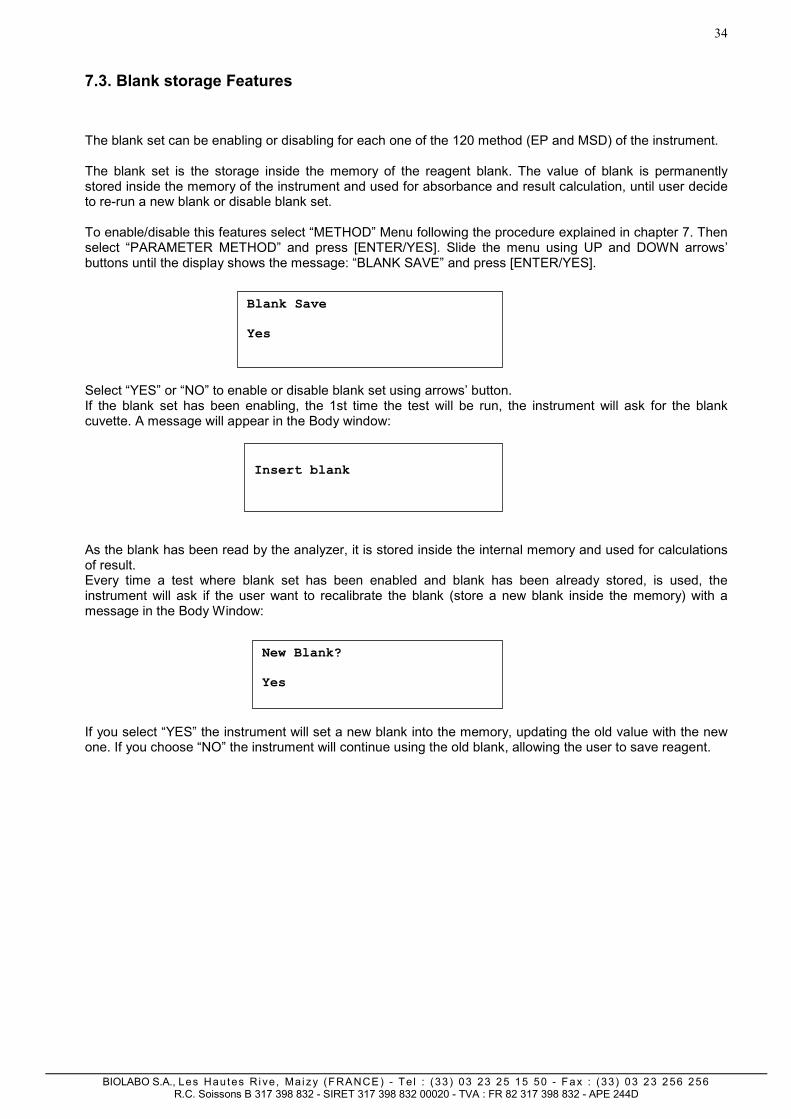
The blank set can be enabling or disabling for each one of the 120 method (EP and MSD) of the instrument. The blank set is the storage inside the memory of the reagent blank. The value of blank is permanently stored inside the memory of the instrument and used for absorbance and result calculation, until user decide to re-run a new blank or disable blank set. To enable/disable this features select “METHOD” Menu following the procedure explained in chapter 7. Then select “PARAMETER METHOD” and press [ENTER/YES]. Slide the menu using UP and DOWN arrows’ buttons until the display shows the message: “BLANK SAVE” and press [ENTER/YES].
Select “YES” or “NO” to enable or disable blank set using arrows’ button. If the blank set has been enabling, the 1st time the test will be run, the instrument will ask for the blank cuvette. A message will appear in the Body window:
As the blank has been read by the analyzer, it is stored inside the internal memory and used for calculations of result. Every time a test where blank set has been enabled and blank has been already stored, is used, the instrument will ask if the user want to recalibrate the blank (store a new blank inside the memory) with a message in the Body Window:
If you select “YES” the instrument will set a new blank into the memory, updating the old value with the new one. If you choose “NO” the instrument will continue using the old blank, allowing the user to save reagent.
Blank Save Yes
Insert blank
New Blank? Yes
35
BIOLABO S.A., Les Hautes Ri ve, Mai zy (FRANCE ) - Te l : (33 ) 03 23 25 15 50 - Fax : (33) 03 23 256 256 R.C. Soissons B 317 398 832 - SIRET 317 398 832 00020 - TVA : FR 82 317 398 832 - APE 244D
8. TECHNICAL FEATURES
Optical systemLight source: 20 W long-life iodine incandescent lamp Spectral field: 340 to 690 nm Filter change: automatic - motor-driven Filters: 340, 405, 492, 505, 546, 578, 630 nm; 1 empty position Detector: solid state device ThermostatHeating element: refrigerating and heating Peltier cell Temperature: selectable from 20°C to 40°C Temperature accuracy: ±0.2°C Stabilization period: at least 15 min Thermostatic unit: 9-position for square or cylindrical cuvettes, macro or semi-micro cuvette. Flow systemFlow cell: 18 µL / 80 µL (two ways) Typical working volume: 500 µL with 80 µL flow cell Minimum working volume: 350 µL with 18 µL flow cell Carry over: less than 1% Intake: peristaltic pump with programmable intake volume and air gap setting Cuvette type 1cm optical-path square or cylindrical cuvettes
Measuring system:Reset: automatic Measuring range: -200 to +2.500 OD Photometric linearity: ± 1% from 0 to 2.000 OD Photometric accuracy: ± 1% from 0 to 2.000 OD Precision: CV < 1% @ 2.0 O.D Drift: lower than 0.005 OD per hour Reagent volume in cuvette: 1 mL (minimum) for macro cuvette, 0.3 mL for semi-micro cuvette Reagent volume in flow cell: 0.35 mL (minimum) Wash function: manual Measuring method: Absorbance, End-Point, Kinetic, Fixed Time, Multistandard Data display and programming:Keyboard: 8 Keys multifunctional keyboard or external connection for PS2 keyboard Display: Graphic 240 x 128 pixels Thermal printer: built-in graphic 24 columns high performance Memory capacity: 120 programs Reagent Blank Saving: included Results Memory: 400 test results ID sample: selectable QC Program: last 30 results, 2 levels for 30 selectable tests with Levey-Jennings Plot Language: English, French, 2 other language on request Serial output: RS-232 standard
Power supply: Auto sensing (80 – 260 V) Size: H 35x L 34x l 24 cm Weight: 11 kg Working temperature: 15-30°C
Instrument class: I Installation class: II
Serial transmission of data:The serial output, standard type RS-232, uses the following transmission parameters: 38400, N, 8, 1. Refer to Appendix C for further details. Serial connection:The output connector, male 9-pole D-type, is located on the back of the instrument. The connections are as follows: pin 2: input pin 3: output pin 5: reference ground To connect the serial input to a personal computer IBM type or IBM compatible, you can use a connecting cable directly into the three pins mentioned above.
36
BIOLABO S.A., Les Hautes Ri ve, Mai zy (FRANCE ) - Te l : (33 ) 03 23 25 15 50 - Fax : (33) 03 23 256 256 R.C. Soissons B 317 398 832 - SIRET 317 398 832 00020 - TVA : FR 82 317 398 832 - APE 244D
9. DESCRIPTION OF MECHANICAL PARTS:
37
BIOLABO S.A., Les Hautes Ri ve, Mai zy (FRANCE ) - Te l : (33 ) 03 23 25 15 50 - Fax : (33) 03 23 256 256 R.C. Soissons B 317 398 832 - SIRET 317 398 832 00020 - TVA : FR 82 317 398 832 - APE 244D
APPENDIX A: TROUBLESHOOTING Excluding the main plug fuses, the instrument has no user serviceable parts: only trained technicians are allowed to service the instrument. An unauthorized action on the instrument may invalidate its safety and features, beside void the warranty.
In case of suspect malfunctioning of the instrument, we recommend to check the instrument with coloured solution or control serum of known value.
In the following table we describe messages and flags which appears in the display:
MESSAGE DESCRIPTION
POSSIBLE OPERATIONS
ERROR -1 The sample absorbance is too high or the reading is impossible, due to faulty instrument
Press [ENTER/YES] to repeat the reading otherwise dilute the sample. If message persists call our
service technicians.
Printer error Error when printing Press [STOP/NO] to disconnect the printer, or any other key to try again.
Temperature Window is fixed
The thermostat is already regulated at the required temperature.
//
Temperature Window is blinking
The thermostat has not yet reached the required temperature.
Wait until it is fixed
Temperature Window shows -
- - -
The thermostat is disenabled. //
Const ERROR Critical error in EEPROM Call service.
EEP0 ERROR Critical error in EEPROM Call service
EEP1 ERROR Critical error in EEPROM Call service
EEP2 ERROR Critical error in EEPROM Call service
Delay XXX XXXX = time (in seconds) required to complete the analysis.
Wait or press [STOP/NO] to interrupt the analysis
--- In a KIN or FXT analysis, the absorbance-variation of the sample is too high during the first time-interval
(Delay).
Dilute the sample.
LLLL In an MSD analysis, the sample concentration is less than that of the lowest standard.
//
HHHH In an MSD analysis, the sample concentration is greater than that of the highest standard
Dilute the sample.
CALIBRATE
(Y/N)
It appears when you select an EP analysis with standard or FXT with standard.
Press [ENTER/YES] if a new calibration is required. The instrument will be ready to read the standard:
INSERT STANDARD.
Press [STOP/NO] if a new calibration is not necessary. The instrument is ready to read the
sample: INSERT SAMPLE.
D Appears when printing a result. The analytical result exceeds the linearity limit of the reagents.
Dilute the sample
* Appears when printing a result. The thermostat has not reached the right temperature when the analysis
was performed (blinking temperature window). Therefore, the result is not correct.
Repeat the analysis when the thermostat and the reagents have reached the right temperature.
L Appears when printing a result. The analytical result is less than the lower limit value of the method.
//
H Appears when printing a result. The analytical result is more than the higher limit value of the method.
//
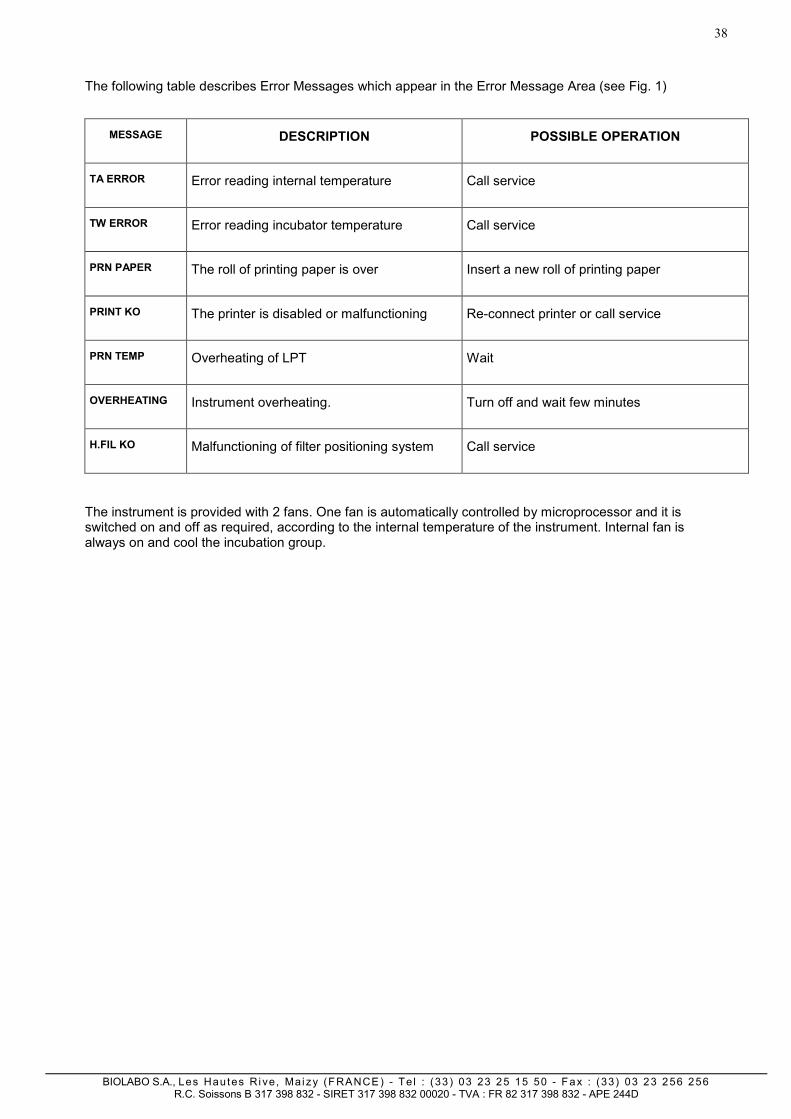
38
BIOLABO S.A., Les Hautes Ri ve, Mai zy (FRANCE ) - Te l : (33 ) 03 23 25 15 50 - Fax : (33) 03 23 256 256 R.C. Soissons B 317 398 832 - SIRET 317 398 832 00020 - TVA : FR 82 317 398 832 - APE 244D
The following table describes Error Messages which appear in the Error Message Area (see Fig. 1)
MESSAGE
DESCRIPTION POSSIBLE OPERATION
TA ERROR
Error reading internal temperature Call service
TW ERROR
Error reading incubator temperature Call service
PRN PAPER
The roll of printing paper is over Insert a new roll of printing paper
PRINT KO
The printer is disabled or malfunctioning Re-connect printer or call service
PRN TEMP
Overheating of LPT Wait
OVERHEATING
Instrument overheating. Turn off and wait few minutes
H.FIL KO
Malfunctioning of filter positioning system Call service
The instrument is provided with 2 fans. One fan is automatically controlled by microprocessor and it is switched on and off as required, according to the internal temperature of the instrument. Internal fan is always on and cool the incubation group.
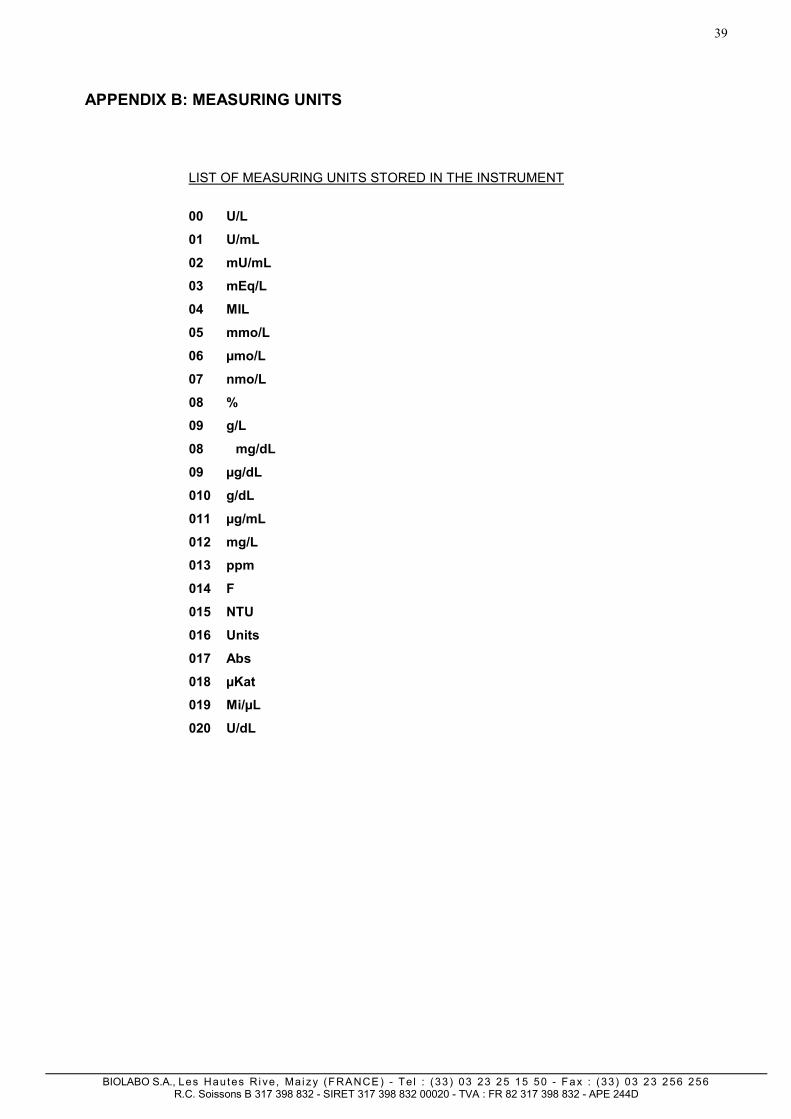
39
BIOLABO S.A., Les Hautes Ri ve, Mai zy (FRANCE ) - Te l : (33 ) 03 23 25 15 50 - Fax : (33) 03 23 256 256 R.C. Soissons B 317 398 832 - SIRET 317 398 832 00020 - TVA : FR 82 317 398 832 - APE 244D
APPENDIX B: MEASURING UNITS
LIST OF MEASURING UNITS STORED IN THE INSTRUMENT
00 U/L
01 U/mL
02 mU/mL
03 mEq/L
04 MIL
05 mmo/L
06 µmo/L
07 nmo/L
08 %
09 g/L
08 mg/dL
09 µg/dL
010 g/dL
011 µg/mL
012 mg/L
013 ppm
014 F
015 NTU
016 Units
017 Abs
018 µKat
019 Mi/µL
020 U/dL
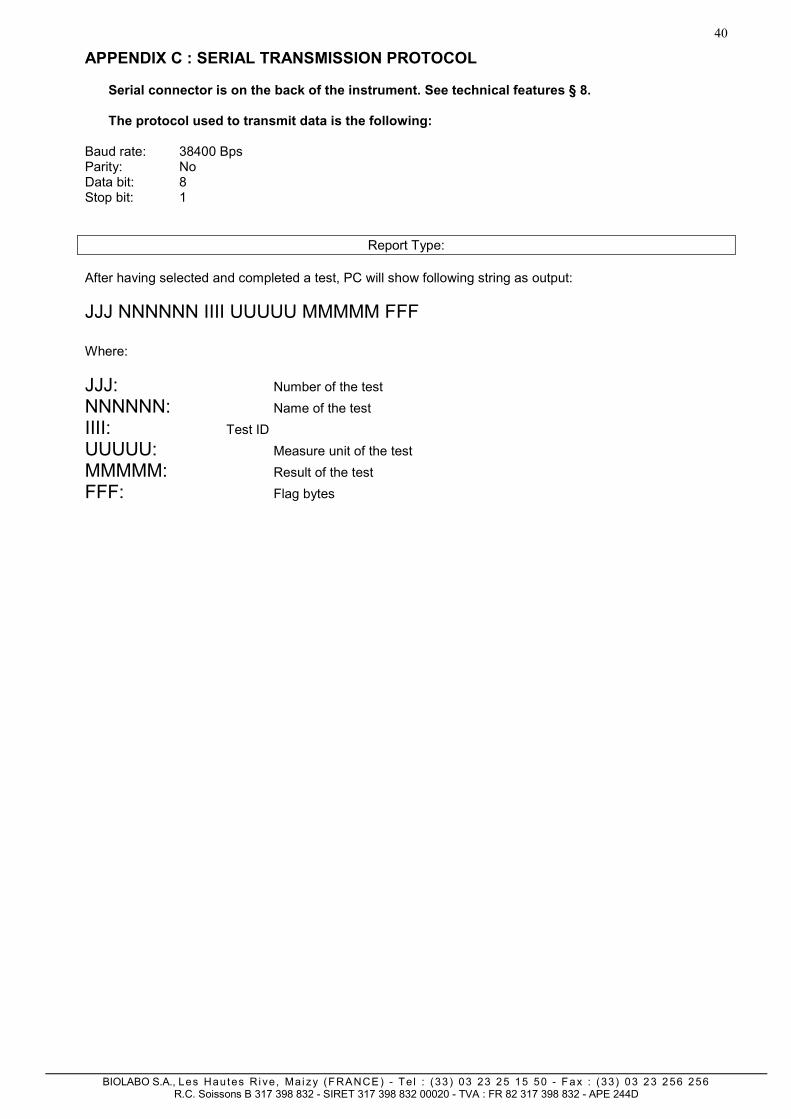
40
BIOLABO S.A., Les Hautes Ri ve, Mai zy (FRANCE ) - Te l : (33 ) 03 23 25 15 50 - Fax : (33) 03 23 256 256 R.C. Soissons B 317 398 832 - SIRET 317 398 832 00020 - TVA : FR 82 317 398 832 - APE 244D
APPENDIX C : SERIAL TRANSMISSION PROTOCOL
Serial connector is on the back of the instrument. See technical features § 8. The protocol used to transmit data is the following:
Baud rate: 38400 Bps Parity: No Data bit: 8 Stop bit: 1
Report Type:
After having selected and completed a test, PC will show following string as output: JJJ NNNNNN IIII UUUUU MMMMM FFF Where: JJJ: Number of the test NNNNNN: Name of the test IIII: Test ID UUUUU: Measure unit of the test MMMMM: Result of the test FFF: Flag bytes
41
BIOLABO S.A., Les Hautes Ri ve, Mai zy (FRANCE ) - Te l : (33 ) 03 23 25 15 50 - Fax : (33) 03 23 256 256 R.C. Soissons B 317 398 832 - SIRET 317 398 832 00020 - TVA : FR 82 317 398 832 - APE 244D
APPENDIX D: REDUCING CARRY-OVER AND WORKING VOLUME USING AIR-GAP Carry-over is the residual solution inside the flow cell that affects the final result of an optical measurement. This quantity depends on several factors, but the most important for our purpose are: • The density of the solution used • The absorbance value of the solution • The internal cleanliness of the flow cell • The quantity of aspirated volume (called “Sample asp.”) • The flow cell volume. The instrument is furnished with 18 µL flow cell (that is the standard flow cell) or
can work either with 80 µL flow cell (upon request). Anyway instrument carry-over must be less than 1% to pass the Quality Control. To reduce instrument carry-over several measures can be taken: • Use 18 µL flow cell instead of 80 µL flow cell. • Wash the instrument with sodium hypochlorite (diluted 1+9 with water) to clean internally the flow cell.
Well rinse with demineralised water. • Use a greater quantity of reading solution. • Use air-gap. Air-gap can reduce dramatically carry-over effects, but requires a little of experience in working with it. Air-gap is an instrument features that allows the User to set up : • Sample volume • Delay time • Air suction volume. Delay and Air suction volume are General Setup Parameters (not test parameters) so will remain the same for all the test. Basically the instrument performs a DOUBLE ASPIRATION (the first for the sample, the second for the air). In fact, after each sample the peristaltic pump is turned OFF for a programmable amount of time (User should remove the reading solution from the suction spout during this delay) and is turned ON again for a certain amount of time in order to aspirate a programmable volume of air.
The instrument is shipped with this 2 parameters disabled (that is their values set to 0000). DELAY = 0000 ms ASP. VOL. = 0000 µL
Recommended values for beginner are: DELAY = 1000 ms ASP. VOL. = 0080 µL

42
BIOLABO S.A., Les Hautes Ri ve, Mai zy (FRANCE ) - Te l : (33 ) 03 23 25 15 50 - Fax : (33) 03 23 256 256 R.C. Soissons B 317 398 832 - SIRET 317 398 832 00020 - TVA : FR 82 317 398 832 - APE 244D
APPENDIX E: READING IN STANDARD CUVETTE WITH LESS THAN 1500 µL
The analyser is shipped with the reading height that exactly matches the reading aperture in the flow cell (the same height for 18 or 80 µL flow cell). In this condition the analyser can work correctly in the flow cell and with a minimum reading volume of 1500 µL in standard plastic cuvette (10 mm optical path), like the ones supplied with the instrument. Some reagents or methods however have a reading volume of less than 1500 µL (for example 1000 µL). With these reagents it is not possible to work with the instrument unless: 1) Use reduced volume cuvette (still 10 mm optical path). Contact your nearest distributor for more
information. 2) Adjust the screw in the incubator chamber in order to increase the reading height. In this way you can
reduce the volume according to your needs, but remember that the light beam does not match anymore the flow cell reading aperture and you have to setup it again if you want to work again with flow cell.
The figure below explains how to adjust the reading height (regulating the height of the PVC screw) in order to work with flow cell or reduced volume. Refer to the following table for more information: Screw HEIGHT (h) FLOW CELL REDUCE VOLUME CUVETTE STANDARD CUVETTE 0 * -Figure A - YES YES YES (Minimum Volume 1500 µL) 2.5 turn * -Figure B- NO YES YES * The screw height is measured according to the turn from the down position.
NOTE: Use maximum care when performing this operation, since an excessive strength may damage permanently the PVC screw inside the reading incubator chamber.
APPENDIX F: WEEE AND ROHS DIRECTIVES Biolabo complies with WEEE EC Directive (2002/96/CE) about recycling of electrical and electronic equipment waste. This EC Directive forbid to collect no more used electrical and electronic equipment waste with normal rubbish and entrust the producers the collection and the recycling of such kind of waste. When you have to dismiss a Biolabo instrument, please don’t throw it with normal rubbish, but contact Biolabo or the authorized dealer.Wasting should be performed in the country were the instrument has been sold. The label present on each instrument certifies that Biolabo complies with WEEE Directive:
Biolabo also assures that no one of the materials listed by ROHS Directive (2002/95/05) is used to build and assemble its instruments.
B
A
43
BIOLABO S.A., Les Hautes Ri ve, Mai zy (FRANCE ) - Te l : (33 ) 03 23 25 15 50 - Fax : (33) 03 23 256 256 R.C. Soissons B 317 398 832 - SIRET 317 398 832 00020 - TVA : FR 82 317 398 832 - APE 244D
Should you have any questions please do not hesitate to contact us:
APPENDIX G: IMPORTANT NOTICE ABOUT BIOHAZARD The following notes regard this label you find on the instrument:
Working with analytical instruments for in-vitro diagnostics involves the handling of human samples and controls, which should be considered at least potentially infectious. Therefore, every part and accessory of the instrument which may have come into contact with such samples must also be considered as potentially infectious. Before servicing the instrument it is very important to thoroughly disinfect all possibly contaminated parts. Before the instrument is removed from the laboratory for disposal or servicing, it must be decontaminated. Decontamination should be performed by a well-trained, authorized person, observing all necessary safety precautions. Instruments to be returned must be accompanied by a decontamination certificate completed by the responsible laboratory manager. If a decontamination certificate is not supplied, the returning laboratory will be responsible for charges resulting from non-acceptance of the instrument by the servicing center or from any authority’s intervention.
Should you have any questions please do not hesitate to contact us: